How to enable Microsoft Entra ID Authentication for vCenter Server by using the on-premises SCIM App by Microsoft
Enabling Microsoft Entra ID (formerly Azure Active Directory) authentication for VMware vCenter Server allows organizations to integrate their on-premises or cloud-based vCenter environments with Microsoft Entra ID for centralized identity and access management (IAM).
This integration simplifies user authentication by leveraging Microsoft Entra ID’s robust security features, such as multi-factor authentication (MFA), conditional access policies, and single sign-on (SSO).
This post will show step by step how to configure Microsoft Entra ID authentication for vCenter Server and how to set up user provisioning by using System for Cross-domain Identity Management (SCIM).
vCenter Server introduced support for Microsoft Entra ID authentication starting with vCenter Server 8.0 Update 2.
Entra ID finally provides a few options to configure SCIM 2.0 Push, we can therefore also use the VMware Identity Service app as shown in my following post.
Or just by just manually publishing users into the vCenter Identity Broker (vIDB) and not by SCIM.
Set up Entra ID Identity Provider in VMware vSphere
Microsoft Entra ID can be used as an Identity Provider (IdP) for VMware vSphere authentication. This setup allows you to leverage modern authentication methods, such as SSO, MFA, and conditional access, to securely log in to vSphere.
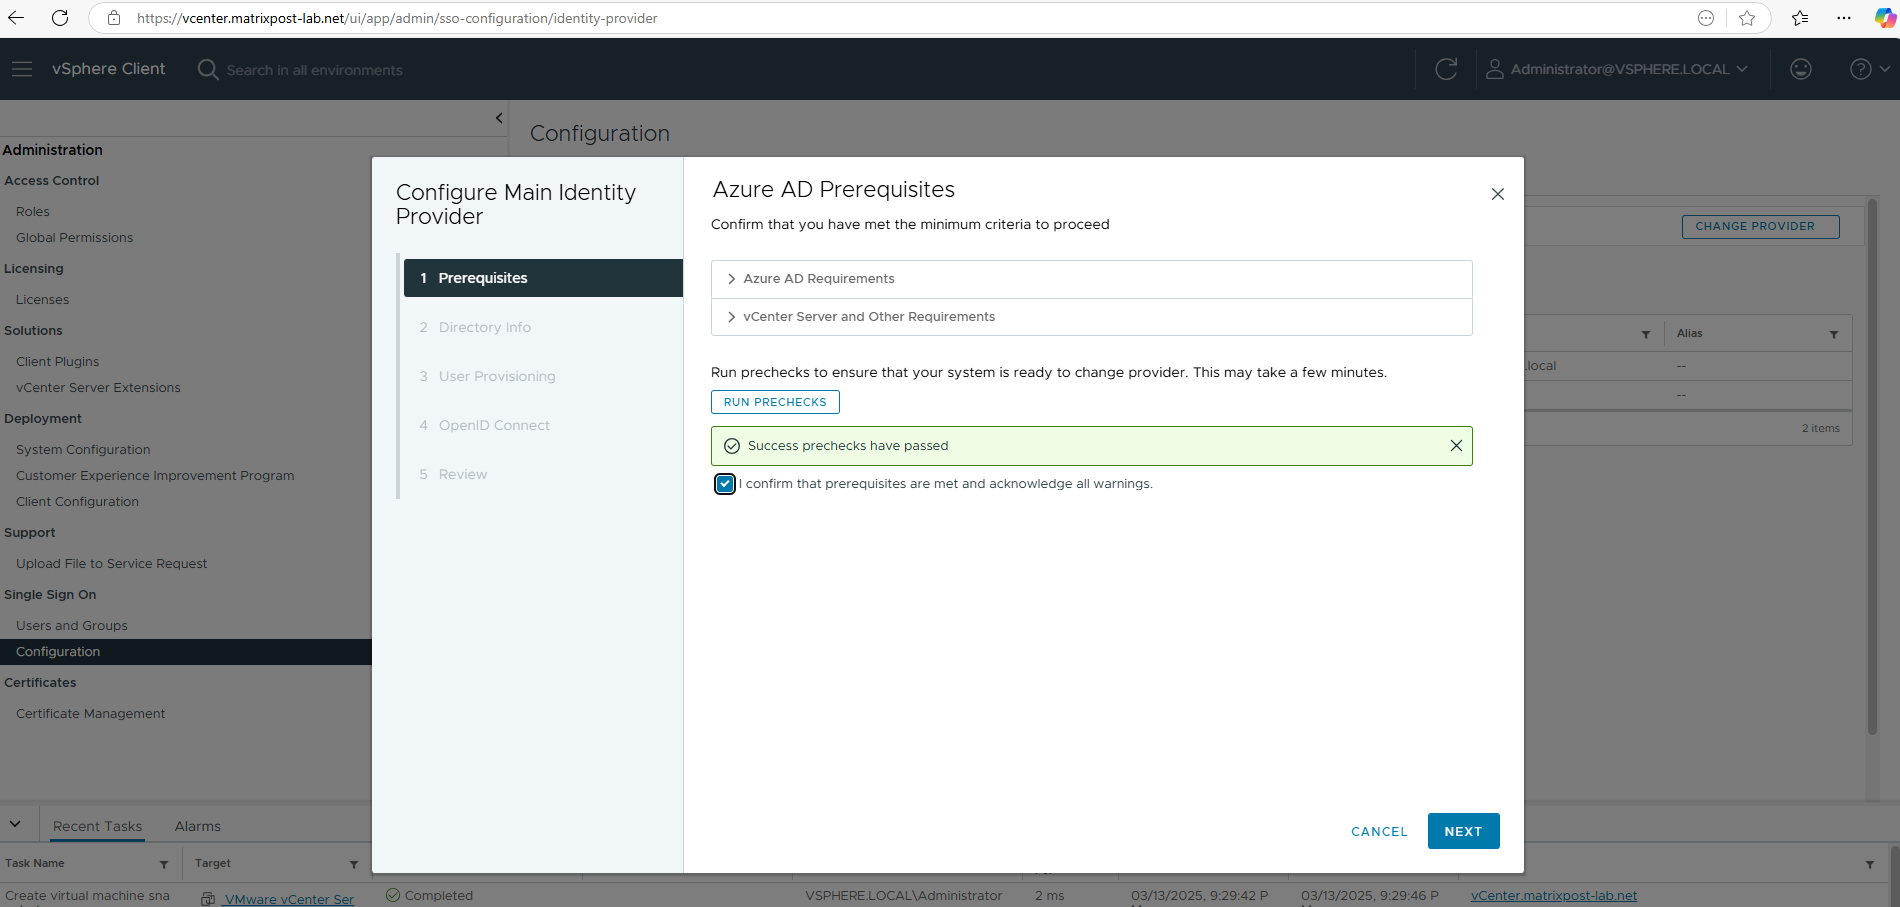
To setup Entra ID as an Identity Provider (IdP) for VMware vSphere, navigate in vSphere to Administration -> Single Sign On -> Configuration and within the Identity Provider tab click on Change Provider as shown below.

Entra AD Requirements
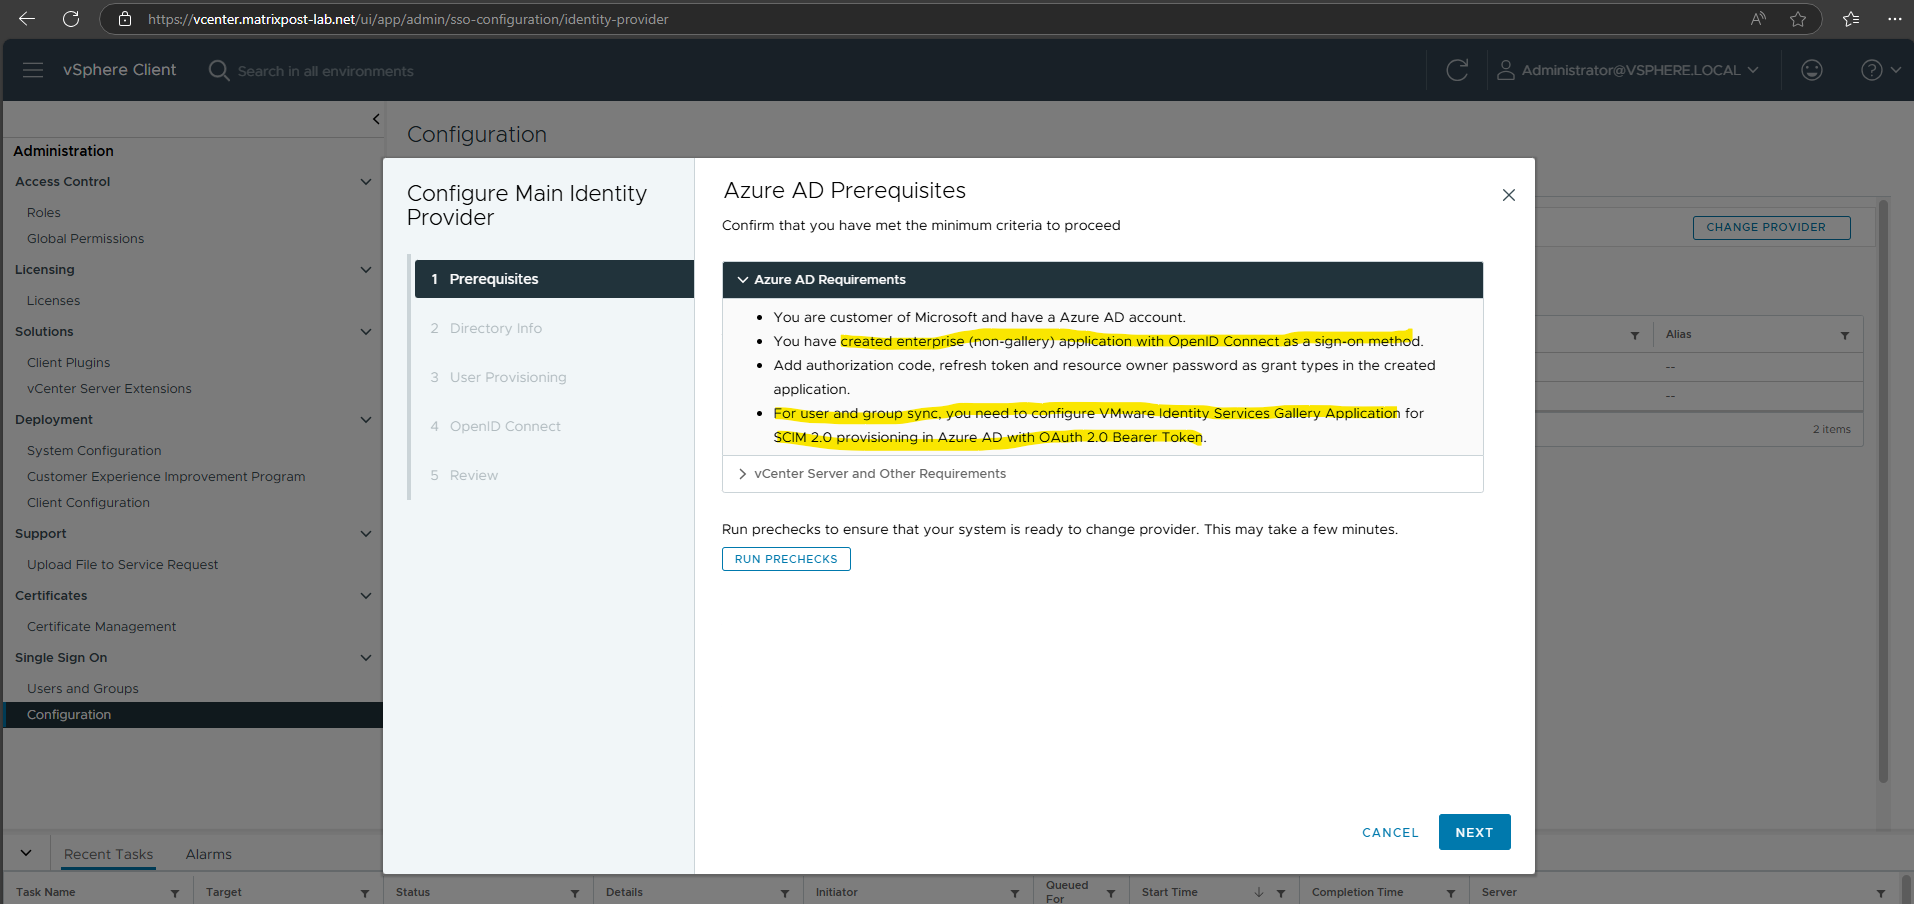
vCenter Server and Other Requirements
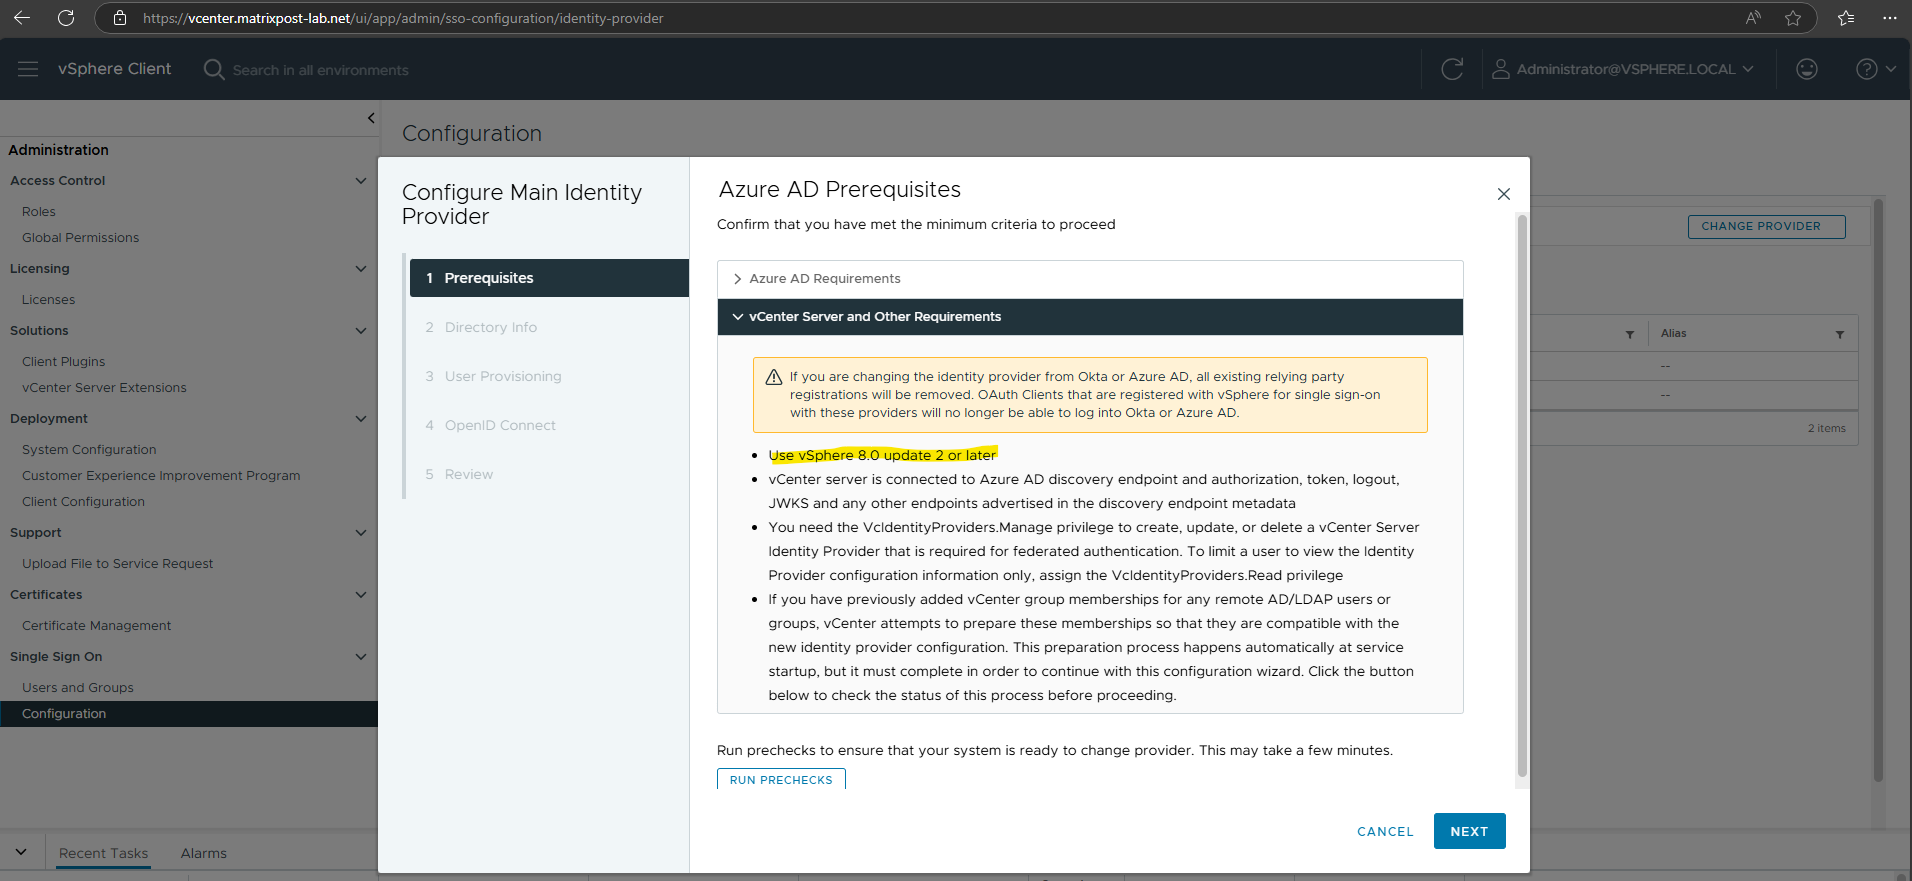
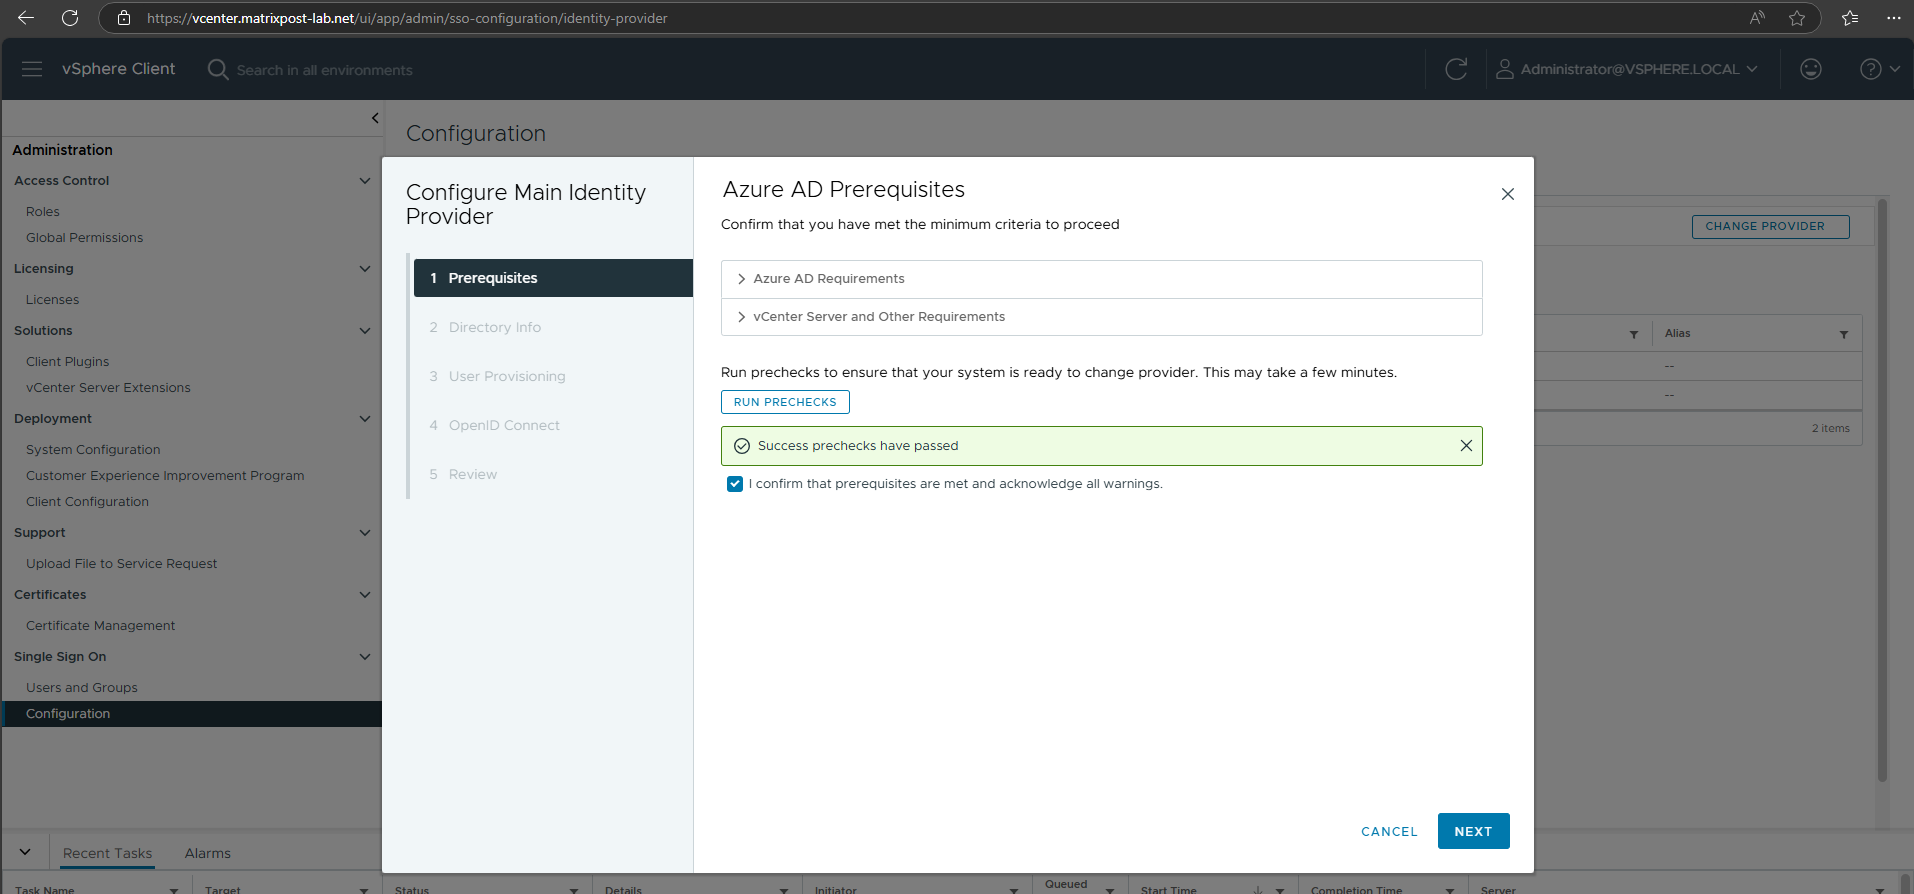
Click on Run Prechecks to ensure the system is ready to change the provider.
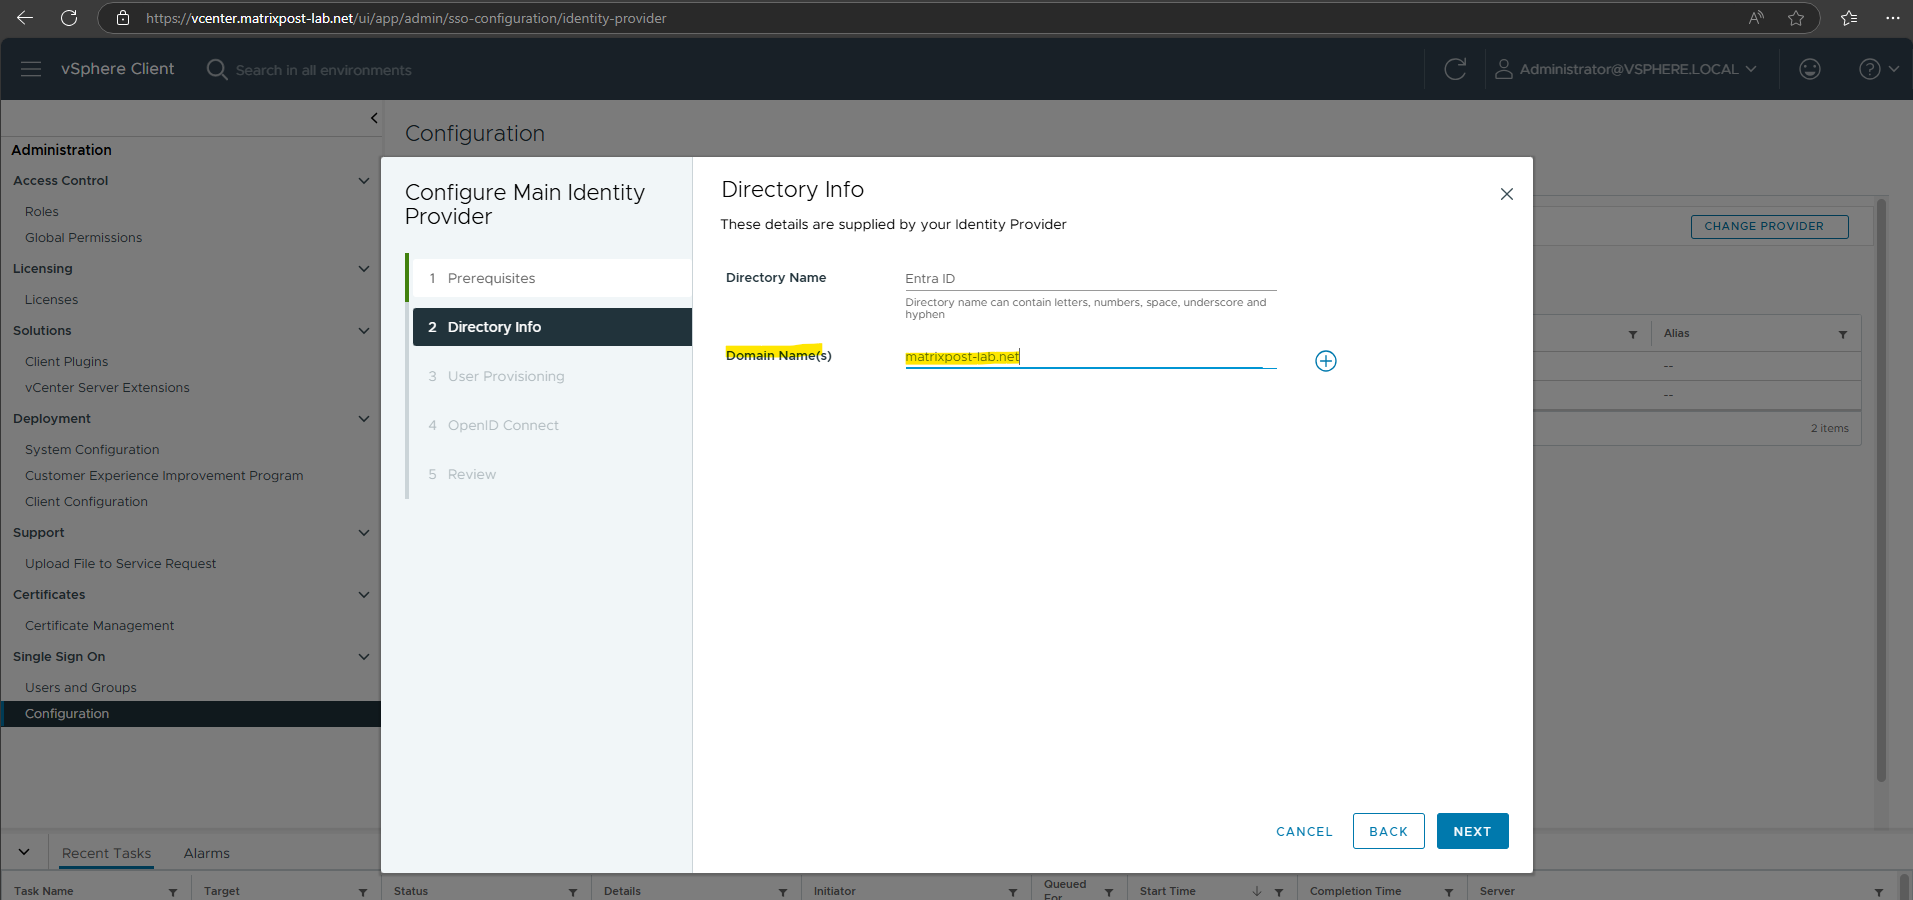
Click on the plus icon to add finally the domain name your users are configured for in Entra ID.
Click Next.

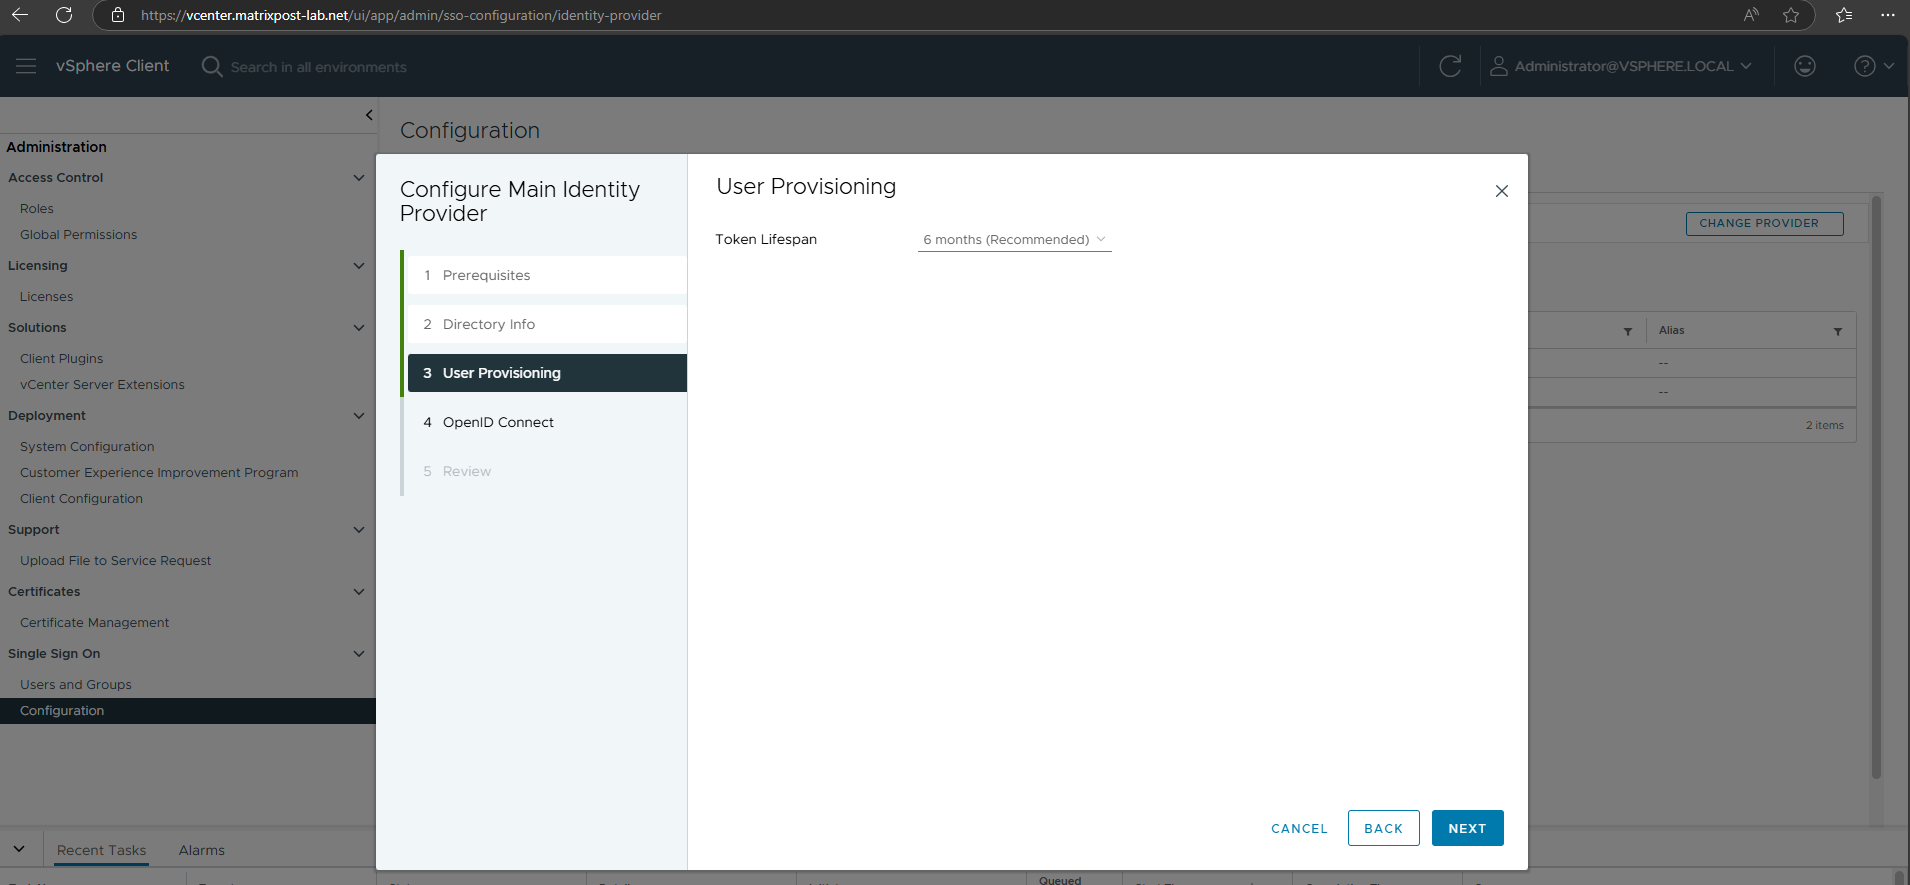
I will use the recommended token lifespan with 6 months.
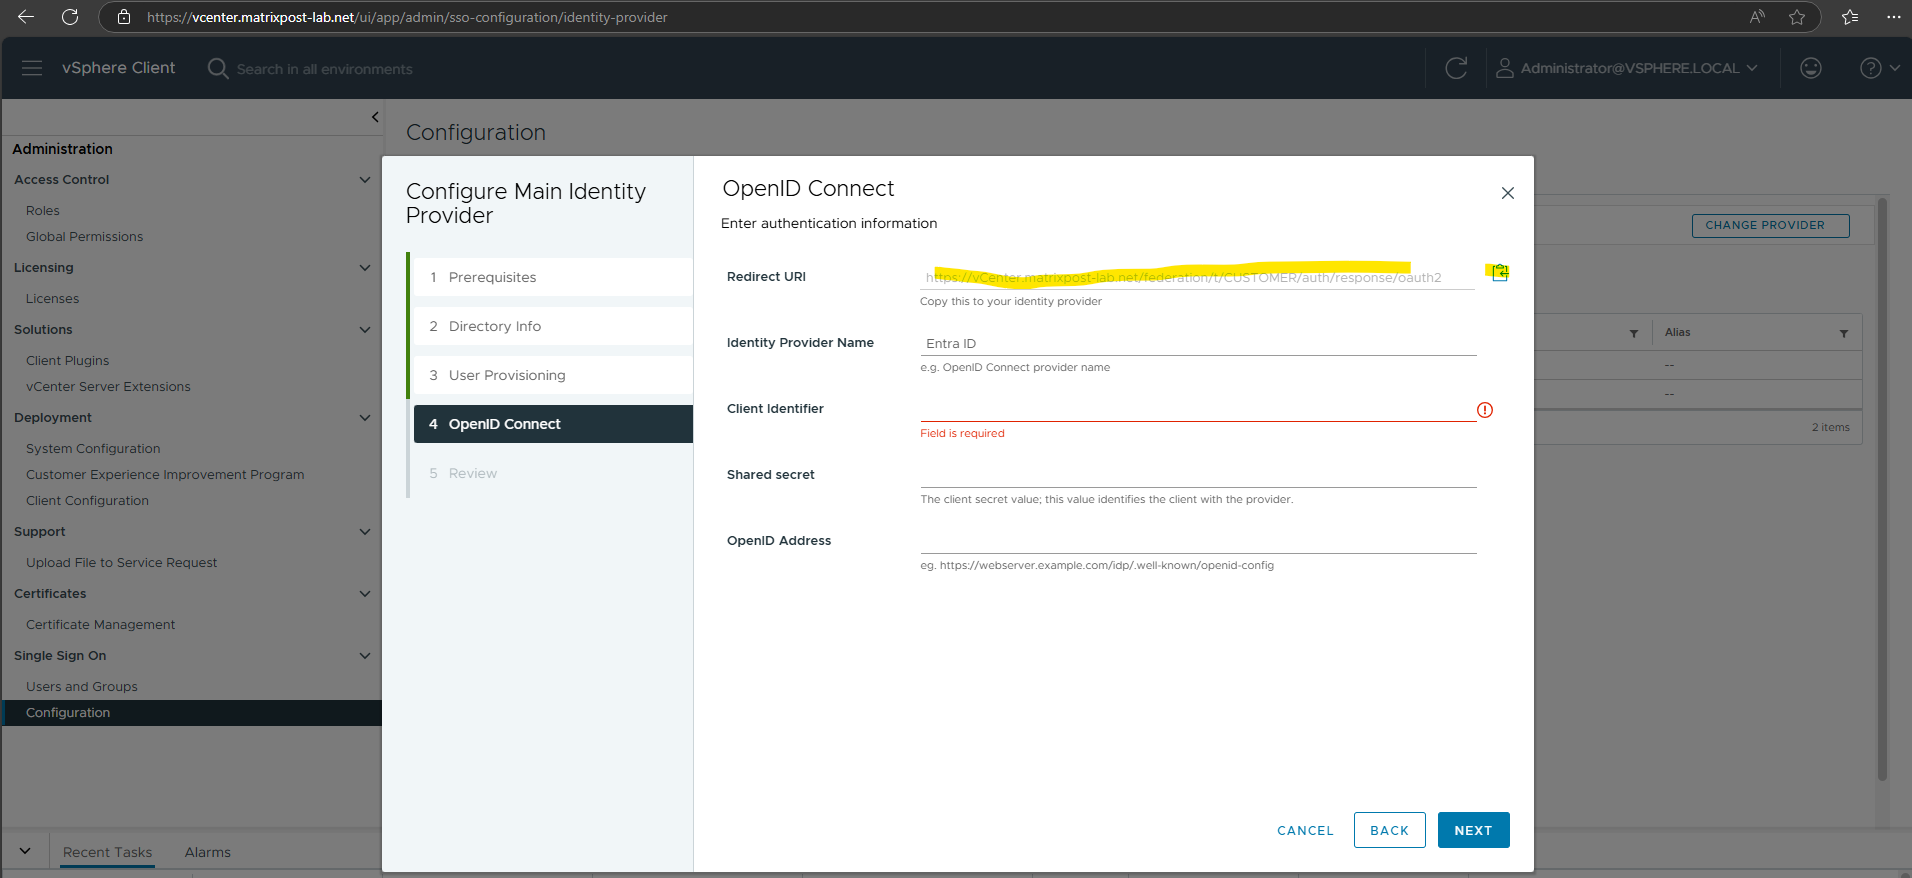
Next we need to copy the shown Redirect URI below which we later need to copy to our Entra ID identity provider in Azure.
The Redirect URI tells Entra ID where to send the authentication response after a user successfully signs in.
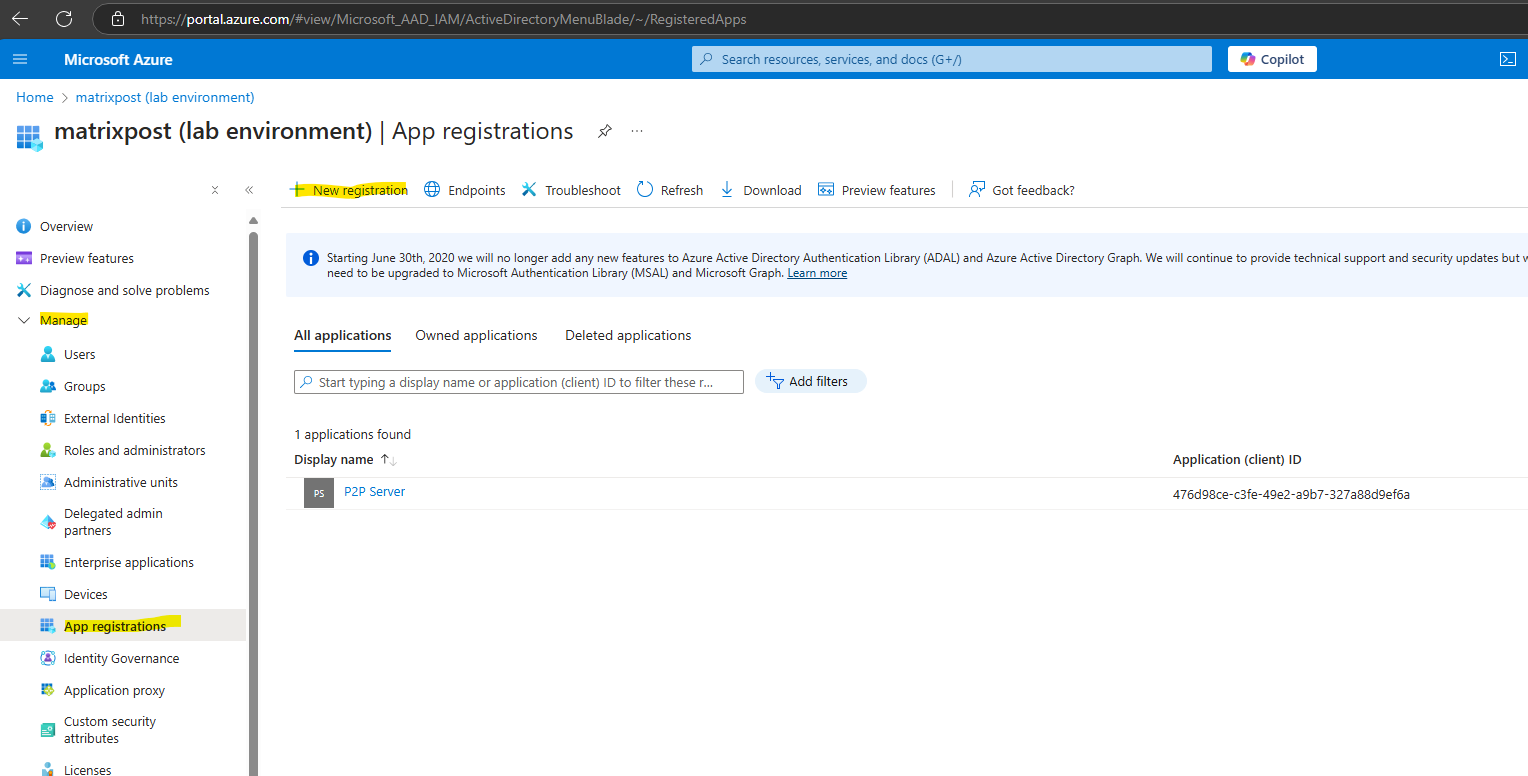
Create a new App registration
Next we need to create a new app registration which handles the authentication for our on-premise vCenter Server.
Therefore browse to the Azure portal and the Entra ID blade. Here we select under Manage -> App Registrations and click on New registration.
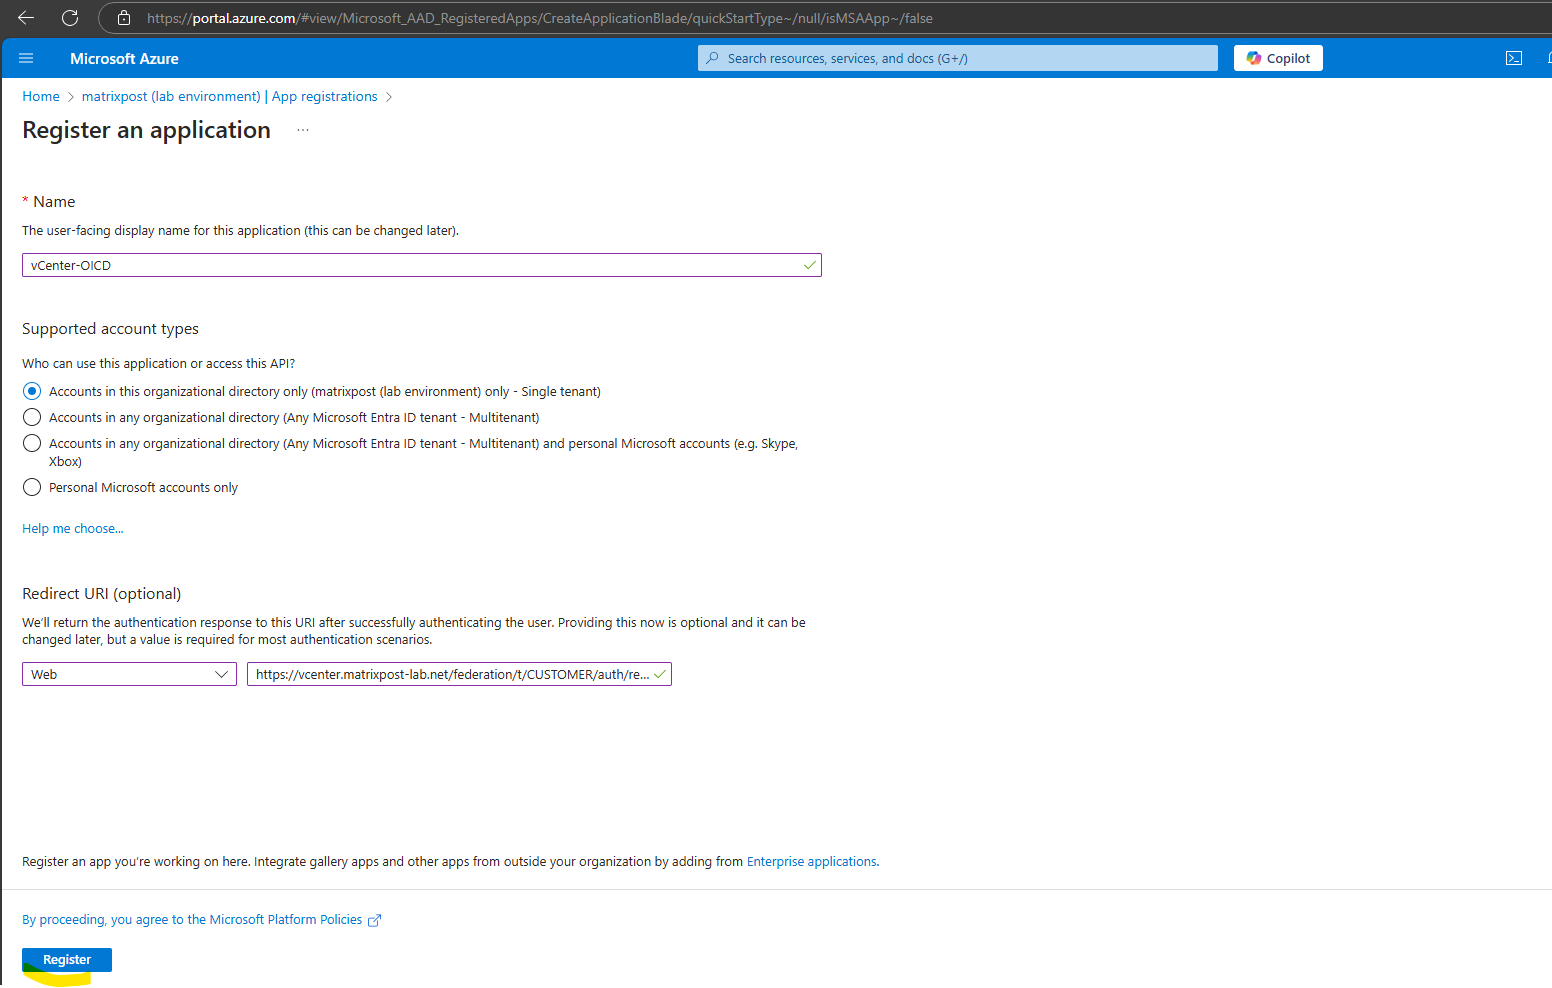
Below we first need to enter a user facing display name for this application. Then we leave the by default selected account type with Accounts in this organizational directory only.
And we also need to insert the previously copied Redirect URL from our vCenter Server. Select Web for this URI. Finally click on Register.
The application is created successfully.
We now first need to copy the Application (client) ID highlighted below into the wizard on our vCenter.
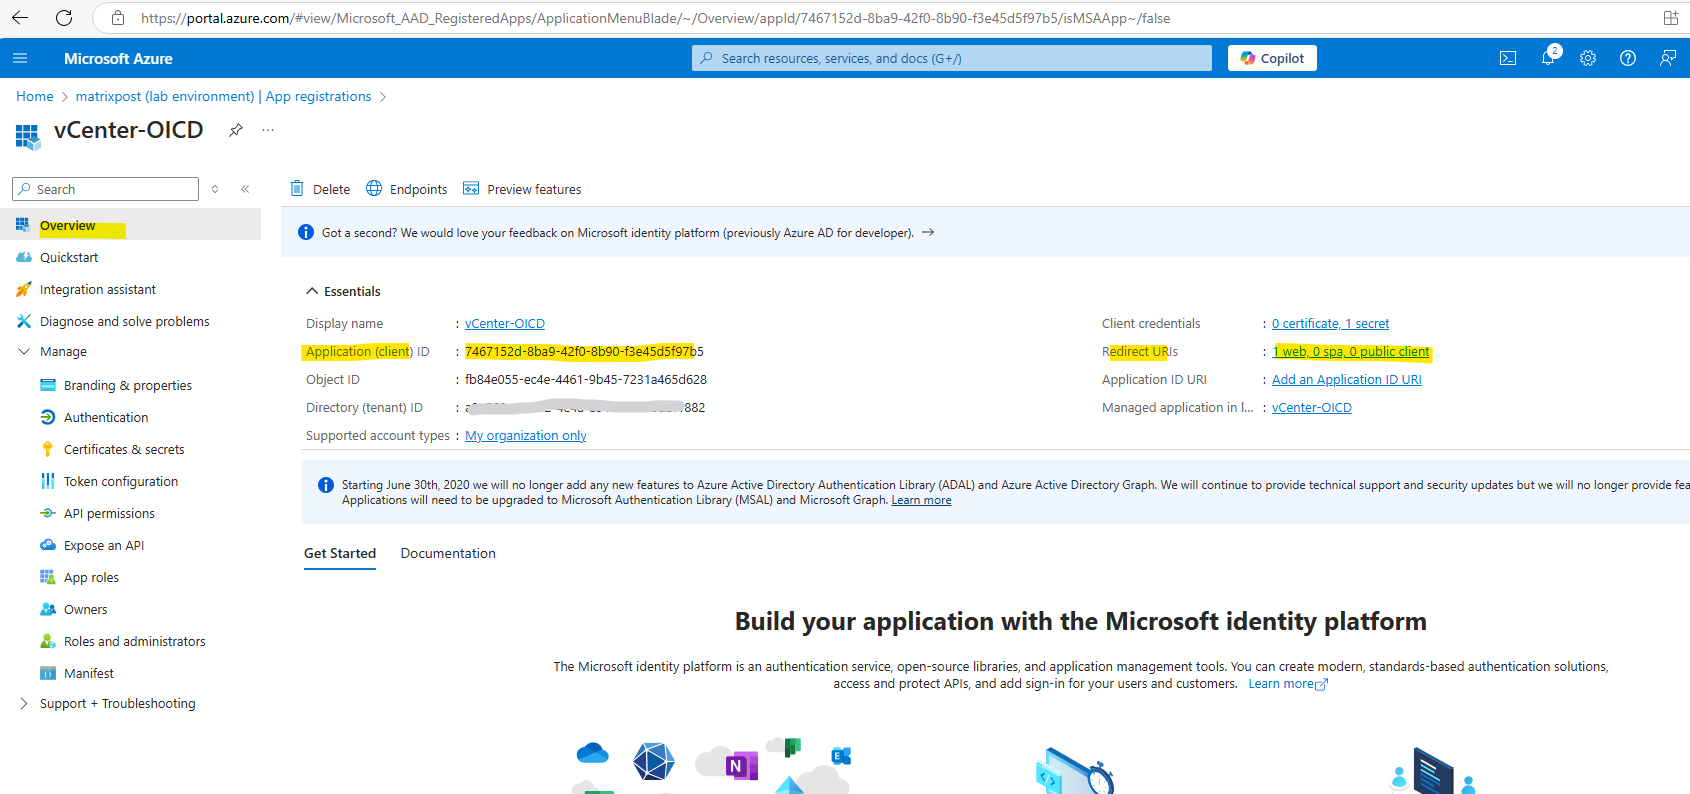
Insert this Application (client) ID into the Client identifier field on the vCenter wizard below.
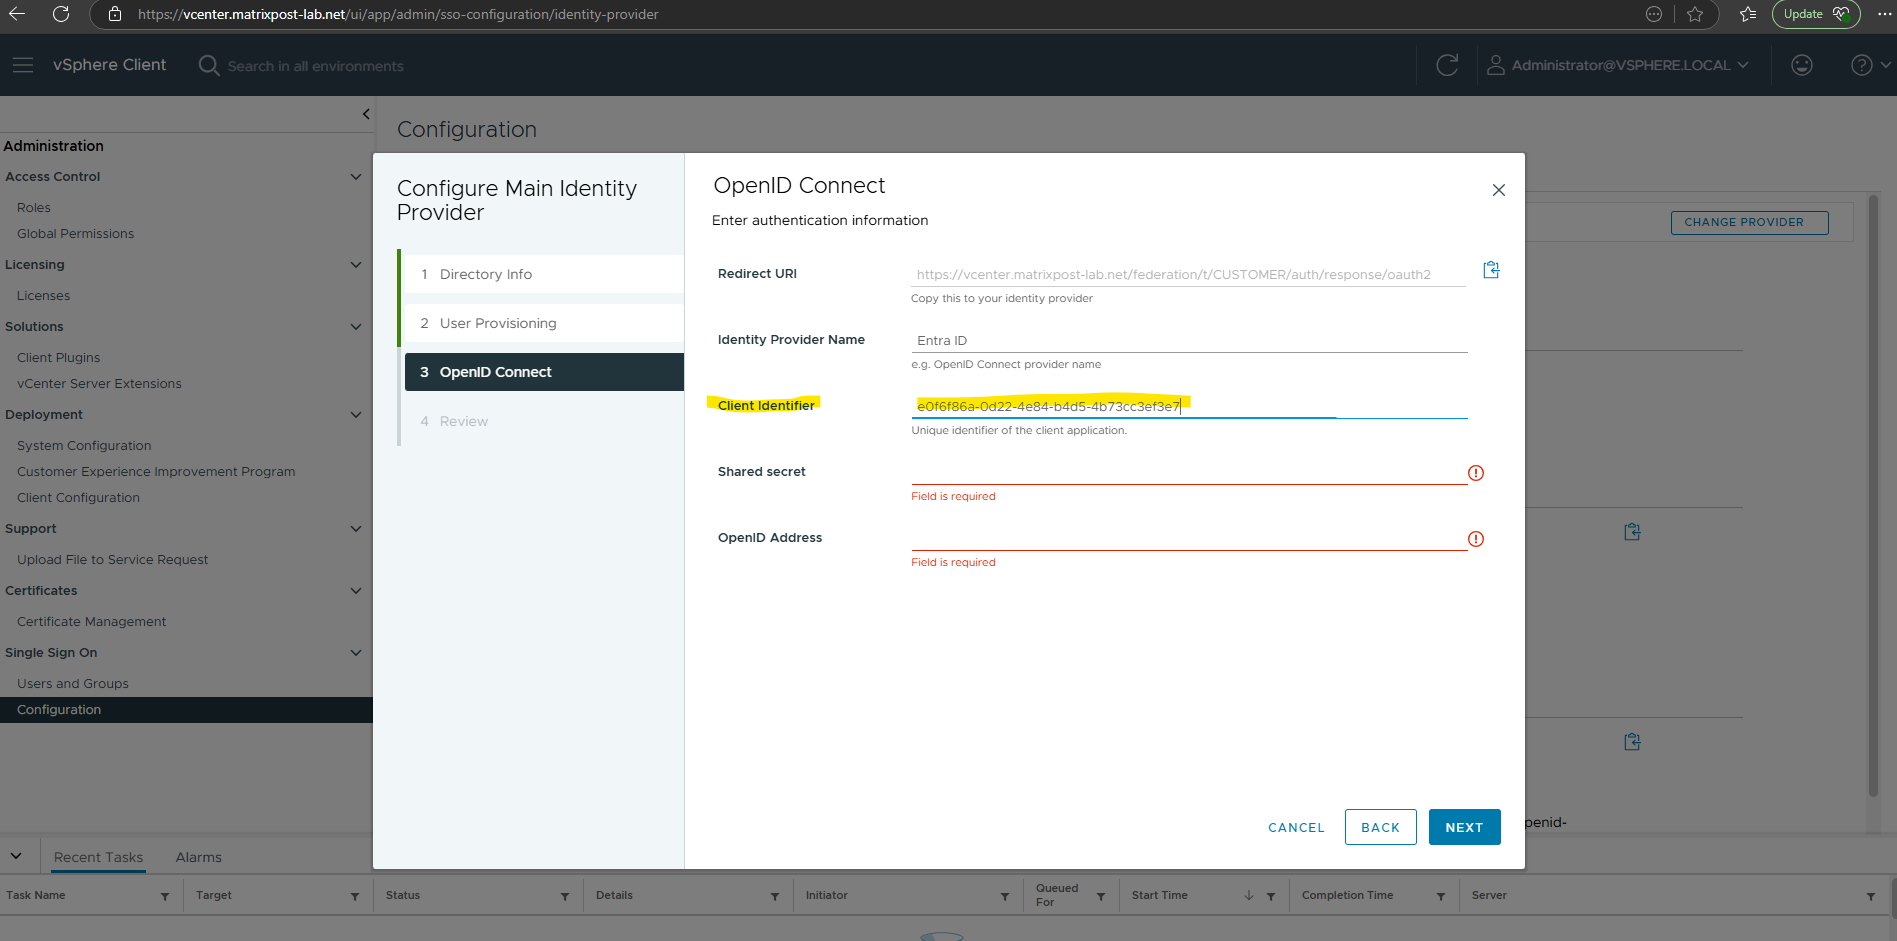
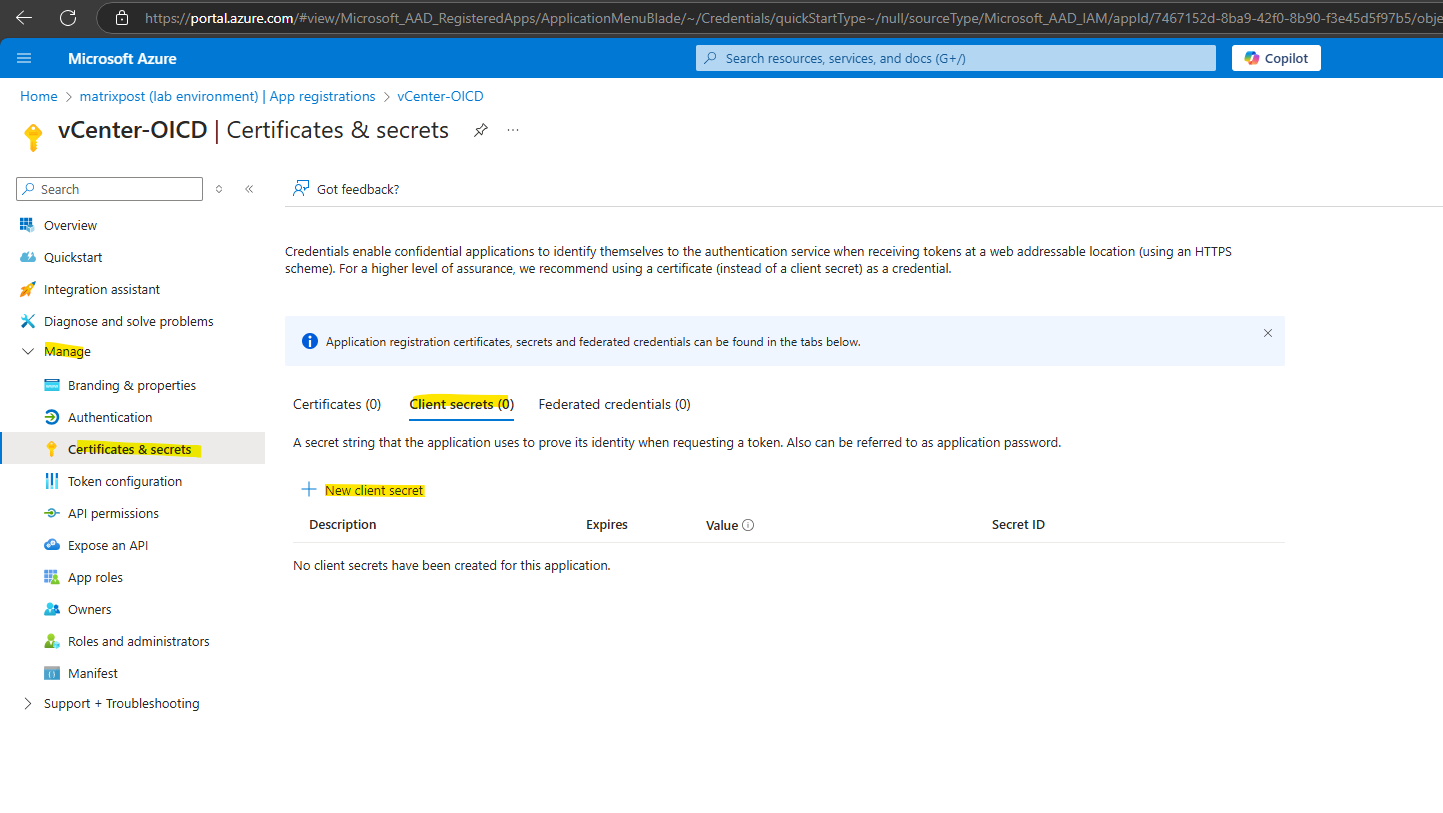
As you can see above, next we need to provide here a shared secret which is in Azure the client secret for the application we created there.
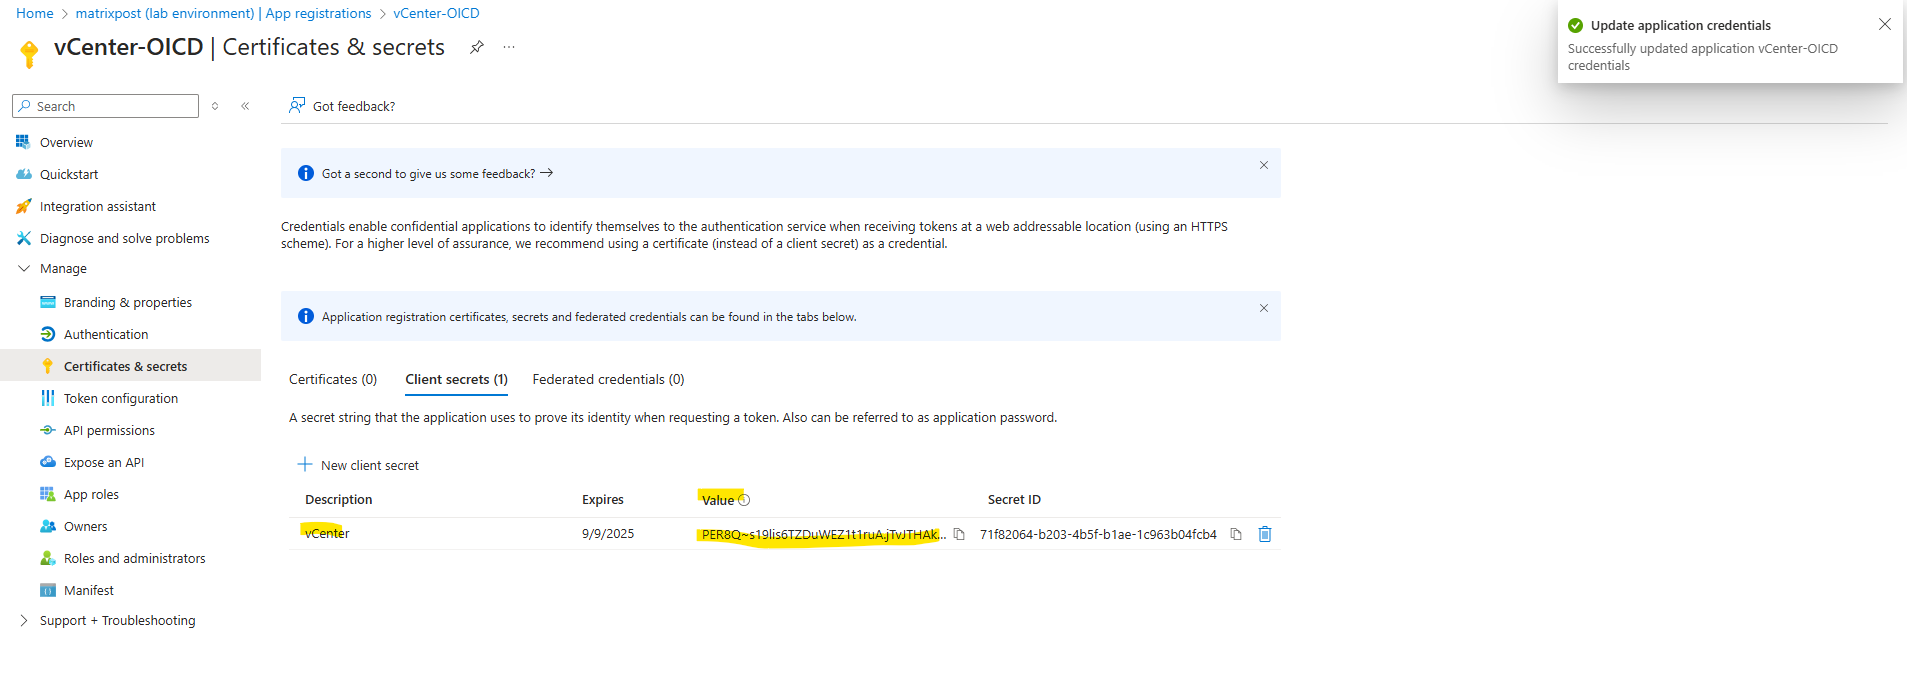
Therefore navigate back to Azure and our created app registration and here under Manage -> Certificates & secrets -> tab Client secrets click on New client secret as shown below.
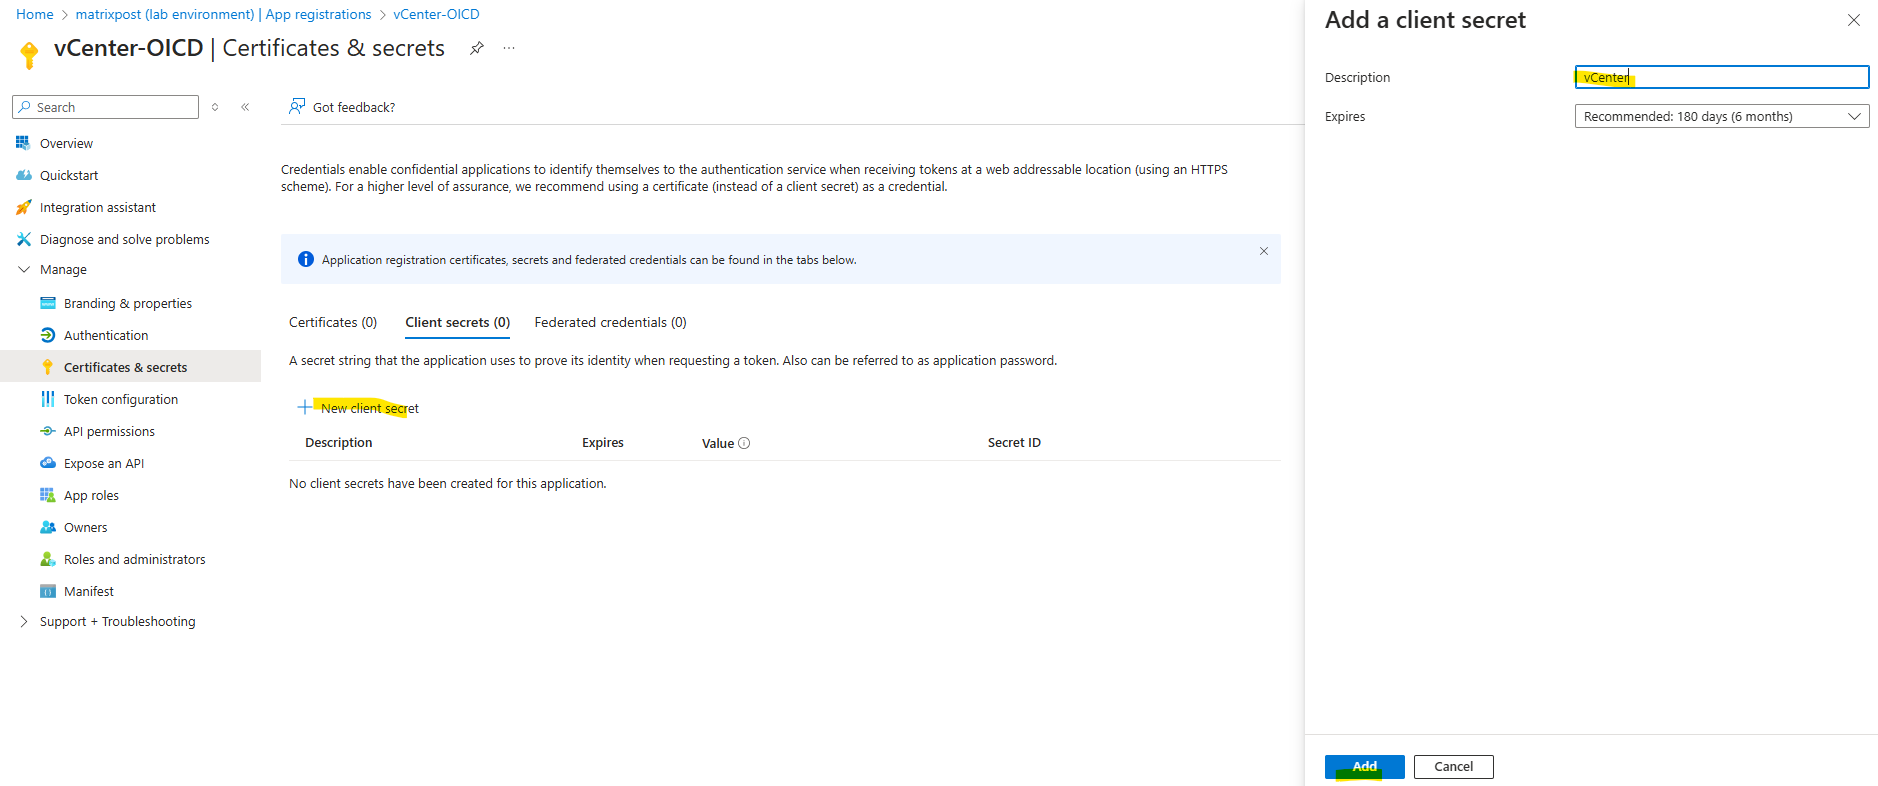
Here we just need to enter a name for the client secret. Click on Add.
Copy the client secret, its value to insert it then into the vCenter wizard.
Enter the client secret below in our vCenter wizard.
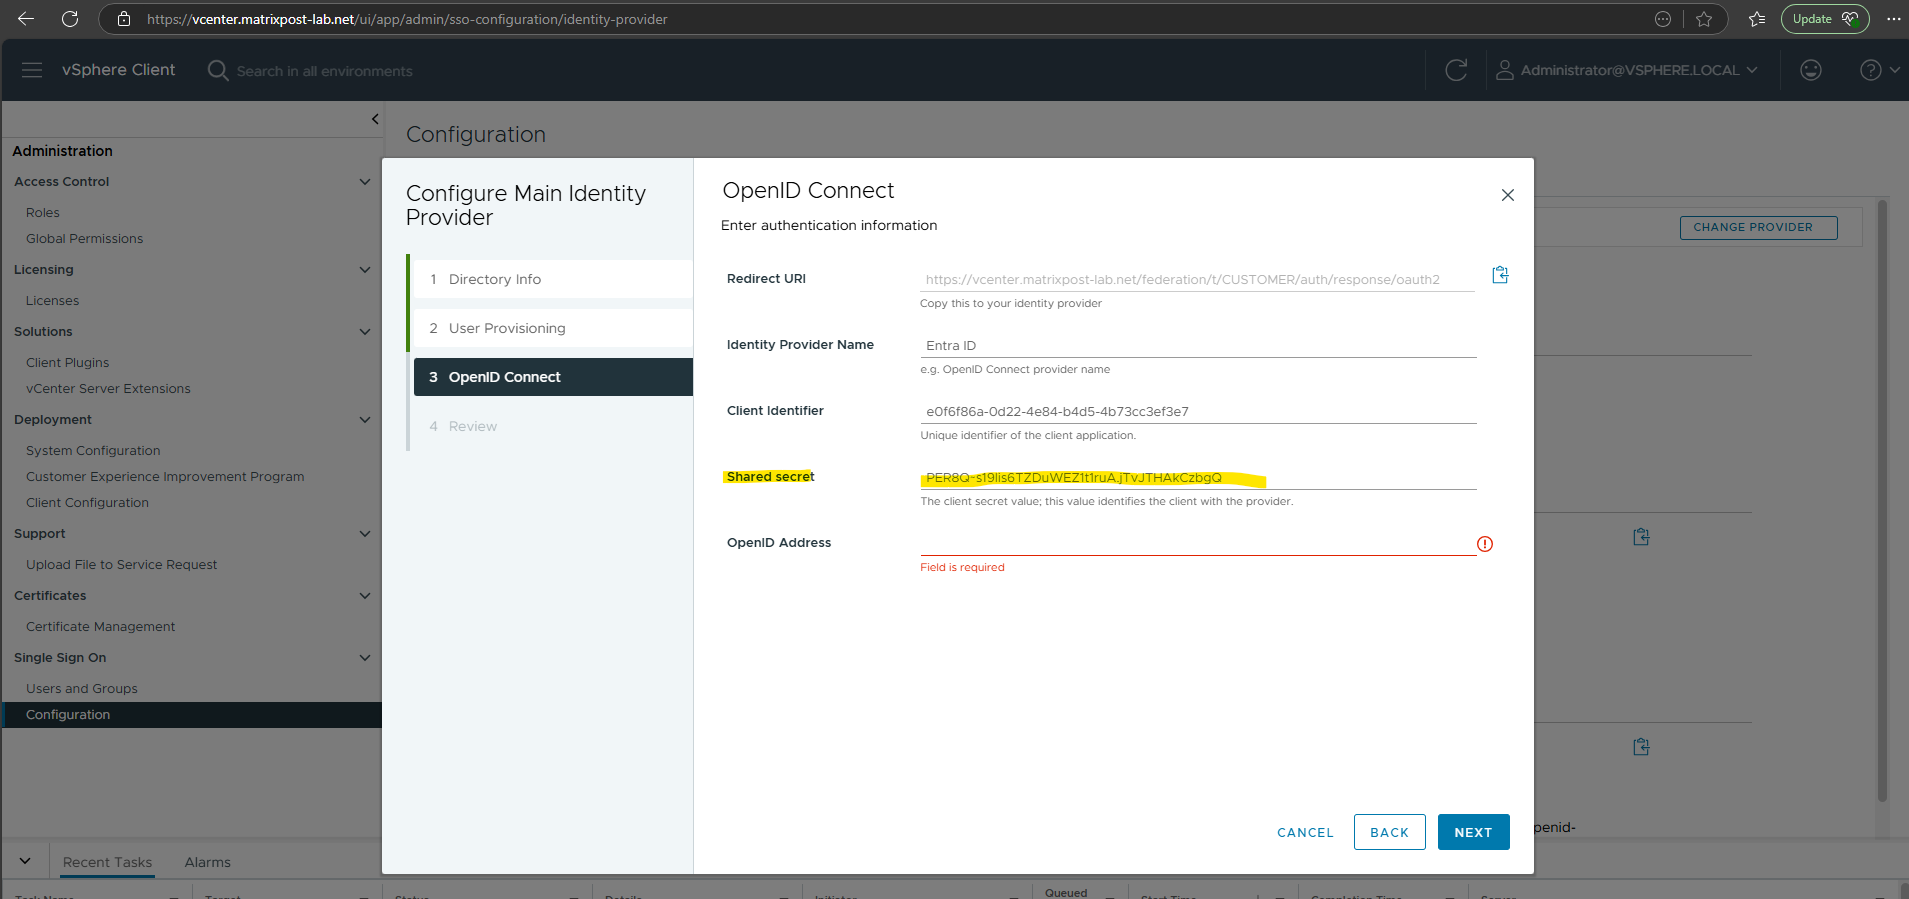
Finally we also need to provide the OpenID Address below in vCenter.
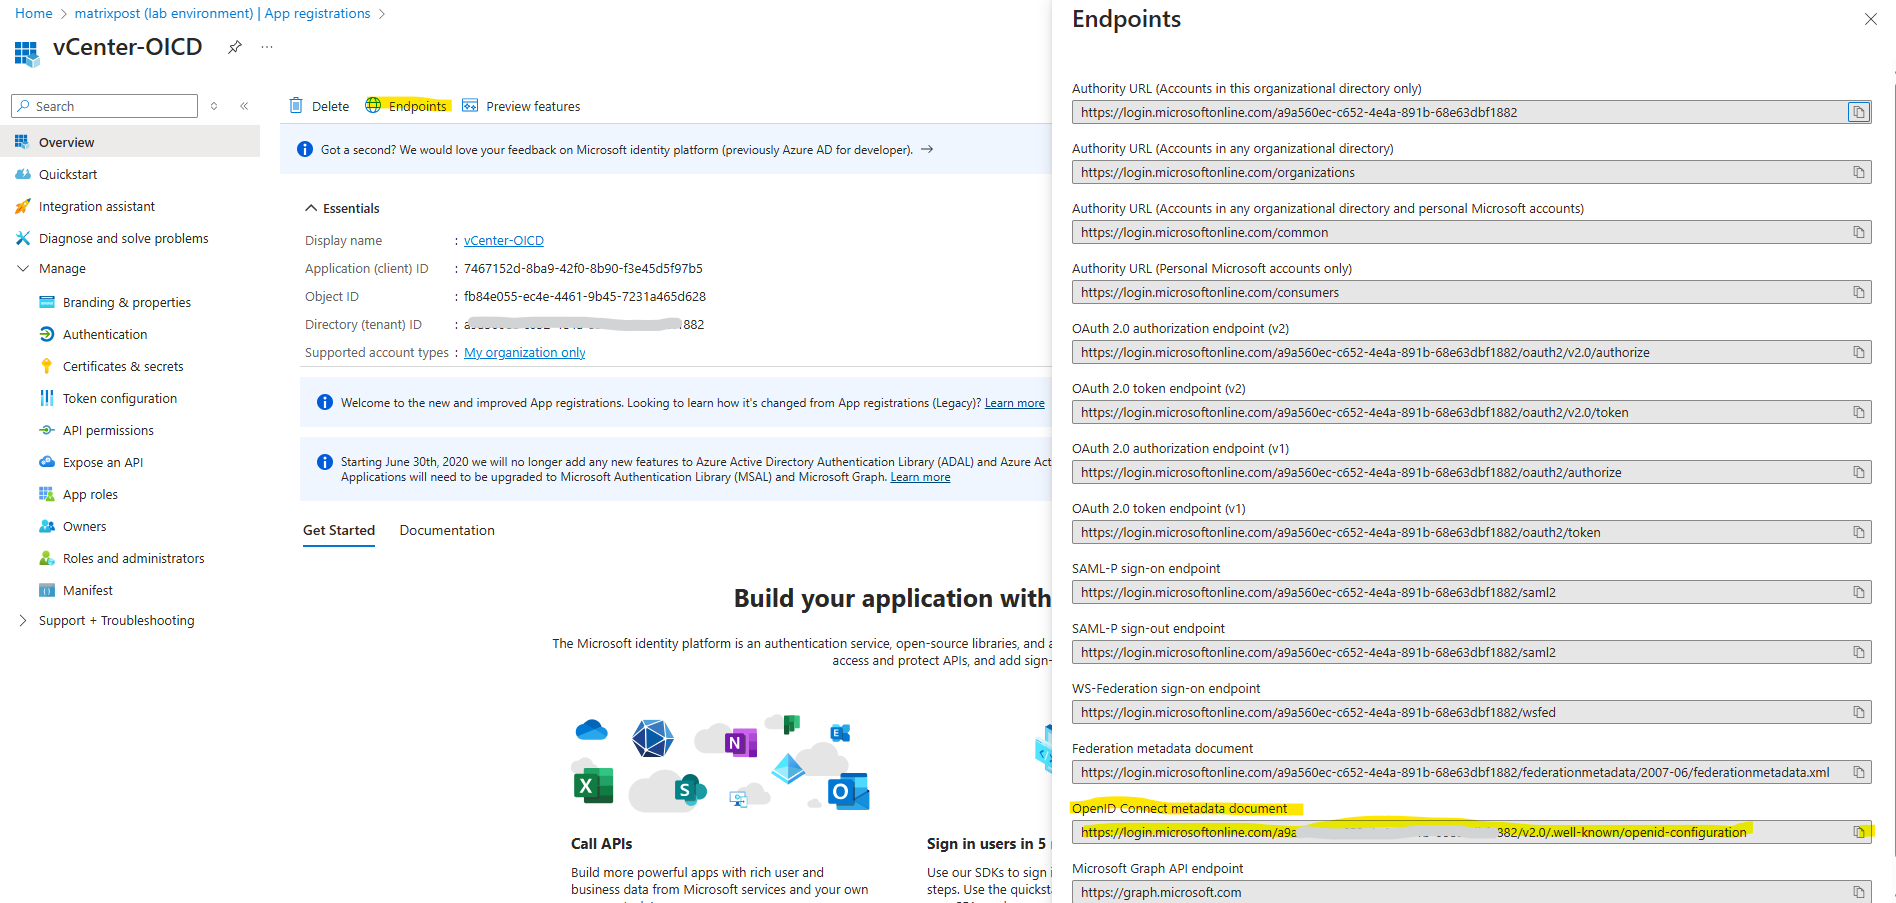
We get this address from our app registration in Azure. Directly on the Overview blade on the top bar click on Endpoints and copy the URI from OpenID Connect metadata document as shown below.
The OpenID Connect (OIDC) metadata document provides configuration details for an identity provider, such as authorization endpoints, token endpoints, supported scopes, and signing keys. In Microsoft Entra ID (formerly Azure AD), this metadata is available in a JSON document.
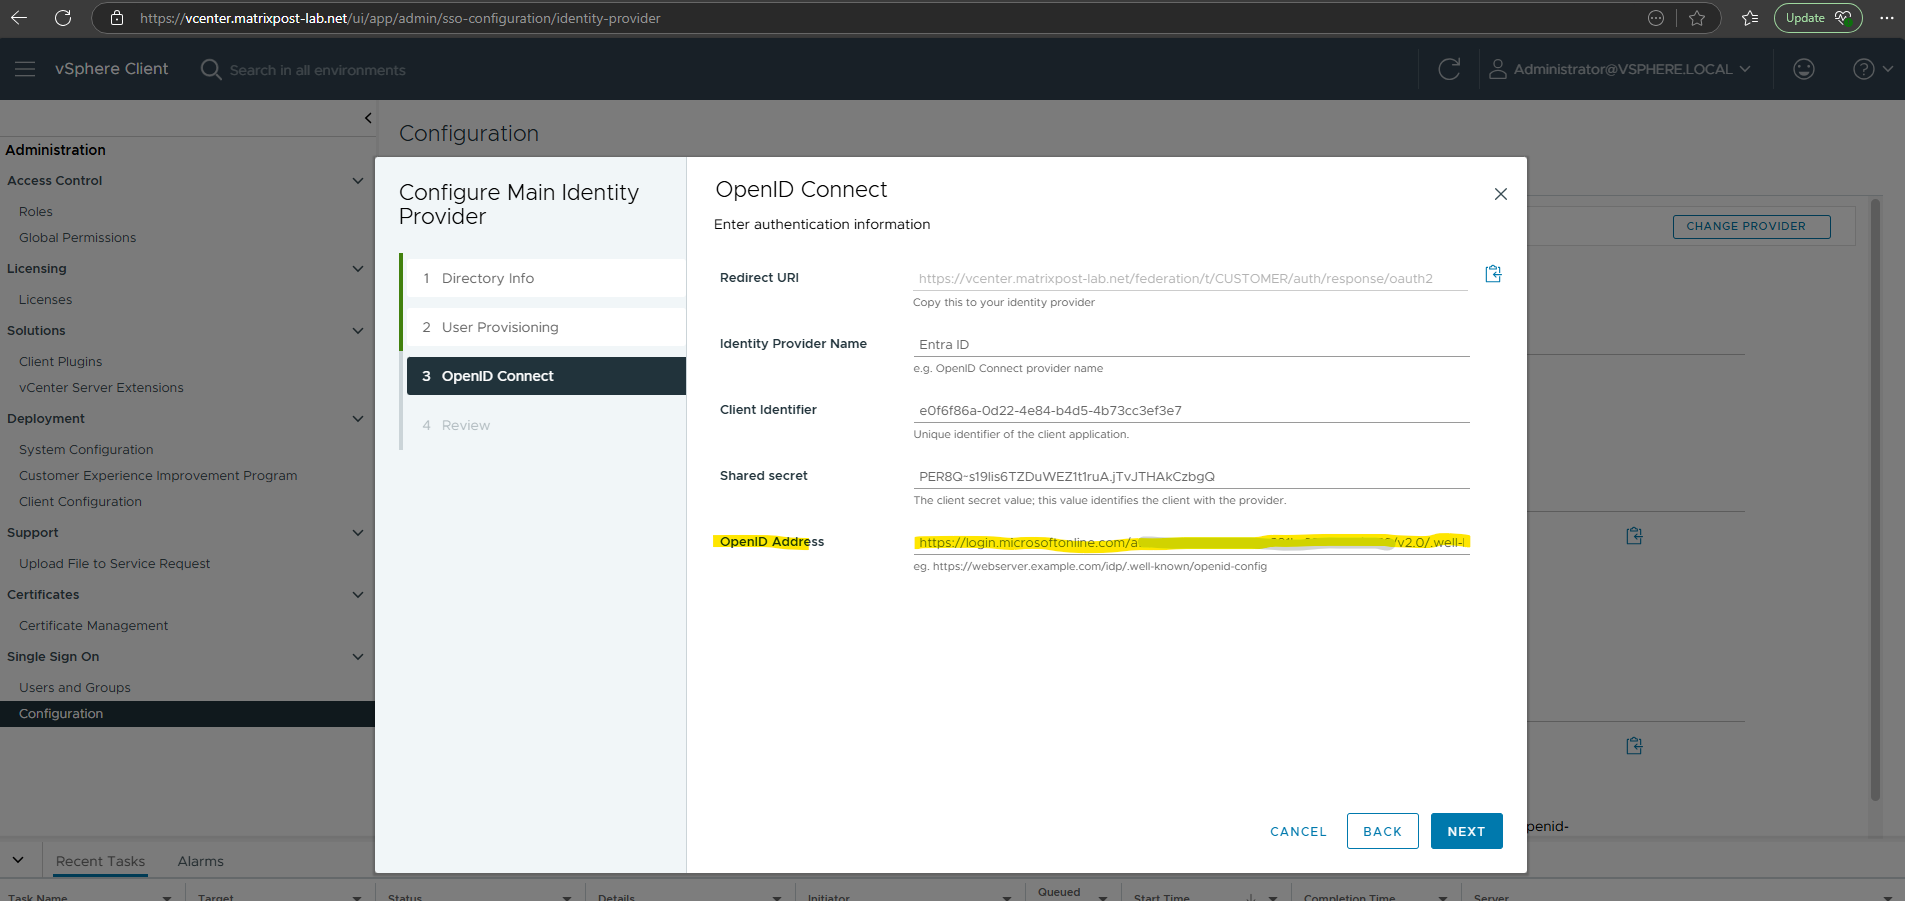
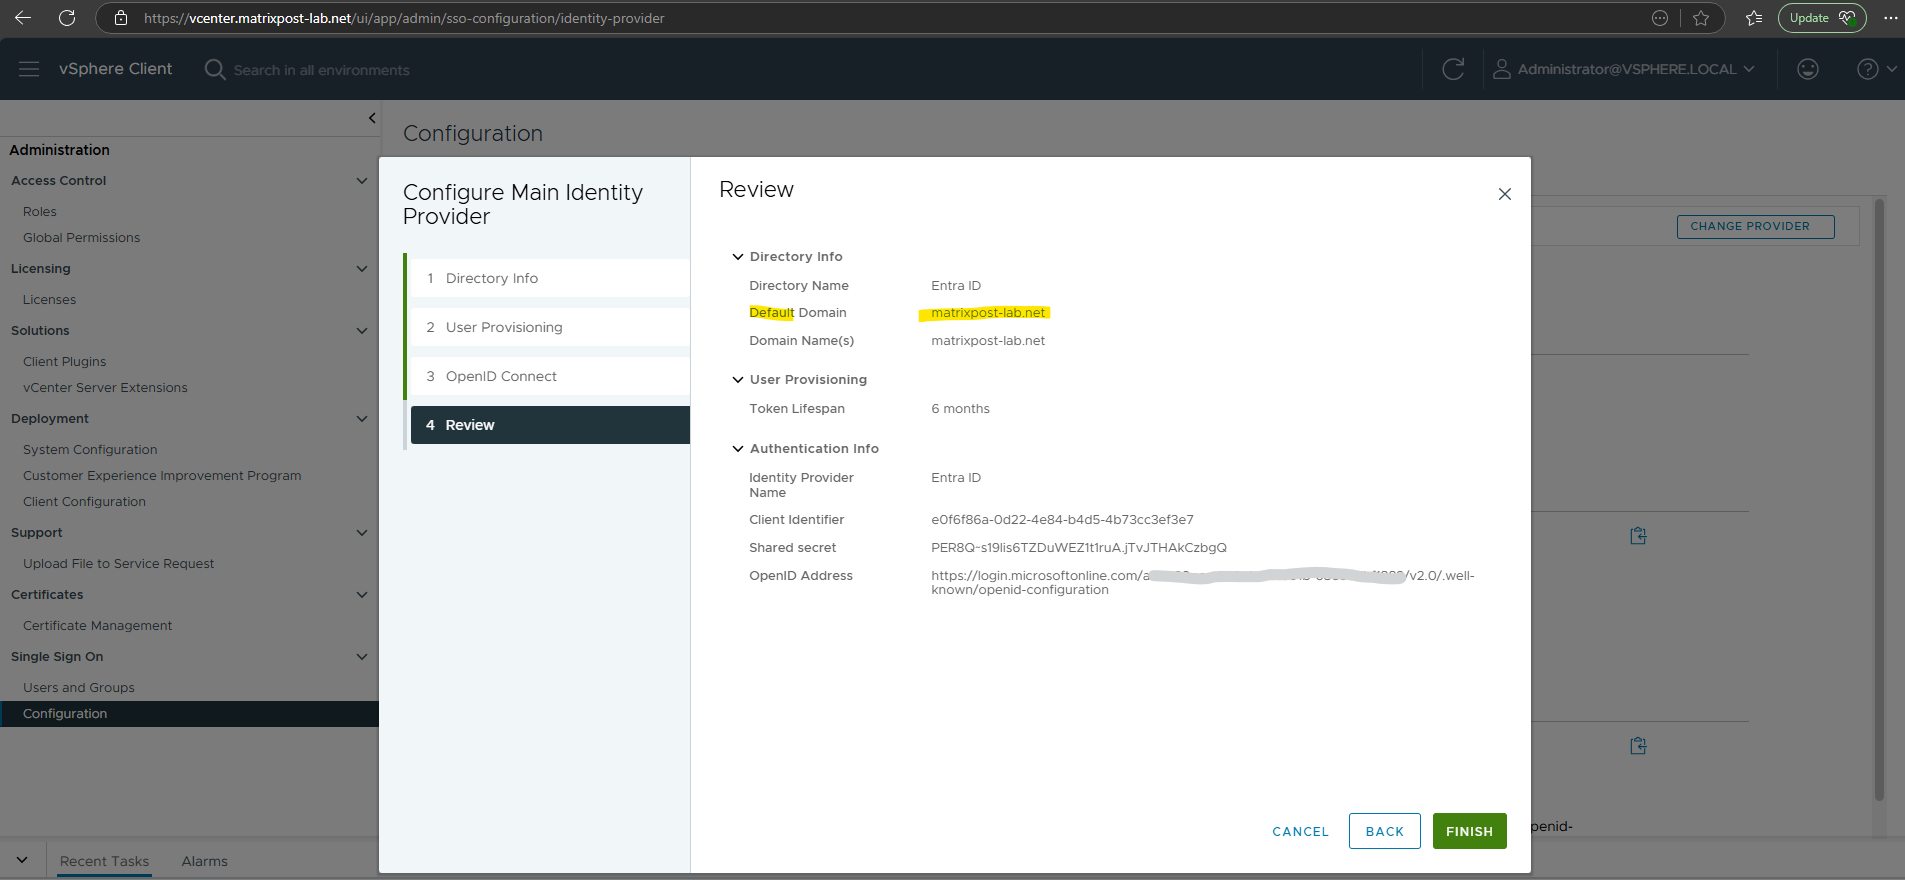
This URI we now need to enter for the OpenID Address below. Click on Next.
Finally click on Finish.

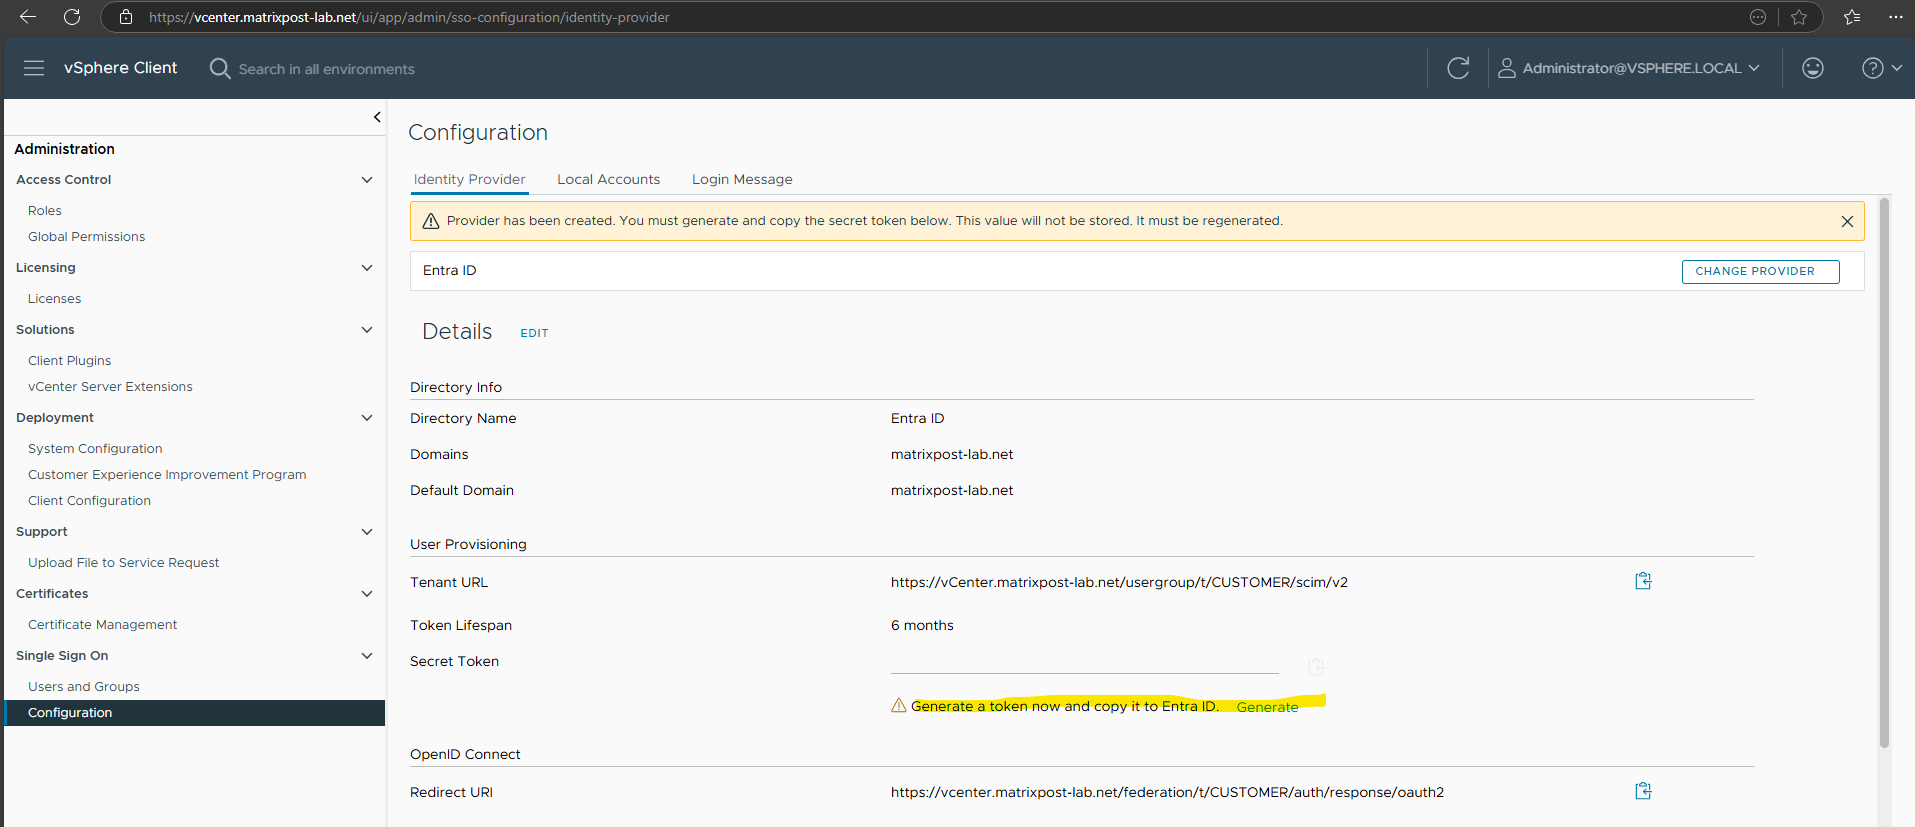
Provider has been created. You must generate and copy the secret token below. This value will not be stored. It must be regenerated.
Click on Generate.
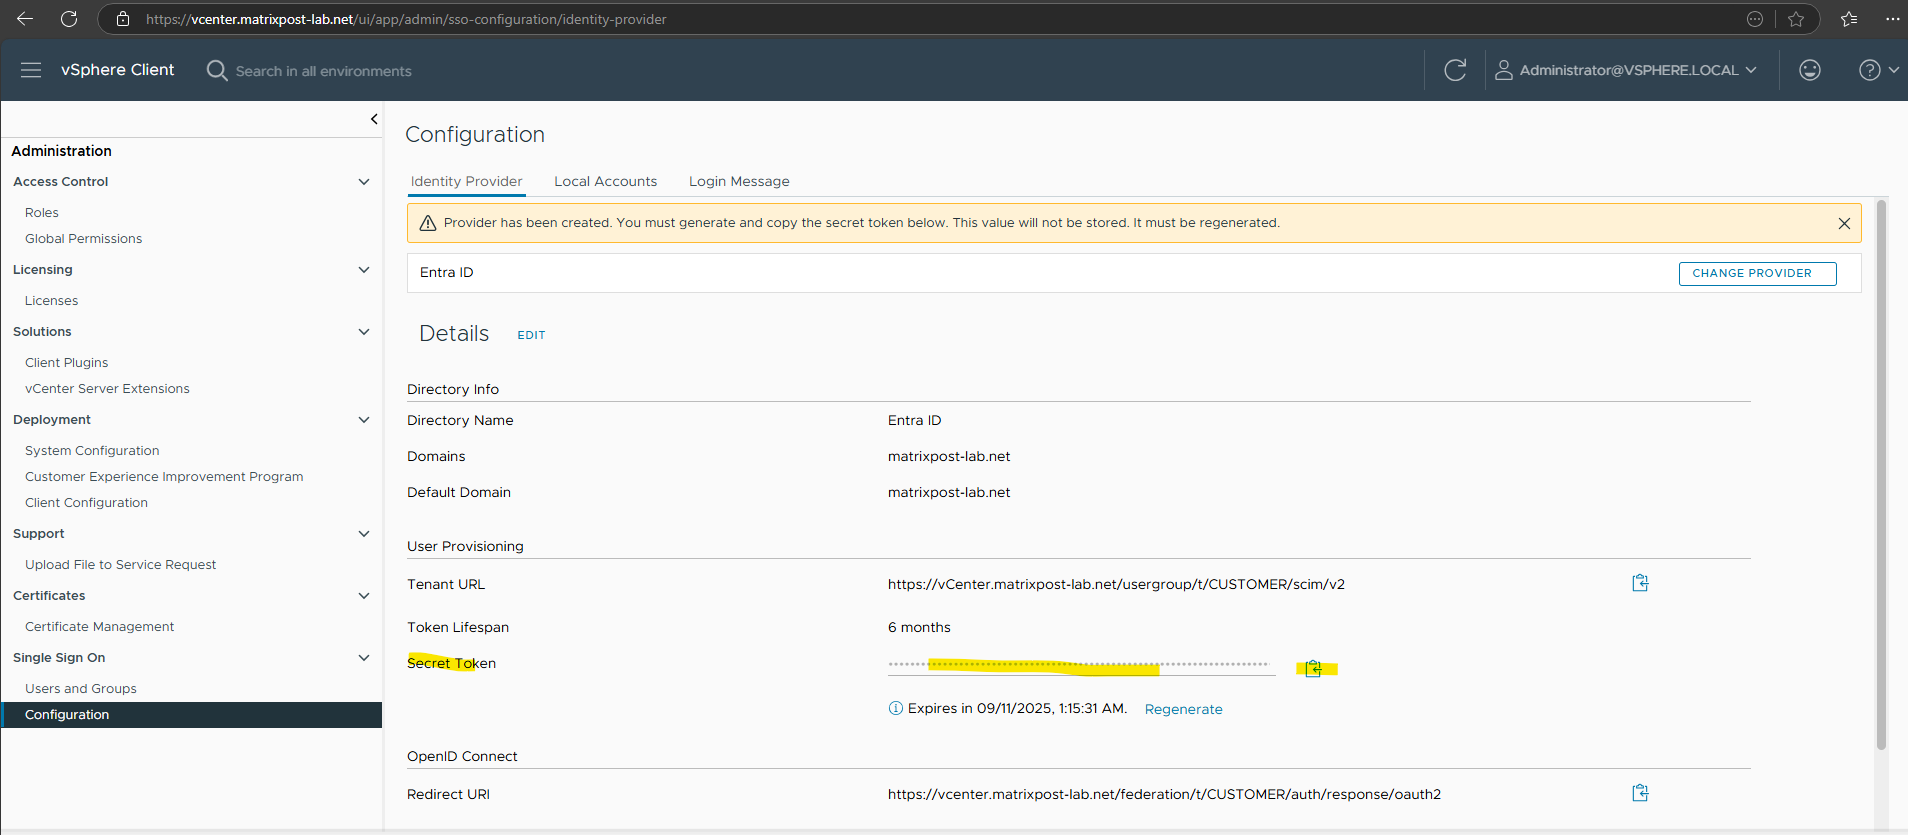
Copy the generated secret token which we need later further down.
Set up User Provisioning
If you want to sync users from Microsoft Entra ID to an on-premises application like vCenter by using SCIM (System for Cross-domain Identity Management), you need to set up an on-premises SCIM endpoint and configure Entra ID provisioning.
Creating the Entra ID App for System for Cross-domain Identity Management (SCIM)
We also need to create a new Entra ID application (SCIM) for the user provisioning. In the Azure portal navigate to Entra ID -> Enterprise applications and clik on New application like shown below.
This app will sync the users and groups from Entra ID to your on-premise vCenter Server.

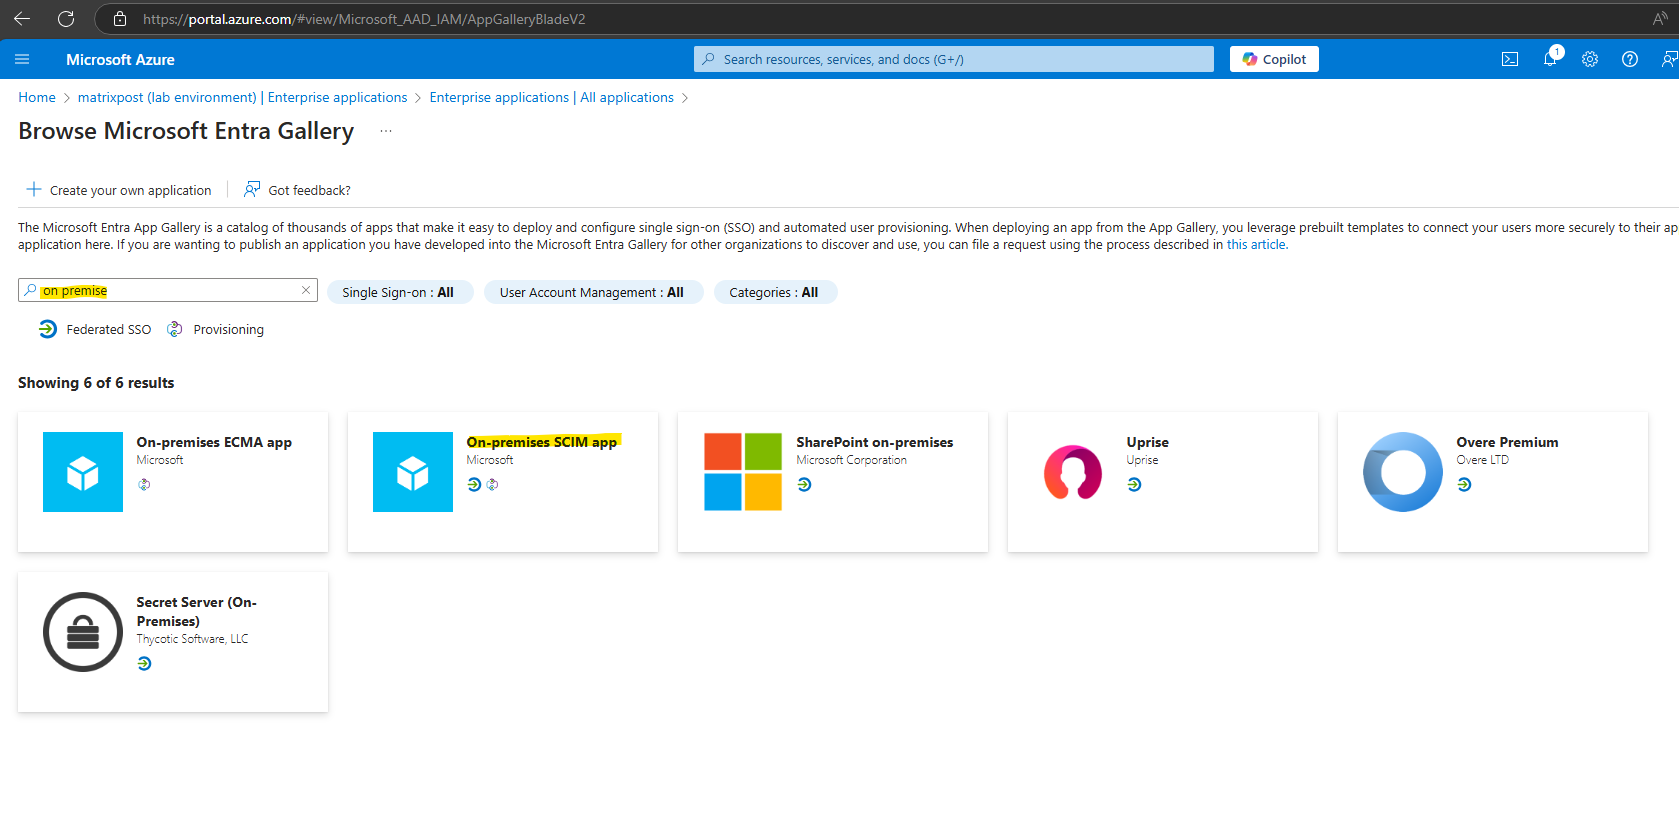
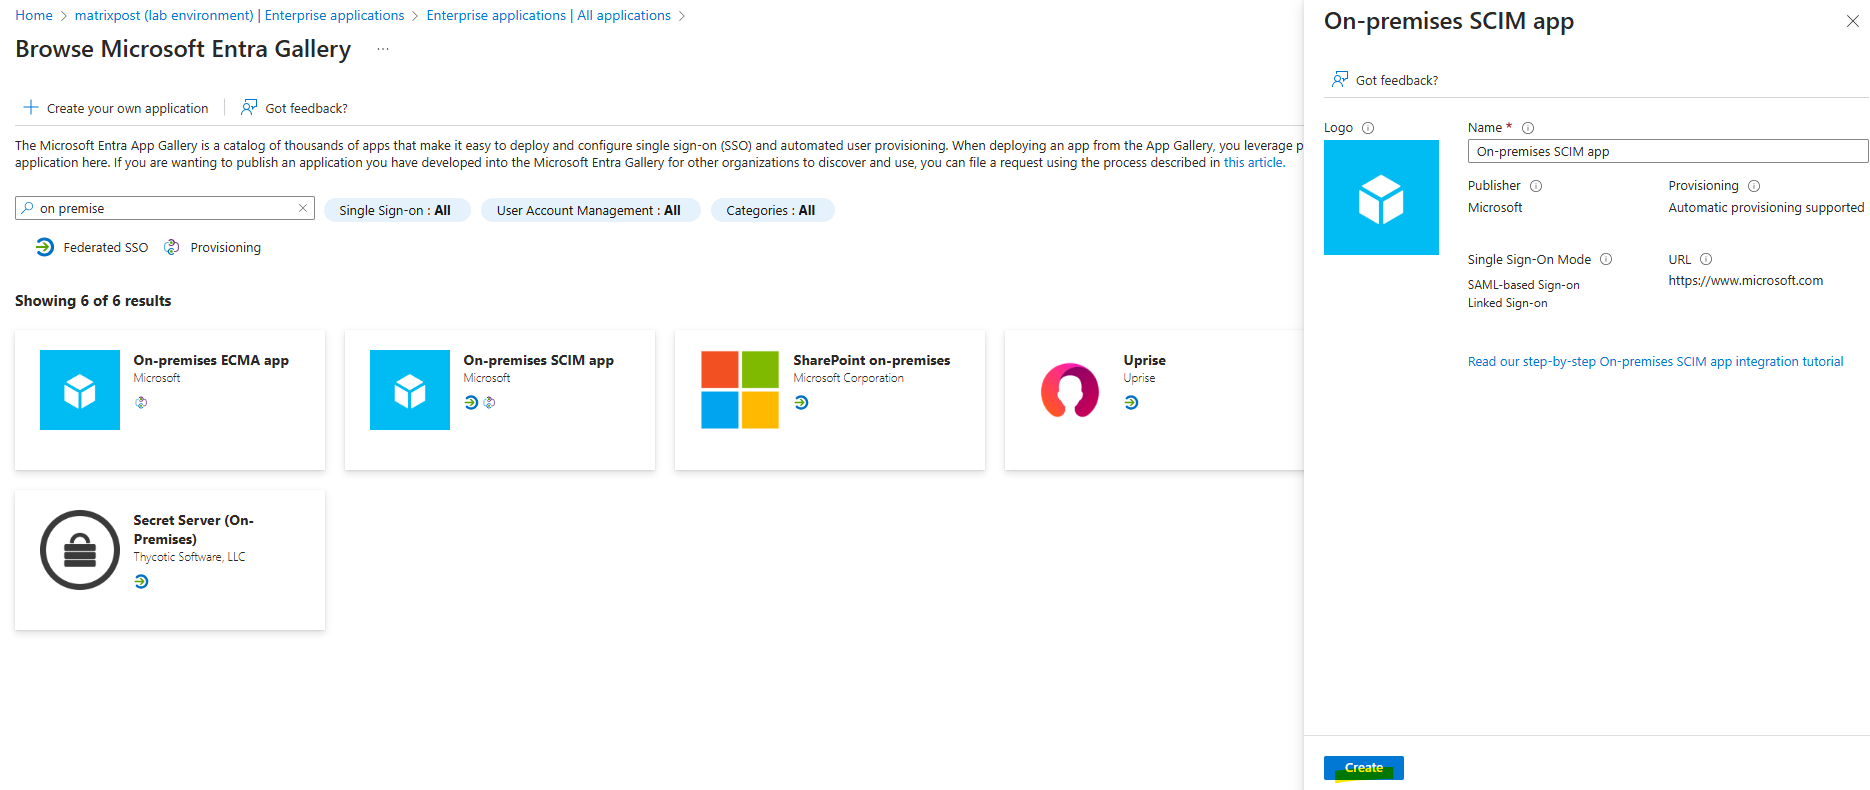
Search for on premise and select the On-premises SCIM app below.
Click on Create.
After the app is created successfully select Provisioning.
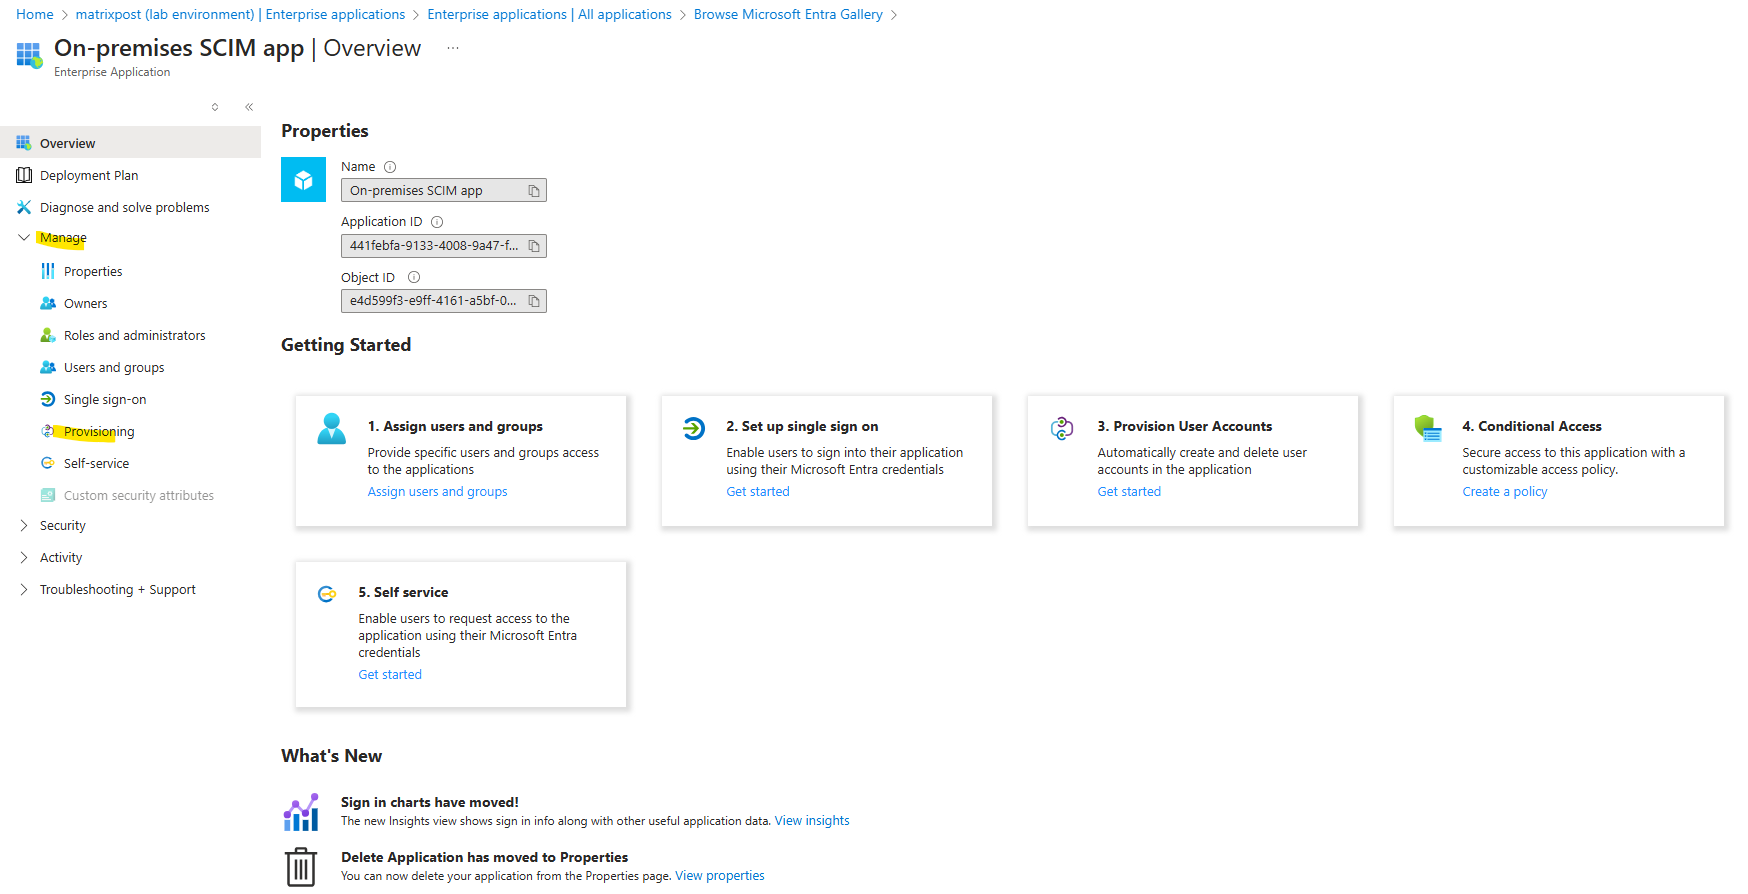
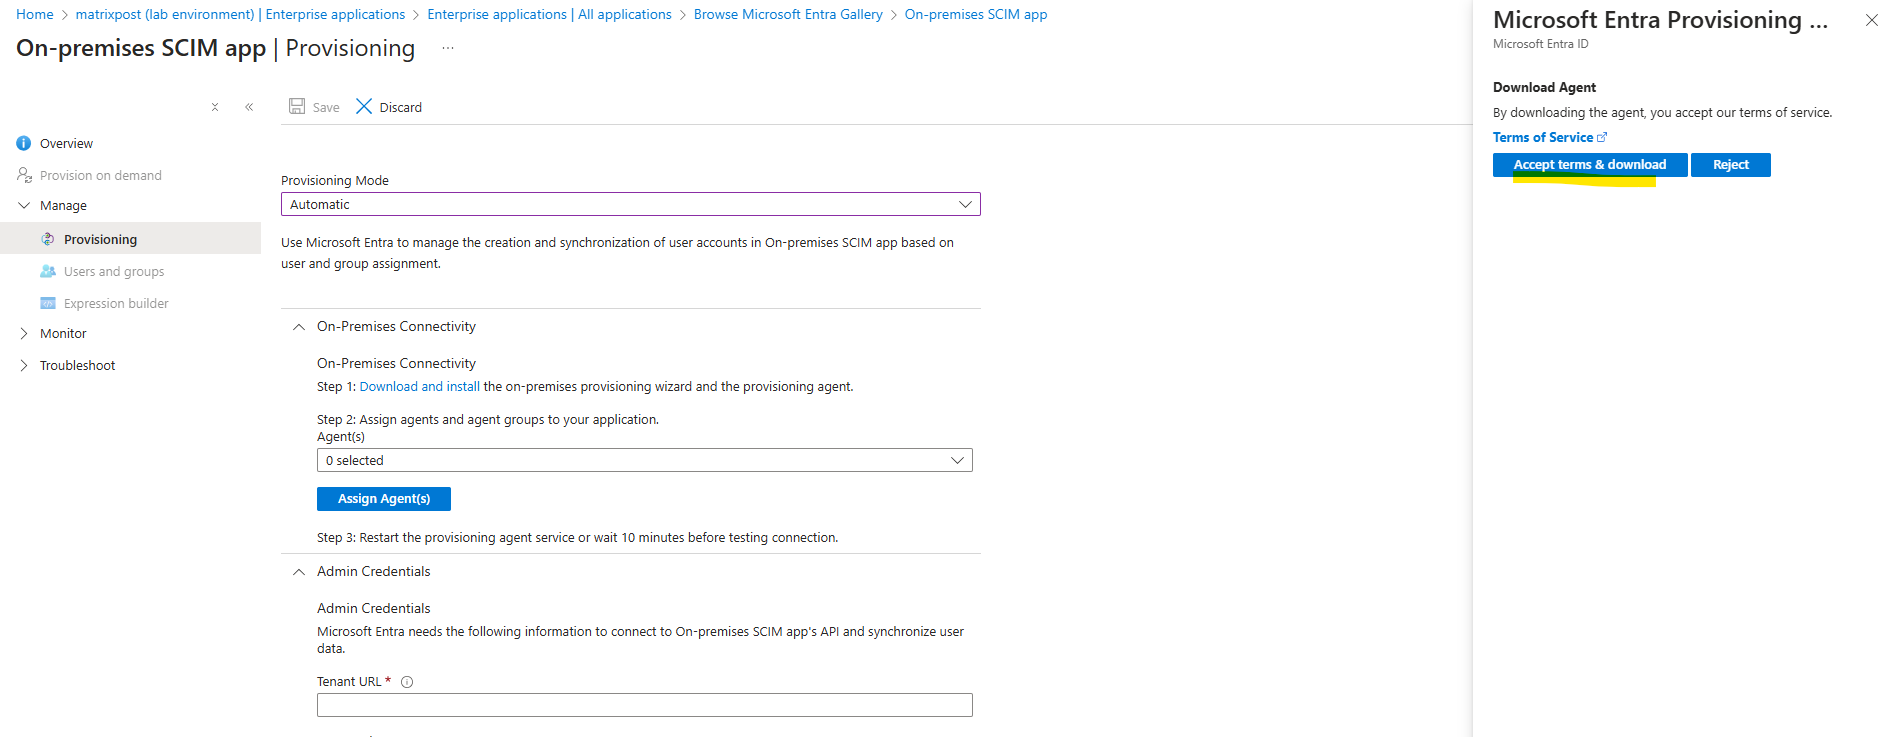
Click on Provisioning and select for the provisioning mode here Automatic.
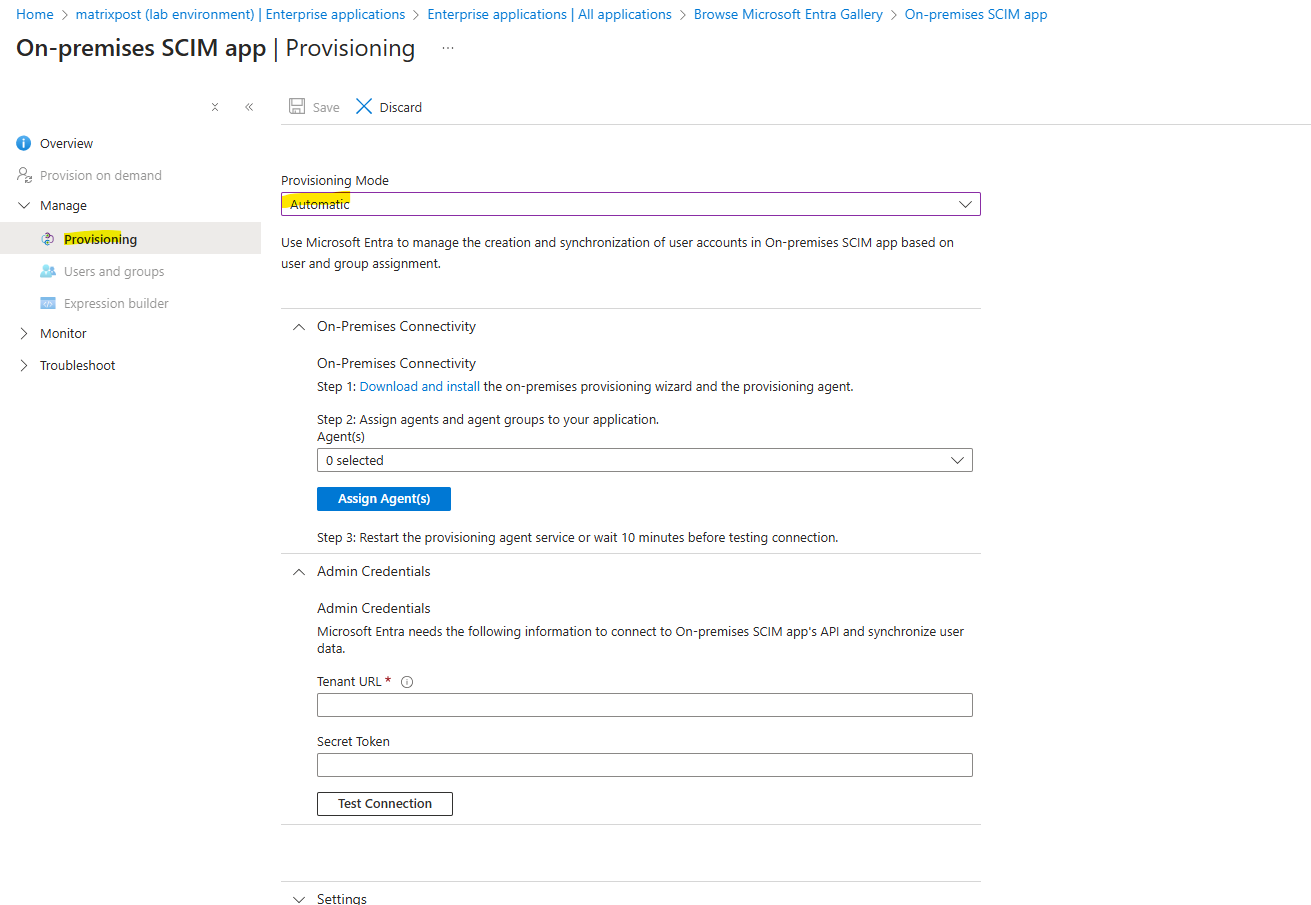
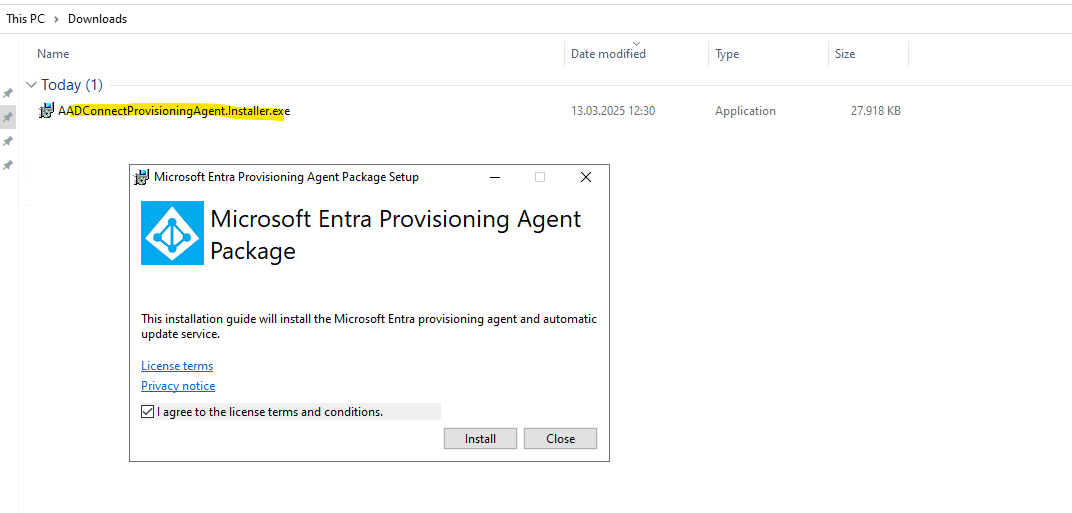
We can now download the on-premise provisioning wizard and provisioning agent by clicking on the link below.
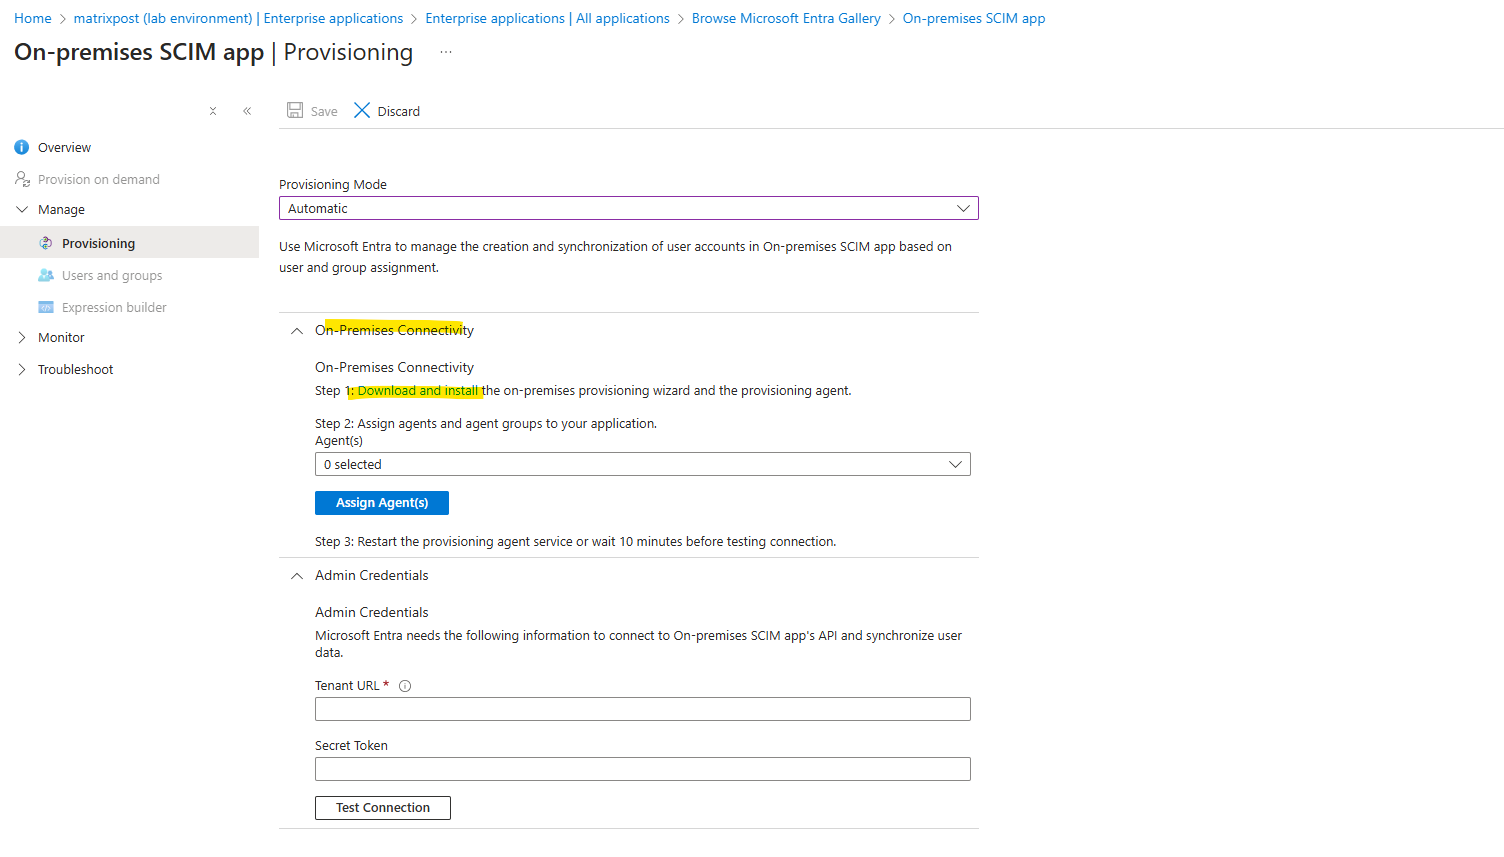
Click on Accept terms & download.
Installing the Microsoft Entra Provisioning Agent in the on-premise Network
We need to install this agent on an internal Windows Server which is able to connect to your vCenter Server.
Firewall and Proxy requirements
https://learn.microsoft.com/en-us/entra/identity/hybrid/cloud-sync/how-to-prerequisites?tabs=public-cloud#firewall-and-proxy-requirements

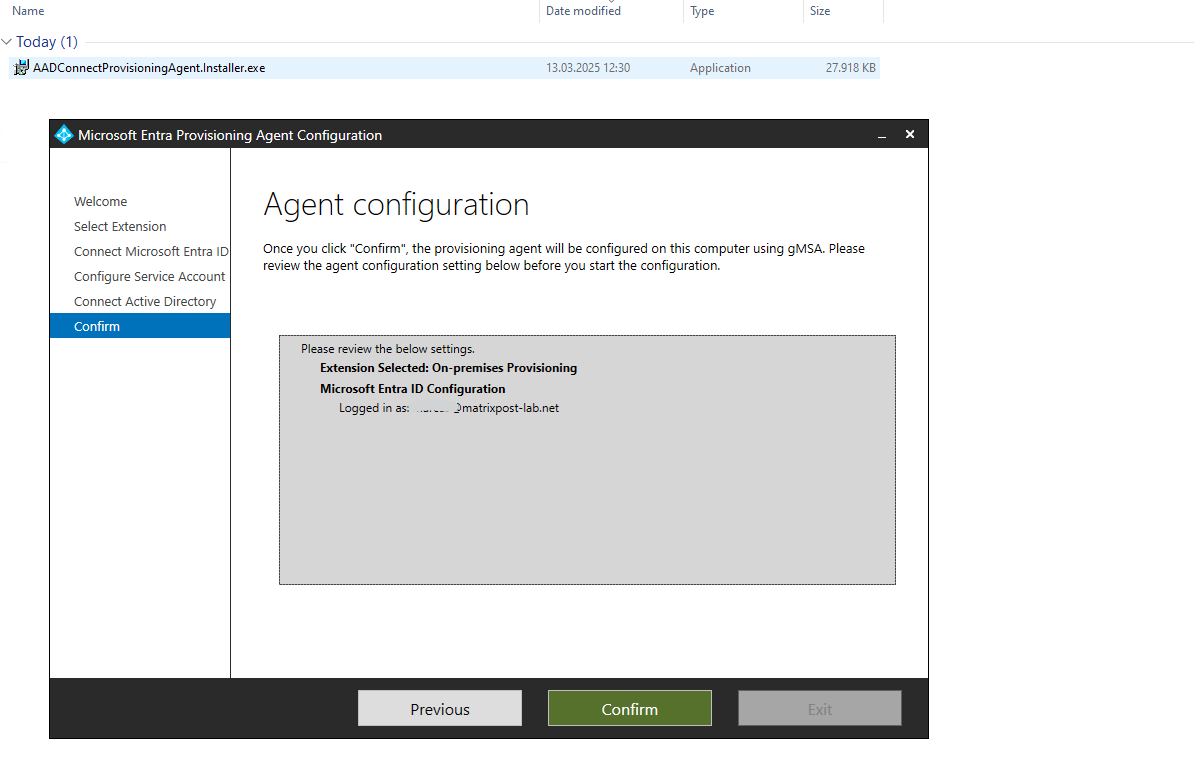
Select On-premises application provisioning (Microsoft Entra ID to application)

We need to connect to Microsoft Entra ID and click on Confirm.
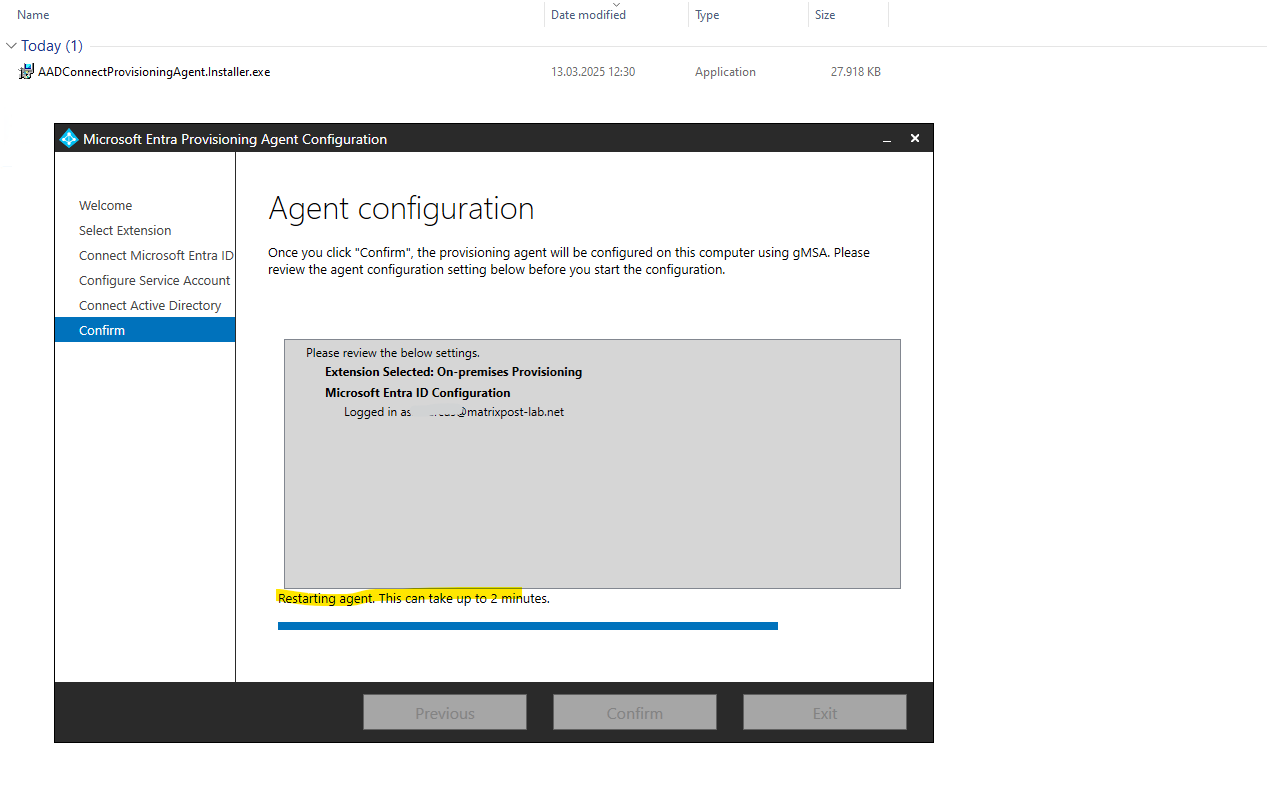
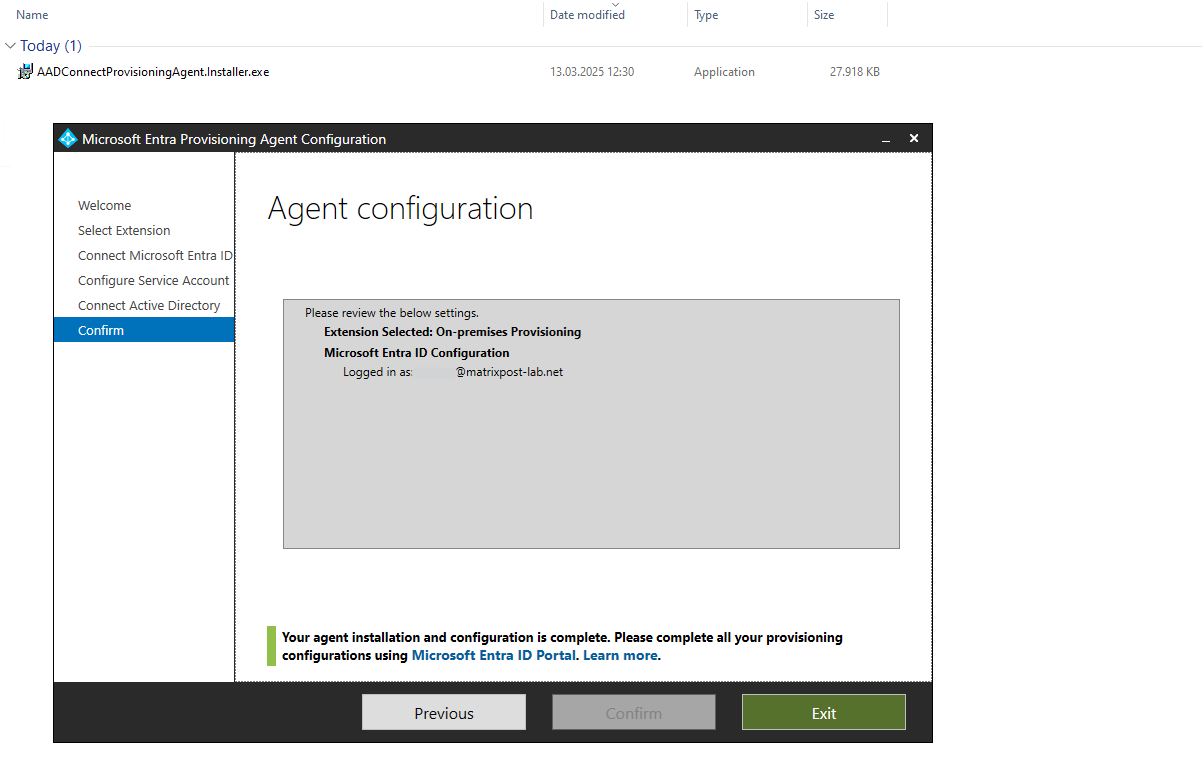
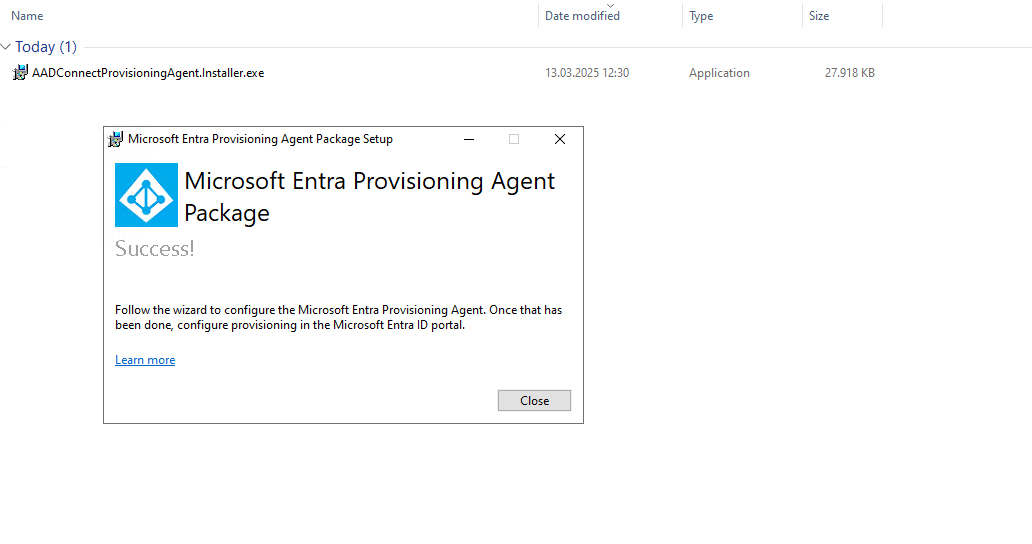
Finally we can close the install wizard.
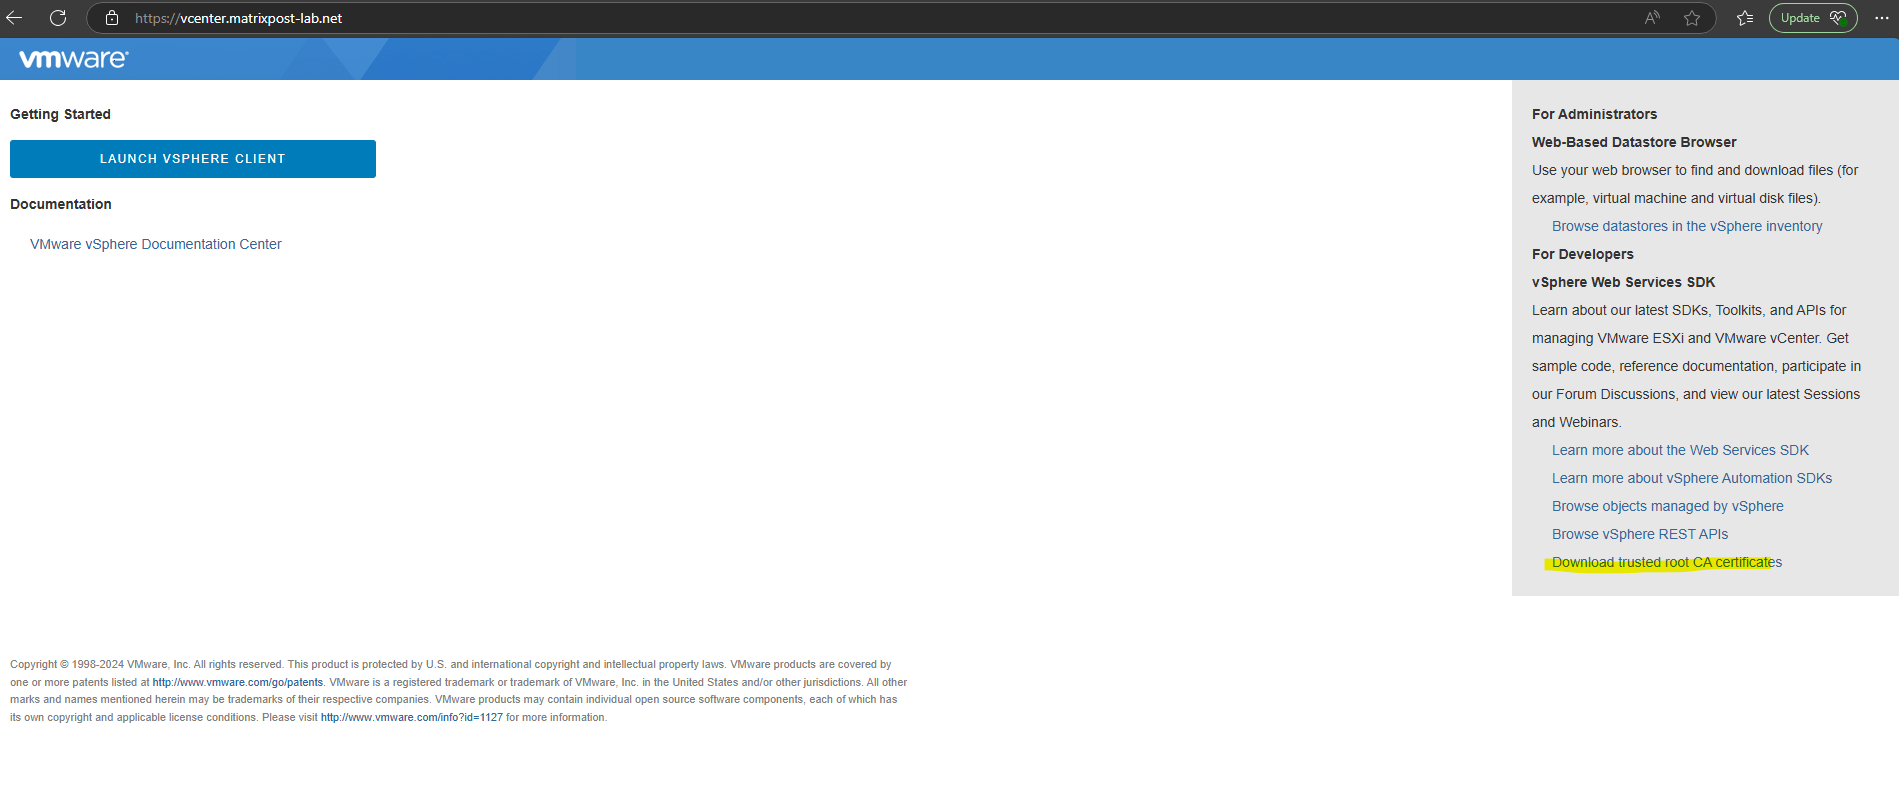
The Windows Server on which our agent is running, needs to trust the vCenter Server SSL/TLS certificate. Therefore you can download these certificates as usual on the Launch vSphere Client page to install them into the local Trusted Root Certification Authorities store.
Configure the on-premise Agent in the SCIM App
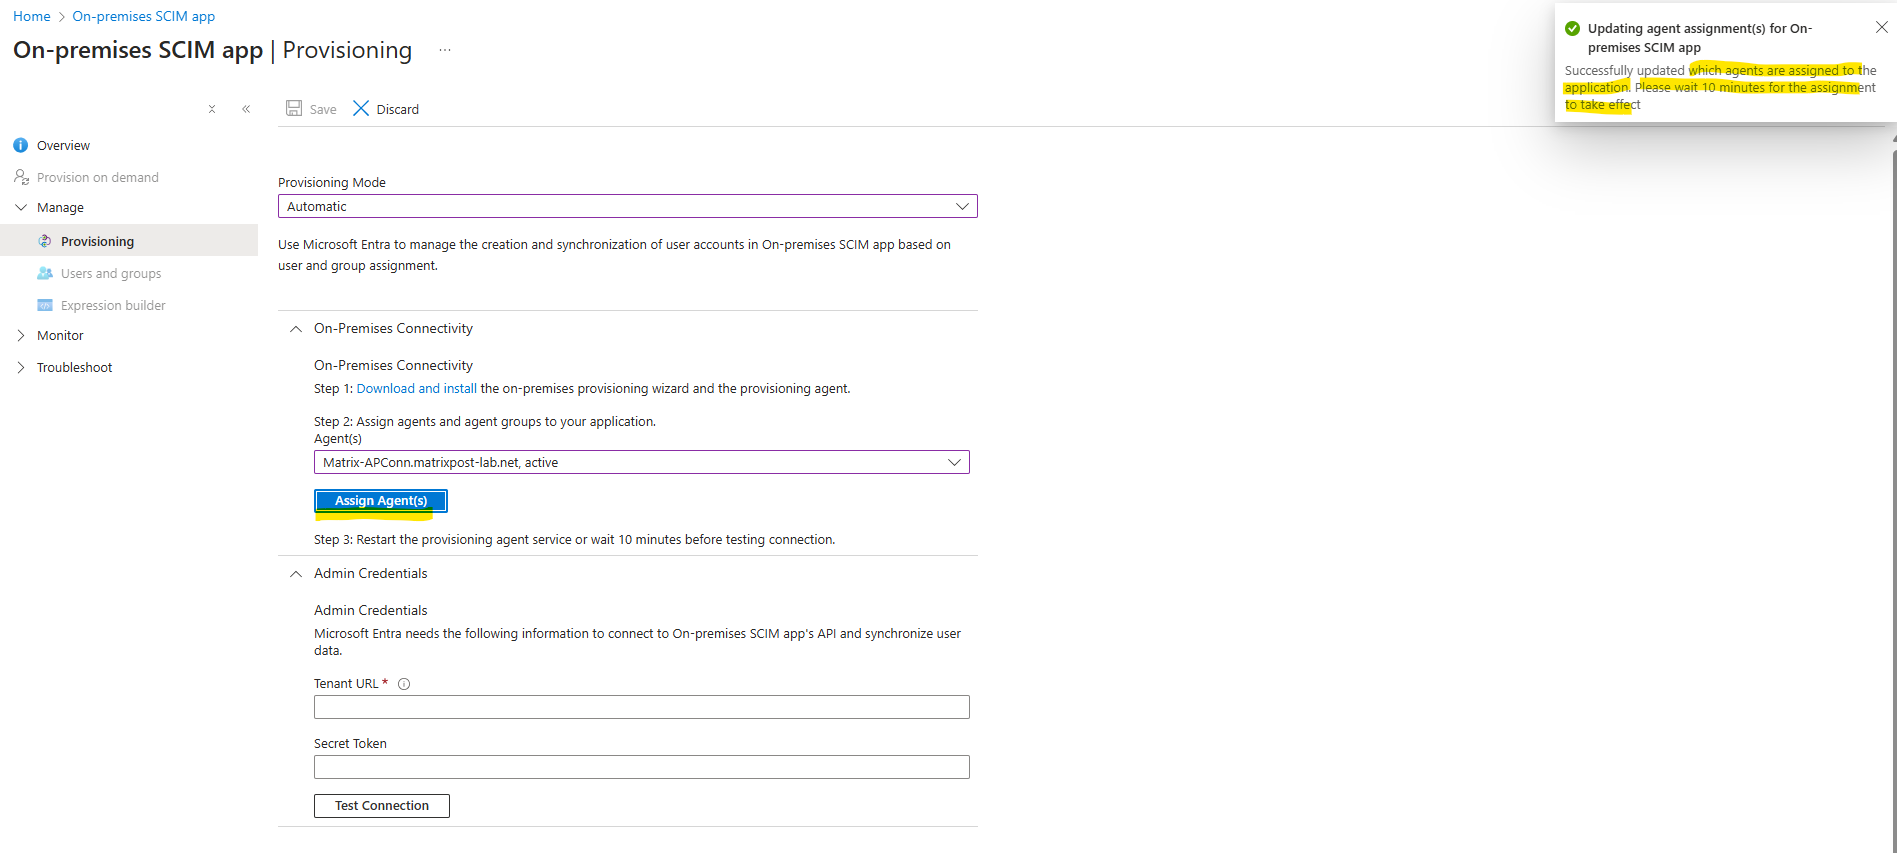
Back in the Azure portal we need to reload our SCIM app so that our provisioning agent will appear to select.
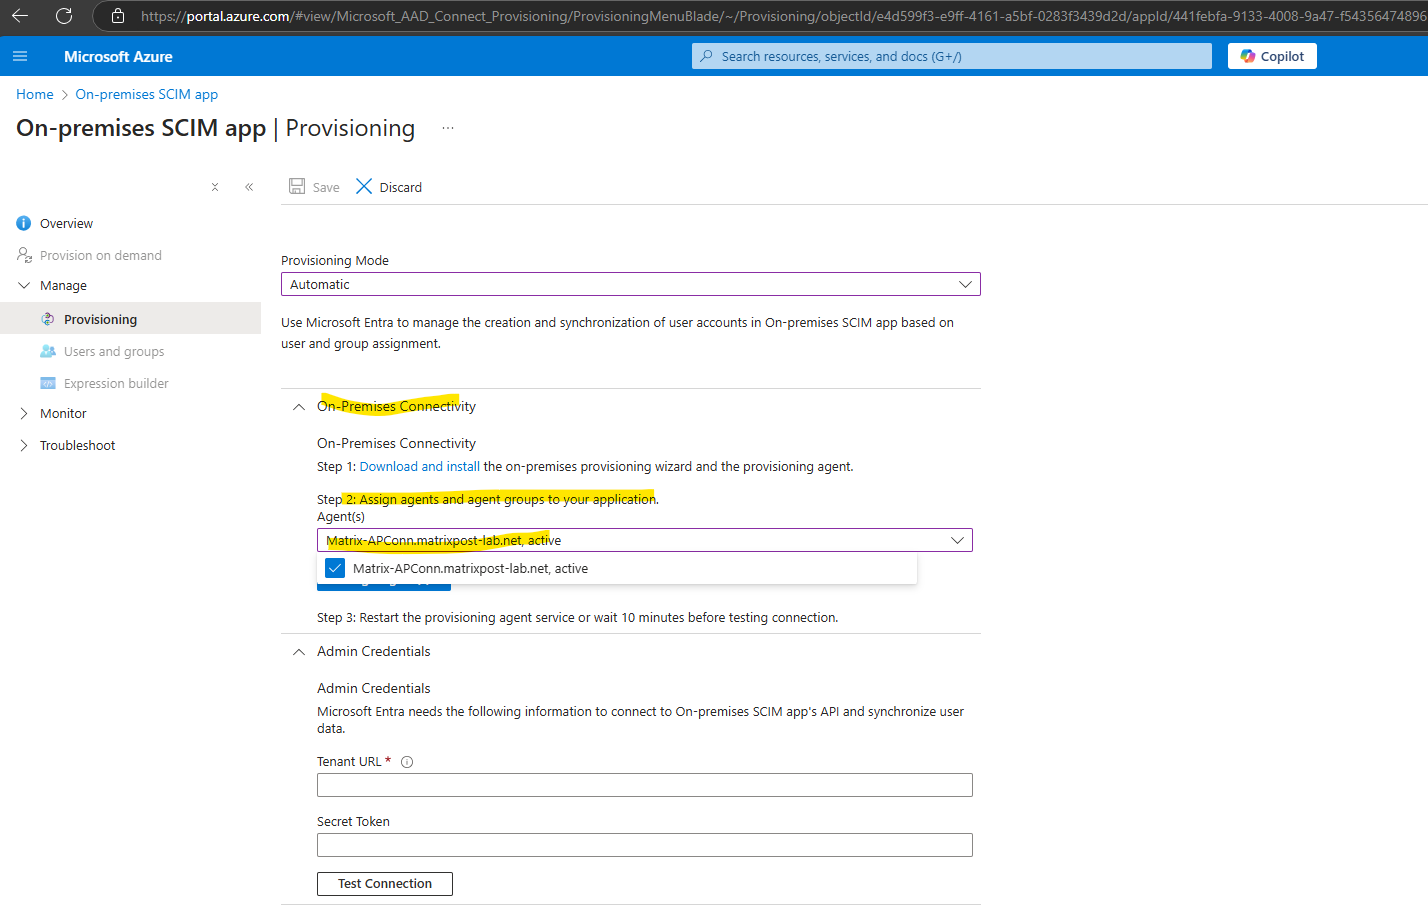
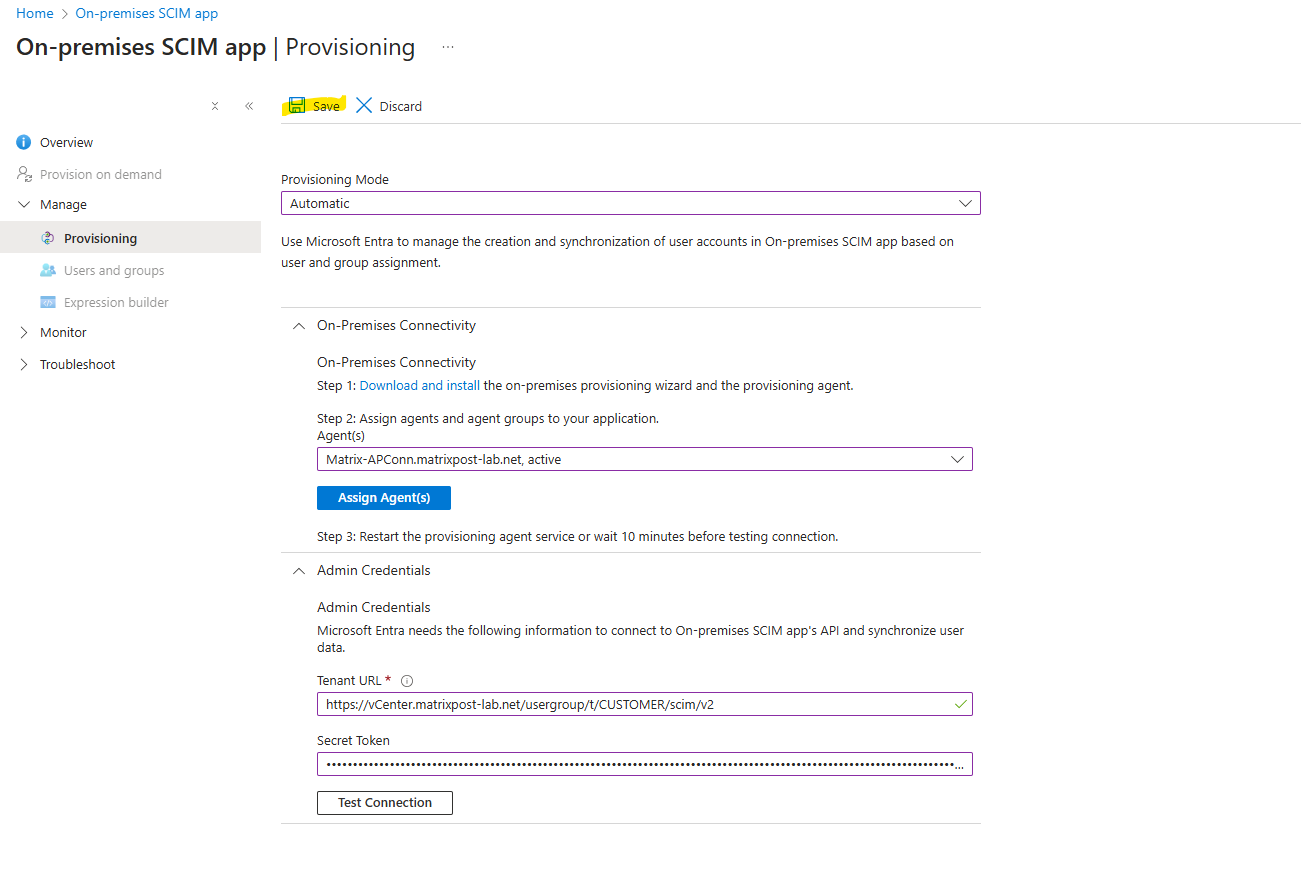
Click on Assign Agent(s).
Successfully updated which agents are assigned to the application. Please wait 10 minutes for the assignment to take effect.
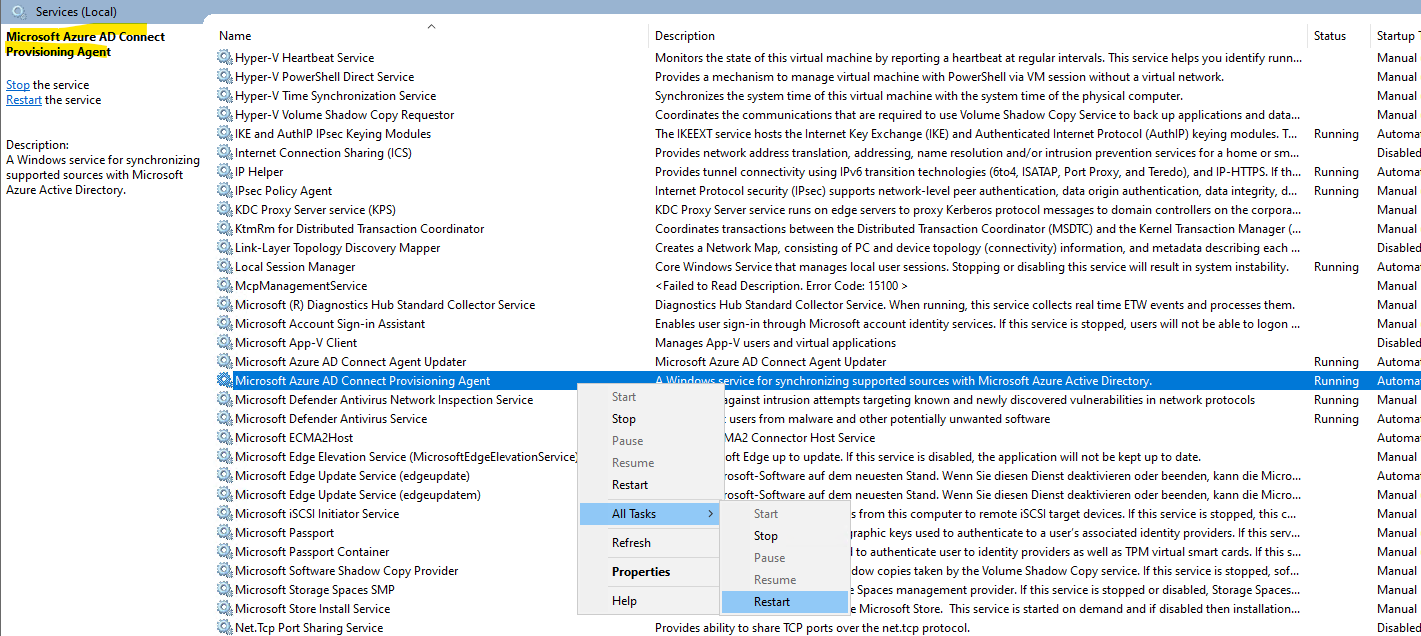
Instead waiting 10 minutes we can force this process by restarting the Microsoft Azure AD Connect Provisioning Agent.
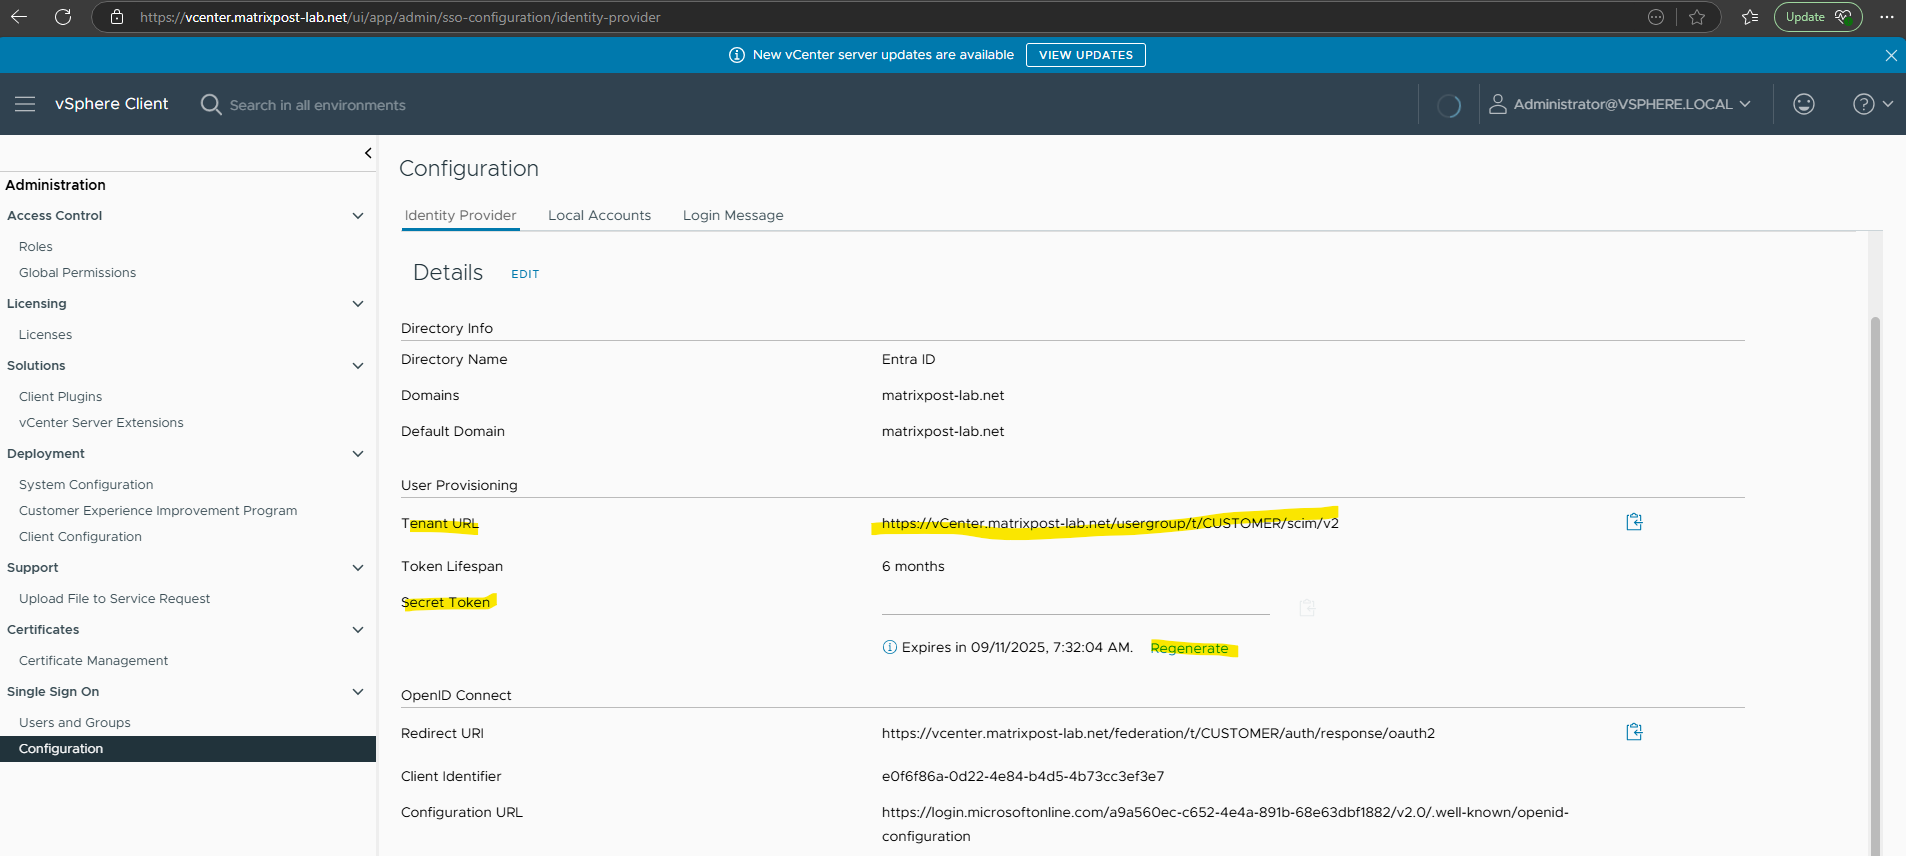
To connect Microsoft Entra to our on-premises SCIM app’s API and synchronize user data, we need to provide the Tenant URL and Secret Token from our vCenter Server.
In case we forgot to note the Secret Token previously, we can click below on Regenerate to create a new one which we can copy.
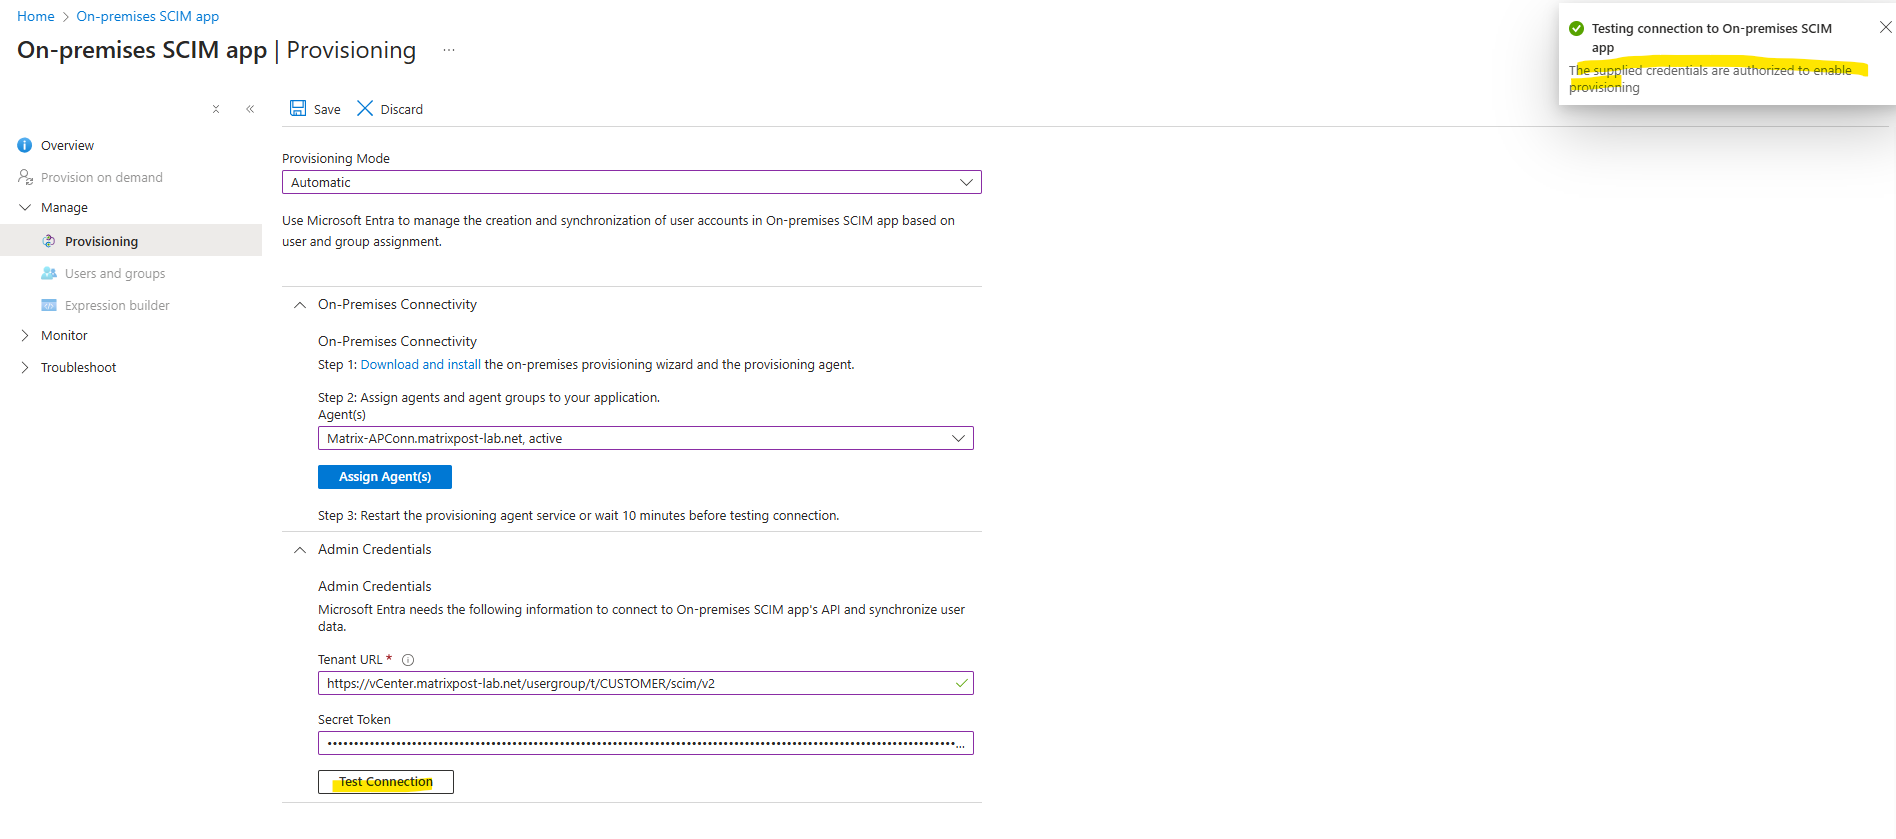
Enter both into the SCIM app below and click on Test Connection.

Looks good!
Now we can click on Save.
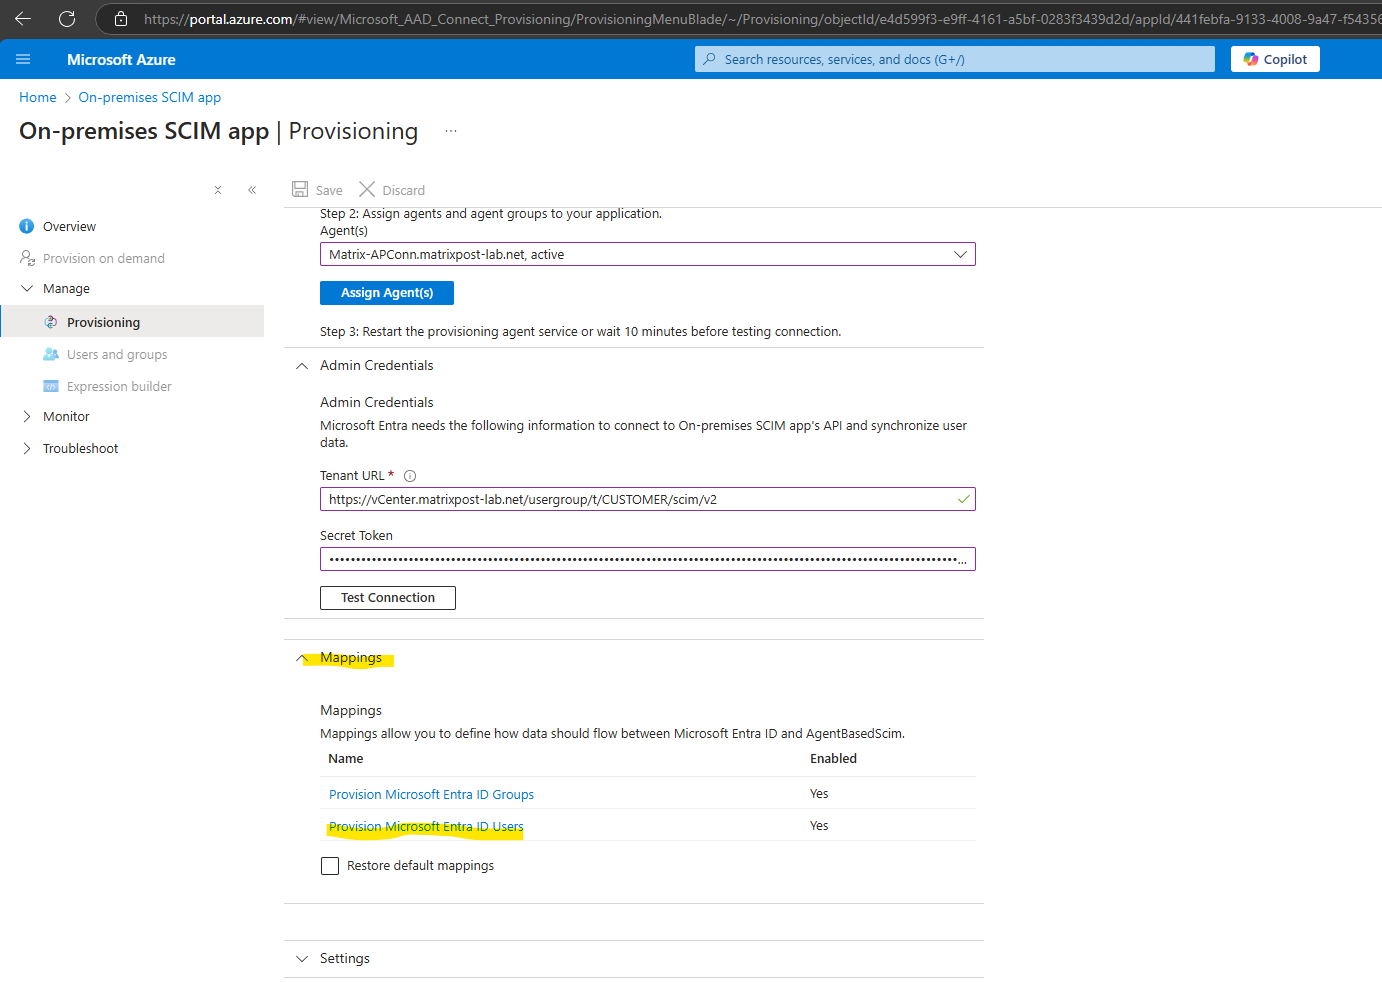
Configure User Mapping between Microsoft Entra ID and vCenter Server
Next we need to map some Entra ID attributes to our attributes in vCenter Server.
Below expand the Mappings section and click on Provision Microsoft Entra ID Users.
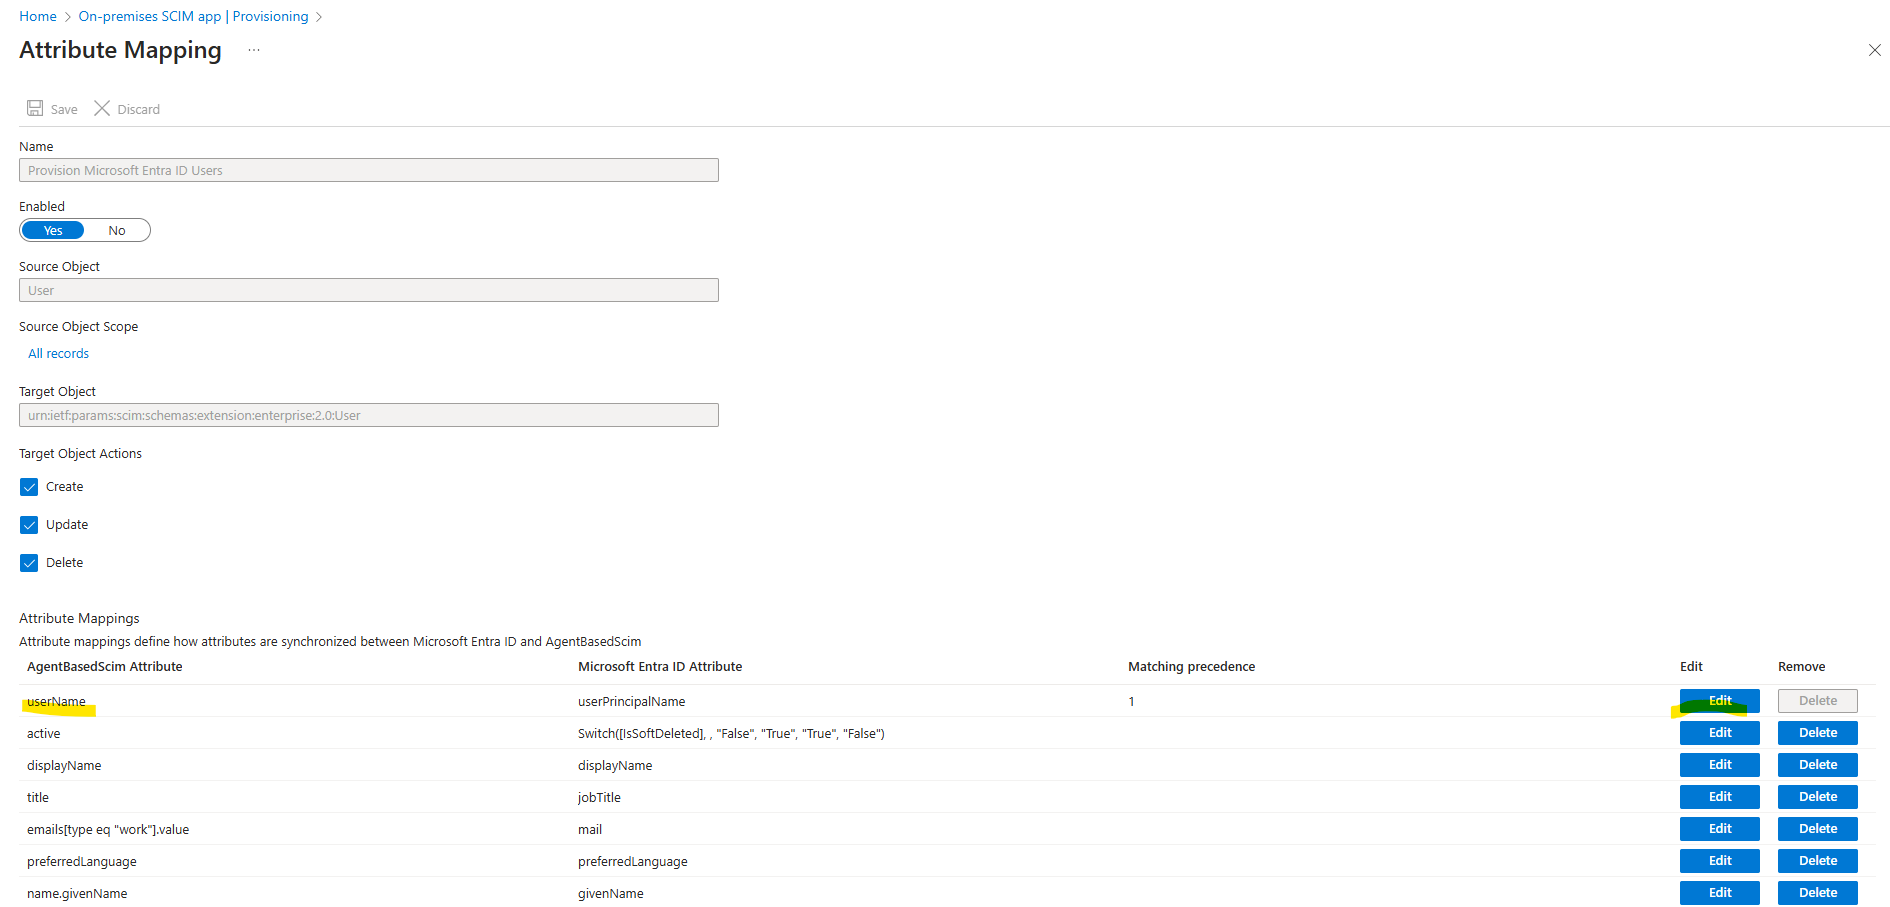
Update the Attributes so that we send the username part and domain part separately.
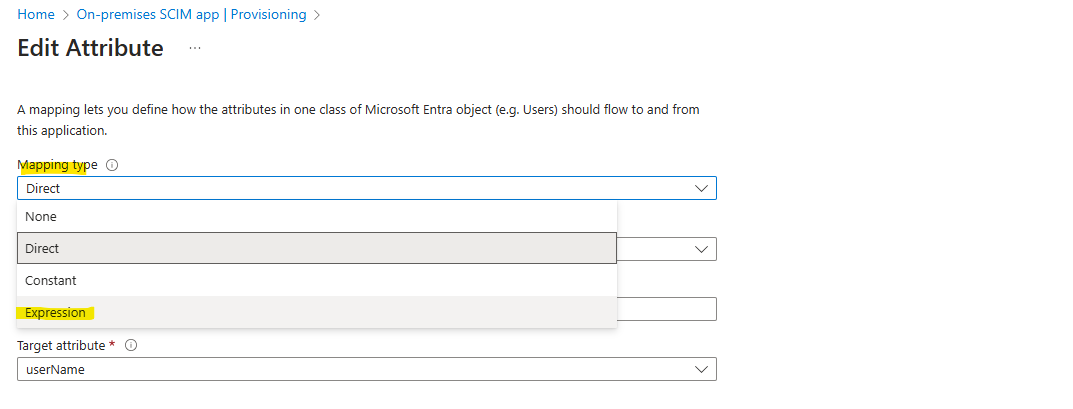
Therefore click on Edit for the userName attribute below.
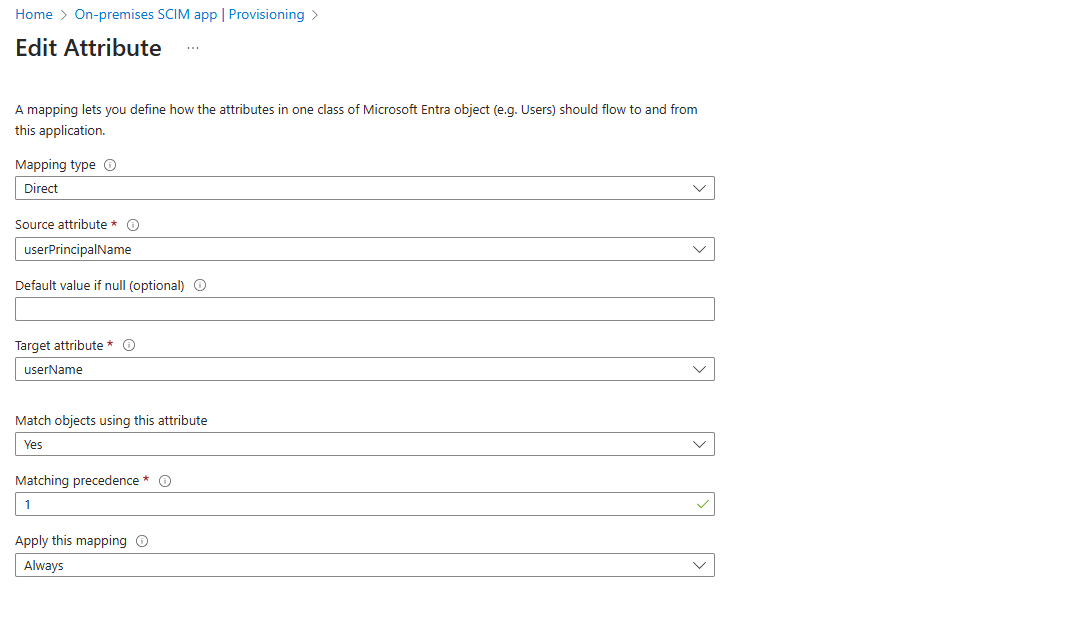
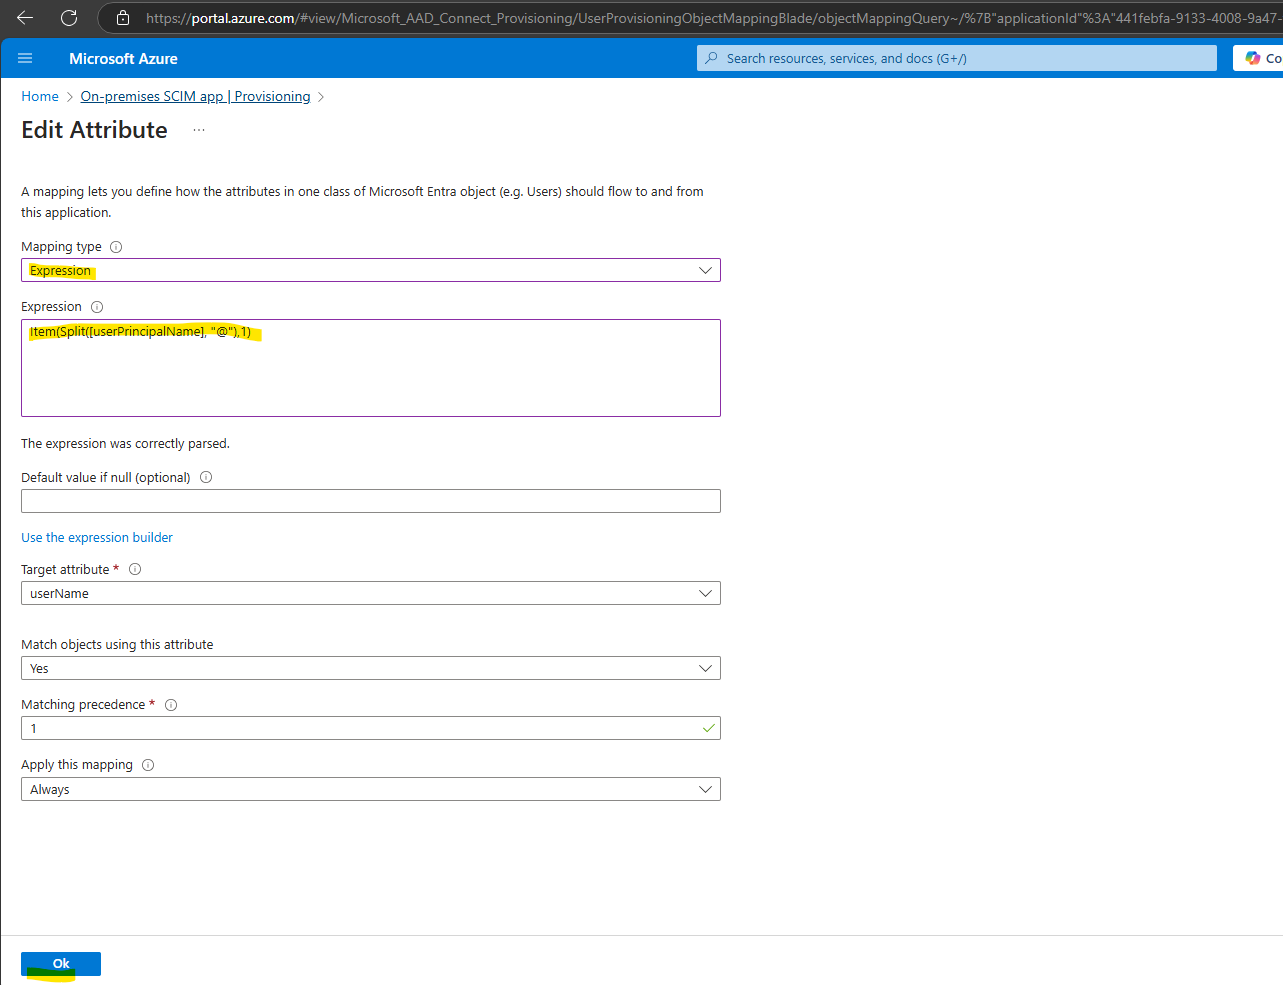
For the Mapping type switch from Direct to Expression.
Replace [userPrincipalName] with the following expression and click on OK.
Item(Split([userPrincipalName], "@"),1)
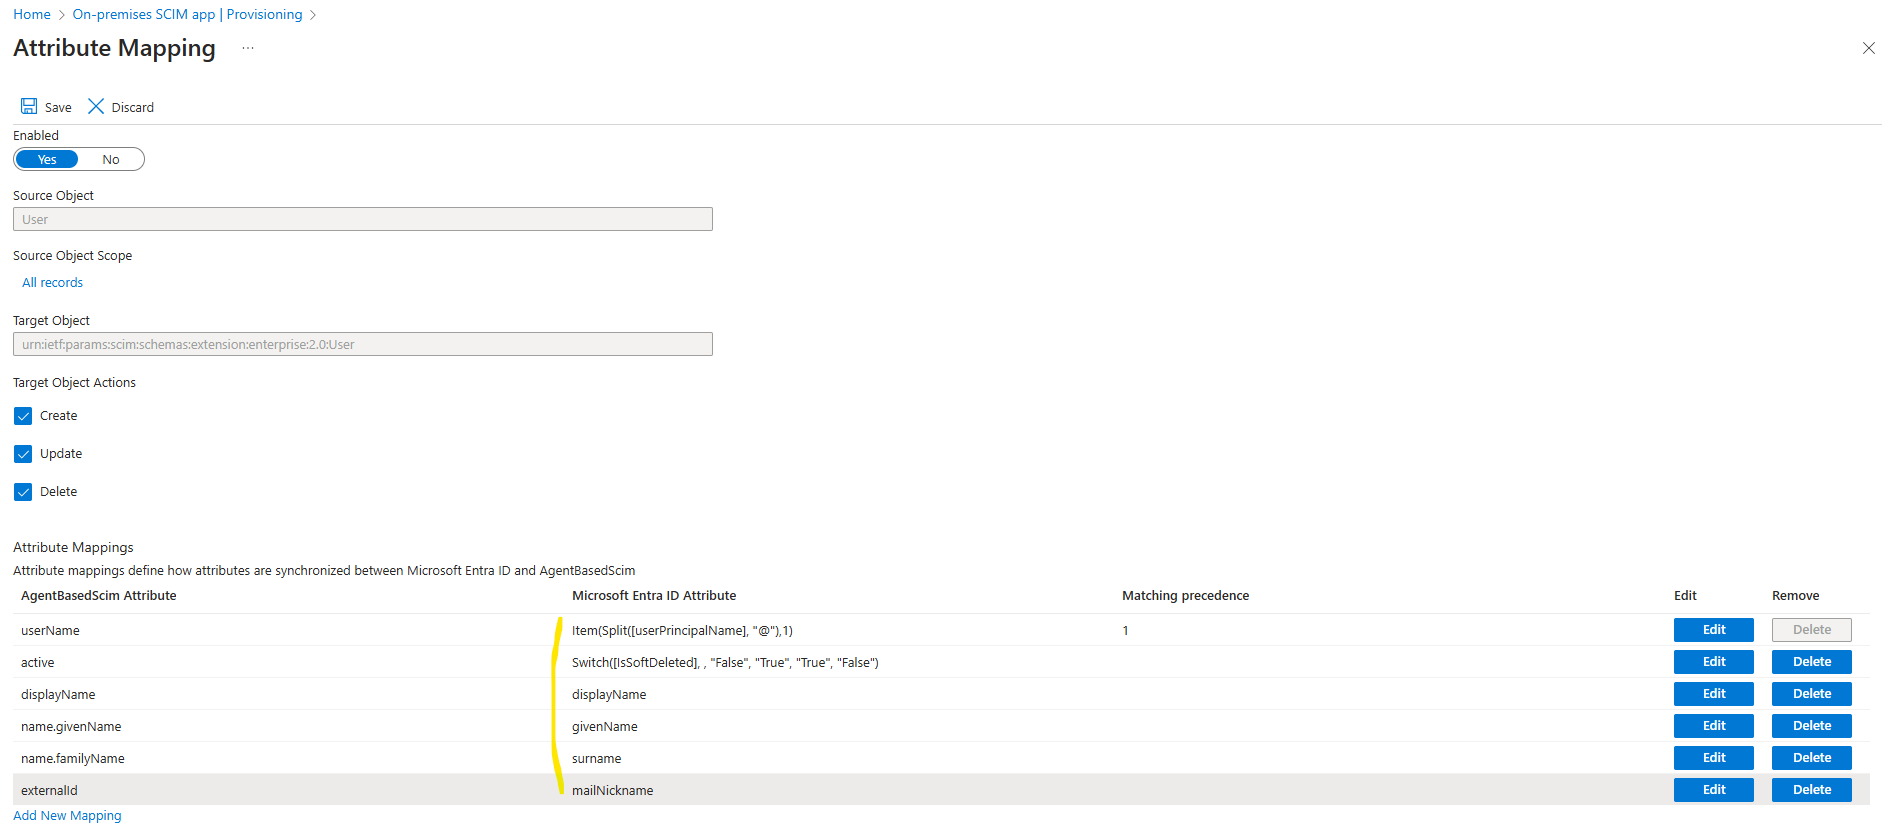
Next I will also remove some attributes we doesn’t need in vCenter Server. Finally just the following attributes are left.
Click on Save.
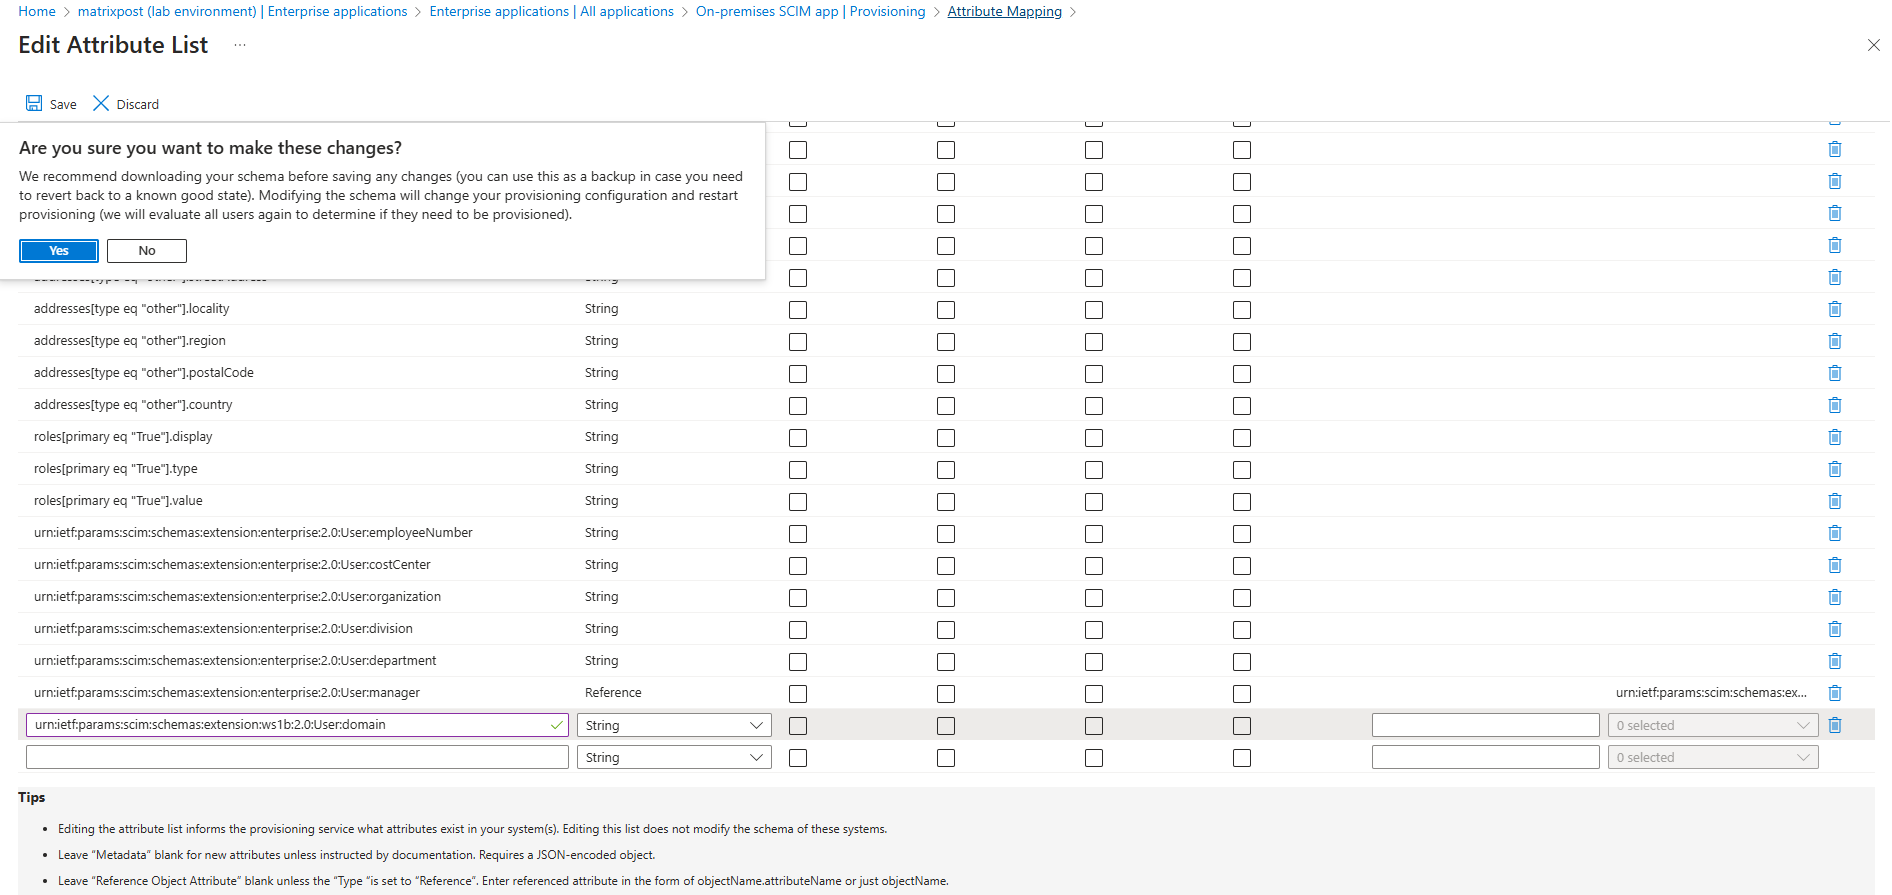
Next we also need to edit the attribute list for AgentBasedScim. Check Show advanced options and click on Edit attribute list for AgentBasedScim as shown below.
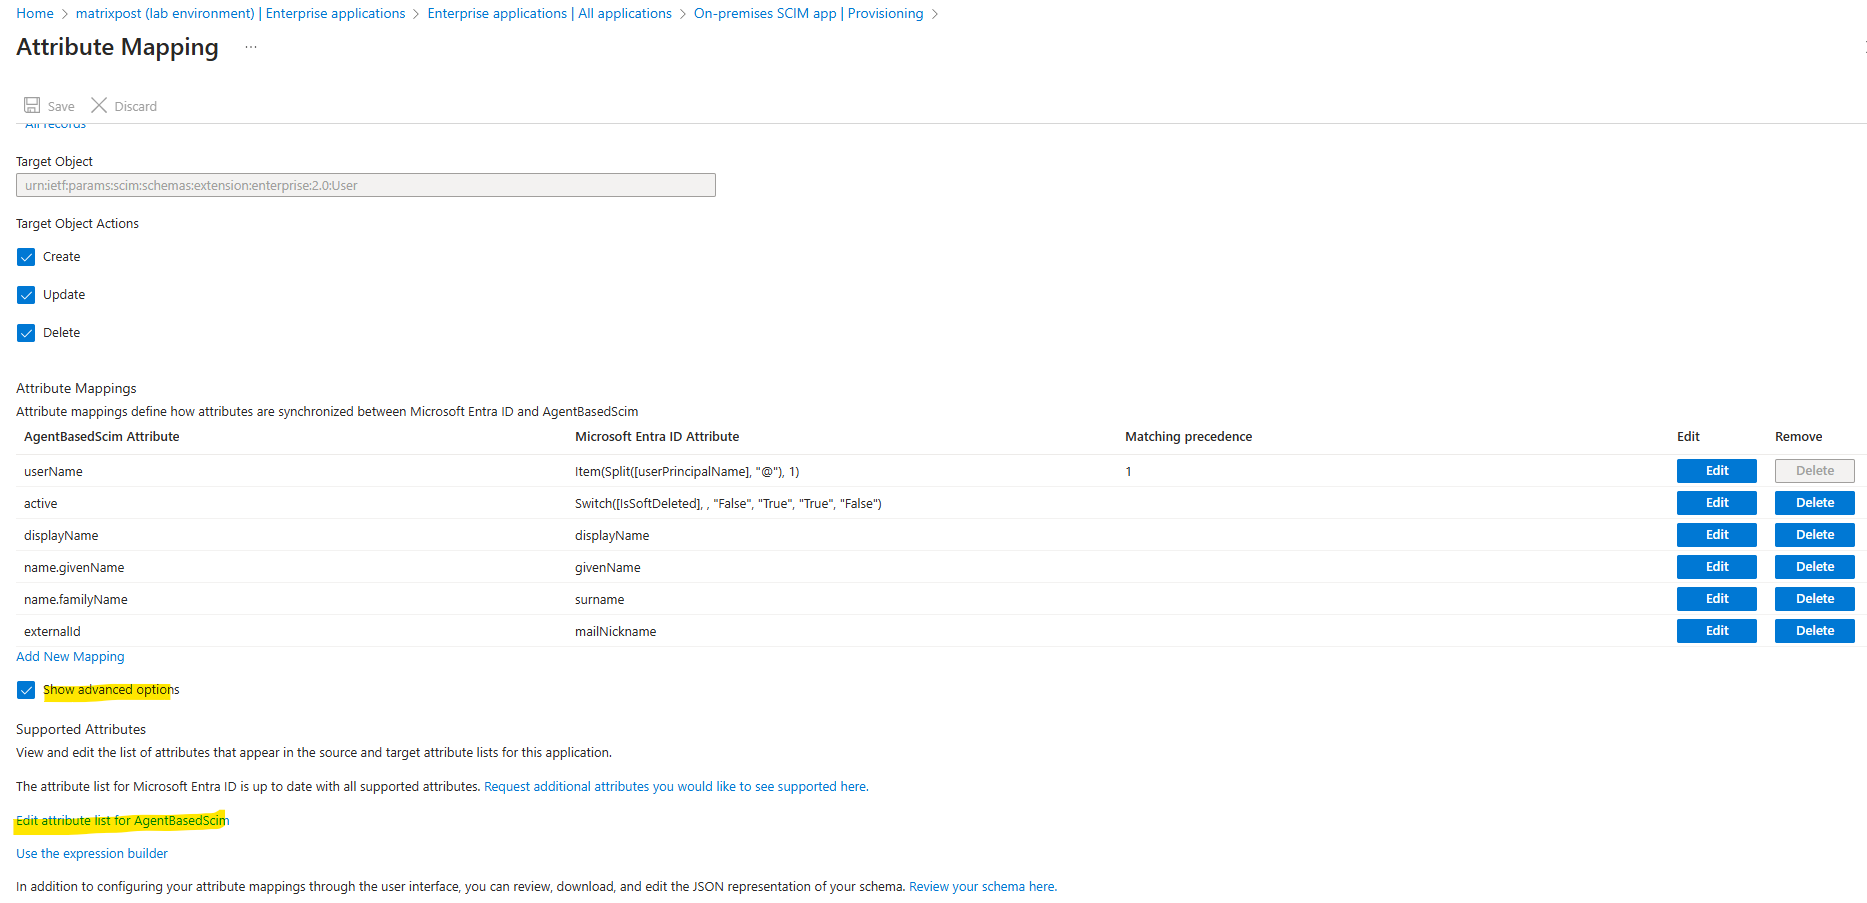
Scroll down and add the following entry. Then click on Save.
urn:ietf:params:scim:schemas:extension:ws1b:2.0:User:domain

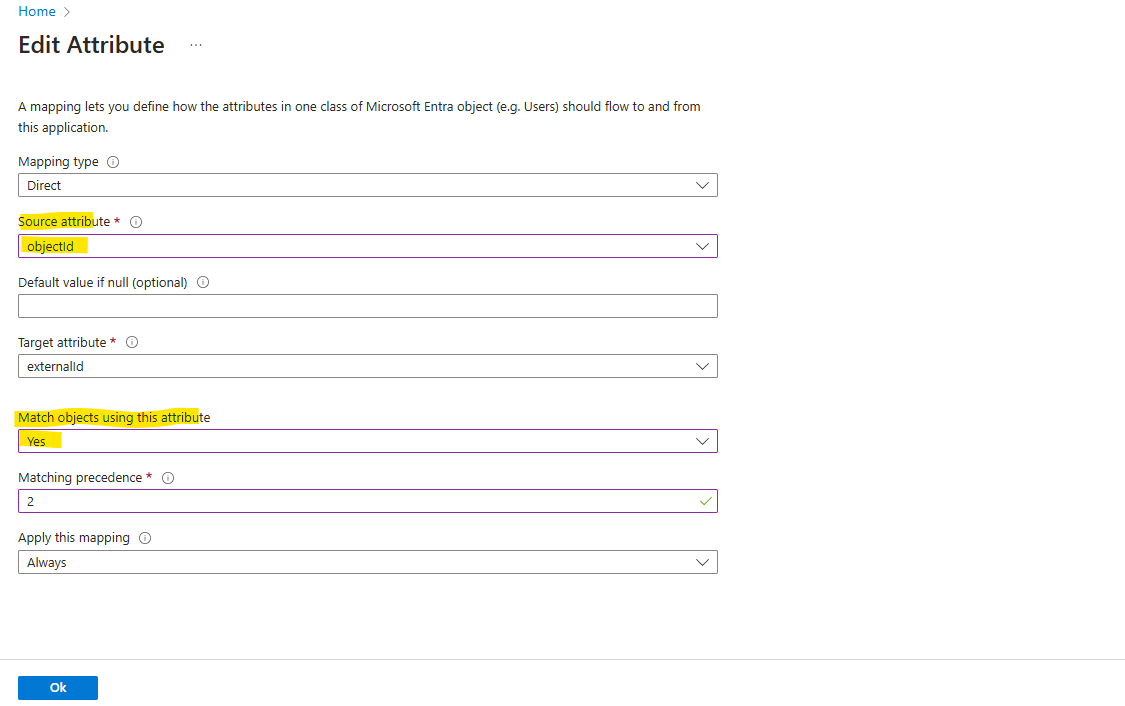
One last change for the mapping, select the externalId / mailNickname and click on Edit.
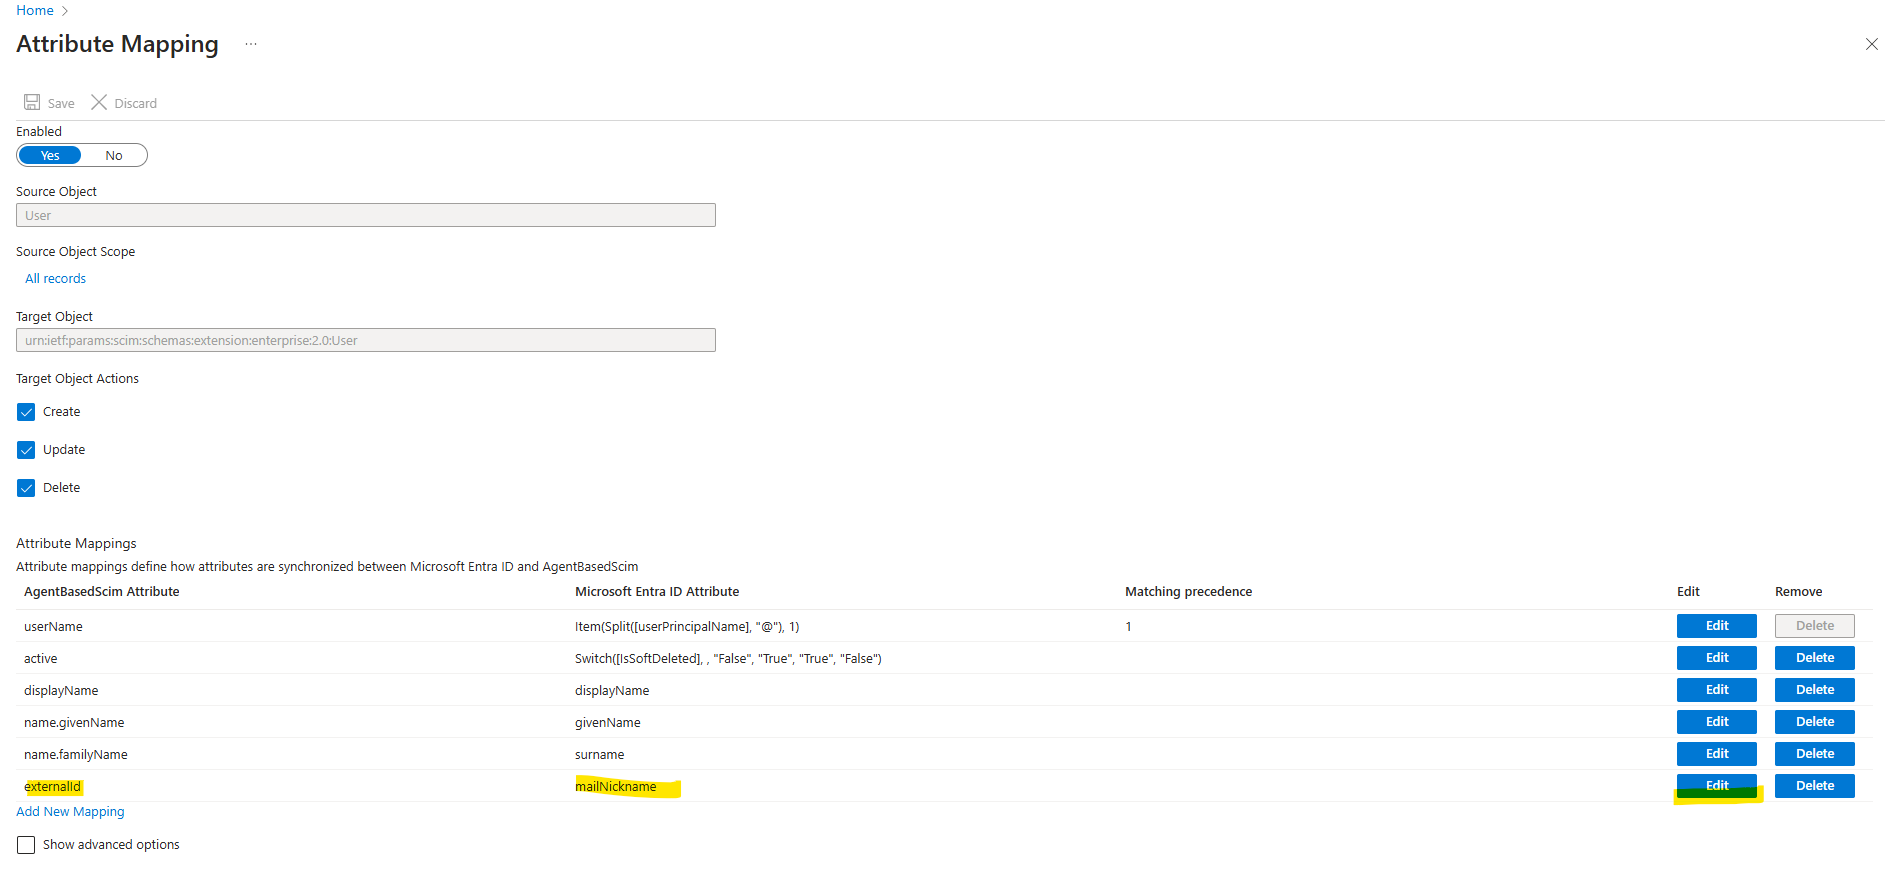
Change source attribute from mailNickname to object and for Match objects using this attribute select yes. Click on OK.
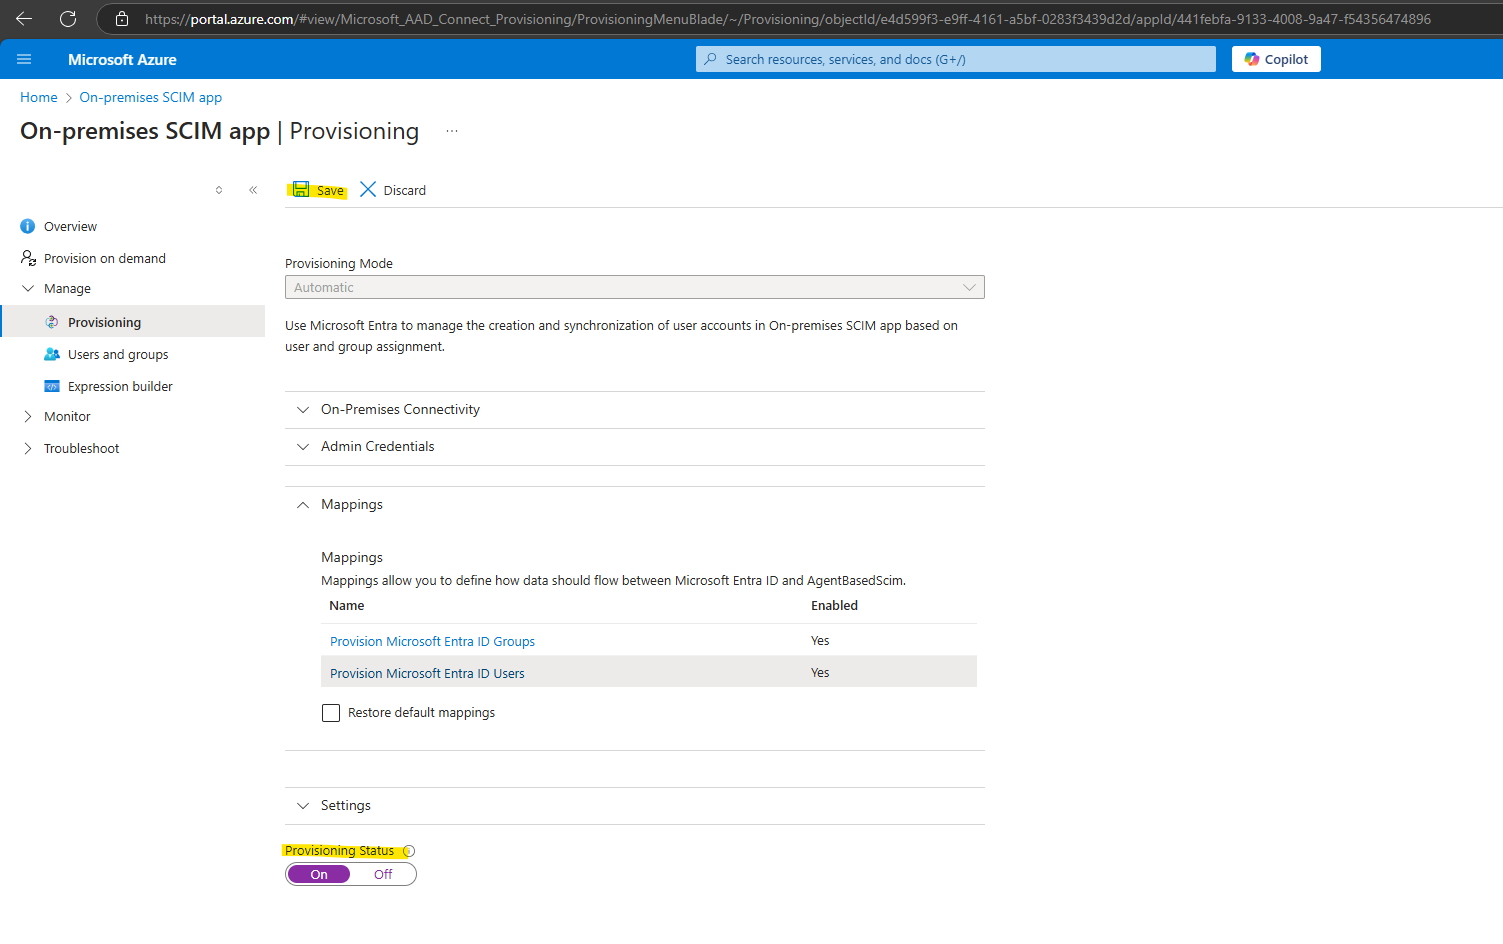
Finally we need to enable provisioning status. Click on Save.
Configure Provisioning
Assign users and groups to the application which later should be synced to our vCenter Server.
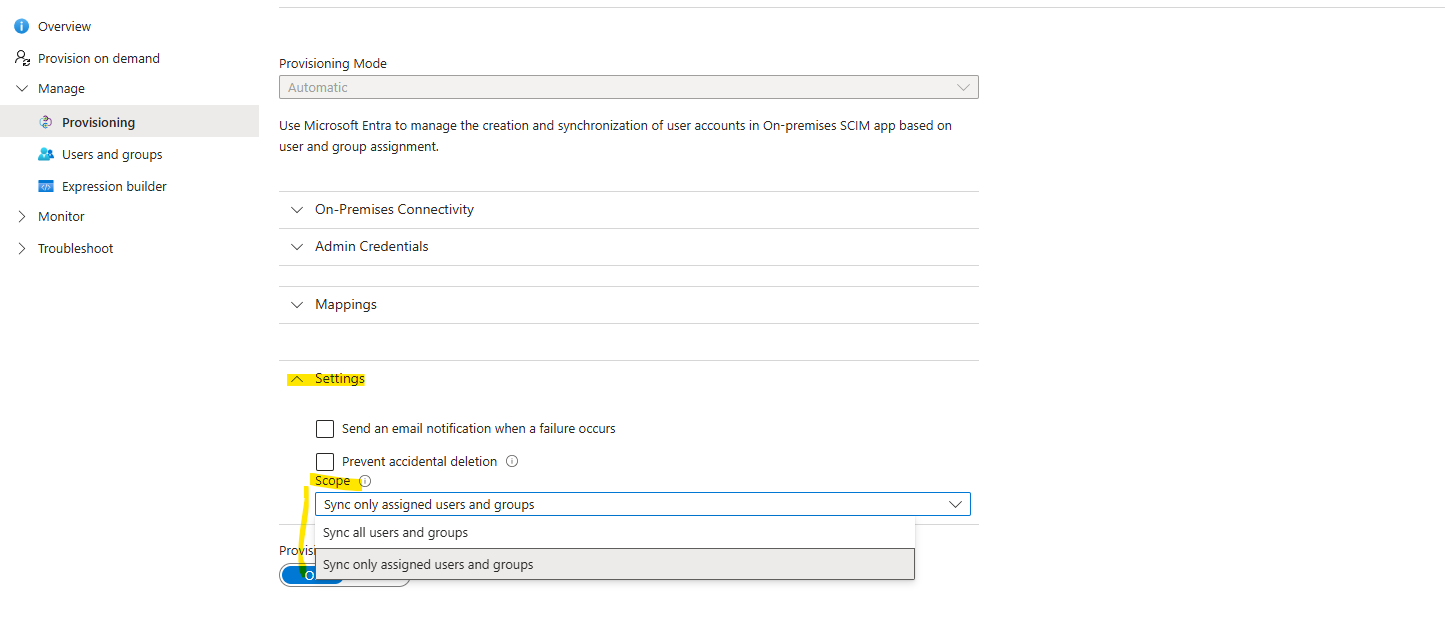
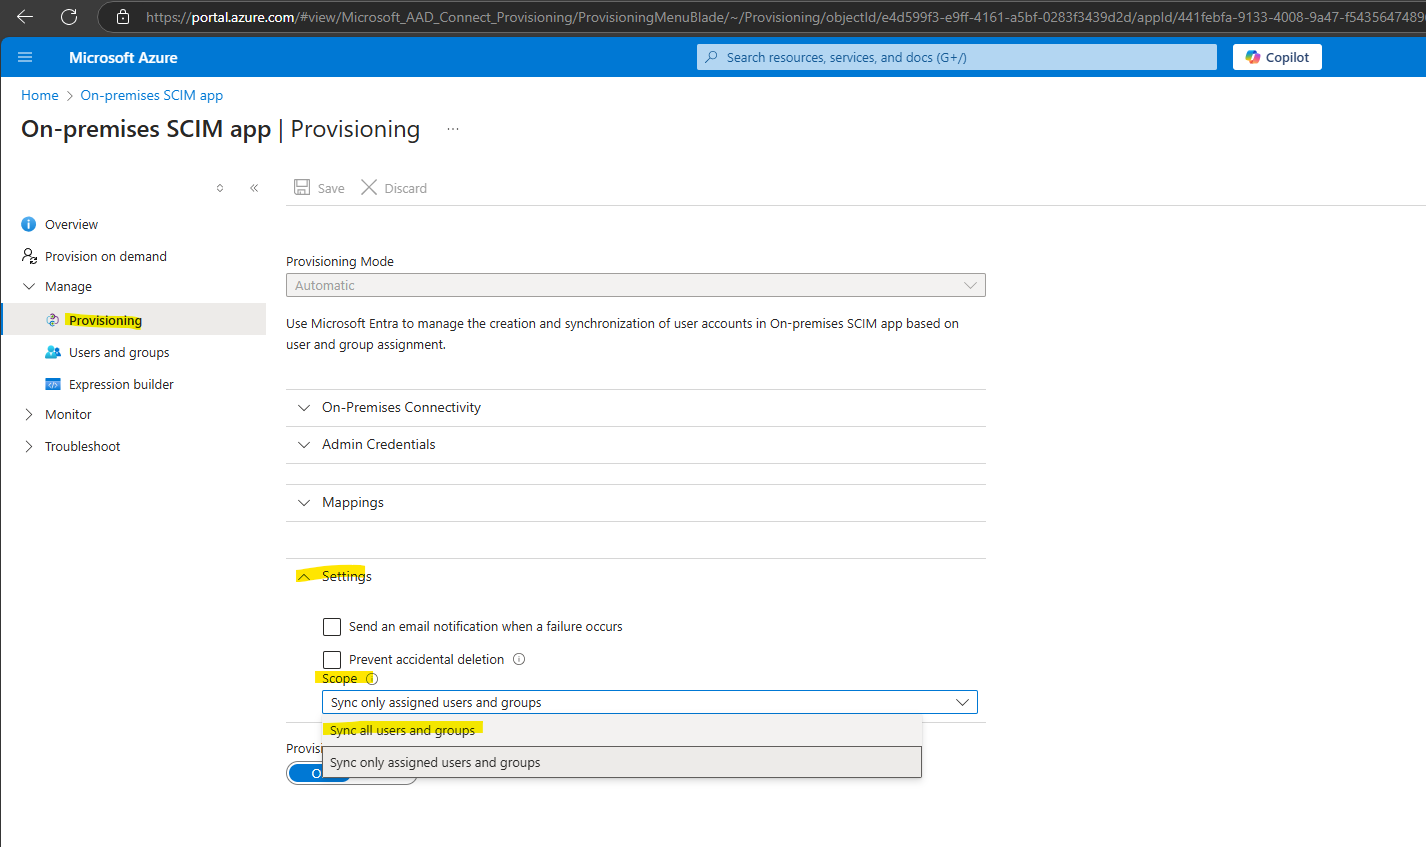
We can select for the provisioning scope (defines which users and groups should be provisioned to vCenter) either Sync all users and groups or Sync only assigned users and groups (Users we assign below).

Provisioning scope within Provisioning -> Settings.
Select as mentioned here Sync all users and groups or Sync only assigned users and groups.
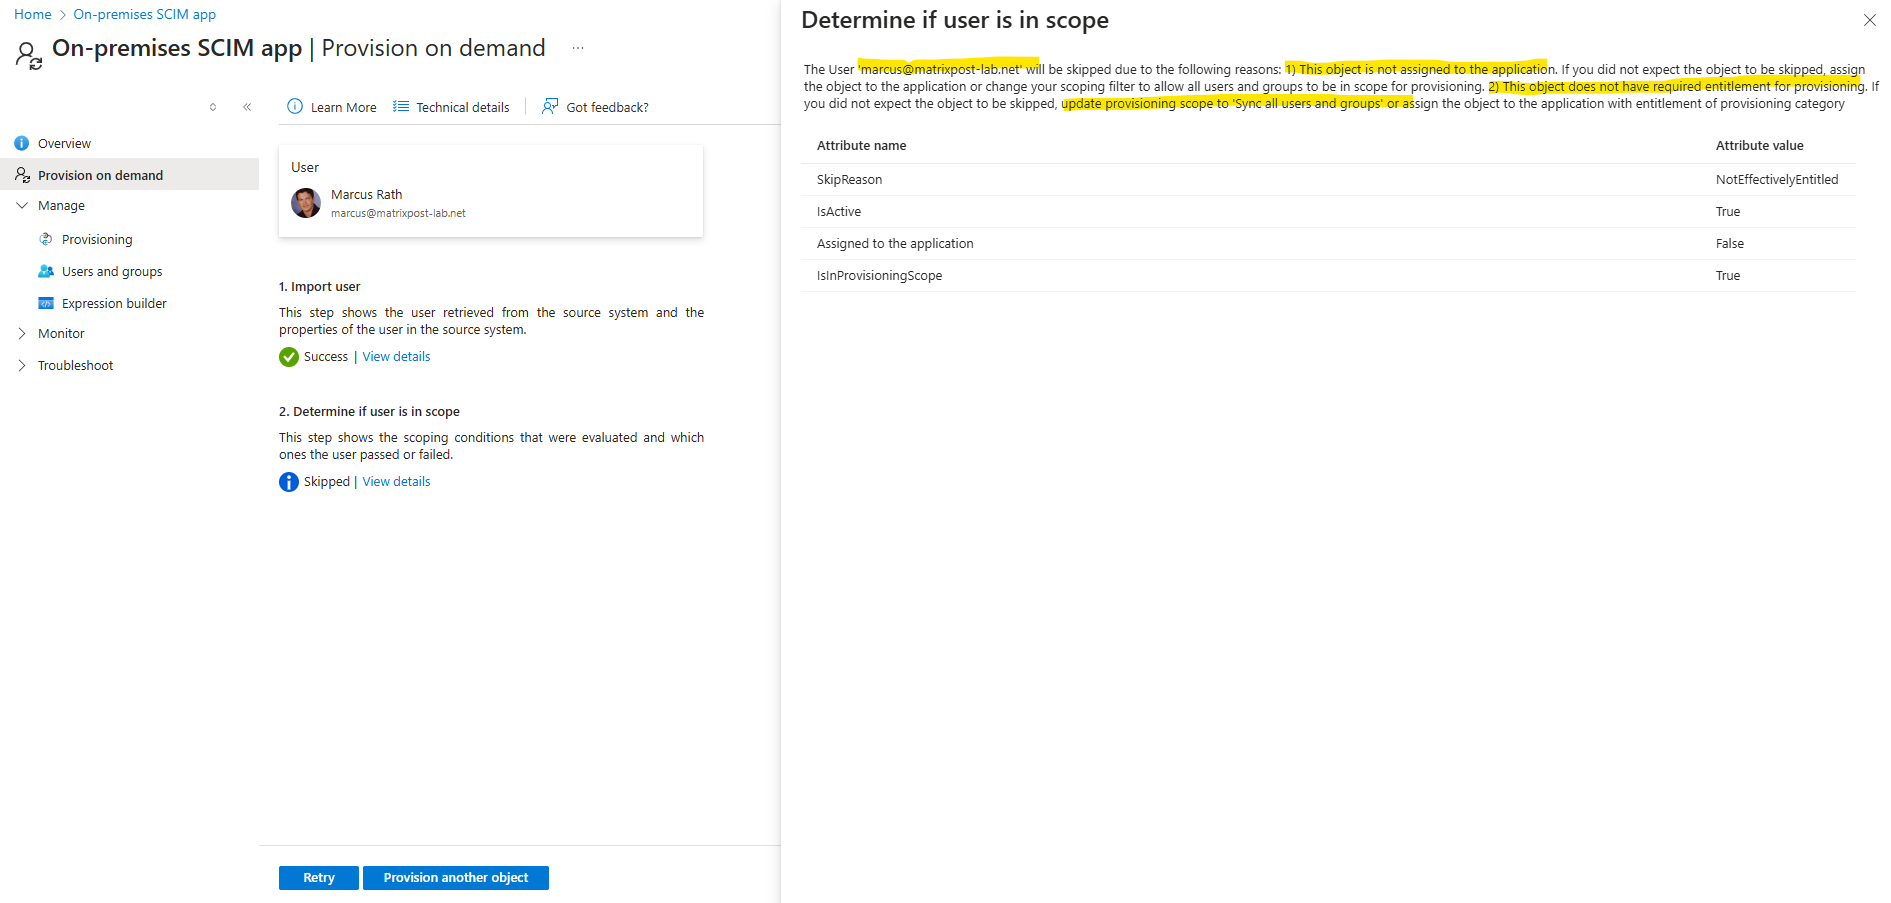
We can provision users also on demand.

So regarding this message the user I want to provision on demand from Entra ID to vCenter is either not assigned to the application under Mange -> Users and groups or the object does not have required entitlement for provisioning which will finally be set by the provisioning scope, this scope will define which users and groups will be provisioned.
The reason in my case is, that I have two users with the same display name and select below the user which is not assigned to the application and the provisioning scope is set to Sync only assigned users and groups.
Below we can change the provisioning scope.
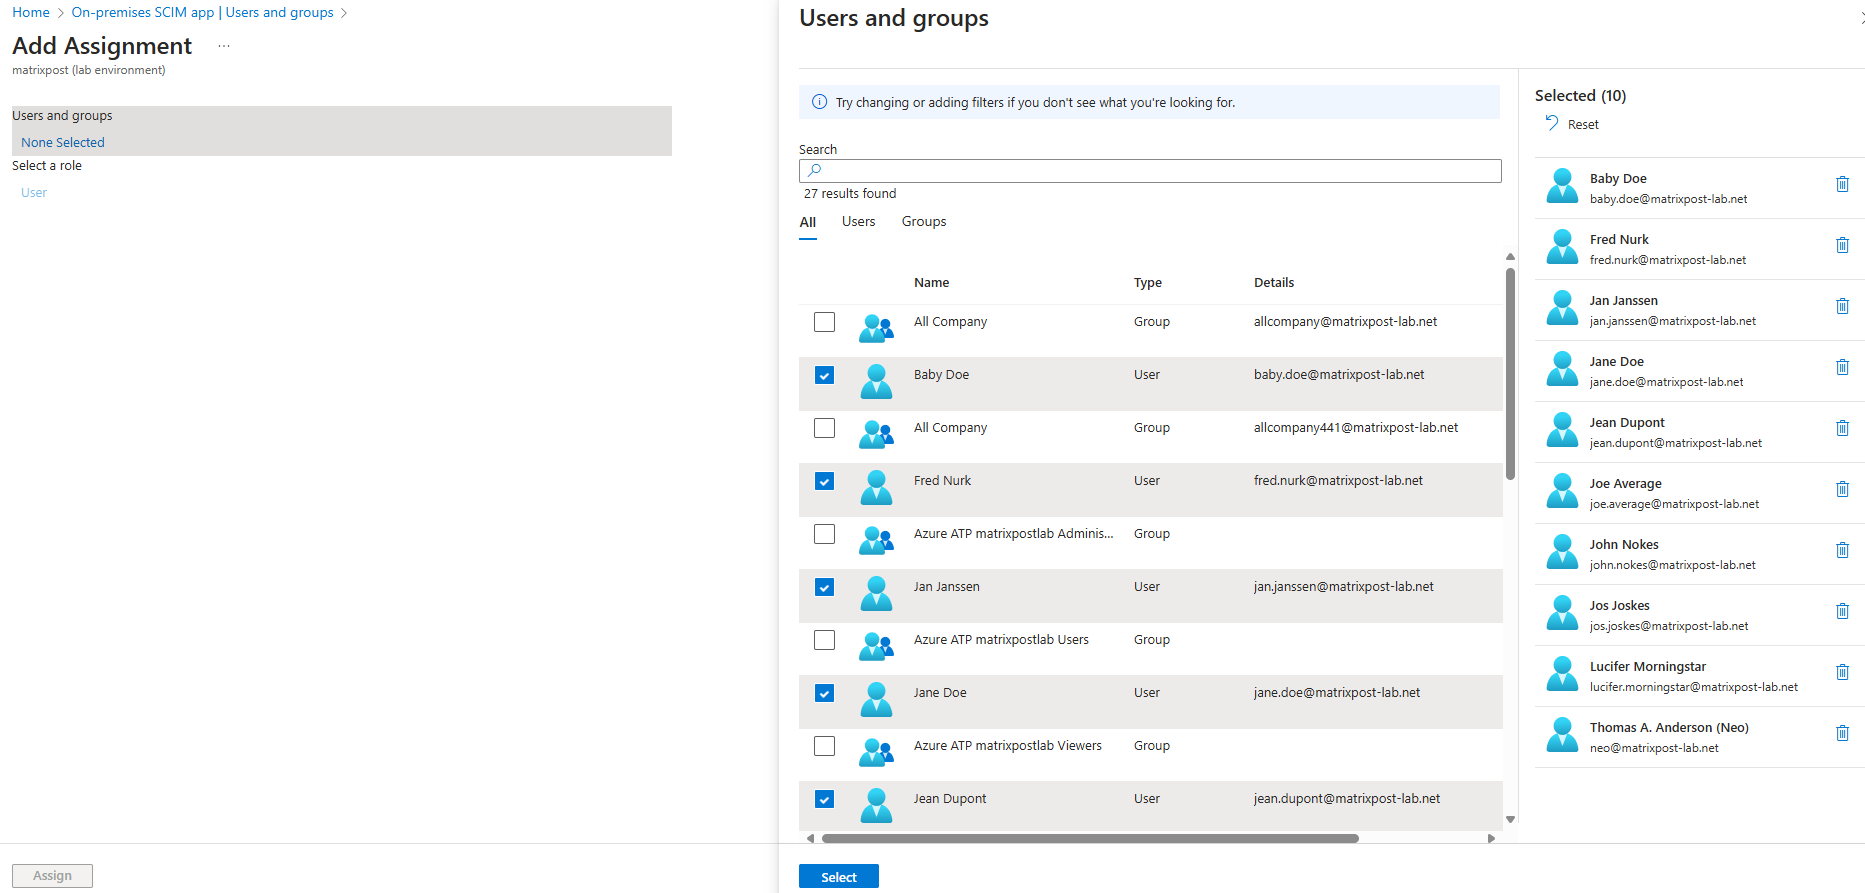
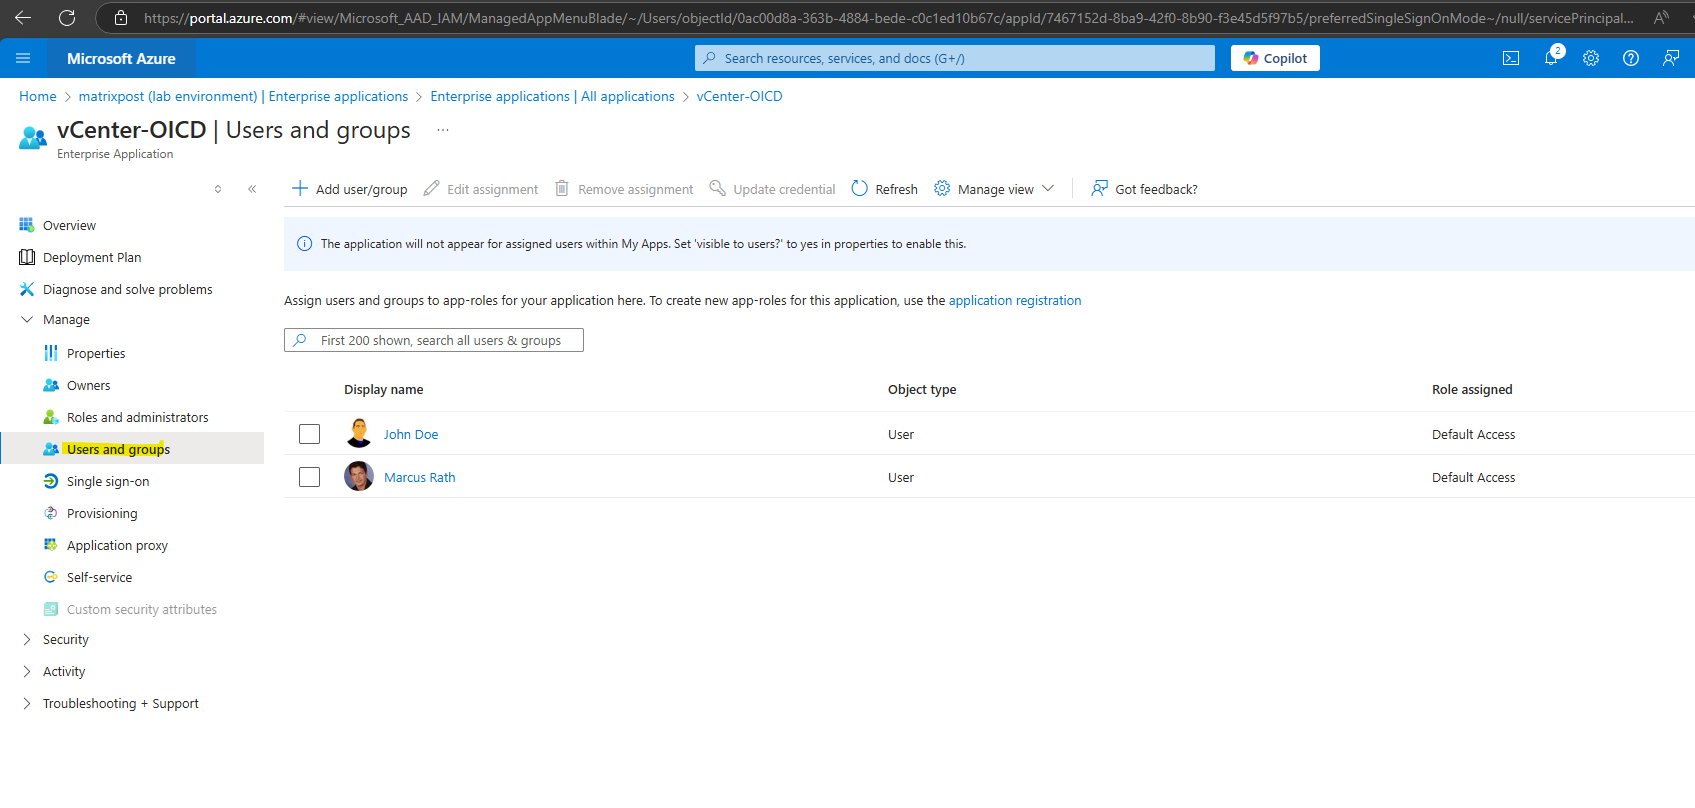
I will now assign the following two users to the application which I next will provision on demand to vCenter.

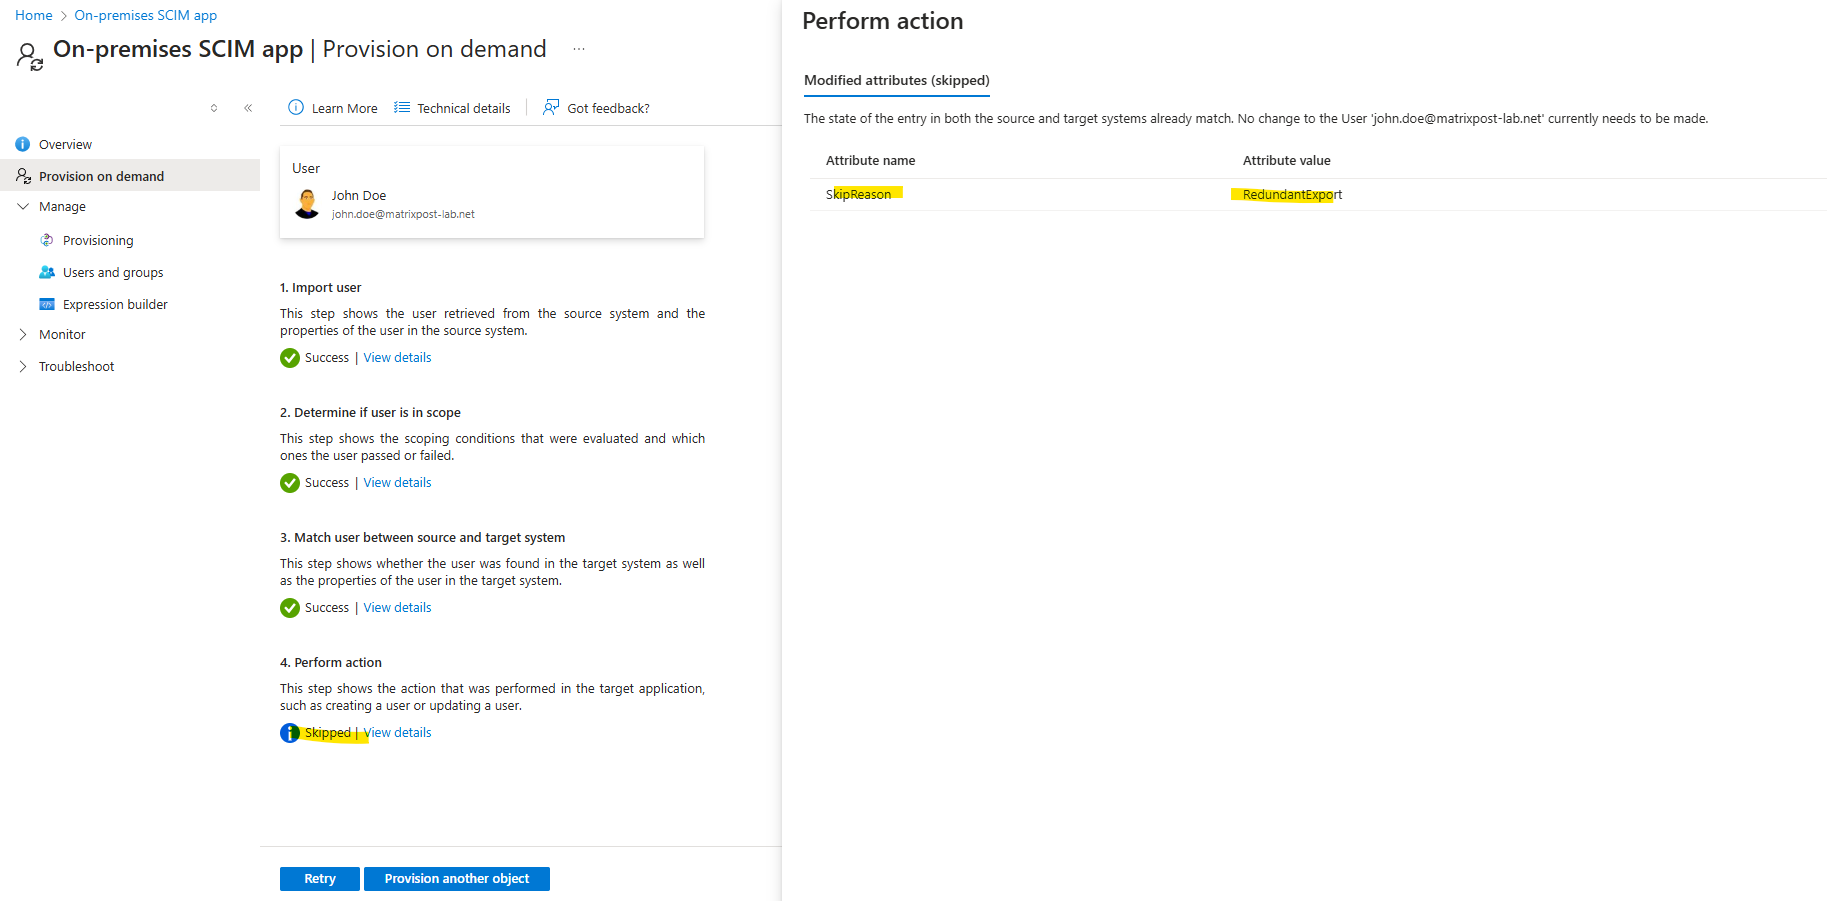
This time the final provisioning to vCenter will be skipped because the user is already existing in vCenter with the same attributes so no changes needs to be applied to.
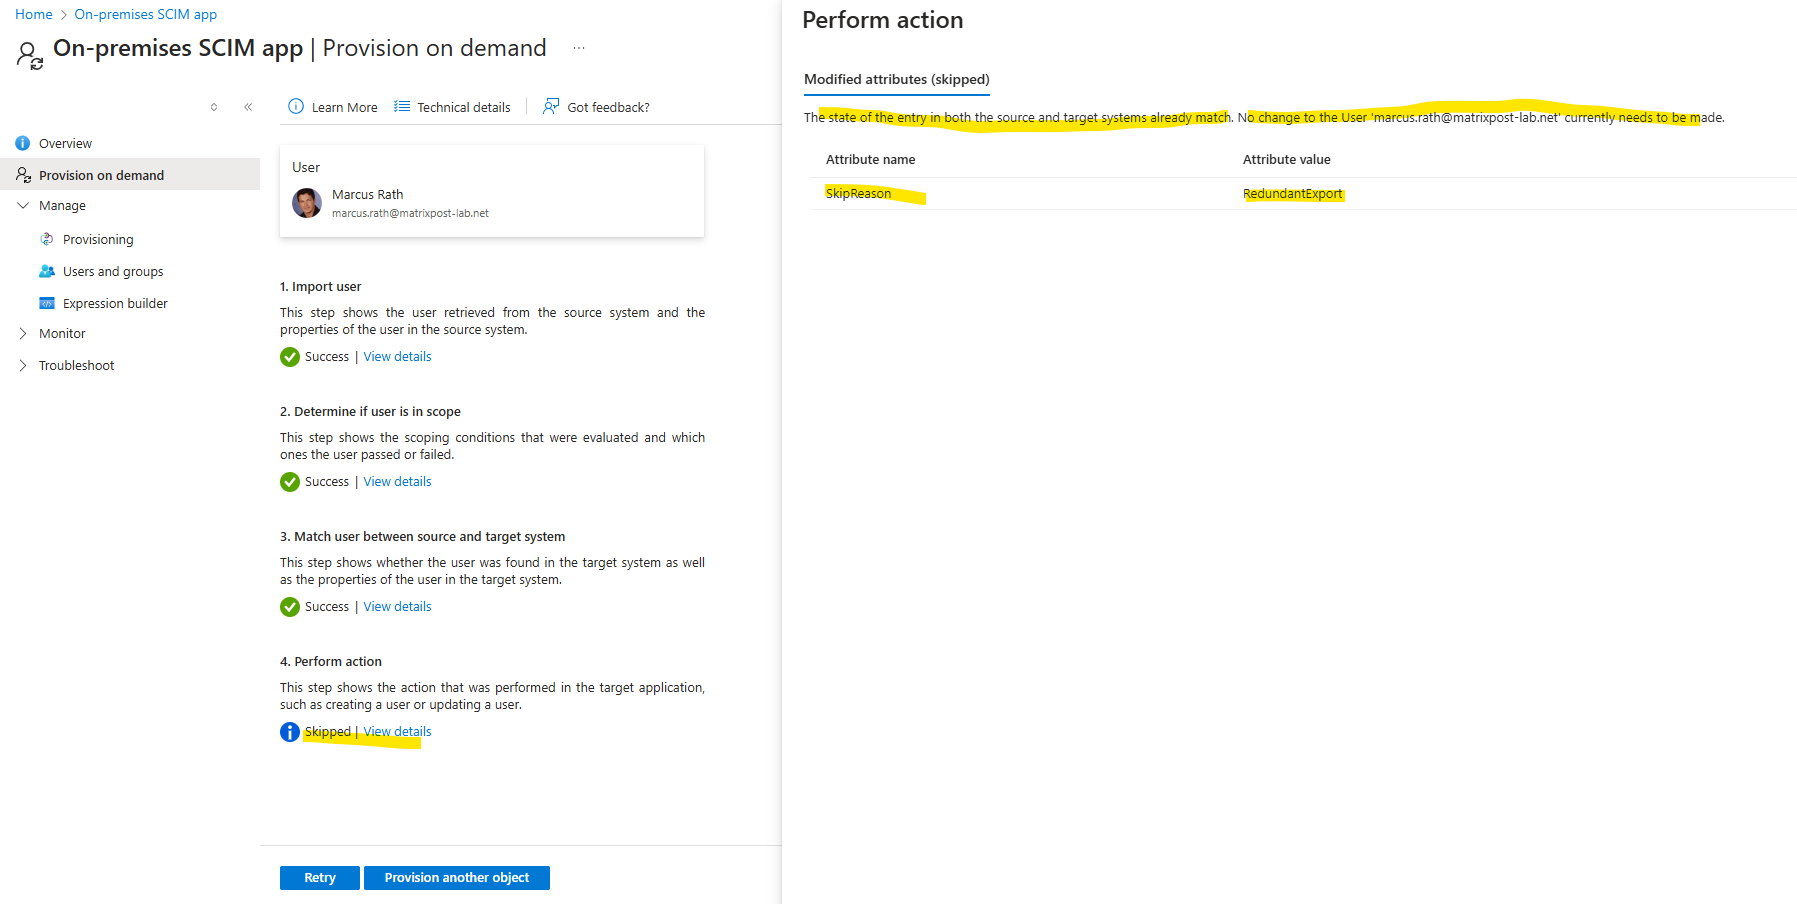
Same for my second assigned user on the app.
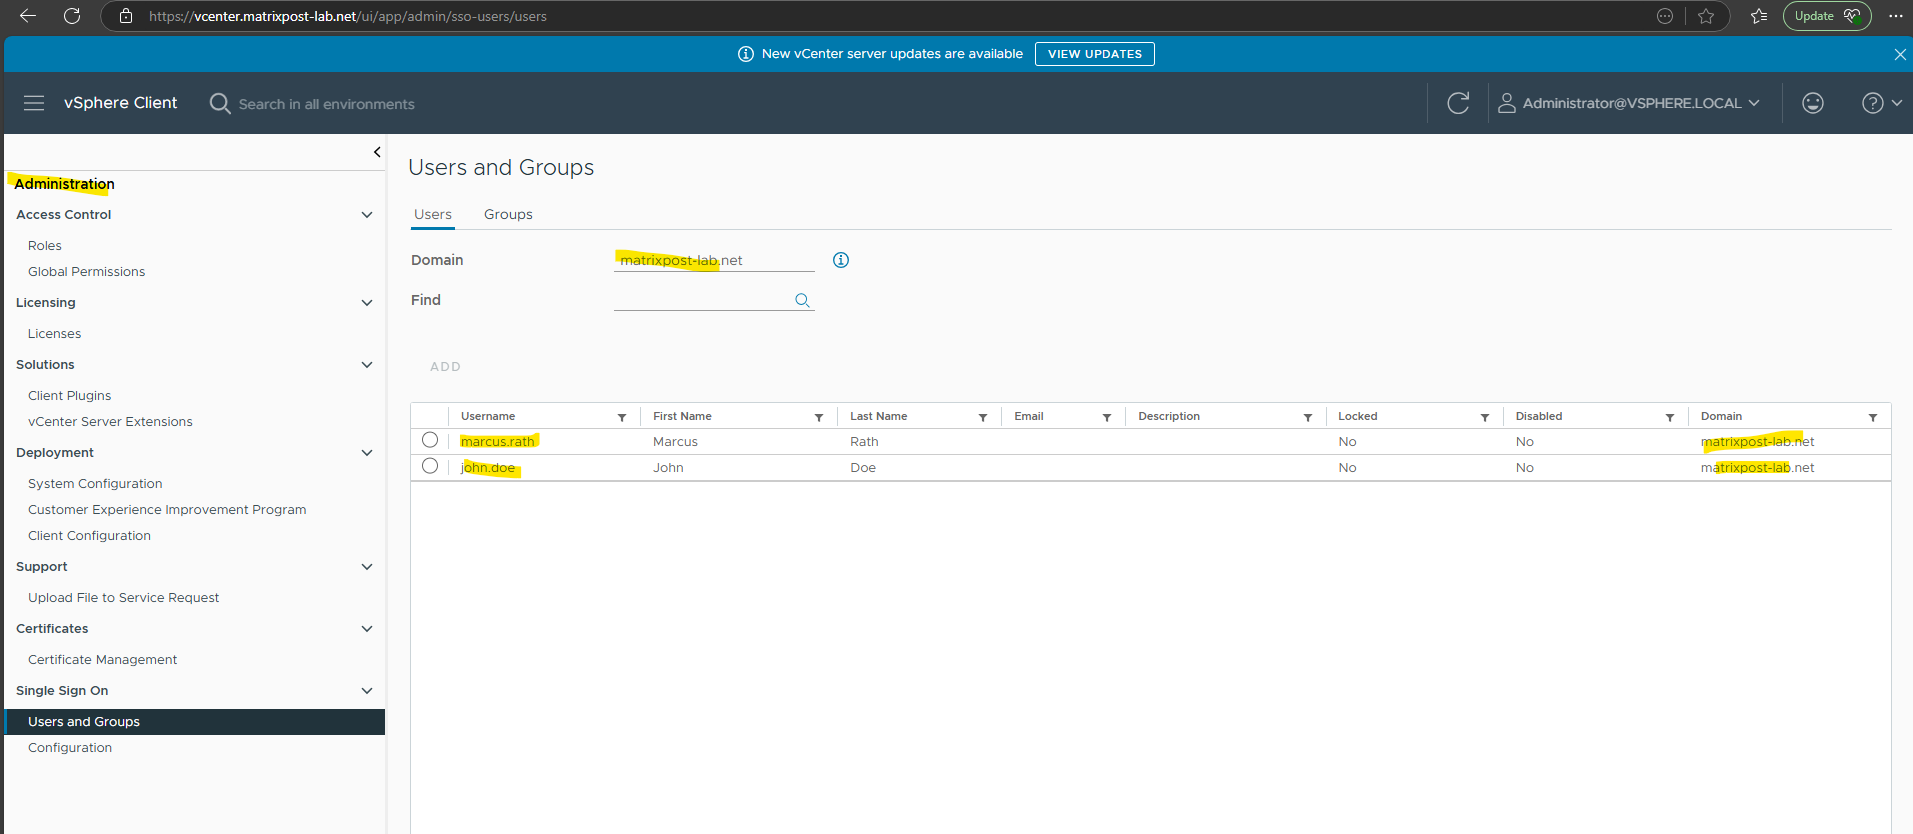
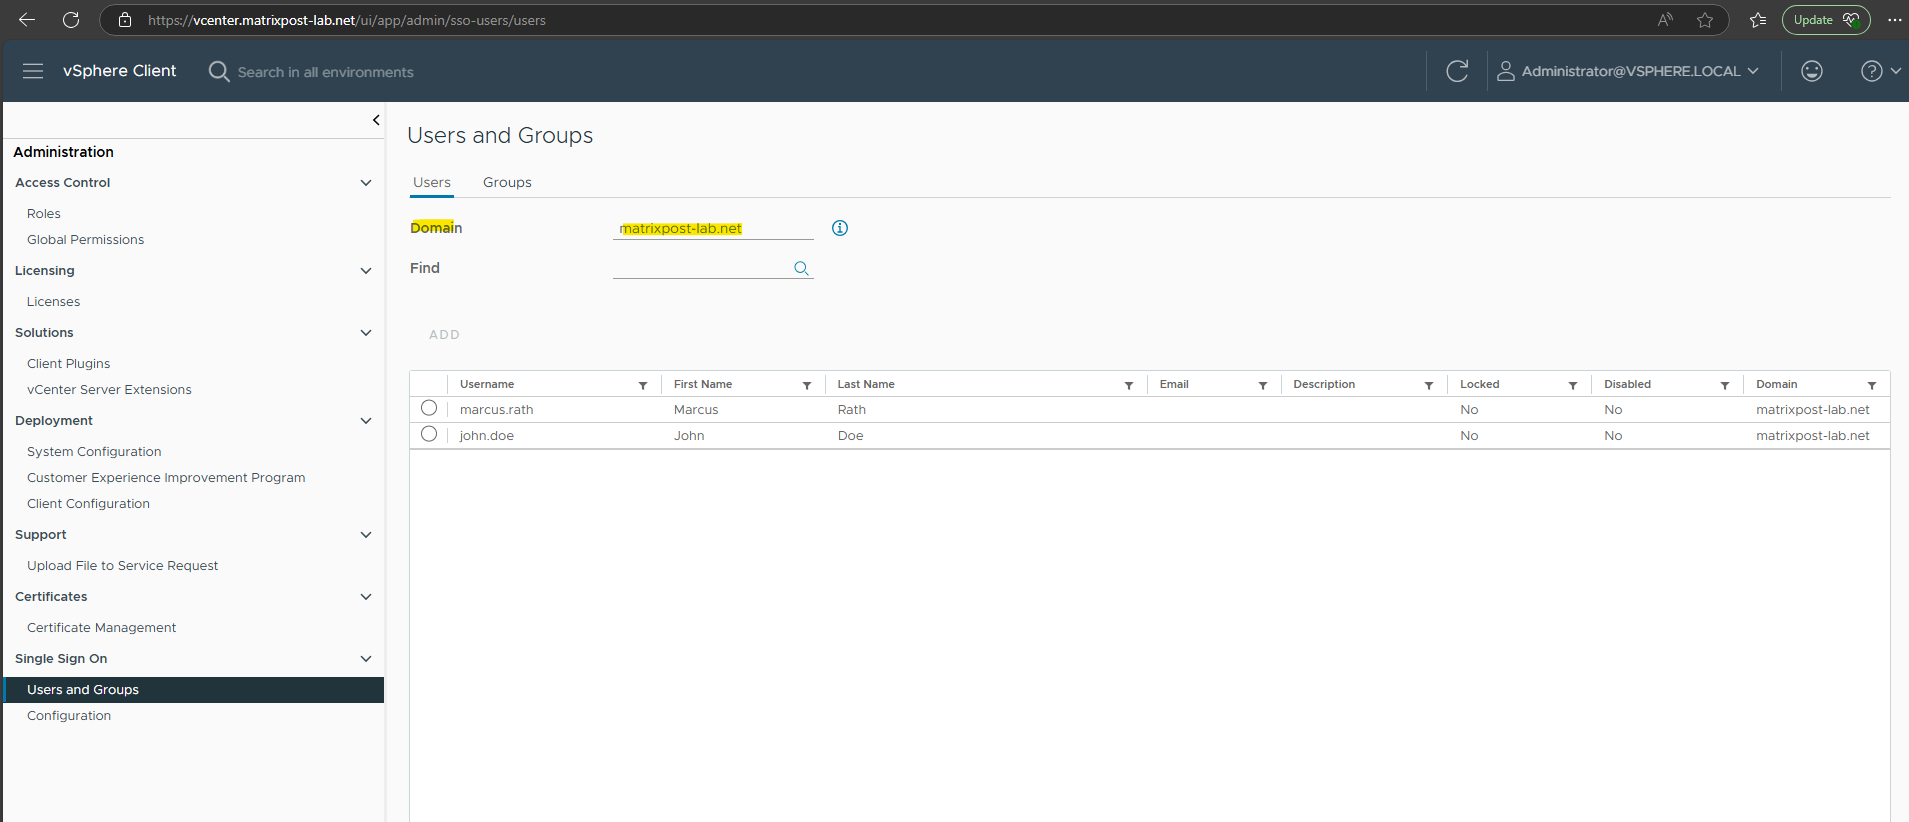
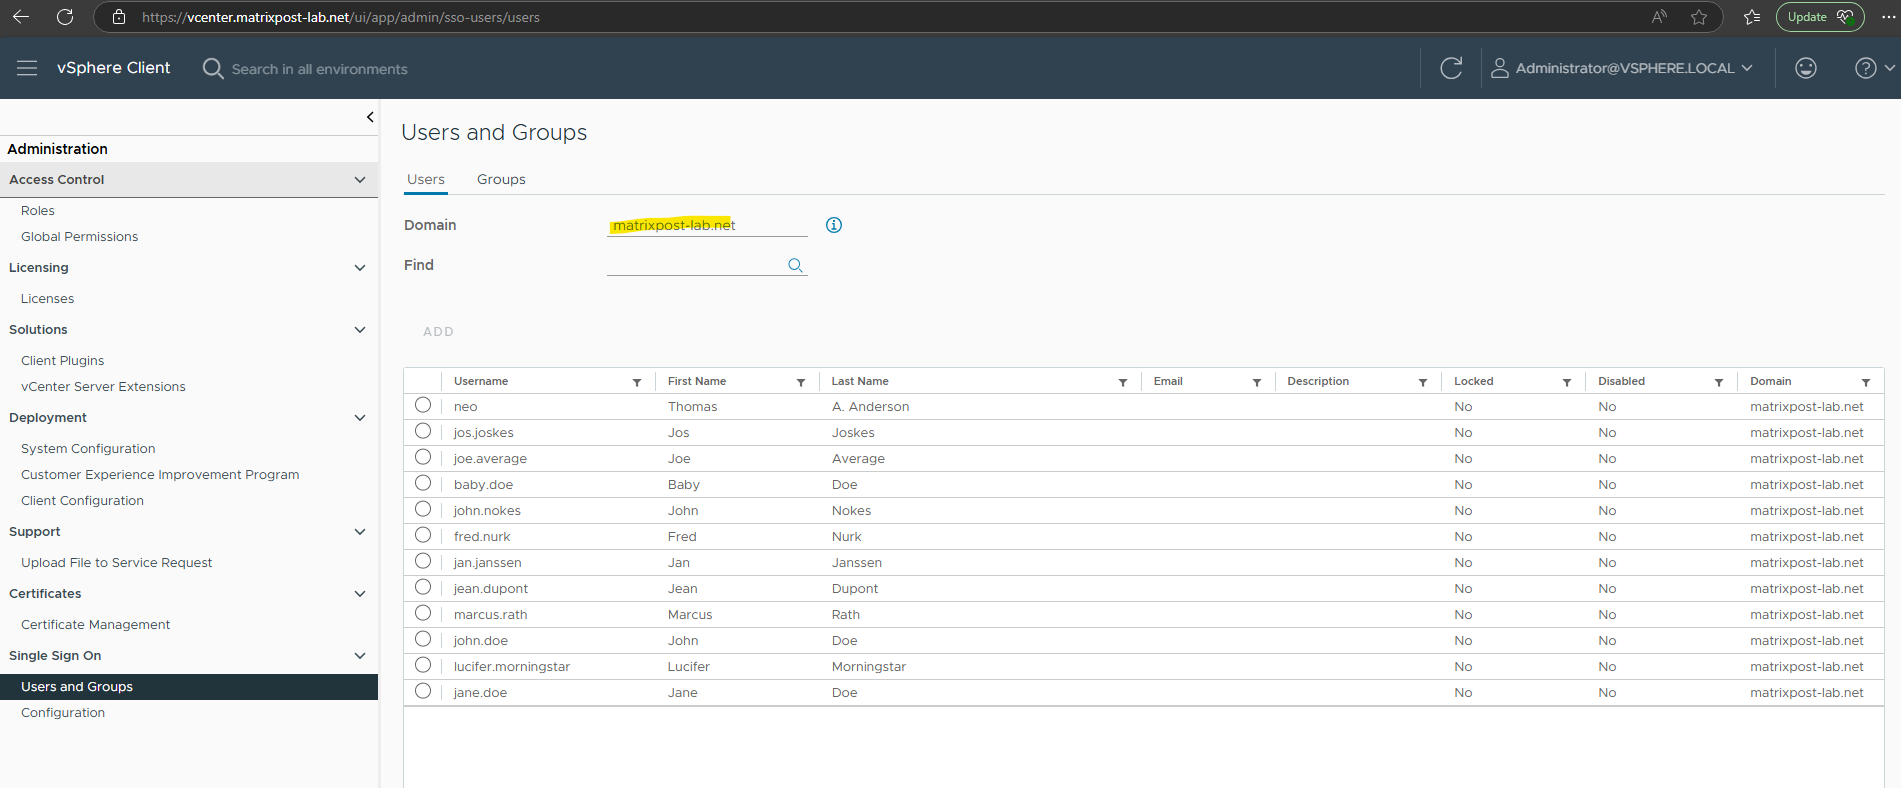
A quick check in vCenter will confirm this. Both users are already synced from Microsoft Entra ID to my on-premise vCenter Server.
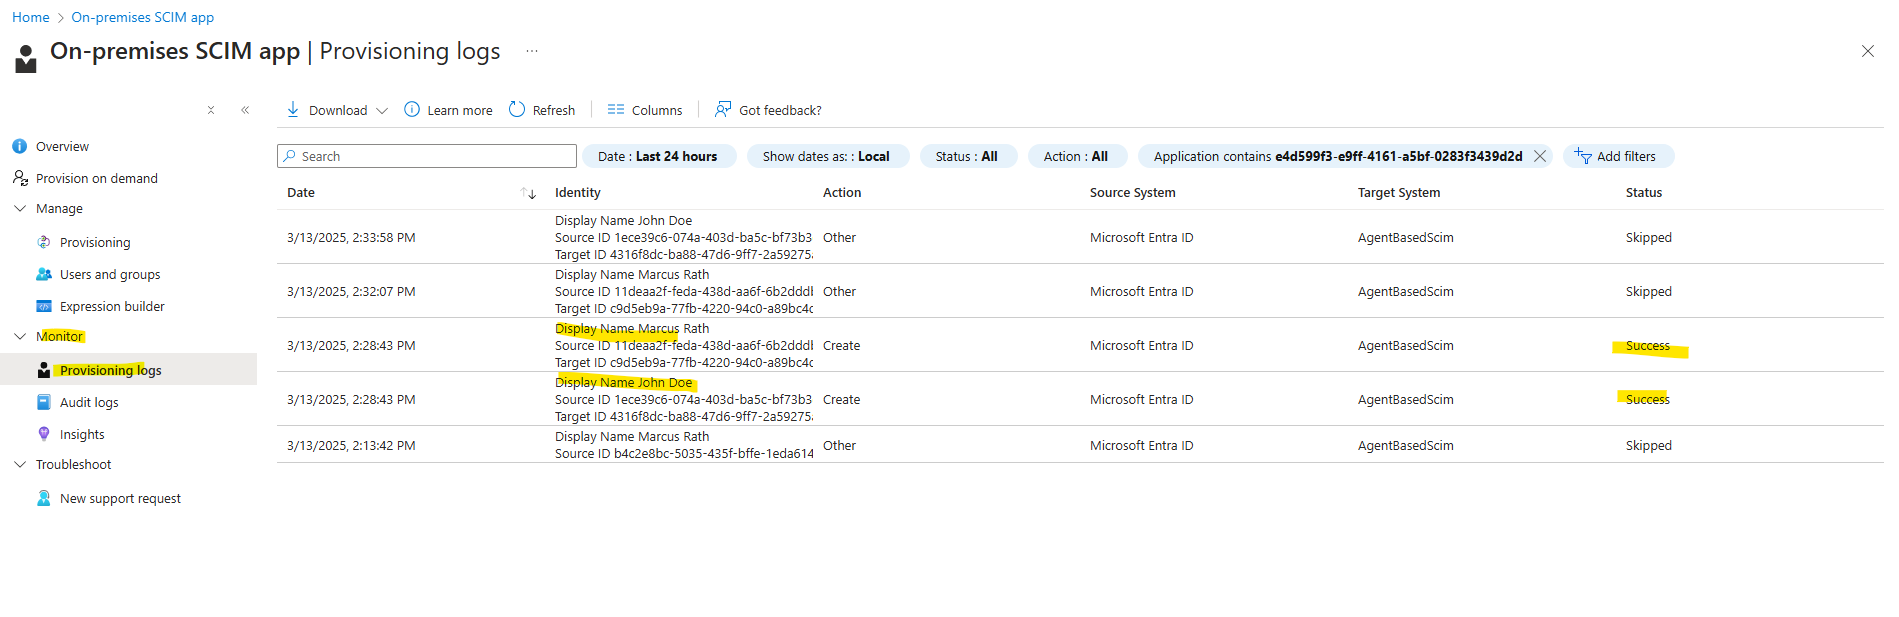
We can also check the provisioning logs within the SCIM app under Monitor -> Provisioning logs.
For testing purpose I will now assign some more users to the application.
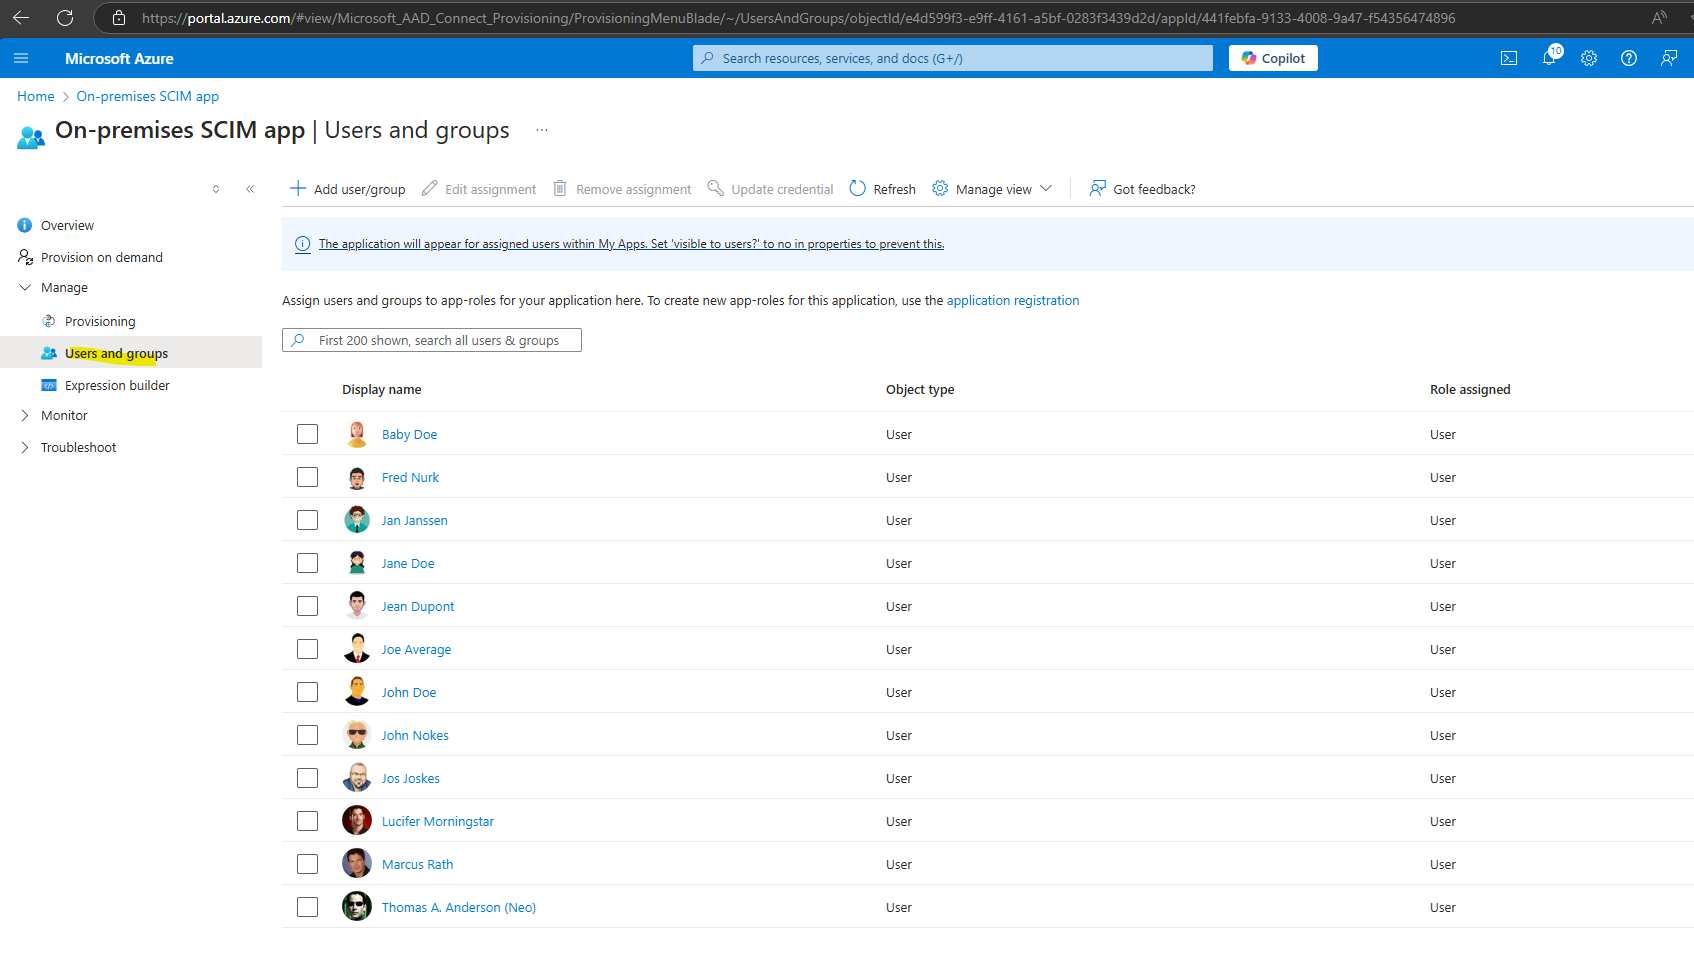
So far these further assigned users are not synced to vCenter.
The initial Microsoft Entra ID sync is triggered immediately after you enable provisioning. Subsequent syncs are triggered every 20-40 minutes, depending on the number of users and groups in the application. See Provisioning summary report in the Microsoft Entra ID documentation.
Source: https://learn.microsoft.com/en-us/azure/databricks/admin/users-groups/scim/aad
In my case around 15 minutes later finally also these users were synced from Microsoft Entra ID to my on-premise vCenter.
Set Permissions on vCenter Server
The users we provision to be synced with vCenter Server we also must empower on vCenter.
Before we can sign-in to vCenter by using our Entra ID users, we first have to assign the required permissions to the provisioned users in vCenter.
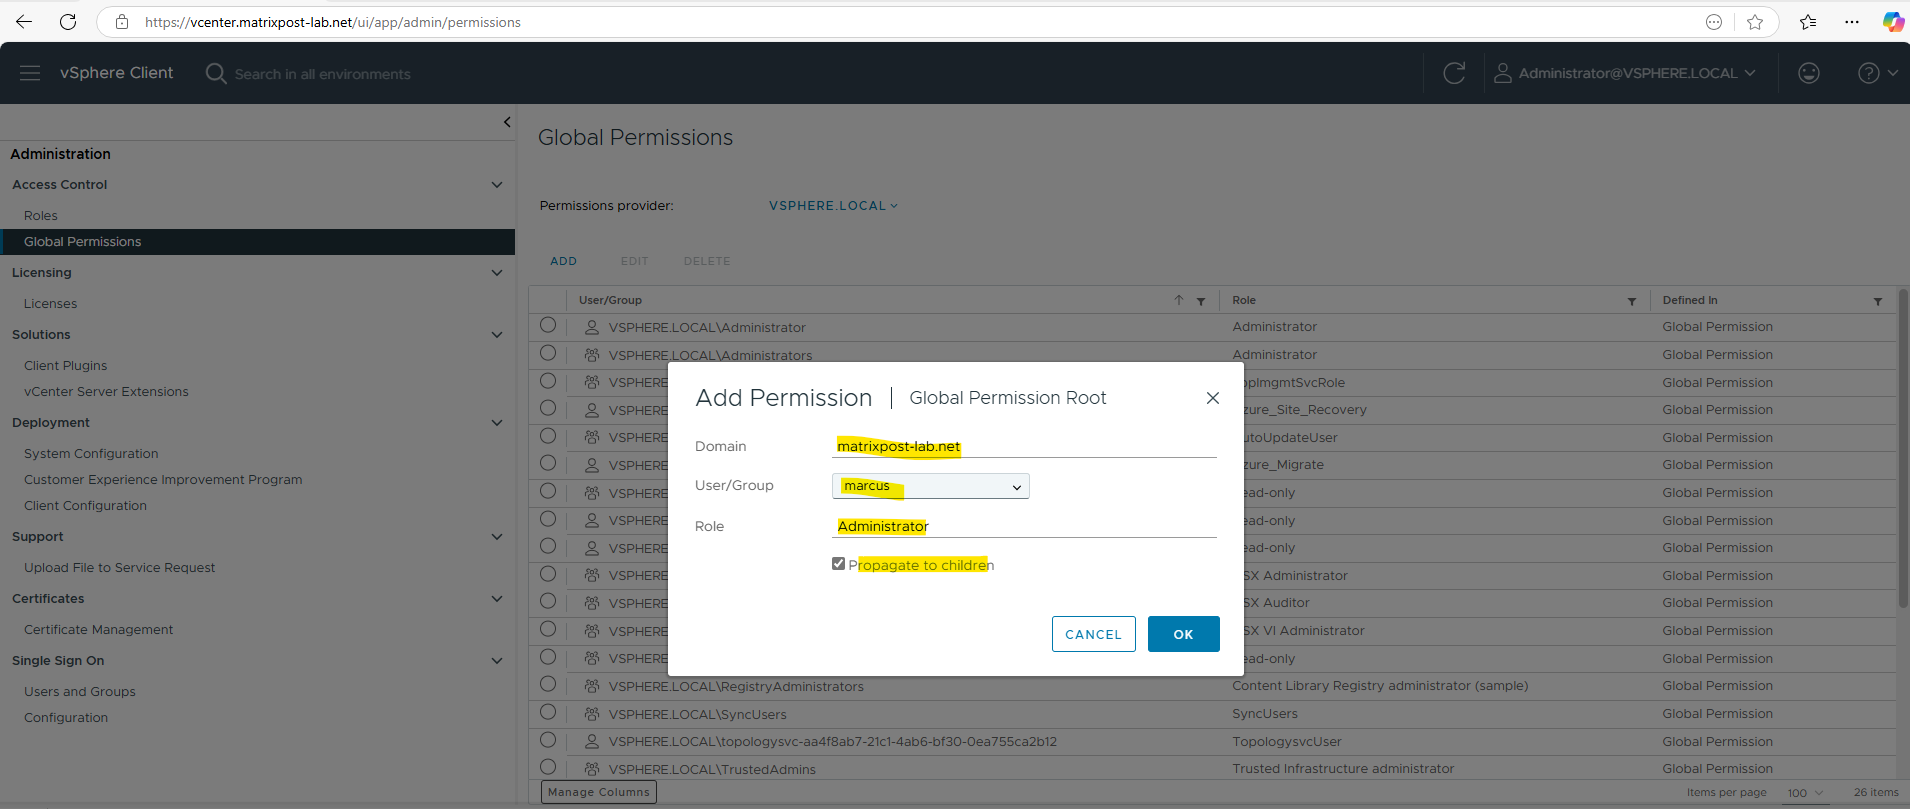
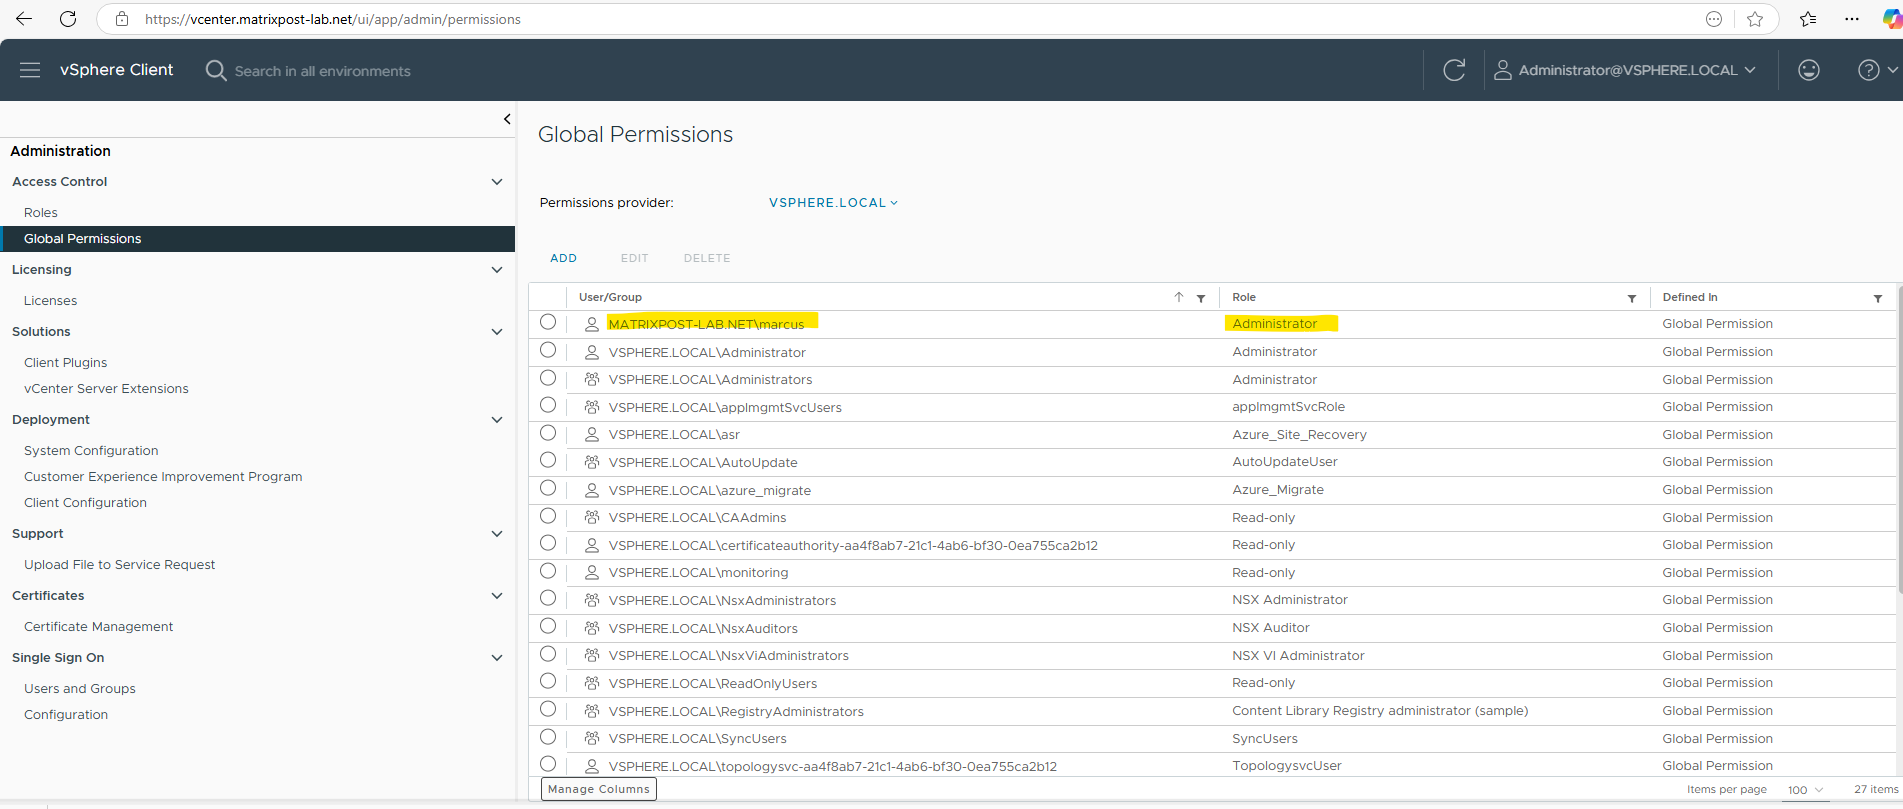
In vCenter navigate to Administration -> Access Control -> Global Permissions and click on Add.

Select the on-premise Active Directory / Entra ID domain and search for the user or group you want to assign permissions to.
If you set a permission at a vCenter Server level and propagate it to the children objects, the permission applies to data centers, folders, clusters, hosts, virtual machines, and similar objects in the vCenter Server instance.
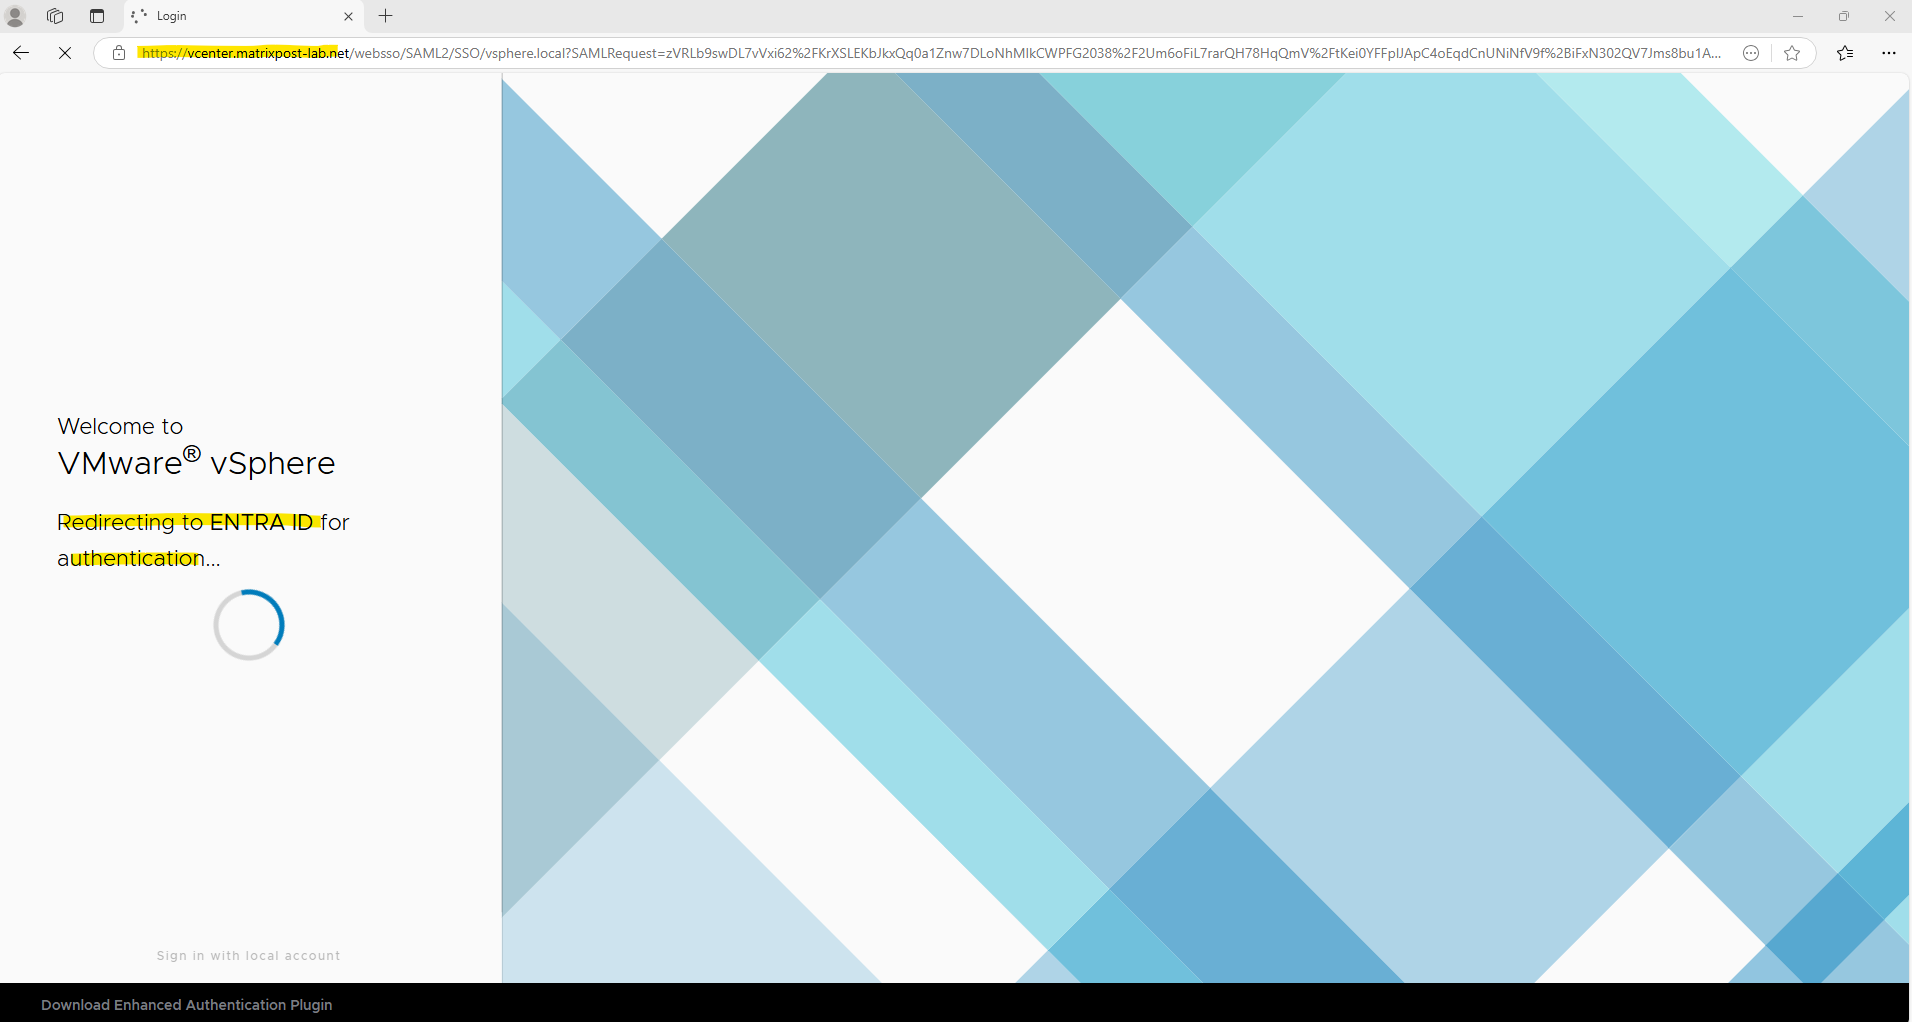
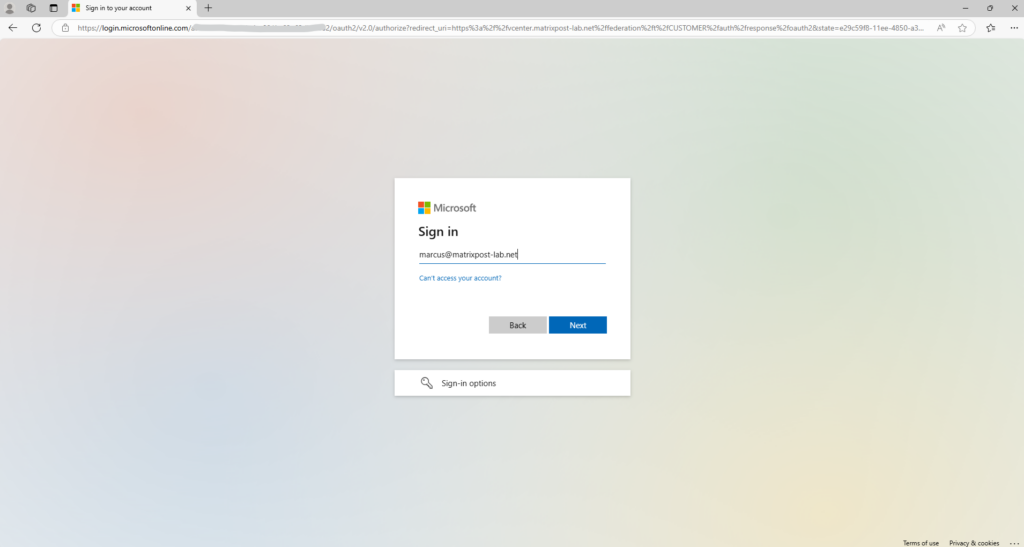
We can now try to sign-in to vCenter by using our provisioned and in vCenter authorized Entra ID user.
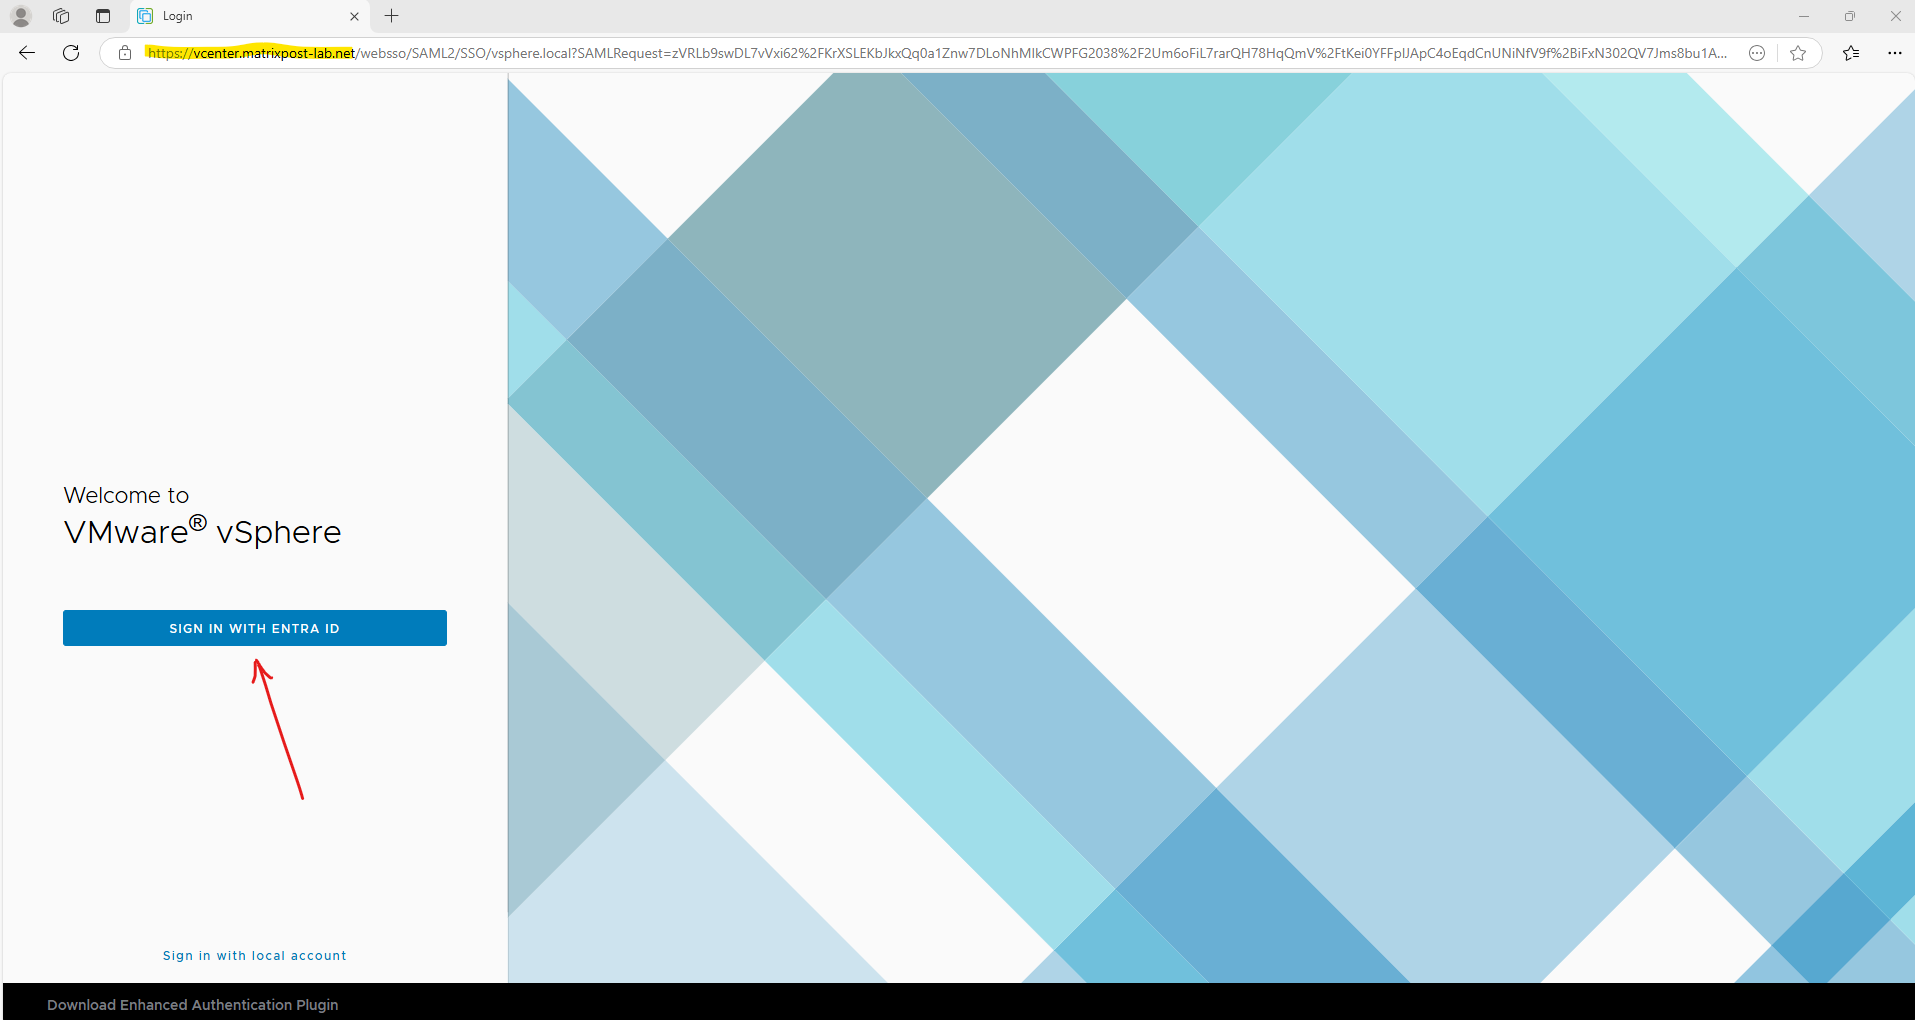
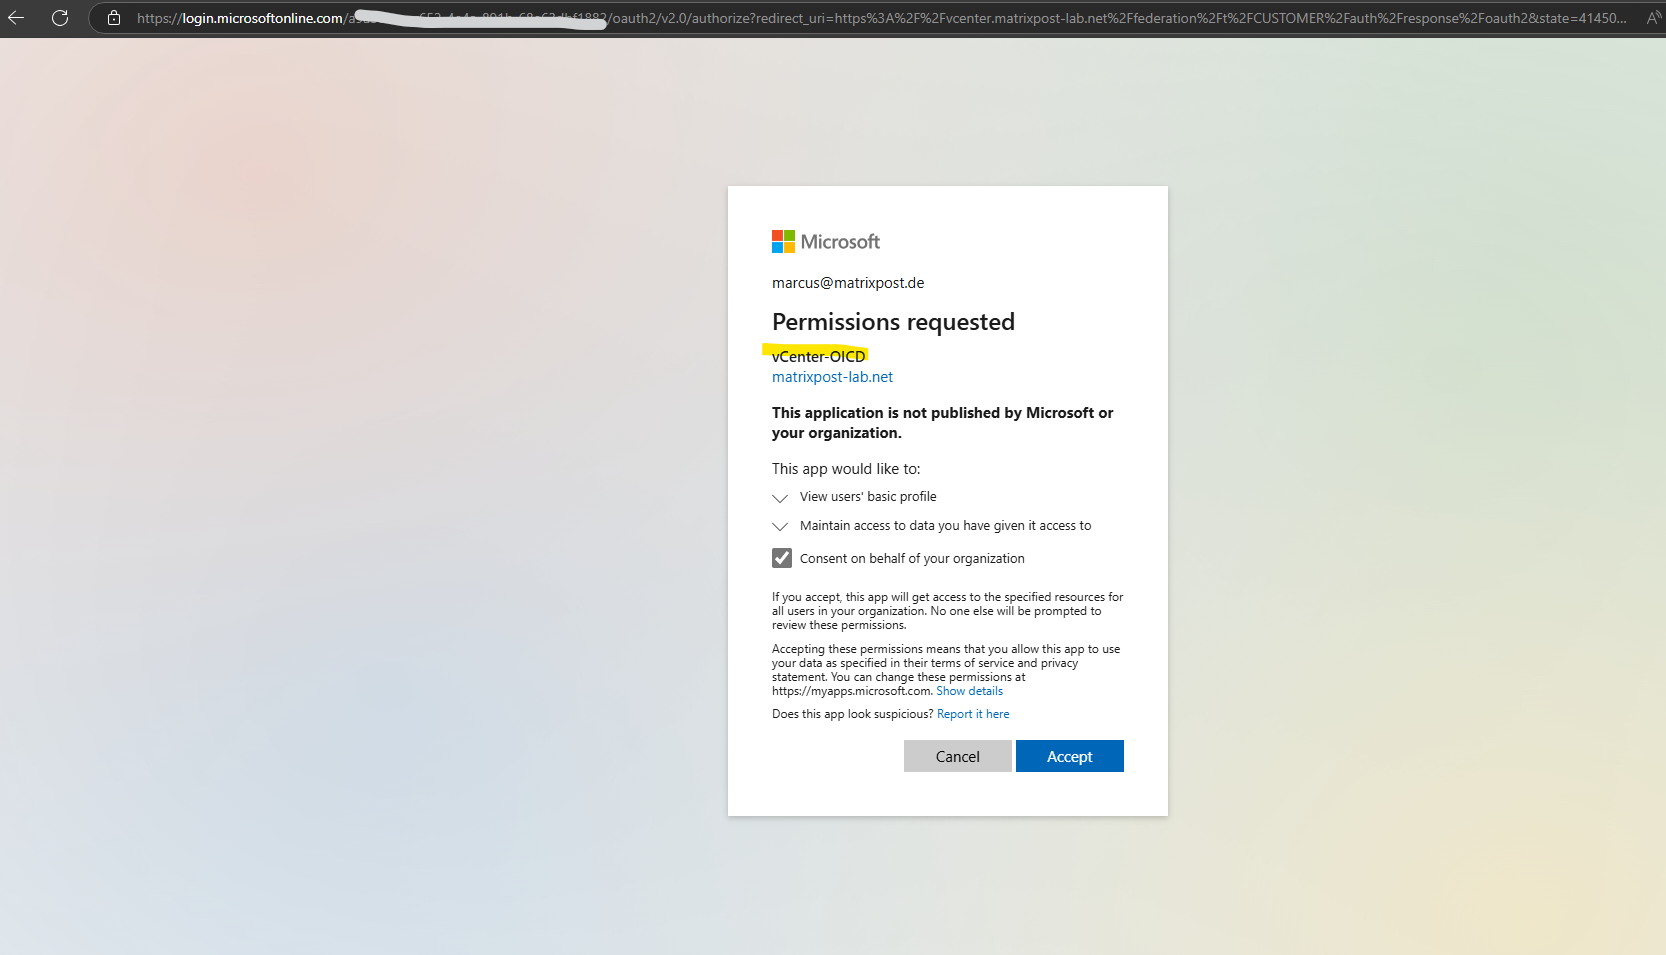
Enter the Entra ID user. This user should have the permissions to grant on behalf of your organization.
Accept to consent on behalf of your organization.
When integrating applications with Microsoft Entra ID, users and admins may encounter a “Consent on behalf of your organization” option during authentication. This setting determines whether an app can access data for multiple users without each user needing to grant consent individually.
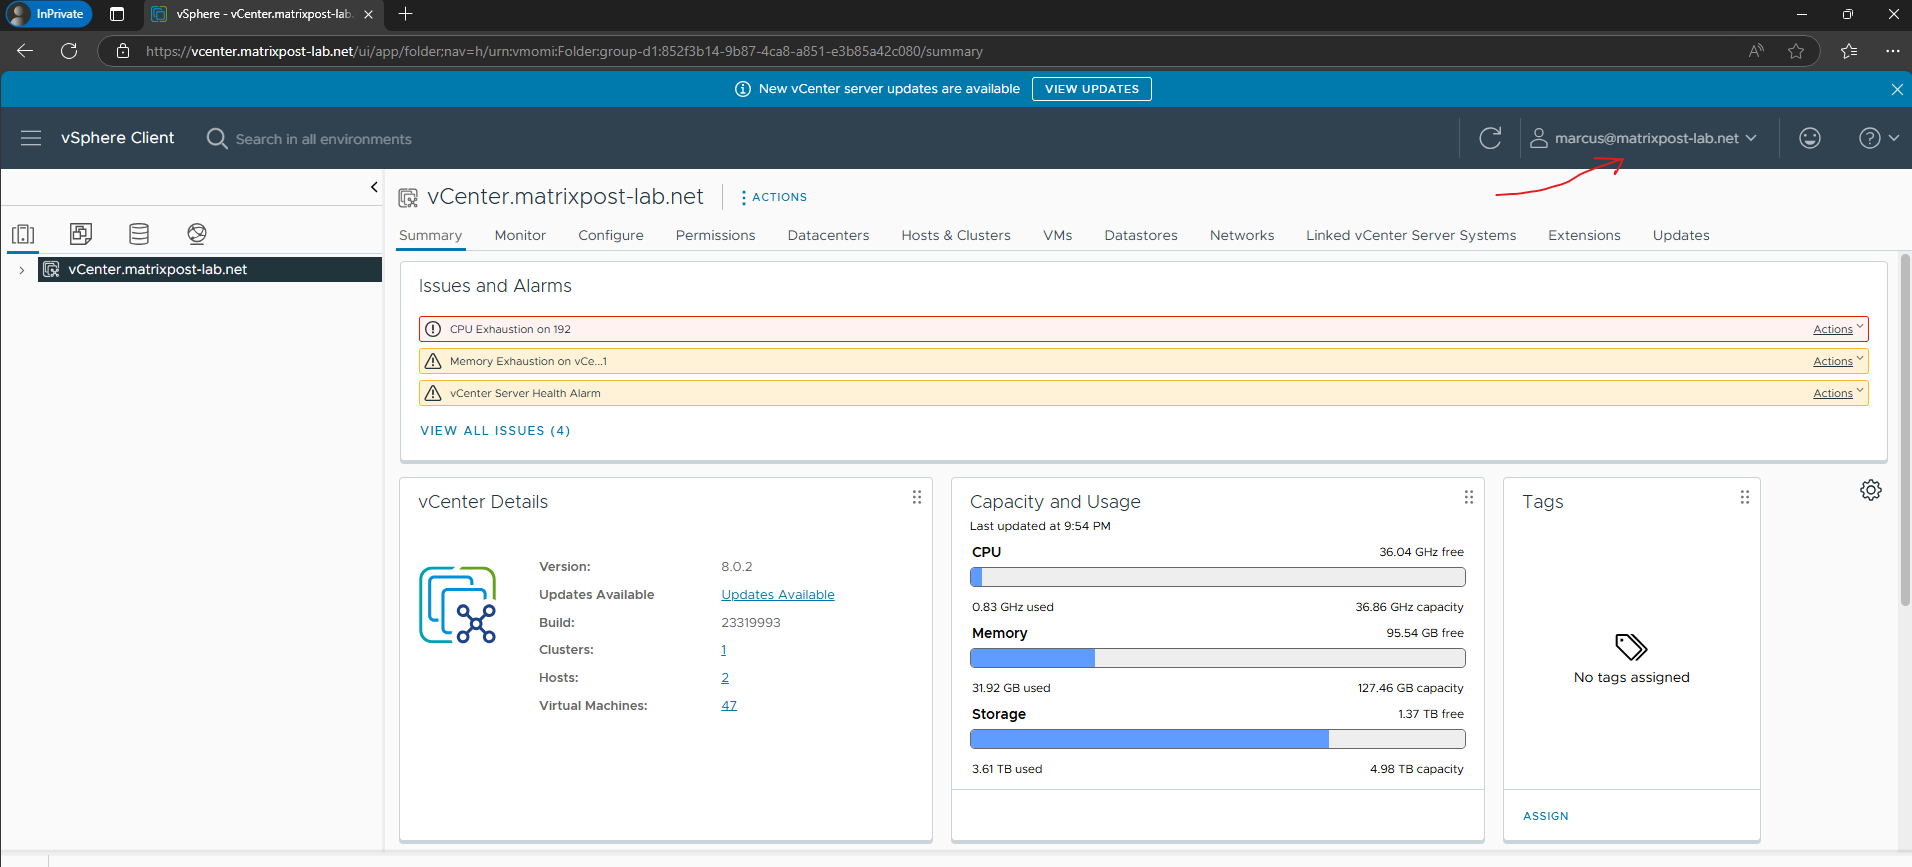
Looks good!
Troubleshooting
Access Denied – Unable to authenticate the user
The following error page will shown up in case the user you are using to sign-in to Entra ID, isn’t found in vCenter. This can happen when our previous user mapping configuration for the SCIM app is wrong.
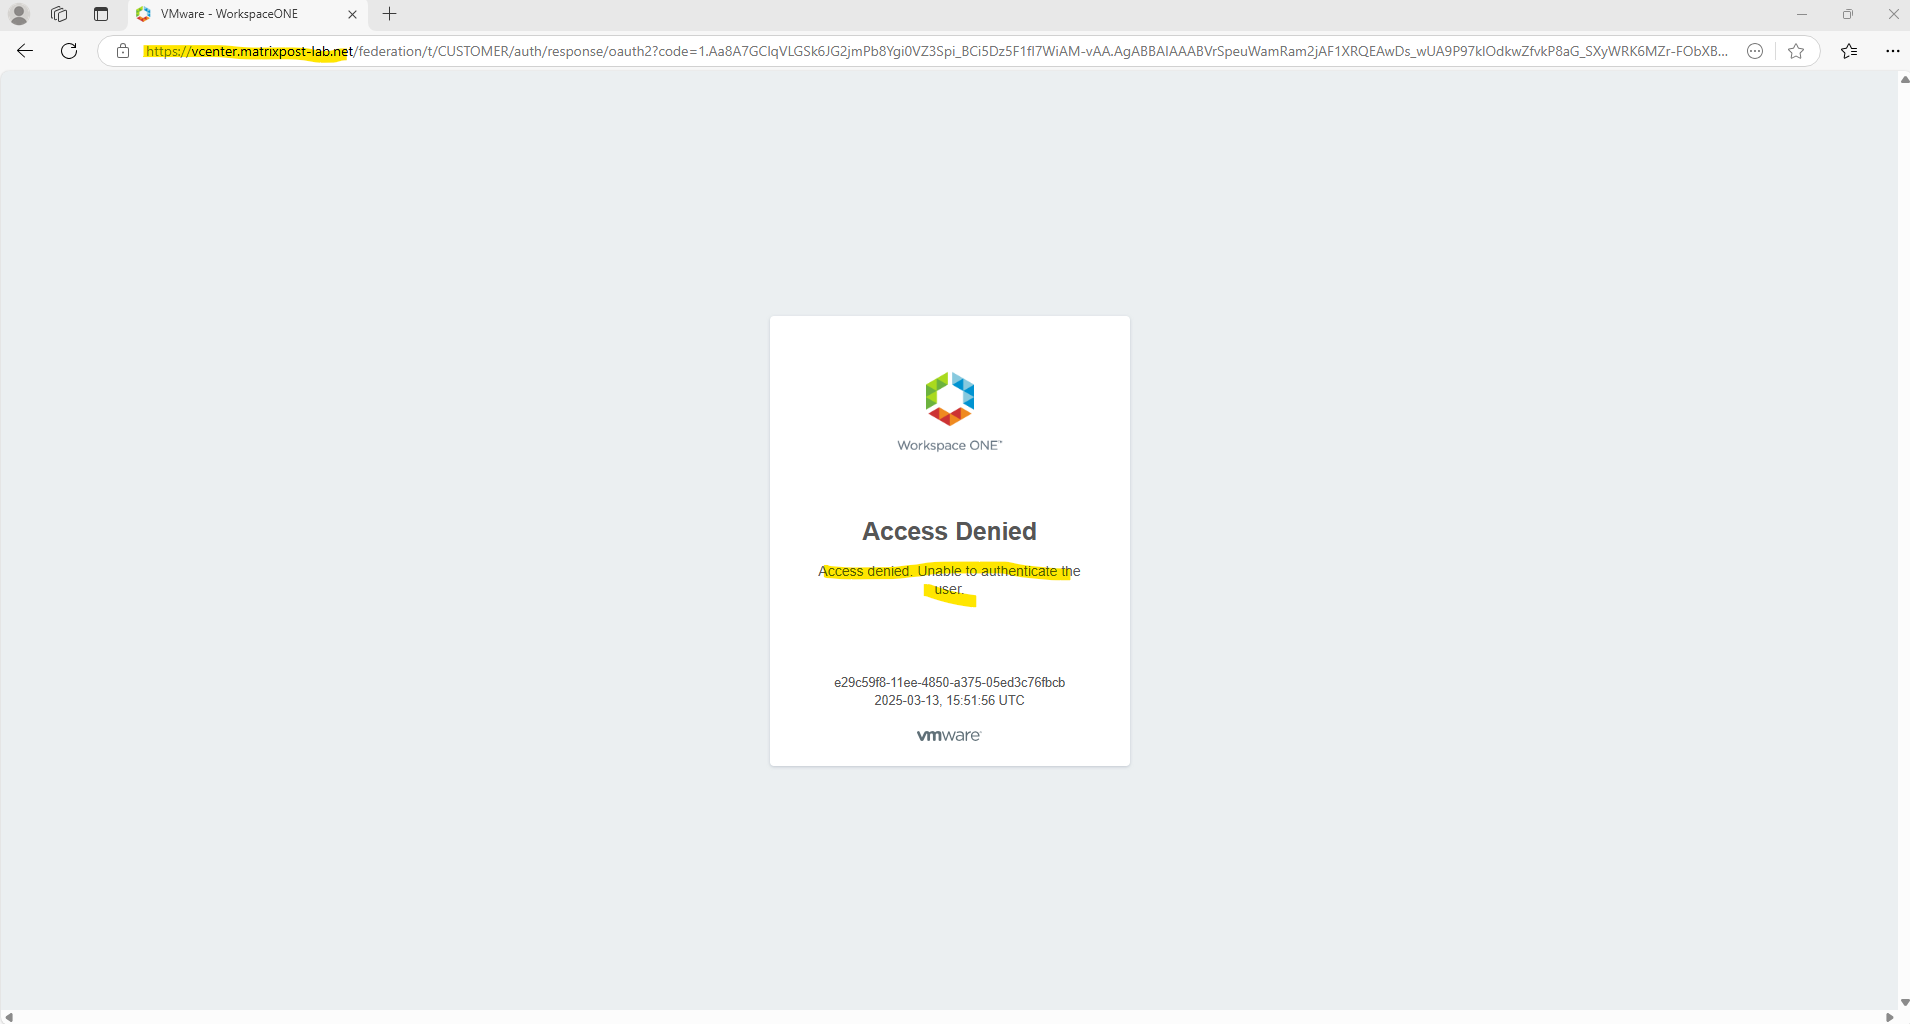
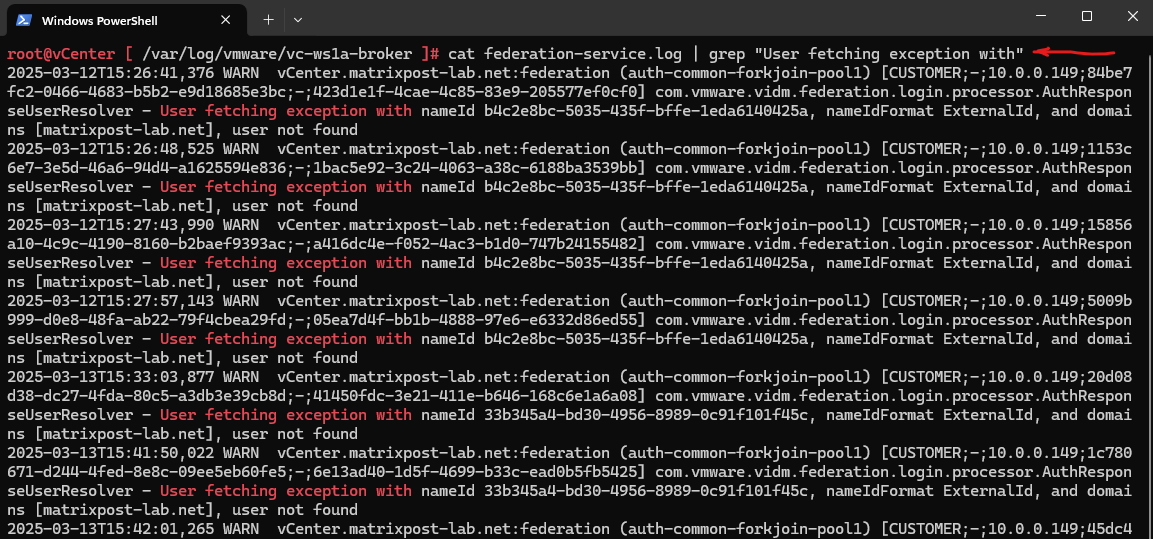
When connecting the vCenter by using SSH you will then find the following error messages in /var/log/vmware/vc-ws1a-broker\federation-service.log.
root@vCenter [ /var/log/vmware/vc-ws1a-broker ]# cat federation-service.log | grep "User fetching exception with"
User fetching exception with nameId b4c2e8bc-5035-435f-bffe-1eda6140425a, nameIdFormat ExternalId, and domains [matrixpost-lab.net], user not found
All credit here to solve this issue goes to Spencer Shiley which finally found a solution for as shown in his following LinkedIn article https://www.linkedin.com/pulse/vcenter-80u2-mfa-entra-id-spencer-shiley-ibi3c/.
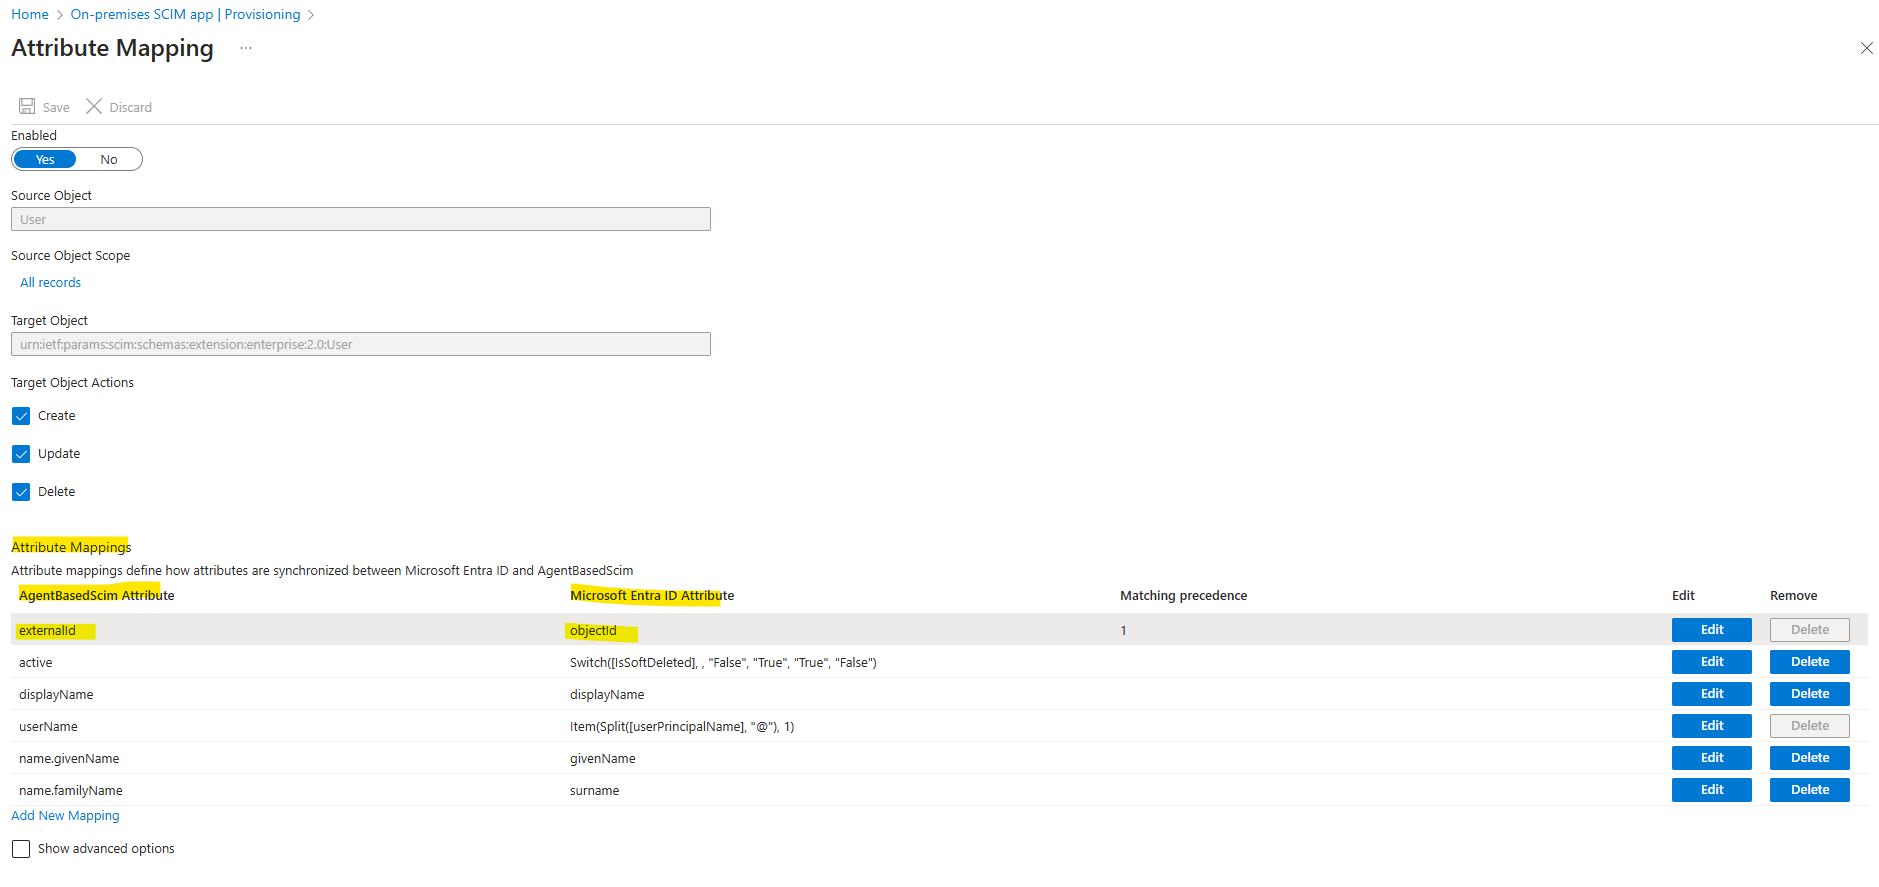
In a nutshell, vCenter expects that the ExternalId attribute by the SCIM app finally matches the Microsoft Entra ID Attribute named objectID shown below.
As mentioned to the beginning we can use a few options to configure SCIM 2.0 Push, another option is to use VMwareIdentityServices app and shown here.
The VMwareIdentityServices app will also use a bunch of predefined attribute mappings, here the ExternalId attribute is mapped by default correctly to the objectID attribute of Entra ID and shown here.
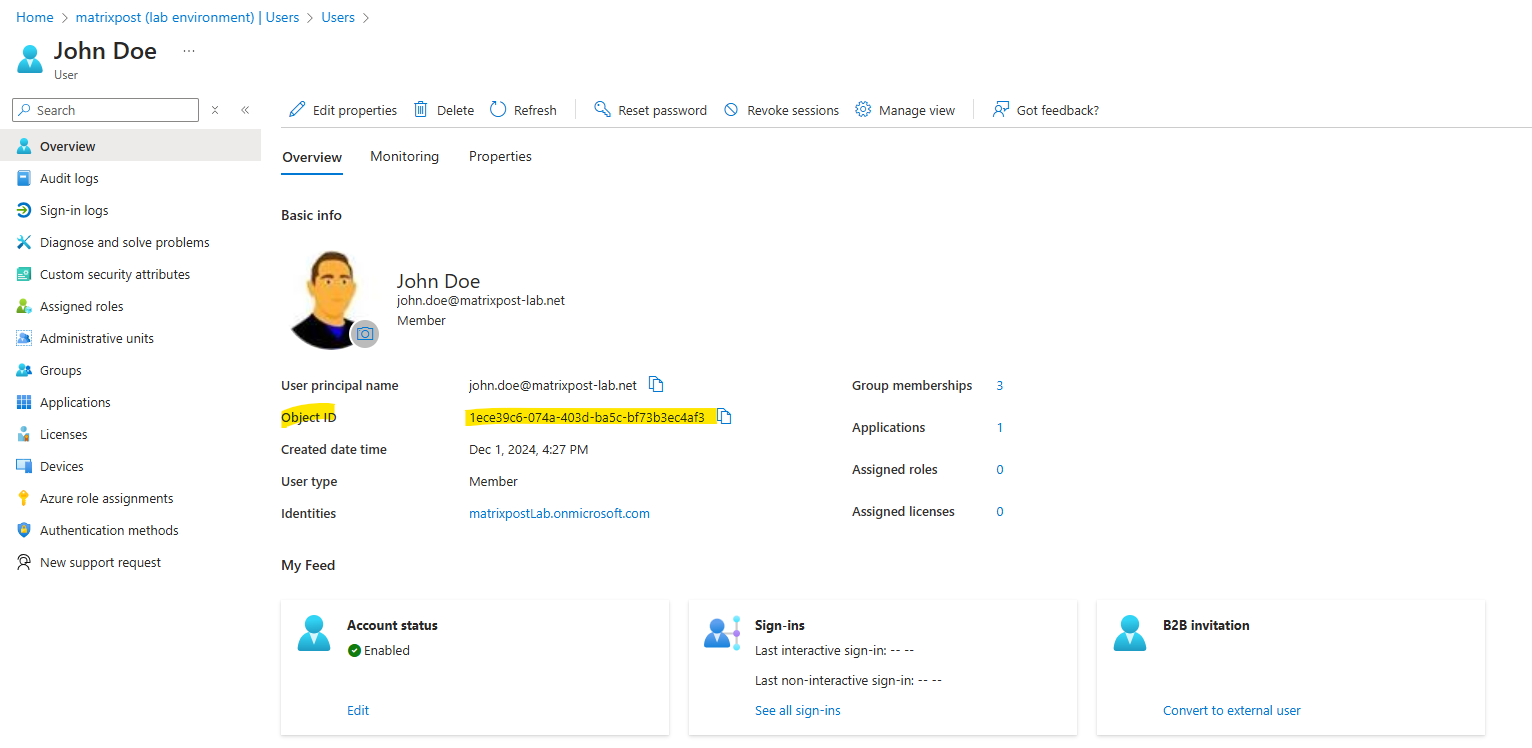
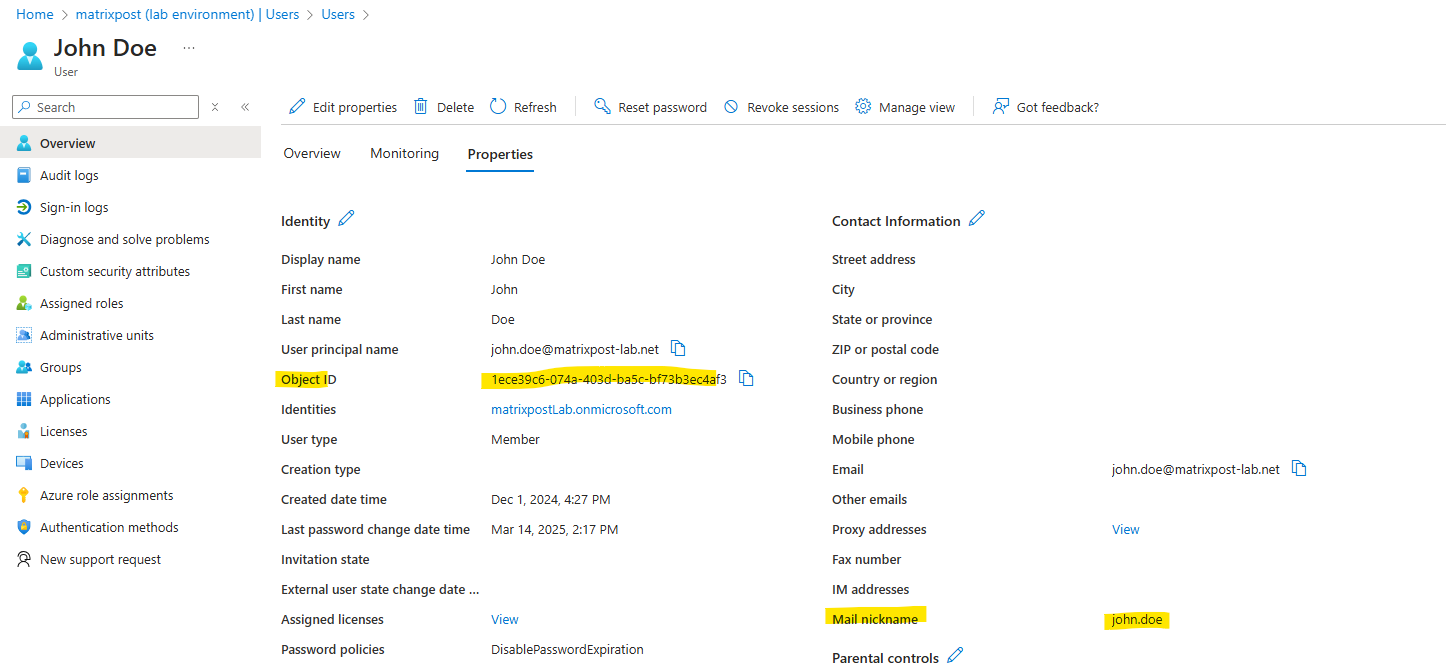
By default this is mapped to mailNickname in the SCIM app which then leads to this error.
Unfortunately you can’t remediate this mapping by using a delta sync from Entra ID to vCenter. All users which are already synced to vCenter will not be able to sign-in.
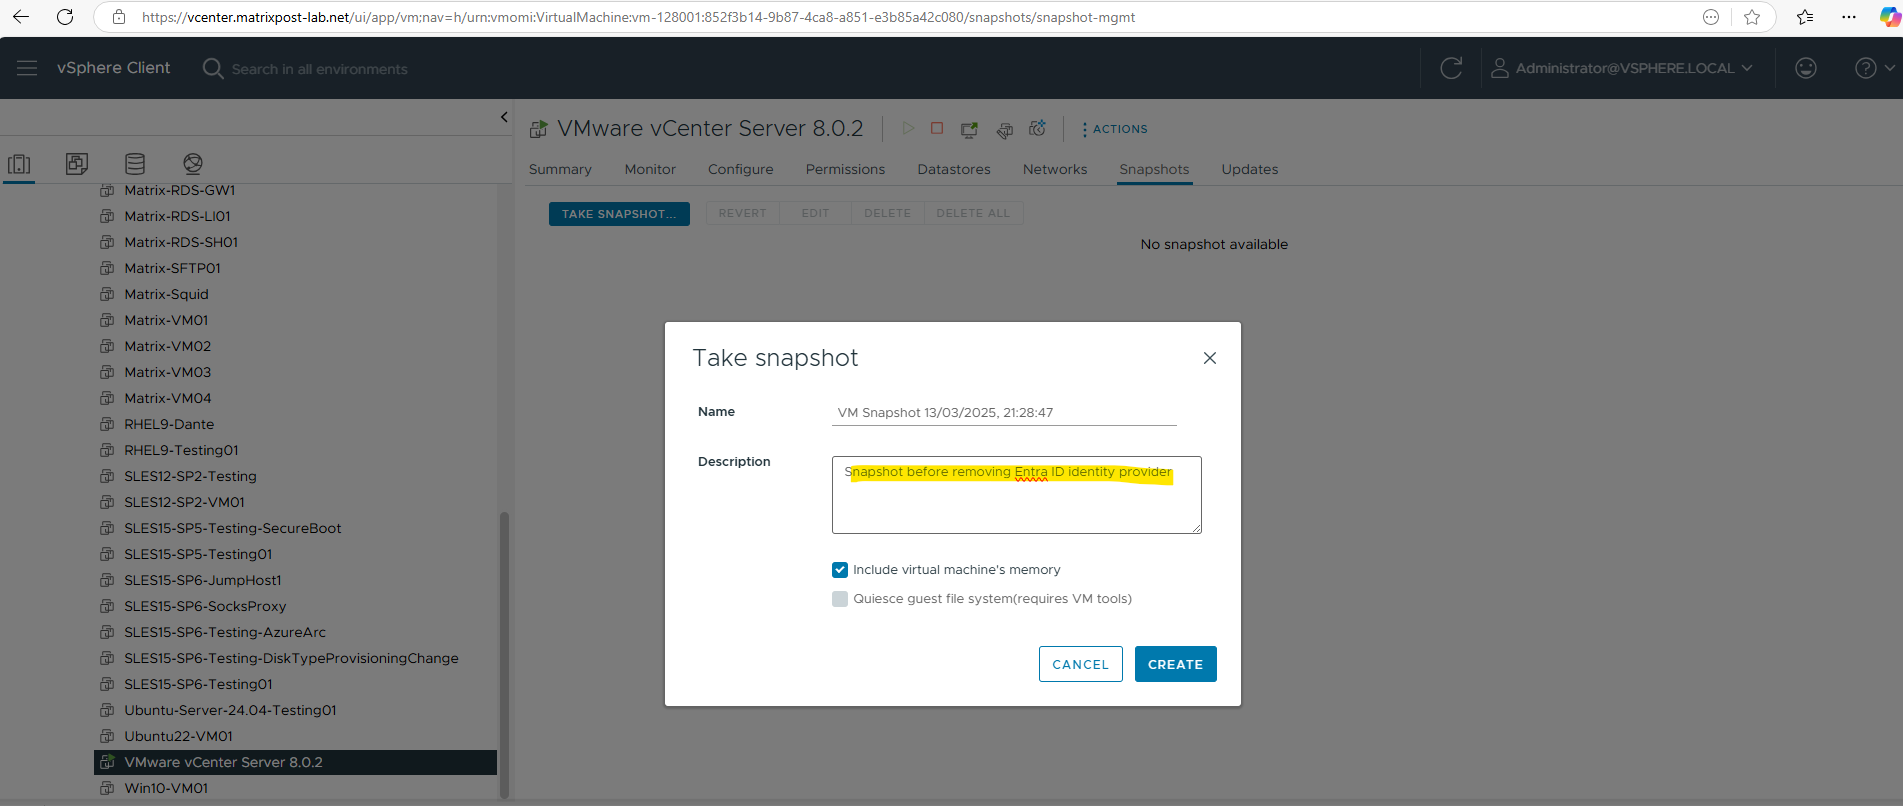
To solve this issue we need to remove the Entra ID Identity Provider (IdP) from vCenter to finally remove the already synced users and then re-connect it.
If the domain user was provisioned using an external identity source (e.g., Entra ID), you can’t delete the user directly from vCenter. Instead, you must delete the user from the external identity provider.
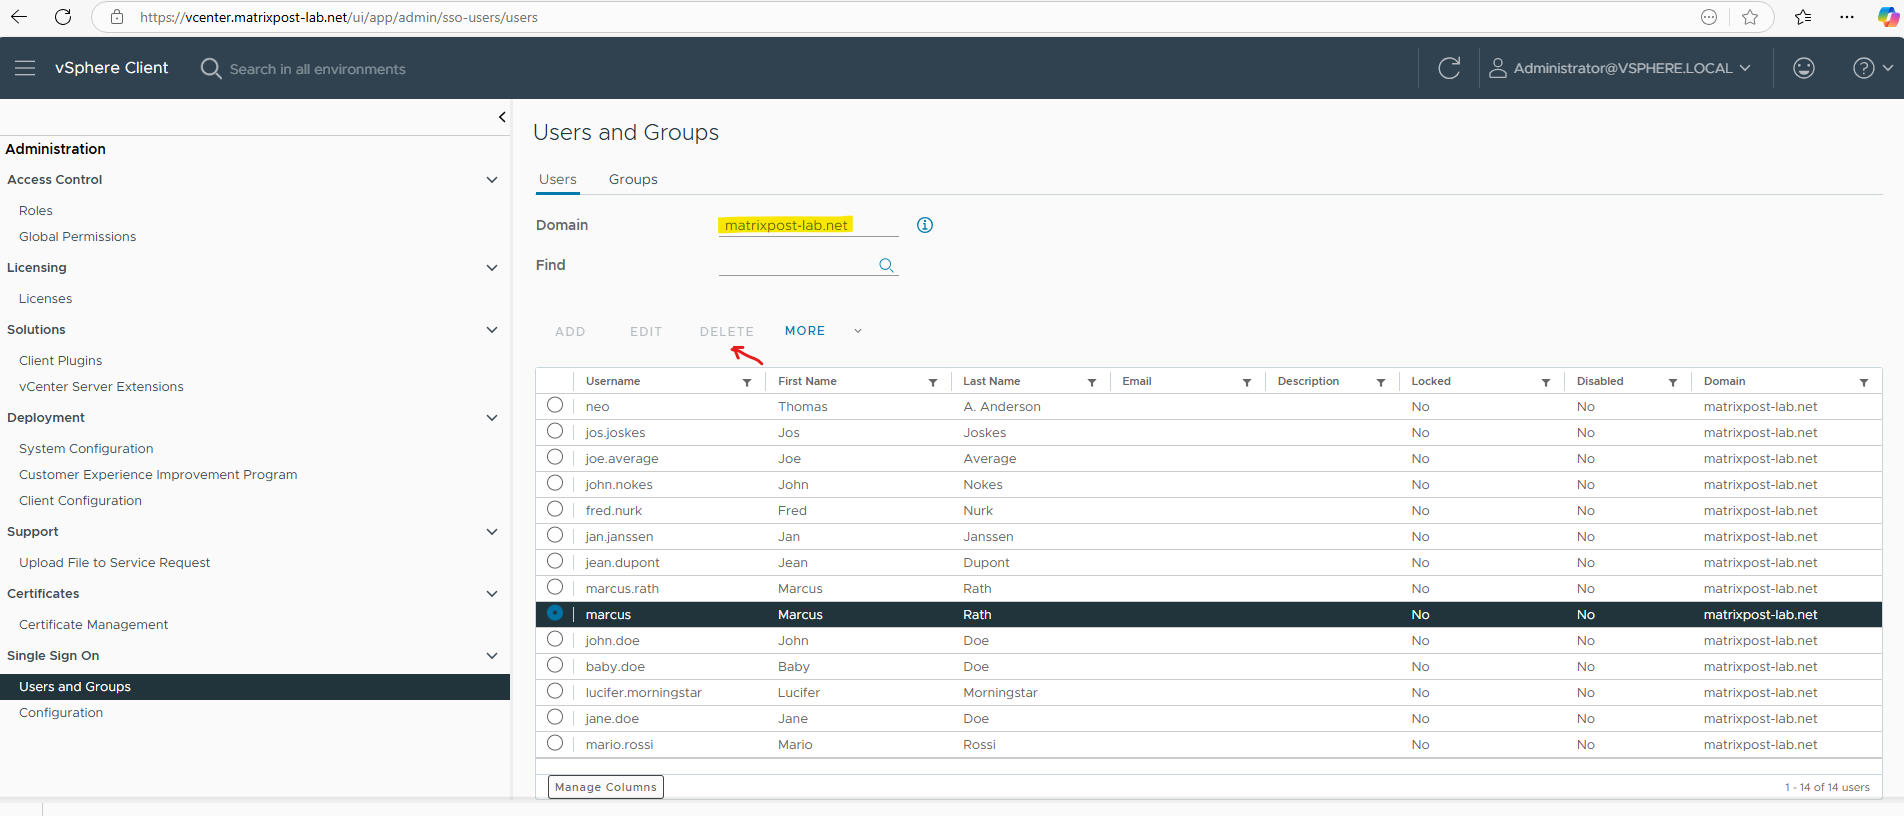

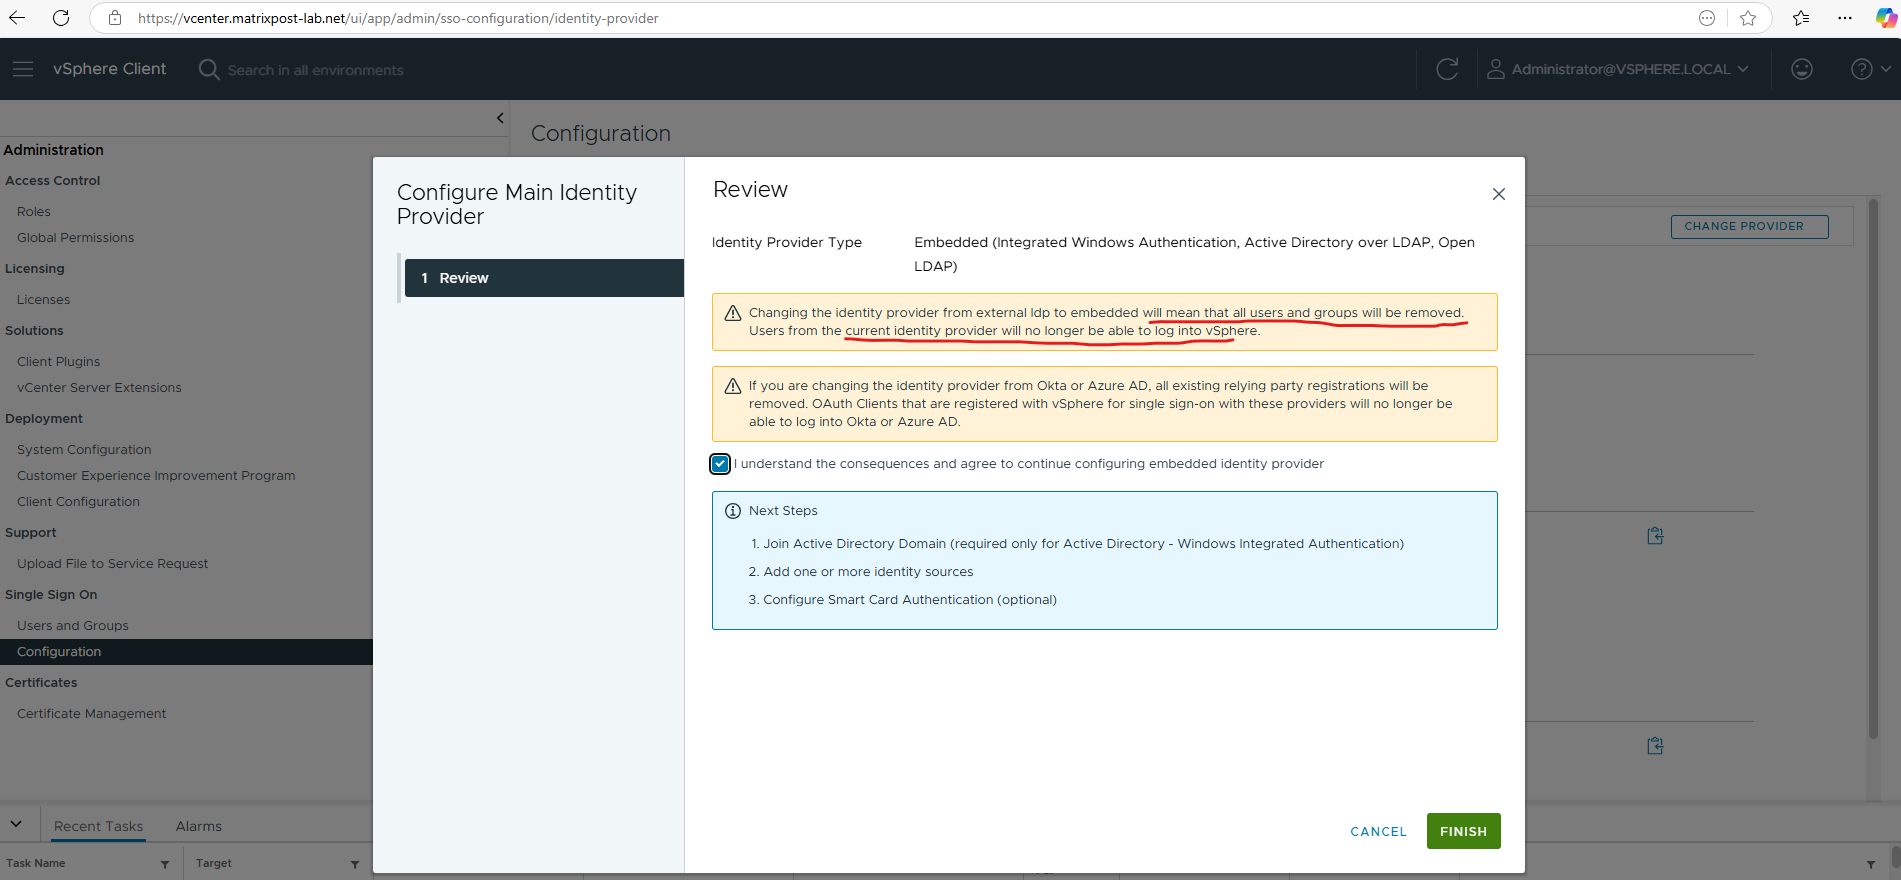
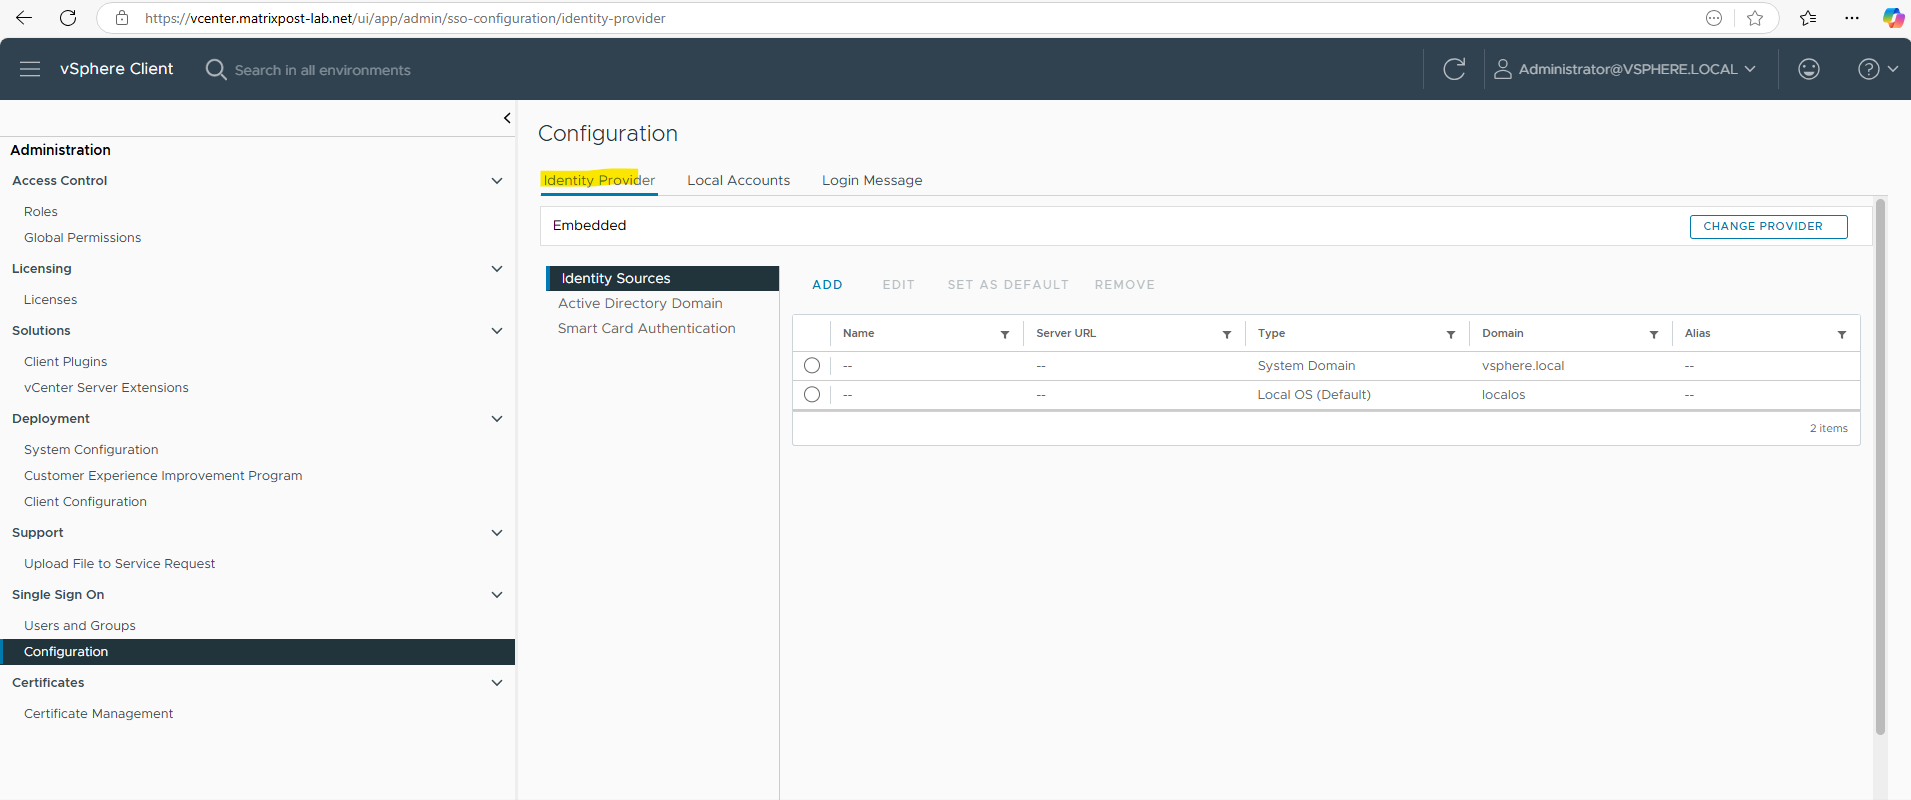
Now its like before we configured Entra ID for vCenter Server and we just have the vsphere.local domain and local OS as identity source.
We can now enable Entra ID for vCenter Server again in vSphere to sync the users this time with the correct mappings.
Unable to login because you do not have permission on any vCenter Server systems connected to this client

Unable to login because you do not have permission on any vCenter Server systems connected to this client.
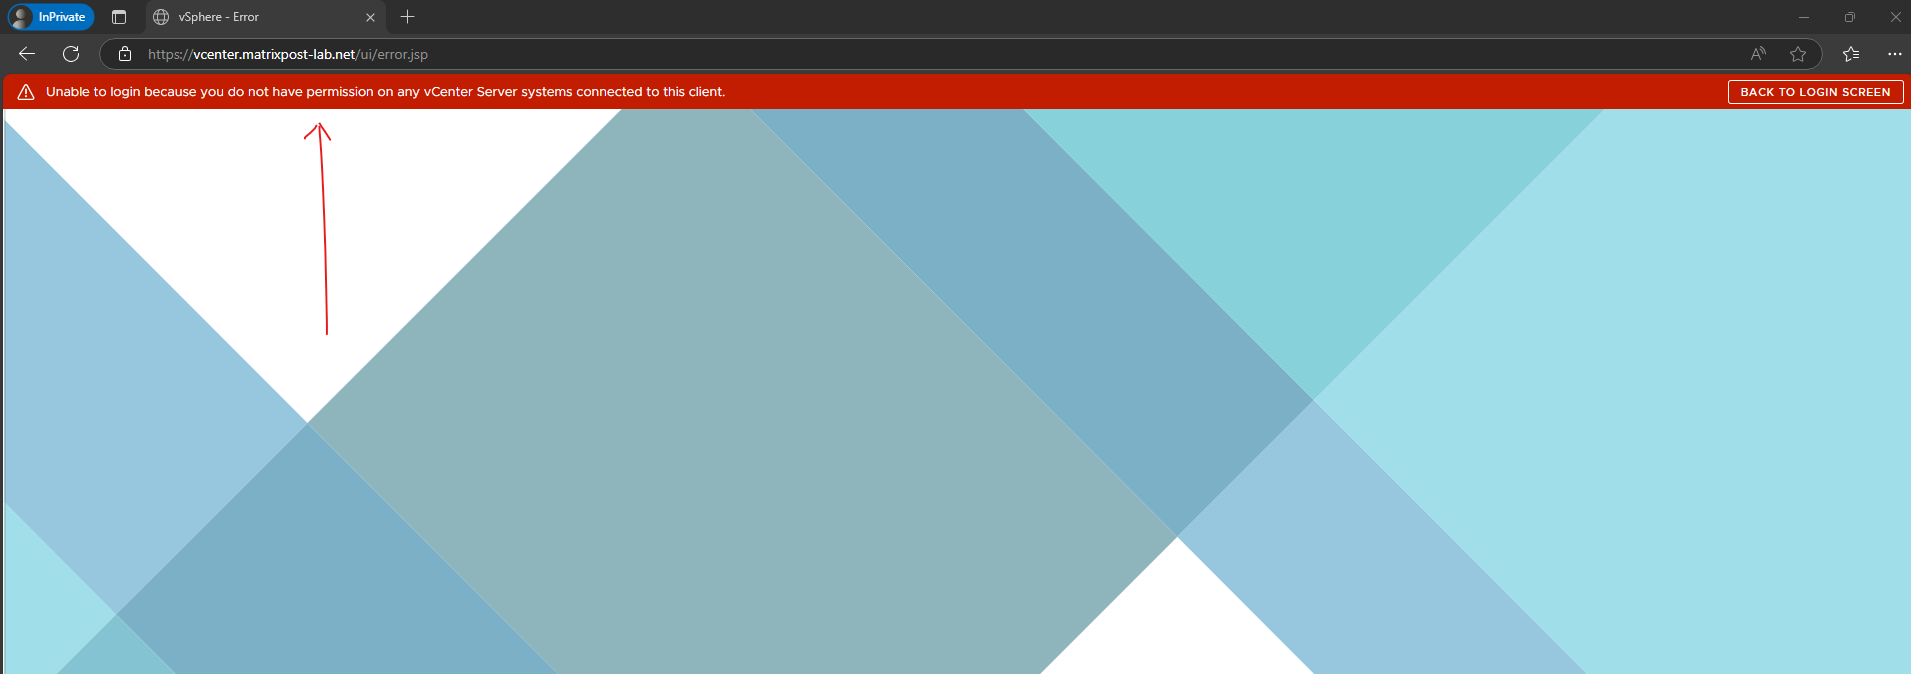
Before we can sign-in, we first have to assign the required permissions to the provisioned users in vCenter.
In vCenter navigate to Administration -> Access Control -> Global Permissions and click on Add.
Select the on-premise Active Directory / Entra ID domain and search for the user or group you want to assign permissions to.
If you set a permission at a vCenter Server level and propagate it to the children objects, the permission applies to data centers, folders, clusters, hosts, virtual machines, and similar objects in the vCenter Server instance.
Links
VMware vSphere 8.0 U2 and federated Authentications with Microsoft Entra ID
https://www.debruinonline.net/post/vmware-vsphere-8-0-u2-and-federated-authentications-with-microsoft-entra-idvCenter 8.0u2 MFA with Entra ID
https://www.linkedin.com/pulse/vcenter-80u2-mfa-entra-id-spencer-shiley-ibi3cConfigure SCIM provisioning using Microsoft Entra ID (Azure Active Directory)
https://learn.microsoft.com/en-us/azure/databricks/admin/users-groups/scim/aadWhat is System for Cross-domain Identity Management (SCIM)?
https://www.microsoft.com/en-us/security/business/security-101/what-is-scimHow Application Provisioning works in Microsoft Entra ID
https://learn.microsoft.com/en-us/entra/identity/app-provisioning/how-provisioning-worksMicrosoft Entra on-premises application identity provisioning architecture
https://learn.microsoft.com/en-us/entra/identity/app-provisioning/on-premises-application-provisioning-architecture