Step-by-Step Guide Part 1: How to build your own NetApp ONTAP 9 LAB
Setting up your own NetApp ONTAP 9 lab is one of the best ways to gain hands-on experience with enterprise-grade storage technology, whether you are preparing for certification, testing disaster recovery, or just learning ONTAP’s core features.
In this step-by-step guide, we will set up and explorer a fully functional ONTAP 9 lab environment by using the official NetApp ONTAP 9 simulator, including cluster setup, networking, and basic storage provisioning.
To be able to download the NetApp ONTAP 9 simulator which is available as vSphere OVA file (Open Virtual Appliance), we need to have a NetApp Customer Access account.
In this first part we will see how to get the ONTAP Simulate appliance and how to deploy it in vSphere. Further we will see the initial cluster setup by using a 2-node cluster (virtual appliances).
In part 2 we will building the foundational storage setup: aggregates, Storage Virtual Machines (SVMs), logical interfaces (LIFs), and volumes.
Once a volume is created on a NetApp system, it can be exposed over various protocols depending on your use case.
You can export it via NFS or share it using CIFS/SMB for file-based access, or present it as block storage using iSCSI or Fibre Channel, ideal for applications like shared datastores in vSphere or file servers.
In part 3, we will see step by step how to provide block-based storage from a NetApp ONTAP system to VMware vSphere using iSCSI.
In part 4, we’ll cover common administrative tasks.
About NetApp
NetApp is a leading enterprise storage and data management platform, best known for its ONTAP operating system, which powers highly scalable and feature-rich storage systems.
NetApp delivers unified storage that supports file (NFS/SMB) and block (iSCSI/FC) protocols, making it ideal for both traditional workloads and modern cloud-integrated environments.
Unlike storage arrays that specialize in either block or file, NetApp systems provide true multiprotocol access, allowing the same dataset to be used across Windows, Linux, and VMware environments.
NetApp stands out with its multiprotocol architecture, mature data protection, and cloud-first strategy, making it a strong choice for hybrid IT environments, file-heavy workloads, and enterprise virtualization while also competing directly with block-centric storage arrays in performance and manageability.
How NetApp Compares to Other Storage Vendors
| Feature | NetApp | Dell EMC (PowerStore/Unity) | HPE (Primera/Nimble) | Pure Storage |
|---|---|---|---|---|
| Protocol Support | Unified (NFS, SMB, iSCSI, FC) | Strong block, some file support | Block first, file via gateway | Block primary, file optional |
| Data Services | Snapshots, SnapMirror, FlexClone | Snapshots, replication | Data protection, deduplication | Always-on dedup/compression |
| Cloud Integration | Deep Azure/AWS/GCP support | Available, more recent focus | Basic cloud backup | Cloud block storage tier |
| Flexibility | Hybrid & all-flash systems | All-flash & hybrid | Midrange to high-end | All-flash only |
| Strengths | Multiprotocol, efficiency, automation | Enterprise block storage | Simplicity and InfoSight AI | Simplicity, performance |
Limitations of ONTAP Simulator
The NetApp ONTAP Simulator is a free virtual appliance used for testing and learning ONTAP features. While powerful for labs and demos, it has several key limitations compared to a physical or production ONTAP system.
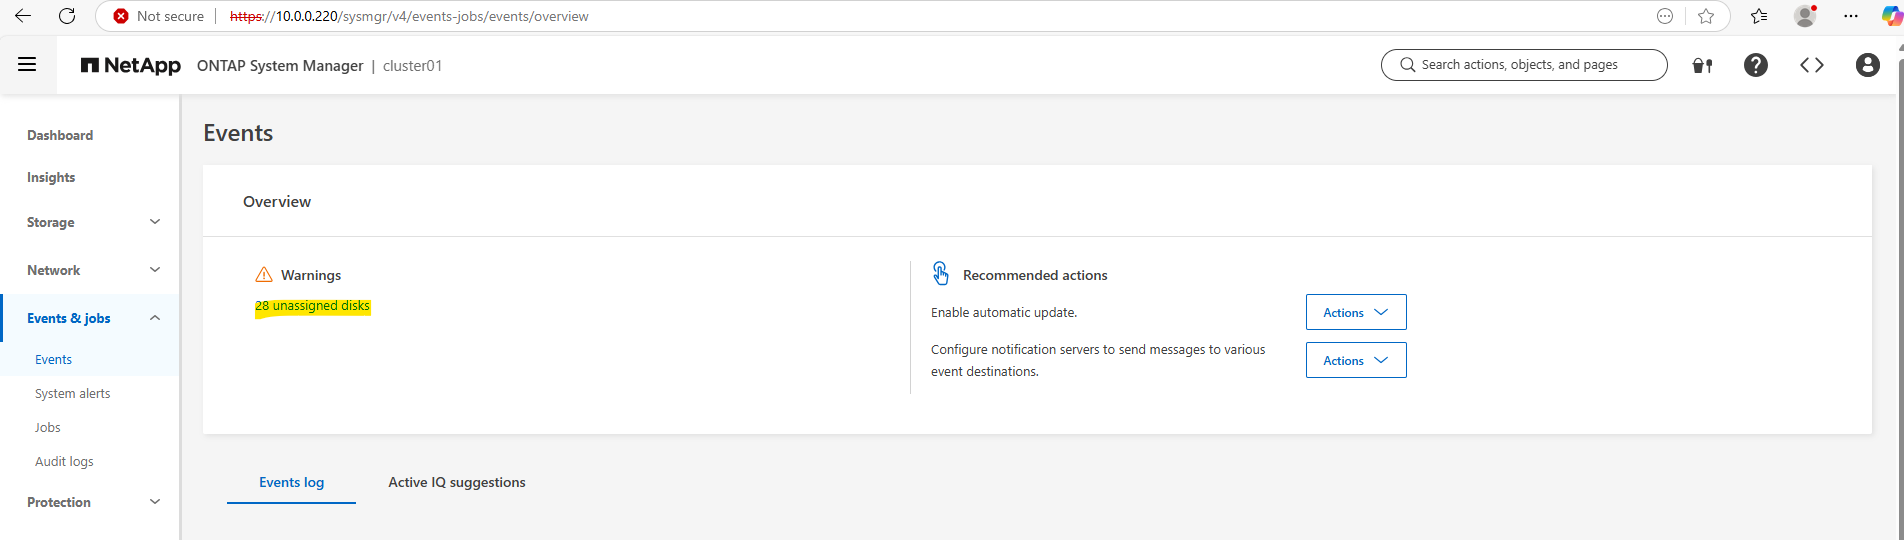
The simulator image comes pre-configured with 28 x 1GB disks totaling 220GB maximum storage. Additional disks can be added to shelves 2 and 3 using diagnostic commands to increase available storage beyond 220GB.
- Max disk size = 1 GB per virtual disk (limited by the simulator’s emulation)
- Max number of disks = 56 (28 per node for 2-node cluster)
- No support for real physical storage ==> Only uses virtual disks attached to VM
- SAN protocols FCP/iSCSI are simulated but not functional for real SAN testing
- iSCSI protocol stack nevertheless works, you can create LUNs, igroups, maps, and connect from ESXi, Windows, or Linux as shown in part 3. Just be aware it’s not performance-accurate and lacks some hardware-backed features
- Cluster expandability Max 2 nodes (no scale-out clusters)
Simulate ONTAP does not support the following features:
- High Availability (CFO/SFO)
- Fiber channel and SAN connectivity
- RLM (Remote LAN Module)
- CFE, BIOS, shelf FW, and so on
- Multipathing
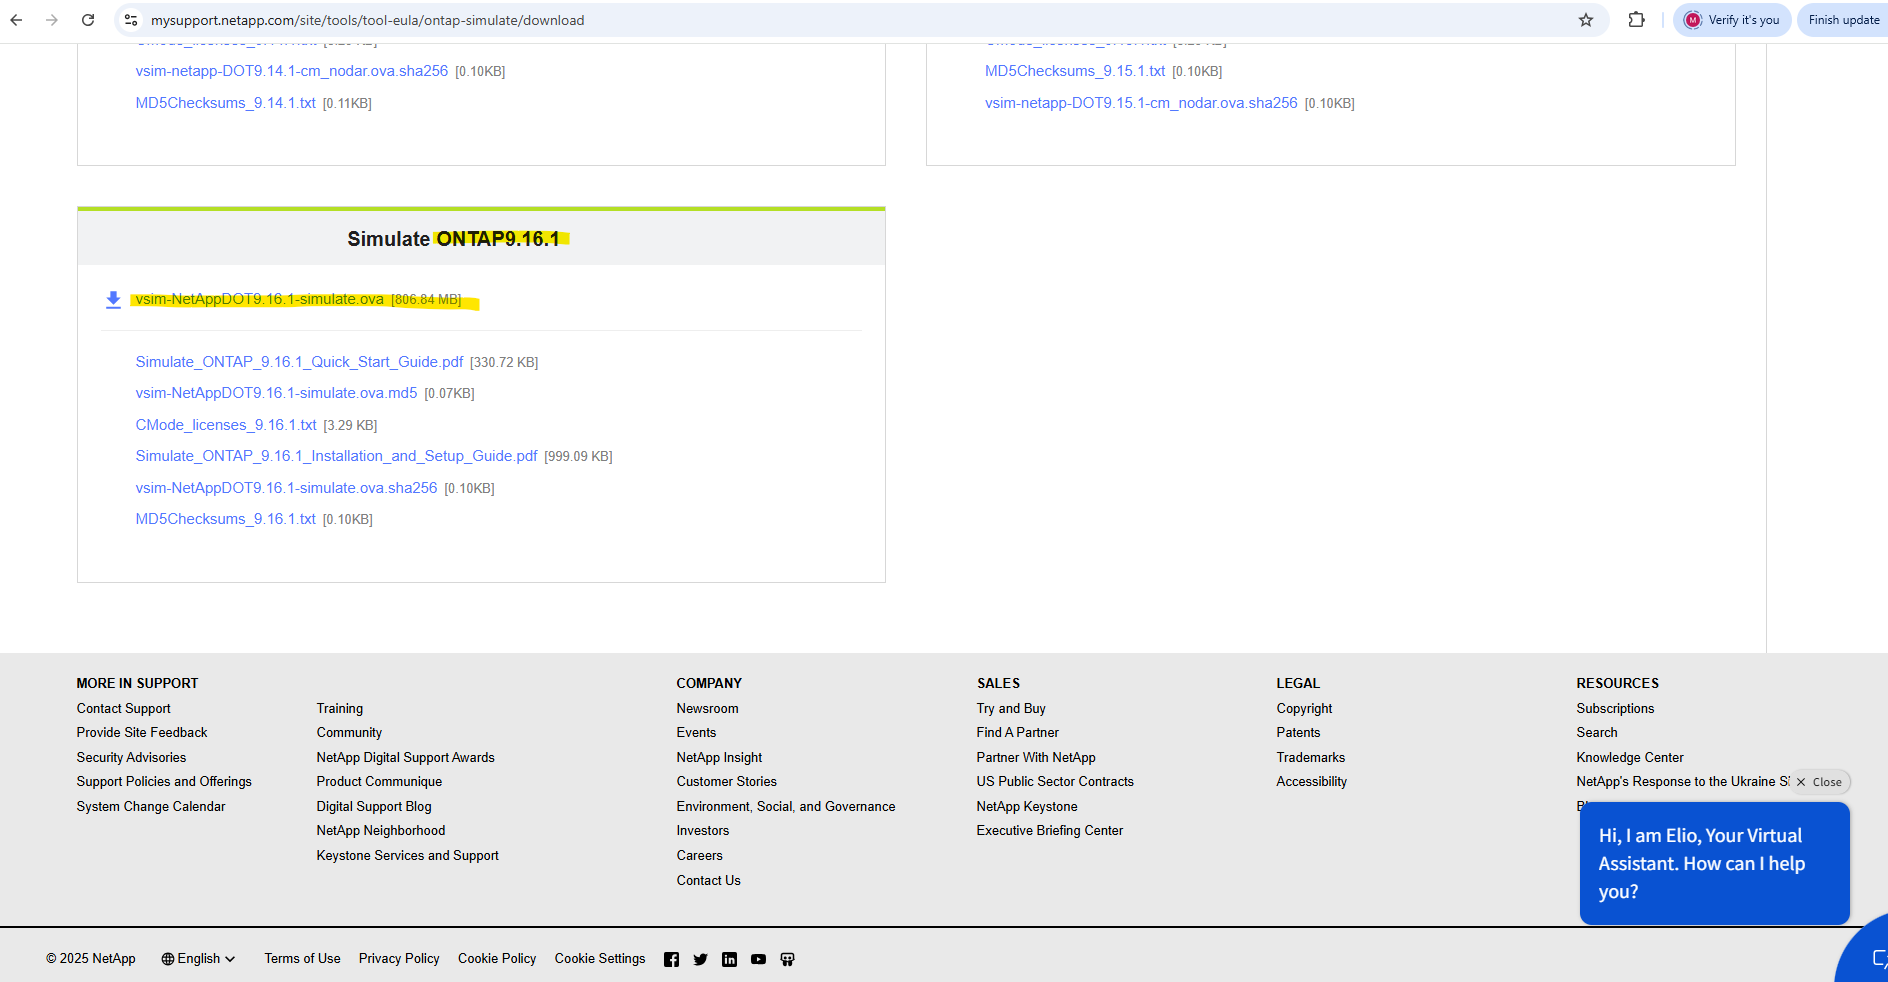
Download the Simulator
Open the following link https://mysupport.netapp.com/ and sign in.
You need to have or create an account and also deposit a valid serial number of a NetApp to get full access and to be able to download the ONTAP Simulate app.
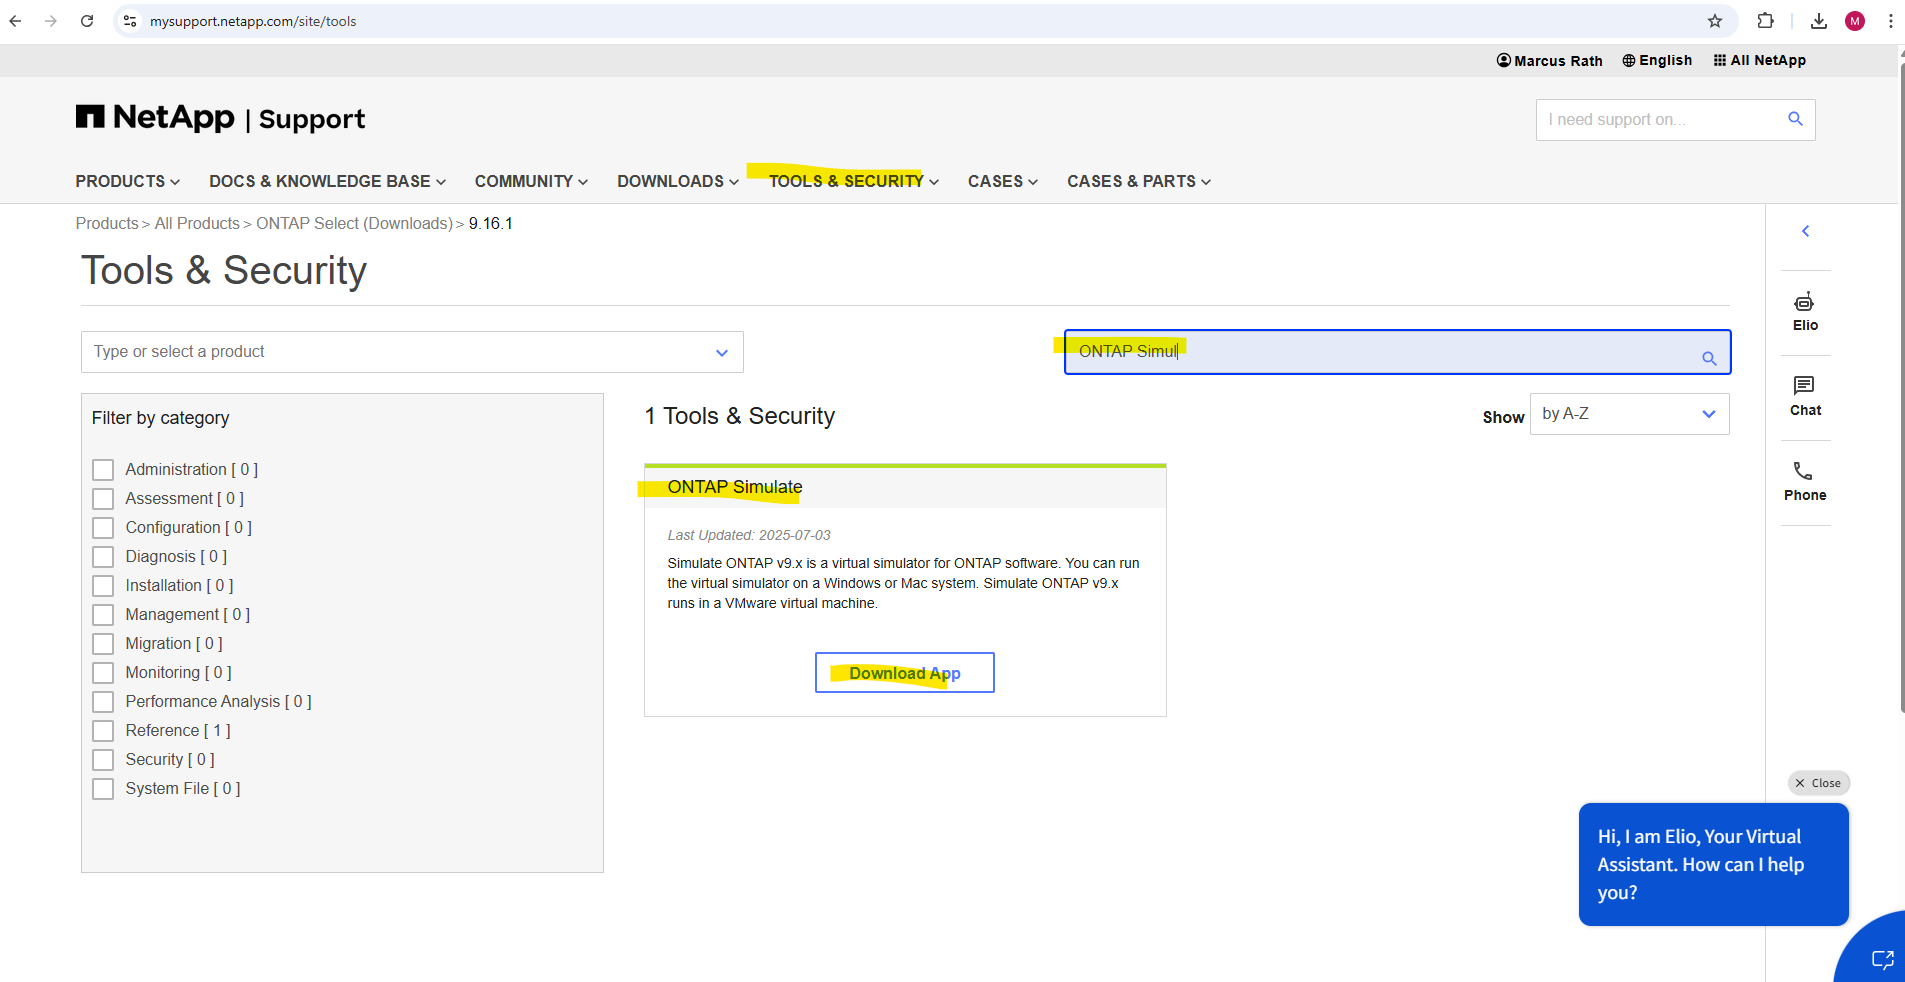
There are different versions of ONTAP 9 available.
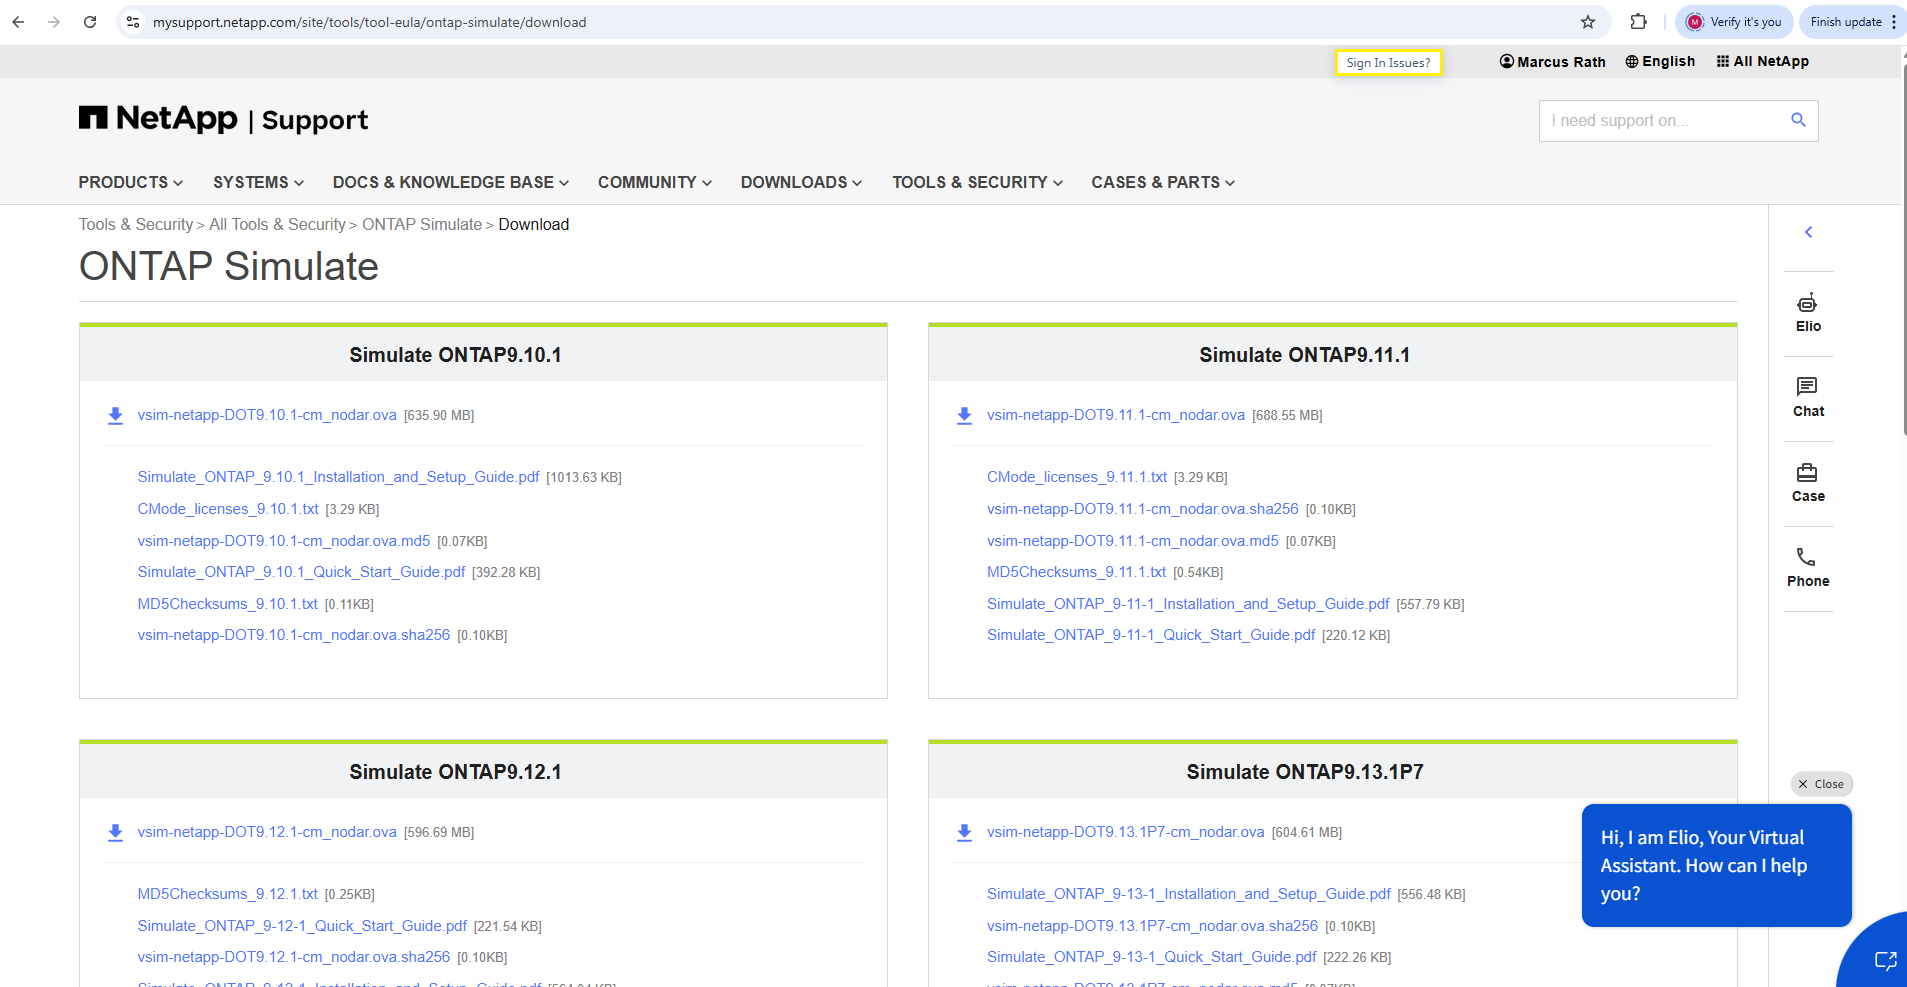
I will download the latest version ONTAP 9.16.1.
Deploy the first Simulator Node in vSphere
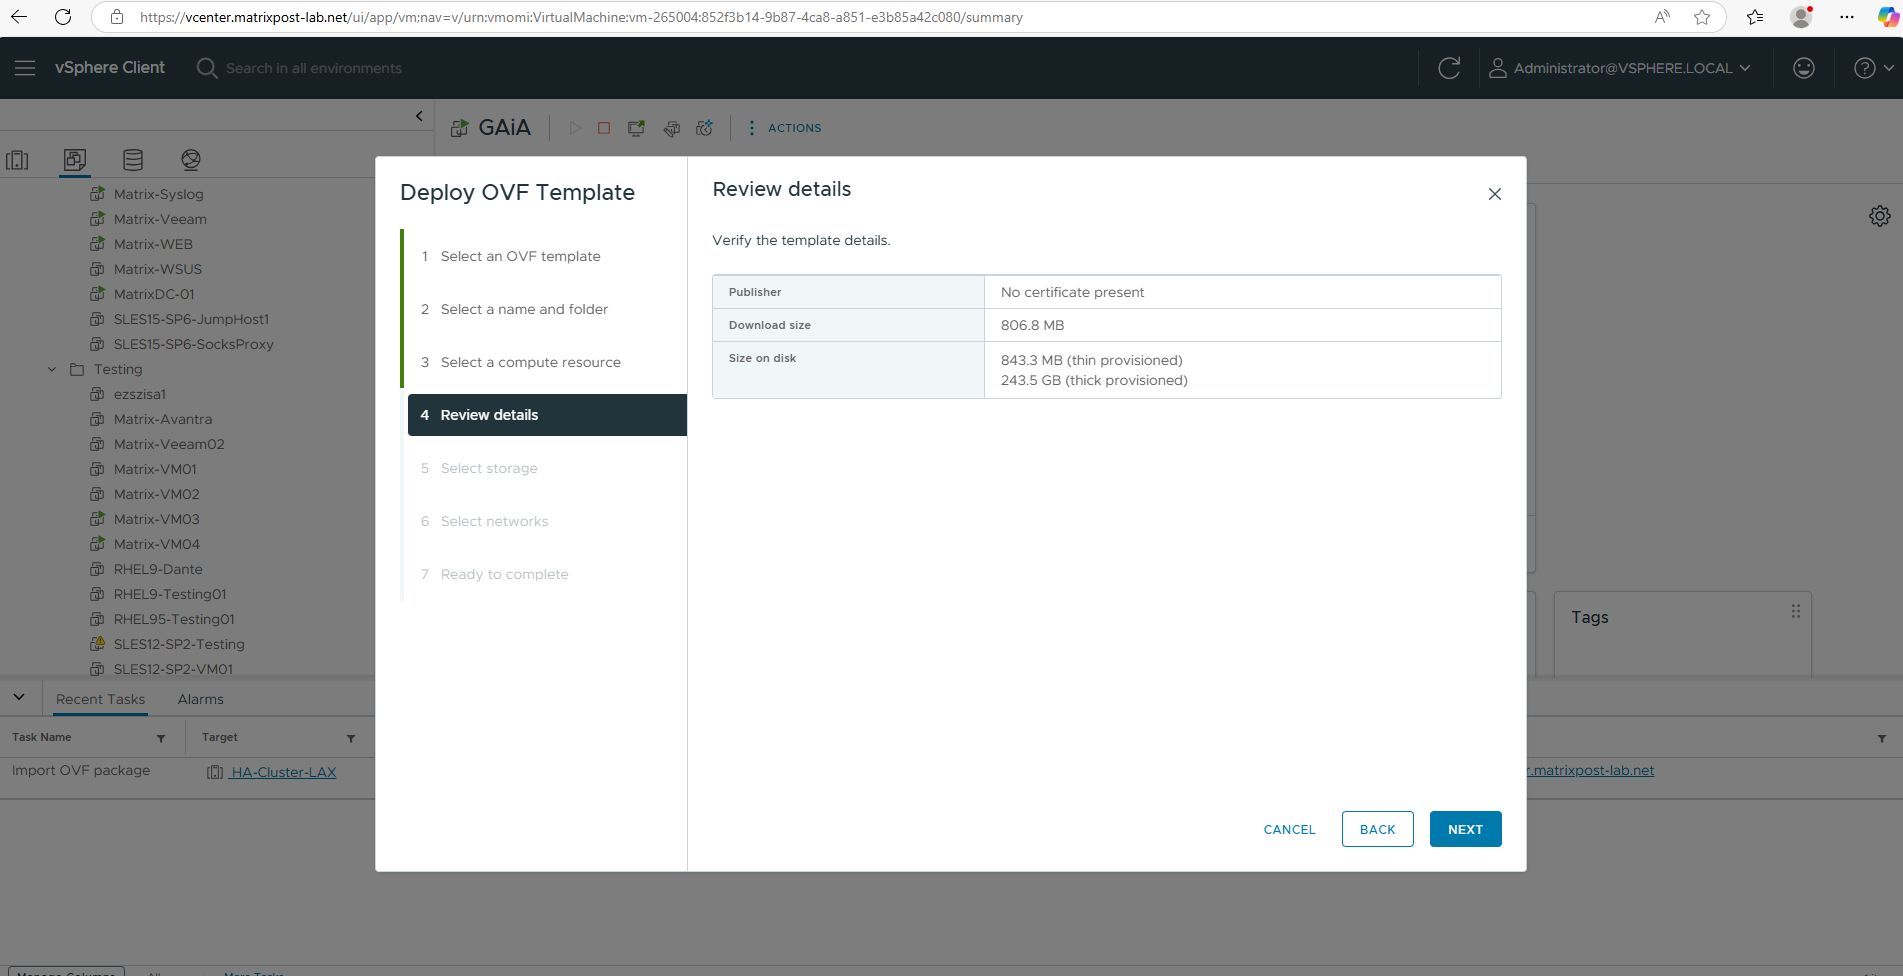
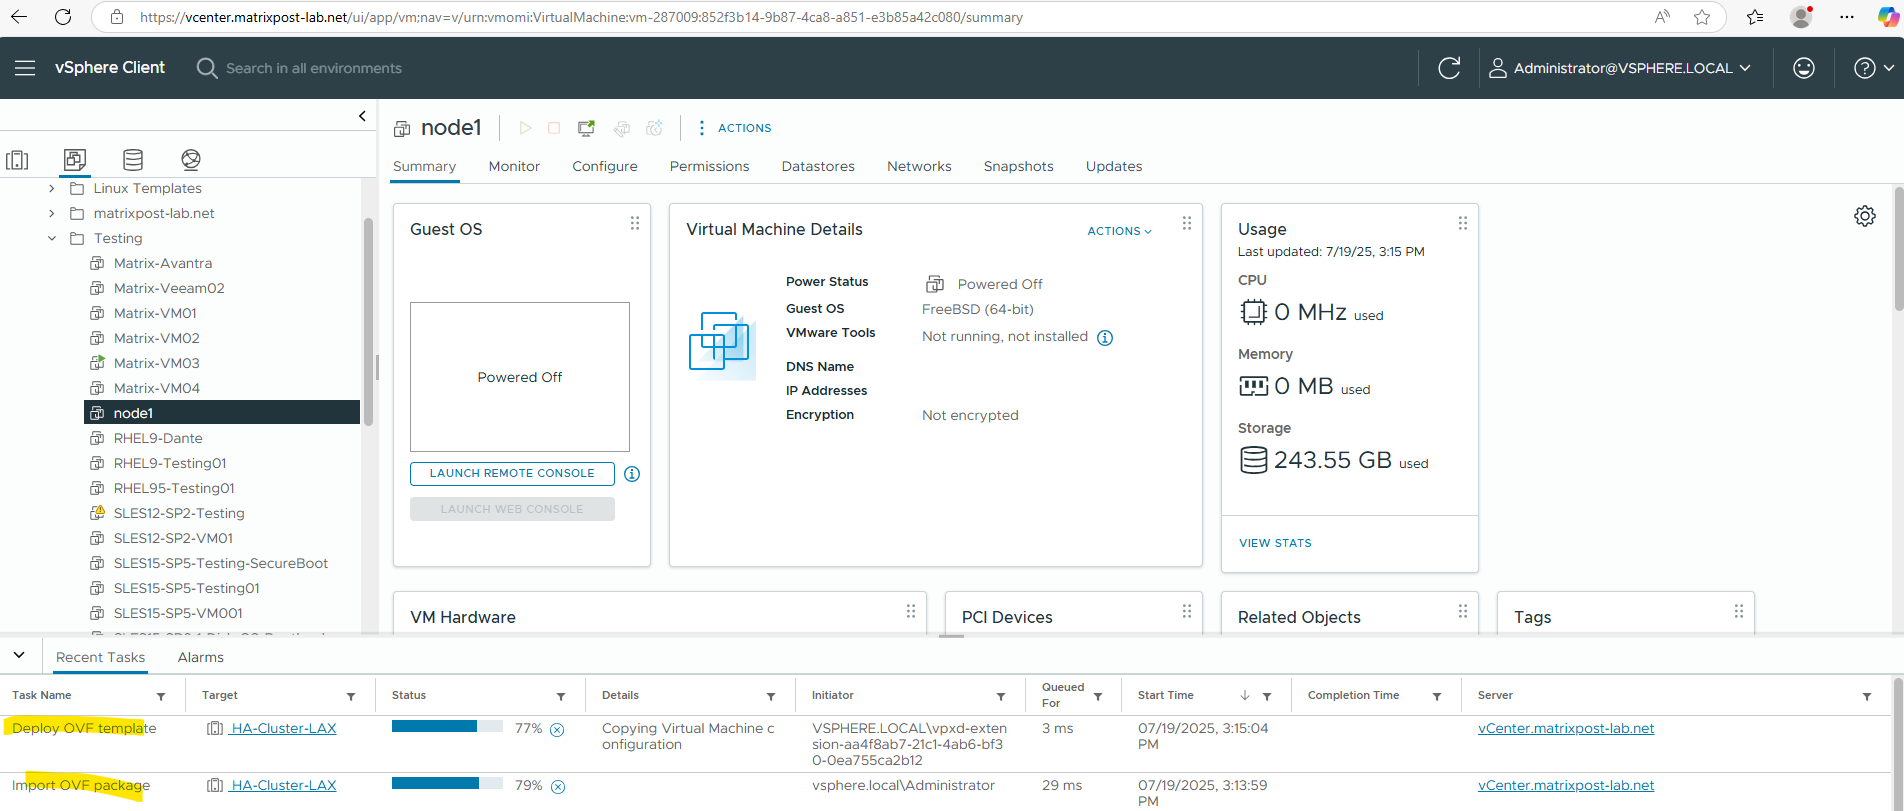
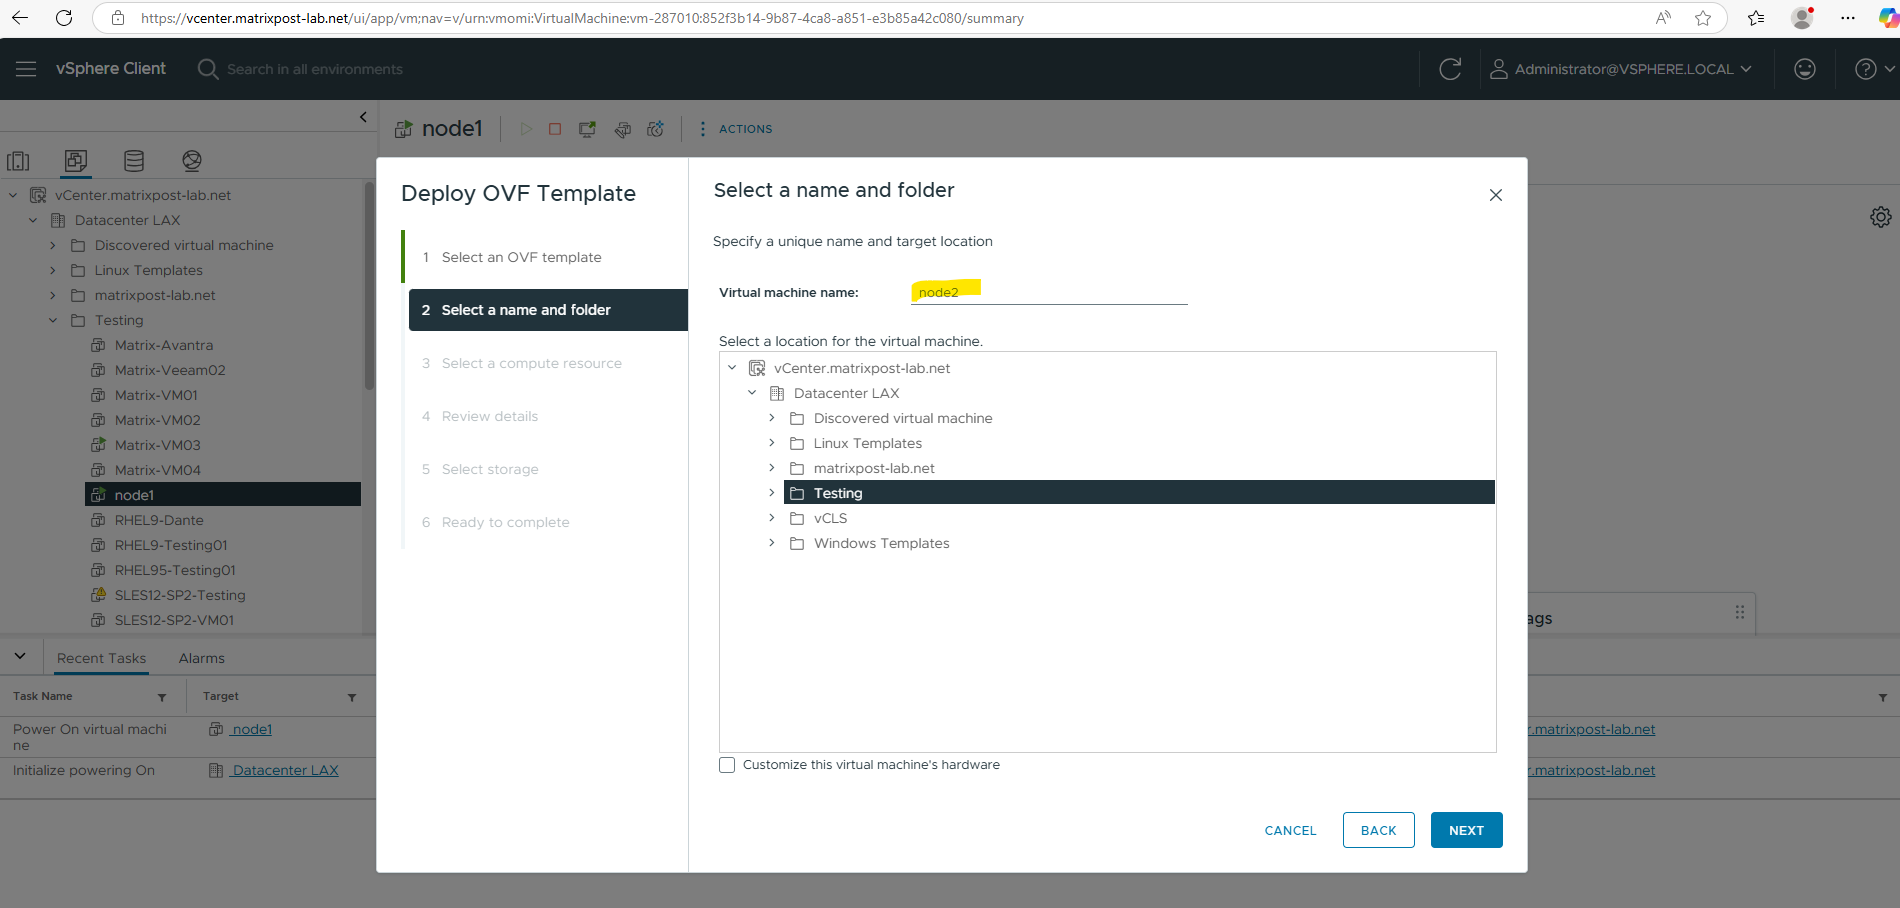
After downloading the vSphere OVA file (Open Virtual Appliance) file we can deploy the first node in our vSphere environment.
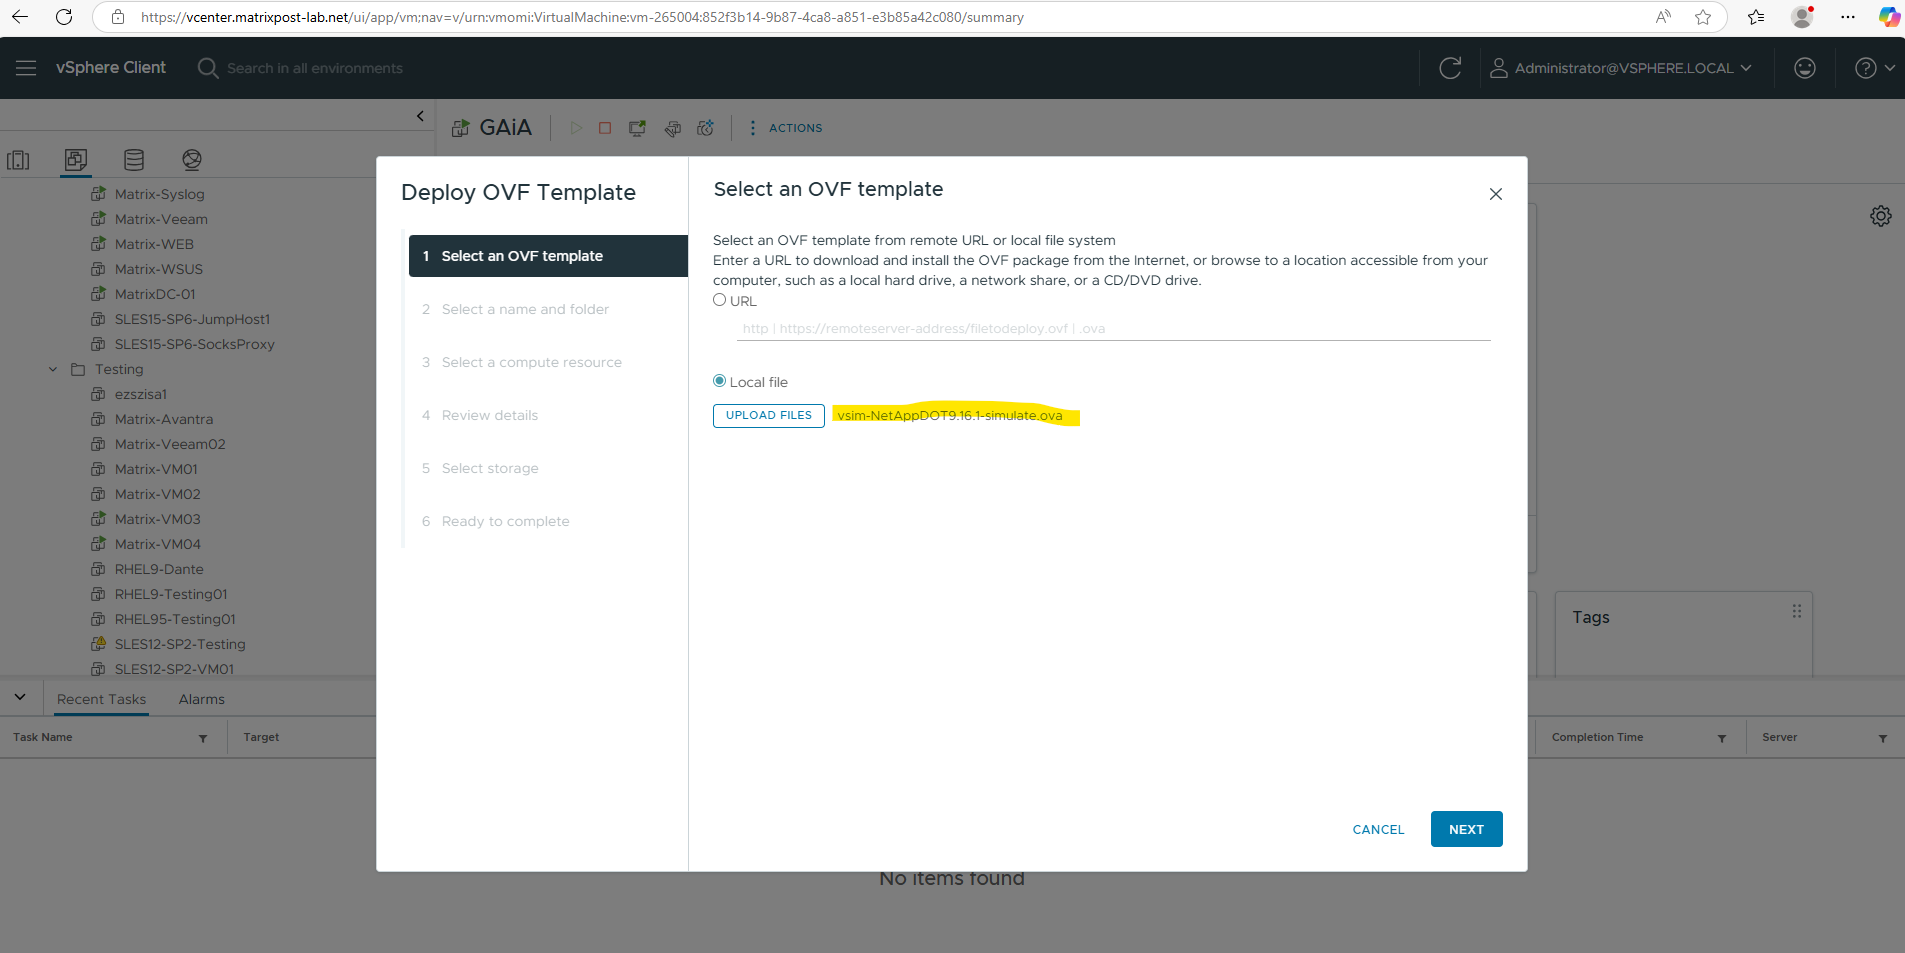
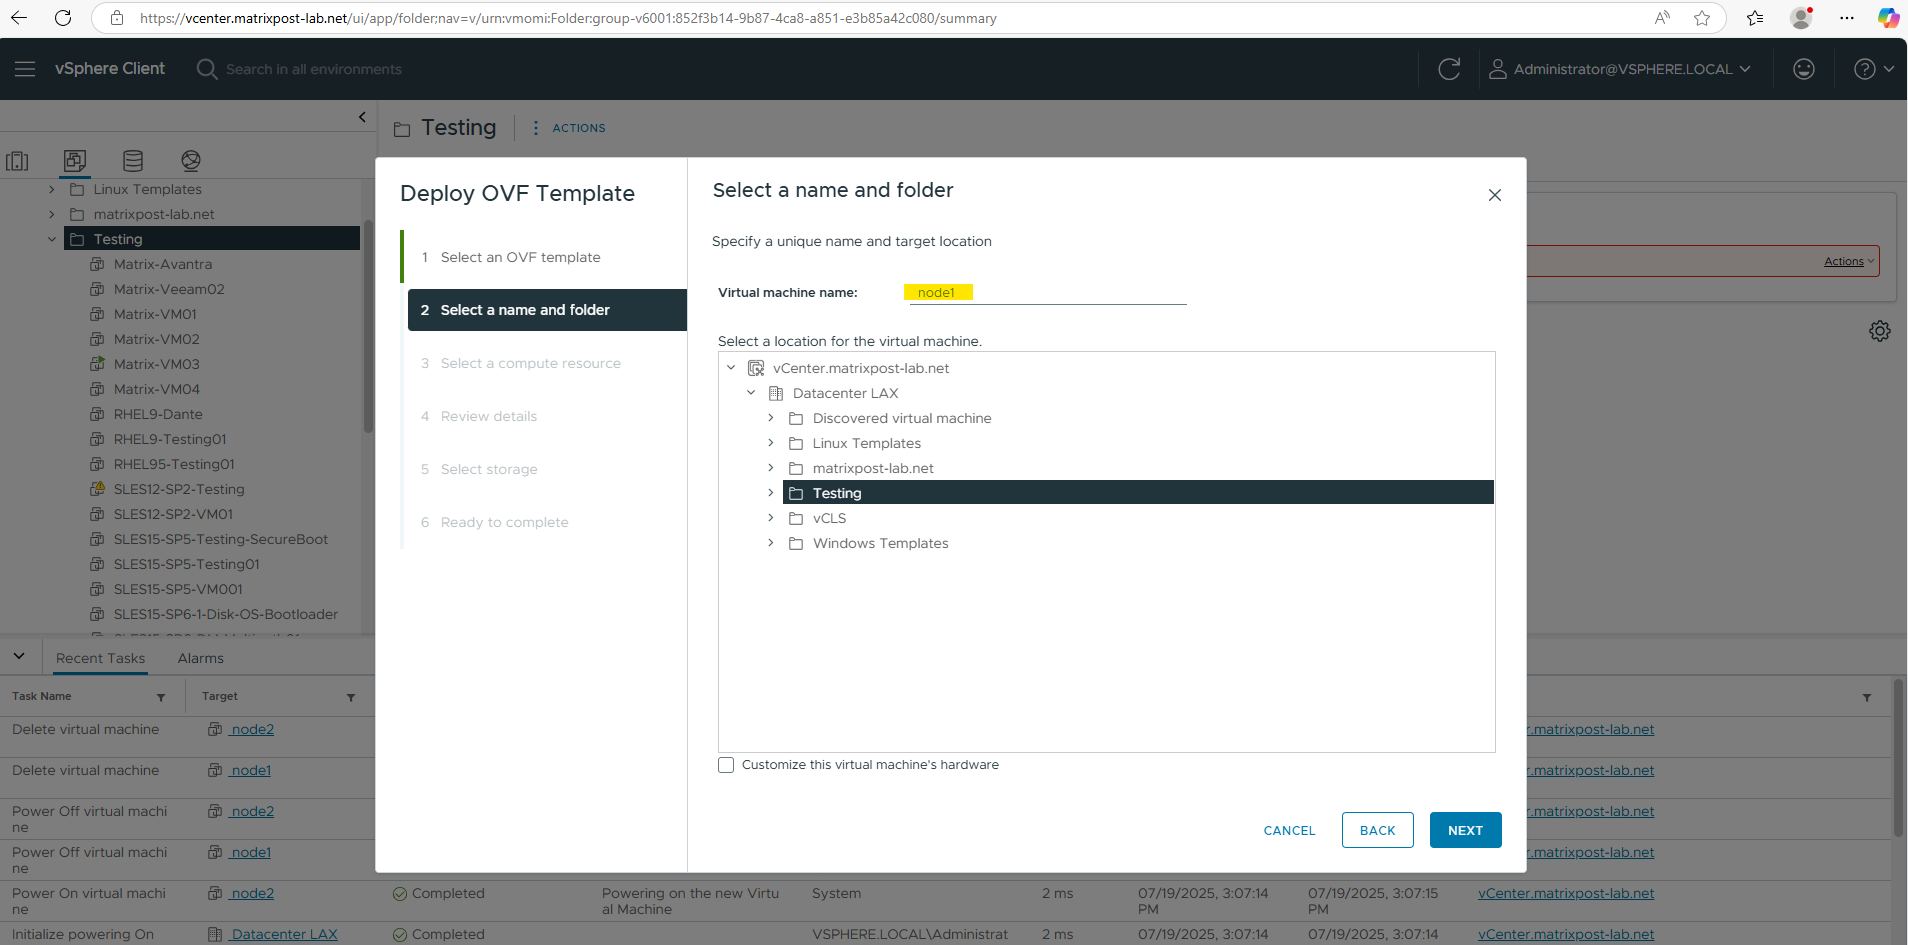
Name it node1.
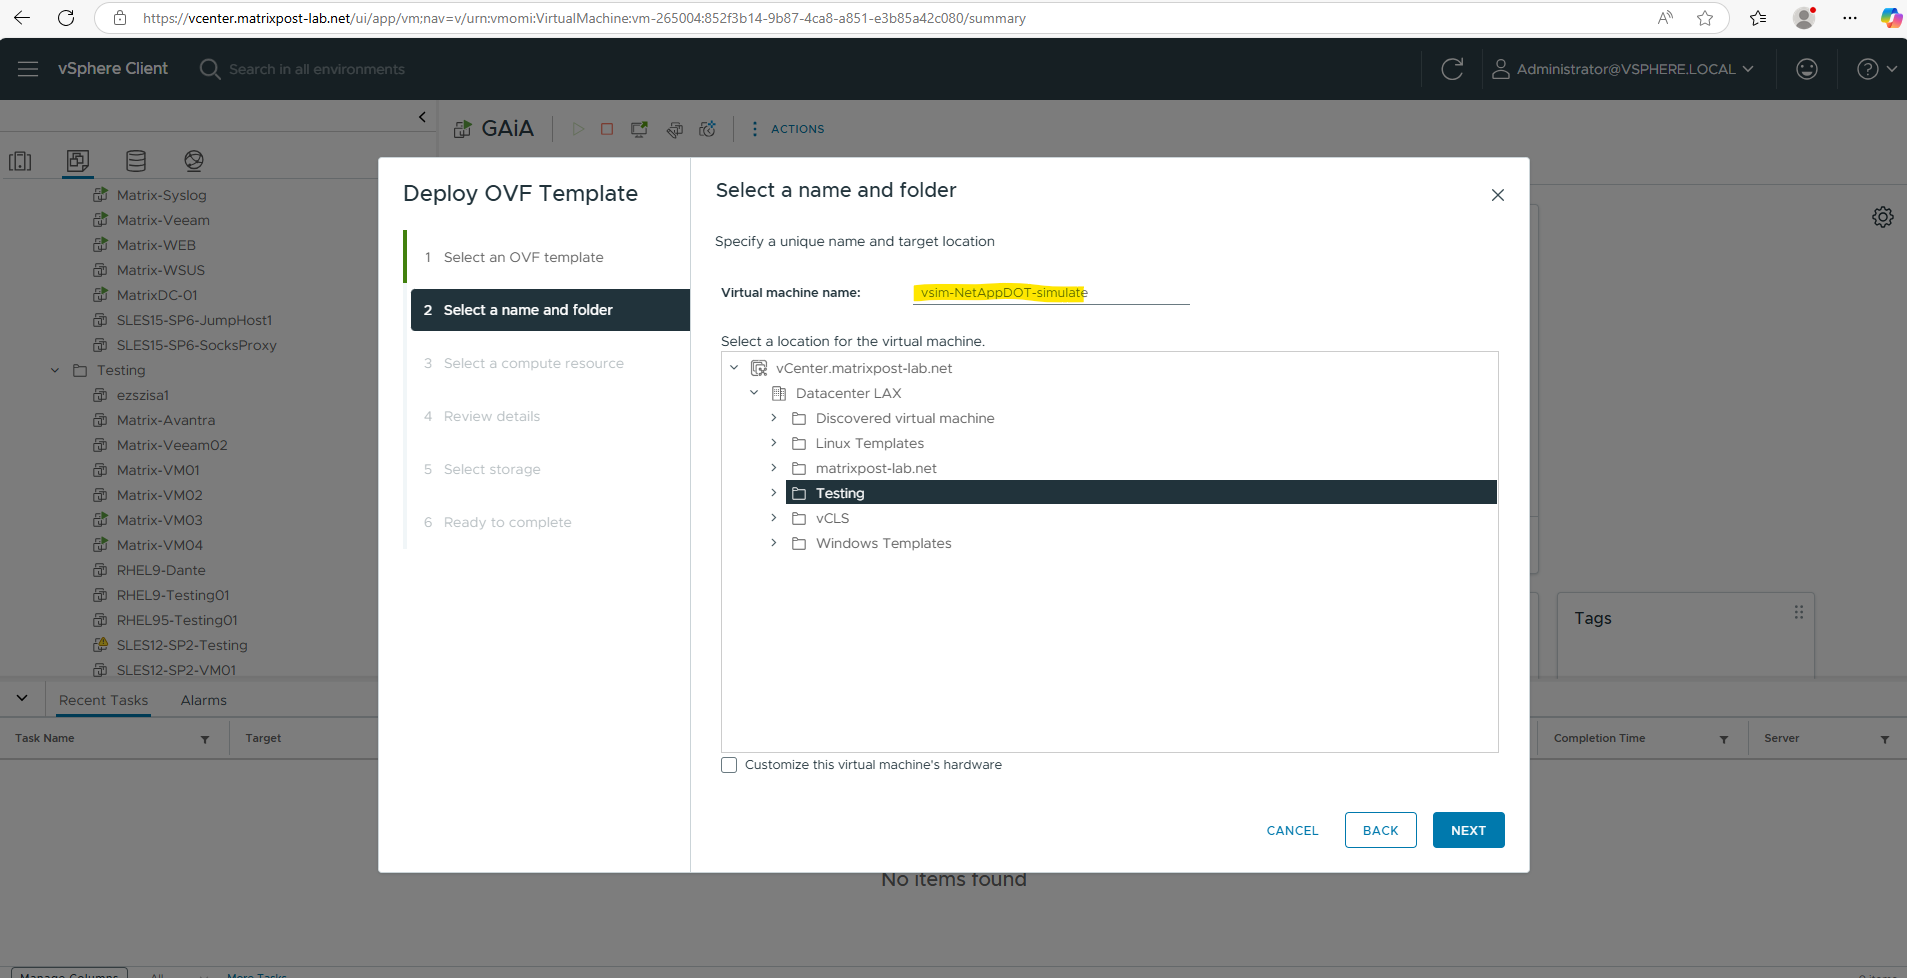
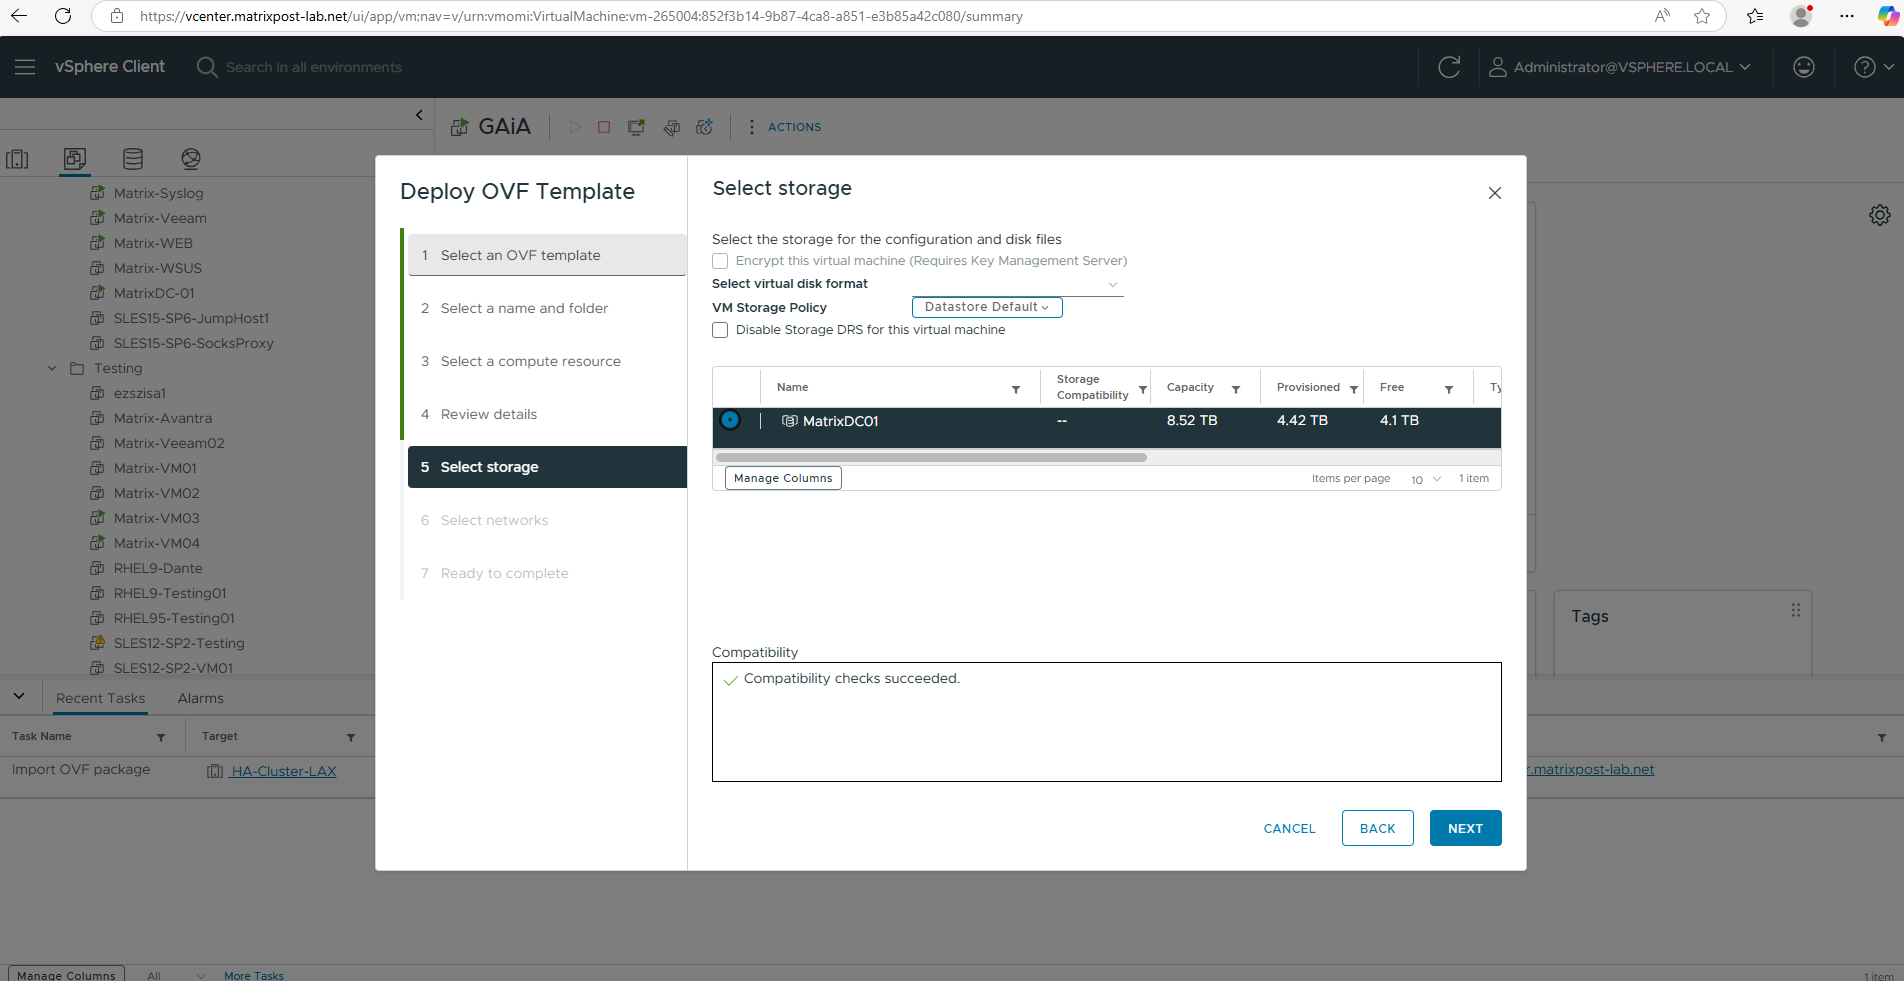
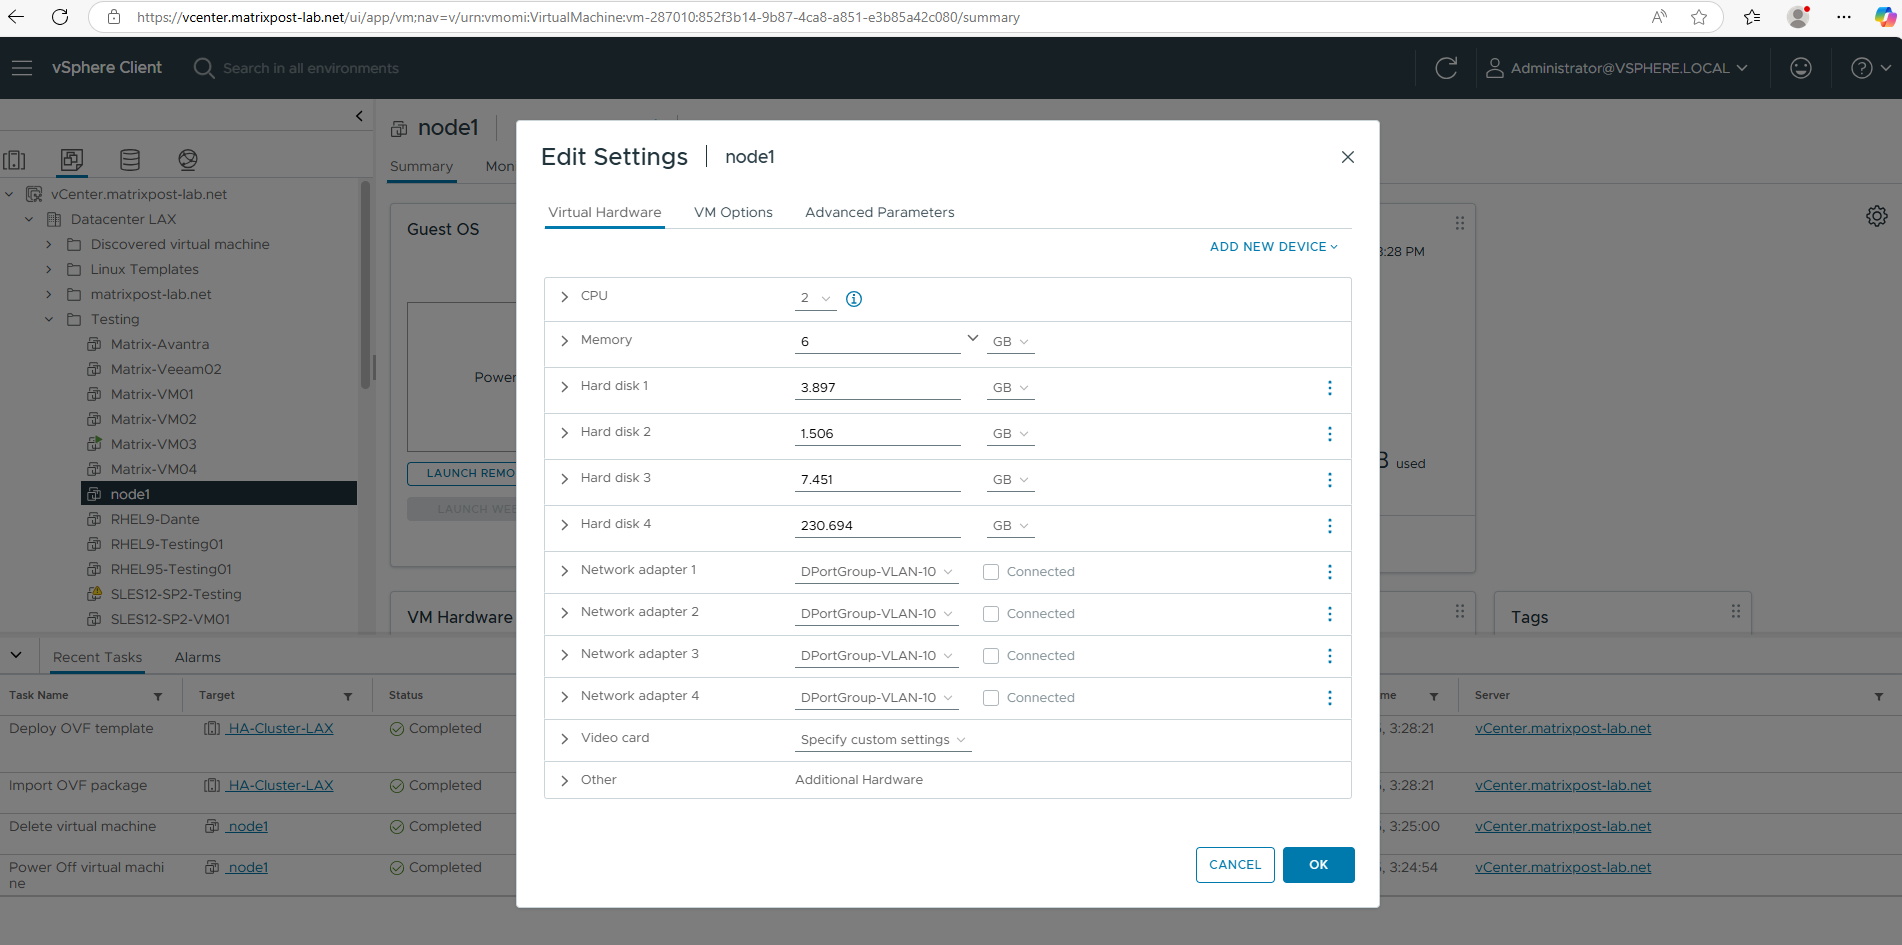
Select the appropriate storage in your vSphere environment.
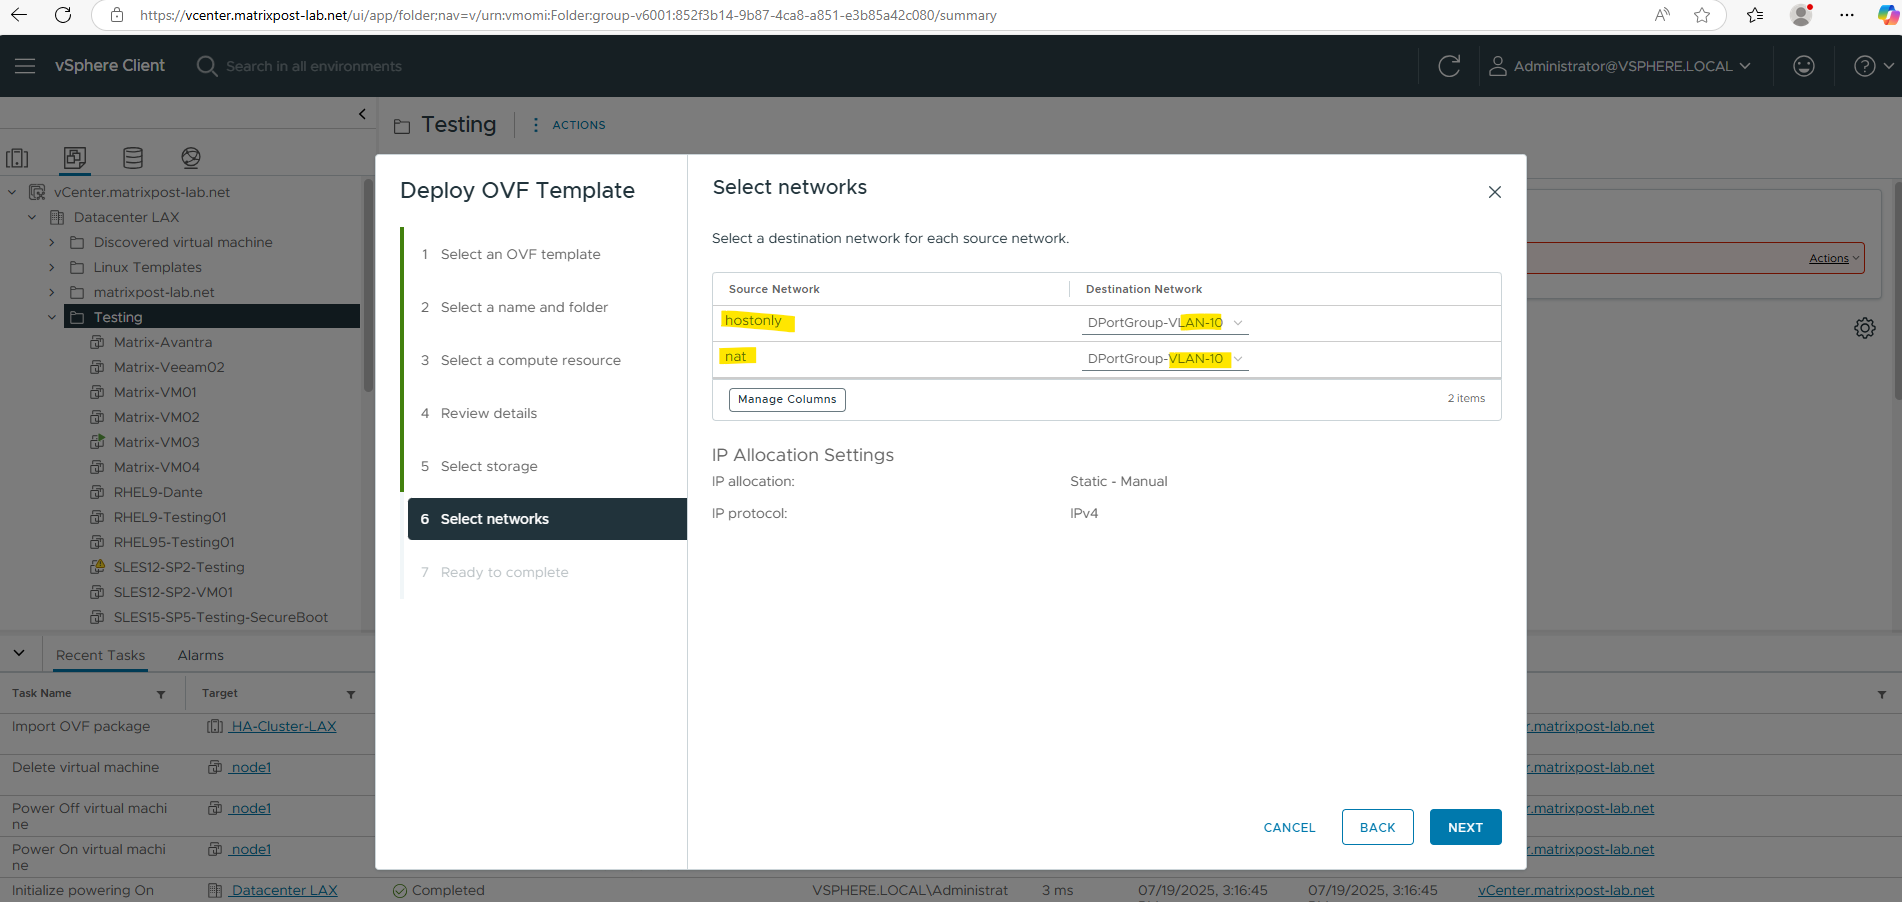
I will place both network adapter types into my internal LAN (VLAN ID 10). The NetApp ONTAP Simulator appliance (.ova template) comes with 4 virtual NICs by default, and each has a specific role in the clustered ONTAP architecture.
The default setup includes two interfaces on “VM Network” and two on “Cluster Network”. The cluster network is typically configured as “Host-Only” to isolate it from the client network.
In a real clustered ONTAP environment, the cluster network is private and separate from the client network. For the simulator, it’s often recommended to configure the cluster network interfaces as “Host-Only” to simulate this separation.
Host-Only Network Adapter
Allows communication only between your host machine and the ONTAP simulator VM (i.e., isolated from external network and the internet).
NAT Network Adapter
Allows the simulator VM to access external networks including the internet, via the host’s own network connection using NAT.
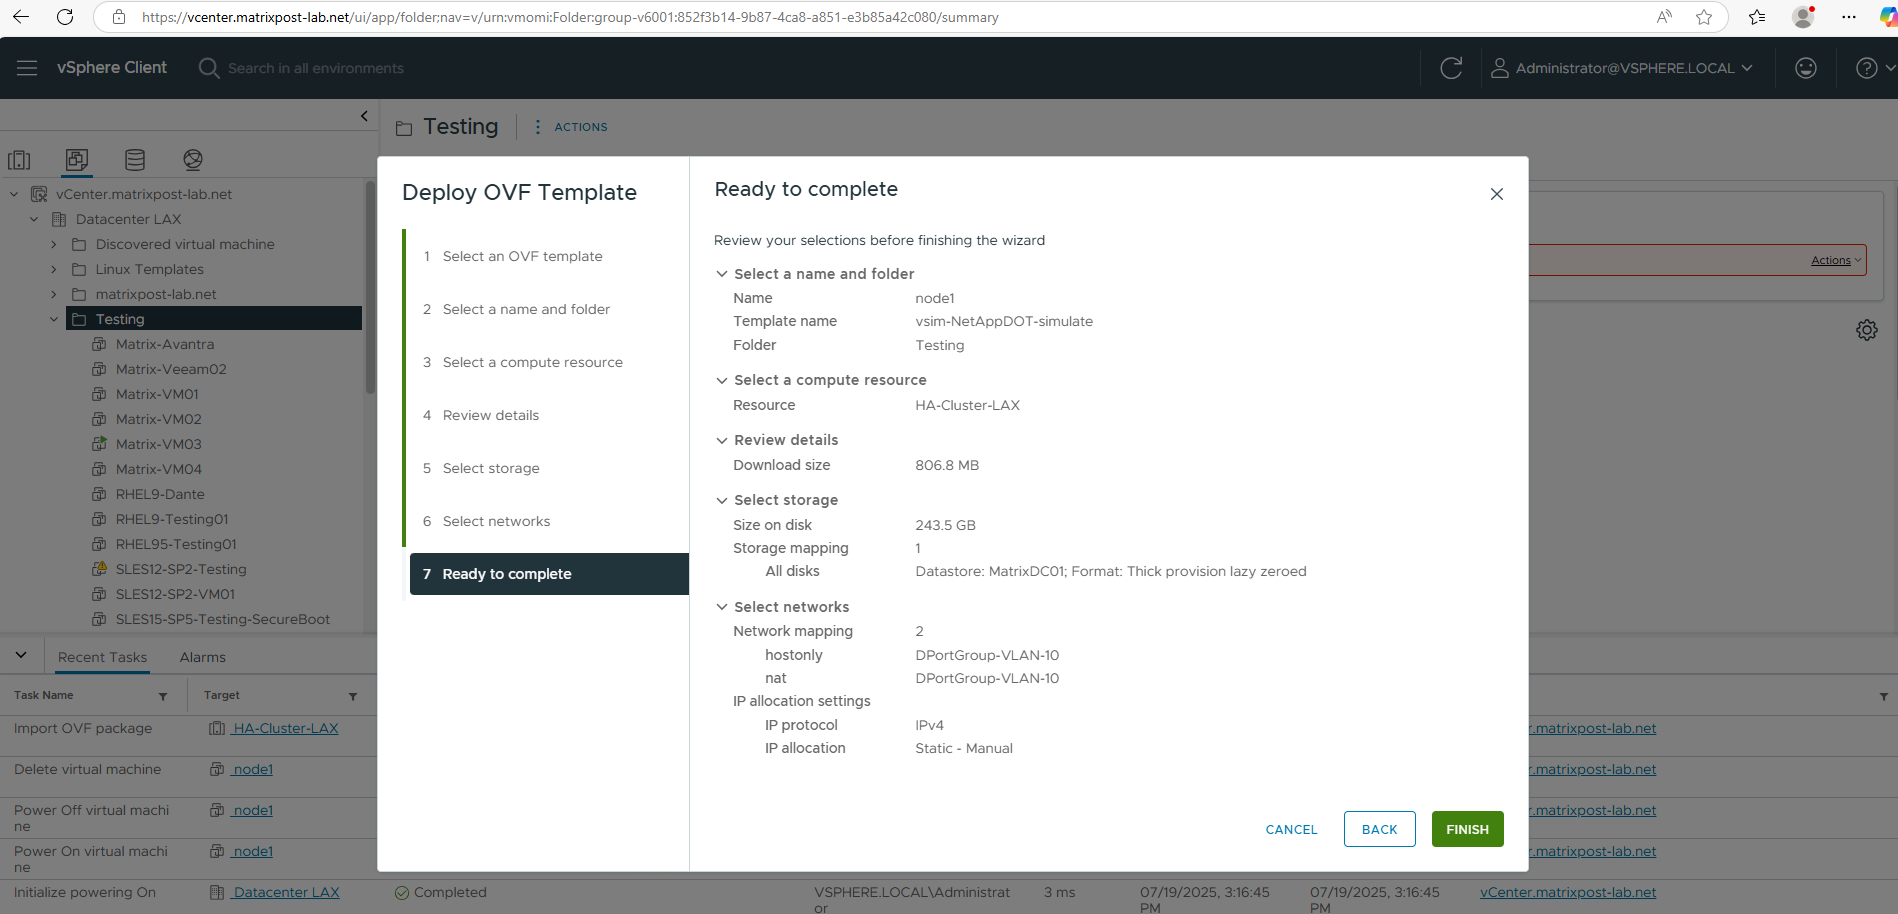
The appliance will be deployed in my lab vSphere environment.
Here we can see the configured network adapters and disks the appliance will have.
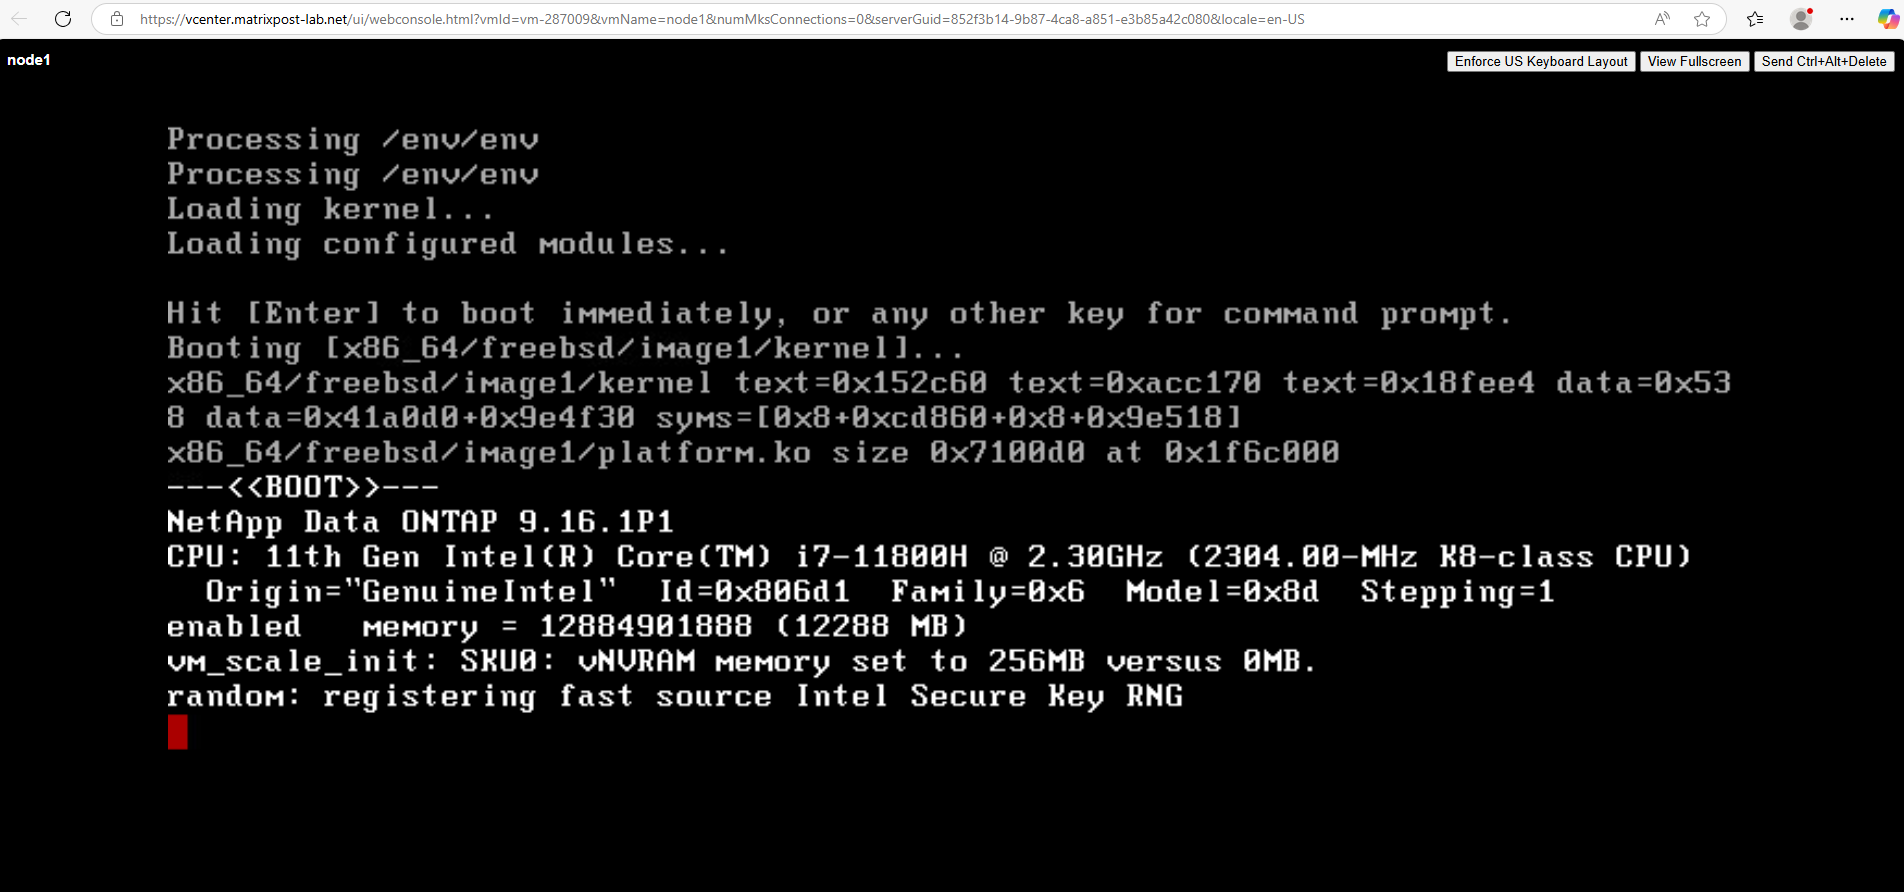
When powering on the virtual machine, the boot process will take some minutes.
Using Simulate ONTAP: Single node
Start and configure a single node cluster using Simulate ONTAP, VMware, and System Manager.
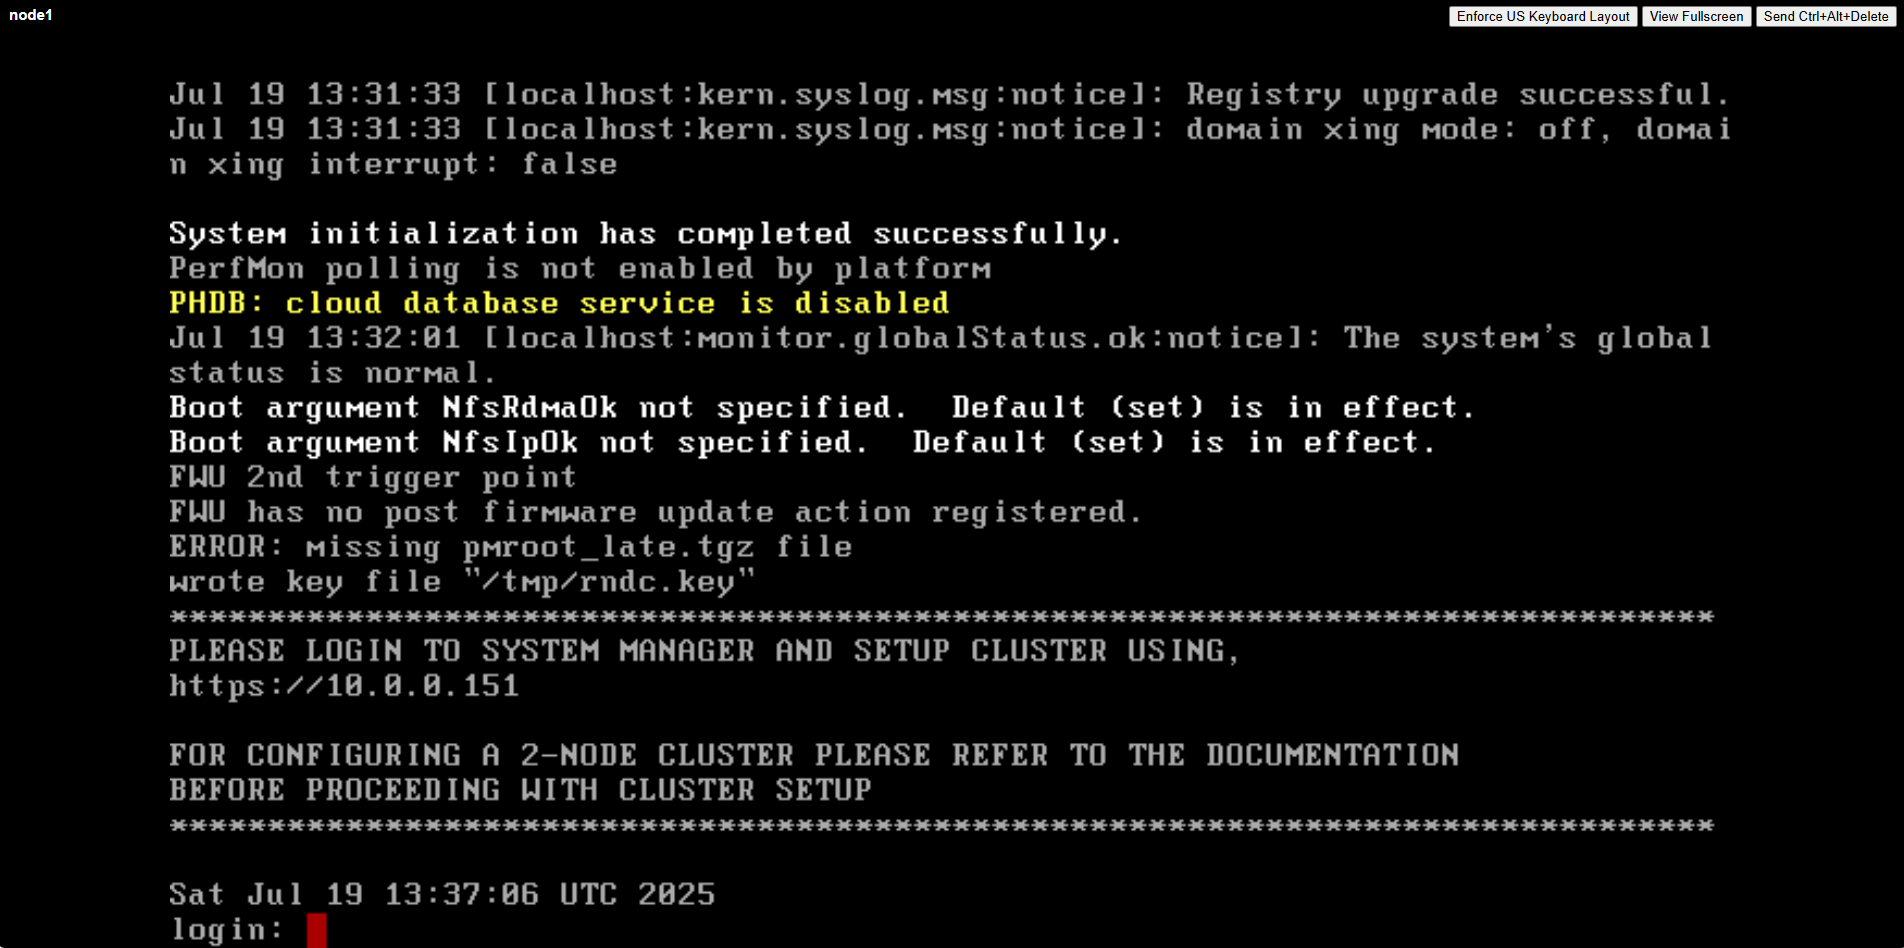
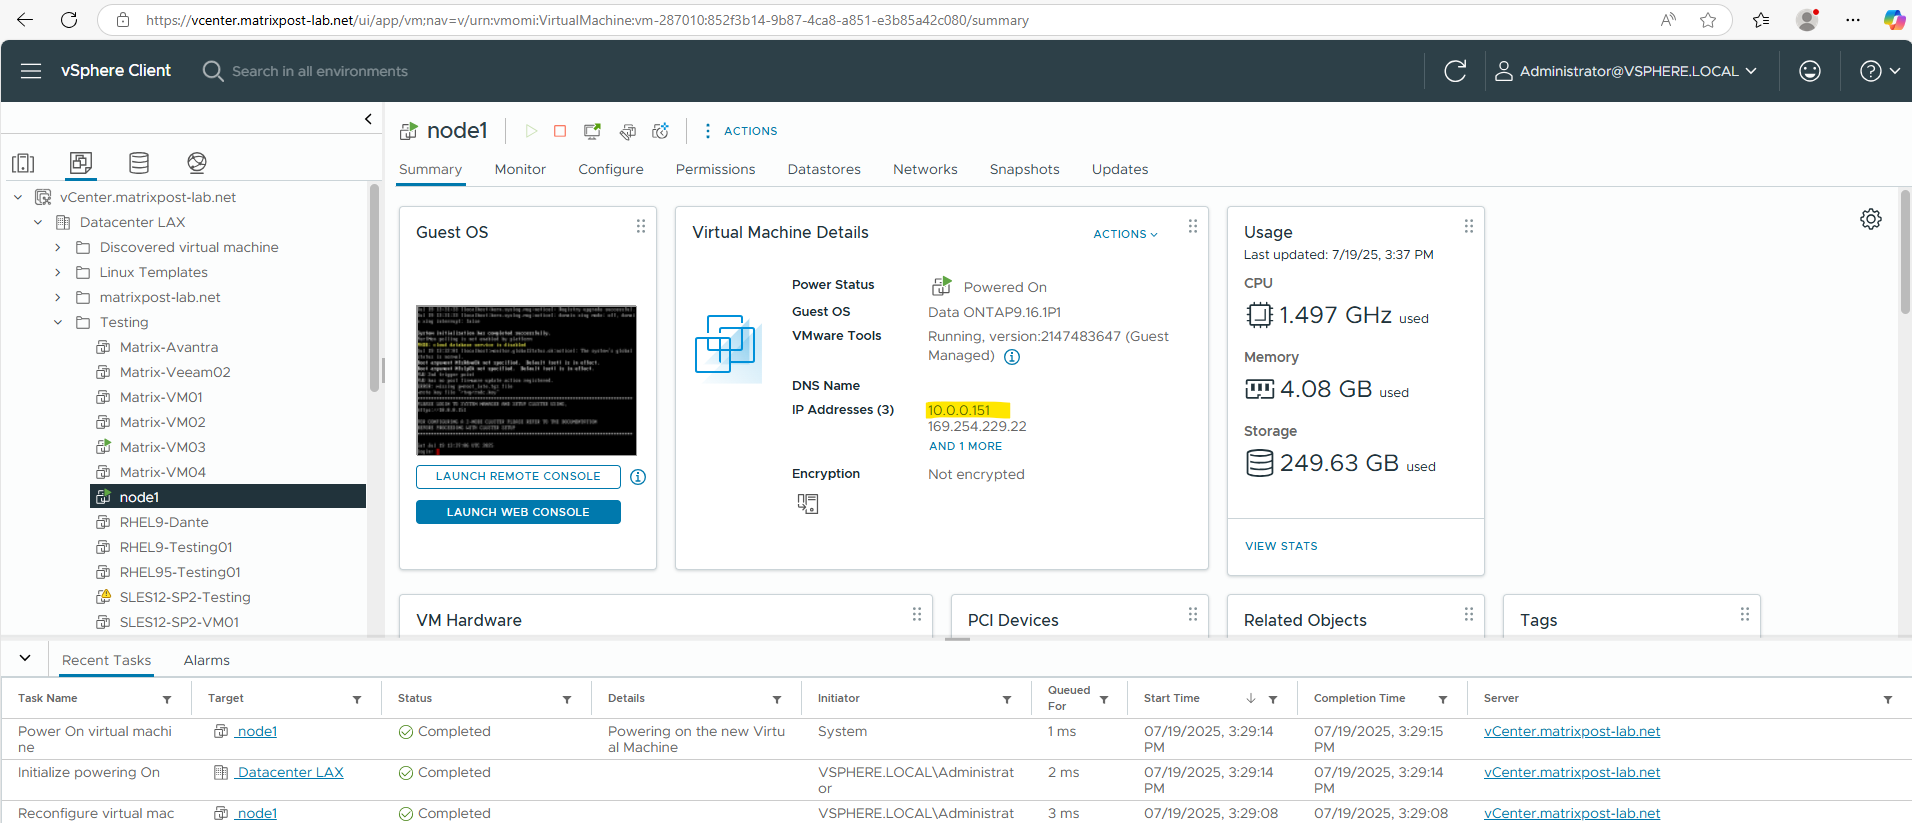
After a few minutes from starting the virtual machine, you receive a message to log in to System Manager to complete cluster setup. This message includes an IP address. Copy this IP address and paste it into your browser address bar to open System Manager.
Ignore the message indicating that the partner node is not found.
Configure the single node cluster in System Manager. Follow the on-screen prompts. For more information, see the System Manager documentation.
For configuring a 2-node cluster see the next section below.

Using Simulate ONTAP: Two nodes
Start and configure a two node cluster using Simulate ONTAP, VMware, System Manager, and the command line.
- Create the first Simulate ONTAP virtual machine and name it node1. (see previous section about how)
- Power on the node1 virtual machine.
Note: DO NOT OPEN SYSTEM MANAGER UNTIL INSTRUCTED IN THESE STEPS.
Create and set up the second Simulate ONTAP virtual machine
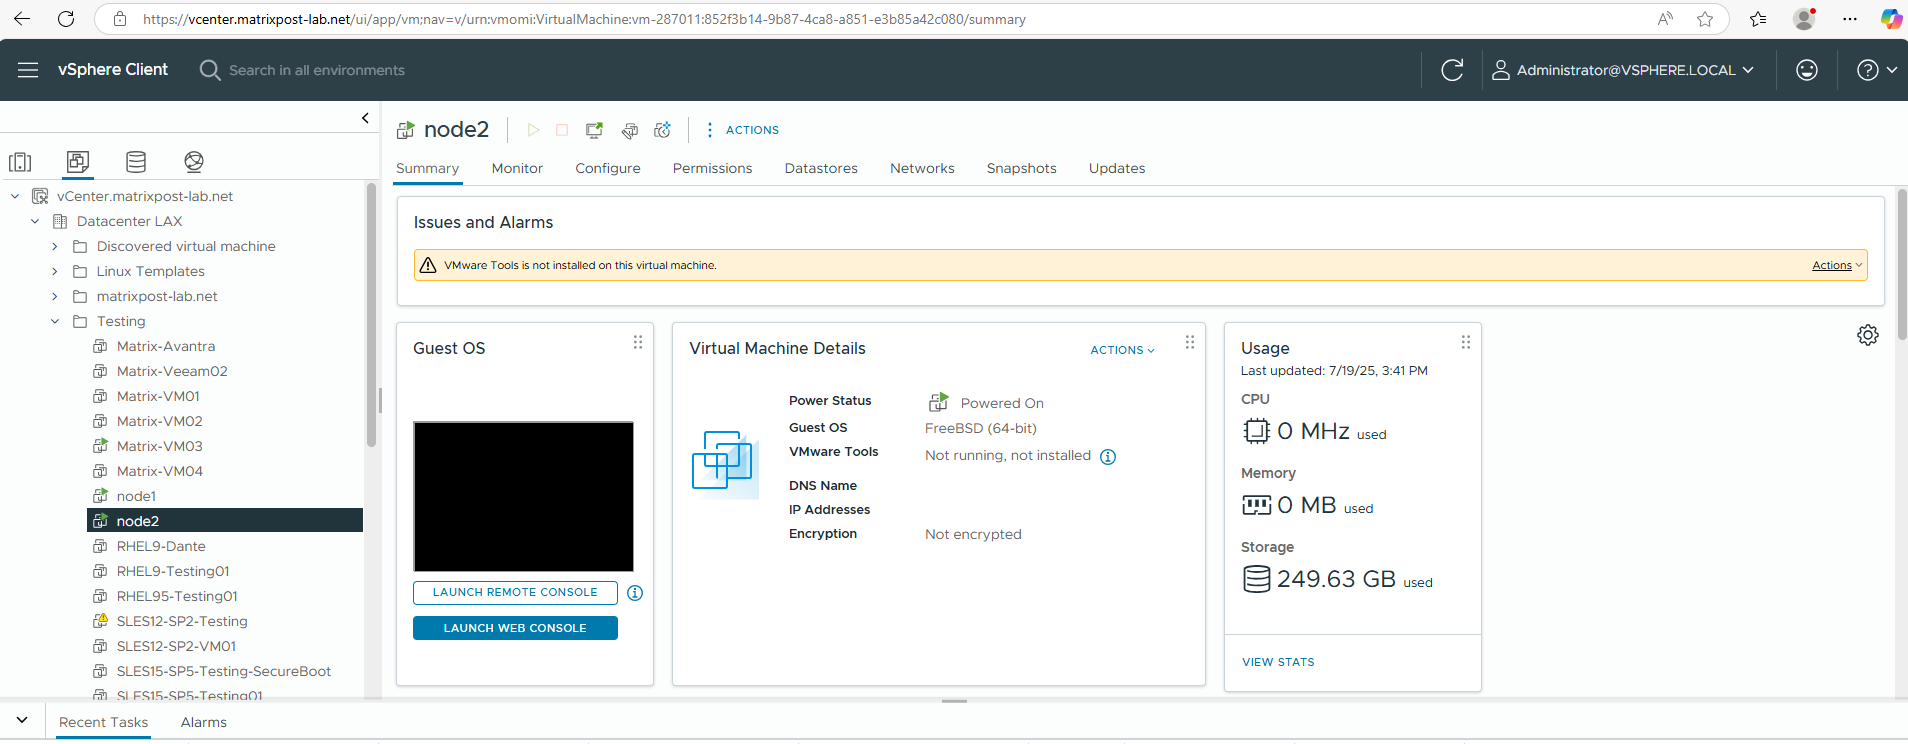
Deploy the second Simulate ONTAP virtual machine by using the same vSphere OVA file (Open Virtual Appliance) file we used before for node1 and this time name it node2.
Power on the node2 virtual machine.
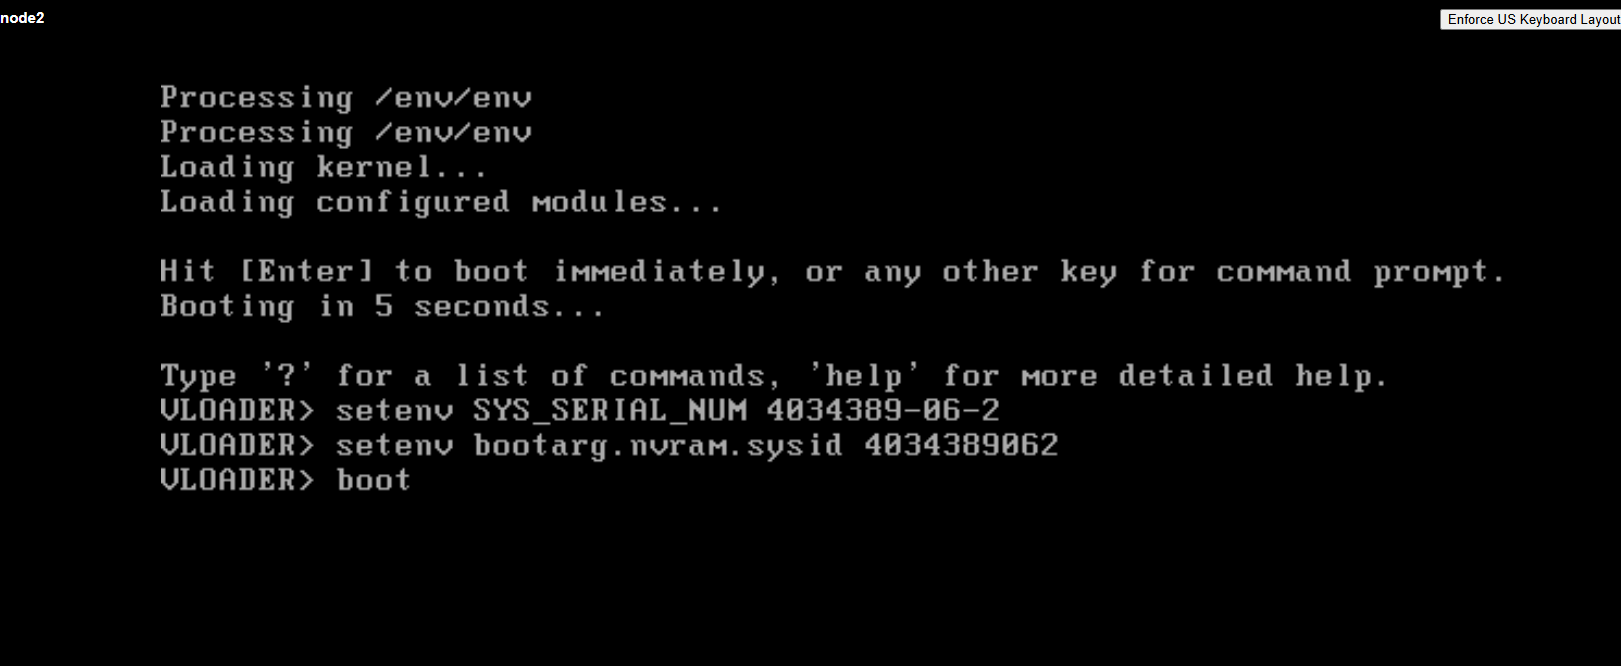
Change the system ID and serial number of the second node before joining the cluster as shown below.
Press the space bar when the message below is displayed in the console of node2.
Hit [Enter] to boot immediately, or any other key for command prompt.
Booting in 10 seconds…
You should see a VLOADER> prompt.
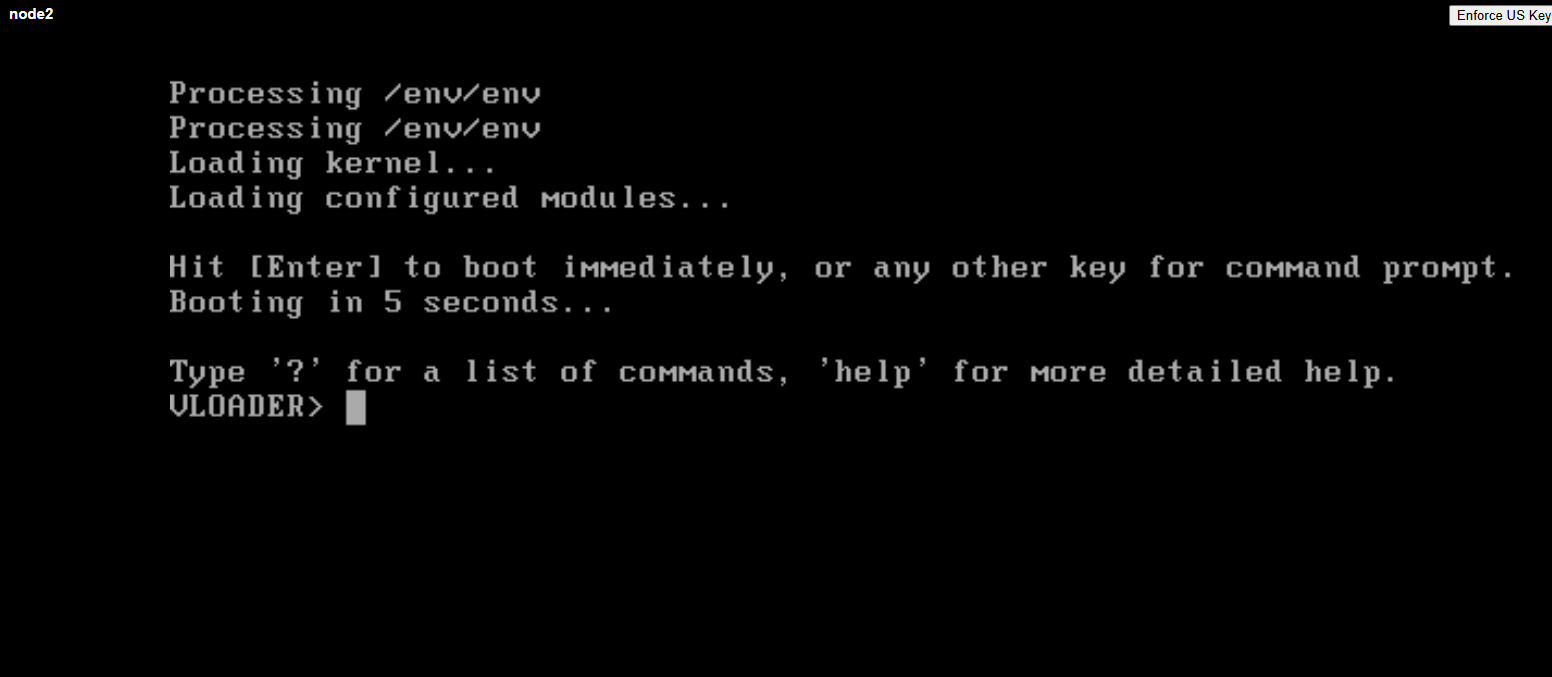
Change the serial number and system ID for node2 into 4034389062 as shown below and type boot to finally booting the virtual machine.
Licenses for the first node (Serial Number 4082368507)
Licenses for the second node in a cluster (Serial Number 4034389062)
The simulator begins the boot process with the new system ID and serial number.
VLOADER> setenv SYS_SERIAL_NUM 4034389-06-2
VLOADER> setenv bootarg.nvram.sysid 4034389062
VLOADER>boot
Set up the Cluster
After the IP address shows for node2 (here 10.0.0.152 below), go back to node1 and open the System Manager in a browser window by using the node1 IP address (here 10.0.0.151) that is shown in the console.
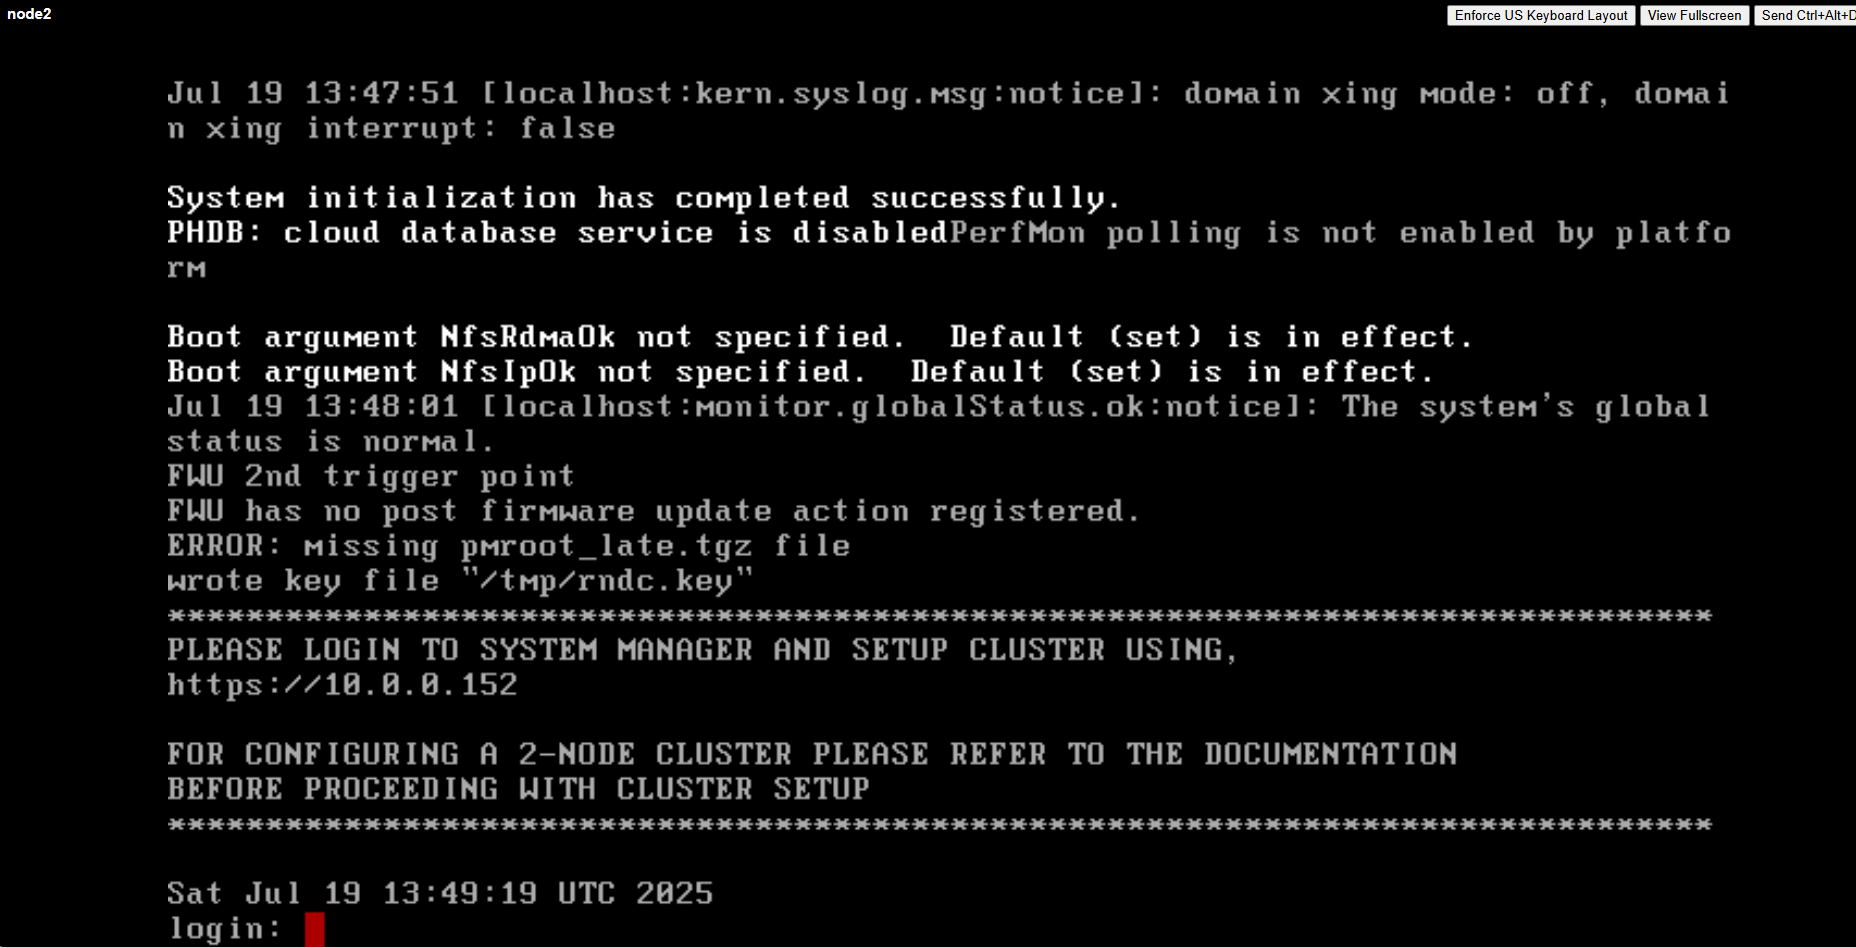
Open the System Manager on node1 by using its IP address.
https://10.0.0.151
You receive a message indicating that the partner node details were not found which is expected at this step.
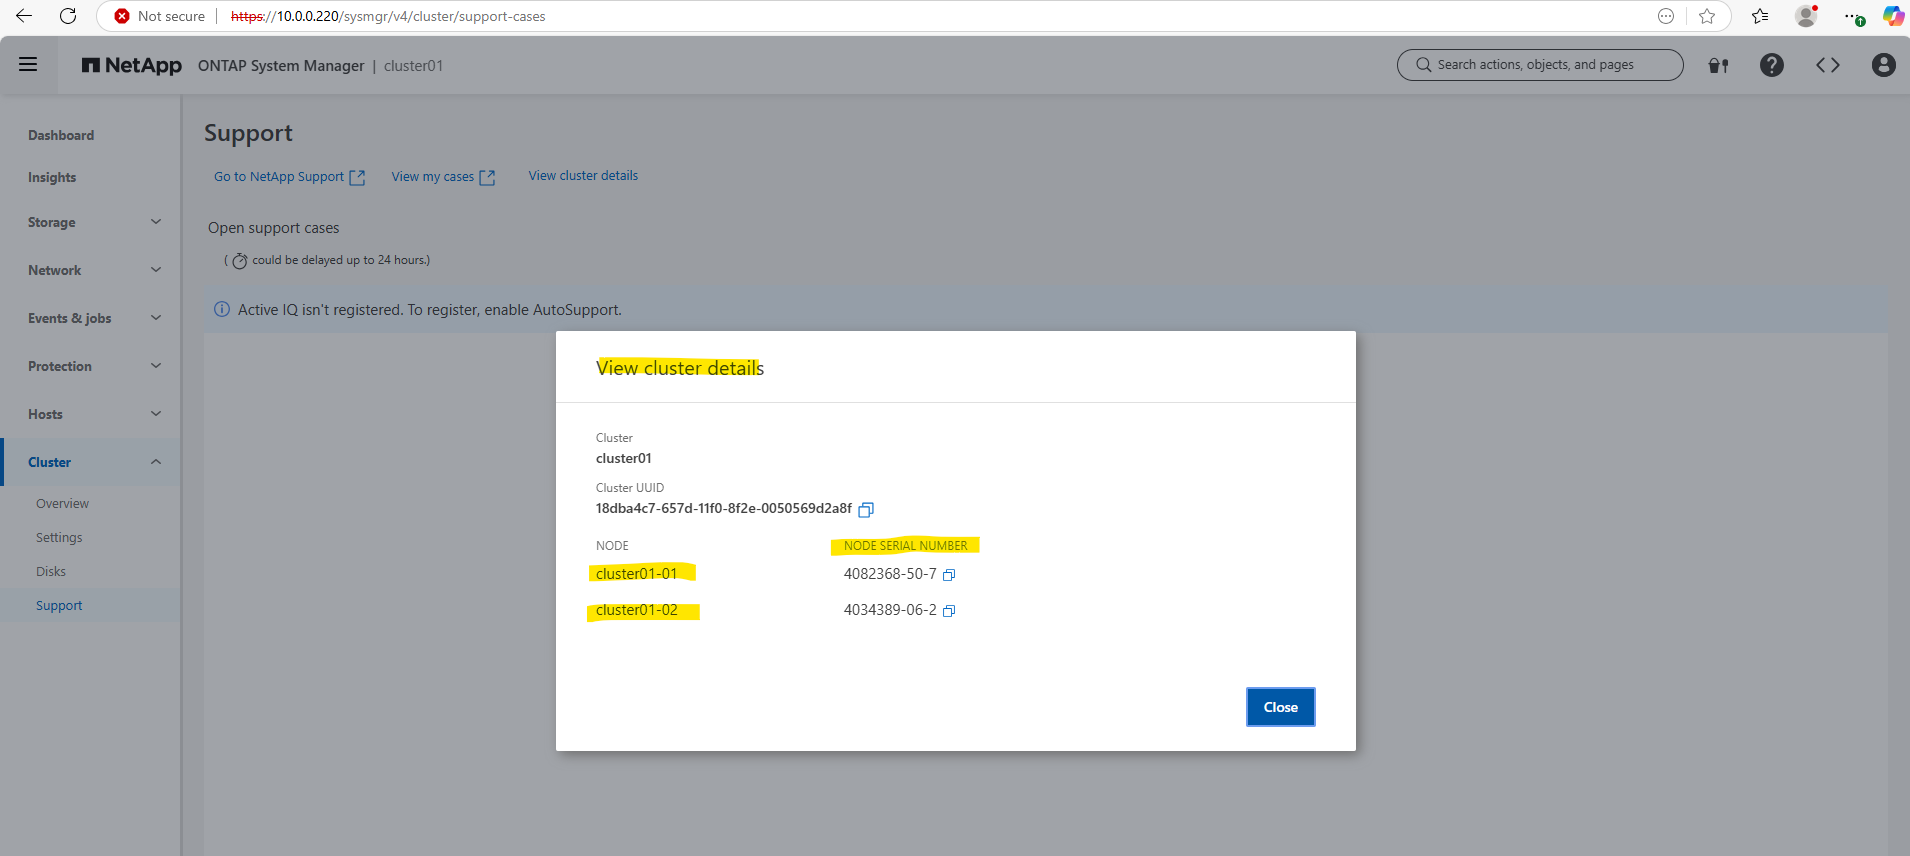
Ensure that both the nodes were detected correctly by checking the serial numbers (4082368-50-7 and 4034389-06-2) displayed in the message. If so we can move on.
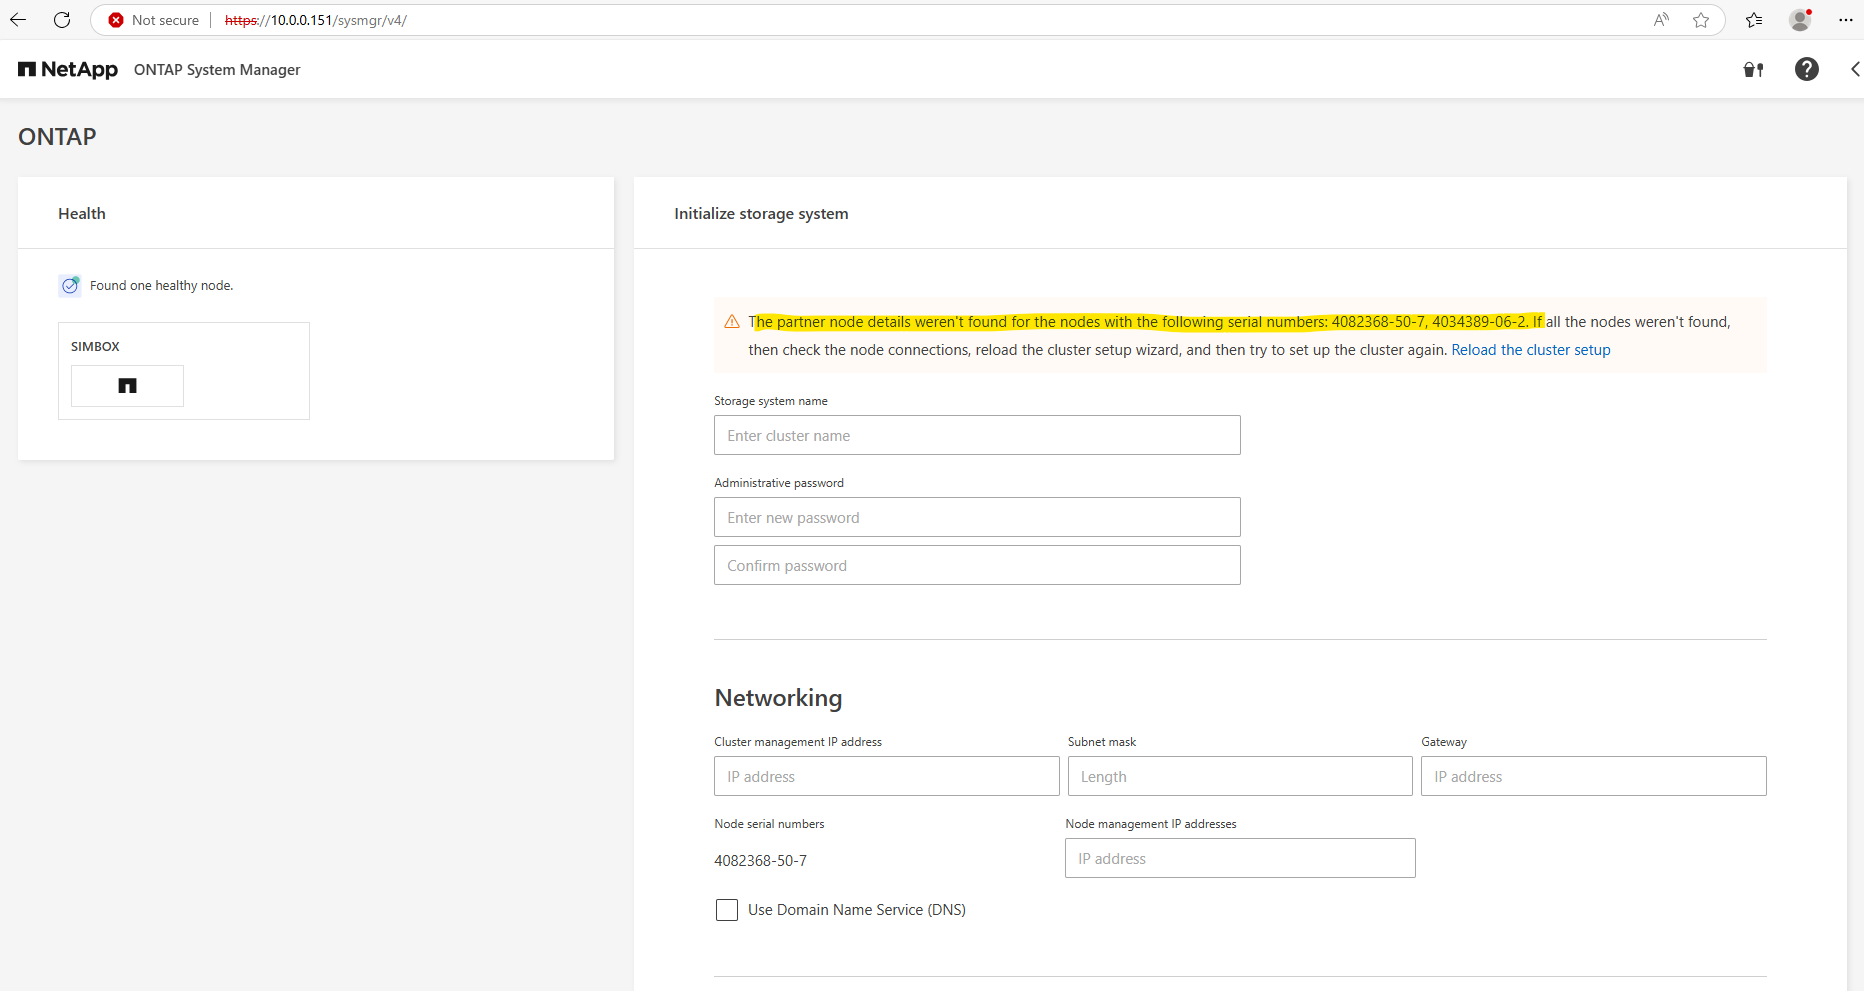
Enter a name for the new cluster and administrative password.
The default cluster admin user in NetApp ONTAP is “admin”.
For both, the Web UI and ONTAP CLI.

The cluster is being configured. This process might take more than 5 minutes to complete. Don’t reload the browser.
Reloading the browser while the process is in progress might cause misconfigurations.
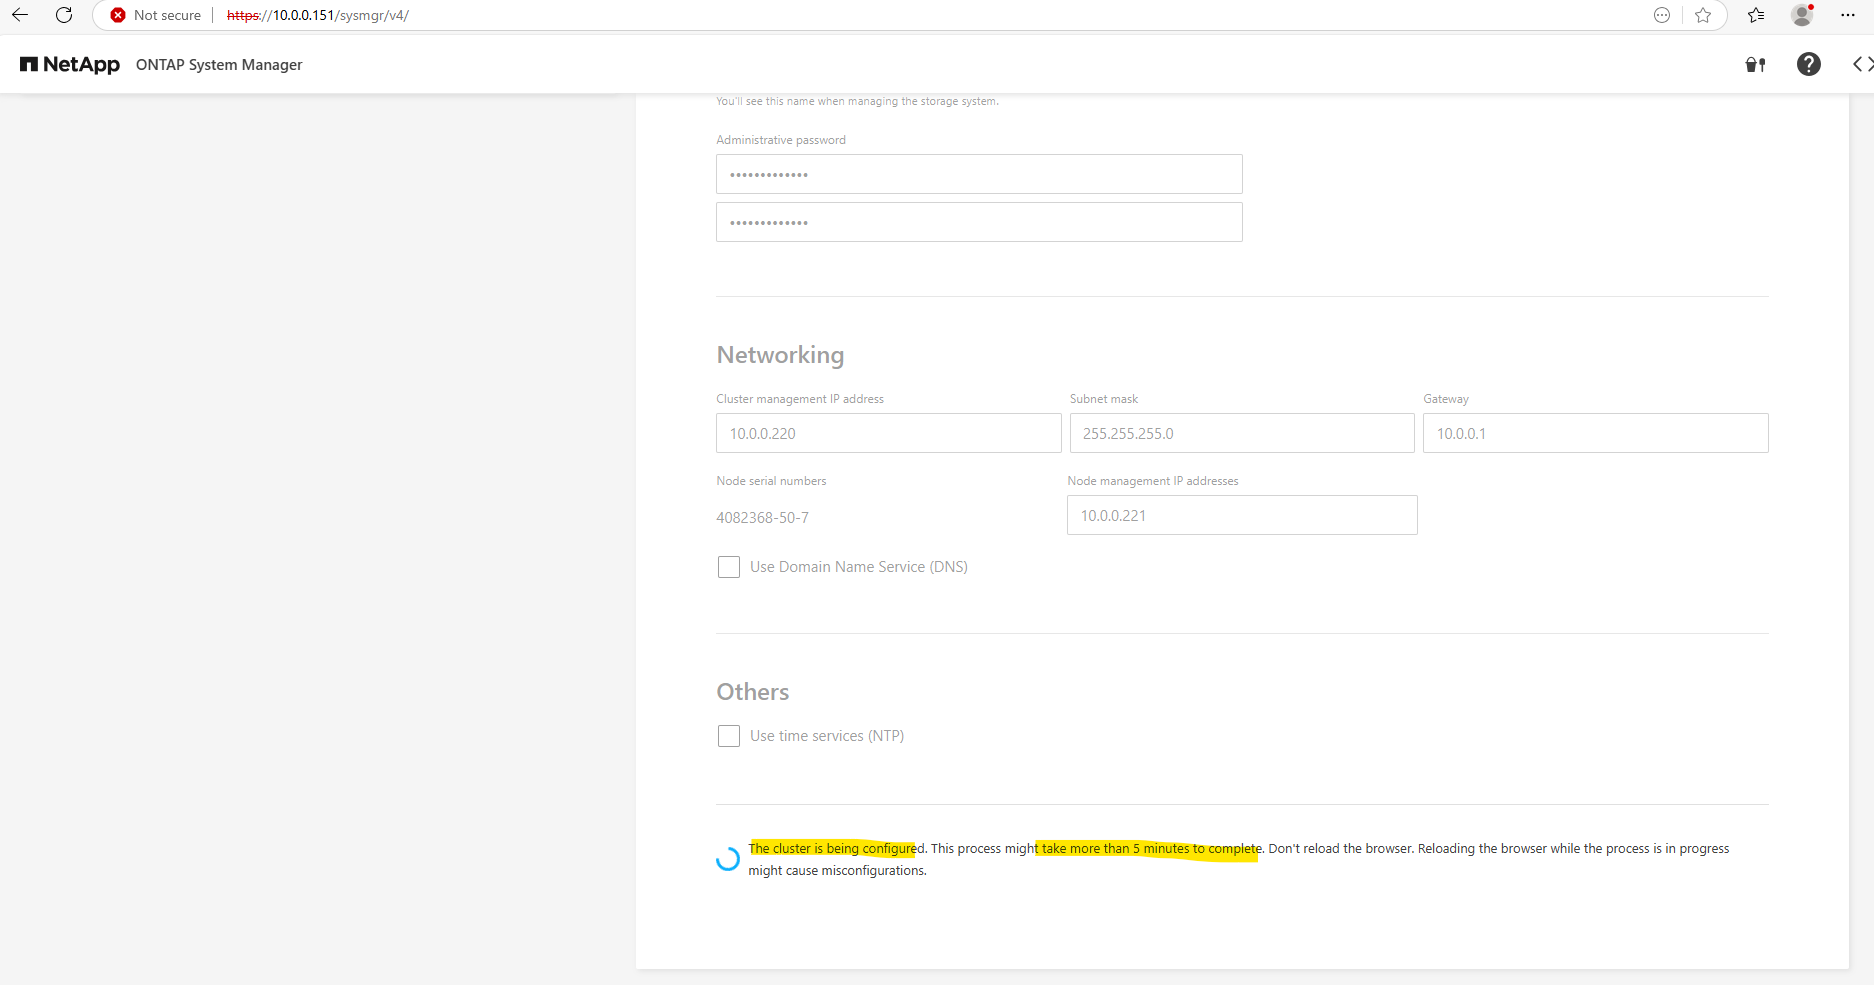
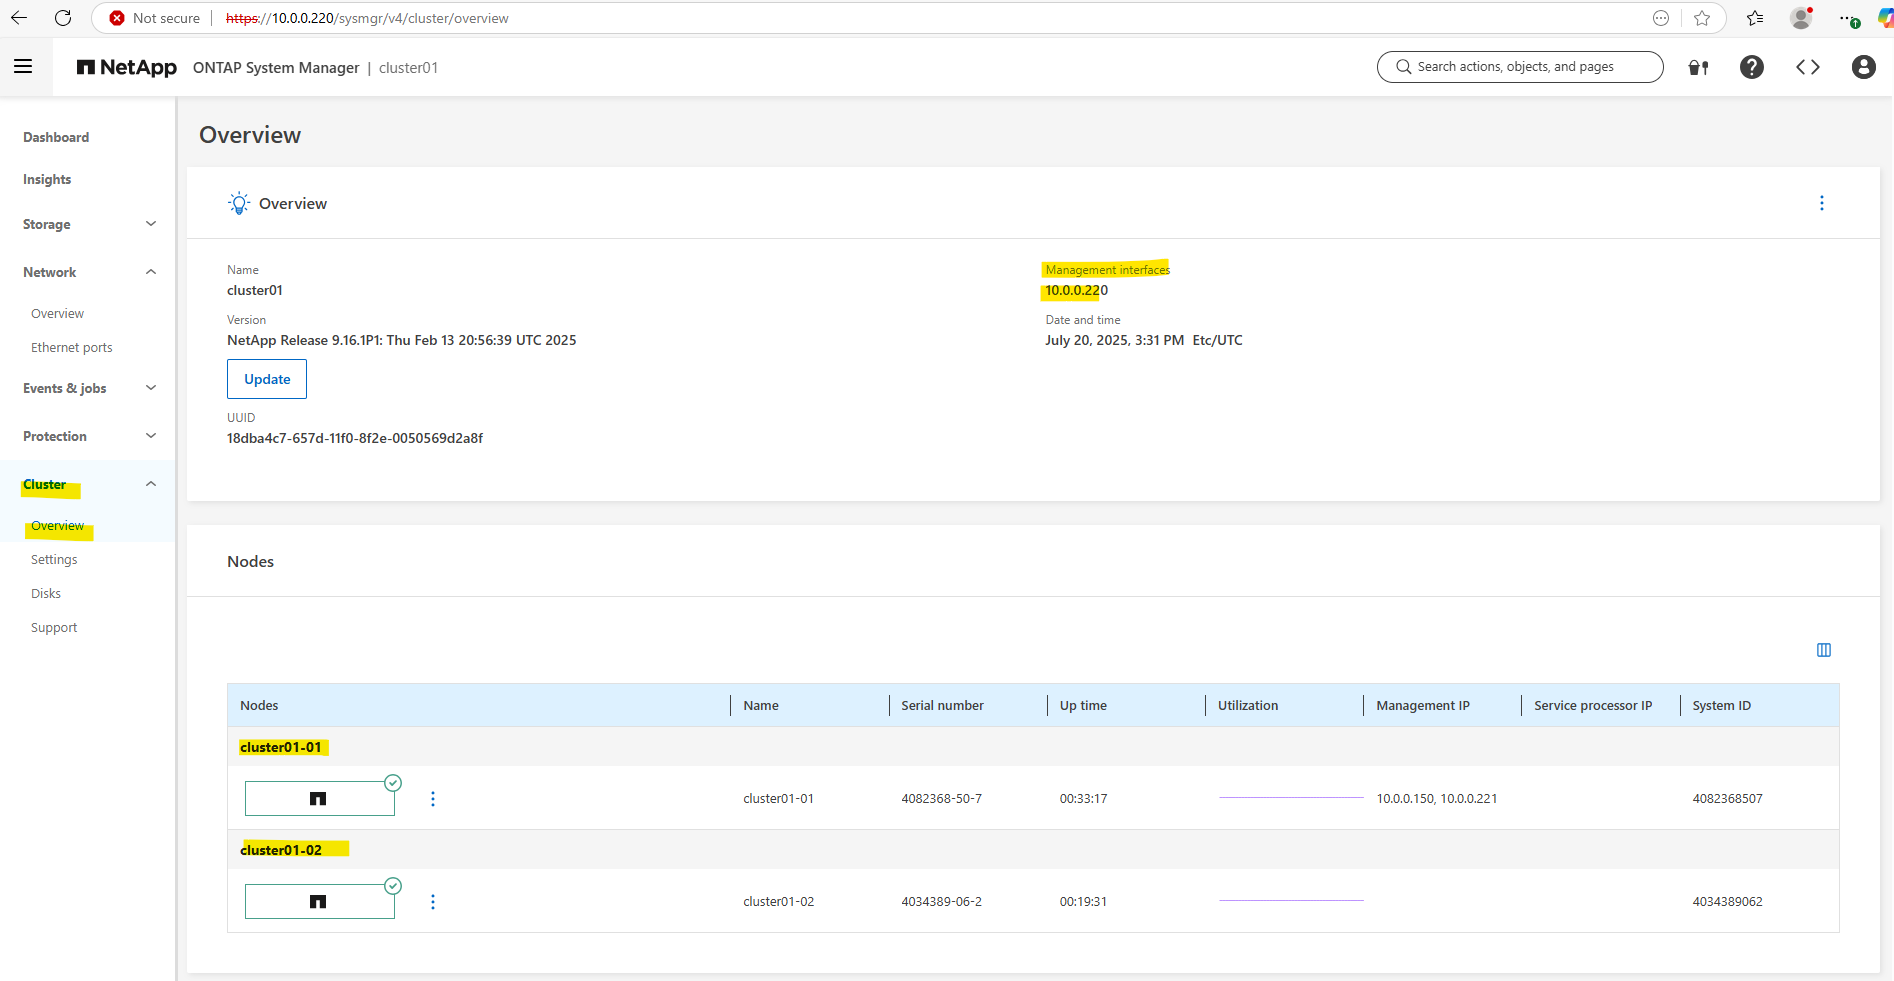
After the cluster creation is successful, you are redirected to the cluster IP provided earlier, in my case 10.0.0.220/24.
Log in to the System Manager using the password provided earlier.
The default user account on NetApp ONTAP systems is admin. This account is automatically created during cluster setup and has access to the service processor (SP).
The Service Processor (SP) in NetApp ONTAP is a dedicated management controller embedded in each controller node (similar to HP iLO, Dell iDRAC, or Cisco CIMC). It provides out-of-band management, even when the node is powered off or ONTAP is unresponsive.
While you cannot delete the default admin user, you can create additional users with different roles and permissions.
Open Network > Overview and pick an IP address with a Type of Cluster and starting with 169.254.x.x in the Network interfaces section.
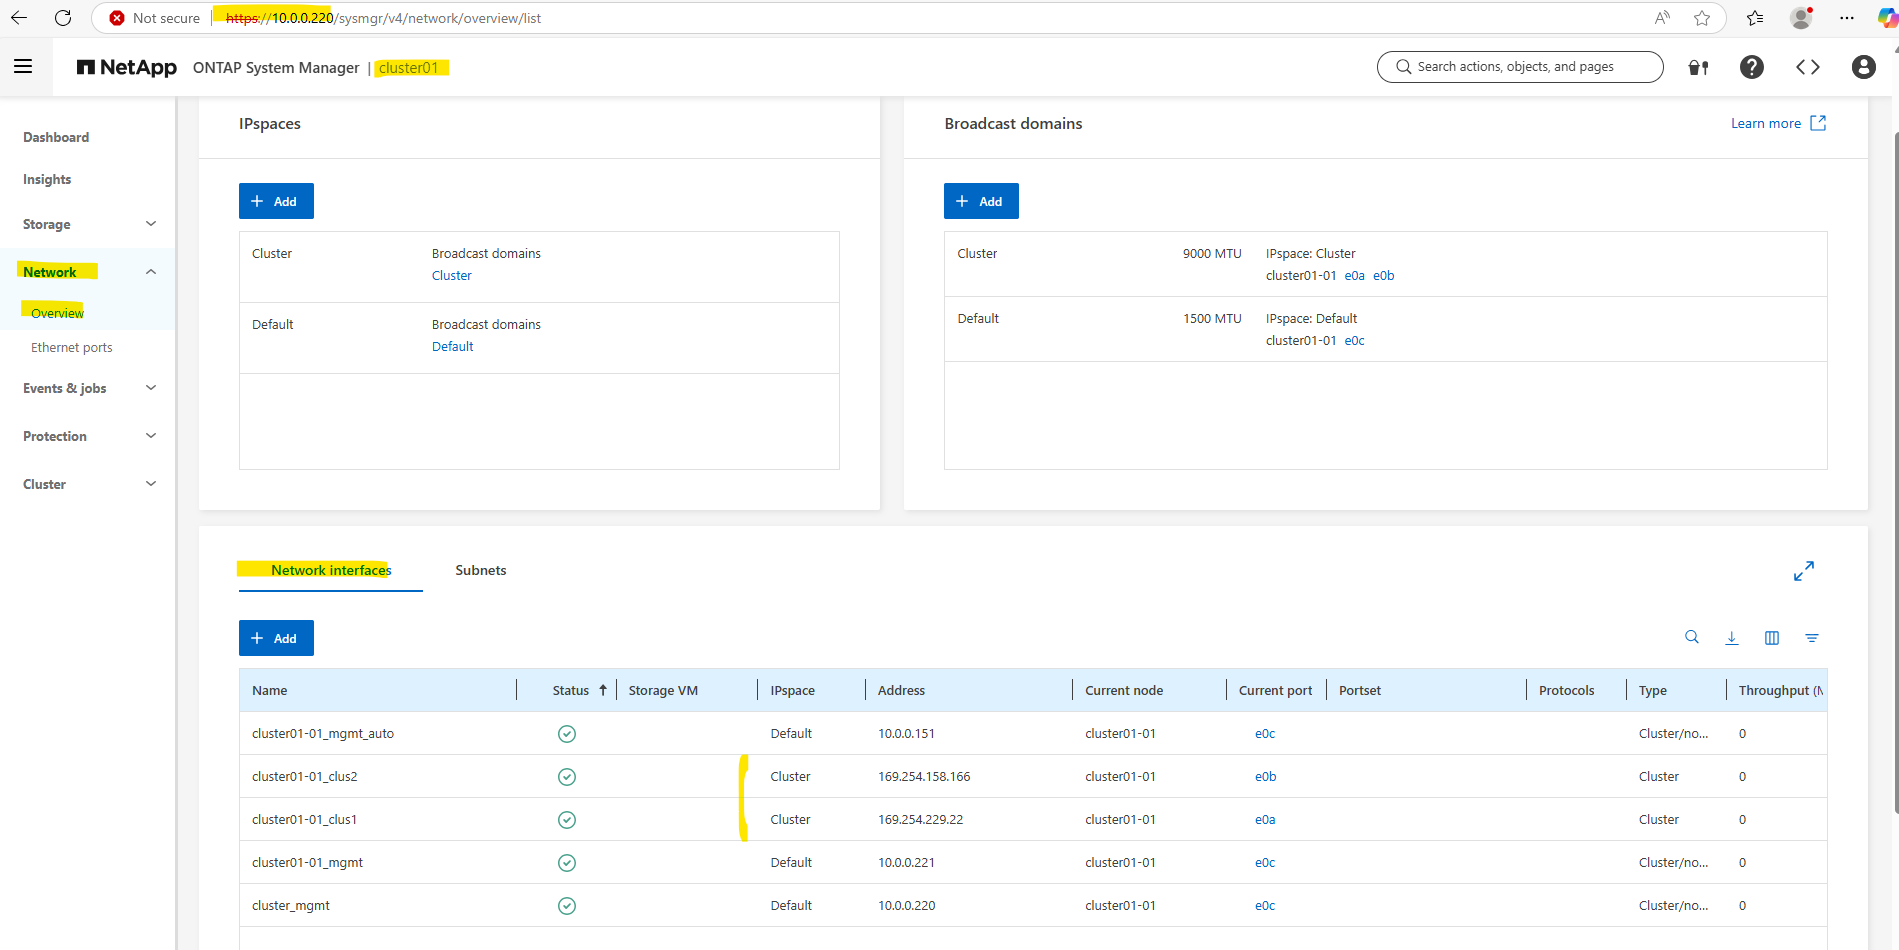
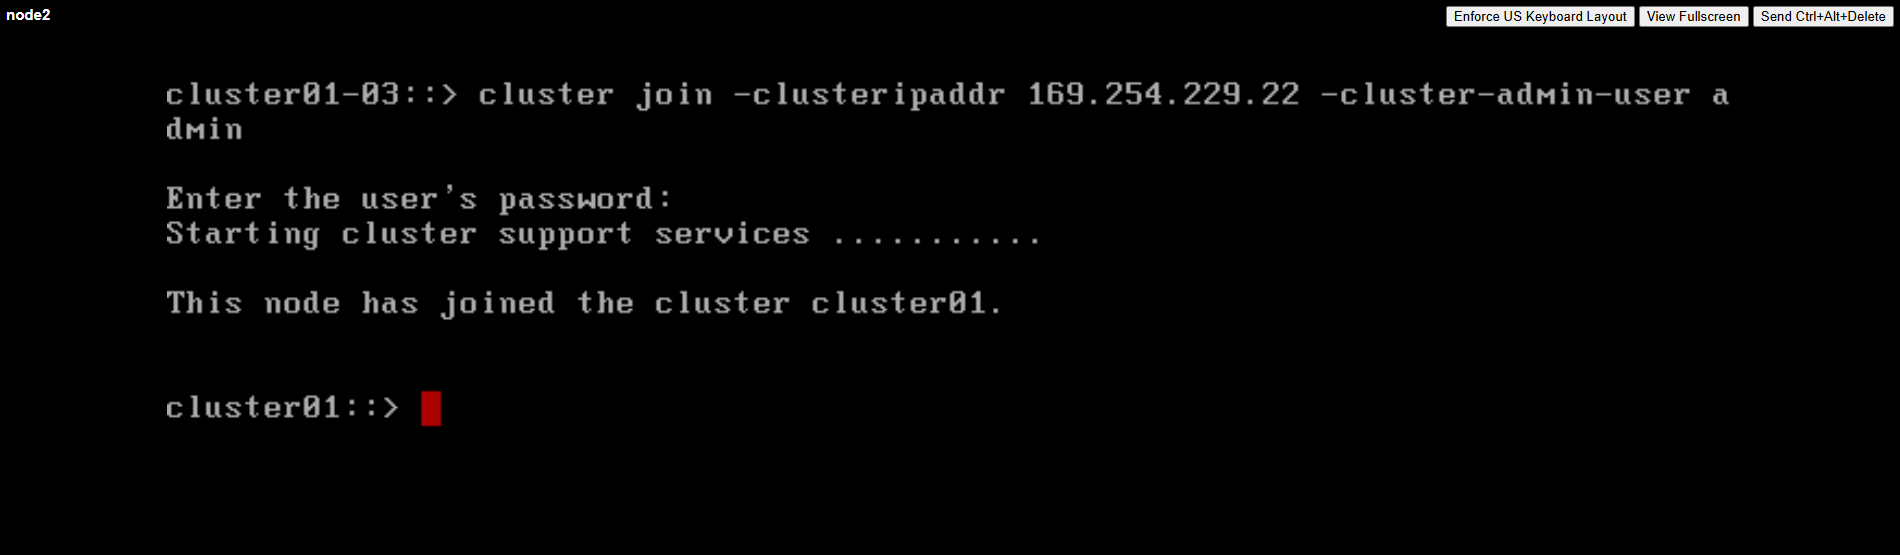
Open the node2 virtual machine console, login with admin (no password before the join needed) and enter the following command to join node1. (for the join enter the password we previously set above as administrative password.
cluster join -clusteripaddr <IP address picked in the previous step> -cluster-admin-user <username>

cluster join -clusteripaddr 169.254.229.22 -cluster-admin-user admin
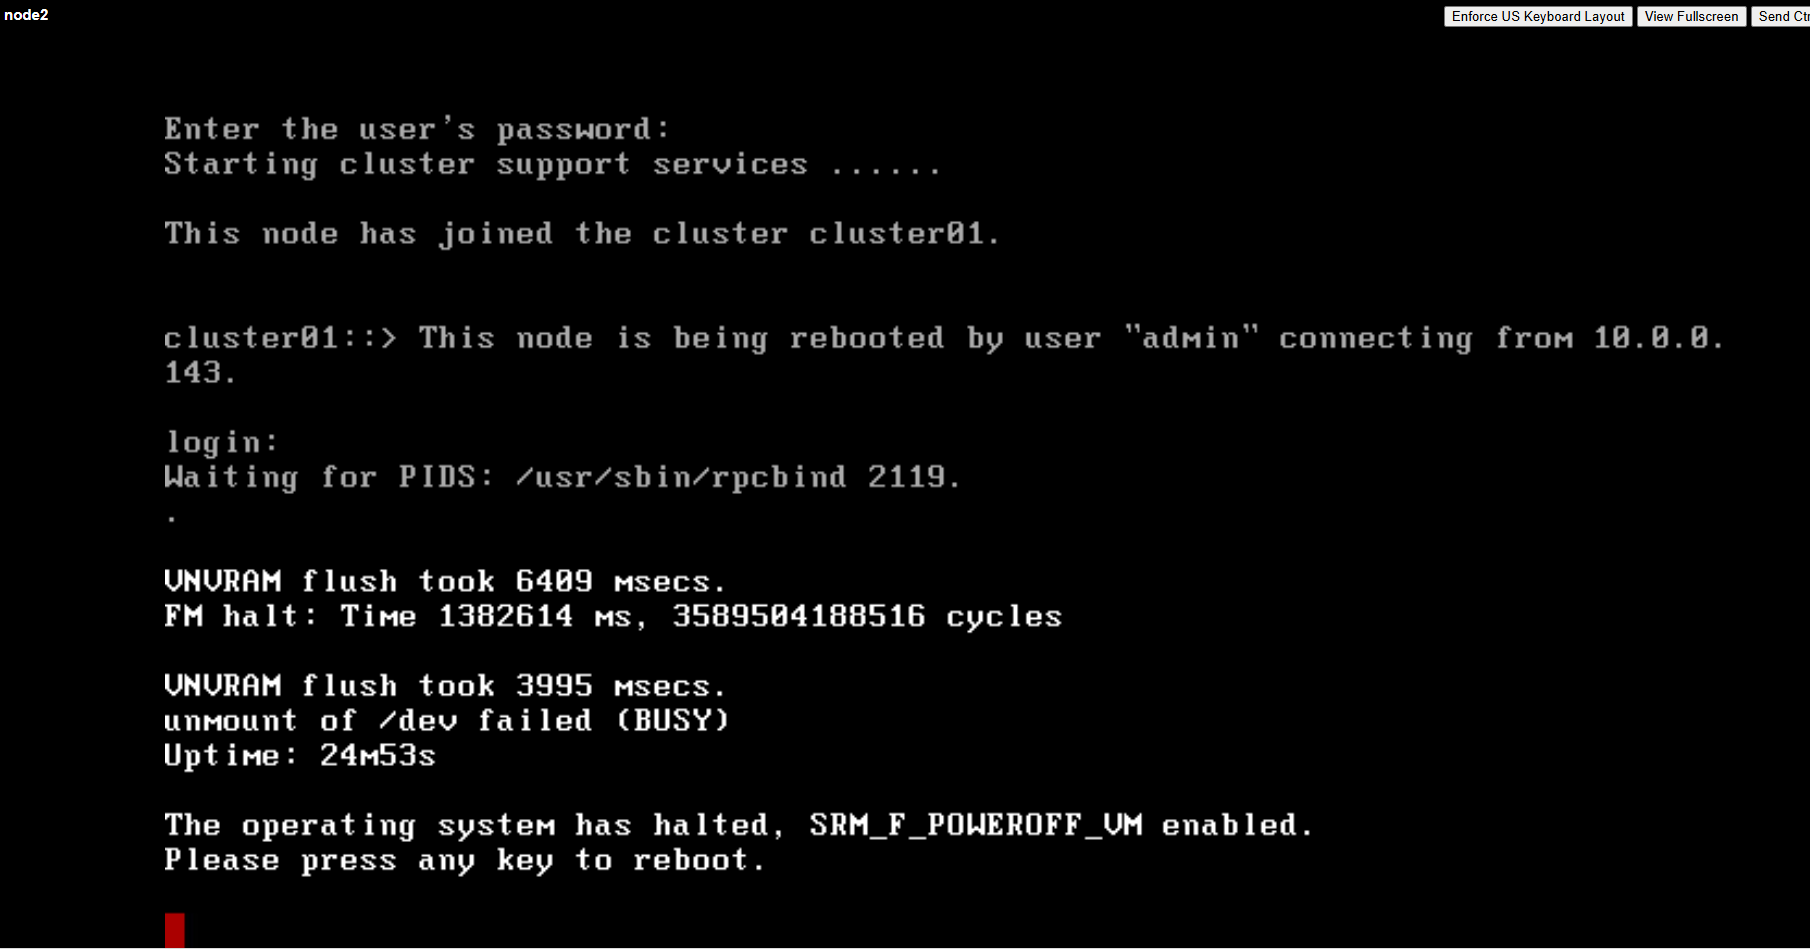
Wait until a message stating “This node has joined to cluster” is displayed.
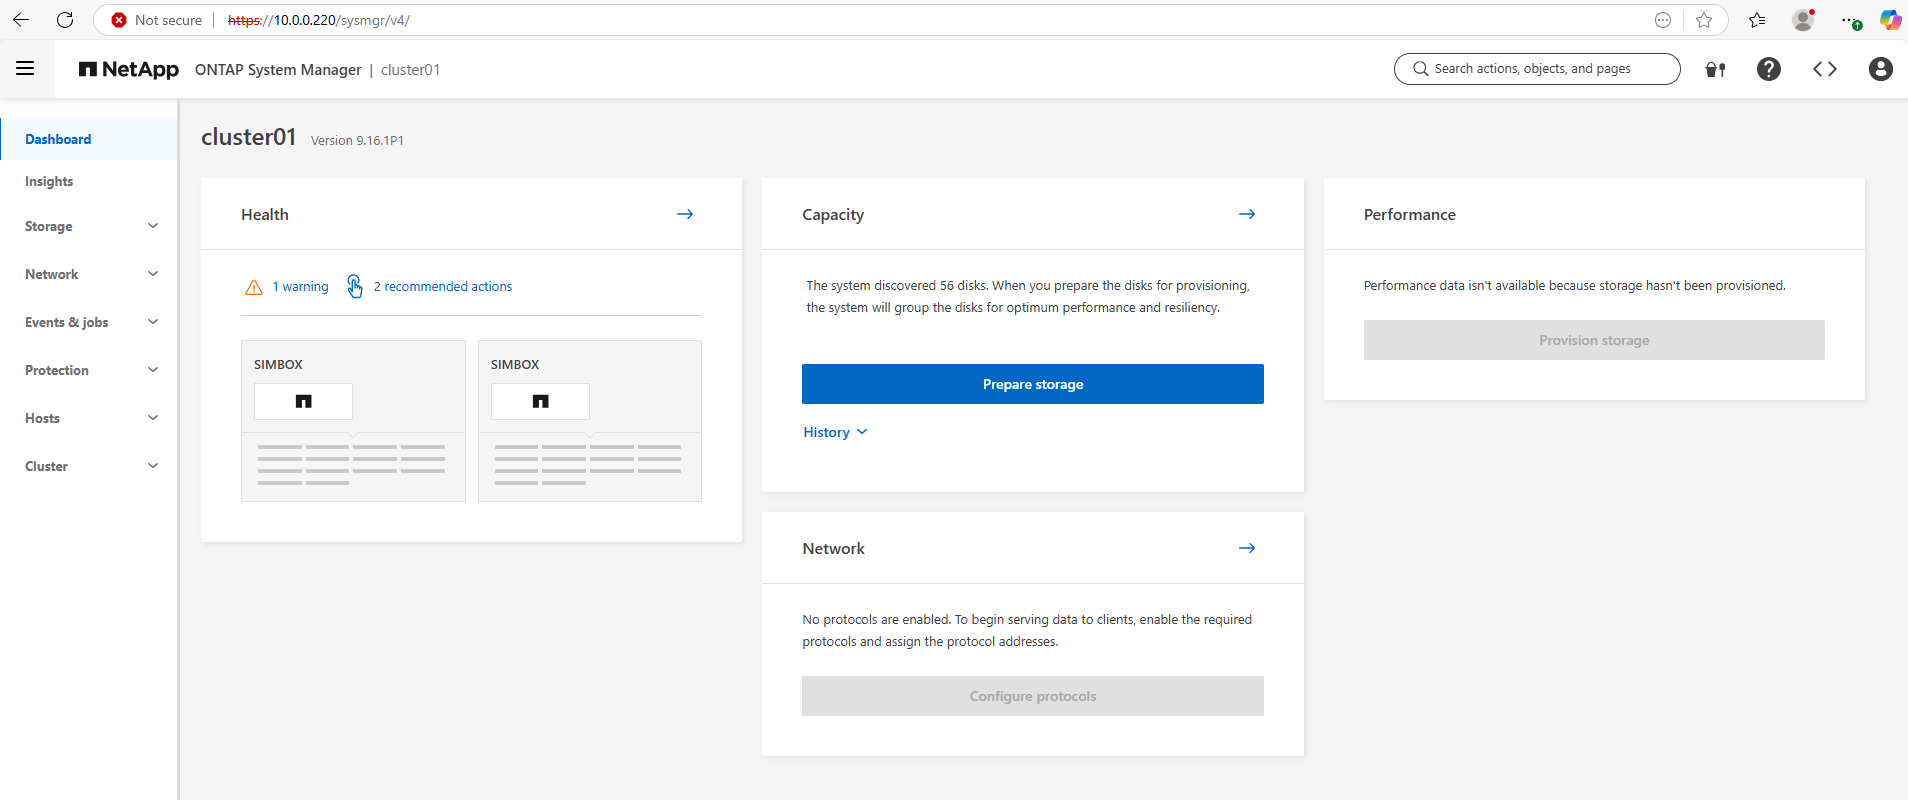
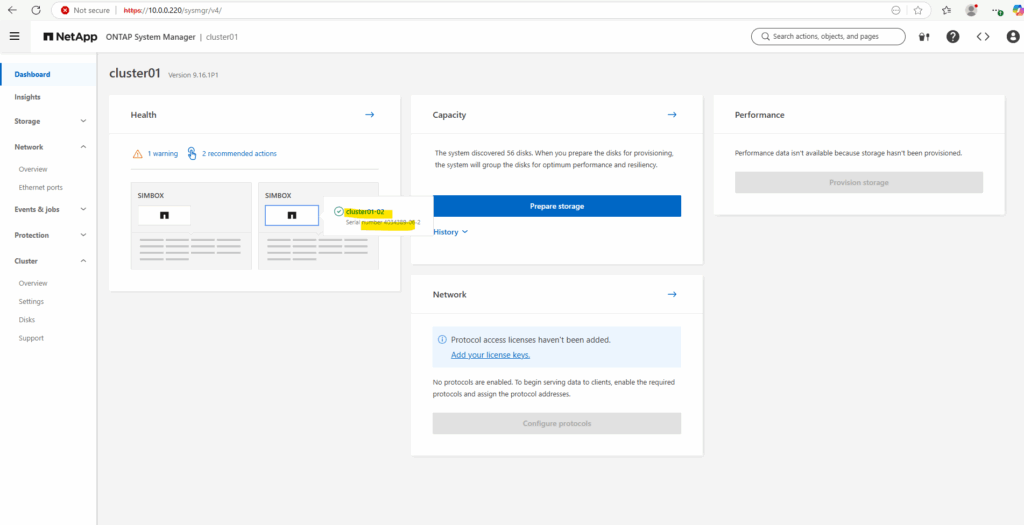
In the System Manager on the Dashboard we can already see both nodes listed as SIMBOX (cluster01-01) and SIMBOX(cluster01-02).
On the numbering for the second node (in my case here cluster01-02) and fine like this, we unfortunately doesn’t have control. This is due to the way the NetApp ONTAP Simulator assigns node names based on its System ID, Node slot number and automated provisioning behavior in clustered ONTAP.
This typically happens in ONTAP Simulator 2-node deployments where node 1 gets the expected name cluster01-01 and node2 gets an unexpected number like cluster01-04. The node slot number (internal system ID component) used during install may be 4 rather than 2 which can be caused by simulated backplane/slots, simulator re-use without full wipe of node 2 or This typically happens in ONTAP Simulator 2-node deployments where node 1 gets the expected name cluster01-01 and node2 gets an unexpected number like cluster01-04. The node slot number (internal system ID component) used during install may be 4 rather than 2 which can be caused by simulated backplane/slots, simulator re-use without full wipe of node 2 or randomized behavior of the vsim in a clean init.
Further under Cluster -> Overview.
Disabling root snapshots
Root snapshots consume a large amount of space on the root volume with snapshots of log files. If you are concerned about running out of space on your root volume, you should disable root snapshots before creating aggregates and volumes.
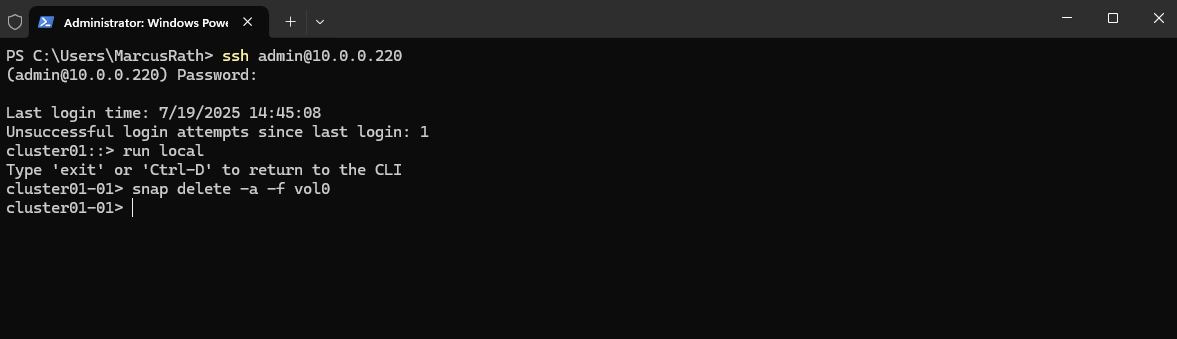
From the command line, enter run local, this takes you into the node shell.
Then delete all existing snapshots on the root volume and suppress confirmation request.
cluster01::> run local
cluster01-01> snap delete -a -f vol0
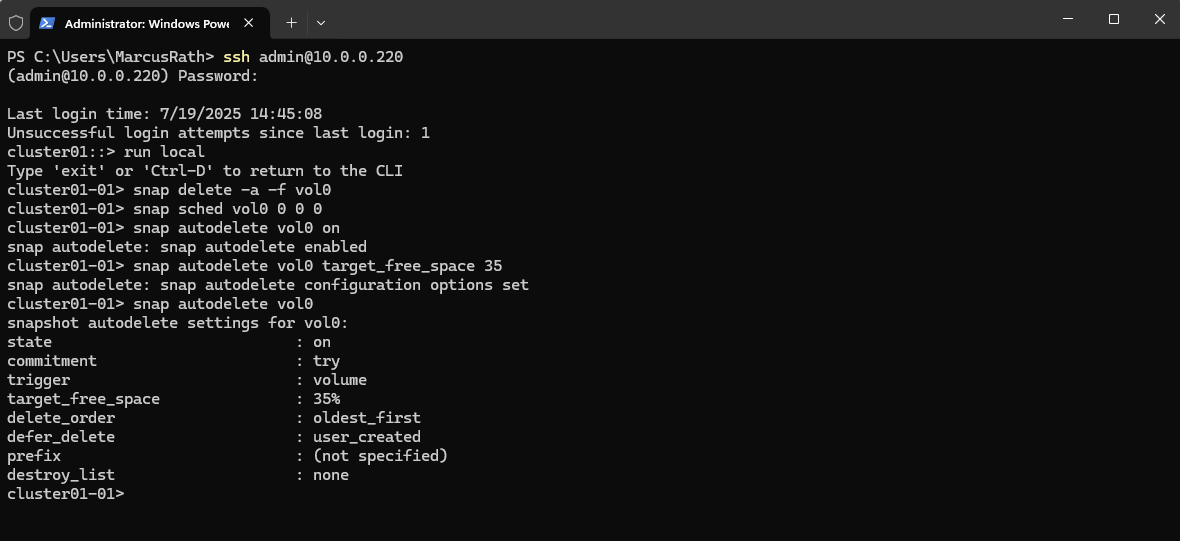
Disable the automatic snapshot schedule
cluster01-01> snap sched vol0 0 0 0
Enable snapshot autodelete.
cluster01-01> snap autodelete vol0 on
Set the snapshot autodelete threshold to 35% for the volume free space. This guarantees the volume has a minimum of free space equal to 35% of its overall size.
cluster01-01> snap autodelete vol0 target_free_space 35
Confirm the autodelete has been configured correctly.
cluster01-01> snap autodelete vol0
Expanding the root volume size
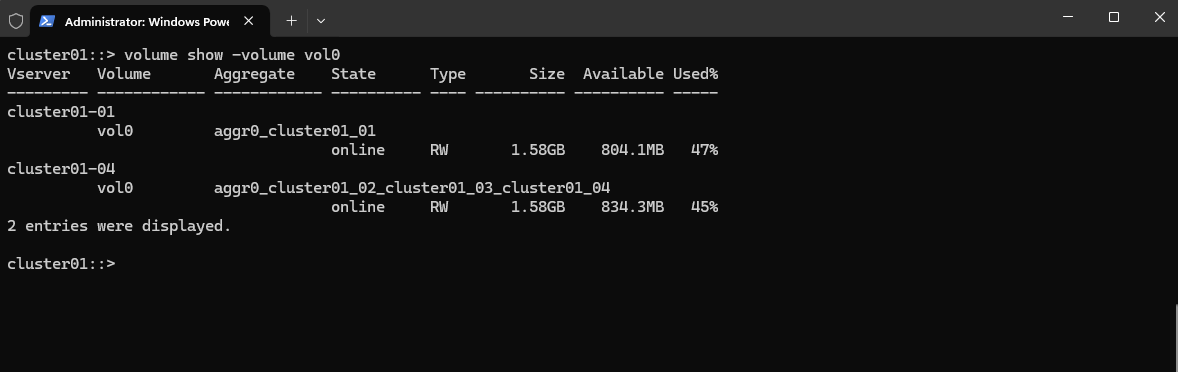
If your root volume is too small, you can expand it. Your root aggregate must have enough free space to accommodate an increase in the size of your root volume.
View the root volume size details:
cluster01::> volume show -volume vol0
If necessary, add more disks to your root aggregate to increase its size and accommodate the additional space needed in your root volume.
cluster01::> storage aggregate add-disks -aggregate aggr0 -diskcount <n>
Set the root volume to a new size.
cluster01::> volume size -vserver <vserver_name> -volume vol0 -new-size <new_size>
Essential ONTAP Command Reference
More you will also find in my following post.
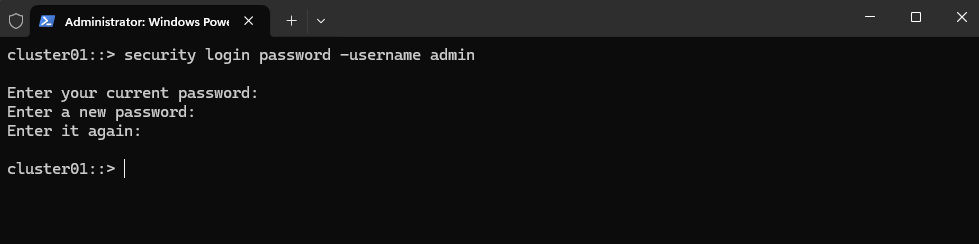
Reset the admin Password
cluster01::> security login password -username admin
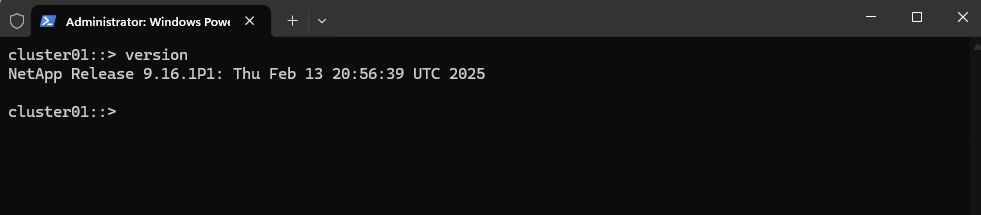
Determine the ONTAP Version
cluster01::> version
Graceful Shutdown Procedure for NetApp ONTAP Cluster
Must be done from the Cluster Admin CLI (SSH or console)
!! Note !!
Just shutdown or powering off the simulator virtual machines by using the vSphere client can crash them, so first perform a graceful shutdown by using the Cluster Admin CLI like shown below.
Use this command for each node:
When using SSH first check which node owns the Cluster Management LIF and then first shutdown the node which not owns it, otherwise you will get disconnected from the SSH console before you are able to shutdown the second node.
cluster01::> system node halt -node <node-name> -inhibit-takeover true -ignore-quorum-warnings true

cluster01::> system node halt -node cluster01-01 -inhibit-takeover true -ignore-quorum-warnings true
cluster01::> system node halt -node cluster01-02 -inhibit-takeover true -ignore-quorum-warnings true
If you’re shutting down a 2-node ONTAP simulator, you still must halt both nodes via CLI before powering off the VM in vSphere or your hypervisor.
We can now finally powering off the VM.
To reboot instead of shut down:
system node reboot -node * -inhibit-takeover true -ignore-quorum-warnings true
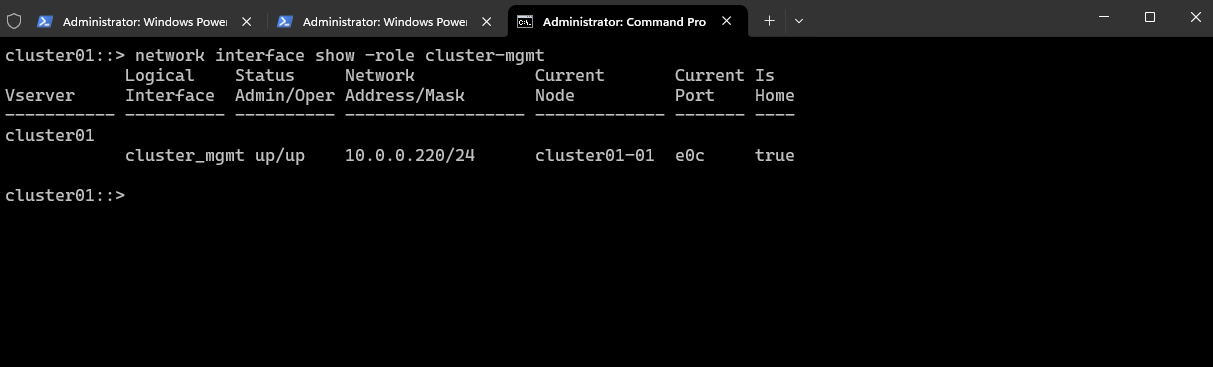
Determine which Node owns the Cluster Management LIF (IP Address)
Show Cluster Management LIF and Owner Node.
cluster01::> network interface show -role cluster-mgmt
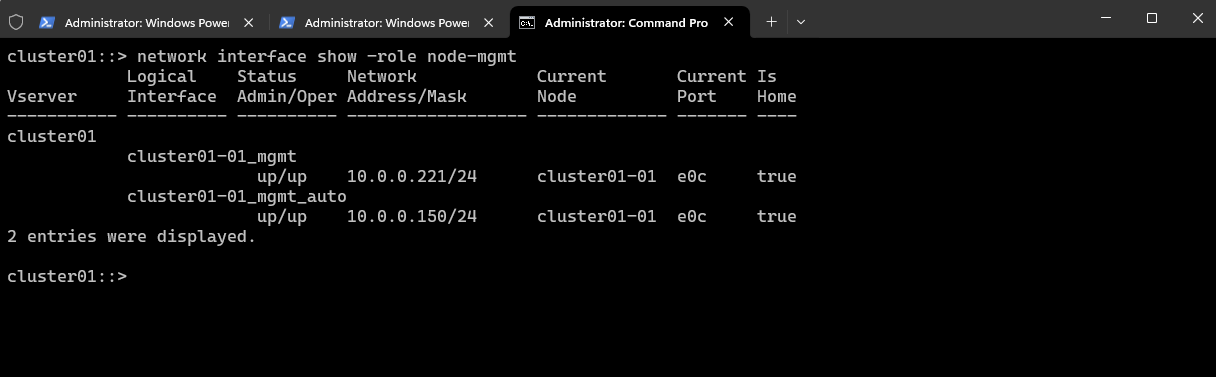
To verify the node management LIFs.
cluster01::> network interface show -role node-mgmt
Check current Date and Time
cluster01::> cluster date show

# Show NTP configuration
cluster01::> cluster time-service ntp server show
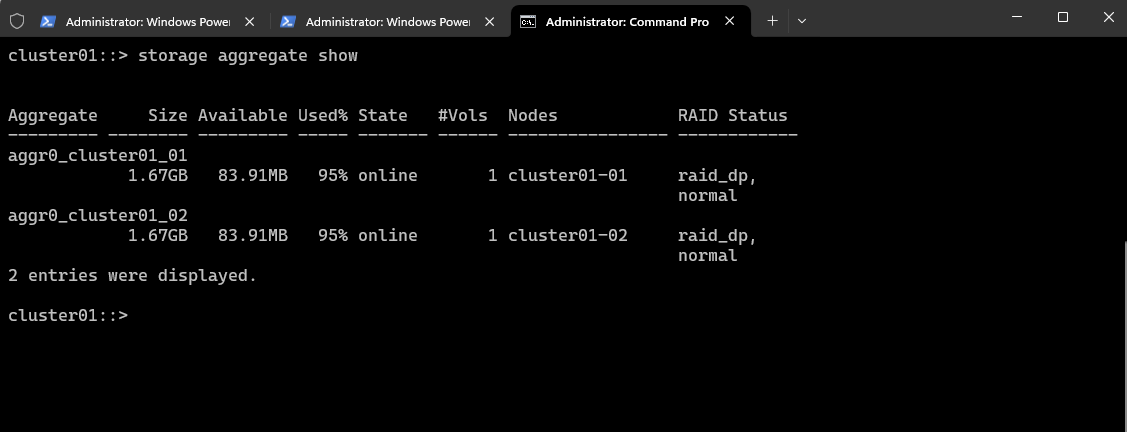
Show all Aggregates
To show aggregates in NetApp ONTAP (CLI), use the following commands.
cluster01::> storage aggregate show
So far we just see here the root aggregates of both cluster nodes.
Root aggregates should generally not be used for user data or additional volumes.
Root aggregate is reporting 95 percent space utilization
This is normal behavior, root aggregate comes with 95% utilization after its creation, because the root volume is thick provisioned.
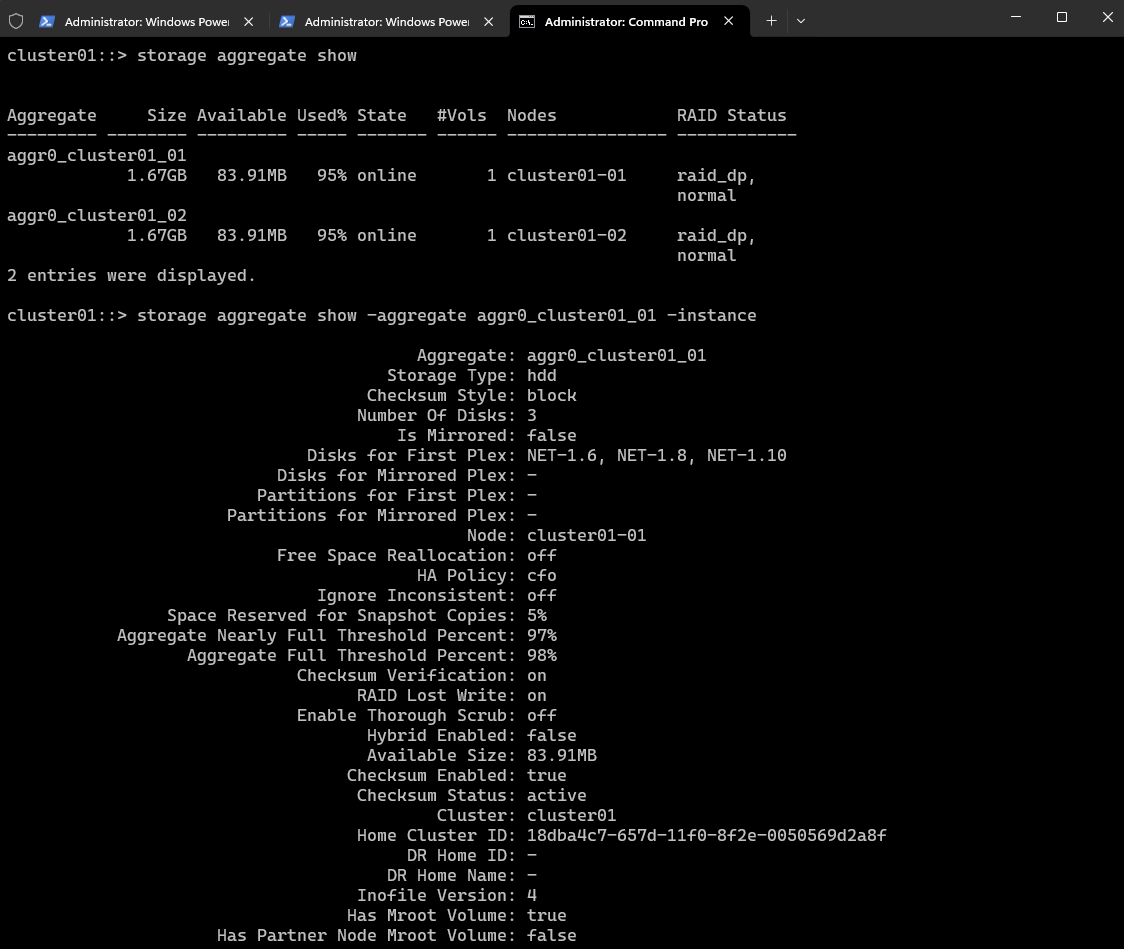
To show a detailed view of one aggregate.
cluster01::> storage aggregate show -aggregate <aggr_name> -instance
cluster01::> storage aggregate show -aggregate aggr0_cluster01_01 -instance
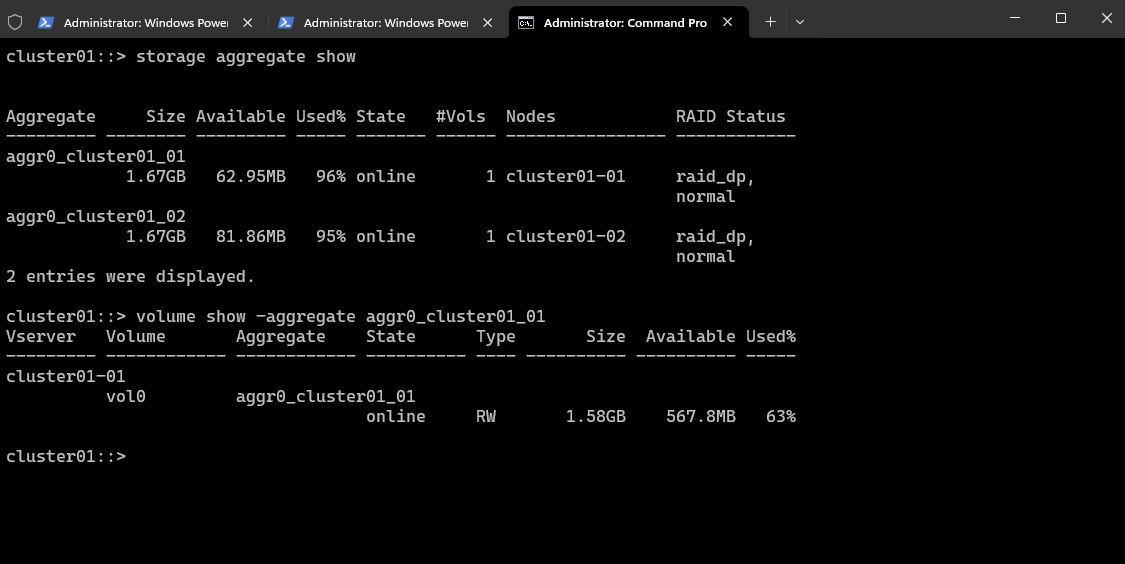
Show which volumes are in an aggregate.
volume show -aggregate <aggr_name>
cluster01::> volume show -aggregate <aggr_name>
cluster01::> volume show -aggregate aggr0_cluster01_01
Show which disks are in an aggregate
cluster01::> storage aggregate show-status -aggregate <aggr_name>
cluster01::> storage aggregate show-status -aggregate aggr0_cluster01_01

Cluster Settings
You can view and change cluster-wide settings and perform cluster-specific tasks from the Cluster tab of the Element UI.
More you will find here https://docs.netapp.com/us-en/element-software/storage/concept_system_manage_cluster_configure_cluster_settings.html.

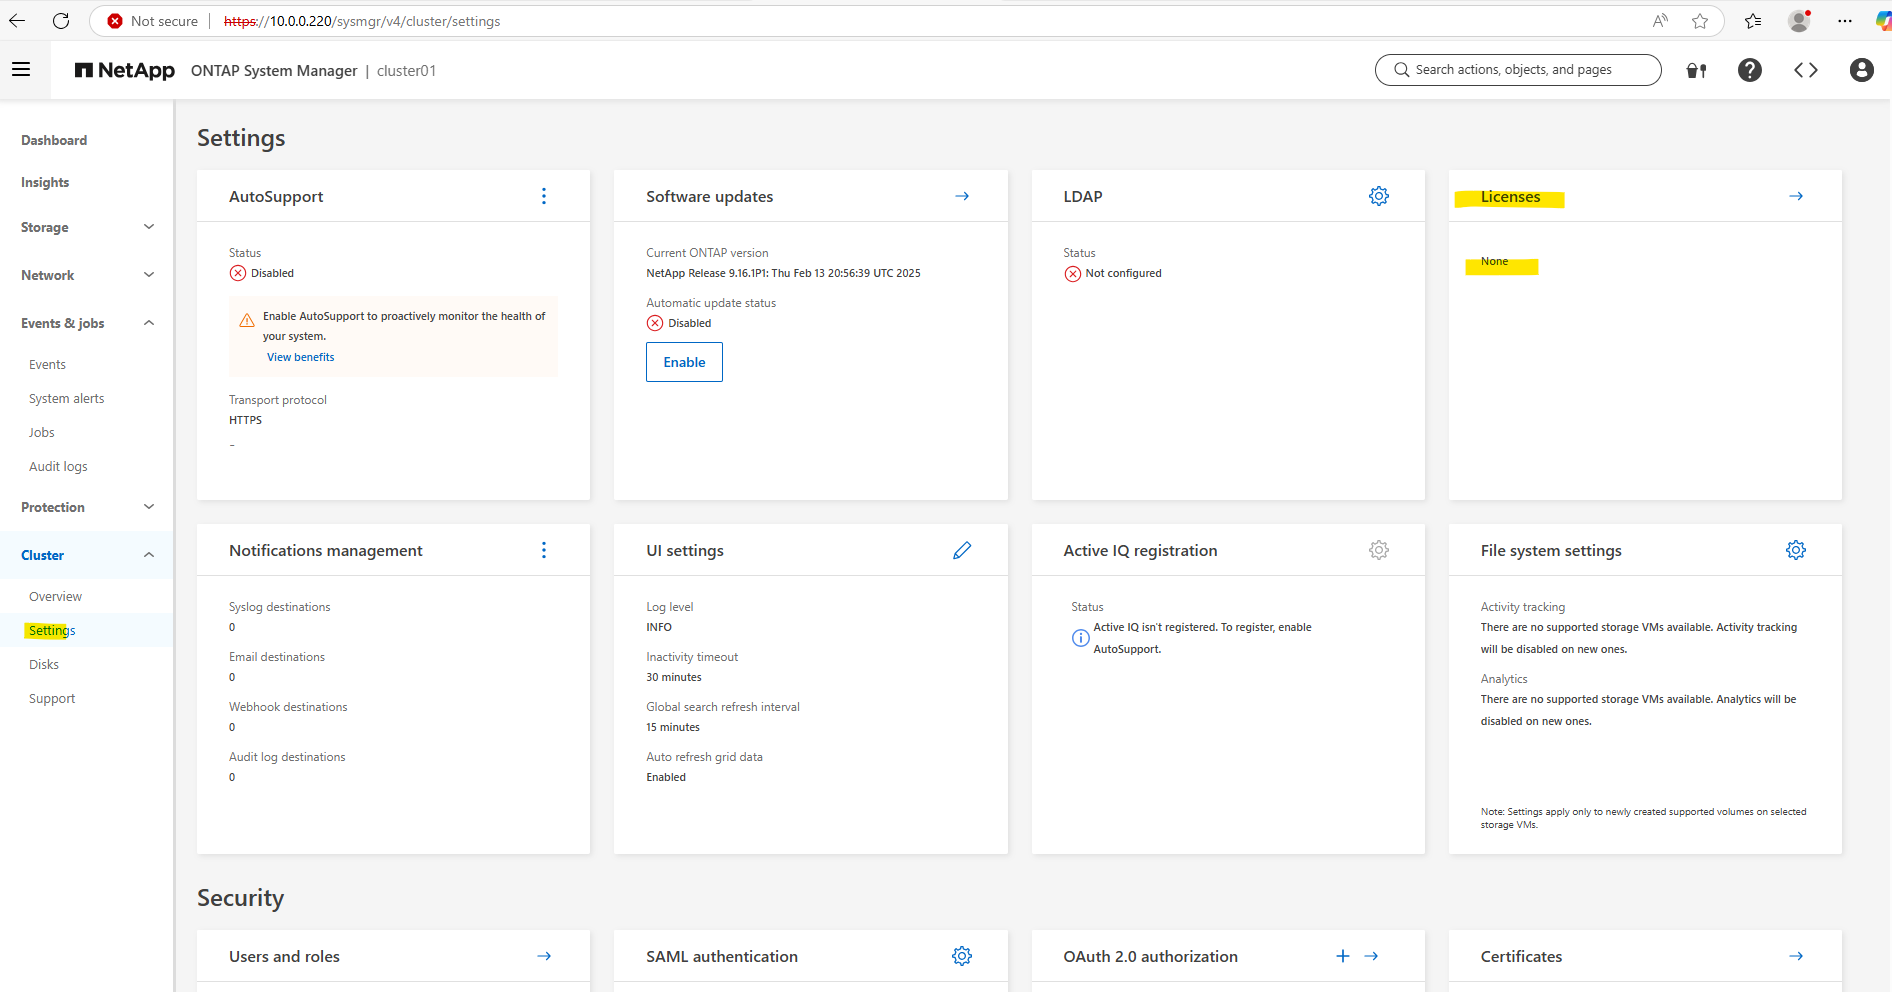
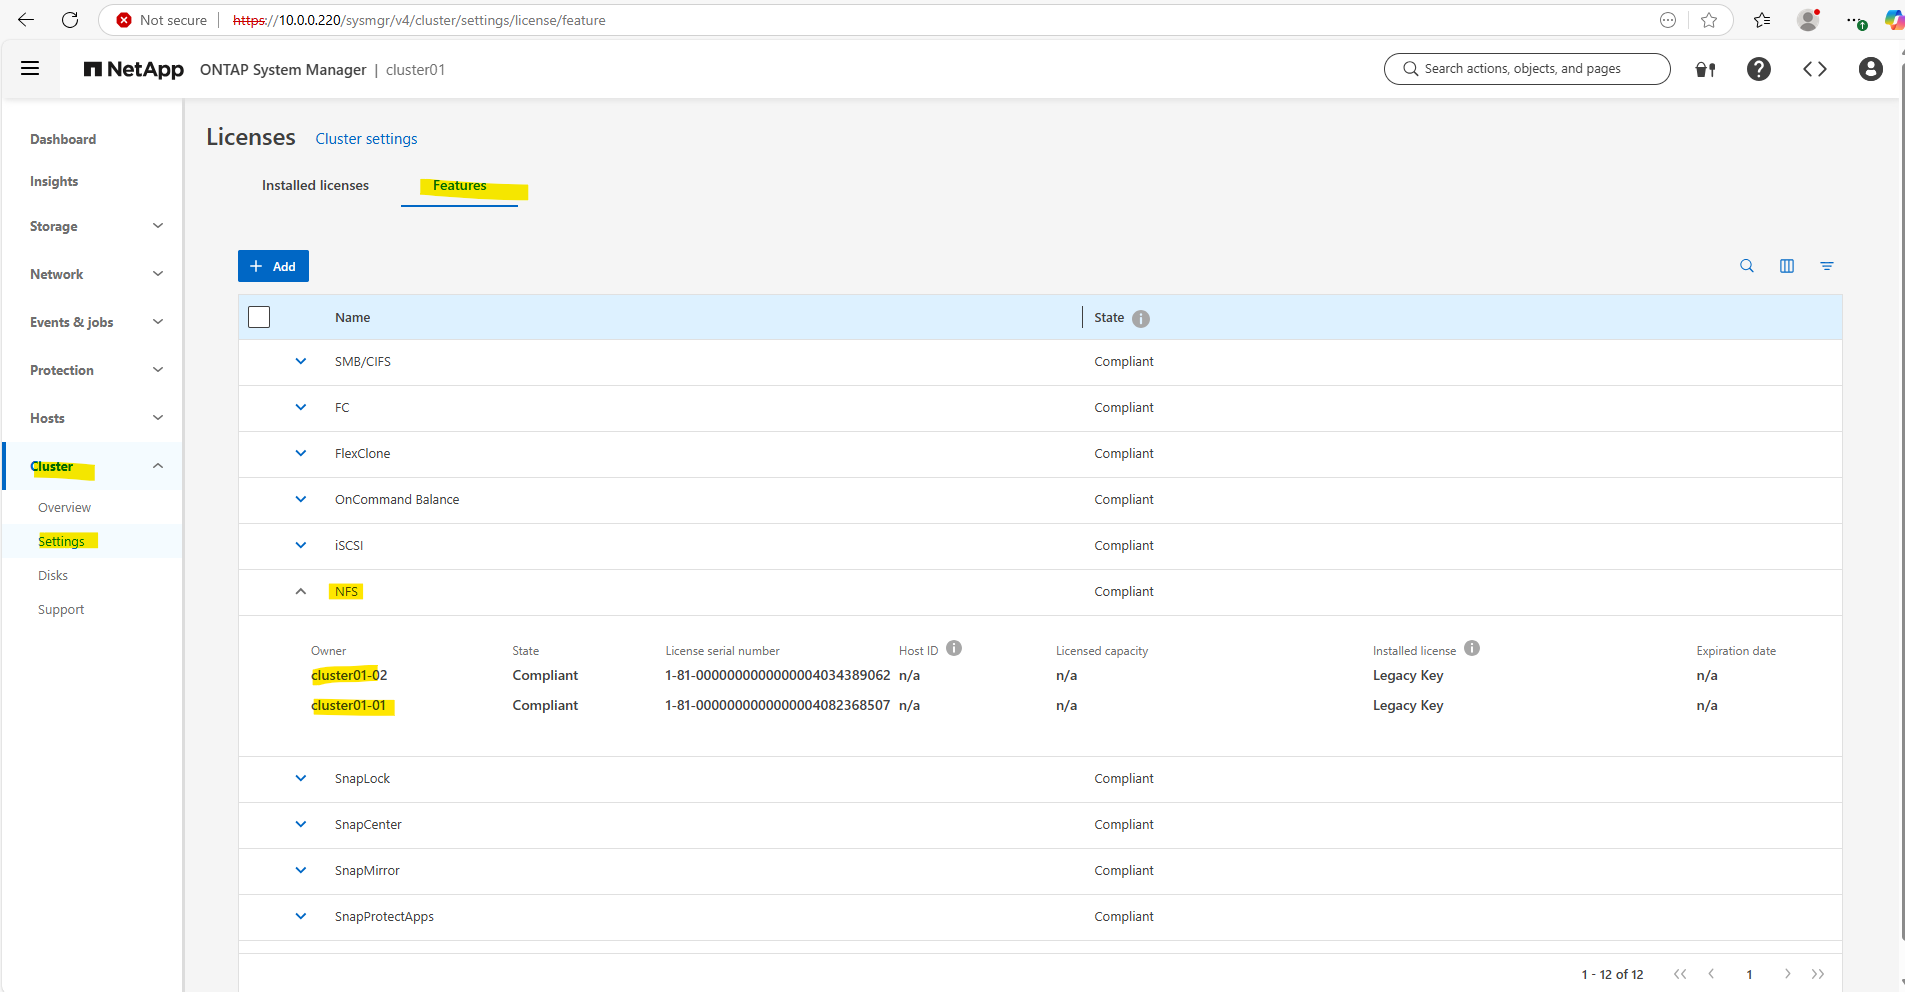
Licenses
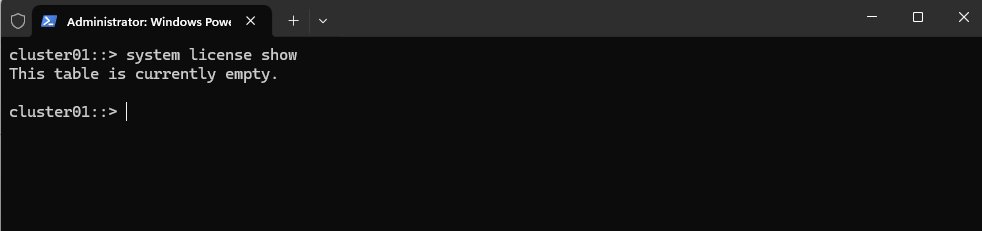
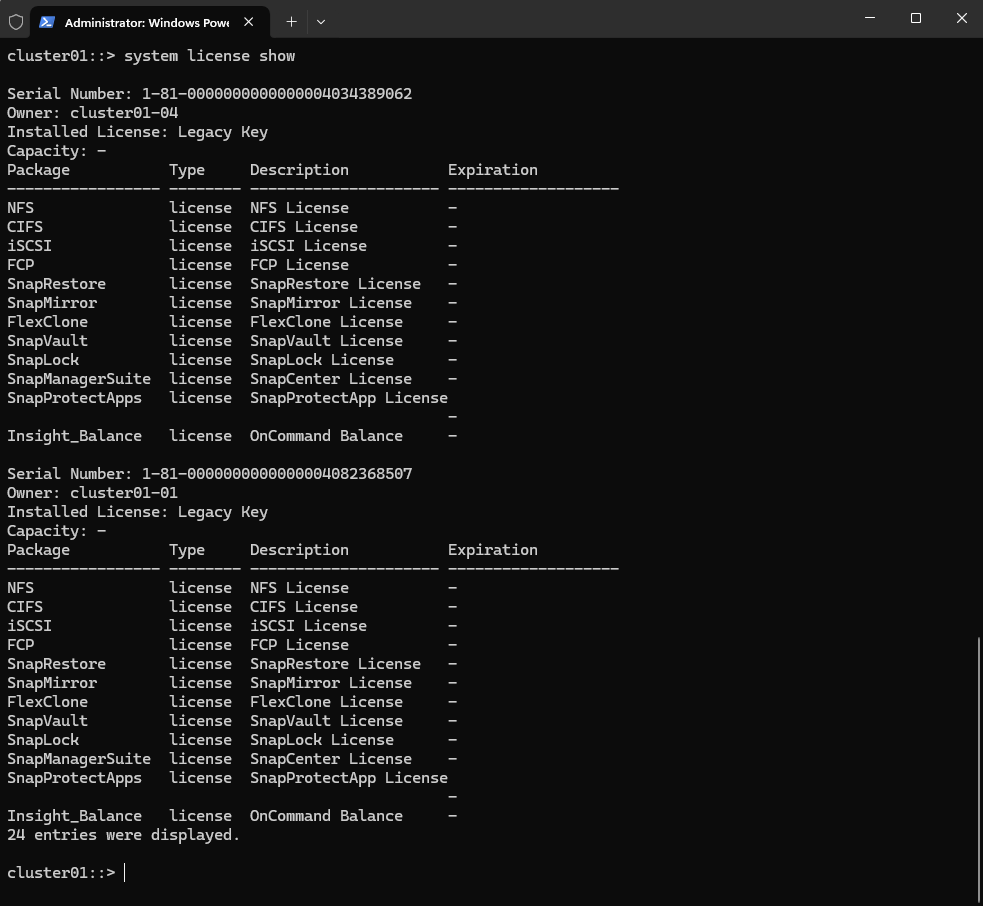
So far no licenses are installed on the cluster.
cluster01::> system license show
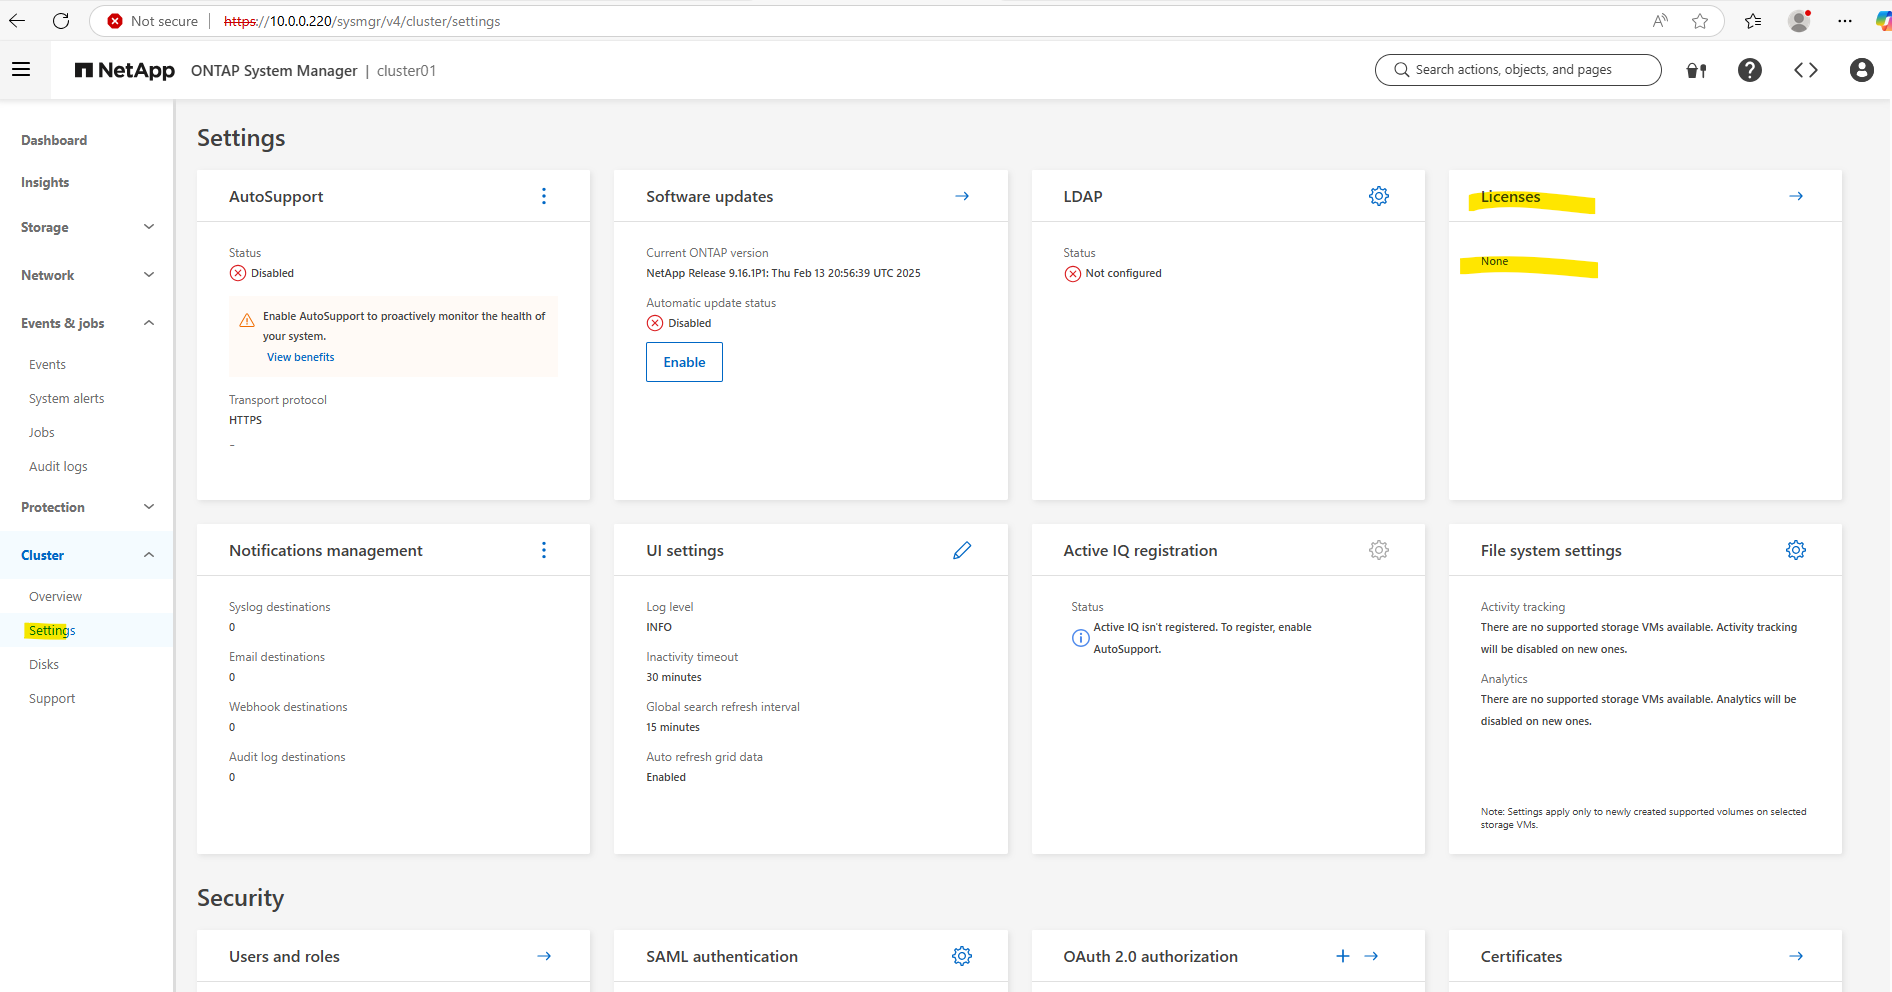
To install our clustered simulate ONTAP licenses click under Cluster -> Settings on the Licenses link.
The license file is also available in the download portal where we previously downloaded the vSphere OVA file (Open Virtual Appliance) file. Here we will find a file named CMode_licenses_9.16.1.txt regarding the version we use.
We need to add them by using the legacy keys.
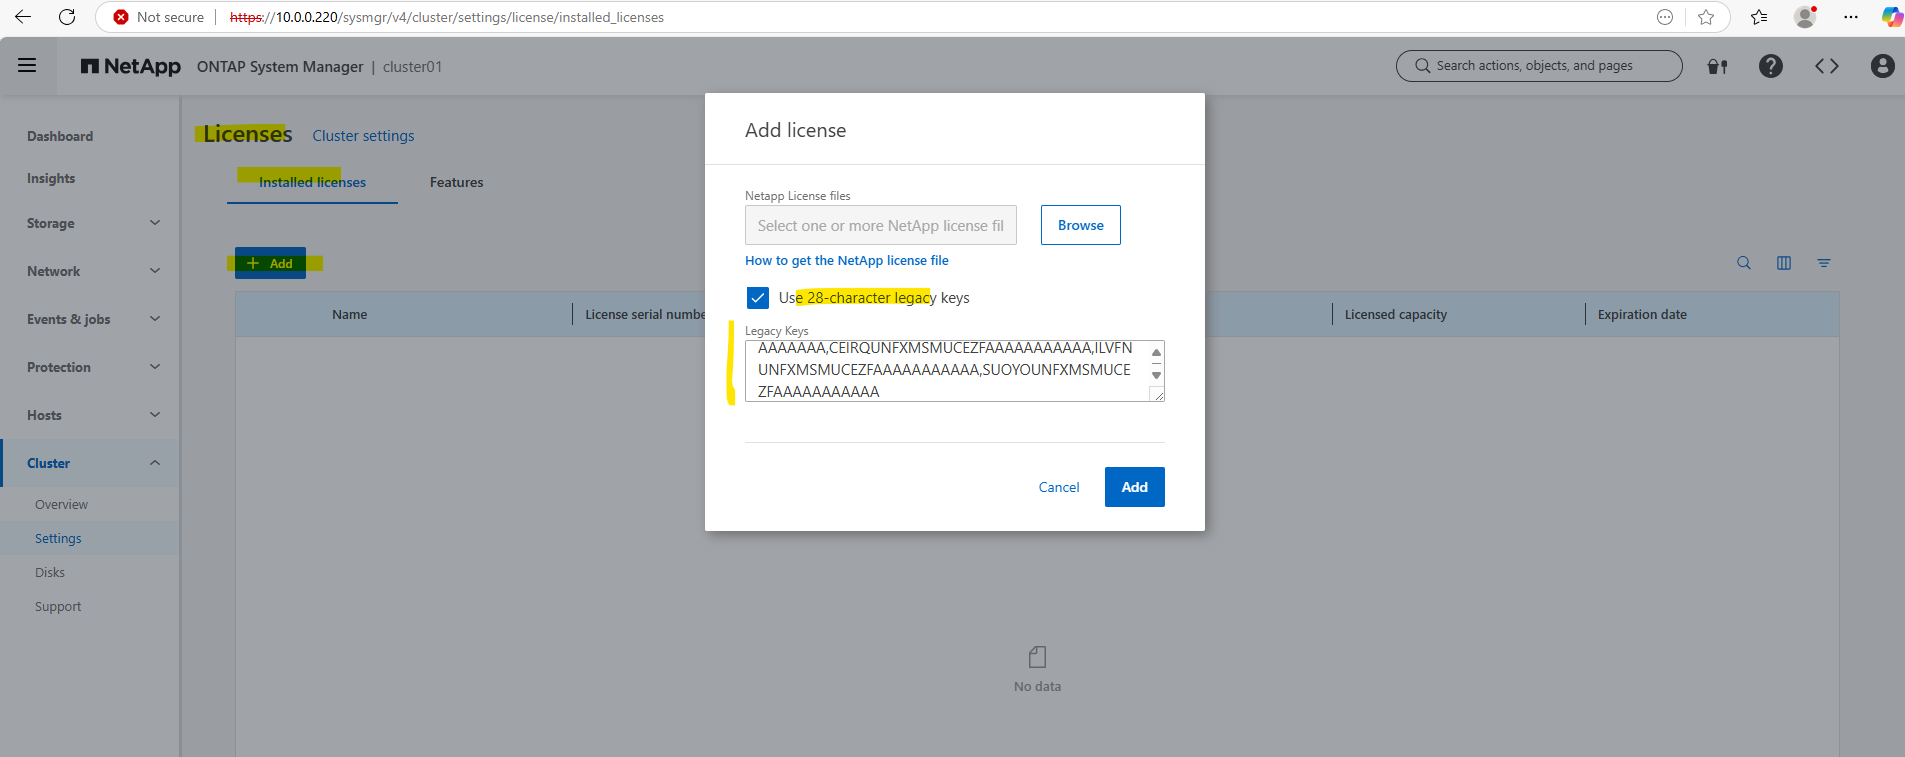
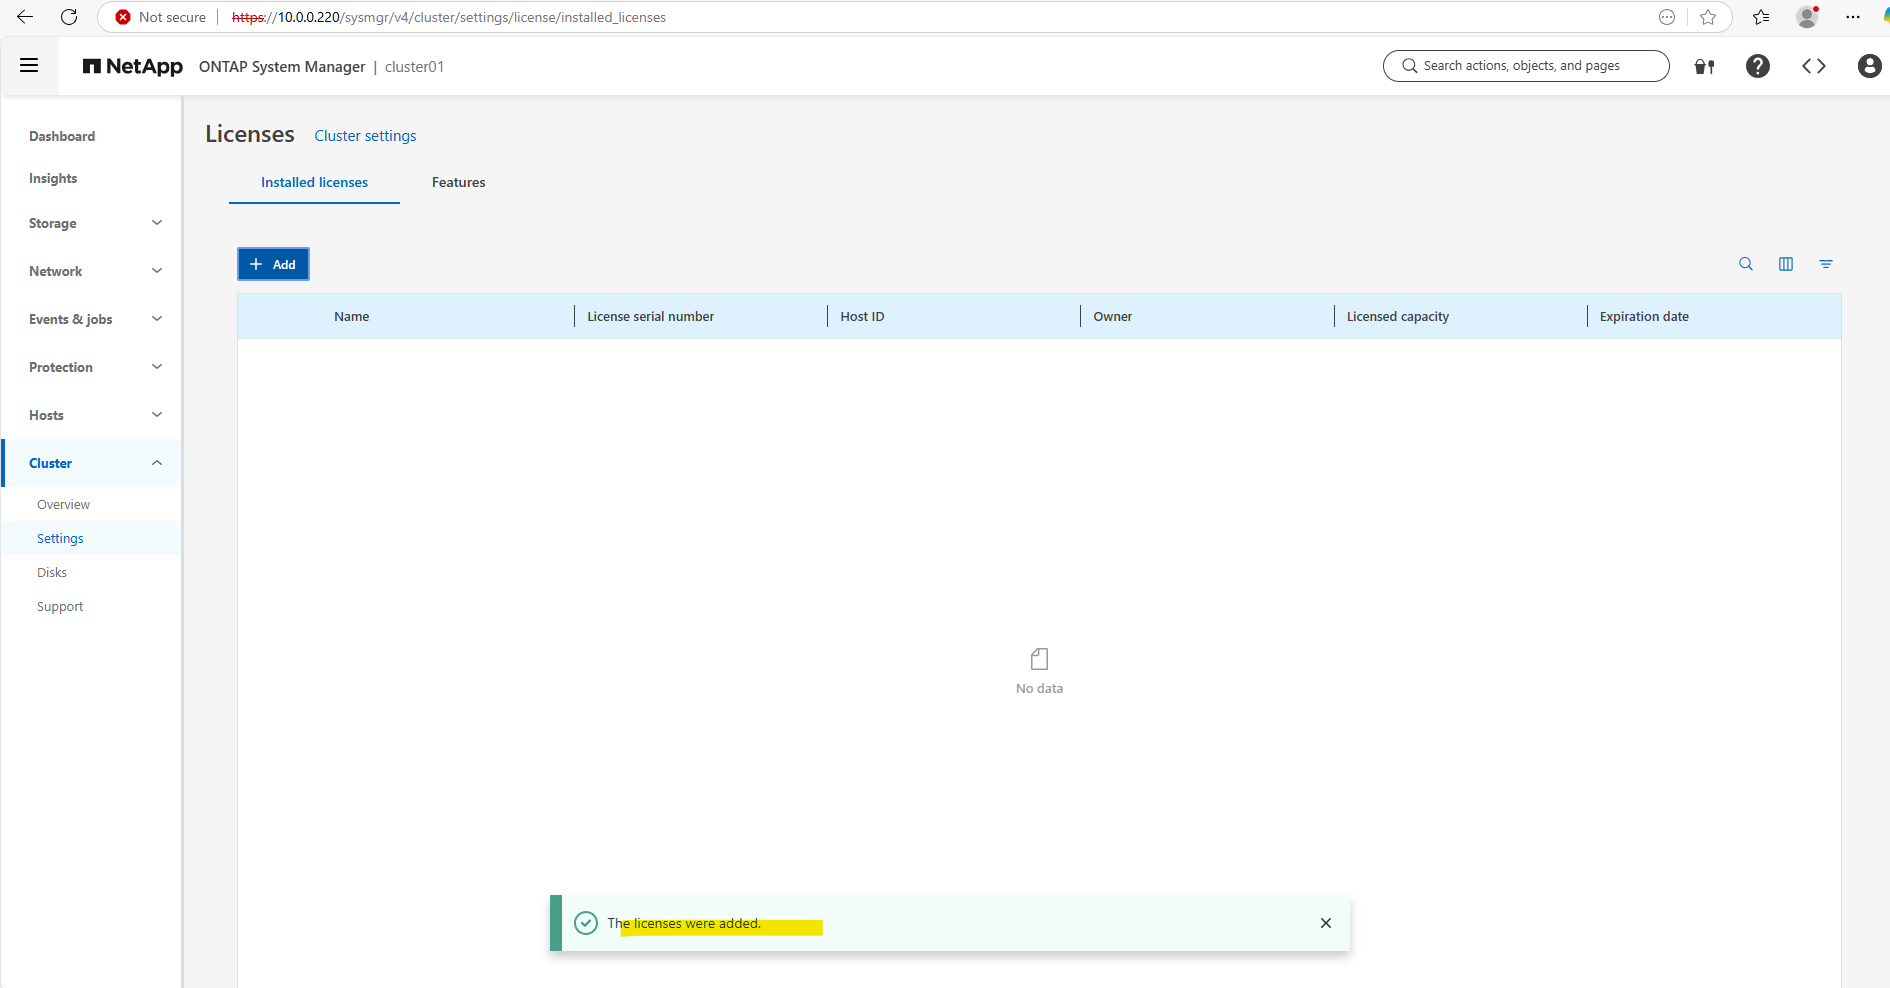
Looks good.

cluster01::> system license show
ONTAP simulator includes non-expiring licenses for lab use.
In part 2 we will building the foundational storage setup: aggregates, Storage Virtual Machines (SVMs), logical interfaces (LIFs), and volumes.
Once a volume is created on a NetApp system, it can be exposed over various protocols depending on your use case.
You can export it via NFS or share it using CIFS/SMB for file-based access, or present it as block storage using iSCSI or Fibre Channel, ideal for applications like shared datastores in vSphere or file servers.
Links
NetApp ONTAP 9 simulator download and support
https://kb.netapp.com/on-prem/ontap/Ontap_OS/OS-KBs/Where_can_the_NetApp_ONTAP_9_Simulator_be_downloadedONTAP 9 Documentation
https://docs.netapp.com/us-en/ontap/index.htmlONTAP licensing overview
https://docs.netapp.com/us-en/ontap/system-admin/manage-licenses-concept.html#licenses-included-with-ontap-one