Cheat Sheet NetApp ONTAP – Commands used in day-to-day operations
Working with NetApp ONTAP often means jumping between clusters, SVMs, LIFs, and shares while keeping an eye on performance and troubleshooting access.
Over time, certain commands become part oConnecting to the AutoSupport endpoint the daily routine, whether you’re checking CIFS configurations, verifying volume security, or confirming network failover groups.
To save time and avoid digging through documentation, I’ve pulled together a compact cheat sheet of ONTAP commands I use most frequently in day-to-day operations.
I will update this post on a regular basis.
- ONTAP Cluster
- Storage Virtual Machines (SVMs)
- Volumes
- ONTAP Volume Management: Automating Growth and Shrinkage (Autosize)
- Qtrees
- CIFS (SMB) Shares
- List all CIFS Server (SVMs enabled for CIFS) and their NetBIOS Name
- List all CIFS Shares for a specific SVM
- Determine Owner and Permissions for a given CIFS Share (ONTAP share-level access)
- Determine Owner and Permissions for a given CIFS Share (File/Folder-level NTFS Permissions on the Volume itself set by the OS e.g. Windows Explorer or icacls)
- Displays the Security Style configured for a specific Volume (UNIX, NTFS or Mixed)
- Creating a new Volume and hidden CIFS Share
- Configure NFS Export on ONTAP
- Check NFS (CIFS/SMB optional) Access
- Reverting a LIF to Its Home Port (here Management Interface LIF)
- From Share to Volume: Check Usage and Expand Capacity in ONTAP
- List CIFS shares on the SVM
- Determine which volume is mounted for your Share
- Check current Volume Usage
- Verify the aggregate has enough free space before extending Volume
- Extend the volume
- Check volume size and available space again
- Optional (Recommended): Enable autogrow
- CIFS and NFS Share Capacity = Volume Capacity
- Snapshot Reserve: How Much Space Do Snapshots Really Need?
- Networking Troubleshooting in ONTAP
- Diagnostic Privilege Mode and Systemshell
- Types of SVMs in an ONTAP cluster
- Troubleshooting
- Links
ONTAP Cluster
The graceful shutdown of a ONTAP cluster shown below usually and hopefully is not a day-to-day operation, but in my case for my vSphere lab environment (running on three notebooks, my ESXi hosts) where I will run ONTAP as simulator, this is indeed a day-to-day operation because of shutting down the notebooks (ESXi hosts) when not needed to test.
More about setting up your own NetApp ONTAP 9 lab, you can also read my following post.
And more about how to install the ESXi image on notebooks they will just provide USB NICs as usual these days, you can read my following post.
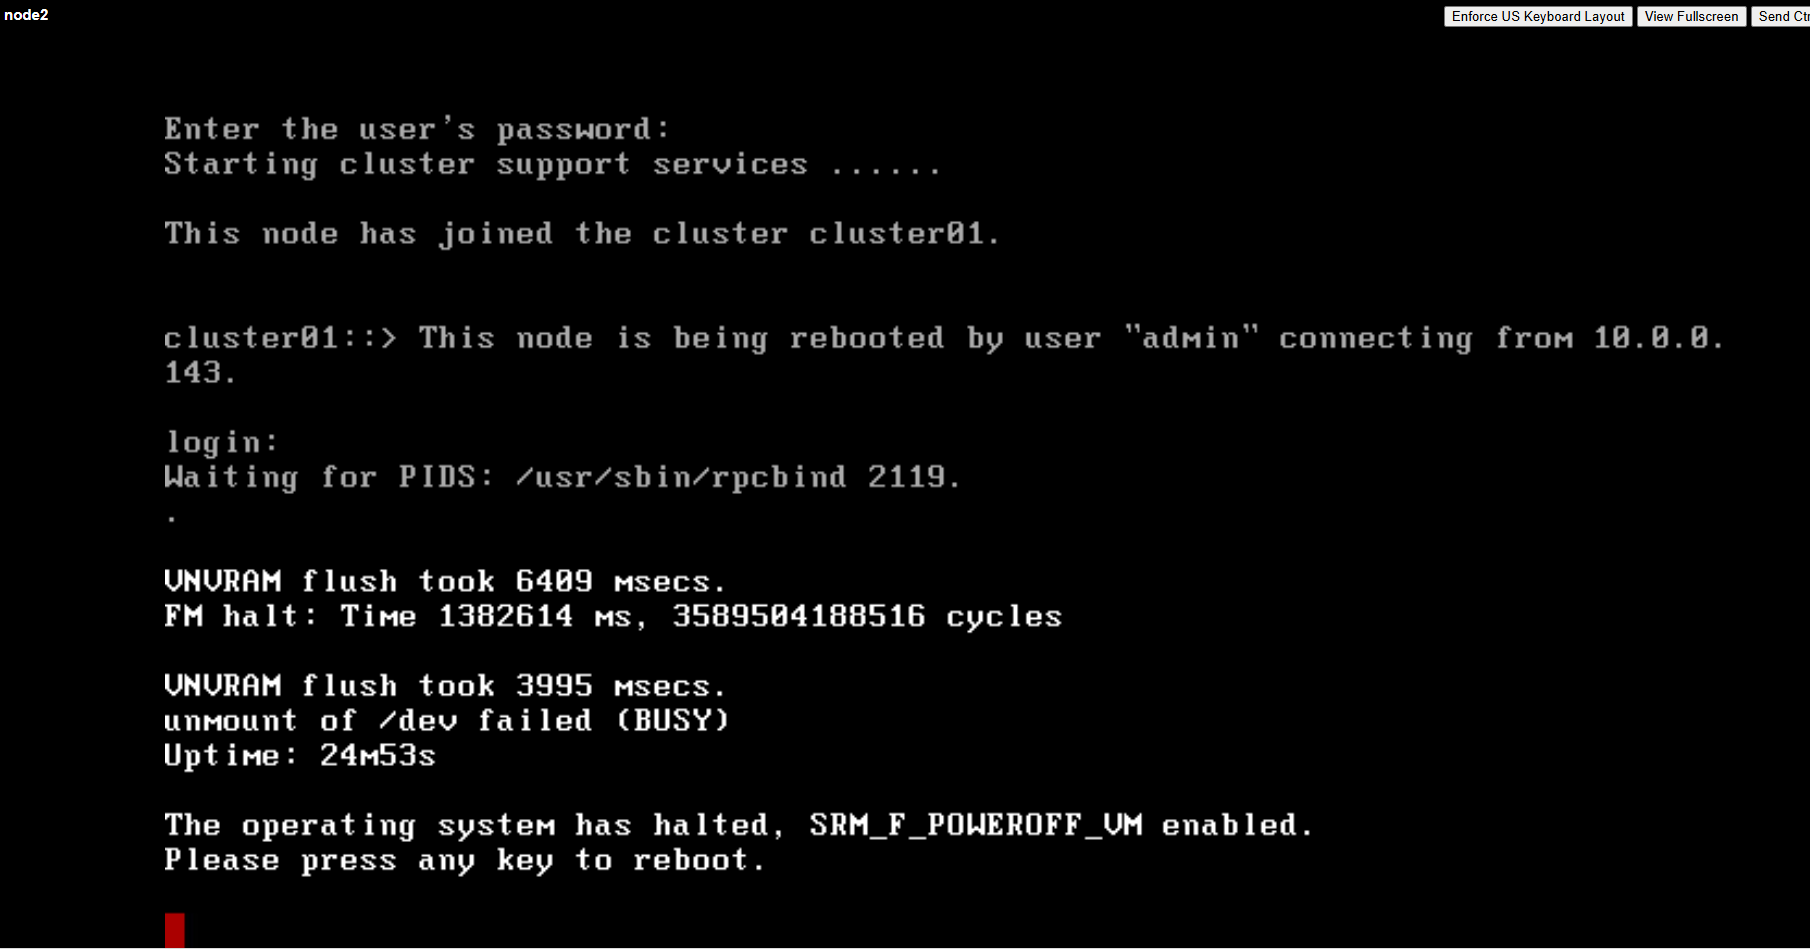
Graceful Shutdown Procedure for NetApp ONTAP Cluster
Must be done from the Cluster Admin CLI (SSH or console)
!! Note !!
Just shutdown or powering off the simulator virtual machines by using the vSphere client can crash them, so first perform a graceful shutdown by using the Cluster Admin CLI like shown below.
Using the command below shuts down all nodes in a single coordinated operation, rather than issuing separate halt commands per node.
This ensures a clean cluster-wide shutdown without triggering unnecessary takeover logic or partial states.
cluster01::> system node halt -node * -inhibit-takeover true -ignore-quorum-warnings true
Alternatively, each node can also be shut down individually by using the following command.
This approach works as well, but requires running the command separately for each node and offers no advantage over using the wildcard method for a full cluster shutdown.
When using SSH first check which node owns the Cluster Management LIF (shown below) and then first shutdown the node which not owns it, otherwise you will get disconnected from the SSH console before you are able to shutdown the second node.
cluster01::> system node halt -node <node-name> -inhibit-takeover true -ignore-quorum-warnings true

cluster01::> system node halt -node cluster01-01 -inhibit-takeover true -ignore-quorum-warnings true
cluster01::> system node halt -node cluster01-02 -inhibit-takeover true -ignore-quorum-warnings true
If you’re shutting down a 2-node ONTAP simulator, you still must halt both nodes via CLI before powering off the VM in vSphere or your hypervisor.
We can now finally powering off the VM.
To reboot instead of shut down:
system node reboot -node * -inhibit-takeover true -ignore-quorum-warnings true
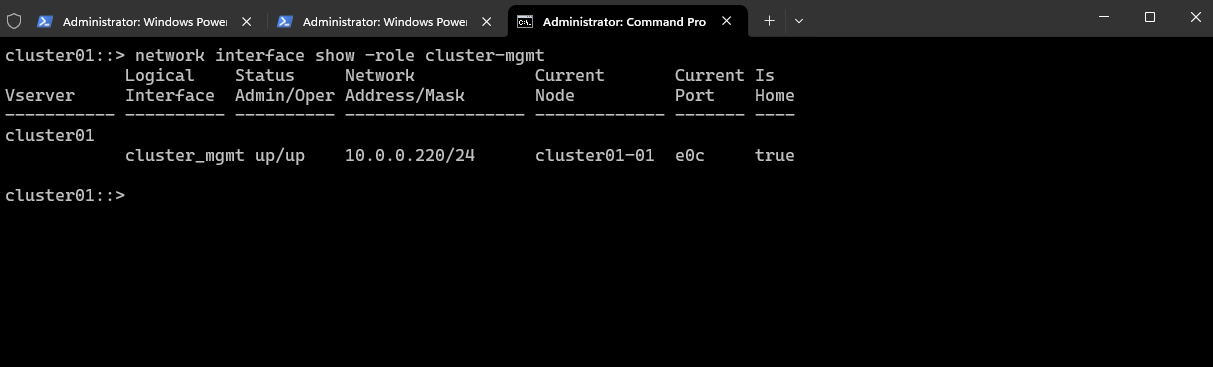
Determine which Node owns the Cluster Management LIF (IP Address)
Show Cluster Management LIF and Owner Node.
cluster01::> network interface show -role cluster-mgmt
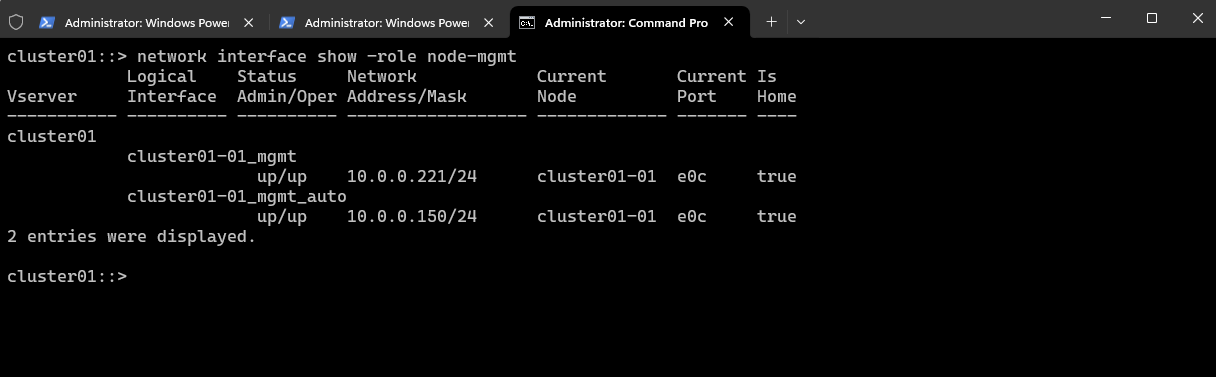
To verify the node management LIFs.
cluster01::> network interface show -role node-mgmt
Check current Date and Time
cluster01::> cluster date show

# Show NTP configuration
cluster01::> cluster time-service ntp server show
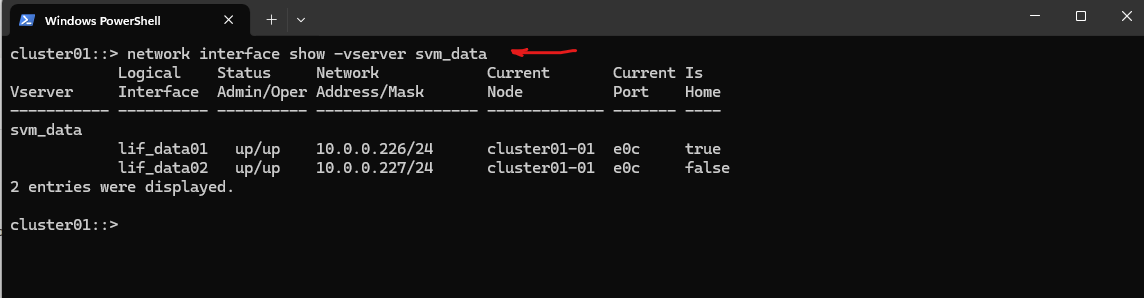
Determine on which Node a specific SVM is currently hosted and running on
In NetApp ONTAP, an SVM (Storage Virtual Machine) can be hosted on any node in the cluster, but its data LIFs (logical interfaces) determine which node (and port) client traffic actually flows through.
We can check on which node a specific SVM is running on (i.e., where its LIFs are active).
Output will list all LIFs (data, management, intercluster, etc.) with Home Node (the node where the LIF is supposed to live), Current Node (the node where the LIF is actually running now) and Status (up/down).
The Current Node tells you on which node the SVM’s traffic is running.
cluster01::> network interface show -vserver svm_data
Restarting a Cluster Node
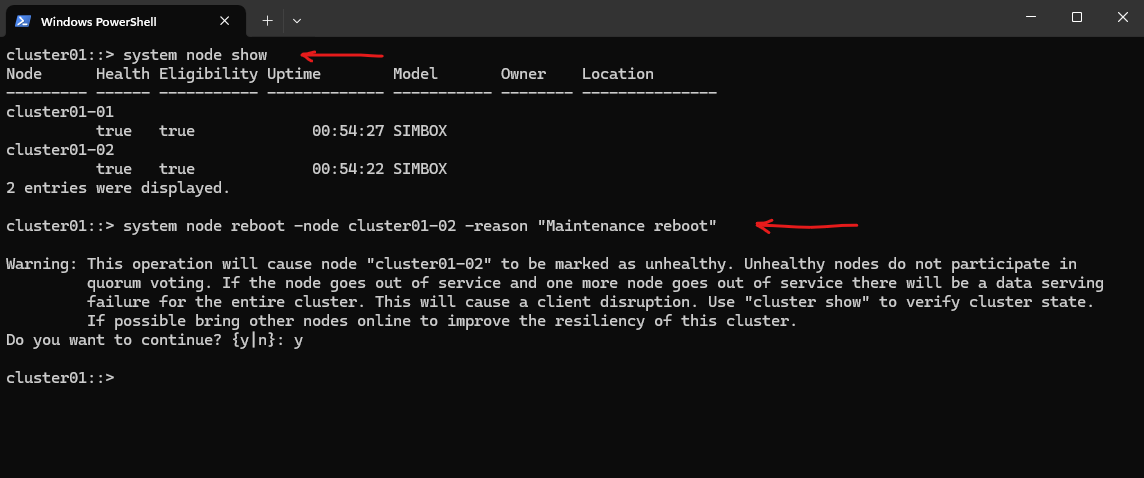
In NetApp ONTAP, restarting a cluster node is a sensitive operation because it affects the HA pair and potentially your storage availability. There are a couple of ways to restart a node safely.
Recommended for maintenance is a soft restart.
This triggers a graceful reboot, and HA will handle failover if necessary.
-node node1 → specify the node you want to reboot.
-reason → optional description that shows in logs.
# cluster01::> system node reboot -node node1 -reason "Maintenance reboot"

cluster01::> system node show
cluster01::> system node reboot -node cluster01-02 -reason "Maintenance reboot"
We can also force a reboot by running.
Only use if the node is unresponsive and normal reboot fails.
-force skips some checks and forces an immediate reboot.
cluster01::> system node reboot -node node1 -force -reason "Emergency reboot"

cluster01::> system node reboot -node cluster01-02 -force -reason "Emergency reboot"
If we are logged into the node directly (console), we can also run
Equivalent to the command system node reboot but only works if you have direct access.
HA failover still works automatically.
cluster01::> reboot
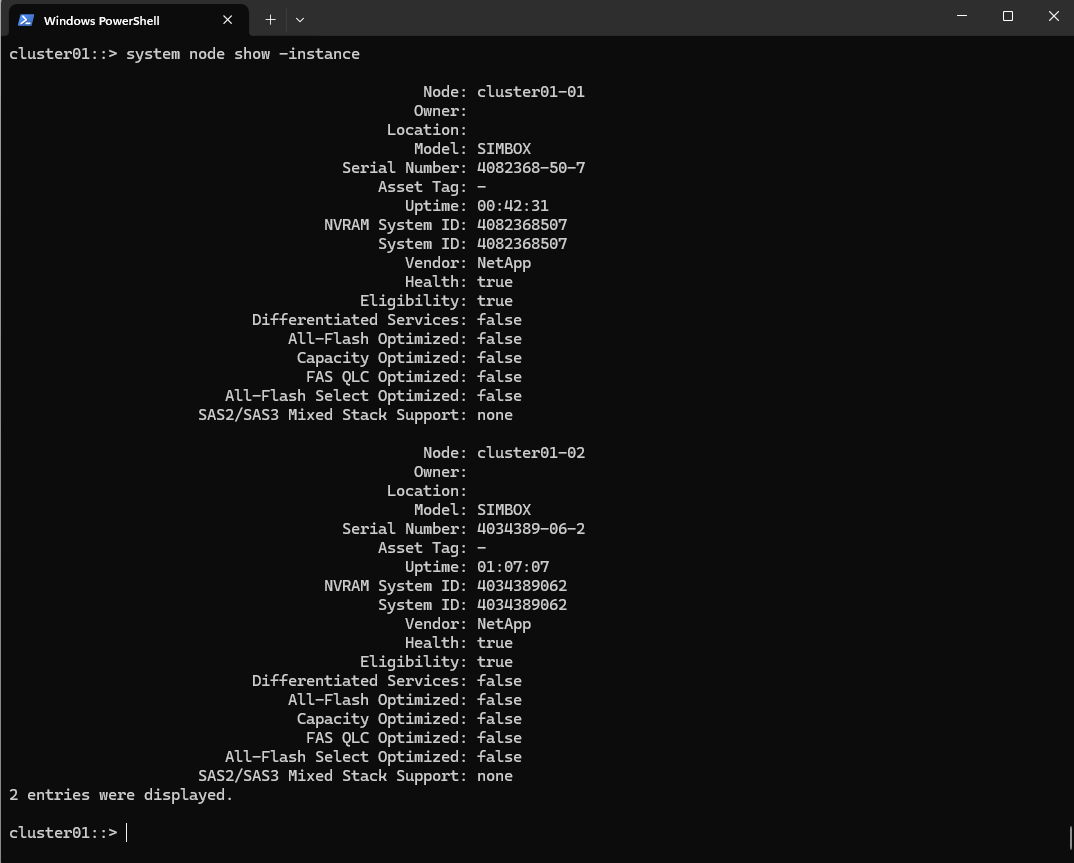
Display detailed Information about each Node in the Cluster
The following command will display detailed information about each node in the cluster.
cluster01::> system node show -instance
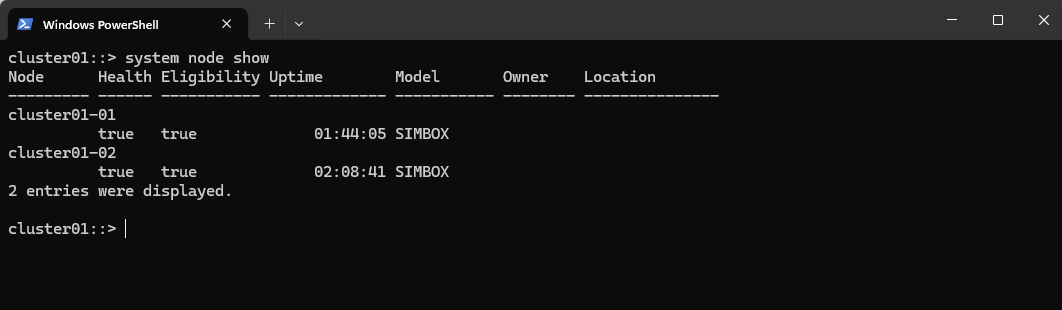
Show Cluster Uptime (Node Uptime)
In NetApp ONTAP, to see the uptime of a node or the cluster, you use the following commands.
cluster01::> system node show
cluster01::> system node show -instance

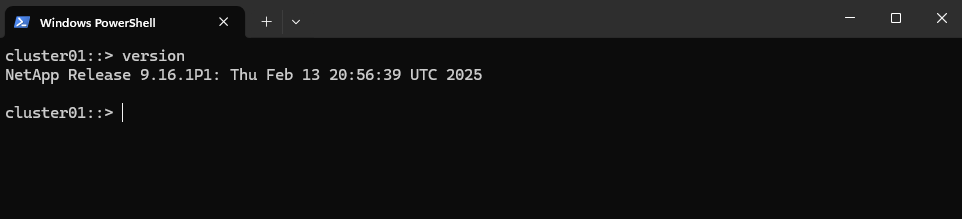
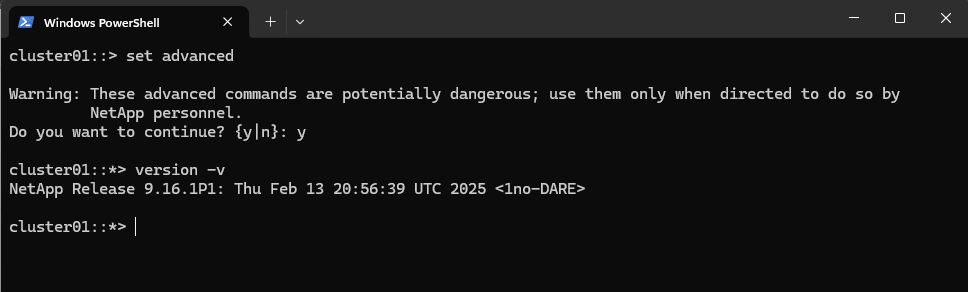
Check current ONTAP Version
We check the version with this command:
cluster01::> version
Or in in advanced mode (optional)
cluster01::> set advanced
cluster01::*> version -v

# To exit advanced mode in the ONTAP CLI, just switch back to admin mode:
cluster01::*> set admin
Storage Virtual Machines (SVMs)
Creating a new Storage Virtual Machine (SVM)
To create a new storage VM with security style unix (for NFS exports) execute.
cluster01::> vserver create -vserver svm_data -aggregate aggr_data01 -rootvolume root_vol_svm_data -rootvolume-security-style unix
To create a new storage VM with security style ntfs (for CIFS/SMB shares) execute.
cluster01::> vserver create -vserver svm_data -aggregate aggr_data01 -rootvolume root_vol_svm_data -rootvolume-security-style ntfs
To create a new storage VM with security style mixed (allows both UNIX and NTFS permissions to be applied) execute.
Even when an SVM uses the mixed security style, identity mapping may still be required in multiprotocol environments. While mixed mode allows both UNIX and NTFS permissions to exist on the same volume, ONTAP must still translate Windows and UNIX identities when users access the same data through different protocols.
Setting the SVM root volume (or volumes) to
mixedsecurity style makes sense when the same data is expected to be accessed regularly by both SMB and NFS clients, and you cannot strictly control which protocol creates the files first. In mixed mode, ONTAP assigns the effective security style dynamically based on the protocol that created the file or directory.If the object is created via SMB, it receives NTFS permissions. If it is created via NFS, it receives UNIX permissions.
cluster01::> vserver create -vserver svm_data -aggregate aggr_data01 -rootvolume root_vol_svm_data -rootvolume-security-style mixed
However, NetApp generally recommends avoiding mixed security style when possible, because it can make permission behavior harder to predict and troubleshoot. In most multiprotocol environments, it is usually better to choose a primary security model (often NTFS) and rely on name mapping so both SMB and NFS clients are evaluated consistently against that model.
In environments where SMB and NFS clients access the same data in roughly equal proportions, NetApp usually recommends using
ntfssecurity style and configuring UNIX → Windows name mapping.In this model, Windows ACLs remain the authoritative permission model, and when NFS users access the data, ONTAP maps the UNIX identity to a corresponding Windows user so that the NTFS permissions can be evaluated consistently.
Display the CIFS/SMB Server configuration for a specific SVM
The following command shows the CIFS/SMB server configuration for the SVM named svm_data.
cluster01::> vserver cifs show -vserver svm_data
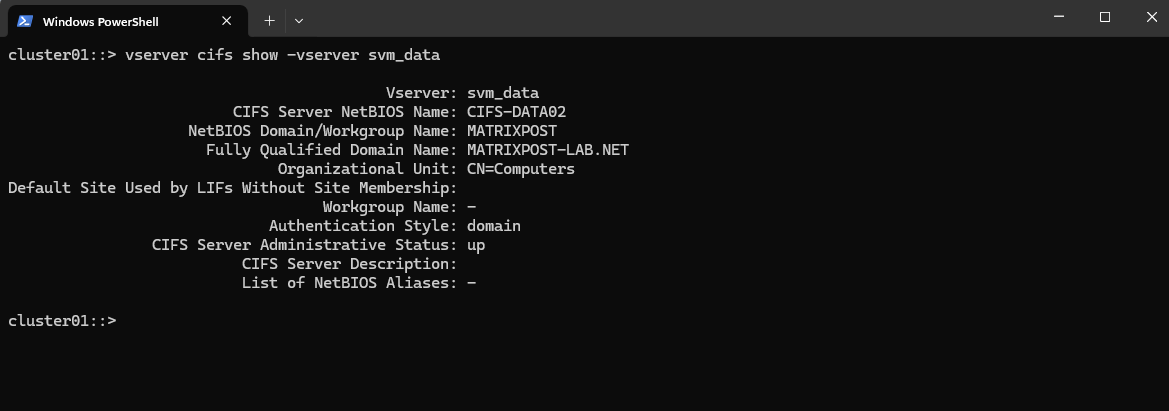
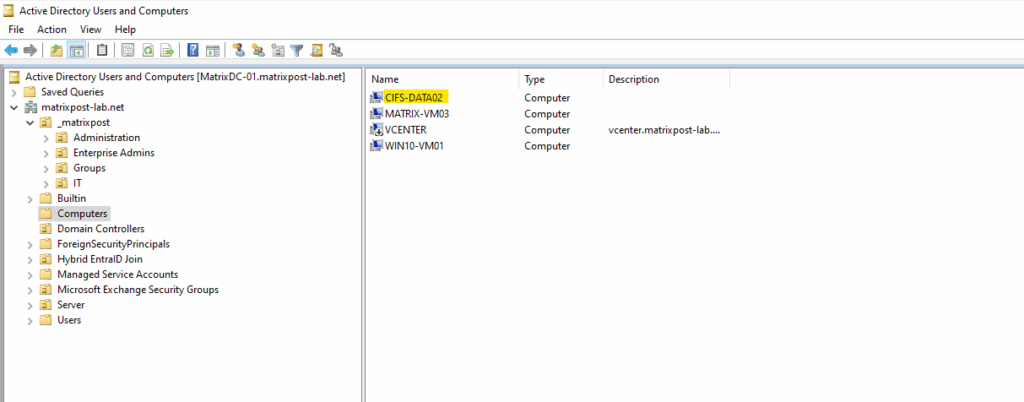
The CIFS server was joined to my AD and the default Computers container during enabling CIFS on the SVM by running the following command. More about in Part 4 under publishing CIFS/SMB shares.
cluster01::> vserver cifs create -vserver svm_data -cifs-server cifs-data02 -domain matrixpost-lab.net
For the CIFS/SMB share (NetBIOS/hostname) I was creating a DNS record in my lab environment which points to the IP address of the SVM we enabled CIFS on.

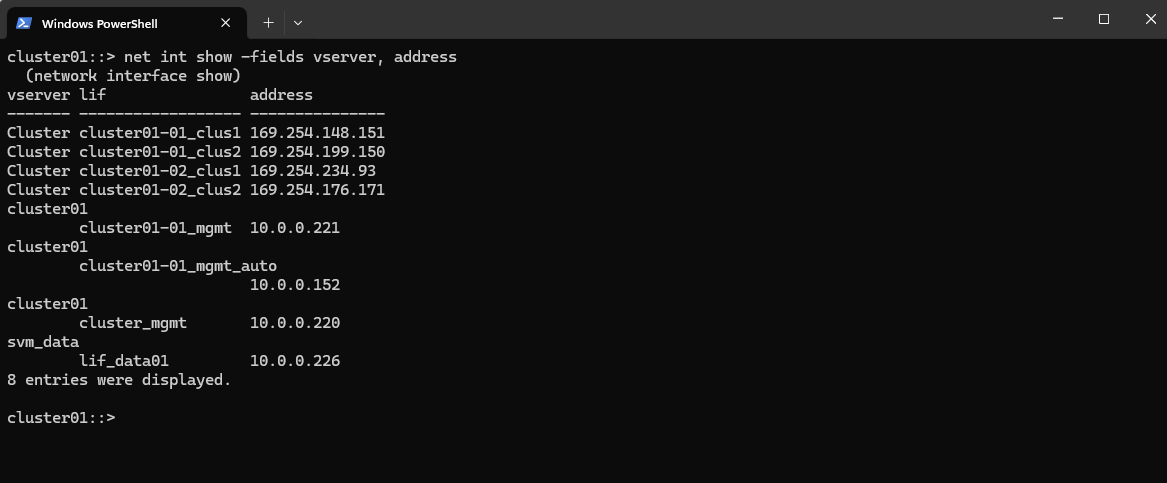
List all LIFs in the Cluster and show to which SVM they belong
This command will list all LIFs in the cluster but only display two pieces of information for each:
- Which SVM they belong to
- Their IP address
cluster01::> net int show -fields vserver, address
Volumes
Volumes are the primary storage containers in NetApp ONTAP.
They hold file systems or LUNs, define capacity limits, and are the unit where key features like snapshots, quotas, efficiency, and replication are applied.
This section summarizes the most important volume concepts and commands you need in day-to-day operations.
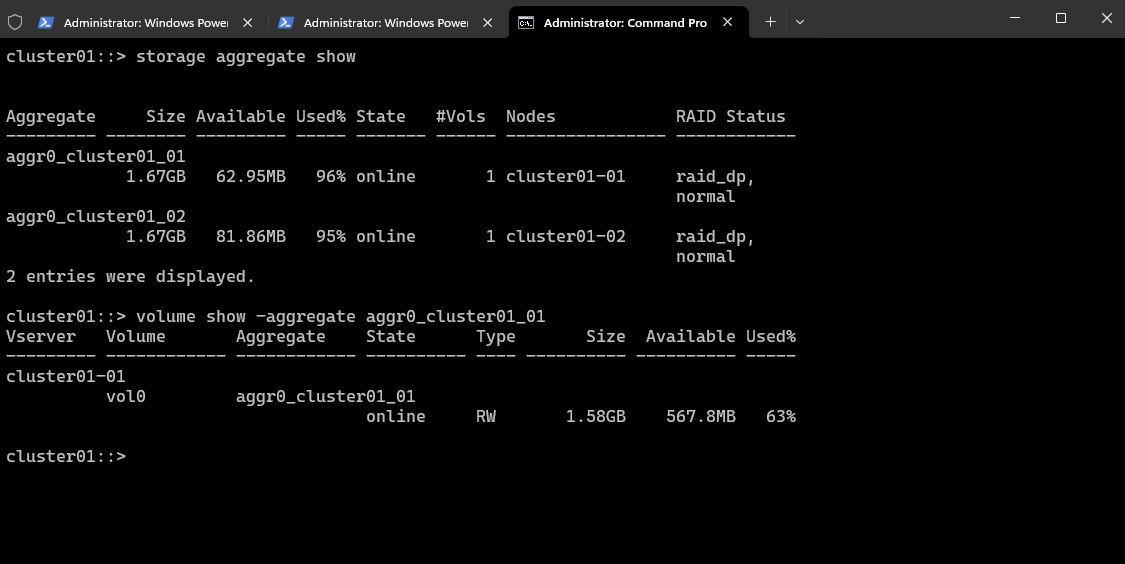
Show which volumes are in an aggregate.
volume show -aggregate <aggr_name>
cluster01::> volume show -aggregate <aggr_name>
cluster01::> volume show -aggregate aggr0_cluster01_01
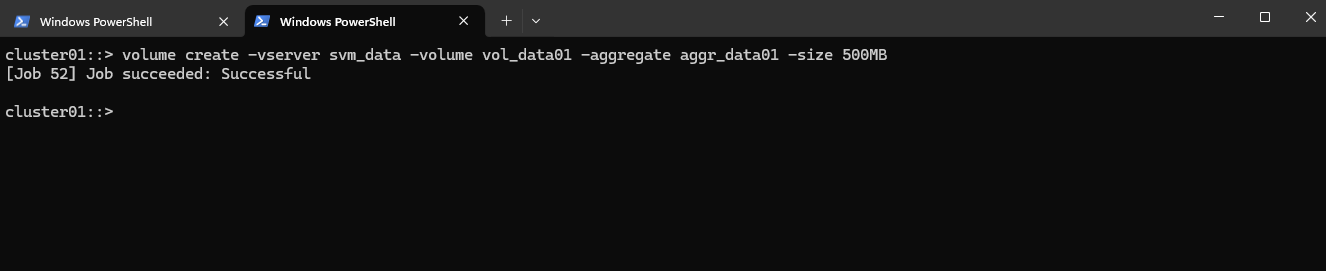
Create a Volume
A volume in NetApp ONTAP is a logical, mountable unit of storage that resides inside an aggregate, is served by a Storage Virtual Machine (SVM), and is accessible to clients via NFS, SMB, iSCSI, or FC.
Below we will create a 500MB data volume called vol_data01 on aggr_data01.
cluster01::> volume create -vserver svm_data -volume vol_data01 -aggregate aggr_data01 -size 500MB
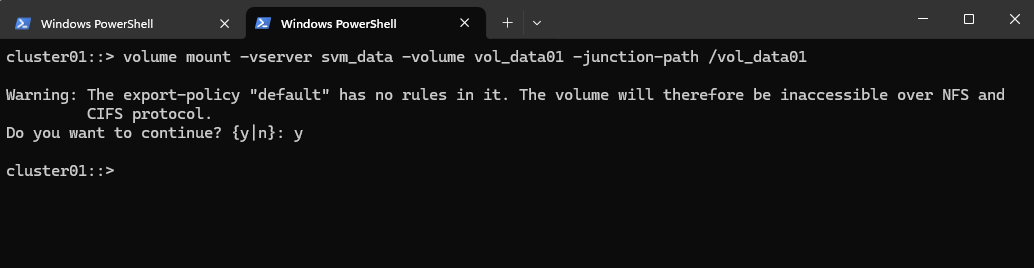
Mounting the Volume (Junction Path)
After creating a volume, it must be mounted into the SVM namespace before it can be accessed by NFS or CIFS clients.
Mounting a volume defines its junction path, which determines where the volume appears in the filesystem hierarchy.
Without this step, the volume exists but cannot be exported (NFS) or shared (CIFS) in NetApp ONTAP.
This command mounts the volume
vol_data01into the SVM namespace at the path/vol_data01, making it accessible to clients.
cluster01::> volume mount -vserver svm_data -volume vol_data01 -junction-path /vol_data01
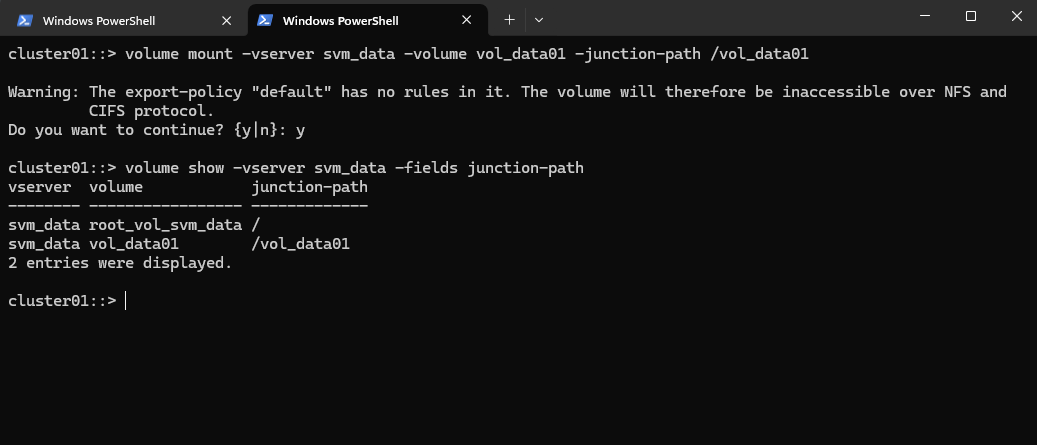
Checking the mount.
cluster01::> volume show -vserver svm_data -fields junction-path
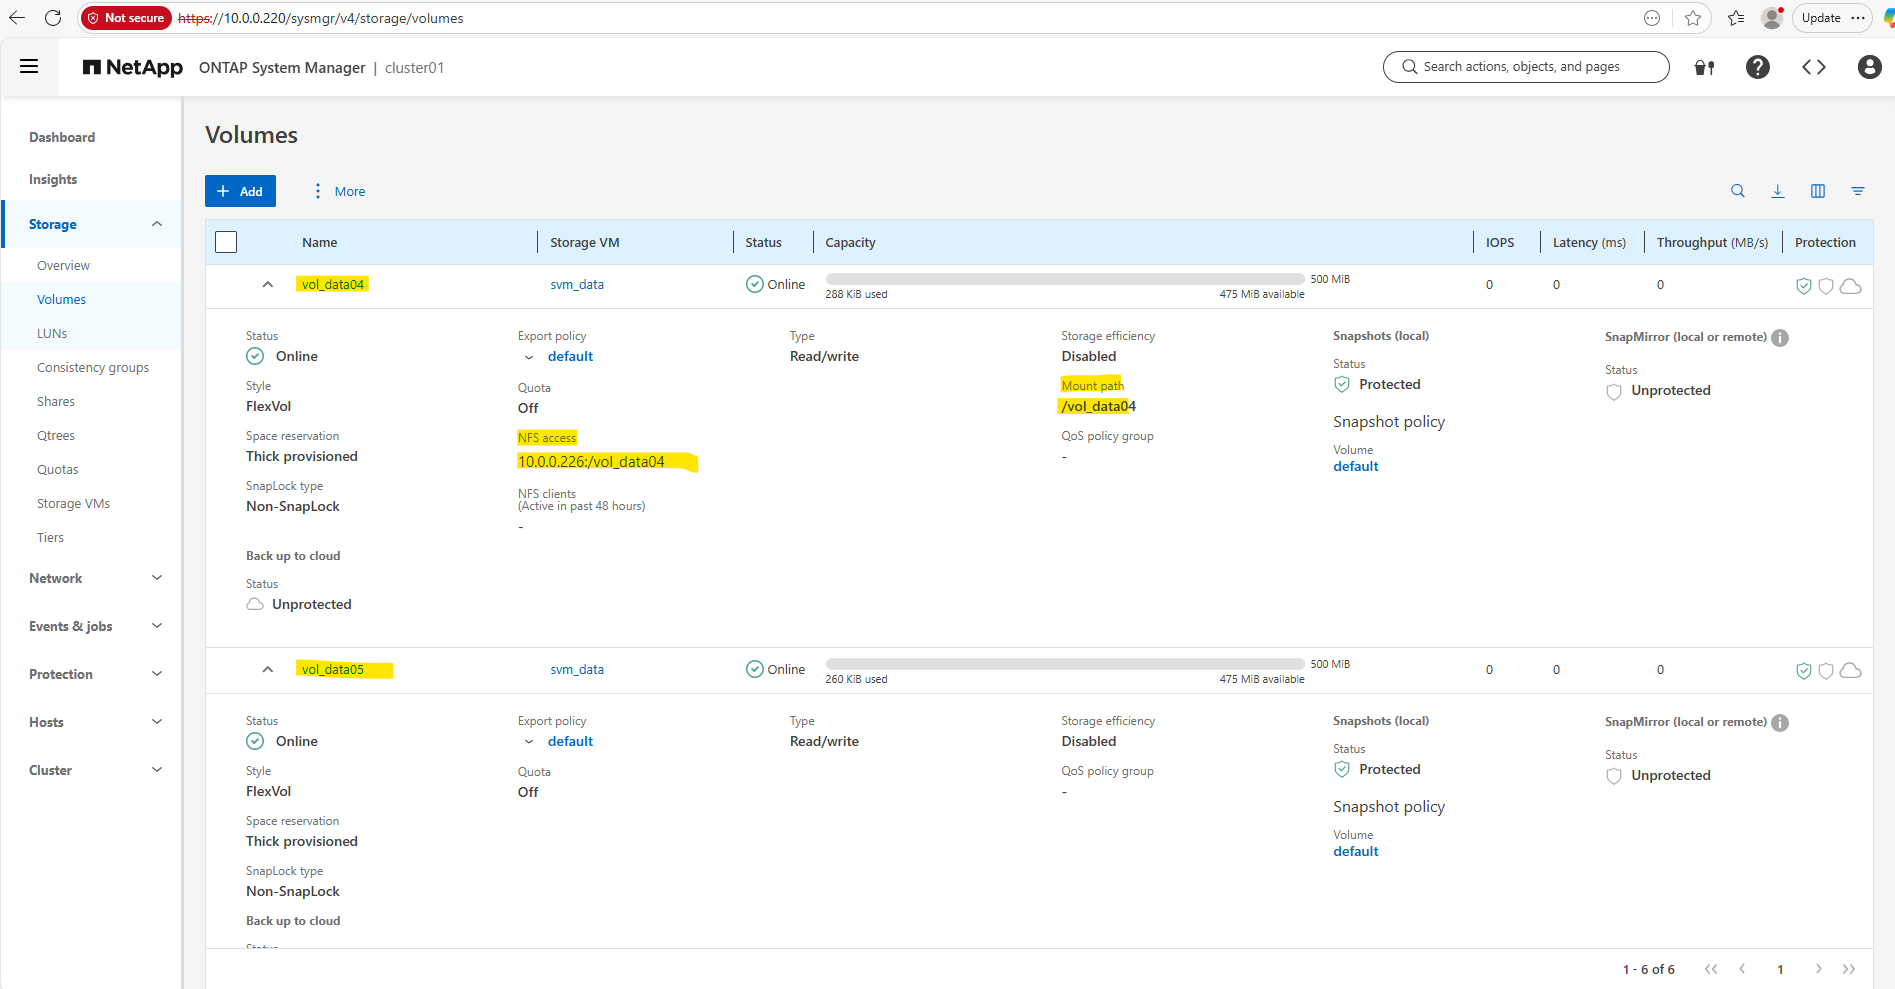
Below for example you see the difference in the NetApp WebGUI when a new created volume is already mounted and when not.
The volume named vol_data04 is already mounted by running the command below. The volume named vol_data05 so far was just created but not mounted.
# first it was created by running
cluster01::> volume create -vserver svm_data -volume vol_data04 -aggregate aggr_data02 -size 500MB

# then mounted by running
cluster01::> volume mount -vserver svm_data -volume vol_data04 -junction-path /vol_data04
Deleting a Volume
Before a volume can be deleted, it must be properly unmounted and taken offline to avoid data corruption or configuration conflicts.
ONTAP enforces this sequence to ensure that no clients or services are still accessing the volume. Once these steps are completed, the volume can be safely removed from the system.
To remove (delete) a volume via the ONTAP CLI, you must follow a specific order to avoid errors:
# list all volumes
cluster01::> volume show

# Unmount the volume
cluster01::> volume unmount -vserver svm_data  -volume vol_data05

# Take the volume offline
cluster01::> volume offline -vserver svm_data -volume vol_data05

# Delete the volume
cluster01::> volume delete -vserver svm_data -volume vol_data05
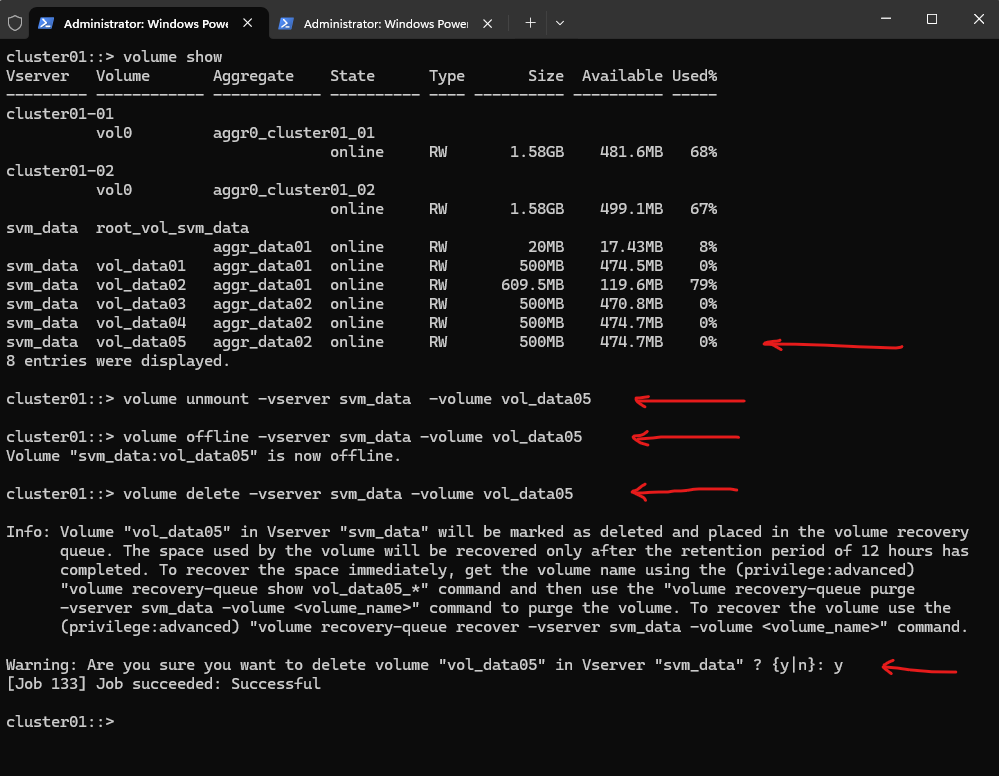
When a volume is deleted in ONTAP, it is not removed immediately, but moved into the volume recovery queue for a default retention period (usually 12 hours).
During this time, the volume can still be recovered if deleted by mistake, and the occupied space is only freed after the retention period expires or the volume is manually purged.
This behavior provides an additional safety layer against accidental data loss in NetApp ONTAP.
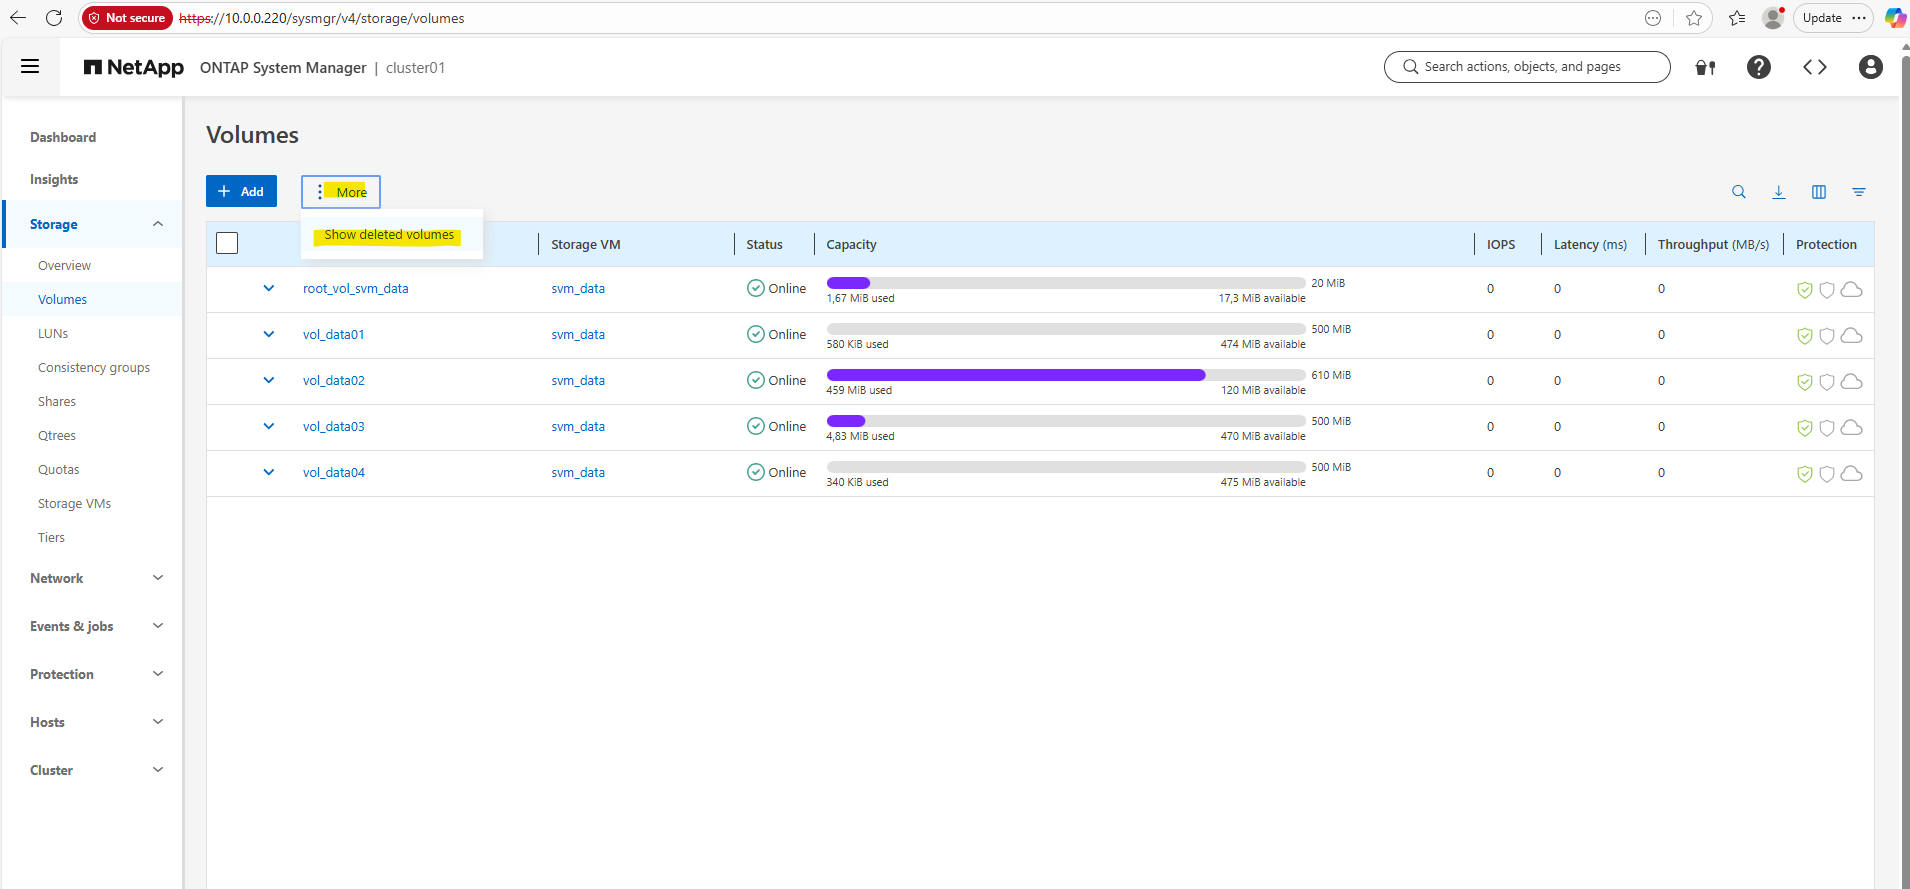
The deleted volumes which are still in the mentioned volume recovery queue, we can also see in the NetApp WebGUI under Storage -> Volumes -> More -> Show deleted volumes like shown below.
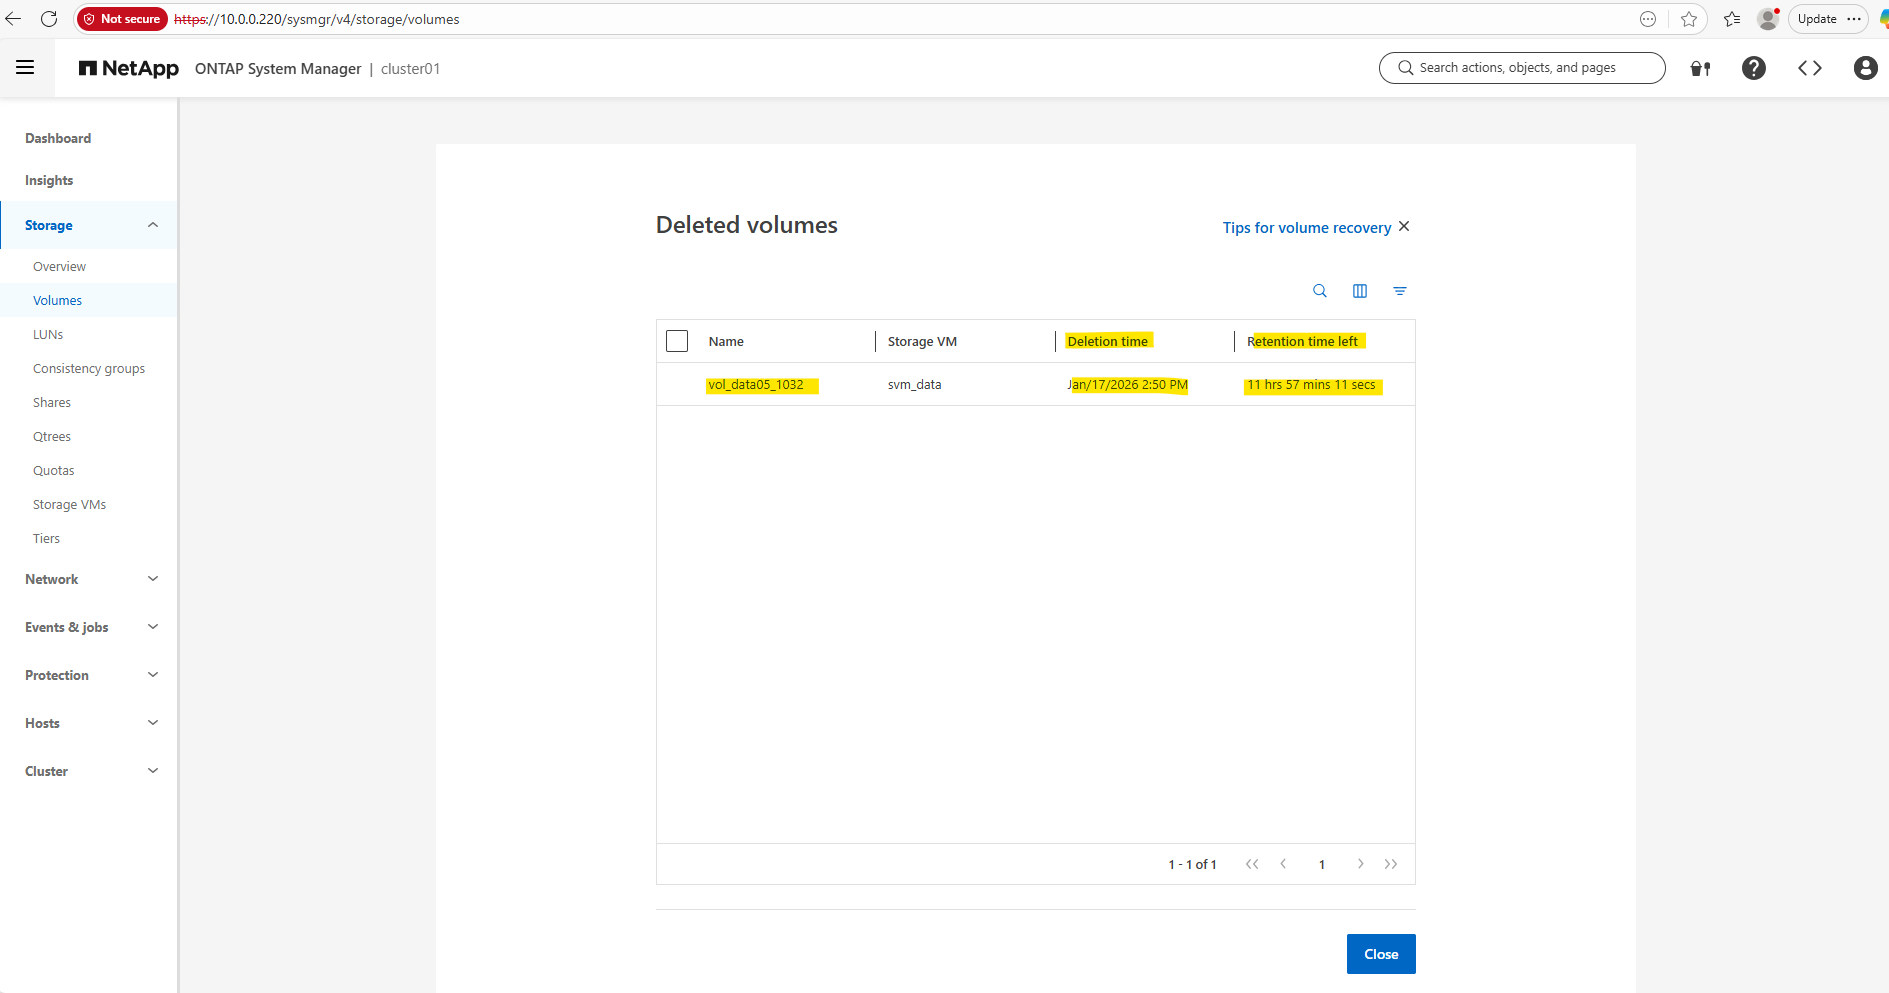
On the deleted volumes page we can see all deleted volumes which are sitll in the volume recovery queue.
For each deleted volume shown up here, we can see the deletion time and retention time left as shown below.
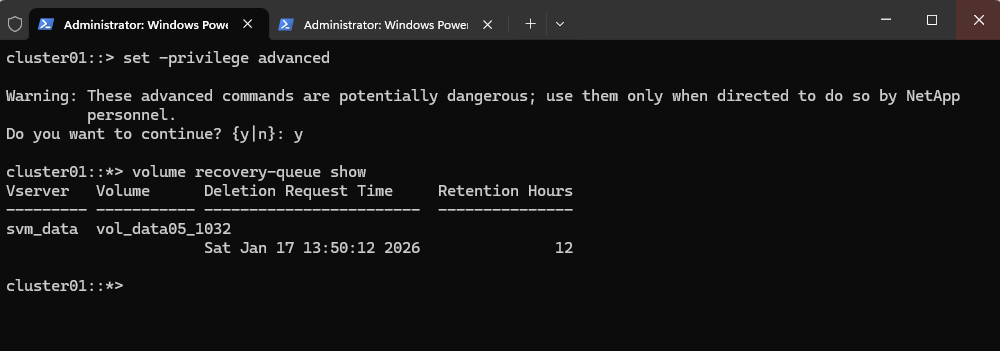
The same by using the CLI.
# switch the cli to the advanced mode
cluster01::> set -privilege advanced

# to return to normal mode (admin) run
cluster01::> set -privilege admin

cluster01::*> volume recovery-queue show
Permanently deleting a Volume (Recovery Queue Purge)
After a volume is deleted, ONTAP keeps it in the recovery queue for a limited time to allow recovery. To permanently remove the volume and immediately free the occupied space, it must be purged manually from the recovery queue. Once purged, the volume and its data are irreversibly deleted.
To purge it manually run:
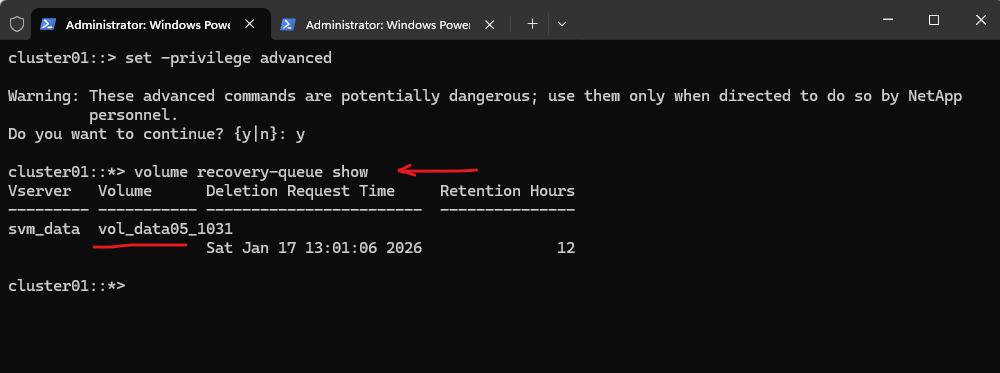
# switch the cli to the advanced mode
cluster01::> set -privilege advanced

# to return to normal mode (admin) run
cluster01::> set -privilege admin

cluster01::*> volume recovery-queue show
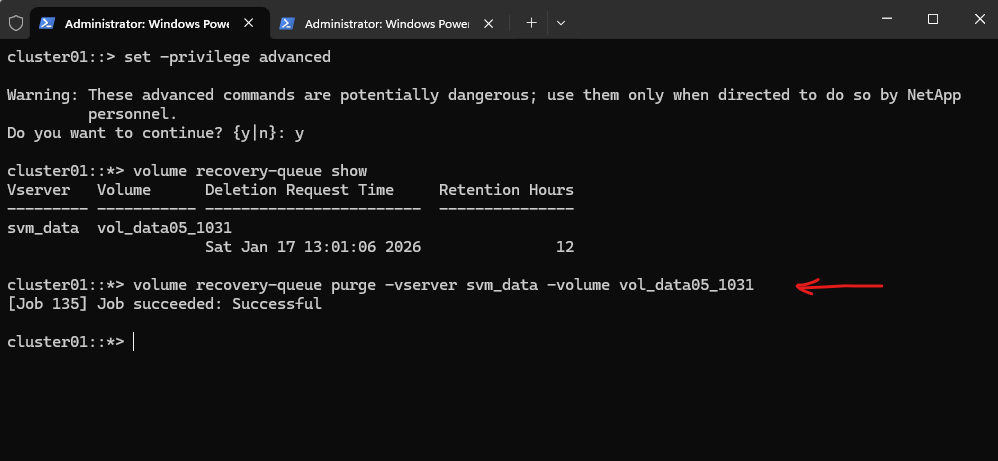
This command permanently removes the deleted volume vol_data05_1031 from the recovery queue and immediately frees the occupied storage space.
After this step, the volume cannot be recovered, as all metadata and data are fully erased from the system.
cluster01::*> volume recovery-queue purge -vserver svm_data -volume vol_data05_1031
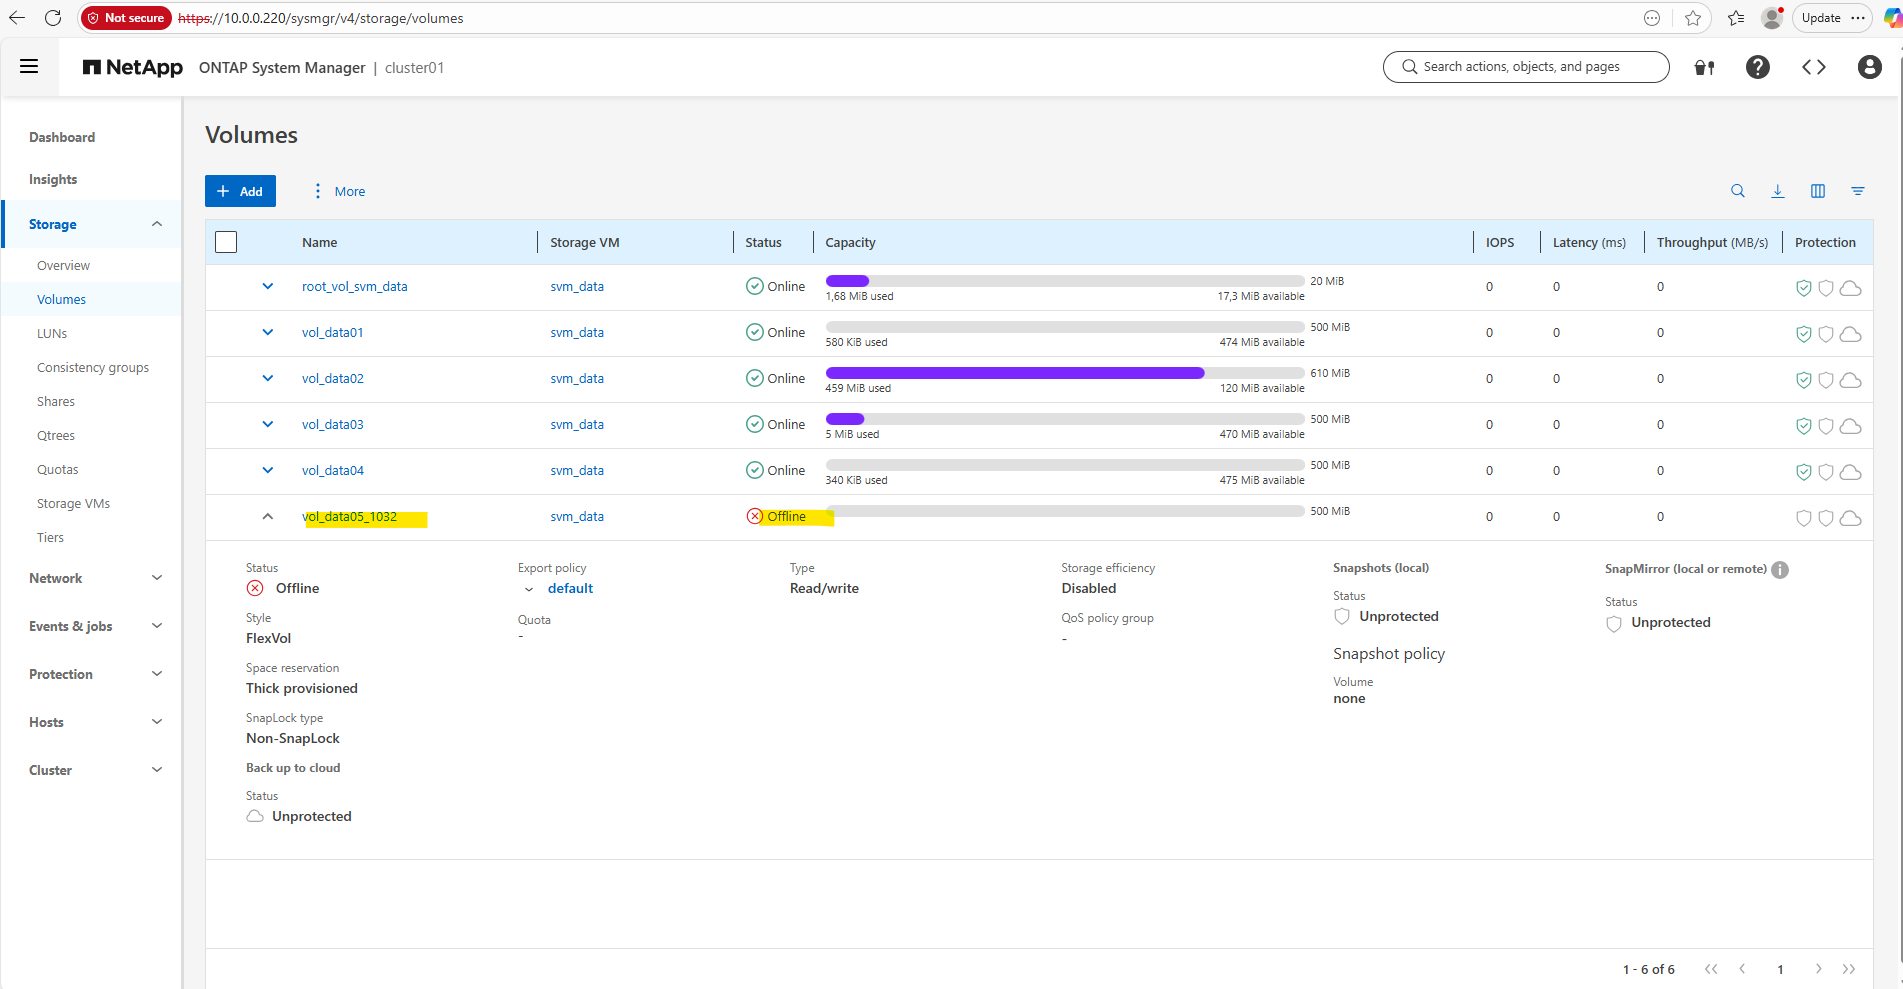
Recovering a deleted Volume from the Recovery Queue
When a volume is deleted in ONTAP, it is first placed in the recovery queue, allowing it to be restored within a limited retention period.
This provides a safety net against accidental deletions. As long as the volume has not been purged, it can be fully recovered with a single command.
# switch the cli to the advanced mode
cluster01::> set -privilege advanced

# to return to normal mode (admin) run
cluster01::> set -privilege admin

# List volumes in the recovery queue
cluster01::*> volume recovery-queue show

# Recover the volume
cluster01::*> volume recovery-queue recover -vserver svm_data -volume vol_data05_1032
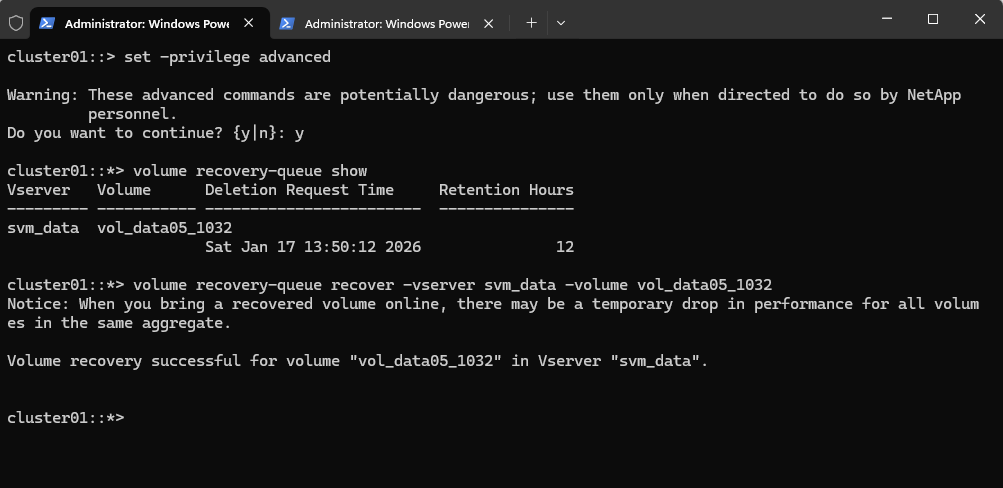
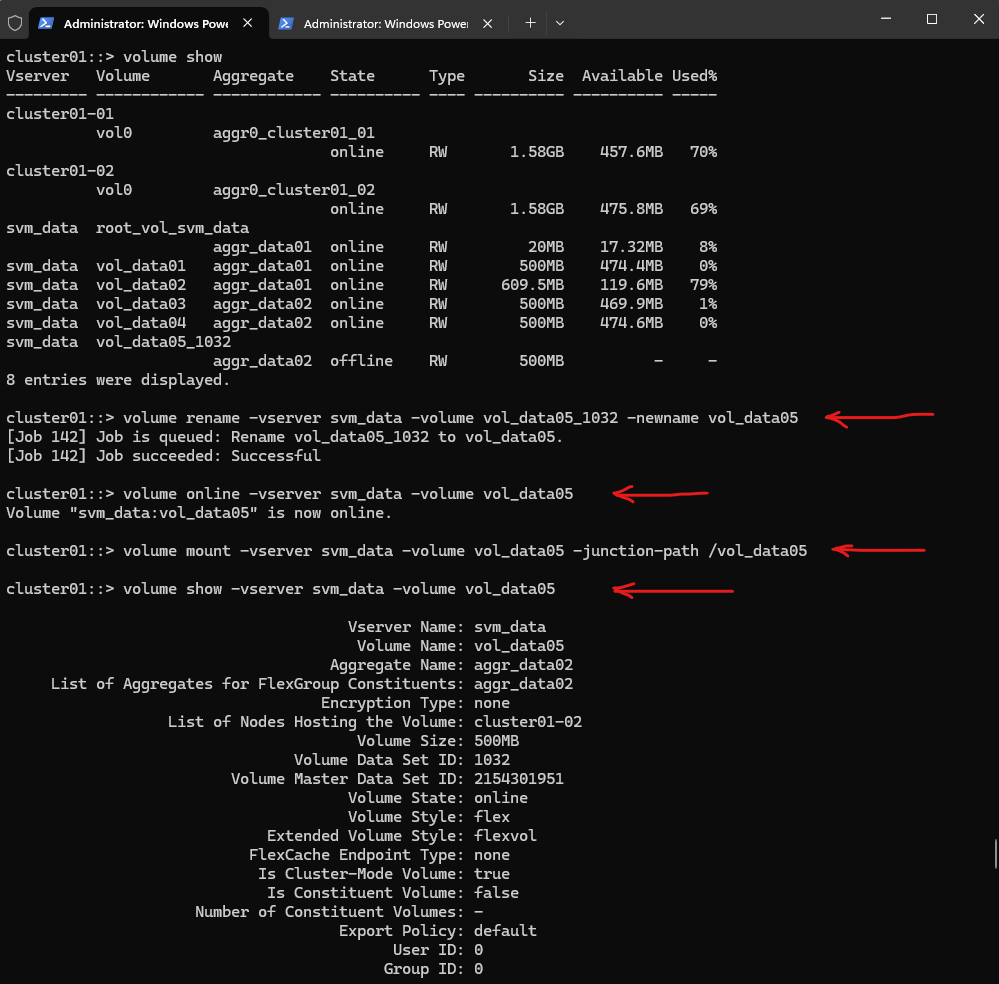
When a volume is recovered from the recovery queue, ONTAP restores it in a safe state:
- Offline
- Not mounted
- Data fully intact
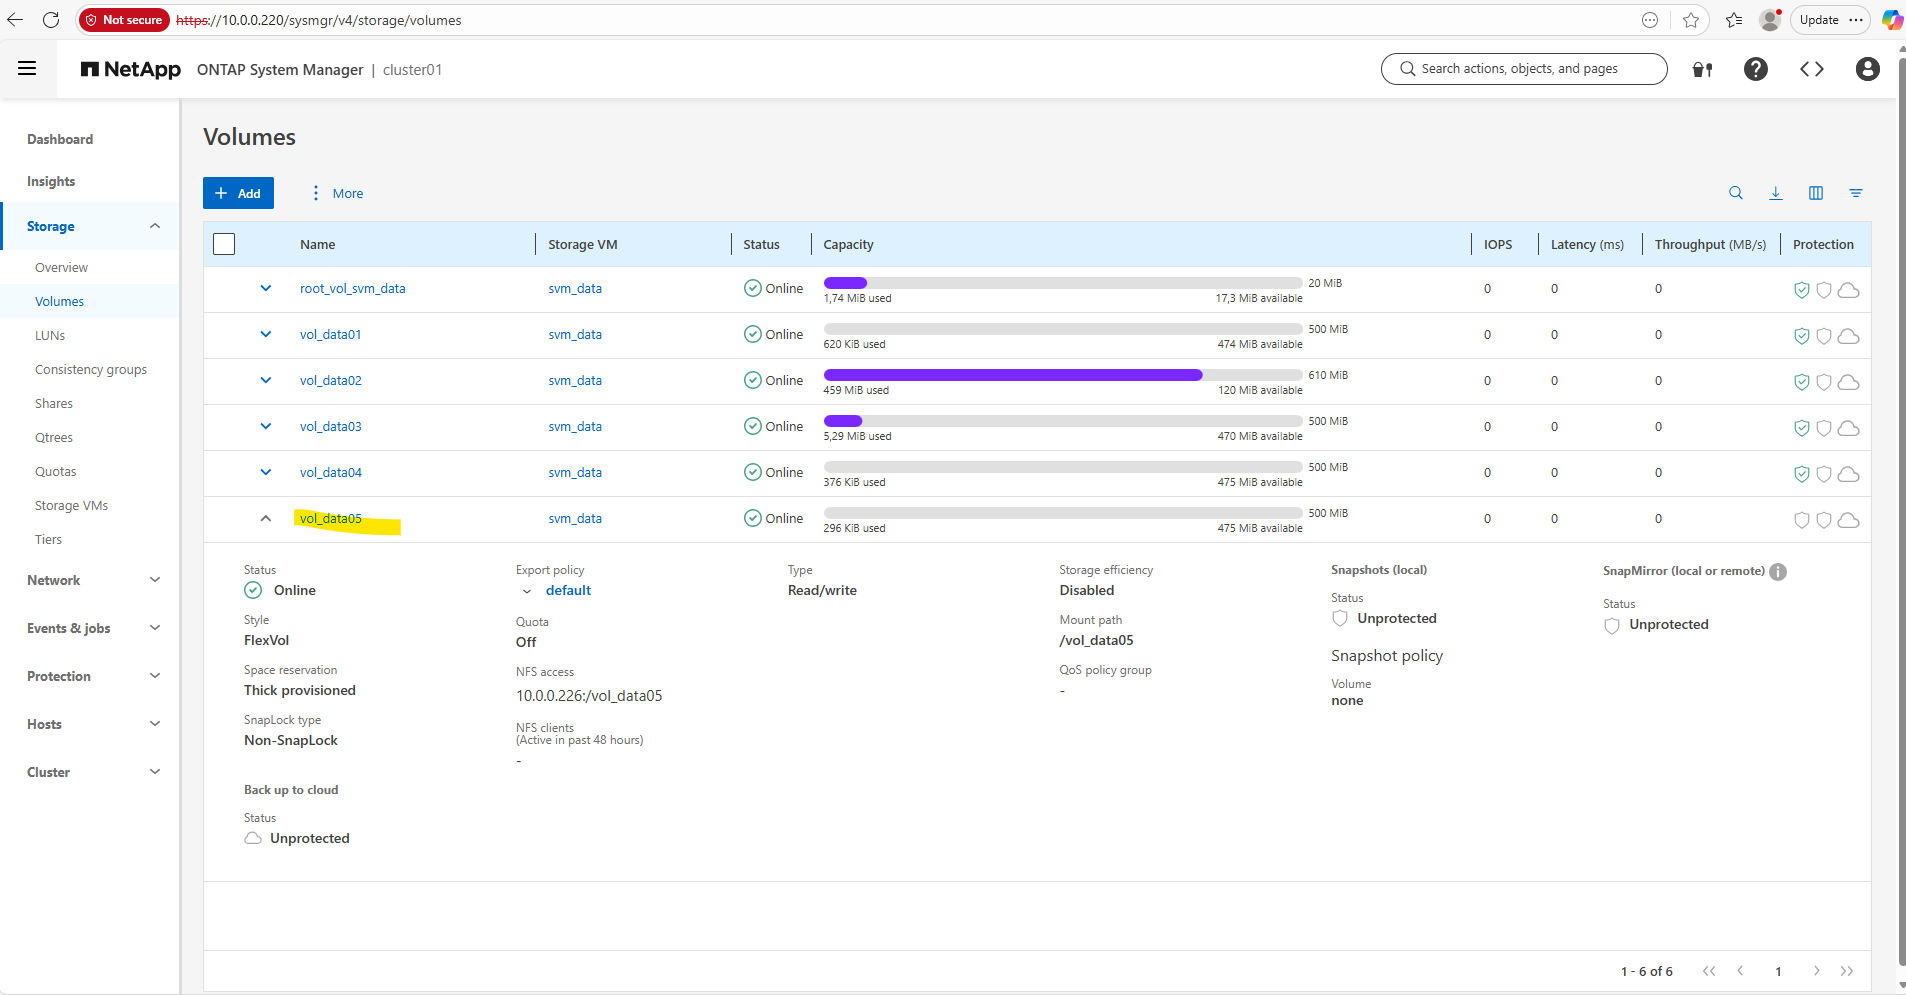
# rename the volume to its initial origin name
cluster01::> volume rename -vserver svm_data -volume vol_data05_1032 -newname vol_data05

# bring the volume online
cluster01::> volume online -vserver svm_data -volume vol_data05

# mount the volume (if required)
cluster01::> volume mount -vserver svm_data -volume vol_data05 -junction-path /vol_data05

# verify the volume
cluster01::> volume show -vserver svm_data -volume vol_data05
ONTAP Volume Management: Automating Growth and Shrinkage (Autosize)
One of the most powerful features in ONTAP for “set it and forget it” storage management is Autosize.
Instead of waiting for an aggregate to fill up or manually resizing volumes when they hit 90%, you can configure volumes to grow (and shrink) automatically based on predefined thresholds.
Use the following command which enables ONTAP volume autosizing, allowing a volume to automatically grow and shrink within defined limits based on space usage thresholds.
The
volume modify -autosize-*options configure ONTAP to dynamically resize a volume by monitoring utilization and automatically growing or shrinking it between defined minimum and maximum sizes.
-autosize-mode:grow(only grows),grow_shrink(grows and shrinks),off(disabled).-max-autosize: The maximum size the volume can reach (e.g.,200GB).-min-autosize: The minimum size the volume can shrink to (e.g.,50GB).-autosize-grow-threshold: Percentage of used space that triggers growth (e.g.,80%).-autosize-shrink-threshold: Percentage of used space that triggers shrinking (e.g.,60%).
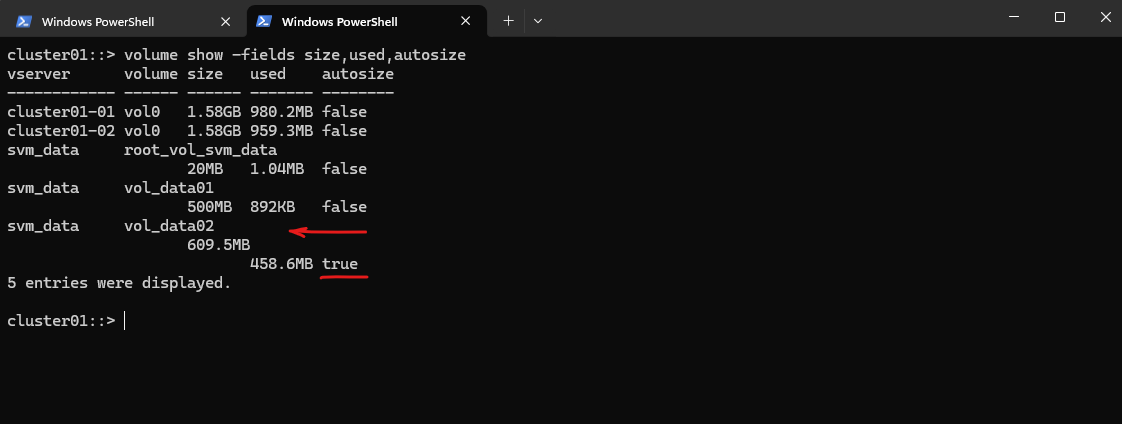
cluster01::> volume modify -vserver svm_data -volume vol_data02 -autosize-mode grow_shrink -max-autosize 1024MB -min-autosize 400MB -autosize-grow-threshold 80% -autosize-shrink-threshold 60%
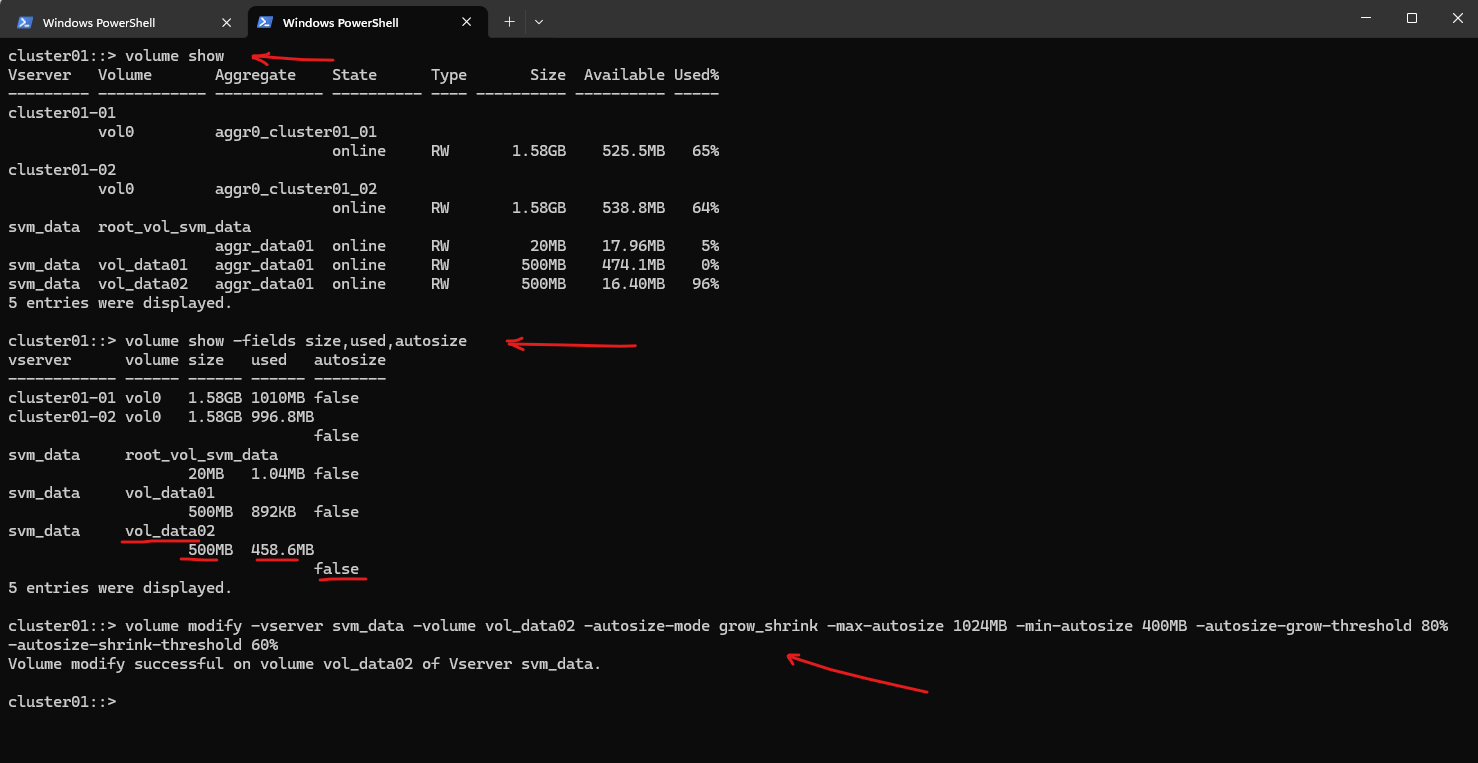
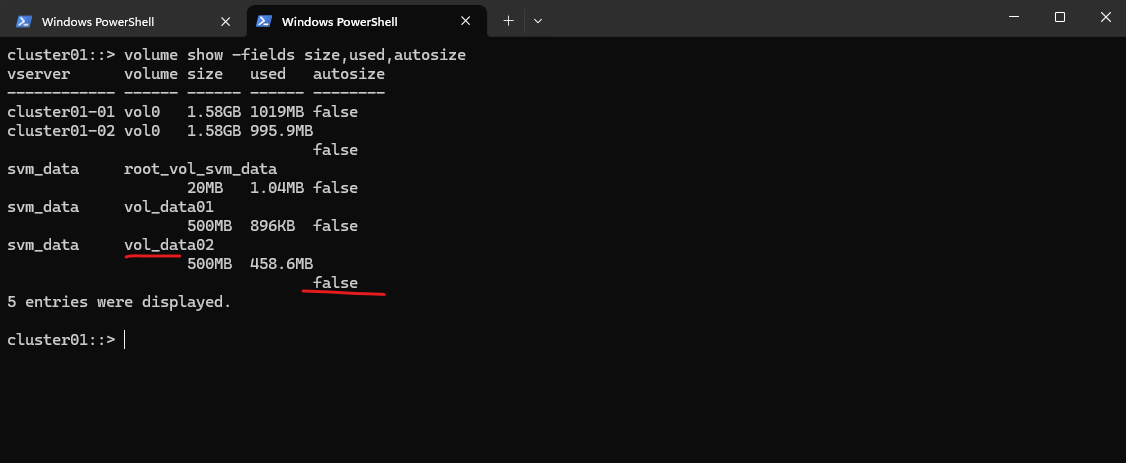
After running the command above, autosize is enabled and the volume was already automatically extended to currently 609.5 MB. (before it was fix 500 MB)
cluster01::> volume show -fields size,used,autosize
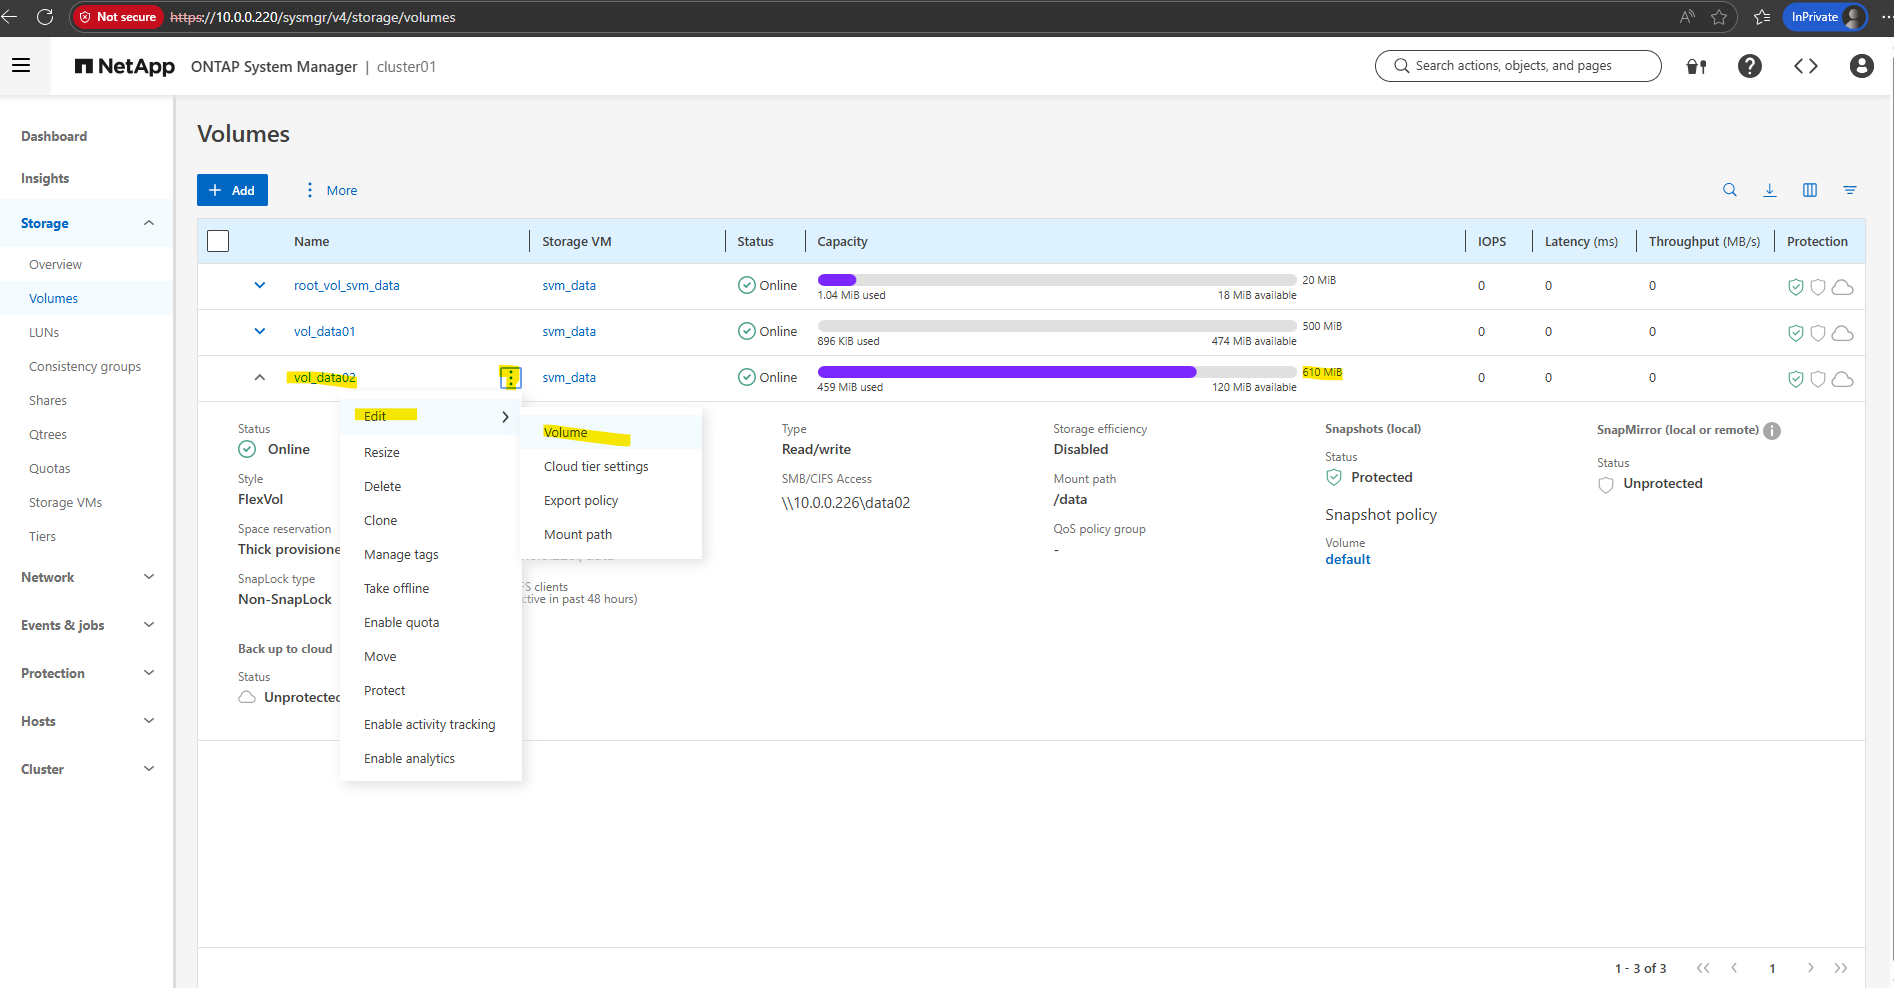
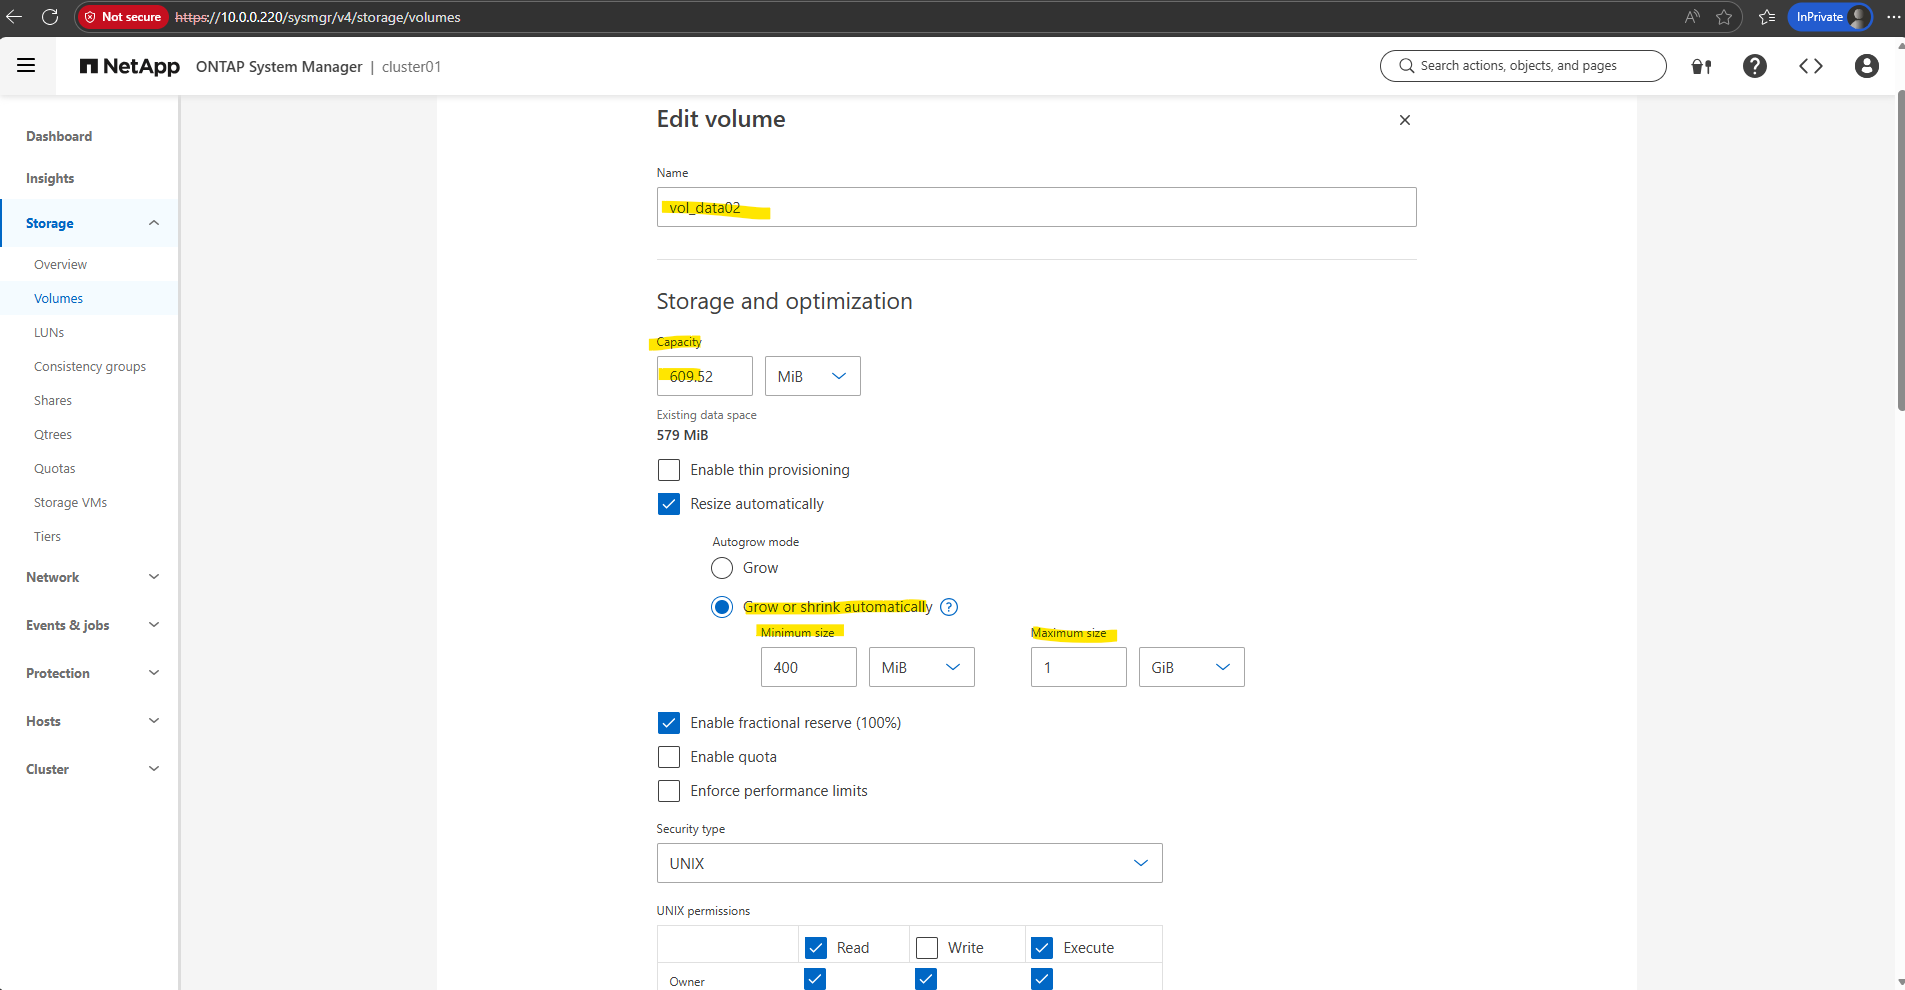
The new autosize settings will also shown up in the WebGUI.
To return a volume to its original manual state, you need to do two things: disable the autosize mode and, if necessary, manually reset the volume size to your preferred starting point.
The command below stops ONTAP from making any further automatic changes. It will stay at whatever size it currently is (e.g., your 609.5MB) until you change it.
By default, ONTAP volumes are created with
-mode off. When you set it tooff, ONTAP also clears the thresholds and increment settings you previously configured, effectively “cleaning” the policy.
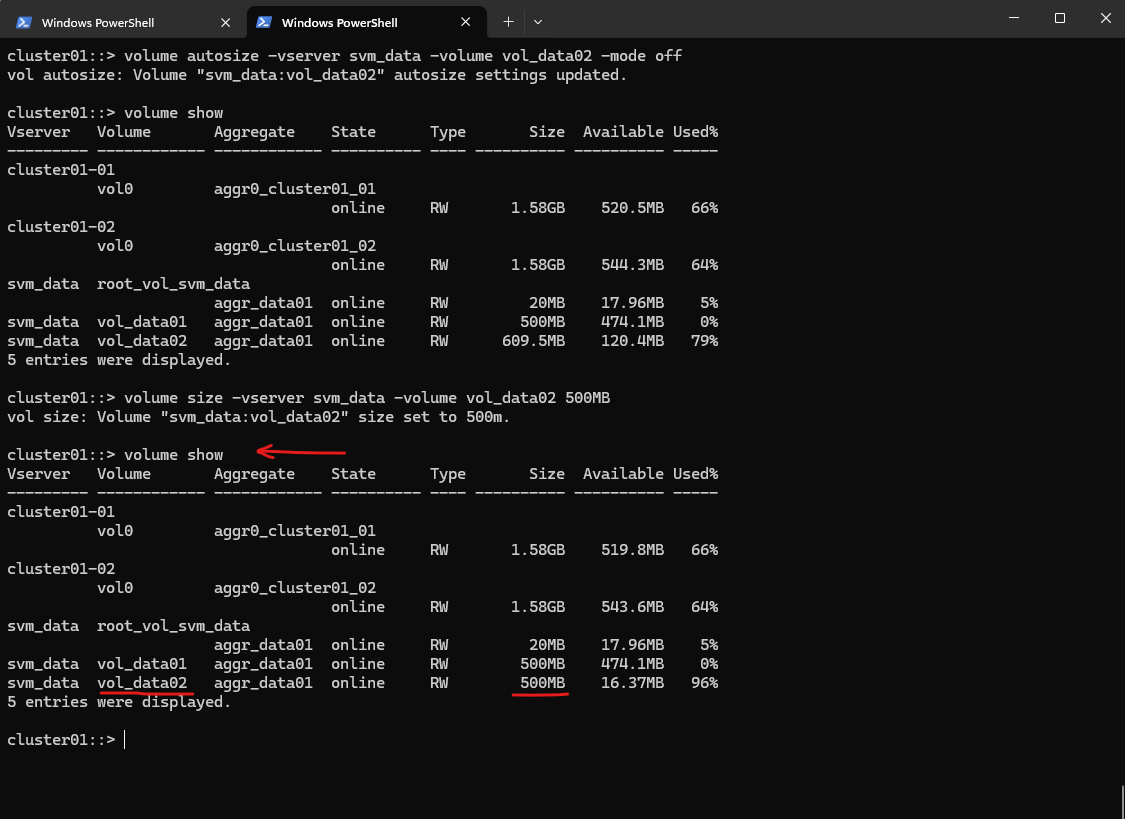
cluster01::> volume autosize -vserver svm_data -volume vol_data02 -mode off

Disabling autosize does not shrink the volume back to its original size. If you want to return your volume from in my case (lab environment) 609.5MB back to exactly 500MB, you must do it manually:
cluster01::> volume size -vserver svm_data -volume vol_data02 500MB
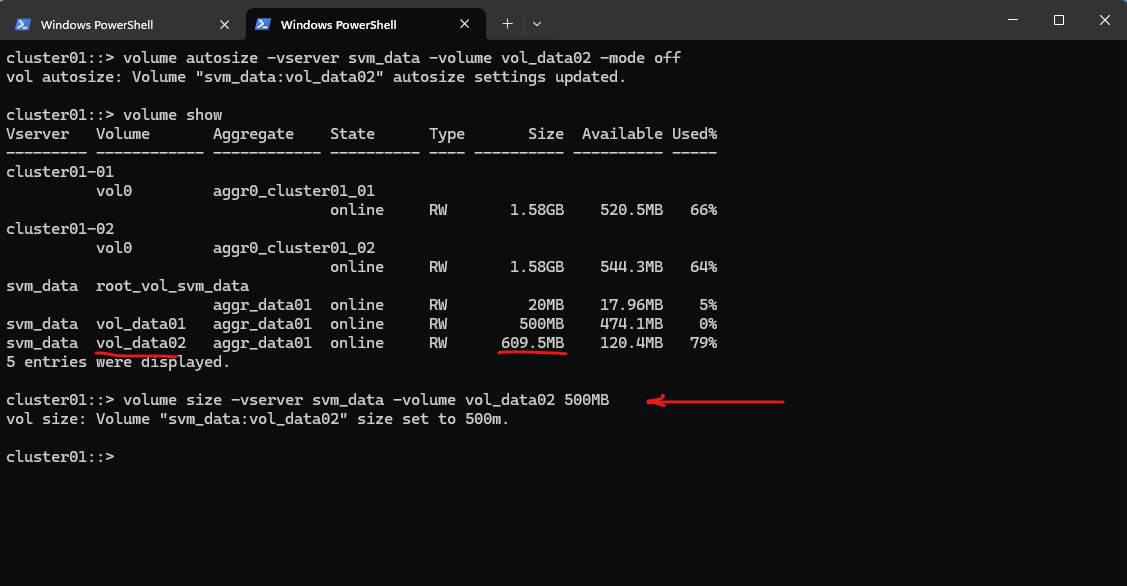
cluster01::> volume show
Checking Aggregate have enough Space for Autosize and Growth
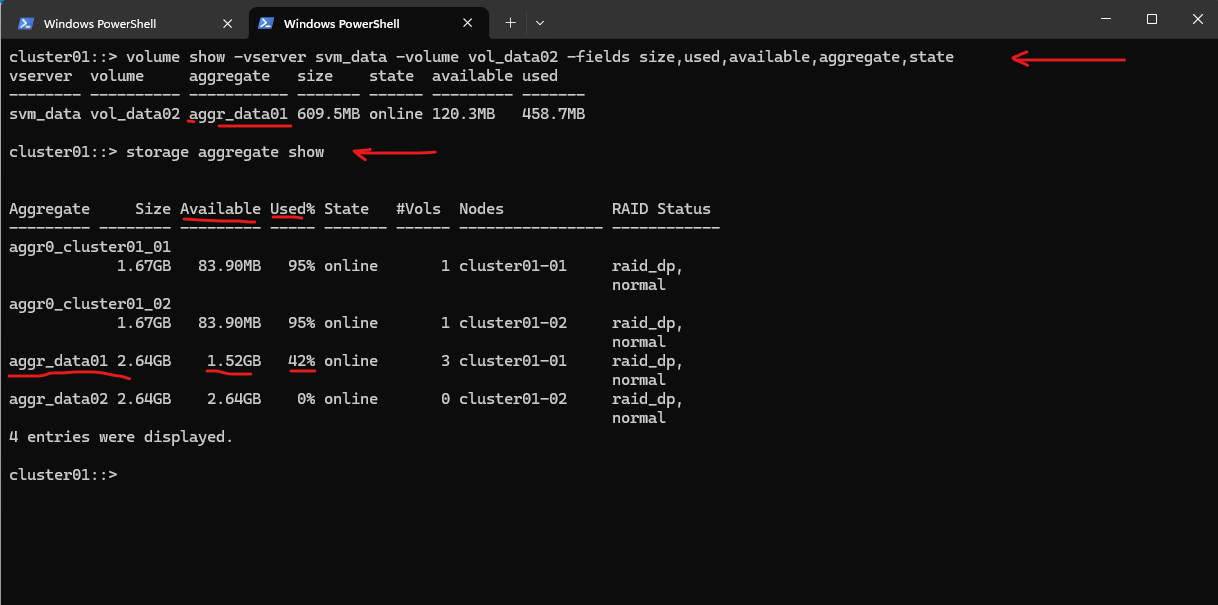
Volume autosize can only grow volumes if storage aggregate show reports sufficient free space on the hosting aggregate.
So for my lab environment the volume which I set to autosize and -max-autosize 1024MB, have currently enough sufficient free space with 1.52 GB.
cluster01::> volume show -vserver svm_data -volume vol_data02 -fields size,used,available,aggregate,state
cluster01::> storage aggregate show
Qtrees
In NetApp ONTAP, a qtree (quota tree) is a logically defined subdirectory within a volume that allows you to apply quotas and manage capacity at a finer level than the volume itself.
Think of a qtree as a container inside a volume that can be individually limited, monitored, and controlled, while still sharing the same volume-level properties (snapshots, efficiency, replication, etc.).
A qtree is not a separate volume, it lives within a volume.
A qtree can have its own security style (NTFS, UNIX, mixed), even if the parent volume uses a different one.
NetApp generally recommends volumes over qtrees for new deployments, especially with modern ONTAP features.
Use qtrees when you need simple capacity control (quotas) and logical separation for multiple teams or applications within the same volume, and when snapshots, replication, and performance can be shared.
Avoid qtrees if you need independent snapshots, replication, QoS, or lifecycle management, or if you want a future-proof, simpler design, in those cases, use separate volumes instead.
Correct Creation Sequence for Qtrees Used by NFS and CIFS
When using qtrees for NFS exports or CIFS shares, the creation order is important to ensure proper access control and quota enforcement.
A qtree must always exist before it can be exported or shared, and quotas should be defined before production use to avoid unexpected capacity issues.
The recommended sequence is:
- Create the volume and mount it in the namespace
- Create the qtree inside the volume
- Configure and initialize quotas (if required)
- Create the NFS export or CIFS share pointing to the qtree path
Following this order ensures that quota limits are enforced correctly and that clients immediately see the intended capacity and access behavior when mounting the share in NetApp ONTAP.
Creating and Limiting a Qtree
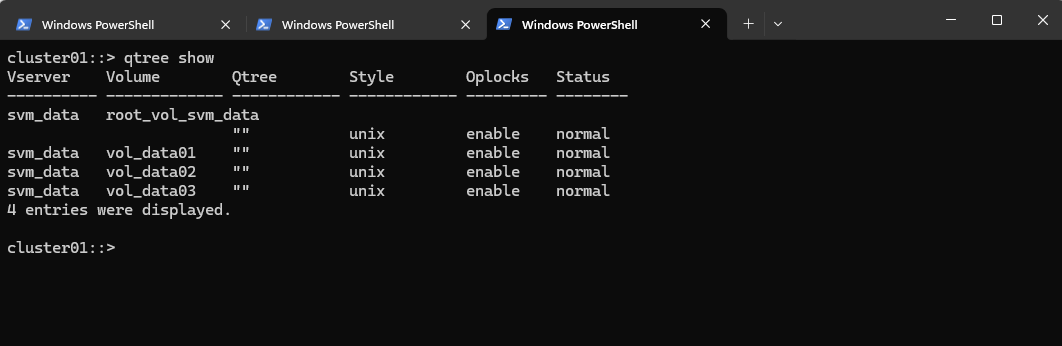
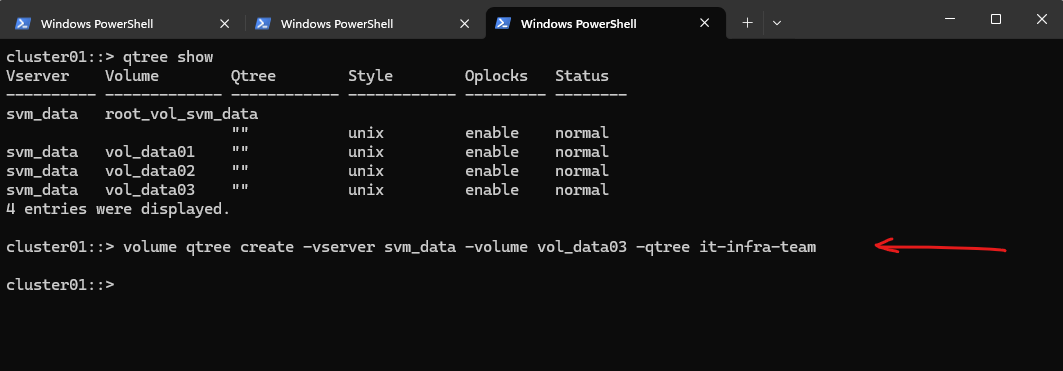
This output shows that no explicit qtrees are configured, only the default qtree ("") exists in each volume.
Every ONTAP volume always has an implicit default qtree (displayed as an empty name
"").
The default qtree represents the entire volume namespace; data written directly to the volume root lives there.
Since no named qtrees appear (likefinance,apps, etc.), all data and quotas, if any, apply at the volume level only.So currently our system is using volumes only, not qtrees, which aligns with modern ONTAP best practices unless you explicitly need qtree-based quotas.
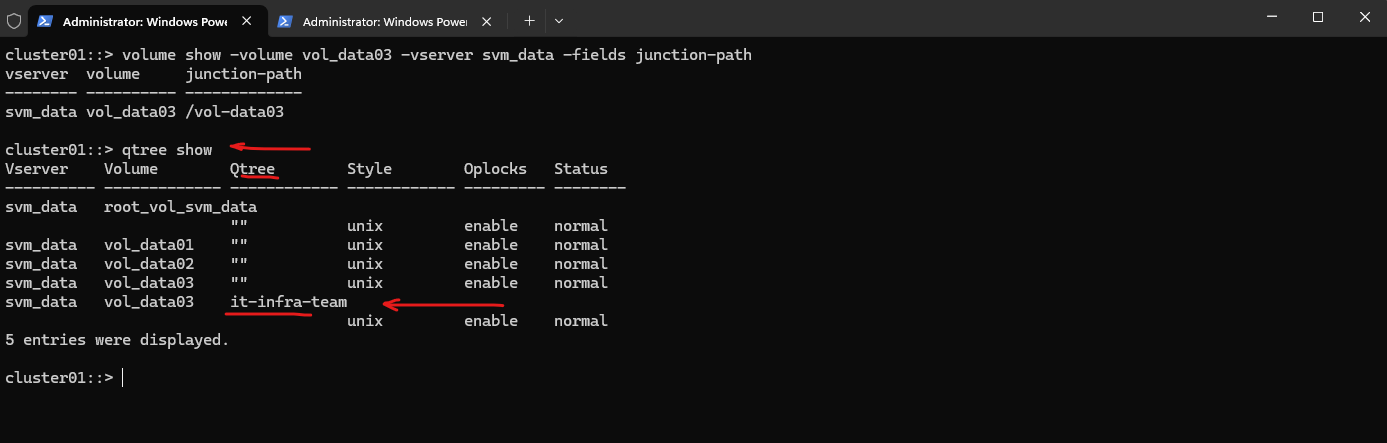
cluster01::> qtree show
Nevertheless to create a new qtree and quota on a specific volume we need to run the following command.
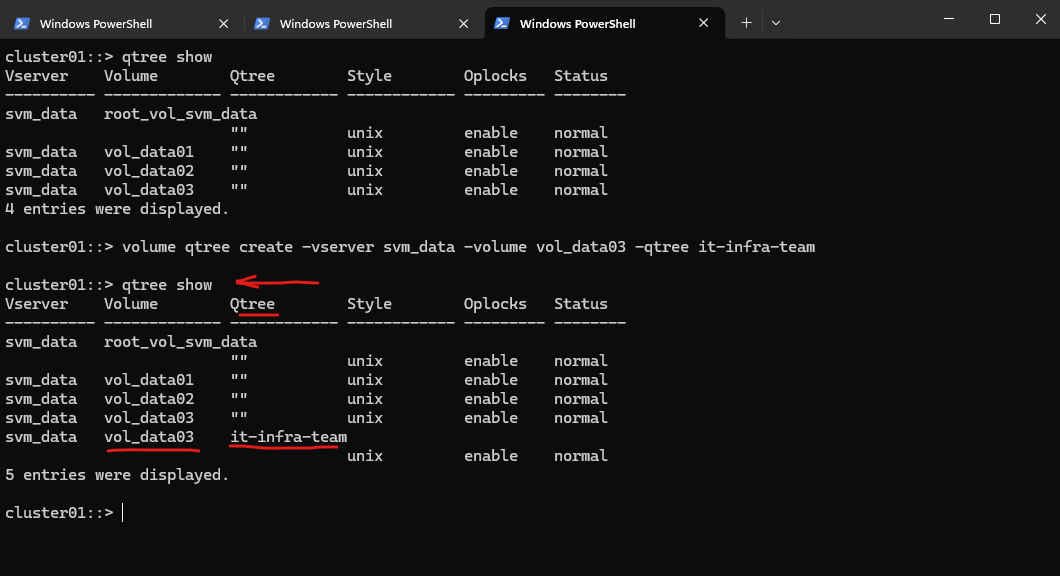
# Create a qtree
cluster01::> volume qtree create -vserver svm_data -volume vol_data03 -qtree it-infra-team
cluster01::> qtree show
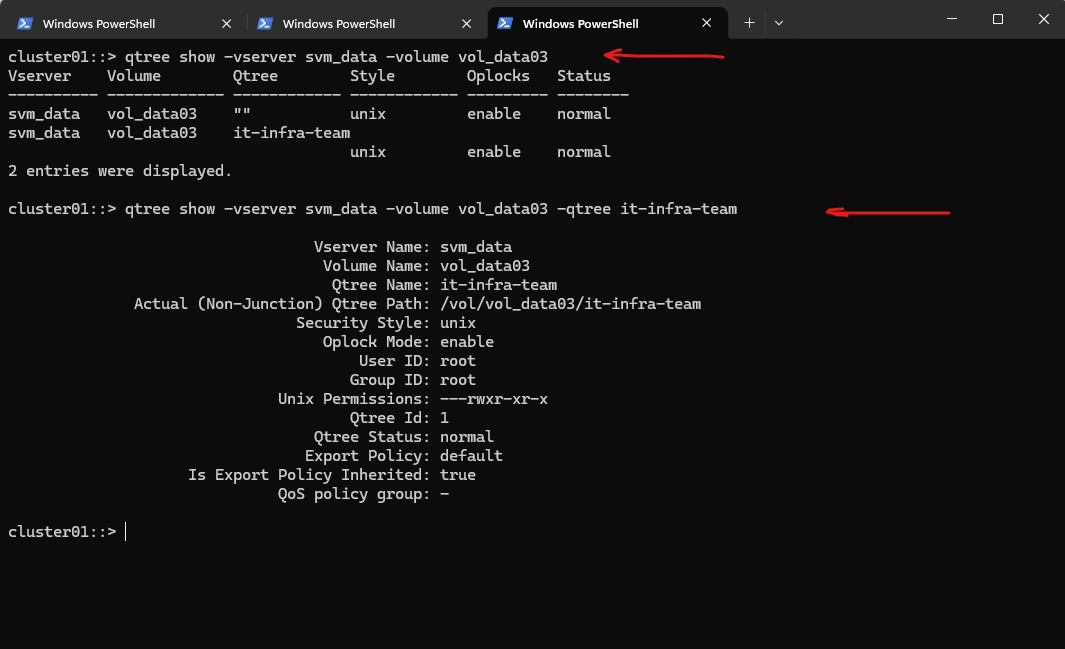
# list all qtrees for a specific volume
cluster01::> qtree show -vserver svm_data -volume vol_data03

# list a specific qtree
cluster01::> qtree show -vserver svm_data -volume vol_data03 -qtree it-infra-team
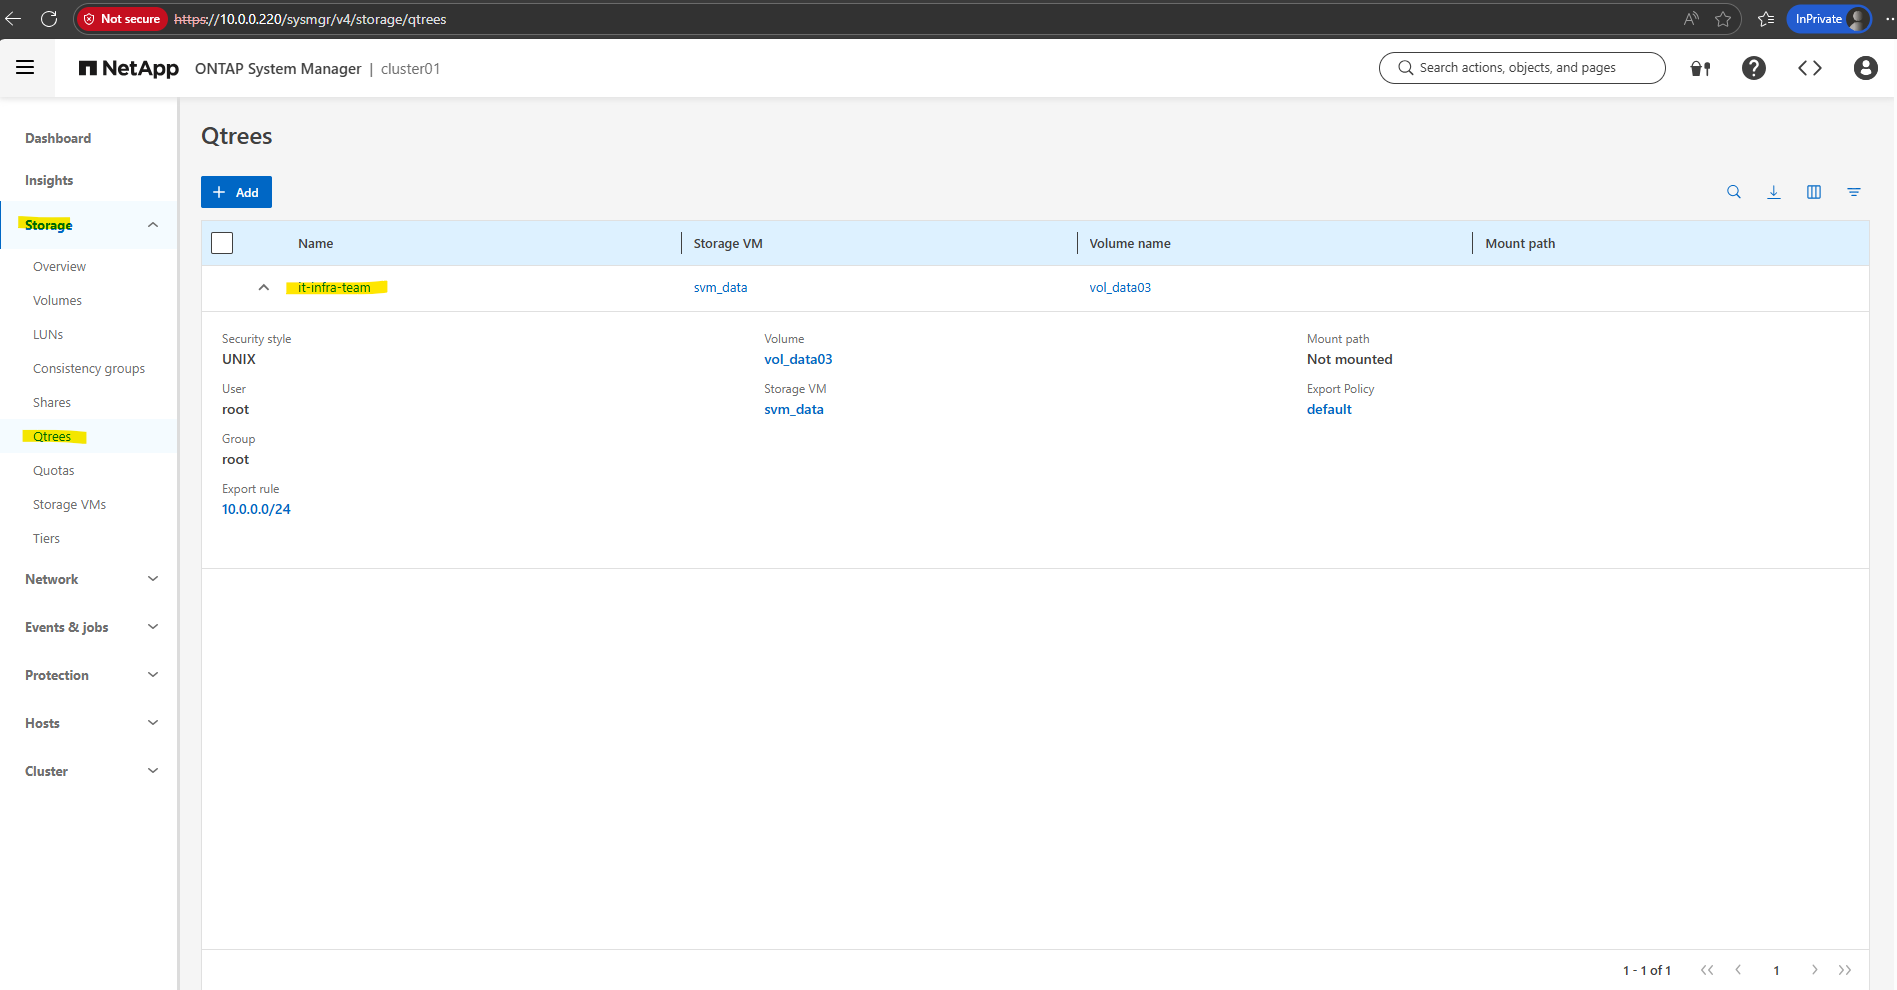
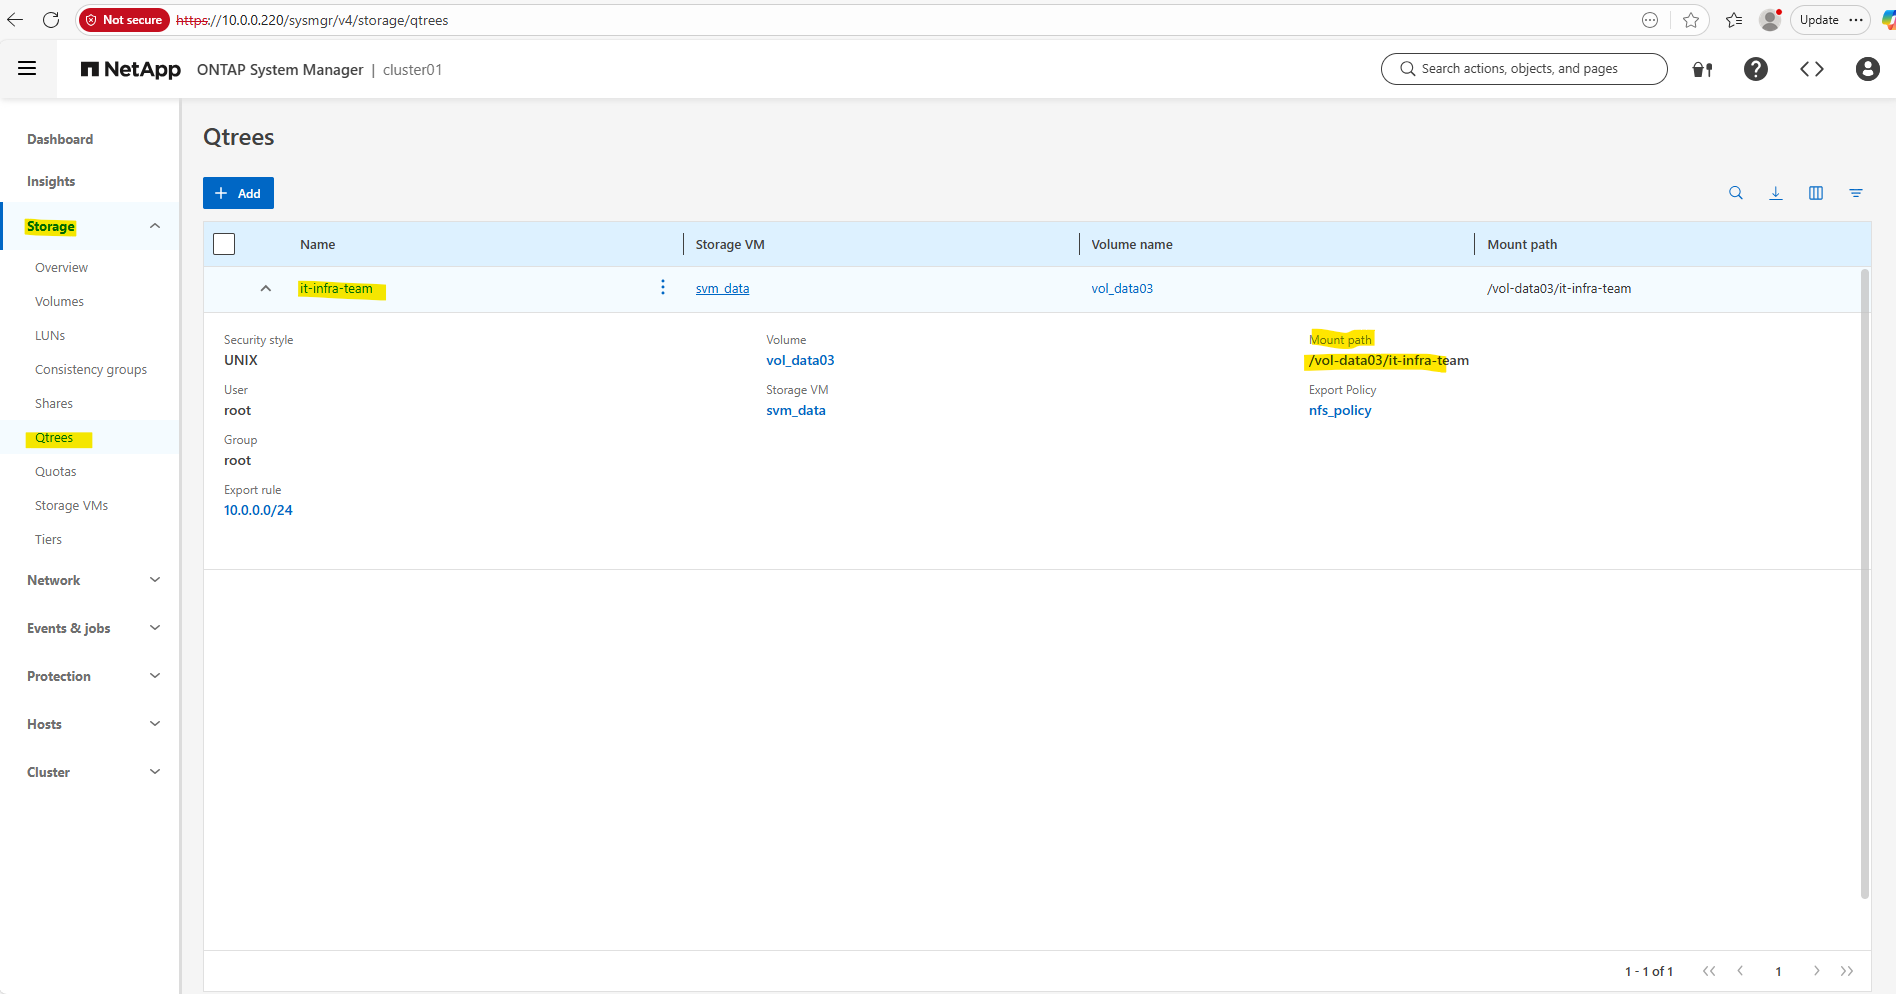
Check the qtree by using the WebGUI under Storage -> Qtrees.
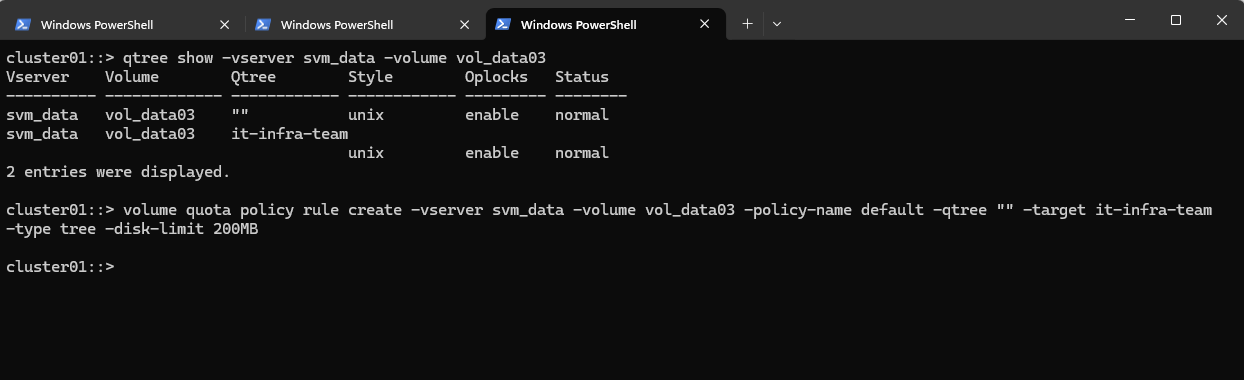
We can now create a new qtree (tree) quota rule on our volume where we previously created the qtree.
This command creates a tree quota that limits the qtree
it-infra-teamto 200 MB within the volumevol_data03. For tree quotas, ONTAP identifies the quota only by the target name, which must match the qtree name, while the-qtreeparameter is ignored and therefore shown as"". As a result, specifying-qtree ""or-qtree it-infra-teammakes no functional difference for tree quotas in NetApp ONTAP.A qtree is a real filesystem object inside a volume that defines a distinct subtree where data is stored. The target is a quota-engine reference that tells ONTAP which qtree (or user/group) a quota rule applies to, linking quota enforcement to that object in NetApp ONTAP.
# Create a quota policy rule
# 1. Create or adjust quota rules with ==> volume quota policy rule create|modify ...
cluster01::> volume quota policy rule create -vserver svm_data -volume vol_data03 -policy-name default -qtree "" -target it-infra-team -type tree -disk-limit 200MB
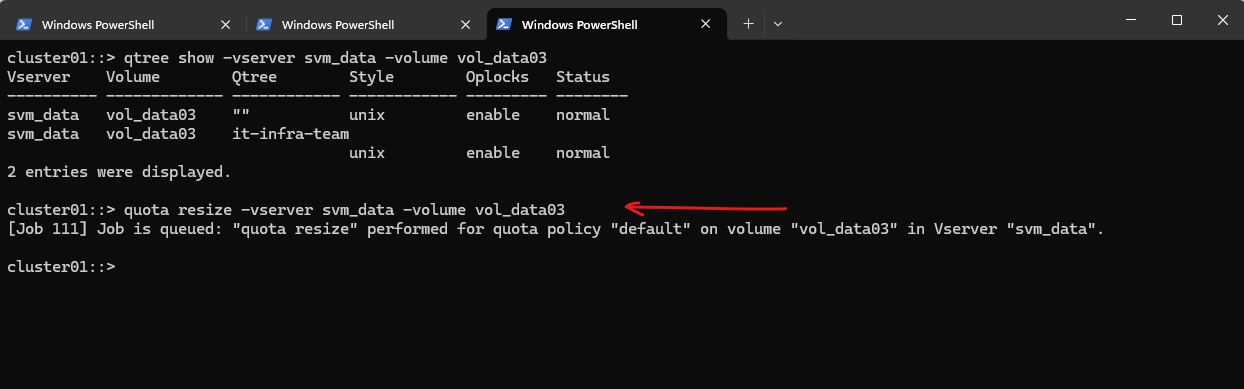
We must run quota resize (if quotas are already enabled on the volume).
Actually in my case so far I haven’t enabled quotas on the volume and could skip this here.
If quotas are already ON, ONTAP does not automatically re-scan the volume when a new qtree appears.
cluster01::> quota resize -vserver svm_data -volume vol_data03
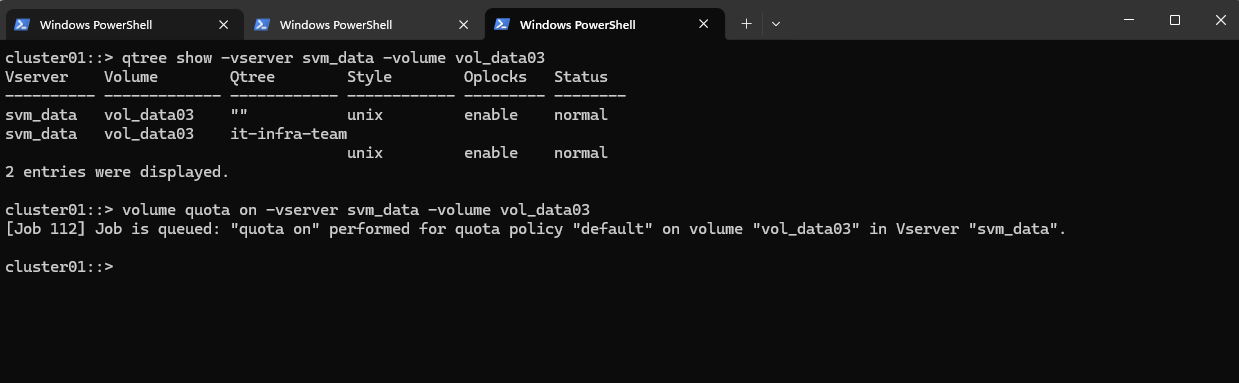
Quotas are not active until you explicitly enable them on the volume.
This command creates a job to activate quotas for the specified volume.
cluster01::> volume quota on -vserver svm_data -volume vol_data03
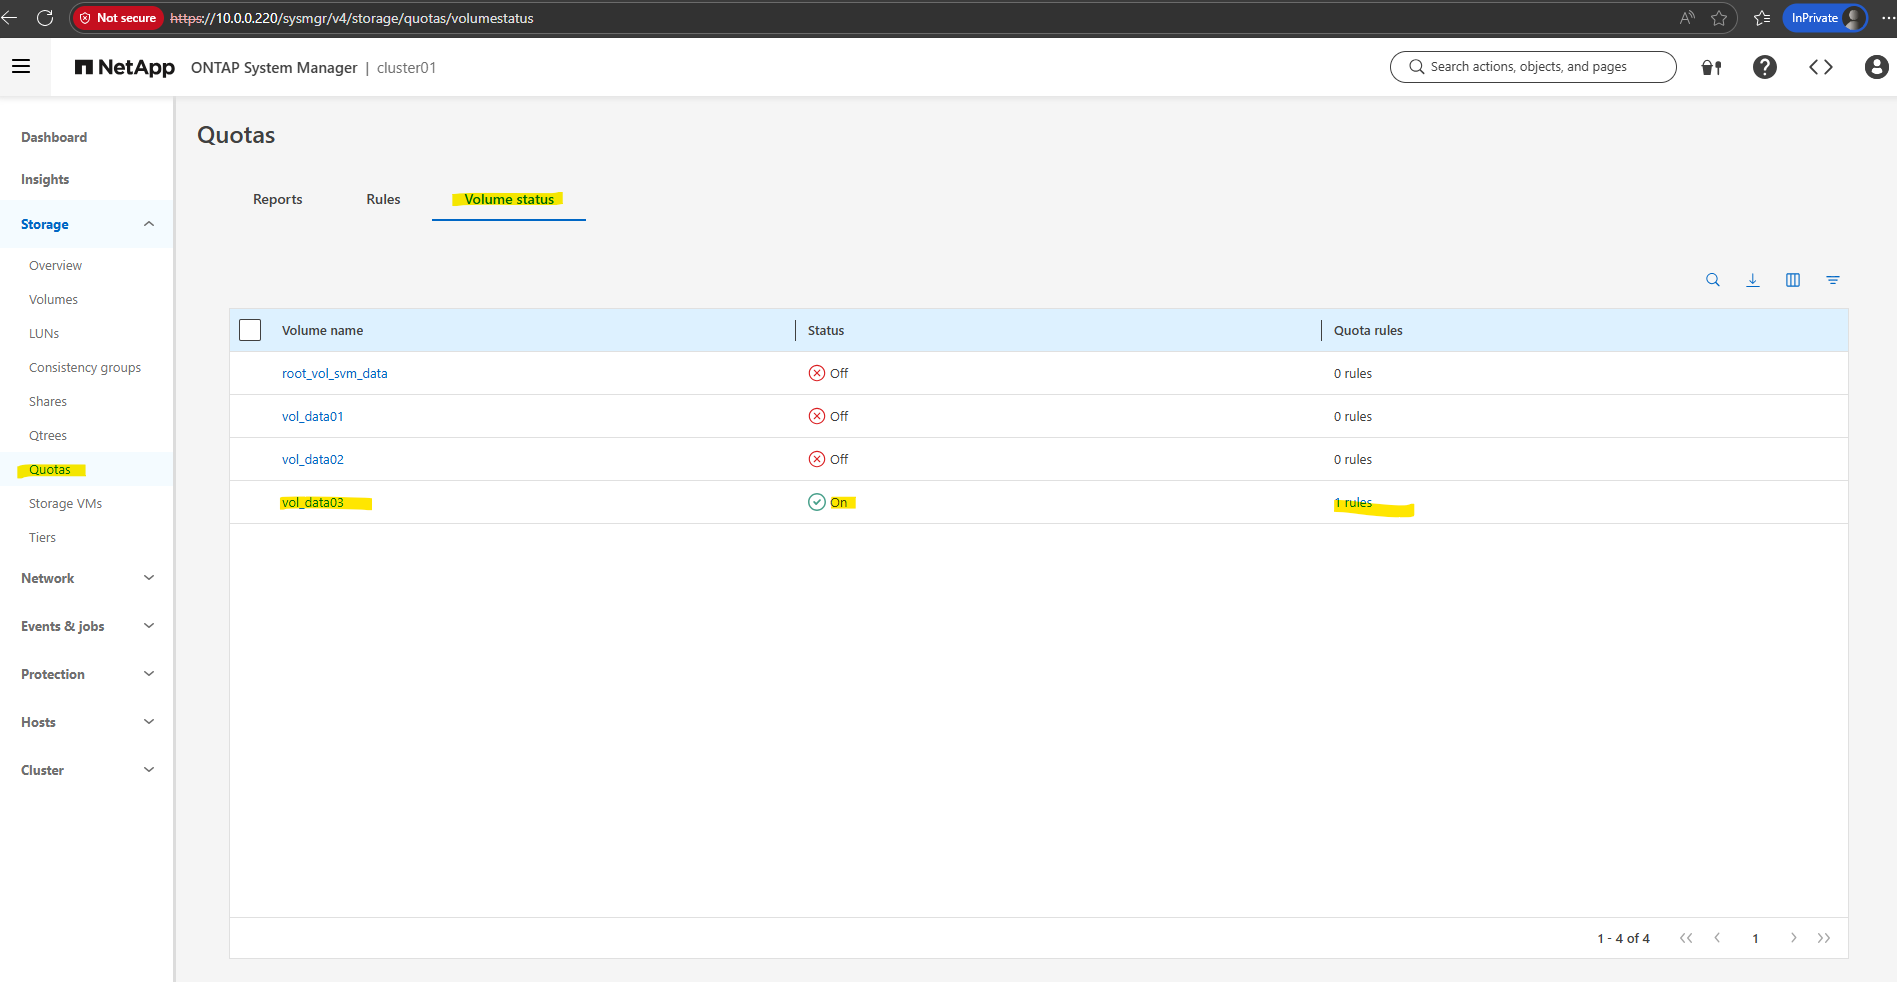
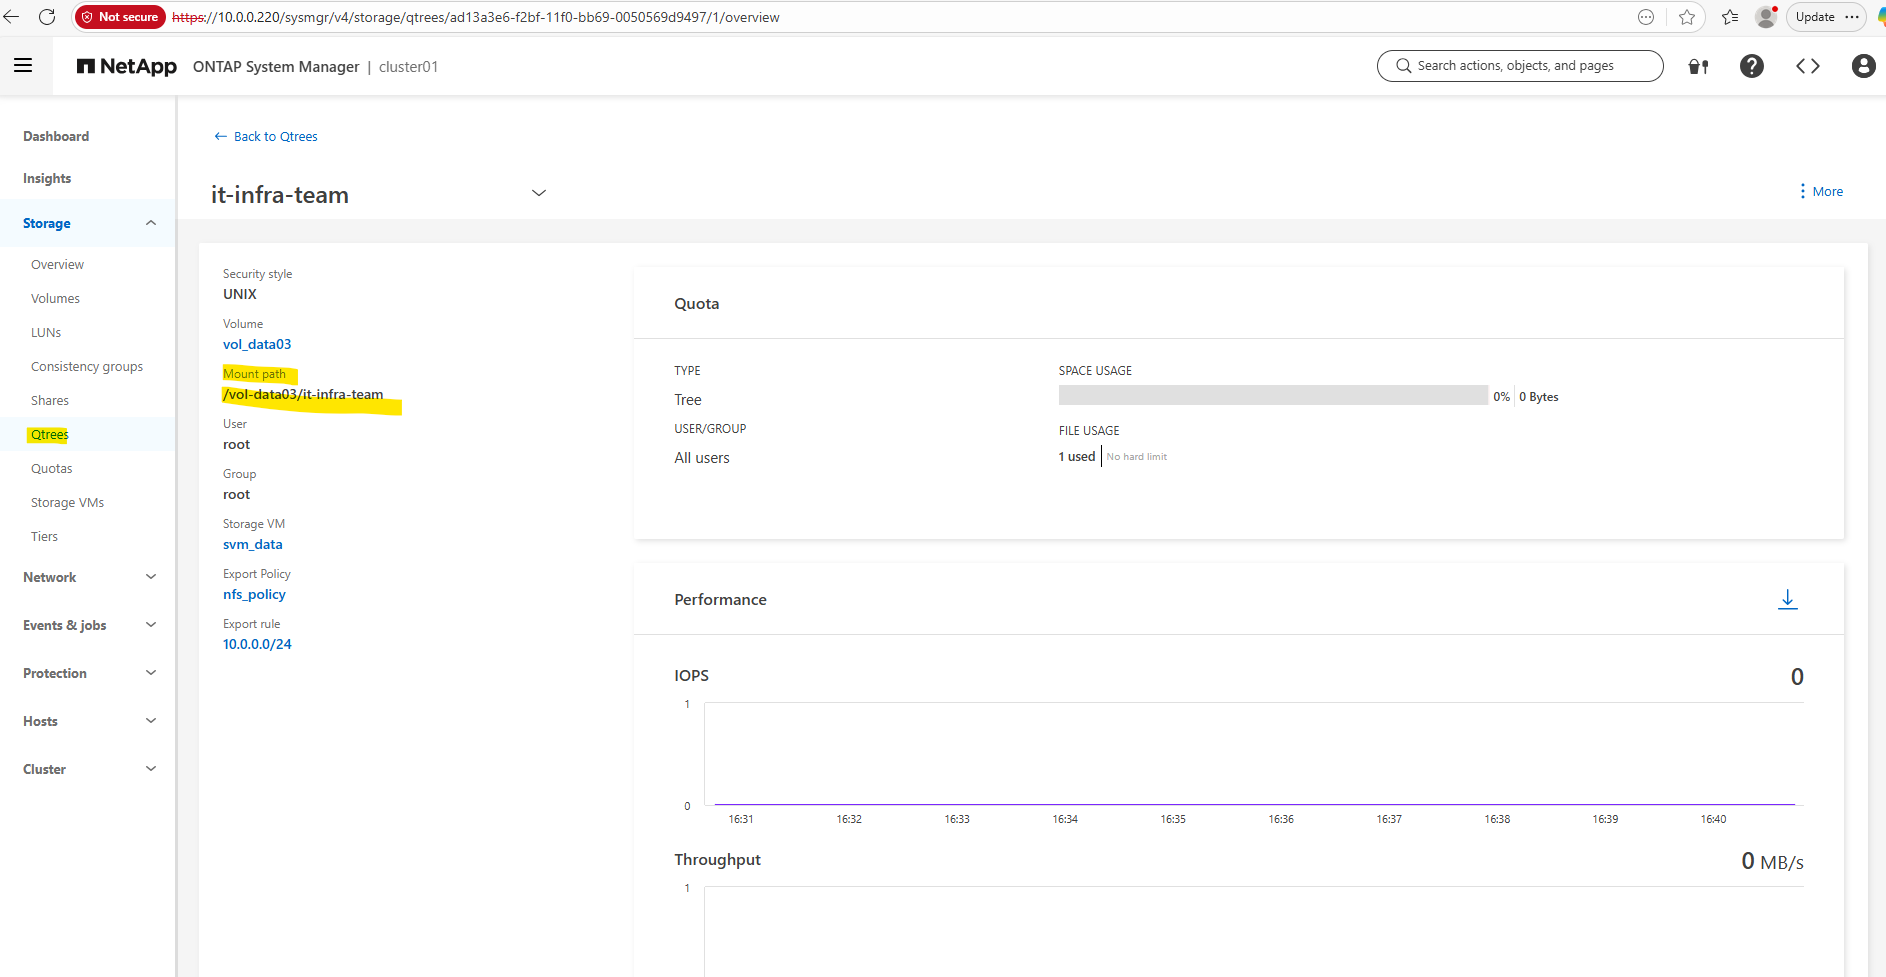
After enabling quotas on the volume we can see it also in the WebGUI under Storage -> Quotas as shown below.
We can check the enabled quota(s) for a specific volume under Volumes -> Volume -> Quota Reports as shown below.
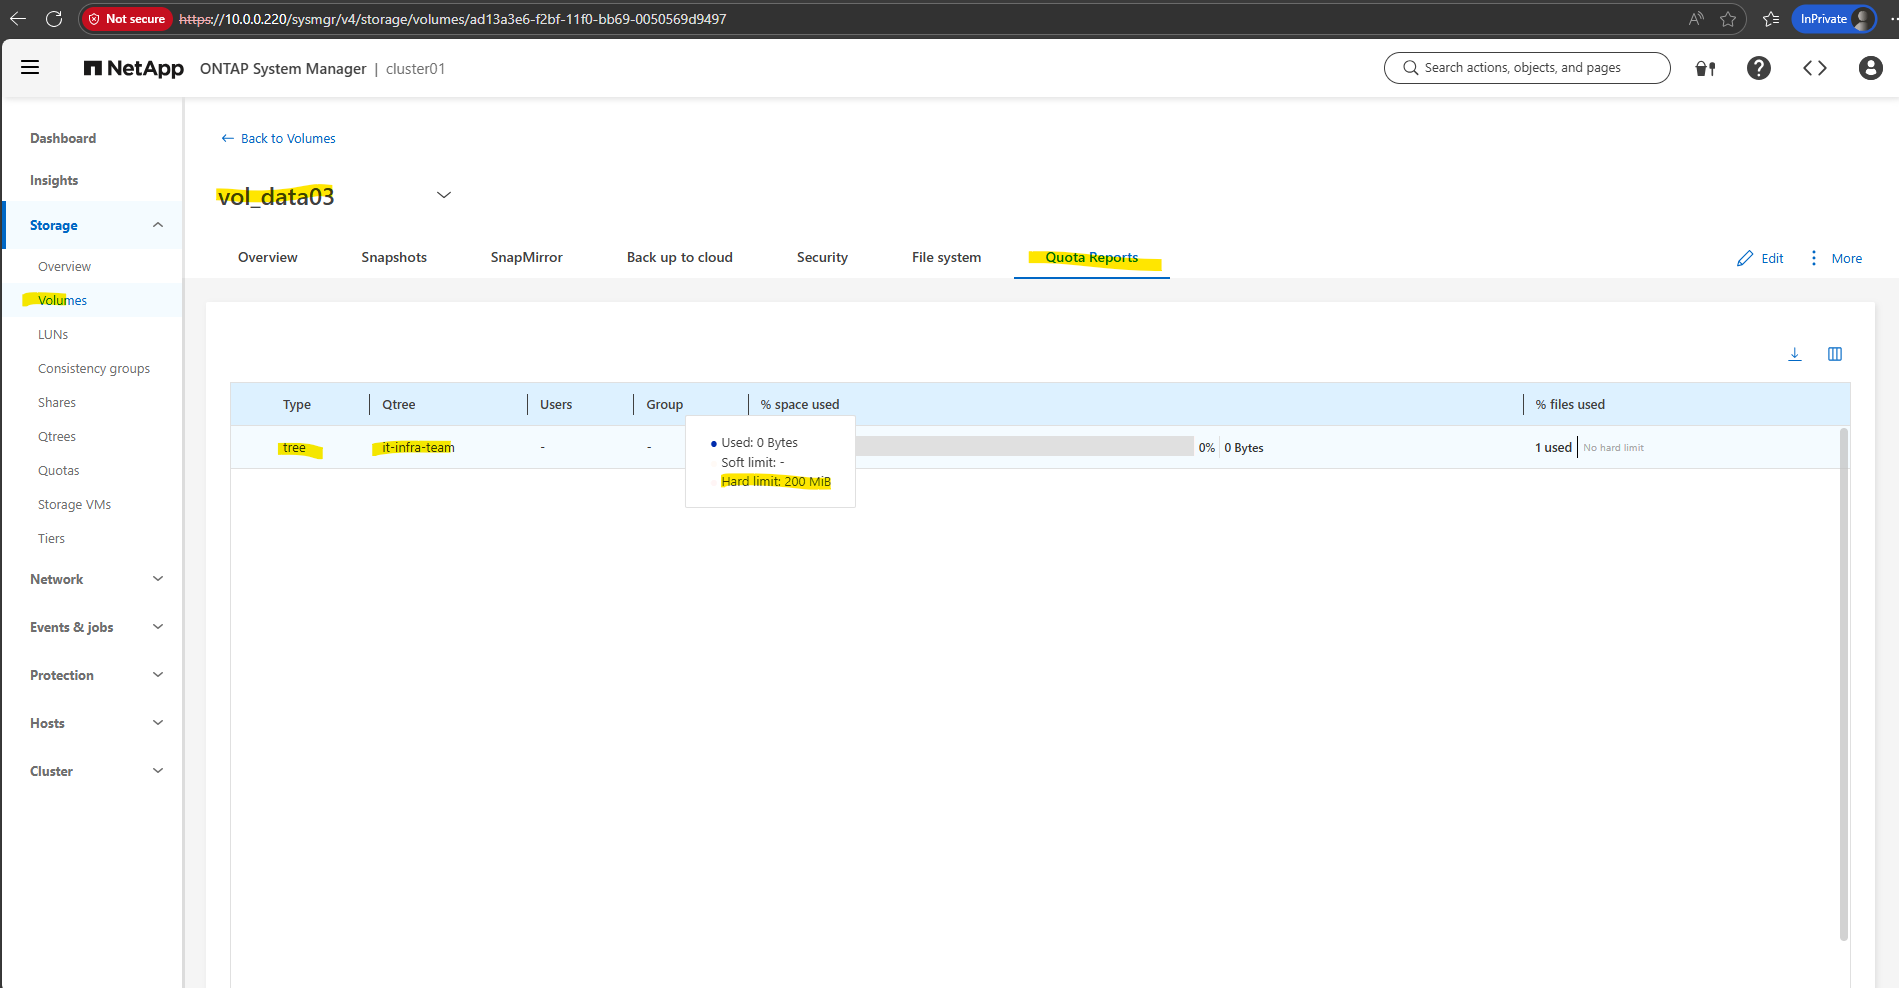
Or by using the CLI and the following command.
This command displays all quota policy rules applied to the volume
vol_data03on the SVMsvm_data, including tree, user, and group quotas.It is typically used to verify which limits are configured and how they are scoped before or after initializing quotas in NetApp ONTAP.
cluster01::> volume quota policy rule show -vserver svm_data -volume vol_data03
Qtree (Resize Quota)
A qtree allows you to logically divide a volume into independent subtrees with their own quota limits.
By resizing a qtree quota, you can adjust capacity for a specific team or workload without changing the volume size, providing fine-grained space control in NetApp ONTAP.
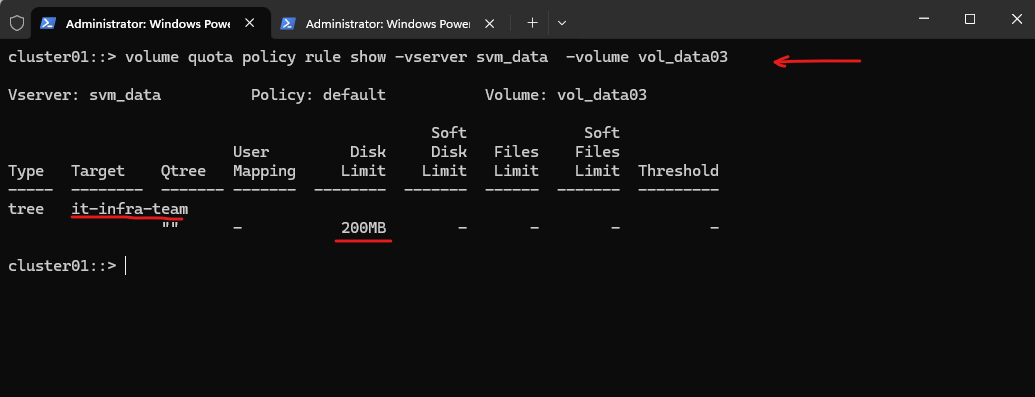
We first check the current quota for a specific qtree by running the following command.
This command displays all quota policy rules applied to the volume
vol_data03on the SVMsvm_data, including tree, user, and group quotas.
cluster01::> volume quota policy rule show -vserver svm_data -volume vol_data03
When volume autosize is enabled, increasing a qtree quota does not require manual volume resizing, as the volume can automatically grow to accommodate the additional space.
ONTAP ensures that the quota change is supported as long as aggregate capacity is available. This makes quota adjustments safe and low-risk in NetApp ONTAP.
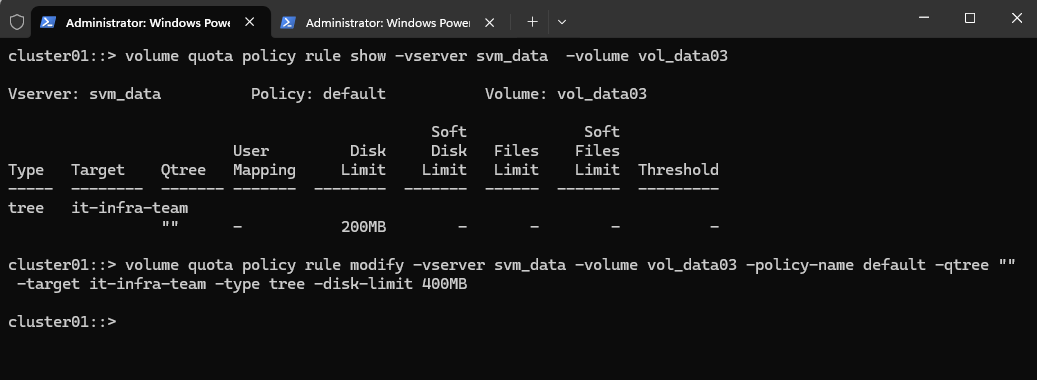
This command modifies the existing tree quota for the qtree
it-infra-team, increasing its disk limit to 400 MB within the volumevol_data03. The change updates quota enforcement for that qtree without affecting the volume structure or other quota rules in NetApp ONTAP.
cluster01::> volume quota policy rule modify -vserver svm_data -volume vol_data03 -policy-name default -qtree "" -target it-infra-team -type tree -disk-limit 400MB
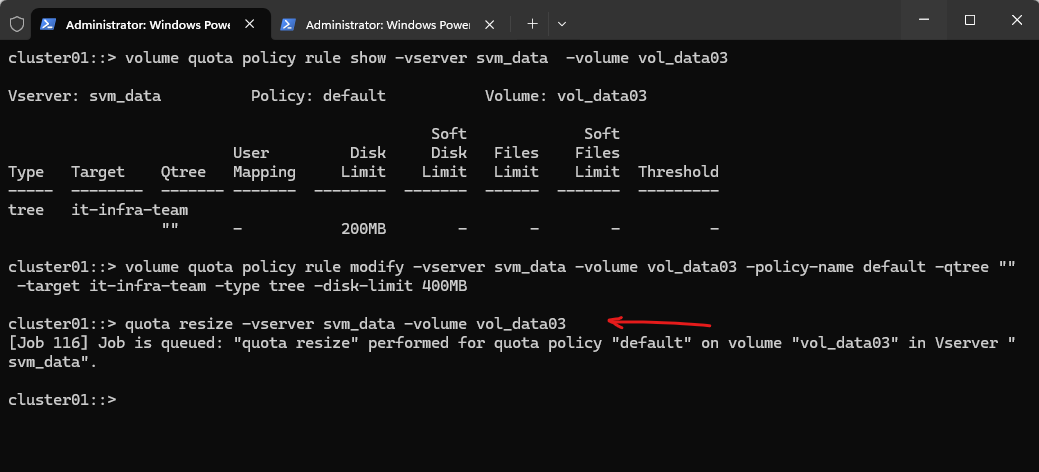
After modifying a quota rule, you must run the following command.
This will apply the new quota limits online without disrupting access. This recalculates and enforces the updated quotas on
vol_data03in NetApp ONTAP.
cluster01::> quota resize -vserver svm_data -volume vol_data03
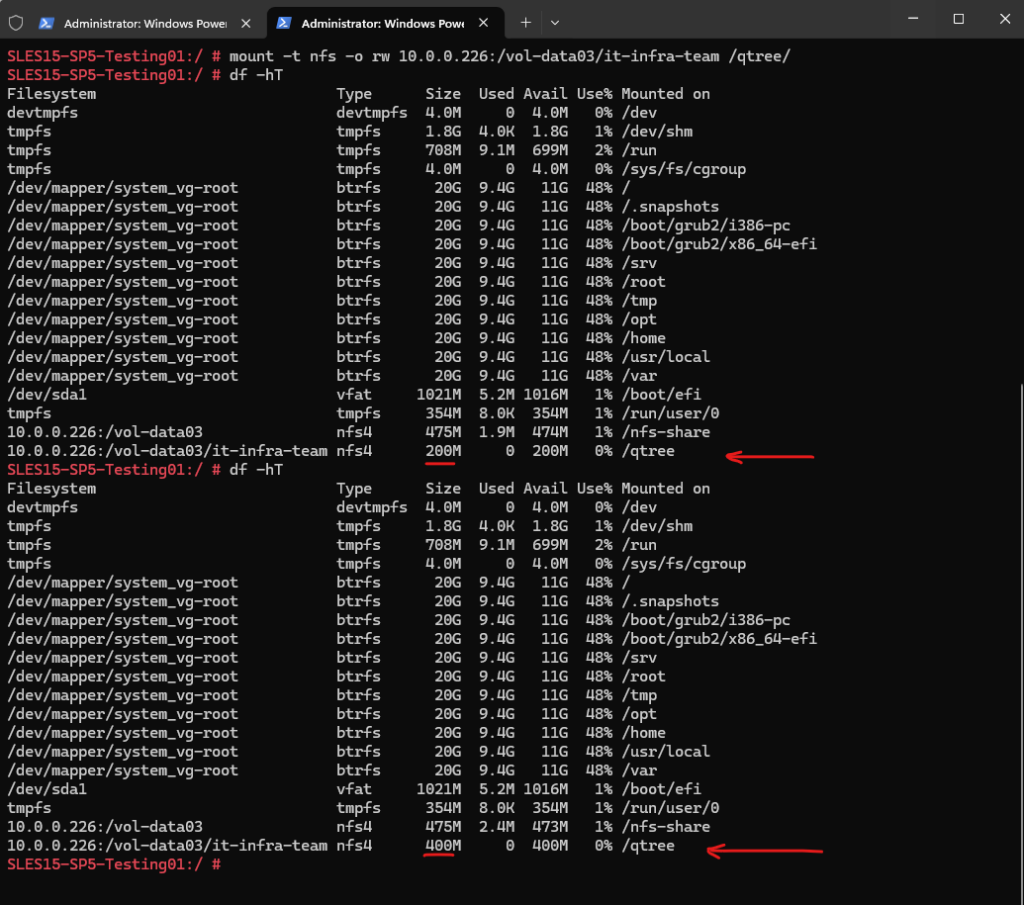
When the qtree is mounted on Linux via NFS, the updated quota size becomes visible immediately after running quota resize, without requiring a remount or service restart.
The Linux client queries the NFS server for updated filesystem statistics, so tools like df -h reflect the new qtree limit right away. This allows seamless, online quota resizing in NetApp ONTAP.
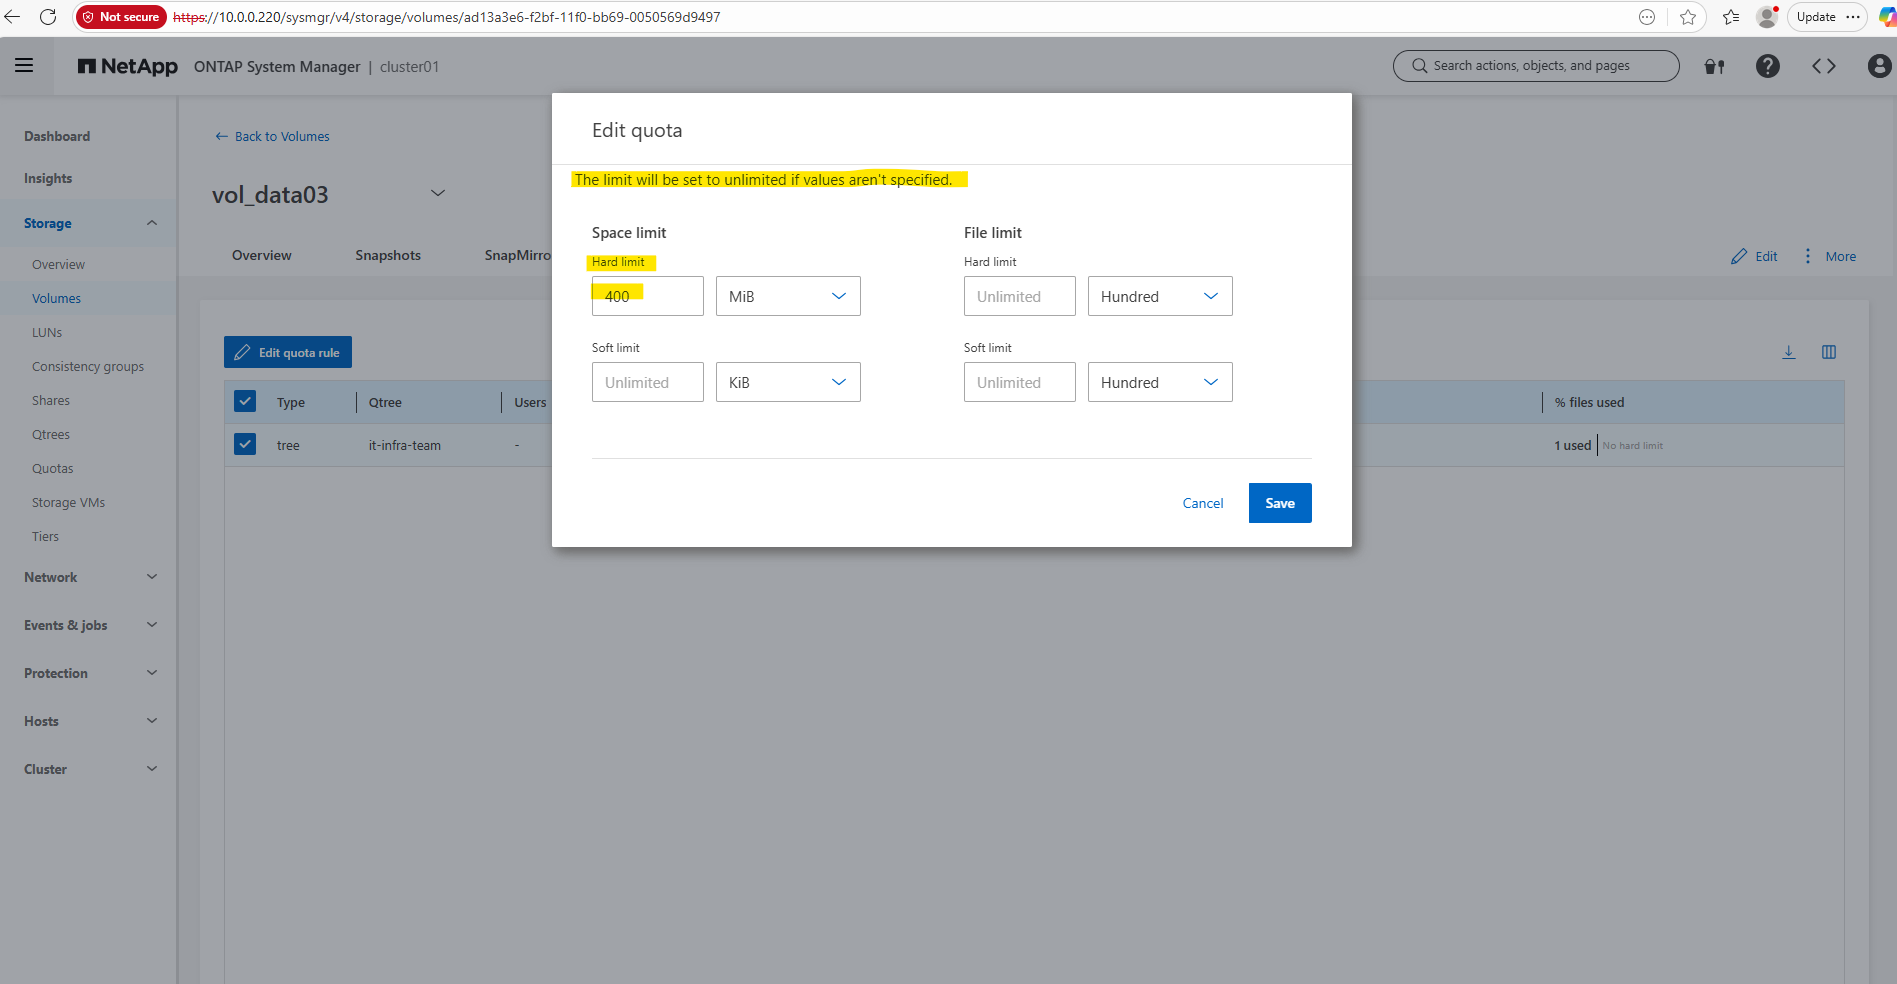
By using the WebGUI
Under Storage -> Volumes search for the volume on which the Qtree was created and click on the volume link.
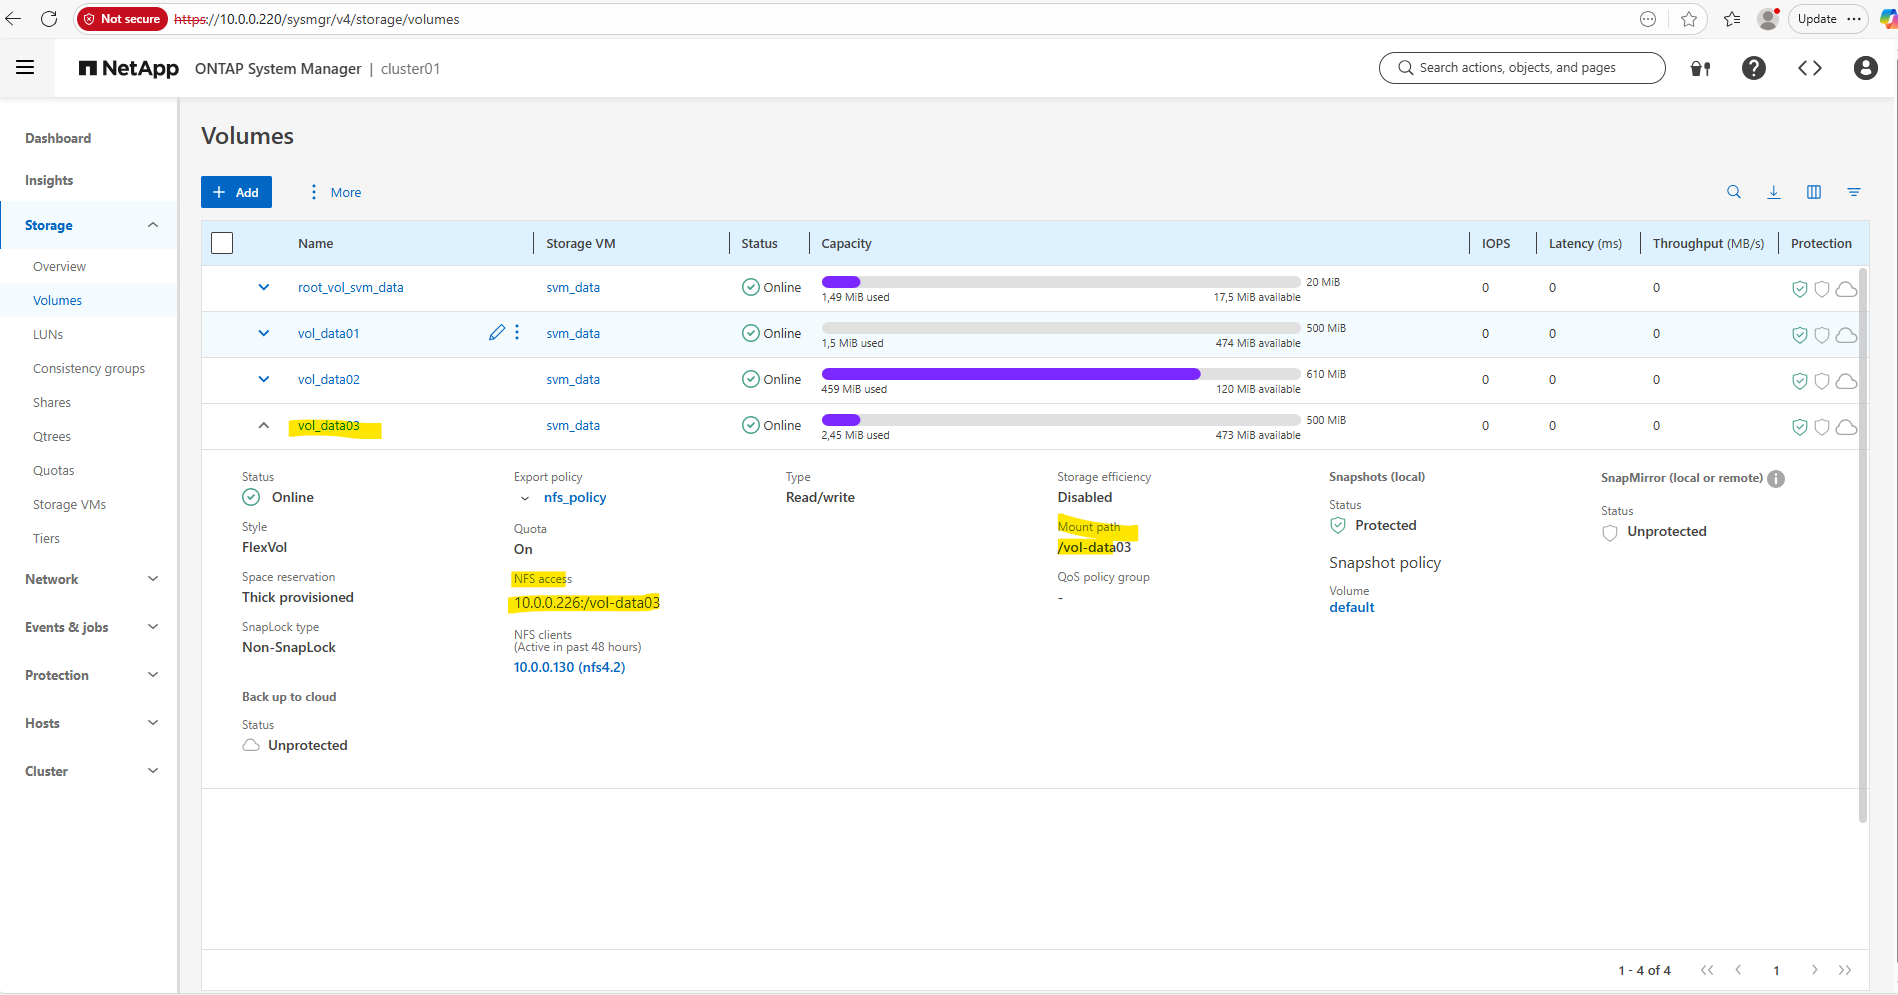
Within the Quota Usage tab select the Qtree you want to change the quoata and click on Edit quota rule.
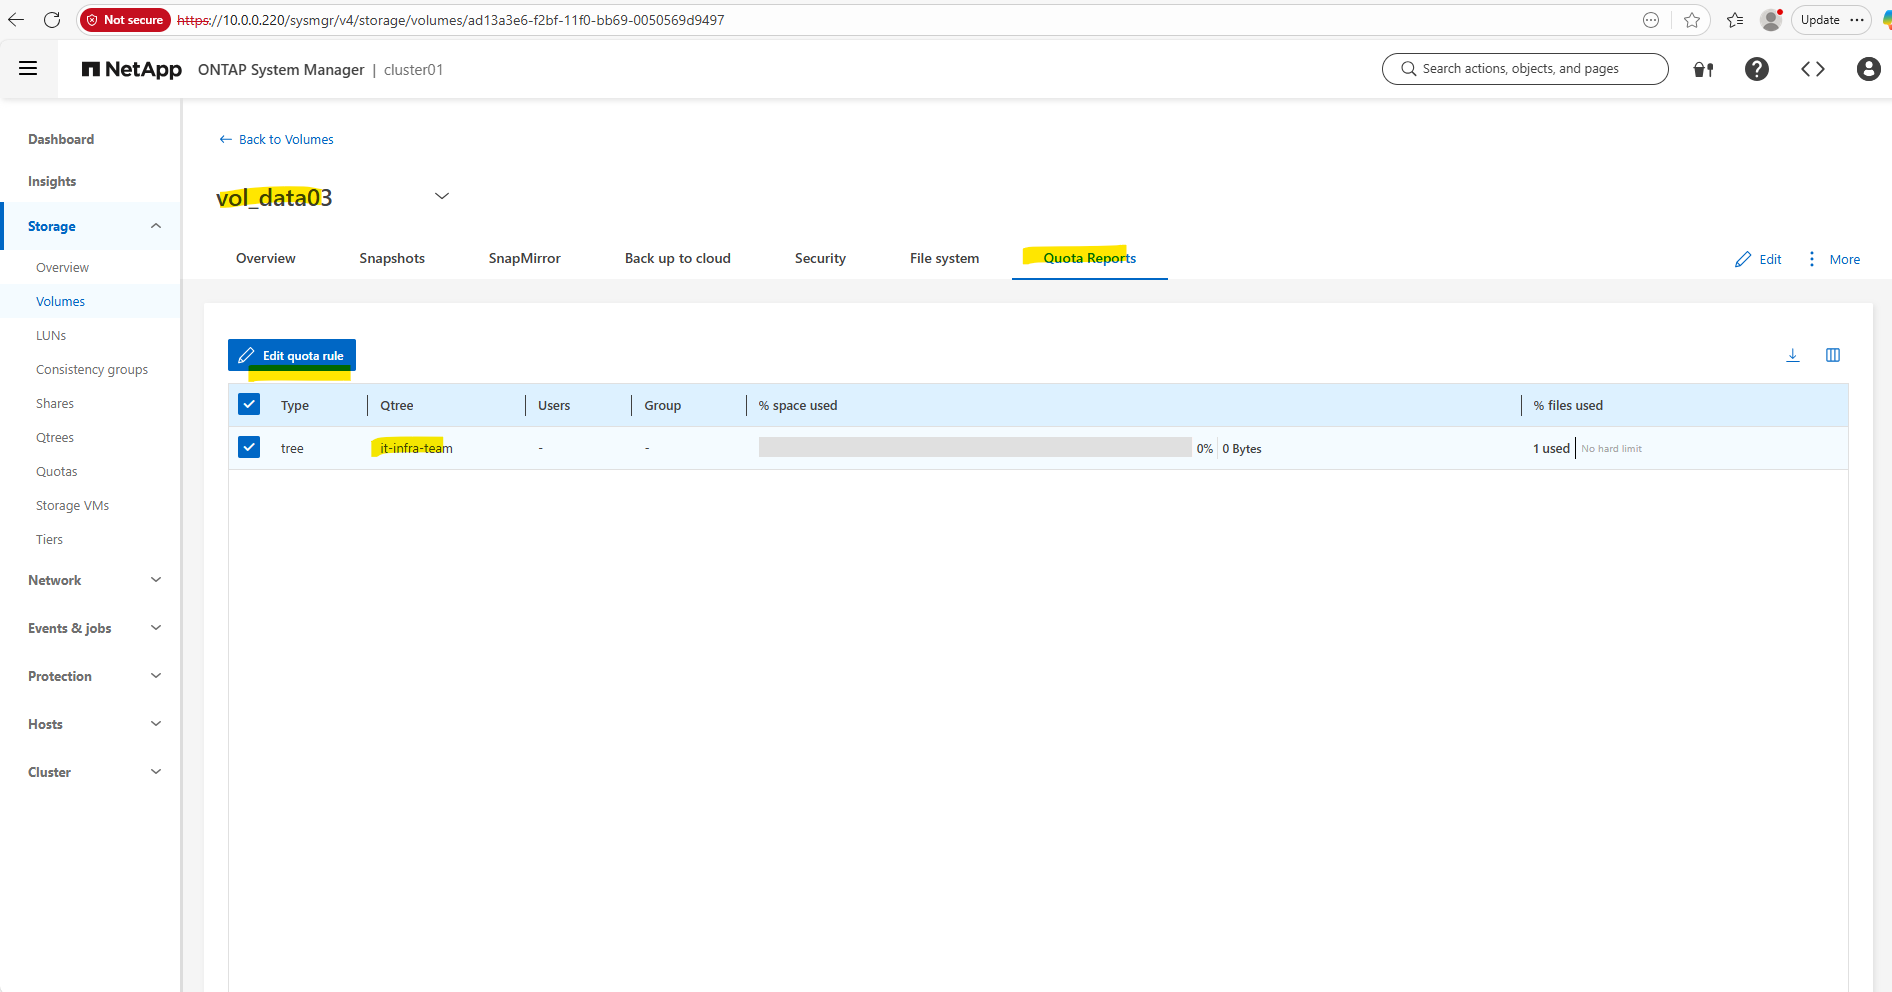
If you leave the qtree hard limit set to “unlimited”, the qtree behaves like a regular directory inside the volume from a capacity-control perspective. In that case, using a qtree provides no real benefit for space management, and you might as well use the volume (or its default qtree) directly.
Qtrees only make sense when you need a boundary, such as:
- Enforcing hard or soft quota limits
- Separating capacity for teams or applications
- Enabling clean resizing, reporting, or chargeback per subtree
Without a limit, a qtree adds structure but no capacity control, so the volume alone is usually sufficient in NetApp ONTAP.
How to mount a Qtree?
You can mount an individual qtree by obtaining the junction path or namespace path of the qtree.
The qtree path displayed by the CLI command qtree show -instance is of the format /vol/<volume_name>/<qtree_name>.
However, this path does not refer to the junction path or namespace path of the qtree.
This output shows two qtrees on the same volume
vol_data03, and it explains exactly how quotas, paths, and export policies are applied.The first qtree with an empty name (
"") is the implicit default qtree of the volume and always exists, even if no qtrees are explicitly created. It represents the volume root (/vol/vol_data03) and is used for volume-level data placement and quotas. Any files stored directly in the volume (not in a sub-qtree) belong to this default qtree.
cluster01::> qtree show -instance -vserver svm_data -volume vol_data03

You need to know the junction path of the volume to obtain the junction path or namespace path of the qtree.
Use the vserver volume junction-path command to obtain the junction path of a volume.
The following displays the junction path of my volume named
vol_data03located on the storage virtual machine (SVM) namedsvm_data:
cluster01::> volume show -volume vol_data03 -vserver svm_data -fields junction-path

Use the following command to obrain the qtree name.
cluster01::> qtree show
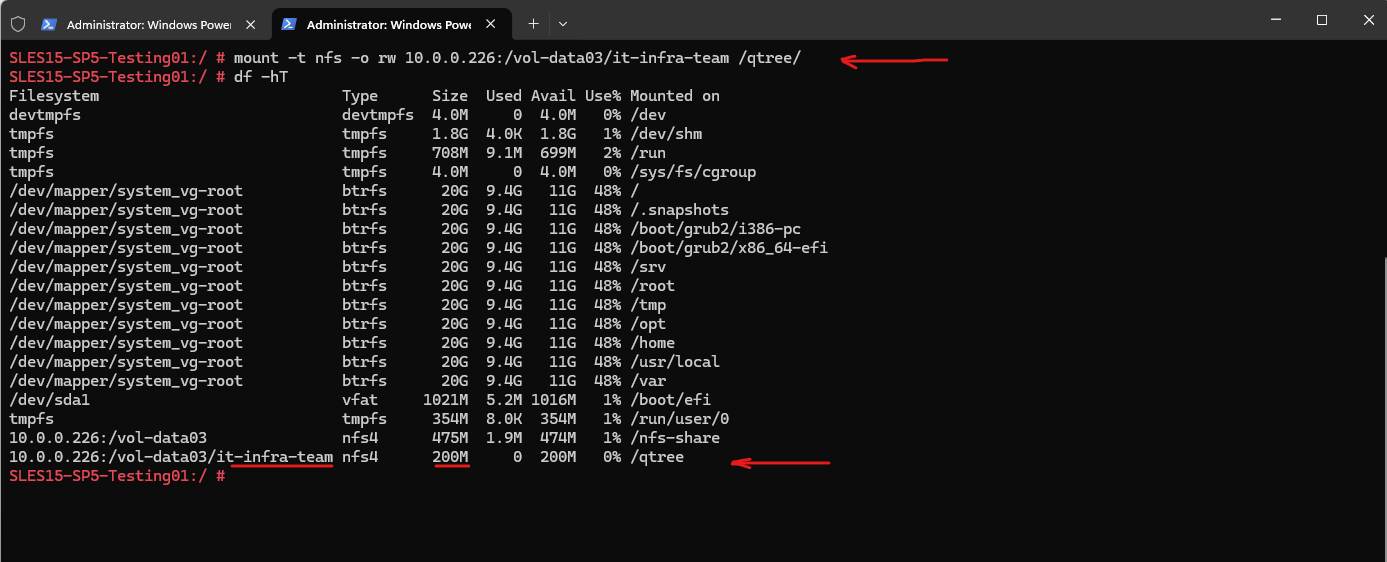
Since qtrees are always rooted at the volume, the junction path or namespace path of the qtree will be in my case /vol_data03/it-infra-team.
I will now mount the qtree on SUSE Linux Enterprise.
Below we can see that size of the qtree with 200 MB fits what we previously set as quota for this qtree.
SLES15-SP5-Testing01:/ # mount -t nfs -o rw 10.0.0.226:/vol-data03/it-infra-team /qtree/
SLES15-SP5-Testing01:/ # df -hT
Source: https://docs.netapp.com/us-en/ontap/volumes/obtain-qtree-junction-path-task.html
Learn more about vserver volume junction-path in the ONTAP command reference
The mount path for the qtree we can also obtain by using the WebGUI under Storage -> Qtrees.
CIFS (SMB) Shares
CIFS (Common Internet File System) is actually Microsoft’s early SMB dialect (SMB 1.0).
When NetApp first integrated Windows file sharing (back in the Data ONTAP 7G / early Clustered ONTAP days), SMB was generally referred to as CIFS across the industry.
NetApp adopted the term CIFS server in their CLI, API, and documentation and still stick to this term, otherwise they needed to adjust thousands of scripts, tools, and habits already use commands like vserver cifs show.
Even though modern ONTAP supports SMB 2.x and SMB 3.x (and you almost never want SMB 1/CIFS anymore), the command set hasn’t been renamed.
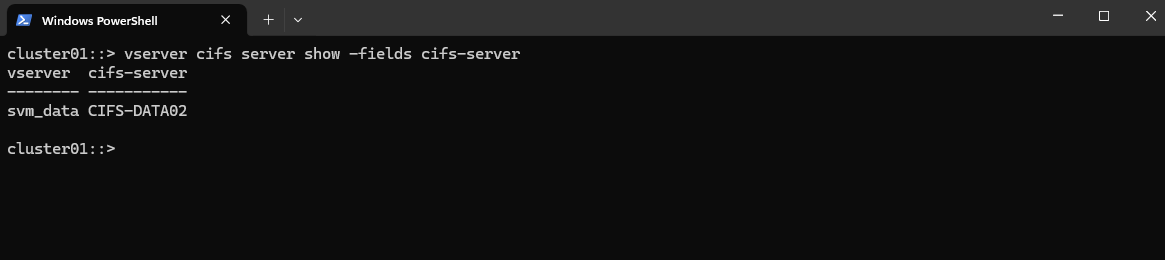
List all CIFS Server (SVMs enabled for CIFS) and their NetBIOS Name
This command gives you a quick list of all CIFS server names in your cluster, showing the SVM they belong to and their configured CIFS/NetBIOS identity.
cluster01::> vserver cifs server show -fields cifs-server
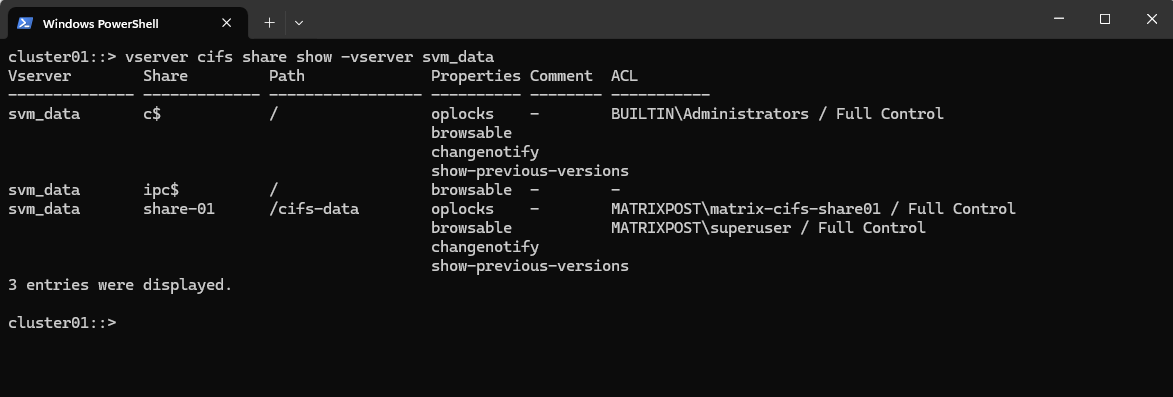
List all CIFS Shares for a specific SVM
We can run the following command to show the currently existing CIFS shares on a specific SVM.
cluster01::> vserver cifs share show -vserver <svm>
cluster01::> vserver cifs share show -vserver svm_data
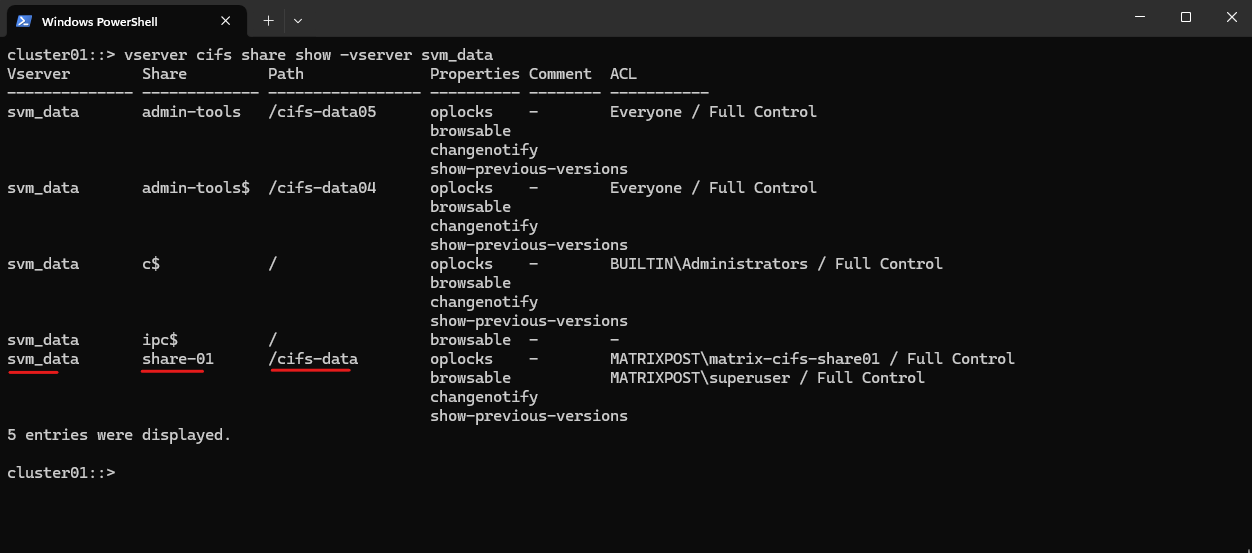
c$ and ipc$ shares here are default administrative shares, very similar to those found on a Windows server.
They are pointing to the root of the SVM namespace, which is the root_vol_svm_data.
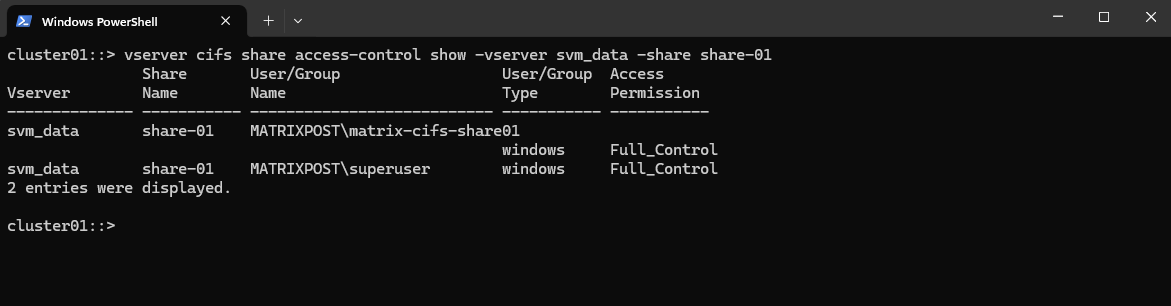
Determine Owner and Permissions for a given CIFS Share (ONTAP share-level access)
This command tells you how ONTAP controls who can even open the share in the first place, regardless of the underlying NTFS/UNIX permissions.
So users get either denied or allowed to access the share even before checking the native underlying NTFS/UNIX permissions set directly on the file system.
!! Note !!
Finally a user or group must be granted access on the ONTAP share-level (ONTAP config) and also directly on the NTFS ACLs/Unix permissions (metadata stored on the volume/disk shown in the section below) in order to access the cifs share successfully.
It shows the ONTAP share-level ACLs (the permissions applied to the SMB share object itself, ONTAP’s own configuration regardless of the native NTFS/UNIX permissions).
cluster01::> vserver cifs share access-control show -vserver svm_data -share share-01
By default, the share-level ACL gives full control to the standard group named Everyone.
Full control in the ACL means that all users in the domain and all trusted domains have full access to the share.Below for example, I already have changed this default share-level ACL to grant only to my enterprise admin and the matrix-cifs-share01 AD security group full control permissions on share-level access.
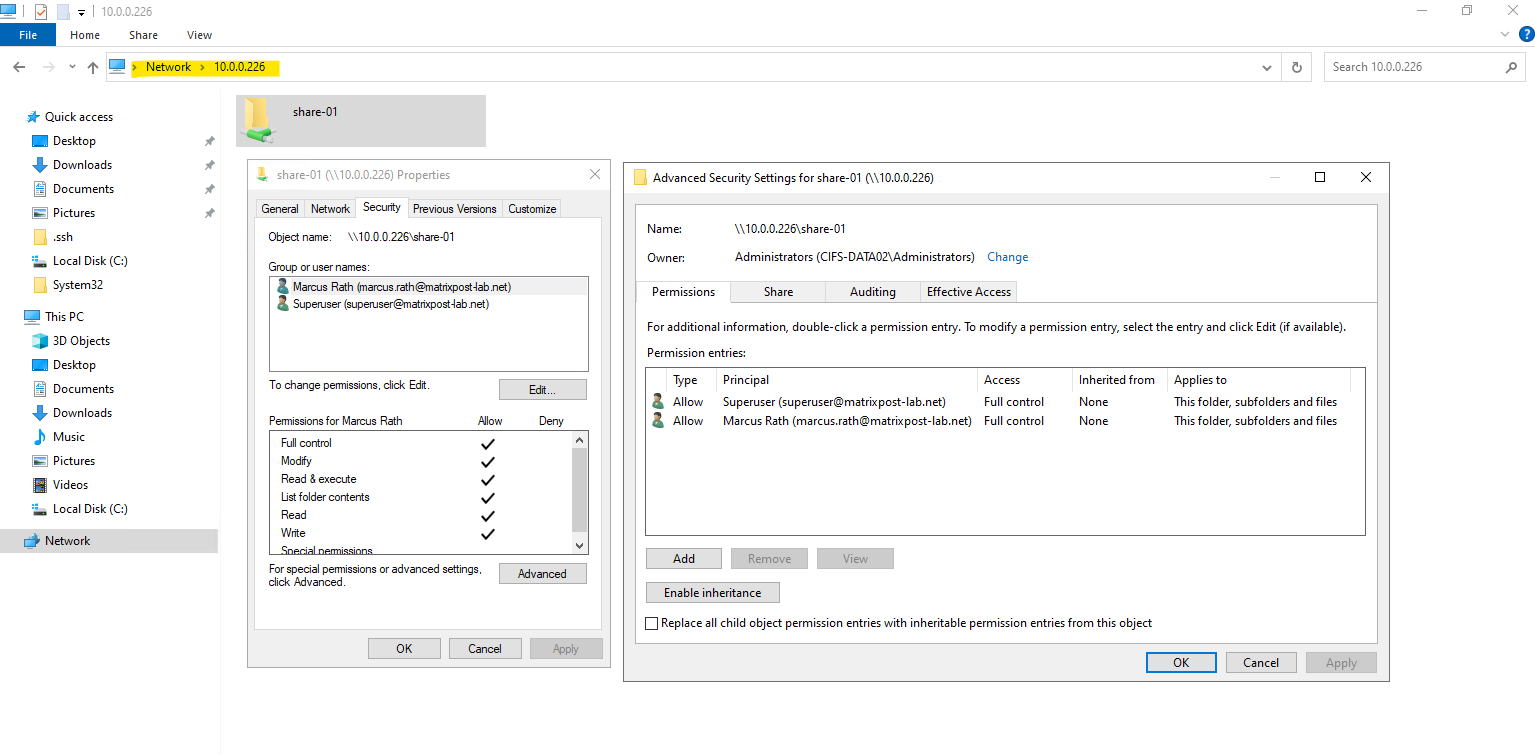
Determine Owner and Permissions for a given CIFS Share (File/Folder-level NTFS Permissions on the Volume itself set by the OS e.g. Windows Explorer or icacls)
This command tells you how ONTAP checks the NTFS/UNIX ACLs for the CIFS share mounted on the SVM by using the junction-path /cifs-data.
Reflects the file/folder-level NTFS (or UNIX) permissions on the volume itself. Those are the same permissions you’d see or set in Windows Explorer → Security tab or via icacls.
Below e.g. I was first listing all CIFS shares provided by the SVM named svm_data and then checking the owner and permissions for the CIFS share named share-01 by using its junction-path “/cifs-data”.
cluster01::> vserver security file-directory show -vserver svm_data -path "/cifs-data"

Below we will see our CIFS share mounted on a Windows host. The IP address in the UNC path with \\10.0.0.226 (IP address of the SVM named svm_data) will return the CIFS share they are mounted on the SVM.
In ONTAP, each SVM (Storage Virtual Machine) has its own namespace, which is essentially a virtual file system tree made up of Mounted volumes (like mount points) and Junction paths (like folders or subdirectories).
This allows ONTAP to present multiple volumes as a unified file system to clients.
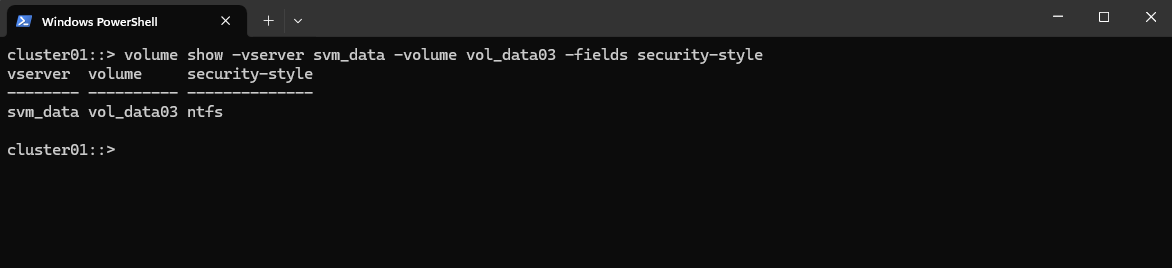
Displays the Security Style configured for a specific Volume (UNIX, NTFS or Mixed)
The following command displays the security style configured for a specific volume (vol_data03 on SVM svm_data).
The security style determines how ONTAP applies file and directory permissions within that volume:
- NTFS → Uses Windows NTFS ACLs
- UNIX → Uses UNIX mode bits and NFS semantics
- Mixed → Accepts both NTFS and UNIX permissions, applies the most recent change
- Unified (for FlexGroup) → Newer style combining NTFS/UNIX semantics
cluster01::> volume show -vserver svm_data -volume vol_data03 -fields security-style
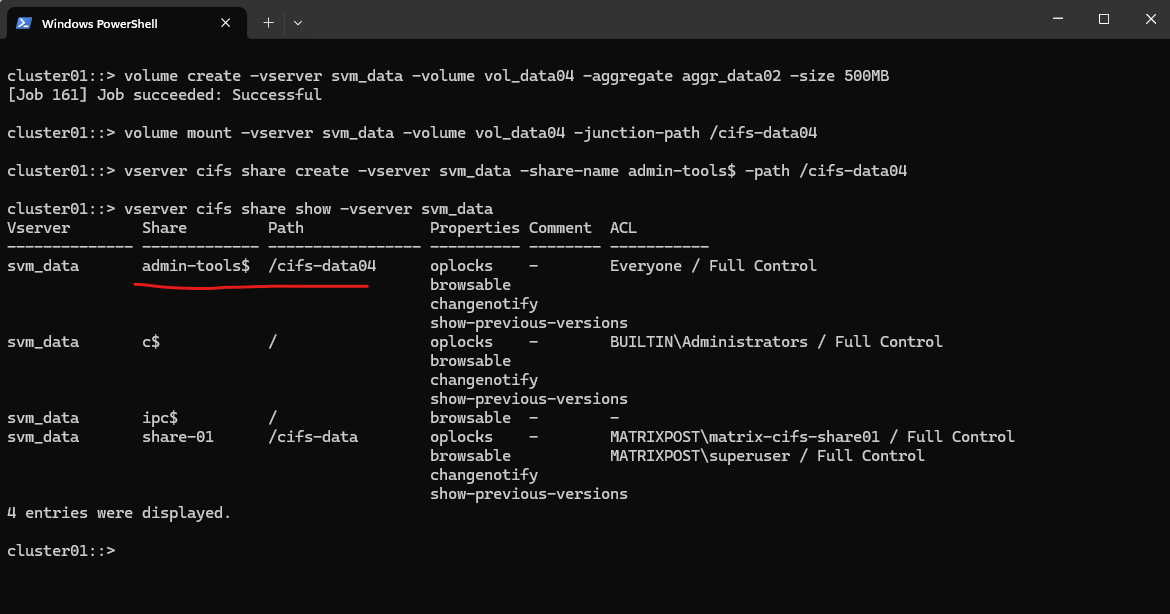
Creating a new Volume and hidden CIFS Share
Below I will create a new volume and hidden CIFS share by running the following commands.
The CIFS share I will be create as hidden share by using the $ character at the end of the share name. The rest is the same as for normal shares.
More about NTFS shares and permissions you will find here https://learn.microsoft.com/en-us/iis/web-hosting/configuring-servers-in-the-windows-web-platform/configuring-share-and-ntfs-permissions.
Share names ending with the $ character are hidden shares.
For ONTAP 9.7 and earlier, the admin$, ipc$, and c$ administrative shares are automatically created on every CIFS server and are reserved share names. Beginning with ONTAP 9.8, the admin$ share is no longer automatically created.
Source: https://docs.netapp.com/us-en/ontap/smb-admin/share-naming-requirements-concept.html
# I will first create a 500MB data volume named vol_data04 on aggr_data02
cluster01::> volume create -vserver svm_data -volume vol_data04 -aggregate aggr_data02 -size 500MB

# Next I will need to mount this volume in the namespace of NetApp ONTAP (SVM)
cluster01::> volume mount -vserver svm_data -volume vol_data04 -junction-path /cifs-data04

# I can now create a new CIFS/SMB share by using the new volume and its junction-path
# !! Note !! By using the $ character at the end of the shares name like admin-tools$, this will make the share hidden from normal browse lists (e.g., it won’t show up in \\cifs-server\ when users browse shares).
cluster01::> vserver cifs share create -vserver svm_data -share-name admin-tools$ -path /cifs-data04

# Finally I will check the creation of the new CIFS share
cluster01::> vserver cifs share show -vserver svm_data
Below to show the difference behavior when using hidden shares, I was creating a further volume and CIFS share with the same name as previously but this time without the suffix $ at the end of the share name, so just admin-tools.
cluster01::> vserver cifs share create -vserver svm_data -share-name admin-tools -path /cifs-data05

When browsing to \\cifs-server\, just my last created CIFS share (the one not marked as hidden) but also named admin-tools will be shown up for the root path of the SVM.
Users still can connect to hidden CIFS shares directly by using the full UNC path (e.g. \\cifs-data02\admin-tools$), provided they have the right share + file system permissions.
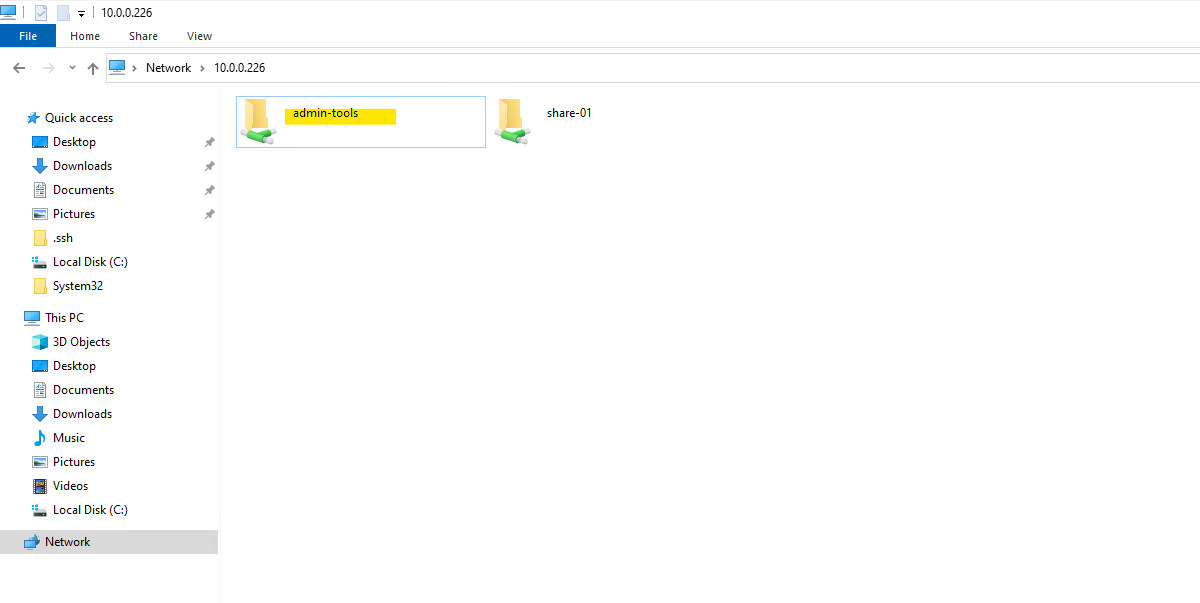
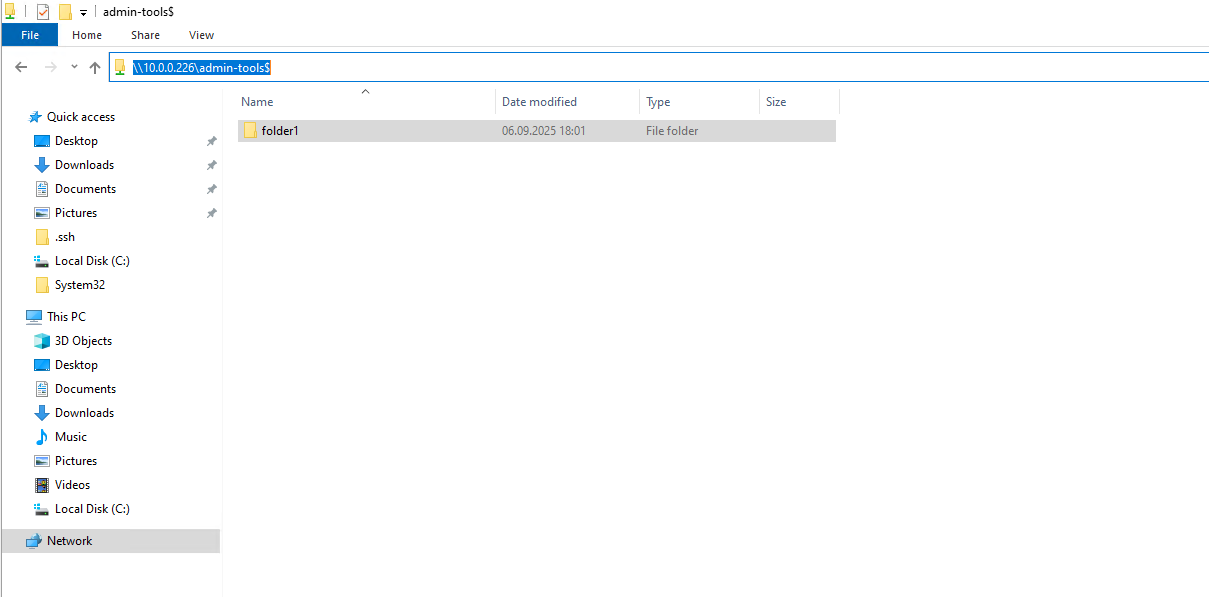
To browse to a hidden share, here also named admin-tools (but with the $ character as suffix), we just need to enter the full path including the $ suffix for the shares name like shown below, access of course provided we have the right share + file system permissions as mentioned.
\\10.0.0.226\admin-tools$
Configure NFS Export on ONTAP
Check NFS (CIFS/SMB optional) Access
In ONTAP we can also simulate an access to check if a specific client can access the NFS export by using the following command.
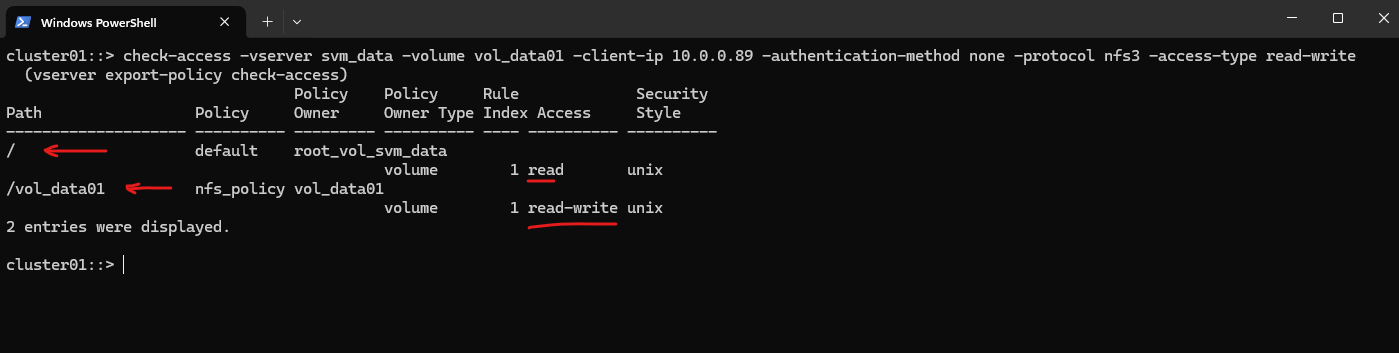
The
check-accesscommand simulates an NFS access check for the specified client without requiring an actual mount attempt. In this example, ONTAP evaluates whether the client 10.0.0.89 would be granted read-write access via NFSv3 to the volume vol_data01, based on the configured export policy rules.
cluster01::> check-access -vserver svm_data -volume vol_data01 -client-ip 10.0.0.89 -authentication-method none -protocol nfs3 -access-type read-write
We can also enable or disable export policies for SMB access on storage virtual machines (SVMs). Using export policies to control SMB access to resources is optional.
The following are the requirements for enabling export policies for SMB:
- The client must have a “PTR” record in DNS before you create the export rules for that client.
- An additional set of “A” and “PTR” records for host names is required if the SVM provides access to NFS clients and the host name you want to use for NFS access is different from the CIFS server name.
When setting up a new CIFS server on your SVM, the use of export policies for SMB access is disabled by default.
You can enable export policies for SMB access if you want to control access based on authentication protocol or on client IP addresses or host names. You can enable or disable export policies for SMB access at any time.
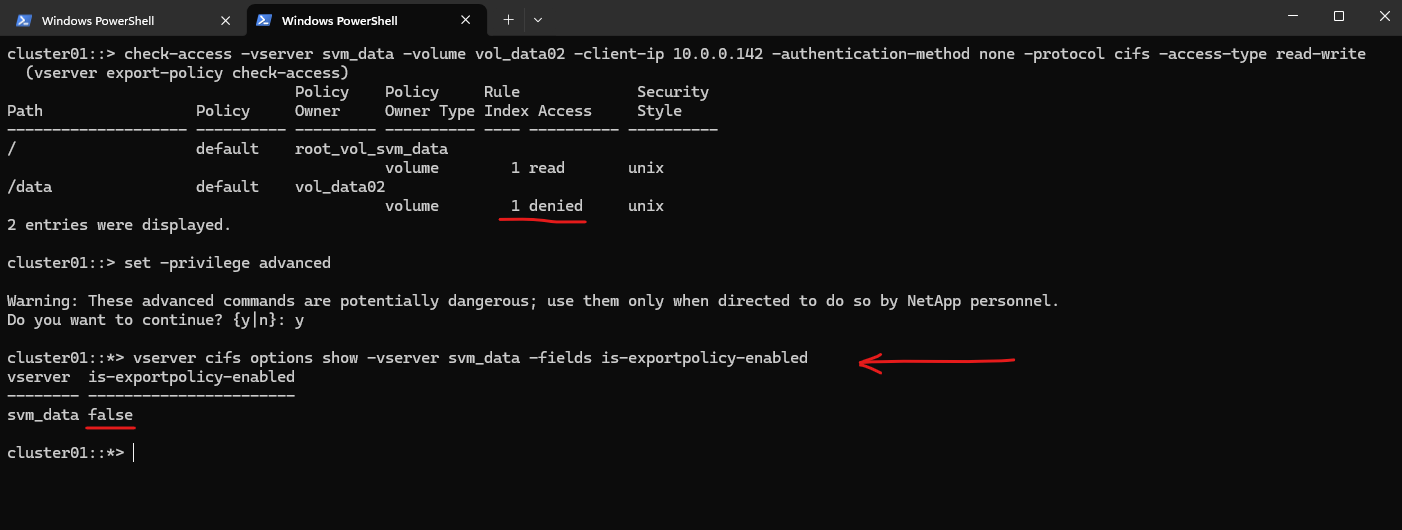
By switching to advanced privilege level and checking the CIFS options, we can see that is-exportpolicy-enabled is set to false for svm_data. This confirms that SMB access is not evaluated against export policy rules in this configuration. Instead, access control is handled exclusively through CIFS share settings and NTFS permissions.
At first glance, the
check-accessoutput suggests that the client 10.0.0.142 would be denied access to vol_data02. In practice, this does not affect SMB access because export policies are not enforced for CIFS on this SVM. Instead, the client’s access is determined entirely by the CIFS share permissions and the NTFS ACLs on the files and directories.
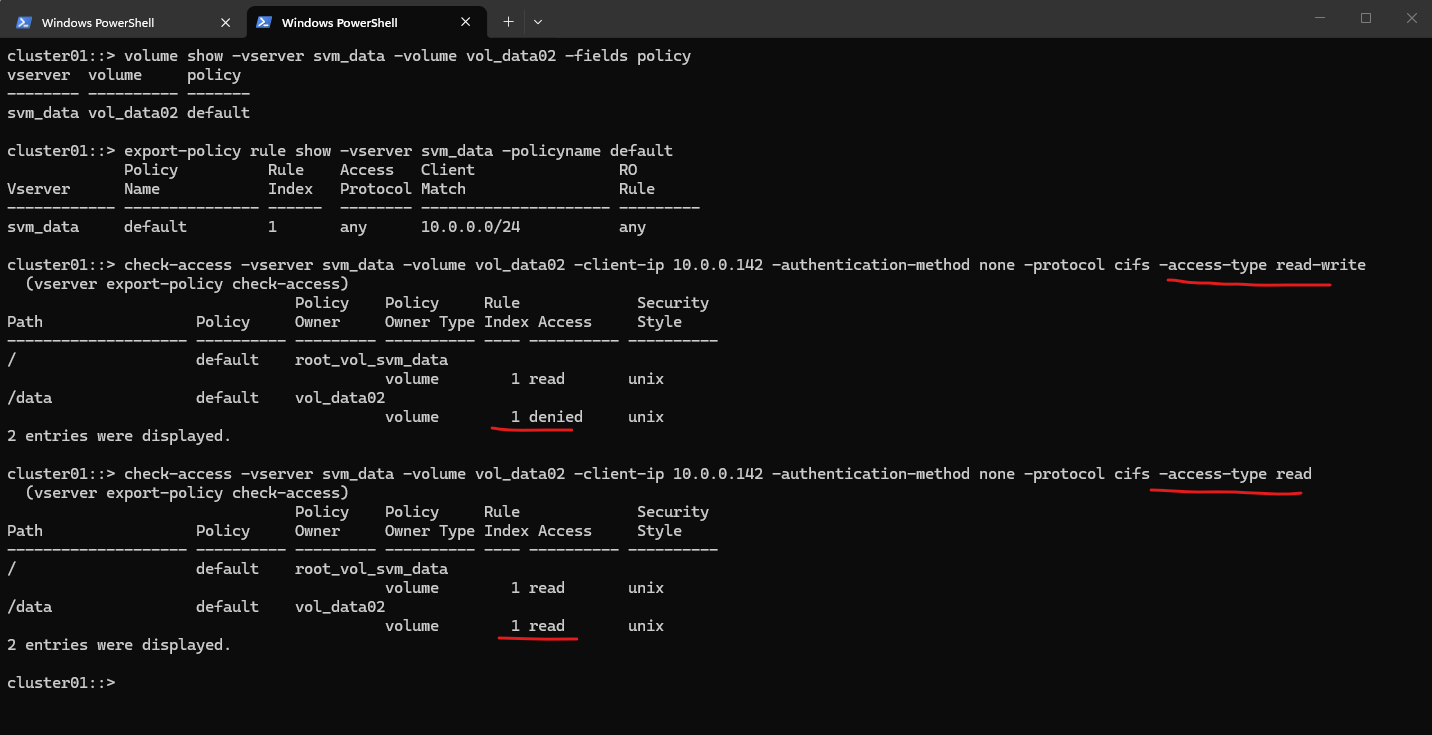
cluster01::> check-access -vserver svm_data -volume vol_data02 -client-ip 10.0.0.142 -authentication-method none -protocol cifs -access-type read-write
cluster01::*> vserver cifs options show -vserver svm_data -fields is-exportpolicy-enabled
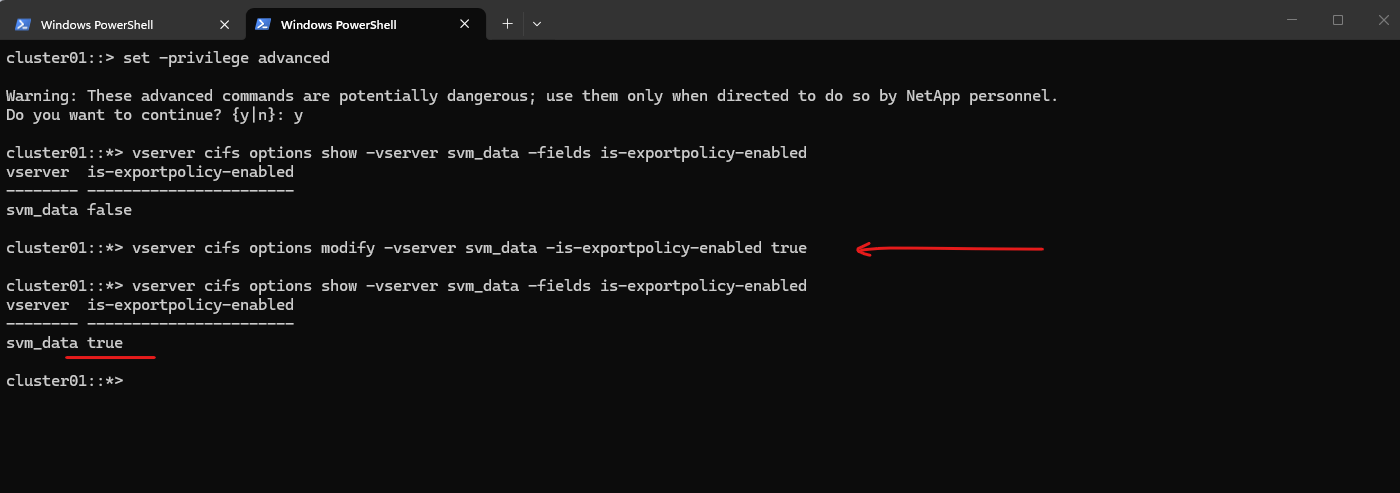
To enable export policy enforcement for CIFS on an SVM, we must modify the CIFS options at the advanced privilege level.
cluster01::*> vserver cifs options modify -vserver svm_data -is-exportpolicy-enabled true
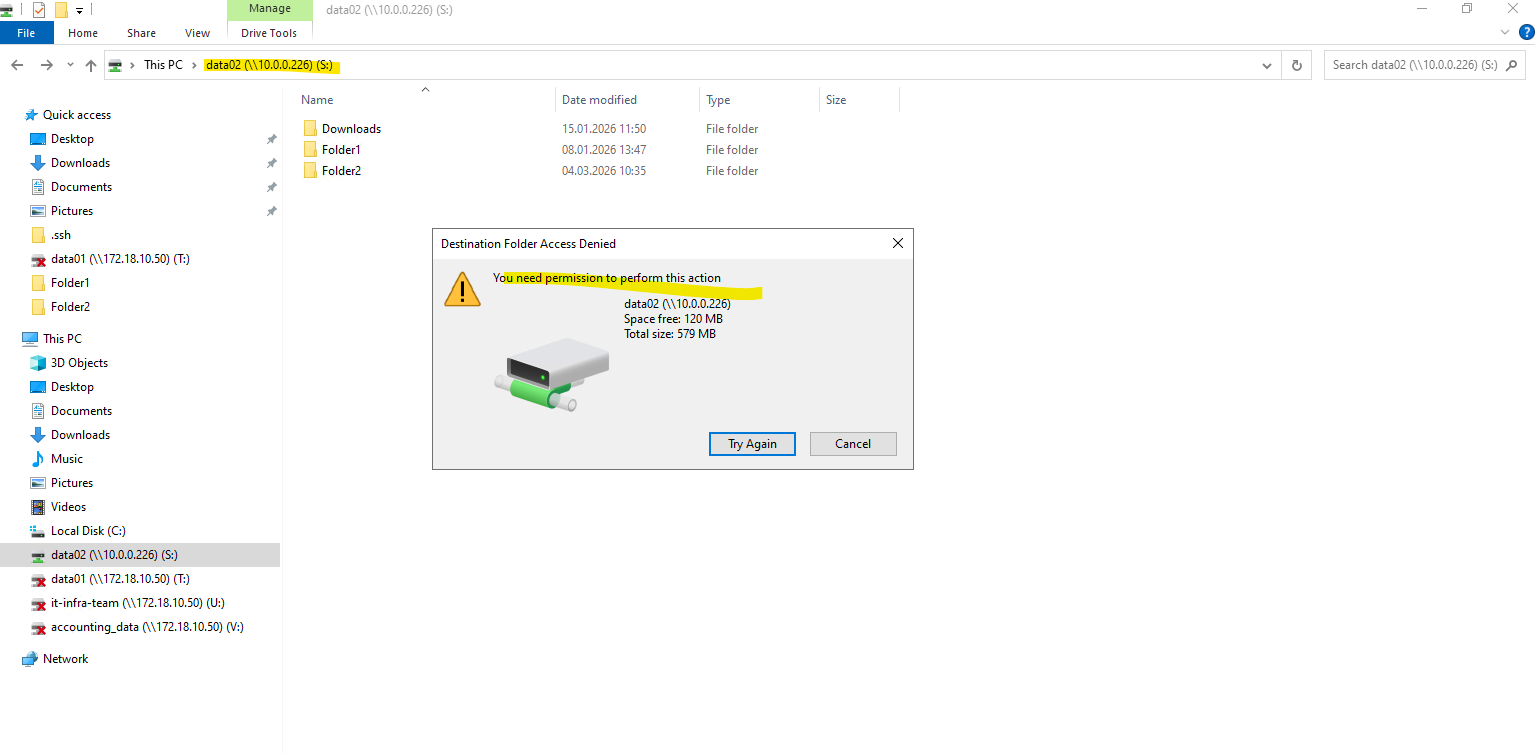
Once export policy enforcement for CIFS is enabled on the SVM, SMB clients are also evaluated against the configured export policy rules.
In this example, the client now only has read access to the volume and the corresponding CIFS share, because the export policy allows read-only access but denies read-write operations.
The following checks verify which export policy is assigned to the volume and evaluate how it affects client access.
While the client 10.0.0.142 is allowed read access to the volume vol_data02, read-write access is denied by the export policy rule, resulting in effective read-only access.
# show the assigned export policy for the specified SVM and volume
cluster01::> volume show -vserver svm_data -volume vol_data02 -fields policy

# show the rules defined in the specified export policy
cluster01::> export-policy rule show -vserver svm_data -policyname default

# check for read-write access
cluster01::> check-access -vserver svm_data -volume vol_data02 -client-ip 10.0.0.142 -authentication-method none -protocol cifs -access-type read-write

# check just for read access
cluster01::> check-access -vserver svm_data -volume vol_data02 -client-ip 10.0.0.142 -authentication-method none -protocol cifs -access-type read
  (vserver export-policy check-access)
Reverting a LIF to Its Home Port (here Management Interface LIF)
When a Logical Interface (LIF) runs on a different node or port, after a takeover, giveback, or manual migration, ONTAP marks it as “is-home = false.”
Using the network interface revert command, you can quickly return the LIF to its designated home node and home port.
This is especially important for the management interface, ensuring it always uses the intended and stable network path.
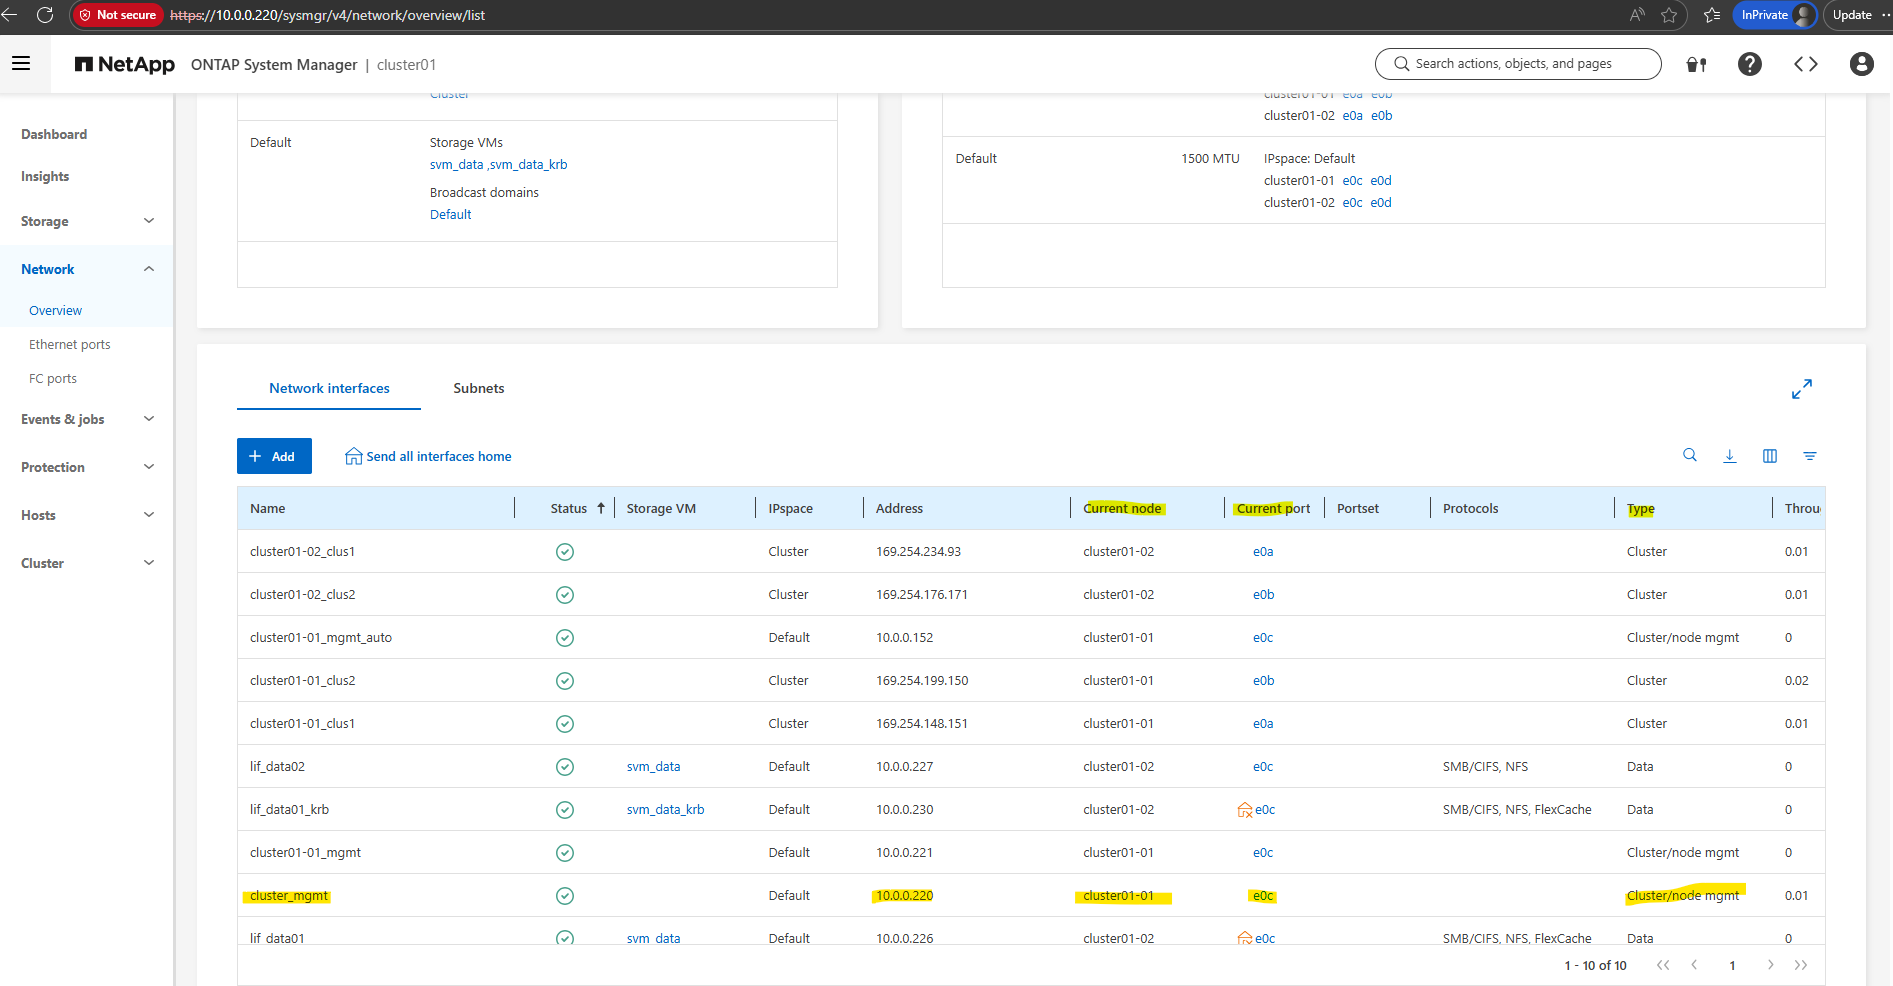
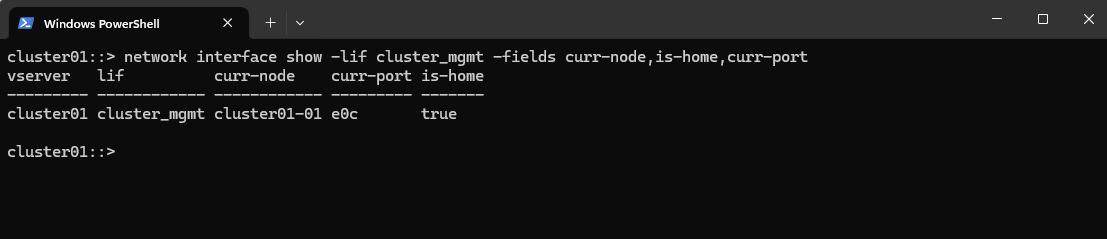
The command below provides a quick view of where the management LIF is currently running. It highlights whether the LIF is on its home node and port, making it easy to identify misplacements after failover or manual migrations.
In my case below, the management LIF is currently running on its home node and port shown in column is-home = true.
cluster01::> network interface show -lif cluster_mgmt -fields curr-node,is-home,curr-port
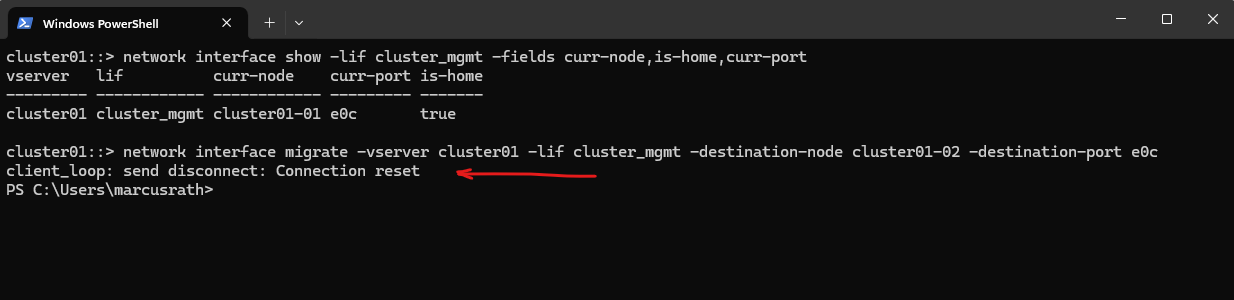
For testing purpose to manually move the cluster_mgmt LIF from cluster01-01 to cluster01-02, you can simply use the network interface migrate command and specify the target node and port:
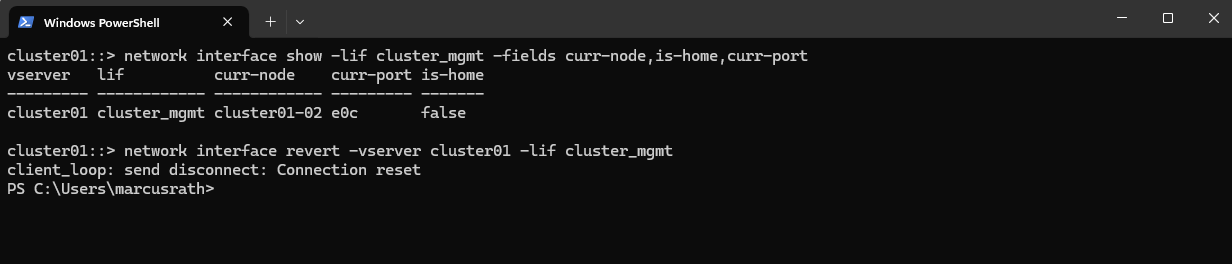
Migrating the cluster_mgmt LIF will immediately disconnect your SSH or System Manager session, because your connection is tied to that very LIF.
That’s why we saw: client_loop: send disconnect: Connection reset
cluster01::> network interface migrate -vserver cluster01 -lif cluster_mgmt -destination-node cluster01-02 -destination-port e0c
After the migration, verify the new location:
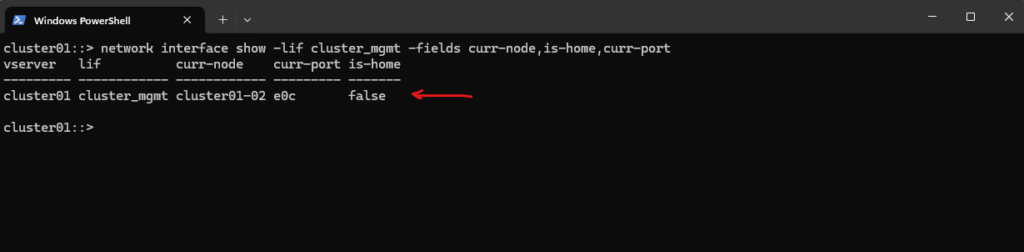
This will show the LIF now running on cluster01-02, with
is-home = false, demonstrating a non-home placement.
cluster01::> network interface show -lif cluster_mgmt -fields curr-node,is-home,curr-port
After demonstrating a manual failover, you can return the cluster_mgmt LIF to its original node/port with:
cluster01::> network interface revert -vserver cluster01 -lif cluster_mgmt
You can verify the state with:
cluster01::> network interface show -lif cluster_mgmt -fields curr-node,curr-port,is-home

How Auto-Revert Interacts With Manual LIF Migrations
Auto-revert determines whether a LIF automatically returns to its home node and port once they become healthy again.
If auto-revert is enabled, any manual migration is temporary and ONTAP will move the LIF back to its home location automatically.
If auto-revert is disabled, the LIF remains on the manually selected node until it is moved again by an administrator.
You can check or change the setting with:
cluster01::> network interface show -lif cluster_mgmt -fields auto-revert

To enable or disable it run:
# enable auto-revert
cluster01::> network interface modify -vserver cluster01 -lif cluster_mgmt -auto-revert true

# disable auto-revert
cluster01::> network interface modify -vserver cluster01 -lif cluster_mgmt -auto-revert false
From Share to Volume: Check Usage and Expand Capacity in ONTAP
Below we will see how to trace a CIFS/SMB share back to its backing volume, verify current capacity, and grow the volume if more space is required.
Since CIFS shares don’t have their own size limits, available space always depends on the mounted volume.
The steps below cover identifying the share path, locating the corresponding volume, checking free space, expanding it online, and validating the result afterwards.
List CIFS shares on the SVM
Identify the relevant share, in my case its share-01.
cluster01::> vserver cifs share show -vserver svm_data
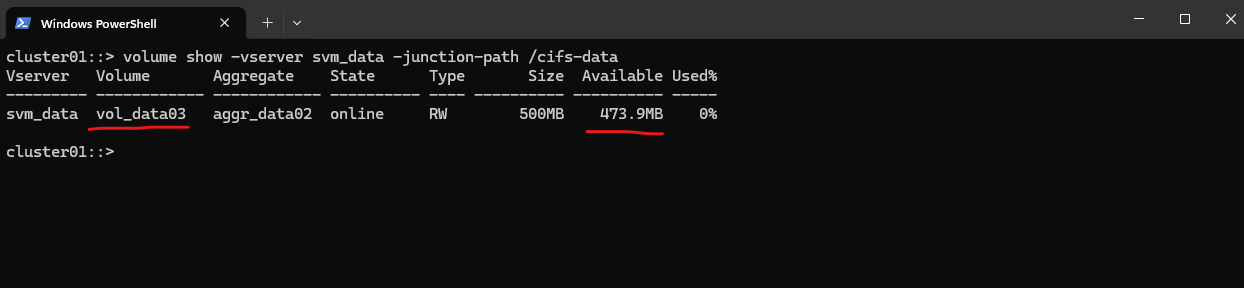
Determine which volume is mounted for your Share
In my case which volume is mounted for the share-01 and its mount path /cifs-data.
/cifs-data is a NAS namespace mount point (junction path) inside the SVM.
It is not a Linux directory on the controller, and it is not a physical path on disk.
cluster01::> volume show -vserver svm_data -junction-path /cifs-data
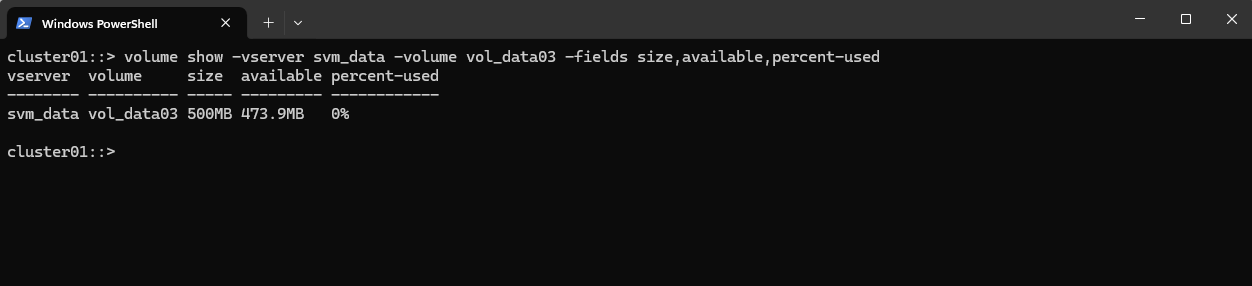
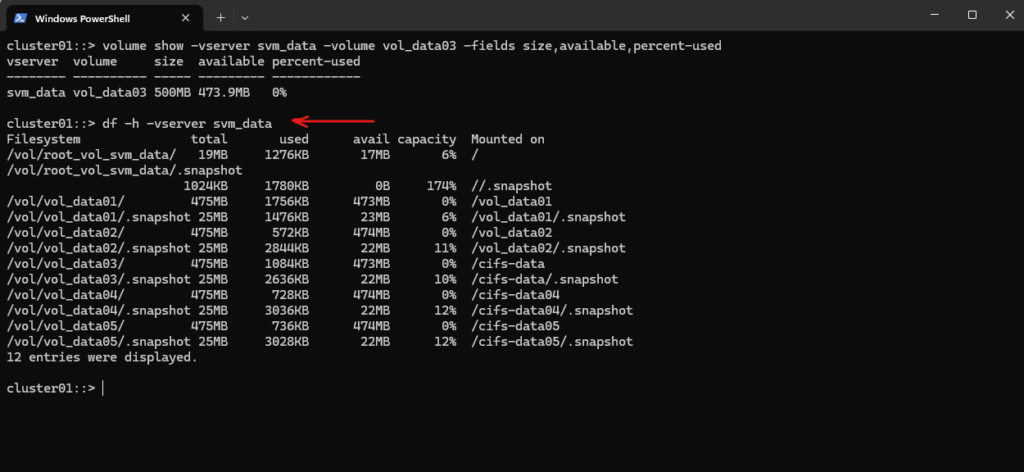
Check current Volume Usage
cluster01::> volume show -vserver svm_data -volume vol_data03 -fields size,available,percent-used
or
cluster01::> df -h -vserver svm_data
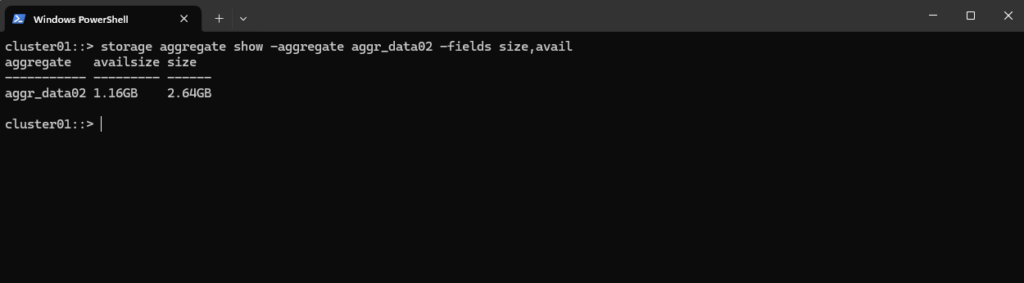
Verify the aggregate has enough free space before extending Volume
cluster01::> storage aggregate show -aggregate aggr_data02 -fields size,available
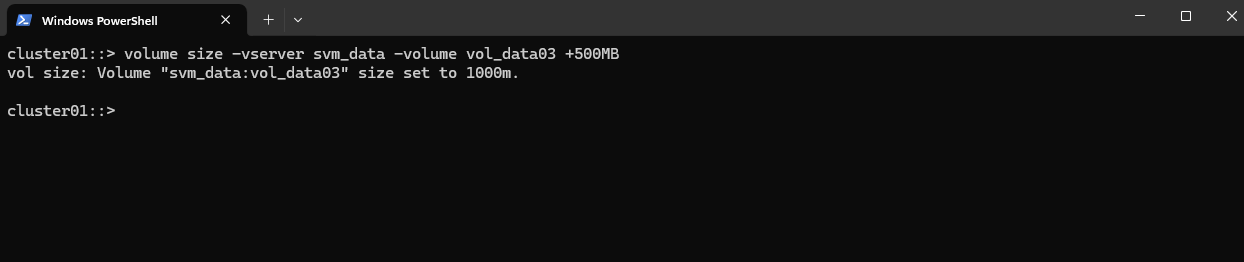
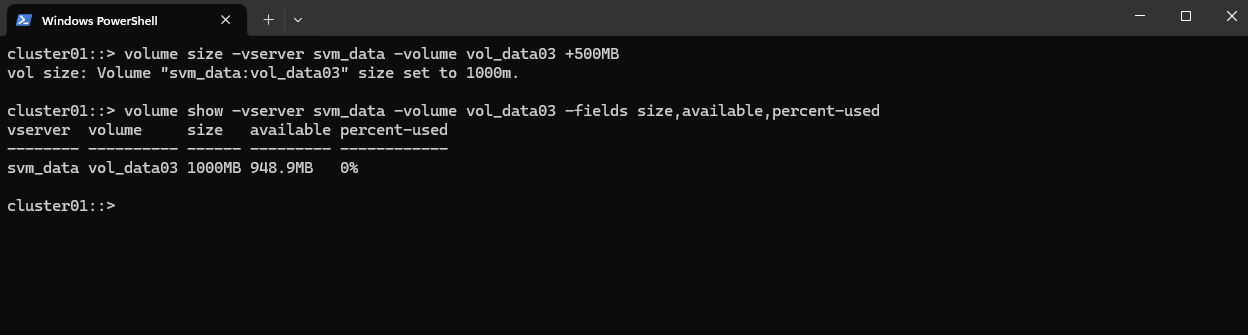
Extend the volume
Add 500 MB more:
cluster01::> volume size -vserver svm_data -volume vol_data03 +500MB

or using absolute size instead of increment:
cluster01::> volume size -vserver svm_data -volume vol_data03 1GB
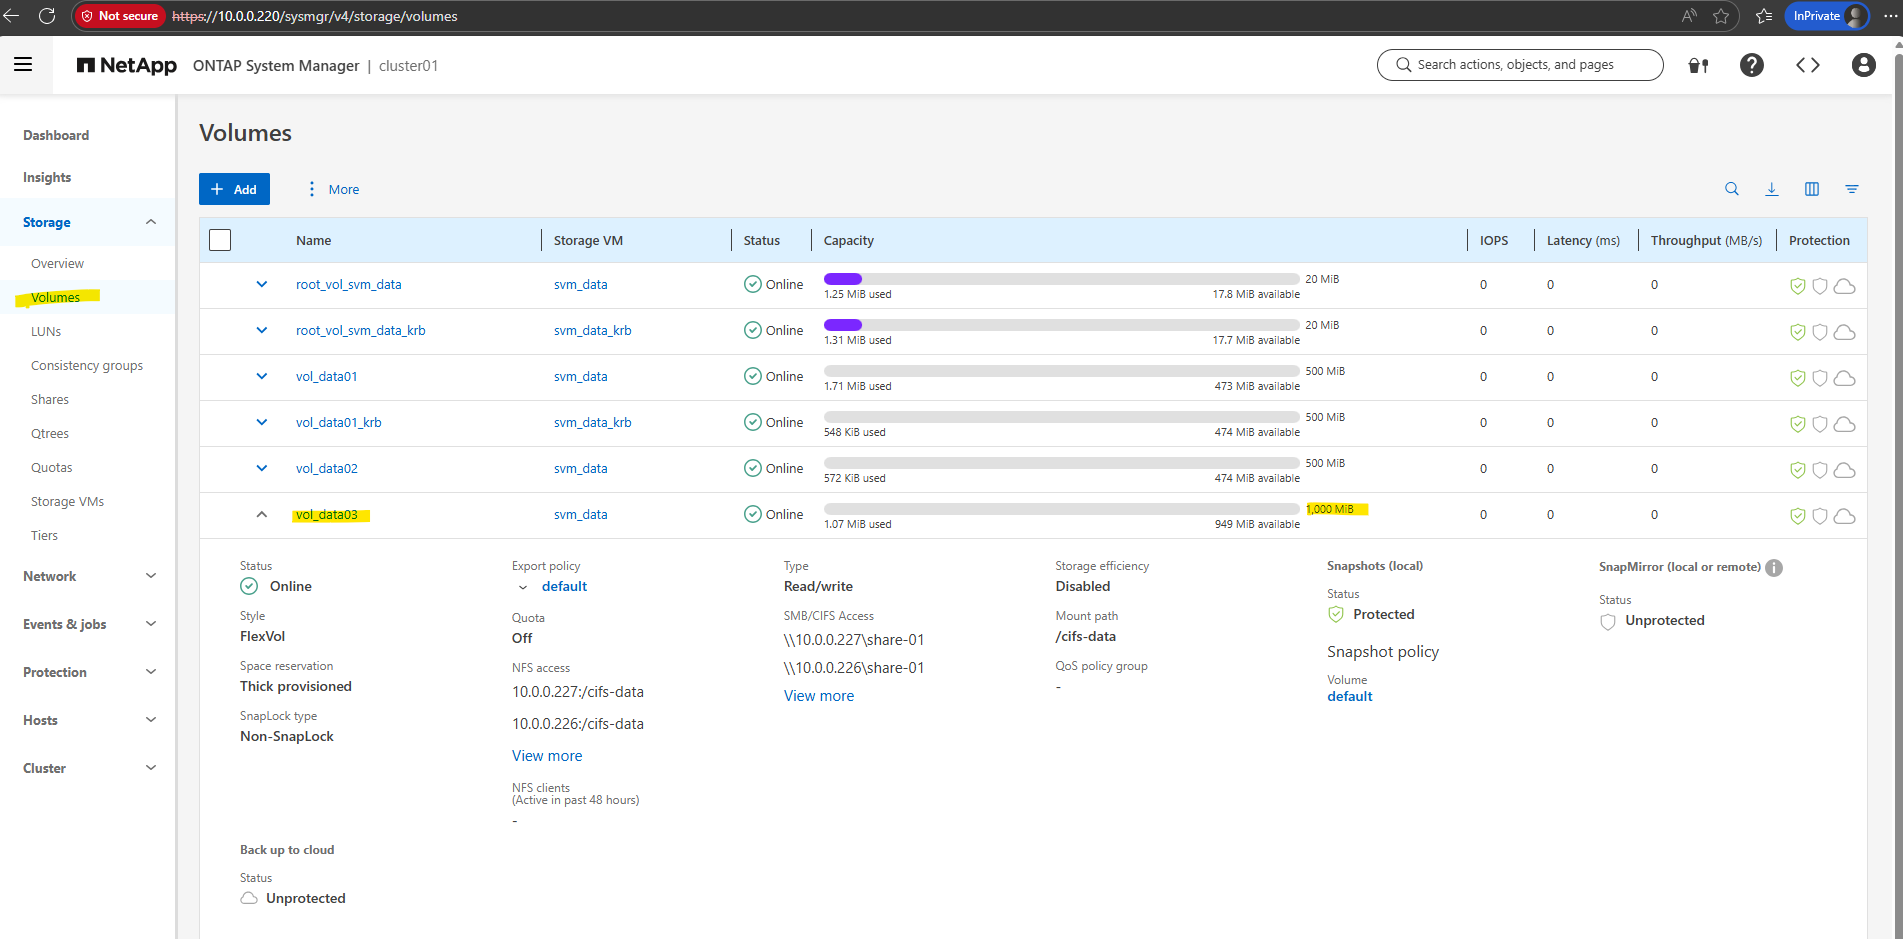
Check volume size and available space again
cluster01::> volume show -vserver svm_data -volume vol_data03 -fields size,available,percent-used
Optional (Recommended): Enable autogrow
ONTAP volume autogrow automatically increases the size of a volume when it becomes nearly full, preventing CIFS/NFS write failures without manual intervention.
With a defined maximum size, the volume can grow safely up to a limit without consuming the entire aggregate. This is ideal for unpredictable file share growth and keeps storage expansion online and seamless.
cluster01::> volume autosize vol_data03 -mode grow -maximum-size 100GB
CIFS and NFS Share Capacity = Volume Capacity
Both SMB/CIFS and NFS shares do not have their own size limits. They simply expose the capacity of the underlying ONTAP volume mounted at the junction path.
If the volume grows (manually or via autogrow), the available space automatically increases for both SMB and NFS clients without any share changes or outages.
Snapshot Reserve: How Much Space Do Snapshots Really Need?
When working with ONTAP volumes, it’s easy to focus on size, tiering, and performance, but Snapshot Reserve is just as important. It directly influences how much writable space your volume actually has and how Snapshot growth is handled. Let’s take a closer look at what happens behind the scenes and how to size it properly.
More about you will find in my post here https://blog.matrixpost.net/deploying-netapp-cloud-volumes-ontap-part-3/#snapshot-space.
Networking Troubleshooting in ONTAP
When troubleshooting, remember that ONTAP commands are often scoped to a specific Storage Virtual Machine (SVM) or node.
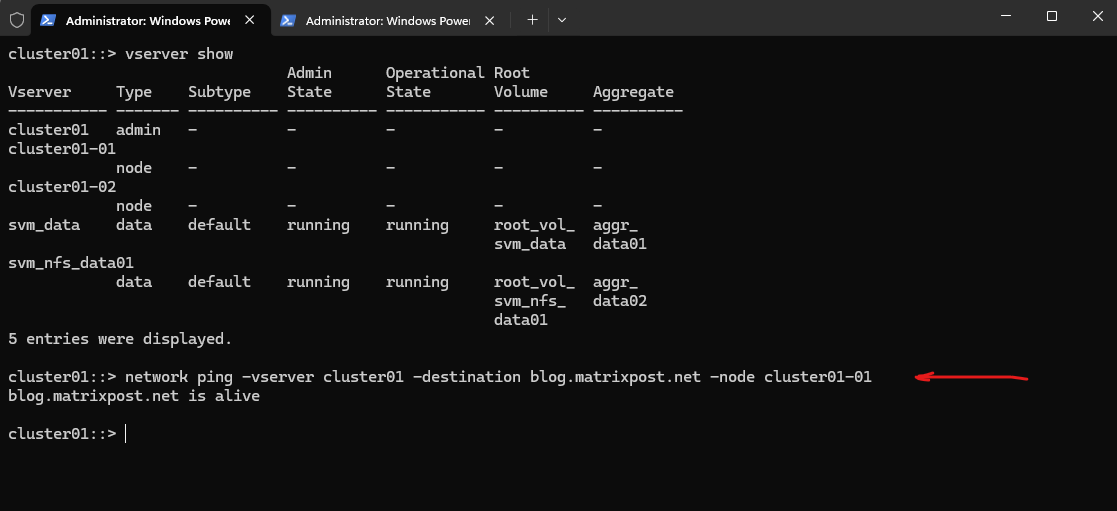
SVM-Level Connectivity (Data Path)
When pinging from the Admin/Cluster Vserver, you must specify which Node or LIF is initiating the traffic.
cluster01::> network ping -vserver cluster01 -destination blog.matrixpost.net -node cluster01-01
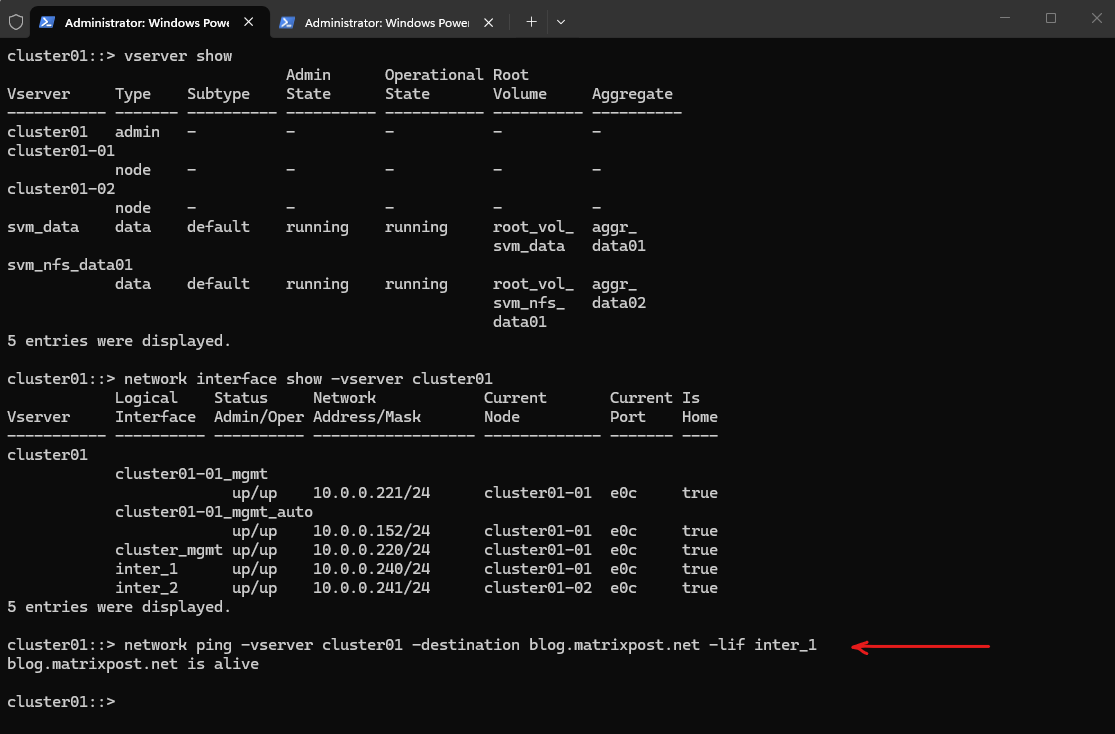
Alternatively, we can specify a-lif instead node.
cluster01::> network ping -vserver cluster01 -destination blog.matrixpost.net -lif inter_1
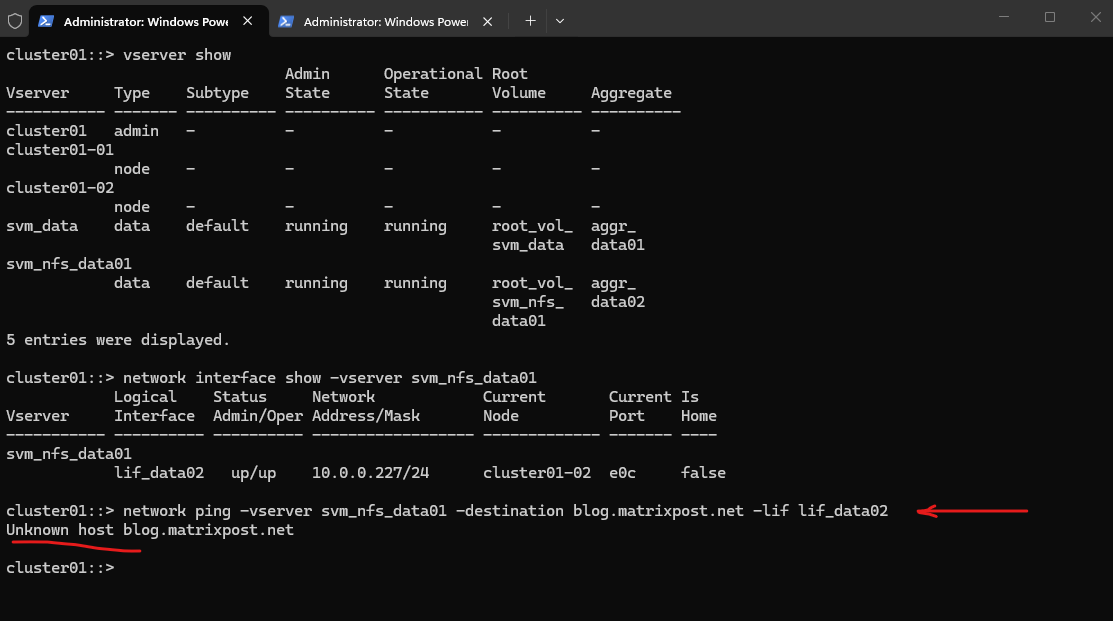
If your NFS or SMB clients are having trouble, you should ping from the Data SVM context.
In ONTAP, each SVM has its own independent DNS configuration. If DNS isn’t configured for that specific SVM, or if the DNS servers aren’t reachable from
lif_data02, the ping will fail before it even leaves the box.
cluster01::> network ping -vserver svm_nfs_data01 -destination blog.matrixpost.net -lif lif_data02
In ONTAP, each Data SVM acts like its own isolated “virtual server”, it doesn’t automatically inherit the DNS settings from the Cluster/Admin level.
cluster01::> vserver services name-service dns show -vserver svm_nfs_data01

To allow your SVM to resolve hostnames (like blog.matrixpost.net), run the following command:
In ONTAP, the
-domainsfield effectively acts as your DNS Search List. Usually we should add two DNS Servers comma separated to avoid a single point of failure, for my lab this is ok.
cluster01::> vserver services name-service dns create -vserver svm_nfs_data01 -domains matrixpost-lab.net -name-servers 10.0.0.70 -state enabled

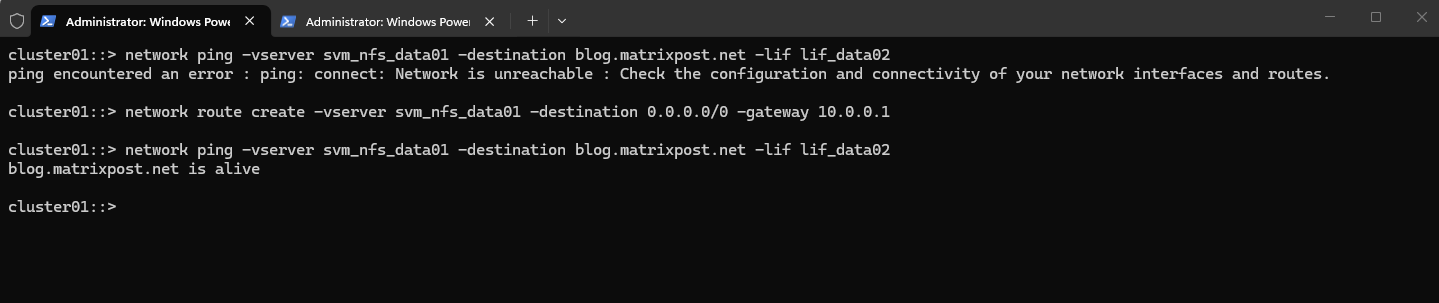
DNS resolution now works but so far we haven’t configured a gateway for the specific SVM.
In ONTAP, you must manually define the static route for each SVM if it needs to talk to anything outside its local Layer 2 broadcast domain.
cluster01::> network ping -vserver svm_nfs_data01 -destination blog.matrixpost.net -lif lif_data02

To add a gateway for a specific SVM we can run the following command. After adding the route, we can try our ping again.
cluster01::> network route create -vserver svm_nfs_data01 -destination 0.0.0.0/0 -gateway 10.0.0.1
Node-Level Diagnostics (Systemshell)
When the standard ONTAP commands are too restrictive, the
systemshellallows you to use familiar Linux-style tools liketelnet,ping, andtcpdumpdirectly from the node’s perspective.Node Context vs. SVM Context: When you run
telnetin the systemshell, you are testing from the Node’s physical management/e0M port or its routing table. This is different from testing from an SVM LIF.
cluster01::> set diagnostic
cluster01::*> systemshell -node cluster01-01 telnet blog.matrixpost.net 443

Diagnostic Privilege Mode and Systemshell
The diagnostic privilege level provides access to low-level ONTAP commands intended primarily for NetApp internal troubleshooting.
These commands can expose system internals and should only be used with caution, as incorrect usage may impact system stability or supportability.
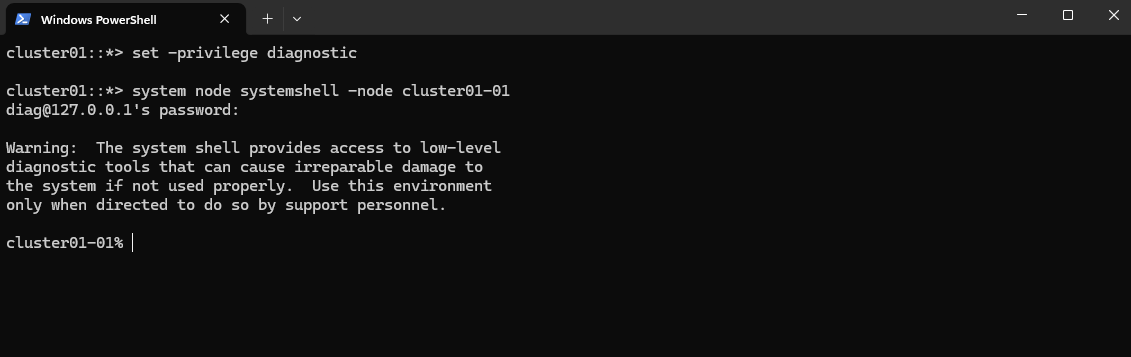
The set -privilege diagnostic mode unlocks internal ONTAP commands that are not available in admin or advanced mode.
The
diaguser is a built-in ONTAP account reserved for advanced troubleshooting and NetApp internal support.By default, the account is locked and cannot be used until explicitly unlocked and assigned a password.
To unlock and set a password for the diagnostic user:
# switch to diagnostic mode
cluster01::*> set -privilege diagnostic

# enable the diag user
cluster01::*> security login unlock -username diag

# set password for
cluster01::*> security login password -username diag
The
system node systemshellcommand provides access to the low-level system shell (nodeshell) of an ONTAP node.This shell exposes internal diagnostic commands and limited OS-level access used primarily for troubleshooting by NetApp support.
cluster01::*> system node systemshell -node cluster01-01
diag@127.0.0.1's password: <we need to enter our previously set password for the diag user>
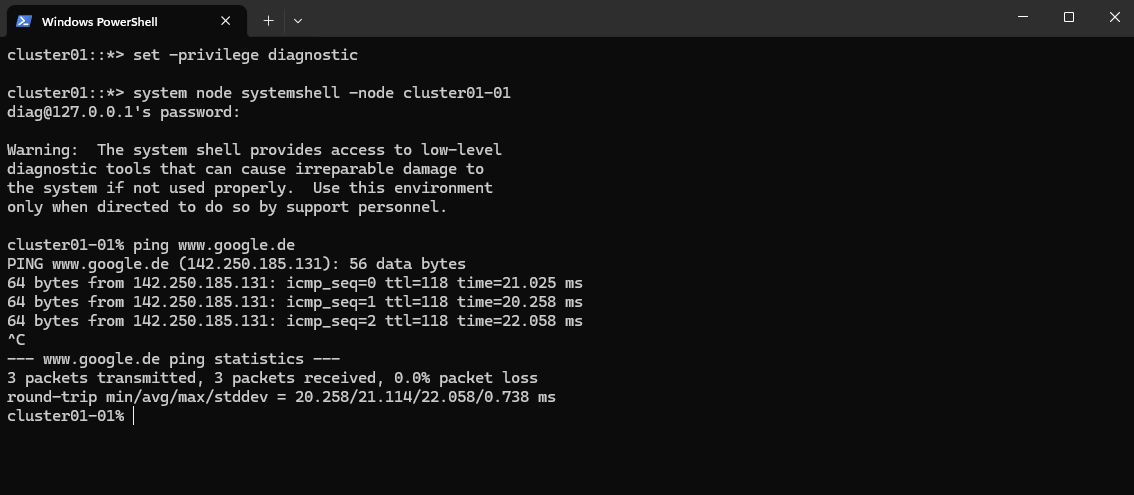
For example we can run the Ping command from this shell. In order DNS resolution will work, we also need to configure a working DNS server for the cluster SVM as shown in the next section below.
cluster01-01% ping www.google.de
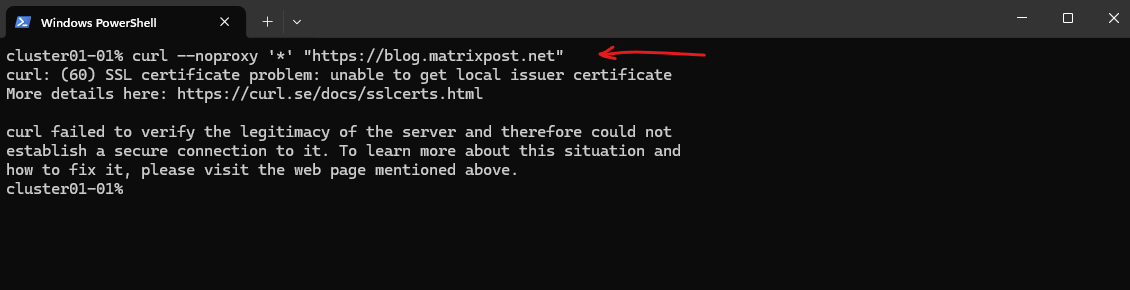
We can also use the curl command to fetch a website, in my case below the OS of the ONTAP node just doesn’t trust the Let’s Encrypt certificate installed on my blog’s web server.
cluster01-01% curl --noproxy '*' "https://blog.matrixpost.net"
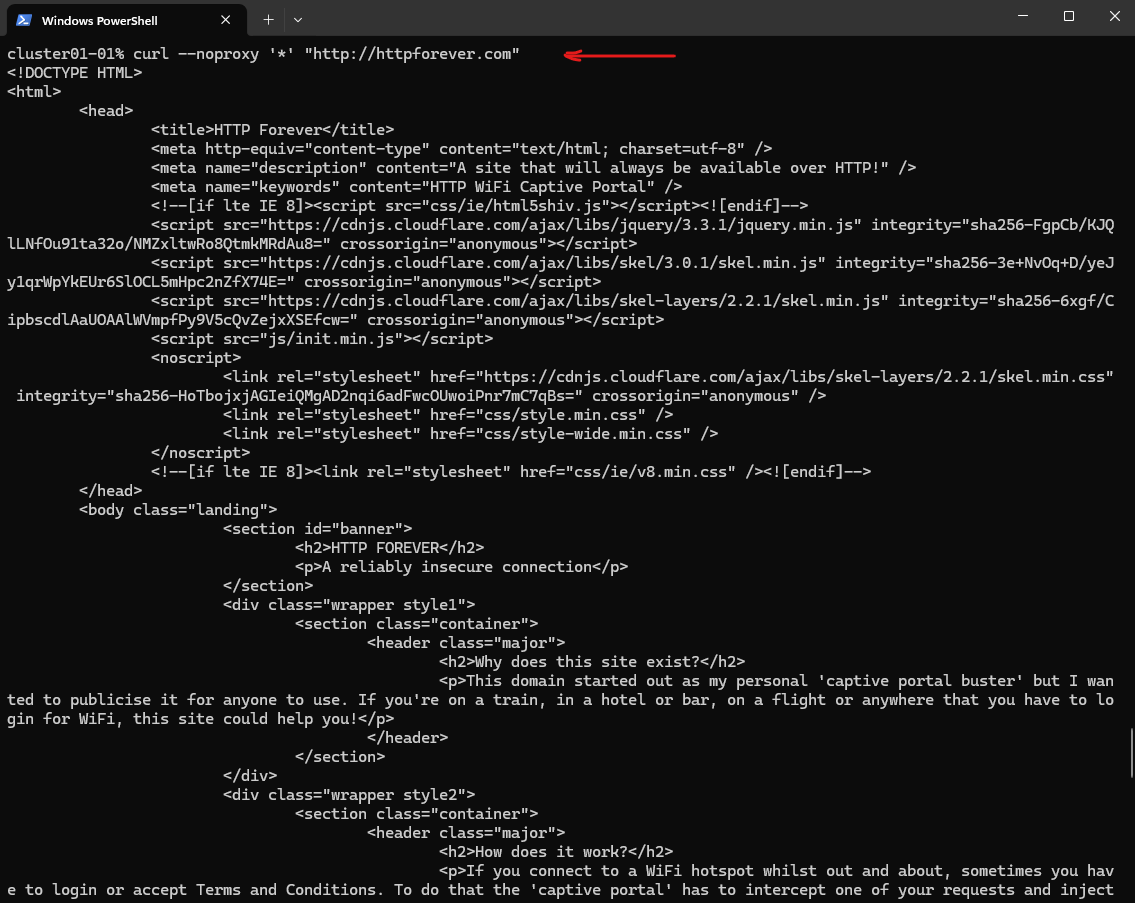
Just for demonstration purpose I will show this by using a pure HTTP web site.
cluster01-01% curl --noproxy '*' "http://httpforever.com"
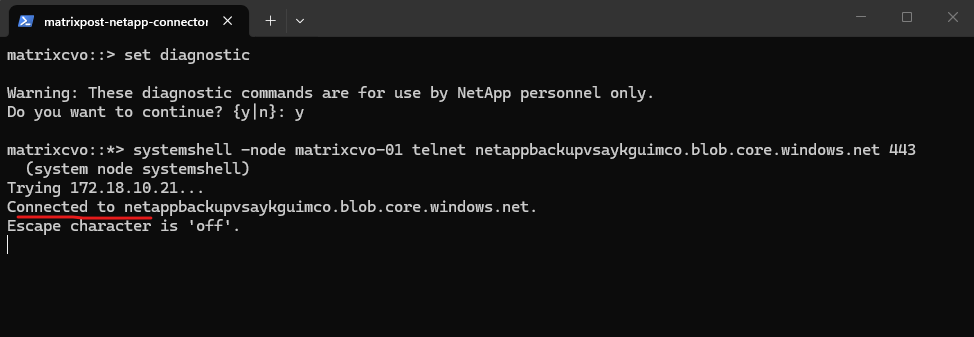
We can also use the telnet command to test if we can reach TCP services through the network.
matrixcvo::*> systemshell -node matrixcvo-01 telnet netappbackupvsaykguimco.blob.core.windows.net 443
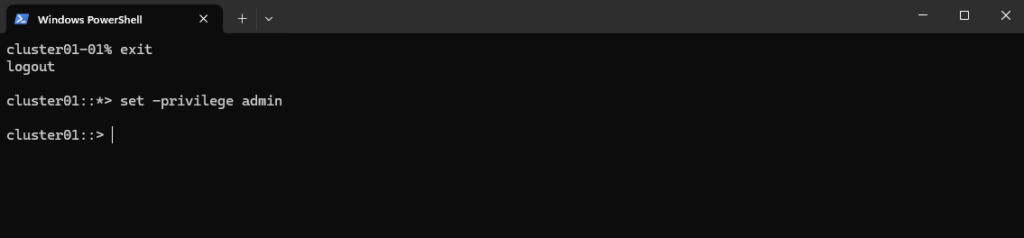
Exit the systemshell and diagnostic mode by running:
cluster01-01% exit
cluster01::*> set -privilege admin
DNS Configuration for a SVM (also default hidden cluster SVM)
The dns show command displays the DNS configuration assigned to a specific Storage Virtual Machine (SVM).
It is useful to verify name resolution settings such as DNS domains and configured name servers.
In NetApp ONTAP, every cluster has a hidden system SVM used for management, typically named after the cluster itself (in my case below this is cluster01).
Even if you only created one data SVM (
svm_datain my case), the administrative layer exists as its own entity.
cluster01::*> dns show
cluster01::*> cluster show
cluster01::*> vserver show -type admin
cluster01::*> dns show -vserver svm_data
cluster01::*> dns show -vserver cluster01
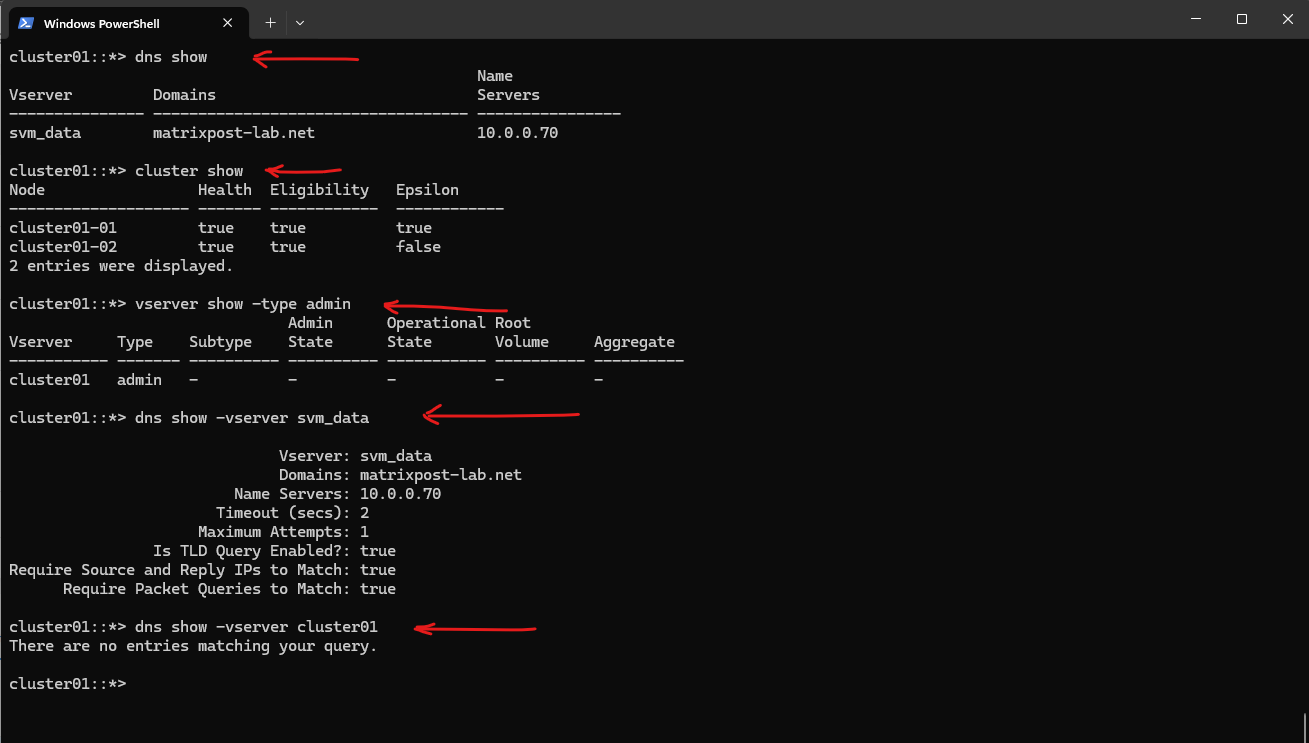
Usually, the admin Vserver is named exactly like your cluster (cluster01). If vserver show -type admin confirms the name is cluster01.
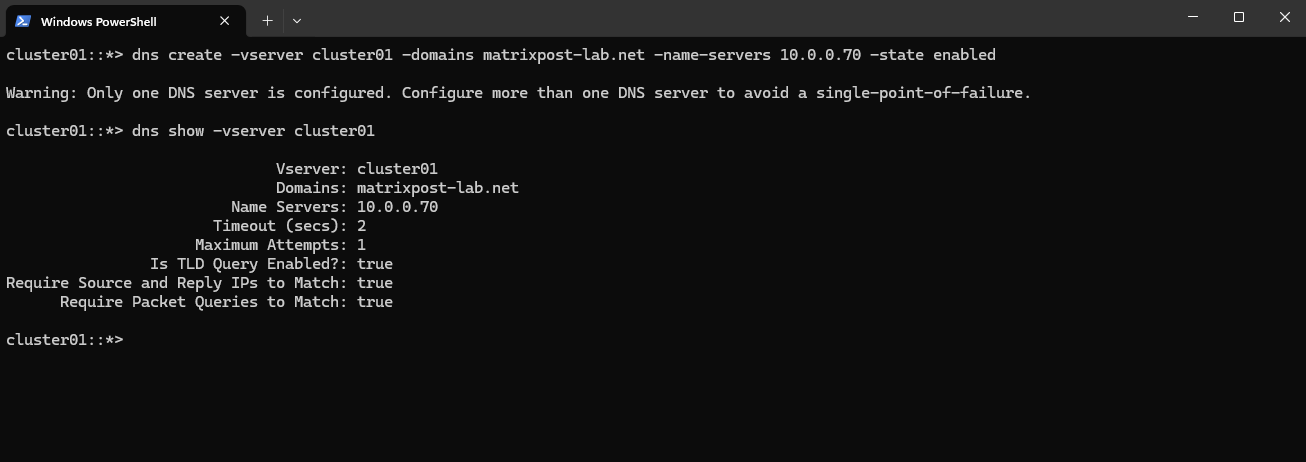
The dns create command here configures DNS settings for the cluster (admin) SVM, which is required for internal services such as authentication and name resolution.
This configuration applies only to the cluster management layer and is independent from DNS settings of data SVMs.
cluster01::*> dns create -vserver cluster01 -domains matrixpost-lab.net -name-servers 10.0.0.70 -state enabled
cluster01::*> dns show -vserver cluster01
Diagnosing HTTPS Connectivity and Certificate Trust Issues in ONTAP
In some troubleshooting scenarios it is useful to verify whether an ONTAP node can establish HTTPS connections to external services and whether TLS certificates can be validated successfully.
While ONTAP provides only limited networking diagnostics in the cluster CLI, the diagnostic systemshell offers additional tools such as curl that can be used to test HTTPS connectivity and inspect the certificate chain presented by a remote server.
This can be particularly helpful when troubleshooting issues related to AutoSupport delivery, proxy servers, TLS inspection devices, or missing Root Certificate Authorities (CAs). If required, additional trusted CAs can also be installed directly in ONTAP.
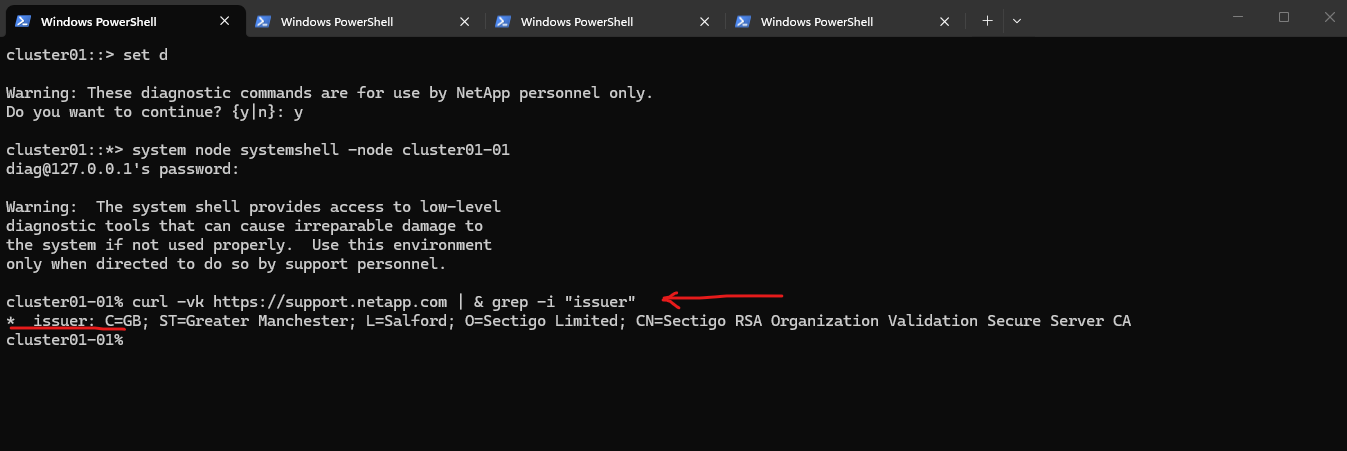
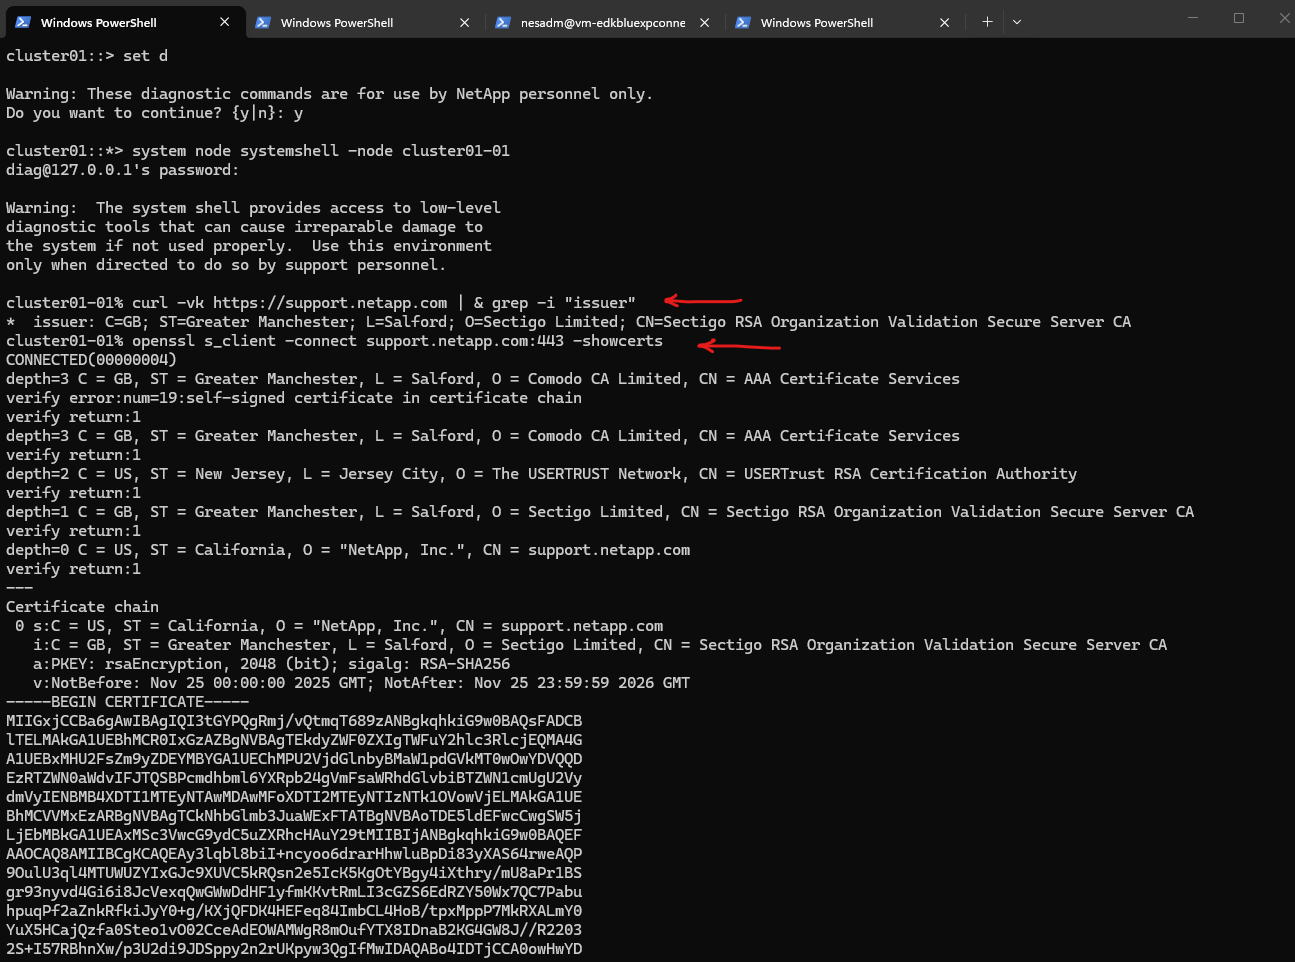
Connecting to the AutoSupport endpoint (support.netapp.com) should succeed without certificate validation errors, because ONTAP already includes the required Root CA in its trusted certificate store. Therefore the TLS handshake completes successfully and the certificate chain can be verified without installing additional CAs.
-kor--insecureto tell the tool to ignore SSL/TLS certificate validation errors.|& grep -i "issuer"By using|&, you are telling the shell: “Take everything, the data AND the background noise, and feed it to grep so I can find the name of the Certificate Issuer.”
cluster01::> set d
cluster01::*> system node systemshell -node cluster01-01
cluster01-01% curl -vk https://support.netapp.com | & grep -i "issuer"
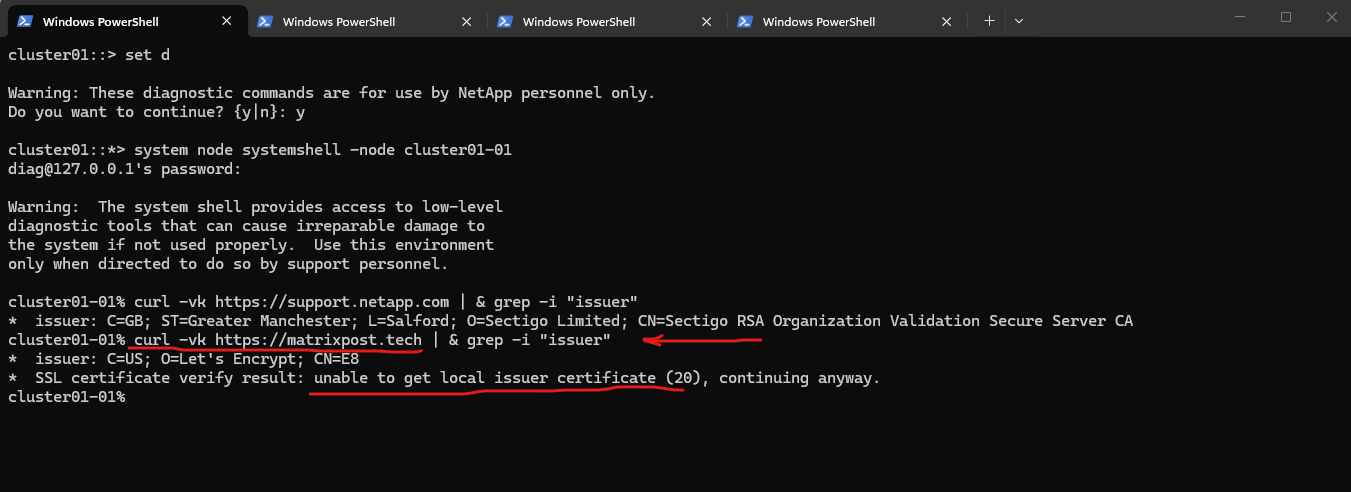
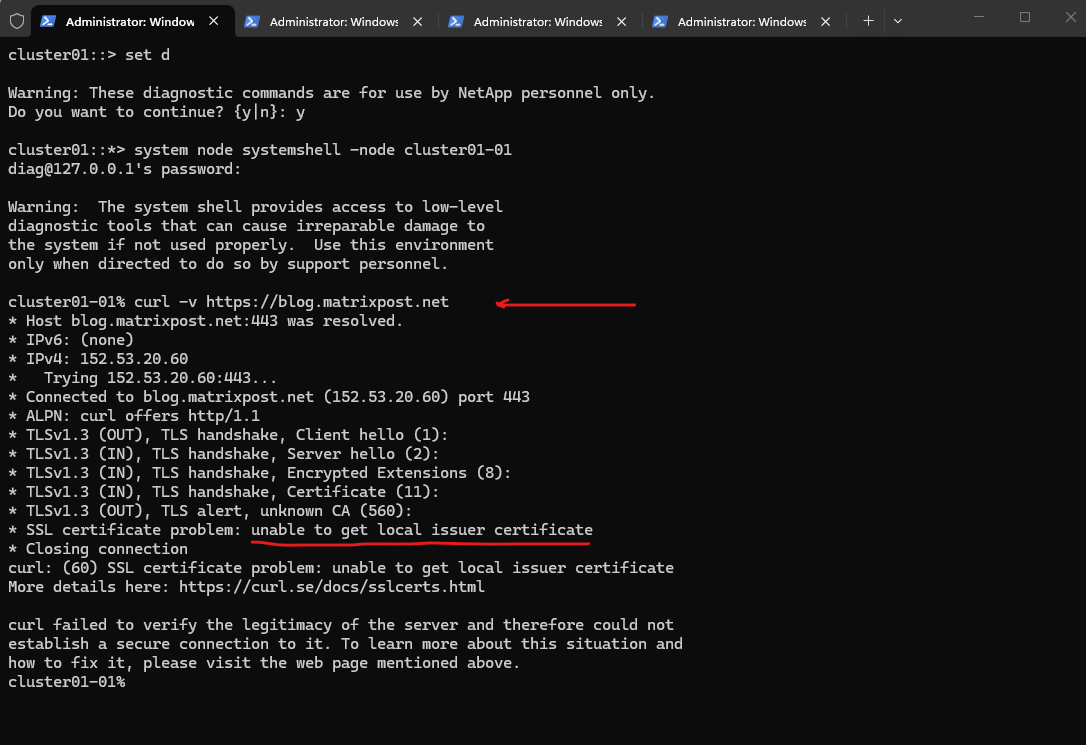
When connecting to common public websites such as my own blog, ONTAP may not be able to validate the certificate chain because its built-in trust store contains only a limited set of Root CAs.
As a result, HTTPS connections still work, but certificate verification may fail with “unable to get local issuer certificate” unless the corresponding Root CA (for example from Let’s Encrypt) is installed manually.
cluster01-01% curl -vk https://support.netapp.com | & grep -i "issuer"
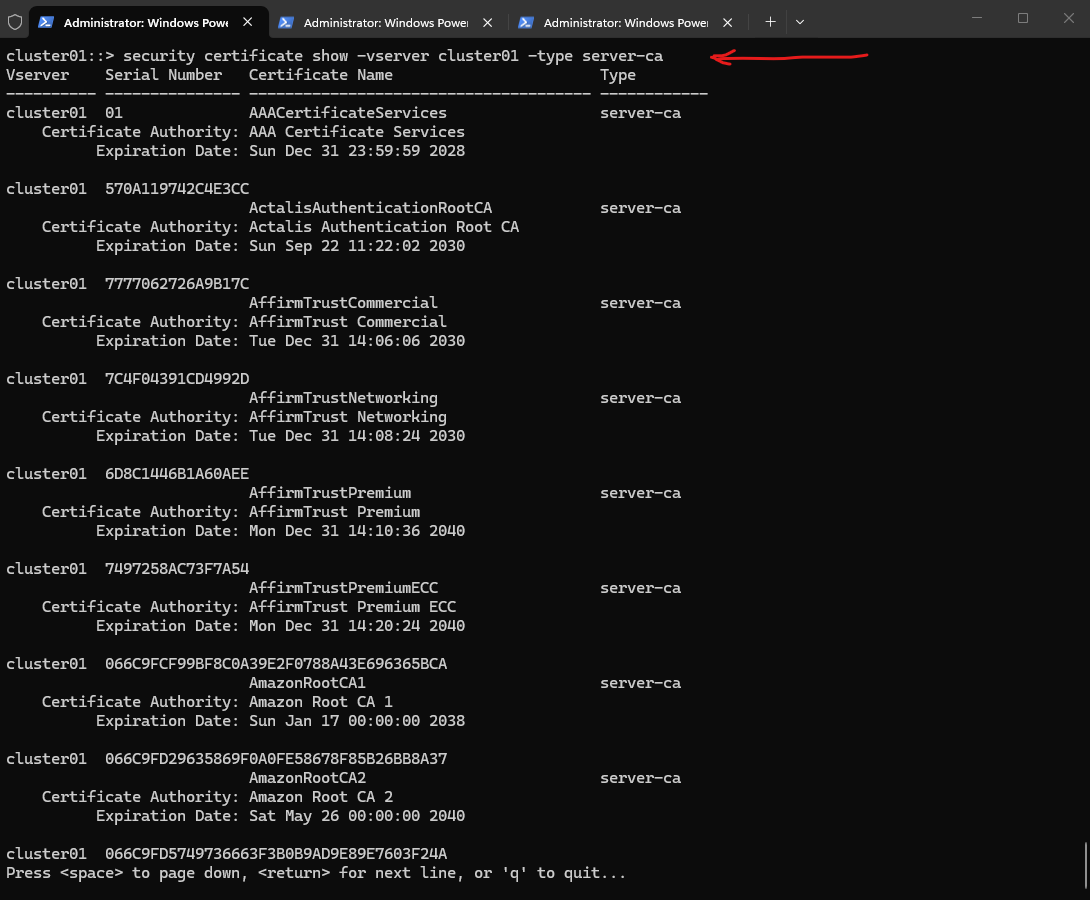
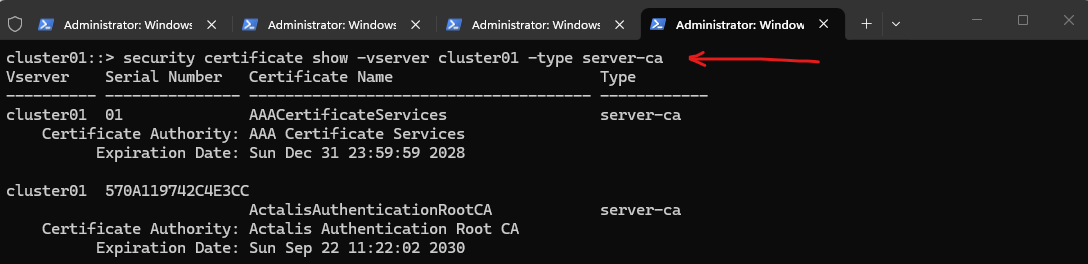
To list the trusted Root CAs in the ONTAP certificate store, use the following command.
cluster01::> security certificate show -vserver cluster01 -type server-ca
To install just the Root CA is usually sufficient because the server provides the intermediate during the TLS handshake.
Run the command below and enter the base64 certificate. Press <Enter> when done.
cluster01::> security certificate install -vserver cluster01 -type server-ca

# (Optional) Install the Intermediate CA - same command finally
cluster01::> security certificate install -vserver cluster01 -type server-ca
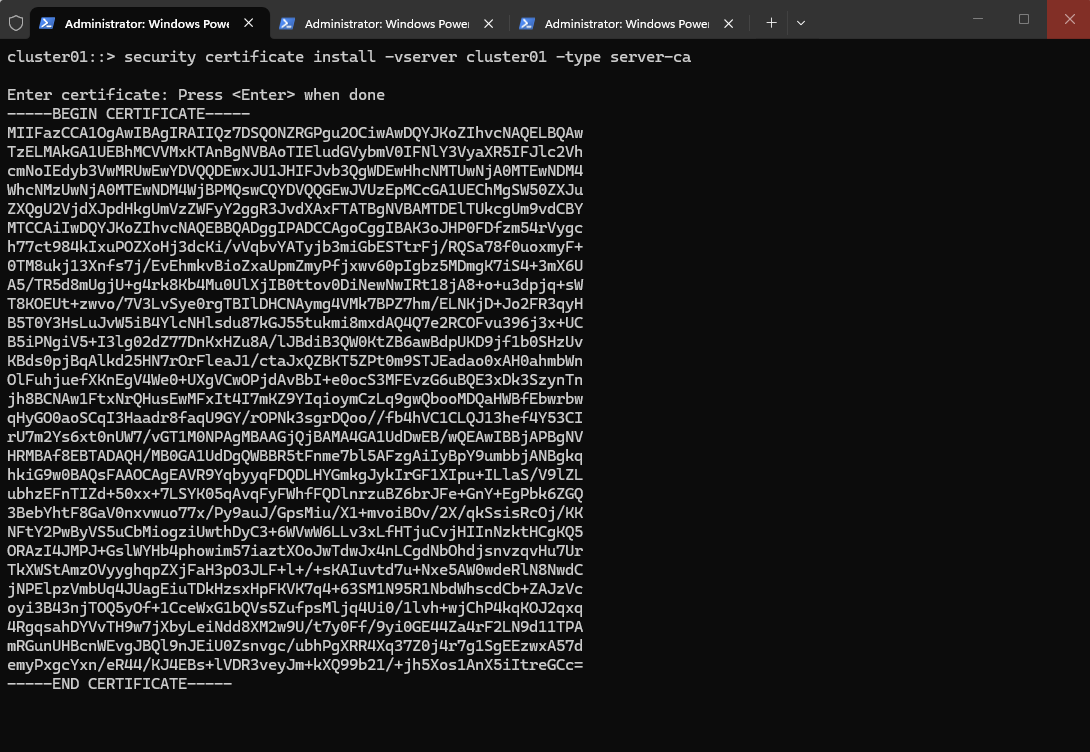
Pressing <Enter> after entering the base64 certificate.

Importing the CA into the ONTAP certificate store resolves trust issues for cluster-level services like FabricPool and AutoSupport (ASUP), but it won’t fix errors in the nodeshell.
This is because the underlying FreeBSD
curlutility looks for a local issuer file in the OS file system rather than querying the ONTAP management database, meaning it will still reportunable to get local issuer certificateeven when the cluster-wide configuration is correct.
cluster01::> set d
cluster01::*> system node systemshell -node cluster01-01
cluster01-01% curl -v https://blog.matrixpost.net
cluster01::> security certificate show -vserver cluster01 -type server-ca
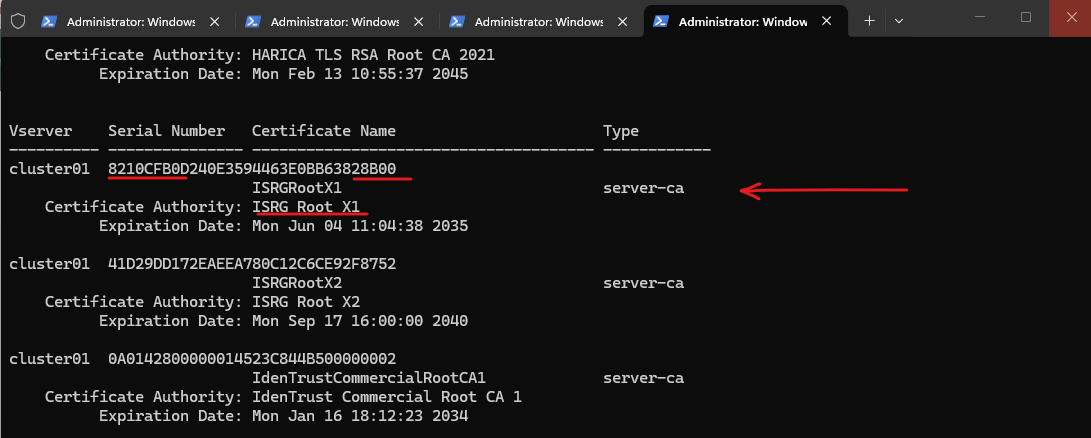
To filter the certificate list efficiently, use the
-cert-nameparameter followed by the specific identifier (e.g.,ISRGRootX1). This ensures you can instantly verify that the root or intermediate CA is properly indexed in the management database.
cluster01::> security certificate show -vserver cluster01 -cert-name ISRGRootX1
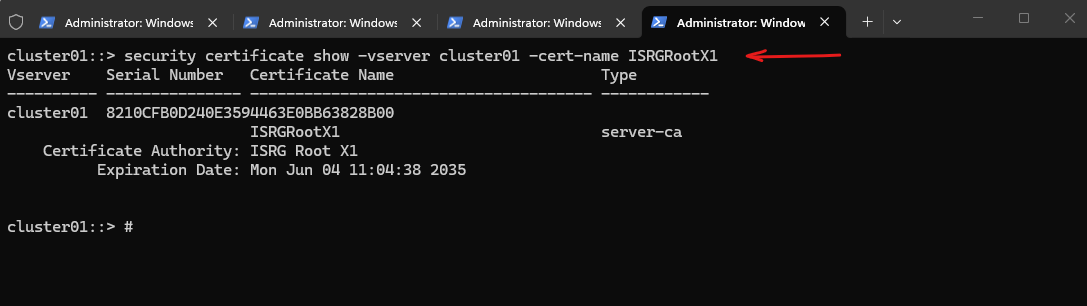
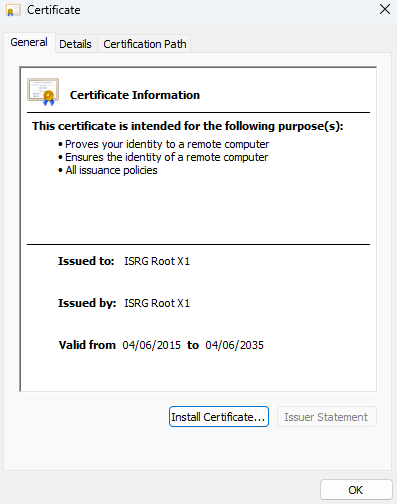
In the ONTAP CLI, the
-cert-nameparameter refers to the local index alias created during import, which often strips spaces for better compatibility. While a certificate decoder will show the ‘Common Name’ with spaces, you must use the space-less identifier (e.g.,ISRGRootX1) when filtering by the certificate name in the console.
Obtaining the Root CA Certificate from a TLS Connection with OpenSSL
In some cases ONTAP may fail to establish HTTPS connections because the Certificate Authority (CA) that signed the remote server certificate is not present in the ONTAP trust store, as shown above.
To resolve this, the missing Root CA must be identified and installed in ONTAP.
The
openssl s_clientcommand can be used to retrieve the full certificate chain from a remote HTTPS endpoint and determine which Root CA is required.
After entering diagnostic privilege mode and accessing the node systemshell, standard Linux tools like curl and openssl can be used to test HTTPS connectivity and inspect the TLS certificate chain of remote services.
While
curlquickly shows the certificate issuer, theopenssl s_clientcommand reveals the complete certificate chain, allowing the required Root CA to be identified, copied, and then installed in ONTAP using thesecurity certificate installcommand as shown in the above section.
cluster01::> set d
cluster01::*> system node systemshell -node cluster01-01
cluster01-01% curl -vk https://support.netapp.com | & grep -i "issuer"
cluster01-01% openssl s_client -connect support.netapp.com:443 -showcerts
Types of SVMs in an ONTAP cluster
A cluster consists of four types of SVMs, which help in managing the cluster and its resources and data access to the clients and applications.
A cluster contains the following types of SVMs:
- Admin SVM
The cluster setup process automatically creates the admin SVM for the cluster. The admin SVM represents the cluster.
- Node SVM
A node SVM is created when the node joins the cluster, and the node SVM represents the individual nodes of the cluster.
- System SVM (advanced)
A system SVM is automatically created for cluster-level communications in an IPspace.
- Data SVM
A data SVM represents the data serving SVMs. After the cluster setup, a cluster administrator must create data SVMs and add volumes to these SVMs to facilitate data access from the cluster.
A cluster must have at least one data SVM to serve data to its clients.
Source: https://docs.netapp.com/us-en/ontap/system-admin/types-svms-concept.html
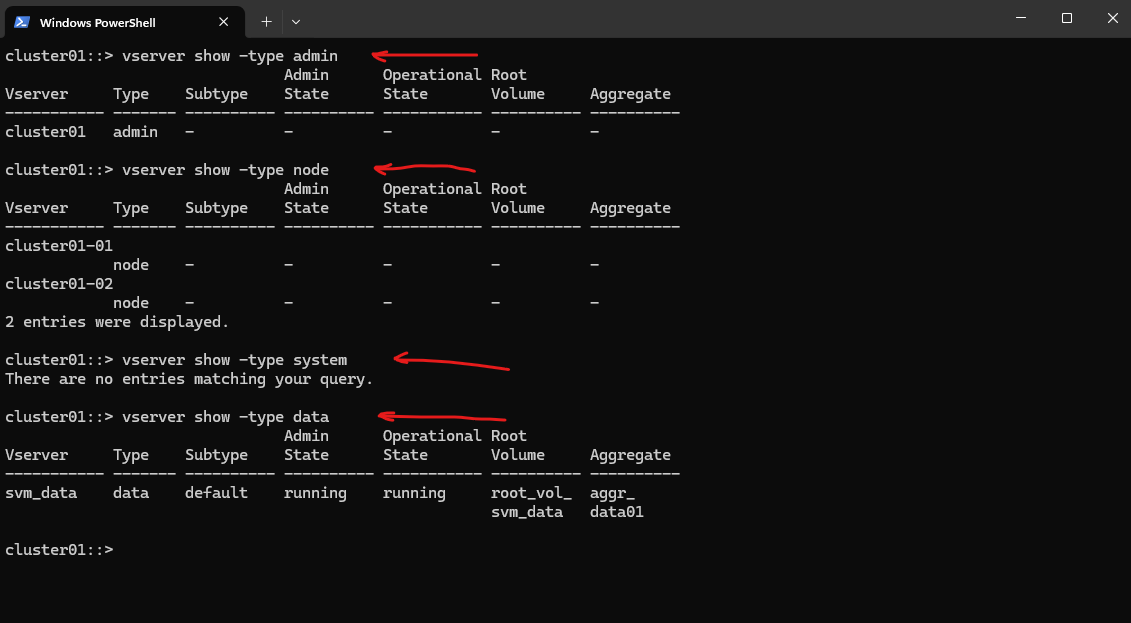
So for my ONTAP lab environment this will looks like below:
ONTAP creates “System” Vservers automatically just for specific, advanced features that require an isolated management or data path.
If you haven’t enabled these features, the Vserver doesn’t exist like for my lab environment. Common reasons for a System Vserver to appear include: MetroCluster, Vscan / FPolicy, Internal Protocols.
cluster01::> vserver show -type admin
cluster01::> vserver show -type node
cluster01::> vserver show -type system
cluster01::> vserver show -type data
Troubleshooting
When issues arise, having quick access to the right commands can save valuable time. This section serves as a troubleshooting cheat sheet, providing commonly used commands and their purpose in a concise format.
It’s designed as a practical reference to help identify problems faster, validate configurations, and verify system health without having to dig through extensive documentation.
Switching between admin mode and advanced mode
Advanced mode in ONTAP is a special CLI privilege level that exposes commands that are hidden or restricted in standard admin mode.
# enter advanced mode
cluster01::> set -privilege advanced

# exit advanced mode and switch back to admin mode
cluster01::*> set -privilege admin
Checking and Troubleshooting DNS Configuration in NetApp ONTAP
DNS is a critical component in NetApp ONTAP environments, enabling name resolution for features such as Active Directory integration, LDAP authentication, AutoSupport, and secure certificate validation.
Each Storage Virtual Machine (SVM) in ONTAP maintains its own DNS configuration, and ensuring these settings are correct, and that the DNS servers are reachable, is essential for smooth operations.
Administrators can verify configured DNS servers, test name resolution, and check network connectivity directly from the ONTAP CLI using commands shown below.
This provides a straightforward way to confirm both configuration and reachability when troubleshooting connectivity issues.
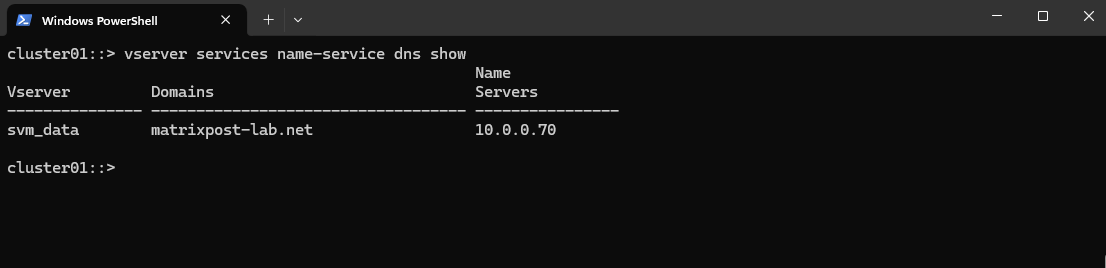
List DNS Configuration for all SVMs
Each SVM has its own DNS configuration.
cluster01::> vserver services name-service dns show
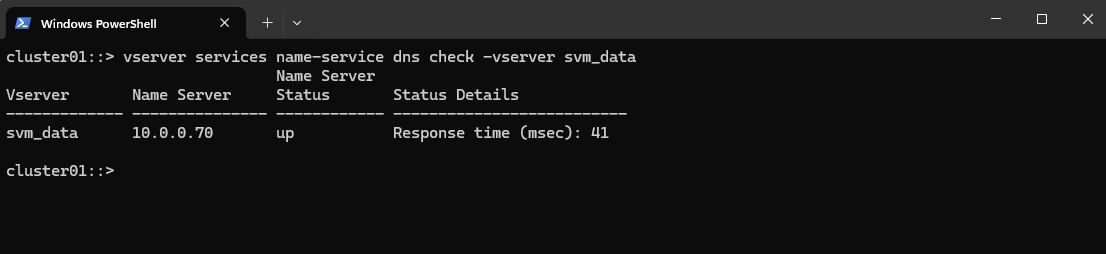
Checking if DNS resolution is working
Checking if your ONTAP system can reach the configured DNS servers and can perform successful name resolution is an important step.
Use the built-in check command.
This tries to resolve a hostname (default example.<svm domain name>) using the configured DNS servers and shows success/failure.
cluster01::> vserver services name-service dns check -vserver svm_data
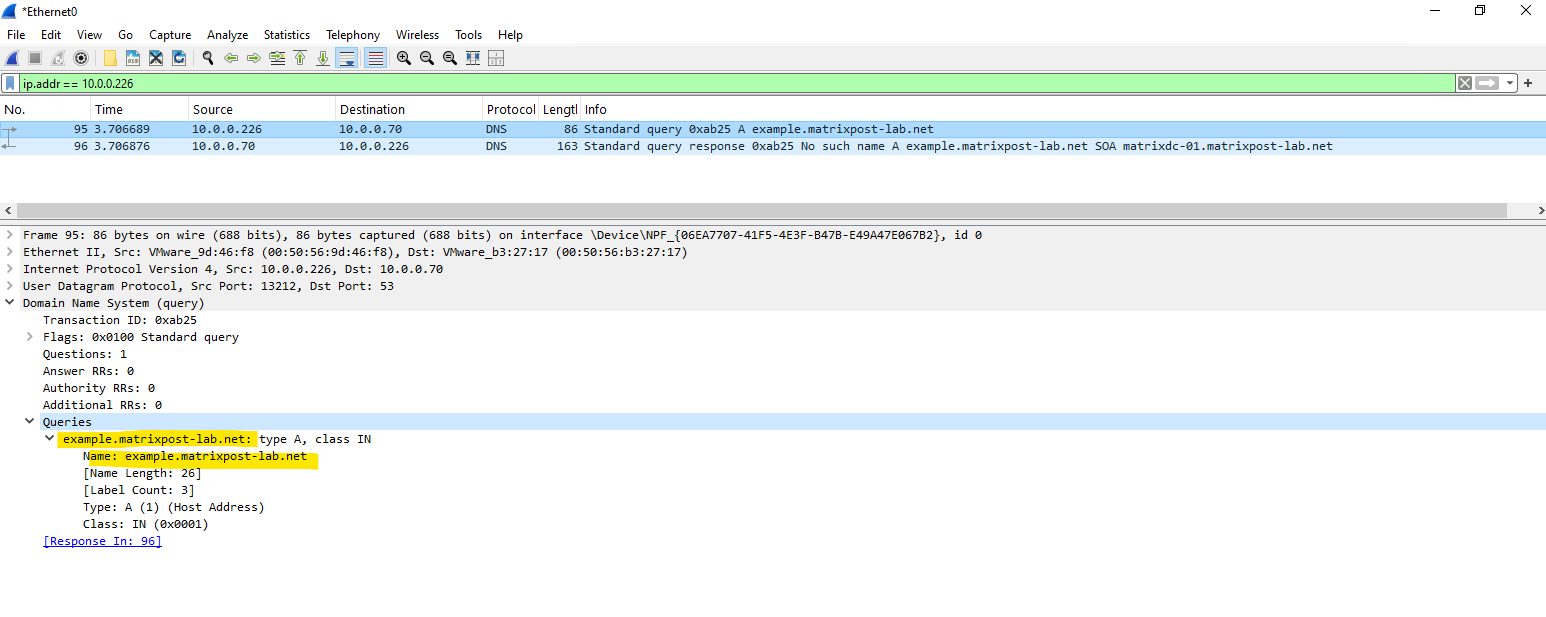
Below I was capturing the traffic on the DNS server when running the above build-in DNS check to see which hostname/FQDN it really tries to resolve.
By entering the advanced mode we can also check if DNS resolution will work for a specific hostname.
Advanced mode in ONTAP is a special CLI privilege level that exposes commands that are hidden or restricted in standard admin mode.
# enter advanced mode
cluster01::> set -privilege advanced

# checking if the hostname cifs-data02 can be resolved successful into an IPv4 address by using the DNS Server with the IP address 10.0.0.70
cluster01::*> vserver services access-check dns forward-lookup -vserver svm_data -hostname cifs-data02 -lookup-type ipv4 -name-servers 10.0.0.70

# exit advanced mode and switch back to admin mode
cluster01::*> set -privilege admin

Verifying SVM Network Connectivity and DNS Reachability in ONTAP
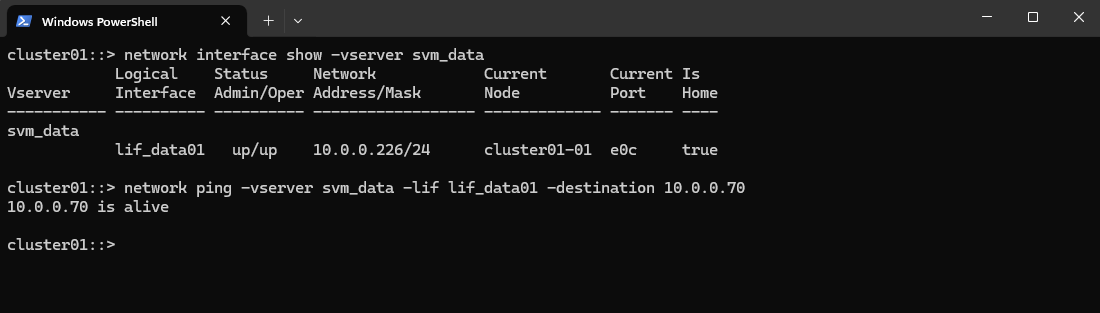
To test whether the ONTAP system can reach a specific destination, such as a DNS server, we can use the network ping command below.
For this command we first need to determine the LIFs for the SVM by using the network interface show command, which finally will be used to send traffic through.
cluster01::> network interface show -vserver svm_data
cluster01::> network ping -vserver svm_data -lif lif_data01 -destination 10.0.0.70
List Event Logs
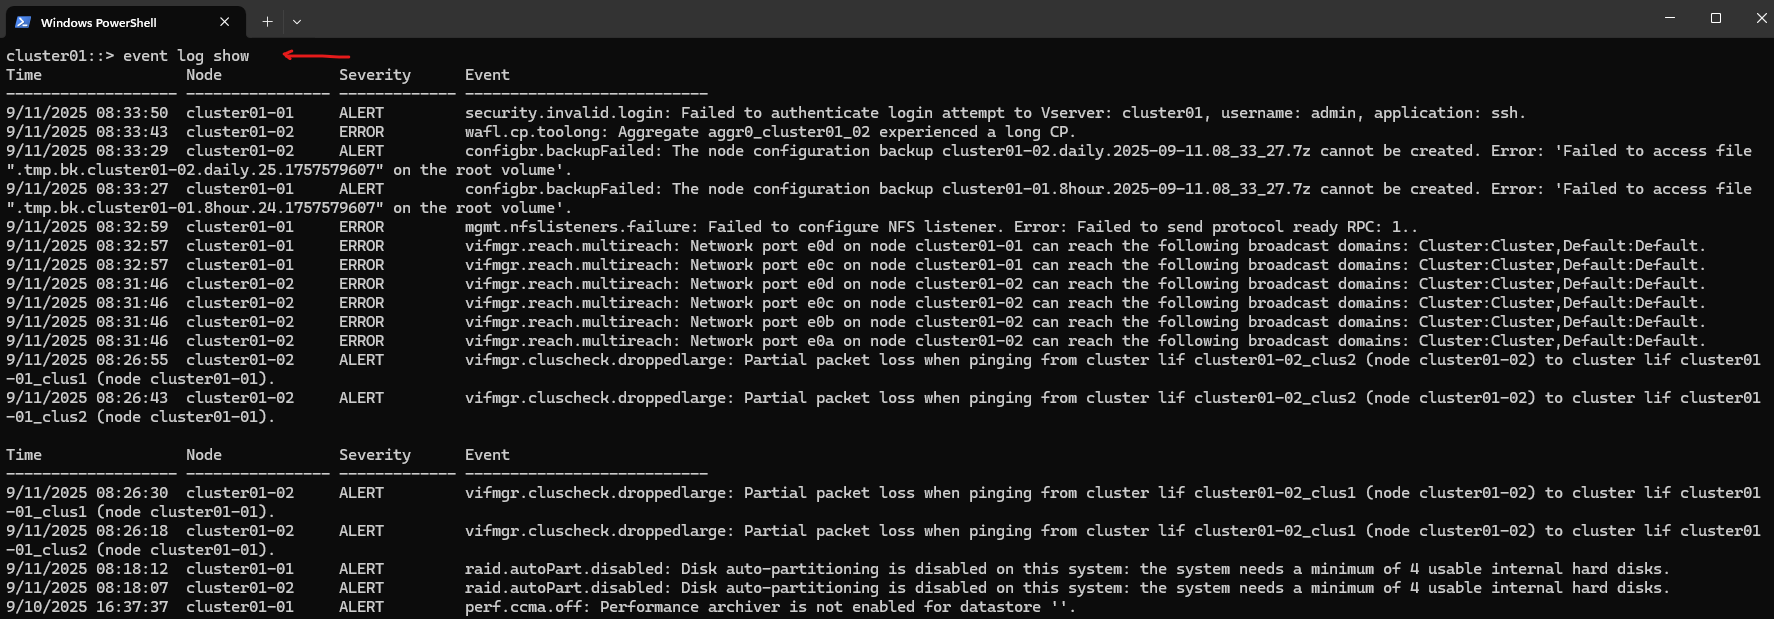
The event log show command lets you view the event management system (EMS) logs, basically the system event log for your cluster. It’s the go-to command for checking cluster activity, errors, warnings, and informational events.
Due to limits in the buffer used to hold EMS messages viewable on running the cluster shell command event log show, you can see no more than 2048 entries for each node.
cluster01::> event log show
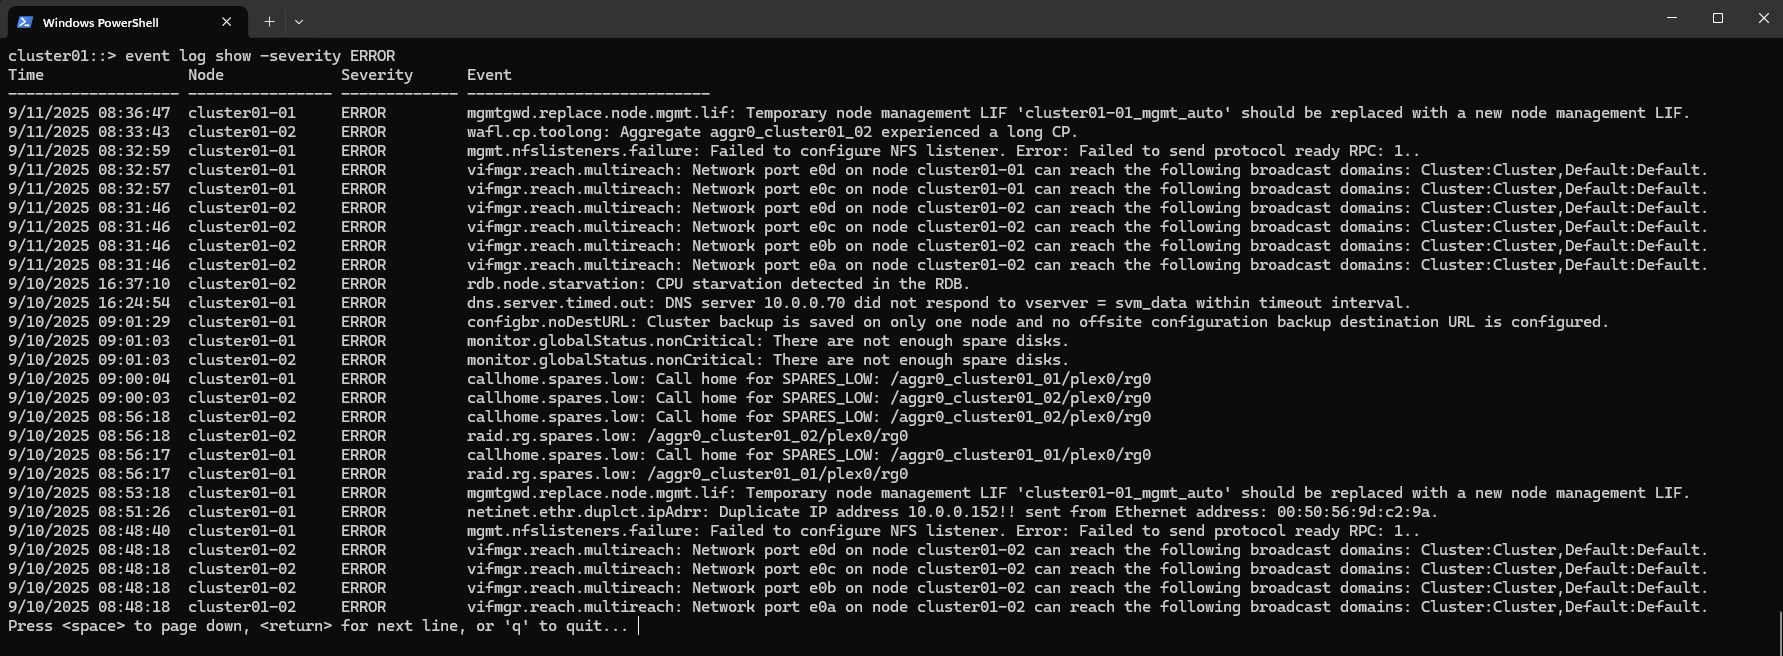
Just show error messages by using the -severity ERROR flag.
cluster01::> event log show -severity ERROR
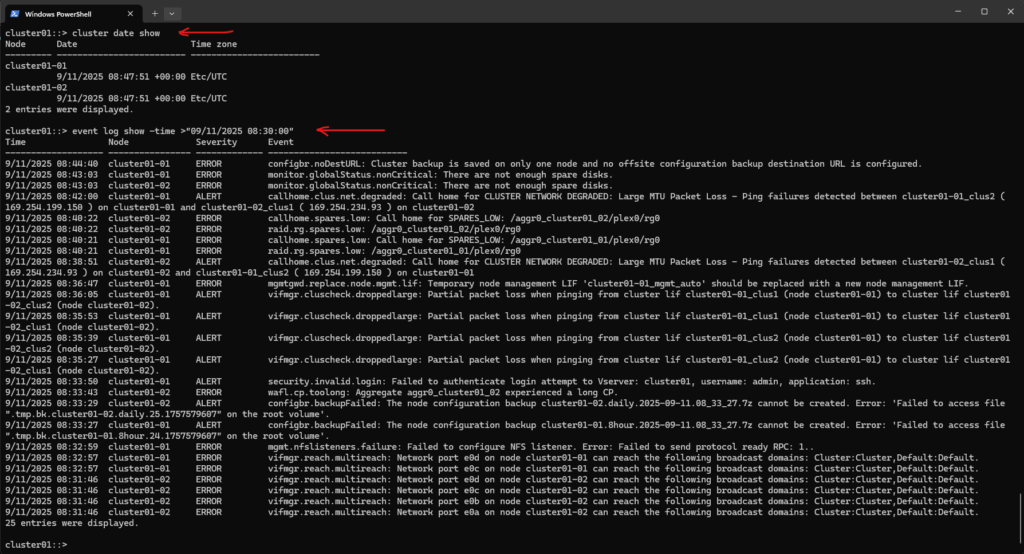
To filter the amount of logs shown by the event log show command, we can e.g. use the -time flag as shown below. Here I want to show all logs raised starting from a specific date and time.
# determine current date/time
cluster01::> cluster date show

# show events after a specific time
cluster01::> event log show -time >"09/11/2025 08:30:00"

# show events before a specific time
cluster01::> event log show -time <"09/11/2025 08:30:00"
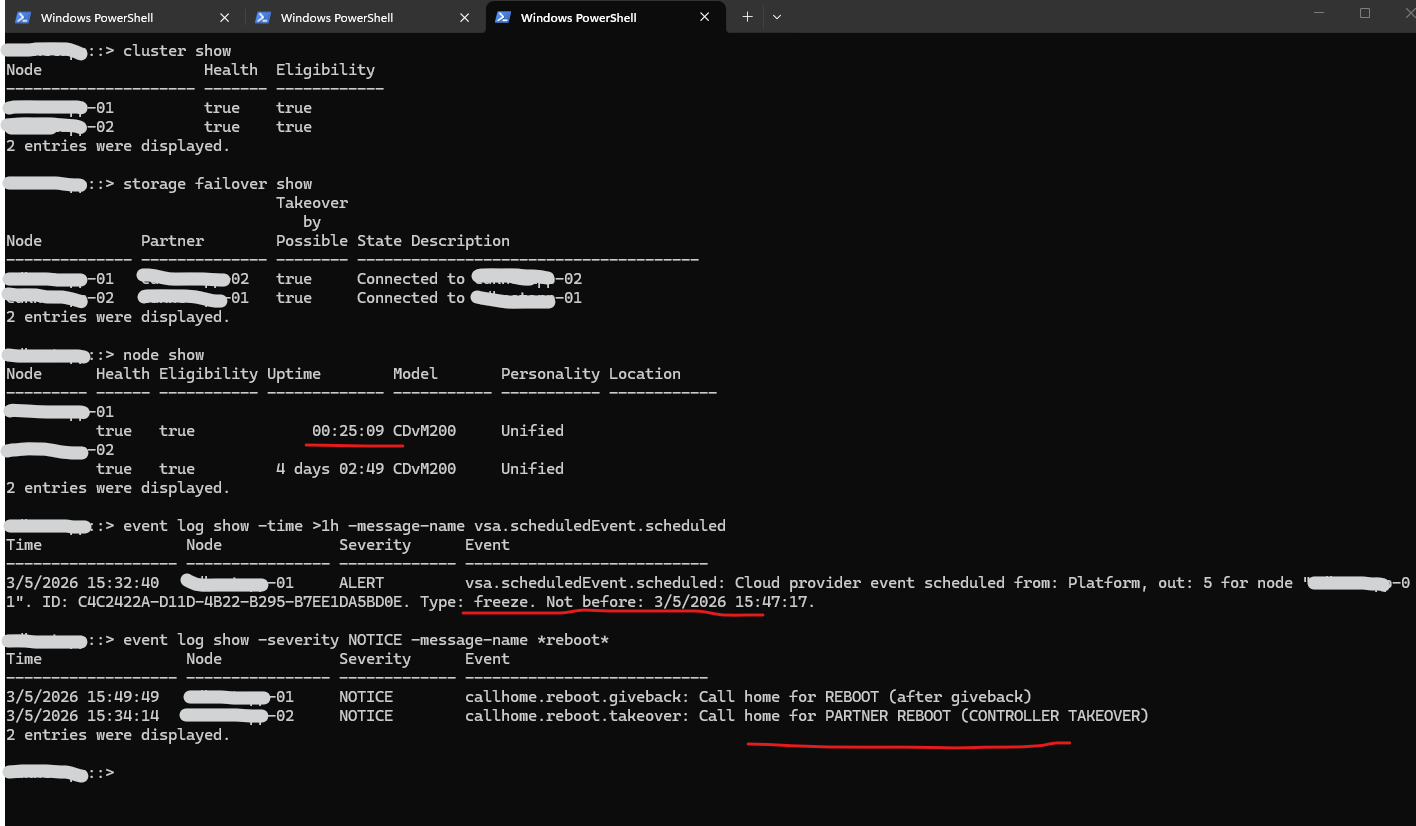
List Cloud Provider Event Schedules (Freeze, Reboot)
To identify whether a graceful takeover and reboot was triggered by a cloud provider scheduled event, the ONTAP event log can be checked for messages like vsa.scheduledEvent.scheduled and reboot-related entries. Using filters such as -time and -severity helps to quickly narrow down relevant events in the recent logs.
matrixcvo::> cluster show
matrixcvo::> storage failover show
matrixcvo::> node show
matrixcvo::> event log show -time >1h -message-name vsa.scheduledEvent.scheduled
matrixcvo::> event log show -severity NOTICE -message-name *reboot*
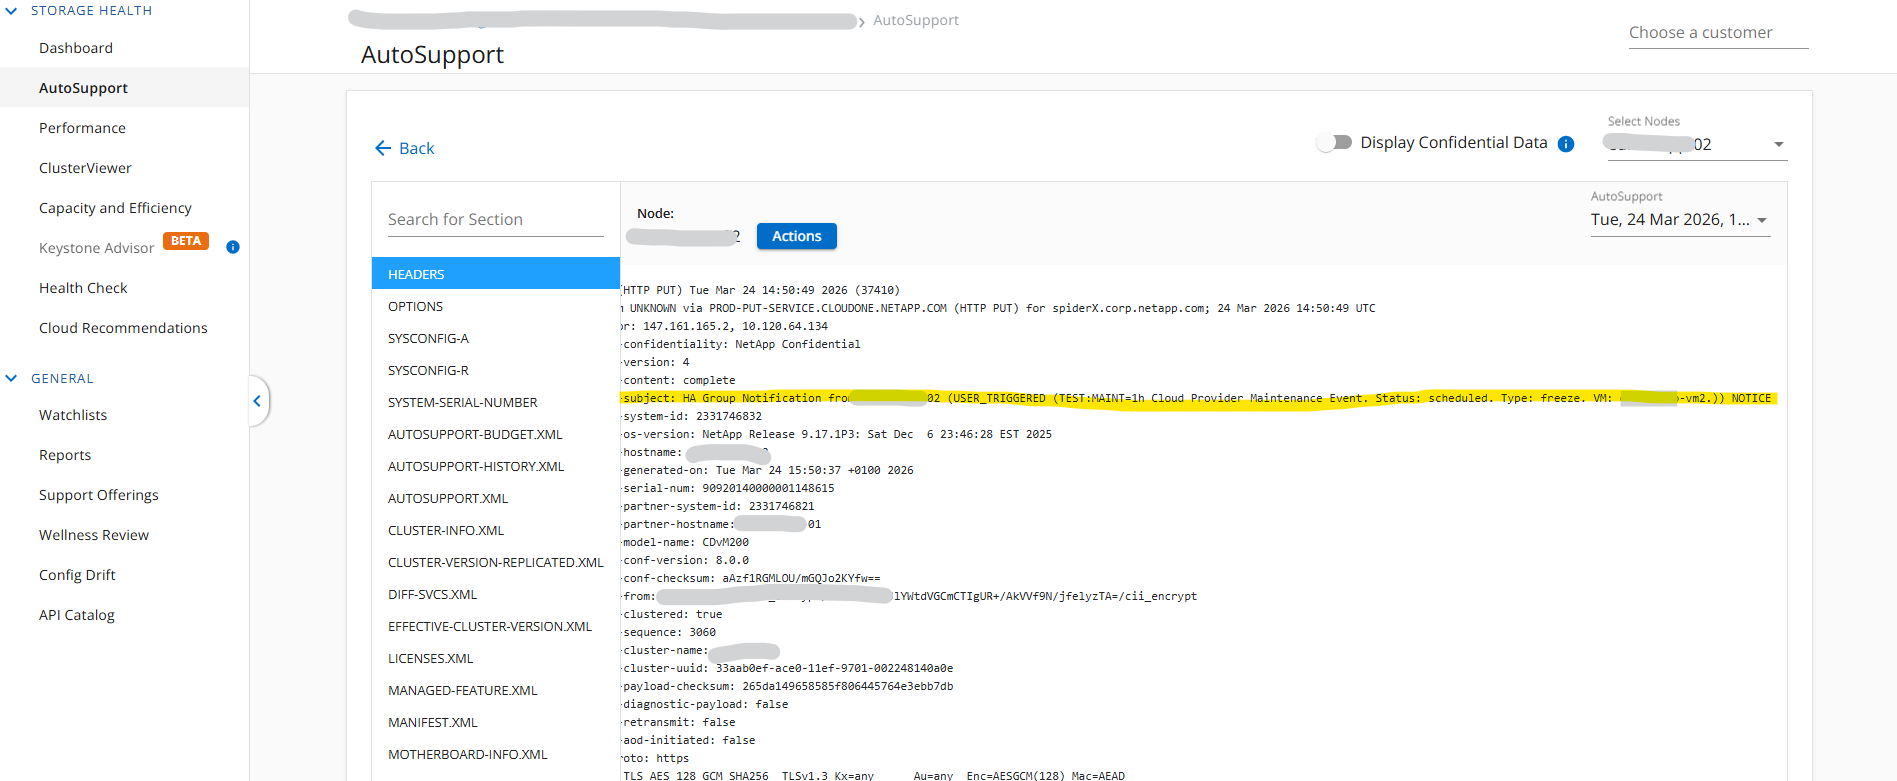
Or by using the NetApp console AI Portal and AutoSupport if enabled. How to enable AutoSupport you will find here.
Filter for “cloud” in the Title column and search for logs related to Cloud Provider Event Scheduled.

Within the Headers section on the top search for Cloud Provider Maintenance Event.
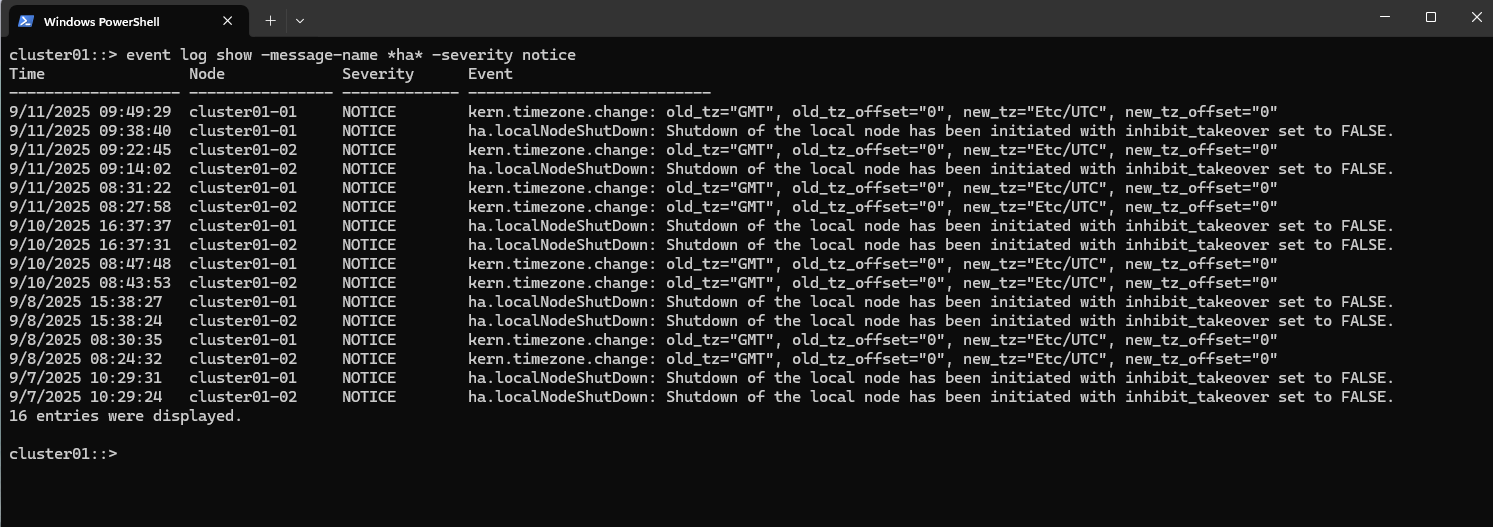
List HA takeover/giveback related events
Check the logs for takeover and giveback related events.
Simulate ONTAP unfortunately does not support High Availability (CFO (controller failover)/SFO (storage failover))
# All HA-related messages
cluster01::> event log show -message-name *ha*

# Only notices
cluster01::> event log show -message-name *ha* -severity notice
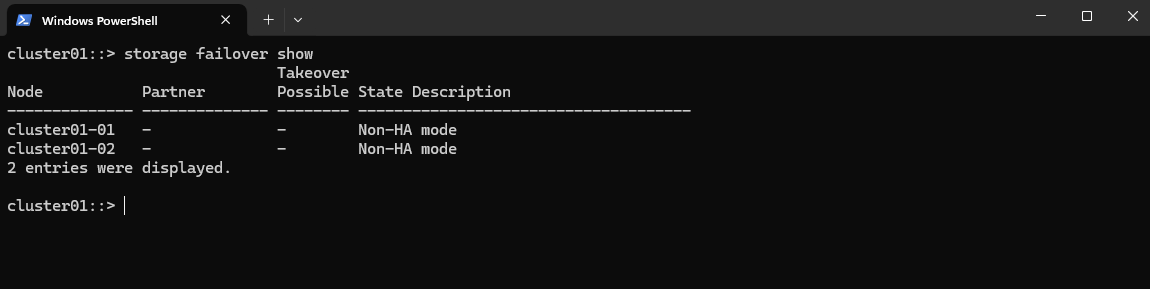
To show the current or recent failover state run.
As mentioned Simulate ONTAP which I am using here unfortunately does not support High Availability (CFO/SFO)
cluster01::> storage failover show
This should actually be looking like this.
cluster01::> storage failover show
                              Takeover
Node           Partner        Possible State Description
-------------- -------------- -------- -------------------------------------
cluster01-01   cluster01-02   true     Connected to cluster01-02
cluster01-02   cluster01-01   true     Connected to cluster01-01
2 entries were displayed.
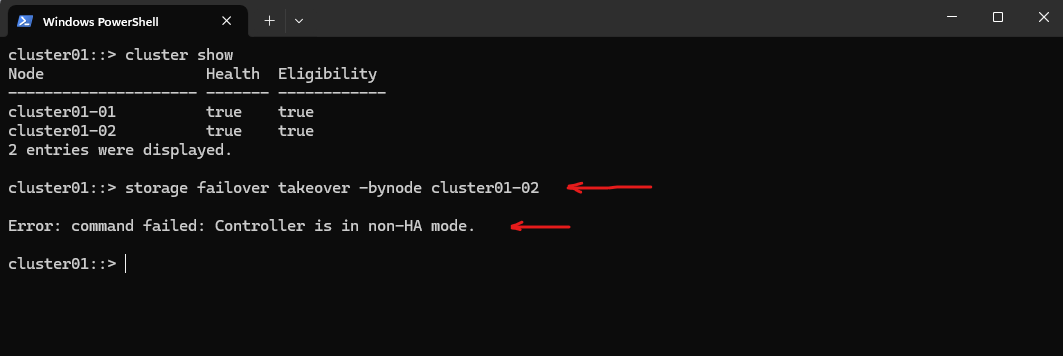
To manually initiate a takeover of the partner node’s storage we can run the following command.
This would cause the node named cluster01-02 to initiate a negotiated optimized takeover of its partner’s (cluster01-01) storage.
Source: https://docs.netapp.com/us-en/ontap-cli/storage-failover-takeover.html
In my case for my lab environment which is using Simulate ONTAP this is as mentioned unfortunately not supported and the cluster is in non-HA mode.
cluster01::> storage failover takeover -bynode cluster01-02

# to initiate an immediate takeover of its partner's storage, can cause temporary I/O errors for clients, so use with caution.
cluster01::> storage failover takeover -bynode cluster01-02 -option immediate
Links
Storage virtualization overview
https://docs.netapp.com/us-en/ontap/concepts/storage-virtualization-concept.htmlManage CIFS shares
https://docs.netapp.com/us-en/ontap-restapi/ontap/protocols_cifs_shares_endpoint_overview.htmlLearn about automatic takeover and giveback in ONTAP clusters
https://docs.netapp.com/us-en/ontap/high-availability/ha_how_automatic_takeover_and_giveback_works.htmlstorage failover giveback
https://docs.netapp.com/us-en/ontap-cli/storage-failover-giveback.htmlcluster ha modify
https://docs.netapp.com/us-en/ontap-cli/cluster-ha-modify.html