Mastering BGP between Check Point and Azure
Enabling BGP (Border Gateway Protocol) on a Check Point Security Gateway running GAiA allows the device to dynamically exchange routing information with external or internal peers, such as cloud providers (e.g., Microsoft Azure) or neighboring routers.
BGP is especially useful in route-based IPSec VPN deployments, where static routes are insufficient or difficult to manage.
To get started, BGP must be explicitly enabled and configured in the GAiA Clish or Web UI.
Once enabled and correctly configured, BGP provides dynamic, scalable, and fault-tolerant routing between your Check Point gateway and its peers.
In my last post we saw step by step how we can set up an IPSec route-based site-to-site VPN tunnel between Azure and on-premise by using for the on-premise VPN device the Check Point GAiA Security Gateway appliance. There we we used on both sites static routing.
In this post we will see step by step how to enable BGP on Check Point and in Azure on the Azure virtual network gateway to provide dynamic and fault-tolerant routing between your on-premise network secured by the Check Point security gateway and your Azure virtual networks.
Enable BGP in Azure
For this post I will finally using the same Azure virtual network gateway as in my last post about how to setup the tunnel between Check Point and Azure.
Therefore I will not have to configure much in Azure to enable and configuring BGP, either on Check Point by the way.
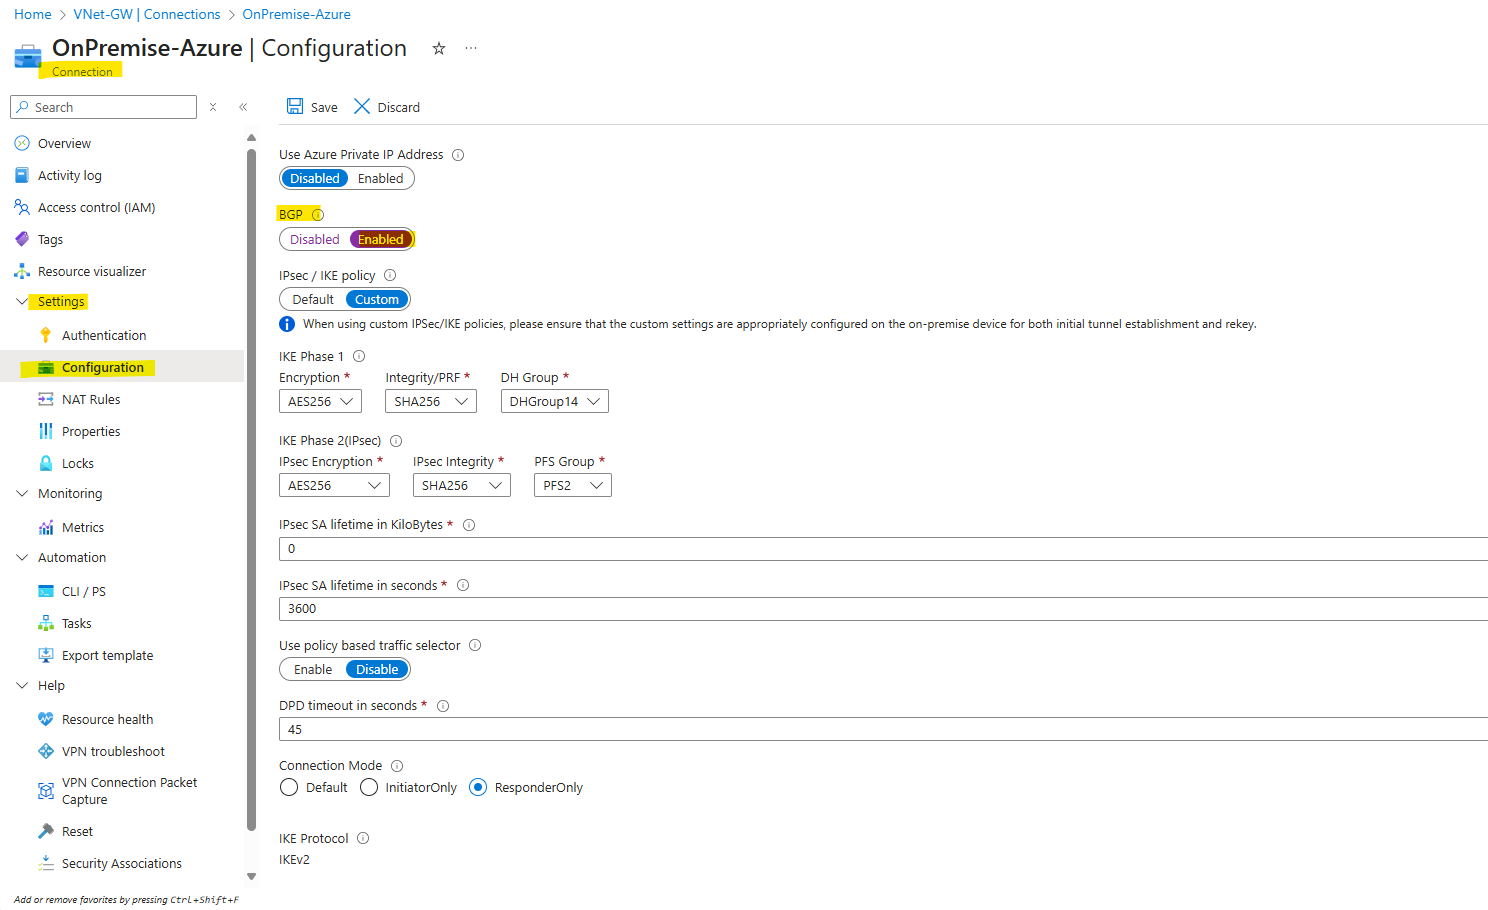
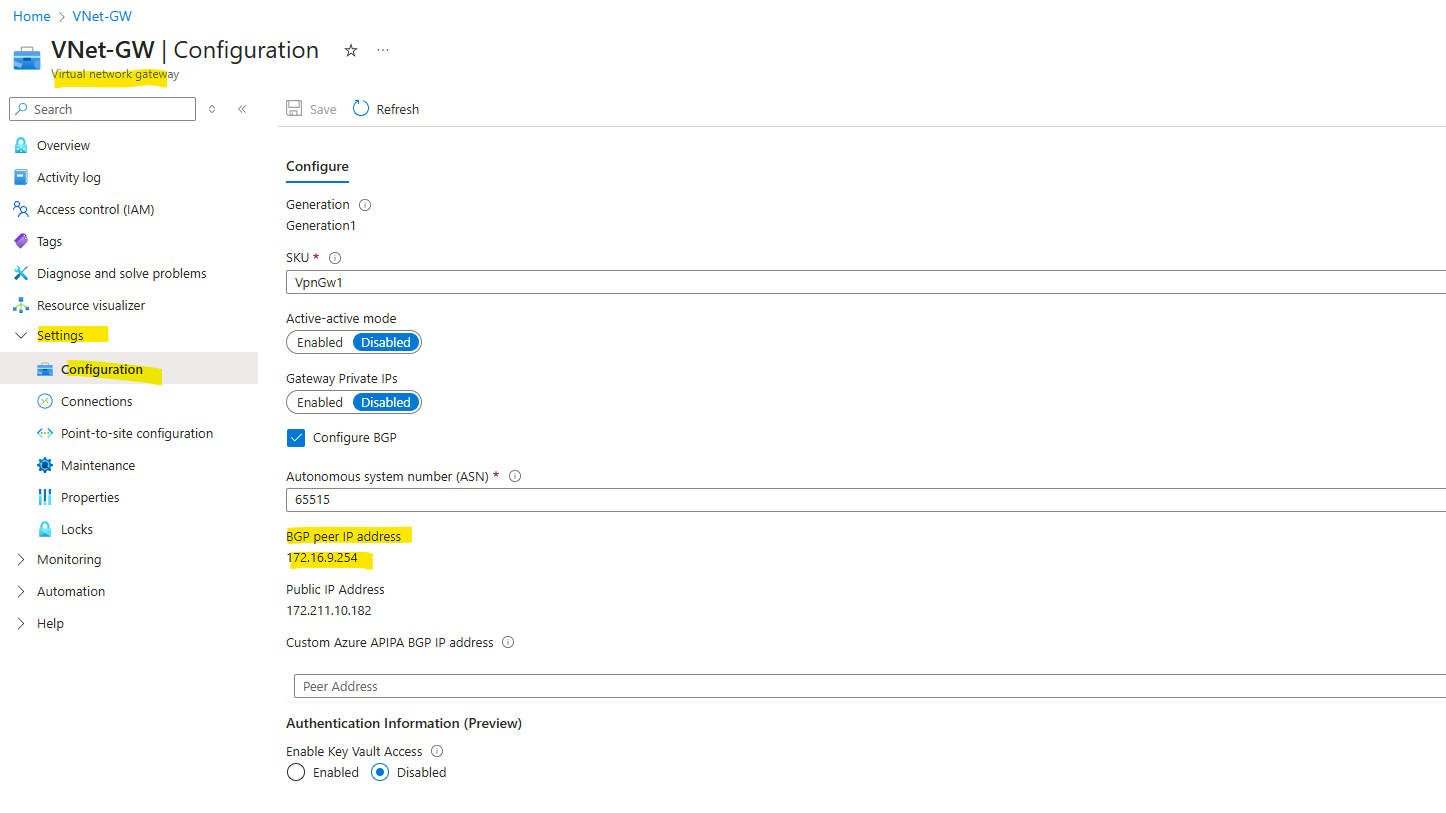
In Azure we check on the virtual network gateway under Settings -> Configuration the checkbox Configure BGP as shown below. That’s all on this blade.
We will also see here the BGP peer IP address of the virtual network gateway below which Azure by design will also use for the VTI interface (transit tunnel) as shown in my last post.
Azure by default will use here the ASN 65515 which is a reserved private ASN (Autonomous System Number) used by Microsoft Azure.
A BGP-enabled connection between two network gateways requires that their ASNs be different. Additionally, the following ASNs are reserved by Azure: 8075, 8076, 12076 (public), 65515, 65517, 65518, 65519, 65520 (private). You cannot specify these ASNs for your on-premises VPN devices when connecting to Azure VPN gateways. While setting up IPsec connectivity from virtual network gateways to Azure virtual WAN VPN, the ASN for Local Network Gateway is required to be 65515.

Next we also need to enable BGP directly on the connection object which we find either on the virtual network gateway blade under its settings or on the local network gateway blade also under settings.
Here below toggle the BGP switch to enabled, that’s all here.
Finally we also need to enable BGP on the local network gateway under Settings -> Configuration as shown below.
Here under BGP Settings -> Configure BGP settings click on Yes.
We also need to enter here the ASN (Autonomous System Number) for the on-premise network (assigned on the Check Point gateway).
We can use here a number from the reserved private use range which is from 64512 – 65534, besides 65515 which is reserved and used by Microsoft Azure for the virtual network gateway.
For the BGP peer IP address we need to enter here Check Point’s main address (screenshot below), in my case 10.0.0.250.
We could also use APIPA addresses for both BGP peer (Azure and Check Point), more about you will find in my following post with Juniper as on-prem VPN device.
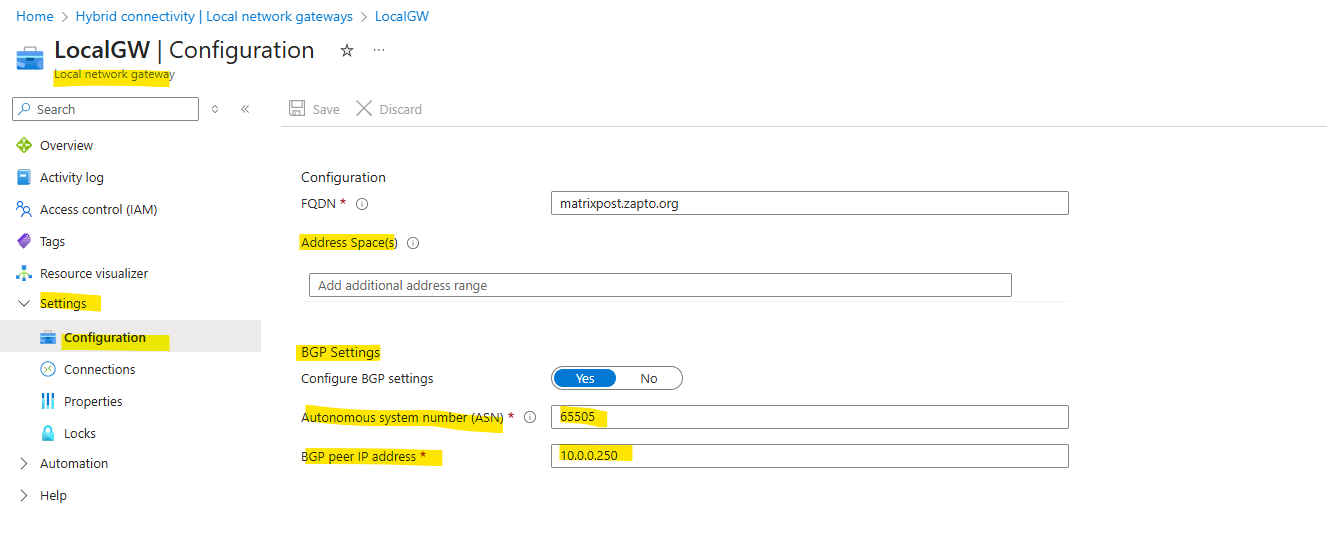
Check Point’s main IP address.
That’s all on Azure side, we will now also need to enable BGP on Check Point.
Enable BGP on Check Point
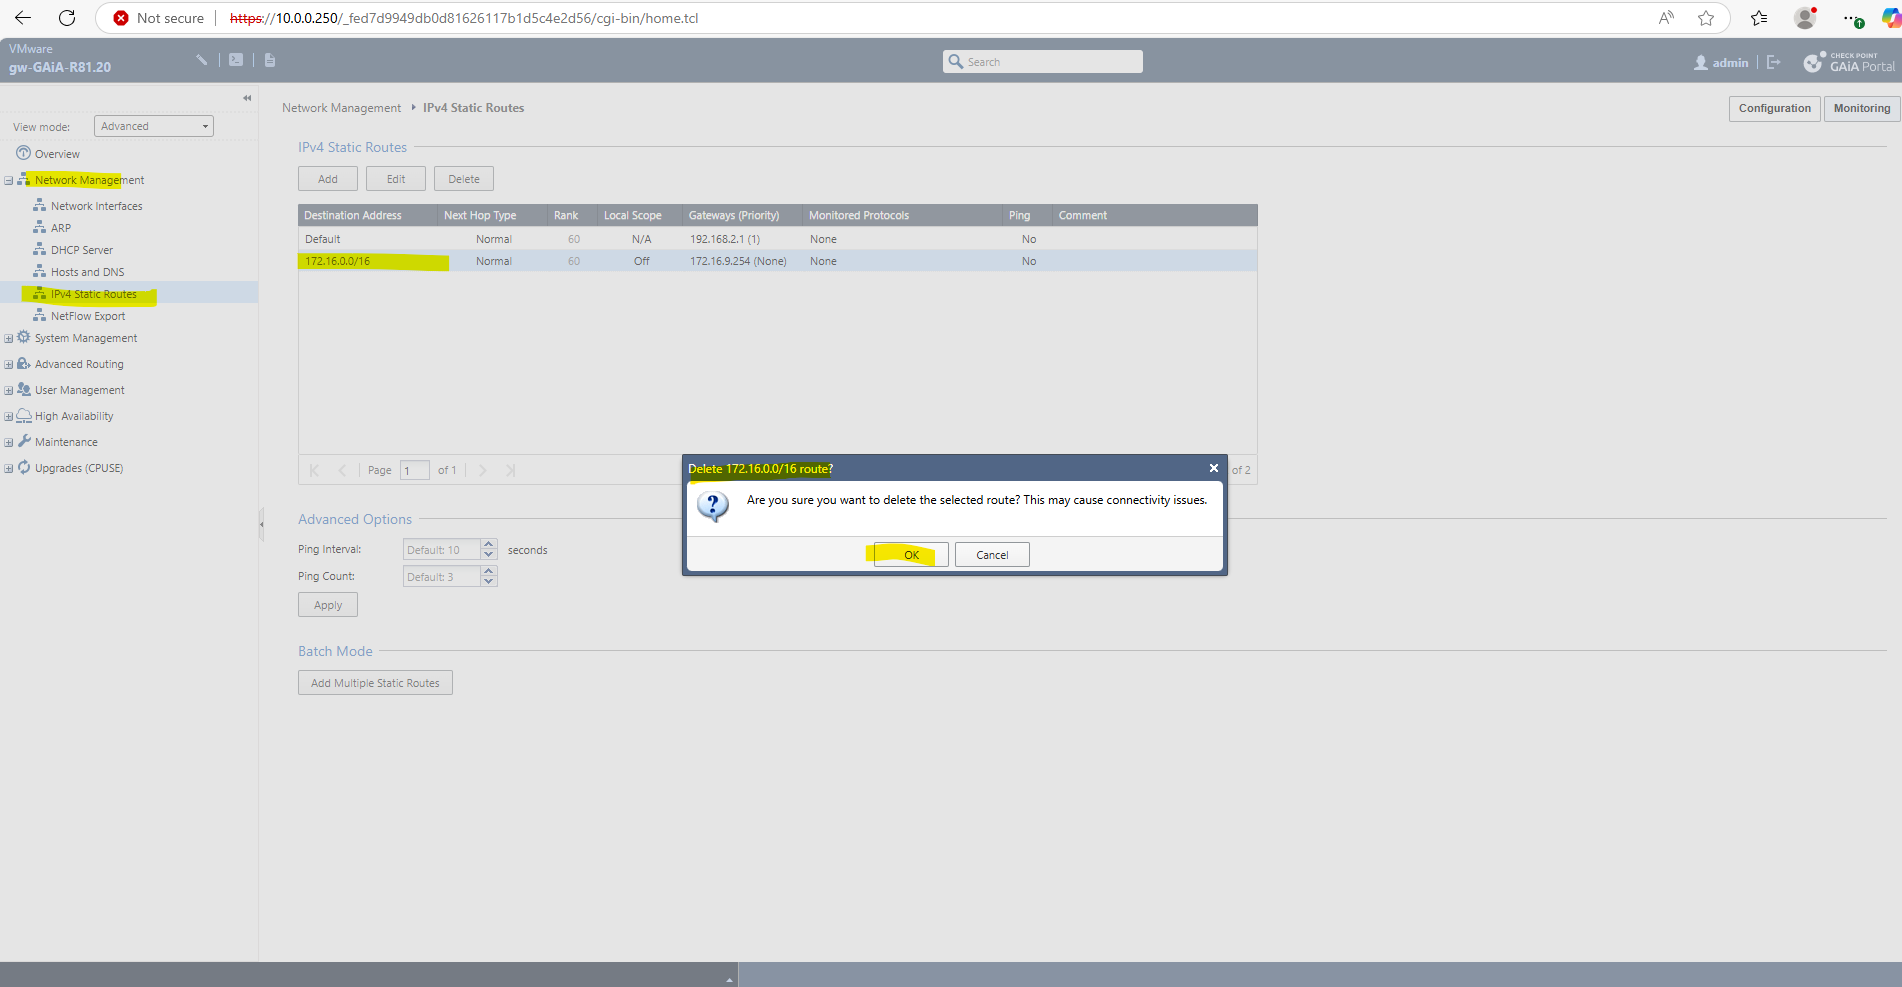
Before enabling BGP on Check Point, I will first delete the previously created static route for the Azure virtual network 172.16.0.0/16 from my previous post without BGP.
This route should now be advertised by Azure and using the BGP protocol.
We can enable BGP on Check Point by using either the Gaia clish or the Web UI.
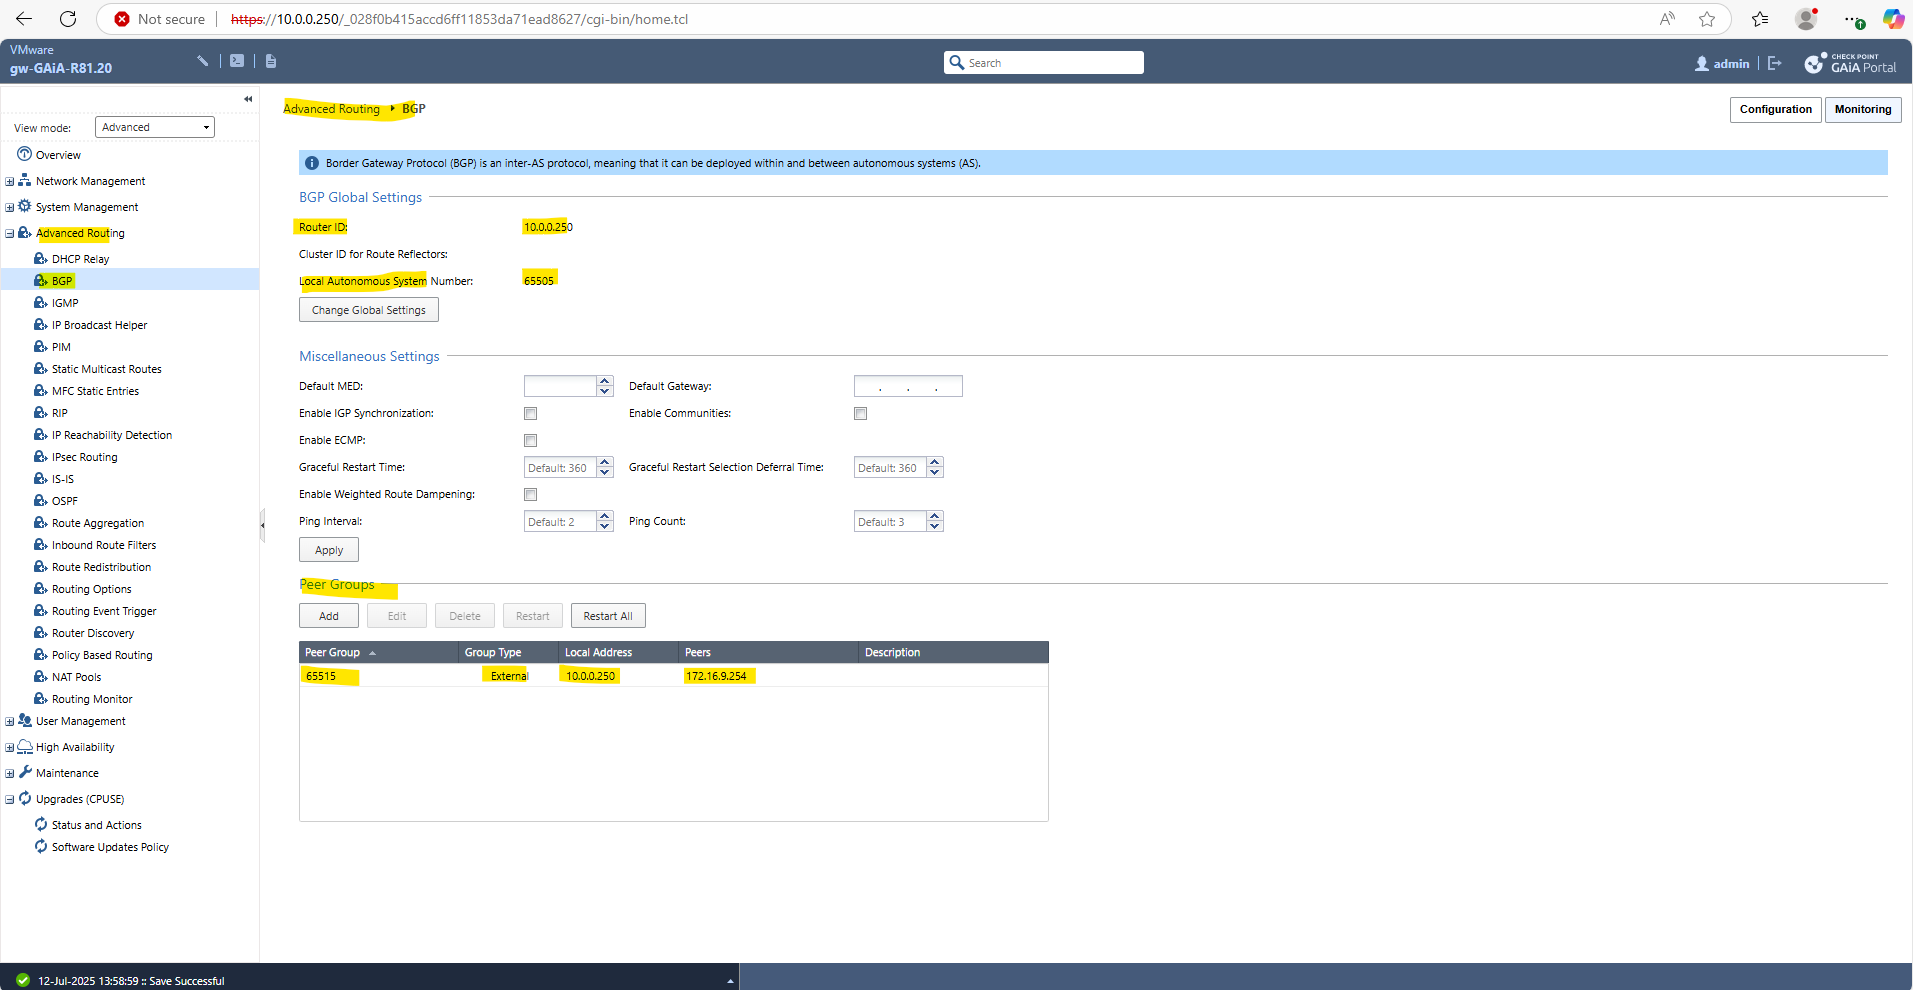
By using the Web UI we first need to navigate to Advanced Routing -> BGP.
Click on Change Global Settings below.
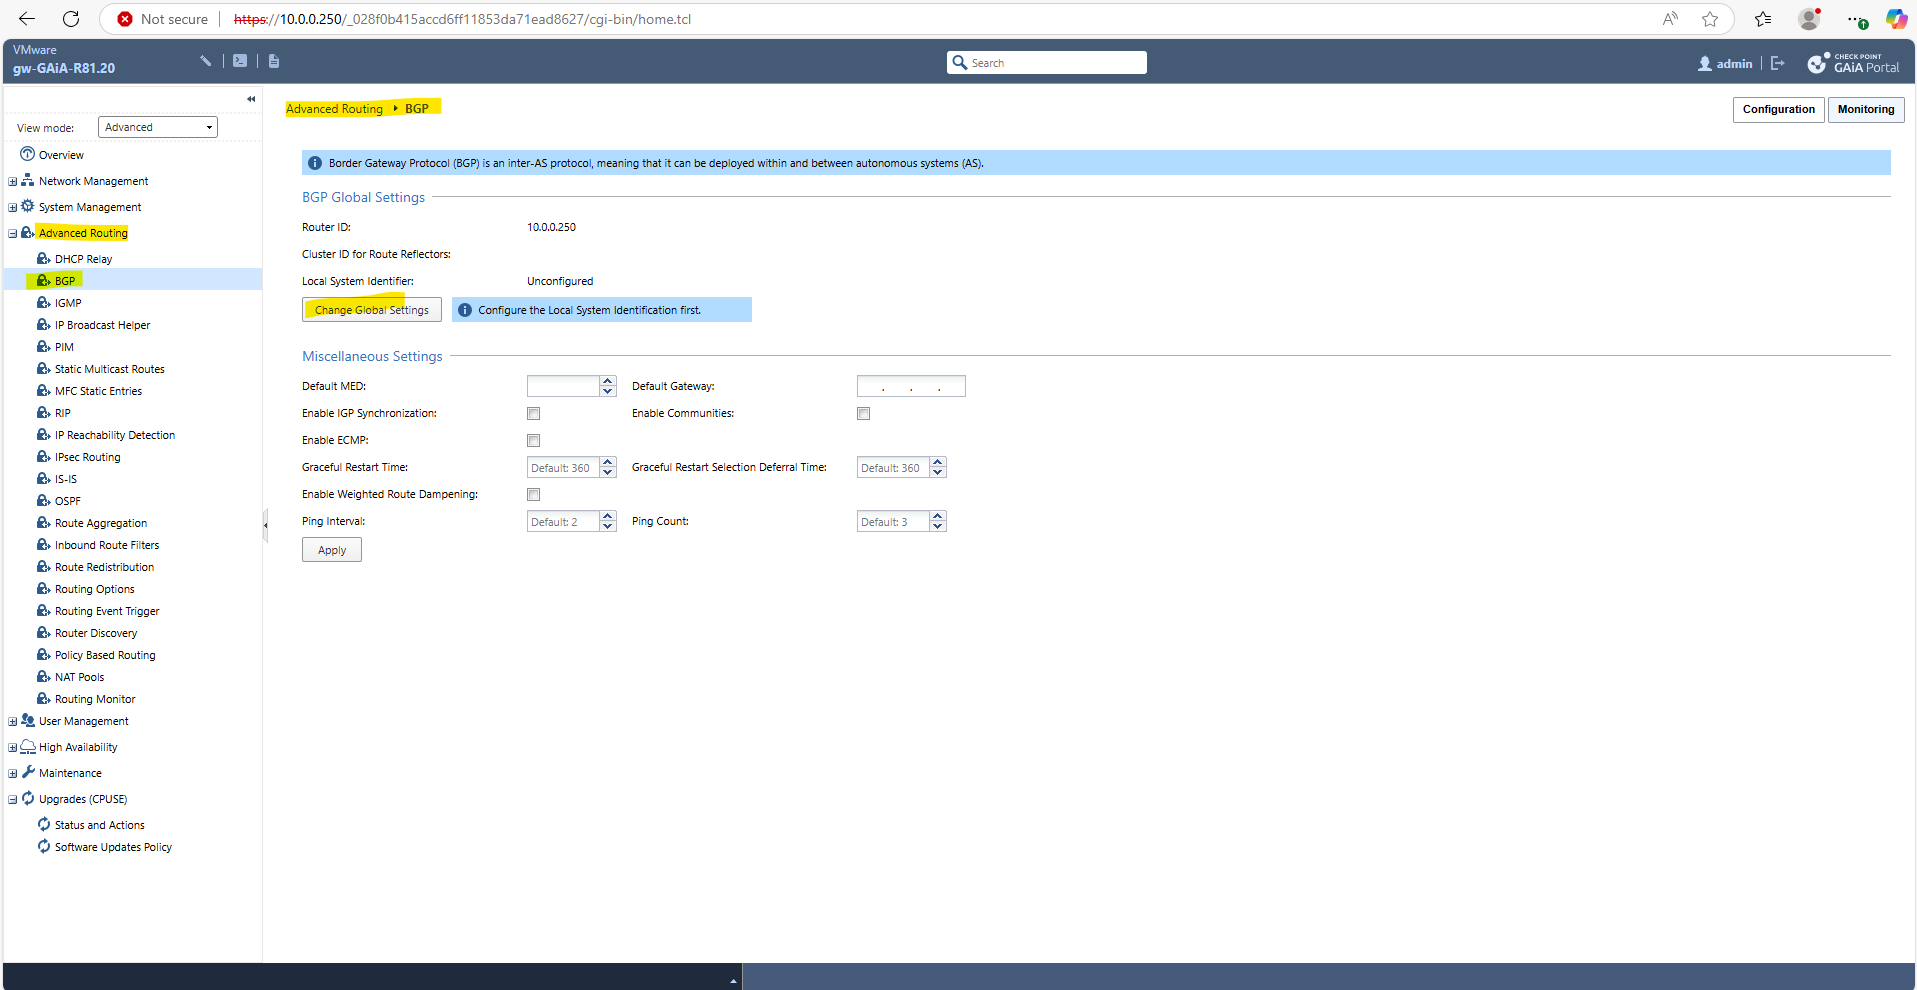
The Router ID is set by default to Check Point’s main address which we can leave this way.
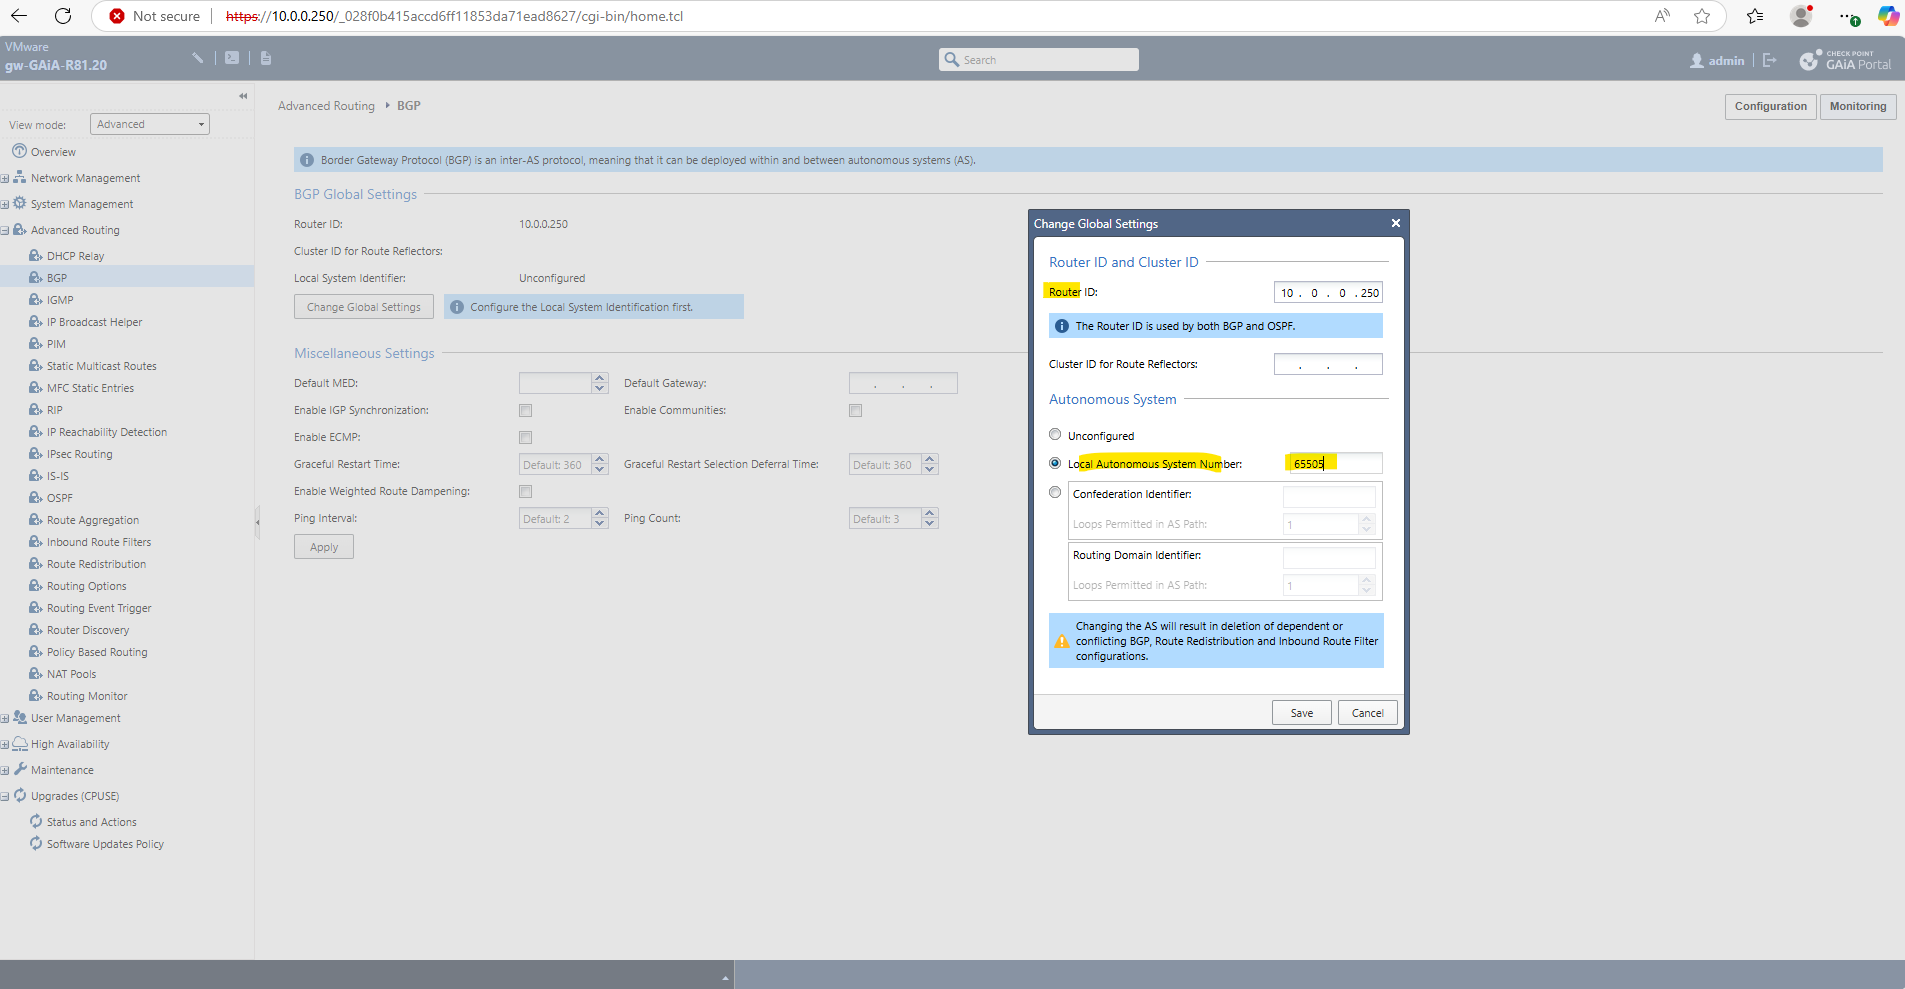
Select Local Autonomous System Number and enter a number from the reserved private use range which is from 64512 – 65534, besides 65515 as already mentioned which is reserved and used by Microsoft Azure for the virtual network gateway.
As we previously already set in Azure on the local network gateway blade here the ASN 65505 for our on-premise network, we also need to enter this here and click on Save.
The BGP Router ID is a 32-bit value (formatted like an IPv4 address, e.g., 1.1.1.1) that uniquely identifies a BGP router within an Autonomous System (AS). It’s crucial for the proper functioning of BGP, especially in scenarios involving loop prevention and path selection.
A router chooses its BGP Router ID automatically but we can always change it.
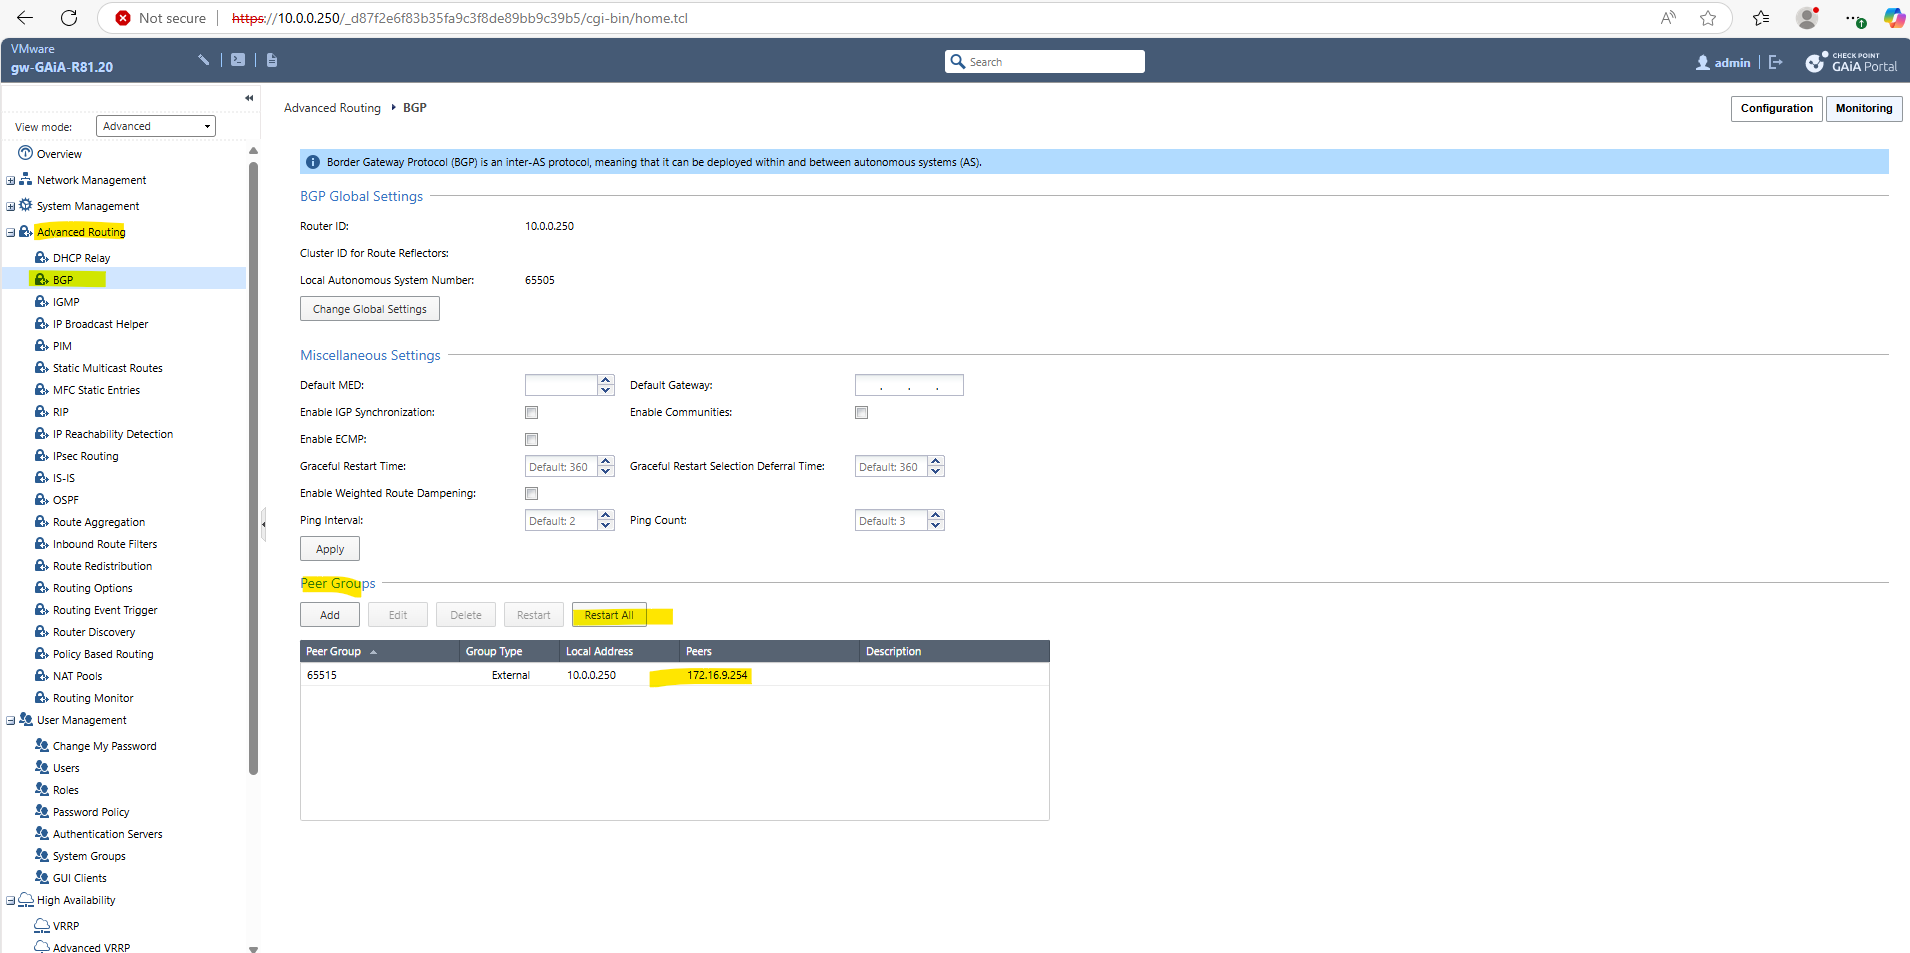
Next under Peer Groups in the same section click on Add. We will here configure the Azure side as BGP peer.
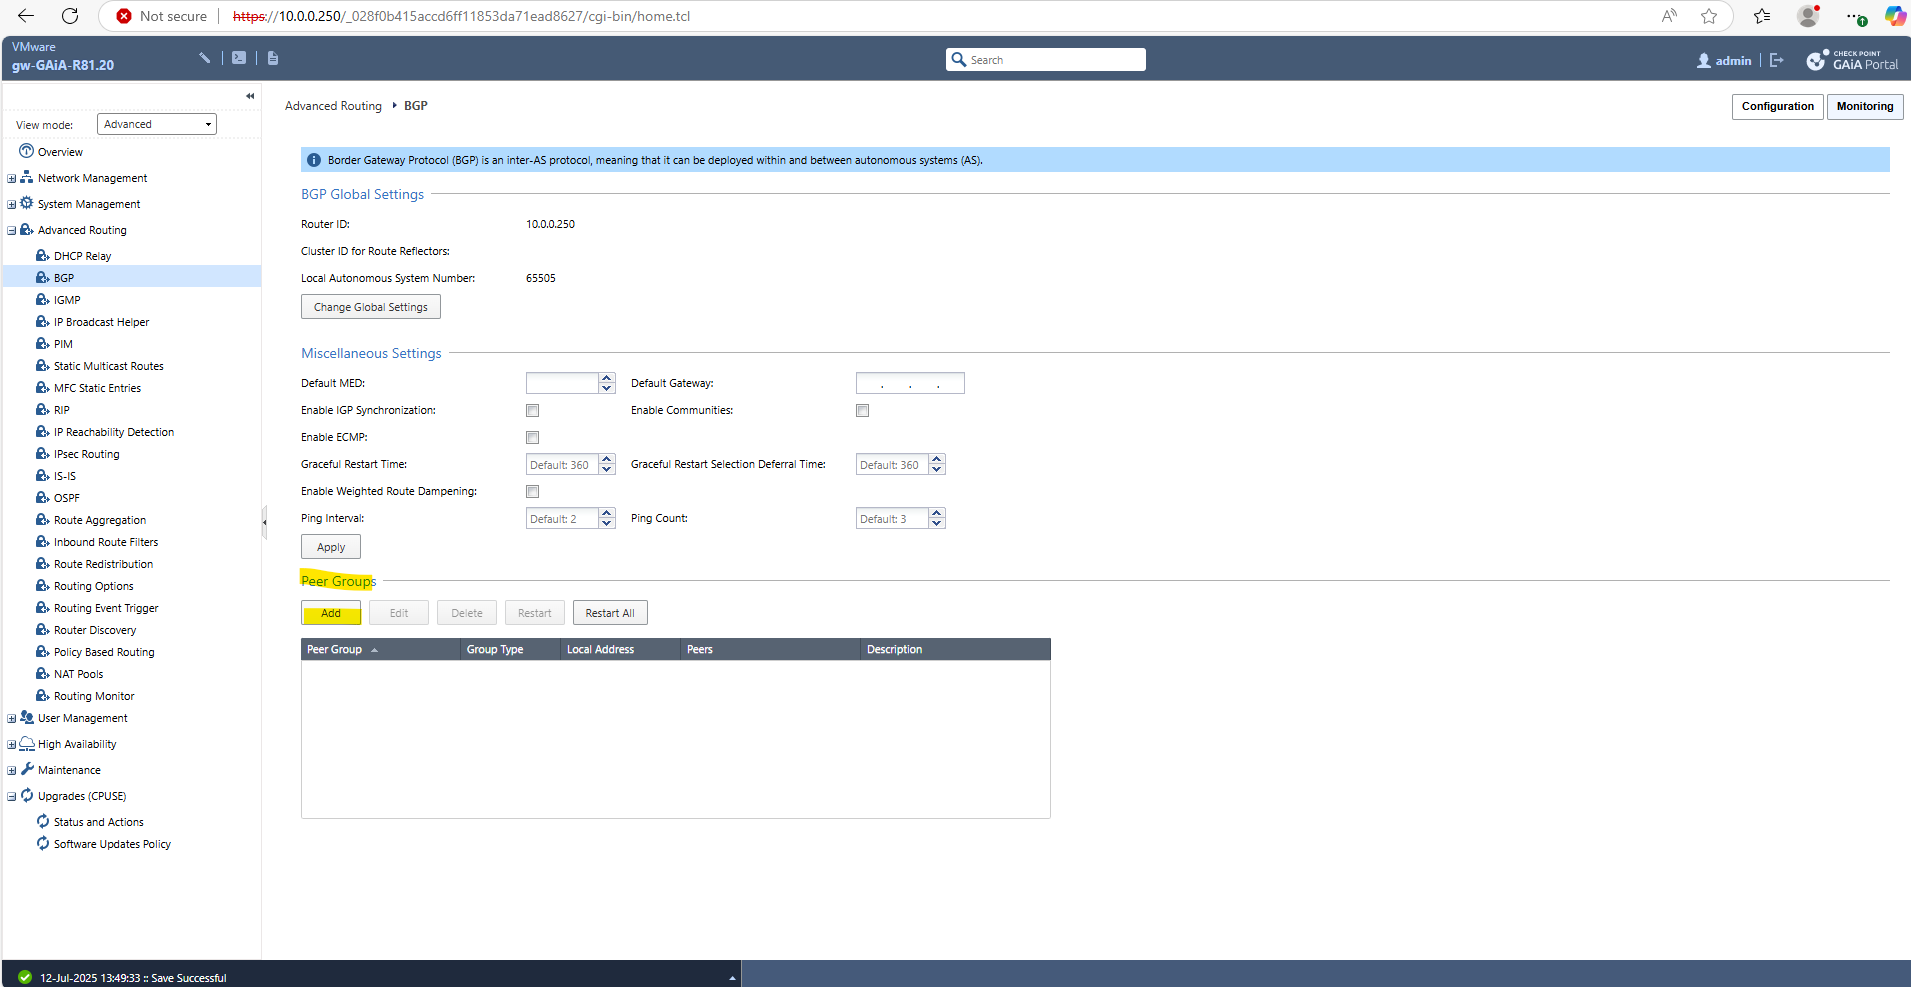
Enter the Azure ASN 65515 number, for the local address enter Check Point’s main address resp. BGP Router ID above, in my case 10.0.0.250.
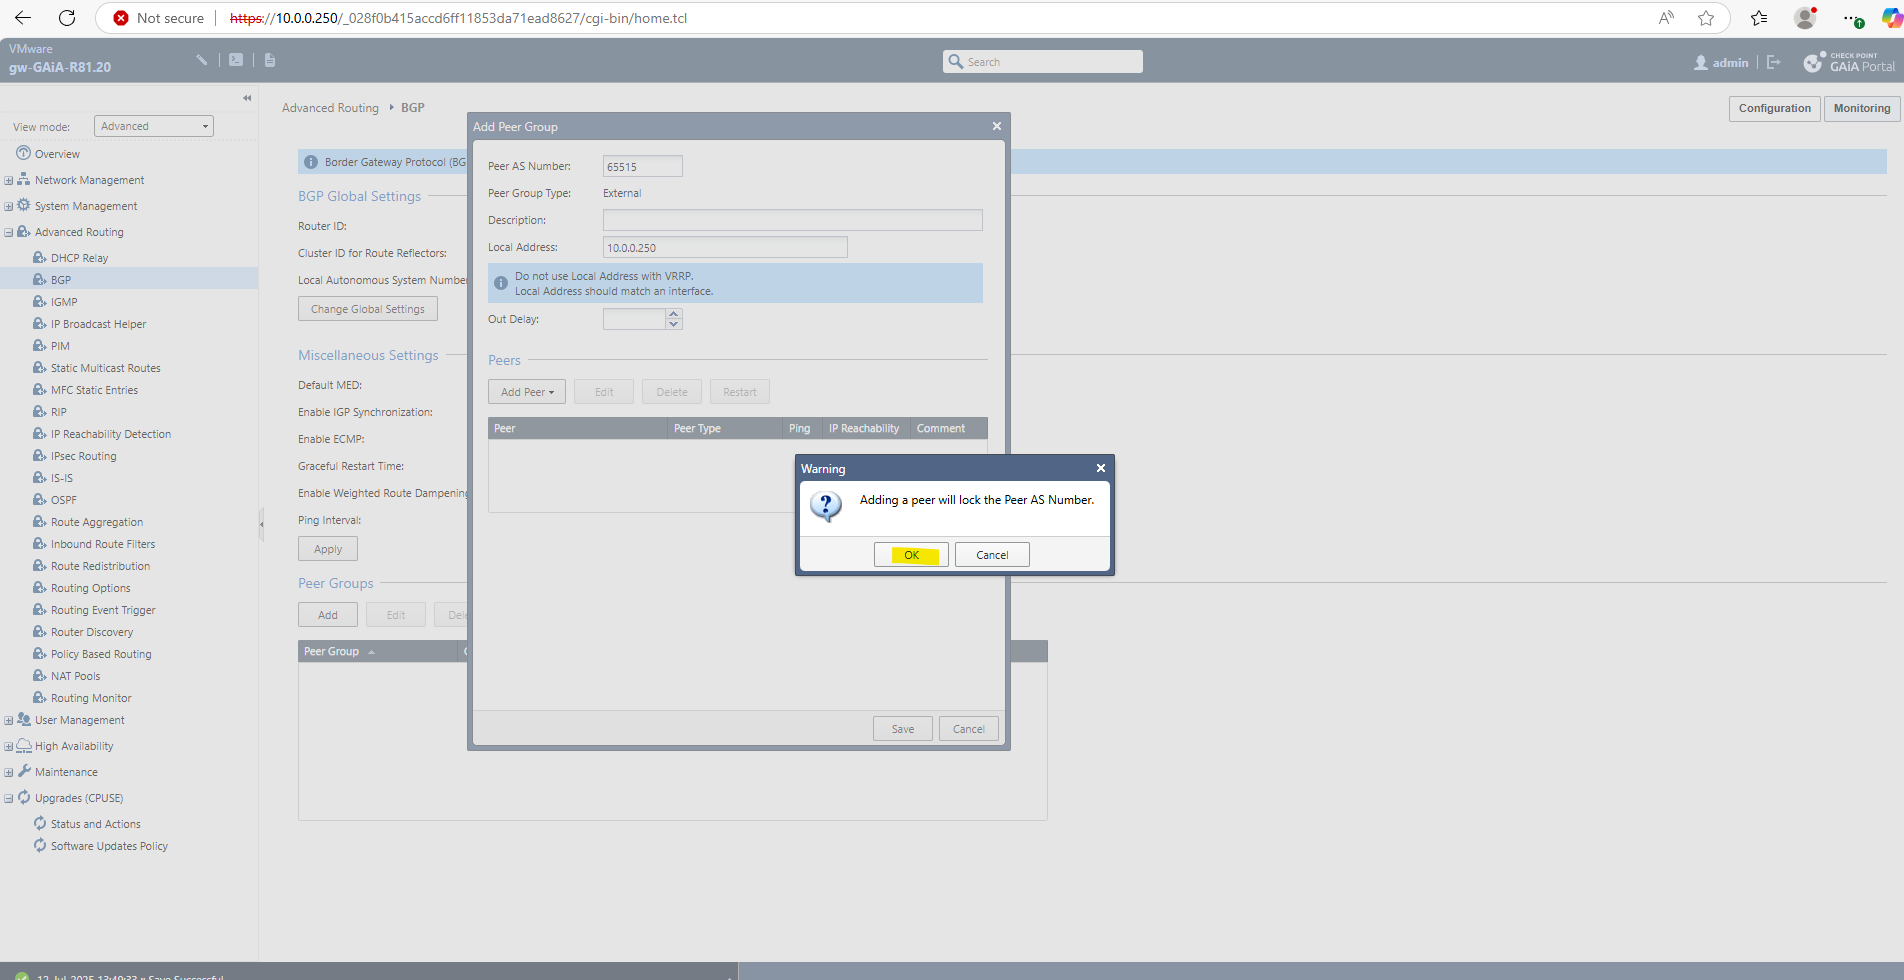
To finally add Azure as BGP peer click on Add Peer -> Add IPv4 Peer.

Click on OK.
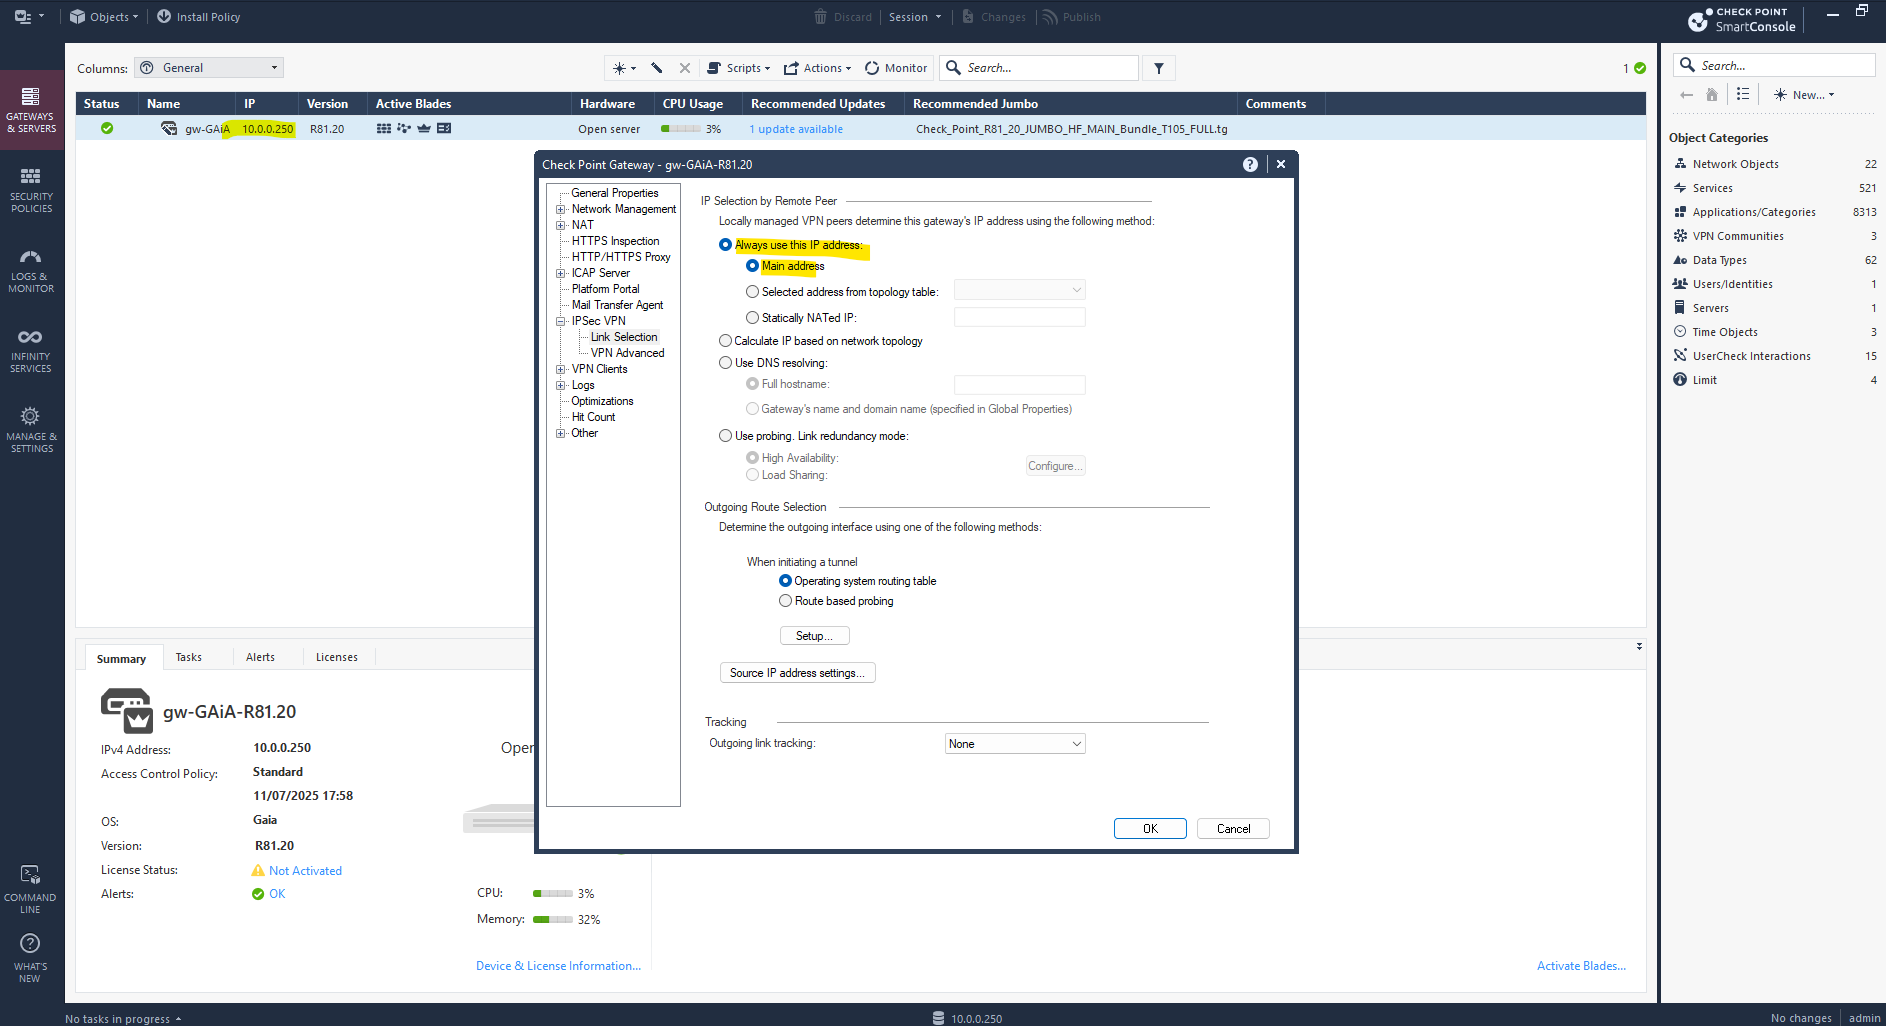
Adding the Azure BGP peer IP and click on Show Advanced Settings.
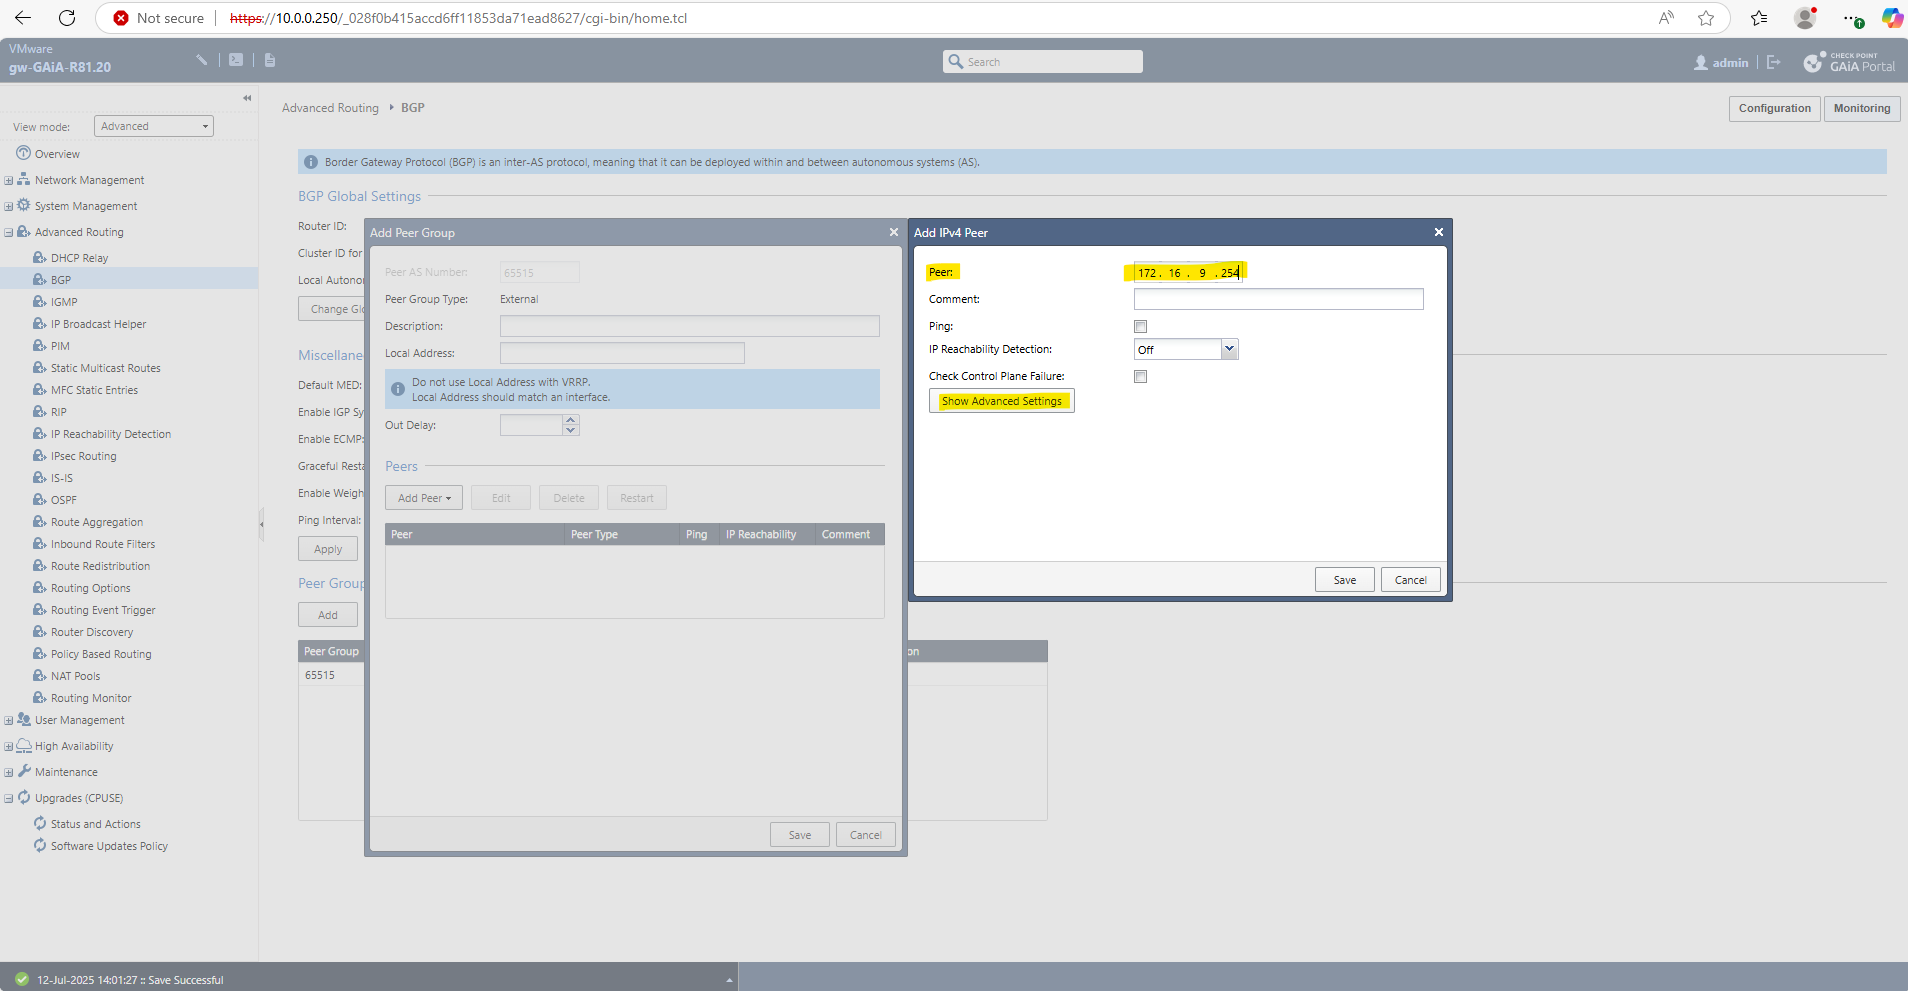
The Azure BGP peer IP address we will find as mentioned on the Azure virtual network gateway under Settings -> Configuration as shown below.
This is also the VTI interface on Azure side of the phase 2 transit tunnel.
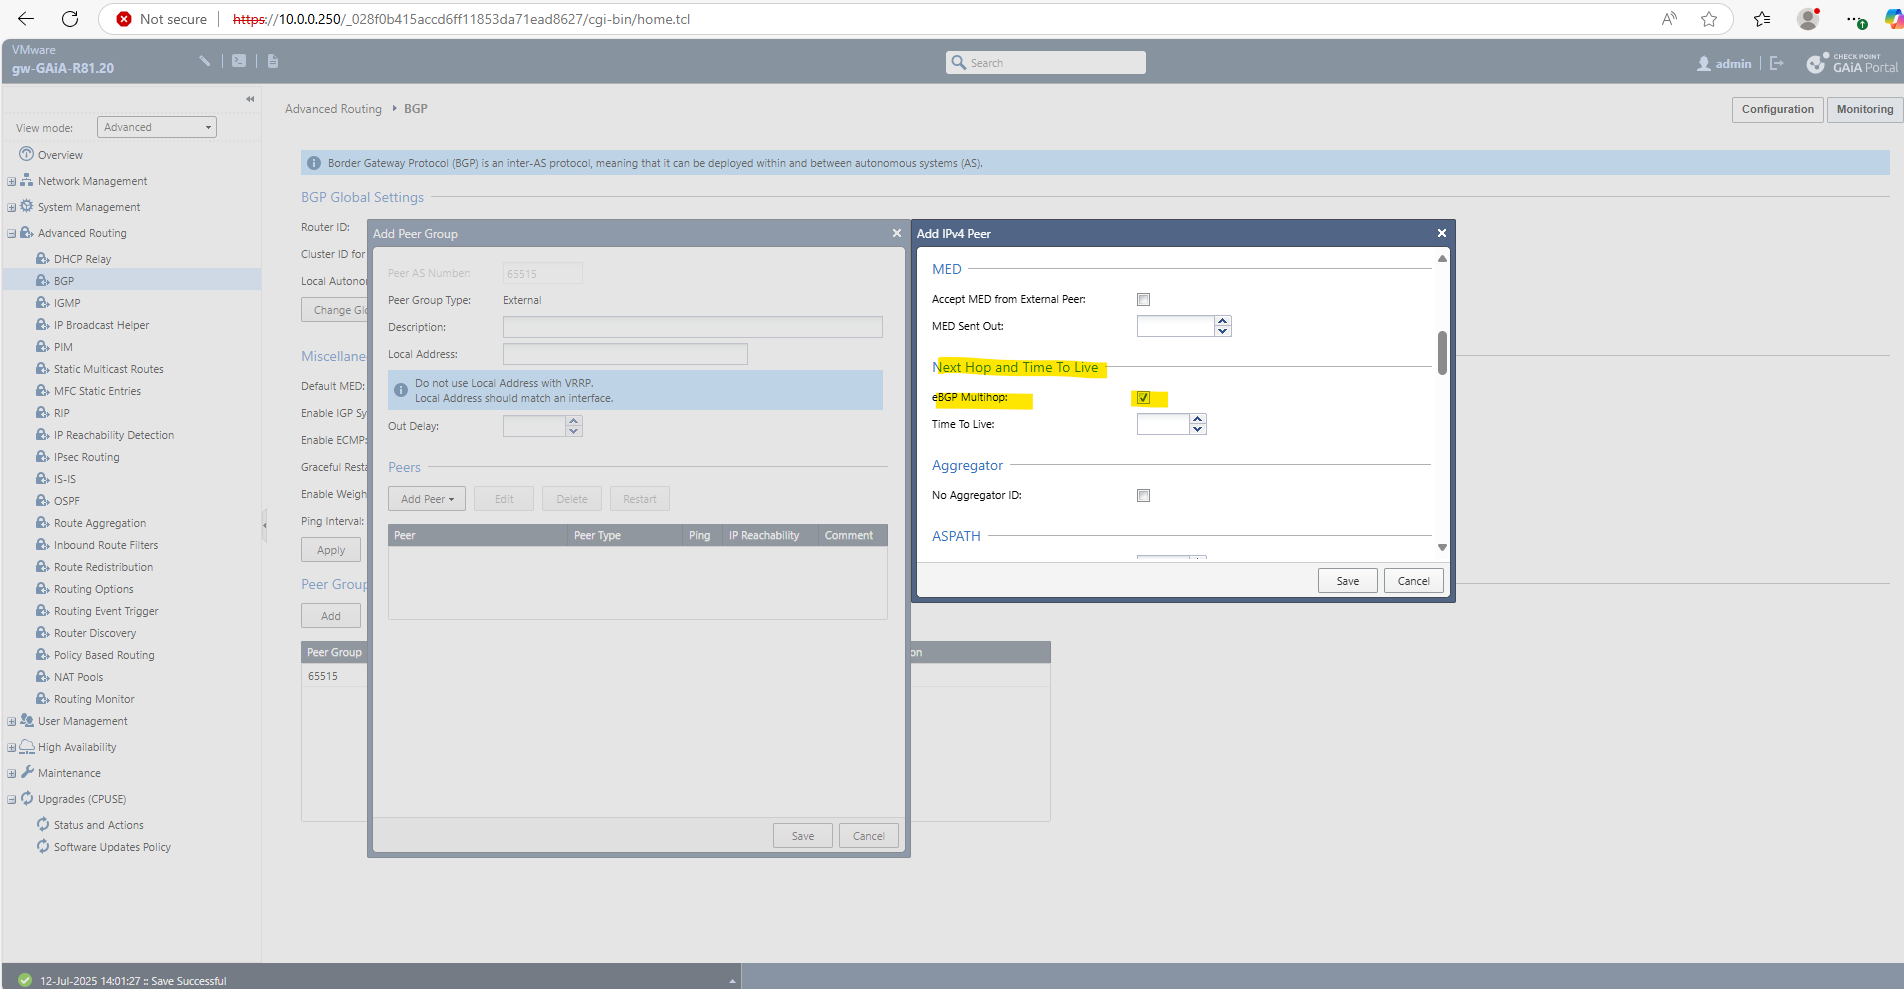
Within the advanced settings section check eBGP Multihop.
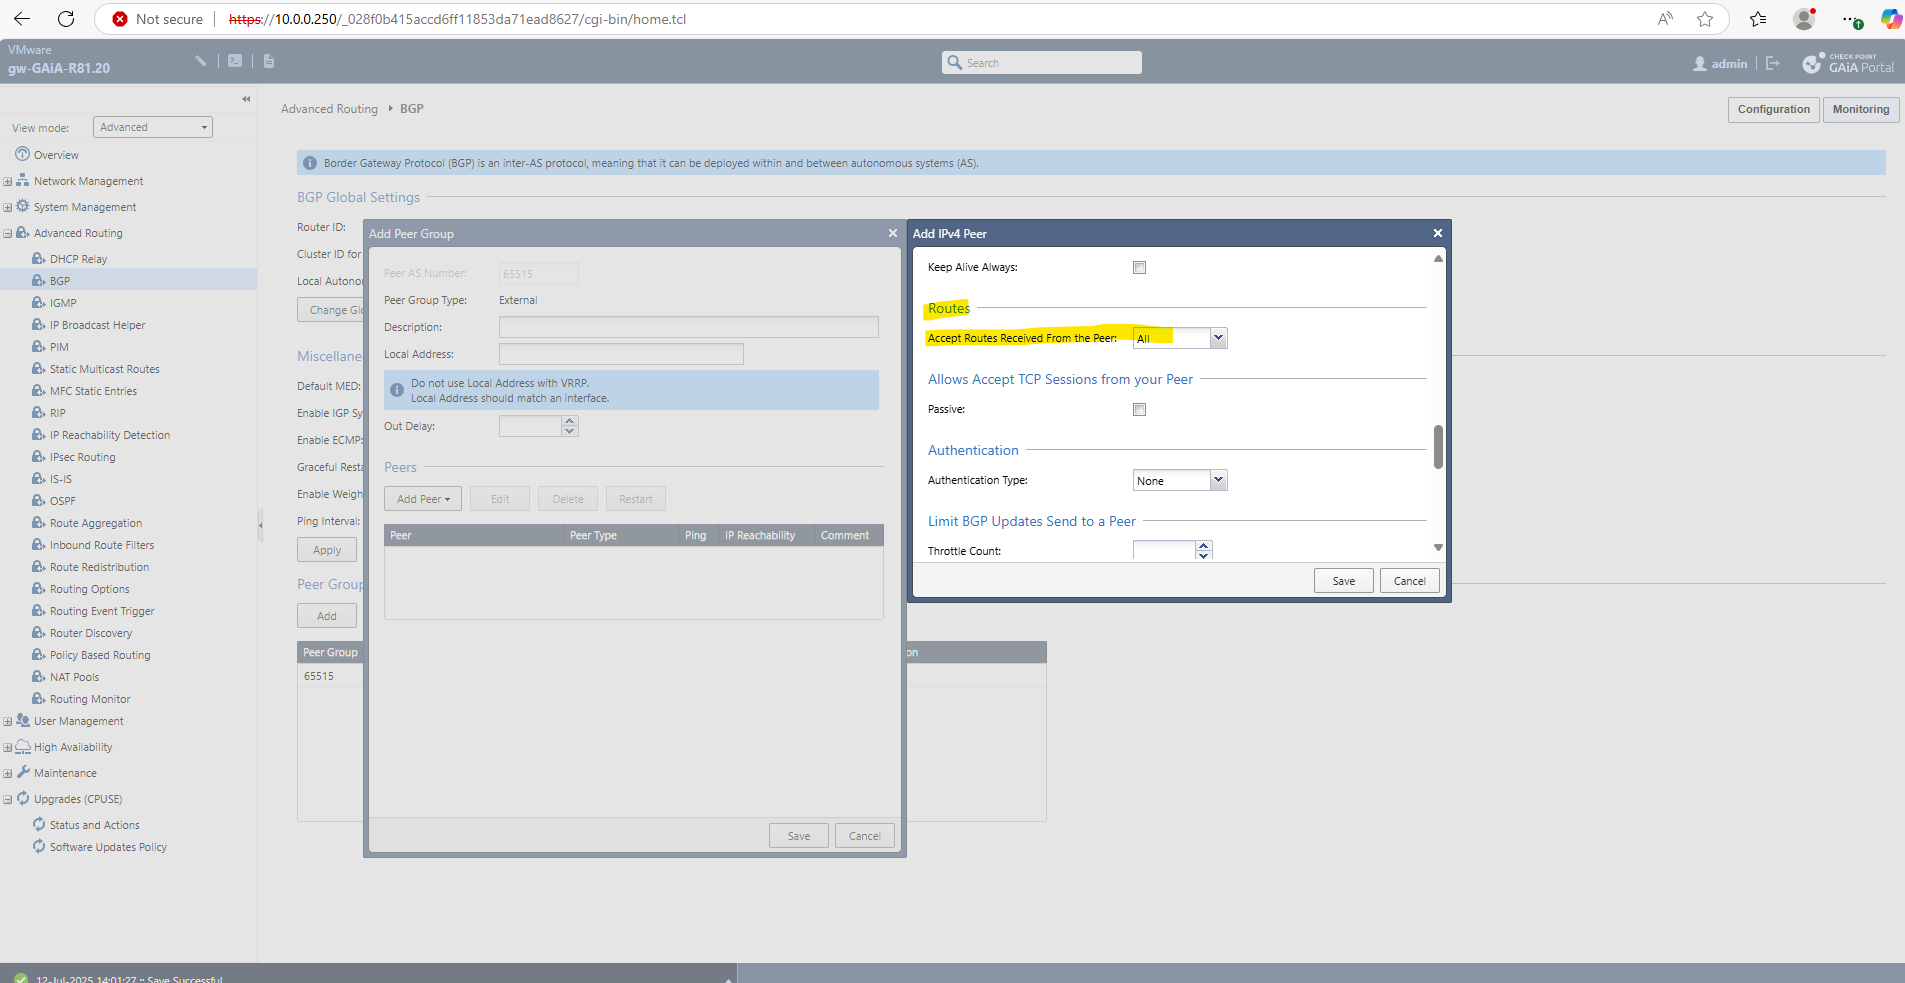
Under Routes by default all routes will be accepted which we need to leave this way.
Finally click on Save.
On this section we now have all configured.
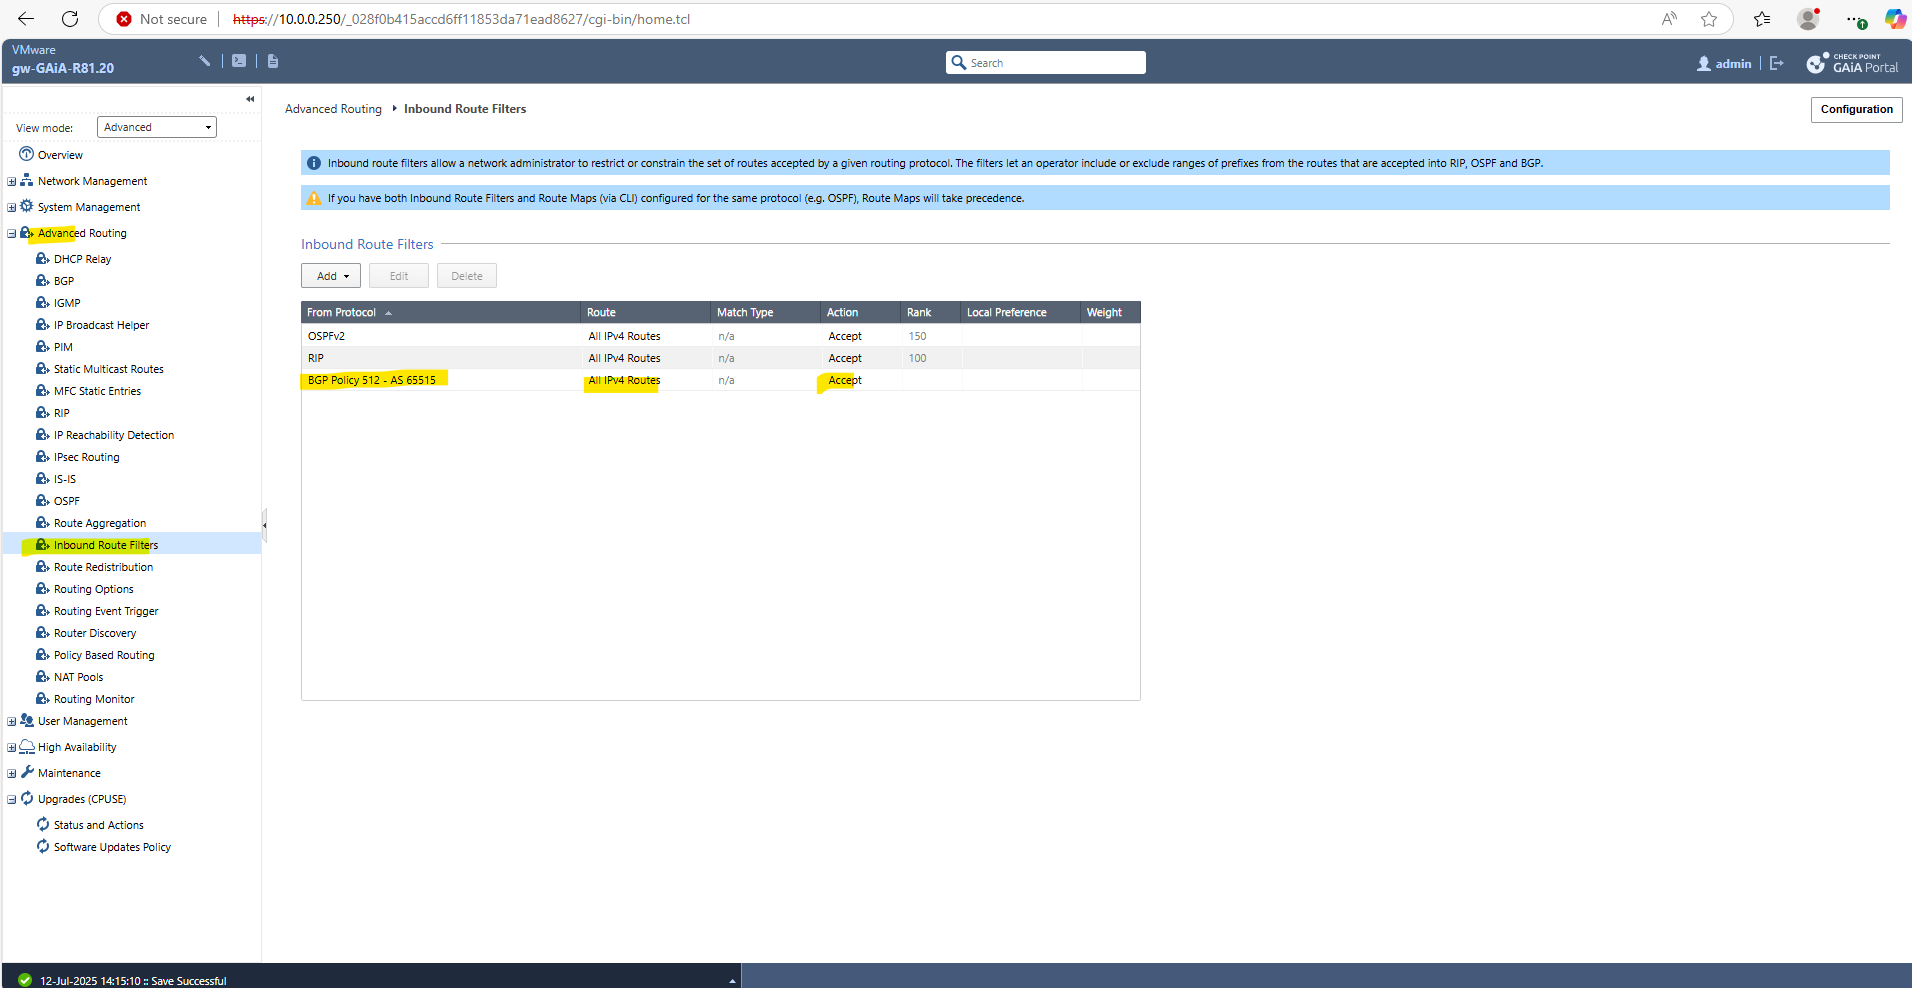
Next navigate to Advanced Routing -> Inbound Route Filters.
Click on Add -> Add BGP Policy Filter (Based on AS)
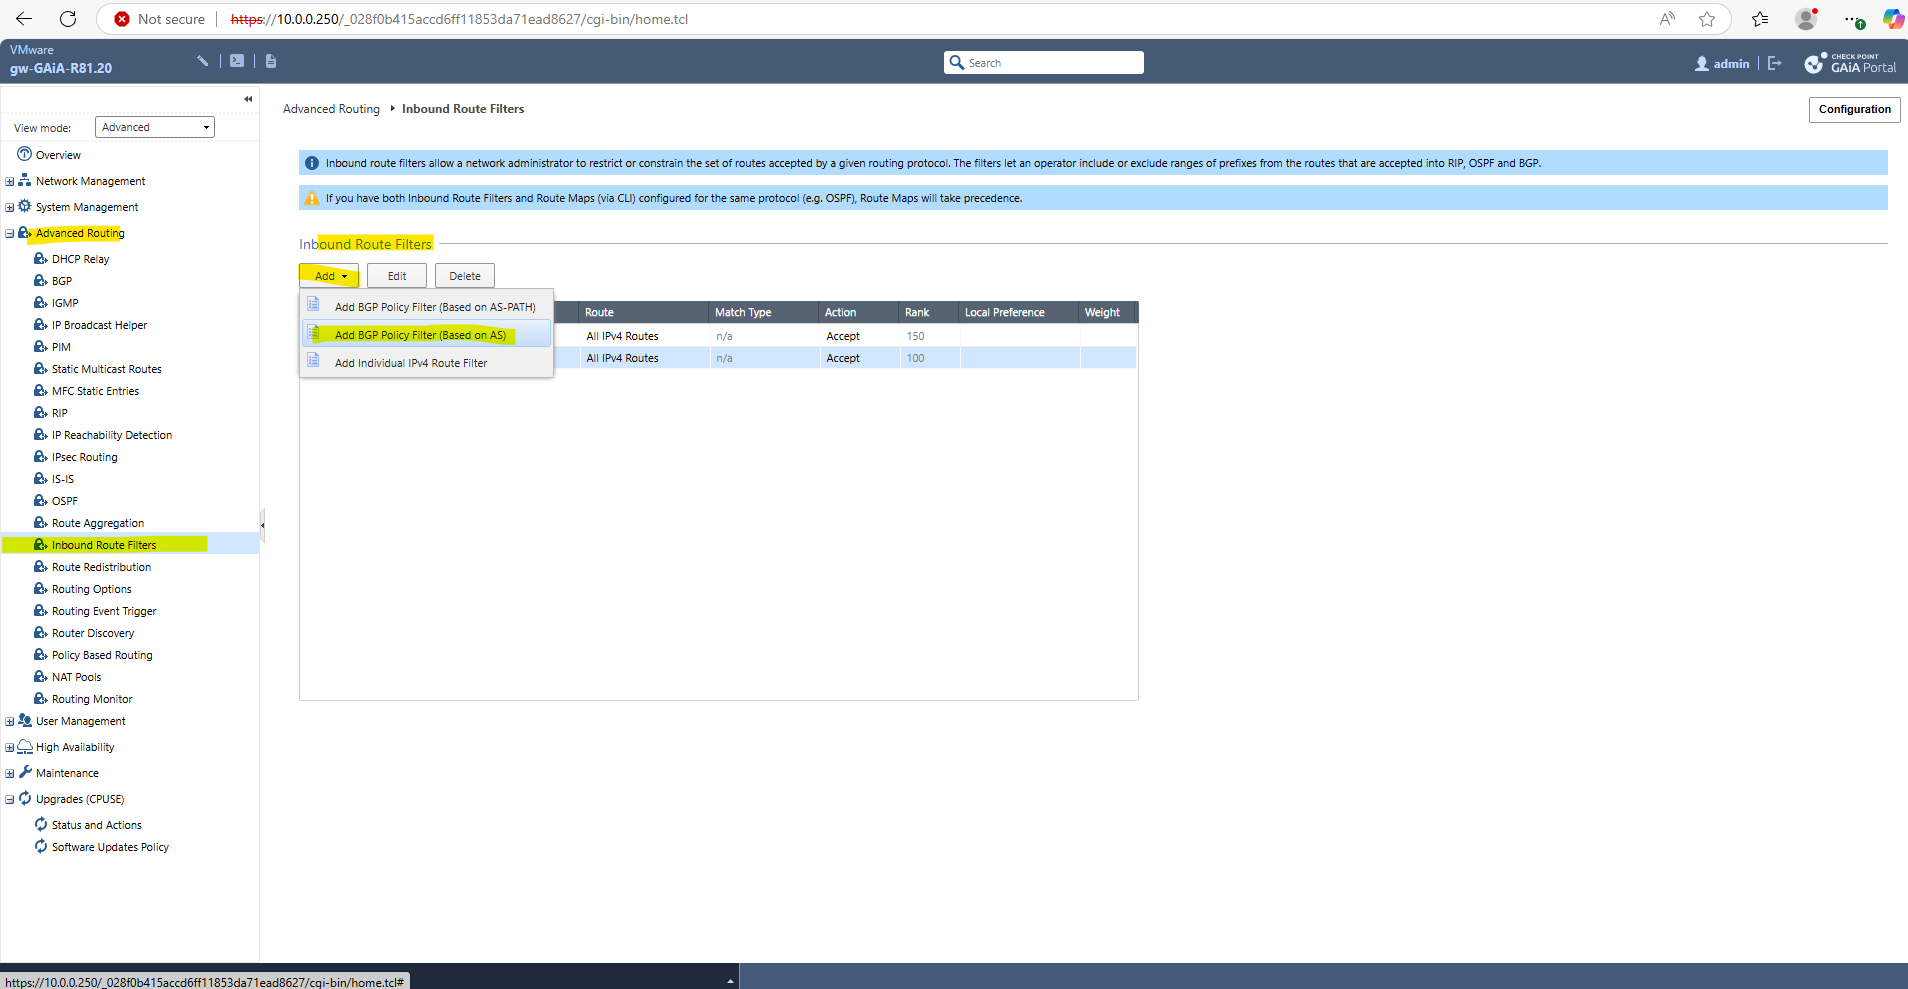
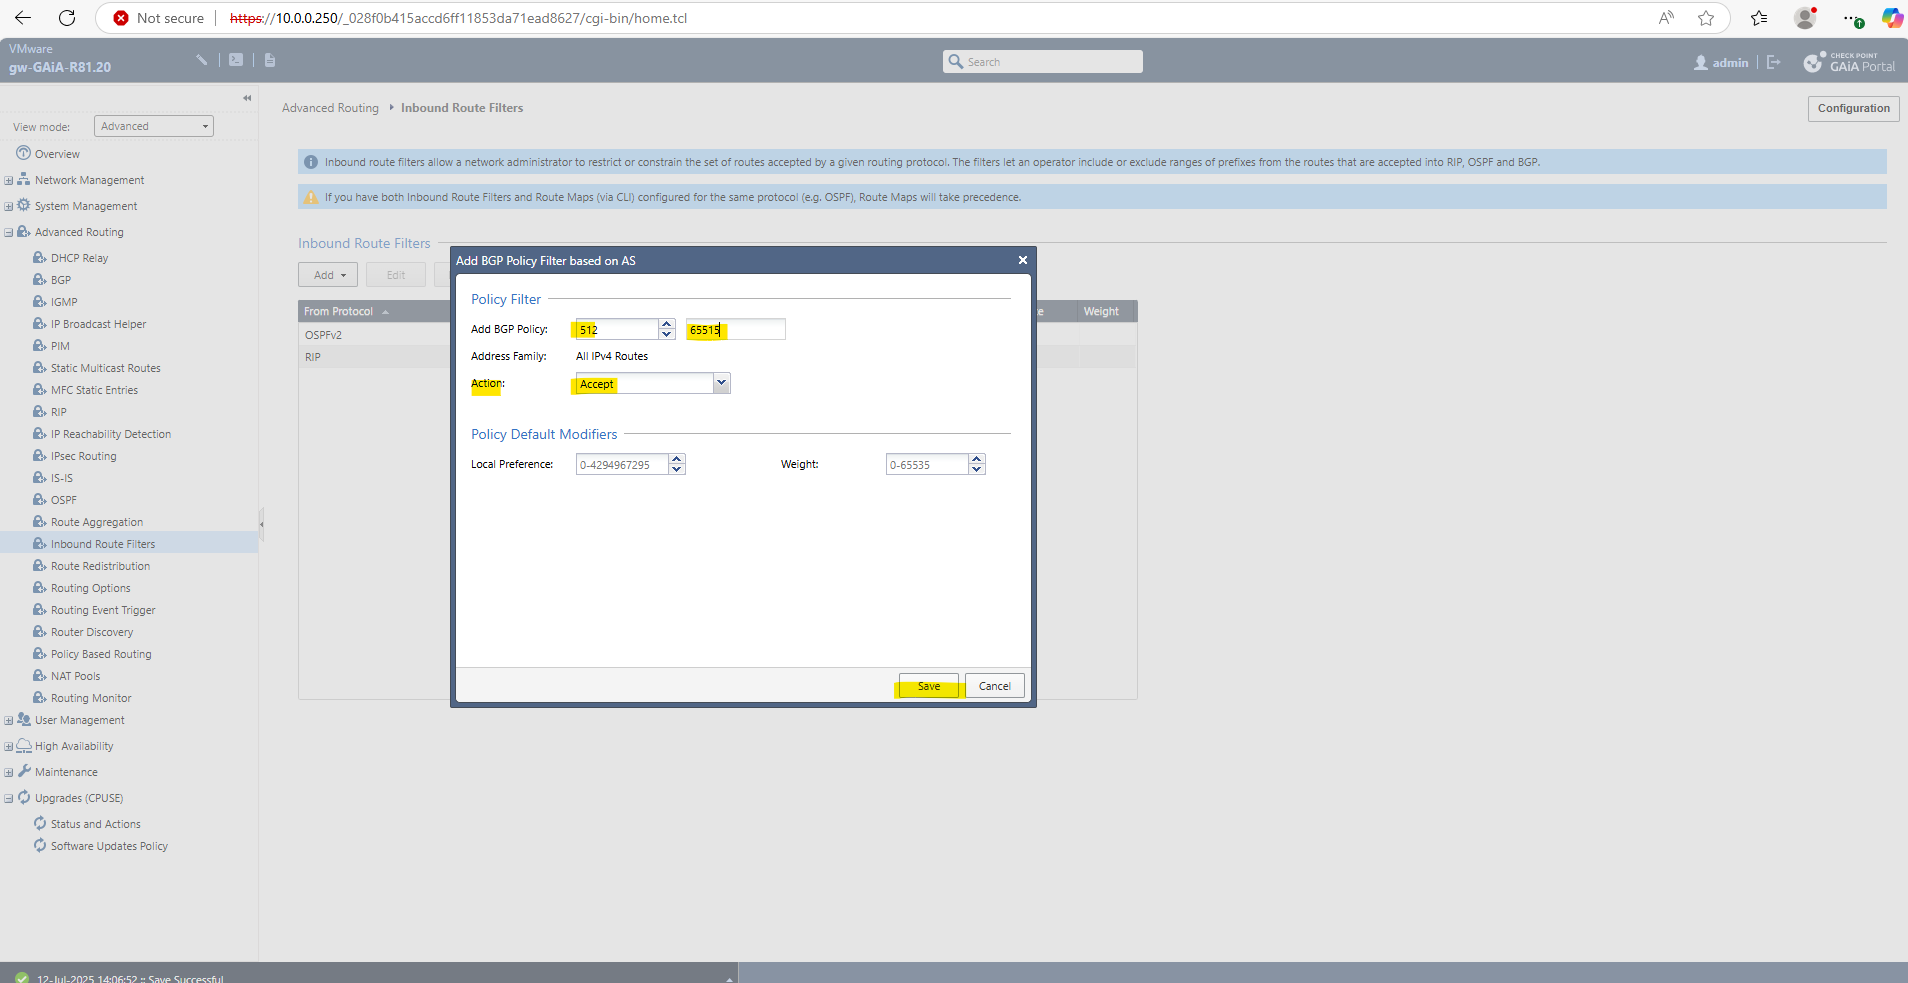
Click on the BGP Policy number section to set one starting from 512.
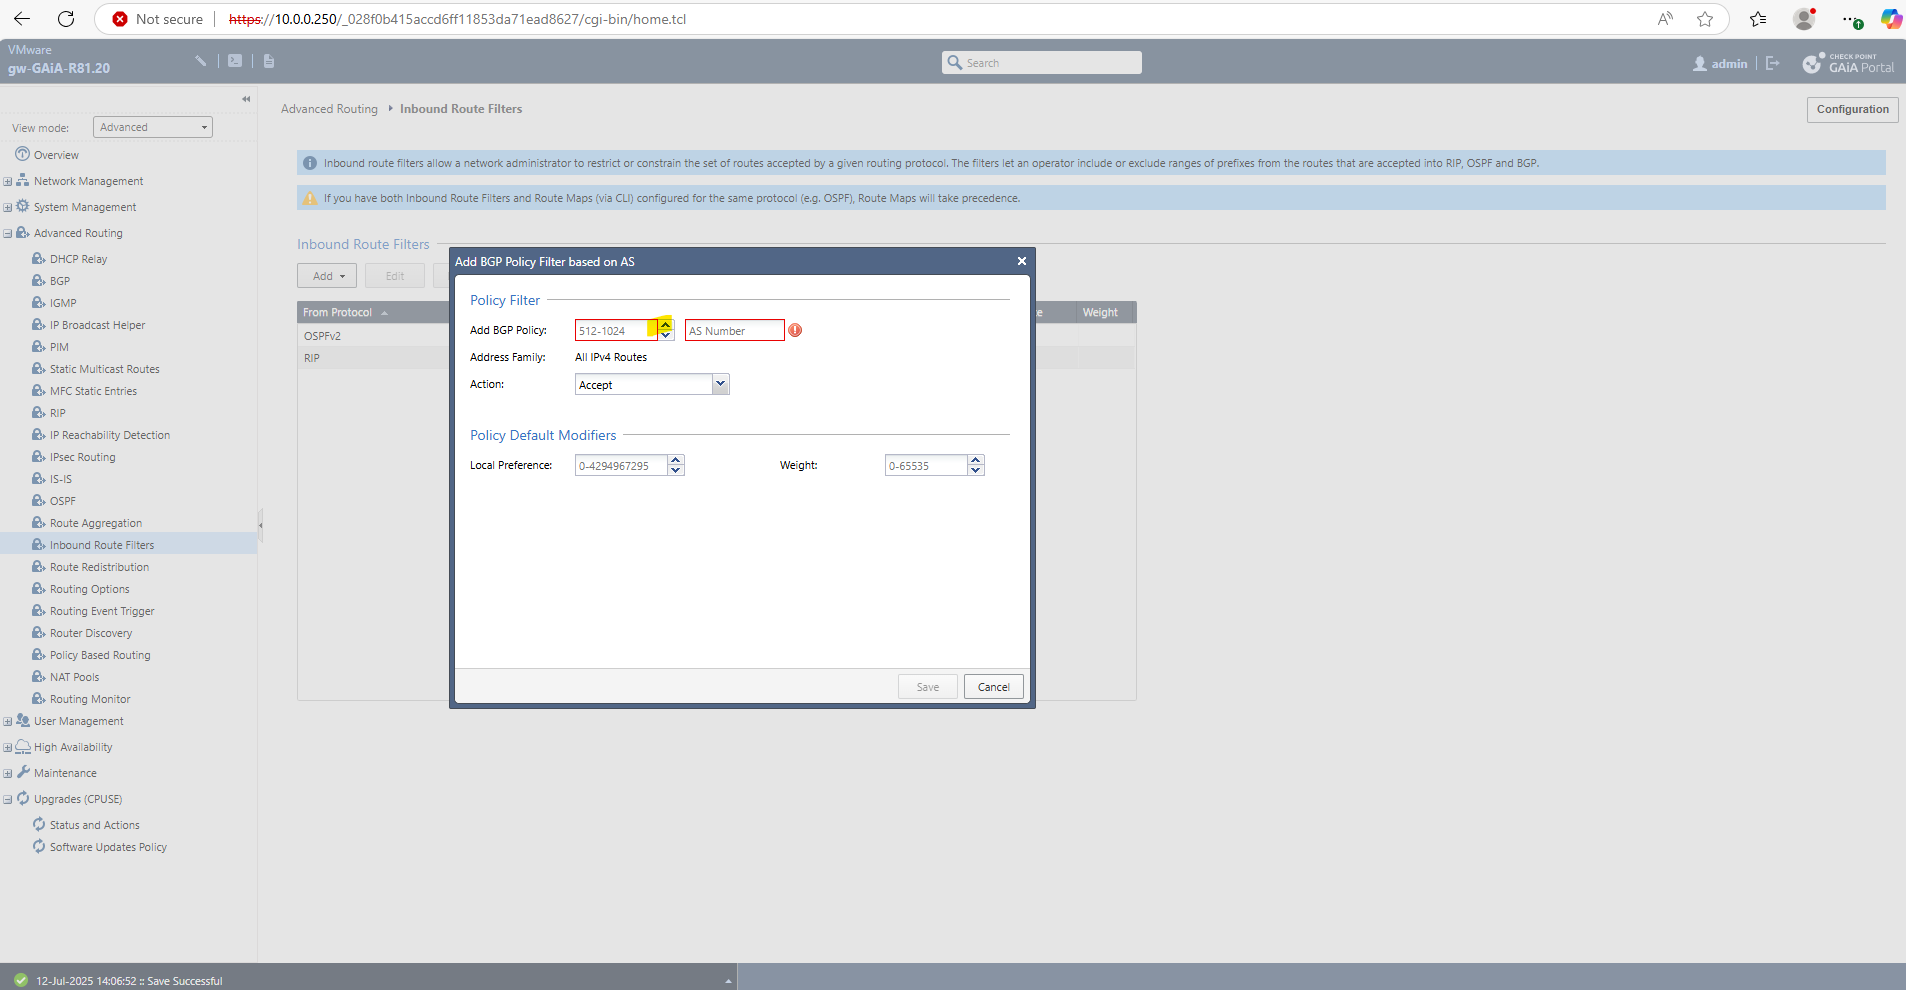
Enter also the Azure ASN 65515 number for this policy and under Action leave default Accept to finally receive all advertised routes by Azure.
Click on Save.
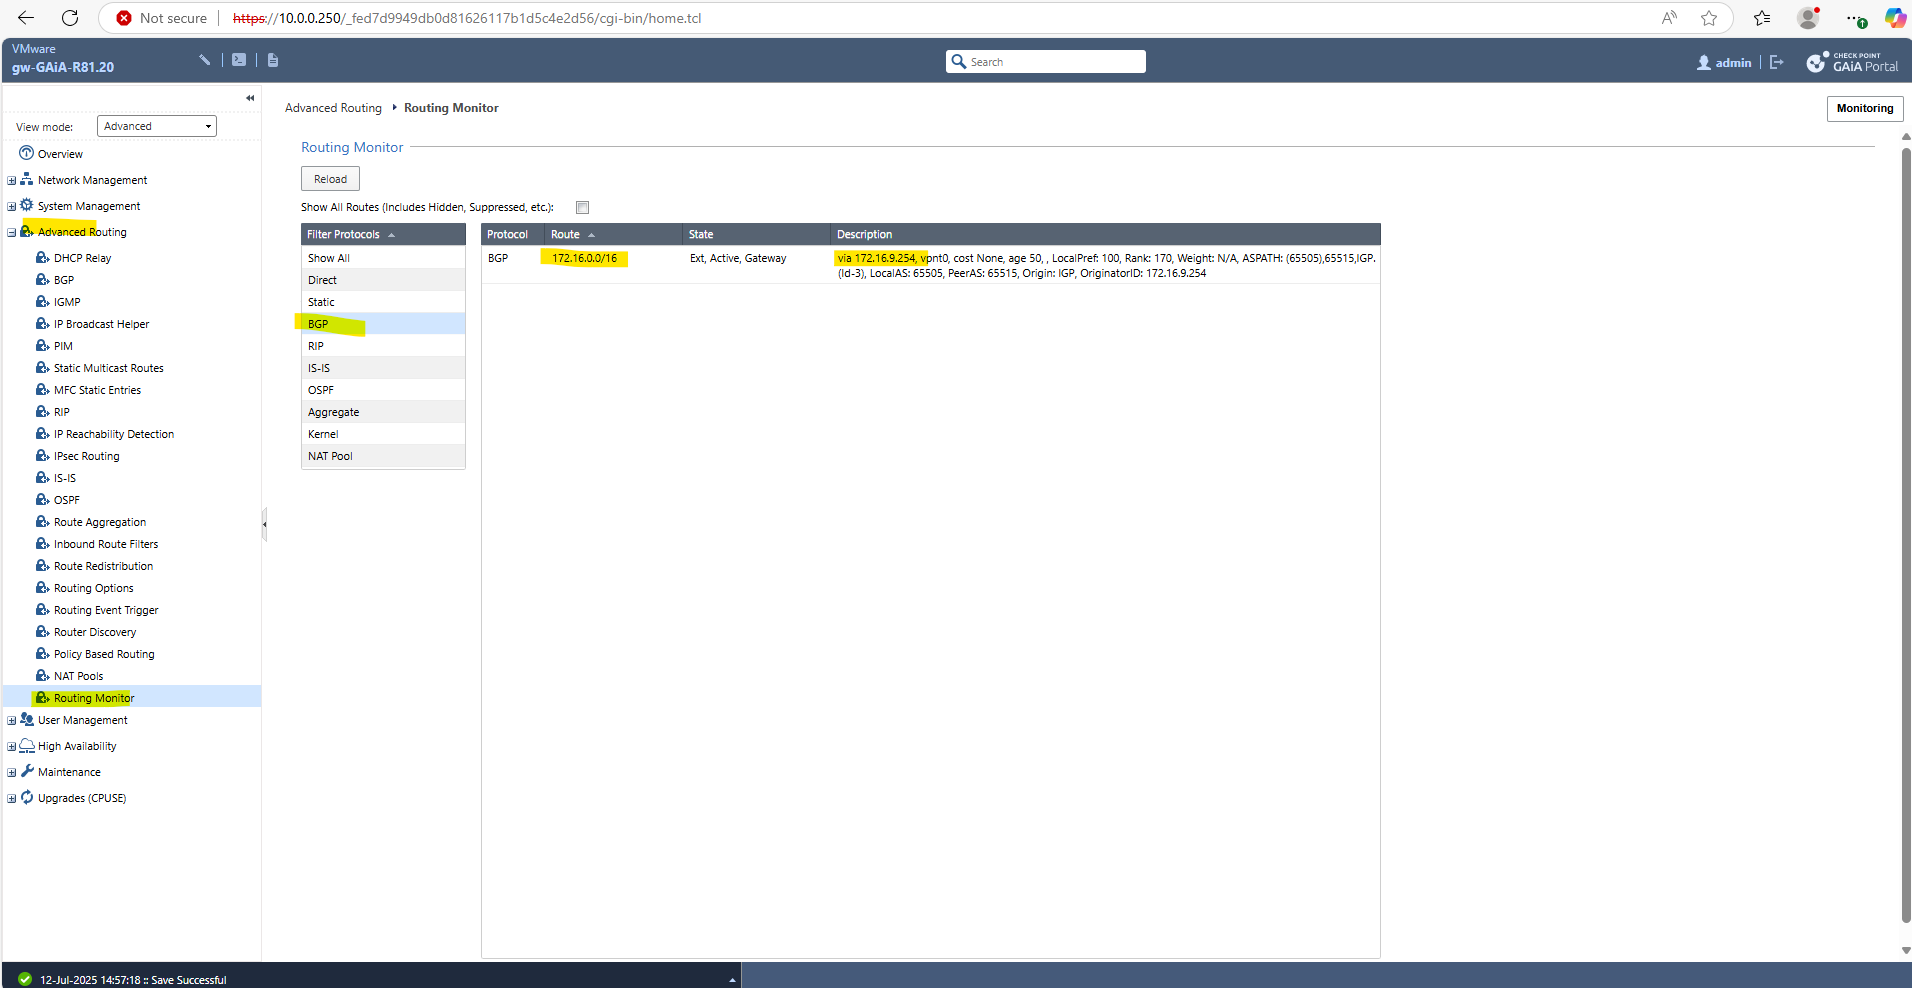
From now on we will already receive the advertised routes by Azure, in my case here the Azure virtual network 172.16.0.0/16 with the next hop 172.16.9.254 (VTI interface transit tunnel phase 2).
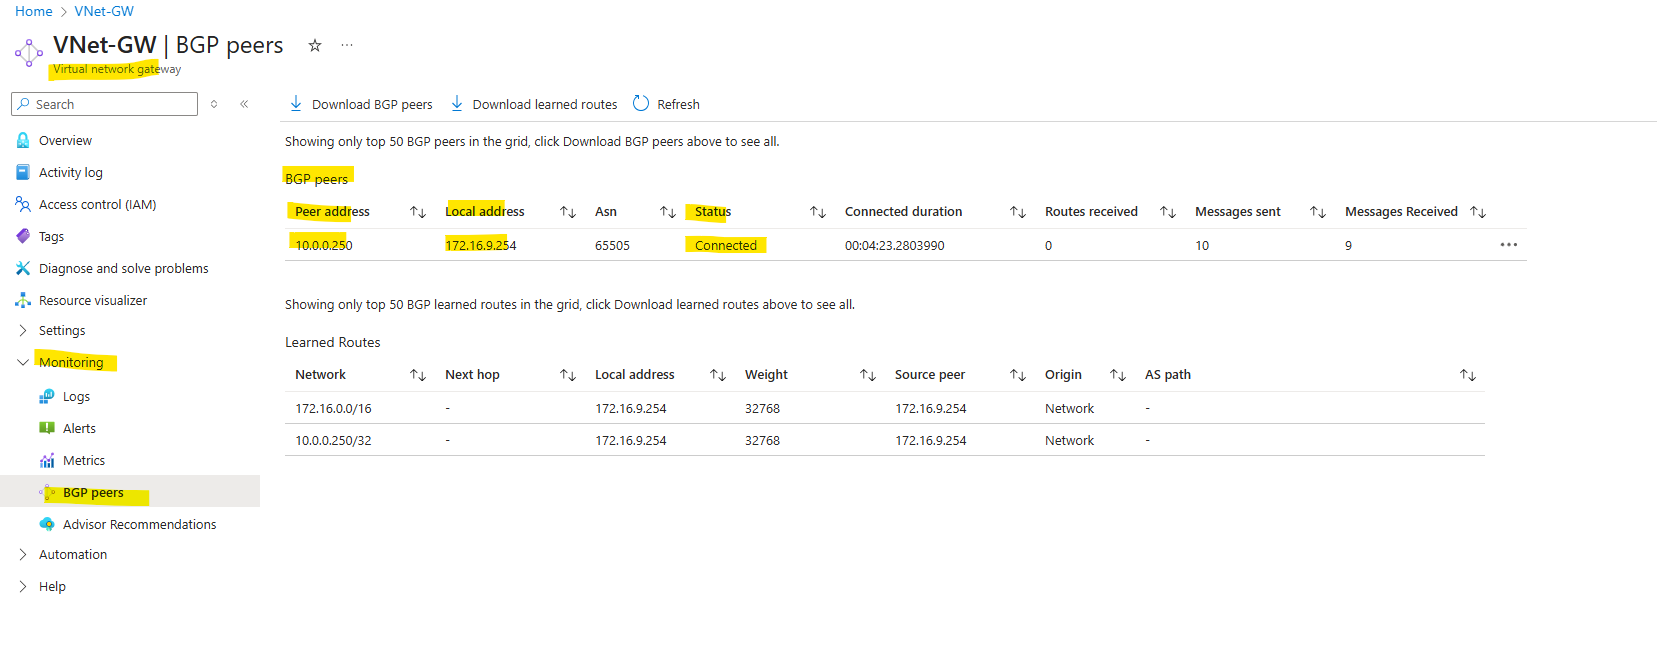
Azure so far doesn’t receive any advertised routes by Check Point. The connection between the peers is already established, otherwise Check Point couldn’t receive the advertised routes by Azure.
In order that we can also advertise our on-premise routes to Azure, we need to redistribute them from Check Point to Azure.
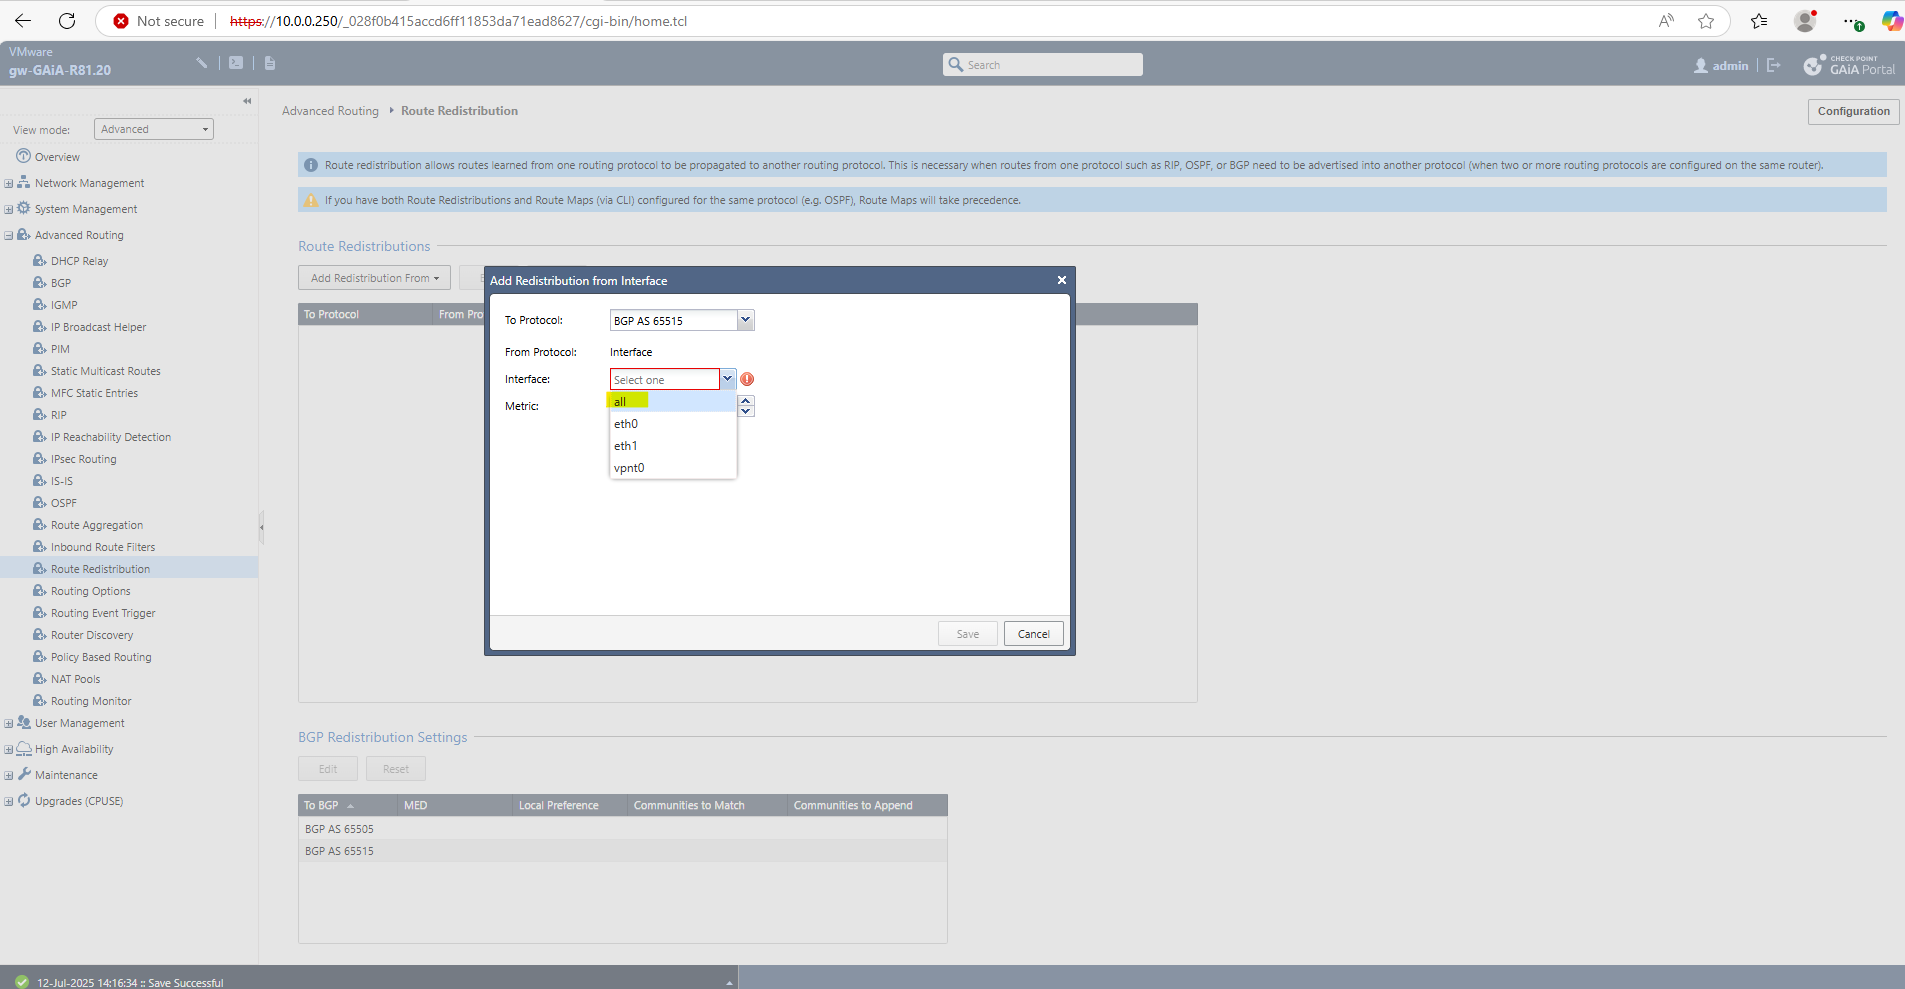
Therefore click on Add Redistribute From -> Interface also located in the Advanced Routing section.
This will advertise all routes known to the selected interface. Select the desired option here.

By selecting BGP AS 65515 (Azure ASN) we will advertise all routes known to the selected interfaces to Azure.
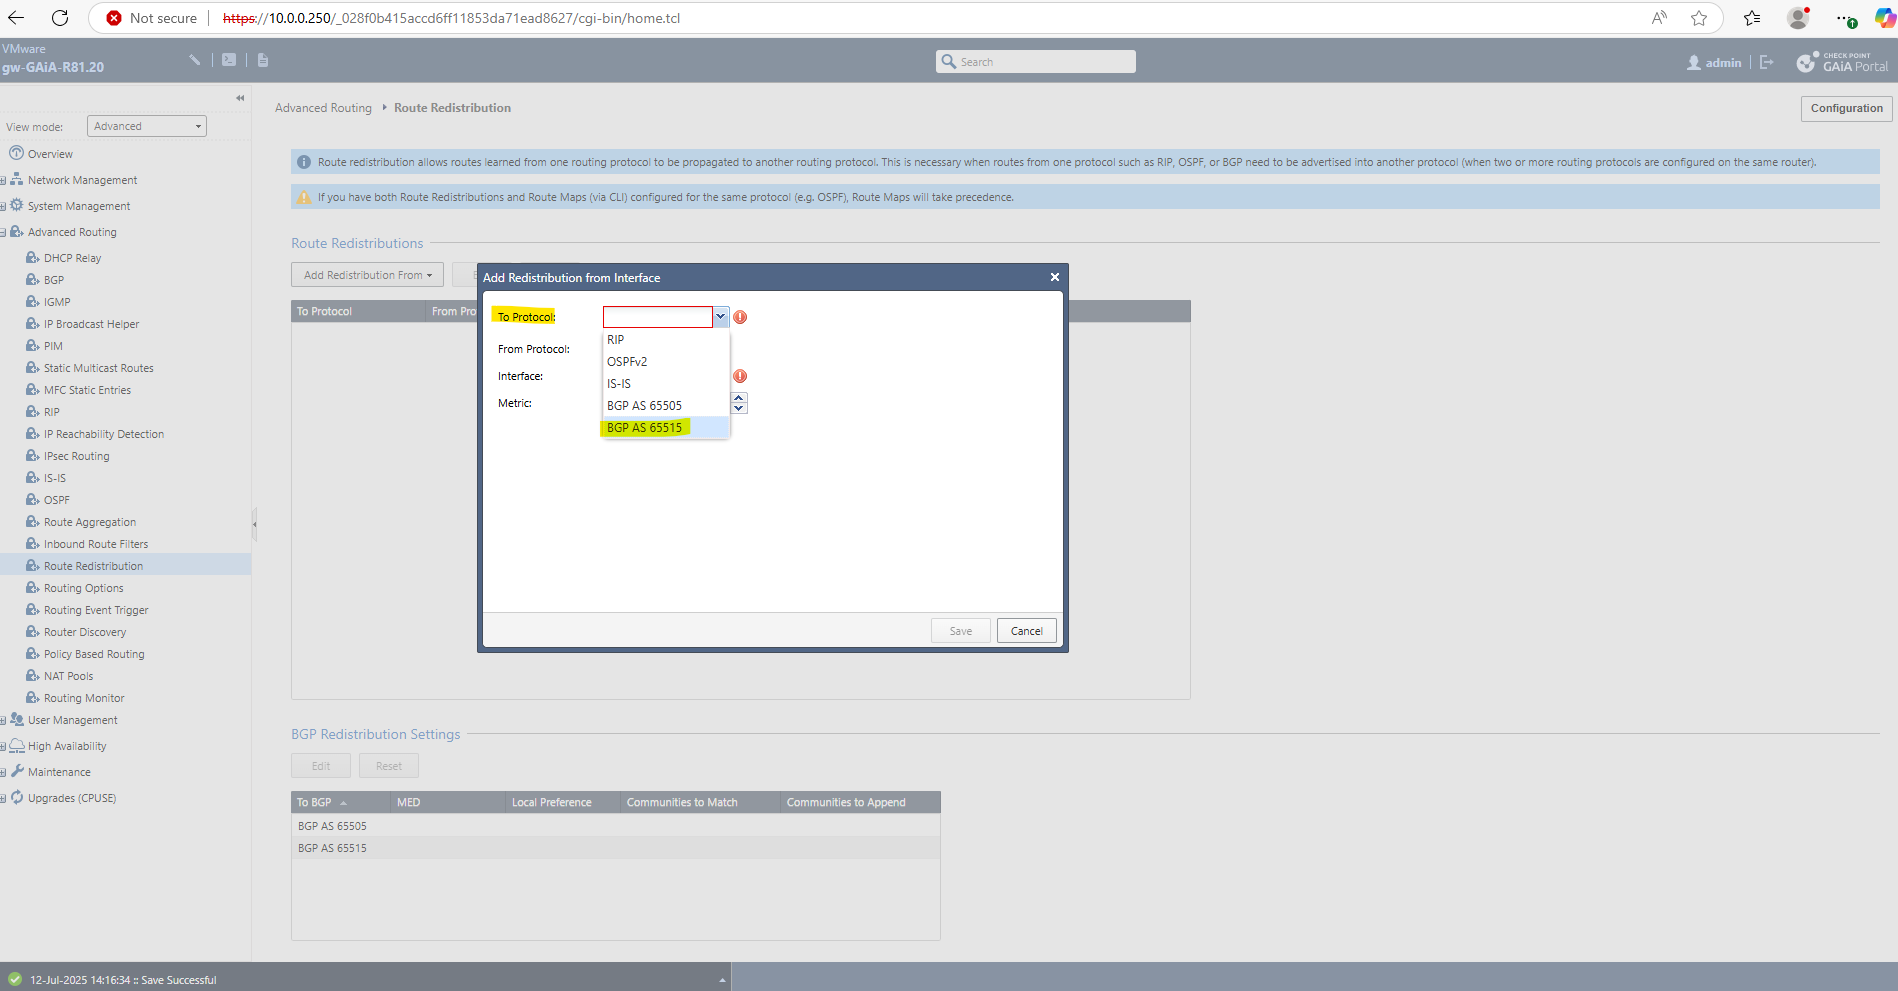
For the interfaces I will select all. Finally just select the interfaces you want to advertise the corresponding routes for and click on Save.
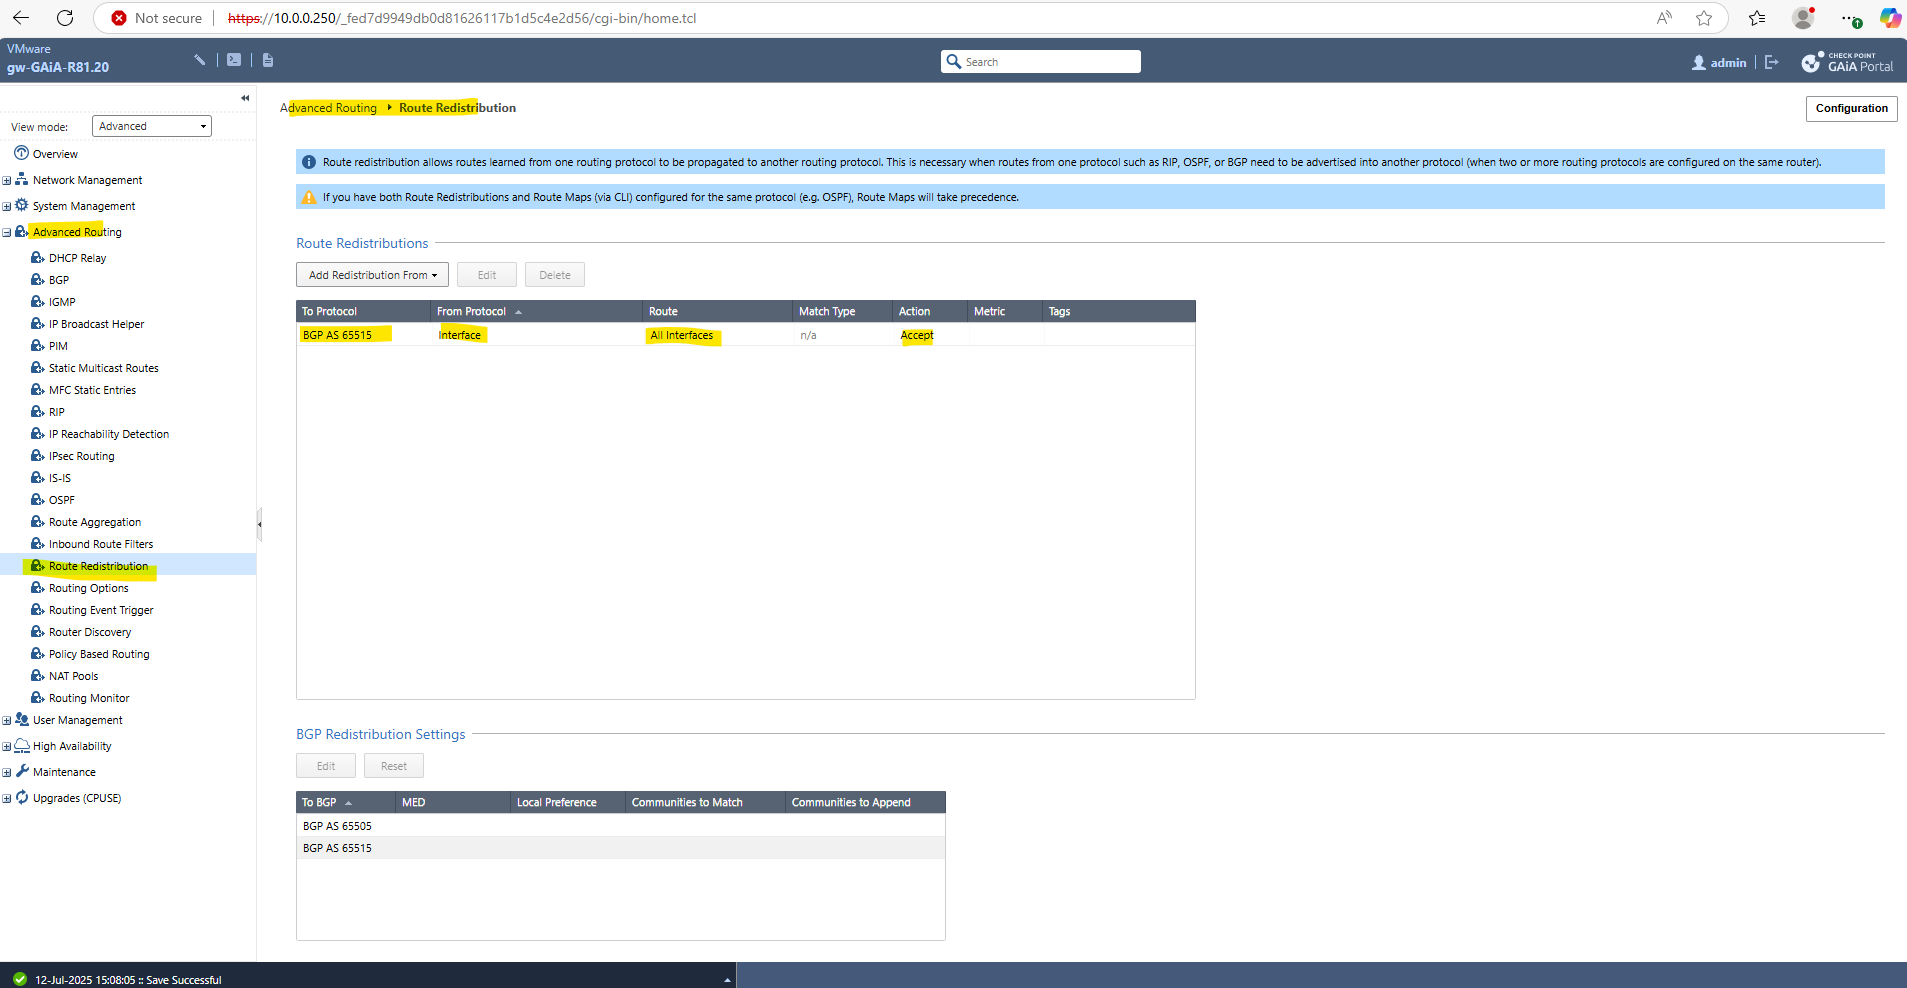
After redistributing the routes from Check Point to Azure’s ASN 65515 above, Azure will immediately receive the routes to my on-premise networks advertised by Check Point.

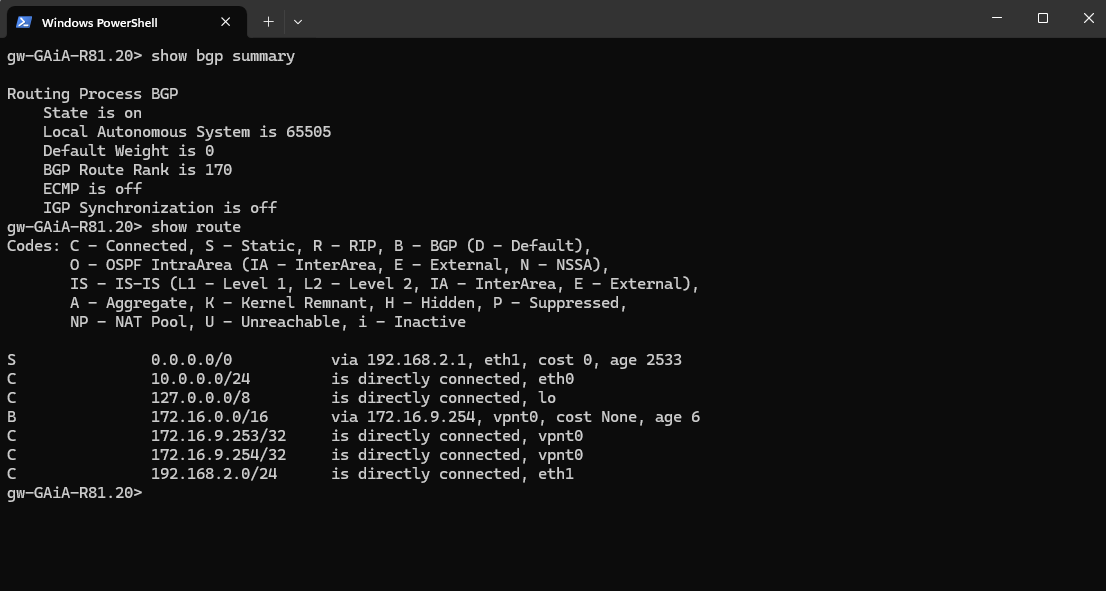
Determine advertised and received routes on Check Point by using the CLI
On the Gaia clish we can determine all routes Check Point will receive from Azure and also which routes will be advertised from Check Point to Azure by using the following commands.
gw-GAiA-R81.20> show bgp peers
gw-GAiA-R81.20> show bgp peer 172.16.9.254 received
gw-GAiA-R81.20> show bgp peer 172.16.9.254 advertise

We can also use the following commands to check the BGP configuration and routes Check Point will have.
gw-GAiA-R81.20> show bgp summary
gw-GAiA-R81.20> show route
Allow BGP Traffic between Check Point and Azure
For BGP to establish and function between a Check Point gateway and Azure, we need to allow TCP port 179 traffic between them.
- From Check Point BGP Peer IP to Azure BGP Peer IP
- From Azure BGP Peer IP to Check Point BGP Peer IP
This means that we need an Access Control Rule on our Check Point gateway that explicitly permits TCP port 179 in both directions between Check Point’s internal BGP peer IP and Azure’s internal BGP peer IP.
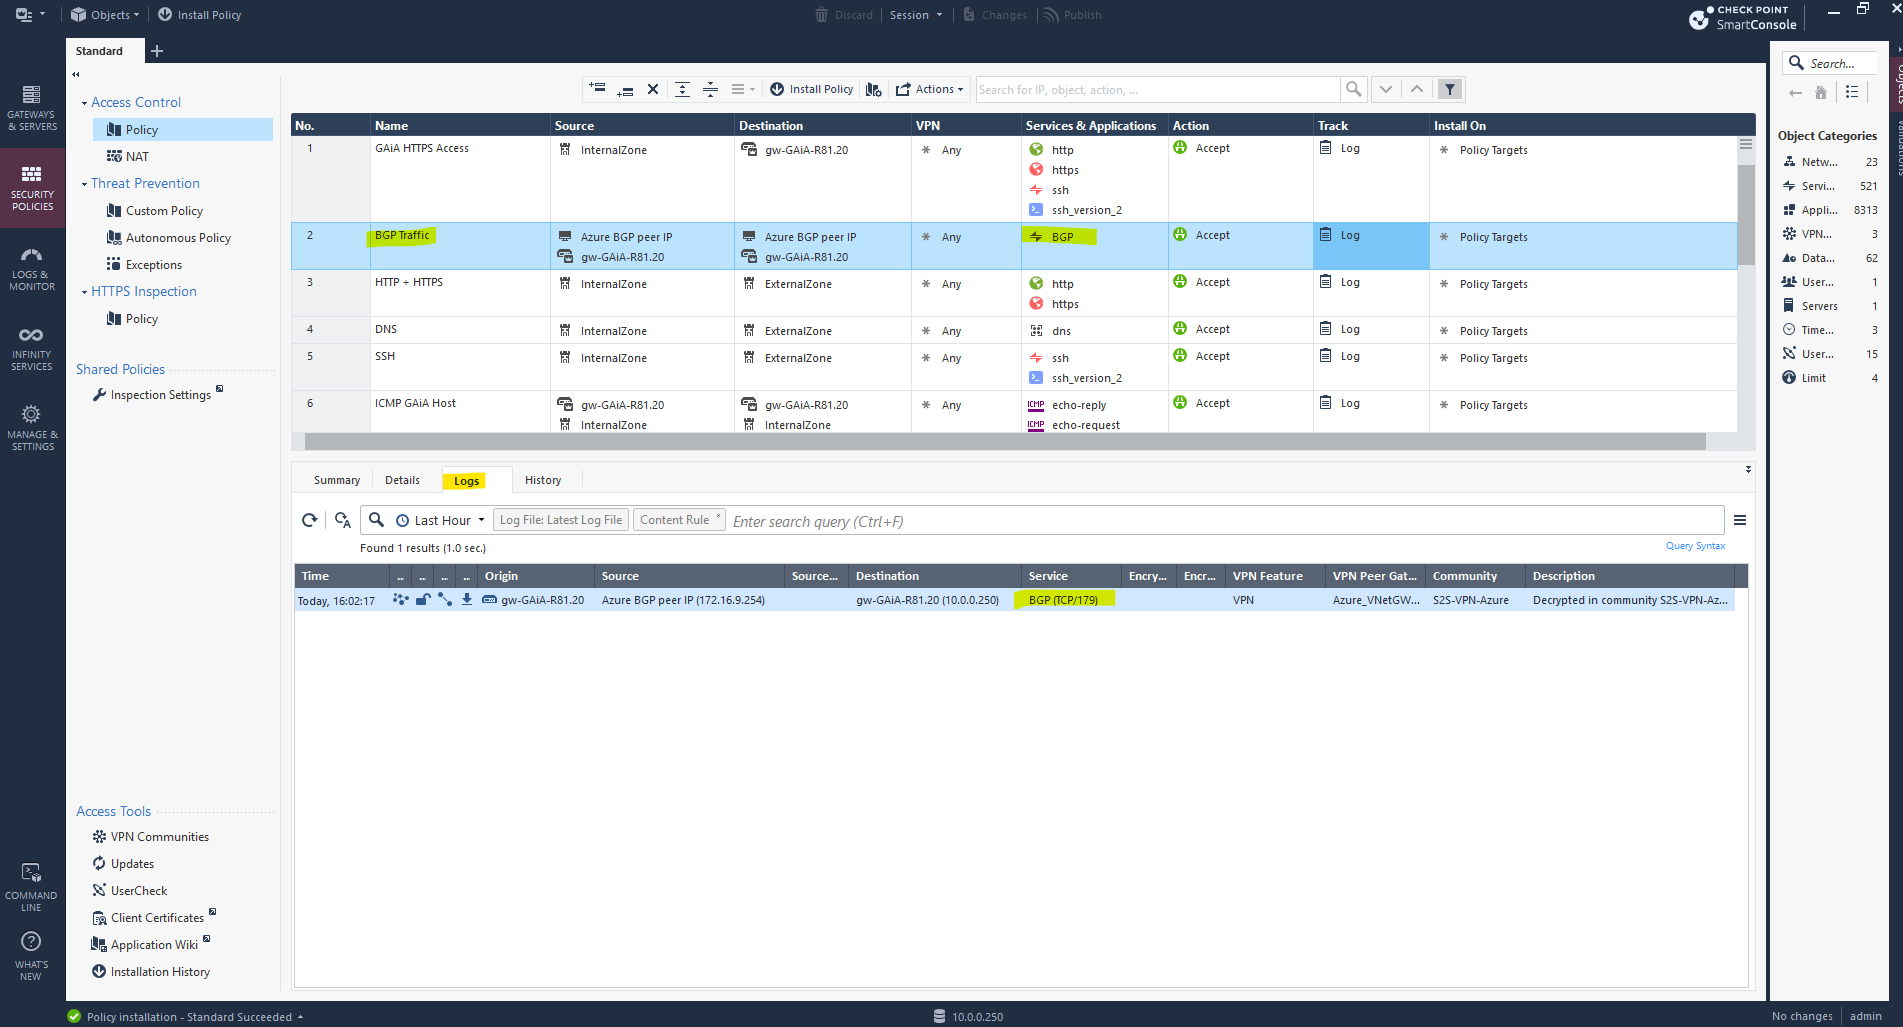
To trigger BGP TCP port 179 traffic we just need to click on Restart All or for a specific peer in case of multiple on Restart in Check Point’s Web UI under Advanced Routing -> BGP as shown below.
Links
Configuring BGP in Gaia Portal
https://sc1.checkpoint.com/documents/R81/WebAdminGuides/EN/CP_R81_Gaia_Advanced_Routing_AdminGuide/Topics-GARG/BGP-Configuring-in-Gaia-Portal.htmConfiguring BGP in Gaia Clish
https://sc1.checkpoint.com/documents/R81/WebAdminGuides/EN/CP_R81_Gaia_Advanced_Routing_AdminGuide/Topics-GARG/BGP-Configuring-in-Gaia-Clish.htm?tocpath=BGP%7CConfiguring%20BGP%20in%20Gaia%20Clish%7C_____0Configuring Check Point Redundant IPsec Tunnel
https://support.perimeter81.com/docs/configuring-check-point-redundant-ipsec-tunnelCP3600 BGP Configuration and advertised networks.
https://community.checkpoint.com/t5/Security-Gateways/CP3600-BGP-Configuration-and-advertised-networks/td-p/218114