Mastering Azure Firewall Forced Tunneling Configuration
In my previous post we saw how to set up an Azure Hub-Spoke Network Architecture by using Azure Firewall and S2S IPSec VPN Cross-premises Network Connection.
The Azure Firewall we can also configure in forced tunneling mode which we will see in this post step by step.
Forced Tunneling Introduction
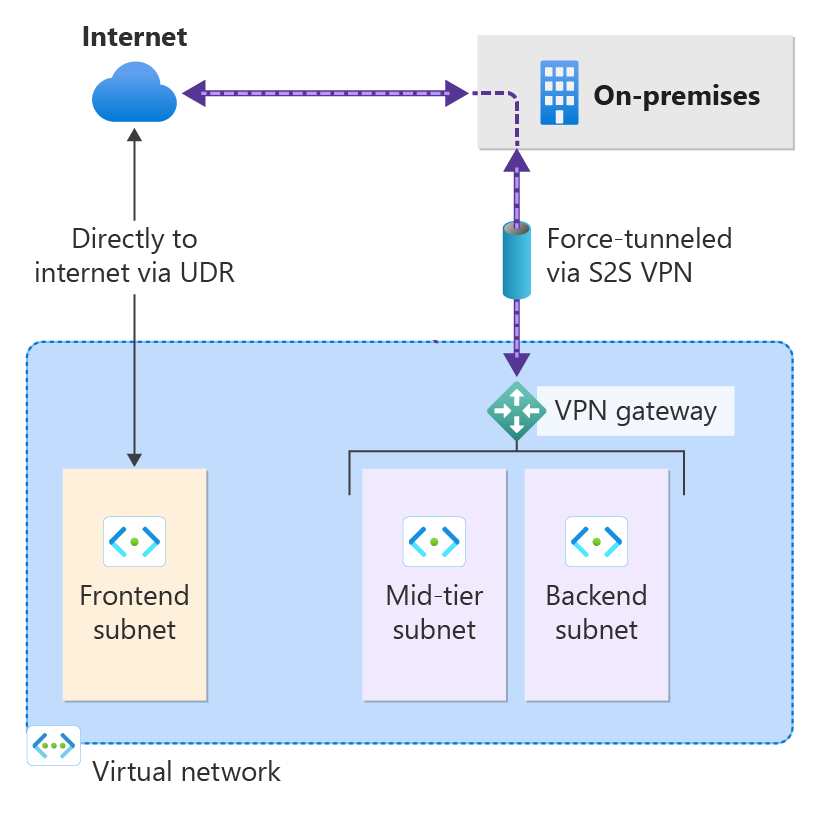
By default, Internet-bound traffic from your workloads and VMs within a virtual network is sent directly to the Internet.
Forced tunneling lets you redirect or “force” all Internet-bound traffic back to your on-premises location via S2S VPN tunnel for inspection and auditing. This is a critical security requirement for most enterprise IT policies. Unauthorized Internet access can potentially lead to information disclosure or other types of security breaches.
The following example shows all Internet traffic being forced through the VPN gateway back to the on-premises location for inspection and auditing.
There are a few different ways that you can configure forced tunneling.
You can configure forced tunneling for VPN Gateway via BGP. You need to advertise a default route of 0.0.0.0/0 via BGP from your on-premises location to Azure so that all your Azure traffic is sent via the VPN Gateway S2S tunnel.
In this post below we will see this way by advertising a default route of 0.0.0.0/0 via BGP from my on-premise lab environment to Azure.
You can also configure forced tunneling by setting the Default Site for your route-based VPN gateway. For steps, see Forced tunneling via Default Site.
- You assign a Default Site for the virtual network gateway using PowerShell.
- The on-premises VPN device must be configured using 0.0.0.0/0 as traffic selectors.
By default, all Internet-bound traffic goes directly to the Internet if you don’t have forced tunneling configured. When forced tunneling is configured, all Internet-bound traffic is sent to your on-premises location.
In some cases, you might want Internet-bound traffic only from certain subnets (but not all subnets) to traverse from the Azure network infrastructure directly out to the Internet, rather than to your on-premises location.
This scenario can be configured using a combination of forced tunneling and virtual network custom user-defined routes (UDRs). For steps, see Route Internet-bound traffic for specific subnets.
Source: https://learn.microsoft.com/en-us/azure/vpn-gateway/about-site-to-site-tunneling
What Purpose have the Firewall Management NIC
The Azure Firewall Management NIC is a dedicated network interface used by Azure Firewall when forced tunneling is enabled, specifically for:
- Sending Azure platform-related traffic (like updates, monitoring, and DNS) outside the forced tunnel, ensuring the firewall can still reach required Azure services even when all other traffic is routed through on-premises or a NVA (Next-Generation Firewall).
- It isolates management traffic from regular network traffic, improving security and clarity.
When forced tunneling is enabled, all default route (0.0.0.0/0) traffic is sent to a custom next hop (typically a VPN gateway or NVA), instead of going directly to the internet.
This affects all outbound traffic, including Azure Firewall’s own system traffic.
But Azure Firewall still needs to reach Azure services for:
- DNS resolution
- Rule updates
- Log analytics and monitoring
- License and service validation
- Time synchronization
These control plane operations must bypass forced tunneling to reach Microsoft endpoints directly. That’s where the dedicated management NIC comes in.
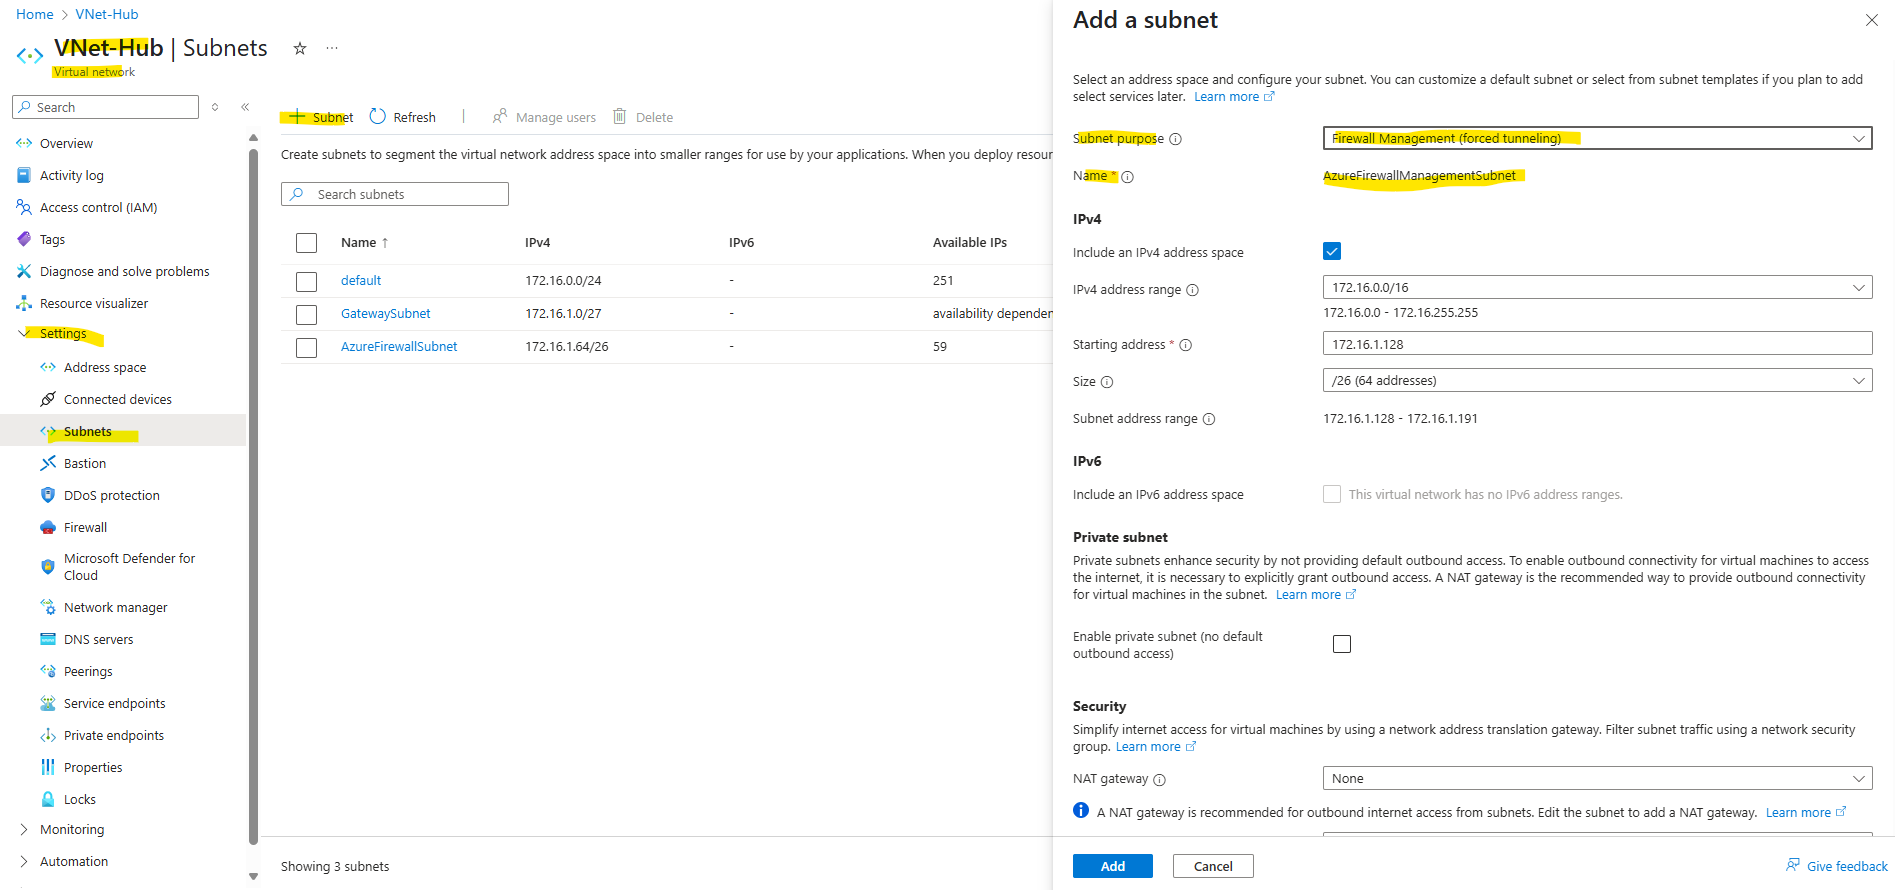
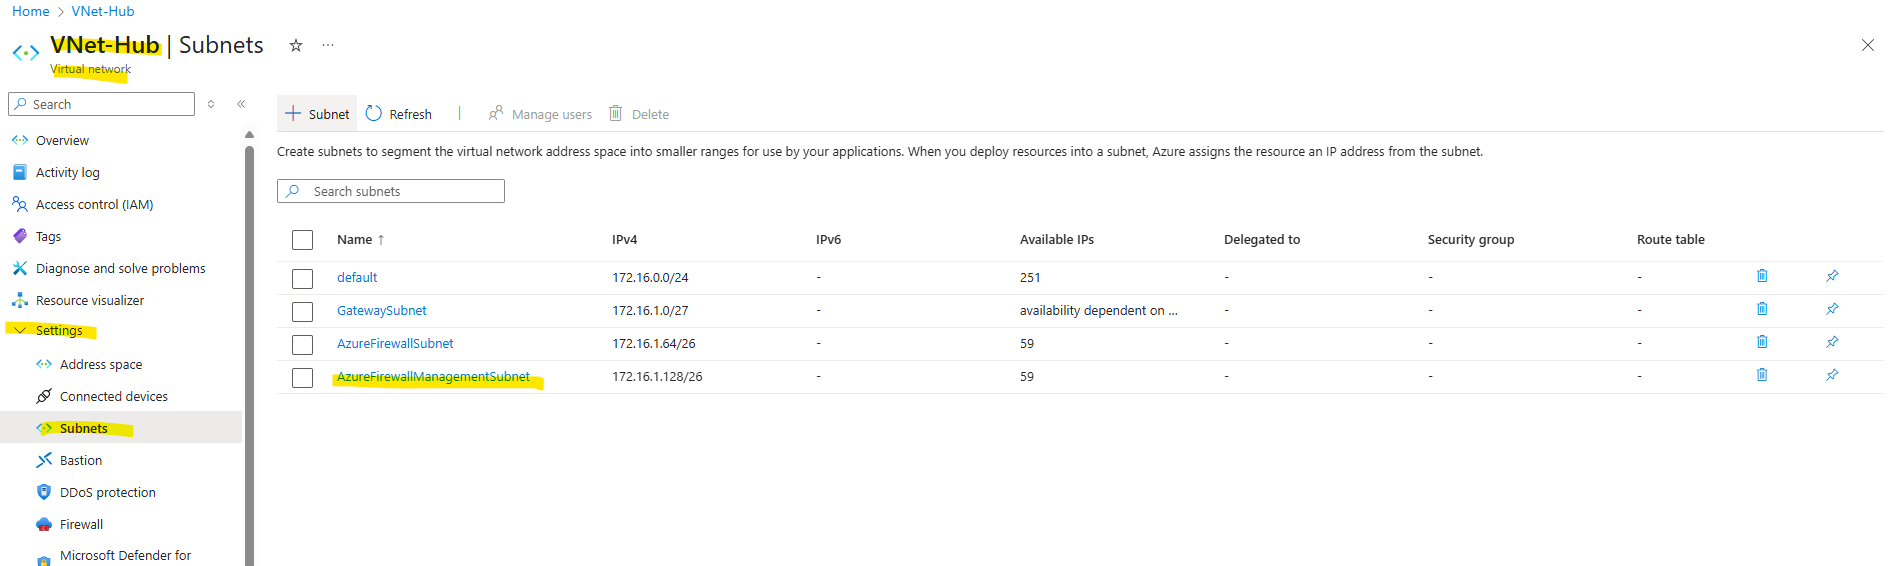
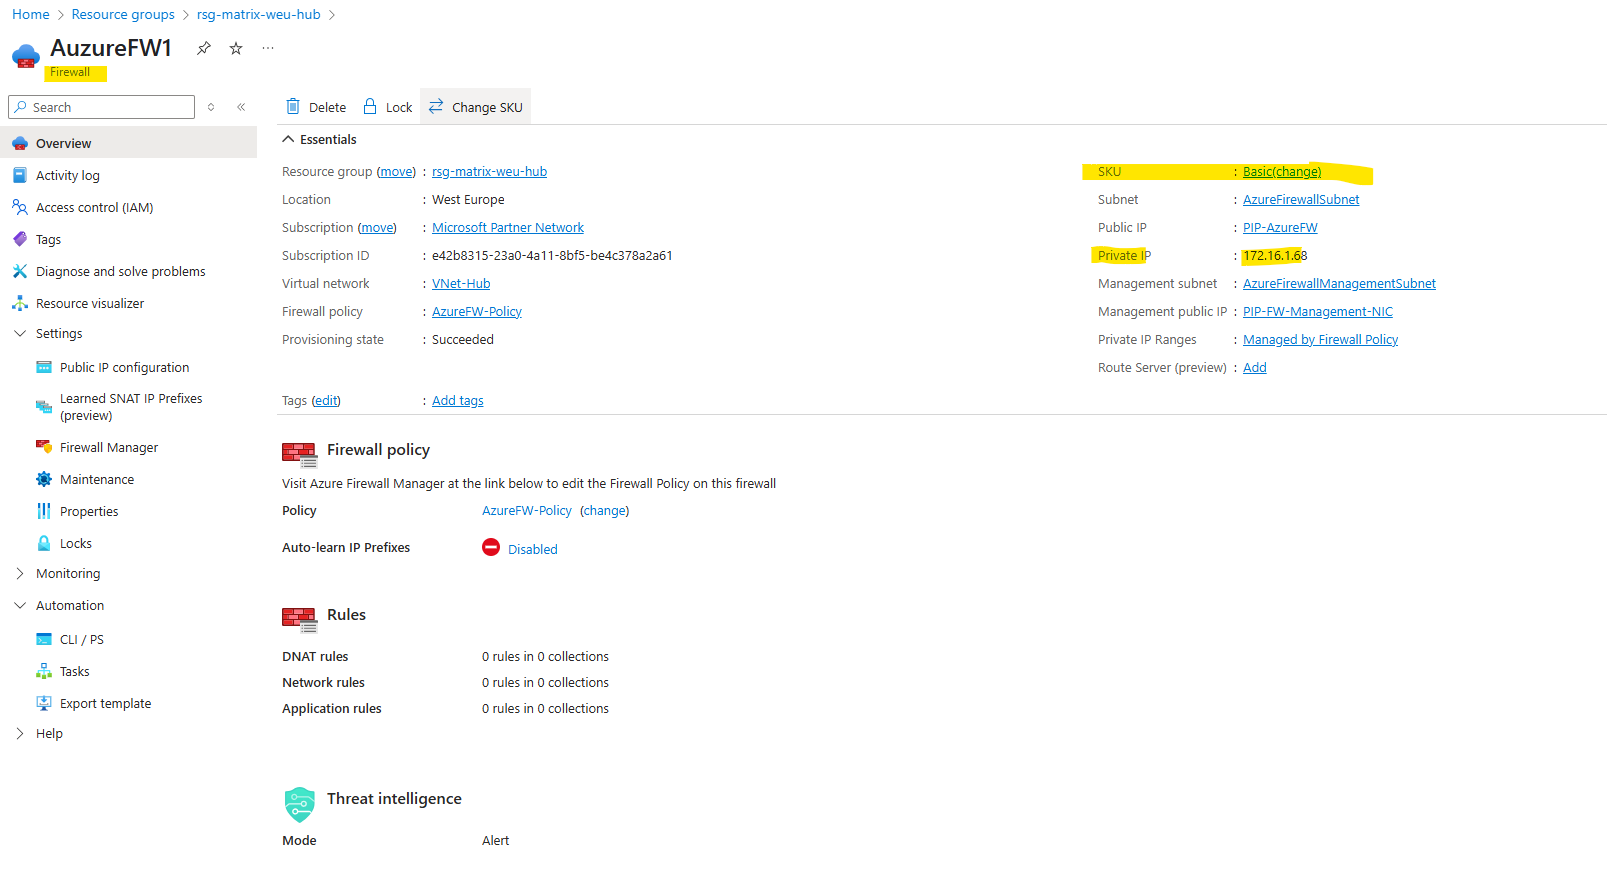
The dedicated management NIC tied to the separate subnet named AzureFirewallManagementSubnet. It uses a separate default system route that bypasses forced tunneling.
It only handles infrastructure traffic, not your application or user traffic.
Finally it ensures Azure Firewall remains functional, even when all user traffic is being tunneled
Creating and Configuring the Azure Firewall for Forced Tunneling
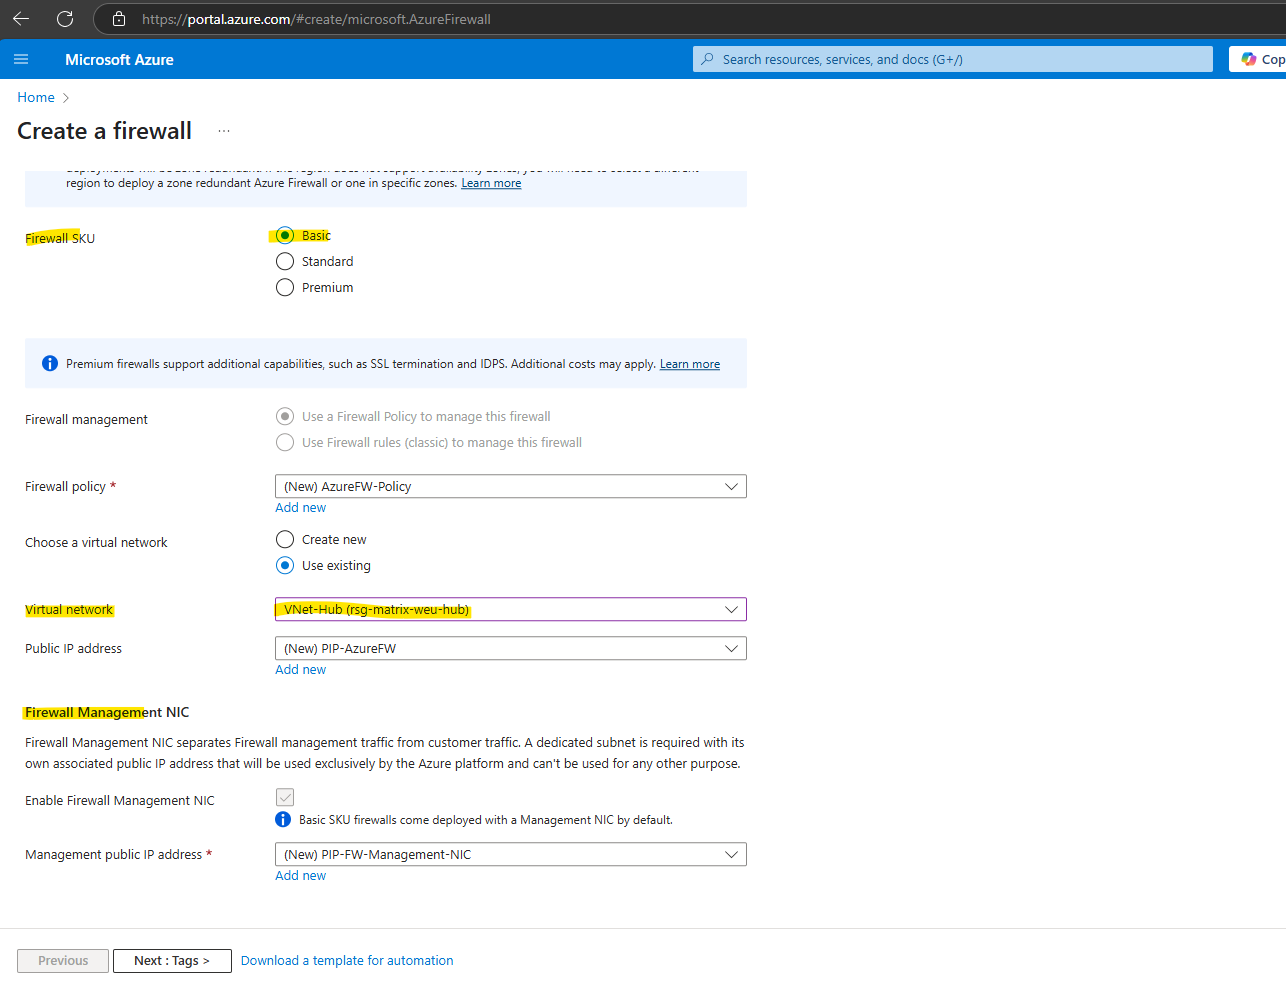
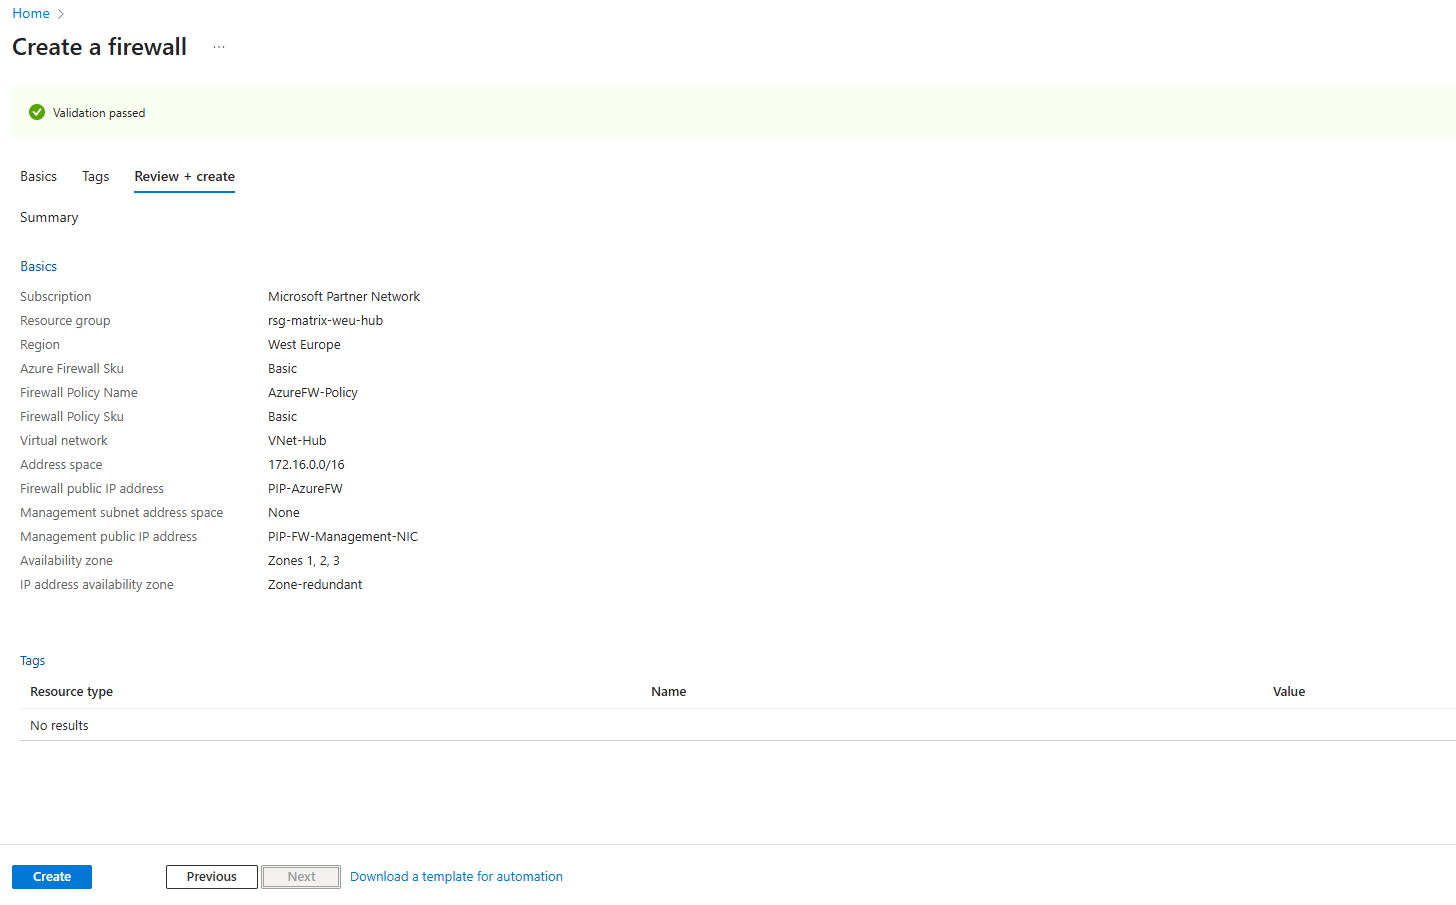
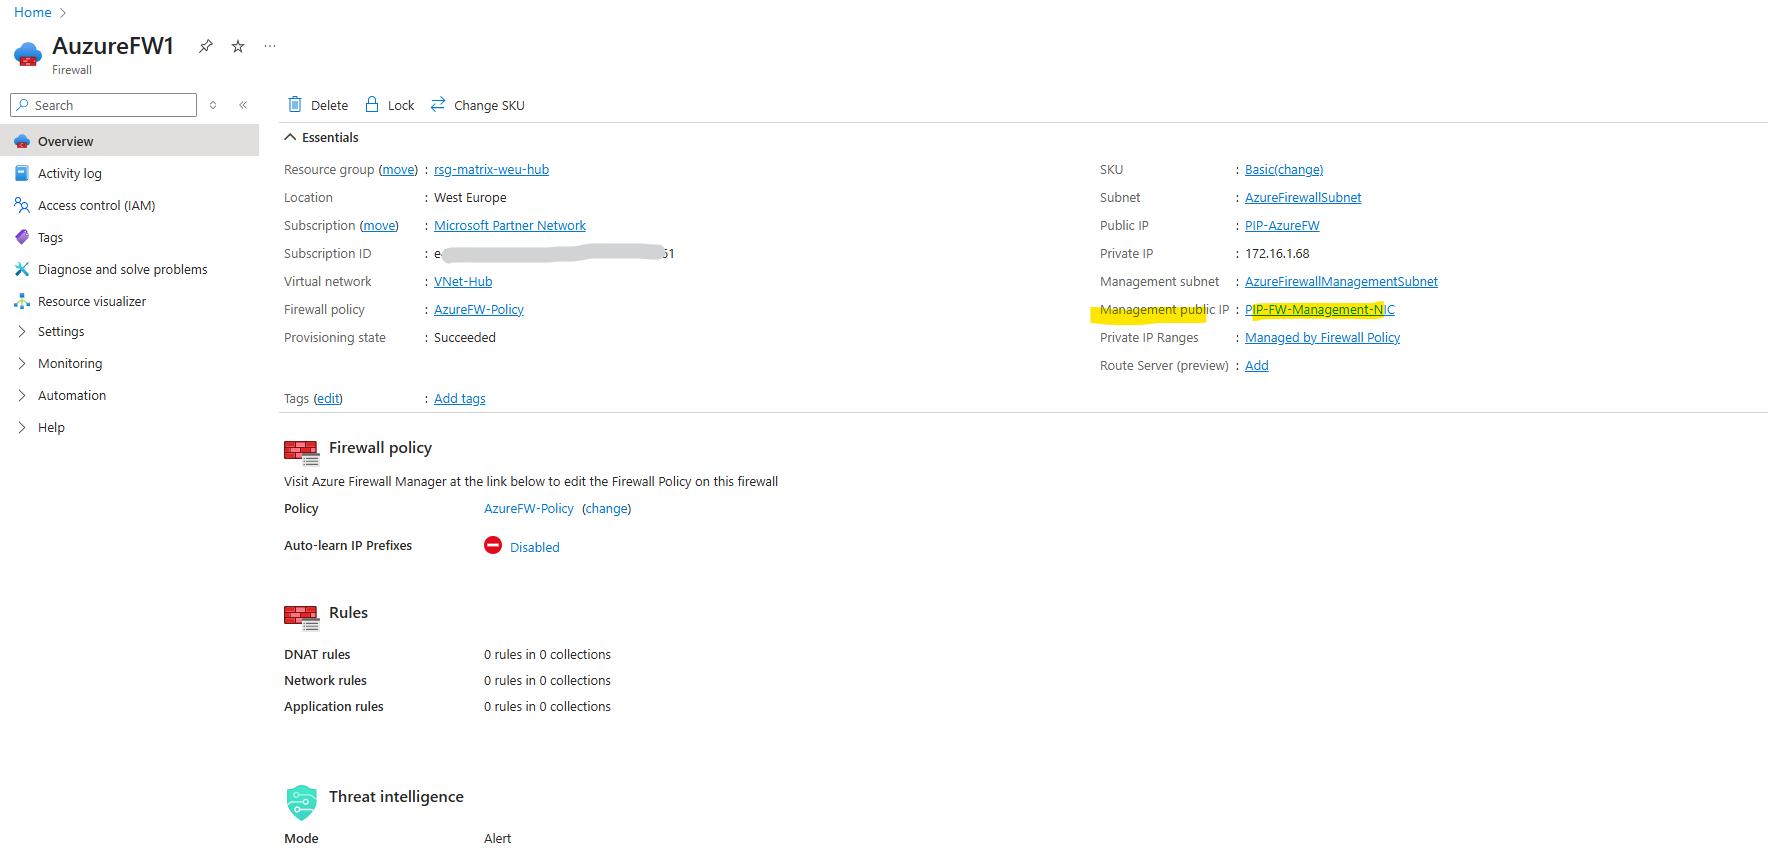
Below I will create Azure Firewall with the SKU Basic which by default have enabled the Management NIC which is required to configure forced tunneling.
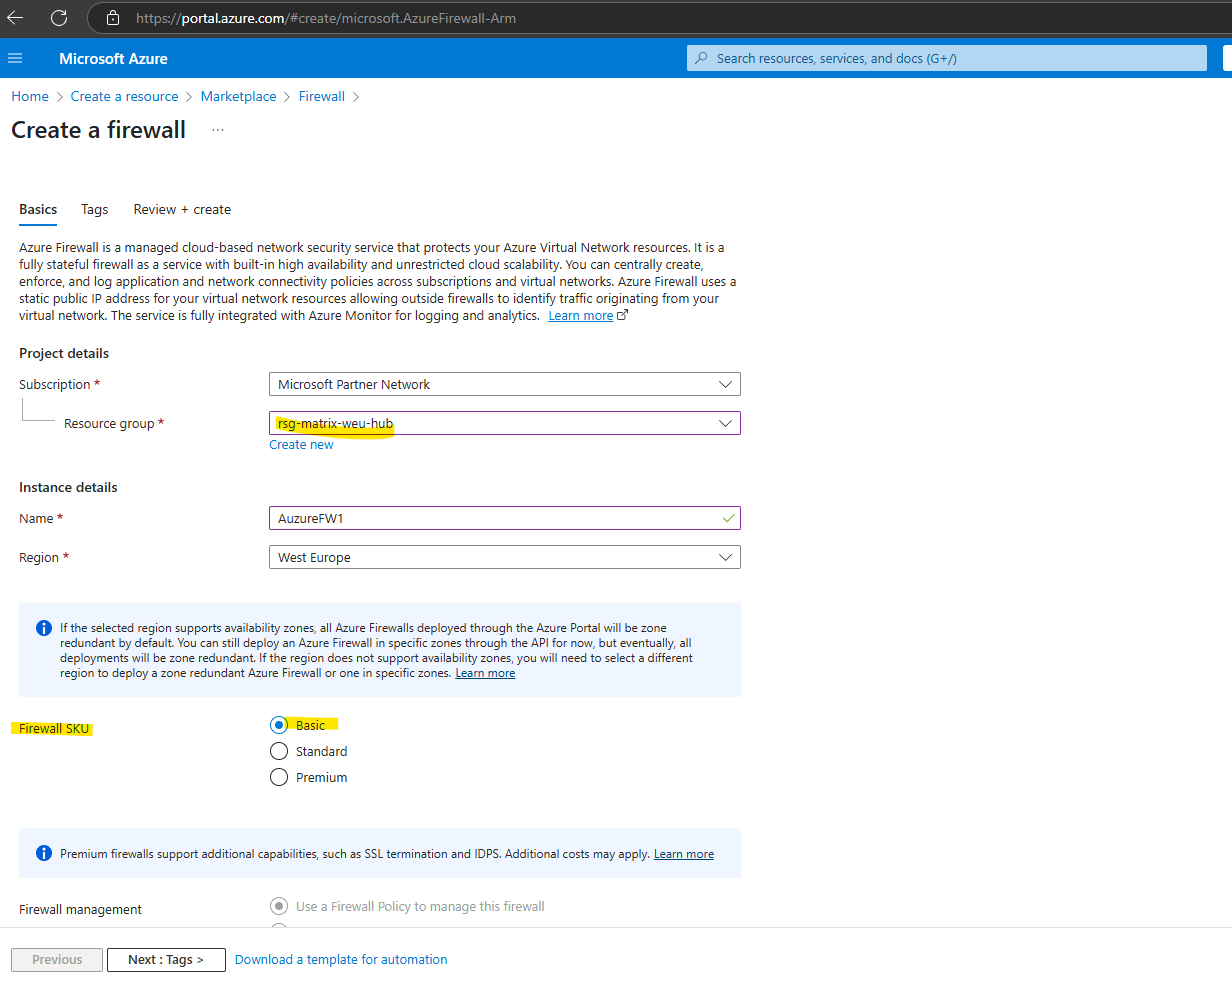
When creating a Basic SKU firewall by default a Management NIC will be deployed and requires a subnet named AzureFirewallManagementSubnet.
The Management NIC feature was previously called Forced Tunneling. Originally, a Management NIC was required only for Forced Tunneling. However, certain upcoming Firewall features will also require a Management NIC, so it has been decoupled from Forced Tunneling.
Basic SKU firewalls come deployed with a Management NIC by default.
An Azure Firewall Management NIC separates firewall management traffic from customer traffic. Certain upcoming Firewall features will also require a Management NIC. To support any of these capabilities, you must create an Azure Firewall with the Firewall Management NIC enabled or enable it on an existing Azure Firewall to avoid service disruption.
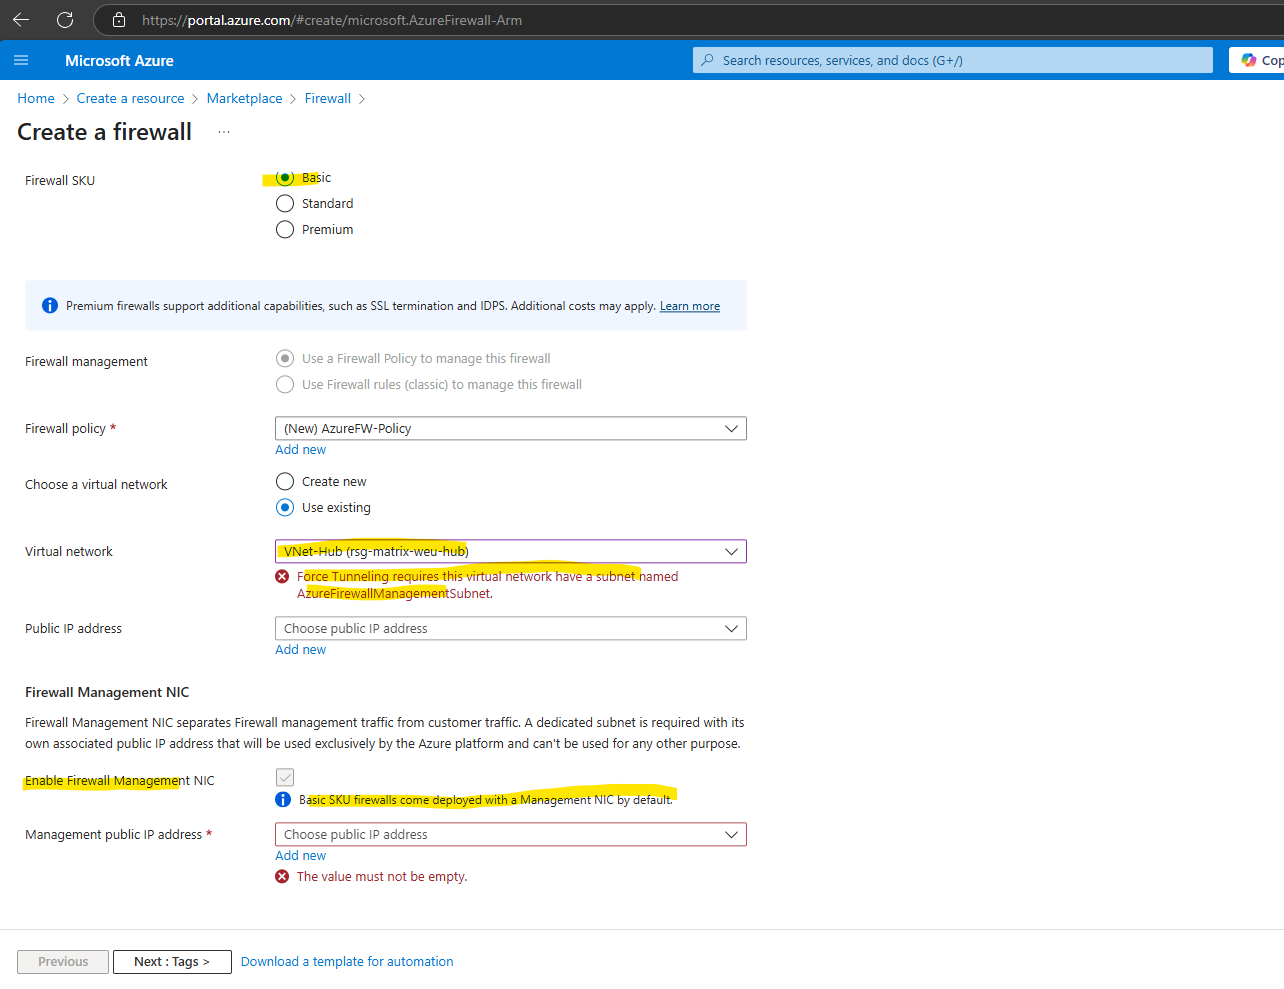
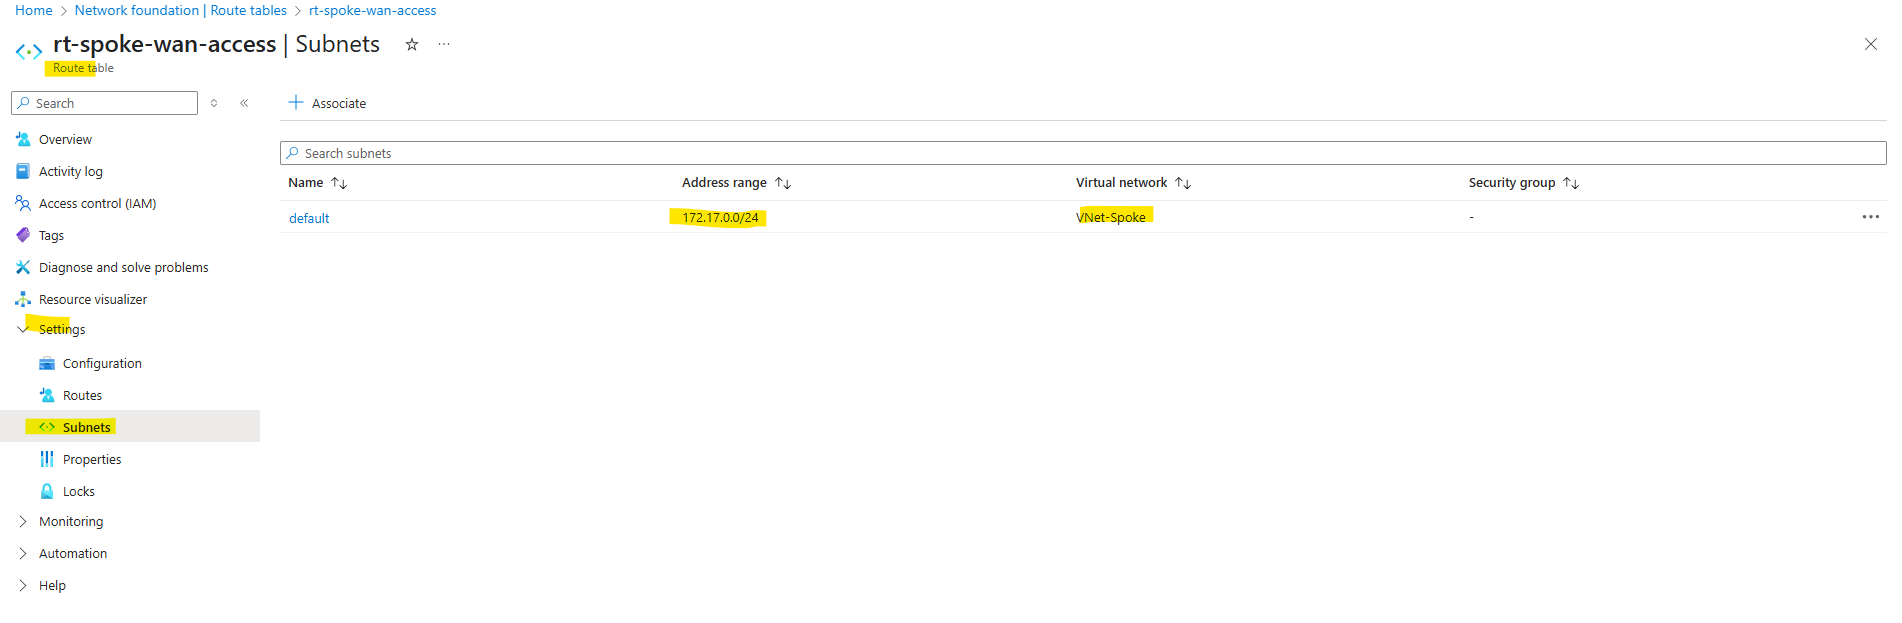
So we first need to create a subnet named AzureFirewallManagementSubnet in the virtual network we selected to deploy the Azure Firewall, usually and also in my case the hub virtual network.
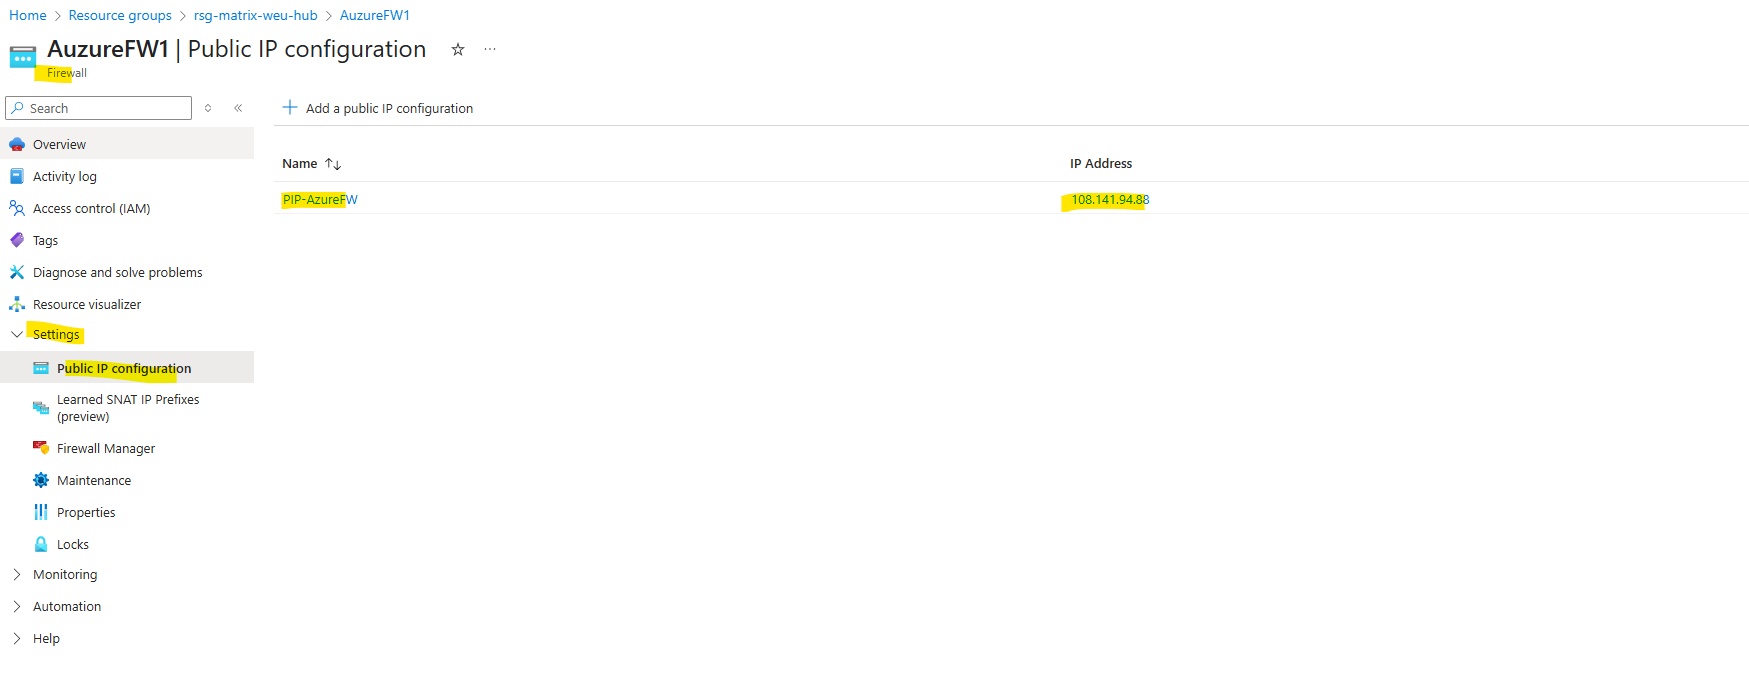
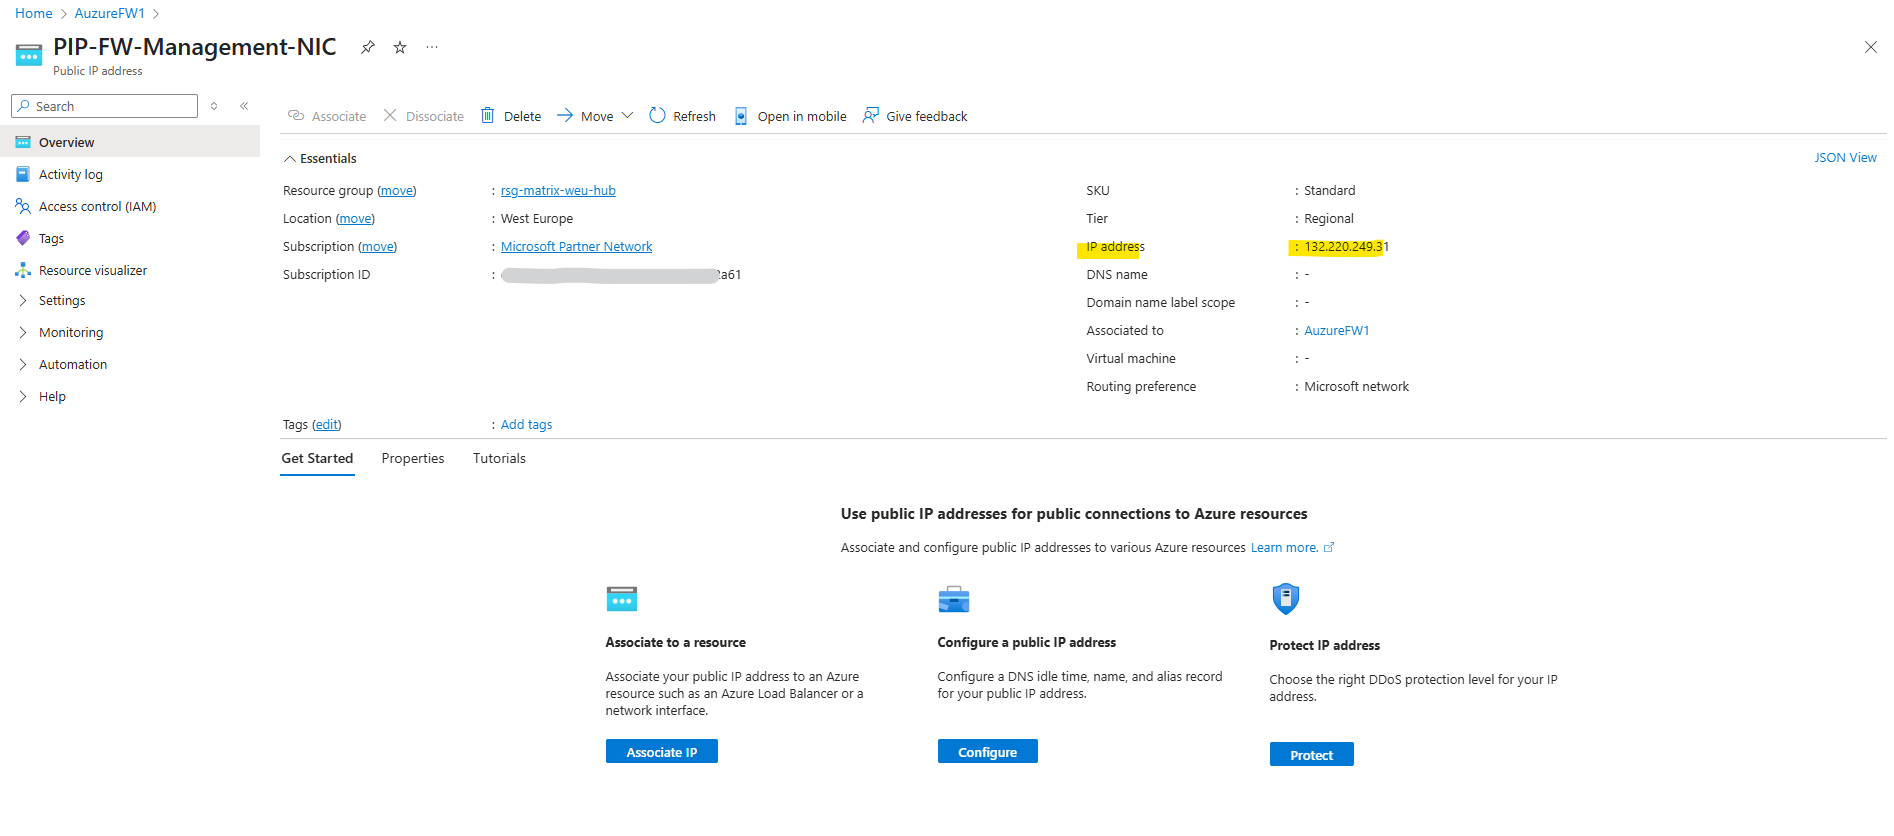
Determine the public Management NIC IP address.
Forced tunneling configuration
When the Firewall Management NIC is enabled, the AzureFirewallSubnet can now include routes to any on-premises firewall to process traffic before it’s passed to the Internet.
You can also publish these routes via BGP to AzureFirewallSubnet if Propagate gateway routes is enabled on this subnet.
For example, you can create a default route on the AzureFirewallSubnet with your VPN gateway as the next hop to get to your on-premises device. Or you can enable Propagate gateway routes to get the appropriate routes to the on-premises network.
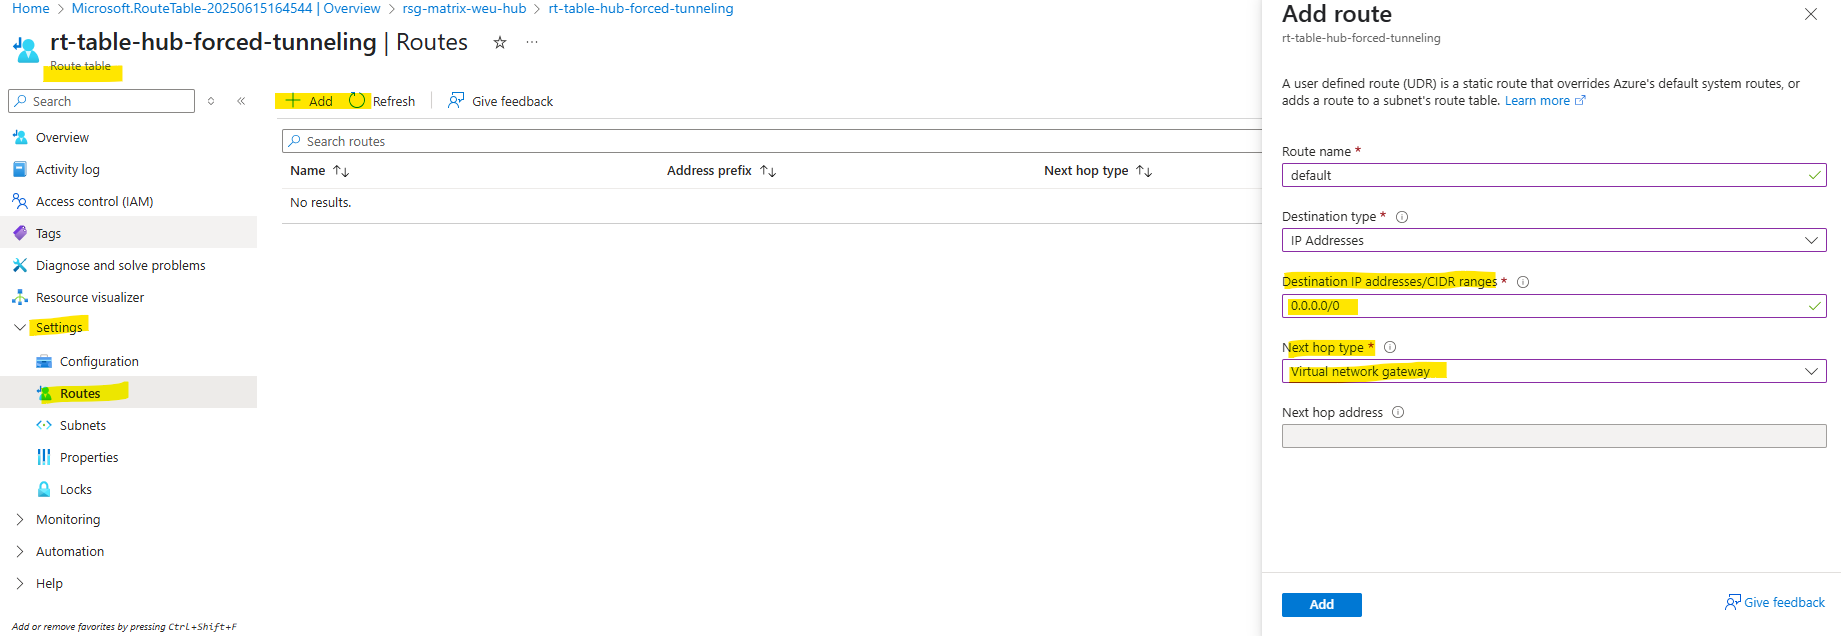
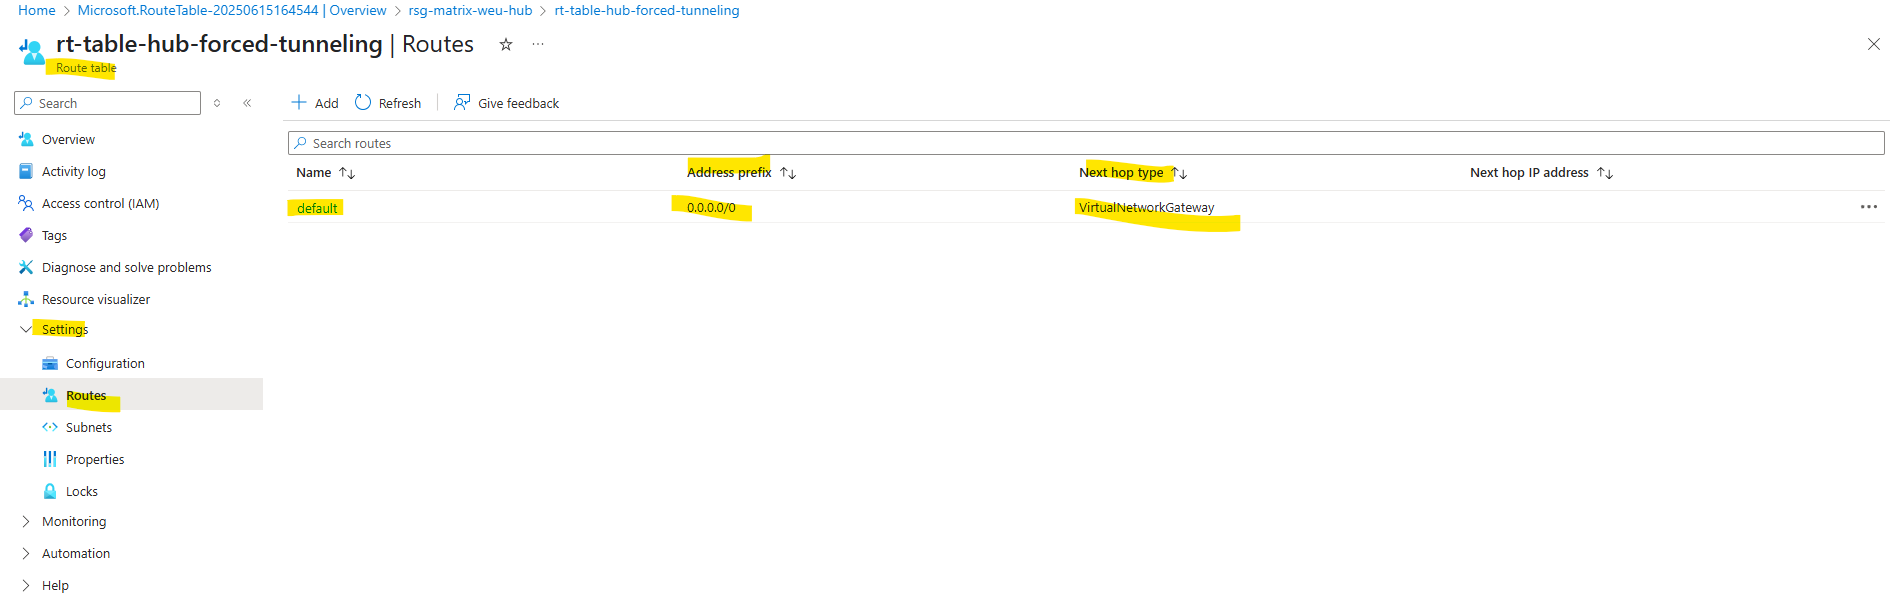
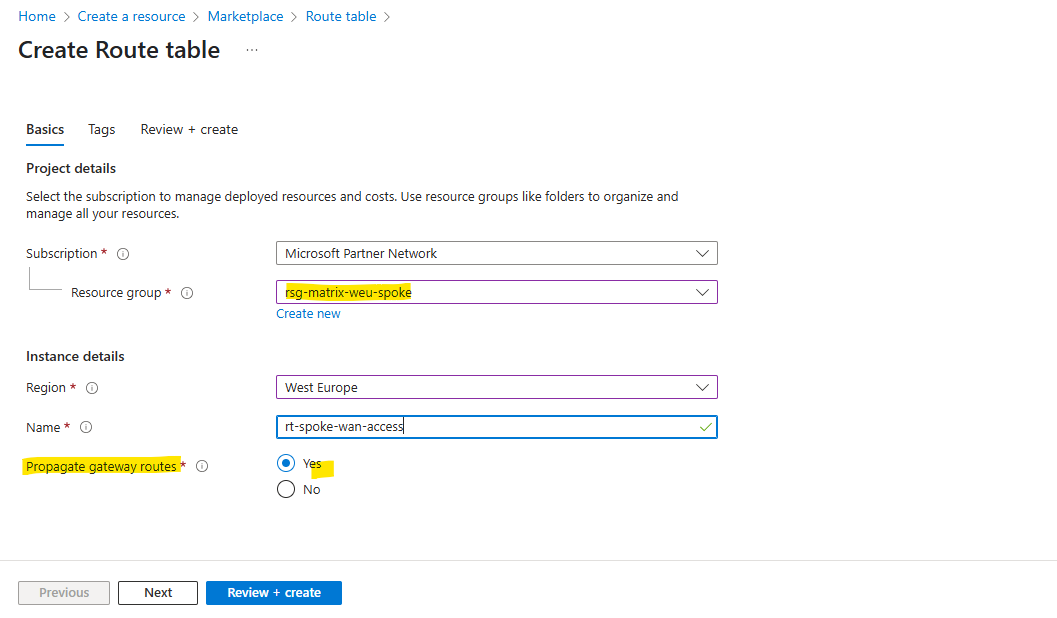
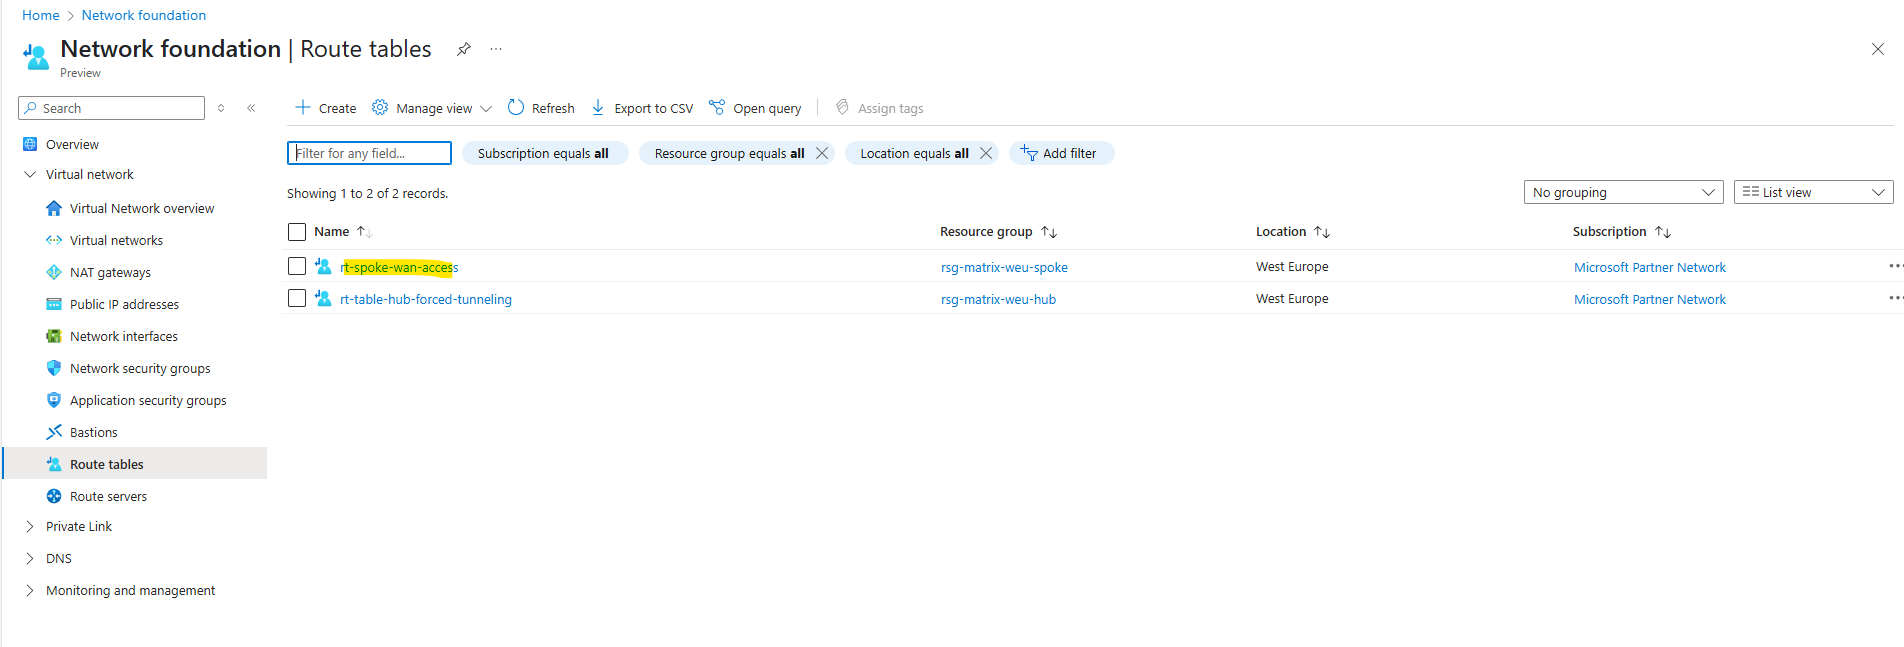
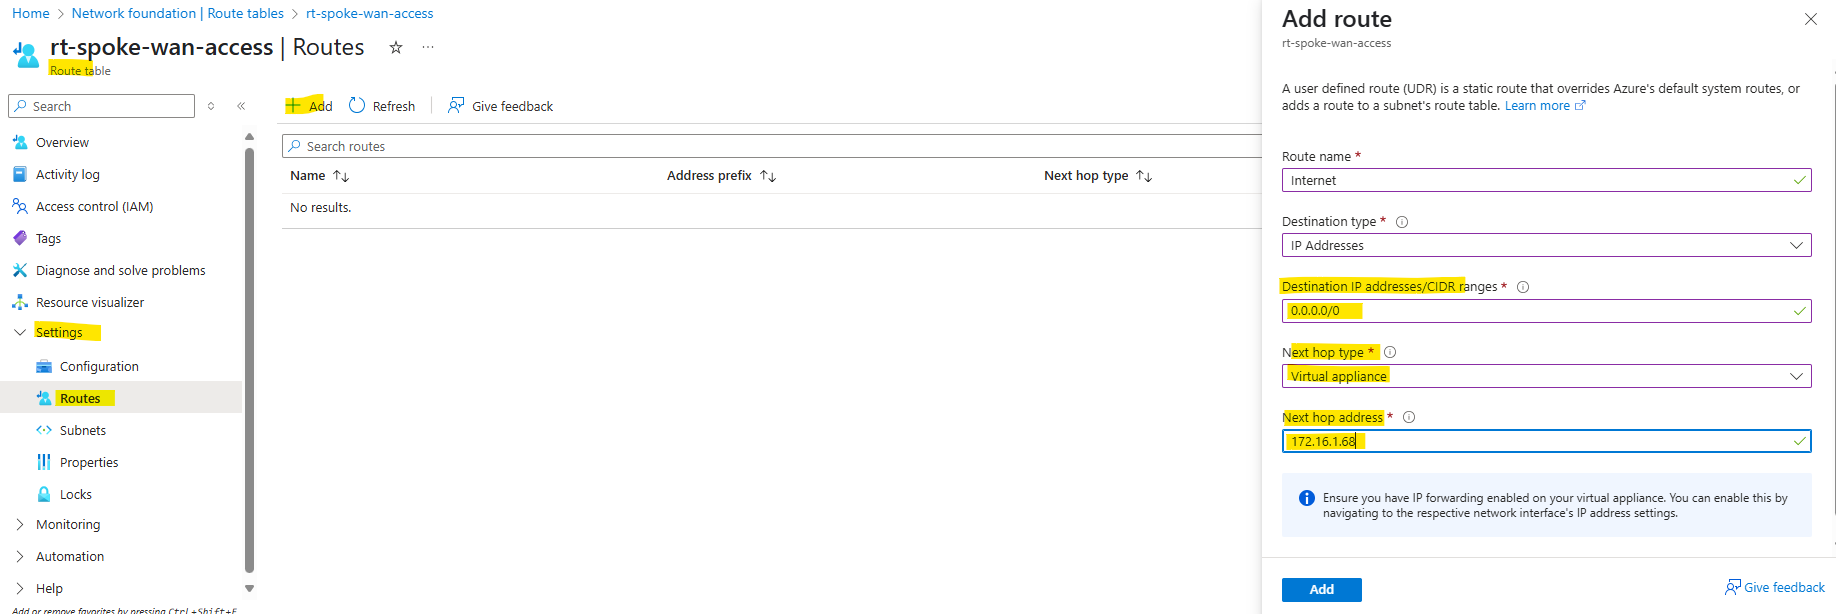
I will configure forced tunneling by adding the on-premise VPN device as next hop for the default route. Therefore I will create a new route table and finally assign it to the AzureFirewallSubnet.
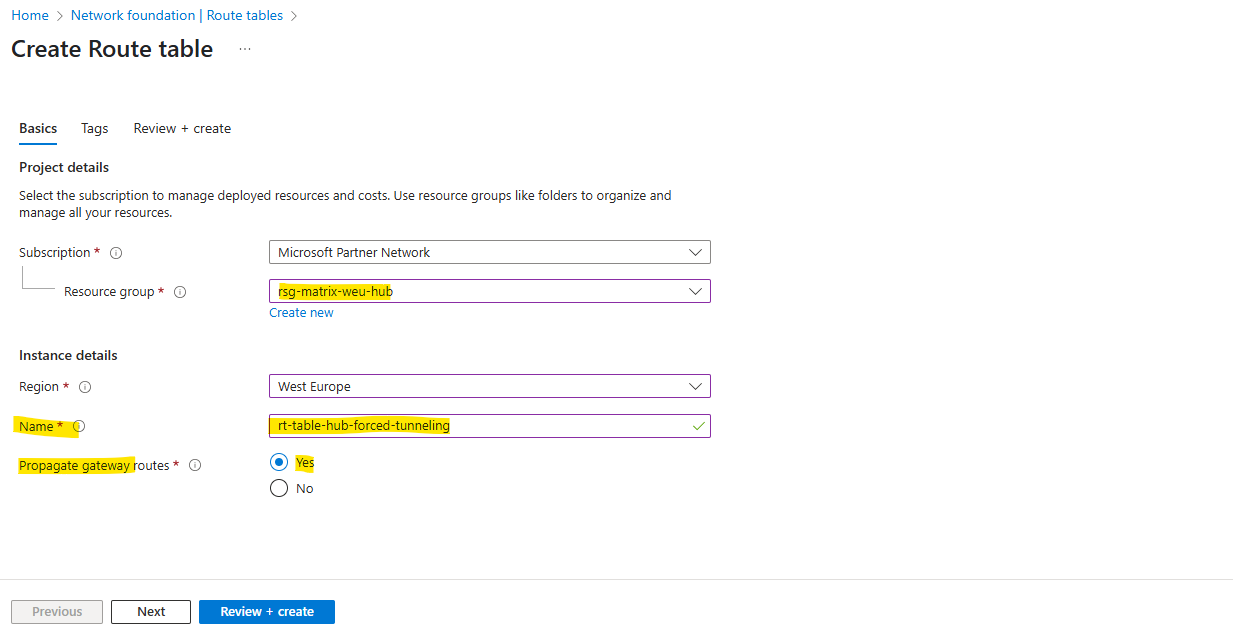
For the destination we set the 0.0.0.0/0 CIDR address range for the Internet and next hop our virtual network gateway to route this traffic through the VPN tunnel to my on-premise network.
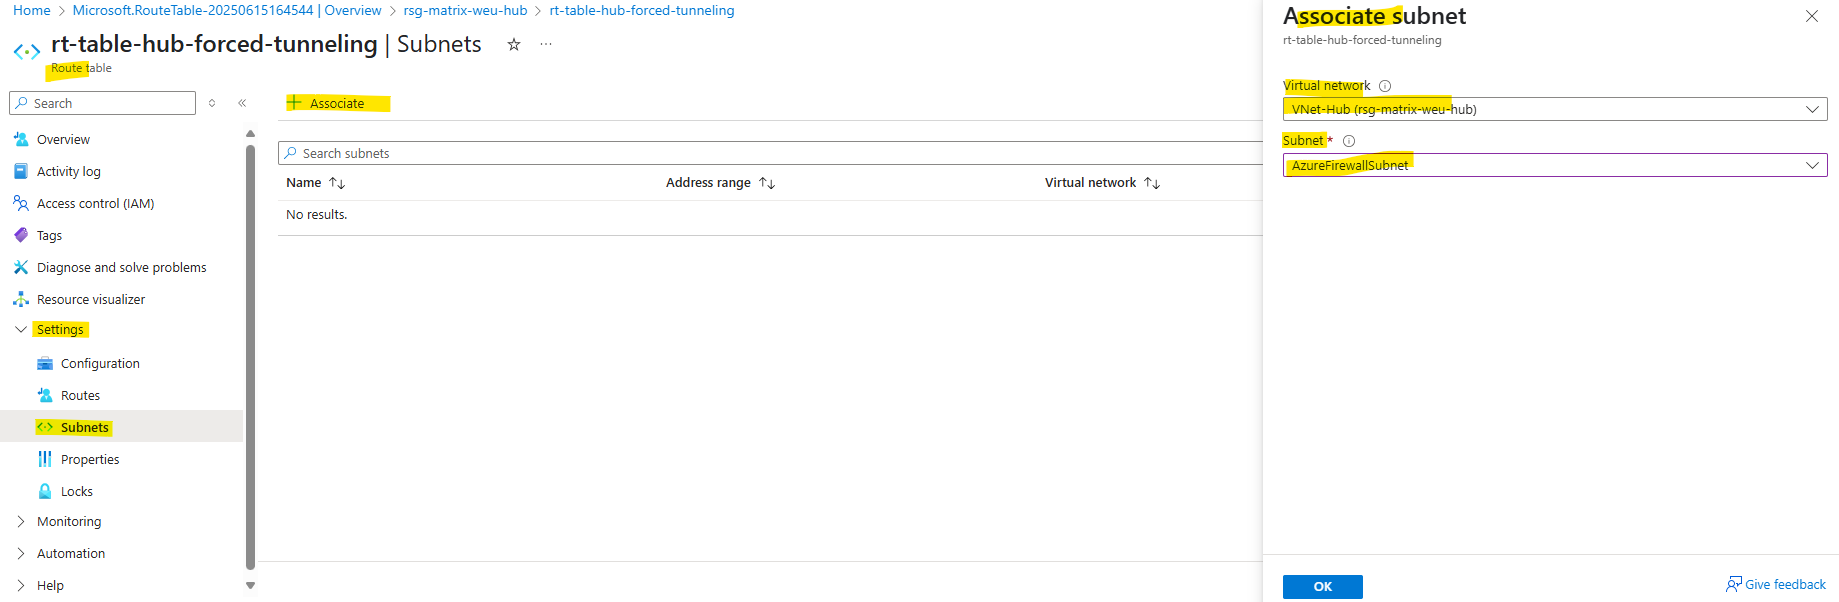
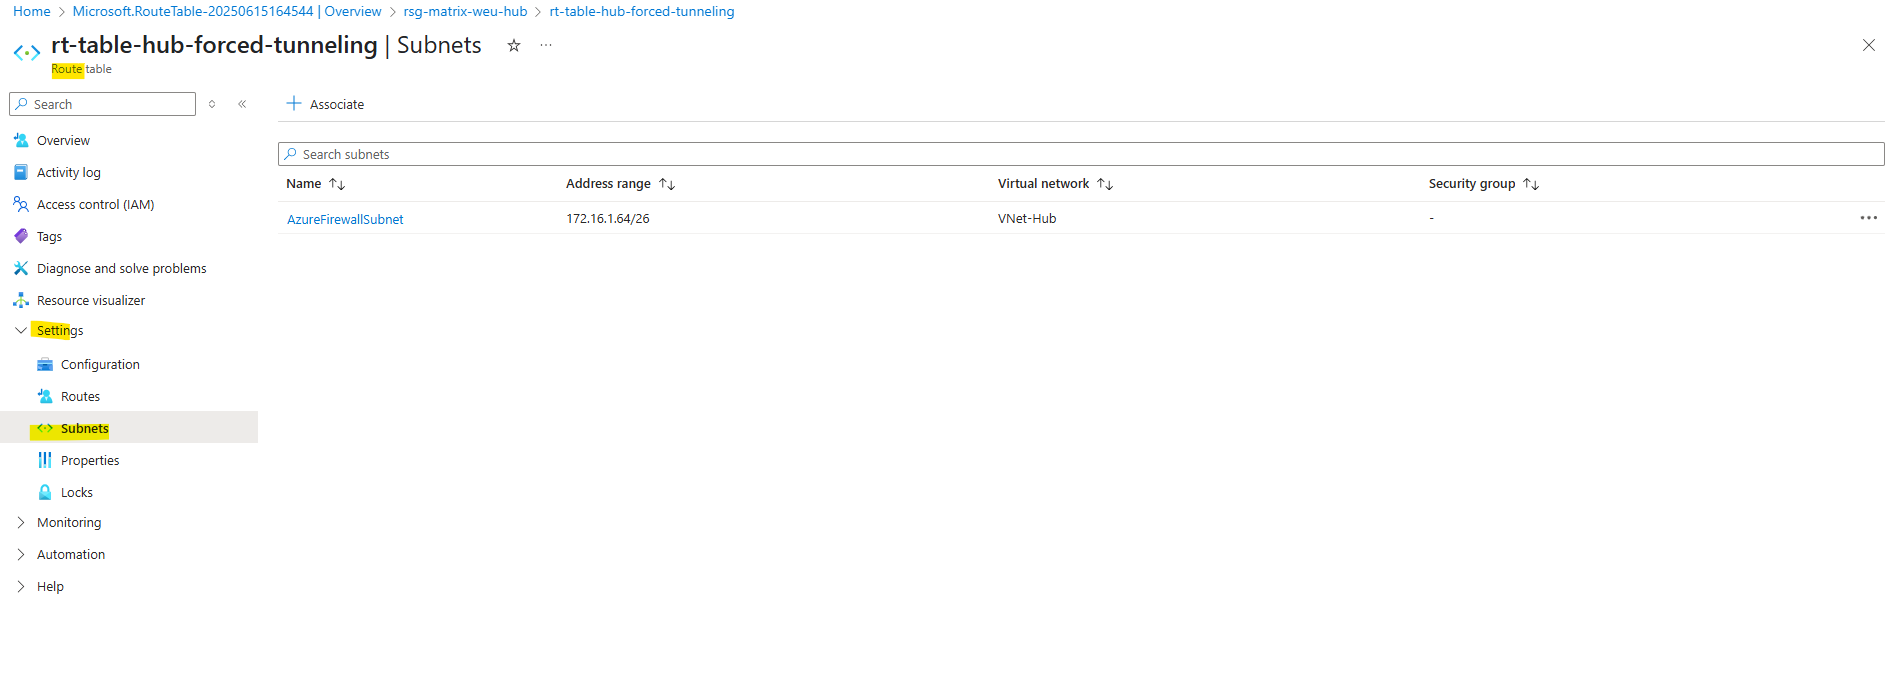
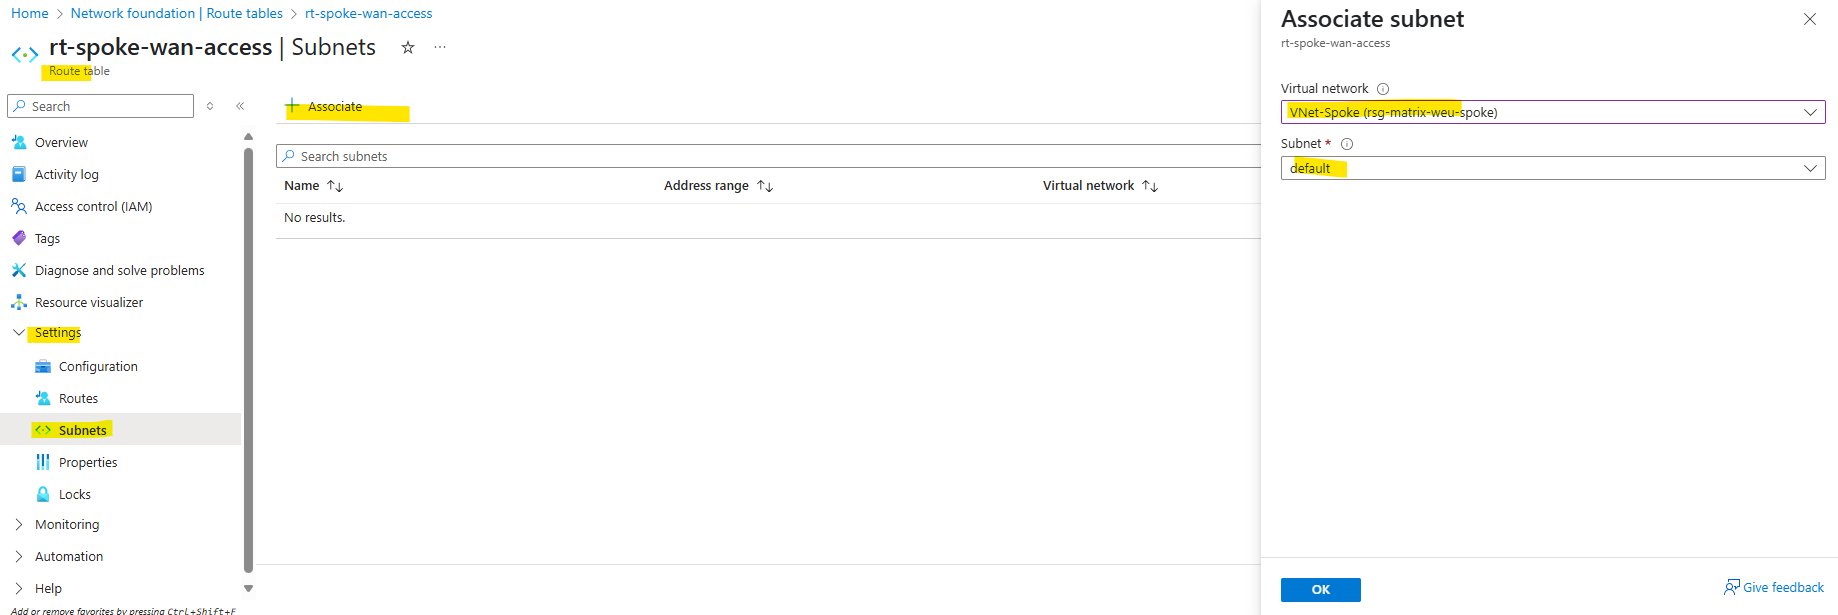
Next we need to assign/associate this route table to the AzureFirewallSubnet where our Azure Firewall is running and then will use its new route to route traffic outbound to the Internet, finally through the VPN tunnel to the on-premise network.
In order our workloads will send Internet traffic in the first place to our Azure Firewall, which is then re-routing it to our on-premise VPN device, we also first need to assign a route table to our workload subnet(s) where the next hop for outbound Internet traffic 0.0.0.0/0 is pointing to the Azure Firewall’s internal private IP address, finally the same as when configuring the Azure Firewall without forced tunneling.
From now on workloads in the spoke virtual network will send outbound Internet traffic first to the Azure Firewall running in the hub virtual network, then the Azure Firewall will re-route traffic destined to the Internet to the next hop we set previously in the route table pointing to our VPN Gateway and therefore finally route this traffic through the VPN tunnel to our on-premise network.
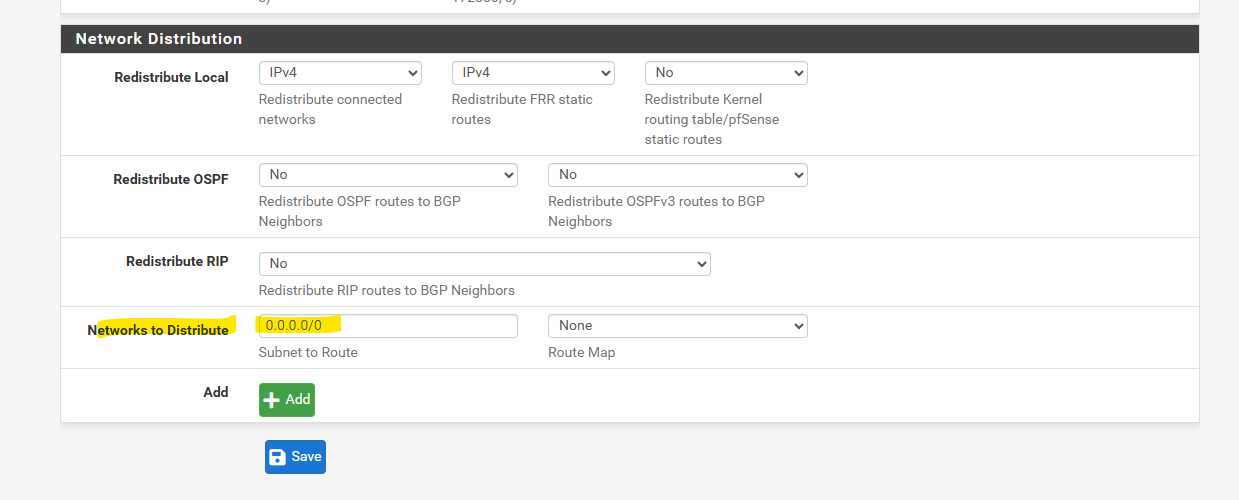
In order traffic destined to the Internet will finally really be routed through the VPN tunnel, we also need to advertise the 0.0.0.0/0 CIDR address range from our on-premise VPN device (pfSense in my case) to Azure.
On pfSense we can configure this under Services -> FRR -> BGP – BGP within the Network Distribution section at the bottom of this page.
Even if you point 0.0.0.0/0 to the Virtual Network Gateway, the on-premises VPN device must advertise a default route (or support it). Otherwise, Azure won’t send Internet traffic through the VPN tunnel.
More about how to set up BGP on pfSense you will find in my following post.
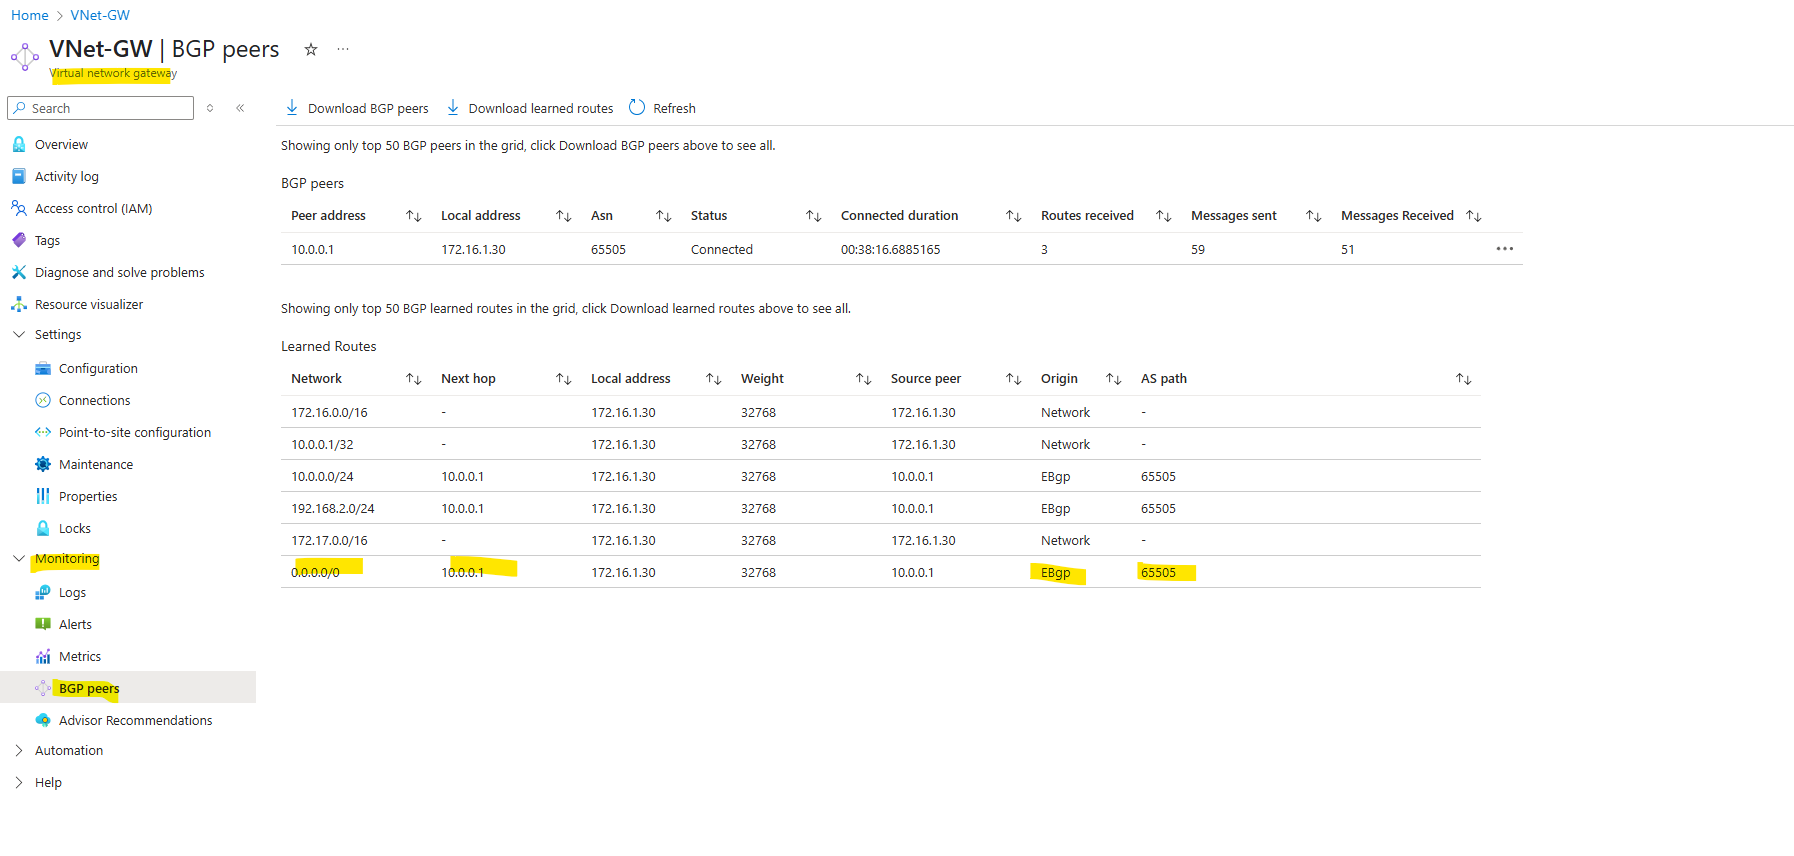
In Azure on the corresponding virtual network gateway, we can see already that our new route 0.0.0.0/0 with the next hop pointing to our on-premise VPN device’s private IP address, was successfully advertised to Azure.
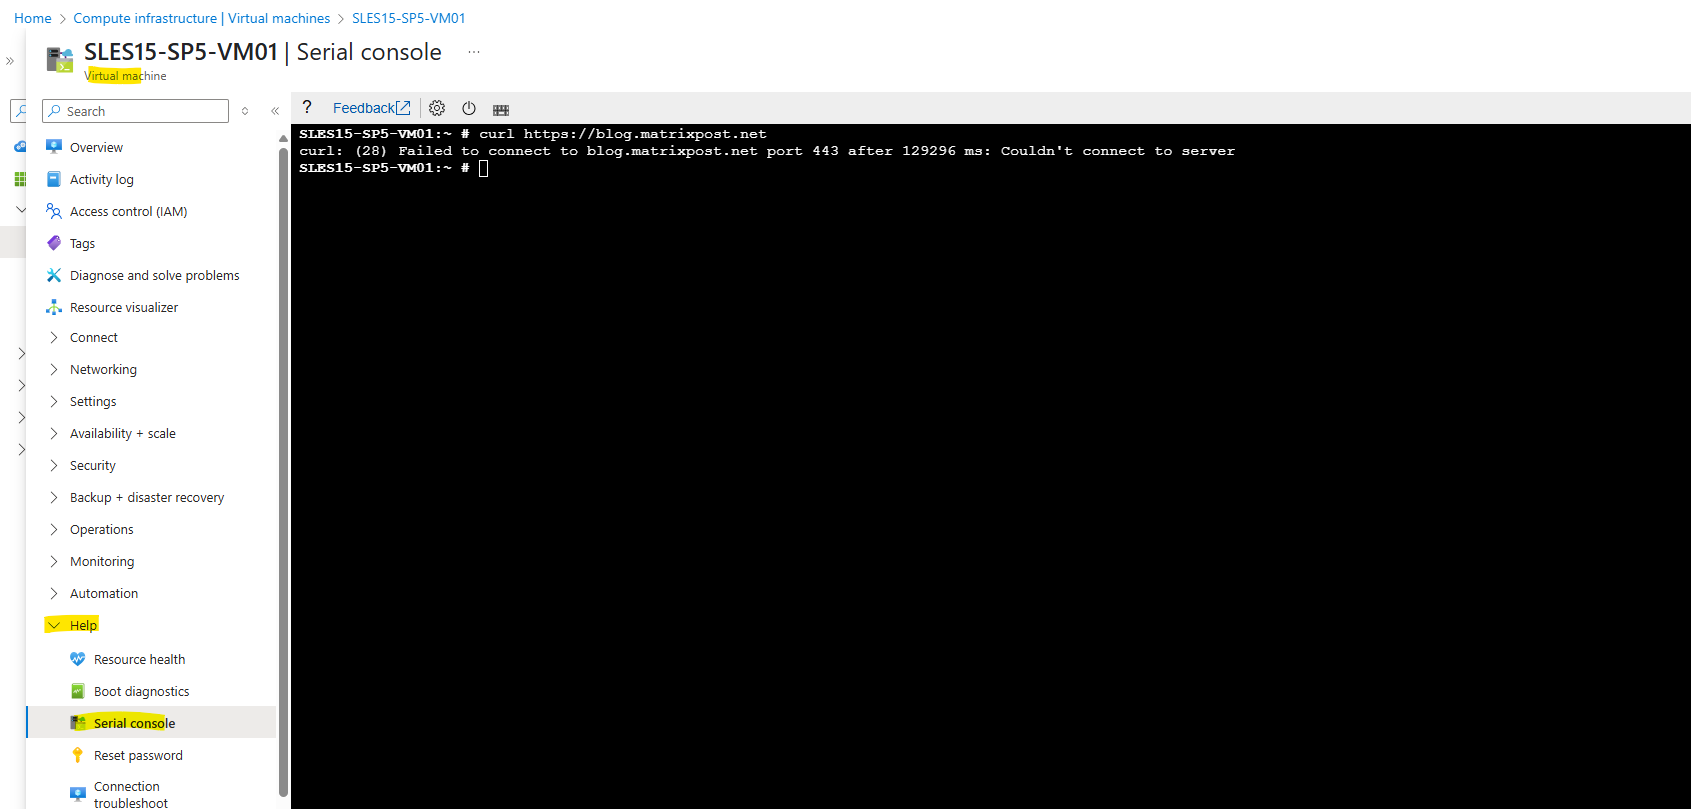
So far unfortunately and nevertheless outbound internet access won’t work for my workload (Linux VM) running in the spoke virtual network.
Below I was trying to fetch my website/blog by using the curl command.
blog.matrixpost.net ==> Public IP 152.53.20.60
To troubleshoot I first wanted to see if traffic is even routed through the VPN tunnel and my on-premise VPN device.
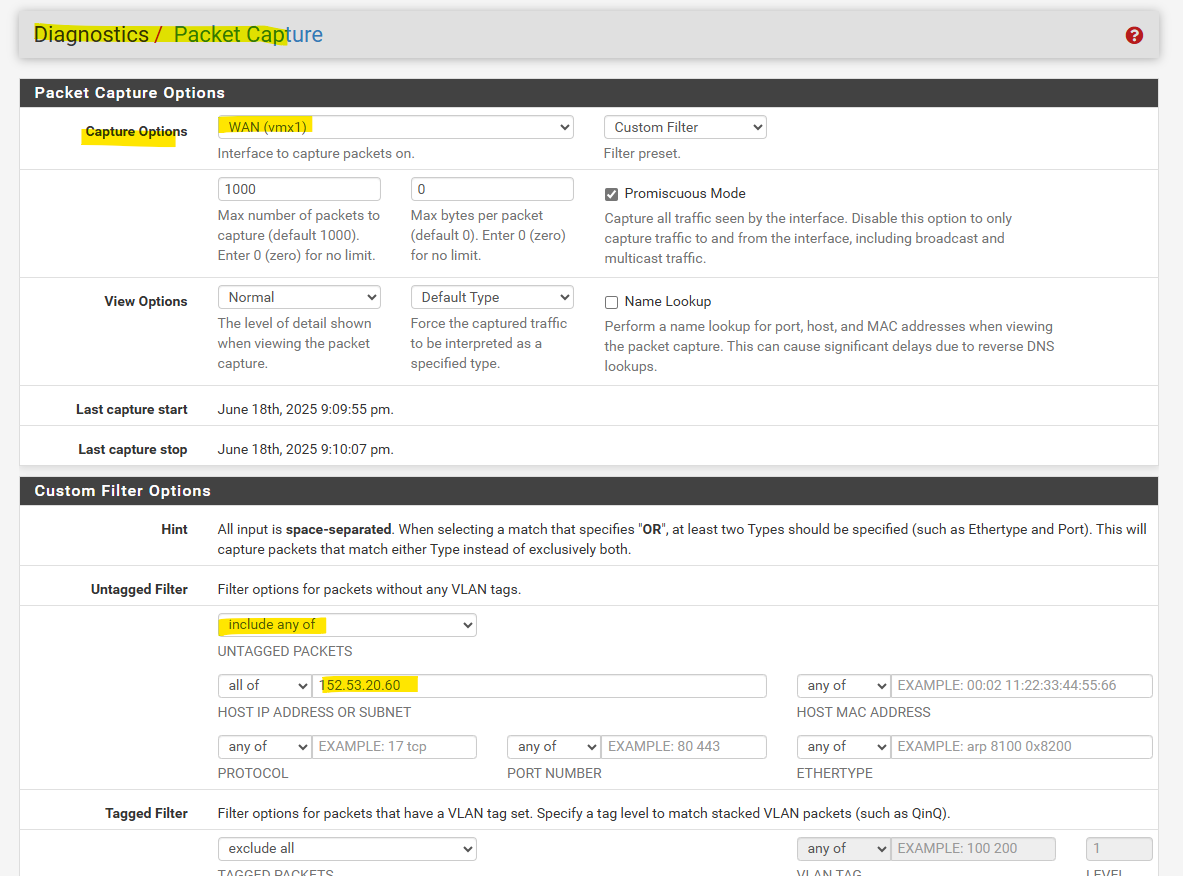
In pfSense we can therefore use the packet capture feature under the Diagnostics menu. Below I was filtering for traffic coming from the IPSECVTI NIC (virtual tunnel interface, therefore from the VPN tunnel) and destined to the public IP address of my website (blog) I wanted to connect to.
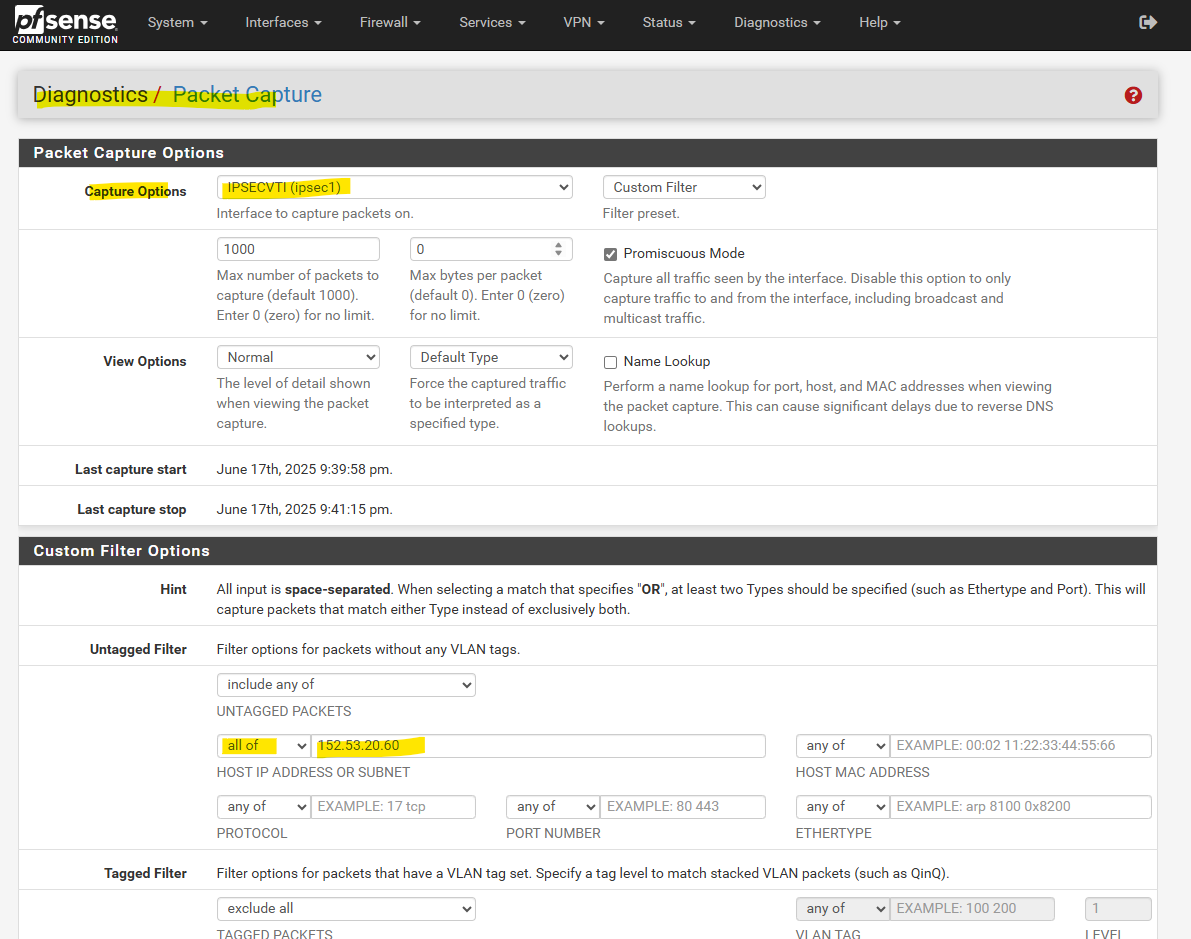
Looks good, below I can see that the traffic destined to the public IP address of my website (blog). The source IP address is one of Azure Firewall’s internal private IP addresses.
Azure Firewall provides automatic SNAT for all outbound traffic to public IP addresses.
Azure Firewall doesn’t SNAT when the destination IP address is a private IP address range per IANA RFC 1918.
This logic works perfectly when you egress directly to the Internet. However, with forced tunneling configured, Internet-bound traffic might be SNATed to one of the firewall private IP addresses in the AzureFirewallSubnet.
This hides the source address from your on-premises firewall. You can configure Azure Firewall to not SNAT regardless of the destination IP address by adding 0.0.0.0/0 as your private IP address range. With this configuration, Azure Firewall can never egress directly to the Internet. For more information, see Azure Firewall SNAT private IP address ranges.
Source: https://learn.microsoft.com/en-us/azure/firewall/forced-tunneling
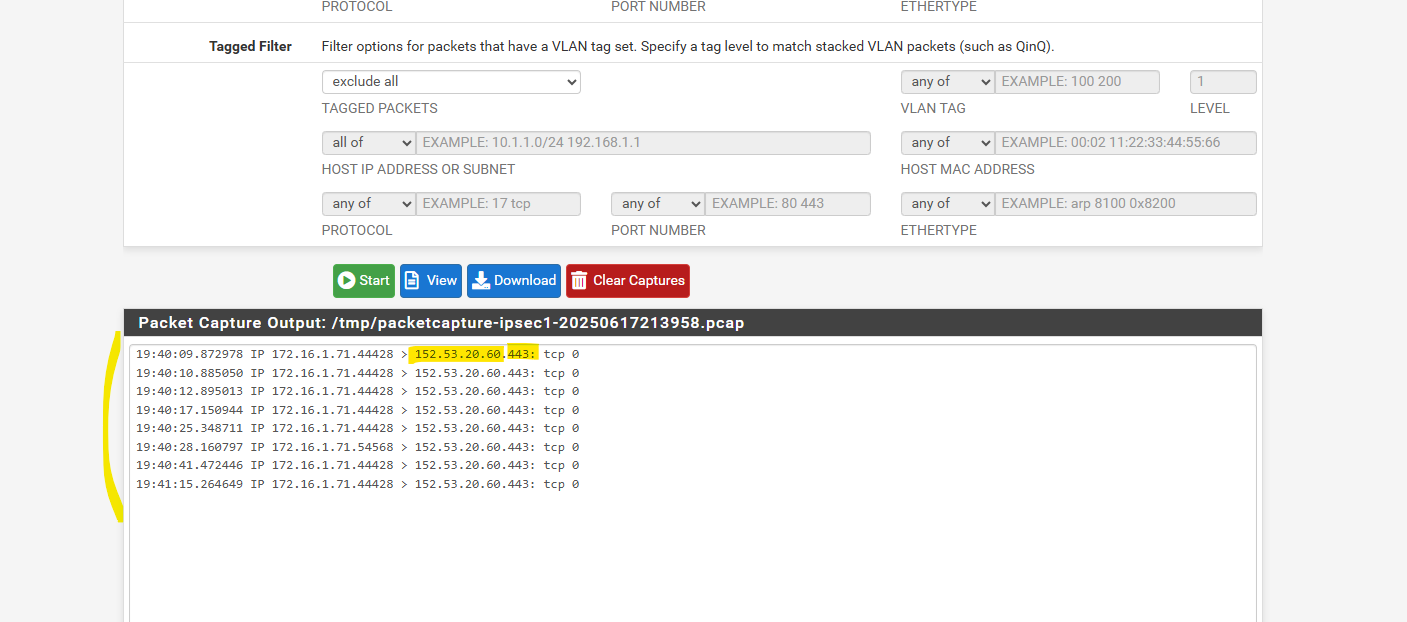
Next I want to see if this traffic finally is really routed outbound from pfSense’s WAN interface to the Internet.
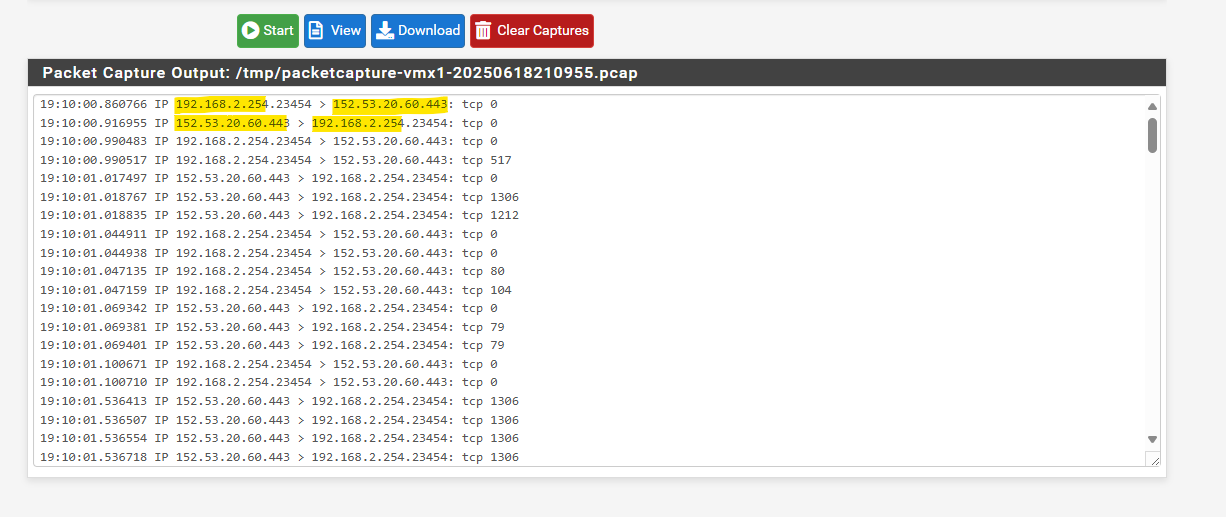
Below therefore I will use the same filter as previously but this time capturing the WAN NIC of pfSense instead its IPSECVTI NIC (virtual tunnel interface).
Below we can see that traffic is routed outbound (egress) through the WAN interface but still using the private IP address of the Azure Firewall (SNAT).
So pfSense doesn’t NAT the private source IP address into its public WAN IP assigned on the WAN NIC.
In case pfSense is directly connected with its WAN interface to the Internet, the HTTPS server cannot reply back to this private IP address. The source IP addresses 172.16.1.71 and 172.16.1.69 are not routable on the public internet. It’s RFC1918 private IP space.
In case pfSense is directly connected with its WAN interface to the Internet, we must configure NAT properly on pfSense so that outbound traffic from Azure (coming via IPsec VTI) gets natted to the WAN interface IP.
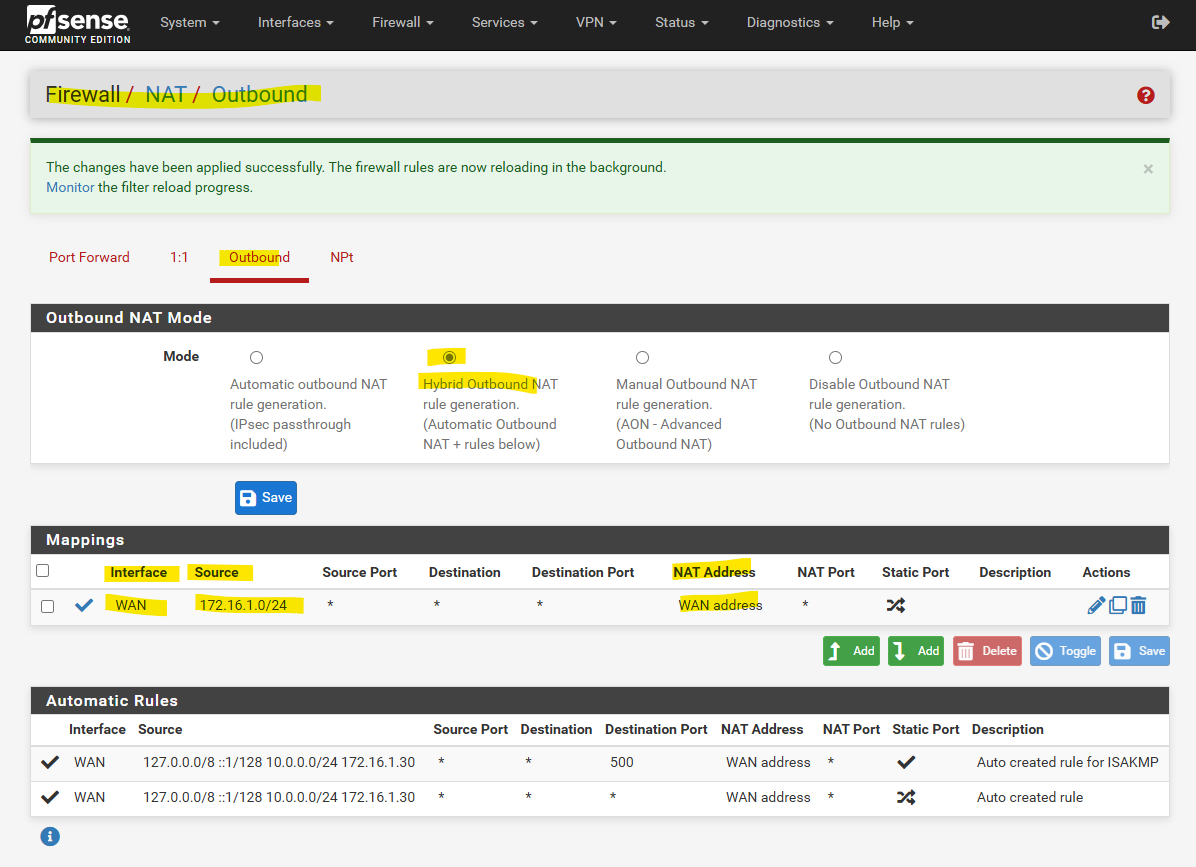
Go to Firewall > NAT > Outbound.
Choose Manual or Hybrid Outbound NAT mode.
Add a new NAT rule:
- Interface: WAN
- Source: Azure subnet (e.g. 172.16.1.0/24, depending on your setup)
- Destination: any
- Translation / Address: Interface address (this is your public IP on WAN)
Azure Firewall forced tunneling now works and the public IP address shown below is my temporary public IP Address assigned by my Internet provider for my on-premise lab environment.
So outbound Internet traffic will now be routed from Azure first to my on-premise lab environment and from there outbound to the Internet.
# dig TXT +short o-o.myaddr.l.google.com @ns1.google.com
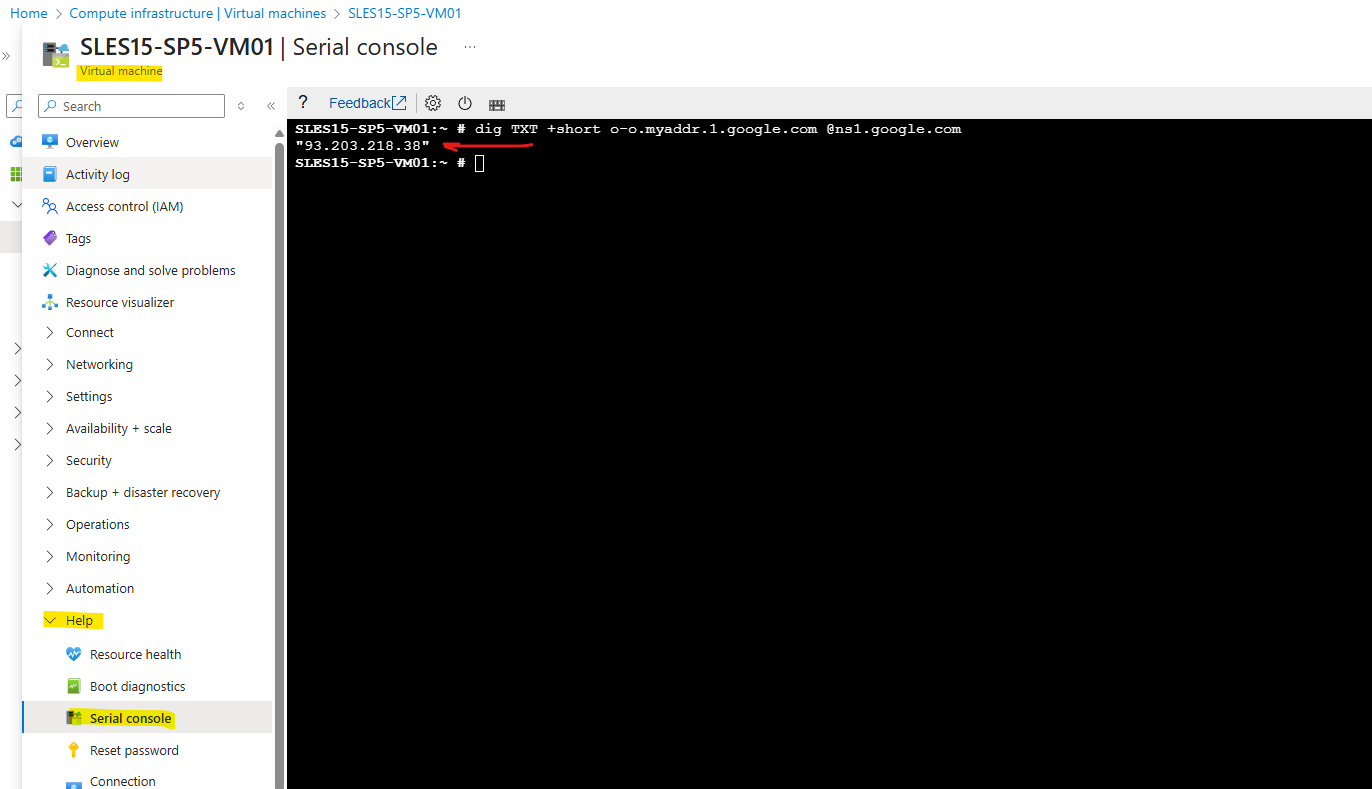
Because pfSense in my lab environment is not directly connected to the Internet with its WAN interface, and instead sitting behind a NAT Router (FRITZ!Box), I can NAT traffic going outbound through the WAN interface and its next hop pointing to the NAT Router (FRITZ!Box), but I can also instead just make sure, that my NAT Router (FRITZ!Box) will know the route back to the SNAT IP addresses of the Azure Firewall and therefore doesn’t need to use here NAT.
Below by using NAT, the private IP address 192.168.2.254 is assigned on the WAN interface of my pfSense and in the same subnet as my NAT Routers (FRITZ!Box) private IP address.
Therefore Internet traffic destined for the Azure Firewall can be routed back to pfSense and its WAN interface.
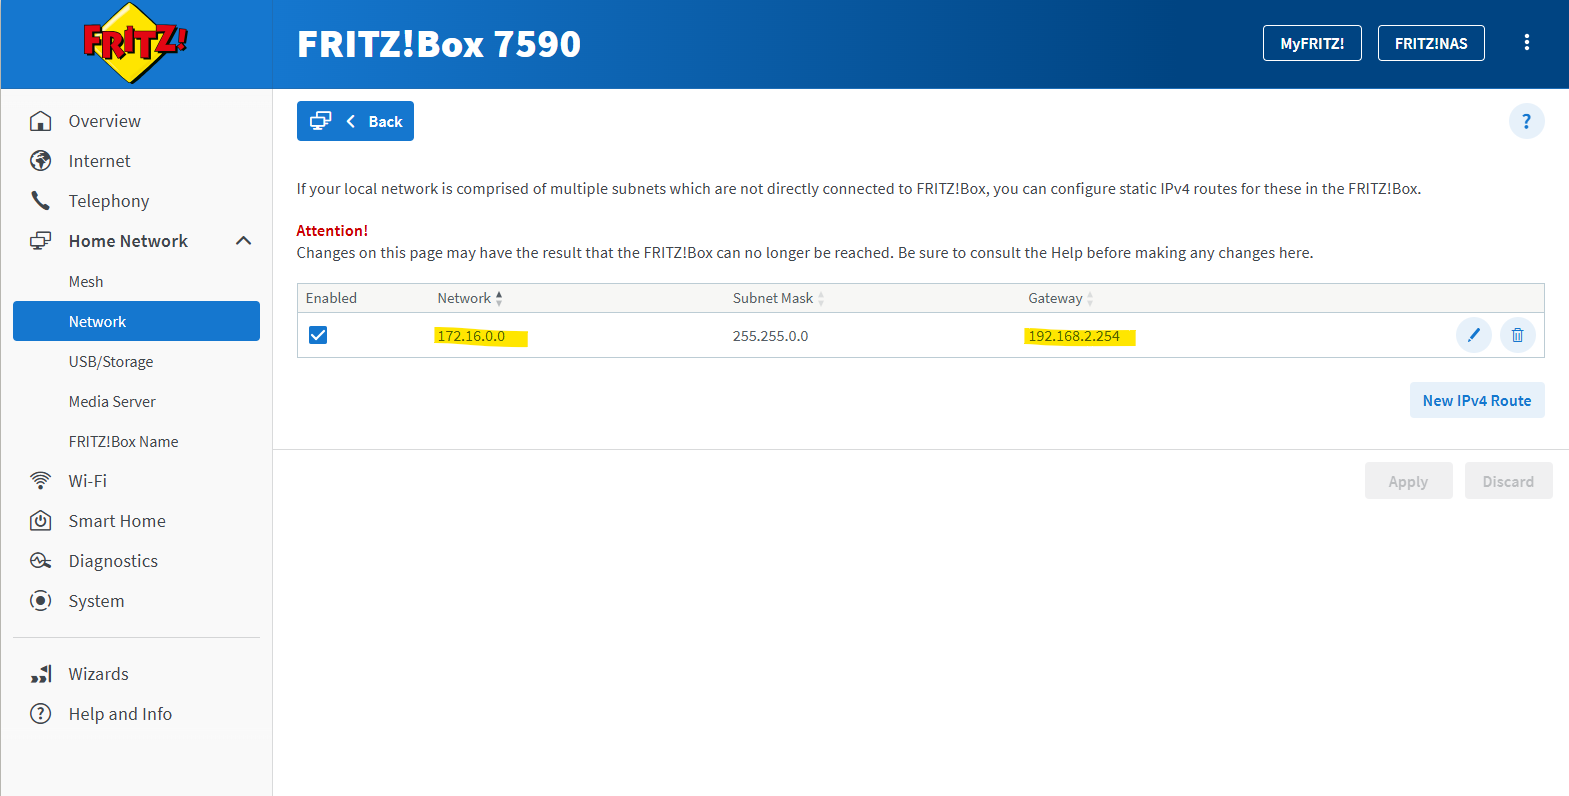
As mentioned in my scenario, I can also instead just make sure, that my NAT Router (FRITZ!Box) will knows the route back to the SNAT IP addresses of the Azure Firewall and therefore doesn’t need to use NAT.
So I was just adding the whole address space 172.16.0.0/16 for the Azure hub virtual network on my NAT Router (FRITZ!Box) and configuring the next hop to point to the WAN interface of pfSense.
In that case I don’t need to NAT outbound traffic on pfSense destined to the Internet.
About how to set up an IPSec route-based Site-to-Site VPN Tunnel between Azure and On-Premise (Home Network) where the VPN Gateway sits behind a NAT Router, you will see in my following post.
Links
About forced tunneling for site-to-site configurations
https://learn.microsoft.com/en-us/azure/vpn-gateway/about-site-to-site-tunnelingConfigure forced tunneling using Default Site for site-to-site connections
https://learn.microsoft.com/en-us/azure/vpn-gateway/site-to-site-tunnelingAzure Firewall Management NIC
https://docs.azure.cn/en-us/firewall/management-nic