Mastering GCP Virtual Machines – Part 2 (Connect to Linux VMs)
In Part 1 we saw how to create a new virtual machine instance (Linux Ubuntu), checking if the google guest environment (VM agent) is installed and what instance schedules are and how to configure them.
Now in this part we will explorer the different access methods we can use to connect to our Linux virtual machine instances. Further we will see what exactly the so called Cloud Shell Instance is.
When working with Compute Engine, there isn’t just one way to get onto your VM. Google Cloud gives you several connection methods, SSH-in-browser for quick access, gcloud / Cloud Shell for CLI-based management, OS Login for IAM-controlled logins, metadata keys for custom SSH key pairs, and even the interactive serial console for break-glass troubleshooting when the network stack is down. In this post, we will see all these different options, when to use each, and what to watch out for.
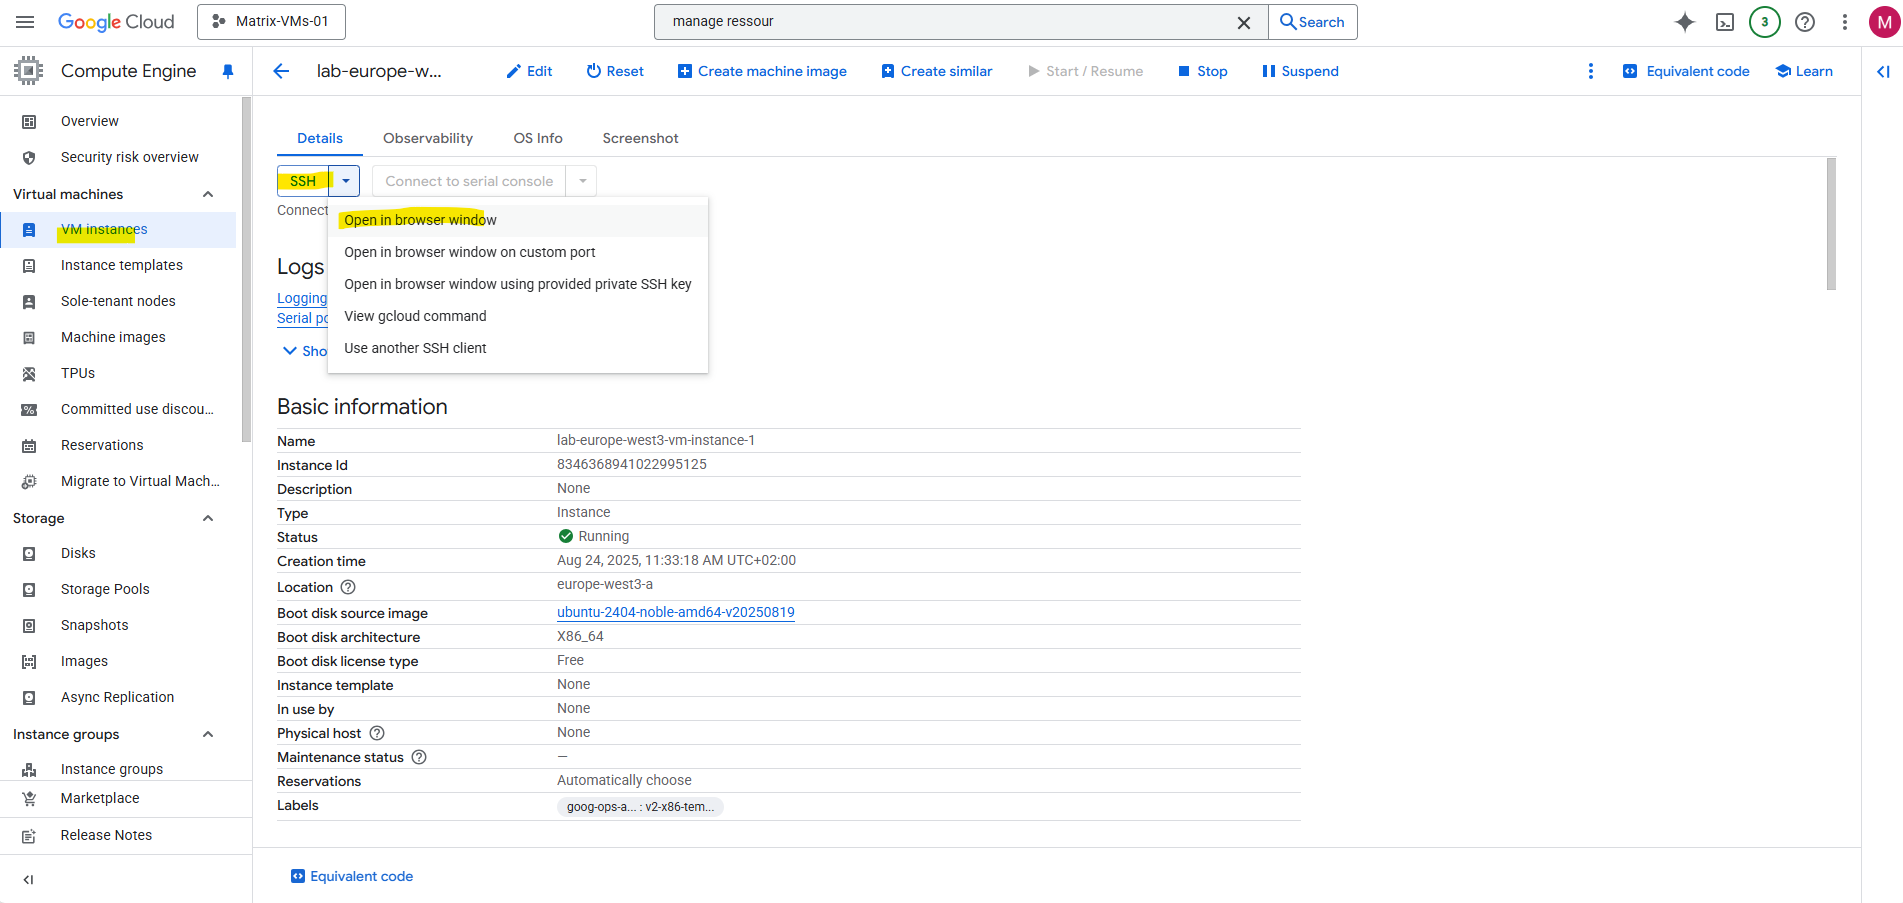
SSH-in-Browser (by default no manual configuration needed)
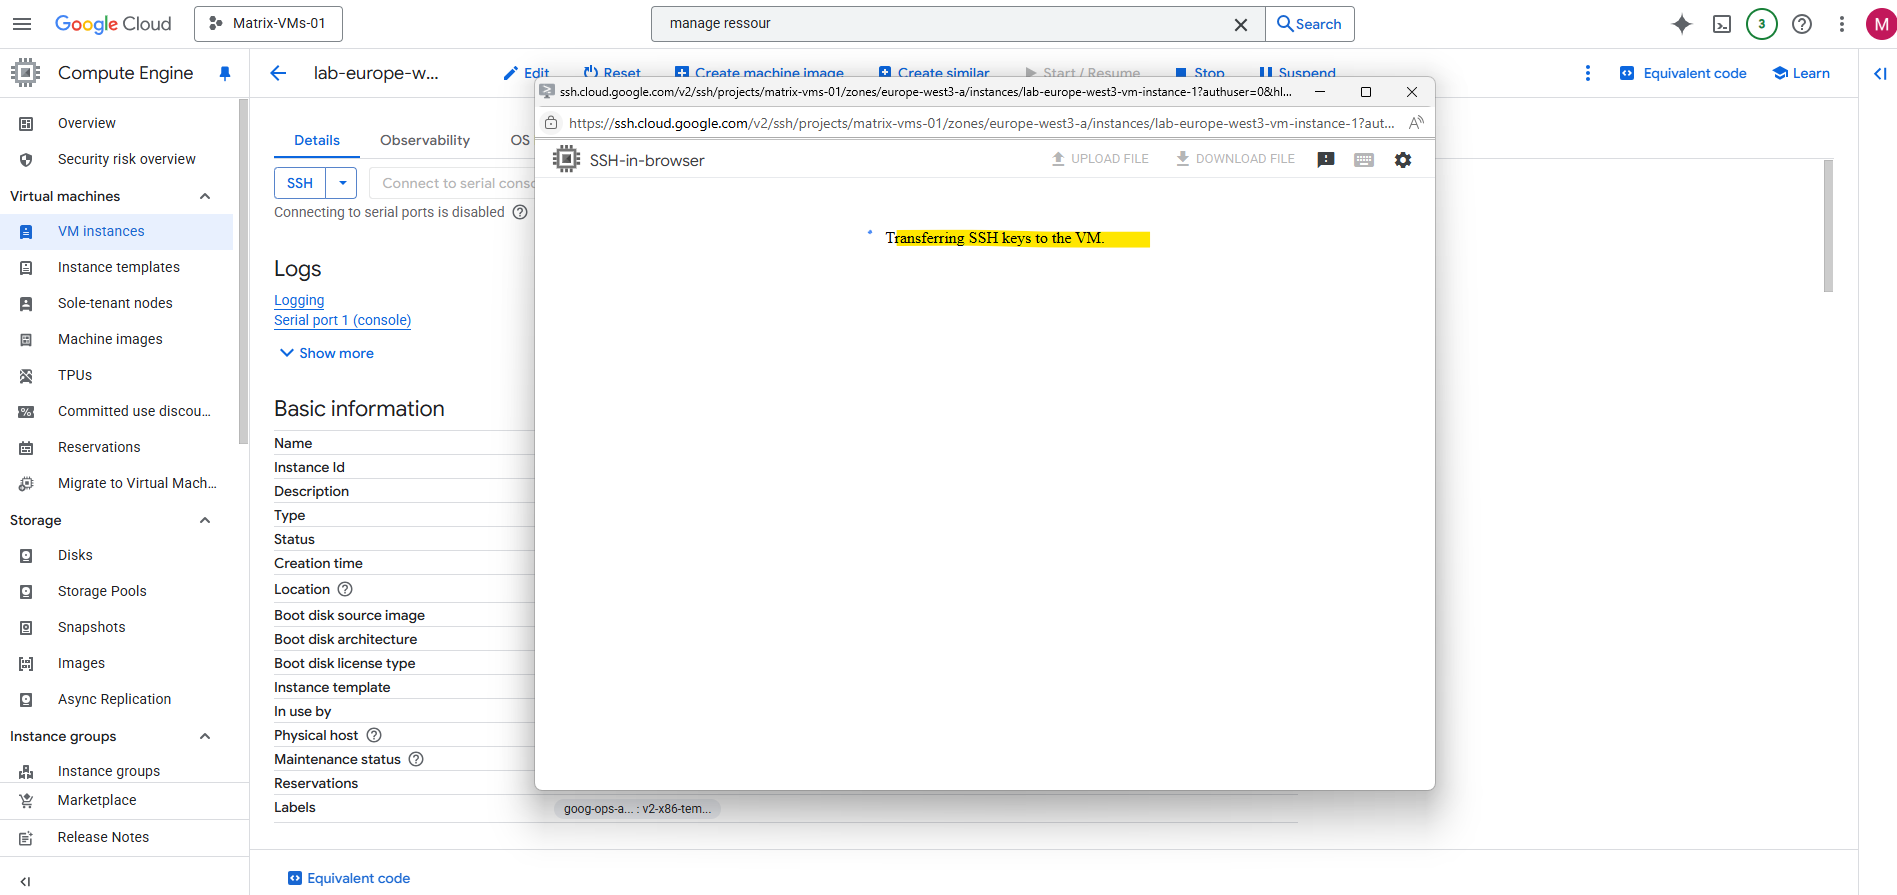
When you click the “SSH in browser” button, Google Cloud automatically generates a temporary SSH key pair for you.
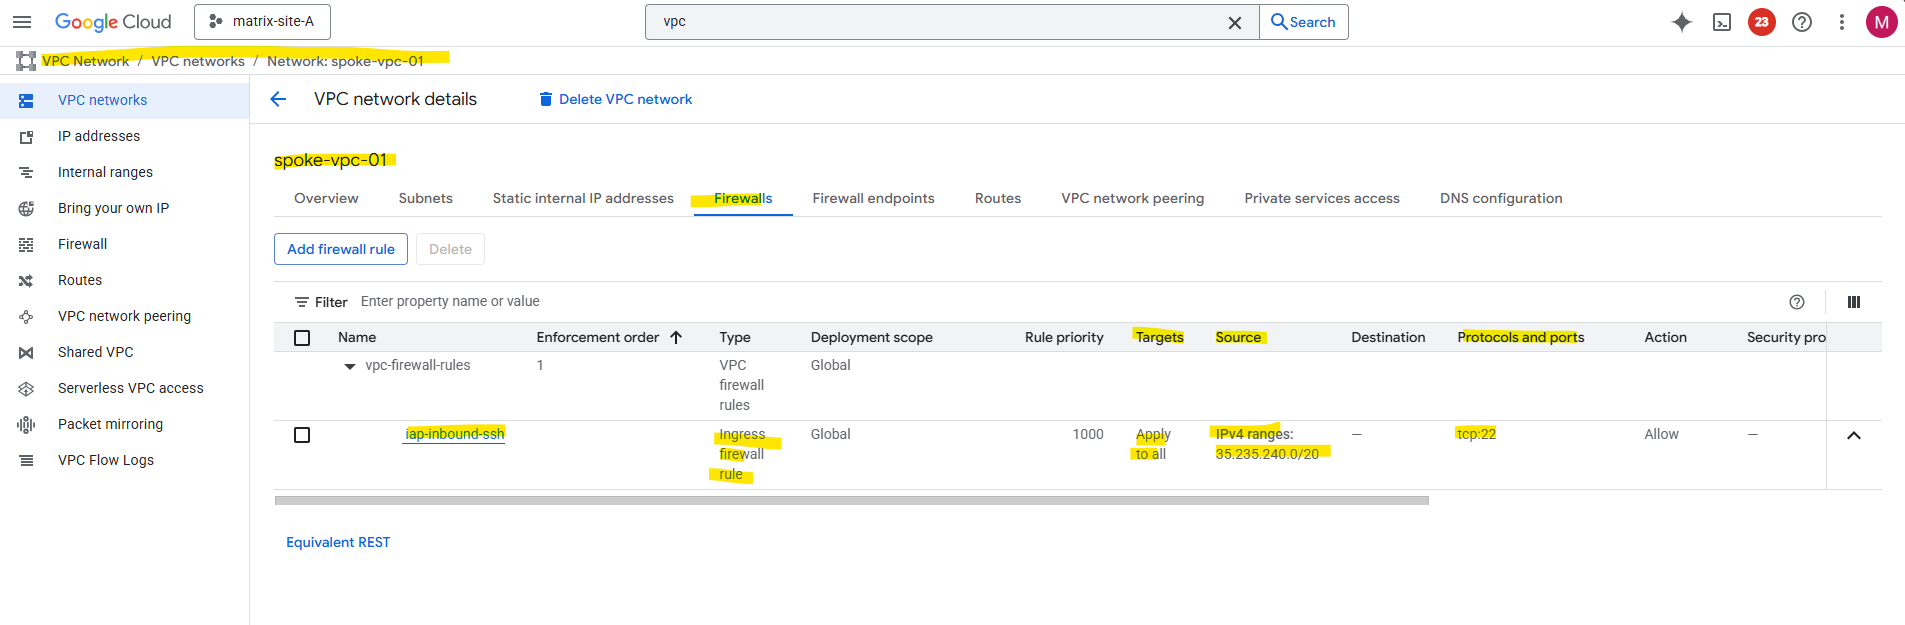
We can always use this method out-of-the-box to connect to our virtual machine instances without any further configuration or public IP address, but limited to access from the Google cloud console.
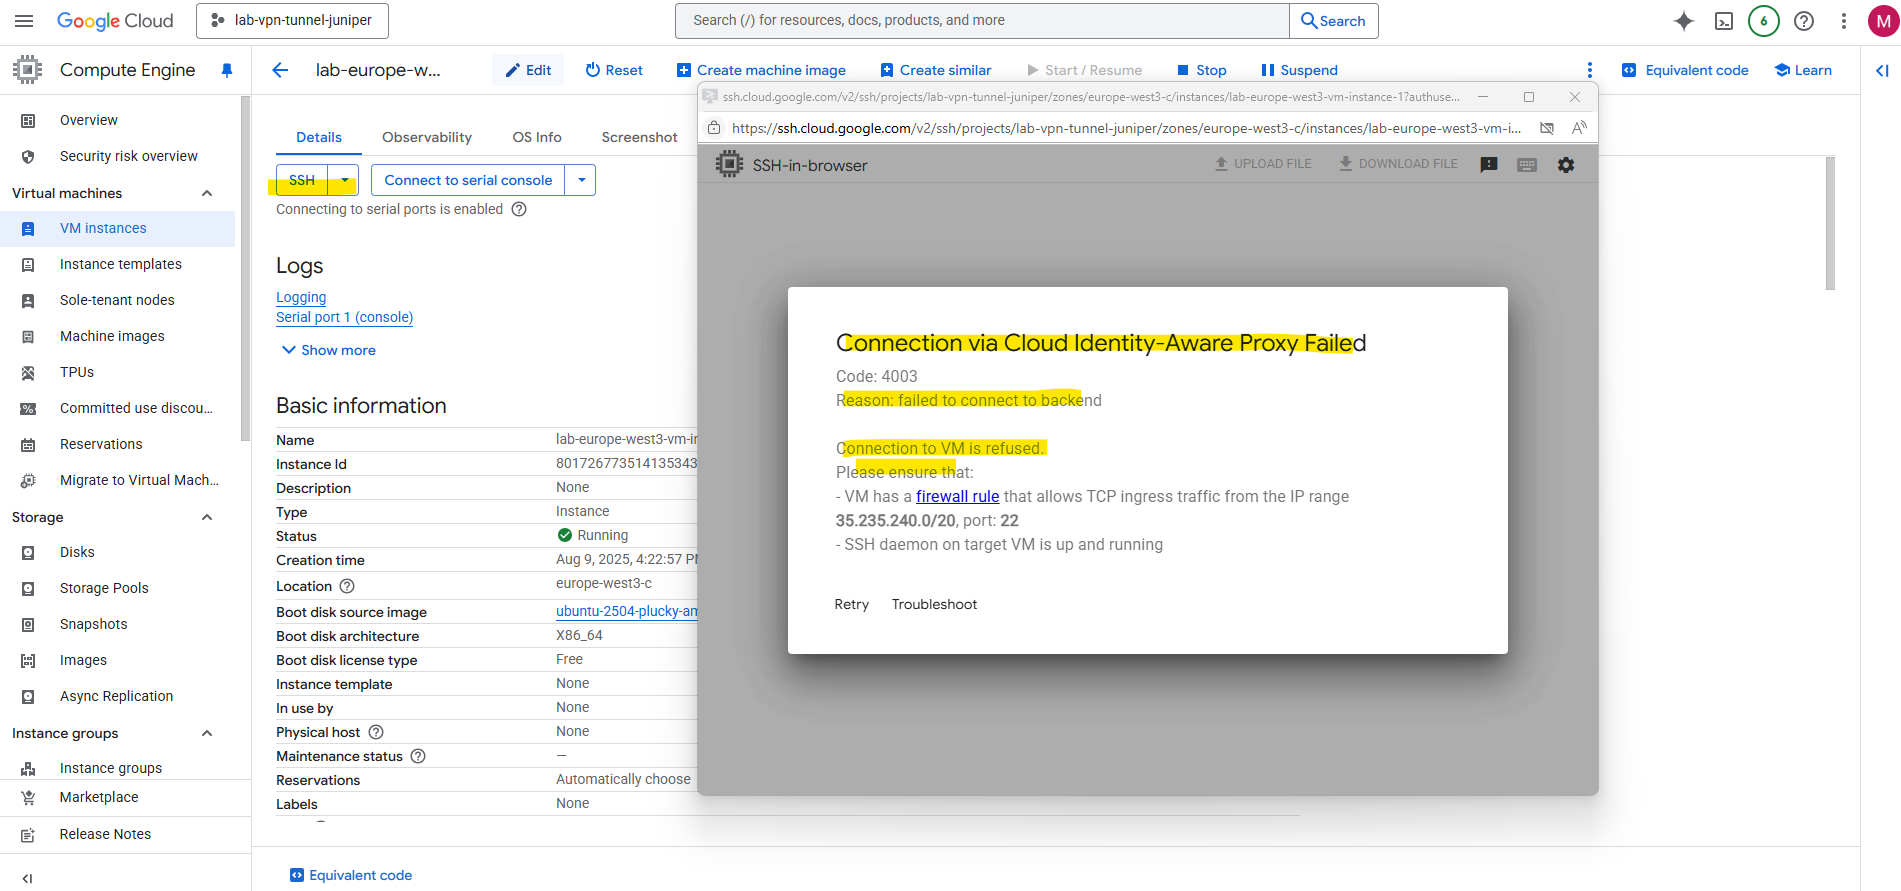
The only configuration we need is to allow TCP 22 traffic from 35.235.240.0/20 (the IAP SSH proxy range) on the VPC network our VM is running.
When you click SSH in the GCP Console for a VM, the browser session connects to the IAP Tunnel (Identity-Aware Proxy) or to the gcloud-proxy infrastructure.
This tunnel then connects to the VM over its internal/private IP, no public IP needed.
How IAP works
https://cloud.google.com/iap/docs/concepts-overview#how_iap_works
As mentioned, that the SSH-in-Browser finally will work, we first need to allow inbound TCP 22 traffic from 35.235.240.0/20 (IAP SSH proxy range) on the VPC network our VM we want to connect to is running.
It then pushes your public key to the instance’s metadata for a short period of time. This allows the SSH session to be authenticated without you having to manually generate and manage keys or enable the full OS Login system.
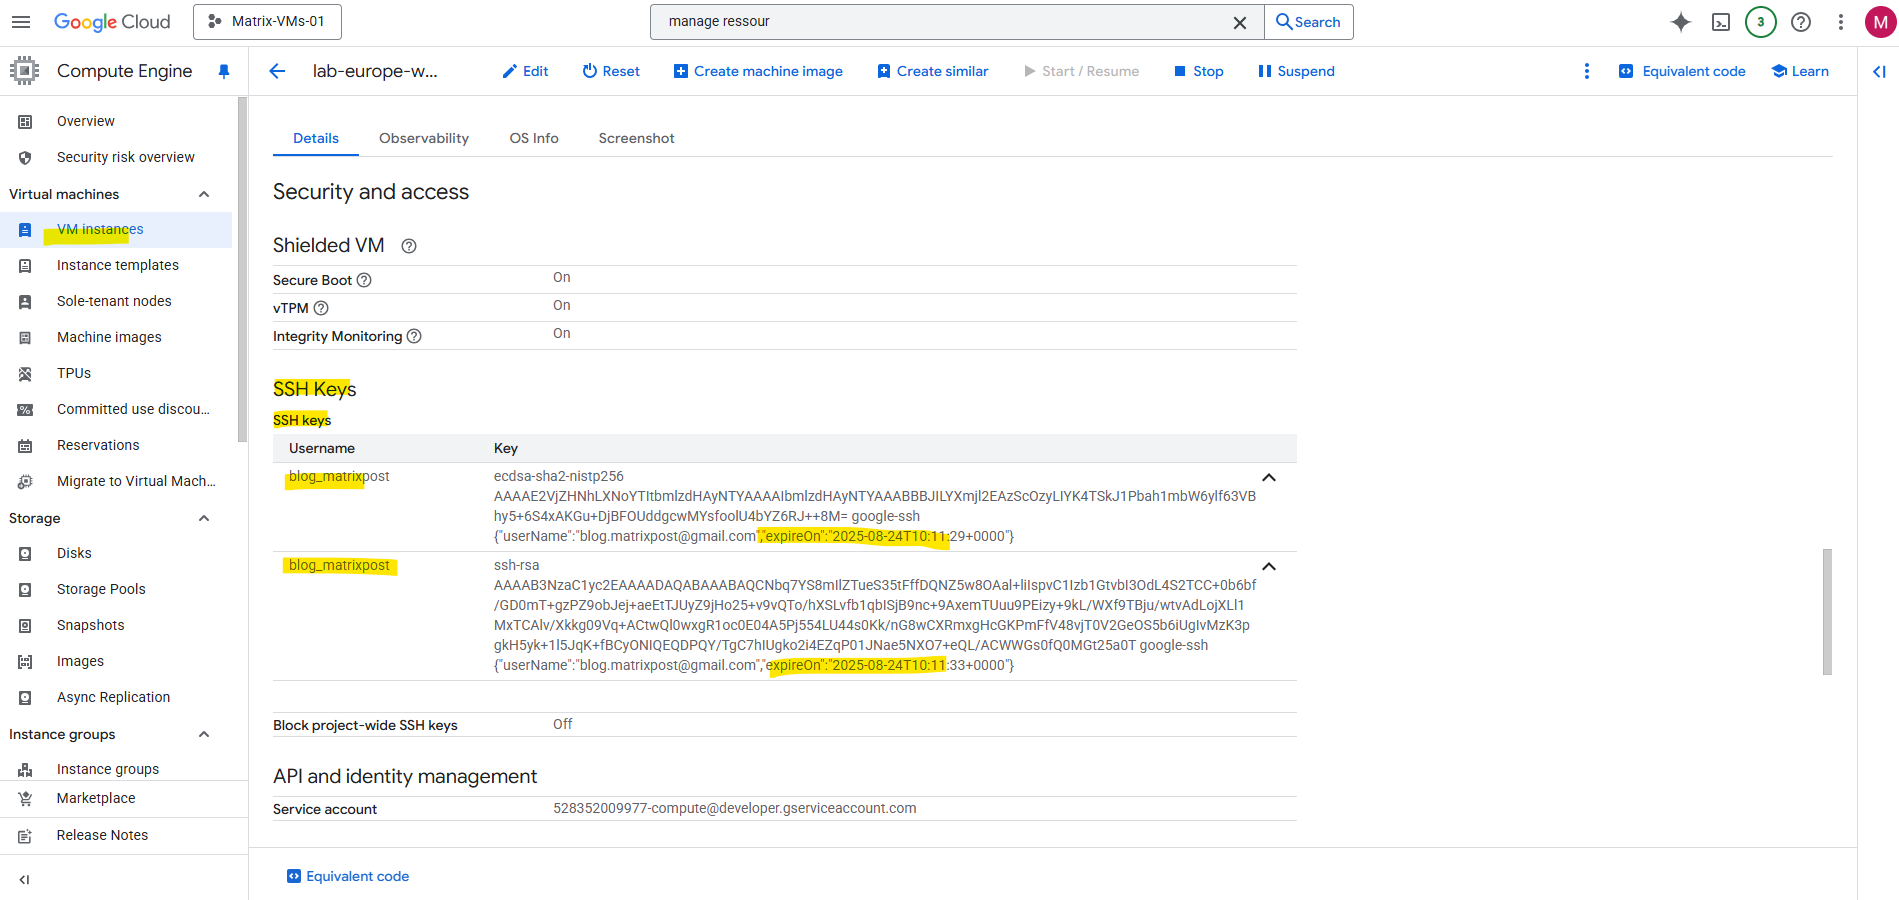
Here e.g. by using the SSH-in-Browser.
The reason we see two keys here is that Google Cloud creates a new key for each session when you connect via the browser. Here I was closing the SSH browser and re-connecting again.
Since the keys are ephemeral, they will automatically expire after a few minutes, so you don’t need to manually delete them. The two keys you’re seeing simply represent two separate connections you’ve made to the virtual machine.
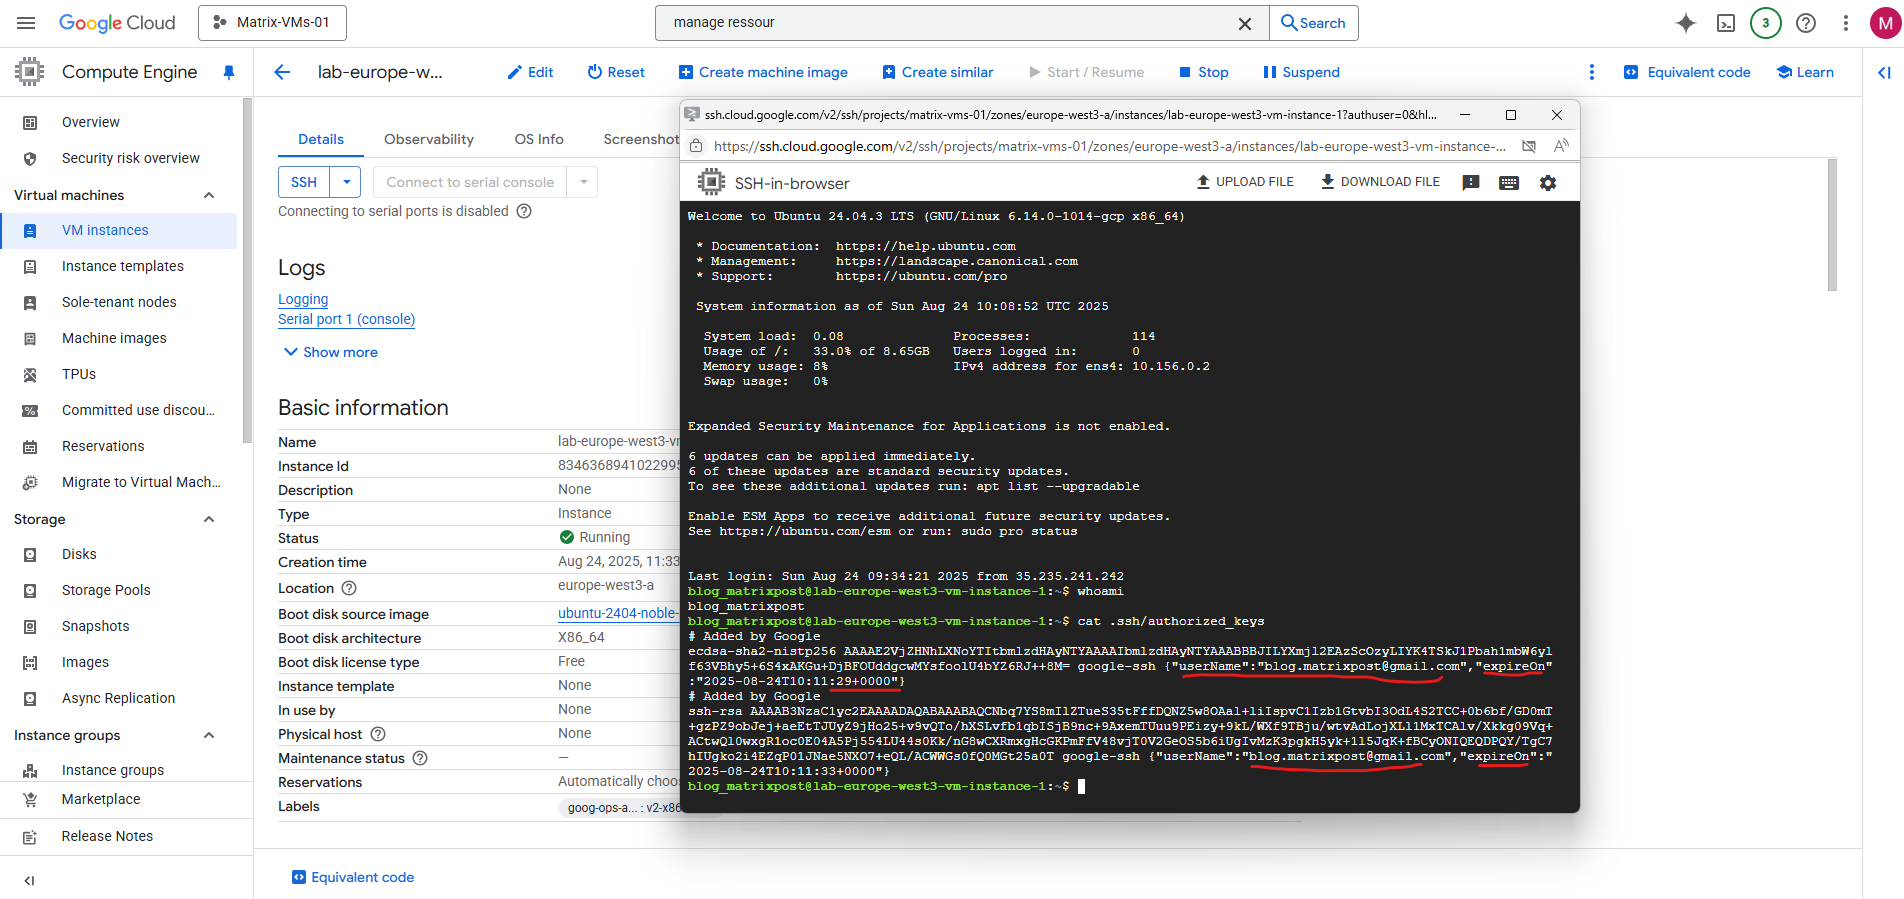
We will also see them directly on the instance’s metadata.
gcloud compute ssh command (by default no manual configuration needed)
We can also use the Cloud Shell to connect to our virtual machine instances out-of-the-box without any further configuration but also limited to access from the Google cloud console and its Cloud Shell instance.
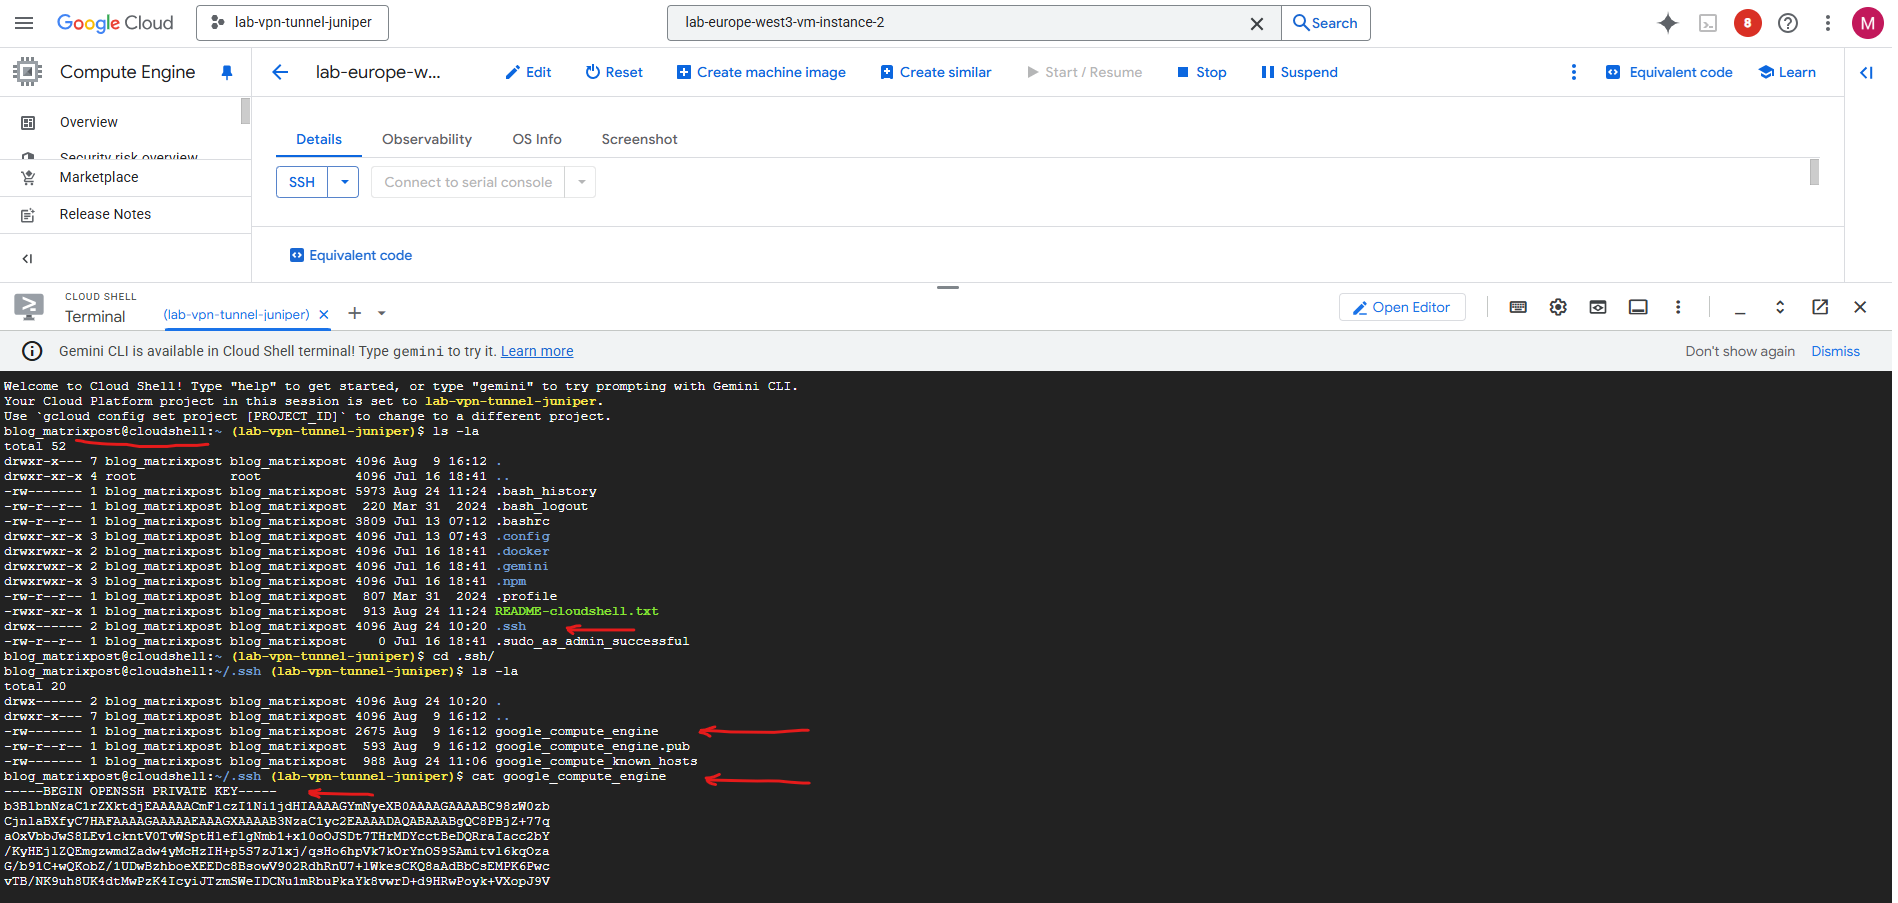
Compute Engine by default sets a username and creates a persistent SSH key pair with the following configurations.
The private key of this persistent SSH key pair is stored on the persistent disk storage mounted as your $HOME directory inside the Cloud Shell instances, more about this instance you will find further down.
- Your username is set as the username in your local machine.
- Your public SSH key is stored in project metadata. If Compute Engine can’t store the SSH key in project metadata, for example, because block-project-ssh-keys is set to TRUE, Compute Engine stores the SSH key in instance metadata.
- Your private SSH key is stored on the persistent disk storage mounted as your $HOME directory inside the Cloud Shell instances as mentioned.
- Your SSH key doesn’t have an expiry. It is used for all future SSH connections you make, unless you configure a new key.
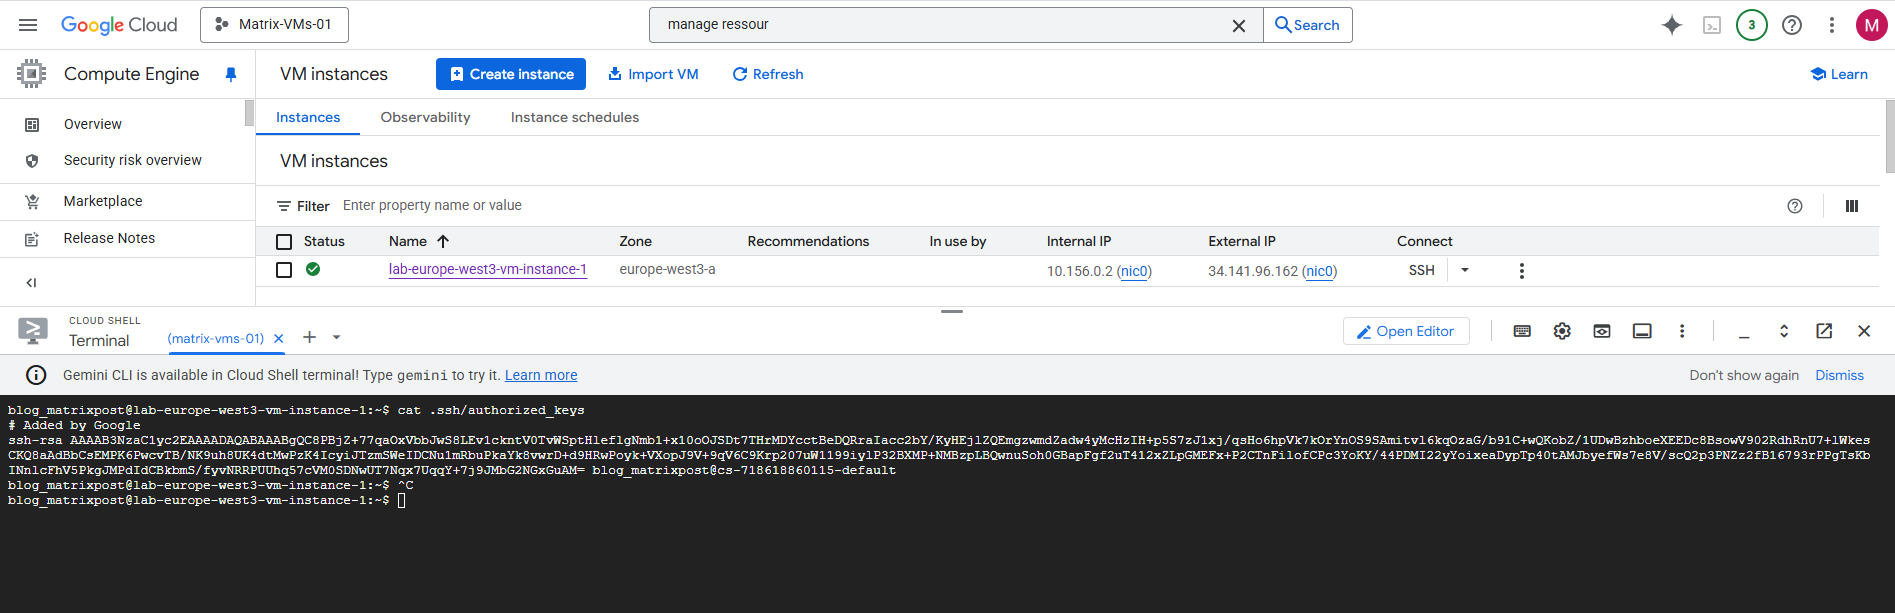
$ gcloud compute ssh [INSTANCE_NAME] --zone=[ZONE]
$ gcloud compute ssh lab-europe-west3-vm-instance-1 --zone=europe-west3-a

When you run the gcloud compute ssh command for the very first time, it checks to see if you have an existing SSH key pair that it can use. If it doesn’t find one, it automatically creates a new one for you on your local machine.
The passphrase you’re being asked to provide is a password that protects your private SSH key. This key is what proves your identity to the virtual machine.
This persistent key is what you will use for all future gcloud compute ssh connections. This is why you are prompted for a passphrase, it’s for this locally stored, persistent private key.

It adds the public key to the project-wide metadata if you haven’t blocked that. This key does not have an expiration date.
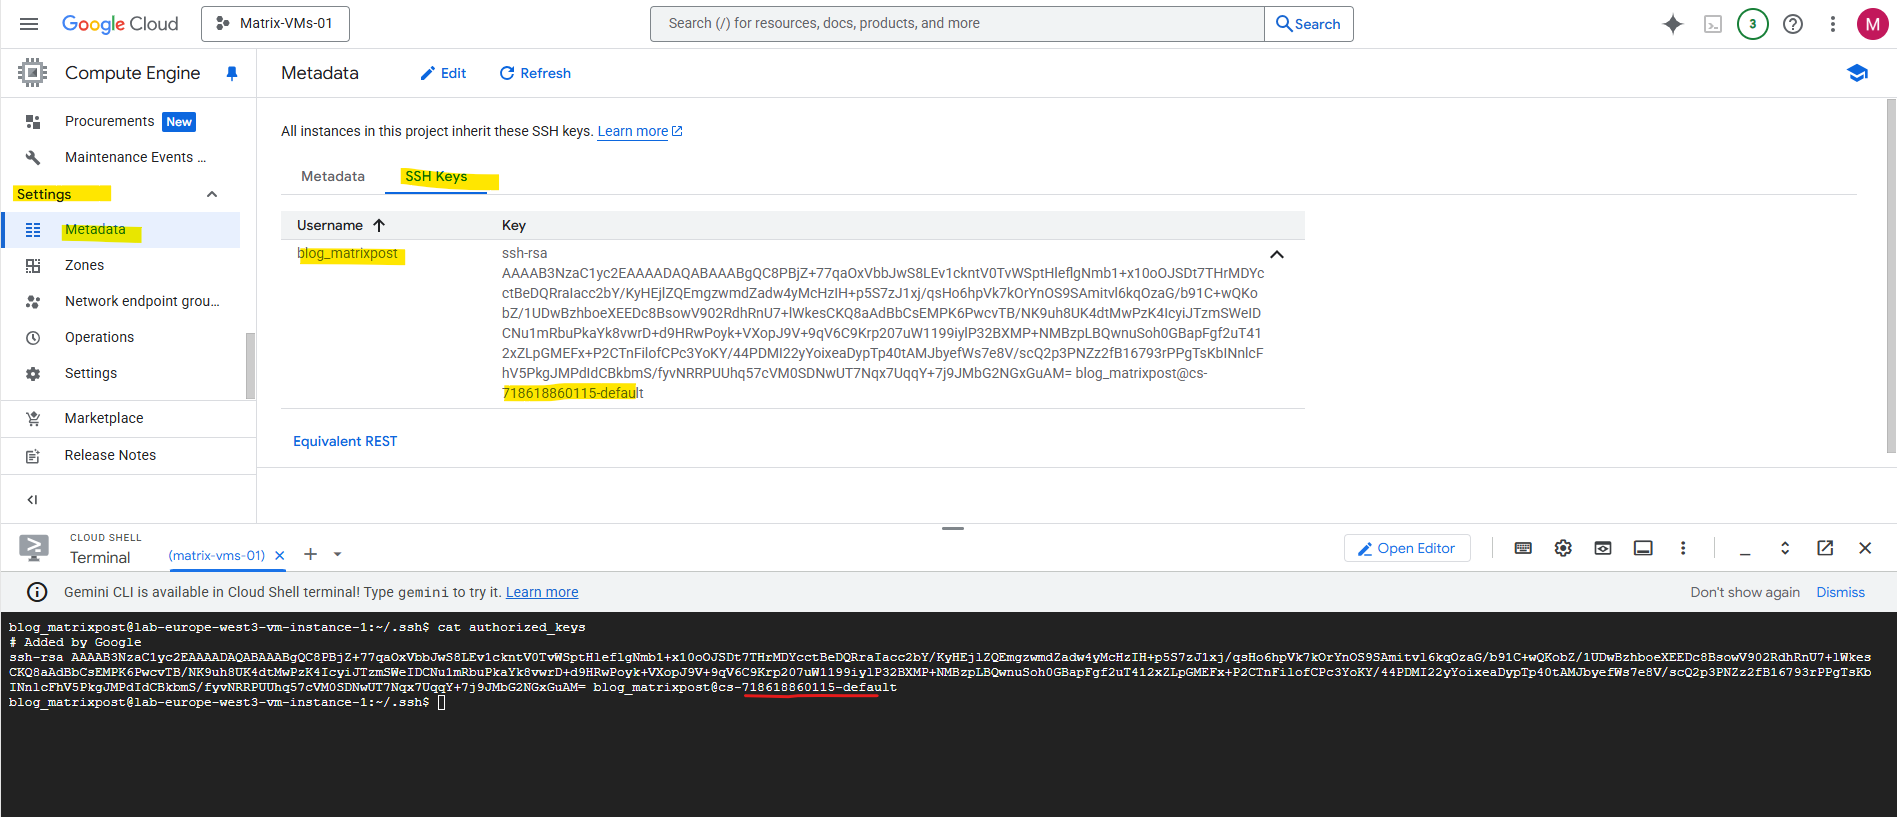
The corresponding private key is stored in your Cloud Shell’s home directory as mentioned and shown below.
When you run gcloud compute ssh from the Cloud Shell like shown above, it’s designed to generate and use keys within that temporary Linux environment (Cloud Shell instance). It doesn’t put them on your local client machine (e.g. notebook you running the browser session and Cloud Shell environment from).
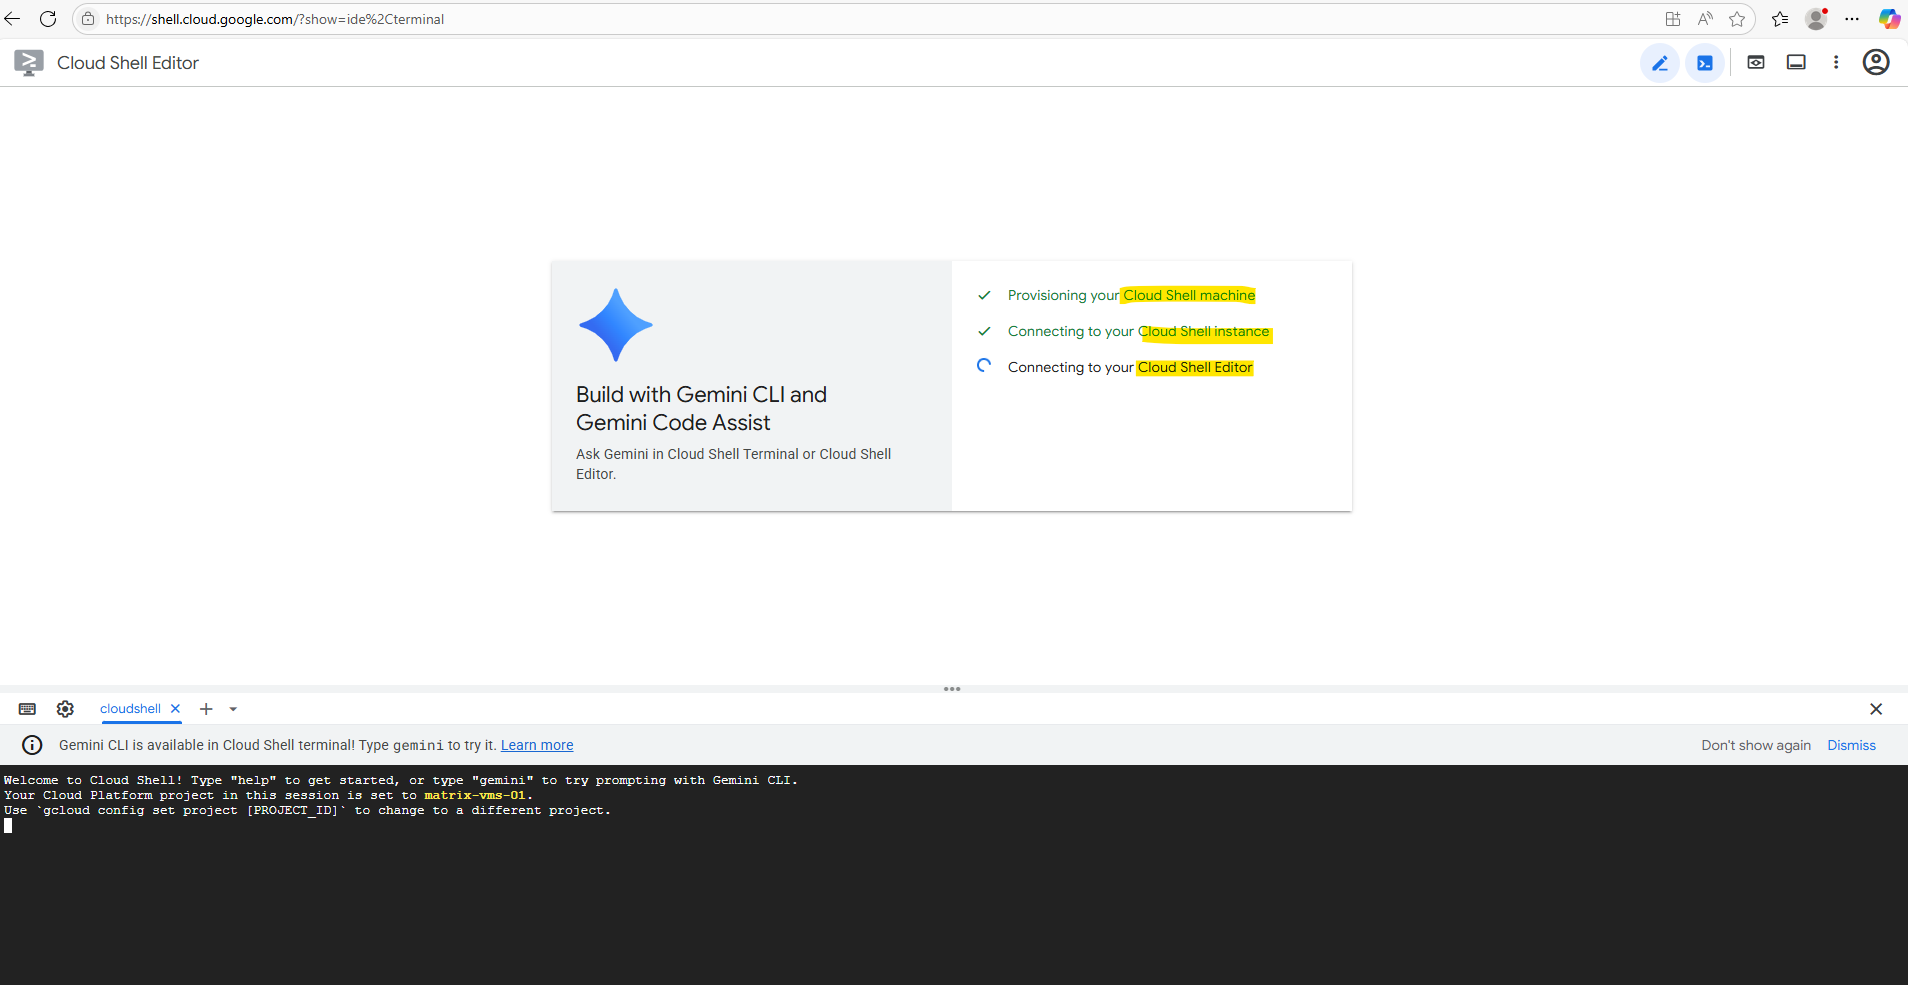
Cloud Shell provisions a Compute Engine virtual machine running a Debian-based Linux operating system for your temporary use. This virtual machine is owned and managed by Google Cloud, so will not appear within any of your Google Cloud projects.
Cloud Shell instances are provisioned on a per-user, per-session basis. The instance persists while your Cloud Shell session is active; after an hour of inactivity, your session terminates and its VM is discarded.
Source: https://cloud.google.com/shell/docs/how-cloud-shell-works
The Cloud Shell virtual machine instance has several pre-installed tools like listed here.
Metadata-based SSH Keys Login
Compute Engine uses key-based SSH authentication to establish connections to Linux virtual machine (VM) instances and additionally supports certificate-based authentication for OS Login VMs (Preview). You can optionally enable SSH for Windows VMs. By default, passwords aren’t configured for local users on Linux VMs.
Before you can connect to a VM, several configurations must be performed. If you use the Google Cloud console or the Google Cloud CLI to connect to your VMs, Compute Engine performs these configurations on your behalf as shown previously above.
By default, Compute Engine uses custom project and/or instance metadata to configure SSH keys and to manage SSH access. All Windows VMs use metadata to manage SSH keys, while Linux VMs can use metadata keys or OS Login.
If you use OS Login, metadata SSH keys are disabled.
To use metadata keys we first need to generate a new SSH key pair. I will generate this directly on my notebook running the Windows OS and using PowerShell and its build-in ssh feature.
Generate a key pair (ED25519 recommended)
ED25519 is a modern type of public-key cryptography algorithm used for creating SSH keys. It’s based on the Edwards-curve Digital Signature Algorithm (EdDSA) with the Curve25519 elliptic curve.
Compared to RSA or ECDSA, ED25519 keys are smaller (shorter key length, but same or better security), faster for signing and verifying, more secure against certain attack classes (side-channel, poor randomness).
They’re supported by OpenSSH (default since v7.6) and recommended for most new SSH deployments.
PS> ssh-keygen -t ed25519 -a 100 -f $env:USERPROFILE\.ssh\gcp_ed25519 -C "marcus"
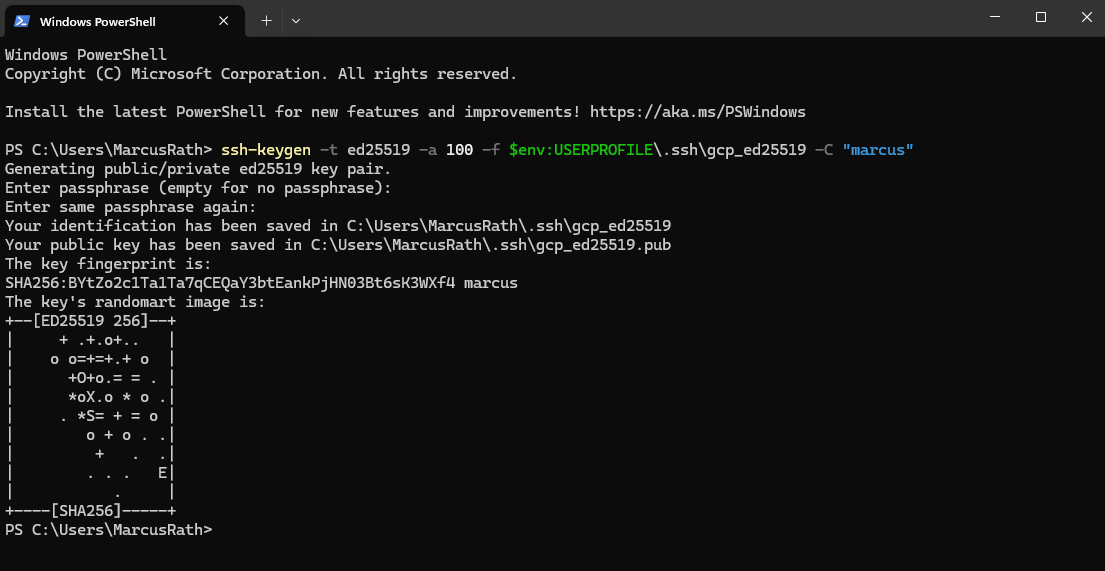
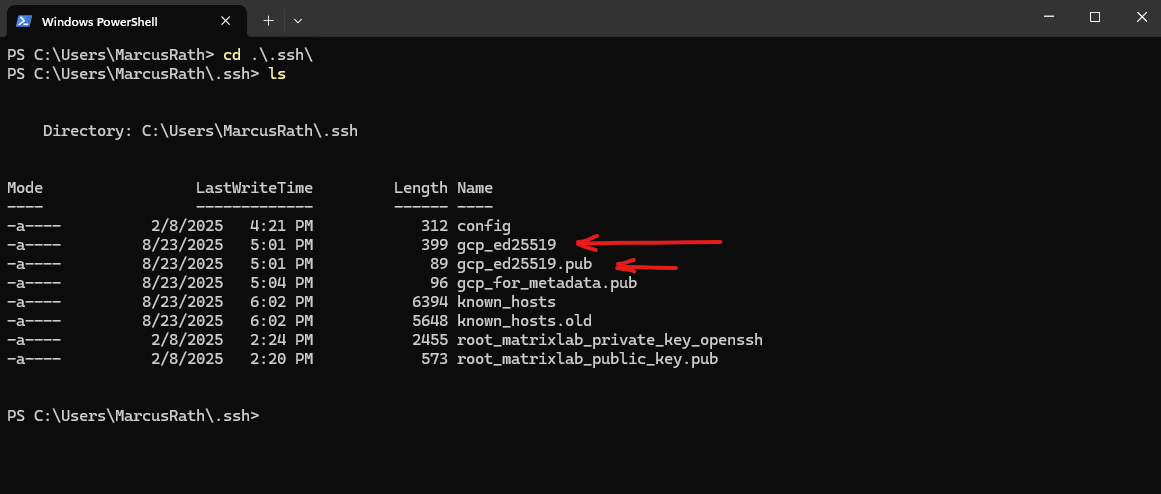
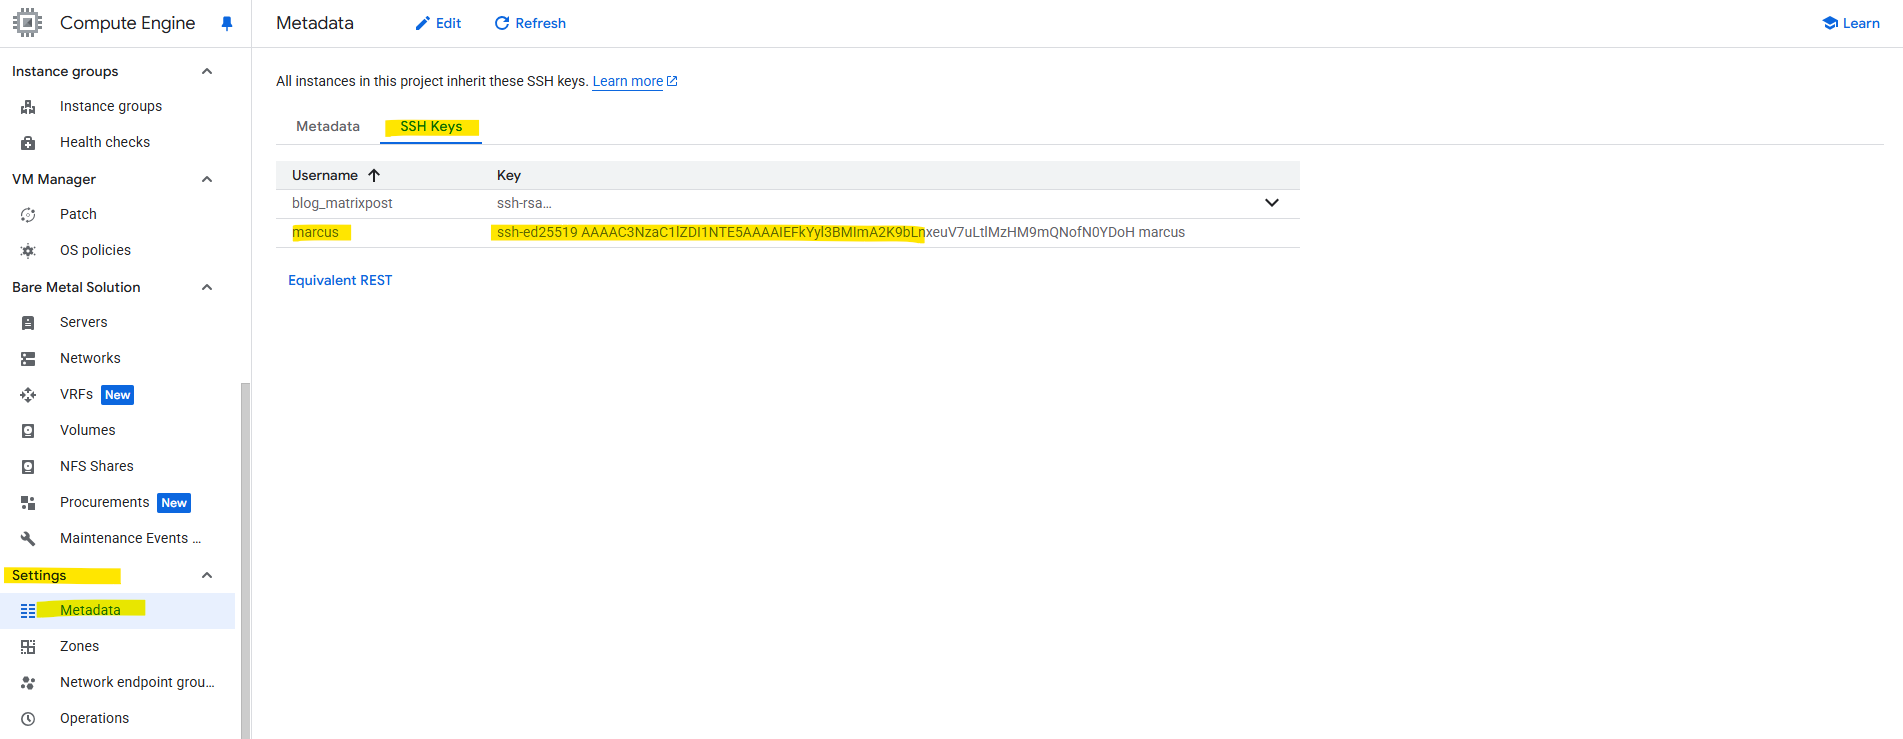
The first gcp_ed25519 is my private key and the second the public we need to add to metadata.
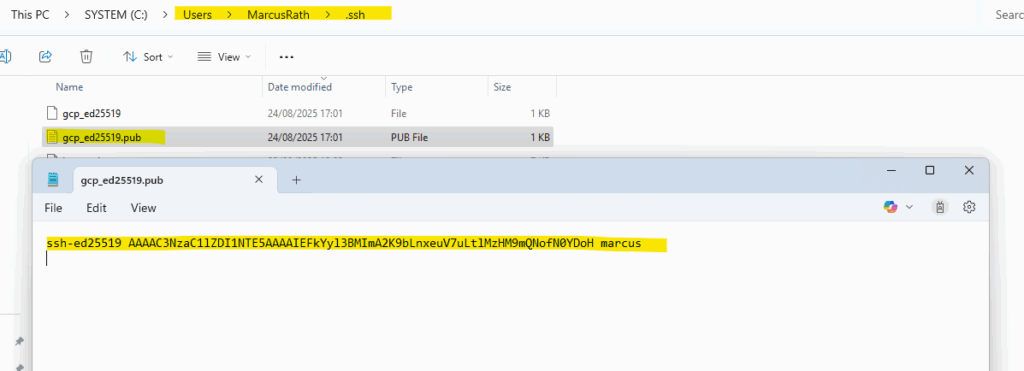
Paste the contents of gcp_for_metadata.pub into Compute Engine → Metadata → SSH Keys (or the VM’s “Edit → SSH keys”).
Format must be: ssh-ed25519 AAAAC3… username.
Determine if the public key is already pushed to our virtual machine.
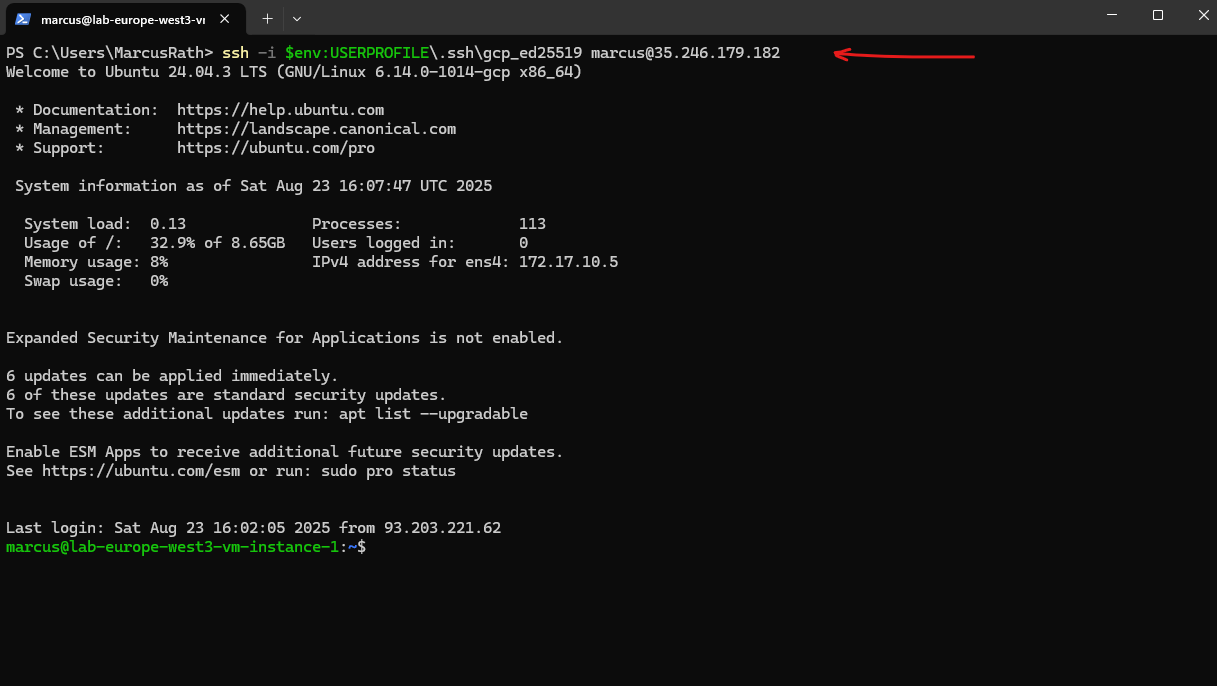
Looks good and I am already able to connect to the virtual machine by using my private key.
PS> ssh -i $env:USERPROFILE\.ssh\gcp_ed25519 marcus@35.246.179.182
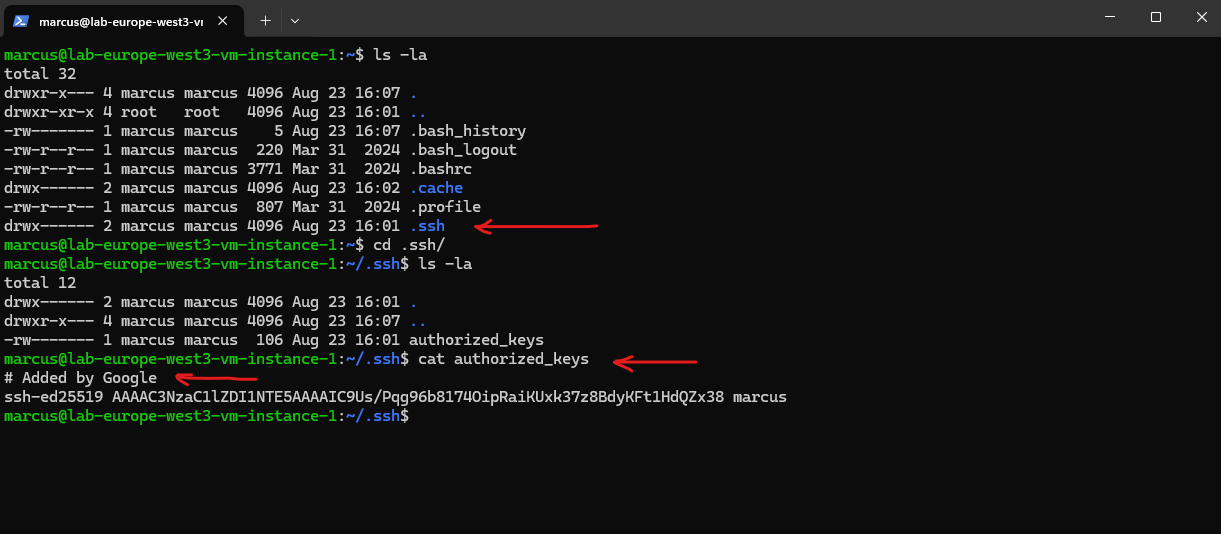
Project-metadata changes are visible to a VM immediately via the metadata server; the guest agent on the VM then writes the key into the user’s authorized_keys, which typically happens within a few seconds (no reboot needed). If it isn’t there after ~1 minute, something’s off.
!! Note !!
When you upload an SSH public key to instance or project metadata, the corresponding Linux user isn’t created right away on the VM.The account and its authorized_keys entry are automatically provisioned only during the first successful SSH connection made with the matching private key, whether that connection comes from a local workstation, another GCP host, or even a remote system over VPN. Until that first login occurs, the user simply doesn’t exist on the operating system.
So finally we added here as shown below our manually generated SSH keys aka metadata-based SSH keys login.
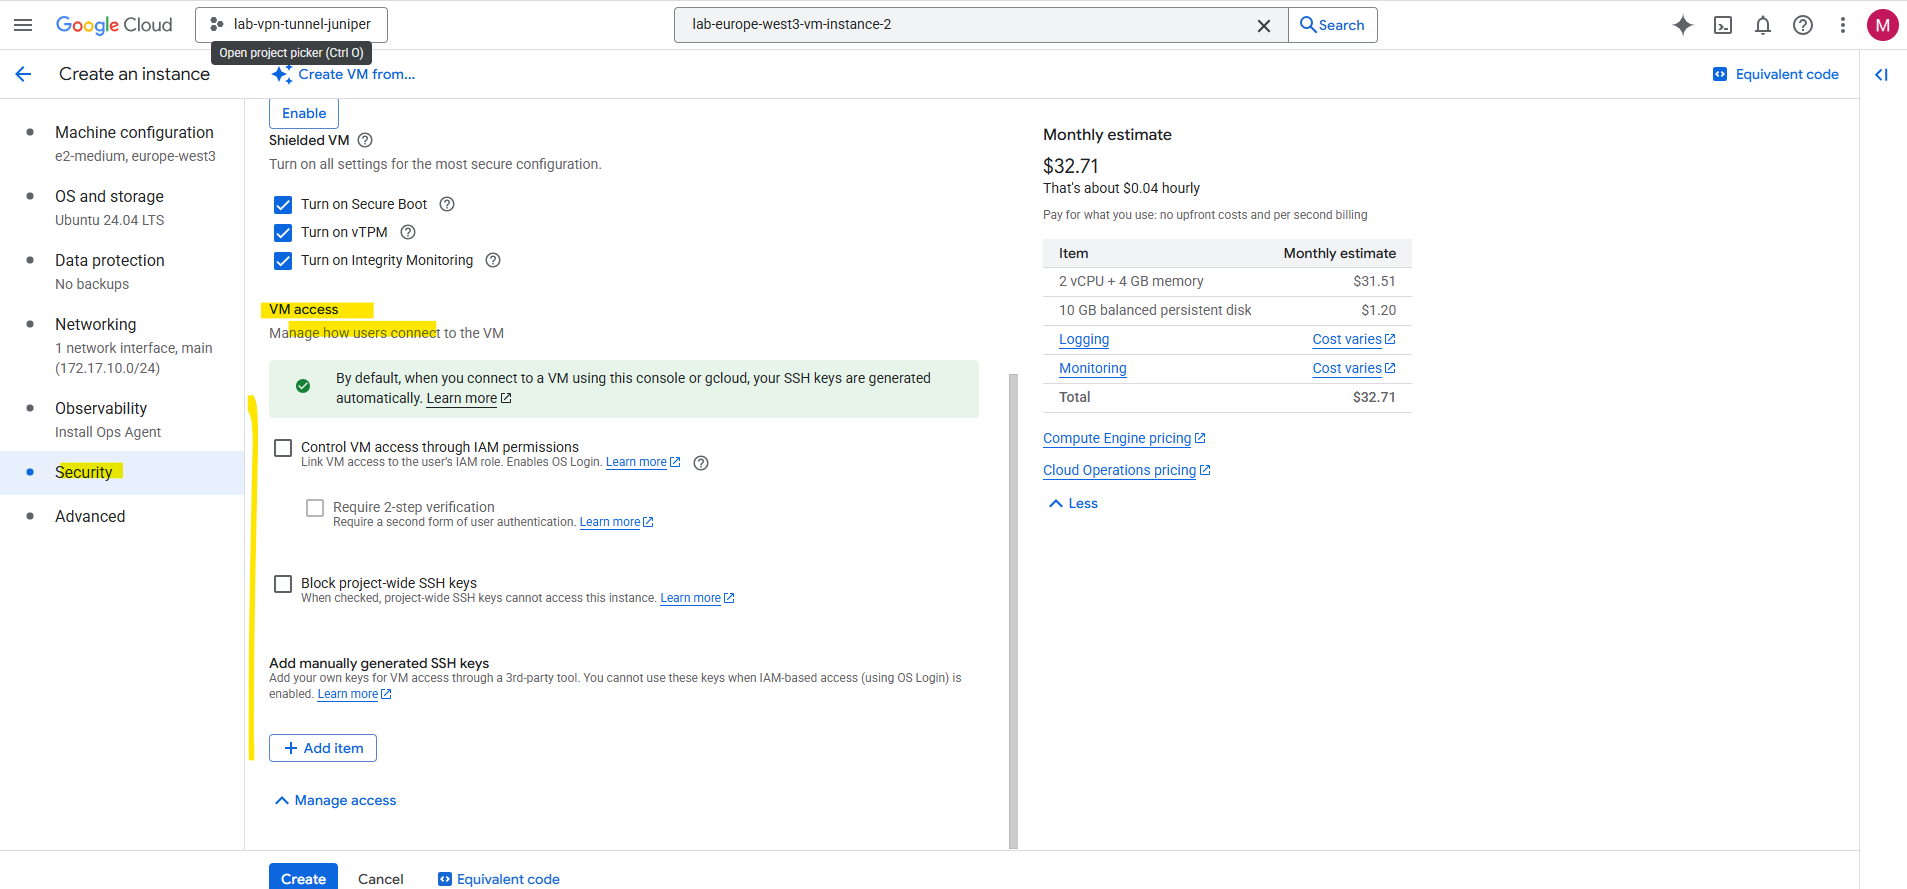
Next we will see the first option above in the screenshot with Control VM access through IAM permission aka OS Login.
When you enable OS Login, the VM ignores metadata-based SSH keys (ssh-keys in project/instance metadata).
Existing local accounts won’t be able to SSH by default, because OS Login removes the VM’s authorized_keys and authorizes logins via IAM. You can still allow a local (non-OS-Login) user by recreating its authorized_keys file (with a username/UID that doesn’t collide with OS Login users).
OS Login
When enabled, metadata keys are ignored and instead, the VM fetches authorized keys tied to your Google account from the OS Login API.
sshd uses google_oslogin_authorized_keys helper to fetch keys directly from IAM / OS Login API
Access is controlled by IAM roles (roles/compute.osLogin, roles/compute.osAdminLogin), not by who has a key in metadata. We can still click SSH-in-browser, but the ephemeral key is checked against your OS Login profile in IAM, not against metadata.
We can enable OS Login either in the virtual machine instance’s metadata or the project wide metadata by adding the following key value pair enable-oslogin=TRUE.
Directly on the virtual machine instance and its metadata section.
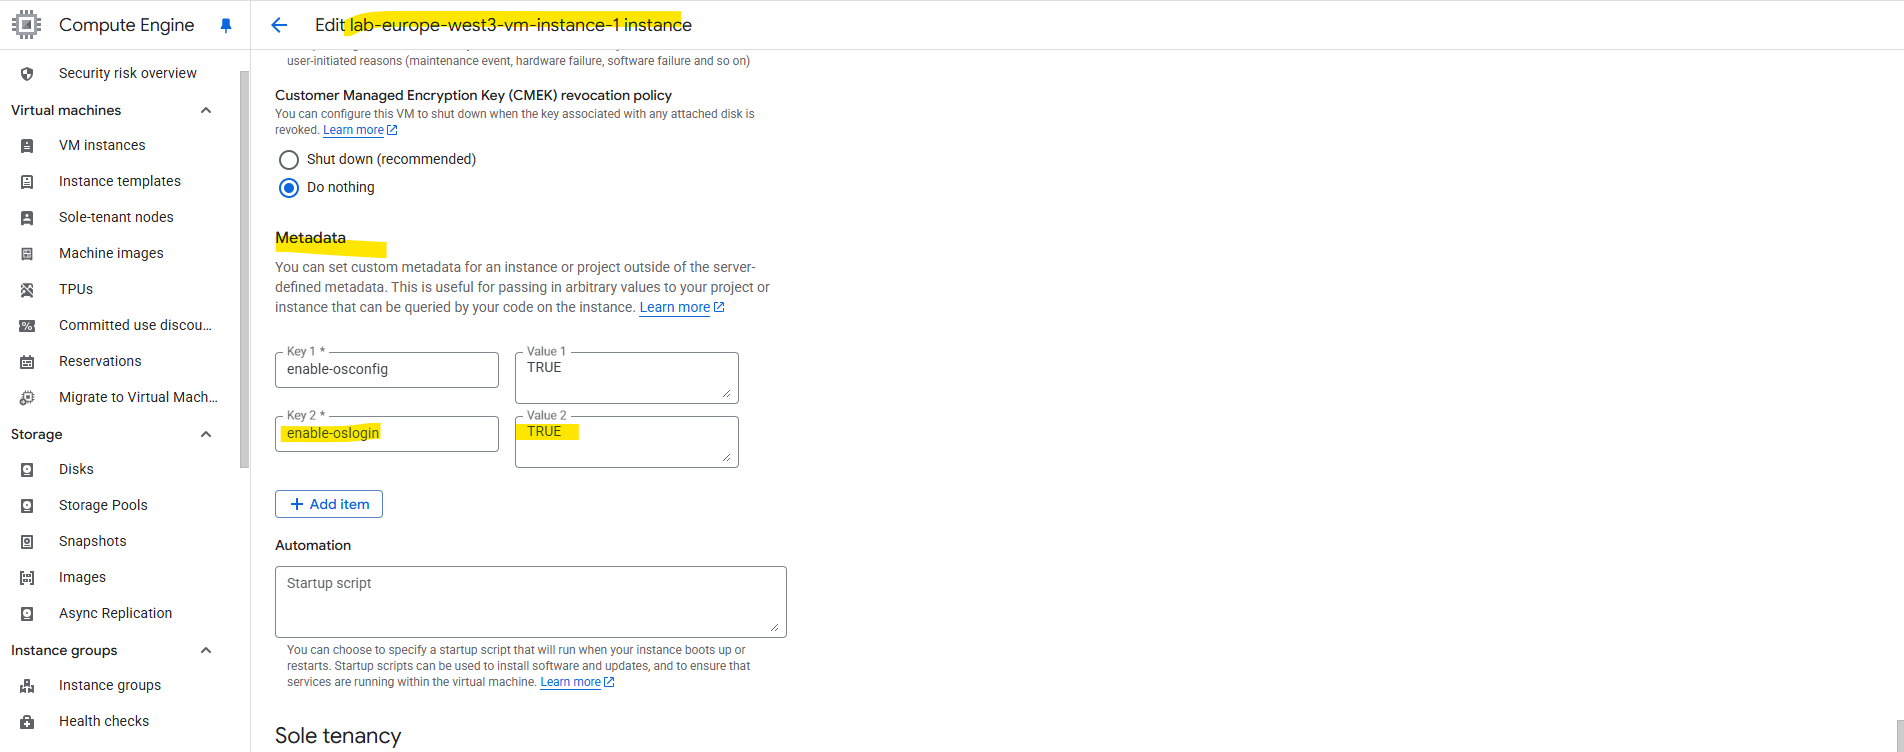
Project wide metadata section.

On the first sight OS Login looks like the out-of-the-box SSH-in-Browser login previously, but when taking a closer look we will see the differences.
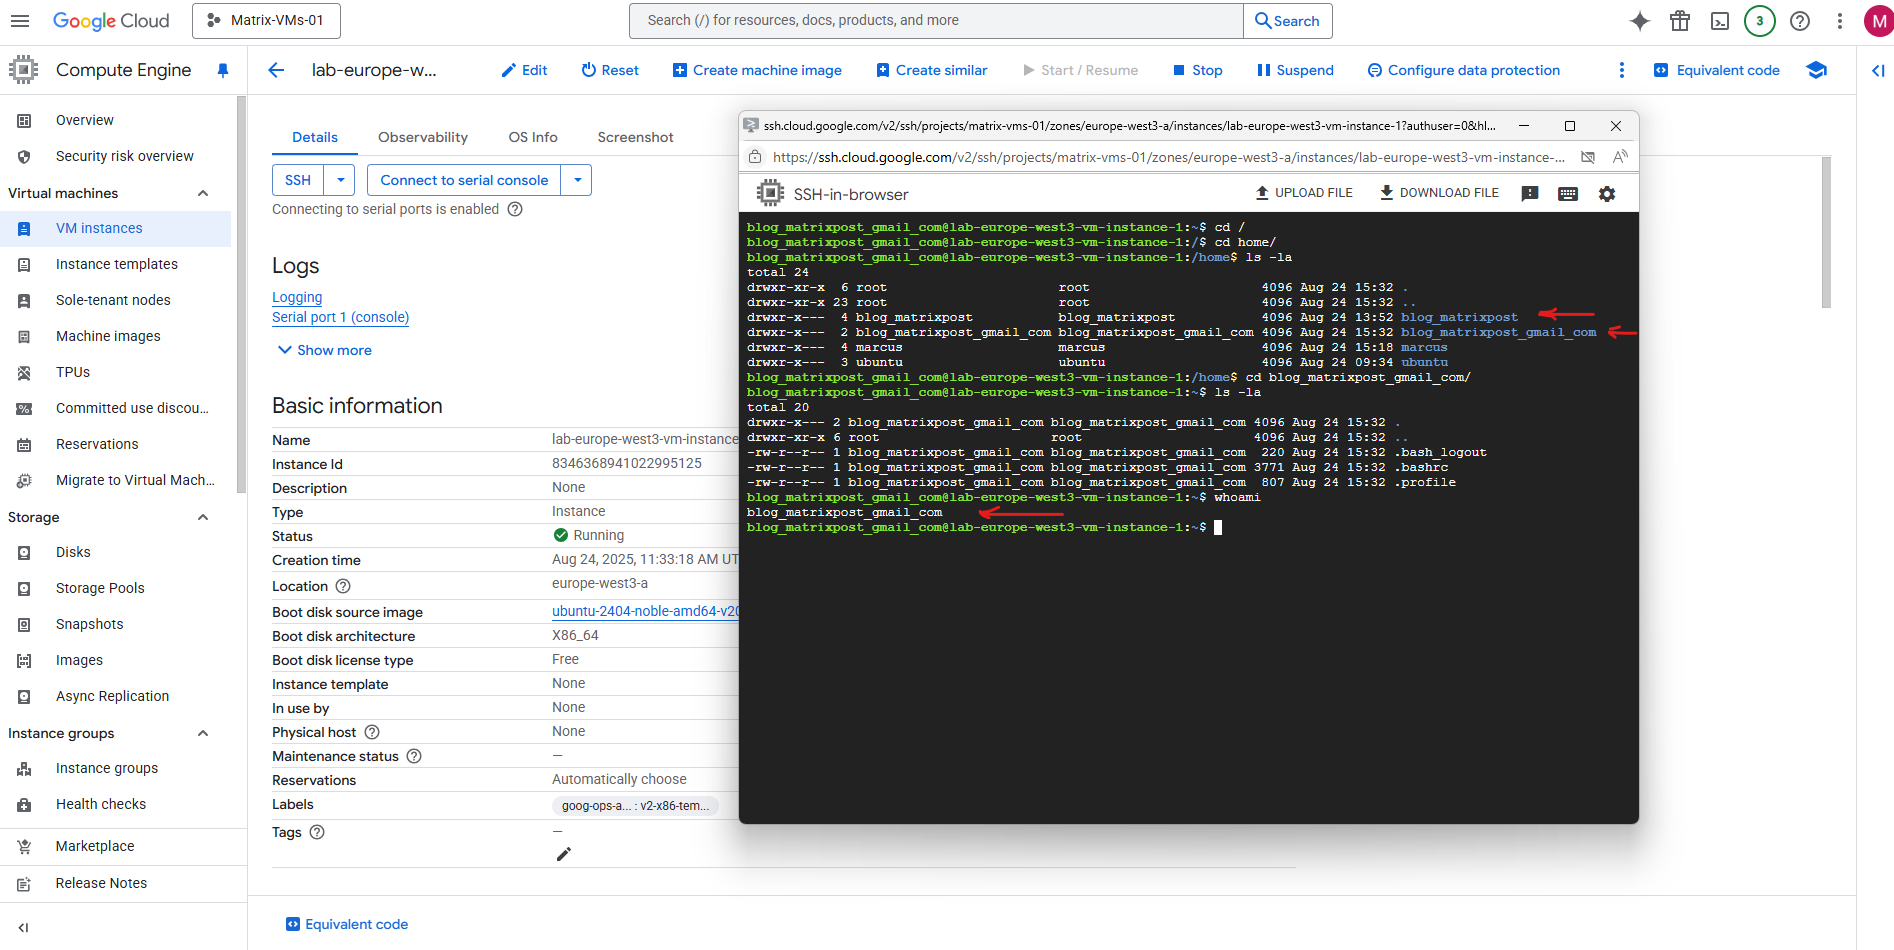
- No ~/.ssh folder by default → nothing to write, because the system doesn’t rely on local authorized_keys at all. SSH-in-Browser in contrast generates a temporary ephemeral SSH key pair.
- The username is now blog_matrixpost_gmail_com, same as my google accounts email address, previously for the out-of-the-box SSH-in-Browser login it was just blog_matrixpost, for this account just the prefix of your google account is used.
GCP Serial Console
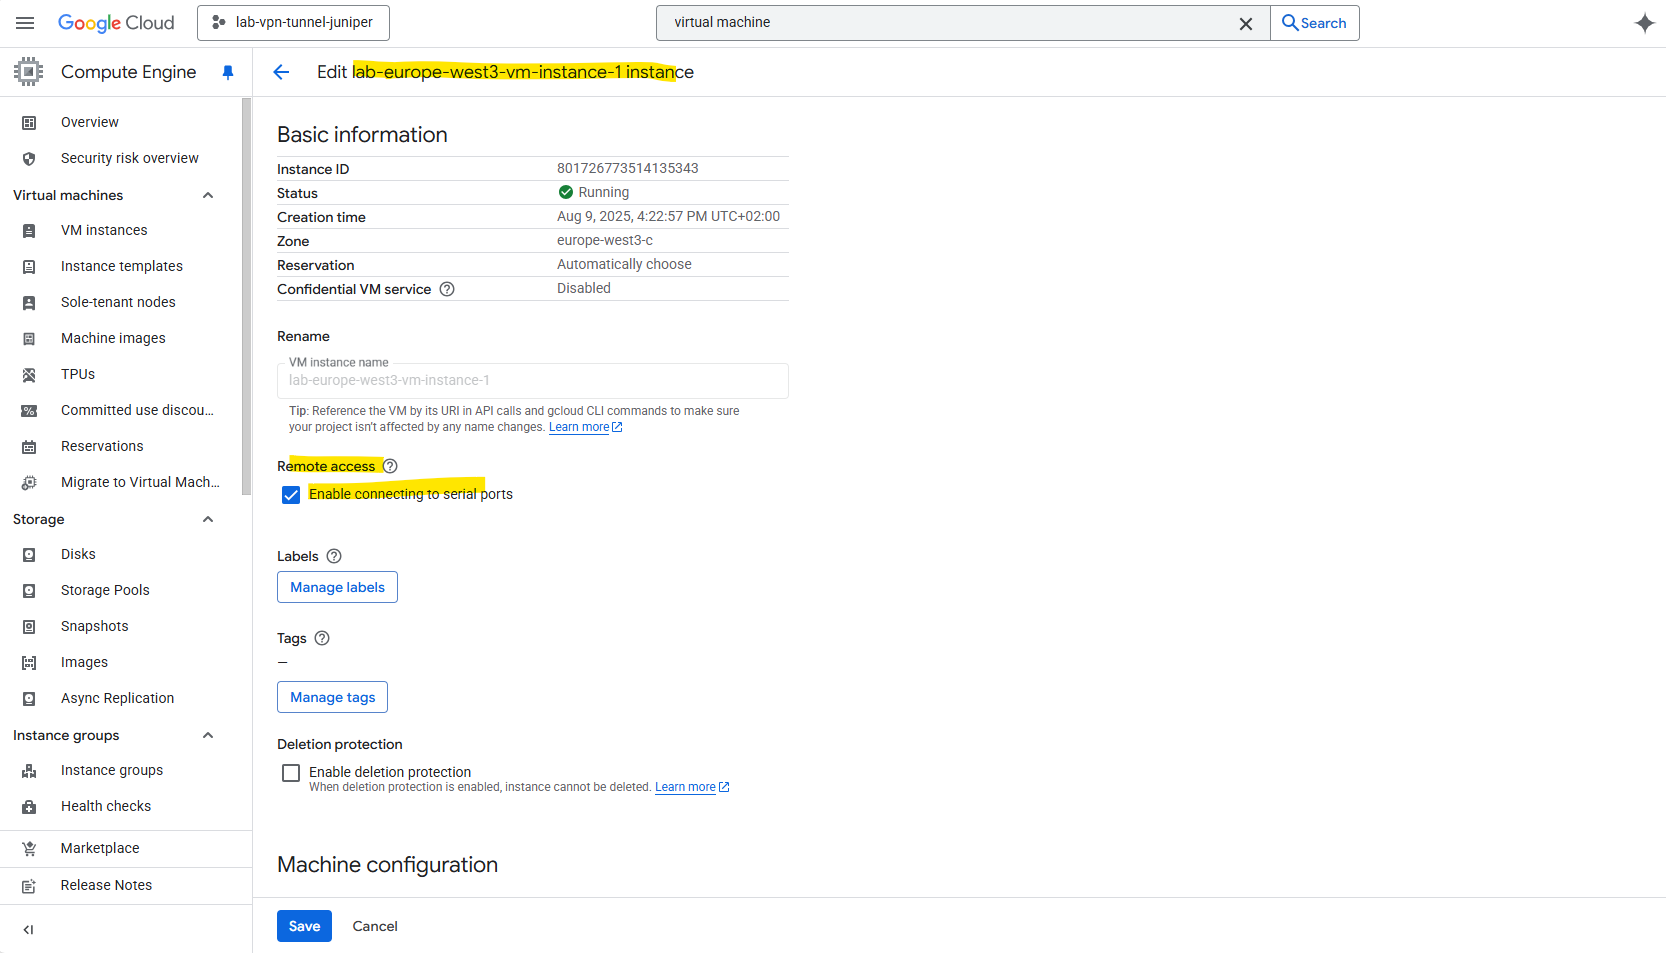
Below I will also enable connecting to the serial console.
The serial console is out-of-band, it works even when SSH-in-browser (or the network stack) is broken. If you lock yourself out with a bad firewall rule, kill sshd, bork routes/NICs, fill the disk, or the VM won’t boot, the serial console still lets you log in, see kernel/GRUB messages, drop to single-user, and fix it.
So I will check below under the Remote access section the checkbox named Enable connecting to serial ports. (this section is just available in Edit mode)
In case of Windows we haven’t access to the GUI console but we can use Windows Special Administration Console (SAC) where we can at least open its Command Prompt or start a PowerShell session.
More about the Special Administration Console (SAC) and how to access Windows Command Prompt or PowerShell from there, you will find in my following post https://blog.matrixpost.net/how-to-run-azure-vms-in-safe-mode-rdp-service-not-available-in-safe-mode-using-the-serial-console-in-azure/.
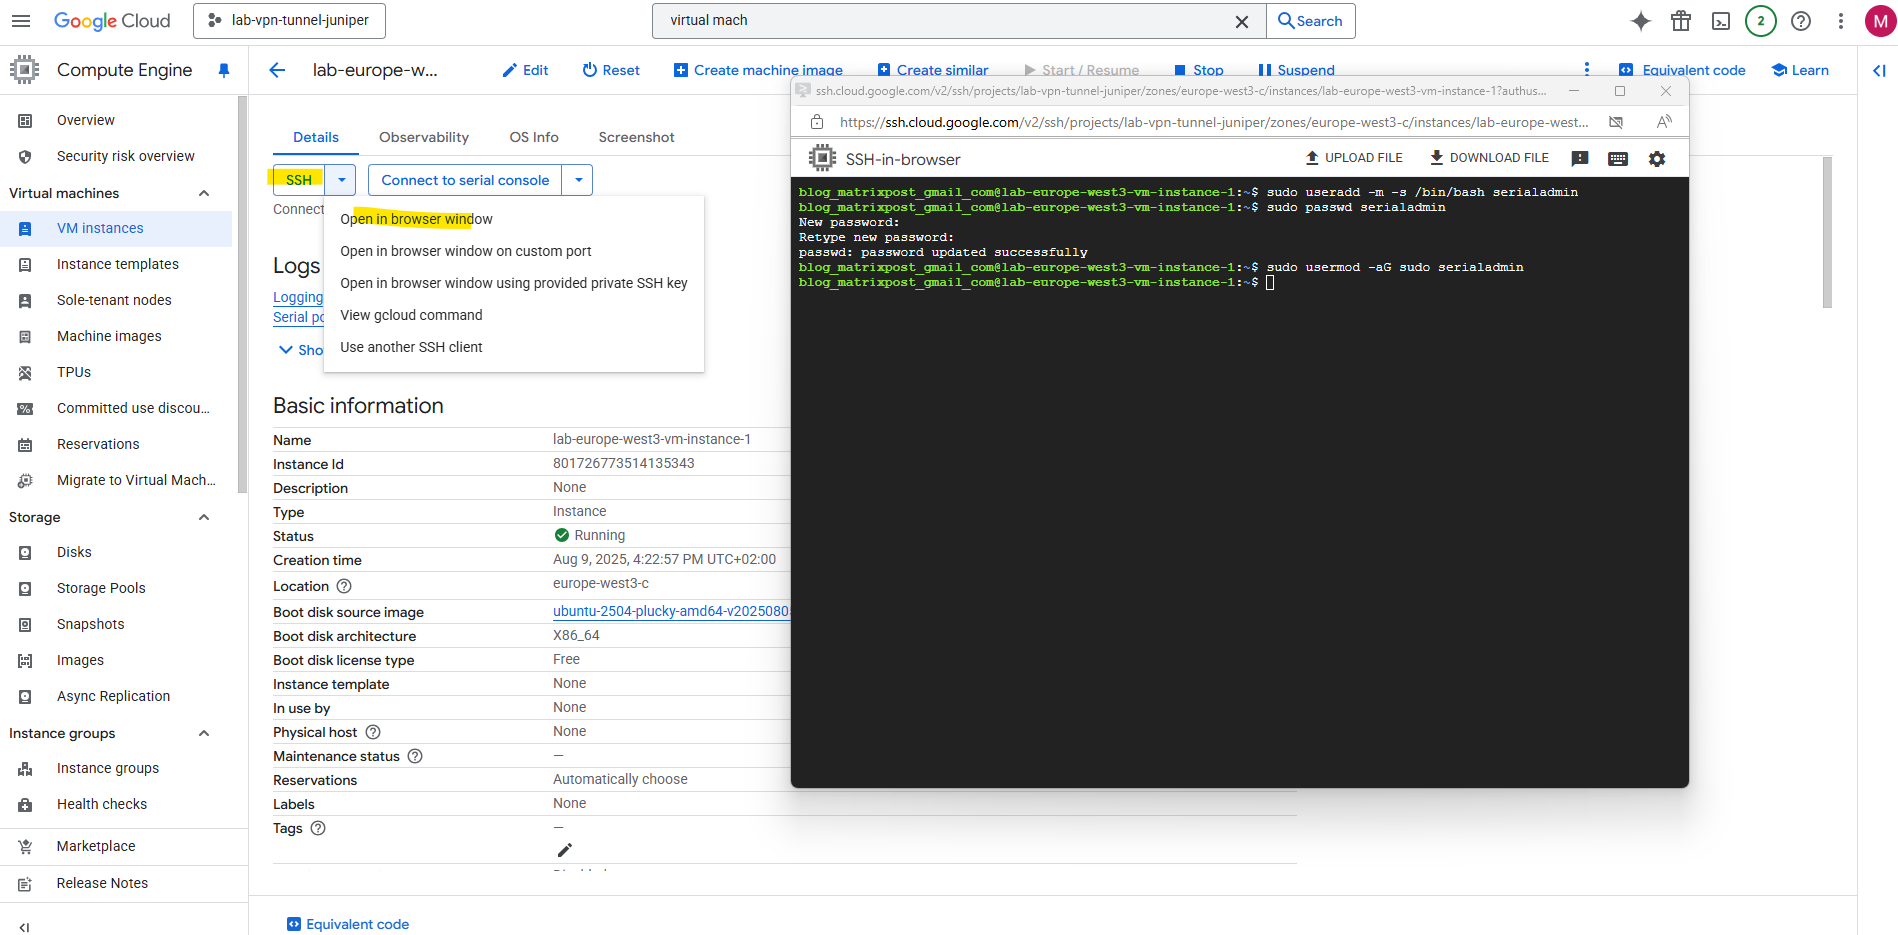
To create a new local user, we can use the out-of-the-box SSH-in-Browser method to connect to our virtual machine.
Create a new local user we can later use to connect directly to the serial console in case other connections won’t work anymore.
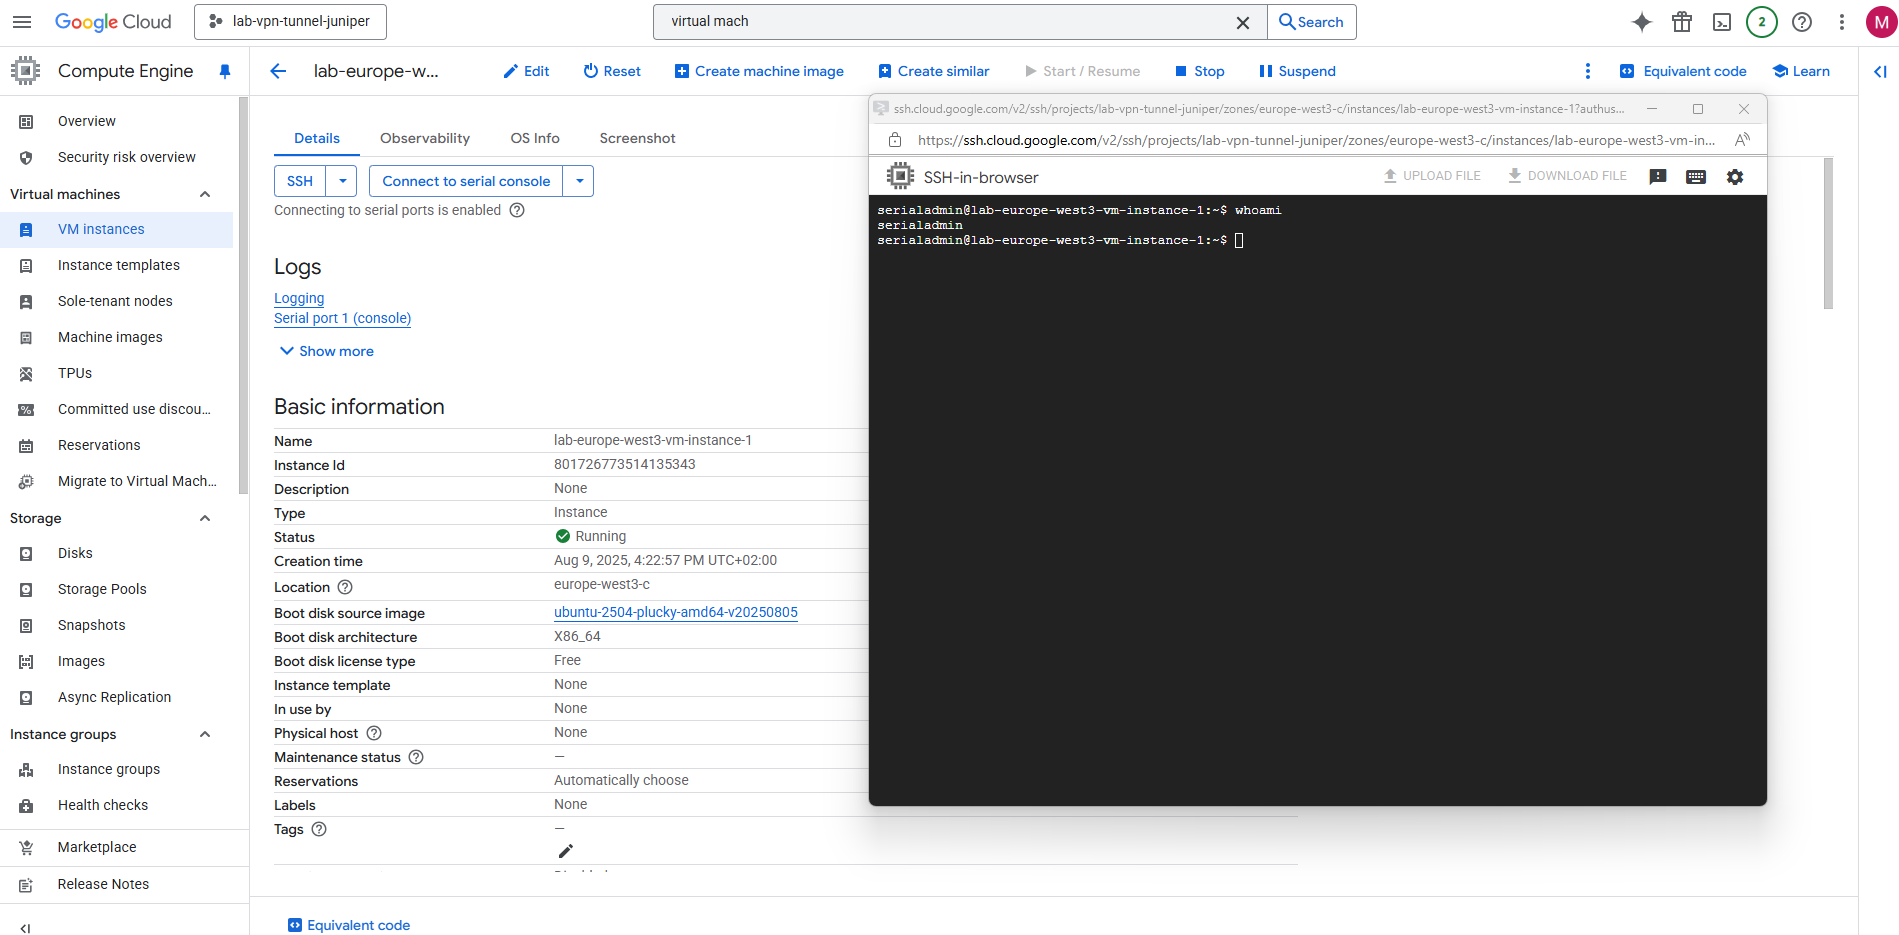
$ sudo useradd -m -s /bin/bash serialadmin
$ sudo passwd serialadmin
$ sudo usermod -aG sudo serialadmin
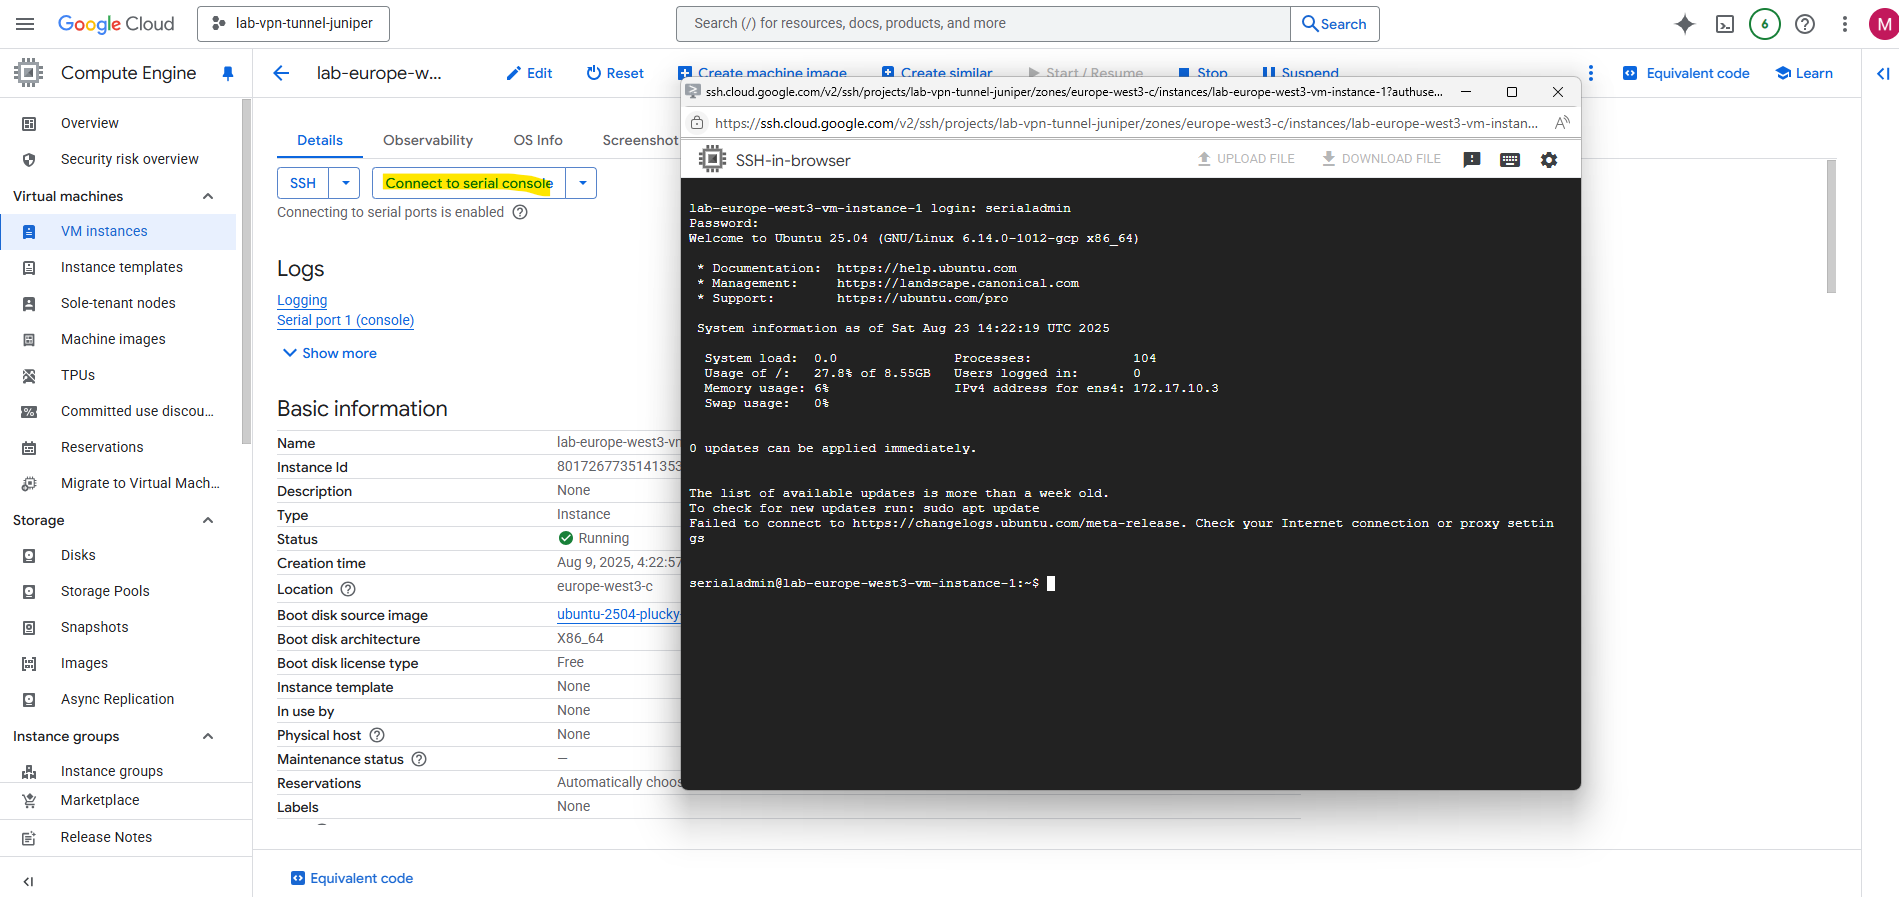
We can now connect to the serial console by clicking below on Connect to serial console -> Serial port 1 (console).
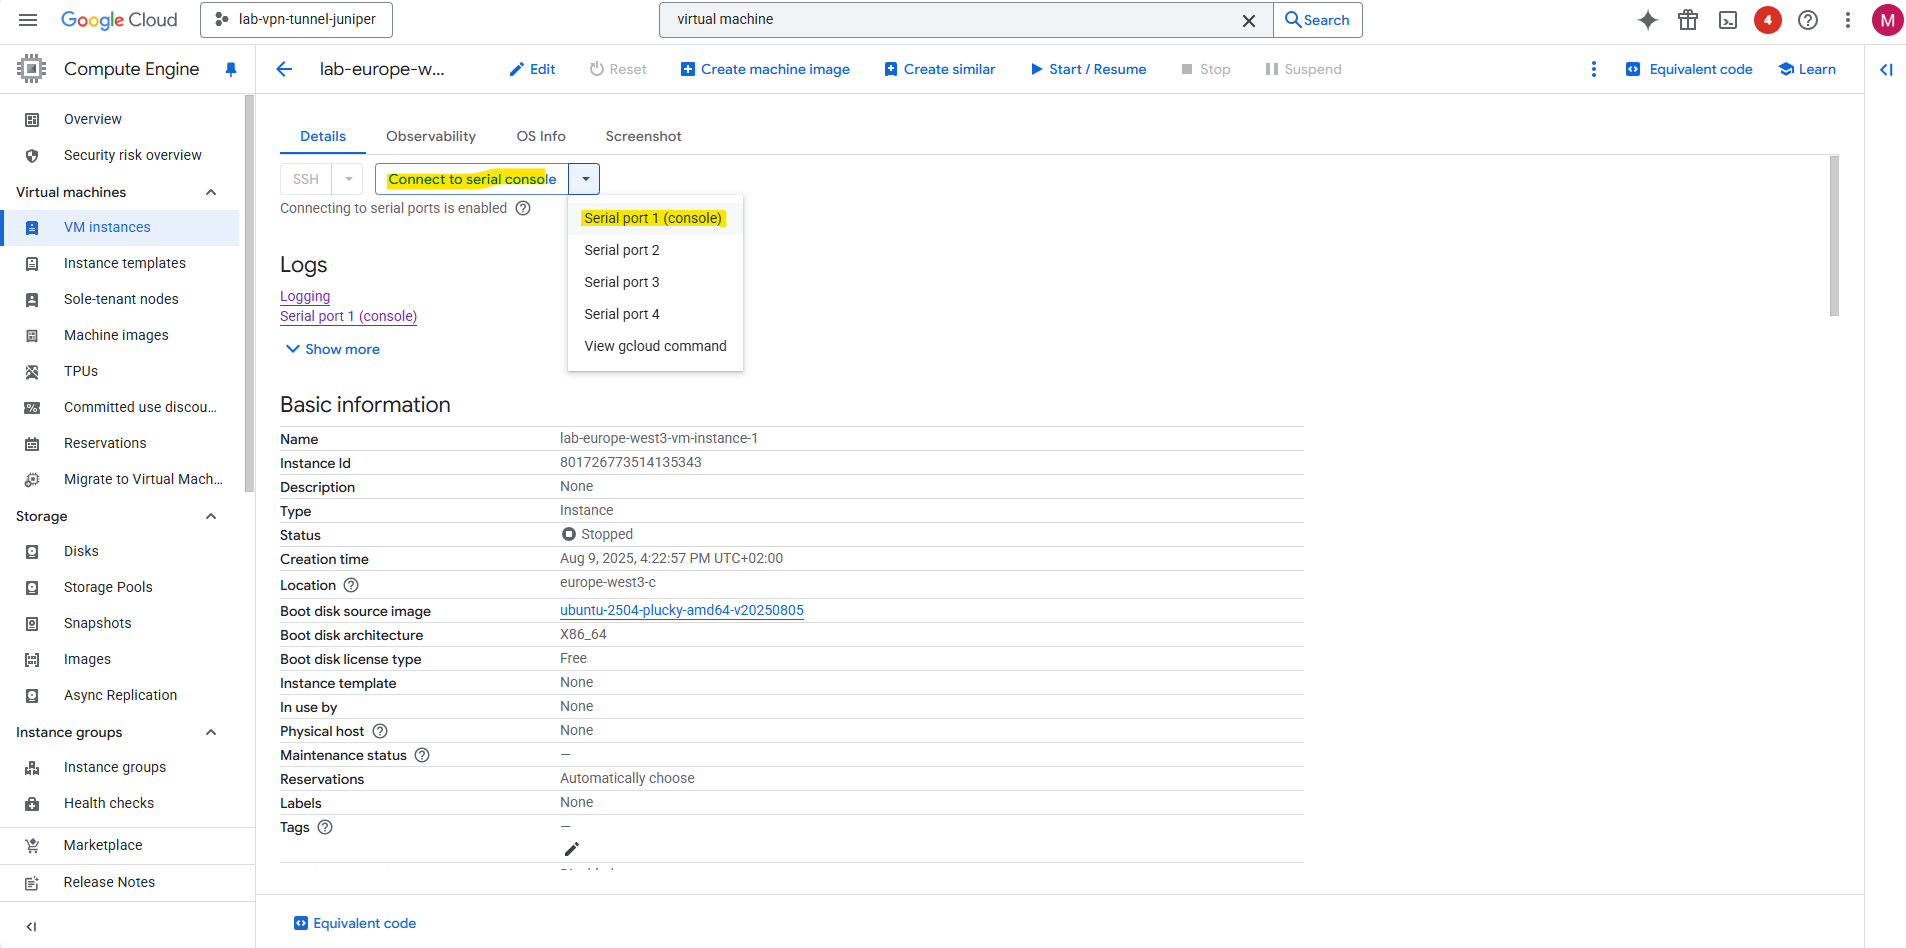
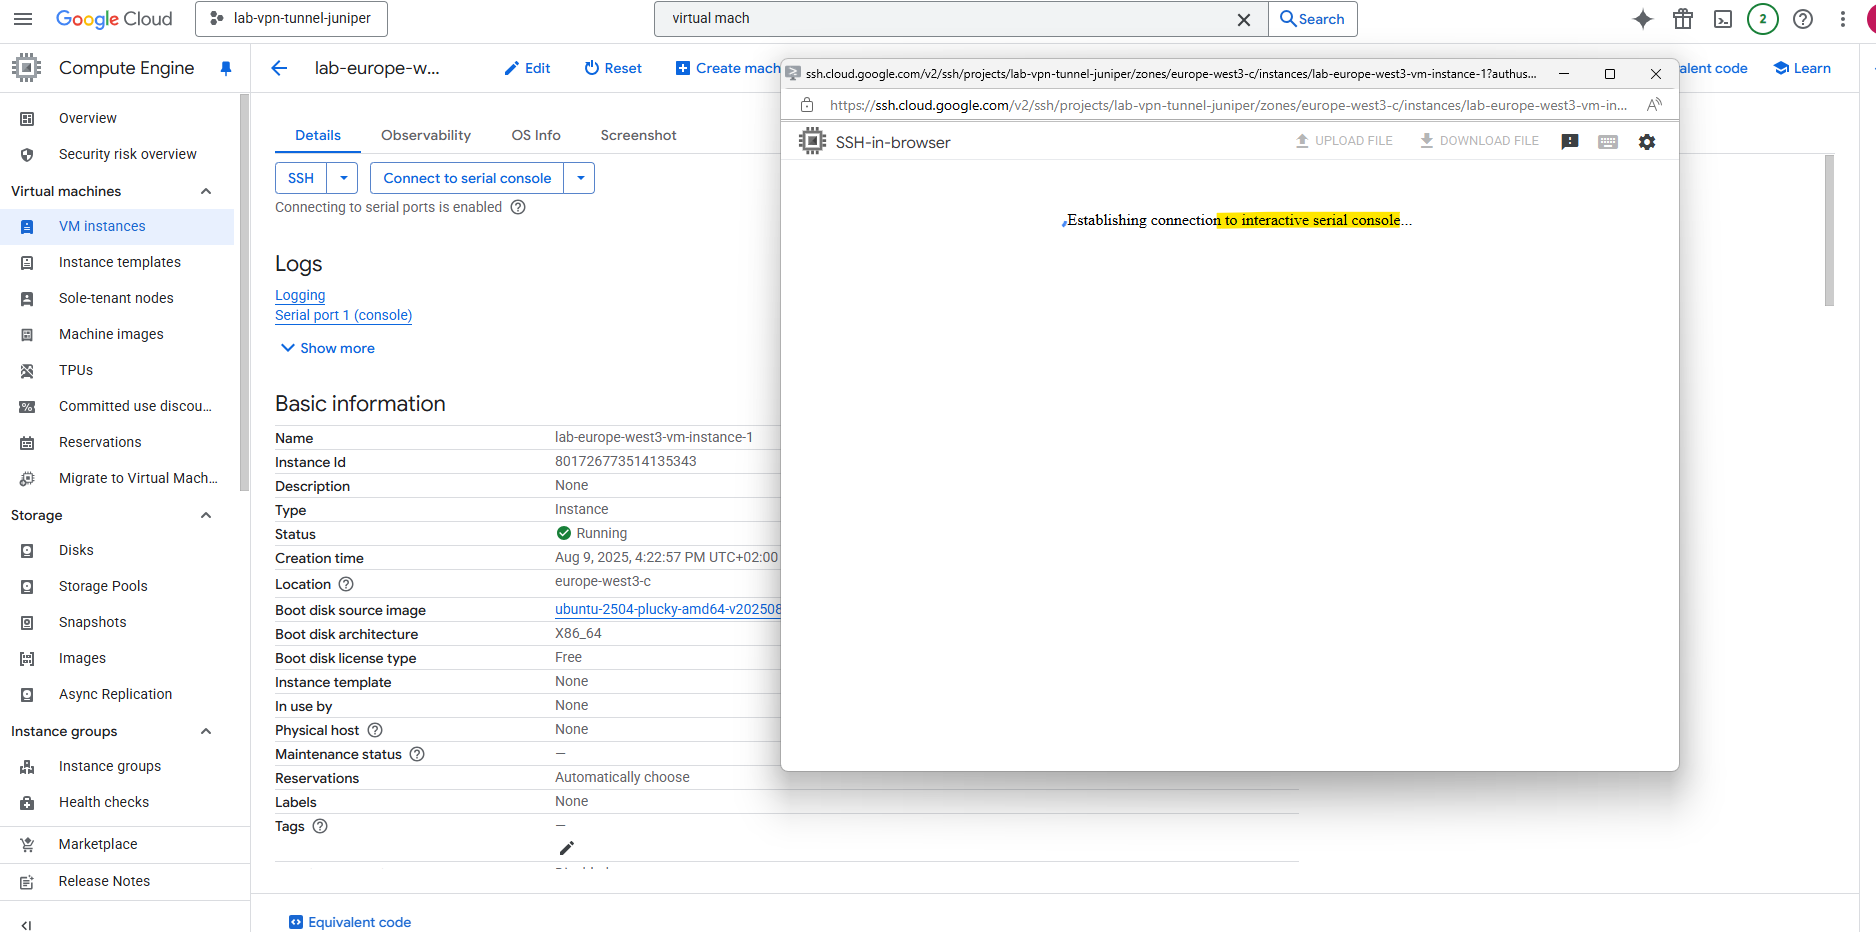
Connect to Serial Console
As mentioned the serial console is out-of-band, it works even when SSH-in-browser (or the network stack) is broken. If you lock yourself out with a bad firewall rule, kill sshd, bork routes/NICs, fill the disk, or the VM won’t boot, the serial console still lets you log in to the system.
To demonstrate this, I will now disable the ssh daemon on the virtual machine instance and then try to connect to by first using the ssh browser, which should fail and next the serial console which should still work.
To stop and disable ssh on GCP Linux virtual machines we first need to stop and disable the ssh.socket daemon.
Stopping ‘ssh.service’, but its triggering units are still active:
ssh.socket

Systemd’s socket-based activation is a method for starting services on-demand. Instead of a service starting at boot and continuously running, systemd listens on its behalf and only launches the service when a connection is made.
For the ssh daemon here e.g., traditionally, the sshd.service (the SSH daemon) would start at boot and listen on port 22, even if no one was trying to connect.
With socket activation, the sshd.socket unit is enabled instead of the sshd.service.
Systemd handles listening on port 22. When a client tries to connect via SSH, systemd detects the incoming connection and activates the sshd.service. It then passes the established connection directly to the sshd daemon, which then takes over and handles the authentication and session.
So to finally to completely disable ssh on the machine, we need to run the following commands.
systemctl disable is a soft disable. It prevents a service from starting automatically at boot. The service can still be manually started, or started as a dependency of another service. It works by removing the symbolic link that tells Systemd to start the service during boot.
systemctl mask is a hard disable. It makes it impossible for a service to be started in any way, whether manually by a user, automatically at boot, or as a dependency. It works by creating a symbolic link from the service unit file to /dev/null, effectively making the service “invisible” and unusable to Systemd.
# Stop & disable socket activation first (prevents auto-start on connect)
systemctl stop ssh.socket
systemctl disable ssh.socket
systemctl mask ssh.socket

# Then stop/disable the service itself
systemctl stop ssh
systemctl disable ssh
systemctl mask ssh
So now on TCP port 22 no service is listening anymore.
$ ss -anpt
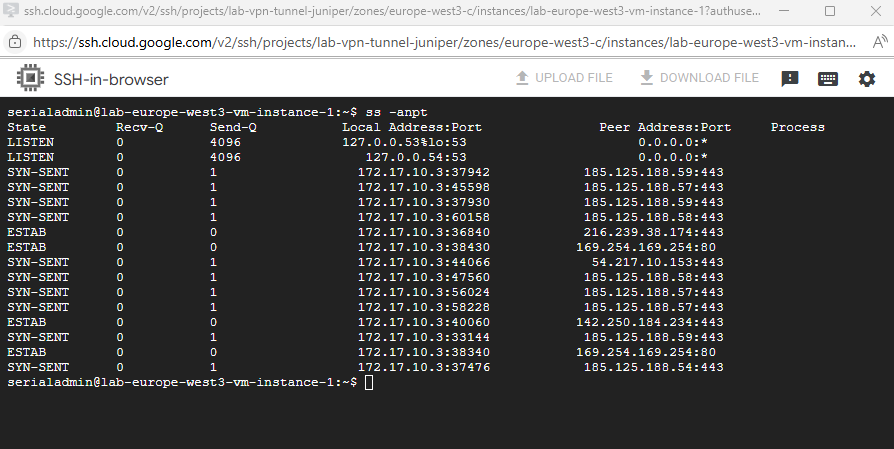
When we now try to connect to by using the SSH browser the connection will fail as no service is listening on TCP port 22.
Using the serial console will of course still working.
Cloud Shell Instance (Linux VM)
Cloud Shell provisions a Compute Engine virtual machine running a Debian-based Linux operating system for your temporary use. This virtual machine is owned and managed by Google Cloud, so will not appear within any of your Google Cloud projects.
Cloud Shell instances are provisioned on a per-user, per-session basis. The instance persists while your Cloud Shell session is active; after an hour of inactivity, your session terminates and its VM is discarded. For more on usage quotas, refer to the limitations guide.
With the default Cloud Shell experience, you are allocated with an ephemeral, pre-configured VM and the environment you work with is a Docker container running on that VM.
You can also customize your environment automatically on VM boot to ensure that your Cloud Shell instance includes your preferred tools.
Cloud Shell is an interactive shell environment for Google Cloud that lets you learn and experiment with Google Cloud and manage your projects and resources from your web browser.
The Cloud Shell terminal comes with the gcloud CLI, Docker, Terraform, and other command-line utilities preinstalled and automatically authenticates you with your Google credentials, so you can use the terminal to run sample code in the documentation.
This means that you can enable and experiment with Cloud APIs, start long-running operations, and manage your Google Cloud resources from the command line without leaving documentation.
If you’d prefer a standalone session, you can launch a Cloud Shell session with shell.cloud.google.com. The Cloud Shell terminal and Cloud Shell Editor are automatically started for you.
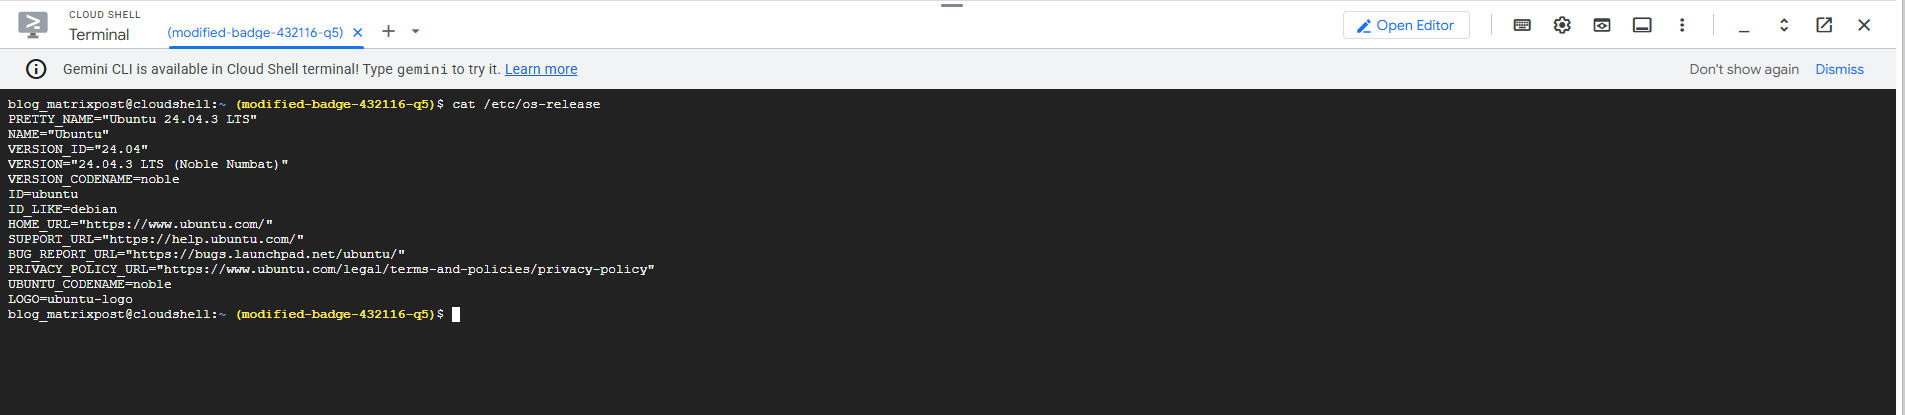
The Cloud Shell using a mentioned a temporary Linux environment, when running the cat /etc/os-release command we can see it is using here Ubuntu as OS.
The only persistent file system / partition here is your /home folder where you can save data to.
Cloud Shell provisions 5 GB of free persistent disk storage mounted as your $HOME directory on the virtual machine instance. This storage is on a per-user basis and is available across projects. Unlike the instance itself, this storage does not time out on inactivity. All files you store in your home directory, including installed software, scripts and user configuration files like .bashrc and .vimrc, persist between sessions. Your $HOME directory is private to you and can’t be accessed by other users.
Source: https://cloud.google.com/shell/docs/how-cloud-shell-works#persistent_disk_storage

Source: https://cloud.google.com/shell/docs/how-cloud-shell-works
In Part 3 part we will see how to create a new Windows virtual machine instance (Windows Server 2025) and how to connect to by using RDP and SSH. Further we will see how to connect to the serial console.
Links
Cloud Shell documentation
https://cloud.google.com/shell/docsHow Cloud Shell works
https://cloud.google.com/shell/docs/how-cloud-shell-worksGoogle Cloud Shell Tutorial for Beginners
https://www.youtube.com/watch?app=desktop&v=RdDyF3jVbbEAbout SSH connections
https://cloud.google.com/compute/docs/instances/sshAbout OS Login
https://cloud.google.com/compute/docs/osloginIdentity-Aware Proxy overview
https://cloud.google.com/iap/docs/concepts-overview