Set up OpenVPN (pfSense) Point-to-Site (P2S) with RADIUS/Active Directory Authentification
Because of the annoying Windows 10 DNS LEAK problem in combination with the native windows vpn, I decided to setup an OpenVPN Applicance with pfSense to provide an alternative VPN Dial-In Gateway which addressed already the problem.

You will find many articles on how to avoid this by set a couple of group policy settings and switch to a low static metric for the vpn adapter, but there are no guaranty that windows 10 will not still use the dns response from your local gateway first instead from the corporate network.
What is OpenVPN?
OpenVPN is open-source commercial software that implements virtual private network (VPN) techniques to create secure point-to-point or site-to-site connections in routed or bridged configurations and remote access facilities. It uses a custom security protocol that utilizes SSL/TLS for key exchange. It is capable of traversing network address translators (NATs) and firewalls. It was written by James Yonan and is published under the GNU General Public License Version 2 (GPLv2).
OpenVPN runs a custom security protocol based on SSL and TLS rather than supporting IKE, IPsec, L2TP or PPTP. OpenVPN offers support of smart cards via PKCS#11-based cryptographic tokens.
Source: https://en.wikipedia.org/wiki/OpenVPN
OpenVPN vs IKEv2 vs PPTP vs L2TP/IPSec vs SSTP – Ultimate Guide to VPN Encryption
https://proprivacy.com/vpn/guides/vpn-encryption-the-complete-guide
OpenVPN vs SSTP VPN: Which Protocol is Best for Your Use?
https://www.purevpn.com/blog/openvpn-vs-sstp-vpn/
About SSTP
https://www.vpnmentor.com/blog/how-to-use-a-vpn-with-sstp-secure-socket-tunneling-protocol/
Set up the RADIUS Authentification Server (Windows Server Network Policy and Access Services Role)
For RADIUS Authentification of course we need a RADIUS Server which will provide Microsoft with the Network Policy and Access Services Server Role.
So if still not installed yet in your network first thing is to provide this Role.
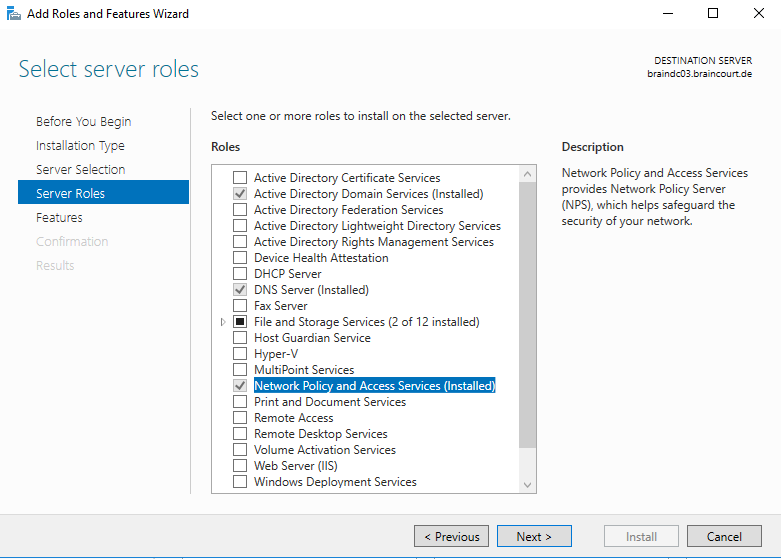
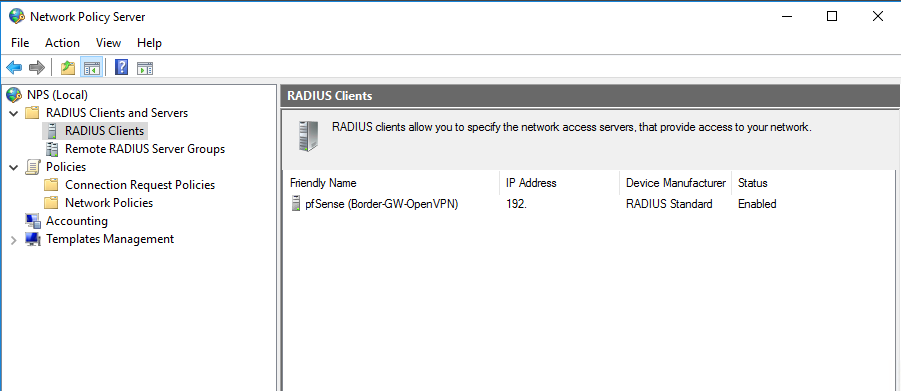
On the Network Policy Server we must add the pfSense Appliance as a new RADIUS Client. Here you must enter a friendly Name for the client and it’s internal IP Address. Further a shared secret which we also must set at pfSense.
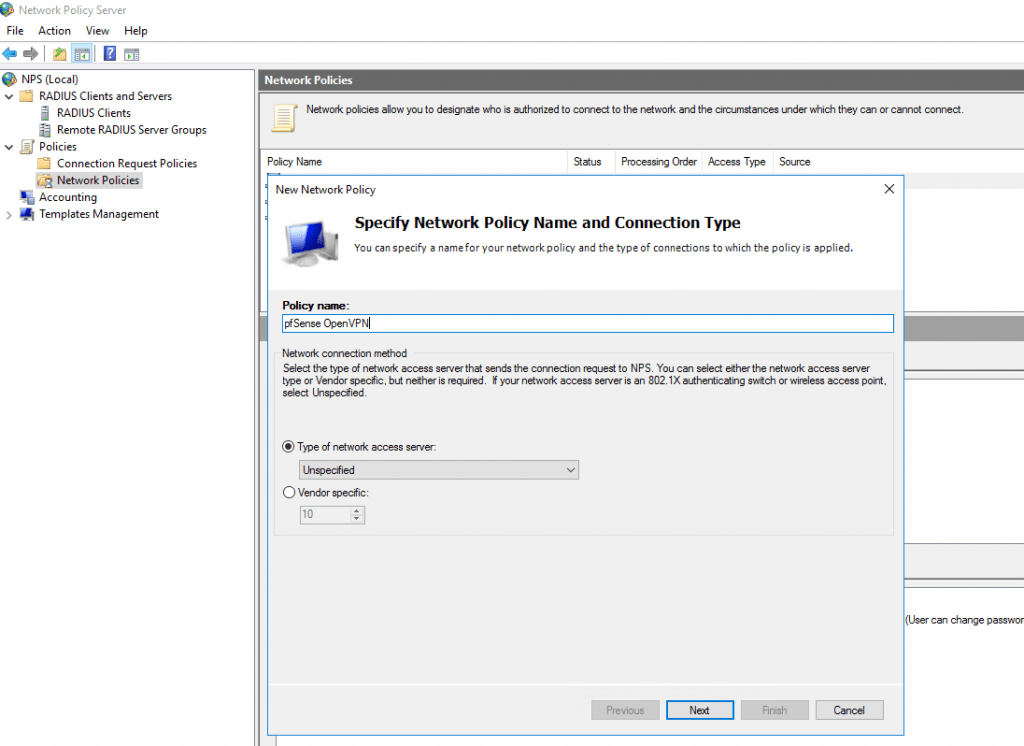
To allow Clients to dialin we must further create a Network Policy which grant dialin permission.
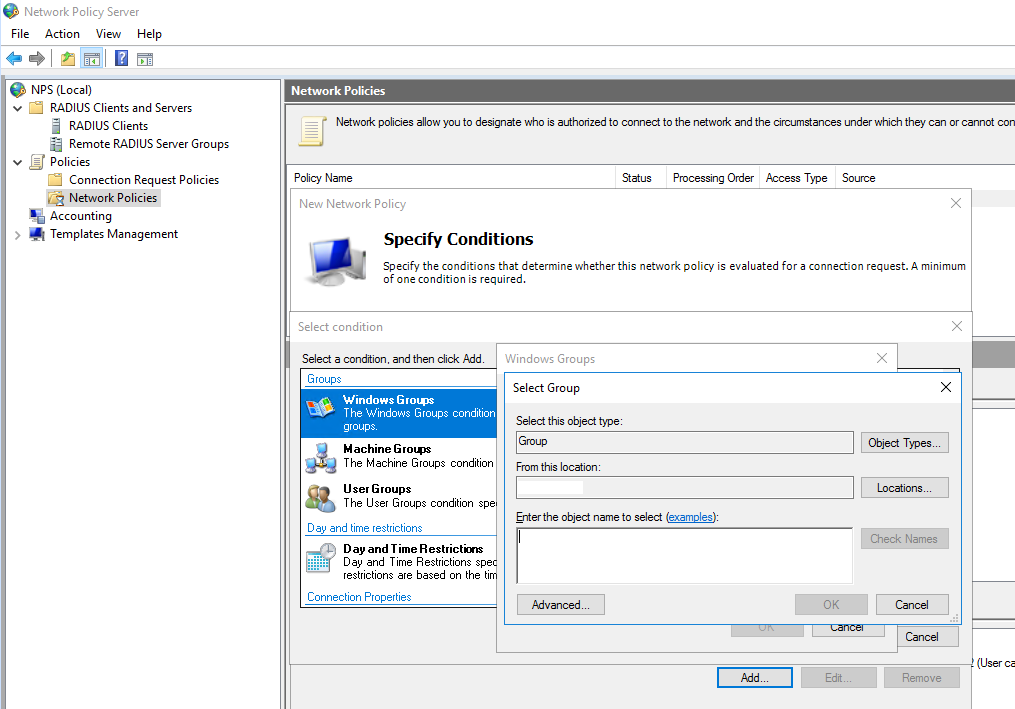
Create or select an Active Directory Group and place all users in it who should be allowed to dialin from remote.
Attach this windows group in the Specify Conditions dialog.
Grant Access for this group.
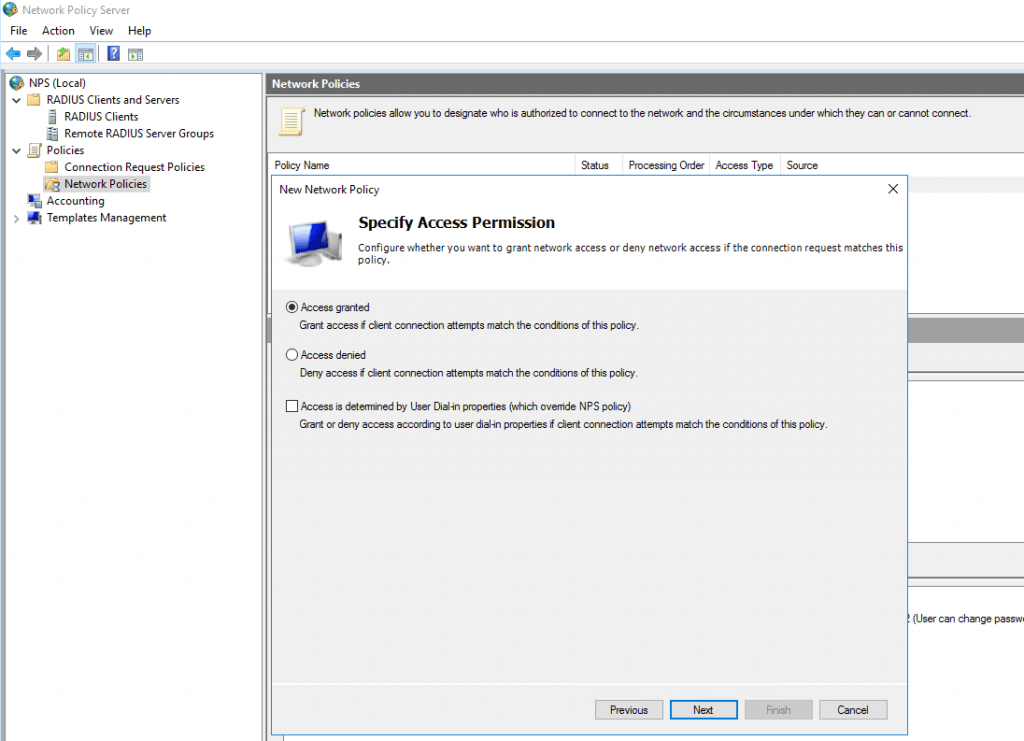
Leave the default settings for Authentification and also for the next two dialogs with Configure Contraints and Settings.
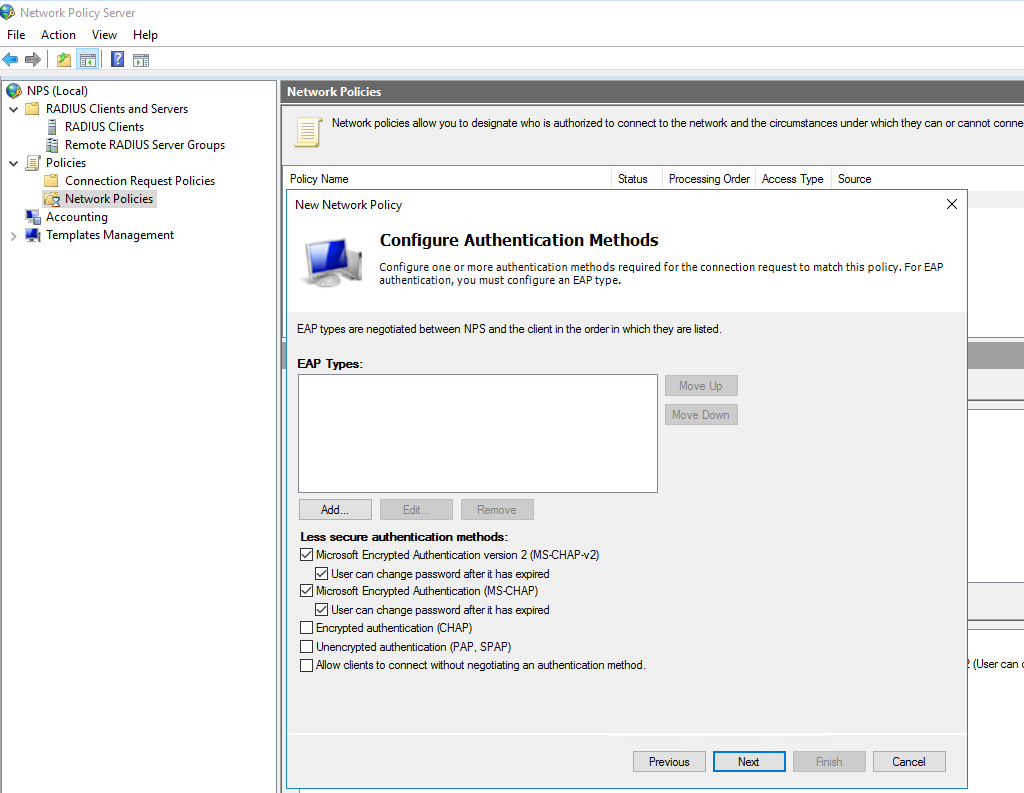
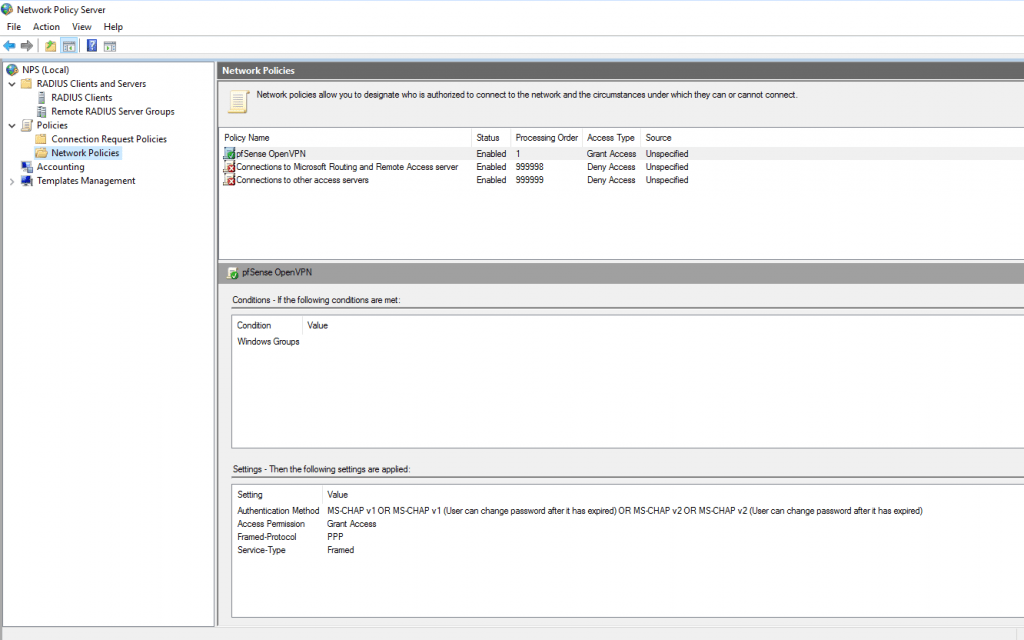
So far configuration of the RADIUS Server is complete!
pfSense Configuration
RADIUS Configuration
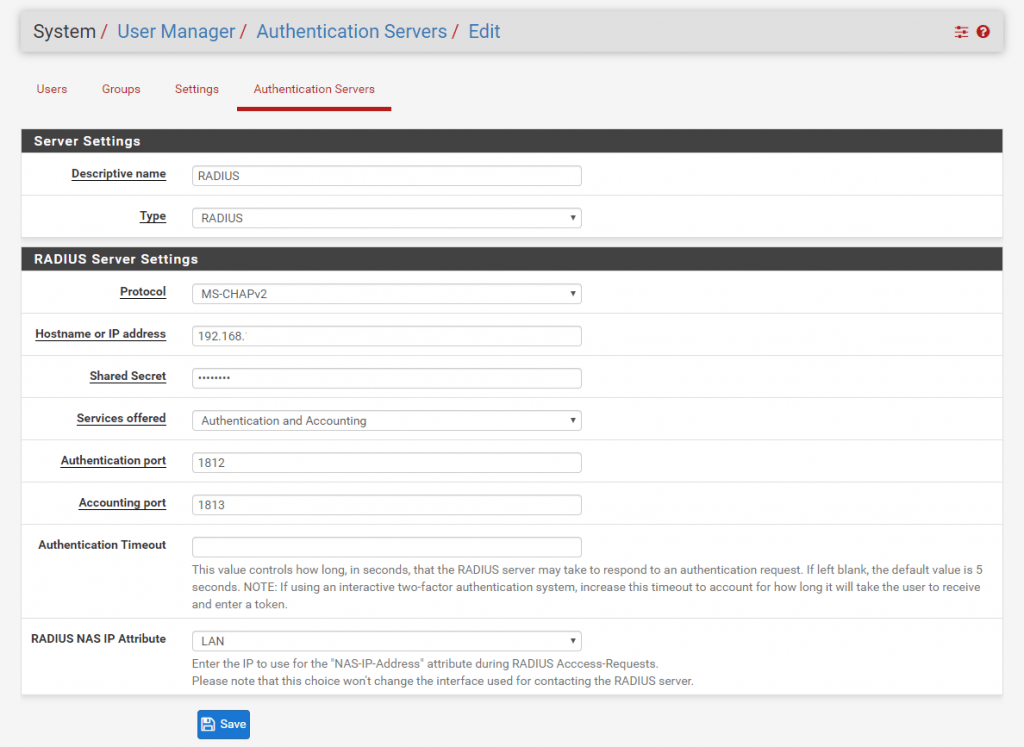
Let’s go to pfSense and there we first add and setup an Authentification Server.
Go to System – User Manger – Authentification Servers and click Add
For the description name we use RADIUS or any other name as it’s only for our information. The Type must be RADIUS of course and for the protocol you can leave MS-CHAPv2. Further we need to enter the ip address of the RADIUS Server and the shared secret we choose previous at adding the RADIUS Client in our NPS console. Leave the ports and the default timeout. Last Step here is to select the internal interface of pfSense for RADIUS NAS IP Attribute.
Next we must create or import a Certification Authority. In this case we import our existing internal company CA from the Active Directory Certification Services (ADCS).
For an only working purpose a self signed newly created CA will be enough and works also. I used our internal CA as the root certificate is on each corporate computer deployed and therefore be trusted from all.
When exporting and installing the Client, the root certificate from the CA will be installed into the config folder from OpenVPN, so it doesn’t matter if it is trusted or not from the computer itself, OpenVPN will trust it. Even if you use a trusted CA for the OpenVPN Server certificate, OpenVPN client will still need the root certificate in the config folder, otherwise you cannot connect to the server.
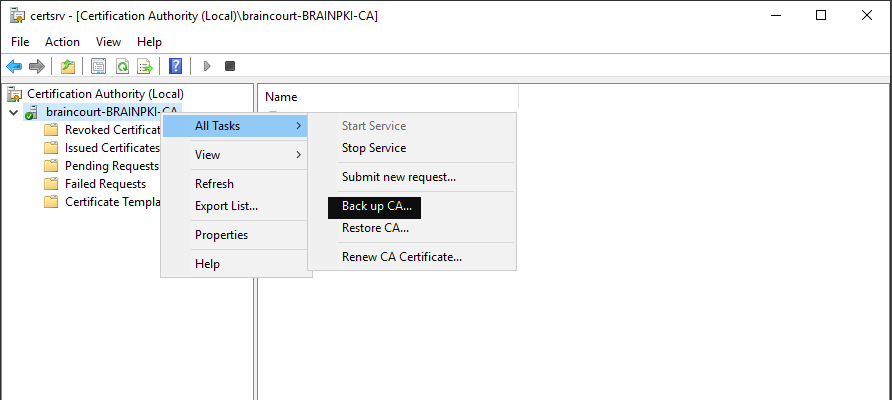
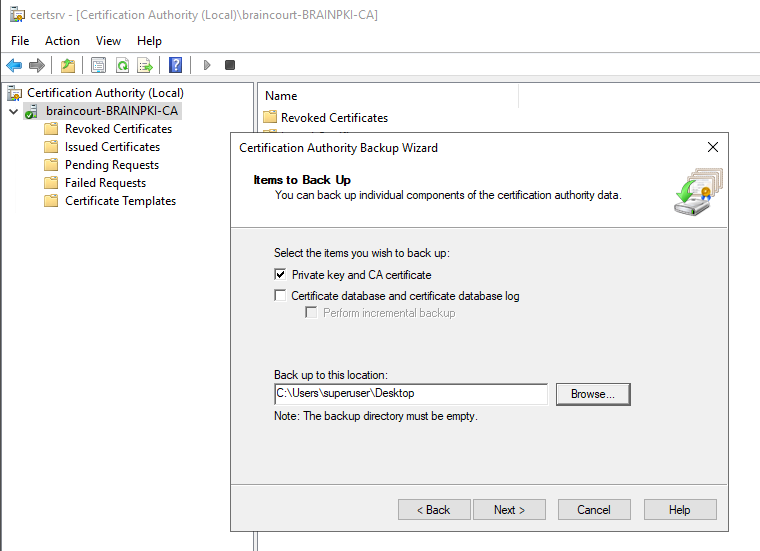
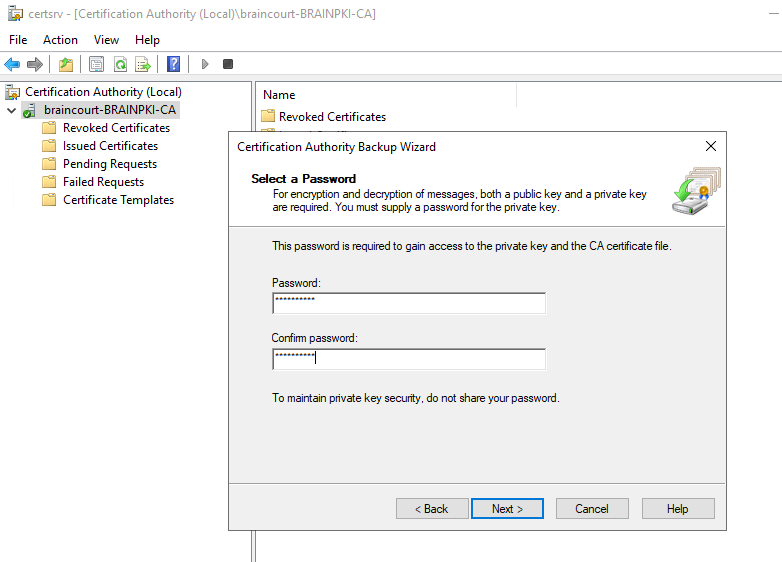
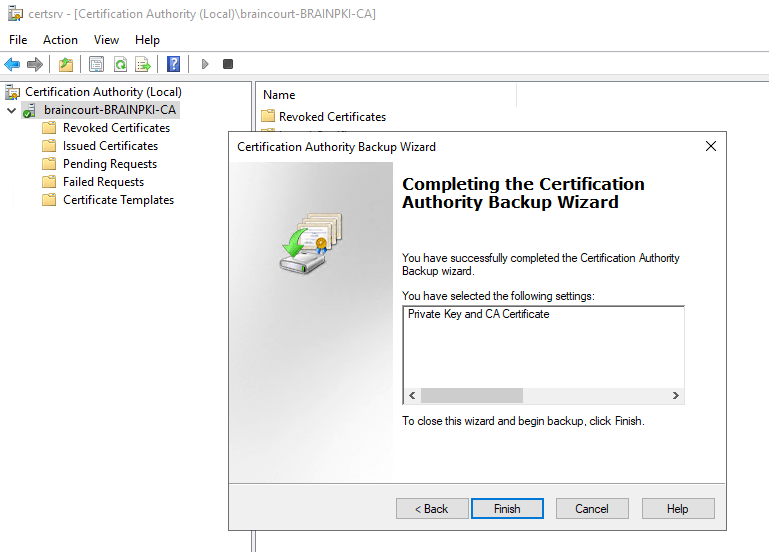
So now we export the Root Cert with the corresponding Private Key that we later can import them into pfSense. The Private key is also needed that the CA can be used to create new certificates or CRL entries on pfSense.
Export the Private key and CA Certificate:
To use this PKCS File we first had to export the private and public key from it. So we need openssl.
Extract the private key:
Don’t be confused if the Enter PEM pass phrase is requested mutiple times! This depends on how many previous CA certificates exists on your PKI.

Extract the certificate:
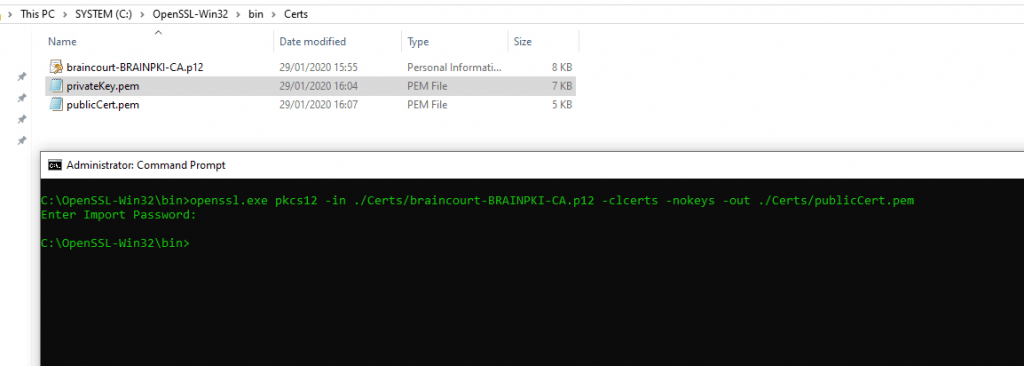
Run the following command to decrypt the private key:

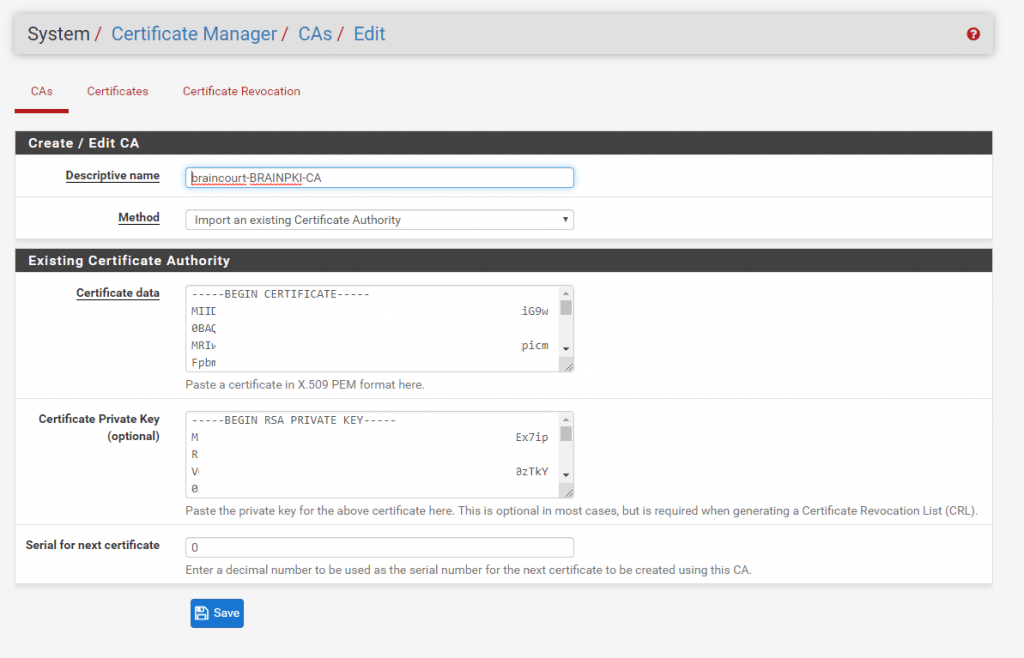
After this we can import the CA into pfSense, therefore go to System – Cert Manager – CAs and click Add
Here select Import an existing Certification Authority

Insert the previous exported public and private key and enter an serial number for the next certificate, can be 1.

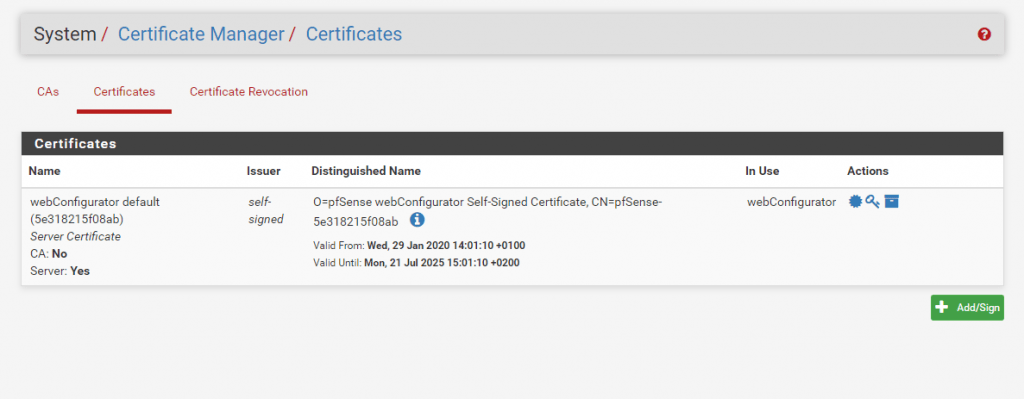
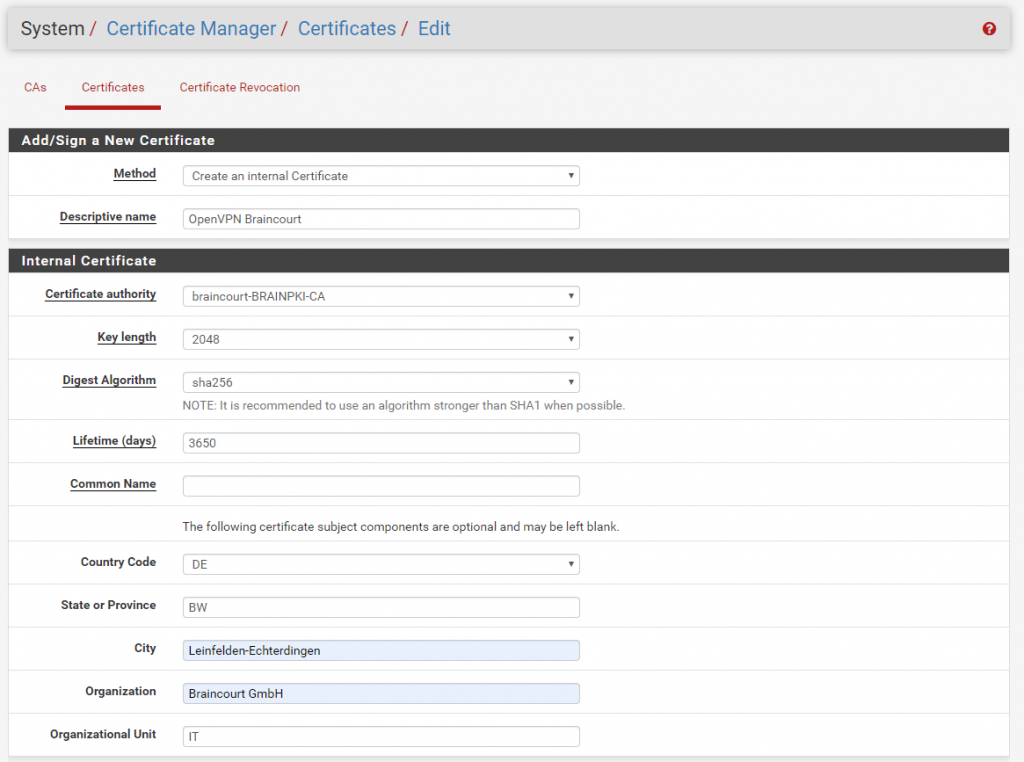
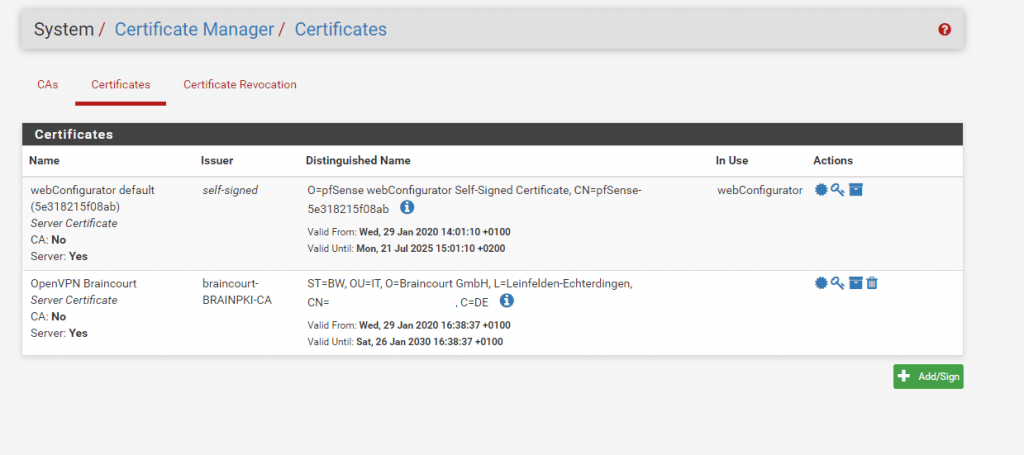
Now we must create a Server Certificate which is then signed from our internal CA.
Don’t forget the Common Name and SANs (Alternative Names) if needed at the end!

pfSense OpenVPN Configuration
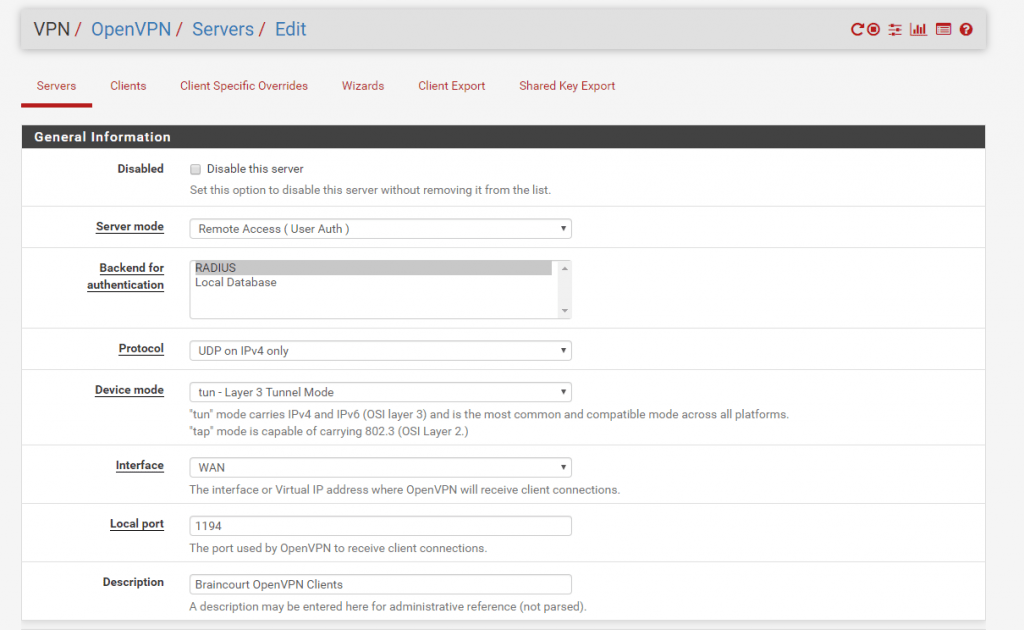
As we setup the RADIUS Server and configured the CA and server certificate, now we come to the actually setup of the OpenVPN Server, therefore go to VPN – OpenVPN and click under Servers the Add button.
As you can see, I used here for the protocol UDP with the local Port 1194 which ist reserved for OpenVPN. Best performance you will get with UDP but OpenVPN can also run with TCP and any other Port.
Therefore you can run OpenVPN with TCP and Port 443 like SSTP. This brings the benefit that users can dial-in from remote networks with restricted outbound traffic rules as HTTP and HTTPS over Port 80 and 443 in most networks outbound allowed.
At Server mode I used Remote Access (User Auth). Recommended and more secure is the Remote Access (SSL/TLS + User Auth).
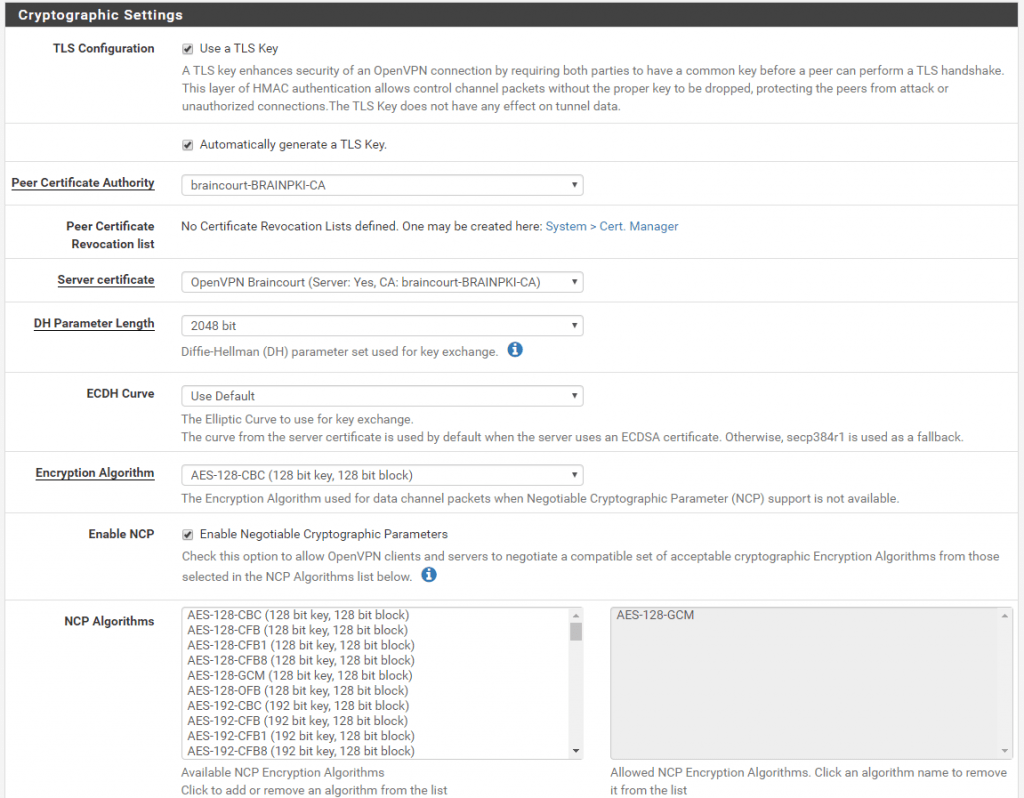
But as we authenticate against RADIUS Server and Active Directory, I don’t want to create for each user a certificate and therefore a separate client install package. Therefore be sure to check Use a TLS Key which enhances the security by adding a further secret as only user and password. If checked, for the user is installed a static key in the config folder which is the same as on the server.
Under https://en.wikipedia.org/wiki/HMAC you will find more about this TLS Key known as Keyed-Hash Message Authentication Code.
At IPv4 Tunnel Network below you must specify a network range in which your dialin clients reside.
If you have enabled netmask ordering on your DNS servers and have more than one AD Site, be aware to use a range near your physical AD Site on which the clients dialin!
Otherwise your vpn clients maybe will get for DNS requests which resides on multiple AD Sites, the IP from a system at the remote site.
More about netmask ordering you can read my following post.
Also under IPv4 Local nework(s) or IPv6 if used, add your local subnets which should be accessible from the vpn clients.
Also keep in mind, that clients/systems in the local network which should be accessible for the remote clients, should know the route into the Tunnel Network!
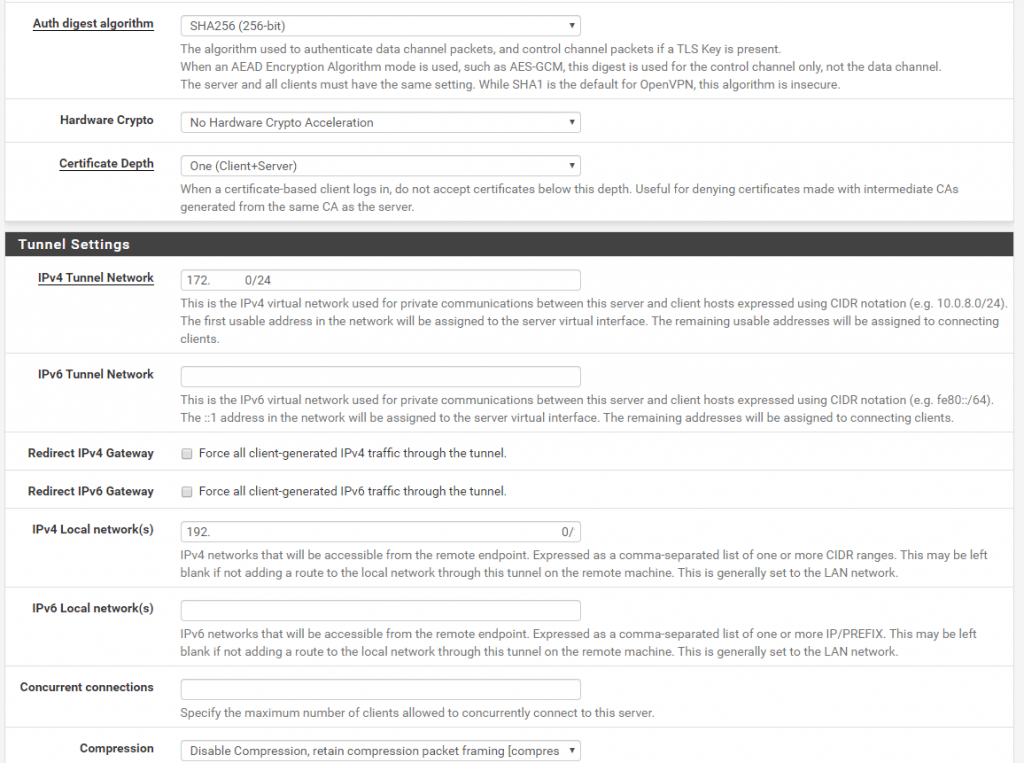
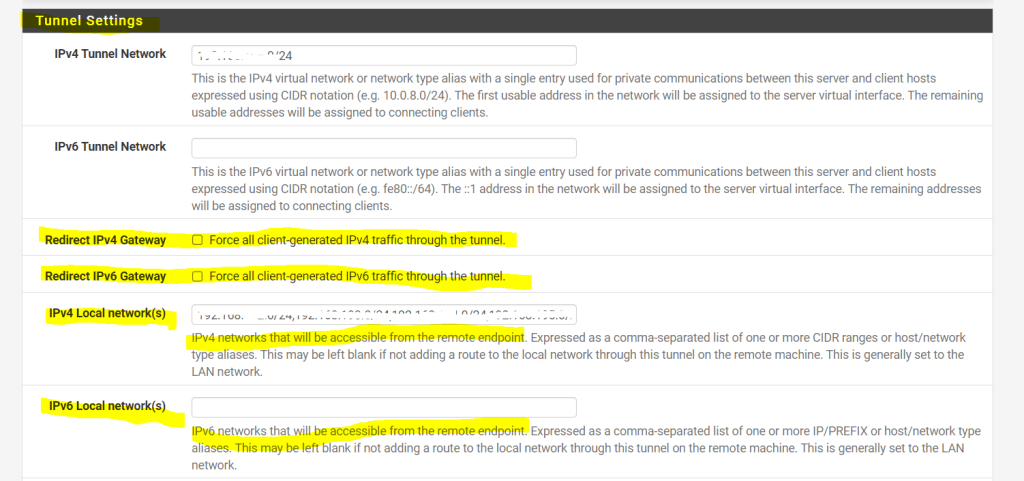
Under the tunnel settings you can also disable vpn split tunneling which is used by default.
By checking Redirect IPv4 Gateway or Redirect IPv6 Gateway you can force your vpn clients to route all traffic through the vpn tunnel and corporate network.By default unchecked, traffic which is destined for the internet (route 0.0.0.0/0), will be routed via the remote user’s local interface (gateway) and internet connection.

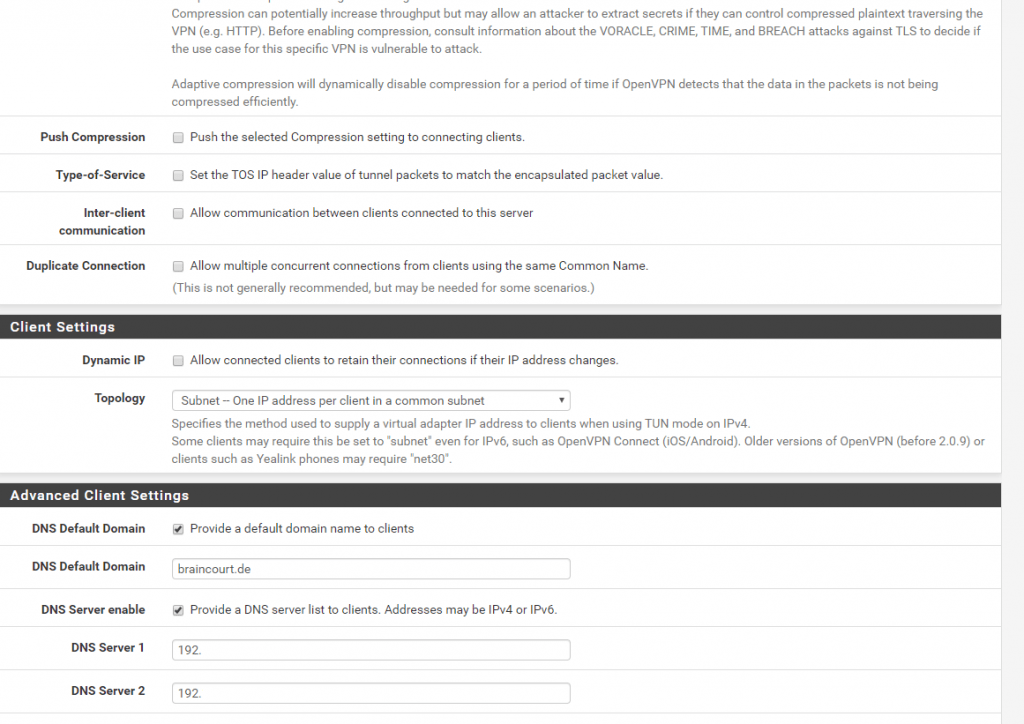
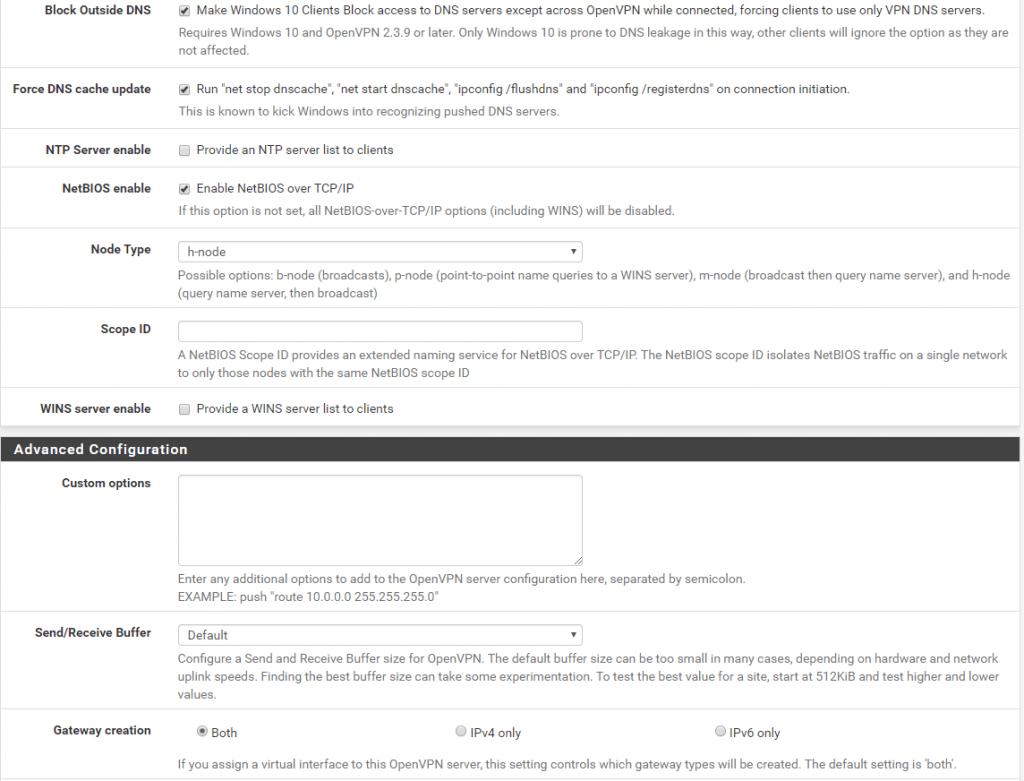
Under the Advanced Client Settings you can specify a default DNS domain and assign internal DNS servers to the clients.
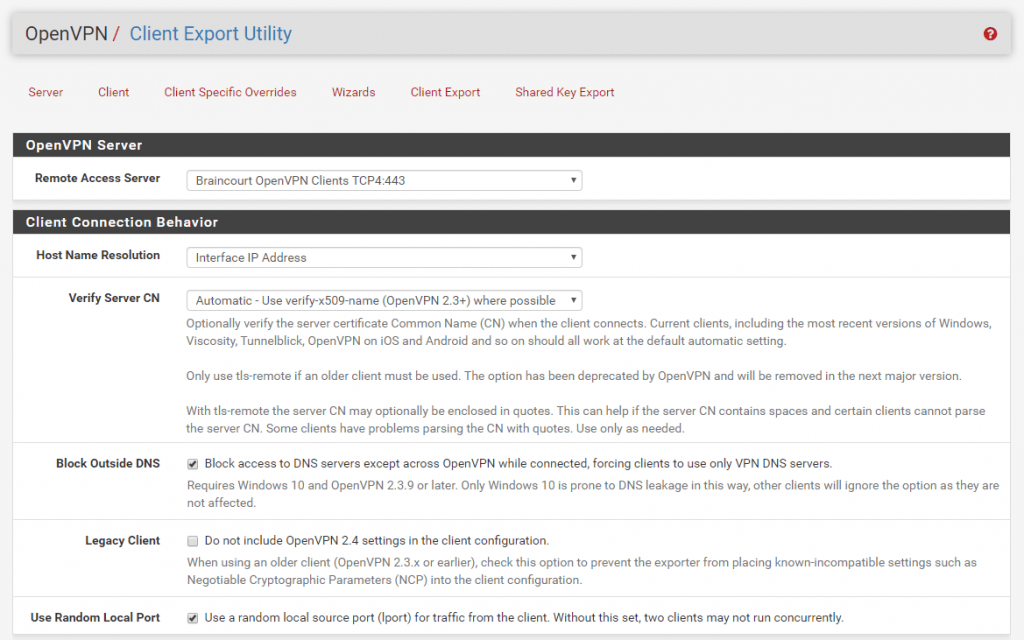
Also you can check here Block Outside DNS to prevent the mentioned Windows 10 DNS Leak!

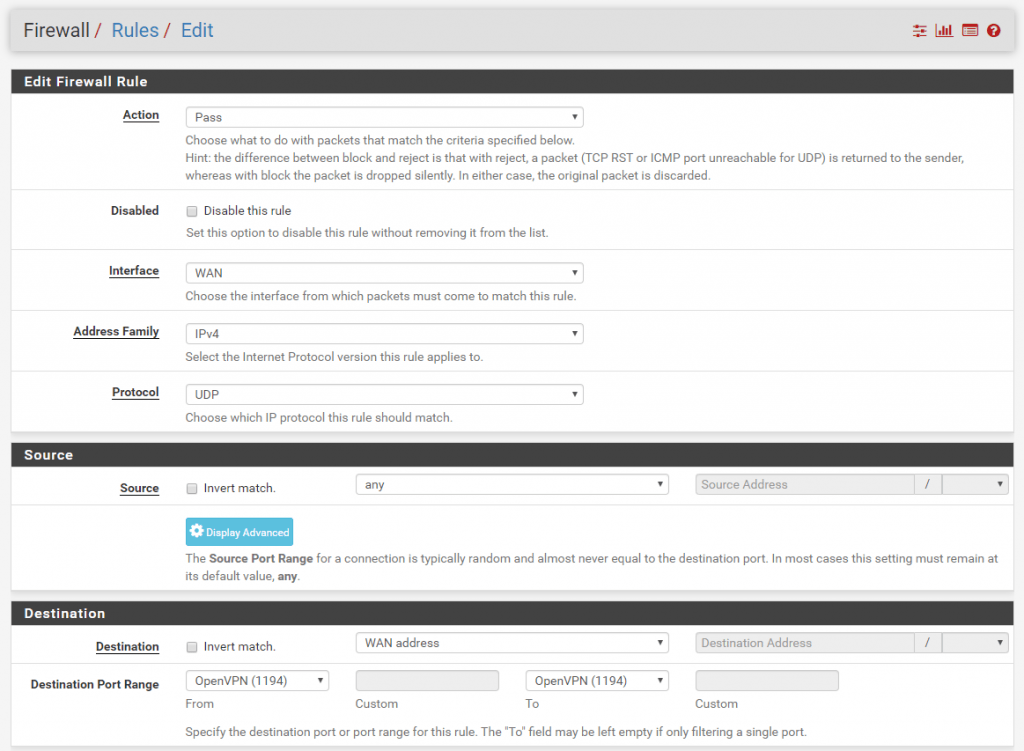
Now we must create a Firewall Rule on the WAN Interface to allow connections from OpenVPN Clients to UDP Port 1194.
OpenVPN Client
That we can export the OpenVPN Client, first we had to install the openvpn-client-export package.
Therefore go to System – Package Manager – Available Packages and search for OpenVPN
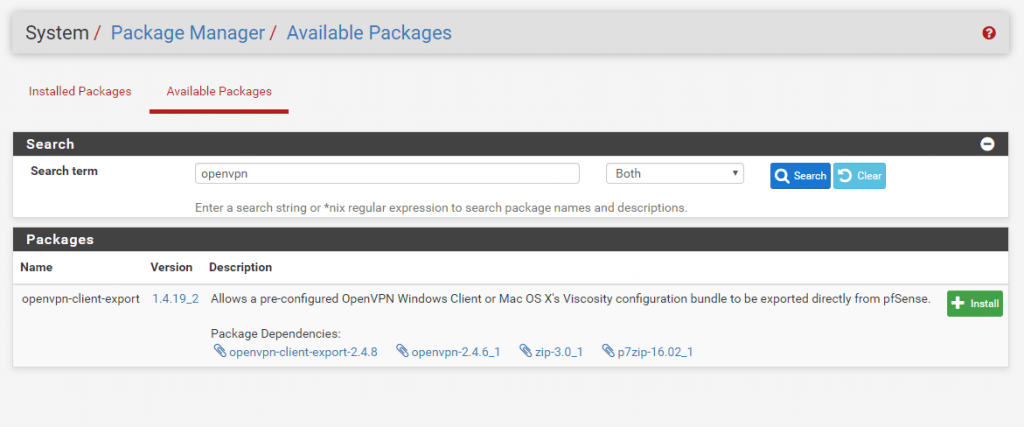
After you installed this package you have under the menu OpenVPN a new tab with Client Export.
Don’t forget to check the Block Outside DNS checkbox to prevent the Windows 10 DNS LEAKS problems!
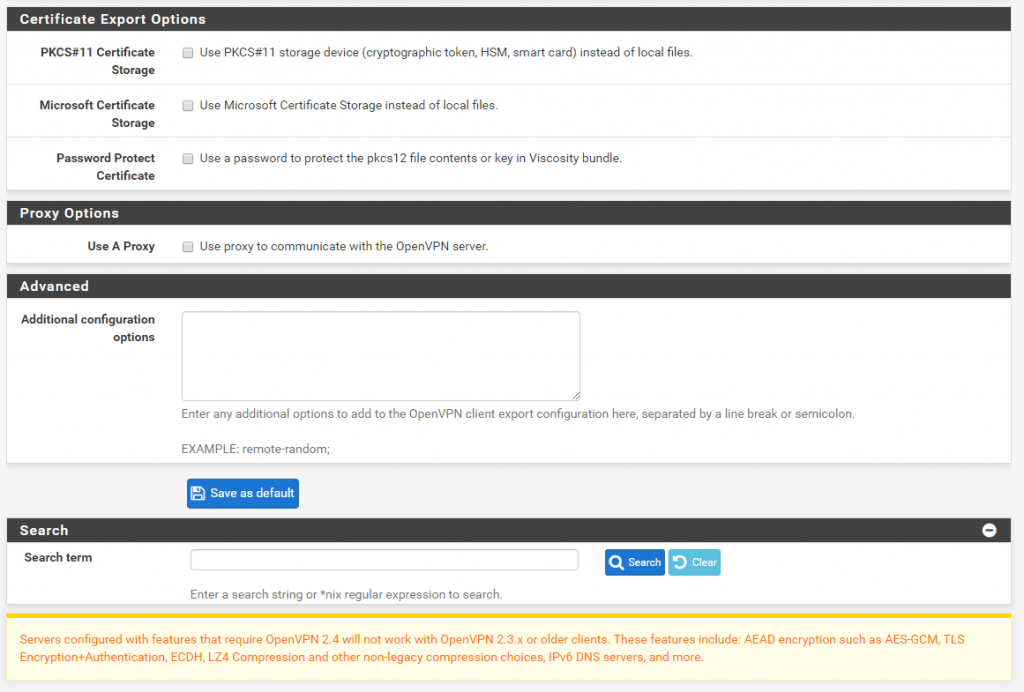
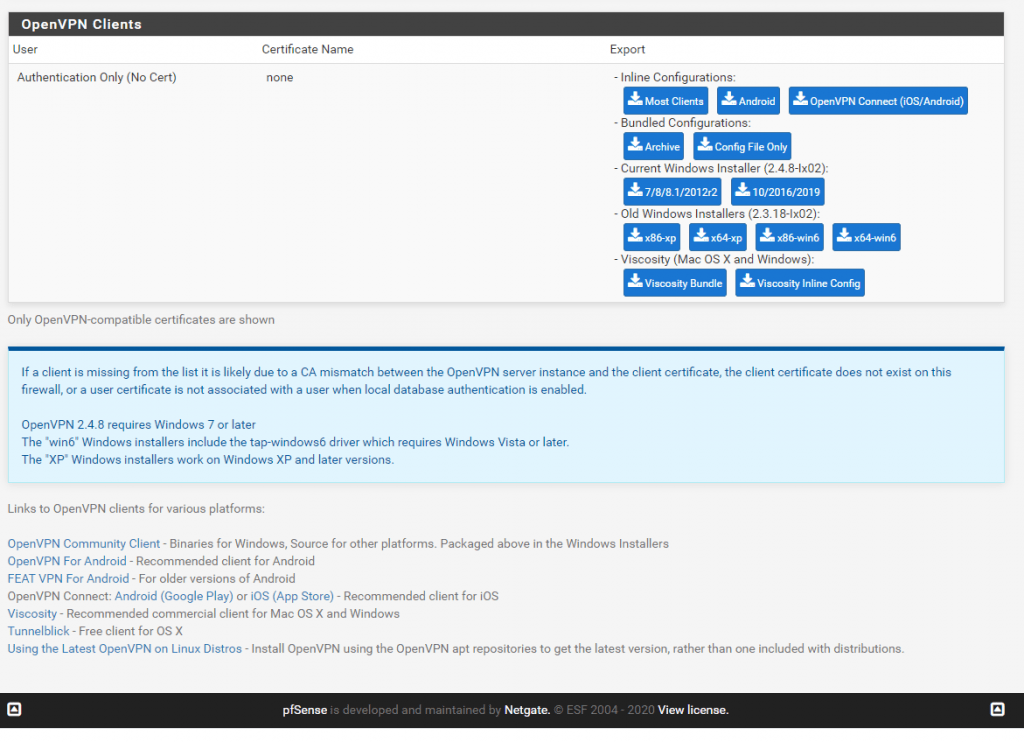
At the bottom of the Site you can download the several VPN Clients suited for your OS.
Firewall Configuration
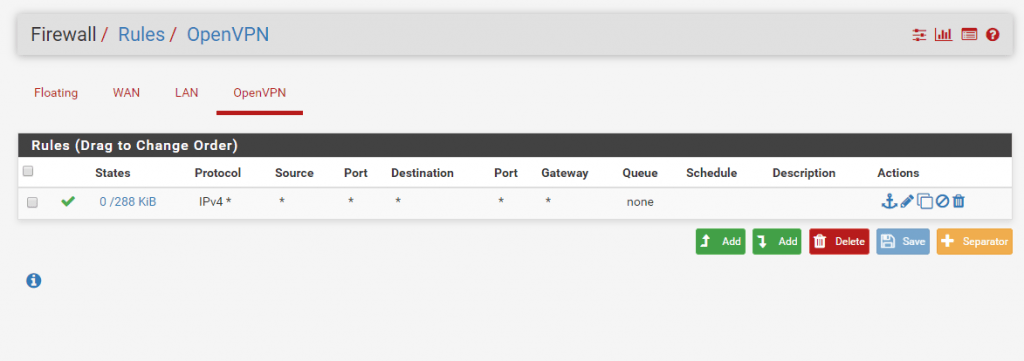
To allow Traffic from the OpenVPN Clients finally you must configure an allow Rule at the firewall under the OpenVPN tab.
In my case I allow all IPv4 traffic but for security reasons you should only allow required traffic.
One last thing we must configure at the corporate network are the new route to the tunnel network which is used by OpenVPN and the Clients, otherwise the internal servers and routers don’t know how to route outbound traffic to your vpn client computers and you can’t connect to them!
Now if you installed the client for your OS you can dialin to your corporate Network.
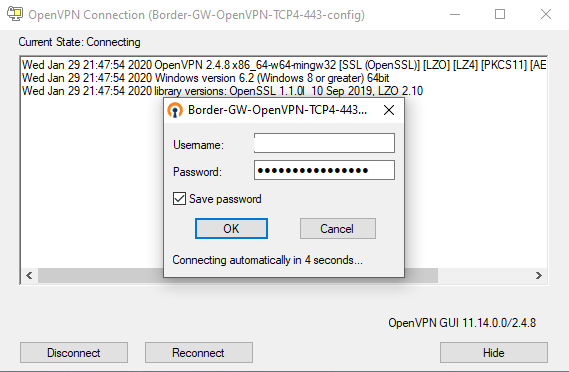
For the username you can type in the new UPN format like user@domain.tld or just the username. The common old legacy pre-Windows 2000 login DOMAINuser is not supported.
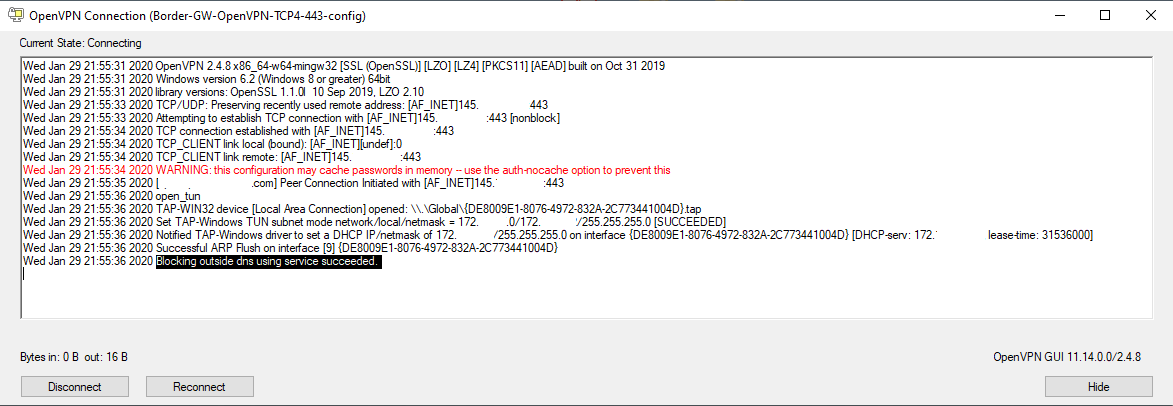
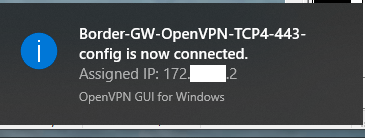
One thing I forget to mention is if you use OpenVPN in a perimeter network configuration with front- and backfirewall. Don’t forget to allow UDP Traffic for RADIUS Authentification on the backfirewall, otherwise you will get an Auth-Error at dialin.
(UDP 1812 & 1813)
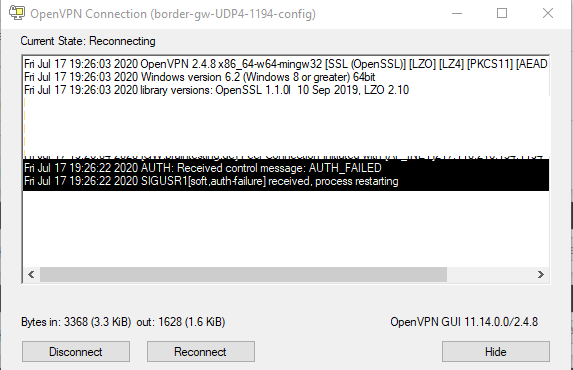
Configuration on the backfirewall

That’s it!
Using Client Certificates for Authentication (Server Mode SSL/TLS + User Auth)
Below you see the few changes to make if you want to use the Server mode Remote Access (SSL/TLS + User Auth) instead of Remote Access (User Auth).
Go to VPN – OpenVPN – Servers
Select at Server mode Remote Access (SSL/TLS + User Auth) .
Go to System – Certificate Manager – Certificates
Click on Add and select Create an internal Certificate. This is the user certficate without the client could not login to OpenVPN. For each user you must create one. Under Descriptive name and Common Name put in the username from the Active Directory. Use her lowecase.
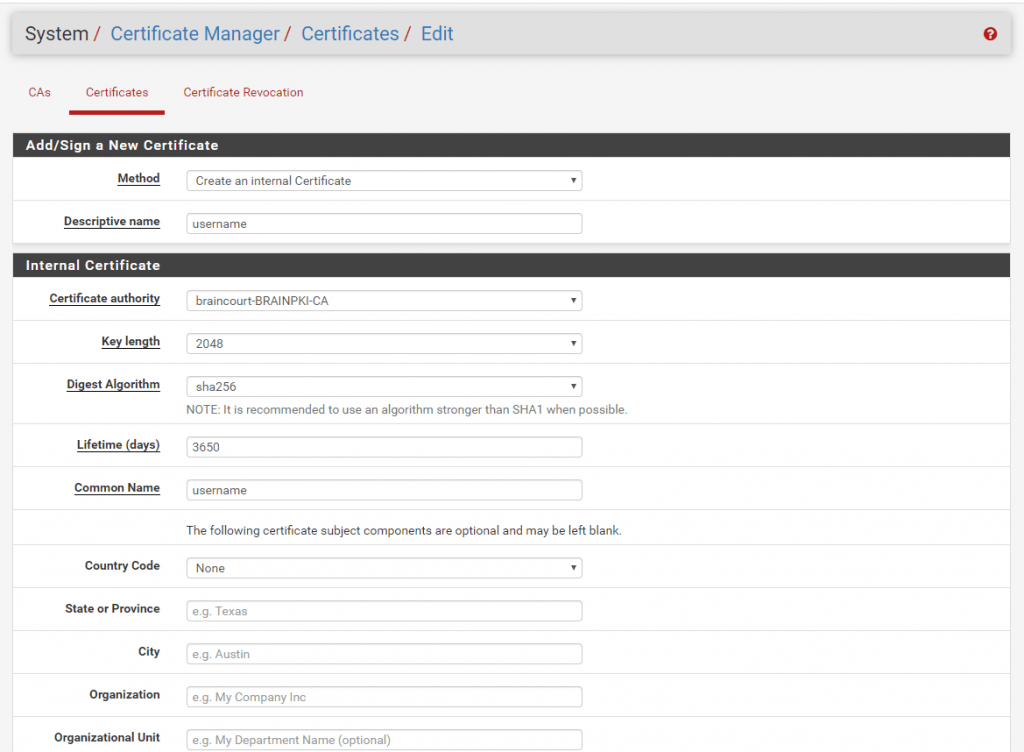
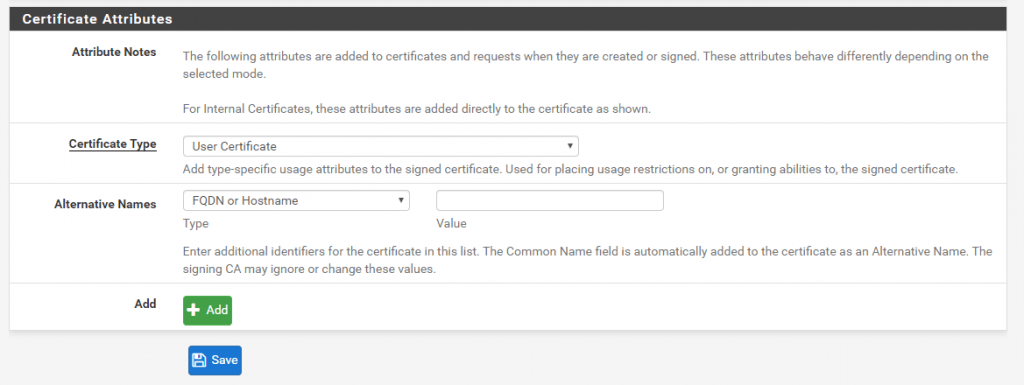
As we switched to Remote Access (SSL/TLS + User Auth) and created the user certificate we now can export the clients install package for this user. As mentioned for this server mode we must create for each user a separate user certficate and clients intall package.
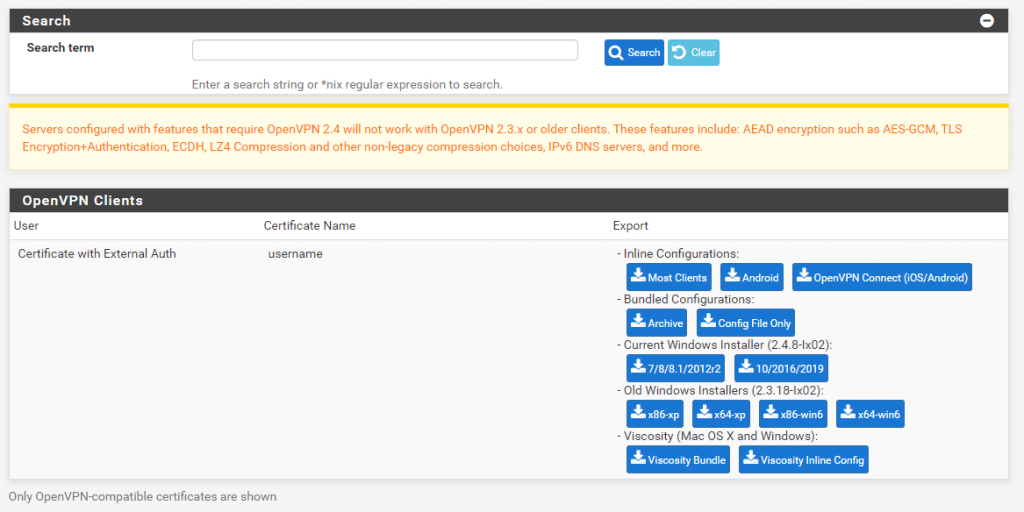
Go to OpenVPN – Client Export
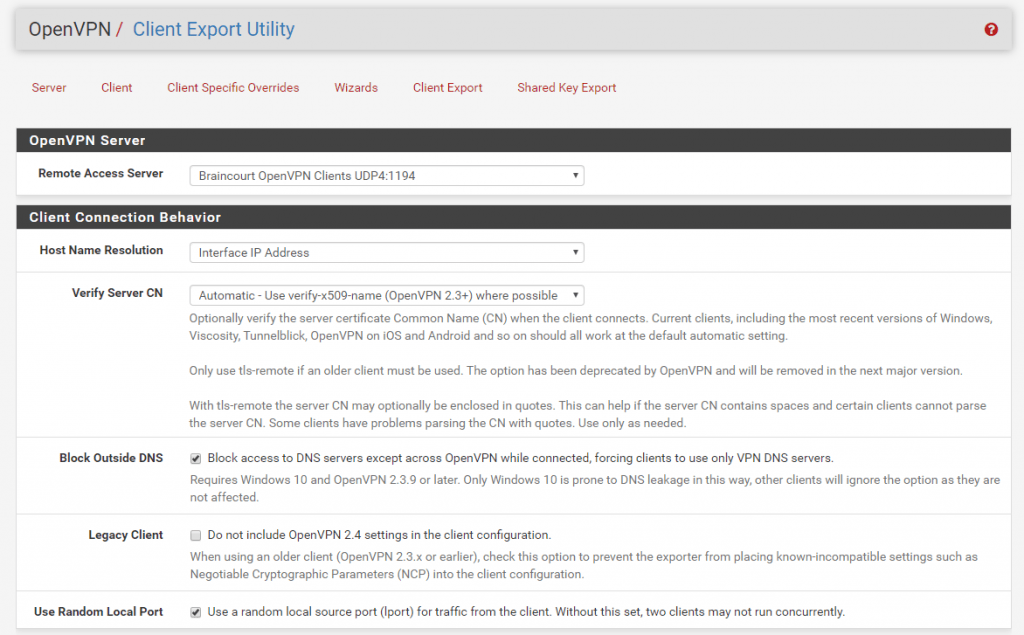
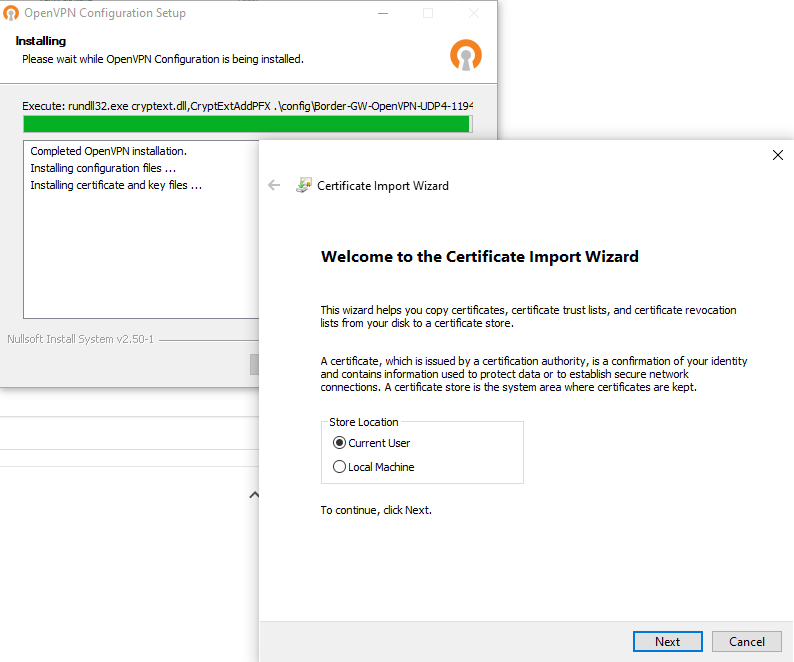
I checked here to use the Microsoft Certficate Storage and protect the certificates with a password. The user will need this when installing the package and importing the user certificate.
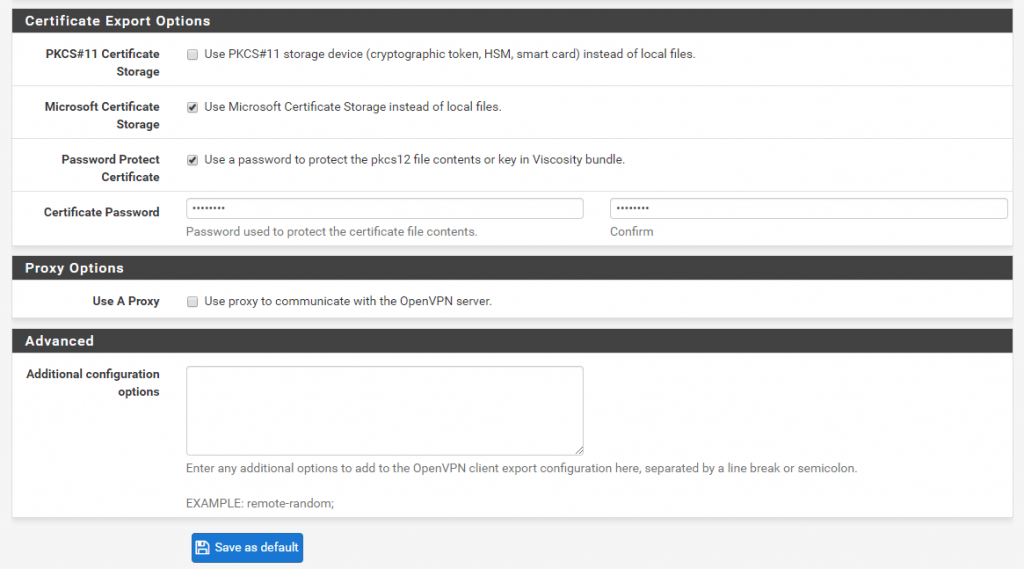
Here you can download the user specific install package with contains the user certificate. If you have many users you can search for them. For each created user certficate you will find here the corresponding client intall package.
At installing the client you will be automatically assisted to import the user certificate to the Microsoft Certificate Storage as selected previous in the Client Export settings.
OpenVPN Split Tunneling
As already metioned under the pfSense OpenVPN Configuration section, with OpenVPN by default vpn split tunneling is used.
Therefore traffic which is destined for the internet (route 0.0.0.0/0), will be routed via the remote user’s local interface (gateway/internet connection) instead through the vpn tunnel and pfSense.
Only traffic destined for the corporate network (networks listed below under IPv4/IPv6 Local networks) is routed through the tunnel.
The configuration is done in pfSense under VPN –> OpenVPN –> Tunnel Settings –> Redirect IPv4 Gateway and/or Redirect IPv4 Gateway.
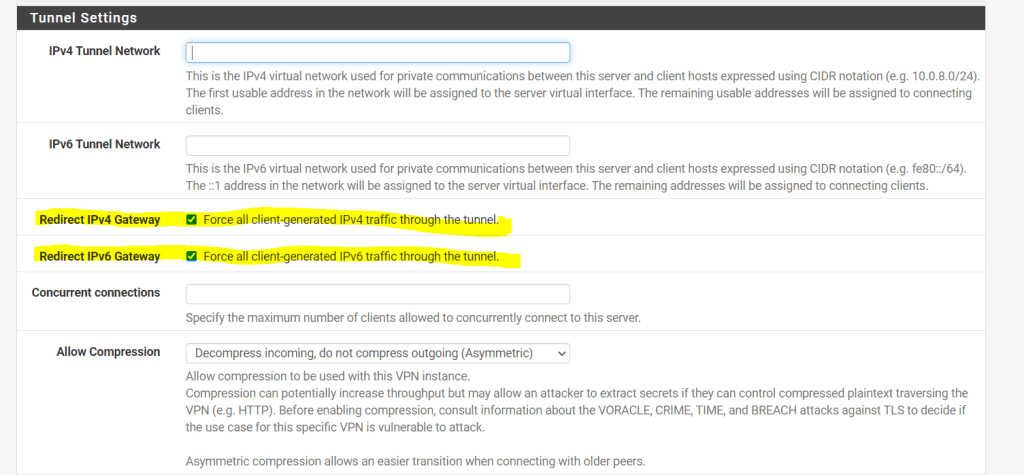
By checking Redirect IPv4 Gateway or Redirect IPv6 Gateway you can force your vpn clients to route all traffic through the vpn tunnel and corporate network.
In case you check and force all traffic to be routed through the tunnel, the above IPv4 and IPv6 Local network(s) fields will disappear as you don’t need to define in that case what networks will be routed through the tunnel as now all traffic will be routed through.
Links
OpenVPN Remote Access Configuration Example
https://docs.netgate.com/pfsense/en/latest/recipes/openvpn-ra.html
Related Posts
Latest posts
Deploying NetApp Cloud Volumes ONTAP (CVO) in Azure using NetApp Console (formerly BlueXP) – Part 5 – Backup and Recovery
Follow me on LinkedIn


