Set up Azure Bastion
In this post I want to show how we can set up Azure Bastion to provide a secure way to connect to our Azure virtual machines without exposing them to the public internet.
The same you can achieve when using an IPSec Site-to-Site VPN tunnel to connect our on-premise network to Azure as shown in different posts here.
Even for private home networks when using a NAT Router.
Azure Bastion is a fully managed PaaS service that you provision to securely connect to virtual machines via private IP address. It provides secure and seamless RDP/SSH connectivity to your virtual machines directly over TLS from the Azure portal, or via the native SSH or RDP client already installed on your local computer. When you connect via Azure Bastion, your virtual machines don’t need a public IP address, agent, or special client software.
Bastion provides secure RDP and SSH connectivity to all of the VMs in the virtual network for which it’s provisioned. Bastion is deployed to a virtual network and supports virtual network peering.
Using Azure Bastion protects your virtual machines from exposing RDP/SSH ports to the outside world, while still providing secure access using RDP/SSH.
Source: https://learn.microsoft.com/en-us/azure/bastion/bastion-overview
About how to use Azure Key Vault stored passwords in Azure Bastion you will see in my following post.
Architecture
Azure Bastion offers multiple deployment architectures, depending on the selected SKU and option configurations. For most SKUs, Bastion is deployed to a virtual network and supports virtual network peering. Specifically, Azure Bastion manages RDP/SSH connectivity to VMs created in the local or peered virtual networks.
RDP and SSH are some of the fundamental means through which you can connect to your workloads running in Azure. Exposing RDP/SSH ports over the Internet isn’t desired and is seen as a significant threat surface. This is often due to protocol vulnerabilities.
To contain this threat surface, you can deploy bastion hosts (also known as jump-servers) at the public side of your perimeter network.
Bastion host servers are designed and configured to withstand attacks. Bastion servers also provide RDP and SSH connectivity to the workloads sitting behind the bastion, as well as further inside the network.
The SKU you select when you deploy Bastion determines the architecture and the available features. You can upgrade to a higher SKU to support more features, but you can’t downgrade a SKU after deploying. Certain architectures, such as Private-only and Developer SKU, must be configured at the time of deployment. For more information about each architecture, see Bastion design and architecture.
Source: https://learn.microsoft.com/en-us/azure/bastion/bastion-overview
How it works under the hood
You deploy Bastion into a subnet named AzureBastionSubnet in your VNet. It spins up managed VMs (you don’t see them directly just a managed service) that handle the session proxying.
You log into the Azure Portal (or Azure CLI / PowerShell if using native client support). The portal uses WebSockets over HTTPS (443) to connect to the Bastion service.
All traffic is encrypted and stays on the Azure backbone, you never hit your VM’s public IP.
Bastion initiates an RDP (3389) or SSH (22) connection to the VM’s private IP inside the VNet. So from the VM’s perspective, it’s just a local LAN connection, no public internet needed.
Bastion takes the RDP/SSH session stream and tunnels/encapsulates it inside HTTPS back to your browser (or to the Azure CLI).
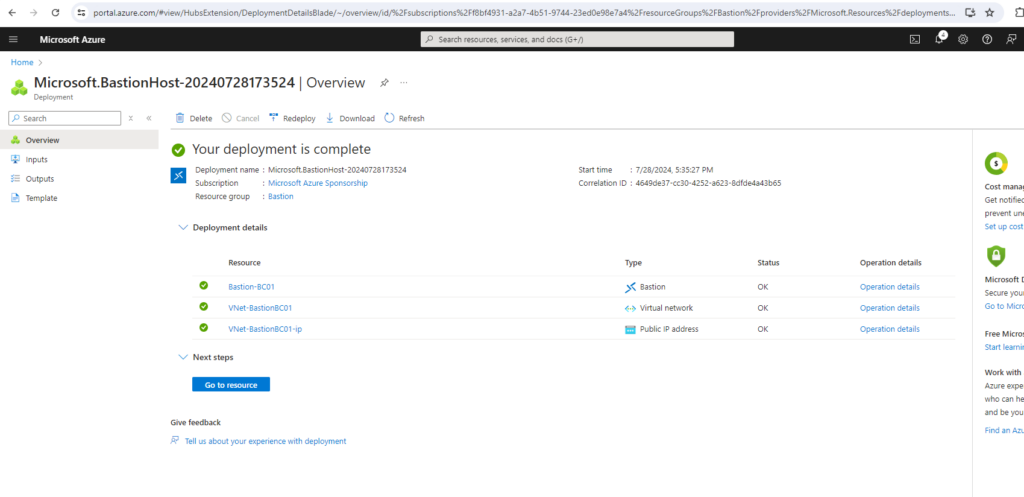
Set up the Azure Bastion PaaS Service
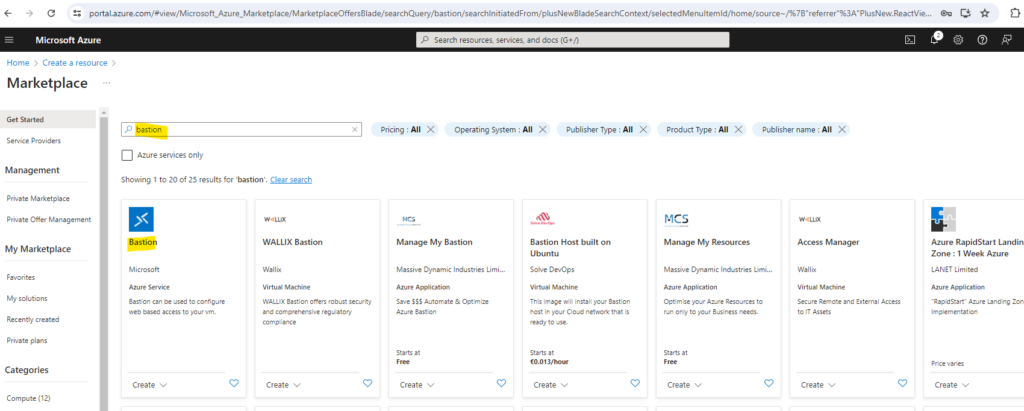
To set up Azure Bastion we create a new resource and search for bastion like shown below.
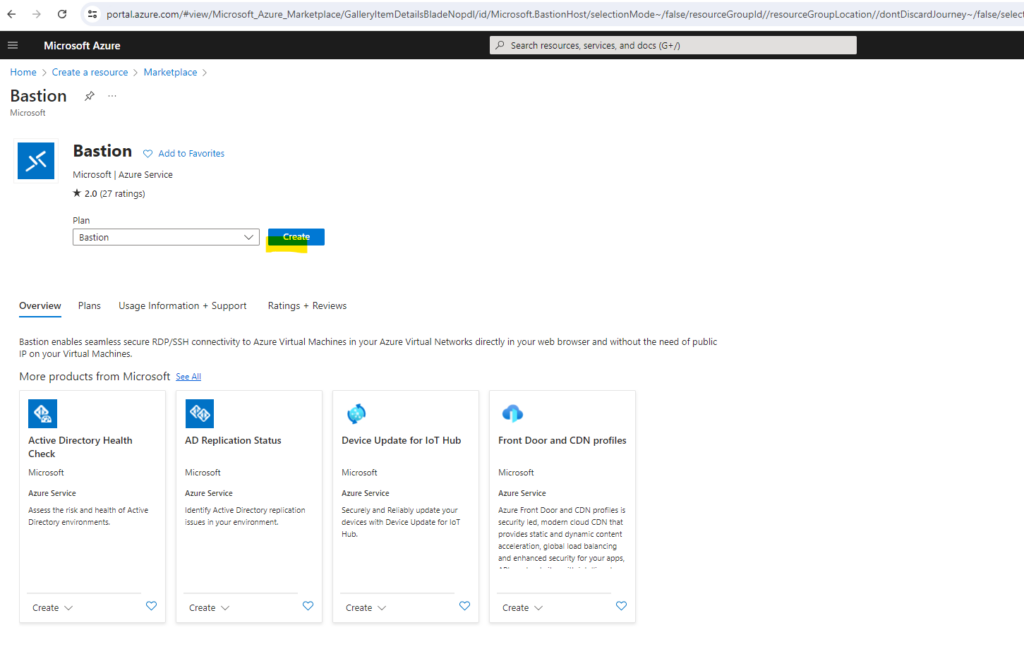
Click on Create.
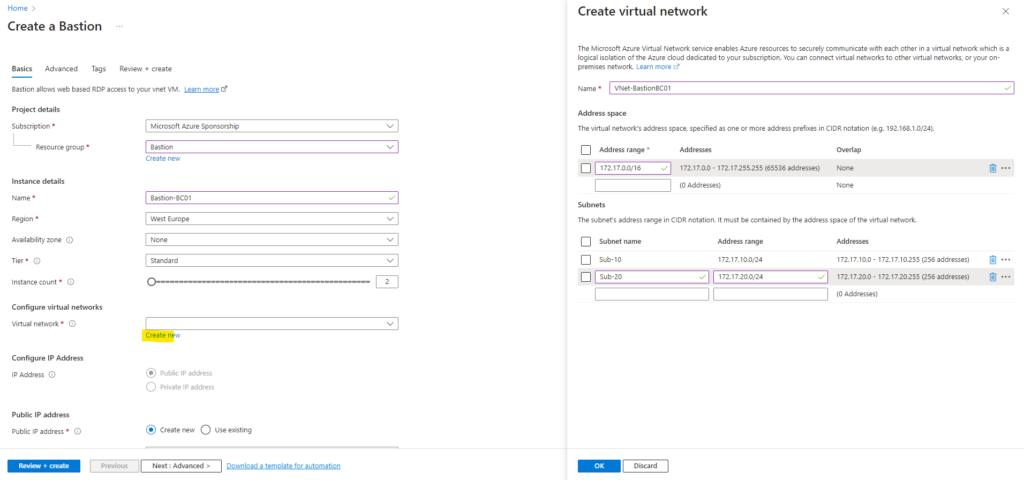
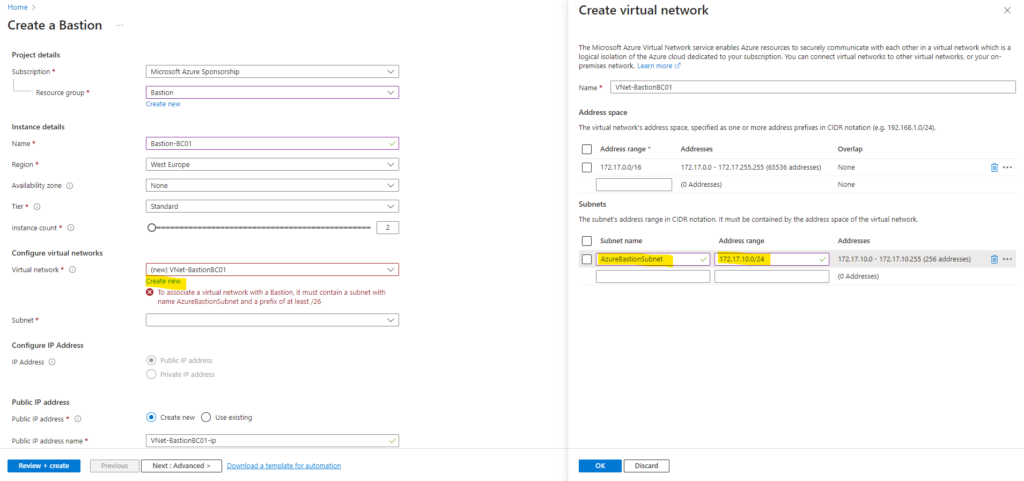
Below I will also create a new virtual network (VNet) for the Azure Bastion service. You can later also peer already existing virtual networks to access virtual machines within also by using this Azure Bastion service.
You can also select and using here an existing virtual network, finally you have to deploy within this virtual network at least a /26 subnet which is named AzureBastionSubnet and used to deploy the Azure Bastion instances within.
An instance is an optimized Azure VM that is created when you configure Azure Bastion. It’s fully managed by Azure and runs all of the processes needed for Azure Bastion. An instance is also referred to as a scale unit. You connect to client VMs via an Azure Bastion instance. When you configure Azure Bastion using the Basic SKU, two instances are created. If you use the Standard SKU or higher, you can specify the number of instances (with a minimum of two instances). This is called host scaling.
Source: https://learn.microsoft.com/en-us/azure/bastion/configuration-settings#instance
As mentioned to deploy Azure Bastion in your virtual network, it must contain at least a /26 subnet which is named AzureBastionSubnet.
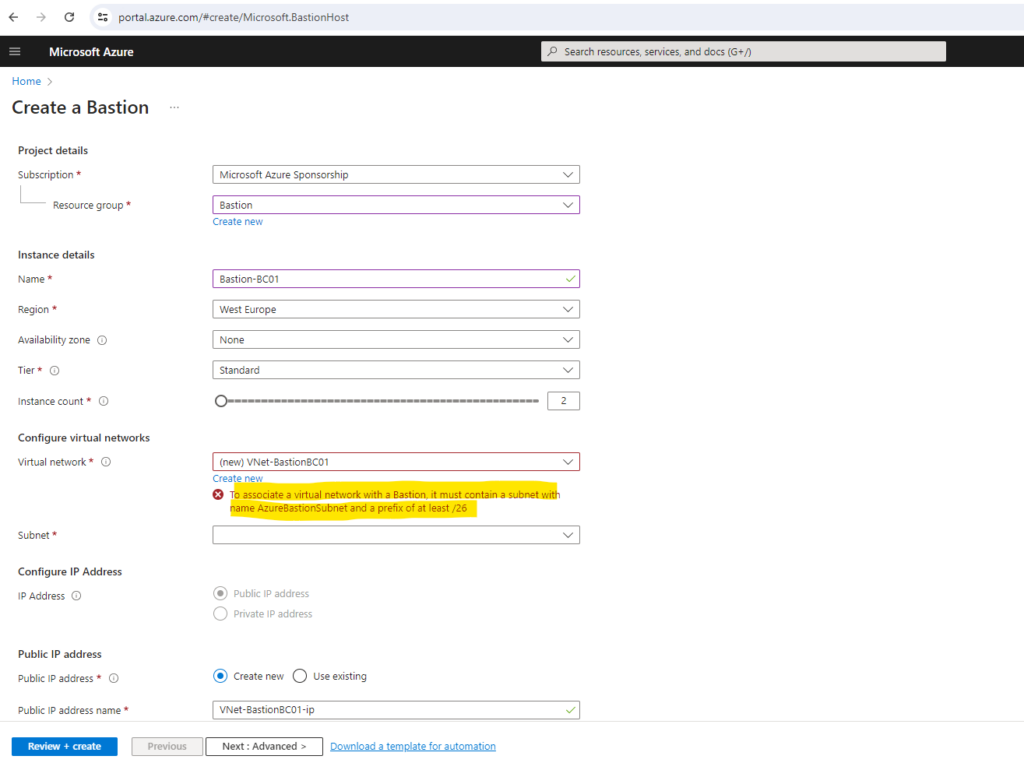
So I will go back and adding a new, in my case /24 subnet named AzureBastionSubnet.
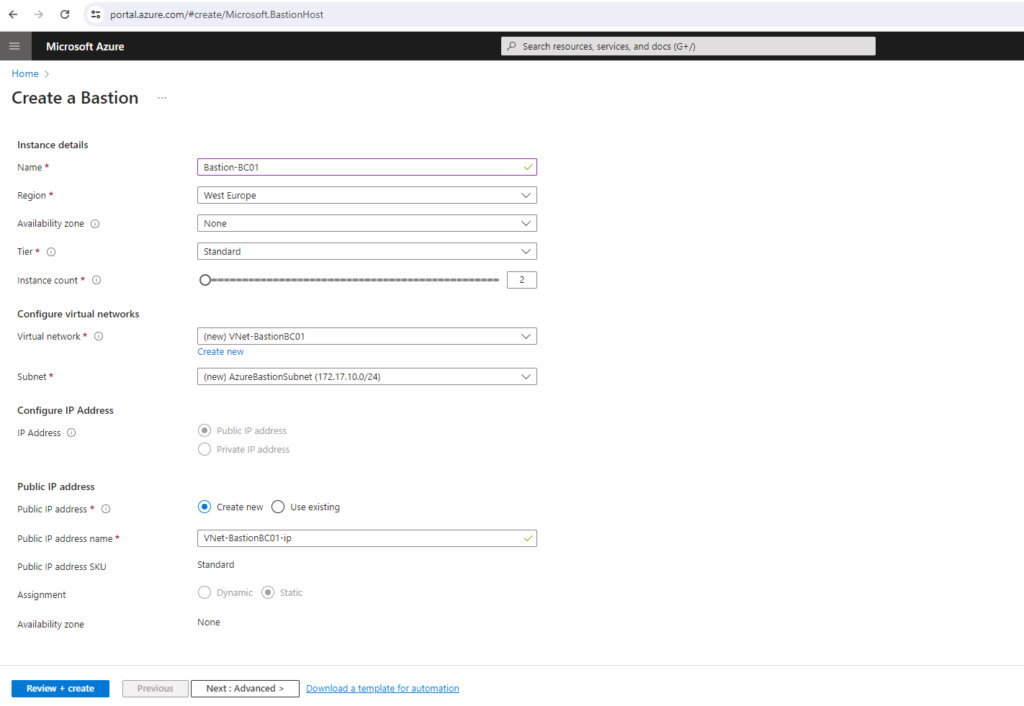
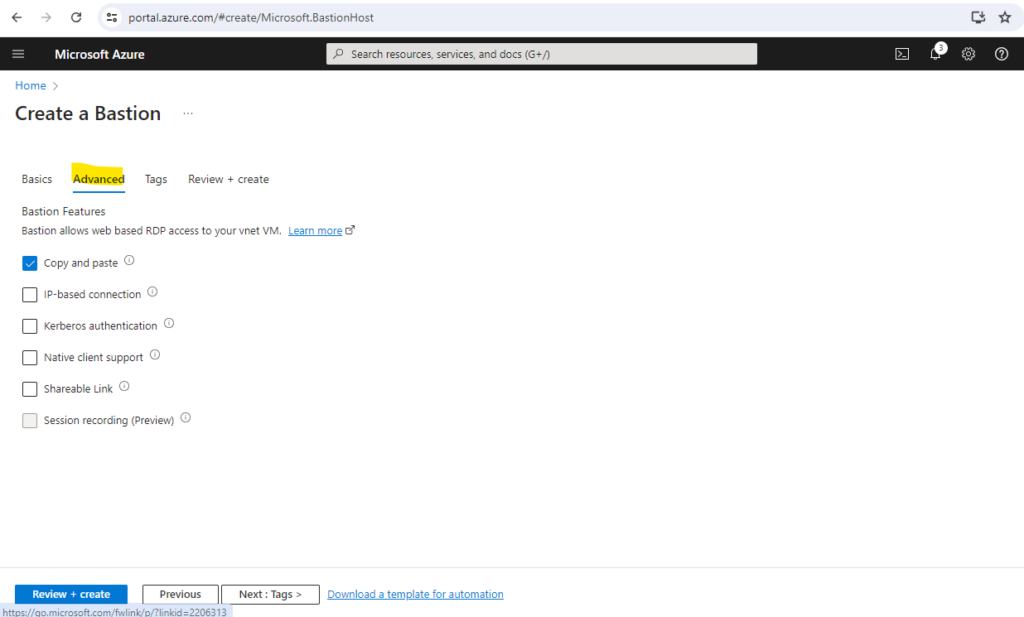
Below we can enable some features for Azure Bastion. For the moment I will just keep Copy and paste checked. In order to connect to the VMs by using the native RDP client (mstsc.exe) we can also enable below Native client support. By default and when using the Azure portal we connect to the VMs by using a browser (over HTML5) session.
We can also enable these features later which I will show for the Native client support.
By default, Azure Bastion is automatically enabled to allow copy and paste for all sessions connected through the bastion resource. You don’t need to configure anything extra. You can disable this feature for web-based clients on the configuration page of your Bastion resource if your Bastion deployment uses the Standard SKU or higher.
Source: https://learn.microsoft.com/en-us/azure/bastion/bastion-vm-copy-paste
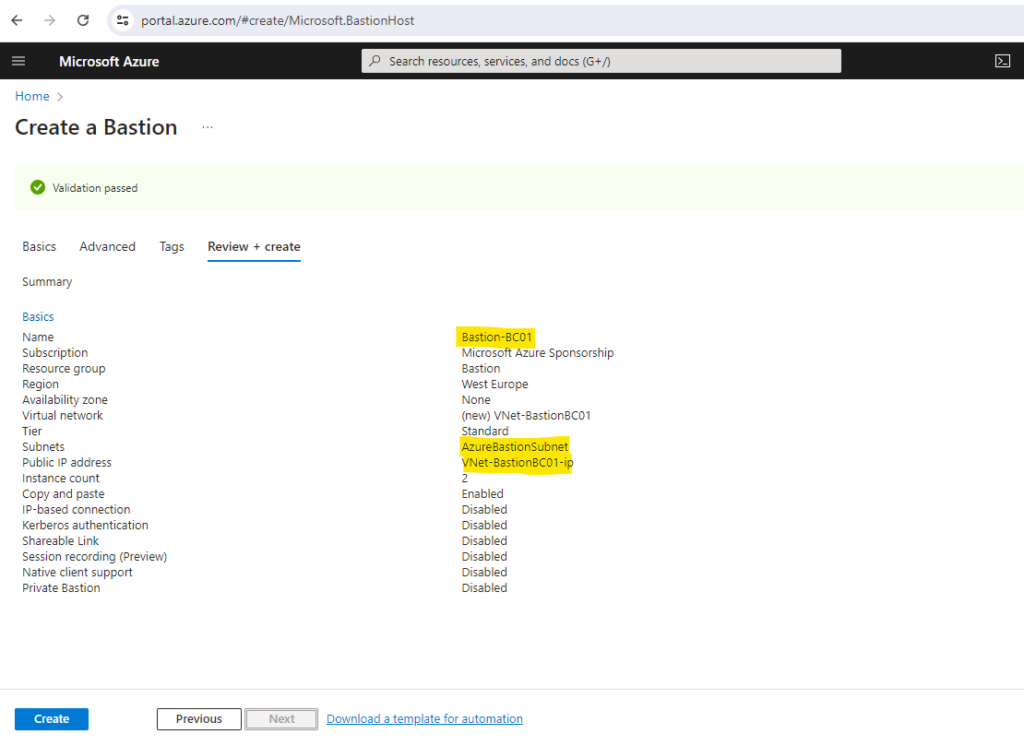
Set up a new Virtual Machine in the Virtual Network of the Azure Bastion Host
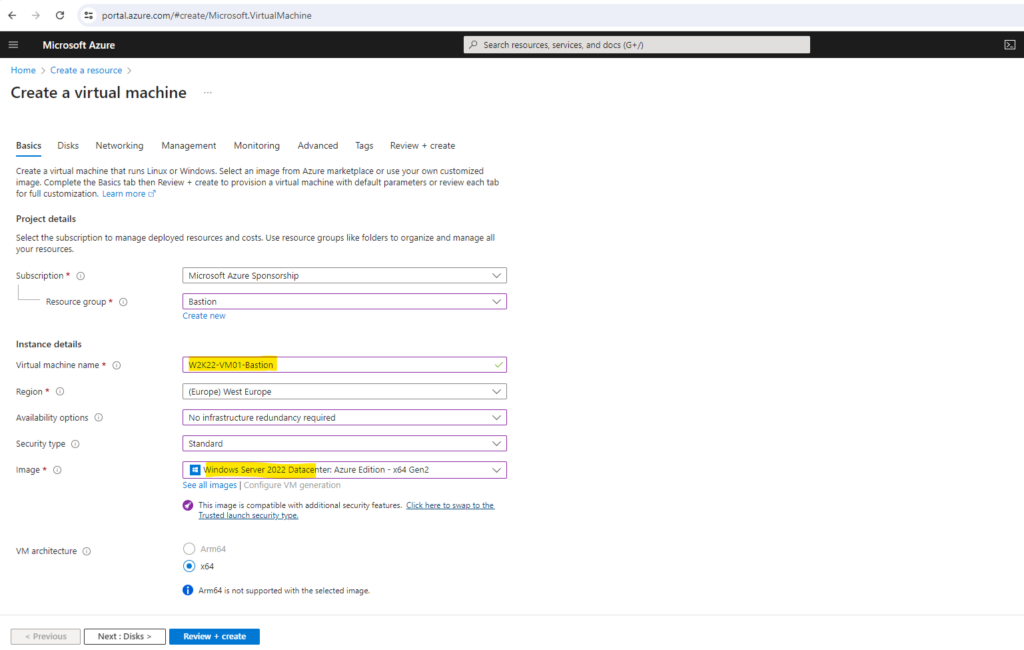
In order to test the Azure Bastion service I will first create a new virtual machine in my virtual network to which I will connect later by using Azure Bastion.
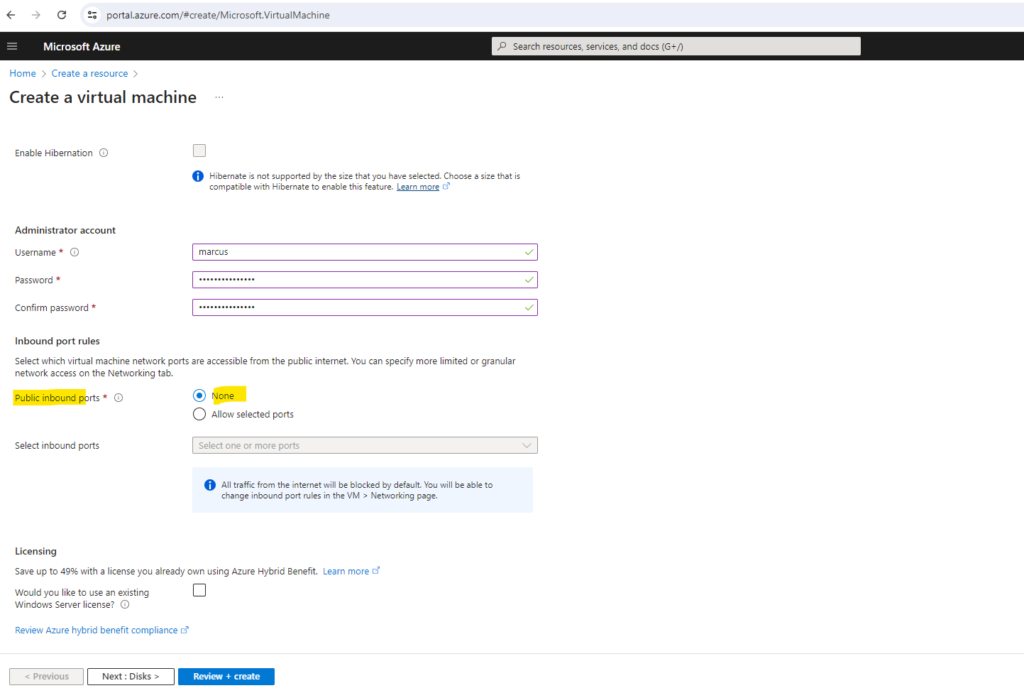
Because we will use the Azure Bastion service to connect to this VM, we of course doesn’t need and want any public IP assigned to and therefore below we select none.
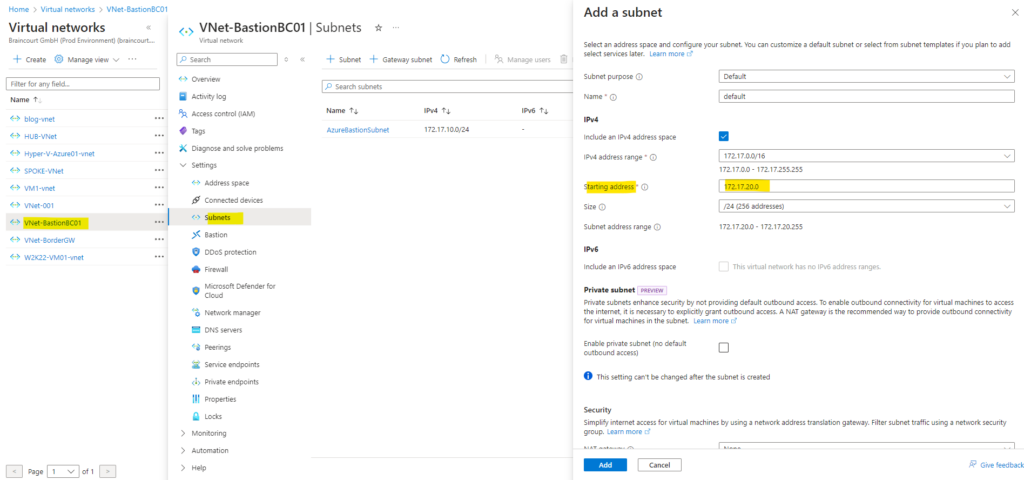
For the virtual machines I will create a new subnet within the previously created virtual network (VNet) where also the subnet for the Azure Bastion instances was created.
You cannot place virtual machines to the Azure Bastion instances subnet.
We can now assign the new subnet to our virtual machine. Further as mentioned we don’t need and create a public IP address, so switch here to none.
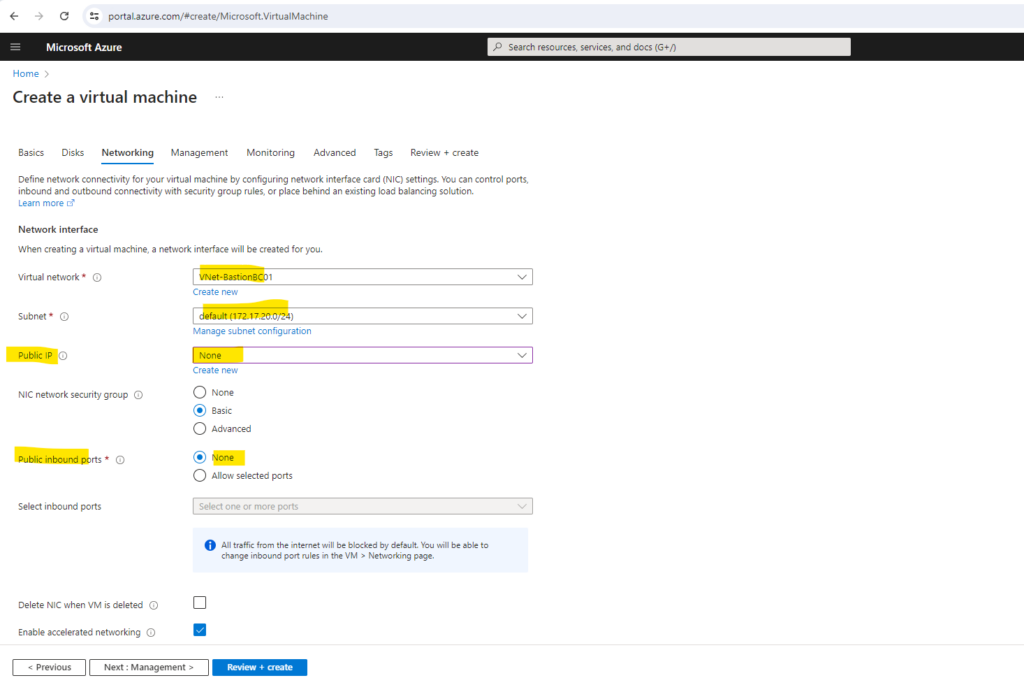
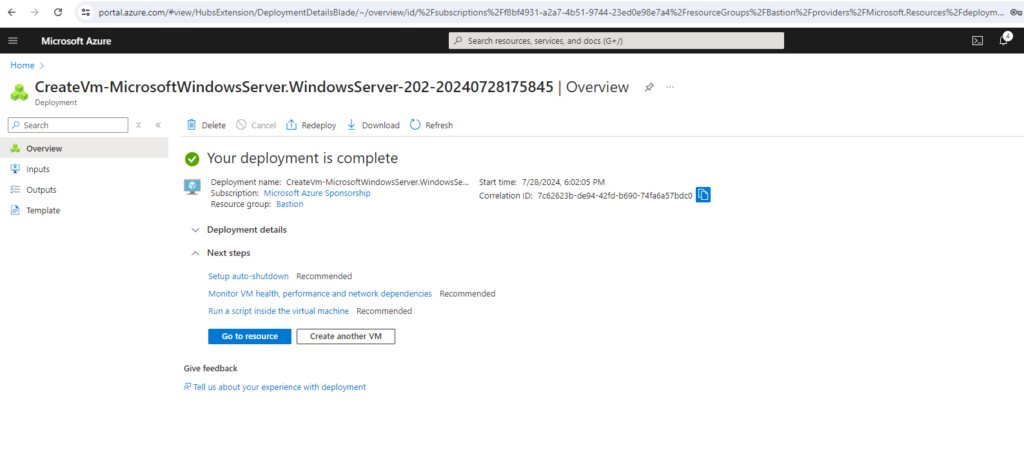
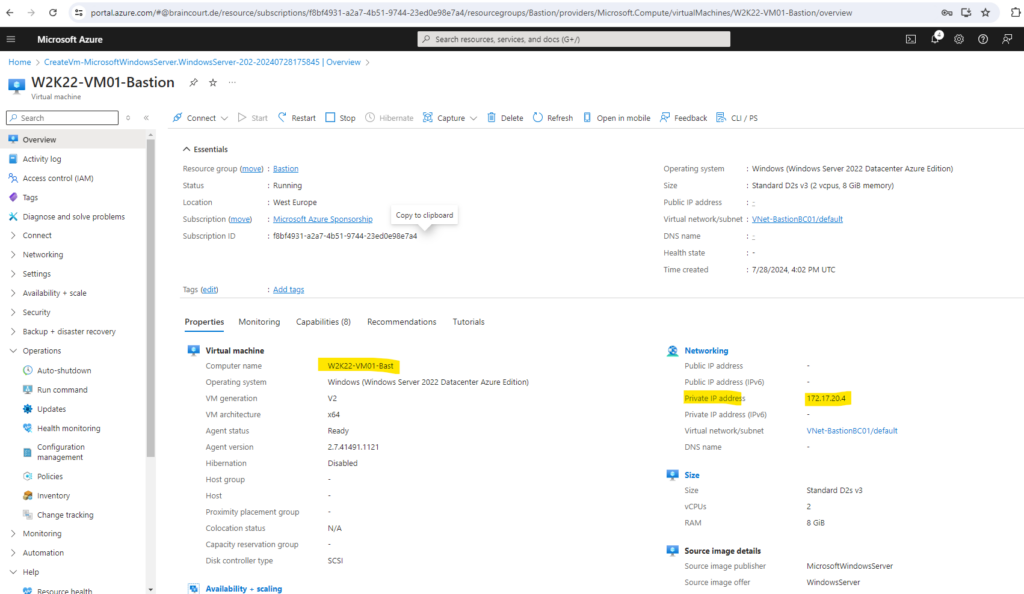
Finally I will just have a private IP address for this virtual machine and there is also no site-to-site IPSec VPN configured which can be used to connect to this private IP address.
Connect to a Windows Virtual Machine via Bastion
We can use either a browser (over HTML5) session to connect to our virtual machine via Bastion or by using the native RDP client.
Connect via Bastion and the Browser
We can now connect to the virtual machine by using Connect via Bastion as shown below.
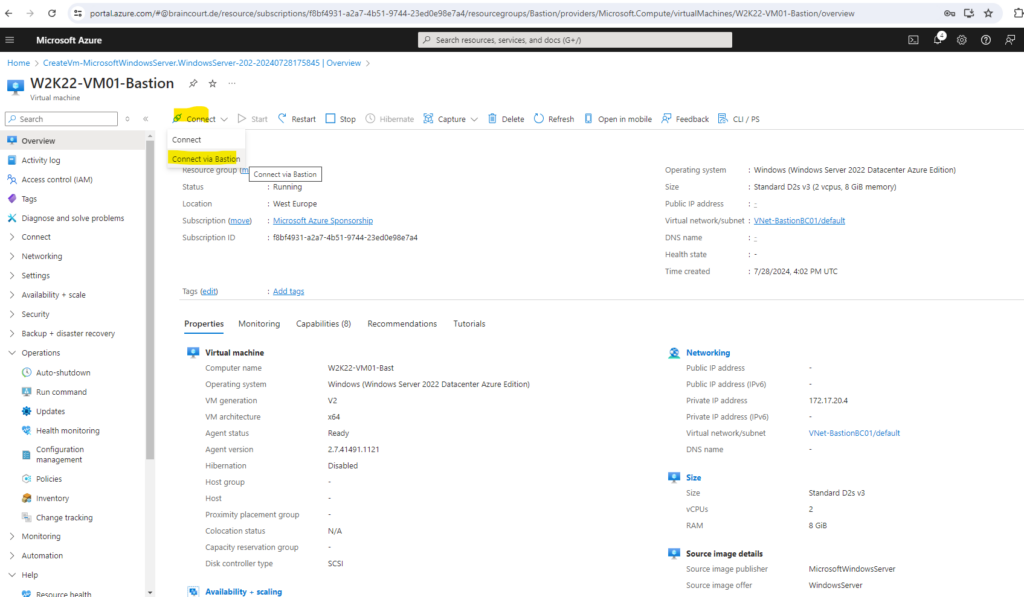
On the Bastion page, enter the required authentication credentials, then click Connect. If you configured your bastion host using the Standard SKU, you’ll see additional credential options on this page.
If your VM is domain-joined, you must use the following format: username@domain.com.
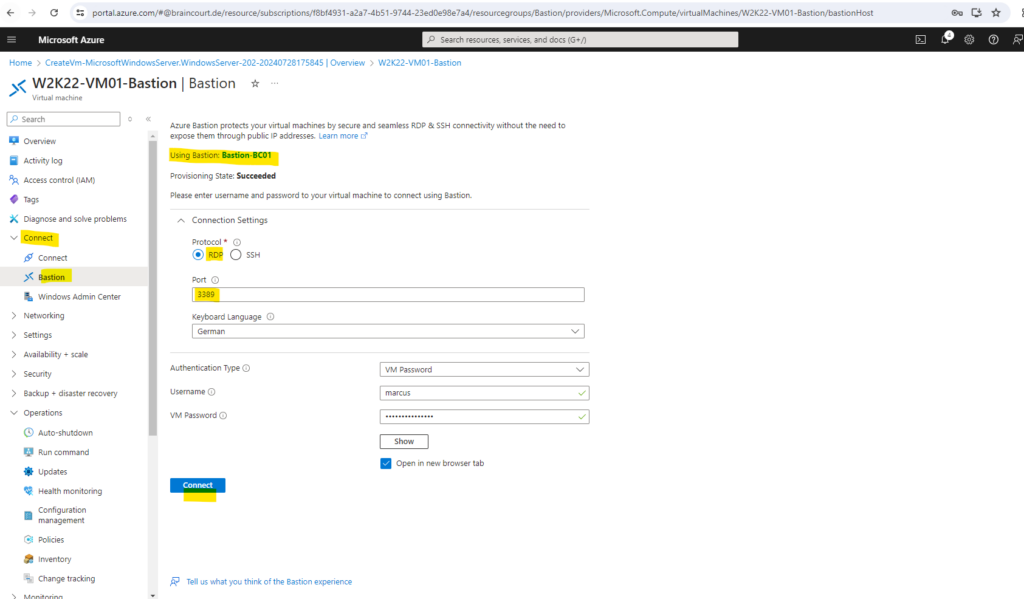
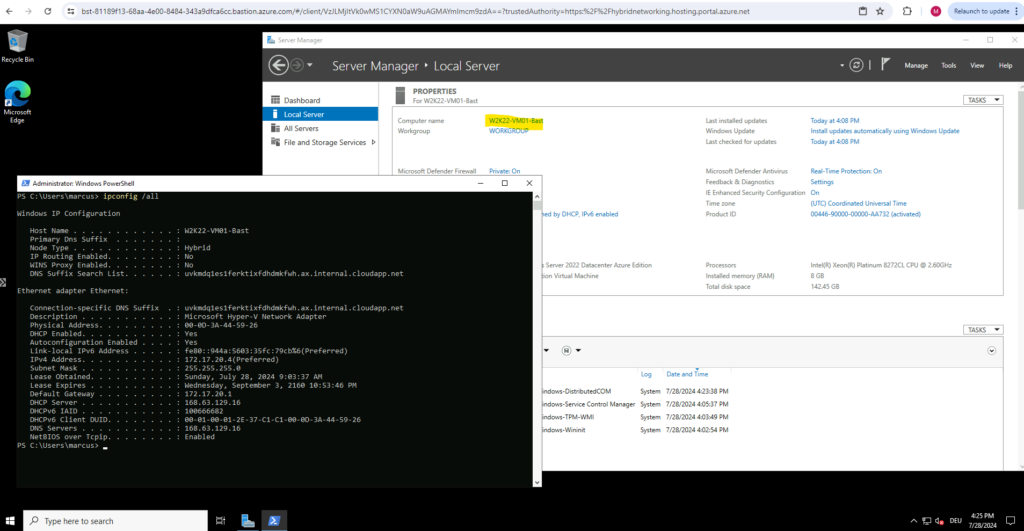
When you click Connect, the RDP connection to this virtual machine via Bastion will open in your browser (over HTML5) using port 443 and the Bastion service.
Connect via Bastion and the native RDP client
In order to finally connect to a virtual machine by using the native RDP client, we need to use the Azure CLI.
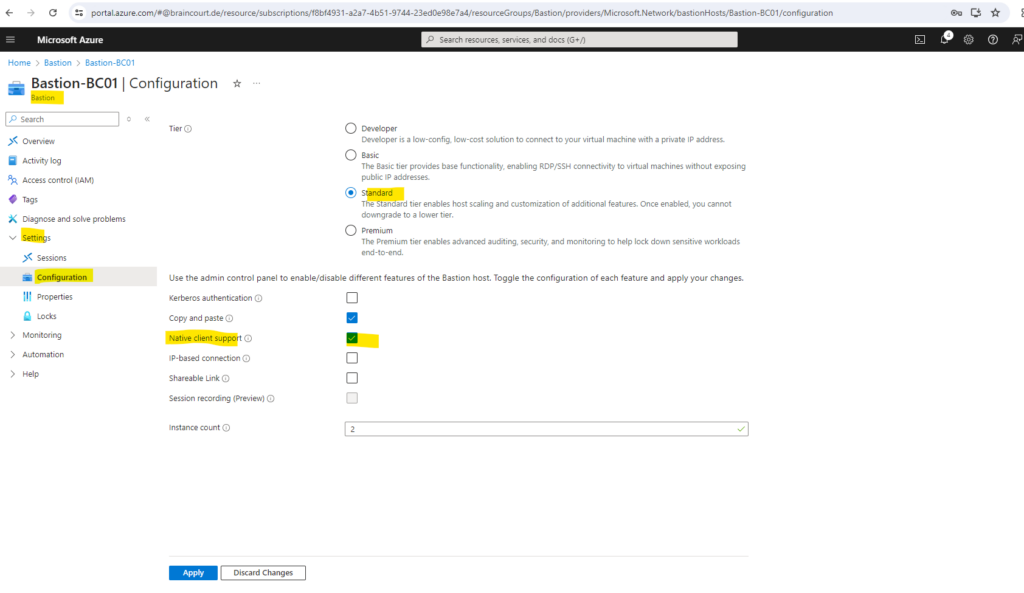
Native client support requires the Standard SKU. We can change the tier below on the Bastion Azure blade under Settings -> Configuration.
On the Bastion host we need to enable native client support as mentioned previously further above.
Configure a Network Security Group (NSG) for the Azure Bastion Subnet
If you want to further secure your native client connection, you can limit port access by only providing access to port 22/3389. To restrict port access, you must deploy the following NSG rules on your AzureBastionSubnet to allow access to select ports and deny access from any other ports.
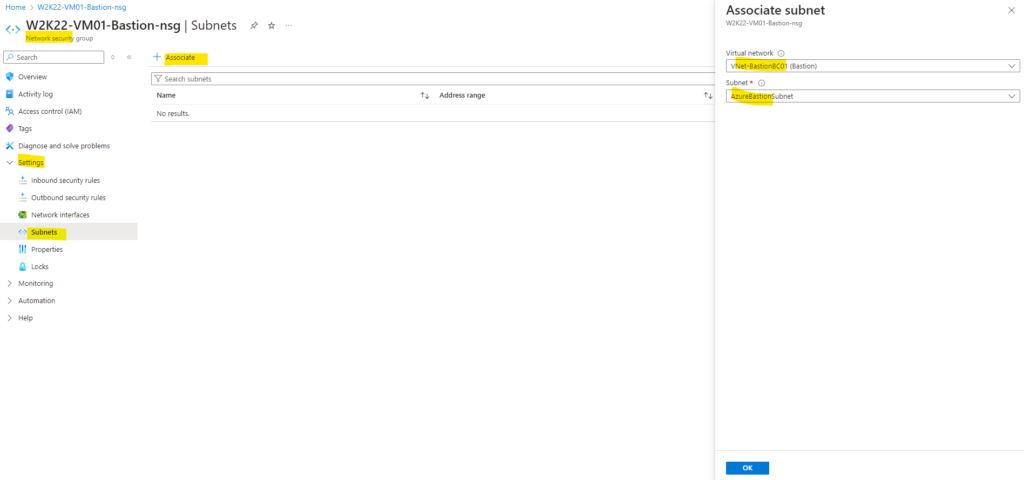
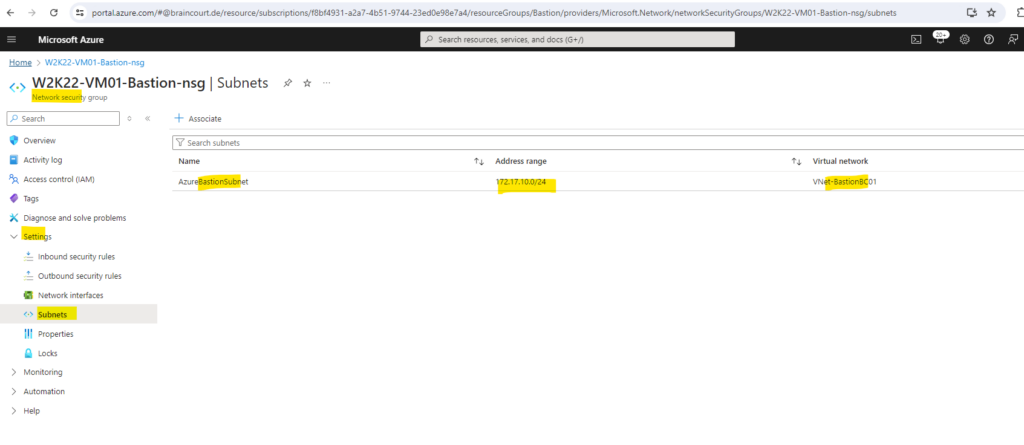
I will therefore create a new network security group (NSG) and associate it later to the Azure Bastion Subnet.
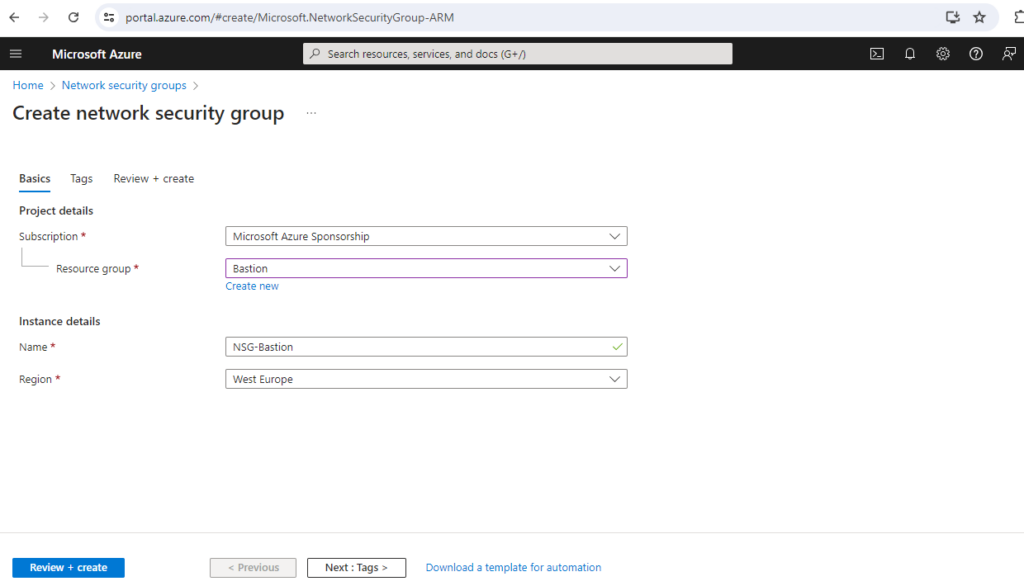
Before I can associate the NSG with my Azure Bastion Subnet, I will first need to configure the necessary rules for the Azure Bastion Subnet.
Inbound (Ingress Traffic) security rules:
The Azure Bastion will create a public IP that needs port 443 enabled on the public IP for ingress traffic. Port 3389/22 are NOT required to be opened on the AzureBastionSubnet. Note that the source can be either the Internet or a set of public IP addresses that you specify.
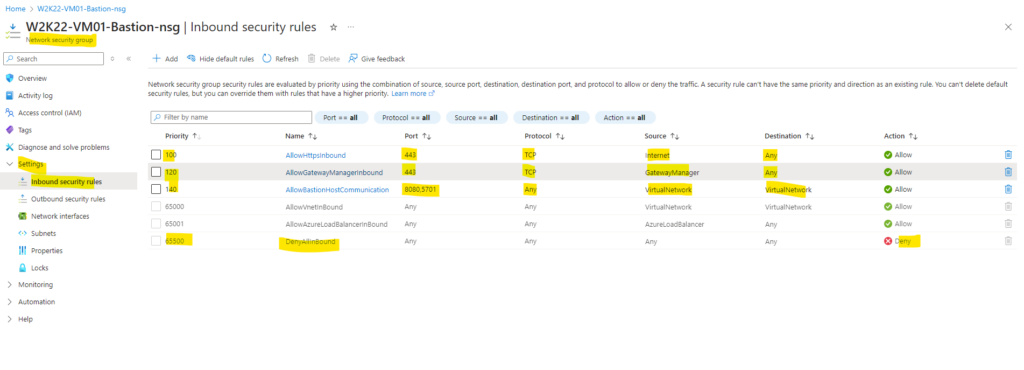
Working with NSG access and Azure Bastion
https://learn.microsoft.com/en-us/azure/bastion/bastion-nsg
Outbound (Egress Traffic) security rules:
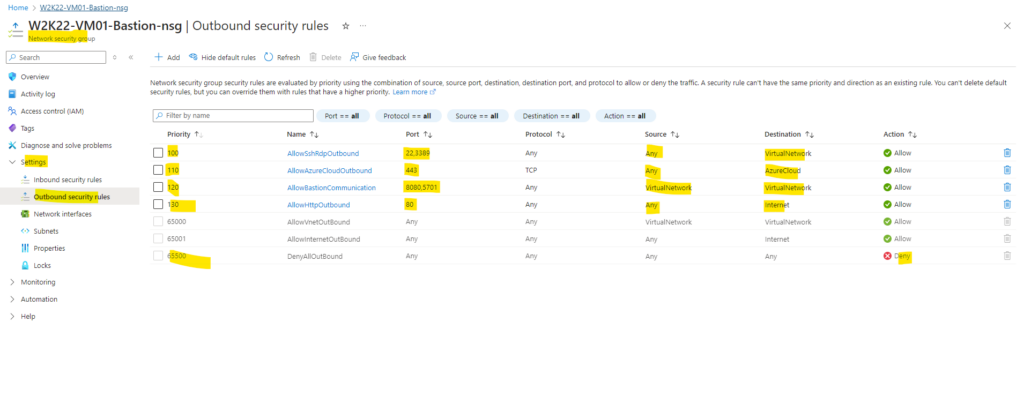
After we configured our NSG we can associate it to the Azure Bastion Subnet. This doesn’t work in case some necessary rules are not already configured for.
Prerequisites for using the native RDP client
- The latest version of the CLI commands (version 2.32 or later) is installed. You can update your CLI for Bastion using az extension update –name bastion. For information about installing the CLI commands, see Install the Azure CLI and Get Started with Azure CLI.
- Azure Bastion is already deployed and configured for your virtual network. For steps, see Configure Bastion for native client connections.
- A virtual machine in the virtual network.
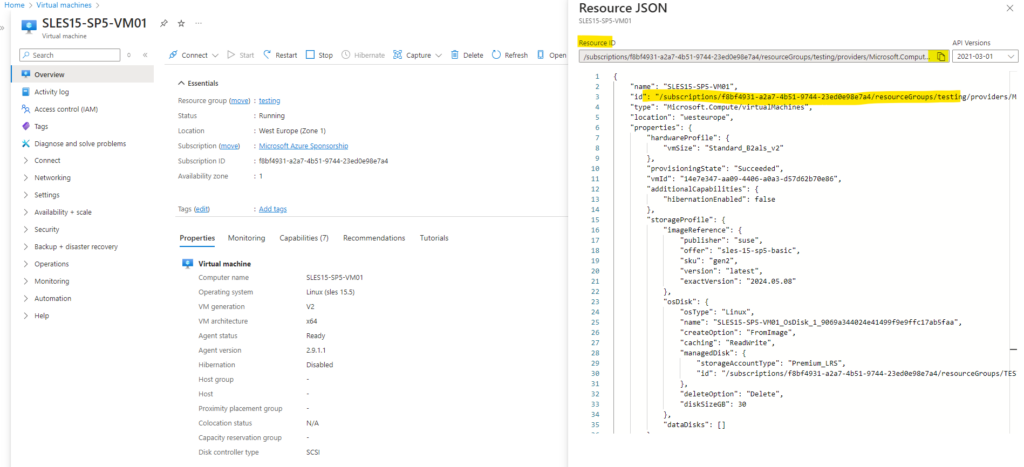
- The VM’s Resource ID. The Resource ID can be easily located in the Azure portal. Go to the Overview page for your VM and select the JSON View link to open the Resource JSON. Copy the Resource ID at the top of the page to your clipboard to use later when connecting to your VM.
- If you plan to sign in to your virtual machine using your Microsoft Entra credentials, make sure your virtual machine is set up using one of the following methods:
- Enable Microsoft Entra sign-in for a Windows VM or Linux VM.
- Configure your Windows VM to be Microsoft Entra joined.
- Configure your Windows VM to be Microsoft Entra hybrid joined.
Source: https://learn.microsoft.com/en-us/azure/bastion/connect-vm-native-client-windows#prereq
First we need to gather to resource ID of the virtual machine we want to connect to by using the native RDP client.
On the overview page of the VM you want to connect to, click on the right top on JSON View link as shown below.
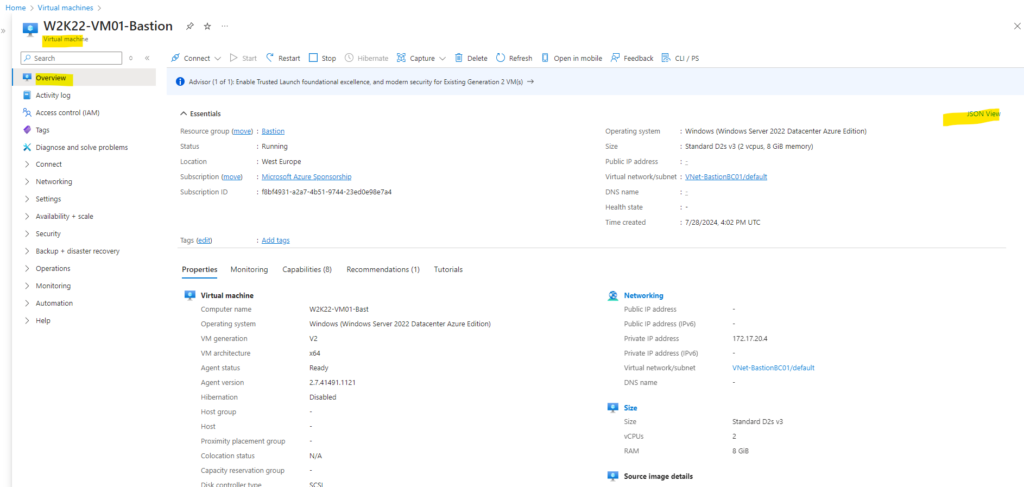
Here we need to copy the resource ID to the clipboard to use it further down.
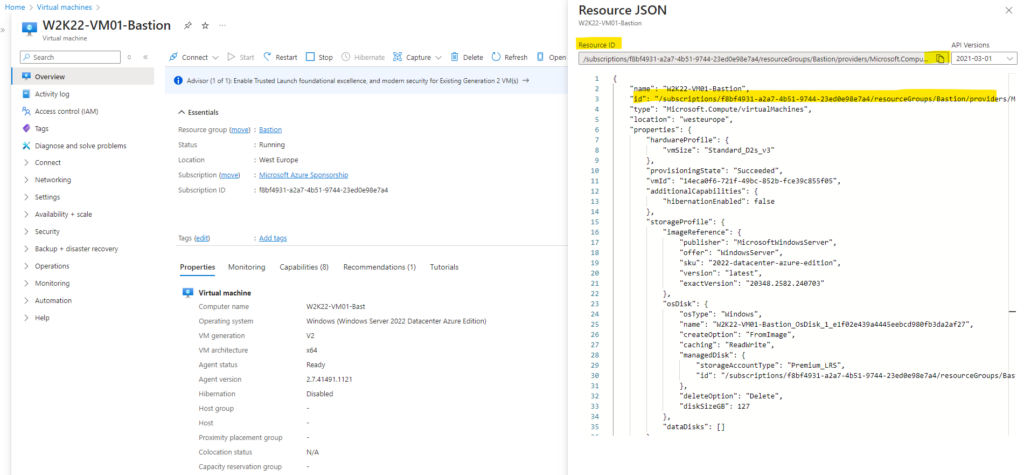
Sign in to your Azure account by using az login command. As mentioned we need to use the Azure CLI to finally connect to a virtual machine by using the native RDP client.
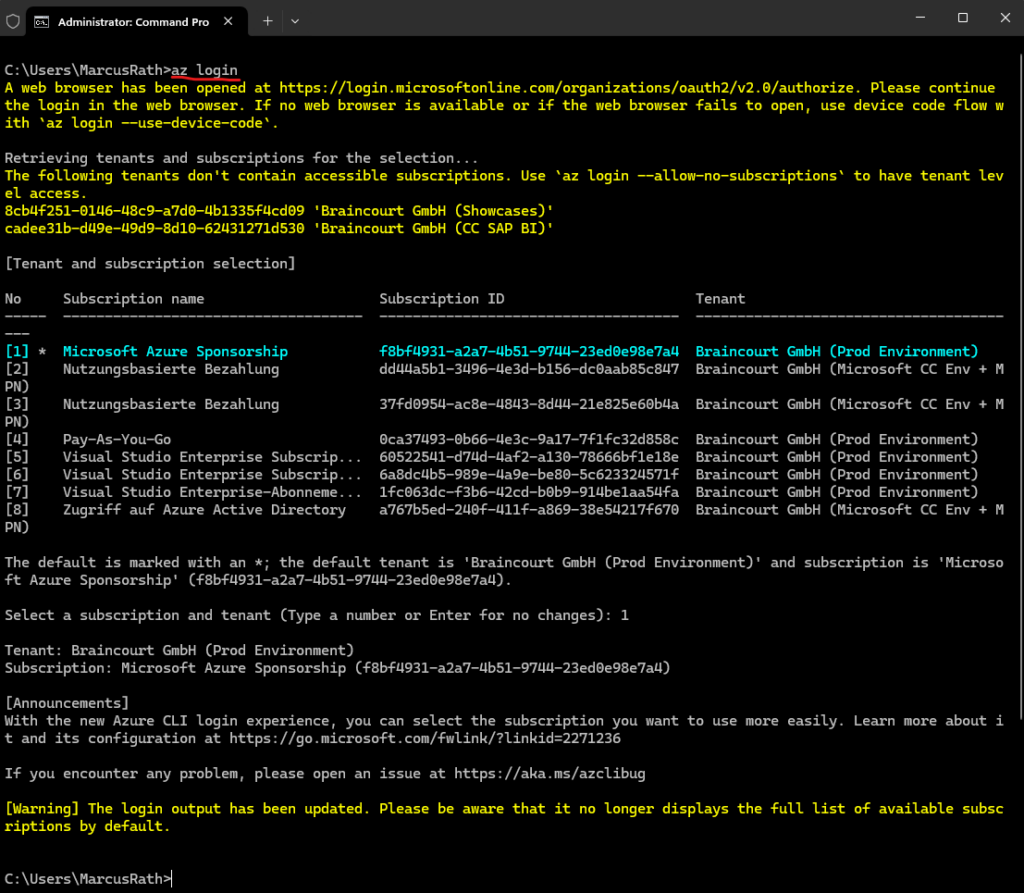
Adjust the following command to your environment. The –target-resource-id we previously copied to clipboard we need to insert here.
az network bastion rdp --name "<BastionName>" --resource-group "<ResourceGroupName>" --target-resource-id "<VMResourceId>"

az network bastion rdp --name "Bastion-BC01" --resource-group "Bastion" --target-resource-id "/subscriptions/f8bf4931-a2a7-4b51-9744-23ed0e98e7a4/resourceGroups/Bastion/providers/Microsoft.Compute/virtualMachines/W2K22-VM01-Bastion"

The native RDP client (mstsc.exe) will get opened.
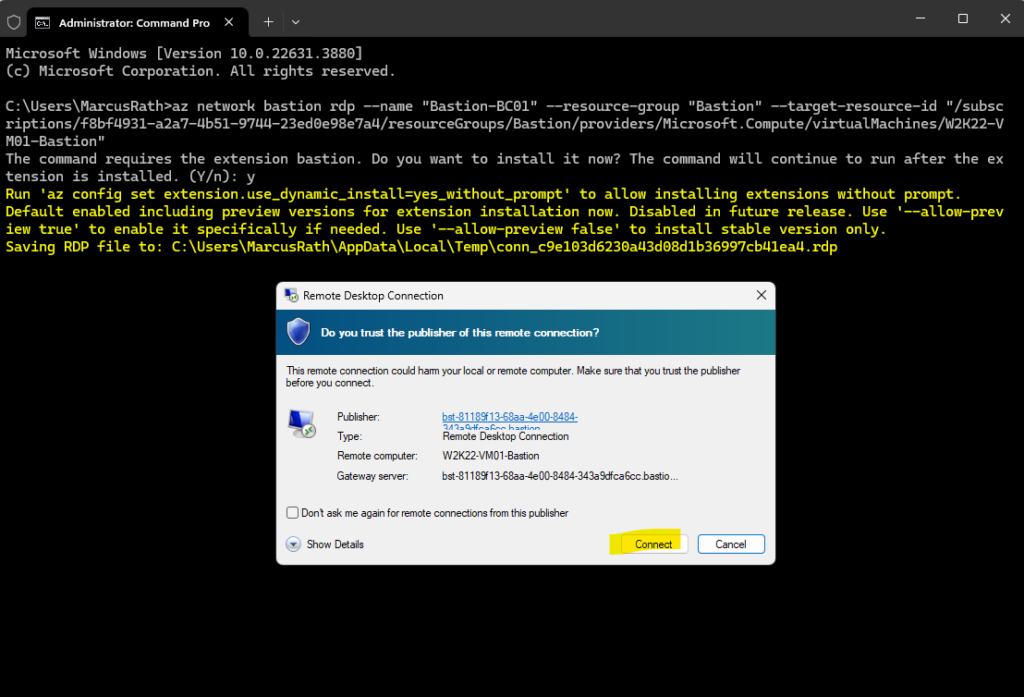
Enter the credentials for your virtual machine.
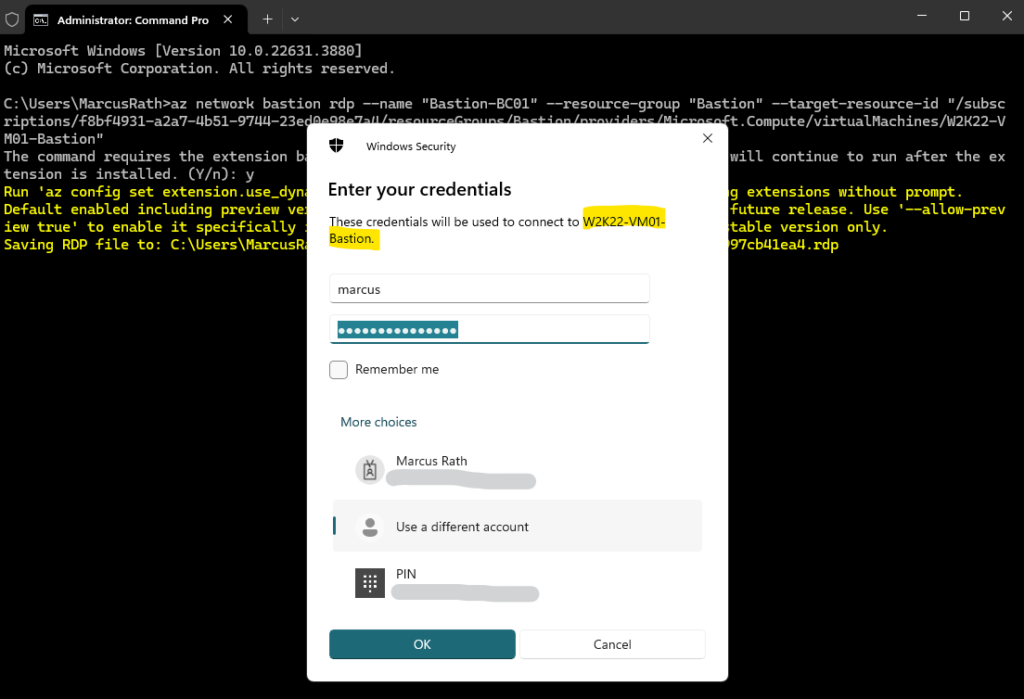
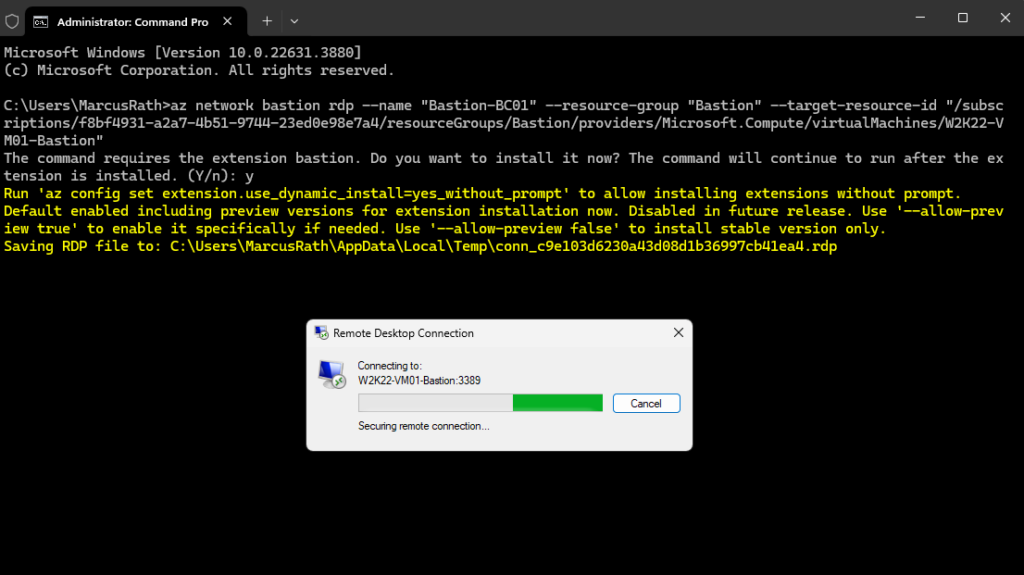
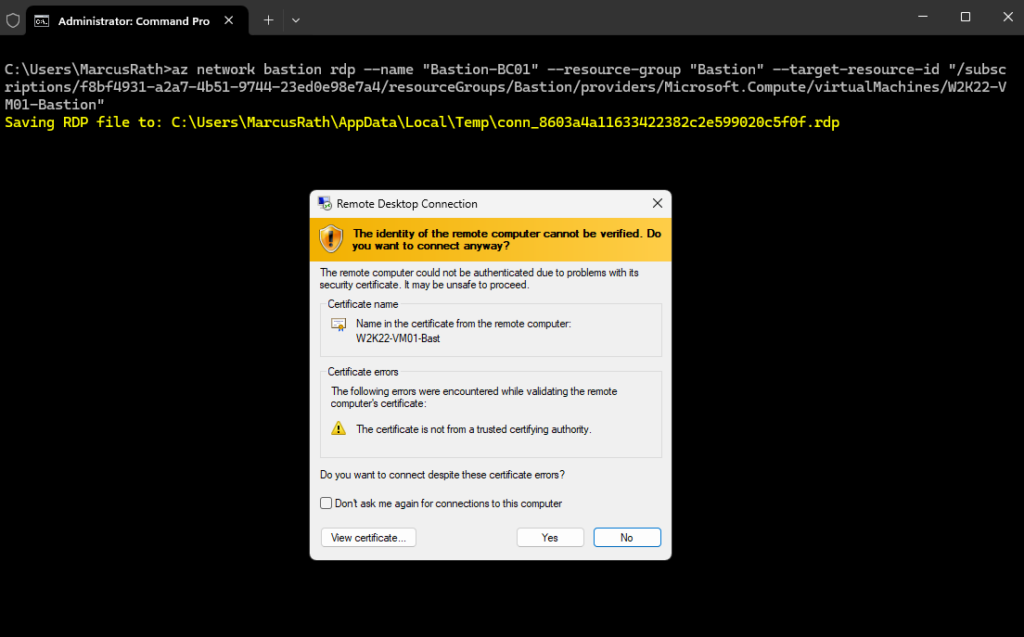
Finally we are successfully connected to our virtual machine by using the native RDP client.
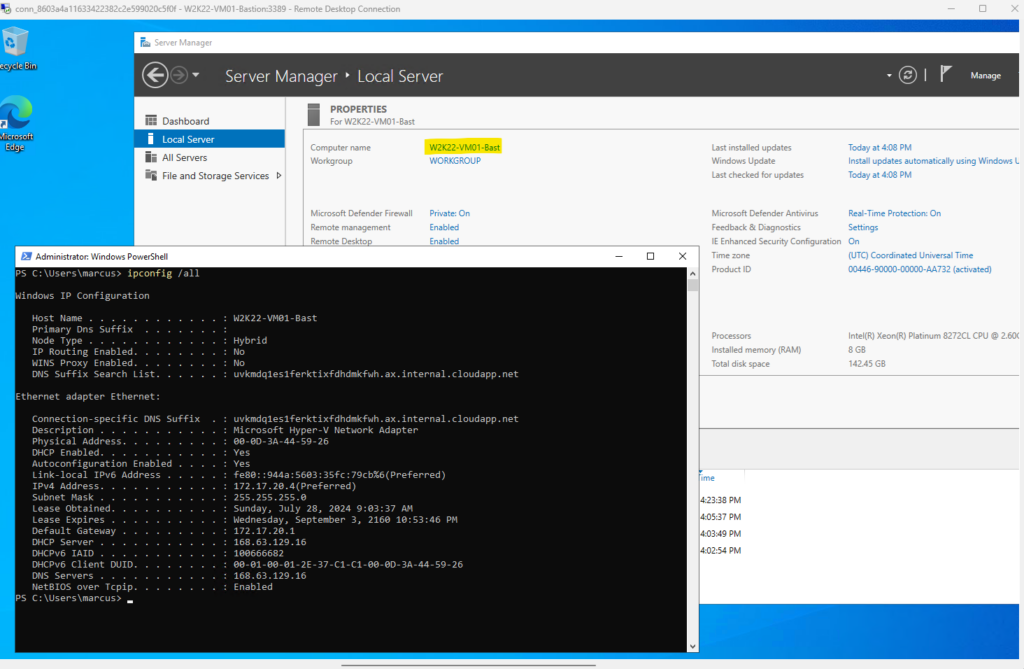
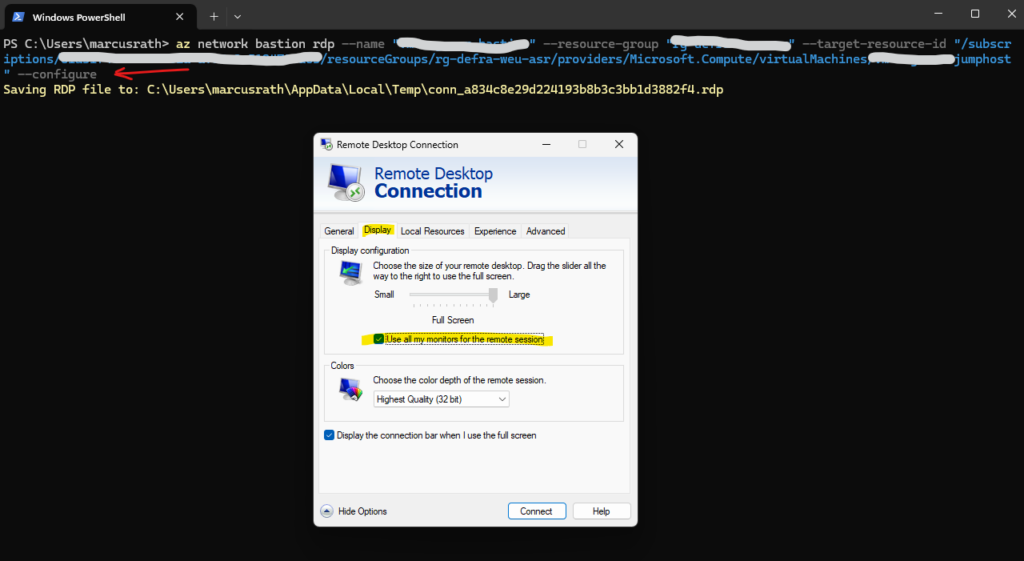
In case you will have multiple monitors, by default the rdp display settings are set to “Use all my monitors for the remote session” and you can’t change this after running the az network bastion rdp command.
In order to disable this setting, we can fortunately use the –configure flag for the az network bastion rdp command like shown below. By using this all configuring tabs on the rdp client are available.
az network bastion rdp --name "<BastionName>" --resource-group "<ResourceGroupName>" --target-resource-id "<VMResourceId>" --configure

az network bastion rdp --name "Bastion-BC01" --resource-group "Bastion" --target-resource-id "/subscriptions/f8bf4931-a2a7-4b51-9744-23ed0e98e7a4/resourceGroups/Bastion/providers/Microsoft.Compute/virtualMachines/W2K22-VM01-Bastion" --configure
Connect to a Linux Virtual Machine via Bastion
The native client feature lets you connect to your target VMs via Bastion using Azure CLI, and expands your sign-in options to include local SSH key pair and Microsoft Entra ID.
Below I will sign-in to a Linux virtual machine by using a username and password for.
As already mentioned you can also peer other virtual networks with the Azure Bastion VNet and then connect to virtual machines in this peered virtual network by using the Azure Bastion service (VM instances).
Below I will first peer the virtual network named W2K22-VM01-vnet in which a Linux virtual machine named SLES15-SP5-VM01 will run with the Azure Bastion VNet.
After the peering I can also connect to this virtual machine by using the Azure Bastion service.
Peering my new Bastion Azure VNet with my existing VNet the Linux VM is running
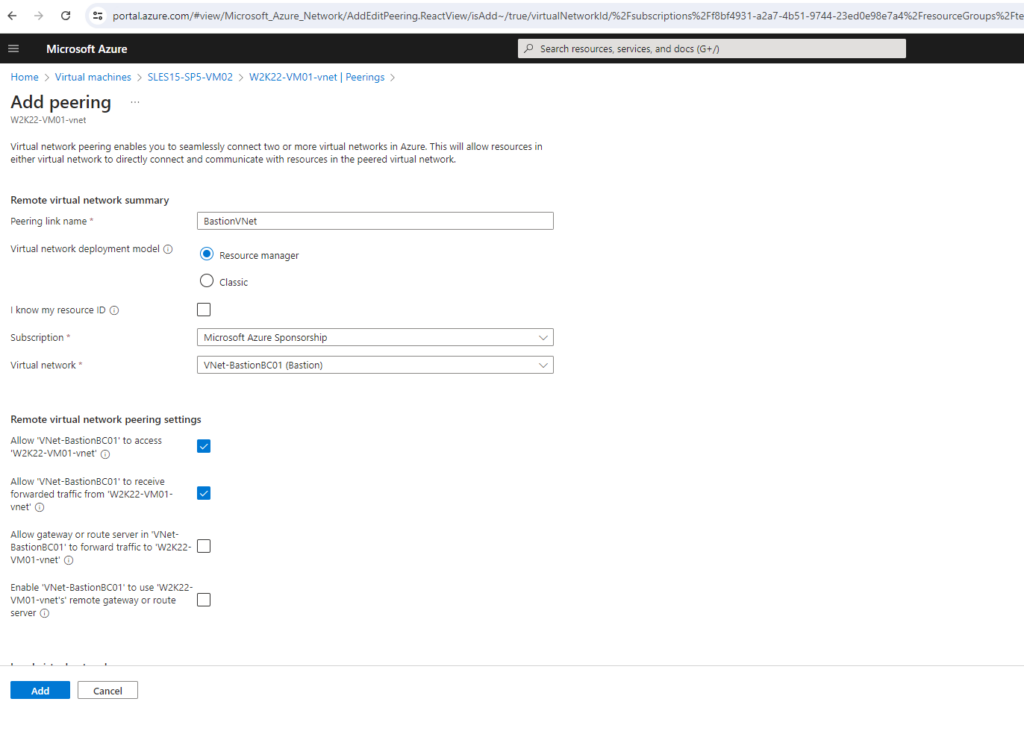

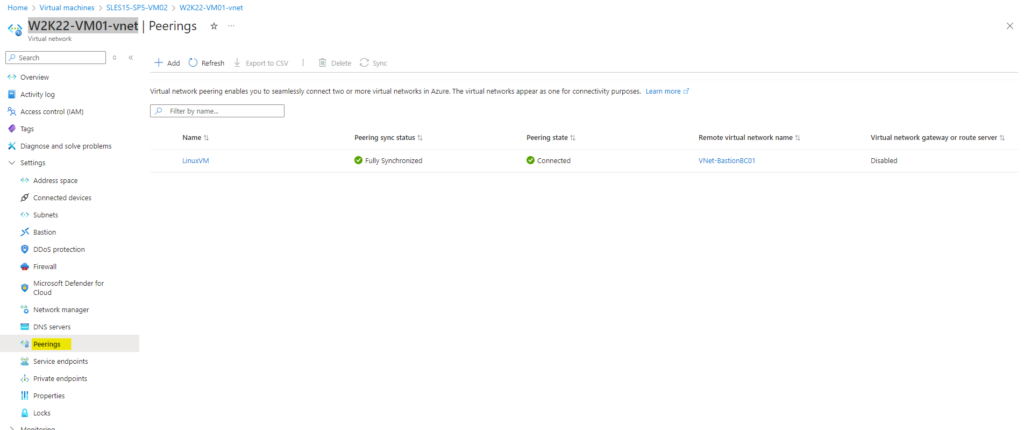
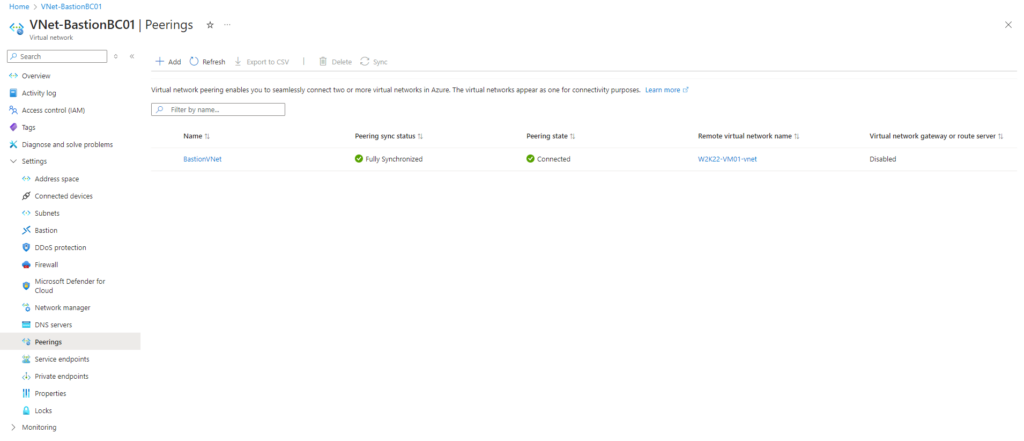
More about virtual network peering you will find in the following Microsoft article https://learn.microsoft.com/en-us/azure/virtual-network/virtual-network-peering-overview.
It is by the way also possible to peer VNets between different Microsoft Entra ID tenants as shown in my following post.
Connect to the Linux Virtual Machine using the Azure Bastion Host
Adjust the following command to your environment.
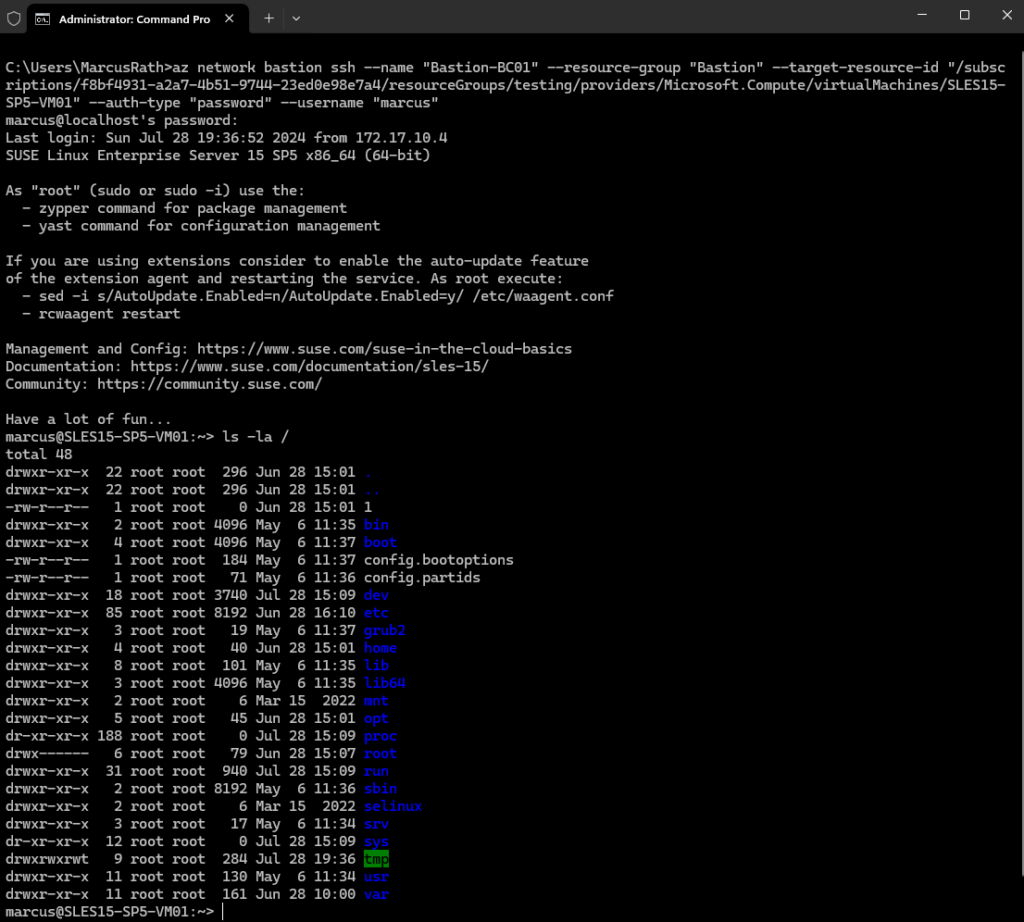
az network bastion ssh --name "<BastionName>" --resource-group "<ResourceGroupName>" --target-resource-id "<VMResourceId or VMSSInstanceResourceId>" --auth-type "password" --username "<Username>"

az network bastion ssh --name "Bastion-BC01" --resource-group "Bastion" --target-resource-id "/subscriptions/f8bf4931-a2a7-4b51-9744-23ed0e98e7a4/resourceGroups/testing/providers/Microsoft.Compute/virtualMachines/SLES15-SP5-VM01" --auth-type "password" --username "marcus"
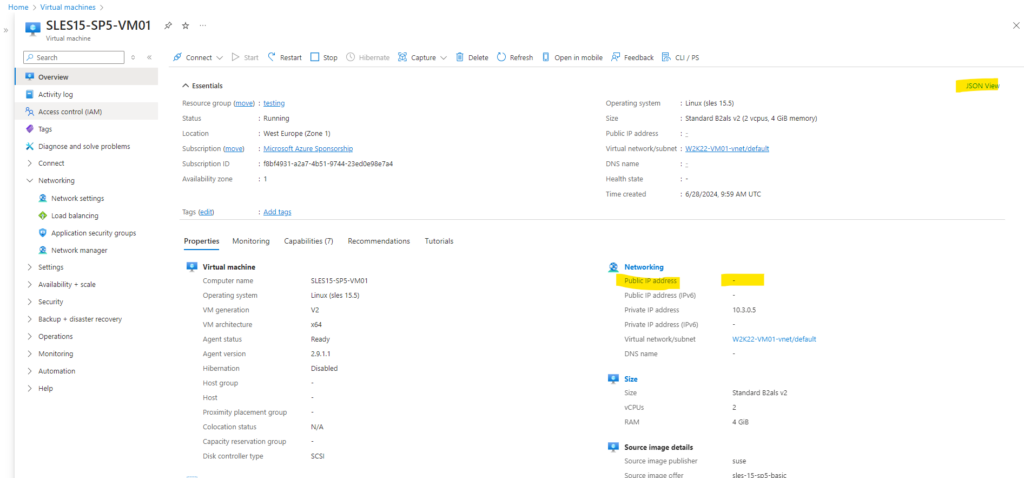
As previously for the Windows VM we first need to gather to resource ID of the virtual machine we want to connect to.
To connect to virtual machine over SSH we also need to add the ssh extension in Azure CLI.
az extension add -n ssh

Now we are able to connect to our Linux virtual machine using SSH and the Azure CLI.
Links
Azure Bastion
https://azure.microsoft.com/en-us/products/azure-bastionWhat is Azure Bastion?
https://learn.microsoft.com/en-us/azure/bastion/bastion-overviewCreate an RDP connection to a Windows VM using Azure Bastion
https://learn.microsoft.com/en-us/azure/bastion/bastion-connect-vm-rdp-windowsConnect to a VM using Bastion and the Windows native client
https://learn.microsoft.com/en-us/azure/bastion/connect-vm-native-client-windowsConfigure Bastion for native client connections
https://learn.microsoft.com/en-us/azure/bastion/native-clientWorking with NSG access and Azure Bastion
https://learn.microsoft.com/en-us/azure/bastion/bastion-nsg
Related Posts
Latest posts
Deploying NetApp Cloud Volumes ONTAP (CVO) in Azure using NetApp Console (formerly BlueXP) – Part 4 – Antivirus VSCAN Configuration
Follow me on LinkedIn


