Step-by-Step Guide: Setting up Route Based S2S VPN between Azure and on-prem by using pfSense – Part 2
Part 1 covers the setup by using static routes, ideal for simpler environments or when dynamic routing isn’t required.
Now this second part explores the BGP (Border Gateway Protocol) to enable dynamic route exchange, which is better suited for larger or more complex networks.
Set up the Tunnel in Azure
About how to set up the tunnel in Azure step by step you can read in one of my previous posts here, where I was also first creating a new virtual network which finally should be connected with my on-prem lab network and environment.
In that post I was also already enabling and configuring BGP in Azure, below I just want to point out what IP addresses we can all use to configure the BGP peer IP on both sides (Azure and on-prem).
That post was showing just to use the default immutable BGP IP address, allocated and assigned from Azure’s VPN Gateway Subnet shown below.
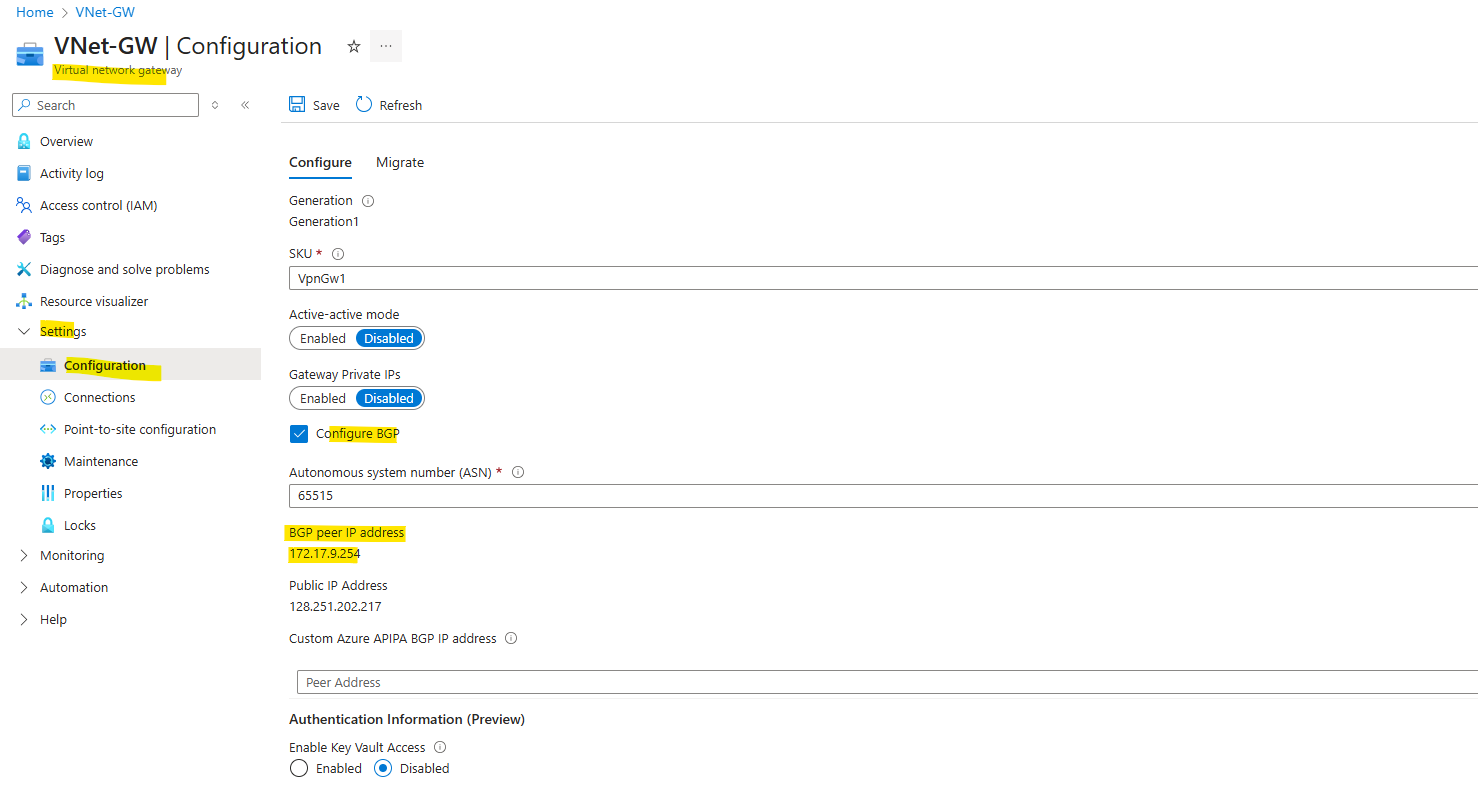
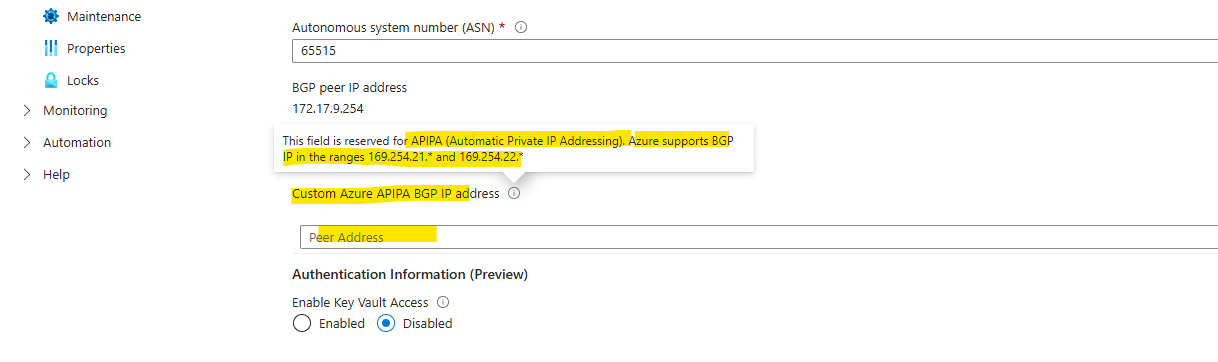
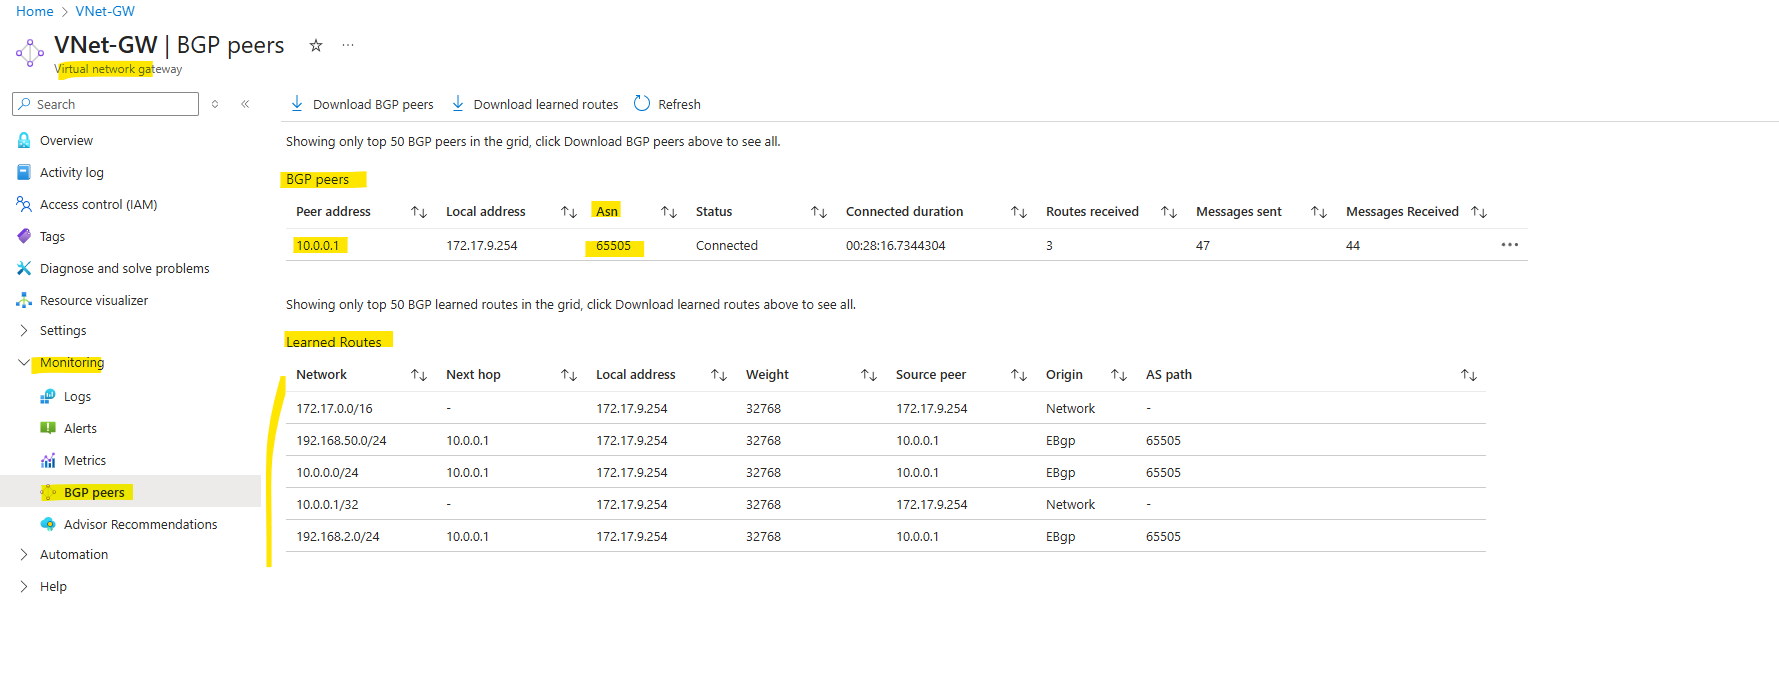
As you can already see in the screenshot below, we can use for the BGP peer IP addresses also custom Azure APIPA BGP IP addresses instead of the default immutable BGP IP address, allocated and assigned from Azure’s VPN Gateway Subnet (here 172.17.9.254).
pfSense blocks APIPA traffic by default for security reasons.
To use APIPA-based transit networks successfully on pfSense, we must first enable APIPA traffic in the advanced system settings or by applying a short PHP command to disable the default block rule.
More about in my following post https://blog.matrixpost.net/pfsense-and-apipa-169-254-16-enabling-link-local-transit-networks-for-ipsec-vti-and-bgp/.
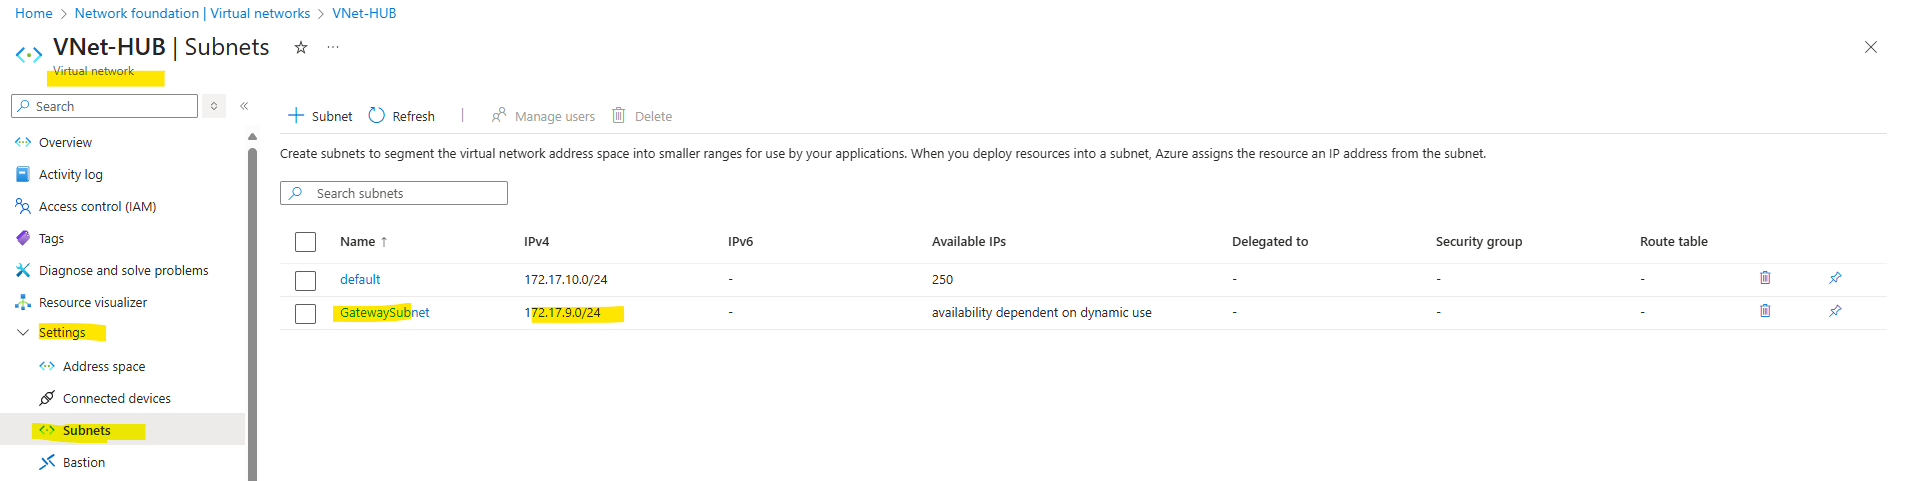
Here you can see this mentioned Azure VPN Gateway Subnet 172.17.9.254.
This subnet hosts the VPN gateway instances (Azure manages these for you) and must be created before deploying the VPN Gateway. Should be sized with enough IPs (typically /27 or larger) to allow future scaling and redundancy.
Is not for workloads, we never place VMs or services into GatewaySubnet.
Enable and Configuring BGP in Azure
If not already done when setting up the tunnel the first time, we can also later enable and configuring BGP in Azure like shown below.
I will use the already existing tunnel configuration from Part 1 where we used static routes and now I just need to enable and configure BGP in Azure.
Finally we need to enable BGP afterwards if not already done in the first place when setting up in Azure on three different objects here, the virtual network gateway, the local network gateway object in Azure and the connection.
First I will enable it on the virtual network gateway by checking the Configure BGP checkbox below.
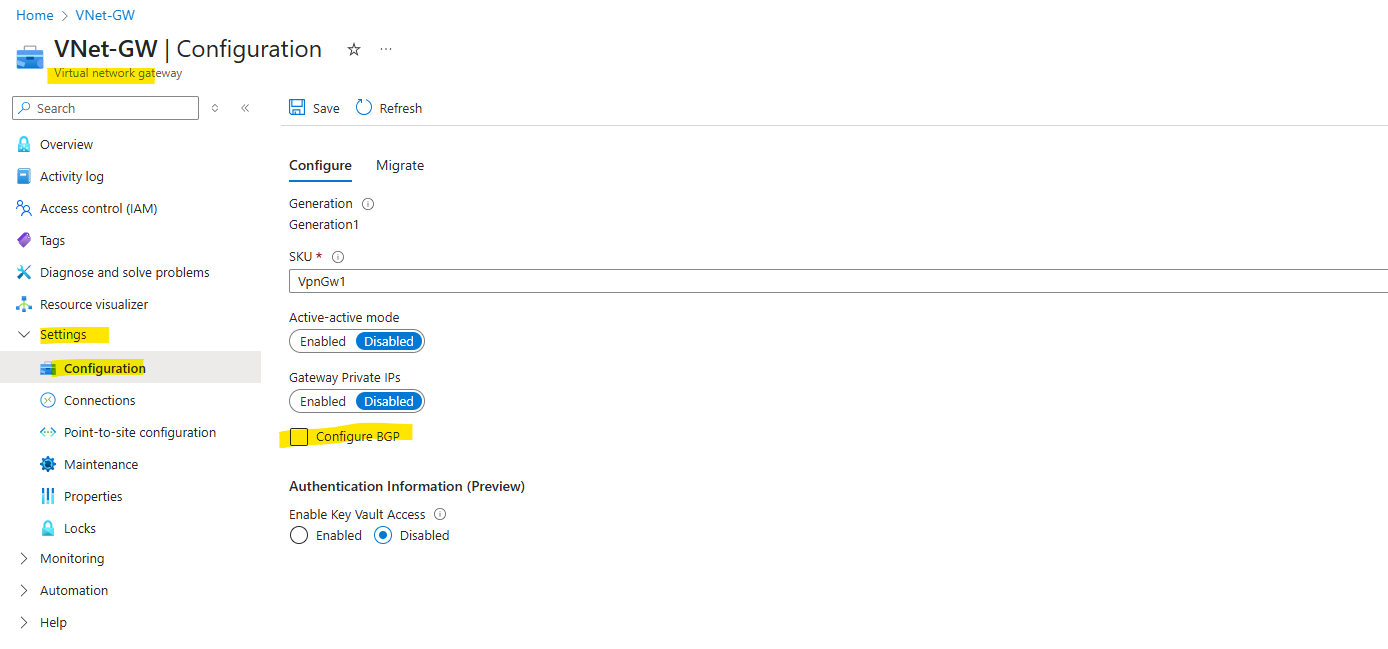
After enabling BGP here we doesn’t need to configure anything else as long we don’t want to use APIPA addresses for the BGP peer IP addresses (Azure and on-prem). Click on Save.
Azure’s ASN is by default 65515.
Azure virtual network gateways are assigned a default ASN of 65515. Note that a BGP-enabled connection between two network gateways requires that their ASNs be different.
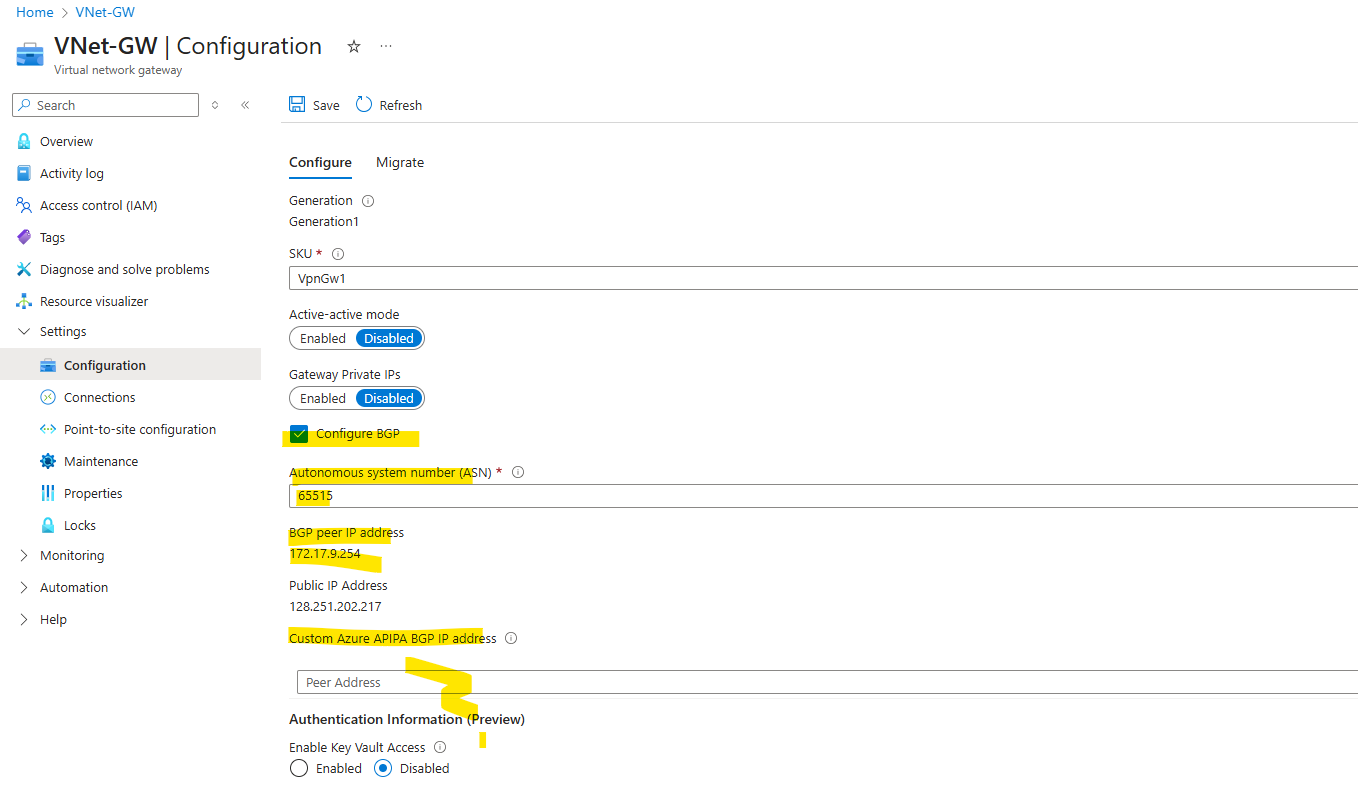
I will first show to set up the BGP by using the default immutable BGP IP address above (in my case here 172.17.9.254), allocated and assigned from Azure’s VPN Gateway Subnet.
Therefore we doesn’t need to change here anything and can move on to enable BGP next on the local network gateway object in Azure.
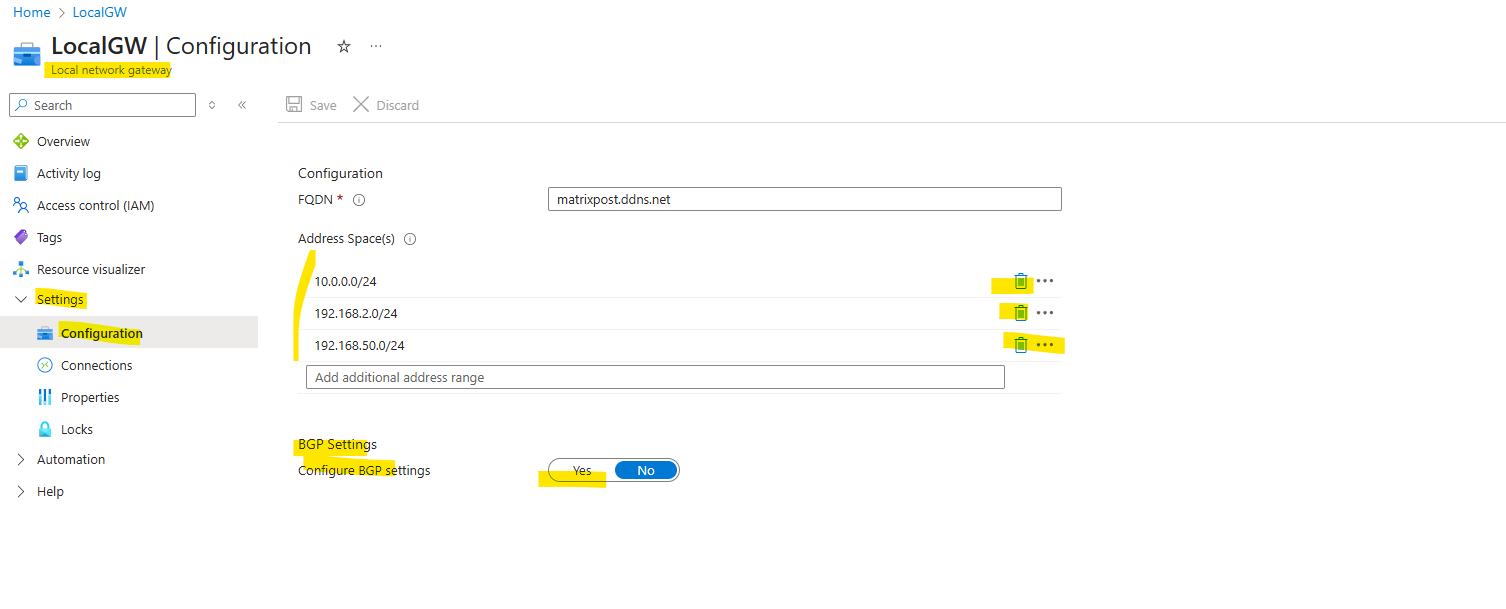
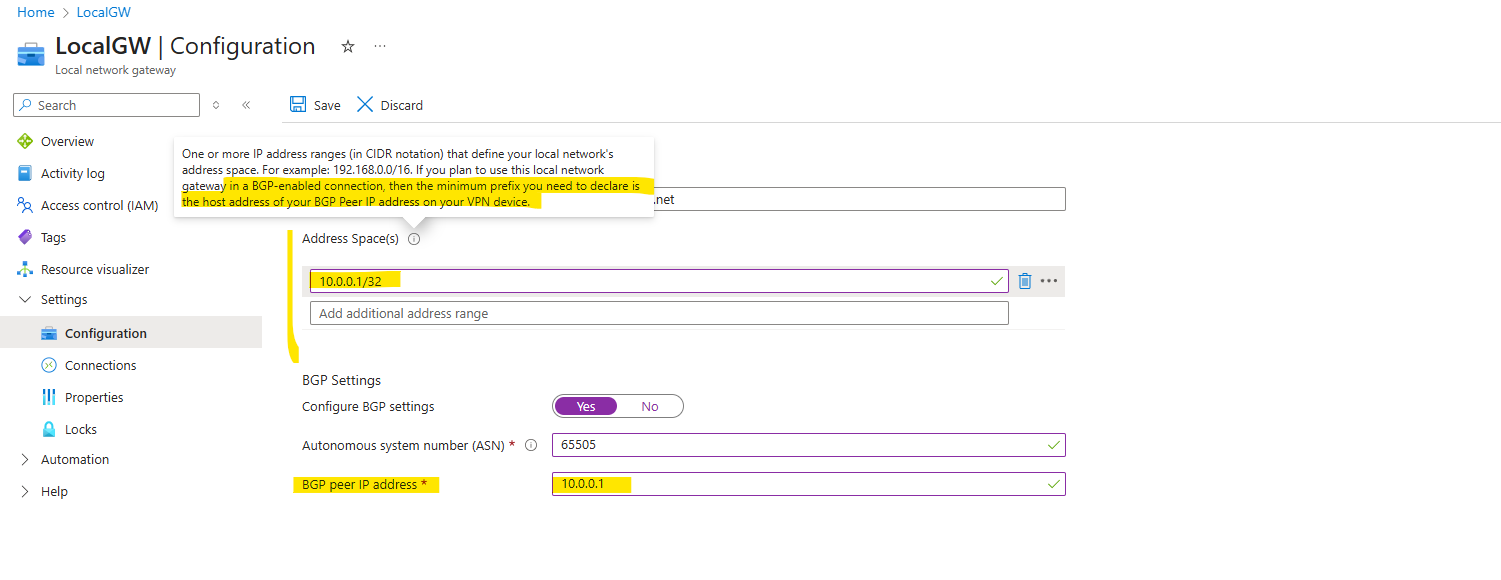
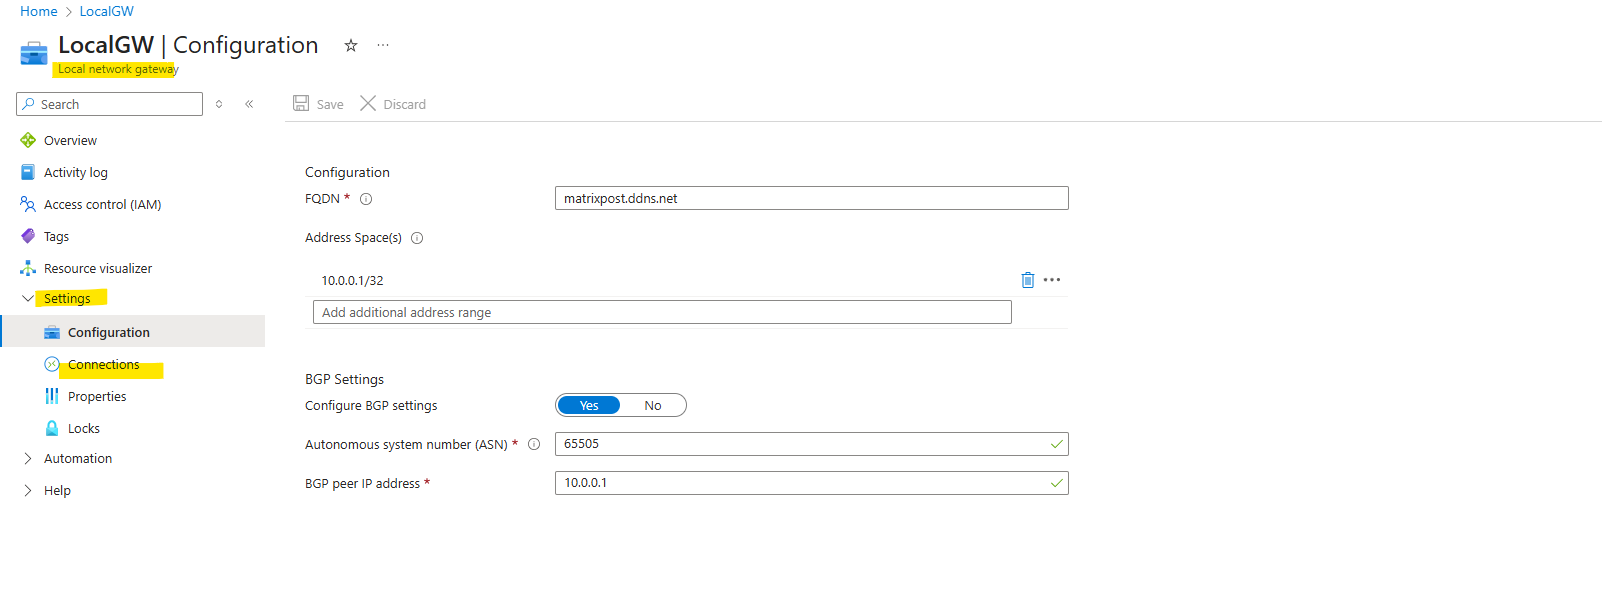
On the local network gateway also under Settings -> Configuration we need to toggle to Yes for the BGP Settings below.
Further we can remove and delete our static routes if existing here, in my case they’re still shown up here from Part 1 when using static routes for the tunnel.
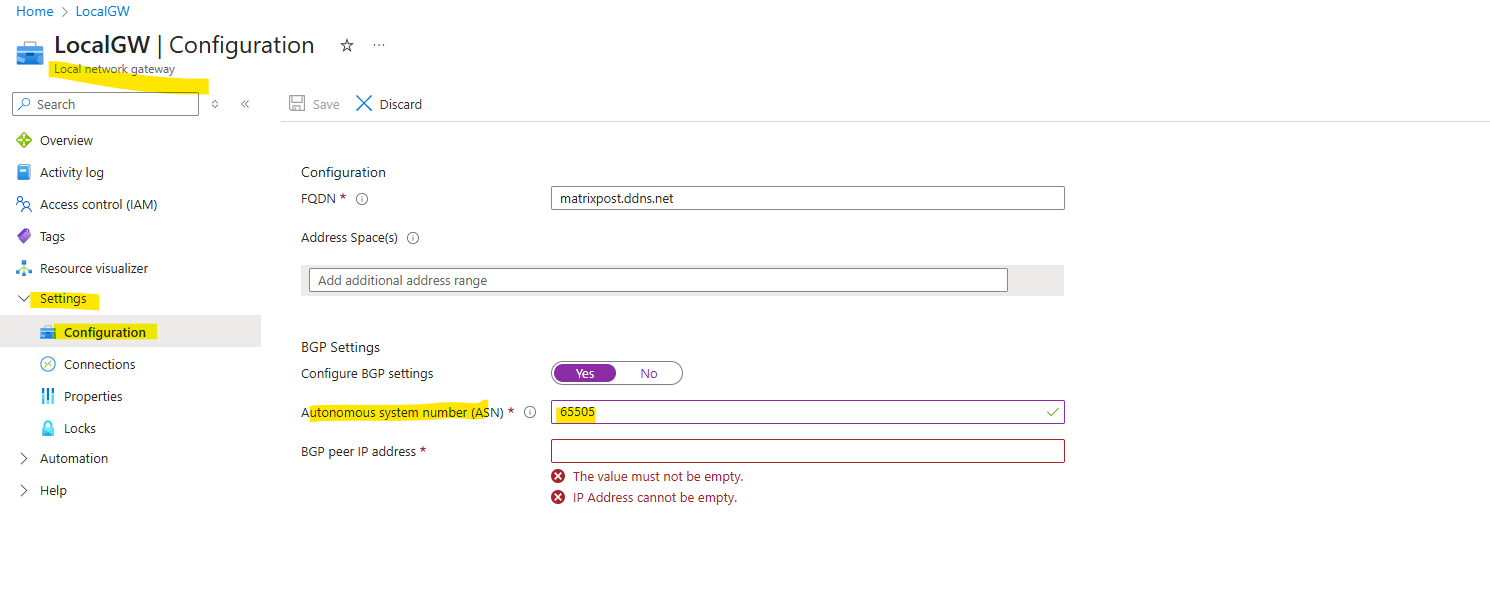
When enabling BGP on the local network gateway object in Azure, we also need to enter below our on-prem ASN number, I will use here always 65505.
For the on-prem ASN number we can use here a number from the reserved private use range which is from 64512 – 65534, besides 65515 which is reserved for the Azure as mentioned.
Next we also need to enter our BGP peer IP address for our on-prem VPN device, in our case here pfSense.
On Azure side this is the default immutable BGP IP address (in my case 172.17.9.254), allocated and assigned from Azure’s VPN Gateway Subnet as mentioned because we not configured to use APIPA addresses instead.
For the BGP peer IP address you would normally use for most VPN devices here a /30 subnet (private IP address space or APIPA addresses) containing two usable IP addresses to build a virtual point-to-point link between both BGP peers (Azure and on-prem here pfSense).
So actually when using the default immutable BGP IP address (in my case 172.17.9.254), allocated and assigned from Azure’s VPN Gateway Subnet, the counterpart IP address or left IP address of this /30 subnet would be 172.17.9.253 which I could configure on pfSense.
The only problem with this unfortunately is, that this IP address is within Azure’s VPN Gateway Subnet and virtual network and would result in an overlapping networks error.
Failed to save configuration changes to local network gateway. Error: This gateway connection creates an address space overlap between two networks. The overlapping addresses are ‘172.17.9.253/32’ and ‘172.17.0.0/16’.
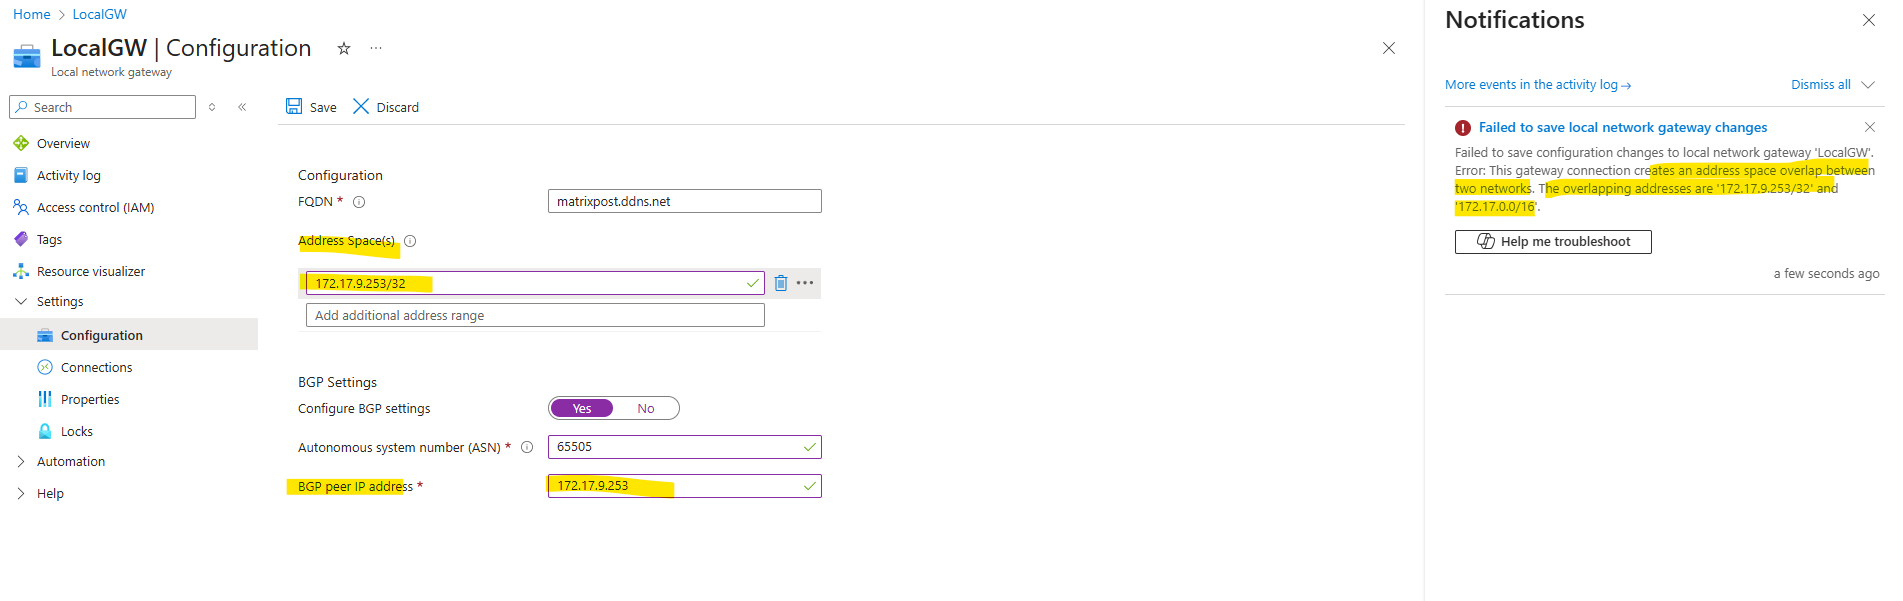
So therefore no matter if using pfSense, Juniper, Check Point or any other VPN devices for on-prem, we need to use some other by Azure reachable IP address configured on the on-prem VPN device to enter here.
For example we could use the IP address assigned on the internal interface of pfSense (LAN interface) which in my case is 10.0.0.1. Finally click on Save.
On Juniper for example in case of not enabling APIPA addresses here, we could also assign a second IP address on the tunnel interface like shown in my following post.
If you plan to use this local network gateway in a BGP-enabled connection, then the minimum prefix you need to declare for the Address Space(s) below, is the host address of your BGP Peer IP address on your VPN device.
So finally we need this static route (/32 host address) to the on-prem VPN device’s BGP peer IP address to tell Azure to route traffic for through the tunnel. All other routes and my whole 10.0.0.0/24 on-prem network will then be advertised to Azure later by using BGP.
At least we also need to enable BGP on the connection, so click below on Settings -> Connection.
Click on the connection.
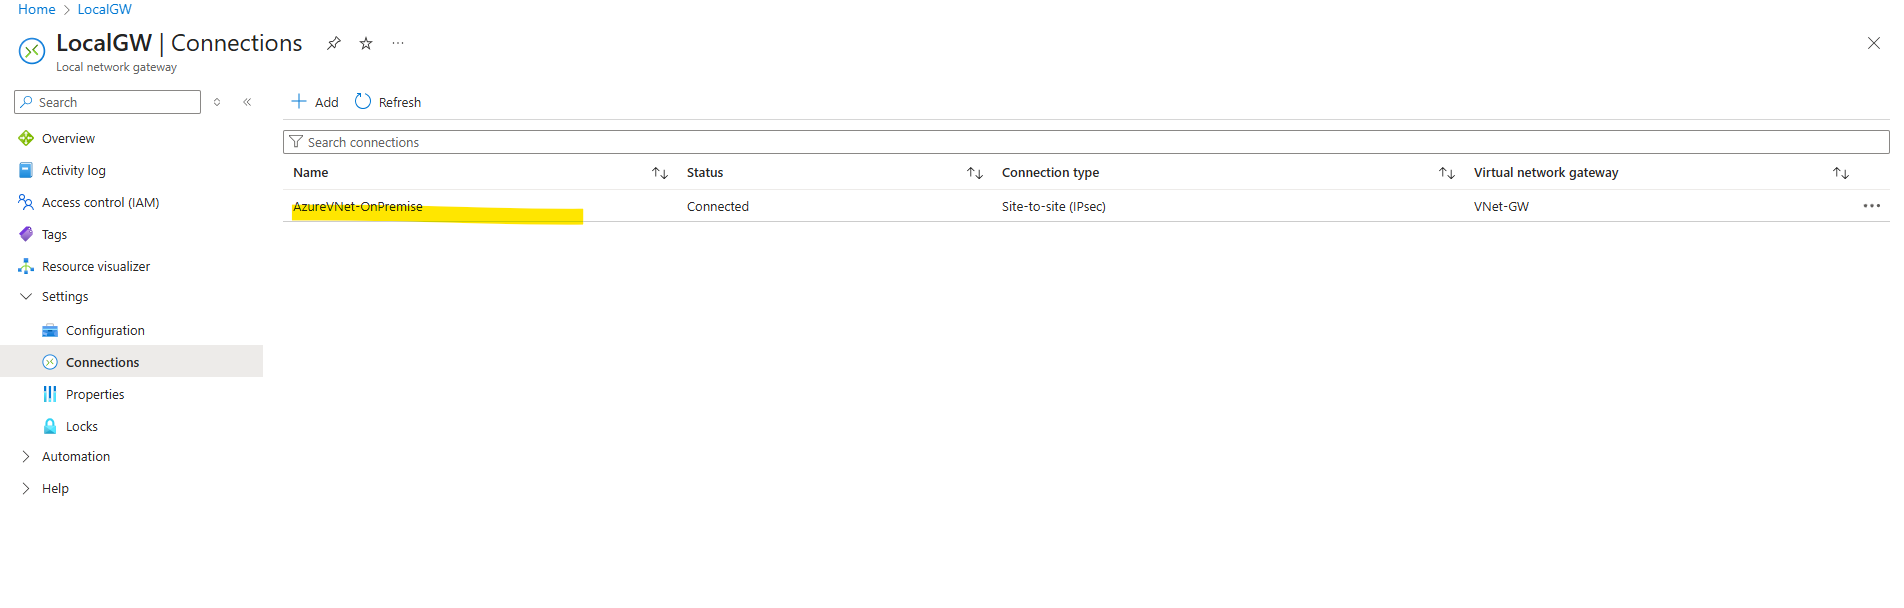
Toggle below BGP to Enabled and click on Save.
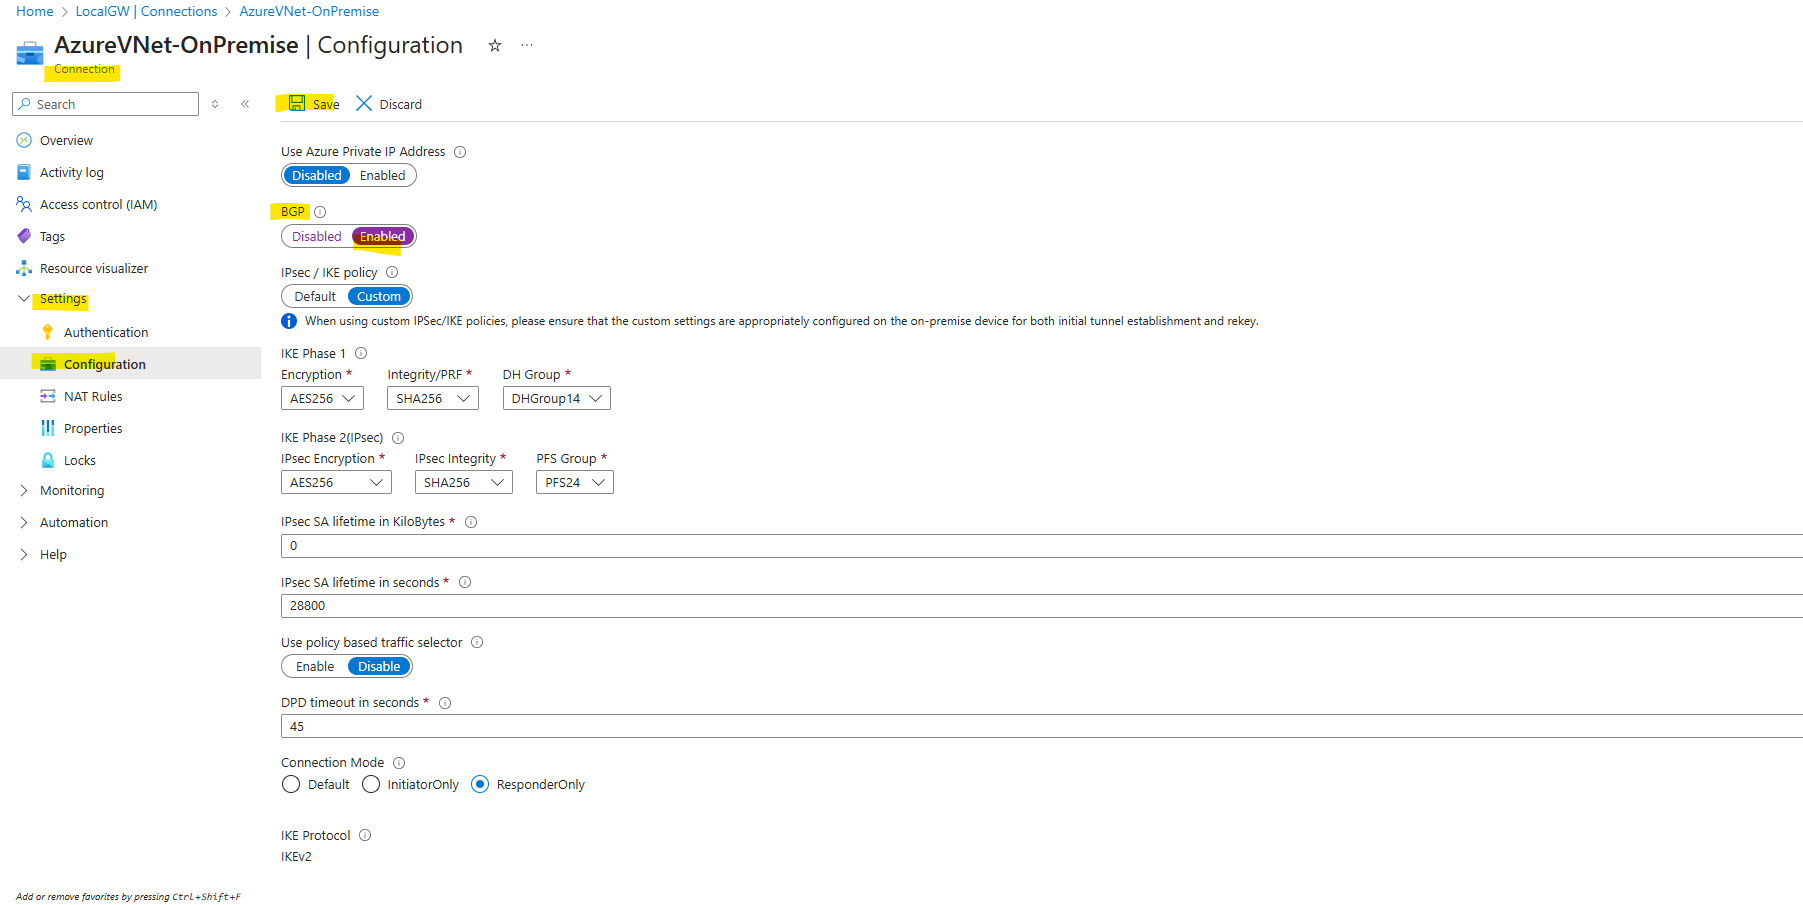
Now we enabled BGP in Azure and can move on with our on-prem VPN device, in our case pfSense.
Set up the Tunnel in on-prem (pfSense)
About how to set up the tunnel in pfSense step by step you can read in Part 1 starting here.
Here I was already using the the counterpart and left IP address (172.17.9.253/30) of the default immutable BGP IP address from the Azure peer (172.17.9.254/30), allocated and assigned from Azure’s VPN Gateway Subnet as mentioned above.
As mentioned in Part 1, actually for a route-based VPNs they use static routes like in Part 1, many firewall and route platforms (like Juniper, Cisco, Check Point, etc.), the tunnel interfaces can be left unnumbered and no need to assign IP addresses like the 172.17.9.253/30 here.
pfSense, however is different and requires numbered interfaces. Each tunnel must have an IP address on both ends (commonly an APIPA /30 or /31 like 169.254.x.x or the counterpart and left IP address of Azure’s VPN Gateway Subnet (e.g. 172.17.9.253/30)). Without this, pfSense won’t allow you to install static routes over the tunnel.
So finally all fits already and we “just” need to enable BGP on pfSense.
Enable and Configuring BGP on pfSense
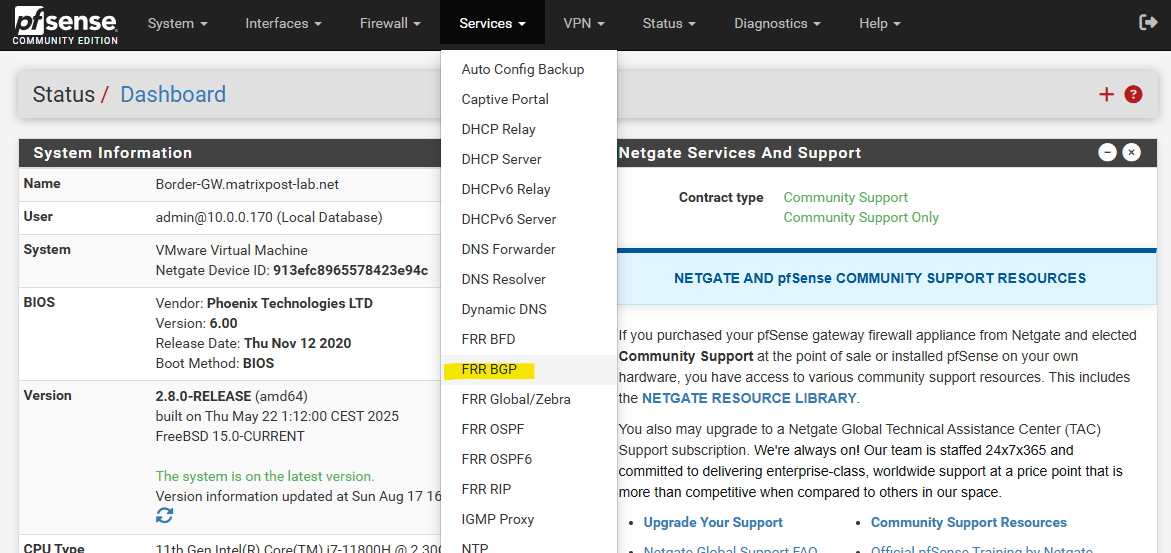
Because OpenBGPD is depricated in pfSense since version 2.5.0 and only available till version 2.4.5, we need to set up the FRR package in pfSense to enable BGP.
Since late 2017 the FRRouting (FRR) package is available in pfSense and supports BGP, OSPF and OSPF6
It is designed to replace the OpenBGPD and Quagga OSPF package and allows pfSense users to run both BGPD and OSPF simultaneously.
If you install FRR, pfSense will automatically uninstall OpenBGPD and Quagga OSPF, if either of these packages are already installed.
About how to install and set up FRR (Free Range Routing) in pfSense you can read my following post.
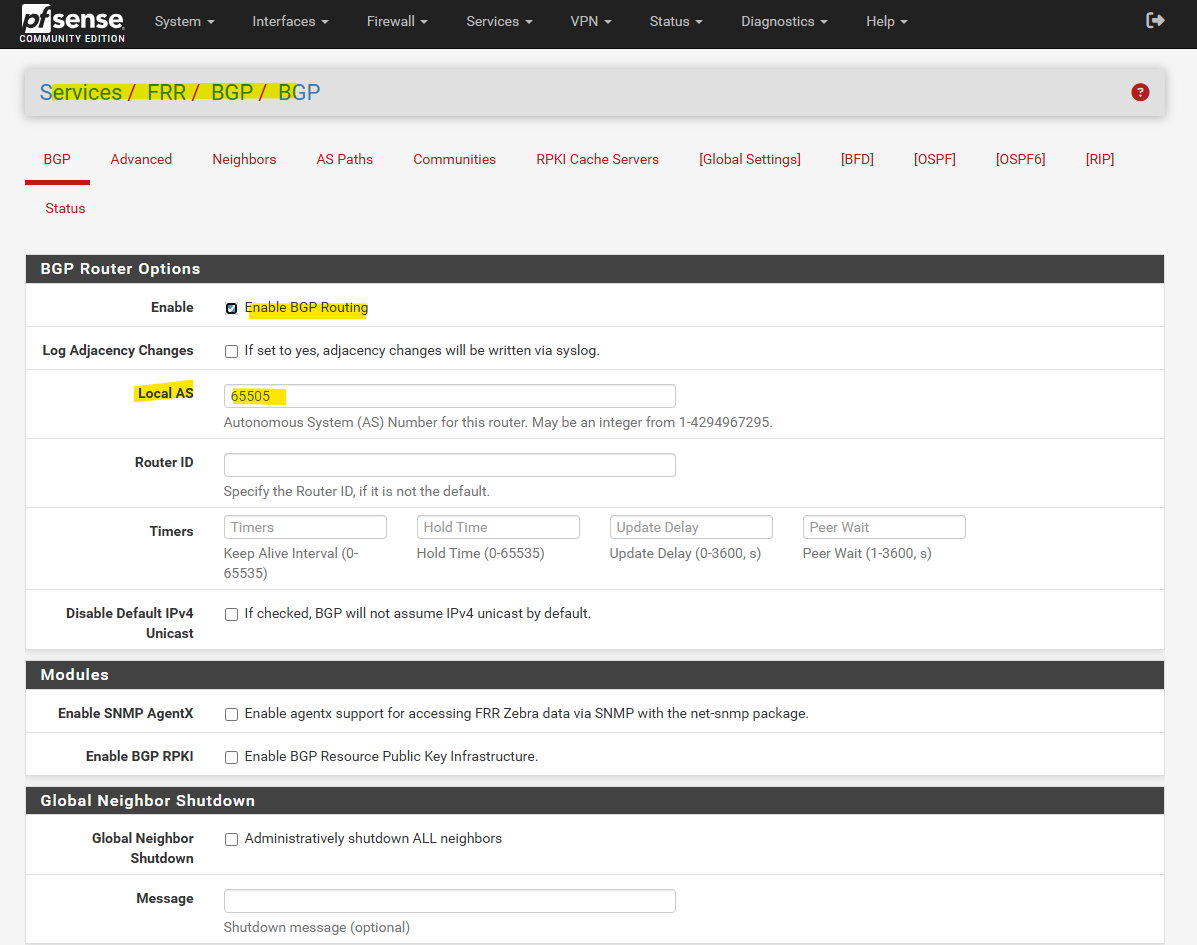
Below just a quick summary of my configured FRR BGP settings and adjusted to the BGP peer IP of Azure. The separate steps to configure in detail you will see in this post.
Here my mentioned on-prem ASN number.
For the on-prem ASN number we can use here a number from the reserved private use range which is from 64512 – 65534, besides 65515 which is reserved for the Azure as mentioned.
Under Neighbors is Azure’s default immutable BGP IP address and ASN number configured.
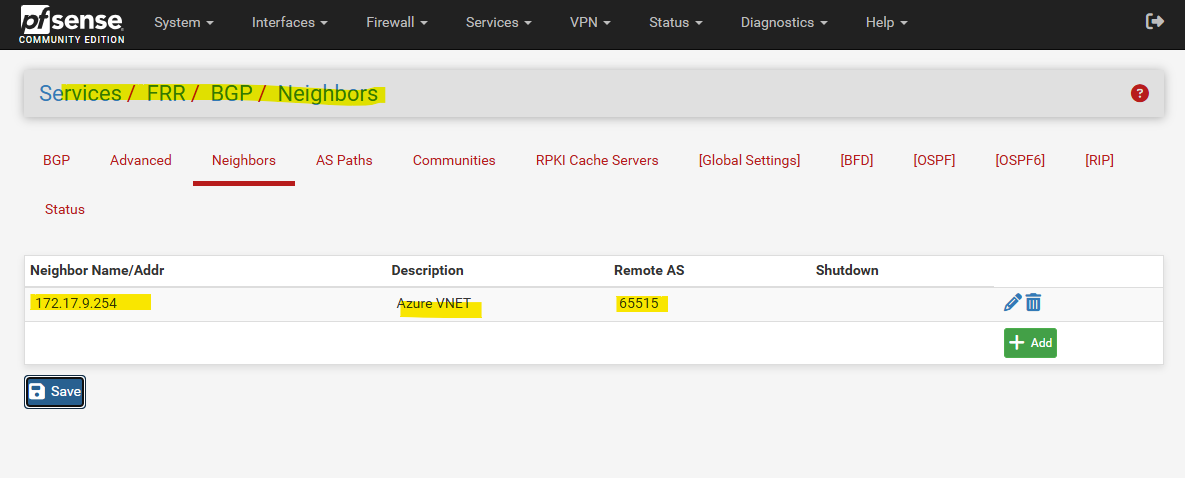
Further on the Neighbors tab we need to configure the Peer Filtering section. Here I will select my already created matrix-any prefix for inbound and outbound filtering.
Without configuring them, the BGP peers (pfSense and Azure) would established a connection and also sending BGP Open Messages, Keepalive Messages, Notification Messages and even Update Messages, but the Update Messages normally should contain the advertised routes and subnets, but without these Peer Filtering settings to allow or deny advertising of routes, the will missing here.
In contrast to OpenBGPD, in FRR you have to configure Inbound and Outbound path policies in order FRR will accept and send inbound and outbound updates for the advertised routes.

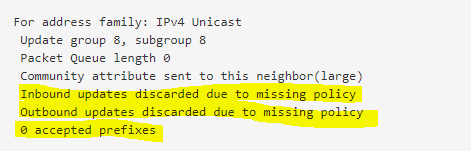
Without configuring them, you will notice under Services -> FRR -> Status -> BGP in the BGP Neighbors section the following information.
Inbound updates discarded due to missing policy
Outbound updates discarded due to missing policy
0 accepted prefixes
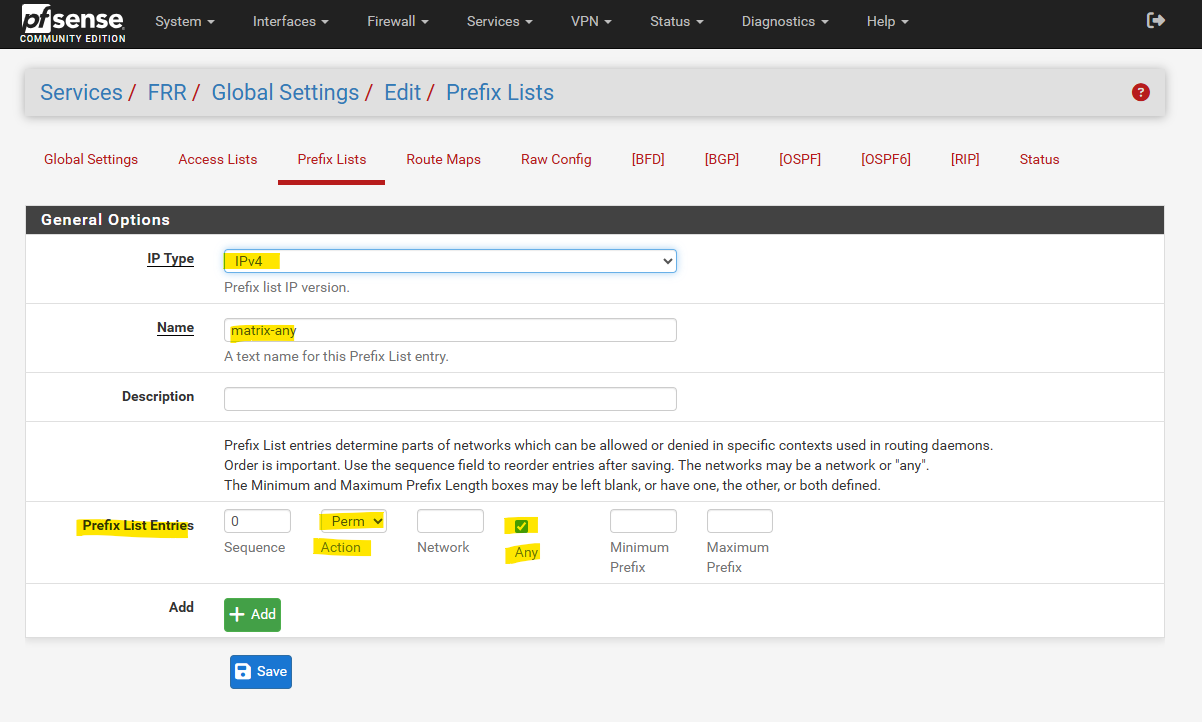
These prefix lists we need to configure under Services -> FRR Global/Zebra -> Prefix Lists.
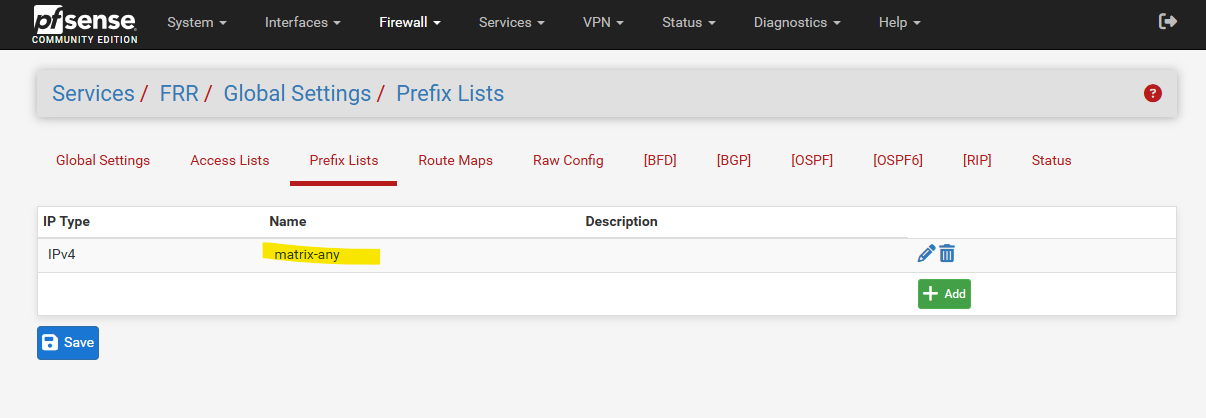
In my case I want to advertise all IPv4 routes without any filtering, so the entry will look like this. You can also restrict here what routes you want to advertise using a set of prefixes and sequences to control the order they will be applied.
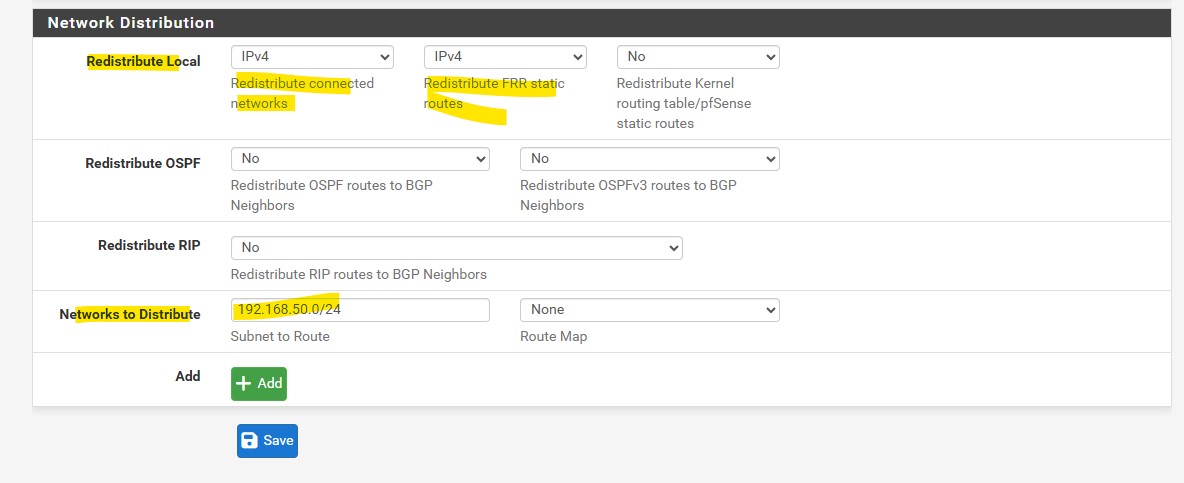
Directly under Services -> FRR -> BGP at the bottom we also need to select all networks which pfsense will advertise to Azure, but finally the Peer Filtering policies will decide if they will advertised or not. In my case the policy will allow all routes set here to be advertised.
Below the first all to pfSense directly connected networks will be advertised to the BGP peer and second all FRR static routes.
Unfortunately the “Redistribute FRR static routes” option in pfSense is inherited from upstream FRR but is basically useless in pfSense, since there’s no GUI place to define FRR-only static routes.
In pfSense, we either use system static routes (and redistribute kernel/static), or using the Network to Distribute fields below to add networks to advertise they not directly connected to pfSense.
Just for demonstration purpose how to add FRR static routes at least temporarily but not persistent by using the FRR console via SSH you can see in the section below.

Adding FRR static routes temporarily and not persistent by using the FRR console
Changes unfortunately won’t survive because the FRR config is regenerated from the GUI. Below just to see how this works.
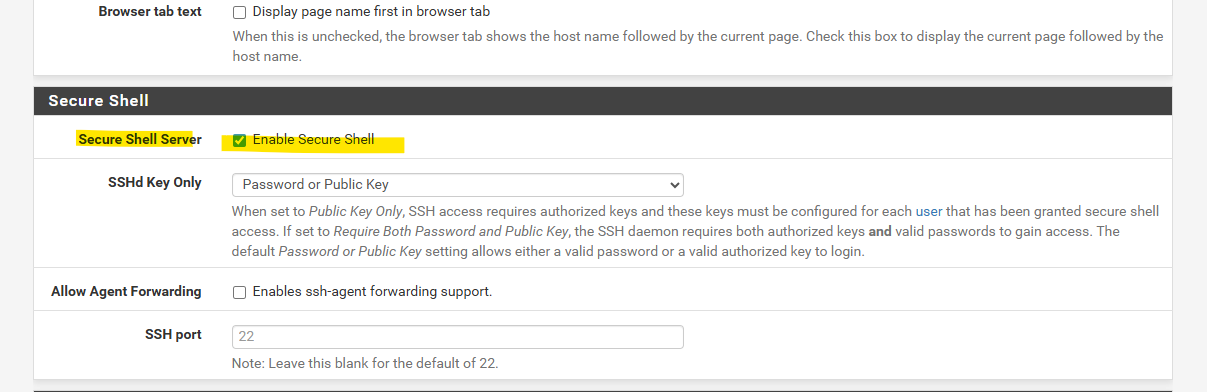
To connect to the FRR console we first need to enable SSH access on pfSense if not already done, navigate to System -> Advanced.
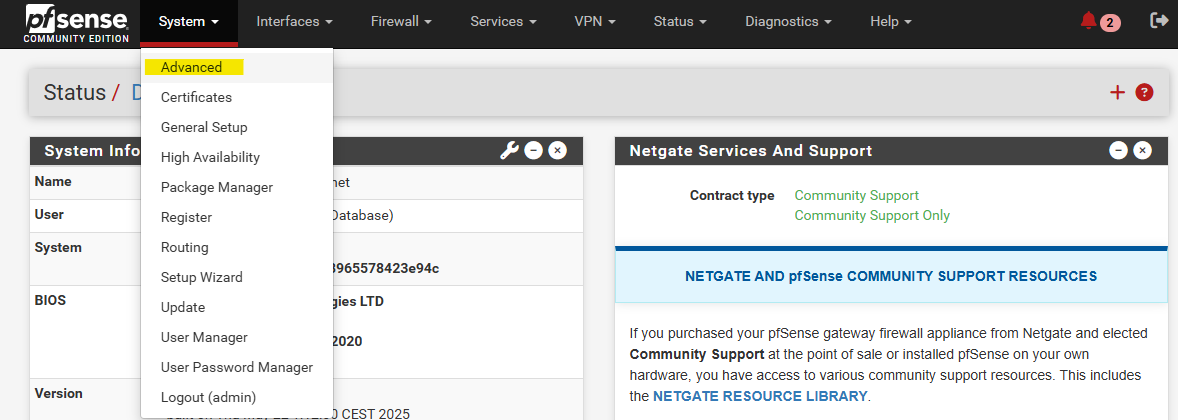
Scroll down and check Enable Secure Shell and finally click on Save.
PS> ssh admin@<pfSense IP internal interface>
8) Shell
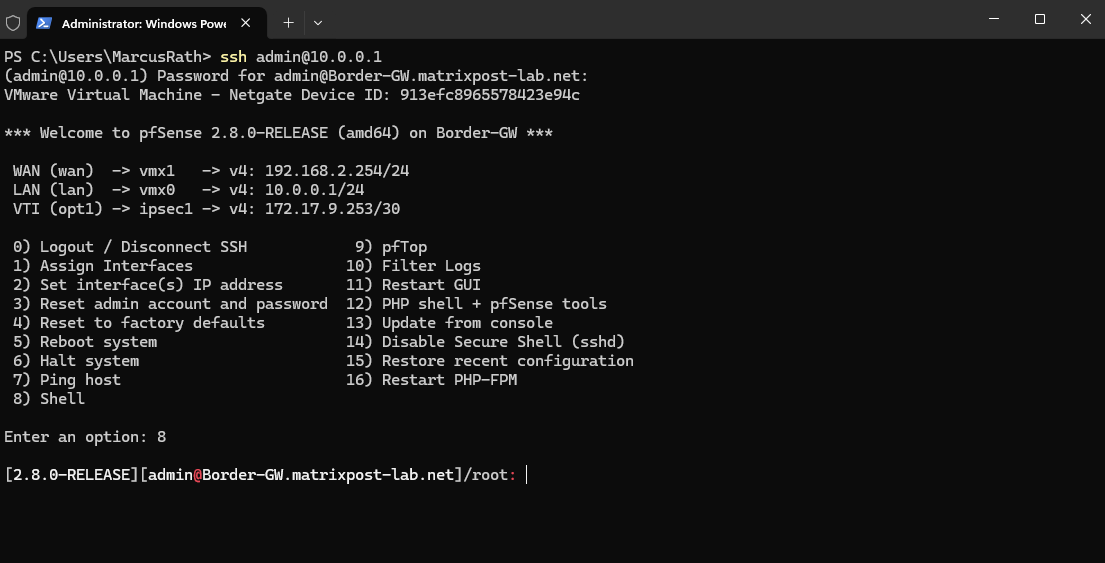
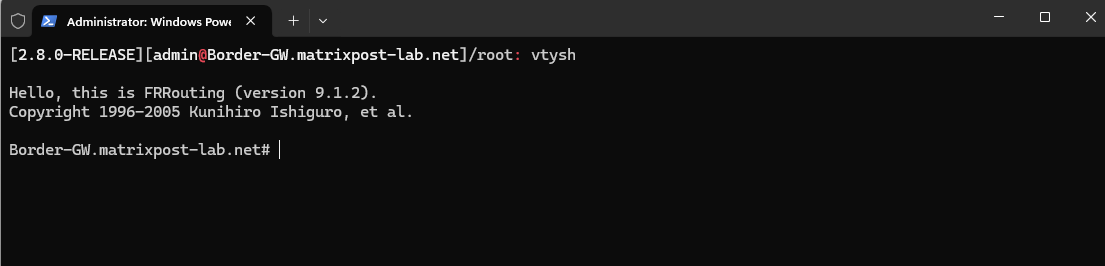
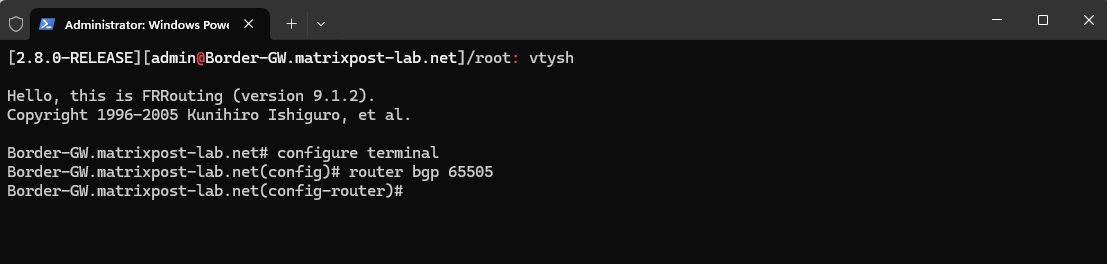
Enter the FRR (vtysh) console, FRR’s integrated CLI (like Cisco/Juniper style).
/root: vtysh
We’re now in the FRR configuration shell
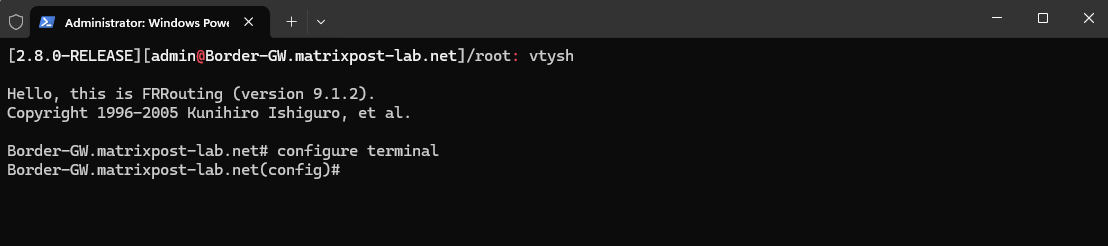
Once we’re inside vtysh, we can configure static routes for BGP/OSPF.
Enter configuration mode:
# configure terminal
Enter BGP configuration (replace 65505 with your AS number for pfSense):
# router bgp 65505
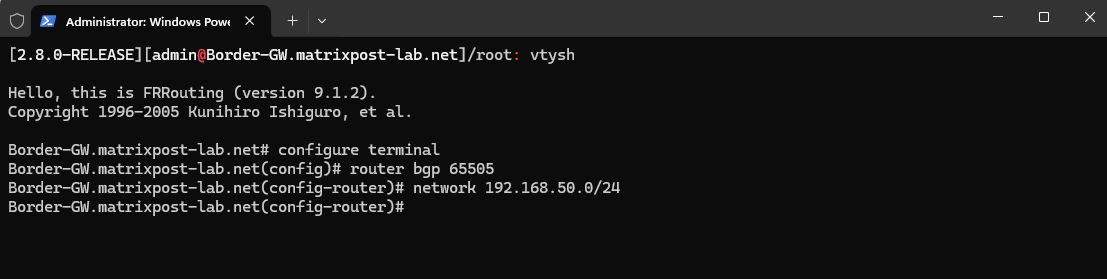
Advertise the network:
# network 192.168.50.0/24
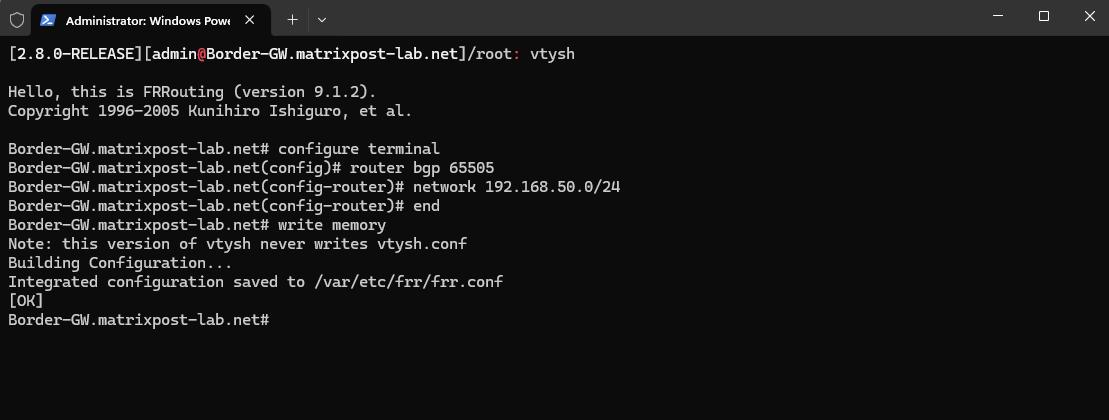
Save the configuration:
# end                      # Exit config mode first
# write memory                          # Save to FRR's config file
Config is saved in /var/etc/frr/frr.conf
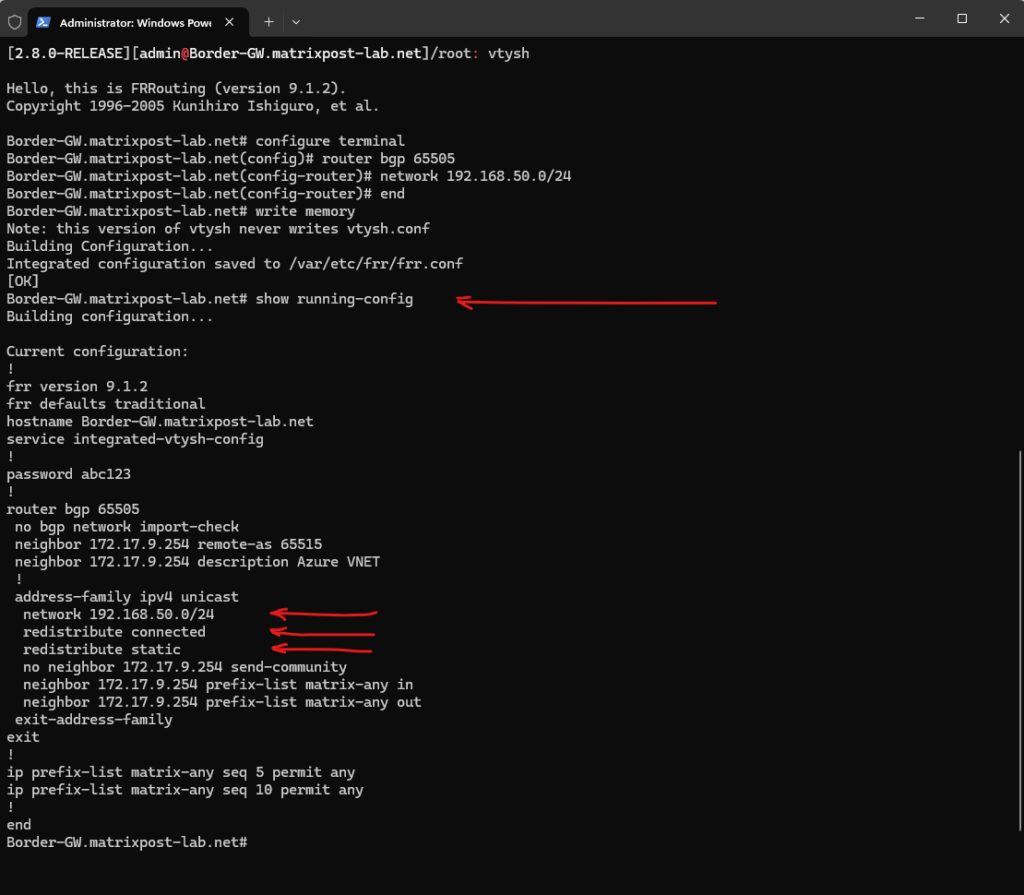
Verify the configuration:
# show running-config
In Azure on the virtual network gateway I can already see the new advertised FRR static route under Monitoring -> BGP peers.
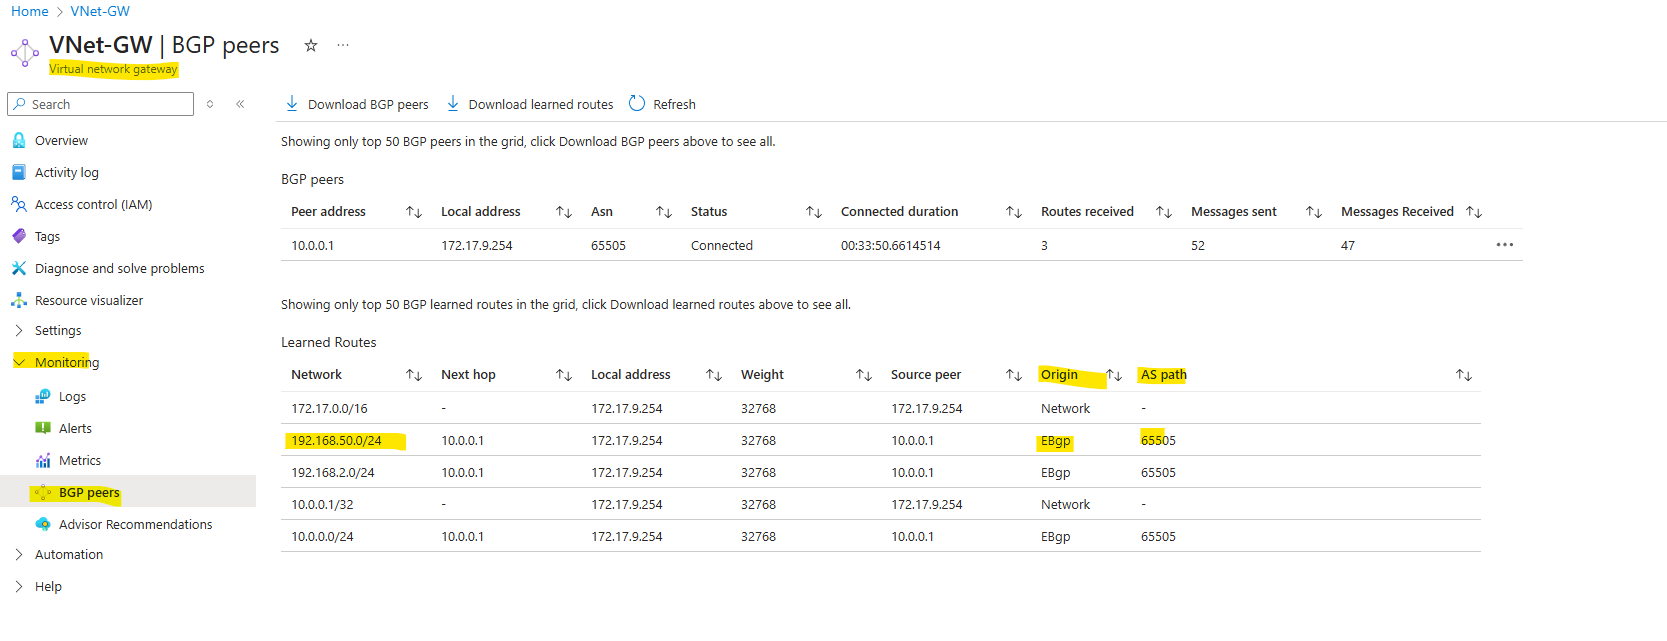
Checking advertised Routes
On pfSense
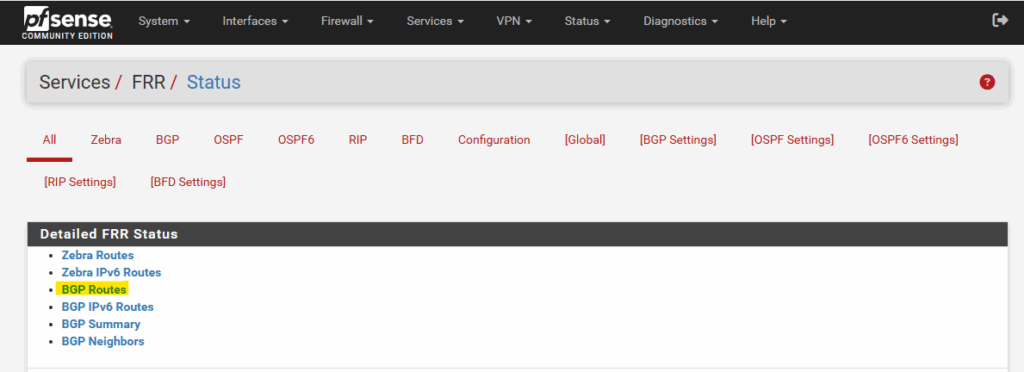
To check advertised routes directly on pfSense, we can navigate to Status -> FRR.

Here click on BGP Routes
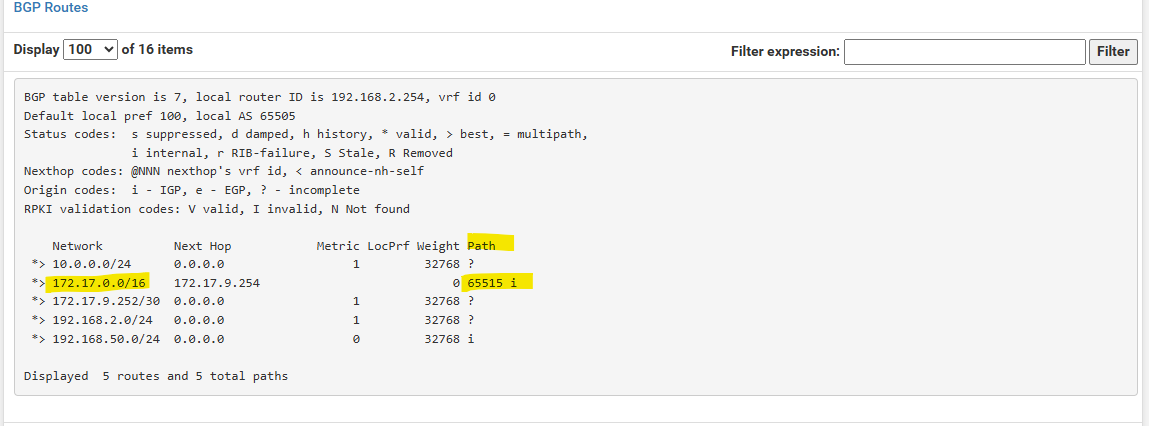
Here we can see Azure’s advertised virtual network 172.17.0.0/16 to pfSense. You will see for this network also the ASN number in the Path column which is Azure’s ASN number.
All other networks shown up here are local on-prem networks which will be advertised to Azure.
In Azure
In Azure we can determine advertised routes from on-prem (pfSense) as already shown above directly on the virtual network gateway under Monitoring -> BGP peers.
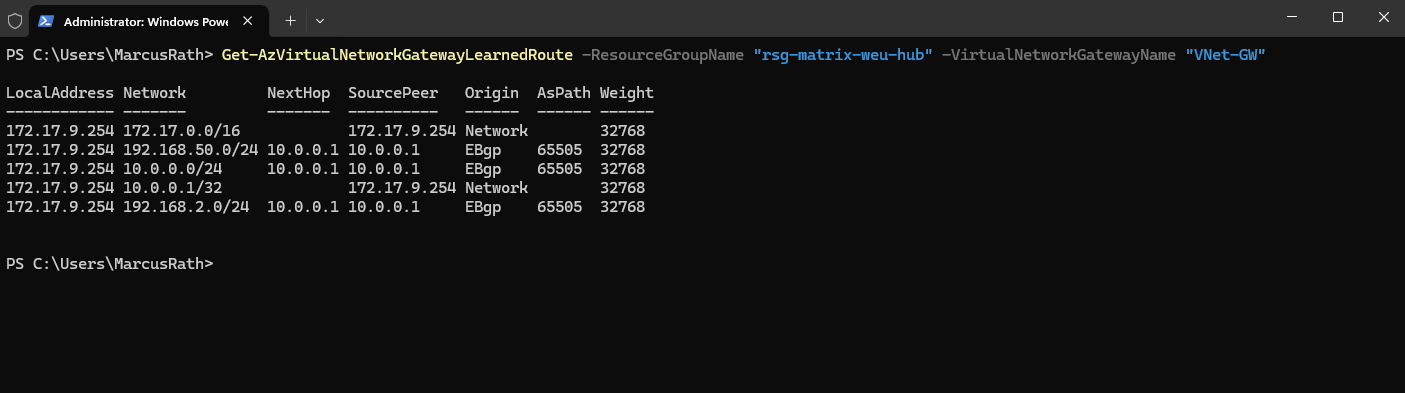
We can also use Azure PowerShell to determine advertised routes by on-prem (pfSense).
PS> az login
PS> Get-AzVirtualNetworkGatewayLearnedRoute -ResourceGroupName "rsg-matrix-weu-hub" -VirtualNetworkGatewayName "VNet-GW"
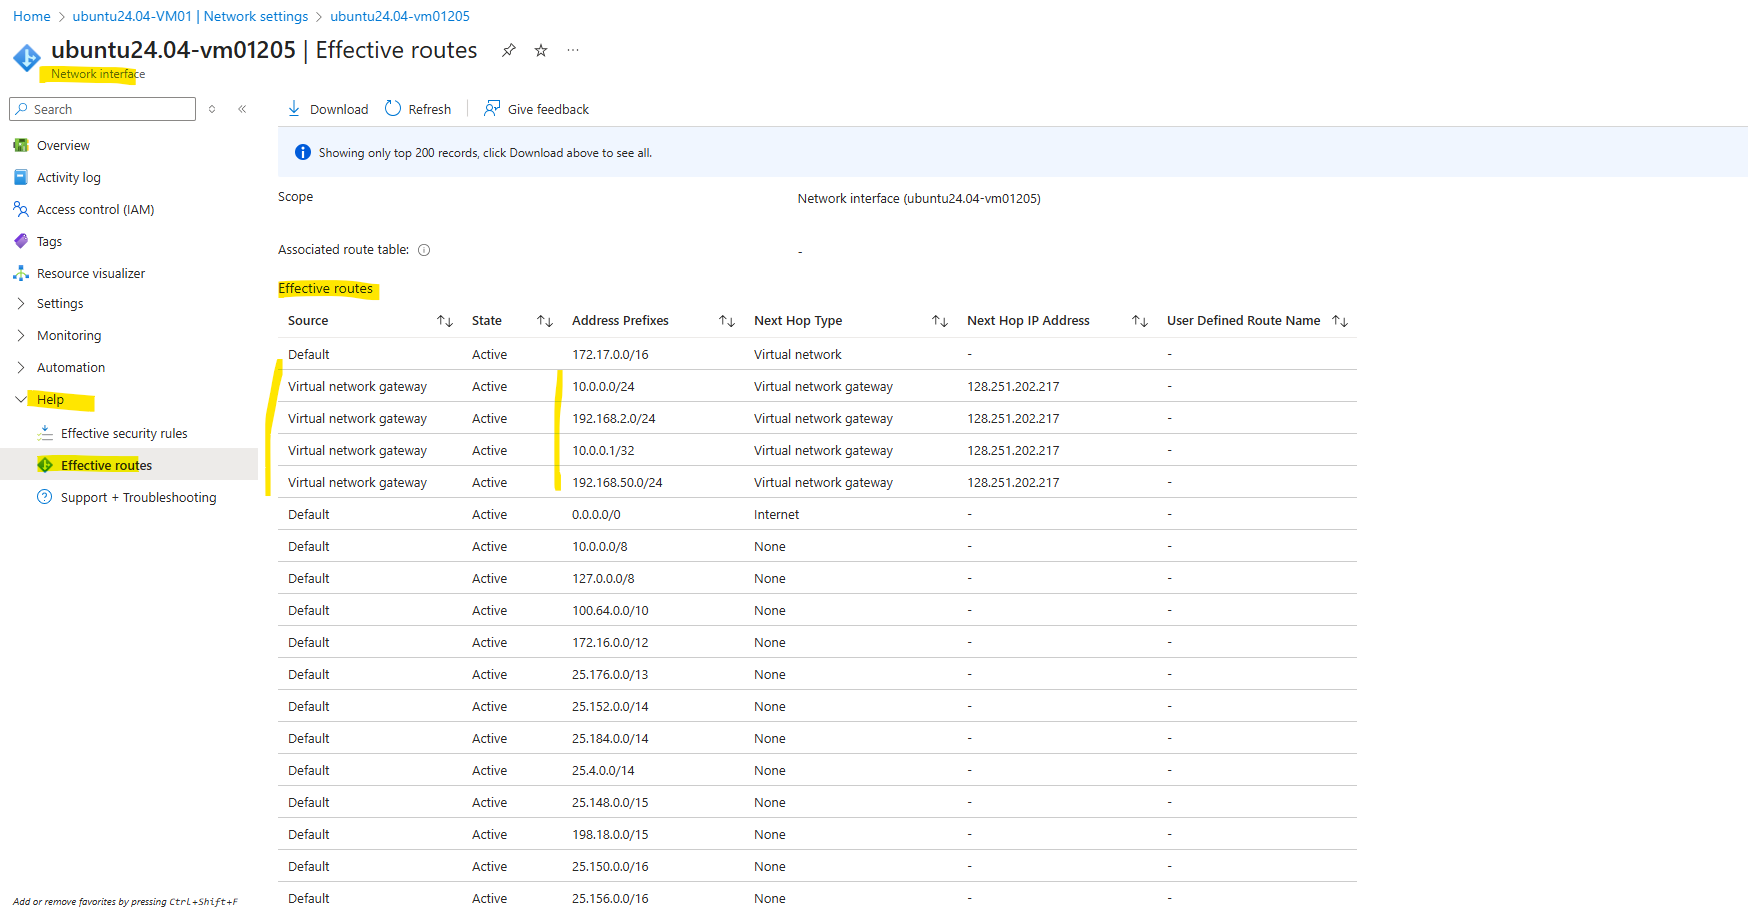
And we can also check the advertised routes directly on a virtual network interface which is attached to our virtual network which is routed through the VPN tunnel.
Links
About BGP and VPN Gateway
https://learn.microsoft.com/en-us/azure/vpn-gateway/vpn-gateway-bgp-overviewCreate a site-to-site VPN connection in the Azure portal
https://learn.microsoft.com/en-us/azure/vpn-gateway/tutorial-site-to-site-portalAzure VPN Gateway vs. ExpressRoute – Quick comparison
https://techcommunity.microsoft.com/t5/fasttrack-for-azure/azure-vpn-gateway-vs-expressroute-quick-comparison/ba-p/3725670Introduction to strongSwan
https://docs.strongswan.org/docs/latest/howtos/introduction.htmlstrongSwan – Route-based VPN
https://docs.strongswan.org/docs/latest/features/routeBasedVpn.html?utm_source=chatgpt.compfSense – IPsec Tunnel Design
https://docs.netgate.com/pfsense/en/latest/vpn/ipsec/configure-design.htmlIPsec and firewall rules
https://docs.netgate.com/pfsense/en/latest/vpn/ipsec/firewall-rules.html