Mastering Hyper-V Clusters with Storage Spaces Direct (S2D)
Storage Spaces Direct (S2D) transforms local disks into highly available, software-defined storage for Hyper-V clusters, without the need for a traditional SAN.
In this post, we’ll walk through the architecture, requirements, and practical setup of a Hyper-V failover cluster using S2D as the underlying storage layer.
About how to set up a Hyper-V Cluster you can read my following post.
About how to use Hyper-V Clusters with iSCSI and Multipath I/O (CSV) you can read my following post.
What Is Storage Spaces Direct (S2D)?
Storage Spaces Direct (S2D) is a software-defined storage technology built into Windows Server that aggregates local disks from multiple cluster nodes into a single, shared storage pool.
It eliminates the need for external SAN or NAS systems by using locally attached drives while still providing high availability, resiliency, and scalability.
S2D is tightly integrated with Failover Clustering and is commonly used as the storage foundation for Hyper-V clusters and Azure Stack HCI.
Hardware vendors such as Dell provide preconfigured and certified systems for Storage Spaces Direct, commonly referred to as S2D Ready Nodes.
Examples include Dell PowerEdge platforms like the R740/R750 series, which are validated with specific CPU, NIC, disk, and firmware combinations for S2D deployments.
These systems simplify implementation by ensuring full hardware compatibility, supported configurations, and vendor-backed support for production environments.
Storage Spaces vs. Storage Spaces Direct (S2D)
Storage Spaces is a standalone storage technology that aggregates disks within a single Windows server to create resilient virtual disks and volumes.
Storage Spaces Direct (S2D) extends this concept across multiple servers in a failover cluster, pooling locally attached disks from all nodes into shared, highly available storage.
In short, Storage Spaces is single-node, while S2D is cluster-wide and designed for highly available workloads like Hyper-V.
My Lab Setup
This lab runs entirely on VMware, with two Hyper-V servers deployed as nested virtual machines to simulate a real-world failover cluster.
Each Hyper-V VM is equipped with two dedicated VMware virtual disks, presented as local storage and used exclusively by Storage Spaces Direct (S2D).
This setup allows me to explore S2D behavior, resiliency, and performance characteristics in a controlled, repeatable lab environment, without relying on physical hardware or an external SAN.
Nested virtualization makes it possible to experiment with Storage Spaces Direct without dedicated hardware or multiple physical servers. By running Hyper-V inside VMware, the full S2D and Failover Clustering stack can be deployed, configured, broken, and rebuilt quickly.
This approach is ideal for learning, testing configurations, validating concepts, and documenting behavior, while keeping the lab flexible and cost-efficient.
Limitations of Running S2D in a Nested Lab
While functional, an S2D lab running on nested Hyper-V has clear limitations compared to physical deployments.
Disk performance, latency, and cache behavior are heavily influenced by the underlying VMware storage layer, making performance results non-representative.
Hardware features such as RDMA, persistent memory, NVMe offload, and real disk fault domains are either missing or simulated, so this setup should be used strictly for education and functional testing, not benchmarking or production validation.
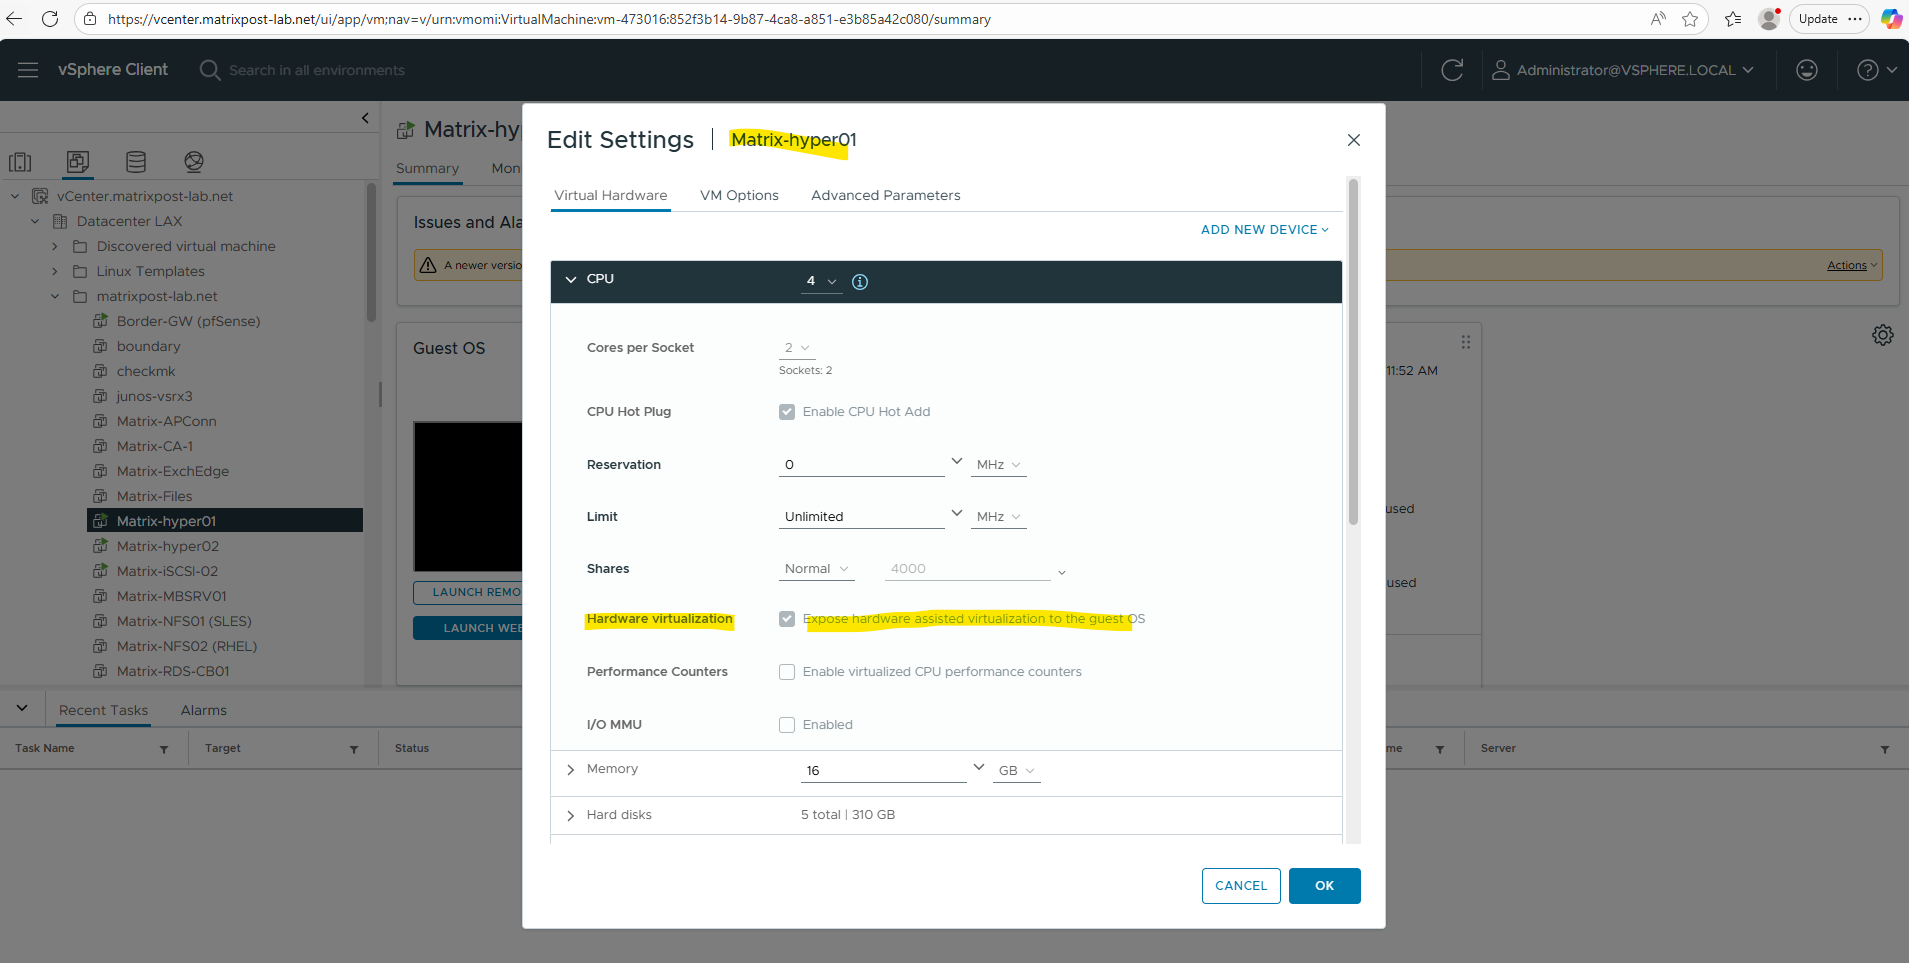
Enable Hardware Virtualization on the nested Hyper-V Virtual Machines
To install the Hyper-V role inside a Windows Server virtual machine running on vSphere, hardware-assisted virtualization must be exposed to the guest.
This is done by enabling “Expose hardware-assisted virtualization to the guest OS” in the VM’s CPU settings in vCenter as shown below. Without this option, the Hyper-V role installation will fail because the required virtualization extensions are not available to the guest operating system.
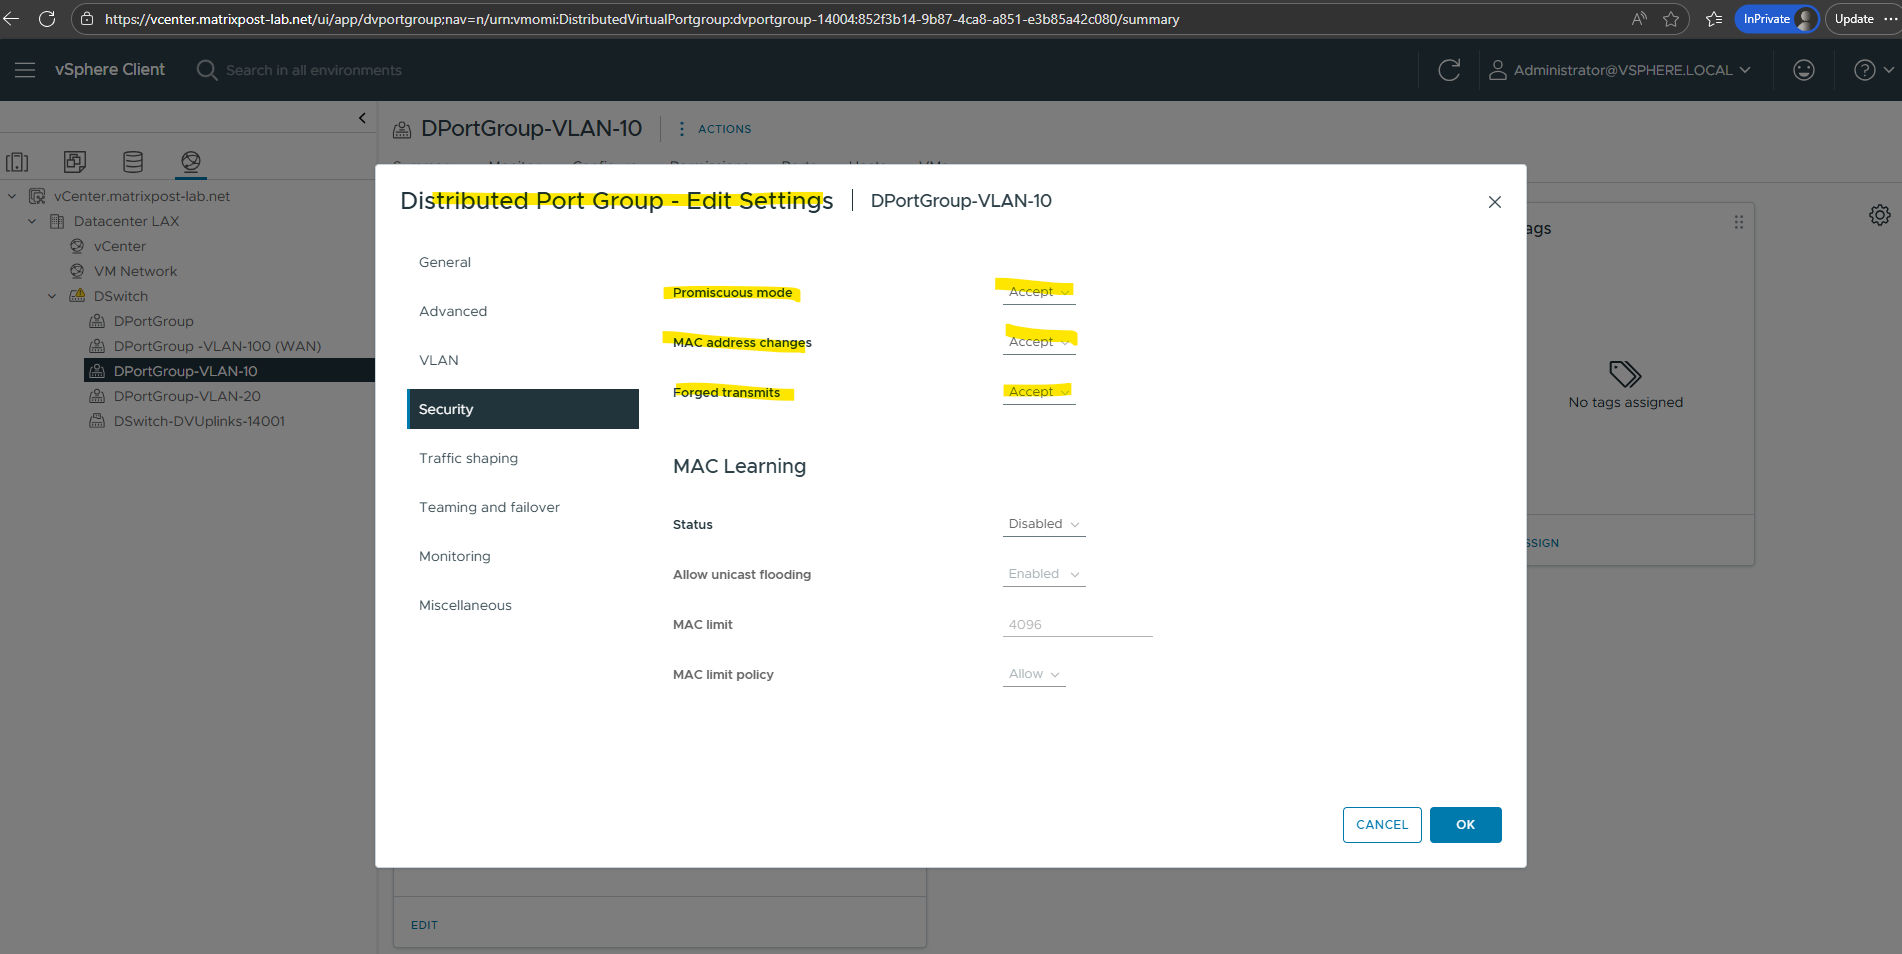
Enable MAC Address Spoofing for Hyper-V nested Virtualization in VMware vSphere
When running Hyper-V inside a VMware VM, the ESXi host must allow the Hyper-V parent VM to forward traffic from its nested VMs.
Enabling MAC address spoofing allows the Hyper-V parent VM to transmit Ethernet frames using source MAC addresses that differ from the one assigned to its own virtual NIC.
This is required because nested Hyper-V guests generate traffic with their own MAC addresses, which would otherwise be rejected by the ESXi virtual switch.
By allowing MAC spoofing, the ESXi host forwards these frames correctly, enabling full Layer-2 connectivity for nested virtual machines.
In vCenter, edit the port group used by the Hyper-V VM and set Promiscuous Mode, MAC Address Changes, and Forged Transmits to Accept.
This, combined with enabling MAC address spoofing on the Hyper-V parent VM’s virtual NIC, ensures full network connectivity for all nested Hyper-V VMs.
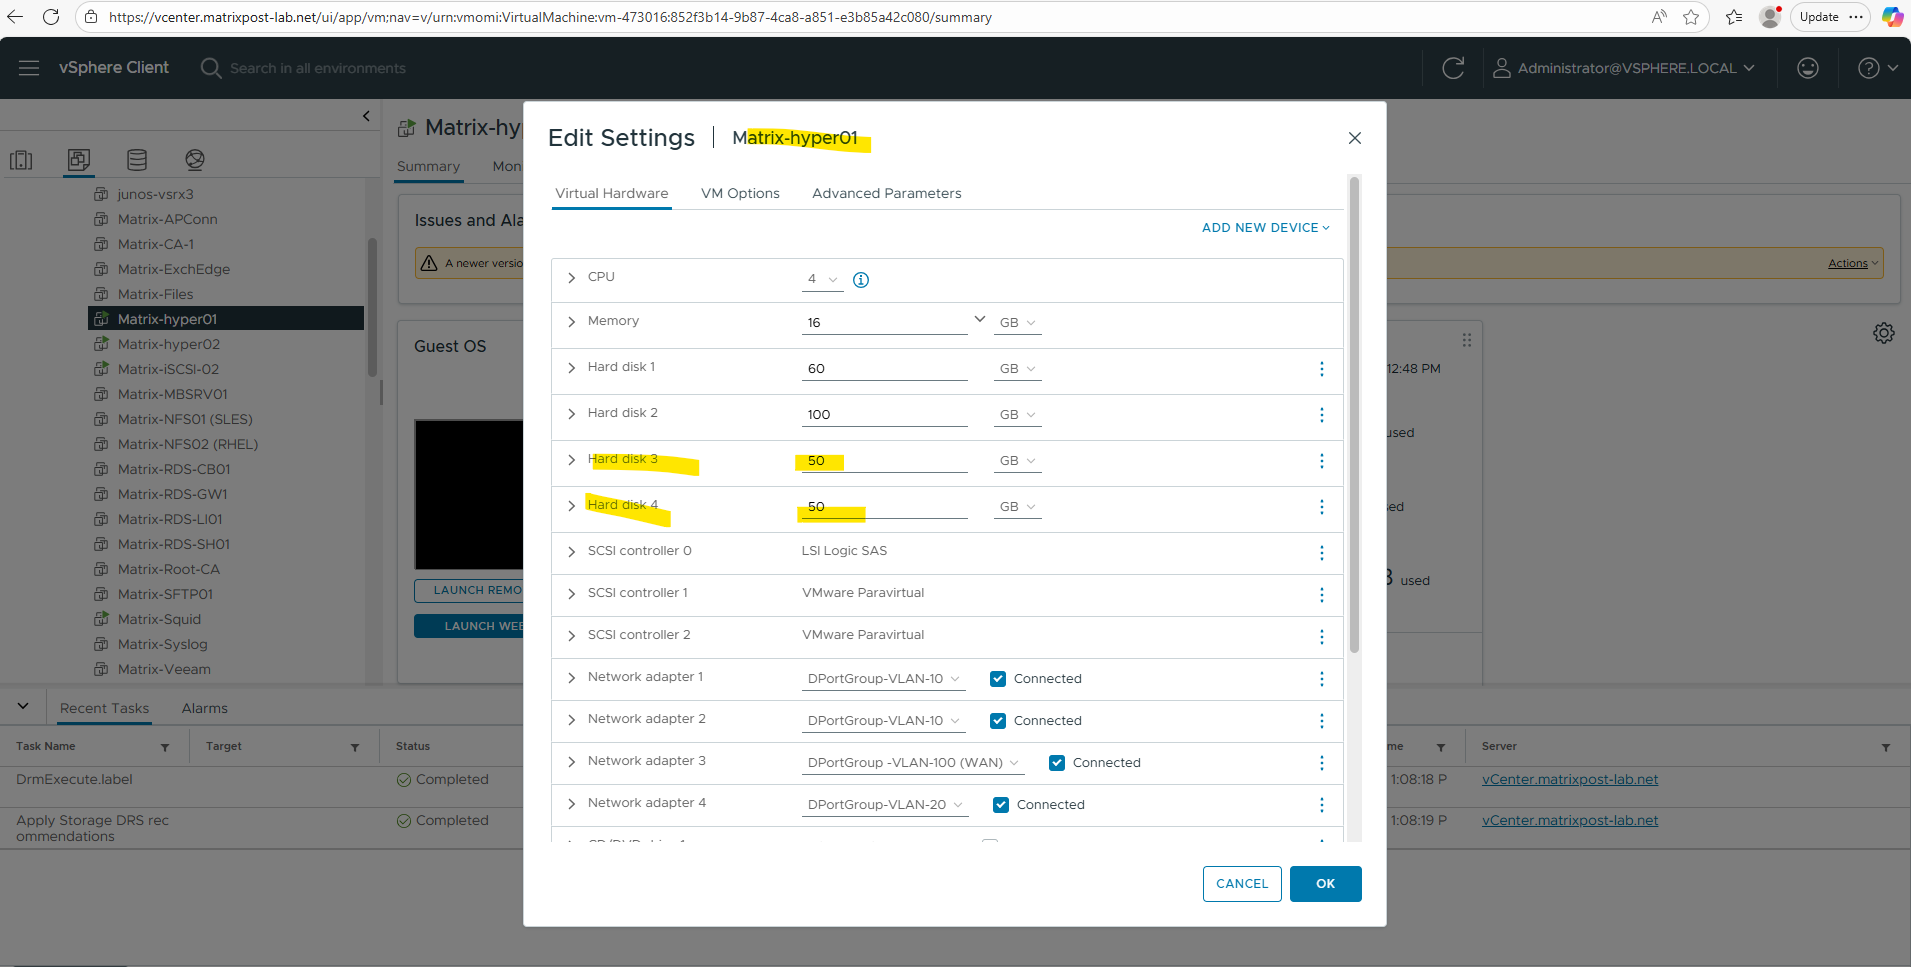
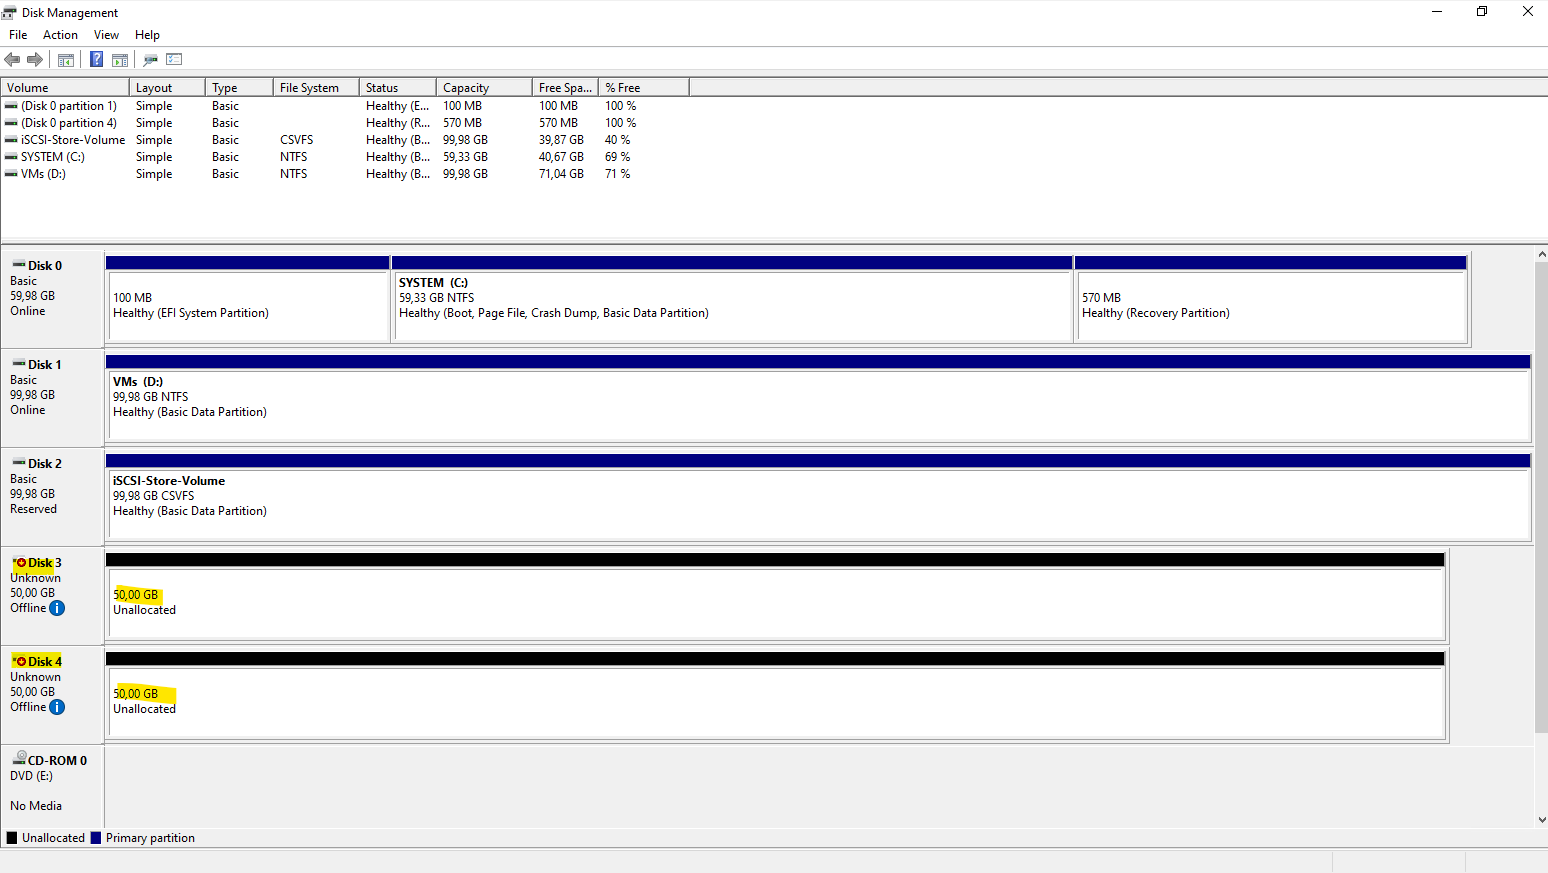
Creating the Storage Spaces Direct Pool
In this step, Storage Spaces Direct aggregates the locally attached disks from each cluster node into a single storage pool.
For this lab, each Hyper-V VM contributes two 50 GB virtual disks provided by VMware, which are detected as eligible local disks by S2D.
This forms the foundation for all resilient VM storage in the cluster.
Finally both of my Hyper-V nodes have attached two virtual disks each of 50 GB which I will use dedicated just for the S2D Storage Pool.
Enabling Storage Spaces Direct (S2D)
Before creating any storage pool, Storage Spaces Direct must be enabled on the cluster. Although the GUI allows manual pool creation, this approach is not suitable for S2D because disks are still grouped per node while S2D is disabled.
Enabling S2D instructs the cluster to automatically claim all eligible local disks across every node and create a single, cluster-wide storage pool.
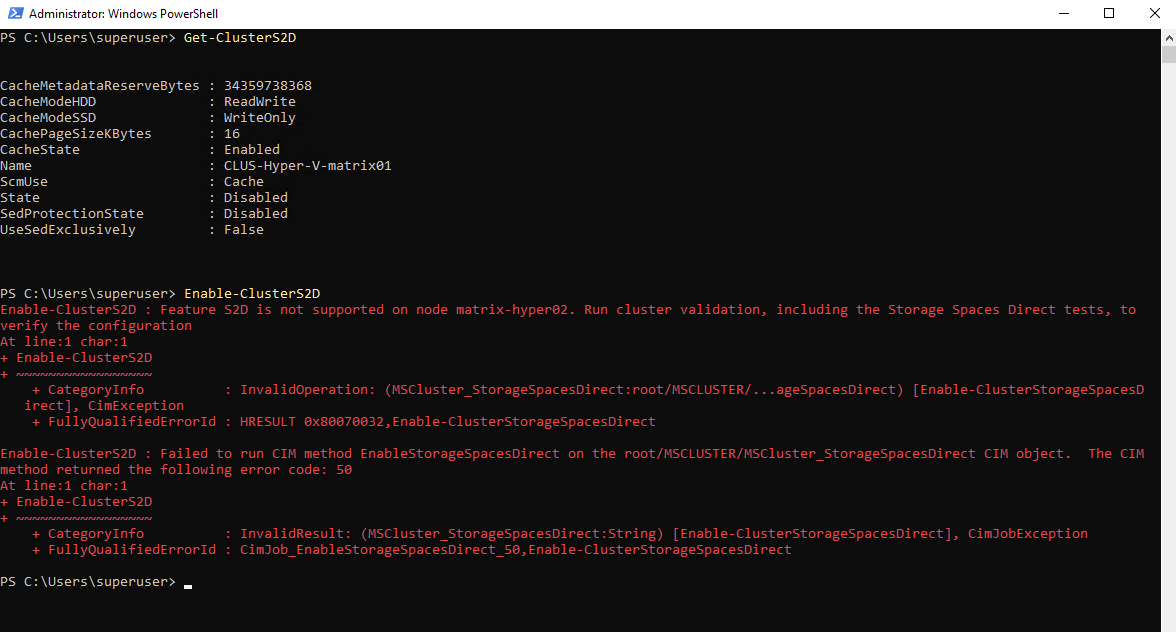
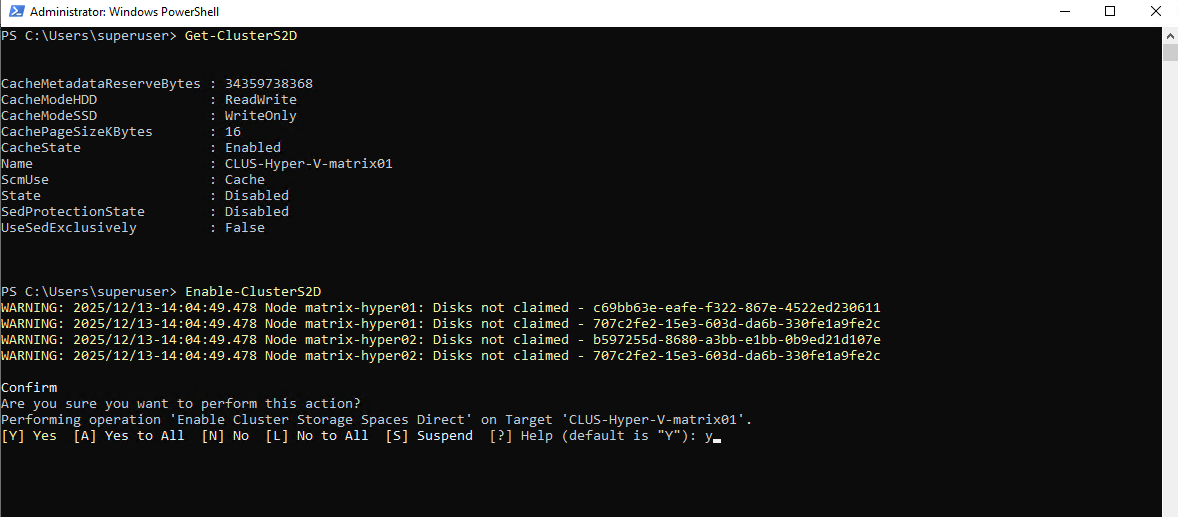
The current S2D state can be verified using:
PS> Get-ClusterS2D
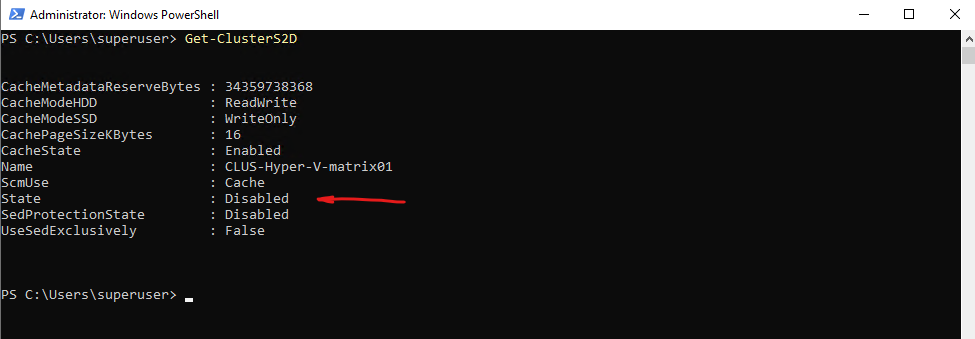
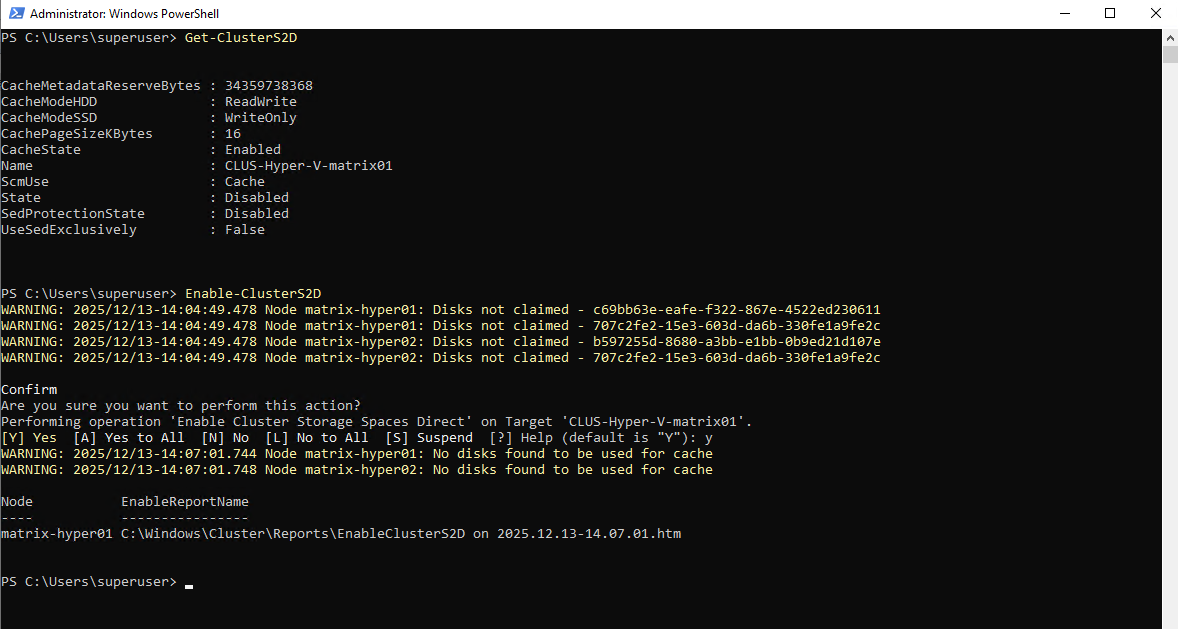
As long as the state is reported as Disabled, no S2D pool exists and disks are not yet managed at the cluster level. To enable S2D and create the required storage pool automatically, run:
Enable-ClusterS2Dimmediately detected all eligible local disks across the cluster. In my lab, that meant all four 50-GB VMware virtual disks (two per node) were listed as not claimed and ready to be used by Storage Spaces Direct.After confirming the prompt, S2D automatically claimed the disks cluster-wide and created the initial storage pool using all four drives.
PS> Enable-ClusterS2D
PS> Get-ClusterS2D
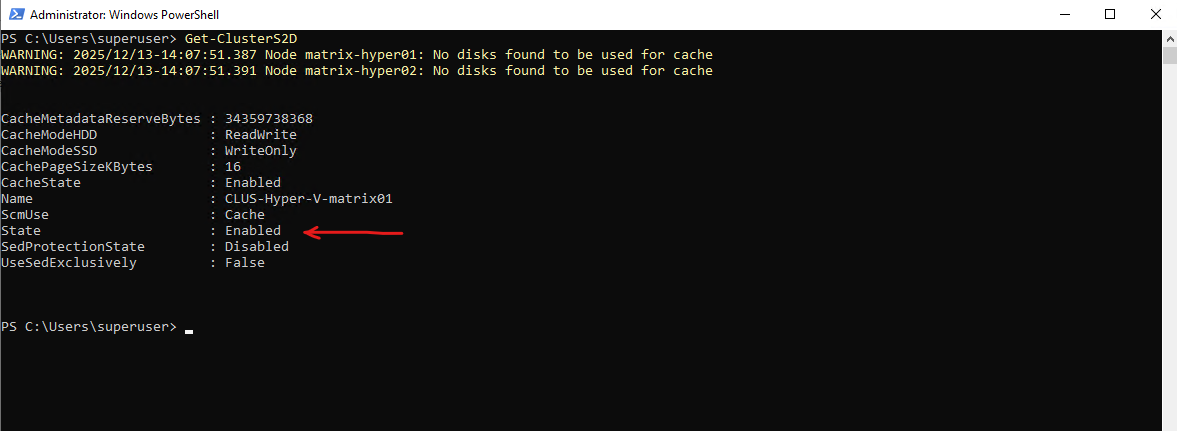
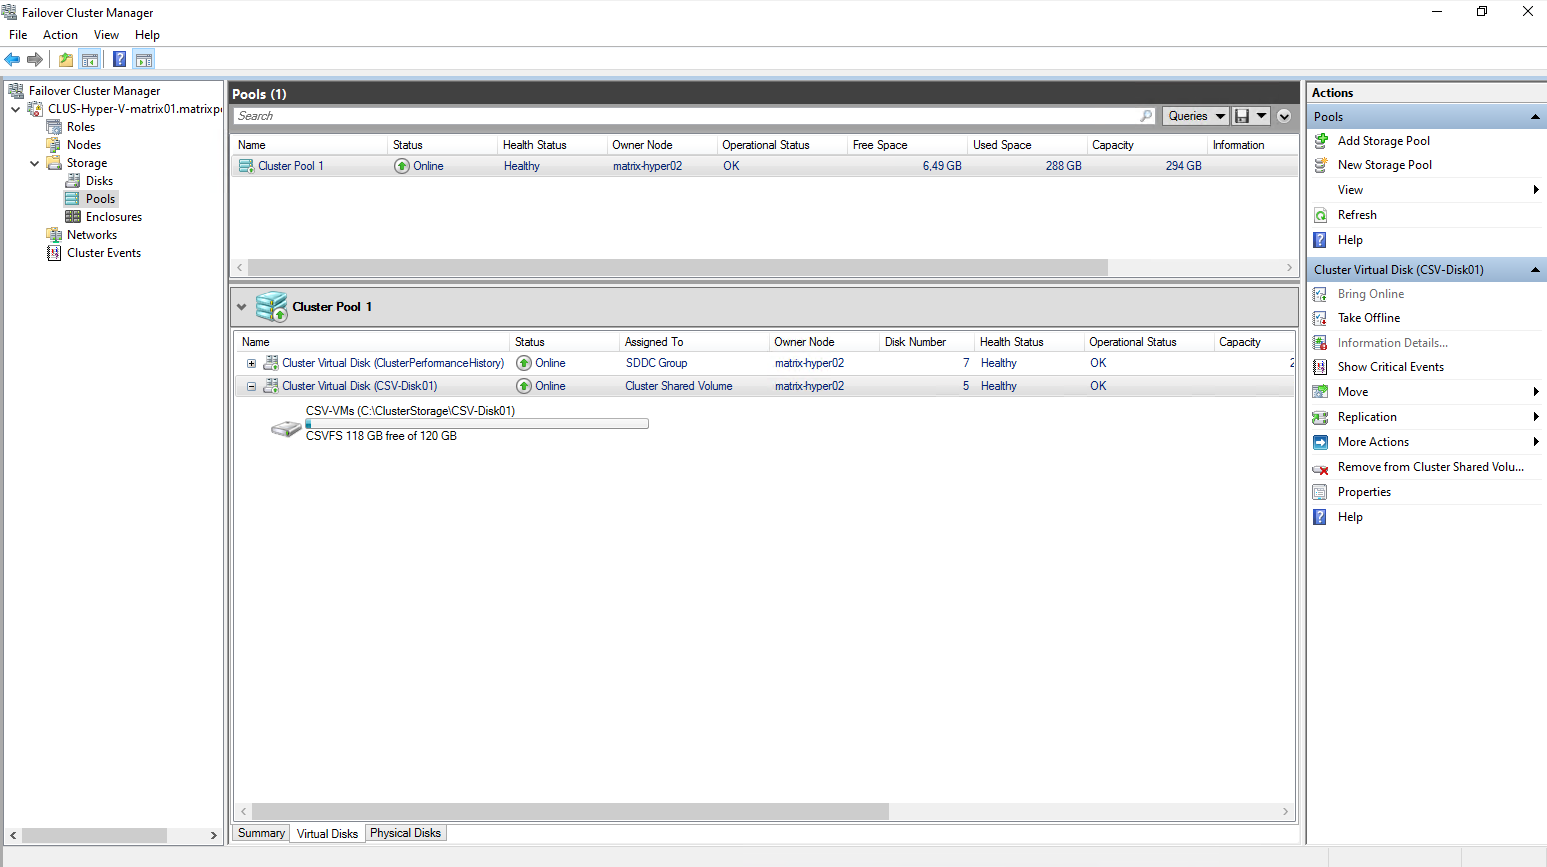
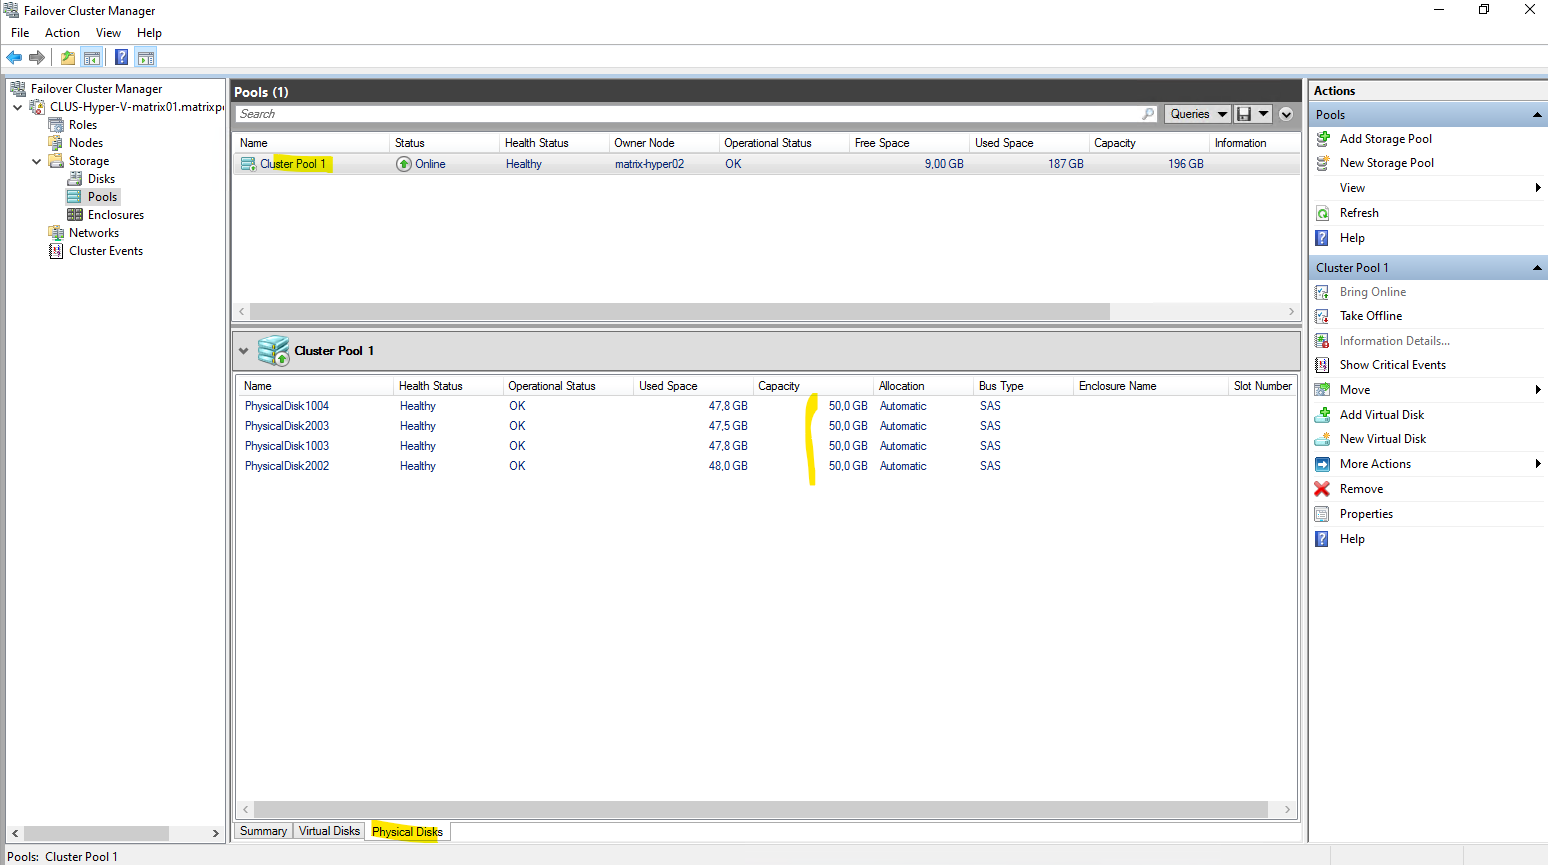
In my case, the pool was created as “Cluster Pool 1”. Depending on the Windows Server version and UI/PowerShell context, the S2D pool may also appear as “S2D on <ClusterName>”, both refer to the same concept: the single, cluster-managed pool that serves as the foundation for all S2D volumes and VM storage.
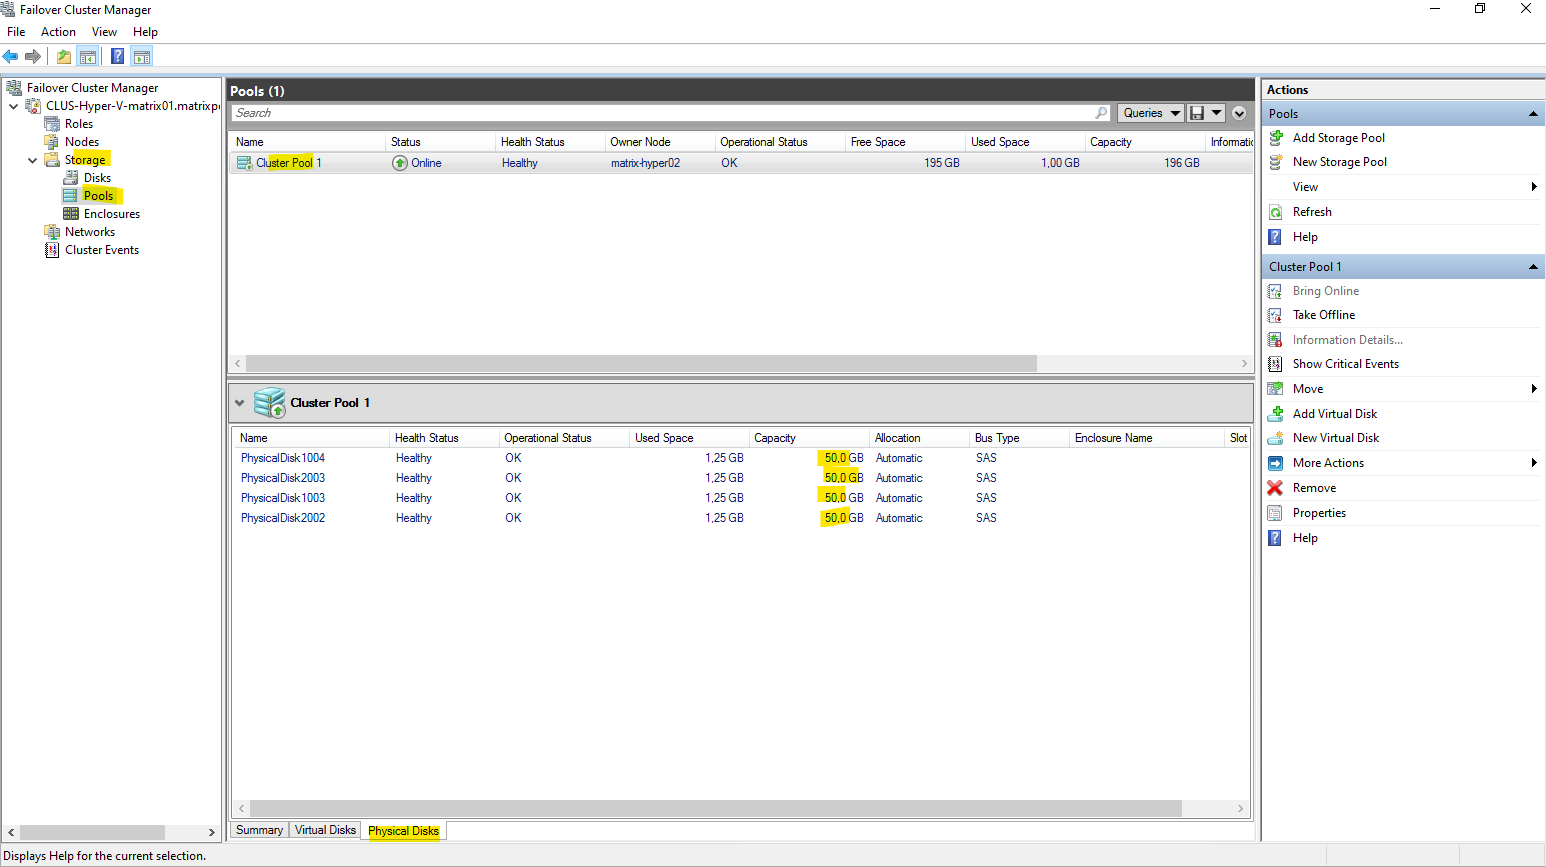
The Primordial pool is the system-managed container for all unclaimed disks. It represents raw storage that is available for creating new storage pools, while any non-primordial pool, such as the S2D pool, contains disks that are already claimed and in use.
PS> Get-ClusterS2D
PS> Get-StoragePool

Get-PhysicalDisk |
Select FriendlyName,
       @{Name='Size (GB)';Expression={[math]::Round($_.Size / 1GB, 1)}},
       CanPool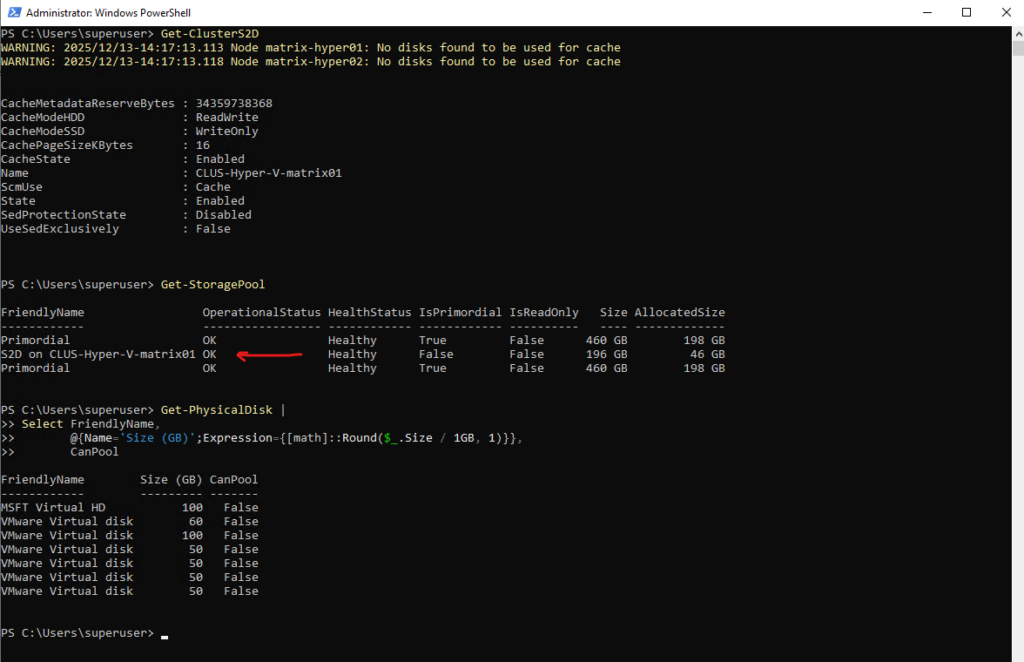
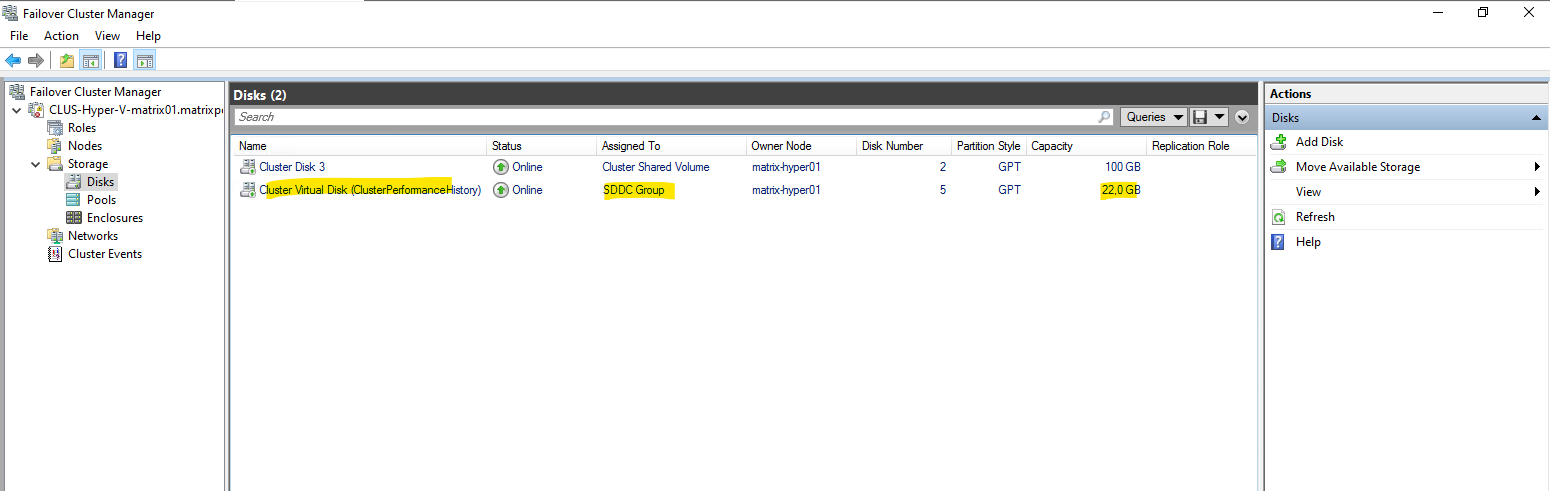
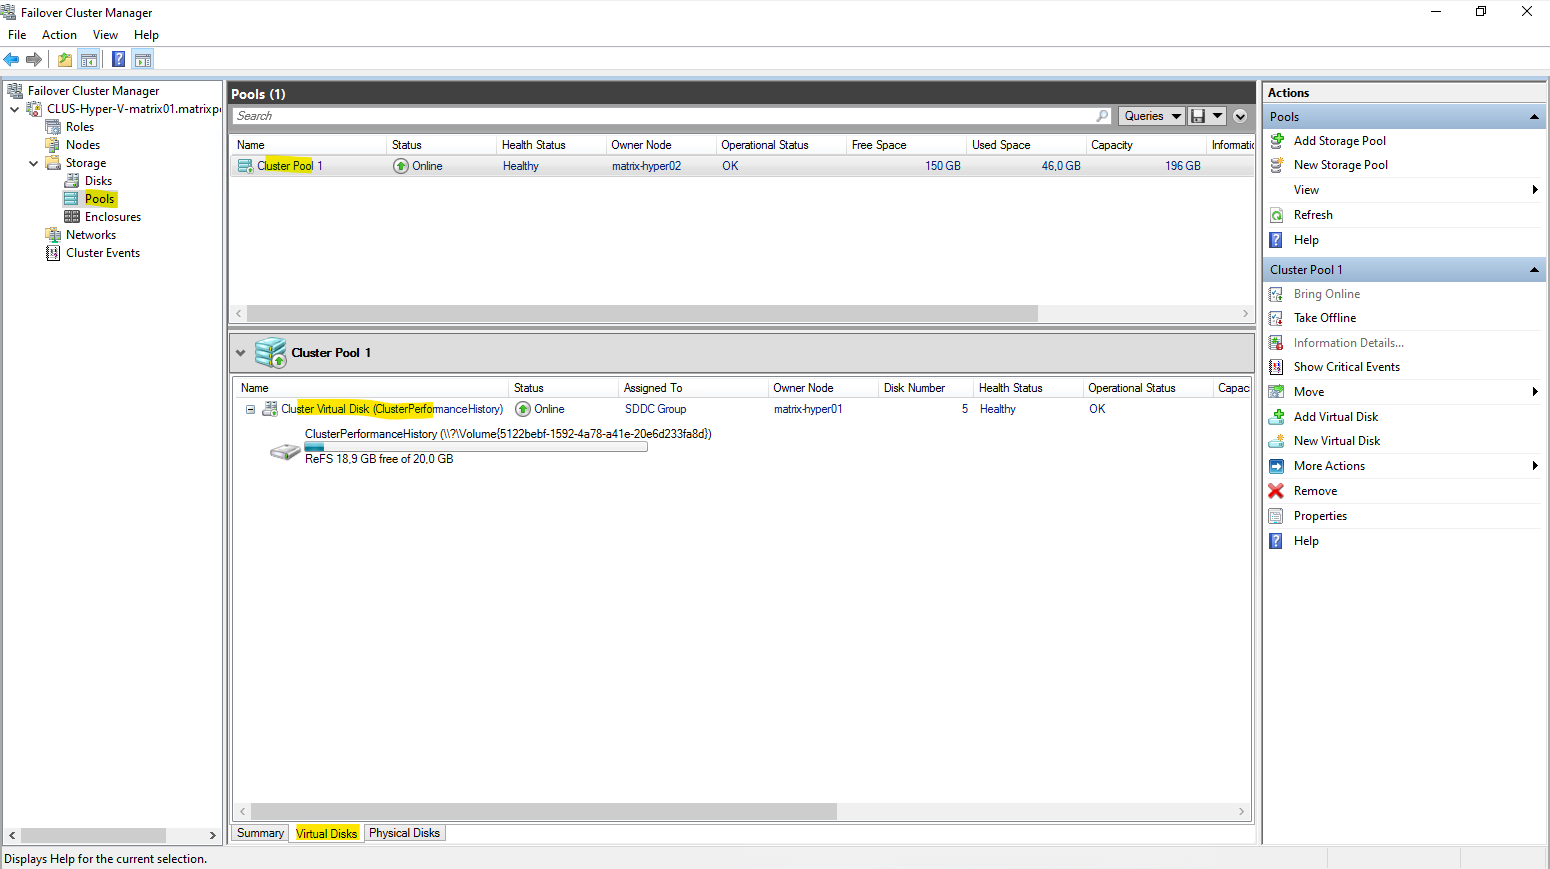
After enabling Storage Spaces Direct, the cluster automatically creates a virtual disk named ClusterPerformanceHistory as shown below.
This system-managed disk is used to store historical performance data for the cluster and enables performance graphs in Failover Cluster Manager and Windows Admin Center. Its size is dynamic and depends on the cluster layout; it should not be modified or used for VM storage.
With the S2D storage pool in place, the next step is to create a virtual disk on top of it. This virtual disk is then formatted as a volume and added as a Cluster Shared Volume (CSV), providing shared, resilient storage that can be used by all Hyper-V nodes to host virtual machines.
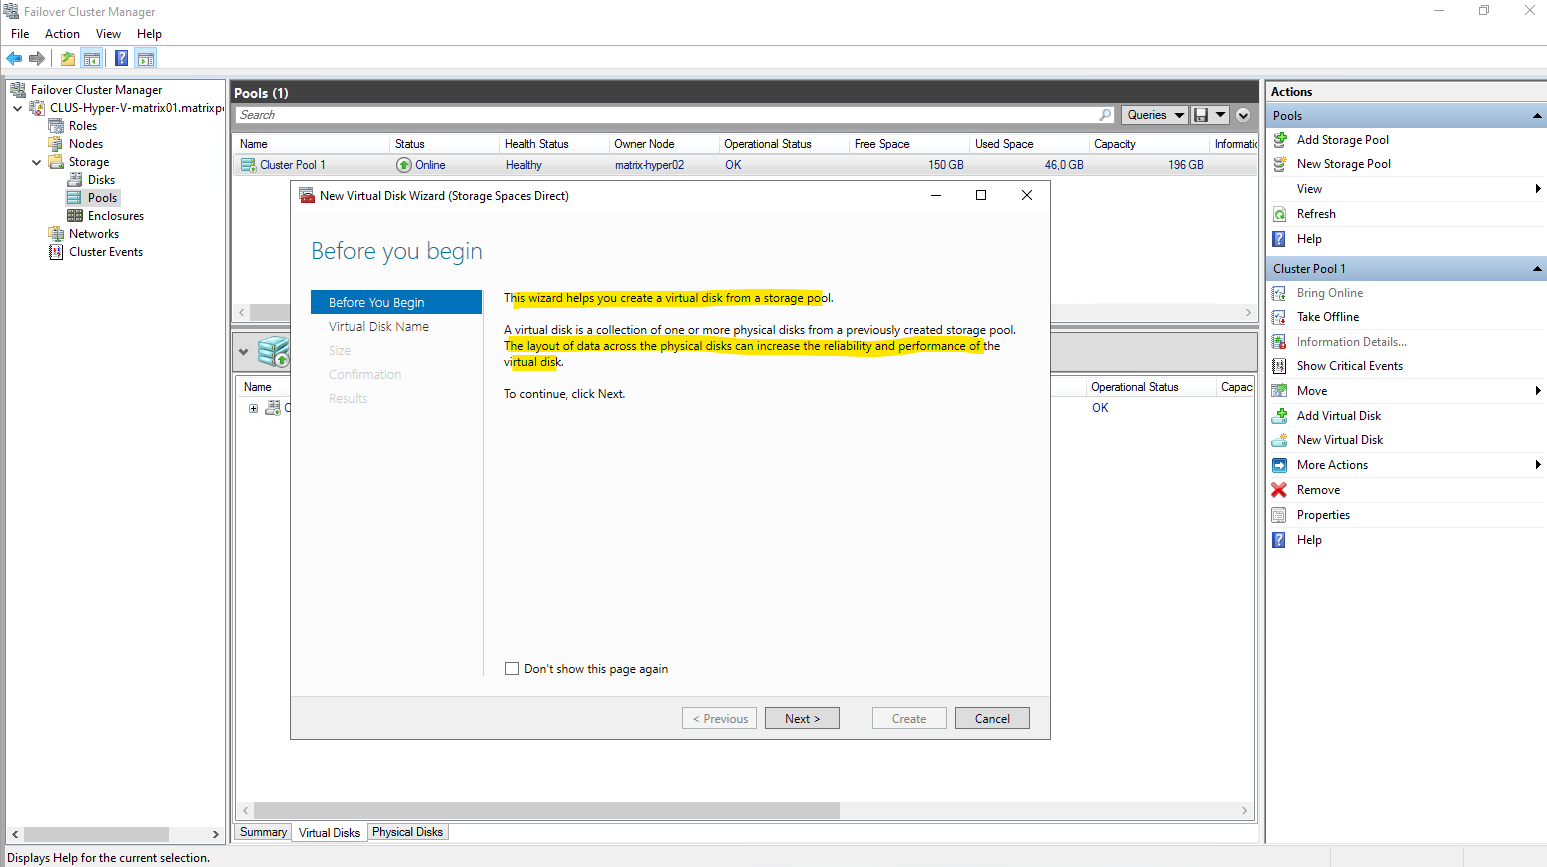
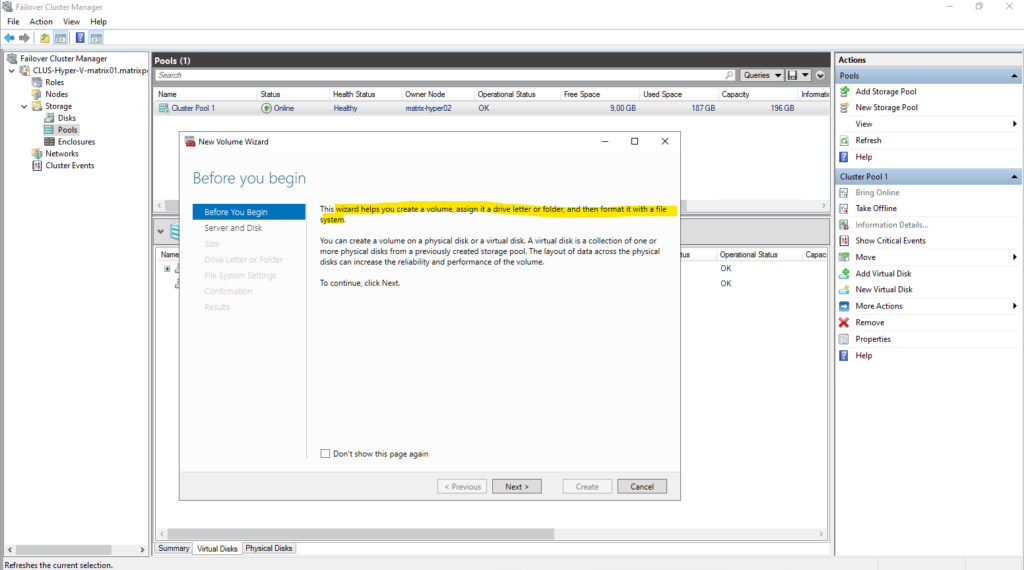
Creating a Virtual Disk and Cluster Shared Volume (CSV) for VM Storage
This section walks through the practical steps required to create a virtual disk and CSV on the S2D pool. The resulting CSV will be used as shared storage for Hyper-V virtual machines across the cluster.
Under Storage -> Pools click on New Virtual Disk as shown below.

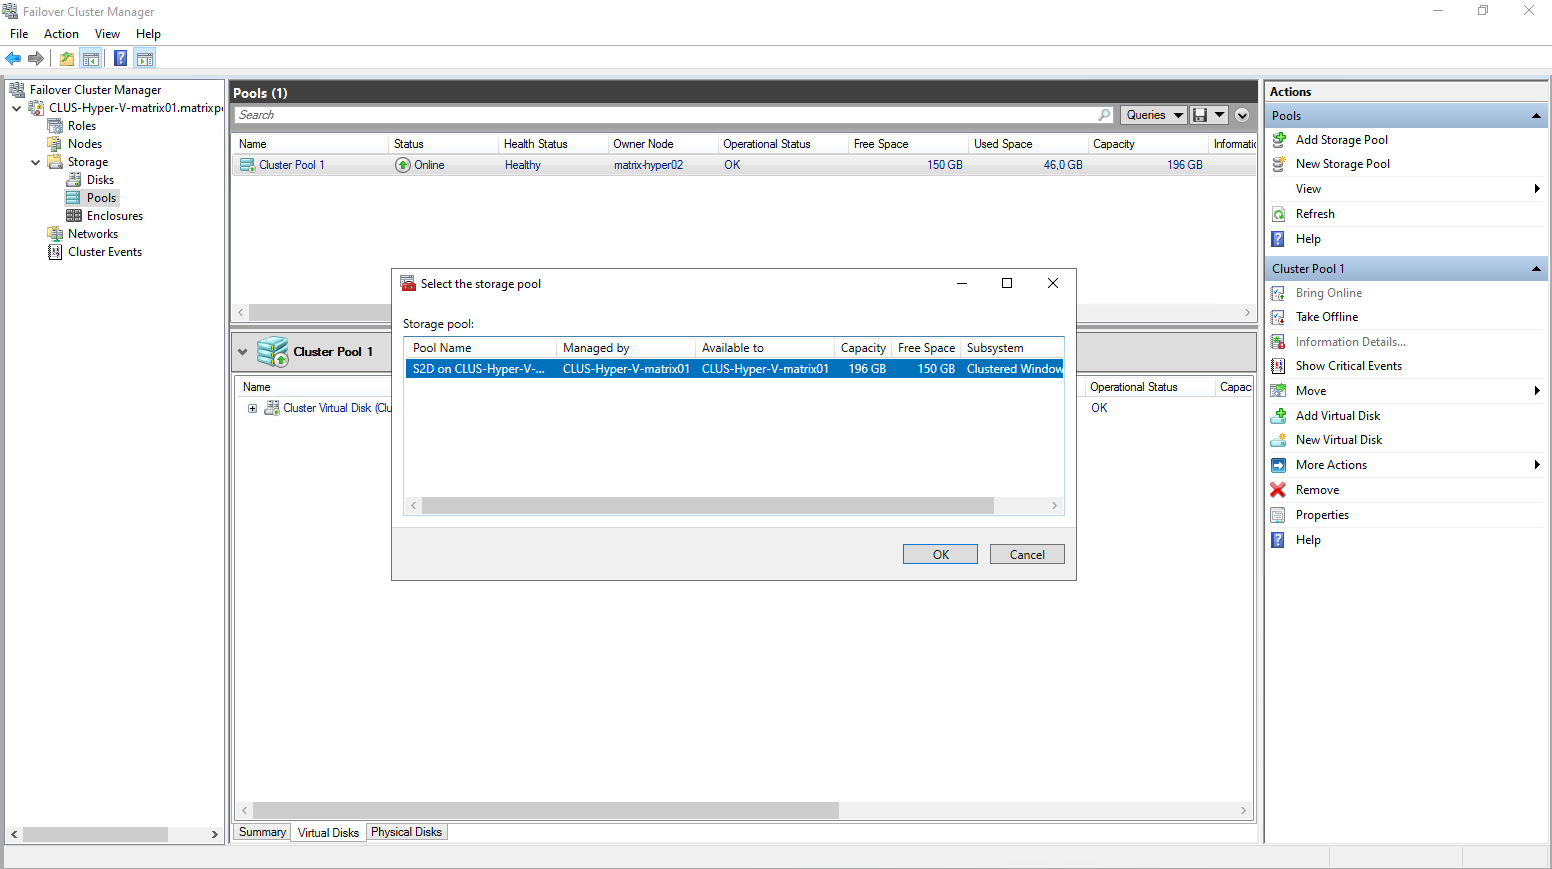
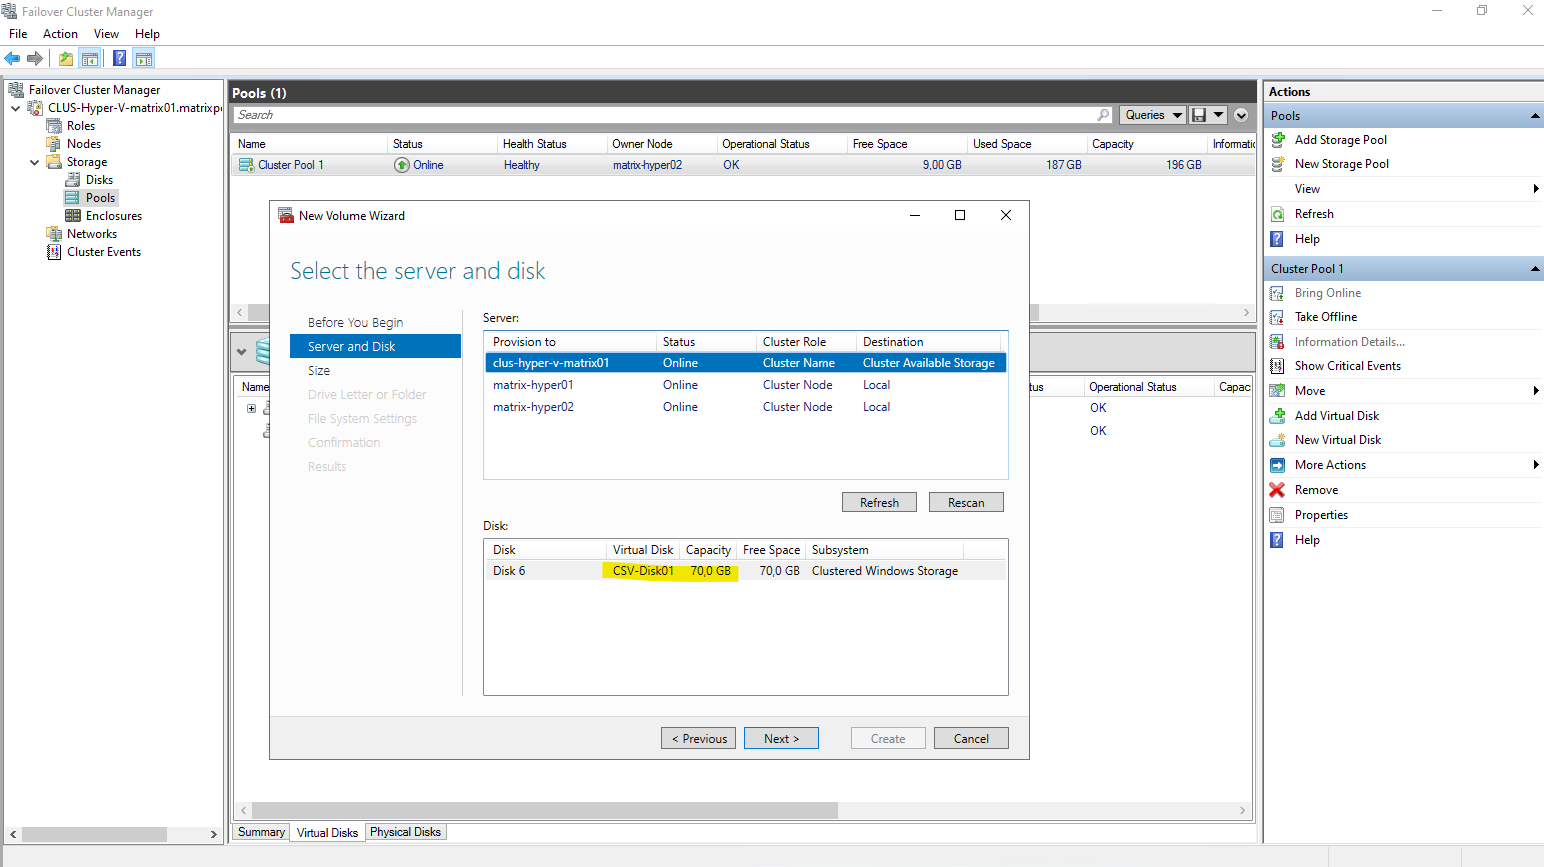
Select the desired storage pool you want to use to create a new virtual disk in case you will have multiple.
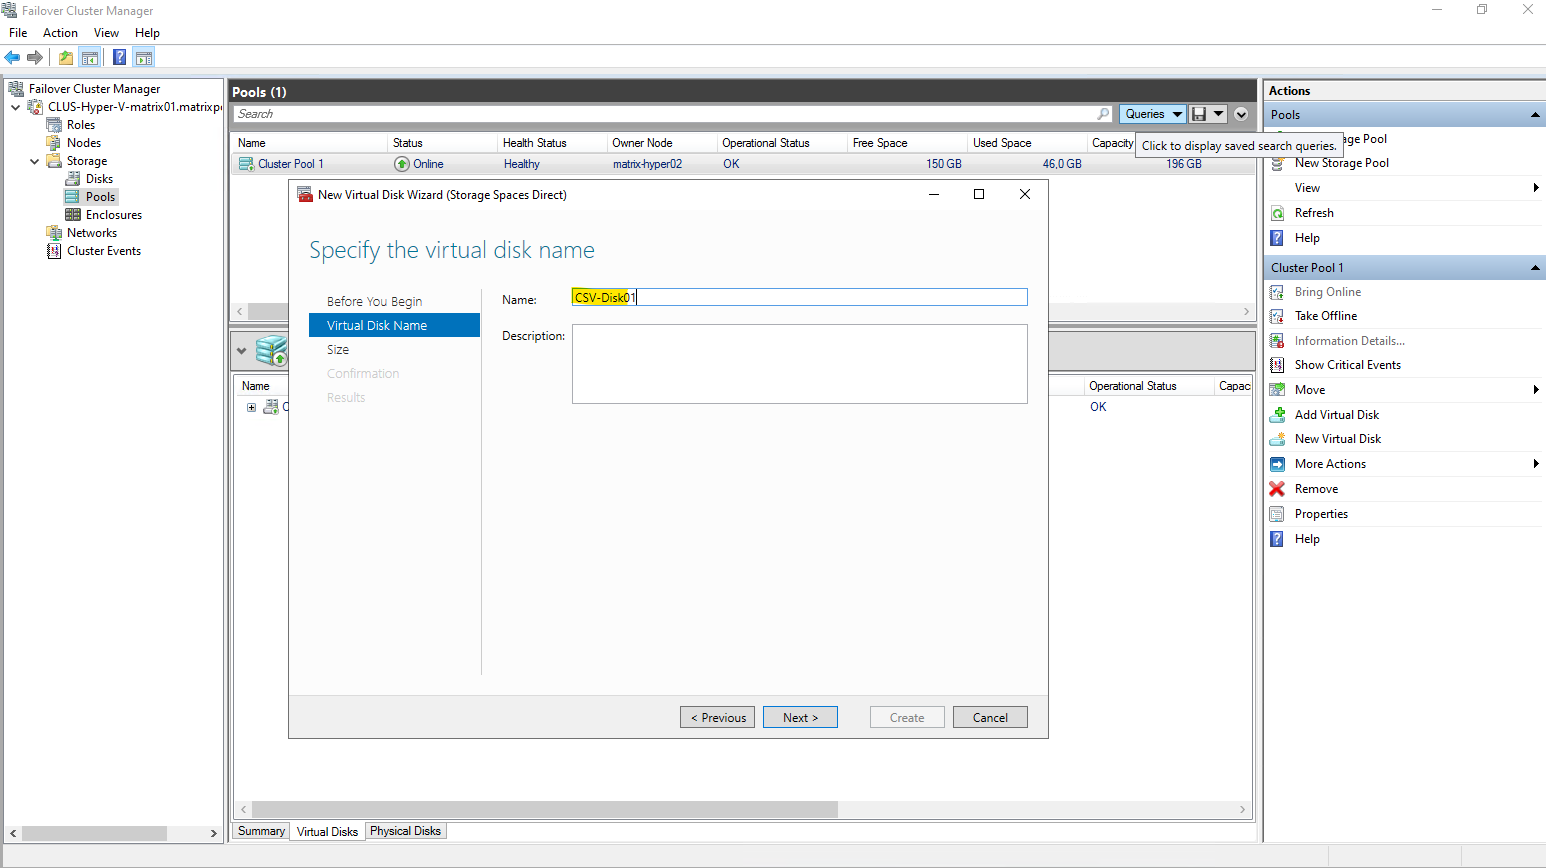
Enter a name for the new virtual disk.
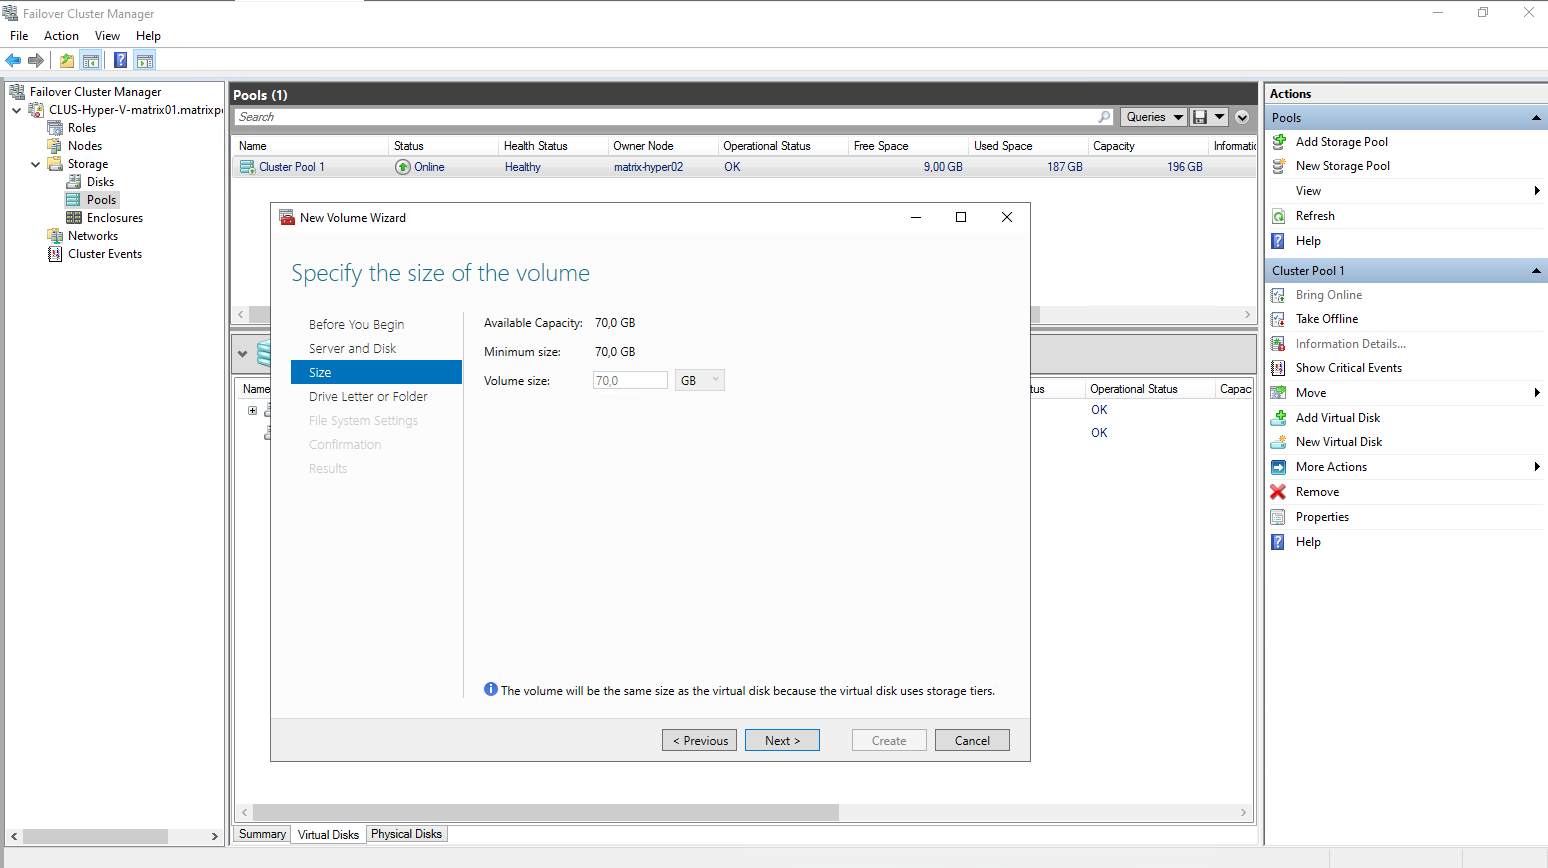
Specify the size o f the new virtual disk.
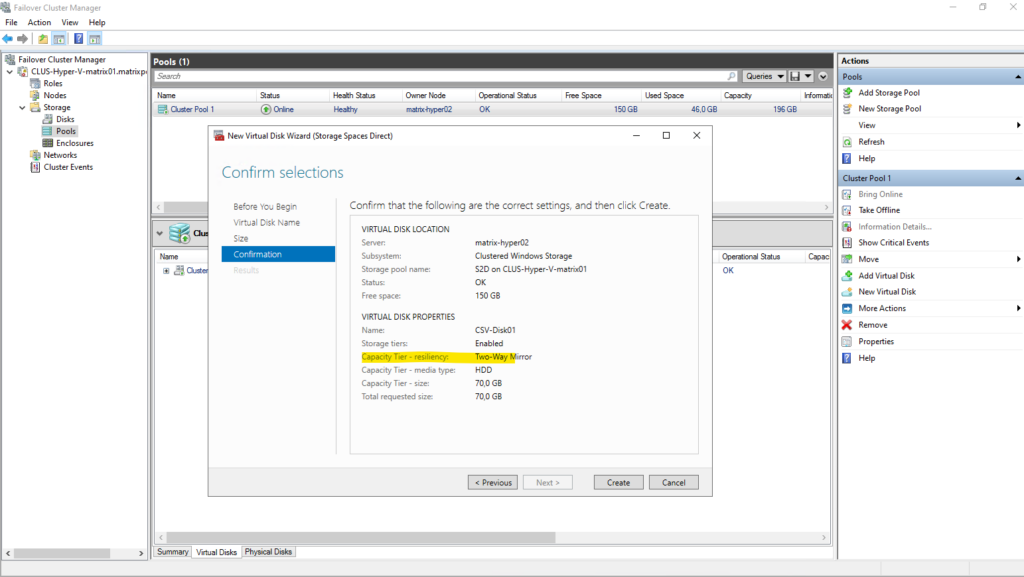
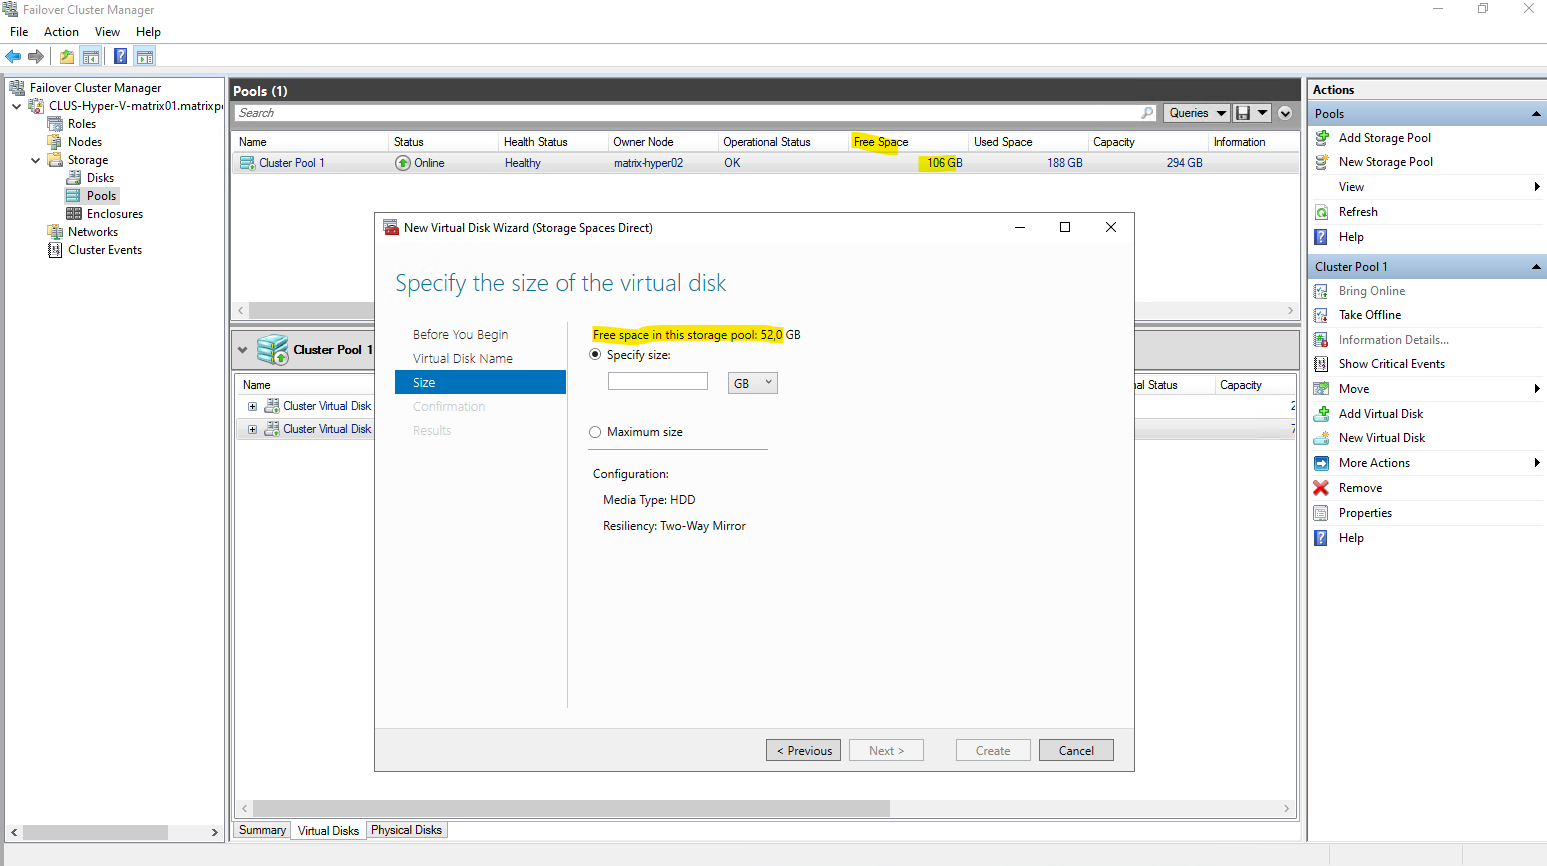
Although the S2D pool reports around 150 GB of free space, the usable capacity for a virtual disk is significantly lower.
In this setup, a two-way mirror resiliency is used, meaning all data is written twice across both nodes. As a result, the effective maximum size for a new virtual disk is reduced to about 73.5 GB, reflecting the mirrored storage overhead.
In a two-node S2D cluster, two-way mirror resiliency is selected automatically and does not need to be configured explicitly. Since parity and three-way mirror require more nodes, mirroring is the only supported resiliency option and therefore becomes the default.

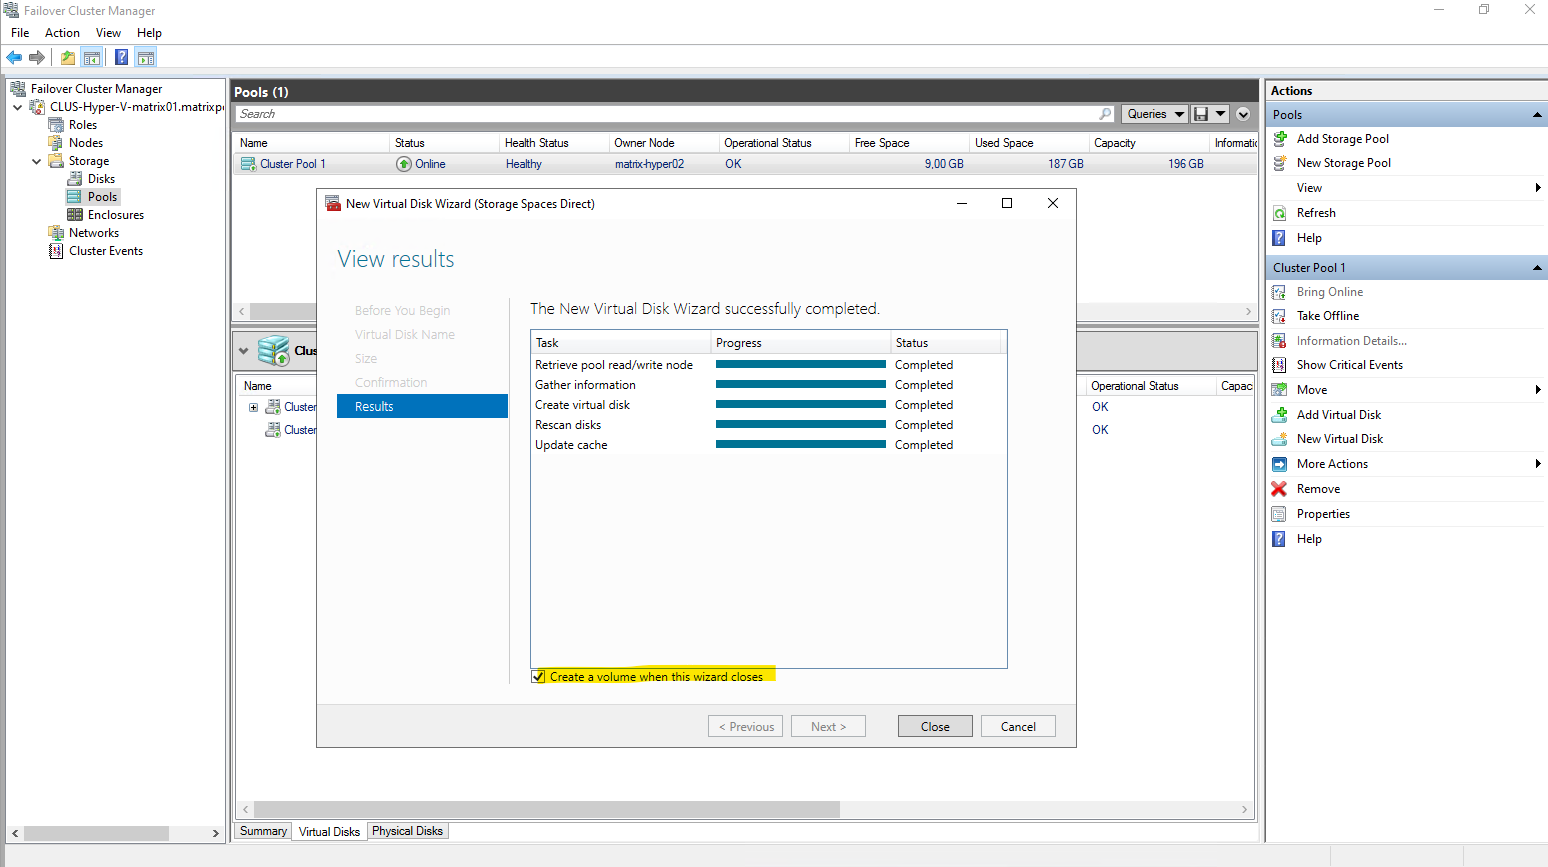
Leave the Create a volume when this wizard closes checked to afterwards already creating a new volume with a file system on our newly created virtual disk.
Select our previously created new virtual disk to create a new volume on.
Assigning a drive letter makes no sense in our case when finally creating a new CSV. So select Don’t assign to a drive letter or folder.
When a volume is intended to be used as a Cluster Shared Volume, assigning a drive letter is unnecessary and typically avoided.
CSVs are accessed through the unified path under C:\ClusterStorage\ on all nodes, making traditional drive letters irrelevant.
While a drive letter may be temporarily assigned during creation, it is not used once the volume is added to the cluster.
Assigning a volume to a folder is primarily useful for standalone or locally mounted volumes. For Cluster Shared Volumes, this option is typically unnecessary because CSVs are always mounted automatically under C:\ClusterStorage\<VolumeName> on every node.
Any custom folder mount points created during the wizard are not used once the volume becomes a CSV.

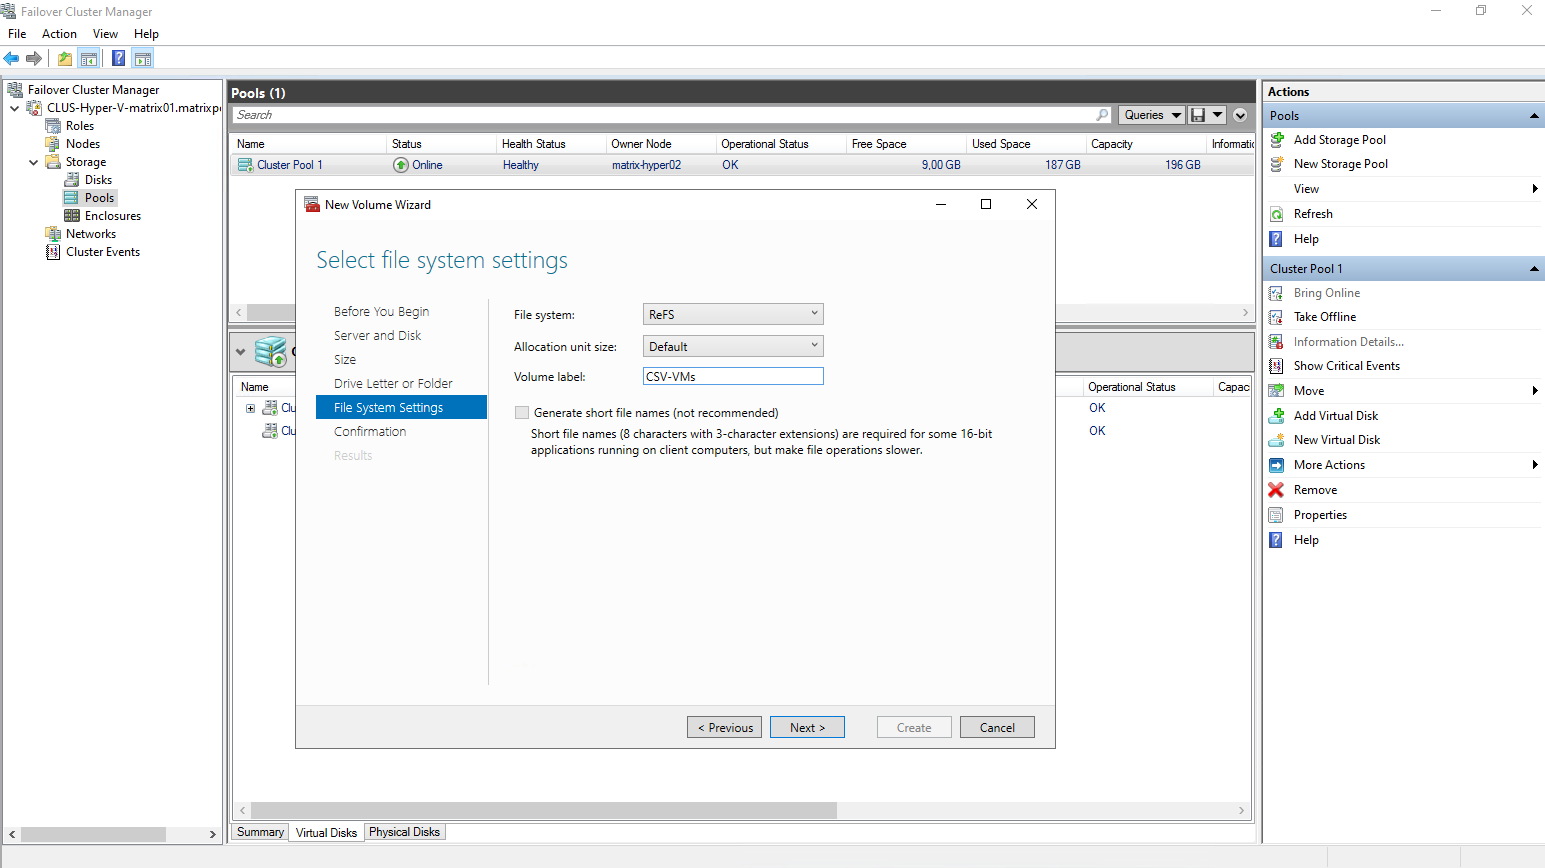
In an S2D-backed cluster, ReFS is the only file system offered when creating new CSV volumes.
Storage Spaces Direct is optimized for ReFS, and features such as accelerated VHDX operations and metadata resiliency depend on it.
NTFS is therefore not presented as an option for new S2D volumes intended to host virtual machines.
With S2D, ReFS isn’t a choice, it’s the standard.

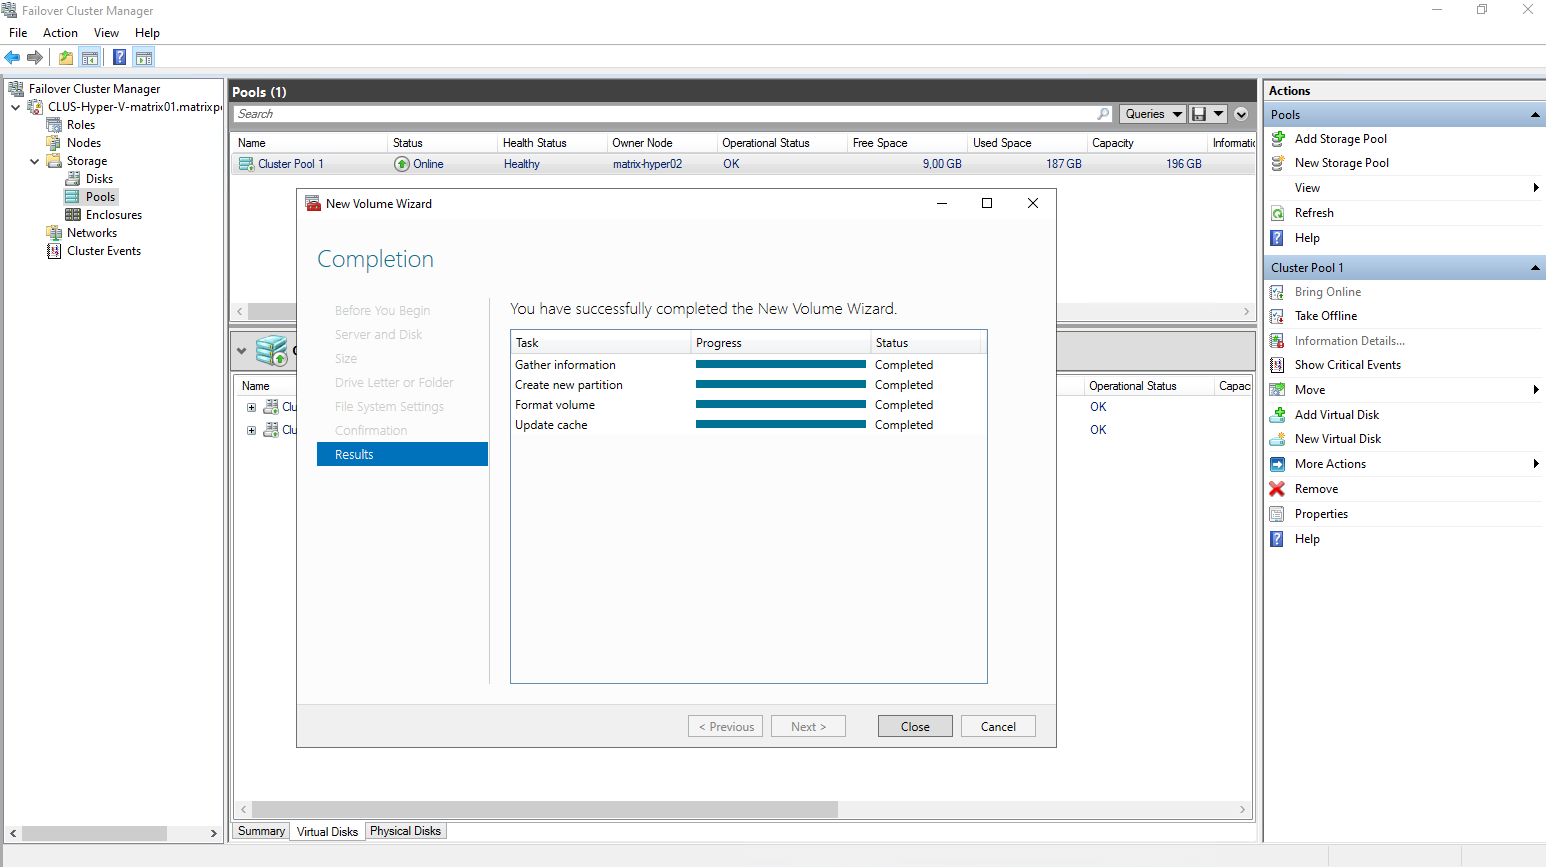
Finally our new virtual disk and volume is created.
So far its not a Cluster Shared Volumes (CSV) and we first need to add this new virtual disk to in the next step.
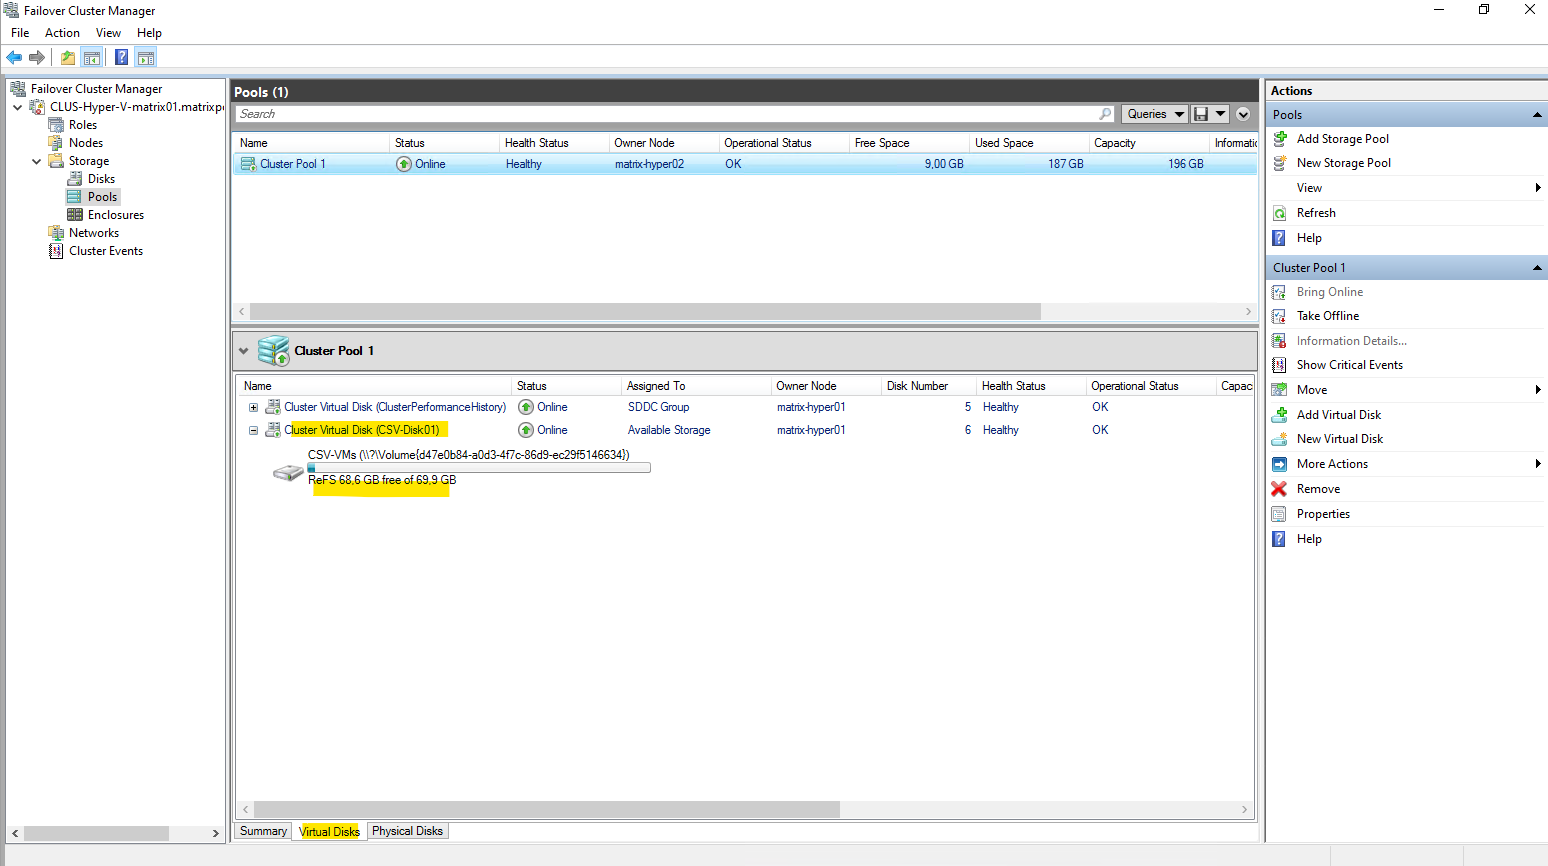
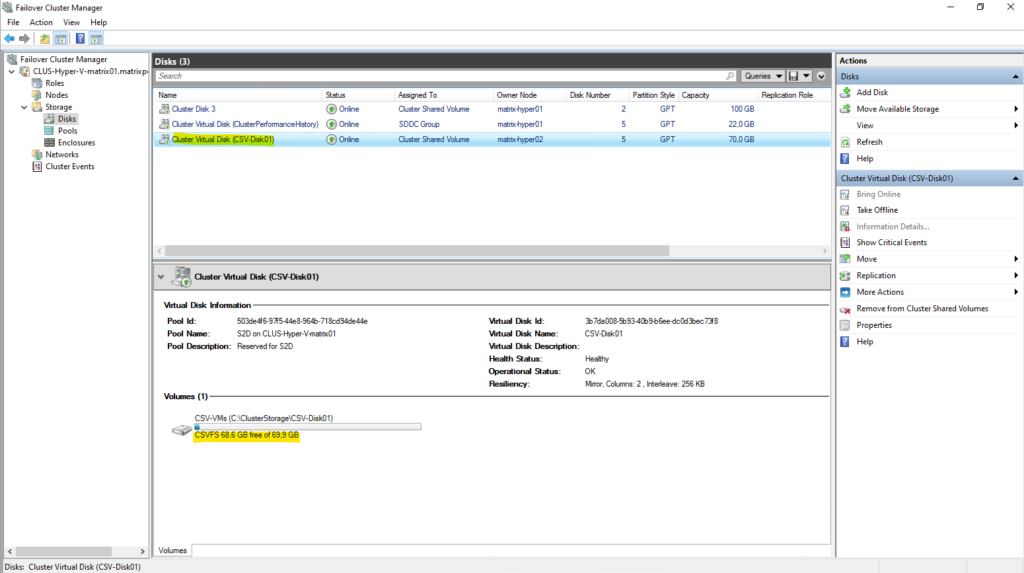
Under Storage -> Disks we can see our newly created virtual disk out of our newly created storage pool and that so far it is just assigned as available storage but not to Cluster Shared Volumes like the first disk.
To add it finally to the Cluster Shared Volumes (CSV), right click on it and select Add to Cluster Shared Volumes as shown below.
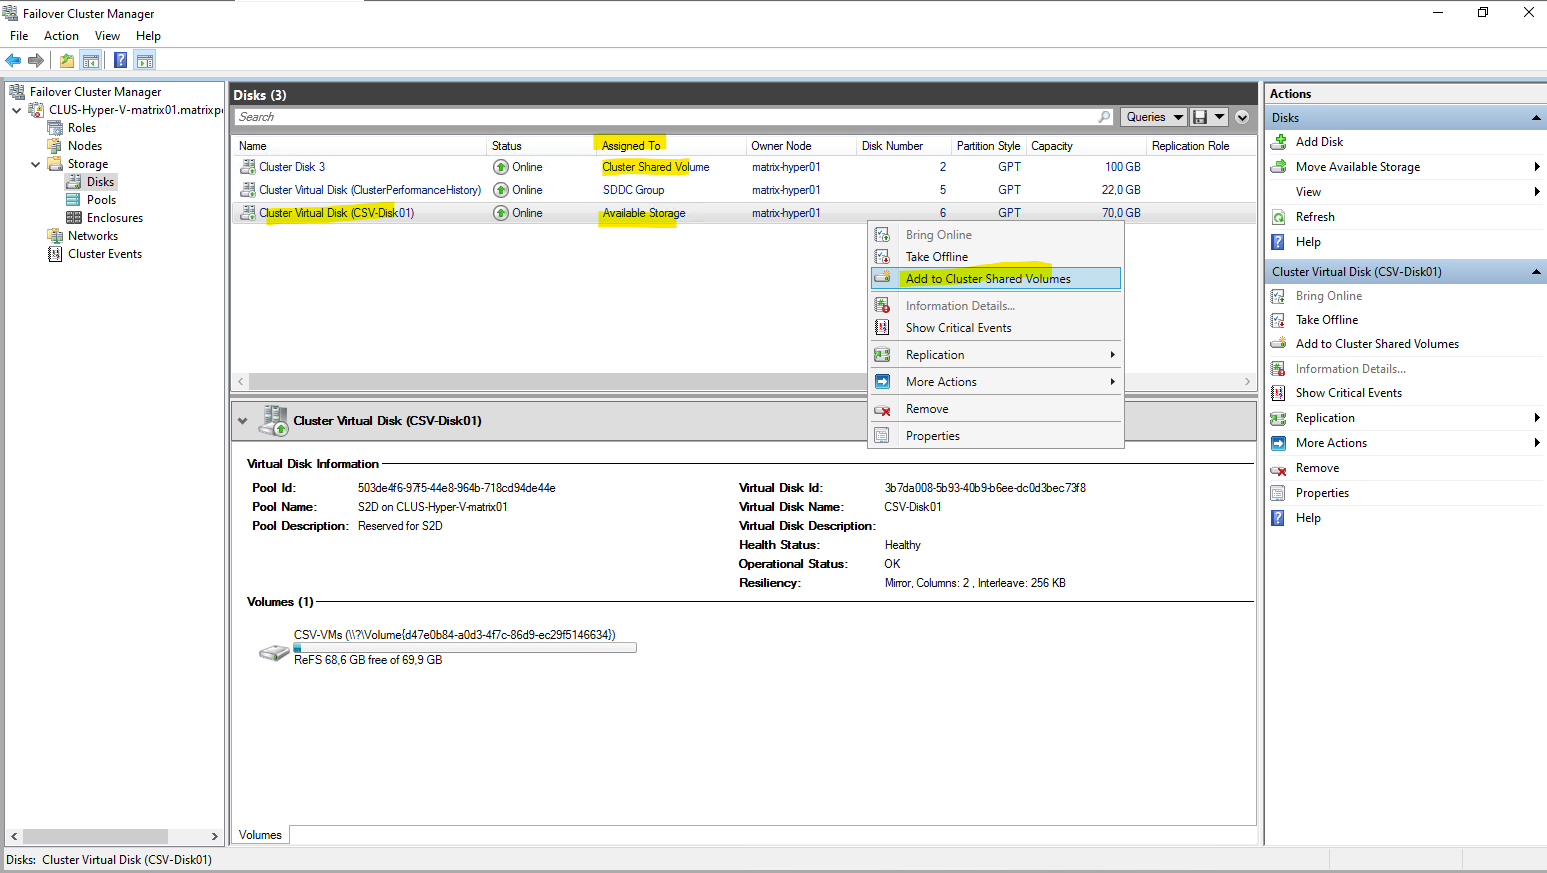
Looks good, our new virtual disk and volume is now successfully added to the Cluster Shared Volumes (CSV).
When a volume is added as a Cluster Shared Volume, the file system label changes from ReFS to CSVFS.
CSVFS (Cluster Shared Volume File System) is not a separate file system, but a clustered access layer that sits on top of the underlying ReFS volume.
This layer enables simultaneous read/write access from all cluster nodes while preserving ReFS on disk.
CSVFS is ReFS with cluster semantics.
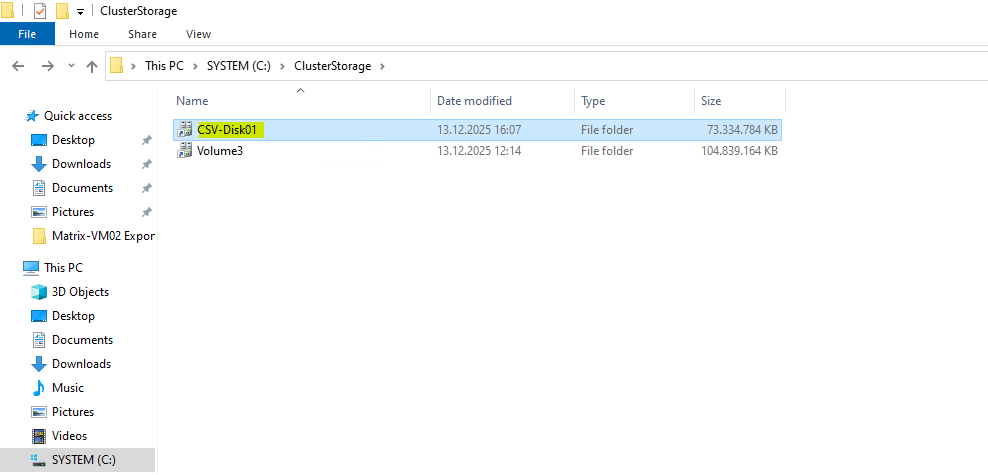
After being added as a Cluster Shared Volume, the new virtual disk is automatically mounted under
C:\ClusterStorage\CSV-Disk01on every node in the cluster as already mentioned.This unified path provides consistent access to the volume regardless of which Hyper-V host is currently running a virtual machine.
All VM files stored in this directory are therefore available cluster-wide and can move seamlessly between nodes.
With the Cluster Shared Volume in place, the S2D storage pool is now fully prepared to host virtual machines.
From this point on, Hyper-V VMs can be created directly on the new CSV, benefiting from shared, resilient storage across all cluster nodes.
Any VM placed here can be moved freely between hosts without requiring changes to its underlying storage.
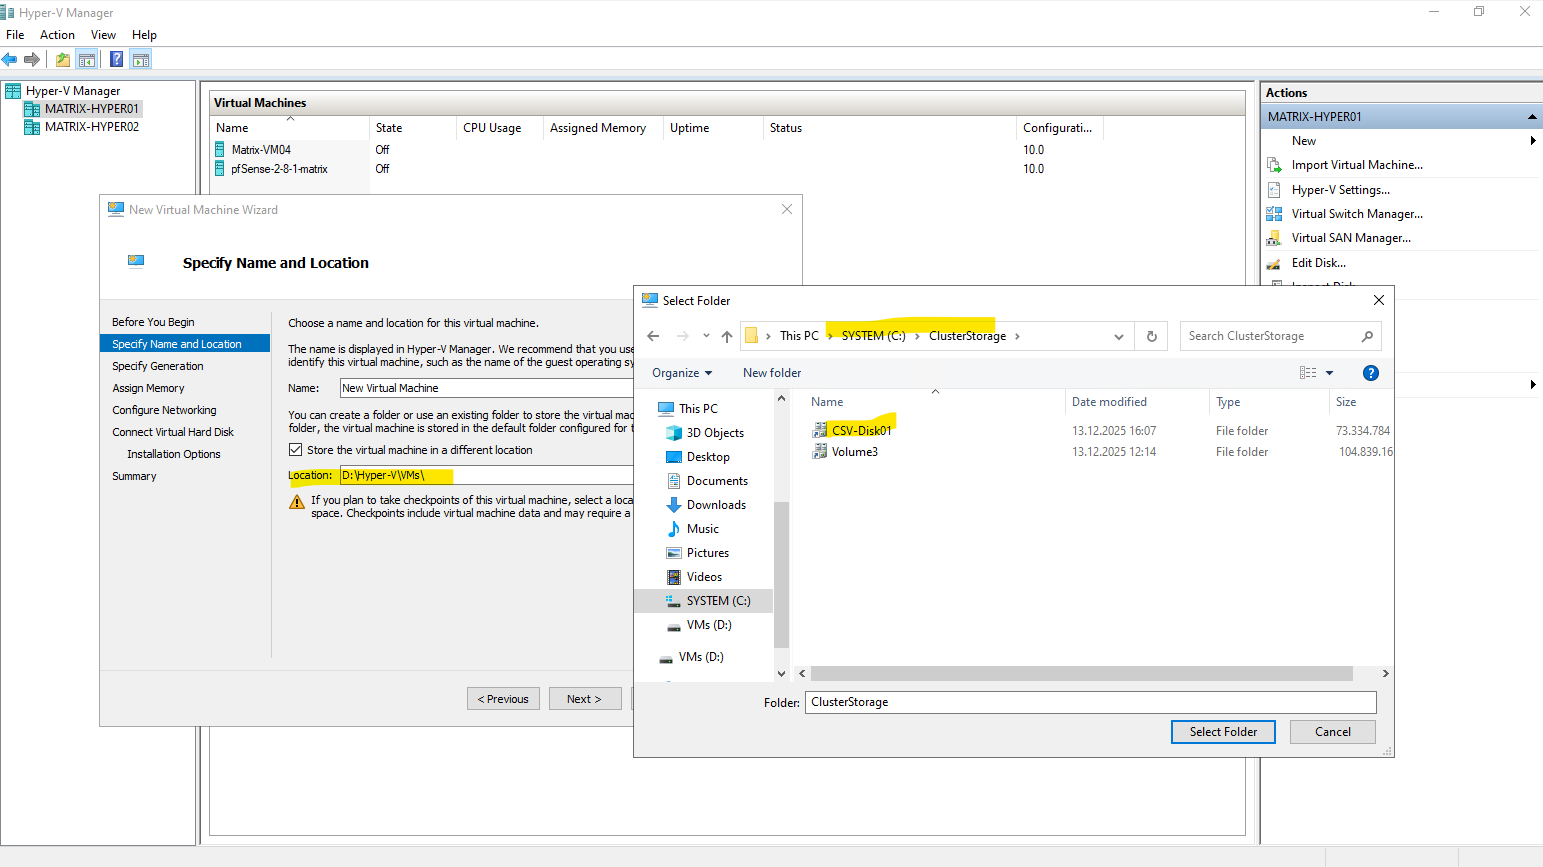
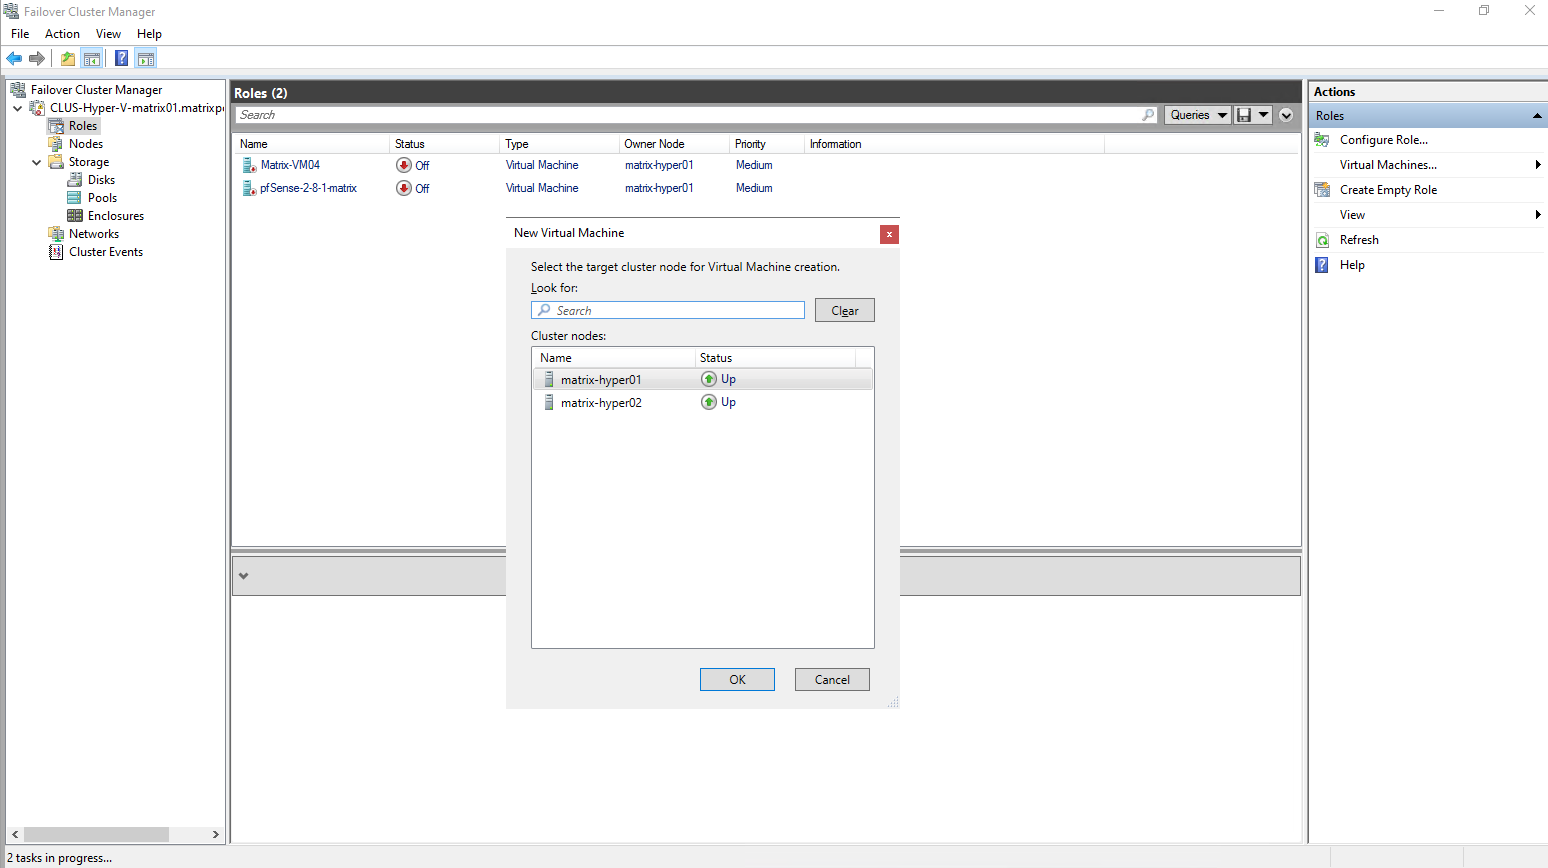
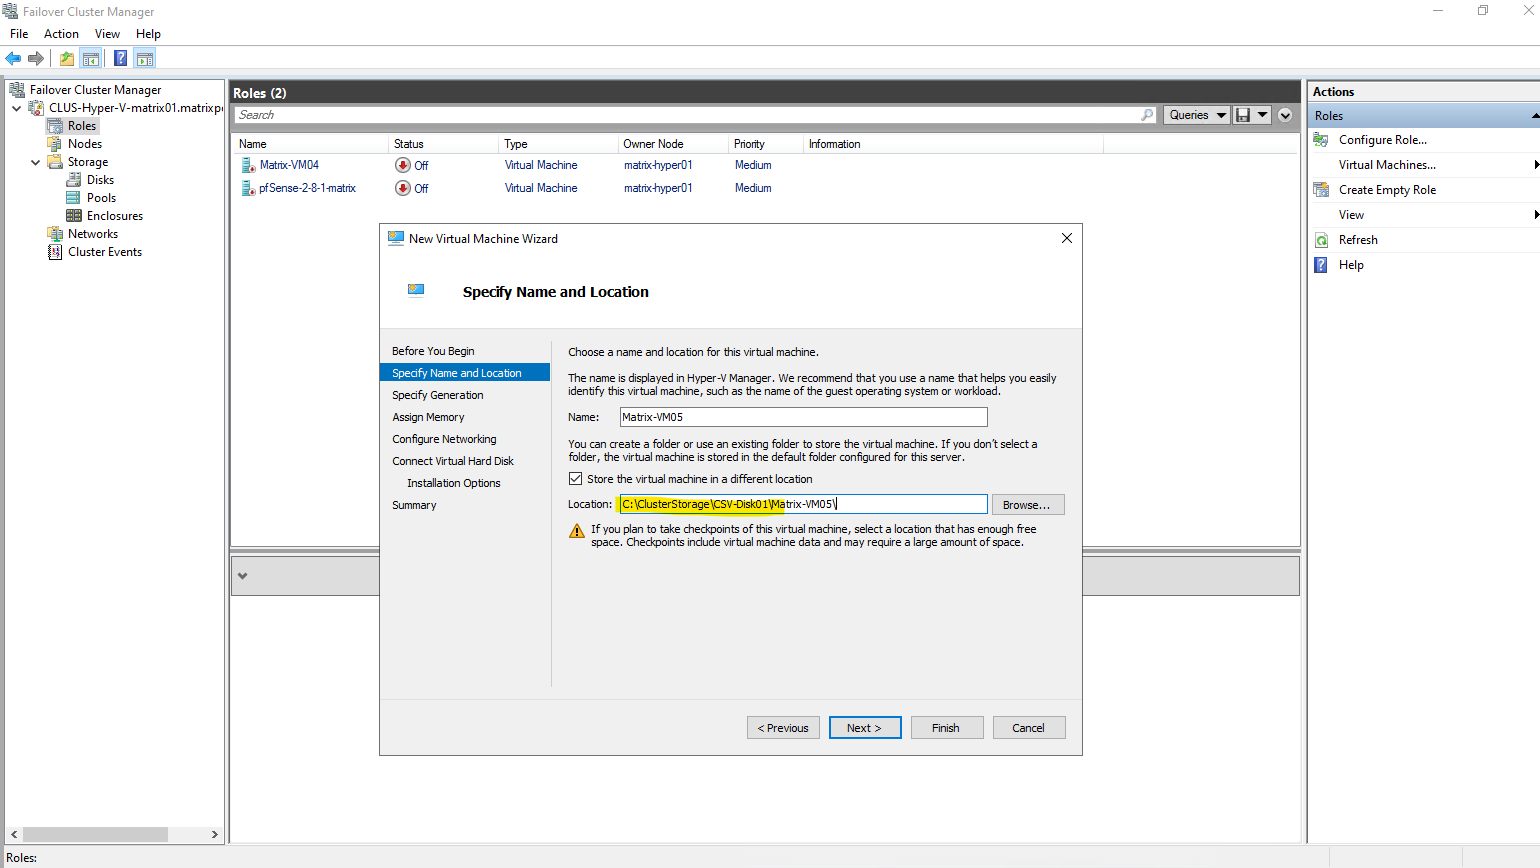
So when creating a new virtual machine, by using either the Hyper-V console or the Failover Cluster Manger, we need to select under Store the virtual machine in a different location our newly created CSV.
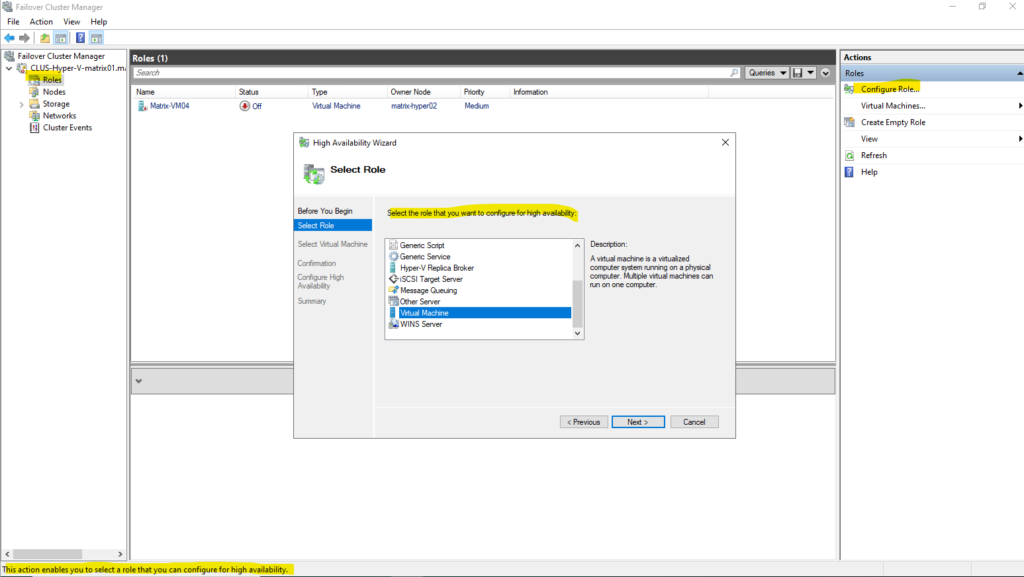
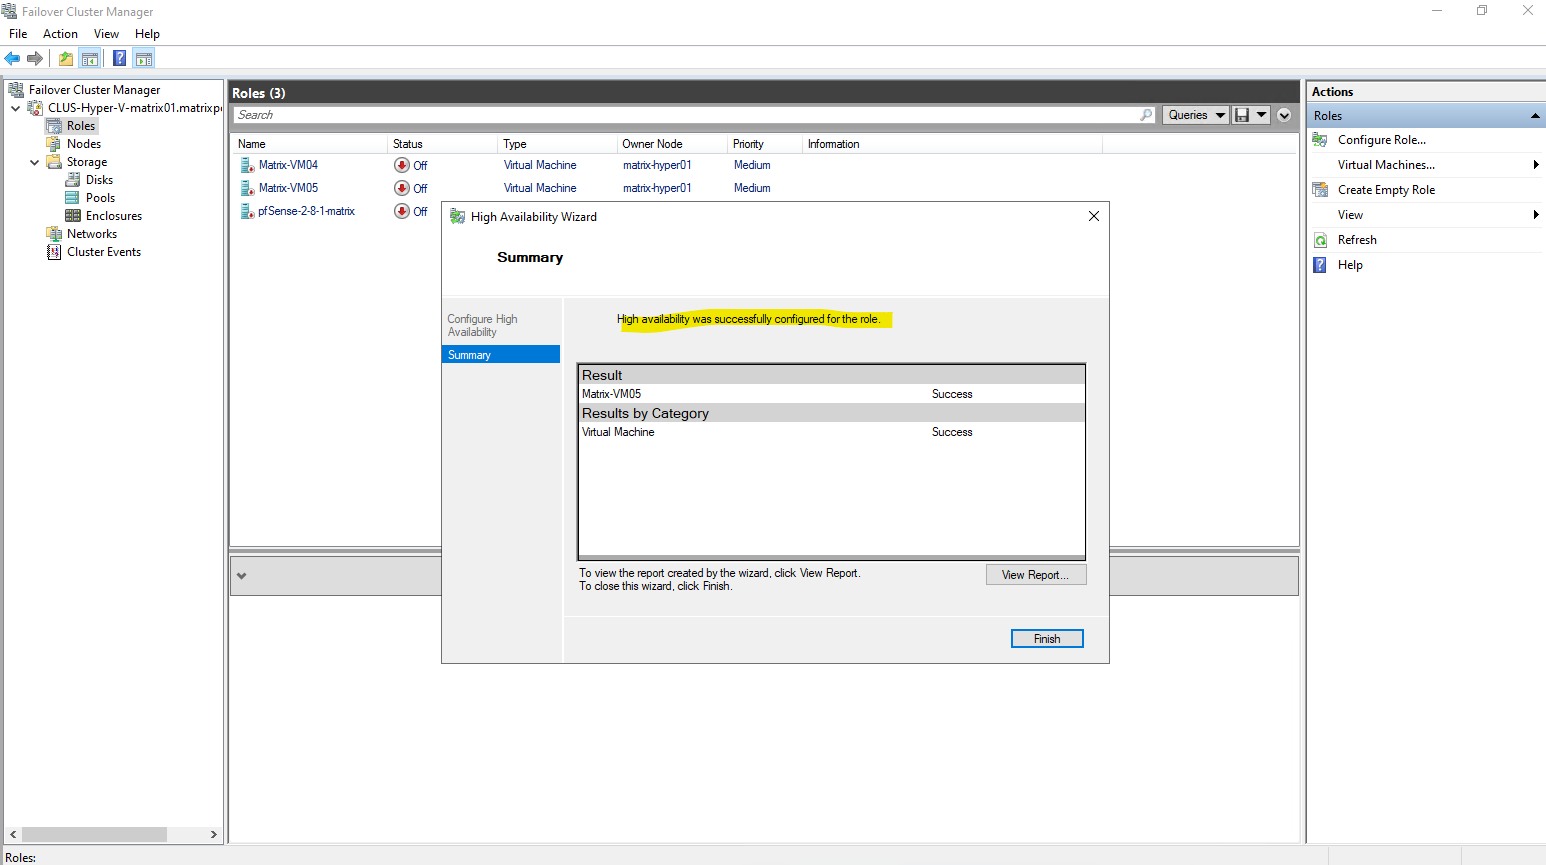
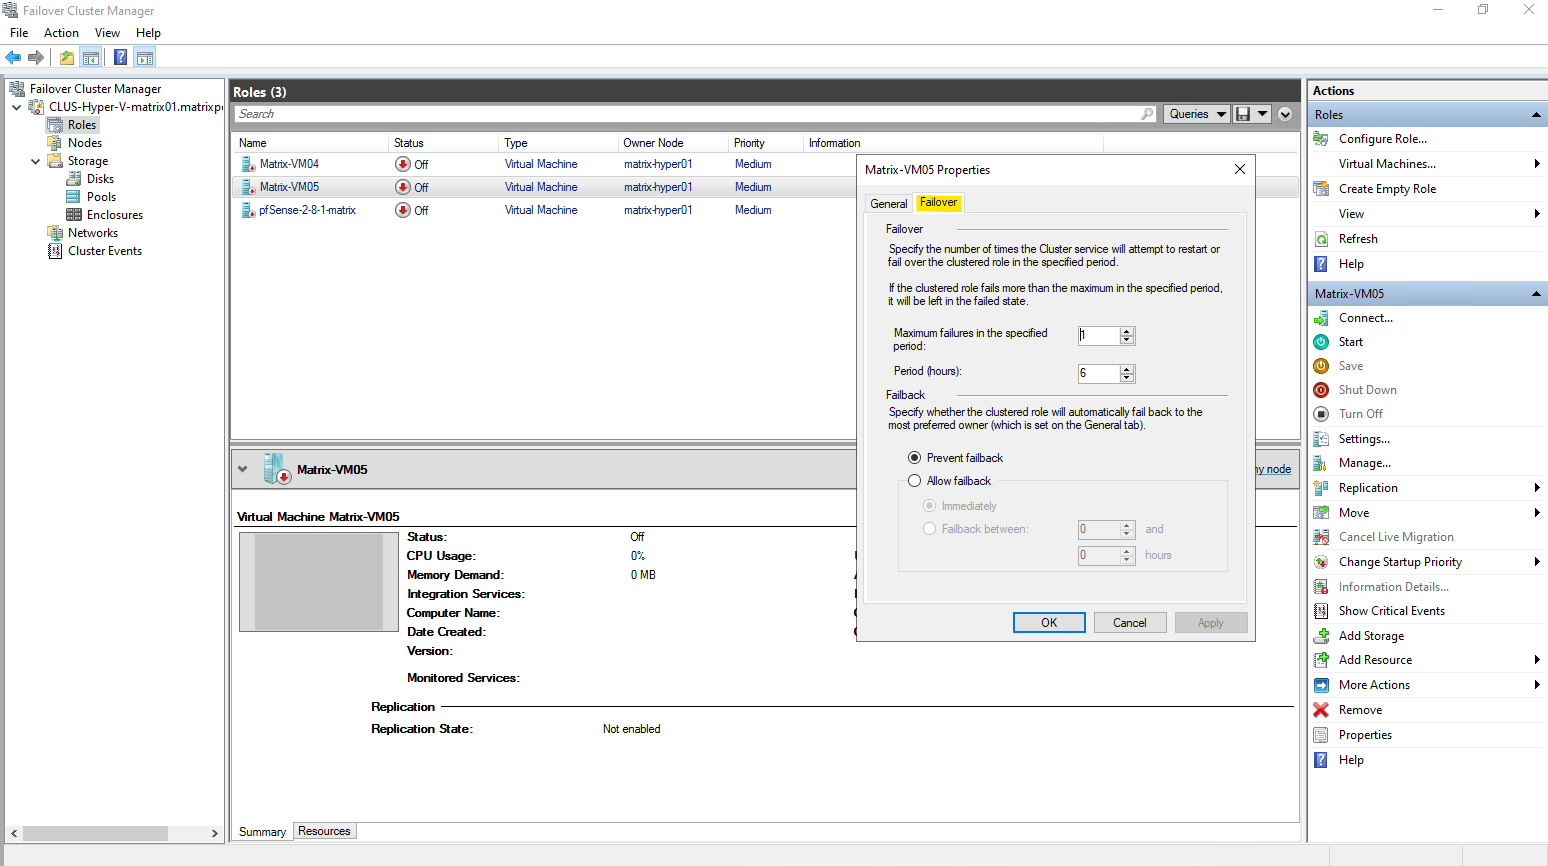
When a virtual machine is created using the classic Hyper-V Manager as shown below, it is not automatically made highly available.
To enable high availability, the VM must be added manually in Failover Cluster Manager by configuring it as a new clustered role.
Only after this step does the virtual machine become cluster-aware and eligible for failover and live migration between nodes.
Adding a VM created in the classic Hyper-V Manager as shown above, manually in Failover Cluster Manager to make it high available and cluster-aware and eligible for failover and live migration between nodes.

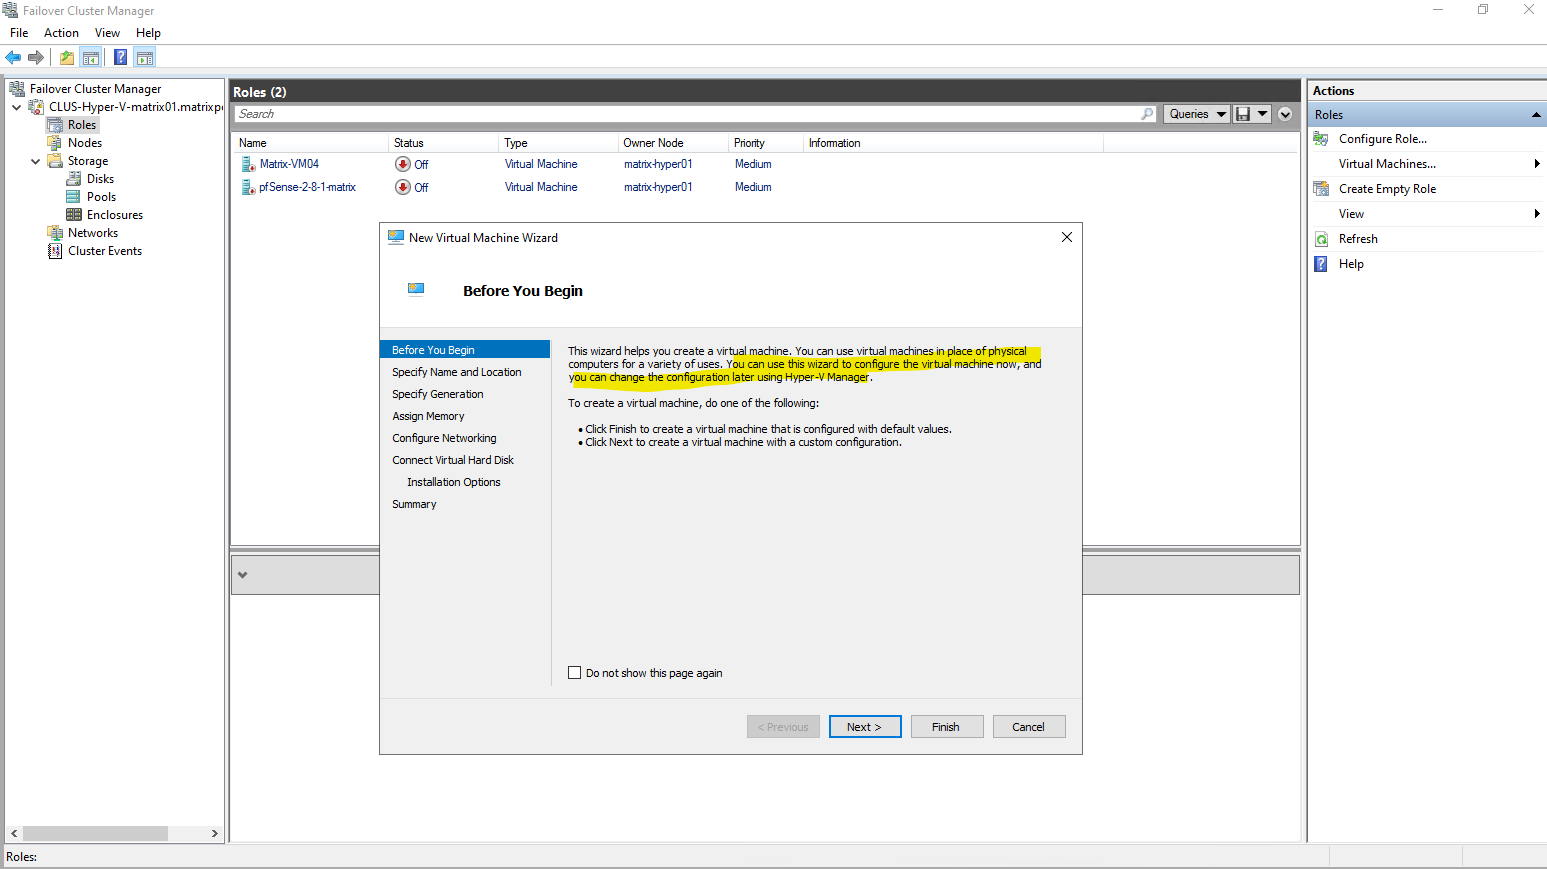
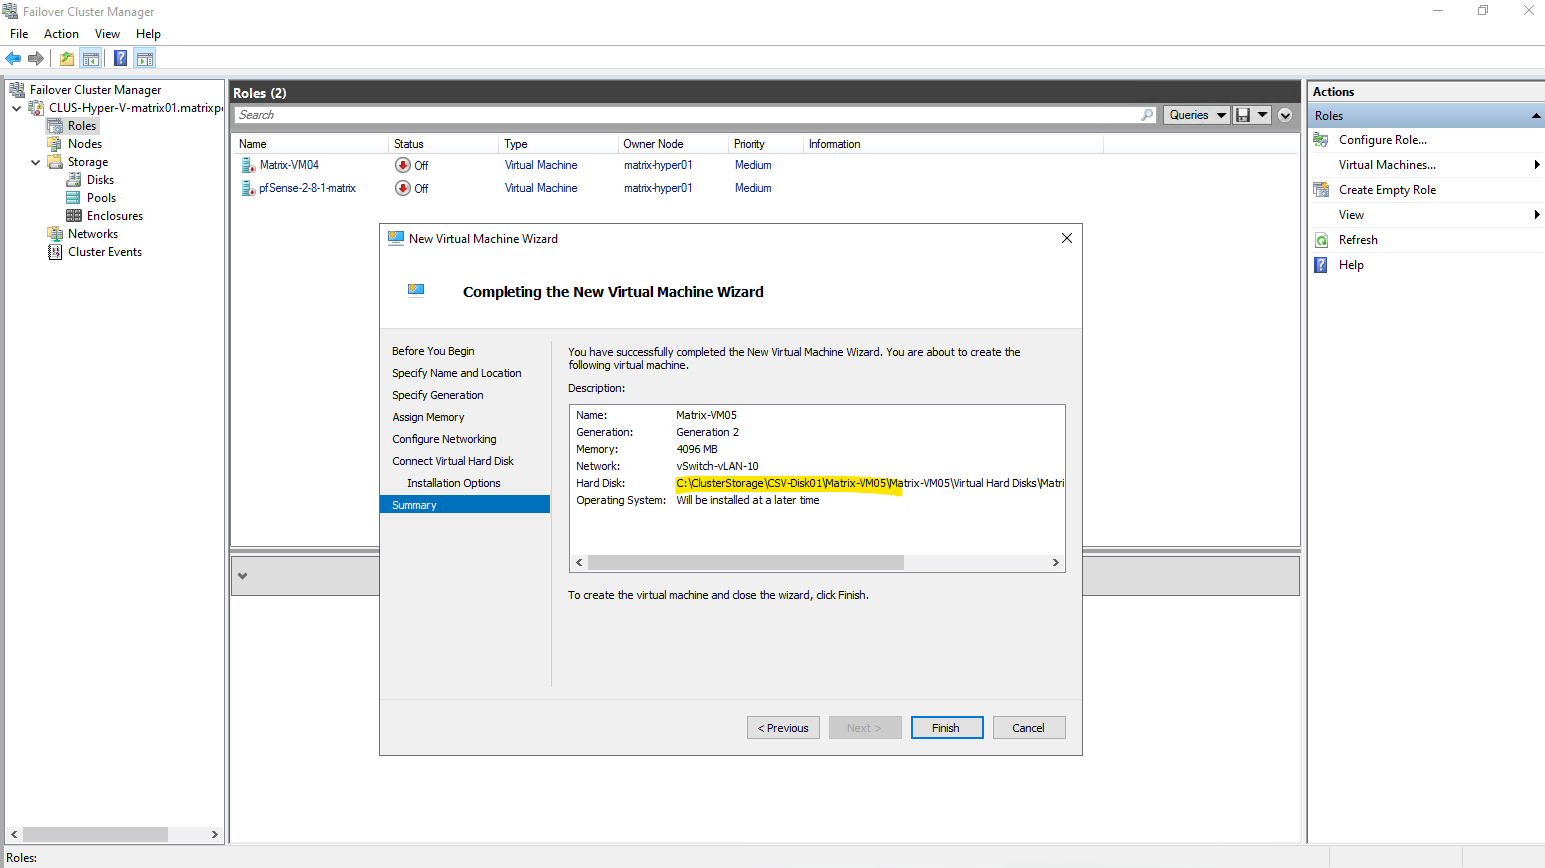
Or creating the virtual machine directly in the Failover Cluster Manager.
In contrast, creating a virtual machine directly through Failover Cluster Manager automatically configures it as a highly available workload.
The VM is registered as a clustered role from the start and placed on shared storage, making it immediately eligible for failover and live migration.
No additional configuration steps are required to enable high availability in this case.


Extending the Storage Spaces Direct Pool and CSV
As storage requirements grow, Storage Spaces Direct allows capacity to be expanded by simply adding new disks to each cluster node.
Once the additional disks are detected, S2D automatically extends the existing storage pool without downtime.
To make the new capacity available to virtual machines, the corresponding virtual disk and Cluster Shared Volume must then be resized explicitly.
So far my storage pool (Cluster Pool) will have 4 x 50 GB disks (each Hyper-V node will have 2 x local 50 GB Disks dedicated for).
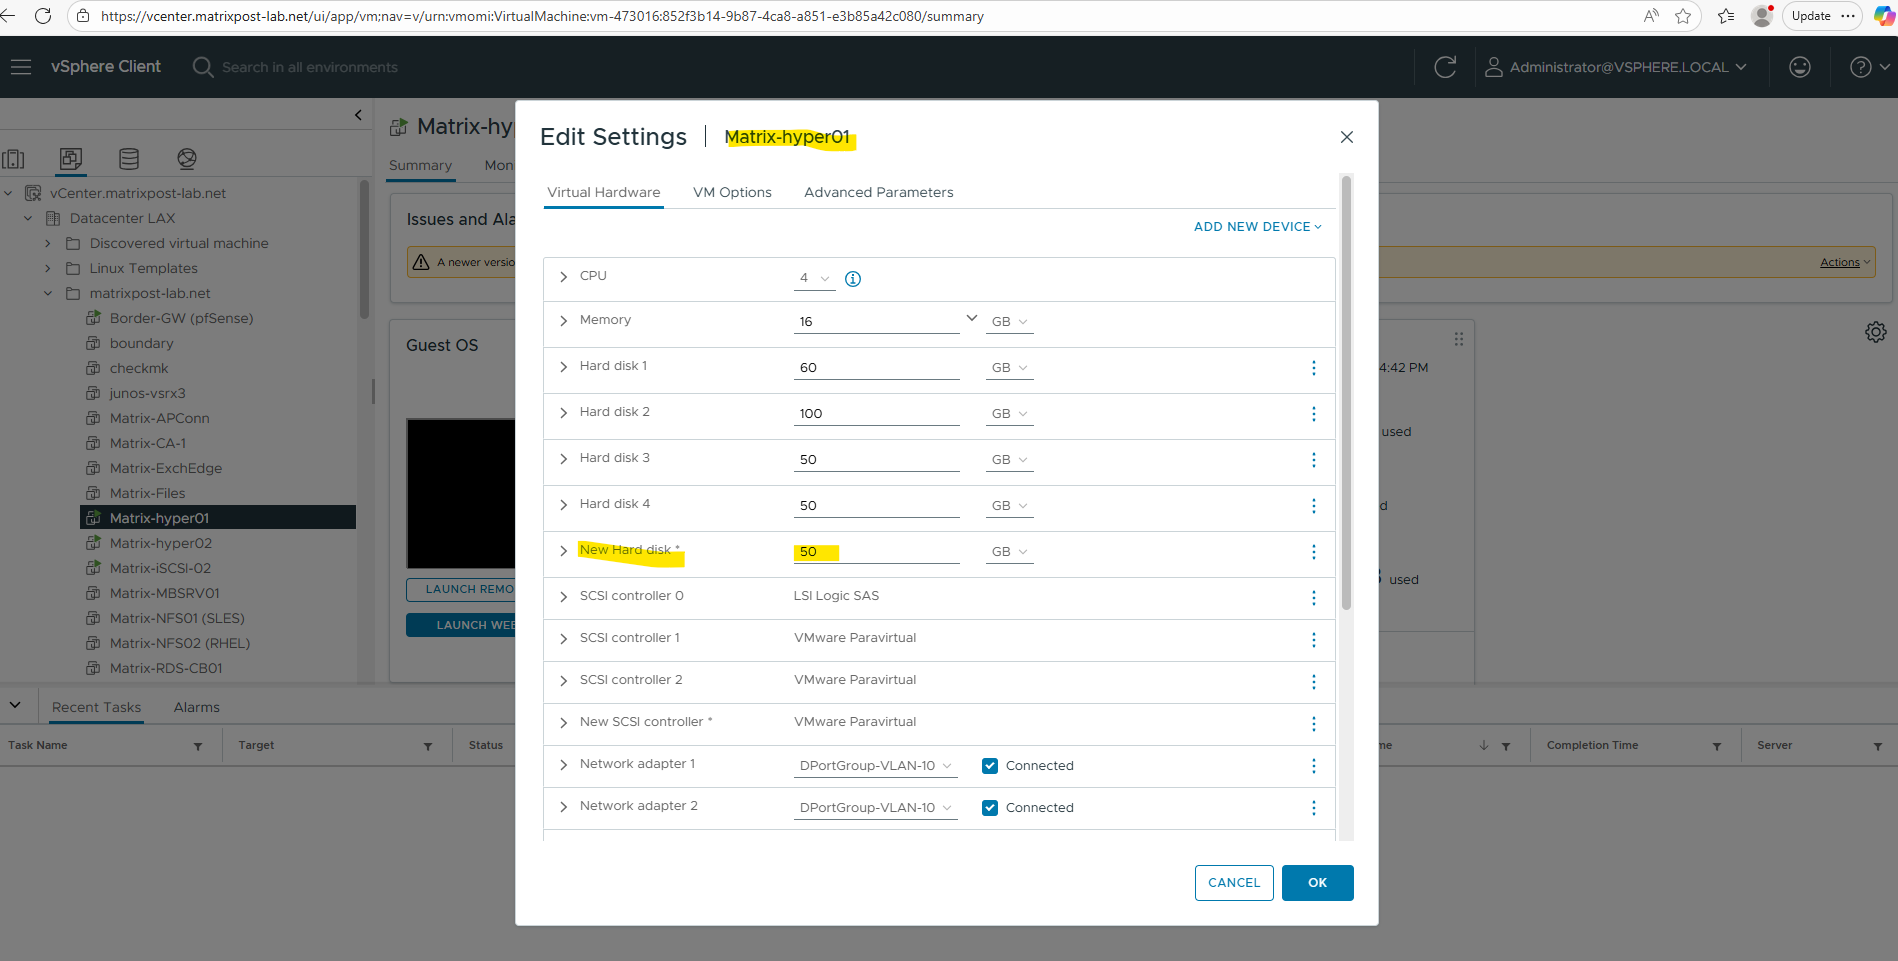
Adding physical Disks to the Hyper-V Hosts (virtual VMware Disks in Lab)
I will add to both Hyper-V Host (nested in my case) a further 50 GB disk (VMware virtual disk).
In a nested Hyper-V lab running on top of VMware, adding additional storage is particularly straightforward.
New disks can be attached to the Hyper-V virtual machines directly in vSphere and immediately presented to Windows as local disks.
This makes capacity expansion in the lab quick, flexible, and easy to repeat without any physical hardware changes.
After adding the disks in vSphere, without any further steps, the S2D Storage Pool will be automatically extended with both new local added disks as mentioned.
Once the additional disks are detected, S2D automatically extends the existing storage pool without downtime.
One of the most impressive aspects of Storage Spaces Direct is that newly added disks are picked up automatically. As soon as the additional virtual disks are attached in vSphere or physical disk in real world scenarios, S2D claims them and extends the existing storage pool without any manual intervention. No rescans, no pool reconfiguration, and no downtime are required.
This automatic disk discovery is not limited to lab or nested environments. In real-world deployments with bare-metal Hyper-V hosts, Storage Spaces Direct behaves the same way: newly added, eligible disks are automatically detected and incorporated into the S2D pool. As long as the hardware meets S2D requirements, capacity expansion works online and without service interruption.
In a Storage Spaces Direct cluster, only a single storage pool can be created. Once S2D is enabled, all eligible disks are automatically claimed into this pool, leaving no additional disk groups available for further pools.
Capacity expansion is therefore achieved by adding disks to the nodes and extending or creating volumes within the existing pool.
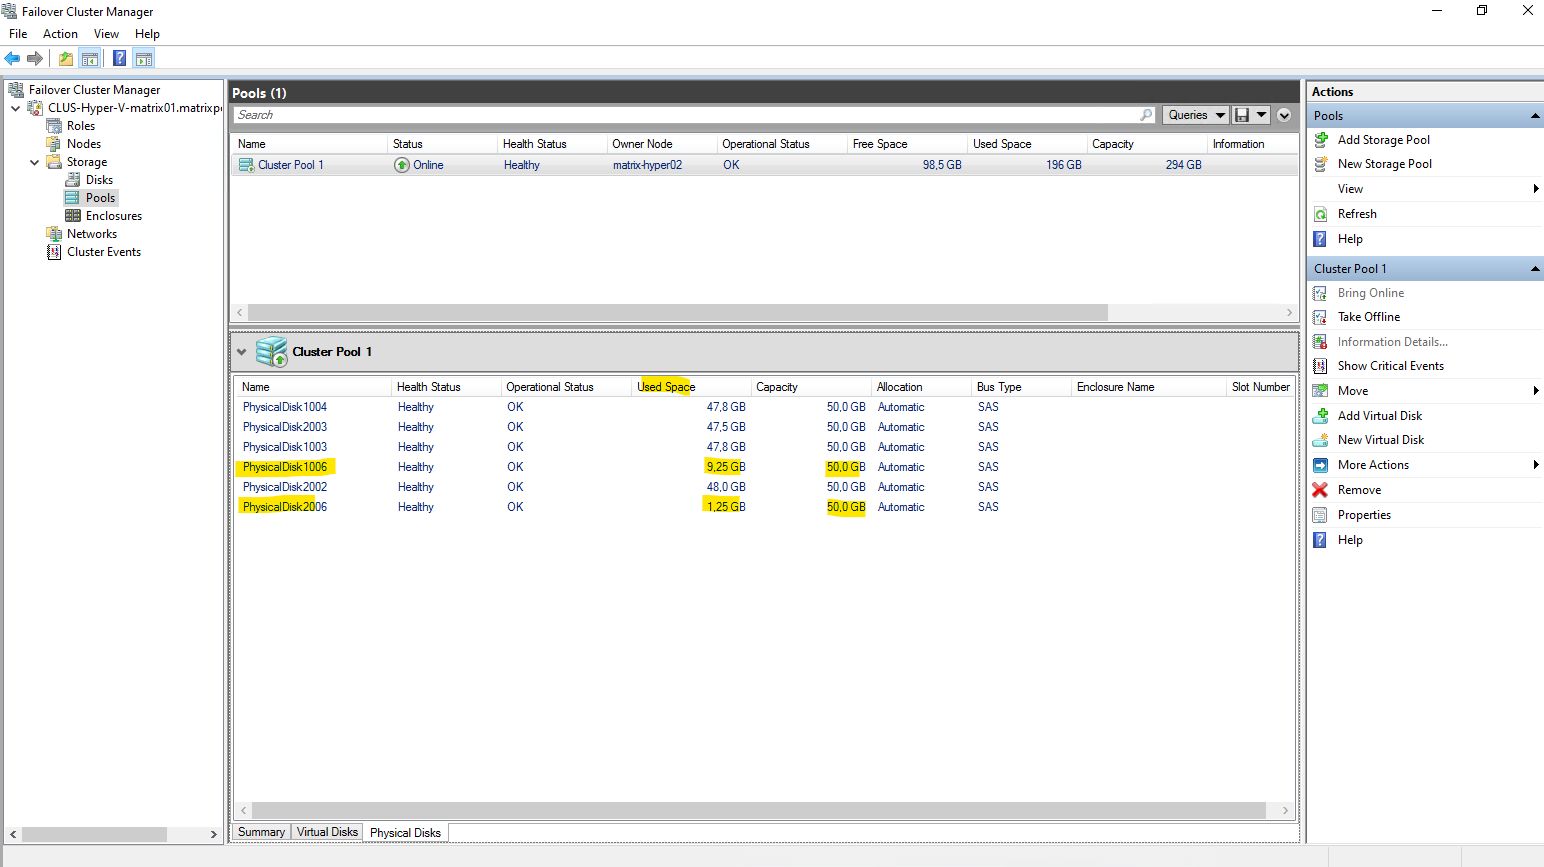
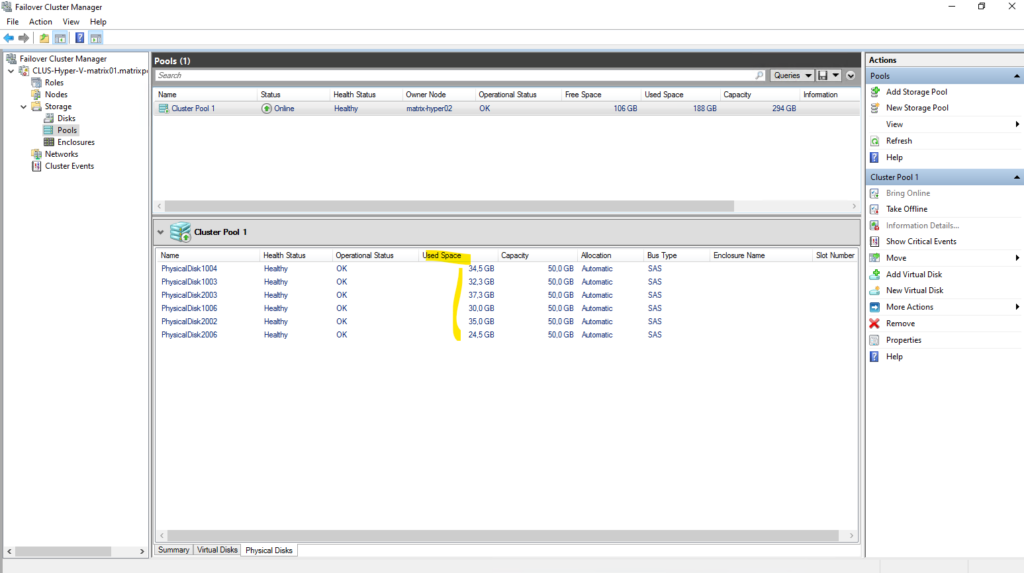
After adding new disks to the S2D pool, the existing data is automatically redistributed across all available drives.
Initially, the newly added disks appear mostly empty as shown in the screenshot above, but over time S2D rebalances the data so that space usage evens out across all disks.
As a result, the previously used disks show reduced utilization while the new disks gradually fill up, ensuring balanced capacity and performance across the pool.
S2D doesn’t just add capacity, it also rebalances it.
Extending the CSV by using PowerShell
Before creating or extending a virtual disk, the maximum usable size can be checked directly in the management console like shown below.
When starting the New Virtual Disk wizard, the manager calculates and displays the available free space and the resulting maximum size based on the selected resiliency.
This provides a reliable reference value and helps avoid sizing the disk too aggressively, especially in small S2D environments.
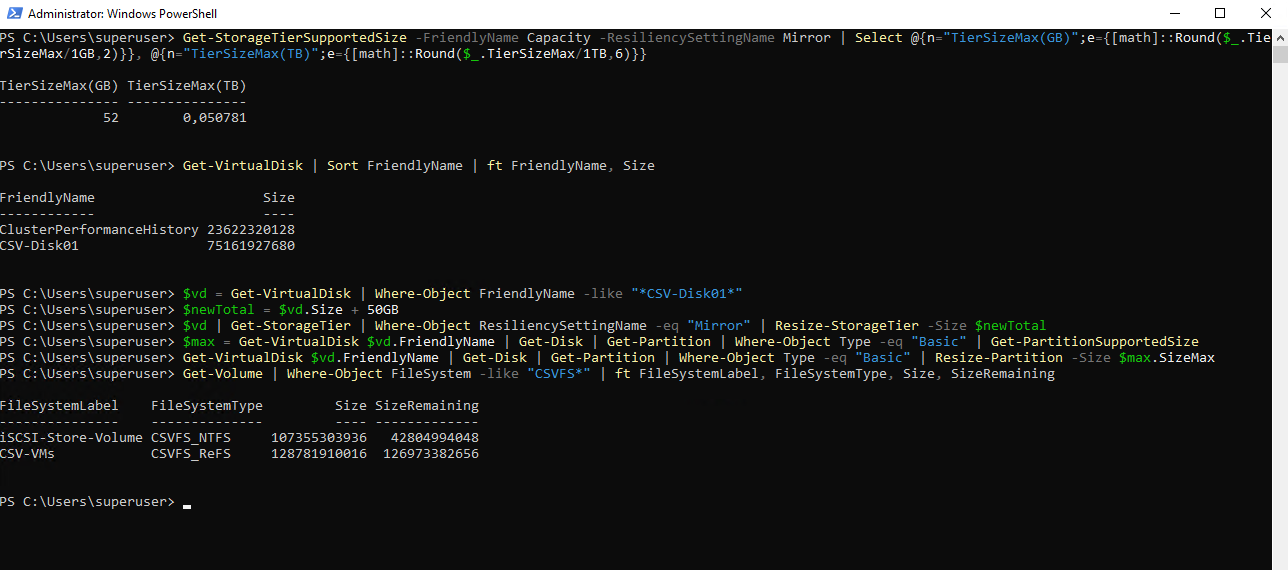
So in my case I can extend the existing CSV max with 52 GB but never consume 100% of the reported usable capacity, so in my case better just use 50 GB to extend.
Or by running the following PowerShell cmdlet:
So in my case the remaining mirror capacity is 52 GB.
PS> Get-StorageTierSupportedSize -FriendlyName Capacity -ResiliencySettingName Mirror | Select @{n="TierSizeMax(GB)";e={[math]::Round($_.TierSizeMax/1GB,2)}}, @{n="TierSizeMax(TB)";e={[math]::Round($_.TierSizeMax/1TB,6)}}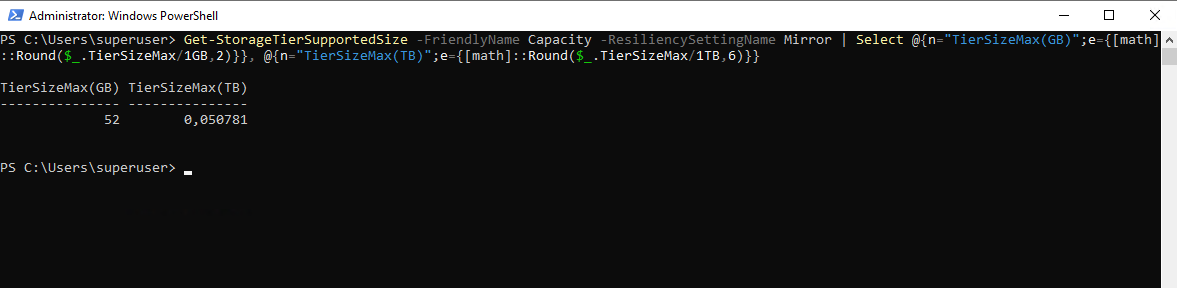
Below the steps to finally extend the existing CSV created out of a S2D Storage Pool.
First the underlying S2D virtual disk is expanded to increase the available capacity within the storage pool.
This operation only adjusts the virtual disk size and does not yet make the additional space visible to the file system.
# Current size of your S2D virtual disk (use your real FriendlyName if different)
Get-VirtualDisk | Sort FriendlyName | ft FriendlyName, Size

# Example: resize the (mirror) tier to NEW TOTAL size
# (current_size + 50GB)
$vd = Get-VirtualDisk | Where-Object FriendlyName -like "*CSV-Disk01*"
$newTotal = $vd.Size + 50GB

$vd | Get-StorageTier | Where-Object ResiliencySettingName -eq "Mirror" |
Resize-StorageTier -Size $newTotal
After the virtual disk has been resized, the partition and CSV file system are extended to consume the newly available space. Once completed, the additional capacity becomes immediately usable for storing virtual machines without impacting running workloads.
# Run on the CSV owner node
$max = Get-VirtualDisk $vd.FriendlyName | Get-Disk | Get-Partition |
       Where-Object Type -eq "Basic" | Get-PartitionSupportedSize

Get-VirtualDisk $vd.FriendlyName | Get-Disk | Get-Partition |
Where-Object Type -eq "Basic" | Resize-Partition -Size $max.SizeMax

# Verify the new size
Get-Volume | Where-Object FileSystem -like "CSVFS*" | ft FileSystemLabel, FileSystemType, Size, SizeRemaining
Displaying the new extended CSV size in a human-readable format (GB).
Get-Volume |
Where-Object FileSystem -like "CSVFS*" |
Select FileSystemLabel,
       FileSystemType,
       @{n="Size (GB)";e={[math]::Round($_.Size / 1GB, 2)}},
       @{n="Free (GB)";e={[math]::Round($_.SizeRemaining / 1GB, 2)}} |
Format-Table -AutoSize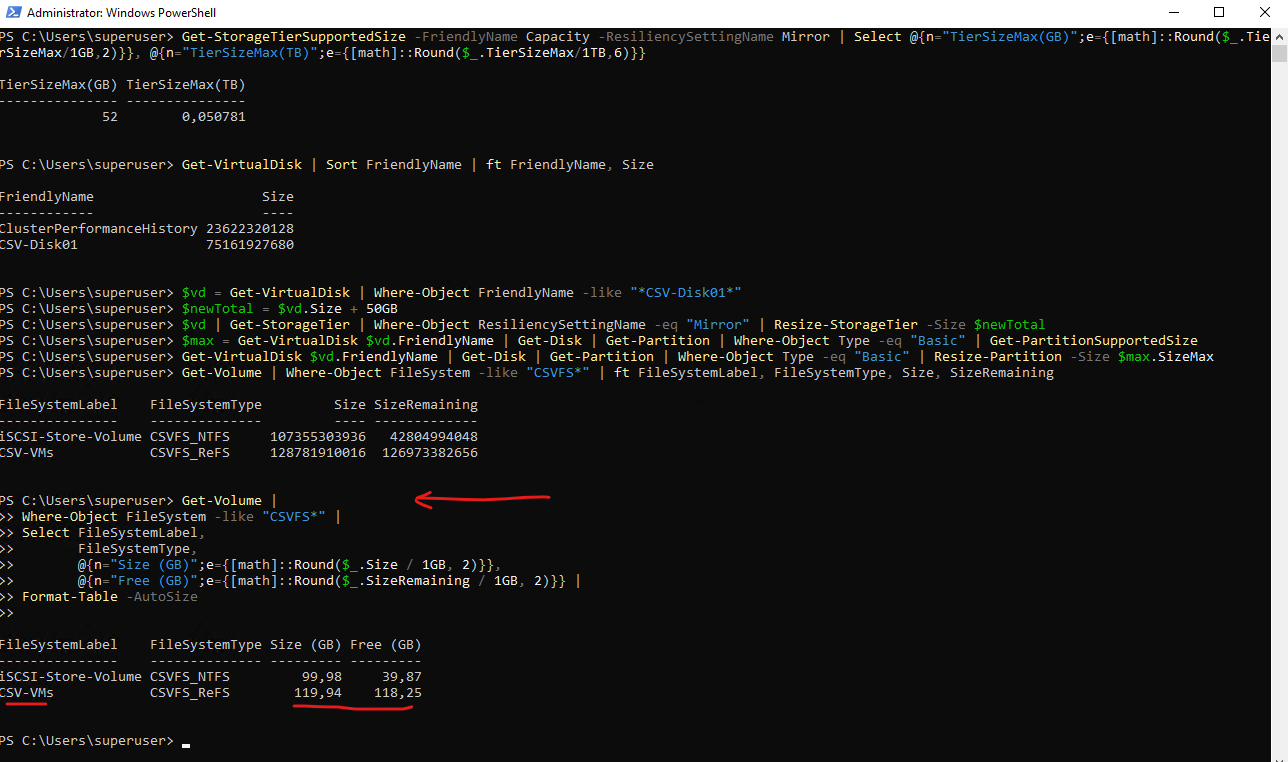
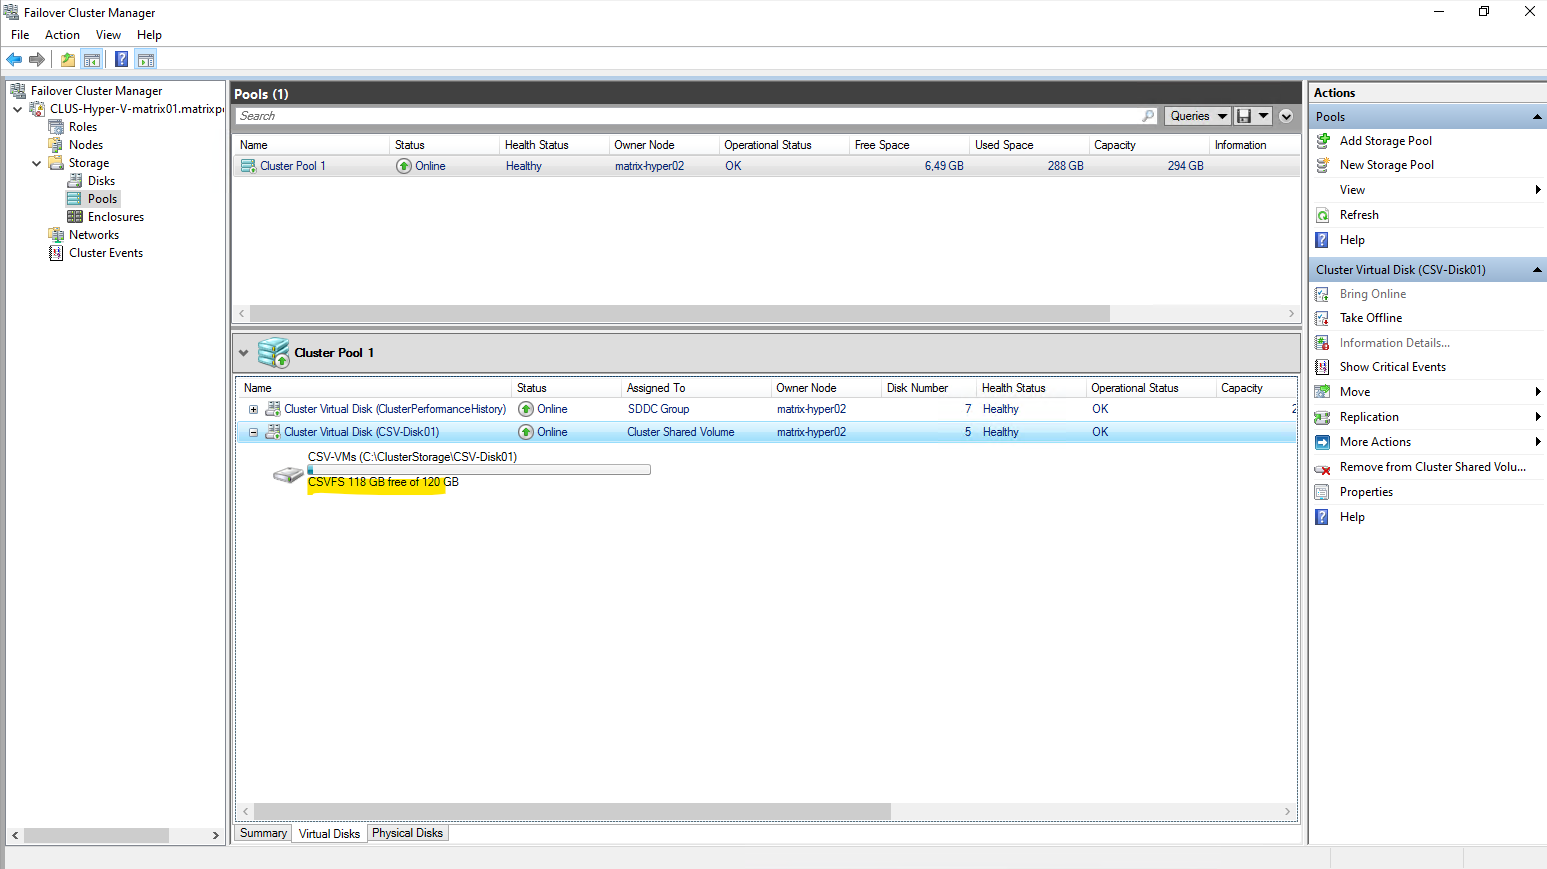
The new size will also shown up in the Failover Cluster Manager.
Troubleshooting
Enabling S2D fail
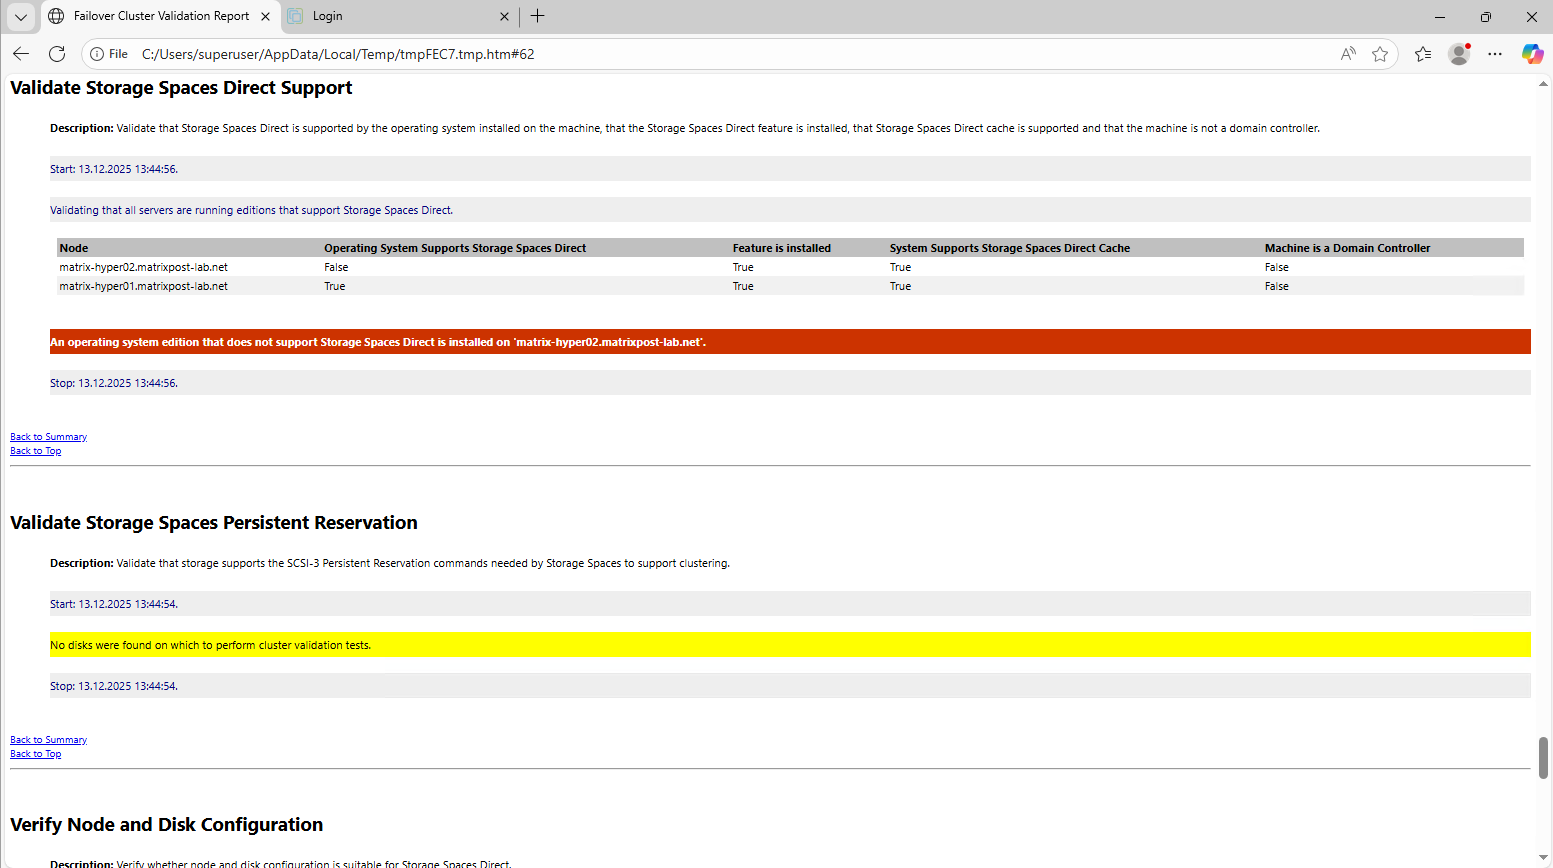
Enabling Storage Spaces Direct initially failed because one of the cluster nodes was running Windows Server 2022 Standard.
Storage Spaces Direct requires the Datacenter edition on all participating nodes, and mixed editions are not supported. After upgrading the node to Datacenter, S2D could be enabled successfully without further issues.
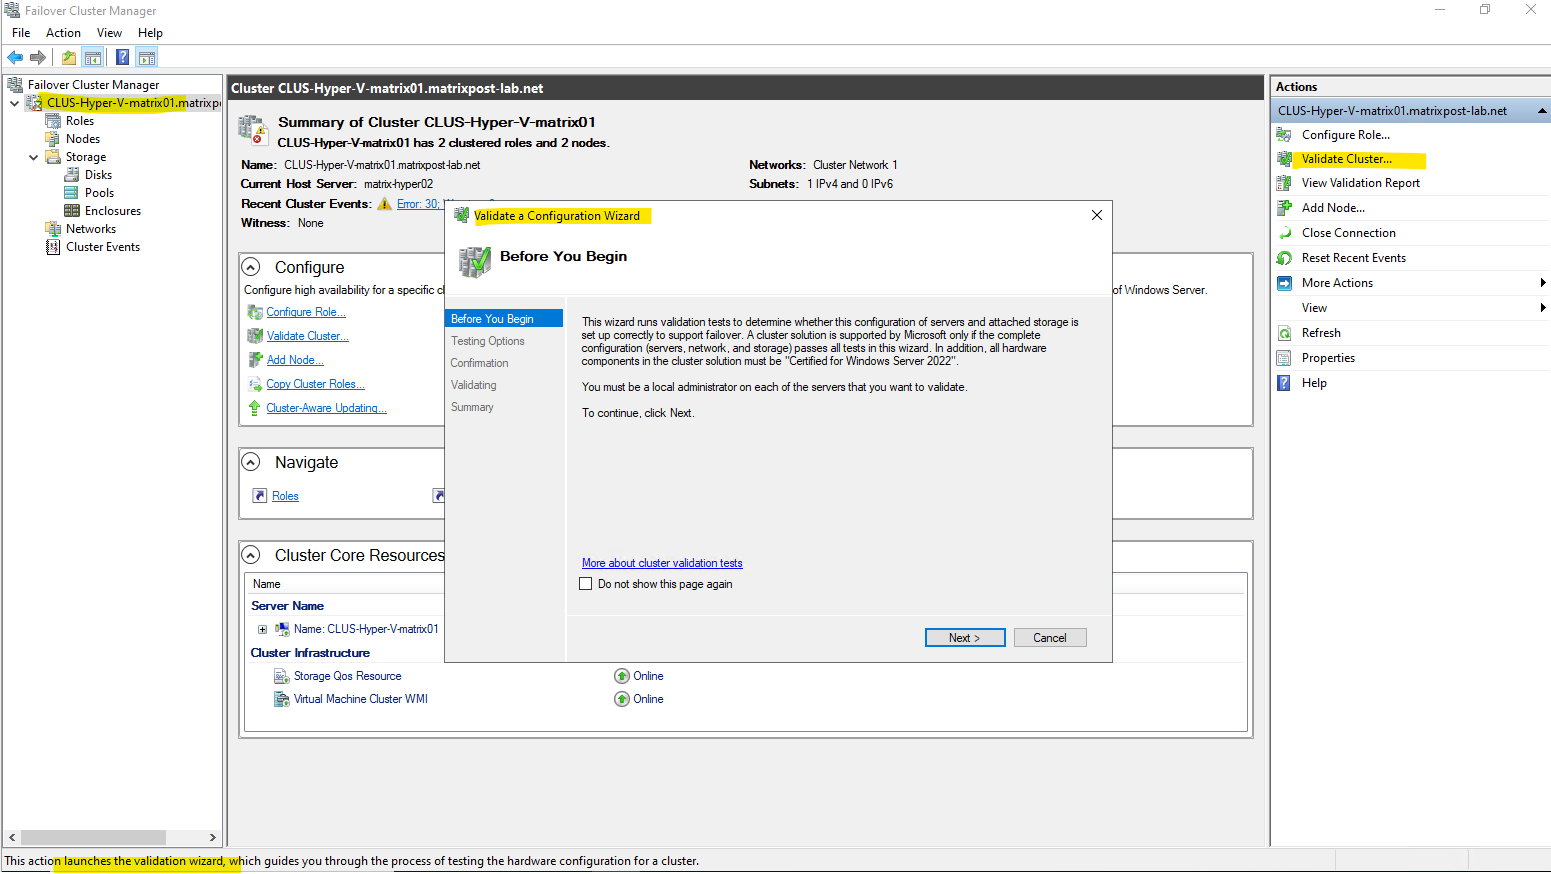
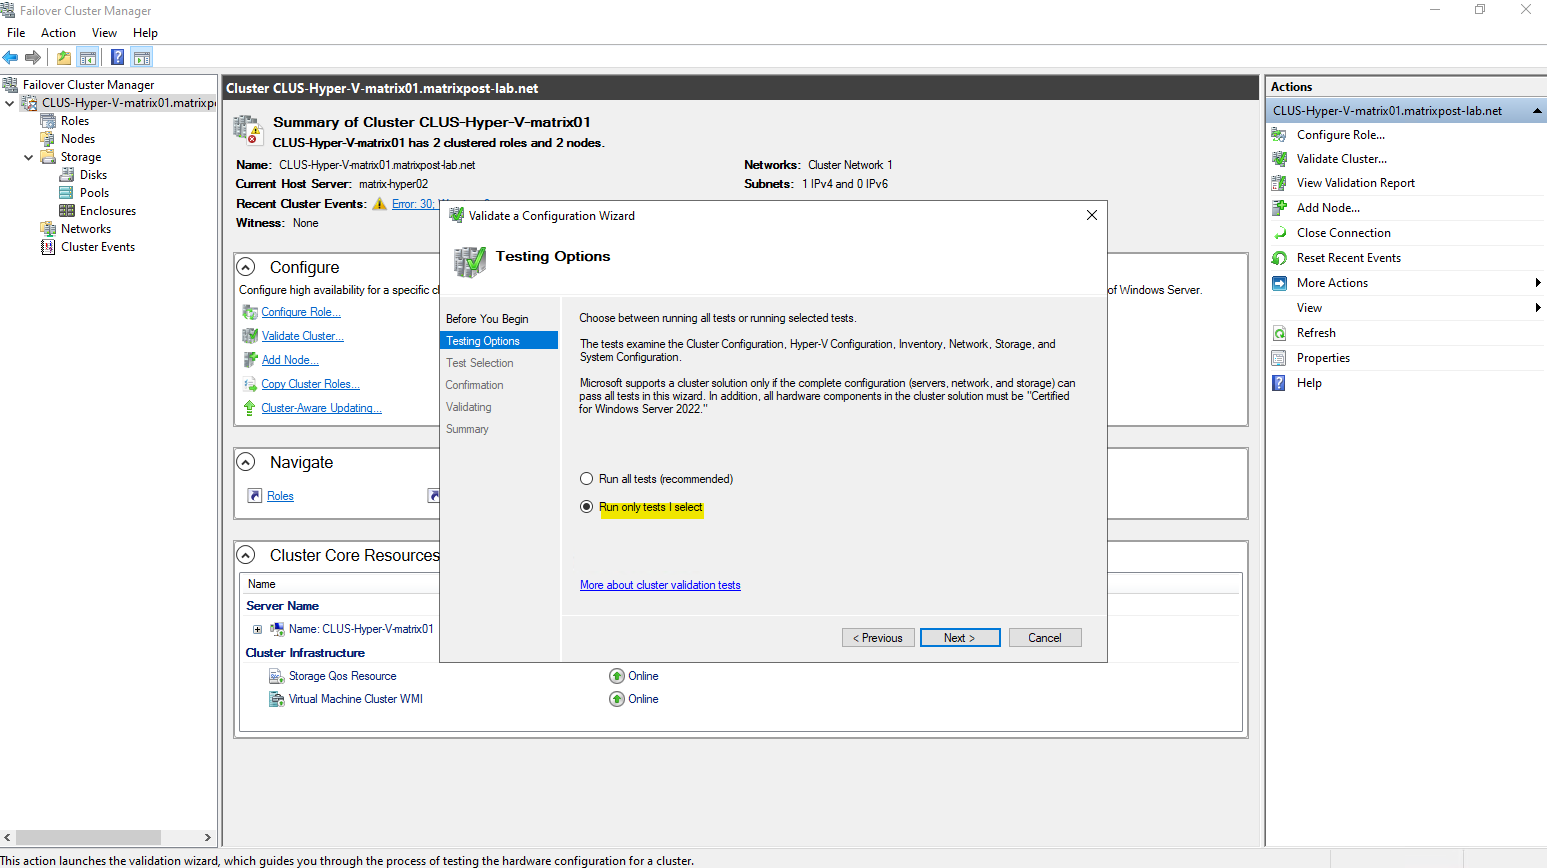
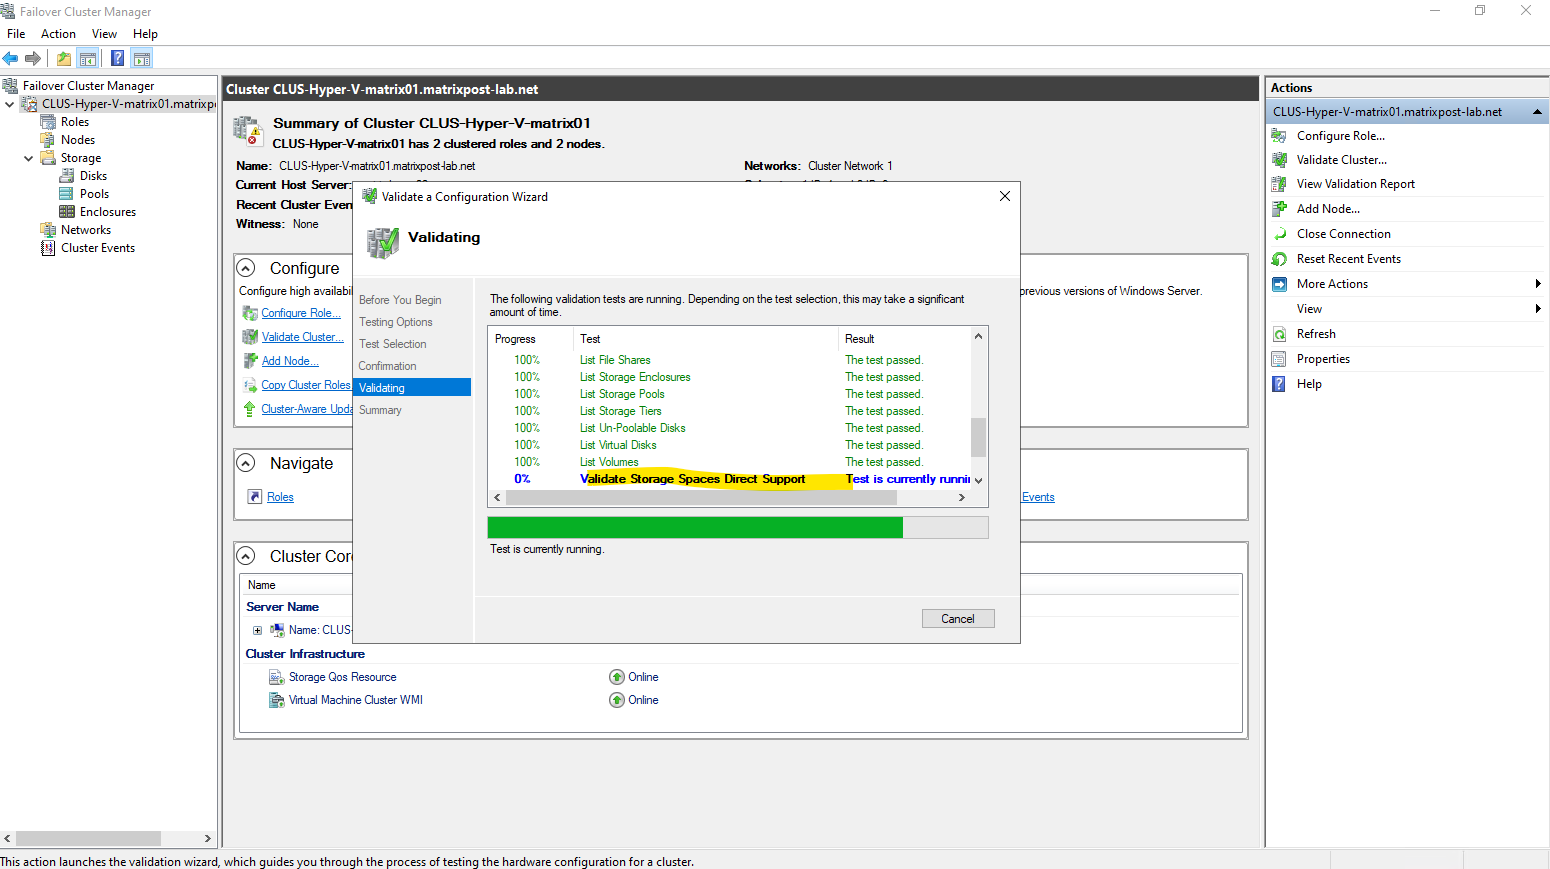
We can run a S2D validation test by using the console or PowerShell.
PS> Test-Cluster -Include "Storage Spaces Direct", "Inventory", "Network", "System Configuration" -Verbose


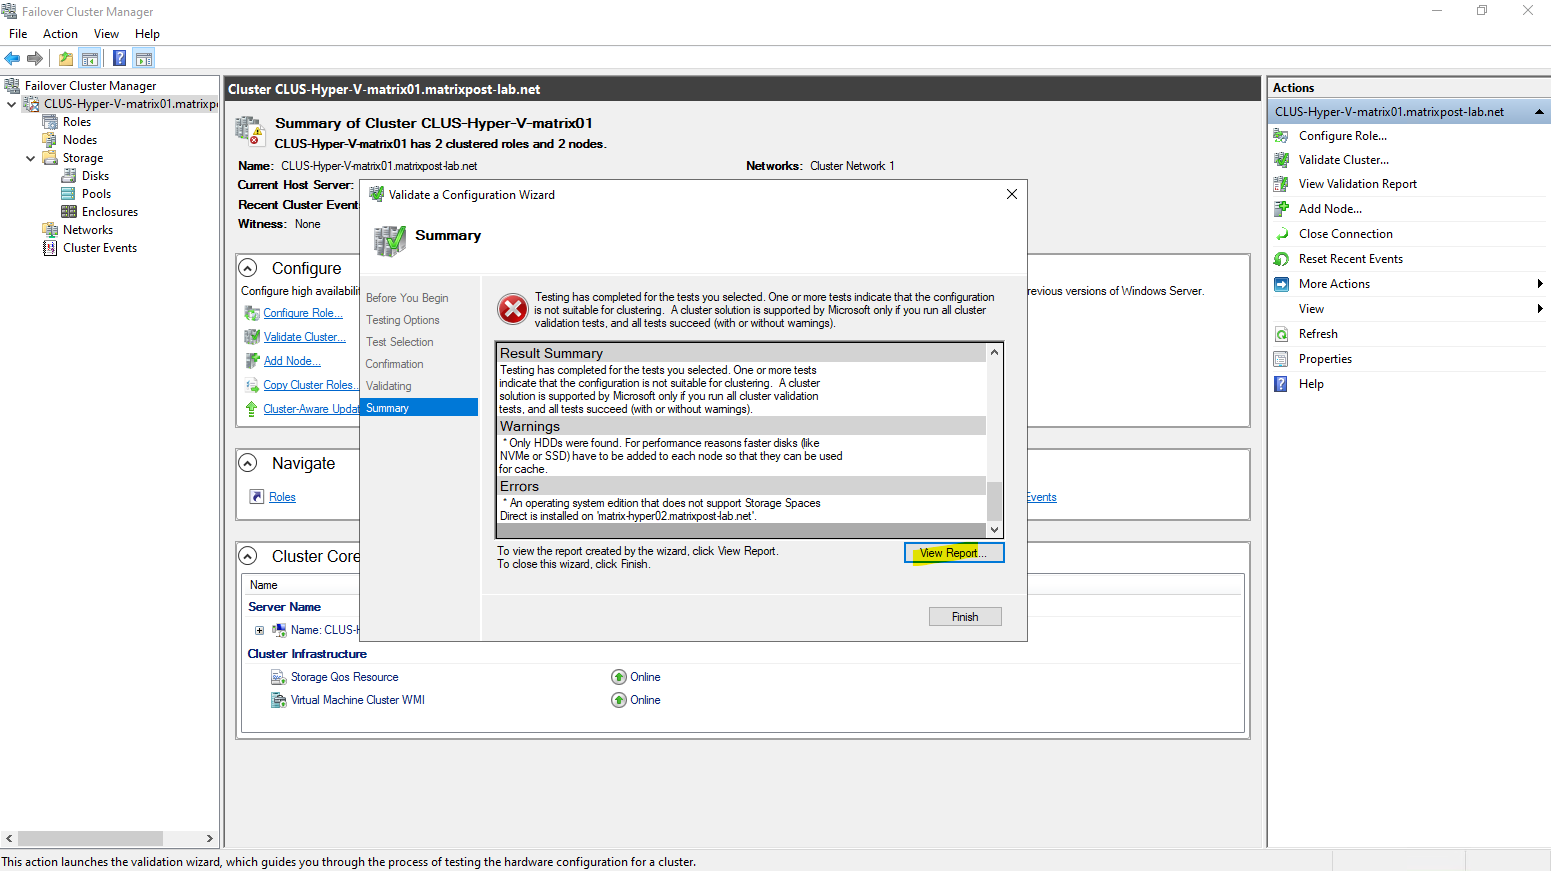
An operating system edition that does not support Storage Spaces Direct is installed on ‘matrix-hyper02.matrixpost-lab.net’.
In my case the second Hyper-V host (node) is running on the Windows Server 2022 Standard version which not supports S2D.
So I first need to update here the node from Windows Server 2022 Standard to Datacenter as shown in my following post.
Afterwards enabling S2D works.
Links
Configuring Simple Storage Spaces in a Failover Cluster
https://petri.com/configure-storage-spaces-failover-clusterStorage Spaces Direct overview
https://learn.microsoft.com/en-us/windows-server/storage/storage-spaces/storage-spaces-direct-overviewManage Cluster Shared Volumes
https://learn.microsoft.com/en-us/windows-server/failover-clustering/failover-cluster-manage-cluster-shared-volumesHow to Expand and Resize Storage Spaces Direct CSV Volume?
https://charbelnemnom.com/how-to-expand-and-resize-storage-spaces-direct-csv-volume-ws2016-hyperv-s2d