Deploying NetApp Cloud Volumes ONTAP (CVO) in Azure using NetApp Console (formerly BlueXP) – Part 4 – Antivirus VSCAN Configuration
In this part of the series, we shift the focus to security and take a closer look at how antivirus protection is implemented in Cloud Volumes ONTAP using ONTAP VSCAN.
Unlike traditional file server antivirus solutions, ONTAP relies on an external scanning engine. In enterprise environments, this is commonly implemented using products such as Trend Micro ServerProtect, which is also used in this setup.
ONTAP VSCAN is NetApp’s native antivirus integration framework. Instead of scanning files itself, ONTAP forwards file access requests to one or more external antivirus servers through the NetApp ONTAP Antivirus Connector.
This design allows enterprise antivirus products such as Trend Micro ServerProtect to inspect files while ONTAP remains responsible for managing storage and coordinating scan requests.
This part shows how VSCAN works from an architectural perspective, how it integrates with third-party antivirus engines, and what is required to make it function properly in an Azure-based CVO deployment.
We will also cover practical aspects such as scanner pool configuration, on-access policies, and how ONTAP interacts with Trend Micro during file access, including what happens when scanning is enabled, disabled, or misconfigured.
In Part 5 we will configure snapshot and backup policies, validate protection workflows, and perform real restore operations to ensure data can be recovered quickly and reliably.
In Part 6 we walk through the process of performing a Non-Disruptive Upgrade (NDU) of a NetApp Cloud Volumes ONTAP (CVO) HA pair in Microsoft Azure.
In Part 7 we dive into NetApp AutoSupport, the critical telemetry system that acts as the heartbeat of our CVO instance.
In Part 8 we focus on Disaster Recovery and explore how to protect Cloud Volumes ONTAP in Azure against outages and unexpected failures.
To learn how to protect your NetApp ONTAP workloads with the native Autonomous Ransomware Protection (ARP) feature, check out my following post.
- Trend Micro Server Protect Trial Version
- Install and Configure Trend Micro Server Protect
- Download and Install the ONTAP Antivirus Connector on the Trend Micro Virtual Maschine
- Adding the NetApp System to the ServerProtect Device List
- Configure VSCAN on ONTAP
- VSCAN Scanning Model: On-Access Only and No Initial Full SCAN
- Configure VSCAN On-Demand Scanning
- Disable Microsoft Defender on Client and ServerProtect Host
- When ServerProtect Finds a Virus (Virus Actions)
- Troubleshooting
- Links
Trend Micro Server Protect Trial Version
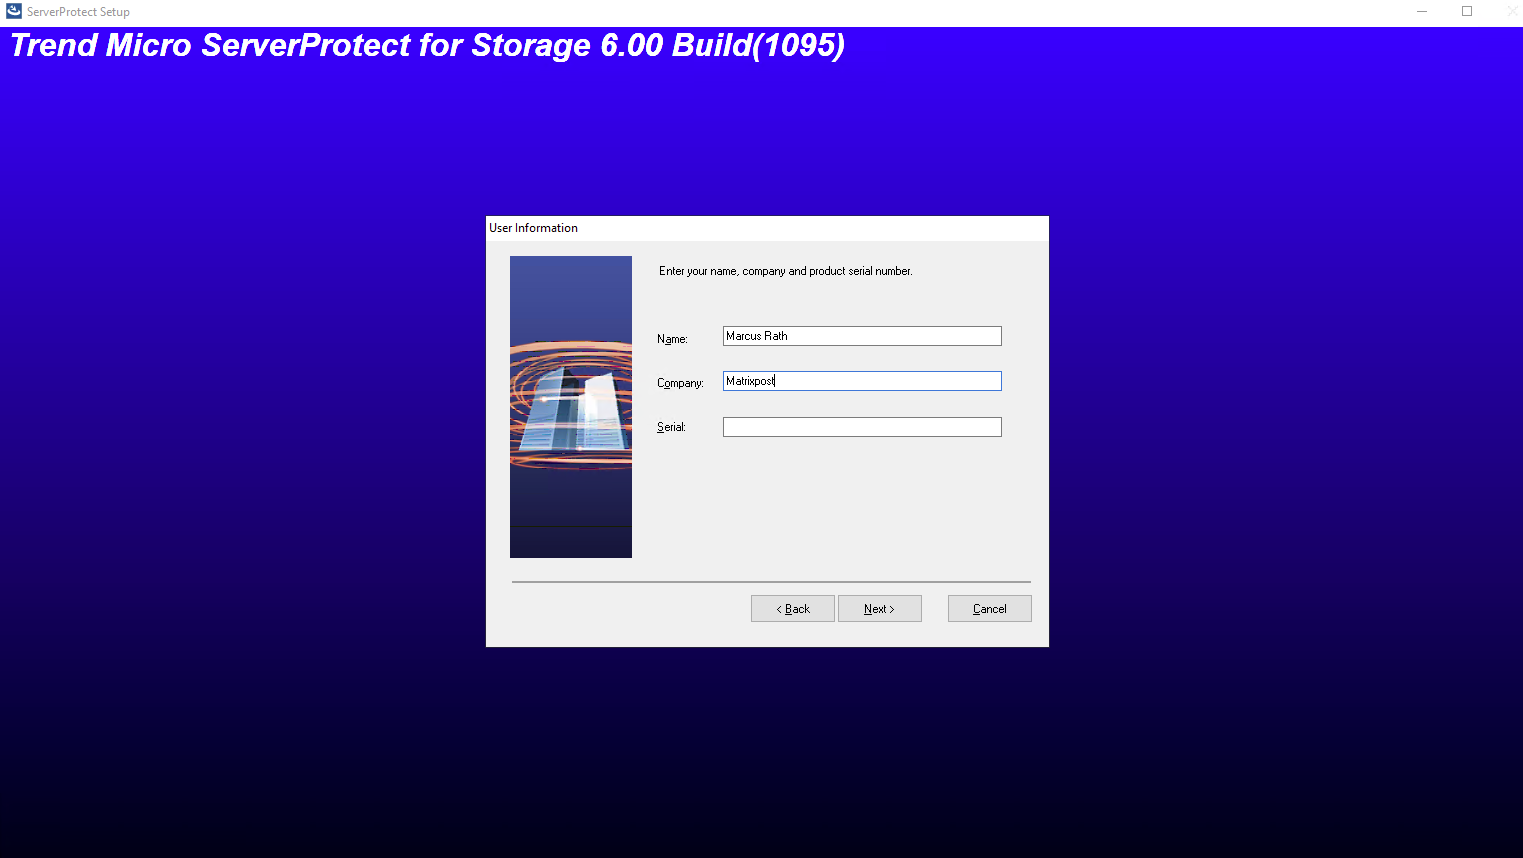
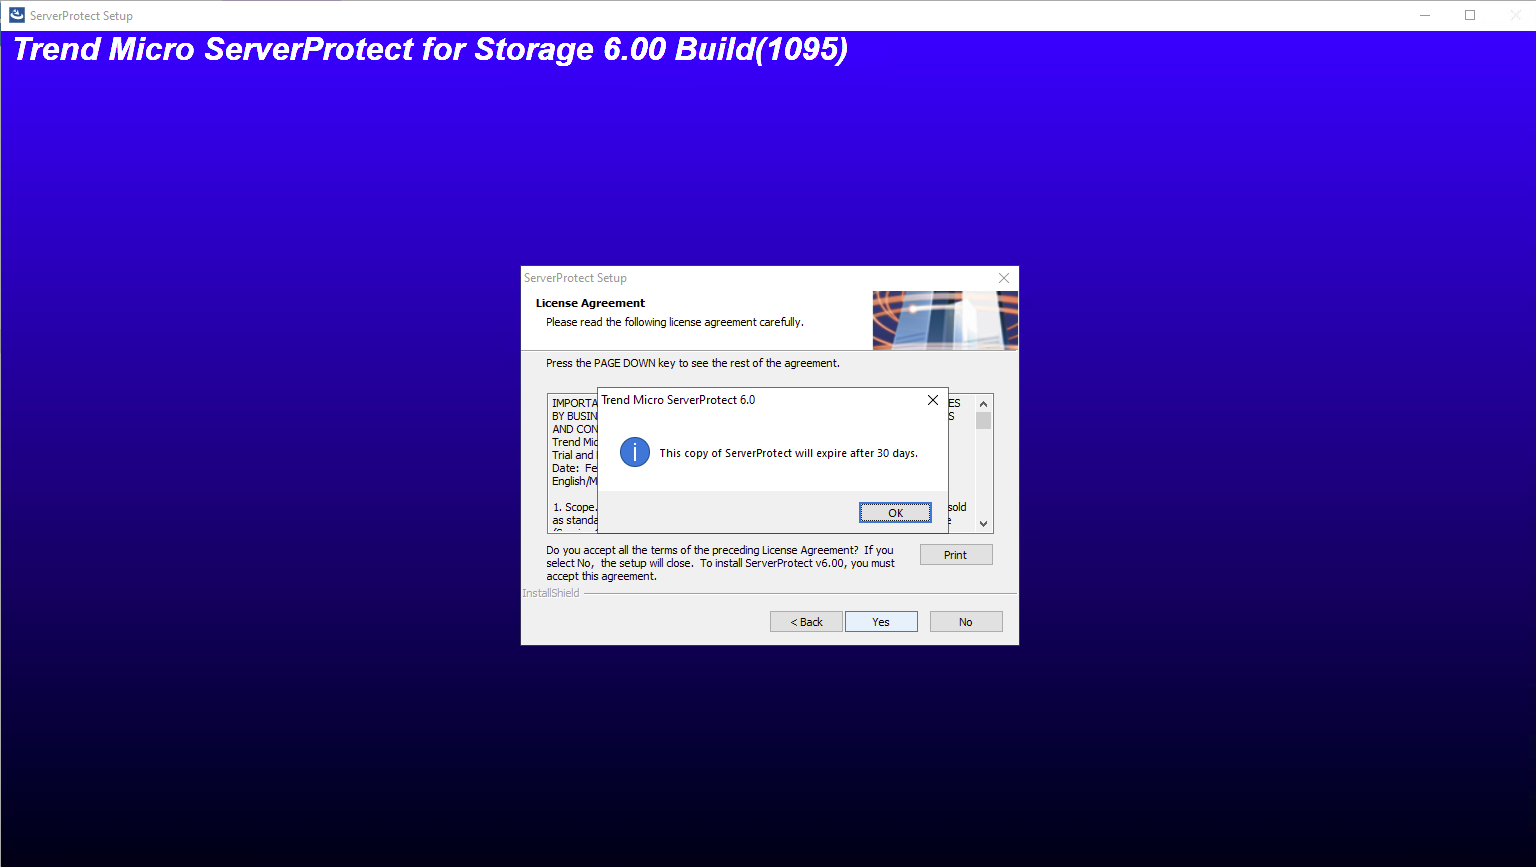
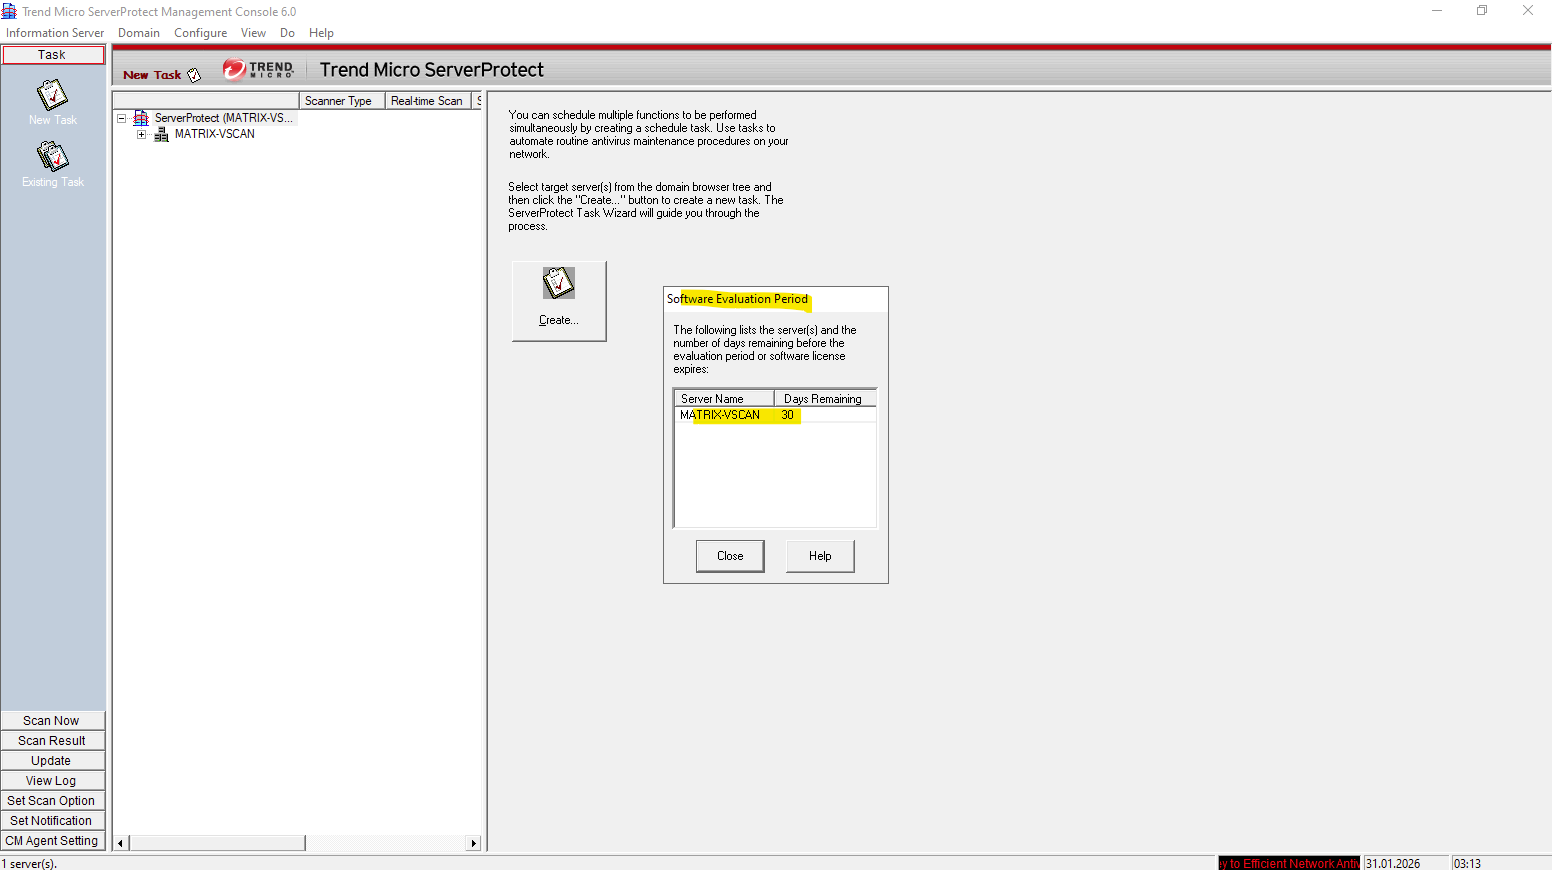
A 30-day trial version of ServerProtect will be installed if no serial number is entered. This version will be fully functional but after 30-days virus scanning will be disabled. After this, you should either purchase the product or remove it.
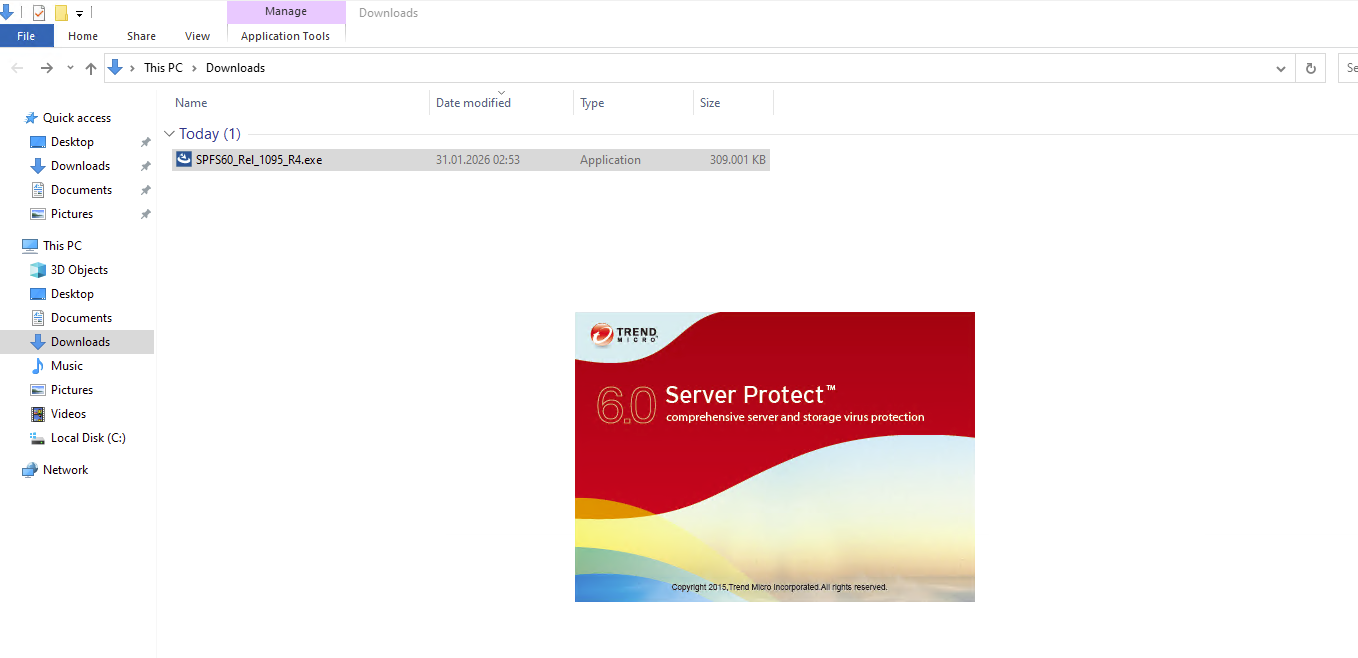
We can download it on the following link https://www.trendmicro.com/en_us/business/products/downloads.html. Here we need to select and click on ServerProtect for Storage.


Install and Configure Trend Micro Server Protect
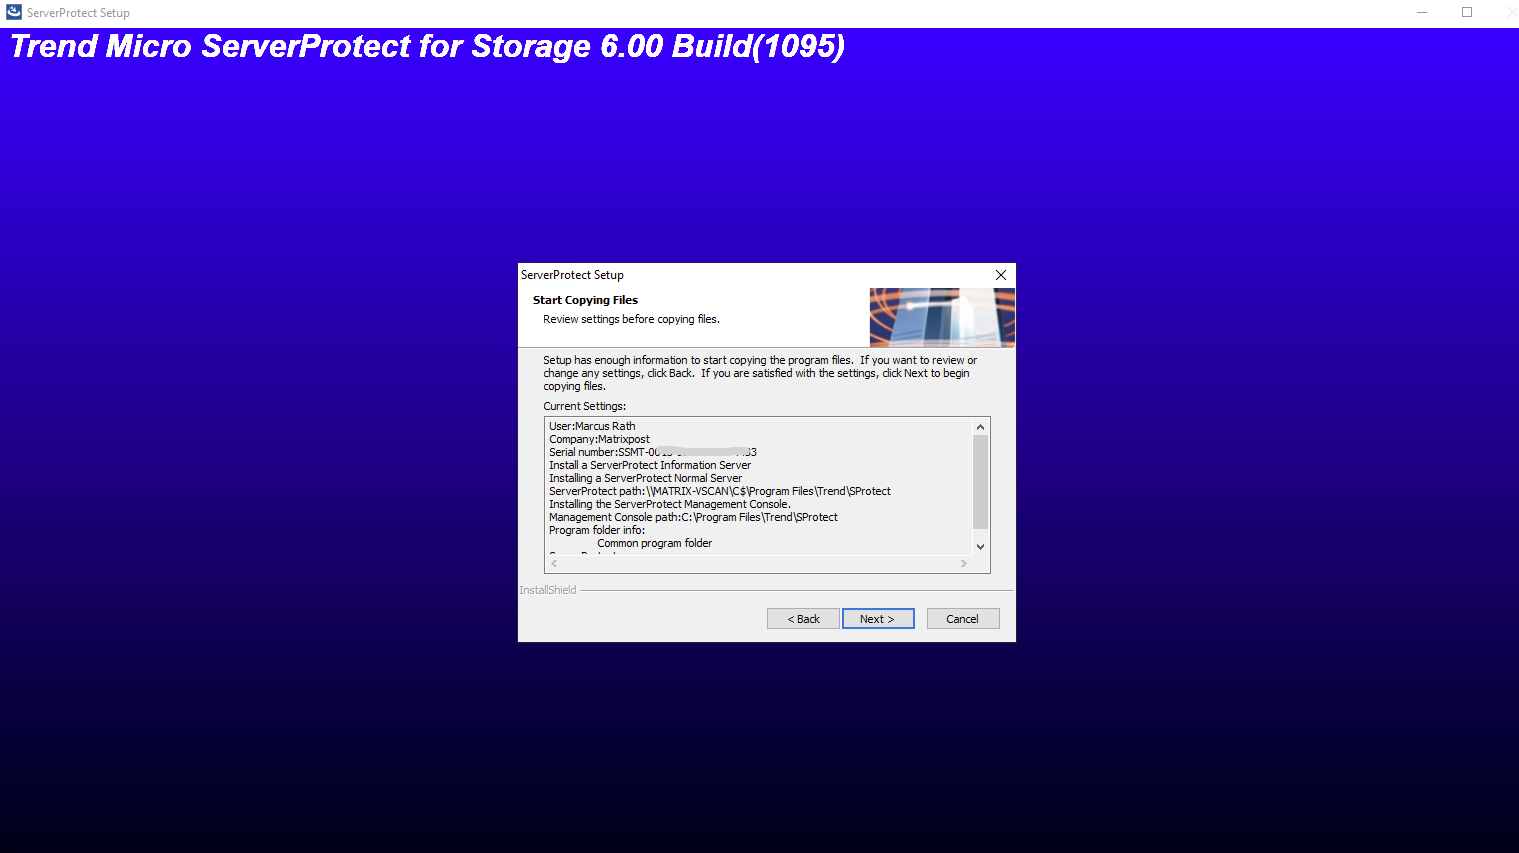
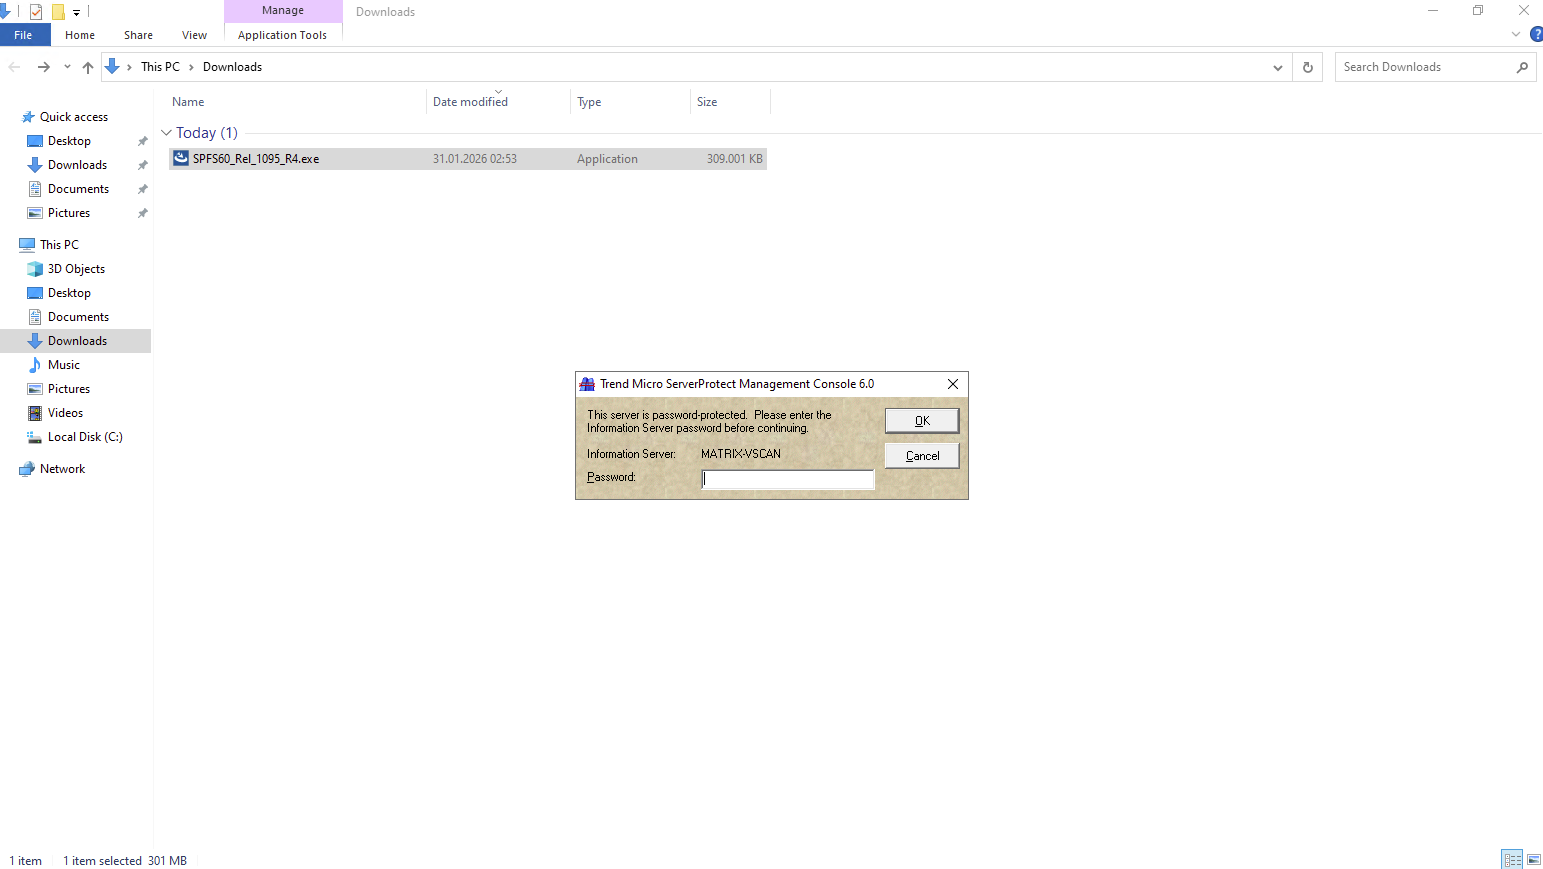
Execute the installer file to install ServerProtect.
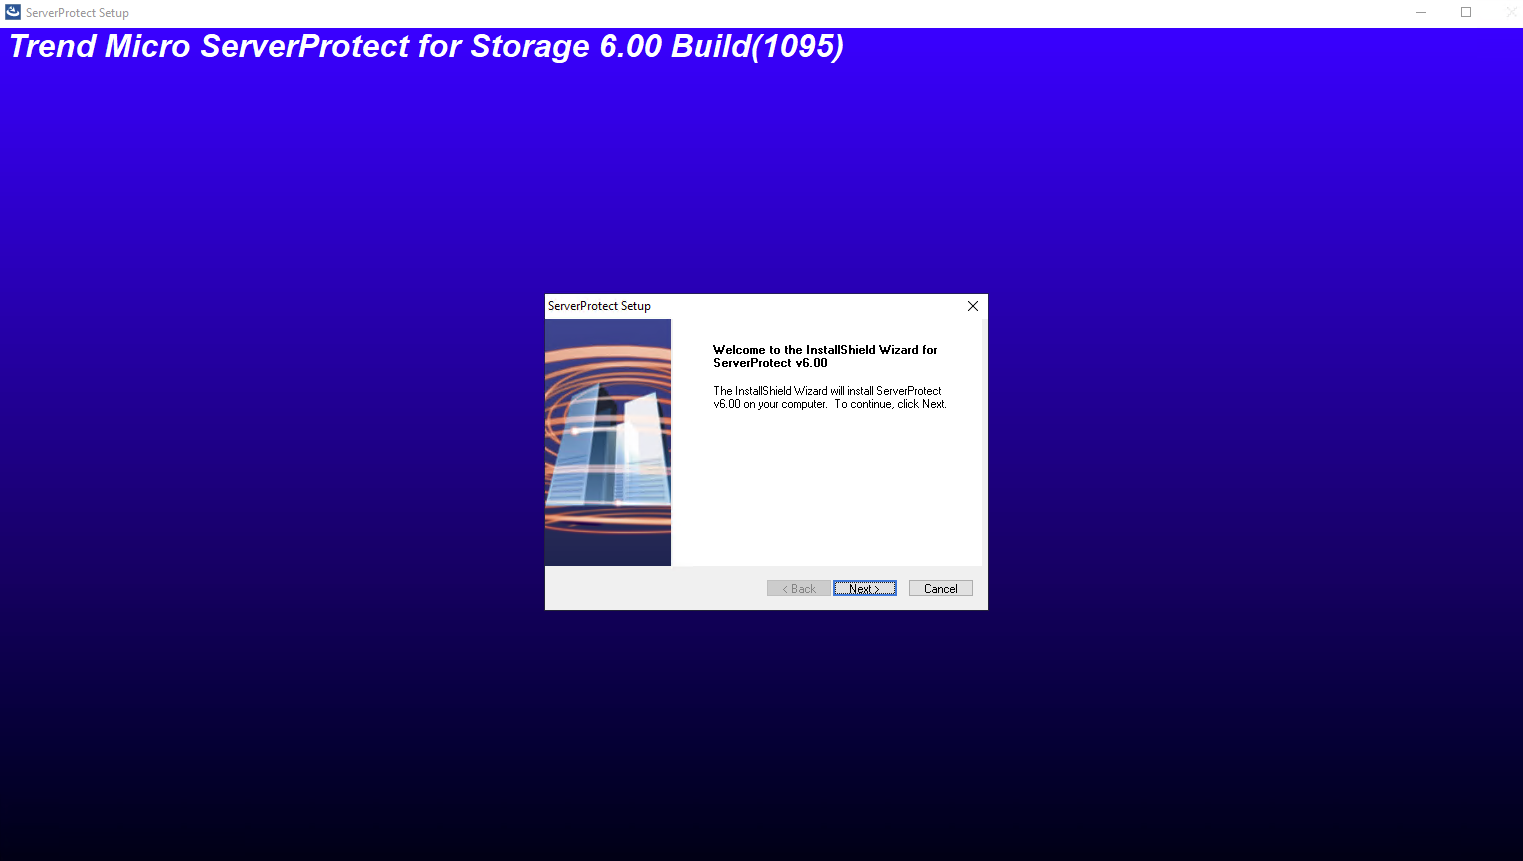
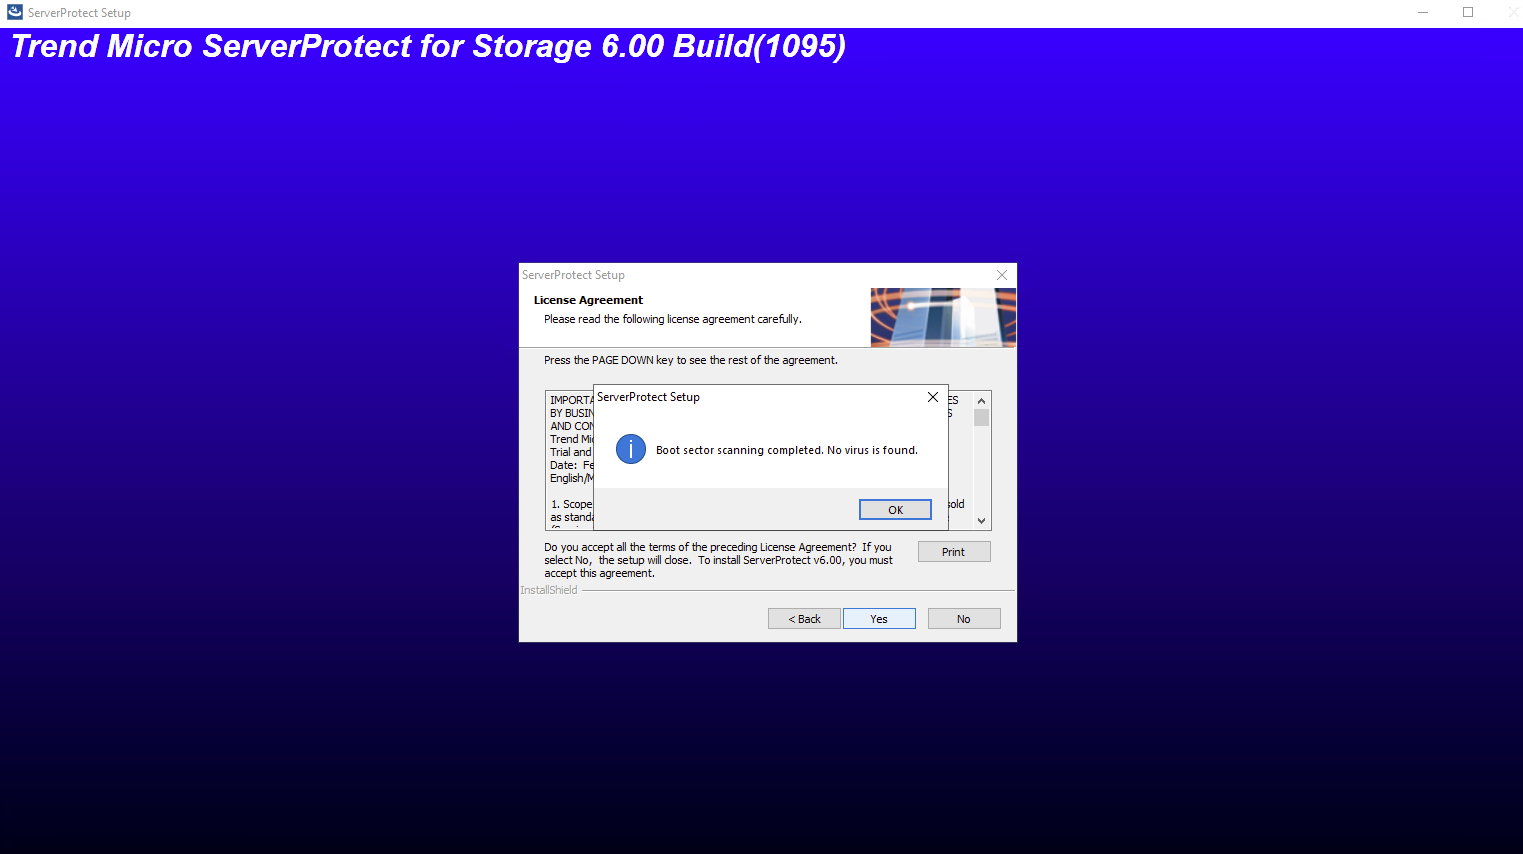
A 30-day trial version of ServerProtect will be installed if no serial number is entered. This version will be fully functional but after 30-days virus scanning will be disabled. After this, you should either purchase the product or remove it.
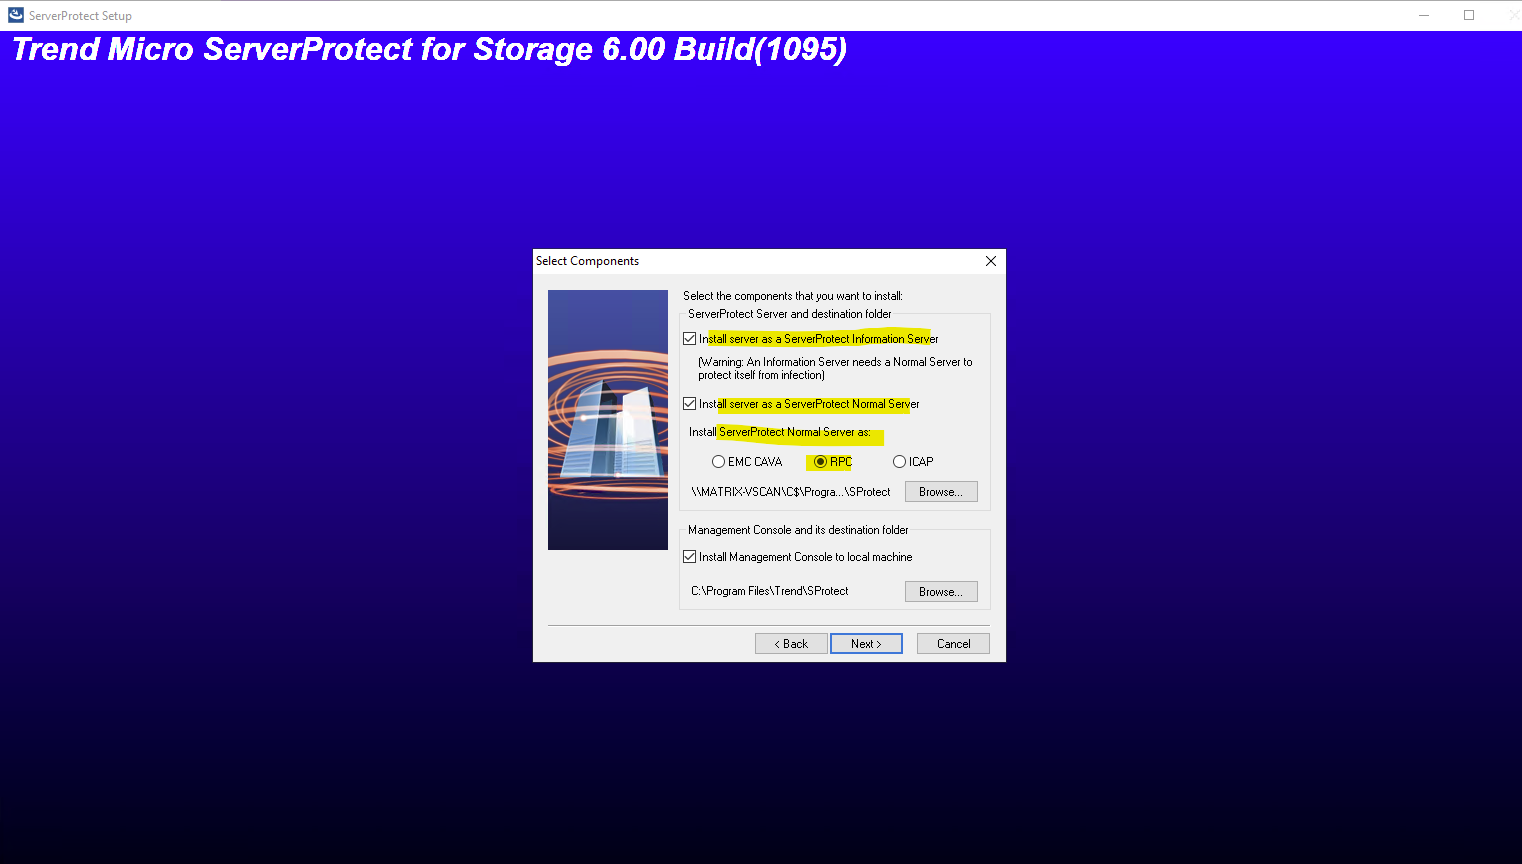
Below we need to select for the scanner type here RCP to protect NetApp Cloud Volume ONTAP (CVO).
ServerProtect for Storage with RPC Scanner scans viruses using “on-access” mode,
which takes place on a Scan Server. In turn, the Information Server manages the Scan
Servers.If you want to protect EMC VNX/VNXe, select EMC CAVA.
If you want to protect NetApp Devices using RPC, select RPC.If you want to protect a storage device supporting ICAP, select ICAP.
If you want to protect Huawei OceanStor Storage, select EMC CAVA.Source: https://docs.trendmicro.com/all/ent/spfs/v6.0/en-us/spfs_6.0_gsg_new.pdf
Further we will leave checked by default to install the server as a ServerProtect Information Server.
The Information Server carries out the commands issued by the Management Console
and manages Normal Servers hosted by its Information Server domain(s).
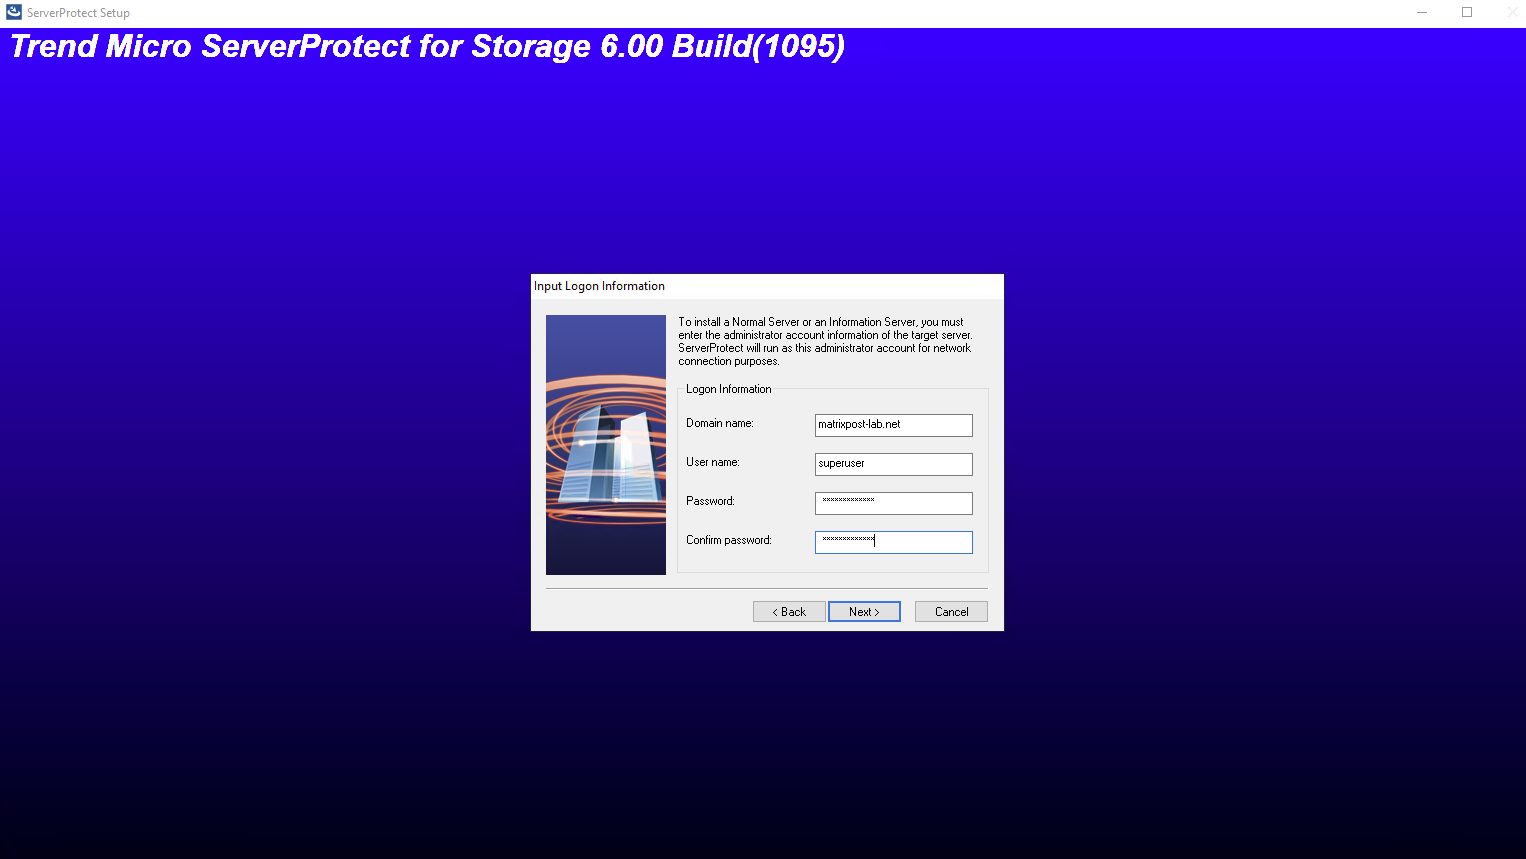
Under Logon Information, type the appropriate data in the Domain name, User
name, Password, and Confirm Password fields. Click Next to continue.
The ServerProtect Setup Information Server screen appears. Provide a password and make the confirmation as requested. This prevents unauthorized access to this Information Server from either the Management Console or the setup program.
The Domain Name field is automatically prefilled with the server’s hostname and represents an internal ServerProtect domain (not an Active Directory domain). For most lab or single-server setups, the default value can be left unchanged.
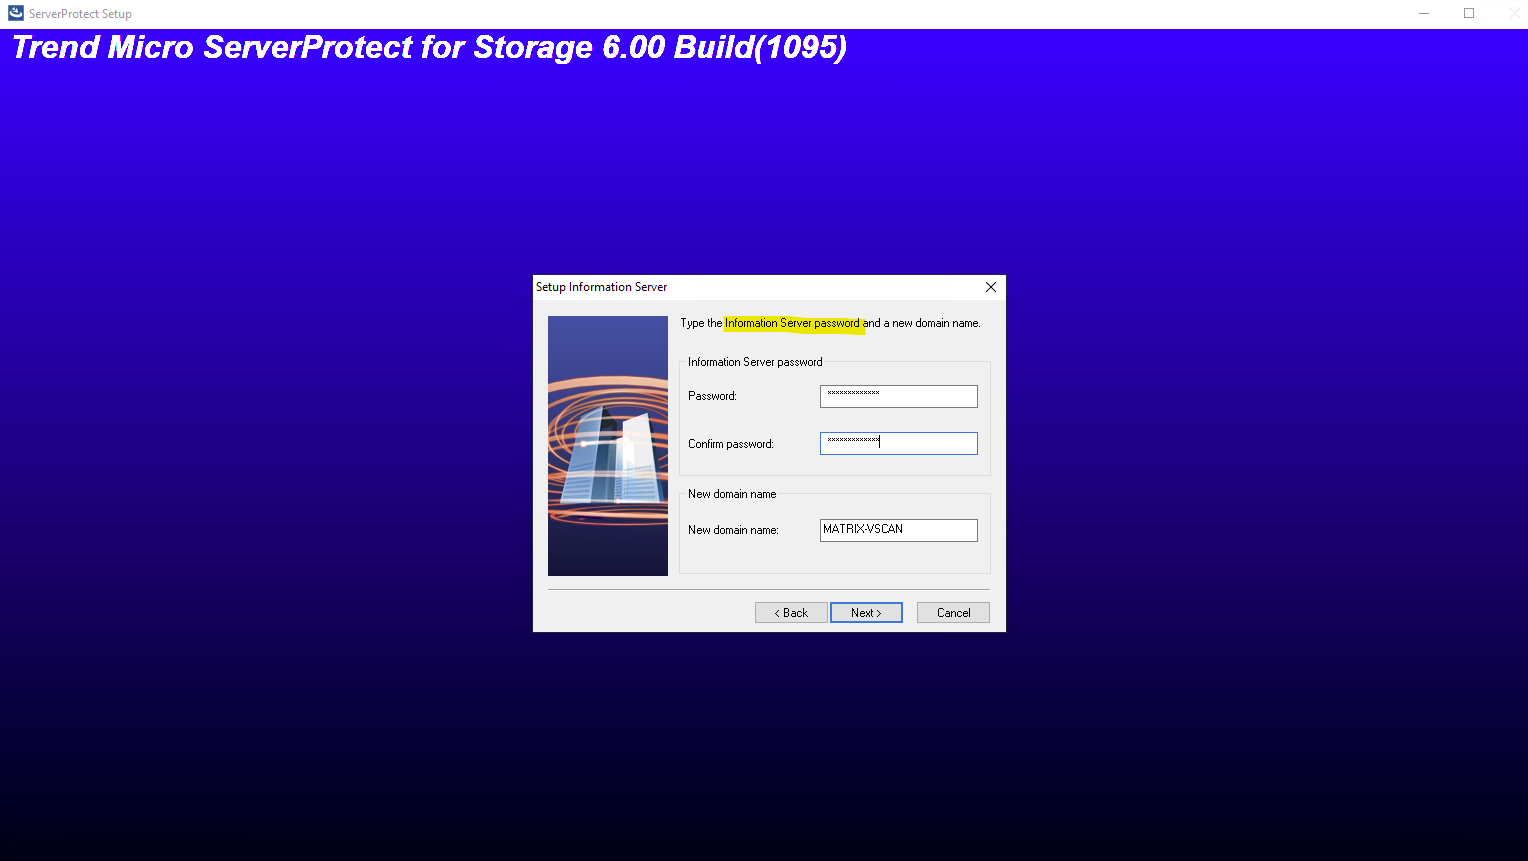
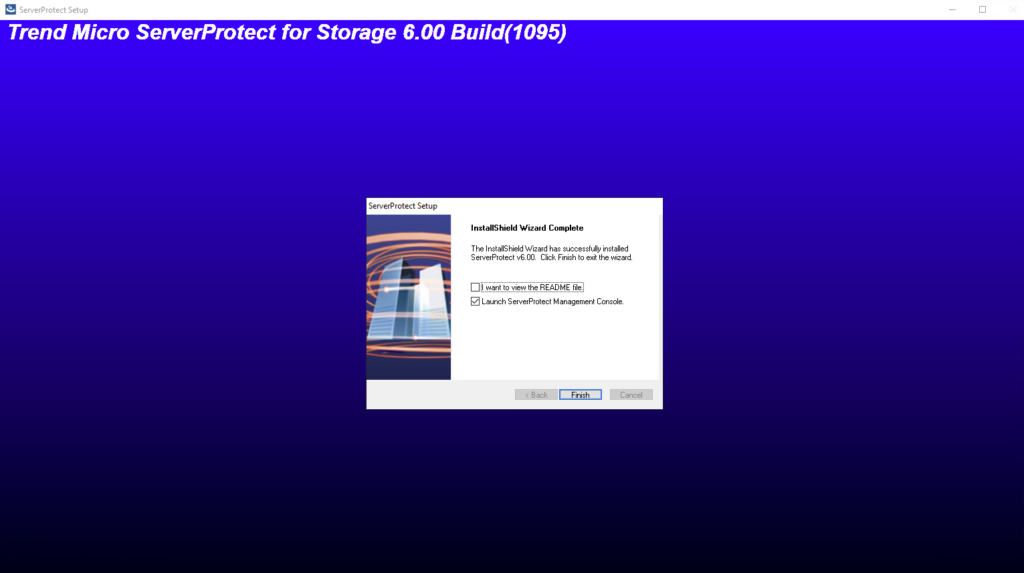
Enter the Information Server password we set previously further above to sign-in to the ServerProtect Management Console.
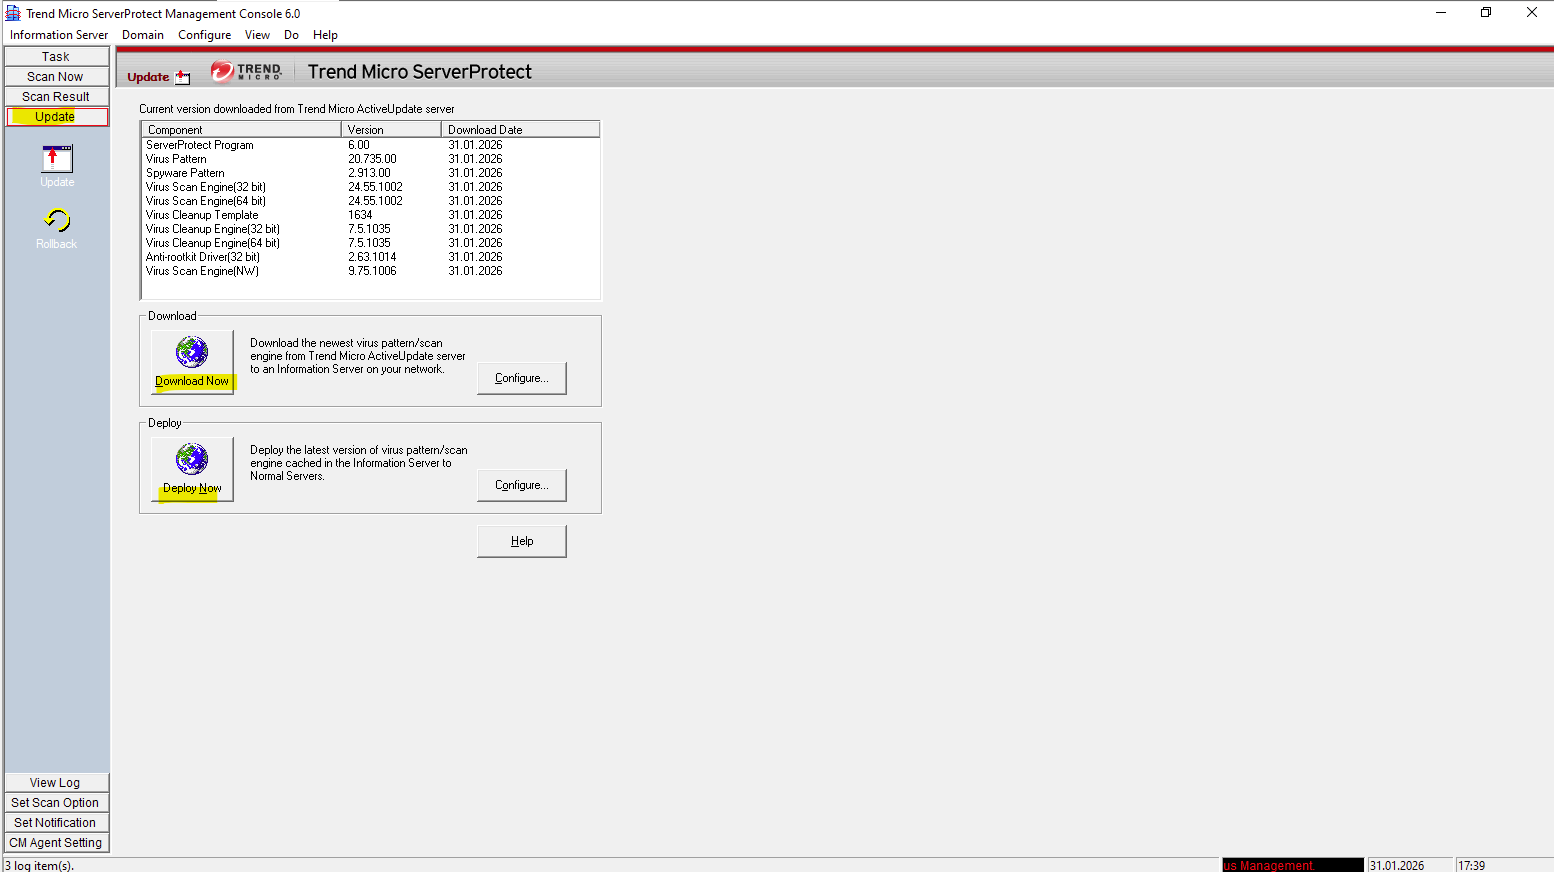
We also should first update the server.

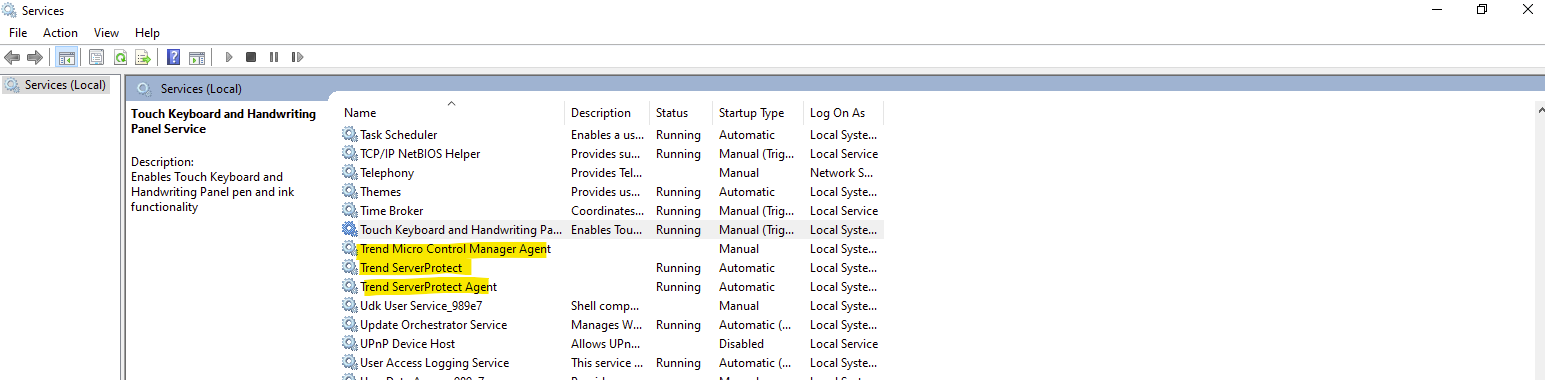
Also verify if the Trend ServerProtect and Trend ServerProtect Agent service is running and start it if not.
After installing Trend Micro ServerProtect for Storage, the remaining configuration step on the antivirus side is to define the Device List, as described in the official documentation and shown further down.
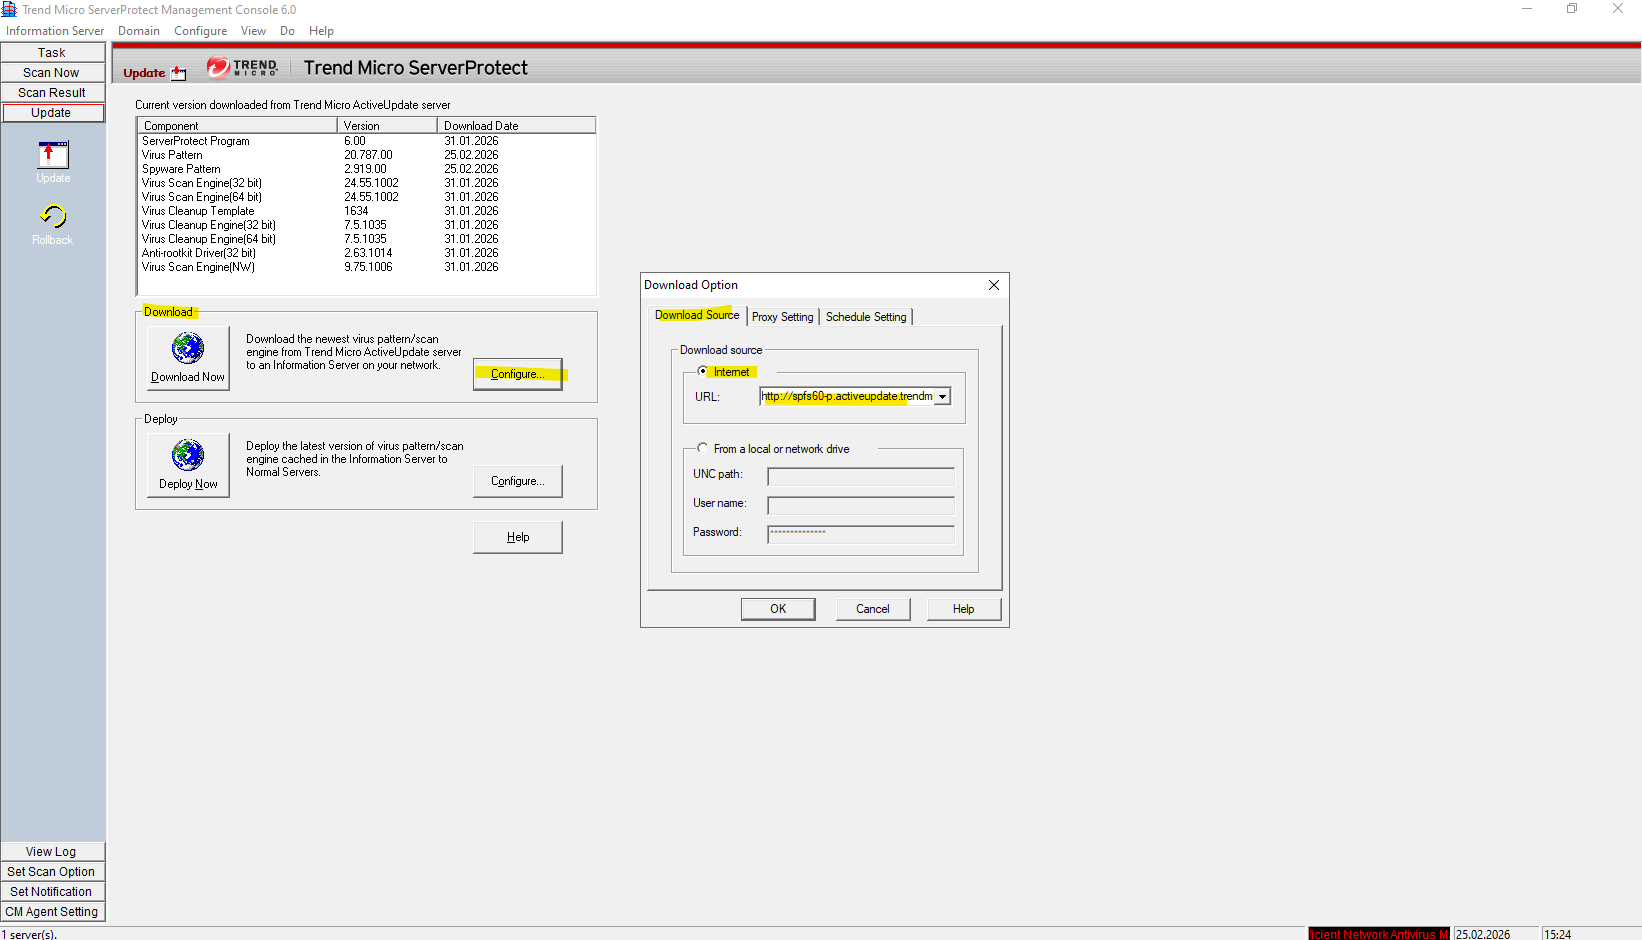
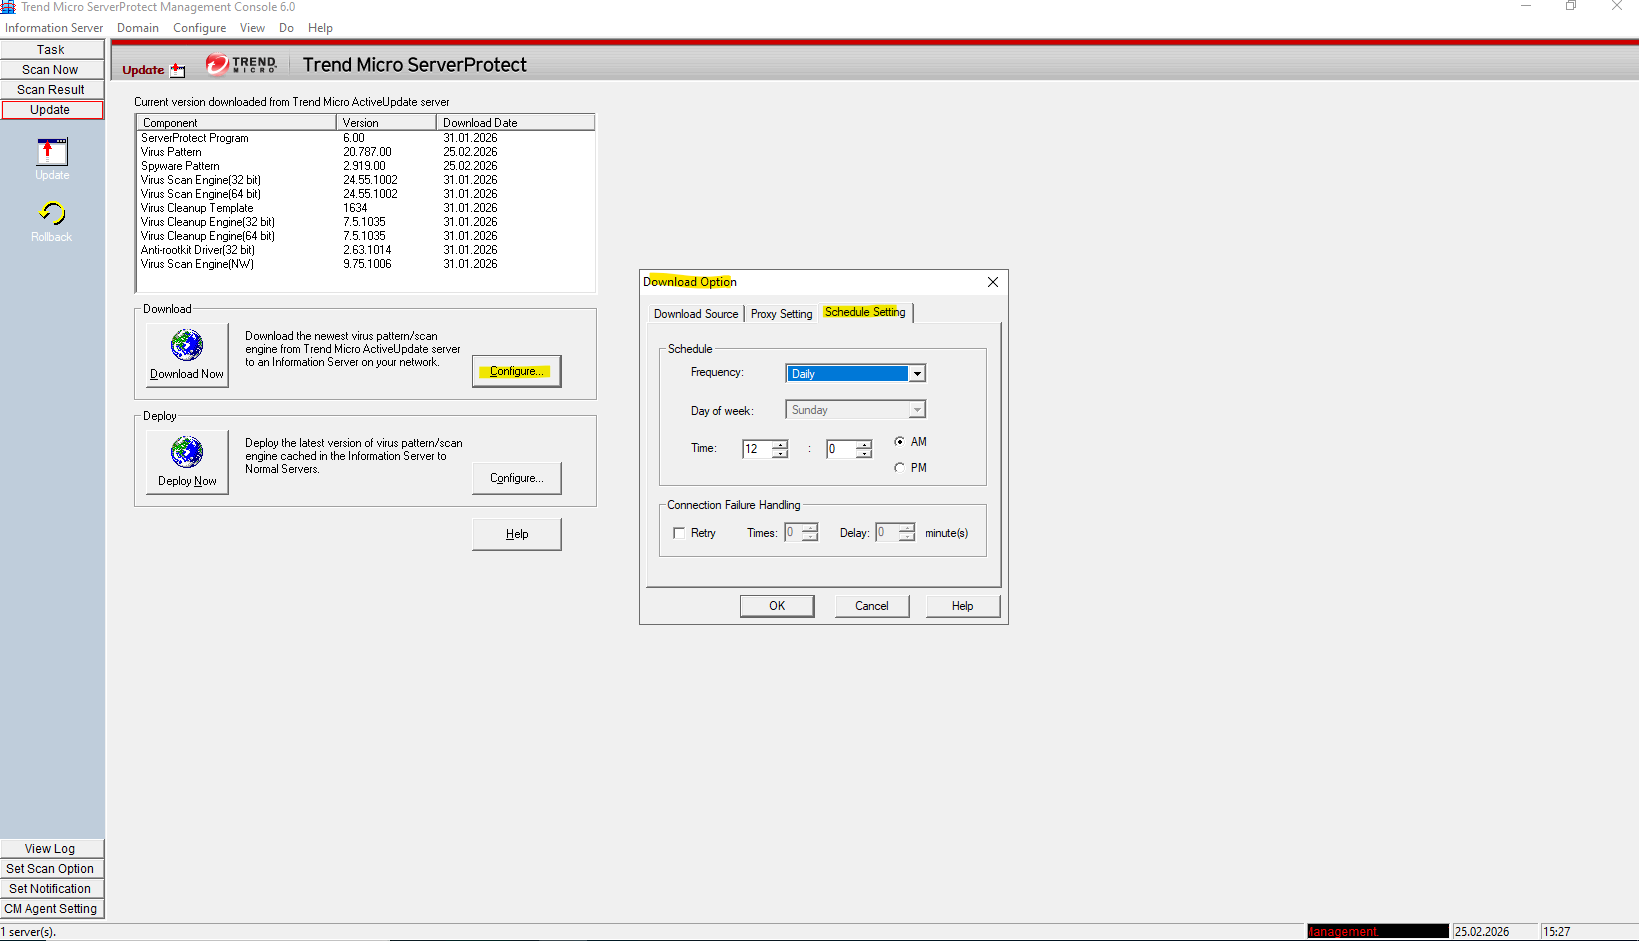
To ensure your updates are flowing correctly, verify that the Download settings are configured to pull from the Trend Micro ActiveUpdate server (or your specific source) and that the scheduled frequency aligns with your security policy.
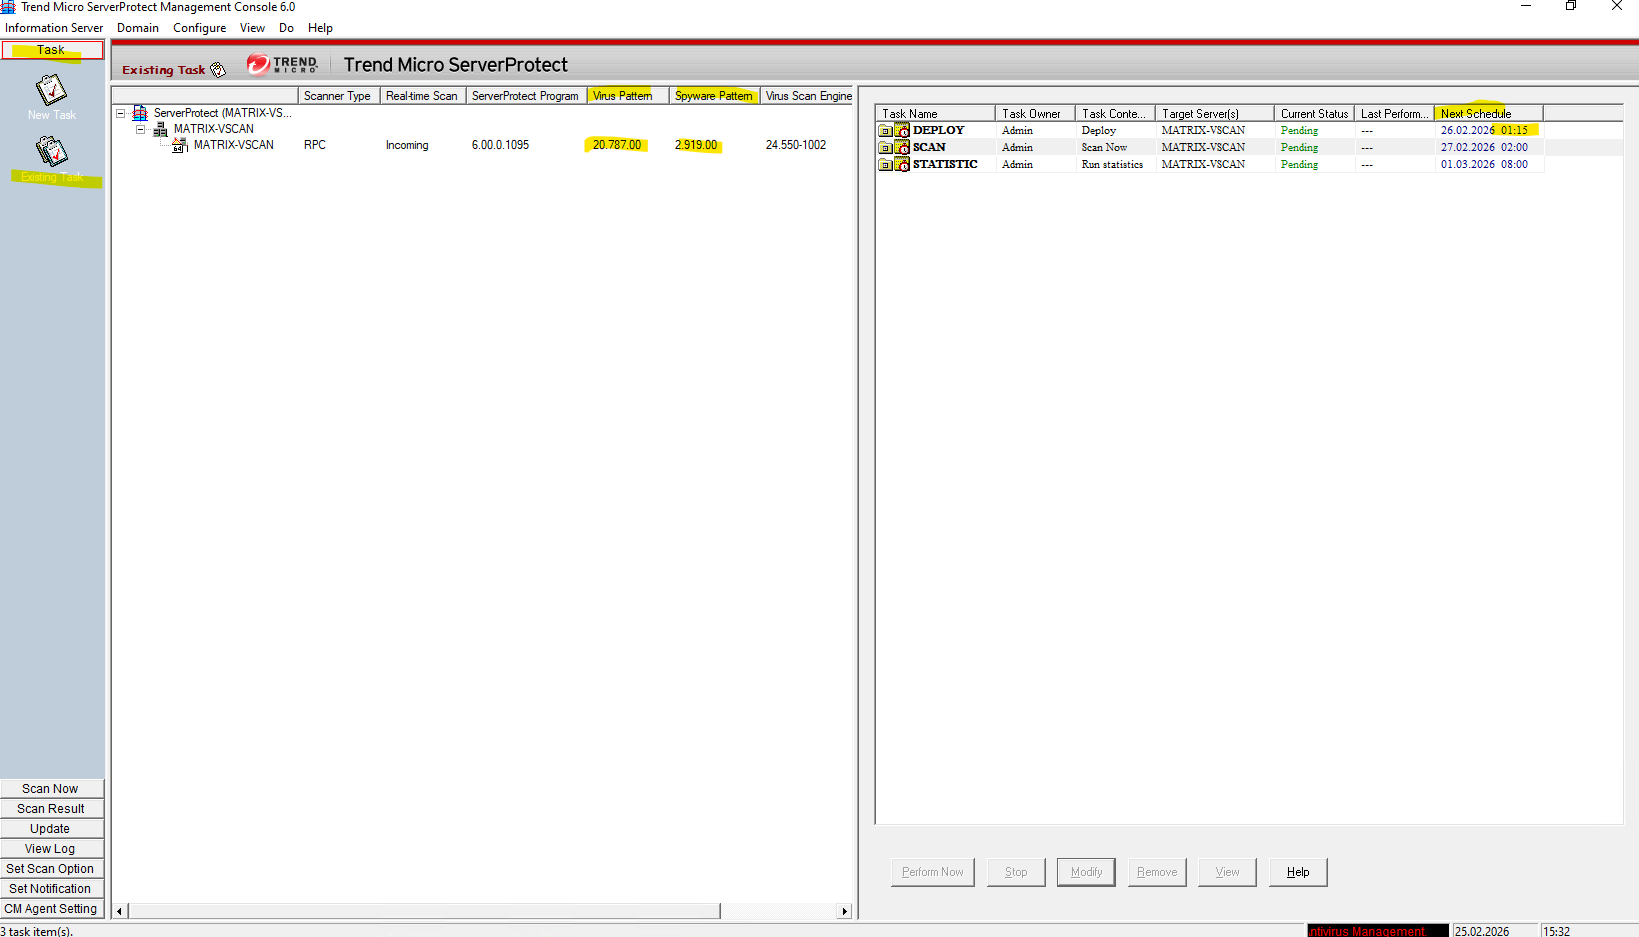
To ensure the DEPLOY task is operating correctly, verify that it is scheduled to trigger immediately after your download finishes and that the Target Server (in your case, the local localhost) is correctly selected. You can confirm success by checking the “Task Logs” to ensure the status shows as Completed without errors, signifying the new patterns are actively loaded into the scanning engine.
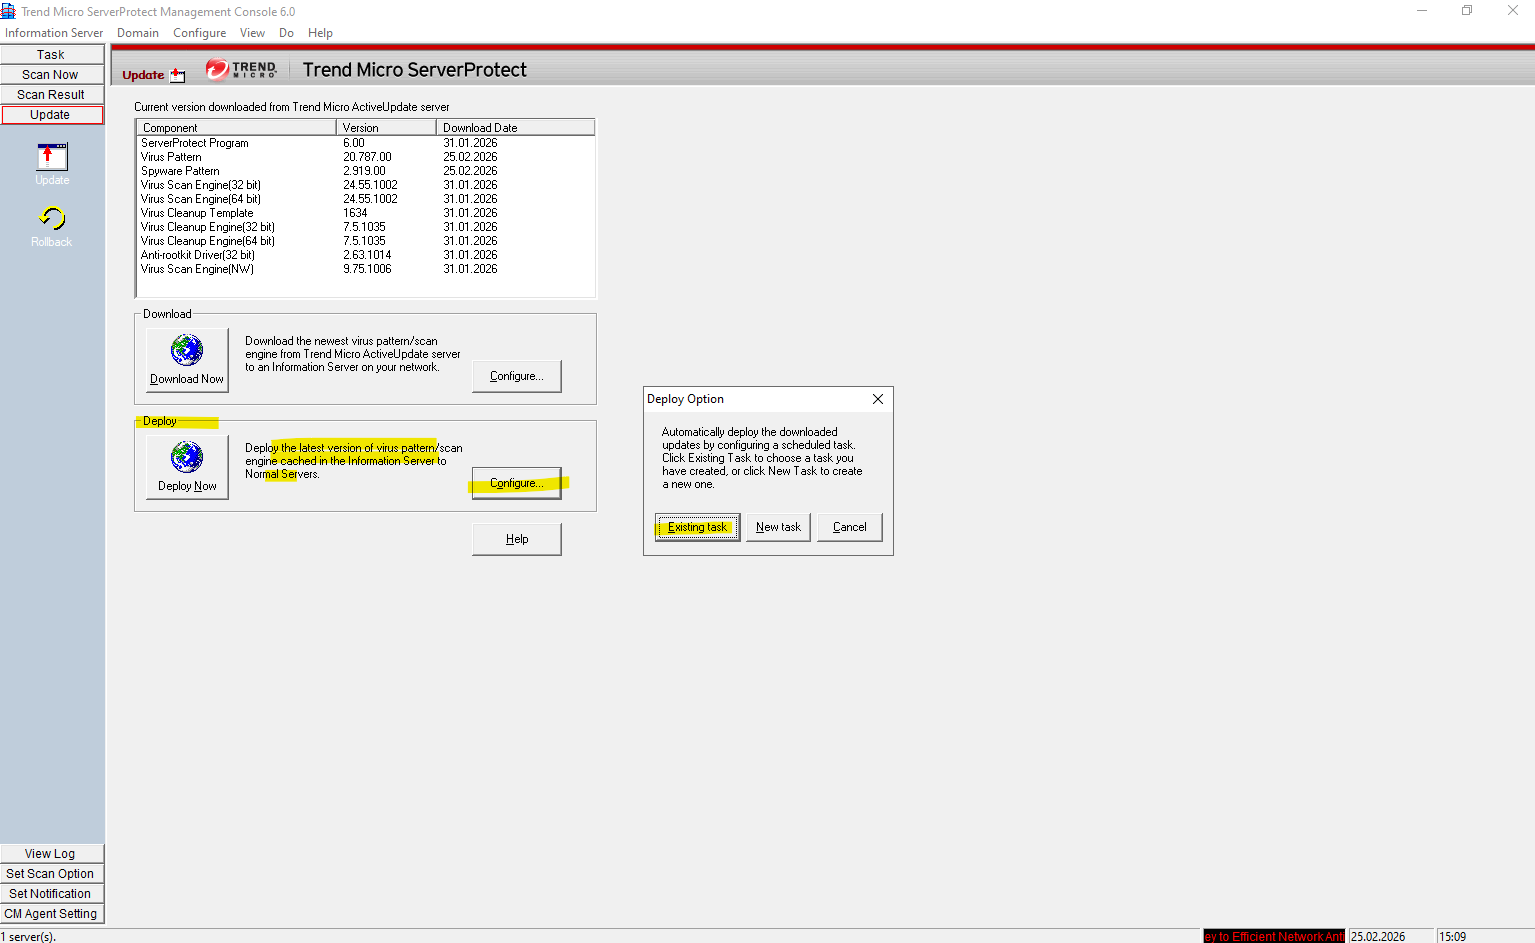
While a separate update schedule handles the download of new components from the internet, the DEPLOY task is the mechanism that actually activates and installs those components into the scanning engine. It serves as the final bridge in the update chain, ensuring that the latest virus patterns are properly loaded and ready to inspect traffic coming from your NetApp CVO volumes.
To ensure a smooth transition from acquisition to activation, I have scheduled the DEPLOY task to trigger automatically 15 minutes after the download schedule finishes, allowing ample time for the new patterns to be fully staged before they are loaded into the scanning engine.
Download and Install the ONTAP Antivirus Connector on the Trend Micro Virtual Maschine
Cluster-Mode Device (also known as C-Mode Device) is the machine where Data
ONTAP Cluster-Mode is installed.
Cluster-Mode AV Connector (called by NetApp as Clustered Data ONTAP Antivirus Connector) is an agent program provided by NetApp and installed together with the Normal Server to manage the Cluster-Mode Device.
Source: https://docs.trendmicro.com/all/ent/spfs/v6.0/en-us/spfs_6.0_gsg_new.pdf
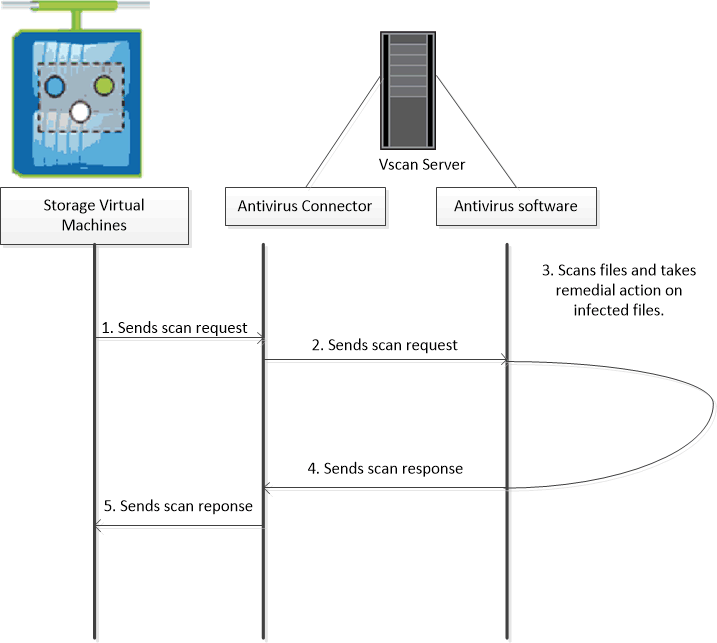
In Cluster-Mode, When a user tries to access a file or store a new file in a NetApp Cluster-Mode Device, the Cluster-Mode Device performs a virus check. If the filename extension matches the file scanning criteria (for example, an “.EXE” or a “.VBS” file), the Cluster-Mode Device sends a scan notification to the Cluster-Mode AV Connector.
The Cluster-Mode AV Connector sends a scan request to the Scan Server(s). The Scan Server passes back the scan result to the Cluster-Mode AV Connector, and the Cluster-Mode AV Connector sends it to the Cluster-Mode Device. According to the scan result, the user is either allowed to open, save, or is denied to access the file.
Soure: https://docs.trendmicro.com/all/ent/spfs/v6.0/en-us/spfs_6.0_gsg_new.pdf
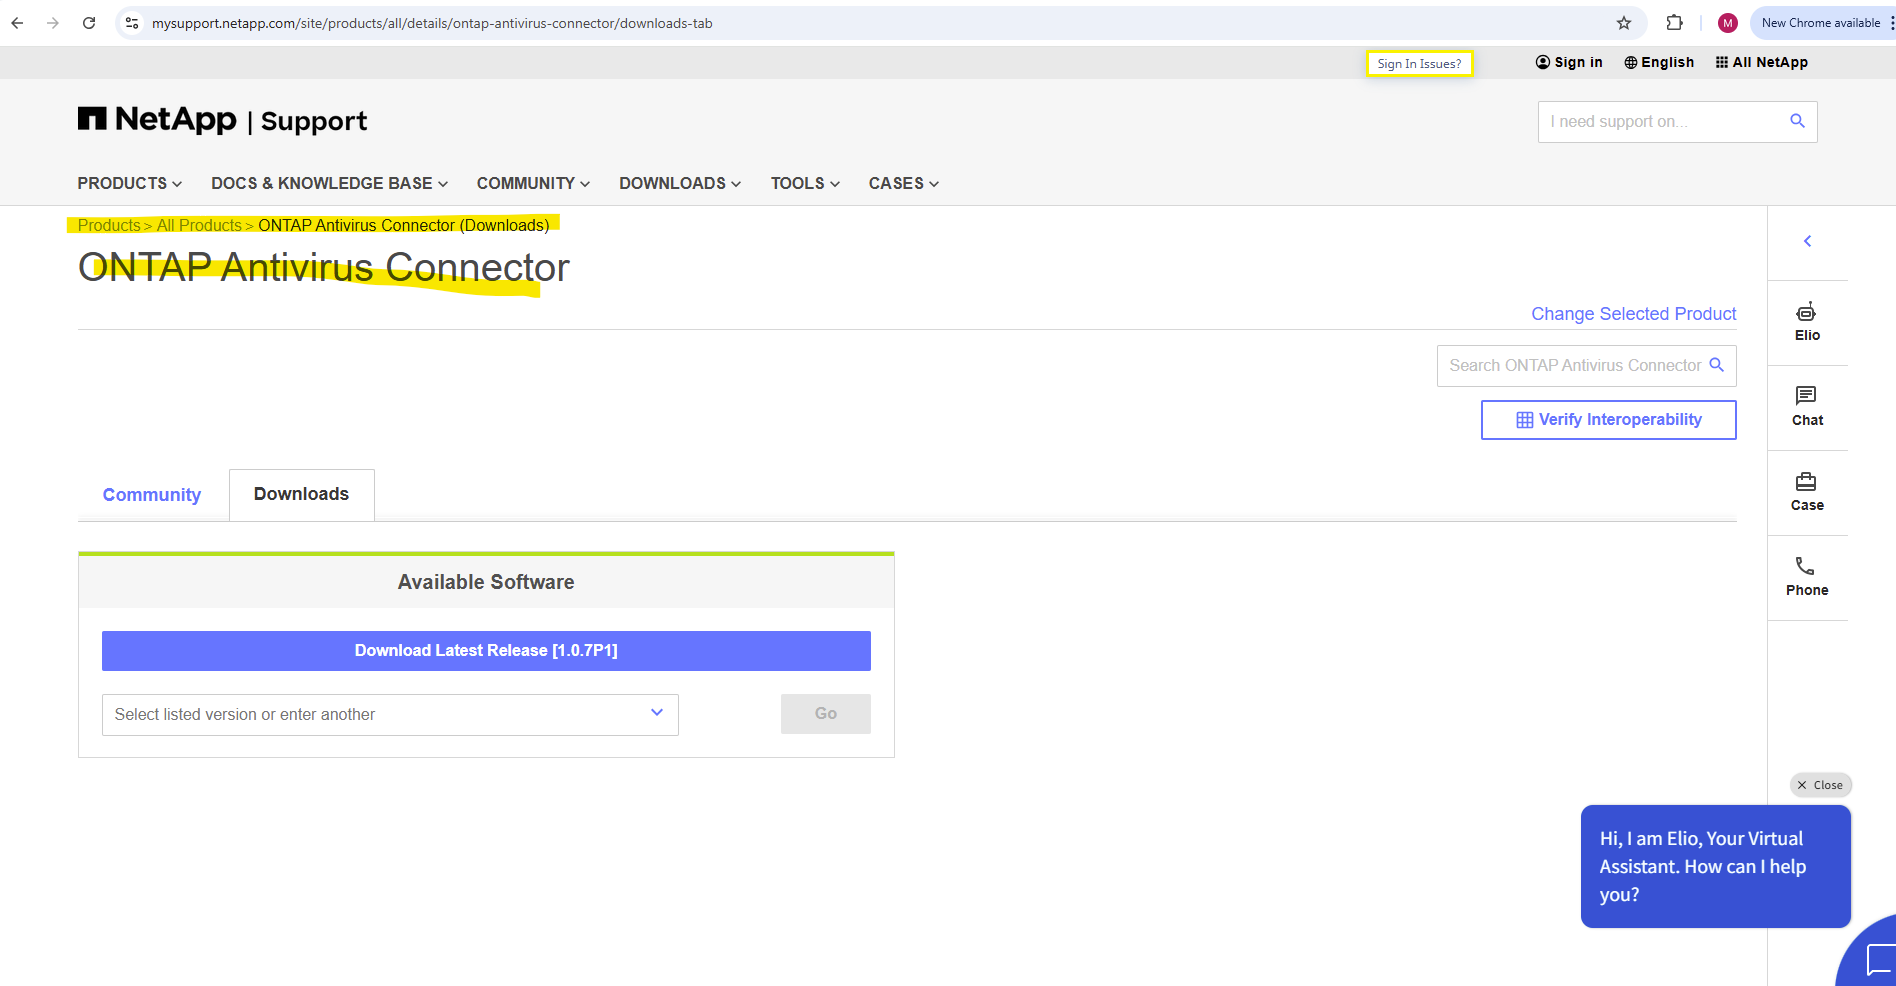
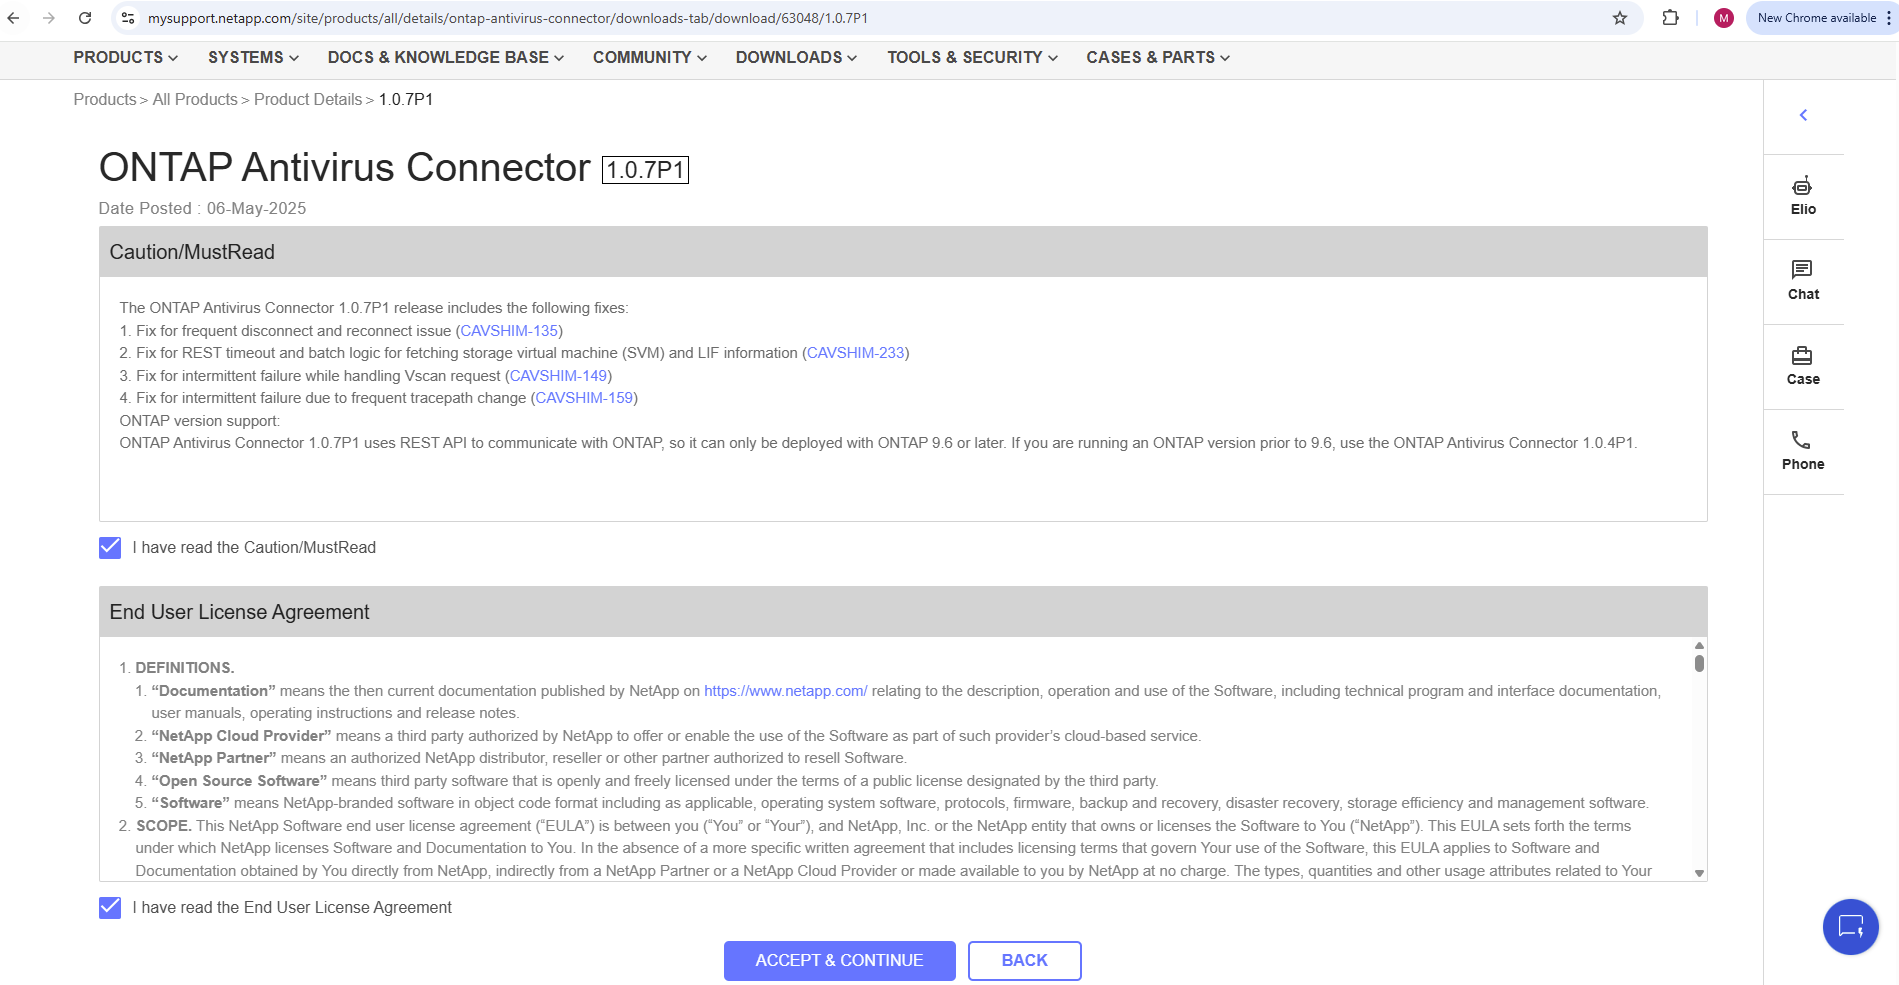
To download the ONTAP Antivirus Connector go to https://mysupport.netapp.com
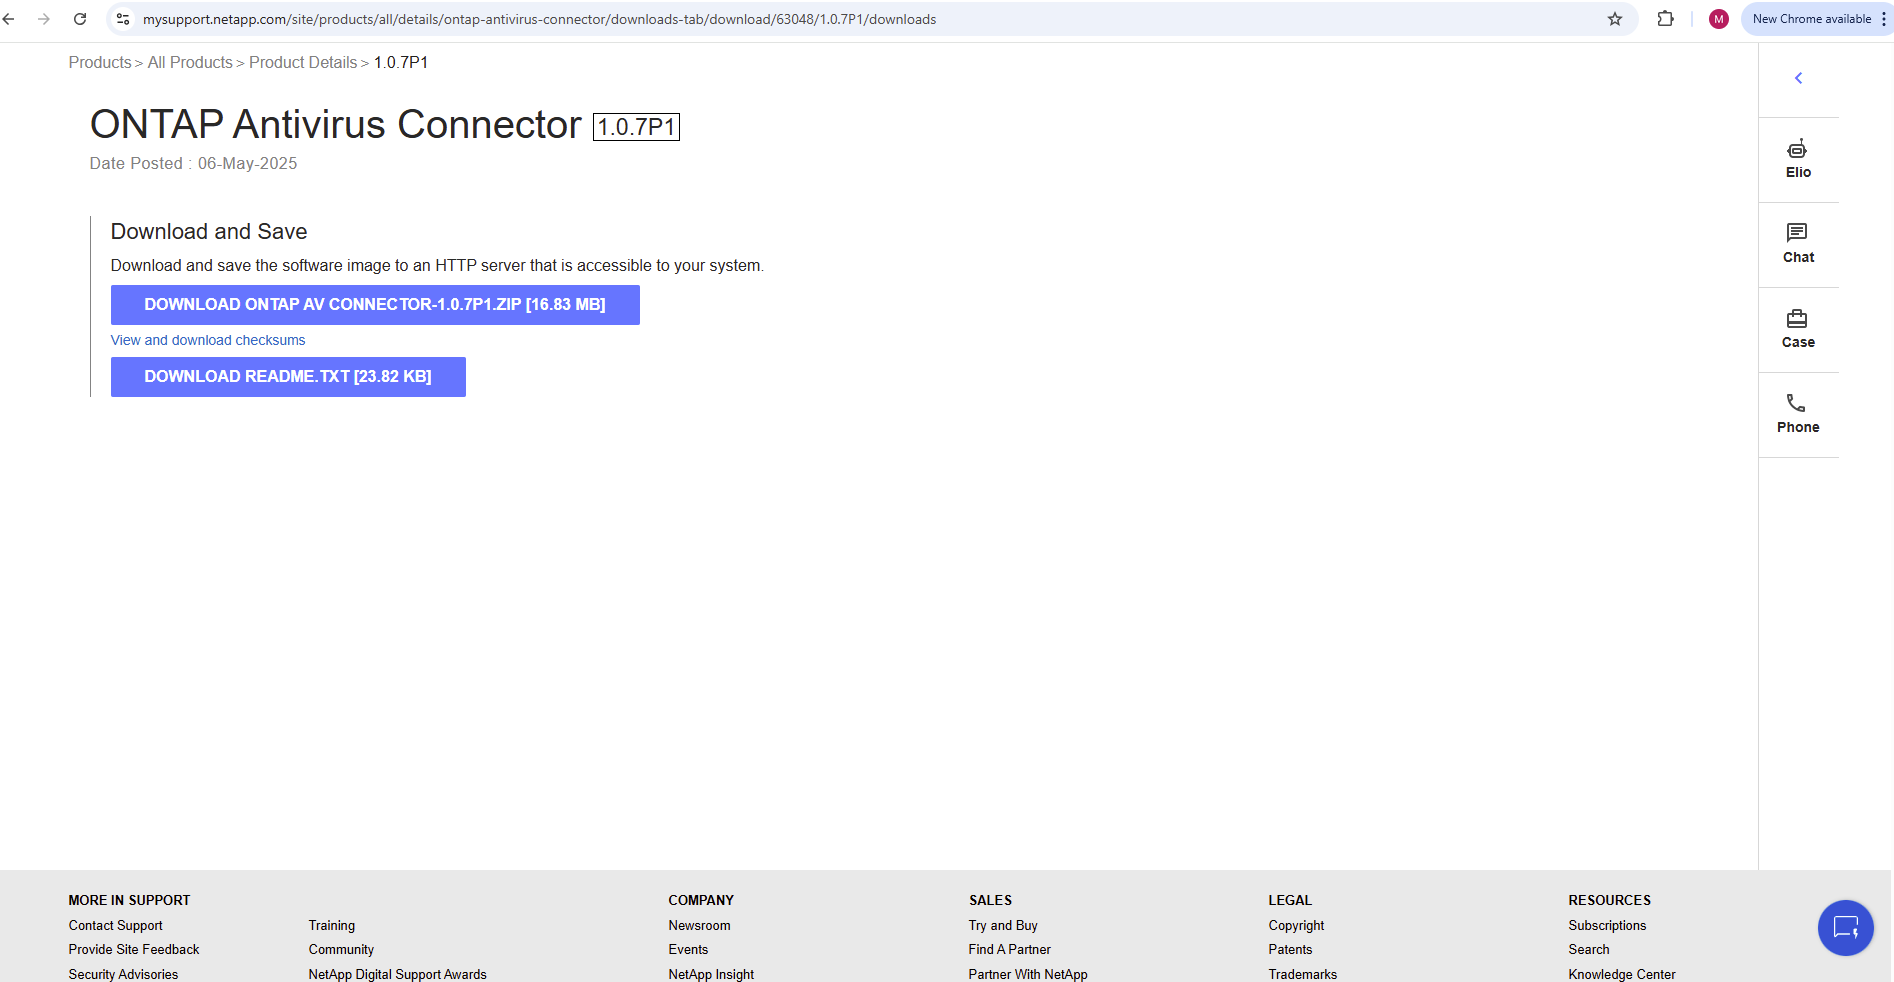
Download the AV Connector to your Trend Micro ServerProtect server.
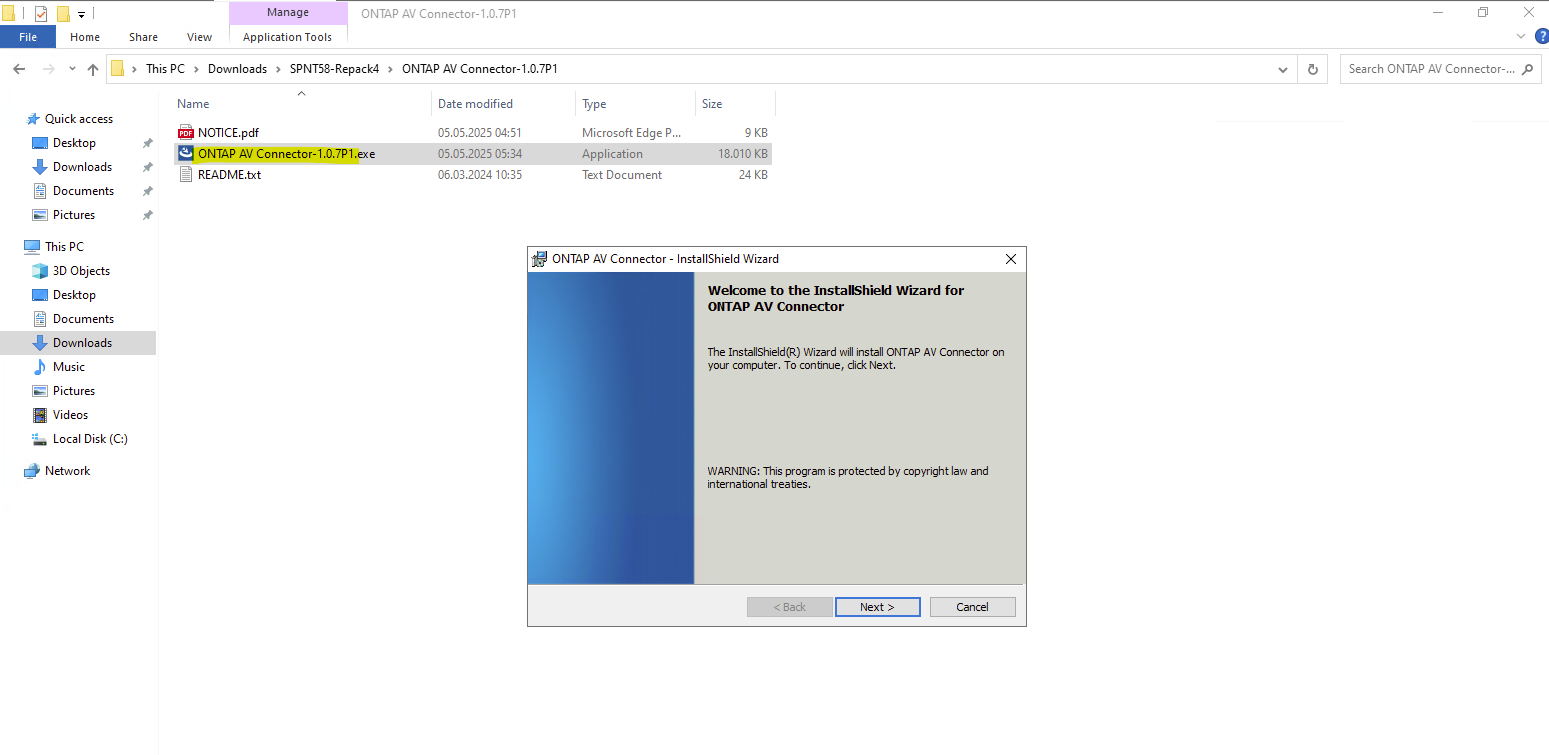
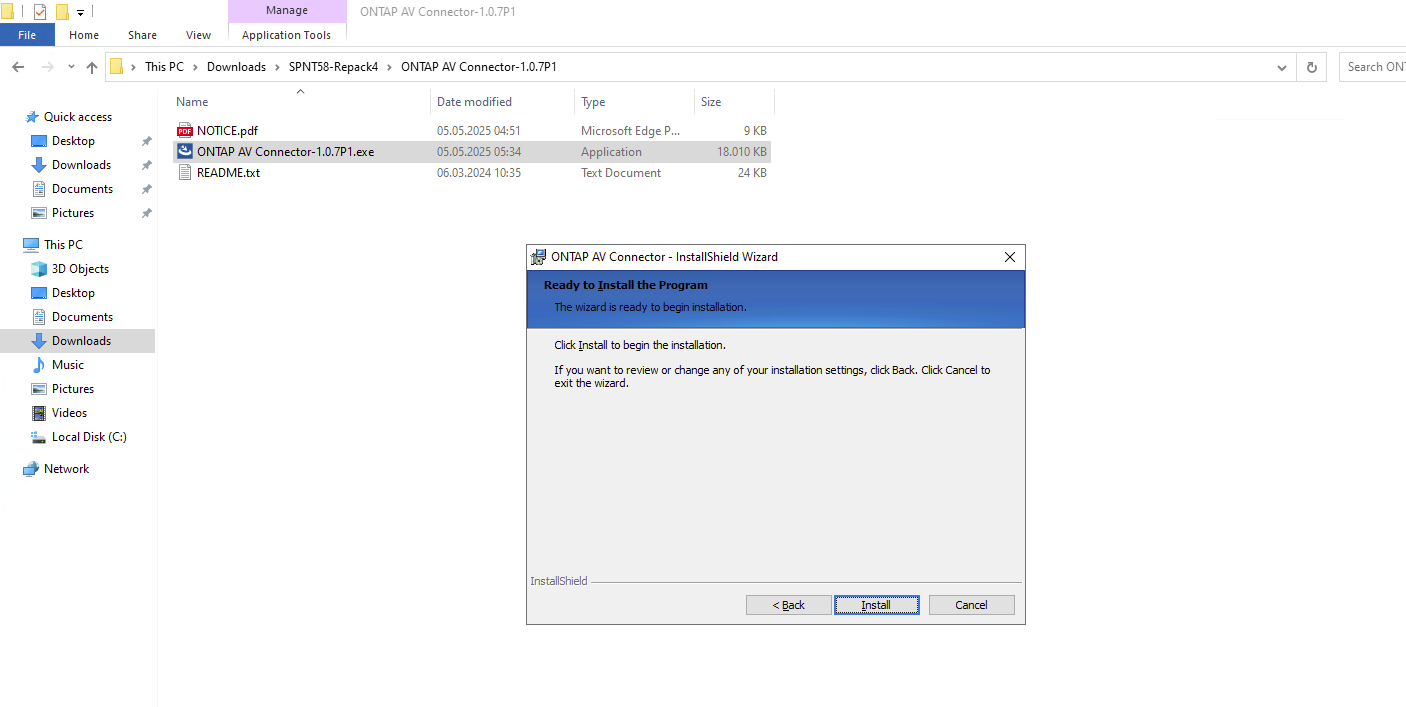
Install the the AV Connector on your Trend Micro ServerProtect server.
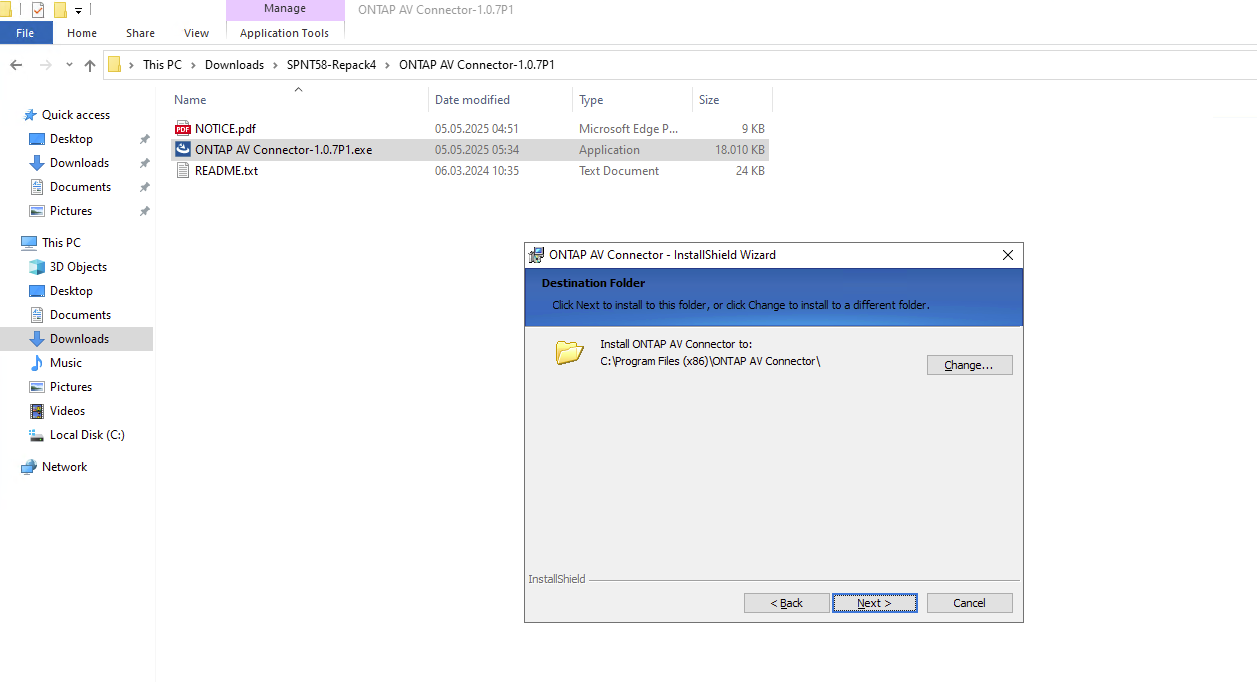
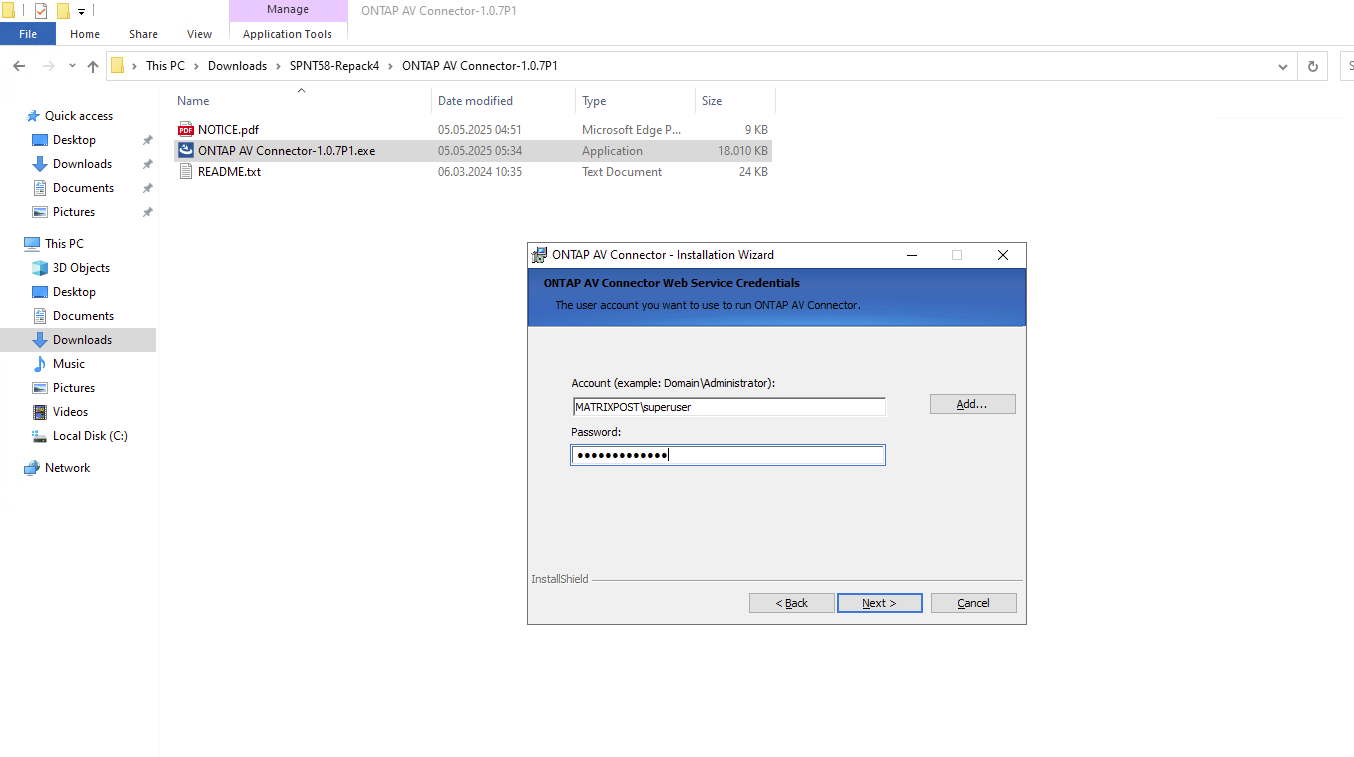
The ONTAP AV Connector should run under a dedicated service account, for my lab environment I will use my enterprise admin, not recommended for production environments.
The ONTAP AV Connector should run under a dedicated service account with local administrator privileges on the AV server. This account is only used to operate the AV Connector and communicate with the antivirus engine; it does not require domain or ONTAP administrative permissions.
“Configure ONTAP LIFs” launches the configuration wizard to register the ONTAP data LIFs for VSCAN communication, which is typically done next and can also be configured manually later.

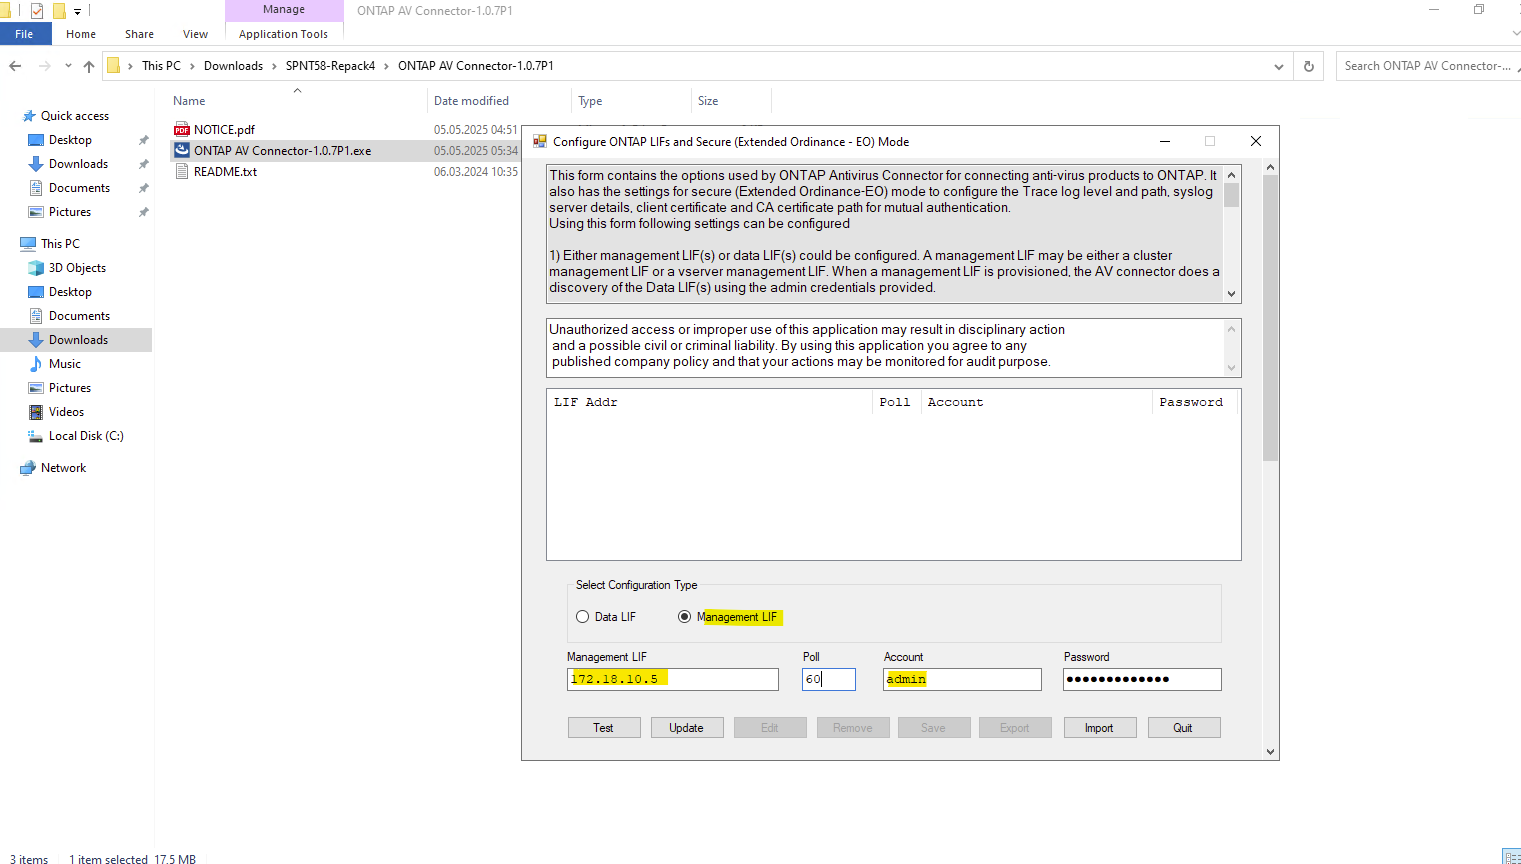
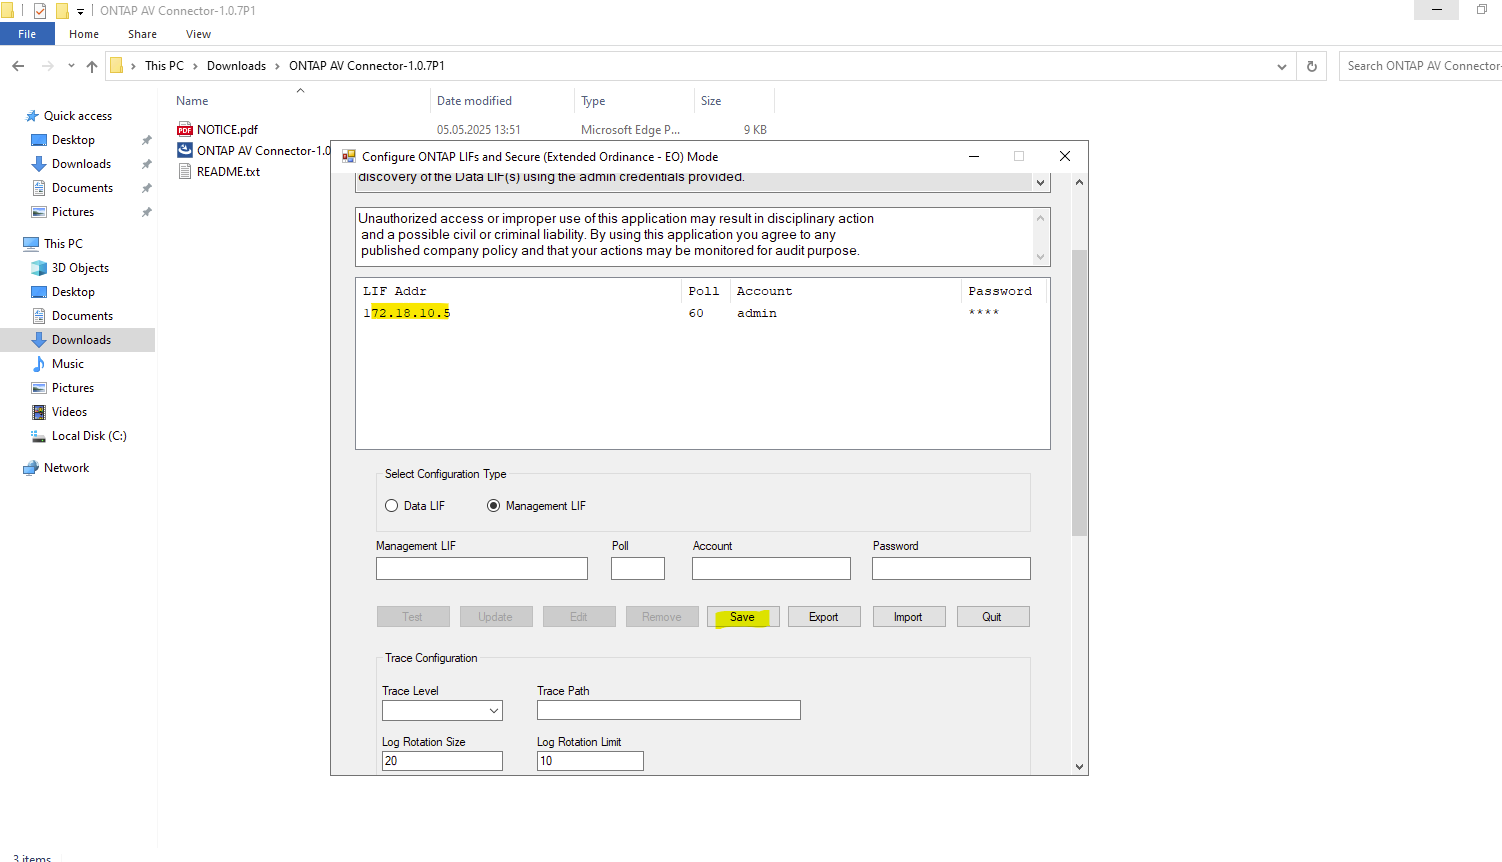
After clicking Finish above, another dialog appears titled “Configure ONTAP LIFs and Secure (Extended Ordinance – EO) Mode”.
This form contains the options used by ONTAP Antivirus Connector for connecting anti-virus products to ONTAP. It also has the settings for secure (Extended Ordinance-EO) mode to configure the Trace log level and path, syslog server details, client certificate and CA certificate path for mutual authentication.
Using this form following settings can be configured1) Either management LIF(s) or data LIF(s) could be configured. A management LIF may be either a cluster management LIF or a vserver management LIF. When a management LIF is provisioned, the AV connector does a discovery of the Data LIF(s) using the admin credentials provided.
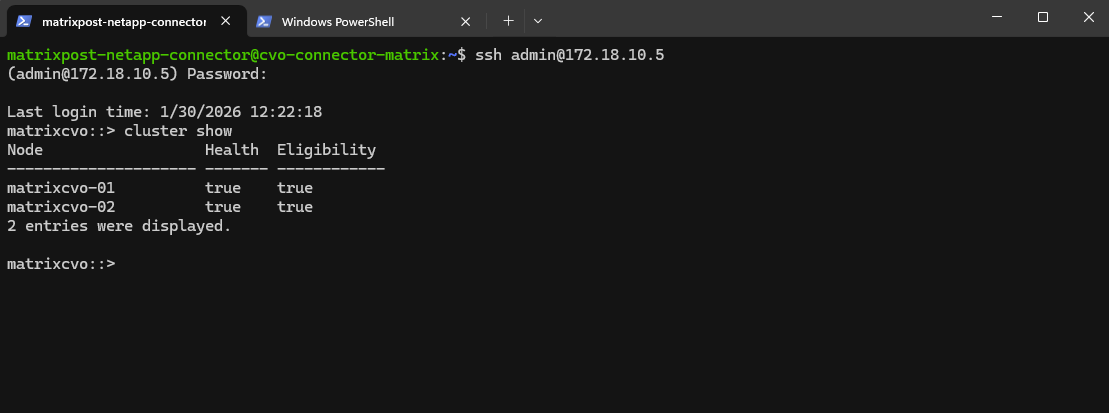
I will use my cluster management LIF and its IP address 172.18.10.5.
Poll Interval
Defines how often the AV Connector polls ONTAP for configuration or status updates.
The default value is usually sufficient and does not need to be changed.
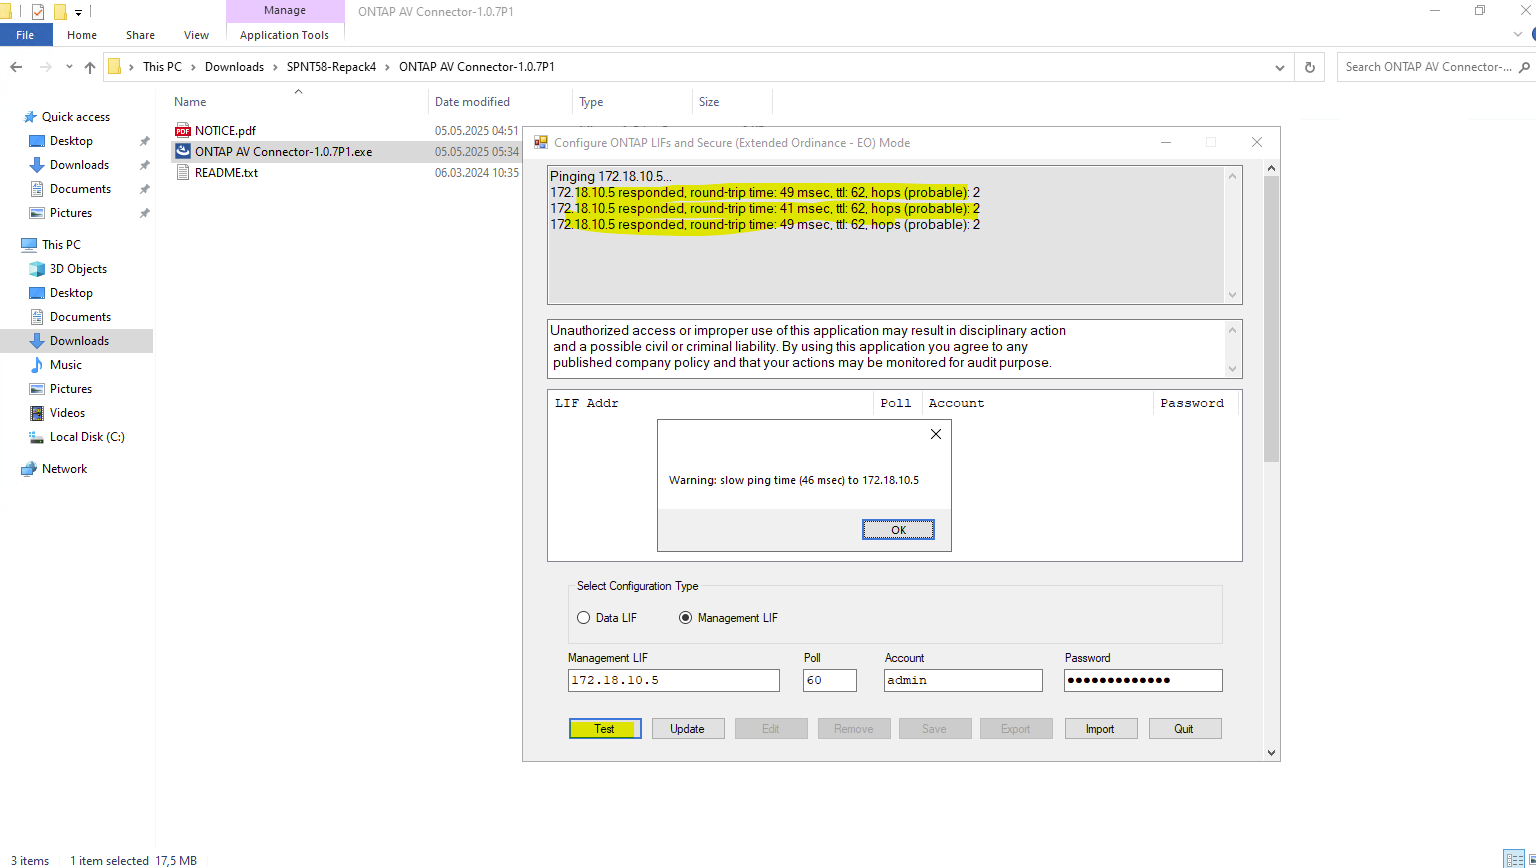
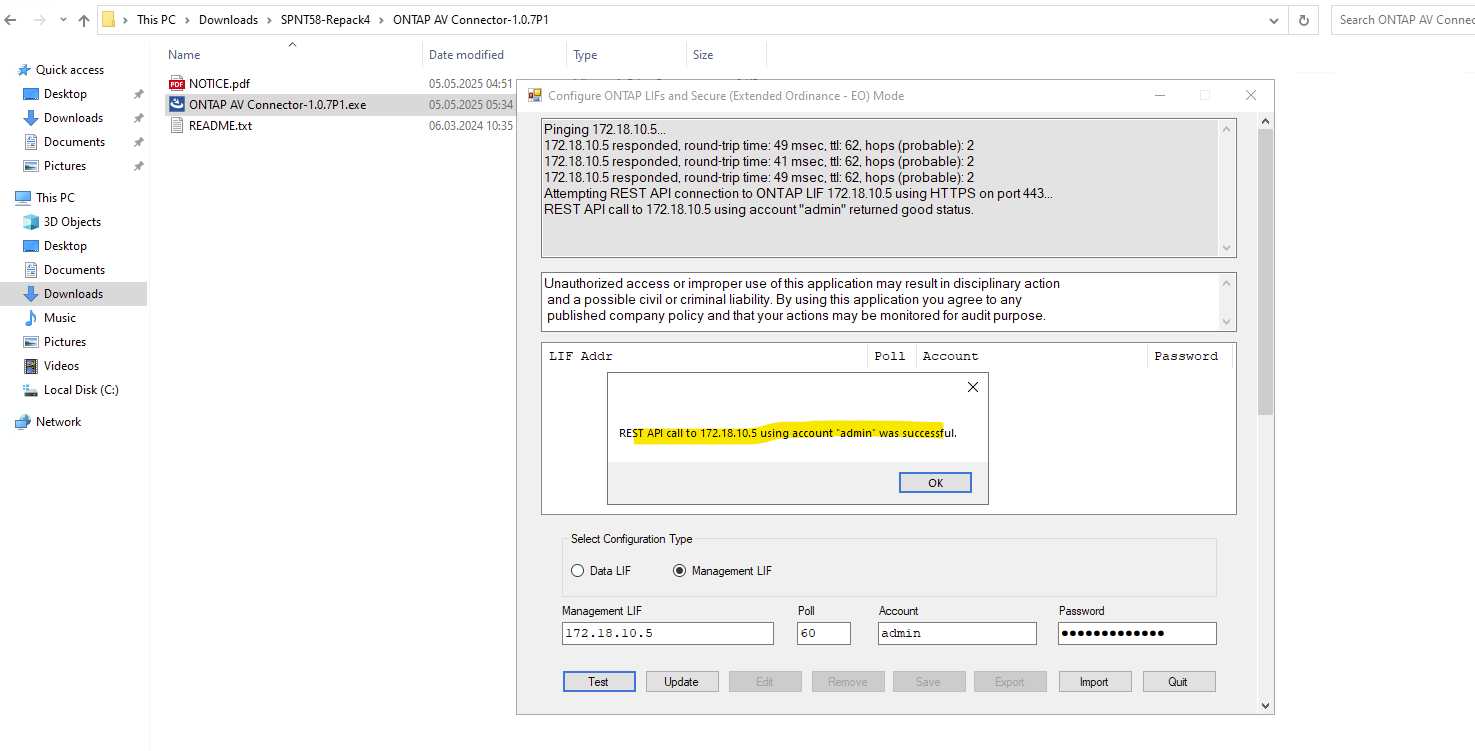
After clicking Test, the connection succeeds, but a warning is displayed indicating a slow ping response time (~46 ms) to the ONTAP management LIF.
This is expected in this setup, as the communication traverses a site-to-site IPsec VPN tunnel between my on-premises vSphere lab environment and the Azure virtual network hosting the CVO instance. Despite the warning, the latency is well within acceptable limits for management and VSCAN operations.
Click on Update.
The Update button is used to re-read and refresh the ONTAP configuration from the specified Management or Data LIF.
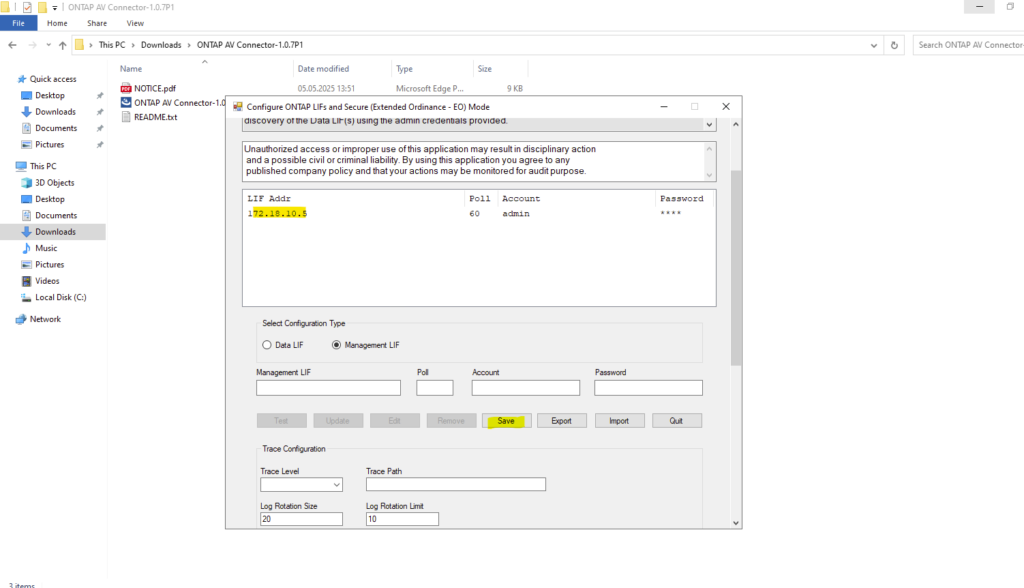
Finally click on Save.
The Update button in the ONTAP AV Connector only refreshes the local configuration and does not establish a connection to ONTAP.
A connection is created only after clicking Save, which registers the scanner and initiates the VSCAN session in case VSCAN has been properly configured and enabled on ONTAP as shown in the next section below.
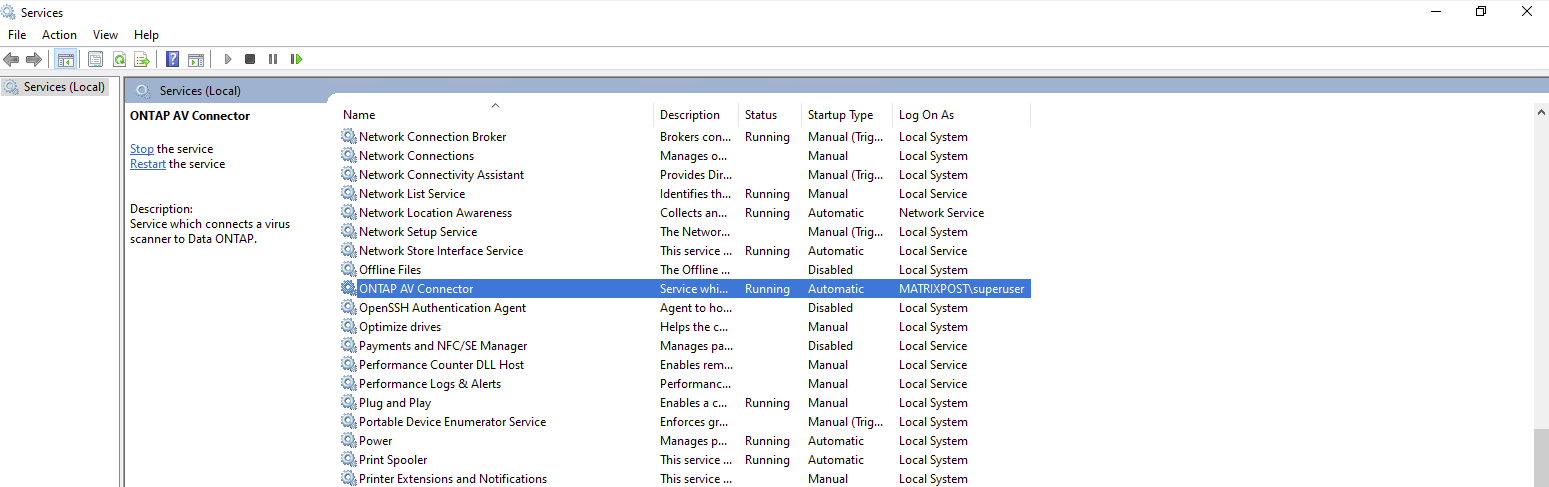
After completing the configuration, a new Windows service called ONTAP AV Connector is created and started automatically as shown below.
This service acts as the communication layer between ONTAP VSCAN and the antivirus engine (Trend Micro ServerProtect), handling scan requests and returning results to ONTAP.
The service must be running at all times for real-time virus scanning to function correctly. If the service is stopped or unreachable, ONTAP will be unable to perform on-access scans.
Adding the NetApp System to the ServerProtect Device List
Before ONTAP can successfully send scan requests to the antivirus engine, the storage system must be registered in Trend Micro ServerProtect.
This is done by configuring the Device List, which defines which storage systems are allowed to communicate with the ServerProtect scan service.
Without this step, scan requests from ONTAP will be rejected, even if the AV Connector and VSCAN configuration are correct.
Once the NetApp system (or AV Connector endpoint we installed previously) is added to the Device List, ServerProtect is ready to receive scan requests and operate as the backend antivirus engine for ONTAP.
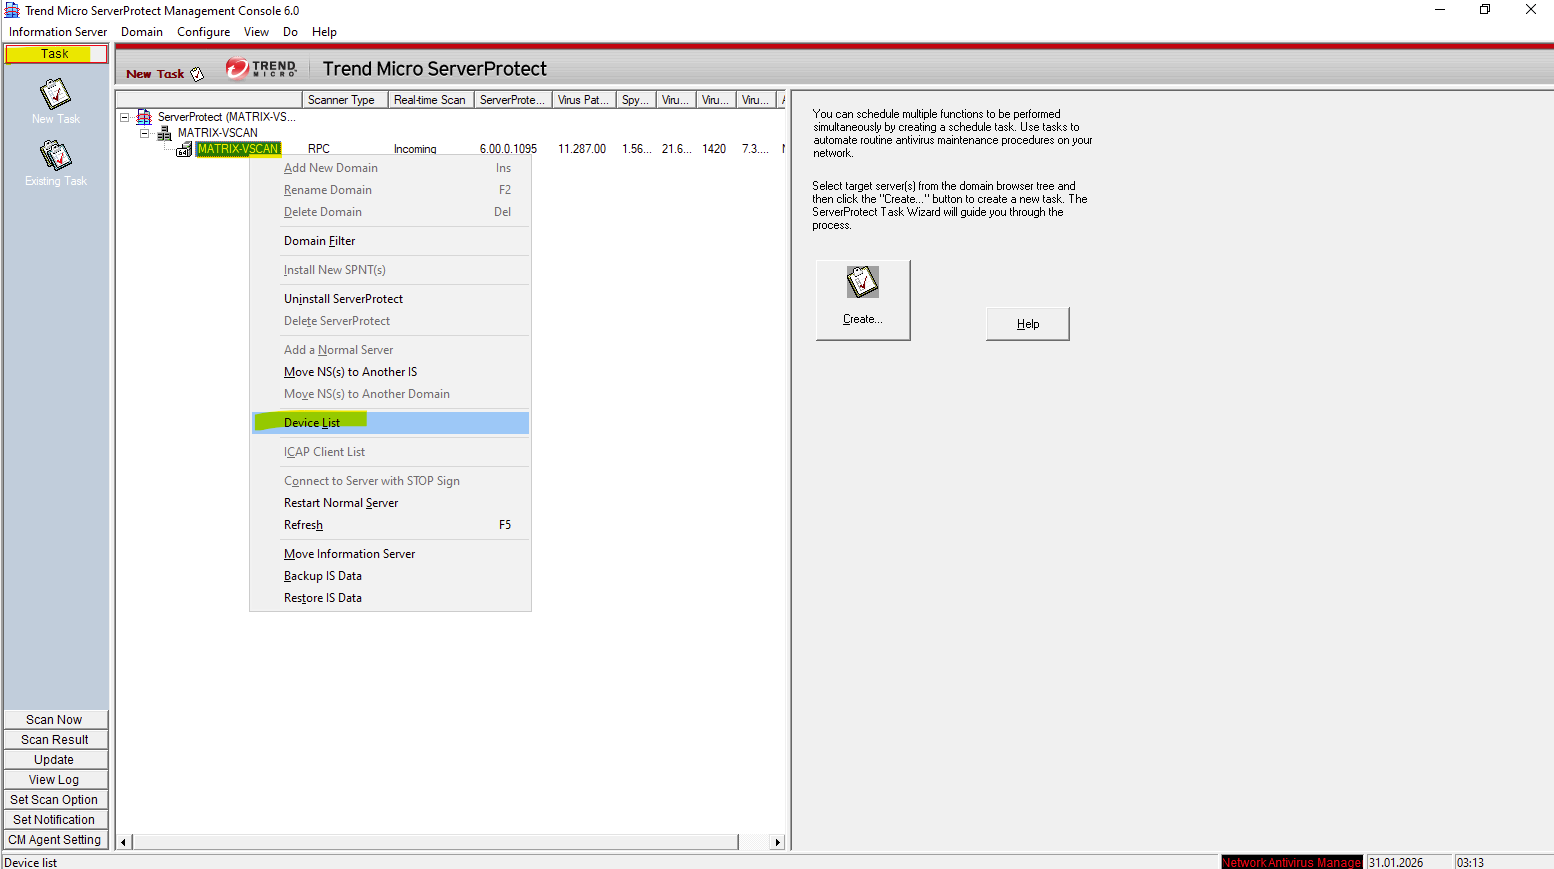
Under Taks select the ServerProtect server and right click on it. In the context menu select Device List.
Click on Add.
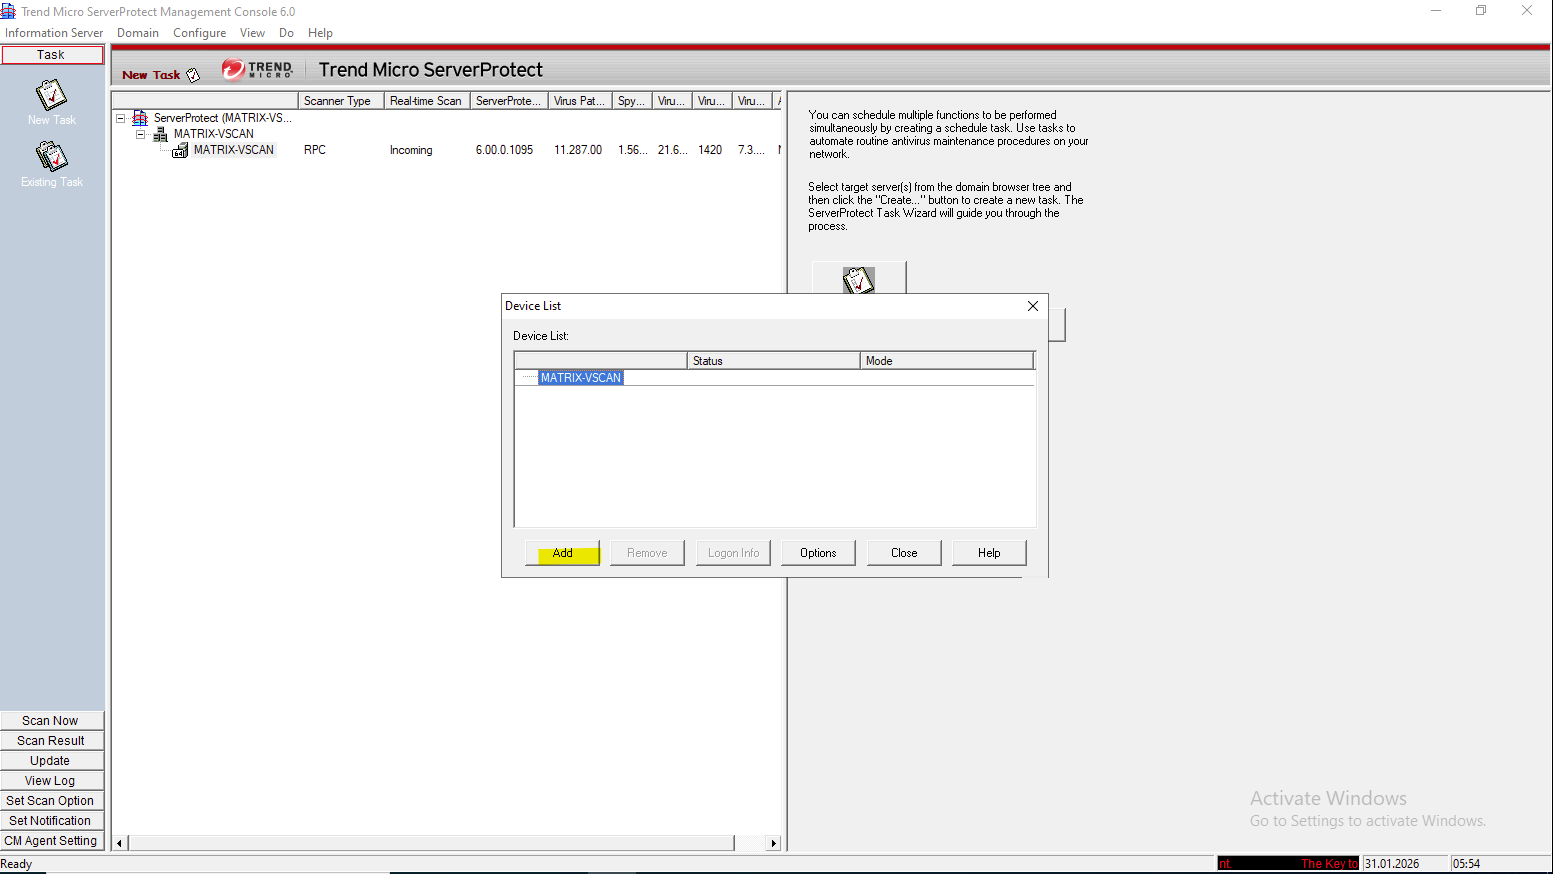
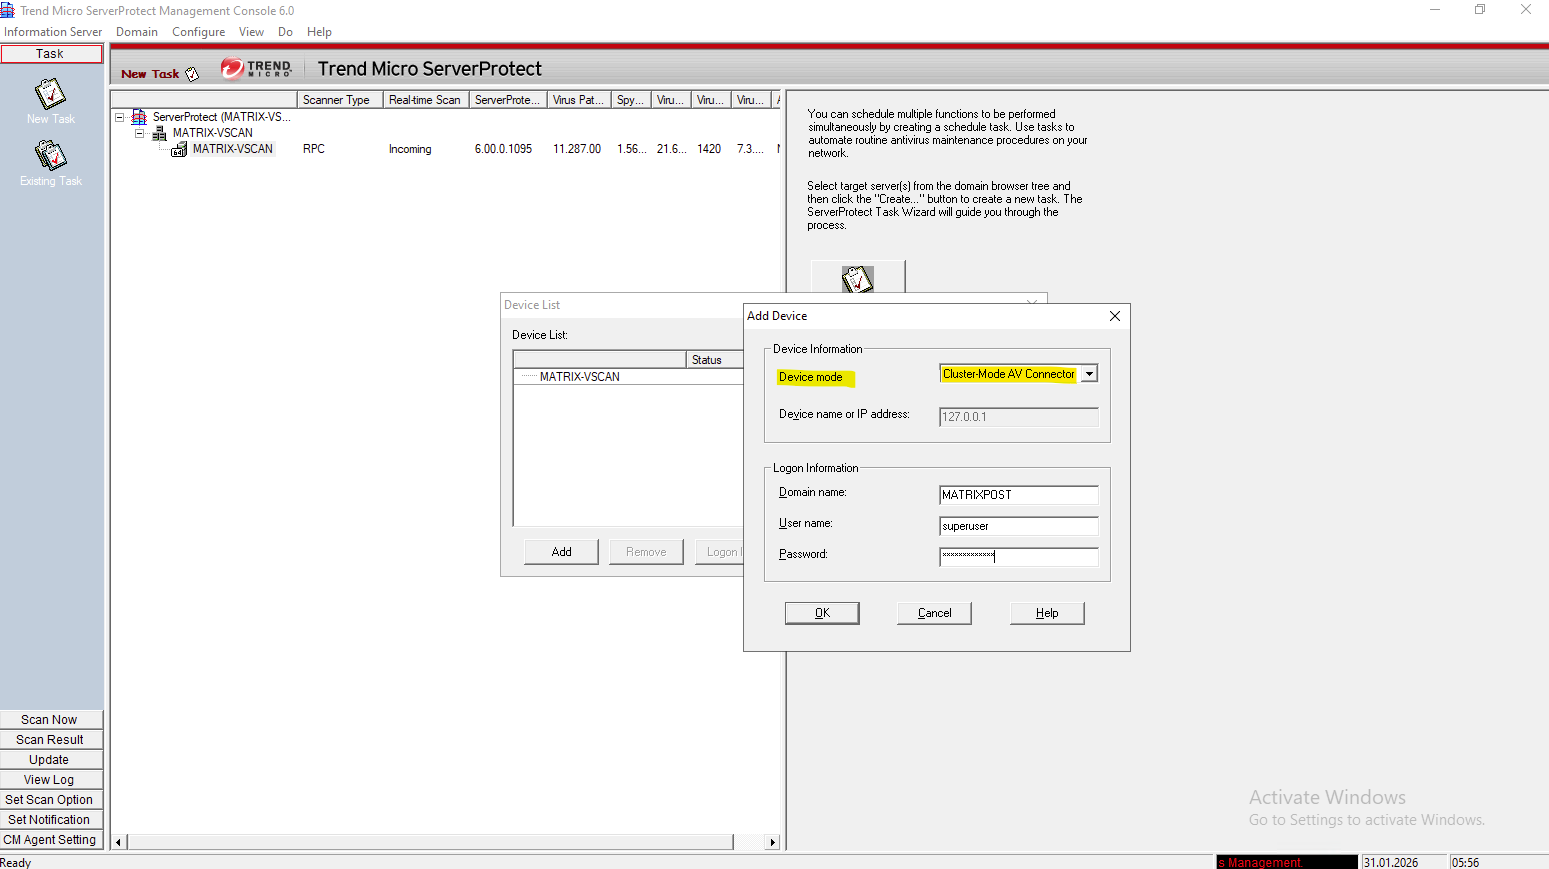
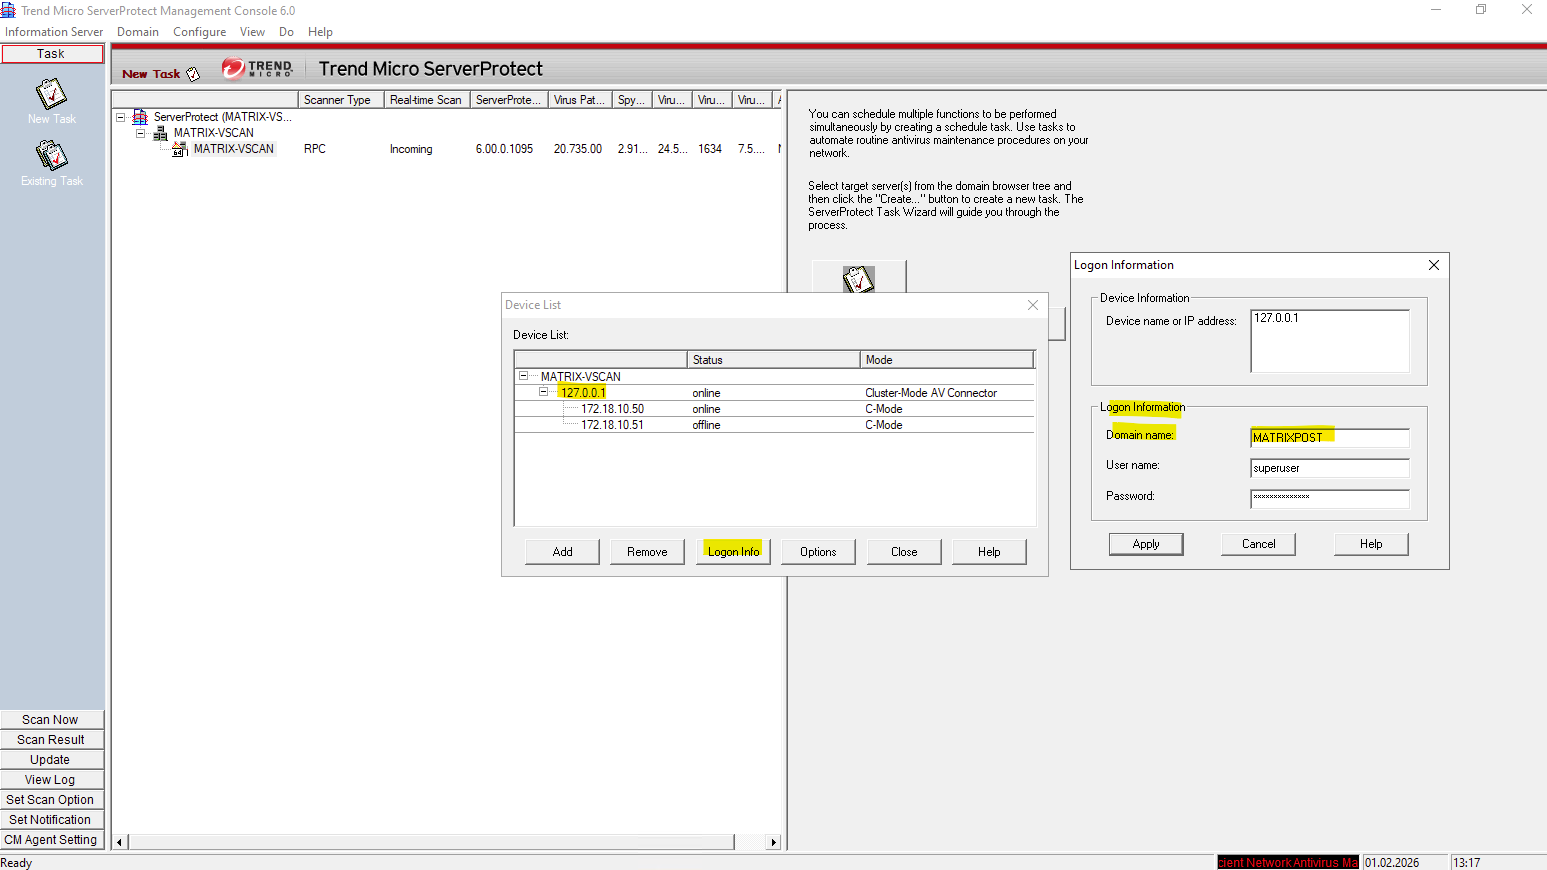
For the Device mode select Cluster-Mode AV Connector.
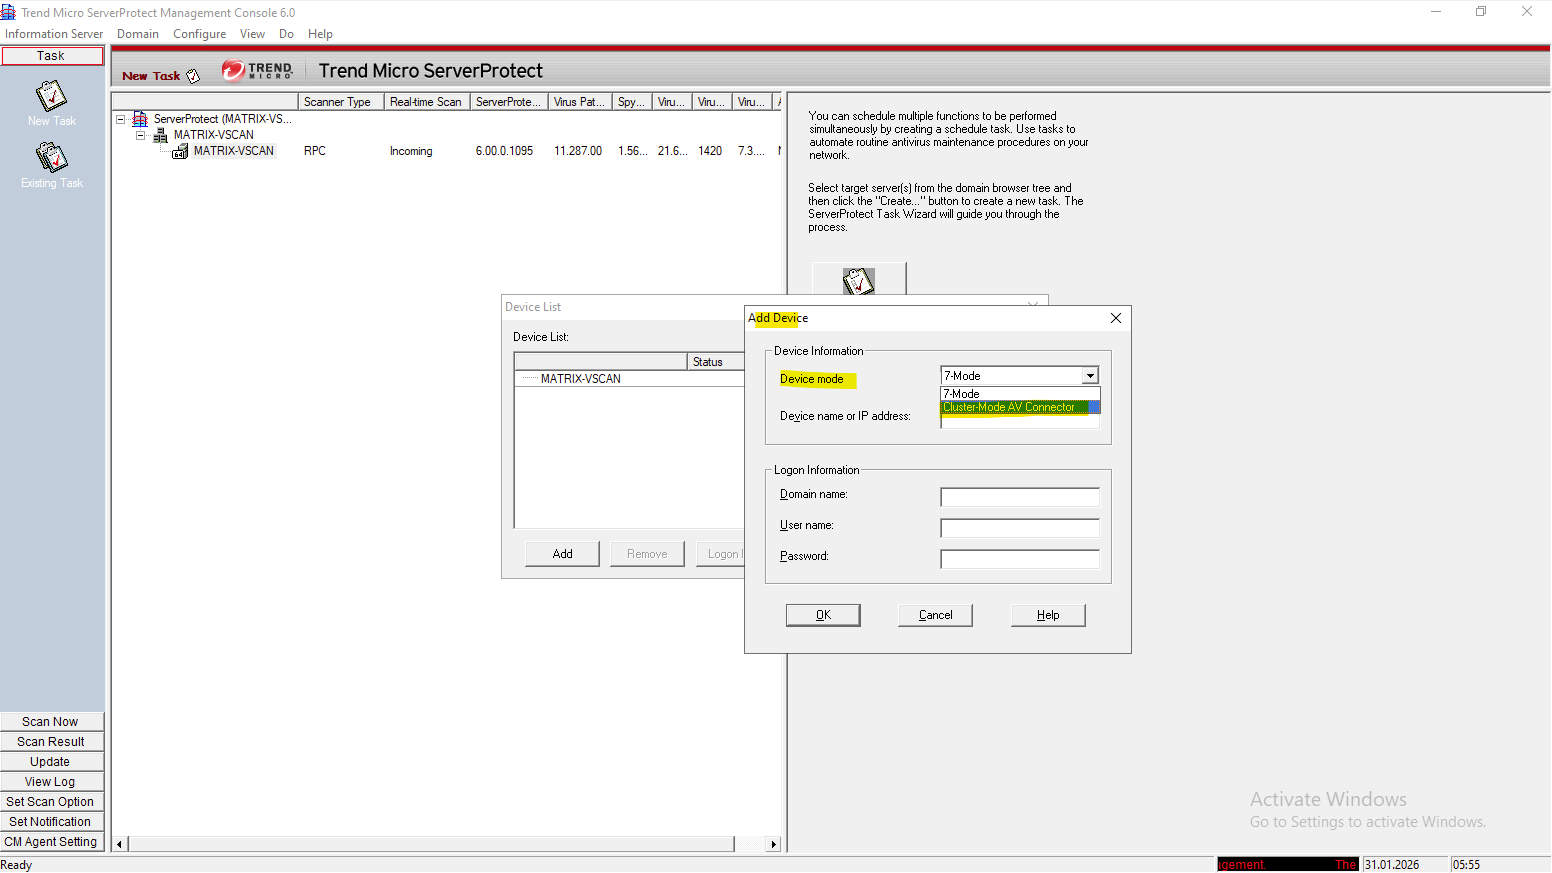
Enter the logon information the AV connector will use to access ONTAP.
This account we later also need to set as privileged Active Directory account when creating the ONTAP VSCAN scanner pool as shown further down.
matrixcvo::> vscan scanner-pool create -vserver svm_matrix_cifs -scanner-pool vscan_matrix_cifs_pool -hostnames 10.0.0.80 -privileged-users MATRIXPOST\superuser
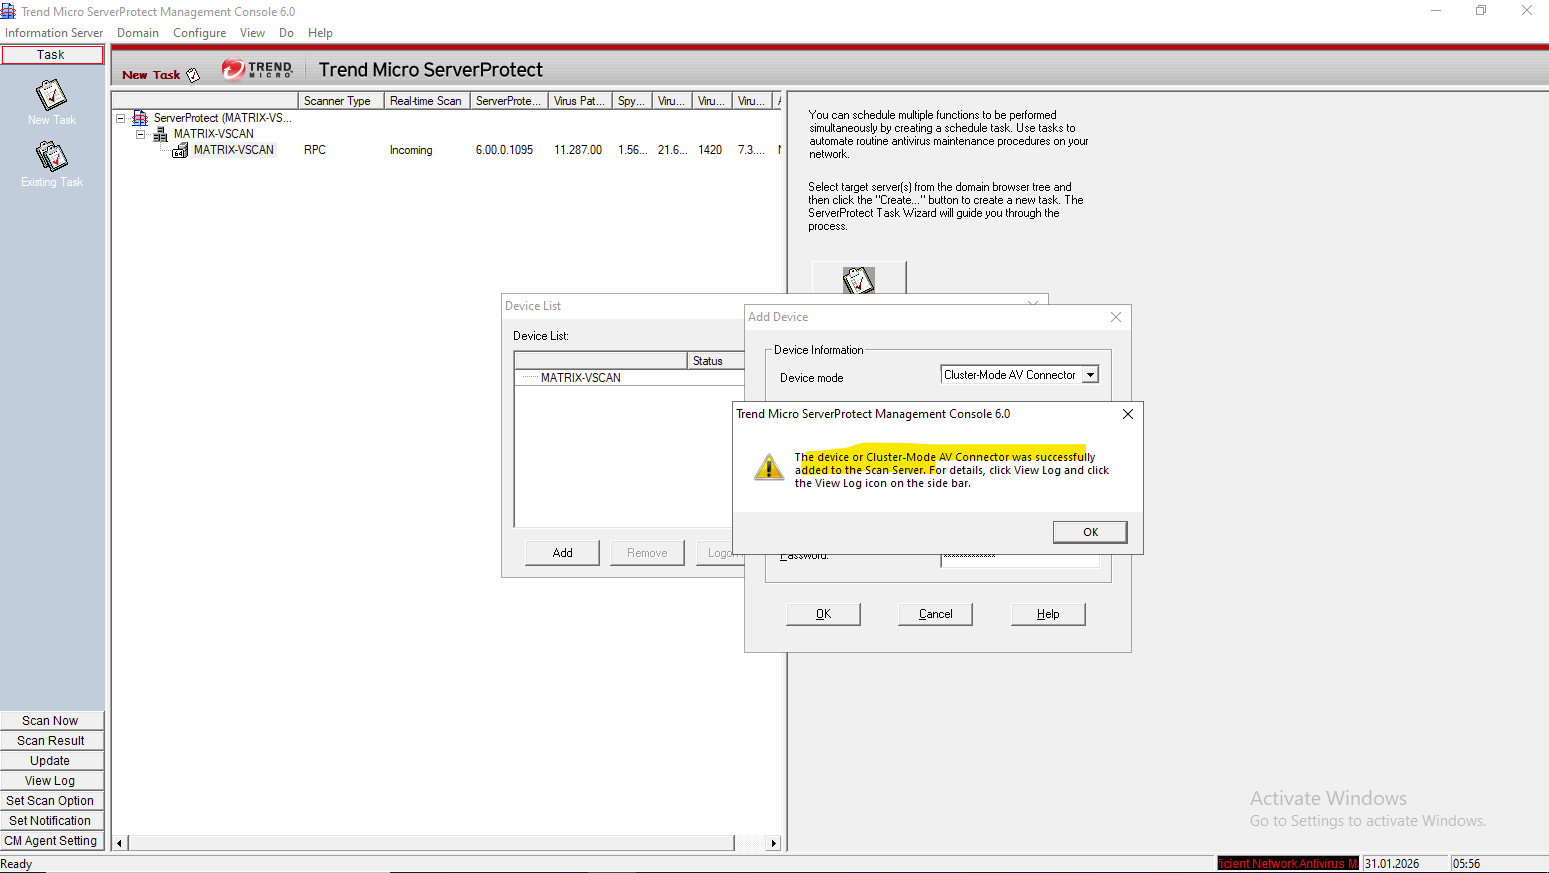
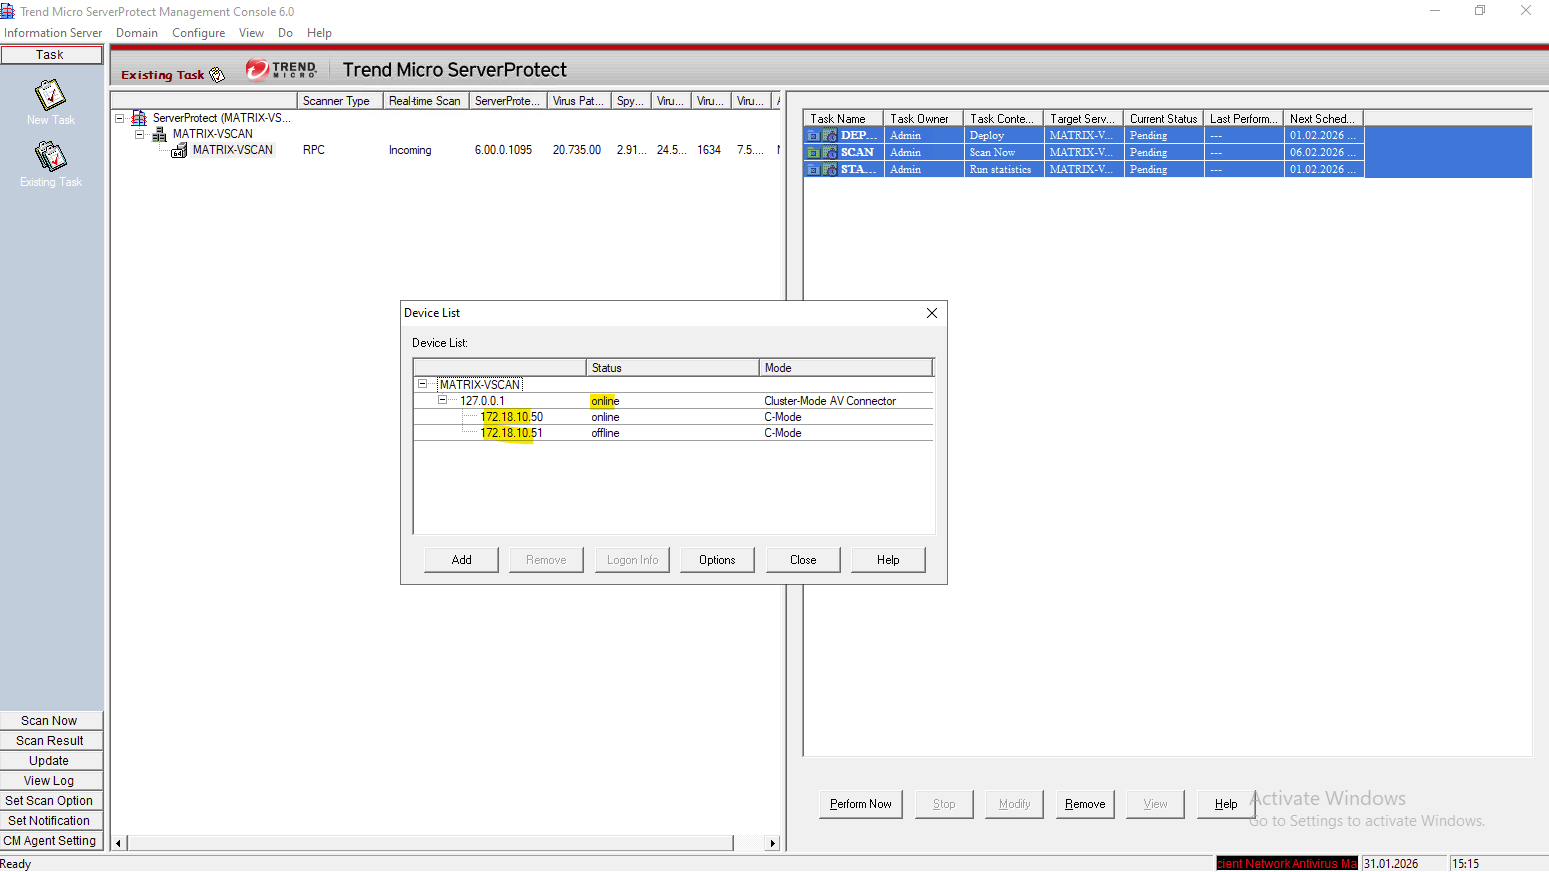
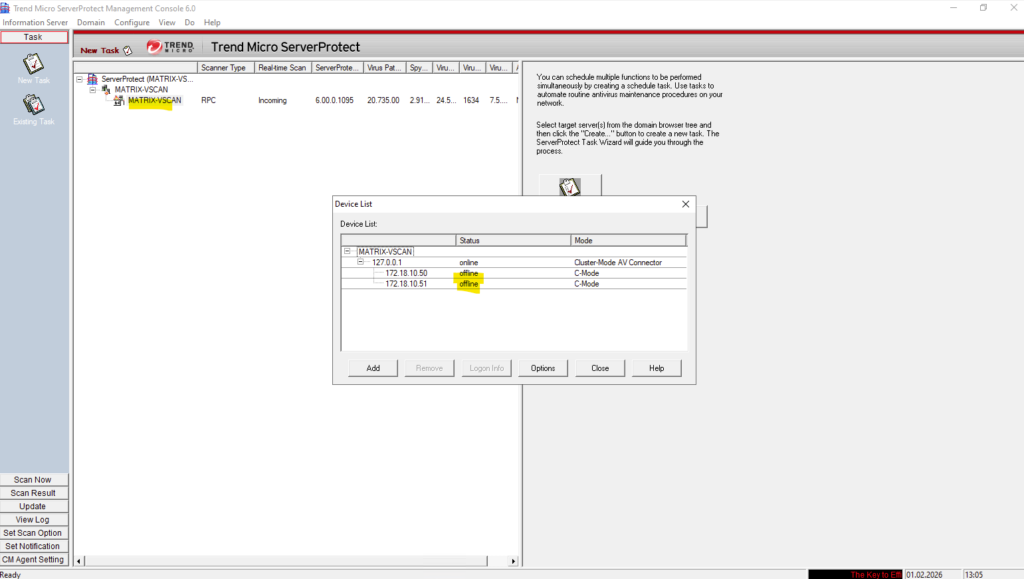
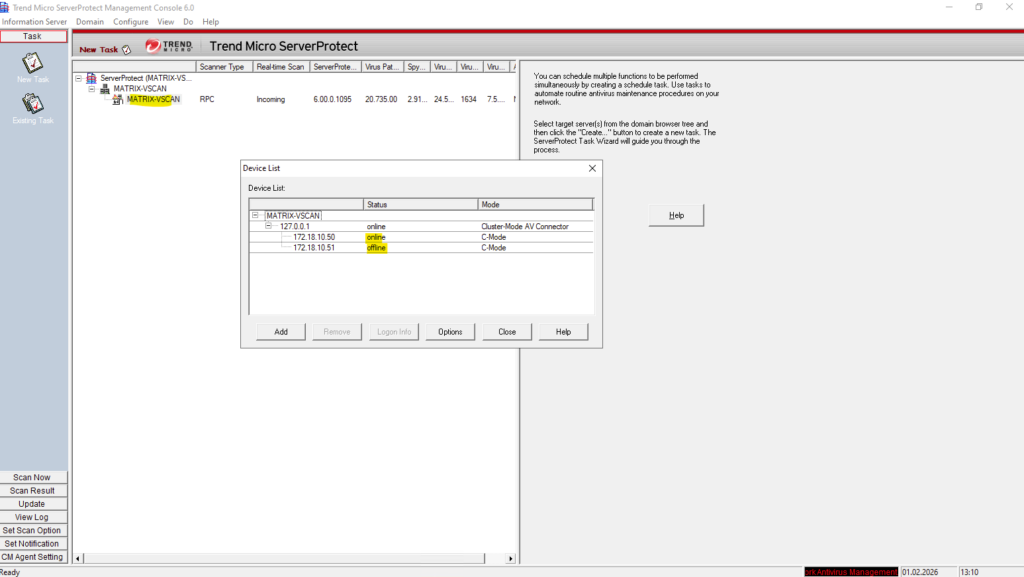
If the AV Connector has not yet established a successful connection to ONTAP, the storage system will appear as Offline in the Device List.
This indicates that ServerProtect cannot currently communicate with the scanner endpoint and therefore cannot accept scan requests. Once the AV Connector successfully connects and registers with ONTAP, the device status automatically changes to Online.
Configure VSCAN on ONTAP
We will now configure and enable VSCAN directly on ONTAP, which is required before any antivirus scanning can take place.
This includes creating the scanner pool, assigning the AV servers, and activating an on-access policy.
Only after these components are in place can ONTAP begin forwarding file access requests to the antivirus engine.
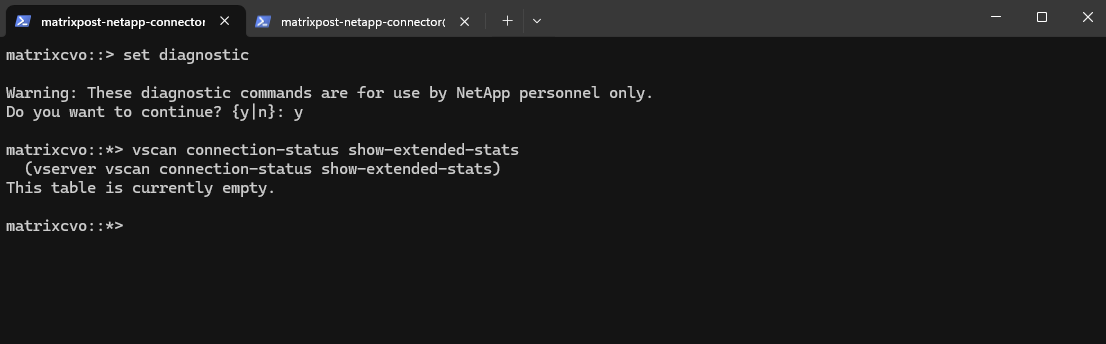
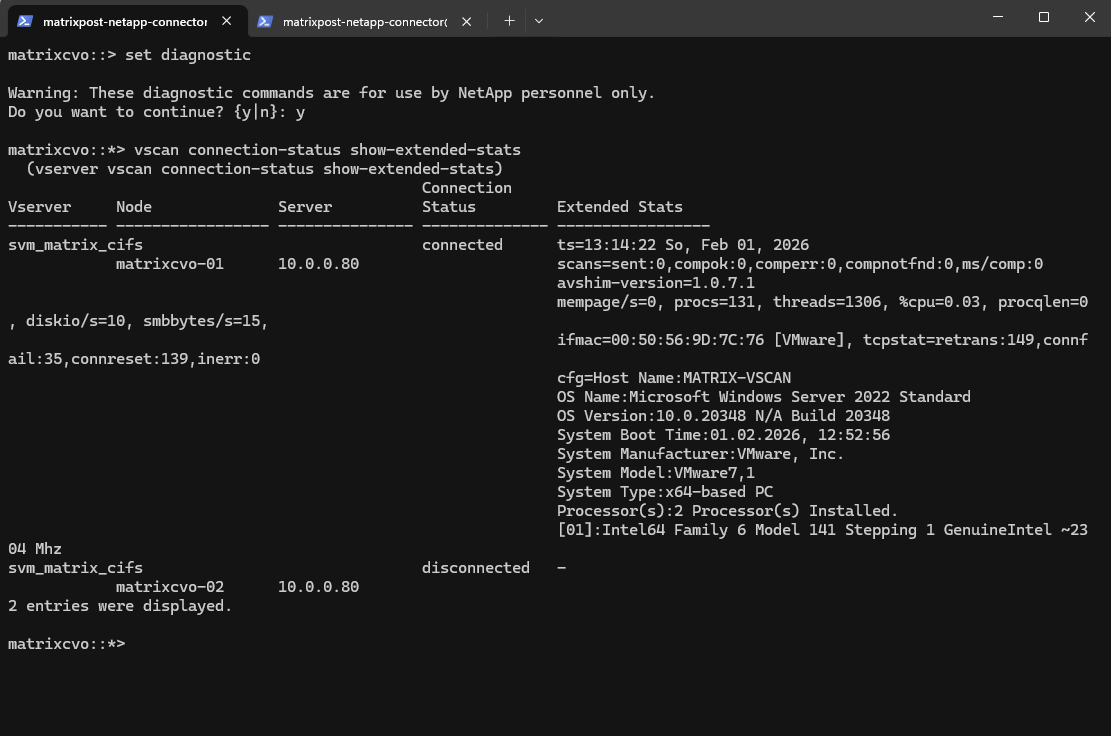
Determine ONTAP’s Vscan (virus scanning) connections to external Antivirus Servers (Trend Micro ServerProtect in my case)
We can first check if so far already any connections to an external antivirus server established.
This command displays detailed status information about ONTAP’s Vscan (virus scanning) connections to external antivirus servers (here Trend Micro VMs from Edeka).
Vscan is part of ONTAP Antivirus (On-Access / On-Demand scanning) and is used mainly for SMB workloads.
It shows whether an external antivirus (AV) server is connected. Which SVMs are configured for Vscan.
If an SVM does not appear in the output like below in my case, it means that no Vscan configuration is present and its volumes are not being scanned. This is expected behavior for environments where antivirus integration has not been enabled.
matrixcvo::> set diagnostic
matrixcvo::*> vscan connection-status show-extended-stats
That above a SVM is shown up as connected with our antivirus server, we first have to enable vscan on a SVM by using the following command.
But first we also need to configure some other things like a scanner pool, so skip this command for now.
matrixcvo::> vscan enable -vserver <svm name>
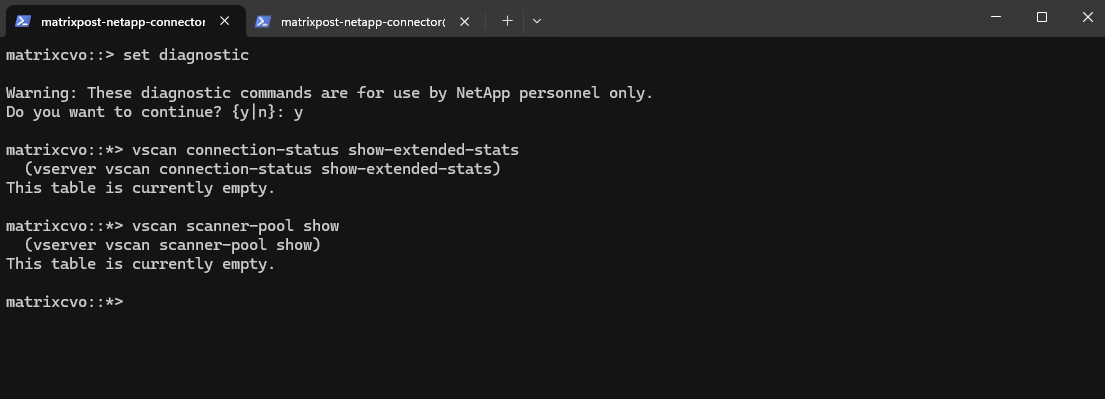
Create the Scanner Pool
To verify if there are scanner pools already configured we can run the following command.
matrixcvo::*> vscan scanner-pool show
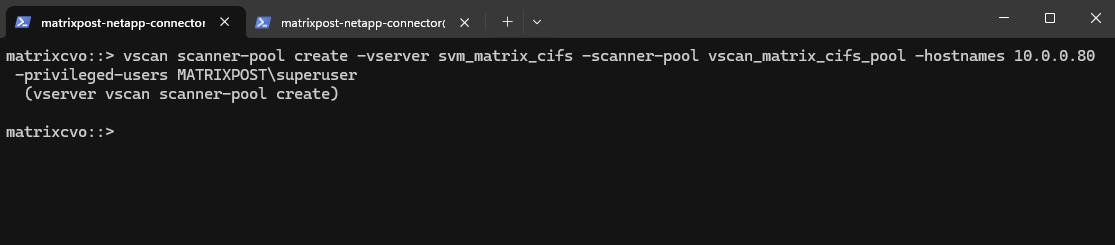
The
vscan scanner-pool createcommand defines a pool of external antivirus servers that ONTAP can use for file scanning.It specifies the SVM, the antivirus servers (in my case the Trend Micro ServerProtect server with the IP address
10.0.0.80), and the privileged Active Directory account used by the AV connector. This command does not enable scanning by itself but prepares the infrastructure required for ONTAP Vscan to operate.
matrixcvo::> vscan scanner-pool create -vserver svm_matrix_cifs -scanner-pool vscan_matrix_cifs_pool -hostnames 10.0.0.80 -privileged-users MATRIXPOST\superuser
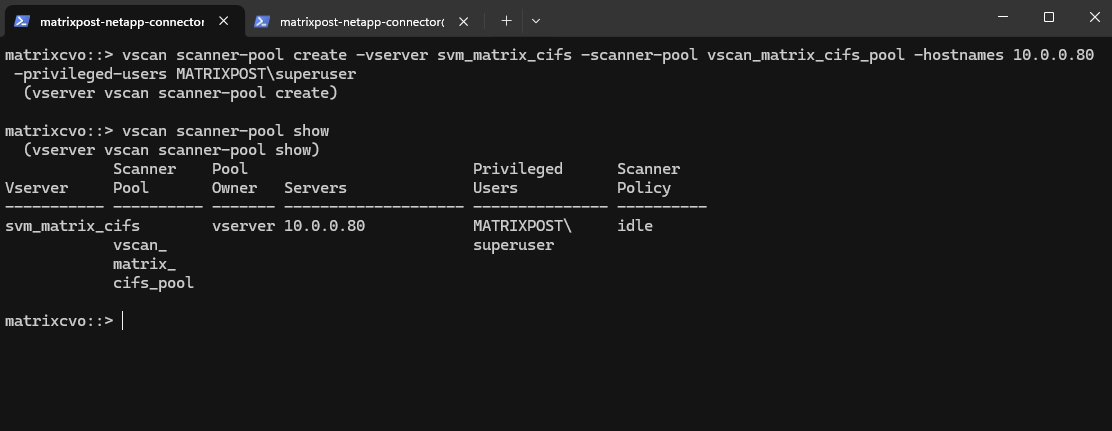
matrixcvo::*> vscan scanner-pool show
Create the On-Access Scan Policy
Defines what should be scanned (protocol, file types, mandatory scan behavior).
The
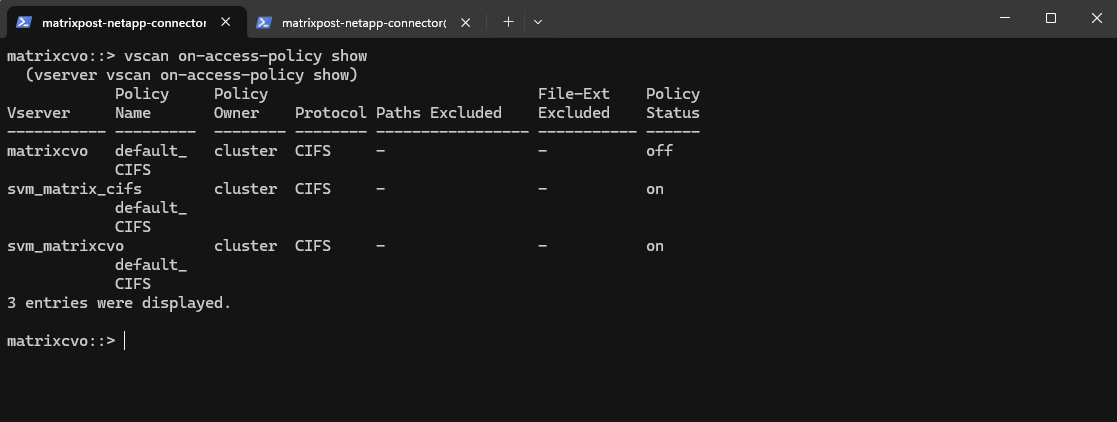
vscan on-access-policy showcommand displays the on-access virus scanning policies configured on the system. These policies define when files are scanned, which file types are included, and whether access is blocked if scanning fails.An on-access policy must be enabled for antivirus scanning to take effect.
ONTAP automatically creates default on-access antivirus policies (below all named
default_CIFS).The policy name itself is irrelevant, only its enabled state determines whether scanning occurs.
matrixcvo::> vscan on-access-policy show
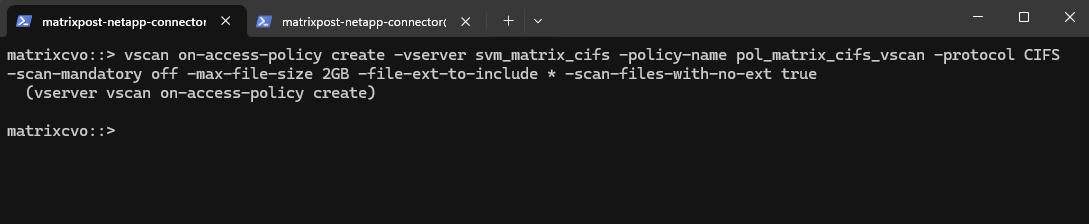
The
vscan on-access-policy createcommand defines how and when files are scanned for malware on SMB shares. It specifies the SVM, protocol, file size limits, and whether access should be blocked if scanning fails. This command creates the policy configuration but does not yet enable antivirus scanning, which must be activated separately.
matrixcvo::> vscan on-access-policy create -vserver svm_matrix_cifs -policy-name pol_matrix_cifs_vscan -protocol CIFS -scan-mandatory off -max-file-size 2GB -file-ext-to-include * -scan-files-with-no-ext true
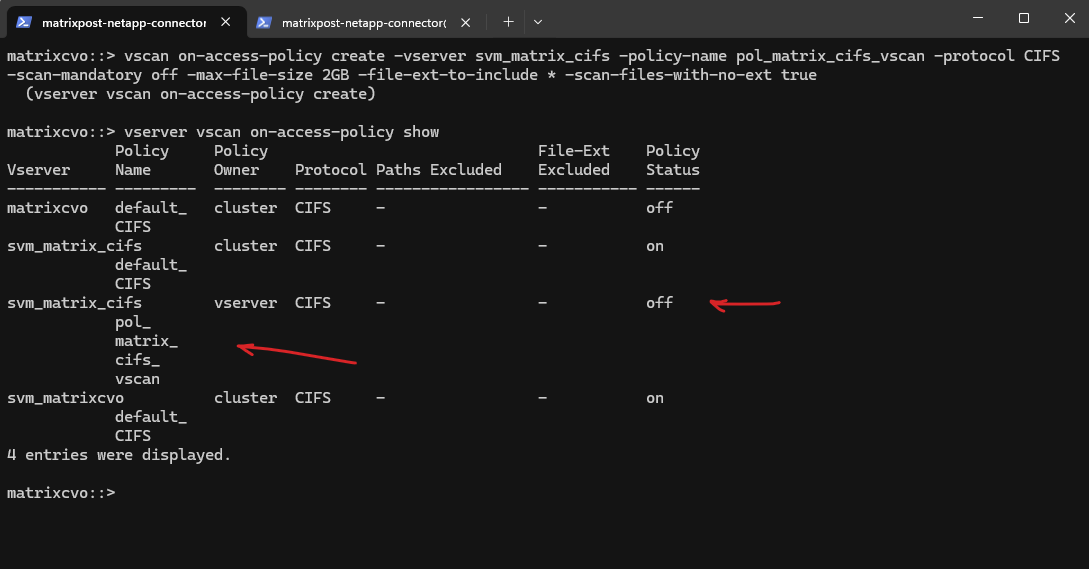
We can verify if the on-access policy was created successfully by showing all again.
matrixcvo::> vserver vscan on-access-policy show
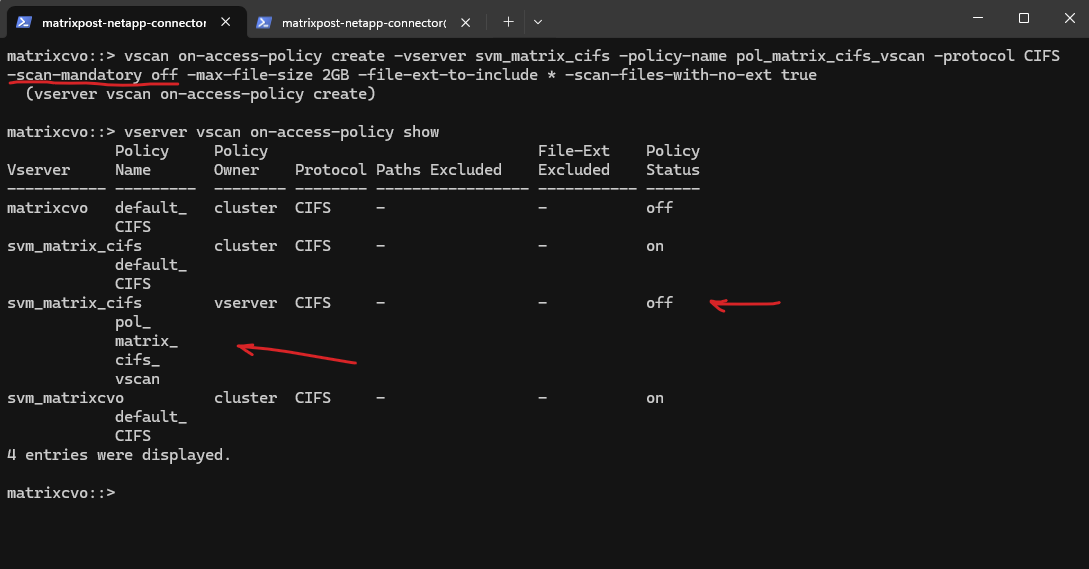
!!! Note !!!
-scan-mandatory offThis is a very important setting. If the antivirus server is unavailable → file access is still allowed and no hard blocking of users.
If this were set to
on→ File access would be blocked if AV servers are unreachable. This is usually only used in high-security environments.👉 Best practice for most environments:
off
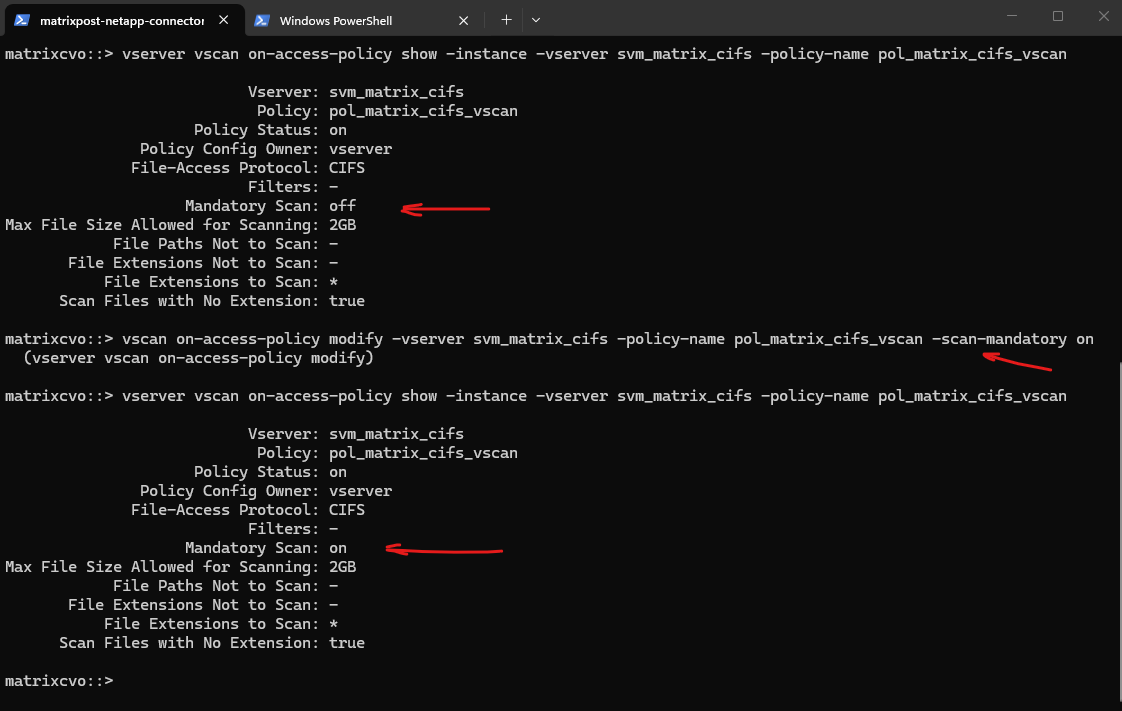
To change this on-access policy we can use the vscan on-access-policy modify command.
Below for example to switch
Mandatory Scantoon.!! Note !!
If this were set to
on→ File access would be blocked if AV servers are unreachable. This is usually only used in high-security environments.
matrixcvo::> vscan on-access-policy modify -vserver svm_matrix_cifs -policy-name pol_matrix_cifs_vscan -scan-mandatory on

# verify the change
matrixcvo::> vserver vscan on-access-policy show -instance -vserver svm_matrix_cifs -policy-name pol_matrix_cifs_vscan
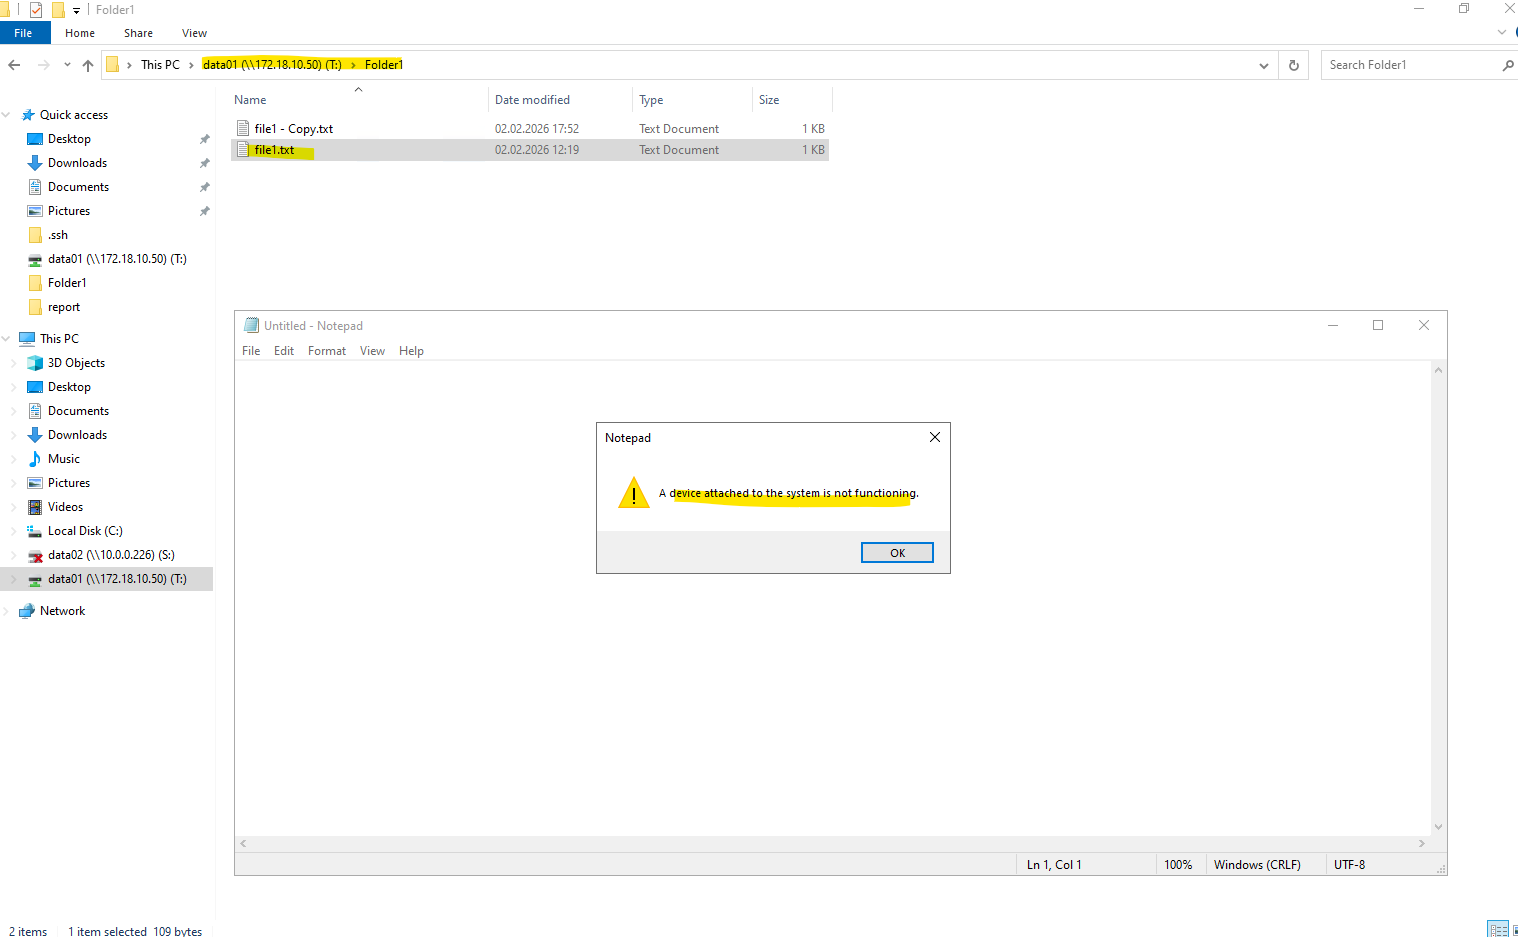
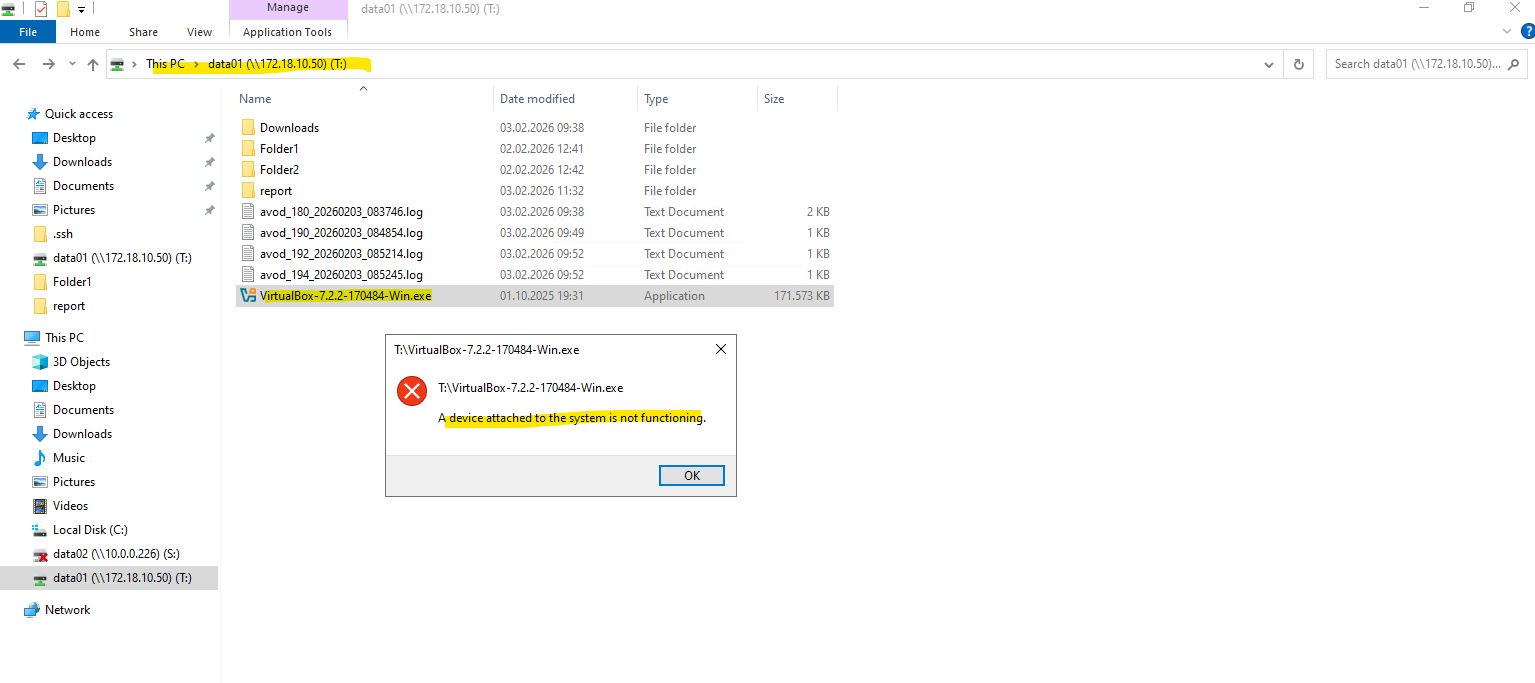
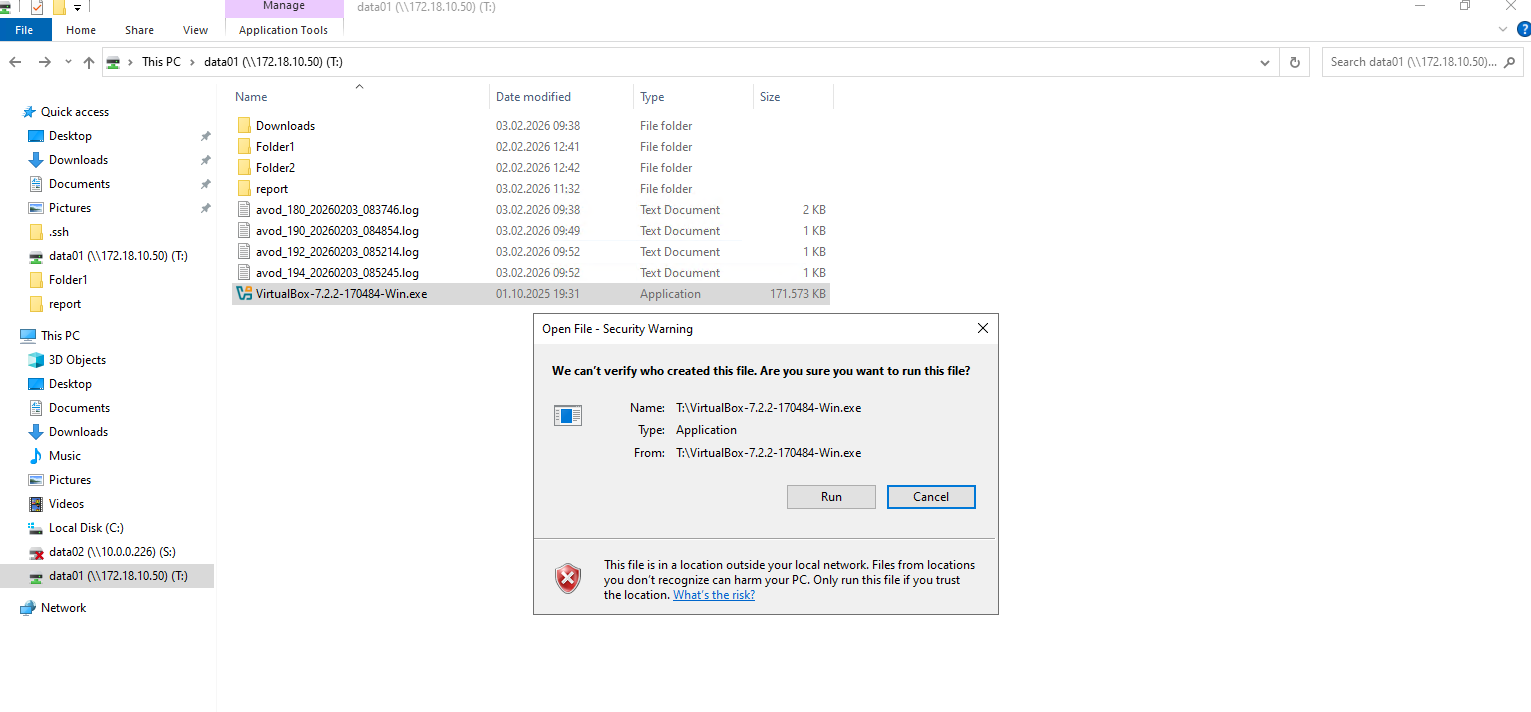
As mentioned, File access is be blocked if AV servers are unreachable and you will see the following error message when trying to access a file.
A device attached to the system is not functioning.
matrixcvo::> set diagnostic
matrixcvo::*> vscan connection-status show-extended-stats
So in case you will run into this error and can’t access the files anymore, we can either try to solve the connection issue with the external antivirus engine, disabling VSCAN on the affected SVMs or switching -scan-mandatory on to -scan-mandatory off.
E.g. disabling VSCAN on the affected SVM.
matrixcvo::> vscan disable -vserver svm_matrix_cifs
Afterwards file access is immediately restored.
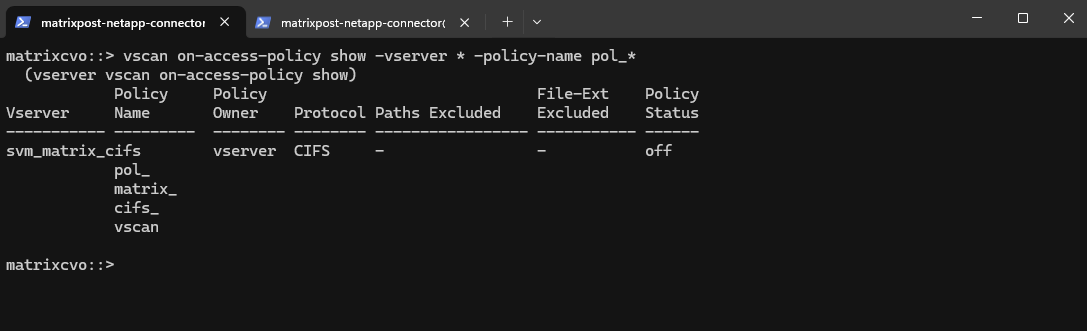
To just listing the custom policies and not also the by default created and named default_CIFS, we can use wildcards for the policy name like shown below.
matrixcvo::> vscan on-access-policy show -vserver * -policy-name pol_*
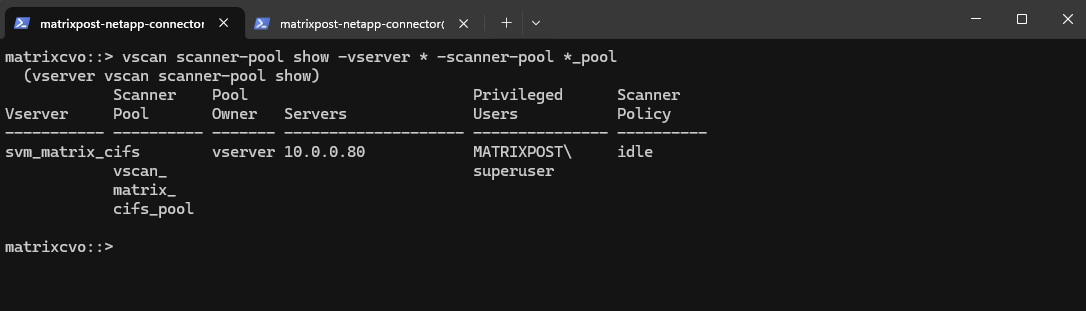
A scanner policy determines whether a scanner pool is active. You must activate a scanner pool before the Vscan servers that it defines can connect to an SVM. You can apply only one scanner policy to a scanner pool. If you created a scanner pool for all the SVMs in a cluster, you must apply a scanner policy on each SVM individually.
A scanner policy can have one of the following values:
Primaryspecifies that the scanner pool is active.Secondaryspecifies that the scanner pool is active only if none of the Vscan servers in the primary scanner pool are connected.Idlespecifies that the scanner pool is inactive.
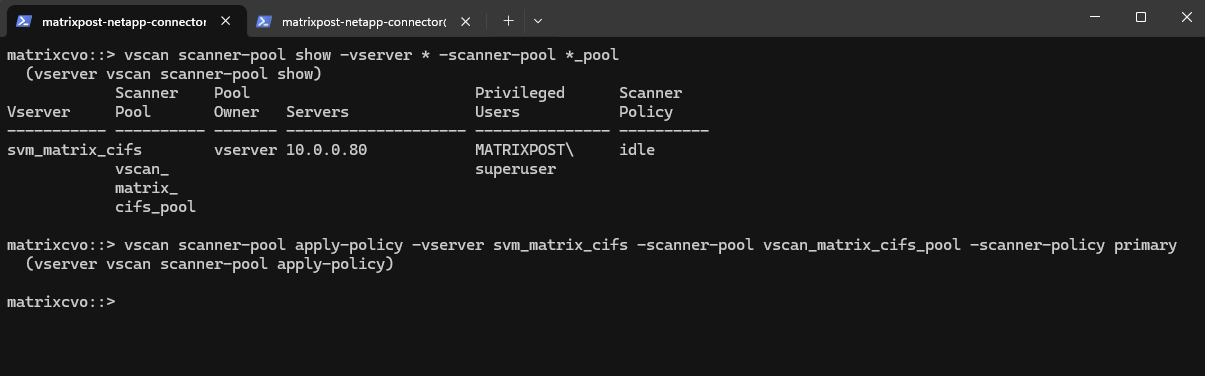
matrixcvo::> vscan scanner-pool show -vserver * -scanner-pool *_pool
Apply the Scanner Pool Policy
Marks the scanner pool as primary, making it eligible for scanning.
To change the state from currently idle to primary we can run the following command and also shown further down.
matrixcvo::> vscan scanner-pool apply-policy -vserver svm_matrix_cifs -scanner-pool vscan_matrix_cifs_pool -scanner-policy primary
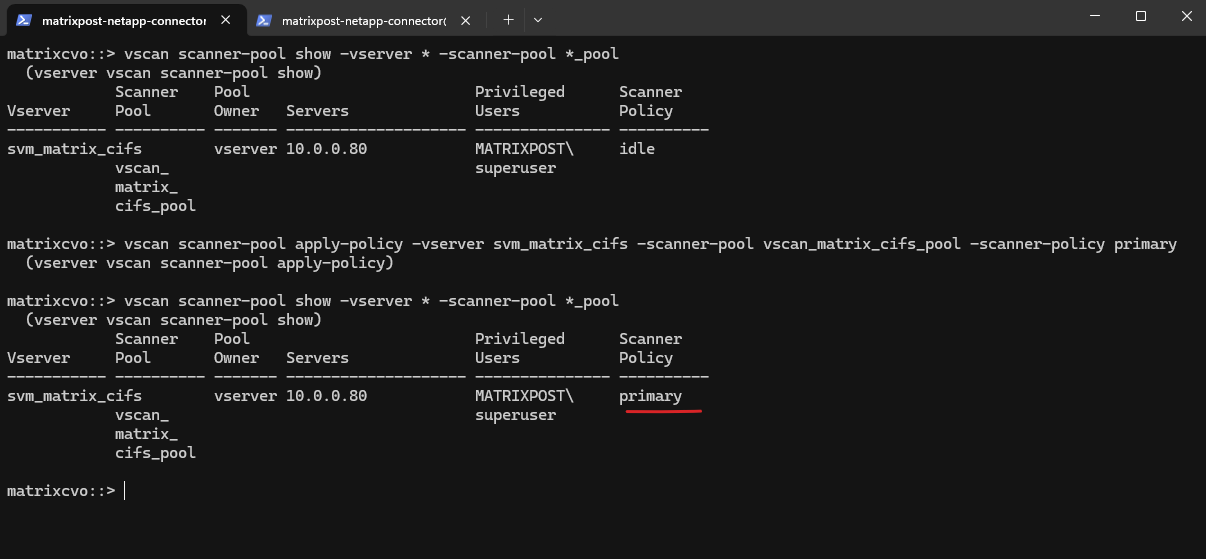
Verifying if the scanner policy is set to primary successful.
matrixcvo::> vscan scanner-pool show -vserver * -scanner-pool *_pool
Enable the On-Access Policy
Next we need to activate our custom on-access antivirus policy for the SVM which activates the scan policy so ONTAP can start using it.
ONTAP only allows one enabled on-access policy per protocol (per SVM). In your SVM
svm_matrix_cifs, the CIFS on-access policydefault_CIFSis already enabled, so ONTAP refuses to enablepol_matrix_cifs_vscanuntil you disable the other one.
matrixcvo::> vscan on-access-policy enable -vserver svm_matrix_cifs -policy-name pol_matrix_cifs_vscan
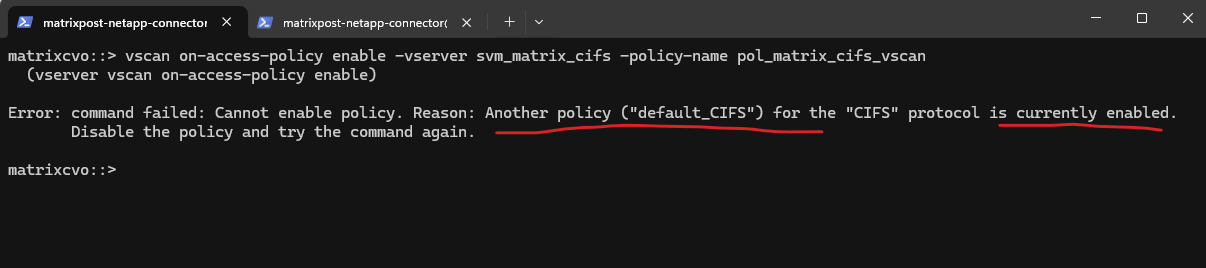
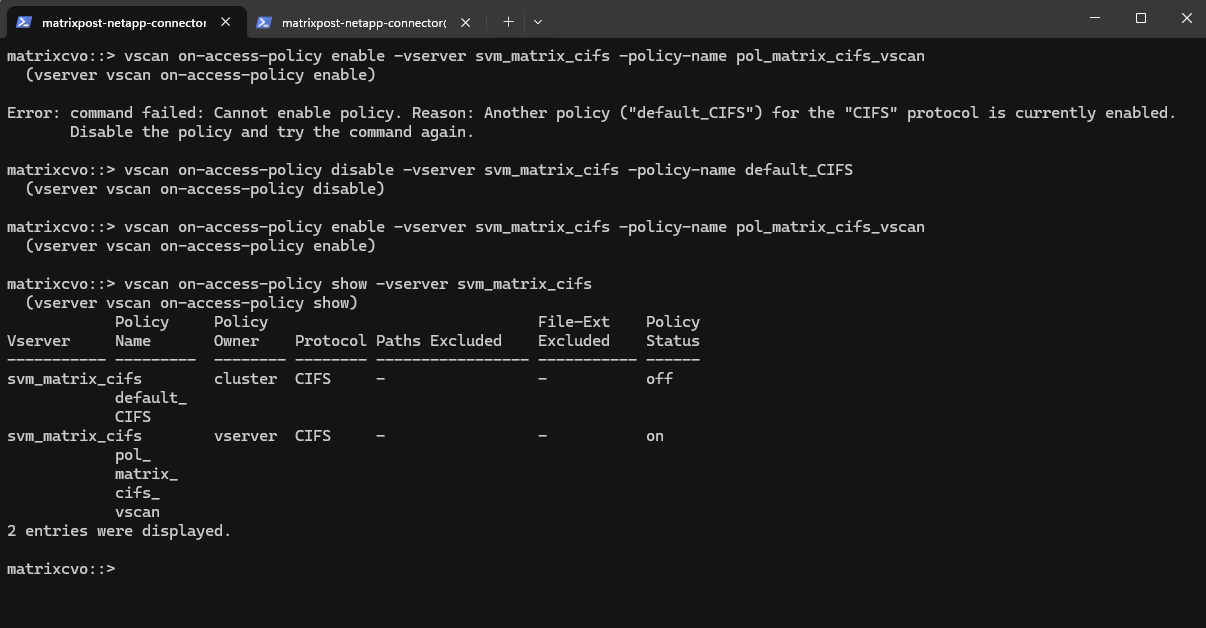
So we first need to disable the existing default CIFS policy before we can enable our custom policy:
# verify what’s enabled
vscan on-access-policy show -vserver svm_matrix_cifs

# disable the currently enabled CIFS policy
matrixcvo::> vscan on-access-policy disable -vserver svm_matrix_cifs -policy-name default_CIFS

# enable your custom policy
matrixcvo::> vscan on-access-policy enable -vserver svm_matrix_cifs -policy-name pol_matrix_cifs_vscan

We can verify again if now our custom policy is enabled, looks good.
matrixcvo::> vscan on-access-policy show -vserver svm_matrix_cifs
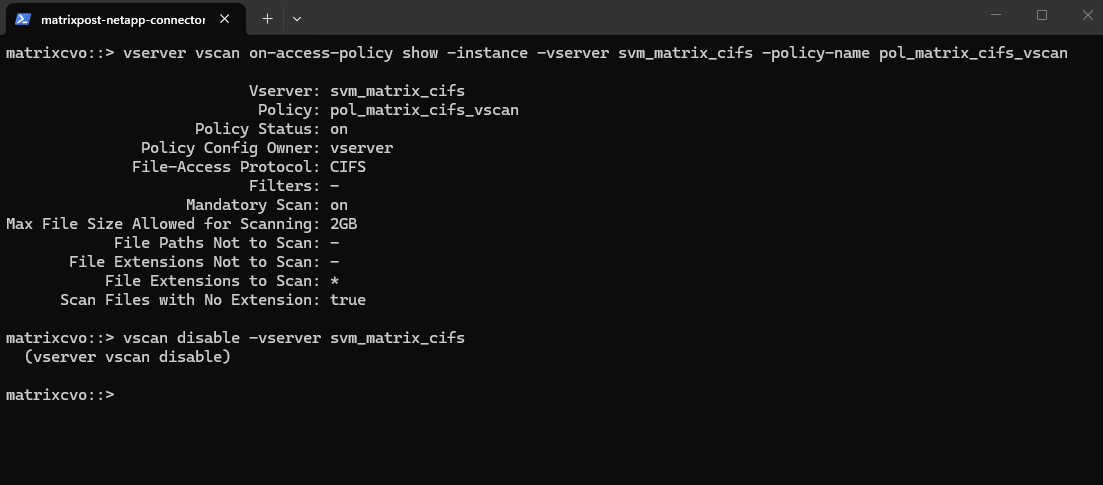
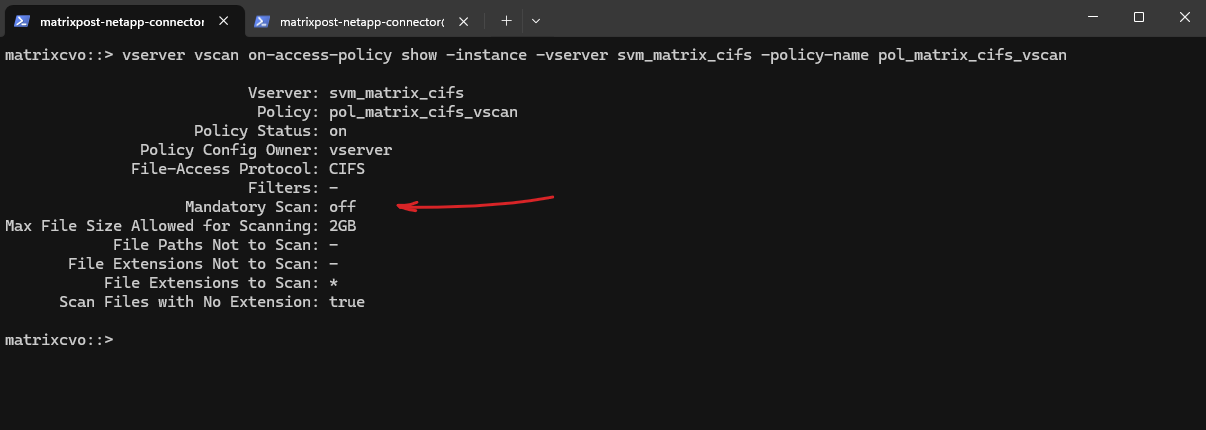
We can verify the full configuration details of our specified on-access scan policy by running the following command.
It shows which protocols, file operations, and scan settings are applied, allowing you to verify that the policy is correctly configured before or after enabling it. This is useful for confirming that the policy matches the intended VSCAN behavior for the SVM.
!! Note again!!
Mandatory Scan = Off means file access is allowed even if the antivirus scanner is unavailable or does not respond.
When Mandatory Scan = On, ONTAP blocks file access if the scan cannot be completed, providing higher security but potentially impacting availability if the AV service is down.
matrixcvo::> vserver vscan on-access-policy show -instance -vserver svm_matrix_cifs -policy-name pol_matrix_cifs_vscan
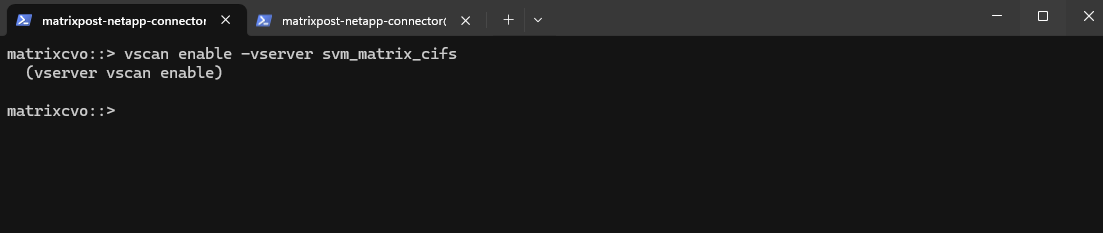
Enable VSCAN on the SVM
Globally enables antivirus scanning for the SVM.
Enabling VSCAN on the SVM activates the antivirus framework and allows ONTAP to start sending file operations to the configured scanner pools. Once this command is executed, on-access scanning becomes effective; if any issues occur, VSCAN can be immediately stopped again using the corresponding disable command without changing the existing configuration.
matrixcvo::> vscan enable -vserver svm_matrix_cifs

# to disable in case something went wrong
matrixcvo::> vscan disable -vserver svm_matrix_cifs
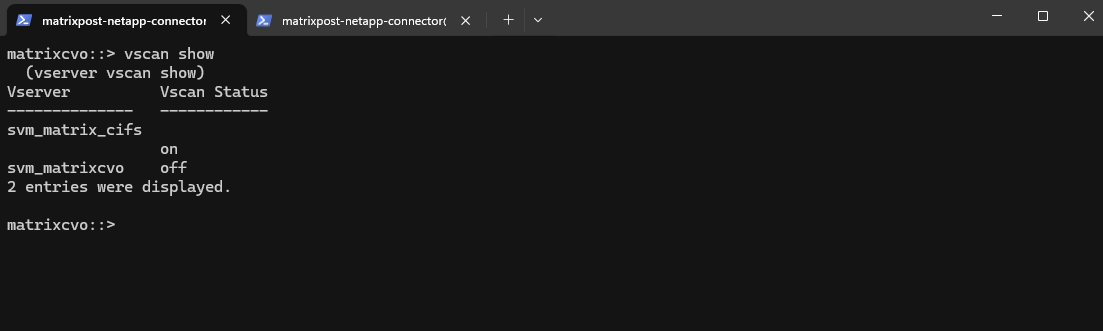
We can check for which SVMs VSCAN is enabled by running:
This output shows that VSCAN is enabled only for the
svm_matrix_cifsSVM, while the default and by NetApp console preconfigured SVM (svm_matrixcvo) does not have antivirus scanning enabled.VSCAN is only required on SVMs that provide CIFS/SMB file services.
matrixcvo::> vscan show
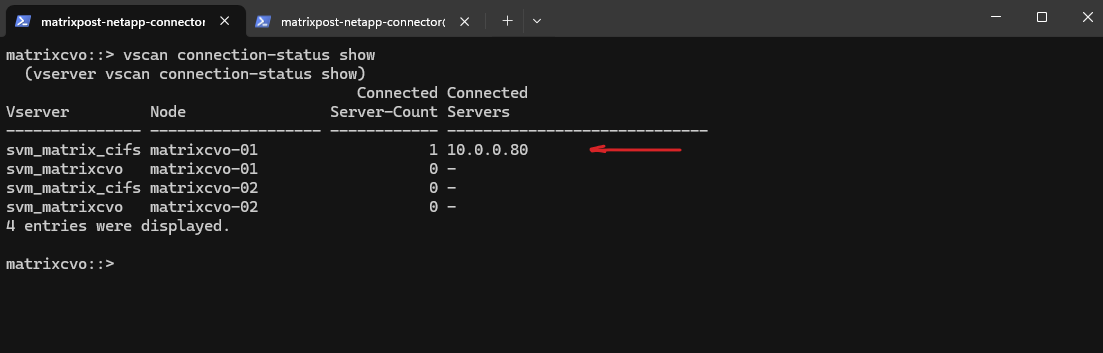
Verify VSCAN Connectivity and Status
After enabling VSCAN on the SVM, the next step is to verify that ONTAP can successfully communicate with the configured antivirus server.
vscan connection-status show provides a quick overview of whether the scanner is connected as shown below.
matrixcvo::> vscan connection-status show
vscan connection-status show-extended-stats displays detailed runtime information such as scan counters, connection state, and AV engine details.
matrixcvo::> set diagnostic
matrixcvo::*> vscan connection-status show-extended-stats
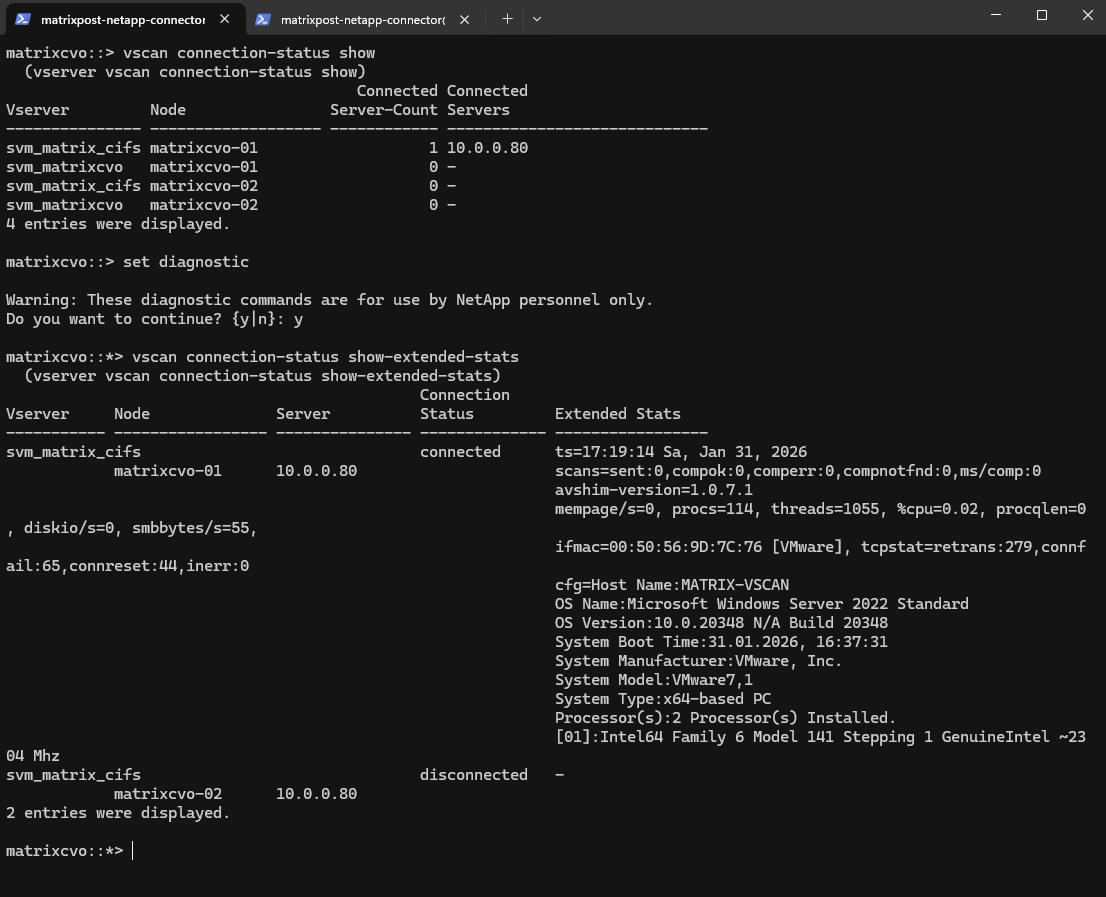
matrixcvo-01→ 10.0.0.80 = connected
The AV server is reachable and has an active session from node 01. Thets=15:17:14 Sa, Jan 31, 2026timestamp shows when the stats snapshot was taken, andavshim-version=1.0.7.1confirms the AV shim/connector component responding.Scans are not being triggered yet
scans=sent:0and all completion counters at 0 means: connection exists, but ONTAP hasn’t actually submitted any scan job through this session (yet), or your on-access policy conditions didn’t match the file operations you tested.Although both nodes (
matrixcvo-01+matrixcvo-01) host data LIFs, only the node currently serving active SMB sessions establishes a VSCAN connection. In this case, all CIFS traffic is handled by node 01, which is why only that node shows an active connection to the antivirus server. The second node remains disconnected until a failover or client access occurs, which is the expected behavior in an HA configuration.

Before any file access occurs, the VSCAN connection remains idle and the scan counters stay at zero. As soon as a file is created or accessed on the CIFS share, ONTAP forwards the file to the antivirus engine, which is reflected by an increase in the
scans=sentandcompokcounters. This change clearly confirms that VSCAN is actively scanning files as intended.The second output shows different values and changed after a EICAR test antivirus file being created on the CIFS share with
scans=sent:3, compok:3, comperr:1, compnotfnd:0This confirms that ONTAP successfully sent three scan requests to the antivirus engine, all of which were processed correctly, with one scan reporting a transient error during processing.
The value
ms/comp:4671indicates the average time in milliseconds required to complete a scan, whileavshim-version=1.0.7.1confirms the version of the AV Connector handling the request. Together, these values verify that VSCAN is actively scanning files and that the EICAR test triggered real antivirus activity.
matrixcvo::> set diagnostic
matrixcvo::*> vscan connection-status show-extended-stats
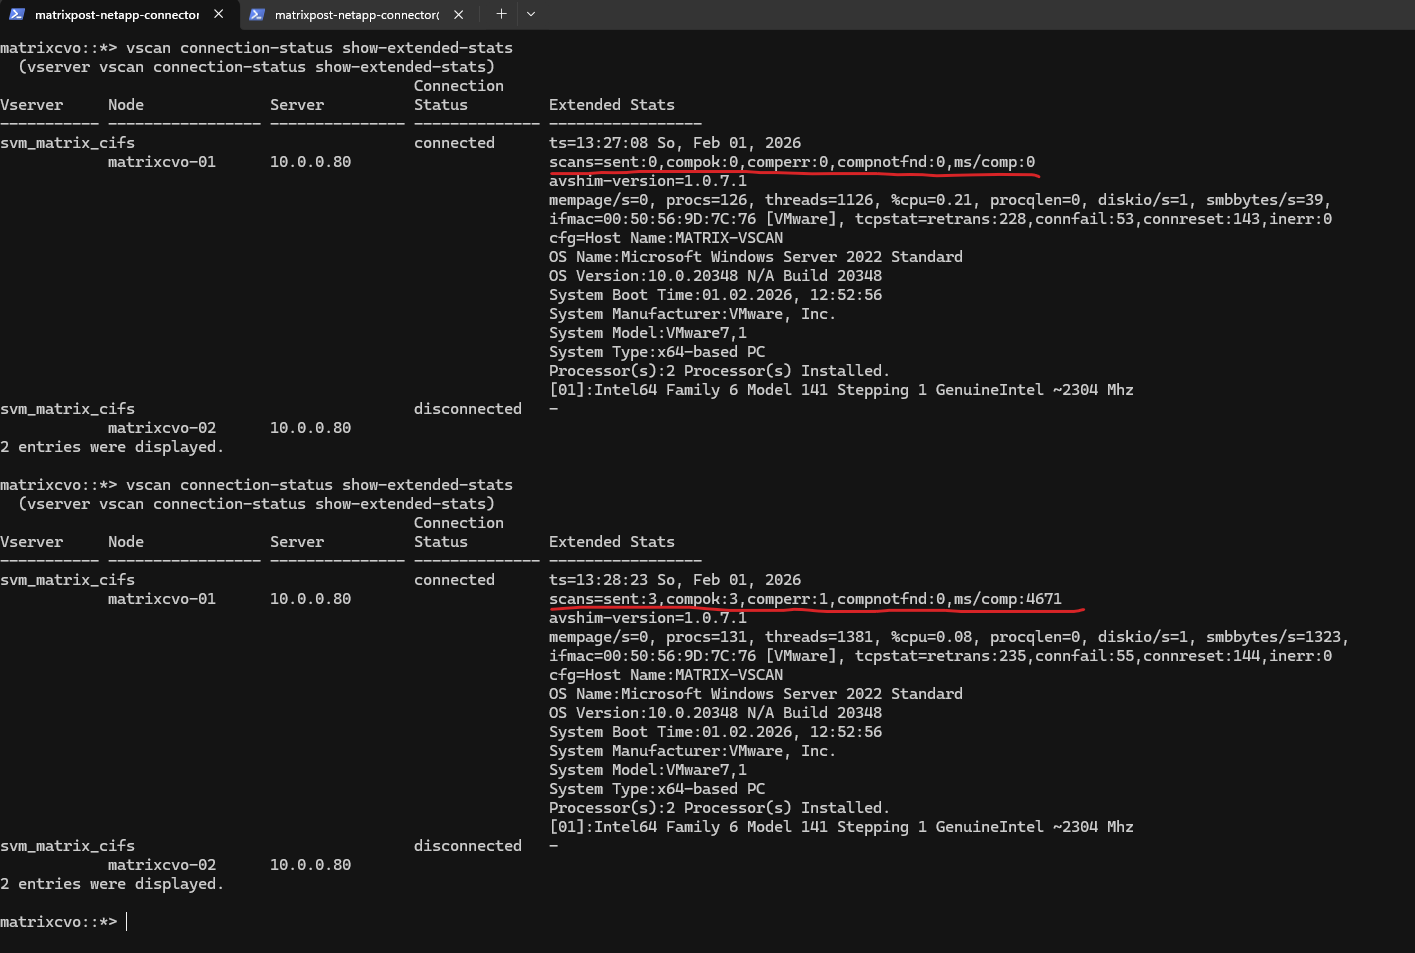
scans=sent:3
This value shows the total number of scan requests ONTAP has sent to the antivirus server.
In this case, the EICAR test triggered three scan requests, which is normal as a single file operation can result in multiple scan actions (for example, open, close, or metadata access).
compok:3
This indicates the number of scans that were successfully completed by the antivirus engine.
A matching value between scans=sent and compok confirms that the antivirus server processed all requests correctly.
comperr:1
This counter shows how many scan requests returned an error during processing.
A small number here is not uncommon and can occur due to timing issues, duplicate scan attempts, or a file being closed or removed before the scan completed. It does not necessarily indicate a malfunction, especially when successful scans are also present.
compnotfnd:0
This value indicates how many scan requests failed because the file was no longer available when the antivirus engine attempted to scan it.
A value of 0 means all requested files were still accessible during scanning, which is the expected behavior.
VSCAN Scanning Model: On-Access Only and No Initial Full SCAN
ONTAP VSCAN does not perform an initial or scheduled full scan of existing data. Instead, it operates purely in on-access mode, scanning files only when they are accessed by clients.
To scan existing data, files must be accessed manually or via an external scanning process, which then triggers VSCAN automatically.
You can use on-access scanning to check for viruses when clients open, read, rename, or close files over SMB. File operations are suspended until the external server reports the scan status of the file. If the file has already been scanned, ONTAP allows the file operation. Otherwise, it requests a scan from the server.
On-access scanning is not supported for NFS.
You can use on-demand scanning to check files for viruses immediately or on a schedule. We recommend that on-demand scans run only in off-peak hours to avoid overloading existing AV infrastructure, which is normally sized for on-access scanning.
The external server updates the scan status of checked files, so that file-access latency is reduced over SMB. If there were file modifications or software version updates, it requests a new file scan from the external server.
You can use on-demand scanning for any path in the SVM namespace, even for volumes that are exported only through NFS.
You typically enable both on-access and on-demand scanning modes on an SVM. In either mode, the antivirus software takes remedial action on infected files based on your software settings.
The ONTAP Antivirus Connector, provided by NetApp and installed on the external server, handles communication between the storage system and the antivirus software.
On-Access Scanning vs. On-Demand Scanning
Vscan performs virus scans when clients access files over SMB. You can configure Vscan to scan on-demand or on a schedule.
ONTAP supports both on-access and on-demand antivirus scanning. On-access scanning is triggered automatically whenever a file is accessed and provides real-time protection, while on-demand scanning allows administrators to manually or periodically scan existing data.
In most production environments, only on-access scanning is used, as on-demand scans can generate significant load and are typically reserved for compliance or one-time cleanup scenarios.
More about on-demand scanning you will find here https://docs.netapp.com/us-en/ontap/antivirus/configure-on-demand-scanning-concept.html.
Configure VSCAN On-Demand Scanning
An on-demand task defines the scope of the on-demand virus scan. You can specify the maximum size of the files to be scanned, the extensions and paths of the files to be included in the scan, and the extensions and paths of the files to be excluded from the scan. Files in subdirectories are scanned by default.
A maximum of ten (10) on-demand tasks can exist for each SVM, but only one can be active.
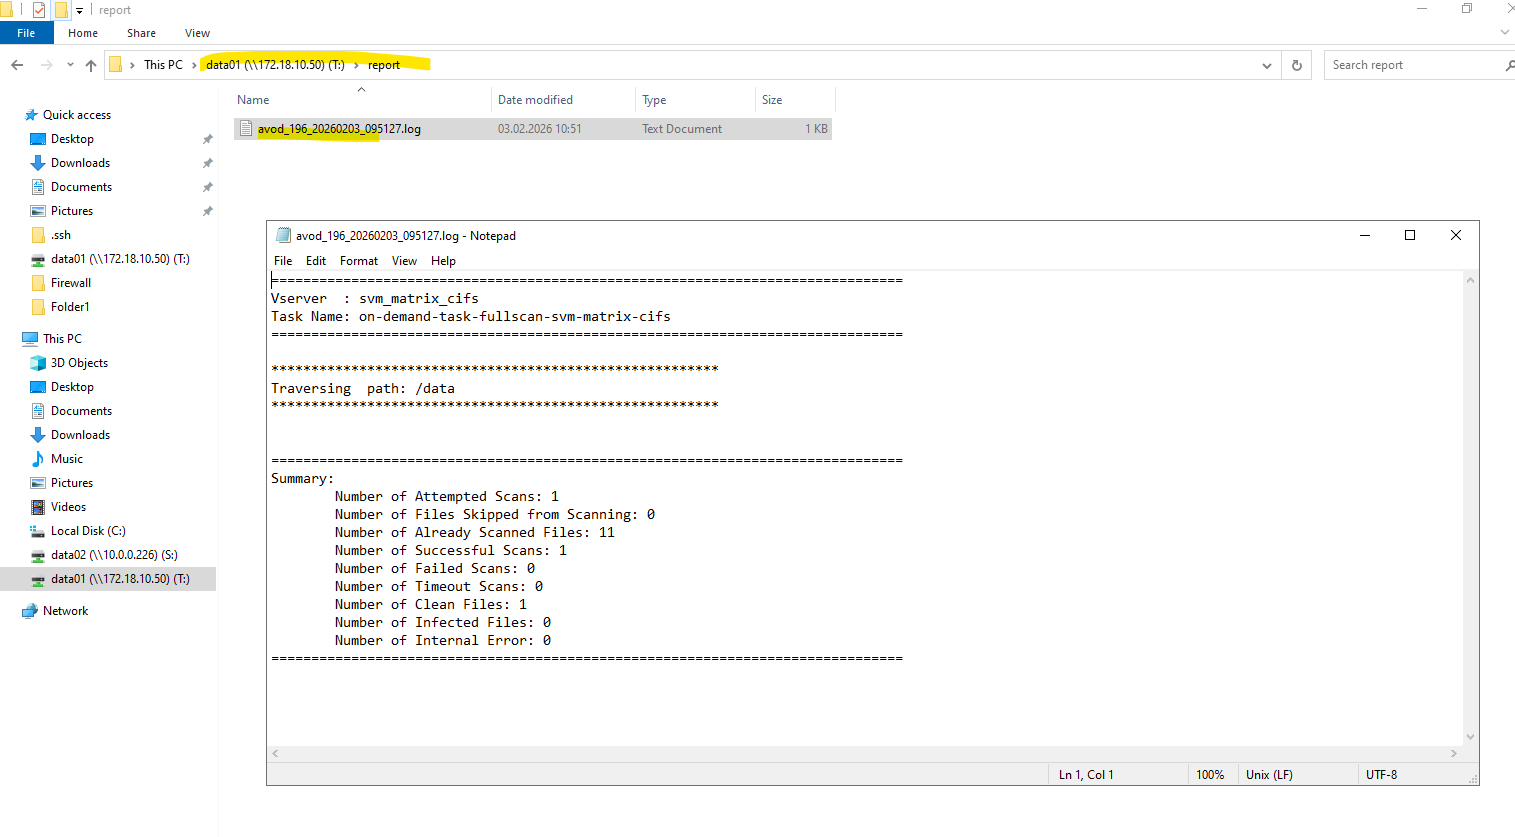
An on-demand task creates a report, which has information regarding the statistics related to the scans. This report is accessible with a command or by downloading the report file created by the task at the location defined.
You must have created an on-access policy. The policy can be a default or user-created one. Without the on-access policy, you cannot enable the scan.
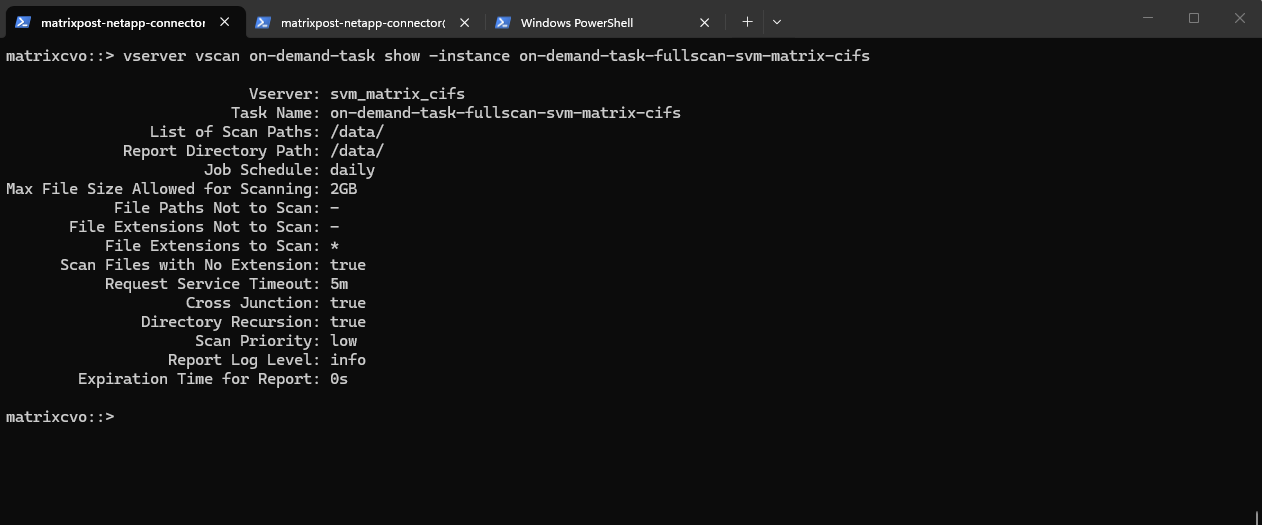
matrixcvo::> vserver vscan on-demand-task create -vserver svm_matrix_cifs -task-name on-demand-task-fullscan-svm-matrix-cifs -scan-paths "/data/" -report-directory "/data/" -schedule daily -max-file-size 2GB -scan-files-with-no-ext true -directory-recursion true

Verify that the on-demand task has been created:
matrixcvo::> vserver vscan on-demand-task show -instance on-demand-task-fullscan-svm-matrix-cifs
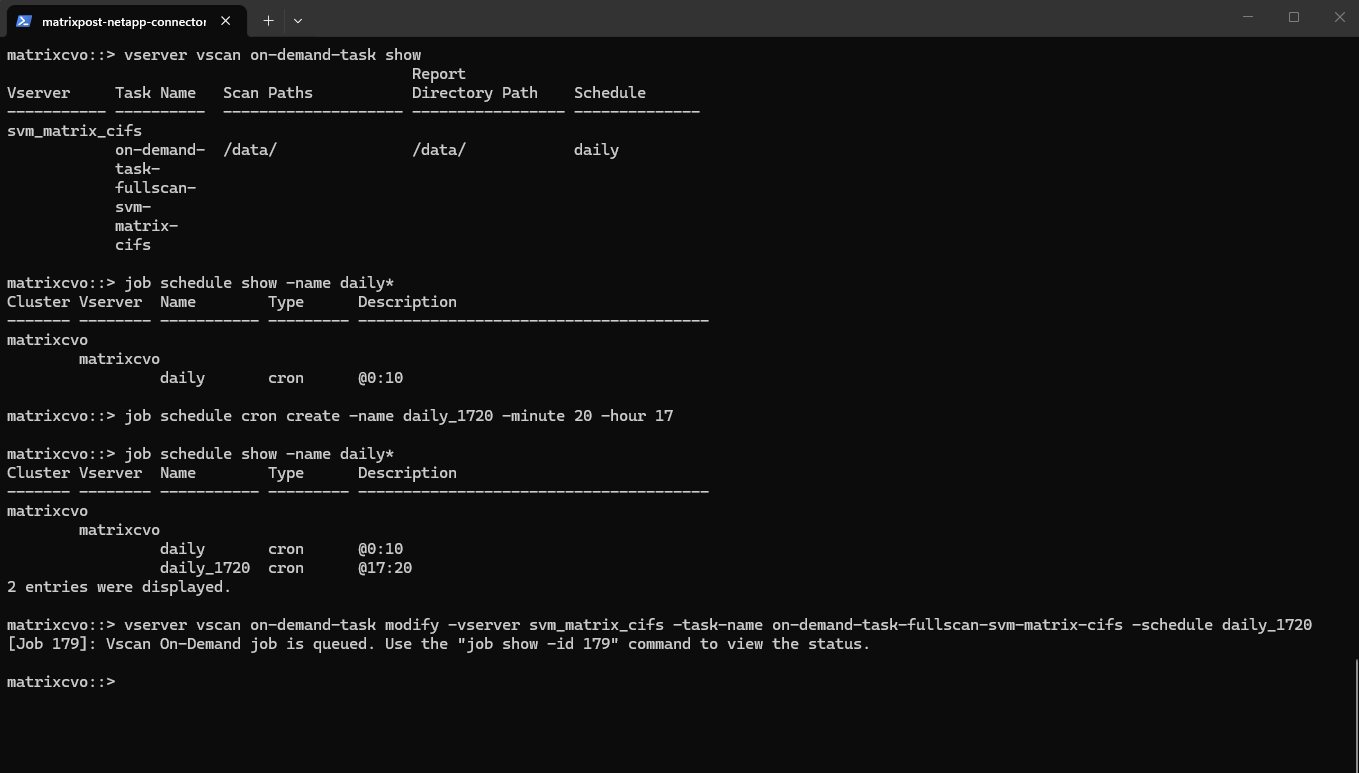
matrixcvo::> vserver vscan on-demand-task show
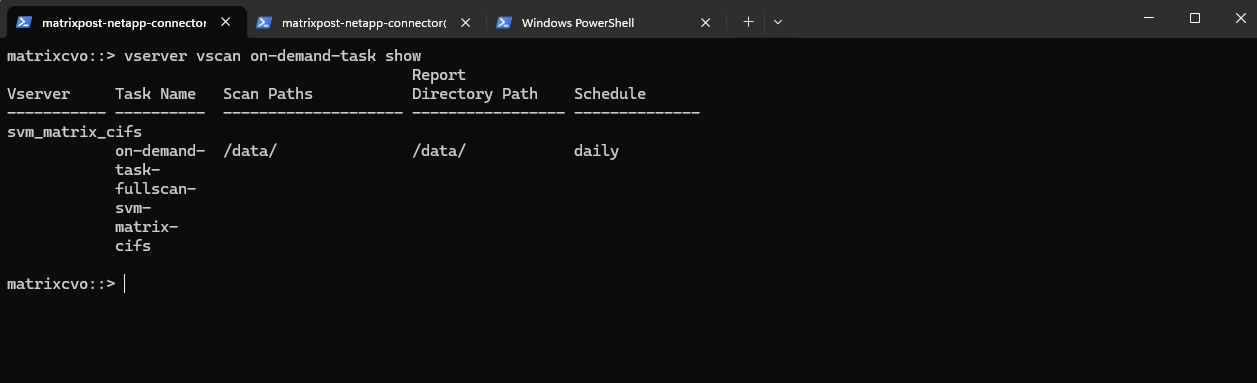
The on-demand VSCAN task is linked to the built-in ONTAP job schedule
daily, which in this cluster is defined as@0:10. This means the scan is executed every day at 00:10 in the cluster’s local time zone.
matrixcvo::> job schedule show -name daily
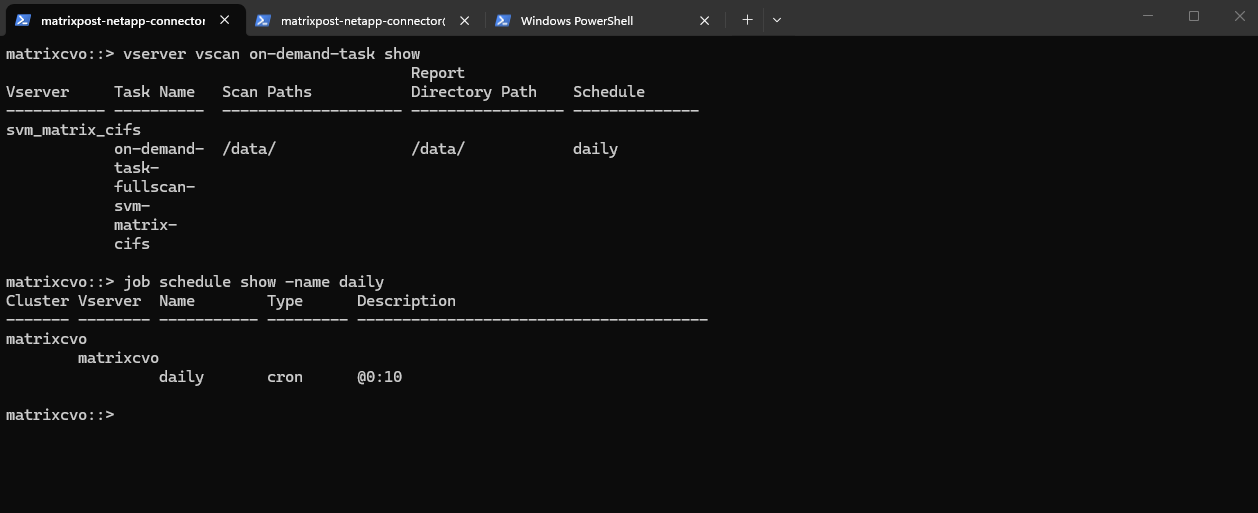
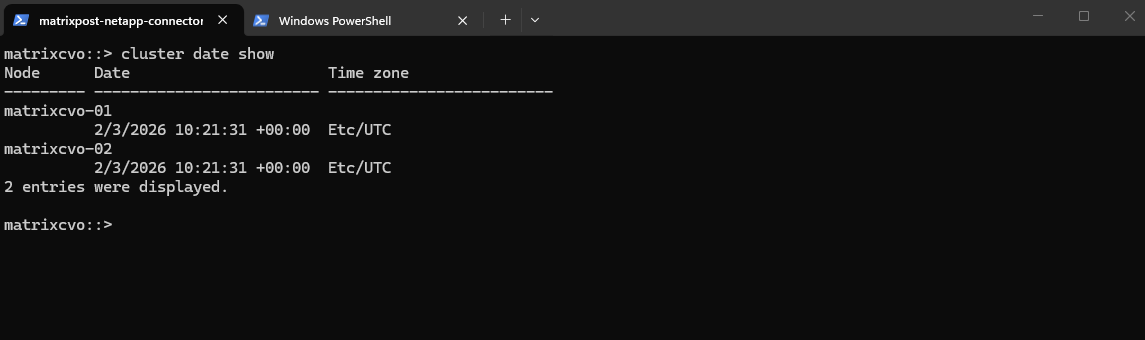
ONTAP job schedules follow the cluster time zone, which in many Cloud Volumes ONTAP deployments defaults to UTC. As a result, administrators must account for the time offset when planning scan windows.
To verify the cluster time we can run.
matrixcvo::> cluster date show
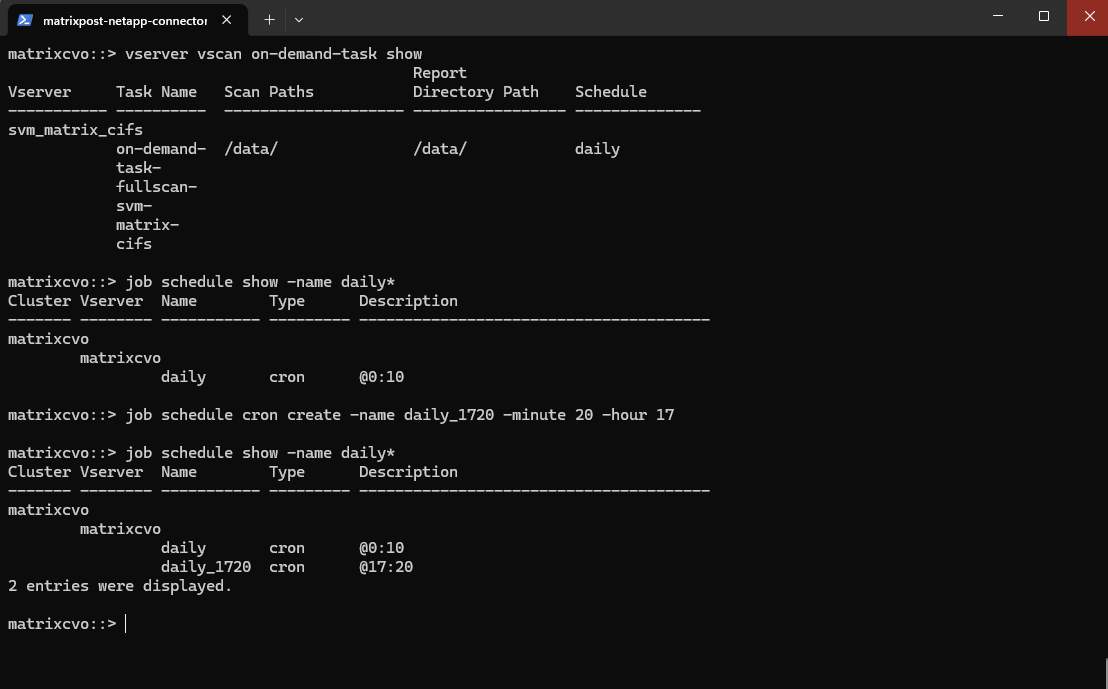
Create a new schedule and define a specific time to run the scan.
matrixcvo::> job schedule cron create -name daily_1720 -minute 20 -hour 17
matrixcvo::> job schedule show -name daily*
Attach the new schedule to our existing on-demand-task.
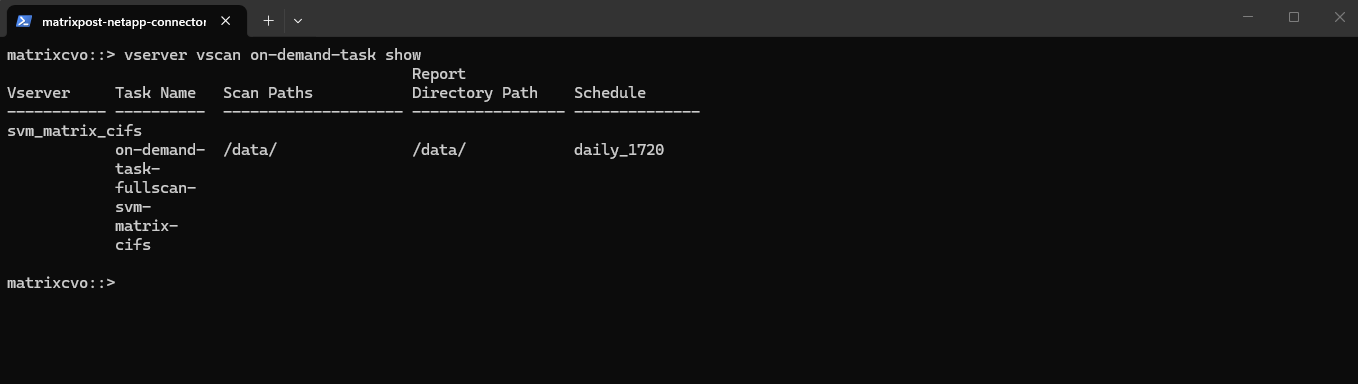
matrixcvo::> vserver vscan on-demand-task modify -vserver svm_matrix_cifs -task-name on-demand-task-fullscan-svm-matrix-cifs -schedule daily_1720
matrixcvo::> vserver vscan on-demand-task show
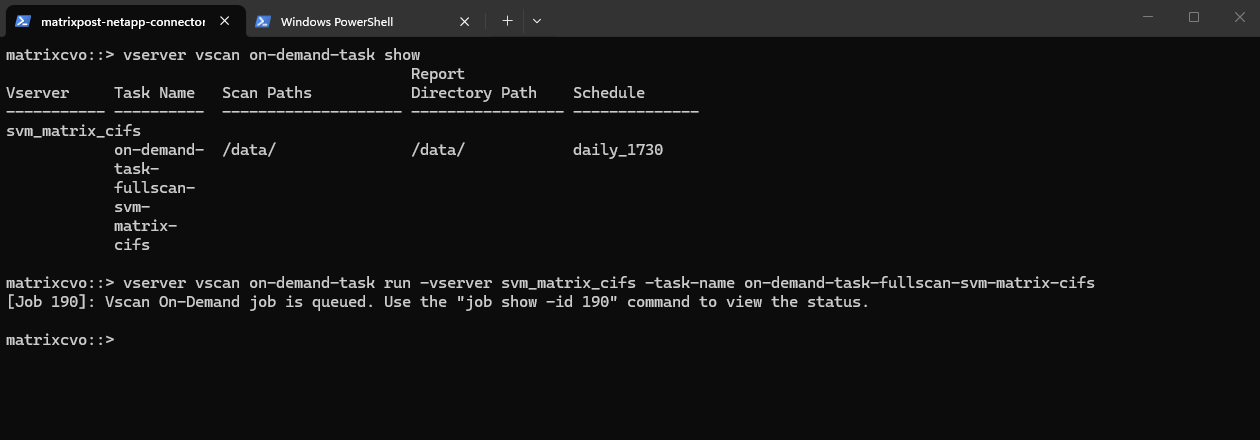
To start virus scanning immediately for an On-Demand task, we can use the vserver vscan on-demand-task run command as shown below.
matrixcvo::> vserver vscan on-demand-task run -vserver svm_matrix_cifs -task-name on-demand-task-fullscan-svm-matrix-cifs
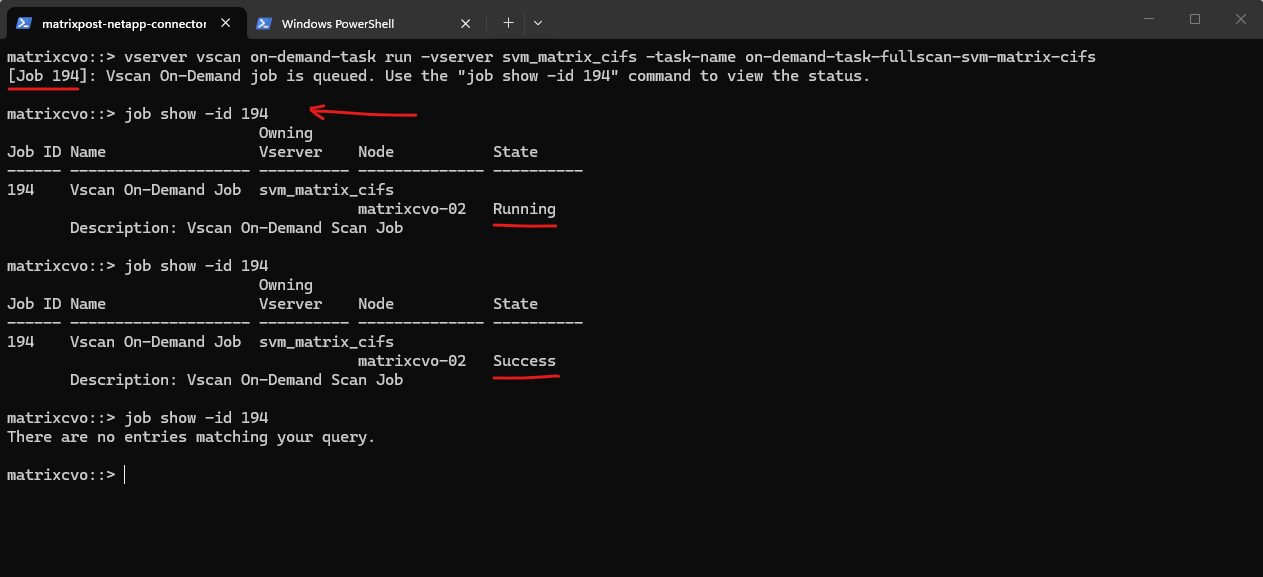
You can use the job show command to view the status of the job. You can use the job pause and job resume commands to pause and restart the job, or the job stop command to end the job. Learn more about job in the ONTAP command reference.
ONTAP jobs are temporary runtime objects that automatically disappear from the job list once they complete successfully. Persistent information about an on-demand VSCAN scan is stored in the generated scan report rather than in the job history.
matrixcvo::> job show -id 194

# pause the job
matrixcvo::> job pause

# restart the job
matrixcvo::> job resume
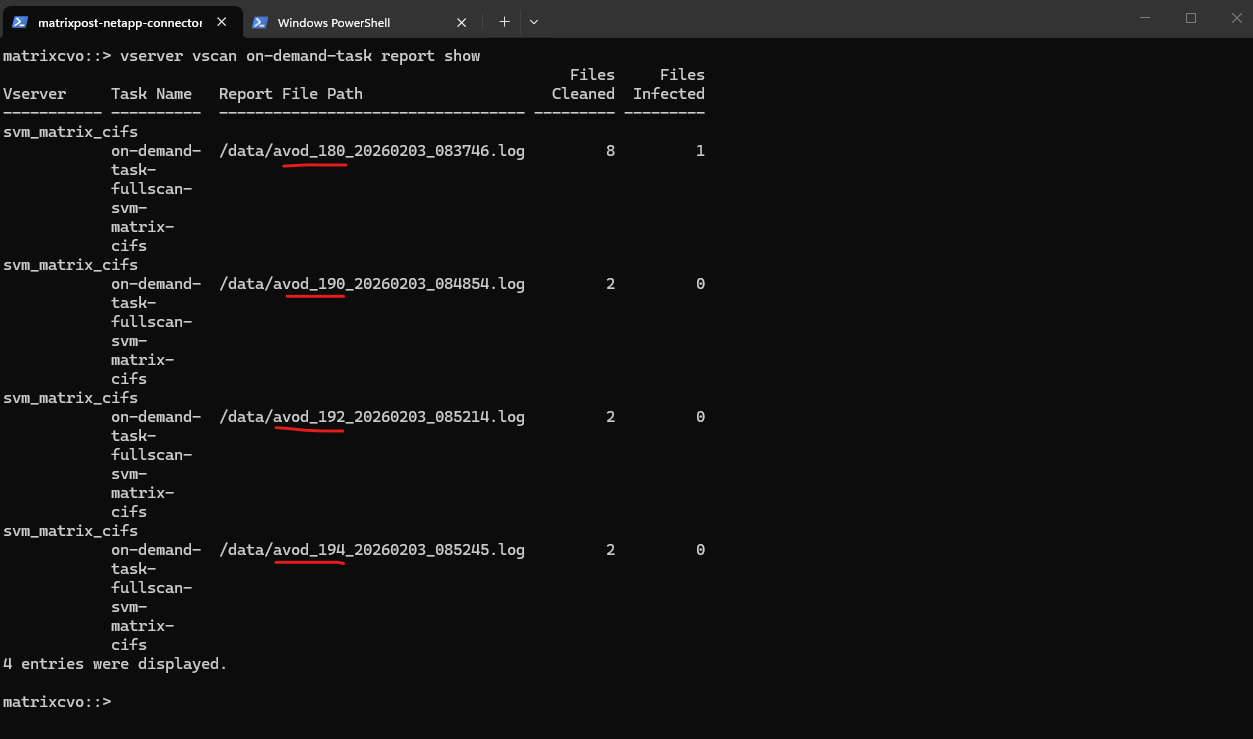
The vserver vscan on-demand-task report show command displays information about the On-Demand reports belonging to the Vserver.
A new report record is generated at the end of an On-Demand task run. If you do not specify any parameters, the command displays the following information about all On-Demand tasks as shown below.
matrixcvo::> vserver vscan on-demand-task report show
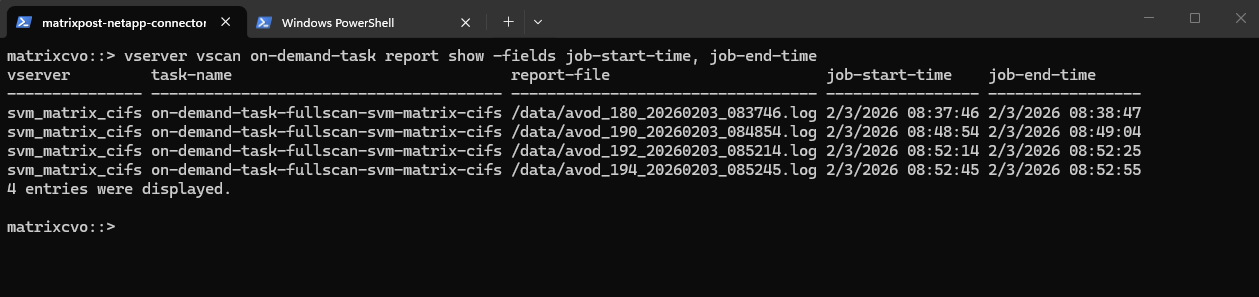
We can specify the -fields parameter to specify which fields of information to display about On-Demand report. In addition to the fields above, we can display the following fields:
- Job ID
- Job duration
- Number of attempted scans
- Number of files skipped from scanning
- Number of already scanned files
- Number of successful scans
- Number of failed scans
- Number of timed-out scans
- Job start time
- Job end time
matrixcvo::> vserver vscan on-demand-task report show -fields job-start-time, job-end-time
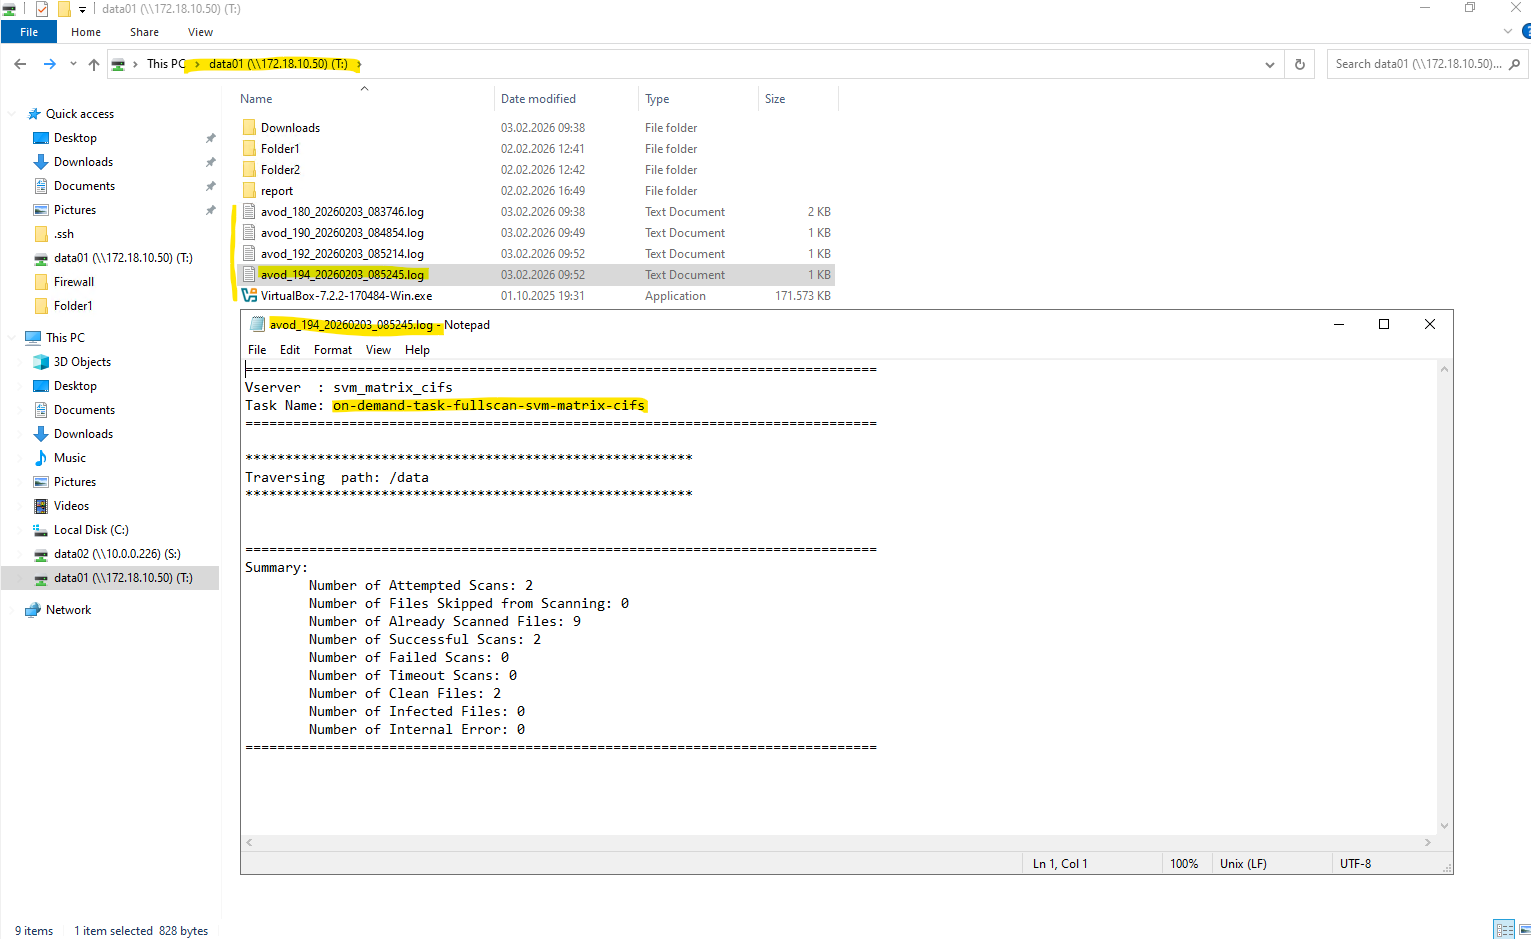
So far my reports will be stored directly on the root path -report-directory "/data/" which is the SVM namespace (junction path) of my volume and set for the creation of the on-demand task previously.
matrixcvo::> vserver vscan on-demand-task create -vserver svm_matrix_cifs -task-name on-demand-task-fullscan-svm-matrix-cifs -scan-paths "/data/" -report-directory "/data/" -schedule daily -max-file-size 2GB -scan-files-with-no-ext true -directory-recursion true
I want to change this to store them in a dedicated folder on the volume instead. Therefore we can run the vserver vscan on-demand-task modify command below.
When specifying a path for a CIFS share in the ONTAP CLI, we must use the SVM namespace (junction path) rather than the CIFS share name.
Even though clients access the share as
\\<server>\data01, the underlying filesystem path is/data, so the correct report directory becomes/data/report/and not/data01/report/. ONTAP always operates on namespace paths, while share names are only used for client.
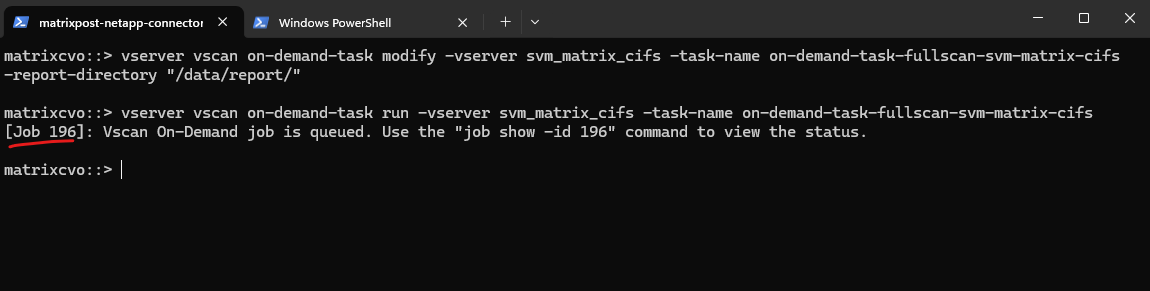
matrixcvo::> vserver vscan on-demand-task modify -vserver svm_matrix_cifs -task-name on-demand-task-fullscan-svm-matrix-cifs -report-directory "/data/report/"

To test I will run the on-demand task again.
matrixcvo::> vserver vscan on-demand-task run -vserver svm_matrix_cifs -task-name on-demand-task-fullscan-svm-matrix-cifs
Looks good and the report is now stored in the report folder.
Source: https://docs.netapp.com/us-en/ontap/antivirus/configure-on-demand-scanning-concept.html
Disable Microsoft Defender on Client and ServerProtect Host
Before validating ONTAP VSCAN functionality, it is important to ensure that Microsoft Defender is disabled on both the client accessing theCIFS share and theServerProtect server itself.
If Microsoft Defender remains active, it will intercept and delete test files (such as EICAR) locally before they ever reach ServerProtect, leading to misleading test results.
More about Microsoft Defender for Endpoint and the EICAR Anti-Virus Test File you will also find in my following post.
Disabling Defender ensures that all file scanning is handled exclusively by ONTAP VSCAN and the ServerProtect engine, allowing the antivirus workflow to be tested correctly end-to-end.
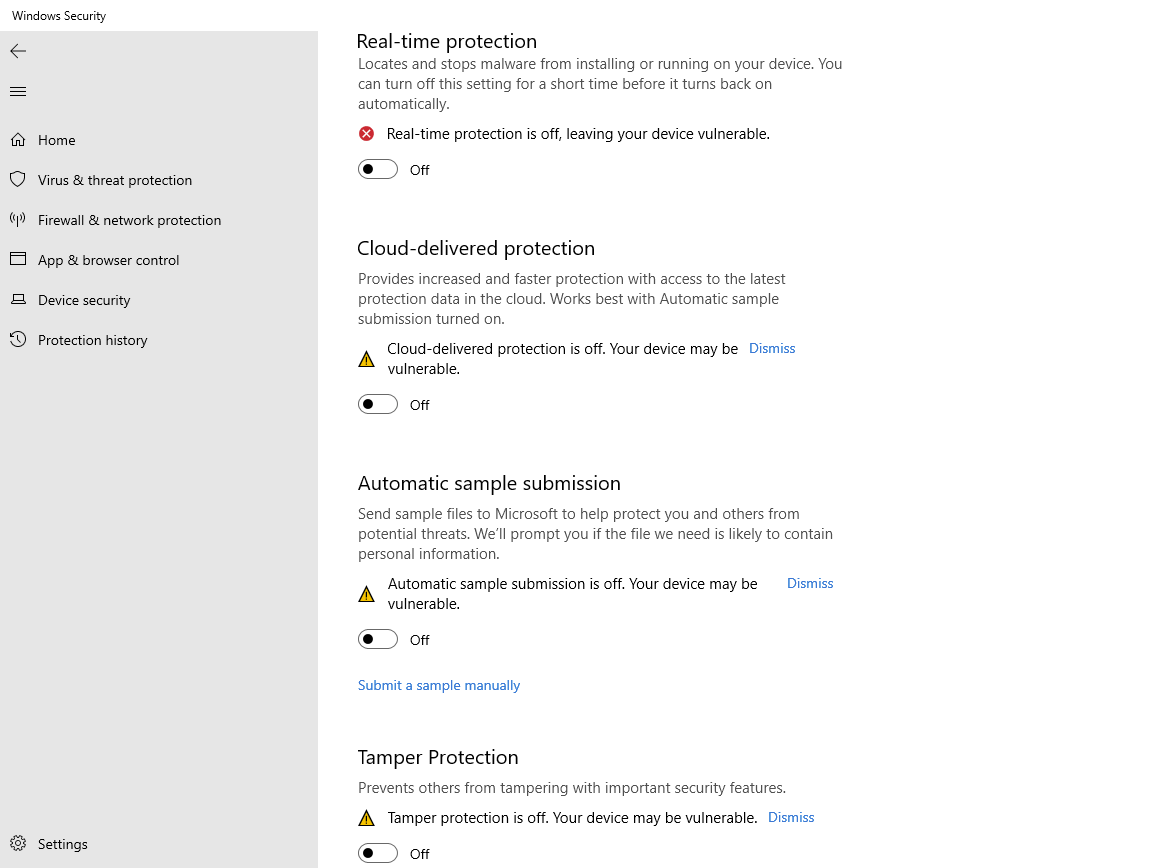
In my case the initial test failed to produce scan results in ServerProtect because Microsoft Defender was still active on the AV server and removed the EICAR file before ServerProtect could process it.
The EICAR test file resp. the required content you will find here https://en.wikipedia.org/wiki/EICAR_test_file.
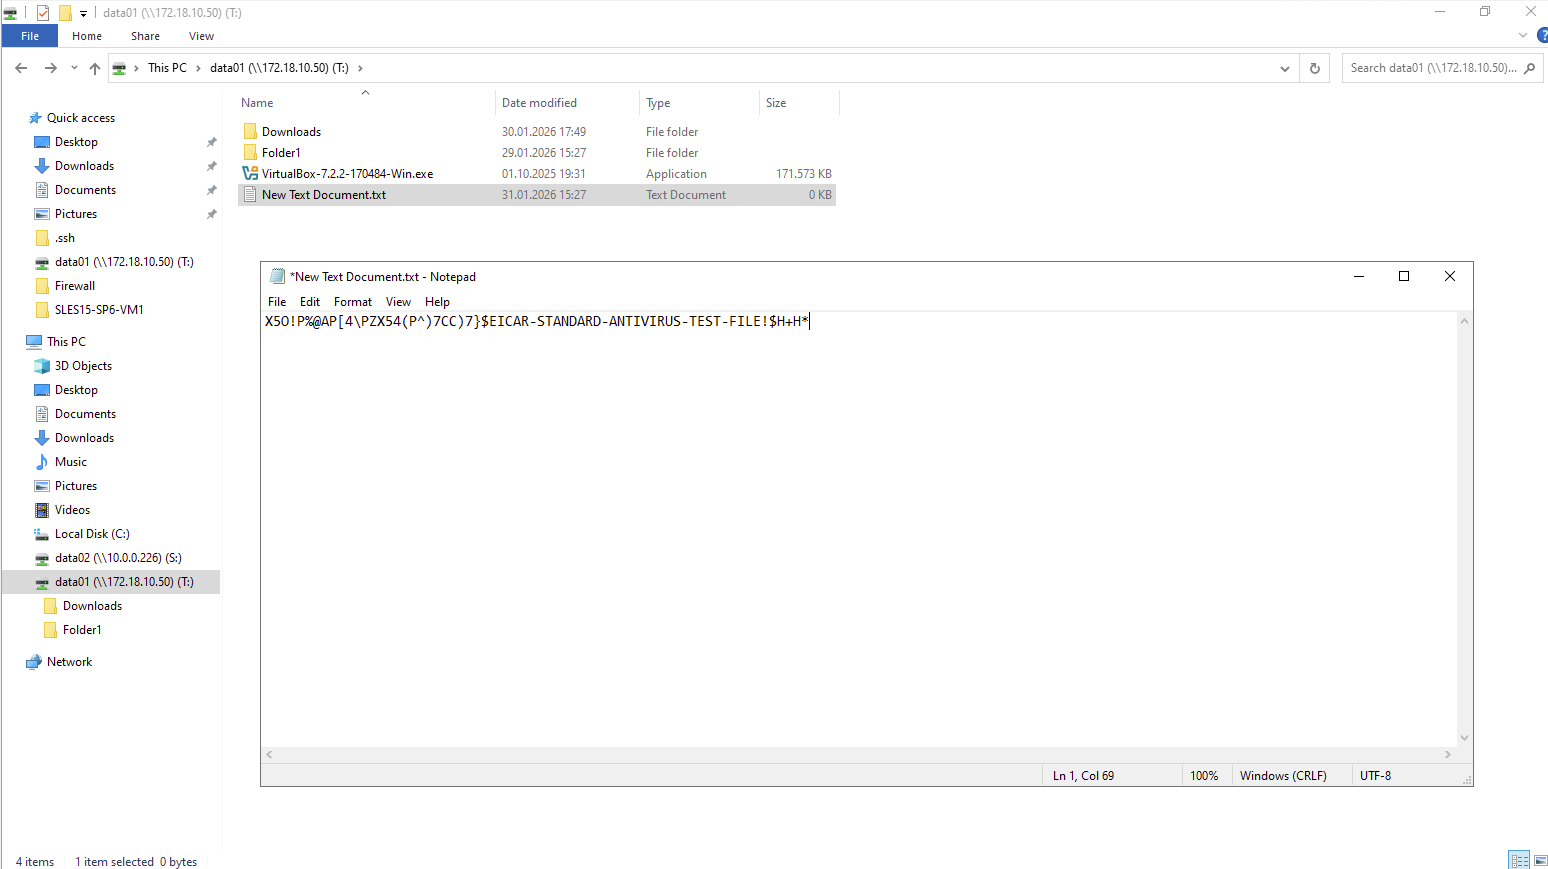
When ONTAP Vscan is enabled, file access requests matching the configured policy are evaluated for inspection. If the file is not already in the scan cache, ONTAP triggers a scan request to Trend Micro ServerProtect via the AV Connector; the engine then returns a verdict which ONTAP uses to allow or block the access.
When a user accesses a file, ONTAP checks its local cache and, if a scan is required, sends a request to Trend Micro ServerProtect via the AV Connector. The Trend Micro server then “pulls” the file data directly from the ONTAP volume to inspect it, returning a verdict that allows ONTAP to either permit or block the user’s access. This “pull-based” workflow ensures that only necessary data is scanned, preventing the storage system from being overwhelmed by redundant traffic.
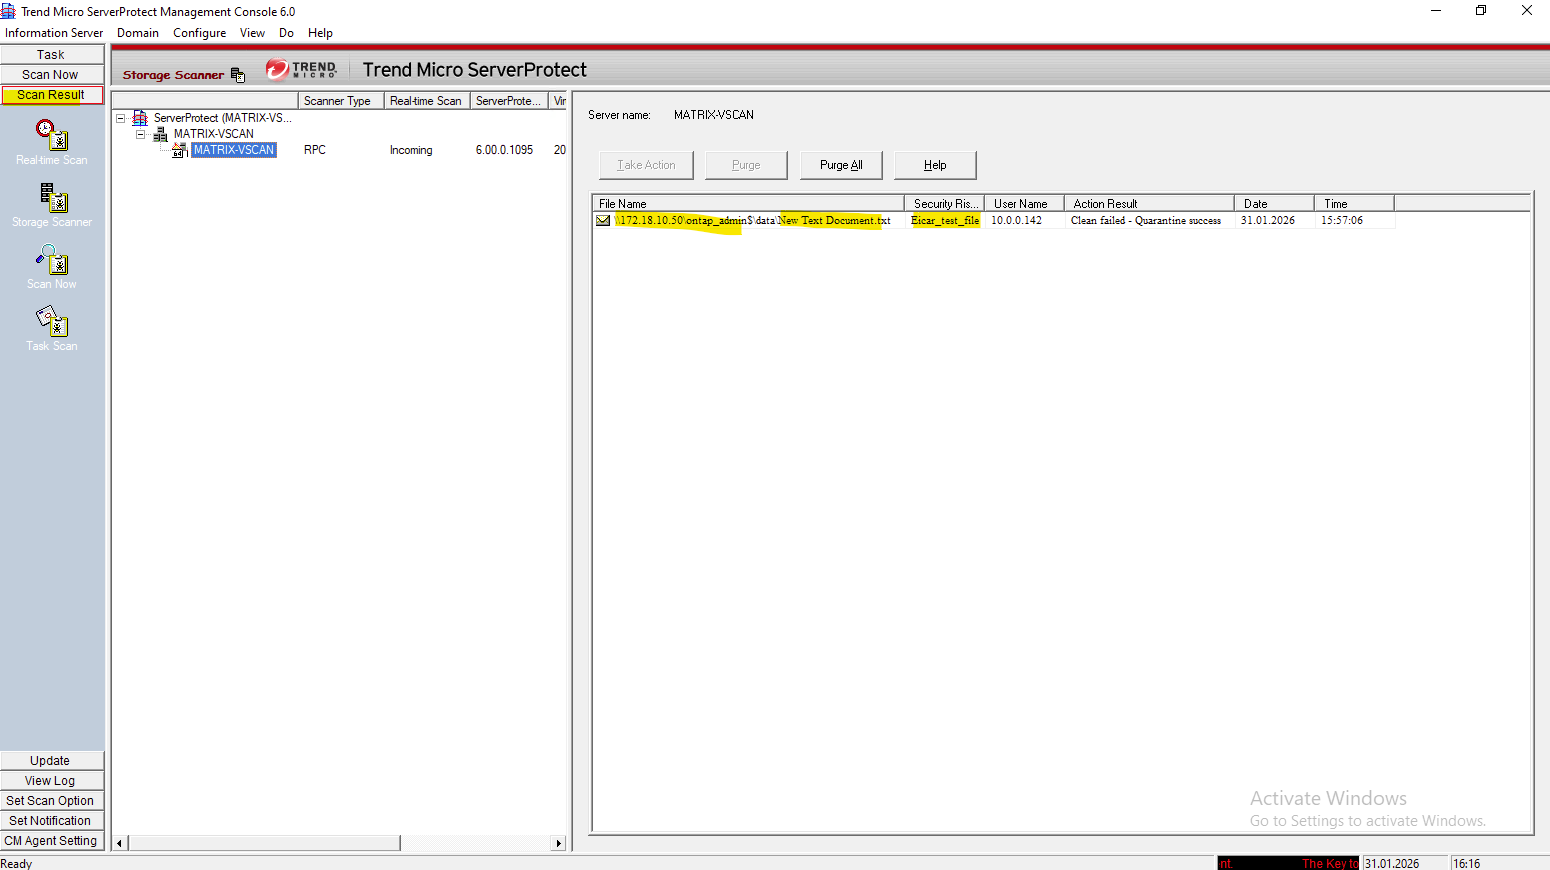
After disabling Defender, ServerProtect successfully detected the test file and the scan results became visible in the console, confirming correct VSCAN operation.
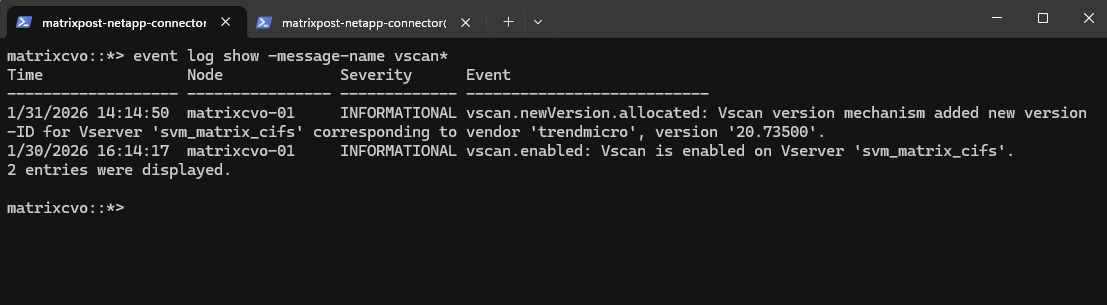
The event log show -message-name vscan* command displays only VSCAN-related error and status events recorded by ONTAP.
It does not log individual scan operations or virus detections, as successful scans are intentionally not written to the event log. This behavior is expected and ensures that antivirus scanning does not impact system performance.
matrixcvo::> set diagnostic
matrixcvo::*> event log show -message-name vscan*
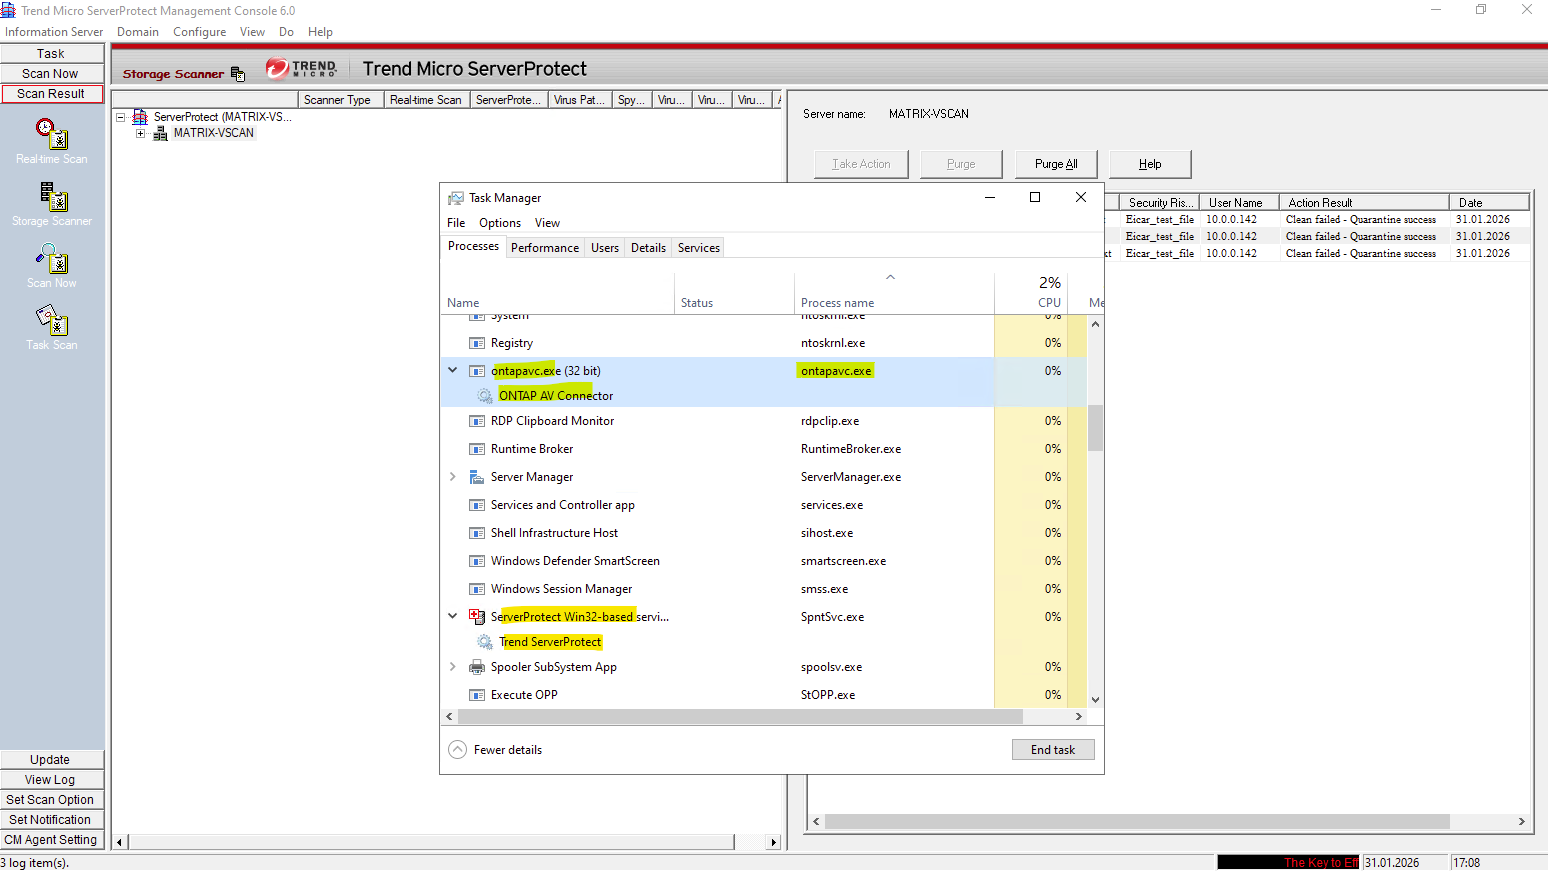
On the antivirus server, two processes are especially important during VSCAN operation: ontapavc.exe and spntsvc.exe.
The ONTAP AV Connector service (ontapavc.exe) handles communication between ONTAP and the antivirus engine, while spntsvc.exe represents the Trend Micro ServerProtect scanning service itself.
By monitoring these processes in Task Manager, you can directly observe how much CPU, memory, and I/O load is generated during active file scans.
When ServerProtect Finds a Virus (Virus Actions)
ServerProtect allows you to configure the type of action that the software takes on infected files. You can choose a specific course of actions to handle certain types of viruses at will. The Damage Cleanup Engine is made more powerful by including the feature of Generic Clean.
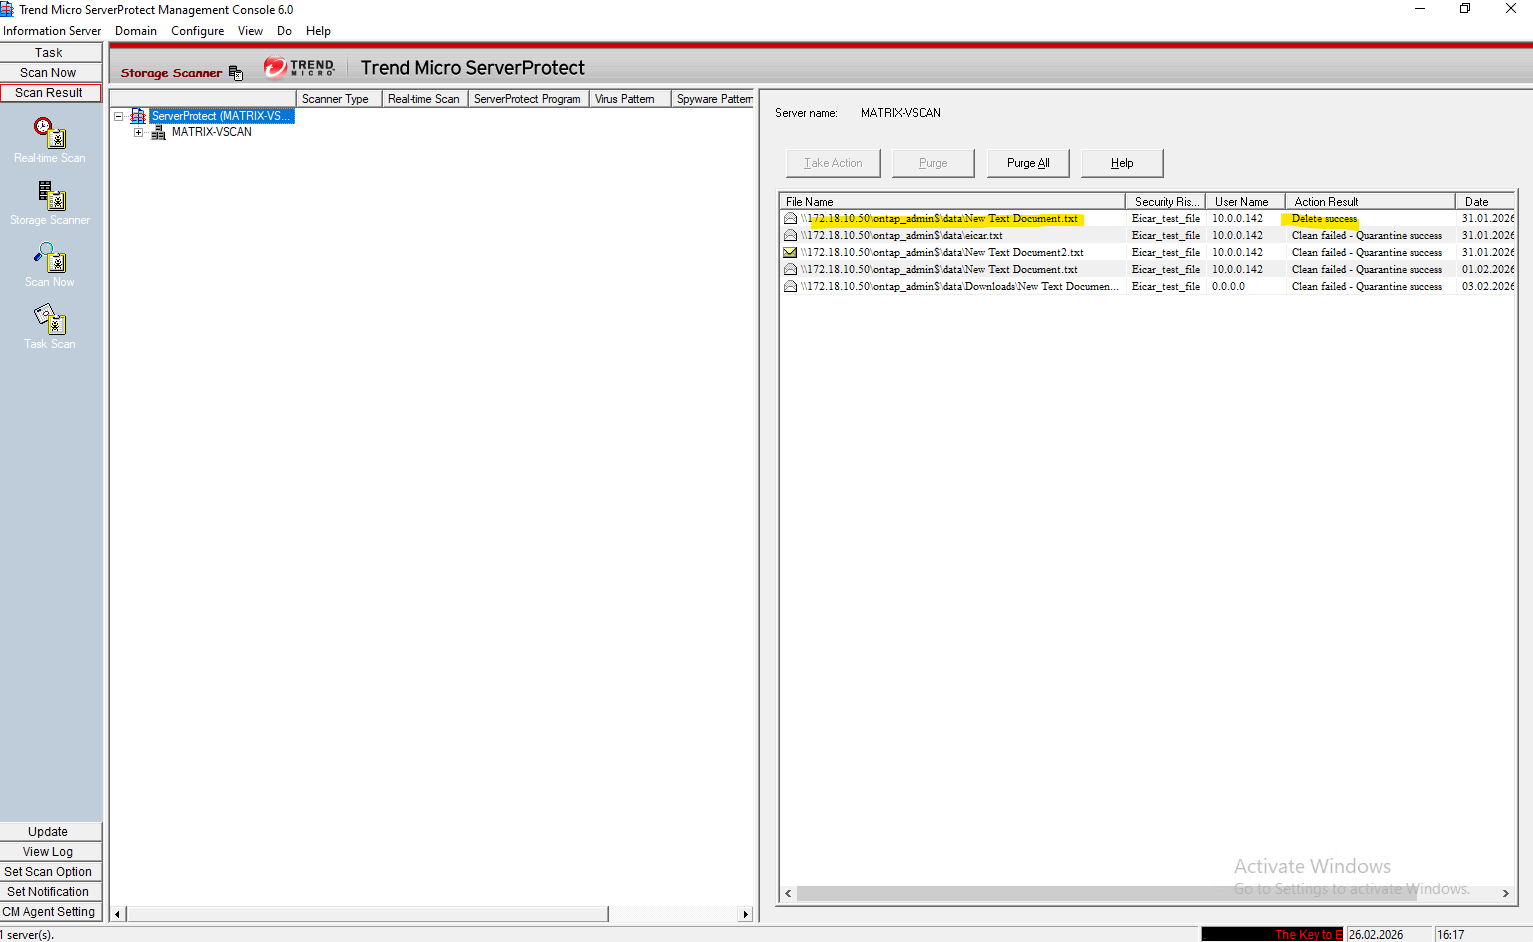
From the Scan Result window, you can manually intervene by selecting an infected entry and choosing Clean, Restore, Rename, or Delete.
The 4 actions you found in the ScanResult tab are your manual tools for managing the aftermath of infections, while the ONTAP policy handles the immediate, automated “Allow/Deny” decision at the storage level
- Clean: Attempts to remove the virus code from the file.
- Restore: Allows you to recover a file that was previously moved or changed during a scan (often used if a file was quarantined).
- Rename: Changes the file extension (typically to
.vir) to prevent it from being executed. - Delete: Permanently removes the infected file from the storage.
The Take Action button in the Trend Micro console allows you to manually execute these 4 actions.
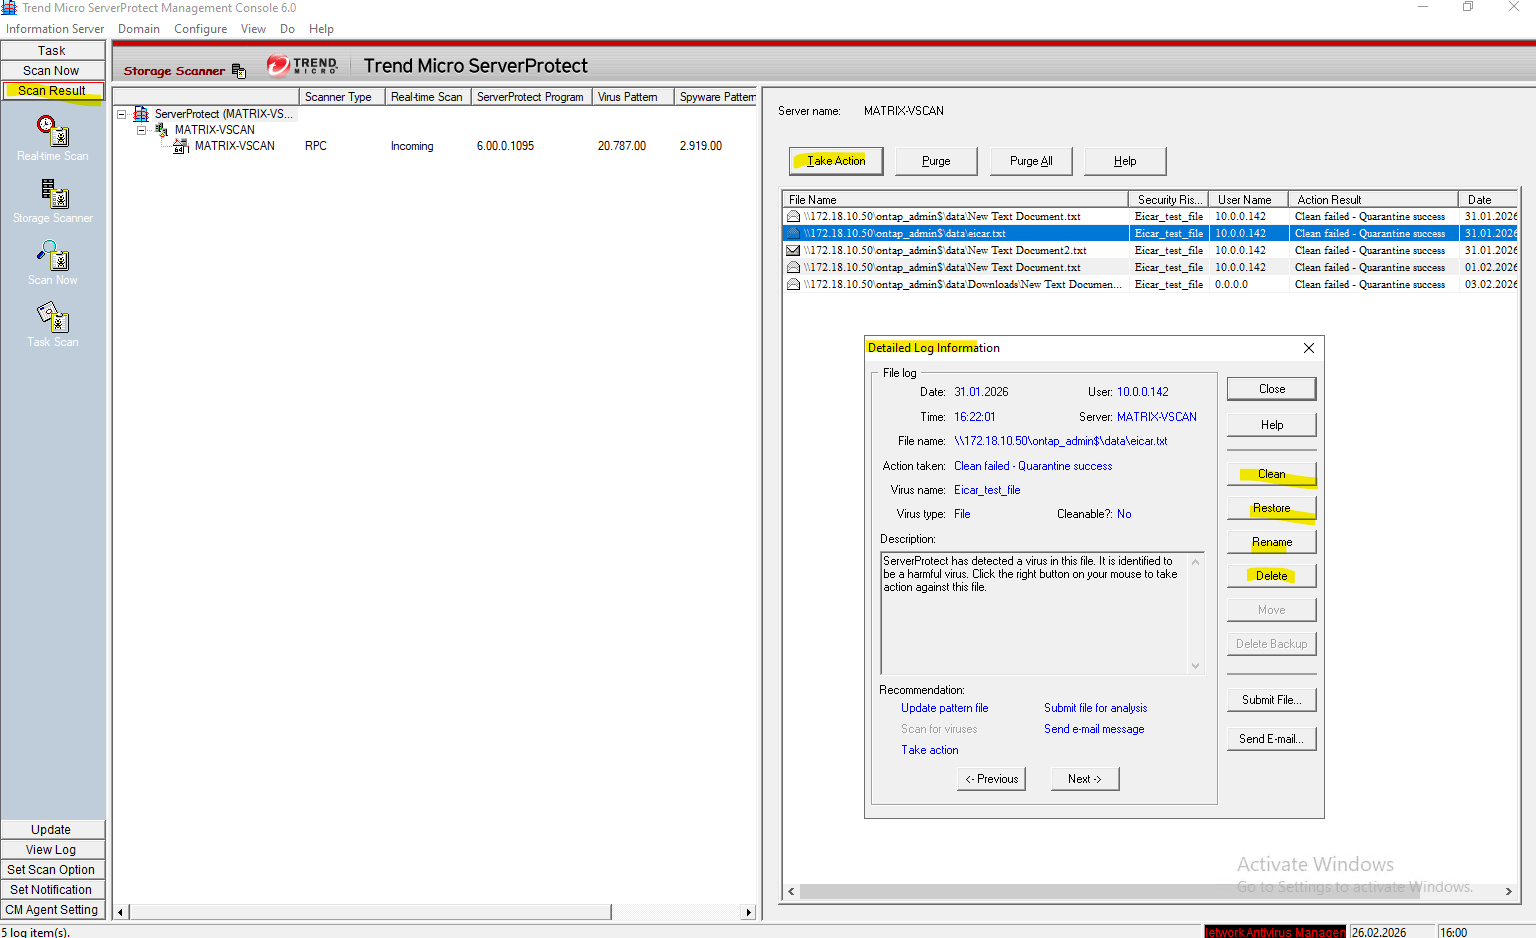
Below for example I will delete the selected file by clicking on Delete.
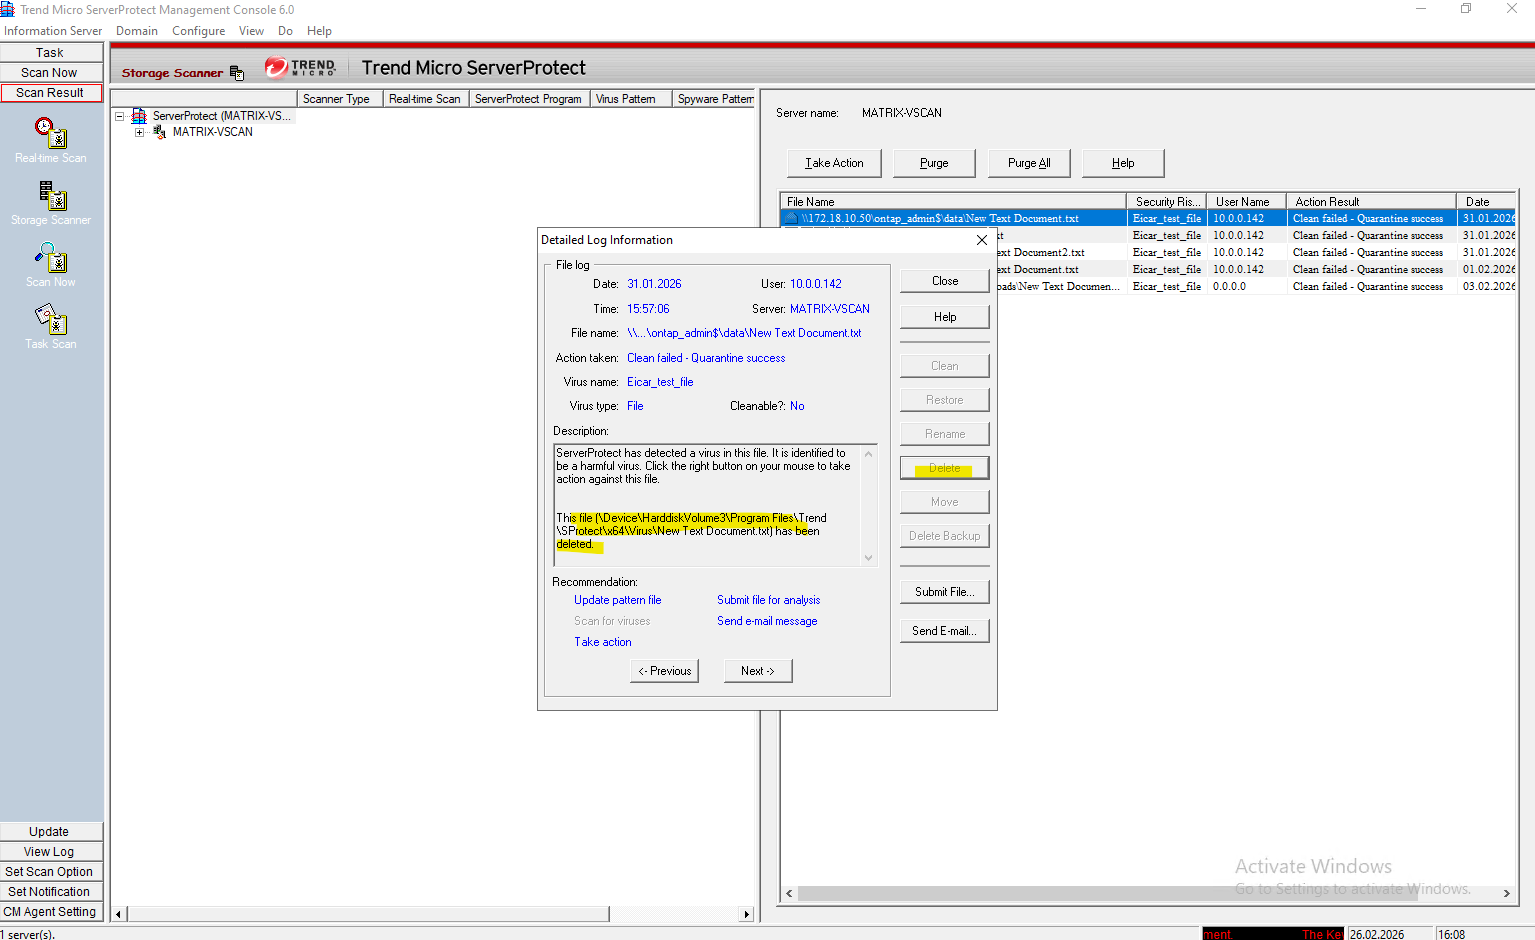
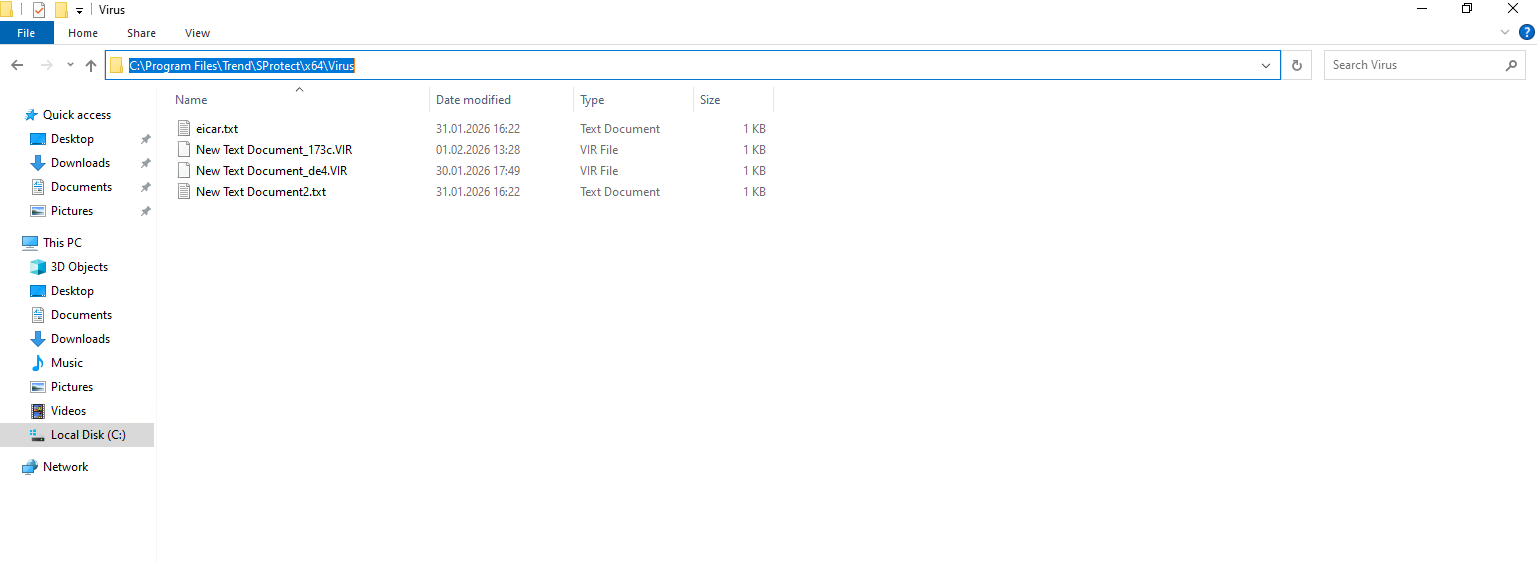
When you click the Delete button, you are instructing ServerProtect to permanently wipe the files that it has already staged in the local
C:\Program Files\Trend\SProtect\x64\Virusquarantine folder. Since the files were already moved there from the ONTAP volume during the initial detection.
The selected log and its Action Result is updated and will show that the file was successfully deleted.
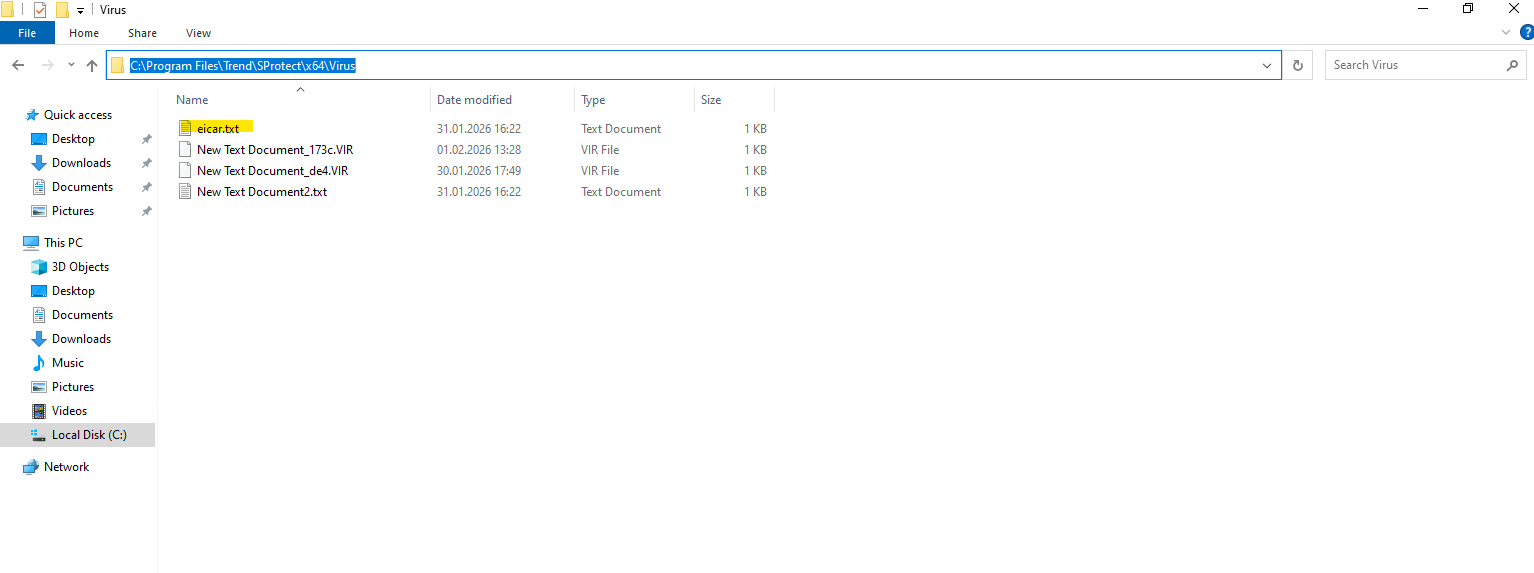
“Purge” in the Scan Results is about the record, not the file. It clears/deletes the scan result entry (the log row) so it no longer shows up in that results list, but it does not remove the quarantined object as shown below.
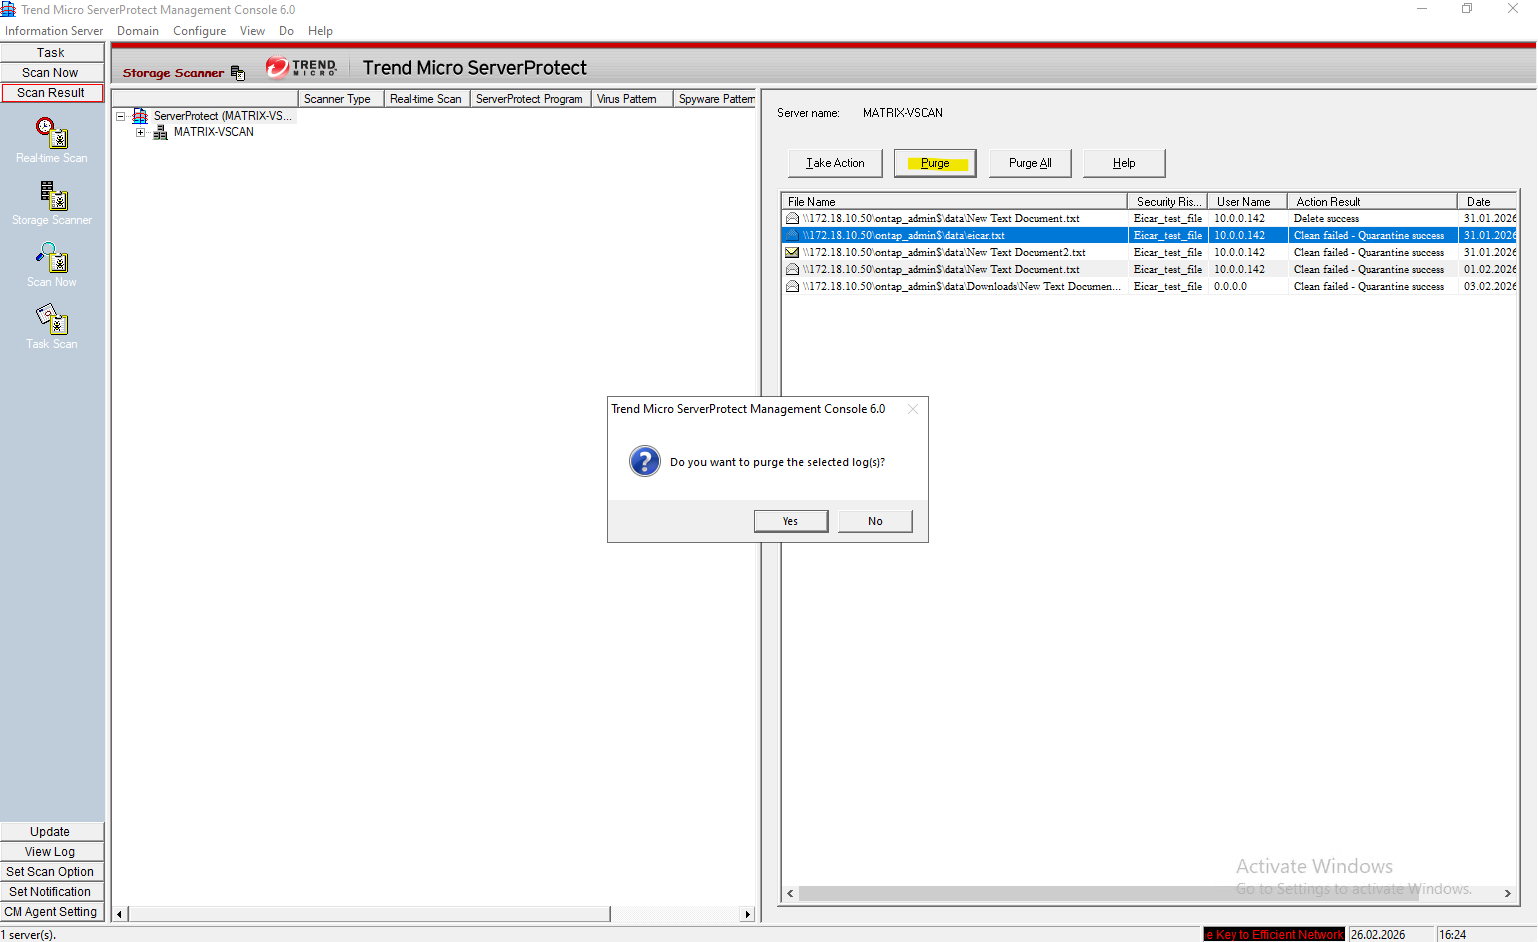
After just purging the log, the quarantined object is still staged in the local
C:\Program Files\Trend\SProtect\x64\Virusquarantine folder.
Troubleshooting
SVM Not Connecting to ServerProtect Due to Domain Dependency
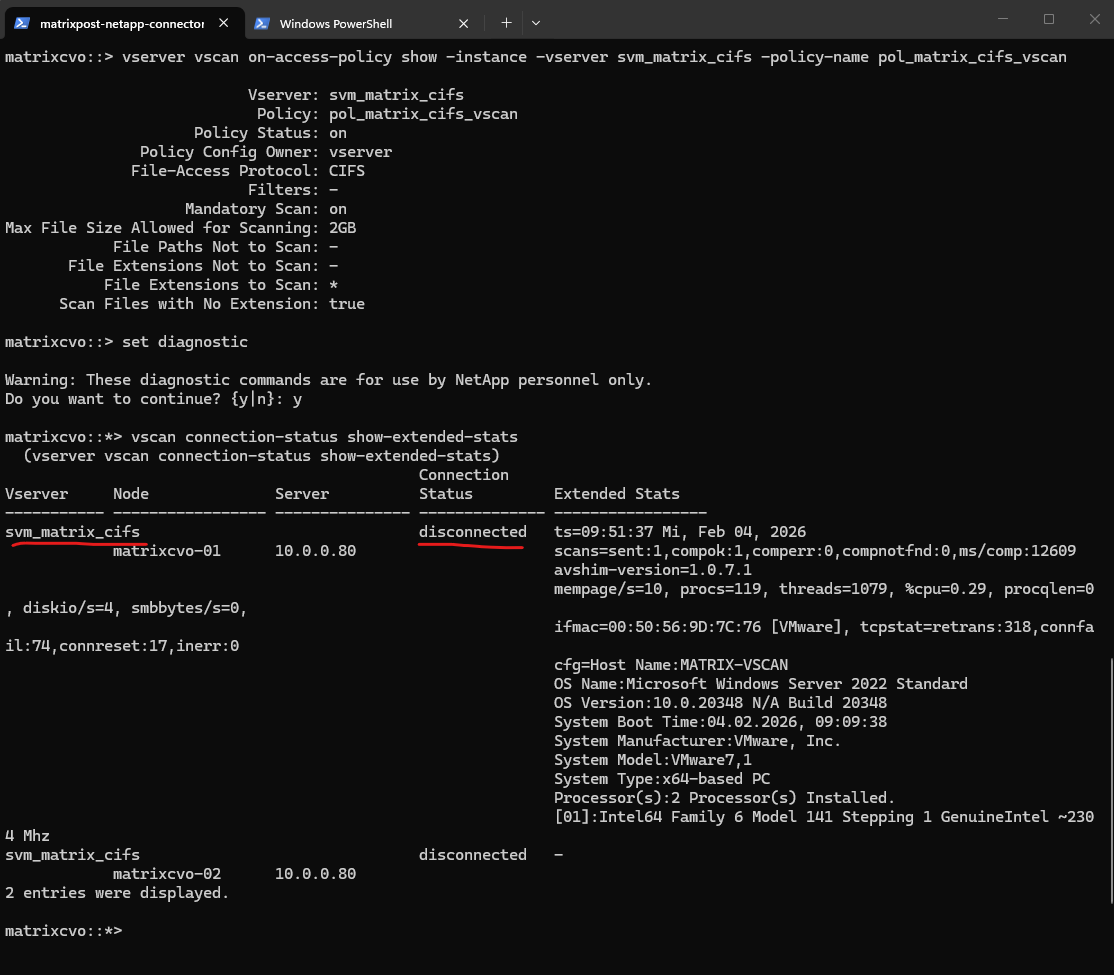
After powering-on my on-prem lab environment, the SVM appeared as disconnected in the ONTAP CLI and as offline in the ServerProtect Device List, even though the VSCAN configuration itself was correct.
The root cause turned out to be a powered-off Active Directory domain controller, which prevented ServerProtect from authenticating the ONTAP device because domain credentials were used for the device configuration.
matrixcvo::> vscan connection-status show

Once the domain controller was started again, the connection was immediately established and the SVM appeared online in ServerProtect.
This highlights an important dependency: when domain credentials are used, ServerProtect requires an available domain controller to authenticate ONTAP and accept scan requests.
Also in ONTAP they shown as connected with the antivirus server again.
matrixcvo::> vscan connection-status show

matrixcvo::> set diagnostic
matrixcvo::*> vscan connection-status show-extended-stats
In Part 5 we will configure snapshot and backup policies, validate protection workflows, and perform real restore operations to ensure data can be recovered quickly and reliably.
Links
Learn about antivirus configuration with ONTAP Vscan
https://docs.netapp.com/us-en/ontap/antivirus/Learn about NetApp virus scanning with ONTAP Vscan
https://docs.netapp.com/us-en/ontap/antivirus/file-protection-virus-scanning-concept.htmlConverting the ServerProtect Trial Version
https://docs.trendmicro.com/en-us/documentation/article/serverprotect-for-storage-gsg-convert-sp-trial-verApply a scanner policy on a single cluster with ONTAP Vscan
https://docs.netapp.com/us-en/ontap/antivirus/apply-scanner-policy-pool-task.htmlTrend Micro ServerProtect for Storage 6.0 Getting Started Guide
https://docs.trendmicro.com/all/ent/spfs/v6.0/en-us/spfs_6.0_gsg_new.pdfLearn about configuring ONTAP Vscan on-demand scanning
https://docs.netapp.com/us-en/ontap/antivirus/configure-on-demand-scanning-concept.html