Skype for Business Call Forwarding and Unified Messaging with Exchange 2013 | Step by Step
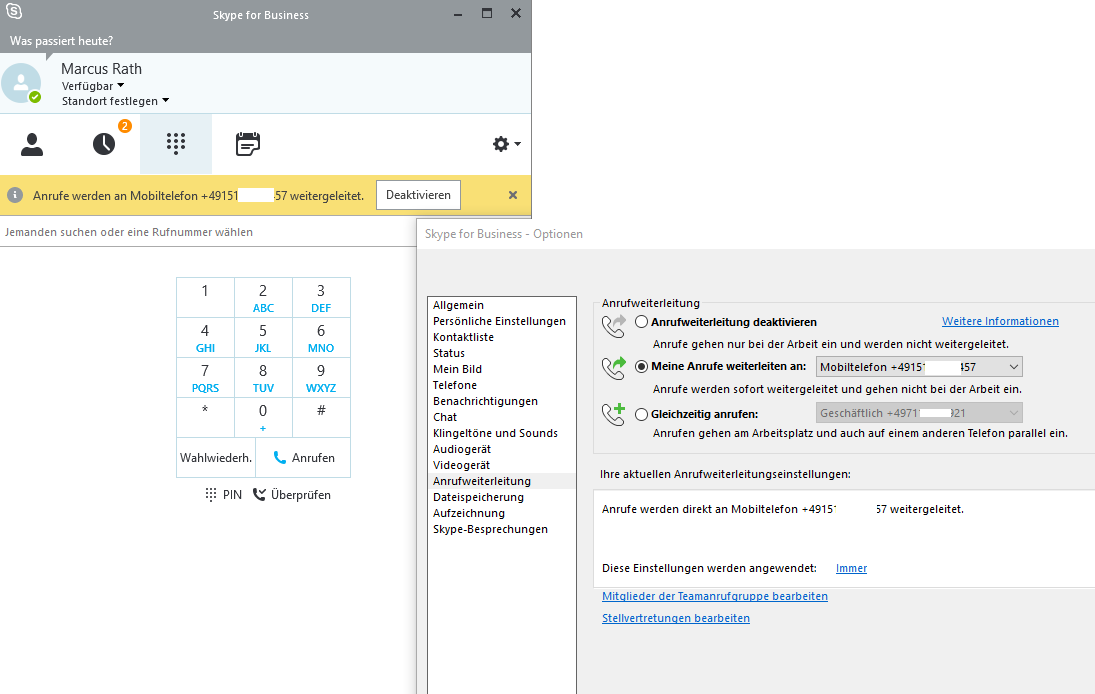
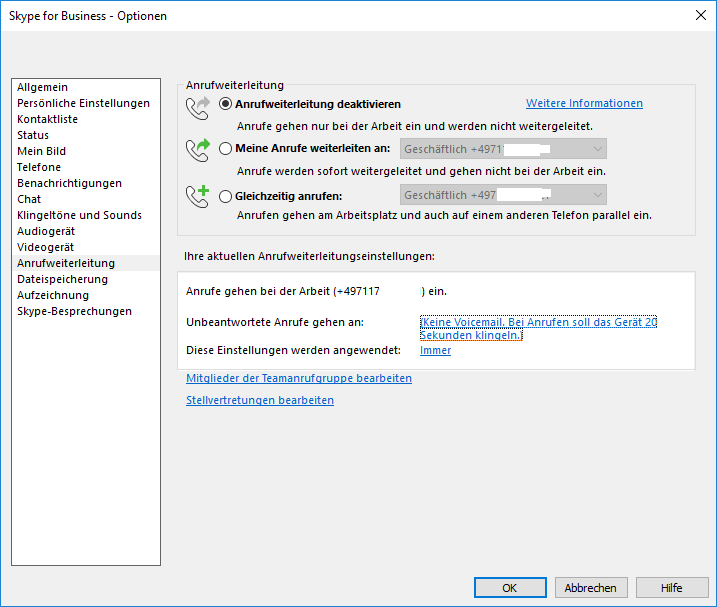
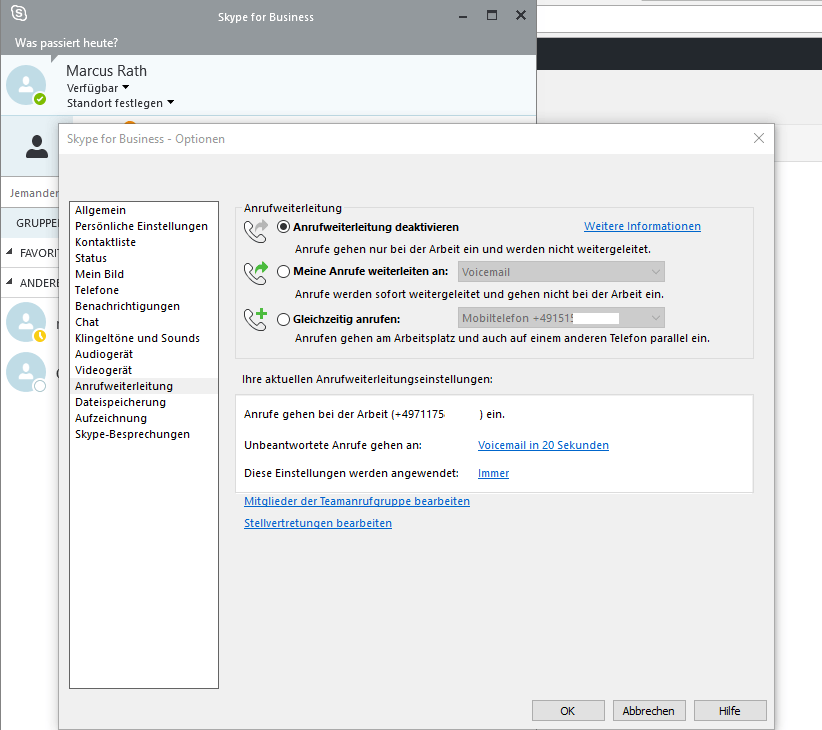
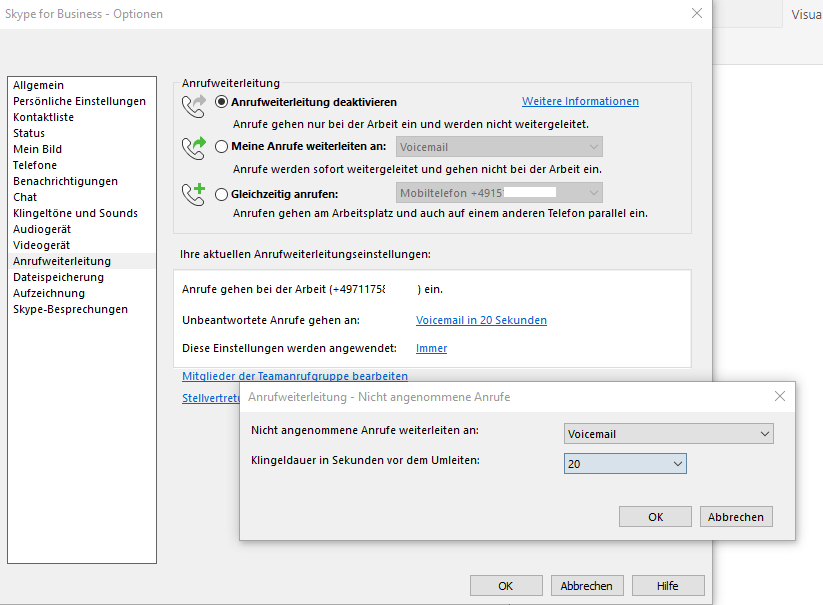
If you want to forward calls you can set this in the options of the SFB Client.
So far we are not able to forward calls to our Voicemail in Exchange. First we had to configure unified messaging on the Exchange Server and then had to activate our exchange account for unified messaging.
But before configuring UM we must configure an Exchange and Skype for Business Partnership so that Skype for Business can access the Exchange Database Engine.
You should configured Autodiscover for Exchange correctly in order to establish the Partnership between SFB and Exchange. SFB and clients must be able to locate the Exchange Server.
First check if Autodiscover is set correct

If not you can set it as following and after a iisreset it will apply immediately.

Check that the FQDN of the Autodiscover URL is correctly listed in the Certificate of the Exchange Server.

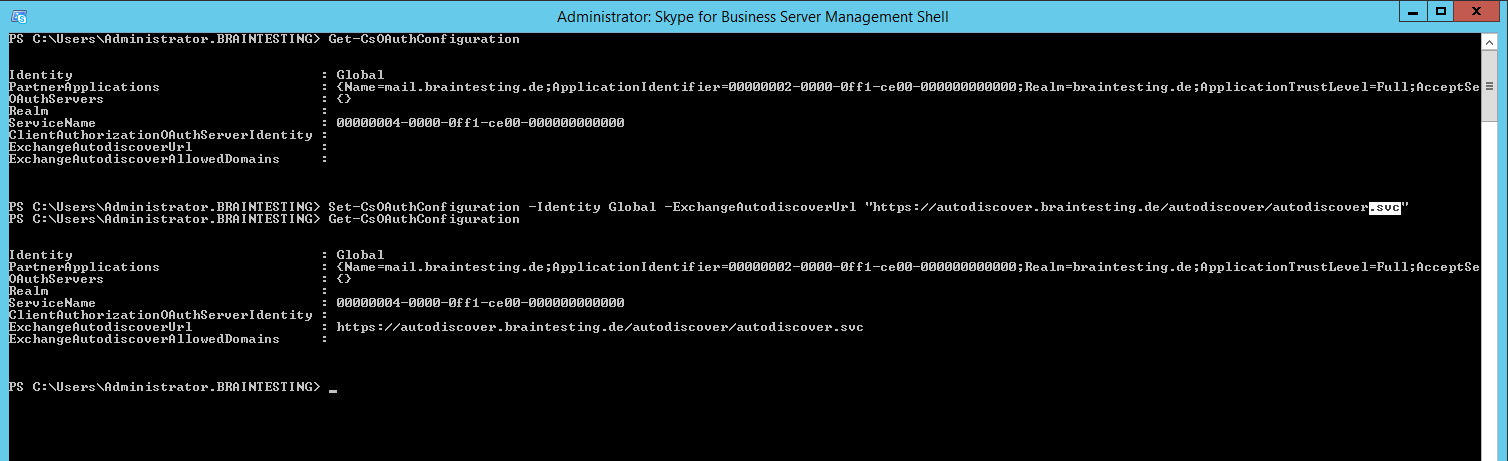
Now as Autodiscover works we must configure Oauth in order to establish a secure connection between SFB and Exchange Server.
We had to set in the SFB Shell for Oauth the AutodiscoverUrl of Exchange as follows.
Note that we had to set here not the xml file and must use instead the svc File!
Now we must configure the actual Partnership of Exchange and SFB. Herefore we can use existing Scripts on both sides.
First we configure the Partnership on the Exchange Server. The Script needs access to the authentication metadata document in json format on the SFB Server. You can test this from the Exchange Server over a browser and the following URL
https://<FQDN SFB Server>/metadata/json/1
You should be able to open a json Files.
If you could open the file you can execute the following script and after this reset the IIS with IISReset

Now the same we had to configure on the SFB Server but instead to use a script we can user here a Cmdlet in the SFB Shell.
First check as before if you can access the authentication metadata document on the Exchange Server under the following URL https://autodiscover.braintesting.de/autodiscover/metadata/json/1
If you see the jason file you can excecute the following Cmdlet to configure the Partnership from the SFB site.

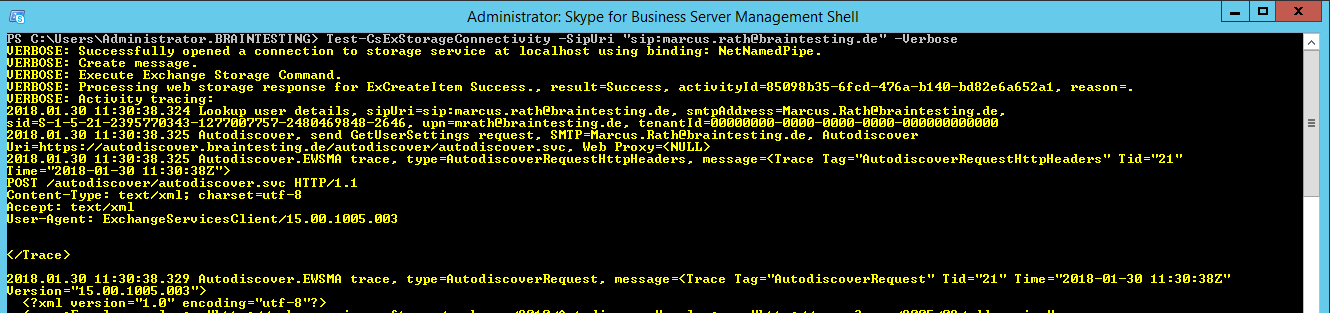
You can test if the partner application relationship has been successfully established with the Test-CsExStorageConnectivity Cmdlet

Now after we configured successful the Partnership between SFB and Exchange we can configure the actual Integration of SFB and Exchange UM.
First we have to configure a unified messaging dial plan on the Exchange Server. This is used for accepting unified messaging calls for the users.
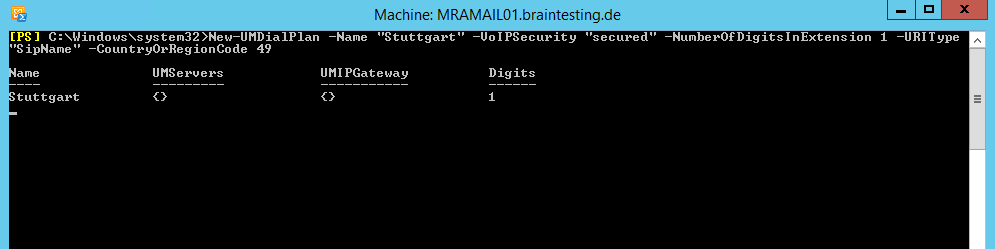
The VoIP Security option is Secured so that both SIP signaling traffic and RTP media traffic will be transmitted between SfB and Exchange using an encrypted TLS communication.
Alternatively you can use the SIP Secured setting which would only encrypt the signaling traffic while all media traffic would be transmitted unencrypted.
Additionally a value of 1 is selected for the number of digits in extension numbers where the last digit are treated as the user’s extension.
Run the following Cmdlet to set the following recommended parameters.
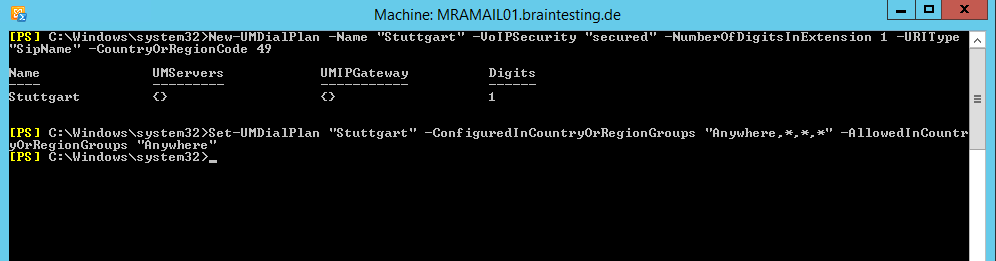
Assign the the UM server to the new UM dial plan and configure support for both TCP and TLS connections with the following cmdlet.
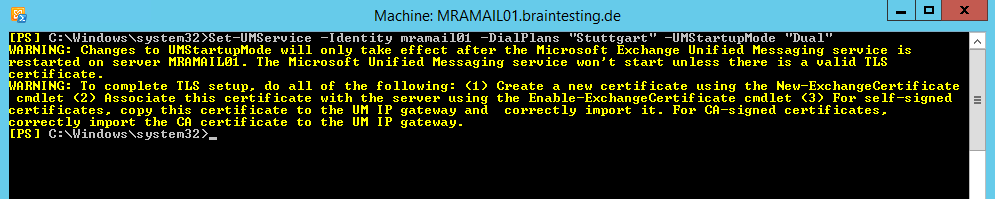
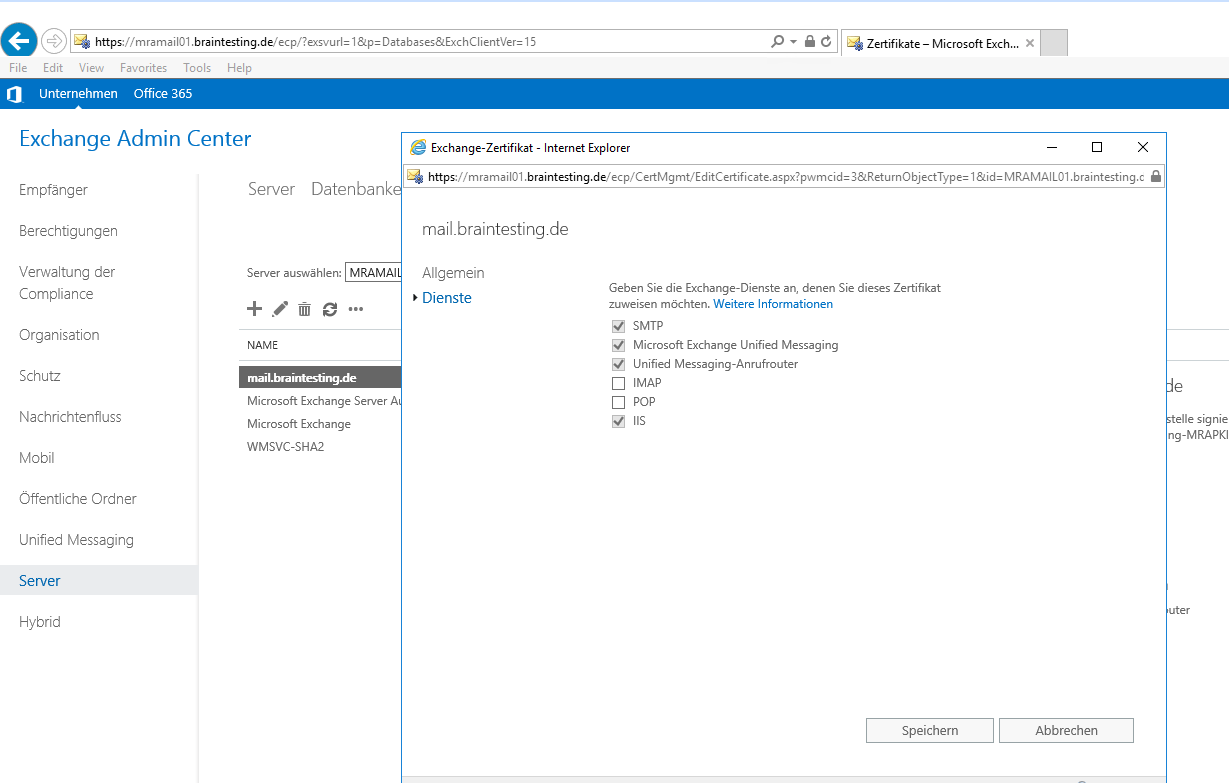
Now that TLS is enabled for the UM service the Exchange Server certificate needs to be assigned to the service to support TLS communications for signaling and media.
The Thumbprint you can determine with the Get-ExchangeCertificate | fl Cmdlet.

To commit these changes and enable TLS communications on the UM service it needs to be restarted, which can be performed quickly from PowerShell using the following cmdlet.
Restart-Service MSExchangeUM
Of course you can also configure the certificates for the UM services with the GUI
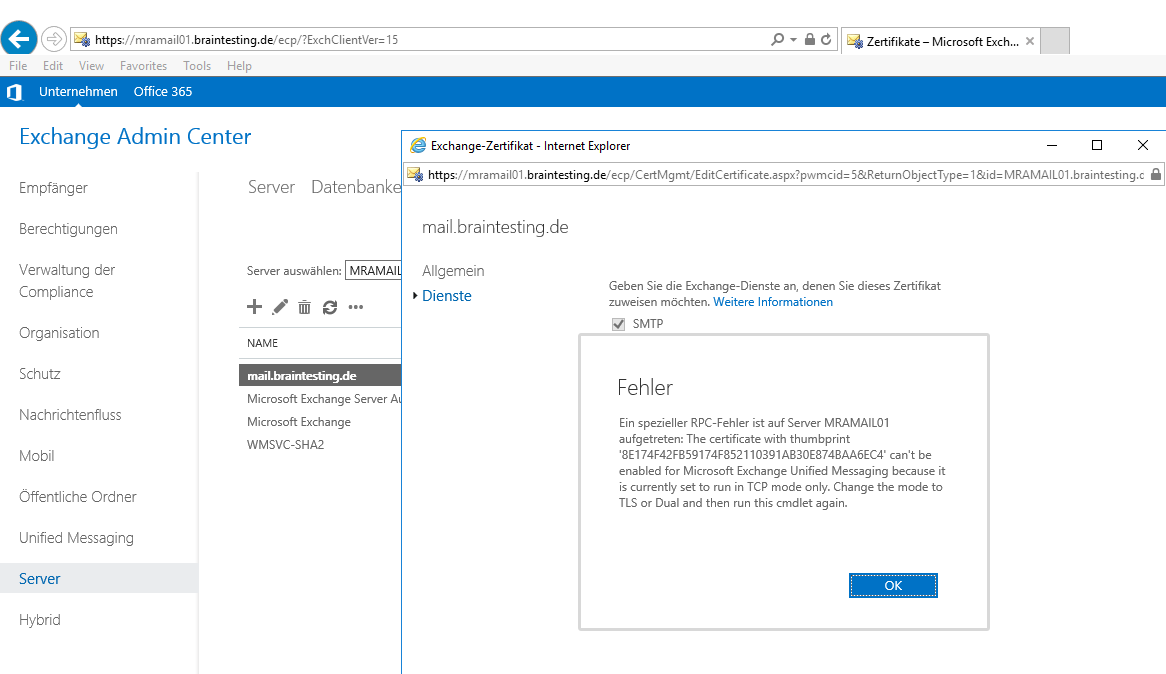
If you above not setup the UMstartupMode to Dual or TLS, you get the following error message:
Next perform the same configuration as above on the UM Call Router service with the following cmdlet.

The UM Call Router service also need to be assigned to the same certificate as the UM service.
Enable-ExchangeCertificate -Server mramail01 -Thumbprint <Thumbprint> -Services “UMCallRouter”
Alternativeley over the GUI as told above.
Just like the UM service the UM Call Router service needs to be restarted to enable the new configuration.
Restart-Service MSExchangeUMCR
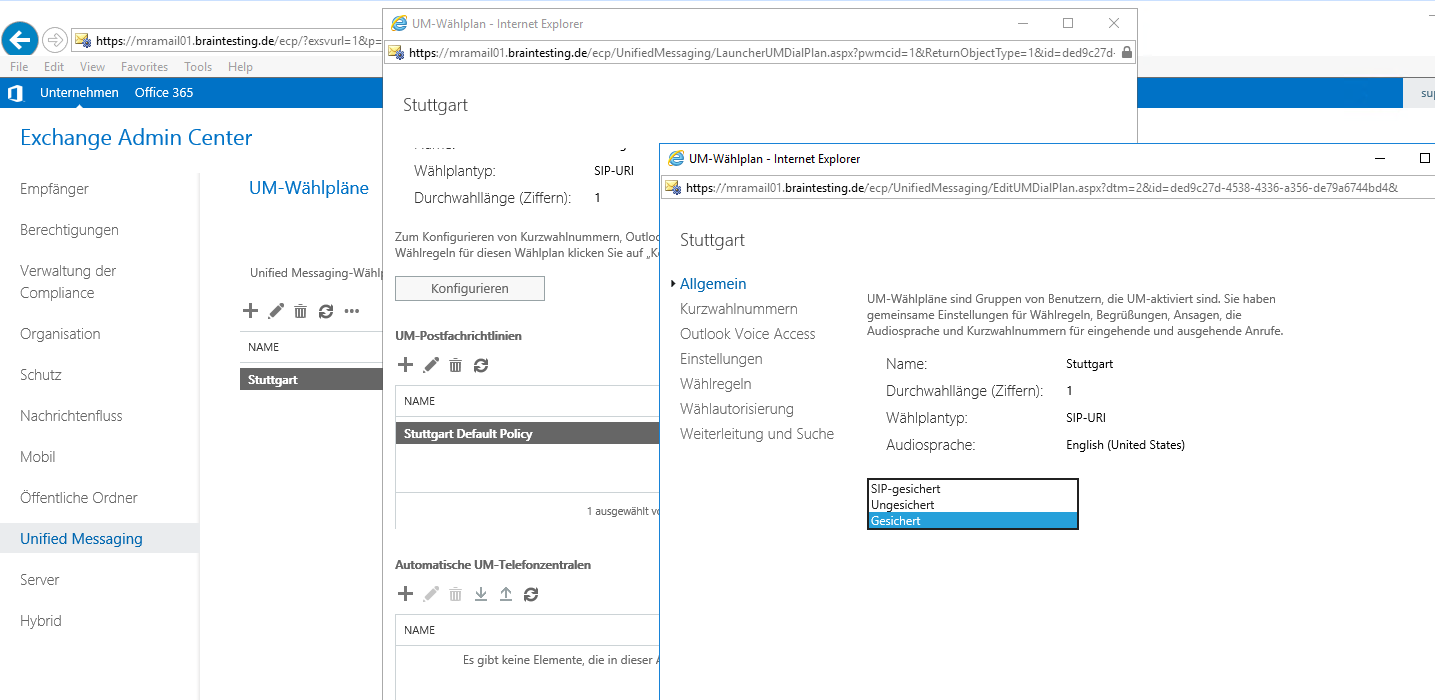
When the new UM dial plan was created the Exchange Server will have automatically created a default UM Mailbox Policy. This object will be named with the label ‘Default Policy” appended to the dial plan’s name (e.g. Stuttgart Default Policy).
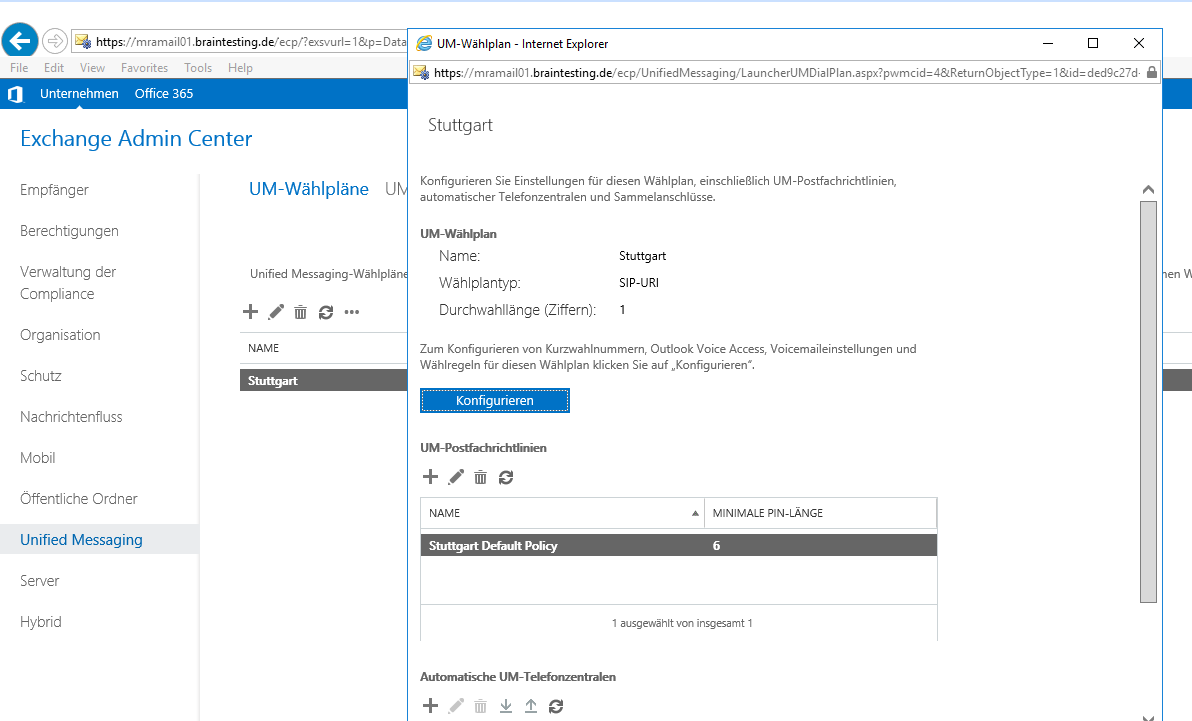
The TechNet documentation seems to omit this fact and instructs the creation of another UM mailbox policy. A simpler approach is to just modify the default object using the following cmdlet.
Get-UMMailboxPolicy | Set-UMMailboxPolicy -AllowedInCountryOrRegionGroups “Anywhere” -MinPINLength “6” -AllowCommonPatterns $true
As only a single policy exists then instead of querying for and entering the name of the default mailbox policy use the Get-UMMailboxPolicy cmdlet to automatically pass the results to the cmdlet as shown above. Additionally some optional parameters were configured to allow for a different amount of digit PIN to be defined instead of the default 6 digit length.
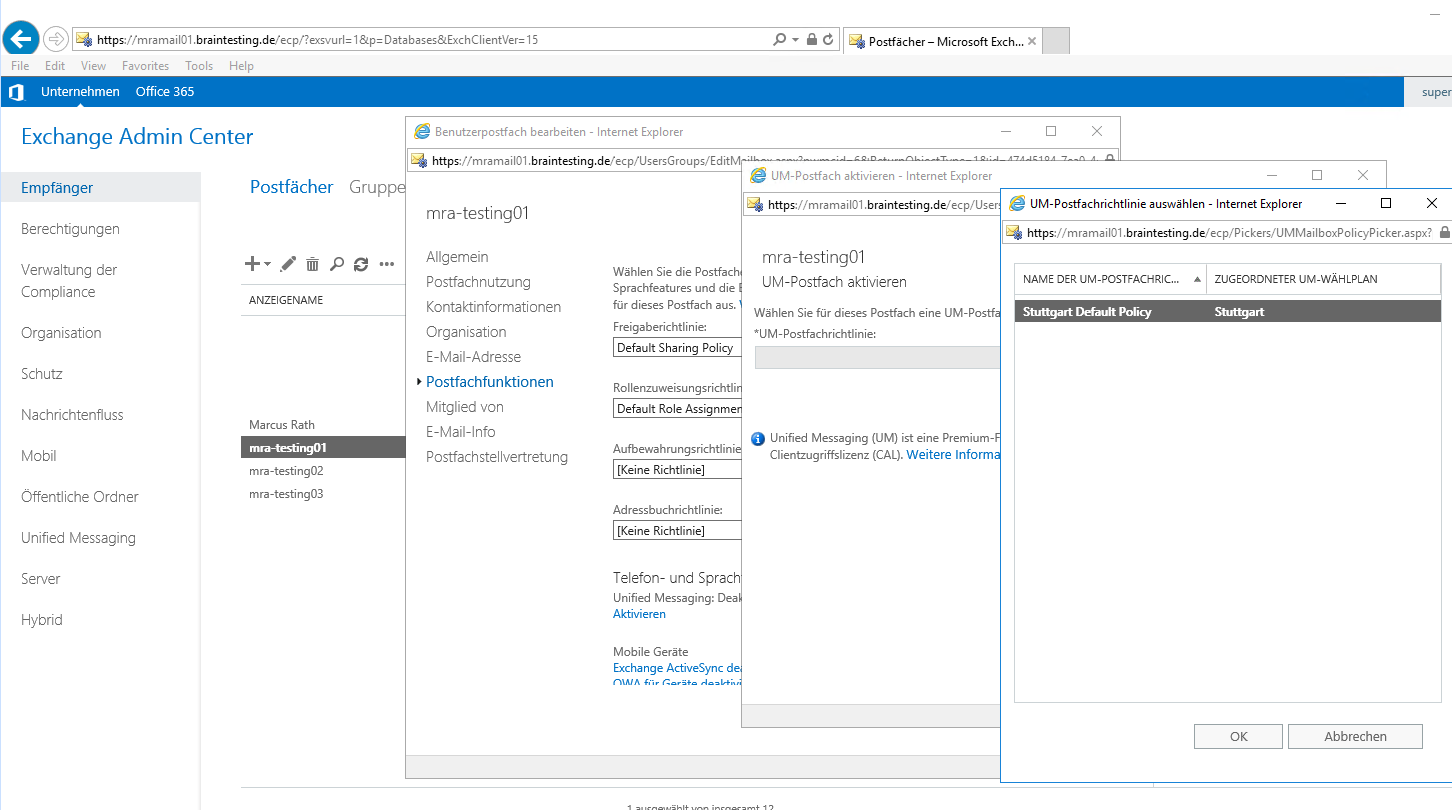
To validate that the UM configuration is functional then at least one user account must be enabled for Unified Messaging. This process can be completed from either the management console or shell.
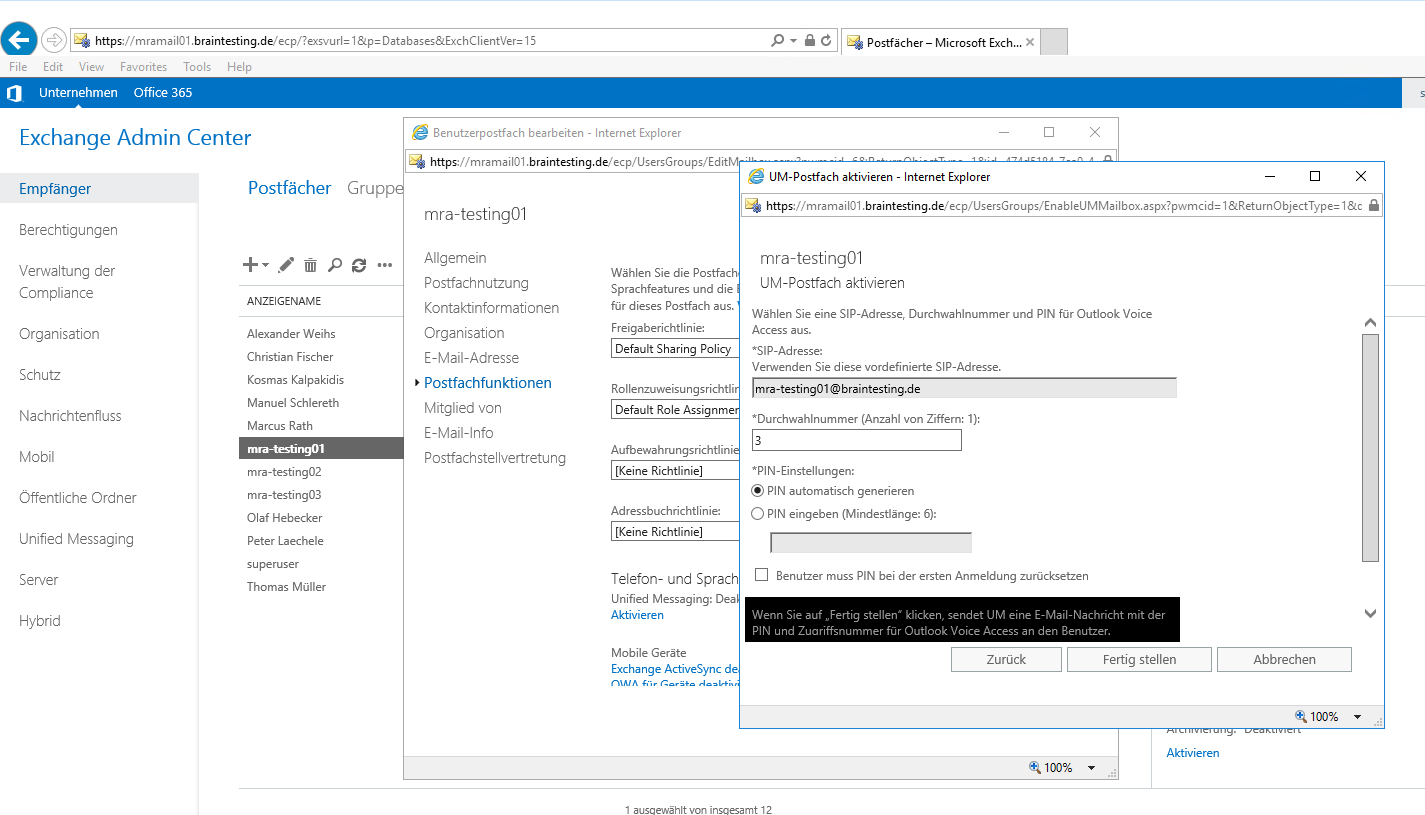
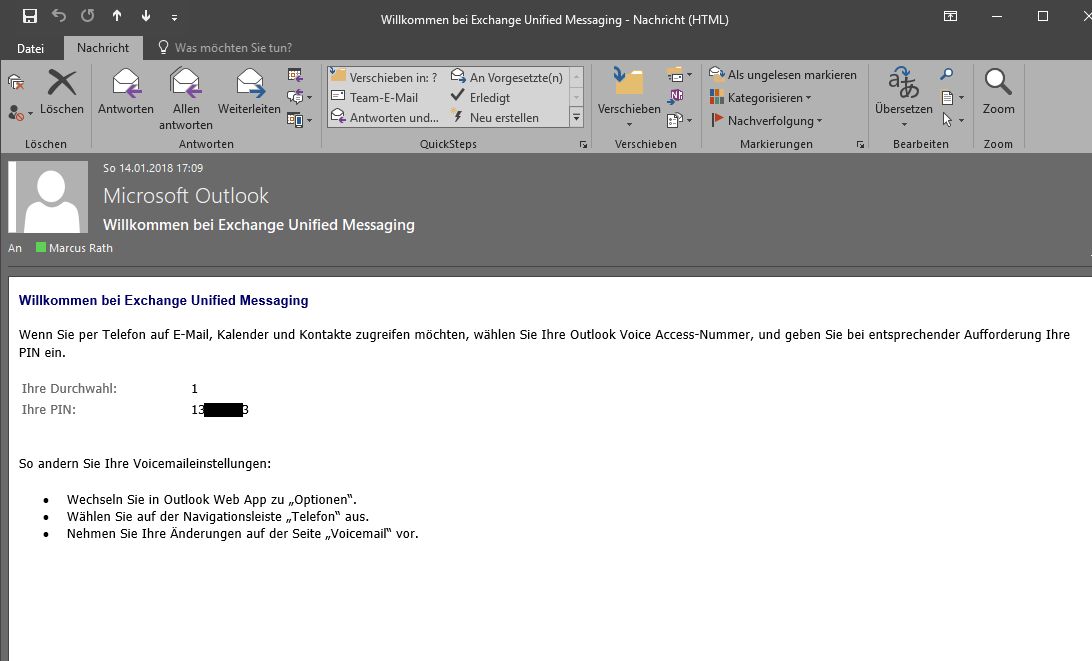
After entering the number and pin, the user get a confirmation mail with his pin per mail.
Alternatively the same steps can be performed using Exchange PowerShell cmdlets, so a second account configuration using this process is also covered as an example.
- Using the Exchange Management Shell enter the following cmdlet to perform roughly the same exact configuration on another existing Exchange user.
Enable-UMMailbox -Extensions 1 -SIPResourceIdentifier “marcus.rath@braintesting.de” -Identity “braintestingmrath” -UMMailboxPolicy “Stuttgart Default Policy”
Make sure to enter a unique extension or to omit that parameter if the account’s phone number is already populated with the desired information. The PIN was not manually set on this account which means Exchange will have automatically assigned a random PIN and then sent an email to the user’s mailbox with that information.
Configure UM IP Gateway
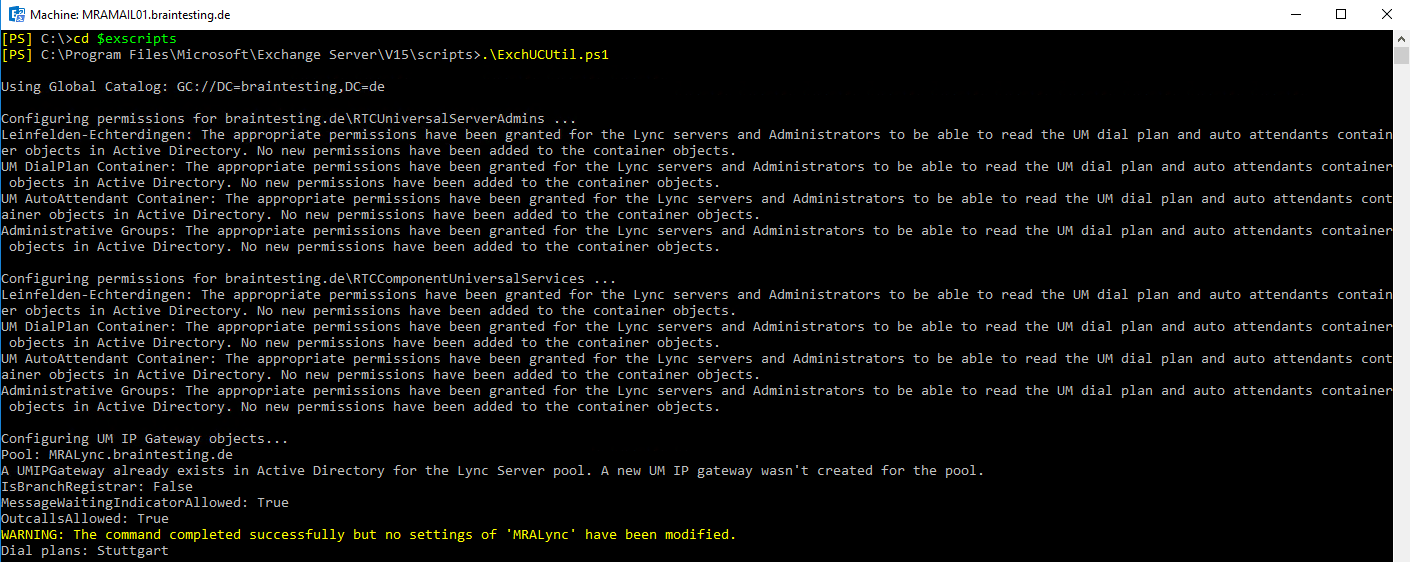
This step is handled by a script which creates the UM IP Gateway and IP Hunt Group as well as grants permissions to Skype for Business Server to read specific UM-related objects in Active Directory.
Make sure to allow for any outstanding AD replication to complete before running this script so that the newly created UM dial plan and any other changes are read by the script in their updated state. If run too soon then sometimes the Dial Plans listed in the last line of the script output will display as “not found” even though the configuration is correct up to that point. If that happens it is safe to simply re-run the script, even multiple times if needed, as it will identify any previously successful configuration and thus report that no new changes were applied in those cases.
- Using the Exchange Management Shell execute the ExchUCUtil.ps1 script located in the Exchange Server’s Scripts directory, as shown in the path below.
cd $exscripts
C:Program FilesMicrosoftExchange ServerV15Scripts>.ExchUCUtil.ps1
Note that if the Skype for Business Front End server shown at the bottom of the script output displays “{(not found)}” for the DialPlans field. The value should be displayed as the UM Dial Plan name (e.g. Stuttgart). As mentioned above this can usually be resolved by going back and re-executing the script after a few minutes have
If this issue appears then repeat the previous step until the results successfully report the expected dial plan as shown below.

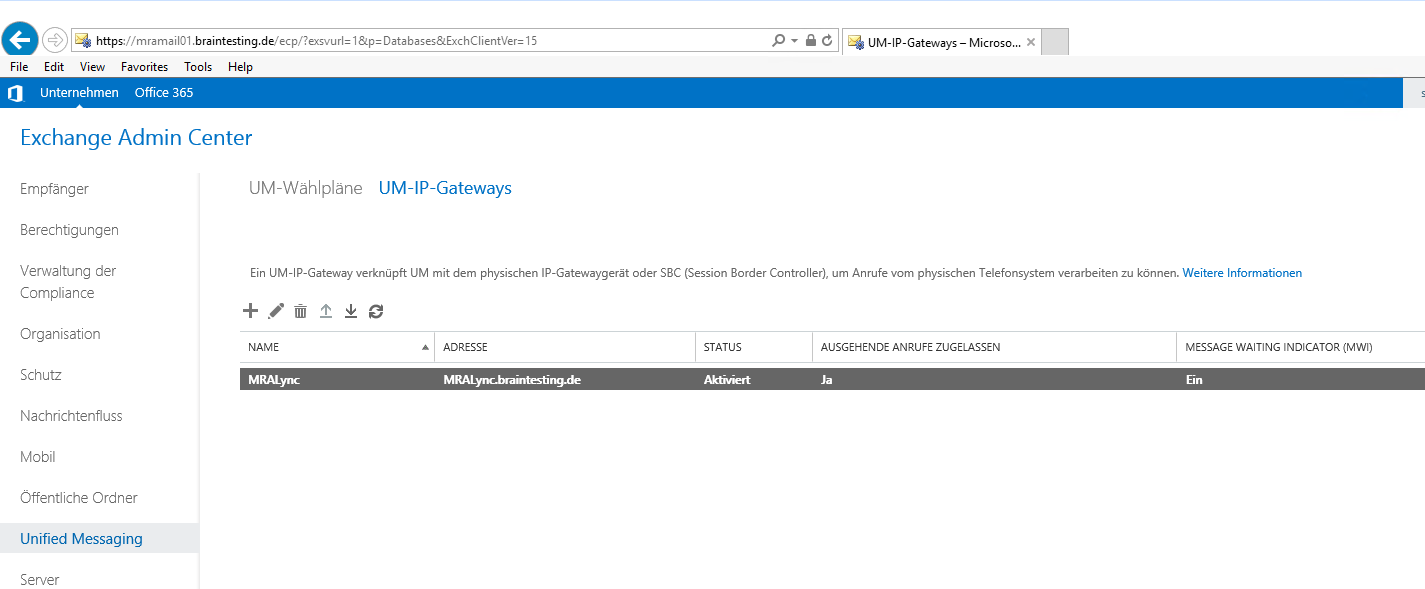
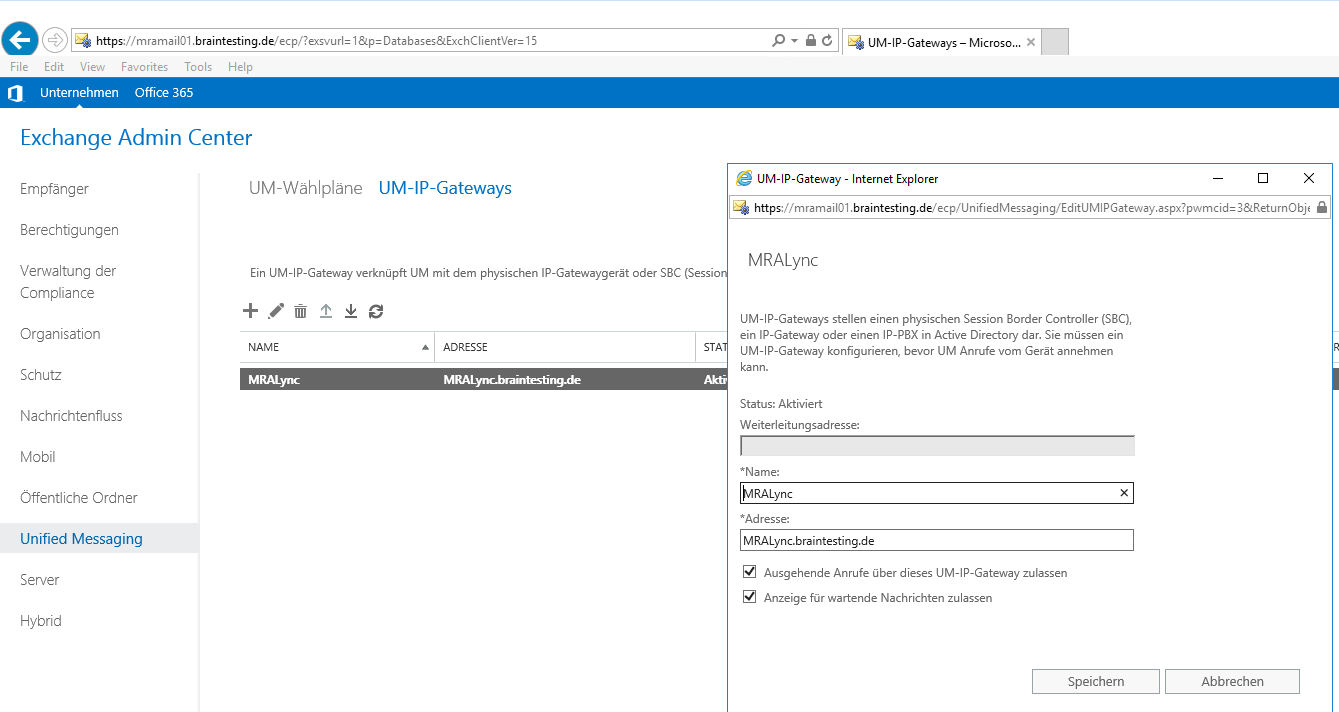
To validate the creation of the UM IP Gateway open the Exchange Management Console and then navigate to the Unified Messaging > UM IP Gateways section. Refresh the page if the new gateway does not appear at first.
Now as Unified Messaging is activated for the user, you are able to forward calls to your Voicemail.
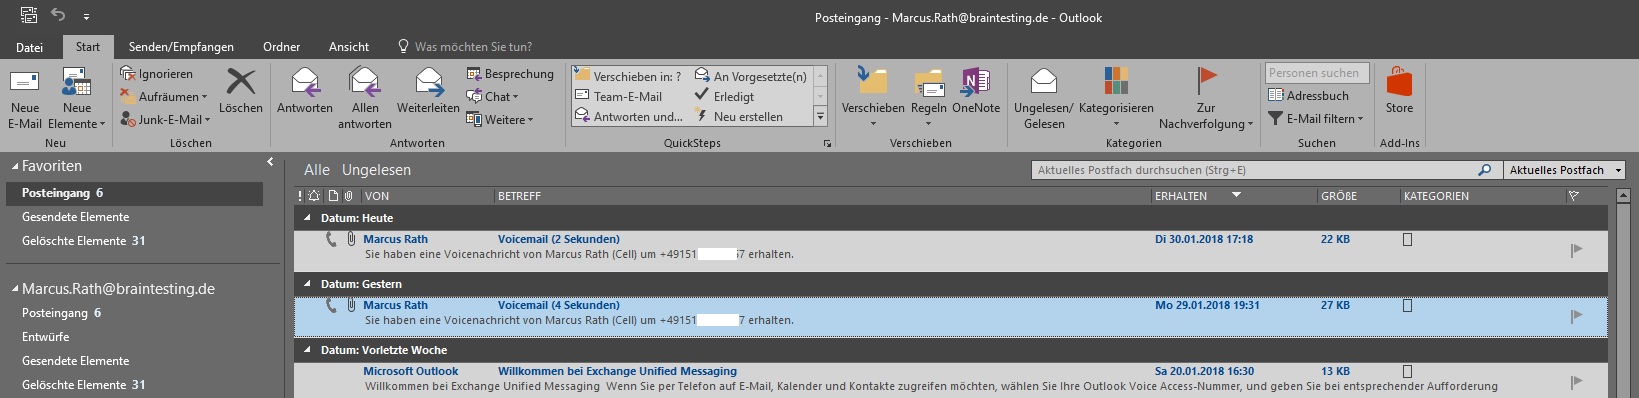
From now calls will be routed to the voicemail and you receive it in your Inbox.

Links/Source:
http://blog.schertz.name/2015/09/exchange-and-skype-for-business-integration/
http://blog.schertz.name/2015/10/skype-for-business-and-exchange-um-integration/