Deploying NetApp Cloud Volumes ONTAP (CVO) in Azure using NetApp Console (formerly BlueXP) – Part 8 – Disaster Recovery
In this part of this series, we shift the focus to business continuity. Disaster Recovery (DR) is a critical component of any production-ready Cloud Volumes ONTAP (CVO) environment in Azure, ensuring data availability even in the event of regional failures, accidental deletions, or major outages.
We focus on Disaster Recovery and explore how to protect Cloud Volumes ONTAP in Azure against outages and unexpected failures. This section walks through the architecture, configuration, and validation steps required to ensure your environment remains resilient and recoverable.
- Introduction
- Simulate a Node Crash
- When Disaster Strikes – Navigating a Real Node Crash in Azure CVO
- When Azure Freezes a CVO Node: Analyzing the Reboot Timeline
- Troubleshooting the Data SVM
- Manual Node Failover (aka Storage Failover or SFO)
- How To Redeploy a CVO Node (VM) in Azure?
- How to access Azure CVO Serial Console from Azure Portal by overriding the Forbidden response
- When Data LIFs Do Not Fail Over During Node Shutdown
- Extending the DR Strategy to Hybrid Replication
- Troubleshooting
- Missing LIF Probe-Port Configuration in ONTAP causes ILB Health Check Failure
- Azure CVO node not booting after Azure maintenance event
- Cloud Volumes ONTAP Azure cluster is down due to storage account key access
- CVO VM not booting after Azure freeze event (SSD firmware Update)
- CVO instance reboots within seconds of announced Azure scheduled maintenance
- Links
Introduction
When disaster strikes, you need a quick, easy, and reliable process for bringing storage back online.
In Azure, protecting CVO from a crash is less about a manual recovery guide and more about choosing the right Architectural Model during deployment.
Because CVO is a virtualized storage appliance, you can’t just fix a crashed node like a physical server; you rely on High Availability (HA) to do it for you.
To protect against CVO node crashes in Azure, the gold standard is deploying a High Availability (HA) pair, which utilizes an Internal Load Balancer and synchronous mirroring.
In an Azure HA pair, the system utilizes a storage “takeover” where the healthy partner automatically assumes ownership of all disks and serves data through a floating IP address.
If a node VM becomes permanently corrupted, the recovery involves a “Node Replacement” workflow in BlueXP that deletes the failed instance and provisions a fresh VM while reattaching the original, intact Azure Managed Disks.
Once the new node boots, the partner performs a “giveback” and resynchronizes all metadata to restore the environment to a healthy, active-active state.
Simulate a Node Crash
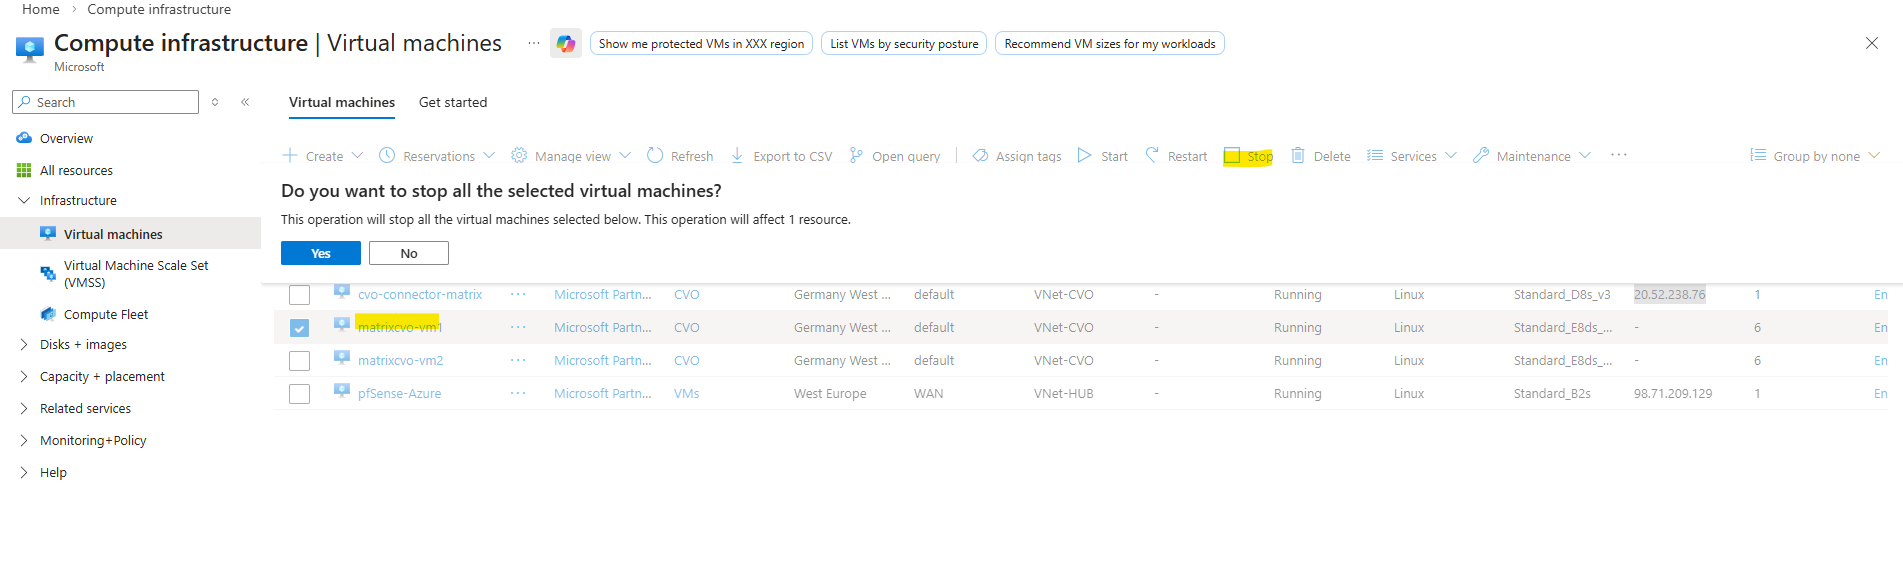
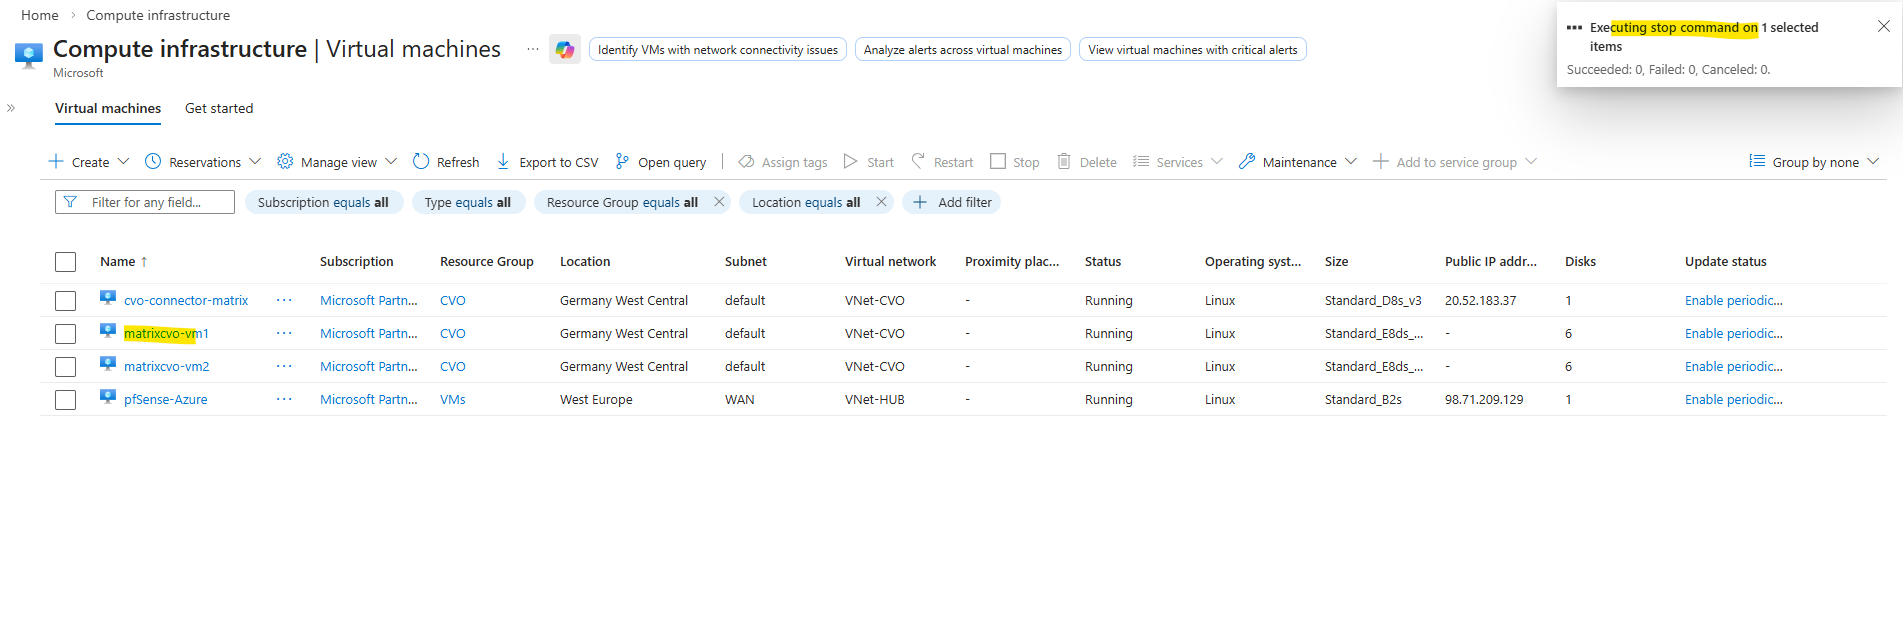
If you want to simulate a real node crash in a controlled way, using Stop the VM in Azure is a valid simulation of an unexpected VM crash.
If you want to simulate a realistic production failure, you should stop the node that is currently serving the most active data traffic.
Because client-facing data LIFs are distributed across both nodes, either node failure would trigger a takeover event.
However, since
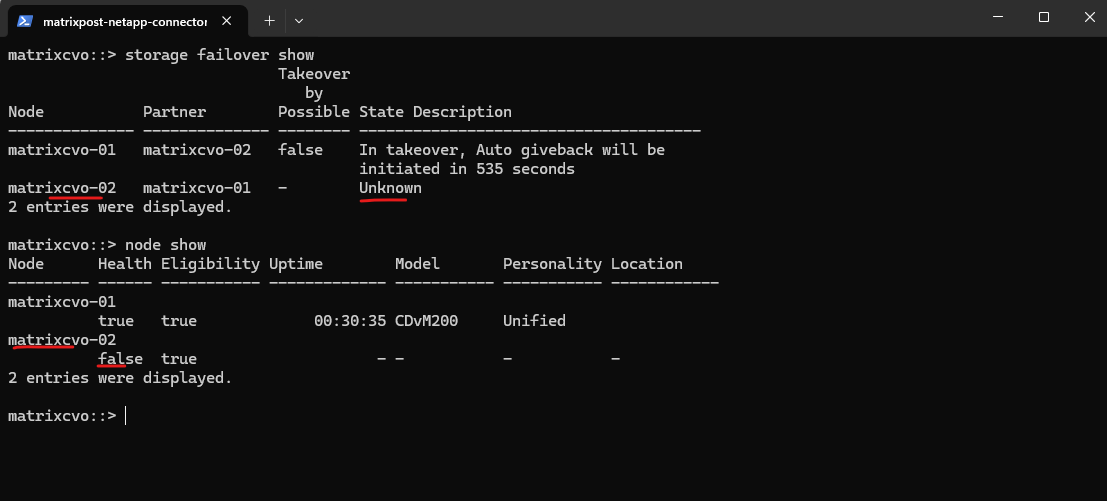
aggr1, the primary data aggregate, is owned bymatrixcvo-01, stopping this node provides the most realistic failover scenario. This validates that the surviving node can assume full data-serving responsibility without disruption.
matrixcvo::> network interface show -role data
matrixcvo::> storage aggregate show -fields home-name,owner-name
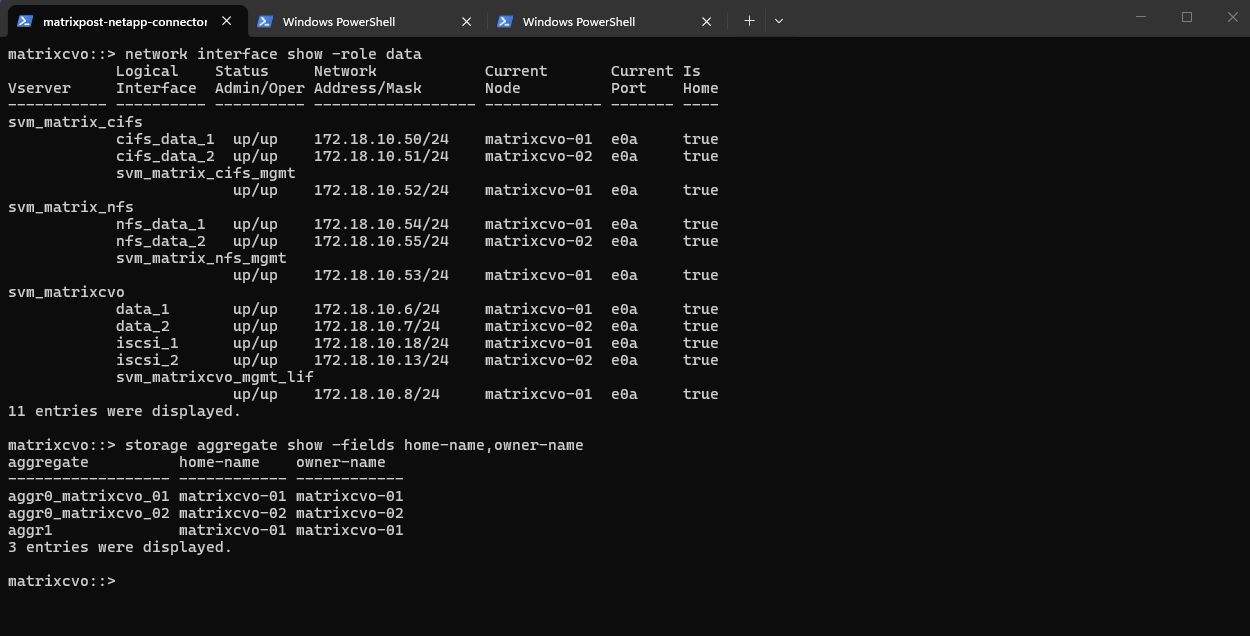
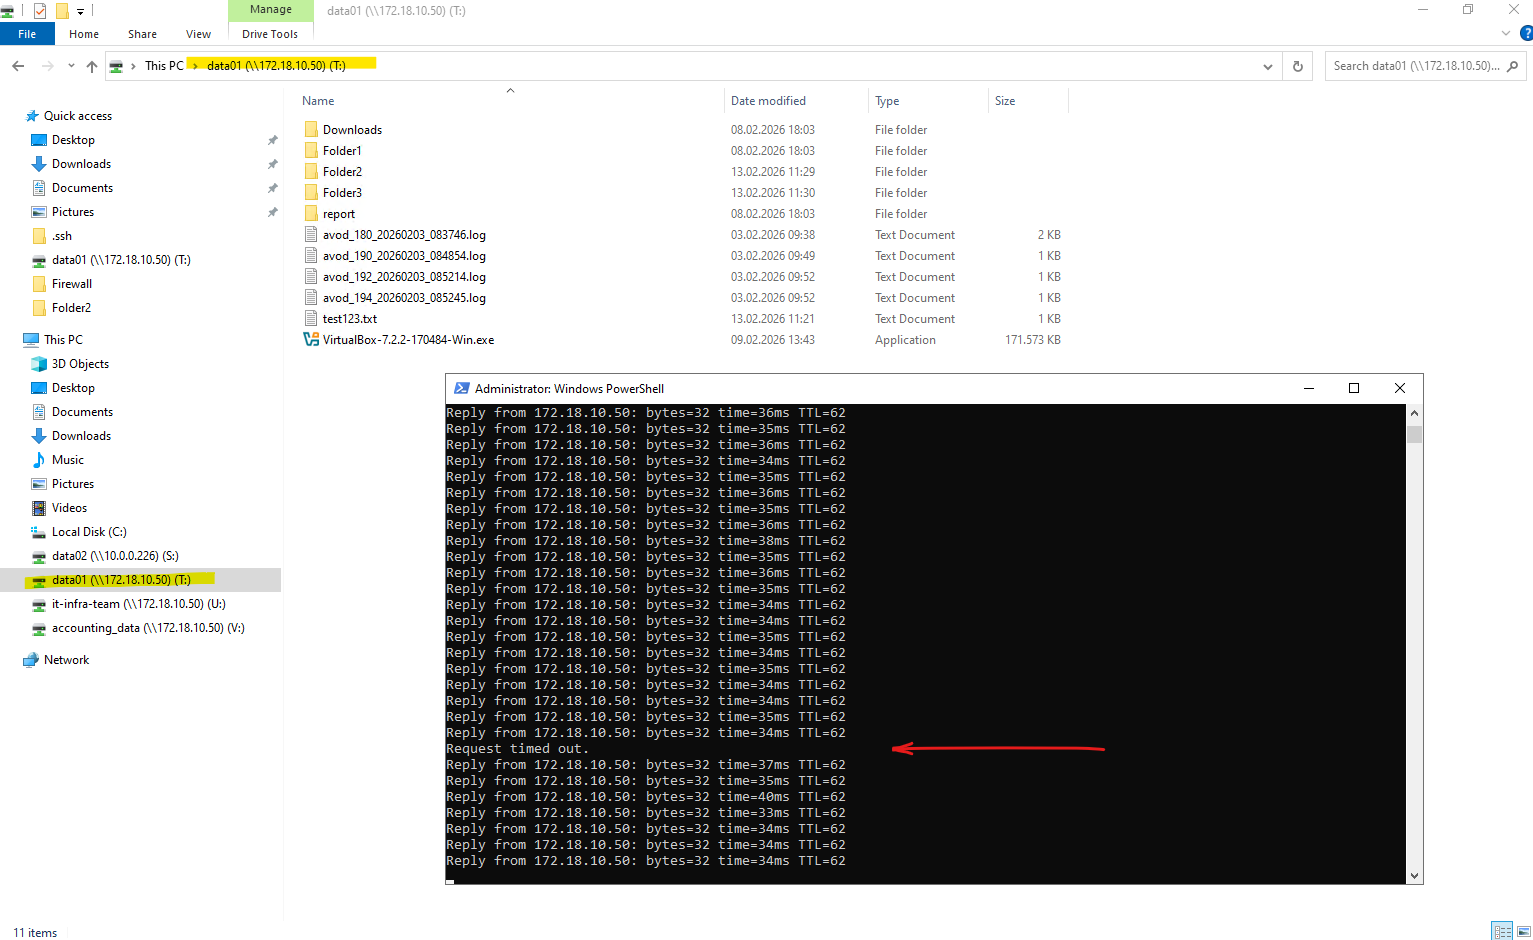
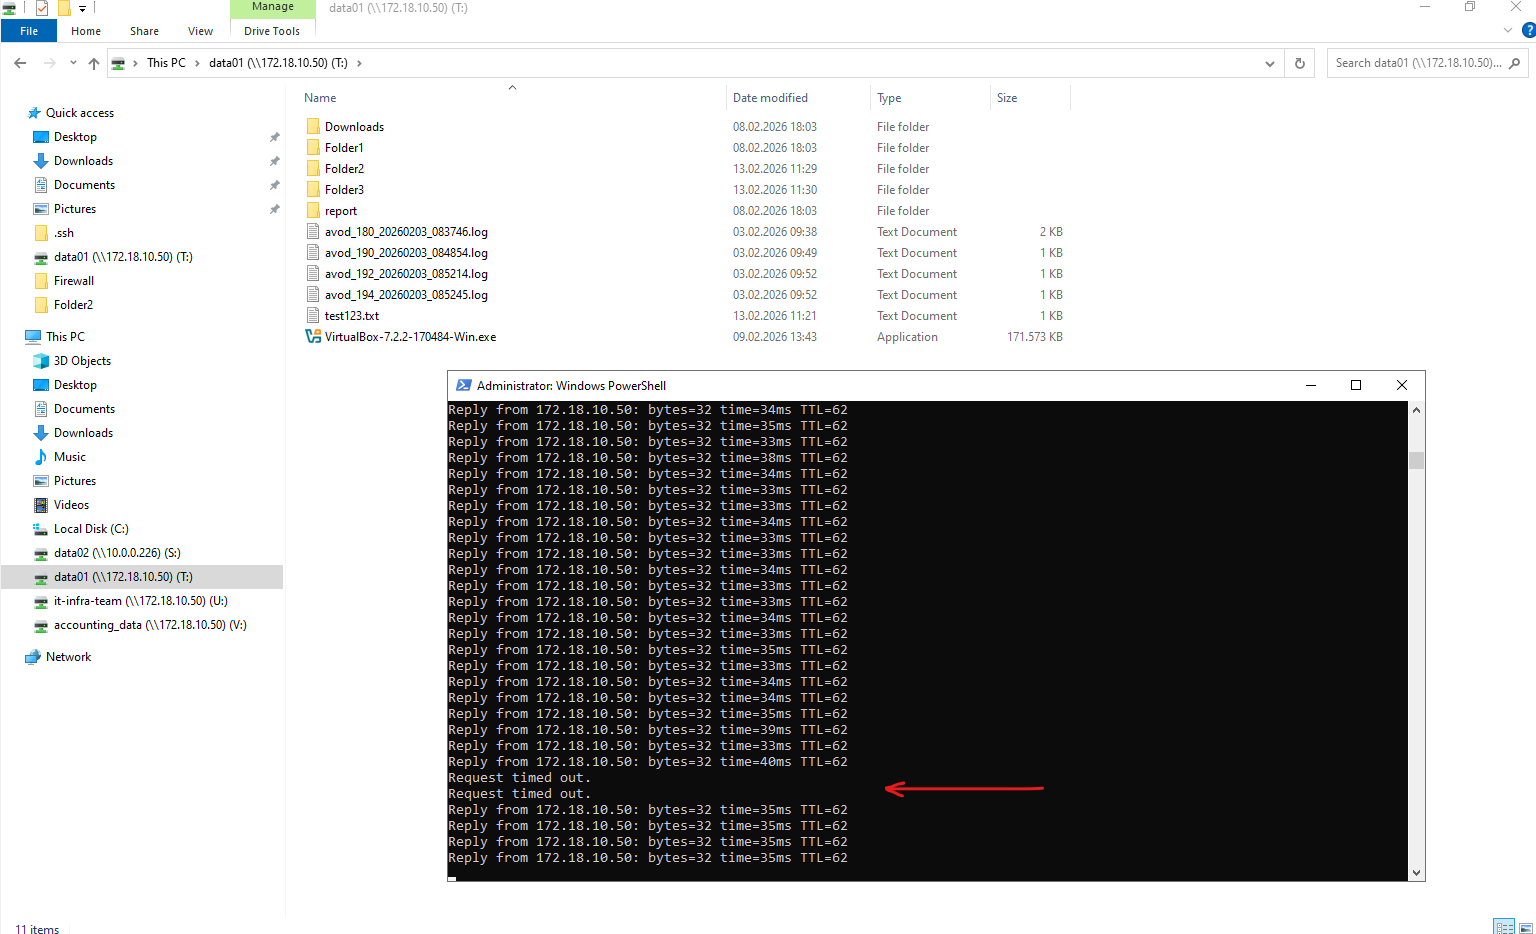
Below we will see that my test client on which three CIFS/SMB shares are mounted, will use the IP address 172.18.10.50 to connect to the shares (volumes).
This IP address belongs to the data LIF
cifs_data_1, which is currently hosted on the first HA node,matrixcvo-01, meaning this VM is actively serving client traffic for that endpoint and I will now stop to simulate a Node Crash.
To simulate a real node crash I will now Stop this node named matrixcvo-01 (Azure VM), which owns the primary data aggregate.
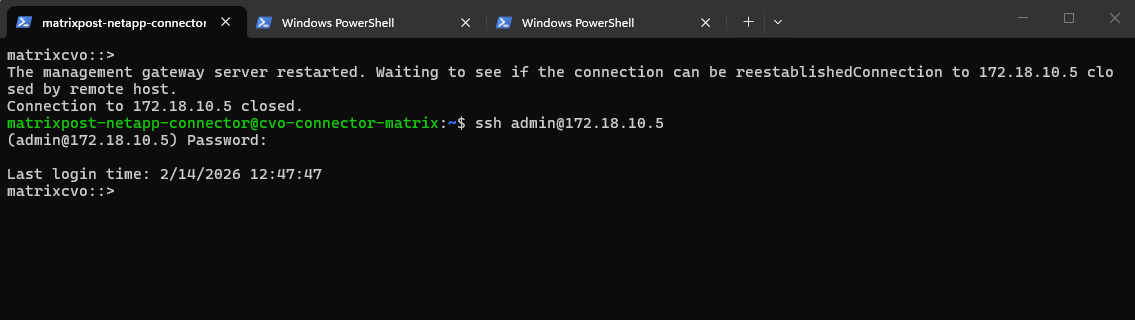
When stopping the primary node, the active management LIF is temporarily disrupted, which causes the current SSH session to drop.
This is expected behavior during an HA takeover, as the management interface must migrate to the surviving node. After a brief interruption, we can reconnect using the same management IP once the LIF is fully operational on the partner node.
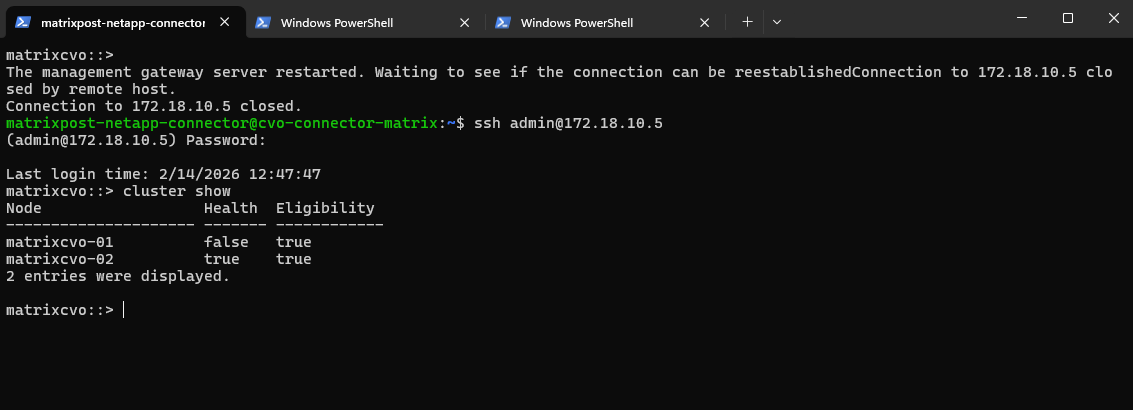
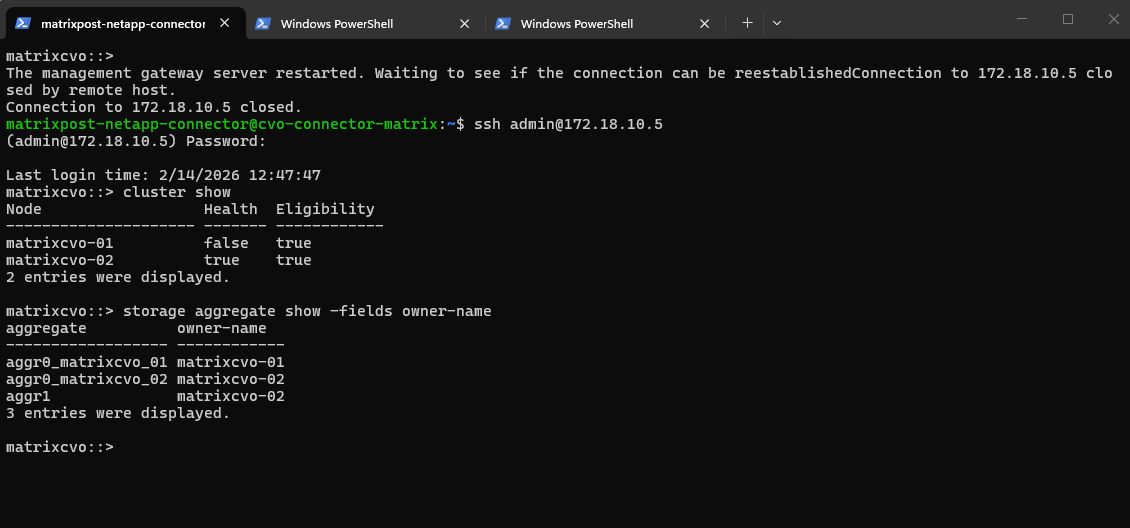
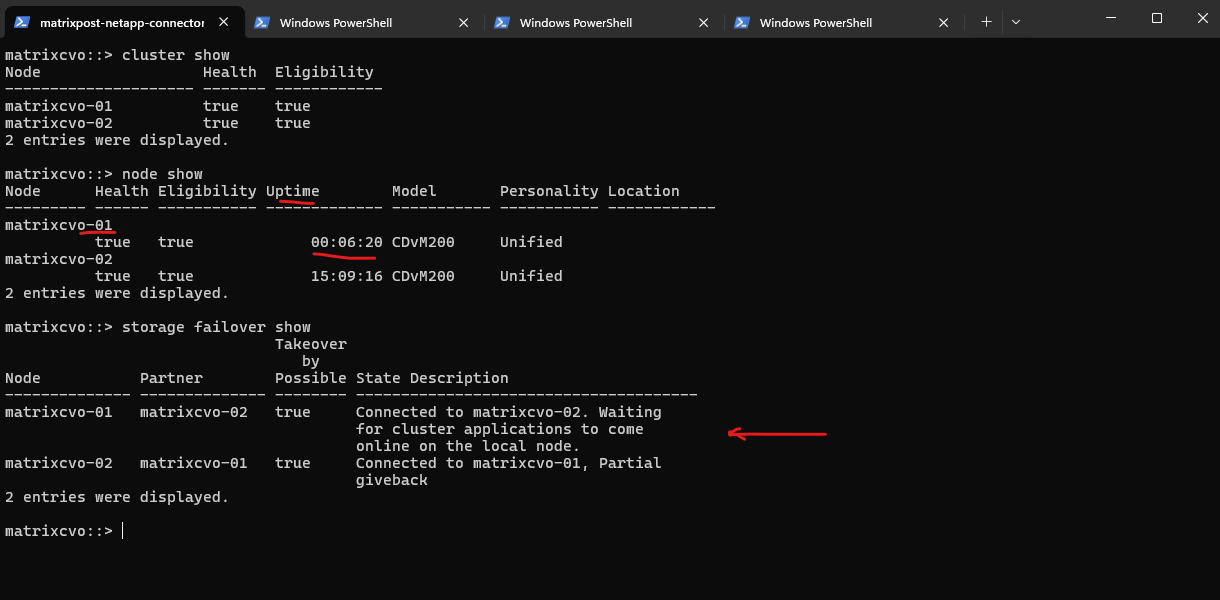
The
cluster showoutput confirms thatmatrixcvo-01is no longer healthy, indicating that the node has gone down as expected after being stopped in Azure. The surviving node,matrixcvo-02, remains healthy and eligible, allowing it to continue cluster operations and handle takeover responsibilities.
matrixcvo::> cluster show
The output shows that aggr1, the primary data aggregate previously owned by
matrixcvo-01, is now owned bymatrixcvo-02, confirming that a successful takeover has occurred. This demonstrates that the surviving node has assumed ownership of the data aggregate and is continuing to serve data without manual intervention.
matrixcvo::> storage aggregate show -fields owner-name
The
network interface show -is-home falseoutput confirms that several LIFs, including the cluster management and SVM management/data LIFs have migrated tomatrixcvo-02, indicating a successful HA takeover. These LIFs are now operational on the surviving node, even though they are not on their home location.
matrixcvo::> network interface show -is-home false
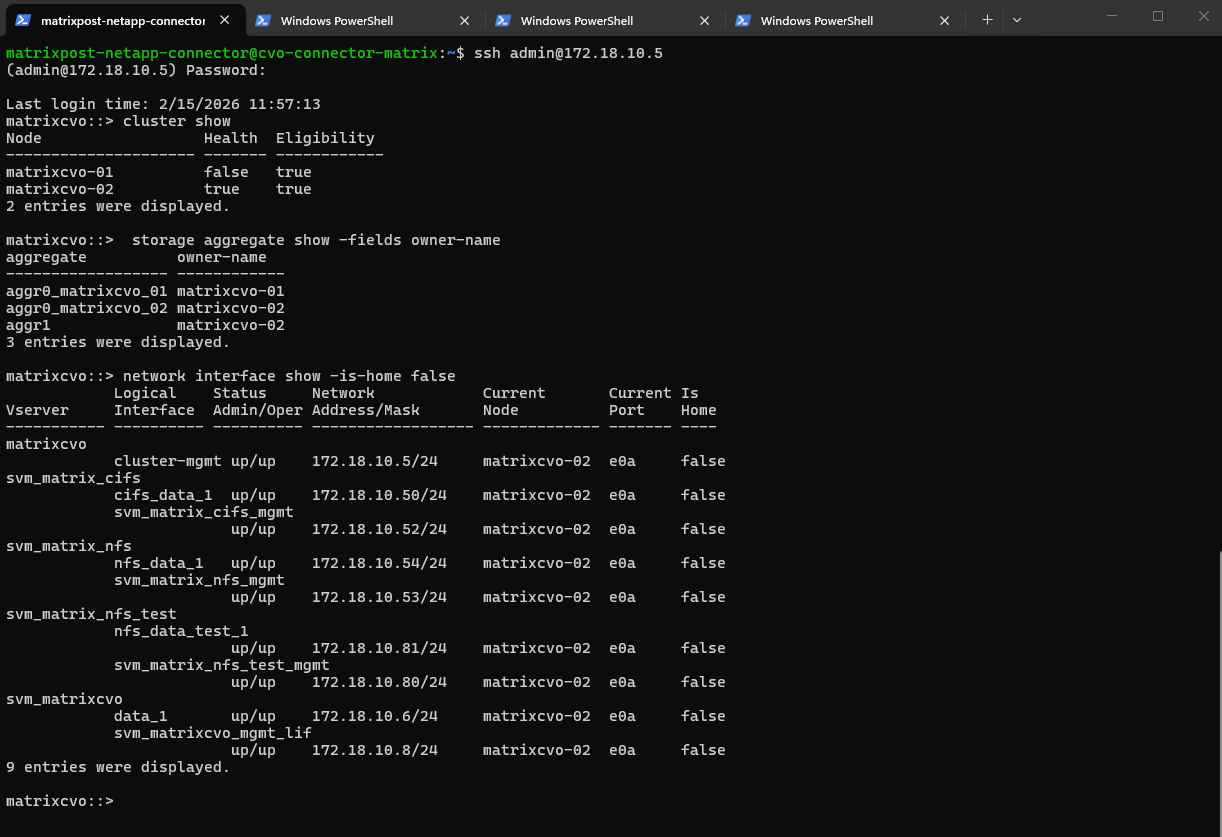
With the failover policies correctly applied, we have verified that all LIFs are currently hosted on matrixcvo-02, demonstrating the expected behavior where non-home LIFs have successfully migrated to the active node.
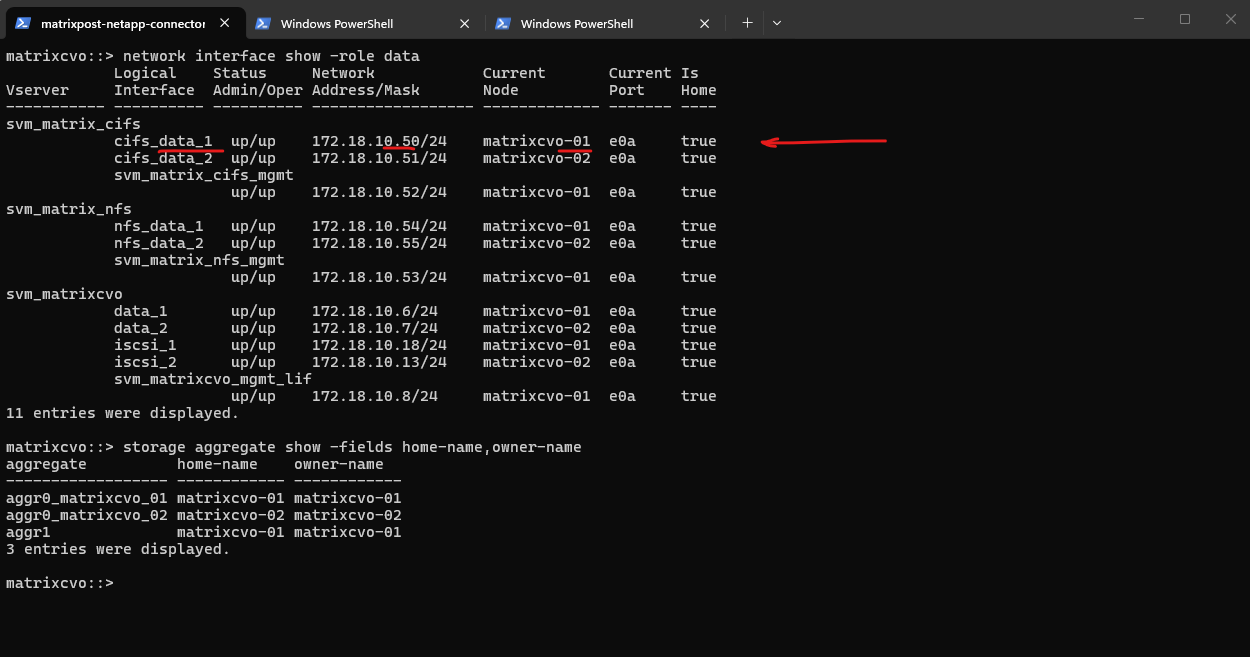
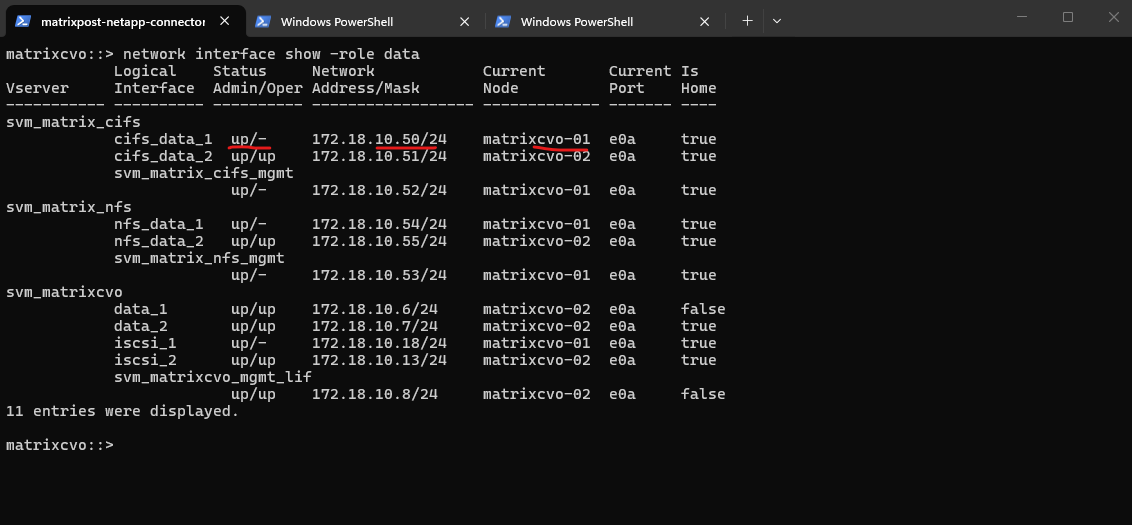
matrixcvo::> network interface show -role data
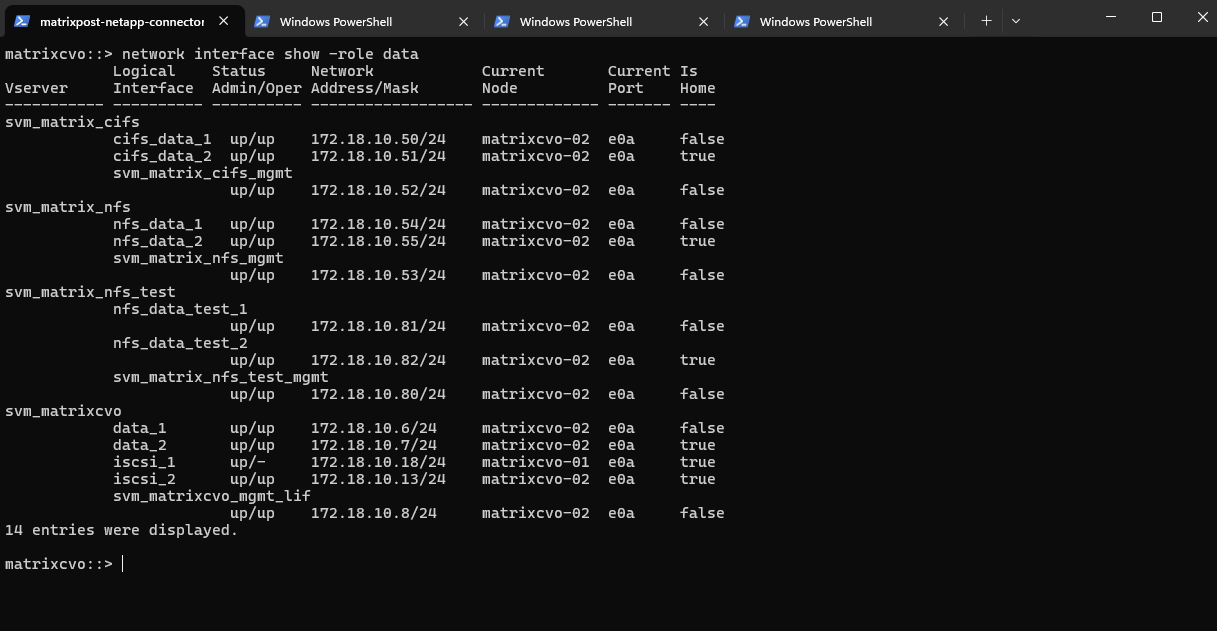
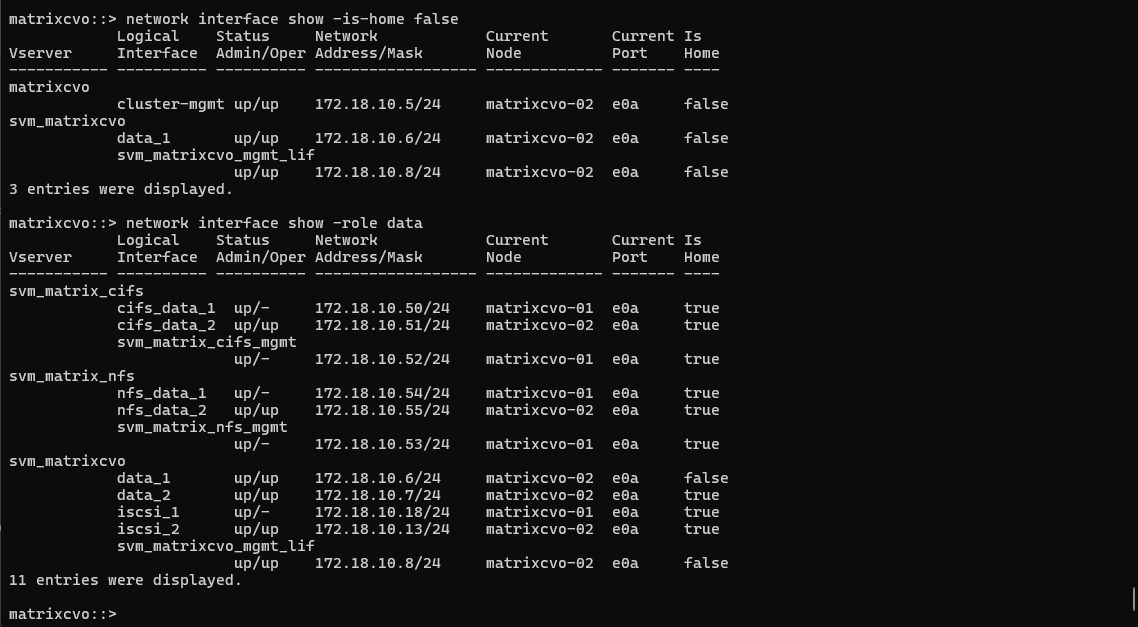
In case the failover policies are not enabled on the LIFs, it will show something like below.
The
network interface show -role dataoutput shows here that all data LIFs originally hosted onmatrixcvo-01are currently unavailable (up/-), while their HA counterparts onmatrixcvo-02remain fully operational (up/up). This demonstrates that client traffic just continues through the surviving node and its home LIFs, but the LIFs from nodematrixcvo-01will not failover to the surviving nodematrixcvo-02, therefore all client connections to this LIF IP address will fail.
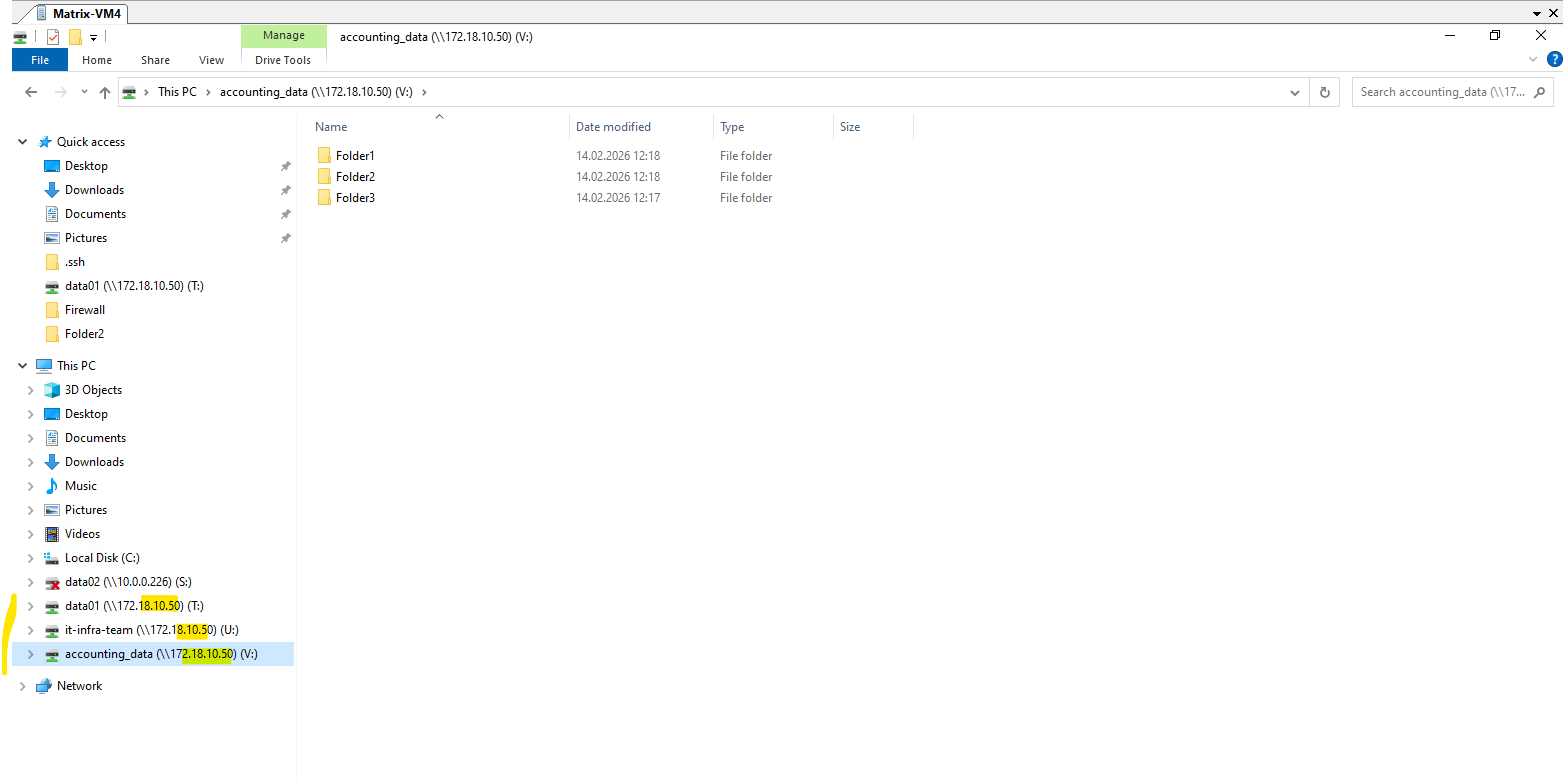
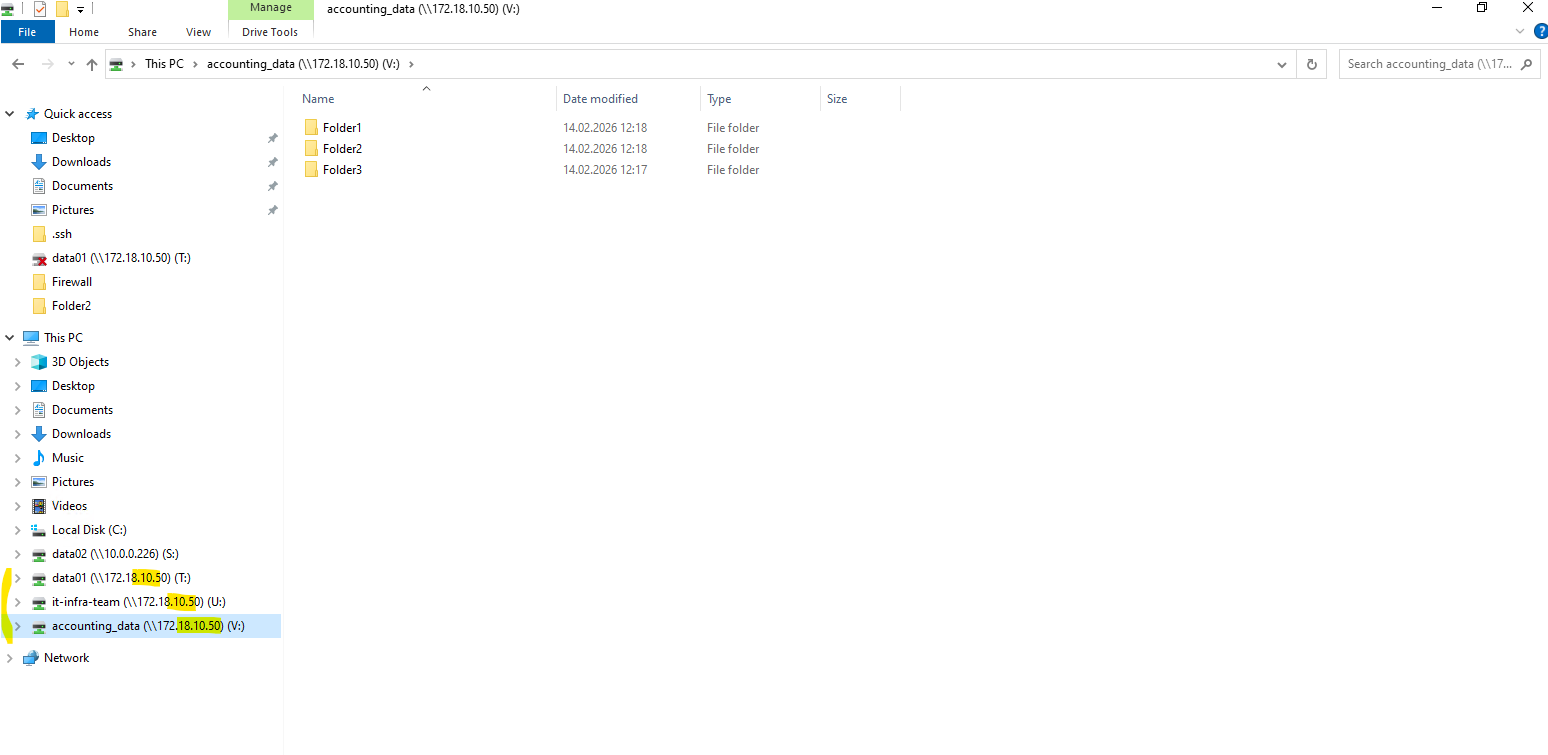
Even with node 1 is down, the clients can still access the CIFS/SMB shares as the data LIF with the IP 172.18.10.50 was successfully failover to the second alive node matrixcvo-02 when the failover policy on the LIFs is enabled.
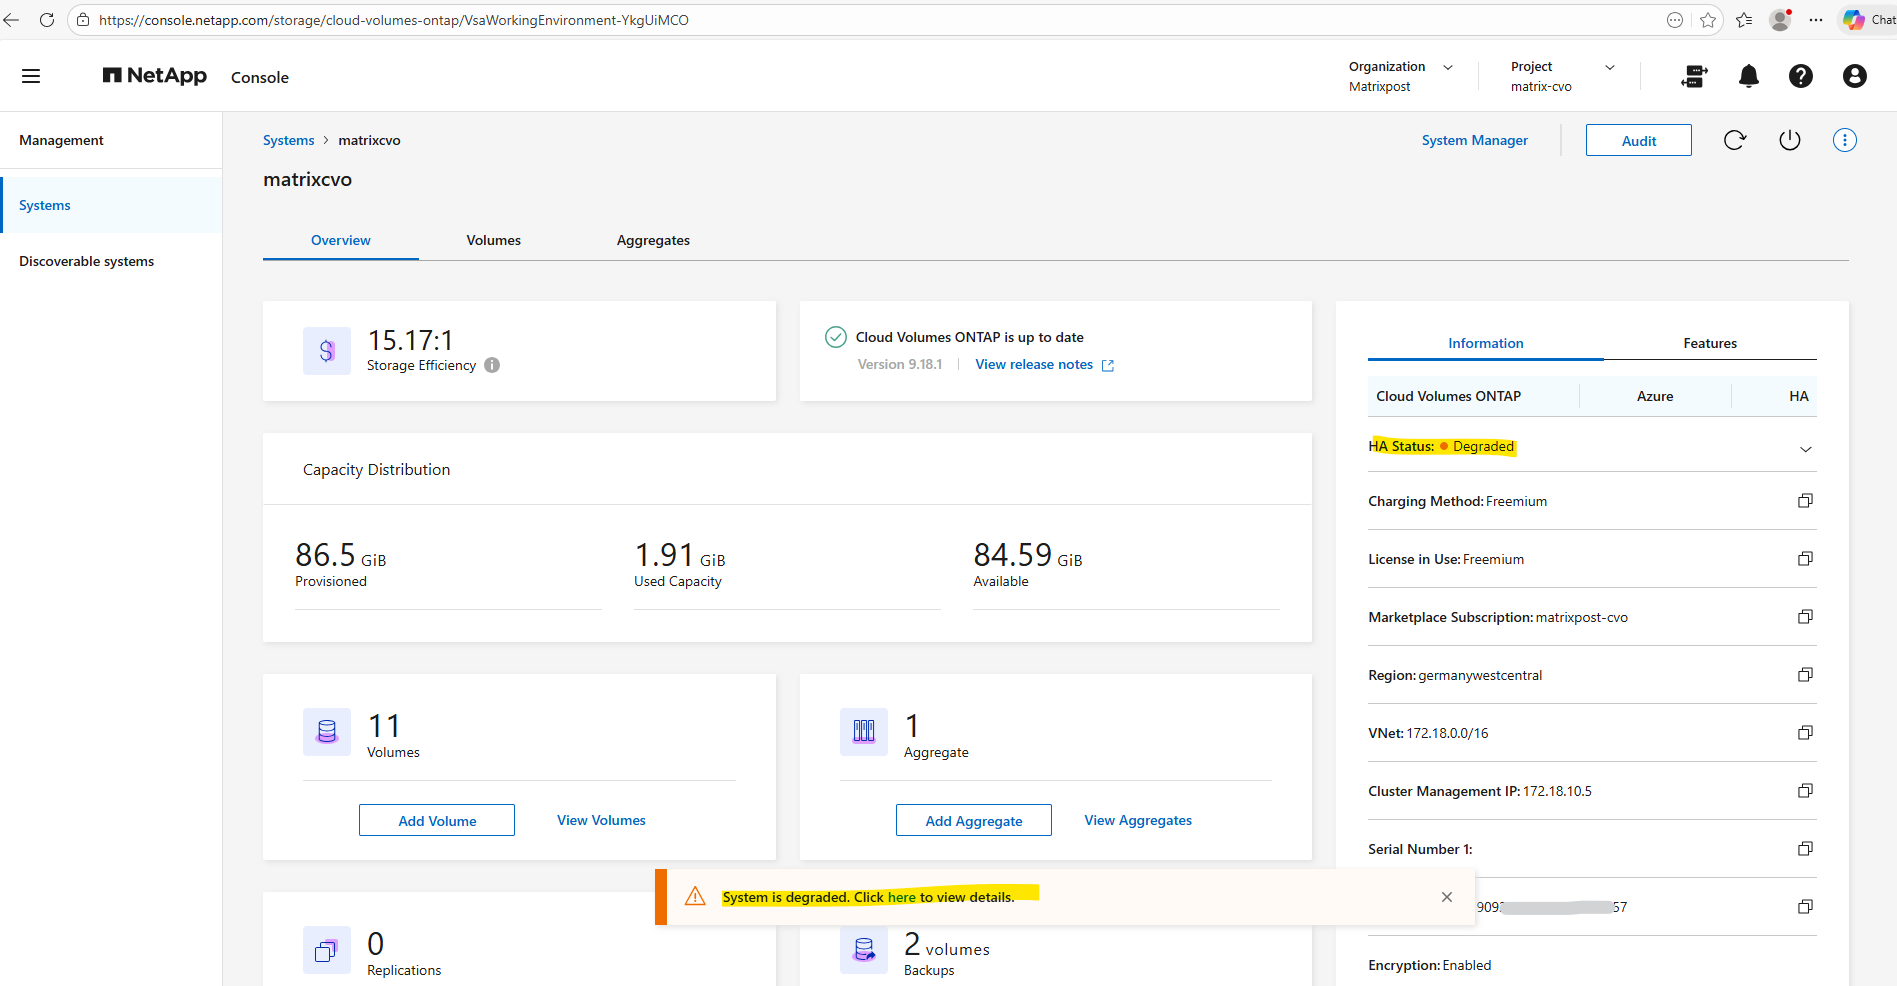
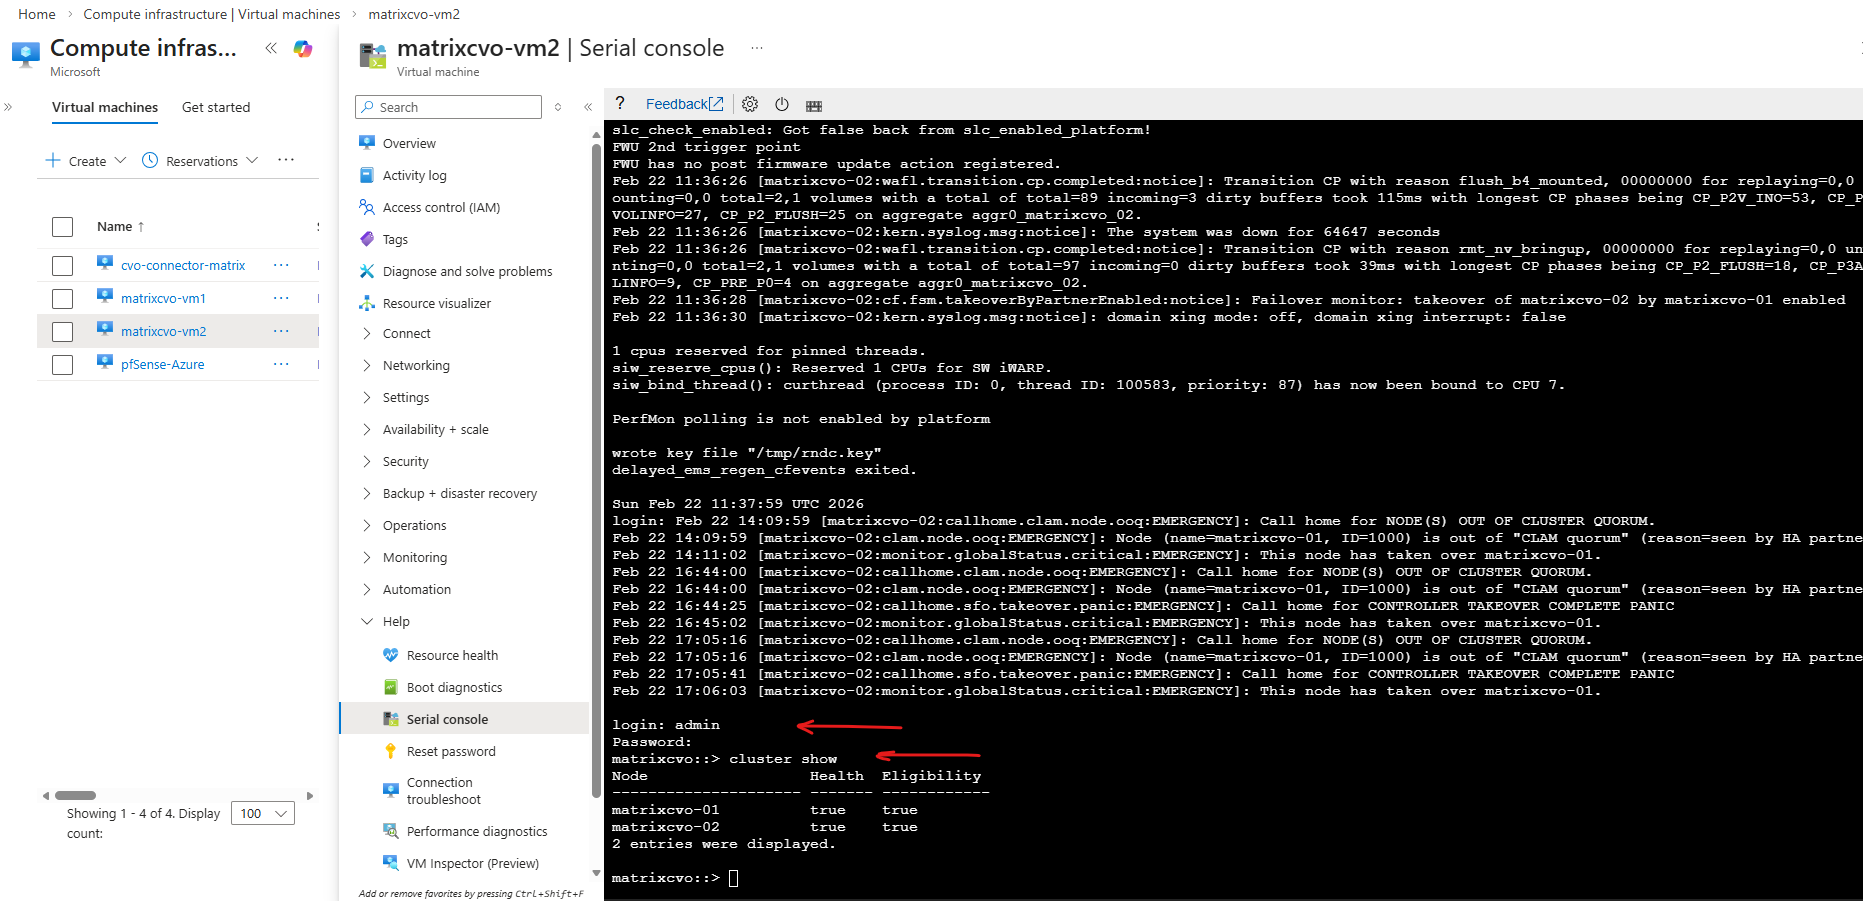
When we simulate a crash by shutting down a node, the Netapp console (formerly BlueXP) marks the system as “Degraded” because the high-availability redundancy is lost.
Although the surviving node successfully takes over the storage and continues serving data, the console alerts us that the cluster is no longer resilient to a second failure.
This status serves as a critical warning that while your data is accessible, the environment requires the failed node to be restored to return to its optimal, protected state.
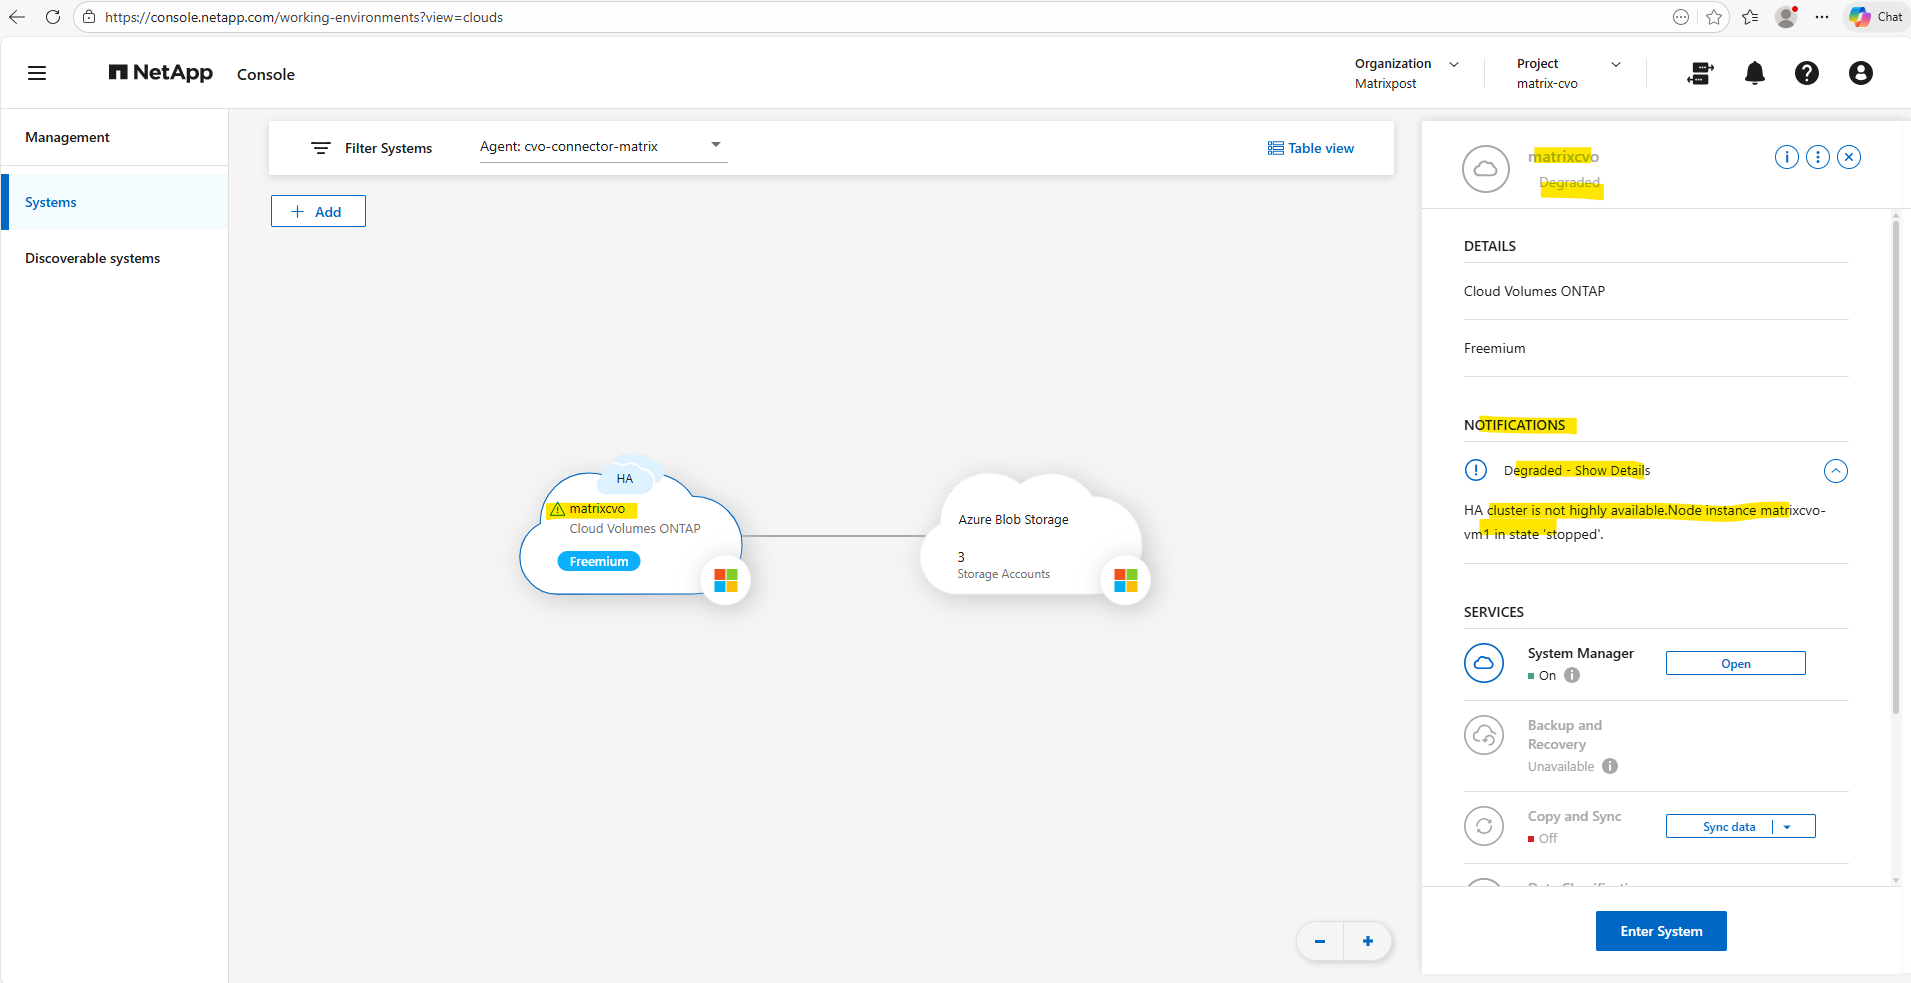
To see more details we can click on the link below within the system manager.
Here we can see which node finally is affected, so in my case node 1 which I was shutting down directly in Azure.
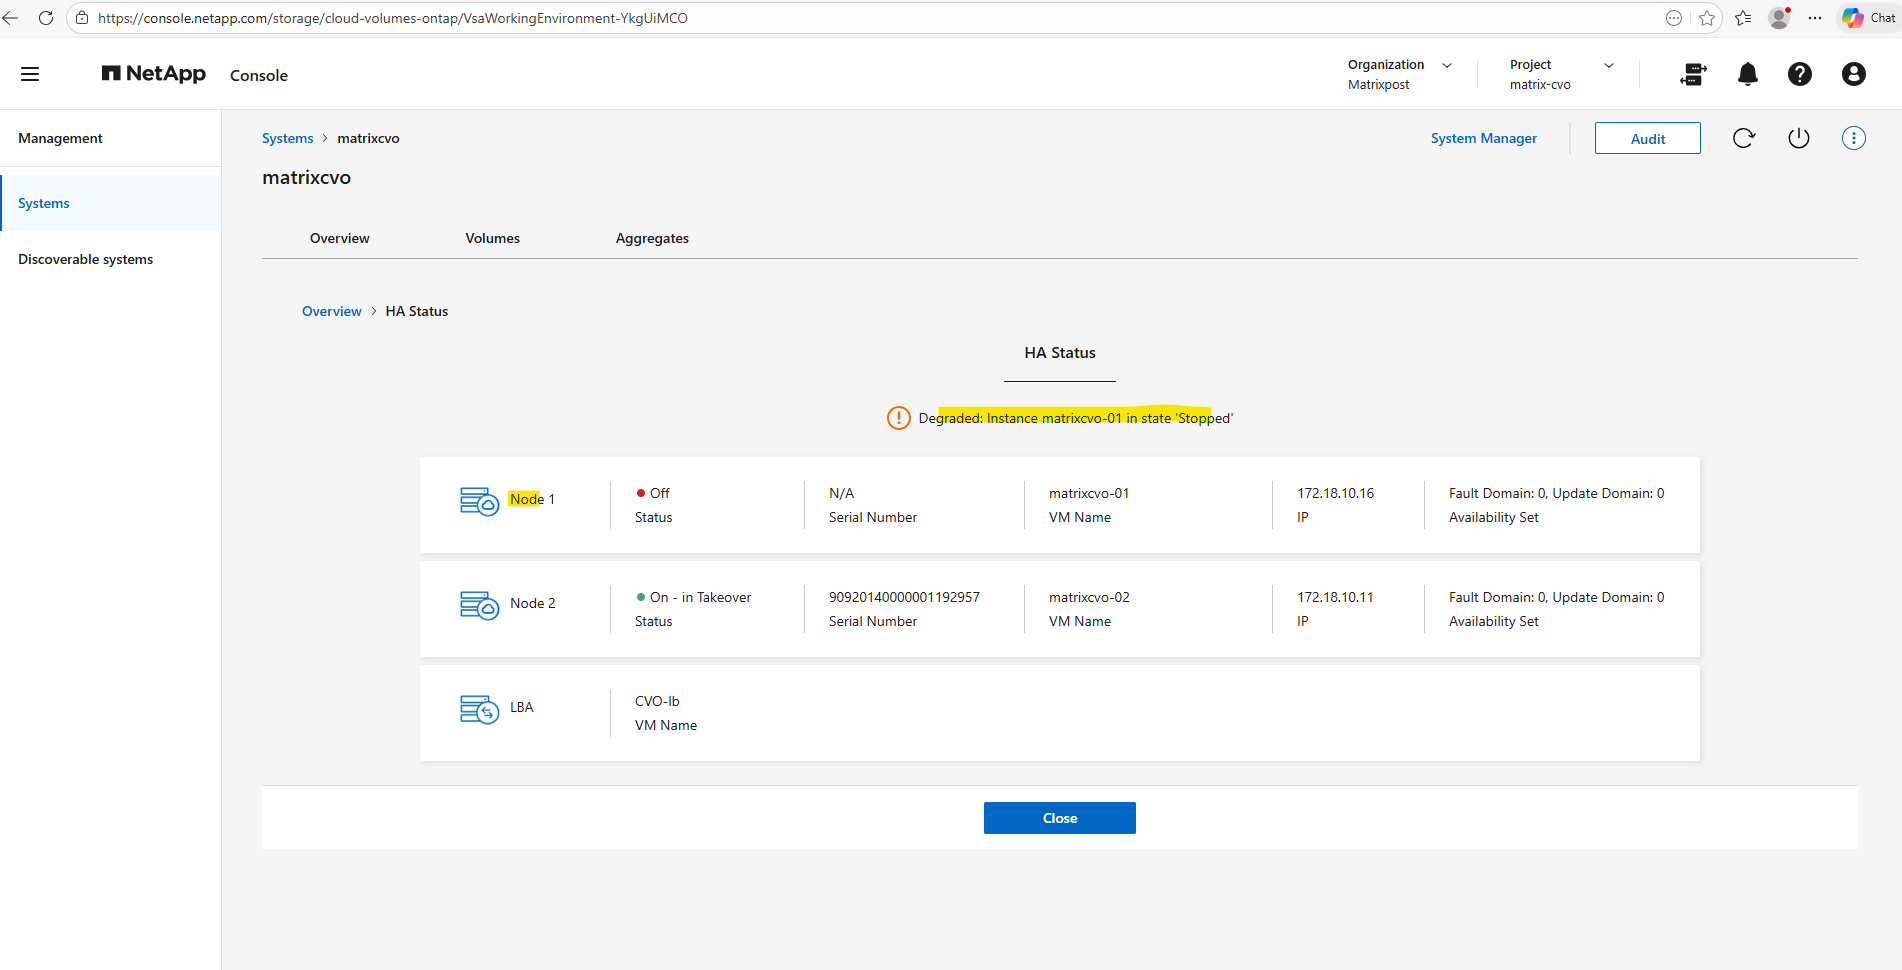
Now that matrixcvo-01 has been started again in Azure and rejoined the cluster, the system is currently in a “Partial giveback” state as it synchronizes applications. Once the giveback process completes, the LIFs with auto-revert enabled should automatically migrate back to their home node, matrixcvo-01. This restoration of the HA pair provides a clean baseline to see if the stabilized cluster triggers any unexpected orchestration within the NetApp Console.
matrixcvo::> cluster show
matrixcvo::> node show
matrixcvo::> storage failover show
The output confirms that the giveback process is complete, with all data aggregates, specifically aggr1 now successfully returned to their home owner, matrixcvo-01.
With the storage layer fully stabilized, the system has transitioned from a “Partial giveback” state to a fully connected HA pair, setting the stage to verify if the data LIFs have automatically followed their aggregates back to the home node.
matrixcvo::> storage failover show
matrixcvo::> storage failover show-giveback
matrixcvo::> storage aggregate show -fields owner-name
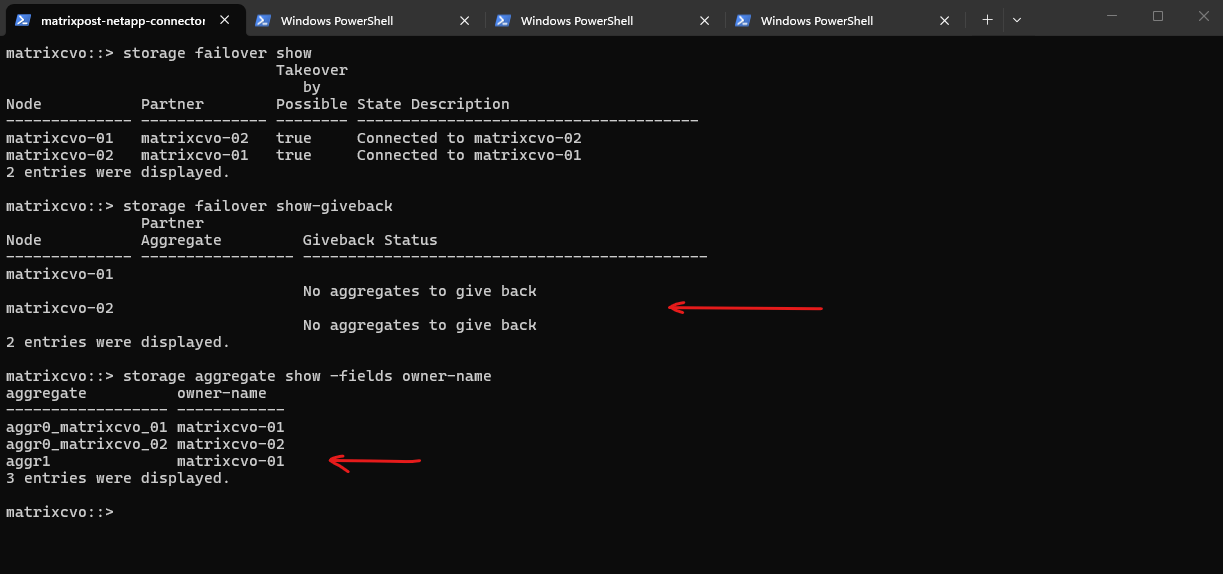
To test the final state of your LIFs and ensure the cluster has fully recovered, you should run the following command to see if any interfaces are still “misplaced” on the wrong node:
With the storage giveback complete, I executed a targeted check to identify any LIFs that failed to migrate back to their home ports. An empty result for this command confirms that the
-auto-revert truepolicy successfully triggered, ensuring that all 14 data and management interfaces have automatically returned to their primary nodes to align with their respective storage aggregates.”
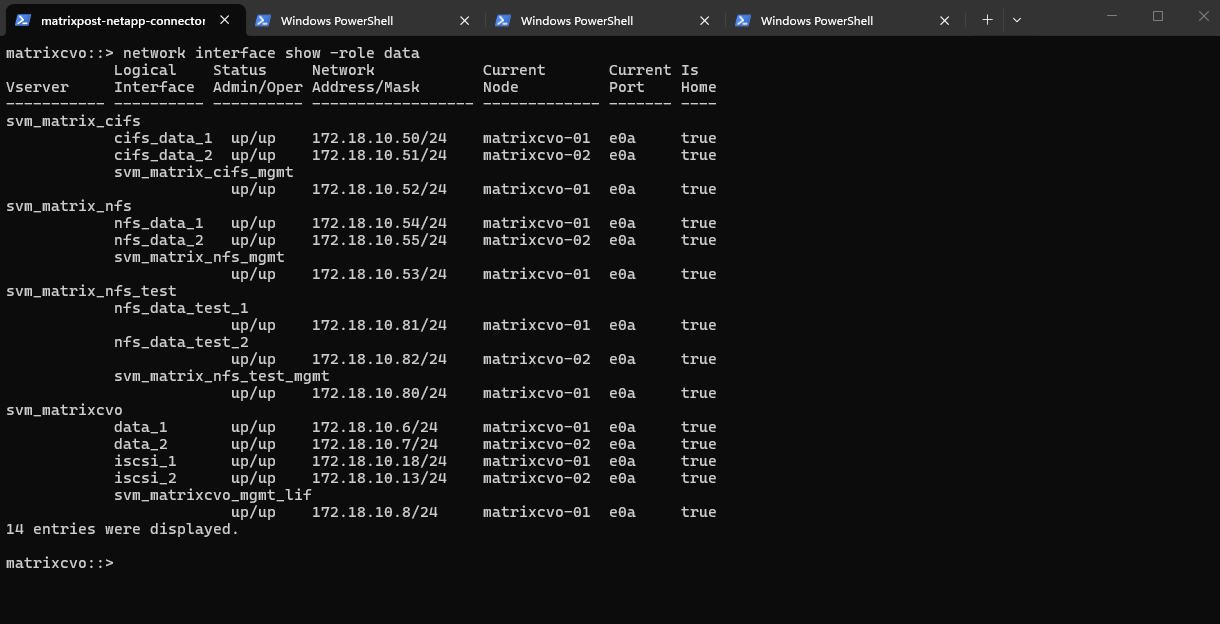
matrixcvo::> network interface show -is-home false

The network interface show output confirms a perfectly balanced cluster state, where every LIF has automatically reverted to its designated home node and port following the giveback.
All interfaces now display
truein the Is Home column, validating that the failover policies and auto-revert settings successfully re-established the primary traffic paths. With the storage and network layers now fully reconciled, the environment is back in its optimal configuration for standard operations.It is important to understand the sequence:
auto-revertis the passenger, not the driver. It waits for the Storage Giveback to finish and the home ports to become healthy; only then does it trigger the automatic migration of the data LIFs back to their primary controller.”
matrixcvo::> network interface show -role data
When Disaster Strikes – Navigating a Real Node Crash in Azure CVO
In a perfect world, Cloud Volumes ONTAP (CVO) HA pairs in Azure handle failures automatically via takeover and giveback. But as we know, the cloud can be unpredictable, and sometimes a VM doesn’t just “reboot”, it vanishes or becomes corrupted beyond repair.
I reached out to NetApp Support to clarify the exact workflow for an unrecoverable node identity, and the answer from NetApp support confirms a critical detail:
This is not a self-service operation and must be handled through Support.
The Official Recovery Paths
According to NetApp Support, if a node in your Azure HA pair is truly “dead” (loss of VM identity, boot disk corruption, or accidental deletion in the Azure Portal), you have two paths:
1. The “Surgical” Path: Support-Led Node Replacement
- What it is: A controlled procedure where NetApp Support rebuilds the failed node’s identity within your existing HA pair.
- Crucial Note: This is not a self-service operation. You cannot trigger this from the BlueXP console or the ONTAP CLI. You must open a Support Case.
- Benefit: It preserves your existing management IPs, IQNs, and share paths, preventing a massive reconfiguration on the client side.
2. The “Nuclear” Path: Full Redeployment & Restore
- What it is: Deploying a brand-new CVO HA pair from scratch via the NetApp Console.
- How to get data back: You must restore your volumes using SnapMirror (if you have a secondary site/inter-cluster relationship) or from NetApp Cloud Backup (Azure Storage Account).
- Downside: A fresh deployment typically results in new IP addresses for your NFS/SMB exports and iSCSI targets. This usually triggers a massive headache: updating DNS records, mounting points on dozens of clients, and updating application connection strings. – Even though the BlueXP wizard doesn’t allow you to pick specific IPs during the initial deployment of the new HA pair, you aren’t stuck with the new ones forever. Once the “Nuclear” redeployment is finished and the new HA pair is healthy, you can manually re-introduce your “Old” IPs as additional Data LIFs. Because you’ve reclaimed the old IPs, your NFS and SMB clients will “see” the storage again without you having to touch a single mount point, update a DNS entry, or change an application connection string.
When Azure Freezes a CVO Node: Analyzing the Reboot Timeline
A sudden HA takeover, multiple alerts, and interrupted client sessions can quickly suggest a serious storage issue.
Instead of assuming the worst, we analyzed the EMS (Event Management System) log chronologically. The reboot timeline ultimately traced back to a scheduled Azure platform freeze event affecting the CVO node.
The reboot timeline can be verified immediately by querying the EMS log of the affected node using the command below. This command quickly reveals whether a scheduled platform event, panic, or user-initiated reboot occurred within the relevant timeframe.
A panic event in ONTAP is a kernel-level fatal error that forces an immediate node reboot to preserve data integrity, comparable to a system crash in traditional operating systems.
EMS log retention is size-based rather than time-based, meaning older entries are rotated automatically depending on overall event volume.
matrixcvo::> event log show -node matrixcvo-01 -time >6h

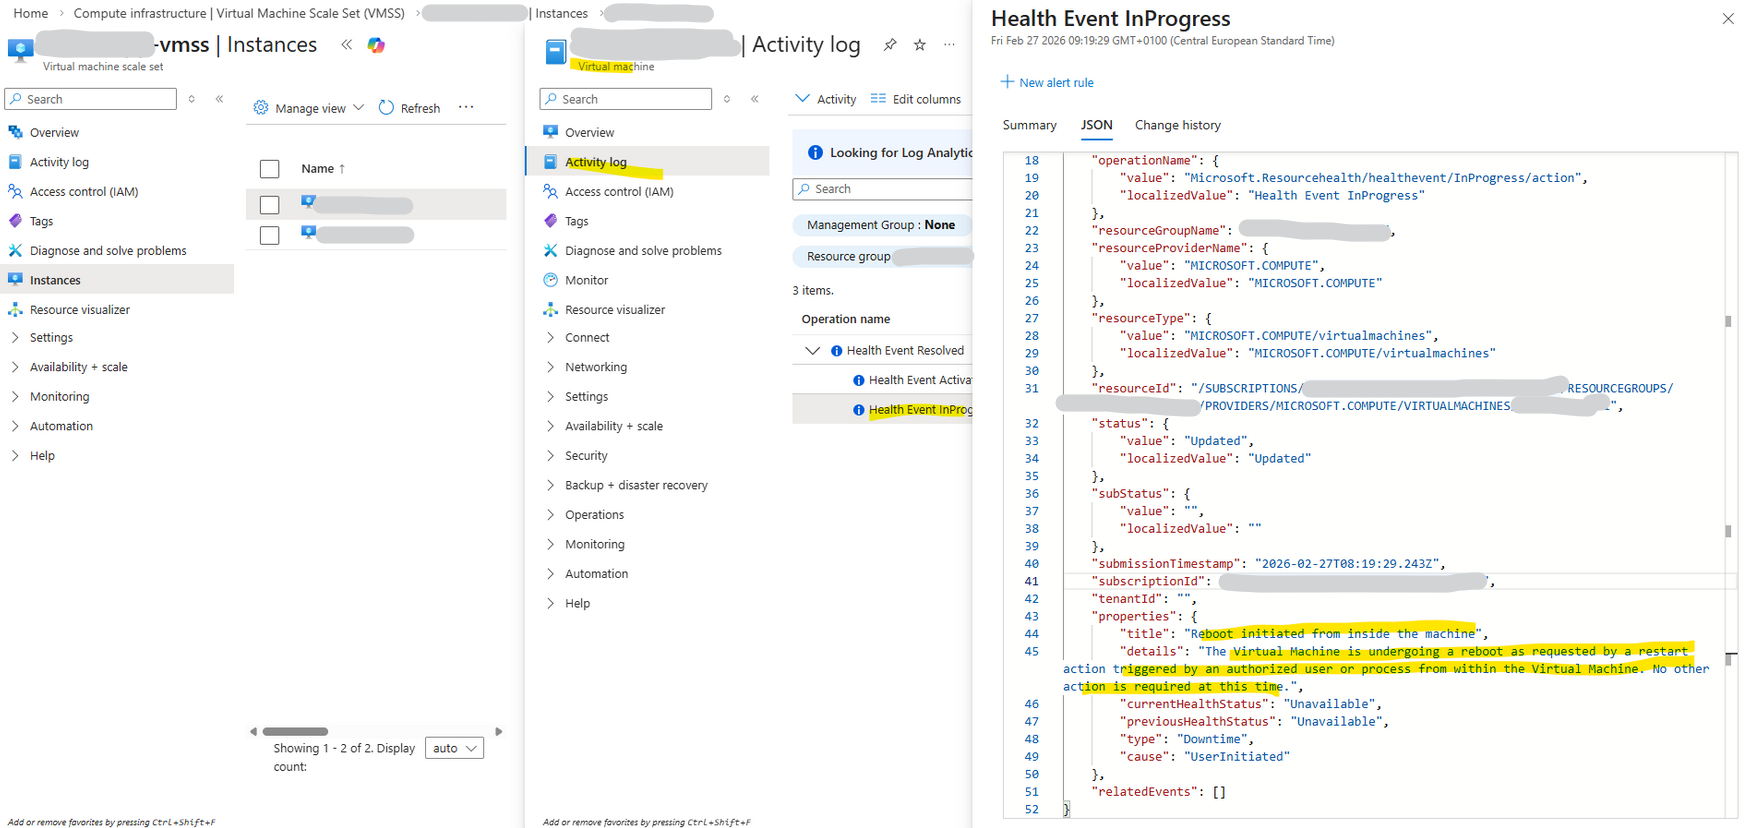
Although the Azure Activity Log classified the reboot as “triggered by an authorized user or process from within the virtual machine,” this reflects how Azure observes the guest operating system restart sequence, not the original cause.
The ONTAP EMS log clearly shows that the reboot was preceded by a scheduled Azure platform freeze event, identifying the cloud maintenance action as the actual trigger.
Although an Azure freeze event does not inherently imply a reboot, the temporary loss of VM responsiveness causes the HA partner to interpret the node as failed. As a result, ONTAP performs a protective takeover, and when the frozen node resumes, the sequence may appear as a reboot from the Azure perspective.
ONTAP EMS log

2/27/2026 09:18:00  matrixcvo-01     ALERT         vsa.scheduledEvent.scheduled: Cloud provider event scheduled from: Platform, out: 9 for node "matrixcvo-01". ID: 0FBFADE4-C6FA-461A-80B2-8B31AB57A61D. Type: freeze. Not before: 2/27/2026 09:32:29.
Troubleshooting the Data SVM
In a NetApp environment, the Storage Virtual Machine (SVM) is the heart of your data delivery. When clients report connectivity issues or protocols hang, your troubleshooting should follow a “surgical” path, starting with the least disruptive network fixes and moving toward a full service reset.
Technically a SVM is a logical container which cannot be just restarted like a real virtual machine. However, you can Stop and Start its services, which is the closest you can get to a “reboot” of the storage personality.
Migrating the Data LIF (Soft Reset)
If the node is healthy but clients can’t connect, the Logical Interface (LIF) may be the issue. Moving the LIF to a different physical port or the partner node and then “reverting” it back often clears network-level hangs without dropping active sessions.
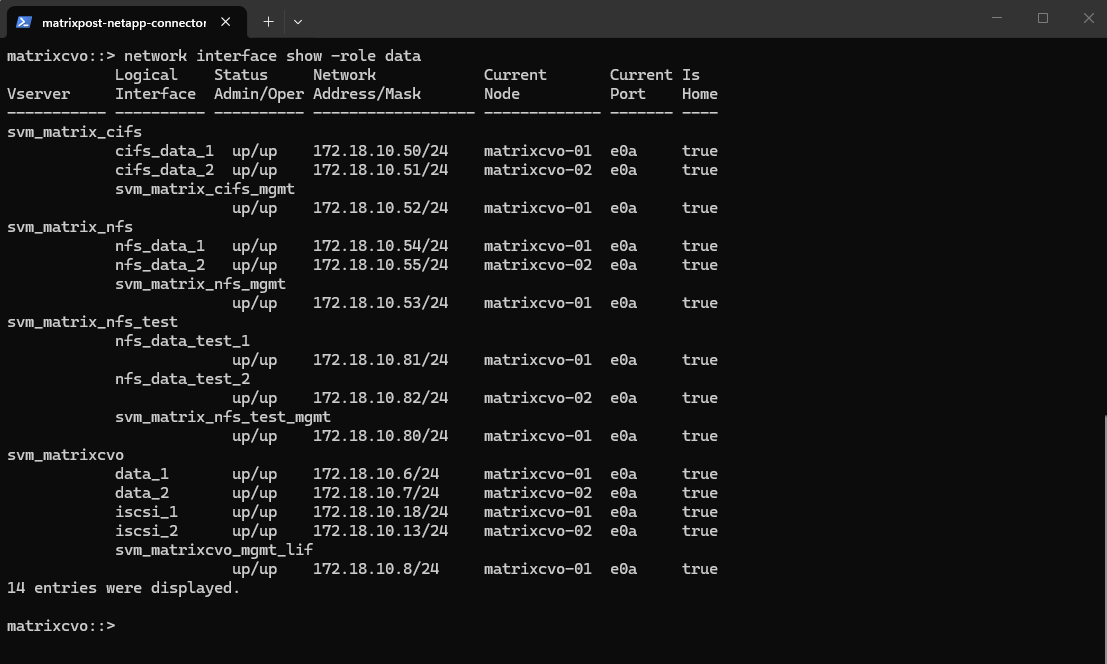
To see all data LIFs we can run:
The output shows all configured data LIFs across the SVMs, including their IP addresses, current node ownership, and operational status. Each SVM is configured with at least one data LIF per node, ensuring high availability and proper failover capability within the Cloud Volumes ONTAP cluster.
matrixcvo::> network interface show -role data
I will now manually migrate the LIF cifs_data_1 to matrixcvo-02.
# Migrate the LIF to the partner node
matrixcvo::> network interface migrate -vserver <svm_name> -lif <lif_name> -dest-node <partner_node>
matrixcvo::> network interface migrate -vserver svm_matrix_cifs -lif cifs_data_1 -dest-node matrixcvo-02
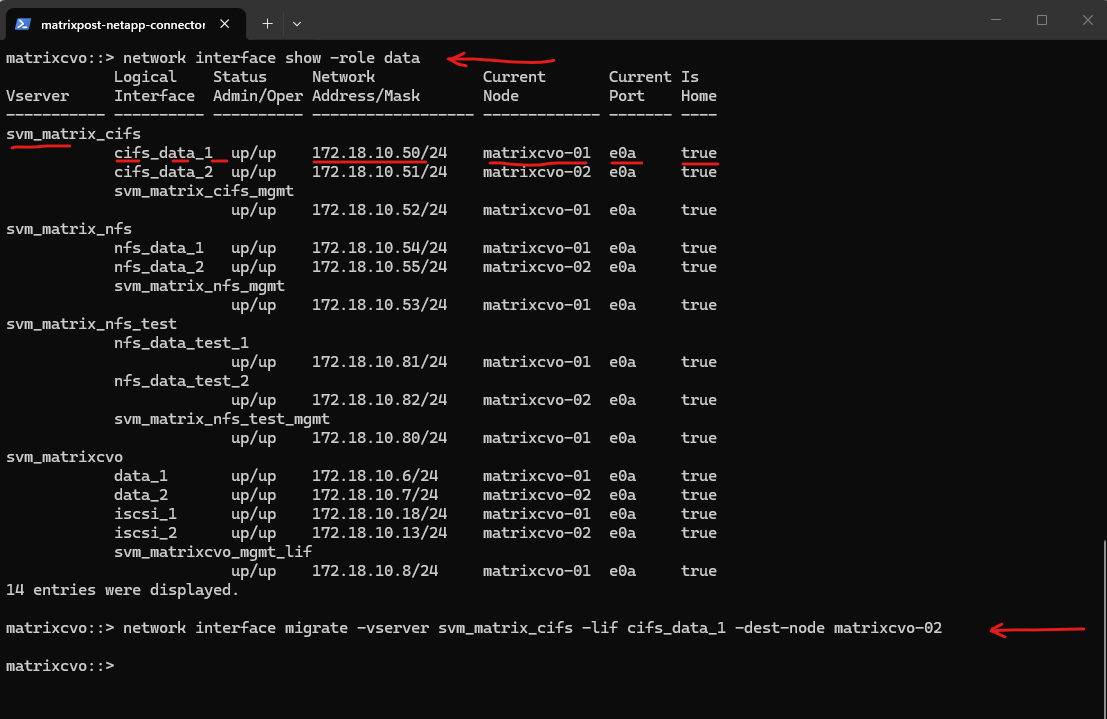
A manual
network interface migratecan cause a very brief interruption while the IP address moves and ARP tables update. In my test, this resulted in a single dropped ICMP packet from the SMB client.
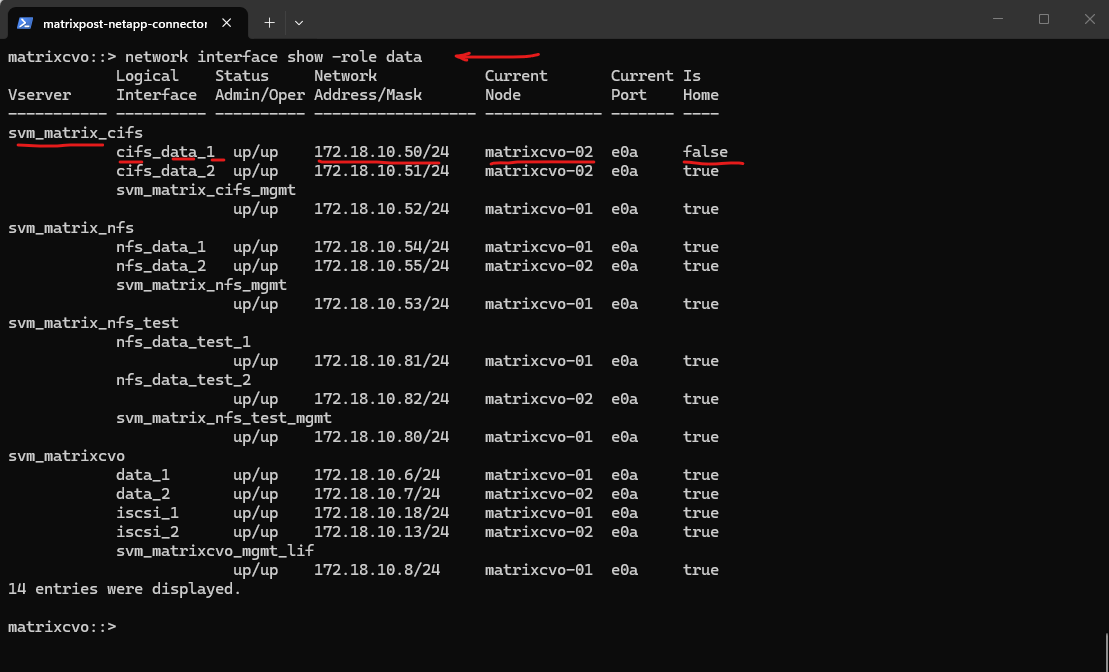
After manually migrating the LIF
cifs_data_1tomatrixcvo-02, the output shows that it is now running on the partner node whileIs Homeis set tofalse, indicating it is temporarily hosted on a non-home node.
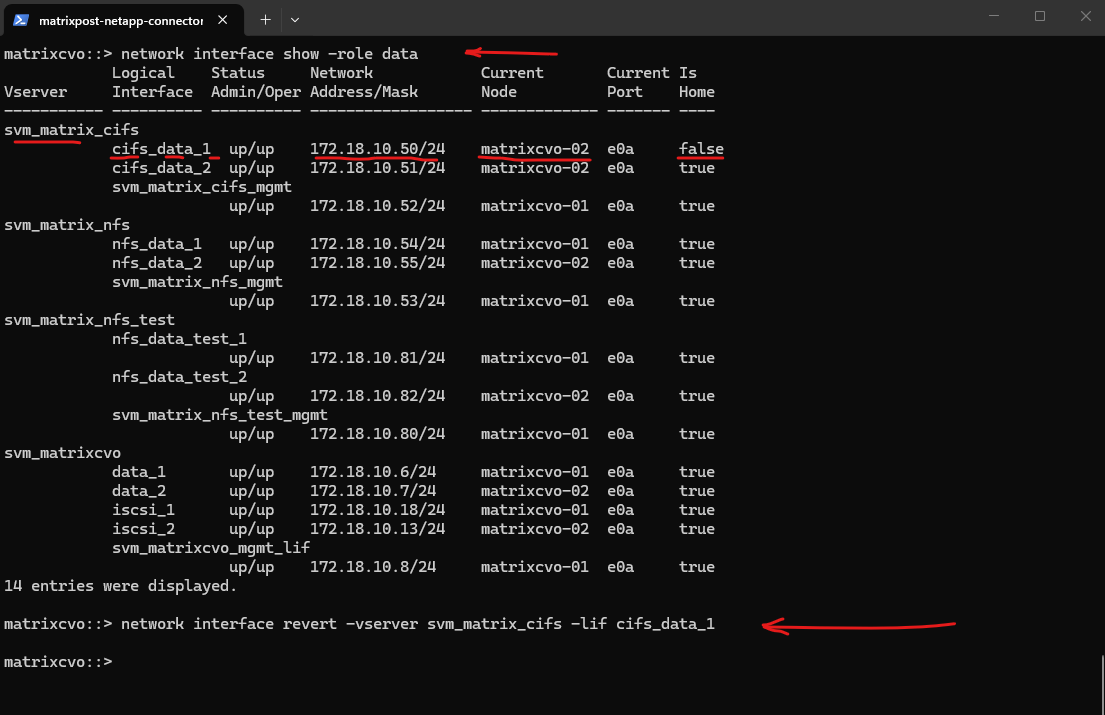
I will now move the LIF back to its configured home node, restoring the intended HA design and normal interface placement after a manual migration.
# Revert the LIF back to its home port
matrixcvo::> network interface revert -vserver <svm_name> -lif <lif_name>
matrixcvo::> network interface revert -vserver svm_matrix_cifs -lif cifs_data_1
When reverting the LIF back to its home node using
network interface revert, I observed two dropped ICMP packets from the SMB client. This again shows that a manual LIF move or revert can cause a very brief interruption due to IP relocation and ARP convergence, even though the impact is typically minimal and short-lived.
After the manual migration,
network interface revert -vserver svm_matrix_cifs -lif cifs_data_1moves the LIF back to its configured home node and restores the normal HA/LIF placement.

During an HA takeover (node failover), ONTAP does not simply “move an IP” like with a manual LIF migrate/revert. Instead, the partner node already has the required failover configuration prepared, and the takeover process includes optimized mechanisms such as:
- Fast LIF failover triggered automatically
- Immediate gratuitous ARP (GARP) announcements
- Tight integration between HA, networking, and data serving stack
- Pre-established failover groups and broadcast domains
Because the failover is part of the HA design path, it is highly optimized and orchestrated internally. A manual network interface migrate or revert, on the other hand, is an administrative action that relocates the IP stack for that LIF, which can briefly interrupt traffic while ARP tables on the client or upstream switch update.
Interestingly, the behavior observed during ONTAP HA takeover is conceptually very similar to what I described in my VMware vMotion article about RARP/GARP and MAC table updates.
Just like ESXi sends RARP or gratuitous ARP frames during vMotion to quickly update upstream switches and prevent traffic disruption, ONTAP also sends gratuitous ARP announcements during HA failover so the network immediately learns the new location of the LIF’s IP address and the corresponding Layer 2 MAC address of the node port now hosting it.
The key difference is that ONTAP HA failover is a tightly orchestrated cluster event, where networking, storage, and failover logic are fully integrated, which explains why a full node takeover was even smoother than a manual LIF migration.
Protocol-Specific Pulse (CIFS/NFS)
If only one protocol is failing (e.g., Windows users can’t connect but Linux mounts are fine), don’t drop the entire SVM. Restarting just the specific service is the best way to clear stuck SMB locks or Kerberos glitches.
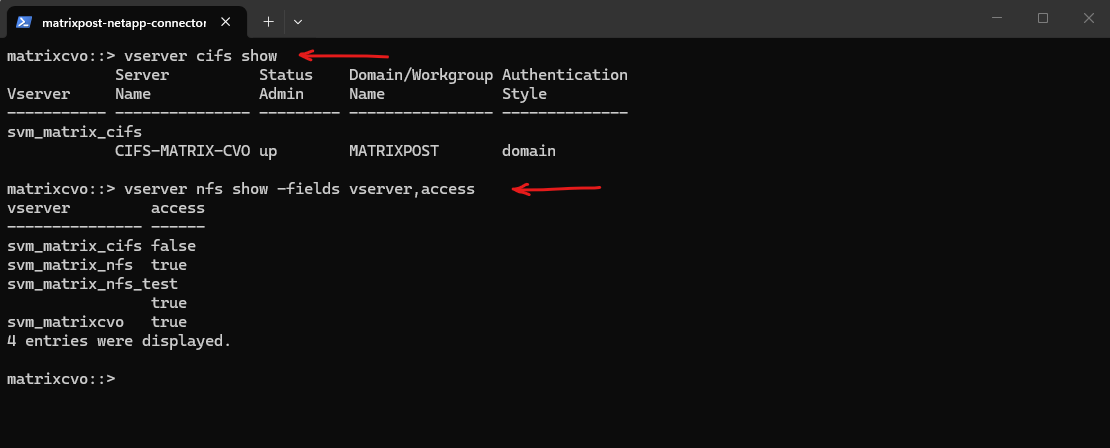
Before restarting the CIFS and NFS service, first identify all SVMs with SMB and NFS enabled using the commands below, so you know exactly which SVM’s CIFS or NFS service you need to stop and start for troubleshooting.
To see whether NFS is administratively enabled (General Access) we can include the
accessfield below.
matrixcvo::> vserver cifs show
matrixcvo::> vserver nfs show -fields vserver,access
Stopping and starting the CIFS or NFS service can help reset active client sessions and clear potential protocol-level issues without affecting the underlying volumes or LIF configuration.
This approach is often useful when troubleshooting stuck SMB connections, authentication problems, or NFS mount issues. Keep in mind that active client sessions will be interrupted during the stop/start operation.
# To pulse Windows/SMB services
vserver cifs stop -vserver <svm_name>
vserver cifs start -vserver <svm_name>

# To pulse Linux/NFS services
vserver nfs stop -vserver <svm_name>
vserver nfs start -vserver <svm_name>
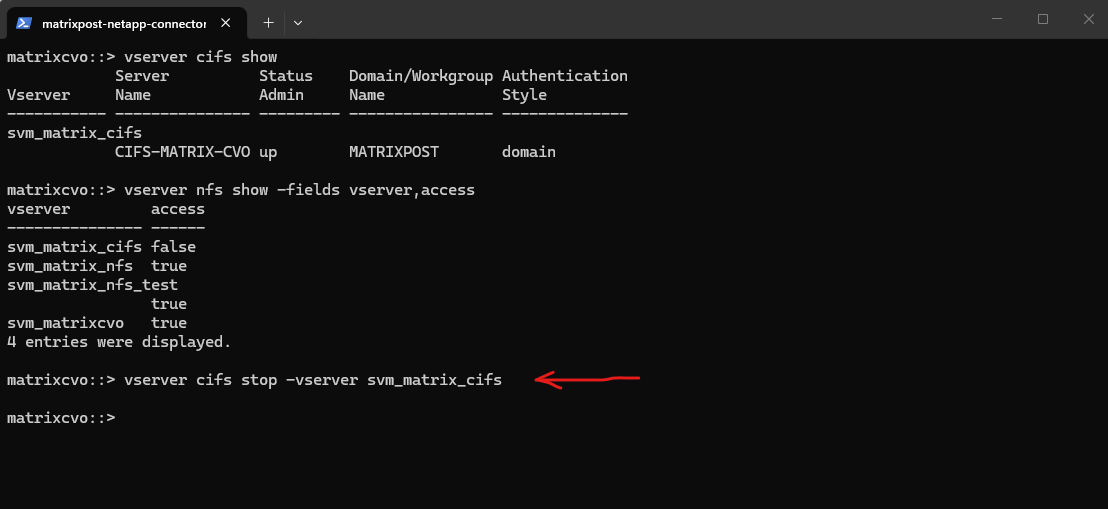
Below I will stop the cifs service on the SVM svm_matrix_cifs.
matrixcvo::> vserver cifs stop -vserver svm_matrix_cifs
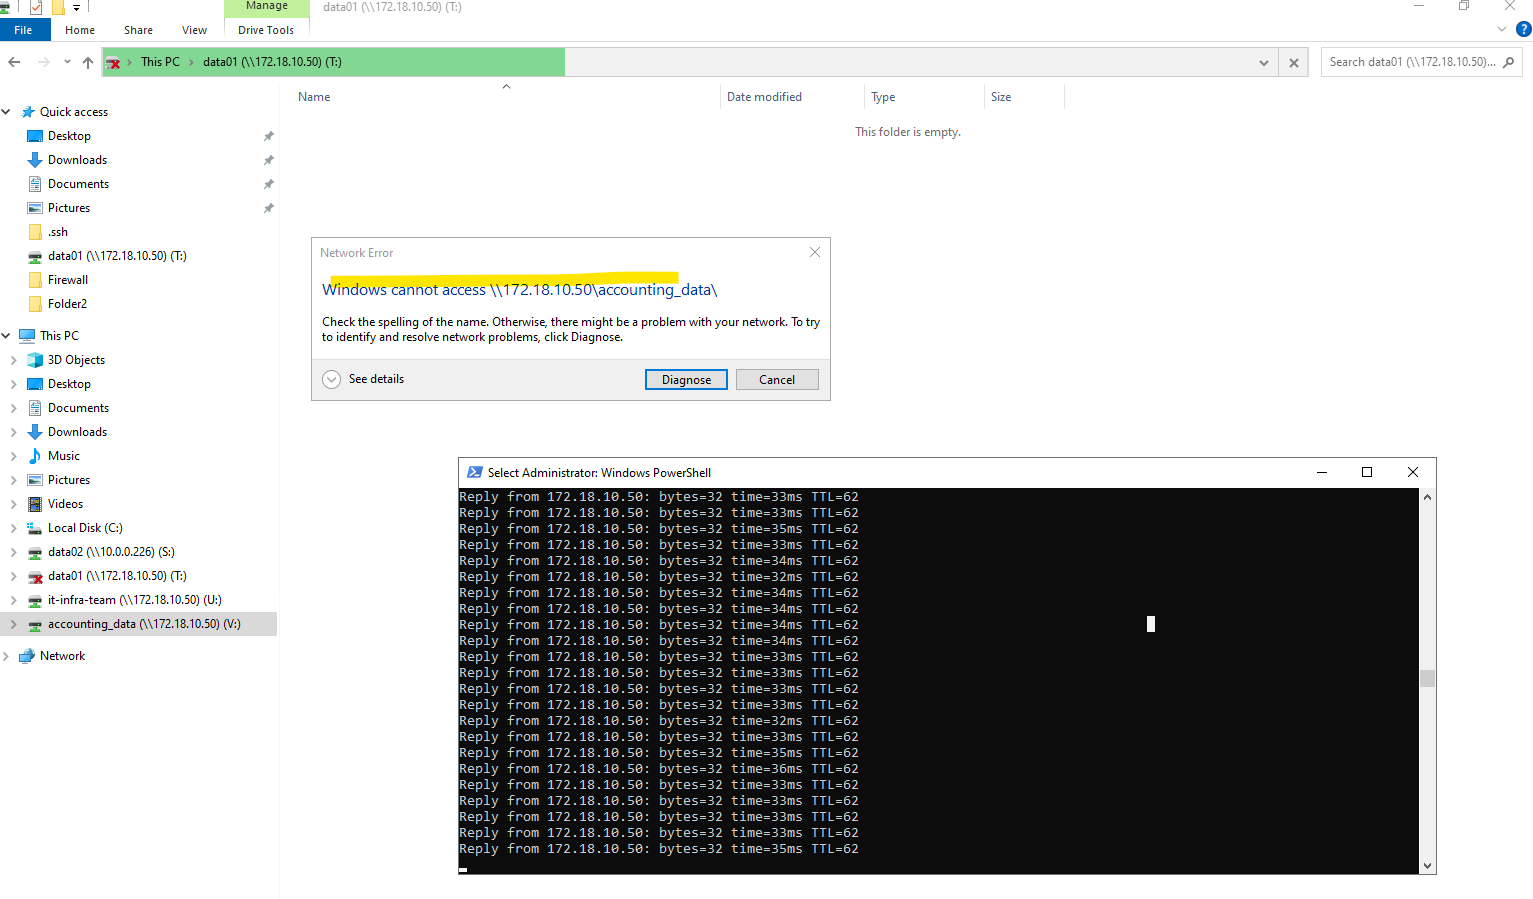
When running
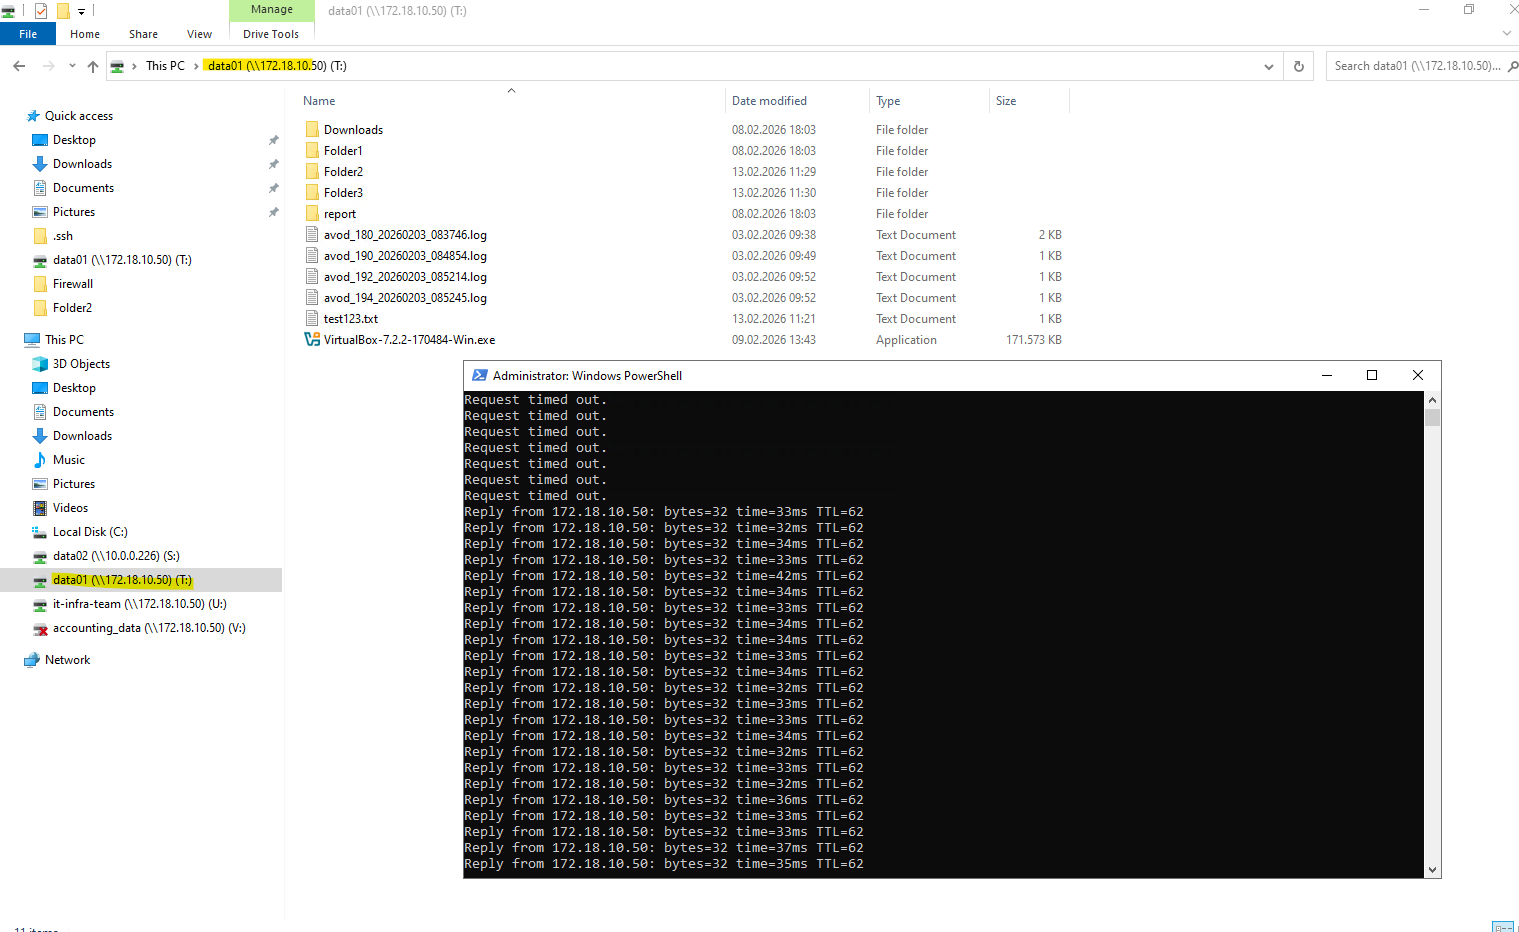
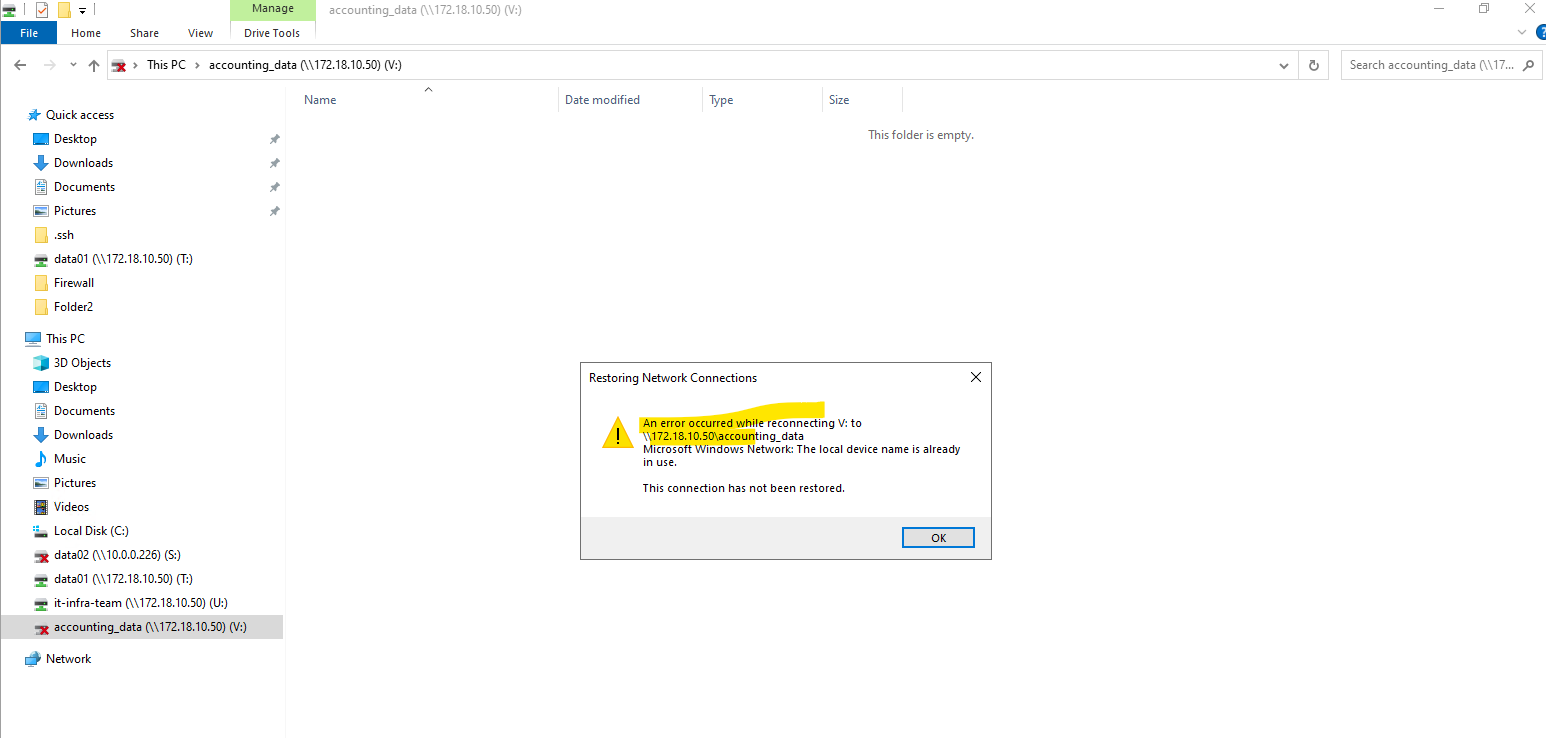
vserver cifs stop -vserver svm_matrix_cifs, all Windows clients with active SMB sessions on that SVM immediately lose access to their mapped drives and receive an error with Windows cannot access <UNC path> like shown below.However, the underlying network connectivity remains intact, ICMP ping to the data LIF IP still works because only the CIFS/SMB service is stopped, not the LIF itself.
I will now start the SVM again by running the command below.
matrixcvo::> vserver cifs start -vserver svm_matrix_cifs
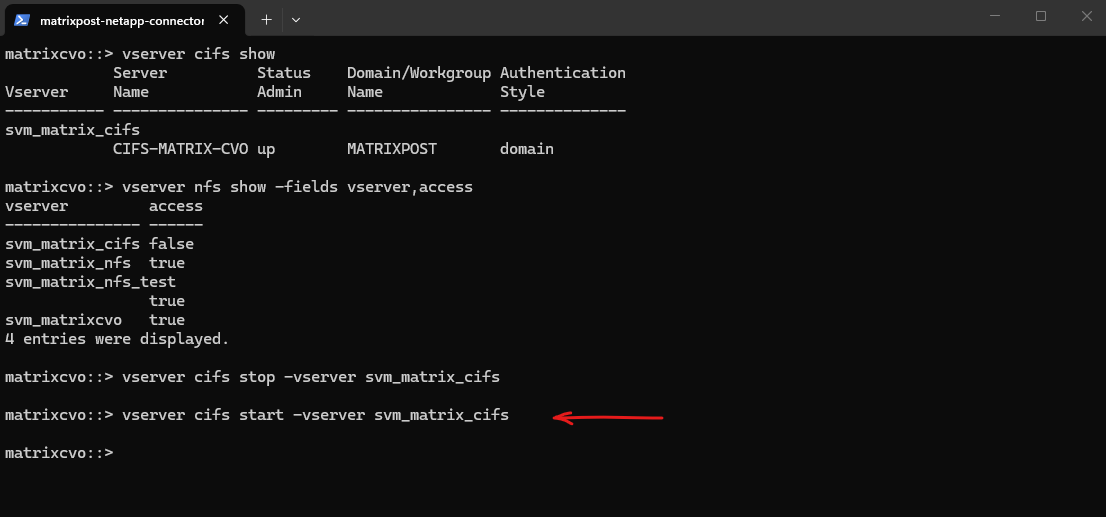
After running
vserver cifs start -vserver svm_matrix_cifs, the SMB service becomes available again and access to the CIFS shares via mapped drives or UNC paths is restored. Clients can reconnect to the shares once the service is fully started and authentication succeeds.
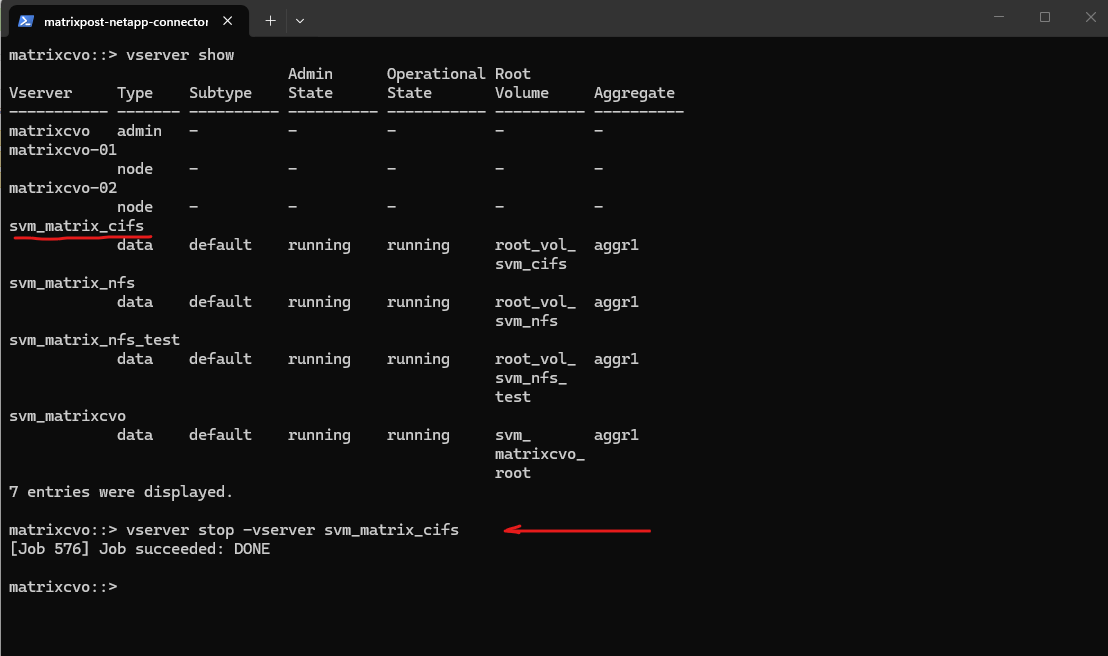
SVM Stop/Start (Hard Reset)
If the entire SVM is unresponsive and protocol-level restarts fail, you must pulse the whole SVM.
Warning: This is a disruptive operation. It will instantly drop every active user session, database mount, and open file handle across all protocols on that SVM.
# Completely stop all SVM services
vserver stop -vserver <svm_name>
matrixcvo::> vserver stop -vserver svm_matrix_cifs

# Restart the SVM services
vserver start -vserver <svm_name>
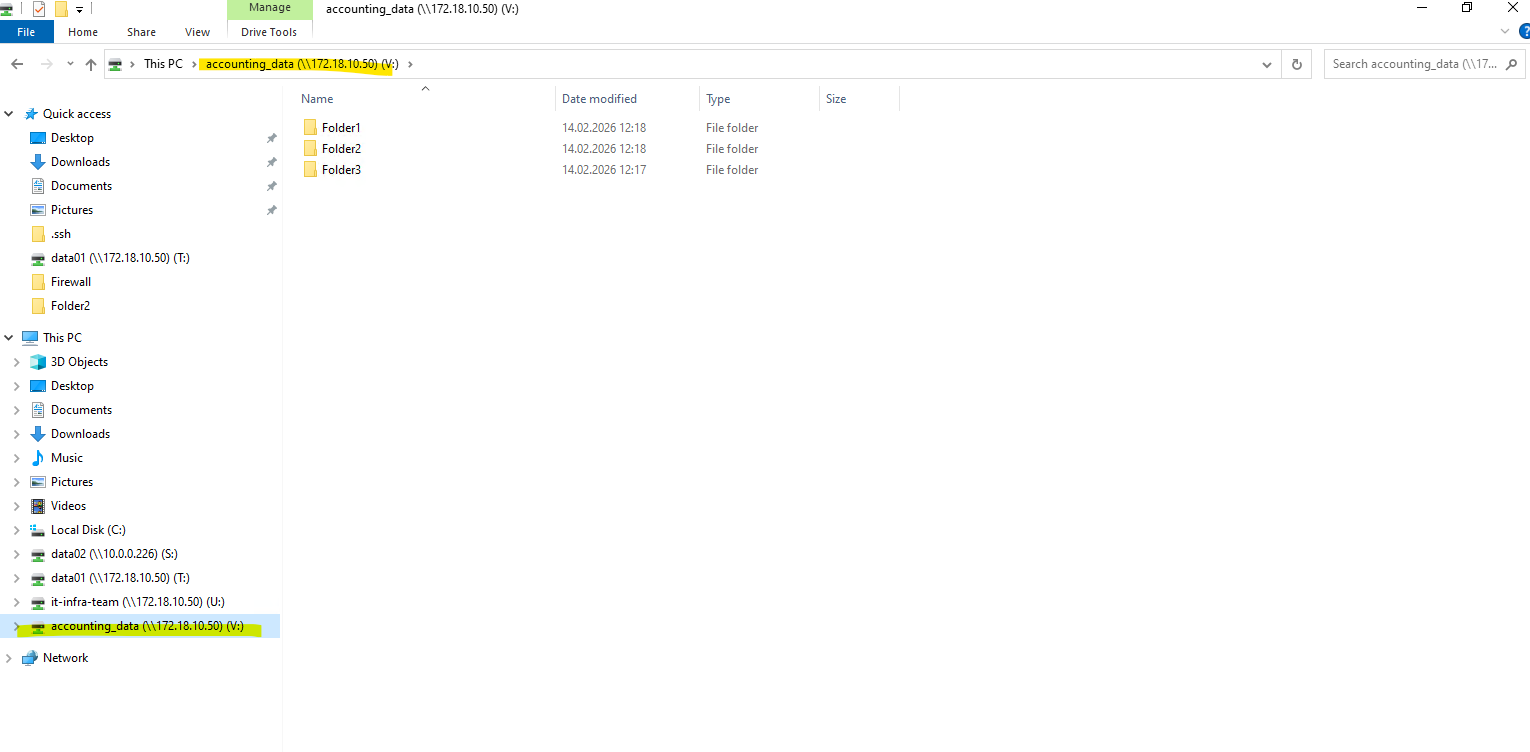
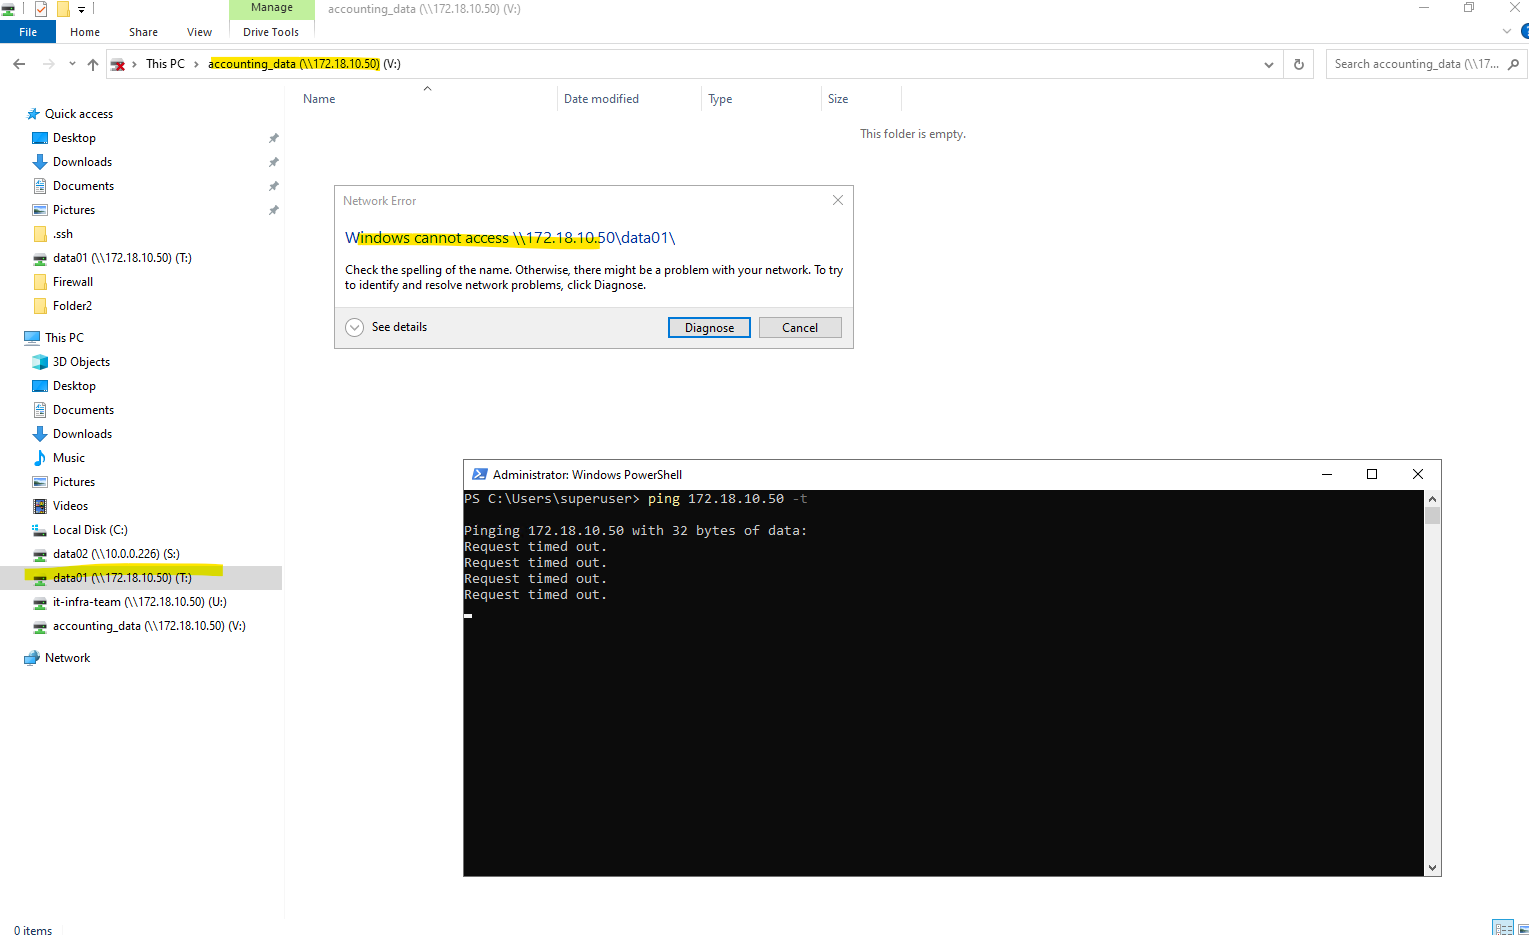
Below, I will stop the entire SVM that provides the CIFS shares.
matrixcvo::> vserver stop -vserver svm_matrix_cifs
After running
vserver stop -vserver svm_matrix_cifs, the entire SVM is stopped, not just the CIFS service.As a result, access to the CIFS shares is no longer possible and even ICMP echo requests to the associated data LIF IP addresses fail. This is because all LIFs and data protocols of that SVM are taken offline when the SVM itself is stopped.
Once the SVM is pulsed, I bring it back online using the command below to restore full connectivity and resume all data services.
matrixcvo::> vserver start -vserver svm_matrix_cifs
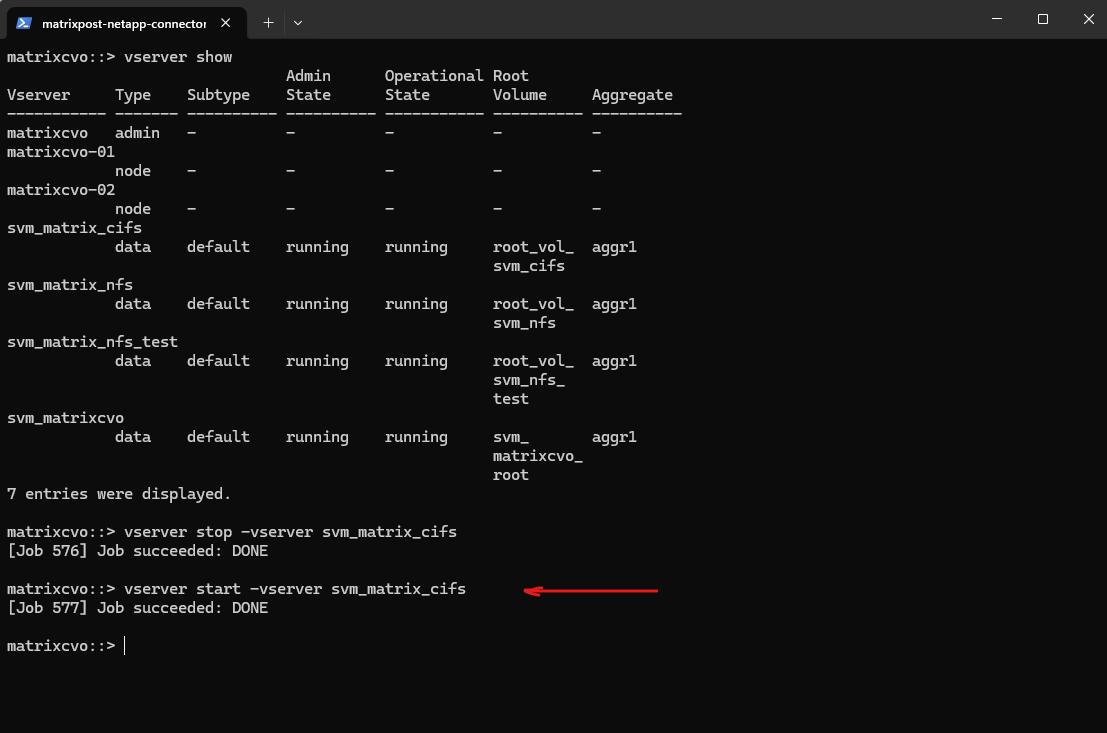
After starting the SVM again, access to the CIFS shares is fully restored and mapped drives reconnect successfully. ICMP echo requests to the data LIF IP addresses also respond again, confirming that both the network interfaces and protocol services are back online.
Manual Node Failover (aka Storage Failover or SFO)
When data service restarts at the SVM level aren’t enough, the next logical step in the troubleshooting ladder is to perform a Manual Node Failover.
In an HA pair, this forces the healthy partner node to take over the storage and “identity” of the problematic node. This is the most effective way to “reboot” the underlying ONTAP instance without deleting any cloud resources.
A manual failover is a two-step process: Takeover and Giveback. This is typically used when a node is reachable via the cluster network but is behaving inconsistently or experiencing OS-level hangs that an SVM restart cannot fix.
You initiate the takeover from the healthy partner node. This tells the healthy node to “grab” the disks and the network interfaces (LIFs) of the node you want to fix.
By triggering a takeover from the healthy partner, you shift the entire storage workload and identity to a different ONTAP instance, allowing the original node to clear its memory state and re-initialize its processes.
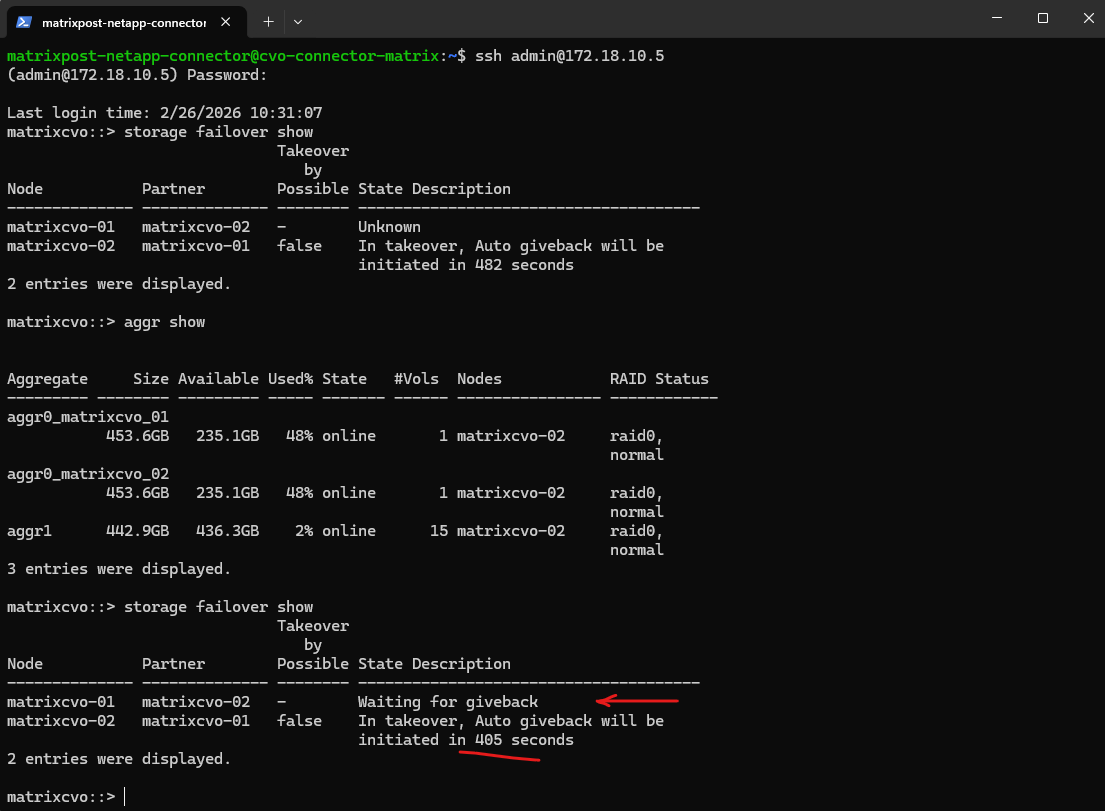
# Run this from the HEALTHY node
storage failover takeover -ofnode <problem_node_name>

matrixcvo::> storage failover show
matrixcvo::> aggr show
matrixcvo::> storage failover takeover -ofnode matrixcvo-01

The manual takeover was successfully triggered, with the system currently in a holding pattern while it counts down the 482-second auto-giveback timer to ensure node stability before returning the storage to its home node.
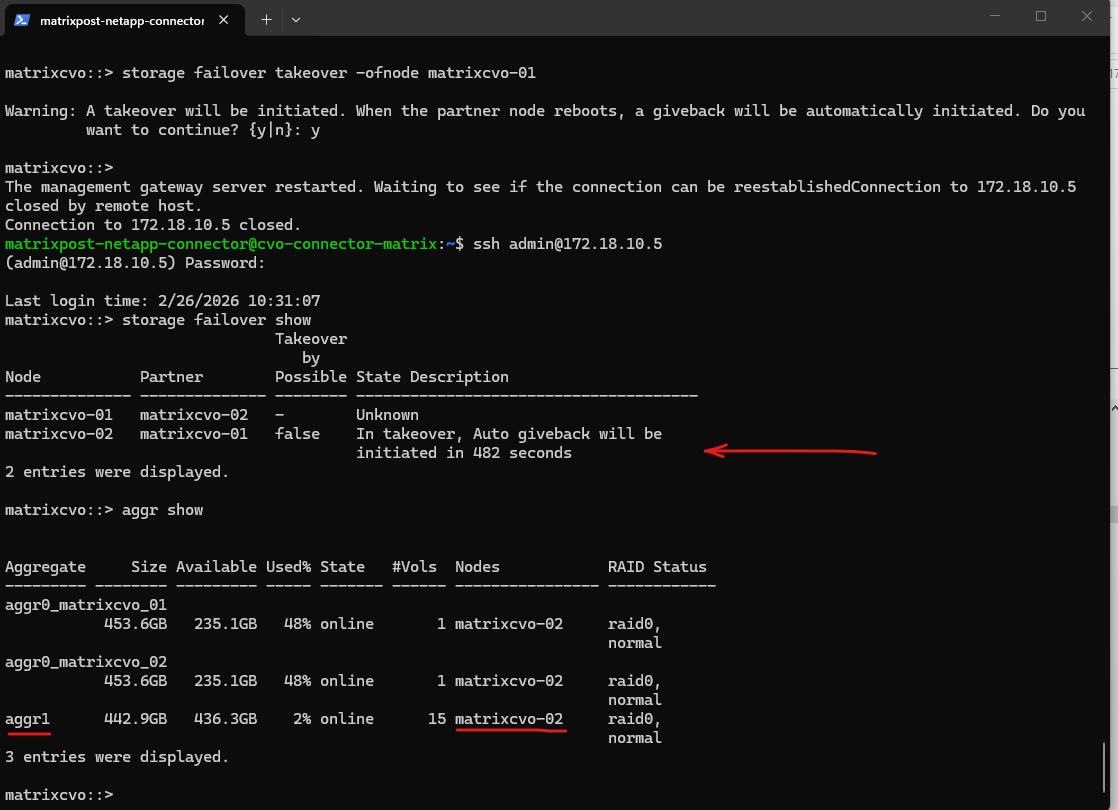
By default, Cloud Volumes ONTAP is configured with an Auto Giveback delay to ensure that a rebooted or recovered node is fully stable and synchronized before it resumes its storage workload.
This countdown prevents “flapping”, where a node prematurely tries to take back its aggregates before its services are ready, minimizing the risk of I/O interruptions during the transition.
Once this safety timer expires and the cluster confirms a healthy handshake, the system automatically returns the storage to its home node without manual intervention.
Besides the automatic giveback (auto-giveback) mechanism shown above, we can also manually initiate a giveback using the storage failover giveback command when operationally required.
The command
storage failover giveback -ofnode matrixcvo-01initiates the process of returning aggregates and services to their original home node after a takeover event.During this operation, ownership of the aggregates is transferred back and cluster services are rebalanced to restore the normal HA state. Temporary management interruptions can occur while the partner node reinitializes and resumes control.
matrixcvo::> storage failover giveback -ofnode matrixcvo-01
matrixcvo::> storage failover show-giveback
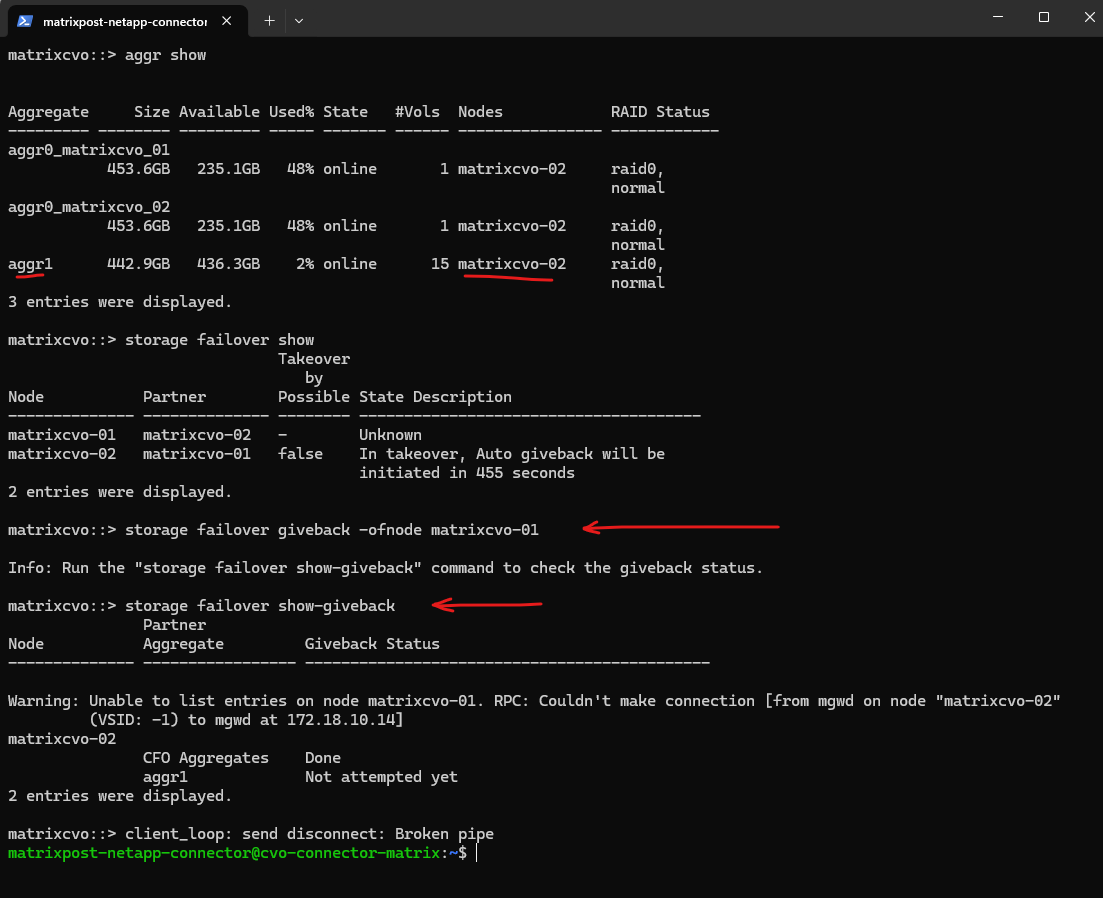
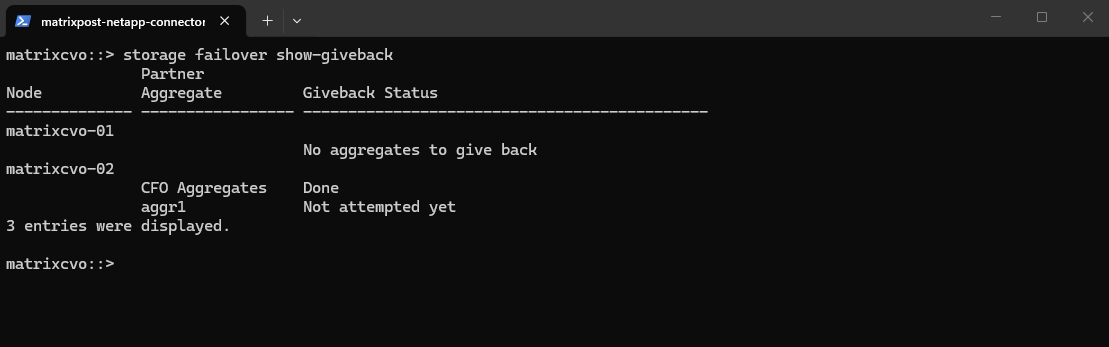
After the manual giveback completes,
storage failover show-givebackconfirms that there are no remaining aggregates to return onmatrixcvo-01, indicating the HA state has been restored. The output shows the giveback status as completed for the relevant aggregates, meaning ownership has successfully transitioned back to the home node.
matrixcvo::> storage failover show-giveback
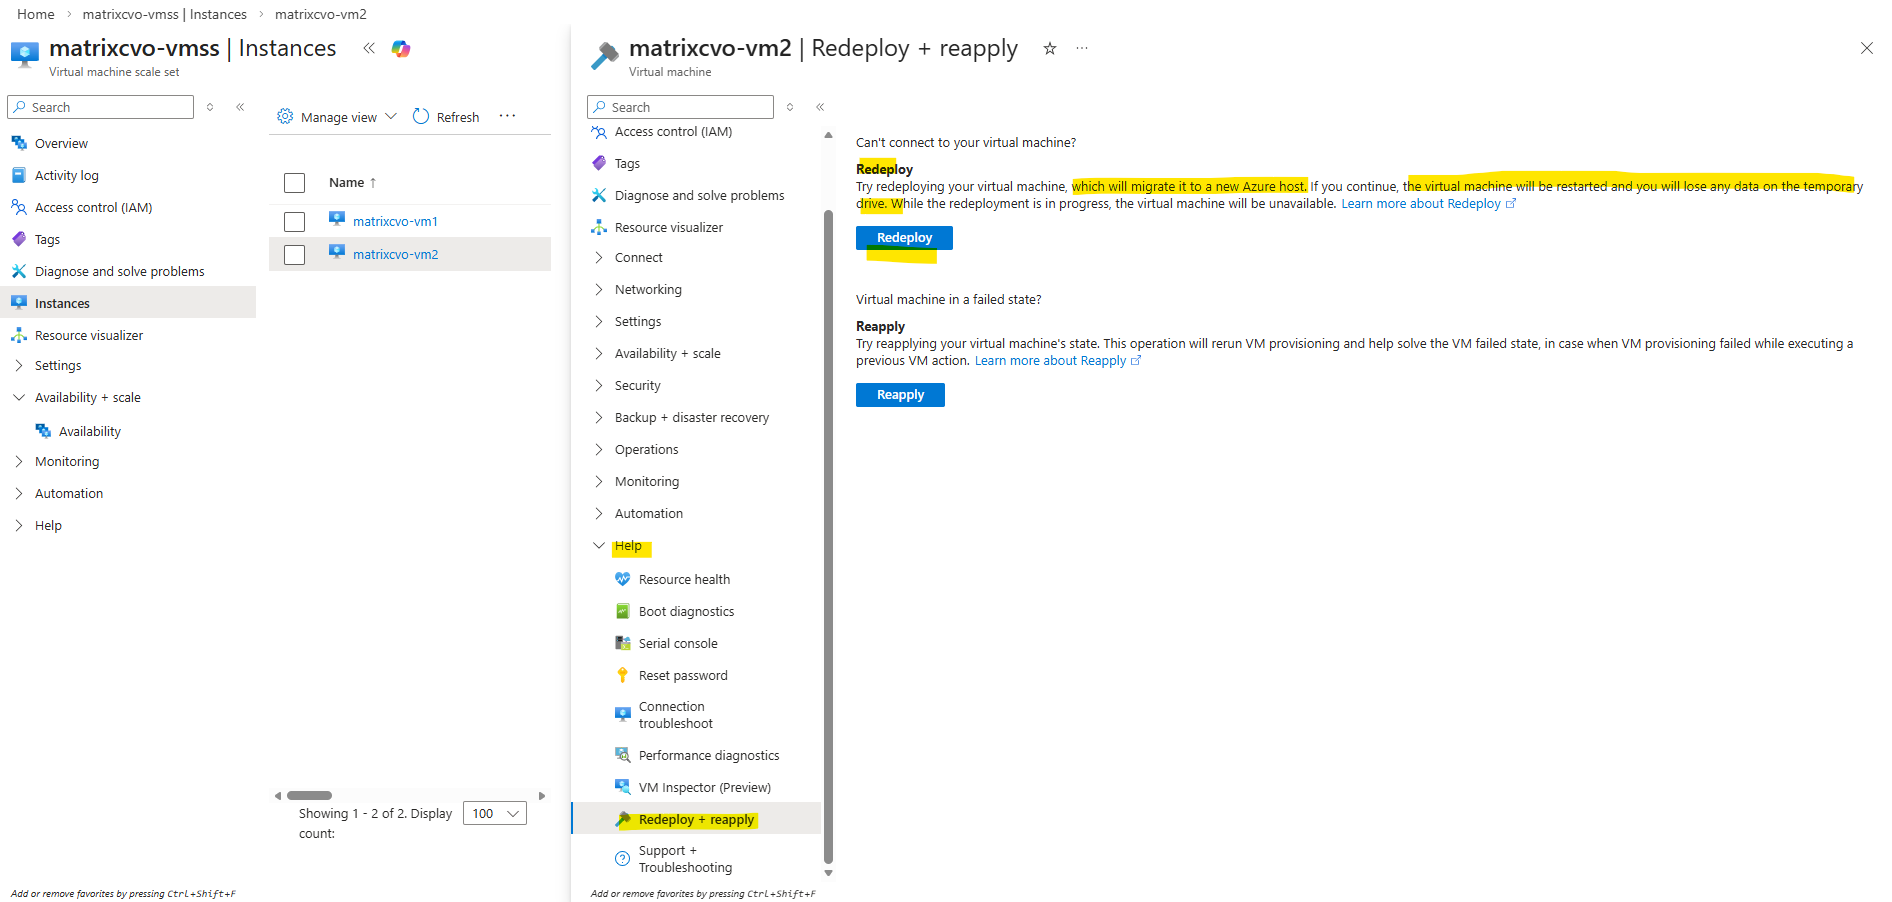
How To Redeploy a CVO Node (VM) in Azure?
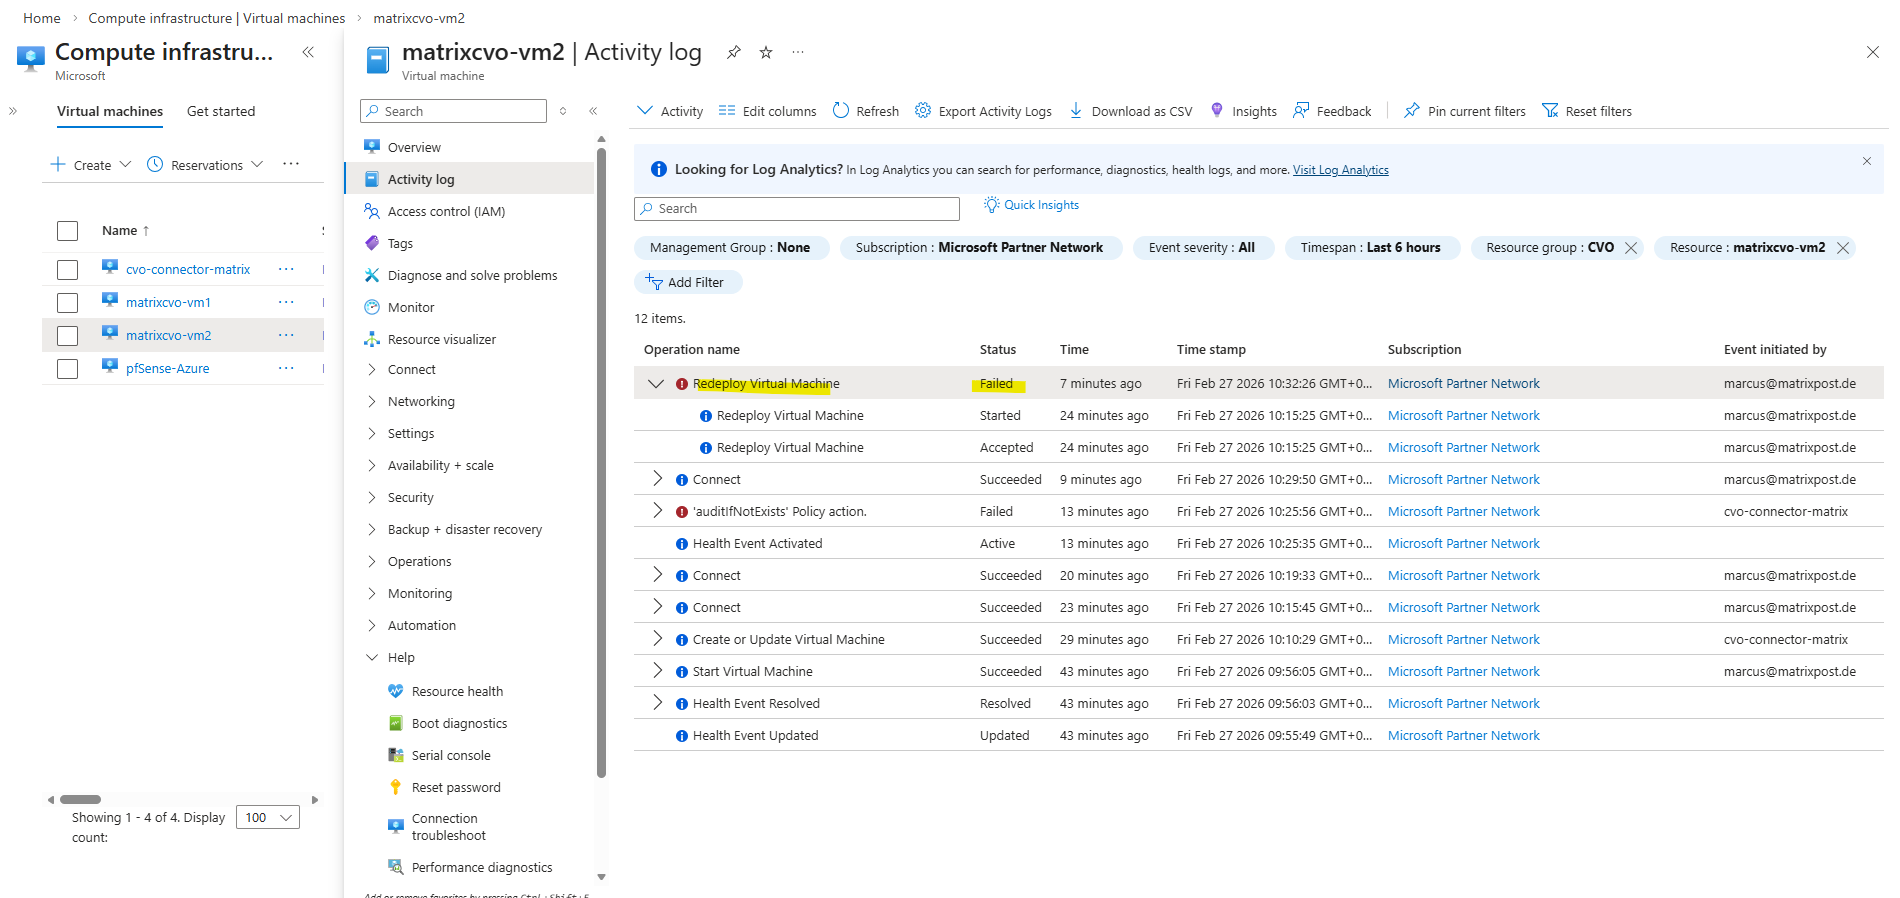
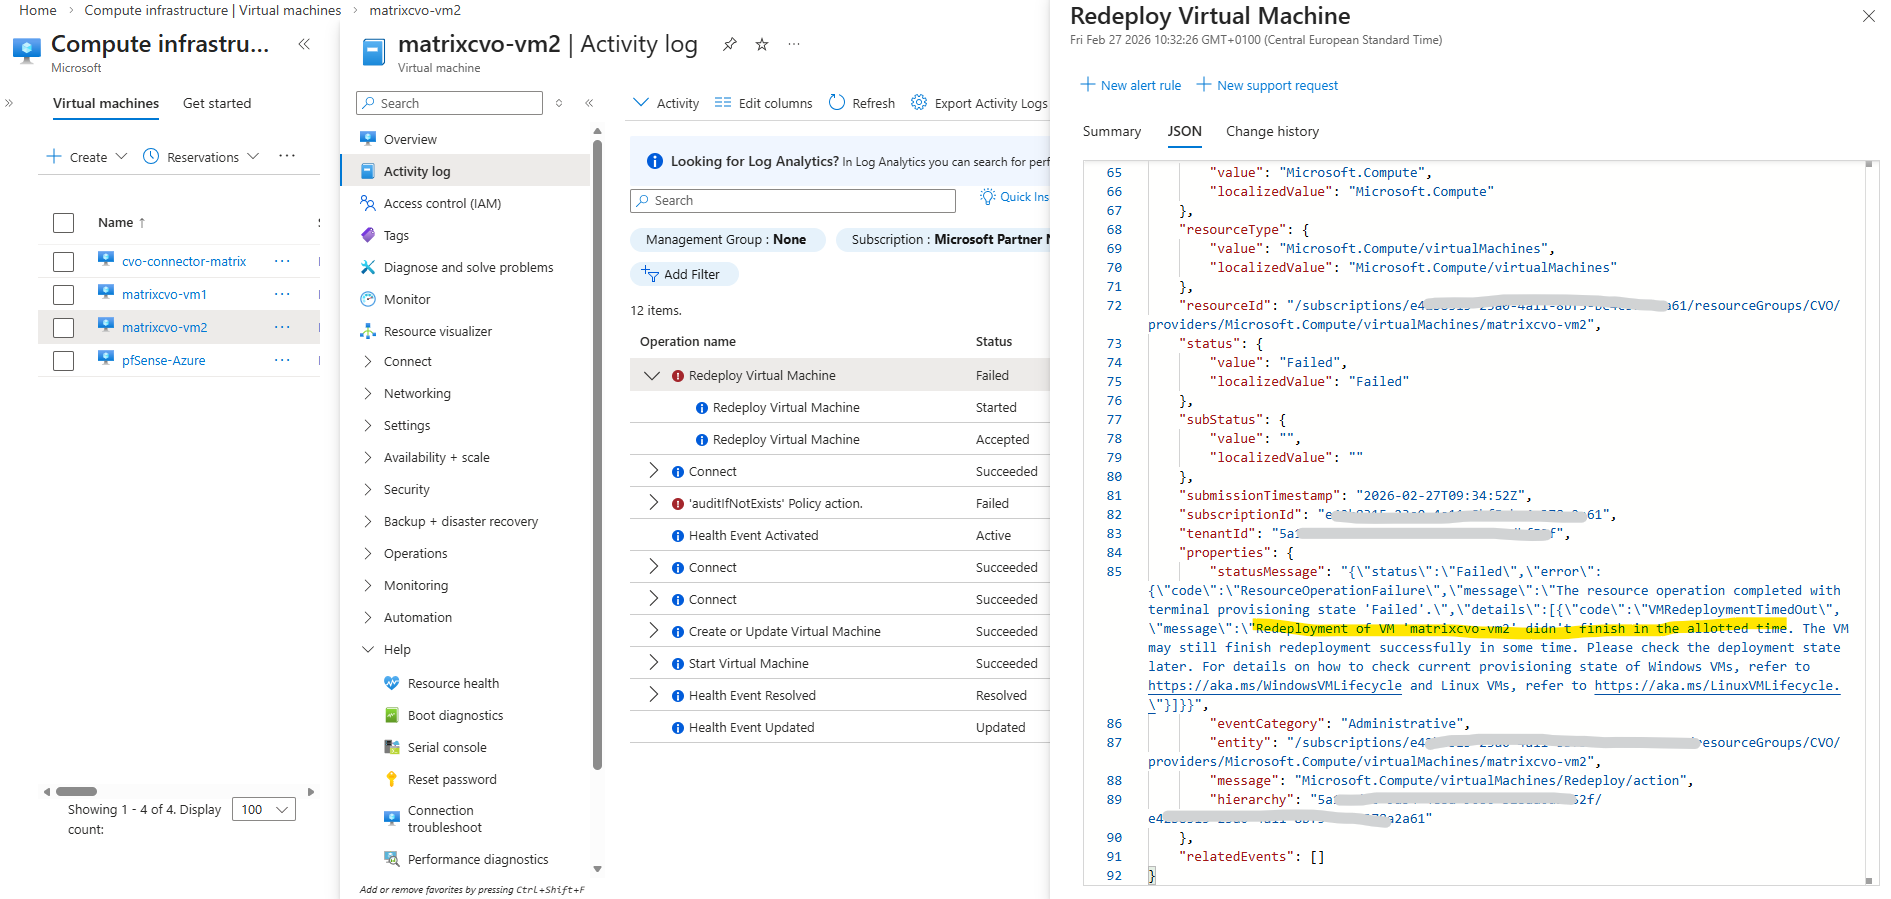
Azure’s Redeploy action is technically supported for Cloud Volumes ONTAP and is designed to move the VM to a new physical host while preserving disks, NICs, and configuration. However, in zonal HA deployments (for example Standard_E8ds_v4 in a specific availability zone with multiple NICs and managed disks), redeployment can fail with VMRedeploymentTimedOut.
In my case, Azure initiated the host move but the control plane timed out before completion, leaving the VM in a Stopped state with provisioningState = Failed. This behavior indicates an Azure platform allocation or orchestration issue rather than a Cloud Volumes ONTAP configuration problem.
Conclusion: Redeploy can be used as a troubleshooting step, but it should not be considered a guaranteed recovery procedure for CVO nodes. If redeployment times out, alternative recovery actions (such as start/deallocate + start or recovery via NetApp Console) are more reliable than repeatedly triggering redeploy.
When you redeploy a VM, Azure will shut down the VM, move the VM to a new node within the Azure infrastructure, and then power it back on, retaining all your configuration options and associated resources.
!! Note !!
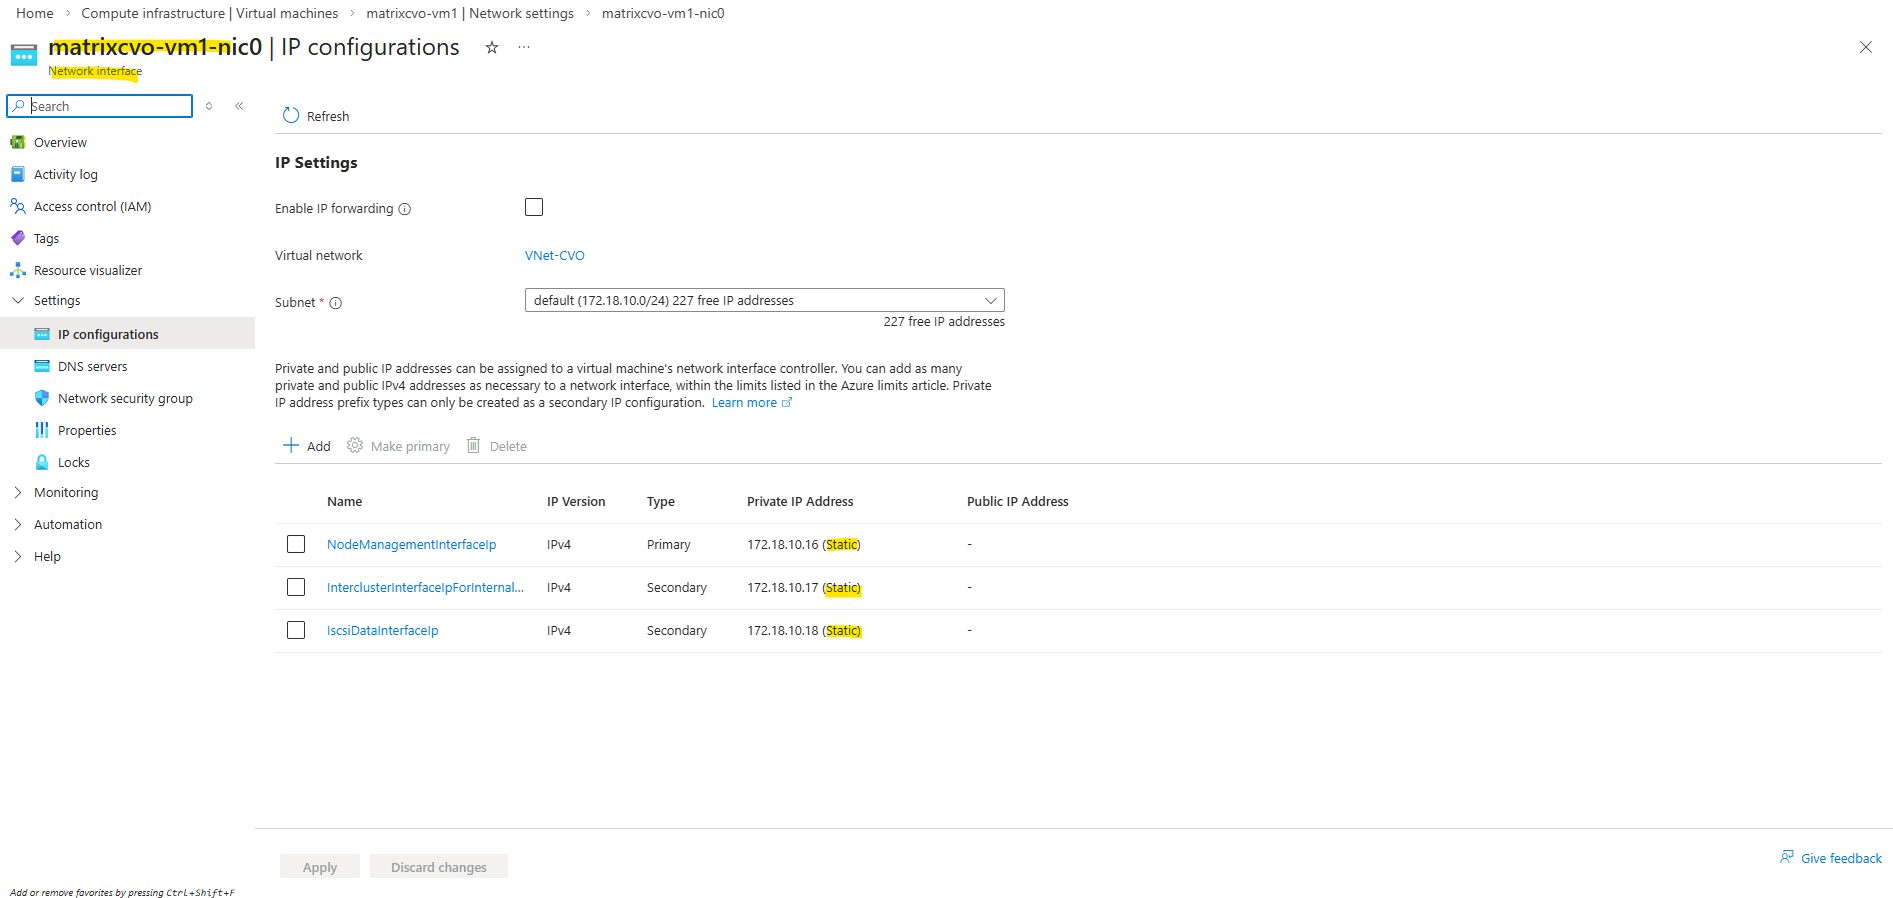
After you redeploy a VM, all the data that you saved on the temporary disk and Ephemeral disk is lost. The dynamic IP addresses associated with virtual network interface are updated.Our CVO nodes will have static IP addresses assigned to.
Redeploy of an Azure VM can be done
- From the Azure CLI ”
az vm redeploy --resource-group myResourceGroup --name myVM“
- From the Azure portal: In the Help section, select Redeploy + reapply, and then select Redeploy to migrate it to a new Azure host.
4 Minutes later still no shutdown and poweroff triggerd to move the VM (Node) to another host.
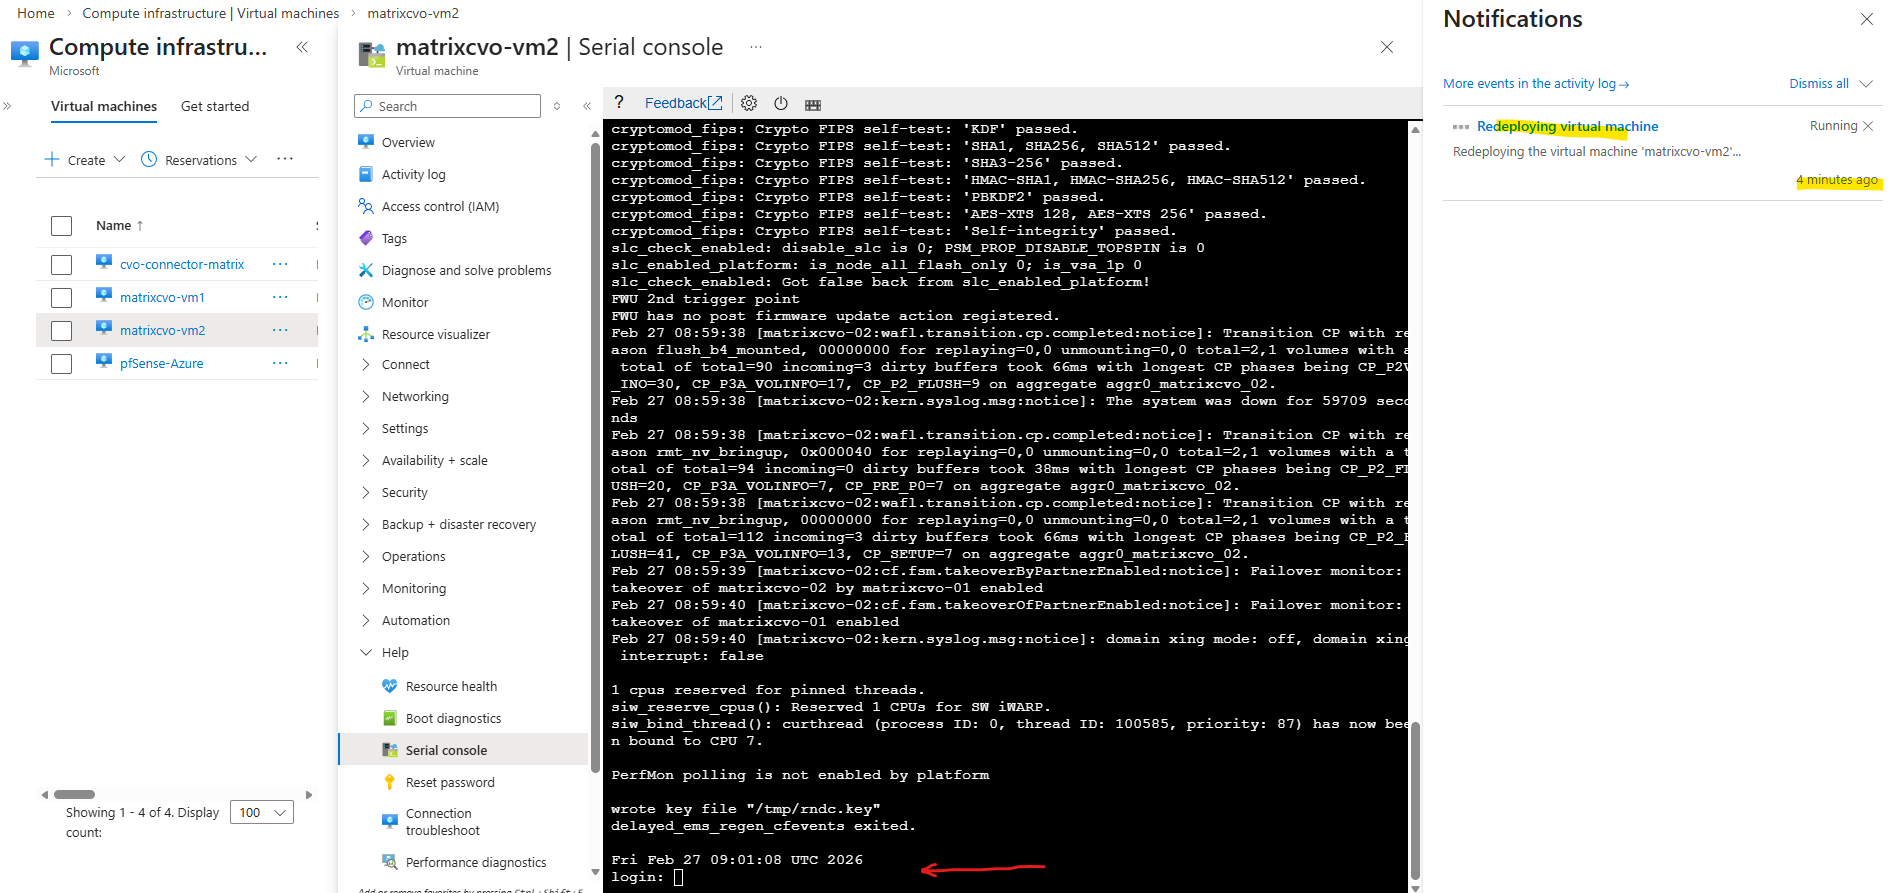
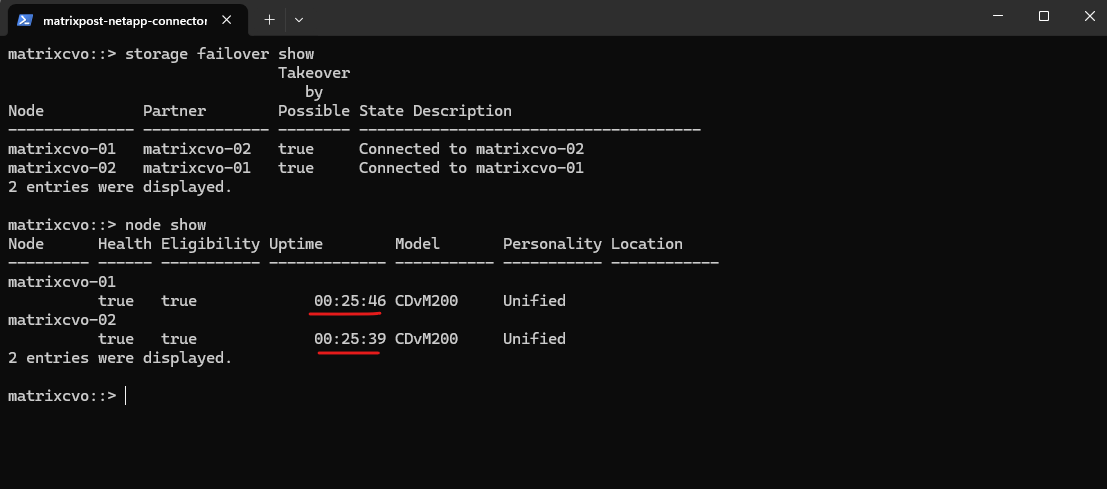
Uptime for both nodes also in ONTAP the same, just 25 minutes because this is my lab environment which I will always shutdown when not working with to save costs in Azure.
10 minutes later a shutdown and poweroff was triggerd to move the VM (Node) to another host.
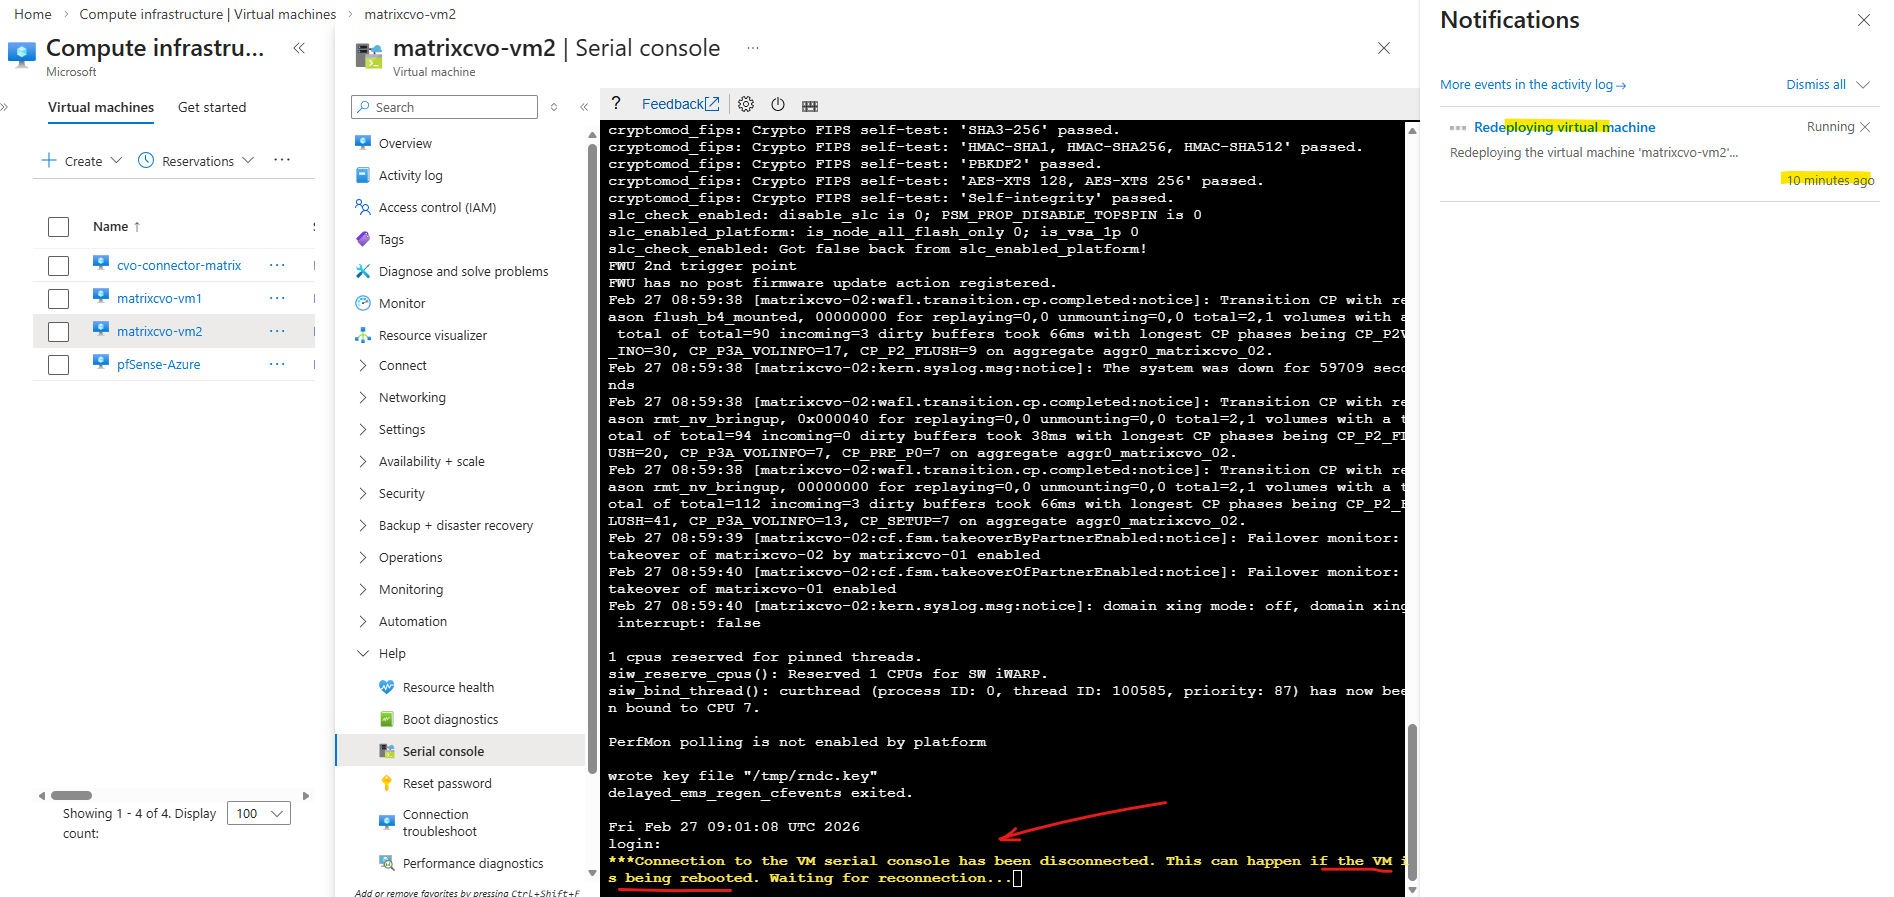
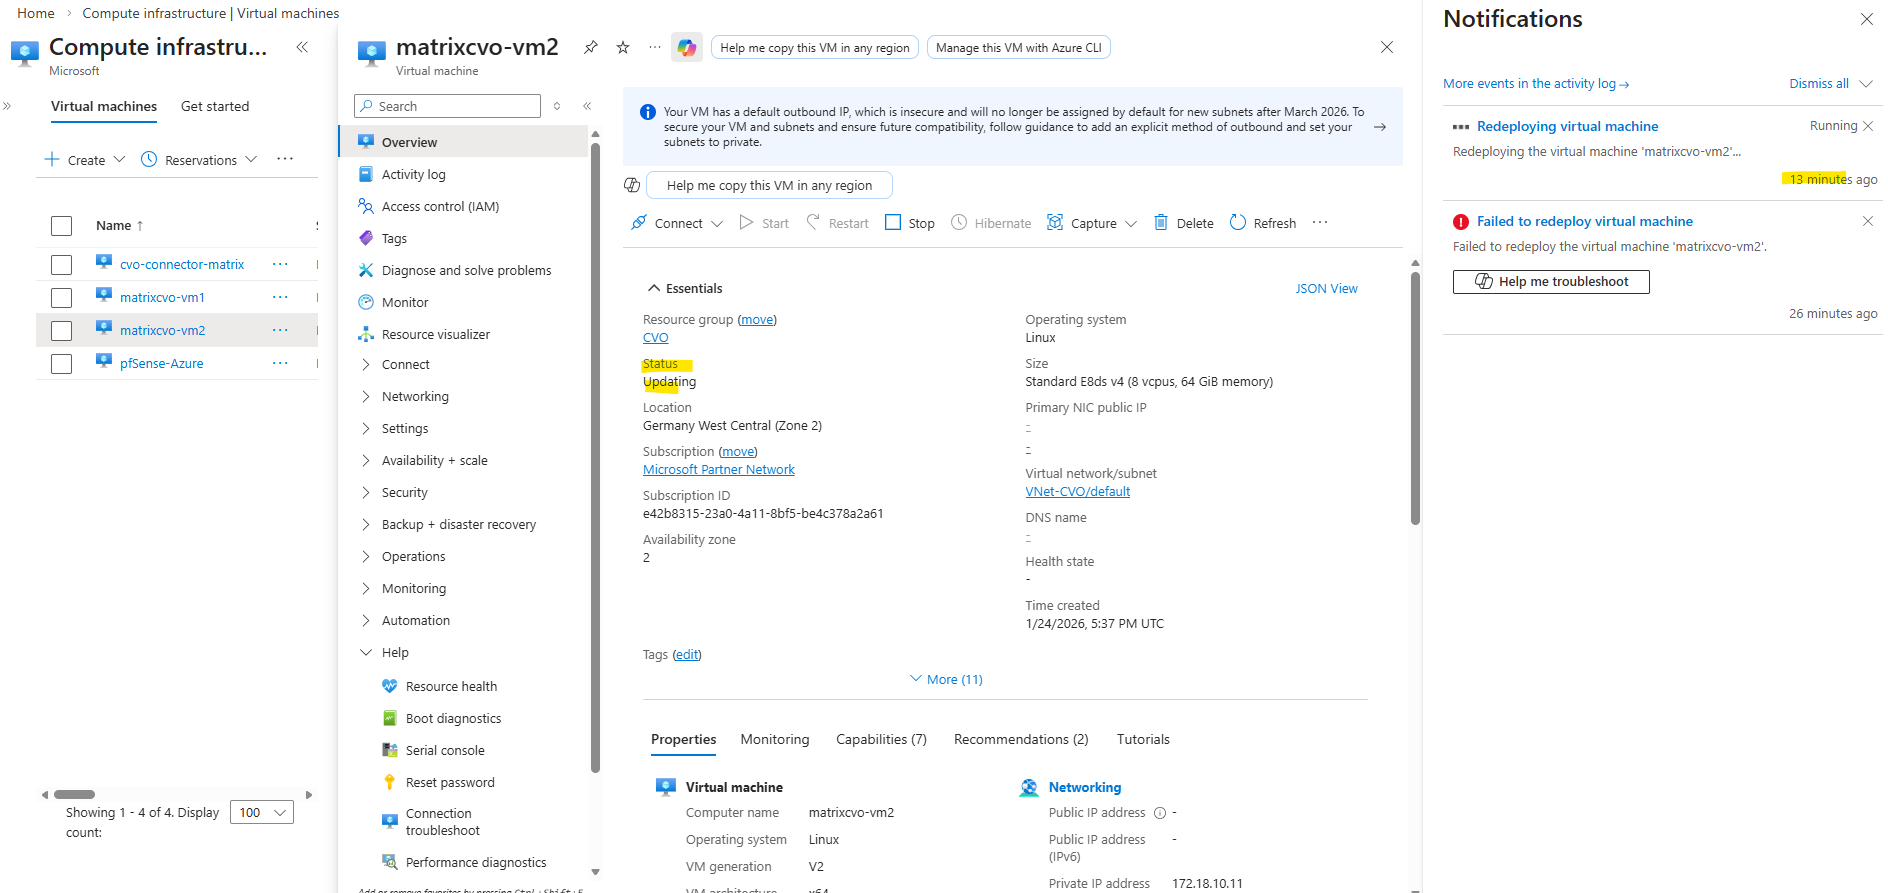
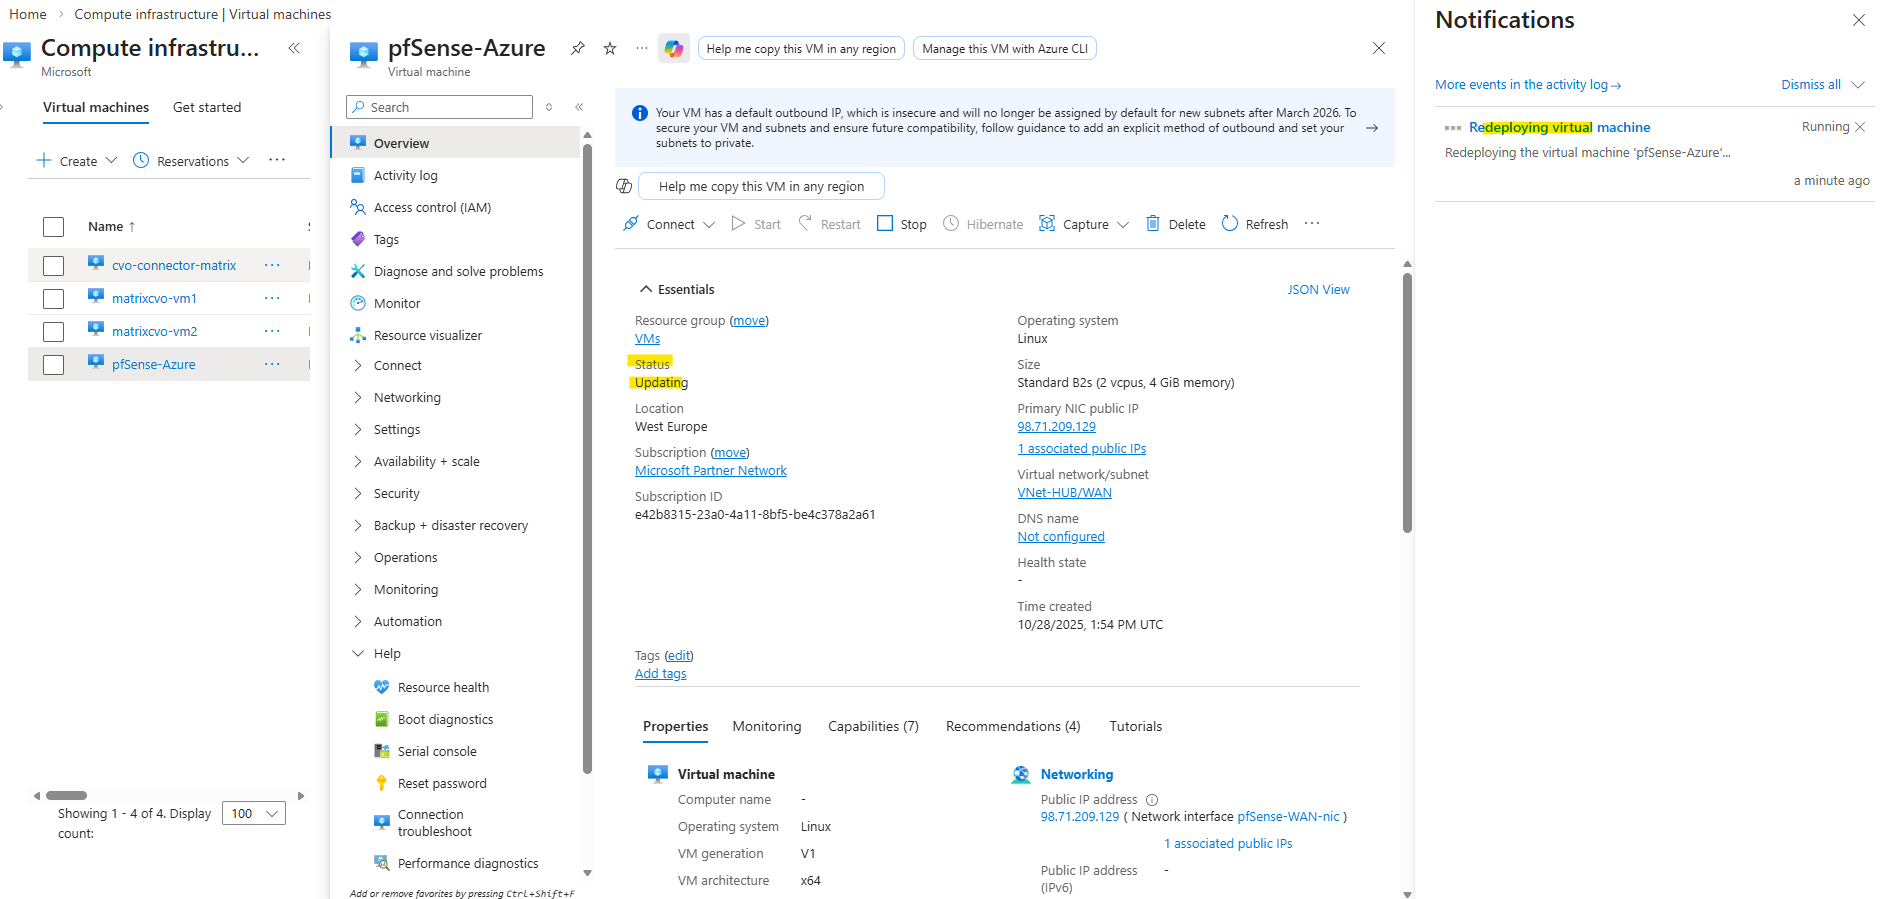
When a VM shows “Updating” during a redeploy, Azure is currently relocating the VM to a new underlying host.
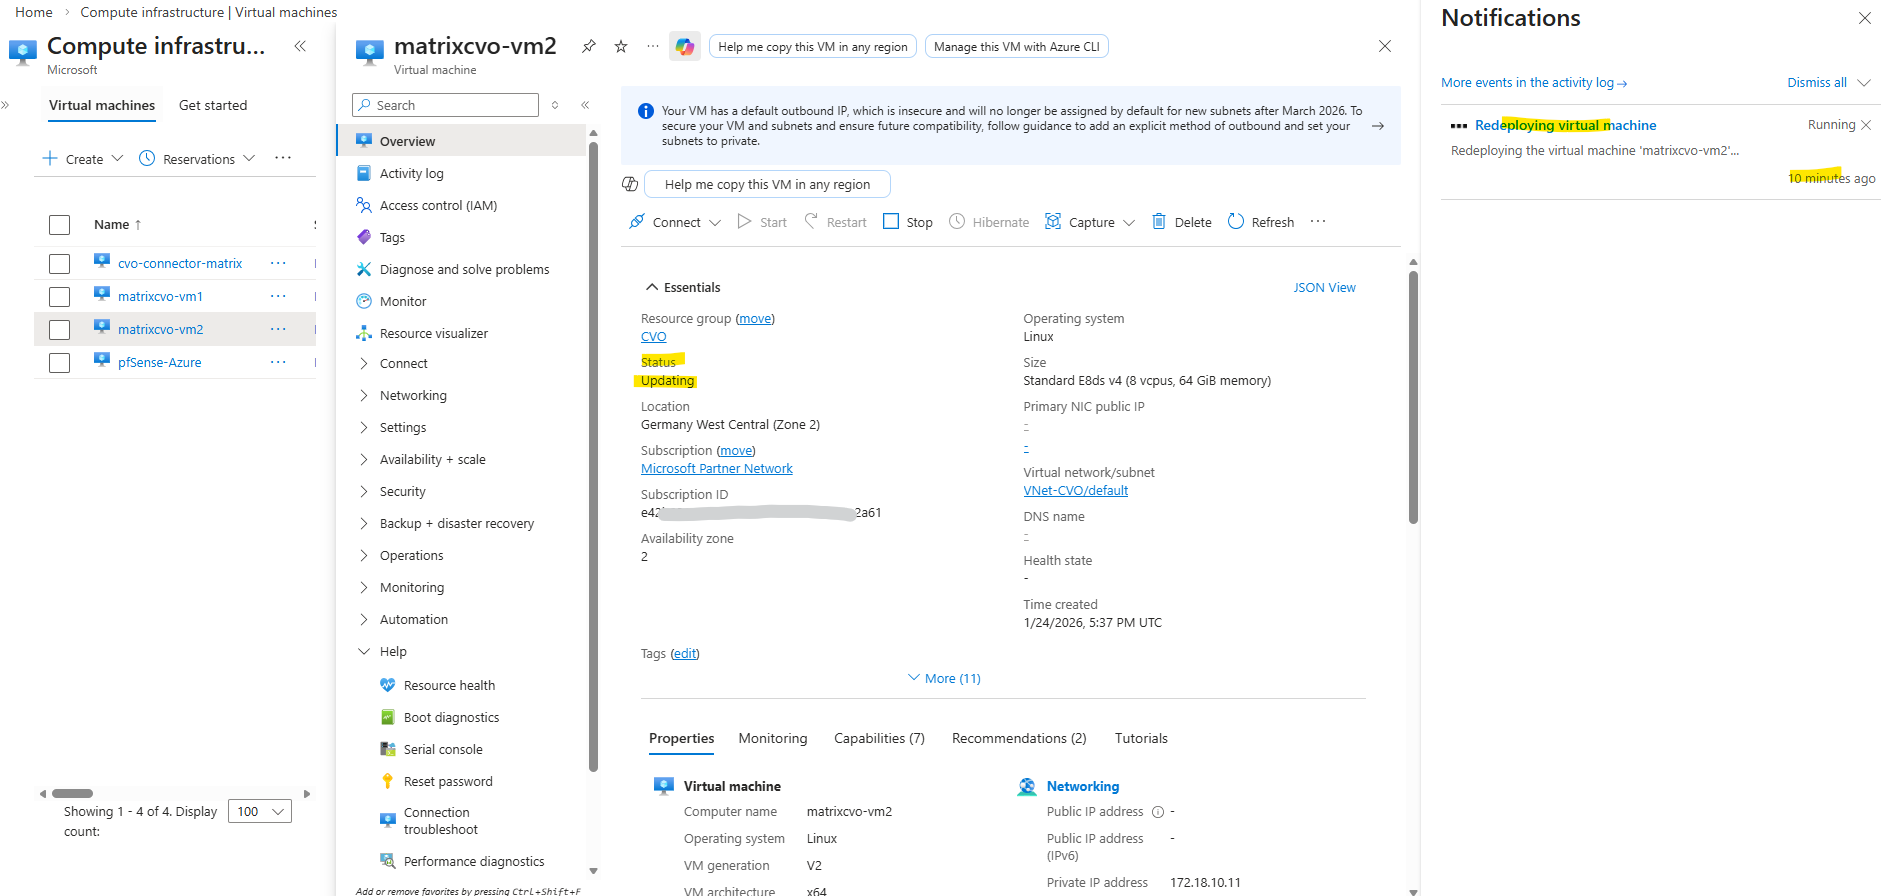
Also in ONTAP we can see that the second node matrixcvo-02 is down.
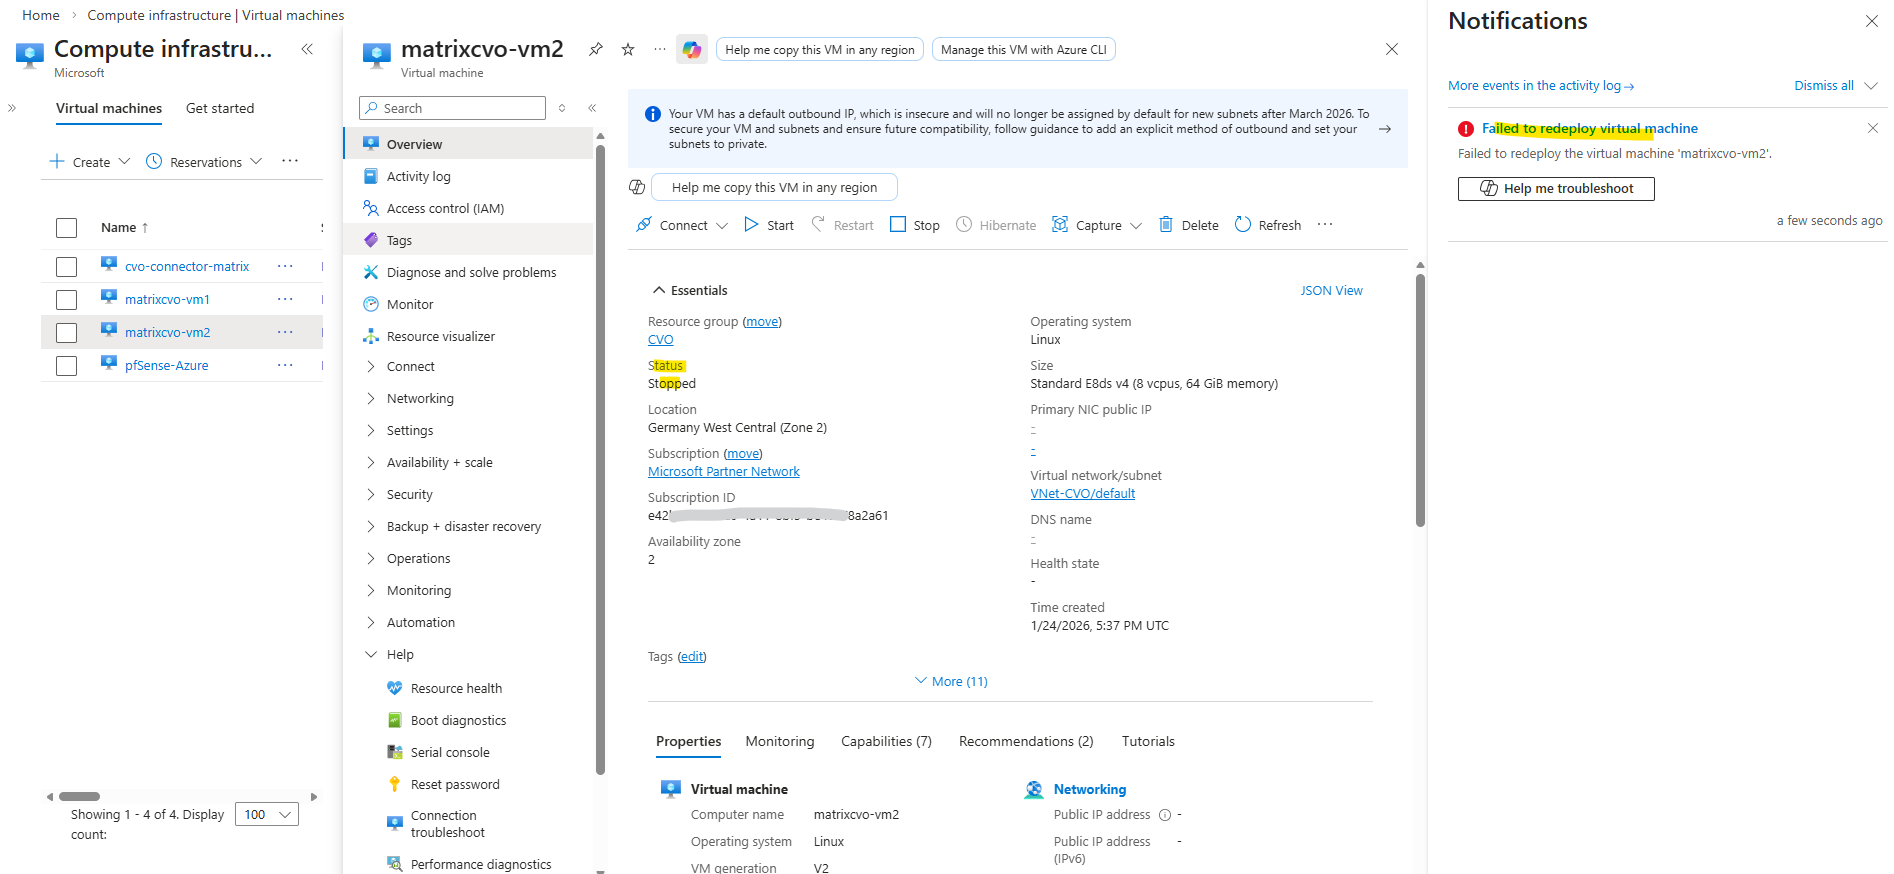
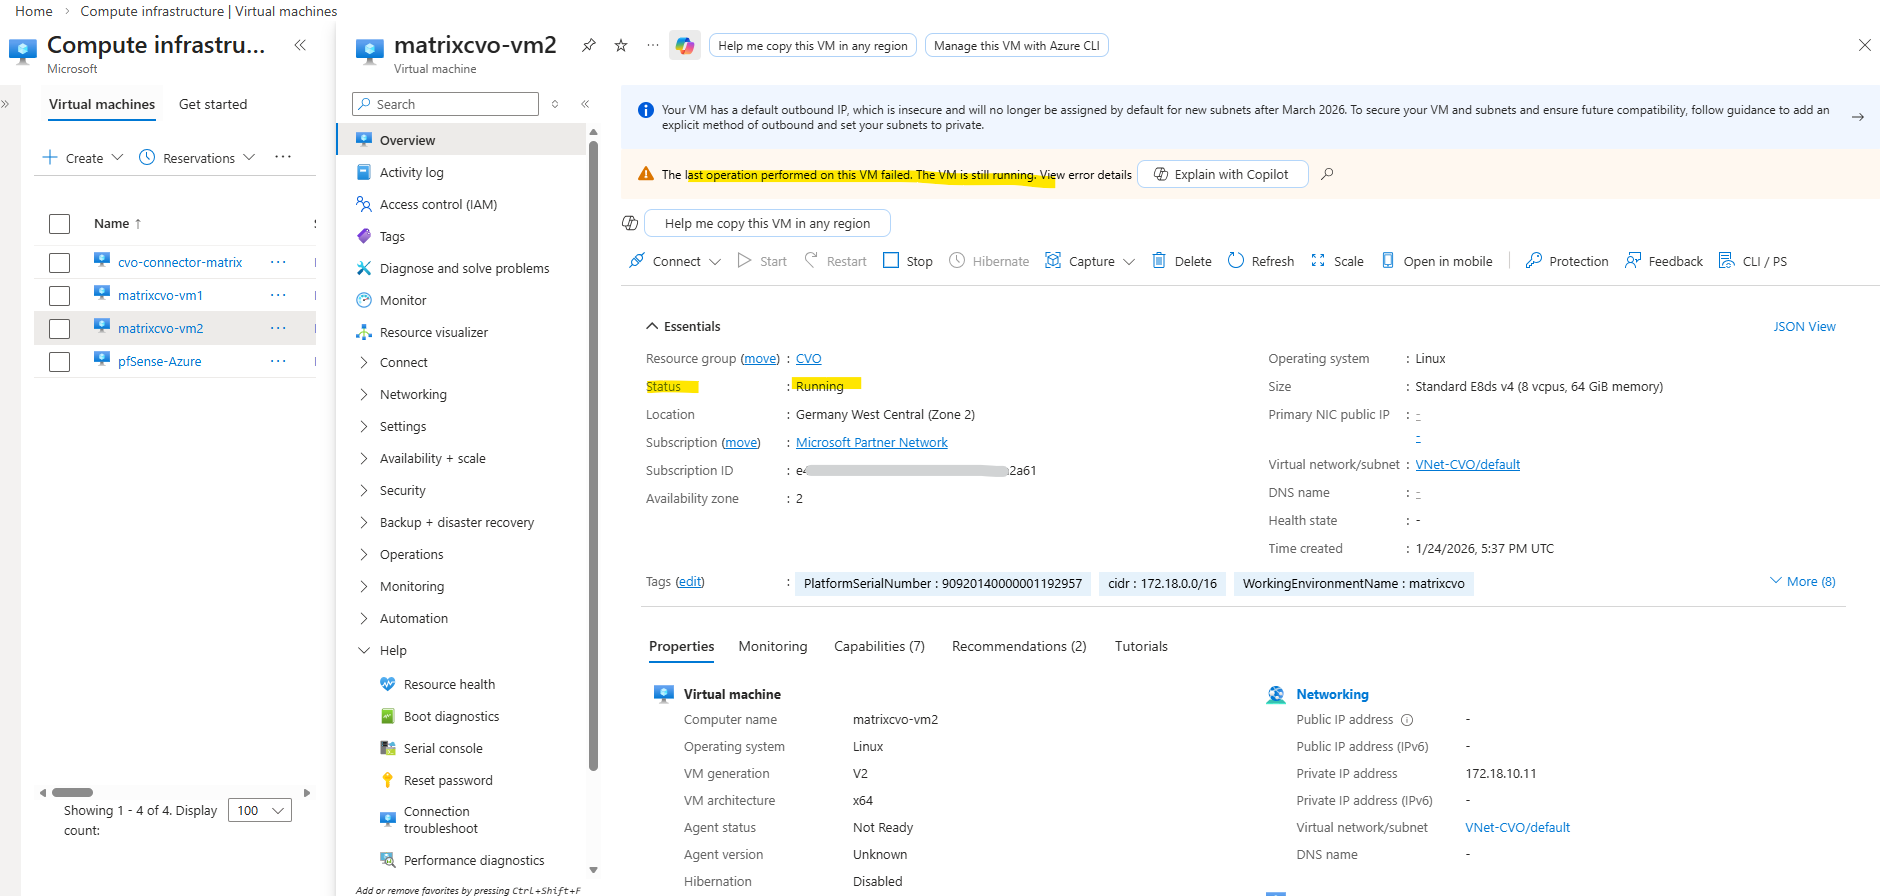
Finally the redeployment failed and left the VM in stopped state as shown below.
One very CVO-specific gotcha here is VM extensions: ONTAP/CVO doesn’t support installing Azure VM extensions, and if anything (policy/agent/automation) is trying to validate/deploy/query extensions, Azure can get “stuck” waiting on extension state and time out.
NetApp even documents a case where querying VM state waits for extensions and times out (1800s) because extension state is “unavailable”
A few minutes later the VM will be started automatically again.
Another try to redeploy the VM also failed.
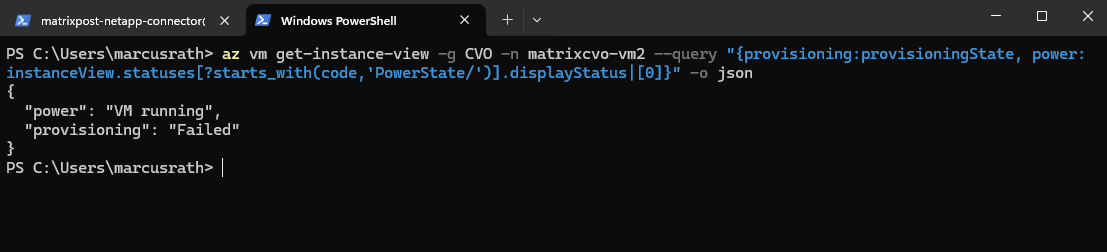
We can also use the Azure CLI to check provisioning + power state.
PS> az login
PS> az vm get-instance-view -g CVO -n matrixcvo-vm2 --query "{provisioning:provisioningState, power:instanceView.statuses[?starts_with(code,'PowerState/')].displayStatus|[0]}" -o json
More about how to redeploy Windows virtual machine to new Azure node you will also find in the following acticles.
https://kb.netapp.com/Cloud/ncds/nds/cvo/cvo_kbs/How_To_Redeploy_a_CVO_cluster_in_Azure
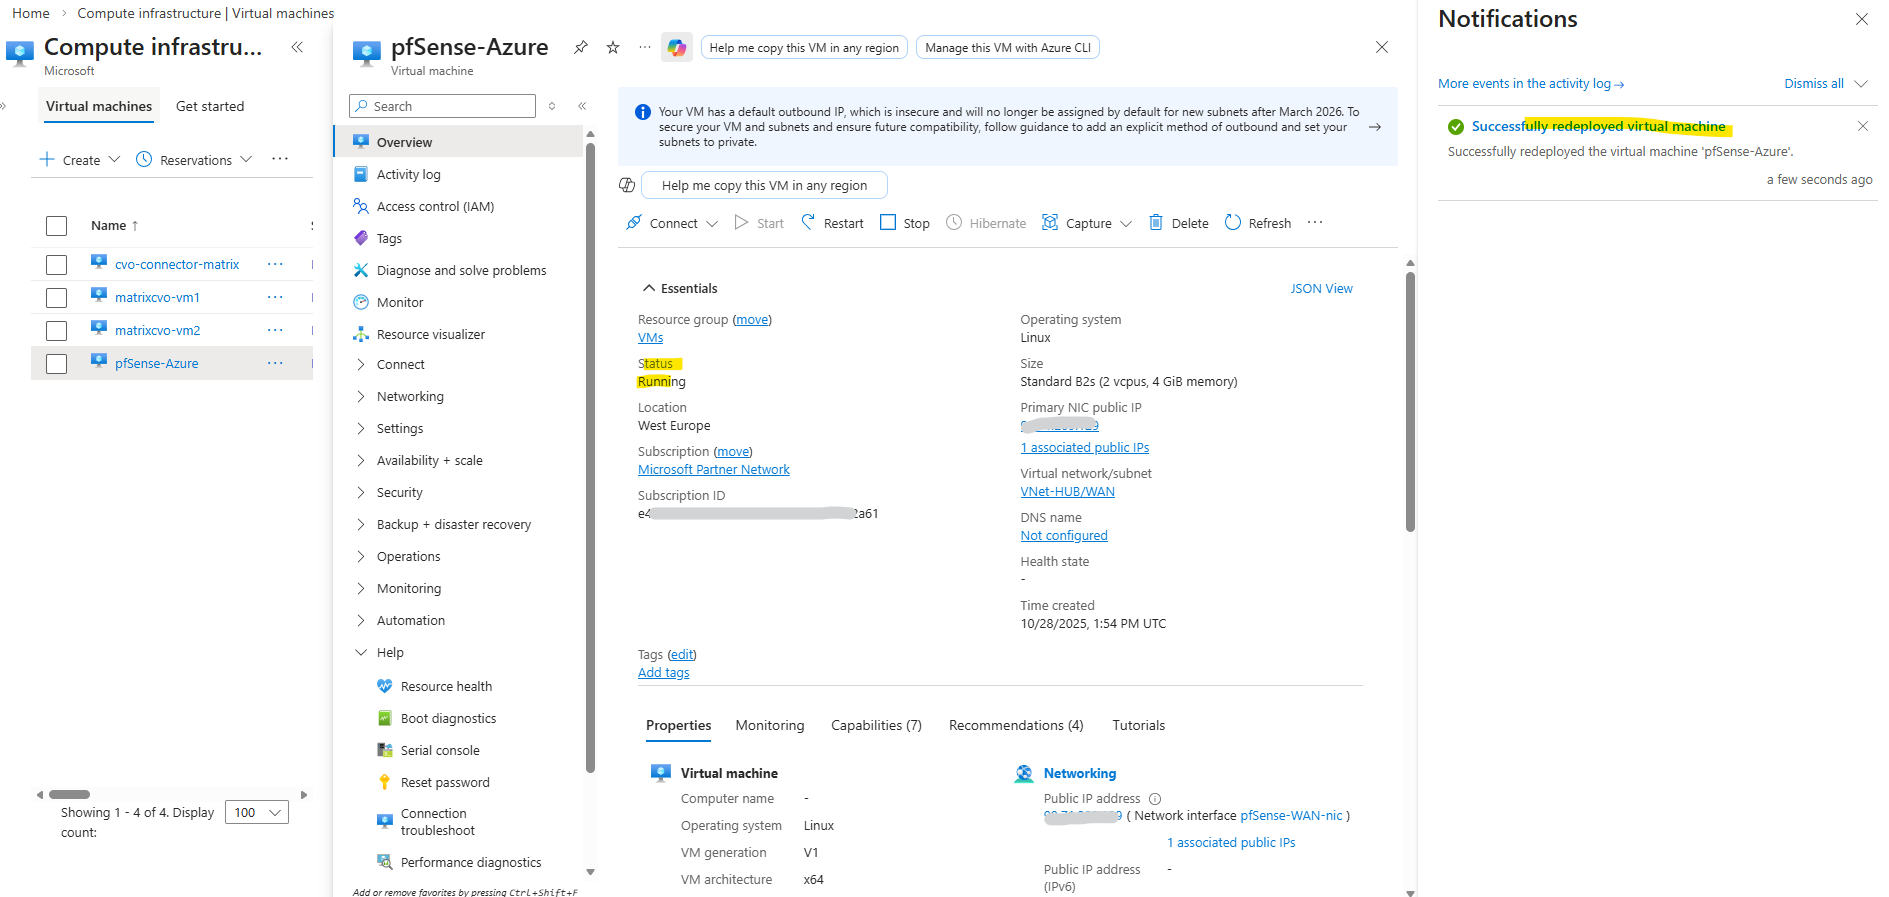
I also wanted to test the redeployment with my pfSense virtual machine which finally works smoothly.
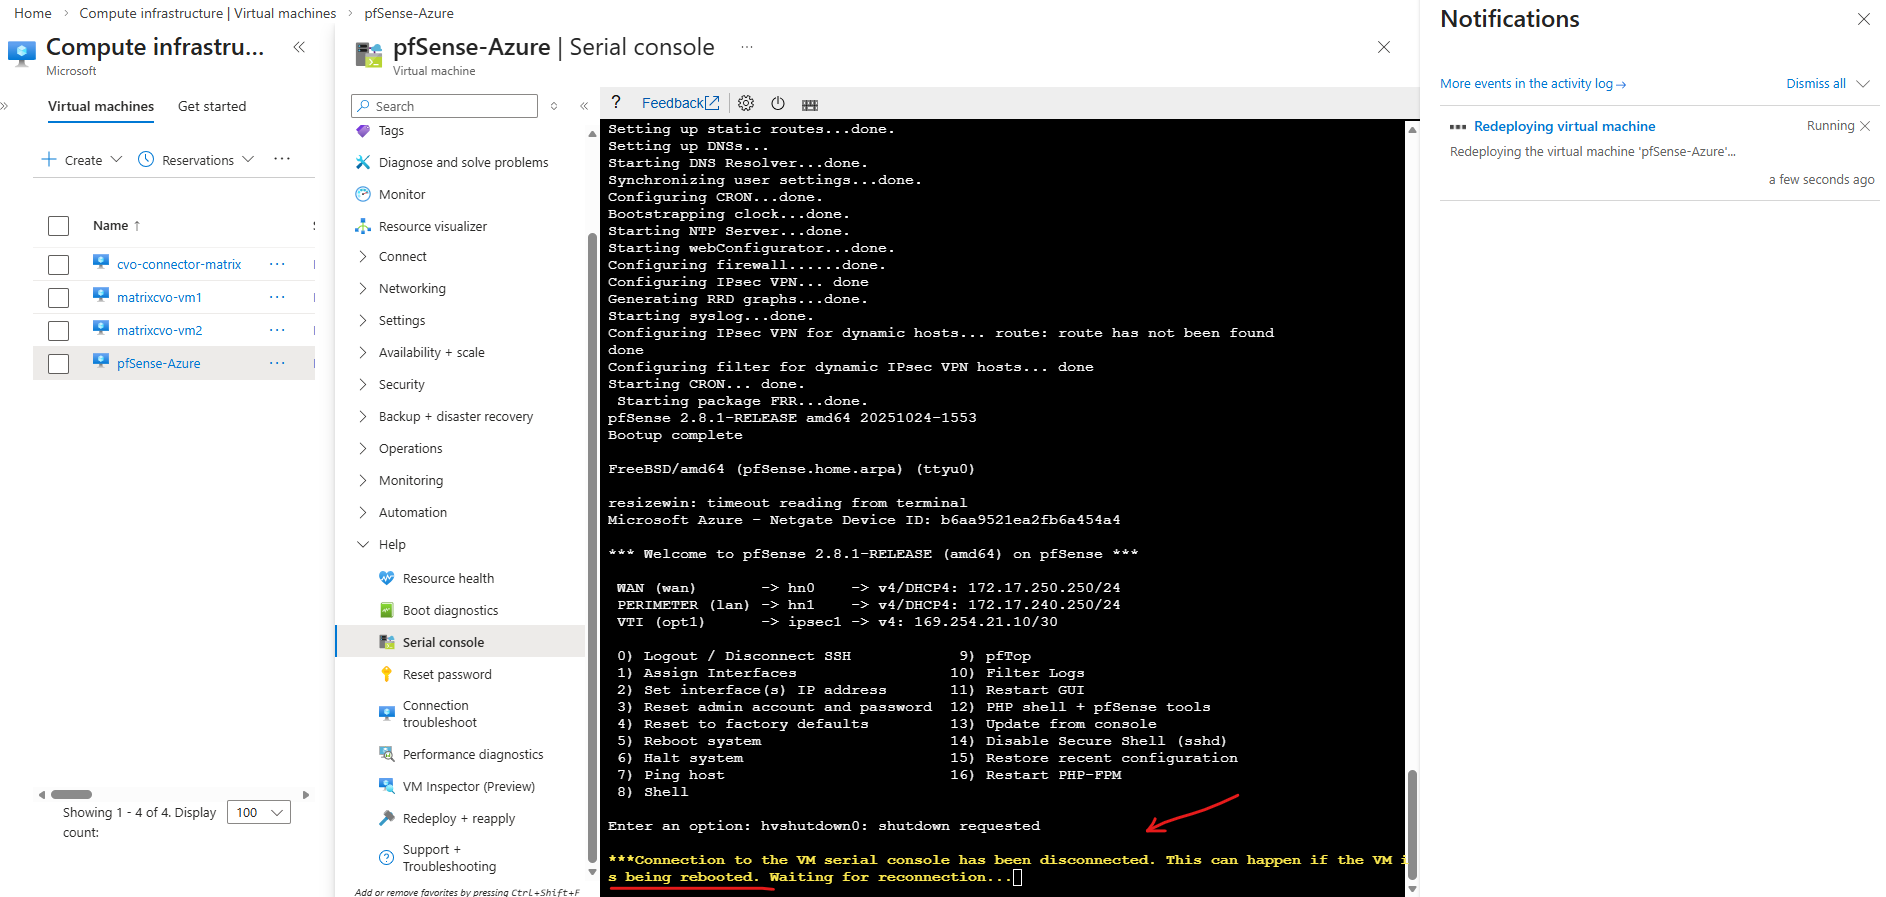
When a VM shows “Updating” during a redeploy, Azure is currently relocating the VM to a new underlying host.
Around 15 Minutes later the redeployment successfully finished.
The redeploy failure previously for the CVO nodes (VMs) was not related to the Azure VM Agent or extensions.
This custom pfSense VM without any VM agent redeployed successfully in the same tenant. The difference lies in the architectural complexity of a Cloud Volumes ONTAP HA node: zonal deployment, multiple NICs, several managed disks (including ZRS), and VMSS orchestration significantly increase the allocation complexity during host migration. As a result, Azure may time out the redeploy operation even though the underlying infrastructure components remain intact.
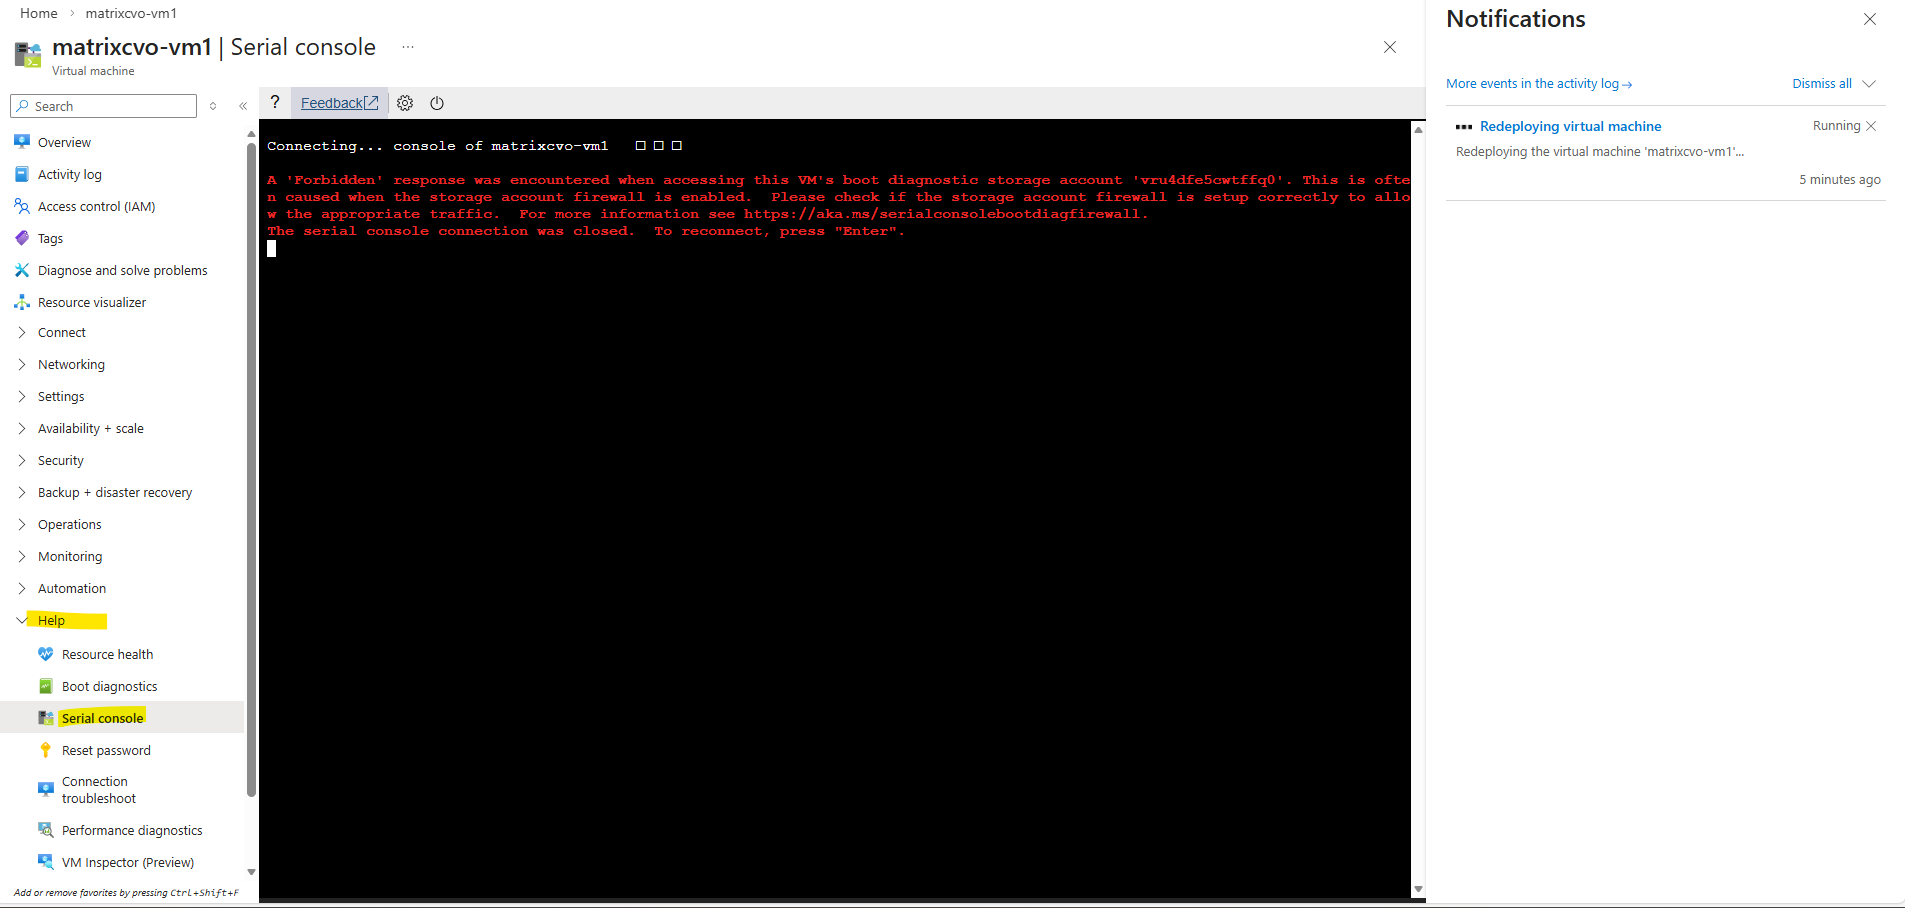
How to access Azure CVO Serial Console from Azure Portal by overriding the Forbidden response
When attempting to access the Azure Serial Console for our CVO nodes, a “Forbidden” error as shown below can occur if the boot diagnostics storage account is protected by firewall restrictions.
Since the Serial Console relies on direct access to this storage account, blocked public network access prevents console connectivity. In the following section, we adjust the storage account’s public network settings to restore Serial Console functionality.
A ‘Forbidden’ response was encountered when accessing this VM’s boot diagnostic storage account ‘<storage-account>’. This is often caused when the storage account firewall is enabled. Azure Serial console cannot function with a boot diagnostics storage account firewall enabled. For more information see https://aka.ms/serialconsolehelp.
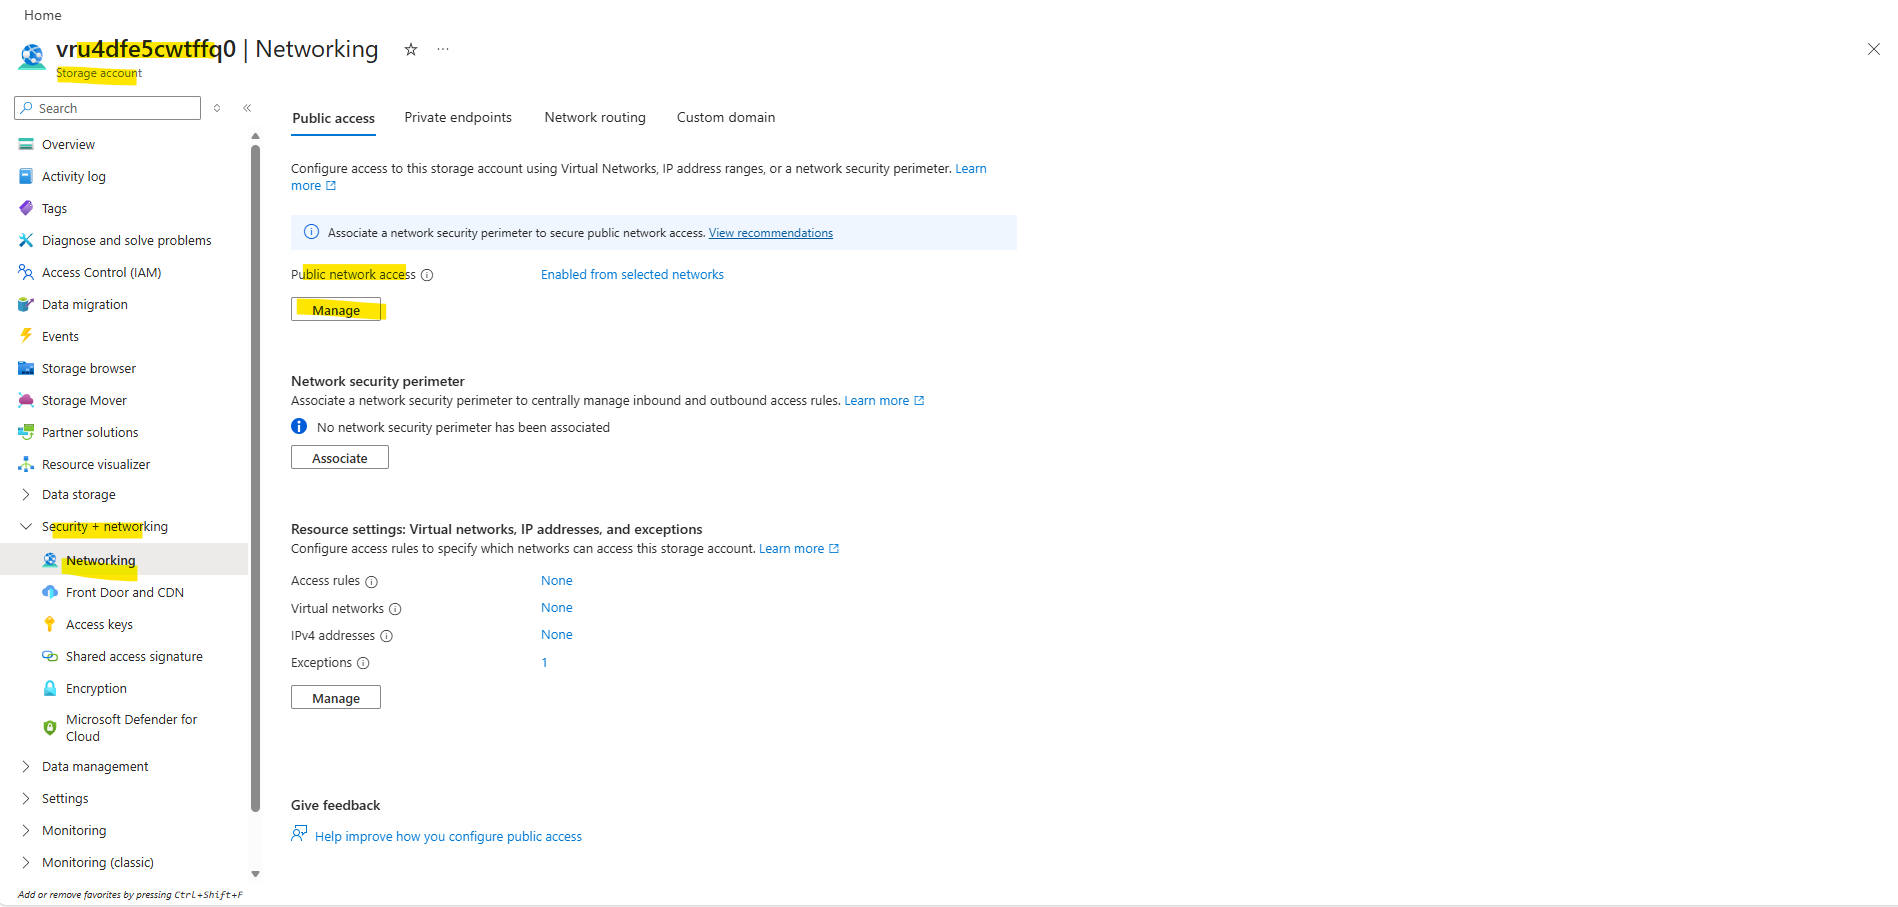
On the left under Security + networking click Networking.
Under Public access Tab -> Public Network access -> click on Manage
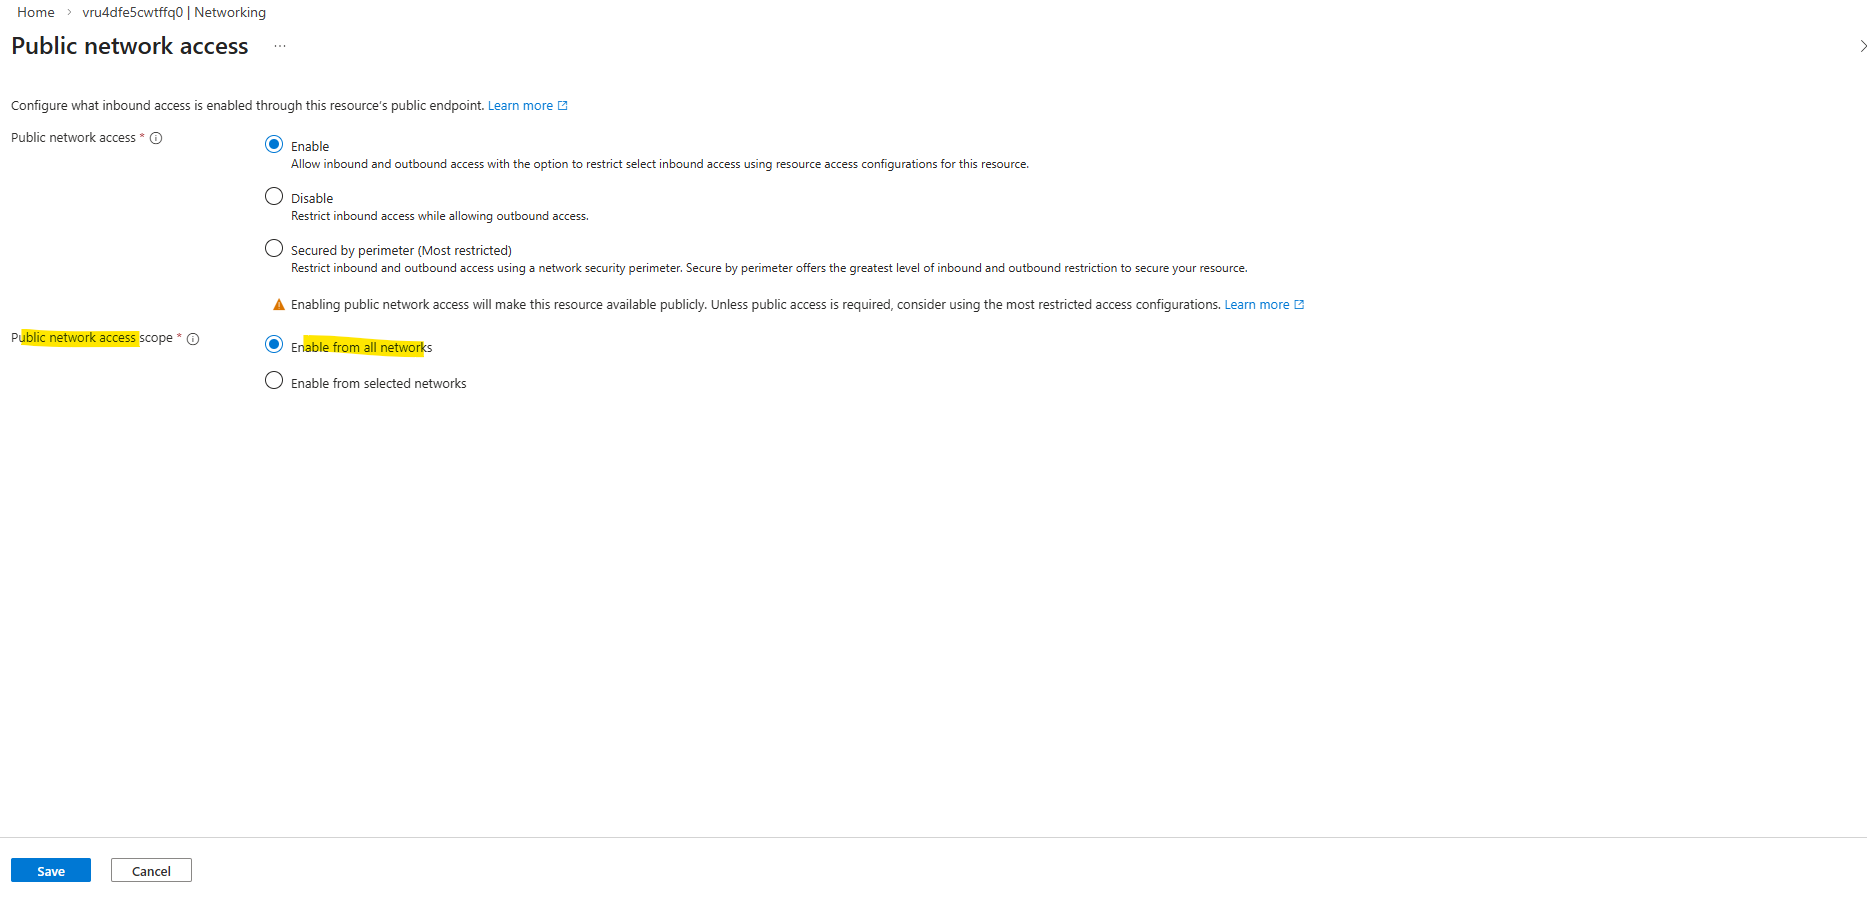
Choose Enabled from all networks and click on Save.
Enabling Public network access on the boot diagnostics storage account is not automatically dangerous, as long as authentication and firewall rules remain properly configured. It does not mean anonymous internet access.
The storage account endpoint becomes reachable over the public Azure endpoint.
Access is still protected by: Azure AD / RBAC, Storage account keys and SAS tokens.
Just restricting the storage account to selected networks and enabling the Allow trusted Microsoft services exception was not sufficient for Azure Serial Console access. The Serial Console backend was still blocked by the storage firewall, resulting in a “Forbidden” error.
The Serial Console service appears to access the boot diagnostics storage account via Azure infrastructure endpoints that are not included in the “trusted Microsoft services” list for storage firewall exceptions.
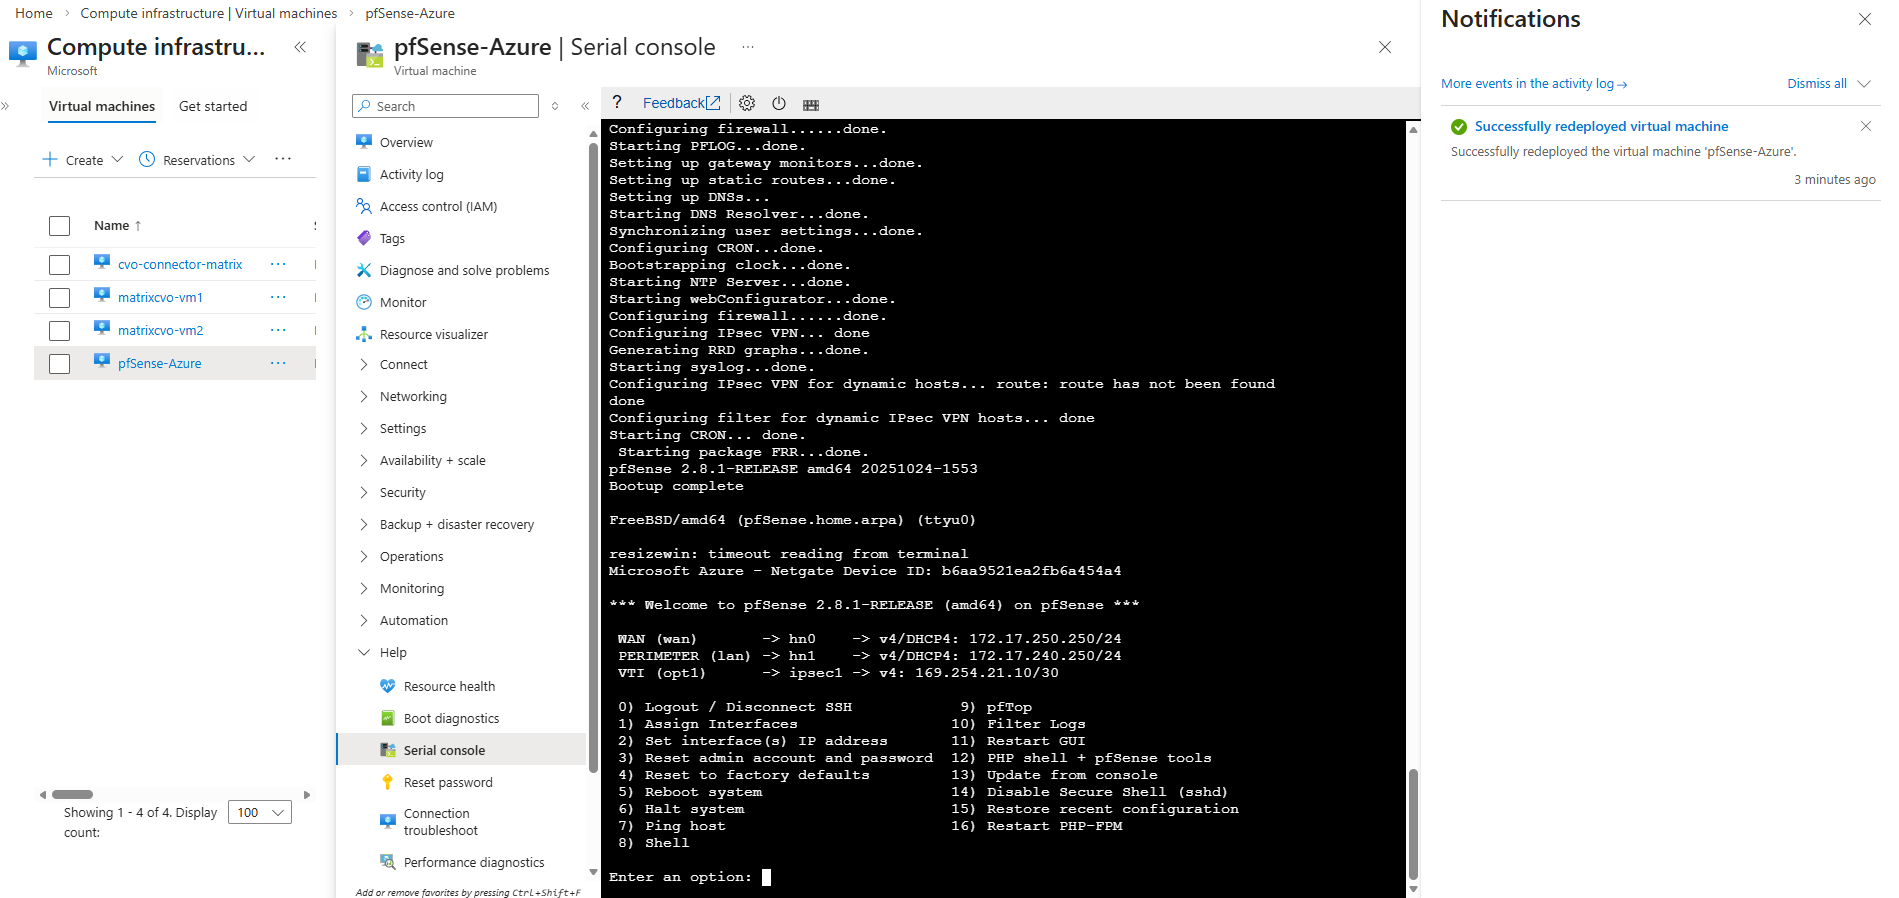
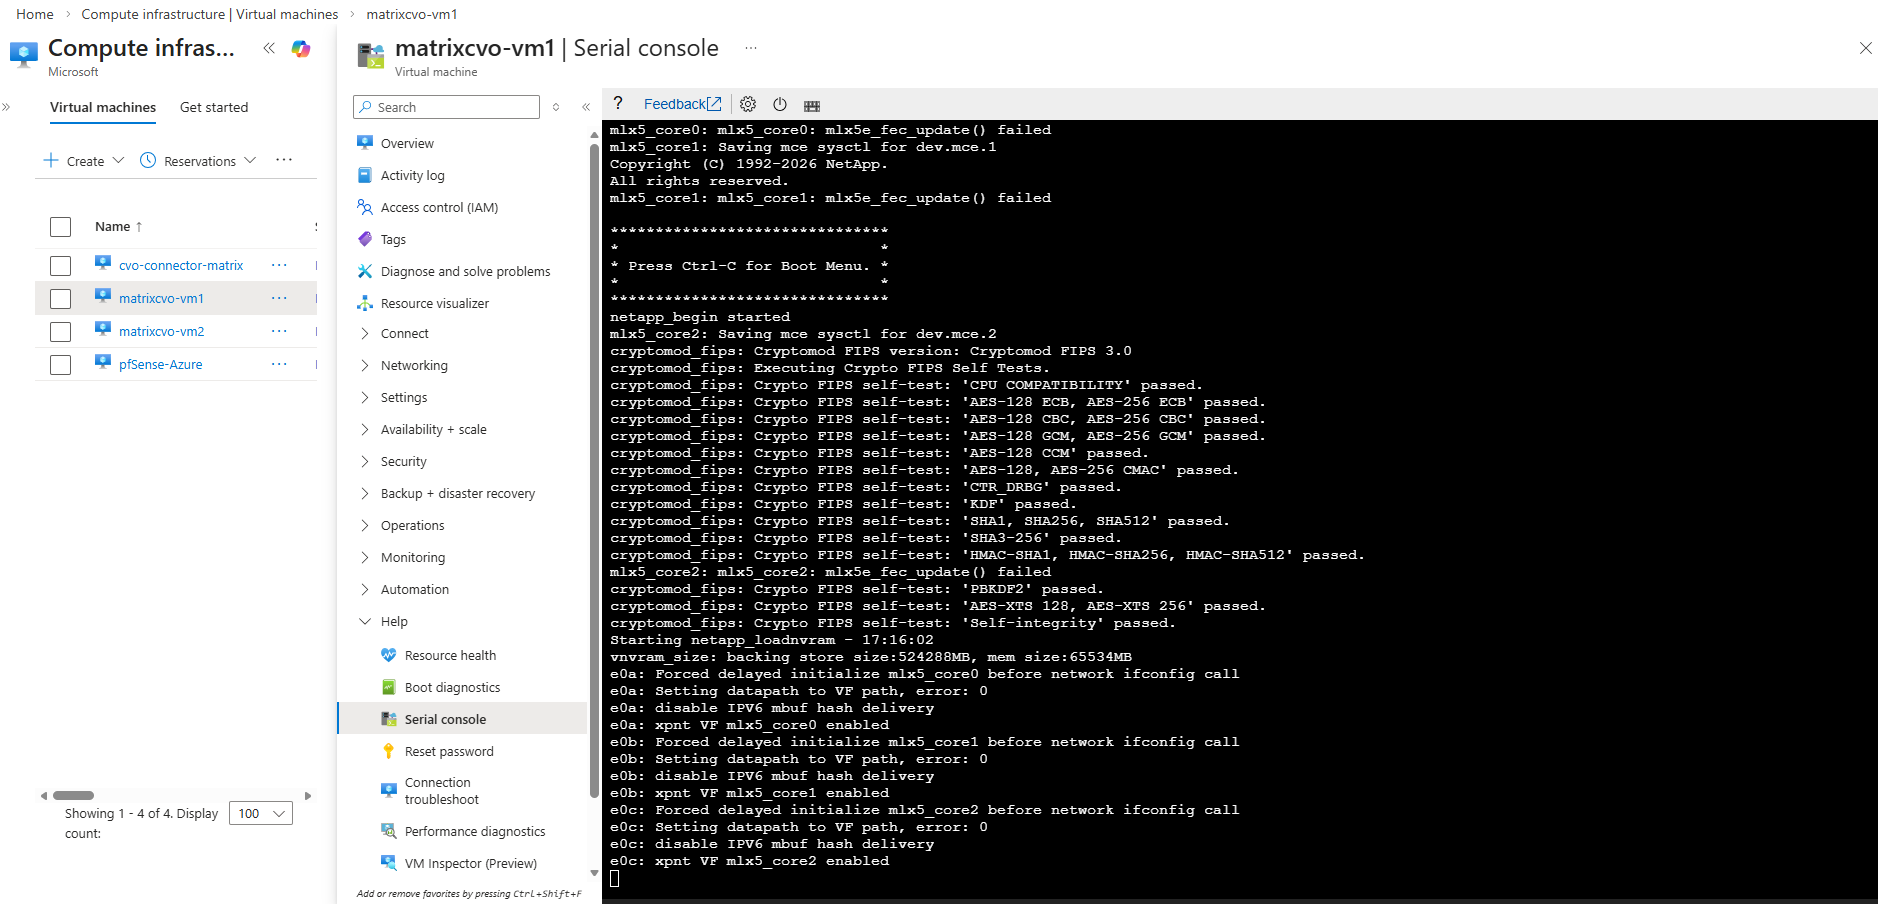
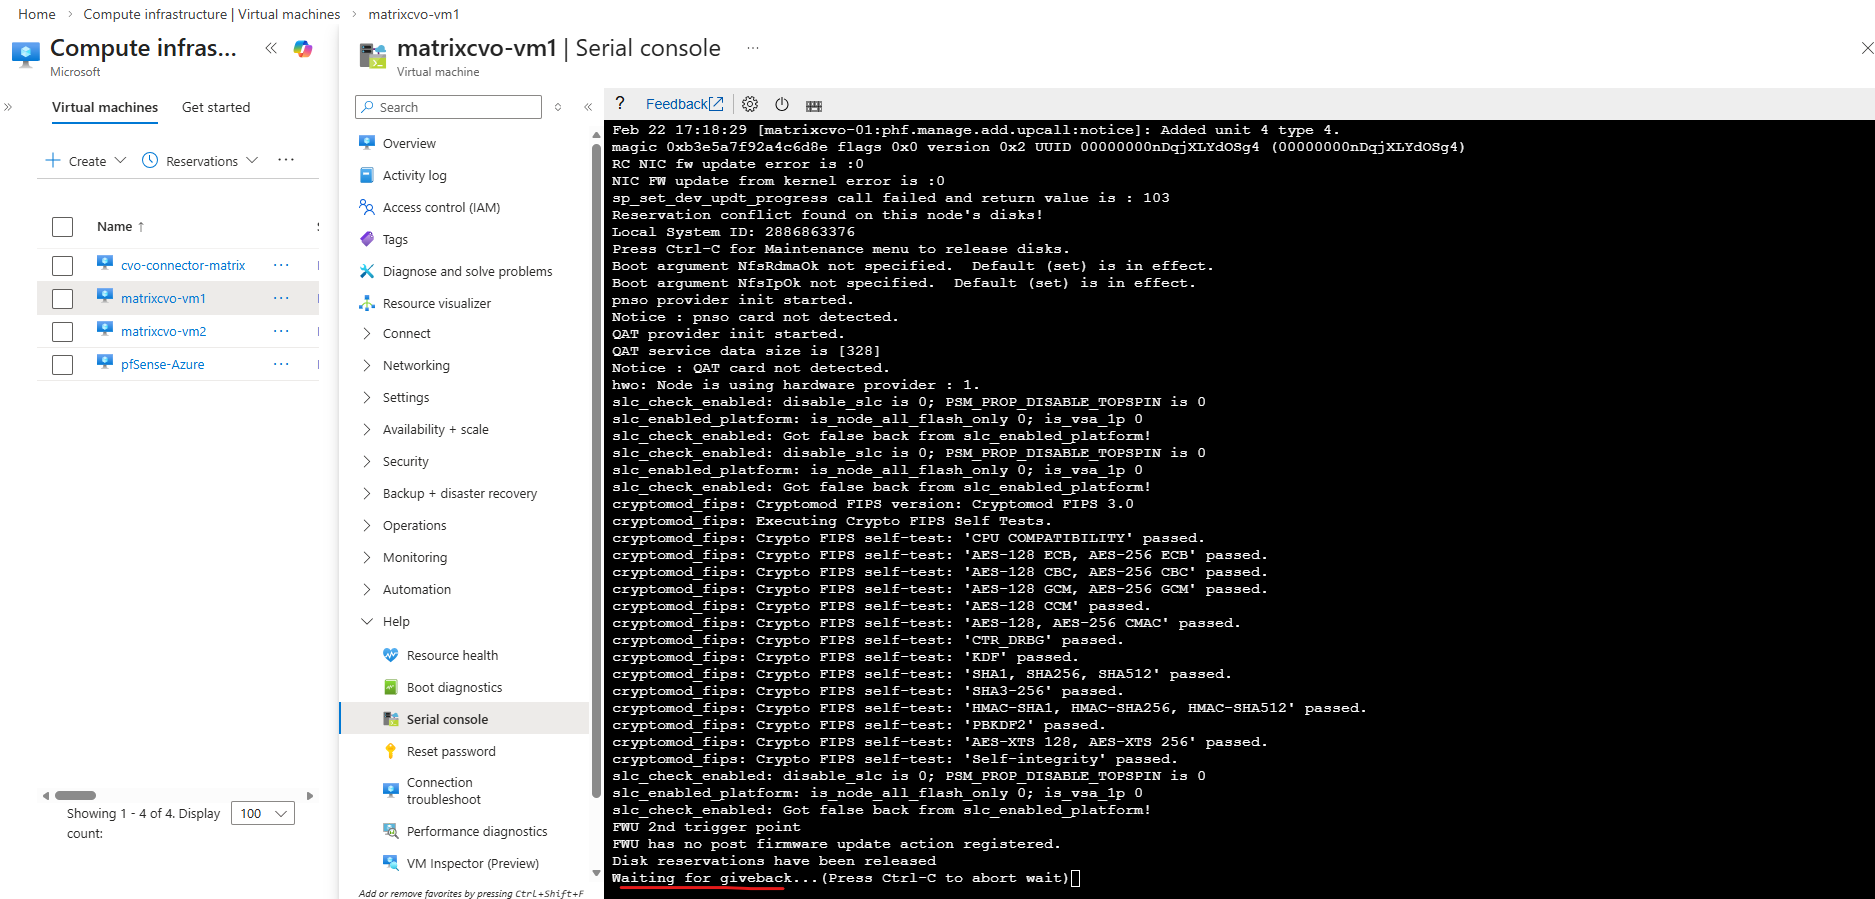
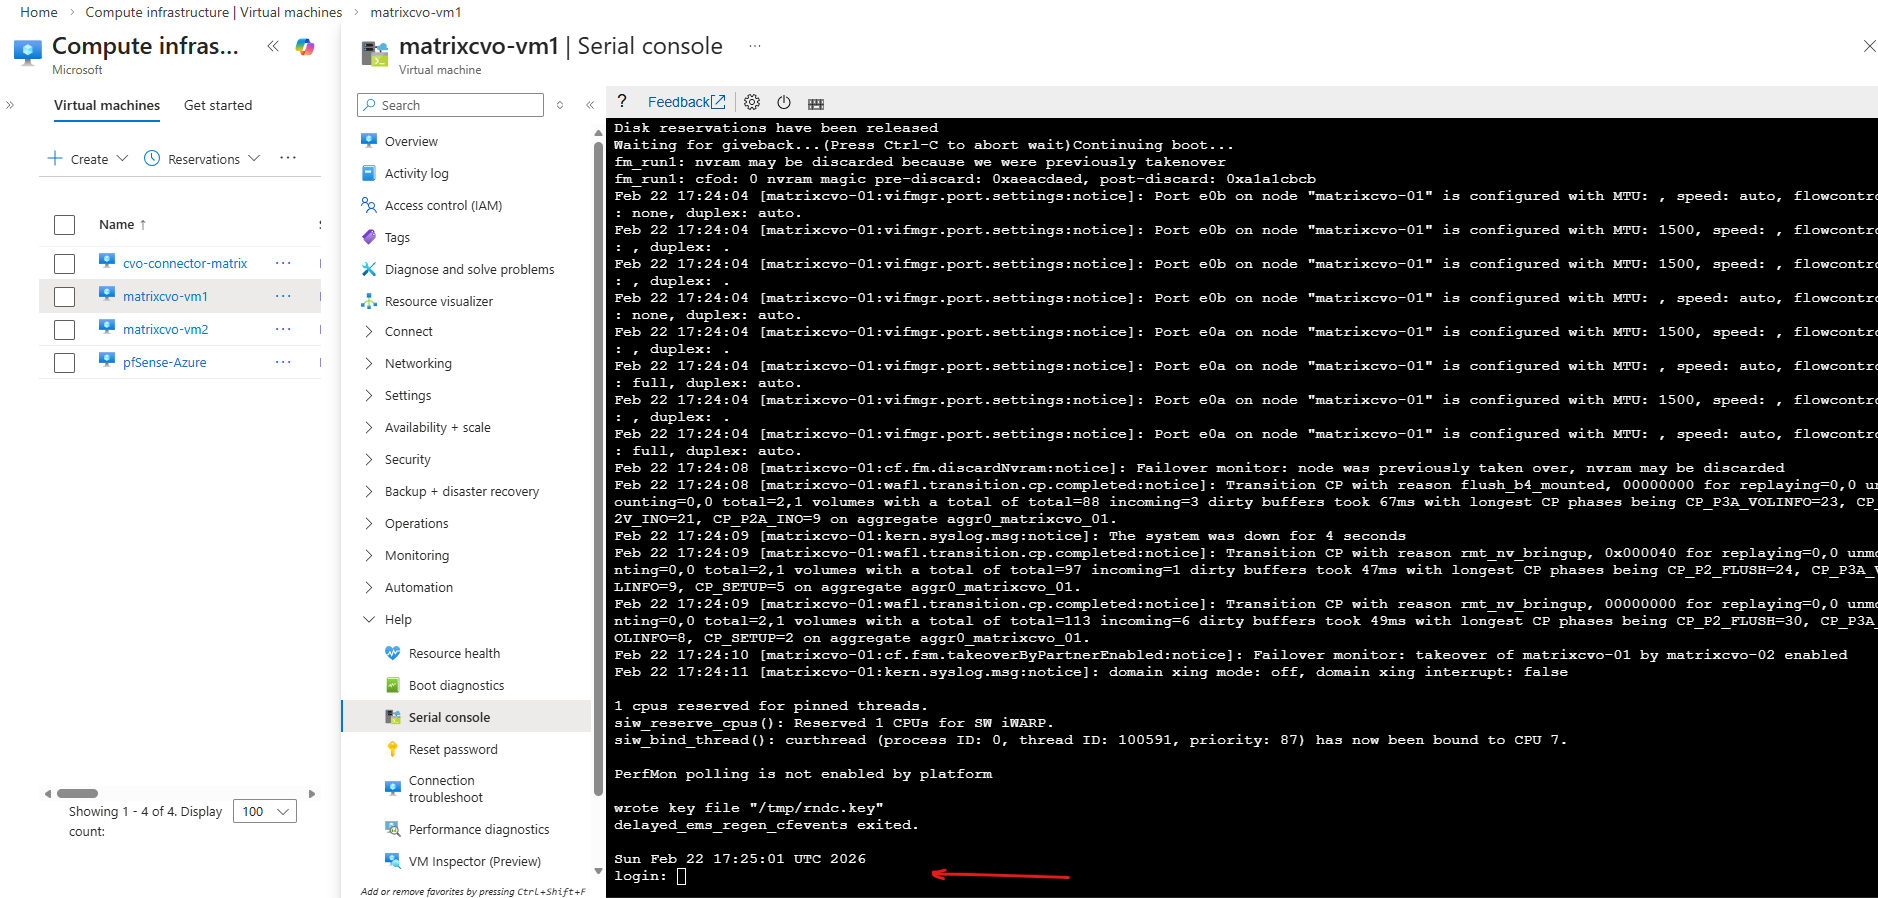
Now the serial console for CVO should work. Below this node currently is booting.
Azure Serial Console relies on Boot Diagnostics, which stores the VM’s console output and boot logs in an Azure Storage account.
When you open the Serial Console, Azure retrieves this data from the storage account to display the console stream in the portal. If access to that storage account is restricted by firewall rules, the Serial Console cannot function properly.
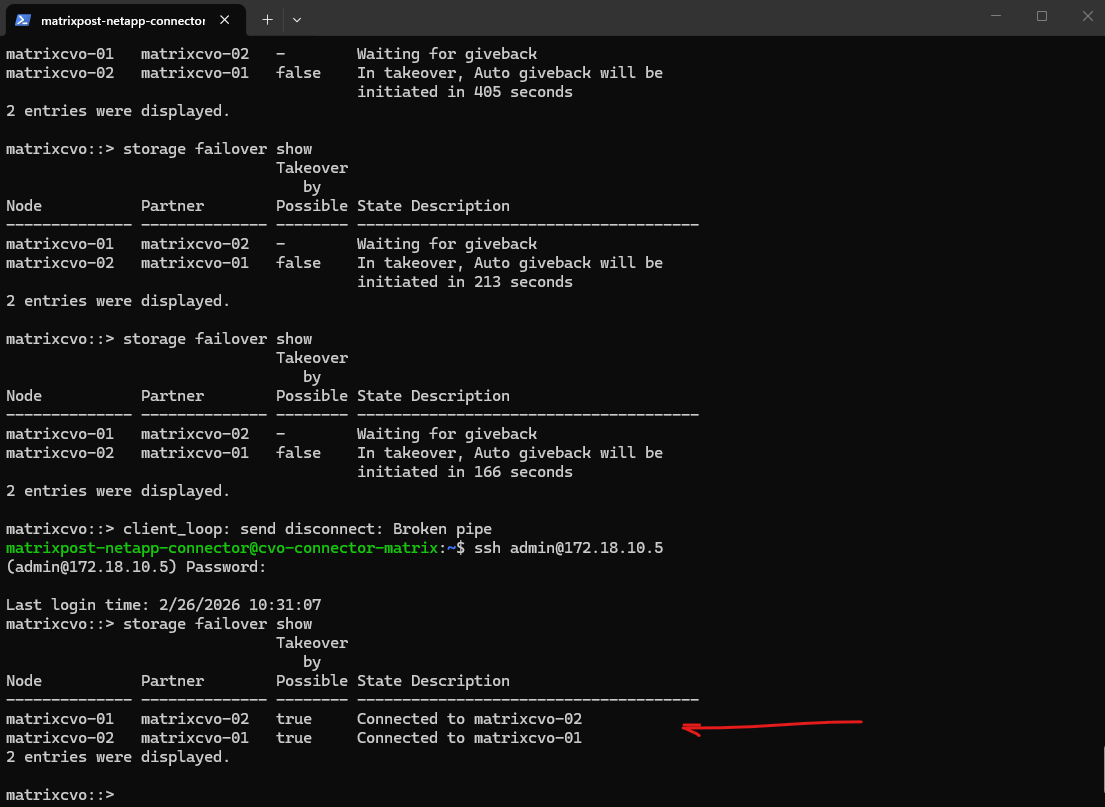
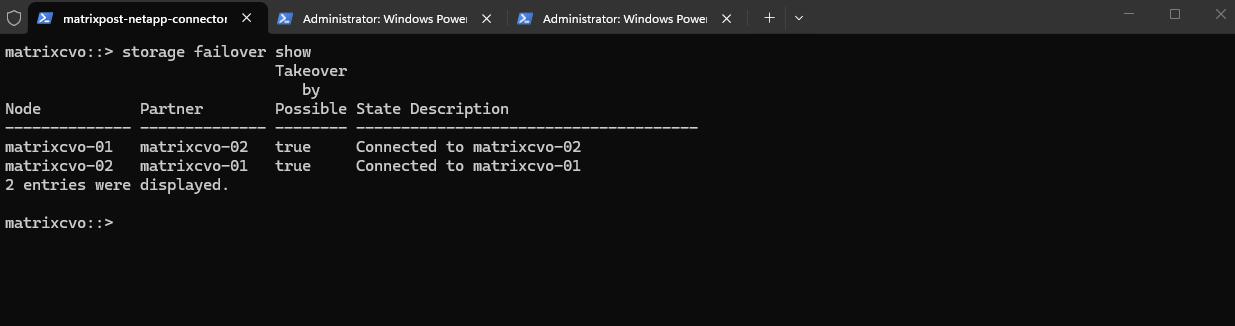
matrixcvo::> storage failover show
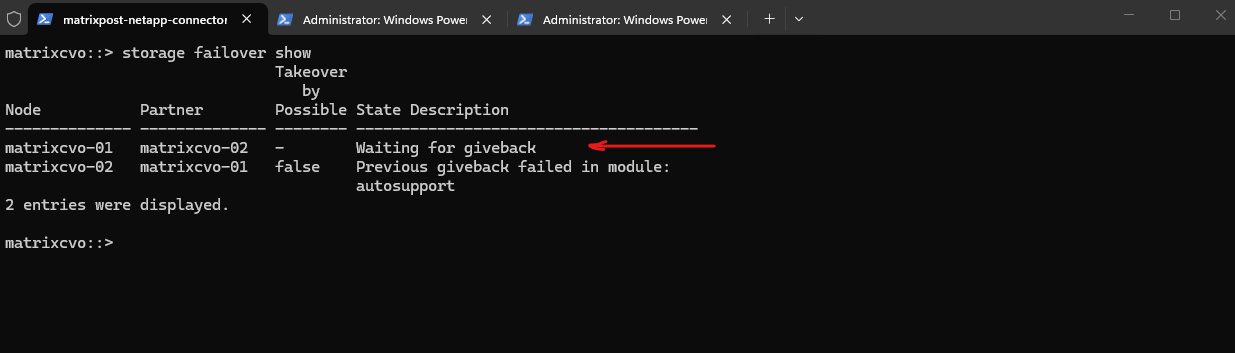
The
storage failover showoutput indicates that the HA pair is connected, but the cluster is not yet fully healthy.Node matrixcvo-01 is still waiting for certain cluster applications (mgmt, SCSI blade, clam) to come online, while matrixcvo-02 is in a partial giveback state, meaning the takeover/giveback process is still completing.
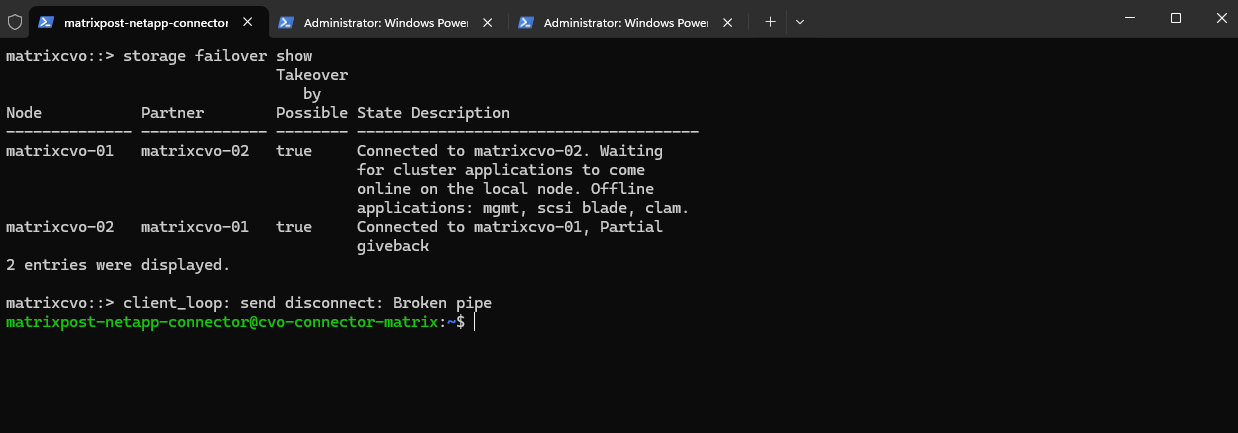
The
client_loop: send disconnect: Broken pipemessage reflects the brief management connectivity interruption that typically occurs during giveback, when network sessions are reset.
The virtual machine (ONTAP node) finally booted succesfully.
The final
storage failover showoutput confirms that the HA pair is fully healthy again. Both nodes are connected to their respective partners and takeover remains possible, indicating normal HA operation. The earlier partial giveback has successfully completed and cluster services are fully restored.
Although console access via Azure Serial Console be technically possible, NetApp officially supports management of Cloud Volumes ONTAP through SSH, System Manager, or the NetApp console (formerly BlueXP).
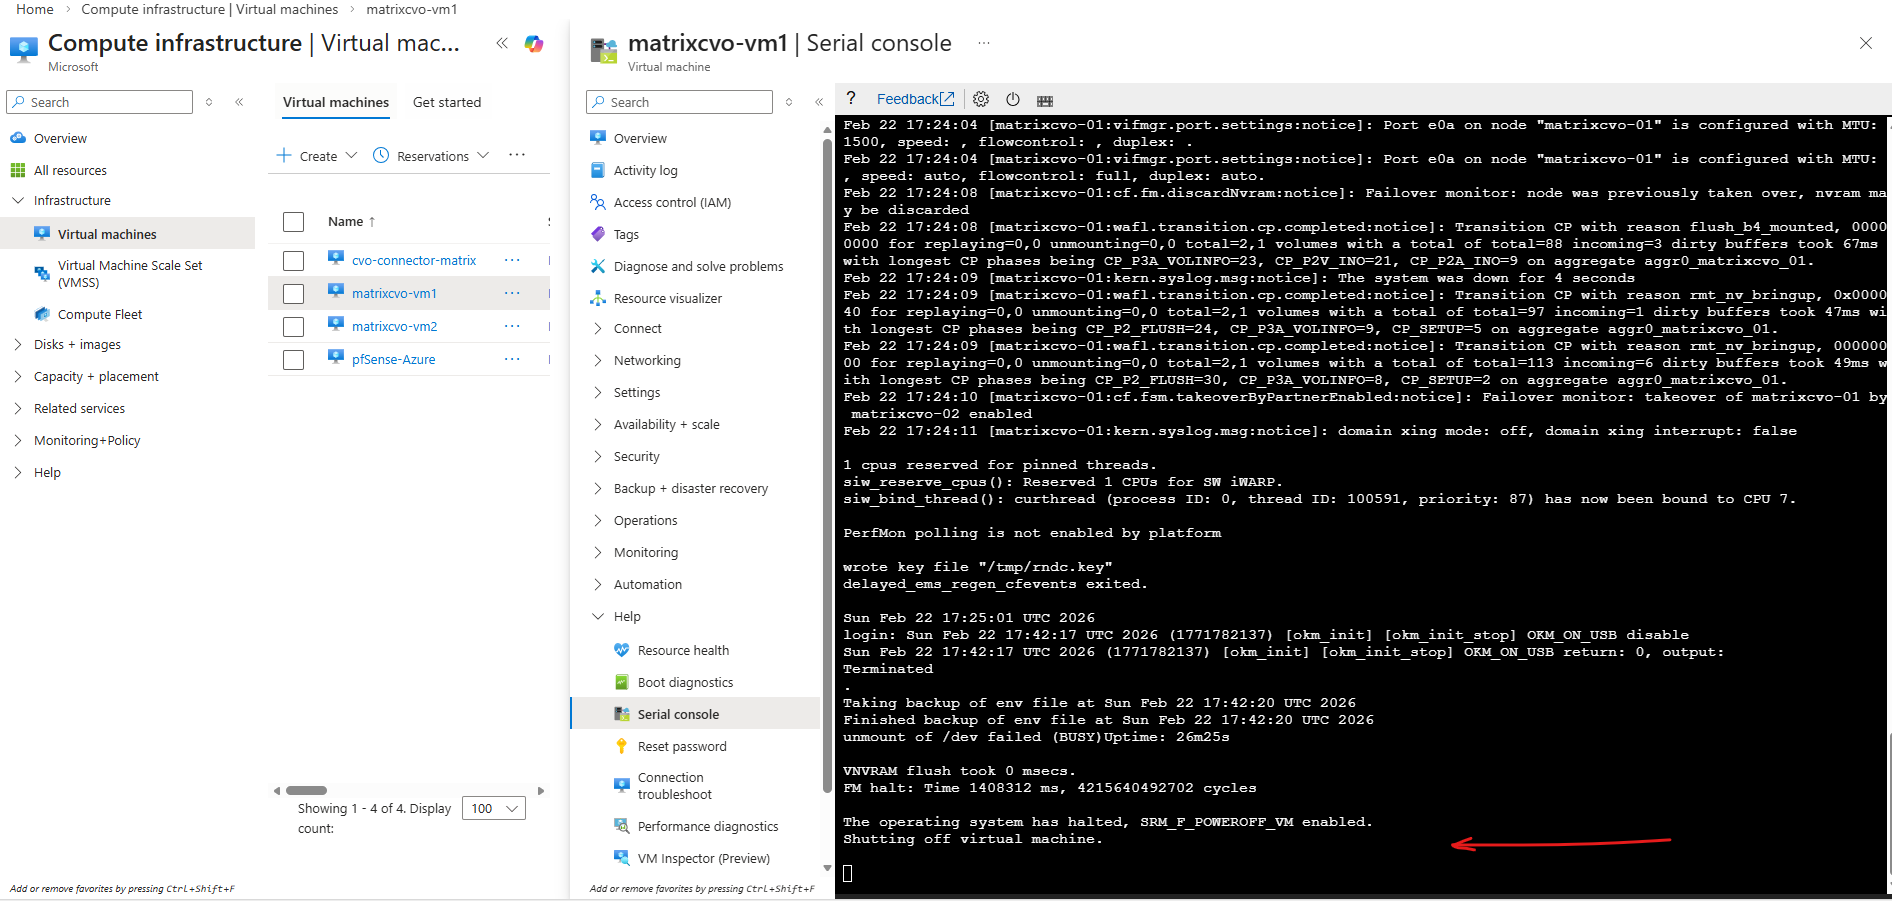
SSH remains the recommended and supported method for day-to-day administration.
When issuing the
system node halt -node *command, ONTAP cleanly shuts down the operating system and then signals the hypervisor to power off the virtual machine.The message “The operating system has halted, SRM_F_POWEROFF-VM enabled. Shutting off virtual machine” confirms that ONTAP has completed its internal shutdown sequence and triggered the hypervisor-level power-off operation. This behavior is identical in Azure and in a vSphere-based ONTAP lab, demonstrating consistent shutdown handling across platforms.
When Data LIFs Do Not Fail Over During Node Shutdown
During an earlier lab test, shutting down one node did not result in the expected automatic failover of data LIFs to the healthy partner node.
Instead of a seamless HA event, client connectivity was interrupted because the data LIFs remained bound to the halted node.
The root cause was a missing or incorrect failover policy configuration, highlighting how critical proper LIF failover settings are for successful disaster recovery testing.
After shutting down the first node matrixcvo-01, my data LIFs (cifs_data_1, nfs_data_1, iscsi_1) are still homed to matrixcvo-01 and did not migrate, which is why:
up/-→ Admin up, but operationally down- Still showing
Current Node = matrixcvo-01 - Clients cannot ping or access that IP
Meanwhile, only the LIFs that were already on matrixcvo-02 are serving traffic.
matrixcvo::> network interface show -role data
In Azure CVO HA, data LIF failover depends on:
- Correct failover-policy
- Proper failover group
- Azure ILB configuration
- Broadcast domain allowing cross-node hosting
If those LIFs are configured as node-local, ONTAP will not move them automatically during takeover.
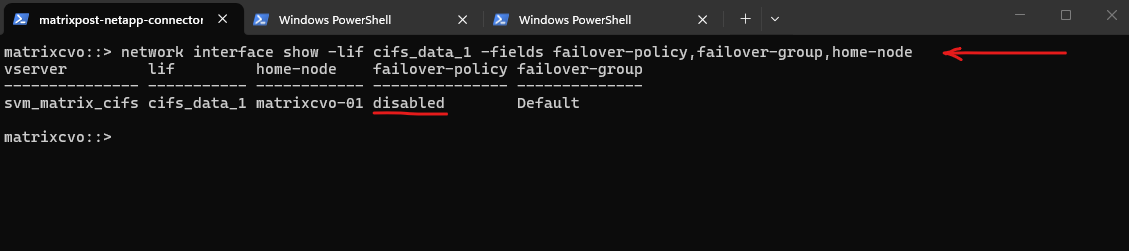
Confirm the configuration by running:
This
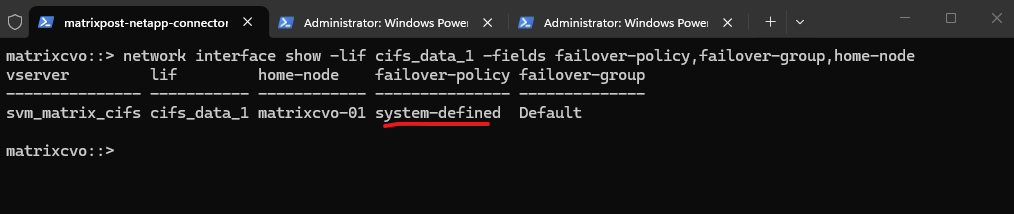
failover-policy: disabledis exactly why my client can’t reach 172.18.10.50 after stoppingmatrixcvo-01.With failover disabled, ONTAP will never move that LIF to the partner node, so the IP stays “stuck” on the dead node and goes
up/-.
matrixcvo::> network interface show -lif cifs_data_1 -fields failover-policy,failover-group,home-node
I was creating the data LIF with the following command.
In the initial configuration, I created the data LIF using the legacy -role data -data-protocol cifs parameters. However, this approach did not explicitly define a service policy or failover behavior, which later resulted in missing automatic LIF relocation during node shutdown.
matrixcvo::> network interface create -vserver svm_matrix_cifs -lif cifs_data_1 -role data -data-protocol cifs -home-node matrixcvo-<em>01</em> -home-port e0a -address 172.18.10.50 -netmask 255.255.255.0
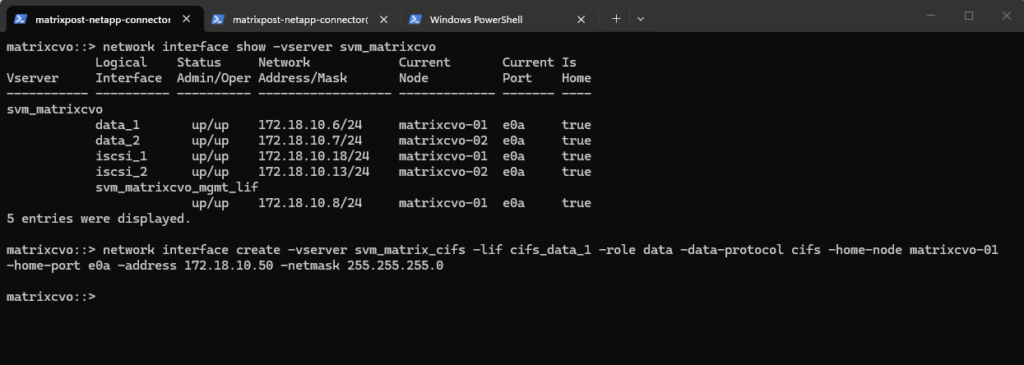
With that command above I have created a node-bound data LIF on matrixcvo-01, and ONTAP defaulted failover-policy disabled, so the IP is not allowed to float to the partner during takeover.
In CVO HA on Azure, “single-IP survives node loss” only works when the IP is presented via the Azure ILB/floating IP design and the LIF is configured to fail over (or clients use the partner LIF instead).
By using the partner LIF instead I can access the CIFS/SMB shares (volume) as shown below.
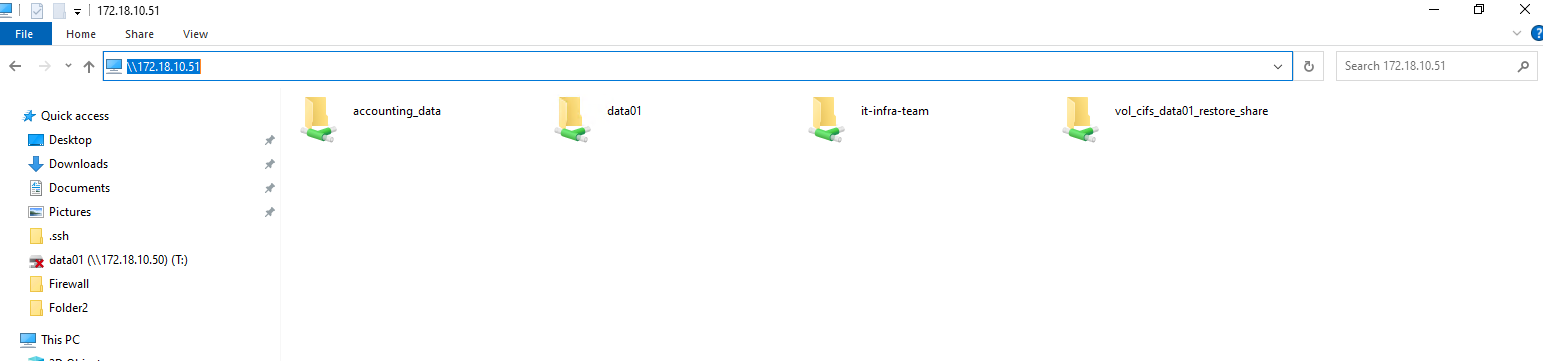
Clients currently must use cifs_data_2 (172.18.10.51) when node 1 is down; for seamless access use DFS/namespace or connect to both targets.
Although the Azure Internal Load Balancer was already configured with a floating frontend IP, the newly created data LIF had its failover policy set to disabled by default.
In CVO for Azure, this is intentional to prevent unintended IP movements unless explicitly designed. For true client-level high availability, the LIF must be configured with an appropriate failover policy aligned with the ILB configuration.
Since the LIF is already in the
Defaultfailover group, we likely only need to change the failover policy.
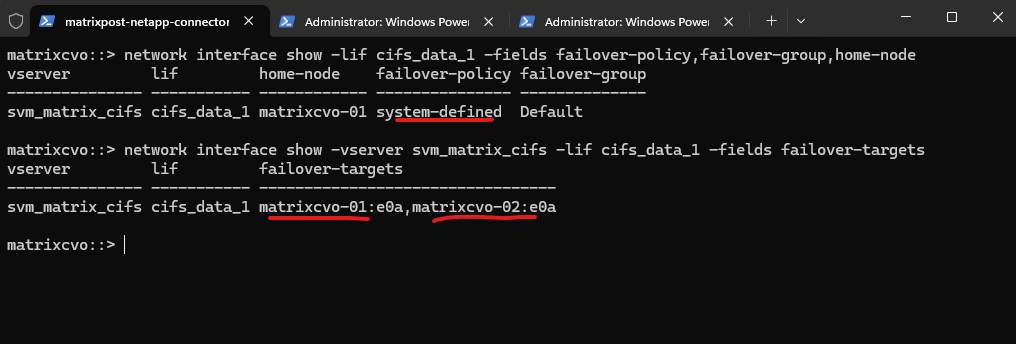
matrixcvo::> network interface show -lif cifs_data_1 -fields failover-policy,failover-group,home-node

Later after enabling the failover-policy as shown further down it must look like this.
When using
system-definedfor the failover policy, the system automatically calculates the most resilient failover path within the broadcast domain, ensuring the LIF stays reachable during an Azure HA event.
Below just the first node is listed as failover target.
Because failover is not actively configured/enabled for that LIF, ONTAP doesn’t populate a full list of eligible targets like it would with a properly defined service policy + system-defined failover behavior.
matrixcvo::> network interface show -vserver svm_matrix_cifs -lif cifs_data_1 -fields failover-targets

When creating the LIF with
-failover-policy system-defined, ONTAP automatically assigns the appropriate failover group so that both HA pair nodes are listed as valid failover targets.

To properly enable failover behavior for the LIF, we had to remove the originally created interface and recreate it with -failover-policy system-defined and the appropriate service policy as shown below.
Only by recreating the network interface with the correct parameters does ONTAP automatically assign the proper failover targets within the HA pair.
!! Note !!
We also need to define a probe port as shown, more about further down.
# take network interface down
matrixcvo::> network interface modify -vserver svm_matrix_cifs -lif cifs_data_1 -status-admin down

# delete the network interface
matrixcvo::> network interface delete -vserver svm_matrix_cifs -lif cifs_data_1

# re-create it with the policy enabled
matrixcvo::> network interface create -vserver svm_matrix_cifs -lif cifs_data_1 -service-policy default-data-files -home-node matrixcvo-01 -home-port e0a -address 172.18.10.50 -netmask 255.255.255.0 -probe-port 63005 -failover-policy system-defined -auto-revert true

# verify
matrixcvo::> network interface show -vserver svm_matrix_cifs -lif cifs_data_1 -fields failover-targets
The network port broadcast-domain show command displays the broadcast domains within each IPspace and lists the physical ports assigned to them.
Broadcast domains define which ports share Layer 2 connectivity and therefore determine where LIFs are allowed to fail over.
In this case, both
matrixcvo-01:e0aandmatrixcvo-02:e0aare part of theDefault broadcast domain, confirming that cross-node LIF migration is technically supported from a networking perspective.
matrixcvo::> network port broadcast-domain show

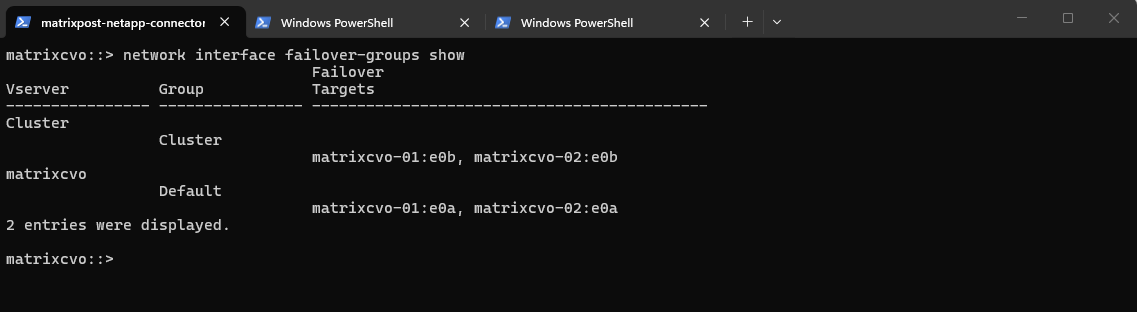
The network interface failover-groups show command displays the configured failover groups and their associated port targets within each Vserver.
Failover groups define the eligible ports to which a LIF can migrate during a node failure.
In this case, the
Default failover groupincludes bothmatrixcvo-01:e0aandmatrixcvo-02:e0a, confirming that from a configuration standpoint the LIF is allowed to fail over between both HA nodes once the appropriate failover policy is enabled.
matrixcvo::> network interface failover-groups show
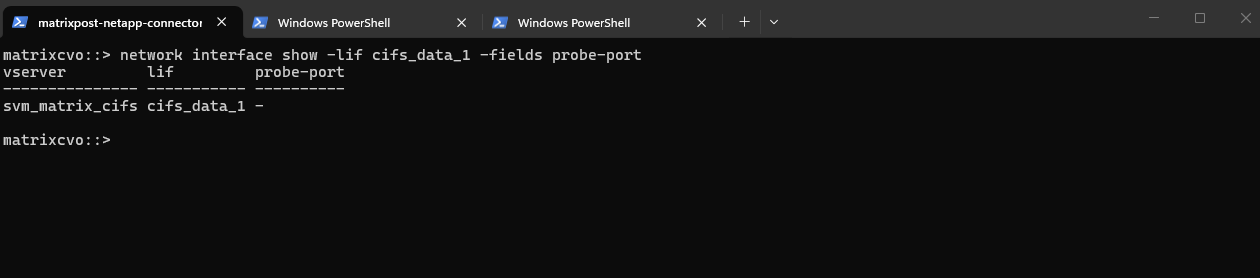
When manually creating a new data LIF in ONTAP, Azure networking components are not configured automatically.
Even if the ILB frontend IP and health probes exist in Azure, the LIF must explicitly define a matching probe port to allow failover.
This illustrates the tight integration required between ONTAP HA mechanisms and Azure Load Balancer behavior.
Without the probe-port defined, ONTAP blocks failover on that LIF to prevent inconsistent ILB state.
matrixcvo::> network interface show -lif cifs_data_1 -fields probe-port
So finally to create a new data LIF we need to run the command below including a service policy (default-data-files for data LIFs, default-management for SVM management LIF), failover policy and the probe port.
For the LIF
probe-port, we typically use ports starting at 63000, and it is essential that the configured port in ONTAP exactly matches the Azure Load Balancer health probe port; otherwise, the probe will fail and the LIF will not be marked as healthy.
matrixcvo::> network interface create -vserver svm_matrix_cifs -lif cifs_data_1 -role data -data-protocol cifs -home-node matrixcvo-01 -home-port e0a -address 172.18.10.50 -netmask 255.255.255.0 -failover-policy sfo-partner-only -auto-revert true -probe-port 63005

matrixcvo::> network interface show -lif cifs_data_1 -fields probe-port

In Part 3 and this section, we’ll dive into creating both a data LIF and a management LIF configured for automatic failover to the healthy node within the HA pair.
We’ll also walk through the corresponding Azure Internal Load Balancer (ILB) configuration to ensure seamless high availability.
Extending the DR Strategy to Hybrid Replication
While this part focuses on disaster recovery within Azure, SnapMirror can also be used to extend the DR strategy beyond the cloud.
By replicating data from an on-prem ONTAP system to Azure Cloud Volumes ONTAP, a true hybrid disaster recovery architecture can be implemented.
A detailed step-by-step guide for configuring this hybrid SnapMirror setup is covered in my dedicated post below.
Troubleshooting
Missing LIF Probe-Port Configuration in ONTAP causes ILB Health Check Failure
In this scenario, the Azure Internal Load Balancer health probe was correctly configured, yet the backend still appeared unhealthy.

For the LIF
probe-port, we typically use ports starting at 63000, and it is essential that the configured port in ONTAP exactly matches the Azure Load Balancer health probe port; otherwise, the probe will fail and the LIF will not be marked as healthy.
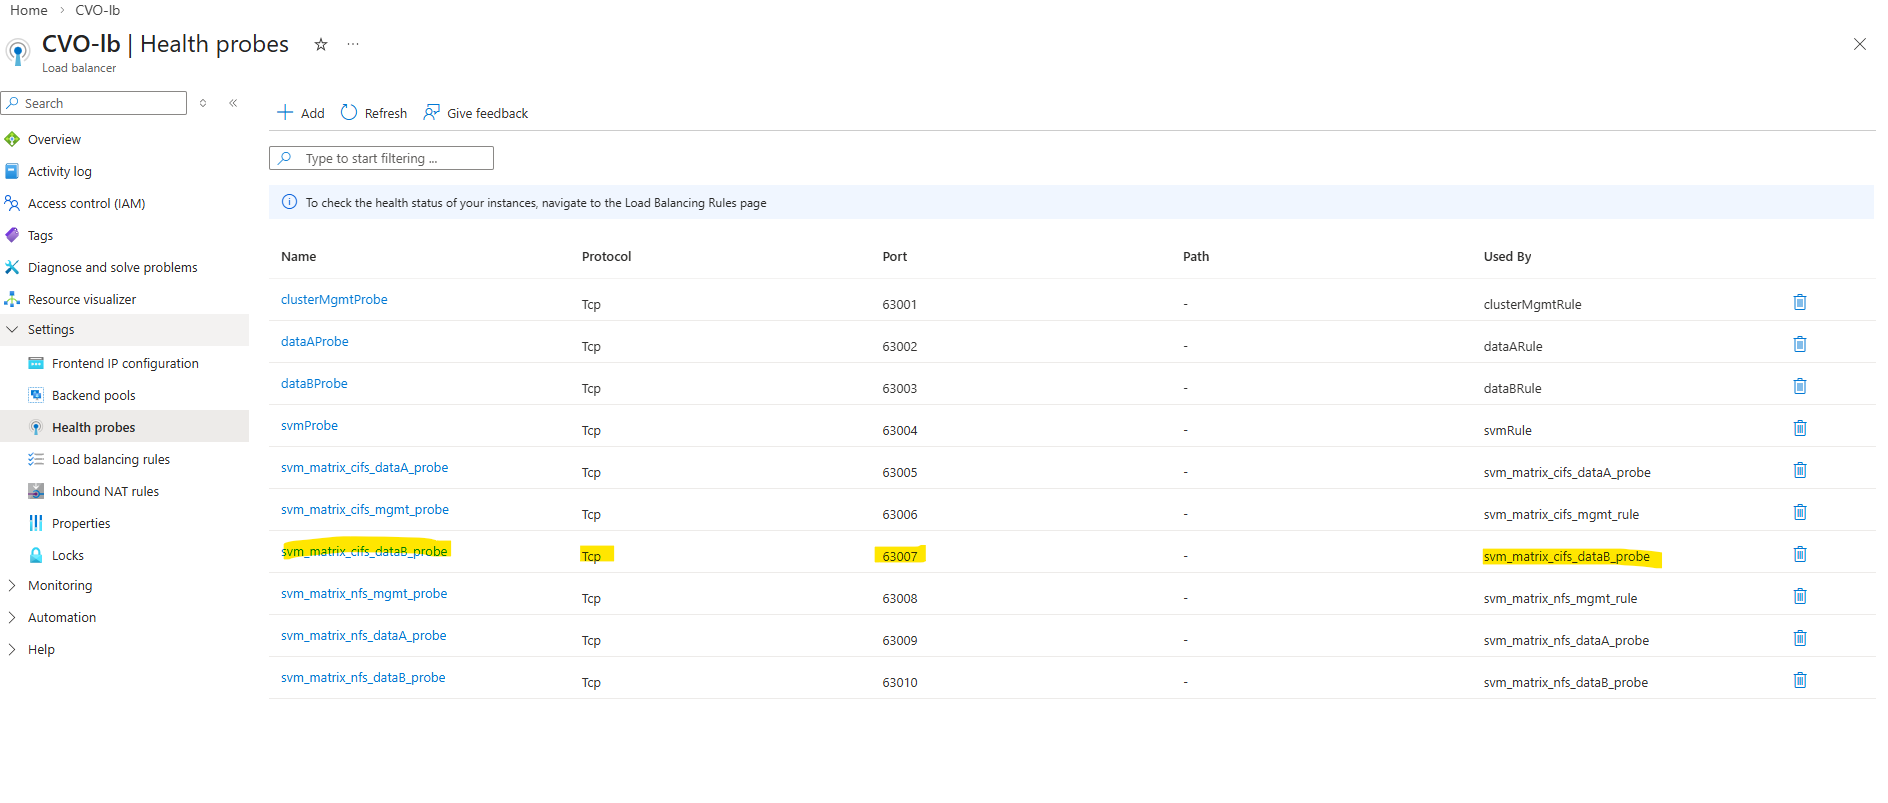
The root cause was not in Azure, but on the ONTAP side: the LIF was created without the required -probe-port configuration. Even with a perfectly configured Azure probe, the health check will fail if ONTAP is not explicitly listening on the defined probe port.
matrixcvo::> network interface show -fields probe-port
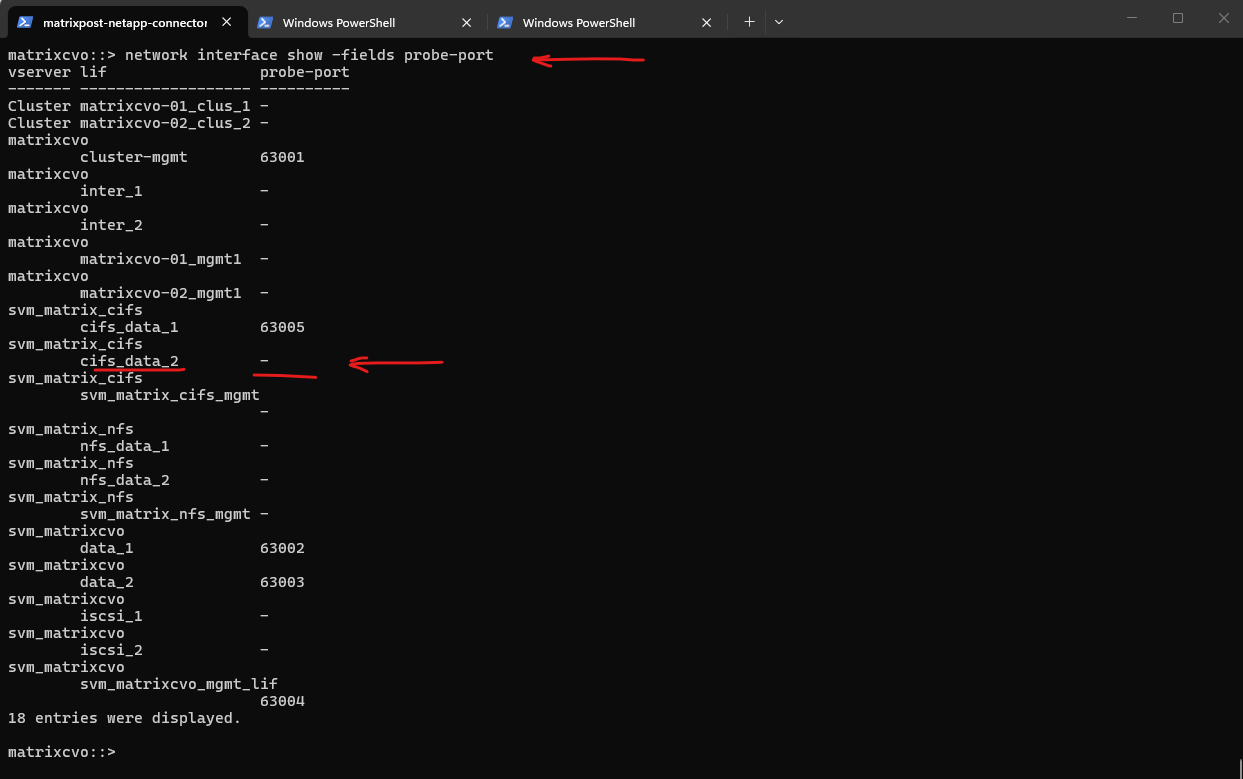
The -probe-port is a creation-time attribute. Even though the CLI shows it as a field, it is not an editable parameter. Once a LIF is born without a probe port (or with the wrong one), its identity is locked.
In Azure, the probe port isn’t just a label; it’s a specific instruction to the internal ONTAP networking stack to listen for Azure Load Balancer health checks on that specific port. Because this involves plumbing into the kernel’s networking stack for the Azure cloud environment, ONTAP requires a fresh “Create” to hook it up correctly.
# shutdown the LIF
matrixcvo::> network interface modify -vserver svm_matrix_cifs -lif cifs_data_2 -status-admin down

# delete the LIF
matrixcvo::> network interface delete -vserver svm_matrix_cifs -lif cifs_data_2

# re-create it with the correct probe port
matrixcvo::> network interface create -vserver svm_matrix_cifs -lif cifs_data_2 -role data -data-protocol cifs -home-node matrixcvo-02 -home-port e0a -address 172.18.10.51 -netmask 255.255.255.0 -failover-policy sfo-partner-only -auto-revert true -probe-port 63007

Probe port verified, everything looks good. From this point on, Azure should be able to successfully probe the LIF and mark it as healthy.
matrixcvo::> network interface show -fields probe-port
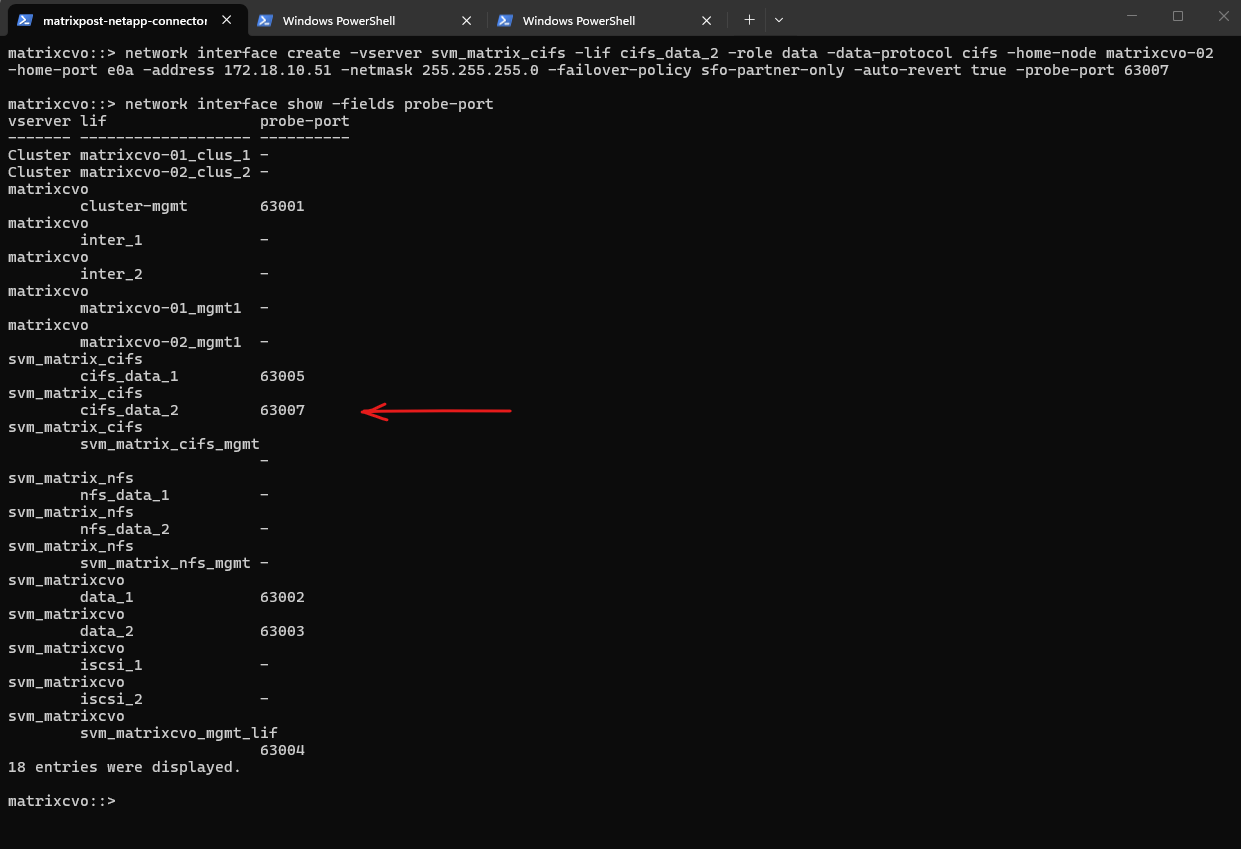
Looks good, the configuration is working as expected.
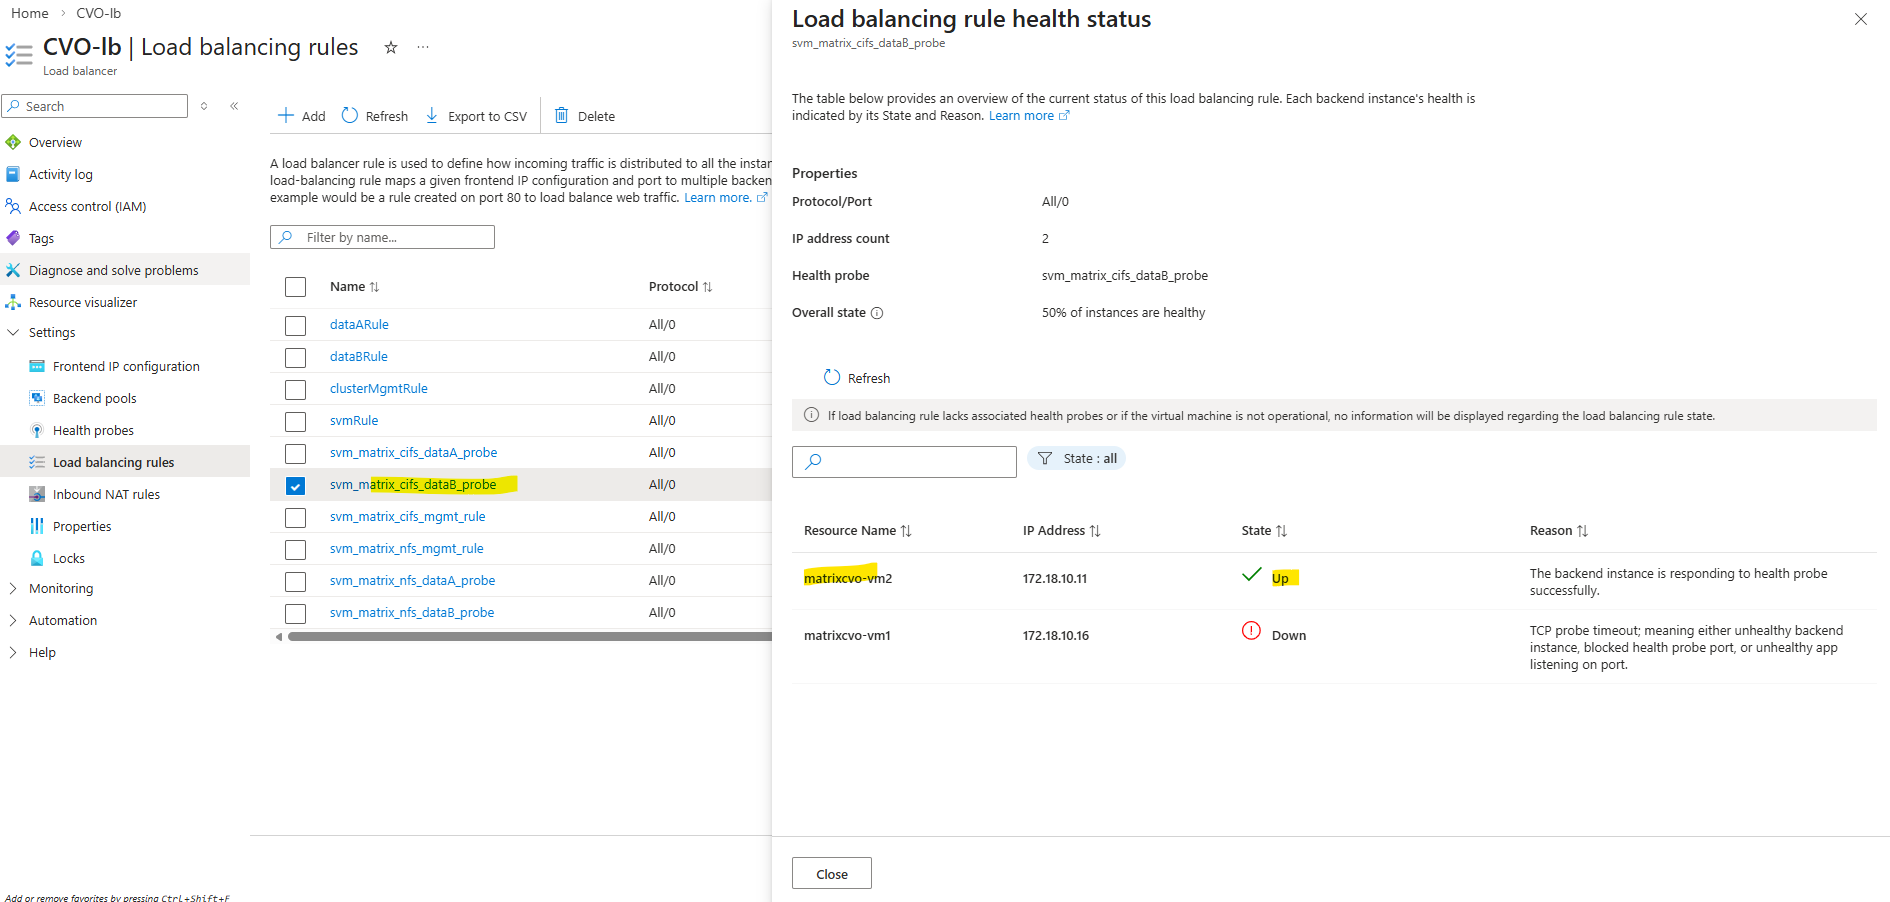
Below we can see the successful load balancing rule: one node is marked as healthy because it currently hosts the LIF, while the partner node appears as down, which is expected since the LIF is not active on that node.
Each data LIF requires a dedicated probe port so the Azure Load Balancer can correctly determine its health and enable proper failover.
As observed, the cluster management LIF and the initially created SVM LIF deployed by the NetApp Console already have the probe port configured by default.

Azure CVO node not booting after Azure maintenance event
Node is not booting up after Azure maintenance event with complete communication loss error in EMS (Event Management System log) :
Azure Maintenance event caused to crash /env/env file in CVO cfcard partition of boot disk.
Solution: Please contact NetApp Technical Support or log into the NetApp Support Site to create a case. Reference this article for further assistance.
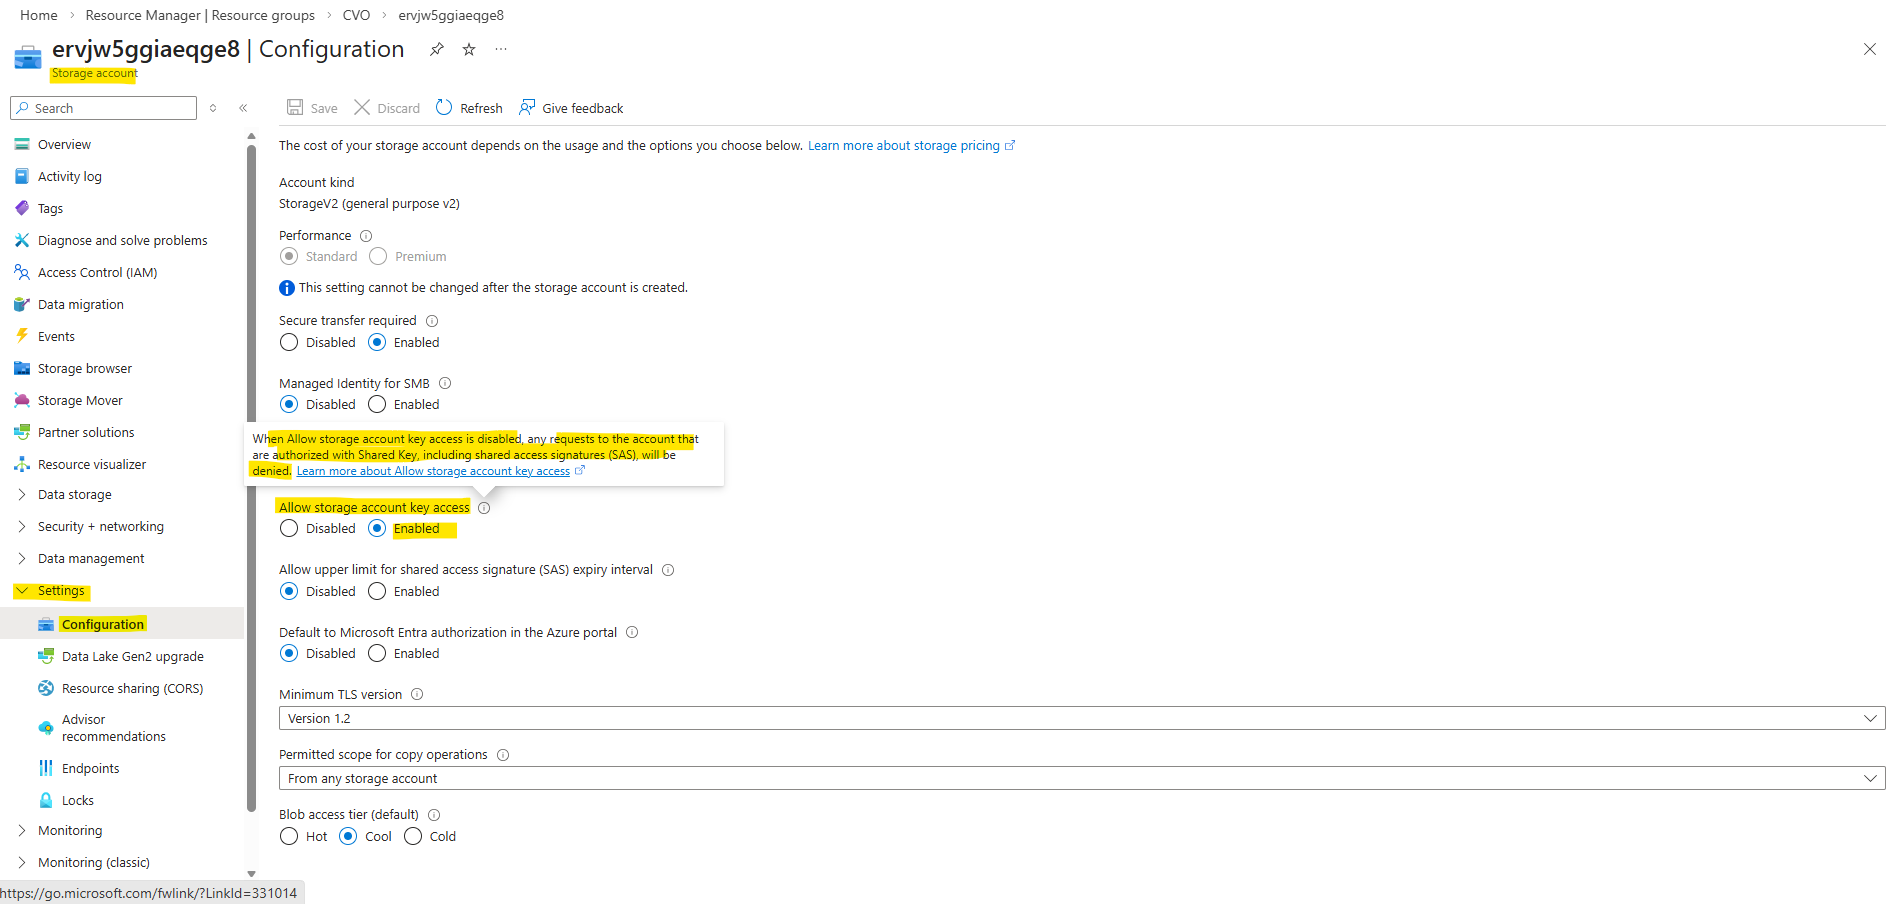
Cloud Volumes ONTAP Azure cluster is down due to storage account key access
- BlueXP shows CVO failed with error “Connection attempt to xx.xx.xx.xx:443 failed”
- The cluster becomes inaccessible by SSH.
- When accessing the Azure serial console for each node, they are stuck in a boot loop displaying the following errors:
WARNING: 0 disks found!
Storage Adapters found:
0 Fibre Channel Storage Adapters found!
1 SAS Adapters found!
0 Parallel SCSI Storage Adapters found!
0 ATA Adapters found!
Select option 4 from the boot menu to choose disks for the root volume and spare core space.
Target Adapters found:
0 Fibre Channel Target Adapters found!
0 iSCSI Target Adapters found!

WARNING: there do not appear to be any disks attached to the system.

No root volume found.

sp_set_dev_updt_progress call failed and return value is : 103

Apr 11 20:22:45 [az-cvoHA-01-01:pha.obj.scanFailure:error]: ONTAP could not get a list of objects from the object store, "object_store0", at "rootsxxxxxx.blob.core.windows.net", using IP address "10.XXX.XXX.XXX" with error: Unknown provider error code.

Apr 11 20:23:16 [az-cvoHA-01-01:config.noPartnerDisks:error]: No disks were detected for the partner; this node cannot perform takeover correctly.

Apr 11 20:23:16 [az-cvoHA-01-01:callhome.dsk.config:error]: Call home for DISK CONFIGURATION ERROR
Cause:
- Storage Account Key Access was disabled on the rootsxxxxxx.blob.core.windows.net storage account listed in the error.
- The Storage Account Keys allow complete control over your storage resources, including Blob storage, File storage, Queue storage, and Table storage.
- Disabling the keys prevents a user or application from performing operations such as reading, writing, and deleting data.
Solution:
To enable storage account keys on a storage account, follow these steps:
- In the Azure portal, navigate to the storage account Settings – Configuration blade.
- For “Allow storage account key access”, select “Enabled”, then click Save.
More about Shared Key authorization for an Azure Storage account you will find here https://learn.microsoft.com/en-us/azure/storage/common/shared-key-authorization-prevent.
CVO VM not booting after Azure freeze event (SSD firmware Update)
Issue: After a maintenance freeze event on a HA CVO cluster, the Ontap OS did not boot up but the VM was in online/ready state.
Cause: Microsoft stated that an SSD firmware had been patched as part of the freeze event and it is known to cause issues with guest OS (ONTAP) booting.
Solution: Stop/start the CVO VM from Azure portal and the CVO will boot normally.
Source: https://kb.netapp.com/Cloud/ncds/nds/cvo/cvo_kbs/CVO_VM_not_booting_after_Azure_freeze_event
CVO instance reboots within seconds of announced Azure scheduled maintenance
Issue: Unexplained Cloud Volumes ONTAP (CVO) reboot after scheduled Azure maintenance window announcement.
AIQ will report the takeover as well as NODE(S) OUT OF CLUSTER QUORUM
Azure will notify you when a scheduled maintenance will start by logging a special EMS Autosupport message.
Sat Jan 02 05:13:12 -0500 [NetApp-01: notifyd: callhome.invoke:notice]: Call home for USER_TRIGGERED (TEST:MAINT=1h Cloud Provider Maintenance Event. Status: scheduled. Type: freeze. VM: NetApp-01-vm1.)

# or something like:
2/27/2026 09:18:00  NetApp-01-vm1     ALERT         vsa.scheduledEvent.scheduled: Cloud provider event scheduled from: Platform, out: 9 for node "NetApp-01-vm1". ID: xxxxxxxxxxxxxxx. Type: freeze. Not before: 2/27/2026 09:32:29.
Cause: When an Azure scheduled maintenance is announced, CVO will proactively perform a Takeover/Giveback (TO/GB) within seconds of the announcement.
Sat Jan 02 05:13:12 -0500 [NetApp-01: notifyd: callhome.invoke:notice]: Call home for USER_TRIGGERED (TEST:MAINT=1h Cloud Provider Maintenance Event. Status: scheduled. Type: freeze. VM: NetApp-01-vm1.)

Sat Jan 02 05:13:26 -0500 [NetApp-01: sfo_fanta_worker_thread: cf.misc.operatorTakeover:notice]: Failover monitor: takeover initiated by operatorSat Jan 02 05:13:12 -0500 [NetApp-01: notifyd: callhome.invoke:notice]: Call home for USER_TRIGGERED (TEST:MAINT=1h Cloud Provider Maintenance Event. Status: scheduled. Type: freeze. VM: NetApp-01-vm1.)

Sat Jan 02 05:13:26 -0500 [NetApp-01: sfo_fanta_worker_thread: cf.misc.operatorTakeover:notice]: Failover monitor: takeover initiated by operator
Solution: proactive takeover is a feature of ONTAP 9.8 deployed in Azure Cloud. Refer to the 9.8 release notes.
- Check the health of your CVO using System Manager or Cloud Manager.
- If the CVO is not healthy contact NetApp technical support.
For freeze events prior to ONTAP 9.8 see: Azure HA rebooted due to Cloud provider scheduled freeze event
Links
Redeploy Linux virtual machine to new Azure node
https://learn.microsoft.com/en-us/troubleshoot/azure/virtual-machines/linux/redeploy-to-new-node-linuxPrevent Shared Key authorization for an Azure Storage account
https://learn.microsoft.com/en-us/azure/storage/common/shared-key-authorization-prevent