Deploying NetApp Cloud Volumes ONTAP (CVO) in Azure using NetApp Console (formerly BlueXP) – Part 6 – Upgrade Cloud Volumes ONTAP
In this part of this series, we walk through the process of performing a Non-Disruptive Upgrade (NDU) of a NetApp Cloud Volumes ONTAP (CVO) HA pair in Microsoft Azure.
Keeping your storage environment up to date is not just about compliance and security, it is about leveraging the latest storage efficiencies and cloud integrations provided by the new ONTAP version.
We will explore the step-by-step workflow within the NetApp Console (formerly BlueXP), analyze how ONTAP orchestrates node takeovers behind the scenes, and demonstrate how to achieve a “Gold Standard” upgrade with zero client packet loss.
In Part 7 we dive into NetApp AutoSupport, the critical telemetry system that acts as the heartbeat of our CVO instance.
In Part 8 we focus on Disaster Recovery and explore how to protect Cloud Volumes ONTAP in Azure against outages and unexpected failures.
- Introduction
- Console Agent Network Requirements
- Pre-Upgrade Health Checks – Validate Before You Upgrade
- Triggering the Upgrade in NetApp Console and Tracking Progress via ONTAP CLI
- Post-Upgrade Validation – Confirm System Health and Version
- Validating Client Connectivity
- Change the Azure VM type for Cloud Volumes ONTAP
- Revert ONTAP (Not supported for Cloud Volumes ONTAP)
- Agent (Connector VM) OS Update
- Links
Introduction
Upgrade Cloud Volumes ONTAP from the NetApp Console to gain access to the latest new features and enhancements. You should prepare Cloud Volumes ONTAP systems before you upgrade the software. Read more about here https://docs.netapp.com/us-en/storage-management-cloud-volumes-ontap/task-updating-ontap-cloud.html.
Automatic giveback must be enabled on a Cloud Volumes ONTAP HA pair (this is the default setting). If it isn't, then the operation will fail.
Run the following command in the ONTAP CLI to check if it is enabled.
To ensure the cluster automatically restores its redundant configuration after an update, you should verify that Automatic Giveback is enabled.
By default, the take-over partner node automatically gives back storage when the off-line node is brought back on line, thus restoring the high-availability pair relationship.
In most cases, this is the desired behavior. If you need to disable
automatic giveback– for example, if you want to investigate the cause of the takeover before giving back – you need to be aware of the interaction of non-default settings.Source: https://docs.netapp.com/us-en/ontap/high-availability/ha_automatic_giveback_commands.html
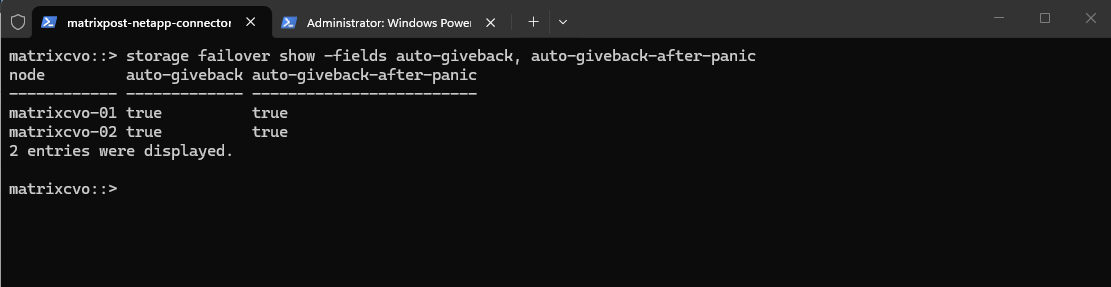
Running the
storage failover showcommand confirms that the system is set to autonomously return storage ownership to the rebooted node, maintaining the environment’s performance and balance without manual triggers.
matrixcvo::> storage failover show -fields auto-giveback, auto-giveback-after-panic

# if not enable it by running
matrixcvo::> storage failover modify -node * -auto-giveback true
Console Agent Network Requirements
While Cloud Volumes ONTAP (CVO) nodes reside in a private VNet, the upgrade process is orchestrated by the NetApp Agent (Connector VM).
It is a common misconception that the nodes download their own updates; instead, the Connector pulls the ONTAP images from NetApp and Azure repositories and pushes them to the nodes internally.
For a successful upgrade, the Connector must have outbound internet access to the Azure Container Registry (*.azurecr.io) and NetApp support endpoints, ensuring it can serve as the local distribution point for the cluster.
More about you will find in the following link and also all endpoints the Console Agent needs to be able to connect to https://docs.netapp.com/us-en/console-setup-admin/task-install-agent-azure-console.html#networking-azure-agent.
Pre-Upgrade Health Checks – Validate Before You Upgrade
Before initiating a Cloud Volumes ONTAP upgrade from the NetApp Console, we should always verify the overall cluster health and replication status.
Even though CVO upgrades are designed to be non-disruptive in HA deployments, underlying issues such as aggregate space pressure, SnapMirror lag, or storage failover problems can turn a routine upgrade into a risky operation.
In this section, we run through a structured set of CLI checks to ensure the system is stable and ready for upgrade.
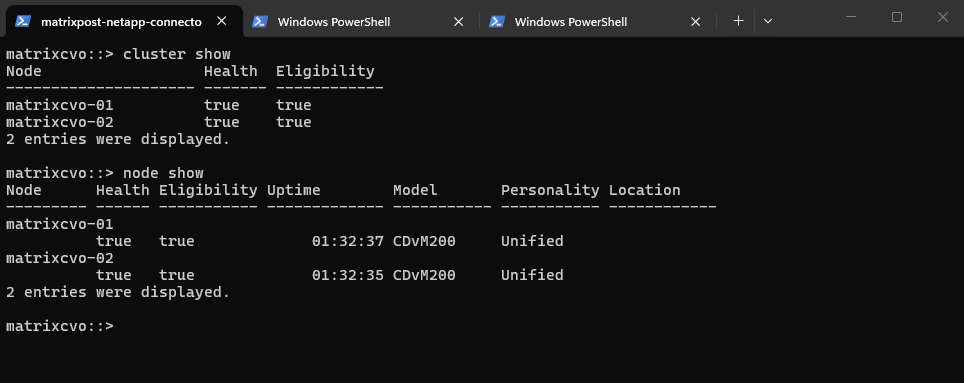
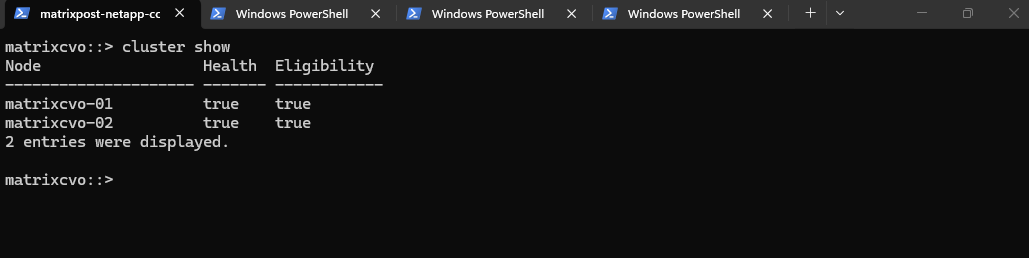
The cluster show command provides a quick overview of all nodes in the cluster, including their health status and eligibility for participation in cluster operations.
Both nodes reporting
Health = trueandEligibility = trueconfirms that the cluster is stable and that each node is ready to participate in normal operations, a fundamental prerequisite before starting an upgrade.
matrixcvo::> cluster show

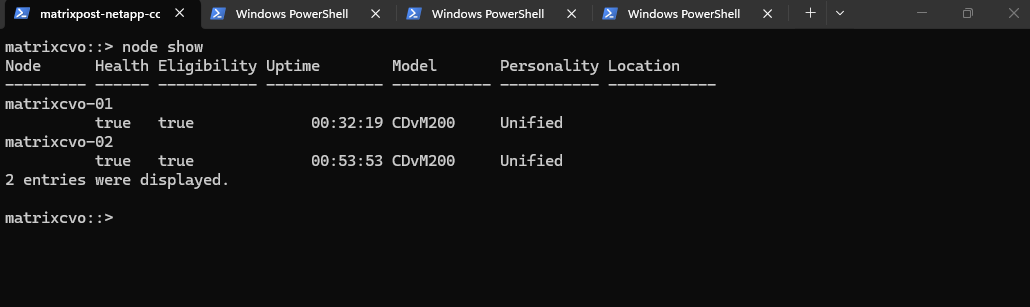
The node show command provides detailed information about each cluster node, including health status, eligibility, uptime, and hardware model.
Both nodes report
Health = trueandEligibility = true, confirming they are fully operational and ready to participate in cluster activities. The similar uptime values also indicate that both nodes were recently started (my lab environment) and are running consistently, which is important to verify before initiating an upgrade.
matrixcvo::> node show
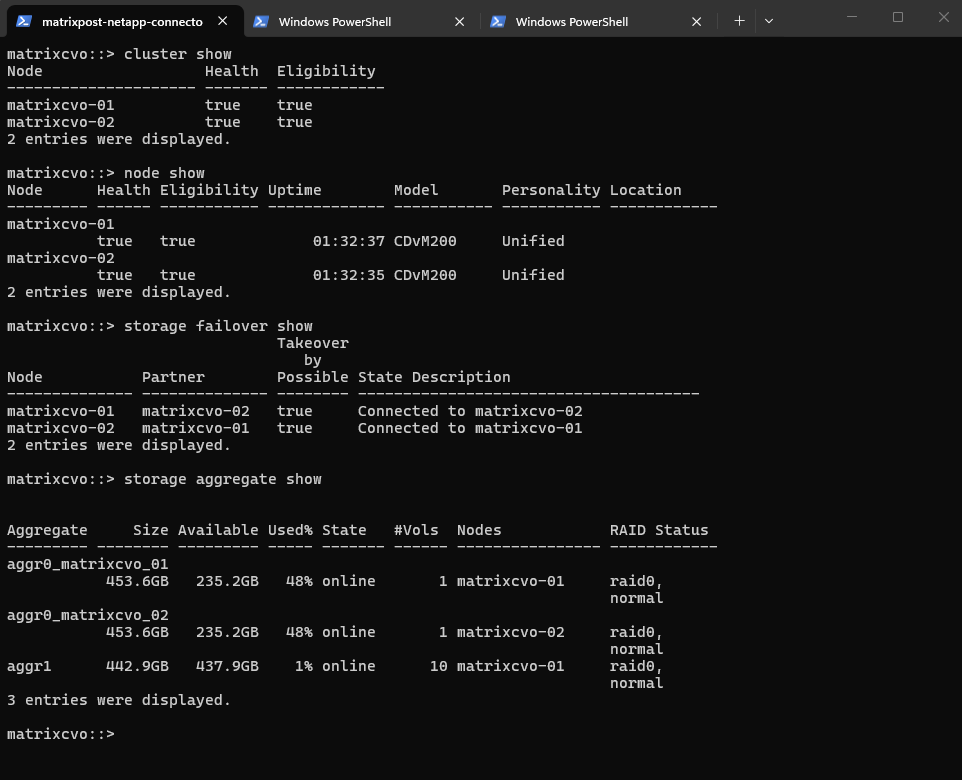
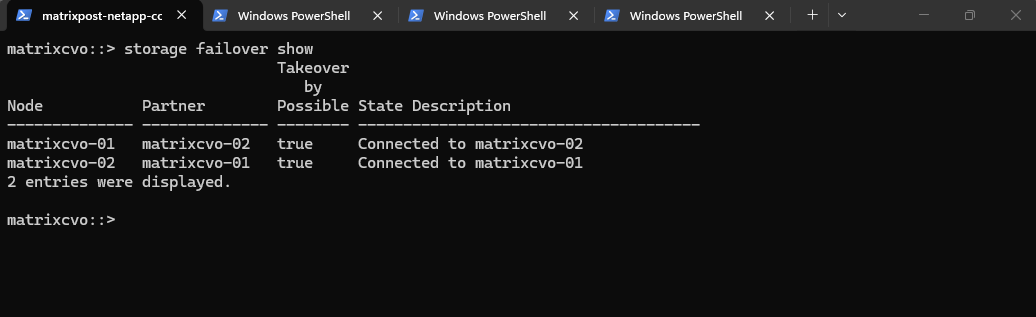
The storage failover show command verifies the high-availability (HA) status between the two nodes and confirms whether takeover is possible.
Both nodes report
Takeover Possible = trueand show a healthy connection to their partner, indicating that HA functionality is fully operational. This is a critical pre-upgrade check, as CVO upgrades in HA environments rely on proper takeover and giveback between nodes to remain non-disruptive.
matrixcvo::> storage failover show

The storage aggregate show command provides an overview of all aggregates, including capacity usage, state, hosting node, and RAID status.
All aggregates are
onlineand innormalRAID state, with sufficient available capacity, indicating no storage-level risk before the upgrade. Verifying aggregate health is important because underlying storage issues could impact volume availability or HA operations during the rolling upgrade process.
matrixcvo::> storage aggregate show
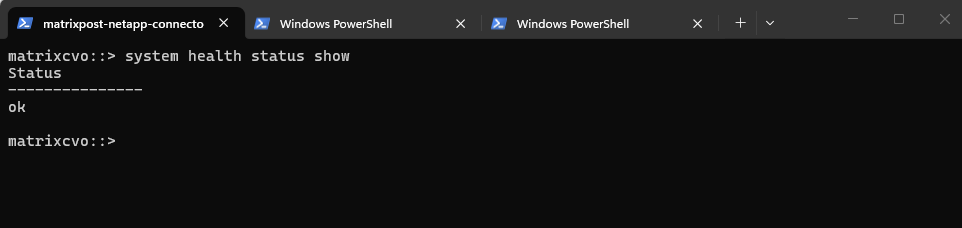
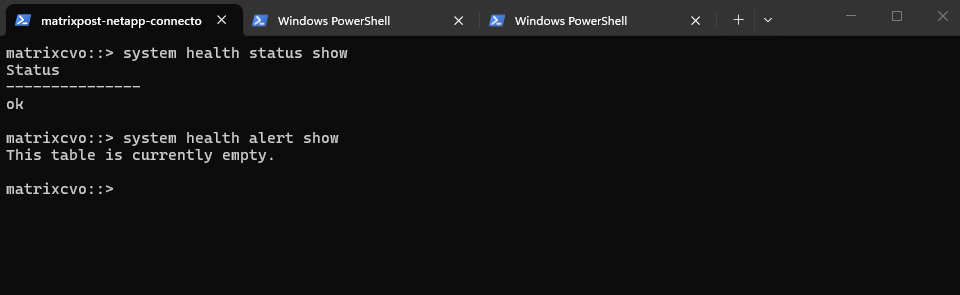
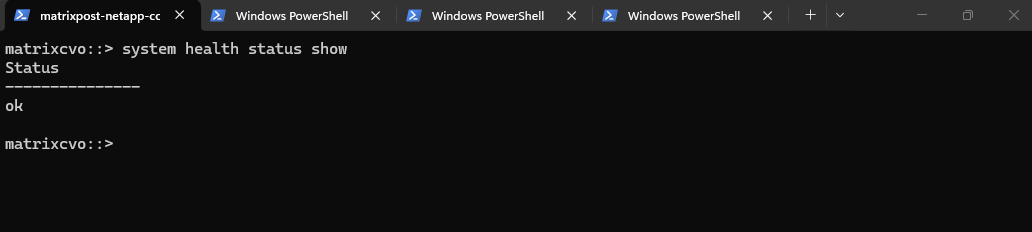
The system health status show command provides a high-level summary of the overall cluster health status.
The result
okconfirms that no active health monitors are reporting critical issues at the cluster level. This is an essential validation step before an upgrade, ensuring that the system is in a stable and fully supported operational state.
matrixcvo::> system health status show
The system health alert show command displays any active health alerts generated by ONTAP’s monitoring framework.
An empty table confirms that there are currently no active system health warnings or critical alerts. This indicates that the cluster components are operating within normal parameters prior to the upgrade.
matrixcvo::> system health alert show
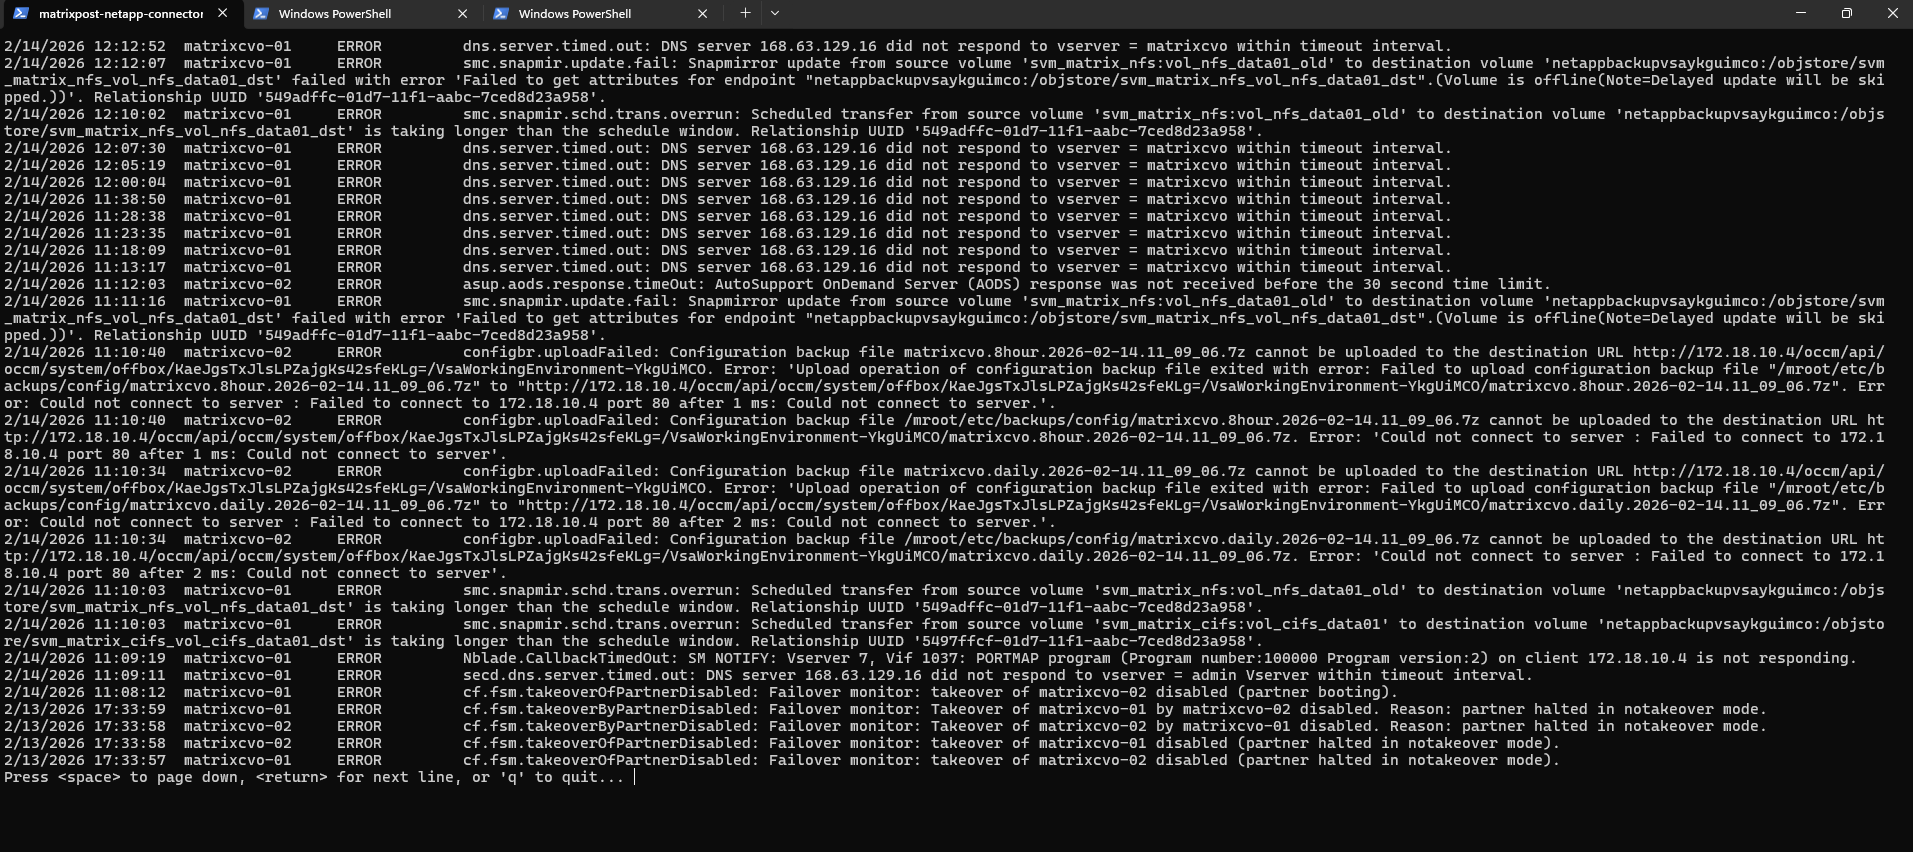
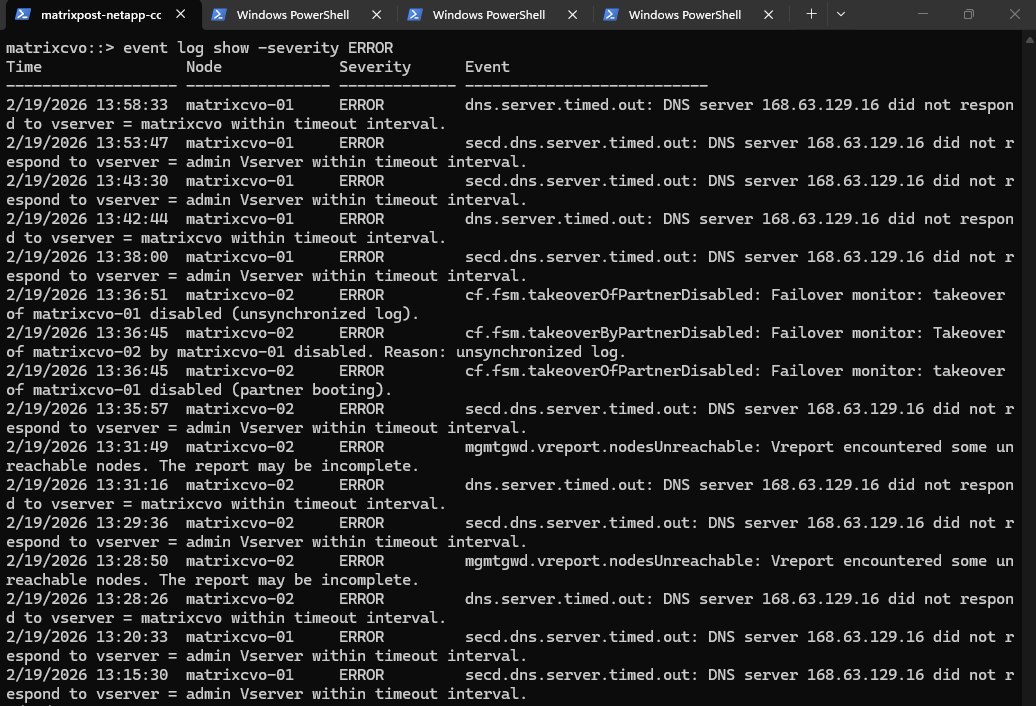
The event log show -severity ERROR command displays all logged events classified as errors, allowing you to quickly identify active or recent issues that could impact system stability before performing an upgrade.
Before starting the upgrade, I reviewed the last 60 minutes of system logs to ensure no active critical errors were present while the cluster and Connector were fully online.
The recurring DNS timeout messages to 168.63.129.16 are expected due to Azure’s link-local DNS behavior and are not upgrade-blocking.
No HA, failover, or active SnapMirror health issues were detected, so the system was considered stable and ready for upgrade.
matrixcvo::> event log show -severity ERROR
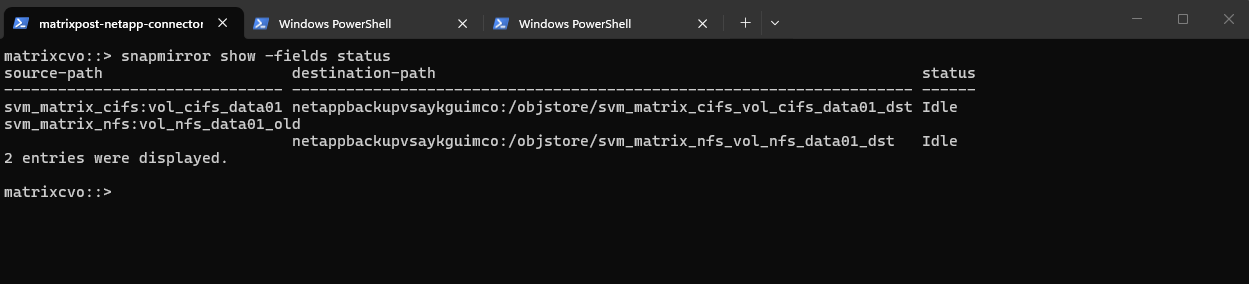
The snapmirror show -fields status command displays the current operational state of all SnapMirror relationships, allowing you to verify whether replications are active, transferring, broken, or idle.
In this case, both relationships are in
Idlestate, meaning no transfer is currently running and the relationships are not actively replicating at that moment.If transfers are running, the
statusfield would typically showTransferring, meaning a SnapMirror update is actively copying data from the source to the destination.For an upgrade, this is not automatically a blocker, CVO HA upgrades are rolling and designed to be non-disruptive, but it’s best practice to avoid starting an upgrade during active replication. Ideally, wait until the relationship returns to
Idleor manually quiesce it to prevent longer transfer times, temporary lag increases, or unnecessary log noise during the upgrade process.
matrixcvo::> snapmirror show -fields status
If a Cloud Volumes ONTAP system has active SnapMirror relationships with ONTAP-to-ONTAP (Volume-to-Volume) relationships, it is best to suspend transfers before you update the Cloud Volumes ONTAP software. Suspending the transfers prevents SnapMirror failures. You must suspend the transfers from the destination system.
Even though NetApp Backup and Recovery uses an implementation of SnapMirror to create backup files (called SnapMirror Cloud), backups do not need to be suspended when a system is upgraded.
Because our destination is Azure Blob (Object Storage), the relationship is “stateless,” meaning it lacks a destination ONTAP “brain” that could get stuck in an error state during a reboot.
Unlike standard Volume-to-Volume mirrors, SnapMirror Cloud (SMC) is designed to natively handle interruptions by automatically retrying or resuming from a checkpoint once the node is back online. Furthermore, since your current status is Idle, there is no active data stream to break, making a manual suspension unnecessary.
About how to suspend SnapMirror you will find here https://blog.matrixpost.net/deploying-netapp-cloud-volumes-ontap-part-5/#suspend_snapmirror.
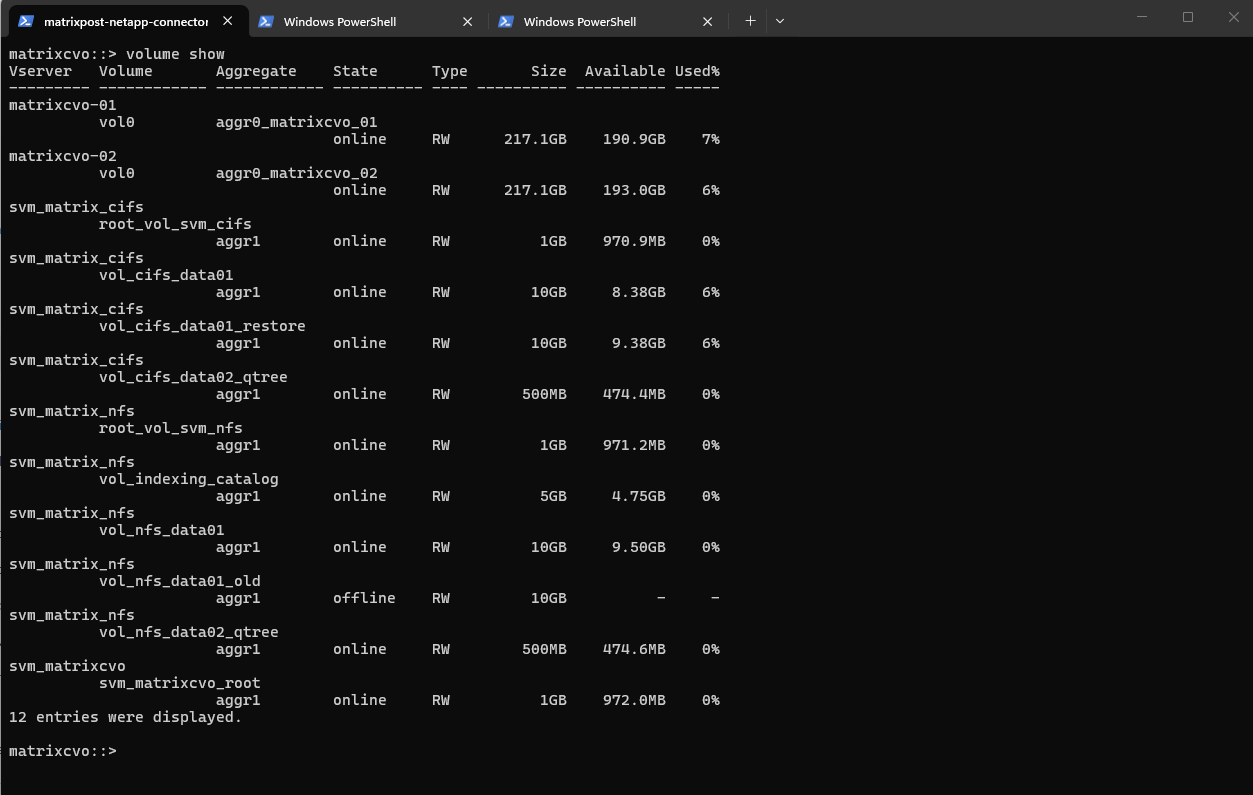
The volume show command provides a quick overview of all volumes, their state, and available capacity. Before an upgrade, this ensures that all production volumes are online and that no unexpected space or availability issues exist.
matrixcvo::> volume show
All core health checks, cluster status, node eligibility, HA failover readiness, aggregate state, volume availability, and system health, report a clean and stable condition.
No active critical alerts or HA issues are present, and all required components are online and operational.
Based on these validations, the environment is in a healthy state and ready to proceed with the upgrade below.
Triggering the Upgrade in NetApp Console and Tracking Progress via ONTAP CLI
After completing all prerequisite health checks and confirming that the cluster is stable, we can now start the actual upgrade process.
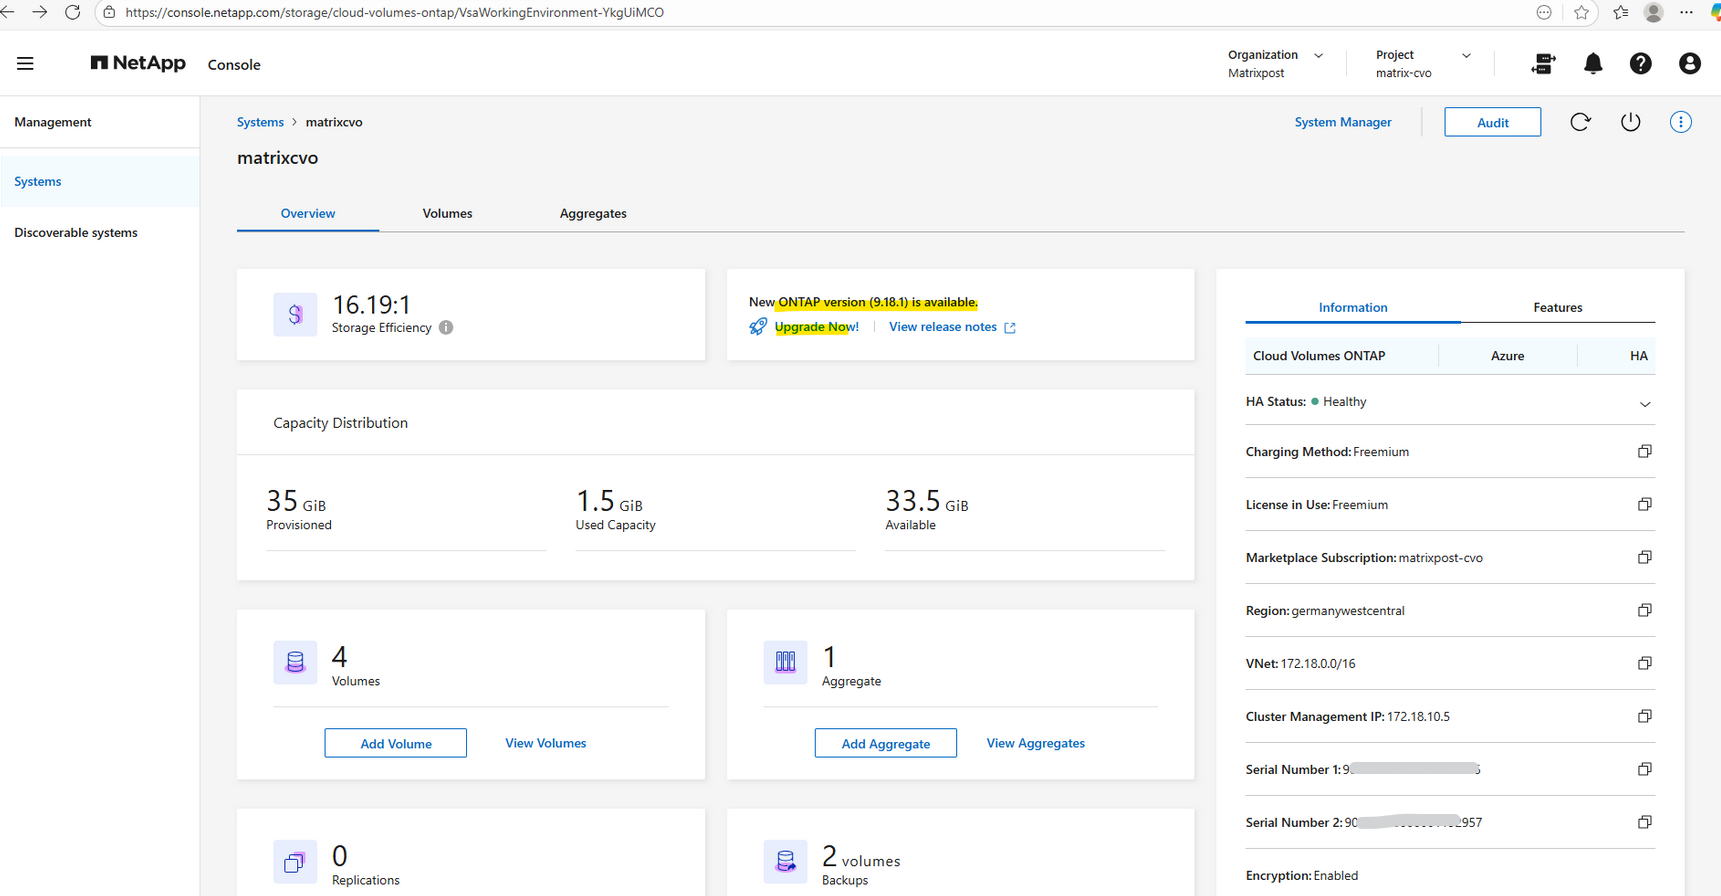
In the NetApp Console (formerly BlueXP), navigate to Management Systems, select the working environment, and click Upgrade Now as shown below.
In the following steps, we’ll walk through the upgrade workflow and observe how the rolling upgrade is performed across both HA nodes.
You
should not upgradeCloud Volumes ONTAP by using ONTAP System Manager or the ONTAP CLI, butonly the Console. Otherwise, it might impact system stability.
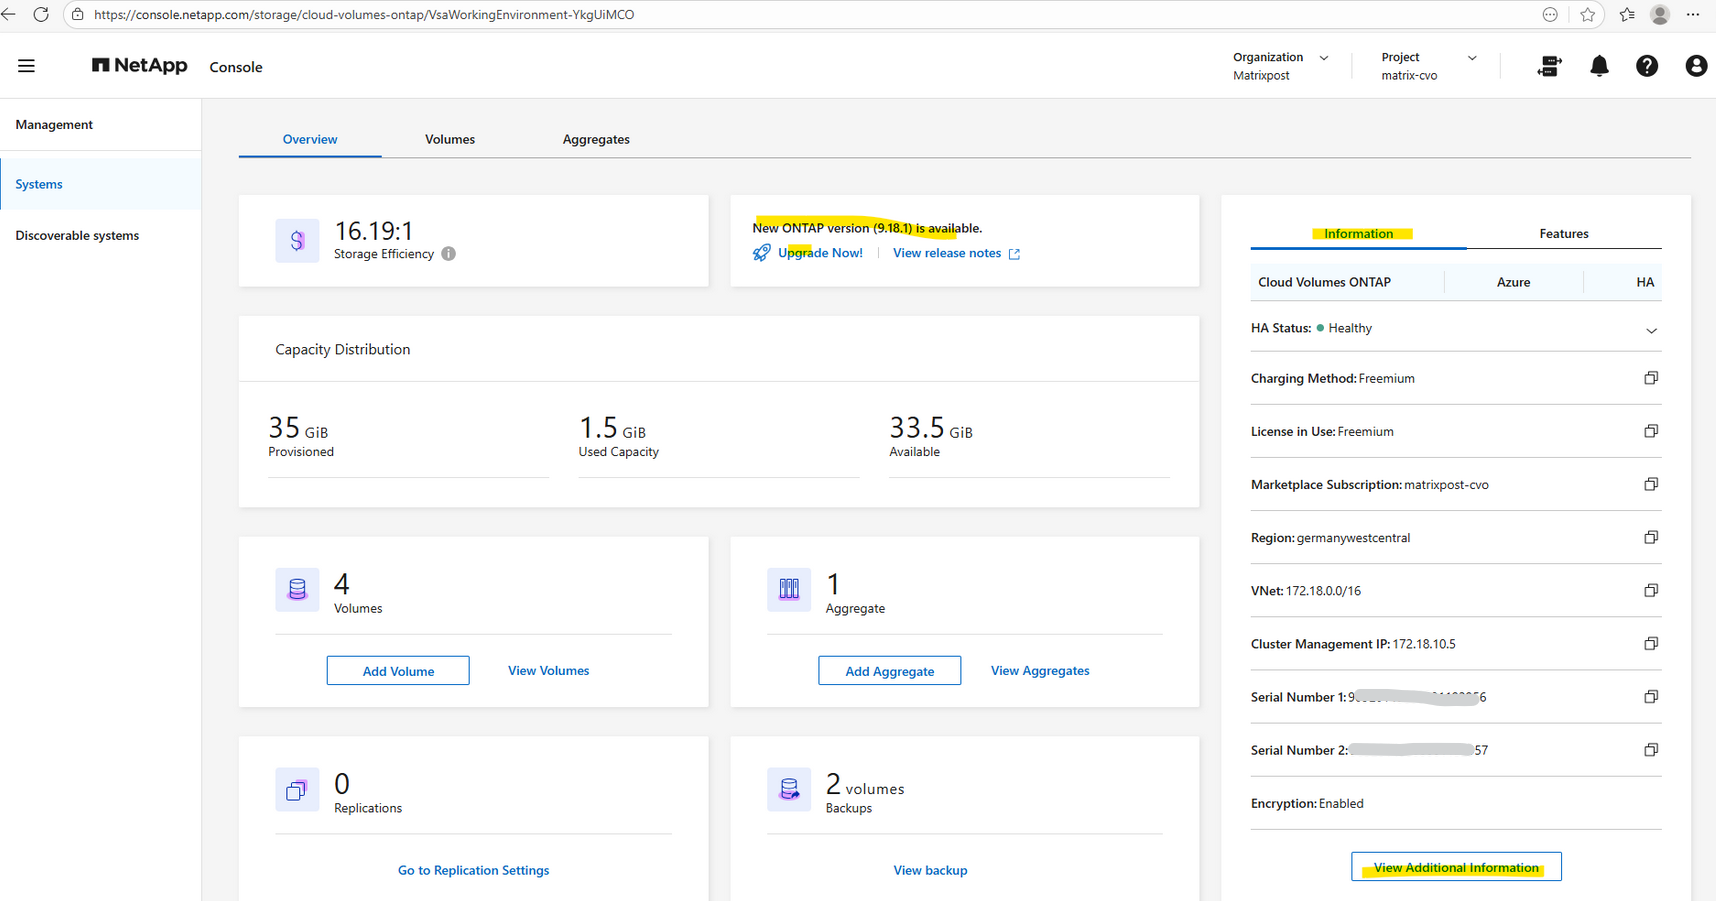
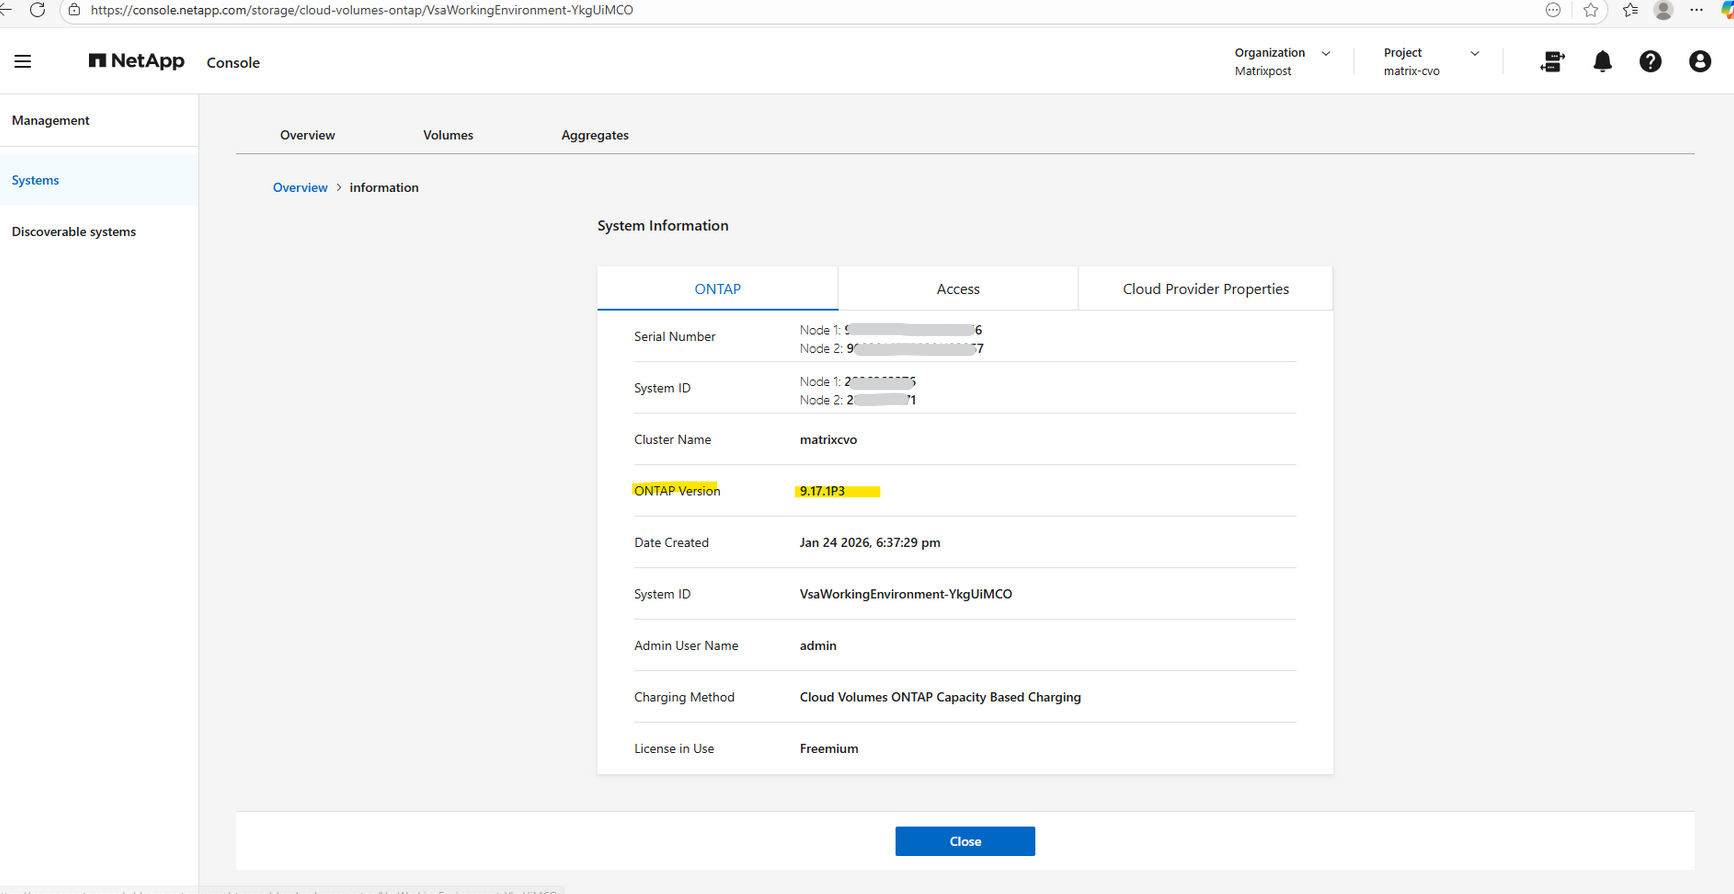
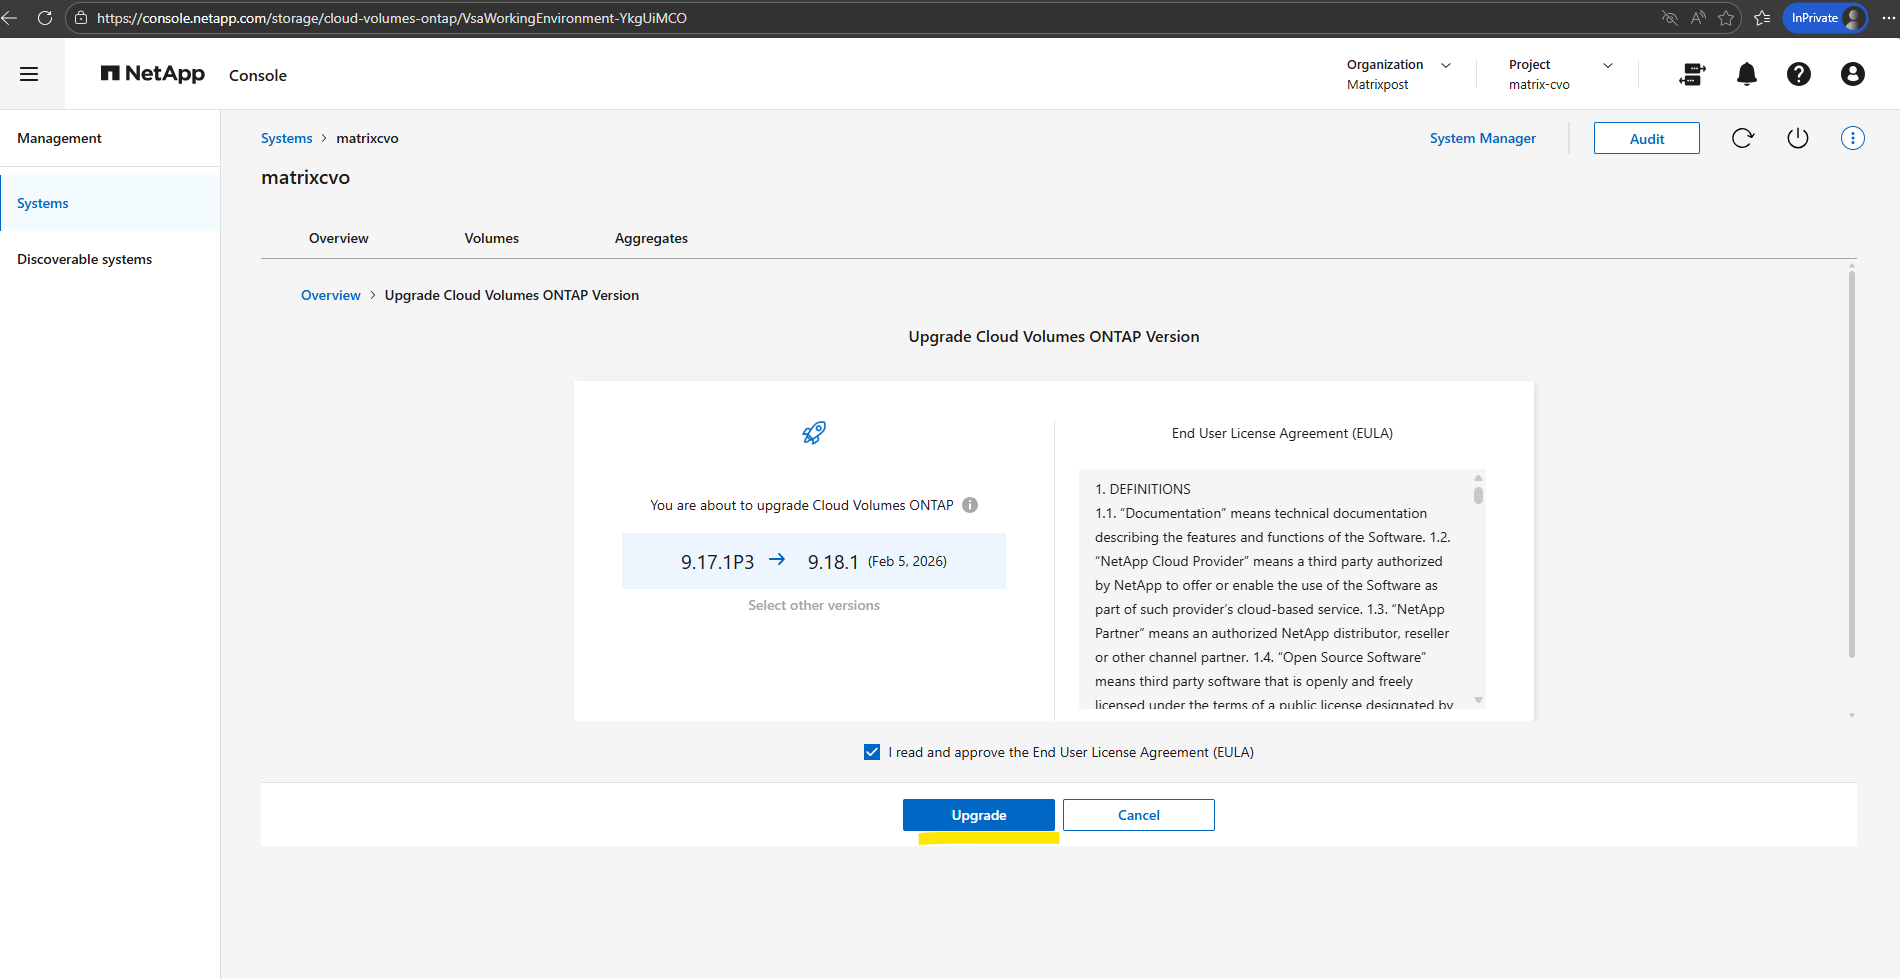
My current version is 9.17.1P3.
I will now click on Upgrade Now!
Cloud Volumes ONTAP must be registered with NetApp Support in order to upgrade the software like shown below.
This applies to both pay-as-you-go (PAYGO) and bring your own license (BYOL).
You’ll need to manually register PAYGO systems, while BYOL systems are registered by default.
In my case, Select other versions is greyed out because no alternative versions are currently available; after reviewing and accepting the EULA, simply click Upgrade to officially initiate the upgrade workflow.
The console will automatically orchestrate the entire rolling upgrade process across both HA nodes.
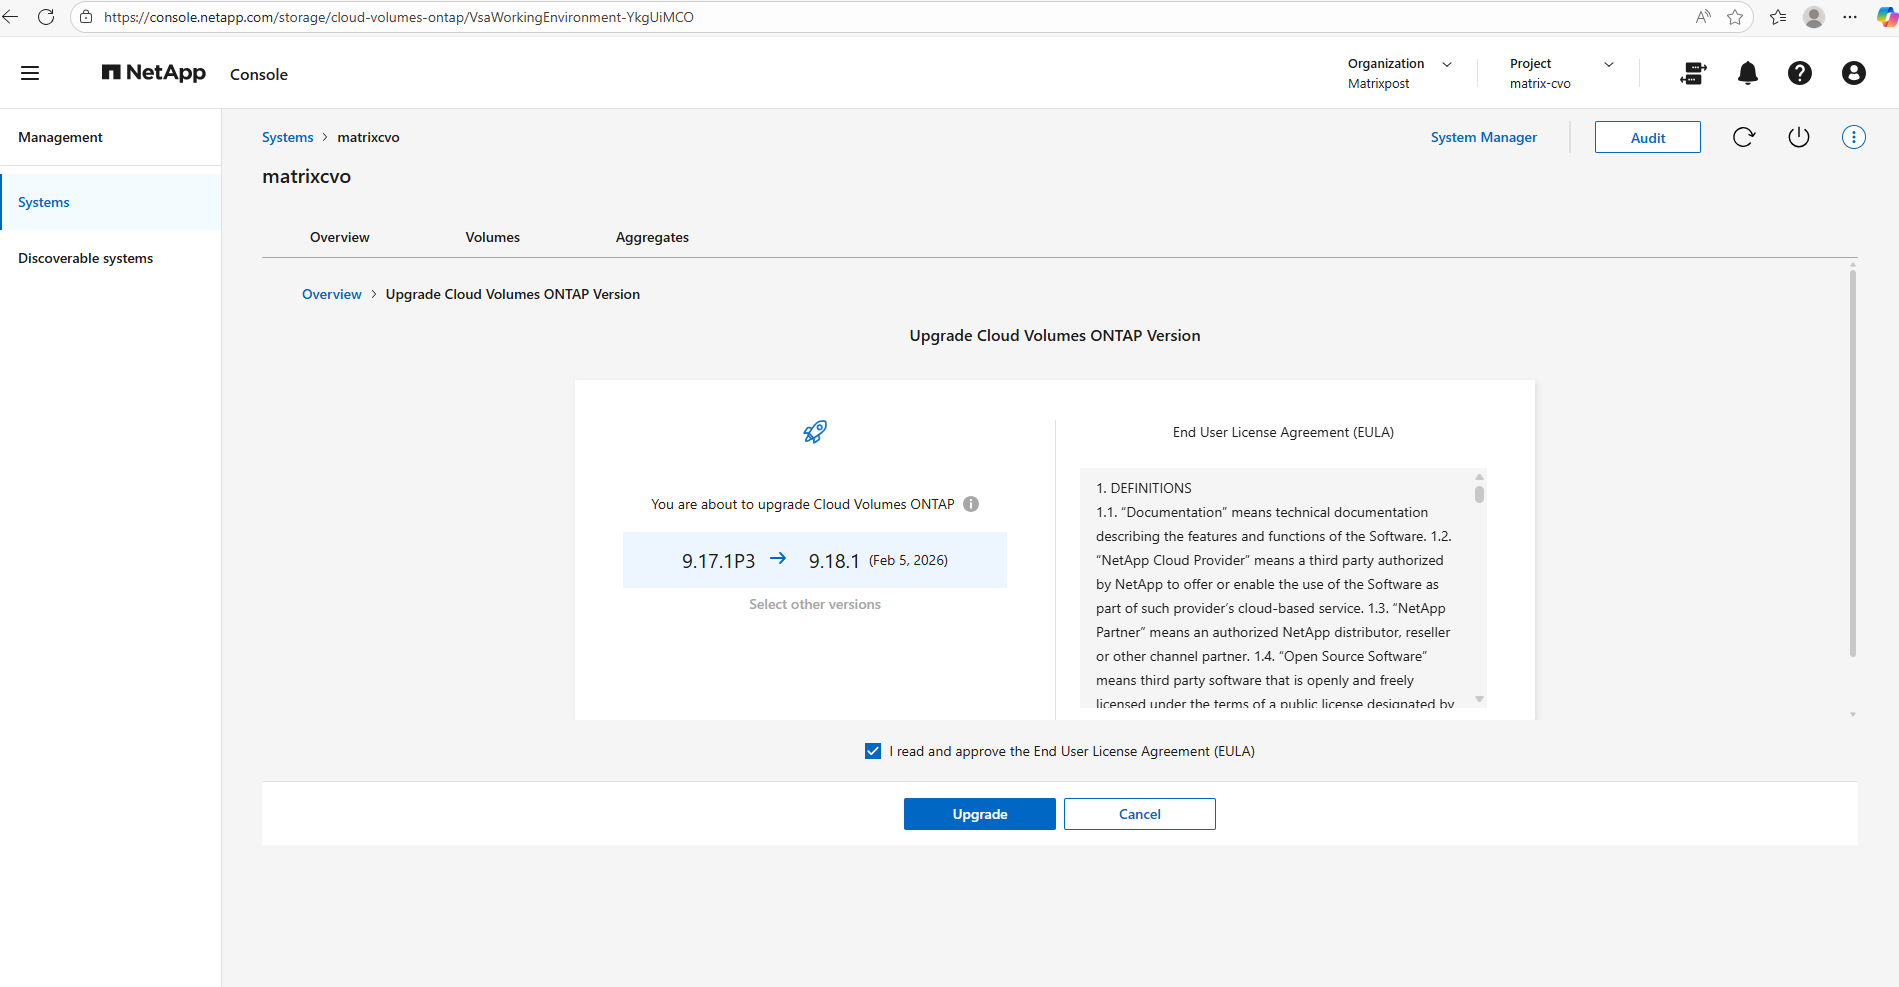
Finally I can trigger the by NetApp Console orchestrated upgrade.
In my case I was running immediately into the following error.
Failed to upgrade version
Cannot change default software image because one or more volumes are not online or restricted
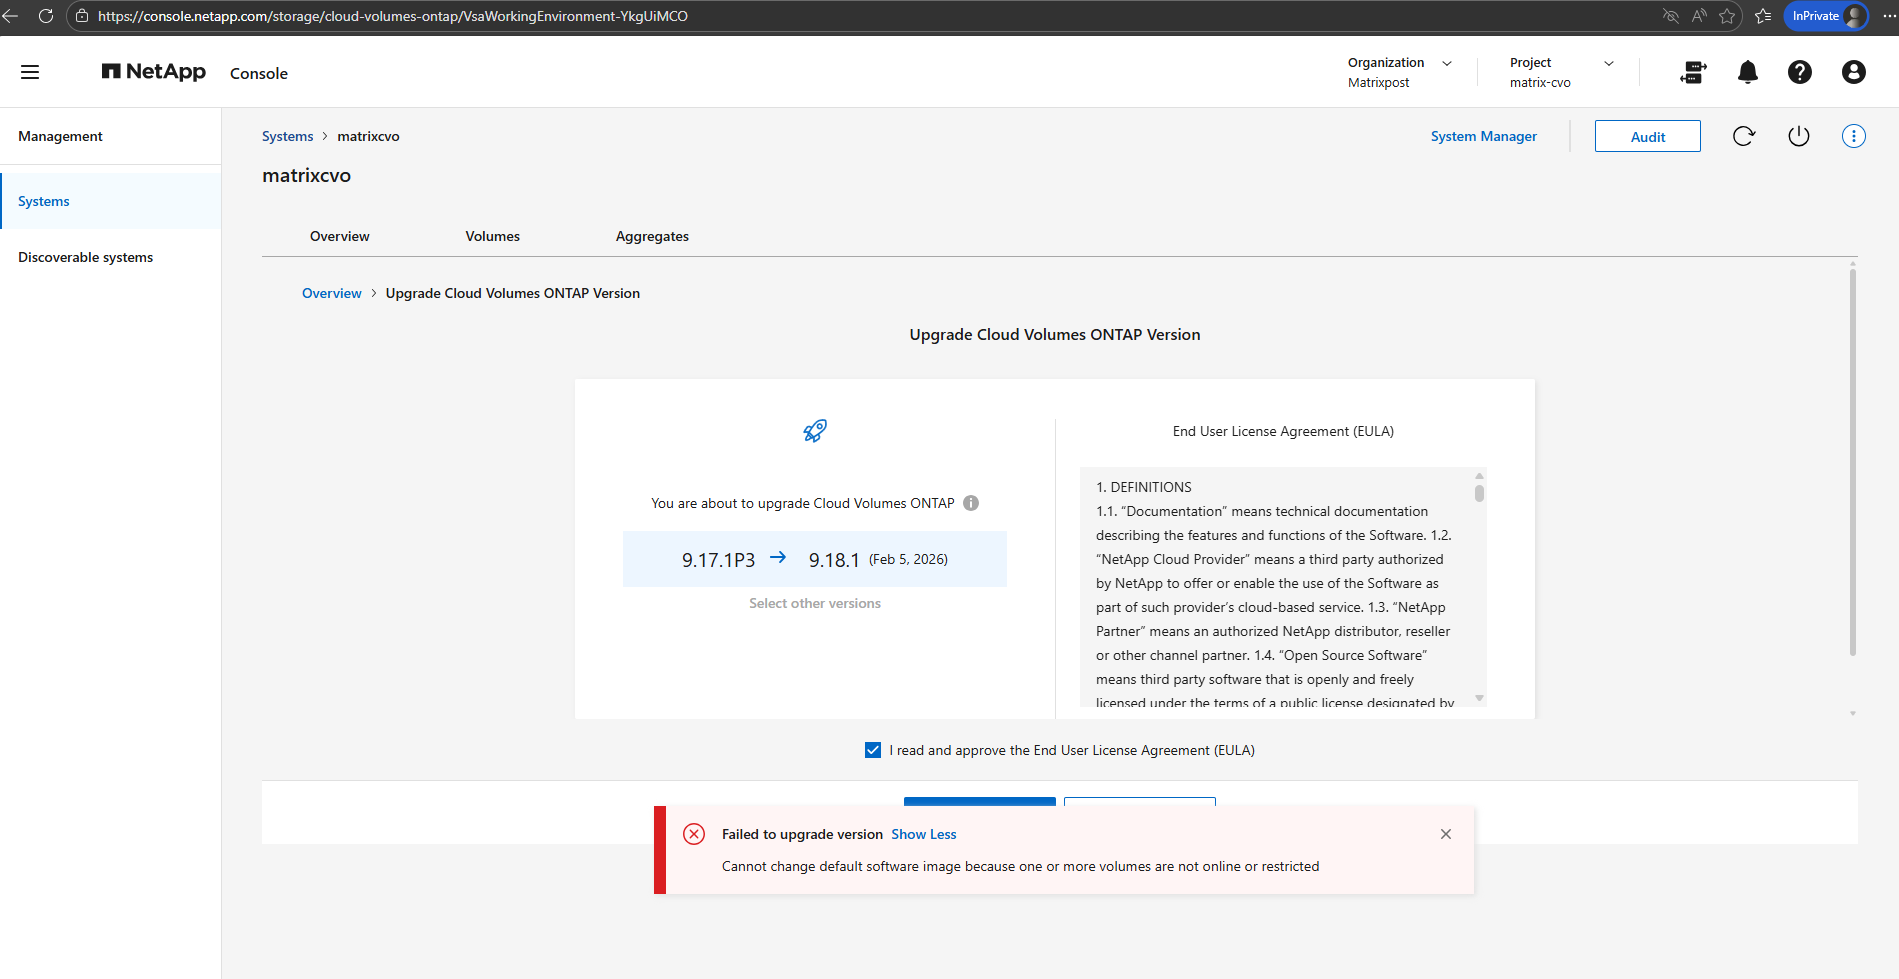
For Cloud Volumes ONTAP (CVO), all volumes must be online and in a healthy state to proceed with a software upgrade.
NetApp console (formerly BlueXP) performs a series of pre-checks before triggering the ONTAP upgrade. If it detects a volume that is offline, restricted, or inconsistent, it will block the process to prevent potential data loss or metadata corruption during the update of the file system structures.
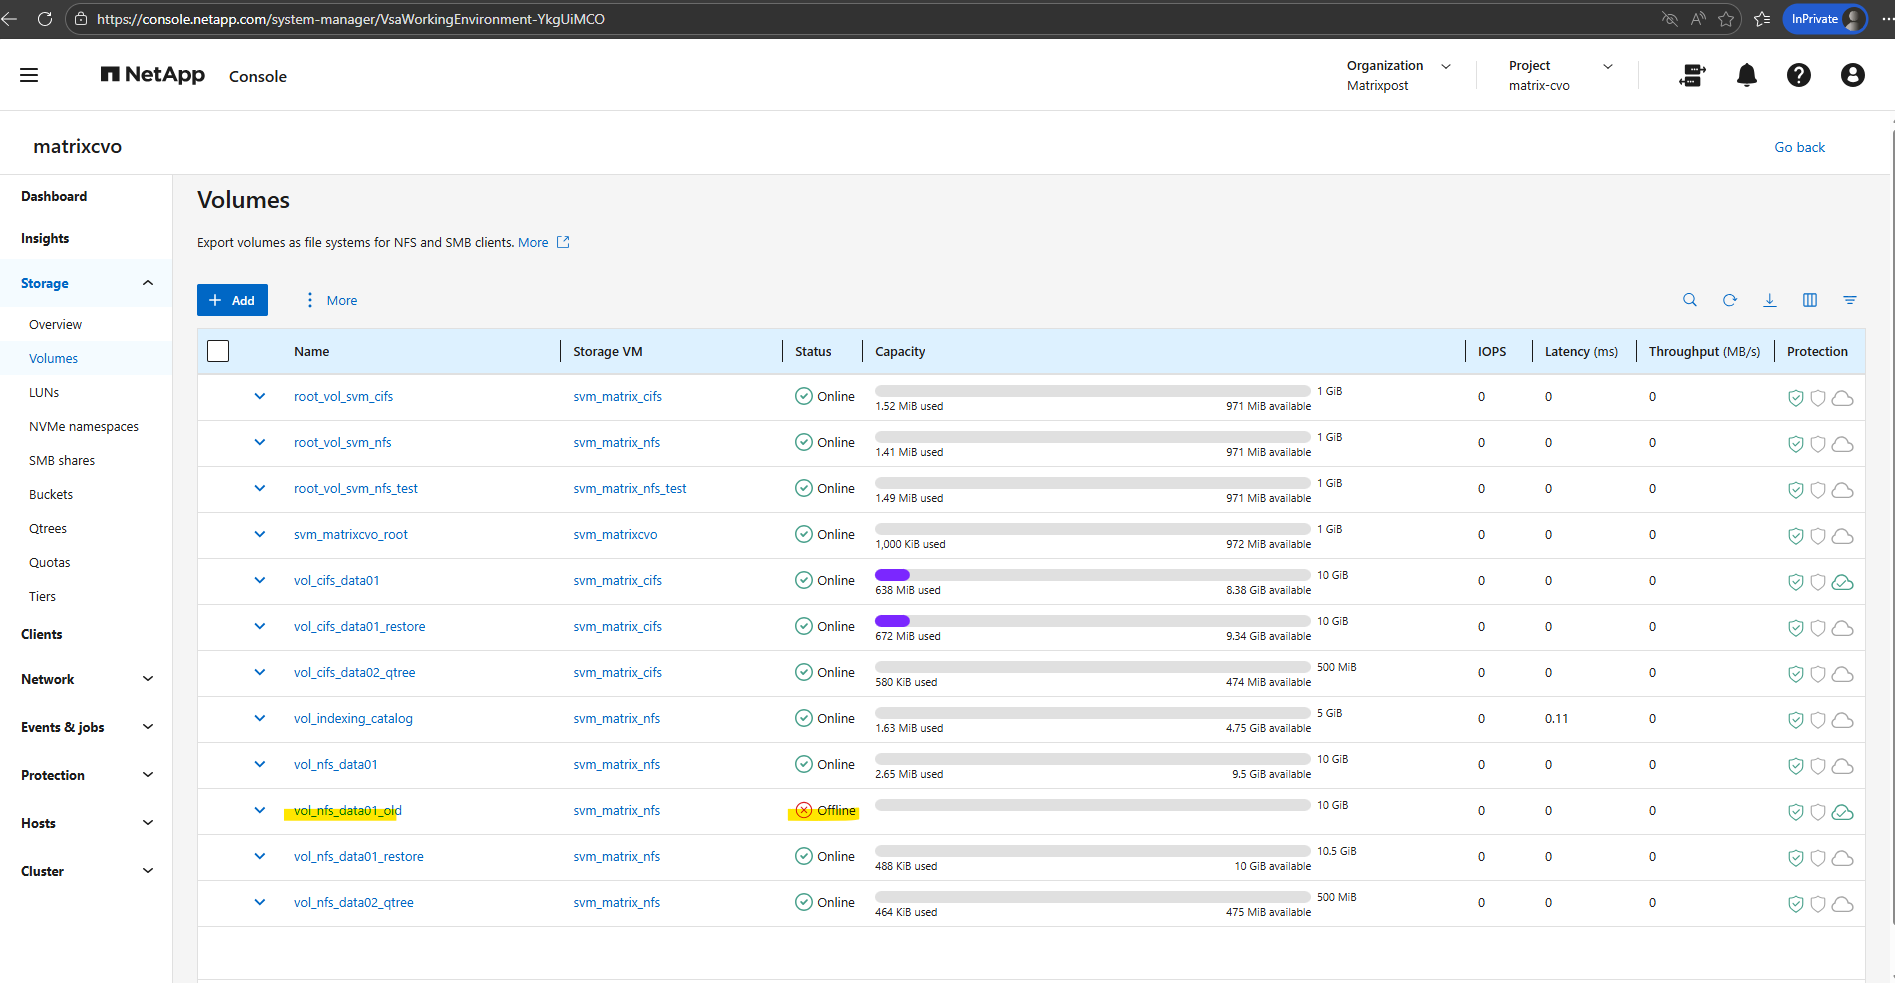
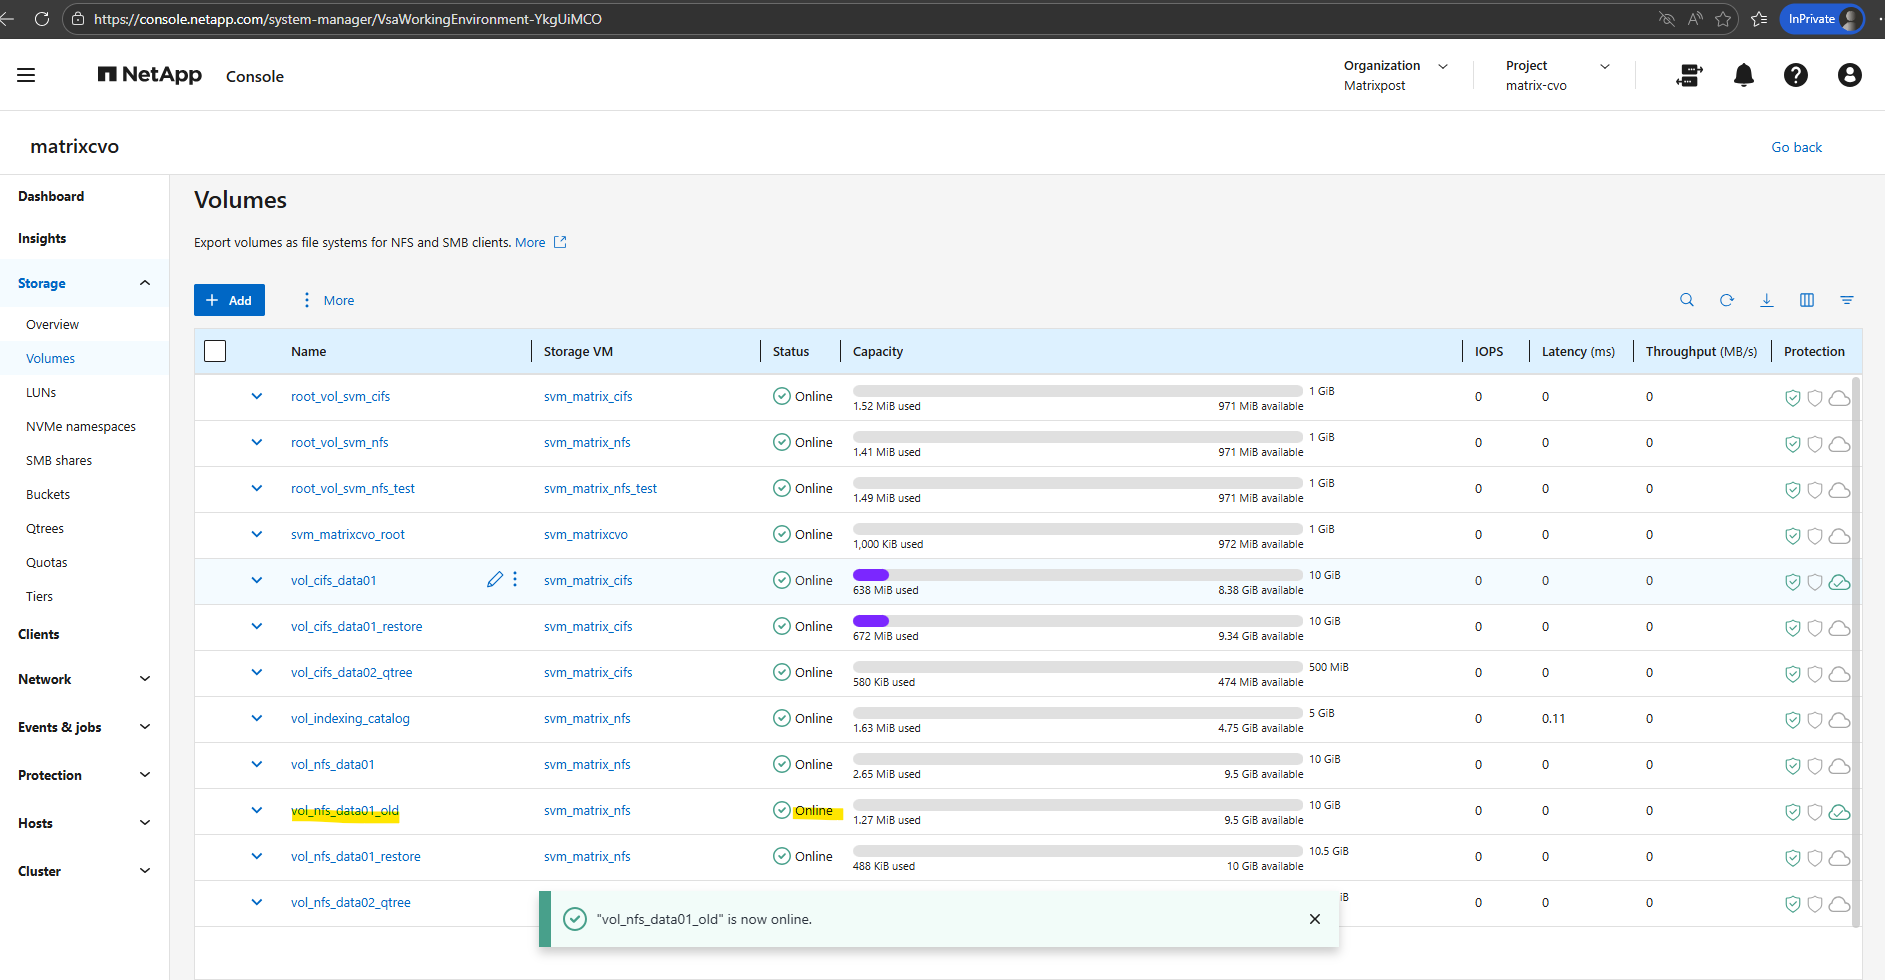
The easiest way to bypass the error is to simply bring the volume back online for the duration of the upgrade.
Or take a final Snapshot, then use NetApp Snapshot Copy or Cloud Backup to move that data to low-cost Blob storage. You can then delete the volume, run your upgrade, and restore it later if that “just in case” moment ever actually happens.
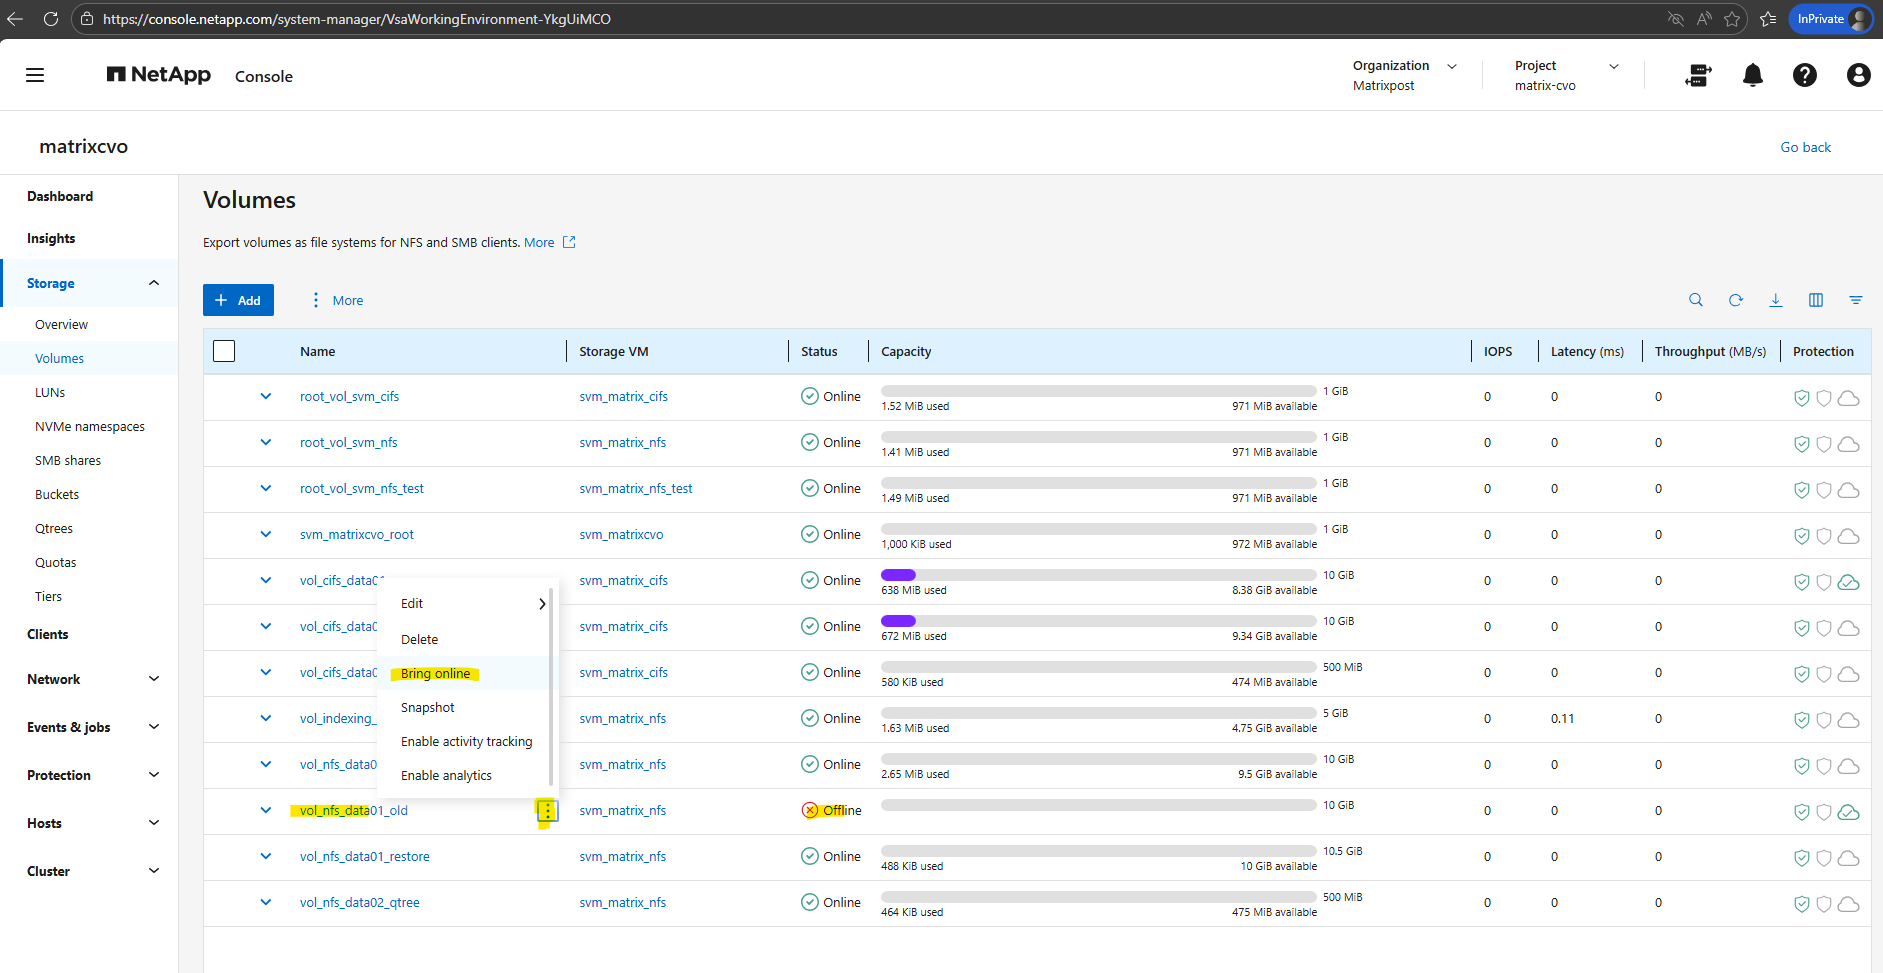
So in my case I will temporarily bring the volume online for the duration of the upgrade.
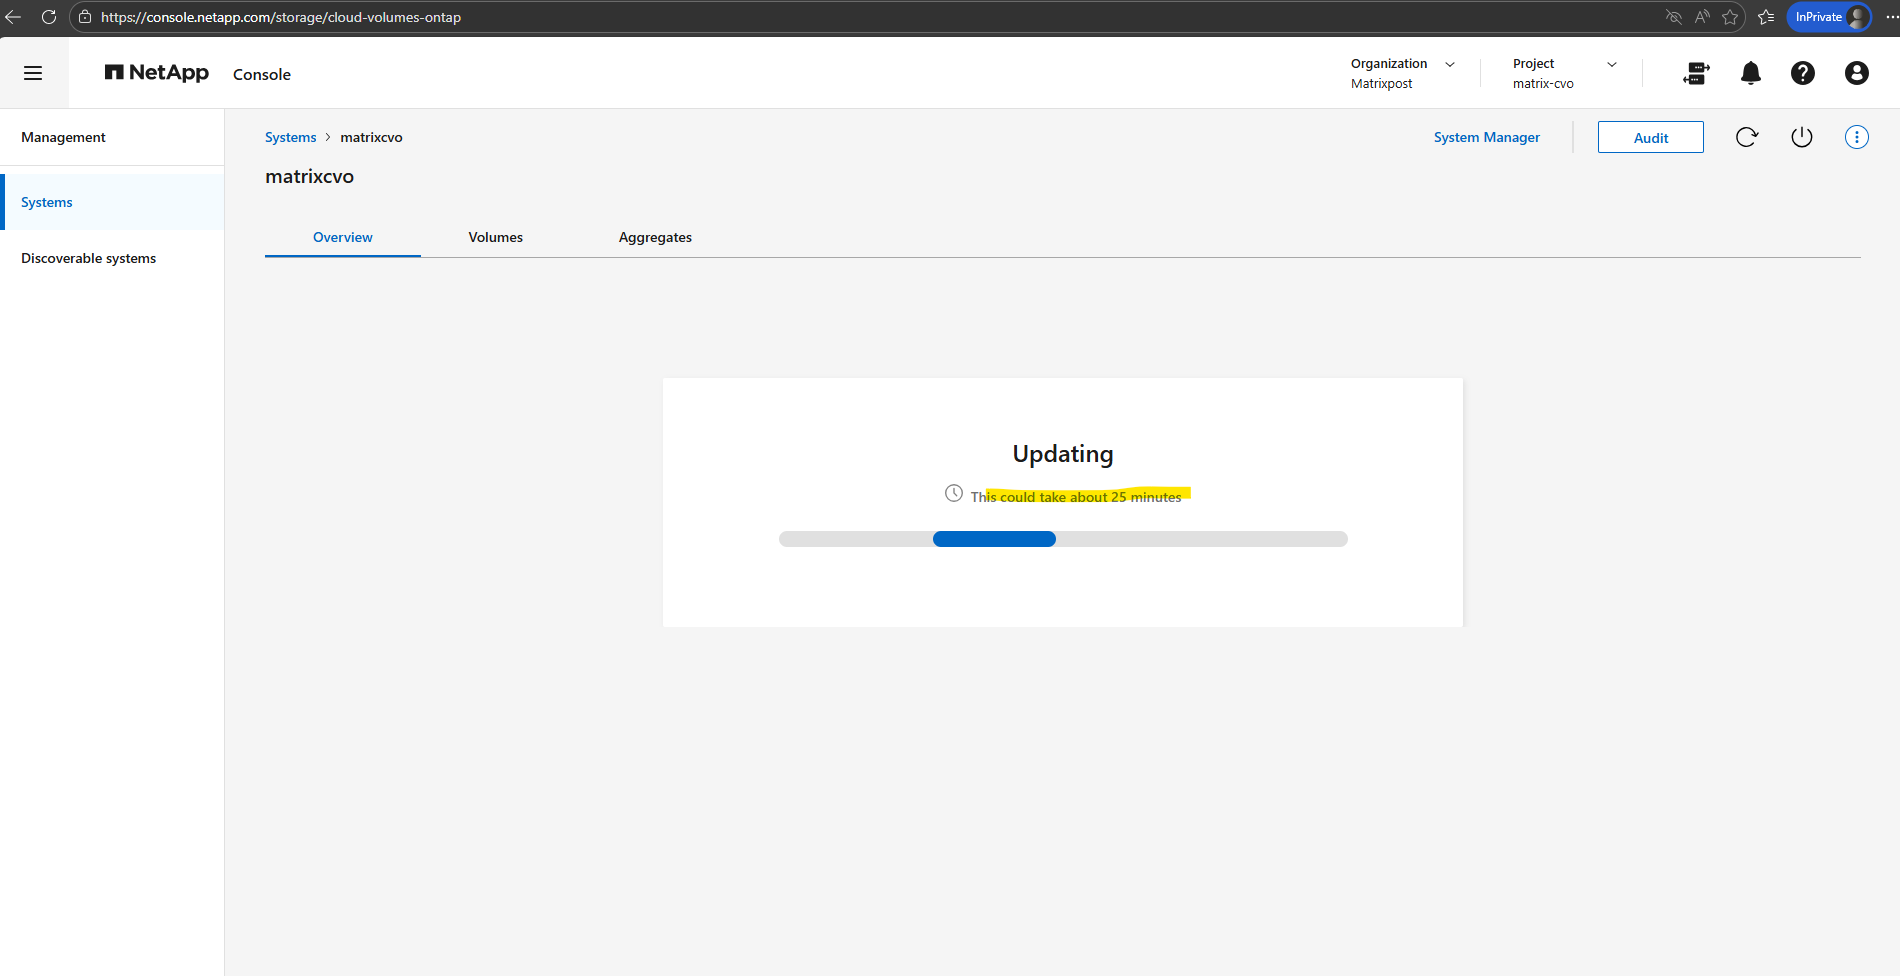
I’ll initiate the upgrade at 1:40 PM. Let’s track the total duration from that point.
It sounds like the NetApp console is being a bit overly optimistic, classic “marketing minutes” vs. reality.
While the NetApp console displays an estimated completion time of 25 minutes after clicking ‘Upgrade,’ my previous experience with two similar upgrades suggests a much longer duration of approximately 70 minutes.
Up to 25 minutes is for a single-node system and also very optimistic.
Throughout the upgrade, I will monitor progress every few minutes by running the following command.
Running this command will show the detailed progress of the software installation and node reboots. It’s the best way to track whether the update is still proceeding as expected or if a specific stage is taking longer than usual.
Note that running this command immediately after clicking ‘Upgrade’ will likely still show the ‘Completed’ status from the previous update. It generally takes a minute or two for the new job to initialize and for the progress output to refresh with the current upgrade’s data
matrixcvo::> cluster image show-update-progress
Under Storage > Management, the interface now confirms that our CVO system is actively processing the update
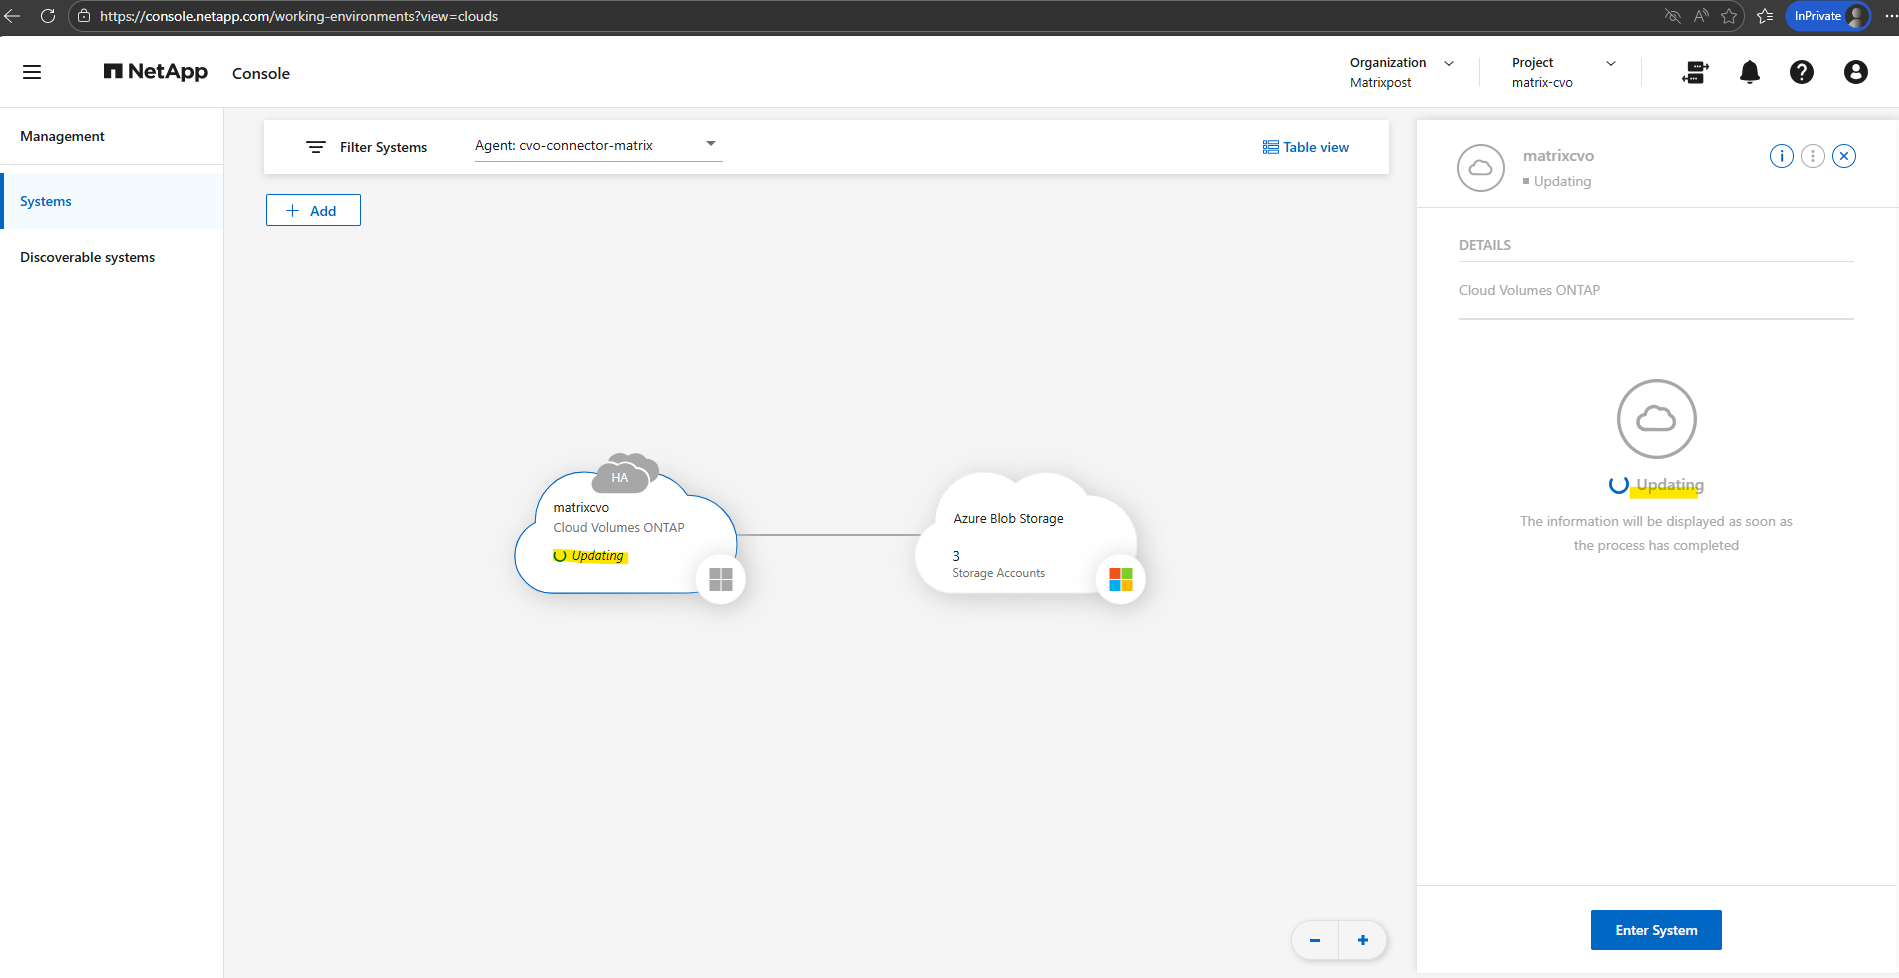
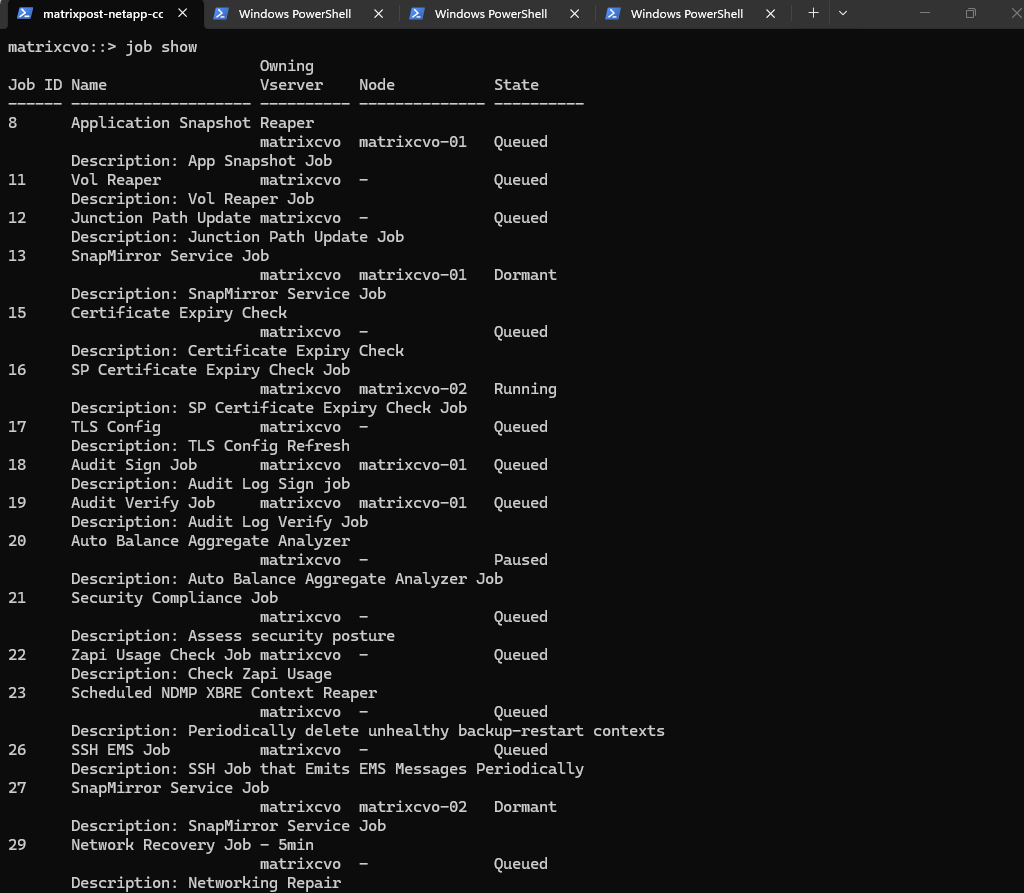
So far there is no active upgrade job running right now.
The jobs listed (like Application Snapshot Reaper, Vol Reaper, and Certificate Expiry Check) are all standard background maintenance tasks that ONTAP runs periodically.
If an upgrade were actually in progress, you would typically see a job named something like “NDU” (Non-Disruptive Upgrade) or “Cluster Image Update”.
matrixcvo::> job show
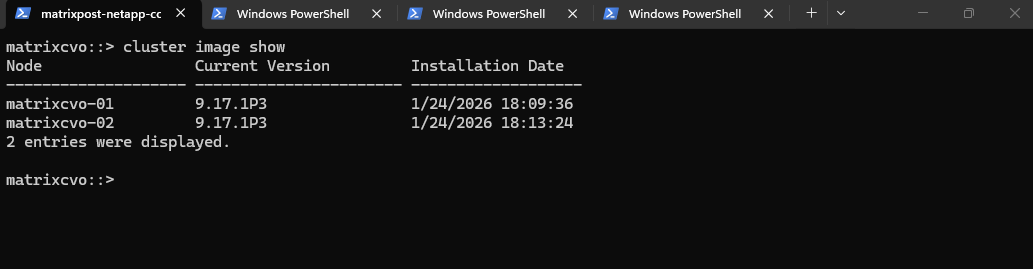
Note that running
cluster image showimmediately after the update begins will still reflect the current version. The output only updates to the new version once the nodes have successfully rebooted and the cluster transition is finalized.
matrixcvo::> cluster image show
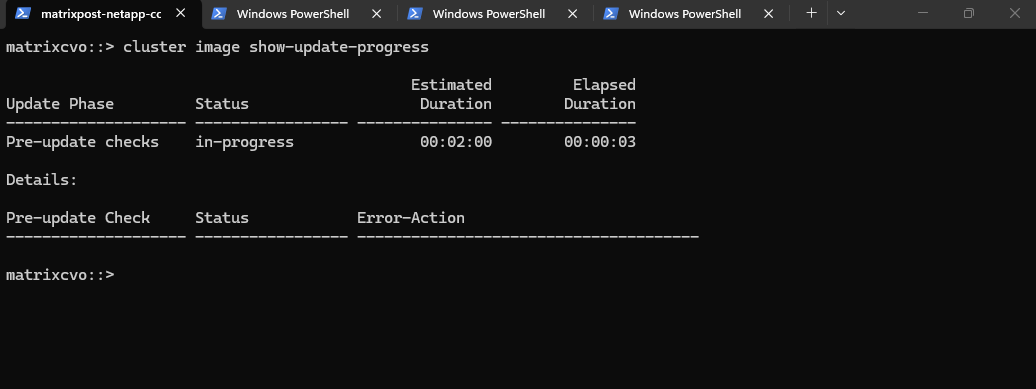
The upgrade is currently stuck in the Pre-update checks phase because the system is actively validating your storage health before starting the installation.
matrixcvo::> cluster image show-update-progress
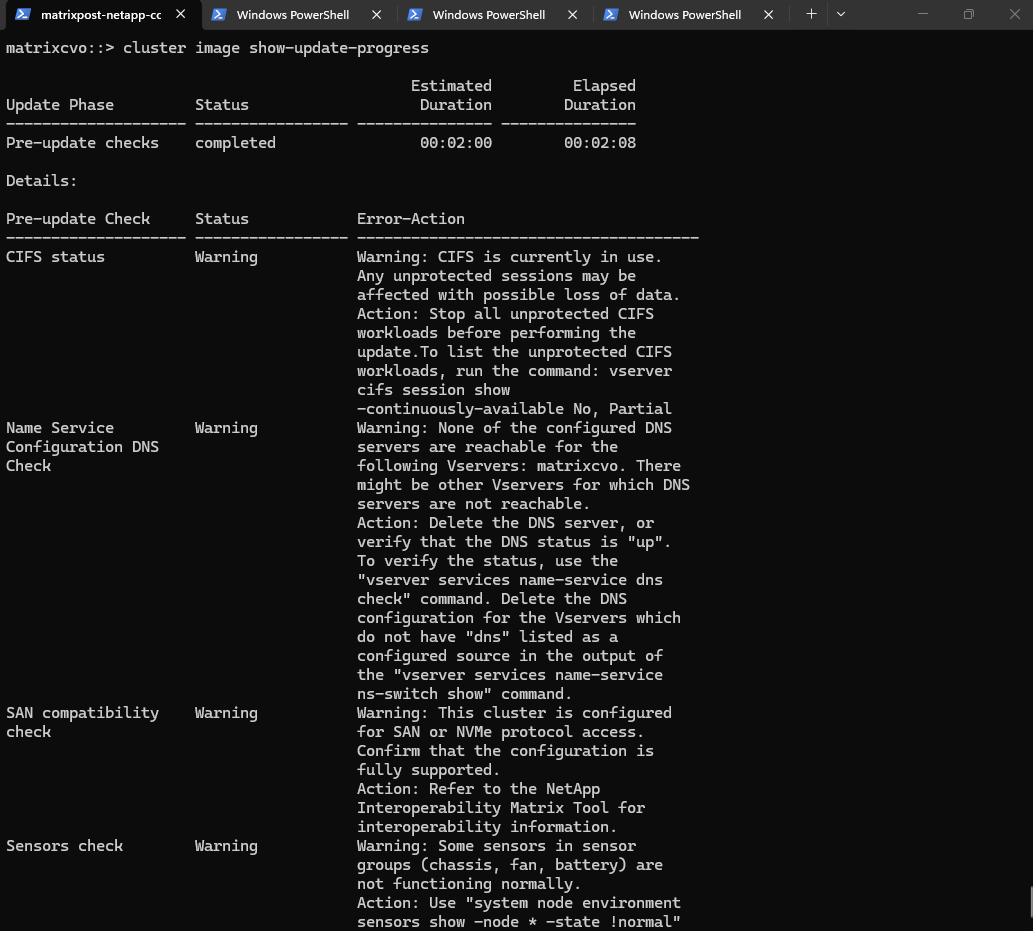
The pre-checks are finished, and the good news is that none of the remaining issues are “hard errors” that will stop the upgrade, they are just Warnings. ONTAP is essentially saying, “I can proceed, but you should know about these potential risks.”
matrixcvo::> cluster image show-update-progress
Right now, the system is performing the image installation on the local boot devices of both nodes. This is the “safe” part of the update where the software is being copied and prepared in the background without affecting your data access.
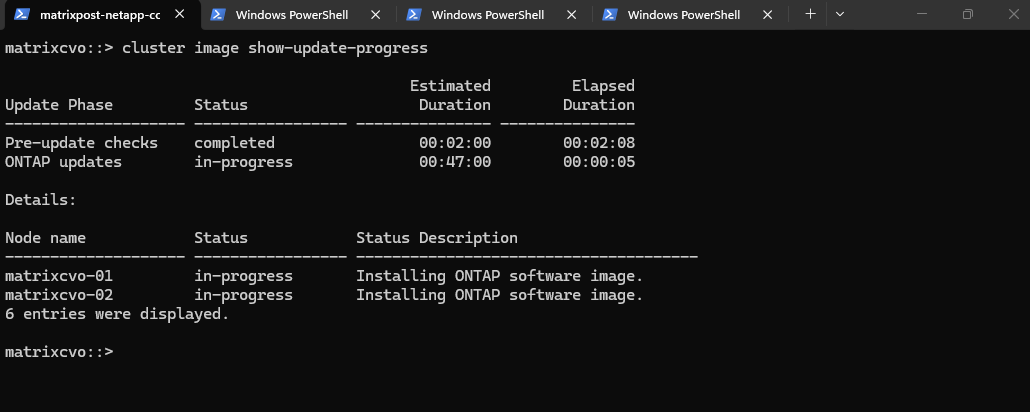
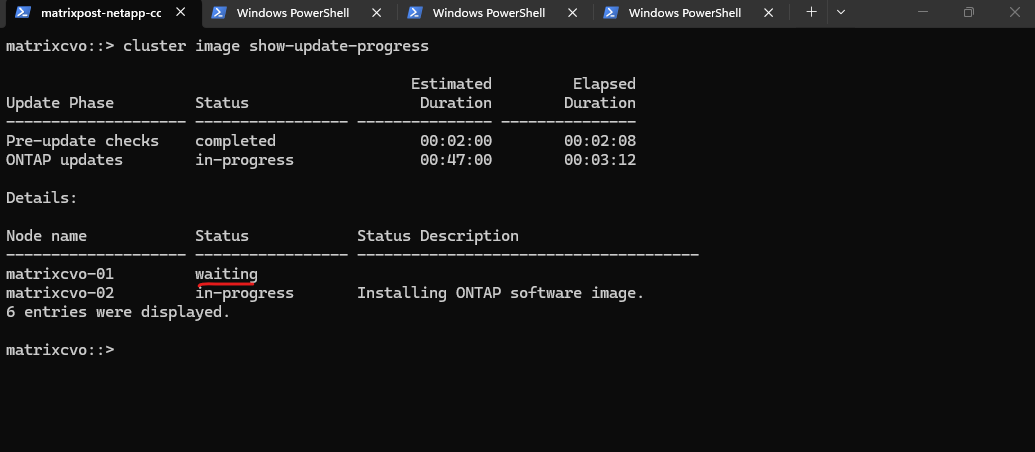
The upgrade has now entered the sequential phase. matrixcvo-02 is the active focus, while matrixcvo-01 is “waiting” its turn to ensure the cluster remains operational throughout the process.
Currently, the system is writing the new ONTAP image to the alternate boot bank of the first node. Once the installation on matrixcvo-02 finishes, the cluster will prepare for the actual takeover and reboot.
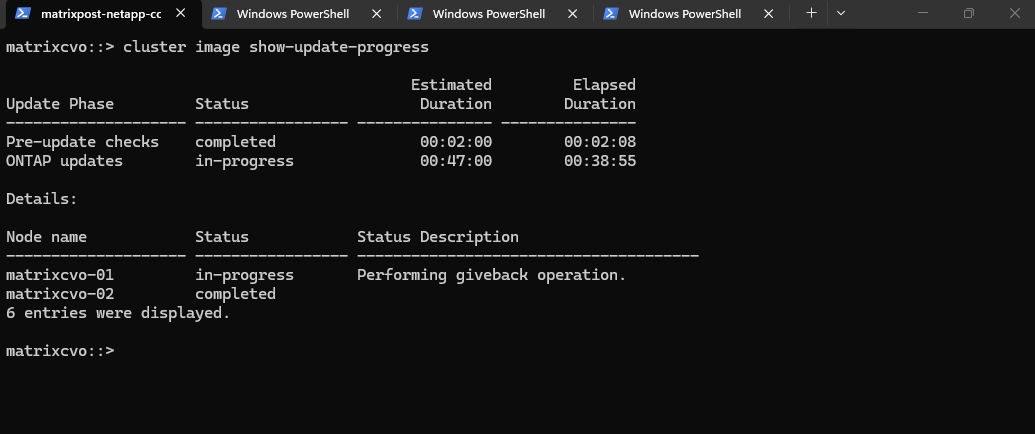
The upgrade has reached the critical Takeover phase, where matrixcvo-01 is assuming control of all storage and data services so matrixcvo-02 can reboot into the new ONTAP version. This automated failover ensures the process remains non-disruptive, allowing the secondary node to update its software while your workloads stay online.

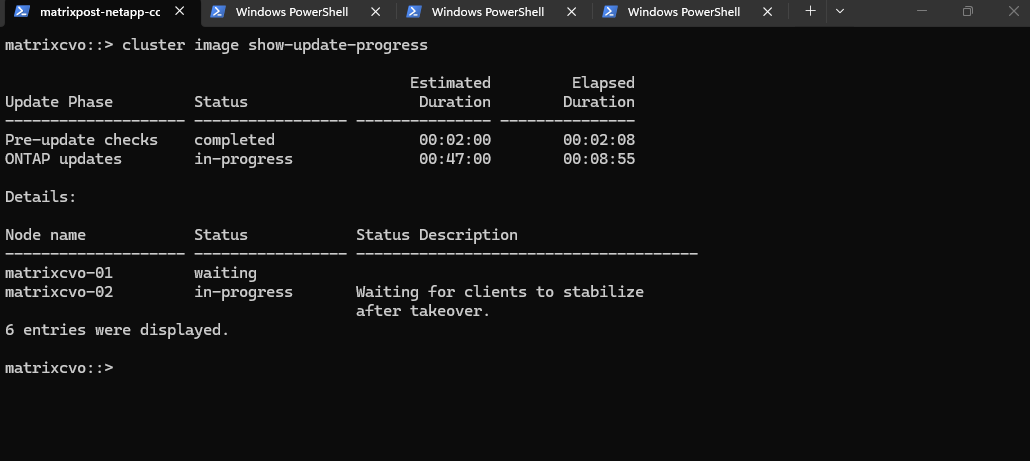
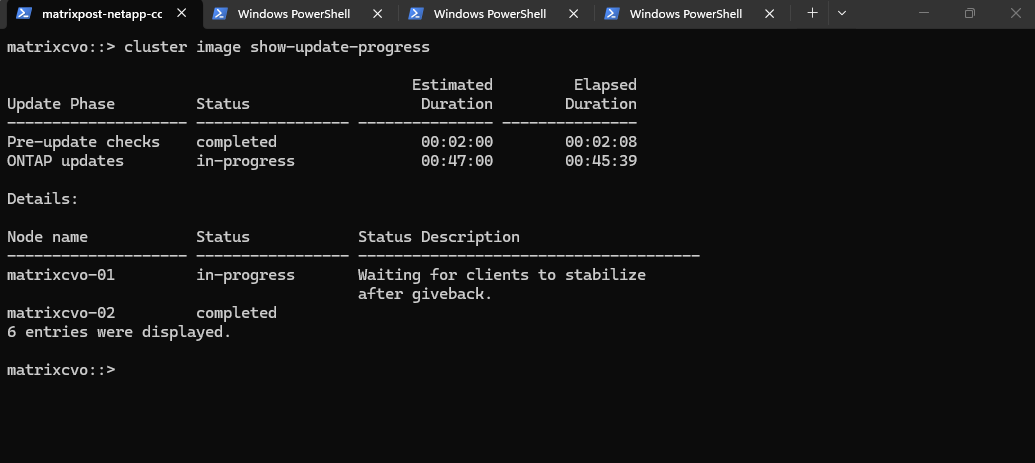
The upgrade is currently in the “Waiting for clients to stabilize” stage, which is a brief safety pause following the successful takeover. ONTAP holds here to ensure that all network paths have updated in Azure and that client connections have successfully transitioned to matrixcvo-01 before it proceeds to reboot the first node.
The system is now in a “stabilization” phase, ensuring all client connections have successfully transitioned to the partner node following the takeover. This safety check verifies network stability in Azure before the target node reboots to finalize its software installation.
The Giveback operation is the process where matrixcvo-01 returns control of the aggregates and LIFs to matrixcvo-02. Once this completes, Node 02 will be fully upgraded and active, and the cluster will then begin the exact same sequence for Node 01.
Node matrixcvo-02 has successfully rebooted with the new software and the cluster is now performing a Giveback operation. Once the storage and services are returned to this node, the upgrade will pivot to begin the update process on the remaining node.

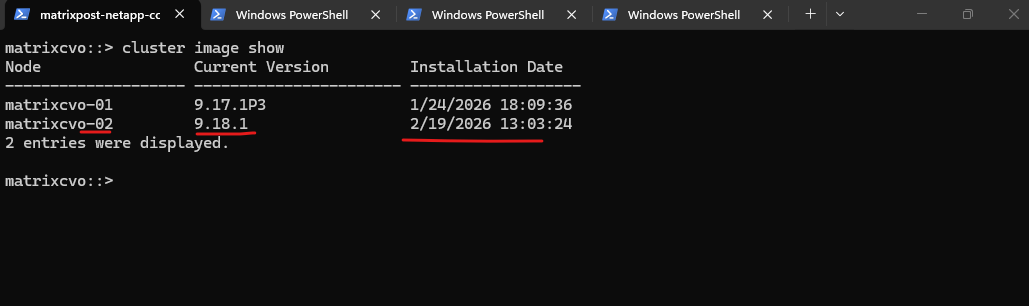
This output confirms that our cluster is currently in a mixed-version state, which is a normal and expected part of a rolling upgrade. matrixcvo-02 has successfully jumped from ONTAP 9.17.1P3 to 9.18.1, while matrixcvo-01 is still running the older code, waiting for its turn to reboot.
matrixcvo::> cluster image show
We have now completed the “round trip” for the first node. matrixcvo-02 is back in control of its storage, and the system is performing a final post-giveback stabilization check to ensure all client traffic has successfully re-homed to the upgraded node.

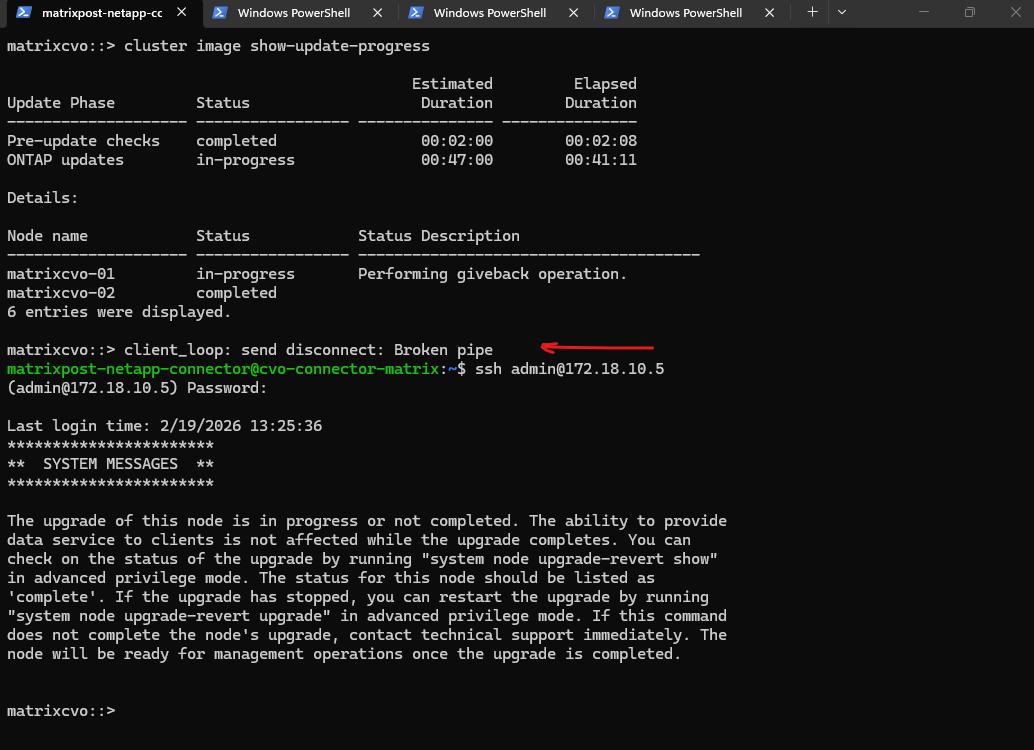
My SSH session was terminated the moment matrixcvo-02 initiated the takeover to allow the first node to reboot.
While data LIFs maintain connectivity through seamless IP migration and Azure SDN path updates, the SSH sessions are stateful connections tied to a specific node’s management process.
When the node reboots, the active SSH session is terminated, necessitating a new login on the partner node even though the management IP itself remains reachable.
Official NetApp documentation distinguishes between data protocols, which use session-recovery features like SMB 3.0 Continuous Availability to stay online, and management traffic, which is tied to node-specific processes. Consequently, while CIFS traffic survives the transition via Azure’s rapid path updates, stateful SSH sessions are inherently reset when the hosting node reboots.
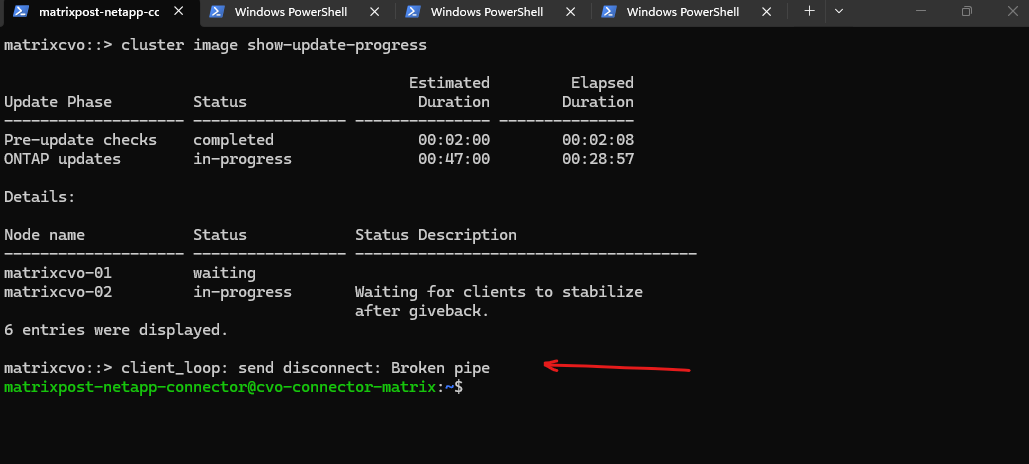
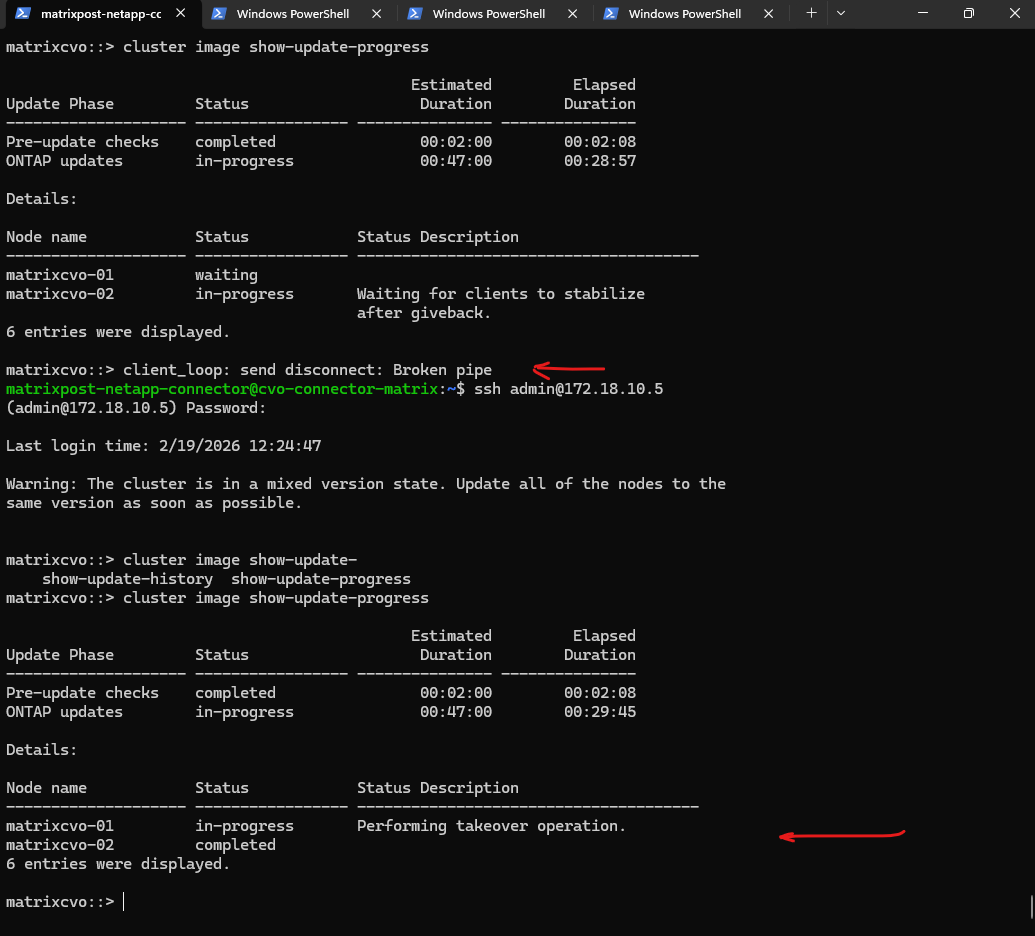
The “Broken pipe” message you saw was actually the perfect indicator of the upgrade moving to the final stage. Since you were connected via SSH to matrixcvo-01, your session was terminated the moment matrixcvo-02 initiated the takeover to allow the first node to reboot.
Now that you’ve logged back in, you can see that matrixcvo-02 is marked as
completedand matrixcvo-01 is officiallyin-progresswith its takeover.
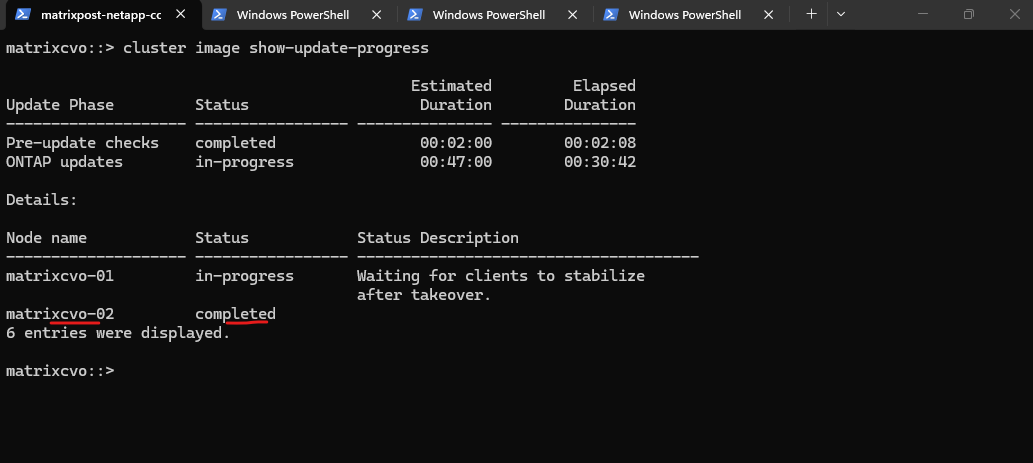
The upgrade is entering its final stretch as matrixcvo-01 undergoes its stabilization period prior to rebooting. Once this safety check completes, the node will restart to load ONTAP 9.18.1, leaving only the final giveback to return the cluster to its fully optimized, dual-node state.
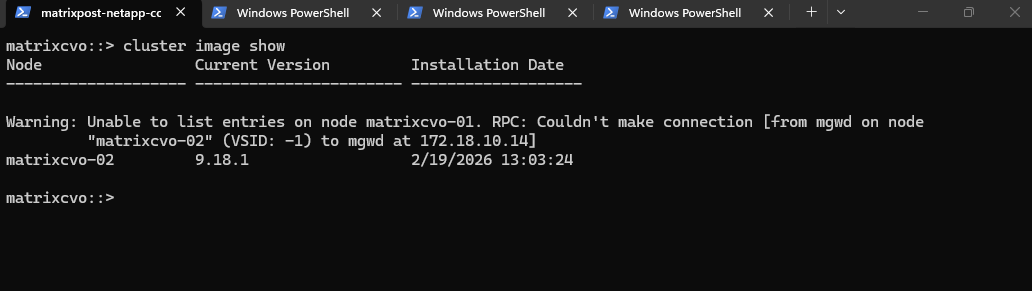
This RPC warning is a perfectly normal “sign of life” during the final stage of an upgrade. It confirms that matrixcvo-01 is currently rebooting; because it’s down, the management gateway (mgwd) on Node 02 can’t talk to it, hence the connection error.
The upgrade’s non-disruptive capability was proven as a continuous ping to the data LIF remained uninterrupted during the matrixcvo-01 reboot. This was achieved by the seamless failover of the IP address to matrixcvo-02, ensuring that client access to the CIFS shares stayed active throughout the entire transition.
That is the “Gold Standard” of a NetApp Non-Disruptive Upgrade (NDU). Achieving zero packet loss during a node reboot in a cloud environment like Azure is a testament to how tightly ONTAP integrates with the Azure software-defined network.
The upgrade proved truly non-disruptive, with zero dropped ICMP packets recorded during the reboot of matrixcvo-01.
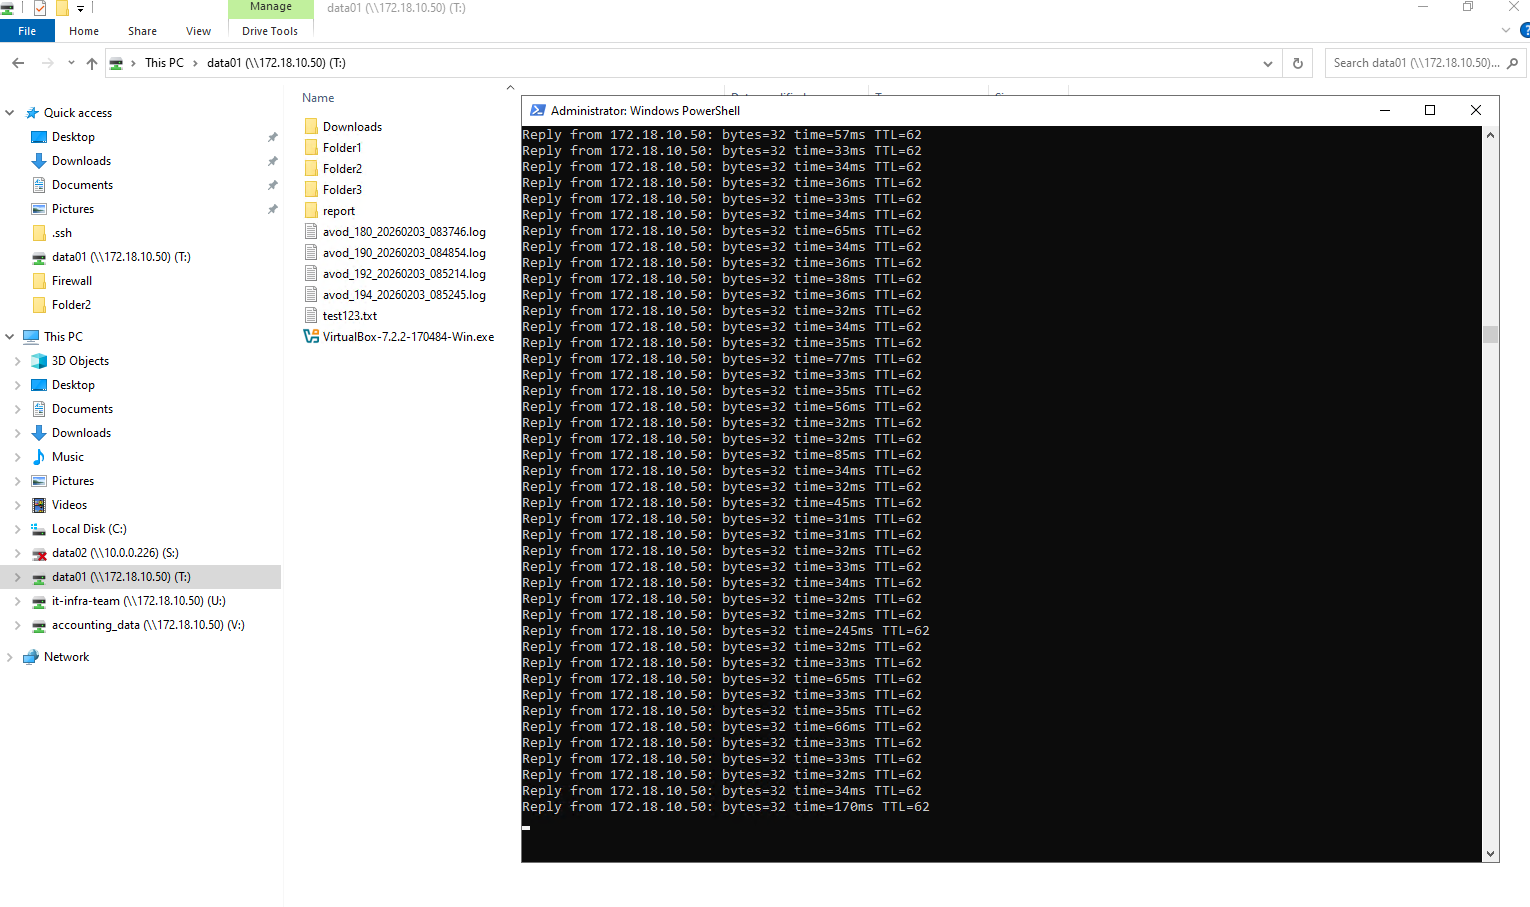
The upgrade is finalizing as matrixcvo-01 performs its giveback operation, reclaiming its storage and data services from the partner node. Achieving this without losing a single ICMP packet demonstrates the efficiency of NetApp’s automated NDU process and its perfect orchestration with Azure’s network layer.
That second “Broken pipe” and the system message are actually signs of success! When
matrixcvo-01completed its giveback, your SSH session (which was likely being hosted on Node 02 while Node 01 was rebooting) had to migrate back to its preferred management path.The “SYSTEM MESSAGES” warning is just the node finishing its final metadata synchronization and cleanup. Even though it says “upgrade in progress,” this is the final stage of the automated workflow where the cluster ensures both nodes are fully aligned and the post-upgrade health checks are green.
The upgrade is concluding as matrixcvo-01 completes its giveback and resumes its role in the HA pair. The automated process is now performing final internal synchronizations, ensuring the cluster metadata is fully aligned on ONTAP 9.18.1 while maintaining seamless data service.
The upgrade is concluding as matrixcvo-01 successfully reclaims its storage ownership during the giveback phase. With the node back online and the cluster finishing its final health checks, the transition to ONTAP 9.18.1 is virtually complete without any service interruption.

The upgrade of both nodes is now physically complete, and the cluster is in its final stabilization window following the successful giveback. This last automated check ensures that all client data paths have normalized on the new ONTAP 9.18.1 version before officially closing the upgrade job.
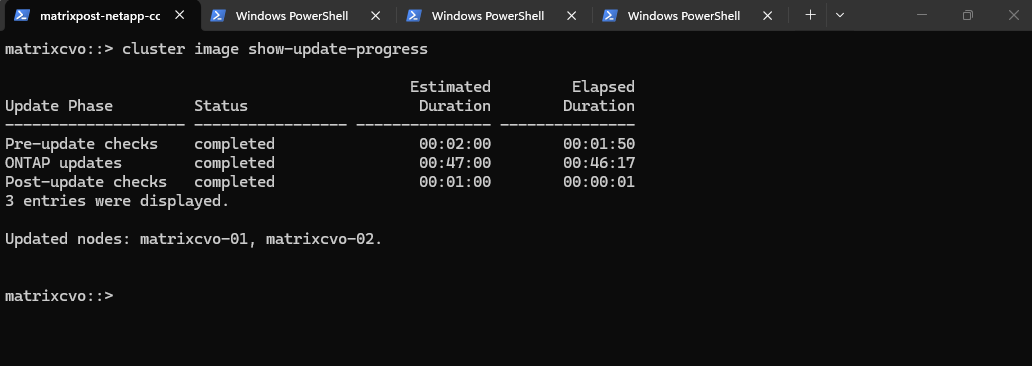
The upgrade completed at 2:50 PM. We initiated the process in the NetApp console at 1:40 PM by clicking the Upgrade button, resulting in a total duration of approximately 70 minutes.
The upgrade has successfully finished, with both nodes now fully transitioned to ONTAP 9.18.1. All post-update health checks have passed, confirming a successful, non-disruptive migration with zero packet loss and a fully healthy HA pair.
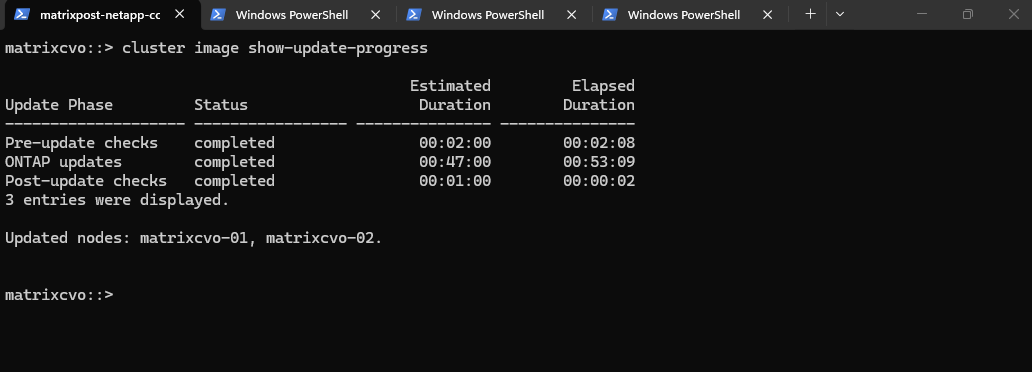
The upgrade duration reflected in the CLI tracks the active installation phases rather than the total time since the button was clicked in BlueXP.
The total execution time of 70 minutes (1:40 PM – 2:50 PM) from the initial click to completion reflects the full orchestration process, including image distribution and the resolution of the offline volume blocker.
The actual software installation and node reboots accounted for 53 minutes of that window, successfully delivering a fully updated 9.18.1 cluster.
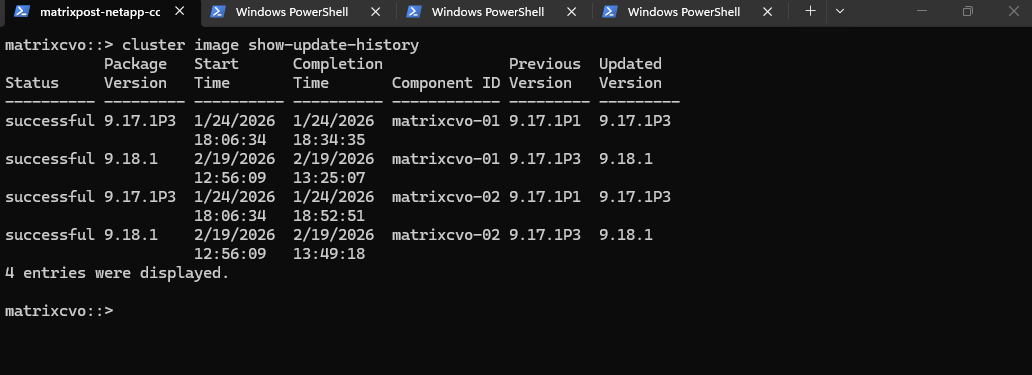
The
show-update-historyoutput is the definitive proof of a job well done. It shows both nodes, matrixcvo-01 and matrixcvo-02, successfully transitioned from 9.17.1P3 to 9.18.1 today.
cluster image show-update-history
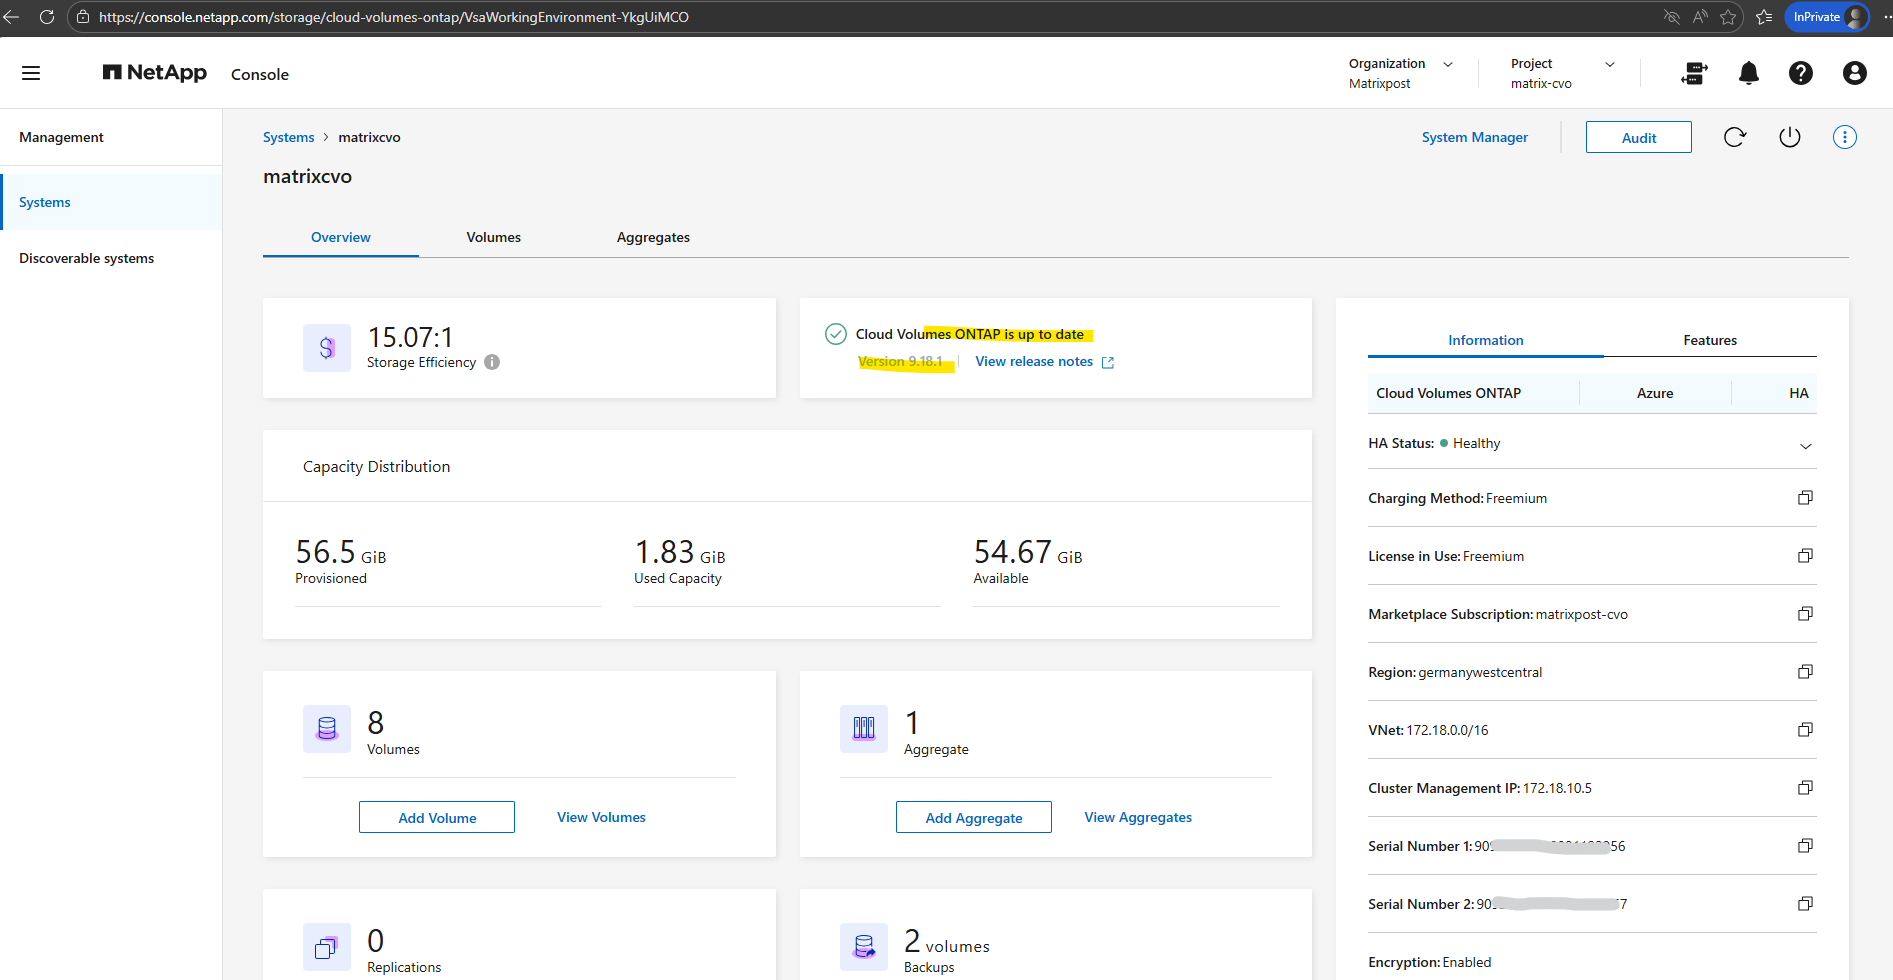
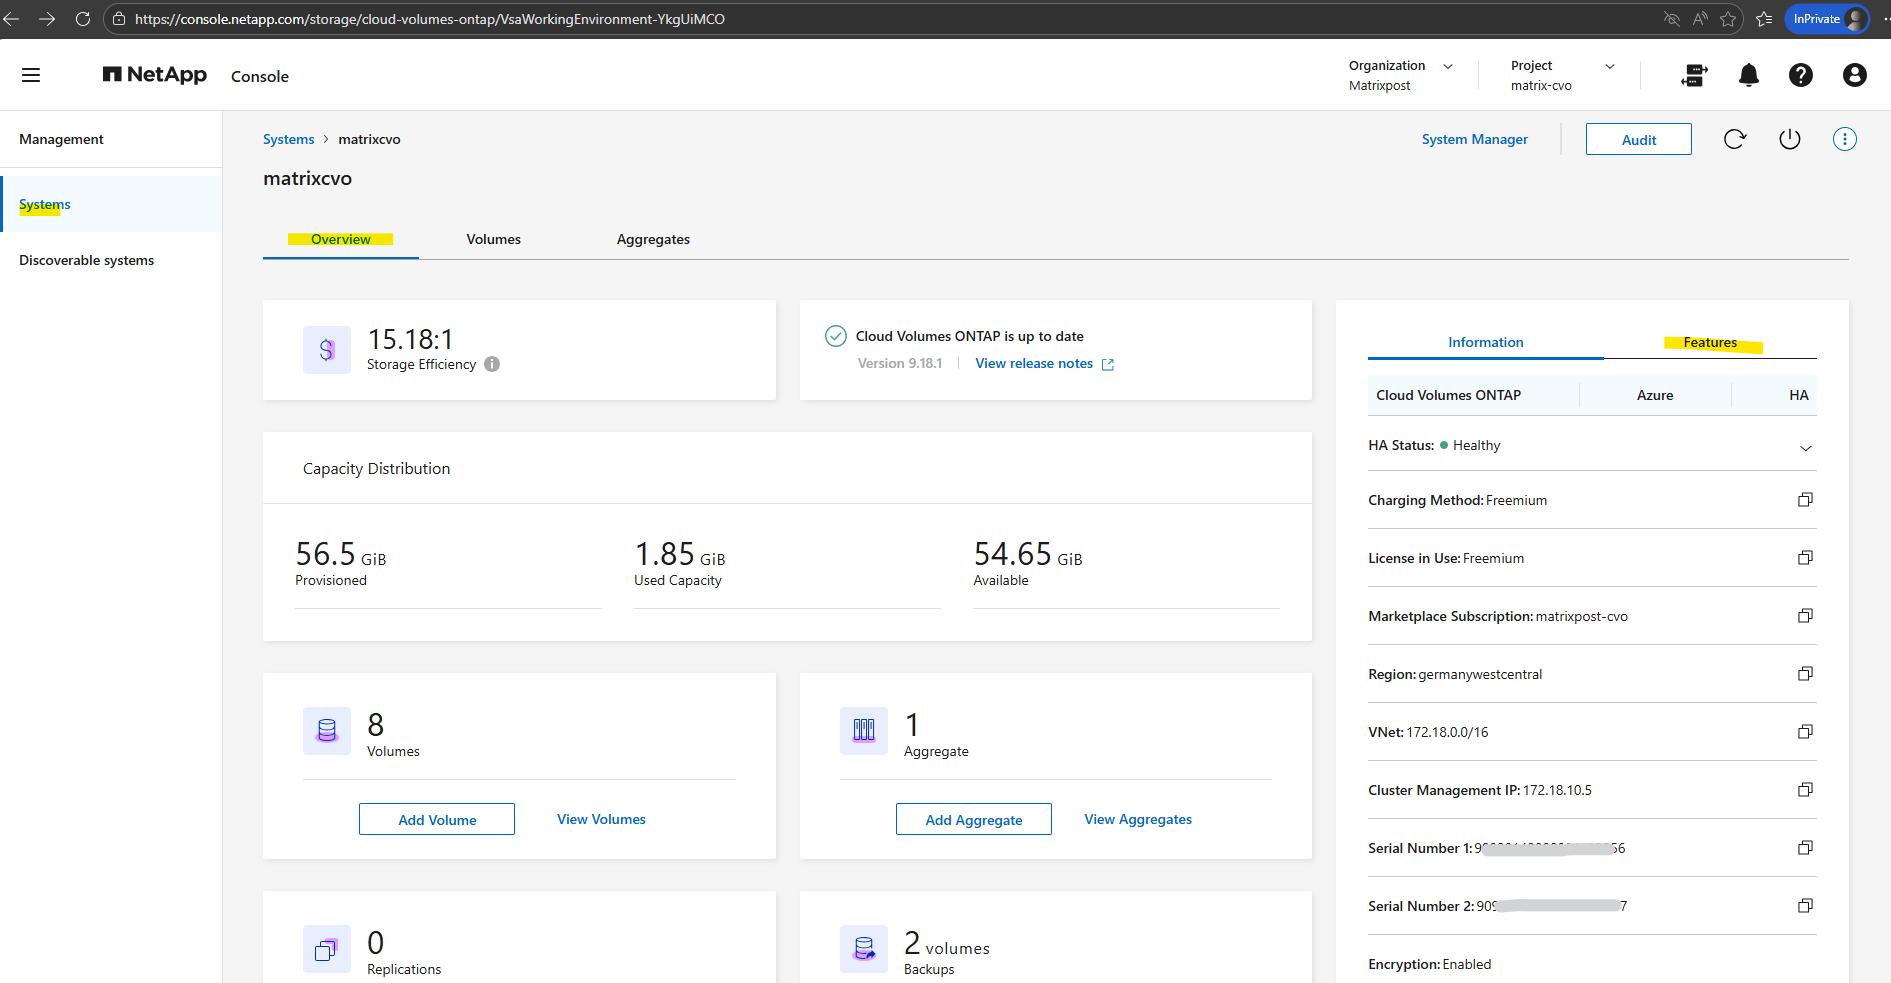
The new ONTAP version is now visible in the NetApp console under Storage → Management → Systems.
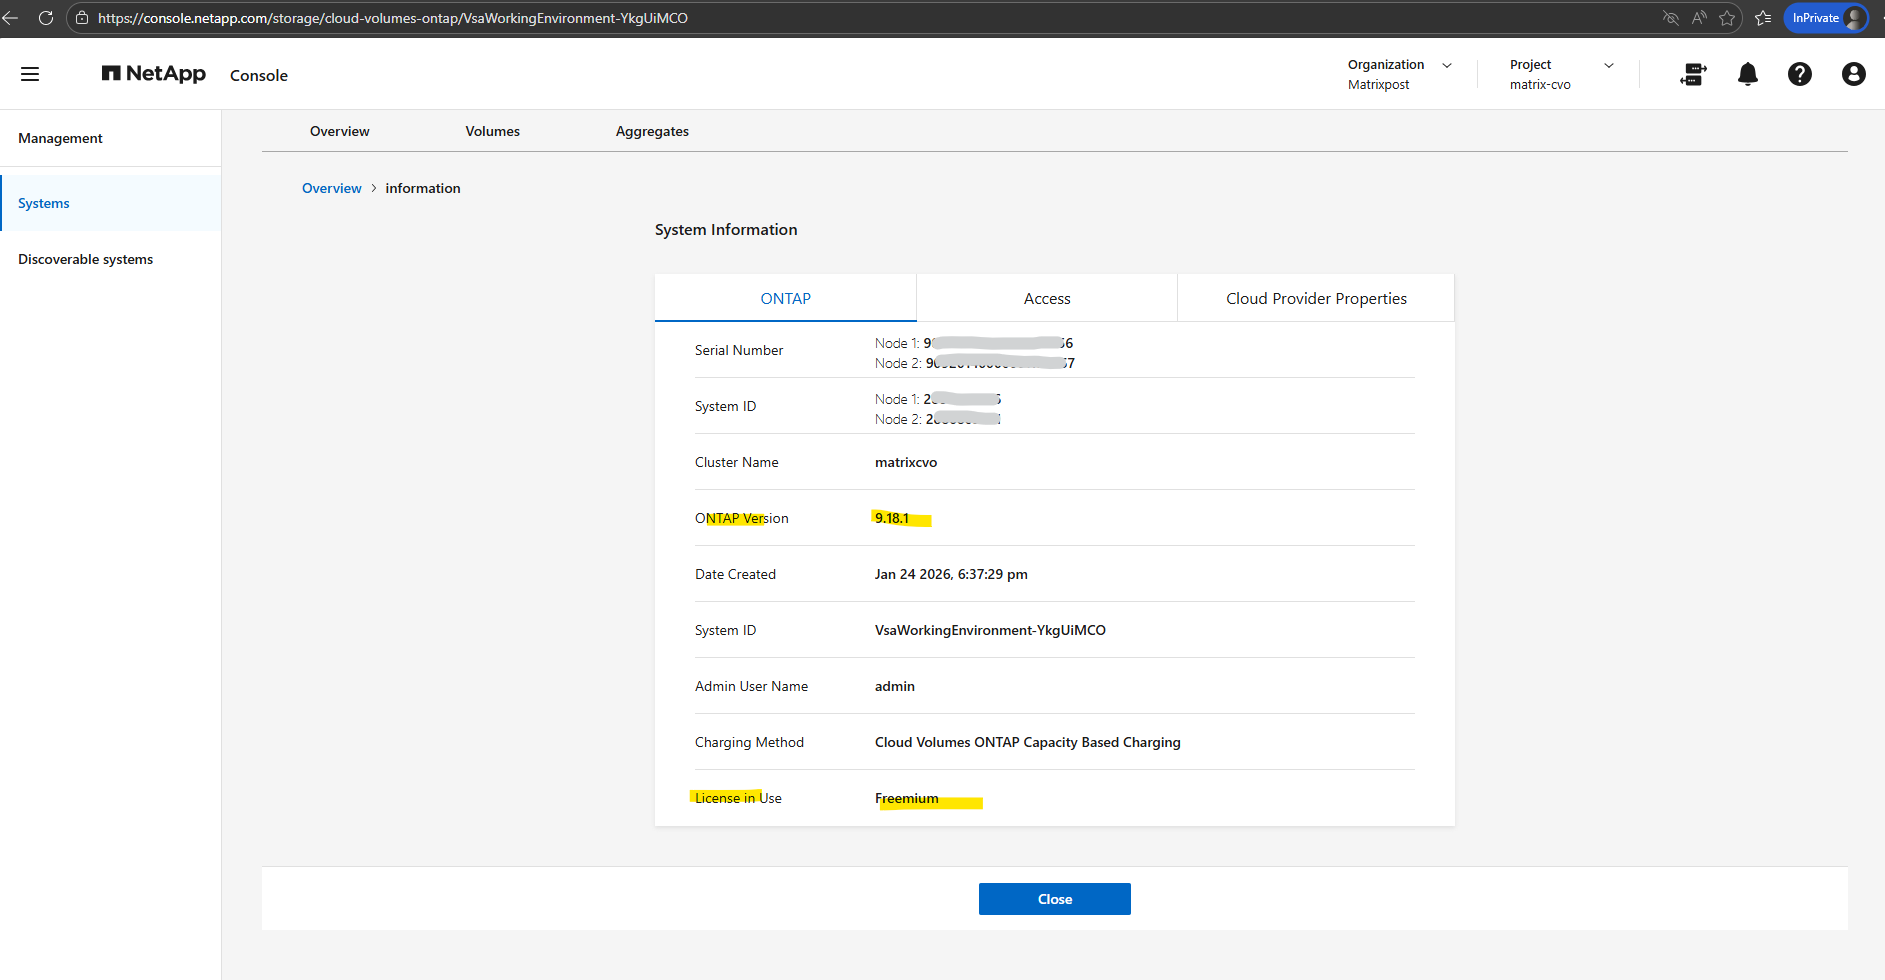
Also within the additional information page.
Post-Upgrade Validation – Confirm System Health and Version
Following the upgrade, a structured validation of the cluster, nodes, storage failover, networking, volumes, and system health ensures that the environment is stable and fully operational.
The checks below confirm that the upgrade completed successfully without introducing issues.
Checking the system version is the most fundamental post-upgrade step to confirm the cluster is running the intended release. The output validates that the nodes have successfully transitioned to ONTAP 9.18.1, ensuring all new features and security patches from the January 2026 build are now active.
matrixcvo::> version

Verifying the storage failover status is critical to ensure the High Availability (HA) relationship has fully restored after the rolling reboots.
The “Connected” state and “true” status for takeover possibility confirm that both nodes are once again synchronized and ready to protect data services in the event of an unplanned failure.
matrixcvo::> storage failover show
The
cluster showcommand provides a high-level health check to confirm that all nodes are fully integrated and participating in the cluster quorum.By verifying that both nodes report a status of
truefor health and eligibility, we ensure the cluster is in a stable, supported configuration following the upgrade reboots.
matrixcvo::> cluster show
Running
node showallows you to verify the health and uptime of individual controllers following their respective reboots.The output confirms that both nodes are healthy and eligible, with the shorter uptime on matrixcvo-01 reflecting that it was the final node to restart during the automated upgrade sequence.
matrixcvo::> node show
The
system health status showcommand serves as the final “all-clear” indicator for the entire cluster environment.By returning a simple ok status, the system confirms that no underlying subsystem issues were introduced during the upgrade and that the environment has fully normalized on ONTAP 9.18.1.
matrixcvo::> system health status show
The
system health alert showcommand is the definitive check for any active hardware or software issues that require administrative attention.An empty table is the ideal result, proving that the cluster has successfully cleared all transient errors from the upgrade and is now operating in a completely healthy, alert-free state.
matrixcvo::> system health alert show

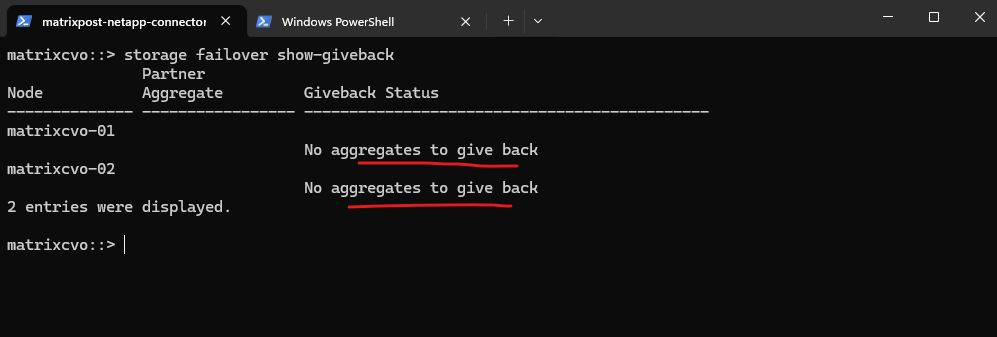
The
storage failover show-givebackcommand is used to monitor the giveback status between both HA nodes. This command allows you to verify whether the partner node has successfully returned ownership of aggregates and whether the giveback process completed without issues.
matrixcvo::> storage failover show-giveback
The storage aggregate show -fields home-name,is-home command is used to verify that all aggregates were back on their designated home nodes. The is-home field should show true for each aggregate, confirming that the giveback process completed successfully and the HA pair is in a healthy state.
matrixcvo::> storage aggregate show -fields home-name,is-home

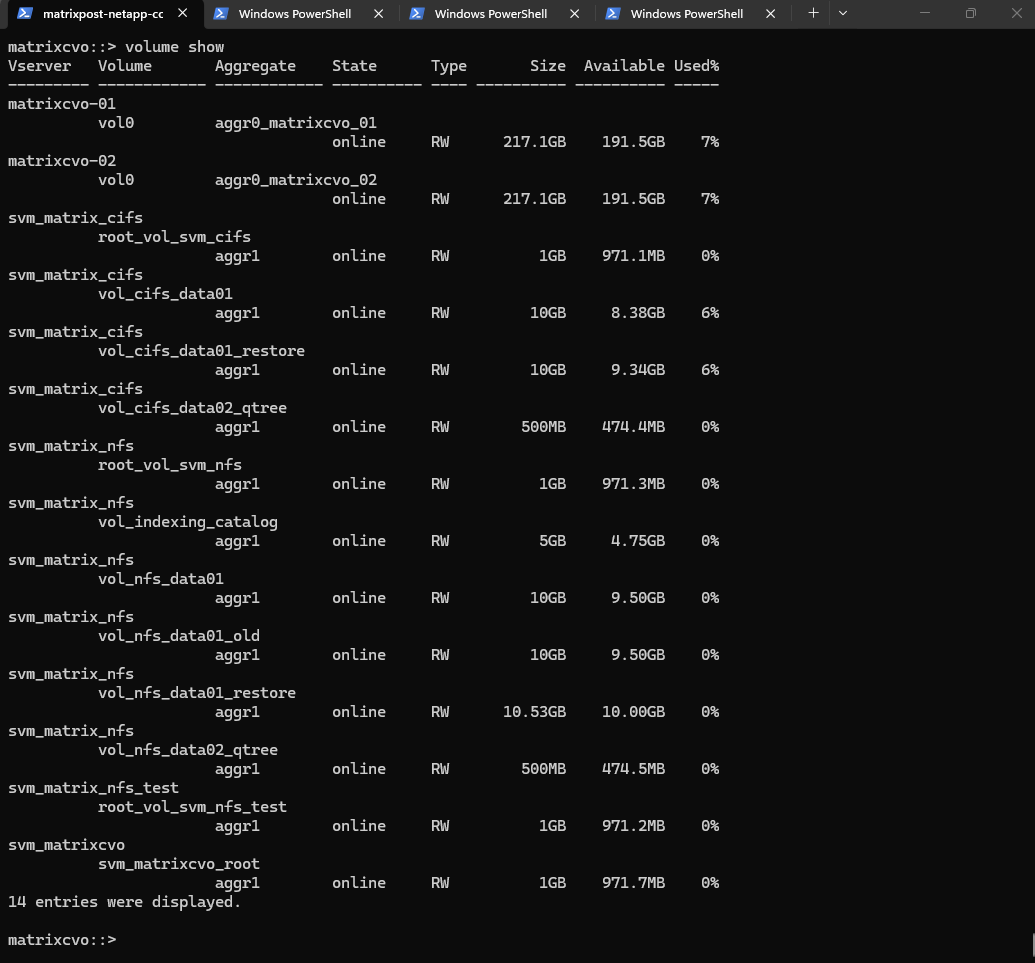
The
volume showcommand confirms that all data containers, including the “restore” volumes and thevol_nfs_data01_oldvolume that previously served as a pre-check blocker, are now fully online and accessible.This output demonstrates that the storage layer has successfully recovered across all Storage Virtual Machines (SVMs) and is ready to serve data on the new ONTAP version.
matrixcvo::> volume show
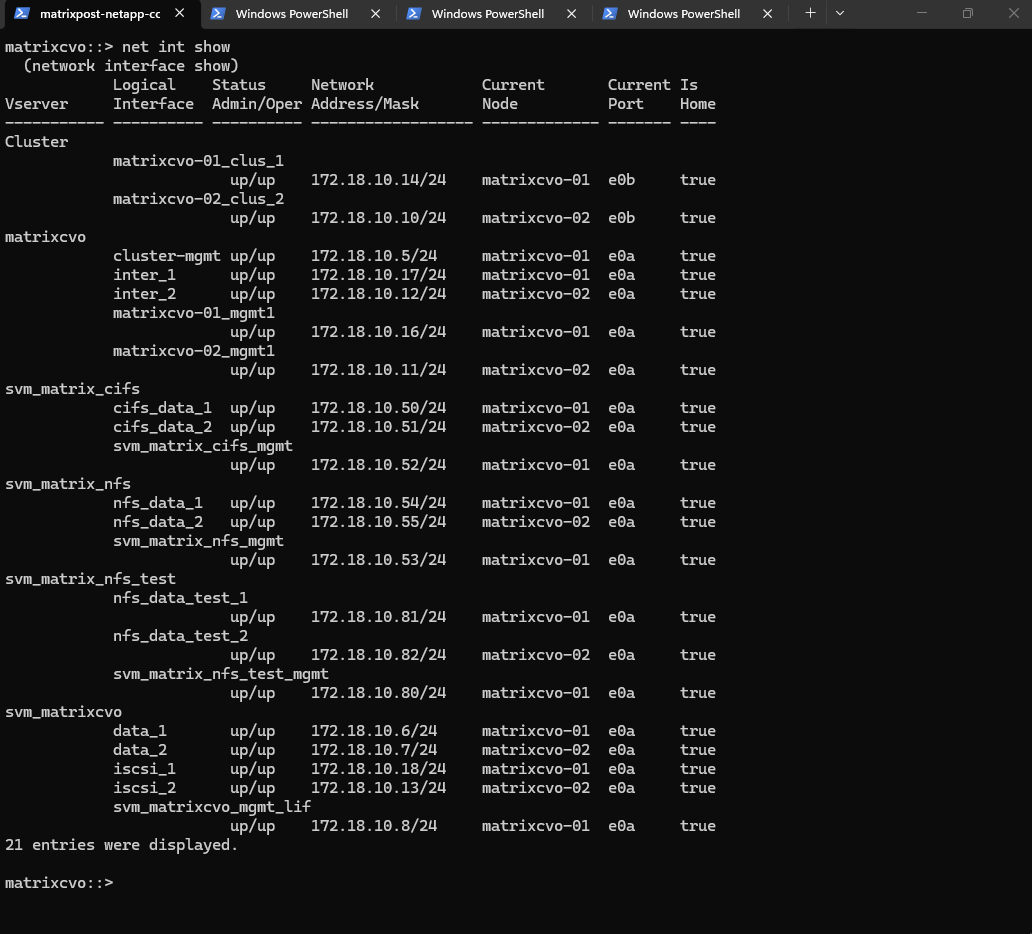
The
network interface show(ornet int show) command is the ultimate confirmation of a successful non-disruptive transition.By verifying that every single Logical Interface (LIF), across Cluster, Management, CIFS, and NFS Vservers, shows a status of
up/upand has returned to its “Home” node, we confirm that the data path has been fully restored to its optimal state.
matrixcvo::> net int show
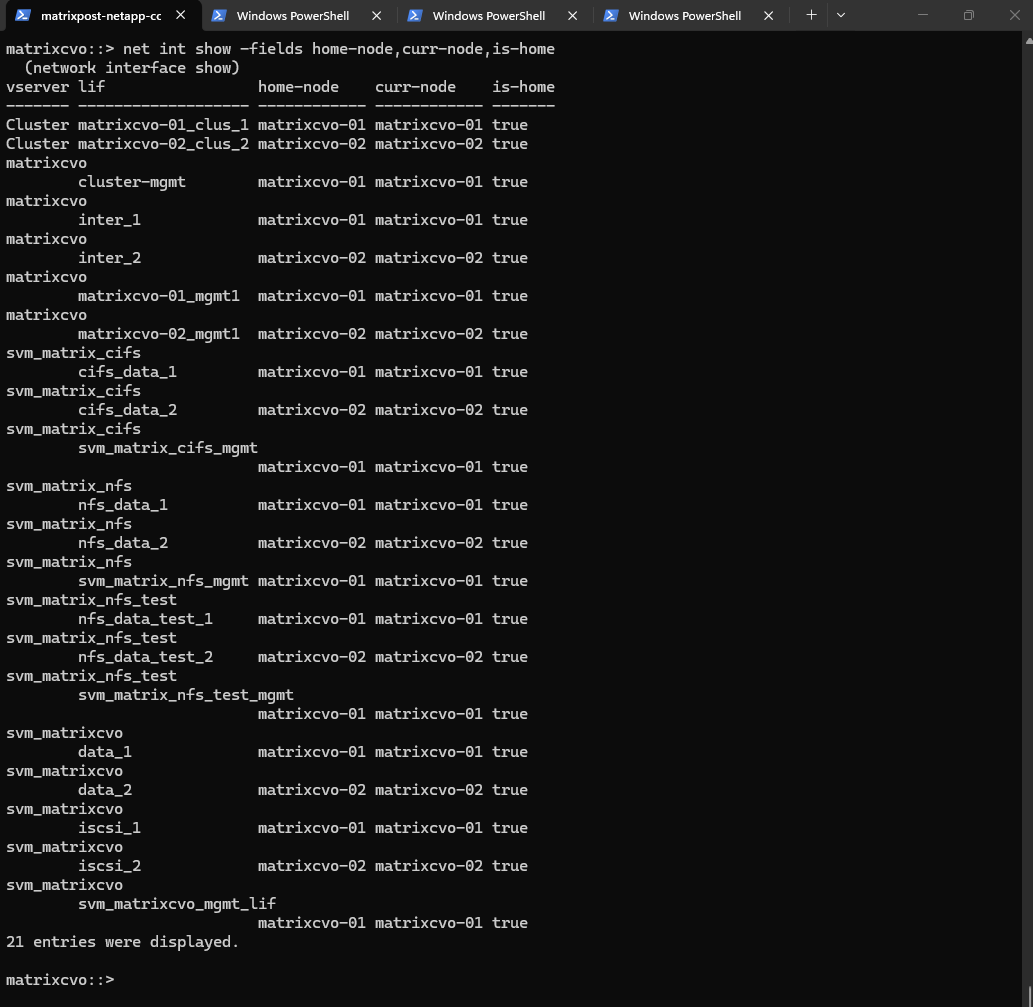
By using the
-fieldsparameter, we can explicitly confirm that the cluster’s logical layout perfectly matches its physical reality. This output shows that every Logical Interface (LIF) has itscurr-nodealigned with itshome-node, resulting in atruestatus for theis-homecolumn across the entire environment.This specific check is the best way to verify that the automated giveback process successfully completed the “revert” phase.
It ensures that data traffic is no longer being proxied through the partner node, restoring optimal performance and maintaining the high-availability balance essential for a production Cloud Volumes ONTAP deployment in Azure.
# check network interfaces if running on the home node
matrixcvo::> net int show -fields home-node,curr-node,is-home
The post-upgrade event log shows several ERROR messages related to version mismatches and DNS timeouts, all of which are standard artifacts of the rolling update process in Azure. These entries reflect the brief moments when nodes were rebooting or migrating services, and since the cluster is now synchronized on 9.18.1, these historical errors can be safely dismissed.
matrixcvo::> event log show -severity ERROR
The recorded DNS timeouts are a known architectural symptom of CVO in Azure, where the Azure WireServer only honors requests from a VM’s primary NIC.
During the node reboots and service starts, ONTAP’s attempts to reach this “Magic IP” from secondary interfaces result in silent drops, creating harmless log entries that don’t impact actual data traffic or cluster health.
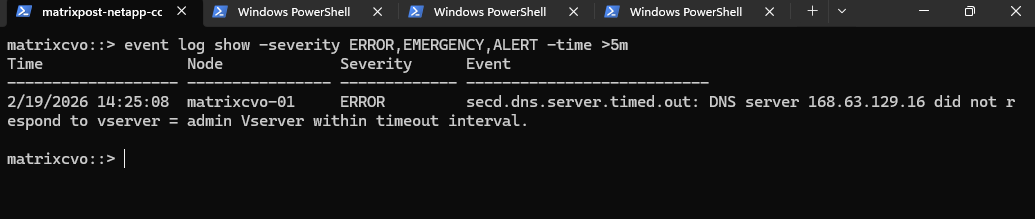
If you want to be 100% sure everything is quiet now, run:
matrixcvo::> event log show -severity ERROR,EMERGENCY,ALERT -time >5m
After an upgrade, it is good practice to ensure the efficiency scanners (deduplication and compression) are still active and reporting correctly.
This command confirms that the background efficiency processes are enabled and provides the current savings ratio. Verifying this ensures that the metadata transition during the upgrade hasn’t paused the deduplication or compression schedules that keep your Azure storage costs optimized.
matrixcvo::> volume efficiency show -vserver svm_matrix_nfs -volume vol_nfs_data01
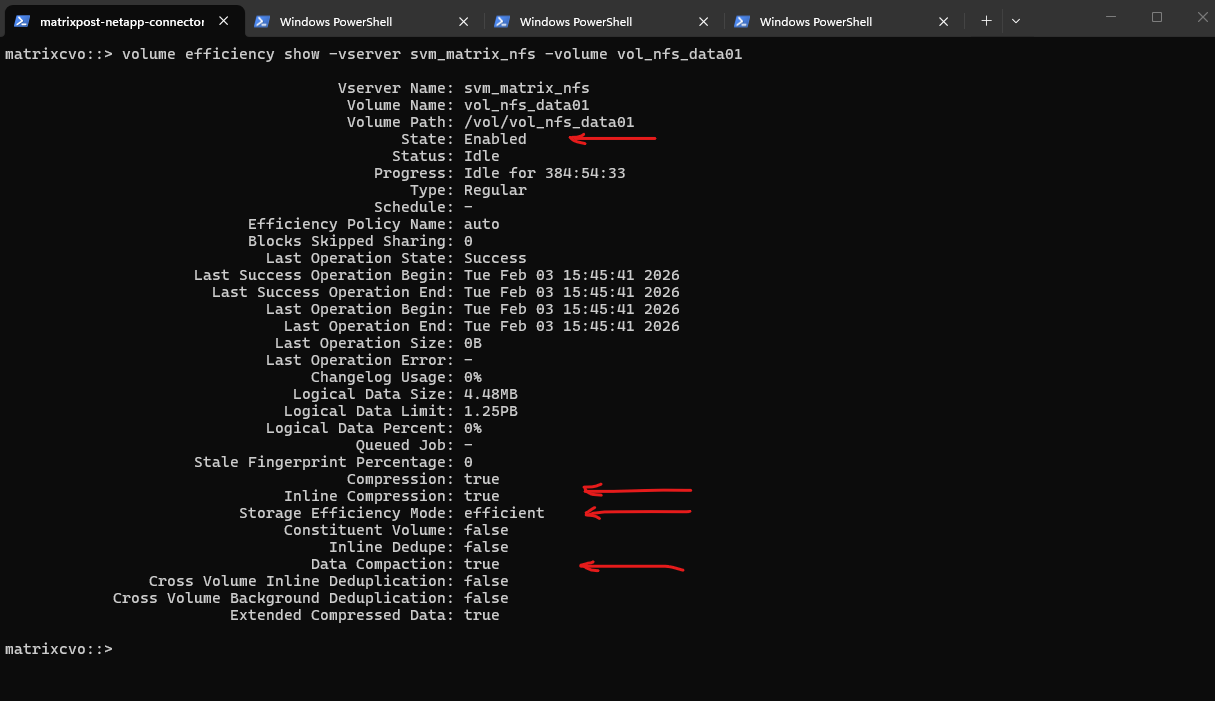
In the output above, we see that the State is Enabled and the Storage Efficiency Mode is set to efficient, confirming that ONTAP 9.18.1 is actively managing the data footprint on the Azure managed disks.
Even though the last background operation was successful in early February, the key indicators here are Inline Compression and Data Compaction, both of which are set to true.
This means that any new data written to vol_nfs_data01 after the upgrade is being optimized in real-time before it even hits the physical storage layer, maximizing your cloud ROI.
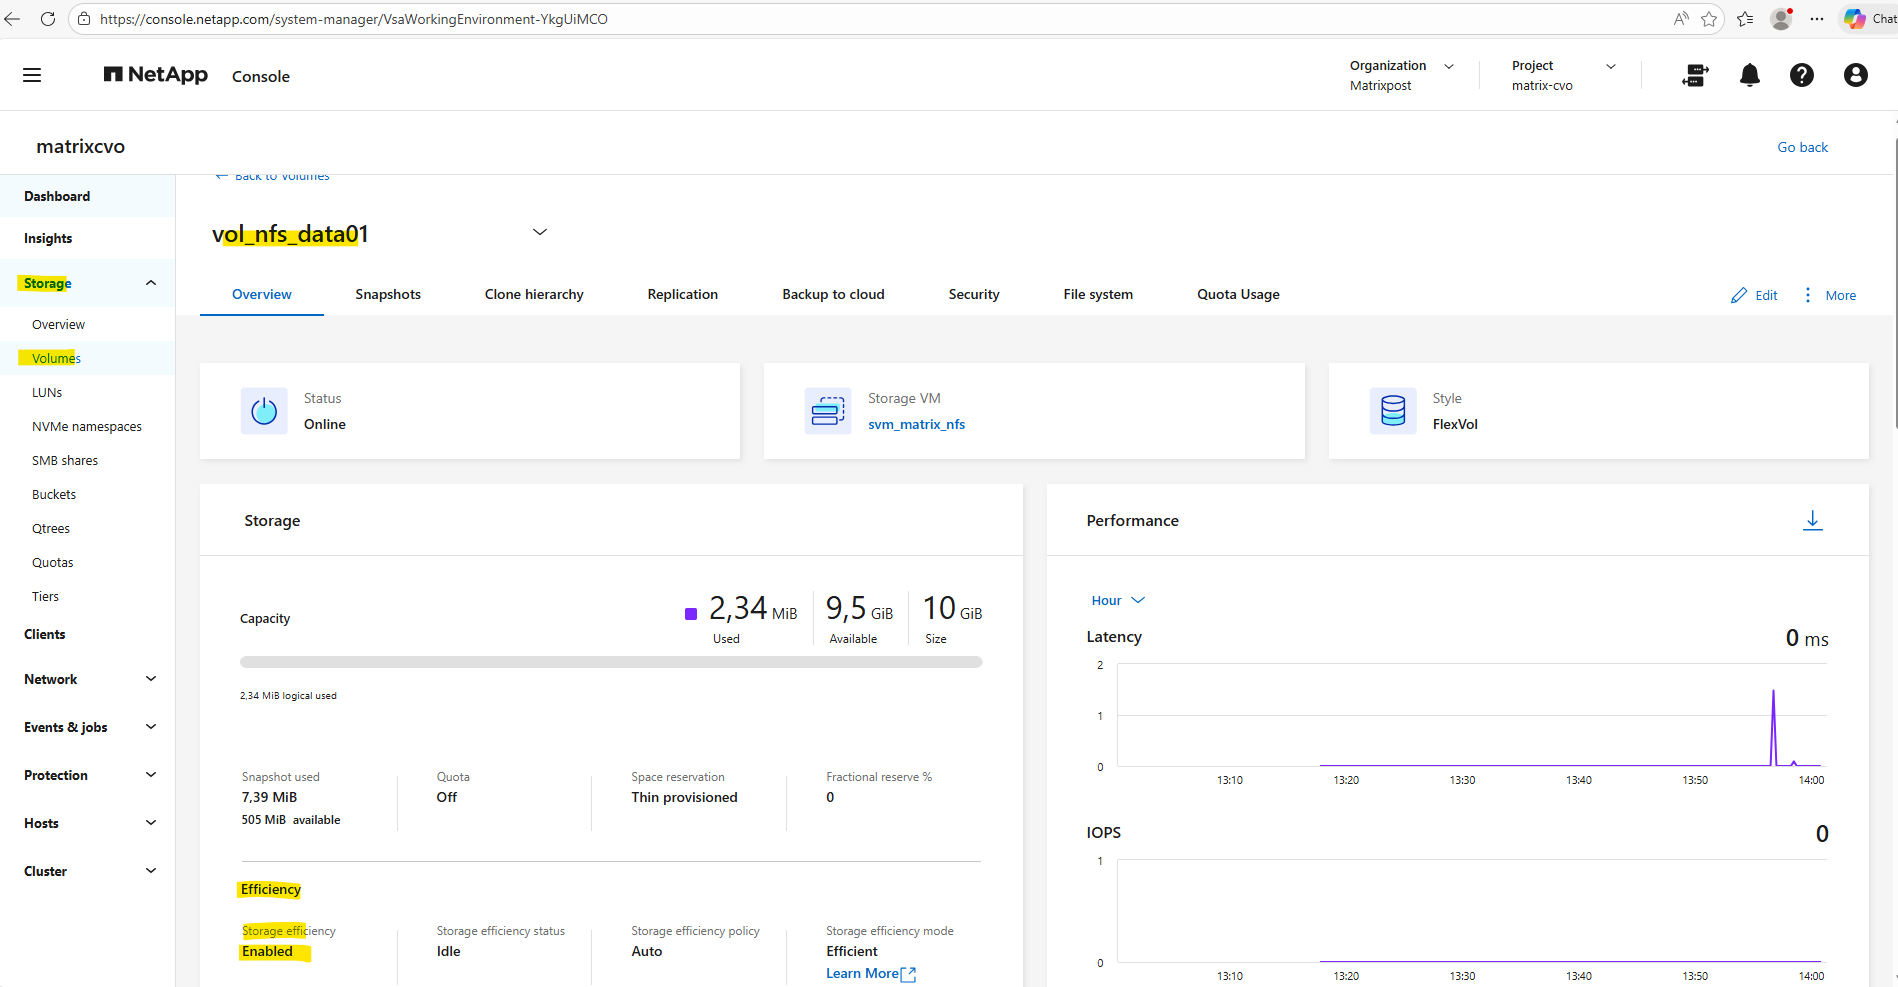
The state if enabled we can also verify by using the ONTAP System Manager as shown below.
More about Deduplication, data compression, data compaction, and storage efficiency you will find here https://docs.netapp.com/us-en/ontap/volumes/deduplication-data-compression-efficiency-concept.html.
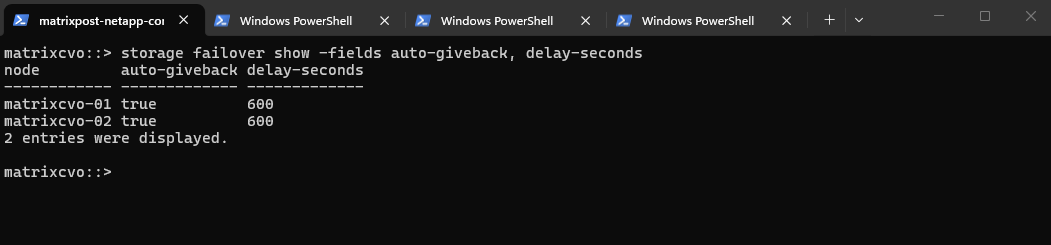
The verification of auto-giveback and delay-seconds below, confirms that the HA pair is configured to automatically restore service balance once a node is healthy following an upgrade reboot.
The 600-second delay is particularly important in Azure, as it ensures all cloud fabric attachments are fully stabilized before the system initiates the final giveback of storage and network interfaces.
matrixcvo::> storage failover show -fields auto-giveback, delay-seconds
Validating Client Connectivity
While the cluster health checks confirm the infrastructure is stable, the true measure of a successful Non-Disruptive Upgrade (NDU) is the persistence of active client sessions.
By inspecting the NFS and SMB/CIFS connection tables, we can verify that our Windows and Linux workloads successfully transitioned through the failover process without losing their mounts or session states.
NFS Connected Clients
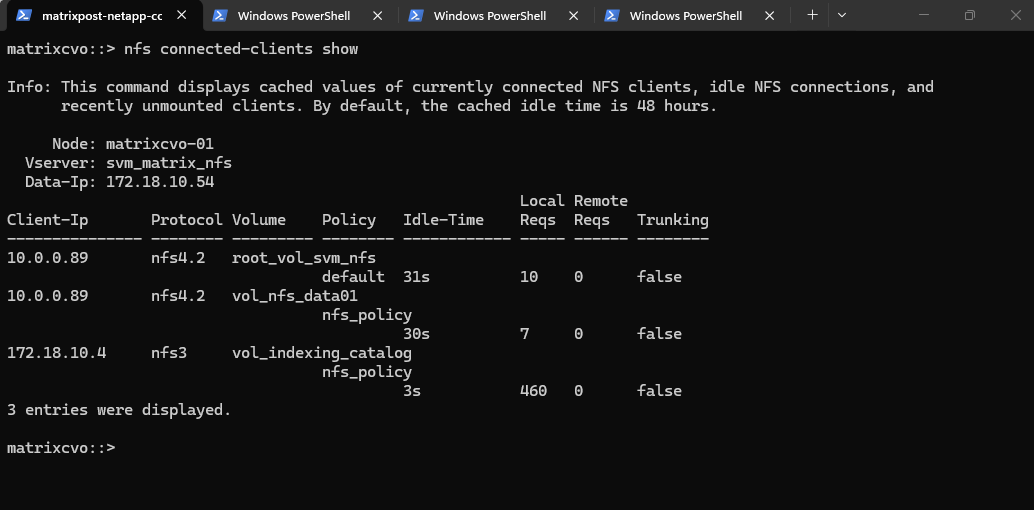
The nfs connected-clients show command provides a snapshot of active mounts and the communication protocols in use, such as NFSv3 and NFSv4.2.
The output reveals our SLES server (10.0.0.89) maintaining its NFSv4.2 sessions, while the NetApp Agent (the Connector VM at 172.18.10.4) remains actively connected to the vol_indexing_catalog.
This is the specific volume we mounted in Part 5 to enable indexing for file-level restores, and seeing the Connector maintain its path here confirms the indexing service remained uninterrupted throughout the upgrade.
matrixcvo::> nfs connected-clients show
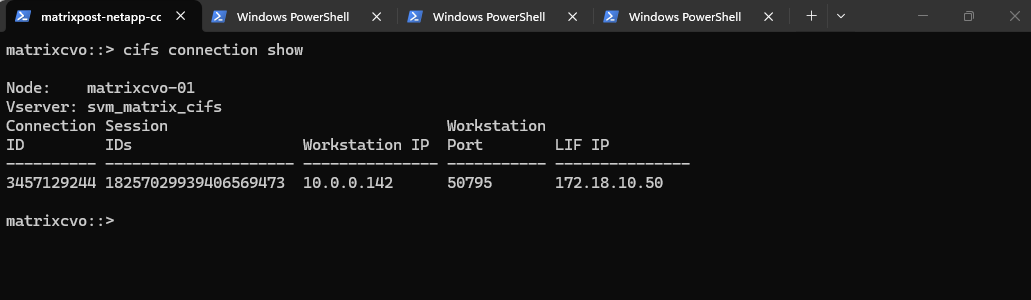
CIFS Connection Status
Checking the CIFS connections ensures that the stateful SMB sessions used by Windows clients remained intact during the node reboots.
The output shows our Windows Server 2022 workstation (10.0.0.142) maintaining its connection ID on the data LIF 172.18.10.50, proving that the Azure Load Balancer and ONTAP’s failover mechanisms worked in tandem to preserve the user session.
matrixcvo::> cifs connection show
Change the Azure VM type for Cloud Volumes ONTAP
You can choose from several VM types when you launch Cloud Volumes ONTAP in Microsoft Azure. You can change the VM type at any time if you determine that it is undersized or oversized for your needs.
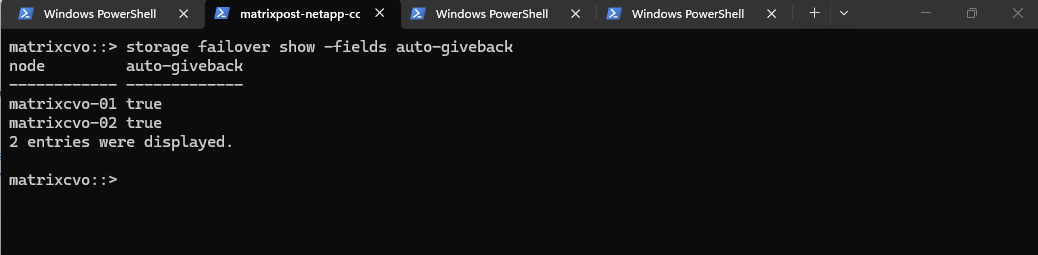
Automatic giveback must be enabled on a Cloud Volumes ONTAP HA pair (this is the default setting). If it isn’t, then the operation will fail.
Run the following command in the ONTAP CLI to check if it is enabled.
To ensure the cluster automatically restores its redundant configuration after an update, you should verify that Automatic Giveback is enabled.
Running the
storage failover showcommand confirms that the system is set to autonomously return storage ownership to the rebooted node, maintaining the environment’s performance and balance without manual triggers.
matrixcvo::> storage failover show -fields auto-giveback

# if not enable it by running
storage failover modify -node * -auto-giveback true
The operation to change the size restarts Cloud Volumes ONTAP. For single-node systems, I/O is interrupted and for HA pairs, the change is nondisruptive. HA pairs continue to serve data.
NetApp Console changes one node at a time by initiating takeover and waiting for give back.
NetApp’s Quality Assurance team tested both writing and reading files during this process and didn’t see any issues on the client side.
As connections changed, some retries were observed on the I/O level, but the application layer overcame the rewiring of NFS/CIFS connections.
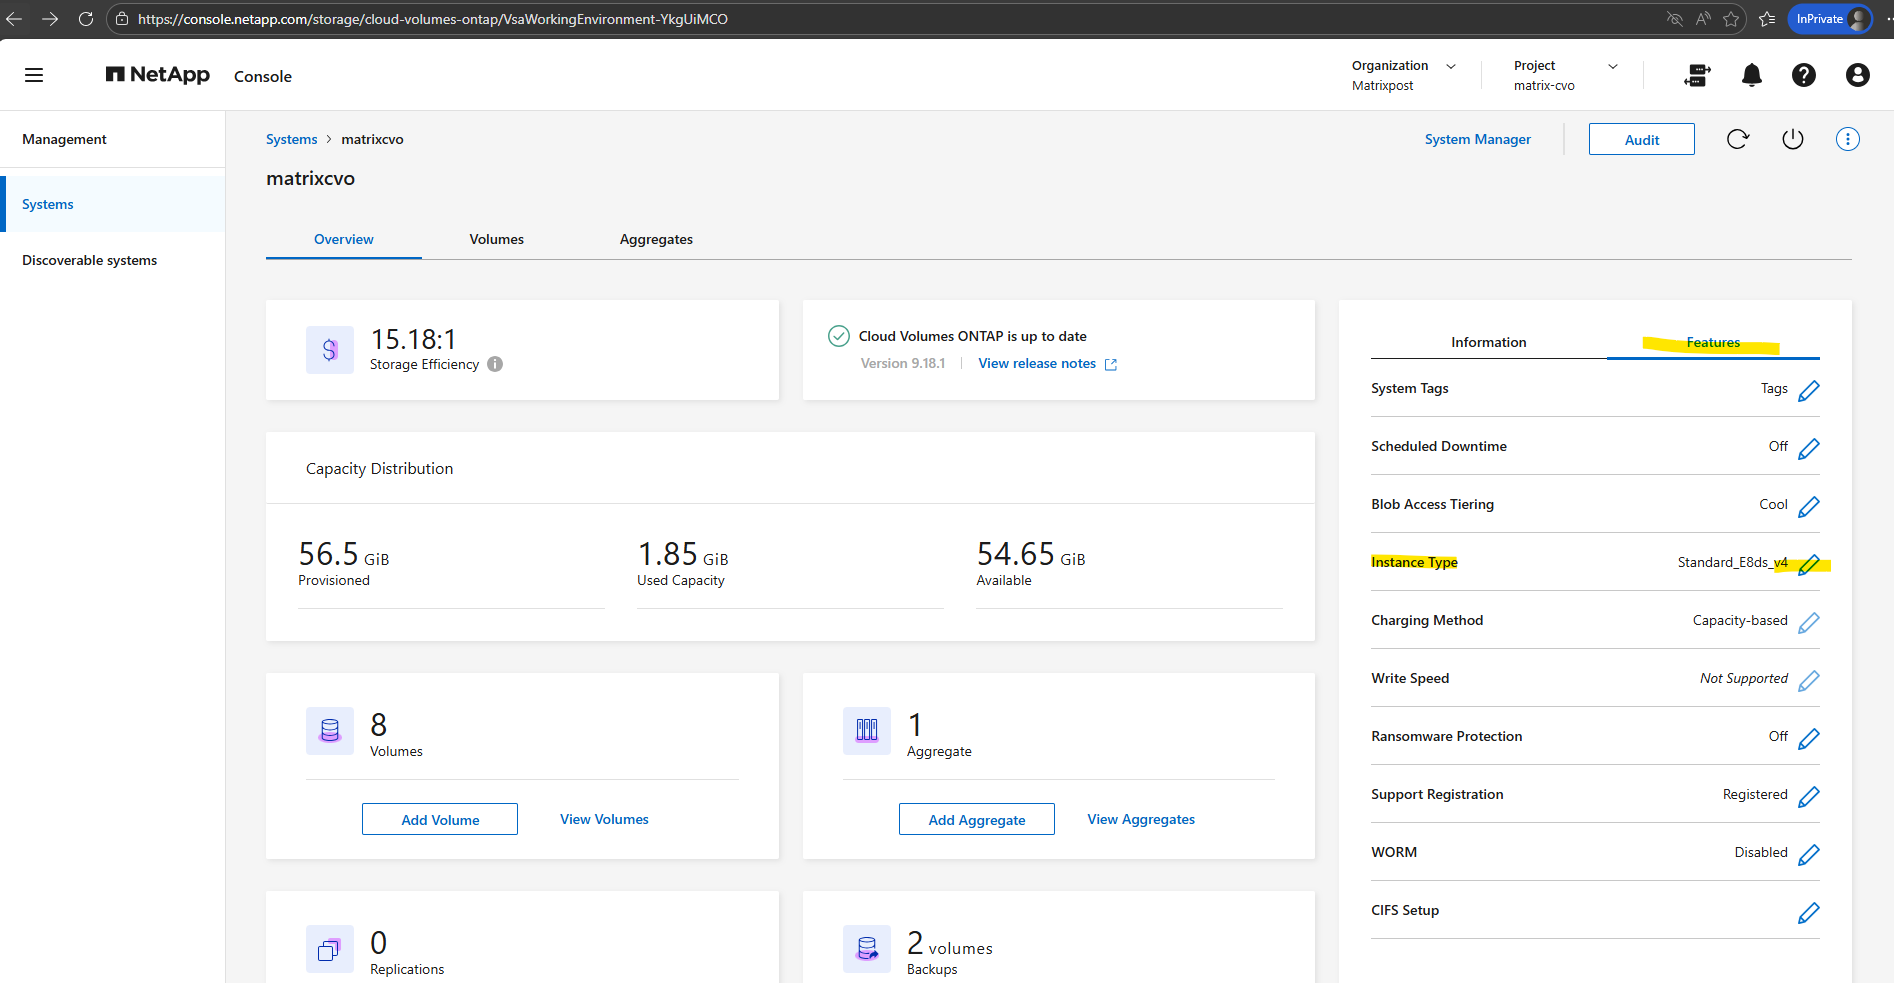
On the Systems page, select the system. On the Overview tab, click the Features panel.
Click the pencil icon next to VM type.
If you are using a node-based pay-as-you-go (PAYGO) license, you can optionally choose a different license and VM type by clicking the pencil icon next to License type.
Select a VM type, select the check box to confirm that you understand the implications of the change, and then click Change.
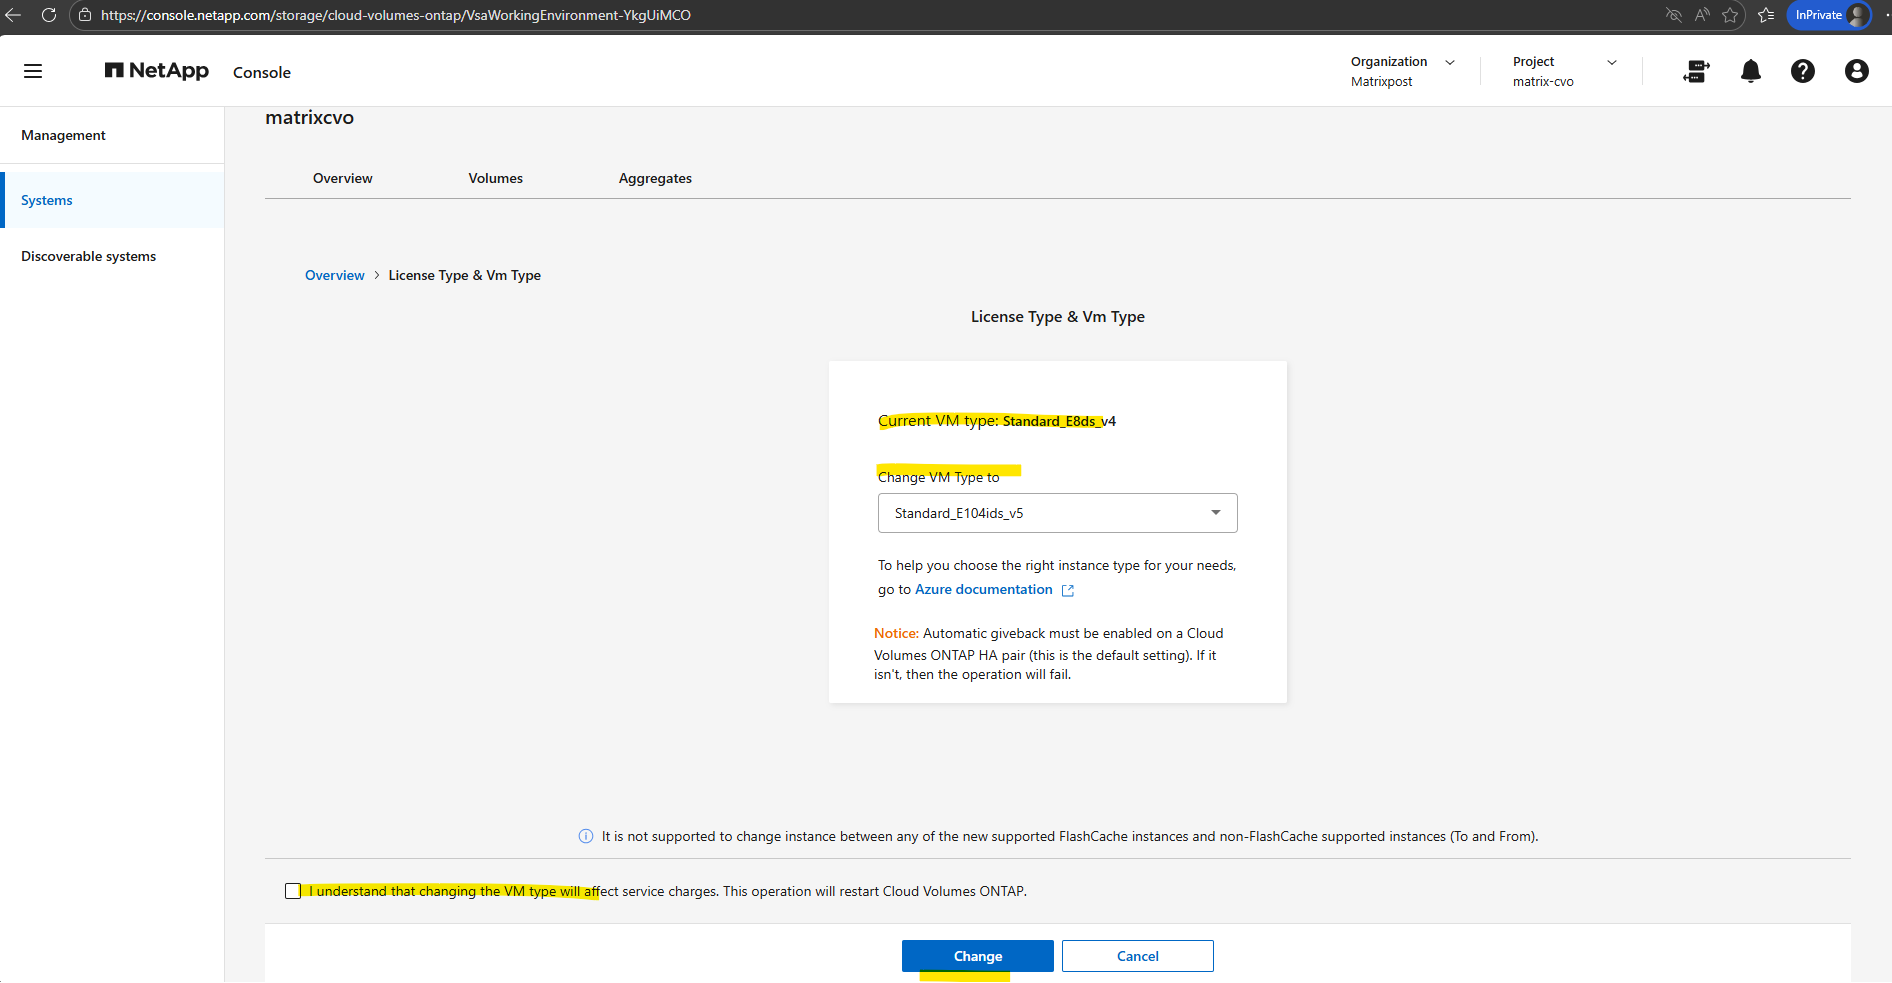
Cloud Volumes ONTAP reboots with the new configuration.
Source: https://docs.netapp.com/us-en/storage-management-cloud-volumes-ontap/task-change-azure-vm.html
Revert ONTAP (Not supported for Cloud Volumes ONTAP)
!! Note !! – Reverting or downgrading Cloud Volumes ONTAP to a previous release is not supported.
Do I need technical support to revert an On-Prem ONTAP cluster?
You should contact technical support before you attempt to revert an ONTAP cluster in the following situations:
- A production environment
Do not attempt to revert a production cluster without assistance from technical support. - You created volumes in ONTAP 9.5 or later and you need to revert to an earlier version.
Volumes using adaptive compression must be uncompressed before reverting.
You can revert new or test clusters without assistance. If you attempt to revert a cluster on your own and experience any of the following issues, you should call technical support:
- The revert fails or cannot finish.
- The revert finishes, but the cluster is unusable in a production environment.
- The revert finishes and the cluster goes into production, but you are not satisfied with its behavior.
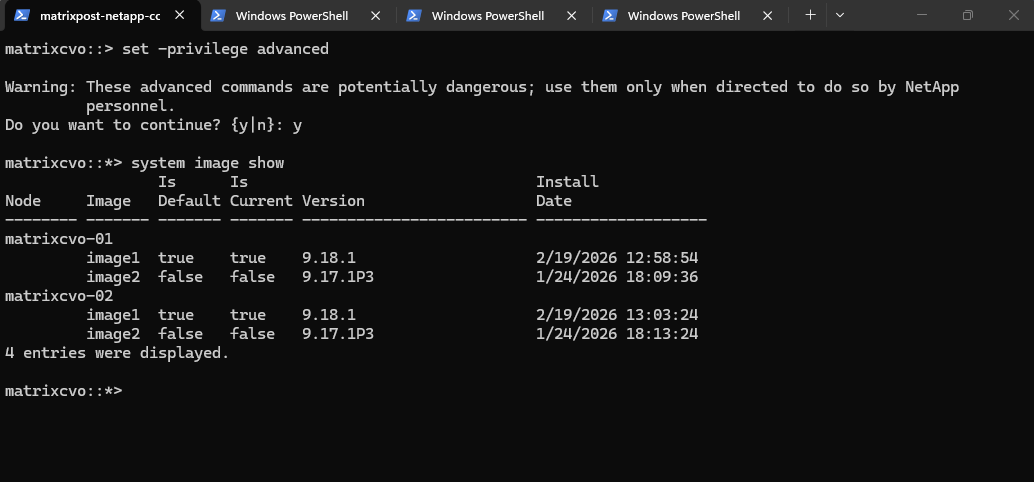
Before you revert any of your cluster nodes, you should verify that your target ONTAP image is installed and you should disable all the data LIFs in the cluster.
The following example shows that version 9.17.1P3 is installed as the alternate image on both nodes. The previously active version remains available as the rollback image; however, in the case of Cloud Volumes ONTAP here, reverting or downgrading to a previous release is not supported.
matrixcvo::> set -privilege advanced
matrixcvo::*> system image show
Source: https://docs.netapp.com/us-en/ontap/revert/concept_when_to_call_technical_support.html
Revert a On-Prem Cluster
You can directly revert your ONTAP software to only one release earlier than your current ONTAP version.
For example, if you are running 9.15.1, you cannot revert directly to 9.13.1. You must first revert to 9.14.1; then perform a separate revert from 9.14.1 to 9.13.1.
Reverting to ONTAP 9.4 or earlier is not supported. You should not revert to unsupported ONTAP versions.
More about you will find here https://docs.netapp.com/us-en/ontap/revert/task_reverting_an_ontap_cluster.html.
Agent (Connector VM) OS Update
Please note that OS updates for the Agent (Connector VM) will be not automatically orchestrated by the Netapp console (formely BlueXP).
Maintaining the operating system on the Console agent host is your (the customer’s) responsibility. For example, you (the customer) should apply security updates to the operating system on the agent host by following your company’s standard procedures for operating system distribution.
Source: https://docs.netapp.com/us-en/console-setup-admin/task-maintain-agents.html
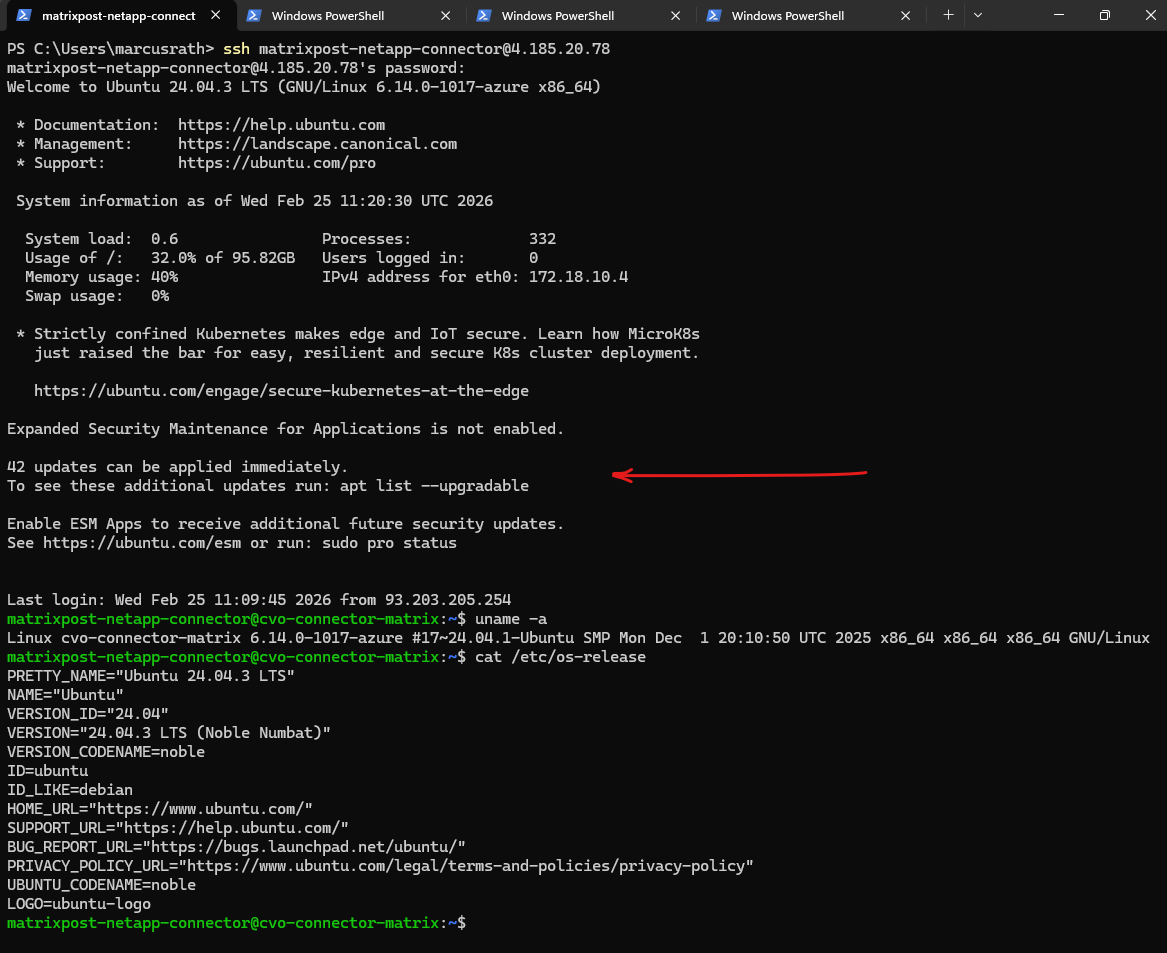
While the NetApp BlueXP Connector software is automatically updated by NetApp to ensure you always have the latest orchestration features, it is important to remember that the underlying Ubuntu OS is not managed by the Netapp console.
You remain responsible for applying standard Linux security patches and kernel updates (e.g., via
apt upgrade) to ensure the VM remains secure and compliant within your Azure environment.You may notice the public IP address changes between my screenshots; since this is a lab environment, I frequently shut down the Connector and CVO nodes to save costs and do not reserve the public IPs, as the specific address is irrelevant for my SSH management.
Rebooting the Connector VM is non-disruptive to data traffic; your users and applications won’t lose access to their shares.
However, the Netapp console (formely BlueXP) management plane will be temporarily ‘blind,’ meaning you cannot perform administrative tasks like creating volumes or triggering manual backups until the occm service has fully restarted.
A key architectural benefit of NetApp BlueXP is the separation of control and data. While the Connector VM orchestrates the SnapMirror and Backup relationships, the actual data traffic flows directly from the CVO instance to the destination (like Azure Blob).
This means you can perform maintenance or reboots on your Connector without interrupting active data transfers or client access.
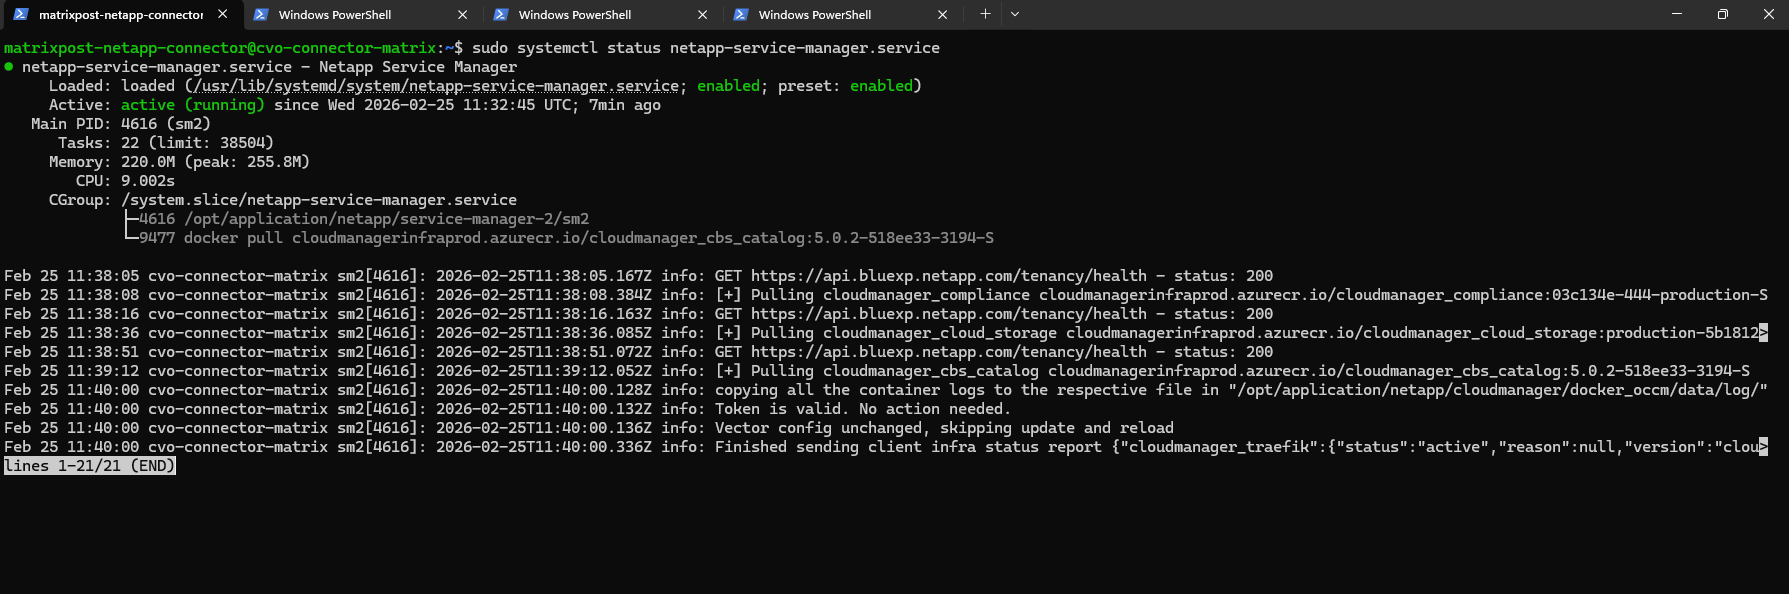
After performing the OS upgrade and rebooting the VM, you can verify that the BlueXP orchestration layer is healthy by running the command below.
This command confirms that the primary watchdog service is active and managing the underlying containerized microservices. If the output shows the service is active (running), you can be confident that the Connector is ready to re-establish its heartbeat with the BlueXP SaaS console.
$ sudo systemctl status netapp-service-manager.service
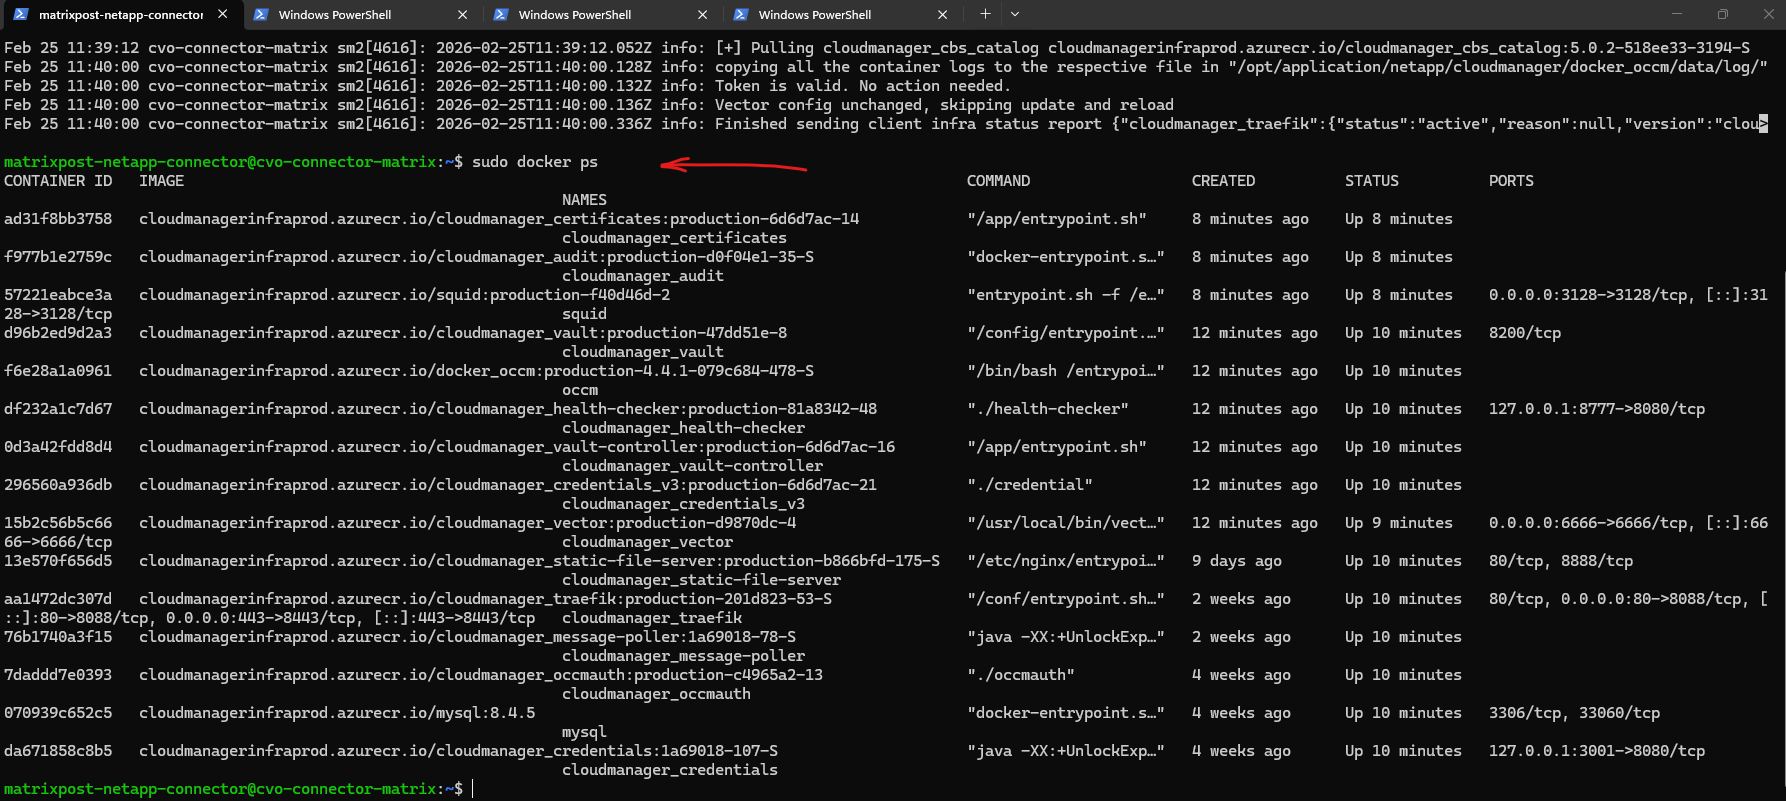
Additionally, you can use the
sudo docker pscommand to inspect the individual microservices that make up the Connector.Since the BlueXP Connector is a containerized application, this command allows you to verify that all critical components, such as the occm (orchestrator), mysql (database), and traefik (reverse proxy), are up and running with a status of “Up.”
Seeing a list of approximately 20-30 active containers confirms that the Connector’s internal architecture has successfully initialized and is ready to manage your Cloud Volumes ONTAP environment.
$ sudo docker ps
In Part 7 we dive into NetApp AutoSupport, the critical telemetry system that acts as the heartbeat of our CVO instance.
Links
Upgrade Cloud Volumes ONTAP
https://docs.netapp.com/us-en/storage-management-cloud-volumes-ontap/task-updating-ontap-cloud.htmlRegister Cloud Volumes ONTAP pay-as-you-go systems
https://docs.netapp.com/us-en/storage-management-cloud-volumes-ontap/task-registering.htmlChange the Azure VM type for Cloud Volumes ONTAP
https://docs.netapp.com/us-en/storage-management-cloud-volumes-ontap/task-change-azure-vm.htmlSupported configurations by license
https://docs.netapp.com/us-en/cloud-volumes-ontap-relnotes/reference-configs-azure.html#supported-configurations-by-licenseWhat’s new in Cloud Volumes ONTAP 9.18.1
https://docs.netapp.com/us-en/cloud-volumes-ontap-relnotes/reference-new.htmlSupported ONTAP versions for Cloud Volumes ONTAP deployments
https://docs.netapp.com/us-en/storage-management-cloud-volumes-ontap/reference-versions.htmlWhat is the difference between CDVM200 and CDVM100?
https://kb.netapp.com/cs/lcm/What_is_the_difference_between_CDVM200_and_CDVM100Deduplication, data compression, data compaction, and storage efficiency
https://docs.netapp.com/us-en/ontap/volumes/deduplication-data-compression-efficiency-concept.htmlCreate a Console agent in Azure from NetApp Console
https://docs.netapp.com/us-en/console-setup-admin/task-install-agent-azure-console.html