

Passwordless Authentication in Linux – Part 3 – Certificate-Based and FIDO2 Authentication
After exploring certificate-based authentication and Passkeys on FIDO2 for Windows in Part 1 and Part 2, this third part takes a look at how the same passwordless concepts can be used on Linux systems.
Linux supports several forms of cryptographic authentication without traditional passwords, including certificate-based authentication using PKCS#11/PIV, as well as FIDO2 security keys.
In this article, we will focus primarily on remote administration over SSH, where hardware-backed credentials can provide an additional layer of protection compared with traditional software-based SSH private keys by keeping the corresponding private key protected on the security key.
A small side note on
localpasswordless logon: While PIV/smart-card authentication can also be integrated into thelocal graphicalLinux logon, the number of components involved, PAM, SSSD, PKCS#11, certificate mapping, GDM, and various smart-card services, can make the configuration surprisingly painful.Even the official Ubuntu documentation acknowledges that
“given the amount of components in play, getting a working configuration may be tricky.”After spending some time with it, I eventually came to the conclusion that Iran might be closer to developing an atomic bomb than I am to configuring a reliable passwordless local logon on Linux.
Unlike the previous Windows-focused parts, this article will not explore each technology in the same level of detail. Instead, we will look at the most important Linux implementations, configure some practical SSH examples, and compare how certificate-based authentication with PIV/PKCS#11 and FIDO2 hardware-backed SSH keys fit into the existing Linux and OpenSSH authentication ecosystem.
- Understanding Passwordless Authentication on Linux
- Understanding Public/Private Key Authentication
- Understanding FIDO2 Authentication on Linux
- Using Certificate-Based Authentication with PIV on Linux
- Detecting the YubiKey and Accessing the PIV Certificate on Linux
- Using the YubiKey PIV Private Key for SSH Authentication
- Using FIDO2 Security Keys for SSH Authentication
- Links
Understanding Passwordless Authentication on Linux
Unlike Windows, where technologies such as smart card logon, Windows Hello for Business, and Passkeys on FIDO2 are tightly integrated into the operating system, Linux authentication is more modular.
Depending on how we access the system, authentication can be handled by different components. PAM (Pluggable Authentication Modules) provides the common authentication framework used by many Linux applications and desktop login managers, while OpenSSH provides its own public-key authentication mechanisms for remote SSH connections.
For passwordless authentication, Linux therefore offers several possible approaches. Smart cards and hardware security keys can expose certificates and private keys through standards such as PIV and PKCS#11, allowing cryptographic credentials to be used without storing the private key directly on the Linux system.
FIDO2 security keys provide another modern option. Besides being used for web authentication and Passkeys, FIDO2-capable hardware such as a YubiKey can also be integrated with Linux authentication and, particularly interesting for server administration, used directly with OpenSSH.
This means that passwordless authentication on Linux is not limited to graphical desktop sign-in. The same hardware-backed authentication concepts can also protect SSH access to Linux servers, which is one of the most common ways Linux systems are administered remotely.
Understanding Public/Private Key Authentication
Before looking at certificate-based authentication and FIDO2 on Linux, it is useful to understand the basic principle of public/private key authentication, as the same fundamental asymmetric cryptography is used throughout these technologies.
A cryptographic key pair consists of a private key and a corresponding public key. The private key must remain secret and is used to create a digital signature, while the public key can be distributed and is used to verify that signature.
During authentication, the client proves possession of the private key by signing authentication data with it. The resulting signature is sent to the server, which verifies it using the corresponding public key. If the signature is valid, the server knows that the client possesses the private key without the private key itself ever being transmitted.
Conceptually, the process looks like this:
Client                                  SSH Server

Private Key                             Public Key
    │                                       │
    │ <------ authentication data ----------│
    │                                       │
    ├── Sign with Private Key               │
    │                                       │
    └──────── Signature ------------------->│
                                            │
                               Verify Signature
                               with Public Key
                                            │
                                           ✓
                                      Access granted
The same basic principle appears in the authentication methods discussed throughout this series, although the way keys and identities are managed differs:
- With SSH public-key authentication, the server typically stores the user’s public key in
authorized_keys, while the corresponding private key remains on the client. - With certificate-based authentication, a certificate contains the public key and additionally binds it to an identity through a trusted Certificate Authority (CA).
- With FIDO2, a credential-specific private key is protected by the authenticator, while the corresponding public key is registered with the relying party.
In all three cases, the essential concept remains the same: the client proves possession of a private key by producing a valid cryptographic signature, while the private key itself never needs to be transmitted to the authenticating server.
Understanding FIDO2 Authentication on Linux
Although FIDO2 is commonly associated with passkeys, the FIDO2 authentication we use here with OpenSSH is not a passkey implementation.
FIDO2 consists primarily of WebAuthn and CTAP (Client to Authenticator Protocol). In a typical web-based passkey authentication flow, WebAuthn defines the interaction between the client/browser and the relying party, while CTAP provides the communication between the client and an external authenticator, such as a YubiKey.
With OpenSSH, however, we are not using the WebAuthn passkey authentication flow. OpenSSH directly integrates support for FIDO authenticators through its special security-key (*-sk) key types, such as ed25519-sk.
The YubiKey therefore still provides the important FIDO authenticator functionality: it protects the cryptographic credential and performs signing operations after satisfying requirements such as user presence by touching the key. OpenSSH integrates this authenticator into its own SSH public-key authentication protocol rather than using a WebAuthn relying party.
From the SSH server’s perspective, authentication remains very similar to conventional SSH public-key authentication. The server stores an sk-ssh-ed25519@openssh.com public key in authorized_keys and verifies signatures generated using the corresponding FIDO-backed credential.
In short:
Passkey: WebAuthn + FIDO authenticator → authentication to a WebAuthn relying party
OpenSSH FIDO2: OpenSSH + FIDO authenticator → SSH public-key authentication
Both can use the same physical YubiKey and FIDO technology, but the authentication protocol and credential type used by the application are different.
Using Certificate-Based Authentication with PIV on Linux
Just like Windows, Linux can use certificates and smart cards for authentication. A hardware security key such as the YubiKey 5C NFC can store the private key and corresponding certificate in its PIV (Personal Identity Verification) application.
The important security property is the same as with certificate-based authentication on Windows: the private key remains stored on the hardware device and cryptographic operations are performed by the security key itself. The private key therefore does not need to be stored as a file on the Linux system.
On Linux, access to smart cards and PIV devices is commonly provided through PC/SC and PKCS#11. Applications can use the PKCS#11 interface to access certificates and request cryptographic operations from the hardware device.
For authentication, this can be integrated at different levels. PAM (Pluggable Authentication Modules) can provide certificate or smart-card authentication for local and graphical logins, while OpenSSH can use a PIV-backed private key for remote SSH authentication.
In the following example, we will use the same YubiKey 5C NFC and PIV certificate concept introduced in Part 1, but this time from a Linux system.
Detecting the YubiKey and Accessing the PIV Certificate on Linux
Before we can use the YubiKey for certificate-based authentication, we first need to make sure that Linux detects the device and can communicate with its PIV smart-card application.
On Linux, smart-card communication is commonly provided by the PC/SC (Personal Computer/Smart Card) framework. The pcscd service communicates with the physical smart-card reader or USB security key, while applications can access the cryptographic objects stored on the device through interfaces such as PKCS#11.
Because we already configured the YubiKey 5C NFC and enrolled the certificate into its PIV application in Part 1, we do not need to generate or enroll another certificate here. Instead, we can connect the same YubiKey to our Linux system and verify that its existing certificate and hardware-protected private key are accessible.
First, we install the required smart-card and YubiKey tools. The exact package names depend on the Linux distribution. After connecting the YubiKey, we can verify that the device is detected and that the PIV certificate stored on it can be accessed.
The private key itself remains non-exportable on the YubiKey. Linux applications instead request the YubiKey to perform the required cryptographic operation, typically after the user has provided the corresponding PIV PIN.
For this lab, I will use an Ubuntu 24.04 LTS virtual machine running on VMware vSphere, with the YubiKey 5C NFC passed through directly to the VM.
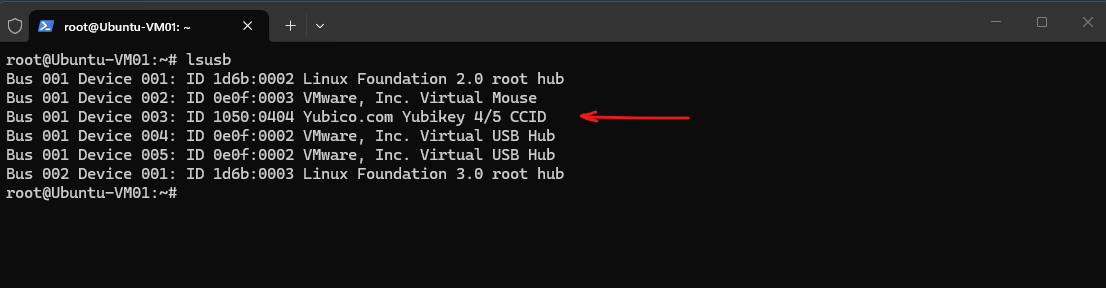
The YubiKey 5C NFCis successfully passed through from the ESXi host to the Ubuntu VM and detected as USB device 1050:0404.
The
(CCID)designation confirms that its smart-card interface, which provides access to the PIV application, is exposed to Linux.
lsusb
First, we update the local package index and install the required smart-card and YubiKey components. These packages provide PC/SC communication, YubiKey management tools, and OpenSC/PKCS#11 support for accessing the PIV certificate and cryptographic functions stored on the YubiKey.
apt update
apt install pcscd pcsc-tools yubikey-manager opensc
Next, we enable and start the PC/SC socket (pcscd.socket), which allows applications on Ubuntu to communicate with connected smart cards and the YubiKey PIV interface. The command completing without an error indicates that the socket was successfully enabled and started.
systemctl enable --now pcscd.socket

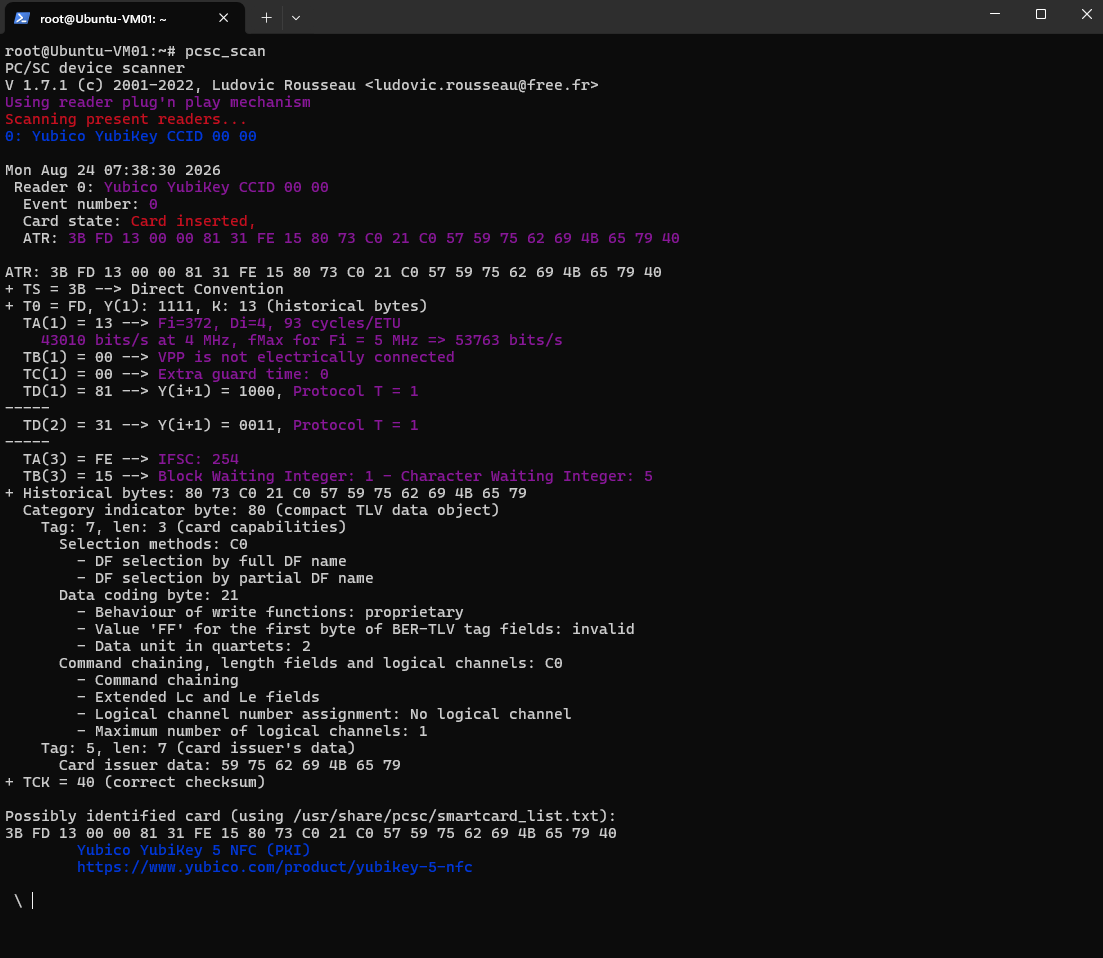
Using pcsc_scan, we can verify that Ubuntu can communicate with the YubiKey through its CCID smart-card interface. The detected ATR (Answer To Reset) is correctly identified as a Yubico YubiKey 5 NFC (PKI), confirming that its PIV functionality is available to the Linux system.
The ATR (Answer To Reset) is a sequence of bytes returned by a smart card when it is initialized by a reader. It describes information about the card and its supported communication protocols, allowing software such as PC/SC to recognize and communicate with it.
PC/SC (Personal Computer/Smart Card) is a standardized interface that allows applications and operating systems to communicate with smart cards and smart-card readers. On Linux, the
pcscddaemon provides this communication layer and enables applications to access devices such as the PIV application on a YubiKey.
pcsc_scan
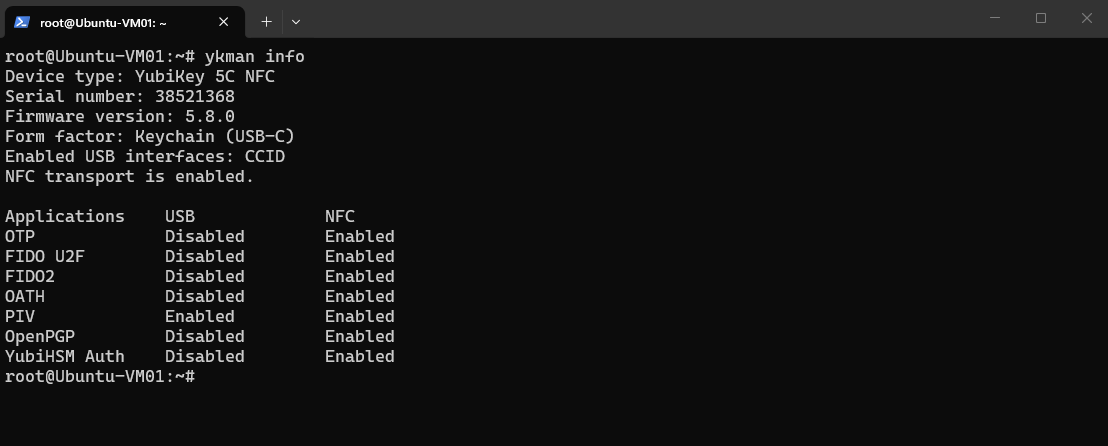
The ykman info command confirms that the YubiKey 5C NFC is detected correctly and that PIV is enabled over the USB CCID interface.
As already configured in Part 1, all other YubiKey applications are disabled over USB, leaving only the CCID interface required for PIV enabled. This configuration was necessary to reliably pass the YubiKey through from the ESXi host to the virtual machine; the applications remain available over NFC.
ykman info
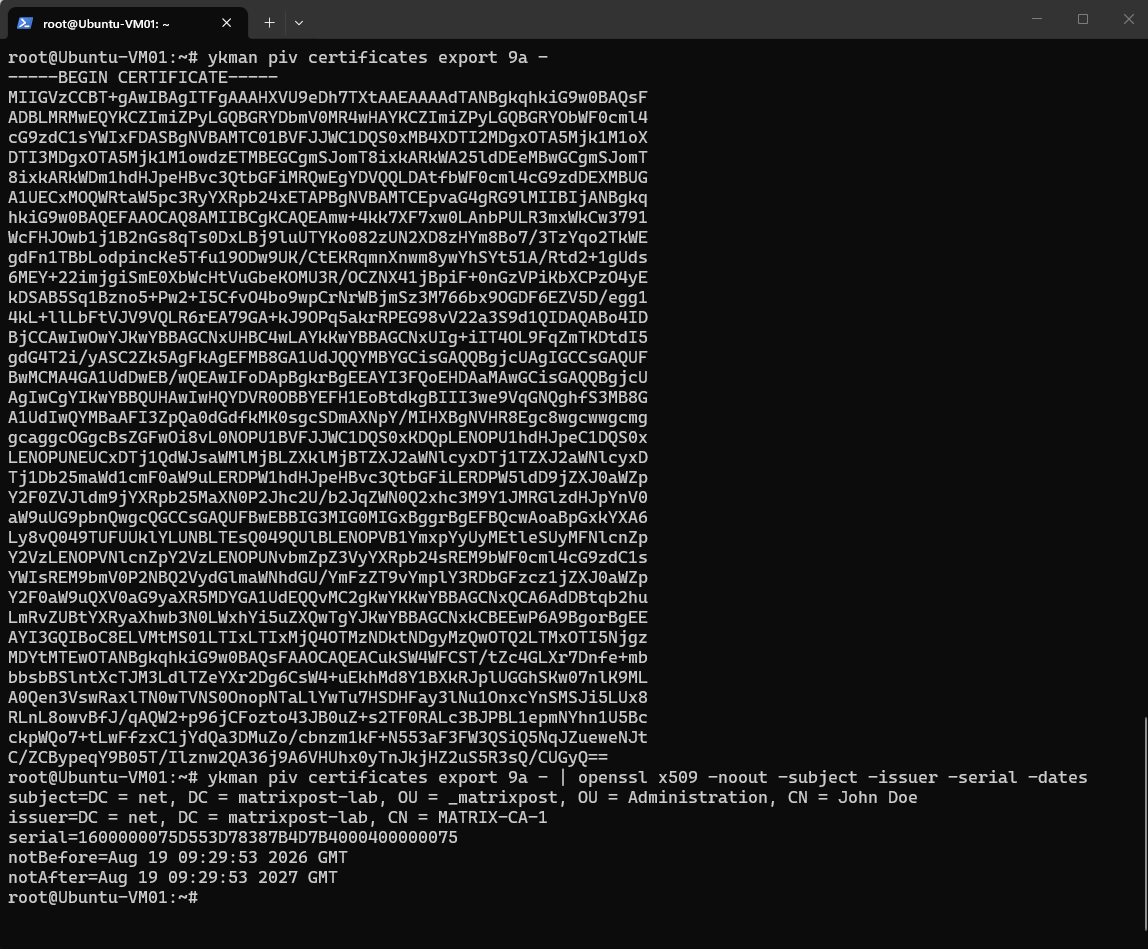
The first command exports the public certificate from PIV authentication slot 9a and displays it in PEM format; the associated private key remains securely stored on the YubiKey and cannot be exported.
By piping the certificate into openssl in the second command, we can verify that it is the existing John Doe certificate issued by our Active Directory Certificate Services CA (MATRIX-CA-1), which we enrolled onto the YubiKey in Part 1.
ykman piv certificates export 9a -
ykman piv certificates export 9a - | openssl x509 -noout -subject -issuer -serial -dates
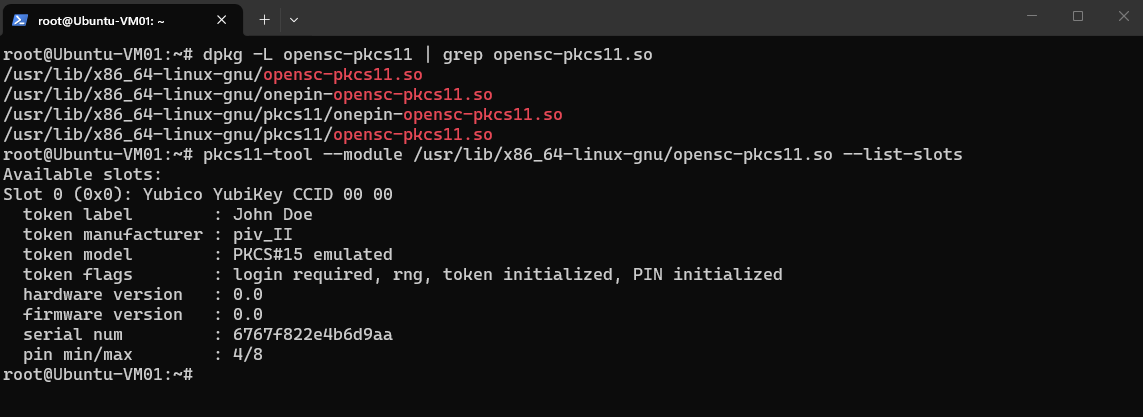
Using pkcs11-tool --list-slots, we can verify that OpenSC detects the YubiKey as a PKCS#11 token, identified here as John Doe.
OpenSC is an open-source set of libraries and tools that provides applications with standardized access to smart cards and cryptographic tokens, including the PIV application on a YubiKey.
In our case, OpenSC provides the PKCS#11 module (
opensc-pkcs11.so), which allows applications such as OpenSSH to use the certificate and hardware-protected private key stored on the YubiKey.
# identify the OpenSC PKCS#11 module:
dpkg -L opensc-pkcs11 | grep opensc-pkcs11.so

pkcs11-tool --module /usr/lib/x86_64-linux-gnu/opensc-pkcs11.so --list-slots
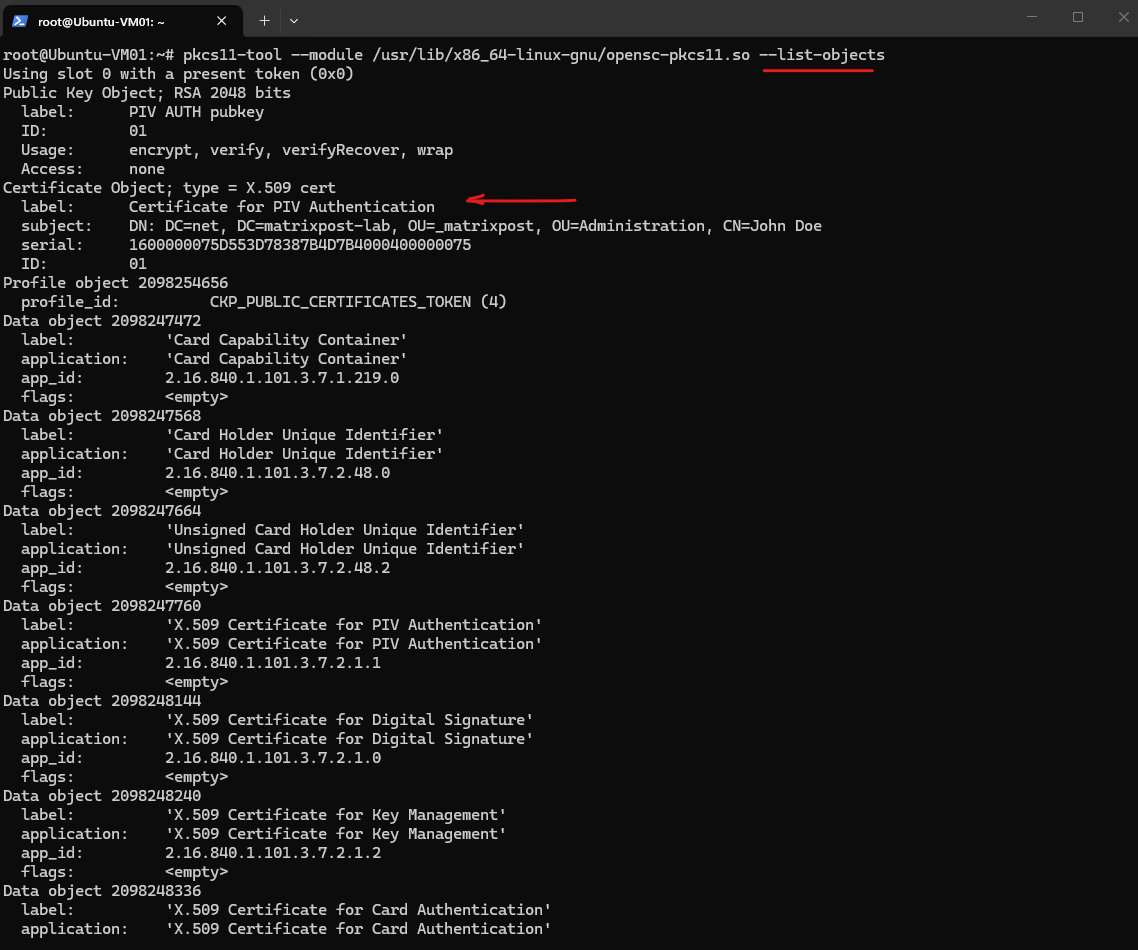
The --list-objects command then enumerates the objects exposed by its PIV application, including the RSA 2048-bit PIV Authentication public key and the corresponding X.509 certificate.
pkcs11-tool --module /usr/lib/x86_64-linux-gnu/opensc-pkcs11.so --list-objects
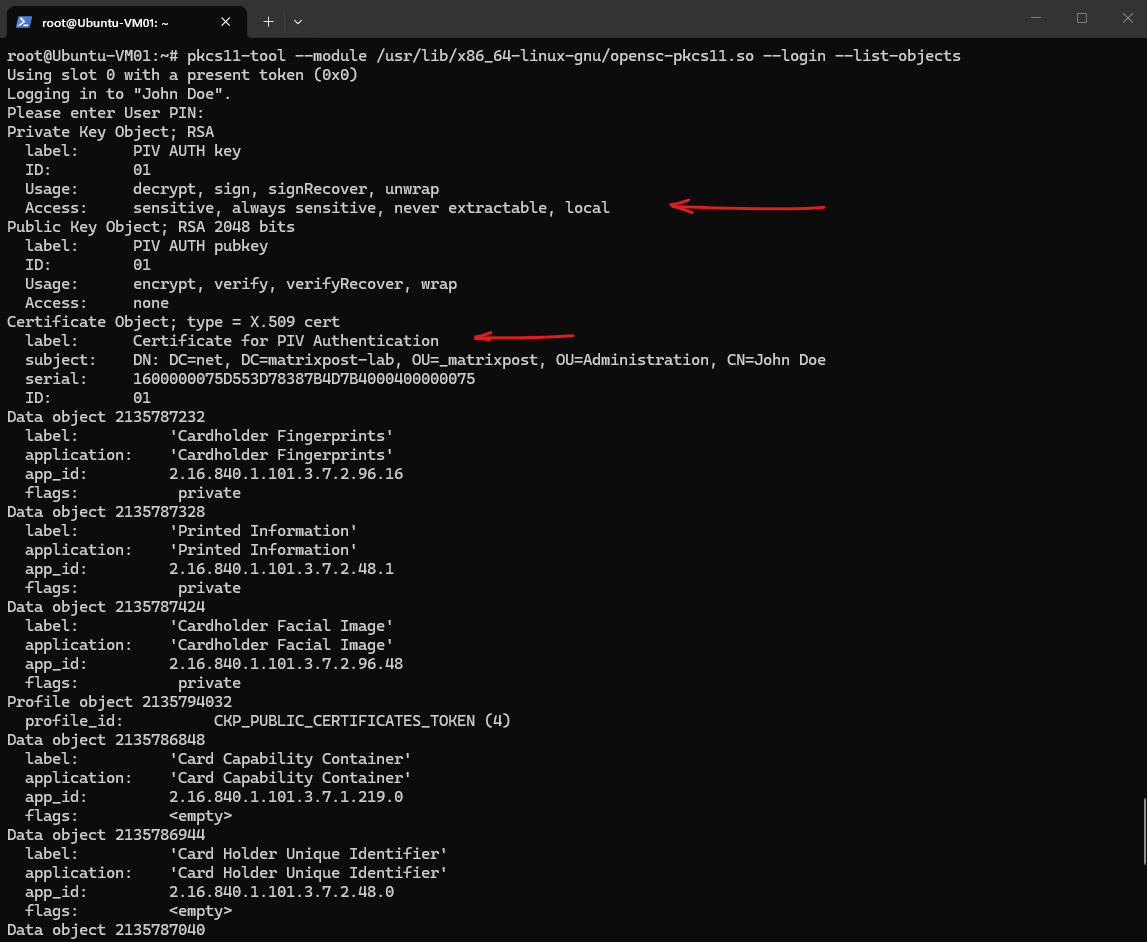
After logging in to the YubiKey with the PIV User PIN, pkcs11-tool also exposes the PIV Authentication private-key object.
The flags sensitive, always sensitive, and never extractable confirm that the private key remains protected on the YubiKey and can only be used for cryptographic operations such as signing, not exported from the device.
pkcs11-tool --module /usr/lib/x86_64-linux-gnu/opensc-pkcs11.so --login --list-objects

Using the YubiKey PIV Private Key for SSH Authentication
First, let OpenSSH retrieve the public key from the YubiKey through the OpenSC PKCS#11 module:
ssh-keygen -Dasks the PKCS#11 module to enumerate all public keys that the token exposes. OpenSC sees the YubiKey’s PIV objects and returns the available public key, in your case the one labeledPIV AUTH pubkeywith ID01.Because our YubiKey currently has only that relevant PIV authentication key pair populated, there is just one SSH public key to print. If multiple suitable private/public key pairs were present on the token,
ssh-keygen -Dcould output multiple public keys.
ssh-keygen -D /usr/lib/x86_64-linux-gnu/opensc-pkcs11.so

Next, save that public key on the target Linux account you want to authenticate to over SSH.
For example, if the target user is john, create the SSH directory and authorized_keys file on the target system:
mkdir -p /home/john/.ssh
chmod 700 /home/john/.ssh/
ssh-keygen -D /usr/lib/x86_64-linux-gnu/opensc-pkcs11.so
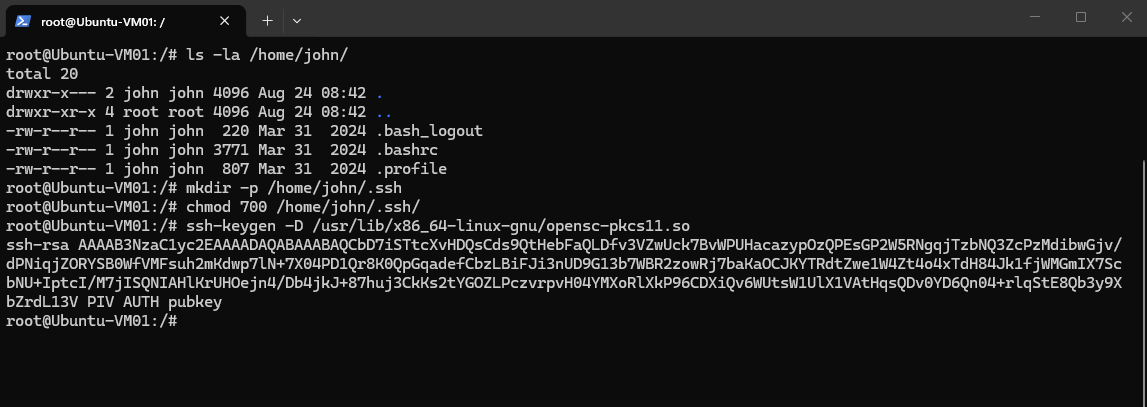
Append the public key to /home/john/.ssh.
nano /home/john/.ssh/authorized_keys
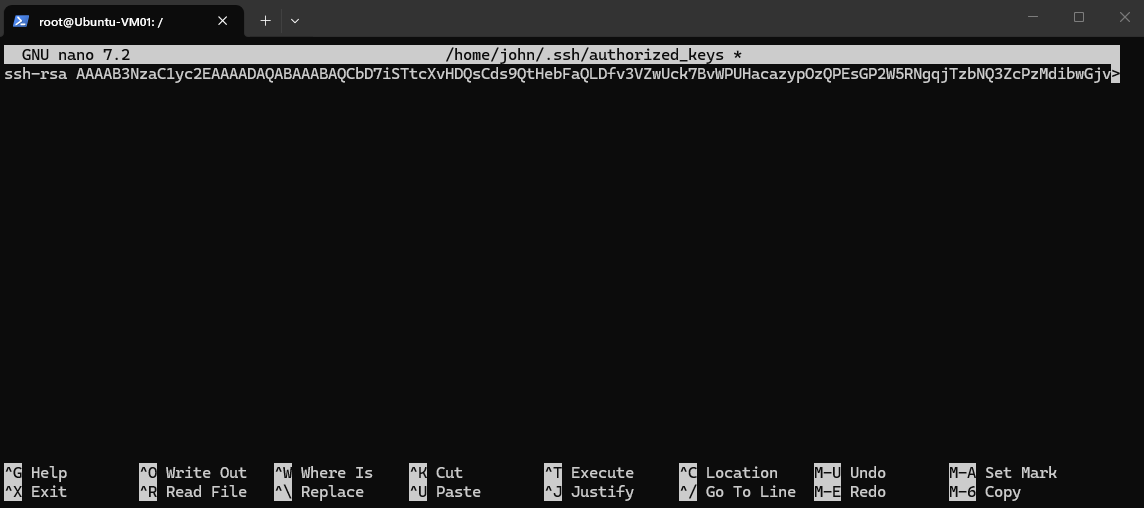
Set permissions for authorized_keys:
chmod 600 /home/john/.ssh/authorized_keys
chown -R john:john /home/john/.ssh
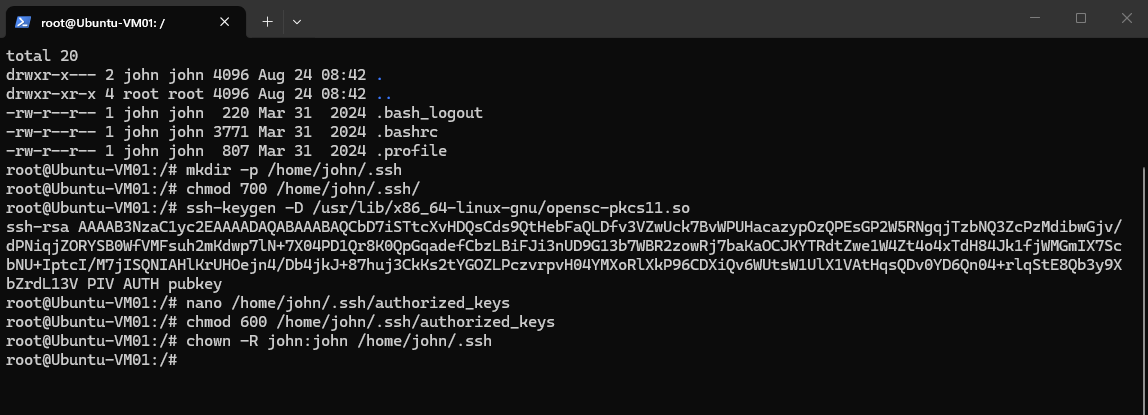
We can now test the login from our Ubuntu client using the YubiKey through PKCS#11:
ssh -I /usr/lib/x86_64-linux-gnu/opensc-pkcs11.so john@<server>

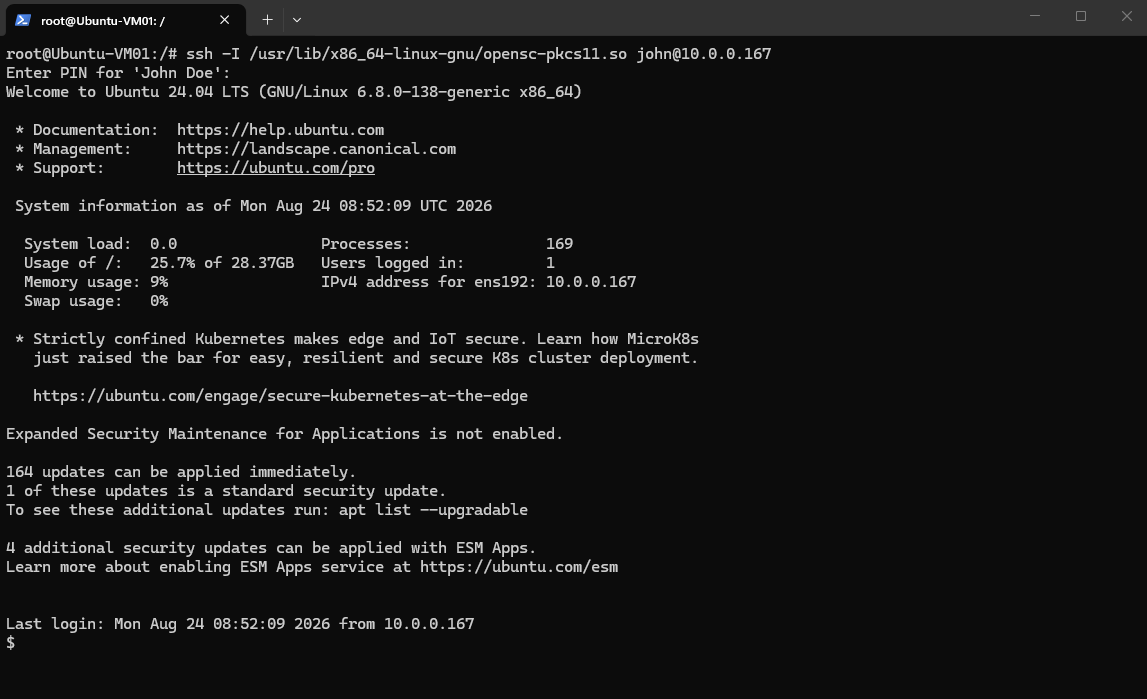
The SSH connection now successfully authenticates using the PIV private key stored on the YubiKey, with OpenSSH accessing it through the OpenSC PKCS#11 provider.
OpenSSH prompts for the PIV PIN, and after successful verification the YubiKey performs the required cryptographic signing operation internally, the private key itself never leaves the hardware device.
Although this is certificate-based/PIV on the YubiKey side, SSH is not authenticating the X.509 certificate itself in this configuration. The SSH server trusts the corresponding SSH-formatted public key in
authorized_keys, while the YubiKey’s PIV private key provides the hardware-backed signing operation.From the SSH server’s perspective, this is standard SSH public-key authentication using the public key stored in
authorized_keys.The difference is entirely on the client side: instead of loading the corresponding private key from a file such as
~/.ssh/id_rsa, OpenSSH uses PKCS#11/OpenSC to perform the signing operation with the hardware-protected private key on the YubiKey.
Using FIDO2 Security Keys for SSH Authentication
Unlike the previous PIV approach, OpenSSH supports FIDO2 security keys natively through special *-sk key types, where sk stands for security key.
This means we no longer need PIV, an X.509 certificate, OpenSC, or PKCS#11, the SSH credential is created specifically through the YubiKey’s FIDO2 application.
OpenSSH supports, among others:
- ecdsa-sk
- ed25519-sk
The corresponding private-key operation is performed by the FIDO2 authenticator, while the SSH server again receives a public key that can be placed in authorized_keys.
For the following FIDO2 tests, I additionally enable the FIDO2 application over USB while keeping PIV enabled. This combination works with the YubiKey passed through to the vSphere VM, where the device is now exposed as Yubico.com YubiKey FIDO+CCID.
As already mentioned in Part 1, leaving all YubiKey applications enabled over USB does not work reliably with vSphere USB passthrough. For our Linux tests, we therefore enable only PIV and FIDO2 over USB, which exposes the YubiKey to the VM as a combined FIDO+CCID device and allows us to use both authentication methods.
We can download the latest version of Yubico Authenticator from the official Yubico website and install it on a Windows computer from which we will configure the YubiKe
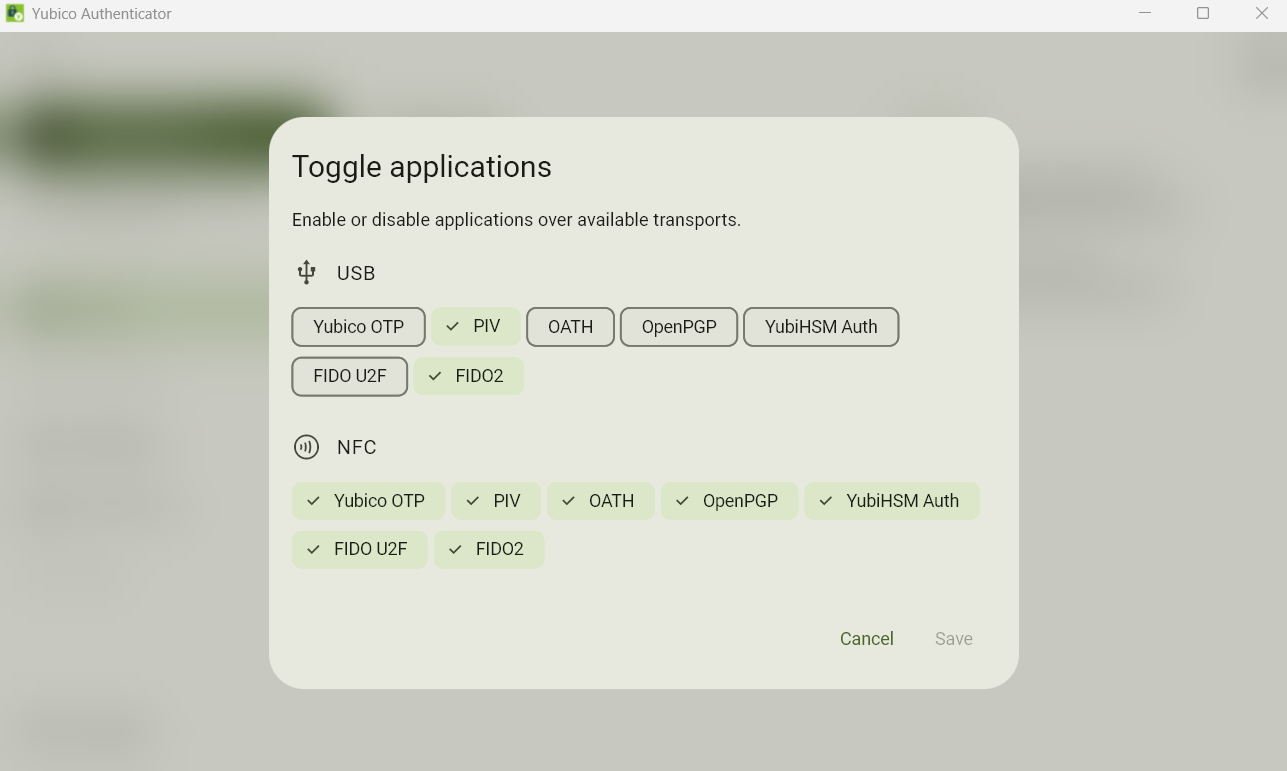
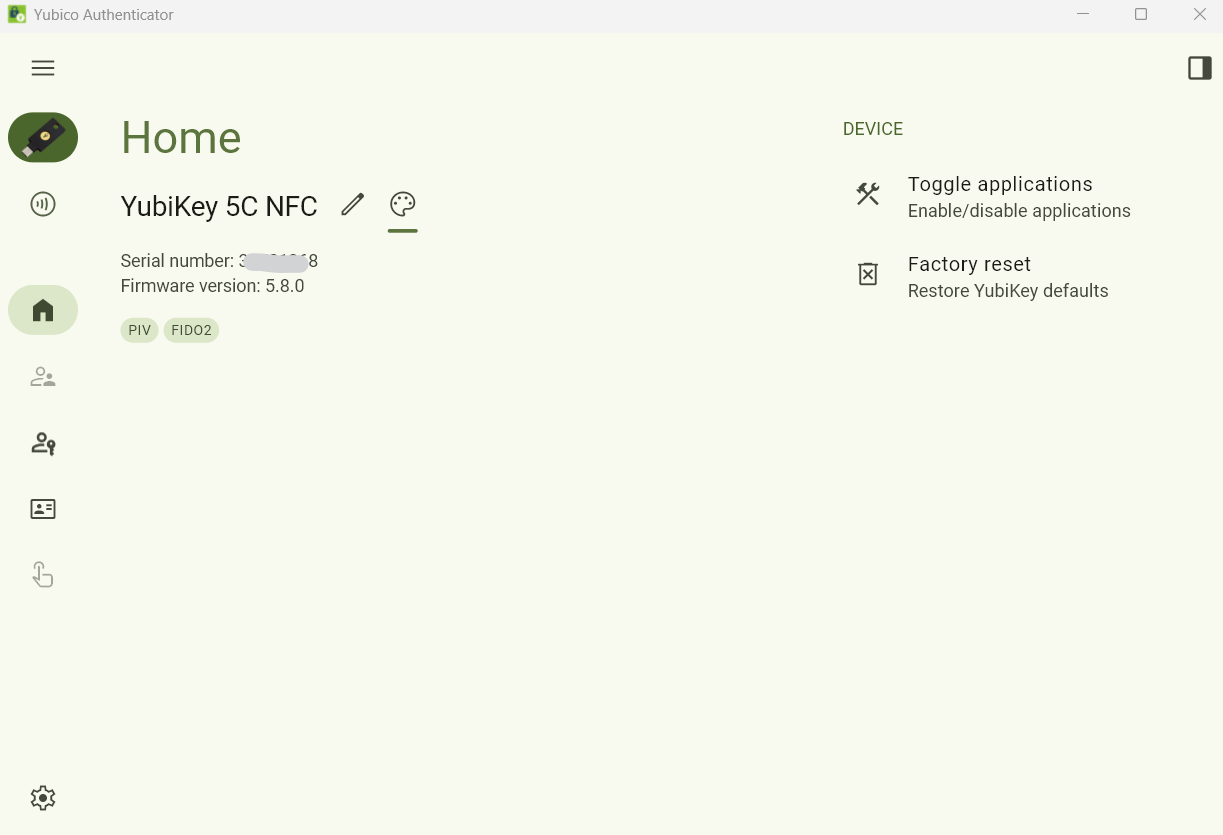
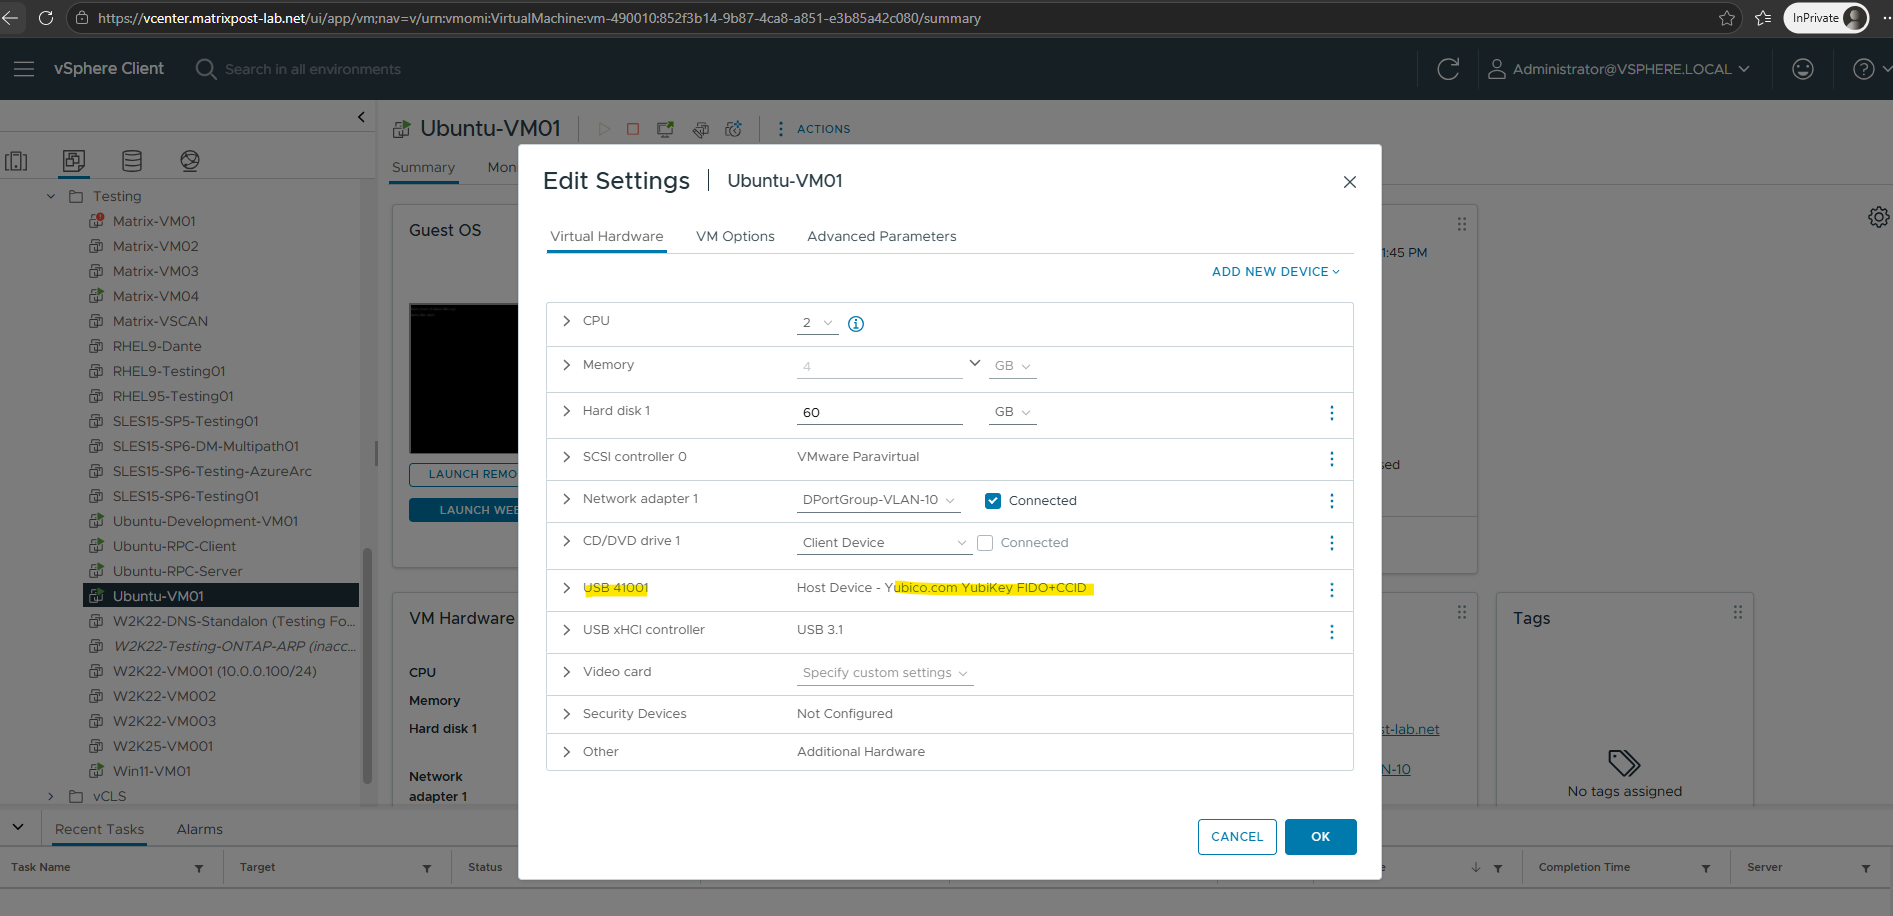
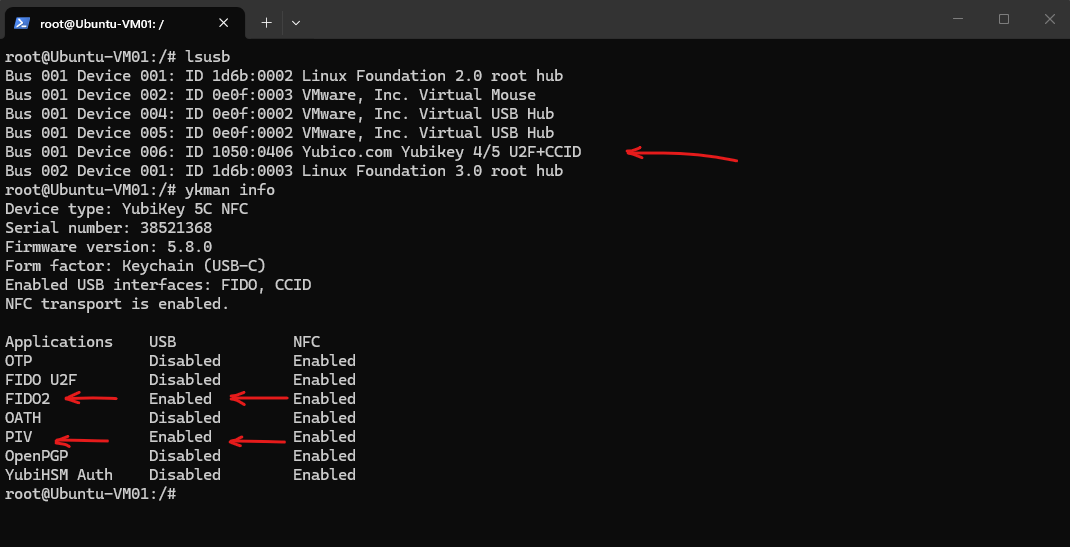
Now that FIDO2 is enabled over USB, we first verify that Ubuntu sees the additional FIDO interface.
After enabling FIDO2,
lsusbnow detects the YubiKey as a combined U2F+CCID (1050:0406) USB device, whileykman infoprovides the more precise application-level view and confirms that FIDO2 and PIV are enabled over USB.Note that the
U2F+CCIDdescription shown bylsusbis the USB product description and does not mean that the FIDO U2F application itself is enabled.
lsusb
ykman info
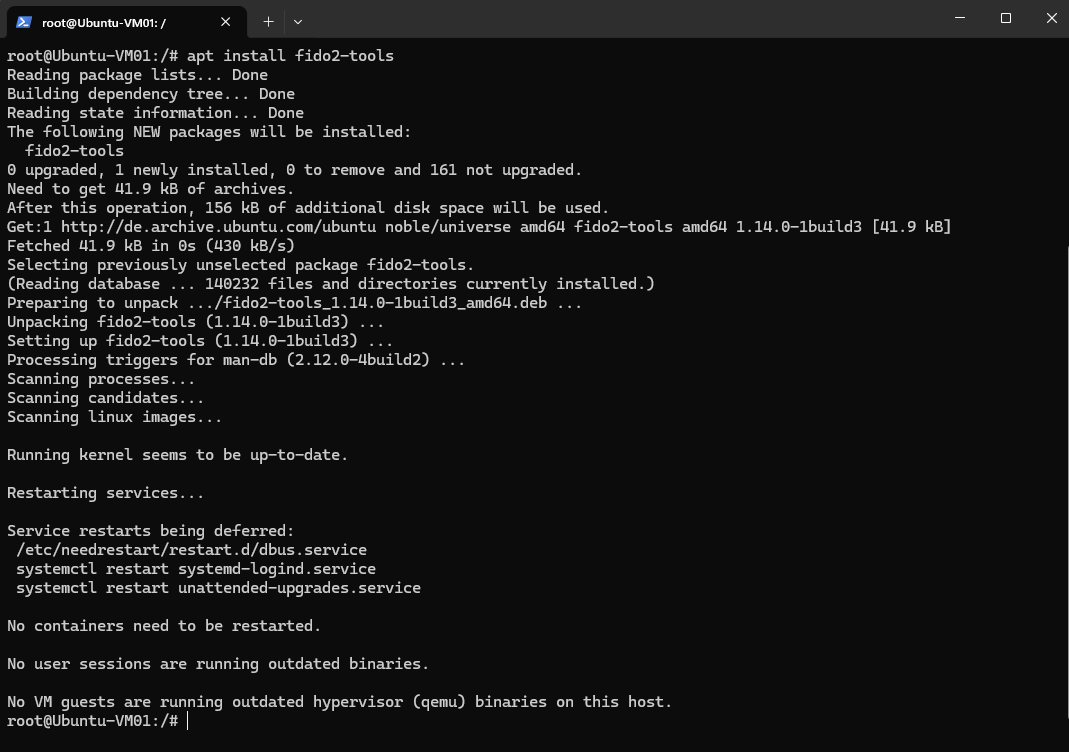
Next, we install the fido2-tools package, which provides command-line utilities for interacting with and inspecting FIDO2 authenticators on Linux.
We will use these tools to verify that the YubiKey’s FIDO2 interface is accessible from our Ubuntu VM.
apt install fido2-tools
The fido2-token -L command confirms that the YubiKey FIDO2 interface is successfully detected by Linux and available through /dev/hidraw1.
This verifies that FIDO2 communication works through the vSphere USB passthrough and we can now use the YubiKey with OpenSSH.
fido2-token -L

Now we can create an SSH key backed by the YubiKey’s FIDO2 application. Unlike the PIV example, we don’t reuse an existing key, we create a new SSH-specific FIDO2 credential.
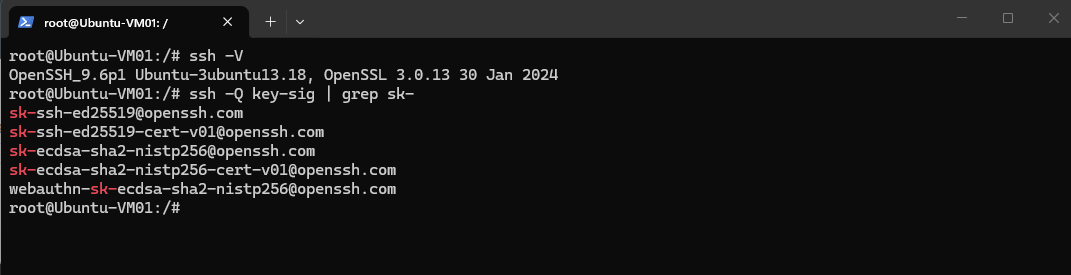
First we check which security-key algorithms our OpenSSH supports:
The
ssh -Q key-sigoutput confirms that our OpenSSH 9.6p1 installation supports the FIDO2-backed*-sksignature algorithms required for hardware security keys.We will use
ed25519-sk, which creates an SSH credential backed by the YubiKey’s FIDO2 application.The
ed25519-skbecause it combines the modern and efficient Ed25519 signature algorithm with hardware-backed FIDO2 authentication, indicated by the-sk(security key) suffix.
ssh -V
ssh -Q key-sig | grep sk-
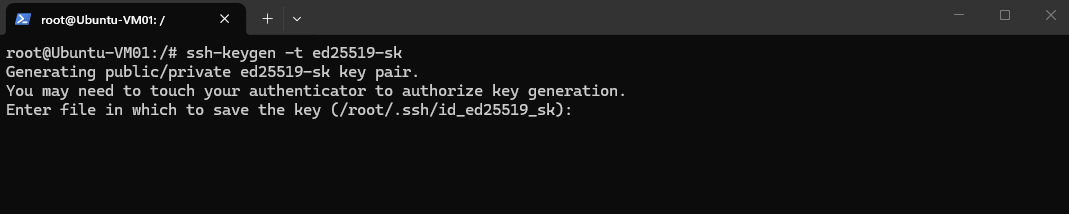
Now we generate the FIDO2-backed SSH credential:
The
ssh-keygencommand starts generating a new Ed25519-SK credential using the YubiKey’s FIDO2 authenticator. Before the credential can be created, the YubiKey requires user presence (UP), indicated by the flashing key and the prompt to physically touch the authenticator.
ssh-keygen -t ed25519-sk

After touching the YubiKey, the user presence is successfully confirmed and the key-generation process continues. OpenSSH now asks where the local FIDO2 SSH credential reference should be stored, using /root/.ssh/id_ed25519_sk by default.
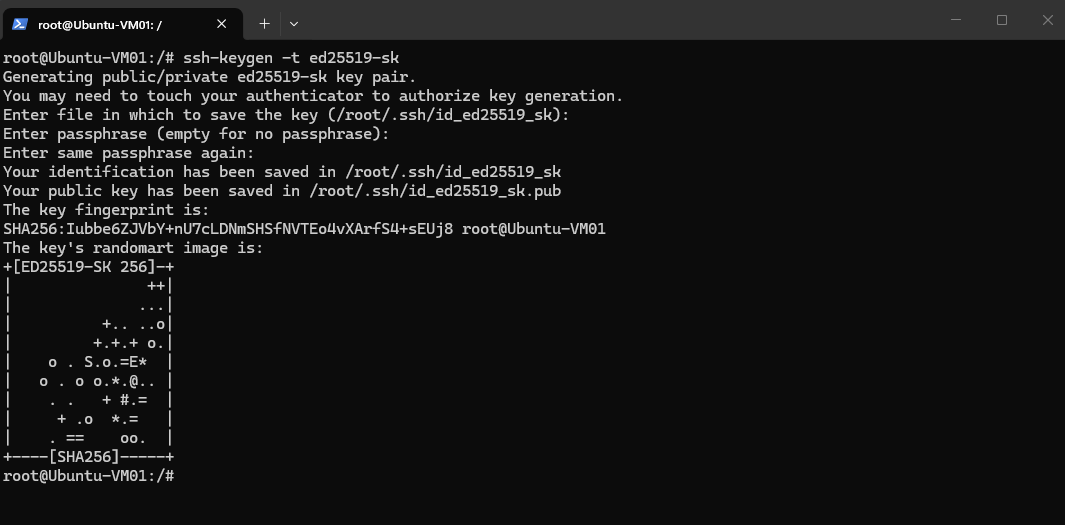
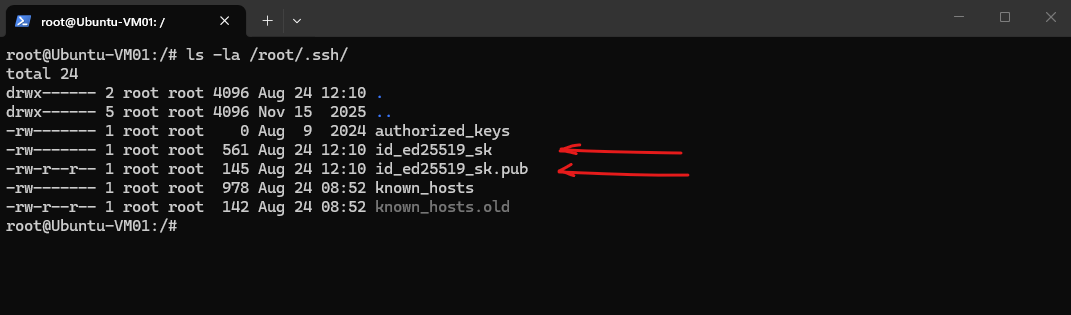
Finally, OpenSSH saves the FIDO2-backed credential reference as id_ed25519_sk and the corresponding public key as id_ed25519_sk.pub. The displayed ED25519-SK fingerprint uniquely identifies the newly created SSH credential, which is now ready to be registered on the target SSH server.
ls -la /root/.ssh/
The generated .pub file contains the FIDO2-backed SSH public key in OpenSSH format. Just like with conventional SSH public-key authentication, this public key must be added to the target user’s ~/.ssh/authorized_keys file on the SSH server.
cat /root/.ssh/id_ed25519_sk.pub
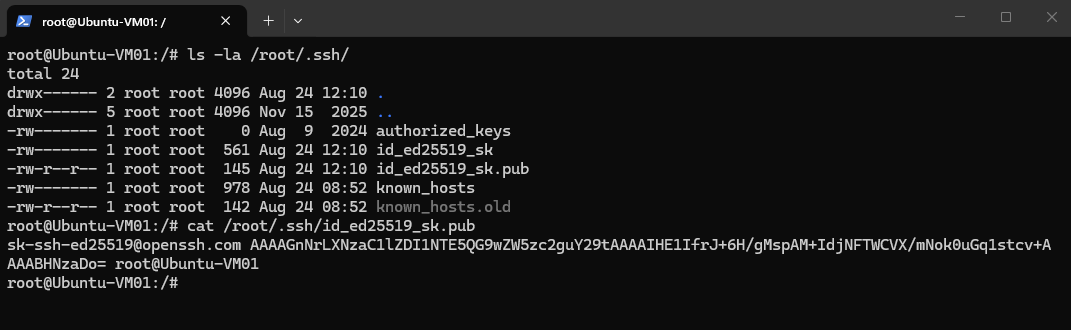
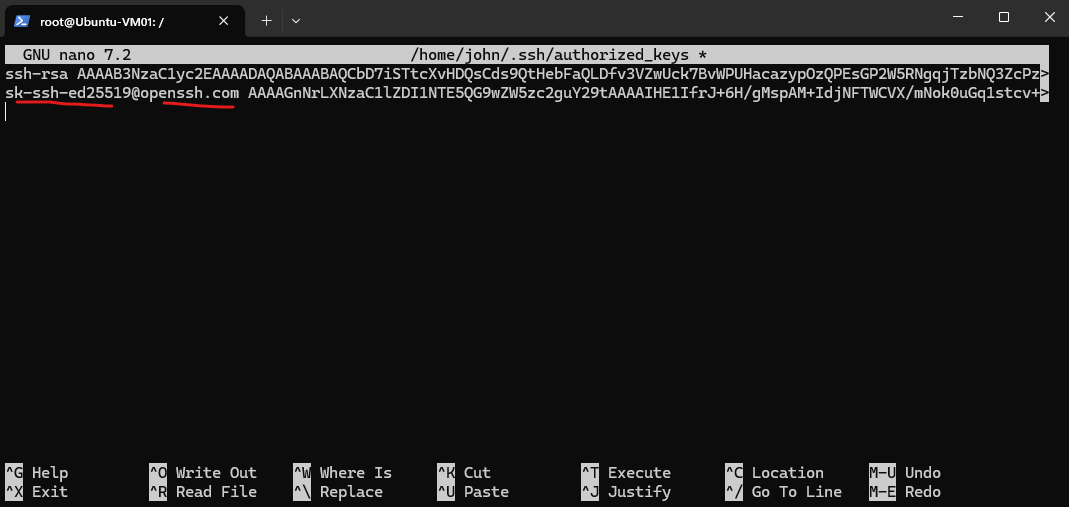
We add the new sk-ssh-ed25519@openssh.com public key to the target user’s ~/.ssh/authorized_keys file. The file now contains both our previous PIV-backed RSA public key and the new FIDO2-backed Ed25519-SK public key, allowing us to test both hardware-backed SSH authentication methods side by side.
nano /home/john/.ssh/authorized_keys
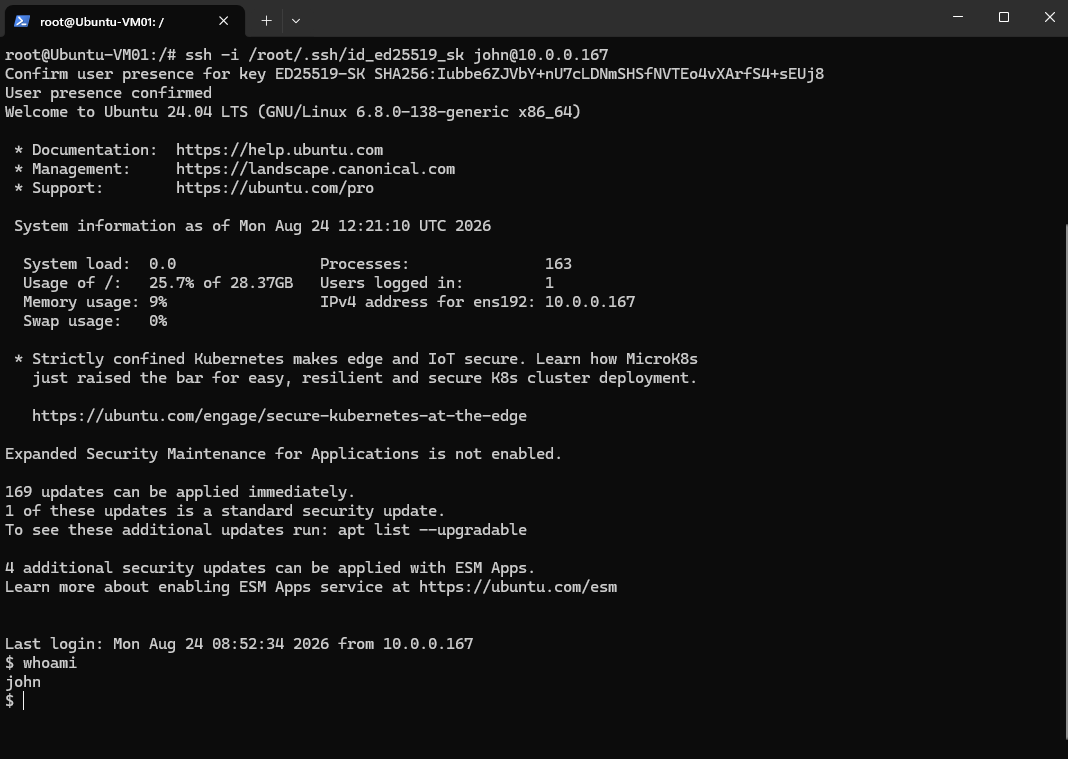
Now we try to authenticate to the SSH server using our newly created FIDO2-backed Ed25519-SK credential.
OpenSSH now asks us to confirm user presence for the ED25519-SK credential, while the YubiKey starts flashing. By physically touching the YubiKey, we authorize it to perform the cryptographic signing operation required for the SSH authentication.
ssh -i /root/.ssh/id_ed25519_sk john@10.0.0.167

After confirming user presence by touching the YubiKey, OpenSSH reports User presence confirmed and successfully authenticates as john without requesting the Linux account password.
The required signature was performed by the FIDO2-backed Ed25519-SK credential on the YubiKey, while the SSH server verified it using the corresponding public key in
authorized_keys.
Links
Log in using a smart card
https://ubuntu.com/desktop/docs/en/latest/how-to/log-in-using-a-smart-card/?_gl=1*4tqg0i*_gcl_au*MjExMzc0NTIxNS4xNzg3ODM3OTQwLi0uLS4xNzg3ODM3OTM5LjIwNDc5ODE3MTkuMTc4ODA5NjE4OC4xNzg4MDk2MzA2Smart card authentication
https://ubuntu.com/server/docs/how-to/security/smart-card-authentication/
