

Passwordless Authentication in Windows – Logon and RDP without Passwords – Part 1- Certificate-Based Authentication
Passwords have been the traditional method for authenticating users to Windows systems for decades. However, passwords also introduce several security risks: they can be stolen through phishing, reused across systems, captured by malware, or exposed when credentials are entered on compromised computers.
Modern Windows environments therefore increasingly move toward passwordless authentication, where authentication is performed using cryptographic credentials instead of a traditional username and password.
Windows supports several technologies for passwordless authentication, including certificate-based authentication, smart cards, Windows Hello for Business (WHfB), and Passkey on FIDO2.
Windows Hello for Business similarly uses device-bound public-key credentials, typically protected by the computer’s TPM, while FIDO2 passkeys can be stored on the Windows device itself or on a physical FIDO2 security key such as a YubiKey.
In this two-part series, we will explore the different options available for passwordless authentication in Windows, with a particular focus on Remote Desktop (RDP) connections.
In this part, we will start by configuring certificate-based authentication and using a YubiKey 5C NFC as a PIV smart card, securely storing the PKI-issued certificate and its private key on the physical security key to establish local and RDP sessions without entering the user’s domain password.
In Part 2, we will continue with Passkey on FIDO2 using a physical FIDO2 security key and explore how Microsoft Entra Kerberos enables this modern passwordless authentication method to be used with on-premises Active Directory and Remote Desktop (RDP).
This is particularly relevant as Microsoft is making passkeys the default authentication experience in Microsoft Entra ID, with the rollout beginning on September 1, 2026. This further emphasizes Microsoft’s move away from passwords and traditional, phishable authentication methods toward phishing-resistant, public-key-based authentication such as FIDO2 security keys.
FIDO stands for Fast IDentity Online. FIDO2 is an open authentication standard designed to replace traditional password-based authentication with phishing-resistant public-key cryptography.
In Part 3, we switch from Windows to Linux and explore how PIV/PKCS#11 certificates and FIDO2 security keys can be used for hardware-backed passwordless authentication with SSH.
I have already covered Windows Hello for Business (WHfB) in detail here, including its different trust models, the underlying authentication process, and Hybrid Azure AD joined environments. Therefore, we will only briefly discuss Windows Hello for Business (WHfB) here and refer to those articles for the complete configuration and technical background.
- Passwordless Authentication Methods in Windows
- Configuring Certificate-Based Authentication
- Creating the Certificate Template for Passwordless Authentication
- Verify the CA Certificate in the NTAuth Store
- Verify Certificate Mapping and the NTDS CA Security Extension
- Preparing the YubiKey for USB Passthrough in vSphere
- Enroll the AD CS Certificate & Deploy the YubiKey Minidriver on Client and Remote Targets
- Verify the Certificate Stored on the YubiKey
- Passwordless Windows RDP Logon with the YubiKey
- Passwordless Windows Local Logon with the YubiKey
- Troubleshooting
- Links
Passwordless Authentication Methods in Windows
Windows supports several authentication technologies that allow users to sign in without entering their account password. Although these methods are commonly grouped under the term passwordless authentication, the underlying technologies can be quite different.
Instead of proving their identity with a shared secret such as a password, users typically authenticate using cryptographic keys or certificates. Access to the corresponding private key is then protected by something the user has, such as a device or security key, and optionally something the user knows or is, such as a PIN, fingerprint, or facial recognition.
The most relevant passwordless authentication methods in modern Windows environments are:
| Authentication Method | Credential | Typical User Verification | Windows Logon | RDP | Typical Use Case |
|---|---|---|---|---|---|
| Certificate / Smart Card | X.509 certificate + private key | PIN | Yes | Yes | Active Directory environments, administrative access, RDP |
| Windows Hello for Business | Device-bound asymmetric key or certificate | PIN / biometrics | Yes | Yes, depending on the environment and configuration | Modern Windows domain and Microsoft Entra environments |
| FIDO2 Security Key / Passkey | Asymmetric key stored on authenticator | PIN / biometrics | Yes | Depends on the RDP scenario | Phishing-resistant passwordless authentication |
| Virtual Smart Card | Certificate + TPM-protected private key | PIN | Yes | Yes | Smart-card authentication without a physical smart card |
A common characteristic of these technologies is that the user’s password does not have to be transmitted to or entered on the target system. Authentication is instead based on proving possession of a cryptographic private key.
This is particularly interesting for Remote Desktop (RDP) connections. Traditional RDP authentication usually involves providing credentials that can potentially be exposed to the remote system.
Passwordless technologies allow us to authenticate using cryptographic credentials instead and can significantly reduce the risks associated with passwords and credential theft.
Certificate-Based Authentication and Smart Cards
Certificate-based authentication is one of the established passwordless authentication mechanisms in Windows and Active Directory environments.
The user receives an X.509 certificate containing a public key, while the corresponding private key is securely stored on a smart card, security device, or the local Windows system. During authentication, the private key is used to prove possession of the certificate without revealing the private key itself.
Windows and Active Directory can use these certificates for interactive logon and Remote Desktop authentication.
This will be the first passwordless authentication method we configure and examine in this article.
Windows Hello for Business
Windows Hello for Business (WHfB) replaces passwords with strong two-factor authentication based on a credential that is bound to the user’s device.
Windows generates a cryptographic key pair, with the private key normally protected by the device’s Trusted Platform Module (TPM). The user unlocks access to this credential using a PIN, fingerprint, or facial recognition.
An important distinction is that the Windows Hello PIN is not another form of the user’s domain password. It only unlocks the cryptographic credential stored on that particular device and therefore cannot simply be used to authenticate from another computer.
It is also important to distinguish between Windows Hello (convenience sign-in) and Windows Hello for Business. While both can provide a similar user experience using a PIN or biometrics, Windows Hello for Business uses enterprise-managed cryptographic credentials for authentication, whereas convenience sign-in is primarily a local sign-in mechanism.
How to identify whether your account is registered for Windows Hello (convenience sign-in) or Windows Hello for Business is also shown in my dedicated Windows Hello for Business article.
Windows Hello for Business supports different deployment and trust models and can be integrated with both Active Directory and Microsoft Entra ID environments.
For a detailed walkthrough of configuring Windows Hello for Business, including the different trust models and its integration with Hybrid Microsoft Entra joined devices, see my dedicated article below.
FIDO2 Security Keys and Passkeys
FIDO2 provides passwordless and strongly phishing-resistant authentication using public-key cryptography.
The private key remains on the authenticator, such as a hardware security key, while the corresponding public key is registered with the identity provider.
Authentication requires the authenticator to cryptographically prove possession of the private key, usually after the user verifies themselves using a PIN or biometric gesture.
Passkeys use the same fundamental public-key authentication model and increasingly extend this concept to platform authenticators and synchronized credentials.
FIDO2 is particularly interesting because authentication credentials are bound to the legitimate service, making traditional credential phishing significantly more difficult.
We will examine FIDO2 security keys and their possibilities for Windows and RDP authentication later in this article.
Virtual Smart Cards
Virtual Smart Cards provide functionality similar to traditional physical smart cards but use the computer’s TPM to protect the private key.
From the Windows authentication perspective, the virtual smart card behaves largely like a conventional smart card. Users authenticate using a PIN, while the cryptographic operations are performed using keys protected by the TPM.
Virtual Smart Cards are therefore another option for certificate-based passwordless authentication, although newer deployments will generally also want to consider technologies such as Windows Hello for Business and FIDO2.
Configuring Certificate-Based Authentication
Now that we have looked at the different passwordless authentication methods available in Windows, let us start with certificate-based authentication.
For our first implementation, we will use Active Directory Certificate Services (AD CS) to issue a user certificate that can be used for Windows authentication. Instead of entering the user’s Active Directory password, authentication will be performed using the certificate and its corresponding private key.
The basic components involved are:
- An Active Directory Domain Services (AD DS) environment
- An Enterprise Certification Authority (CA) running Active Directory Certificate Services
- A certificate template suitable for user authentication / smart card logon
- A domain user receiving the certificate
- A Windows client from which we initiate the authentication
- A domain-joined Windows system accepting the authentication, which we will later access using Remote Desktop (RDP)
Because the certificate is used for Active Directory authentication, simply issuing an arbitrary client certificate is not sufficient. The certificate must contain the appropriate properties and Extended Key Usage (EKU) values, and Active Directory must be able to associate the certificate with the corresponding user account.
Behind the scenes, certificate-based Active Directory authentication also involves Kerberos PKINIT (Public Key Cryptography for Initial Authentication). Instead of initially proving the user’s identity to the Key Distribution Center (KDC) using a password-derived secret, the user can prove possession of the private key associated with a trusted certificate.
In the following sections, we will assume that an Active Directory Certificate Services (AD CS) infrastructure is already available. If you first need to deploy a PKI, see my dedicated blog series about how to set up a 2-tier PKI in Active Directory Certificate Services (AD CS), where I walk through the complete setup of a two-tier PKI consisting of an offline Root CA and an Enterprise Issuing CA.
With the PKI already in place, we can focus here on preparing the required certificate template, enrolling the certificate for our user, and finally using it for passwordless Windows and Remote Desktop authentication.
Creating the Certificate Template for Passwordless Authentication
With our Active Directory Certificate Services (AD CS) infrastructure already in place, the next step is to create a certificate template that can be used for certificate-based Windows authentication.
For an Active Directory user to authenticate using a certificate, issuing a regular User or Client Authentication certificate is not sufficient. The certificate must meet specific requirements so that the Kerberos Key Distribution Center (KDC) can validate the certificate and associate it with the corresponding Active Directory user.
For our passwordless authentication scenario, we will therefore create a certificate template based on the built-in Smartcard Logon certificate template.
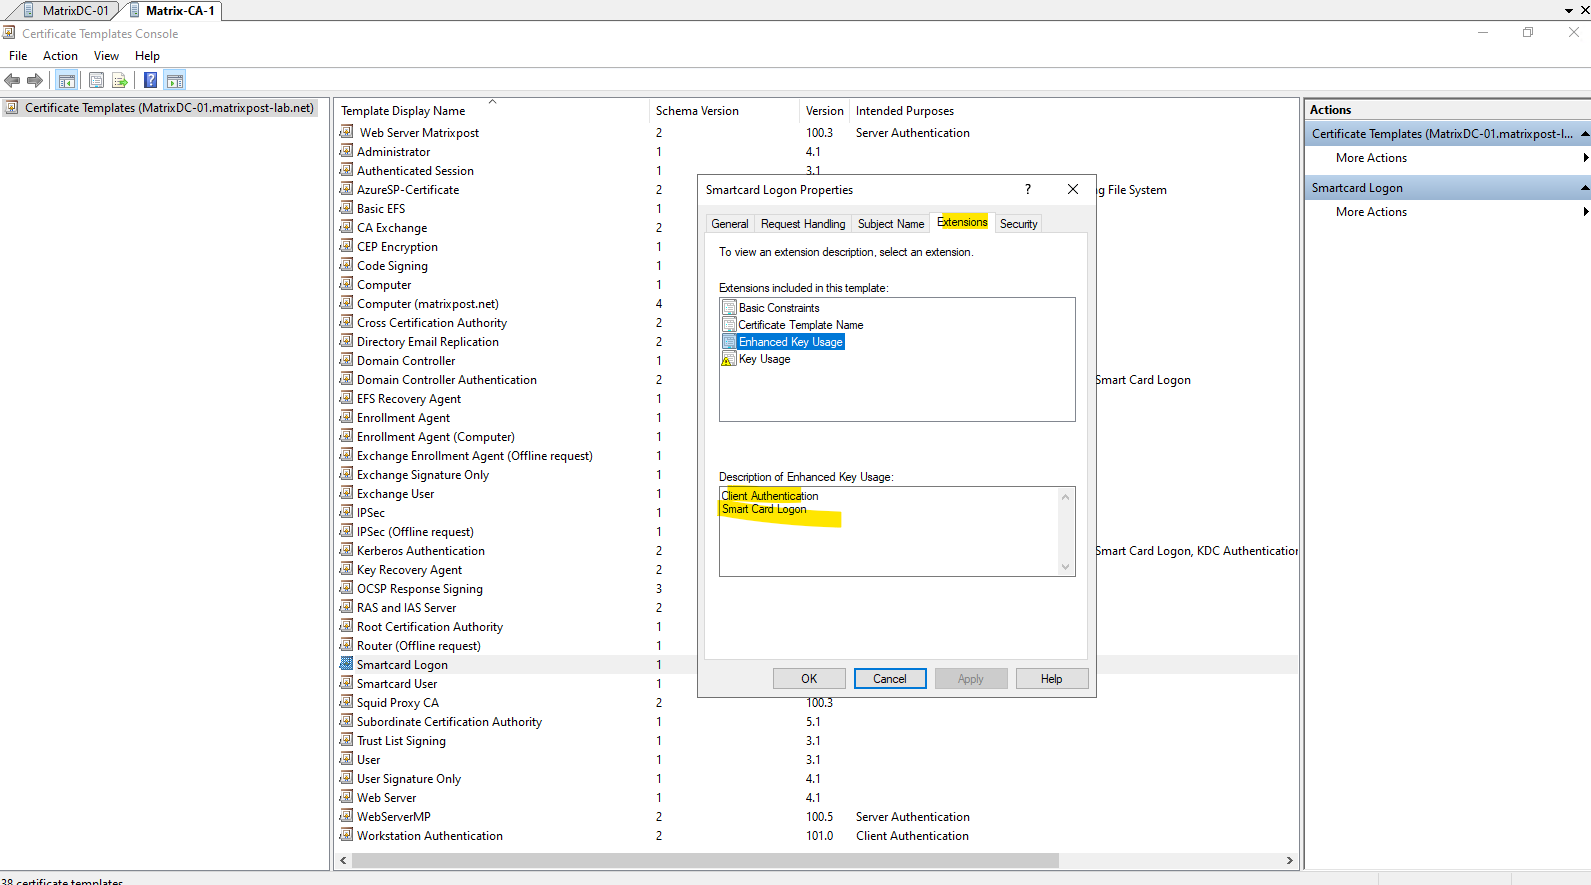
The resulting certificate will include the appropriate authentication purposes, such as Smart Card Logon and Client Authentication, and identify the user through information contained in the certificate.
Although the term Smart Card Logon might suggest that a physical smart card is mandatory, the important part from the Active Directory authentication perspective is the certificate-based logon mechanism and possession of the corresponding private key. Where and how that private key is stored will become particularly important when we later use the certificate for Windows and Remote Desktop authentication.
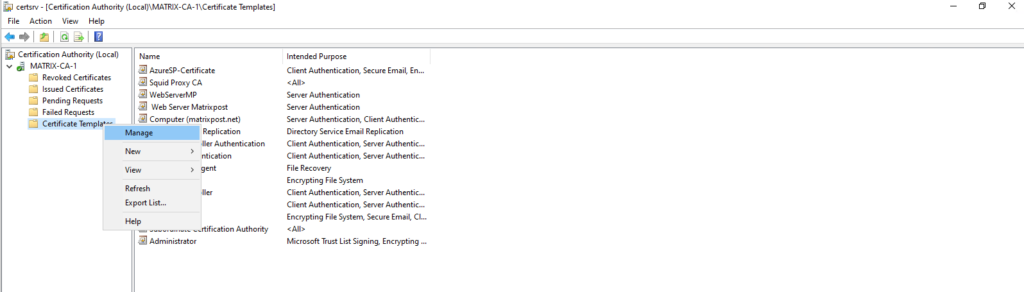
Open the Certificate Templates Console by running certtmpl.msc or right-click within the PKI on the Certificate Template folder -> Manage.
Locate the built-in Smartcard Logon certificate template as shown below.
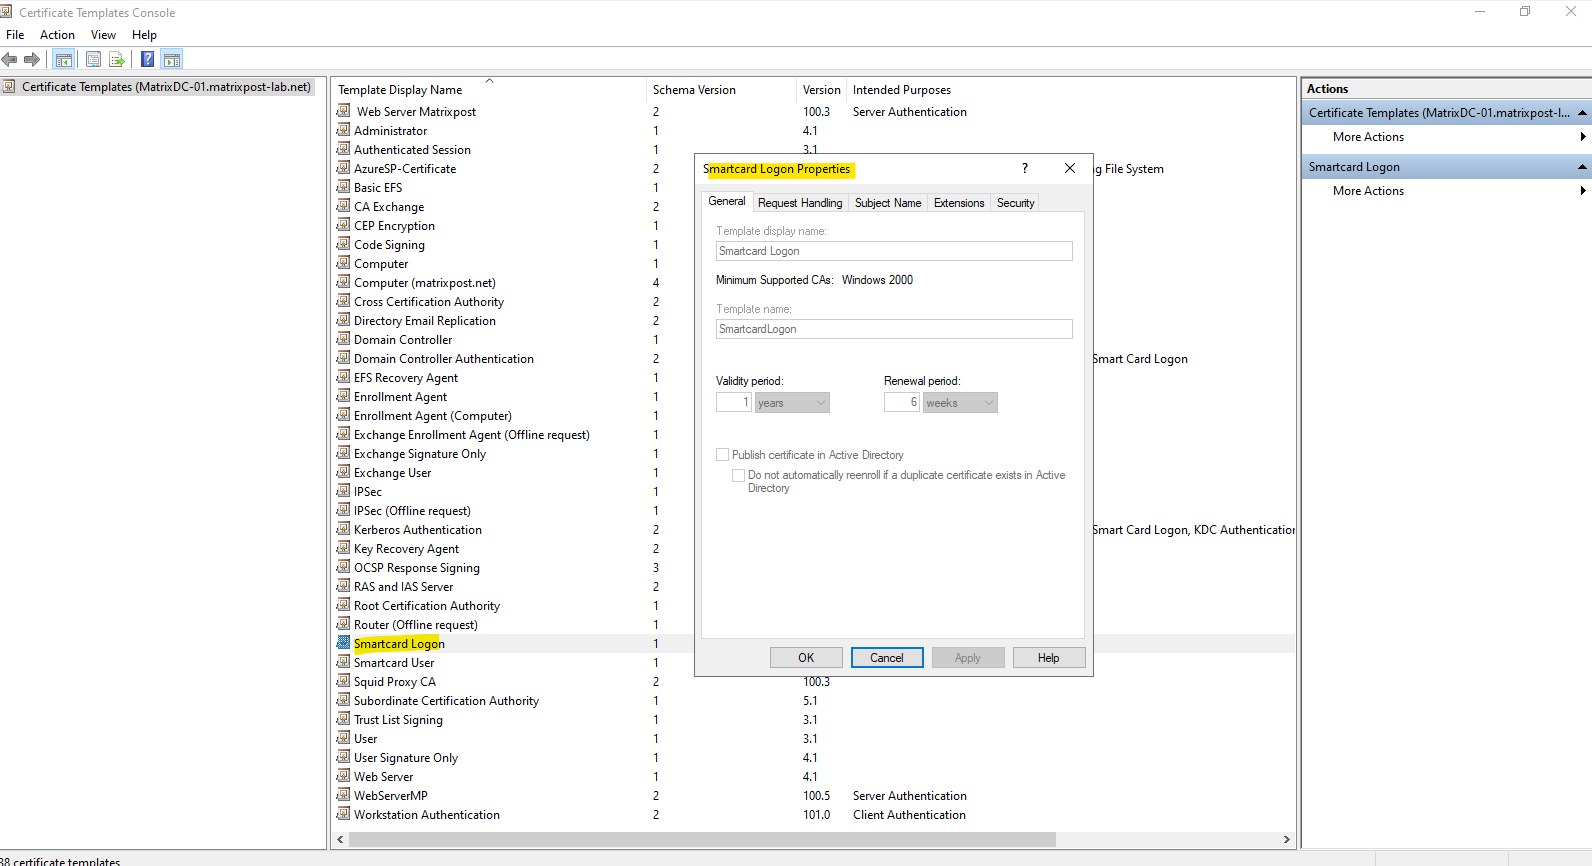
The built-in template already provides the fundamental requirements for certificate-based Active Directory logon, including the appropriate authentication purposes.
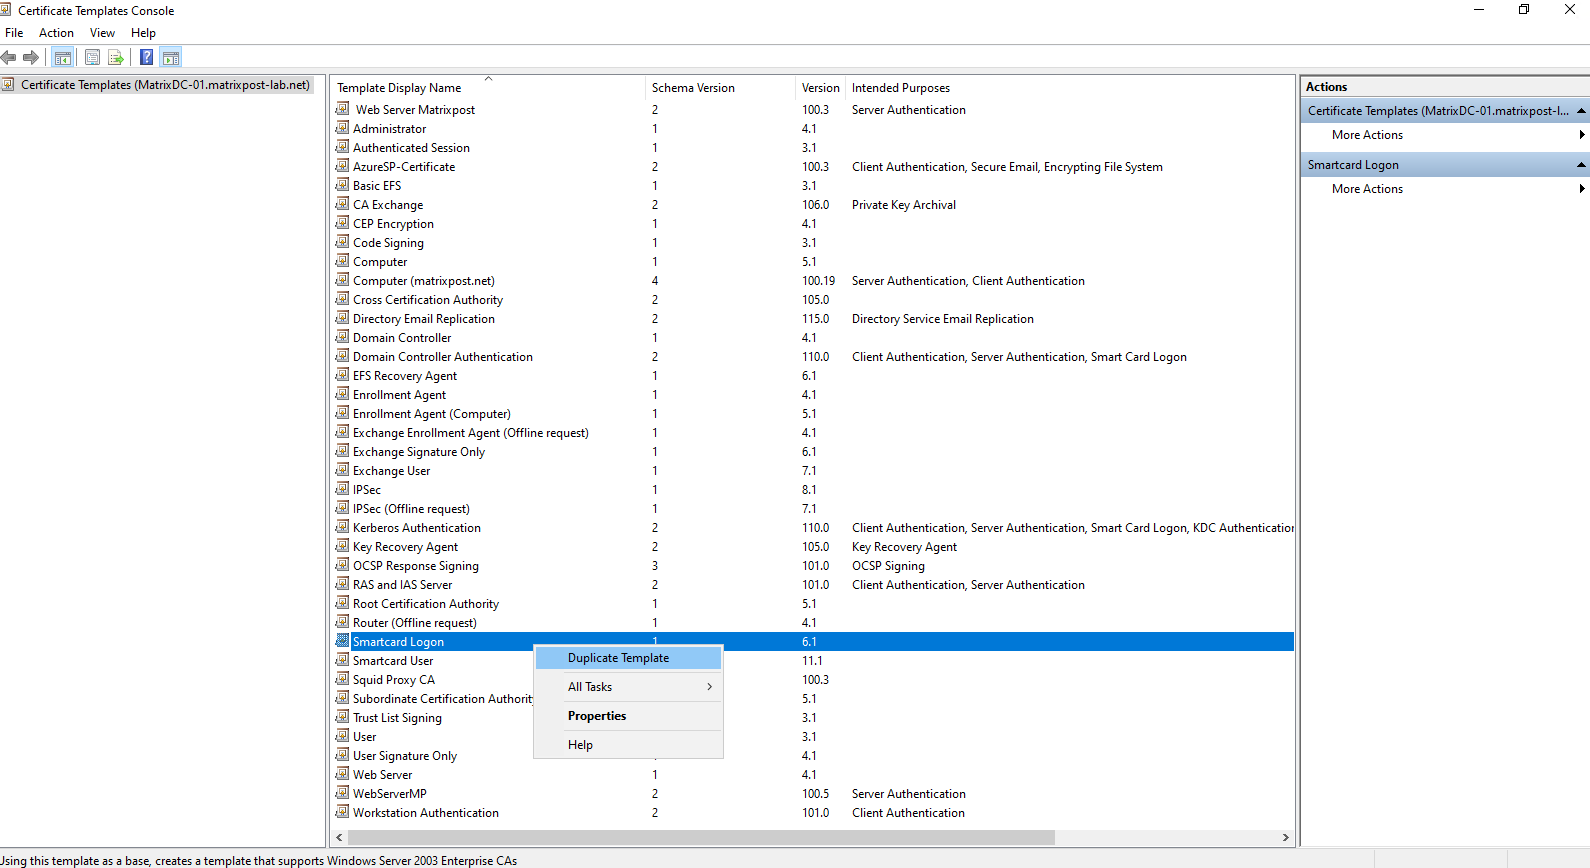
Instead of modifying the built-in template, we will duplicate the Smartcard Logon template and customize the copy for our passwordless authentication scenario.
Right-click the Smartcard Logon template and select Duplicate Template.
After duplicating the template, we first configure the Compatibility settings. Because the built-in Smartcard Logon template originates from much older Windows versions, the duplicated template initially uses Windows Server 2003 for the Certification Authority and Windows XP / Server 2003 for certificate recipients.
For our environment, we can increase these settings to match the Windows Server and Windows client versions we actually support. Increasing the compatibility level also enables newer certificate template features and cryptographic options that are not available with the legacy template settings.
For our certificate template, we will select the highest compatibility levels currently available:
- Certification Authority:
Windows Server 2016 - Certificate recipient:
Windows 10 / Windows Server 2016
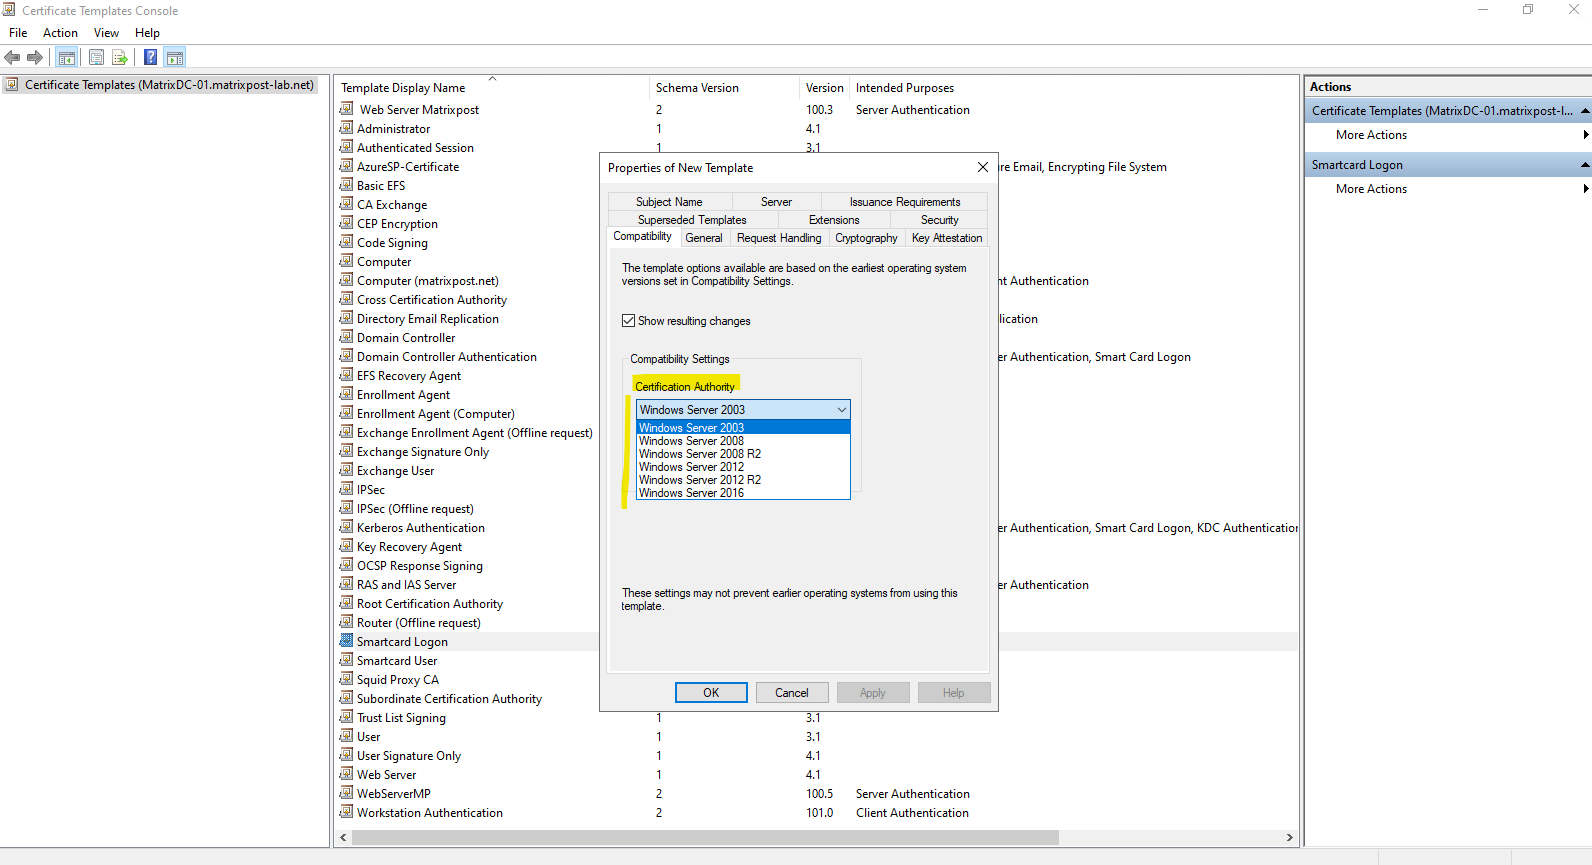
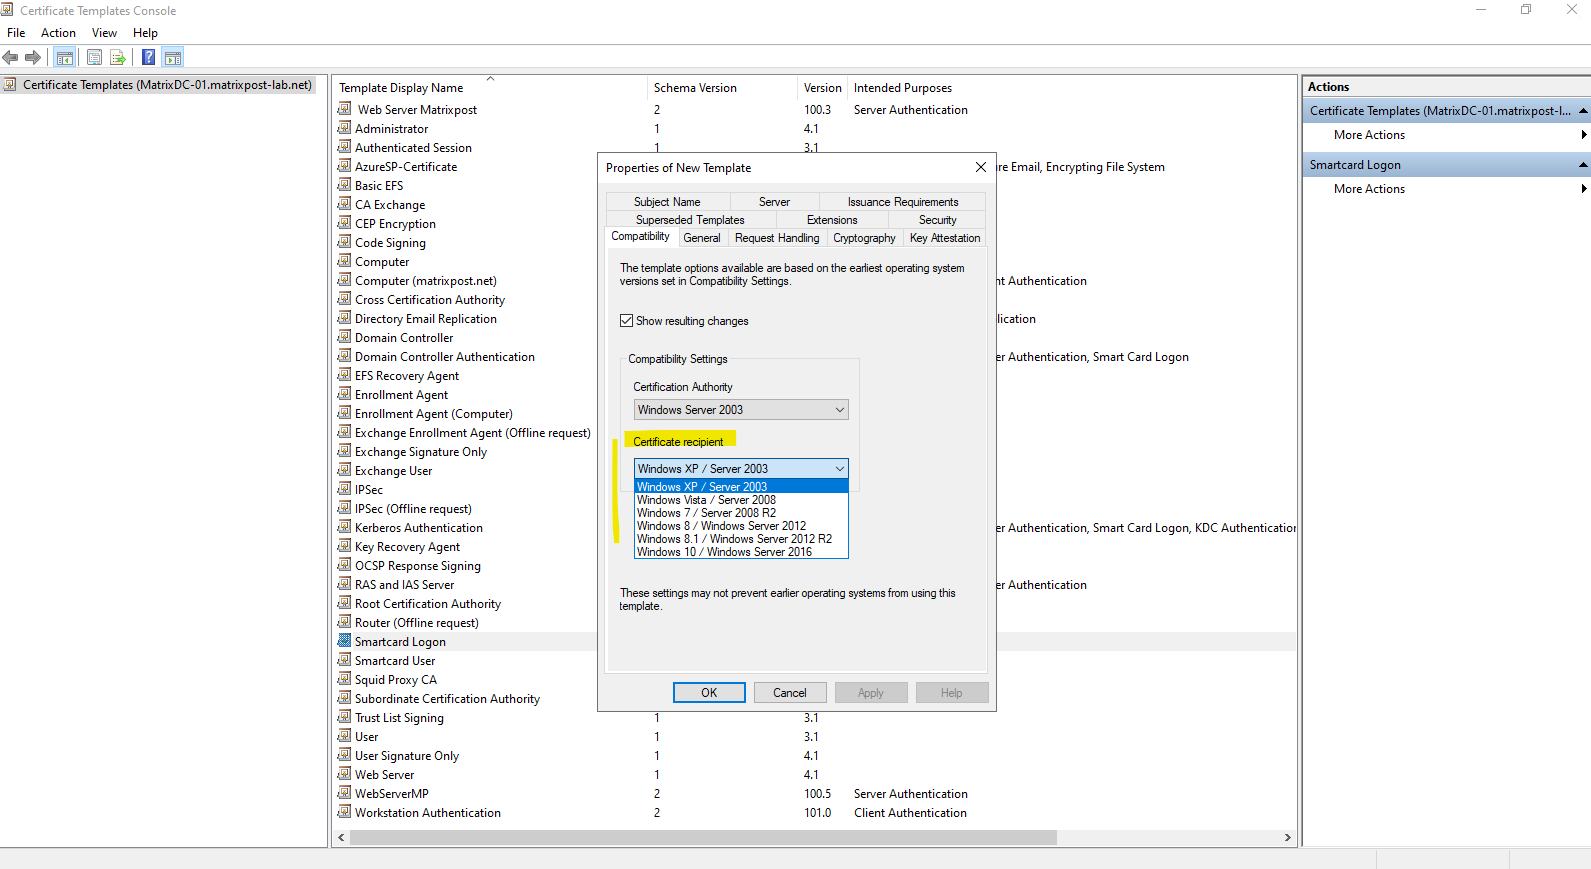
Even on newer Windows Server and Windows client versions, these are still the latest compatibility levels available in the Certificate Templates Console. The compatibility settings therefore do not indicate that the template is limited to Windows Server 2016 or Windows 10; instead, they define the minimum certificate template features and capabilities that can be used.
Because we do not need to support legacy Windows versions in our environment, we can safely use the highest available compatibility levels.
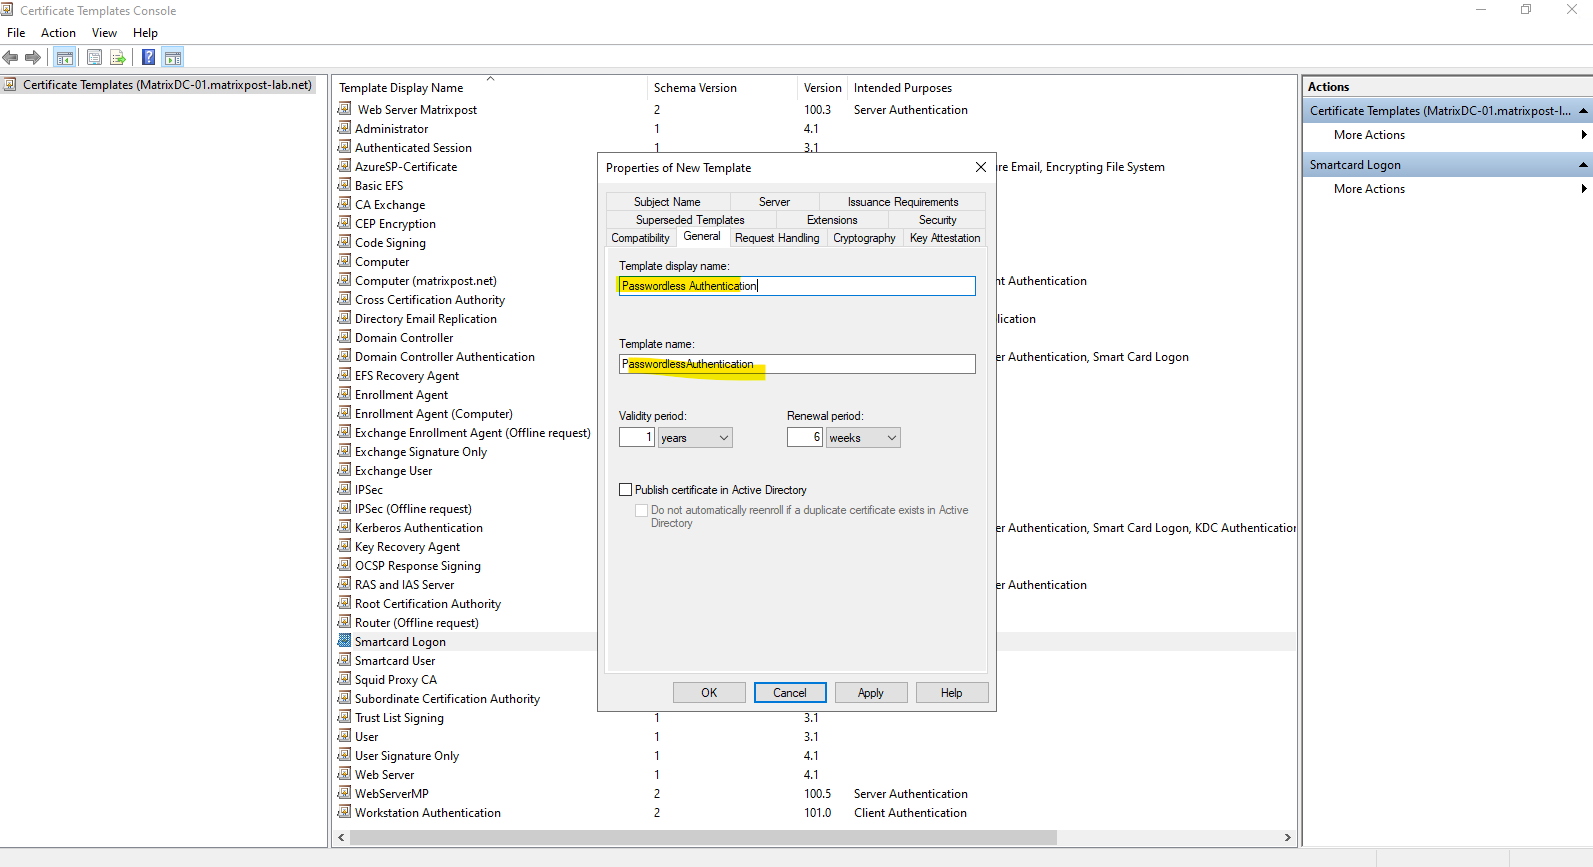
On the General tab, we first assign a descriptive name to our new certificate template. In this example, we will use Passwordless Smart Card Logon to clearly distinguish the template from the built-in Smartcard Logon template and from other passwordless authentication methods we will cover later.
The validity period determines how long an issued authentication certificate remains valid, while the renewal period defines how early before expiration Windows can request a replacement certificate.
We will leave Publish certificate in Active Directory disabled for now. This option controls whether the issued certificate is published to the
userCertificateattribute of the corresponding Active Directory user object.For a detailed explanation of this option, including where the certificate is stored in Active Directory and when publishing certificates can be useful, see my dedicated article Configure certificate auto-enrollment – Publish certificate in Active Directory.
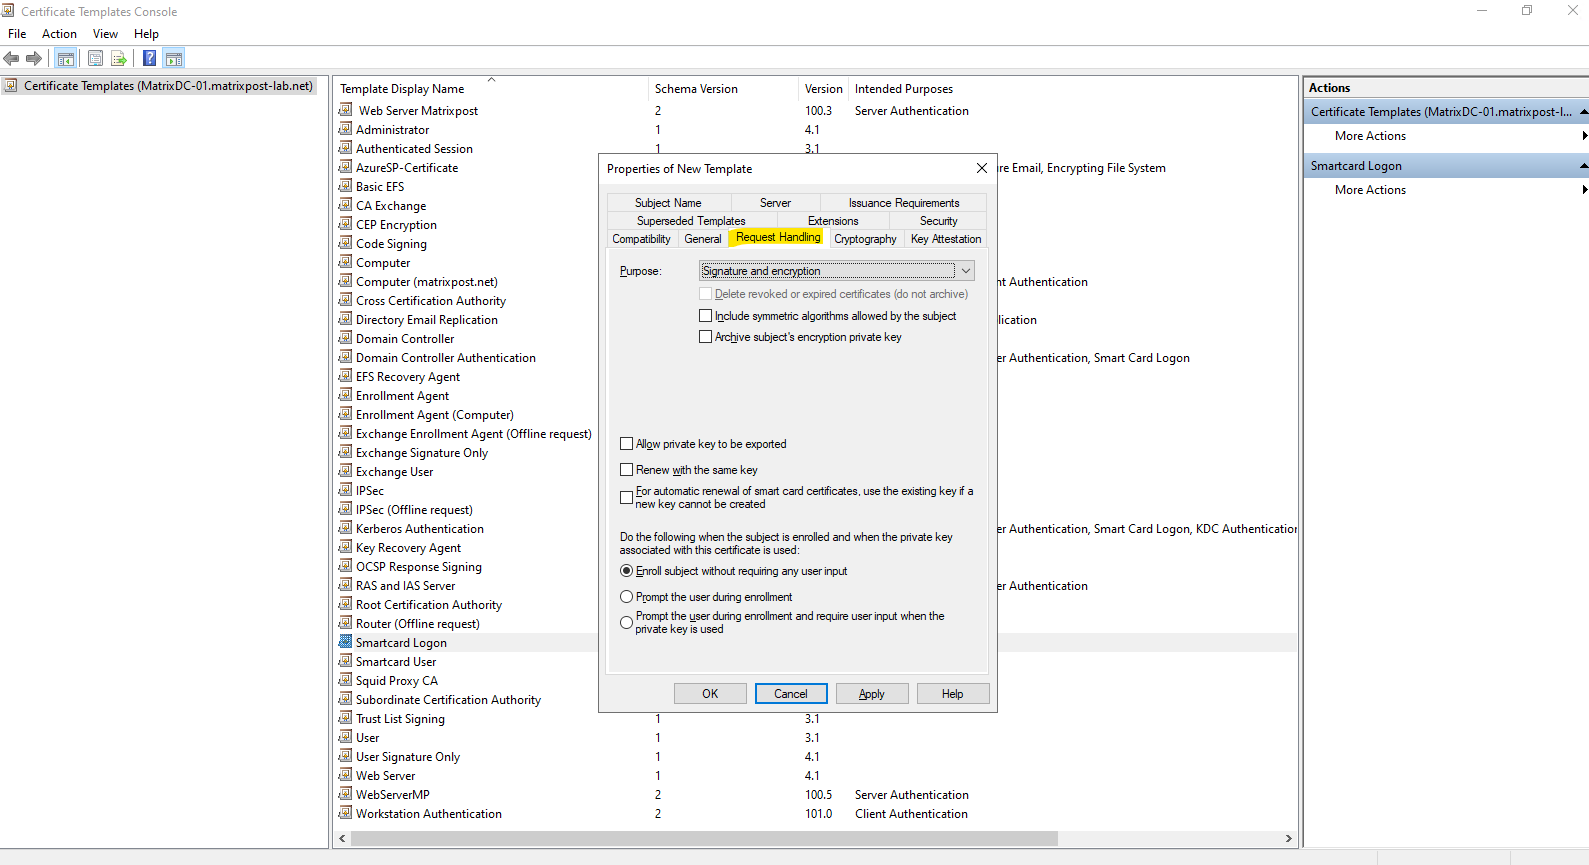
On the Request Handling tab, we will keep the Purpose set to Signature and encryption, as inherited from the Smartcard Logon template.
We will also leave Allow private key to be exported disabled. For an authentication certificate, the private key should generally remain protected by the cryptographic provider and should not be exportable, reducing the risk that the credential can simply be copied to another system.
In our case, the private key is generated and remains securely stored on the YubiKey itself, preventing the authentication credential from simply being exported and copied to another system.
For our initial lab setup, we will keep Enroll subject without requiring any user input selected. This means that certificate enrollment itself does not require an additional interactive confirmation from the user.
The remaining renewal, key archival, and symmetric algorithm options can remain at their default settings for our scenario.
On the Cryptography tab, the original Smartcard Logon template still uses the legacy Cryptographic Service Provider (CSP) architecture.
For our new template, we will instead select Key Storage Provider (KSP). KSP is part of the newer Windows Cryptography Next Generation (CNG) architecture and replaces the older CryptoAPI/CSP model for modern cryptographic operations.
Using a KSP also gives us more flexibility regarding where the user’s private key is generated and protected, for example in software, the computer’s Trusted Platform Module (TPM), or supported hardware security devices.
We will keep the minimum key size at 2048 bits.
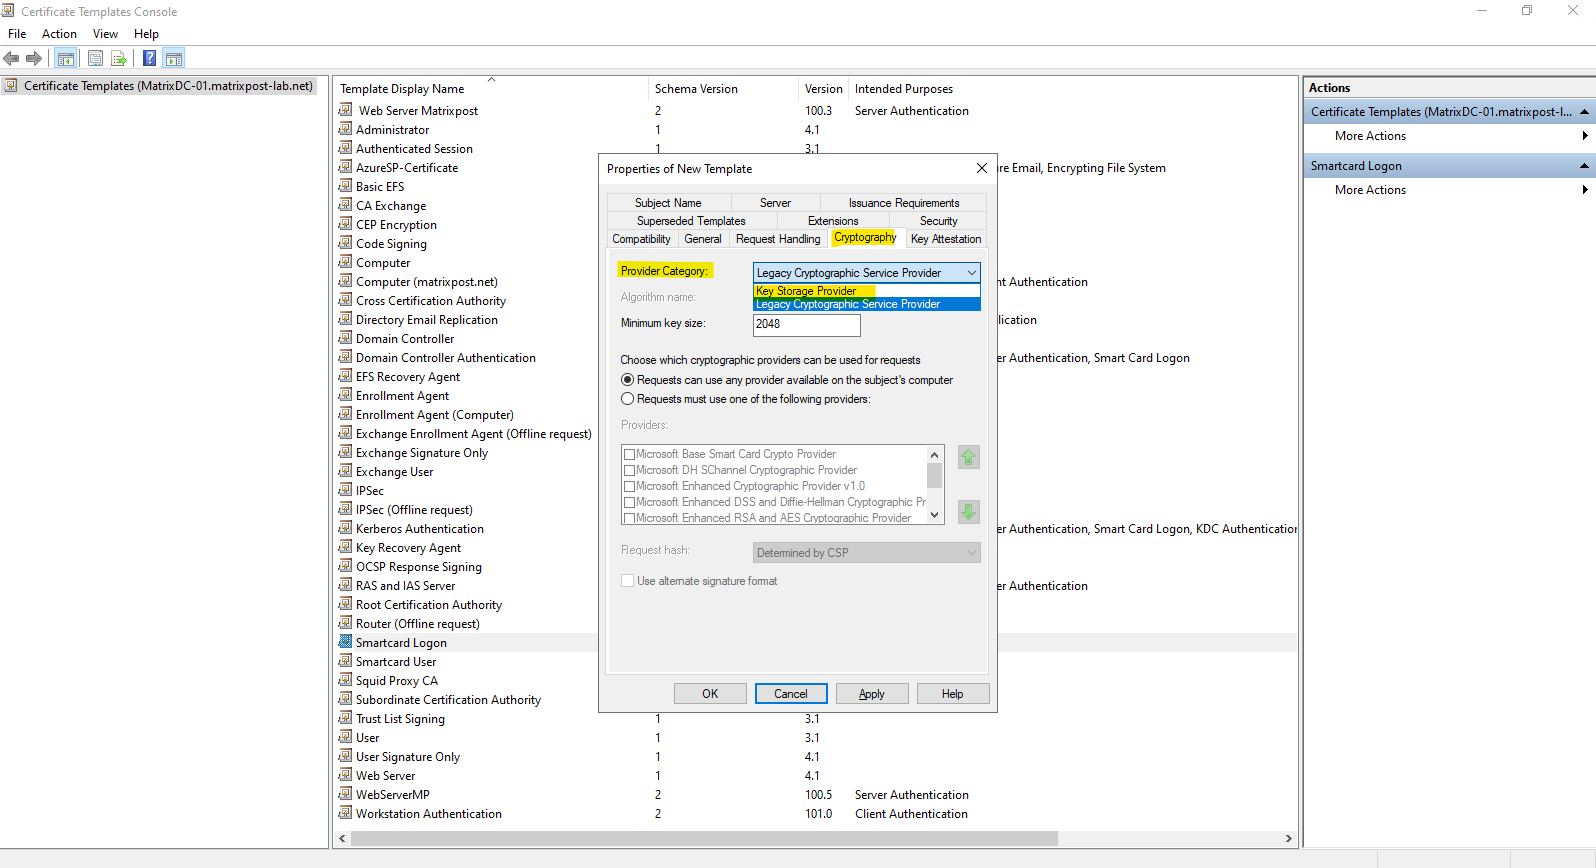
After selecting Key Storage Provider, the provider list below will change.
Now we see the three available KSPs:
- Microsoft Software Key Storage Provider — private key stored locally in software.
- Microsoft Platform Crypto Provider — private key protected by the machine’s TPM.
- Microsoft Smart Card Key Storage Provider — private key resides on a compatible physical smart card.
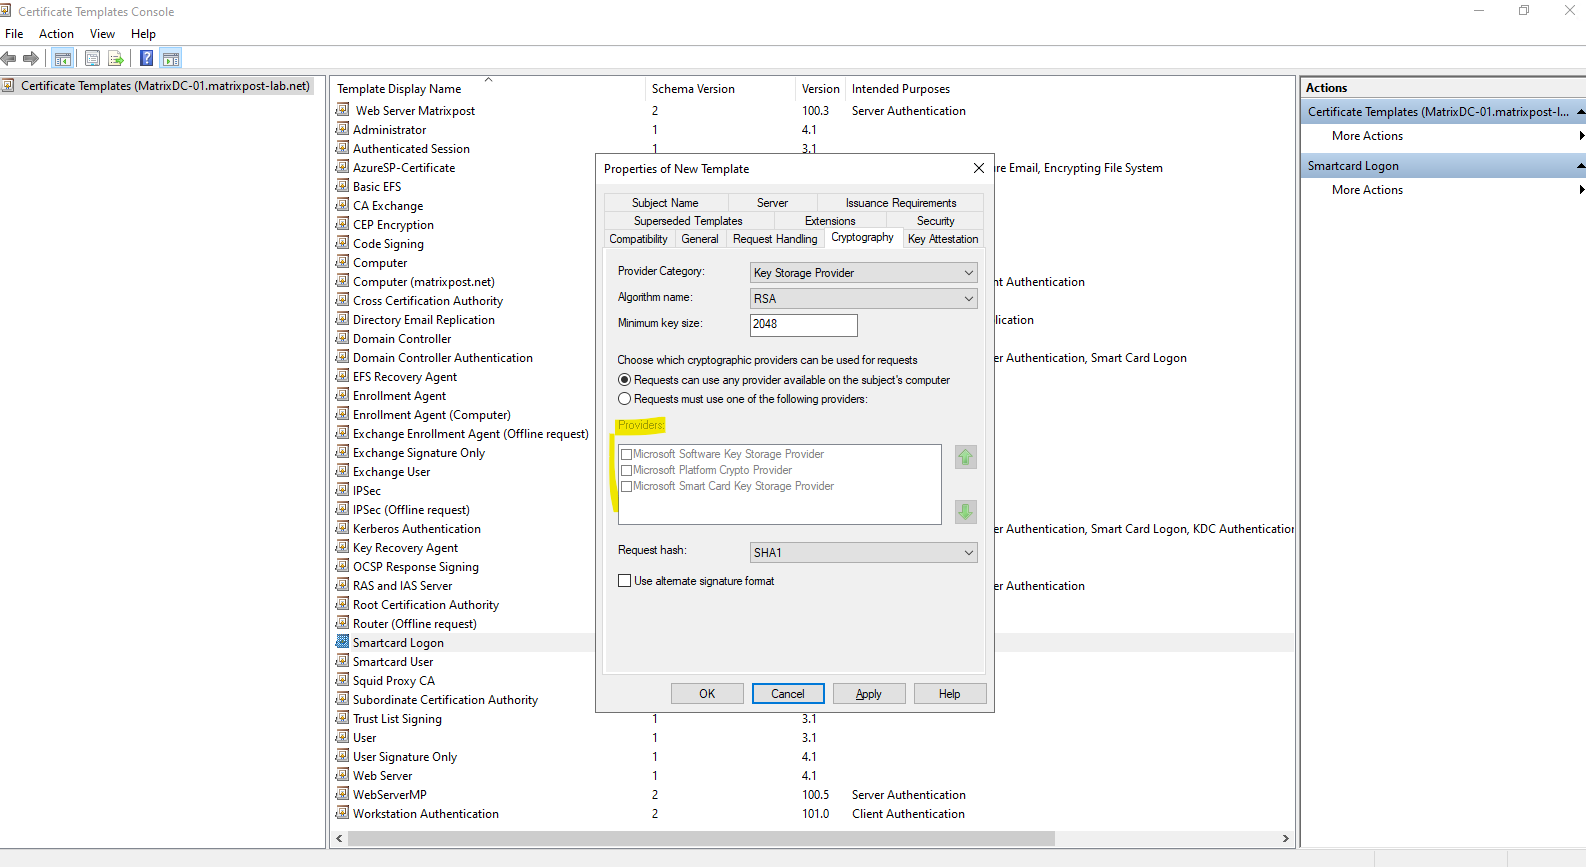
For our passwordless authentication scenario, we want the private key to be generated and stored on a physical smart card rather than in the local Windows software key store or TPM.
We will therefore select Requests must use one of the following providers and enable only the Microsoft Smart Card Key Storage Provider.
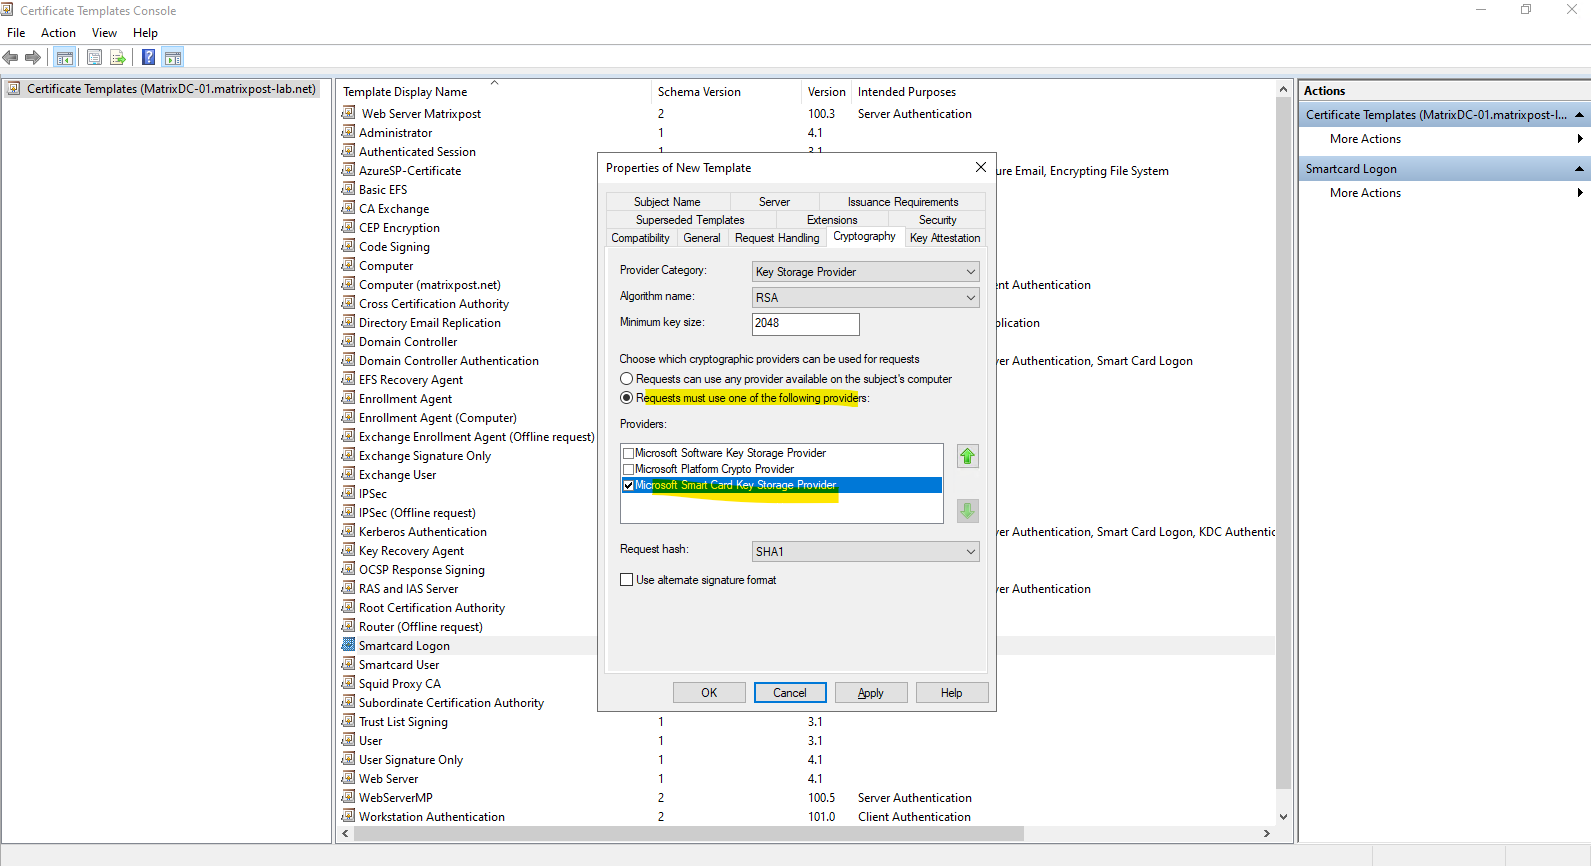
In our lab, we will use a YubiKey 5C NFC as the physical smart card.
The YubiKey provides a PIV (Personal Identity Verification) smart-card application, allowing us to store both our AD CS-issued X.509 certificate and its corresponding private key on the YubiKey.
While the certificate and public key can be read from the device, the private key remains protected by the YubiKey hardware and cryptographic operations are performed directly on the device.
We will additionally change the Request hash from the inherited legacy SHA1 setting to SHA256.
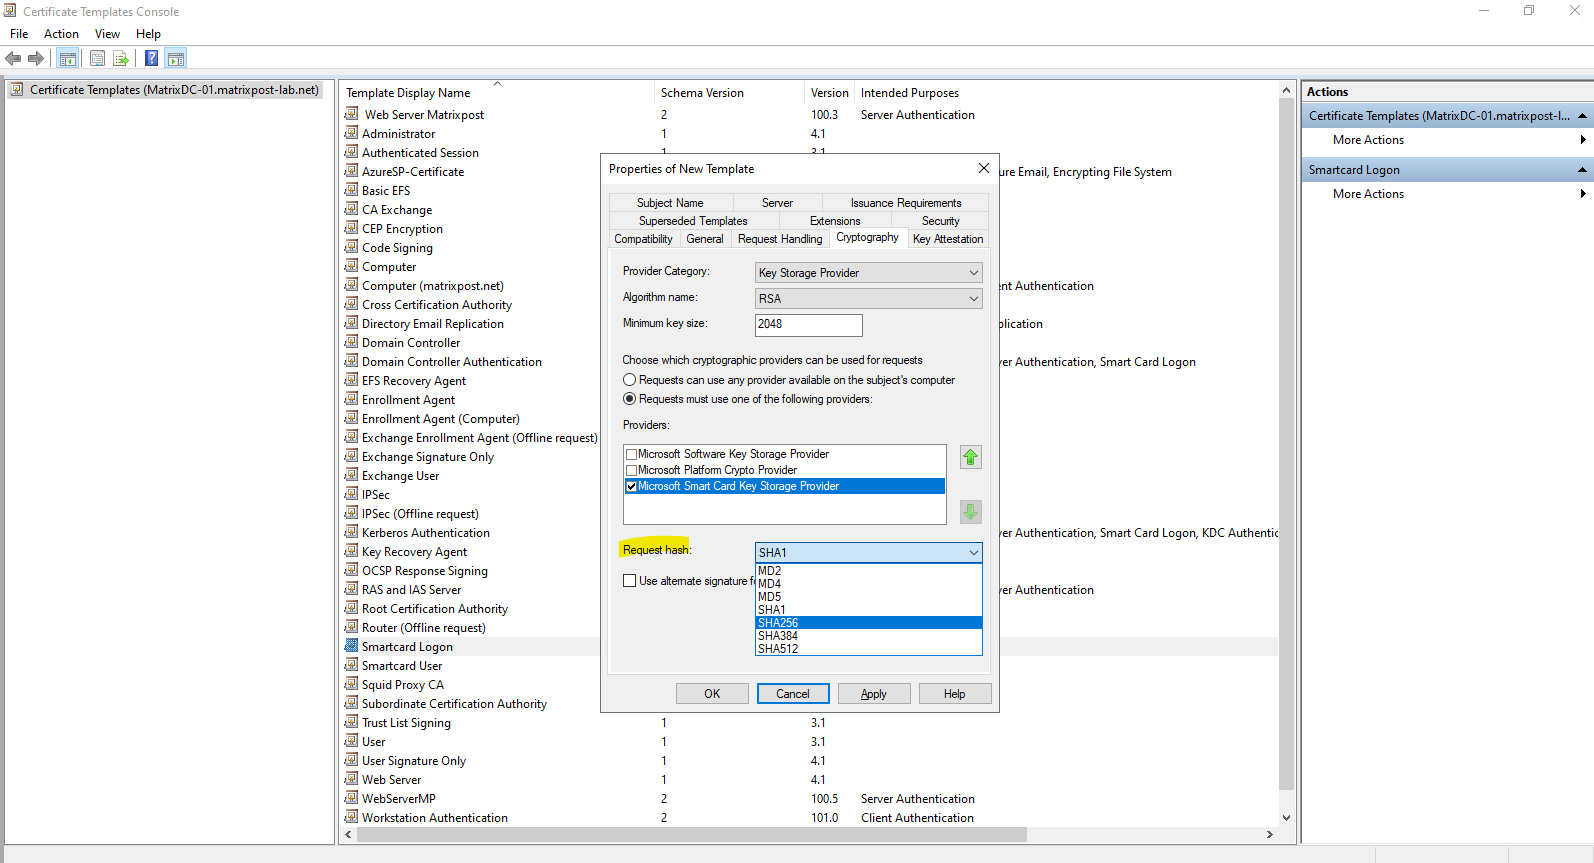
Our cryptographic settings are therefore:
- Provider Category: Key Storage Provider
- Algorithm: RSA
- Minimum key size: 2048 bit
- Provider: Microsoft Smart Card Key Storage Provider
- Request hash: SHA256
Although the YubiKey 5C NFC also supports FIDO2, FIDO2 is not involved in this authentication process. At this point, the YubiKey is used purely as a PIV smart card containing our certificate and private key. We will explore its FIDO2 functionality and Passkey-based authentication separately in Part 2.
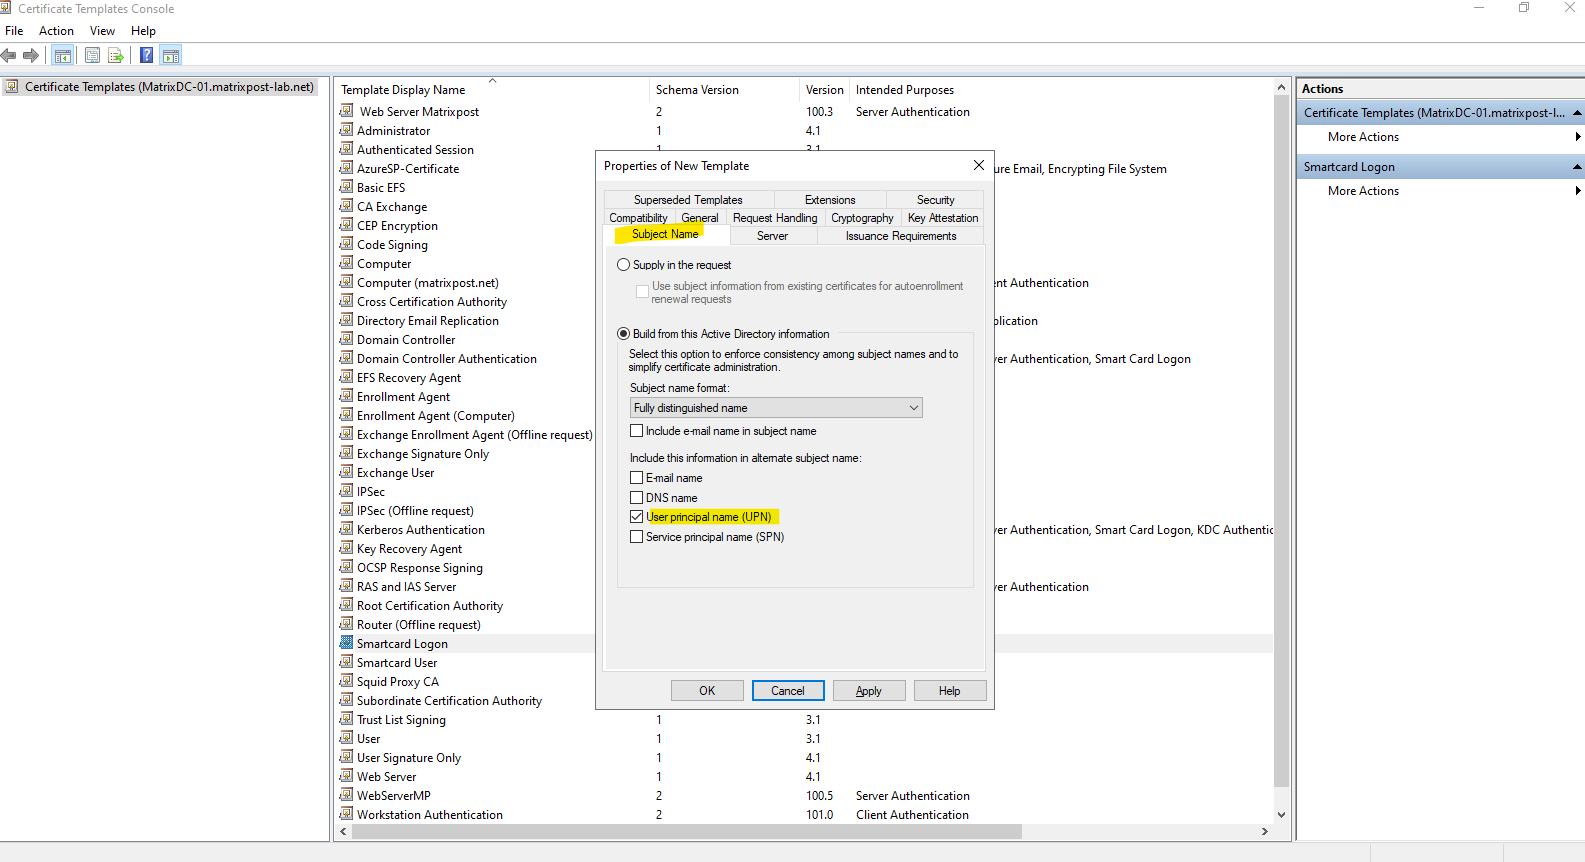
On the Subject Name tab, we will keep the settings inherited from the Smartcard Logon template.
The subject information is configured to Build from this Active Directory information, which means that the CA obtains the identity information directly from the authenticated Active Directory user rather than allowing the requester to supply arbitrary subject information.
Most importantly, User principal name (UPN) is included in the Subject Alternative Name (SAN) of the certificate. The UPN, for example user@matrixpost-lab.net, provides identity information that can be used during certificate-based Active Directory authentication to associate the certificate with the corresponding user account.
Using information retrieved directly from Active Directory also prevents users from simply specifying another user’s identity when requesting a certificate from this template.
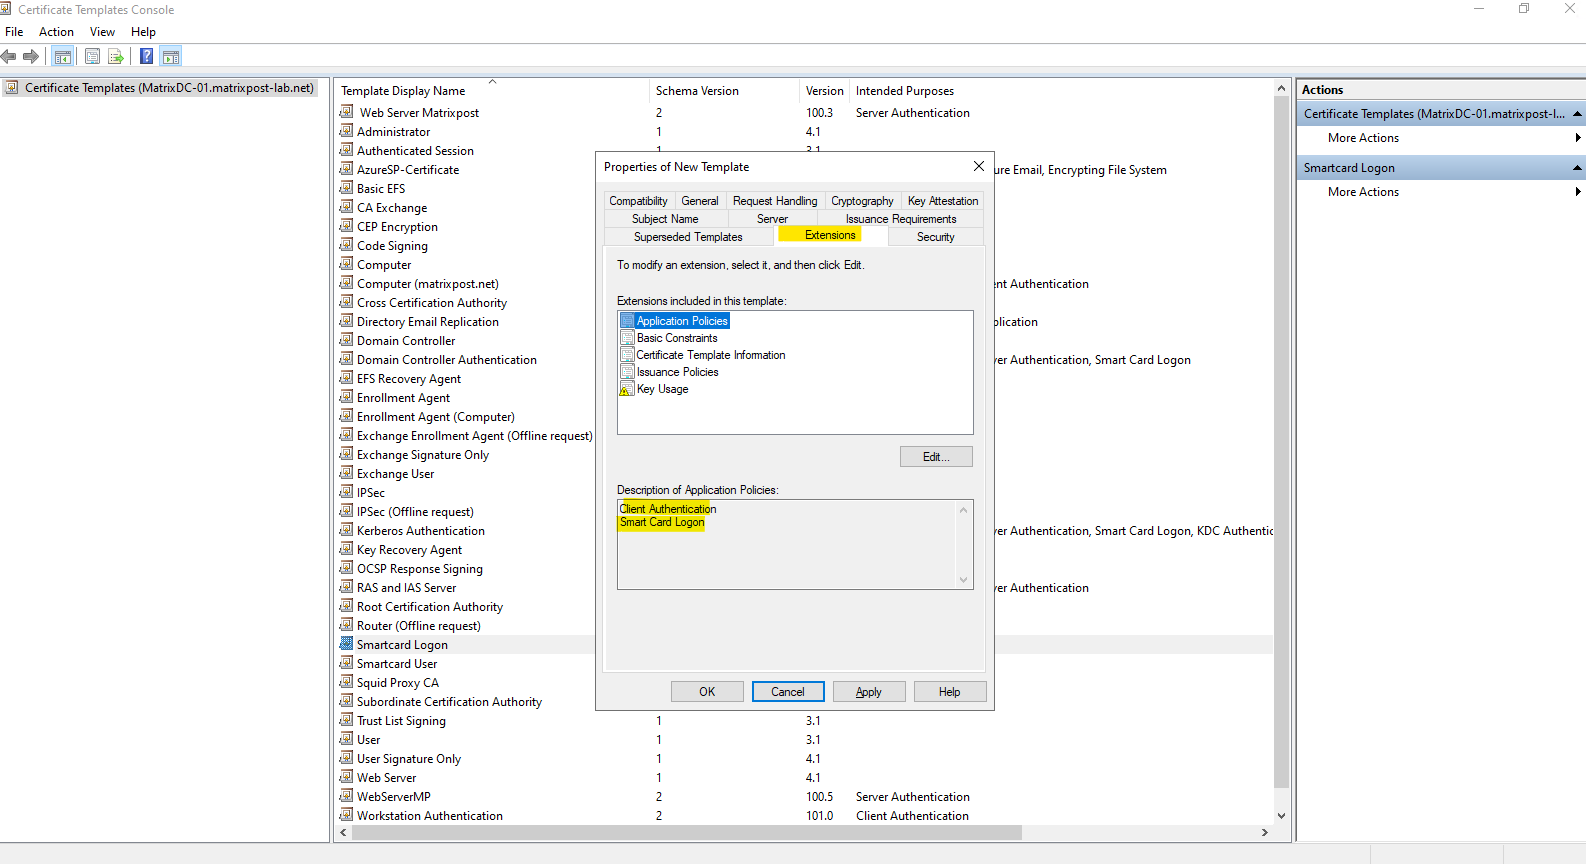
On the Extensions tab, select Application Policies and verify that the certificate template includes the following two Extended Key Usages (EKUs):
- Client Authentication —
1.3.6.1.5.5.7.3.2 - Smart Card Logon —
1.3.6.1.4.1.311.20.2.2
The Smart Card Logon EKU identifies the certificate as suitable for Windows smart-card authentication, while Client Authentication allows the certificate to be used for authenticating the user as a client.
Both application policies are already inherited from the built-in Smartcard Logon template, so no changes are required here.
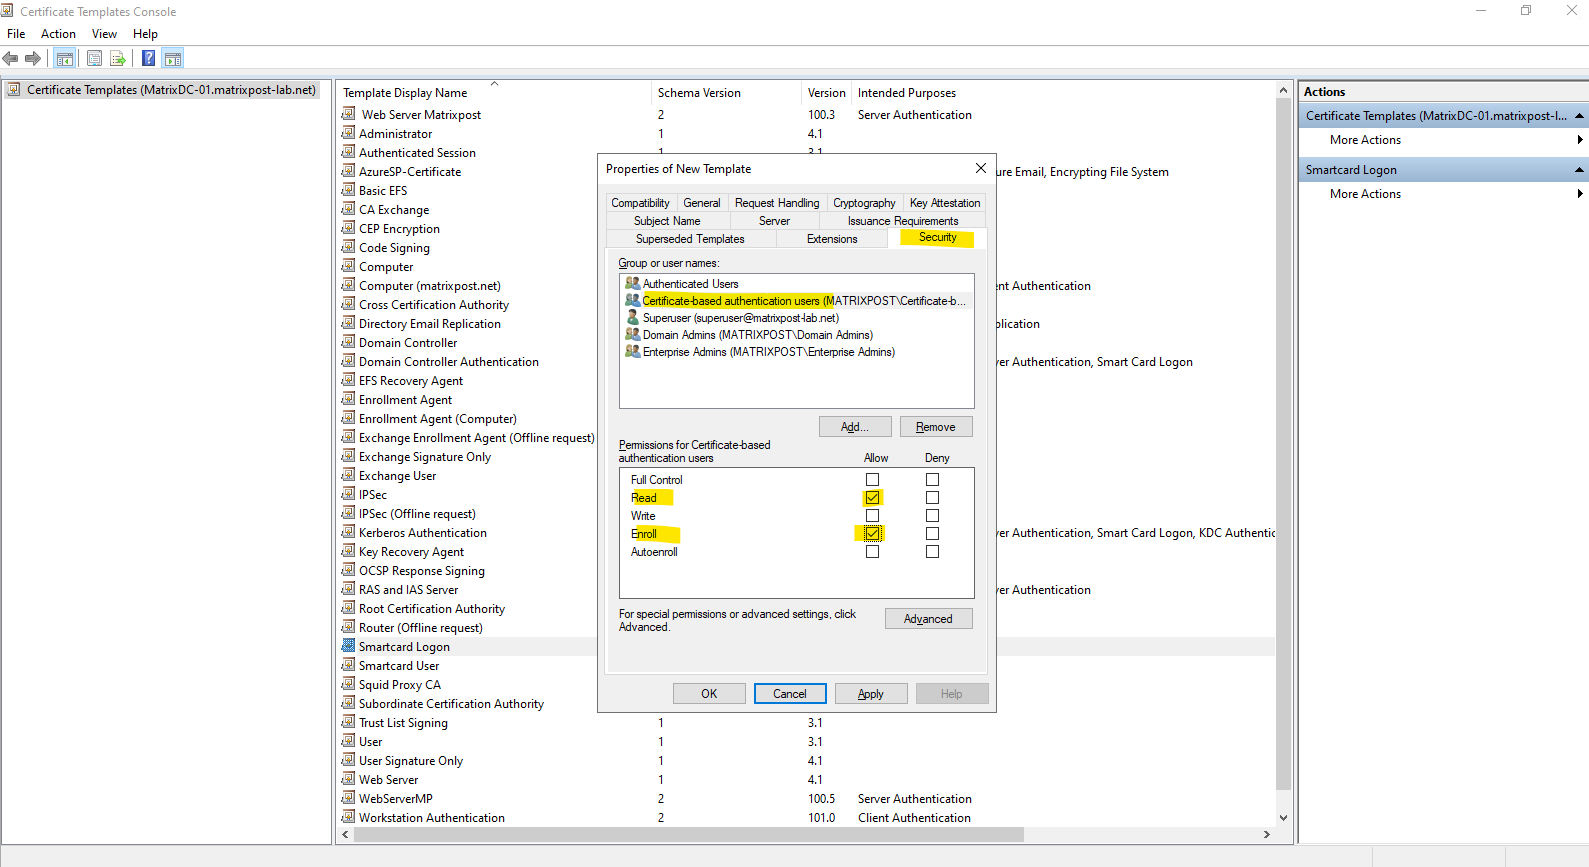
Finally, on the Security tab, we define which users are allowed to request certificates based on this template.
Because this certificate can be used as an Active Directory logon credential, enrollment permissions should be restricted to users or groups that are actually intended to use certificate-based authentication.
For this purpose, we created the dedicated Active Directory security group Certificate-based authentication users and granted the group Read and Enroll permissions on the certificate template.
Users who should be able to use certificate-based passwordless authentication can therefore simply be added to this group.
We will not enable Autoenroll, because we want to manually enroll the certificate onto our physical smart card and explicitly select the YubiKey during the enrollment process.
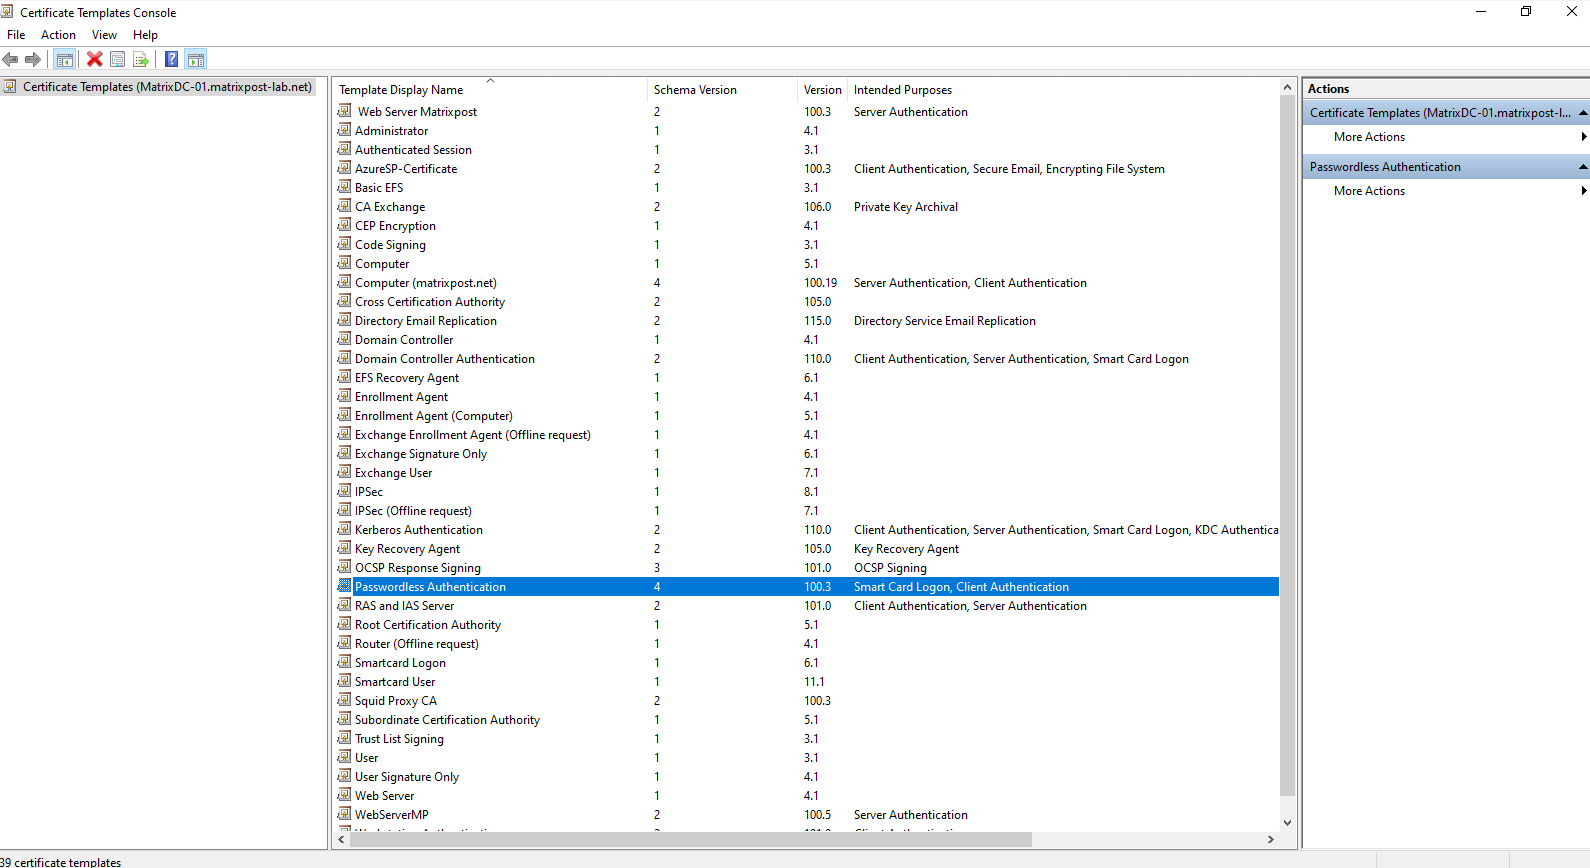
After completing the configuration, click OK to create the new Passwordless Authentication certificate template.
Creating a certificate template does not automatically make it available for certificate enrollment. We must additionally configure our Enterprise Issuing CA to issue certificates based on this template.
Open the Certification Authority console (certsrv.msc) on the Enterprise Issuing CA, right-click Certificate Templates, and select New → Certificate Template to Issue.

Select our newly created Passwordless Authentication template and click OK.
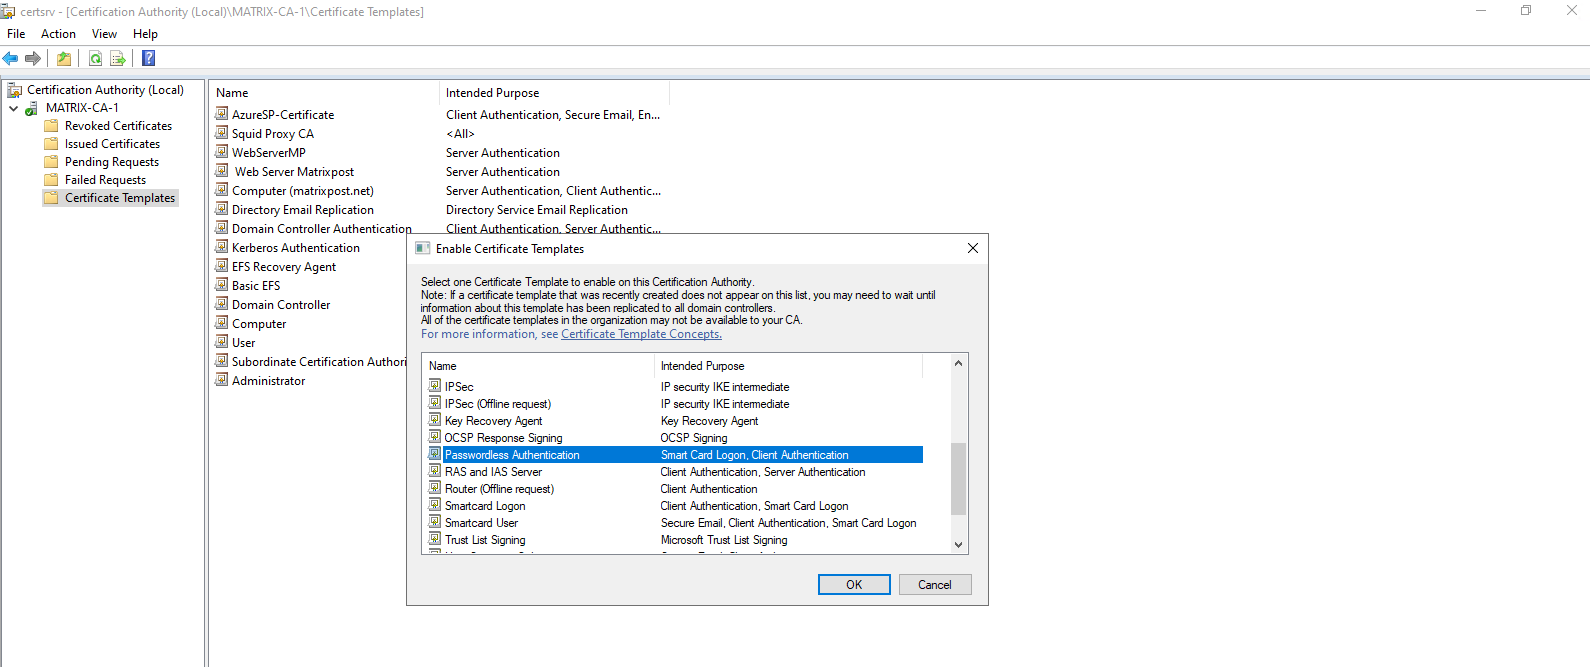
The template is now published on the Enterprise Issuing CA and can be requested by members of the Certificate-based authentication users group.
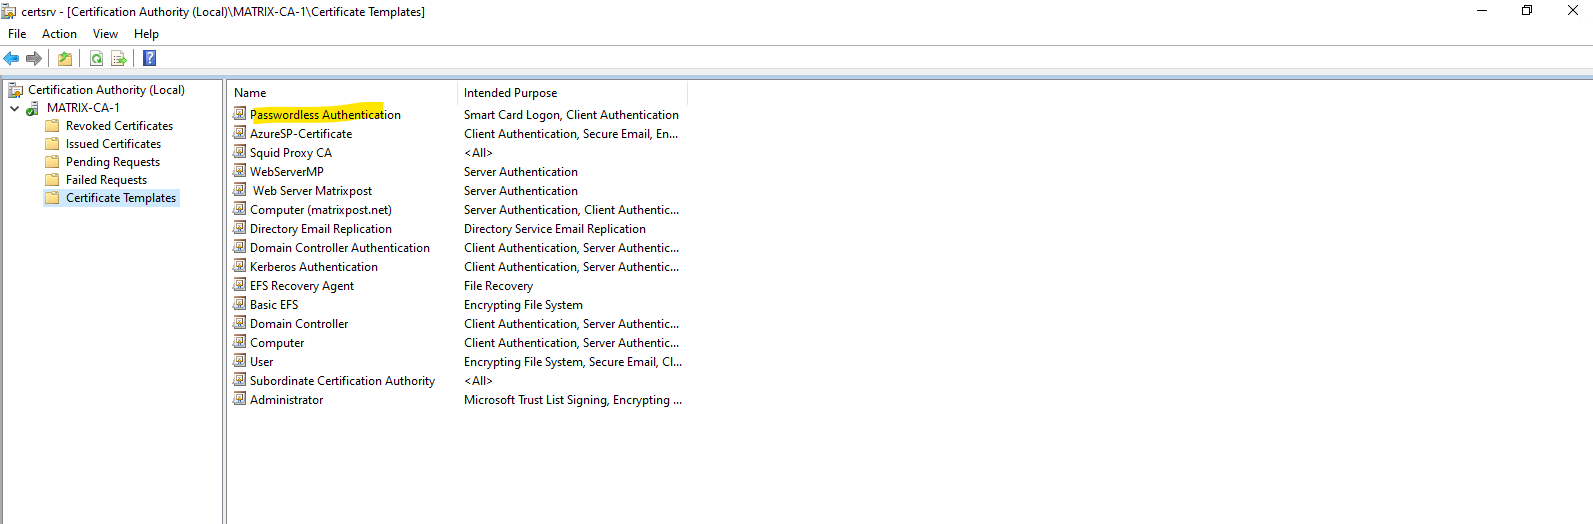
Our Passwordless Authentication certificate template is now published on the Enterprise Issuing CA and available for enrollment. As shown under Intended Purpose, certificates issued from this template support both Smart Card Logon and Client Authentication.
Verify the CA Certificate in the NTAuth Store
Before using the issued certificate for Windows smart-card authentication, we should verify that the issuing Enterprise CA certificate is published in the Active Directory NTAuthCertificates container.
Windows domain authentication uses this store to determine which certification authorities are trusted to issue certificates that can be used for domain logon authentication.
For an Enterprise CA, the CA certificate is normally published to the NTAuth store automatically, but verifying it helps rule out one of the fundamental trust requirements before troubleshooting certificate-based Windows logon.
For this lab, I will use the two-tier PKI hierarchy configured in my previous article, Set up a 2-Tier PKI in Active Directory Certificate Services (AD CS) – Part 1, consisting of an offline Root CA (MATRIX-ROOT-CA) and an Enterprise Issuing CA (MATRIX-CA-1).
The Root CA remains offline during normal operation, while the Issuing CA handles certificate enrollment and issues the smart-card authentication certificate that we will later store on the YubiKey.
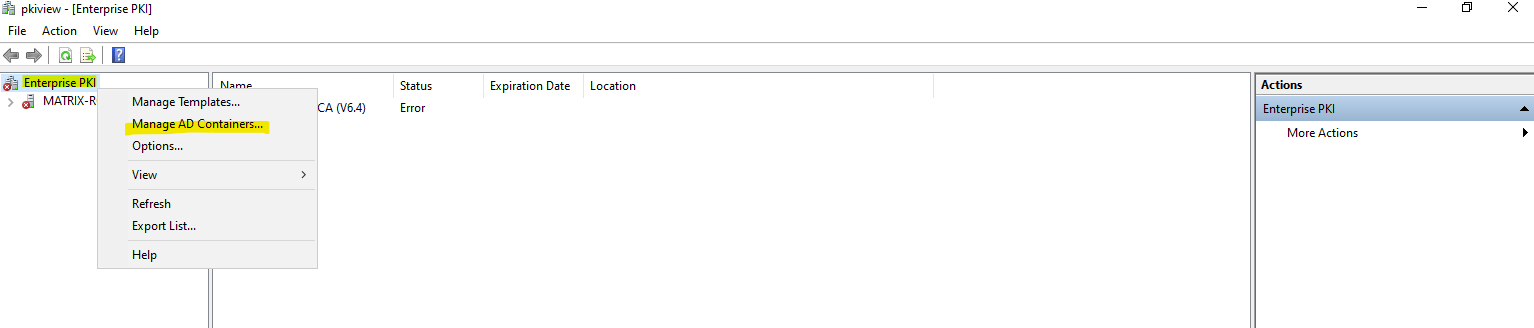
Open the Enterprise PKI management console by running pkiview.msc. Besides checking the overall health of the AD CS PKI hierarchy, the console can also be used to inspect the Active Directory PKI containers, including the NTAuthCertificates container relevant for certificate-based domain authentication.

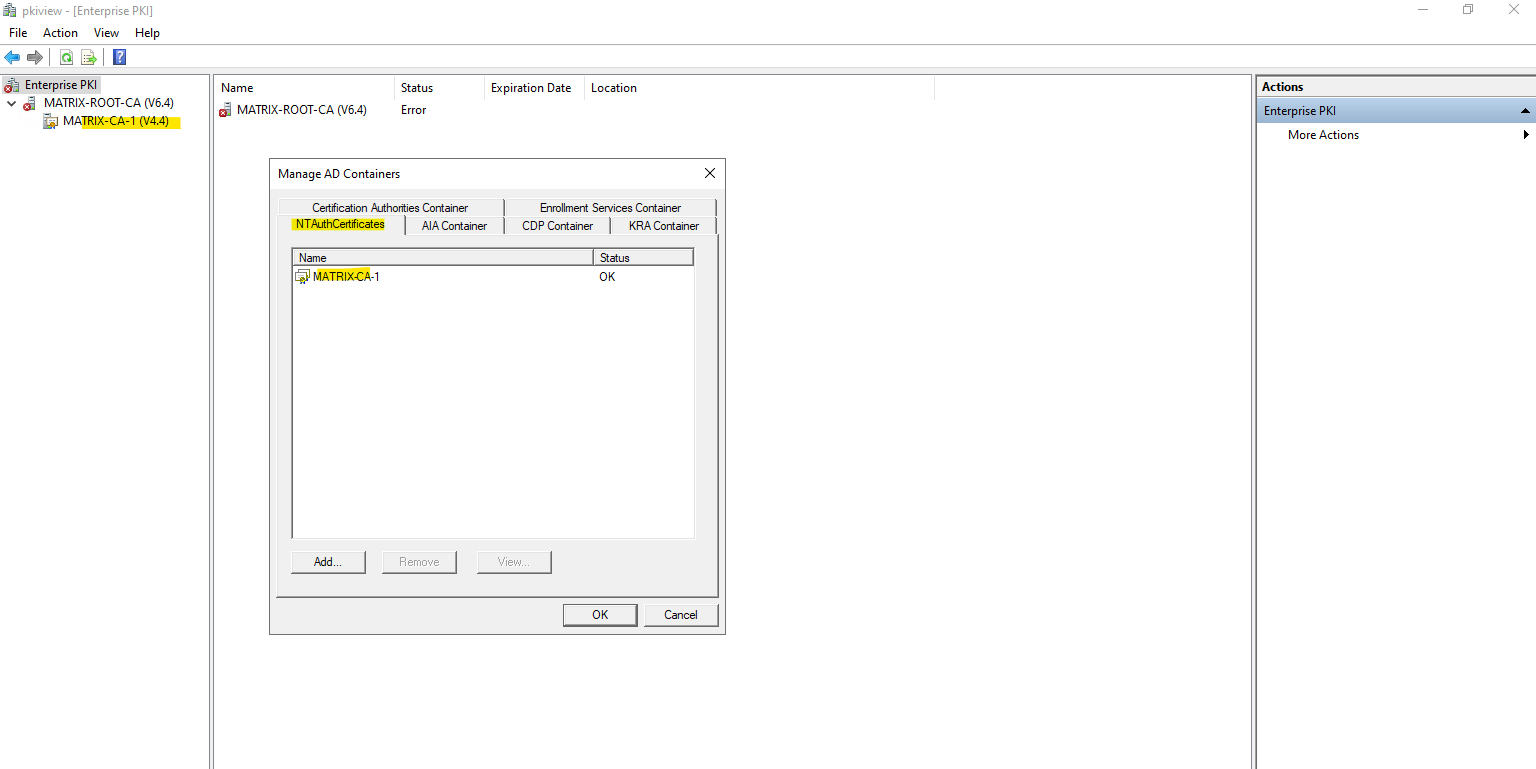
Right-click Enterprise PKI and select Manage AD Containers. This opens the Active Directory containers used by AD CS, where we can verify that the Enterprise Issuing CA is correctly published in the NTAuthCertificates container.
Here we can verify that the Enterprise Issuing CA (MATRIX-CA-1) is published in the NTAuthCertificates container. This establishes the CA as trusted by Active Directory for certificate-based user authentication, including our smart-card logon with the YubiKey.
Verify Certificate Mapping and the NTDS CA Security Extension
For certificate-based authentication, Active Directory must not only trust the issuing CA, but also determine which Active Directory user account the presented certificate belongs to.
In our case, no explicit X.509 certificate mapping is configured for the John Doe account.
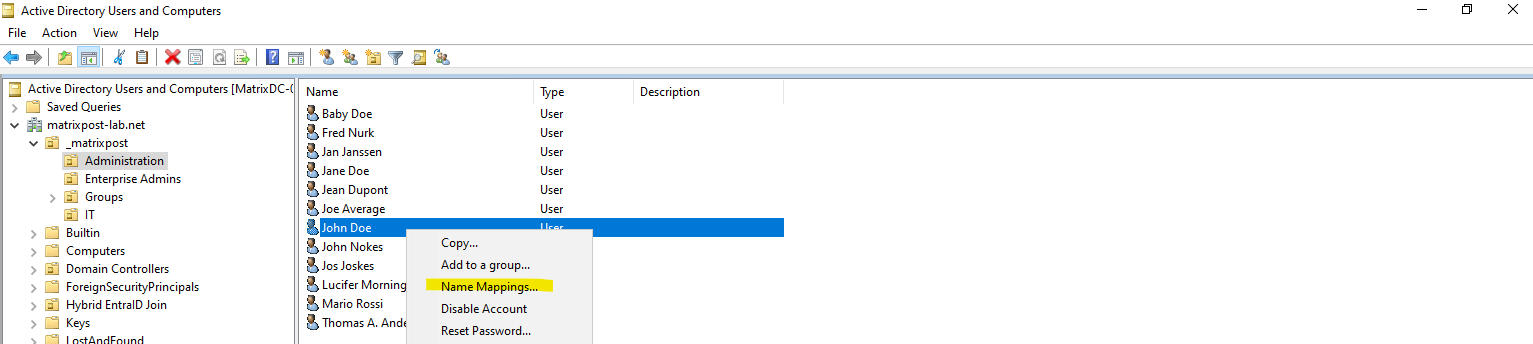

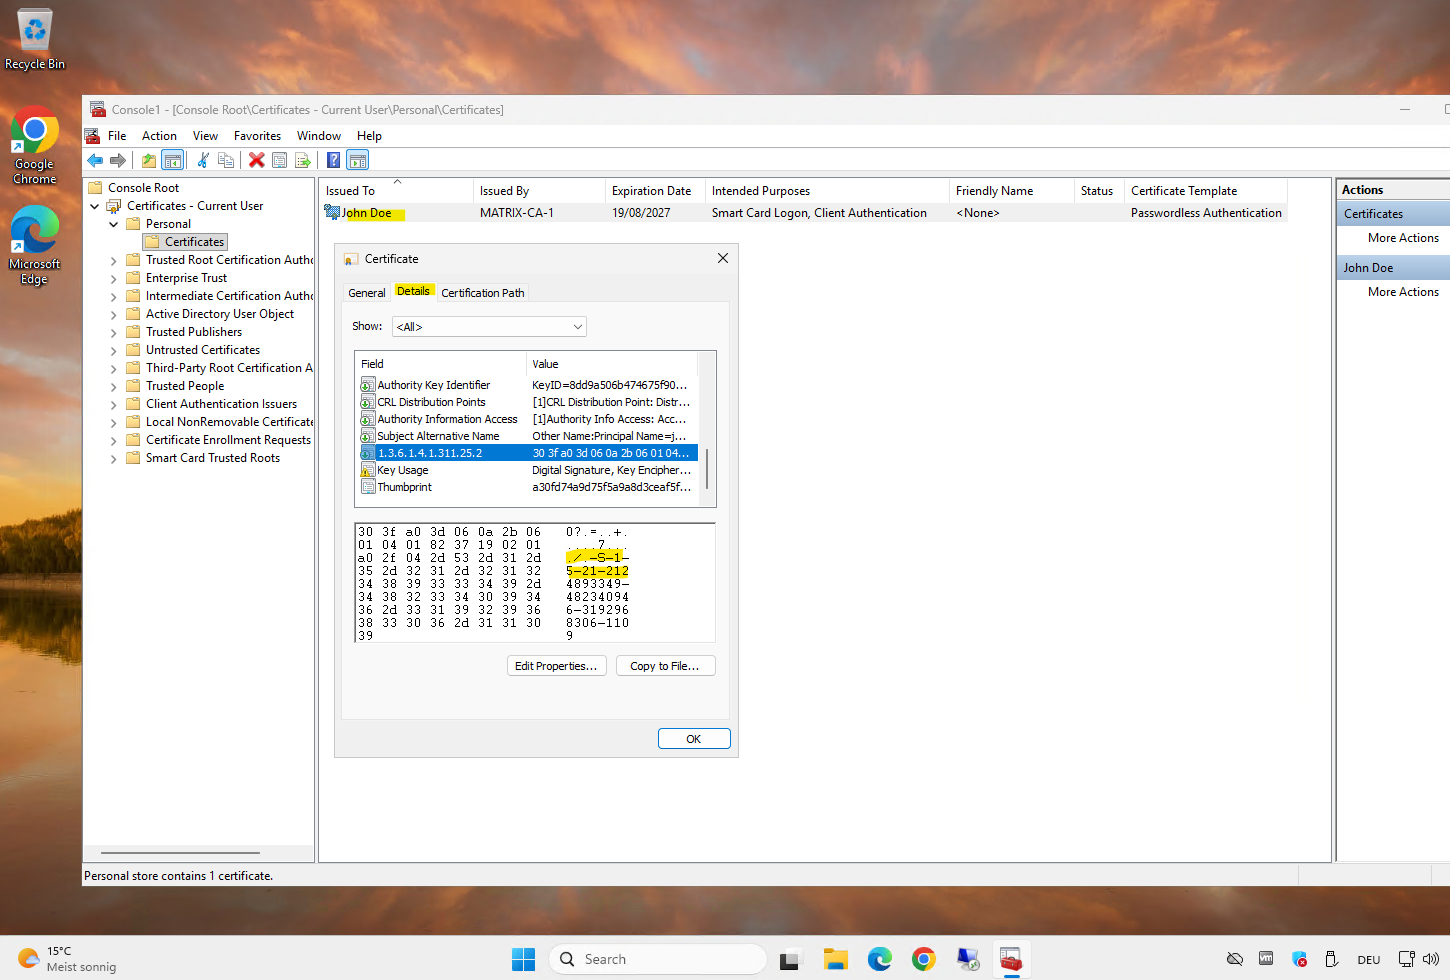
Instead, the certificate issued by our Enterprise CA contains the NTDS CA Security Extension (1.3.6.1.4.1.311.25.2), which includes the user’s Active Directory SID and provides a strong mapping between the certificate and the corresponding AD account.
Preparing the YubiKey for USB Passthrough in vSphere
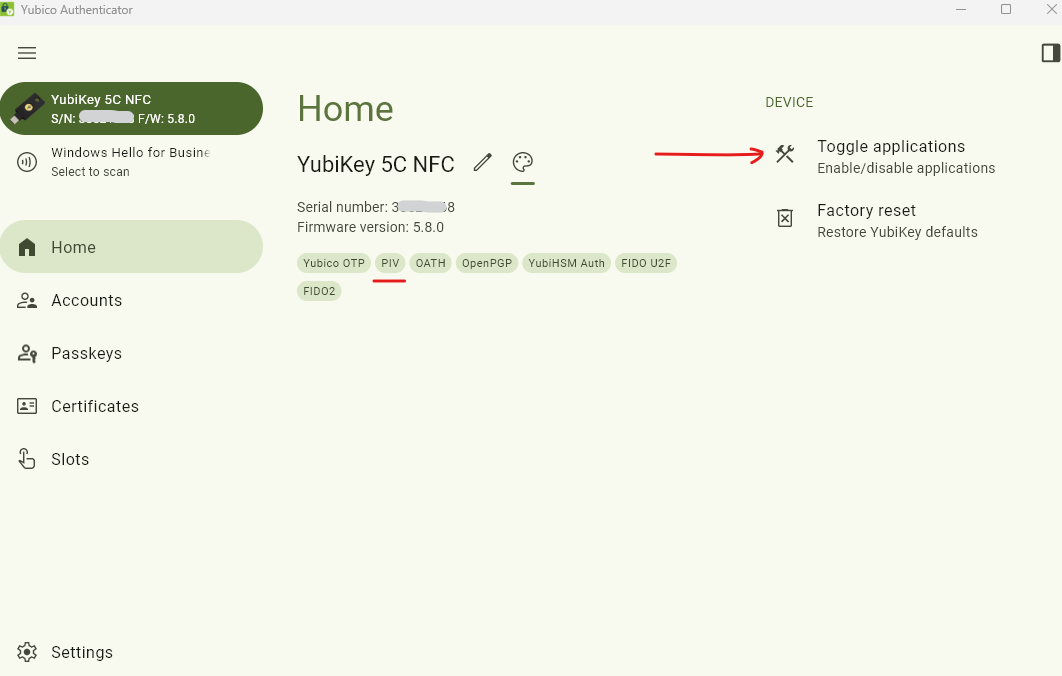
Before enrolling the certificate, I will first need to prepare the YubiKey for my vSphere-based lab environment. Because the YubiKey exposes several USB applications as a composite USB device, the ESXi hosts does not reliably recognize the YubiKey for USB passthrough while all applications are enabled.
Using Yubico Authenticator → Toggle applications, disable all USB applications except PIV. This allows ESXi to recognize the YubiKey as a smart-card device and pass it directly through to our Windows 11 virtual machine.
We can download the latest version of Yubico Authenticator from the official Yubico website and install it on the Windows computer from which we will configure the YubiKey.
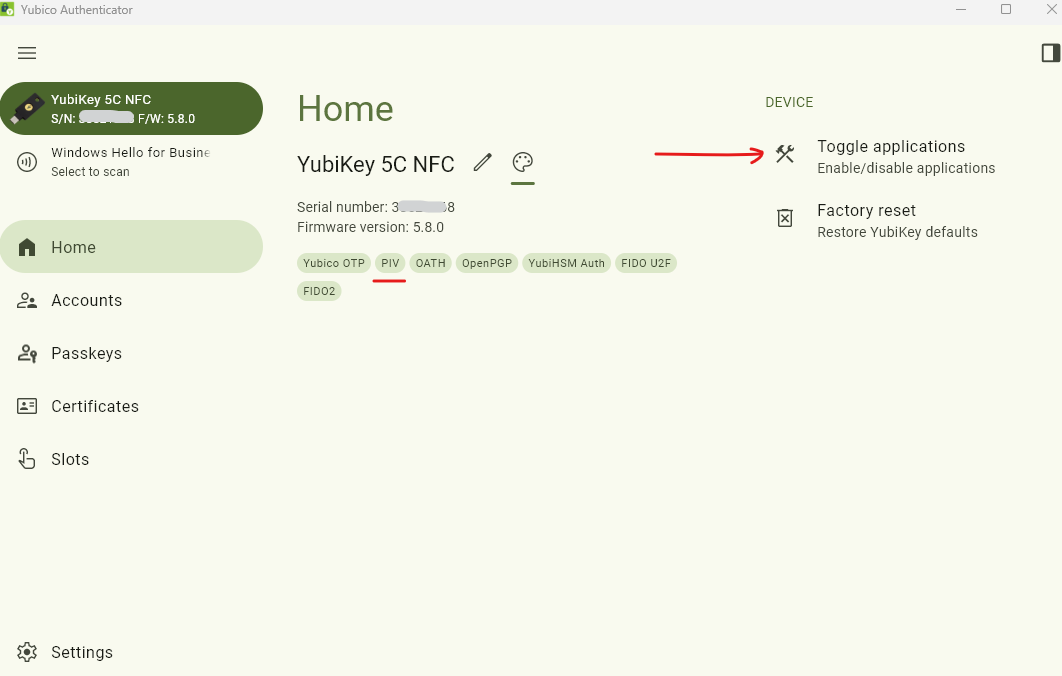
We will also leave the PIV application at its factory-default settings. This is important because Windows, together with the YubiKey Smart Card Minidriver, will initialize and use the PIV application during certificate enrollment, generating the private key directly on the YubiKey rather than creating it on the Windows client and copying it afterward.
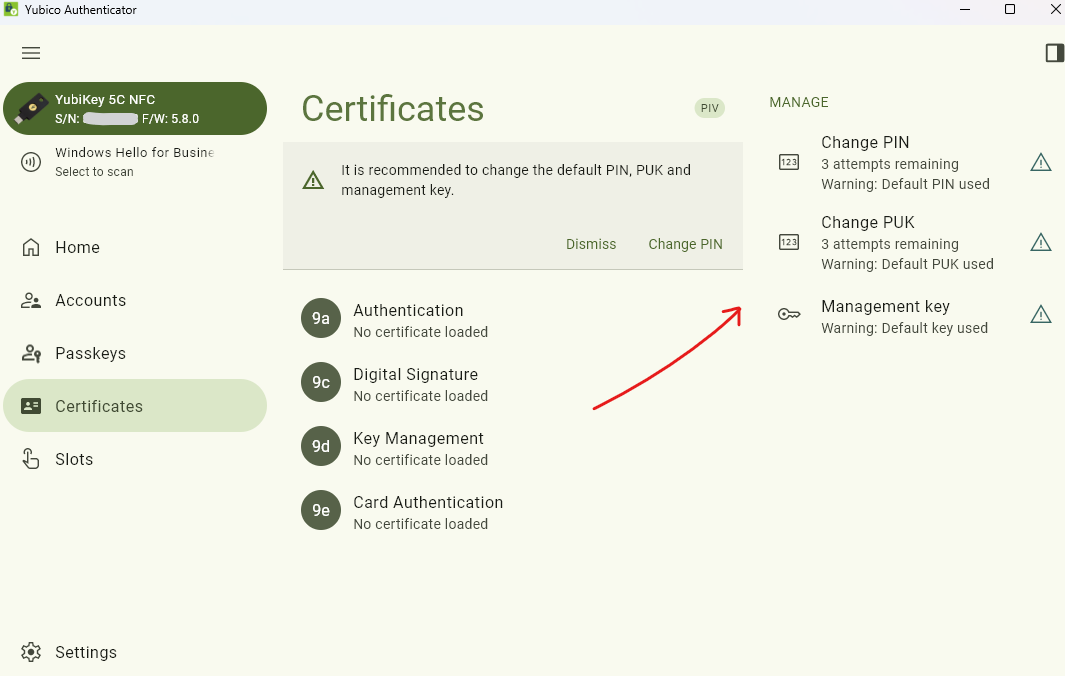
If the PIV application has previously been configured, it can be reset independently without resetting the other YubiKey applications by using the YubiKey Manager (ykman) CLI which can be downloaded here:
ykman piv reset
This resets the PIV keys, certificates, PIN, PUK, and management key while leaving applications such as FIDO2, OTP, OATH, and OpenPGP untouched. After the reset, the factory-default PIV PIN is 123456, which we will use during the initial certificate enrollment below.
After the certificate has been successfully enrolled, we can change the factory-default PIV PIN (123456) using:
ykman piv access change-pin
Changing the PIN does not affect the certificate or its private key stored on the YubiKey.
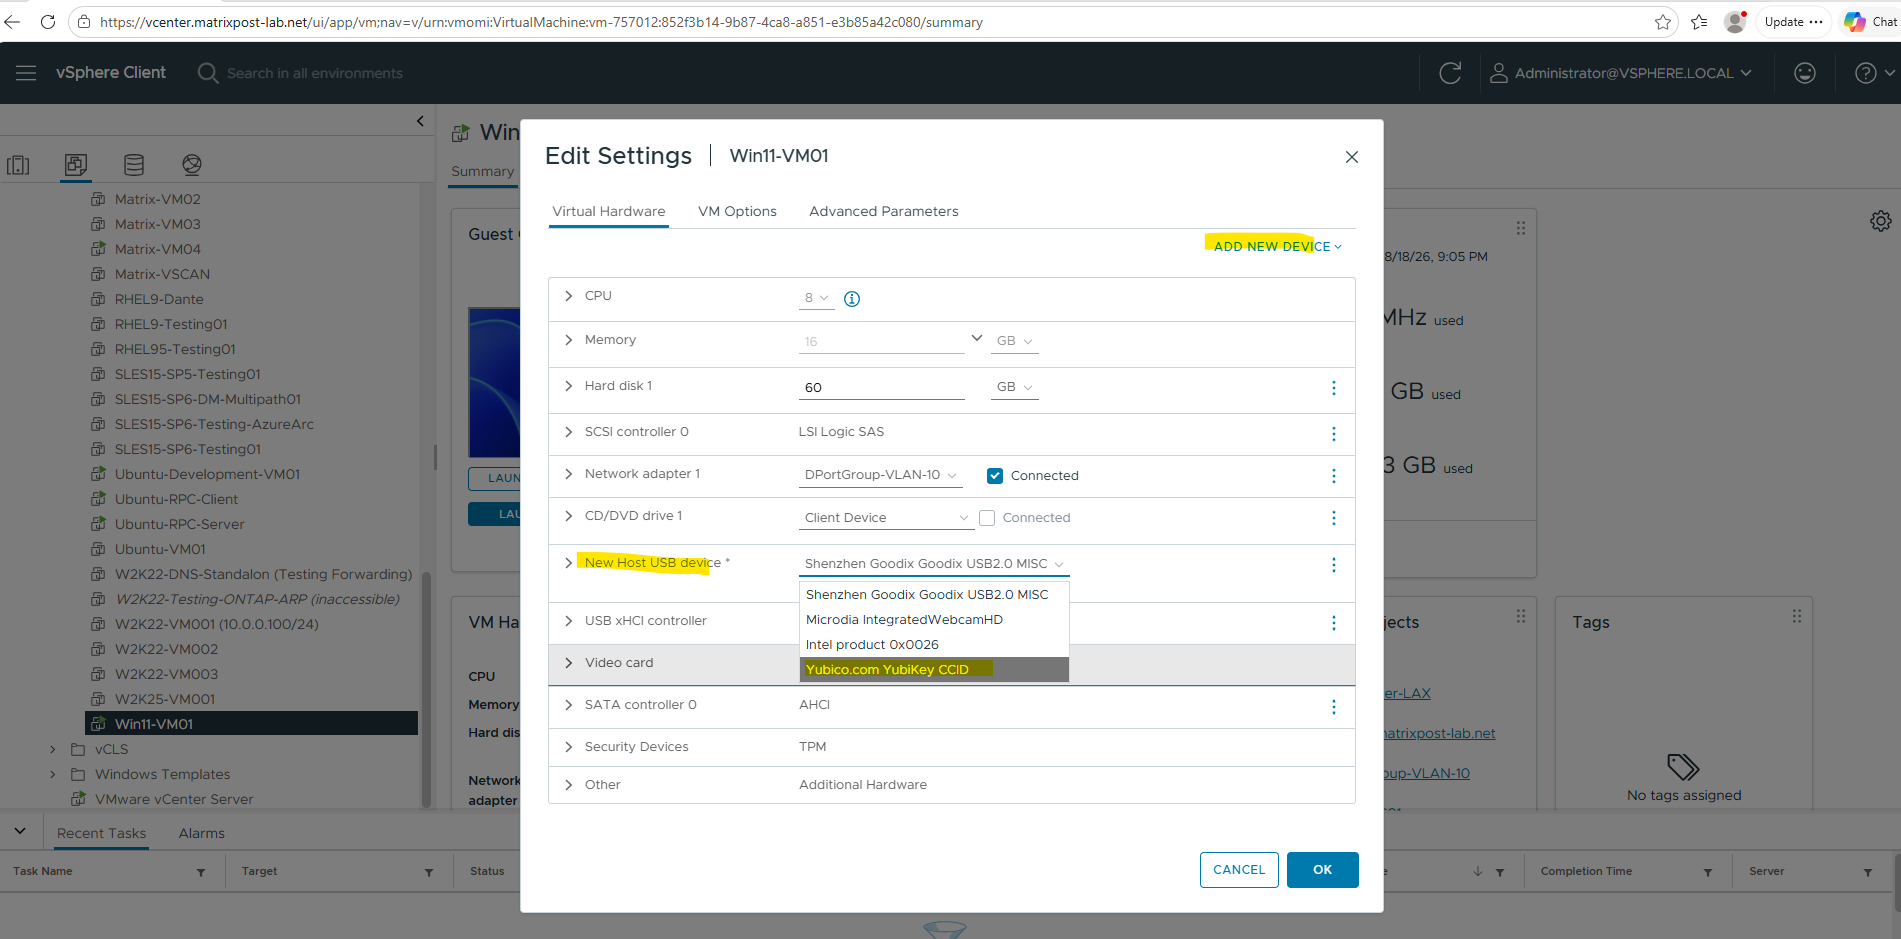
Because we are using a virtualized lab environment based on VMware vSphere, the physical YubiKey must first be passed through from the ESXi host to the Windows 11 VM.
This makes the YubiKey directly available to the guest operating system as a USB device.
Enroll the AD CS Certificate & Deploy the YubiKey Minidriver on Client and Remote Targets
With the PIV application prepared, we can now enroll the user certificate from our Active Directory Certificate Services (AD CS) environment.
On the domain-joined Windows client with the YubiKey connected, open certmgr.msc.

Navigate to Personal > Certificates, right-click Certificates, and select All Tasks > Request New Certificate to start the Certificate Enrollment wizard.
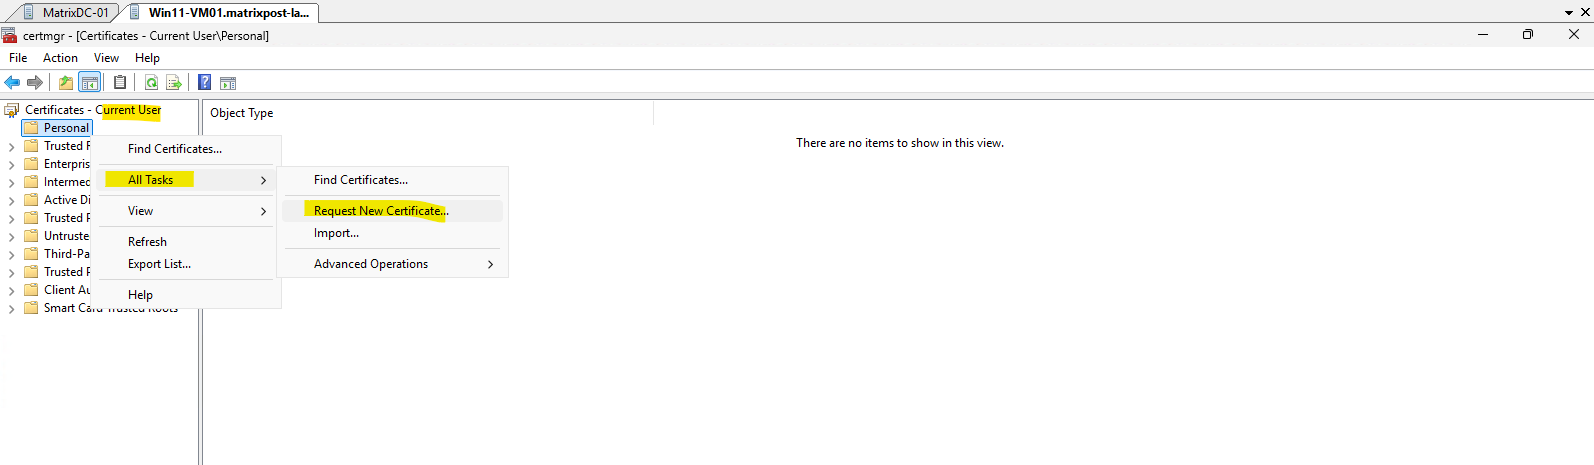
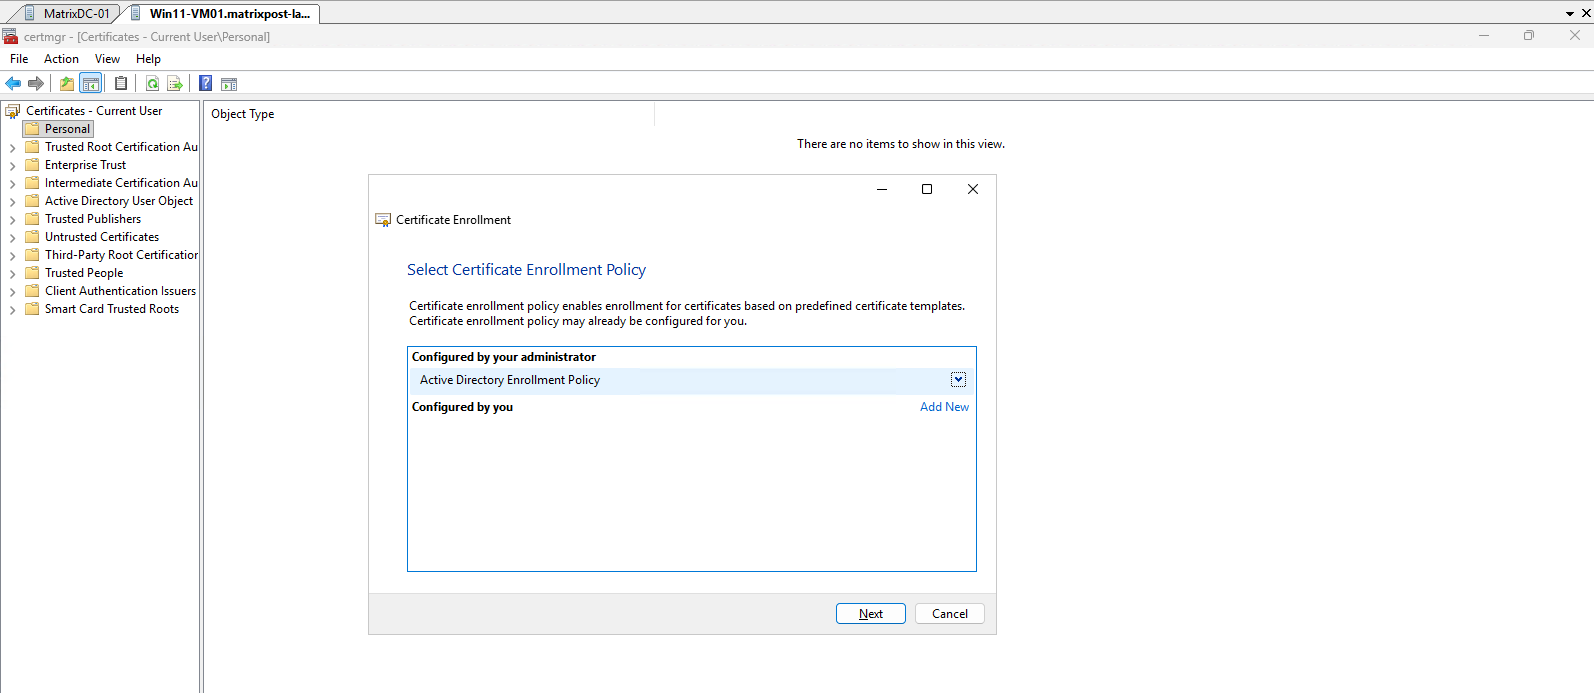
The Certificate Enrollment wizard automatically detects the Active Directory Enrollment Policy, which provides the certificate templates published by our enterprise AD CS environment.
Leave Active Directory Enrollment Policy selected and click Next to retrieve the certificate templates available for the currently logged-on domain user.
The wizard now displays the certificate templates that the currently logged-on user is permitted to enroll. Our goal is to select the dedicated smart-card logon certificate template that we created and published earlier, rather than the standard User certificate template.
If the smart-card template is not immediately visible, enable Show all templates to also display unavailable templates and their corresponding status or enrollment requirements.
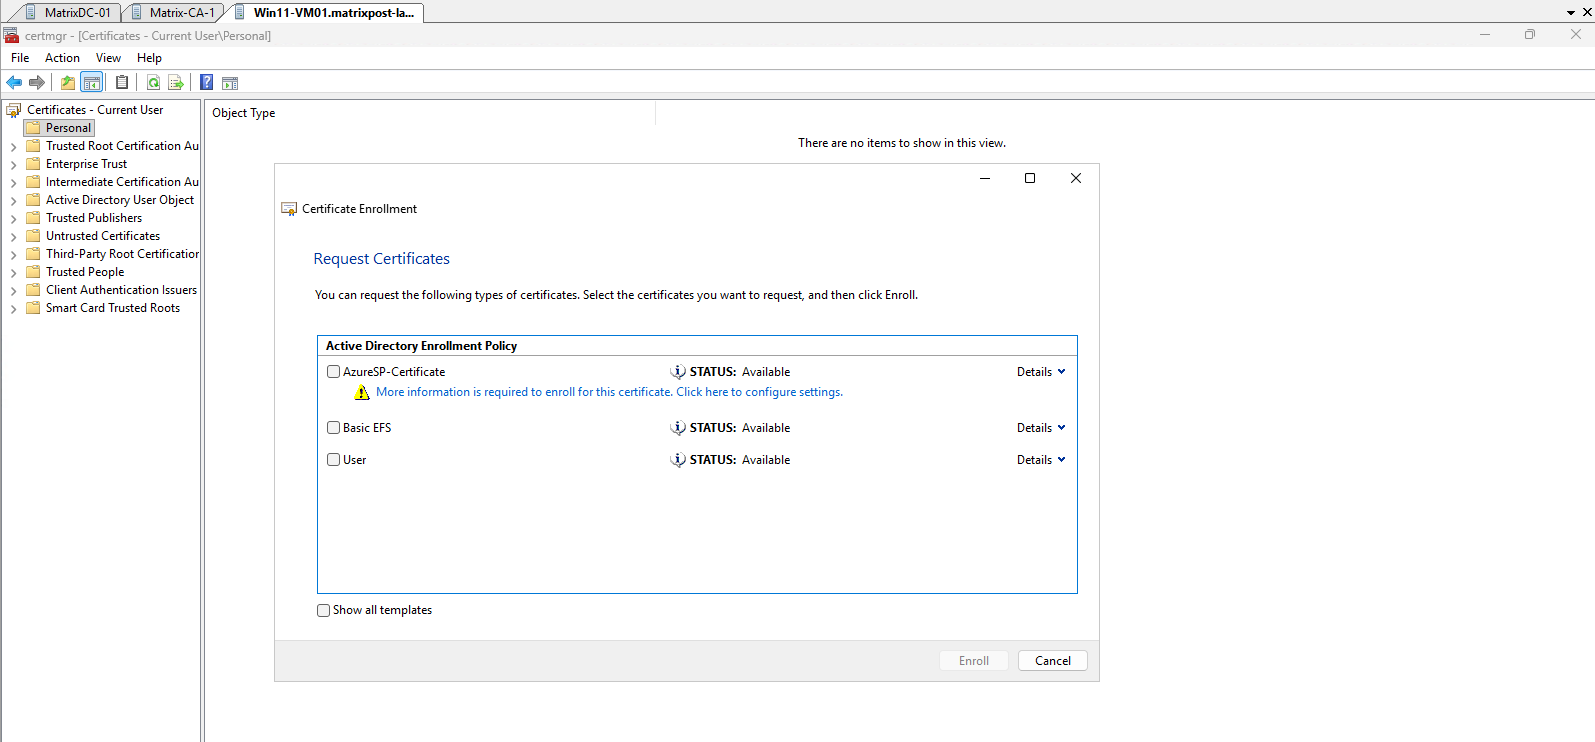
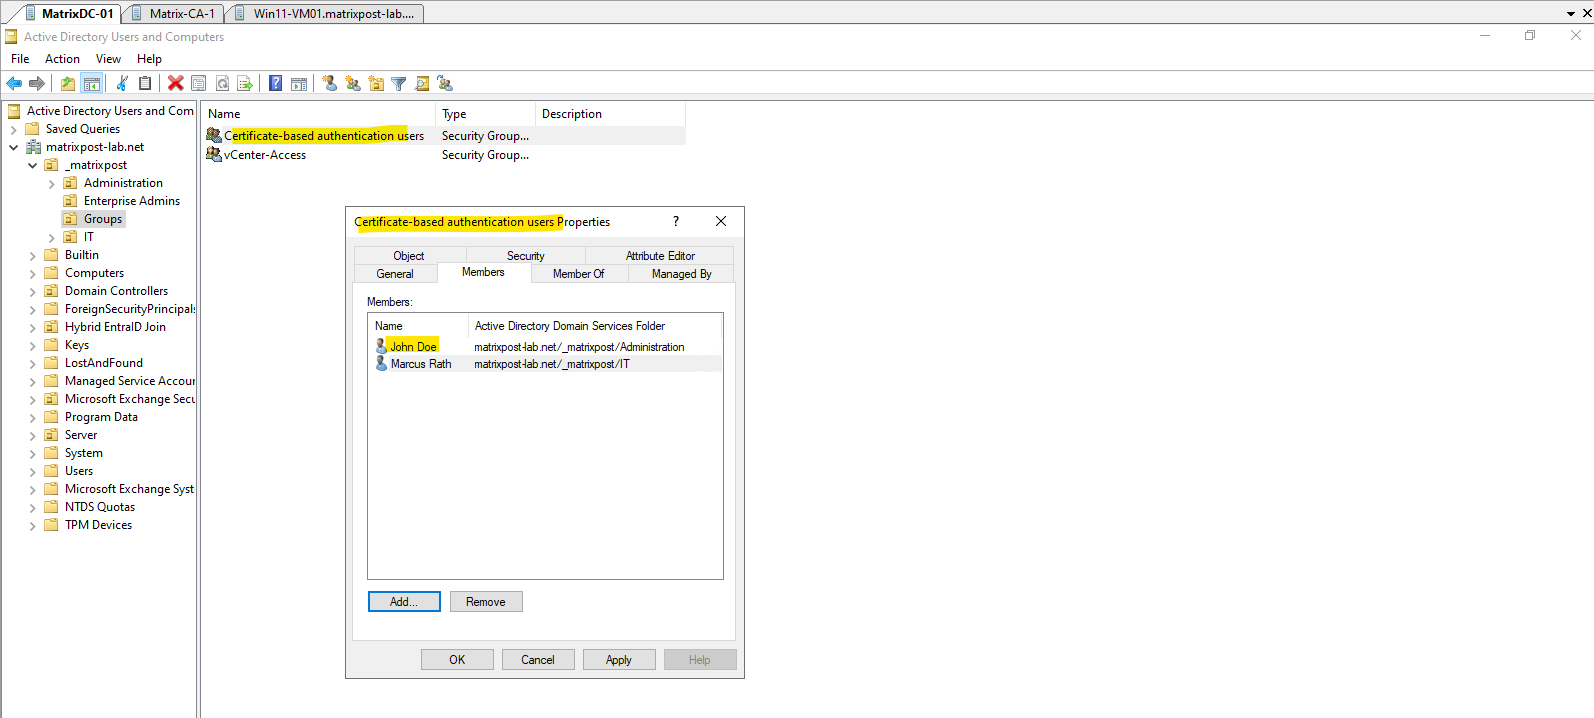
Before enrolling the certificate, I first need to add John Doe to the previously created Certificate-based authentication users security group. Membership in this group grants the user the required permissions to enroll the dedicated certificate-based authentication template.
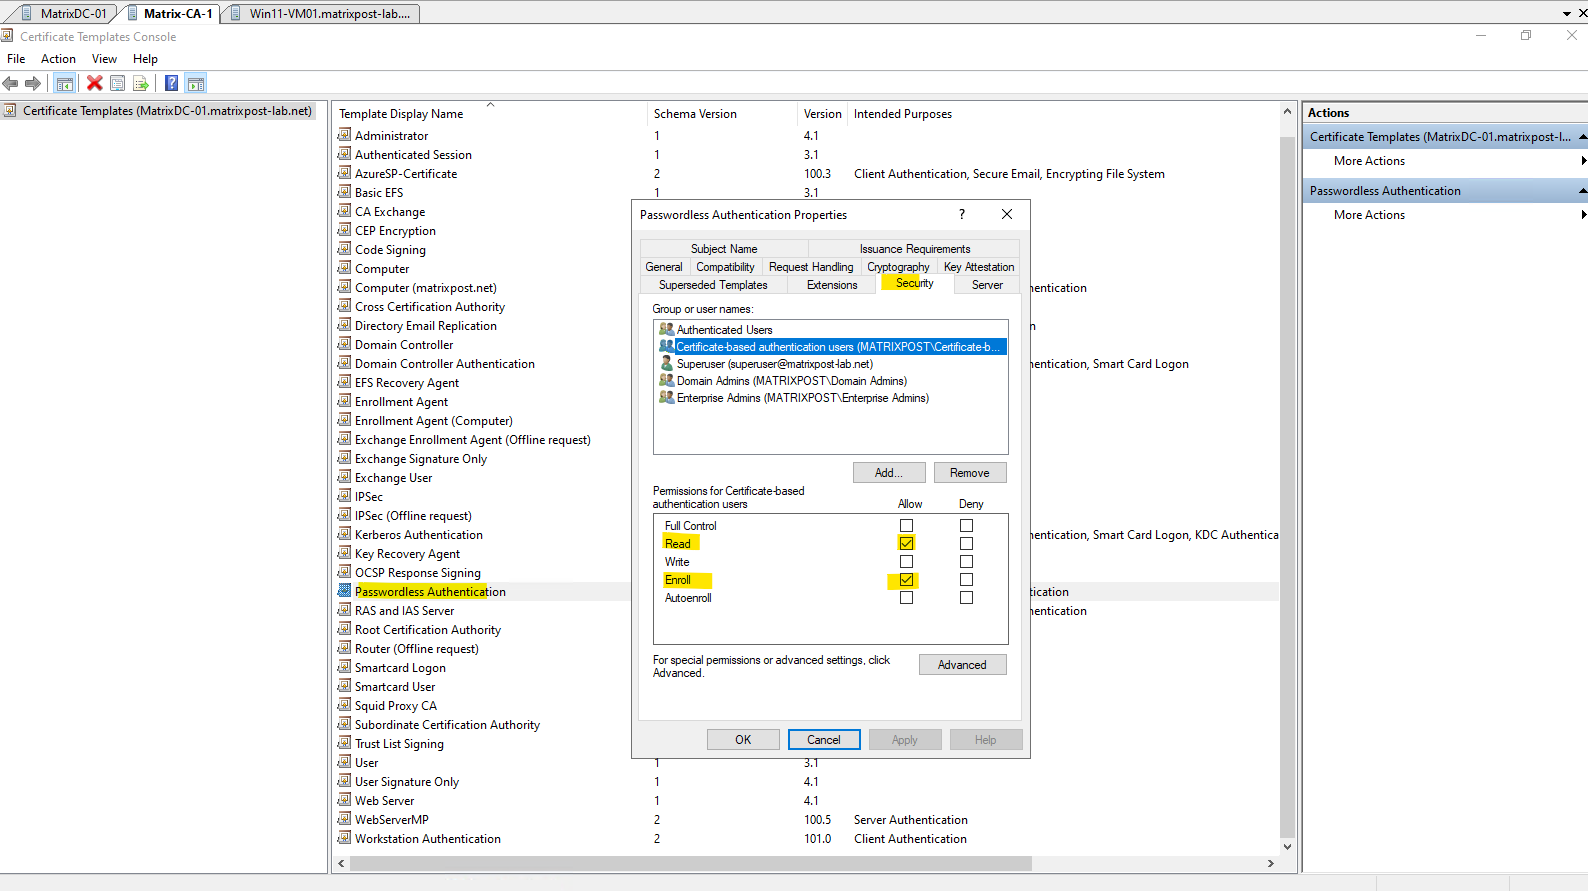
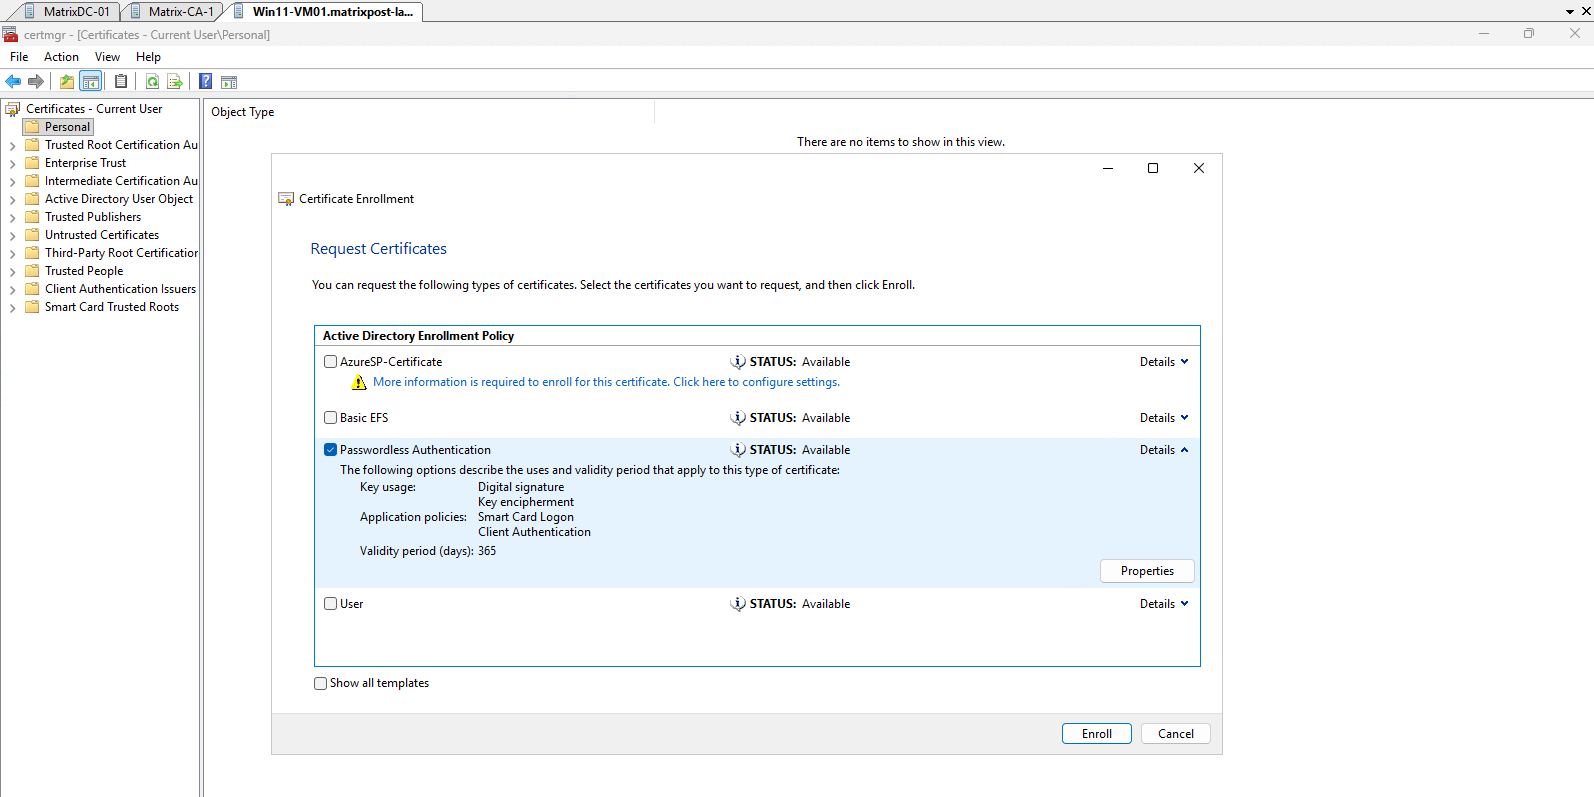
After updating the group membership and starting the enrollment again, our Passwordless Authentication certificate template is now available for the user. Select the template and verify that it includes the Smart Card Logon and Client Authentication application policies required for our certificate-based Windows authentication scenario.
With Passwordless Authentication selected, click Enroll to request the certificate from AD CS.
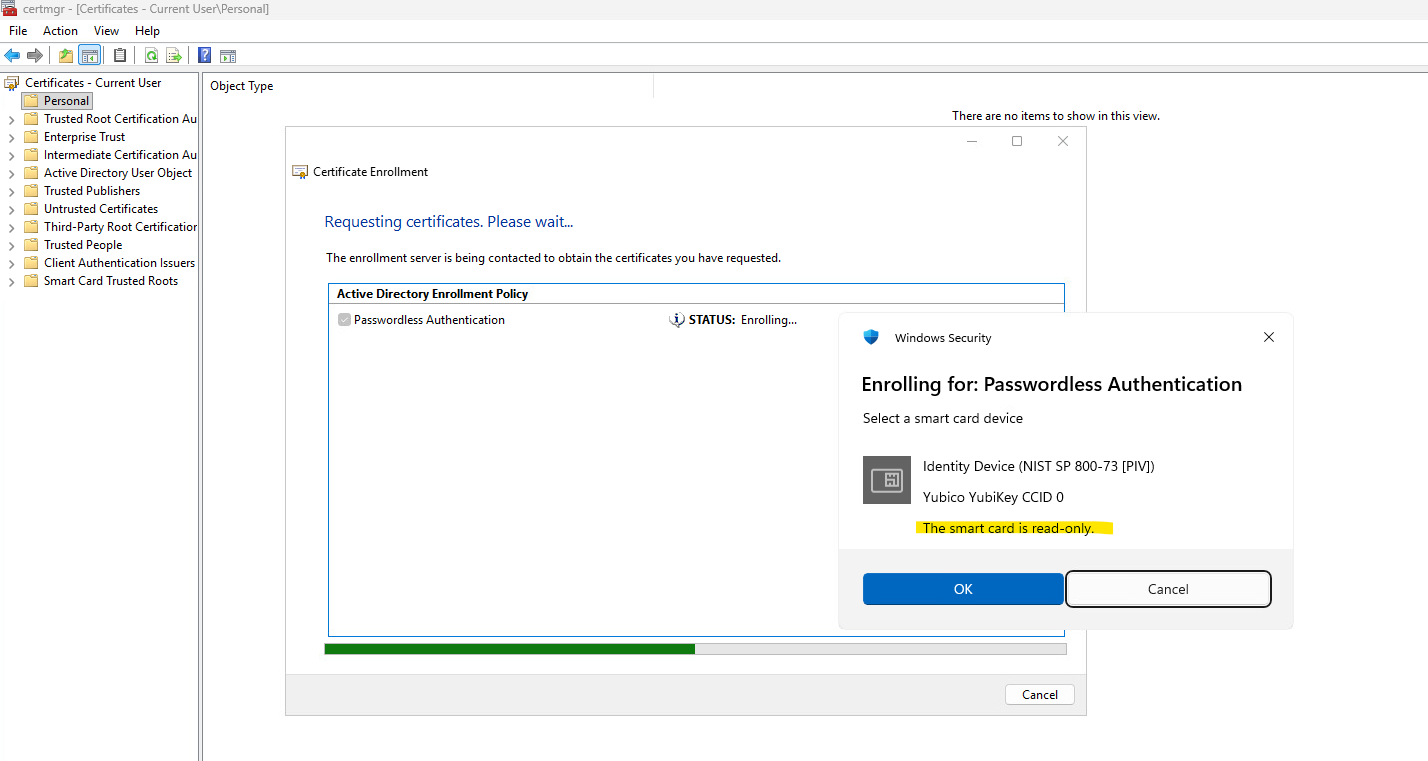
Windows successfully detects the YubiKey through its PIV/CCID smart card interface.
However, during certificate enrollment the card is reported as read-only, indicating that the appropriate YubiKey Smart Card Minidriver is required before Windows can write the certificate and private key to the YubiKey.
Before we can enroll the certificate onto the YubiKey, we first need to install the YubiKey Smart Card Minidriver on the Windows client. Click on Cancel.
Download and install the latest YubiKey Smart Card Minidriver for Windows (x64) from the official Yubico Smart Card Drivers and Tools download page. The minidriver integrates the YubiKey PIV application with the native Windows certificate enrollment and smart card interfaces.
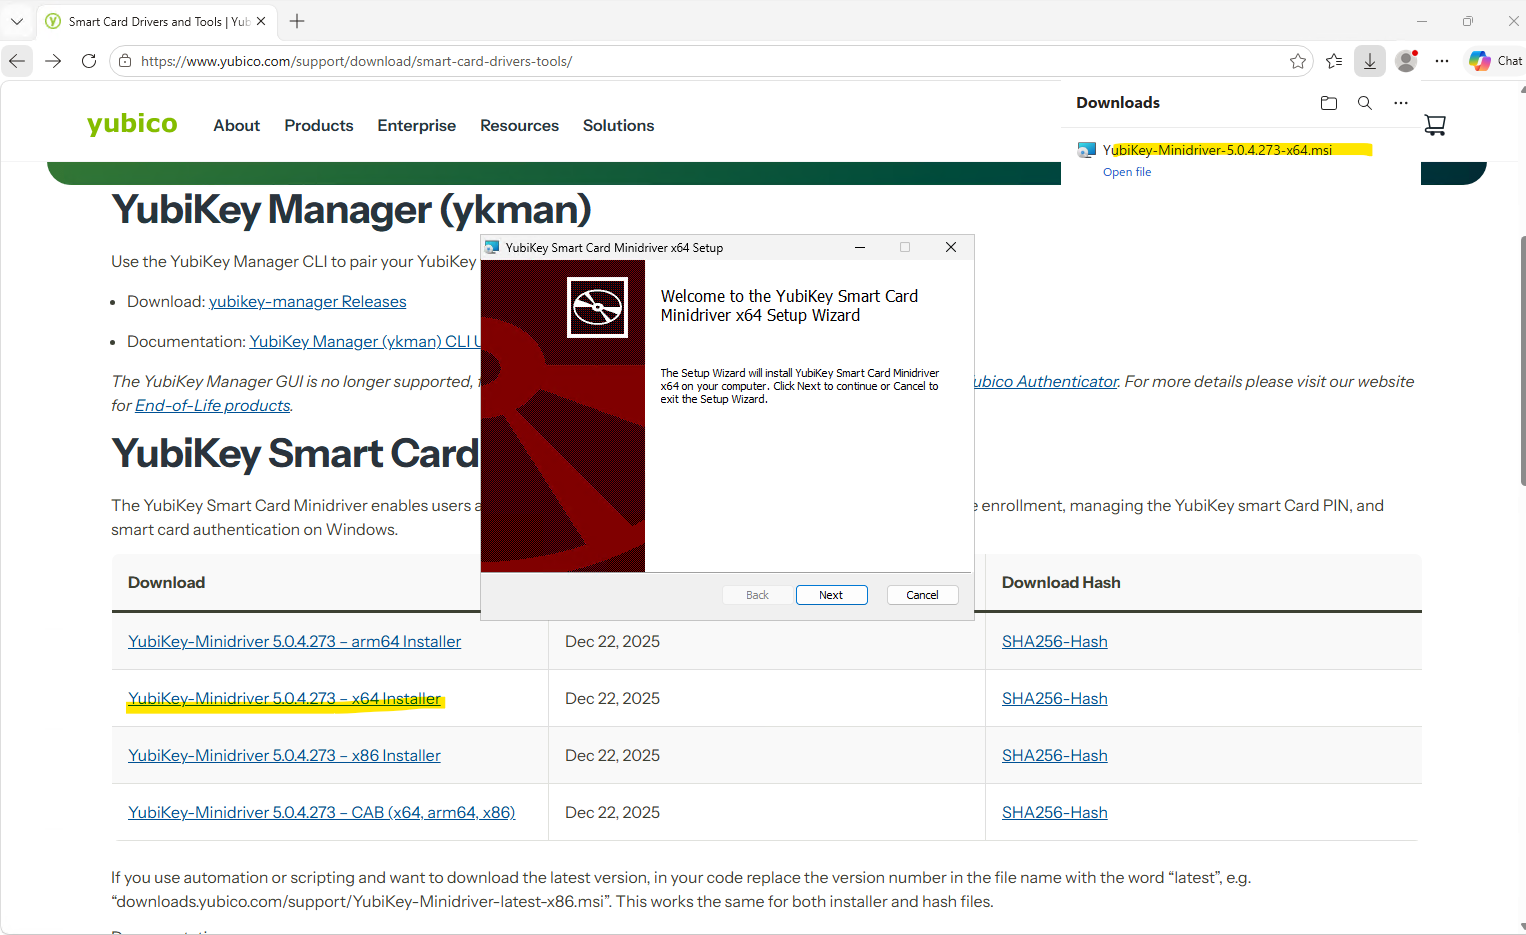
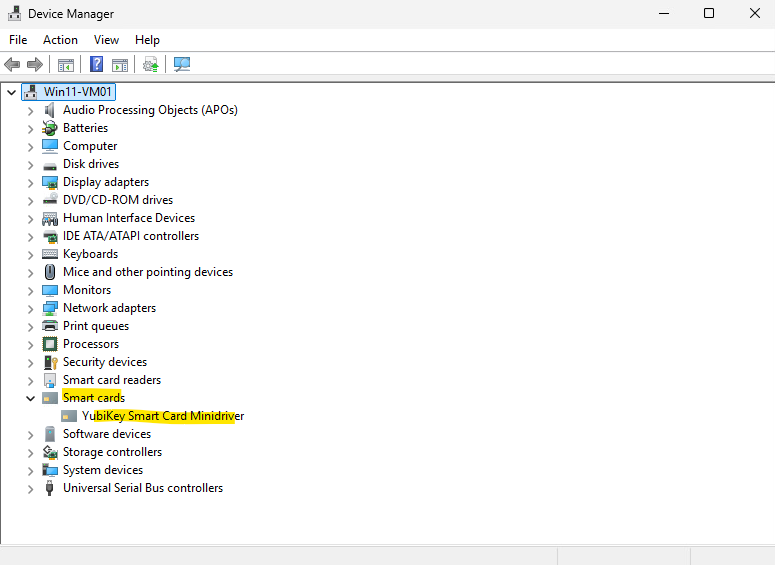
After installing the YubiKey Smart Card Minidriver, the YubiKey is now shown in Device Manager under Smart cards → YubiKey Smart Card Minidriver, replacing the previously used generic Identity Device (NIST SP 800-73 [PIV]) implementation. This enables Windows certificate enrollment to properly interact with the YubiKey’s PIV smart-card functionality.
We also need to install and register the YubiKey Minidriver on every target machine we want to connect to using RDP smart-card (YubiKey) logon.
During RDP smart-card logon, the remote target’s Local Security Authority (LSA) processes the redirected credential, requiring every destination server to have the YubiKey Minidriver registered to locate PIV key containers. If not you will run into the
The requested key container does not exist on the smart carderror shown at the end of this article within the Troubleshooting section.Because headless or remote servers lack a physical USB insertion event to trigger automatic driver binding, run the following commands on every target machine:
msiexec /i YubiKey-Minidriver-5.0.4.273-x64.msi INSTALL_LEGACY_NODE=1 /qn
Set-ItemProperty -Path "HKLM:\SOFTWARE\Microsoft\Cryptography\Calais\SmartCards\Identity Device (NIST SP 800-73 [PIV])" -Name "80000001" -Value "ykmd.dll"
Restart-Service -Name SCardSvr -Force
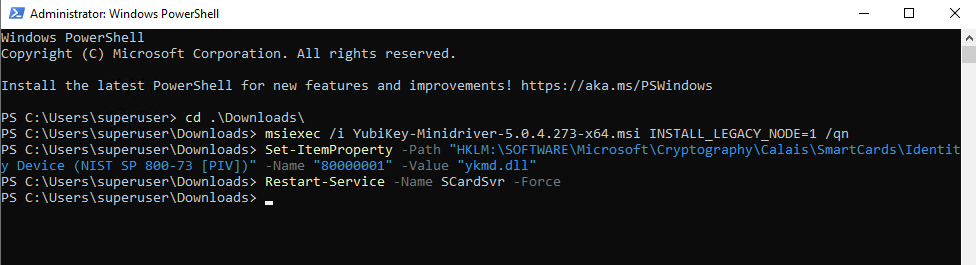
msiexec ... INSTALL_LEGACY_NODE=1: Installs the minidriver silently (/qn) while forcing the MSI to write specific YubiKey ATR subkeys into the registry, enabling Windows to recognize the YubiKey on remote servers where it is never directly plugged in via USB.
Set-ItemProperty ...: Overrides the defaultIdentity Device (NIST SP 800-73 [PIV])fallback entry in the registry, re-pointing the primary driver DLL (80000001) to Yubico’sykmd.dllinstead of Microsoft’s genericmsclmd.dll.
Restart-Service -Name SCardSvr -Force: Restarts the Smart Card Resource Manager service to flush cached driver handles and immediately apply the new registry mappings.
After installing the YubiKey Smart Card Minidriver, we can retry the certificate enrollment.
Note: For the certificate enrollment, in my case for my vSphere lab, I have to switch from the RDP session to the interactive vSphere Web Console session. Otherwise, the directly passed-through YubiKey is not properly accessible to the Windows smart-card subsystem and the enrollment fails.
This time, Windows correctly communicates with the YubiKey PIV application and prompts us for the YubiKey PIN to create and store the private key securely on the YubiKey.
For the initial certificate enrollment, the YubiKey needs to remain at its factory-default PIV settings. Therefore, when prompted for the PIN, enter the factory-default PIV PIN
123456.
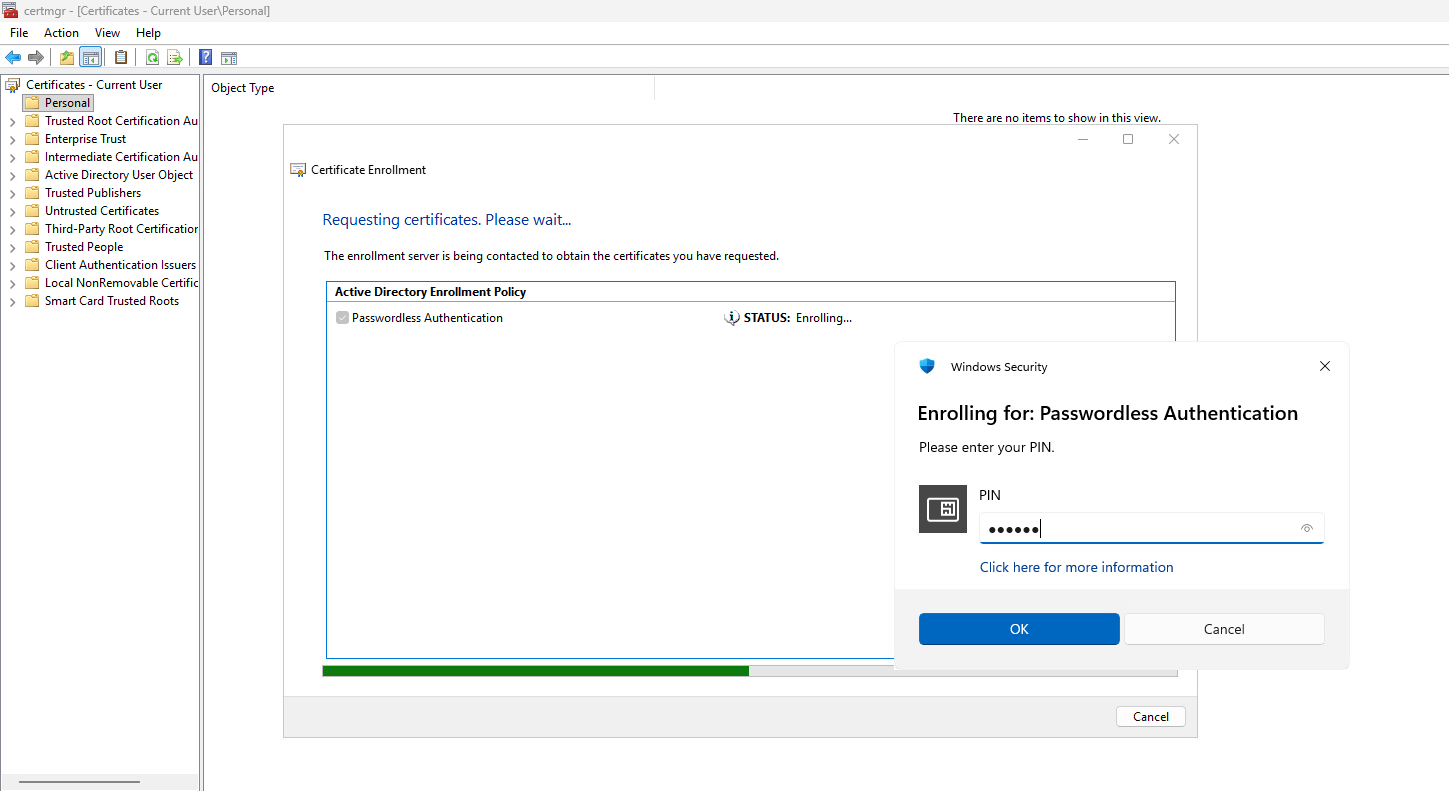
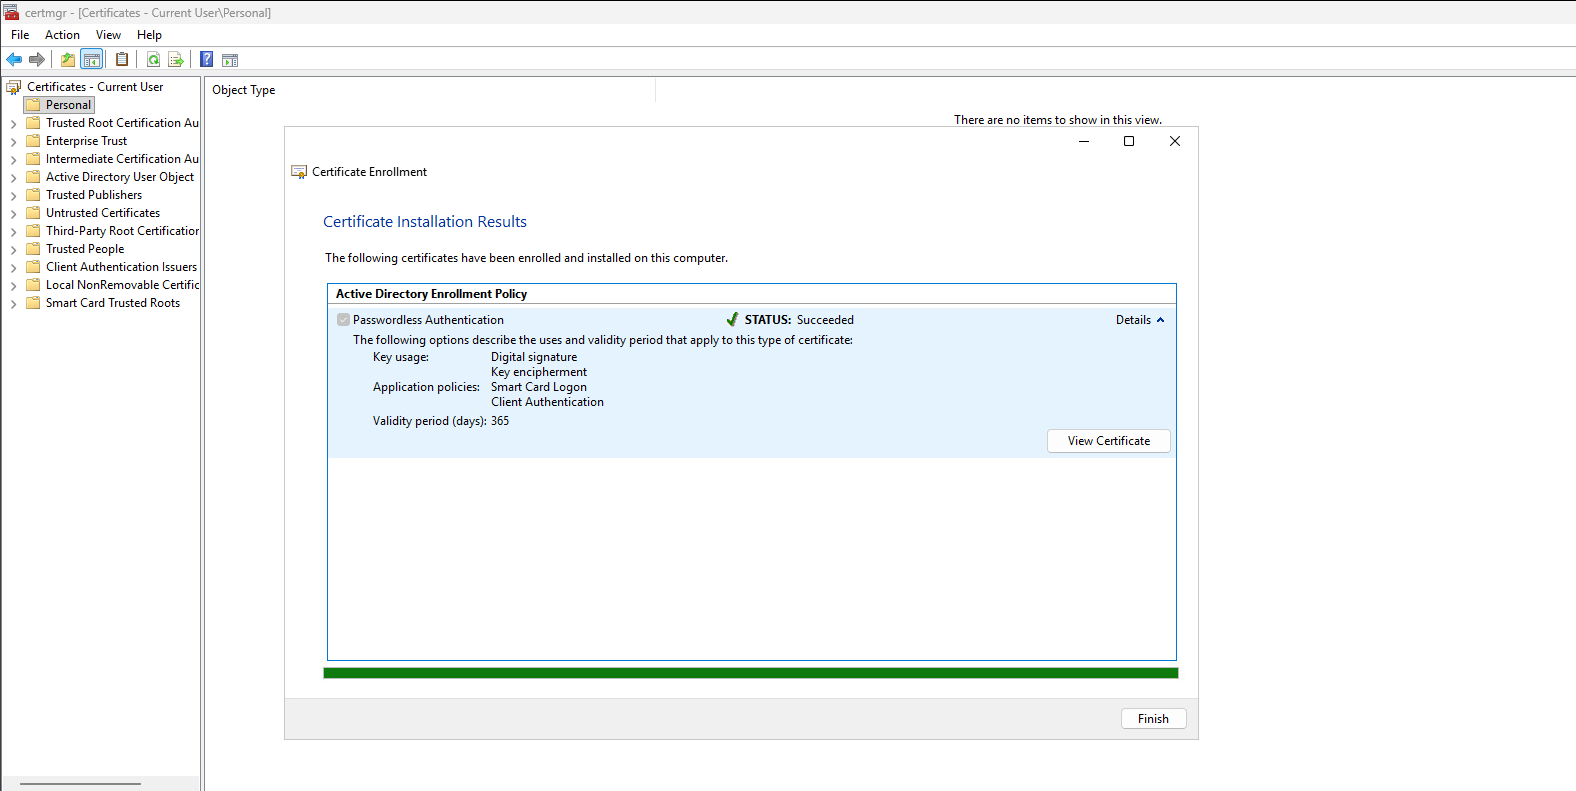
The private key is generated and securely stored on the YubiKey, while the issued certificate provides the Smart Card Logon and Client Authentication application policies required for certificate-based Windows authentication.
Click on Finish.
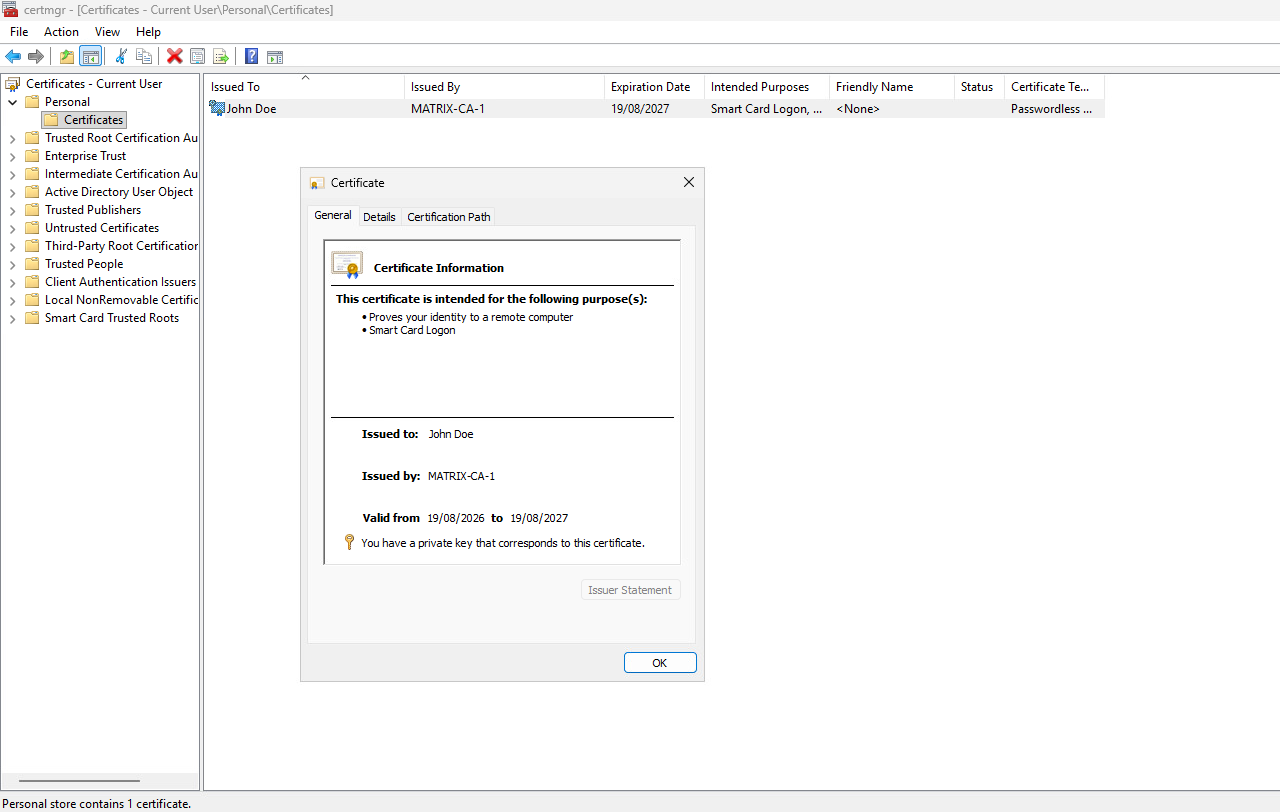
The newly enrolled certificate now appears in the Current User → Personal → Certificates store and is issued to John Doe by our enterprise CA MATRIX-CA-1.
The certificate includes Smart Card Logon and Client Authentication, while the displayed private-key indicator confirms that Windows can access the corresponding private key, which in our case is securely stored on the YubiKey rather than on the VM itself.
Verify the Certificate Stored on the YubiKey
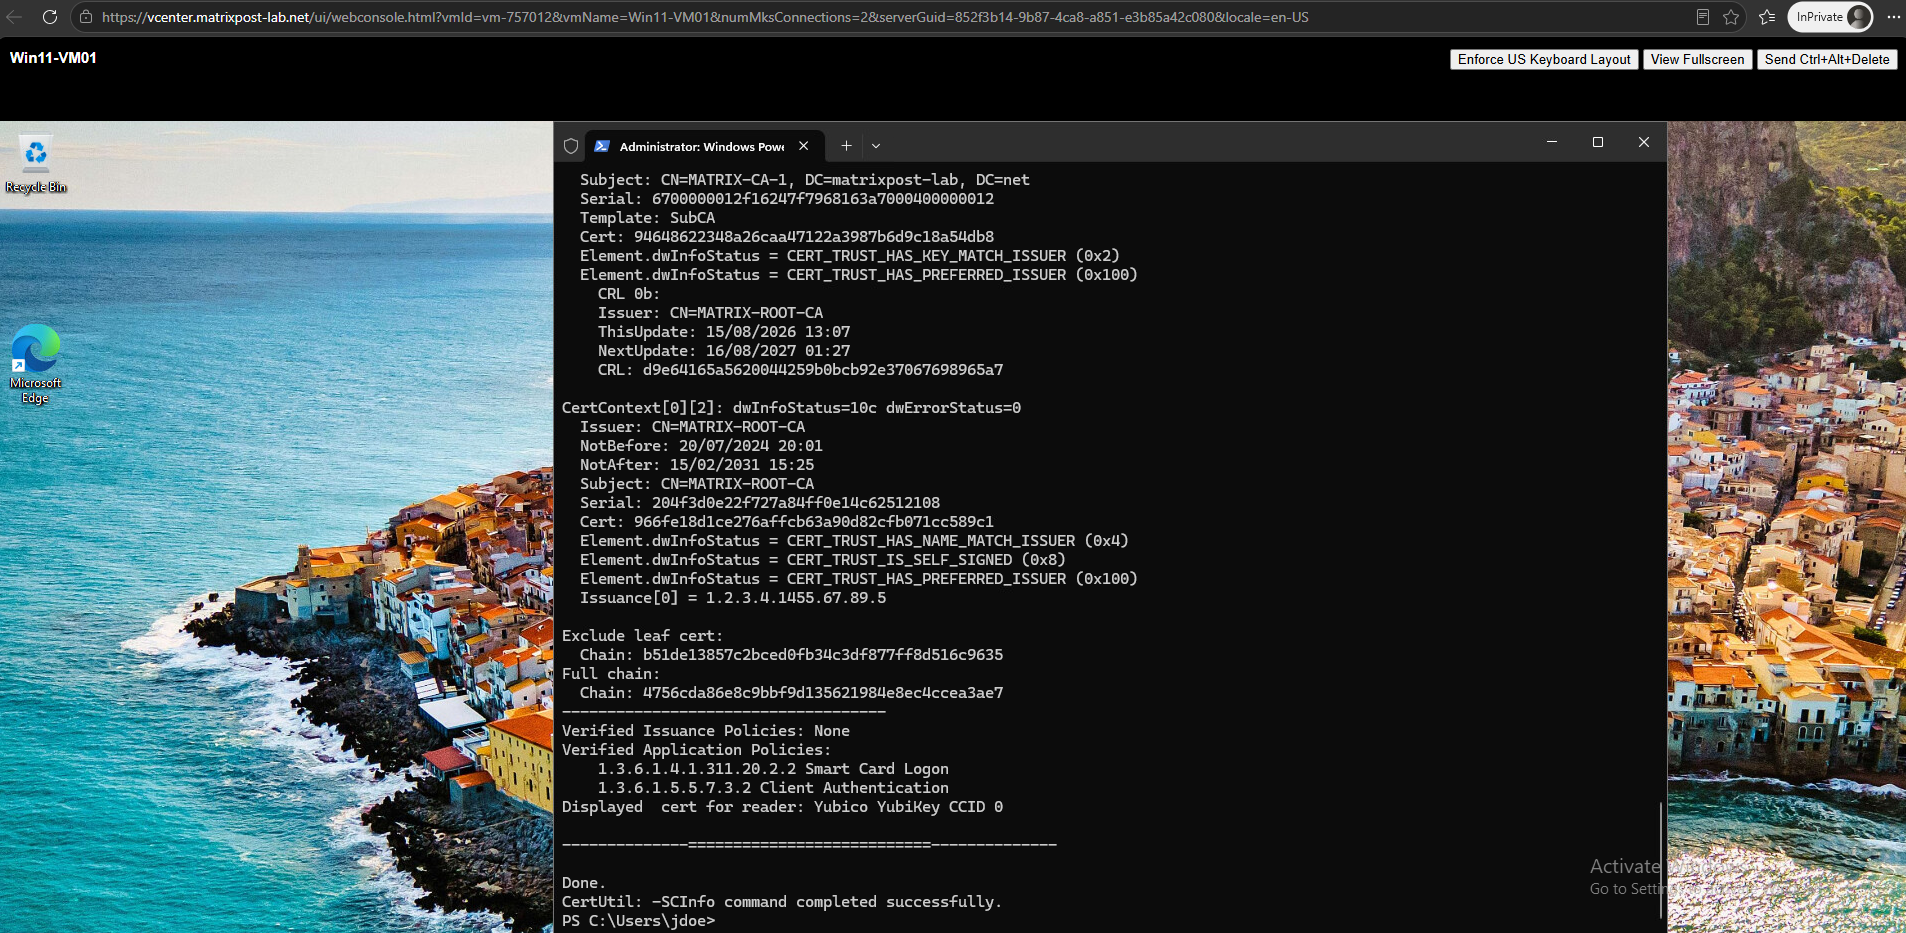
Run certutil -scinfo to verify that Windows can access the certificate and its corresponding private key through the YubiKey.
The certutil -scinfo command enumerates the available smart-card readers and certificates and performs several tests to verify the associated cryptographic keys and certificate chain. Because some of these tests require access to the private key stored on the YubiKey, Windows prompts for the PIV PIN.
As shown below, Windows detects the Yubico YubiKey CCID reader and our Passwordless Authentication certificate and prompts for the PIV PIN when an operation requiring the private key is performed.
certutil -scinfo
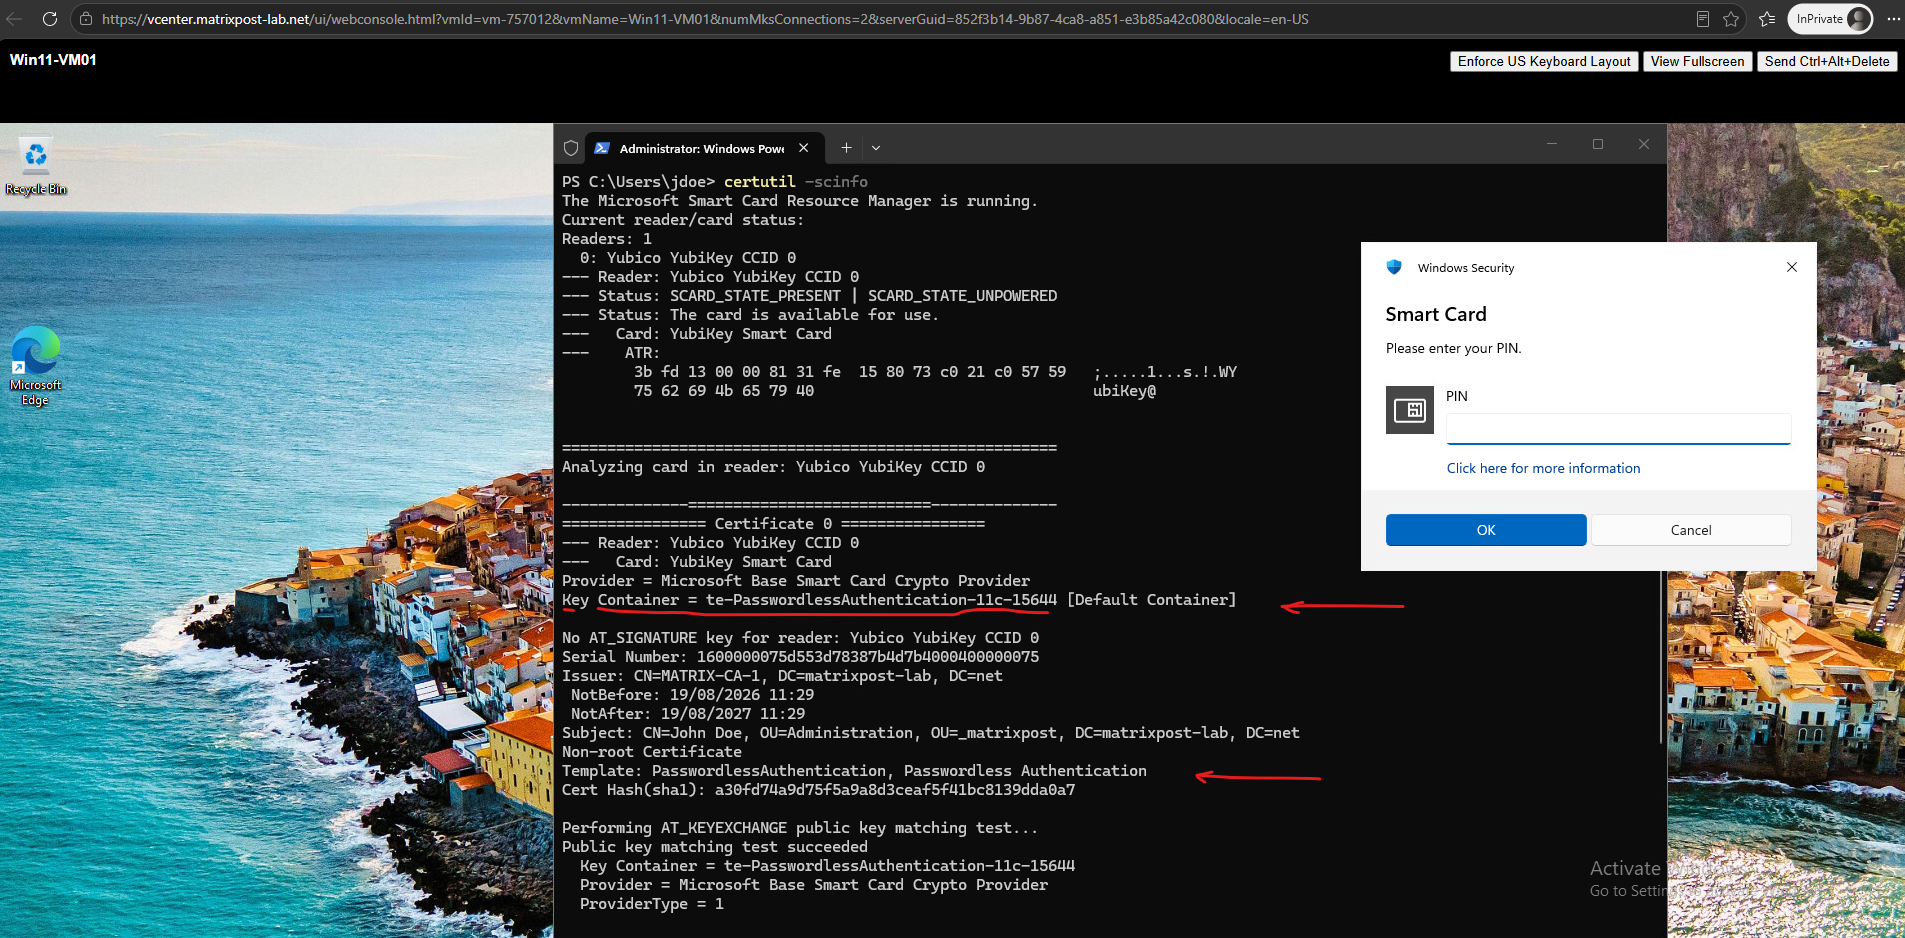
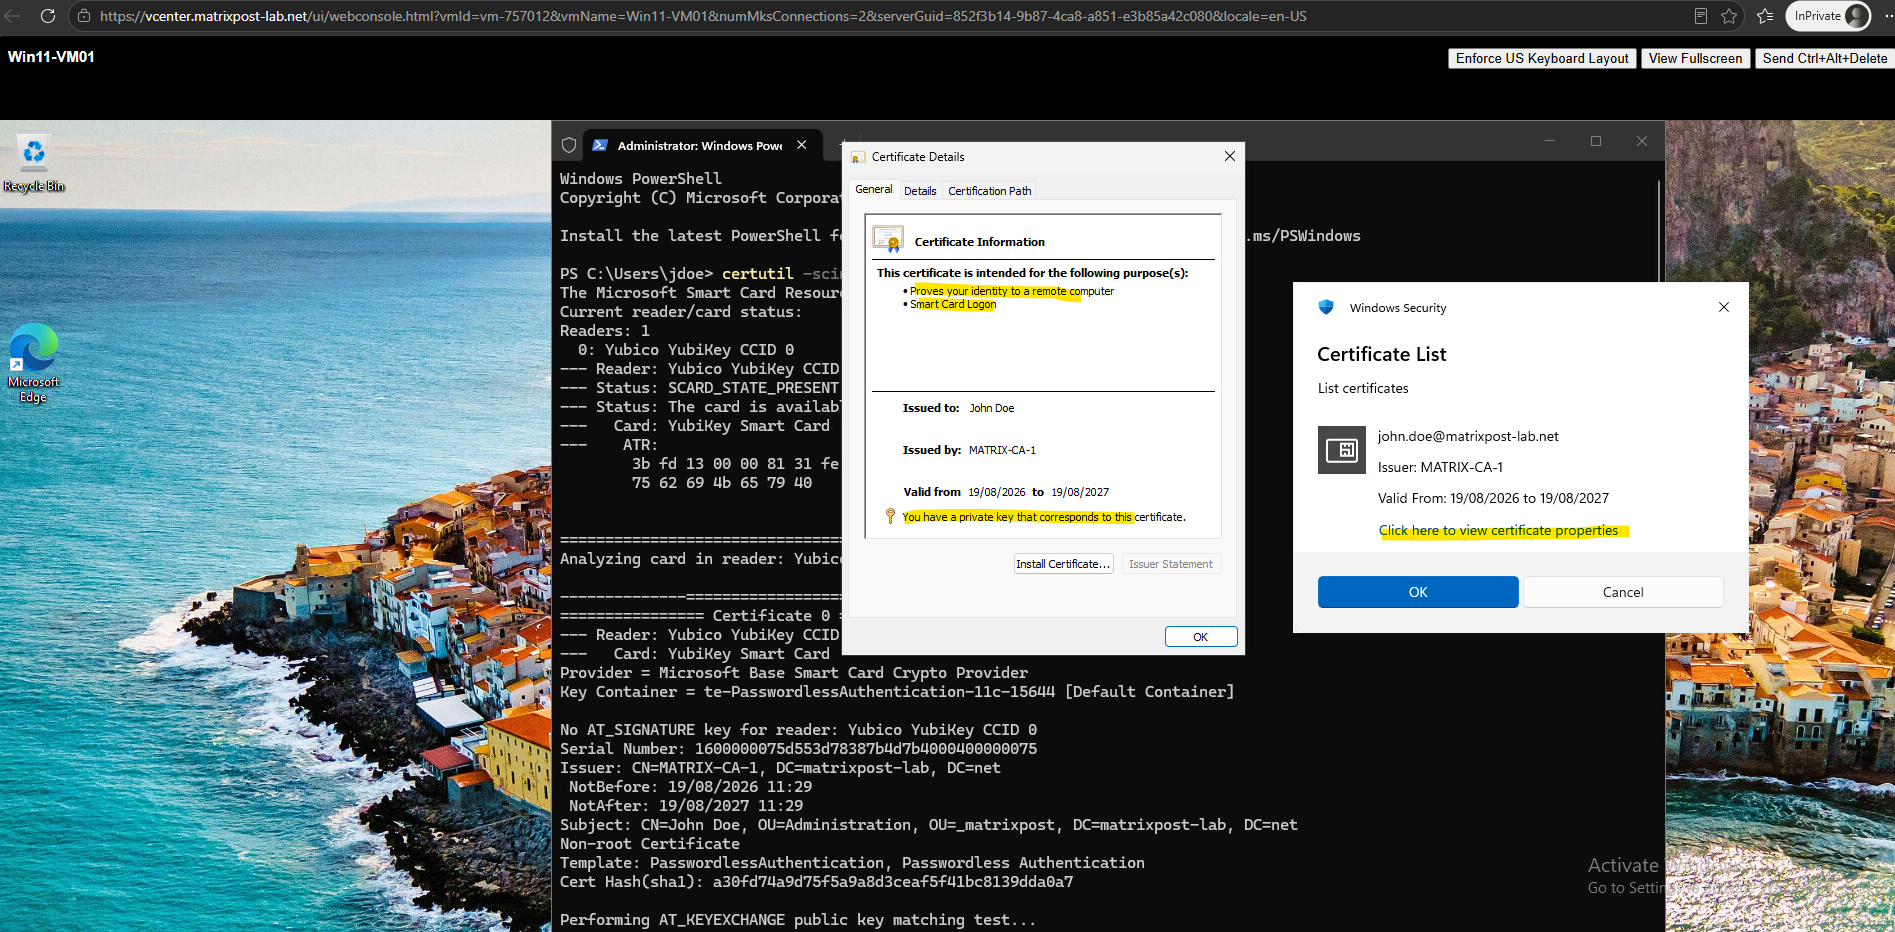
After entering the PIV PIN, certutil -scinfo successfully validates access to the certificate and its associated private key on the YubiKey. The certificate is issued to john.doe@matrixpost-lab.net by MATRIX-CA-1 and includes the Smart Card Logon purpose, confirming that the YubiKey is ready for certificate-based Windows authentication.
Passwordless Windows RDP Logon with the YubiKey
Now that the certificate has been successfully enrolled and its private key is securely stored on the YubiKey, we can finally test our primary use case: passwordless authentication to a Windows system using Remote Desktop (RDP).
Instead of entering the user’s Active Directory password, authentication will be performed using the certificate on the YubiKey together with the PIV PIN.
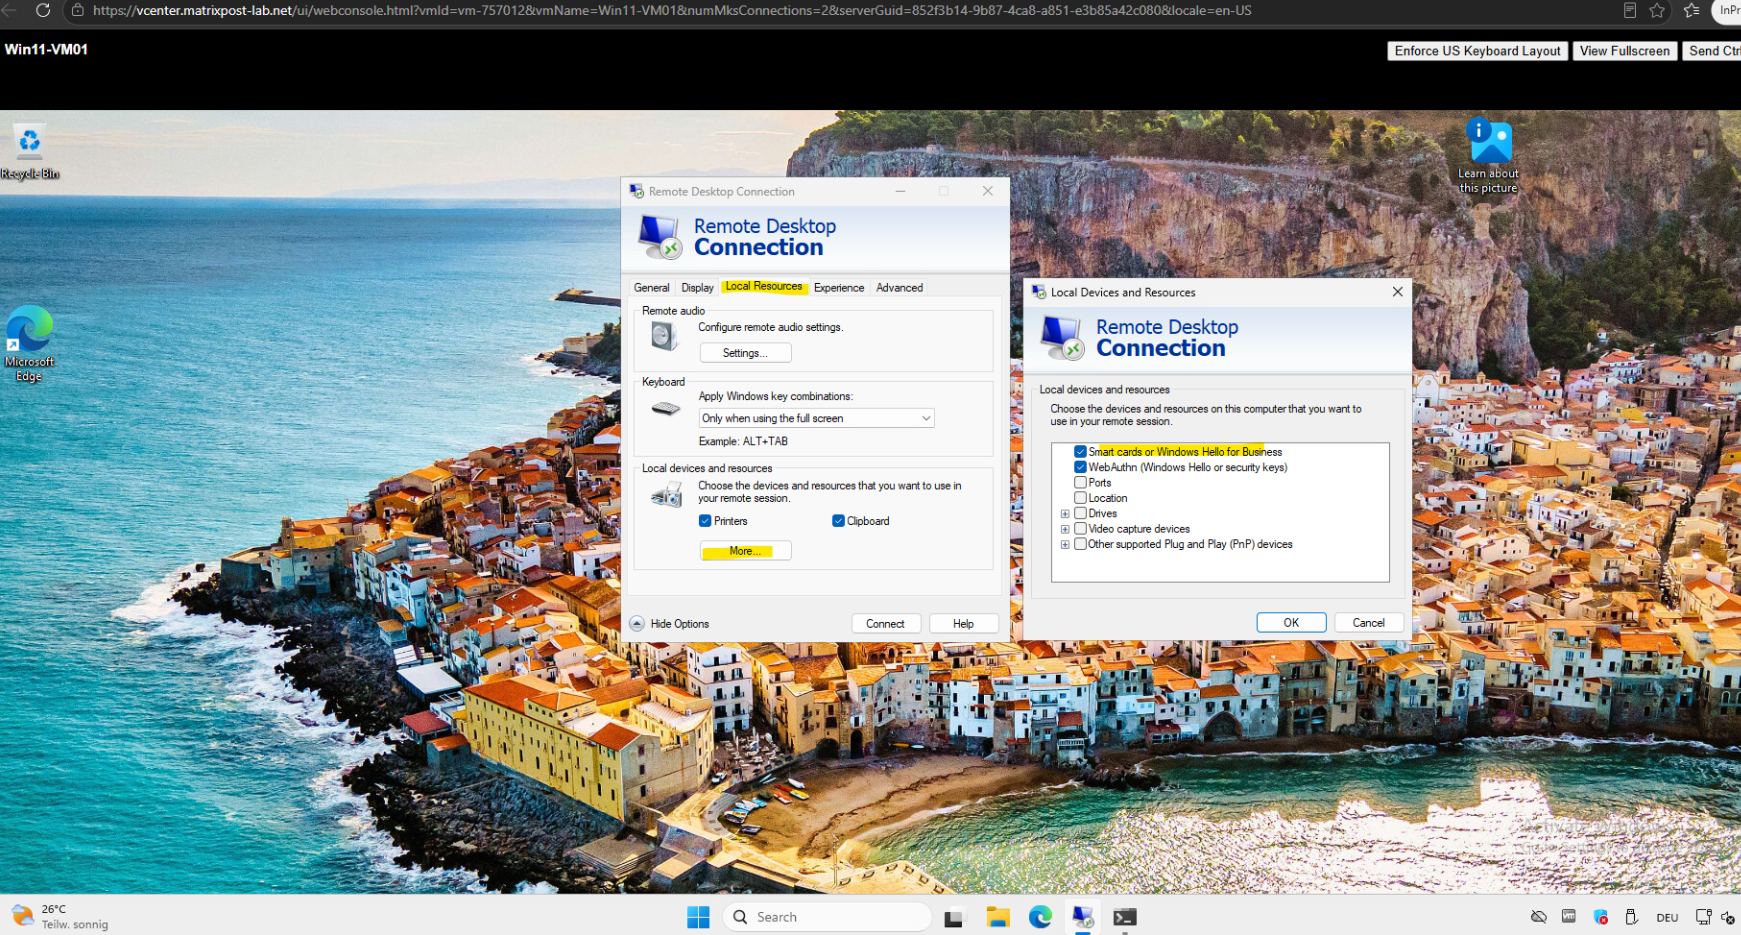
From Win11-VM01, we open Remote Desktop Connection (mstsc.exe) and connect to the target Windows server.
Before establishing the RDP connection, open Local Resources → More and ensure that Smart cards or Windows Hello for Business is enabled. This allows the smart-card functionality of our YubiKey to be redirected through RDP so that the certificate and its private key can be used for authentication on the remote system.
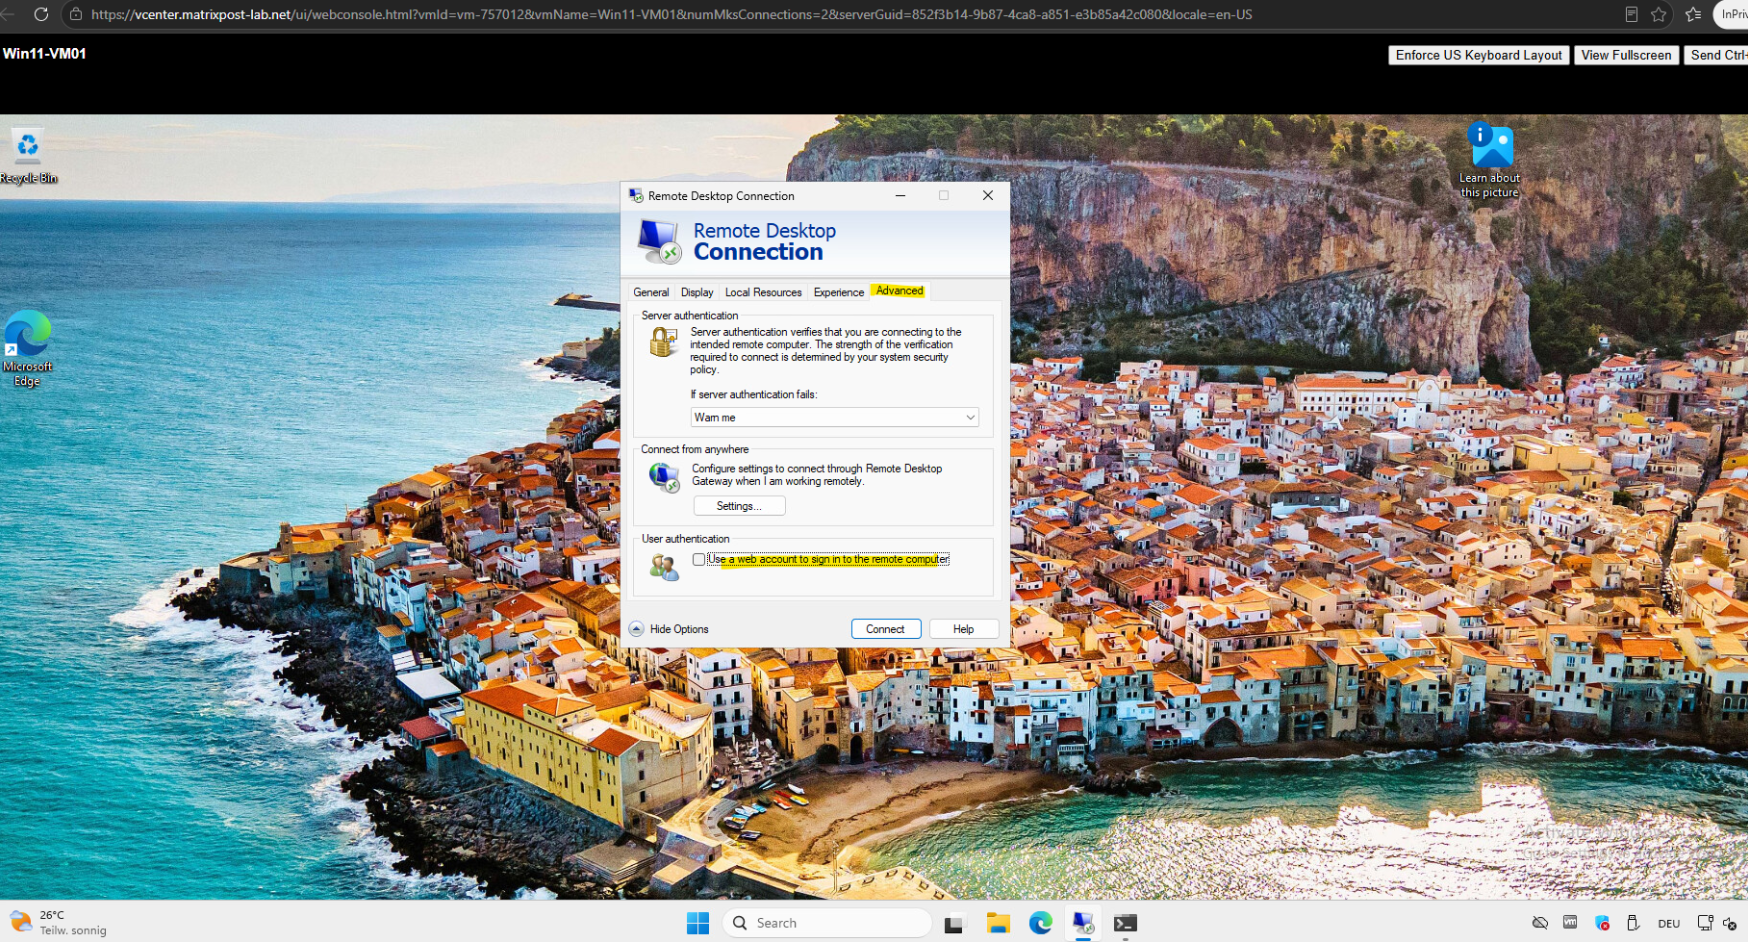
On the Advanced tab, leave Use a web account to sign in to the remote computer disabled.
We will enable and use this option later in Part 2 when testing Entra ID–based passwordless authentication, but it is not required here for our AD CS smart-card certificate stored on the YubiKey.
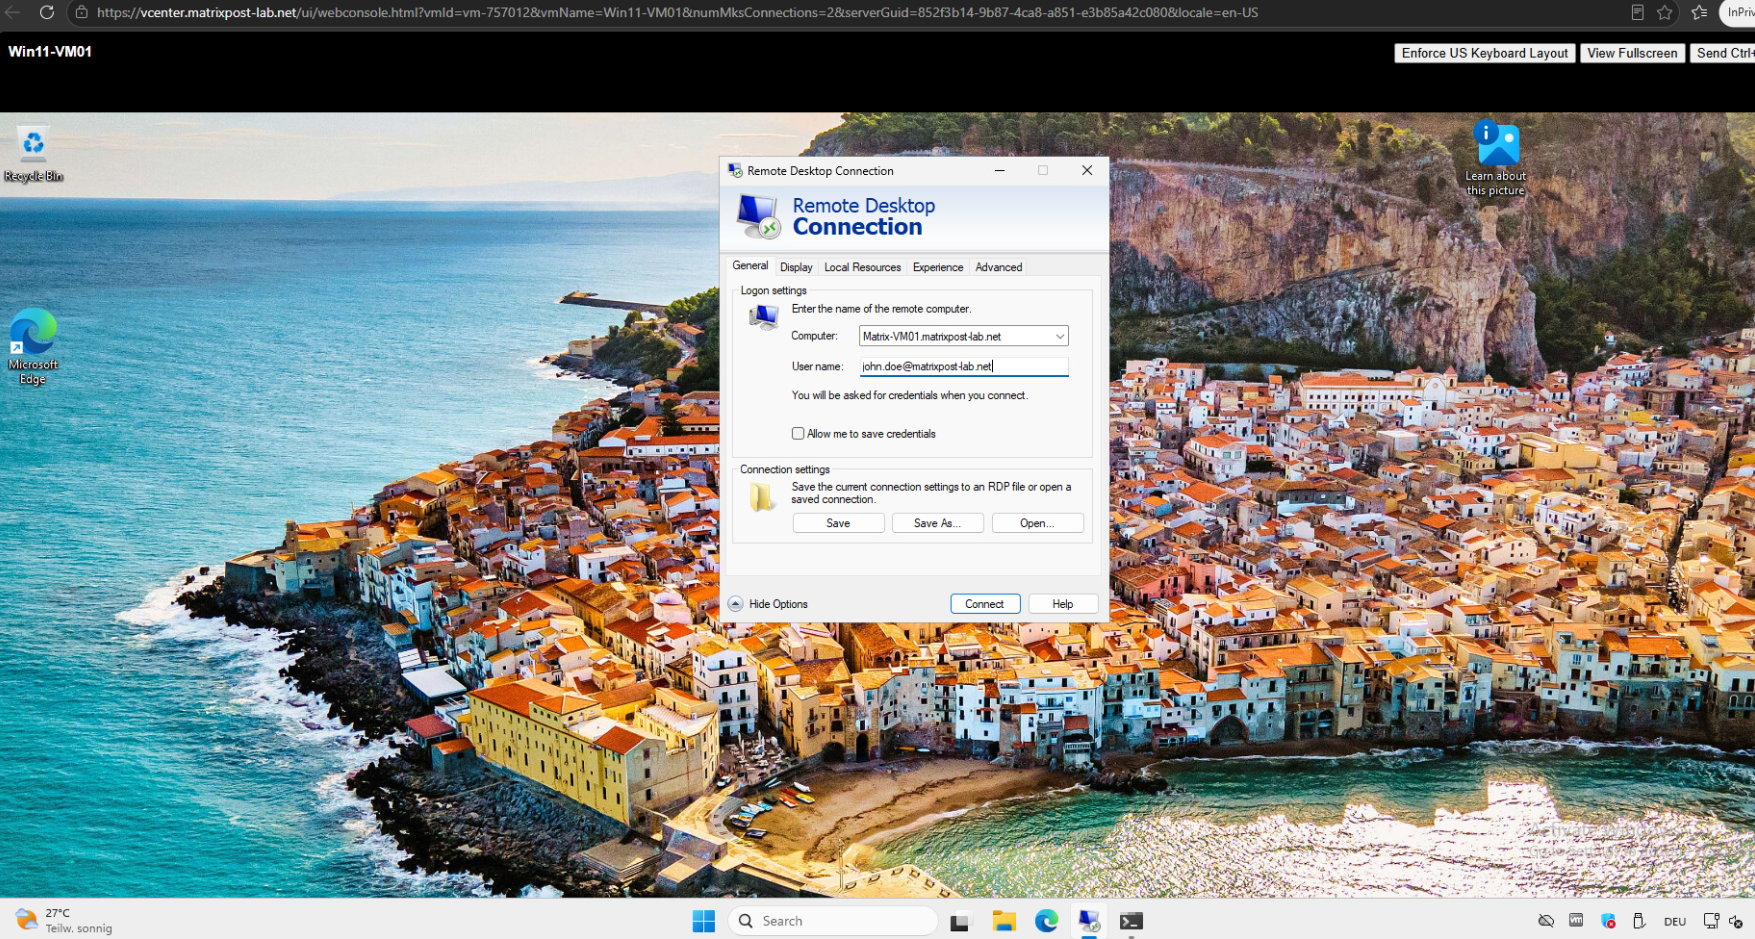
Now enter the FQDN of the target Windows computer and specify the domain user for whom we enrolled the certificate, here john.doe@matrixpost-lab.net.
Then click Connect; instead of authenticating with the user’s password, we want RDP to use the smart-card certificate and private key stored on the YubiKey.
Click More choices and select Smart card credential for John Doe.
This switches the RDP authentication from the normal AD password to the certificate/private key on the YubiKey, with the YubiKey PIN used to authorize the authentication operation.
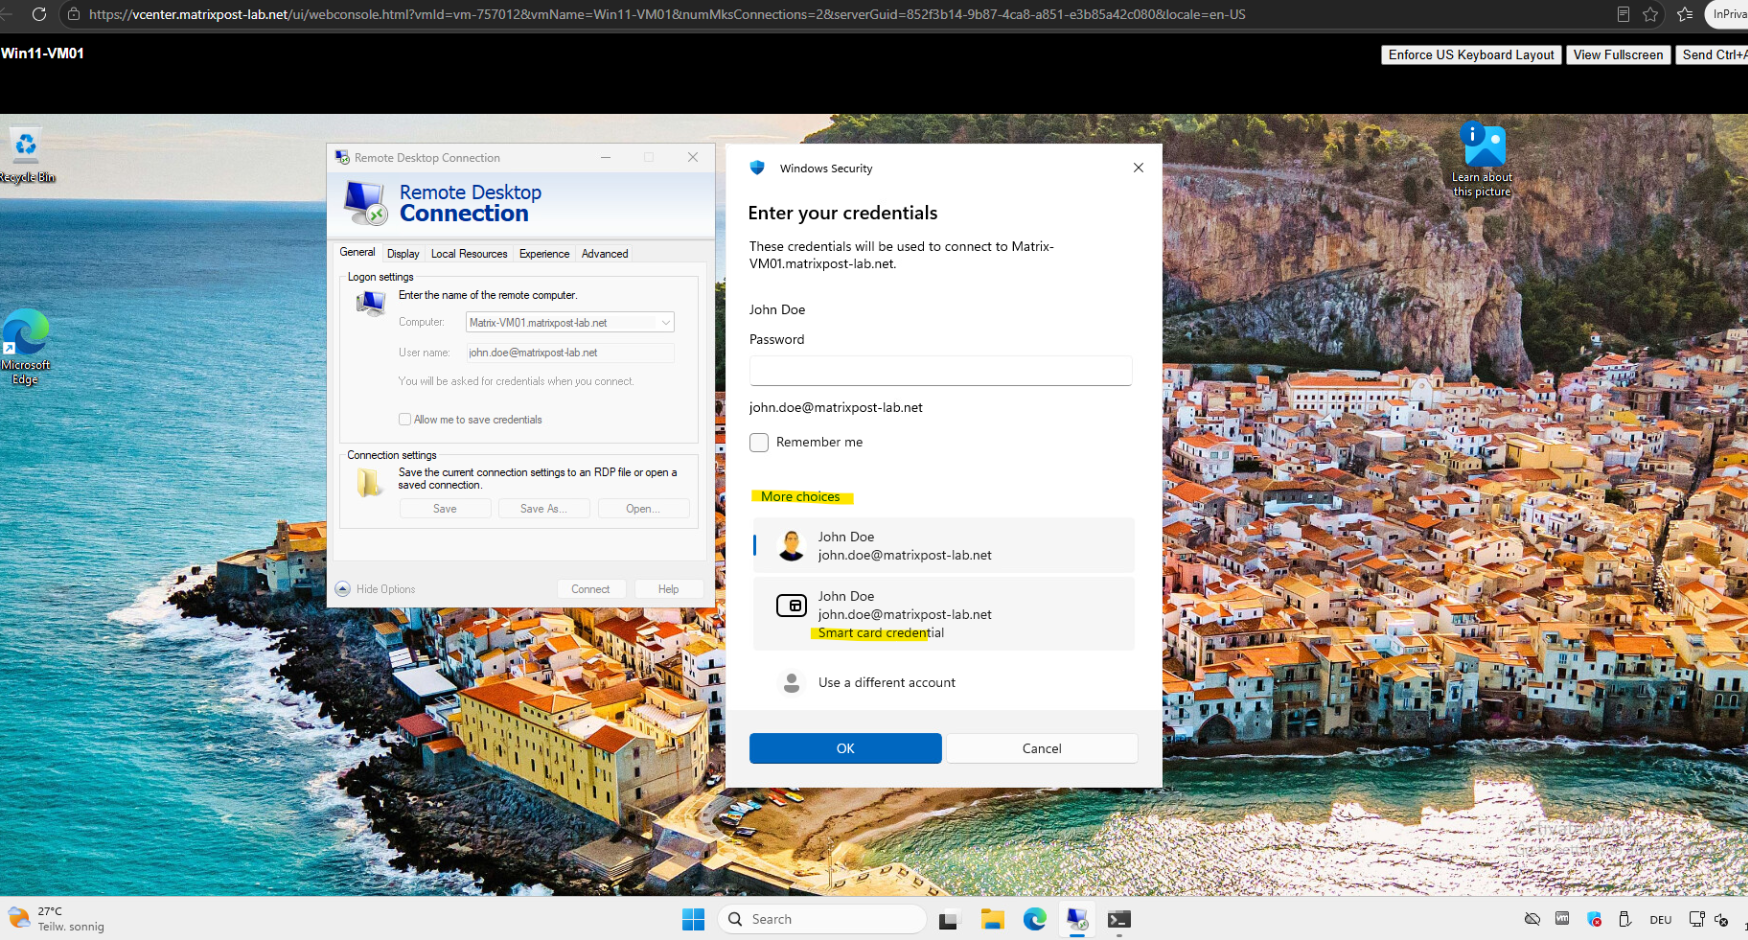
After selecting Smart card credential, Windows prompts for the YubiKey PIV PIN instead of the user’s Active Directory password.
Enter the PIN and click OK; the YubiKey then uses its protected private key to perform the cryptographic authentication required for the RDP logon.
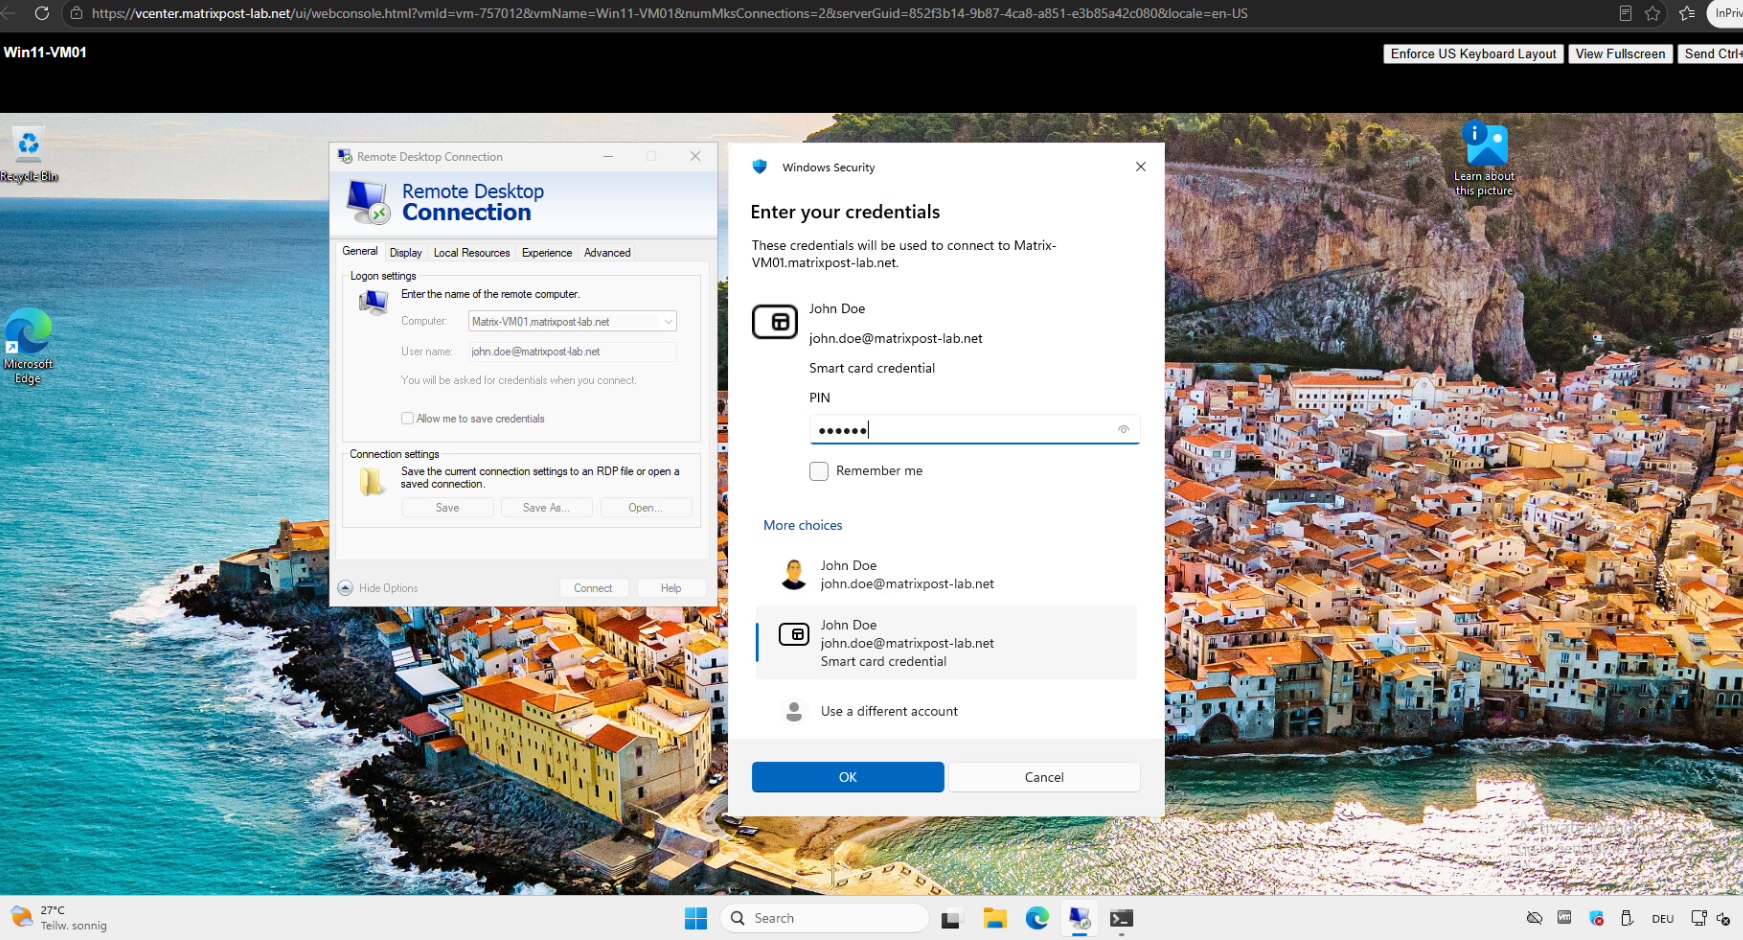
After entering the YubiKey PIN and clicking OK, the RDP client uses the certificate and private key stored on the YubiKey to authenticate the user.
The connection is then secured and the remote session to Matrix-VM01 is established without entering the user’s Windows password.
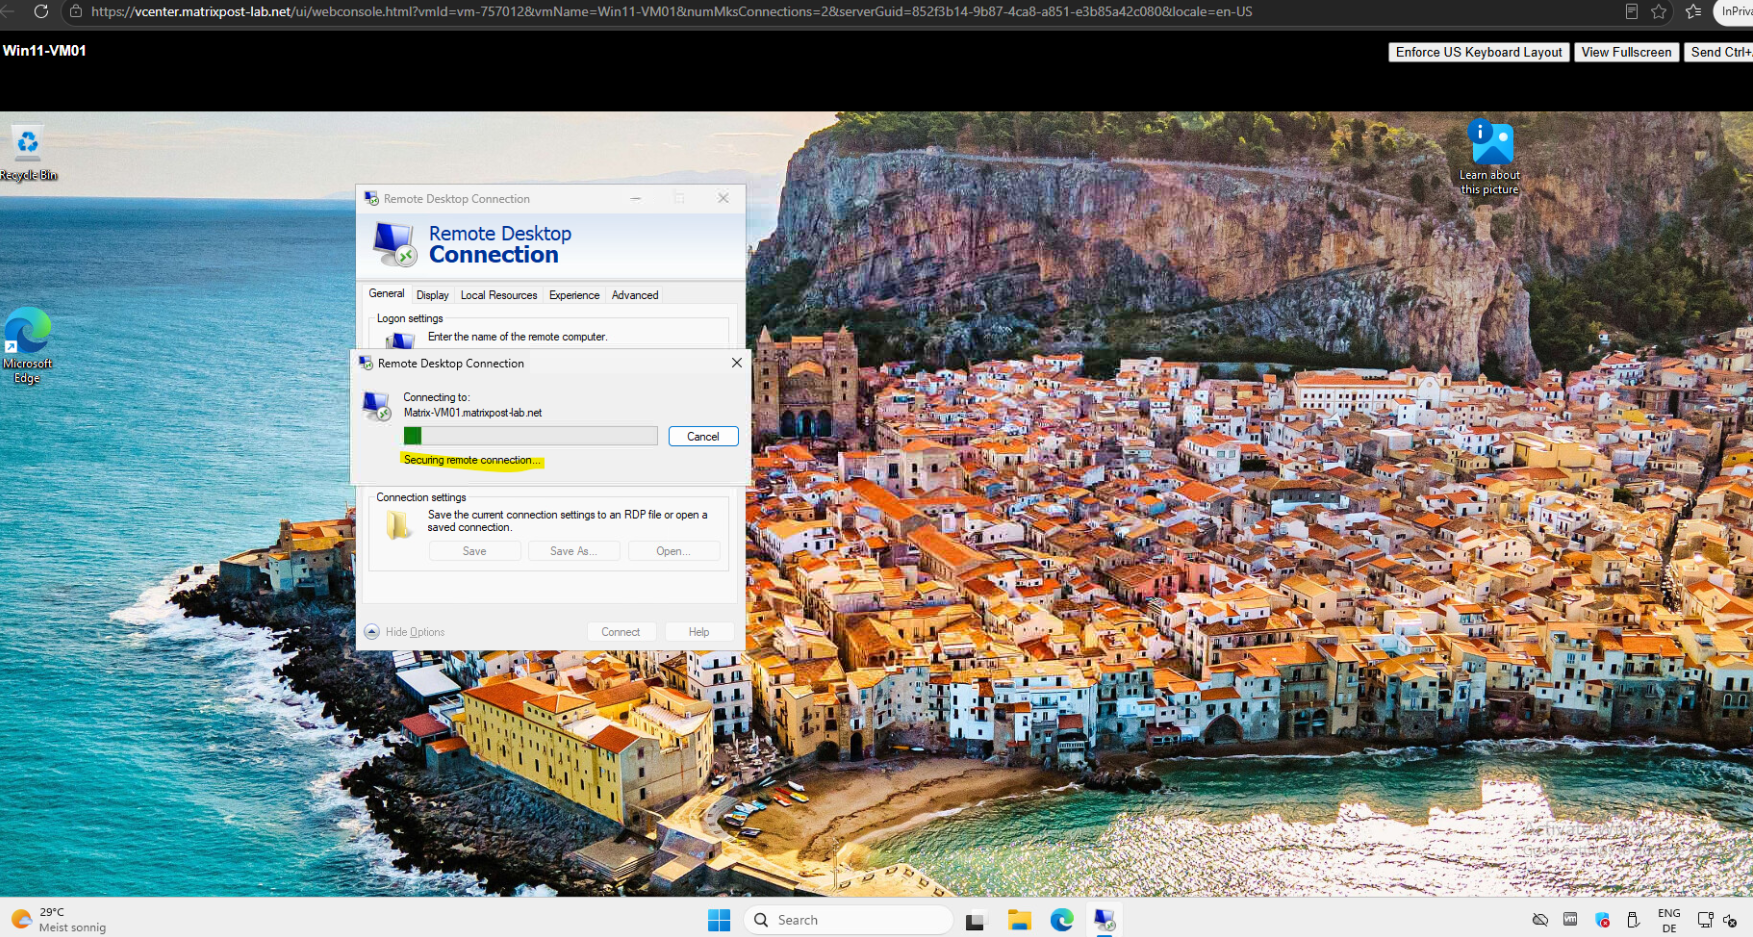
After successful certificate-based authentication, Windows starts the RDP session for John Doe and applies the user’s profile and settings.
This confirms that the complete RDP smart-card authentication process using the YubiKey has succeeded, without using the user’s Windows password.

Once the RDP session is established, we can verify the logged-on identity by running whoami.
As shown below, the session is running as
matrixpost\jdoe, confirming that John Doe was successfully authenticated to the remote system using the YubiKey certificate.
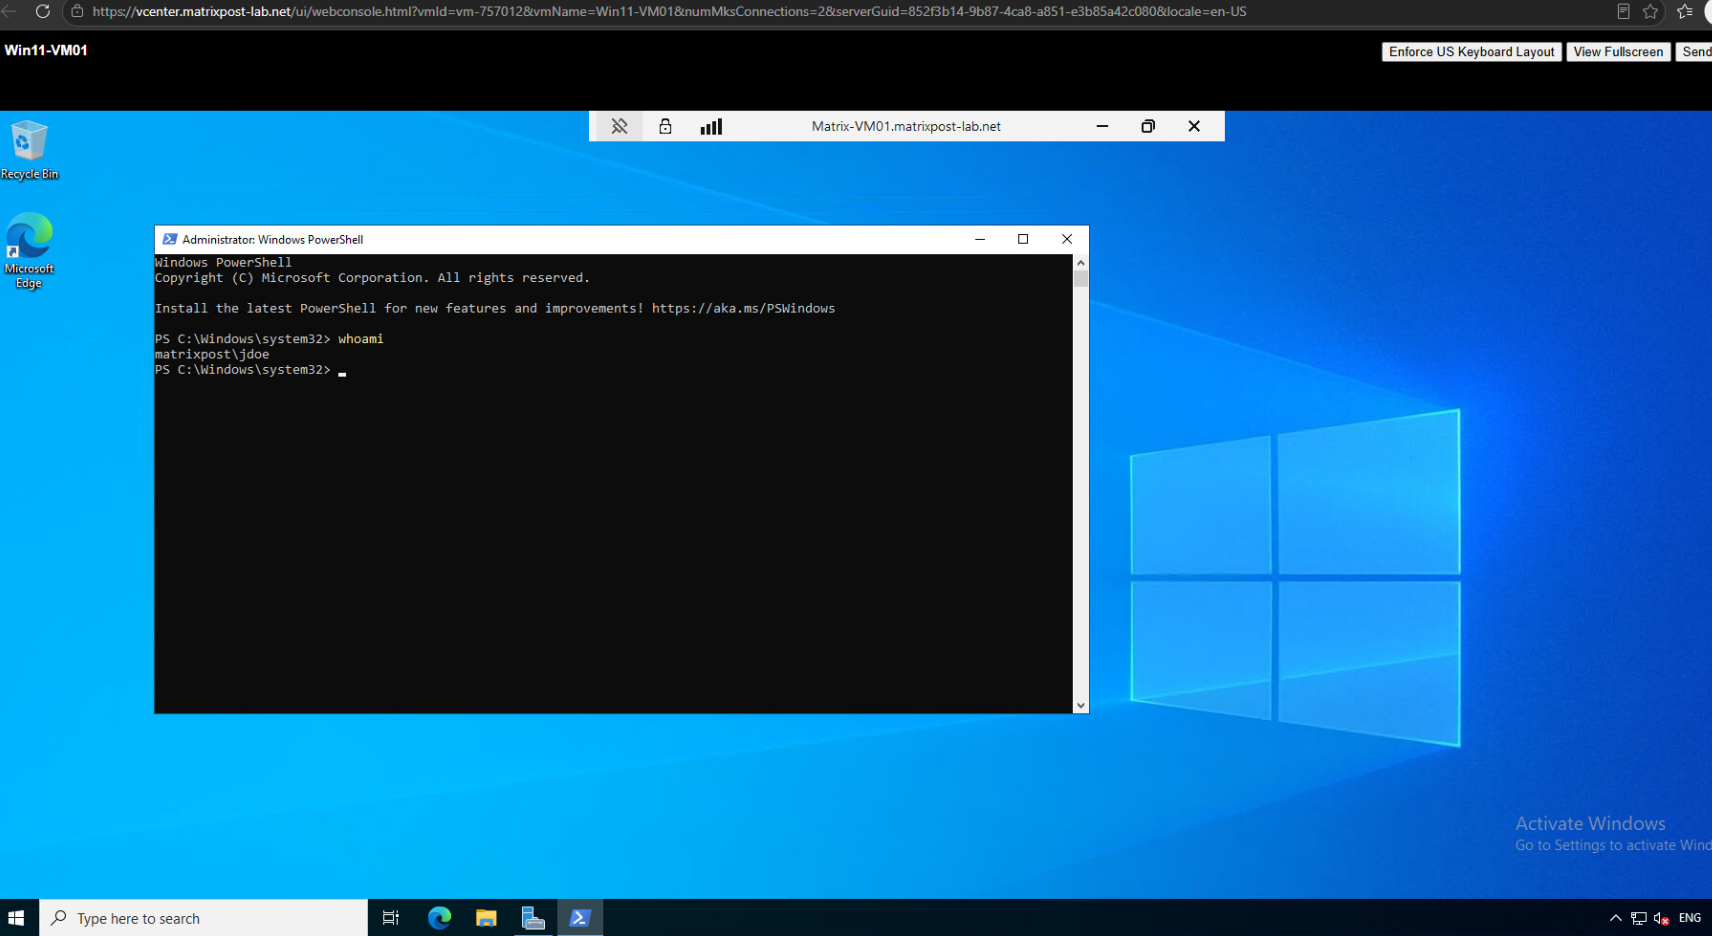
We an run a quick command directly inside a PowerShell window to prove Kerberos PKINIT / Smart Card logon was used.
NT AUTHORITY\This Organization Certificateonly appears in a user’s Kerberos access token when the logon was performed using certificate-based / smart card authentication (PKINIT).This gives us a nice final proof that the YubiKey smart-card RDP logon was successful.
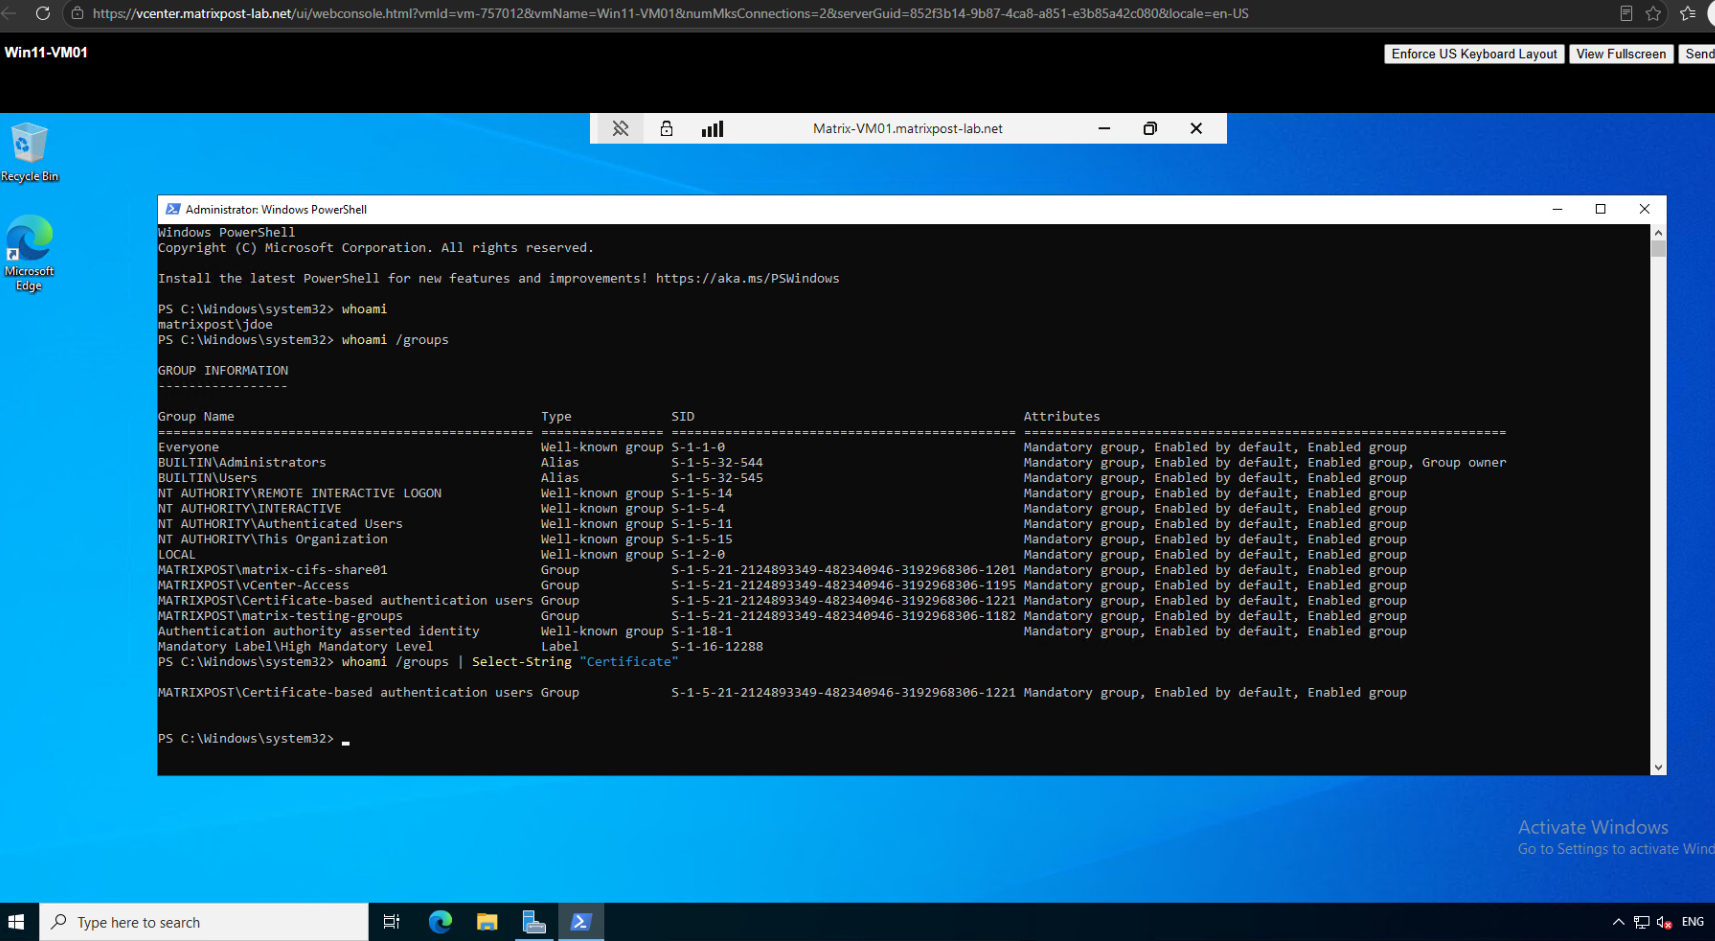
whoami /groups
whoami /groups | Select-String "Certificate"
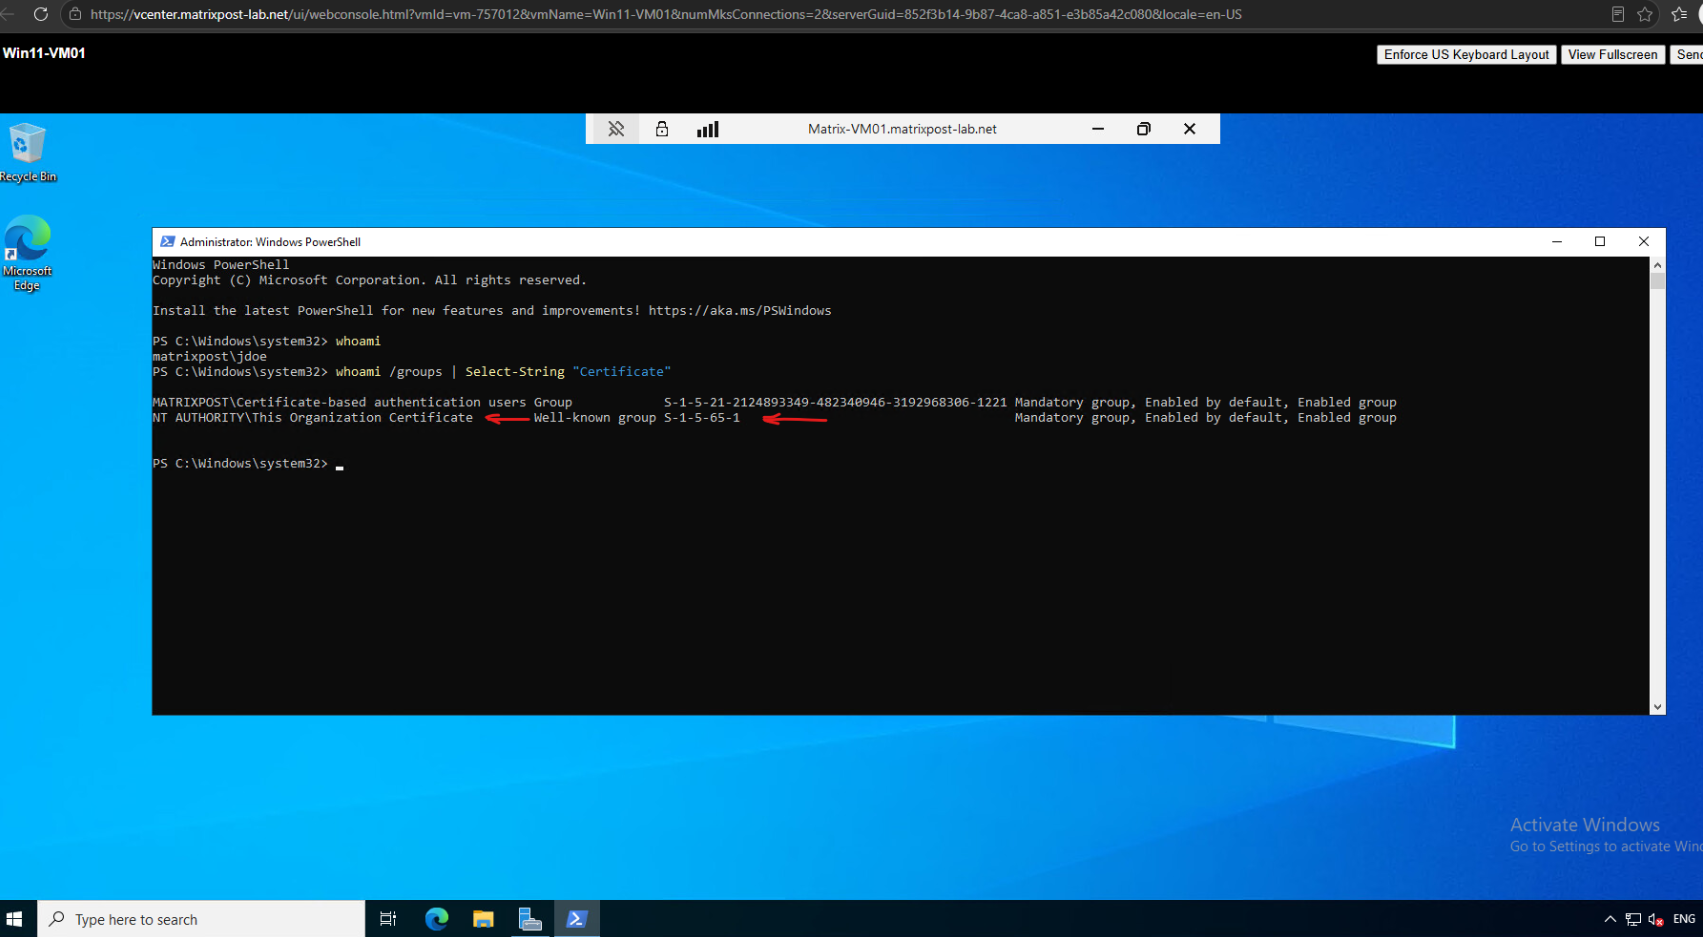
When logging in via standard password authentication, running whoami /groups omits the NT AUTHORITY\This Organization Certificate well-known SID from your Kerberos access token.
Filtering for “Certificate” only matches standard Active Directory security groups (like
Certificate-based authentication users) rather than the official Kerberos PKINIT logon claim.
Passwordless Windows Local Logon with the YubiKey
With all prerequisites already in place, we can finally also test a local passwordless Windows logon using the YubiKey.
This is essentially the same scenario as signing in to a physical Windows client or notebook with the YubiKey inserted into a USB port; in our vSphere lab, the YubiKey is simply passed through from the ESXi host to the Windows 11 client VM.
At the Windows sign-in screen, select Sign-in options and click the smart card icon shown here.
Windows then detects the certificate stored on the inserted YubiKey and switches from password authentication to certificate-based smart card logon.

After selecting Smart card, Windows prompts for the YubiKey PIV PIN instead of the user’s Windows password.
Enter the PIN and press Enter to authenticate with the certificate and private key stored on the YubiKey.

After entering the correct YubiKey PIV PIN, Windows successfully authenticates John Doe using the smart-card certificate and completes the local sign-in. So No Windows account password is required.

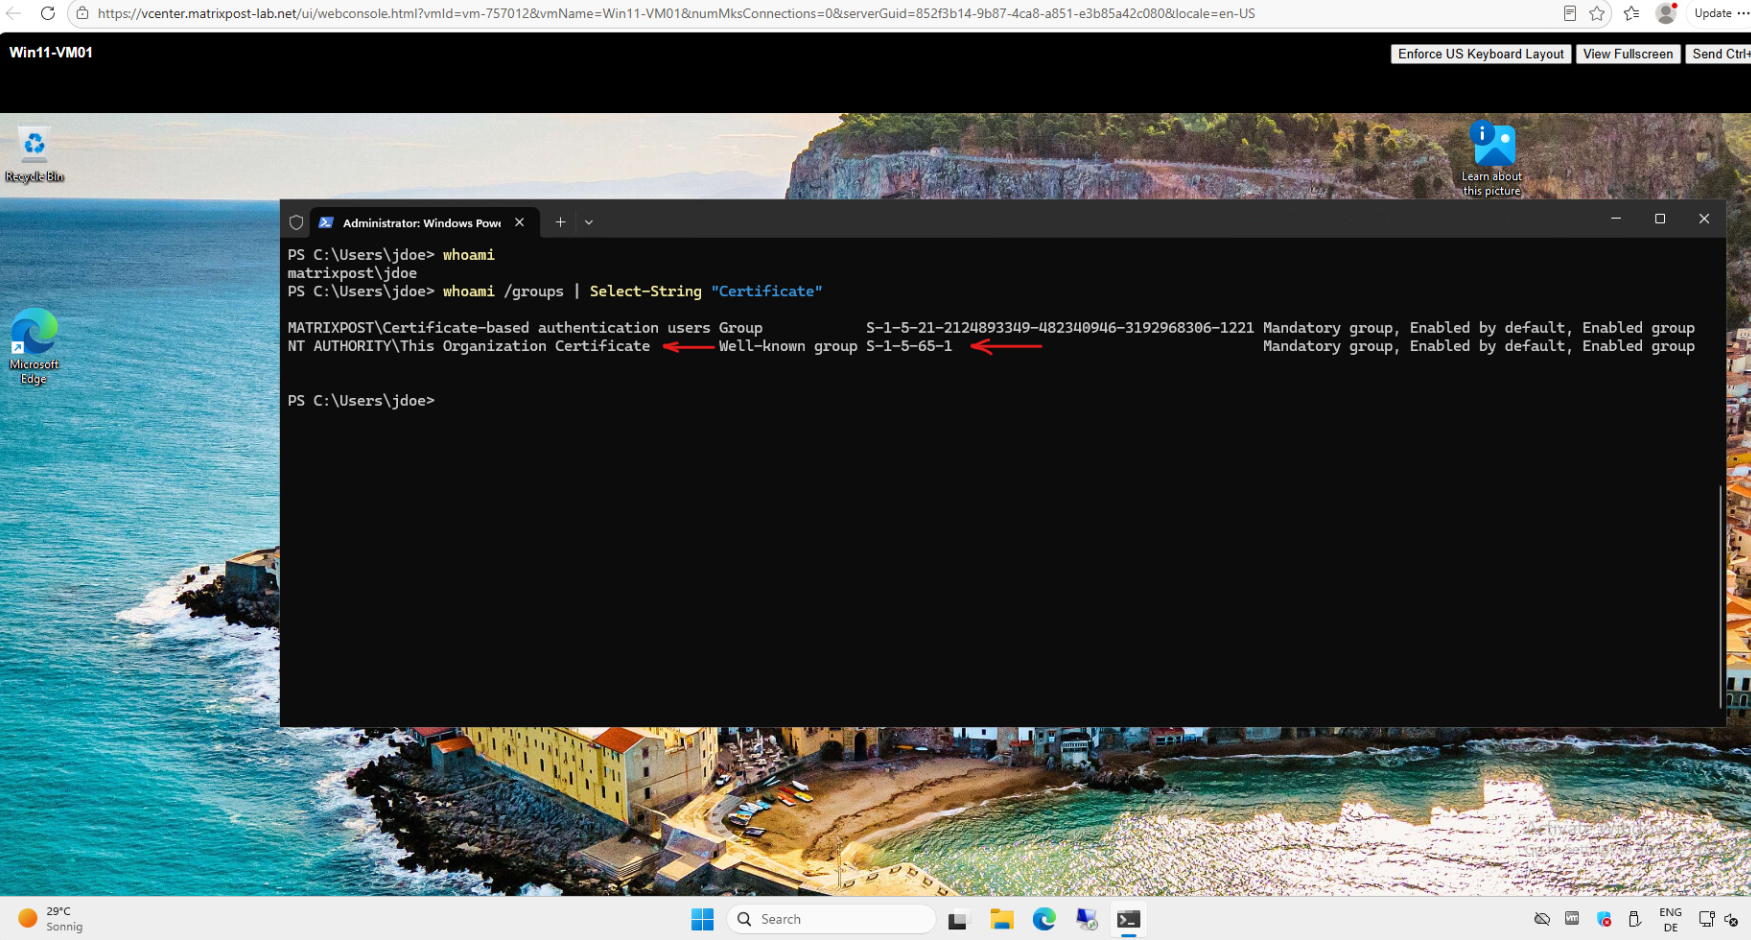
Finally, we can verify that the session was actually established using certificate-based authentication.
The
NT AUTHORITY\This Organization Certificate (S-1-5-65-1)group in the user’s access token confirms that Windows authenticated the session using a certificate rather than the user’s password.
Troubleshooting
YubiKey Not Available for USB Passthrough in VMware vSphere
Because the YubiKey exposes several USB applications as a composite USB device, the ESXi hosts does not reliably recognize the YubiKey for USB passthrough while all applications are enabled.
Using Yubico Authenticator → Toggle applications, disable all USB applications except PIV. This allows ESXi to recognize the YubiKey as a smart-card device and pass it directly through to our Windows 11 virtual machine.
We can download the latest version of Yubico Authenticator from the official Yubico website and install it on the Windows computer from which we will configure the YubiKey.
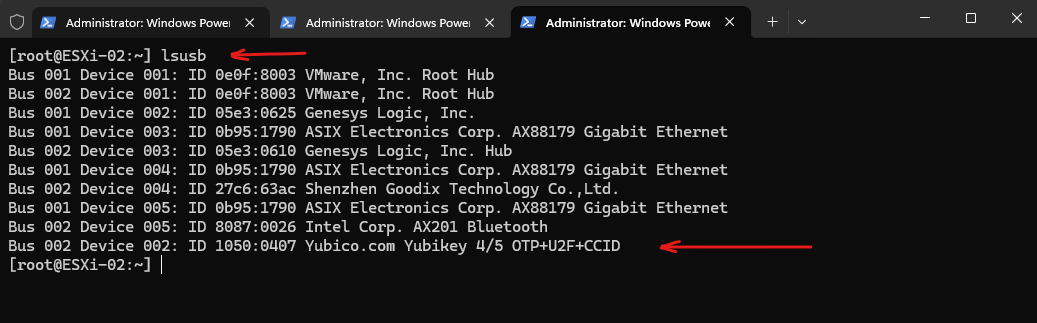
Before disabling the additional USB applications, lsusb shows the YubiKey 4/5 as a composite device exposing OTP + U2F + CCID, which prevents ESXi from reliably offering it for direct USB passthrough.
[root@ESXi-02:~] lsusb
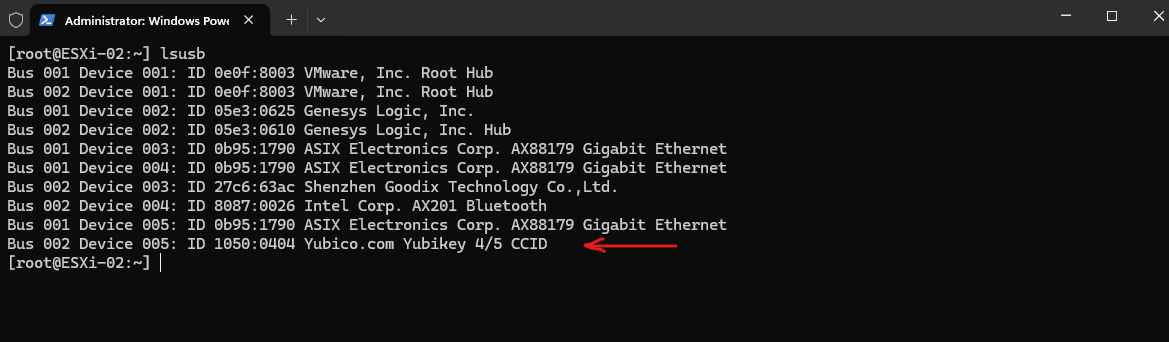
After disabling all USB applications except PIV, lsusb now shows the YubiKey only as a CCID smart-card device, allowing ESXi to recognize and use it reliably for USB passthrough.
[root@ESXi-02:~] lsusb
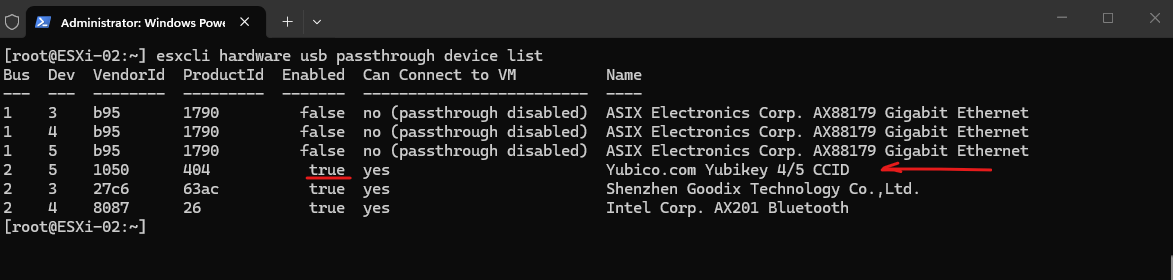
The command output below now confirms that the YubiKey 4/5 CCID is enabled for USB passthrough and, most importantly, reports Can Connect to VM: yes.
The three ASIX AX88179 USB network adapters are claimed by the USB Network Native Driver for ESXi and are therefore unavailable for VM passthrough, while the YubiKey CCID device remains available and reports
Can Connect to VM: yes.
[root@ESXi-02:~] esxcli hardware usb passthrough device list
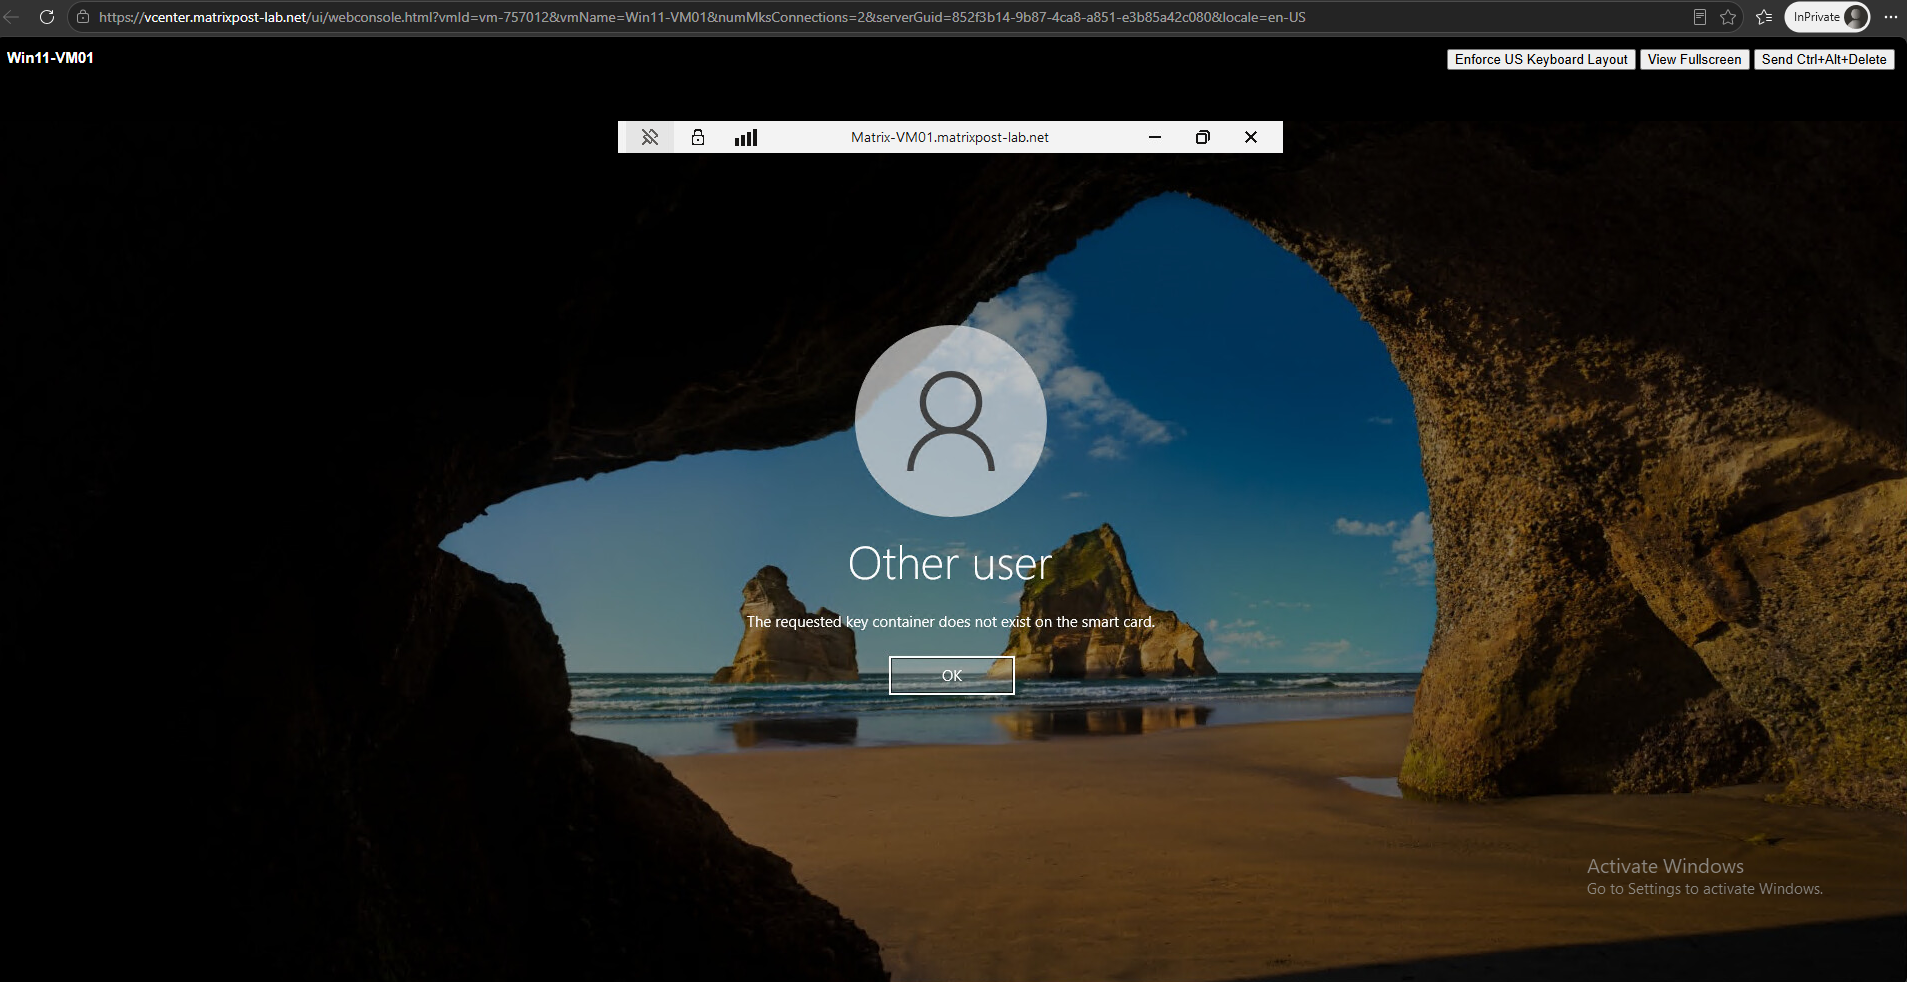
The requested key container does not exist on the smart card
We need to install and register the YubiKey Minidriver on every target machine we want to connect to using RDP smart-card (YubiKey) logon.
During RDP smart-card logon, the remote target’s Local Security Authority (LSA) processes the redirected credential, requiring every destination server to have the YubiKey Minidriver registered to locate PIV key containers.
If not you will run into the
The requested key container does not exist on the smart carderror shown below.Because headless or remote servers lack a physical USB insertion event to trigger automatic driver binding, run the following commands on every target machine:
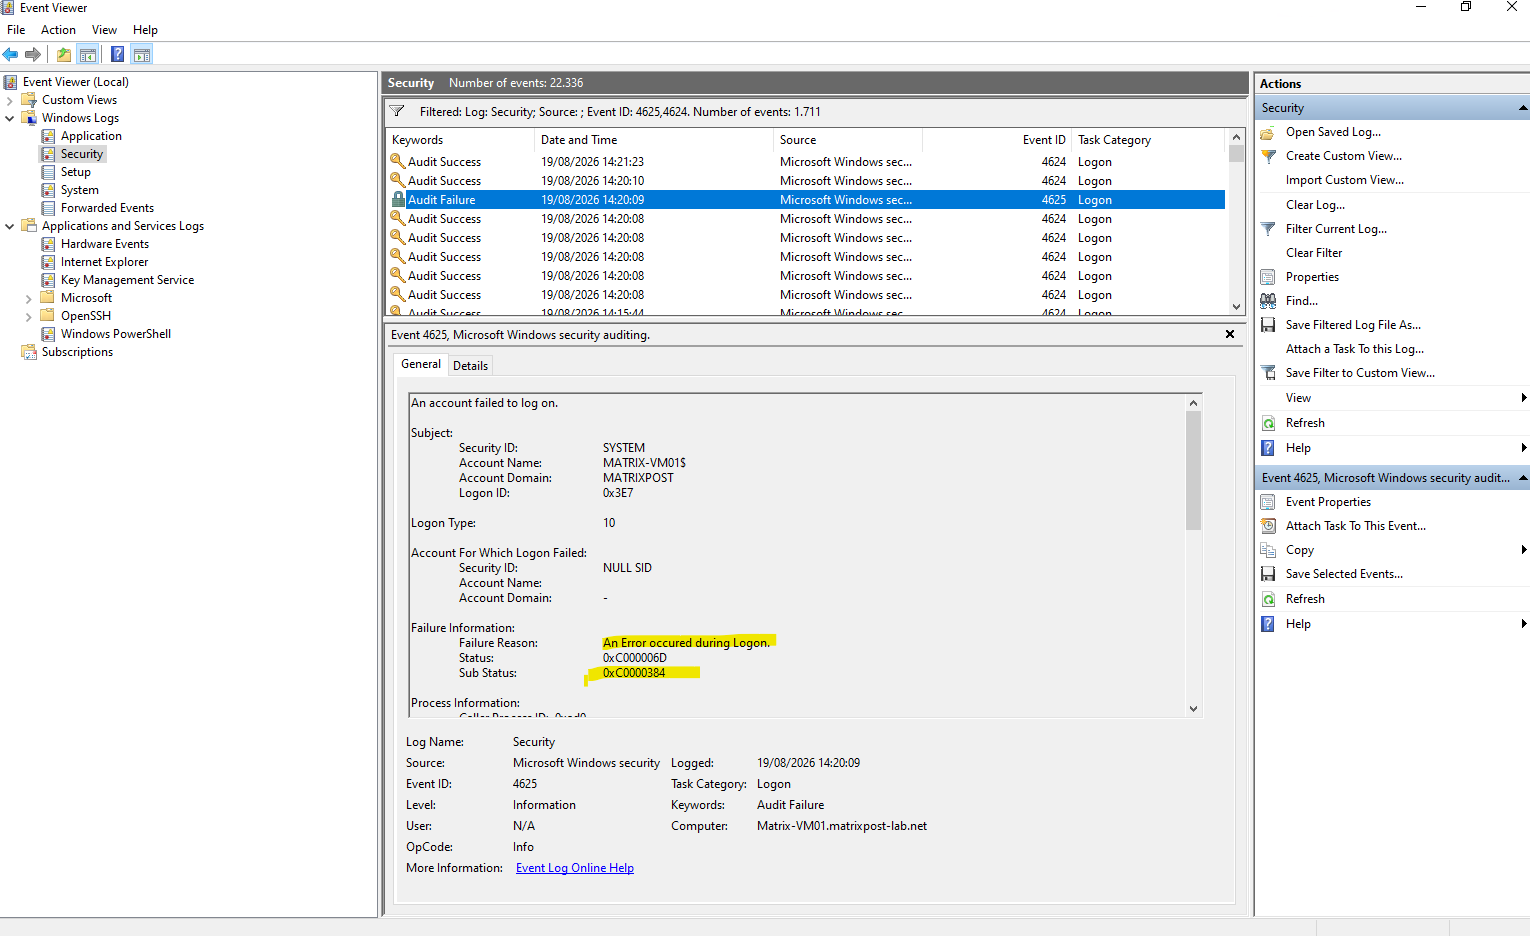
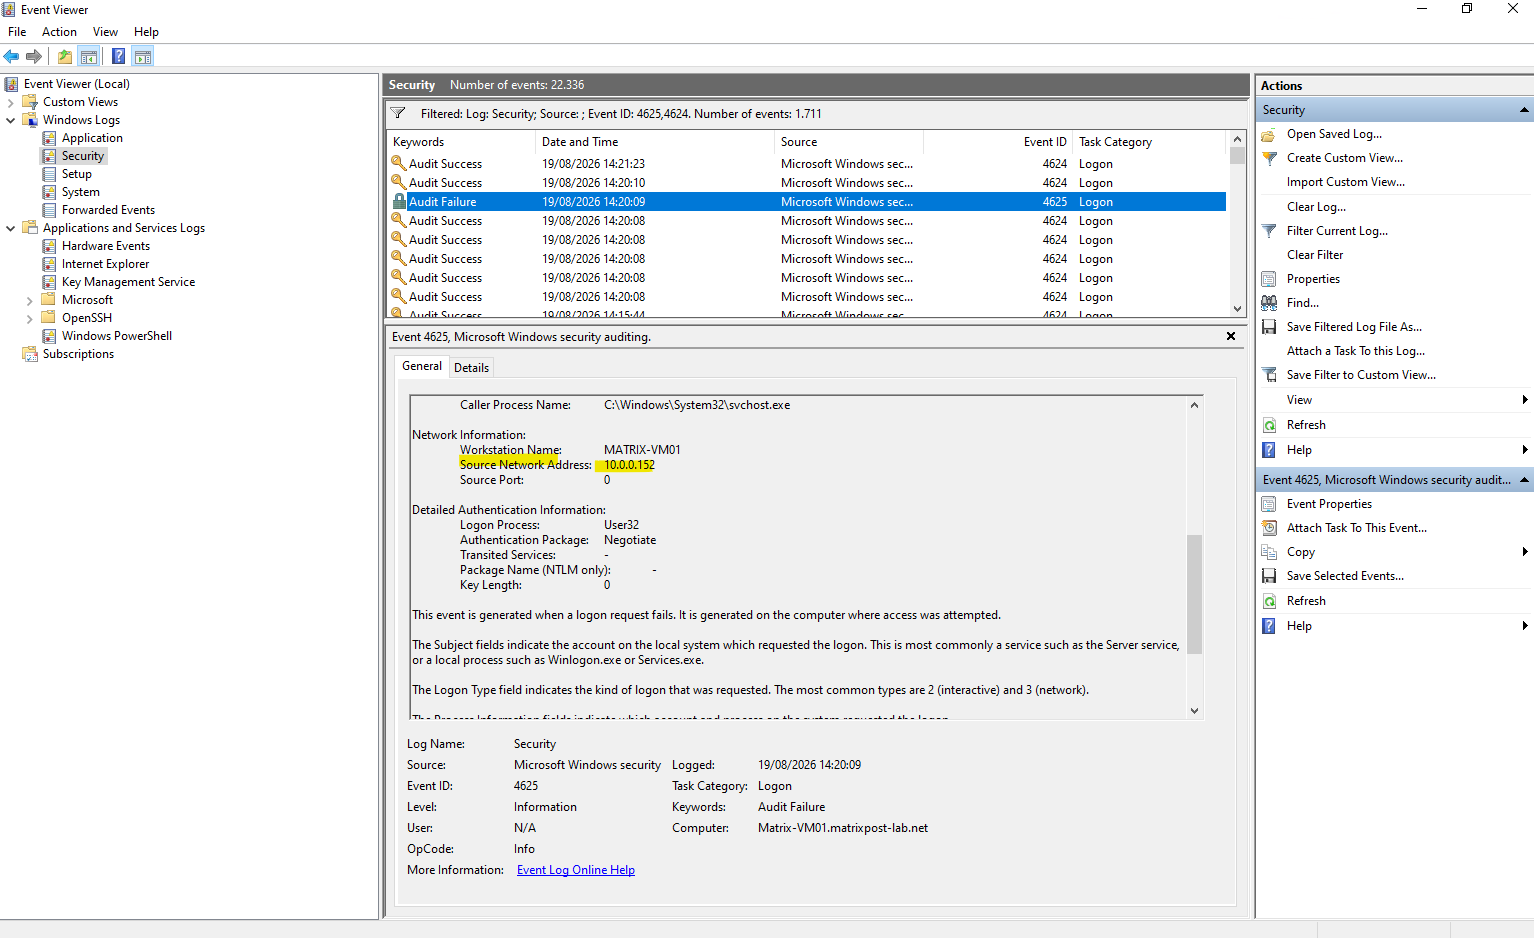
On the remote server the following event is logged.
STATUS_SMARTCARD_NO_KEY_CONTAINER — “The requested key container does not exist on the smart card.”
https://learn.microsoft.com/en-us/openspecs/windows_protocols/ms-erref/596a1078-e883-4972-9bbc-49e60bebca55
To fix it run the following commands on every target machine:
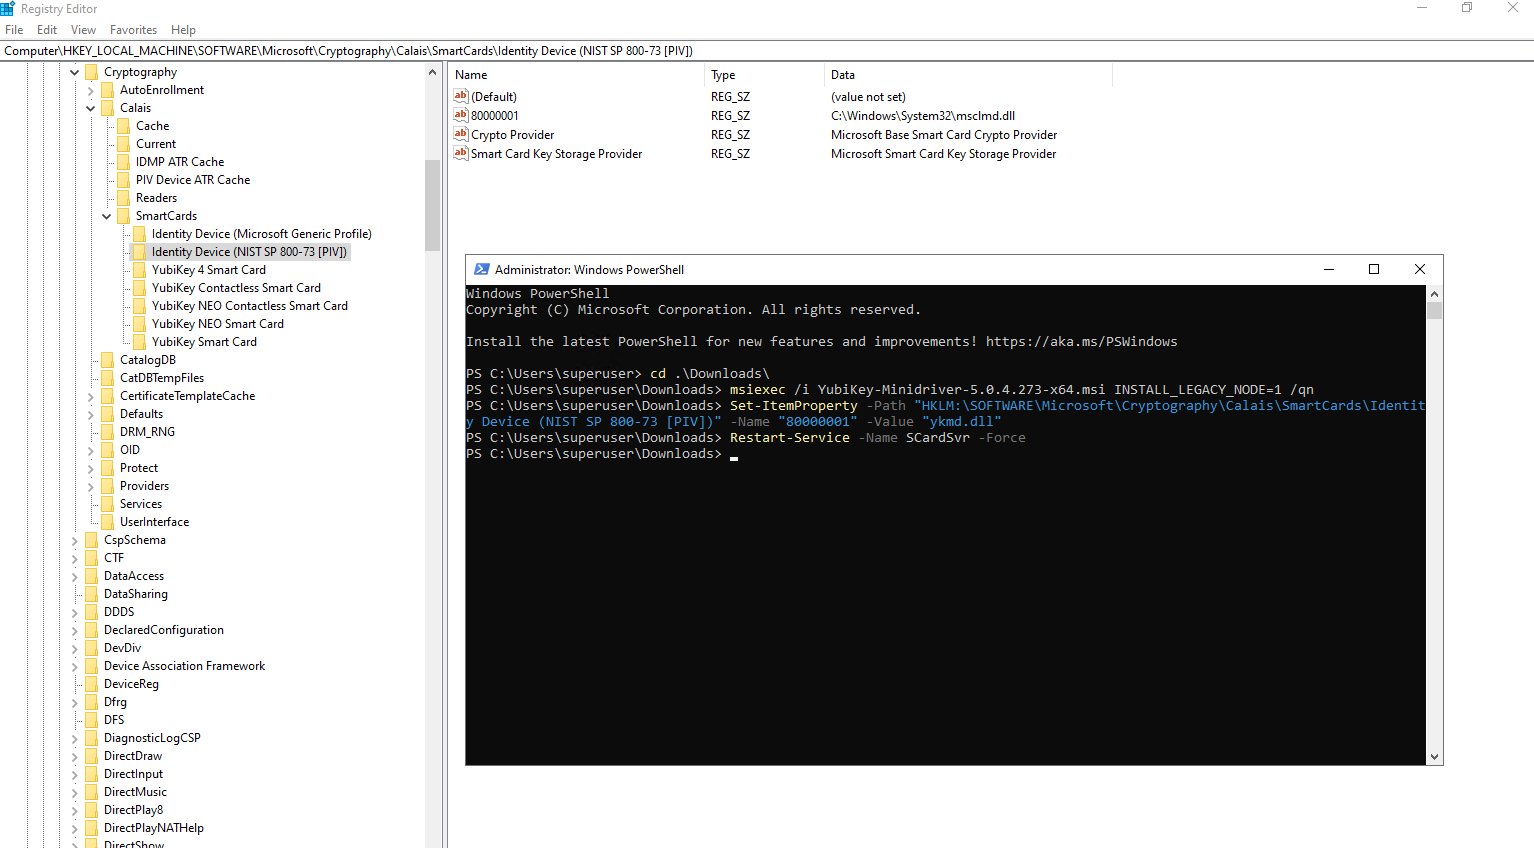
msiexec /i YubiKey-Minidriver-5.0.4.273-x64.msi INSTALL_LEGACY_NODE=1 /qn
Set-ItemProperty -Path "HKLM:\SOFTWARE\Microsoft\Cryptography\Calais\SmartCards\Identity Device (NIST SP 800-73 [PIV])" -Name "80000001" -Value "ykmd.dll"
Restart-Service -Name SCardSvr -Force
Root Cause: Windows RDP logon on the target was defaulting NIST SP 800-73 PIV devices to the generic msclmd.dll driver, which fails to resolve named key containers sent across RDP virtual channels.
Fix Applied: Installed the YubiKey Minidriver with INSTALL_LEGACY_NODE=1, explicitly updated the ATR driver pointer 80000001 in HKLM\SOFTWARE\Microsoft\Cryptography\Calais\SmartCards\ to ykmd.dll, and restarted SCardSvr.
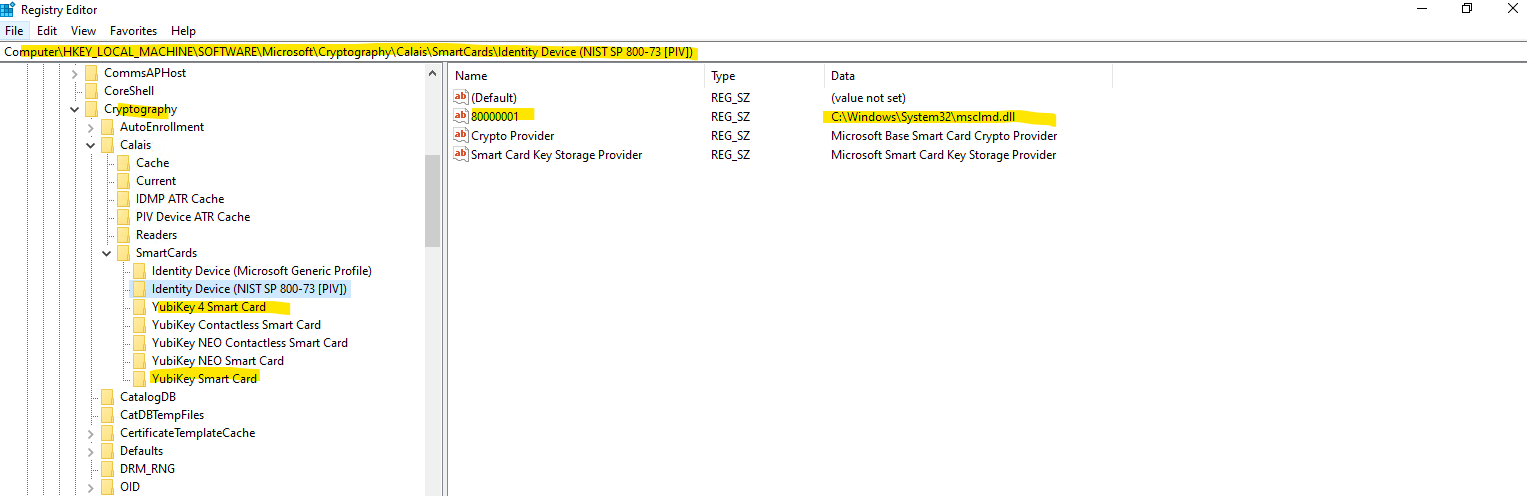
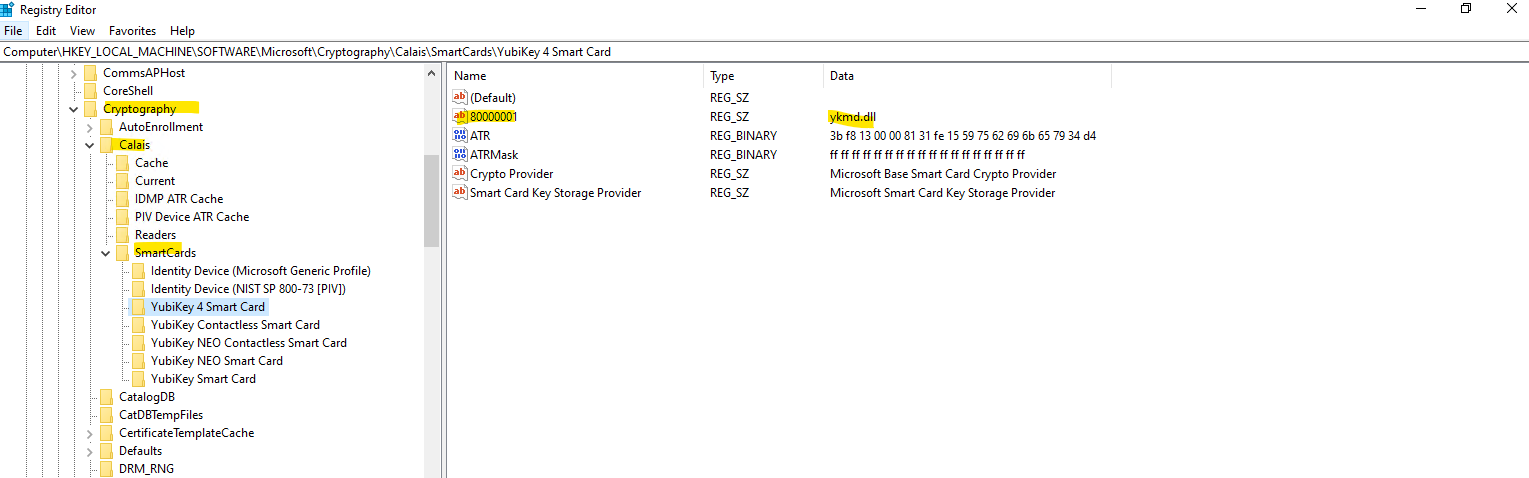
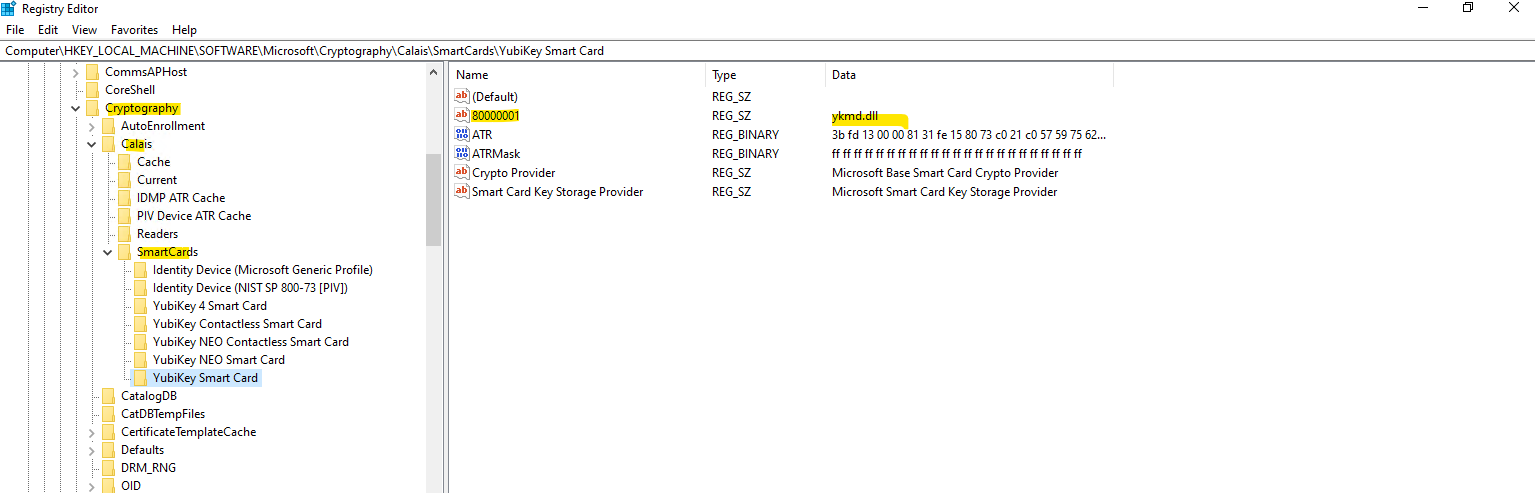
This ensures Windows registers the specific YubiKey ATR keys under HKLM\SOFTWARE\Microsoft\Cryptography\Calais\SmartCards to route authentication through ykmd.dll instead of falling back to the generic Microsoft class driver (msclmd.dll).
The default
Identity Device (NIST SP 800-73 [PIV])key can safely keep its80000001value pointing toC:\Windows\System32\msclmd.dll, as Windows automatically prioritizes the specific ATR entries over the generic fallback driver.In the context of smart cards and token-based authentication like our YubiKey, ATR stands for Answer To Reset.
During the RDP connection, the YubiKey transmitted its unique ATR string to the remote target’s smart card resource manager. Because installing the minidriver with
INSTALL_LEGACY_NODE=1pre-registered this specific ATR string in the registry, Windows matched the incoming card directly toykmd.dllrather than the genericmsclmd.dllfallback. This precise driver mapping allowed LSA on the remote server to locate and read the PIV key container, resolving the authentication error.
Links
Set up Windows Hello for Business Hybrid Azure AD joined Devices
https://blog.matrixpost.net/set-up-windows-hello-for-business-hybrid-azure-ad-joined-devices/YubiKey 5C NFC
https://www.yubico.com/de/product/yubikey-5c-nfc/Introduction to Microsoft Entra Kerberos
https://learn.microsoft.com/en-us/entra/identity/authentication/kerberosSign in to Windows virtual machine in Azure using Microsoft Entra ID and Azure Roles Based Access Control
https://learn.microsoft.com/en-us/entra/identity/devices/howto-vm-sign-in-azure-ad-windowsEnable passwordless security key sign-in to on-premises resources by using Microsoft Entra ID
https://learn.microsoft.com/en-us/entra/identity/authentication/howto-authentication-passwordless-security-key-on-premisesConsiderations for Remote Desktop Connections in a phishing-resistant passwordless authentication deployment in Microsoft Entra ID
https://learn.microsoft.com/en-us/entra/identity/authentication/how-to-plan-rdp-phishing-resistant-passwordless-authentication?tabs=rdp-session-authPermission-issue error 8344, “Insufficient access rights to perform the operation.”
https://learn.microsoft.com/en-us/troubleshoot/entra/entra-id/user-prov-sync/troubleshoot-permission-issue-sync-service-managerCloud Kerberos trust deployment guide
https://learn.microsoft.com/en-us/windows/security/identity-protection/hello-for-business/deploy/hybrid-cloud-kerberos-trustYubico Authenticator User Guide
https://docs.yubico.com/software/yubikey/tools/authenticator/auth-guide/webdocs.pdfConfiguring Hardware Security Token USB Passthrough in vSphere Environment
https://knowledge.broadcom.com/external/article/380954/configuring-hardware-security-token-usb.htmlIdentifying your YubiKey
https://www.yubico.com/products/identifying-your-yubikey
