SAML single sign-on for Atlassian Cloud with Azure AD
In this post I want to go through the separate steps to integrate your Atlassian Cloud with your Azure Active Directory (Azure AD). After that you can:
- Control in Azure AD who has access to Atlassian Cloud.
- Enable your users to be automatically signed-in to Atlassian Cloud with their Azure AD accounts.
- Manage your accounts in one central location – the Azure portal.
Tutorial: Integrate Atlassian Cloud with Azure Active Directory
Source: https://docs.microsoft.com/en-us/azure/active-directory/saas-apps/atlassian-cloud-tutorial
Tutorial: Configure Atlassian Cloud for automatic user provisioning
Source: https://docs.microsoft.com/en-us/azure/active-directory/saas-apps/atlassian-cloud-provisioning-tutorial
I also recommend to first read the following article from Microsoft about understanding the SAML-based single sign-on
Understand SAML-based single sign-on
https://docs.microsoft.com/en-us/azure/active-directory/manage-apps/configure-saml-single-sign-on
Prerequisites
To get started, you need the following items:
- An Azure AD subscription.
- Atlassian Cloud single sign-on (SSO) enabled subscription.
- To enable Security Assertion Markup Language (SAML) single sign-on for Atlassian Cloud products, you need to set up Atlassian Access. Learn more about Atlassian Access.
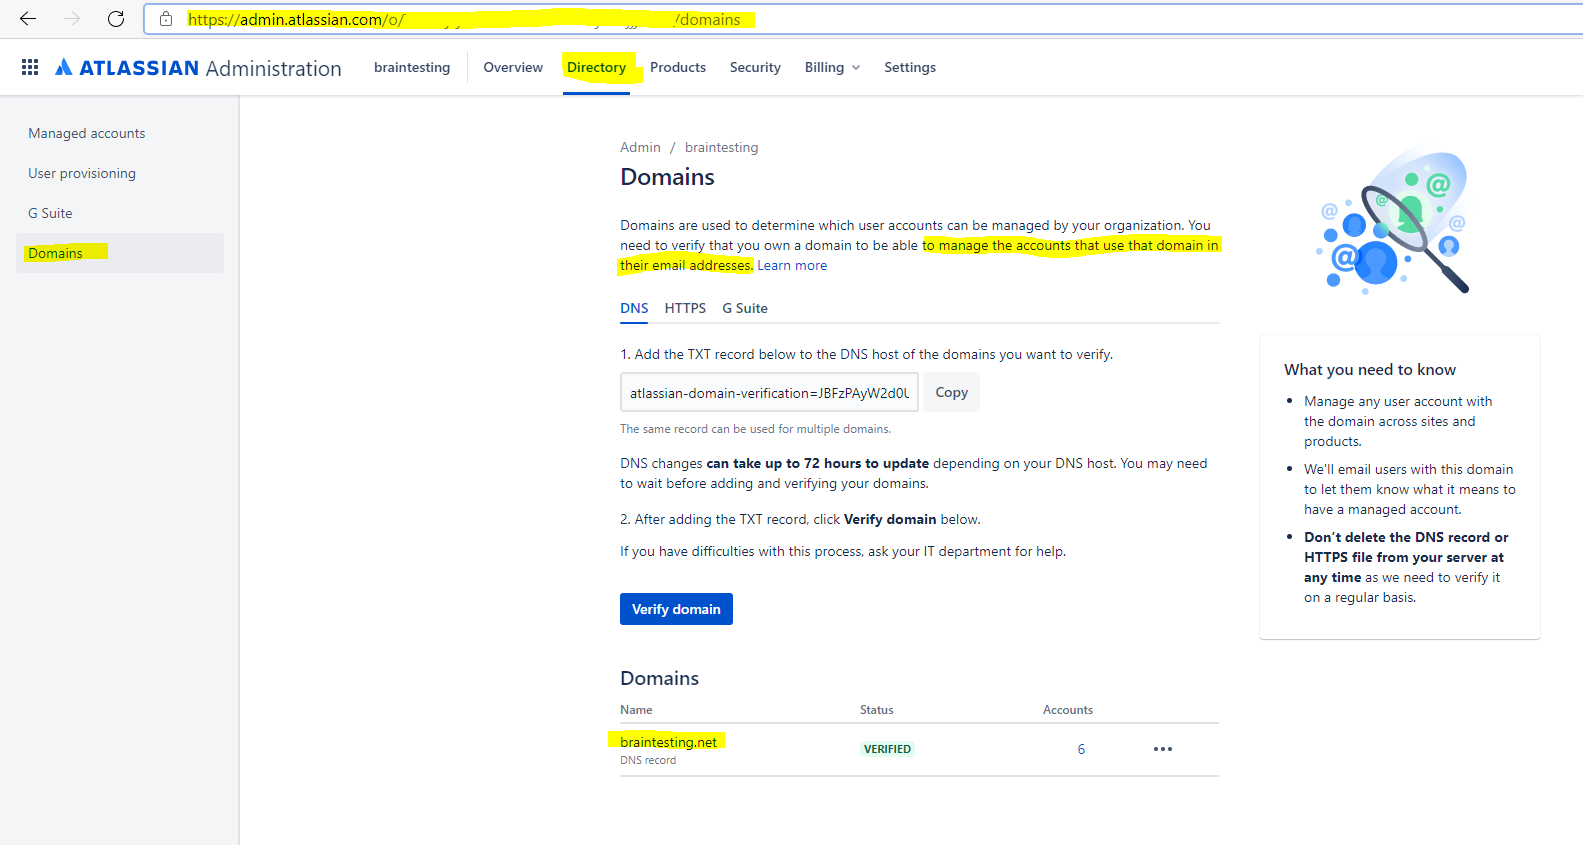
Verify and Claim your domains
I will first verify and claim my lab domain braintesting.net, which is the default e-mail domain from my lab environment and the users using in Atlassian Cloud.
Verify a domain to manage accounts | Claim accounts with the domain
https://support.atlassian.com/user-management/docs/verify-a-domain-to-manage-accounts/
You need to verify that you own a domain to be able to manage the accounts that use that domain in their email addresses. Learn more
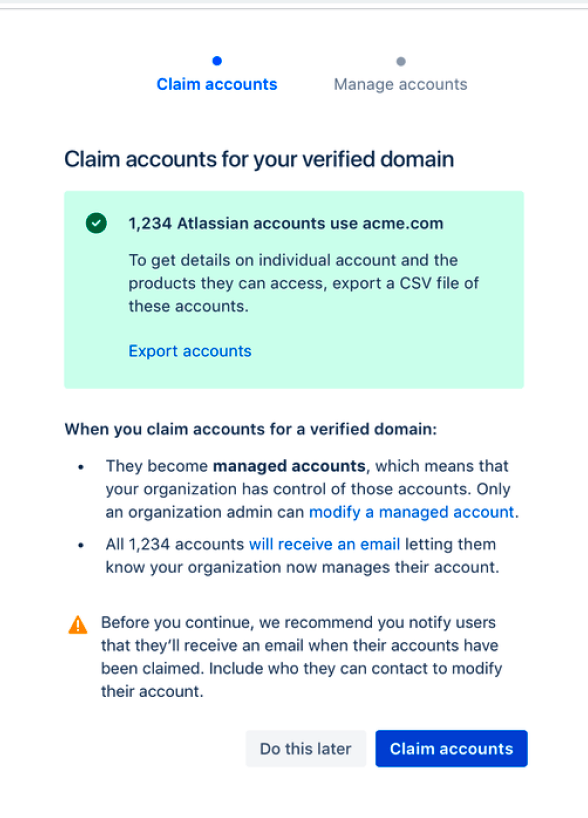
Secondly we need to claim the accounts from this domain.
As part of the domain verification process, you need to claim all the accounts on your domain. Because anyone on your domain can create an Atlassian account, more users than you expect may have an Atlassian account with your domain. If you want to view all the accounts on your domain, you can export and preview a list of users whose accounts you’ll be claiming.
To export and claim accounts:
- From your domain in the Domains table, click Claim accounts.
- From the Claim accounts screen that opens, you’ll see the number of accounts with your domain. Click Export accounts for a list of email addresses for individual accounts on your domain and their product access.
- Click Claim accounts to complete the domain verification process and claim those accounts for your organization.
When you claim accounts, we’ll send an email to your users letting them know your organization now manages their account.
The Manage accounts screen confirms that you claimed all accounts successfully. When you click View managed accounts, you see a list of all your claimed accounts on the Managed accounts screen. Come back to this screen to edit, delete, or deactivate an individual account.
If you don’t claim accounts, your domain will still be verified, but you won’t be able to edit, deactivate, delete accounts or enforce a security policy on those users.
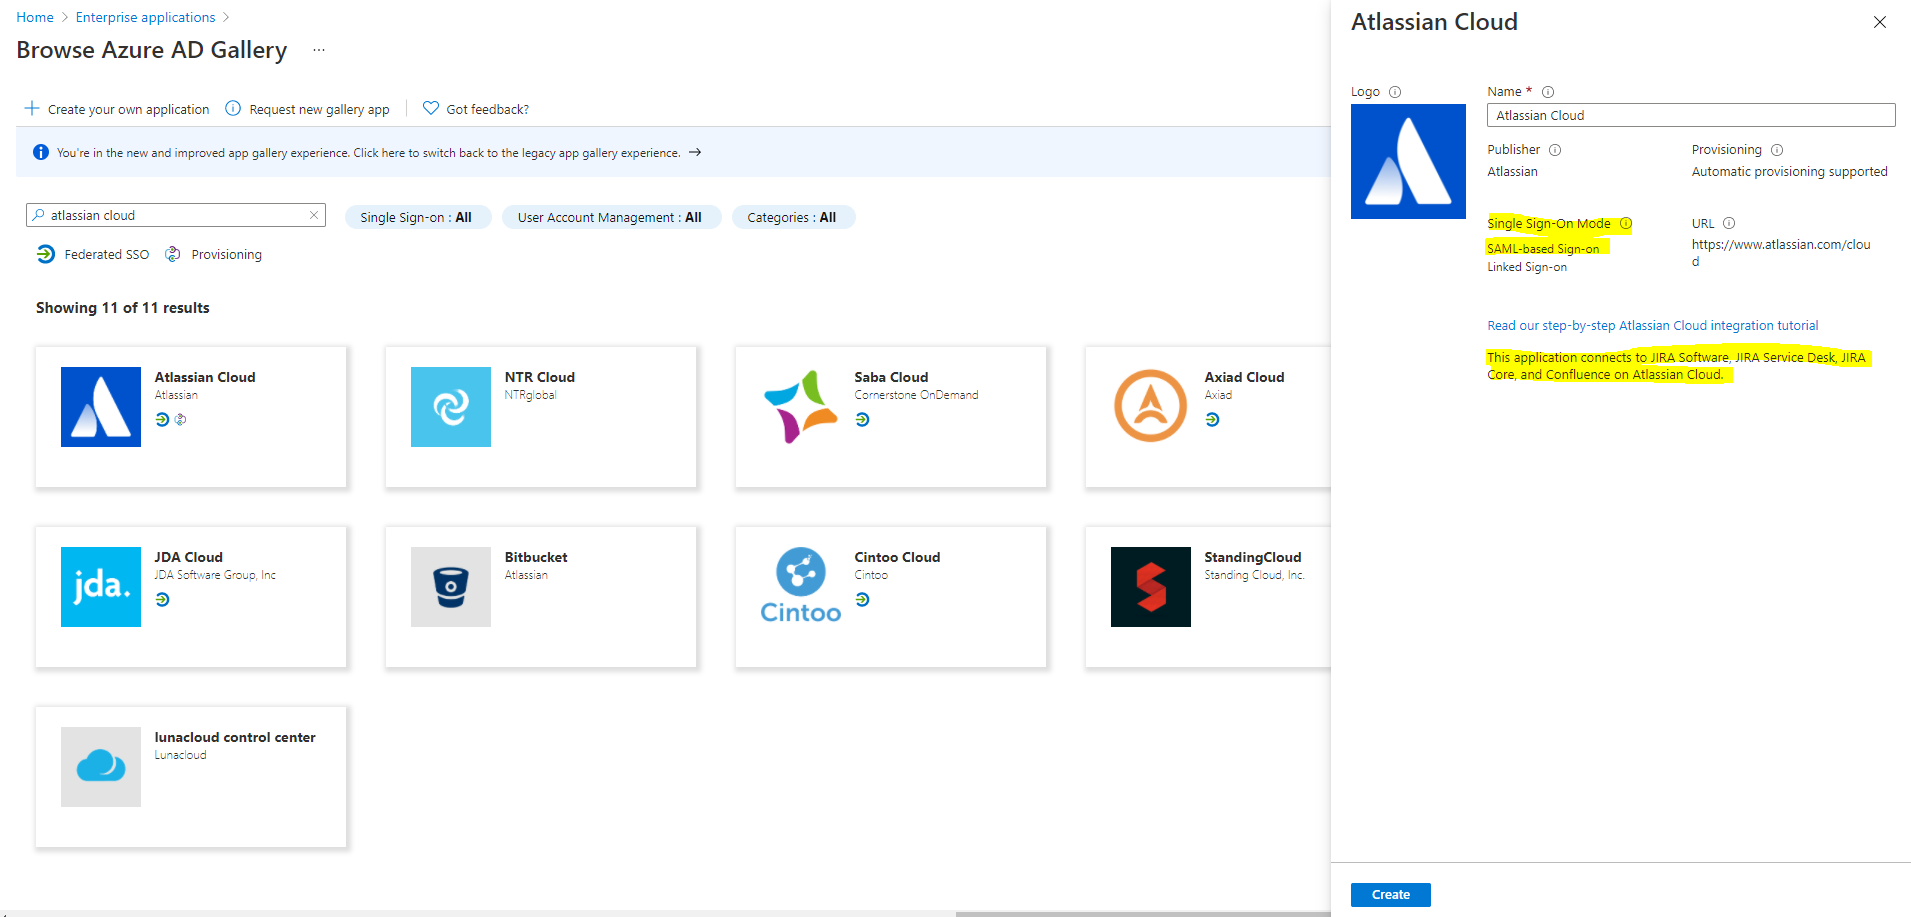
Adding Atlassian Cloud from the gallery in Azure
To configure the integration of Atlassian Cloud into Azure AD, you need to add Atlassian Cloud from the gallery to your list of managed SaaS apps.
- Sign in to the Azure portal using either a work or school account, or a personal Microsoft account.
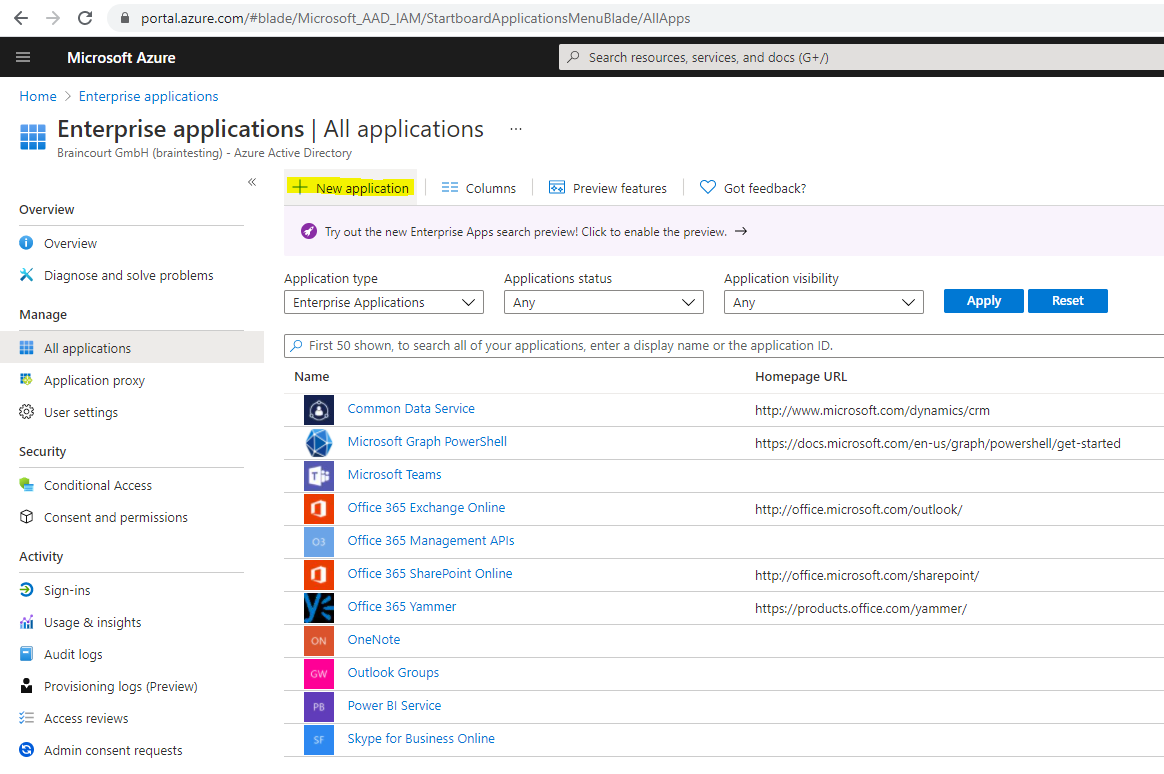
- On the left navigation pane, select the Azure Active Directory service.
- Navigate to Enterprise Applications and then select All Applications.
- To add new application, select New application.
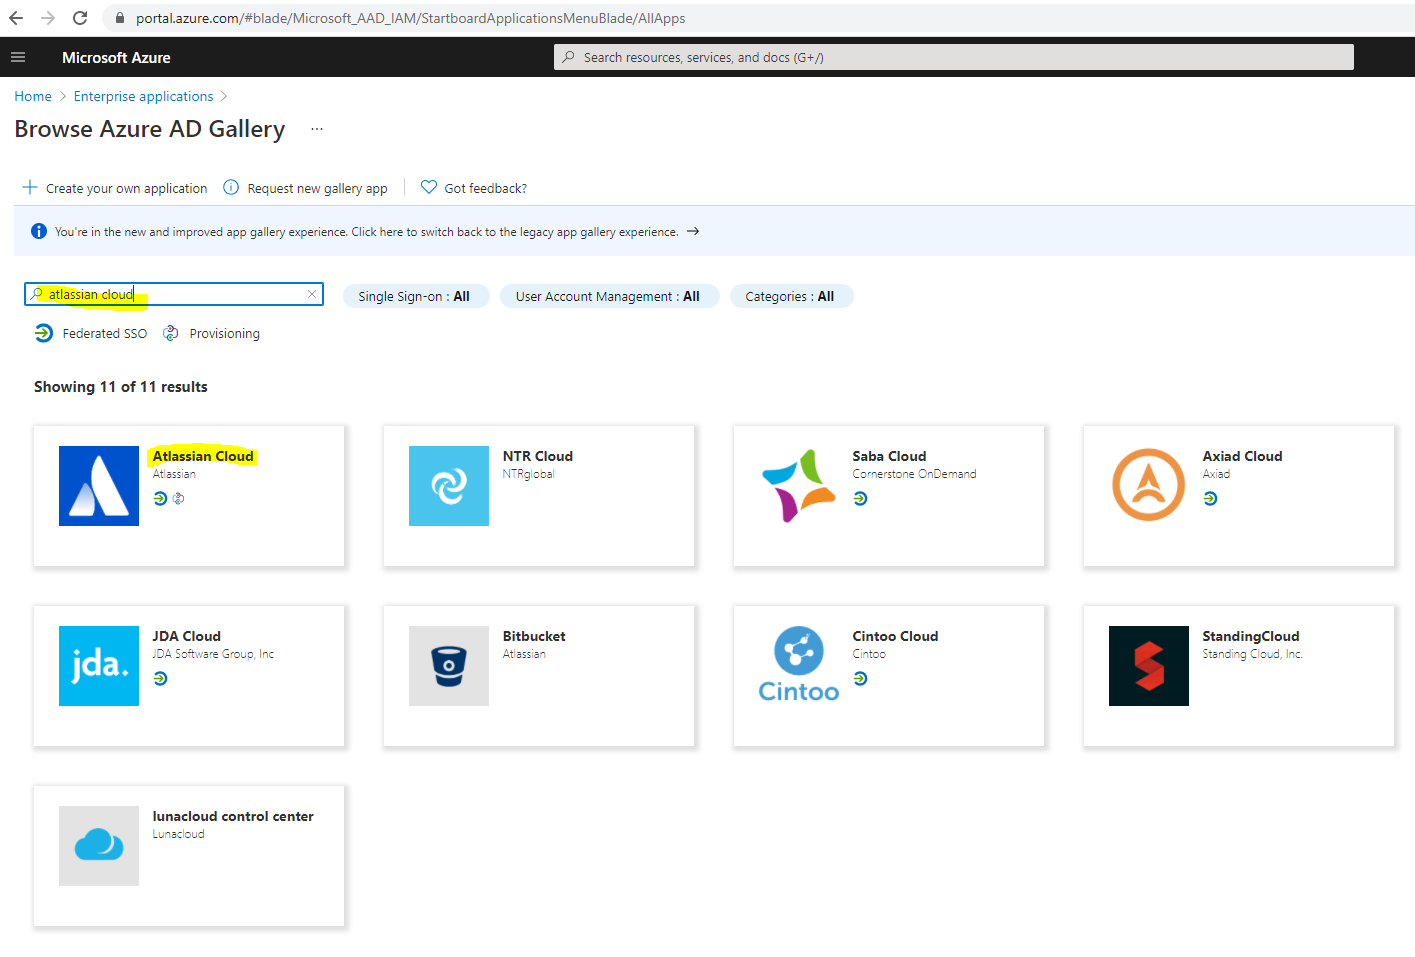
- In the Add from the gallery section, type Atlassian Cloud in the search box.
- Select Atlassian Cloud from results panel and then add the app. Wait a few seconds while the app is added to your tenant.
Before we can set up Azure AD SSO, go to your Atlassian product instance and copy the Instance URL
url should fit
https://<instancename>.atlassian.netpattern
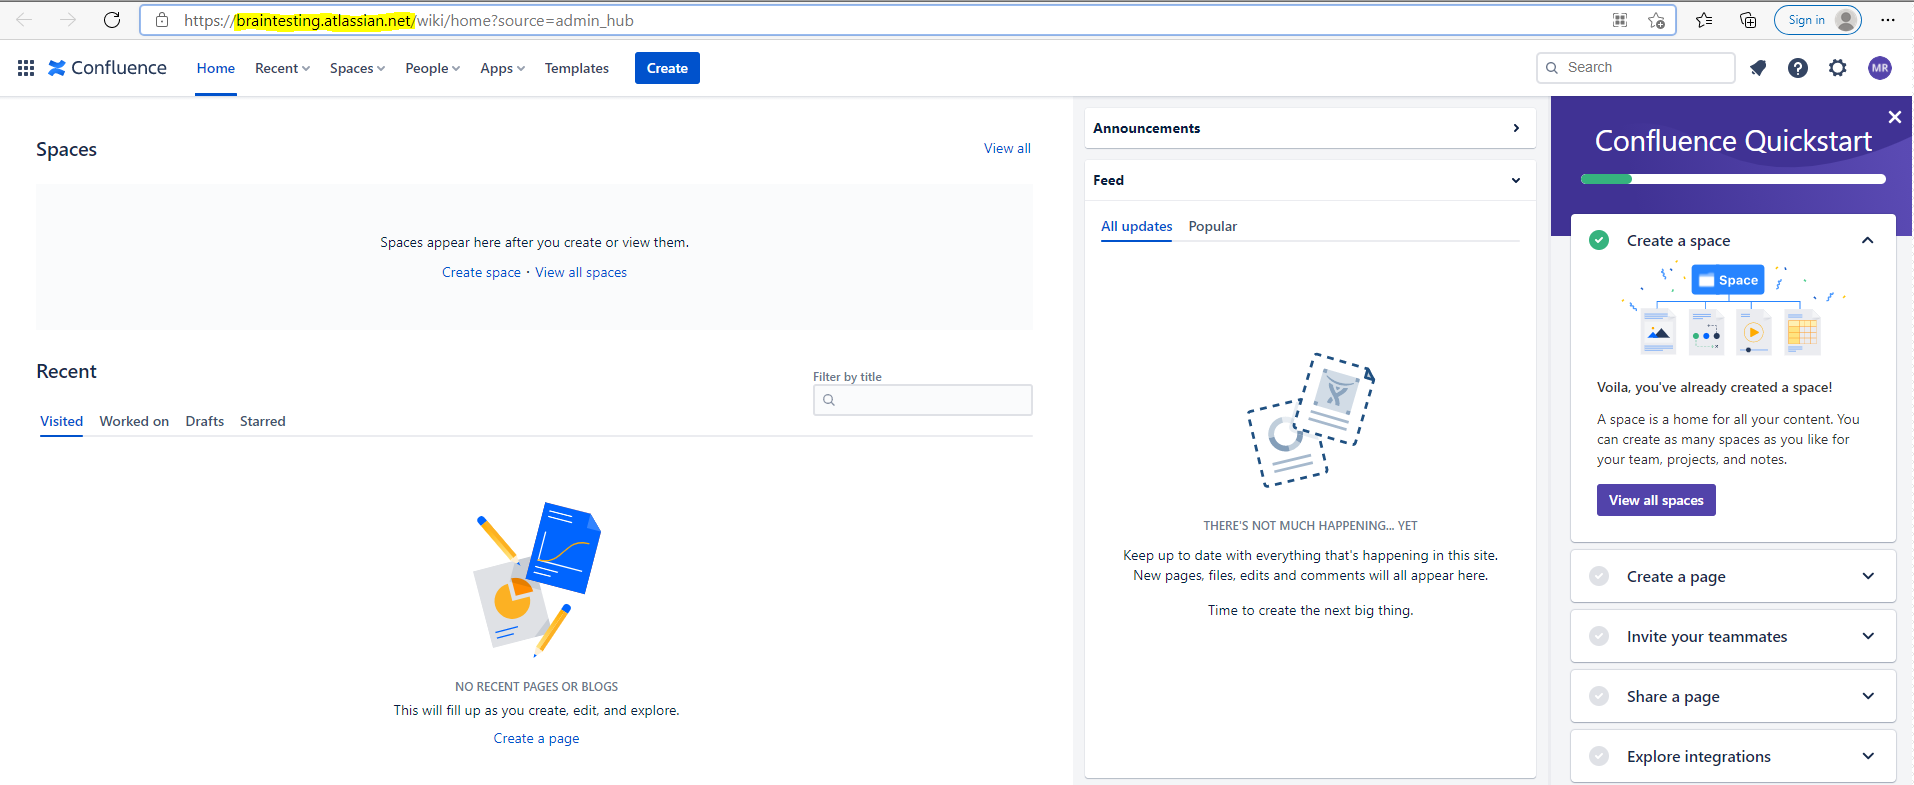
Open the Atlassian Admin Portal and click on your organization name
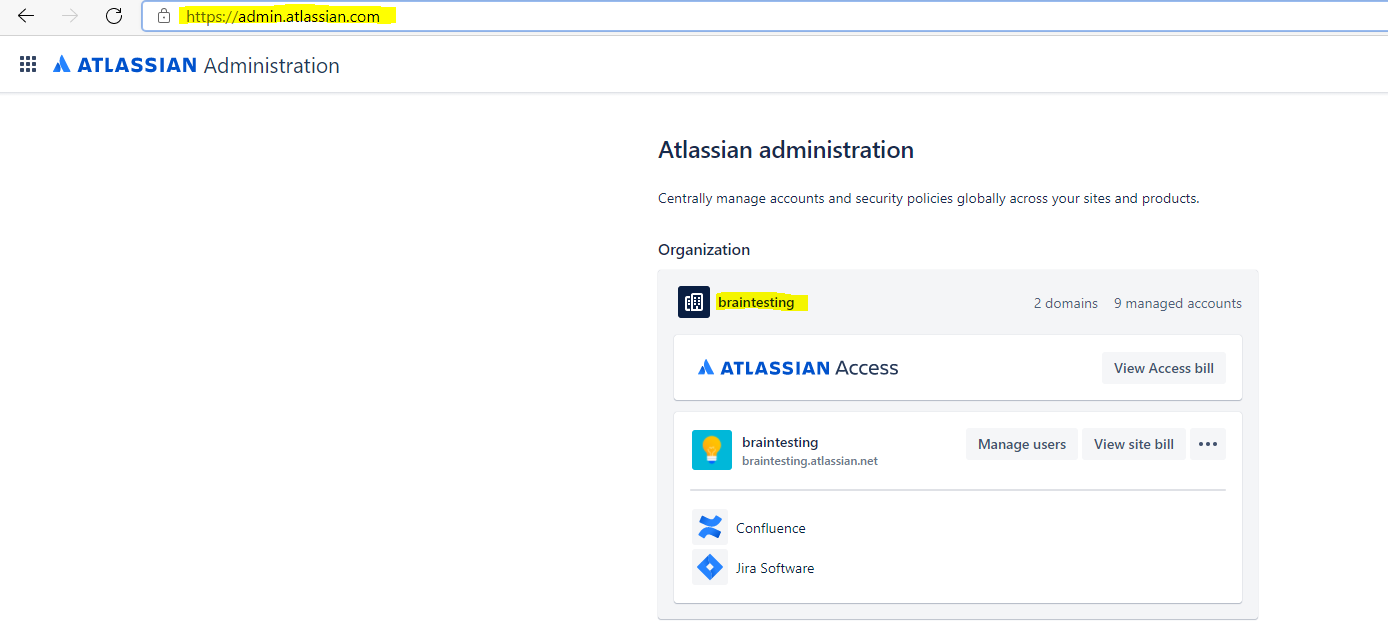
Under Overview in the Organization menu click on your instance you want to configure, in my case Confluence.
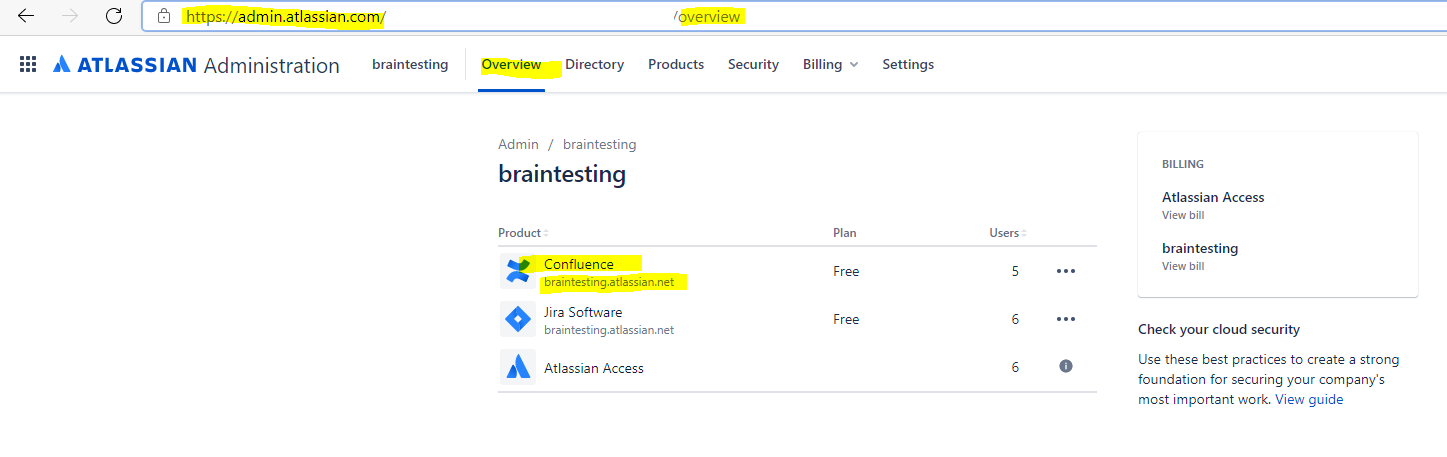
So my Instance URL is https://braintesting.atlassian.net
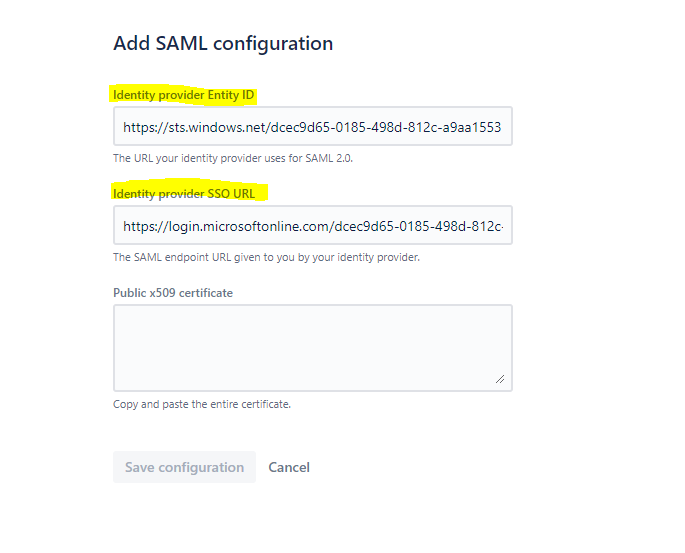
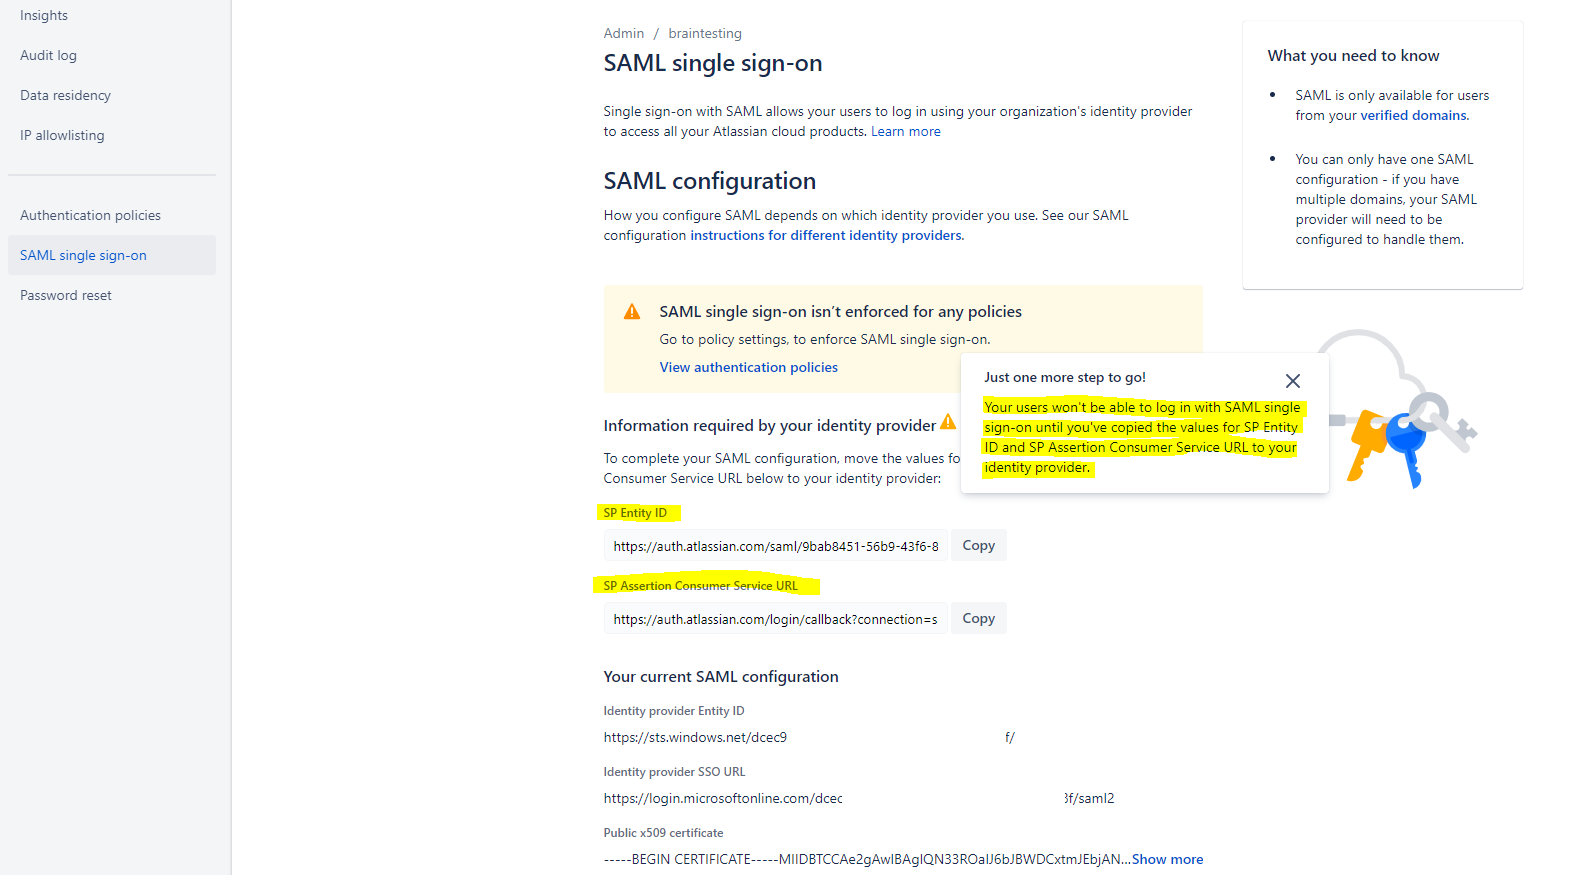
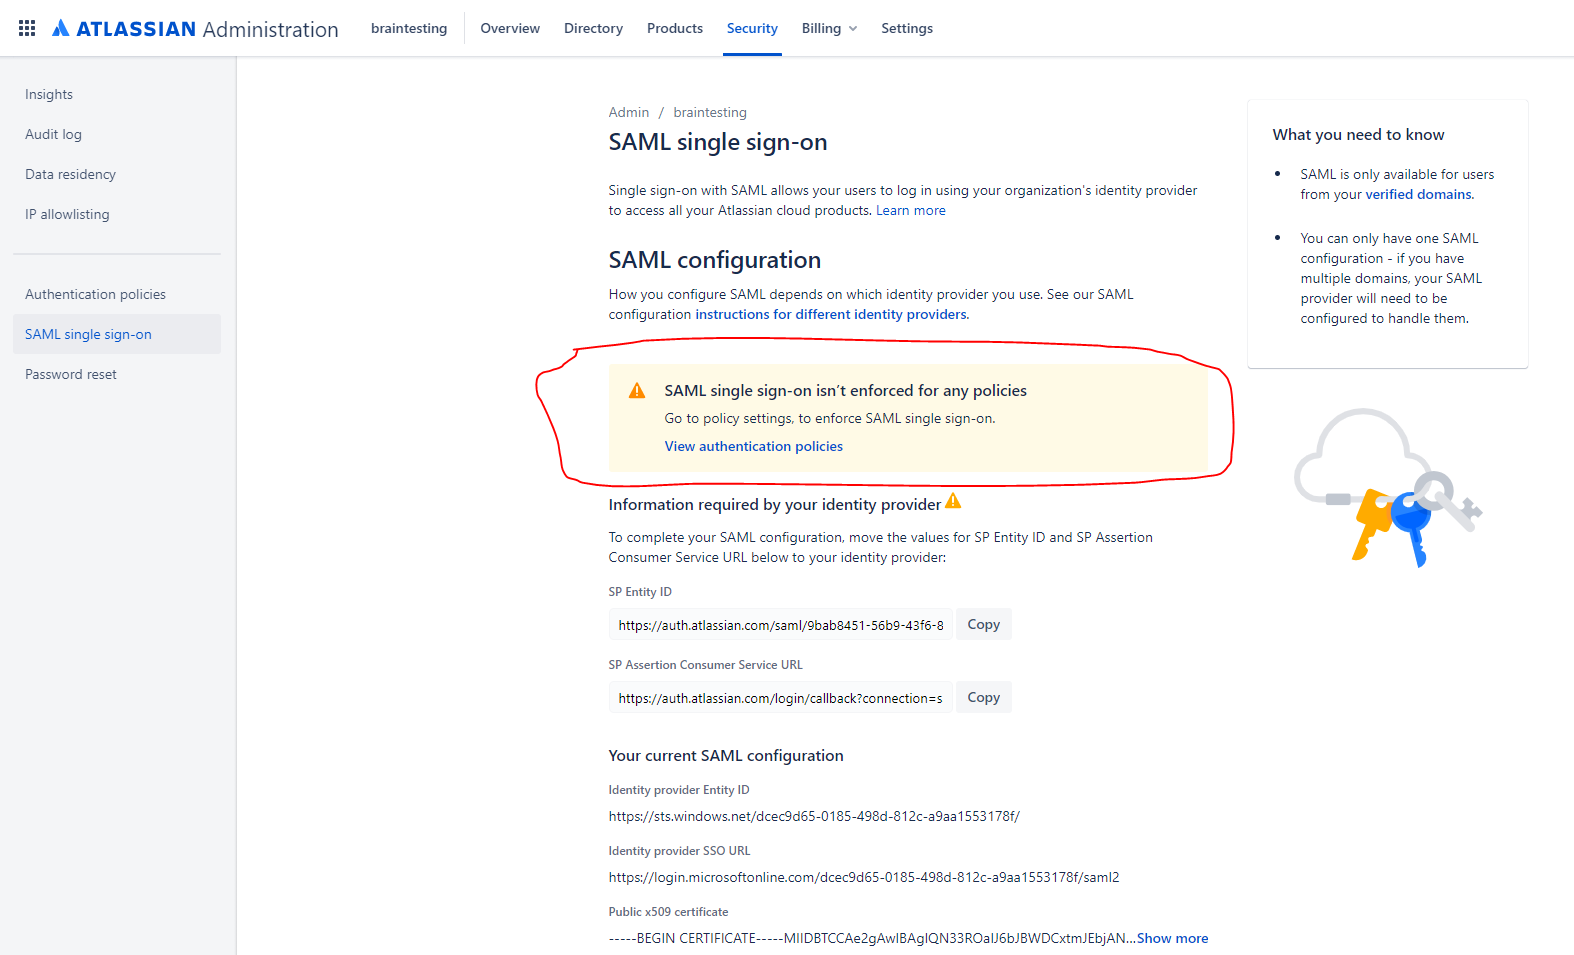
Fom the Atlassian Admin Portal Screen select Security in the top menu and SAML single sign-on in the left menu.
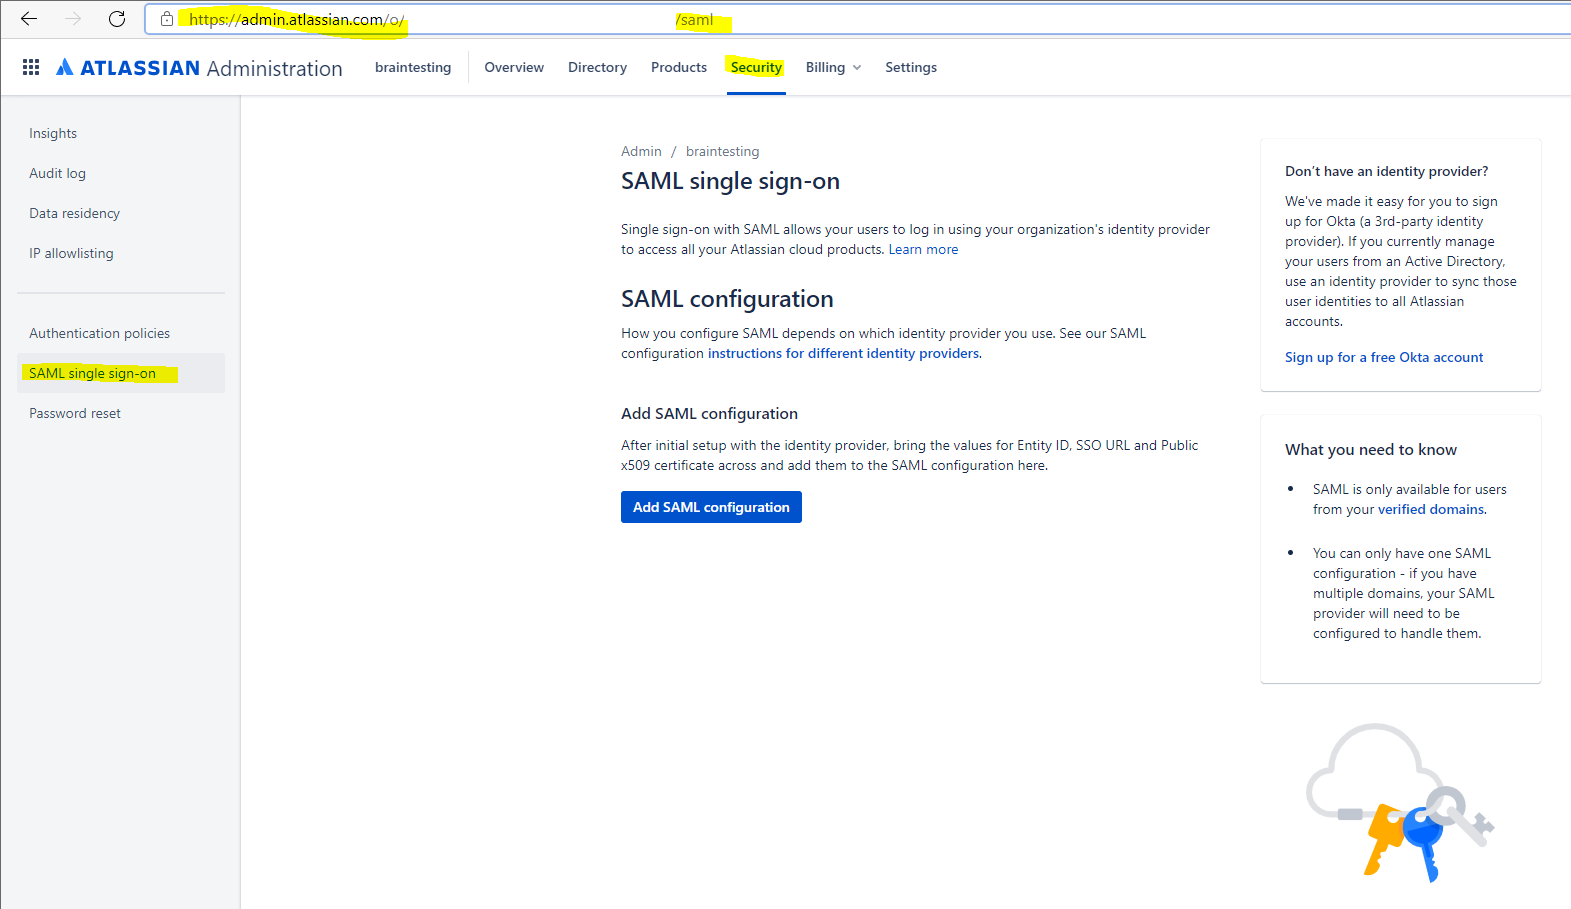
Click on Add SAML Configuration and keep the page open

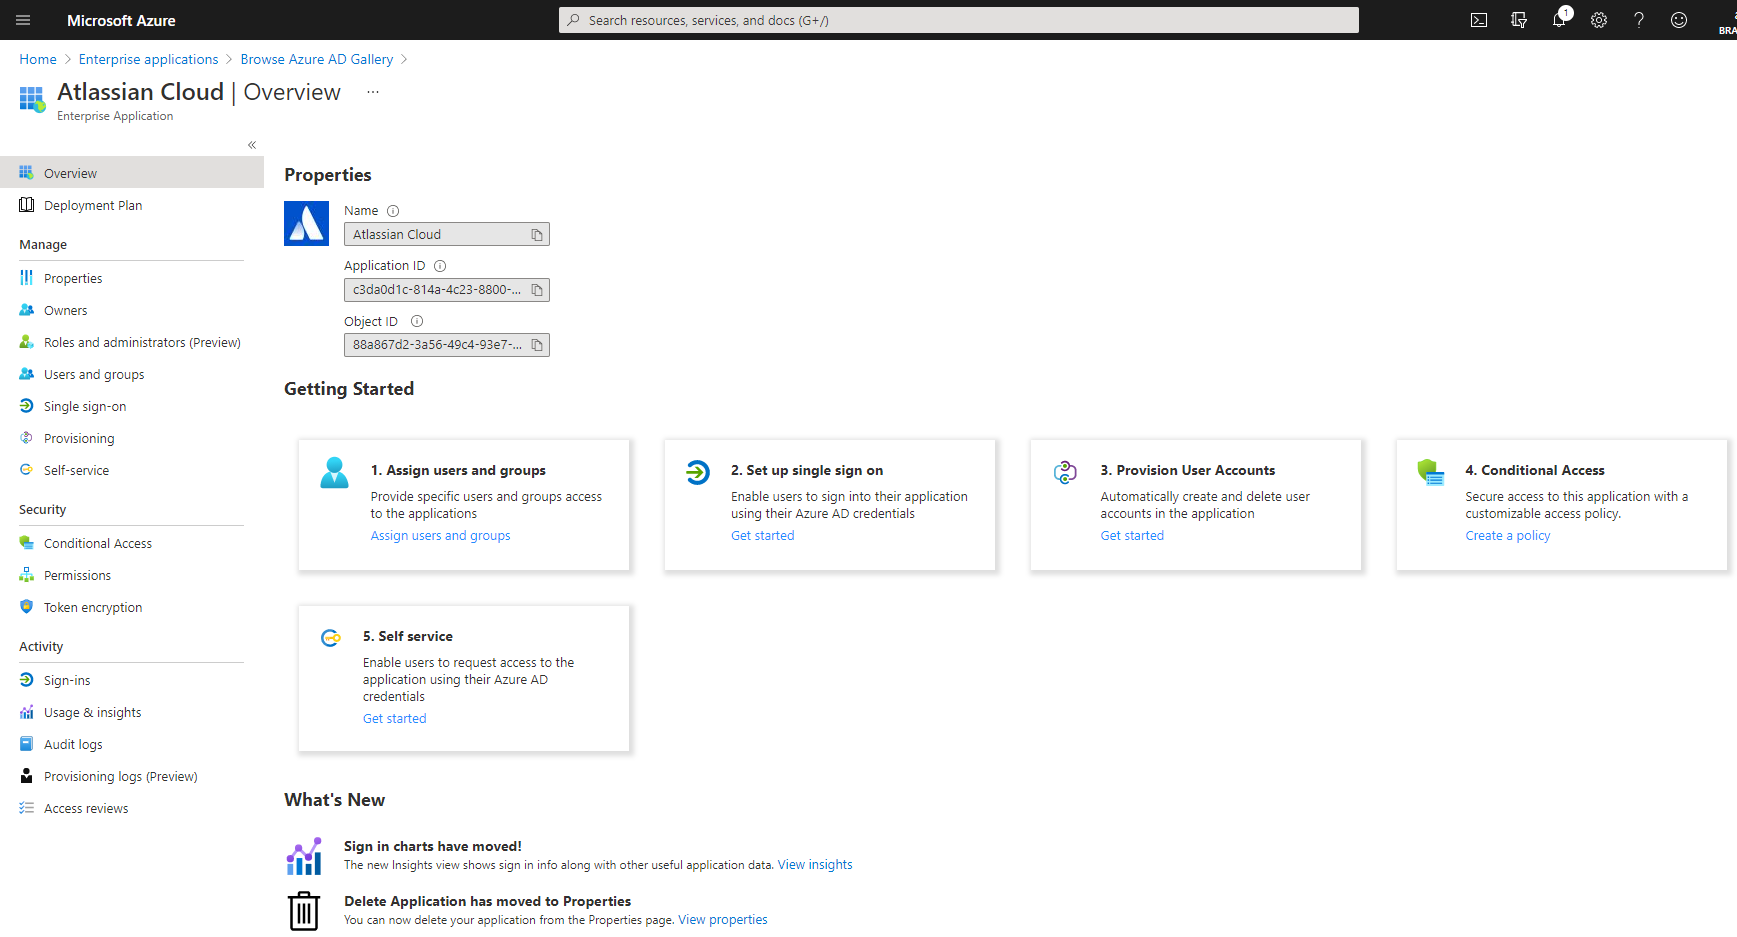
In the Azure portal, on the Atlassian Cloud application integration page, find the Manage section and select Set up single sign-on.
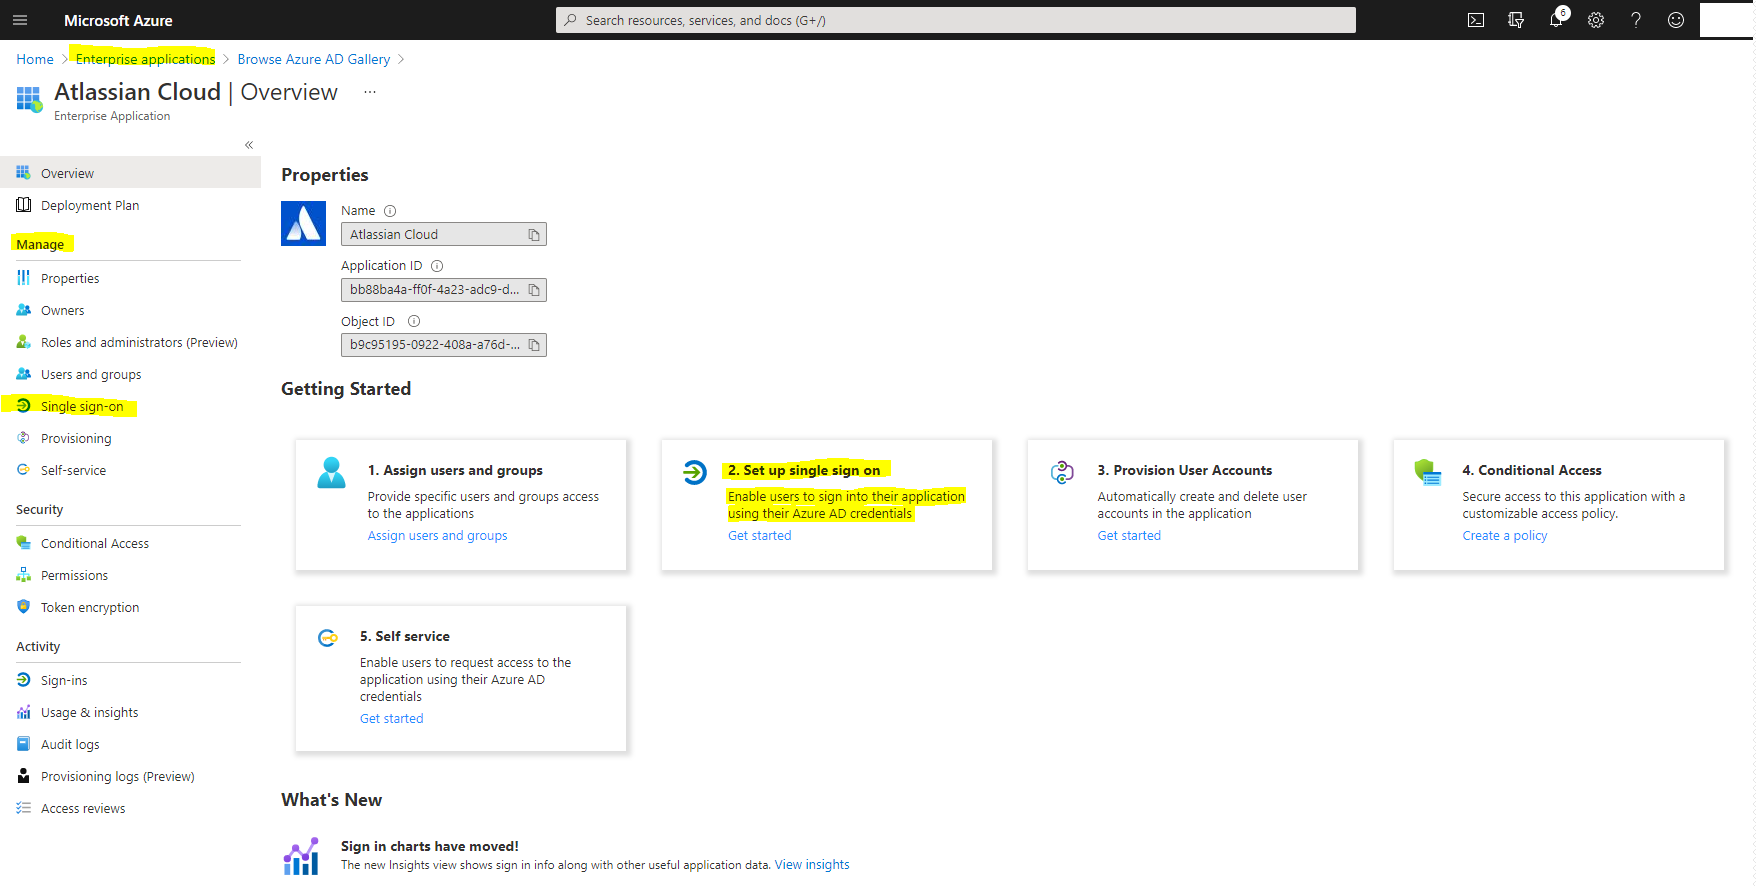
On the Select a Single sign-on method page, select SAML.

Click on No, I’ll save later as we first need some more information from Atlassian Cloud.
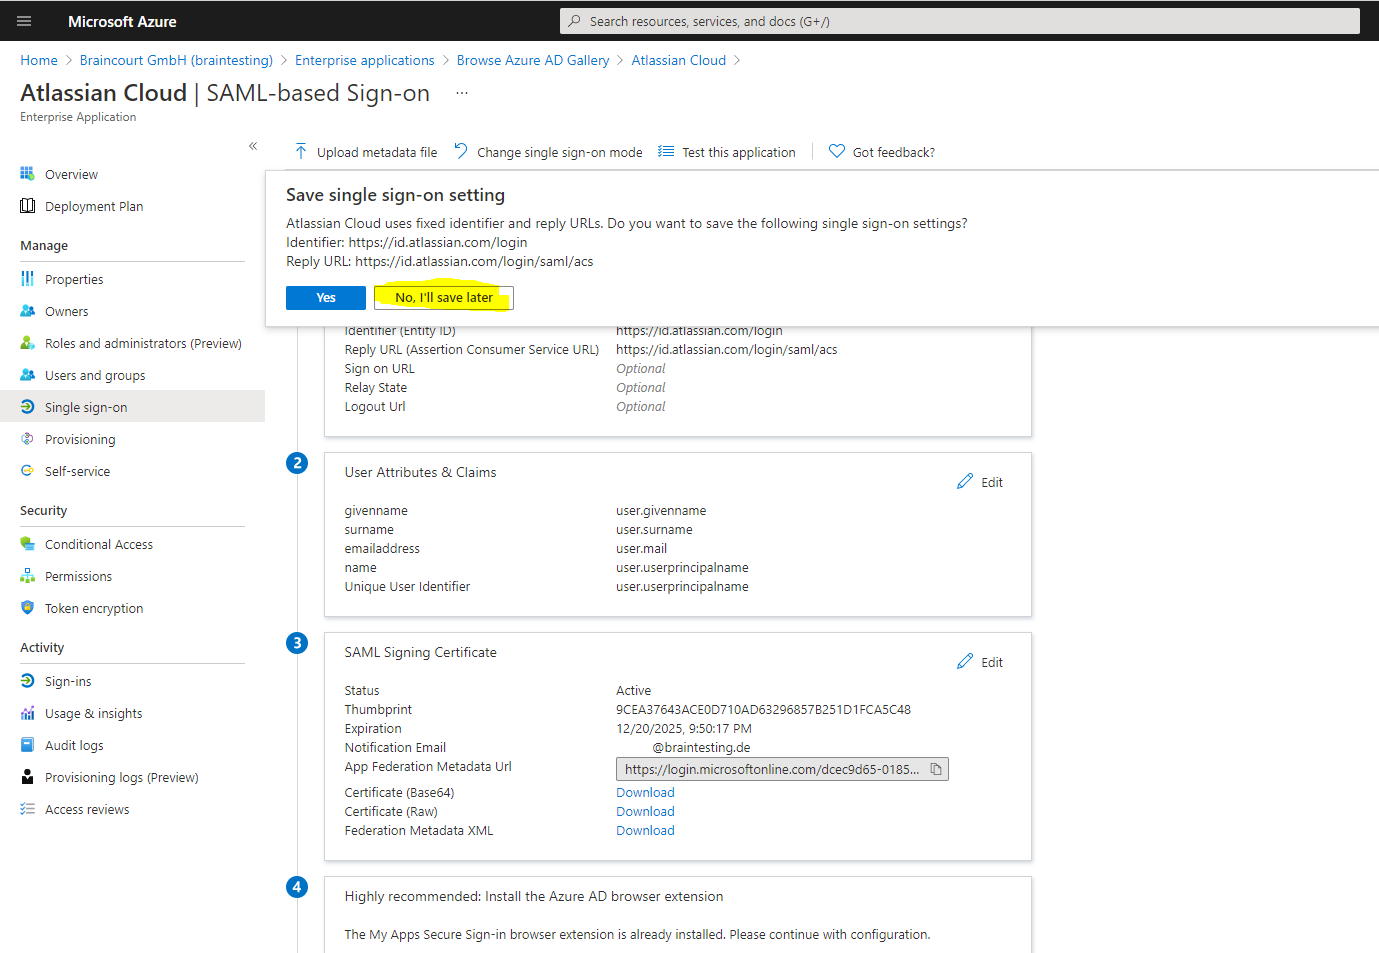
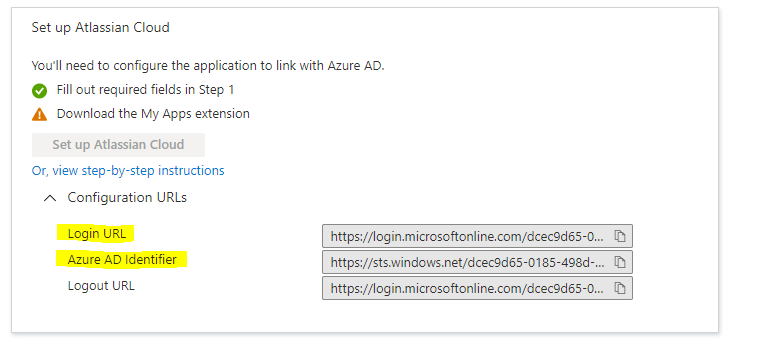
On the Set up Single Sign-On with SAML page, scroll down to Set Up Atlassian Cloud
Click on Configuration URLs

Copy Azure AD Identifier value from Azure portal, paste it in the Identity Provider Entity ID textbox in Atlassian
Copy Login URL value from Azure portal, paste it in the Identity Provider SSO URL textbox in Atlassian
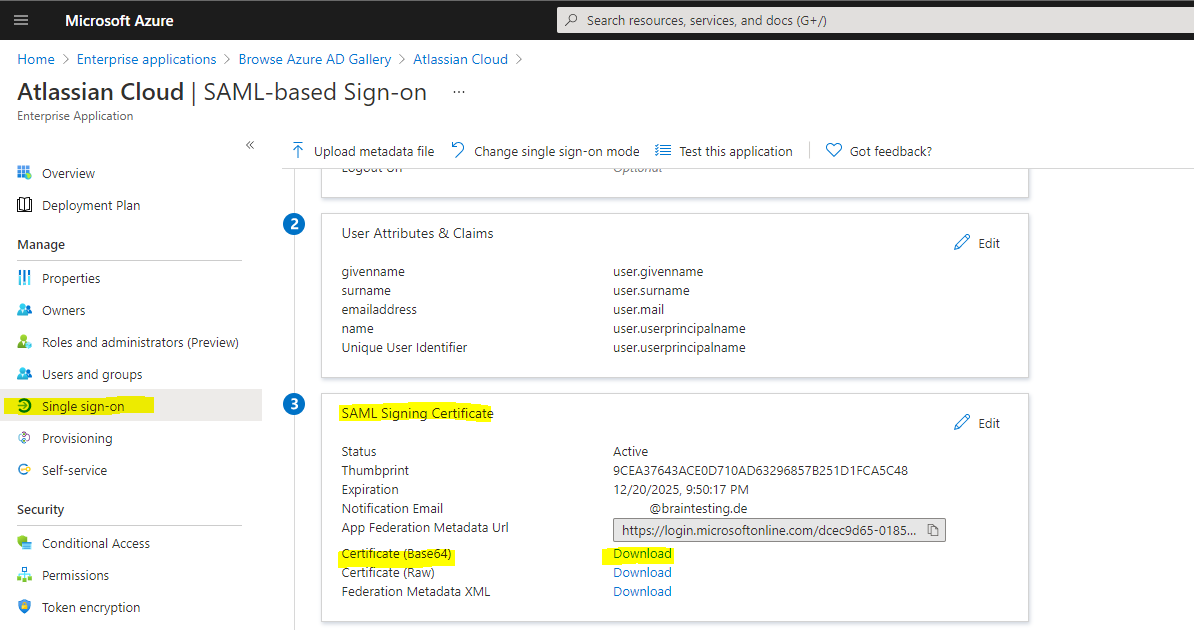
On the Set up Single Sign-On with SAML page, in the SAML Signing Certificate section, find Certificate (Base64) and select Download to download the certificate and save it on your computer.
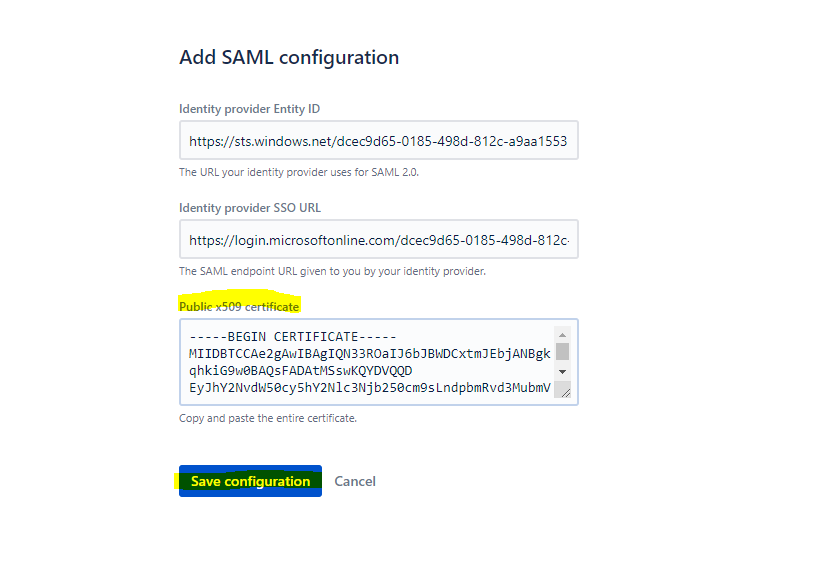
After you downloaded the certificate, open it with an text editor and copy and paste the content into the Public x509 certificate section under the SAML configuration in the Atlassian Cloud.
Add/Save the SAML Configuration in Atlassian
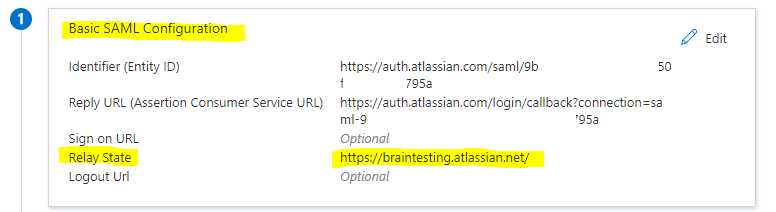
If you wish to configure the application in IDP initiated mode, edit the Basic SAML Configuration section of the Set up Single Sign-On with SAML page in Azure and open the SAML single sign-on page on the Atlassian Admin Portal
A great post about IdP-Initiated vs SP-Initiated you will find in the following blog
https://duo.com/blog/the-beer-drinkers-guide-to-saml
a. Copy SP Entity ID value from Atlassian, paste it in the Identifier (Entity ID) box in Azure and set it as default
b. Copy SP Assertion Consumer Service URL value from Atlassian, paste it in the Reply URL (Assertion Consumer Service URL) box in Azure and set it as default

Insert the SP Entity ID from Atlassian Cloud into Identifier (Entity ID) in Azure in the highlighted field and set it as default.
Insert SP Assertion Consumer Service URL from Atlassian Cloud into Reply URL (Assertion Consumer Service URL) in Azure in the highlighted field and set it as default.

c. Copy your Instance URL value, which you copied at step 1 and paste it in the Relay State box in Azure

If you wish to configure the application in SP initiated mode, edit the Basic SAML Configuration section of the Set up Single Sign-On with SAML page in Azure. Copy your Instance URL (from step 1) and paste it in the Sign On URL box in Azure
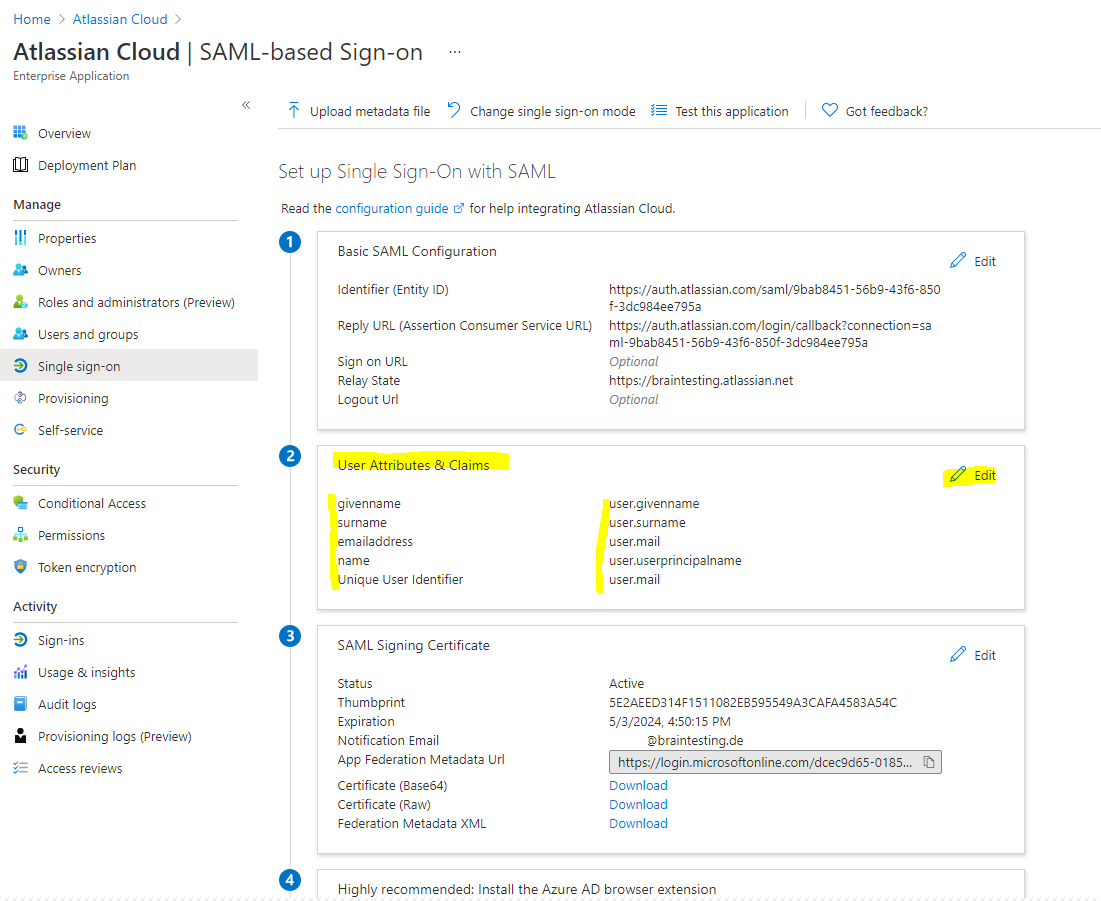
Your Atlassian Cloud application expects the SAML assertions in a specific format, which requires you to add custom attribute mappings to your SAML token attributes configuration. You can edit the attribute mapping by clicking on Edit icon.
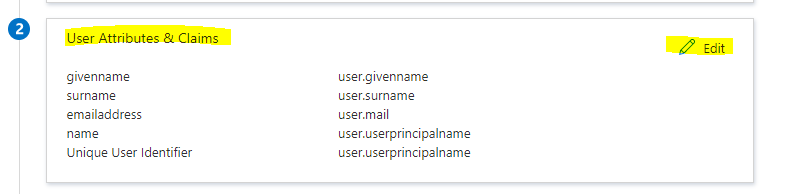
Attribute mapping for an Azure AD tenant with a Microsoft 365 license
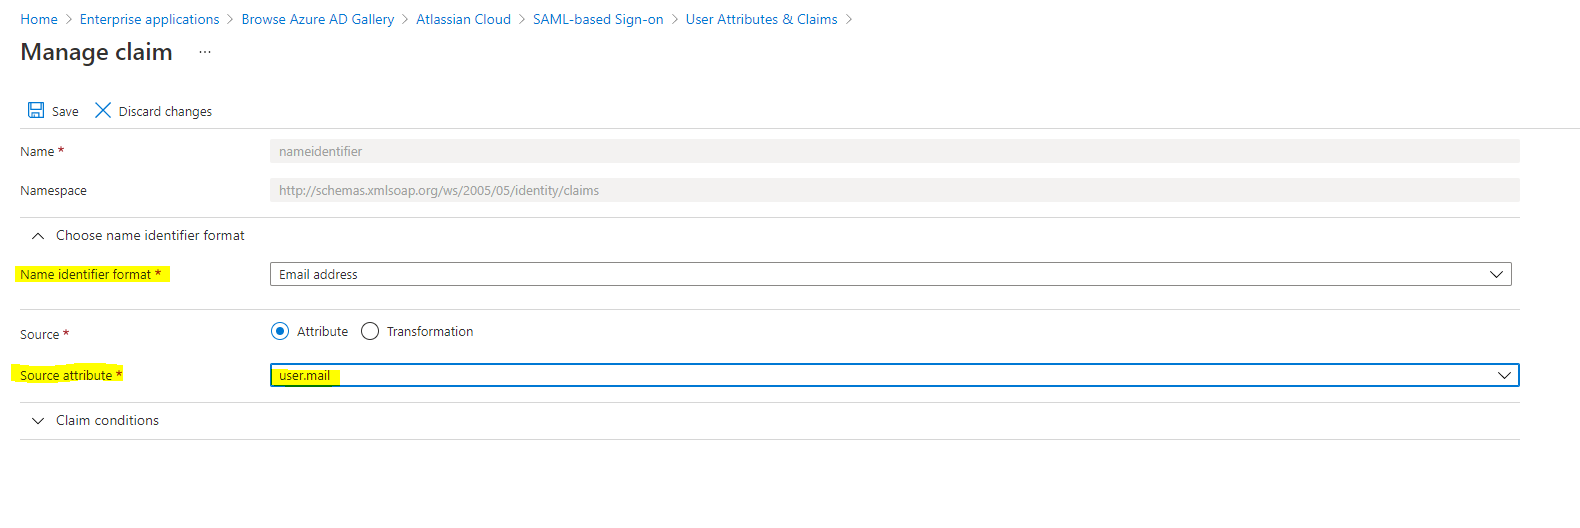
Click on the Unique User Identifier (Name ID) claim
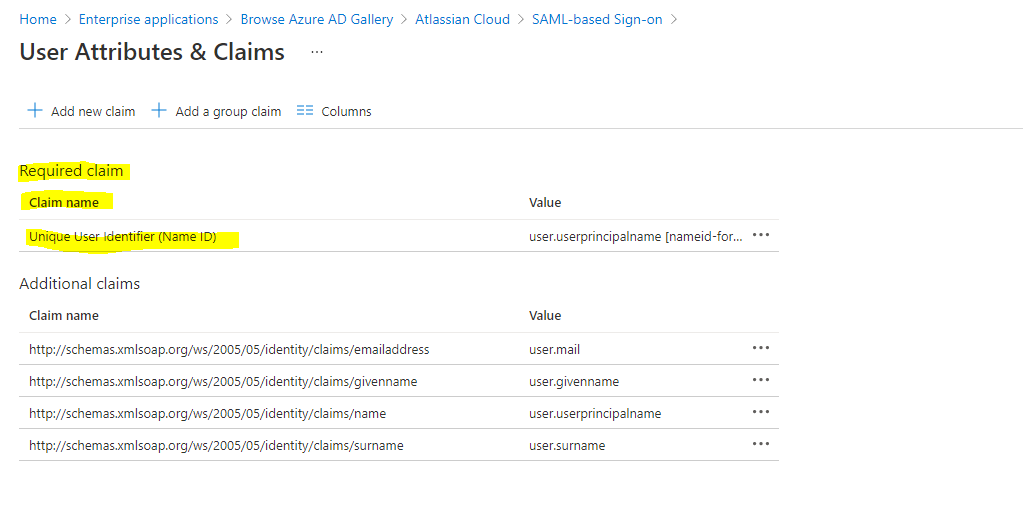
Atlassian Cloud expects the nameidentifier (Unique User Identifier) to be mapped to the user’s email (user.email). Edit the Source attribute and change it to user.mail. Save the changes to the claim.

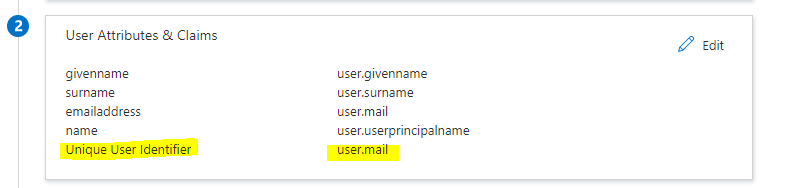
The final attribute mappings should look as follows.
Assign Azure AD User to our Enterprise Application (Atlassian Cloud)
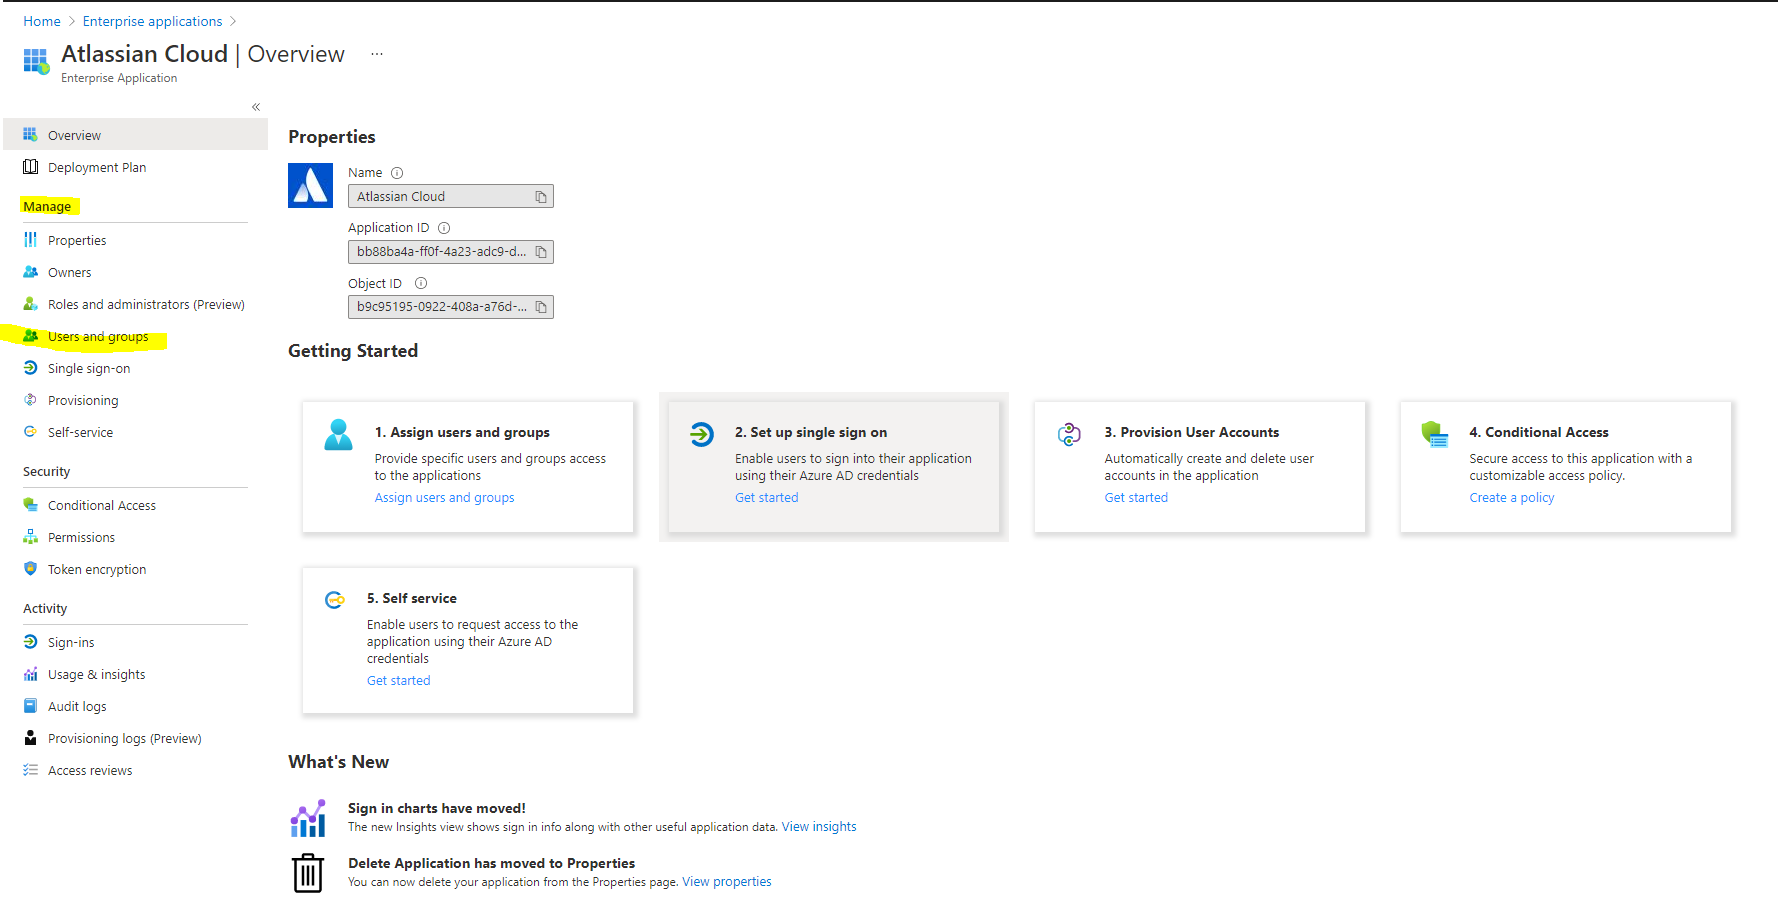
In the Azure portal, select Enterprise Applications, and then select All applications.
In the applications list, select Atlassian Cloud.

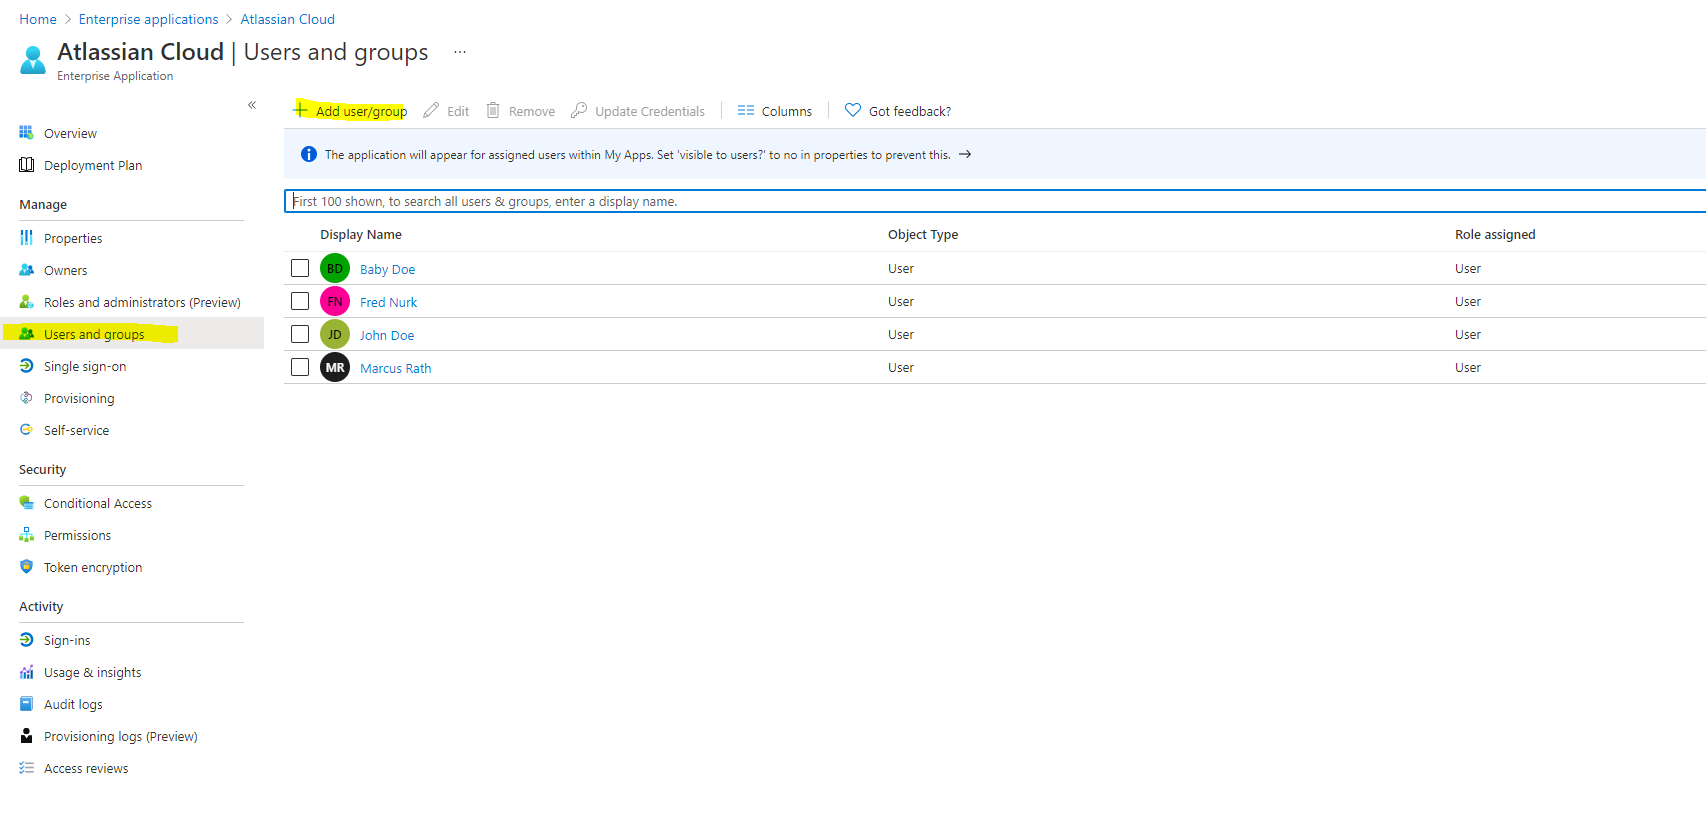
In the app’s overview page, find the Manage section and select Users and groups.
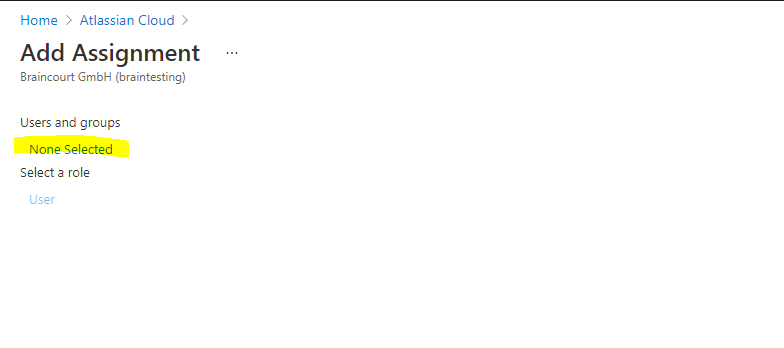
Select Add user, then select Users and groups in the Add Assignment dialog.
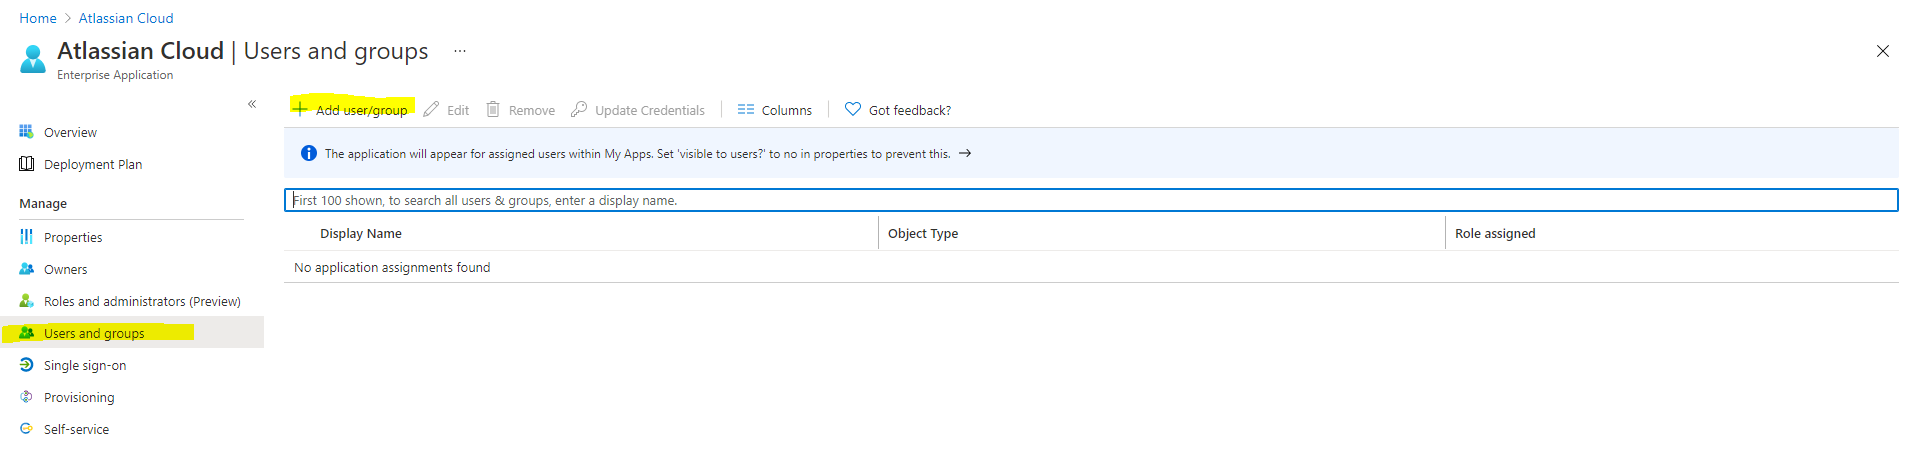
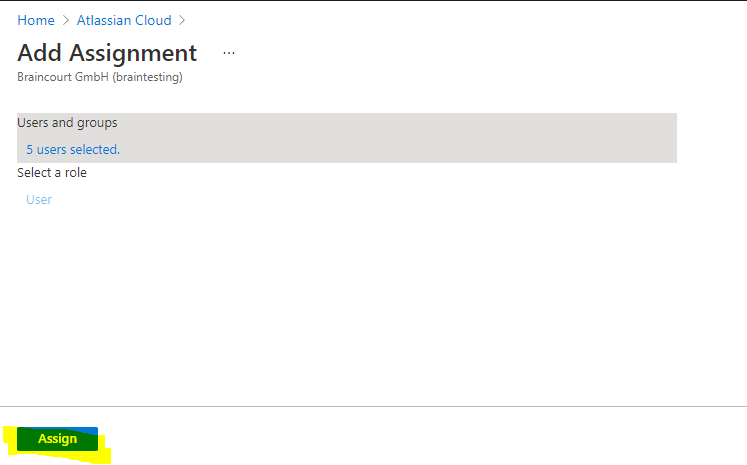
Click on None Selected and select the desired users who should access Atlassian Cloud with their Azure AD accounts.
Finally click on Assign
Create Atlassian Cloud Users
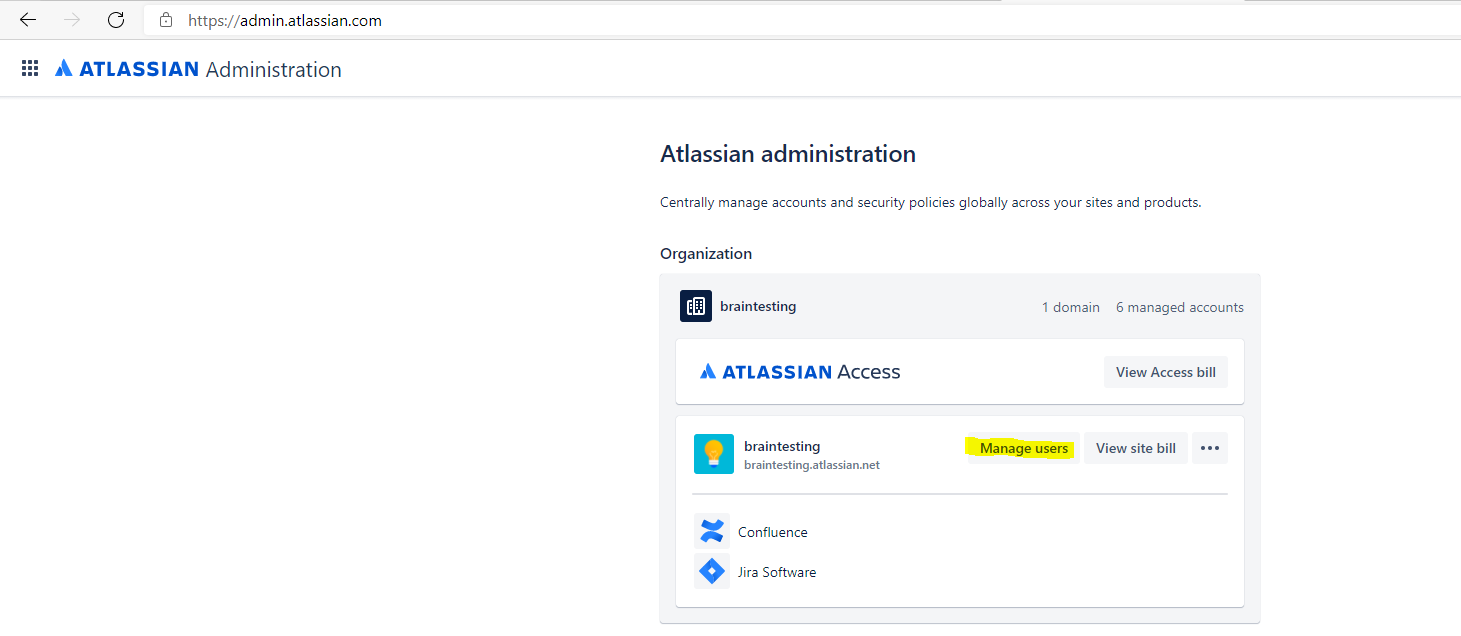
To enable Azure AD users to sign in to Atlassian Cloud, provision the user accounts manually in Atlassian Cloud by doing the following:
In the Administration pane, click on Manage users.
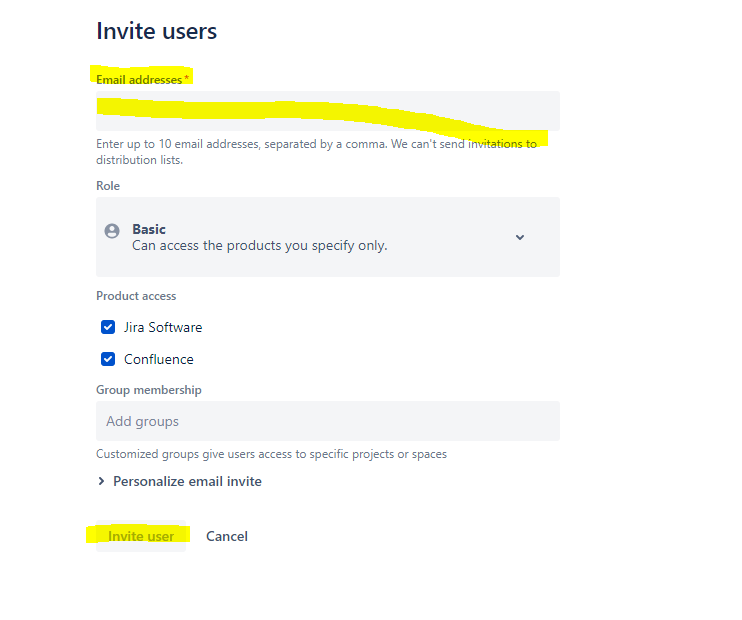
To create a user in Atlassian Cloud, select Invite user.

In the Email address box, enter the user’s email address, and then assign the application access.
To send an email invitation to the user, select Invite users. An email invitation is sent to the user and, after accepting the invitation, the user is active in the system.
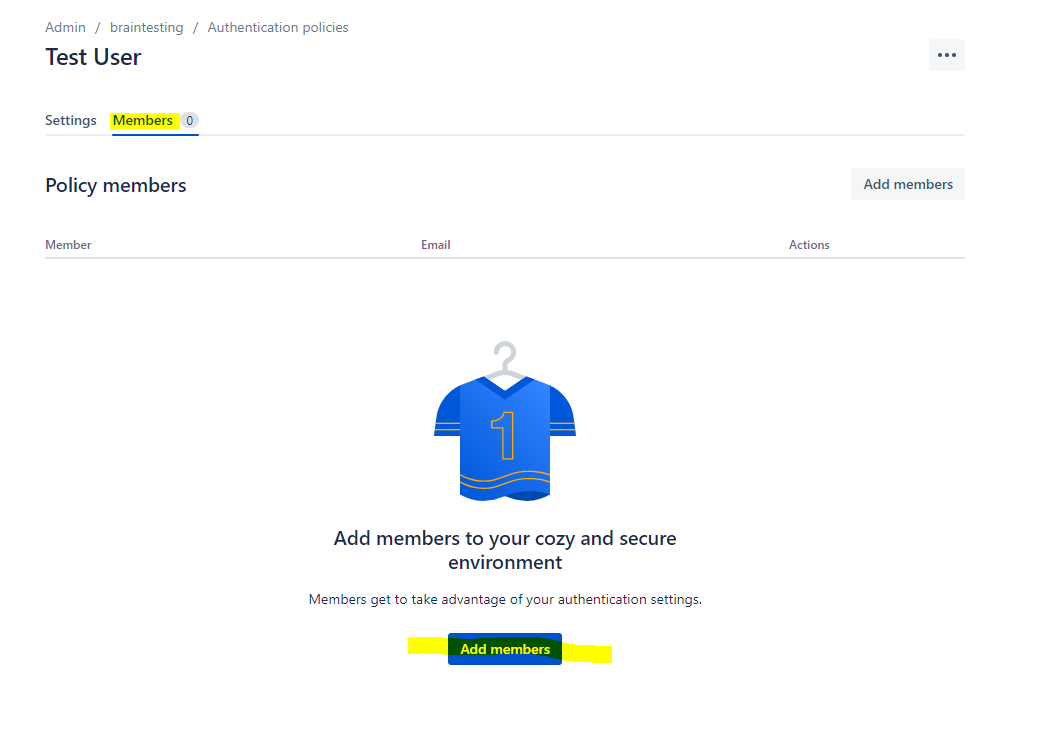
Enforce SAML single sign-on in Atlassian Cloud
In order to login with SAML single sign-on, we also need to enforce an authentication policy in Atlassian Cloud for the desired users.
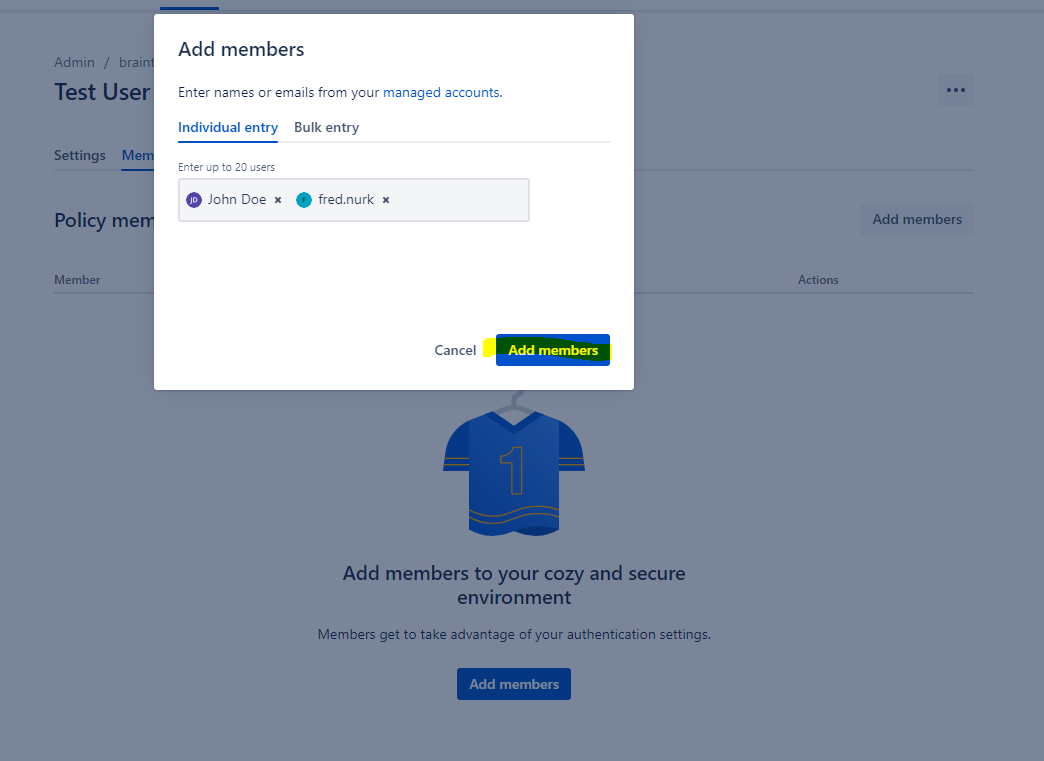
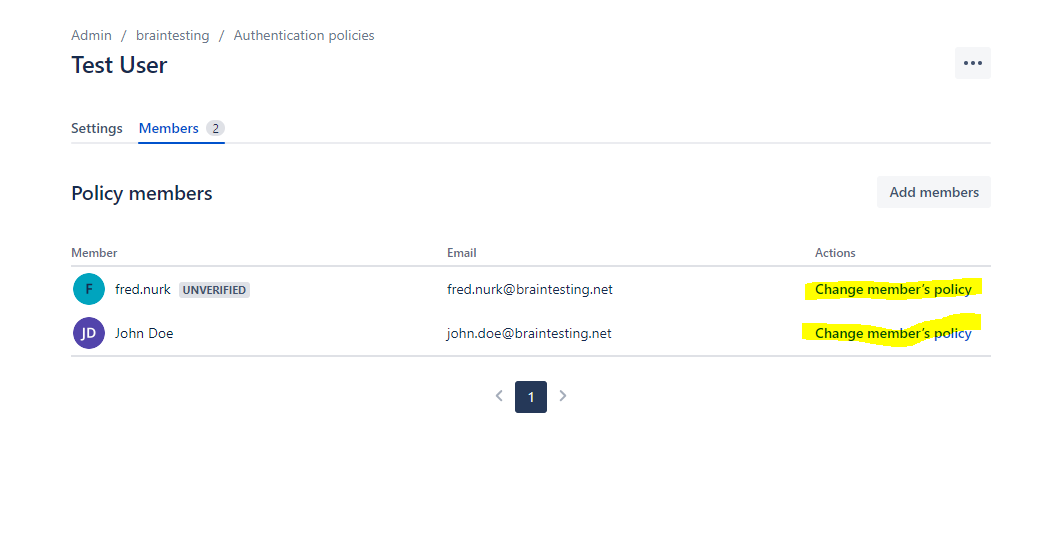
In my case I want first test this with a few users before applying this policy to all users. So you can create a new policy and only add the desired users for testing SAML single sign-on.

After uses are assigned to an policy, you can move them to another policy when you click on Change member’s policy
Finally we can enforce single sign-on for this policy under Settings as follows.
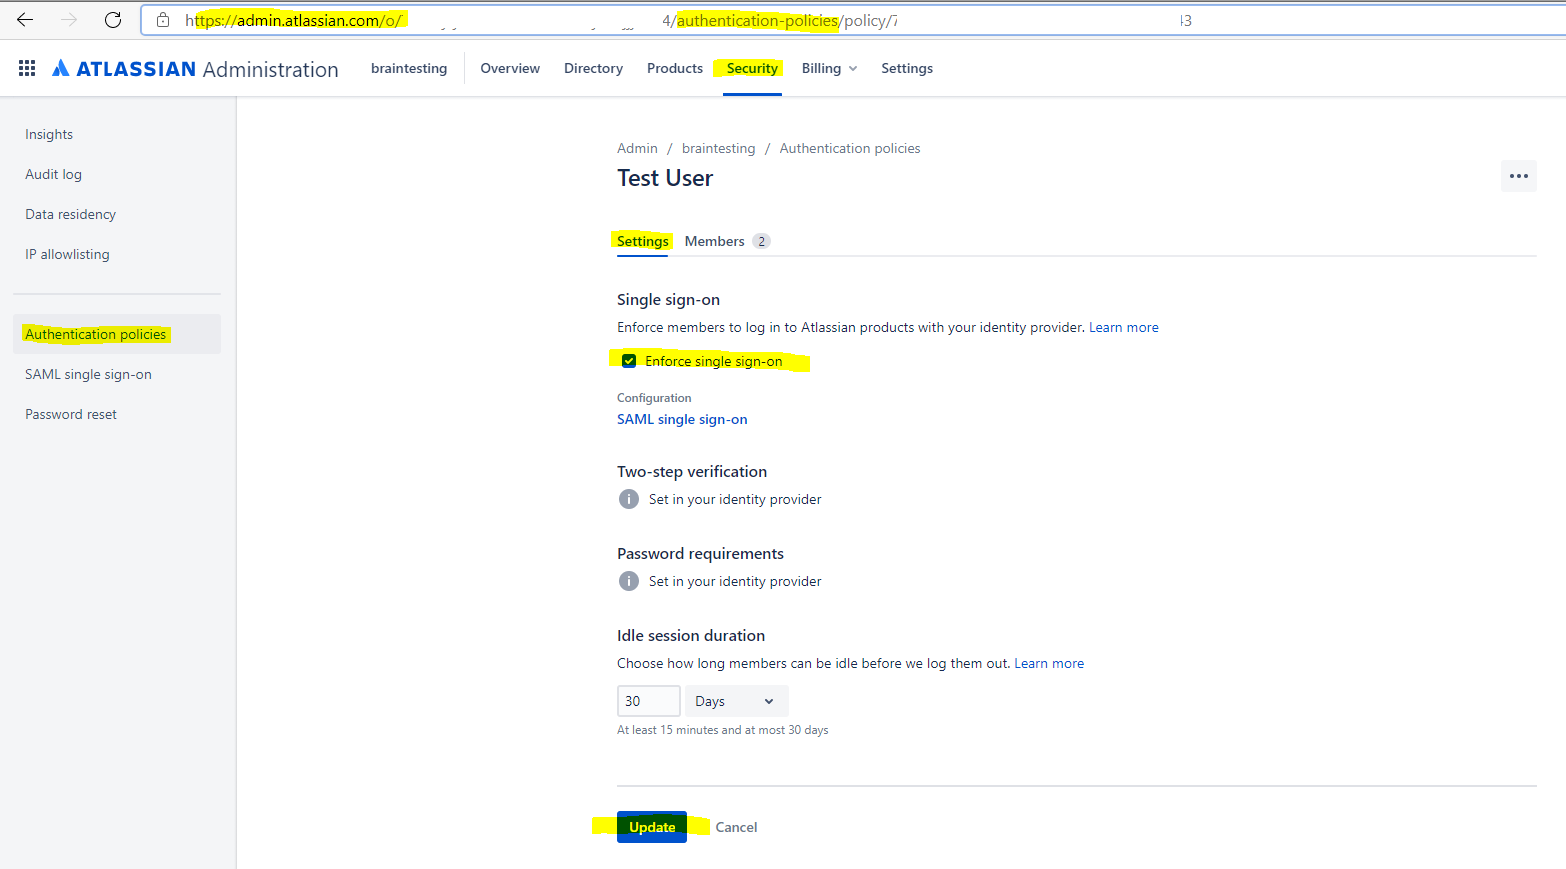
From now on SSO setup is done!
User Provisioning
Instead creating Atlassian Cloud users manually as shown above, we can automate the user provisioning from Azure AD.
Here newly created users in Azure AD will automatically provisioned to Atlassian Cloud.
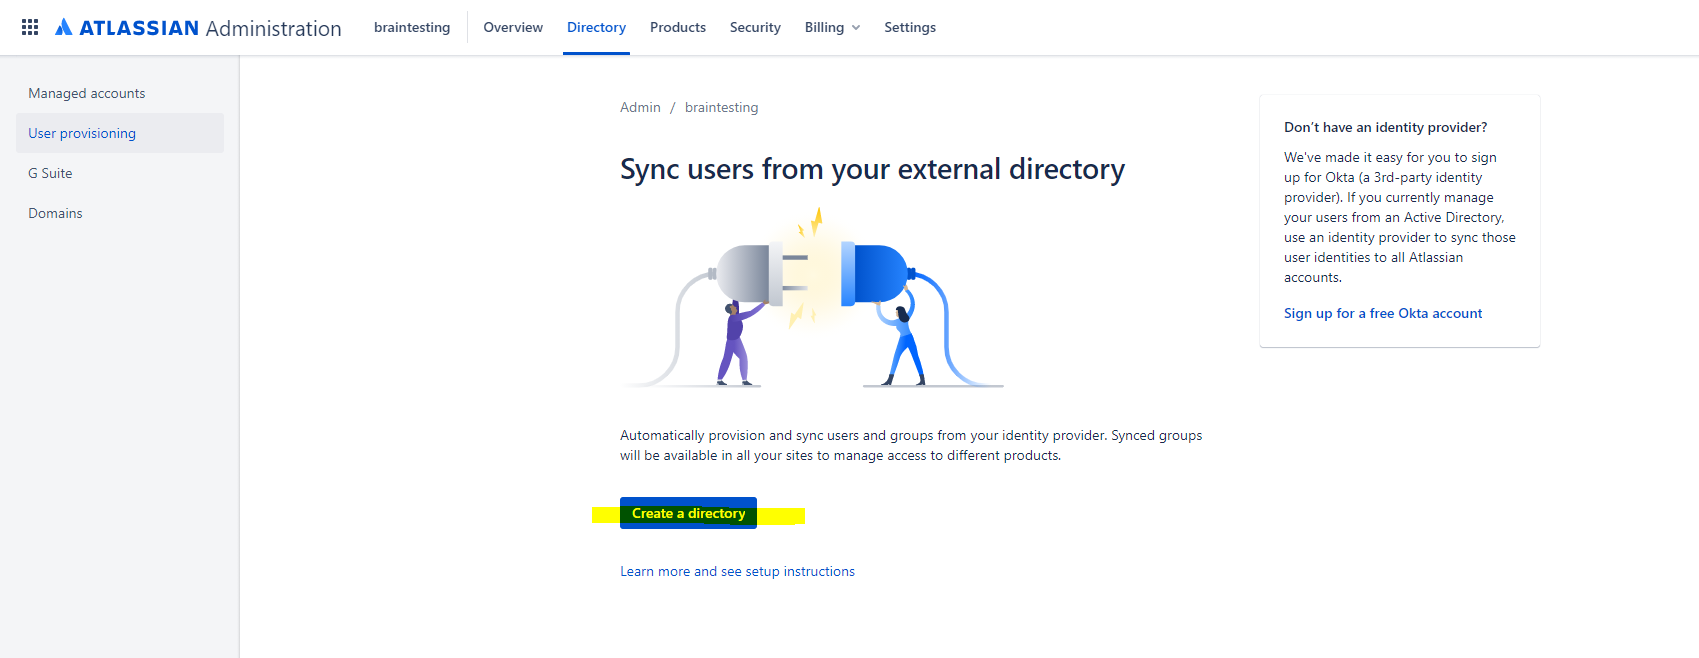
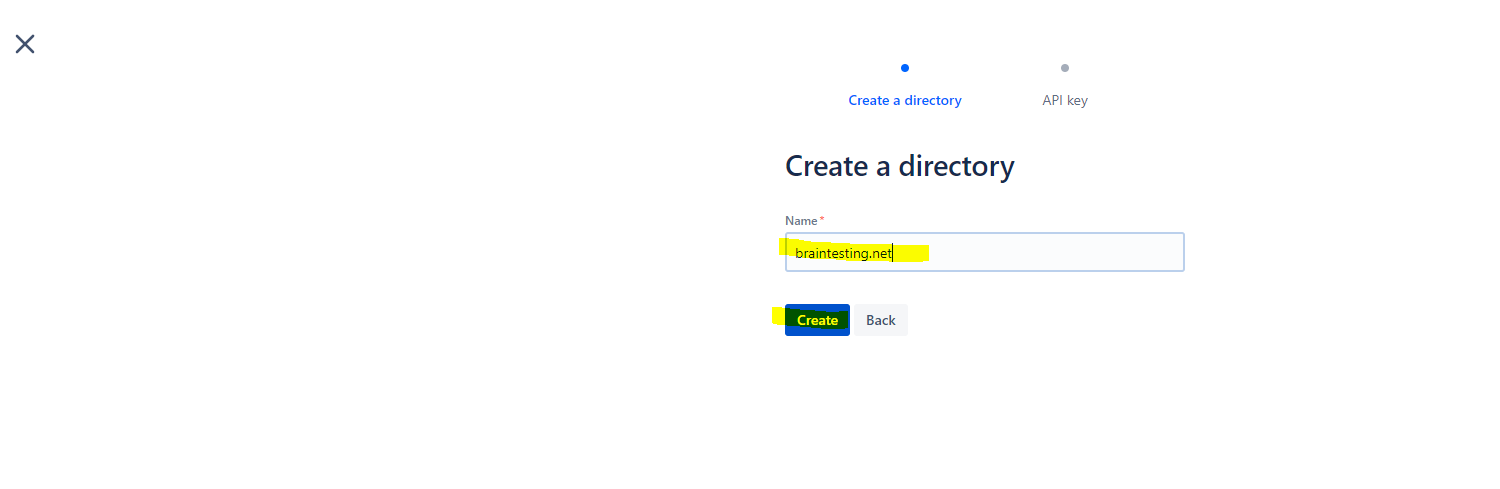
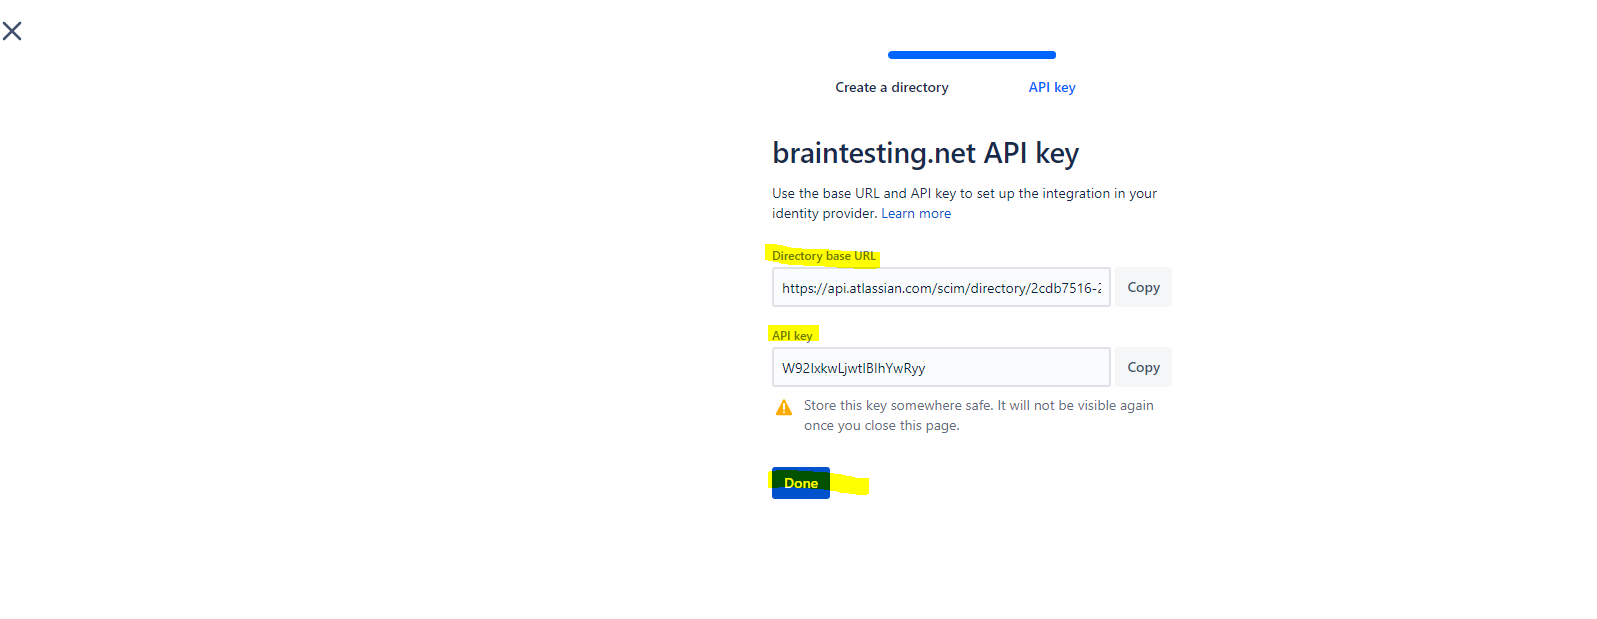
Copy the Directory base URL and API key and paste it into Azure as follows and click on Save.
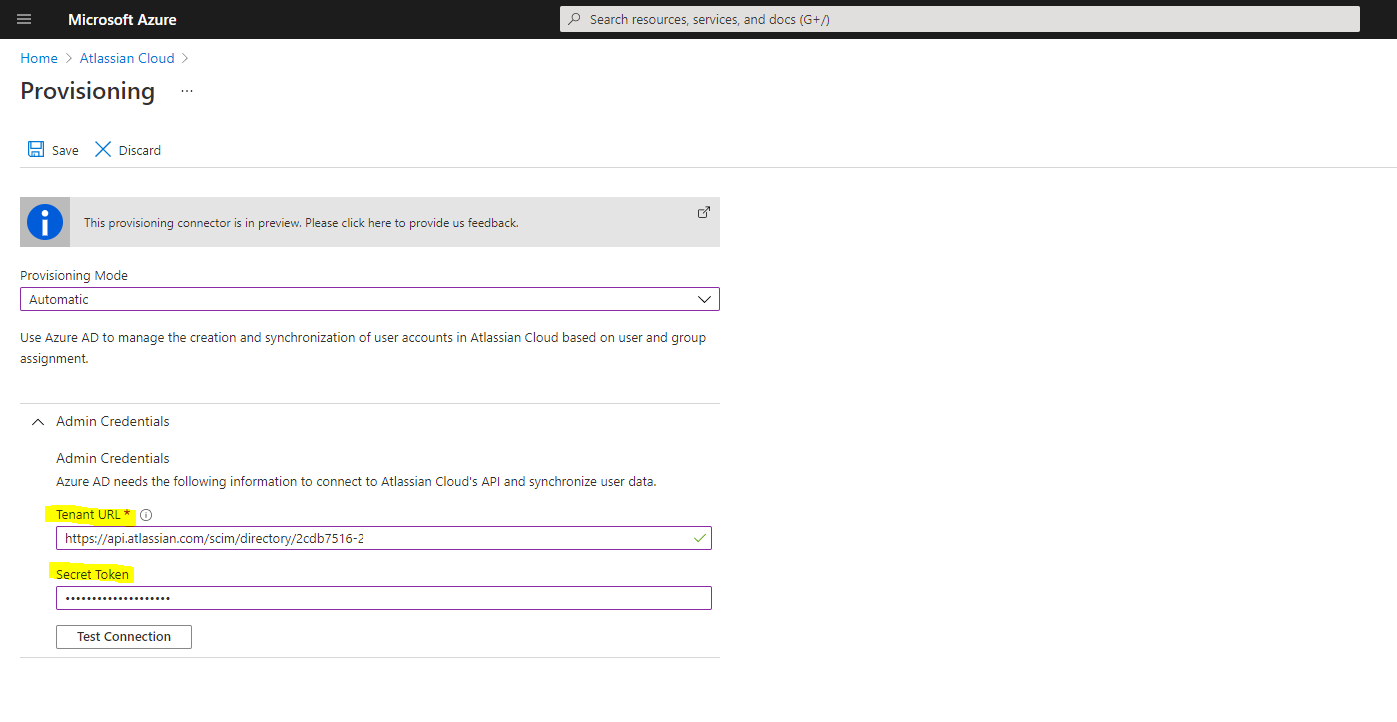
For the Mappings section we can use the default setting.
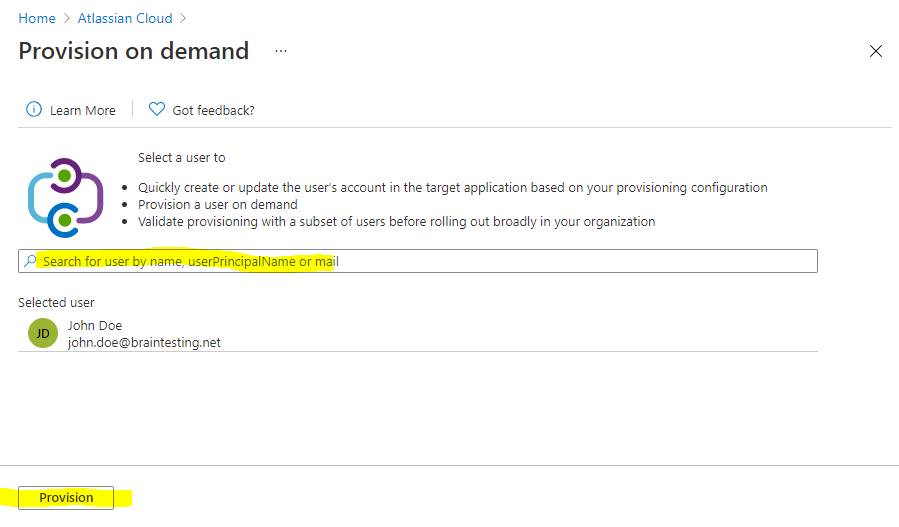
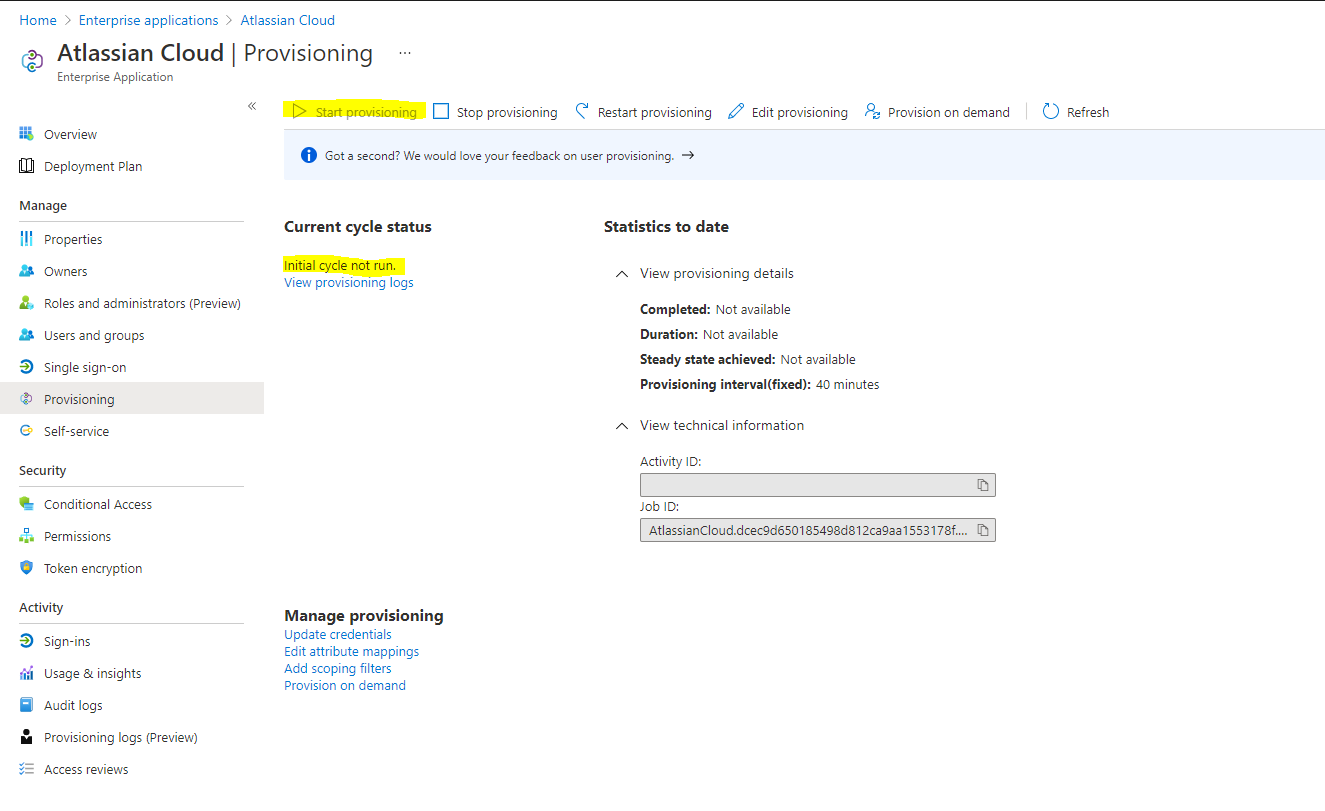
Now I will first try to provision an user on demand
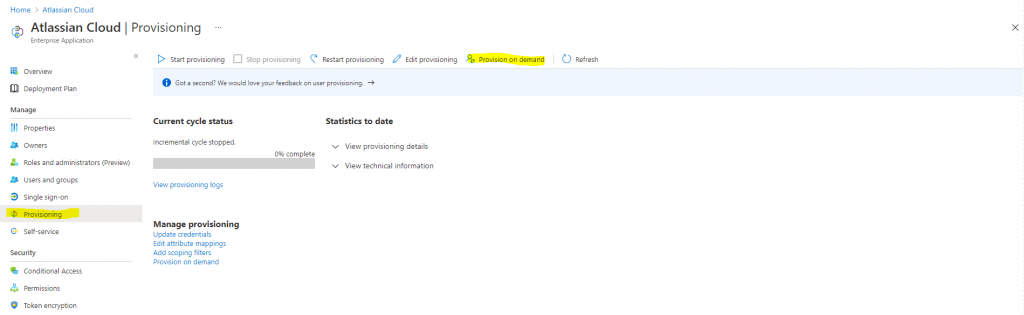
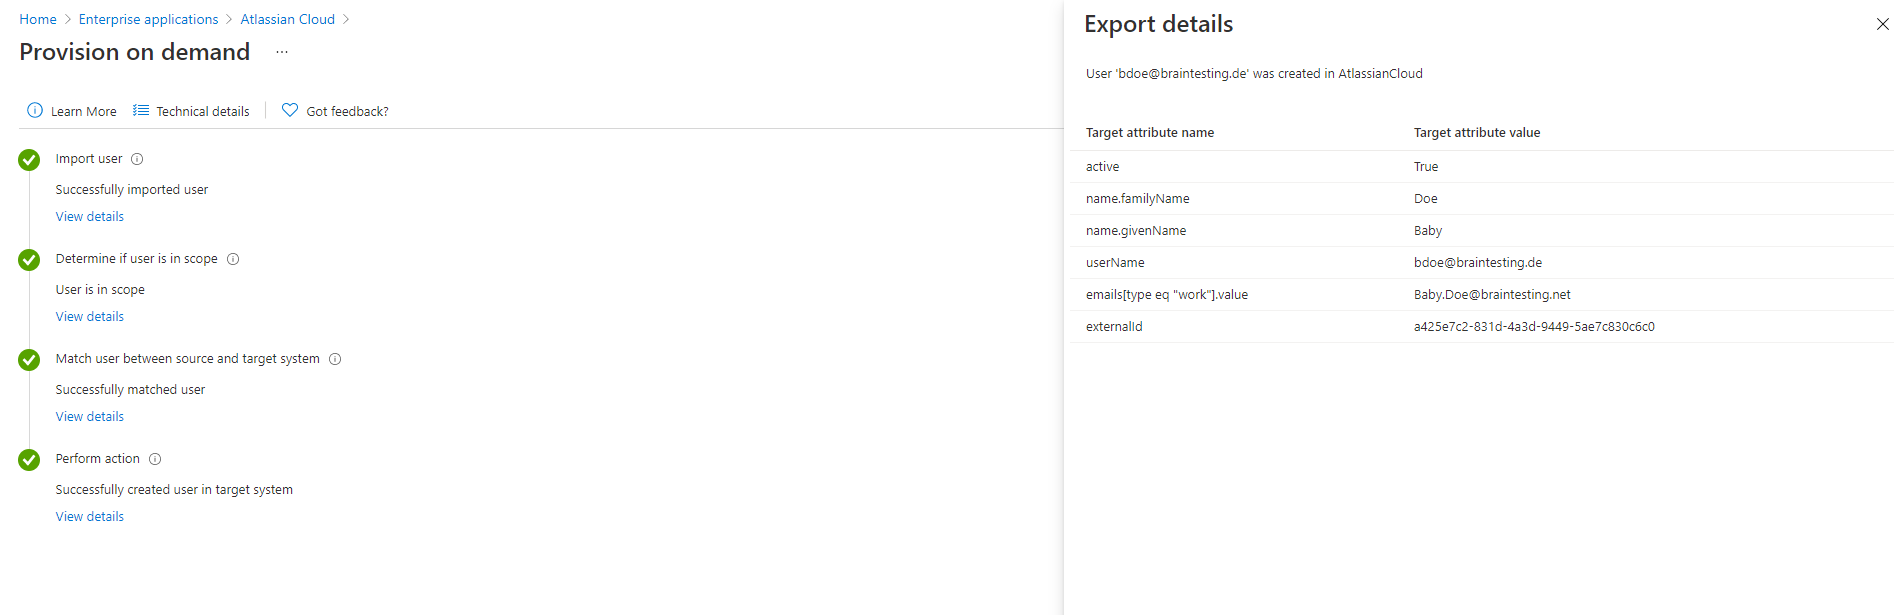
If it works I can click on Start provisioning to get the initial cycle run to start.
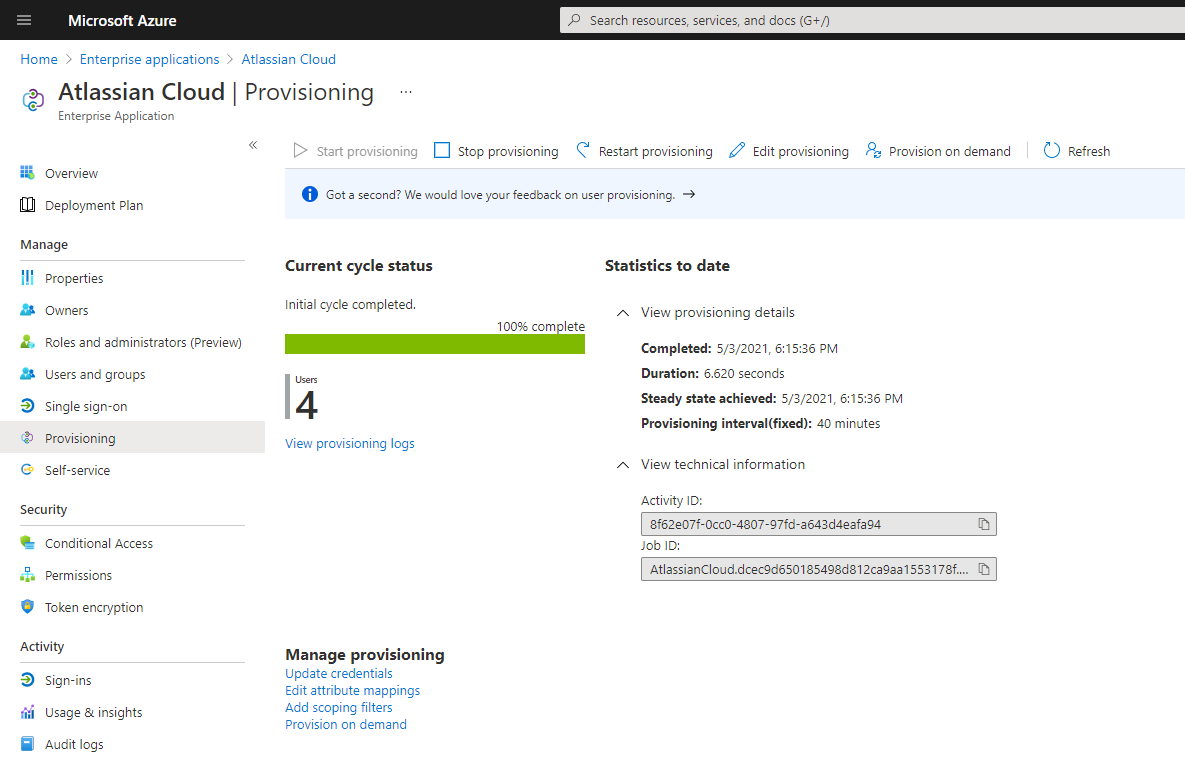
All users in Azure AD, you will add under Users and groups for the Enterprise Application will be automatically provisioned to the Atlassian Cloud.
Analyze SAML Token from Azure AD
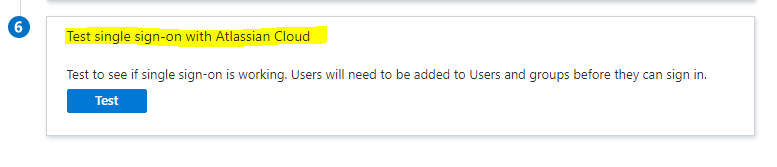
To analyze the issued SAML Token from Azure AD, you can click inside your Atlassian Cloud Enterprise Application on Single sign-on -> Test single sign-on with Atlassian Cloud.
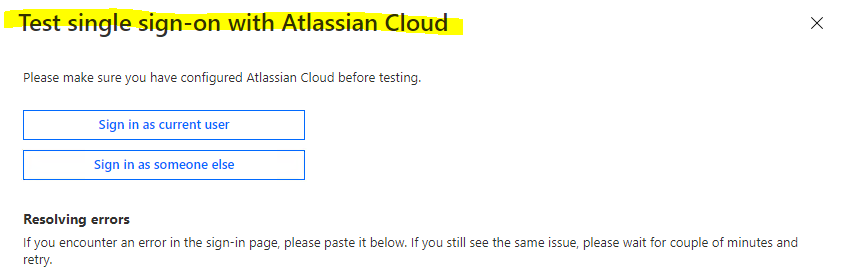
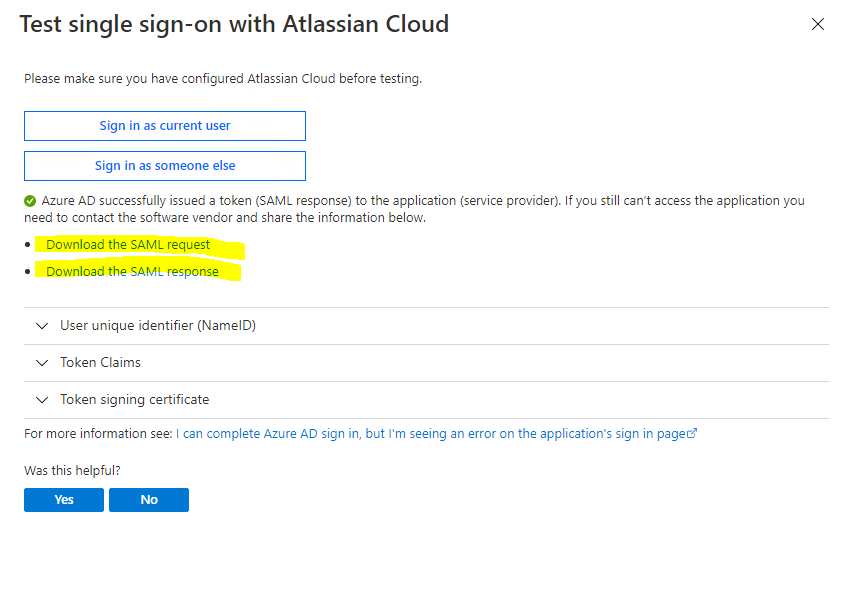
After clicking above on sign-in, Azure AD will issue a token (SAML response) which can be downloaded for further investigation. Azure AD will also provided you the SAML request token.
Alternatively you can also check the issued token with Fiddler.
Here you will see in frame #59 the SAML request and in frame #60 the SAML response and the actual token issued by Azure AD to the Atlassian Cloud application.
You can do a right click on the SAMLResponse Value field and select from the context menu Send to TextWizard, then in the TextWizard you need to select under Transform: From Base64 in order to decode the SAML response.
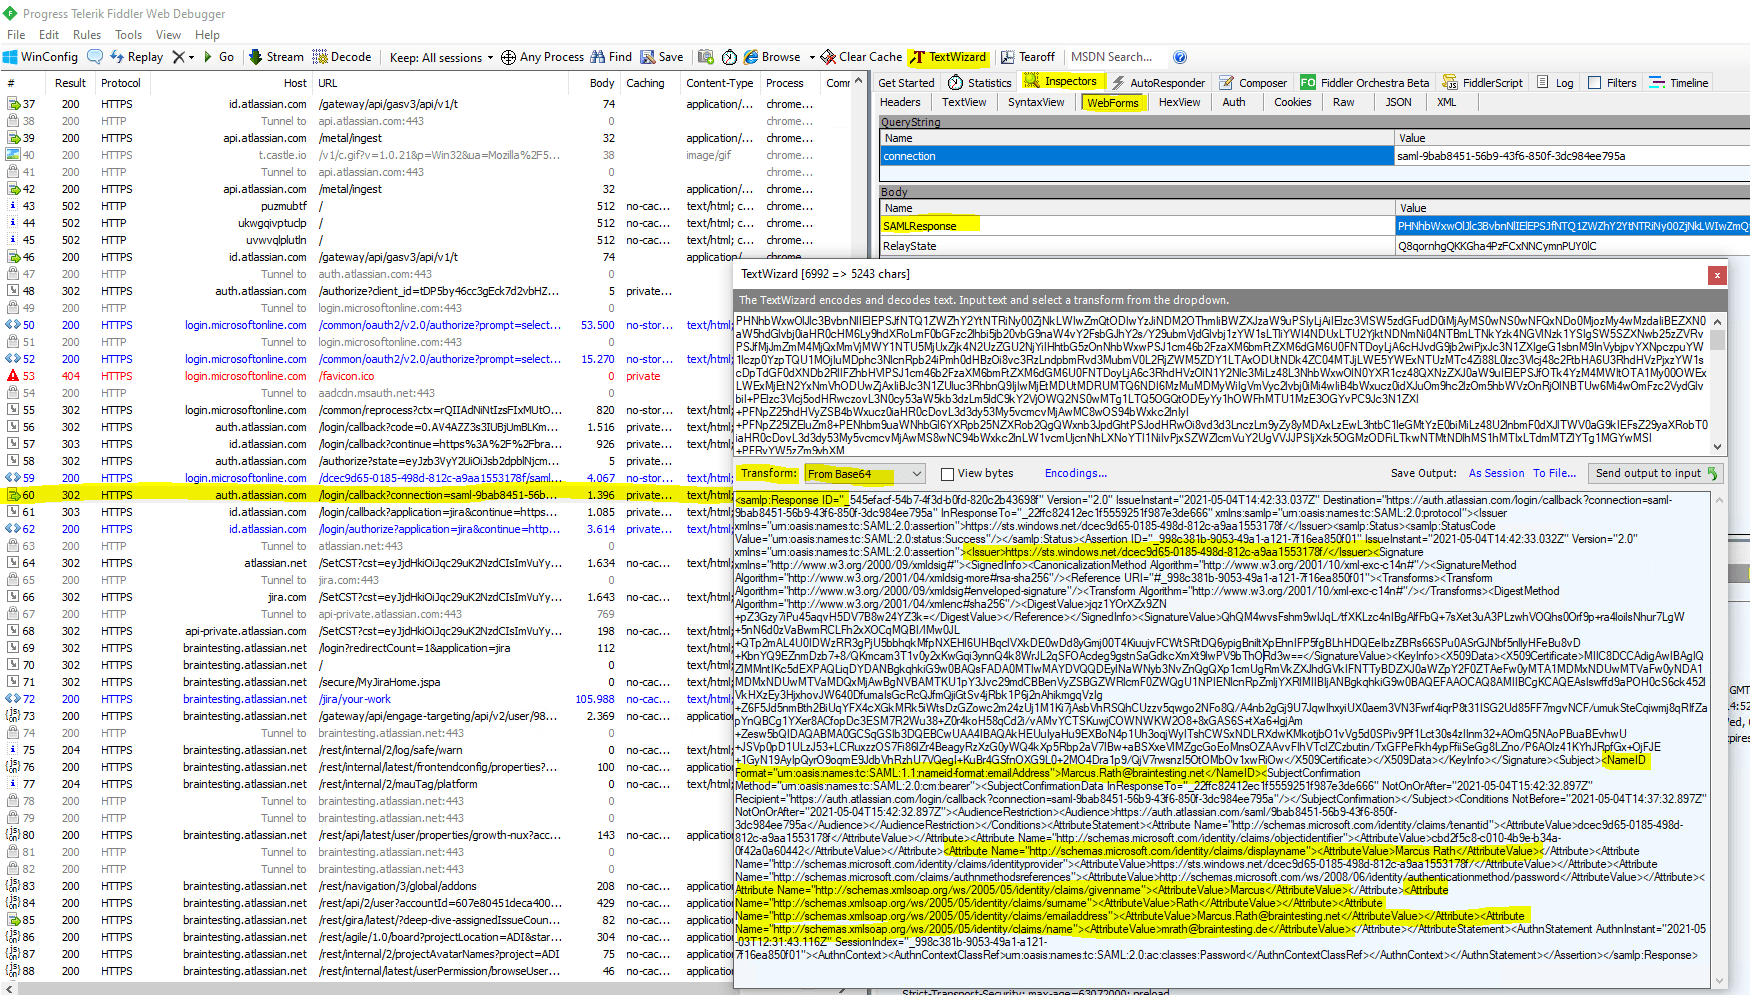
As you can see above, all our configured user attributes will be send as claims to the Atlassian Application, also the issuer URI is included.

Links
Tutorial: Integrate Atlassian Cloud with Azure Active Directory
https://docs.microsoft.com/en-us/azure/active-directory/saas-apps/atlassian-cloud-tutorial
Tutorial: Configure Atlassian Cloud for automatic user provisioning
https://docs.microsoft.com/en-us/azure/active-directory/saas-apps/atlassian-cloud-provisioning-tutorial
Configure SAML single sign-on with an identity provider
https://support.atlassian.com/security-and-access-policies/docs/configure-saml-single-sign-on-with-an-identity-provider/
Configure SAML single sign-on with AD FS
https://support.atlassian.com/security-and-access-policies/docs/configure-saml-single-sign-on-with-ad-fs/
Understand SAML-based single sign-on
https://docs.microsoft.com/en-us/azure/active-directory/manage-apps/configure-saml-single-sign-on
Azure Active Directory: How to debug SAML-based single sign-on to applications
https://social.technet.microsoft.com/wiki/contents/articles/31247.azure-active-directory-how-to-debug-saml-based-single-sign-on-to-applications.aspx
What Is SAML, and Why Does It Exist? | IdP-Initiated vs SP-Initiated
https://duo.com/blog/the-beer-drinkers-guide-to-saml