Set up Active Directory Federation Services (AD FS 5.0) – Create an ASP.NET Web Application (.NET Framework – Web Forms) using WS-FED – Part 4
In this post I want to show you, how you can create a claim aware ASP.NET web application (.NET Framework – Web Forms) with C# in Visual Studio, in order to authenticate users through an AD FS server and WS-FED.
This post is split into multiple parts
Part 1 … will cover the installation from the internal ADFS ServerPart 2 … will cover the installation from the ADFS Reverse Proxy Server in the perimeter network
Part 3 … will cover all about certificates for an ADFS environmentPart 4 … we will create an ASP.NET Web Application (.NET Framework -Web Forms) and configure it to be claim aware using WS-FED.
Part 5 … we will create an ASP.NET Core Web Application (MVCs) and configure it to be claim aware using WS-FED.
Part 6 … we will create an ASP.NET Web Application (.NET Framework – MVC) and configure it to be claim aware by using OAuth 2.0 and OpenID Connect.
Part 7 … we will create an ASP.NET Core Web Application (MVC) and configure it to be claim aware by using OAuth 2.0 and OpenID Connect.
Part 8 … will explain and list all identity protocols, AD FS supports.
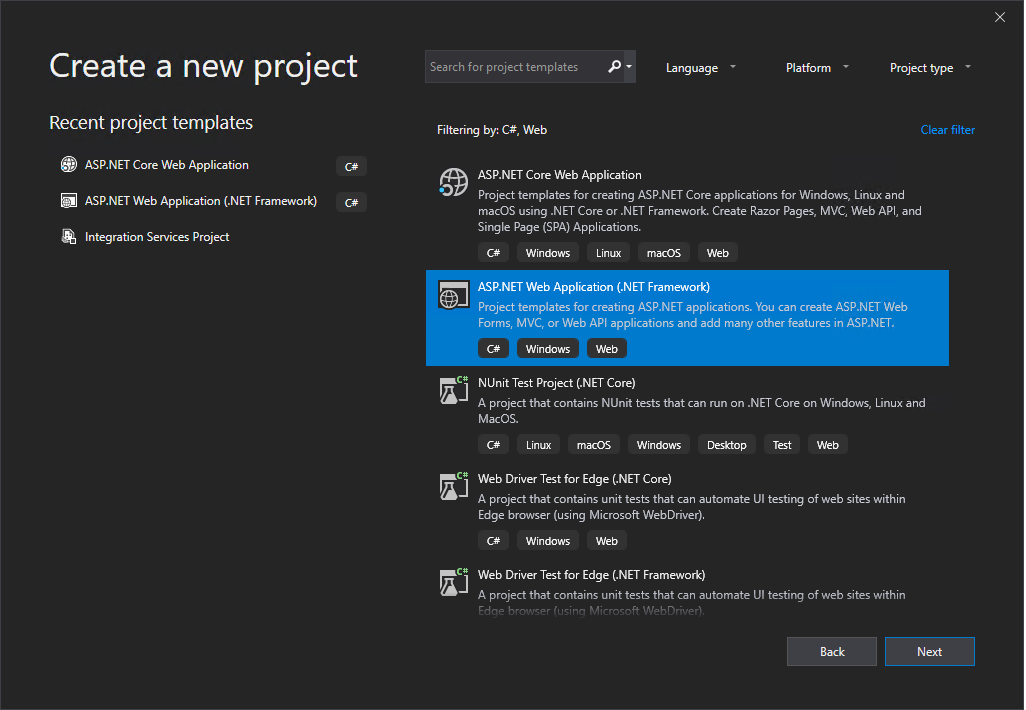
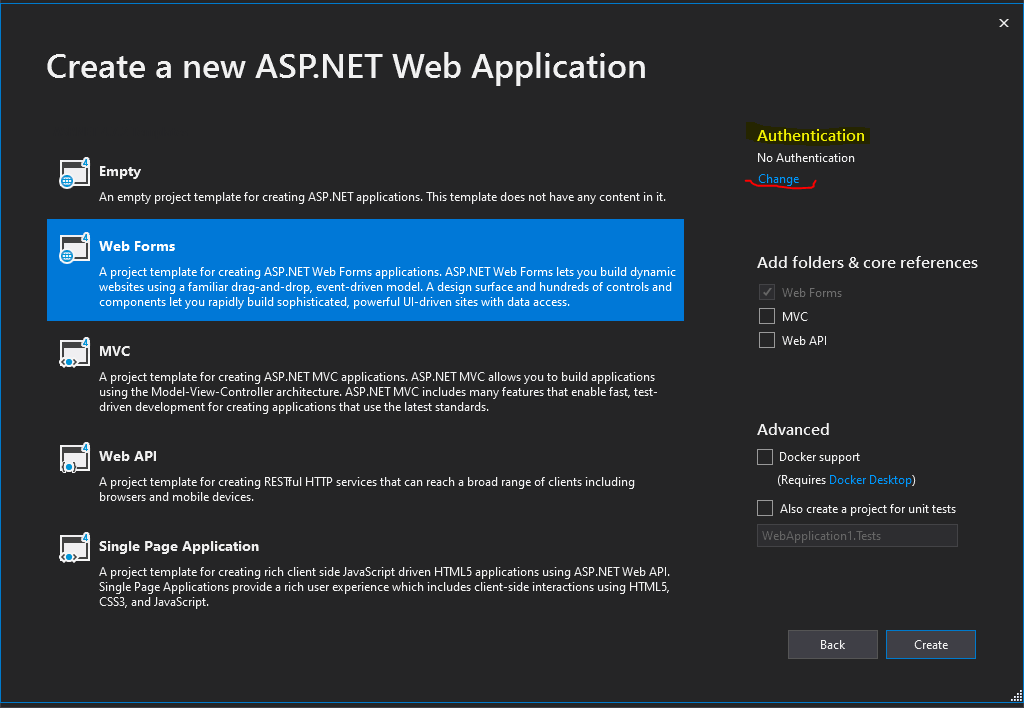
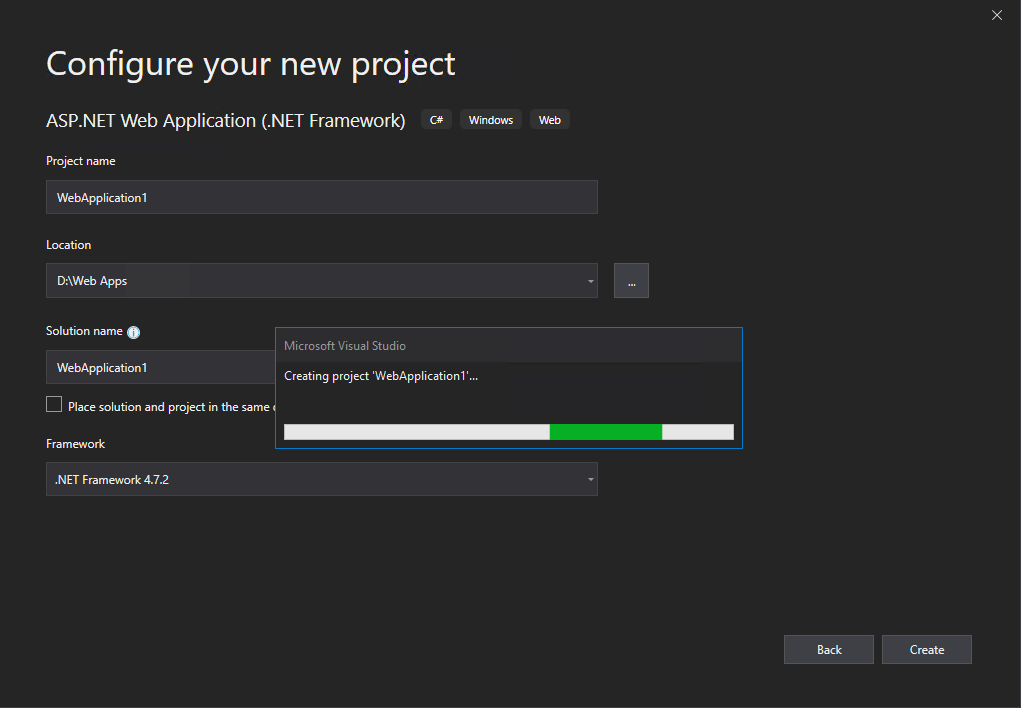
I will use here the Web Forms template.
ASP.NET Web Forms
https://en.wikipedia.org/wiki/ASP.NET_Web_Forms
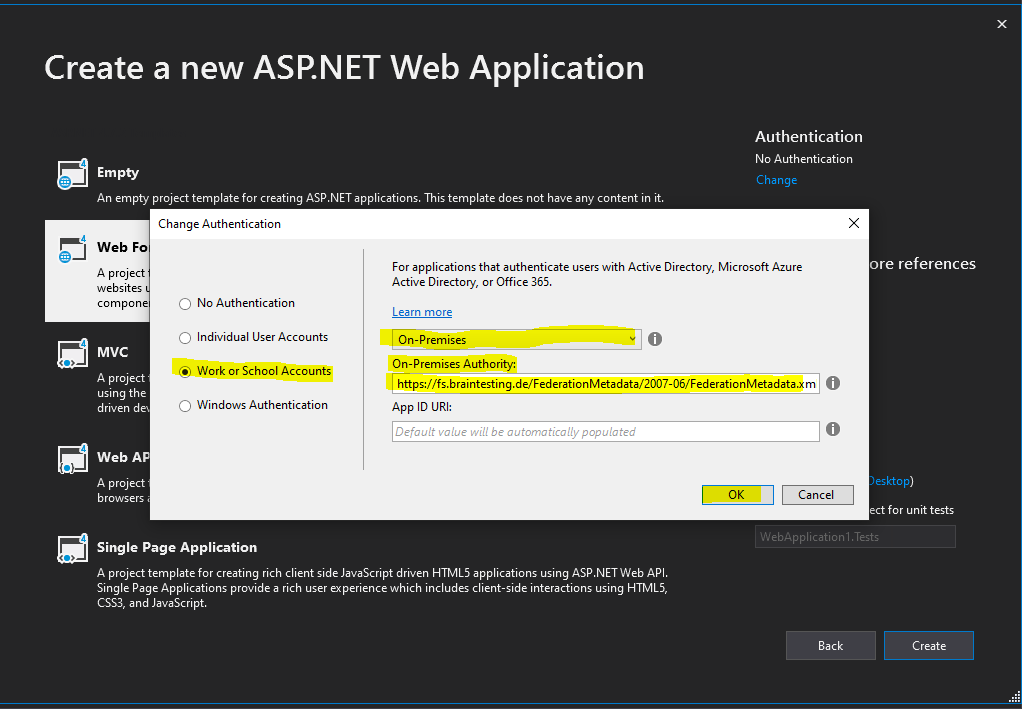
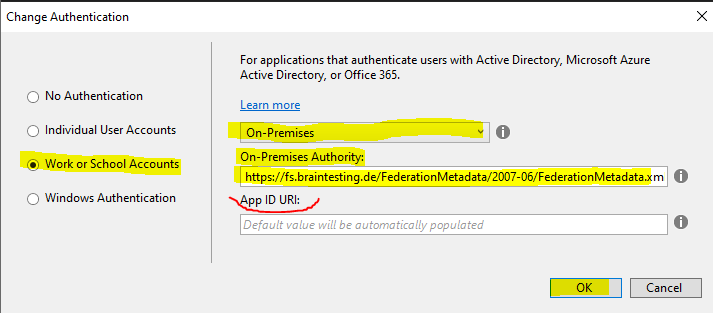
Click on the right top in the Authentication section on Change.
In the following drop-down select On-Premises.
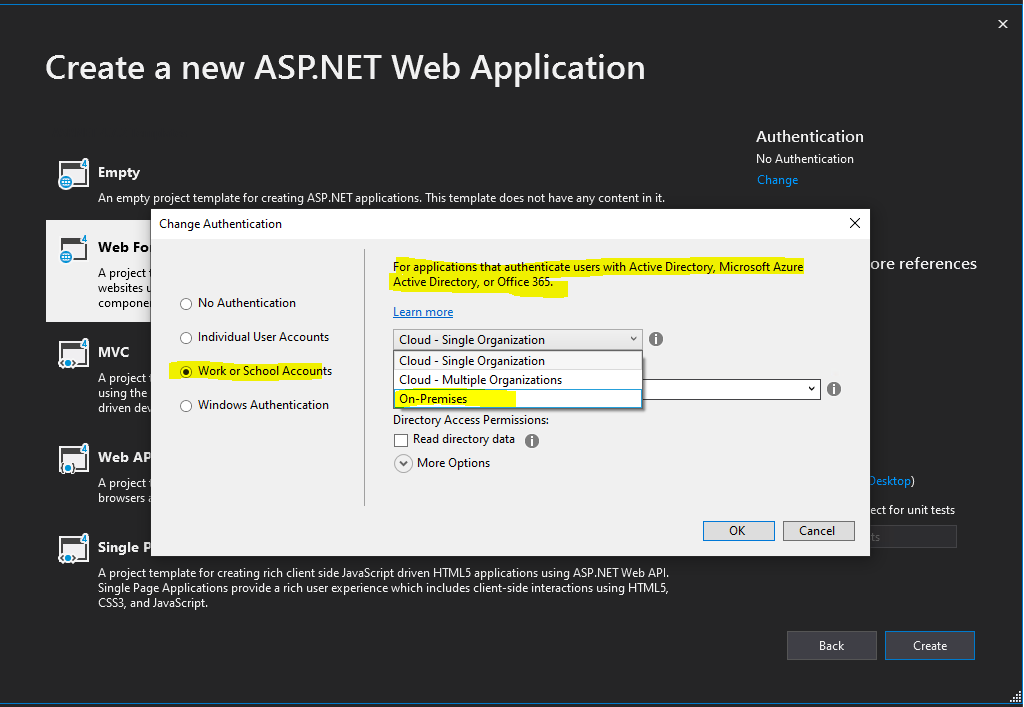
Select Work or School Accounts and On-Premises as follows.
- Cloud – Single Organization is meant for LoB apps tied to a Windows Azure AD tenant; this post has one example that uses this template as starting point
- Cloud – Multiple Organizations is for SaaS applications intended to be used by multiple organizations with their own Windows Azure AD tenants; walkthrough here
- On-Premises, the option we want to explore today, allows you to connect to any WS-Federation provider which offers a metadata document. Note that YMMV for any provider other than ADFS, as our testing focused on the latter.
- “On-Premises Authority” – this represents the URL of the metadata document of your authority. You’ll typically receive this value from your administrator. The template tool will use that document for discovering all of the relevant info about your ADFS (addresses, signing keys, identifiers, etc) and derive the project’s configuration from it
- “App ID URI” – This is, in good ol’ws-fed terms, the realm of your applicaton. You can leave it blank, and the tool will fill it up for you (with the URL assigned to your project by IIS (express)).
Source: https://www.cloudidentity.com/blog/2014/02/12/use-the-on-premises-organizational-authentication-option-adfs-with-asp-net-in-visual-studio-2013/
Under On-Premises Authority we need to enter the Federation Metadata URL from the AD FS server.

https://fs.braintesting.de/FederationMetadata/2007-06/FederationMetadata.xml
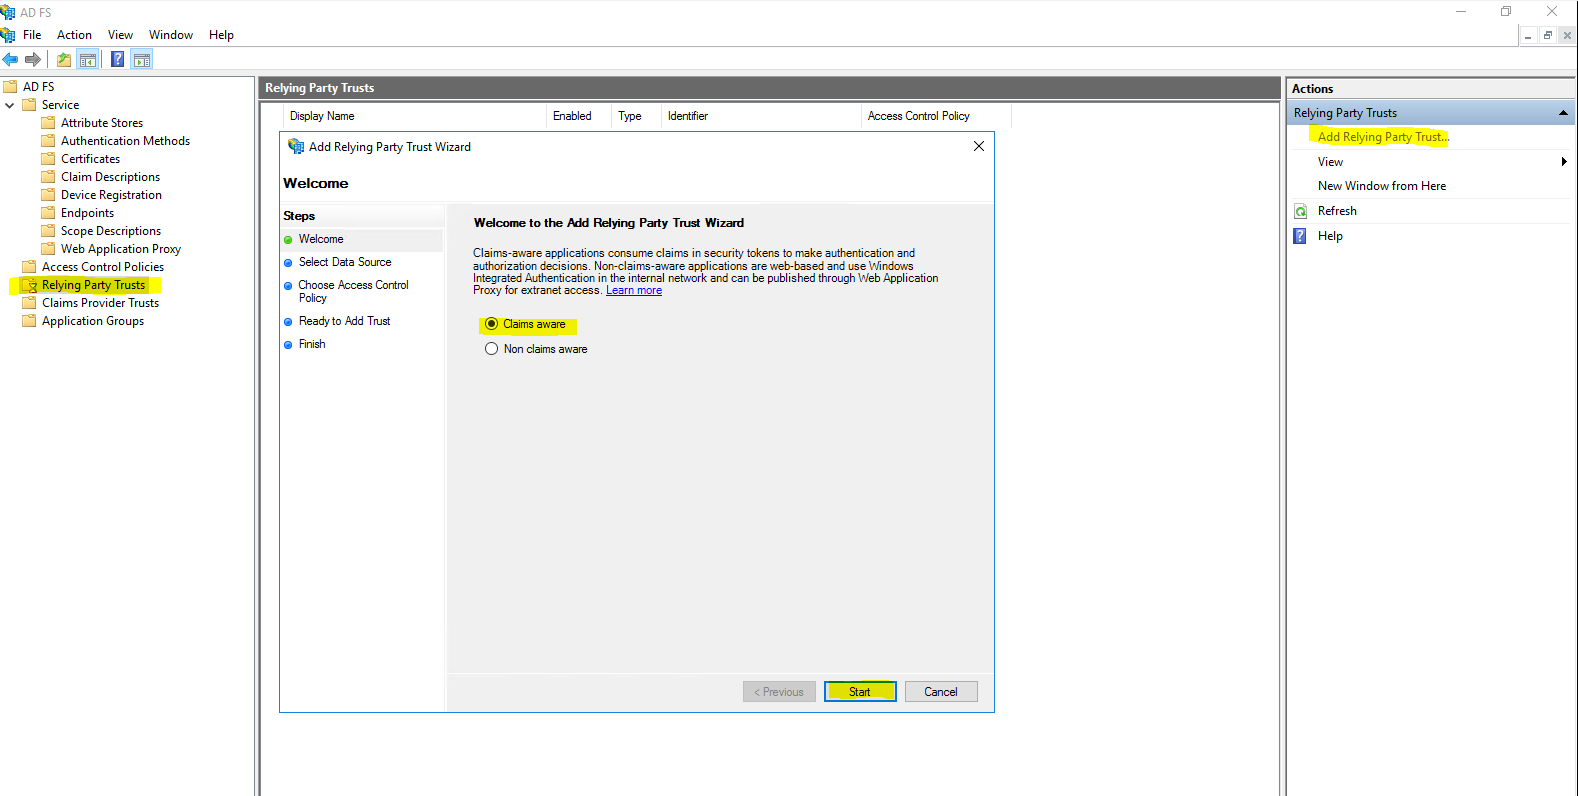
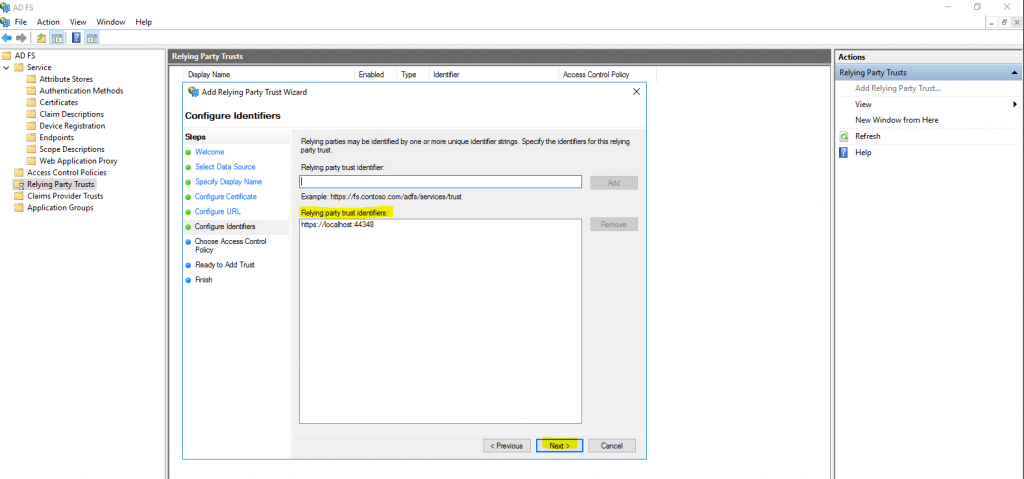
Create a relying party trust for the web application
Therefore go to you AD FS server and click on Add Relying Party Trust …
We want to create an Claims aware application.
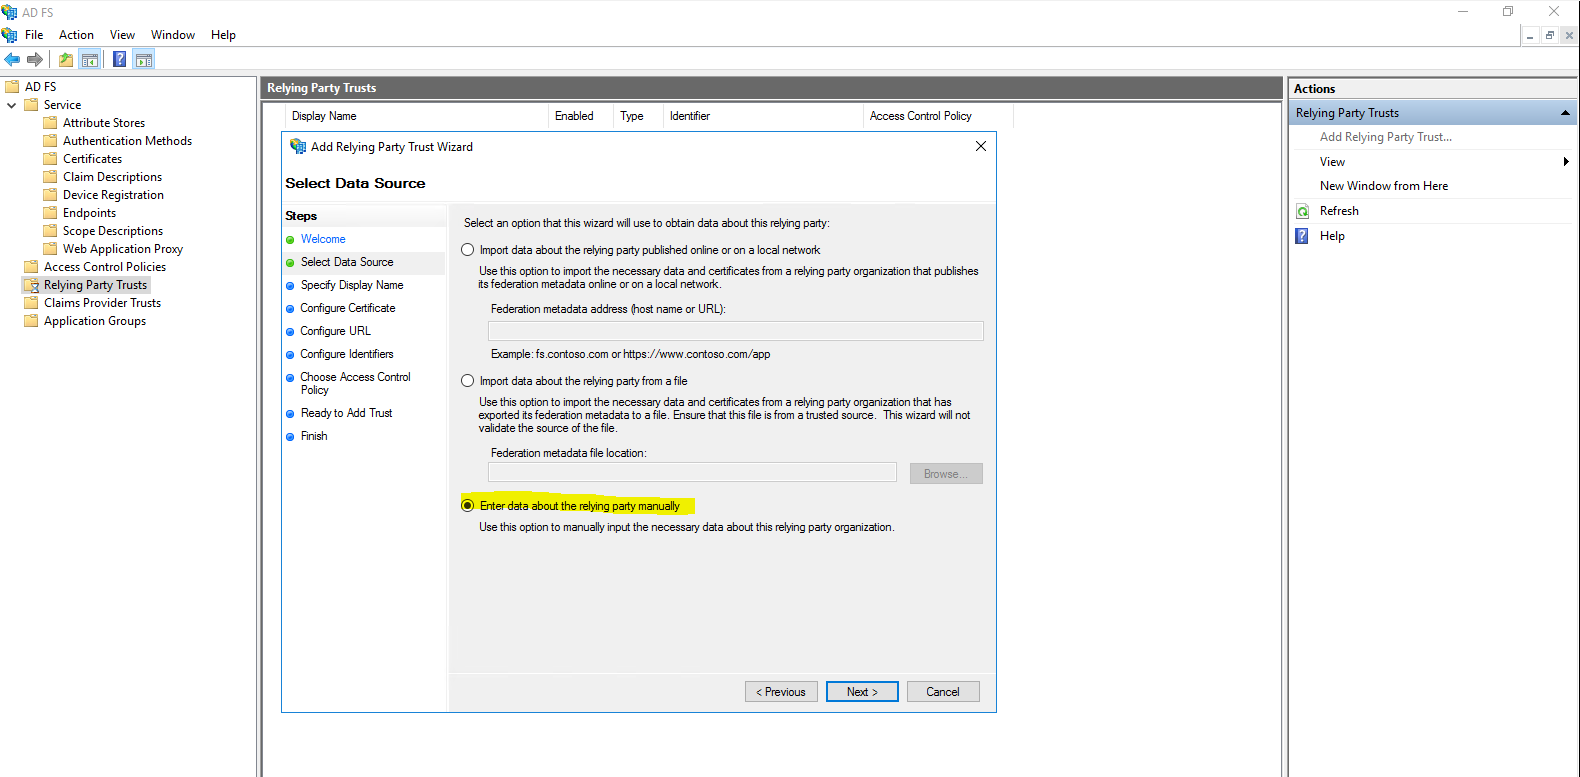
Select Enter data about the relying party manually
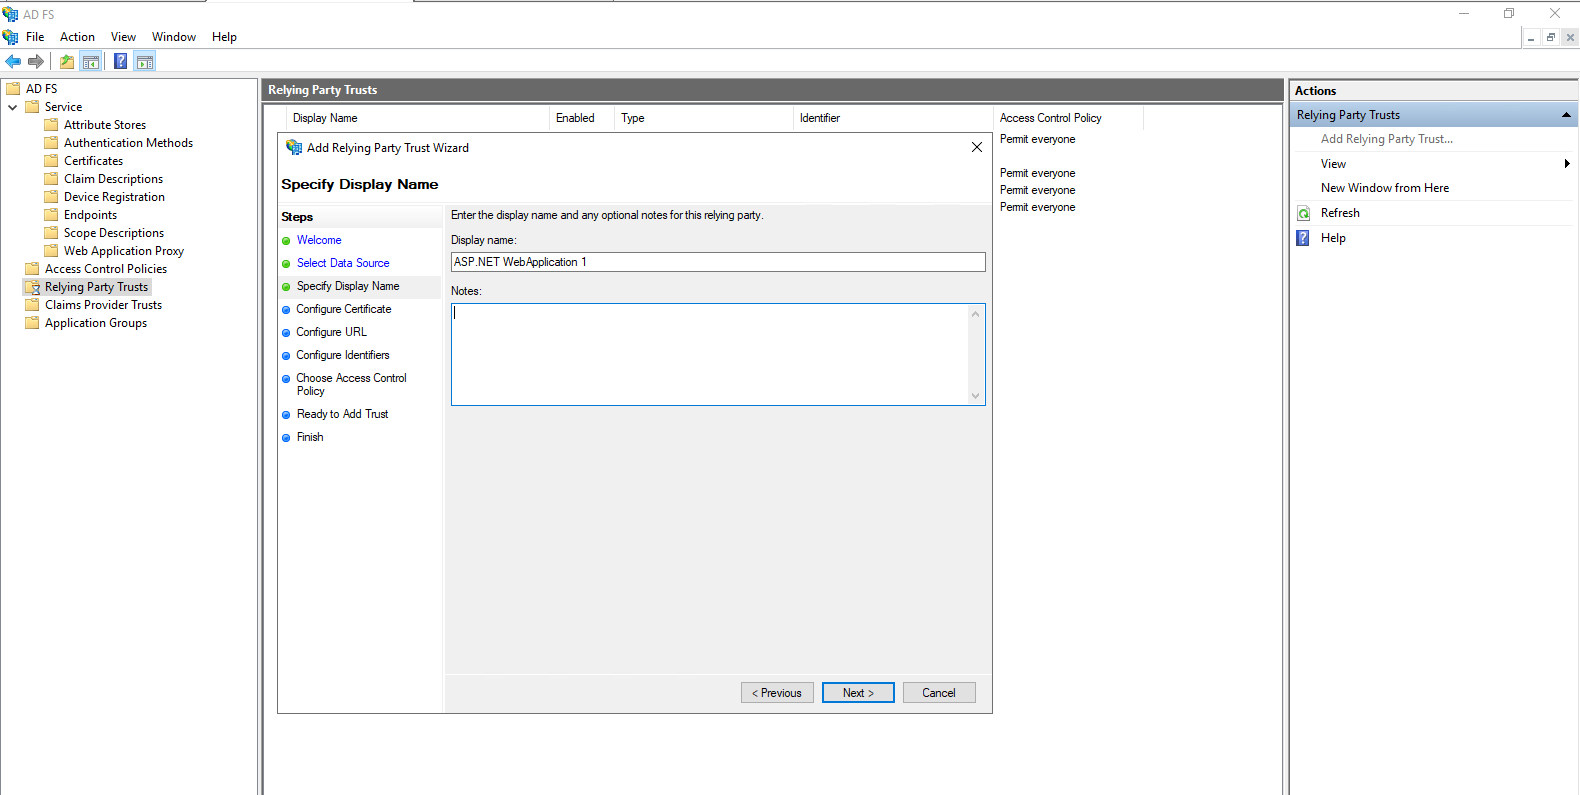
Enter the display name for your application (relying party)
Here click on Next, we do not need to specify a token encryption certificate.

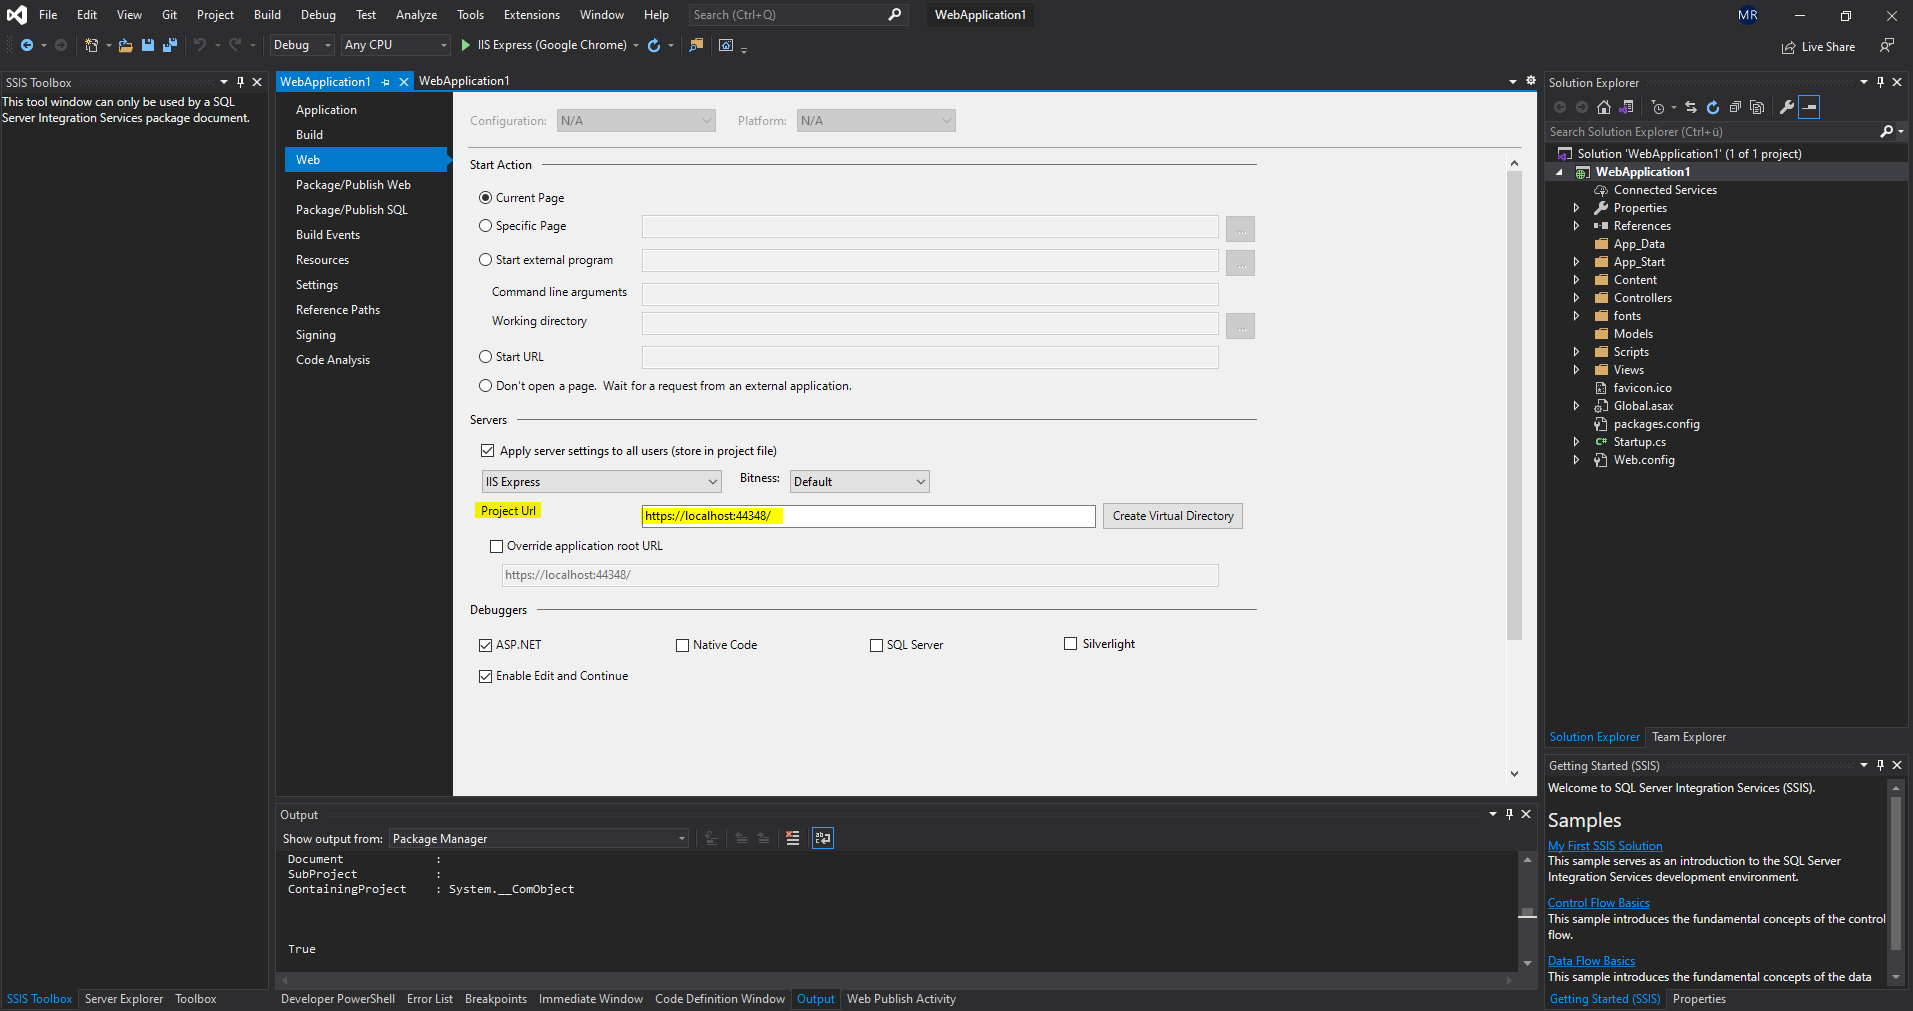
On the next page we need to configure the URL from our web application. To determine the URL we can click on properties for the project in Visual Studio and will find under the Web tab the actual Project Url.
In my case https://localhost:44348/
The configuration with the Federation Metadata URL and App ID URI you can also see in the web.config file as follows.

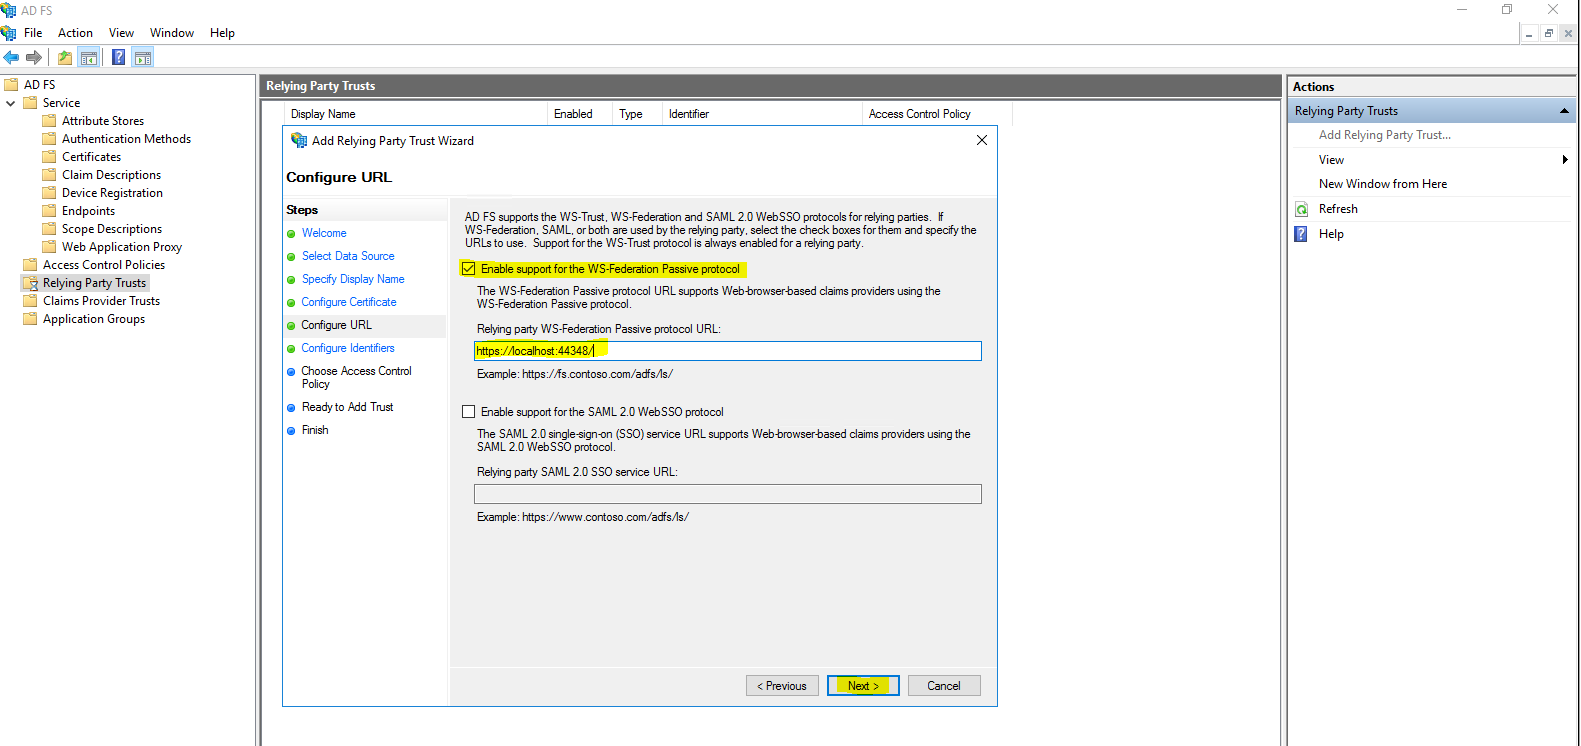
Here we will check the Enable support for the WS-Federation Passive protocol and paste our URL from the web application into it.
Each vendor may support different sign-in protocols but if the application is based on Windows Identity Foundation (WIF) or is a Microsoft-supported web application (SharePoint, Azure, Dynamics CRM), it will more than likely be WS-Fed.
Most other SaaS providers and/or web applications will support the SAML sign-in protocol
Source: https://techcommunity.microsoft.com/t5/core-infrastructure-and-security/adfs-deep-dive-comparing-ws-fed-saml-and-oauth/ba-p/257584
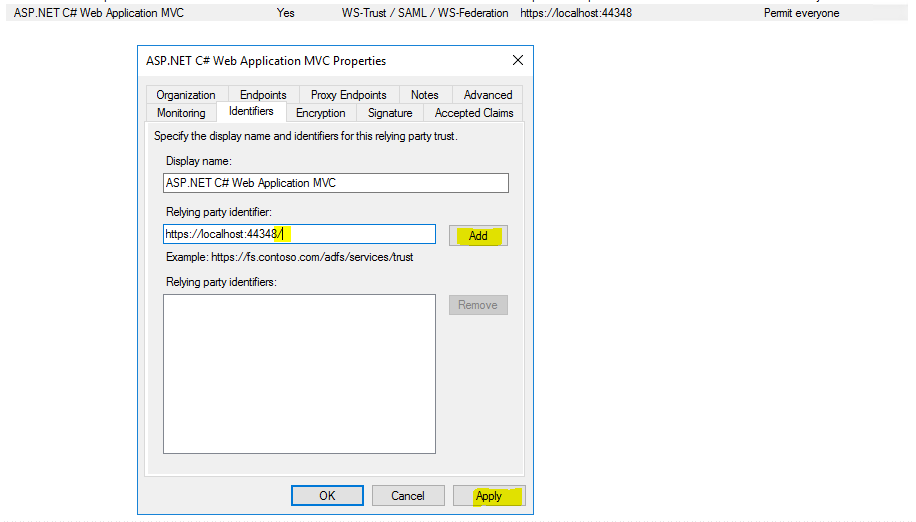
At the next AD FS dialog Configure Identifiers we will see the URL from our web application. You maybe remember that during creation of the web application, Visual Studios asks to enter an App ID URI at the Change Authentication dialog as follow.

If you have entered here an specific identifier, you have also add it here in Configure Identifiers. If you have left this identifier in Visual Studio you can click on Next.

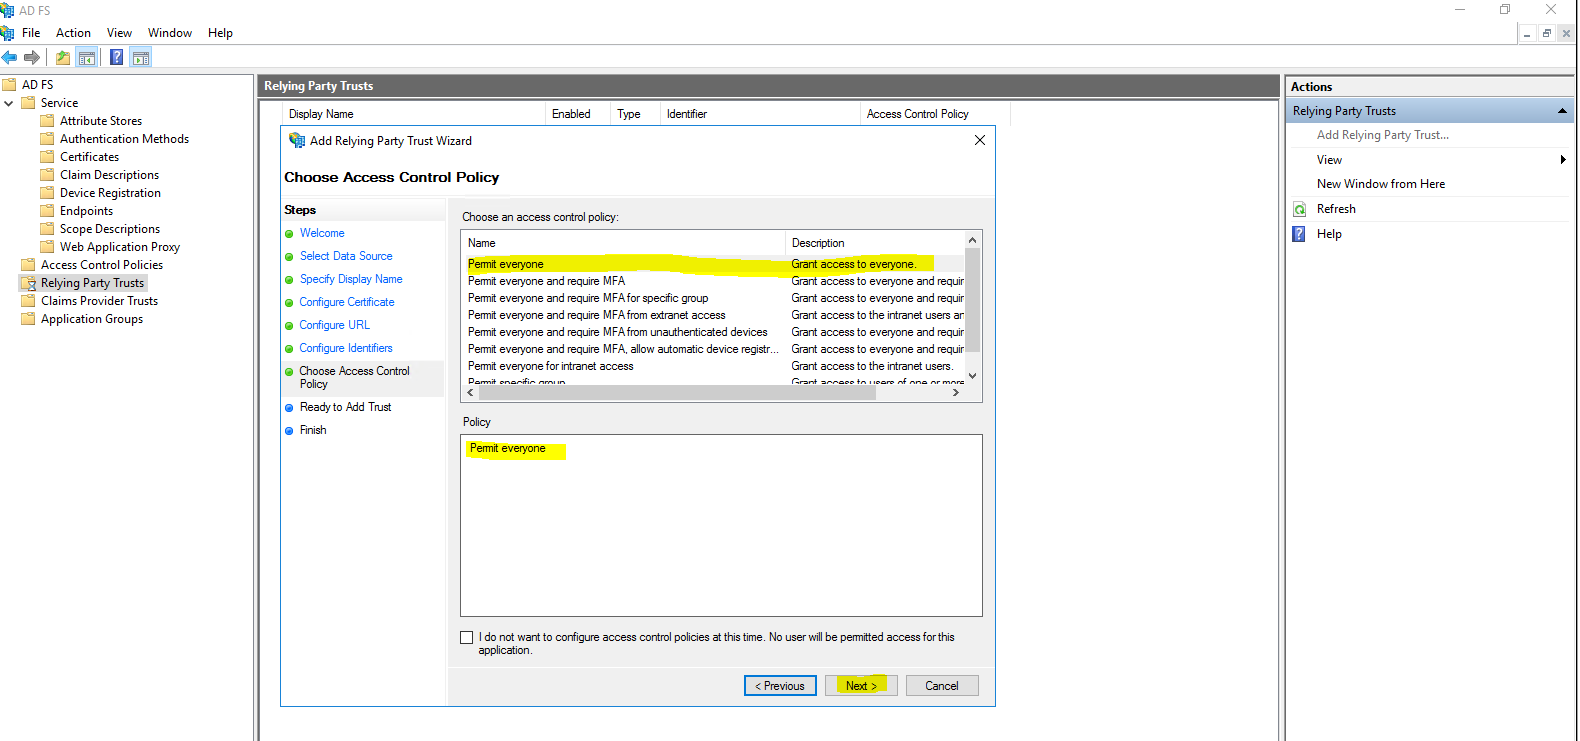
Here we will leave the default settings to permit everyone access to our web application.
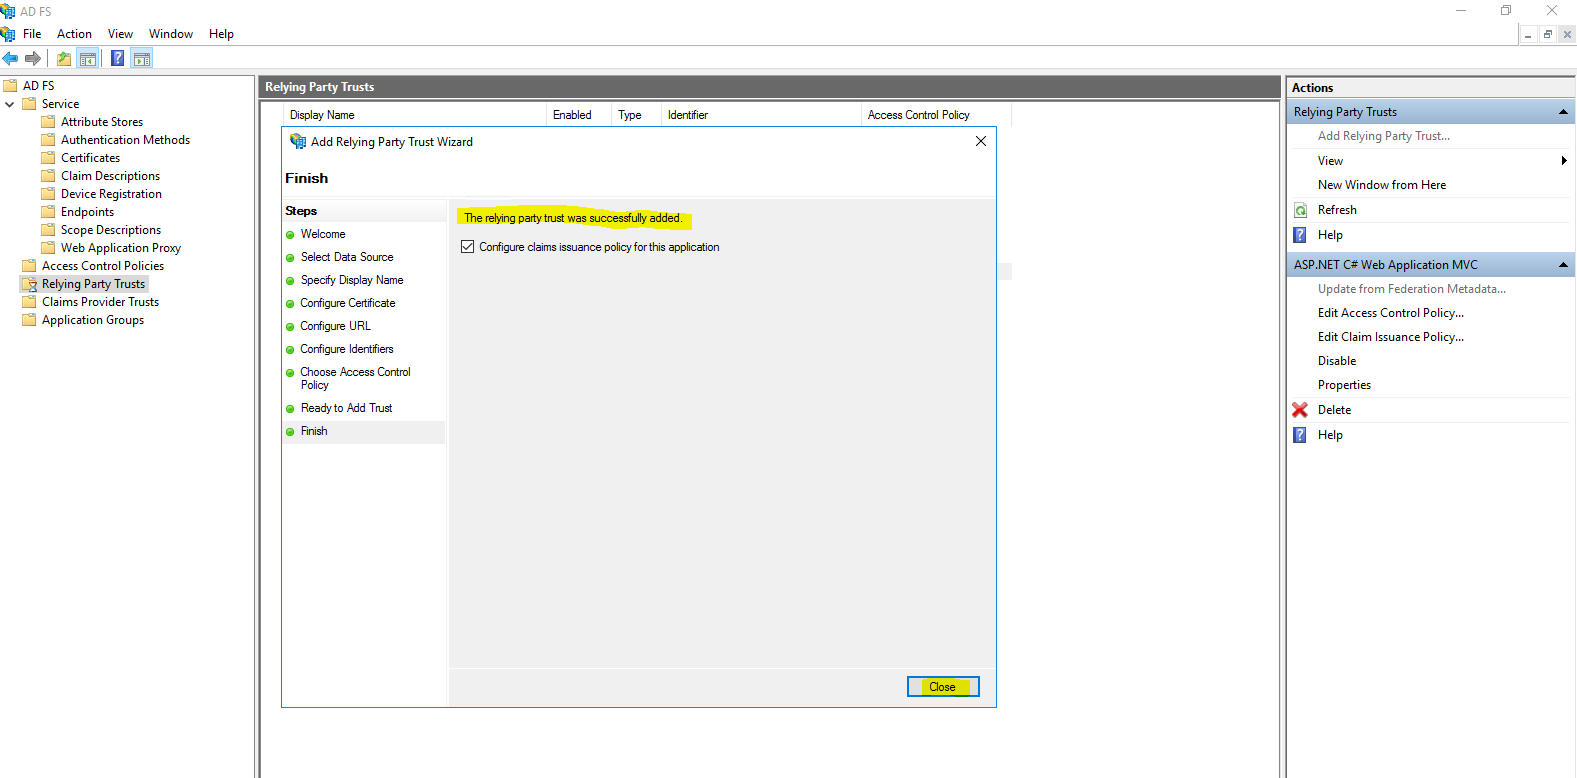
Click on Next.

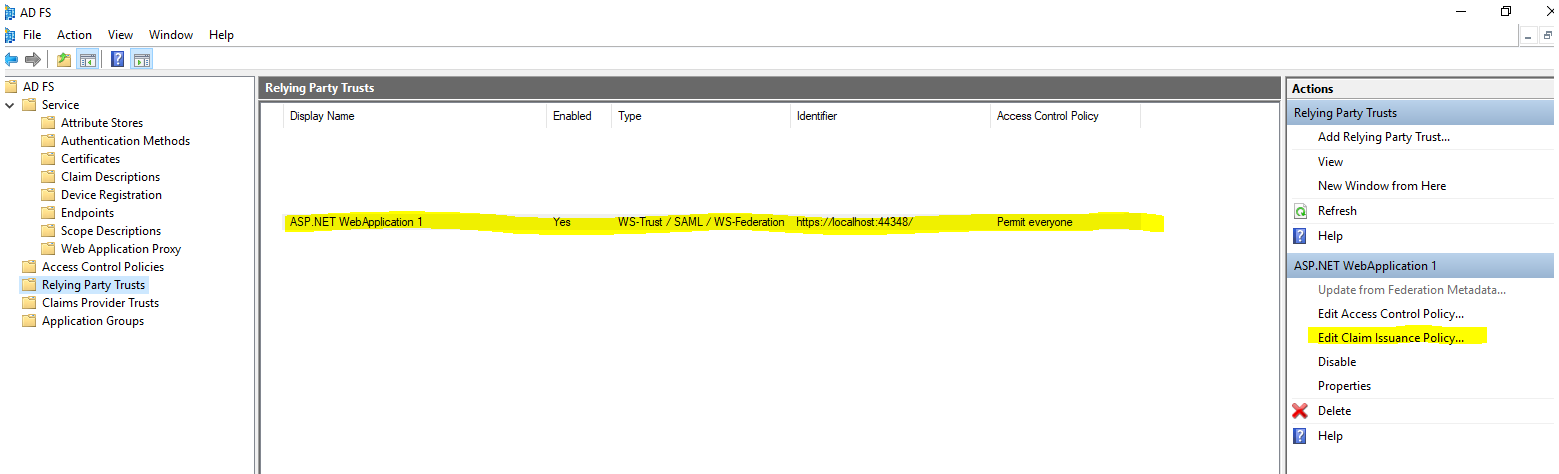
Click on Close to configure the claims issuance policy for our web application.
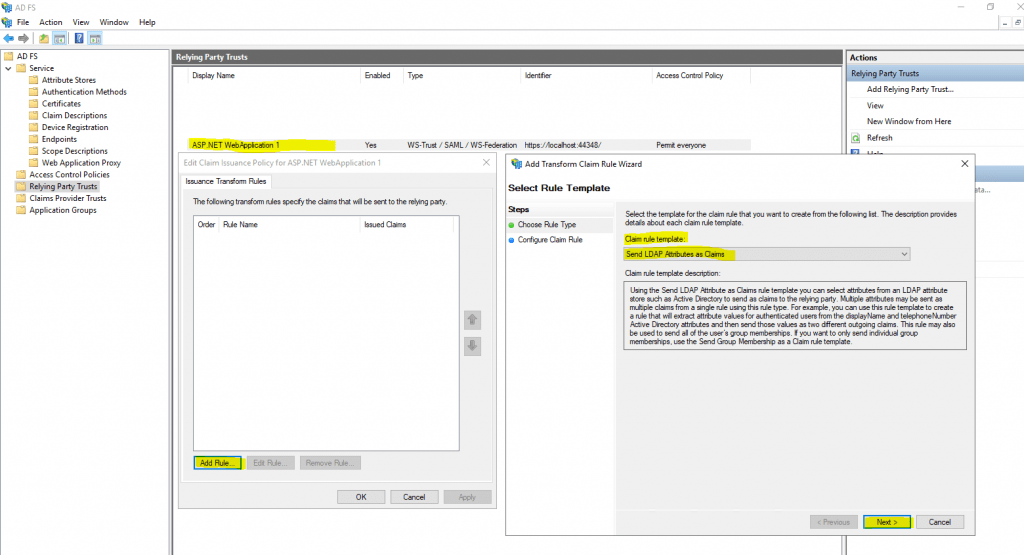
Click on Edit Claim Issuance Policy … to configure what claims should be send from the AD FS server after a successful authentication to our web application.
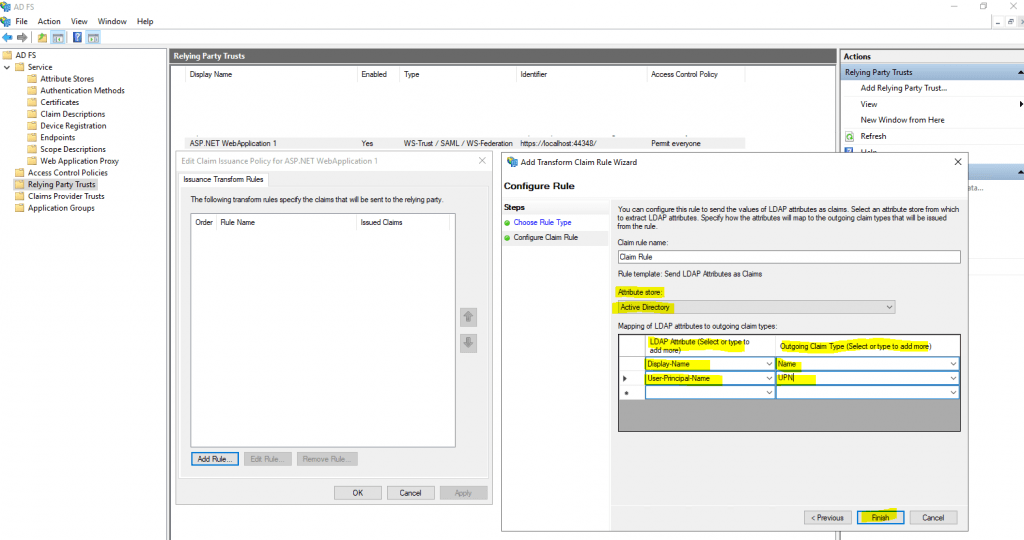
Click on Add Rule … and leave the Send LDAP Attribute as Claims
Here we want to give our web application the User-Principal-Name and Display-Name as claims. Therefore our web application can identify our user and also have the display name.
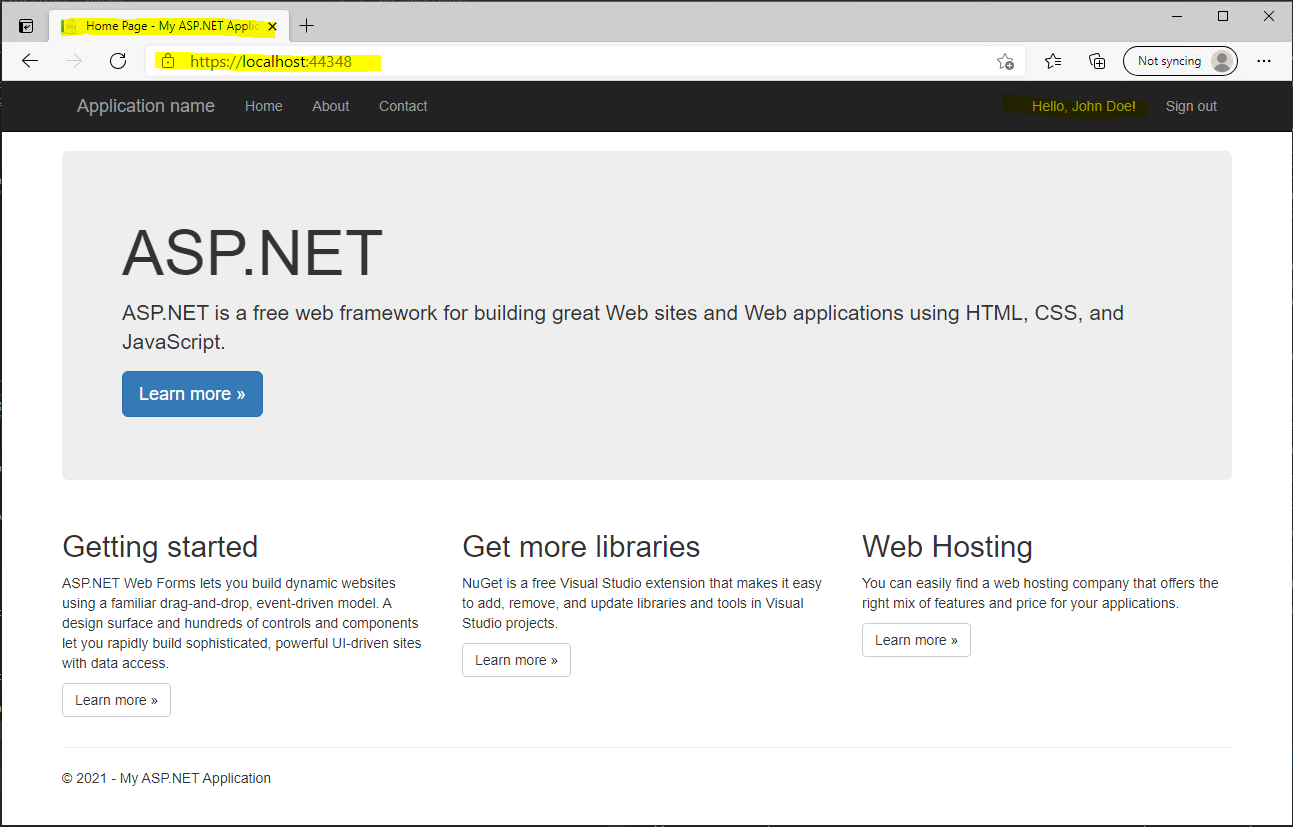
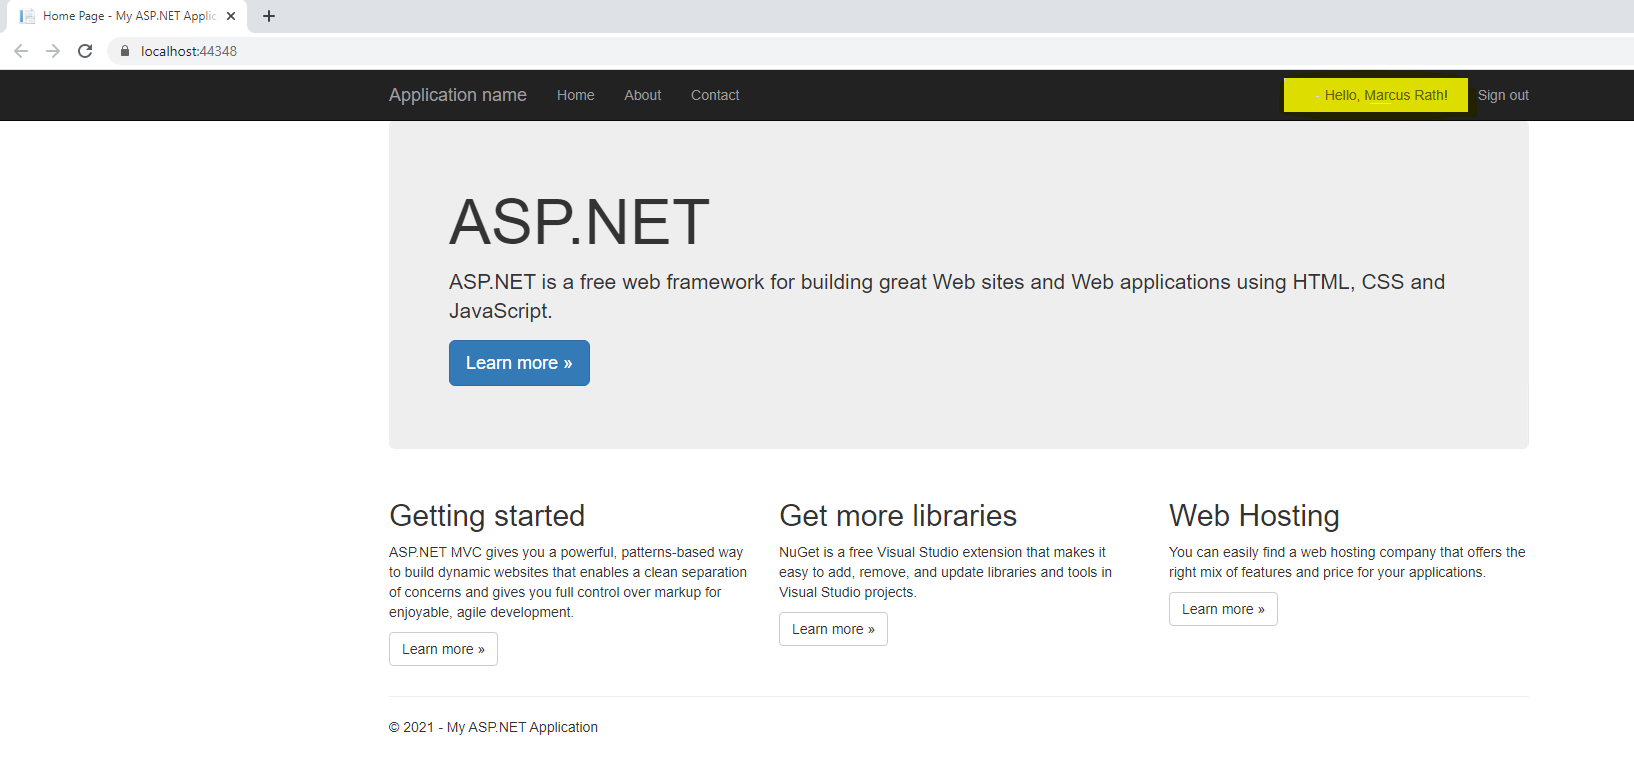
Now we can run our web application from Visual Studio using Start Debugging and pressing F5 as usual
As the web application is configured to be claim aware and with the federation server, we first get redirected to the sign-in page from the AD FS server.

After providing my credentials to the federation server, the federation server issued an SAML assertion to my client, which includes the claim token and redirects me back to the web application.
My client then connects to the web application and post the issued claim token to it. The web application then authenticates and authorized me.
Troubleshooting
IDX10214: Audience validation failed. Audiences: PII is hidden.
If you run into the following error …

PII Security Lockdown
https://docs.microsoft.com/en-us/dotnet/framework/wcf/samples/pii-security-lockdown
… you can make PII (Personally Identifiable Information) visible for debugging with the following code pasting into the Startup class from your web application.
IdentityModelEventSource.ShowPII = true;
You also have include the following using directive to import the namespace from the Microsoft Identity Model.
using Microsoft.IdentityModel.Logging;

Now I will get an error message which shows me what’s exactly the problem.
Here you can see that the Audience validation values are not the same.
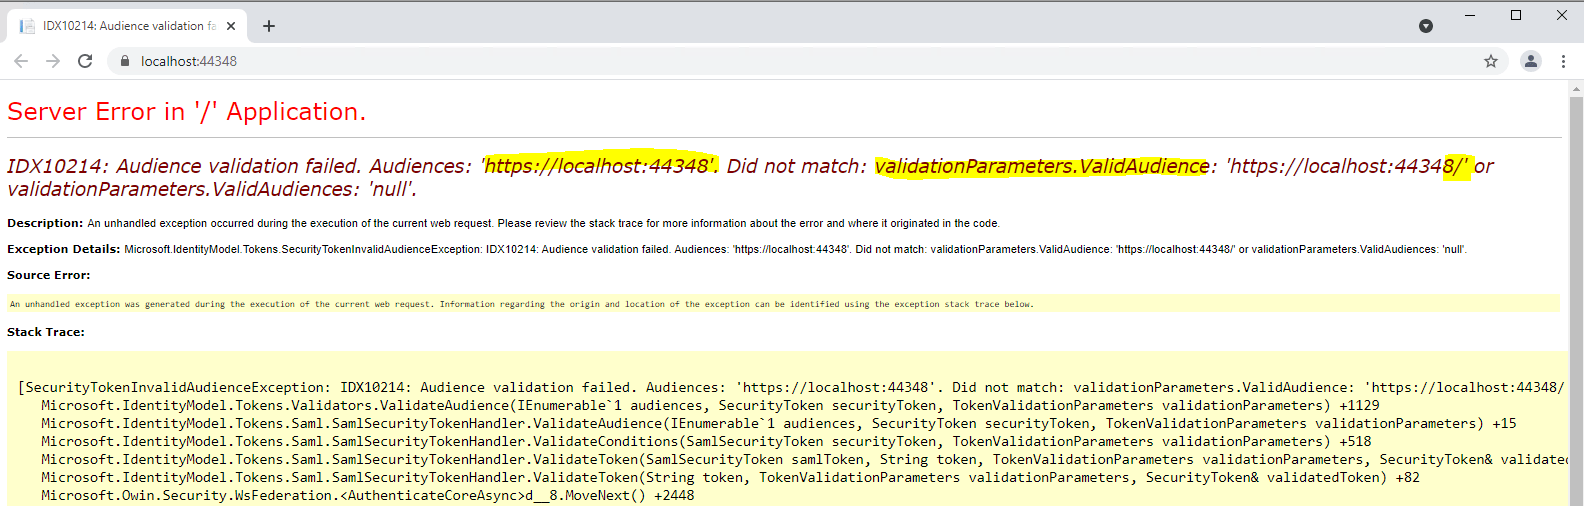
Another time we have to check our App ID URI during the creation of our web application in Visual Studio.
As we leave it blank, the default value was automatically populated with the Project URL https://localhost:44348/
In AD FS for the relying party trust I entered also this identifier but without the last slash / character, so as this is not uses as an URL and used as an identifier, these are complete different identifiers and therefore I was running into this error.
After changing the identifier to the correct value of https://localhost:44348/ finally it works.
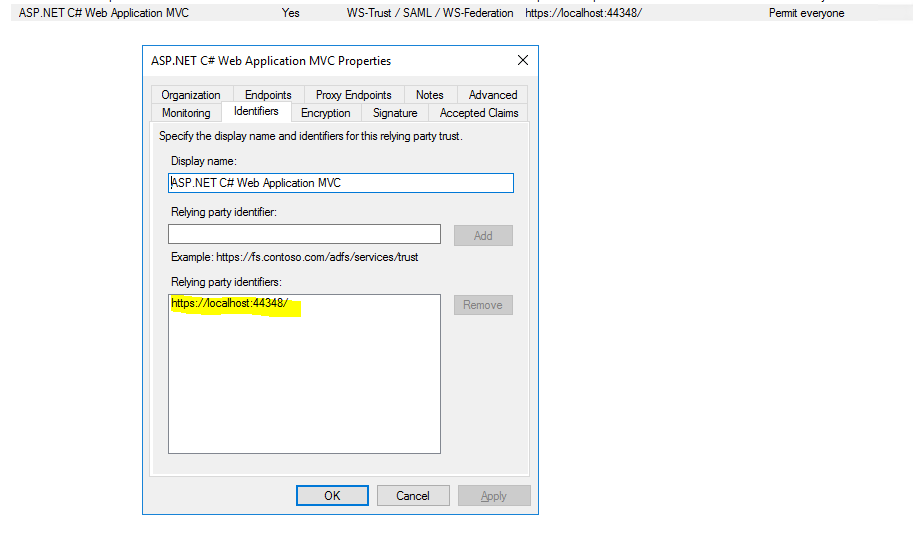
Alternatively you can also change the identifier in your web application in the web.config file instead changing the relying party trust in AD FS.

Now it looks fine.
Error details: MSIS7042: The same client browser session has made ‘6’ requests in the last ‘1’ seconds. Contact your administrator for details.
After publishing the above ASP NET web application to an IIS web server in the internal network and adjusting the AD FS relying party trust settings from localhost to the published FQDN, I run into this error after authentication at the AD FS server sign-in page.
Before the message appears, I can see that I was getting looped several times between my app and the federation server.
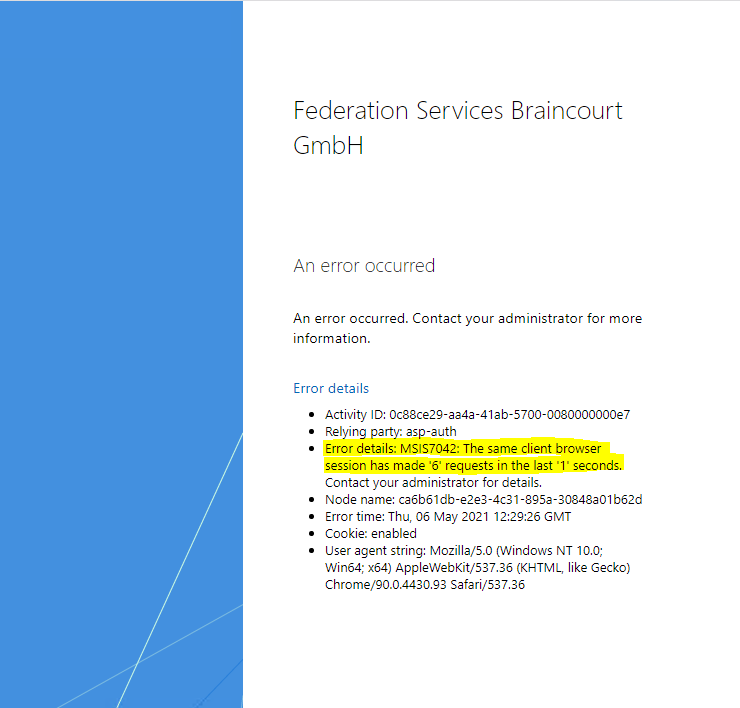
If you are searching the web for this MSIS7042 error, you will notice that this error can have several reasons why it appear.
Debugging with fiddler will show me all the mentioned loops between the web application and the federation server.
The reason for these loops were very simple.
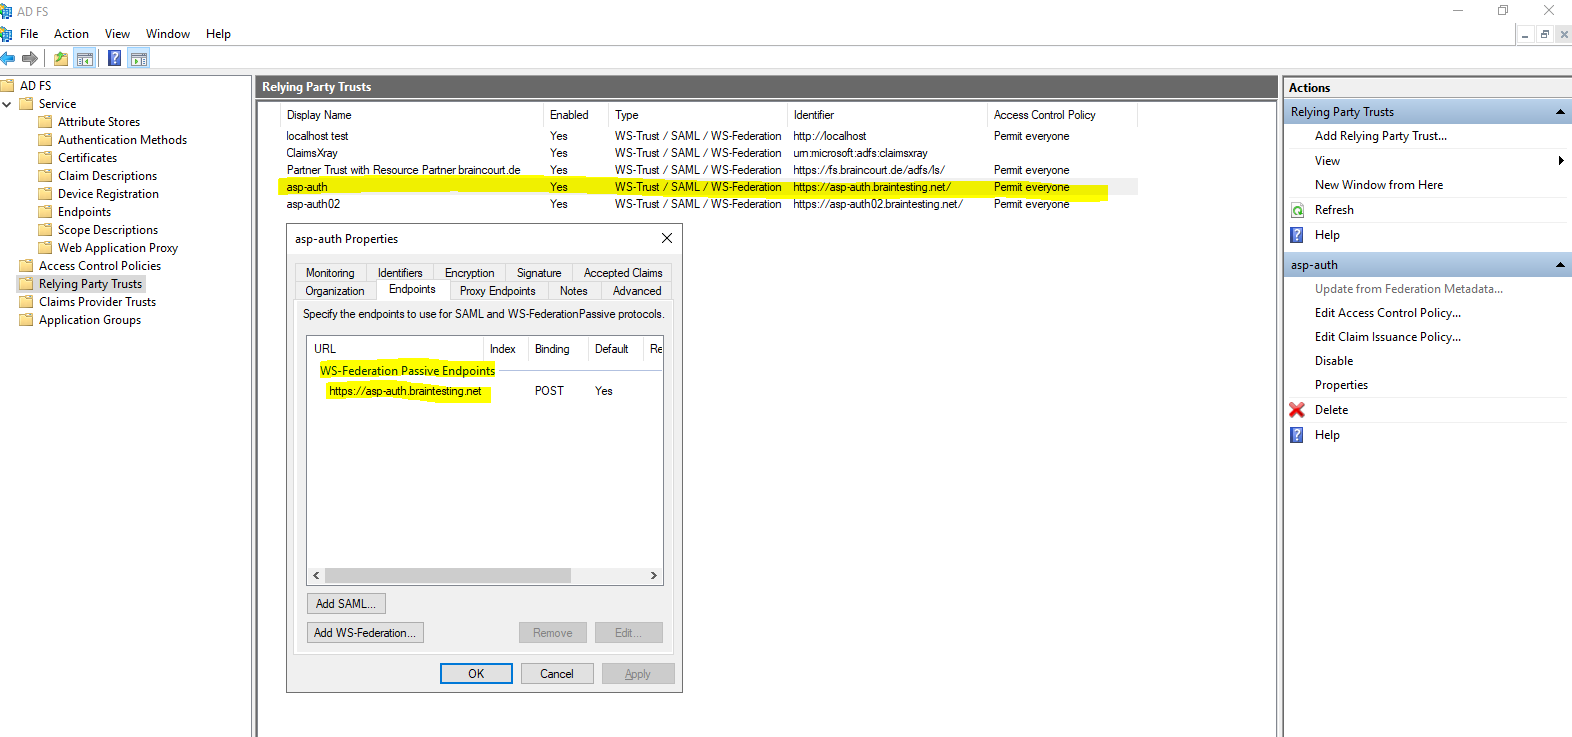
The relying party trust for this web application on the federation server was configured to use for the WS-Federation Passive Endpoints the URL https://asp-auth.braintesting.net
On the IIS Web Server where I published this web application, I configured an HTTP Port 80 and HTTPS Port 443 binding but forgot to redirect all requests from HTTP to HTTPS.
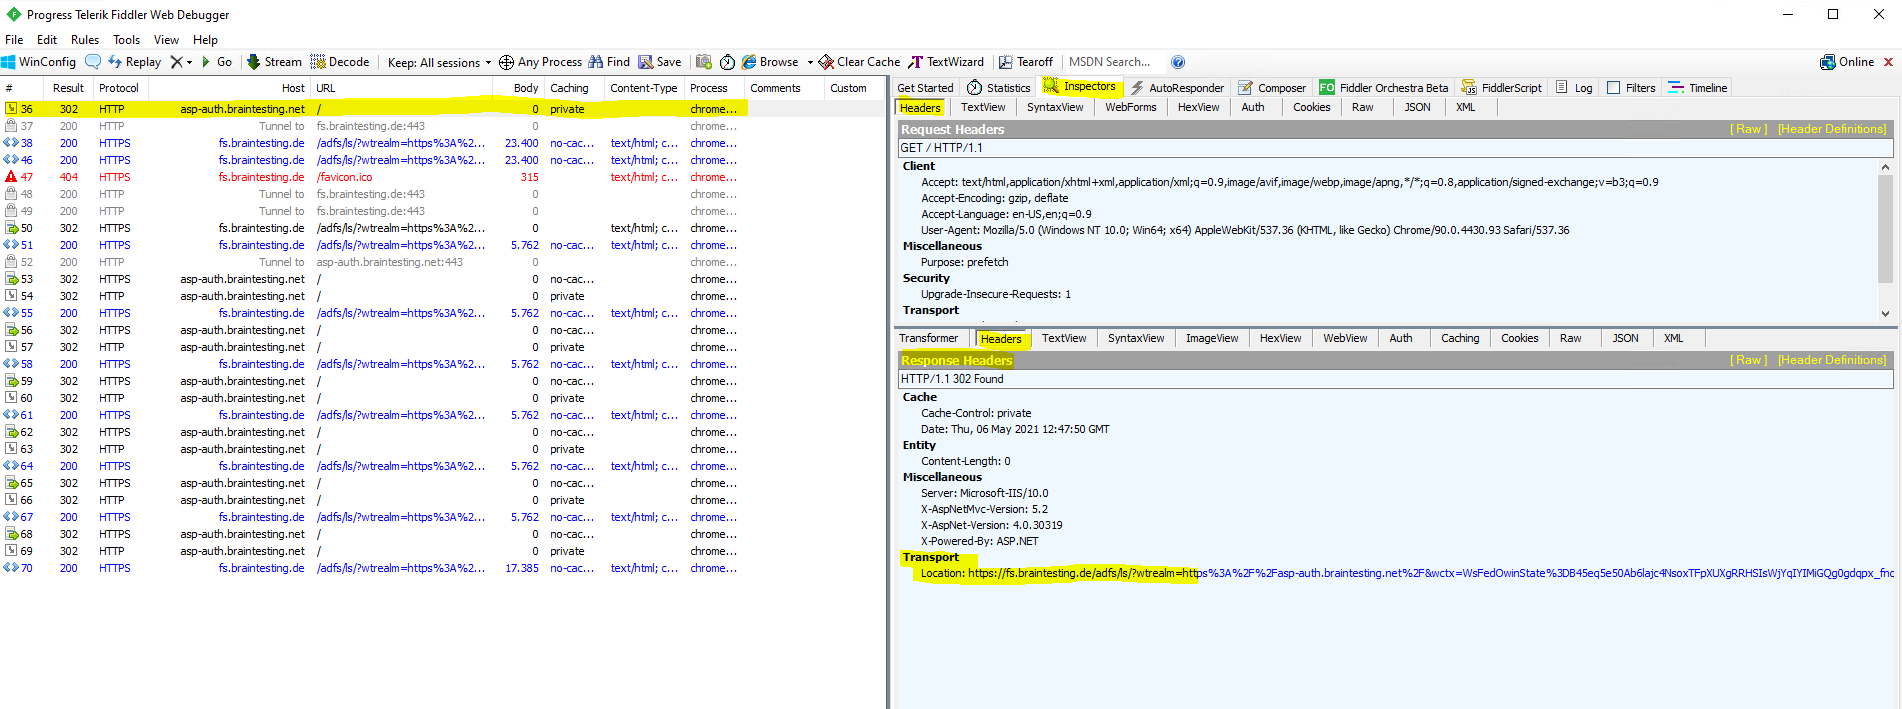
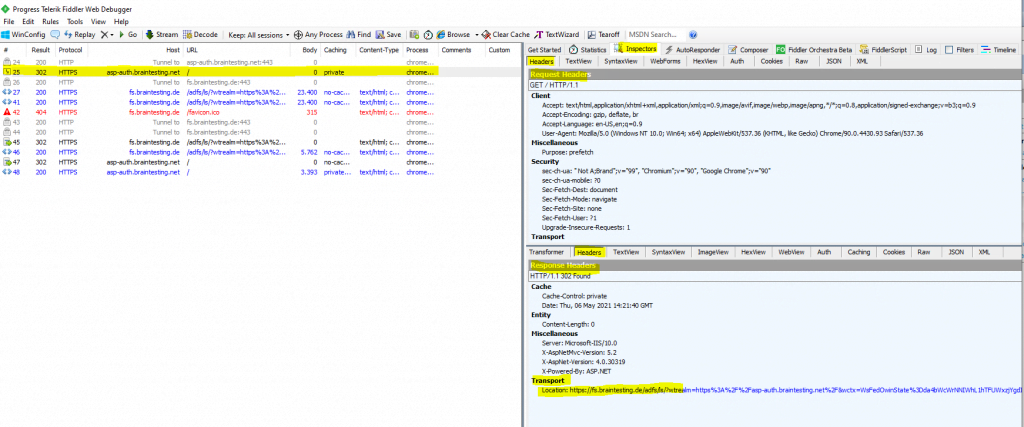
Here you can see that I will get forwarded from the federation server back to the web application and the HTTP URL.
Here you can see that the web application is configured in the endpoints with an HTTPS URL.
So in order to resolve this issue, we have to configure to redirect the web application with the IIS URL Rewrite module from HTTP to HTTPS.
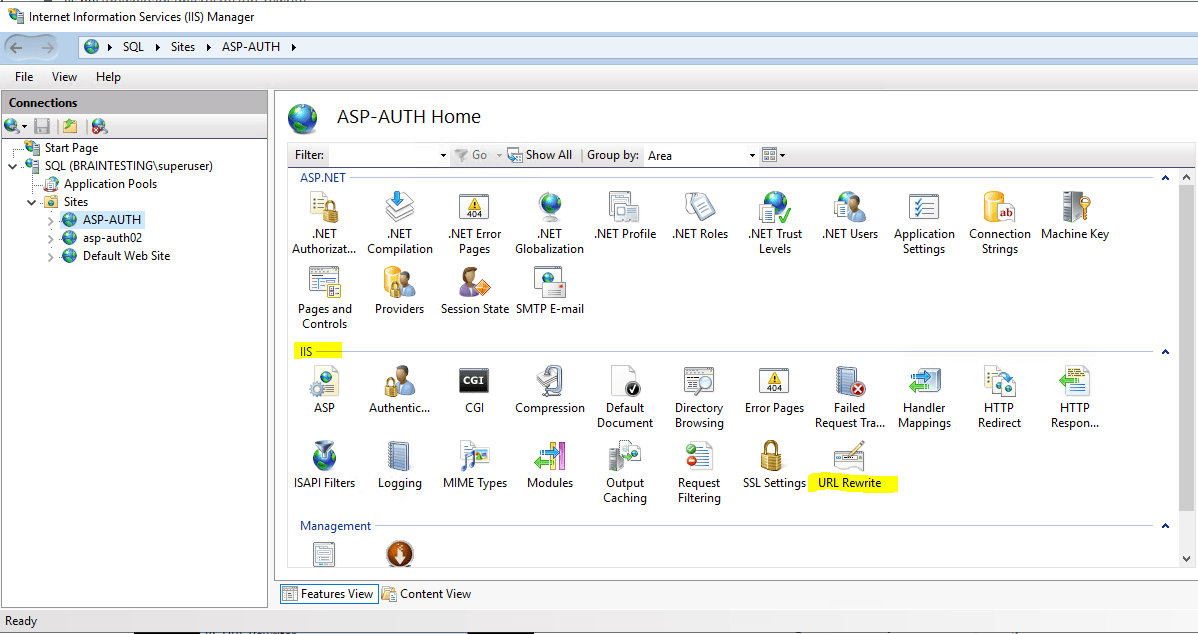
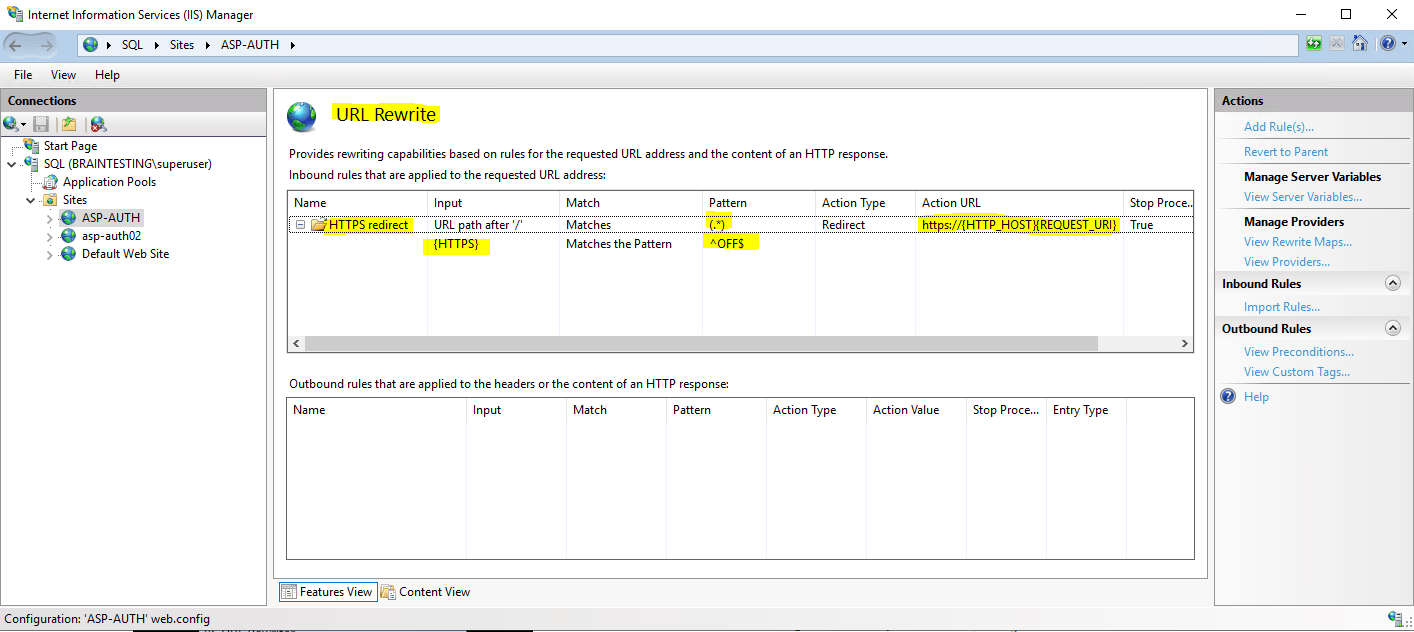
In the following post I will show step by step how to configure the URL Rewrite module to redirect HTTP requests to HTTPS.
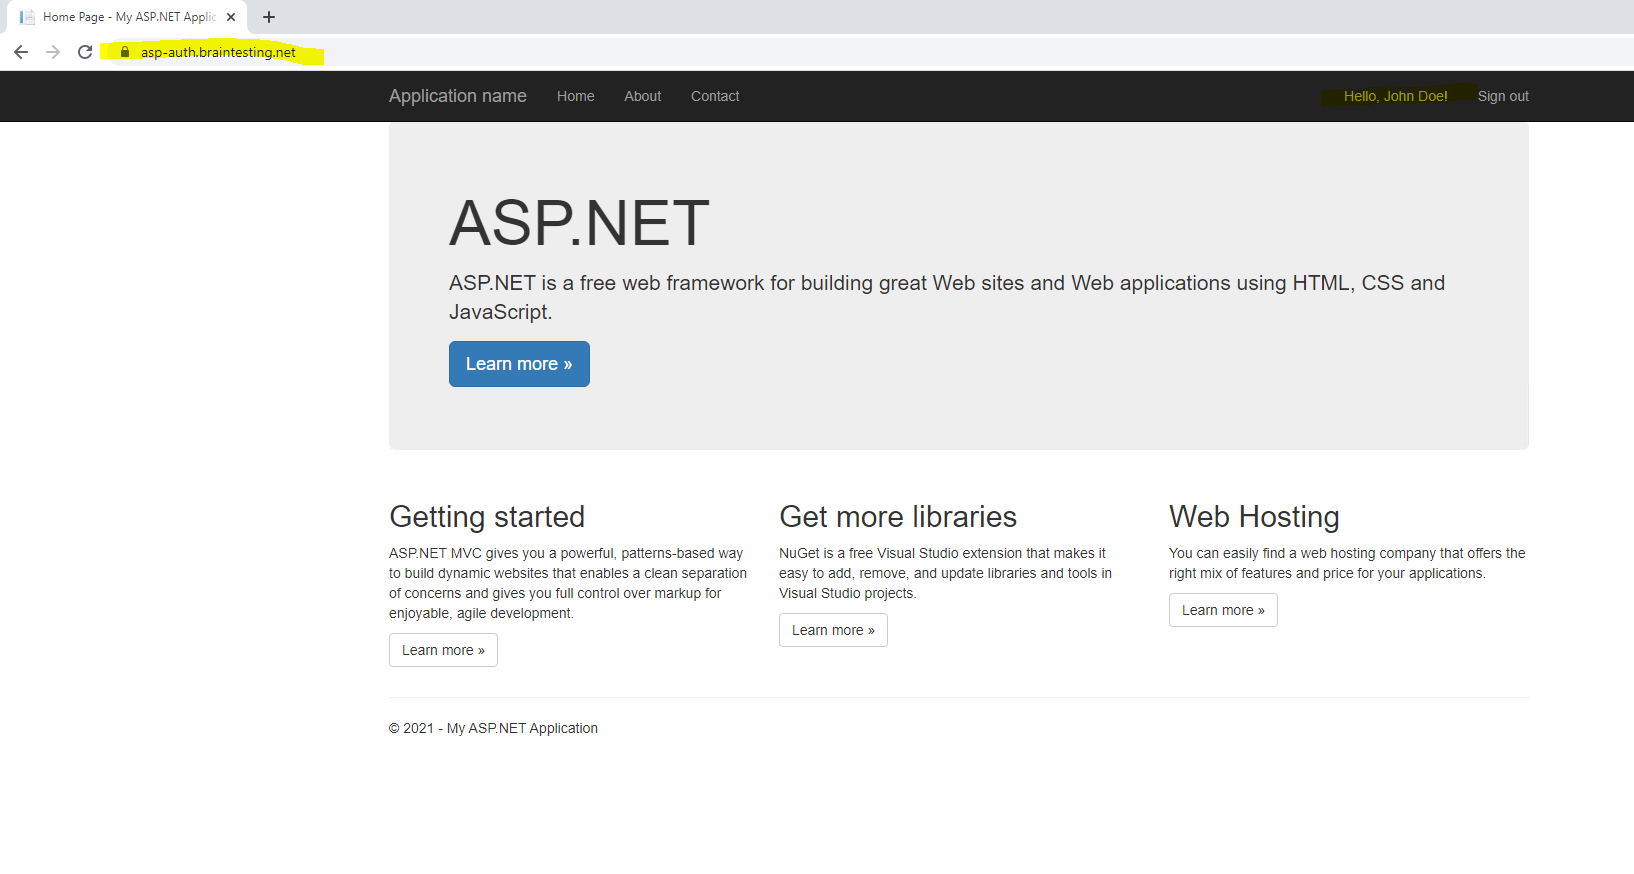
Now finally after configuring the URL rewrite to forward from http to https it works without getting the MSIS7042 error.
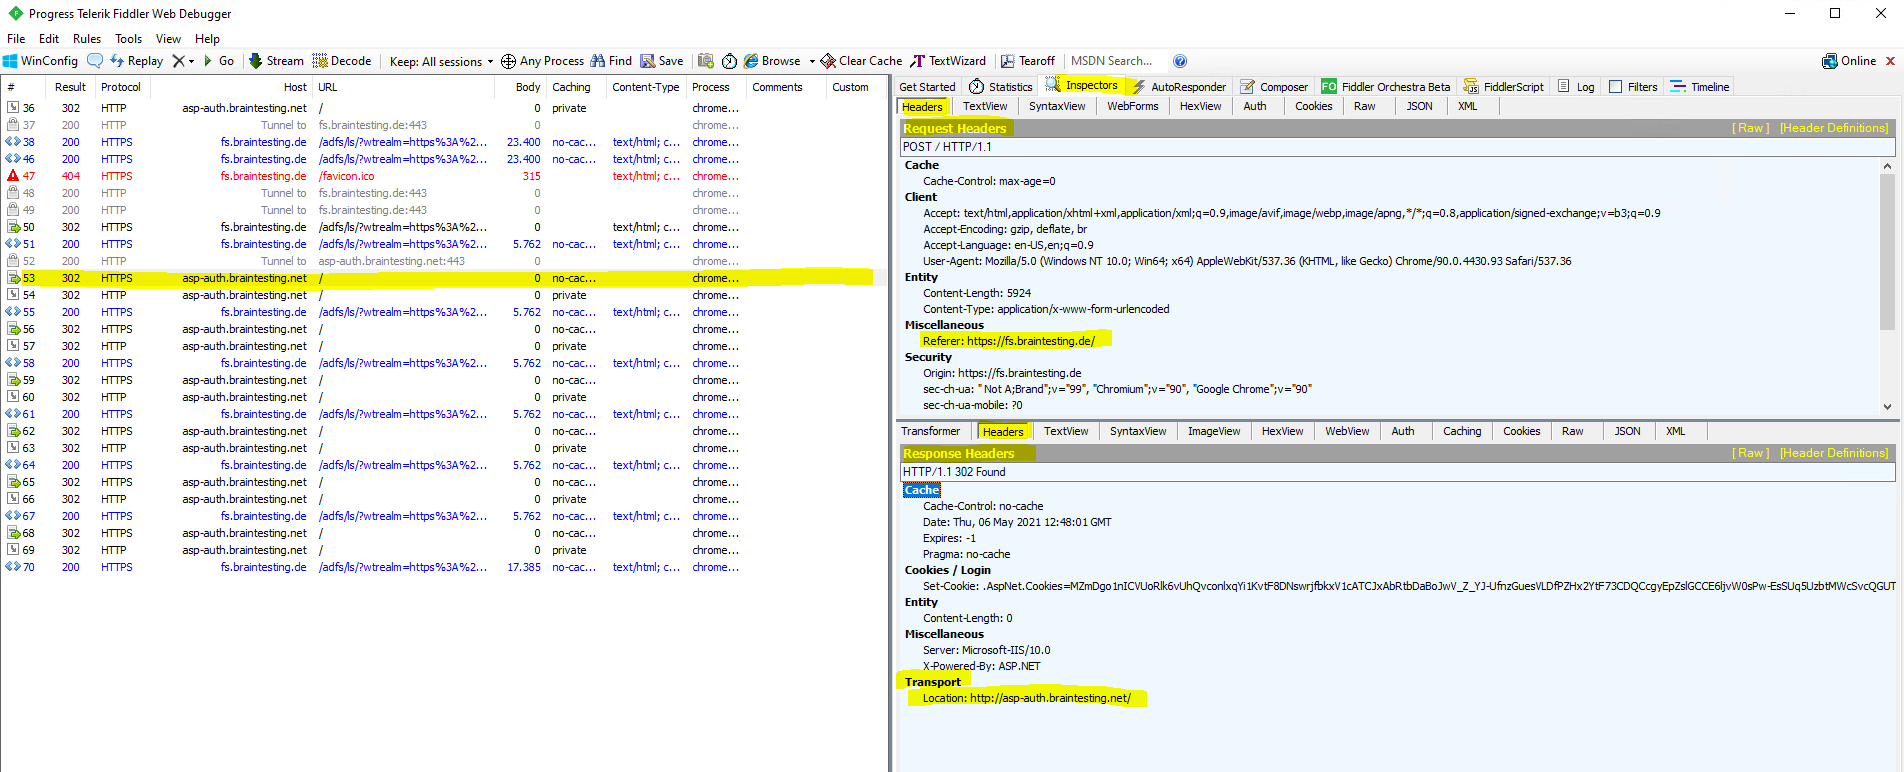
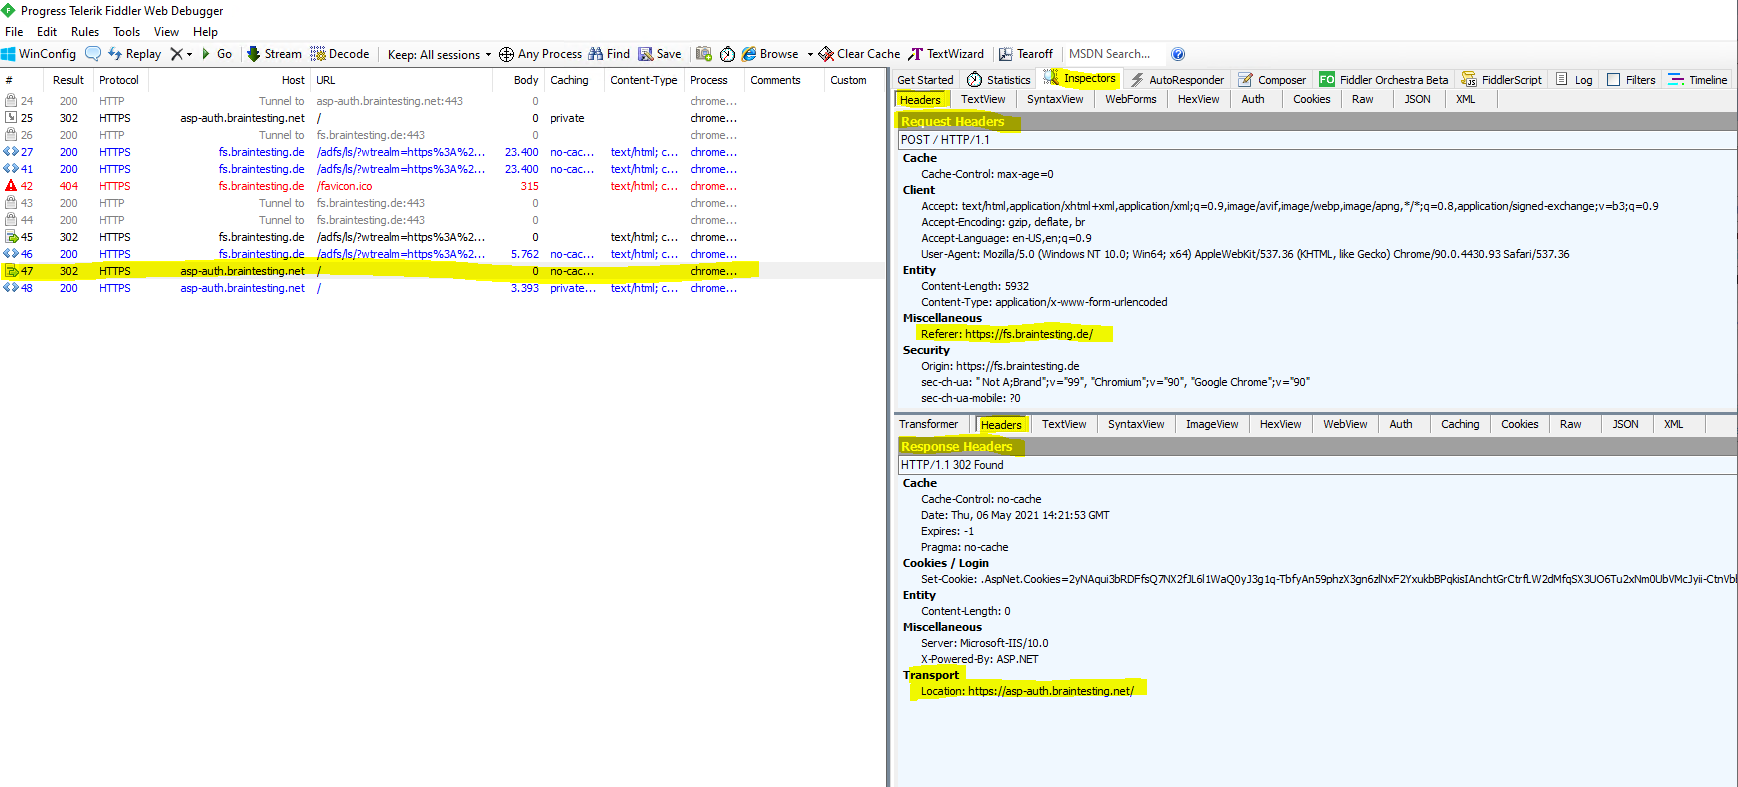
Another trace with fiddler will show me the difference to the previously behavior.
First we will also get redirected from the web application to the federation server to sign-in, same as previously but you can already see that there are only a few of frames and redirects as previously.
In the following frame #id 47 you can see that the federation server will correctly redirect us back to the web application using HTTPS.
Links
What Is SAML, and Why Does It Exist?
https://duo.com/blog/the-beer-drinkers-guide-to-saml
AD FS Help
https://adfshelp.microsoft.com/
ASP.NET Web Forms
https://en.wikipedia.org/wiki/ASP.NET_Web_Forms
ASP.NET MVC
https://en.wikipedia.org/wiki/ASP.NET_MVC