

Passwordless Authentication in Windows – Logon and RDP without Passwords – Part 2 – FIDO2 Passkeys and Microsoft Entra Kerberos
In Part 1, we implemented passwordless authentication using certificate-based smart-card logon, storing the user’s authentication certificate and private key securely on a YubiKey 5C NFC and using it for both local Windows sign-in and Remote Desktop (RDP) authentication.
In this second part, we move to FIDO2/passkeys, which provide a modern and phishing-resistant approach to passwordless authentication by using public-key cryptography instead of traditional passwords.
This is particularly relevant as Microsoft is making passkeys the default authentication experience in Microsoft Entra ID, with the rollout beginning on September 1, 2026. This further emphasizes Microsoft’s move away from passwords and traditional, phishable authentication methods toward phishing-resistant, public-key-based authentication such as FIDO2 security keys.
The private cryptographic key remains securely stored on the authenticator, such as a physical FIDO2 security key, while the corresponding public key is registered with the identity provider, such as Microsoft Entra ID.
We will focus on using a physical FIDO2 security key with Microsoft Entra ID. We will configure the required authentication method, register the security key as a passkey, and use it to sign in to Microsoft Entra ID without entering the user’s password.
We will then take this one step further and use the same FIDO2/passkey authentication for Remote Desktop (RDP) connections to computers in our on-premises Active Directory domain.
For this scenario, we will configure Microsoft Entra Kerberos, which extends the Entra passwordless authentication flow into the on-premises Kerberos authentication infrastructure and enables access to domain resources without requiring the user’s Active Directory password.
FIDO stands for Fast IDentity Online. FIDO2 is an open authentication standard designed to replace traditional password-based authentication with phishing-resistant public-key cryptography.
In Part 3, we switch from Windows to Linux and explore how PIV/PKCS#11 certificates and FIDO2 security keys can be used for hardware-backed passwordless authentication with SSH.
- Why Passkeys (FIDO2) Are Phishing-Resistant
- Configuring Passkey (FIDO2) Authentication
- Using Passkey (FIDO2) Authentication
- Understanding the FIDO2/Passkey and Microsoft Entra Kerberos Authentication Flow
- Links
Why Passkeys (FIDO2) Are Phishing-Resistant
Passkeys (FIDO2) are considered phishing-resistant because authentication is based on a cryptographic public/private key pair instead of a shared secret such as a password. During registration, the public key is stored by the respective service / Identity Provider (IdP), in our example Microsoft Entra ID (login.microsoft.com), while the private key remains securely stored on the user’s device or physical FIDO2 security key and is never transmitted.
During authentication, the service / Identity Provider (IdP) (like Microsoft Entra ID) sends a cryptographic challenge, which is signed using the private key after the user authorizes its use, for example by entering the security key’s PIN and touching the key. The service verifies the resulting signature using the previously registered public key.
Importantly, FIDO2/WebAuthn binds the credential to the legitimate service and its domain (Relying Party). A phishing website operating under a different domain therefore cannot use the credential to generate a valid authentication response for the legitimate service, even if its login page looks identical.
This eliminates one of the fundamental weaknesses of passwords: there is no reusable authentication secret that the user can accidentally enter into and disclose to a phishing website.
Configuring Passkey (FIDO2) Authentication
After configuring certificate-based authentication in Part 1, let us now look at another passwordless authentication method available in Windows: Passkey (FIDO2).
Unlike the previous solution, Passkey (FIDO2) does not use Active Directory Certificate Services (AD CS), X.509 certificates, or the PIV smart-card functionality.
Instead, Passkey (FIDO2) uses public-key cryptography with a device-bound passkey stored directly on the security key, while the corresponding public credential is registered with Microsoft Entra ID.
The private key never leaves the security key.
For the following demonstration, I will use an older Security Key by Yubico (2018–2020), which supports FIDO U2F and FIDO2.
I originally used this older security key because, for Part 1, I first had to purchase a newer YubiKey 5C NFC to demonstrate its PIV smart-card functionality.
Therefore, while waiting for this new YubiKey to arrive, I already started testing Passkey (FIDO2) authentication with my older Security Key by Yubico which essentially is a FIDO-only key, supporting FIDO U2F and FIDO2.
In contrast, the new YubiKey 5C NFC used in Part 1 is a multi-protocol security key that additionally supports PIV (Smart Card), OATH, OpenPGP, and Yubico OTP, besides FIDO U2F and FIDO2, making it something of a Swiss Army knife for authentication.
We will now configure this physical Security Key by Yubico as a Passkey (FIDO2) for passwordless authentication.
Note: Passkey (FIDO2) sign-in to Windows requires a Microsoft Entra joined or Microsoft Entra hybrid joined Windows device.
A device that is joined exclusively to an on-premises Active Directory Domain Services (AD DS) domain
is not supportedfor Passkey (FIDO2) Windows sign-in.
In our lab, we will use a Microsoft Entra hybrid joined Windows device. The complete configuration of Hybrid Microsoft Entra Join (formerly Hybrid Azure AD Join) is already covered in my dedicated article below and will therefore not be repeated here.
Before proceeding, we can verify the device state by running:
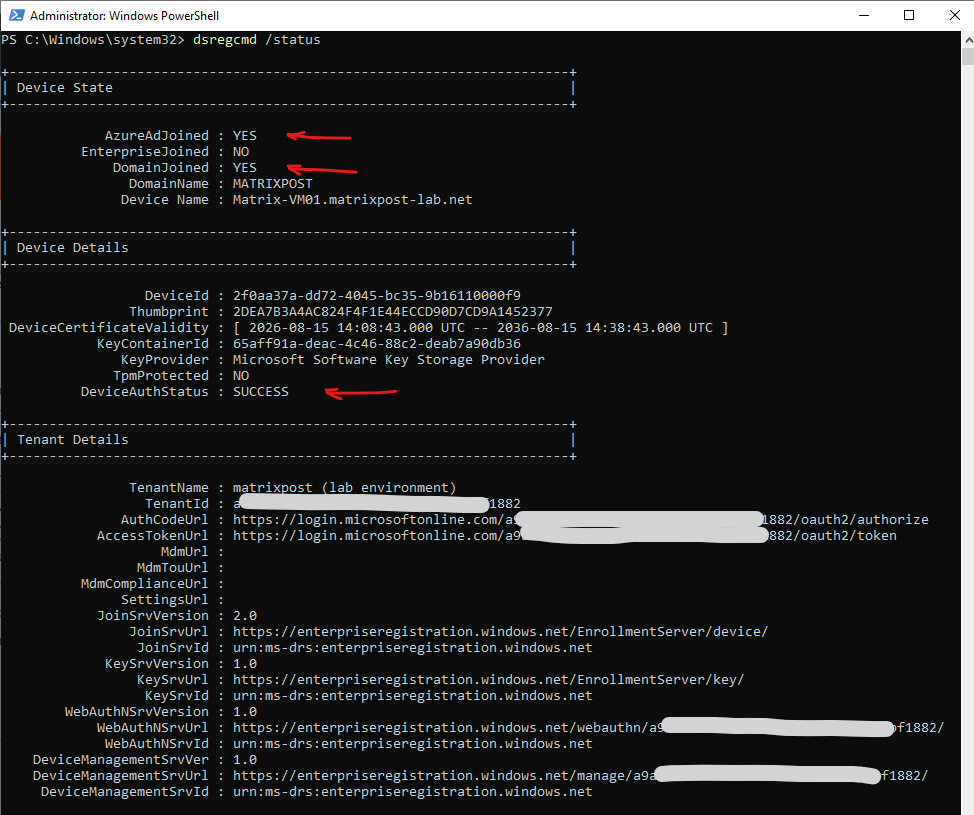
For a successfully hybrid joined device, both AzureAdJoined and DomainJoined should report YES. Additionally, DeviceAuthStatus: SUCCESS confirms that the device object exists in Microsoft Entra ID, is enabled, and can successfully authenticate against Microsoft Entra ID.
dsregcmd /status
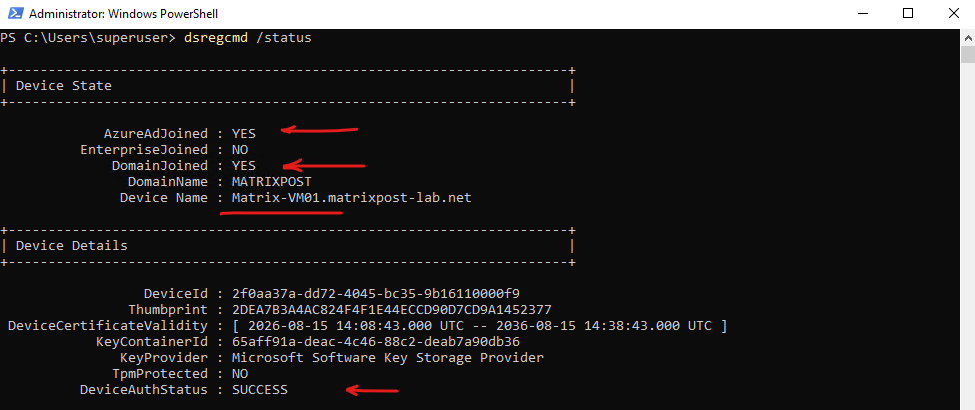
With the device now successfully domain joined and Microsoft Entra hybrid joined, the prerequisites on the device side are fulfilled. We can now continue with configuring Passkey (FIDO2) authentication in Microsoft Entra ID and register our Yubico Security Key as a passwordless authentication method.
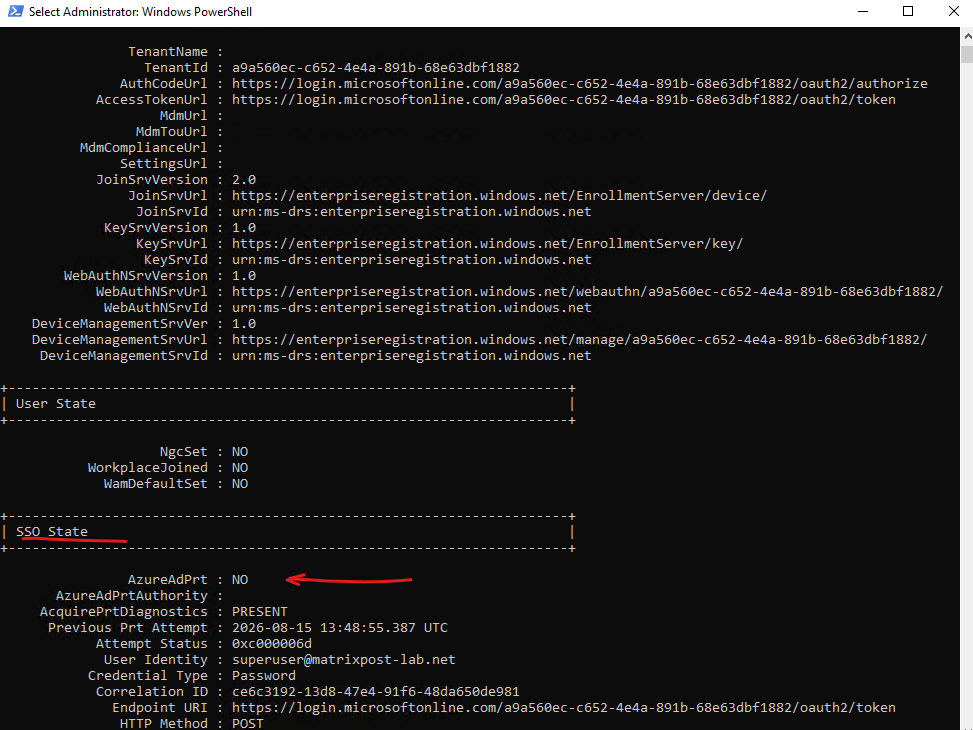
The hybrid join state shown above confirms the identity of the device, but it does not automatically provide Single Sign-On (SSO) to Microsoft Entra ID and Microsoft 365 applications for our currently signed-in user.
For seamless SSO, the user must also obtain a Primary Refresh Token (PRT) from Microsoft Entra ID. Therefore, we need to sign in to Windows using an on-premises Active Directory user account that is synchronized to Microsoft Entra ID. Our currently used Enterprise Admin account is not the account we want to use for this test.
After signing in with the synchronized user, we can again run
dsregcmd /status. Under SSO State,AzureAdPrtshould then report YES.The PRT enables Windows to provide SSO to Microsoft Entra ID-backed resources, including Microsoft 365 applications, without repeatedly prompting the user for their Microsoft Entra credentials.
For a detailed explanation of the Primary Refresh Token (PRT), including how it is issued and how Windows uses it for SSO, see my dedicated post https://blog.matrixpost.net/azure-active-directory-primary-refresh-token-prt-single-sign-on-to-azure-and-office-365/.
Configuring Passkey (FIDO2) Authentication in Microsoft Entra ID
Now that our Windows device is Microsoft Entra hybrid joined and our synchronized user can obtain a Primary Refresh Token (PRT), we can configure Microsoft Entra ID to allow Passkey (FIDO2) as a passwordless authentication method.
Microsoft now generally refers to FIDO2 credentials as Passkey (FIDO2) . A passkey stored on a physical Passkey (FIDO2) such as our YubiKey is device-bound: the private key is generated and stored on the security key and never leaves it.
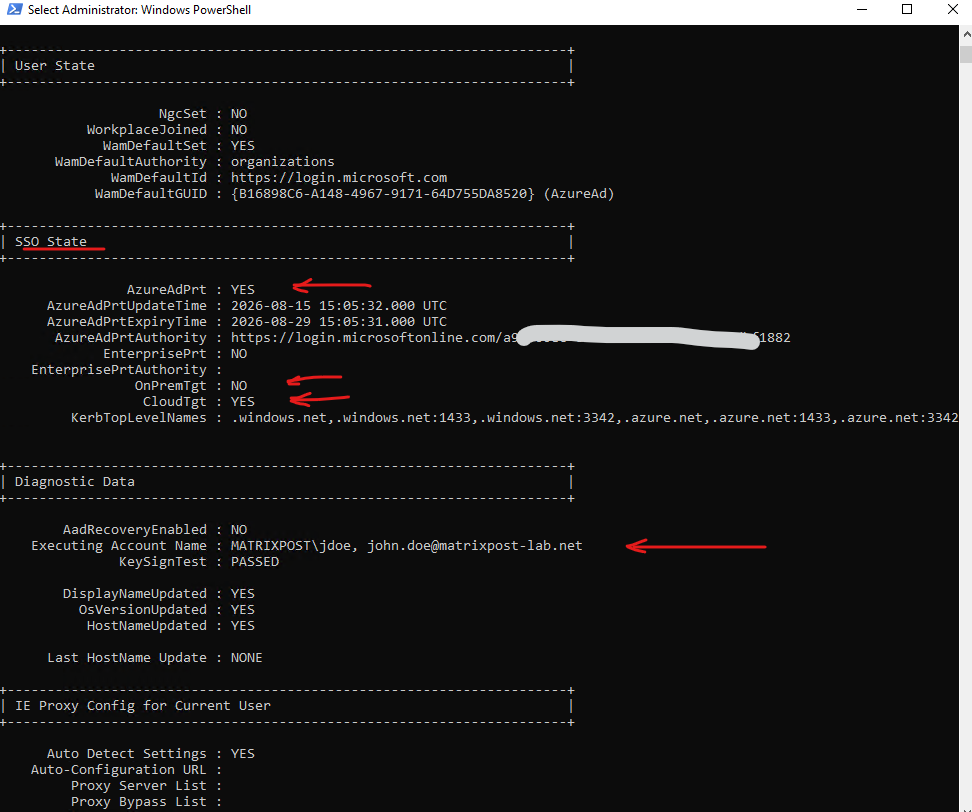
After signing in to the Microsoft Entra hybrid joined device with our synchronized domain user John Doe, we can verify that a Primary Refresh Token (PRT) has successfully been issued. The AzureAdPrt : YES status confirms that the current Windows session can use Single Sign-On (SSO) with Microsoft Entra ID and Microsoft 365 services.
In our case, Executing Account Name also confirms that the on-premises account MATRIXPOST\jdoe is mapped to the synchronized Microsoft Entra identity john.doe@matrixpost-lab.net.
For a detailed explanation of the Primary Refresh Token (PRT), including how it is issued and how Windows uses it for SSO, see my dedicated post https://blog.matrixpost.net/azure-active-directory-primary-refresh-token-prt-single-sign-on-to-azure-and-office-365/.
Here we can see that John Doe (
jdoe) successfully received an Azure AD Primary Refresh Token (PRT), enabling seamless SSO to Microsoft Entra ID and Microsoft 365 resources.
CloudTgt : YESindicates that a Cloud Kerberos TGT is available. This ticket is used to authenticate against the on-premises Kerberos infrastructure and obtain a regular on-premises Kerberos TGT without using the user’s password.
OnPremTgt : NOshows that no Kerberos TGT for accessing on-premises Active Directory resources has been obtained yet. To enable this passwordless Kerberos authentication flow, we first need to configure Microsoft Entra Kerberos, as shown further below.
Before we can use this passwordless Kerberos authentication flow, Microsoft Entra Kerberos first needs to be configured for our on-premises Active Directory domain.
Microsoft Entra Kerberos extends traditional Kerberos authentication to Microsoft Entra ID authentication scenarios, allowing Entra-authenticated users to obtain Kerberos tickets for on-premises Active Directory resources without requiring a traditional domain controller in Azure.
More about Microsoft Entra Kerberos you will find here https://learn.microsoft.com/en-us/entra/identity/authentication/kerberos.
We will configure Microsoft Entra Kerberos later in the section Using Passkey (FIDO2) Authentication with Remote Desktop (RDP), where it is required to bridge the Microsoft Entra passkey authentication with the on-premises Active Directory Kerberos environment.
This enables passwordless RDP authentication to our hybrid Microsoft Entra joined Windows Server.
Enable the Passkey (FIDO2) Authentication Method
In the Microsoft Entra admin center, navigate to Entra ID → Authentication methods. Alternatively, as shown below, we can use the Authentication Methods shortcut directly from the Microsoft Entra home page.
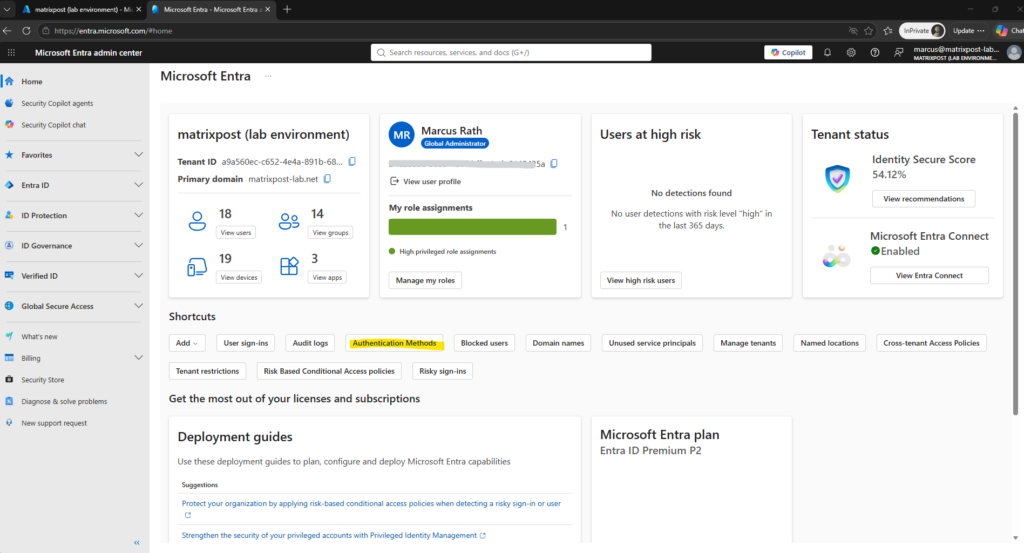
Entra ID → Authentication methods
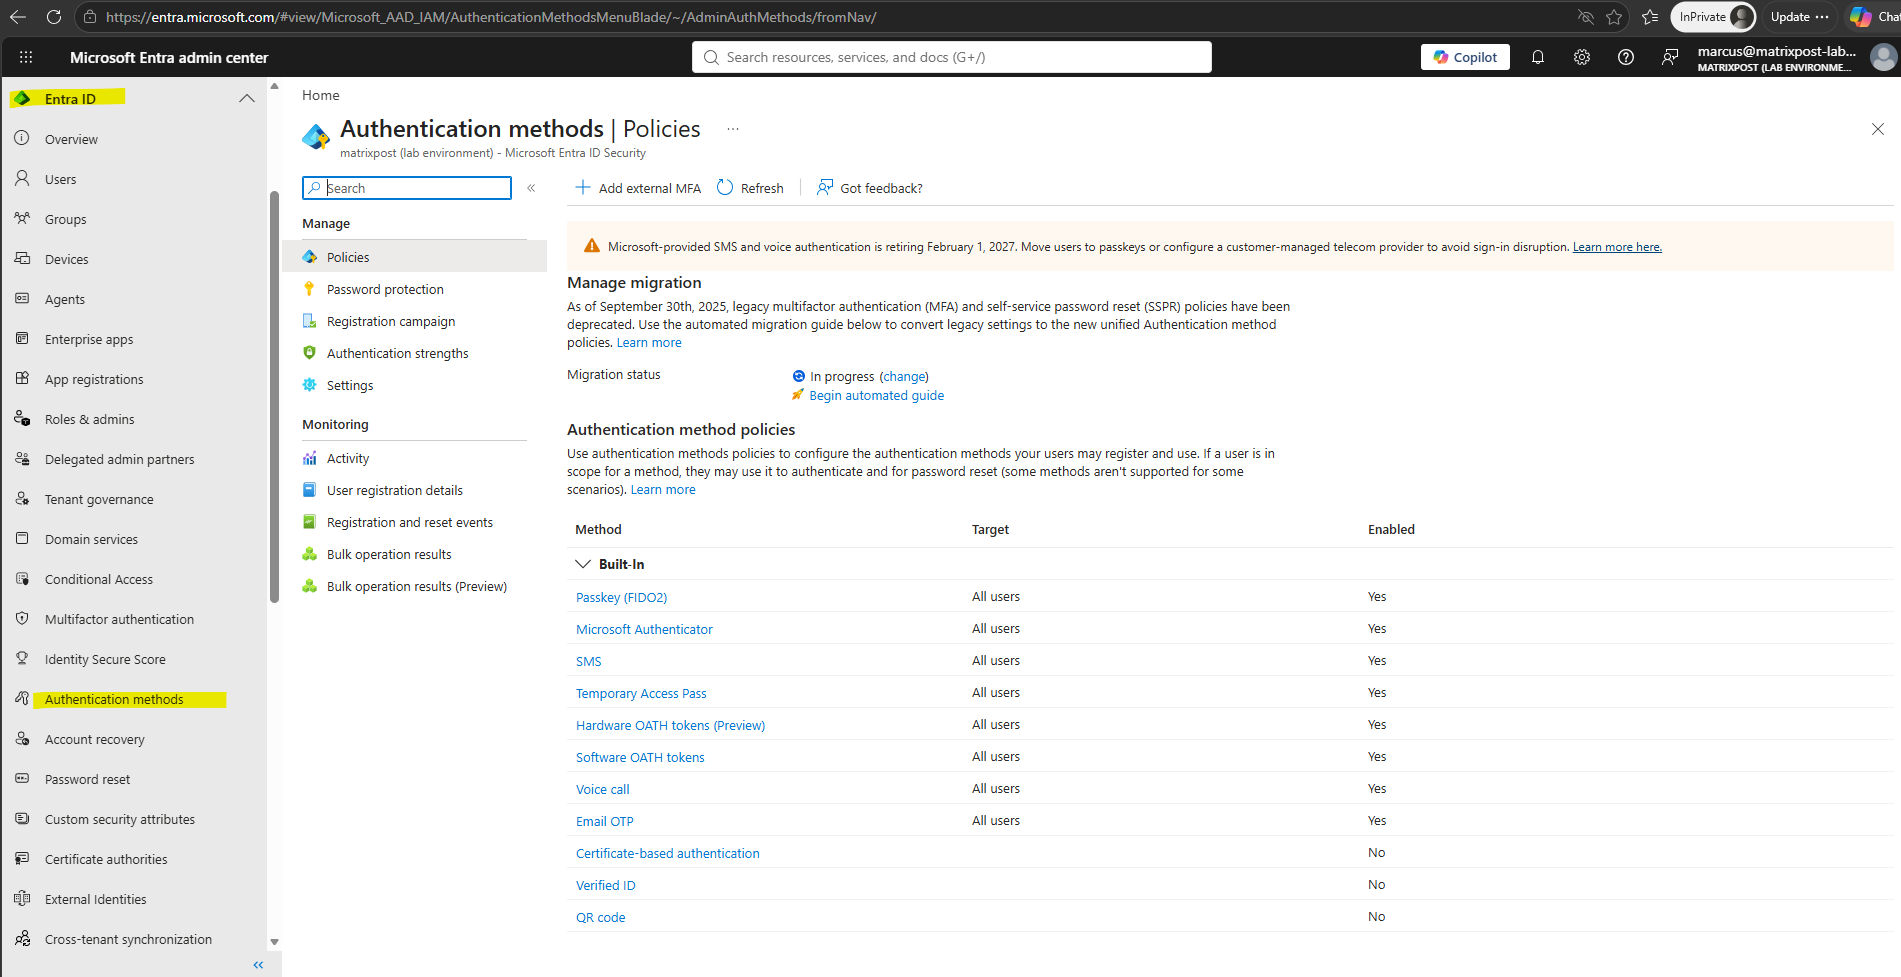
Authentication methods are configured centrally in Microsoft Entra ID and determine which authentication mechanisms, such as Passkey (FIDO2), users are permitted to register and use.
Click on Passkey (FIDO2):
Passkey (FIDO2) authentication uses public-key cryptography instead of a traditional password. During registration, we have already proven our identity by signing in with an existing trusted method, such as a password and MFA, which allows us to register the new passkey; a private key is then securely stored on the authenticator while the corresponding public key is registered with Microsoft Entra ID.
The authenticator can be a physical FIDO2 security key or the Windows computer itself, where the private key is typically protected by the device’s TPM. During sign-in, the authenticator proves possession of the private key by signing a cryptographic challenge, so the user’s password and private key never need to be transmitted.
Under the hood, FIDO2 combines the W3C Web Authentication (WebAuthn) standard with the Client to Authenticator Protocol (CTAP). WebAuthn handles the authentication interaction between the application/platform and the online service, while CTAP defines the communication between the client and an authenticator such as a physical FIDO2 security key.
The FIDO Alliance states this very explicitly: “FIDO2 is comprised of the W3C Web Authentication specification and corresponding Client-to-Authenticator Protocols (CTAP).”
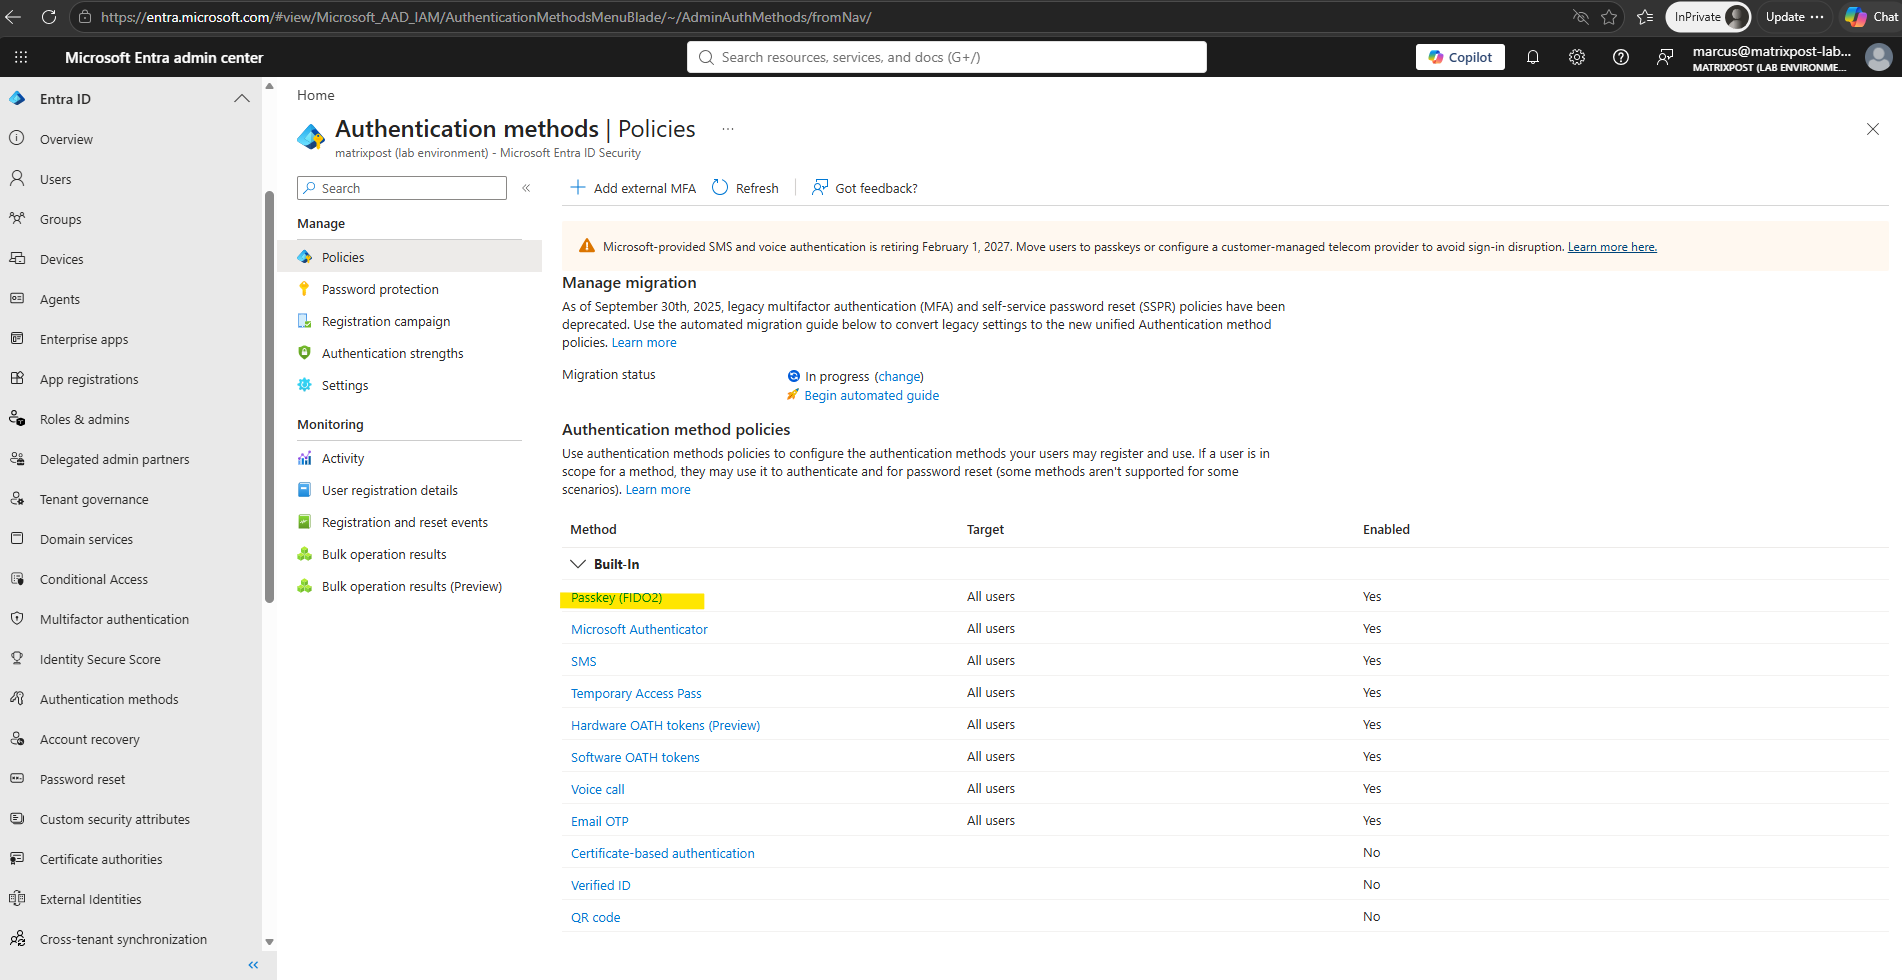
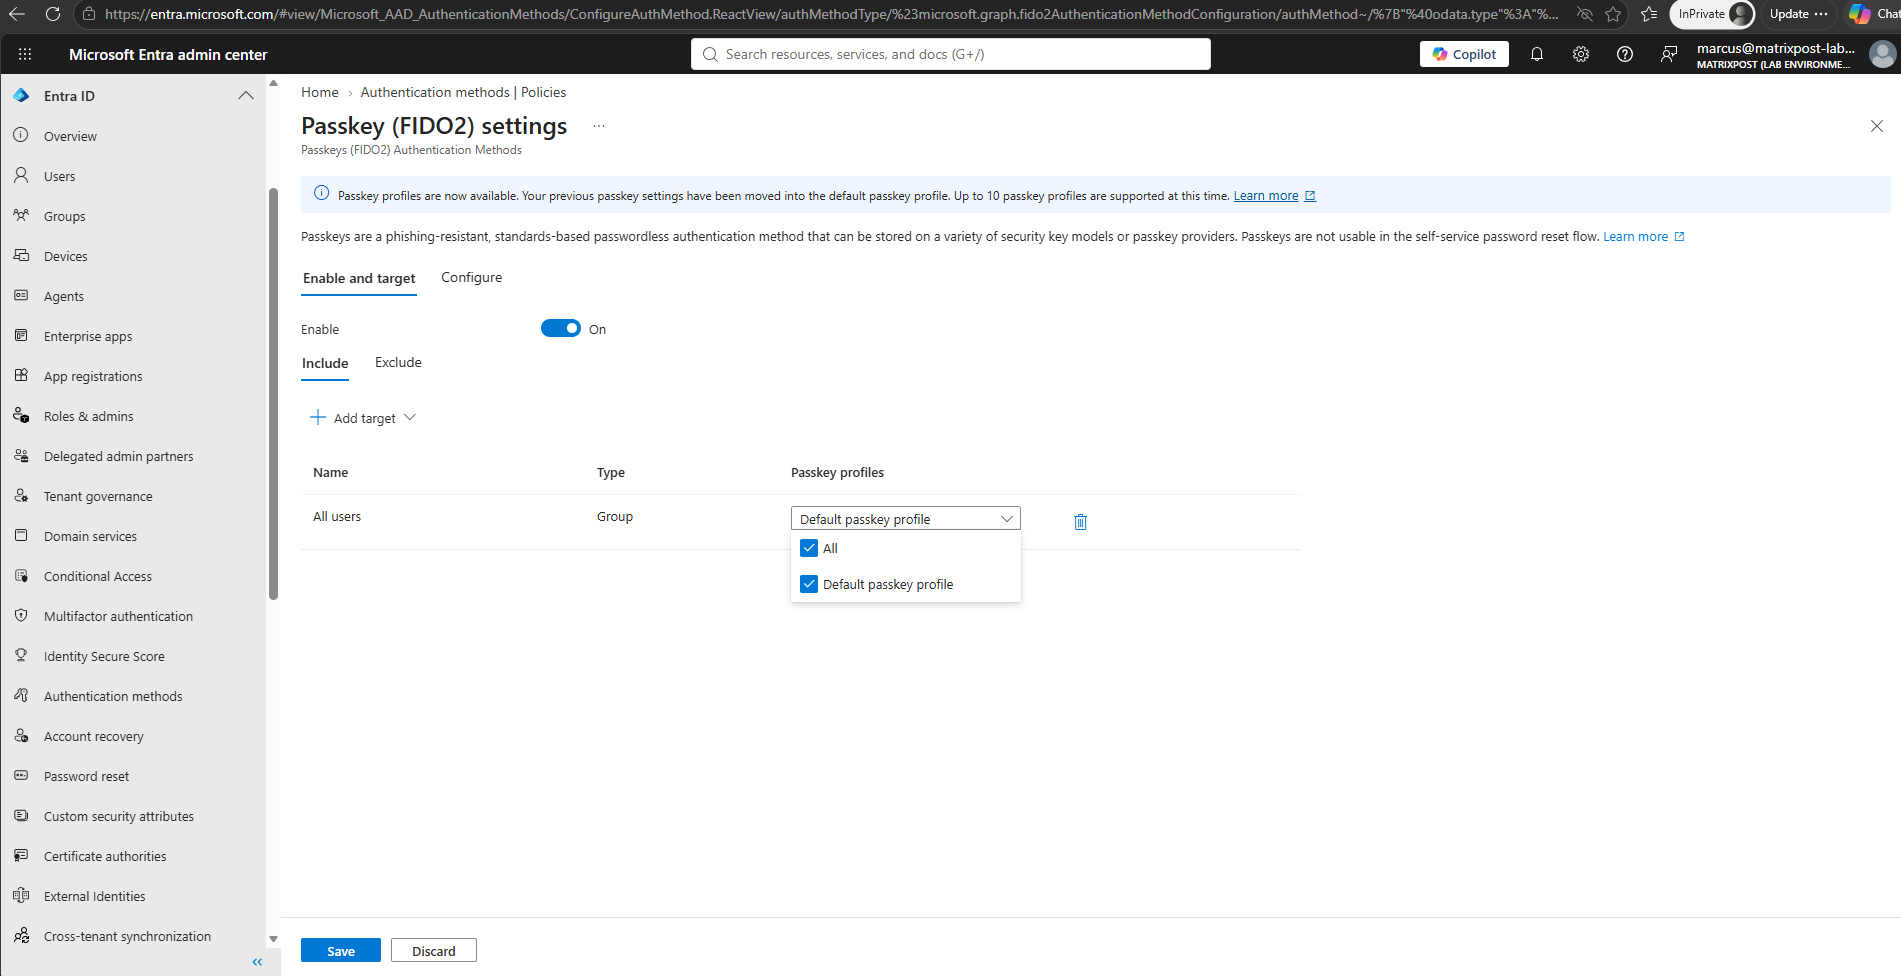
Open Passkey (FIDO2) and make sure the authentication method is set to On. Under Enable and target, we can define which users or groups are permitted to register and use Passkey (FIDO2).
In our lab, the policy is currently assigned to All users using the Default passkey profile. In production environments, the deployment can instead be introduced gradually by targeting selected security groups.
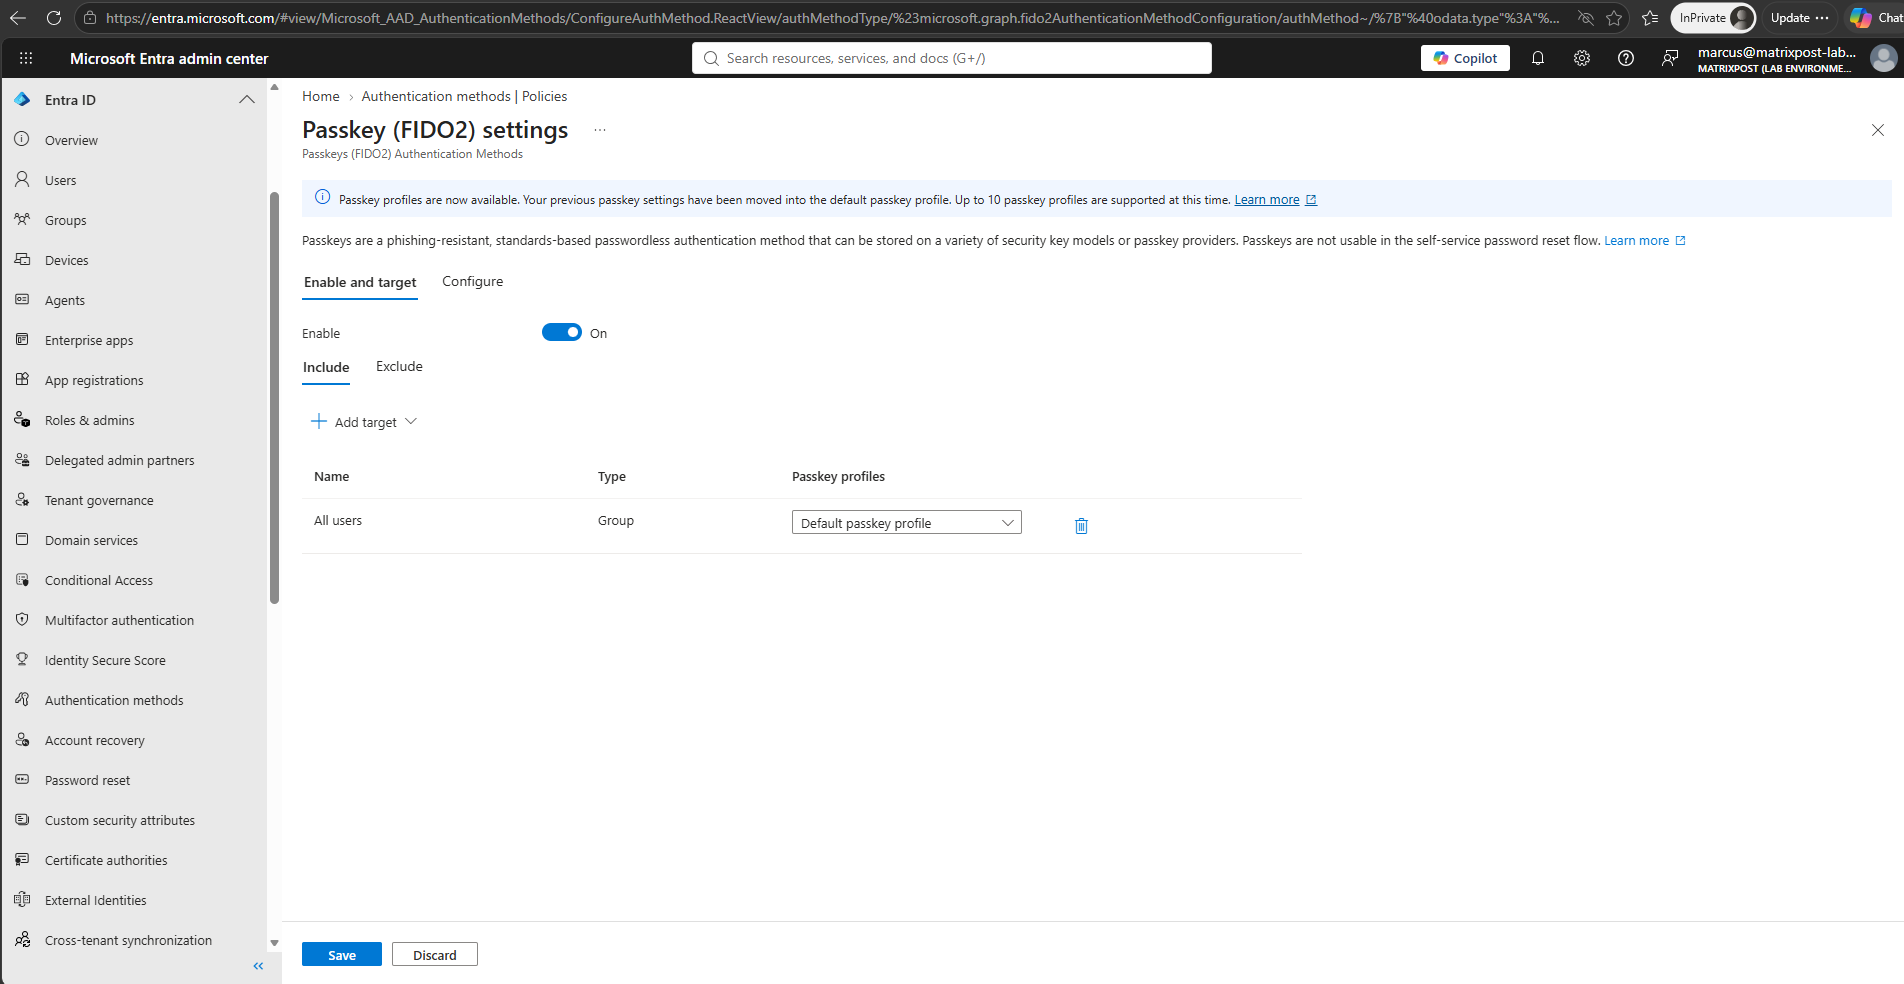
Microsoft Entra ID now supports multiple passkey profiles, allowing different groups of users to receive different Passkey (FIDO2) configurations. Under Passkey profiles, we can assign either specific profiles or All available profiles to the targeted users.
Since our lab currently contains only the Default passkey profile, we will keep this profile assigned to All users.
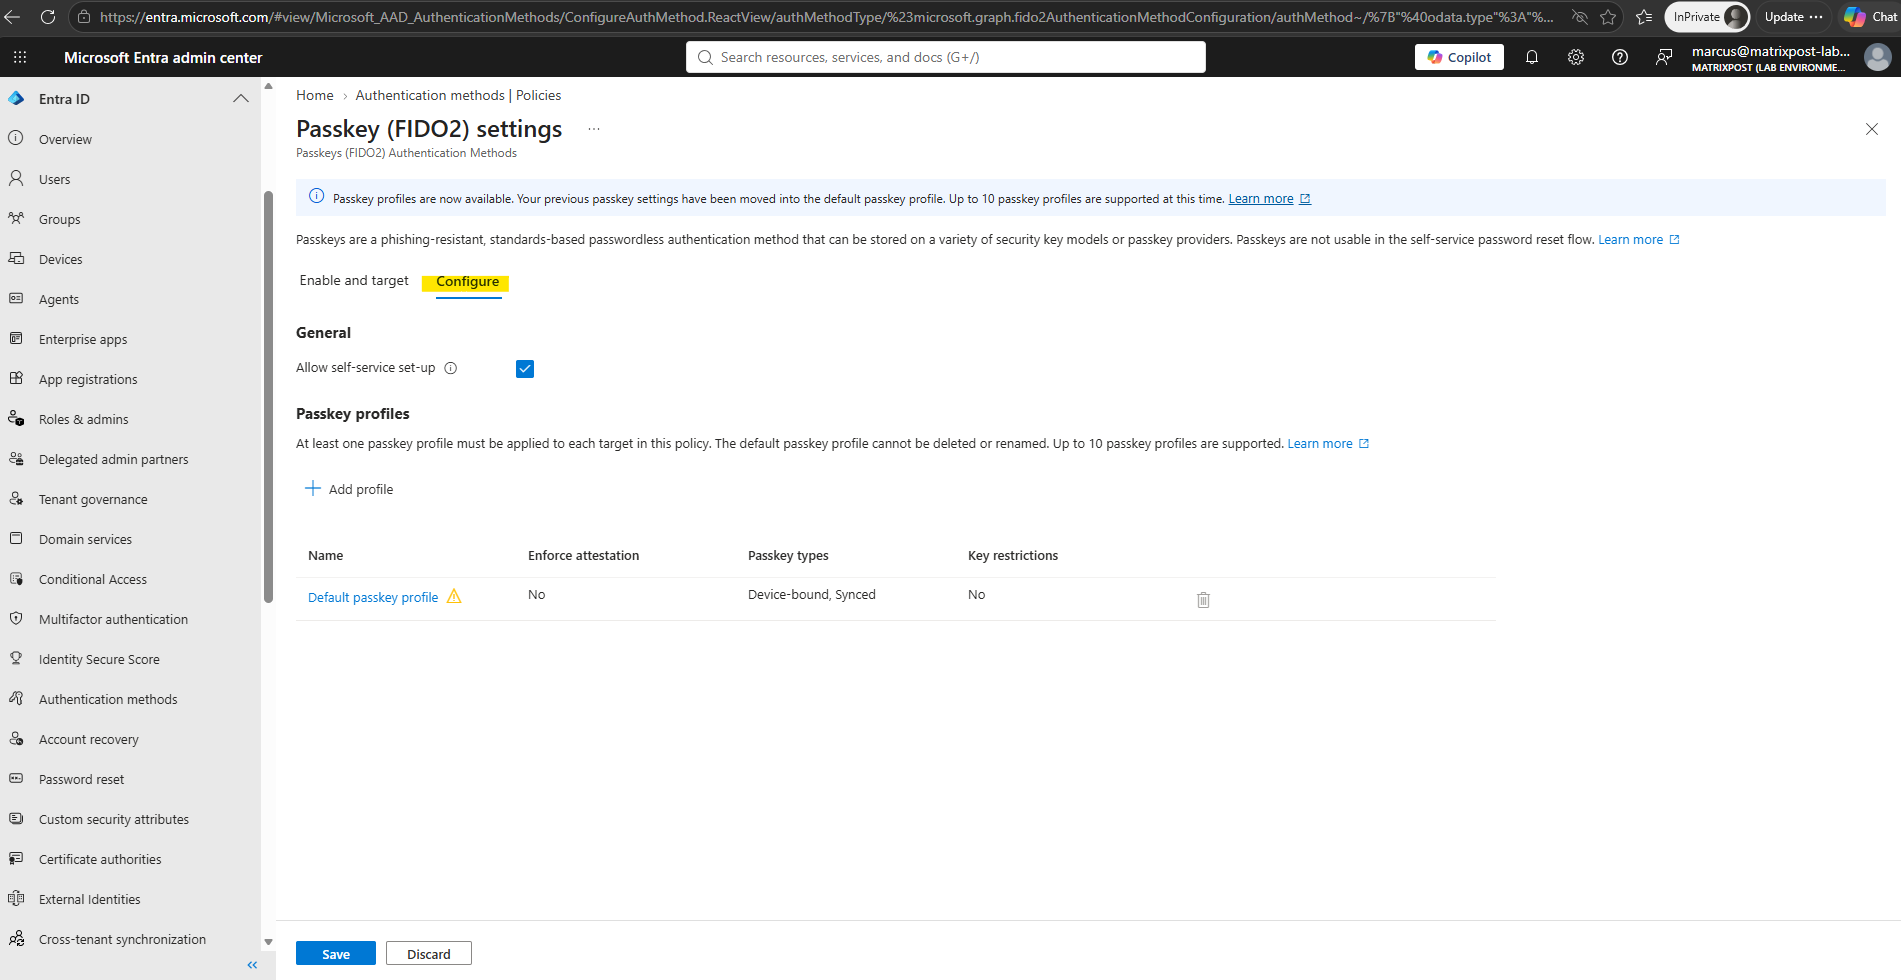
On the Configure tab, we can further control how passkeys are registered and which types of authenticators are permitted. With Allow self-service set-up enabled, users can register their own passkeys without an administrator having to provision them individually.
Microsoft Entra ID now organizes these settings into Passkey profiles. Our Default passkey profile currently allows both Device-bound and Synced passkeys, while attestation enforcement and key restrictions are disabled.
When clicking on Default passkey profile, within we can specify which types of passkeys users are permitted to register. Device-bound passkeys keep the private key on a specific authenticator, such as our physical Yubico FIDO2 security key, whereas Synced passkeys can be synchronized between devices through a supported passkey provider.
Because we specifically want to demonstrate authentication using a physical Yubico security key, here Device-bound must remain enabled. We will leave Synced enabled as well, since there is no reason to restrict other passkey types in our lab.
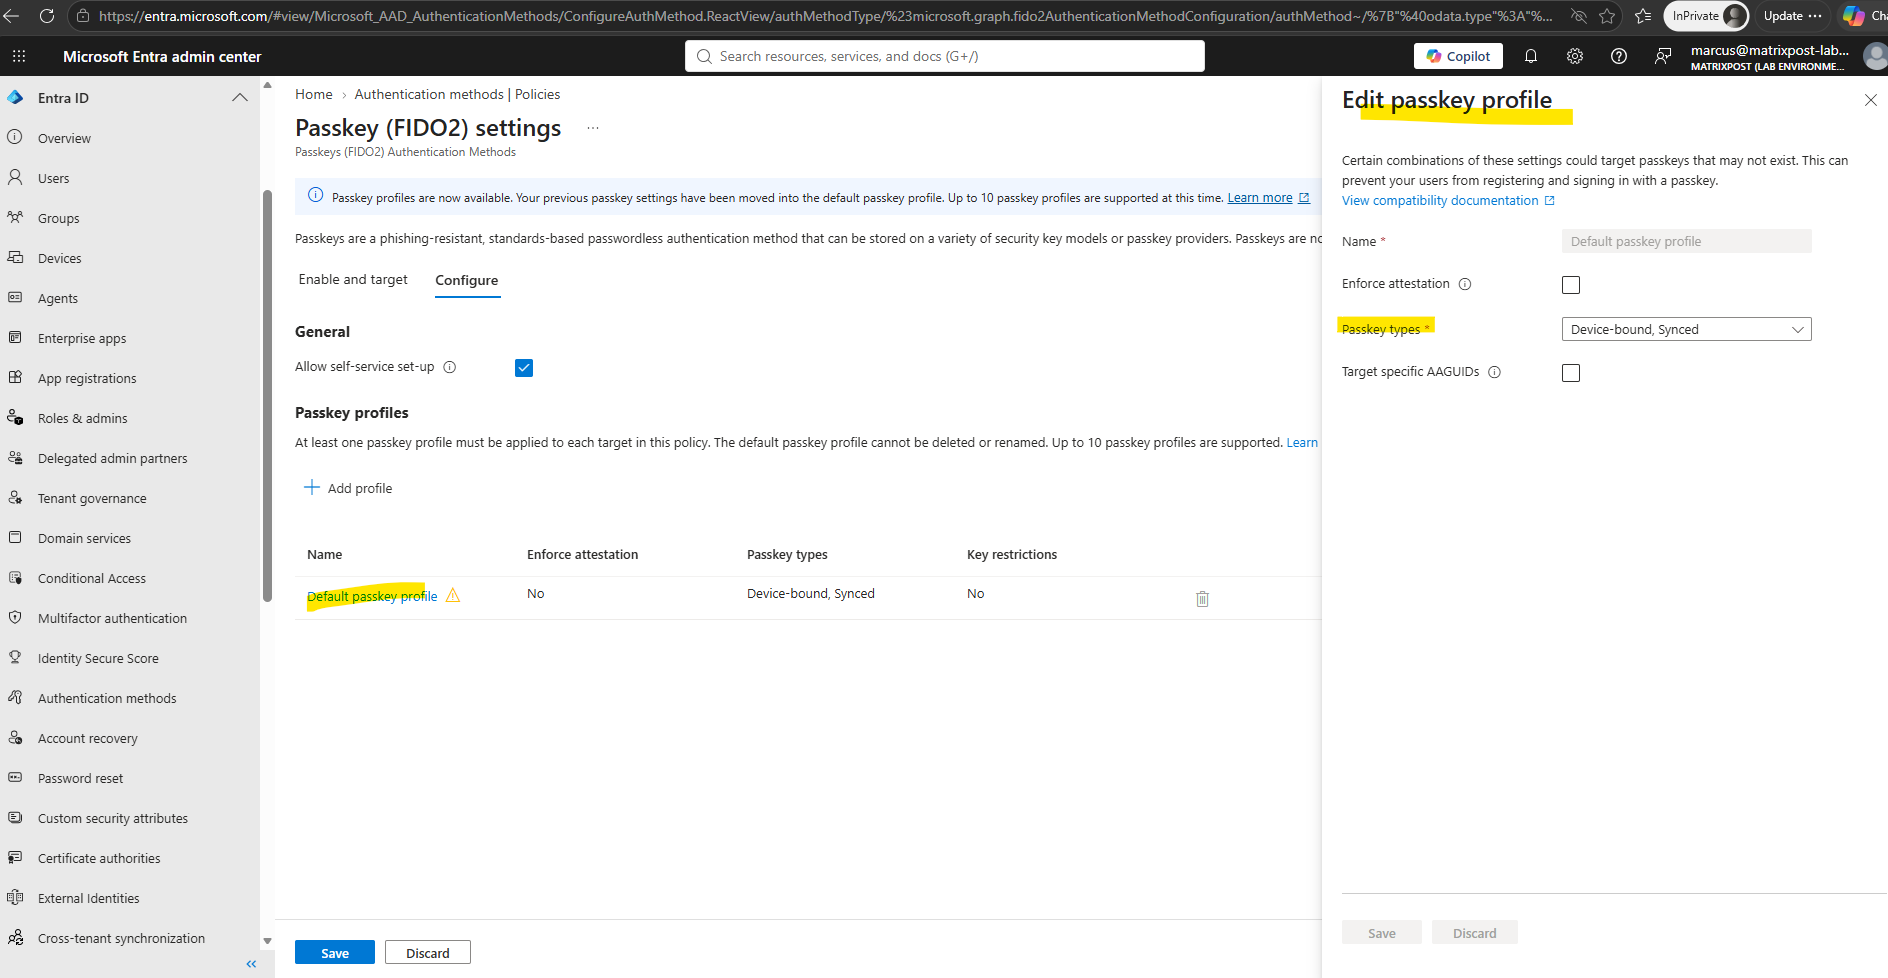
Also, the two other settings here are interesting:
Enforce attestation allows Entra ID to require authenticator attestation during registration. This gives Entra information about the authenticator and can be combined with restrictions on approved authenticators.
Target specific AAGUIDs is the really interesting one for enterprise deployments. An AAGUID (Authenticator Attestation GUID) identifies a particular authenticator model/type. You could therefore restrict registration to approved FIDO2 authenticators, for example, specific YubiKey models, instead of allowing arbitrary security keys.
Managing the Security Key by Yubico with YubiKey Manager CLI (ykman)
Although the older Security Key by Yubico used in this article is limited to FIDO2 and FIDO U2F and does not provide additional applications such as PIV, it can still be managed using the YubiKey Manager (ykman) CLI like shown in Part 1.
The ykman command-line tool allows us to detect the connected security key, display information about the device and its supported capabilities, and manage its FIDO2 configuration and credentials.
We can download the YubiKey Manager (ykman) CLI tool here https://docs.yubico.com/software/yubikey/tools/ykman/Install_ykman.html.
Detecting the key and displaying its basic information
ykman list
ykman info
Show the FIDO2-specific information:
ykman fido info
Managing the FIDO2 PIN:
ykman fido access change-pin
We can also list discoverable credentials / resident passkeys stored on the key:
ykman fido credentials list
Individual credentials can be removed with:
ykman fido credentials delete <credential-id>
This resets the FIDO application and deletes its FIDO credentials:
ykman fido reset
Registering the Yubico FIDO2 Security Key
Now that Passkey (FIDO2) authentication is enabled in Microsoft Entra ID, we can register our physical Yubico security key for the synchronized user John Doe.
Sign in as John Doe on the Microsoft My Sign-Ins page and open the Security info page. Because Allow self-service set-up is enabled in our passkey policy, the user can register the security key without an administrator having to provision it.
After signing in with our synchronized John Doe account, navigate to My Sign-Ins → Security info. Here we can review the authentication methods already registered for the user and select Add sign-in method to register our Passkey (FIDO2).
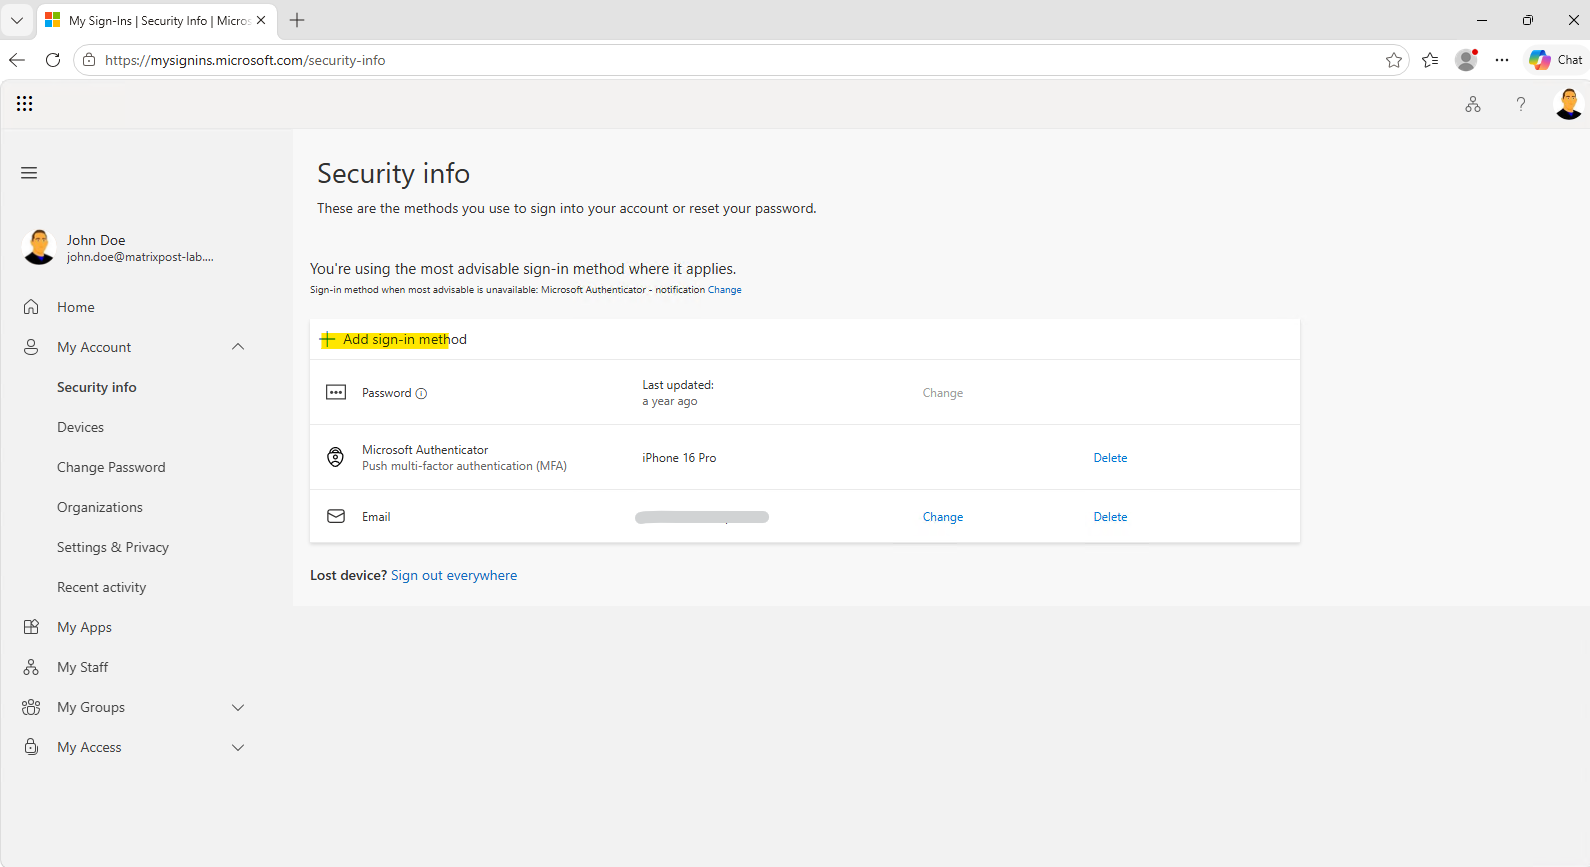
From the available authentication methods, select Passkey. Microsoft now uses the broader Passkey terminology for FIDO2-based authentication, this includes device-bound passkeys, where the private key remains bound to a specific device, typically the physical or virtual Windows computer itself, often protected by its TPM, as well as physical FIDO2 security keys such as our physical Yubico FIDO2 security key and other supported passkey implementations.
For example, with a Windows Hello device-bound passkey, the private key remains protected on the Windows device, typically by the TPM, and is unlocked locally using the Windows Hello PIN, fingerprint, or facial recognition.
Our Yubico FIDO2 security key follows the same FIDO2/Passkey concept, but stores and protects the private key on the external hardware security key instead.
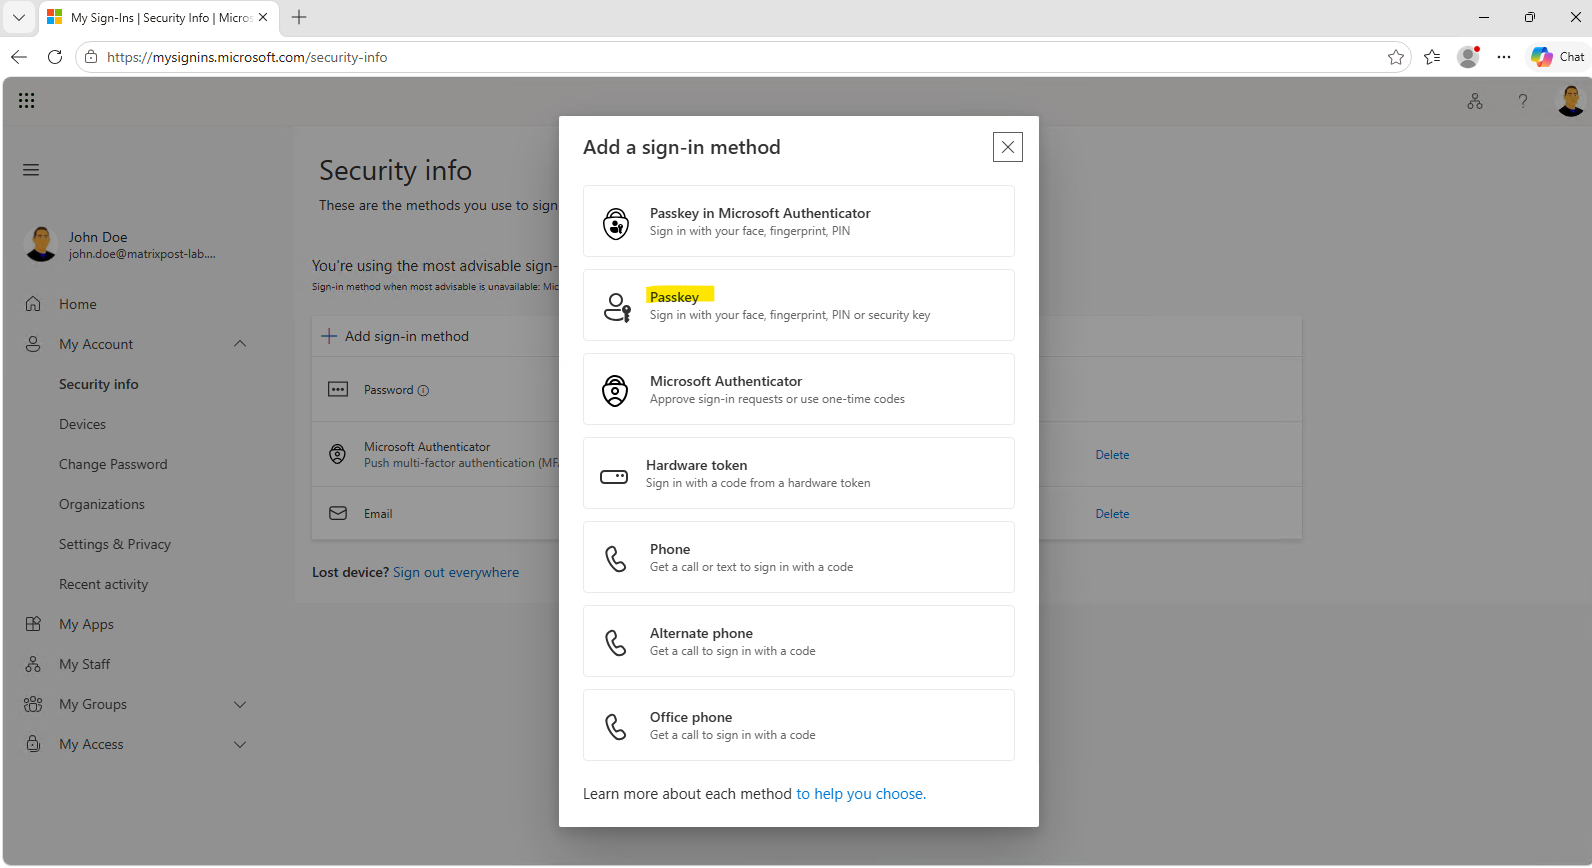
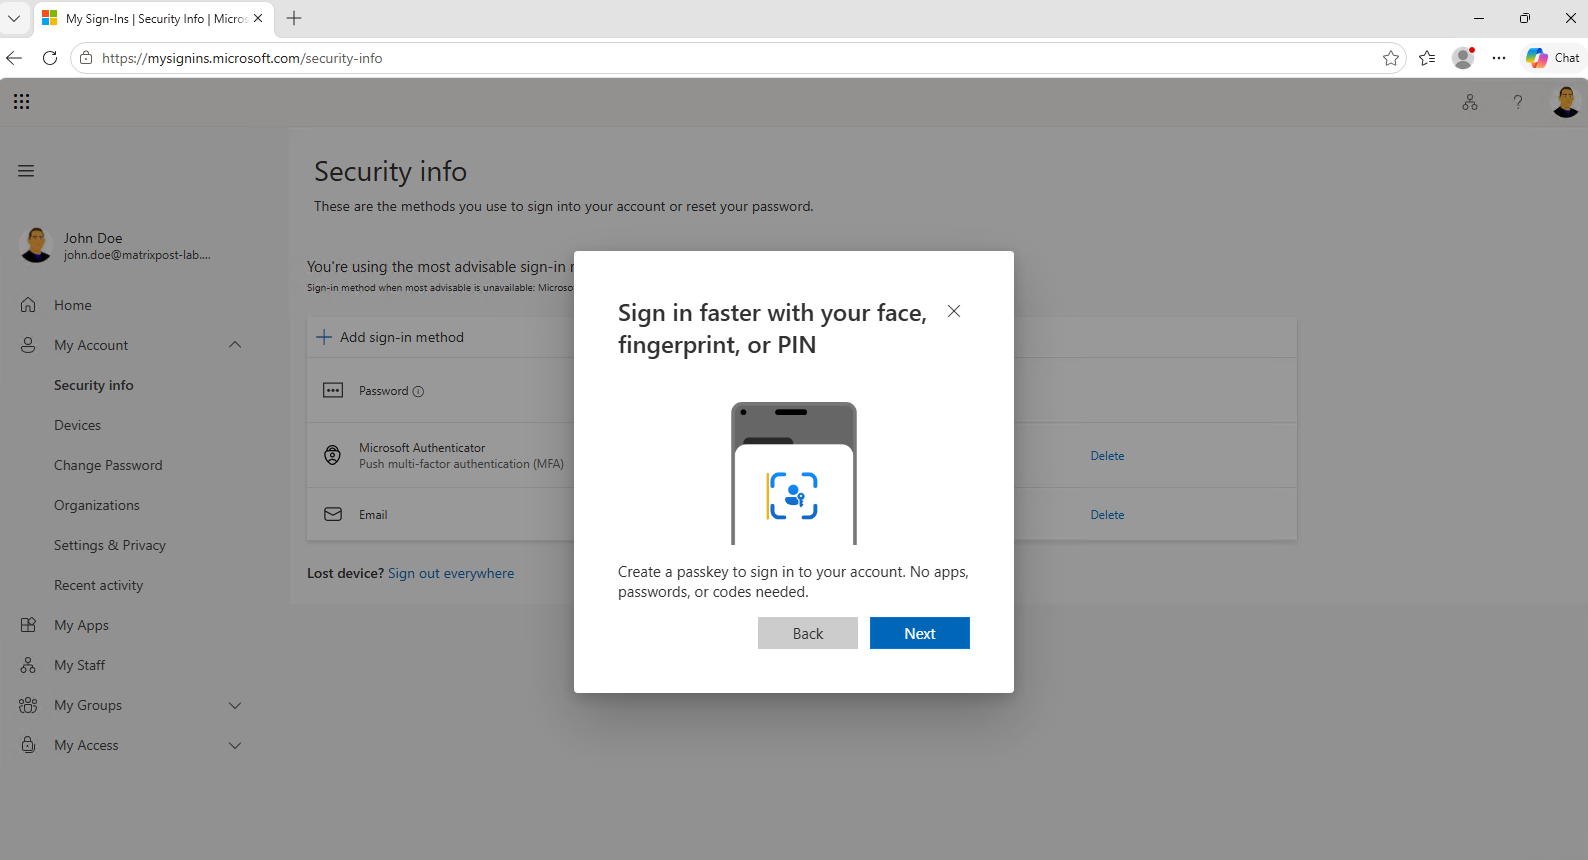
After selecting Passkey, Microsoft starts the passkey registration wizard. Click Next to continue and choose where the new passkey should be stored.
Although the dialog again emphasizes face, fingerprint, or PIN, this does not mean that we have to use Windows Hello. In the following step, we can select our physical Passkey (FIDO2) as the authenticator.
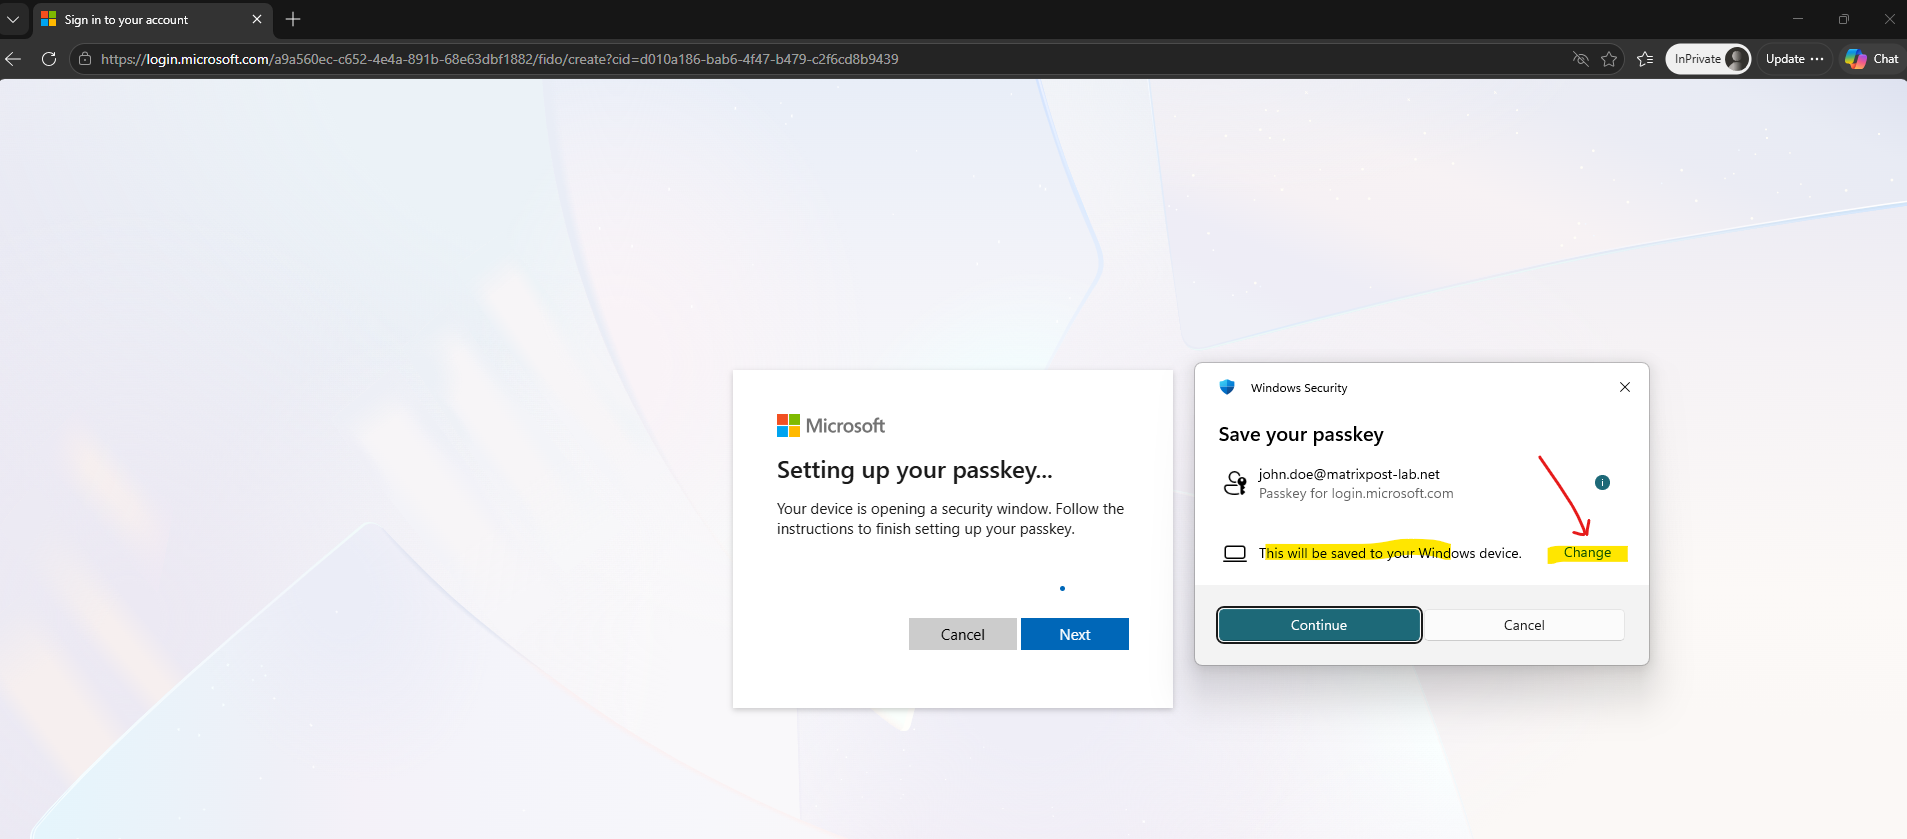
Because Windows initially proposes saving the passkey directly on the local Windows device using Windows Hello, click Change to select a different location for storing the passkey, in our case, the Passkey (FIDO2).
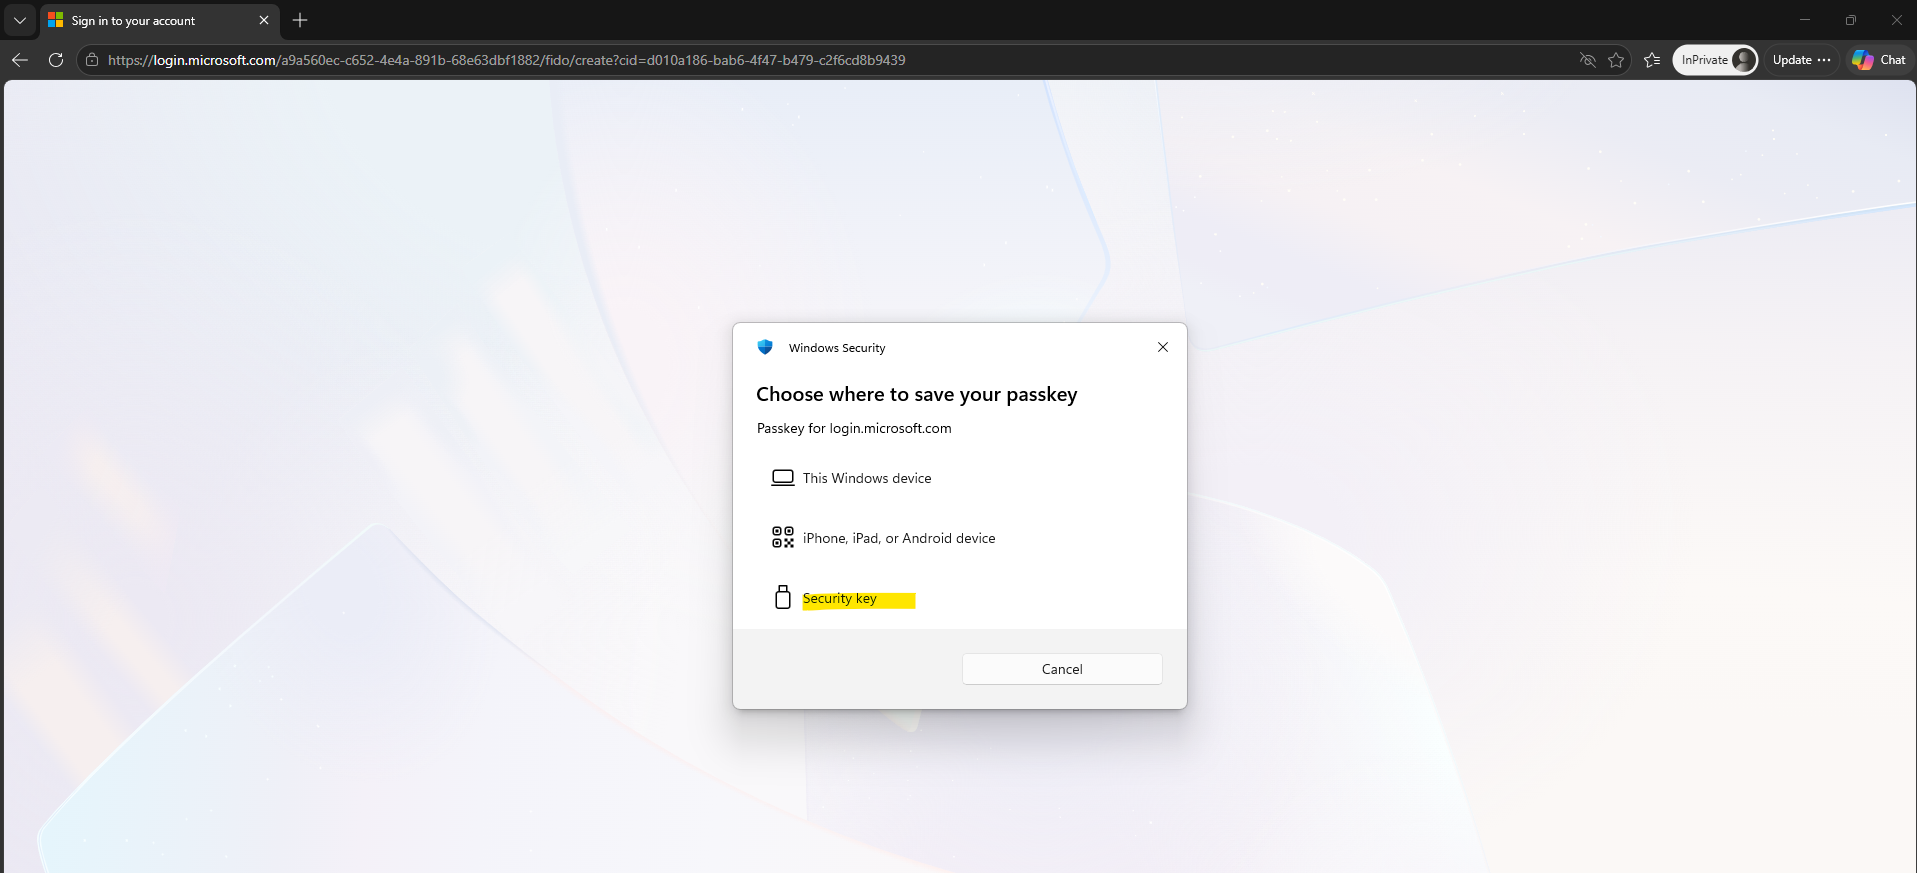
Windows now displays the available locations where the new passkey can be stored. Since we want to register a physical Passkey (FIDO2) rather than another device-bound Windows Hello credential, select Security key.
Because this security key has not yet been initialized for FIDO2 authentication, Windows prompts us to create a PIN for the security key.
This PIN belongs to the physical Passkey (FIDO2) security key itself and is independent of the user’s Windows Hello PIN or Microsoft Entra ID password.
It verifies the user locally and authorizes the security key to use its stored private key to sign the authentication challenge, which Microsoft Entra ID can then verify using the corresponding public key.
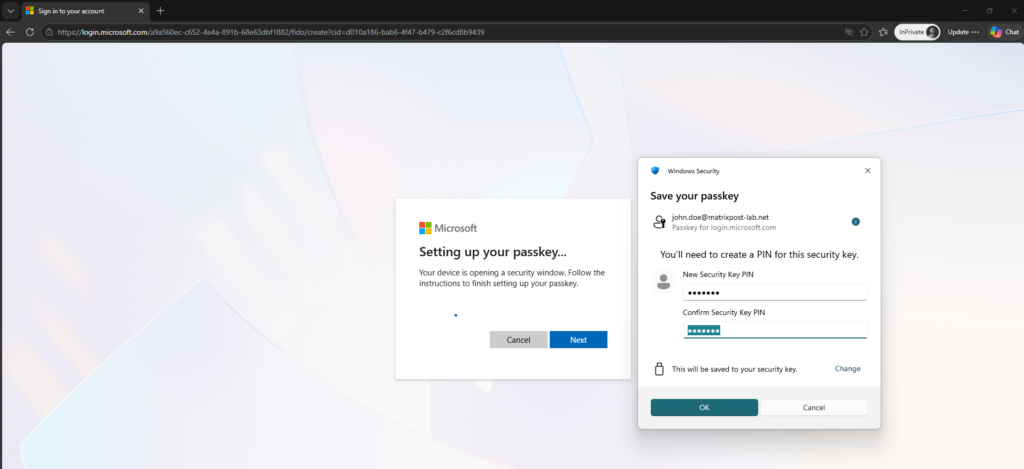
After setting the security key PIN, Windows asks us to physically touch the Passkey (FIDO2) to confirm user presence.
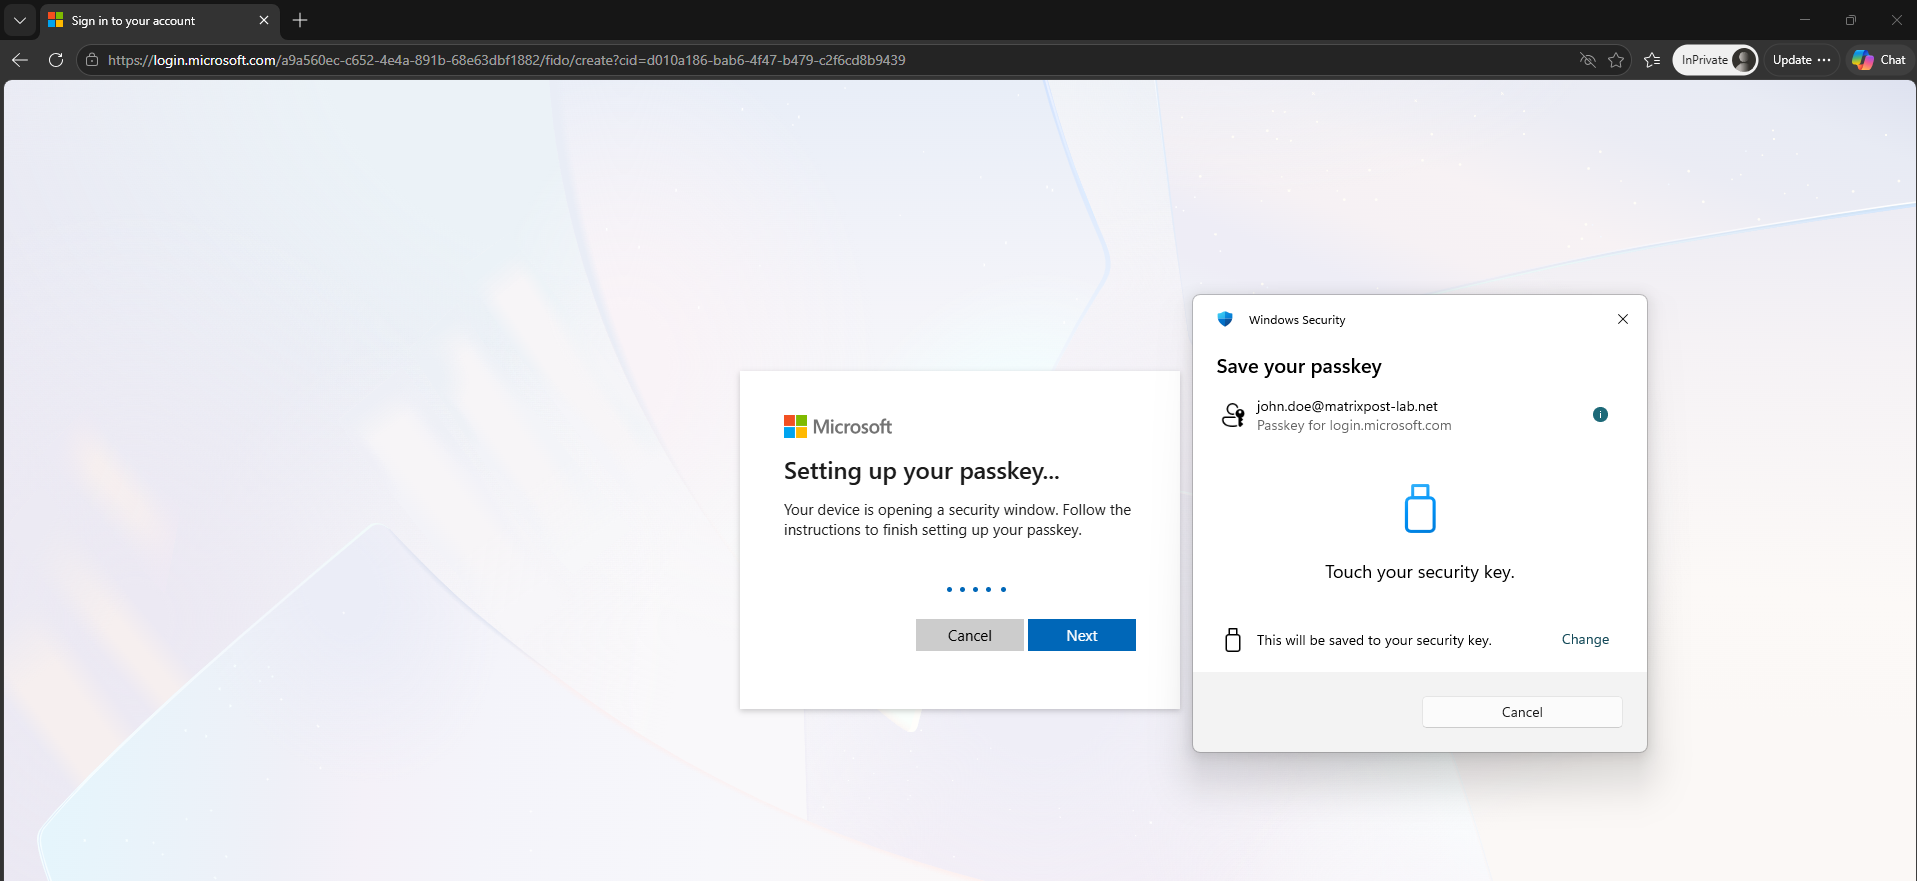
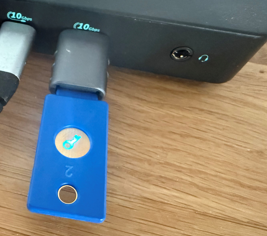
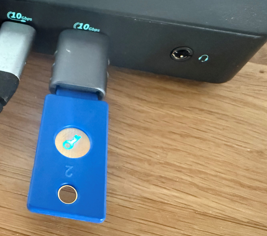
The key indicates this by flashing its blue LED; touching the illuminated sensor confirms the operation and allows the new passkey to be written to the security key.
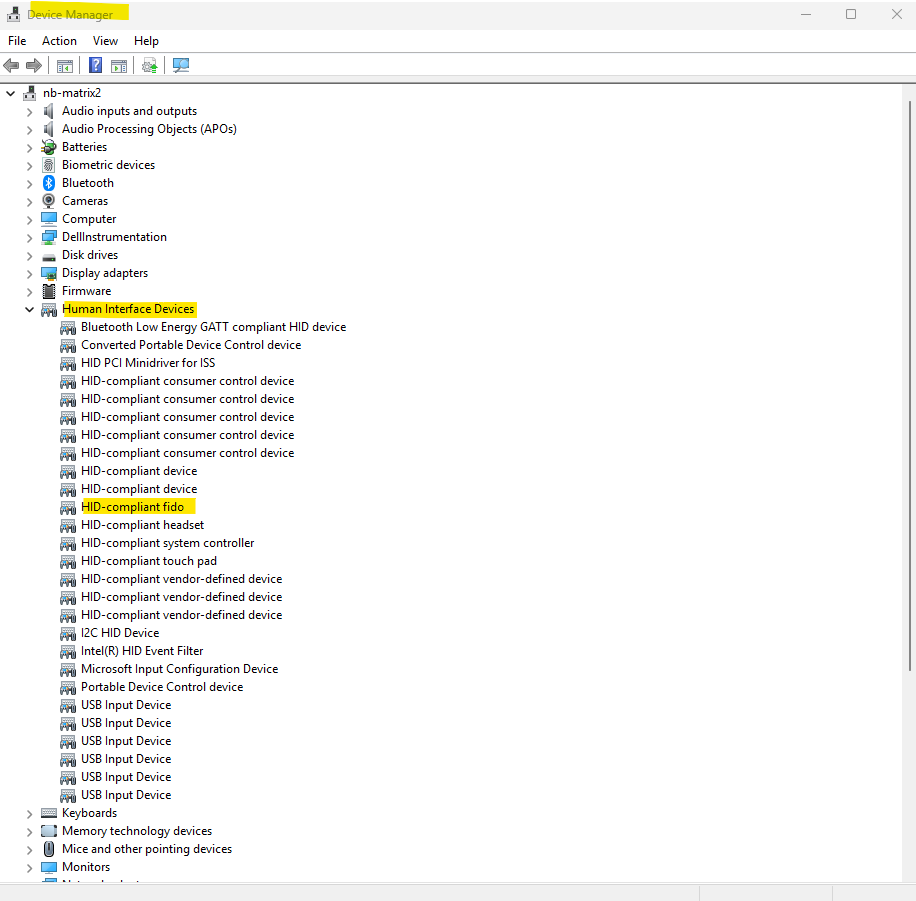
Windows detects the connected FIDO2 security key as a HID-compliant fido device under Human Interface Devices in Device Manager.
Removing and reconnecting the key confirms that this entry represents the FIDO2 HID interface of our physical security key.
Using PowerShell, we can also verify that Windows detects the security key as a FIDO device by querying Plug and Play devices with Get-PnpDevice.
The first command lists the connected
HID-compliant fidodevice, while the second returns its complete Plug and Play properties for further inspection.
Get-PnpDevice -PresentOnly | Where-Object FriendlyName -like "*fido*"
Get-PnpDevice -PresentOnly | Where-Object FriendlyName -like "*fido*" | Format-List *
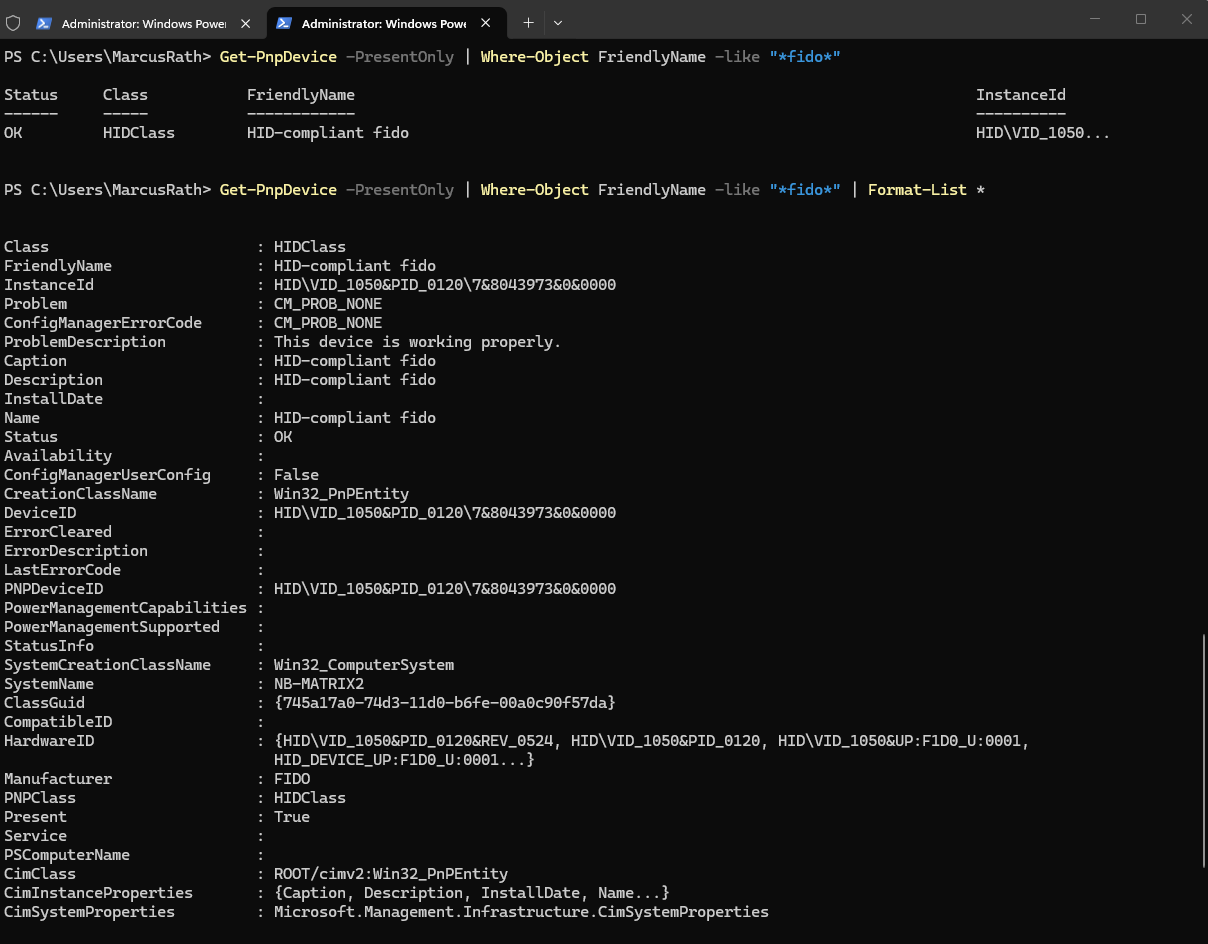
After confirming physical presence on the security key, Microsoft asks us to assign a descriptive name to the newly registered passkey. This makes it easier to identify the physical Passkey (FIDO2) later, especially when multiple passkeys or security keys are registered for the same account.
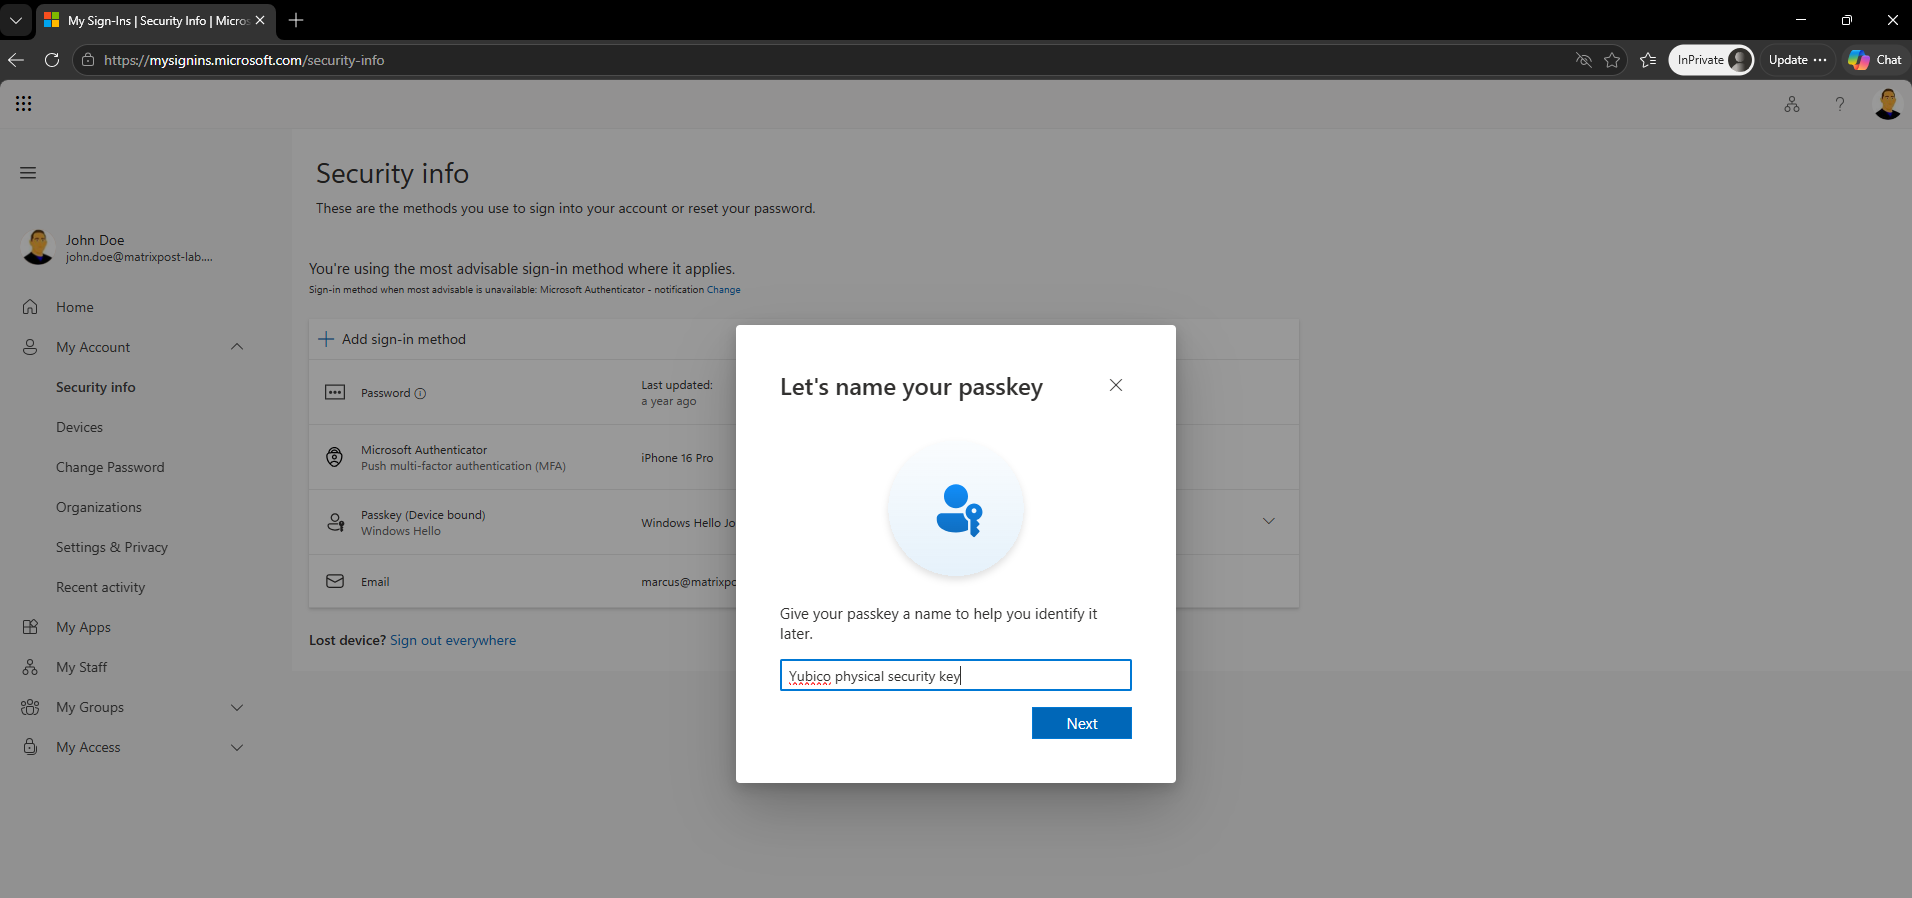
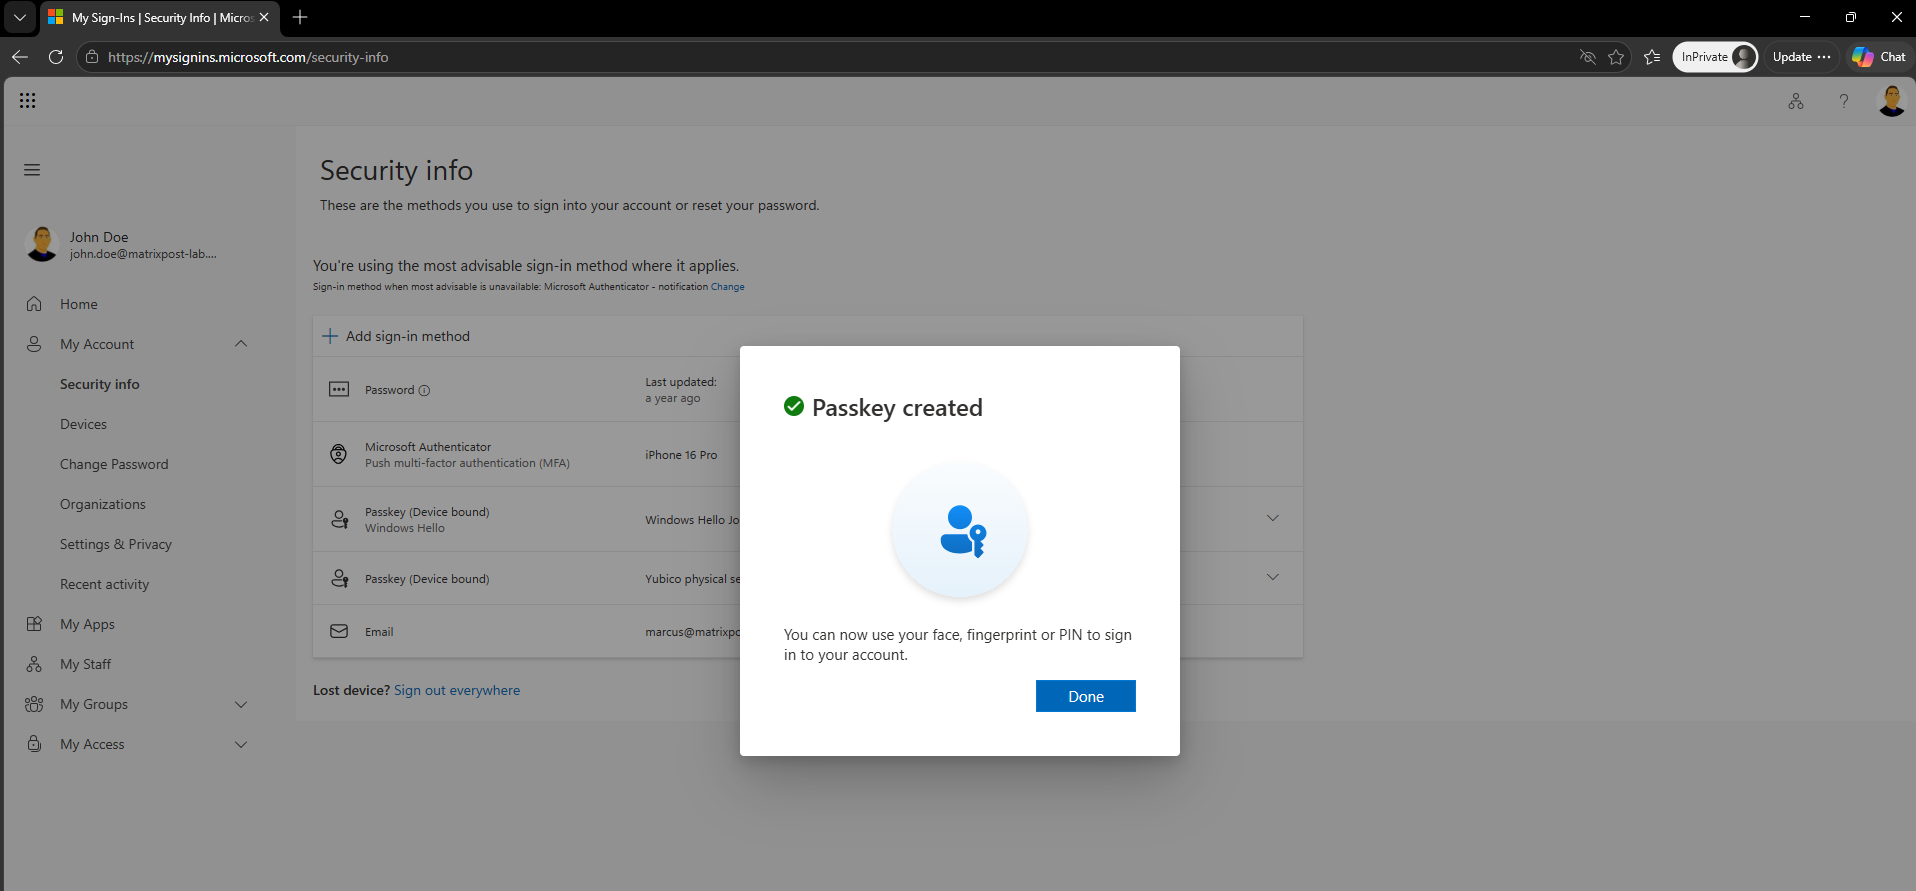
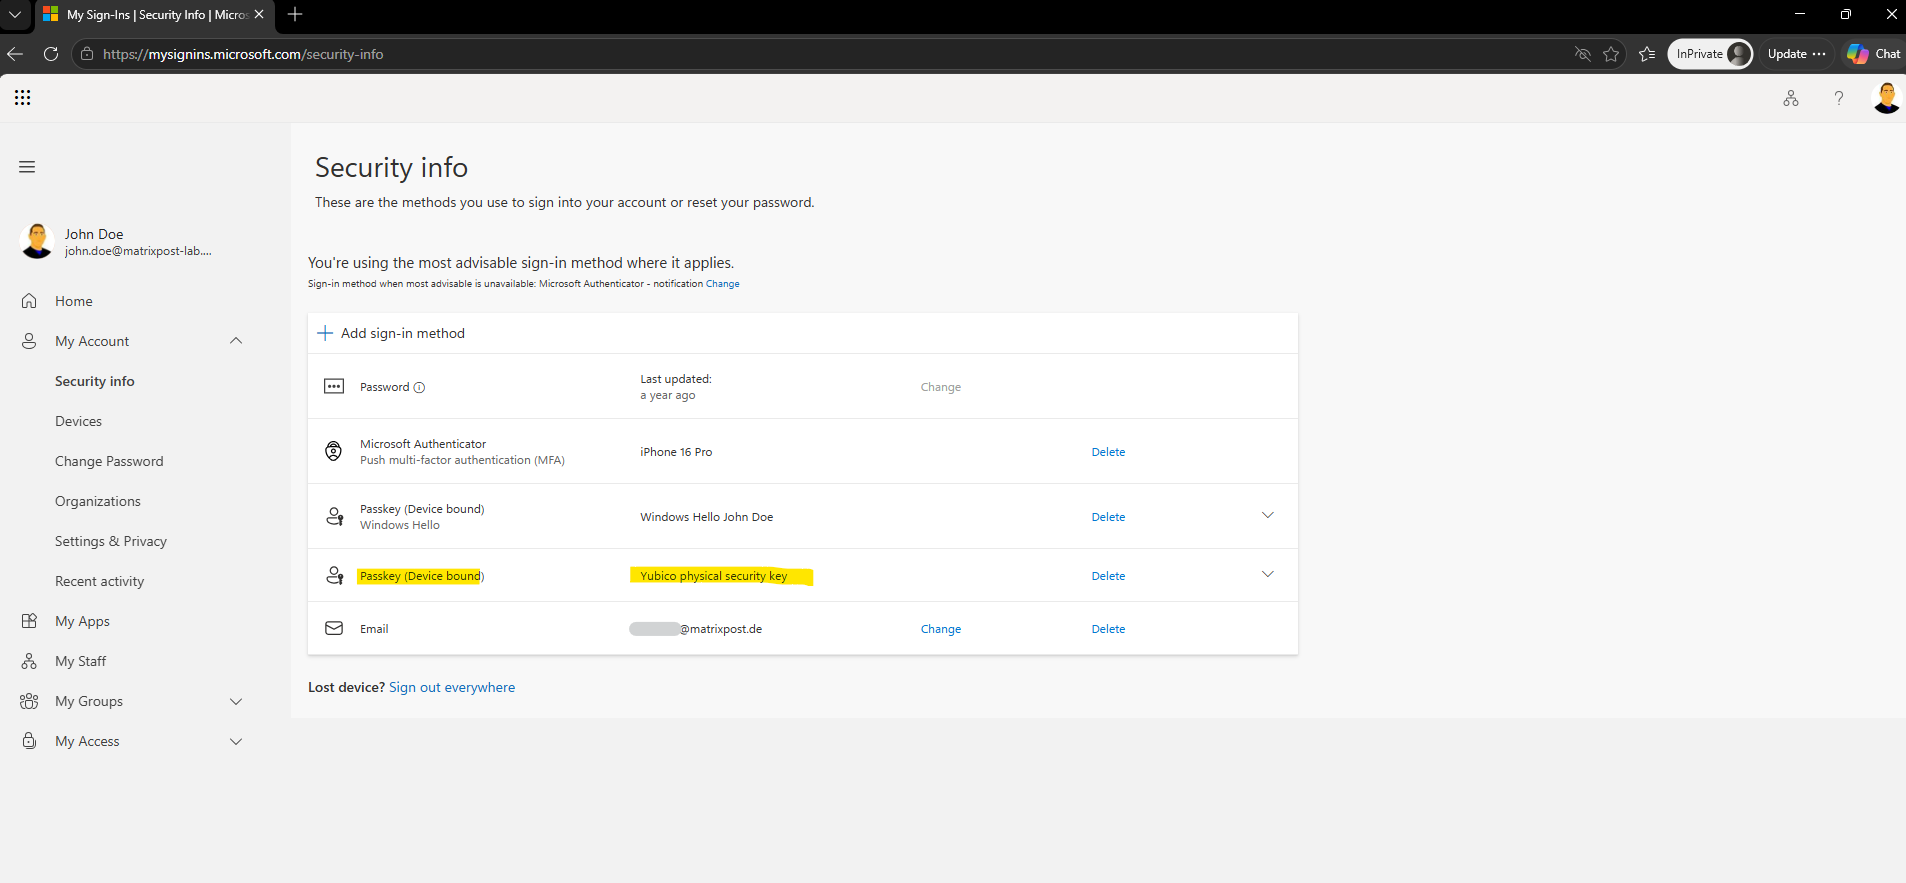
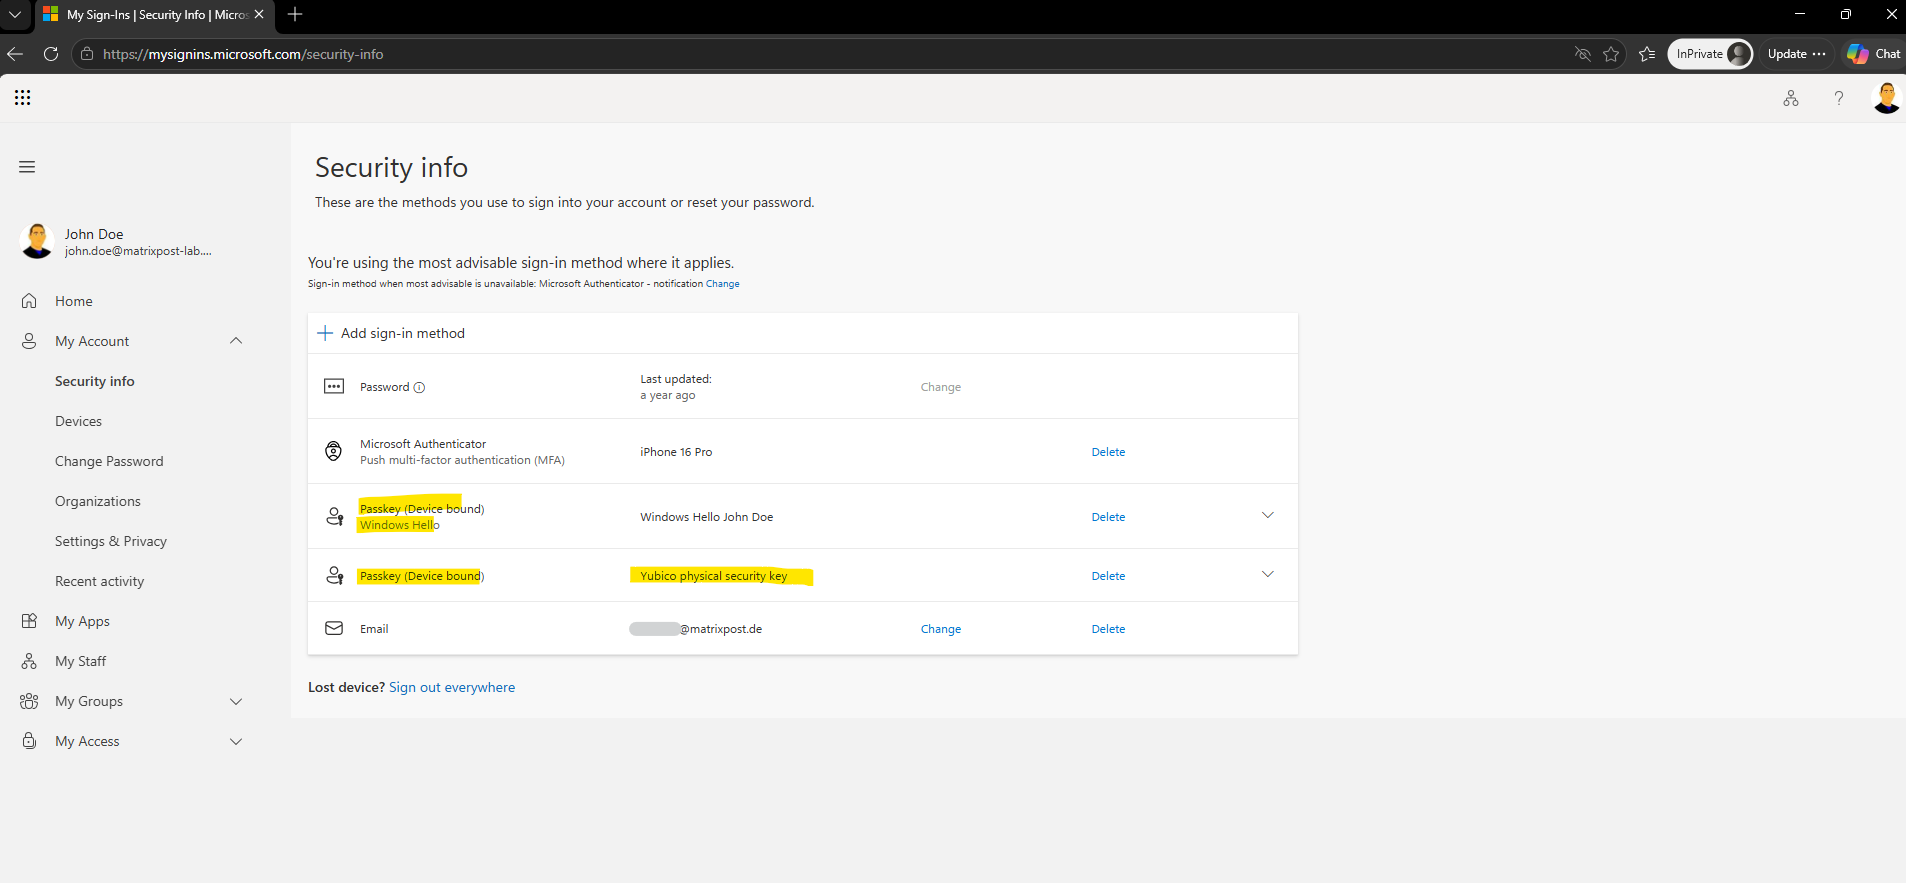
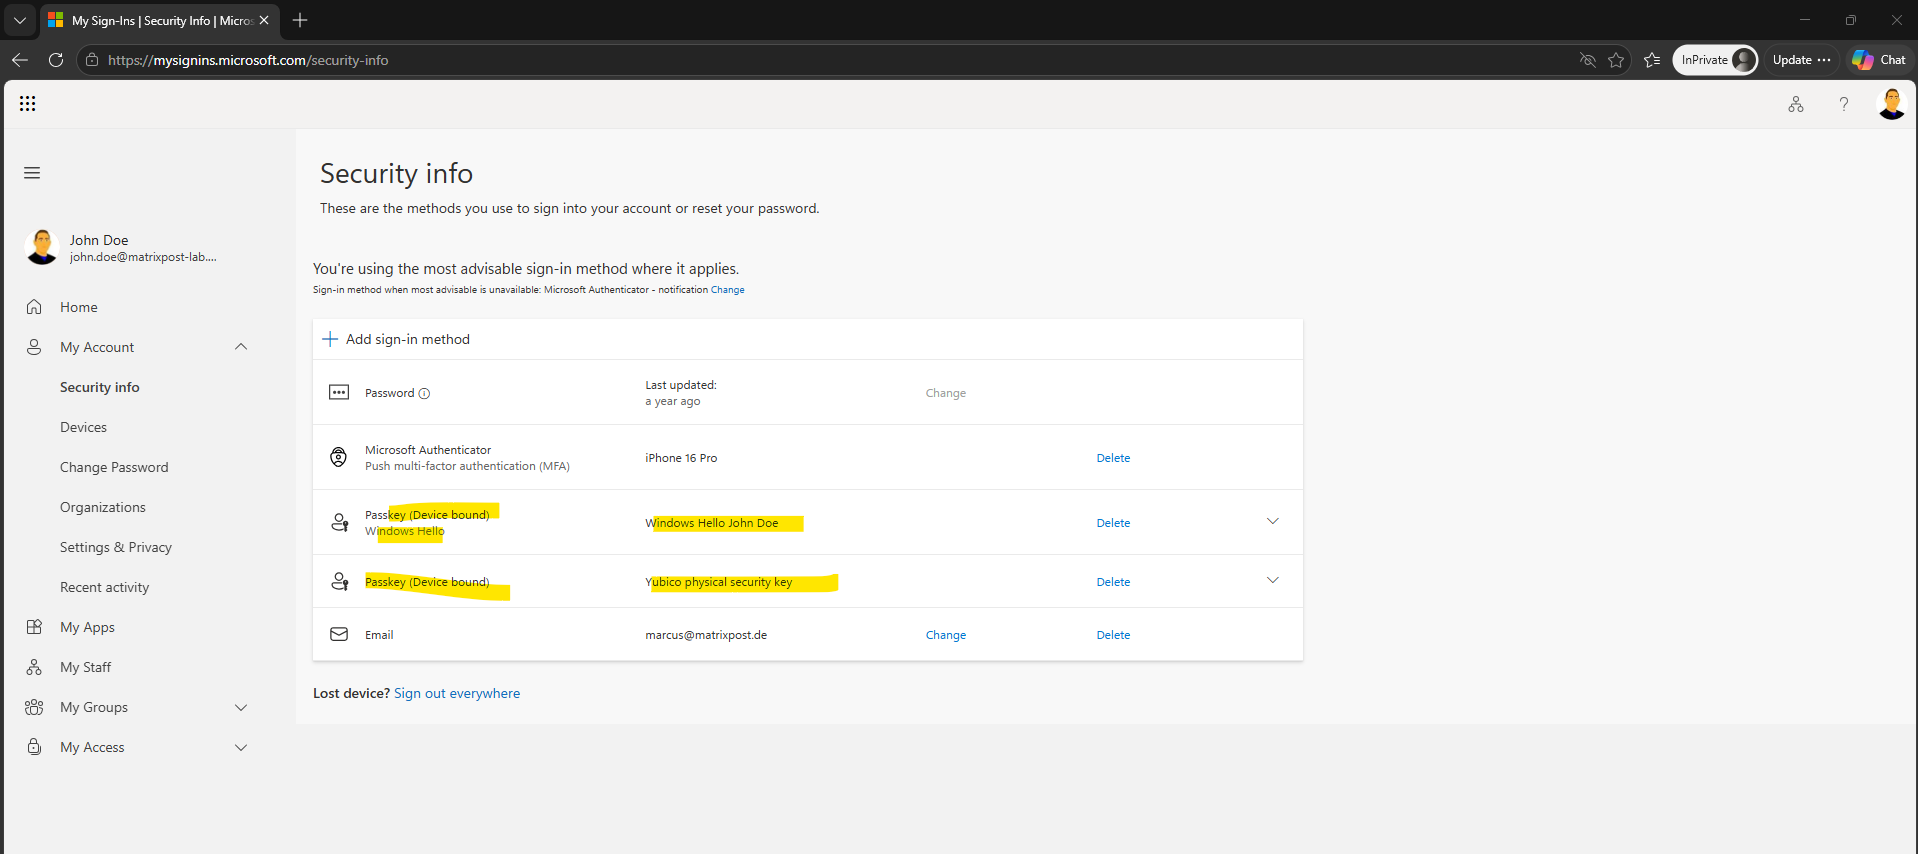
As shown below, Windows Hello is already registered as a device-bound passkey, alongside the physical Passkey (FIDO2). In the next section, we will take a closer look at how these Windows Hello device-bound passkeys work and how they differ from using a physical security key.
Passkeys Beyond Physical FIDO2 Security Keys
When registering a passkey on a modern Windows device, Windows Security can store the credential directly on the Windows device, where it is protected by Windows Hello and typically the device’s TPM.
This is a good example of Microsoft’s broader passkey concept: the credential does not have to reside on a physical Passkey (FIDO2), but can instead be bound directly to the Windows device.
Microsoft these days already increasingly encouraging, and, depending on the configured registration campaign, prompting, users who currently sign in using the traditional password + MFA flow to register a passkey.
Beginning September 1, 2026, Microsoft will begin rolling out passkeys as the default authentication experience in Microsoft Entra ID.
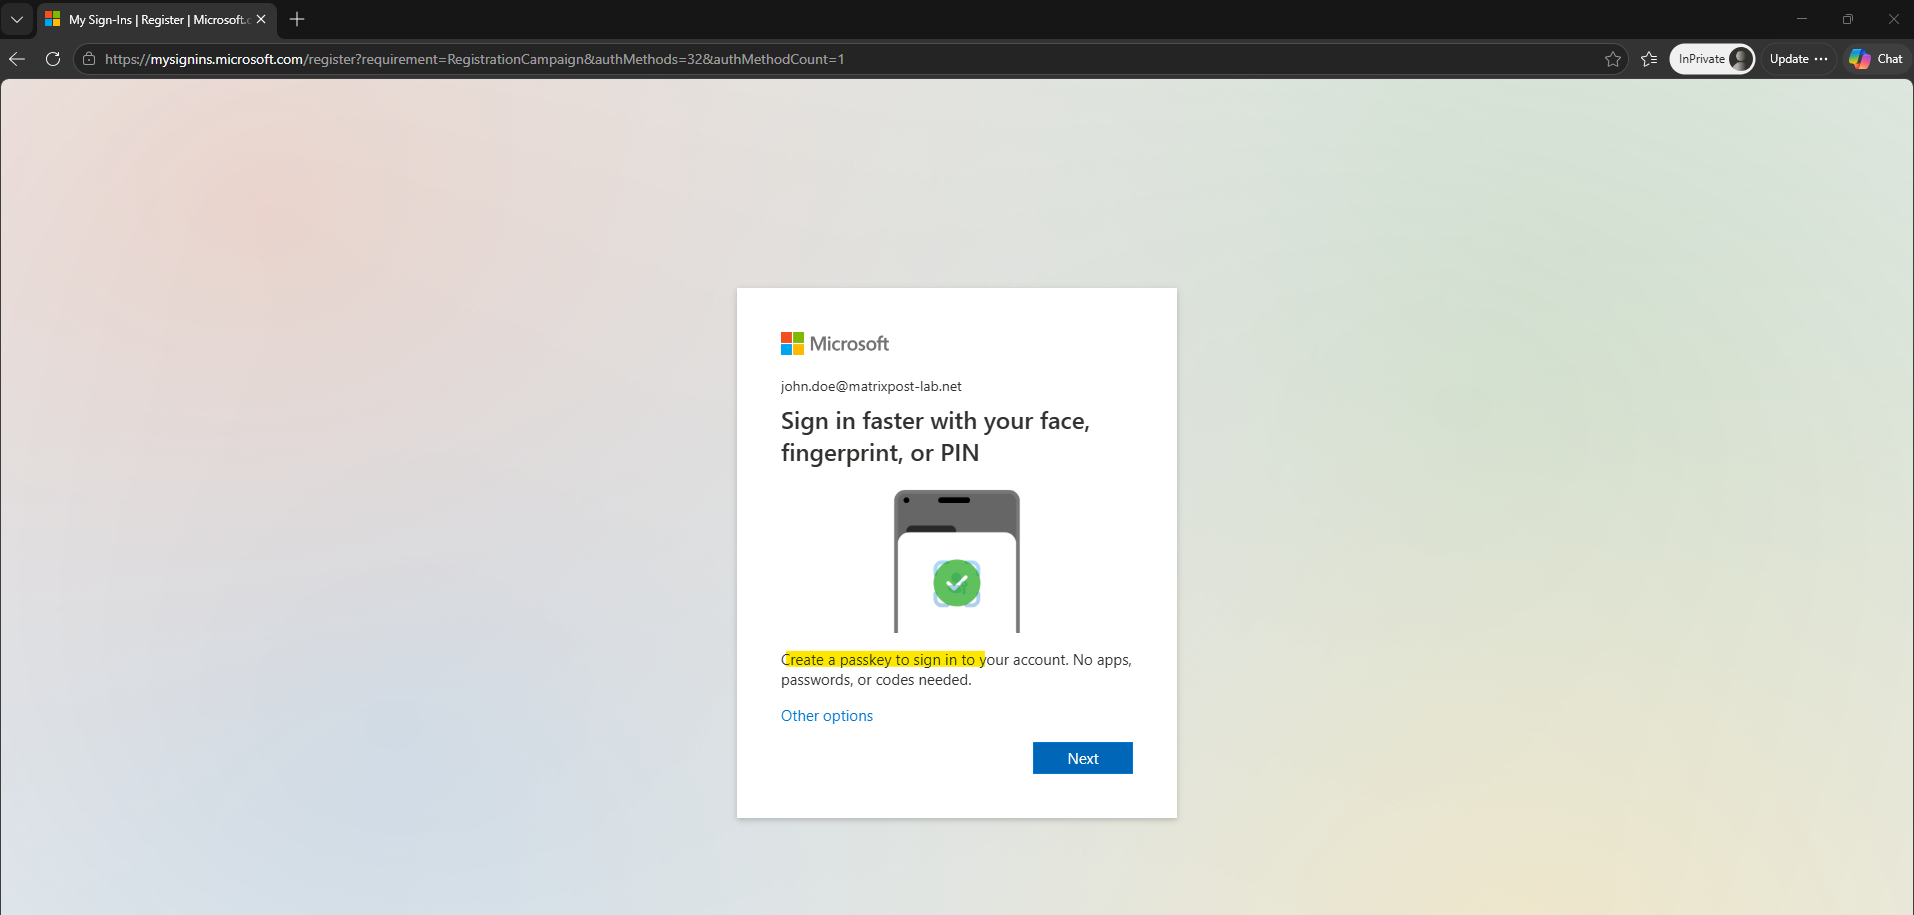
As shown below, the user is offered a passkey using face, fingerprint, or PIN, allowing future authentication without passwords, Authenticator approvals, or one-time codes.
This should not be confused with the physical Passkey (FIDO2) we configured here. Both use the same underlying FIDO2/WebAuthn passkey technology, but the credential can be stored and protected by different authenticators, such as Windows Hello, Microsoft Authenticator, or a dedicated hardware security key.
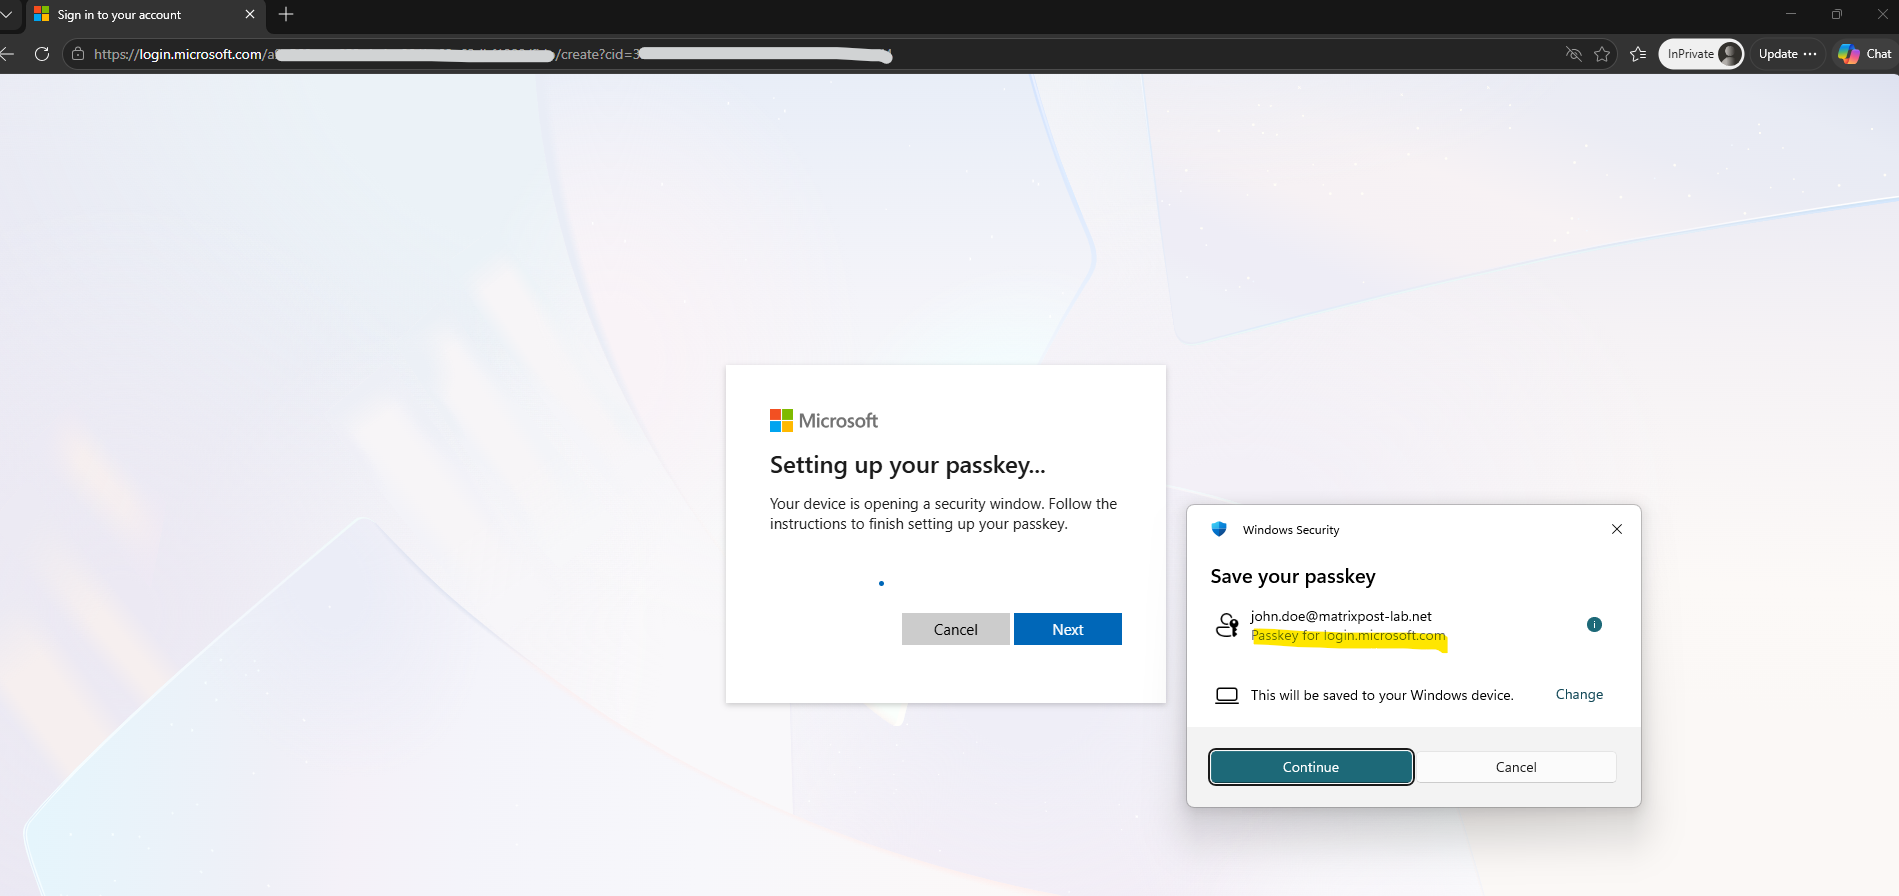
After starting the registration, Windows Security opens and proposes saving the new passkey directly on the Windows device.
In this case, the passkey becomes device-bound and can subsequently be unlocked through Windows Hello, for example using a PIN, fingerprint, or facial recognition.
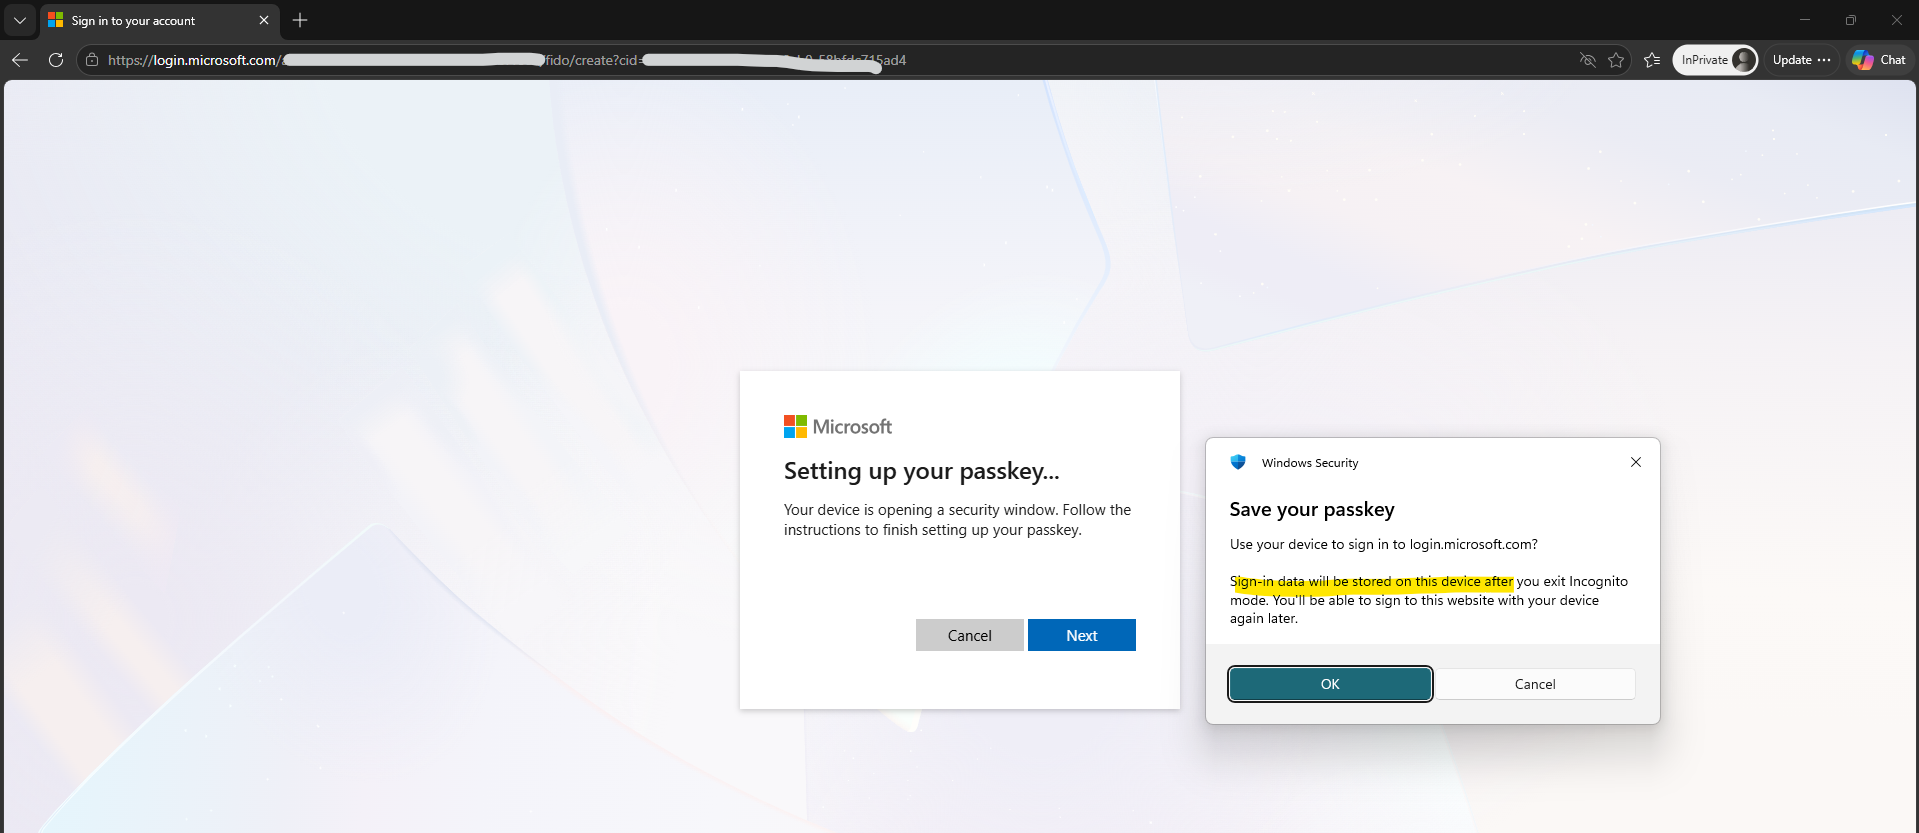
Windows confirms that the sign-in data will be stored locally on this device, even when using an InPrivate/Incognito browser session. This illustrates an important distinction: the passkey is stored and protected by Windows, not simply as browser data or a browser cookie.
To protect the newly created device-bound passkey, Windows requires the user to verify their identity using Windows Hello, in this case the local Windows Hello PIN.
The PIN itself is not sent to Microsoft; it is used locally to unlock and authorize use of the cryptographic credential stored and protected on the Windows device, typically by the TPM.
The device then uses its protected private key to sign an authentication challenge, which is verified using the corresponding public key registered for the user, essentially the same public/private key and challenge-response mechanism we use with our physical Yubico FIDO2 security key.
A physical FIDO2 security key provides additional isolation by storing the private key on a separate dedicated hardware authenticator, independent of the Windows computer being used.
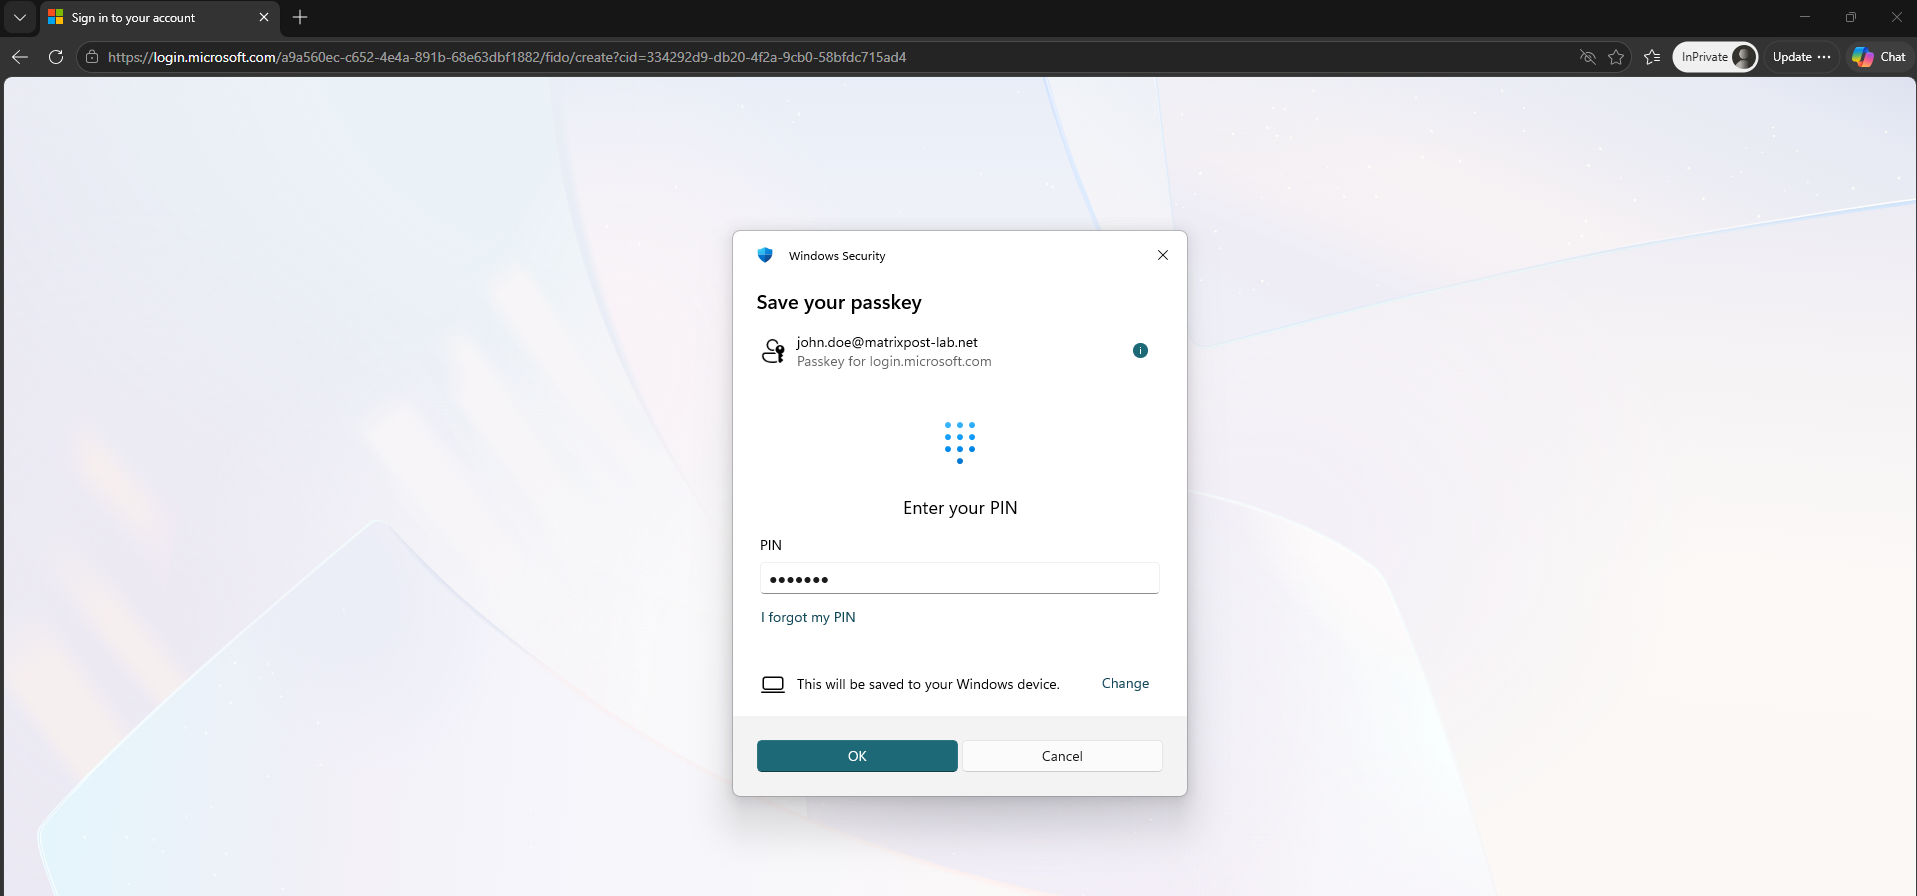
A TPM (Trusted Platform Module) is a dedicated security component that can generate, store, and use cryptographic keys in a hardware-protected environment isolated from the operating system.
When authentication is required, the TPM performs the cryptographic operation internally and returns only the result, such as a digital signature, while the protected private key never leaves the TPM.
Finally, assign a descriptive name to the newly created passkey so that it can easily be identified later in the user’s Security info.
Here, we use Windows Hello John Doe to distinguish this device-bound Windows Hello passkey from other passkeys, such as a physical FIDO2 security key.
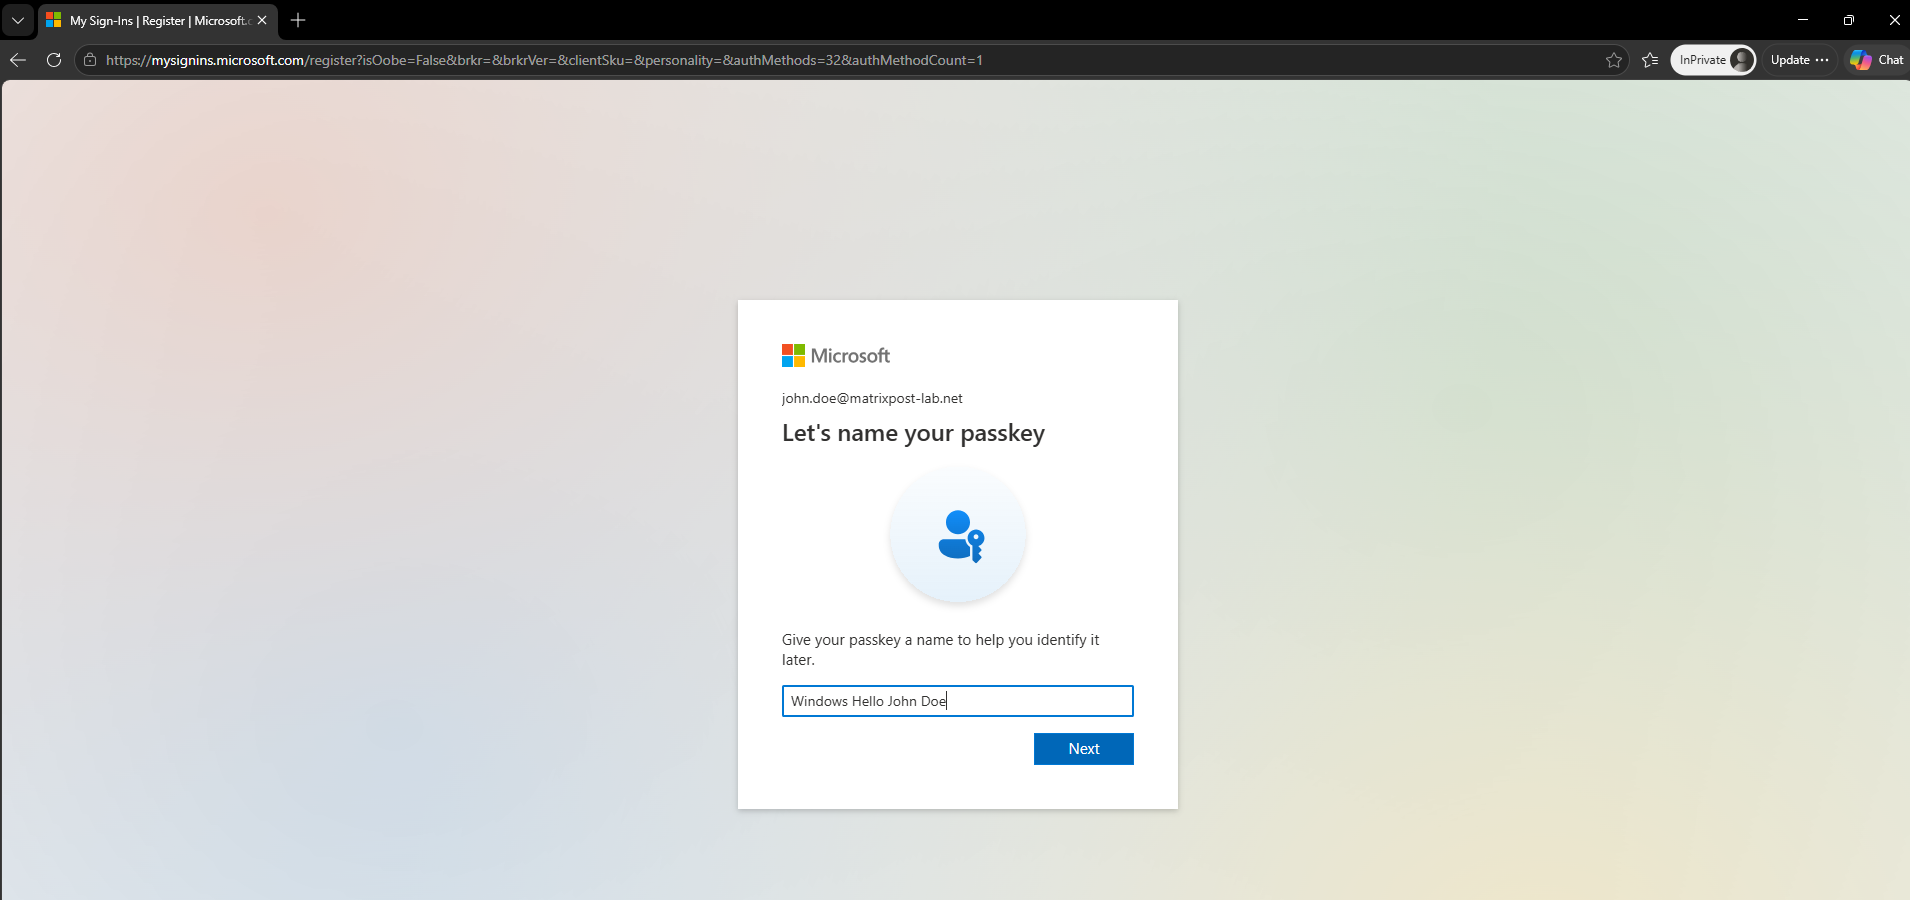
The device-bound passkey has now been created successfully and is associated with the user’s Microsoft Entra ID account. From now on, the user can authenticate on this Windows device using Windows Hello, for example, with the PIN, fingerprint, or facial recognition, instead of entering the account password.
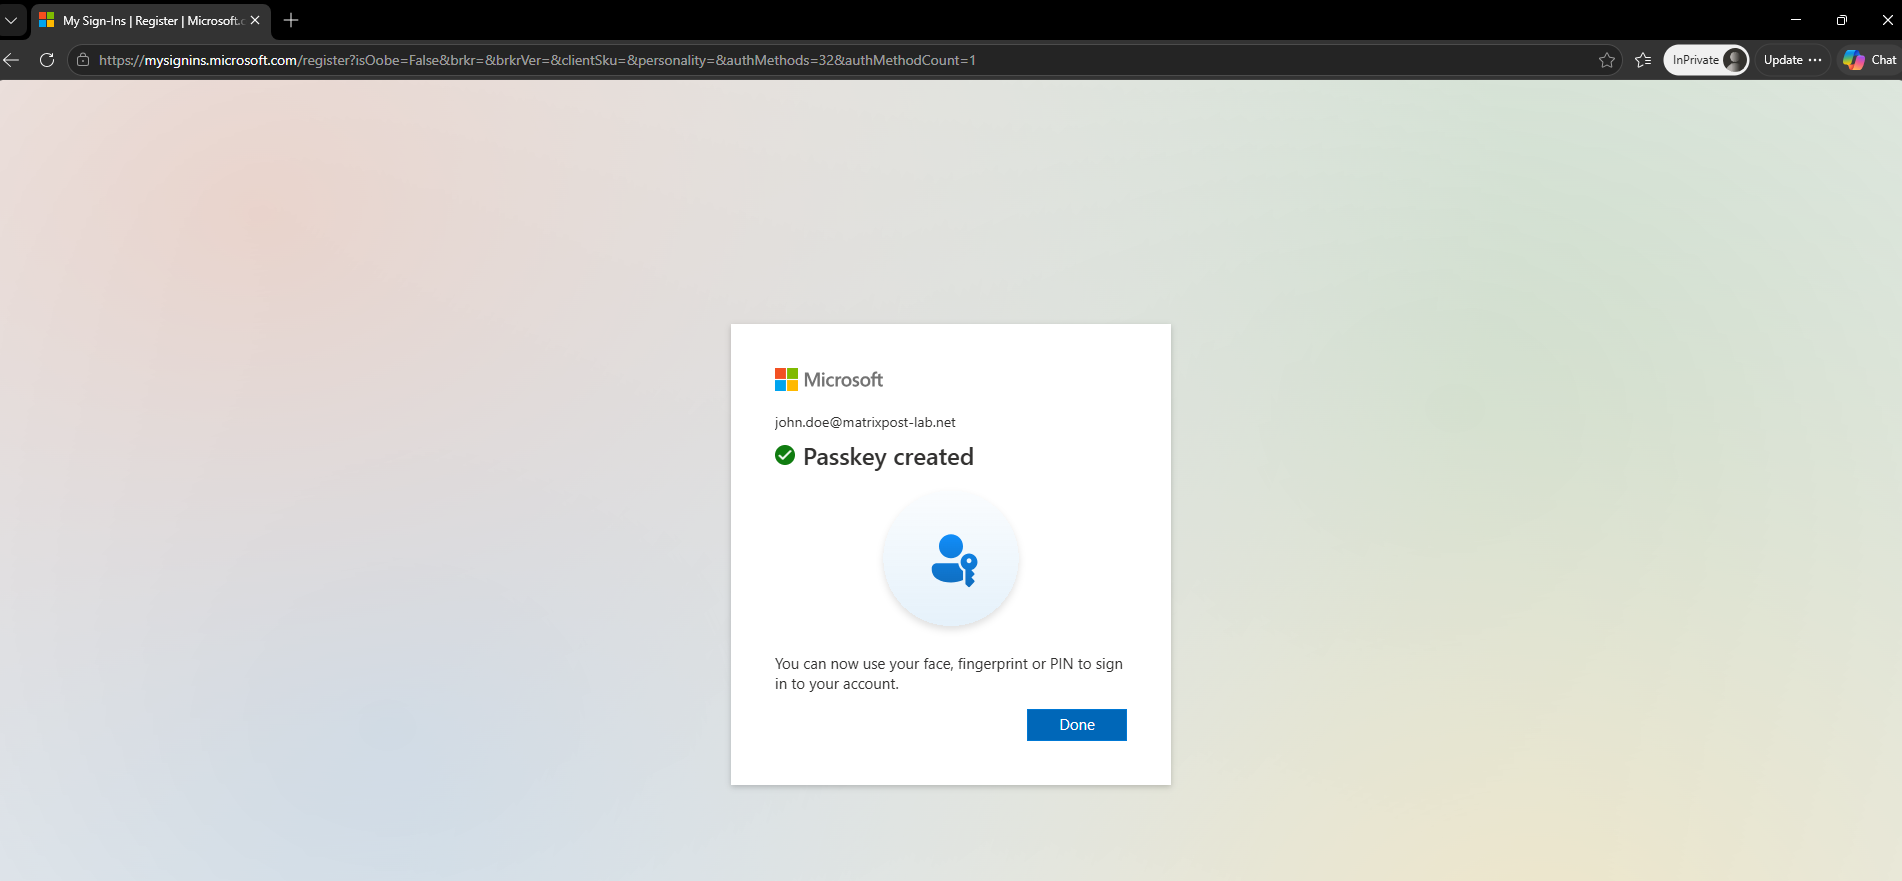
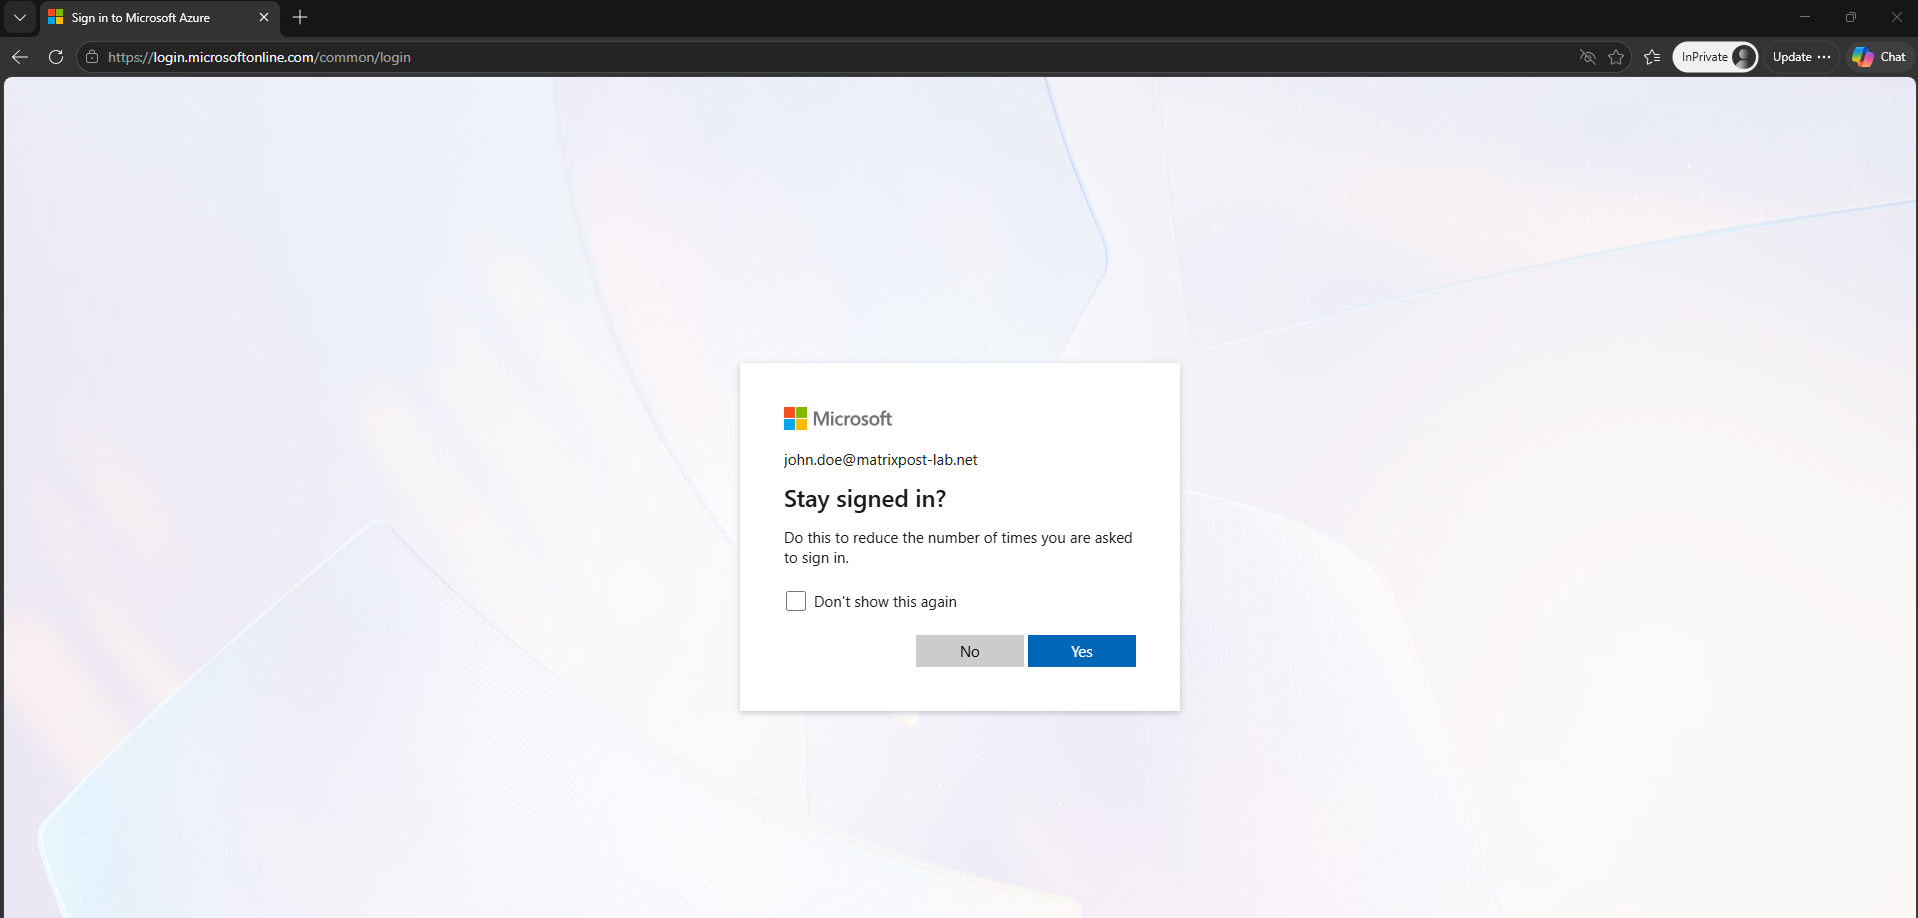
After the passkey registration is completed, the normal Microsoft Stay signed in? prompt is displayed. Selecting Yes keeps the authenticated session active and reduces the number of sign-in prompts for subsequent access to Microsoft services.
Back on the Security info page, the newly registered credential is now listed as Passkey (Device bound) – Windows Hello with the descriptive name Windows Hello John Doe.
This clearly distinguishes the device-bound Windows Hello credential from other authentication methods and from physical Passkey (FIDO2) configured.
Using Passkey (FIDO2) Authentication
Now that passkey authentication has been enabled in Microsoft Entra ID and our physical FIDO2 security key has been successfully registered, we can put the configuration into practice.
In the following sections, we will first use the physical security key for passwordless Microsoft Entra ID sign-in and then take a closer look at how passkey (FIDO2) authentication can be used with Remote Desktop (RDP).
Signing In to Microsoft Entra ID with the Physical FIDO2 Security Key
As a first test, we will use our registered Yubico physical security key to sign in to Microsoft Entra ID without entering the user’s password.
We open a new InPrivate/Incognito browser session and navigate to the Microsoft Entra ID sign-in page. After entering the John Doe user name, Microsoft still initially presents the regular password prompt.
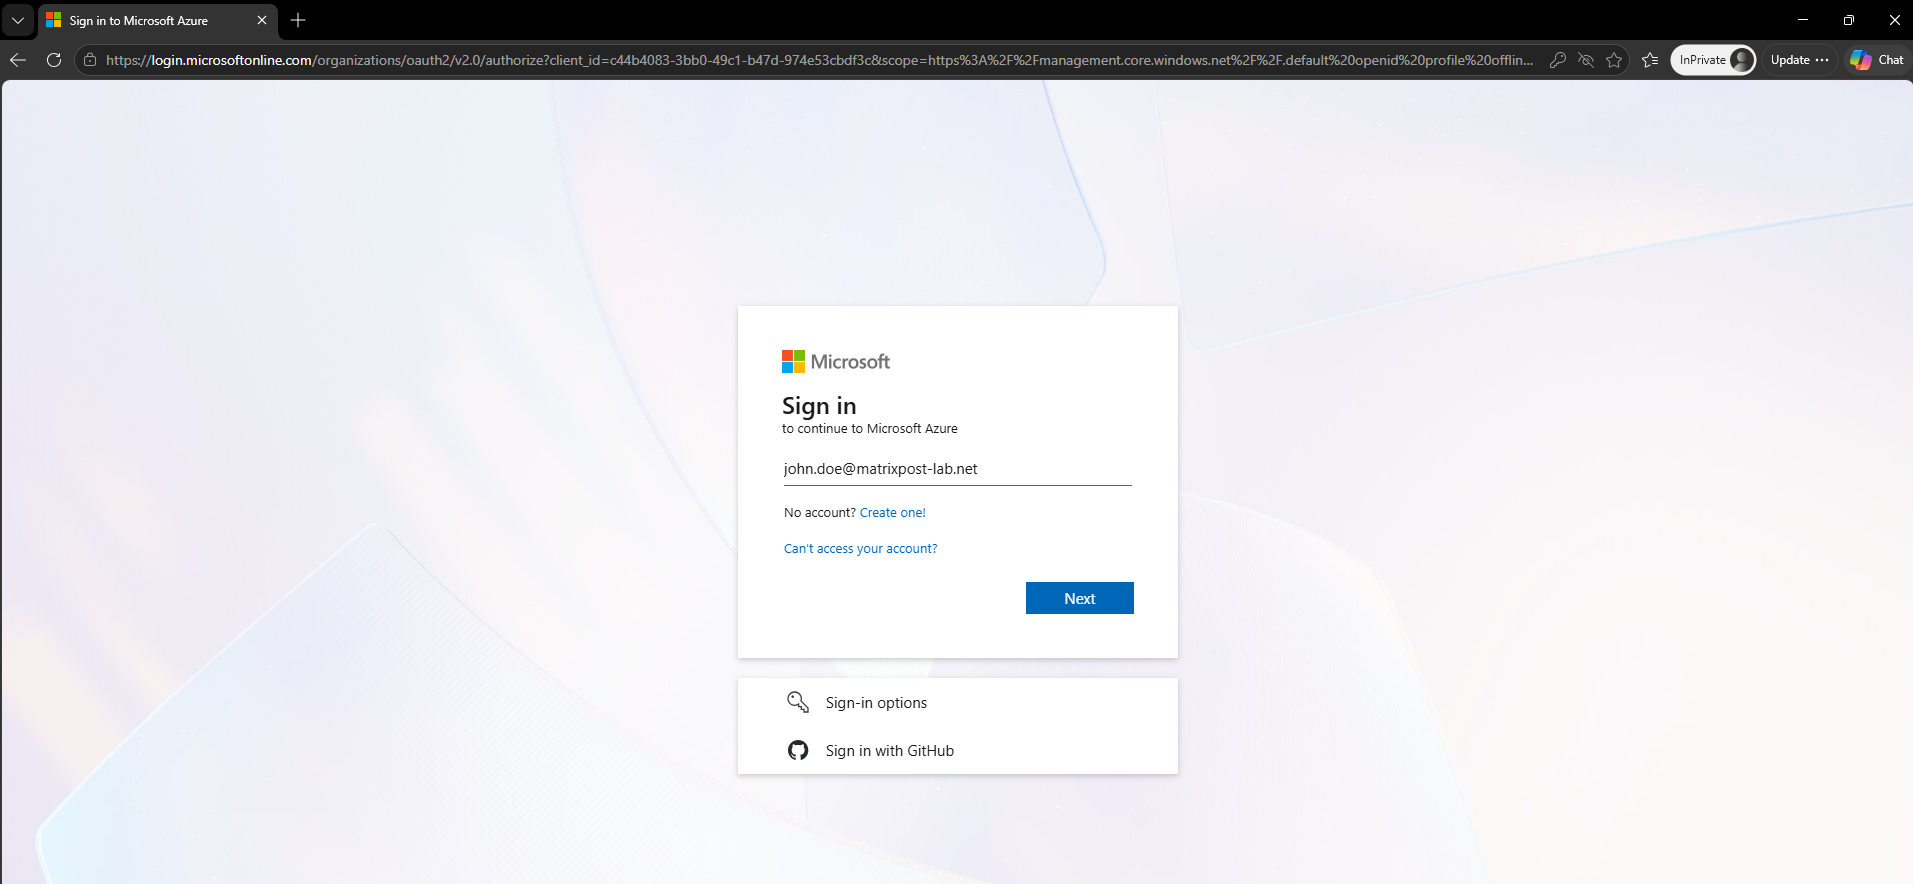
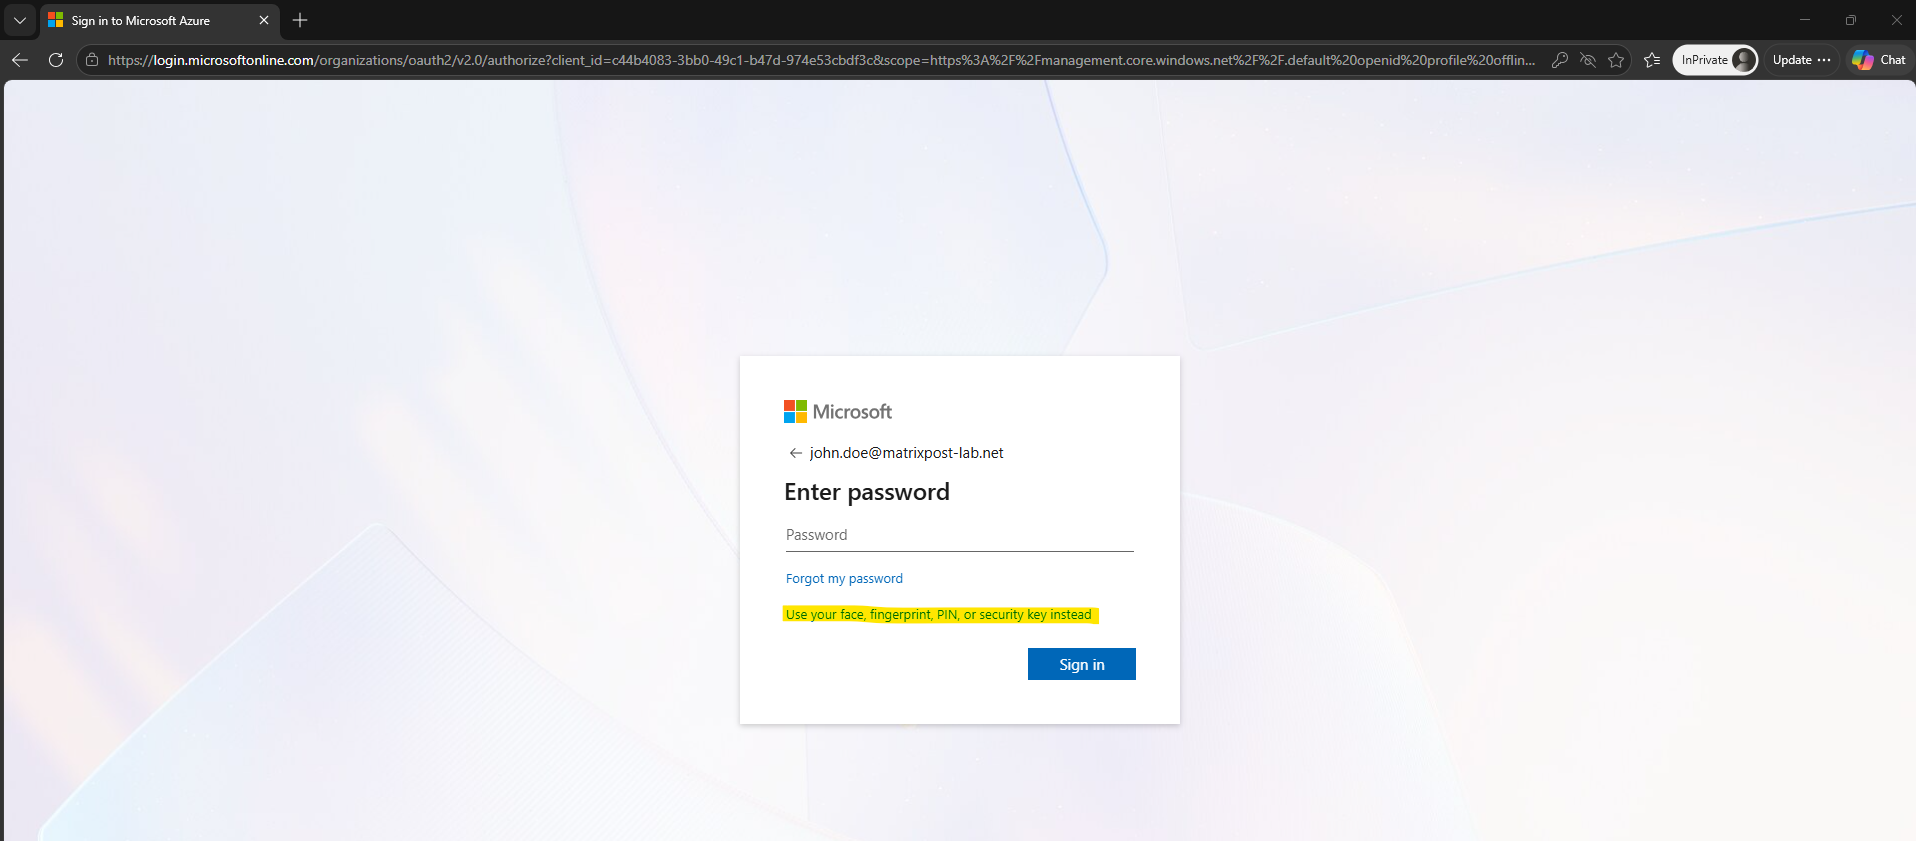
Instead of entering the password, select Use your face, fingerprint, PIN, or security key instead.
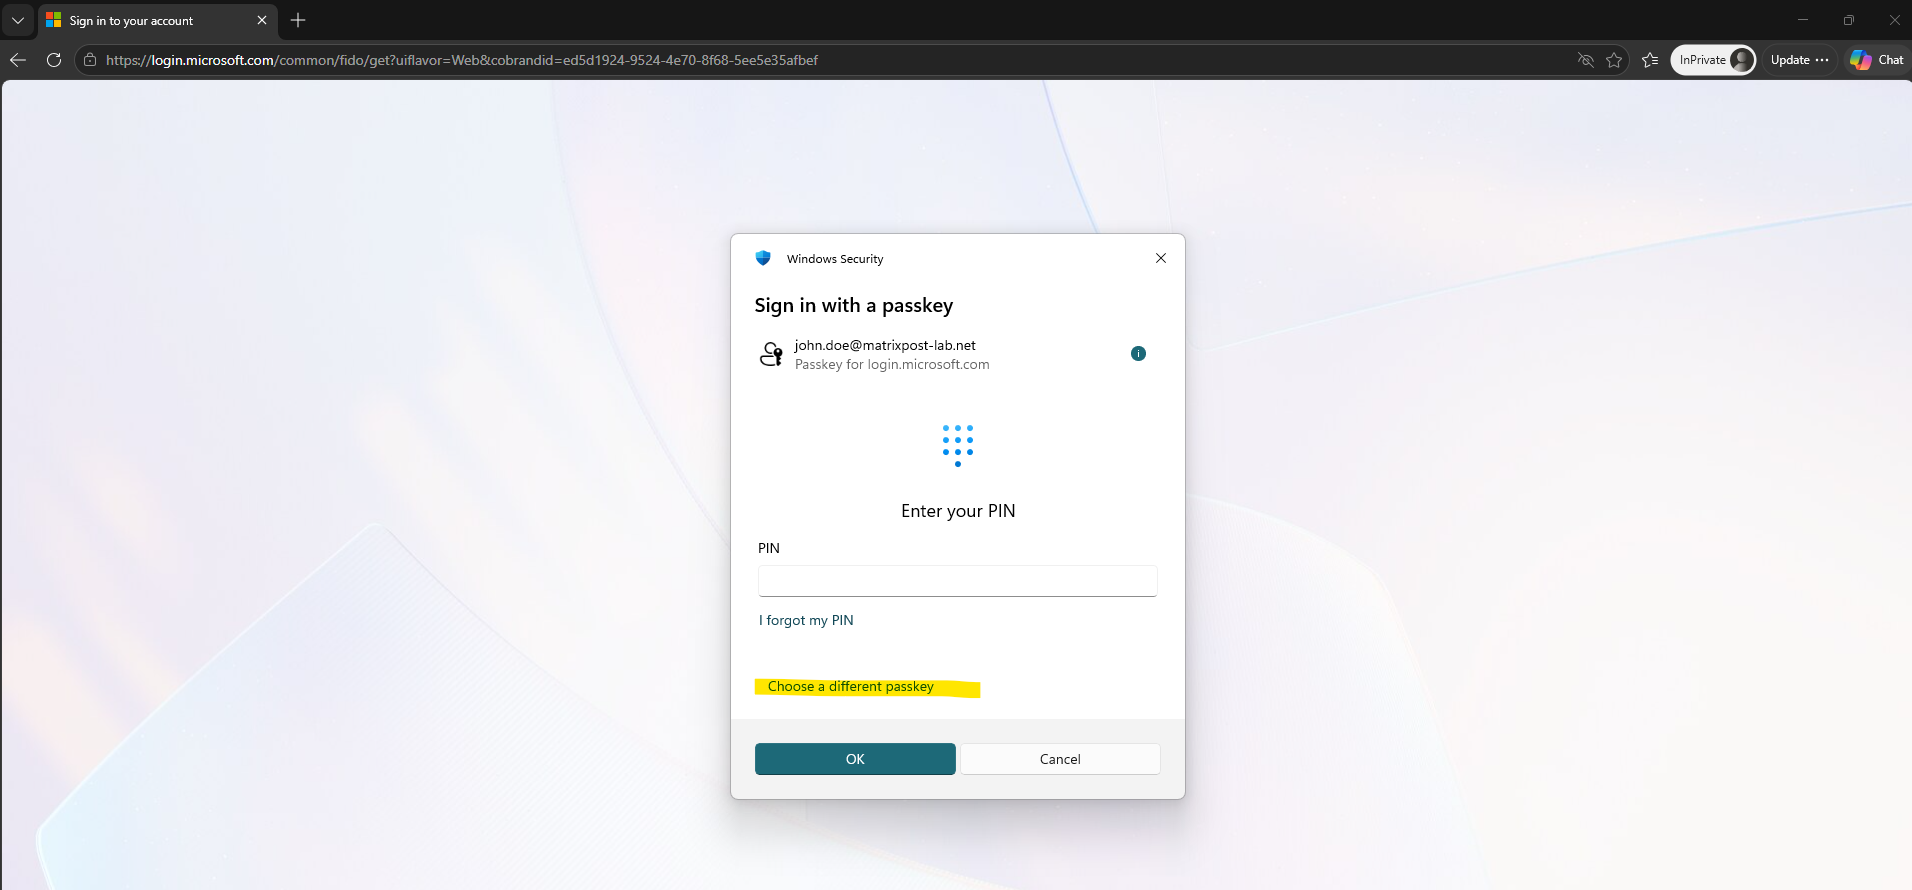
Windows Security then opens the Sign in with a passkey dialog.
Because a Windows Hello passkey is also registered for this account, Windows may initially offer the local Windows Hello credential. To explicitly authenticate with our physical FIDO2 security key, select Choose a different passkey.
Windows now displays the available passkey authenticator options. Select Security key to explicitly use the registered physical FIDO2 security key instead of the device-bound Windows Hello passkey.
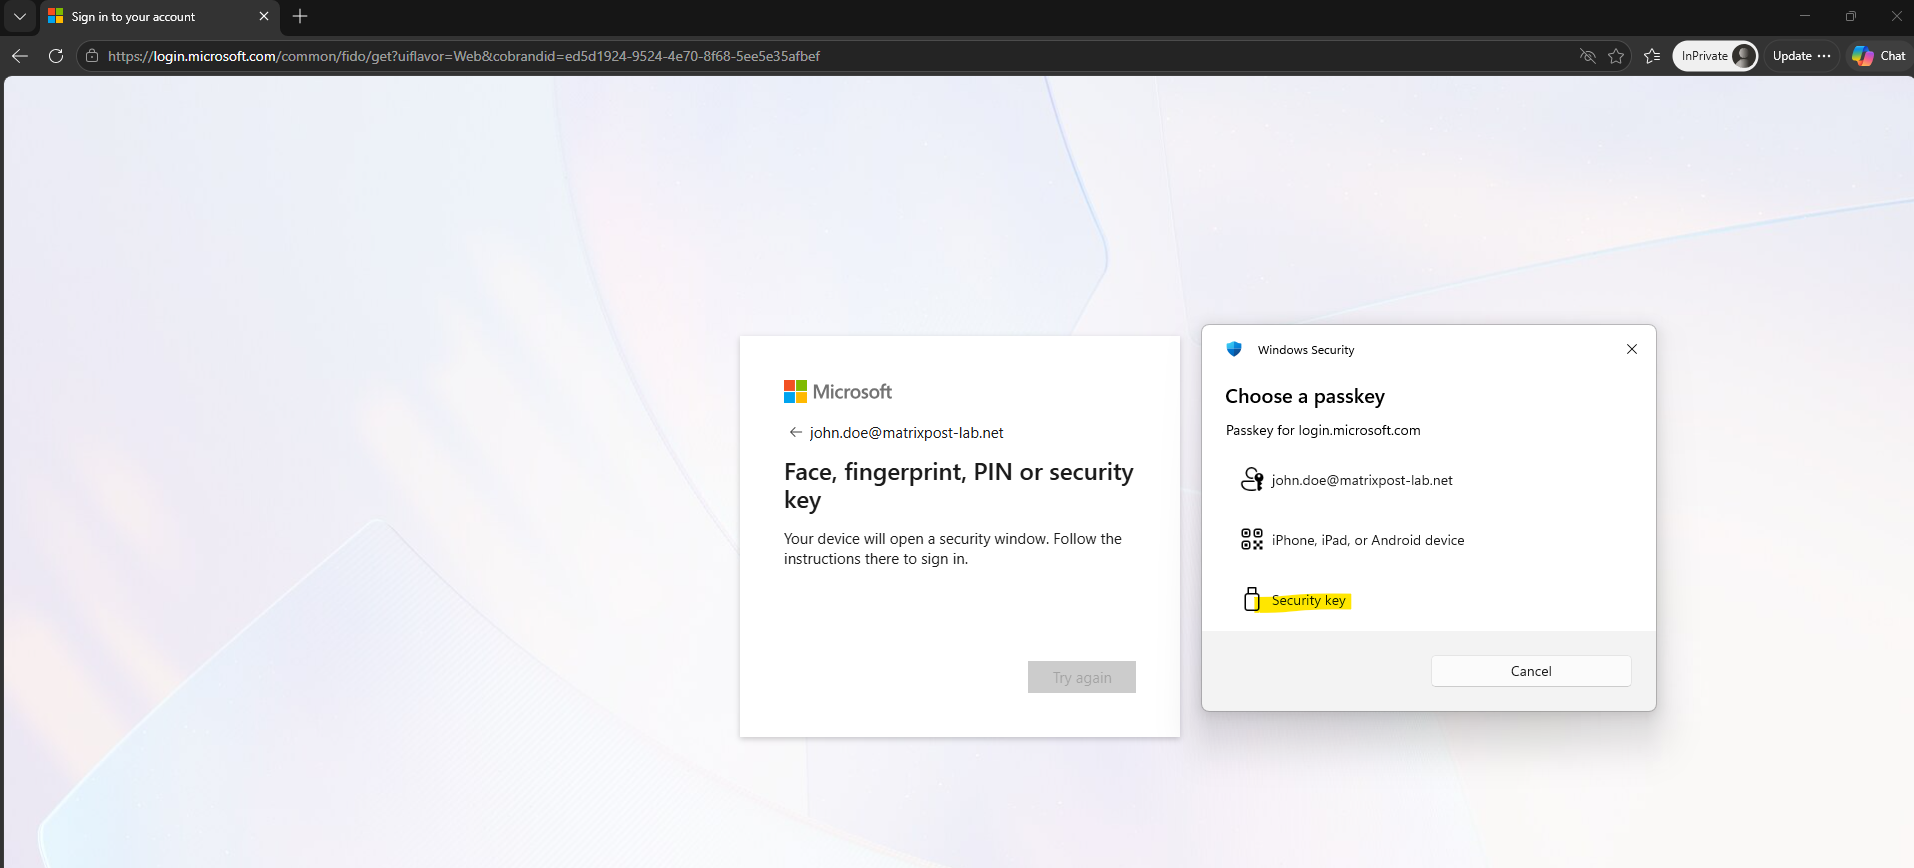
After selecting Security key, the familiar Windows Security dialog appears again.
However, this time Windows is not requesting the Windows Hello PIN, but the Security Key PIN configured on the physical FIDO2 key during registration.
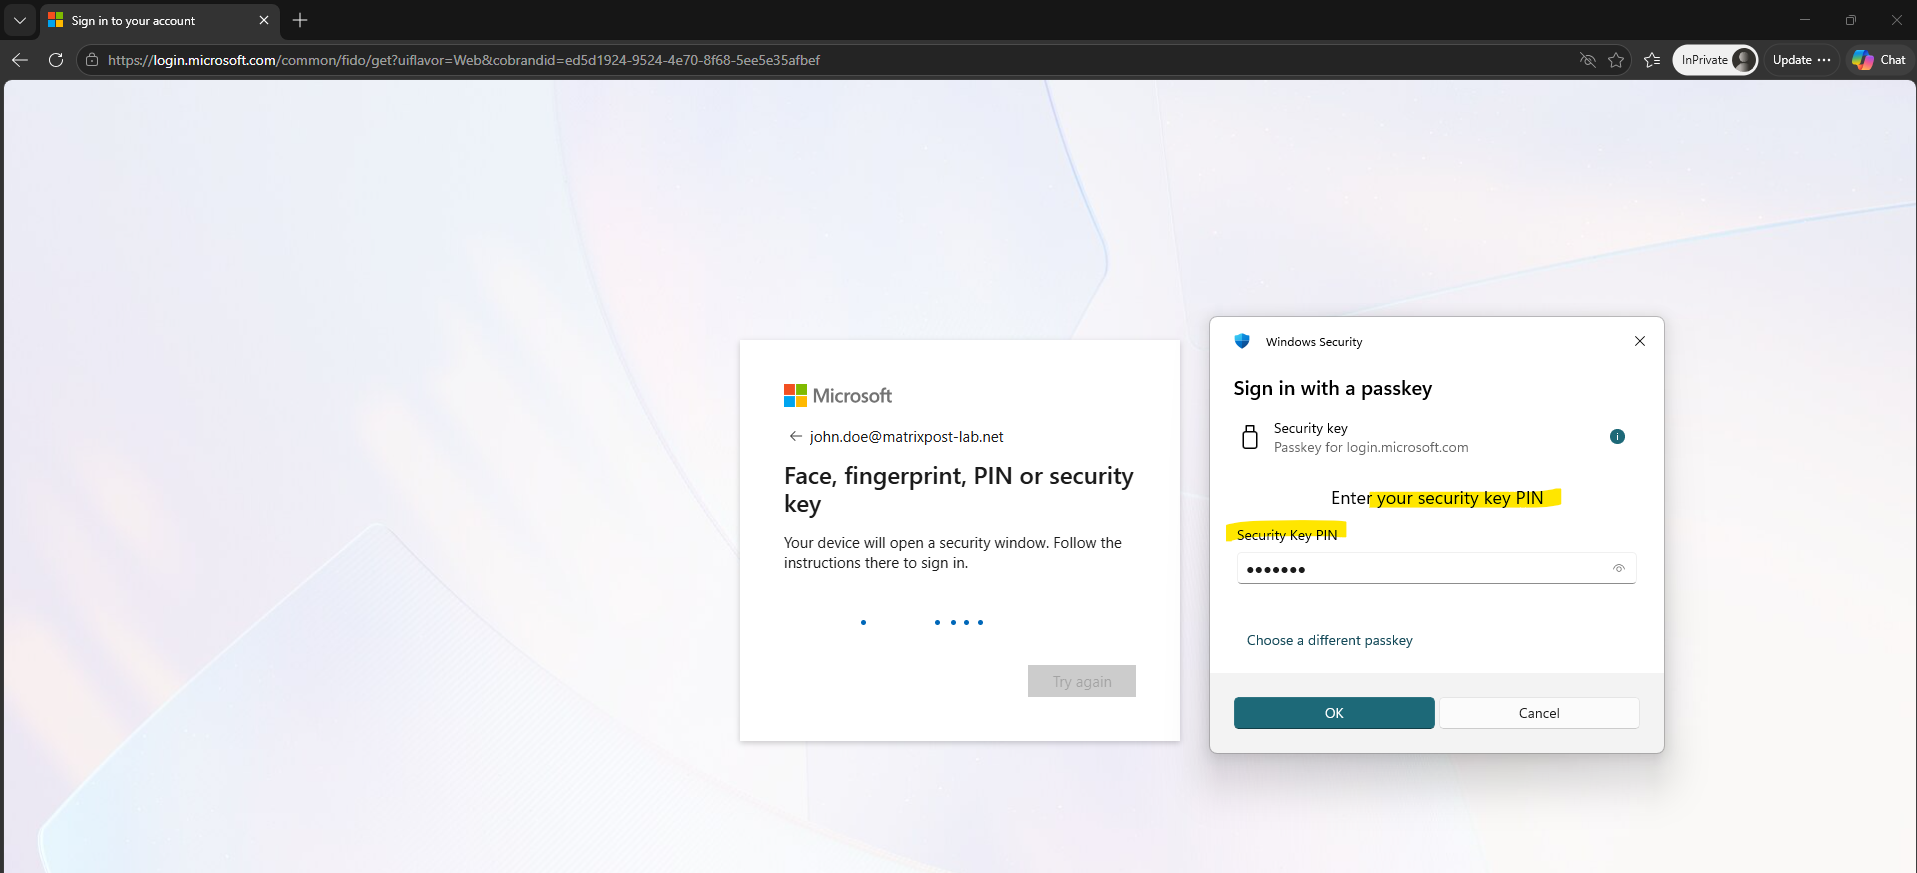
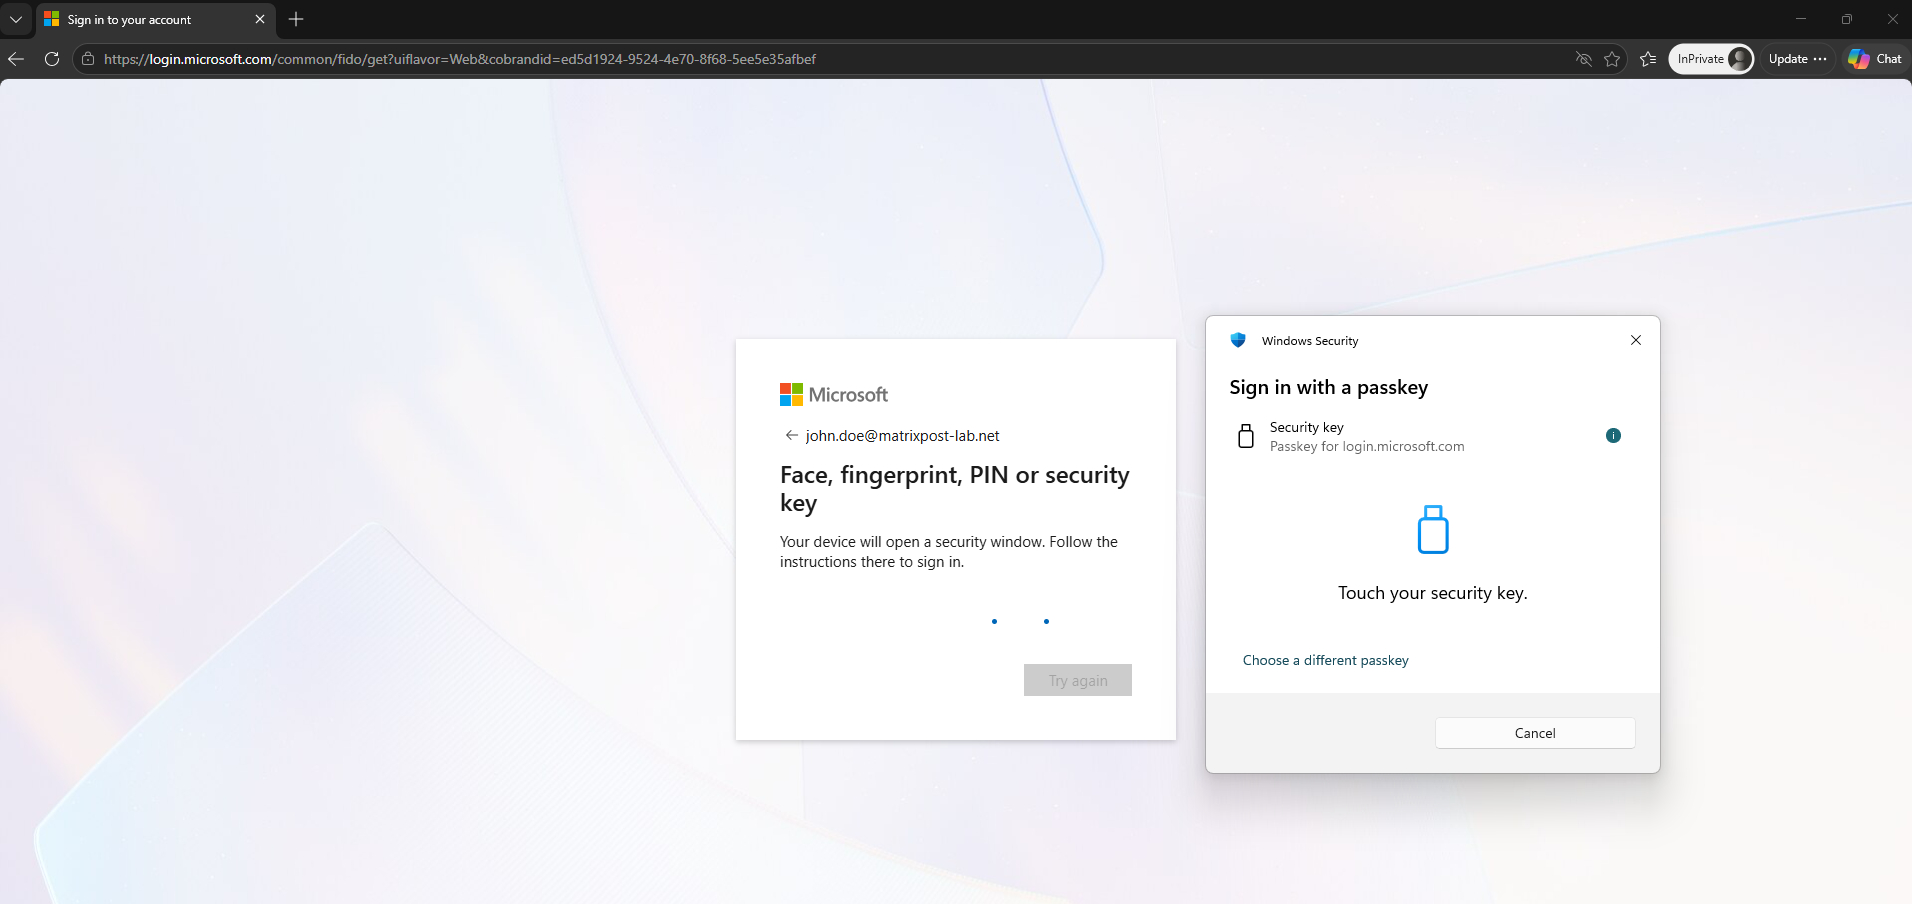
After entering the Security Key PIN, Windows prompts you to touch the physical security key. Touch the sensor on the FIDO2 key to confirm user presence and complete the passwordless authentication.
The PIN + touch combination is important: the PIN verifies the user, while touching the physical key proves user presence and authorizes the FIDO2 operation.
The blinking LED indicates that the physical security key is waiting for user presence; simply touch the illuminated sensor to authorize and complete the authentication.
After touching the physical security key, the FIDO2 authentication is successfully completed and Microsoft continues with the normal Stay signed in? prompt, no password or additional MFA challenge is required.
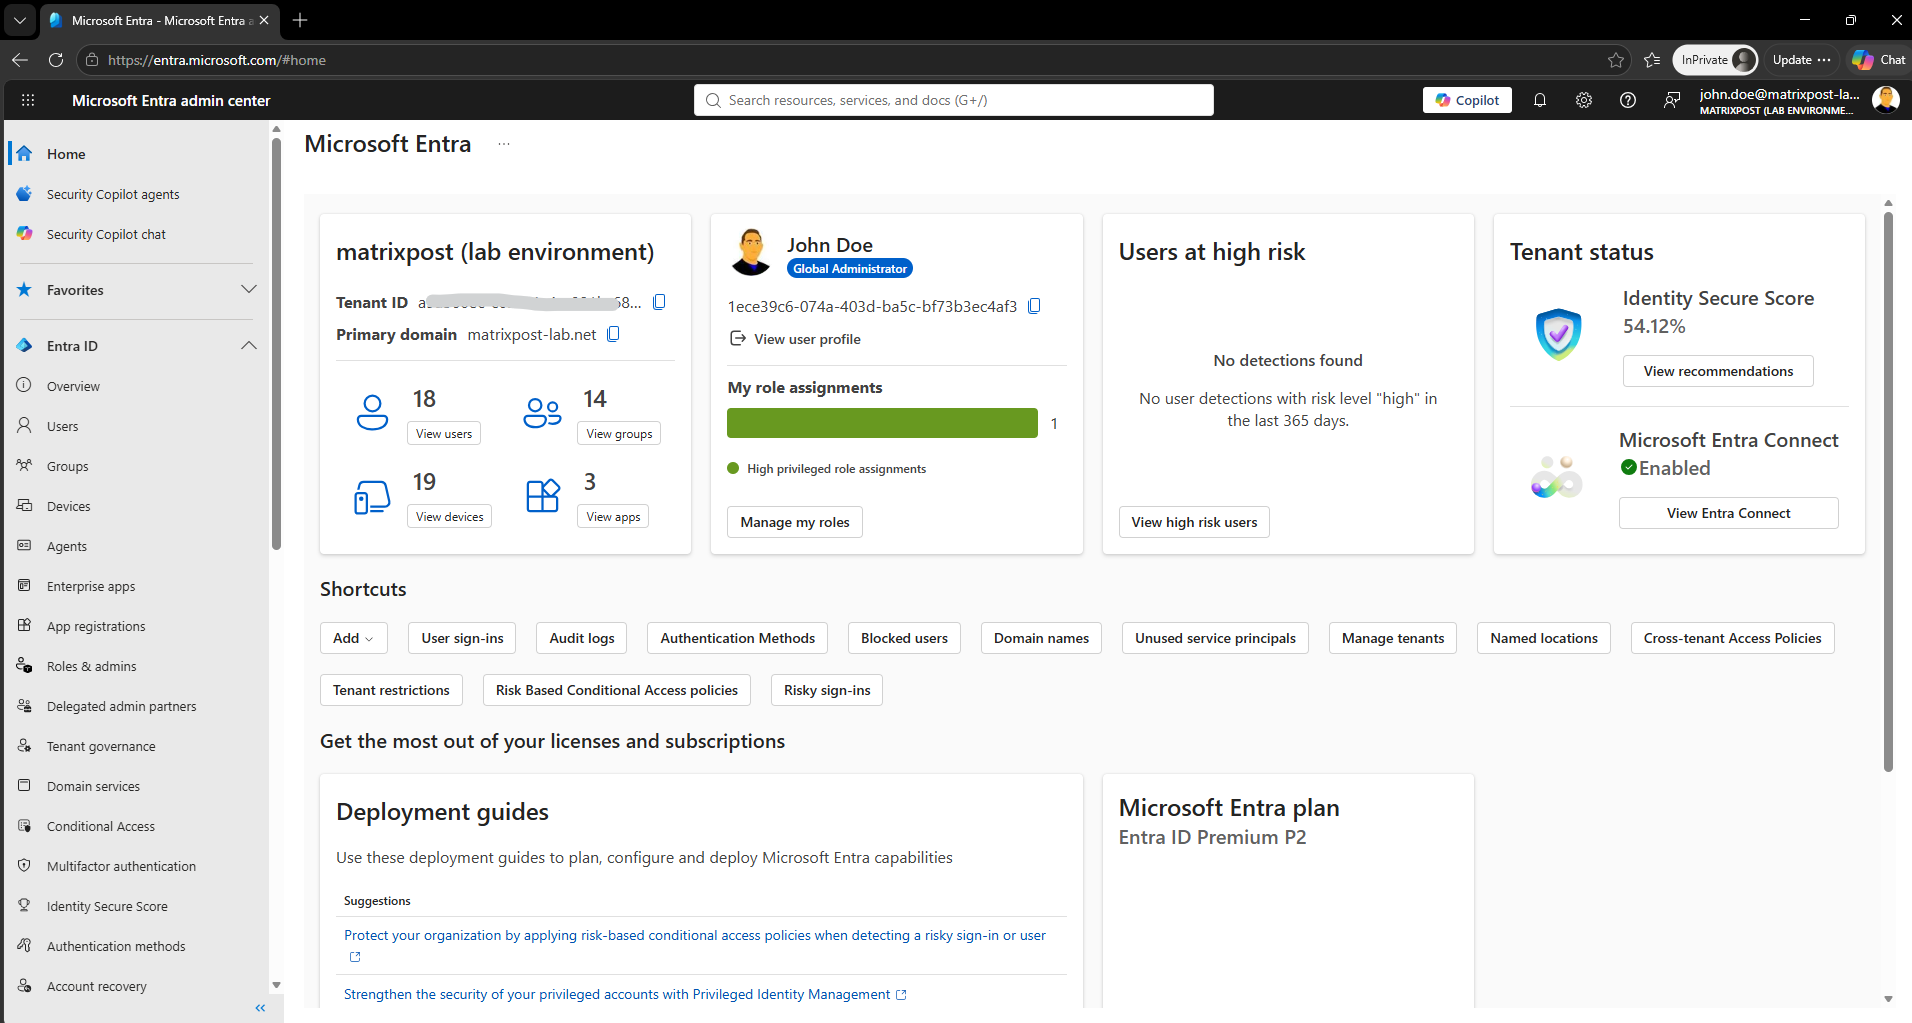
Finally, the authentication completes successfully and John Doe is signed in to the Microsoft Entra admin center using the physical FIDO2 security key.
The entire sign-in was performed passwordless, using the security key PIN and physical touch instead of a password and separate MFA challenge.
Configuring Passwordless RDP Authentication with Passkey (FIDO2)
Next, let us look at Remote Desktop (RDP), because authentication works somewhat differently here than with the browser-based Microsoft Entra sign-in shown above.
While a FIDO2 security key/passkey can directly authenticate a user to Microsoft Entra ID in a browser, classic RDP authentication does not simply present the same WebAuthn/FIDO2 sign-in dialog.
Whether passwordless authentication can be used with RDP depends on the RDP client, the identity of the target system, and the authentication mechanism being used.
Next we will therefore test the John Doe account with our physical FIDO2 security key and see what happens when connecting to a Windows system through Remote Desktop.
For our first test, we open the classic Remote Desktop Connection (mstsc.exe), enter the IP address of the remote Windows system, and specify the Microsoft Entra user john.doe@matrixpost-lab.net.
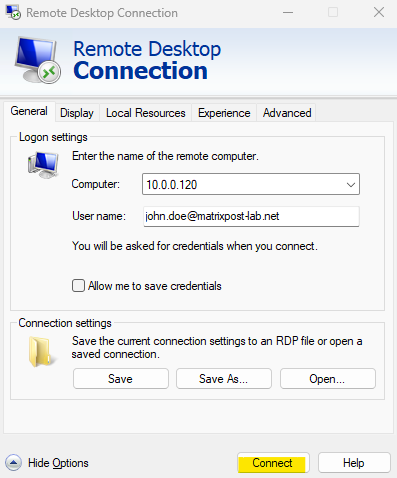
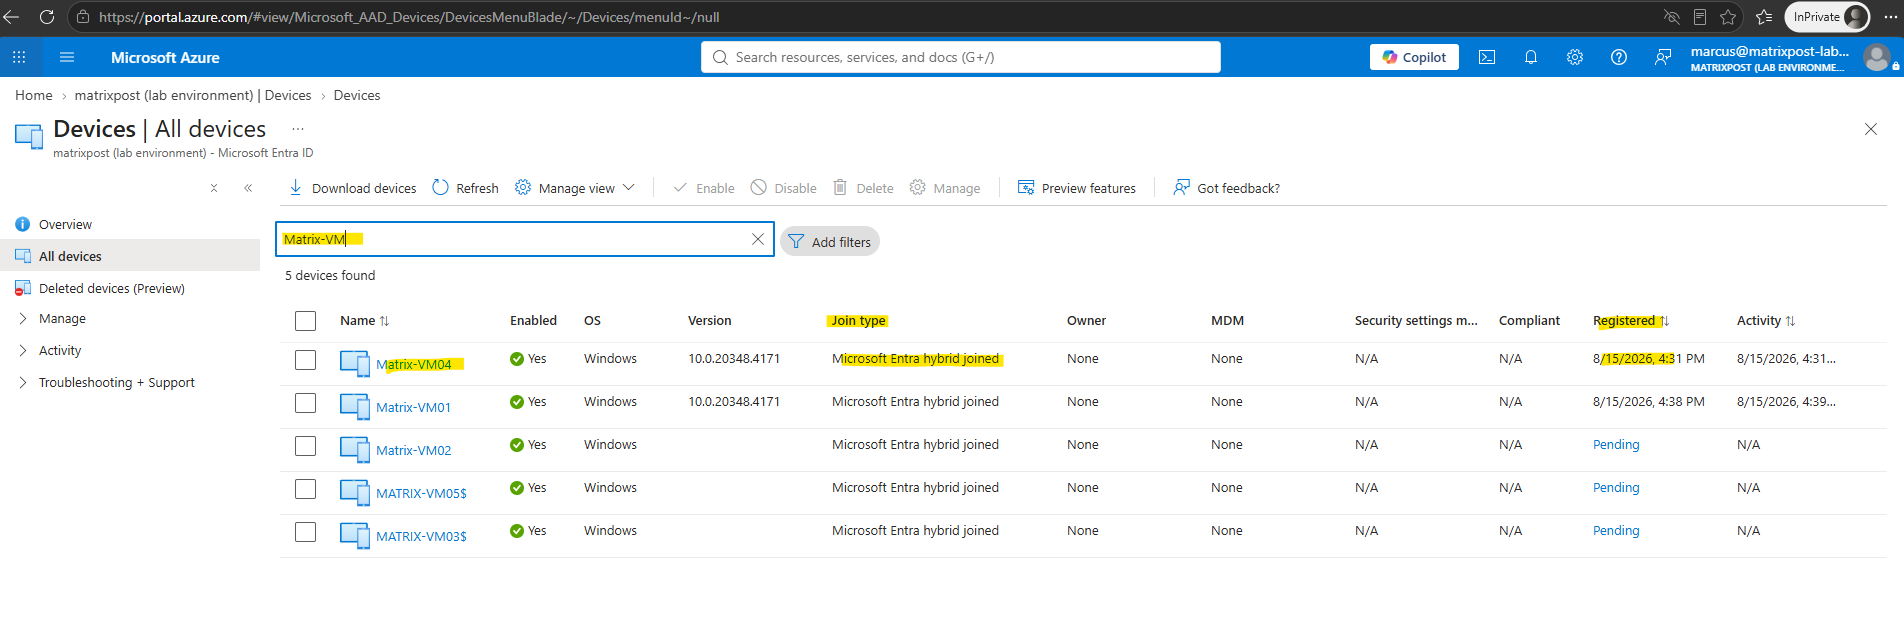
For this test, the remote system Matrix-VM01.matrixpost-lab.net (10.0.0.120) is a Windows Server 2022 system that is Microsoft Entra hybrid joined and running in my vSphere lab environment.
We can also verify the successful hybrid join in Microsoft Entra ID, where the device appears with the Join type
Microsoft Entra hybrid joined.The server does not need to be connected to Azure through Azure Arc for this scenario. Microsoft Entra hybrid join and Azure Arc onboarding are separate technologies, and Azure Arc is not a requirement for the FIDO2/Entra Kerberos authentication flow described here.
After starting the connection with the Entra ID user john.doe@matrixpost-lab.net, the classic RDP credential dialog initially asks for the user’s password.
Next, click More choices to check whether Windows exposes our registered Passkey (FIDO2) security key as an alternative credential provider.
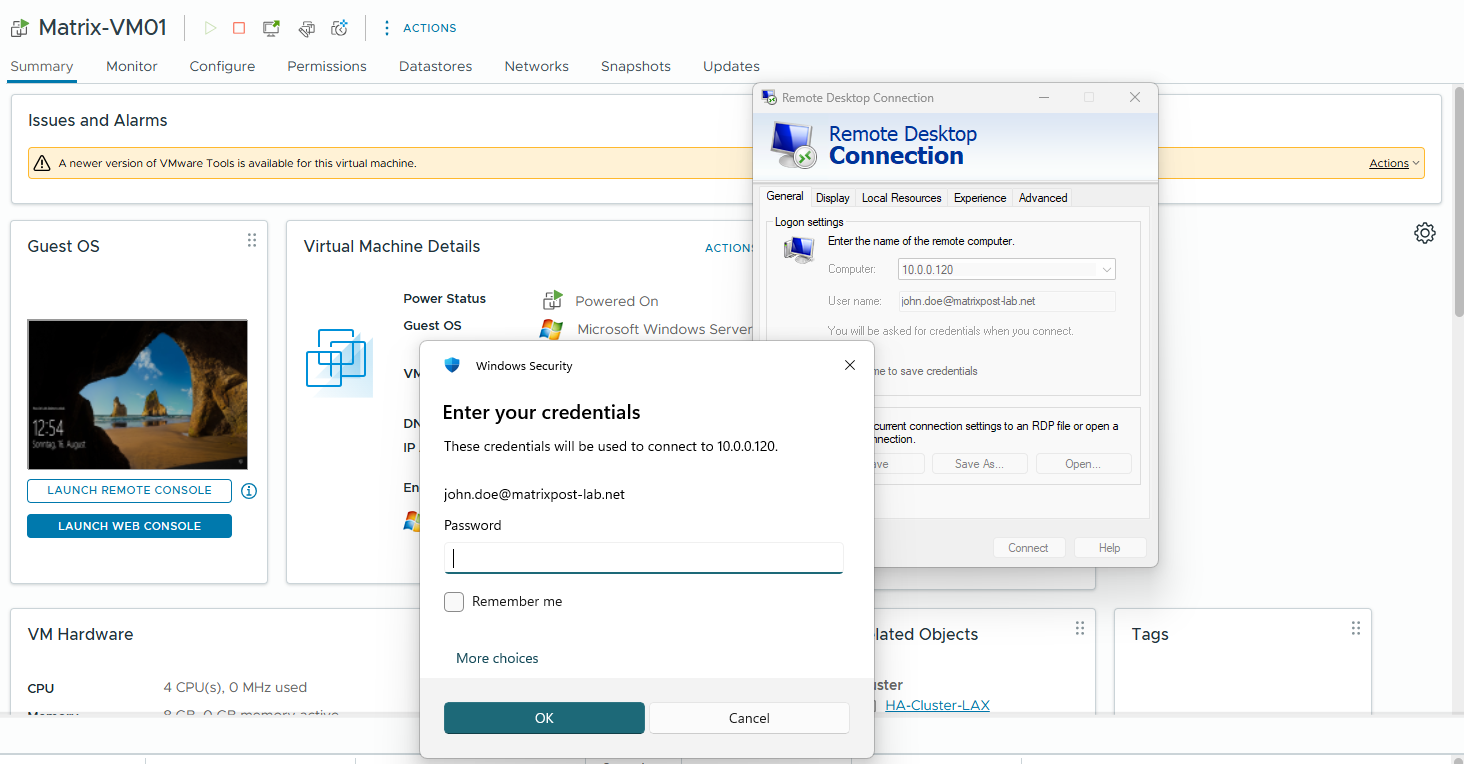
After clicking More choices, the limitation becomes visible: the classic RDP credential dialog offers the normal account/password and a locally available Windows Hello PIN, but no physical FIDO2 security key/passkey option for the John Doe account.
This demonstrates that a FIDO2 security key registered with Microsoft Entra ID cannot simply be used as a native credential in the standard
mstsc.exeRDP authentication flow in the same way as for the browser-based Entra sign-in.
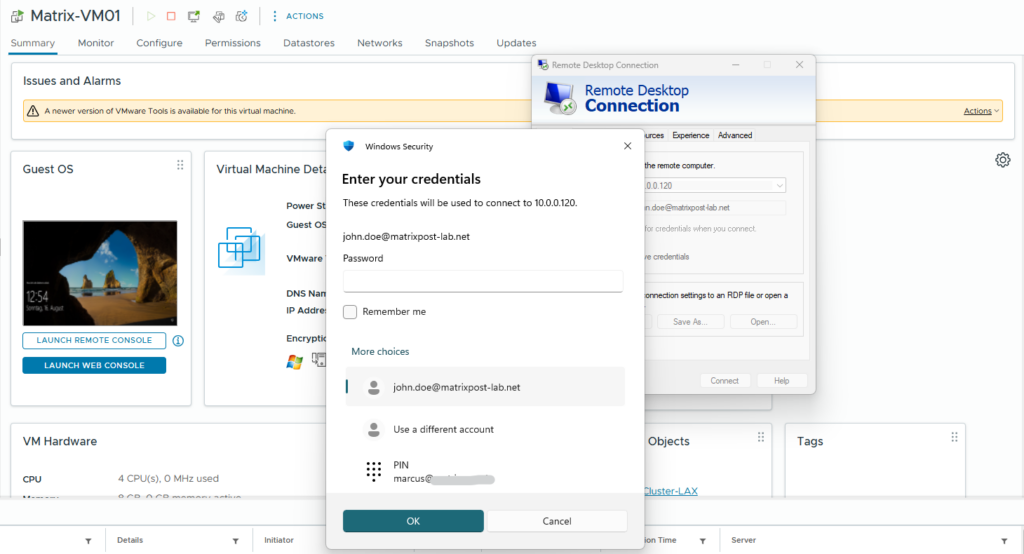
Instead of trying to make the physical FIDO2 key appear in the traditional RDP credential dialog, we tell mstsc.exe to use the Microsoft Entra web authentication flow. That flow can then use passwordless Entra authentication.
Microsoft explicitly supports Windows Server 2022 with the required updates for this scenario.
Sign in to Windows virtual machine in Azure using Microsoft Entra ID and Azure Roles Based Access Control
https://learn.microsoft.com/en-us/entra/identity/devices/howto-vm-sign-in-azure-ad-windows
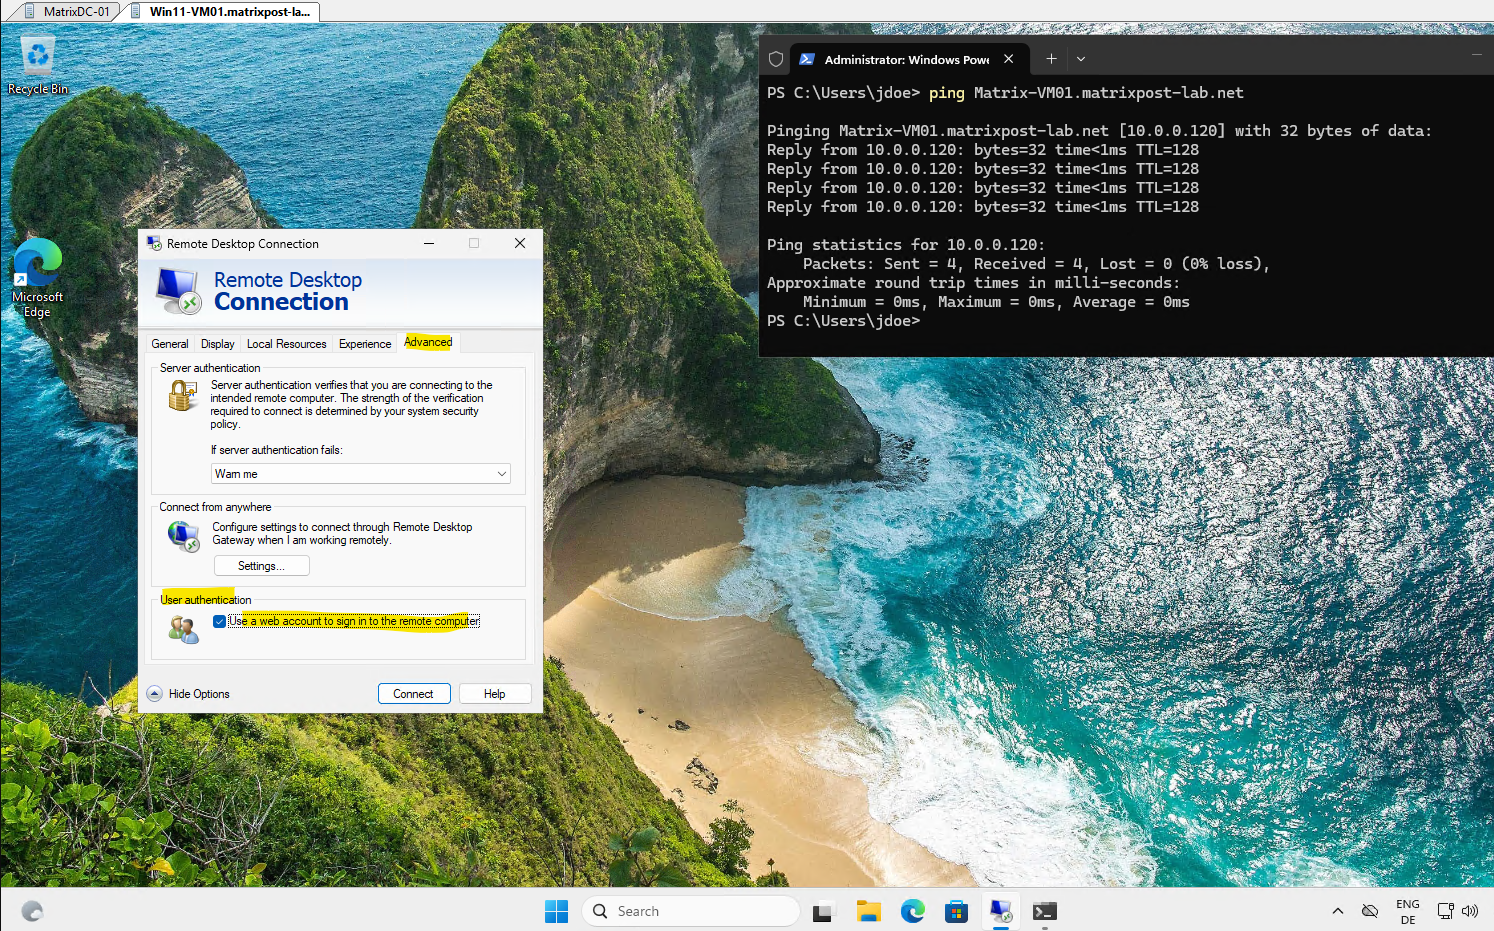
In order to use Microsoft Entra Web Authentication for RDP we need to enable on the Remote Desktop Connection under Advanced → User authentication the option Use a web account to sign in to the remote computer as shown below
This corresponds to the RDP property:
enablerdsaadauth:i:1
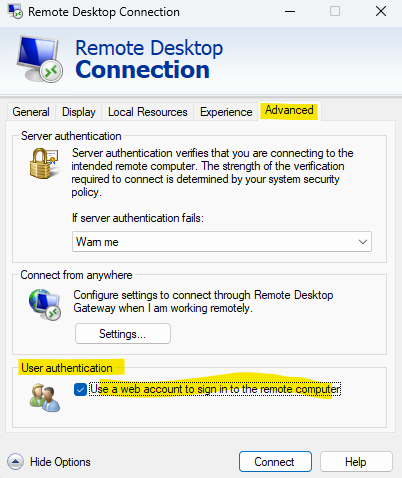
After enabling Use a web account to sign in to the remote computer, the RDP client indicates “A web account will be used to connect to this computer.”
Note: When using Microsoft Entra web authentication for RDP, connect to the remote computer using its FQDN (
Matrix-VM01.matrixpost-lab.net) rather than its IP address.The hostname is required so the authentication process can identify the target computer and obtain the appropriate Kerberos service ticket for its registered SPN; an IP address such as
10.0.0.120does not normally provide this hostname-based Kerberos service identity.This is also true for traditional on-premises Kerberos authentication. Kerberos normally relies on the server’s hostname/FQDN and corresponding SPN to obtain the appropriate service ticket; when connecting by IP address, Kerberos usually cannot use the expected hostname-based SPN and authentication instead fall back to NTLM.
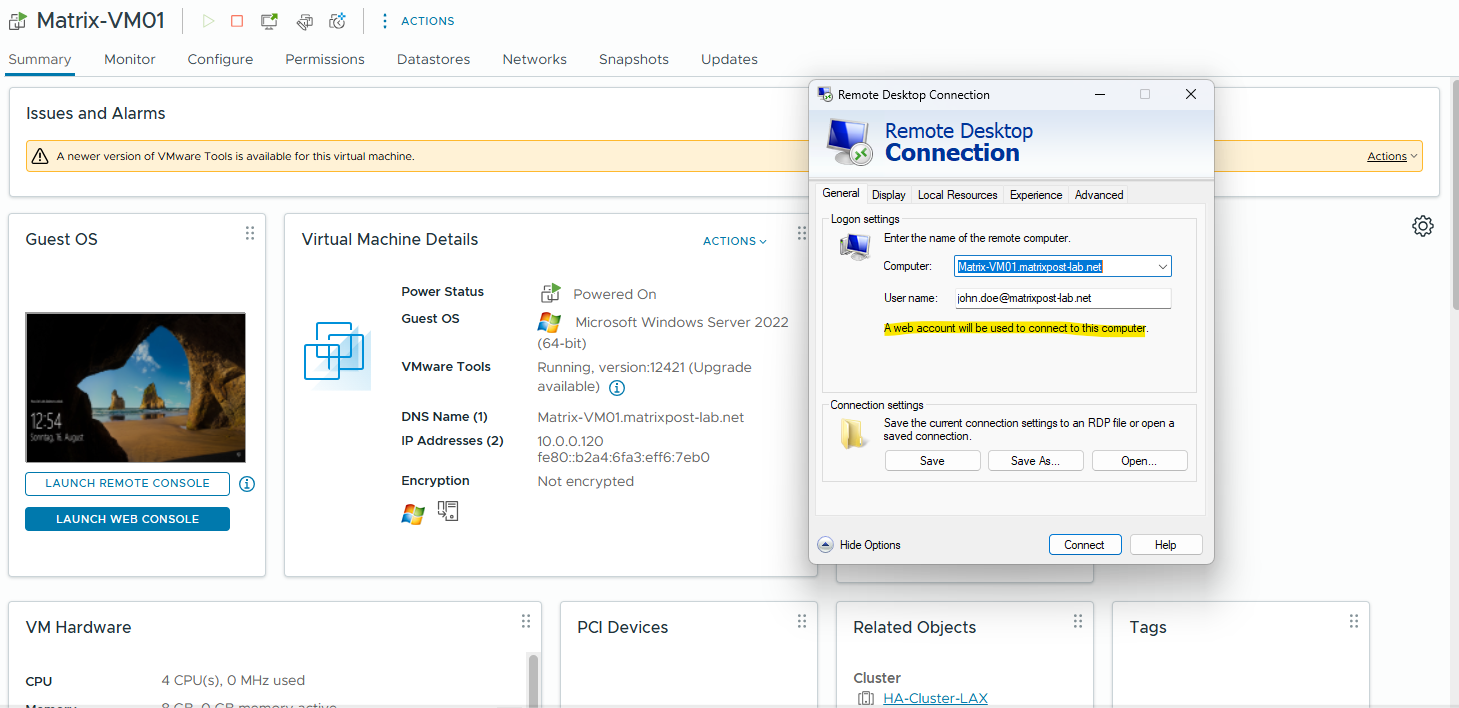
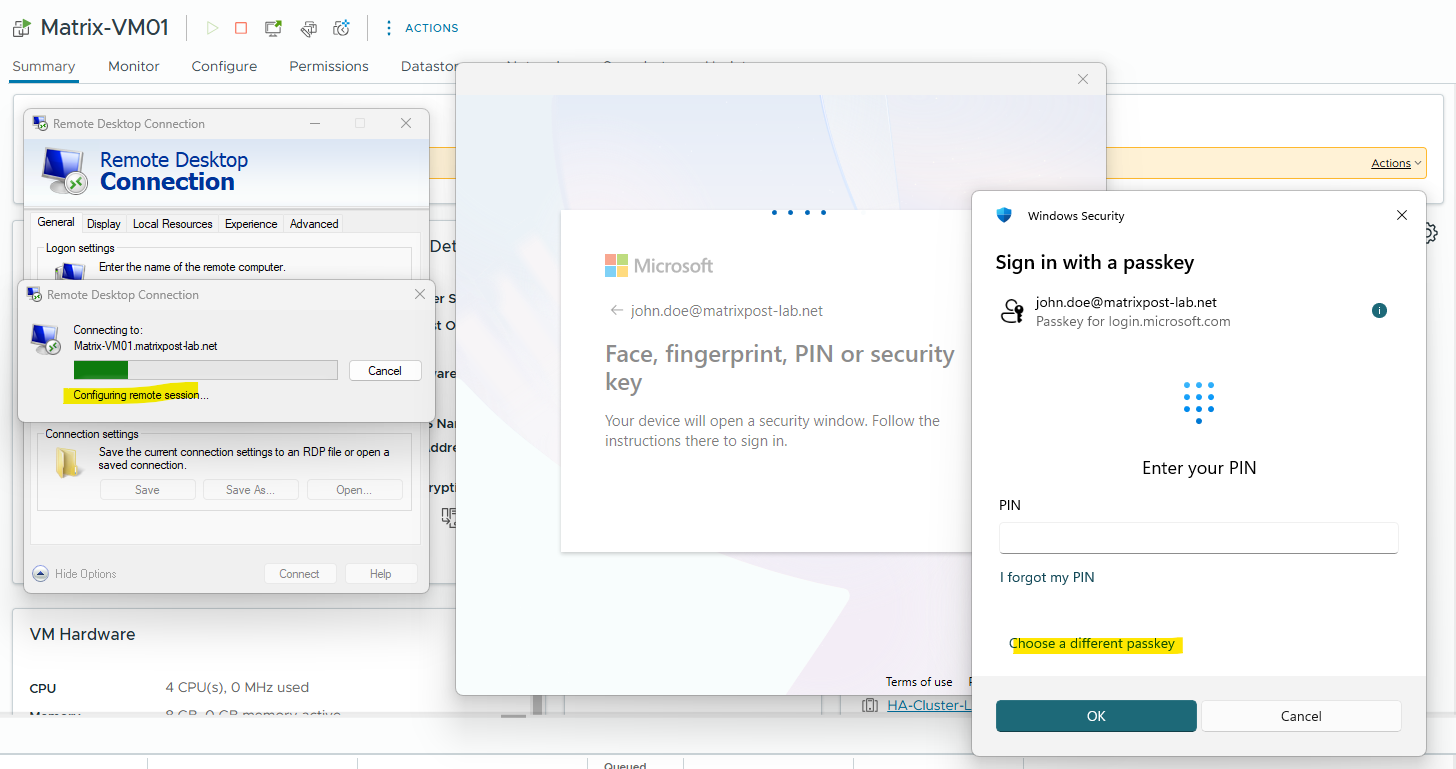
After starting the connection, Remote Desktop is already configuring the remote session, while the embedded Microsoft Entra web authentication invokes Windows Security for the registered passkey.
Since the Windows Hello passkey is selected by default, click Choose a different passkey to explicitly select the physical FIDO2 security key instead.
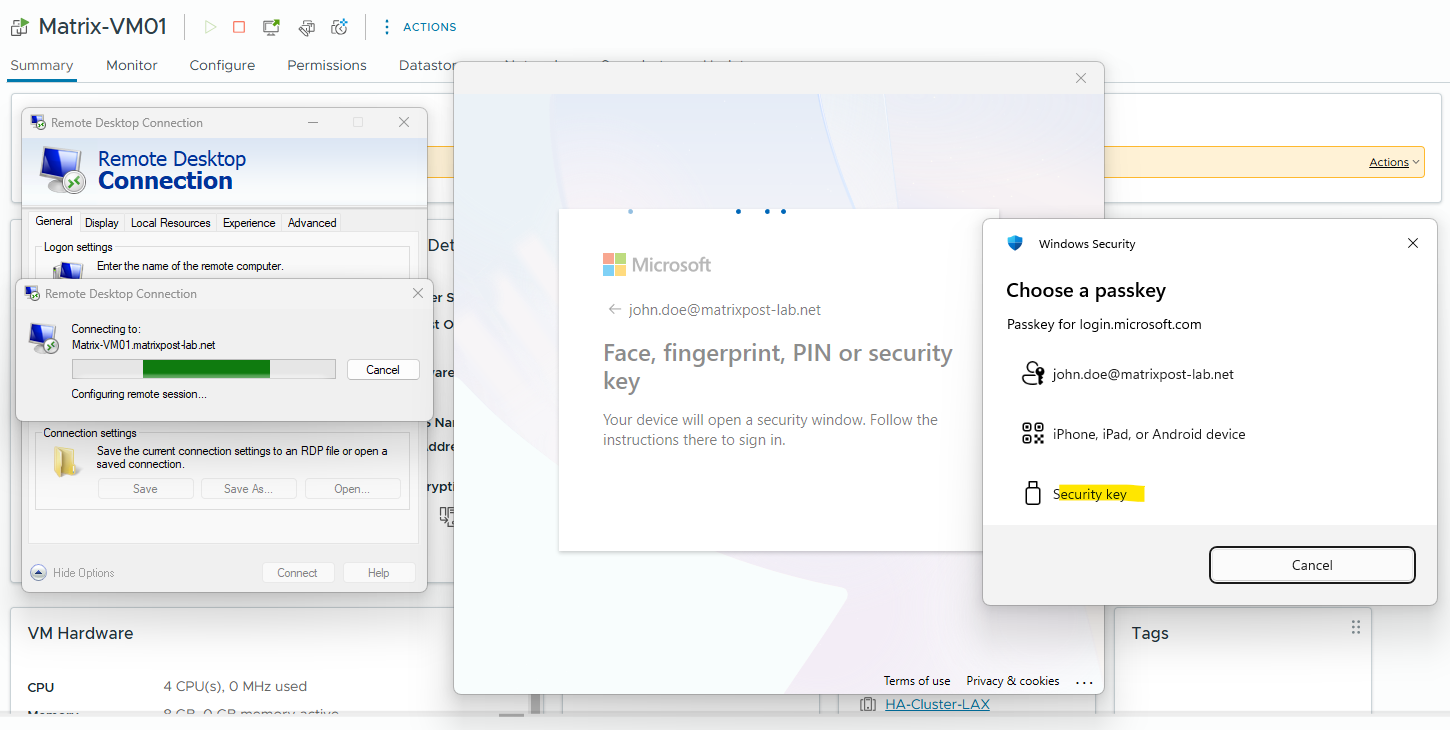
Windows now displays the available passkey locations. Select Security key to explicitly use the registered physical FIDO2 security key instead of the device-bound Windows Hello passkey.
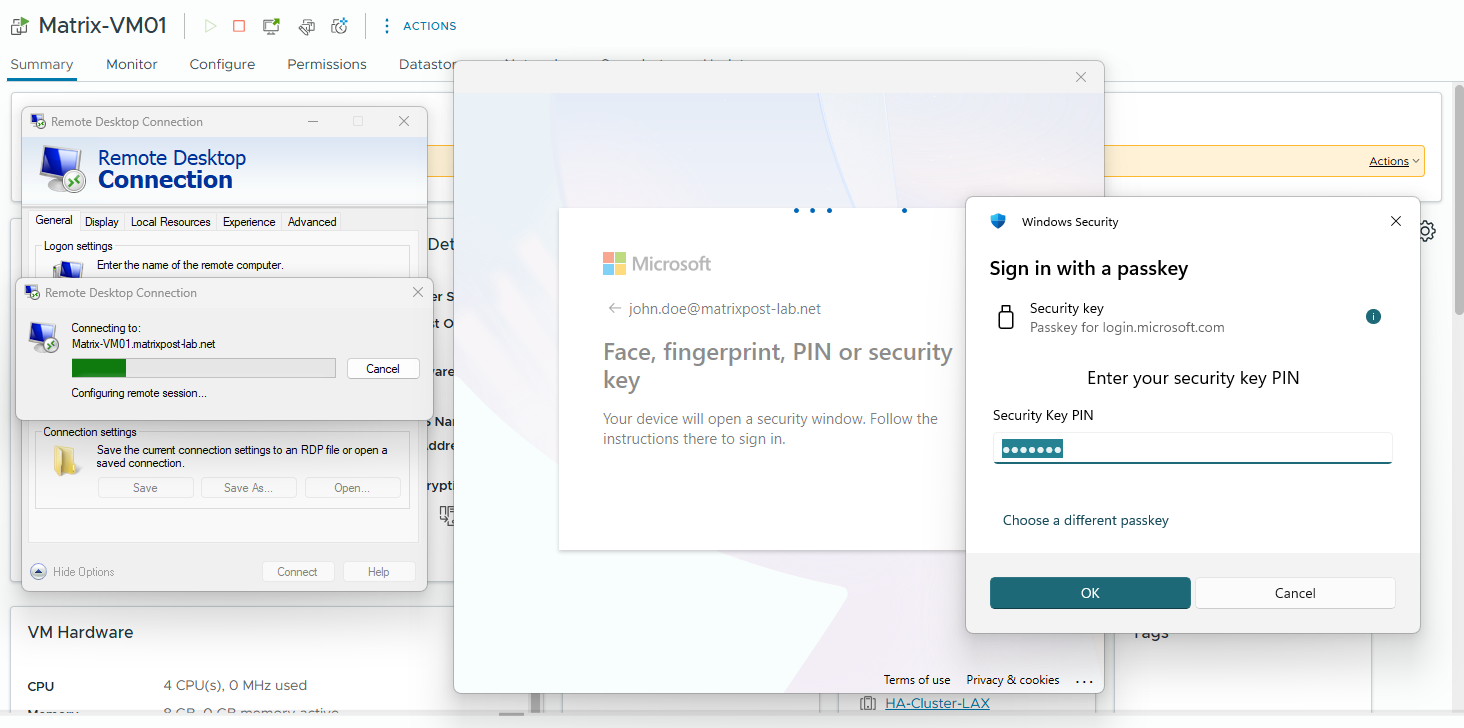
After selecting Security key, Windows prompts for the Security Key PIN that was configured when the physical FIDO2 key was registered. Enter the PIN and click OK; Windows will then request physical presence by asking you to touch the security key.
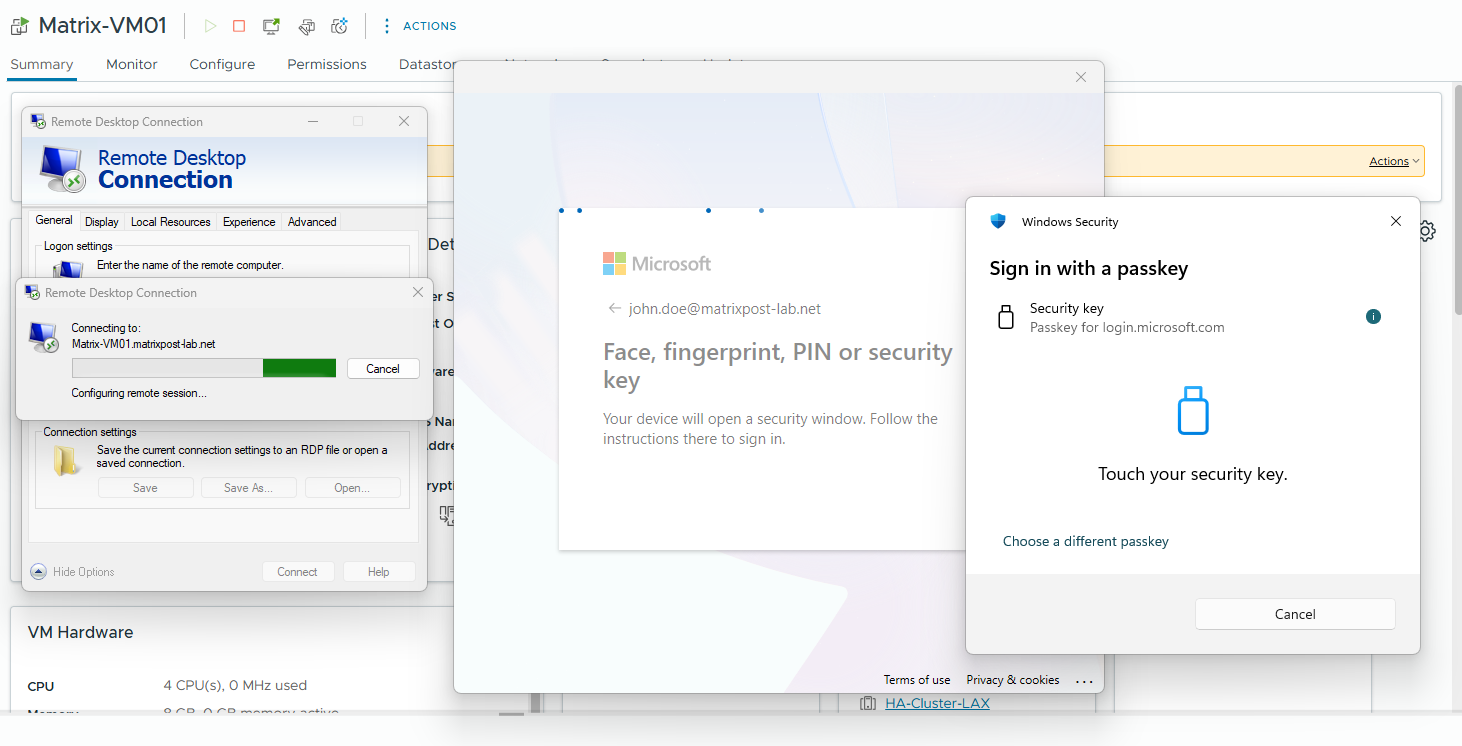
After entering the Security Key PIN, Windows now requests user presence. The security key starts blinking, and we simply touch the key’s sensor to approve the FIDO2 authentication and complete the RDP sign-in.
After successfully verifying the Security Key PIN and touching the physical key, Microsoft asks us to explicitly authorize the Remote Desktop connection to Matrix-VM01. Click Yes to allow the remote device to access the account and continue the passwordless RDP sign-in.
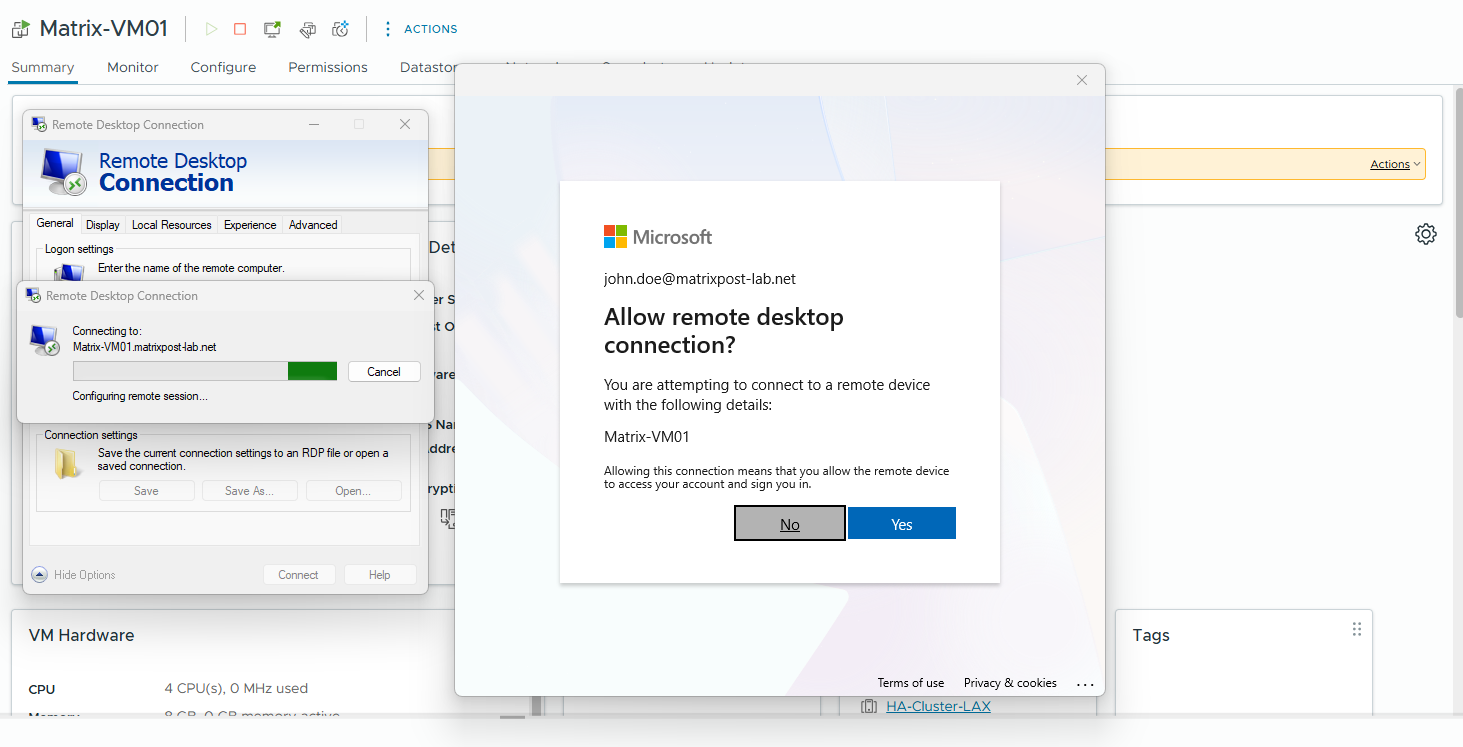
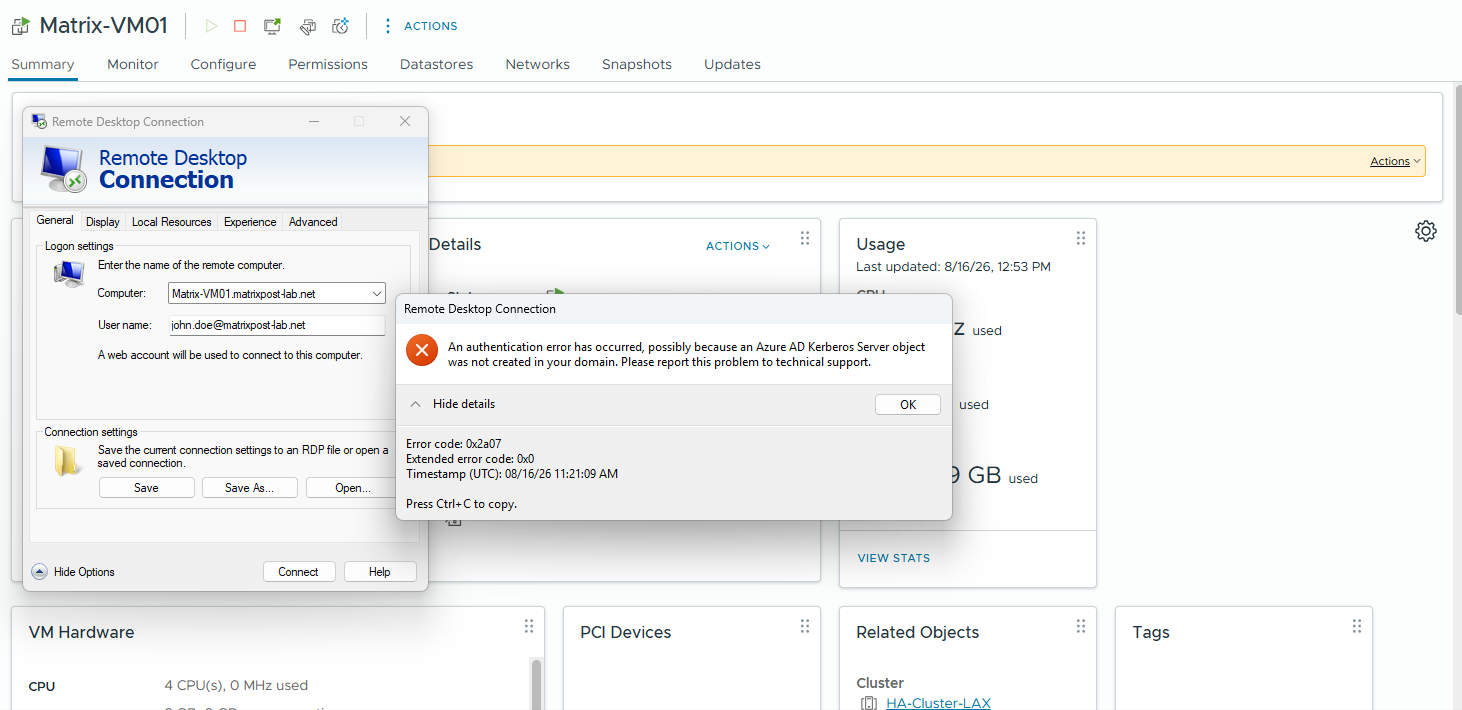
Although the Passkey (FIDO2) authentication itself completed successfully, the Remote Desktop connection fails afterwards with error 0x2a07. The error indicates that the required Microsoft Entra Kerberos (Azure AD Kerberos) Server object has not yet been created in the on-premises Active Directory domain.
For our hybrid Microsoft Entra ID joined Windows Server, this additional integration is required as already mentioned further above so that the Entra-authenticated user can obtain the Kerberos authentication material needed to complete the RDP logon to the domain-joined server.
An authentication error has occurred, possibly because an Azure AD Kerberos Server object was not created in your domain.”
Error code: 0x2a07
We can confirm that the required Microsoft Entra Kerberos server object does not yet exist in our on-premises Active Directory domain. Run the cmdlets below on your on-prem domain controllers.
Both the
AzureADKerberoscomputer lookup and thedomain controller queryreturn no results, which explains the RDP authentication error shown above.
Get-ADComputer -Filter 'Name -like "AzureADKerberos*"'
Get-ADComputer -Identity "AzureADKerberos" -Properties *
Get-ADDomainController -Filter * | Where-Object {$_.Name -like "*AzureADKerberos*"}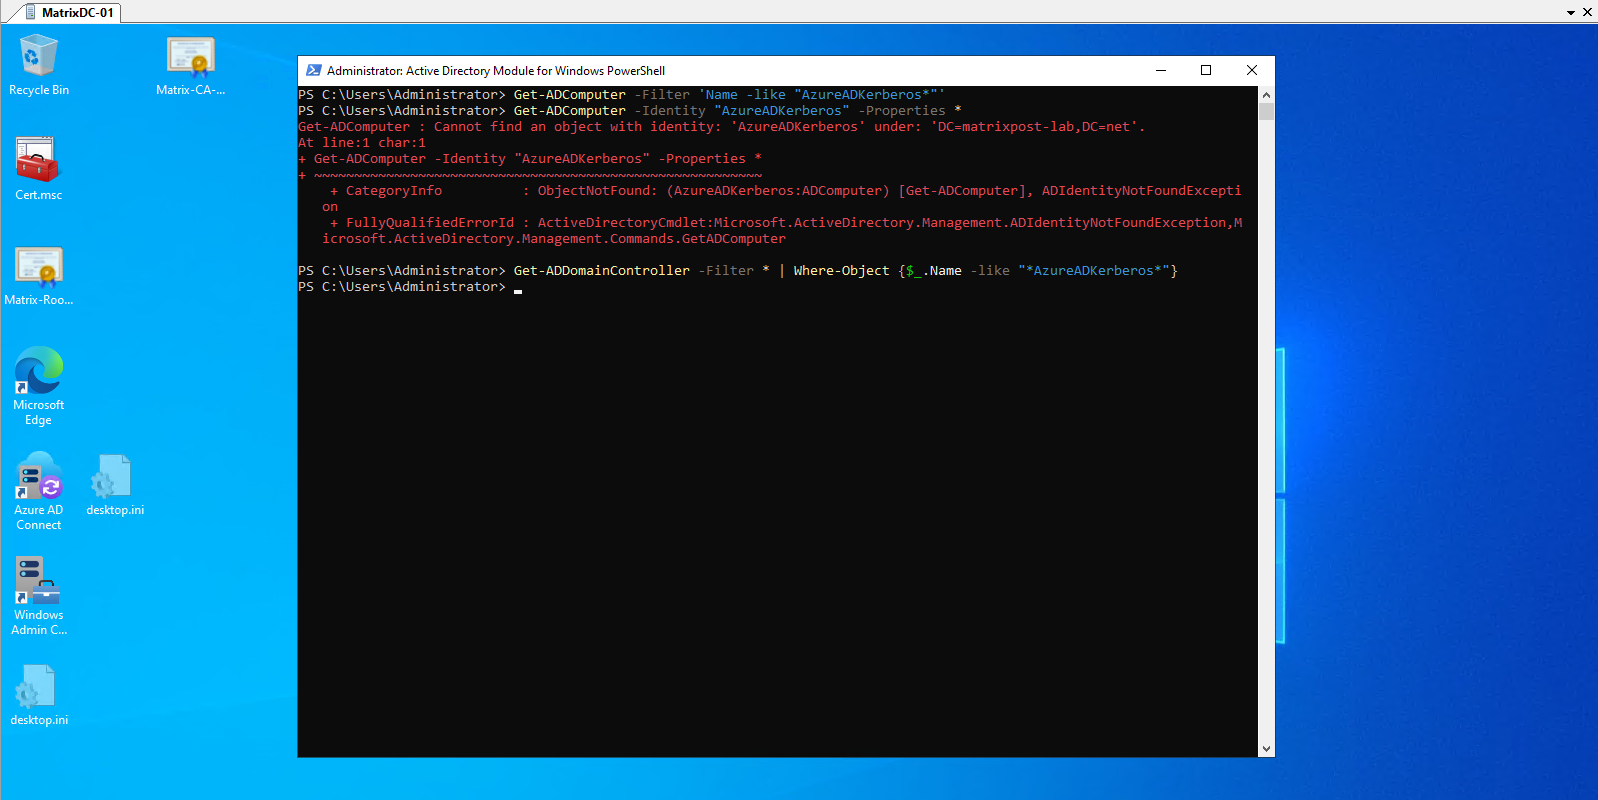
Since the object is definitely missing, we can create it now. Microsoft currently recommends the AzureADHybridAuthenticationManagement module for this. The Kerberos server object is created in on-prem AD and published to Microsoft Entra ID.
Enable passwordless security key sign-in to on-premises resources by using Microsoft Entra ID
https://learn.microsoft.com/en-us/entra/identity/authentication/howto-authentication-passwordless-security-key-on-premises
Creating the Microsoft Entra Kerberos Server Object in our On-Premises Active Directory
On MatrixDC-01 (my on-prem domain controller), where also Microsoft Entra Connect is already installed, we open Windows PowerShell as Administrator and first install the module:
Microsoft notes that the module can generally be installed elsewhere, but creation of the Kerberos server object must run on the Entra Connect server or a server containing the required
Microsoft.Online.PasswordSynchronization.Rpc.dlldependency.
Install-Module -Name AzureADHybridAuthenticationManagement -AllowClobber
Import-Module AzureADHybridAuthenticationManagement
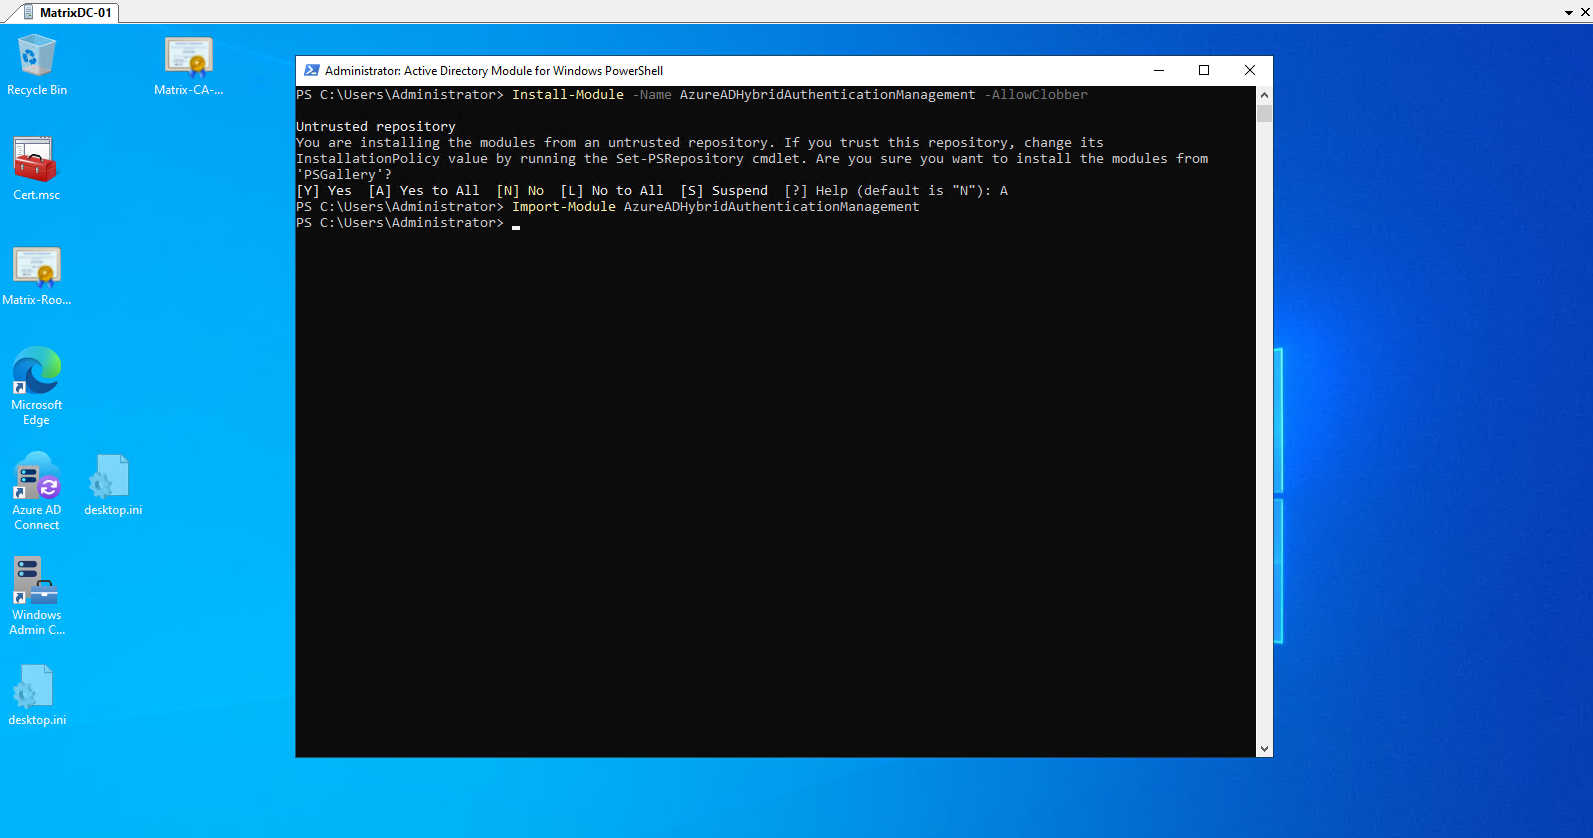
Because my Entra administrator account uses modern authentication/MFA, I’d use Microsoft’s -UserPrincipalName method rather than putting the cloud credentials into Get-Credential.
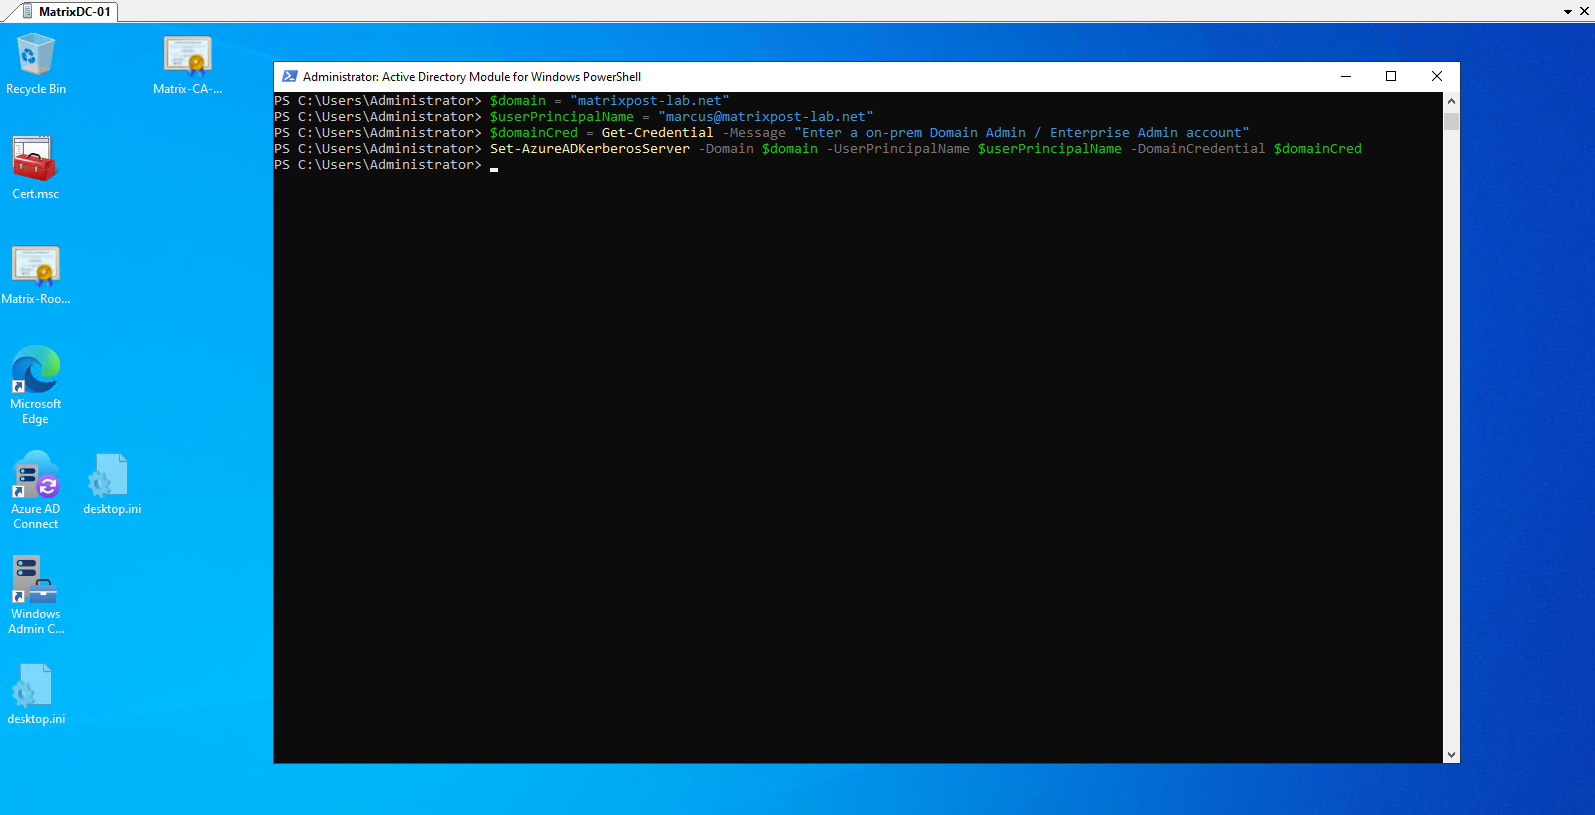
$domain = "matrixpost-lab.net"
$userPrincipalName = "<your Entra Hybrid Identity Administrator UPN>"
$domainCred = Get-Credential -Message "Enter a on-prem Domain Admin / Enterprise Admin account"
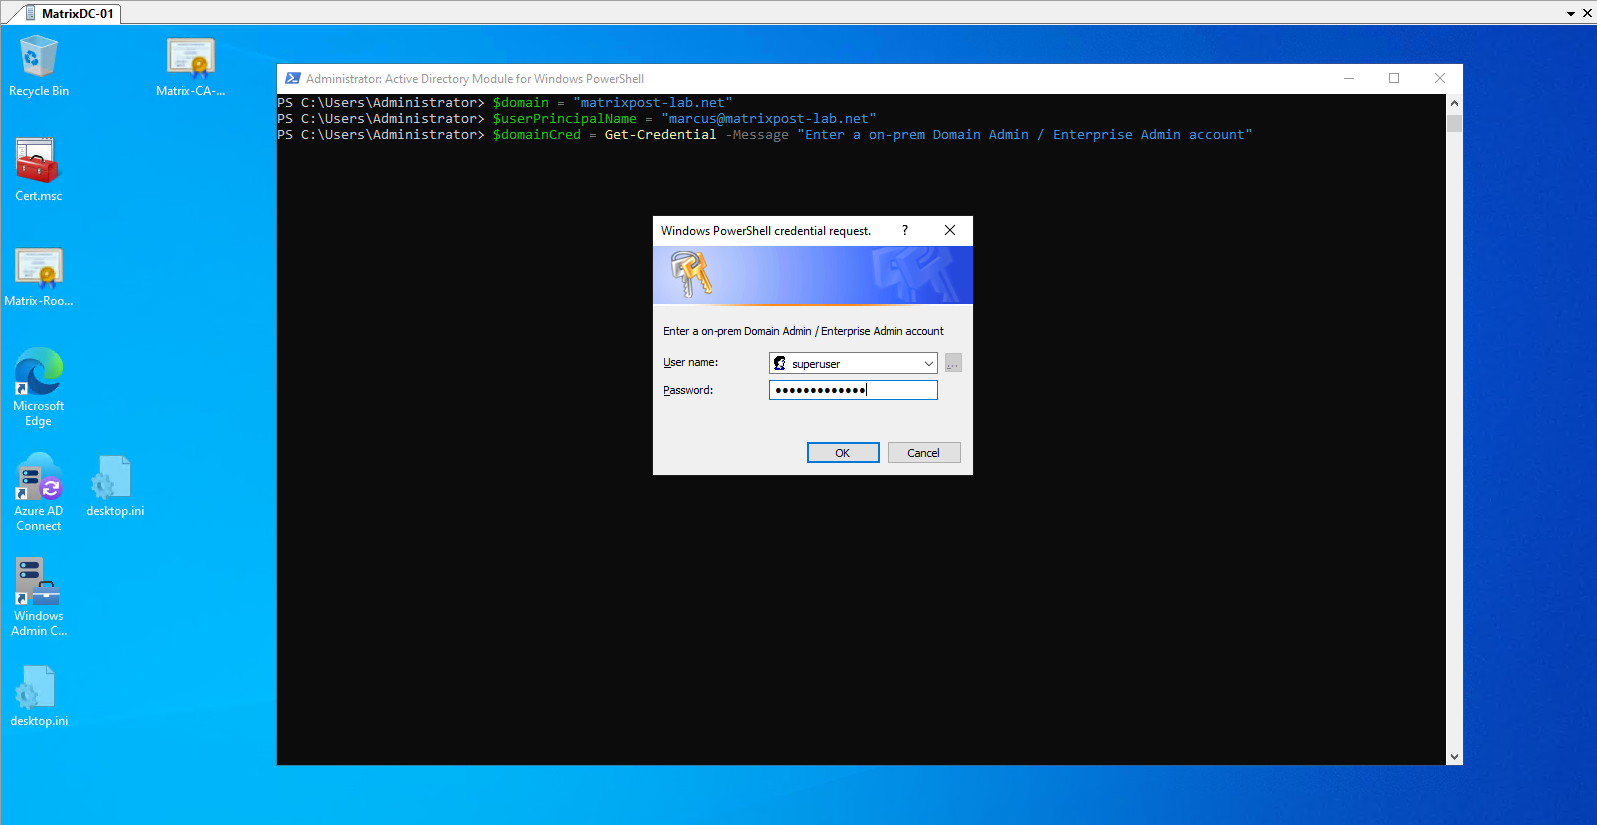
Then we can create and publish the Kerberos server object:
The cmdlet now opens an interactive Microsoft Entra ID sign-in dialog for the account specified with
-UserPrincipalName. Authenticate with the Entra Hybrid Identity Administrator account and complete any required MFA challenge to continue creating the Microsoft Entra Kerberos server object.
Set-AzureADKerberosServer -Domain $domain -UserPrincipalName $userPrincipalName -DomainCredential $domainCred
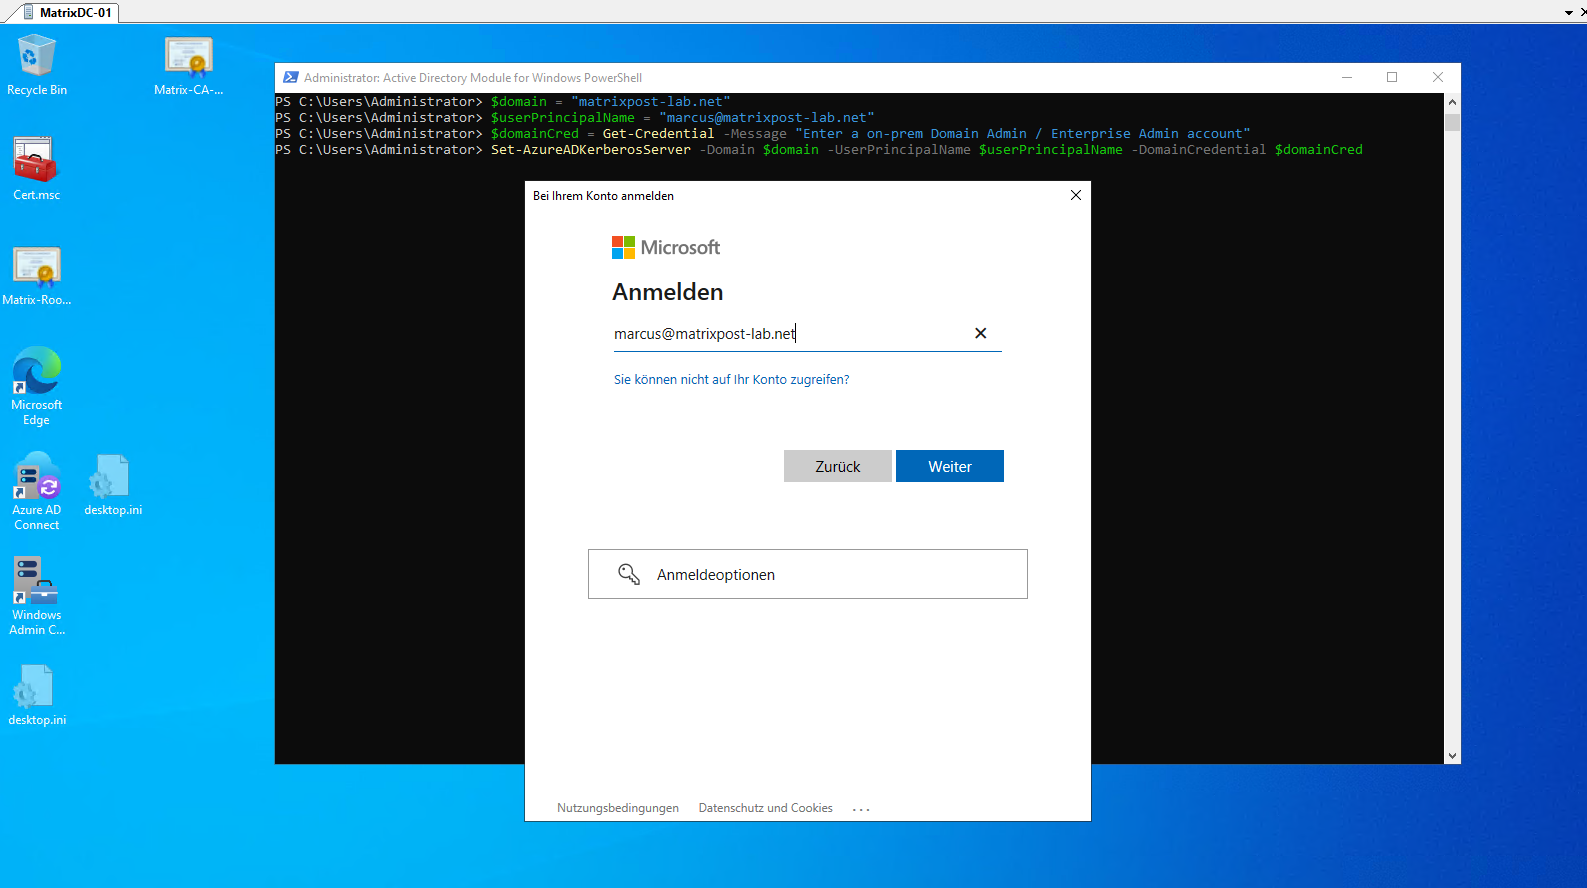
Here we now enter the password of the Microsoft Entra ID account specified with -UserPrincipalName. Since this account is protected with MFA, Microsoft will request the configured additional authentication factor immediately afterwards.
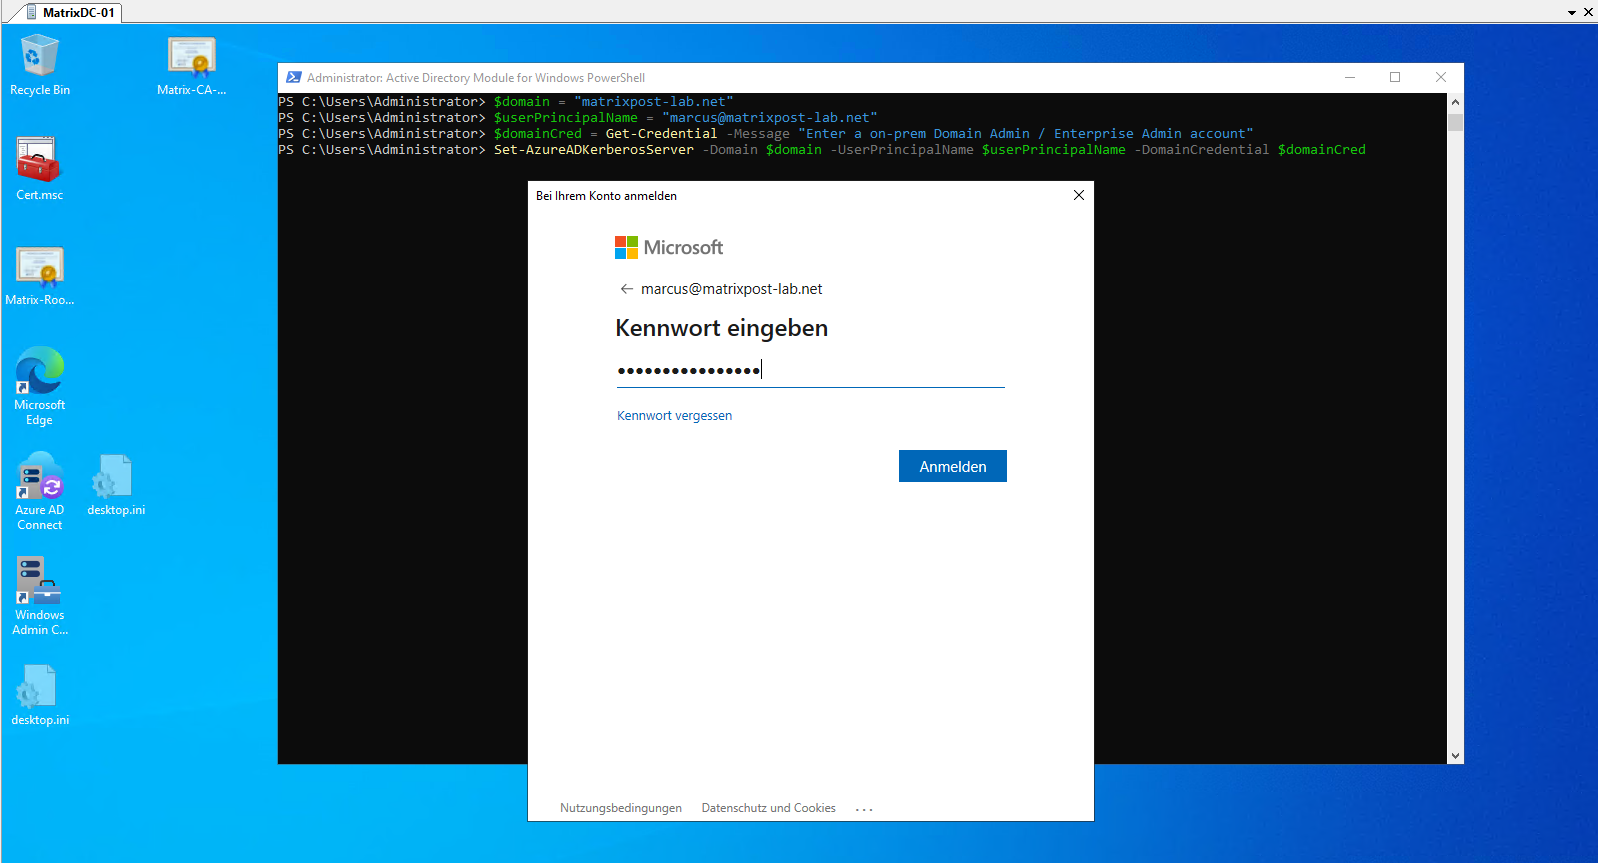
As expected, Microsoft Entra ID now enforces MFA for the administrative account. Approve the sign-in request in Microsoft Authenticator by entering the displayed number-matching code to complete the cloud-side authentication.
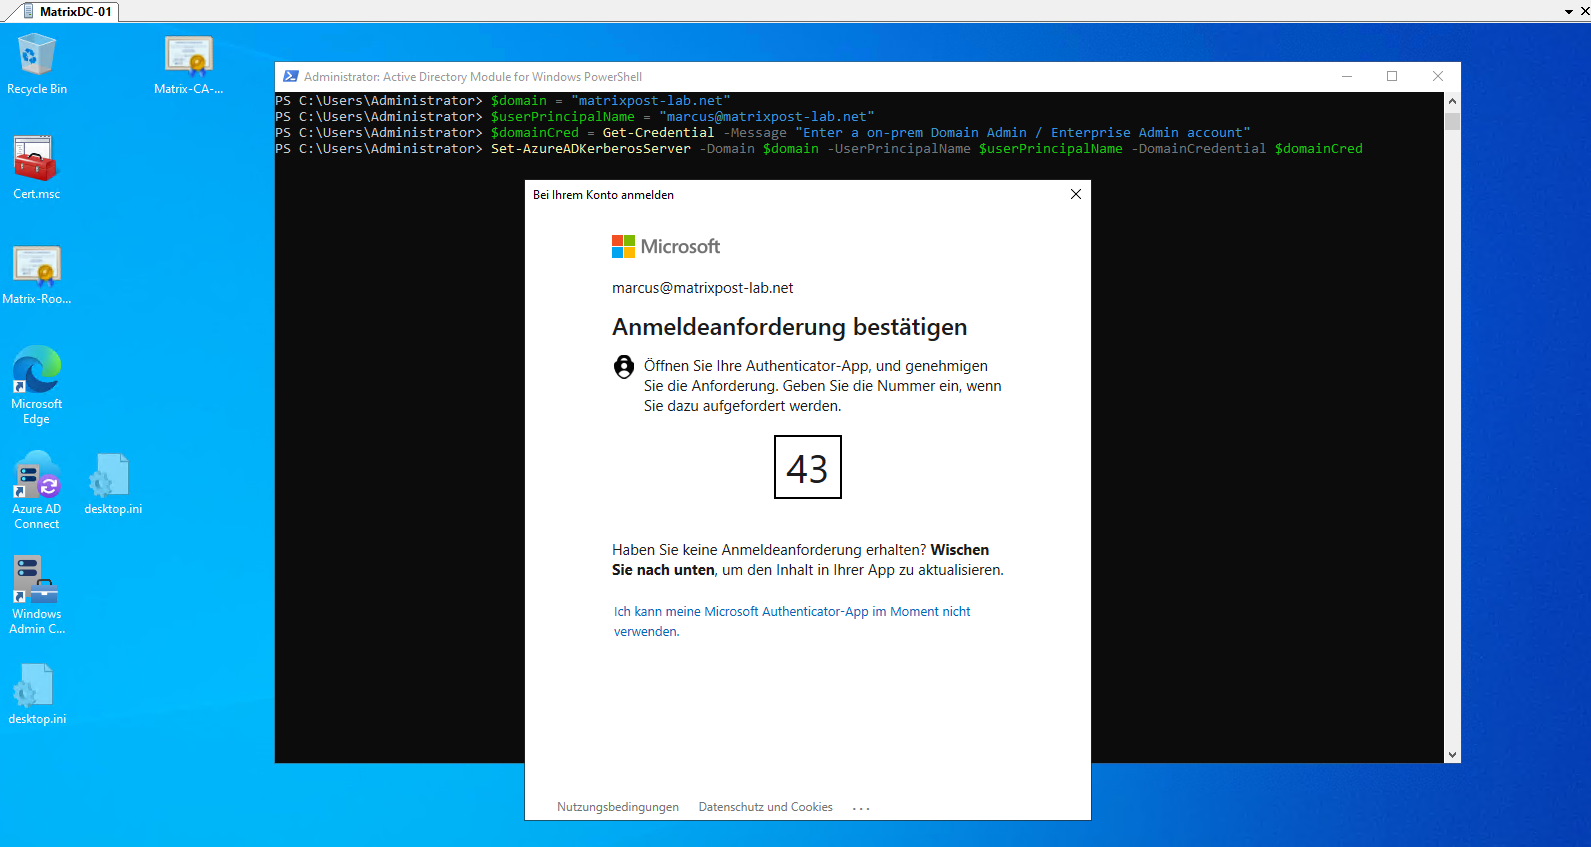
No error and the cmdlet returned to the PowerShell prompt, so Set-AzureADKerberosServer completed successfully.
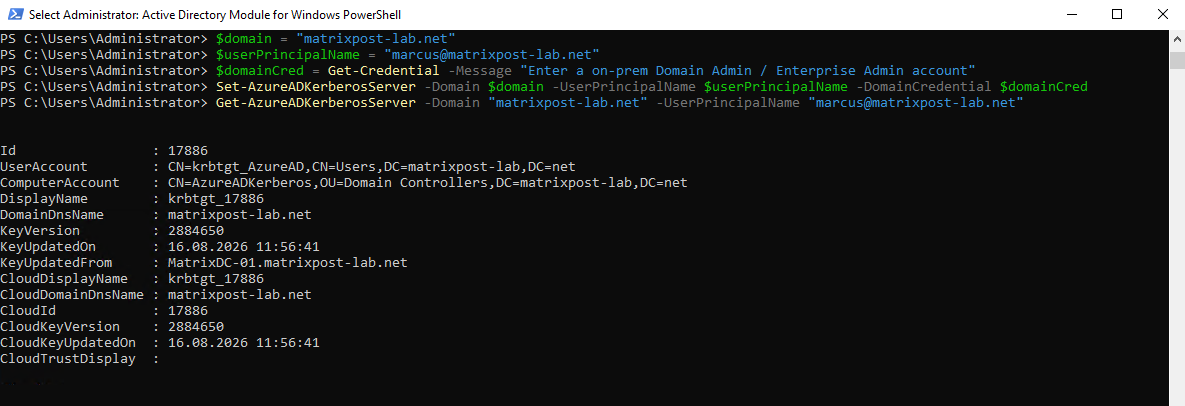
Now verify that the Microsoft Entra Kerberos server object was actually created:
The Microsoft Entra Kerberos server object represents the trust bridge between the on-premises Active Directory domain and Microsoft Entra ID for Kerberos authentication. The output shows both the special
AzureADKerberoscomputer account and its associatedkrbtgt_AzureADaccount, together with the synchronized Kerberos key information used by Entra Kerberos.The
Get-AzureADKerberosServercmdlet displays the Microsoft Entra Kerberos configuration across both the on-premises Active Directory and Microsoft Entra ID sides. It shows the localAzureADKerberos/krbtgt_AzureADobjects together with the corresponding cloud Kerberos object and key version, allowing us to verify that both sides are synchronized correctly.Because
KeyVersionandCloudKeyVersionmatch, the on-premises AD object and the cloud-side Entra Kerberos configuration are synchronized correctly.
Get-AzureADKerberosServer -Domain "matrixpost-lab.net" -UserPrincipalName "marcus@matrixpost-lab.net"
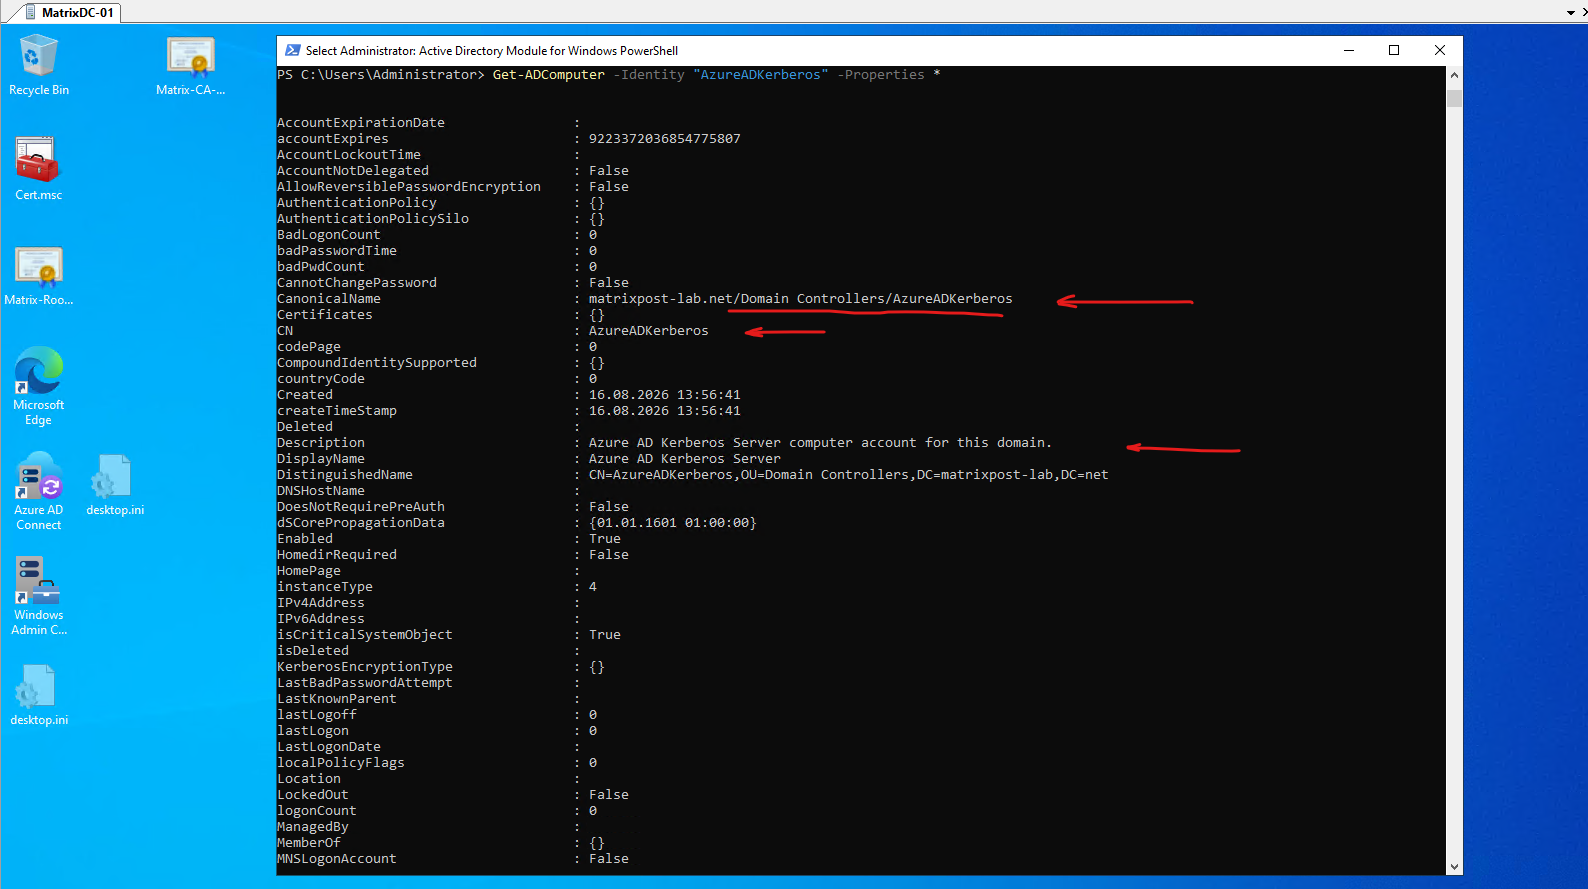
And on the Active Directory side:
On the Active Directory side, the Microsoft Entra Kerberos server is represented by the special
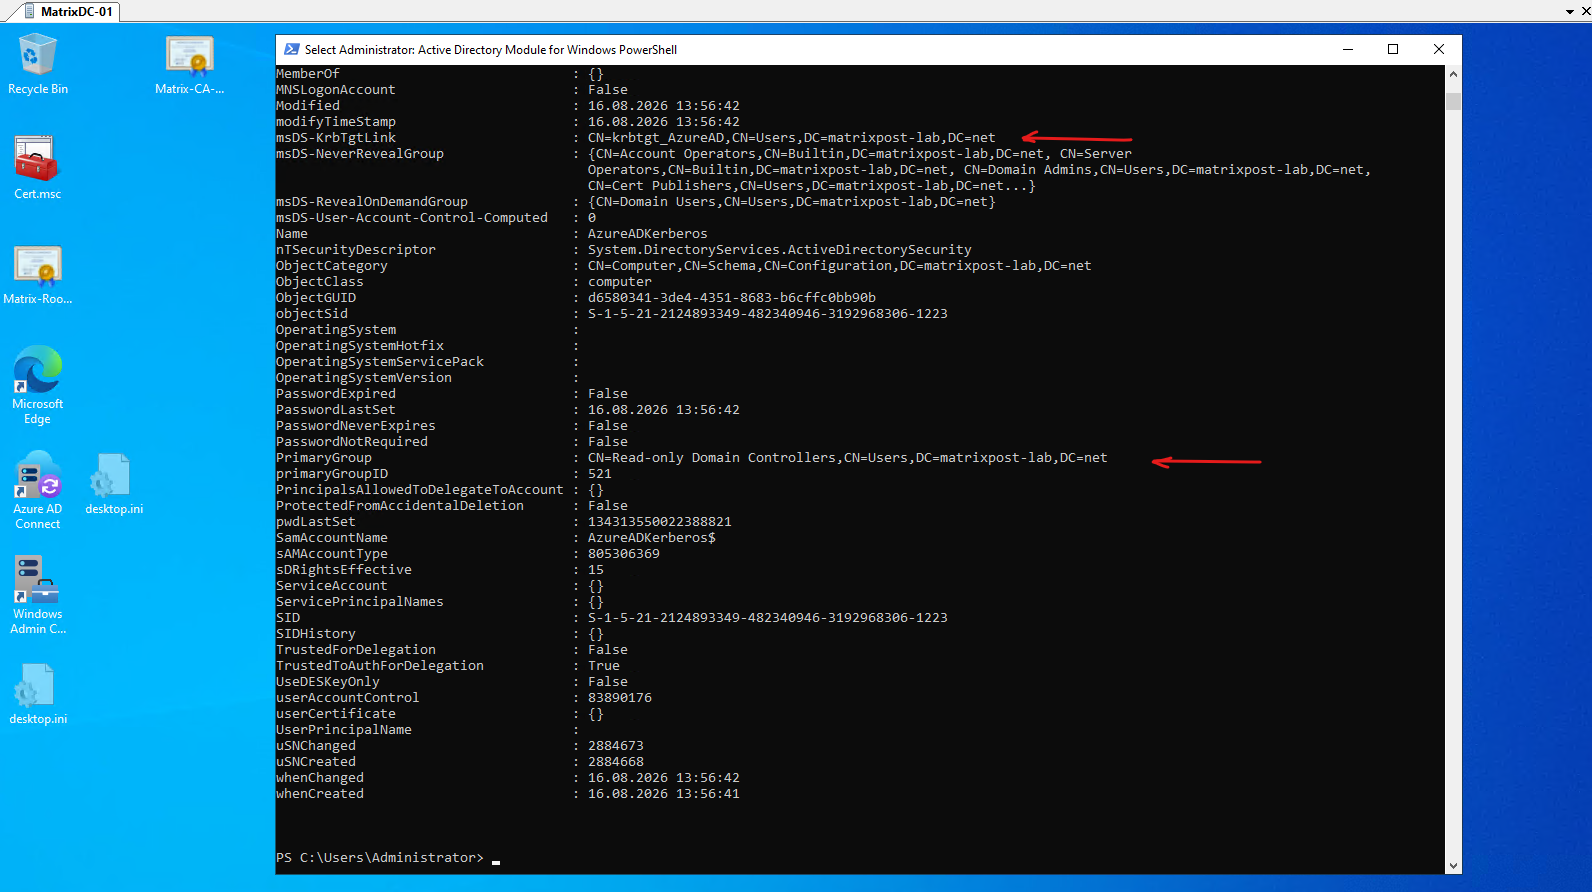
AzureADKerberoscomputer object located in the Domain Controllers OU.The output also shows that it behaves like a special RODC-style Kerberos object, including its link through
msDS-KrbTgtLinkto the dedicatedkrbtgt_AzureADaccount used for Microsoft Entra Kerberos.And the
Get-ADComputeroutput confirms thatAzureADKerberosnow exists as the special RODC-style Kerberos server object, with:
PrimaryGroup : Read-only Domain Controllers
msDS-KrbTgtLink : CN=krbtgt_AzureAD,…
Get-ADComputer -Identity "AzureADKerberos" -Properties *
The
AzureADKerberoscomputer object can also be seen directly in Active Directory Users and Computers (ADUC) under the Domain Controllers OU.Unlike the actual domain controllers
MATRIXDC-01andMATRIXDC-02, it is not a physical or virtual domain controller; it is a special AD object representing the Microsoft Entra Kerberos server for the domain.
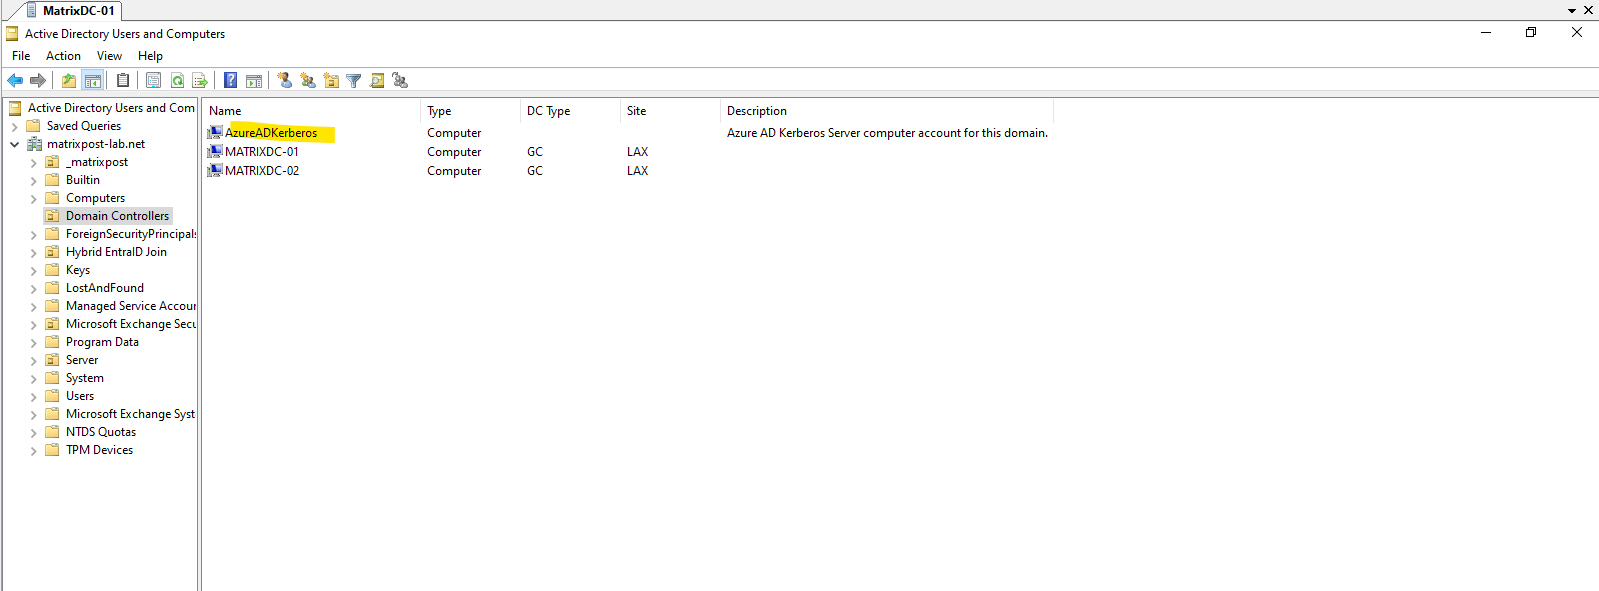
The verification confirms that the Microsoft Entra Kerberos server object has been created successfully in our on-premises Active Directory domain. The matching KeyVersion and CloudKeyVersion values also confirm that the Kerberos key material is synchronized correctly between Active Directory and Microsoft Entra ID.
Verifying Passwordless RDP Logon with the FIDO2 Security Key
With the Microsoft Entra Kerberos server now successfully configured and verified, we can retry the Remote Desktop connection to Matrix-VM01.matrixpost-lab.net.
This time, the required Kerberos bridge between Microsoft Entra ID and our on-premises Active Directory is available.
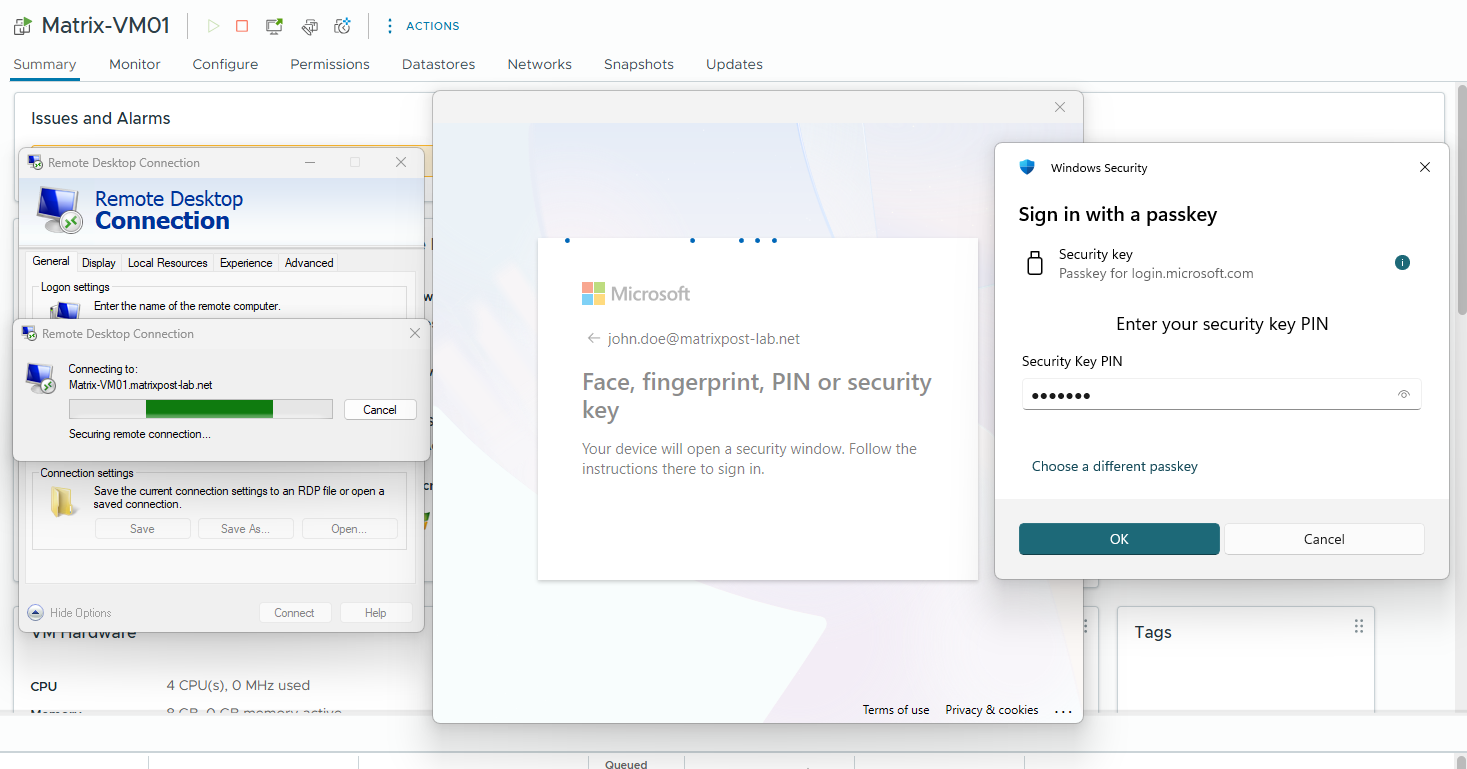
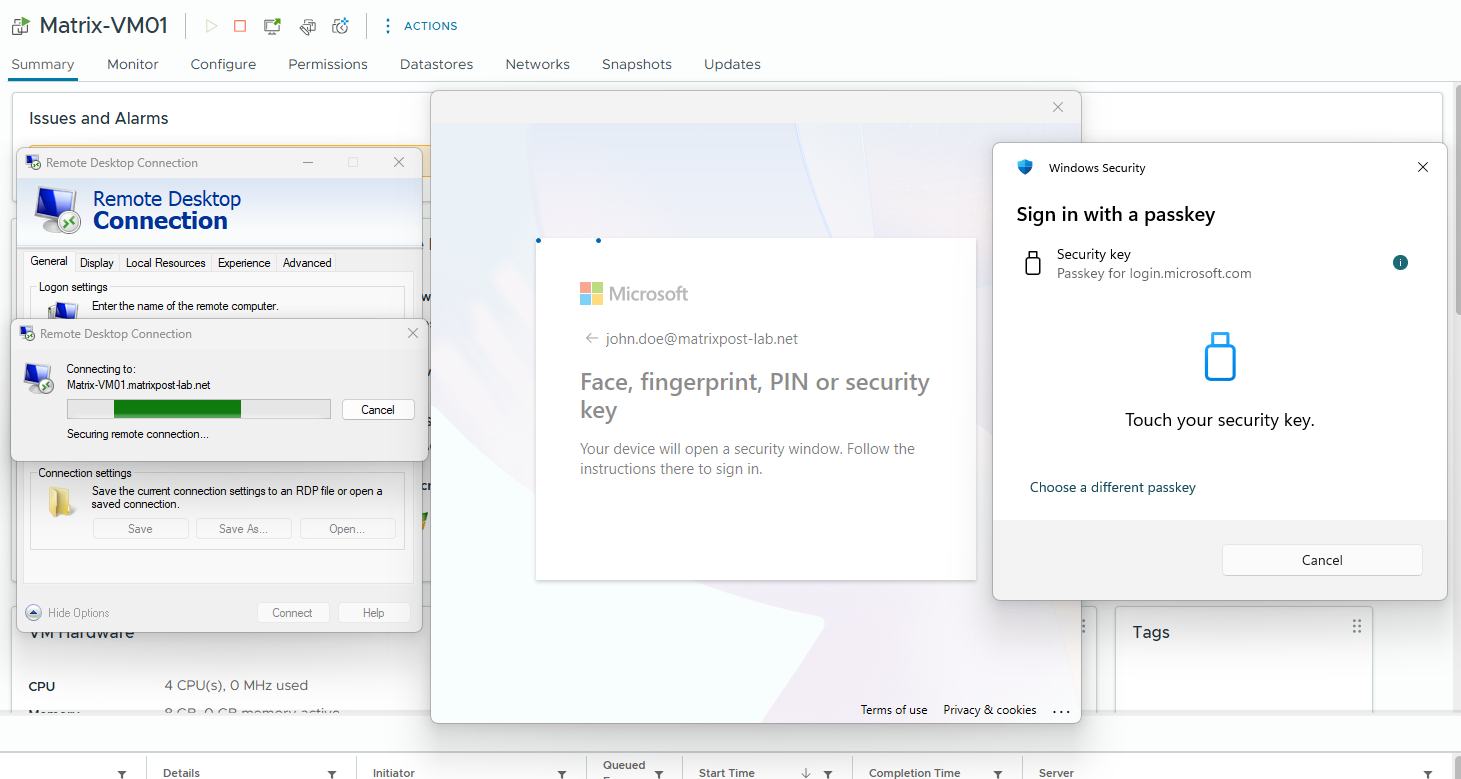
We successfully complete the physical Yubico FIDO2 authentication flow — security-key PIN → physical touch.
However, instead of establishing the RDP session, the authentication process returns to the normal sign-in screen and enters a loop, preventing us from successfully completing the passwordless RDP logon.
As an additional verification, we sign in to
Matrix-VM01normally with the John Doe account and rundsregcmd /status.The values
AzureAdPrt : YES,OnPremTgt : YES, andCloudTgt : YESconfirm that the Microsoft Entra SSO and Kerberos components are available for the user session.
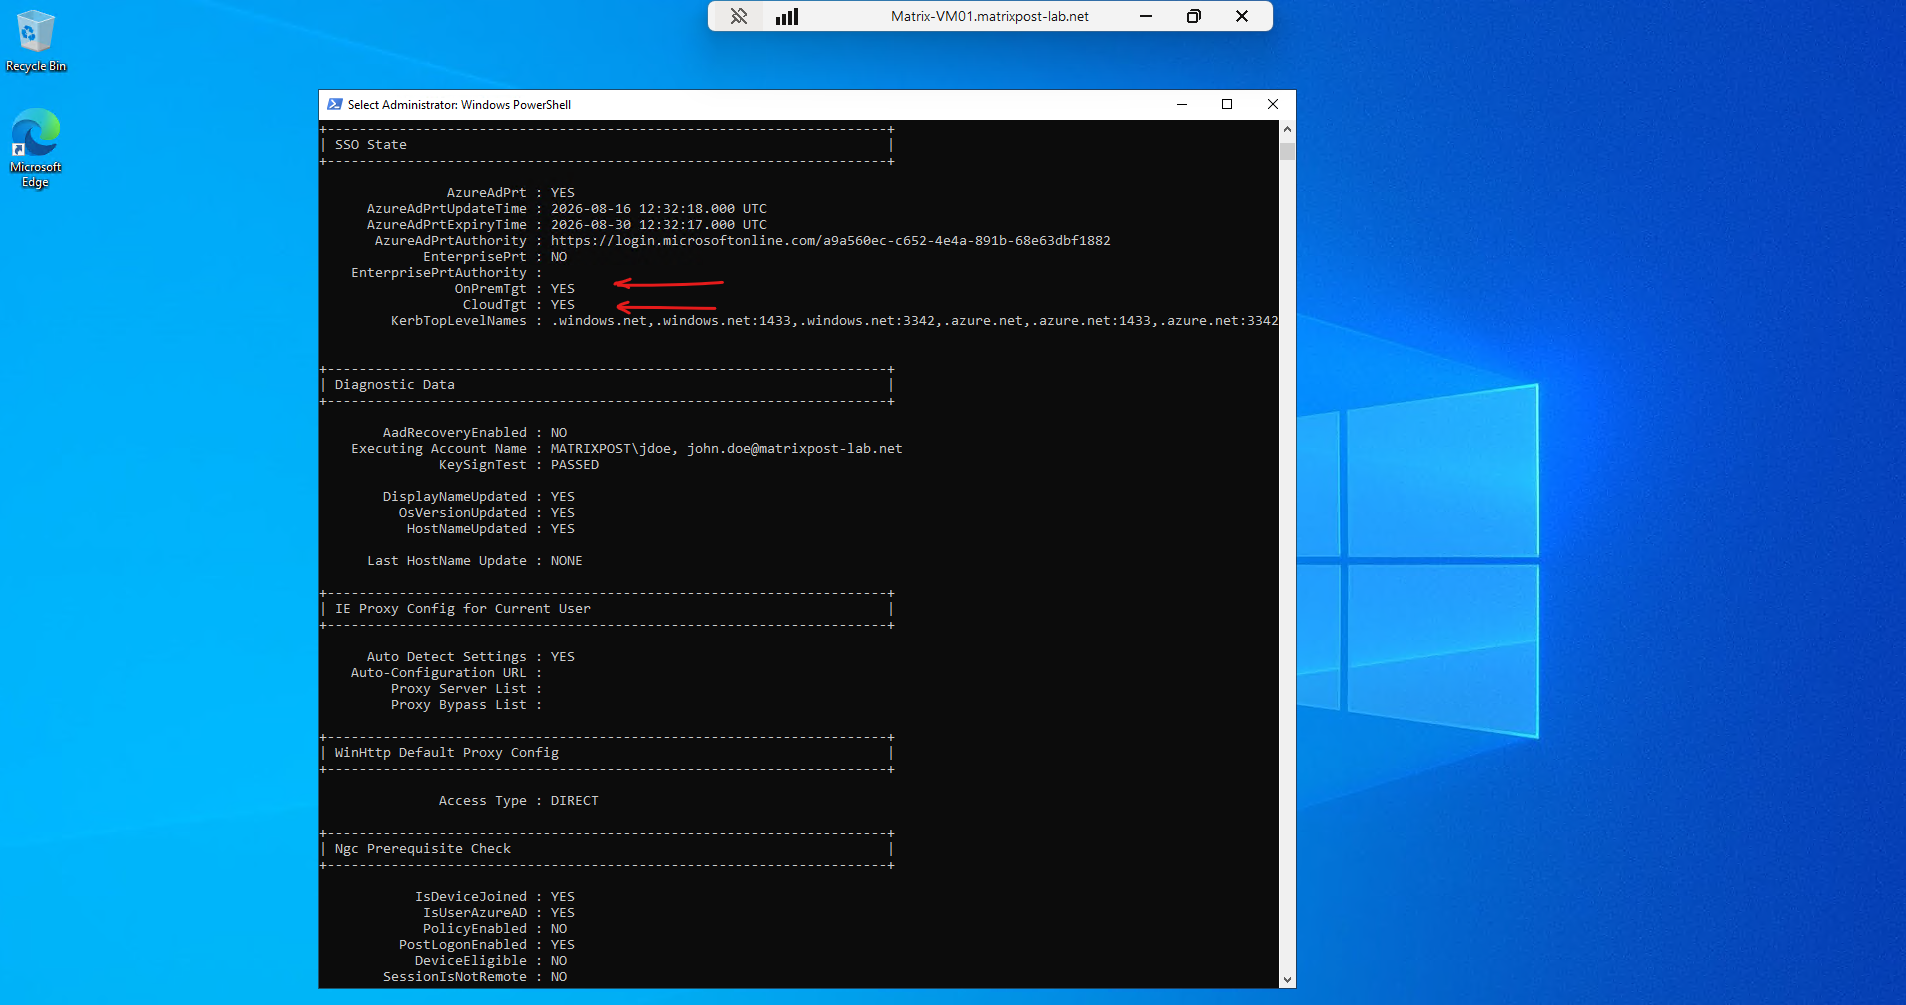
Since the physical notebook from which I first tried to establish the RDP connection is neither Microsoft Entra joined nor Microsoft Entra hybrid joined to my Entra lab tenant, resulting in the authentication loop, I will now switch to a Windows 11 virtual machine in my vSphere lab that is Microsoft Entra hybrid joined to the same tenant.
Client and target devices must be Microsoft Entra joined, Microsoft Entra hybrid joined, or Microsoft Entra registered to the same tenant.
Cross-tenant authentication will not work, the client device will not be able to authenticate to the target device if they are joined to different tenants.
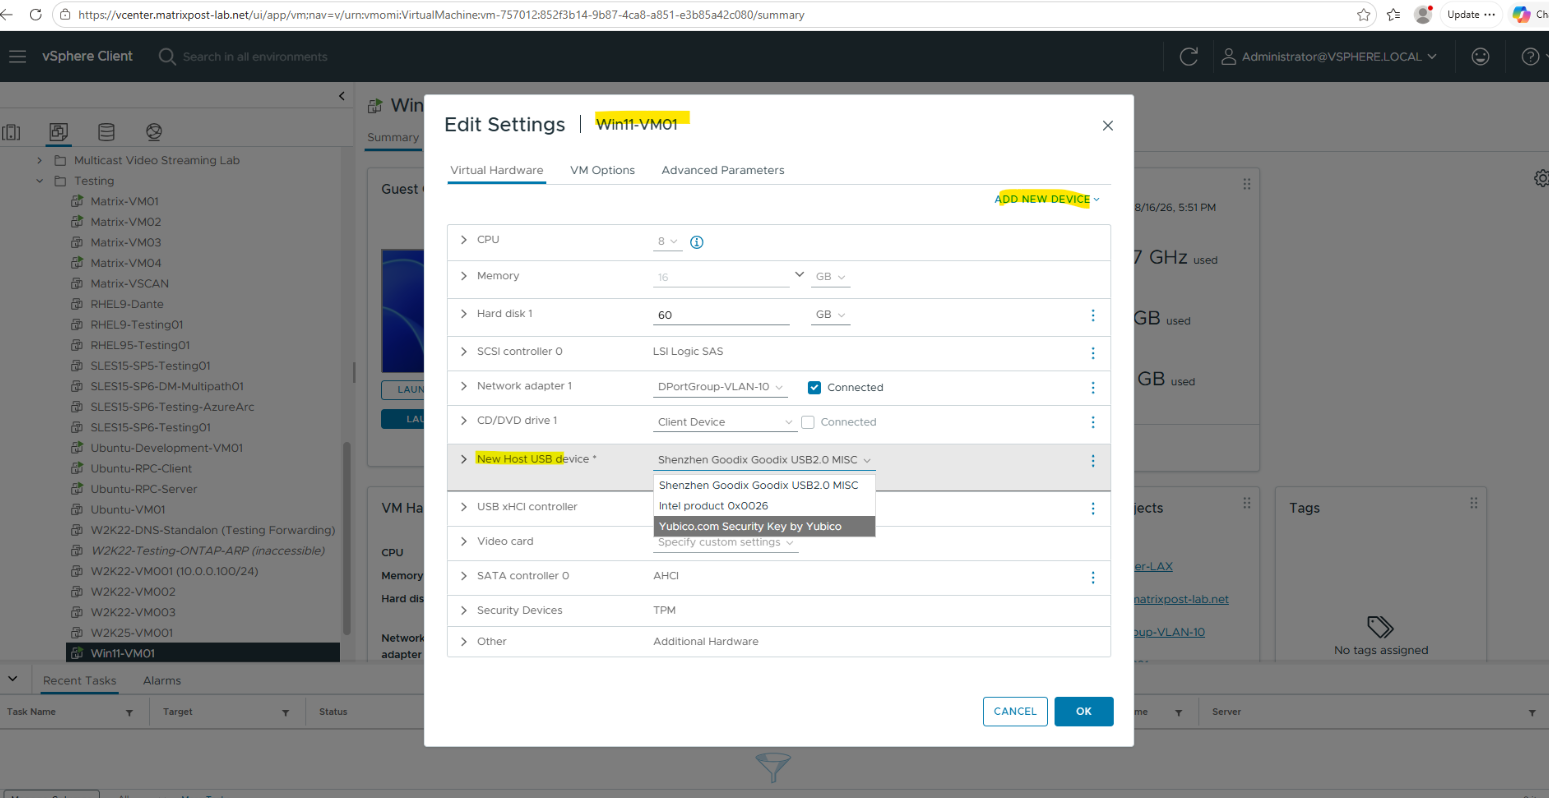
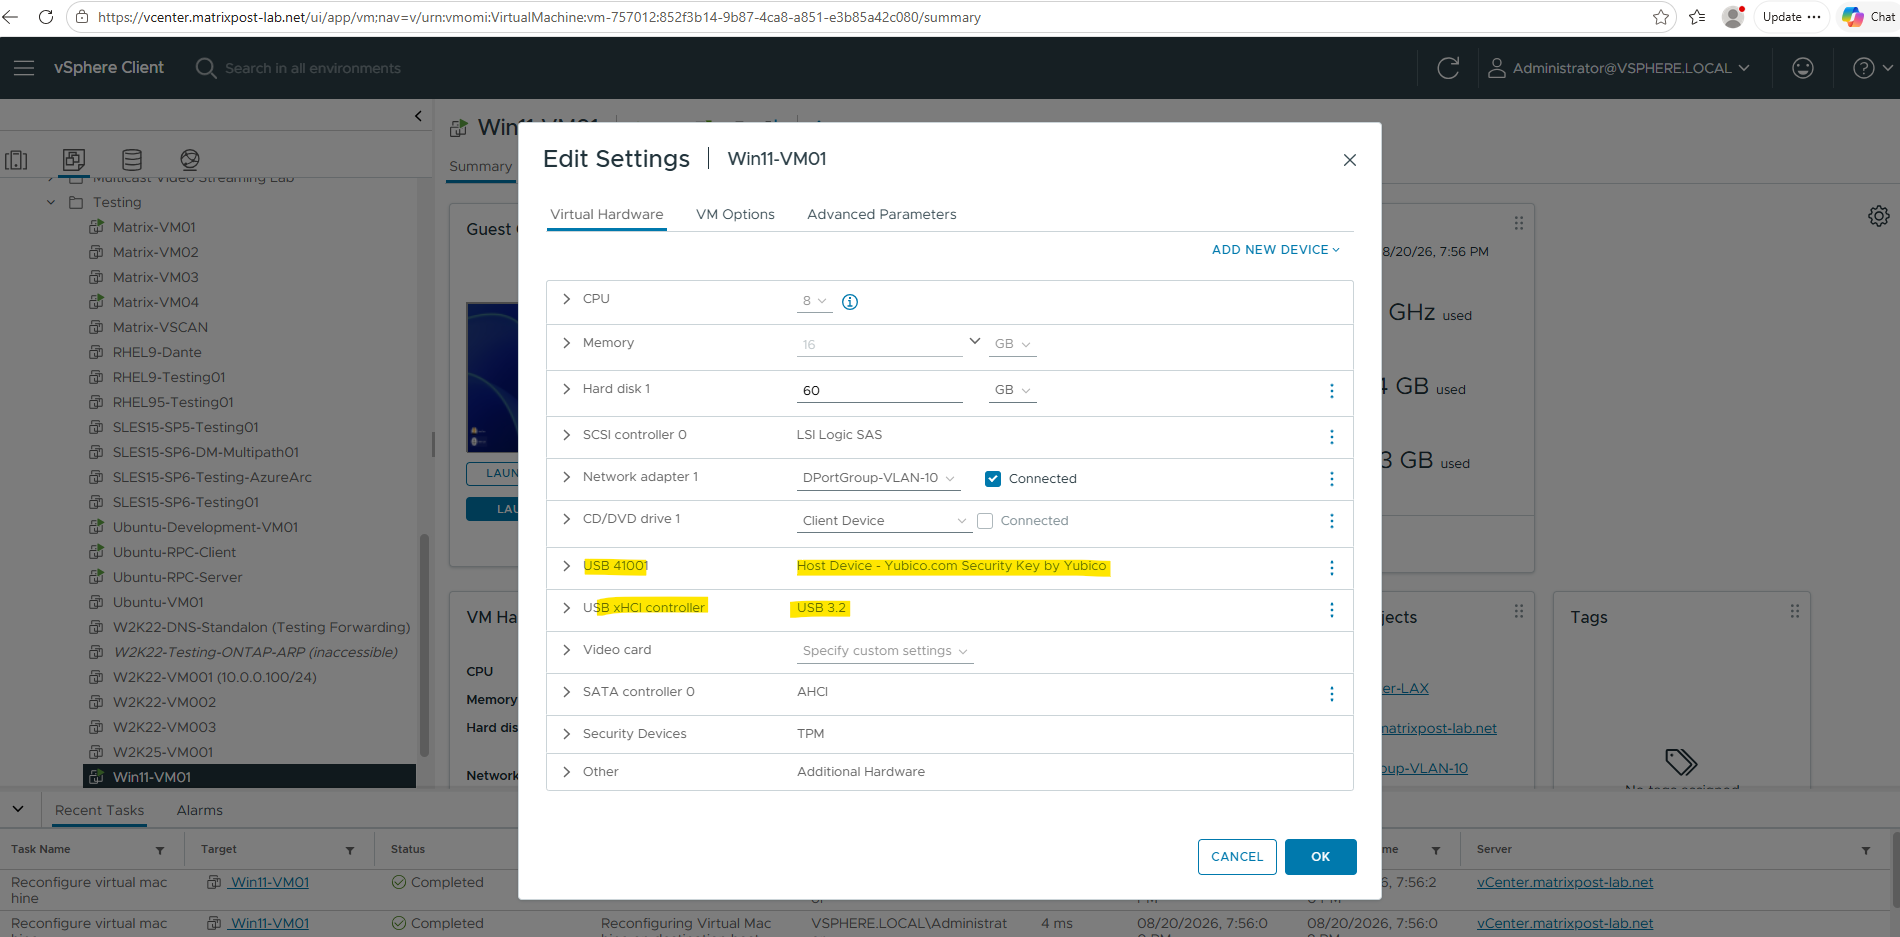
Since my Windows 11 test client is running as a virtual machine in vSphere, we first pass the physical Yubico FIDO2 security key through from the ESXi host to the VM.
In the VM settings, select Add New Device → Host USB Device and choose Yubico.com Security Key by Yubico.
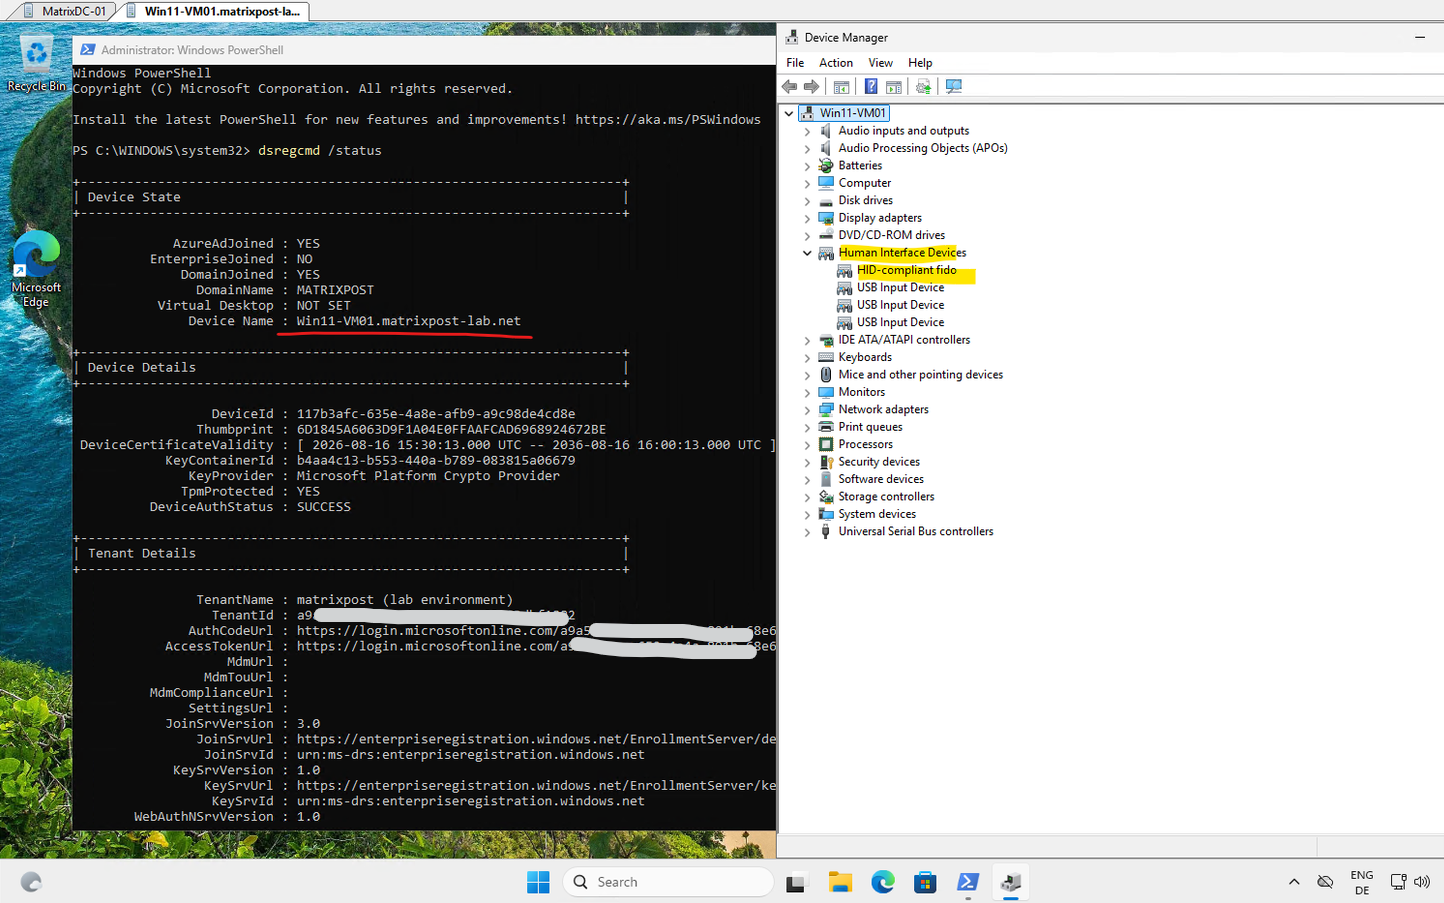
dsregcmd /status verifies that Win11-VM01.matrixpost-lab.net is successfully Microsoft Entra hybrid joined (AzureAdJoined : YES and DomainJoined : YES) and belongs to our lab tenant. At the same time, Device Manager confirms that the USB-passthrough security key is correctly detected by Windows as HID-compliant fido, so the client is ready for our next FIDO2/RDP test.
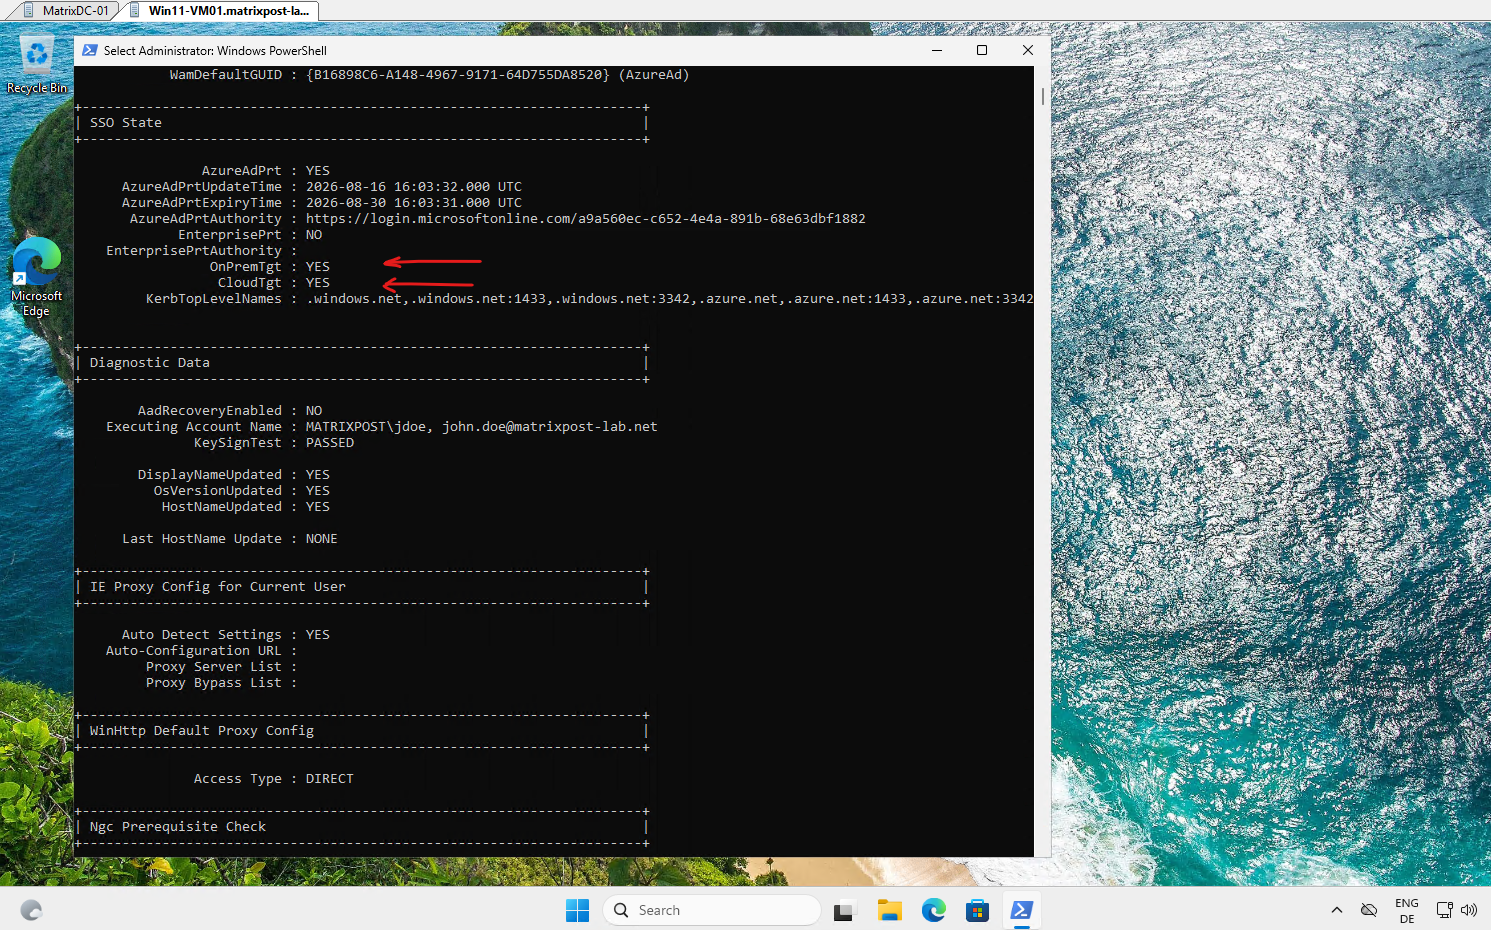
OnPremTgt : YESconfirms that the signed-in user has obtained the on-premises Kerberos TGT through Microsoft Entra Kerberos, while
CloudTgt : YESconfirms that the PRT session also contains the cloud Kerberos TGT. Together withAzureAdPrt : YES, the client-side hybrid authentication chain now looks correct.
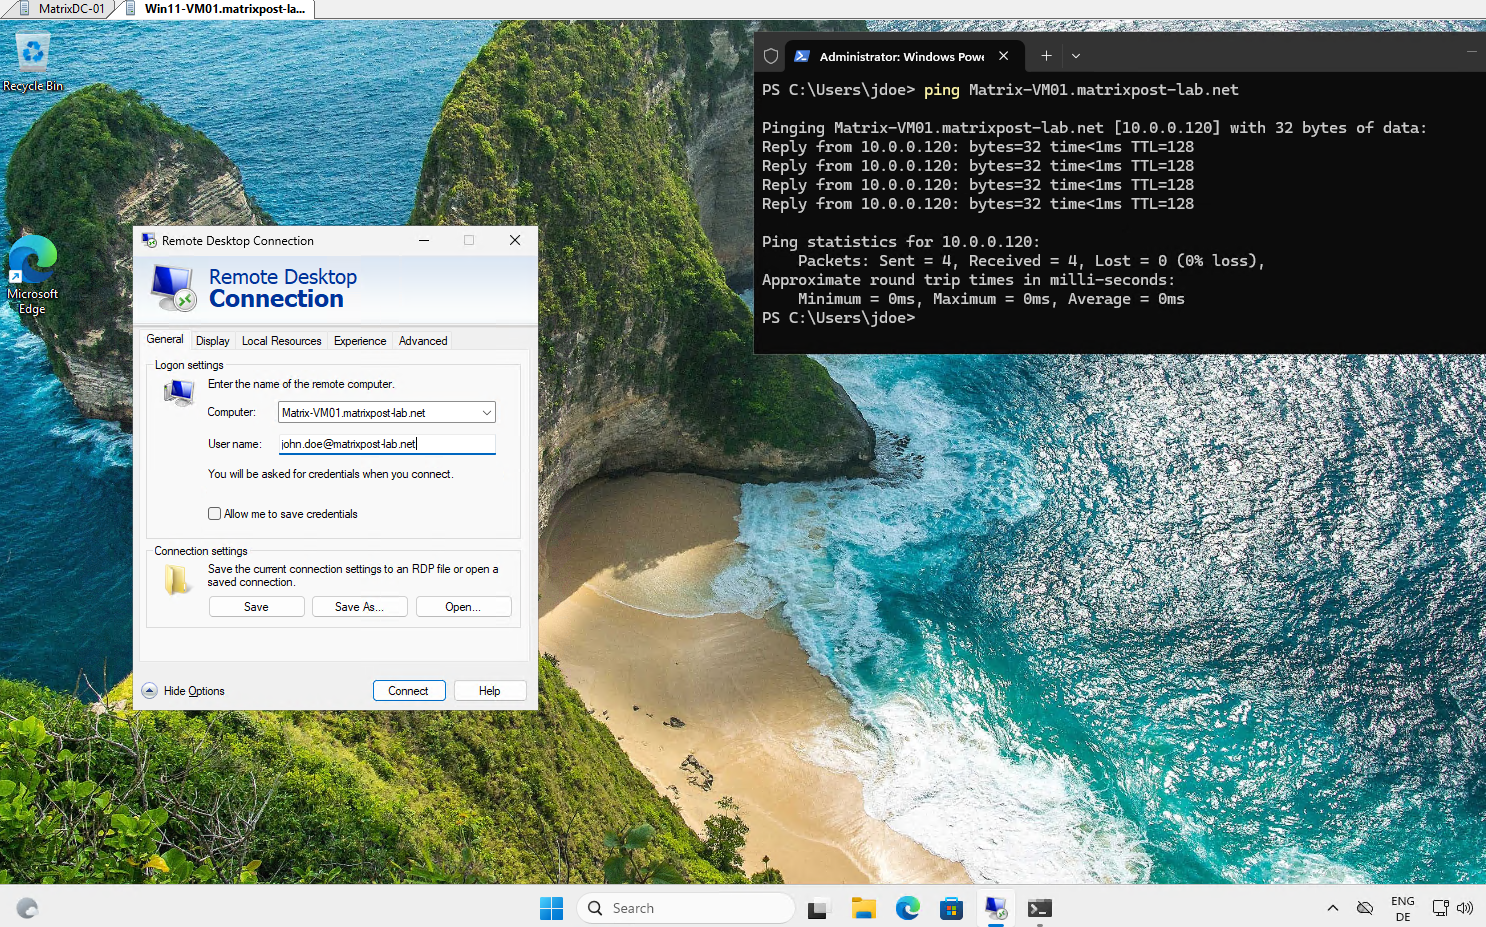
On the General tab for the Remote Desktop Connection, we connect to the remote system using its FQDN Matrix-VM01.matrixpost-lab.net and the synchronized Microsoft Entra user john.doe@matrixpost-lab.net.
Using the FQDN is important because the authentication process relies on proper Kerberos name/SPN resolution rather than simply connecting to the server by IP address as already mentioned.
We also need to enable Use a web account to sign in to the remote computer under the RDP Advanced settings. This enables the web-based Microsoft Entra authentication flow required for using modern authentication methods such as passkeys with RDP.
After clicking Connect, Remote Desktop starts the web-based Microsoft Entra authentication flow and automatically carries over the specified john.doe@matrixpost-lab.net account.
Instead of entering the user’s traditional AD password, we can now select Sign-in options to authenticate with the previously registered FIDO2 security key/passkey.
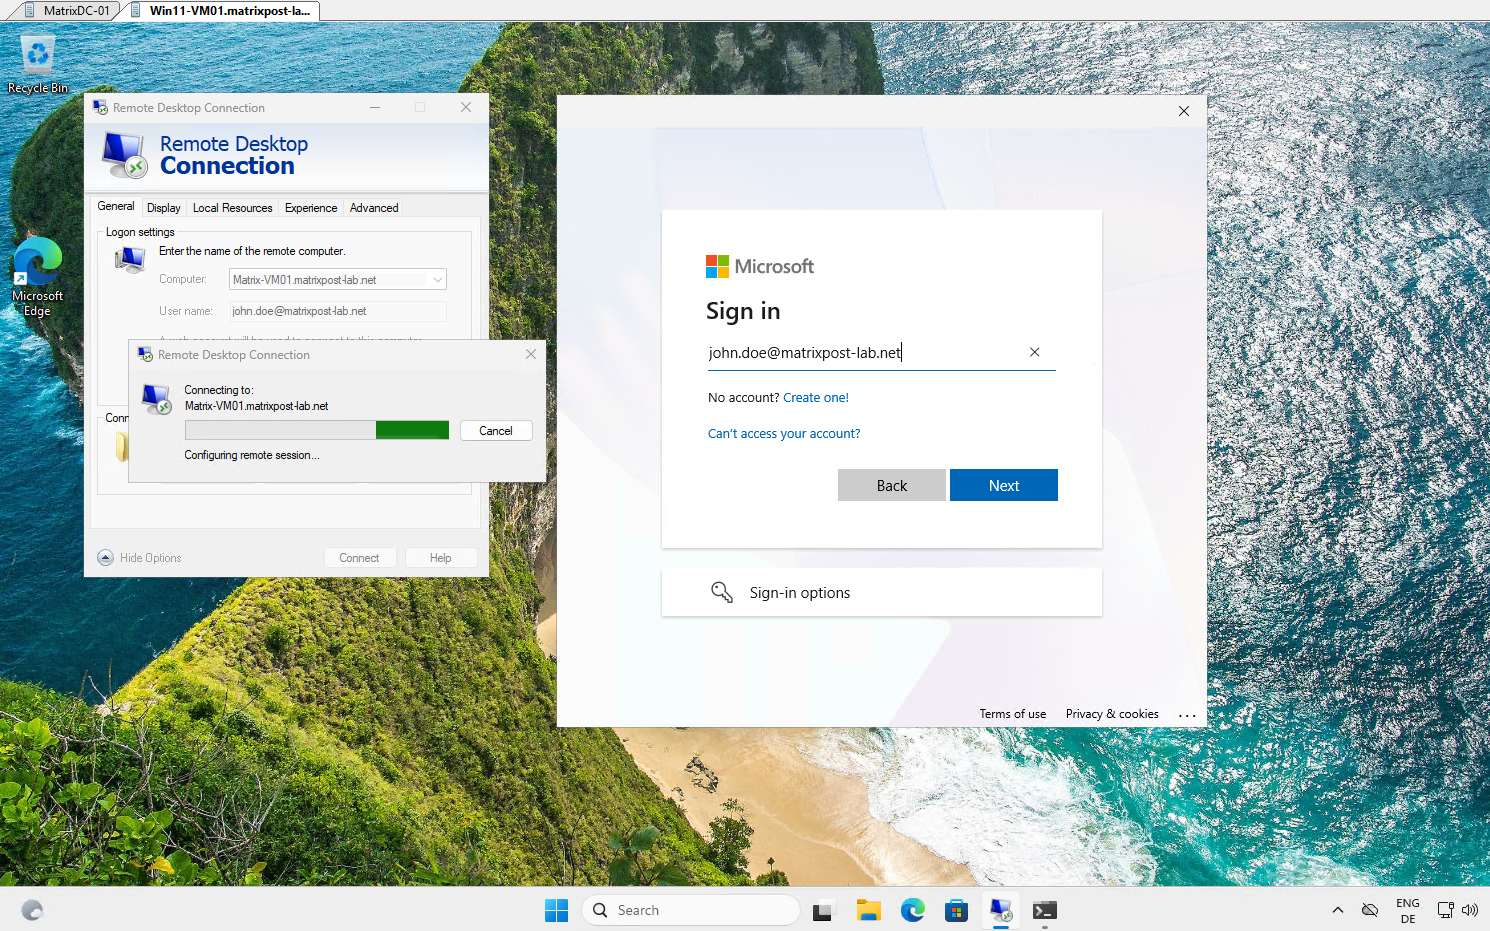
Click Use your face, fingerprint, PIN, or security key instead. This opens the available Windows Hello and FIDO2 authentication methods associated with the user account.
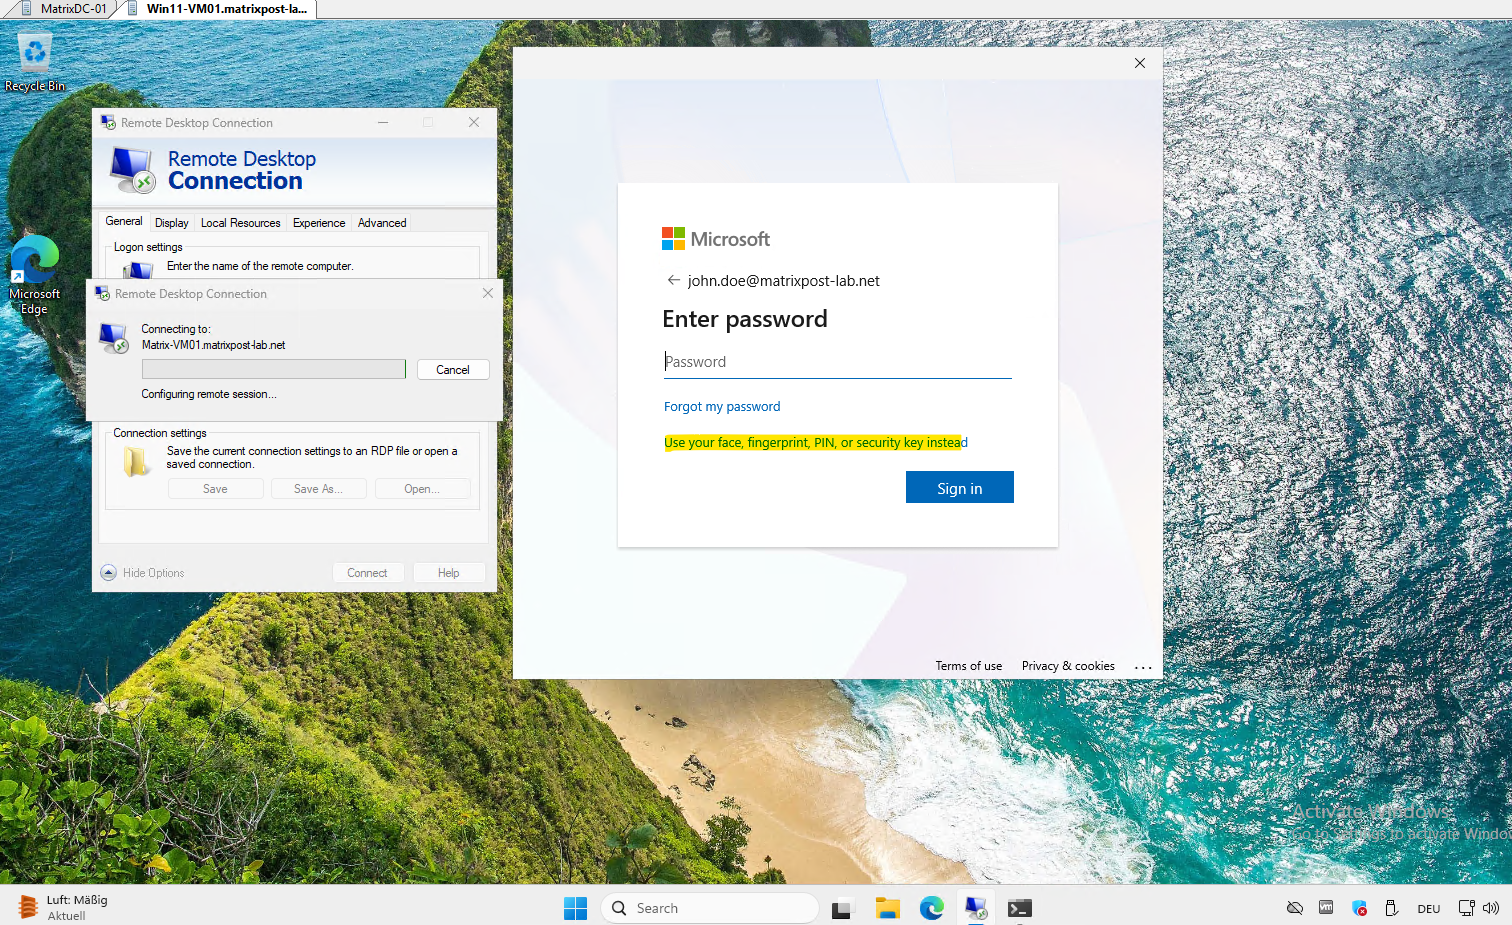
After selecting the security key as the passkey method, Windows Security prompts for the YubiKey/FIDO2 security key PIN. Enter the PIN and click OK to unlock the FIDO2 credential stored on the security key and continue the passwordless authentication.
The FIDO2 security key does not store the user’s password. Instead, it securely stores the private cryptographic key for the registered passkey, while Microsoft Entra ID holds the corresponding public key; the security key PIN only locally authorizes use of that private key.
During FIDO2 registration, the user first authenticates using an already trusted method, allowing Microsoft Entra ID to securely associate the newly generated public key with the user account. From then on, possession of the corresponding private key on the security key, combined with successful PIN verification, can be used to authenticate the user without a password.
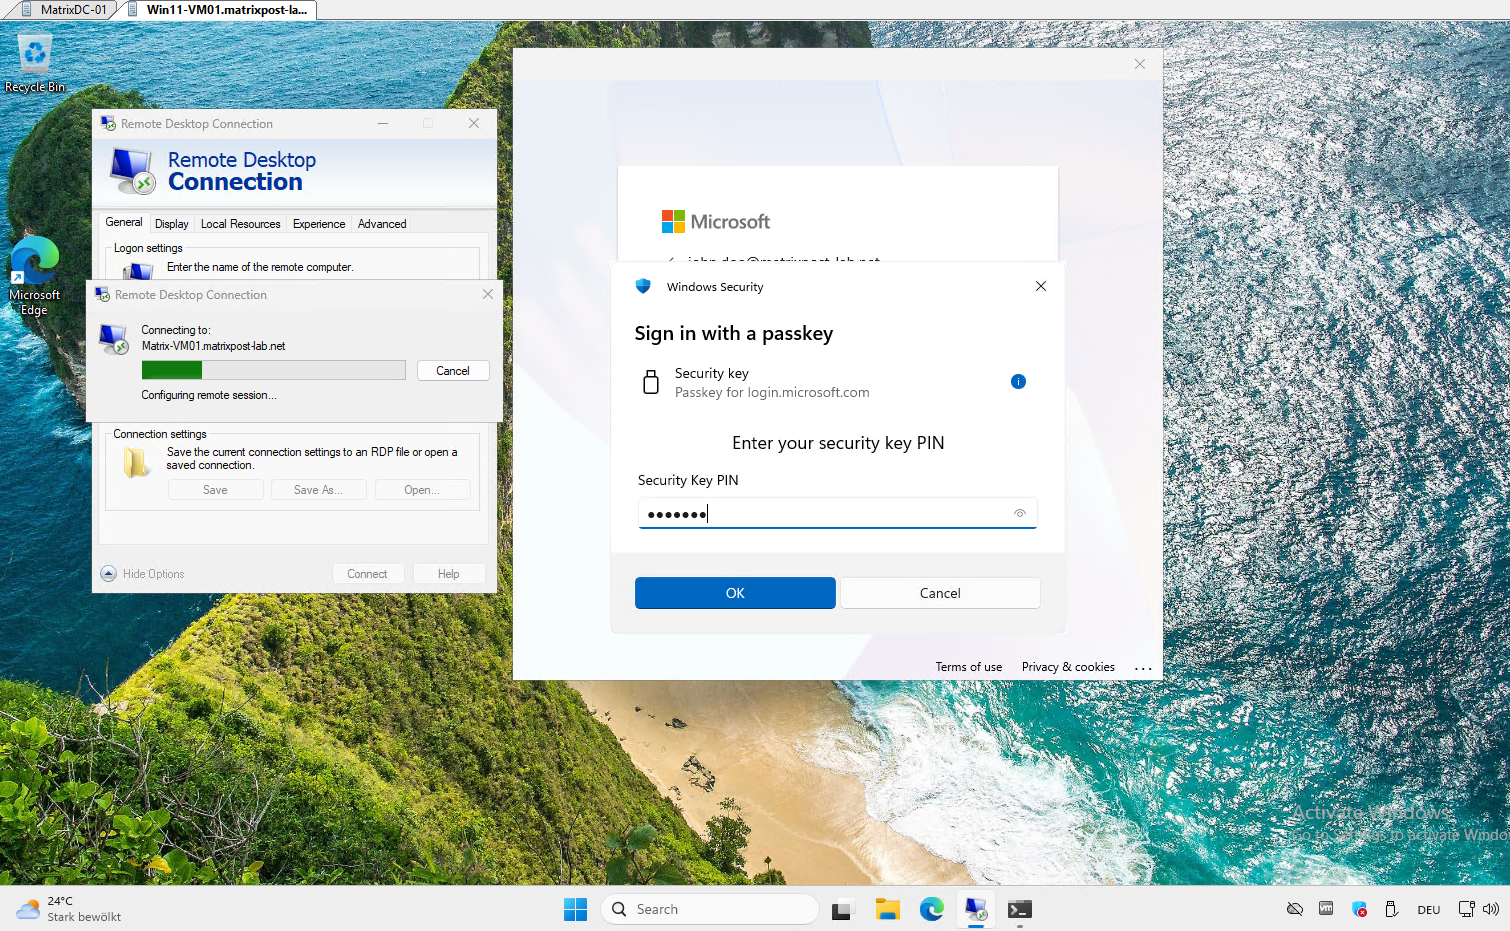
After the PIN has been successfully verified, Windows asks the user to physically touch the YubiKey, providing the required user-presence verification. The YubiKey can then use its protected private key to sign the authentication challenge and complete the FIDO2/passkey sign-in.
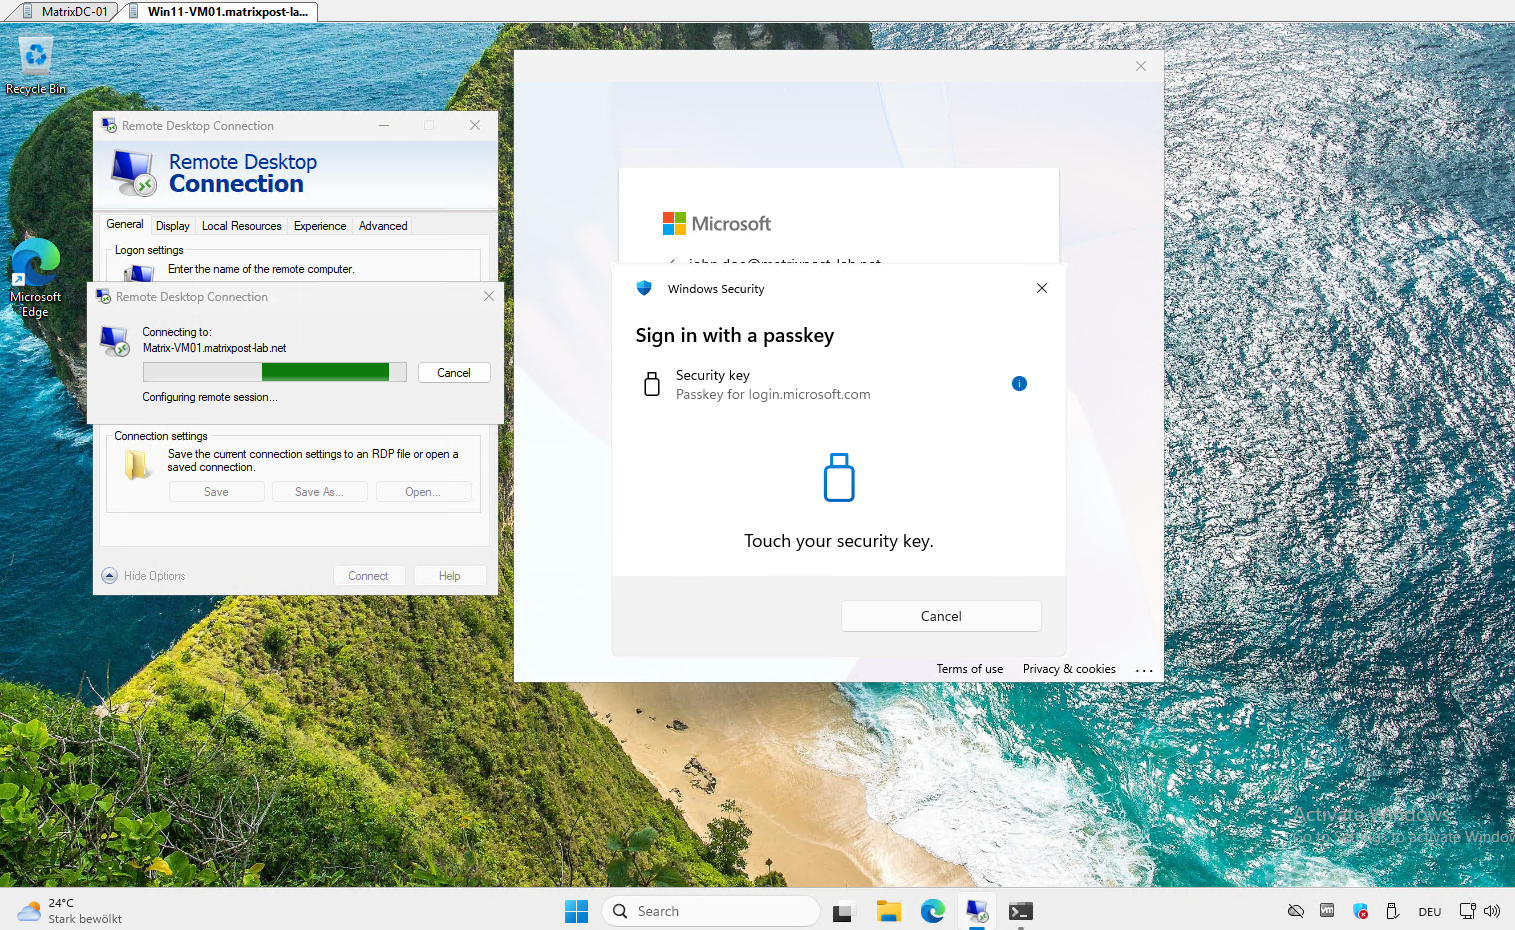
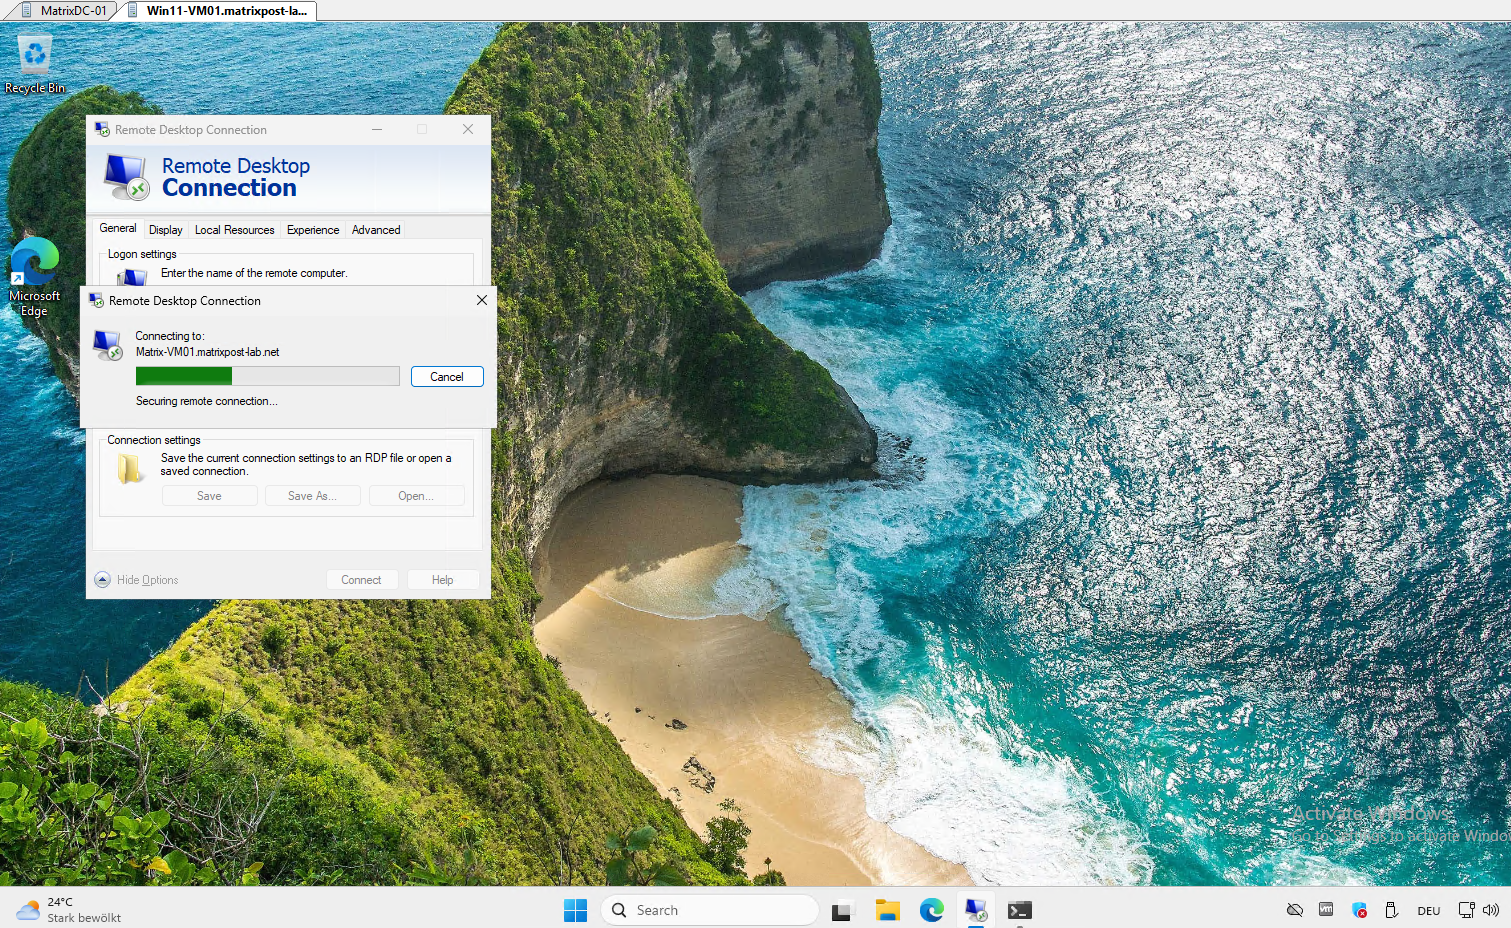
After successful FIDO2 authentication, the RDP client continues with Securing remote connection and establishes the Remote Desktop session. At this point, no user password has been entered or transmitted, the authentication was completed using the FIDO2/passkey credential on the security key.
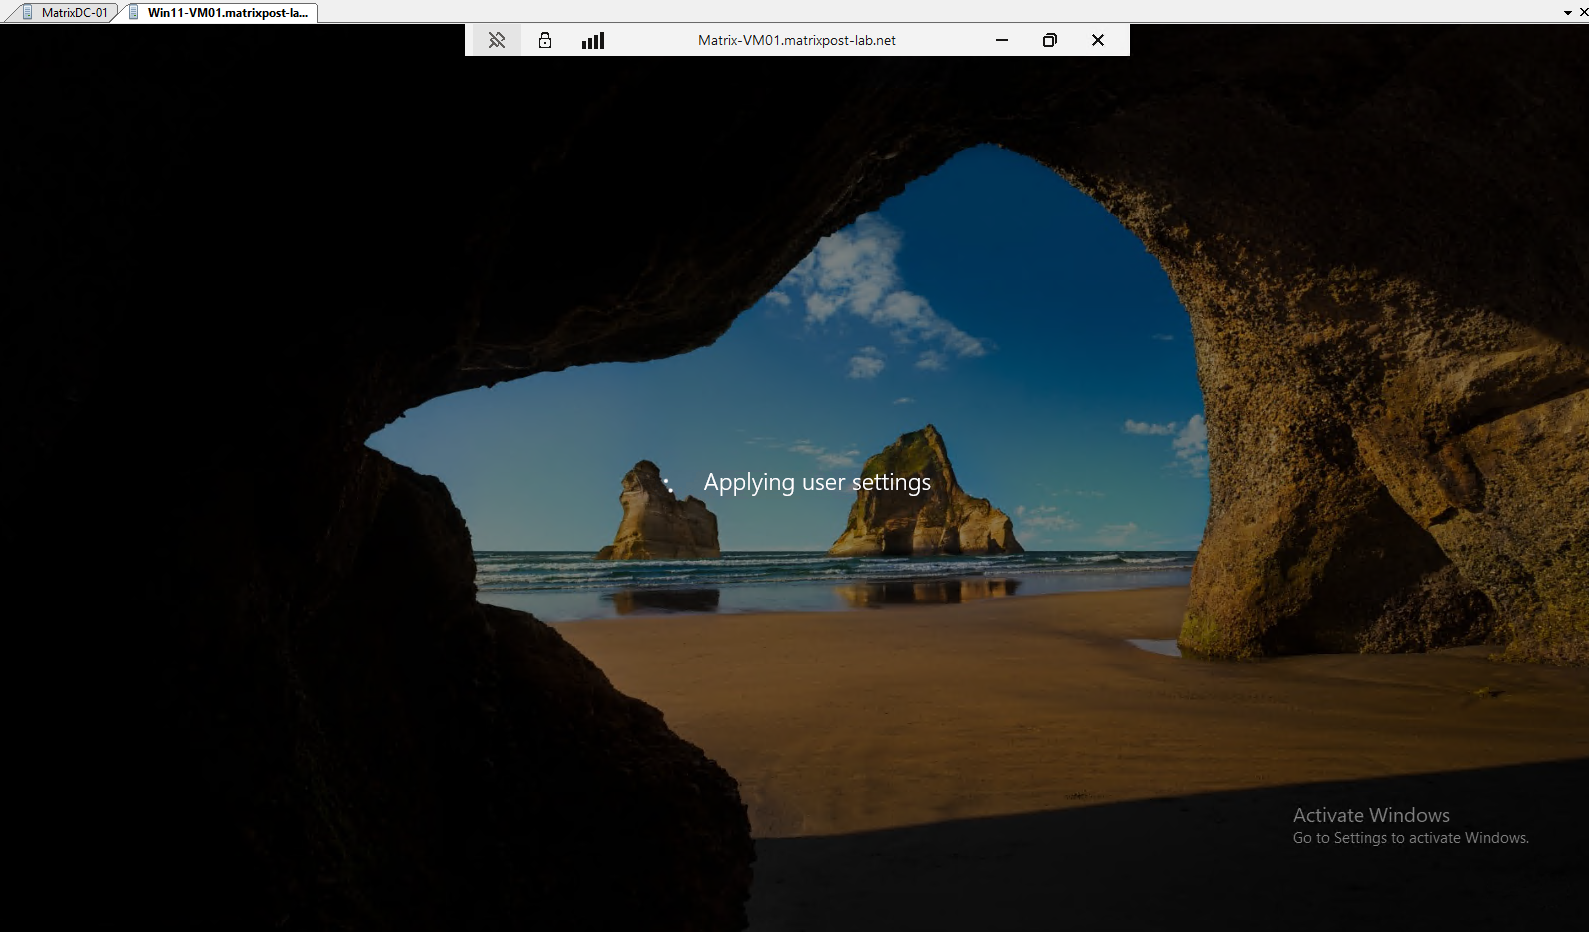
After successful authentication, the Remote Desktop session is established and Windows begins applying the user settings for John Doe on the remote computer. This confirms that the complete RDP logon was successfully performed using the FIDO2 security key without entering the user’s password.
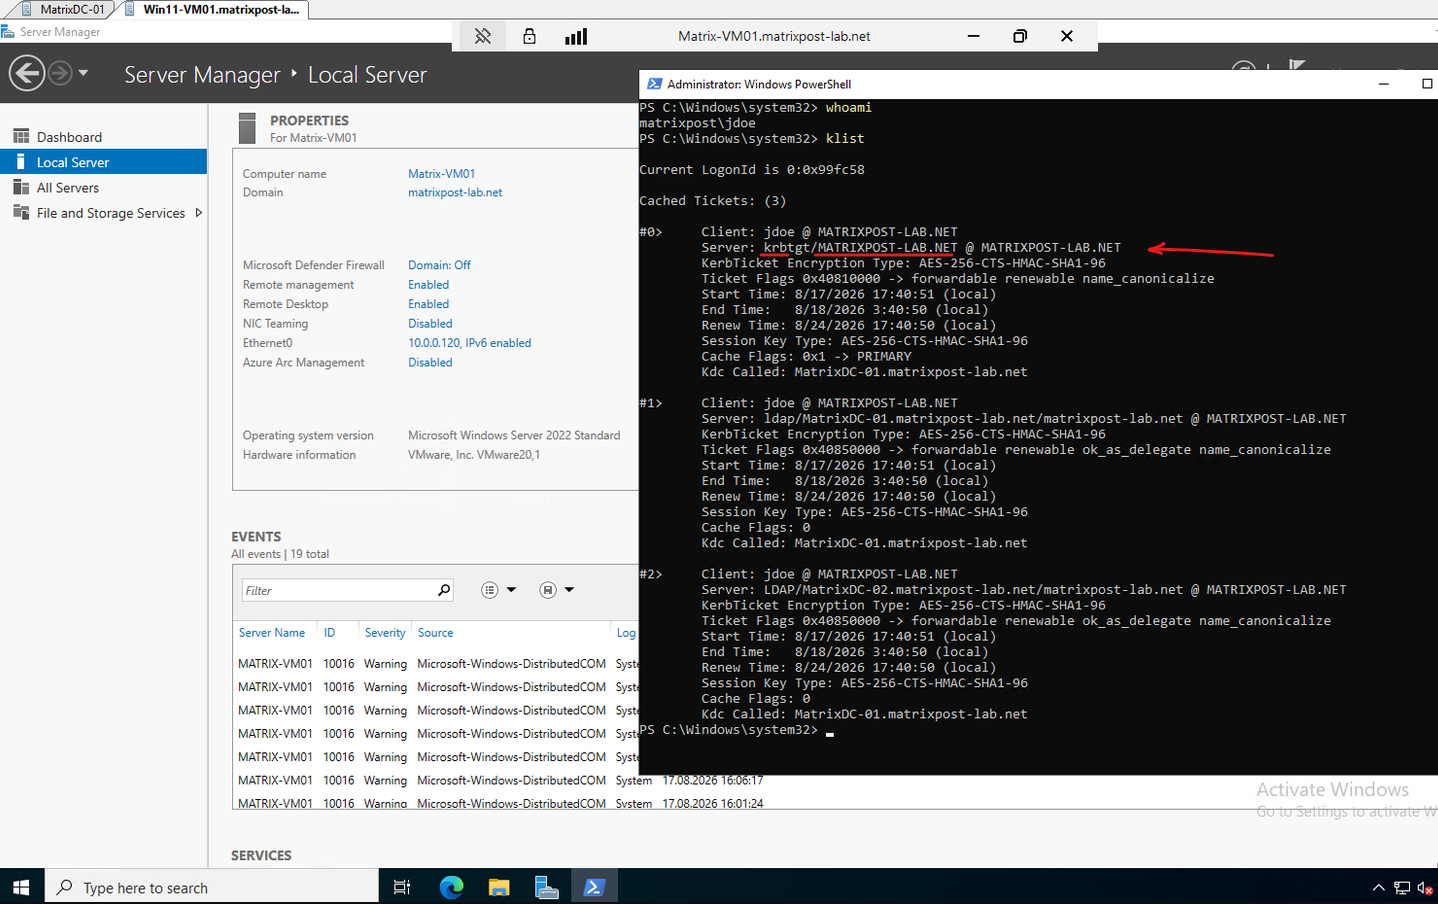
After the passwordless FIDO2 authentication and successful RDP logon, whoami confirms that the resulting Windows session runs as the corresponding on-premises AD user MATRIXPOST\jdoe.
Running klist also shows that the user has obtained a regular Kerberos TGT and service tickets for the MATRIXPOST-LAB.NET domain, allowing normal access to Active Directory resources.
The Ticket Granting Ticket (TGT) highligted below acts as the user’s reusable Kerberos credential and is presented to the KDC whenever a service ticket for a particular network service, such as CIFS/SMB or LDAP, is required. This allows the user to access multiple Kerberos-enabled services without repeatedly providing their password or performing another interactive authentication.
whoami
klist
Configuring Passwordless Windows Sign-In with Passkey (FIDO2)
Besides using our FIDO2 security key (passkey) for passwordless Remote Desktop (RDP) authentication, we can also use the same credential to sign in directly to our Microsoft Entra hybrid joined Windows 11 client.
However, FIDO2 security key sign-in at the Windows logon screen is a separate Windows authentication capability and must be explicitly enabled.
By default, our Windows 11 client only offers the password credential provider at the Windows logon screen, and no option for signing in with the FIDO2 security key is available yet. Therefore, we first need to enable security key sign-in for Windows.
In contrast, as demonstrated in Part 1, Windows automatically exposes the Smart Card credential provider when a compatible smart card containing the PKI-issued certificate and corresponding private key is connected.
For FIDO2 security keys, the corresponding Windows sign-in capability must first be explicitly enabled.

Below we will configure the required policy and use our YubiKey FIDO2 security key for a completely passwordless interactive Windows sign-in.
For our Microsoft Entra hybrid joined Windows 11 VM, we will enable FIDO2 security key sign-in centrally by using a Group Policy (GPO) in our on-premises Active Directory domain.
Microsoft explicitly supports enabling FIDO2 security key sign-in through Group Policy for Microsoft Entra hybrid joined devices.
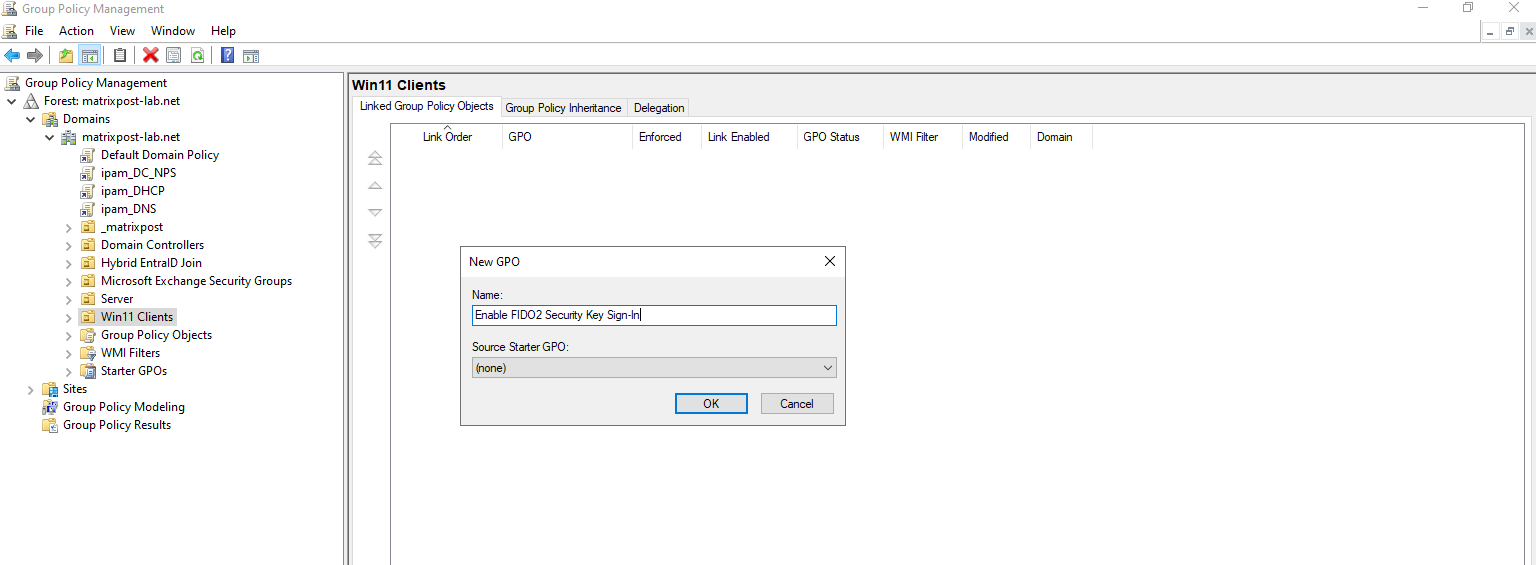
On our Domain Controller, open Group Policy Management (gpmc.msc), create a new GPO such as Enable FIDO2 Security Key Sign-In, and link it to the OU containing your Windows 11 client computer.
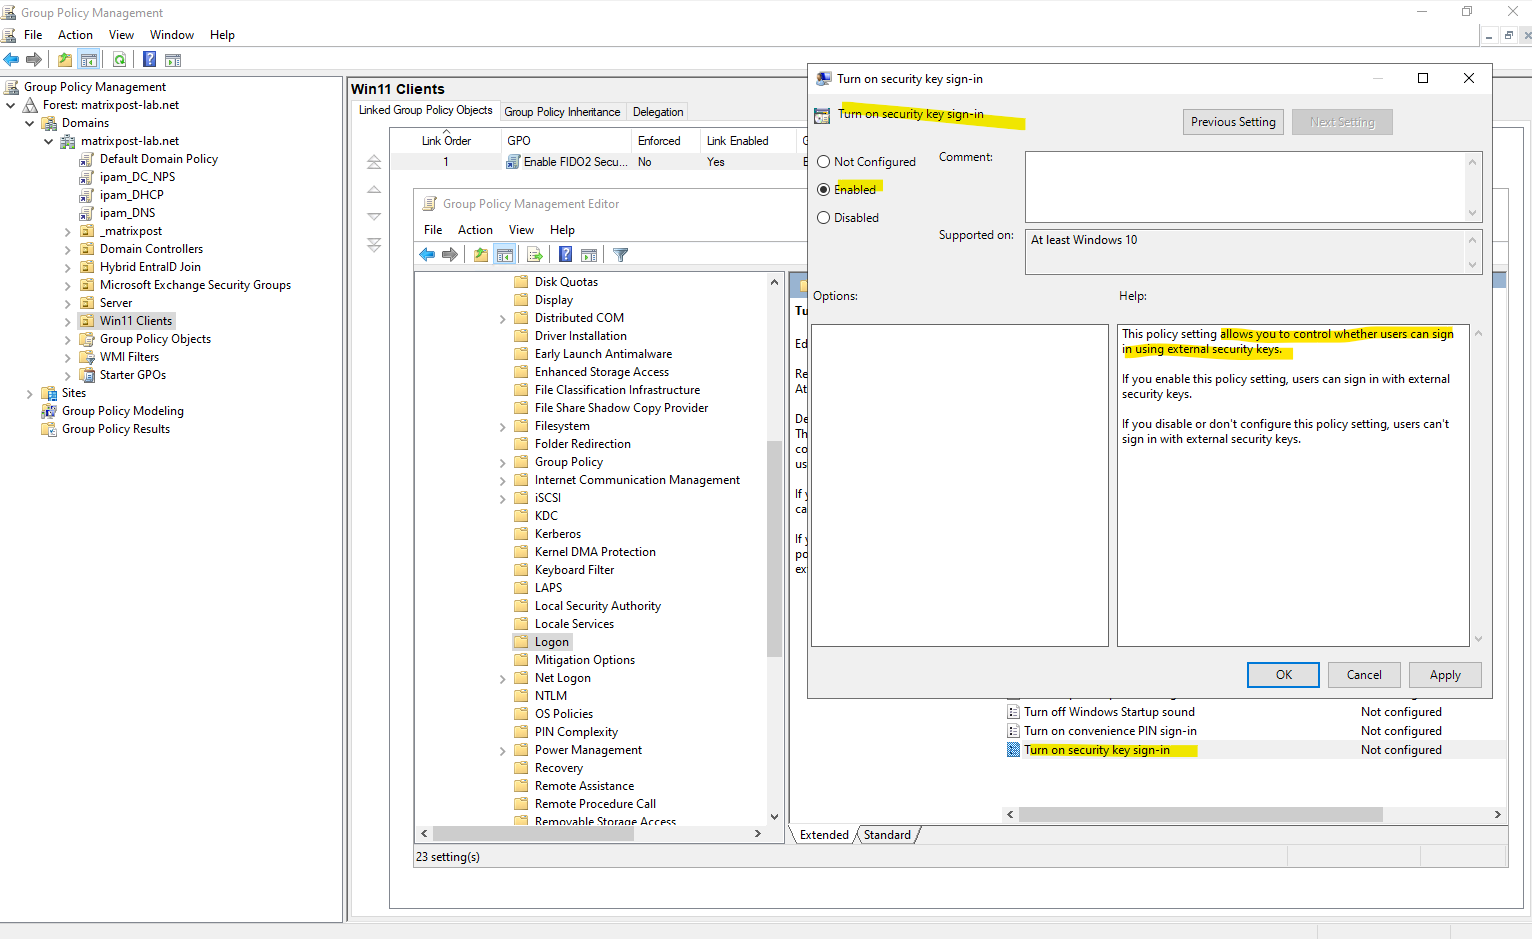
Under Computer Configuration → Policies → Administrative Templates → System → Logon, enable the policy Turn on security key sign-in, which enables the Windows credential provider required for FIDO2 security key sign-in.
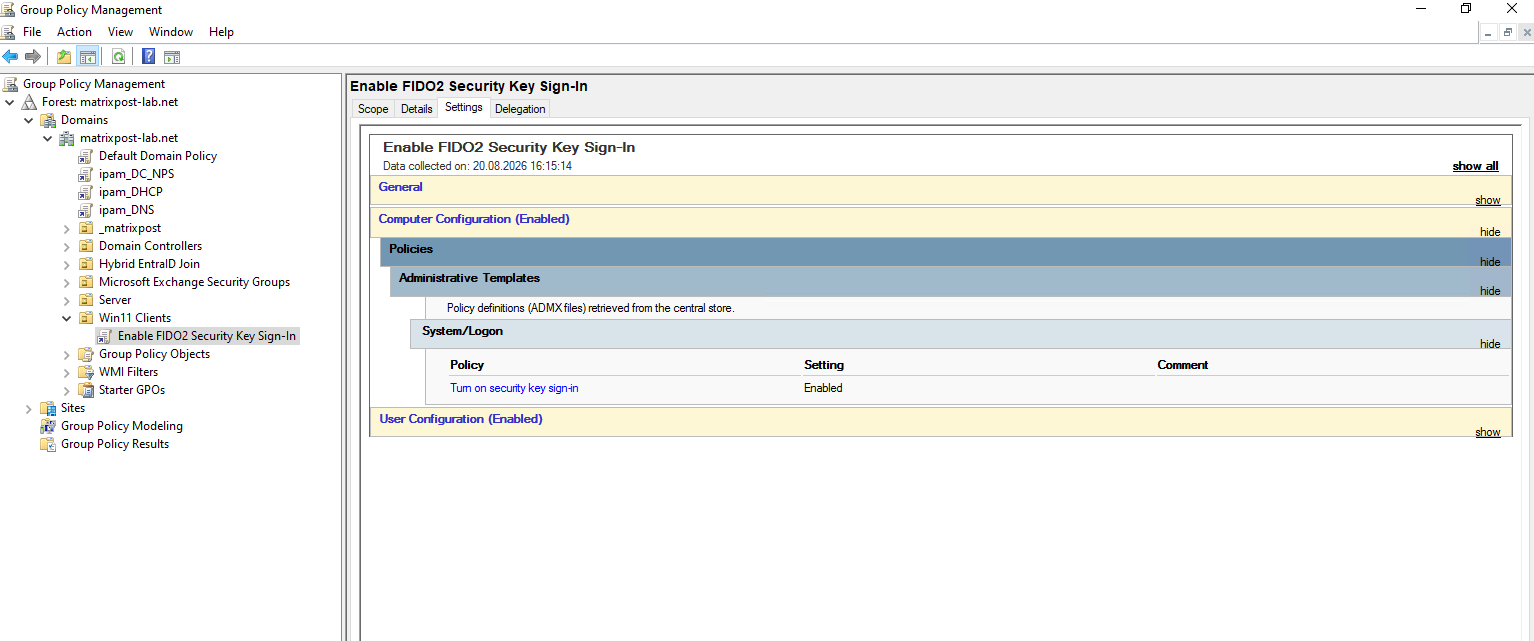
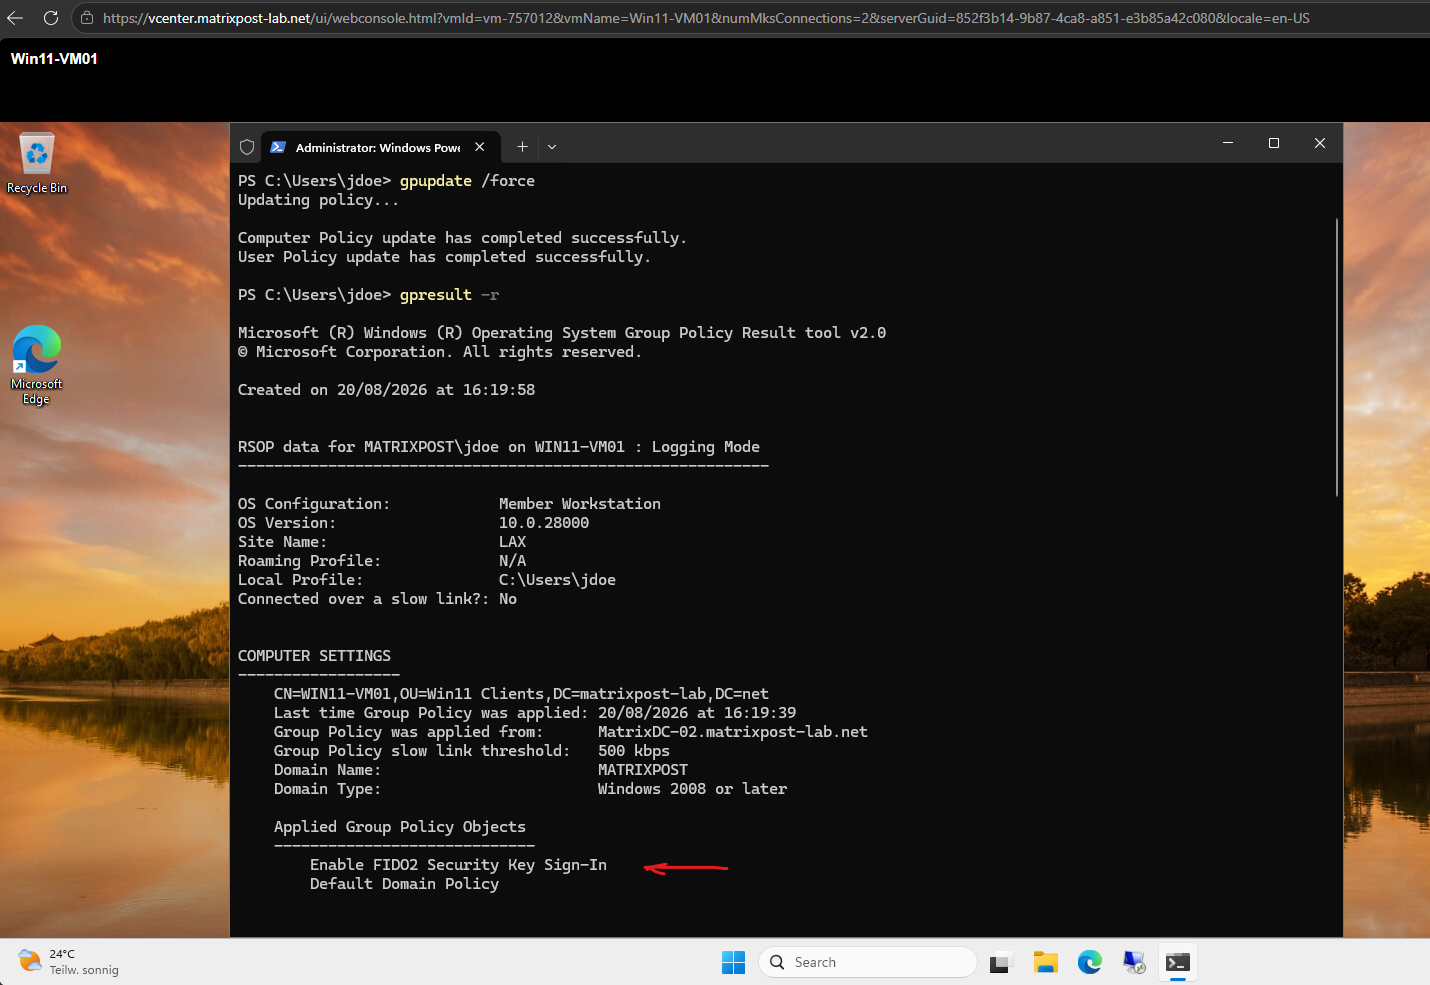
On our Windows 11 client, run gpupdate /force to immediately refresh the Group Policy configuration. Using gpresult -r, we can then verify that the Enable FIDO2 Security Key Sign-In GPO has been successfully applied to the computer.
gpupdate /force
gpresult -r
After signing out/rebooting, Sign-in options should expose the Security key credential provider for our FIDO2/YubiKey sign-in.
After applying the Group Policy, the Sign-in options link is now available on the Windows logon screen.

After selecting Sign-in options, Windows now displays the FIDO security key credential provider, as indicated by the tooltip when hovering over the security-key icon.
We can now select this option to authenticate with our registered FIDO2 security key (passkey) instead of using the user’s password.

After the security key is detected, Windows switches to the generic Other user credential provider and prompts for the Security Key PIN.
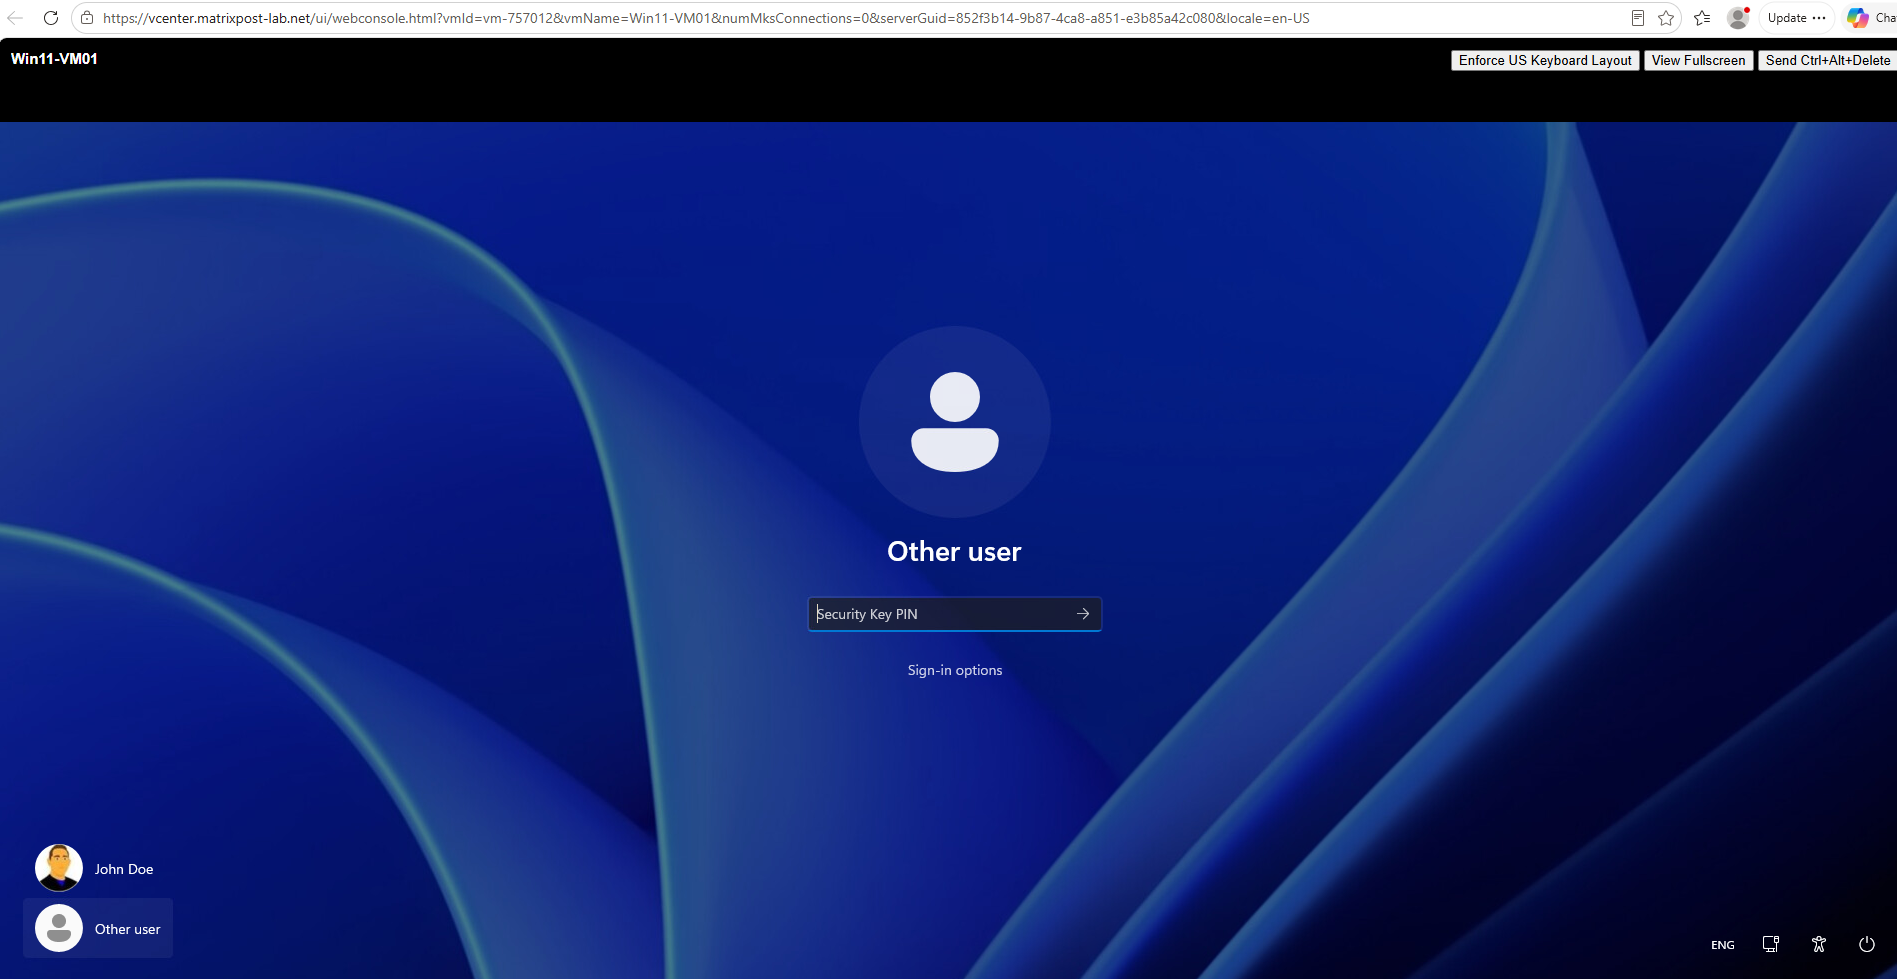
After typing the PIN, submit it by pressing Enter or clicking the arrow button.
This action unlocks the private key stored on the FIDO2 security key, allowing Windows to send a cryptographic challenge to the device.
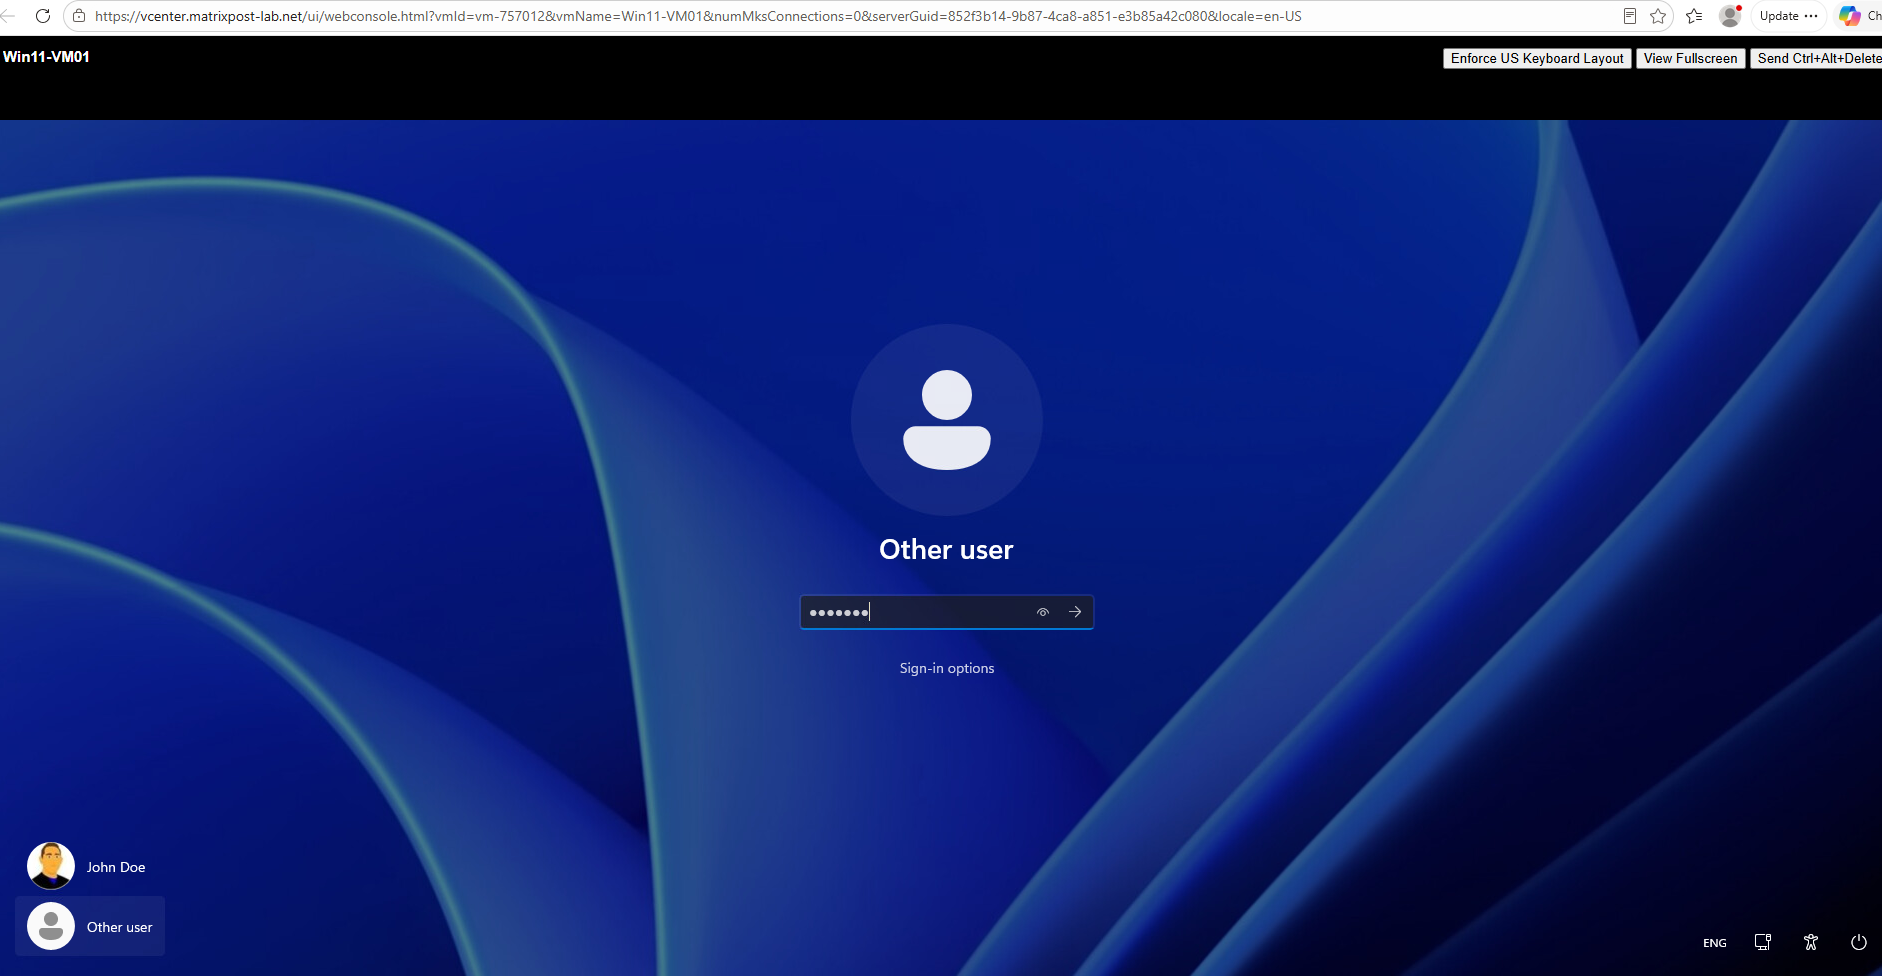
After submitting the PIN, Windows briefly displays “Getting ready…” while it verifies the PIN with the FIDO2 key, initializes the CTAP protocol, and prepares the cryptographic challenge. Once the key accepts the PIN, it moves to the physical touch prompt.
Client to Authenticator Protocol (CTAP) is the protocol used by a client device, such as a Windows PC or smartphone, to communicate with an external FIDO2 authenticator, such as a YubiKey, over USB, NFC, or Bluetooth.
Together with WebAuthn, CTAP forms the core of FIDO2: WebAuthn handles communication between the application/browser and the client, while CTAP handles communication between the client and the authenticator.
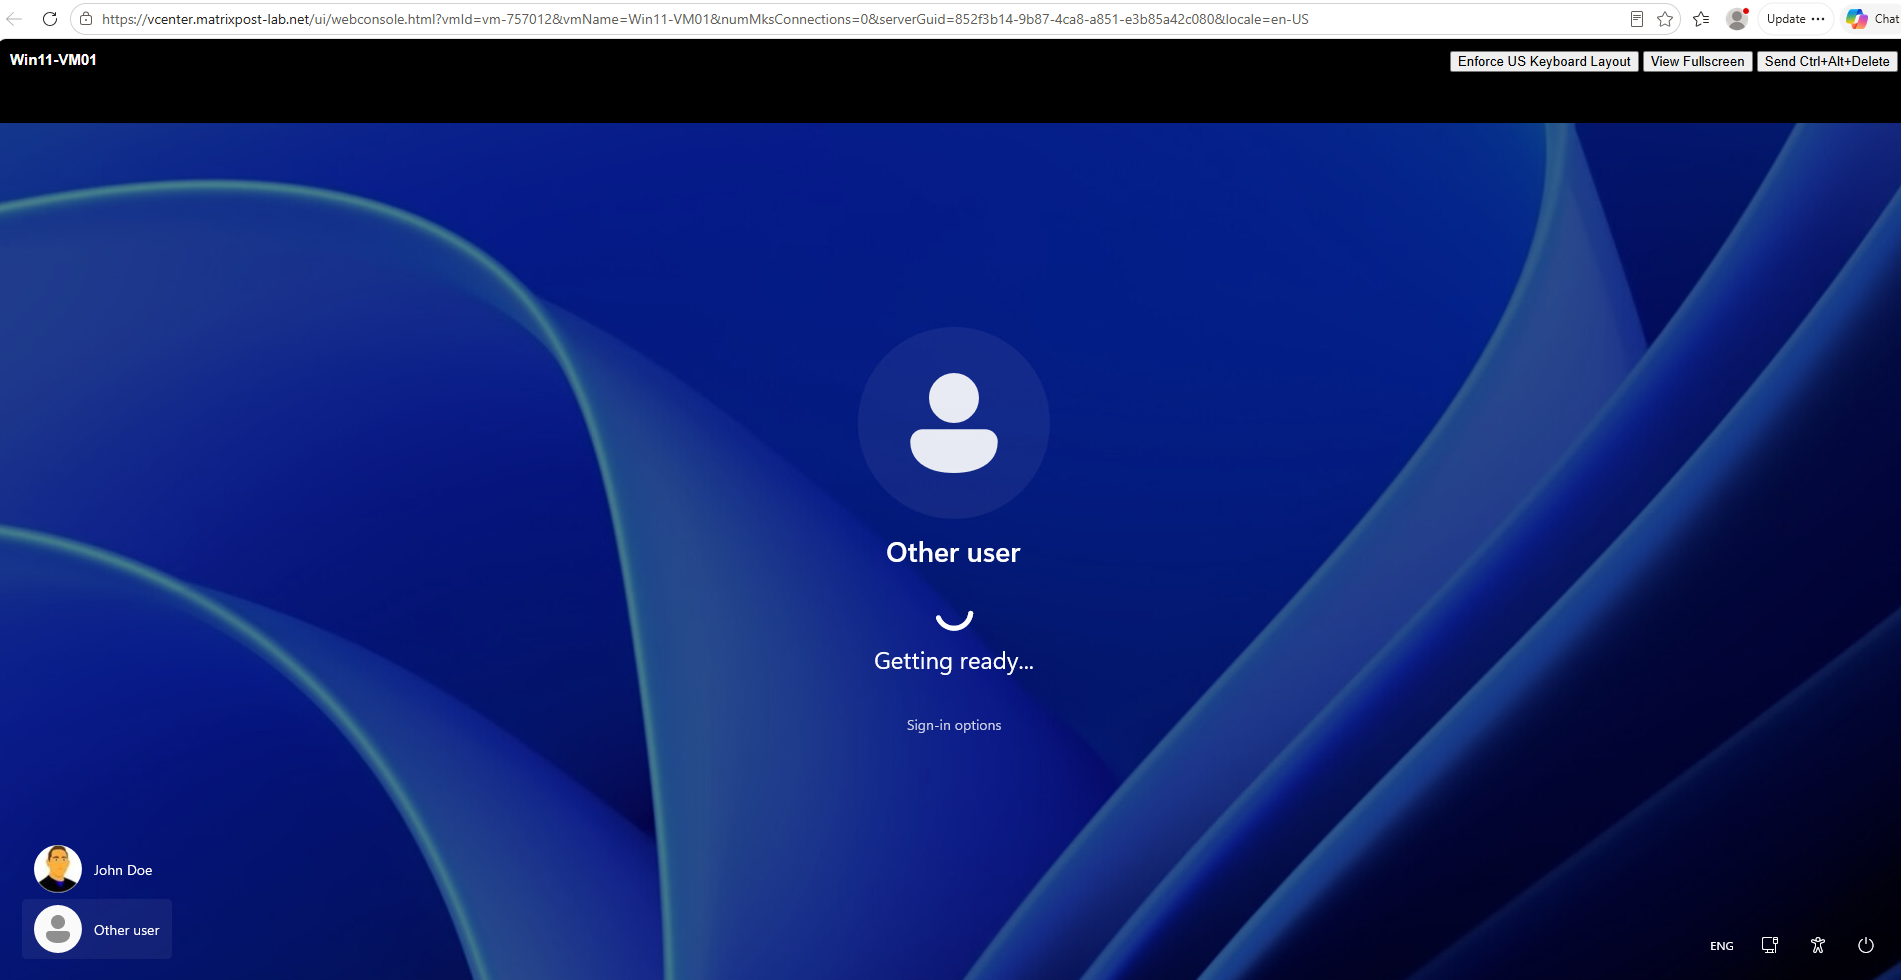
Windows displays the “Touch your security key” prompt to satisfy the FIDO2 User Presence (UP) requirement.
Tapping the physical sensor instructs the security key to sign the cryptographic assertion using its hardware-protected private key, proving physical possession of the device.
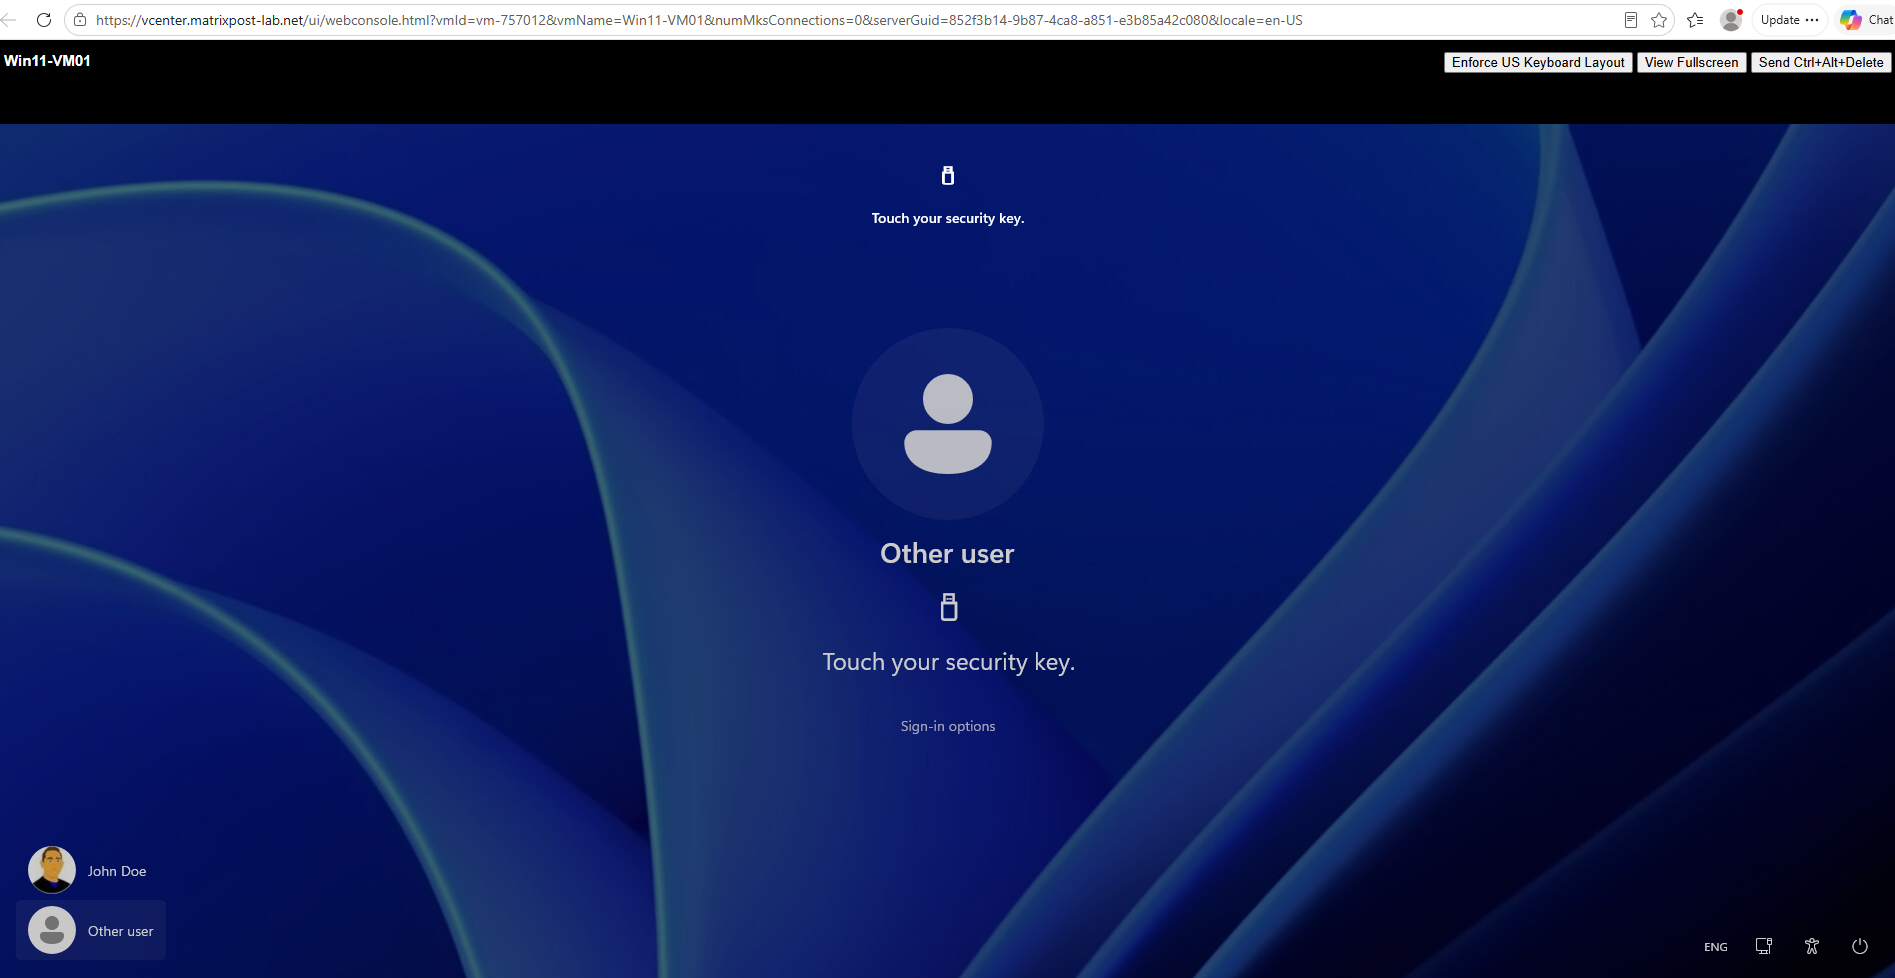
After touching the key, the logon process hangs indefinitely at the prompt.
Therefore, we first checked the Microsoft Entra hybrid join and device authentication status of the Windows 11 client using
dsregcmd /status, which revealed a device authentication failure.
dsregcmd /status
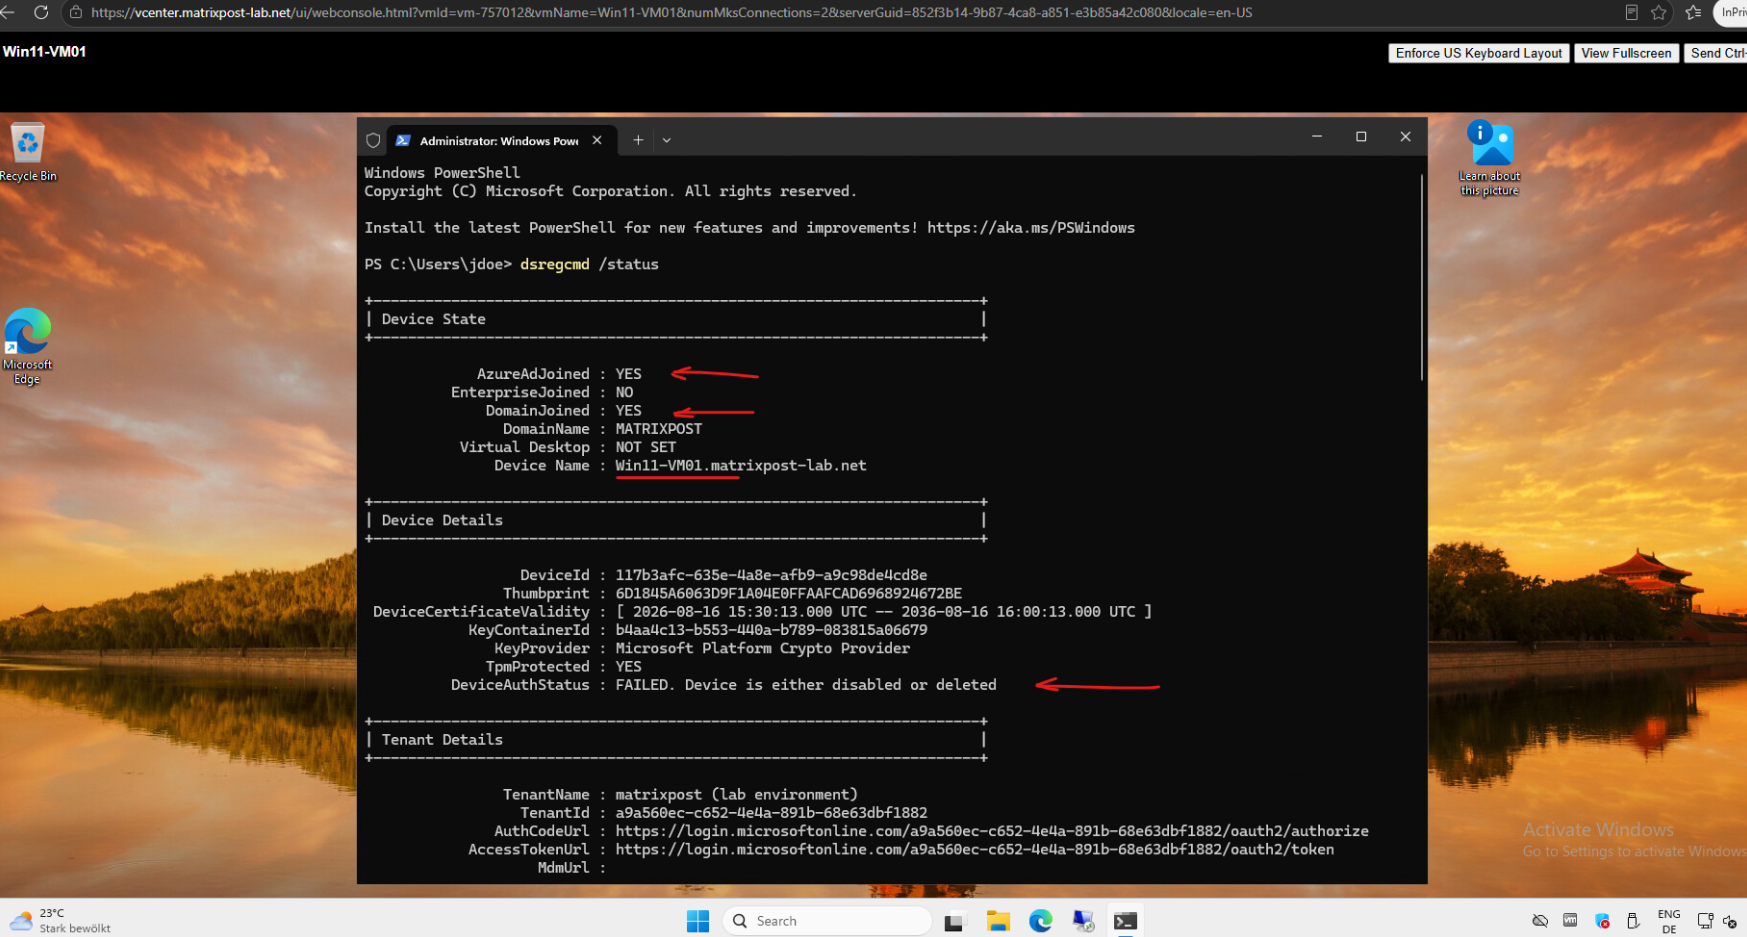
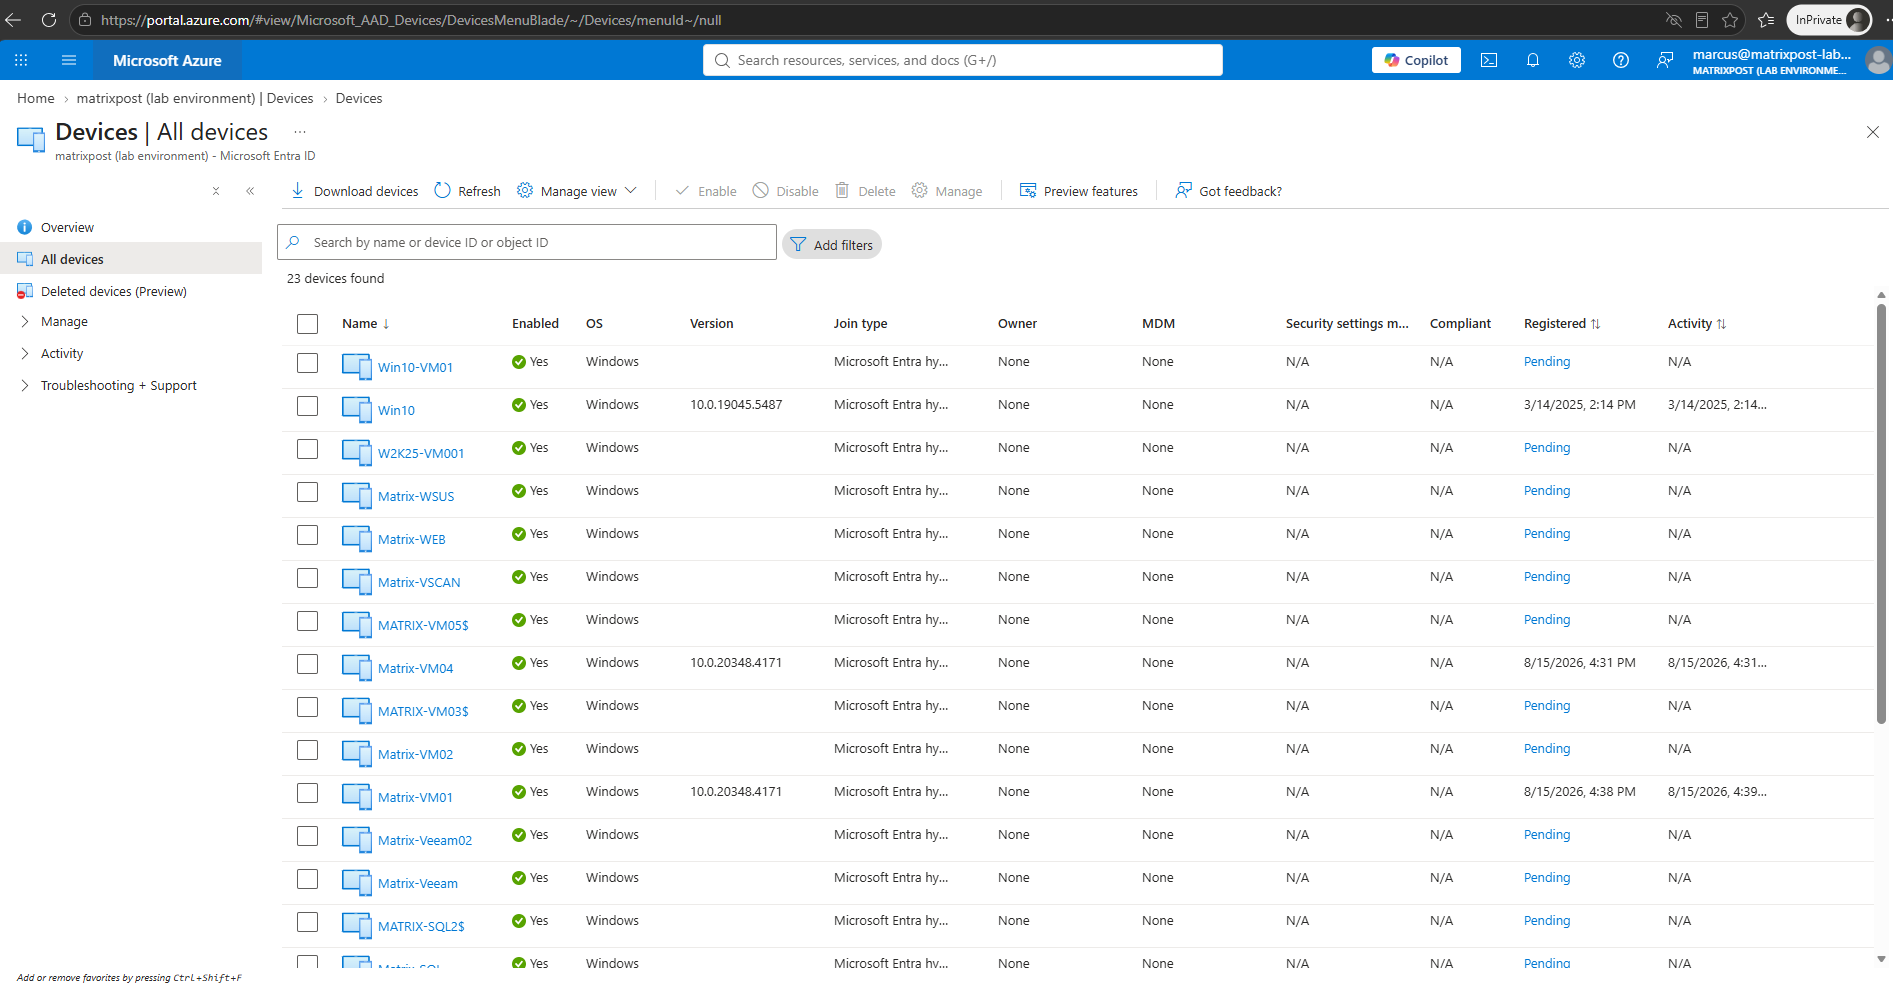
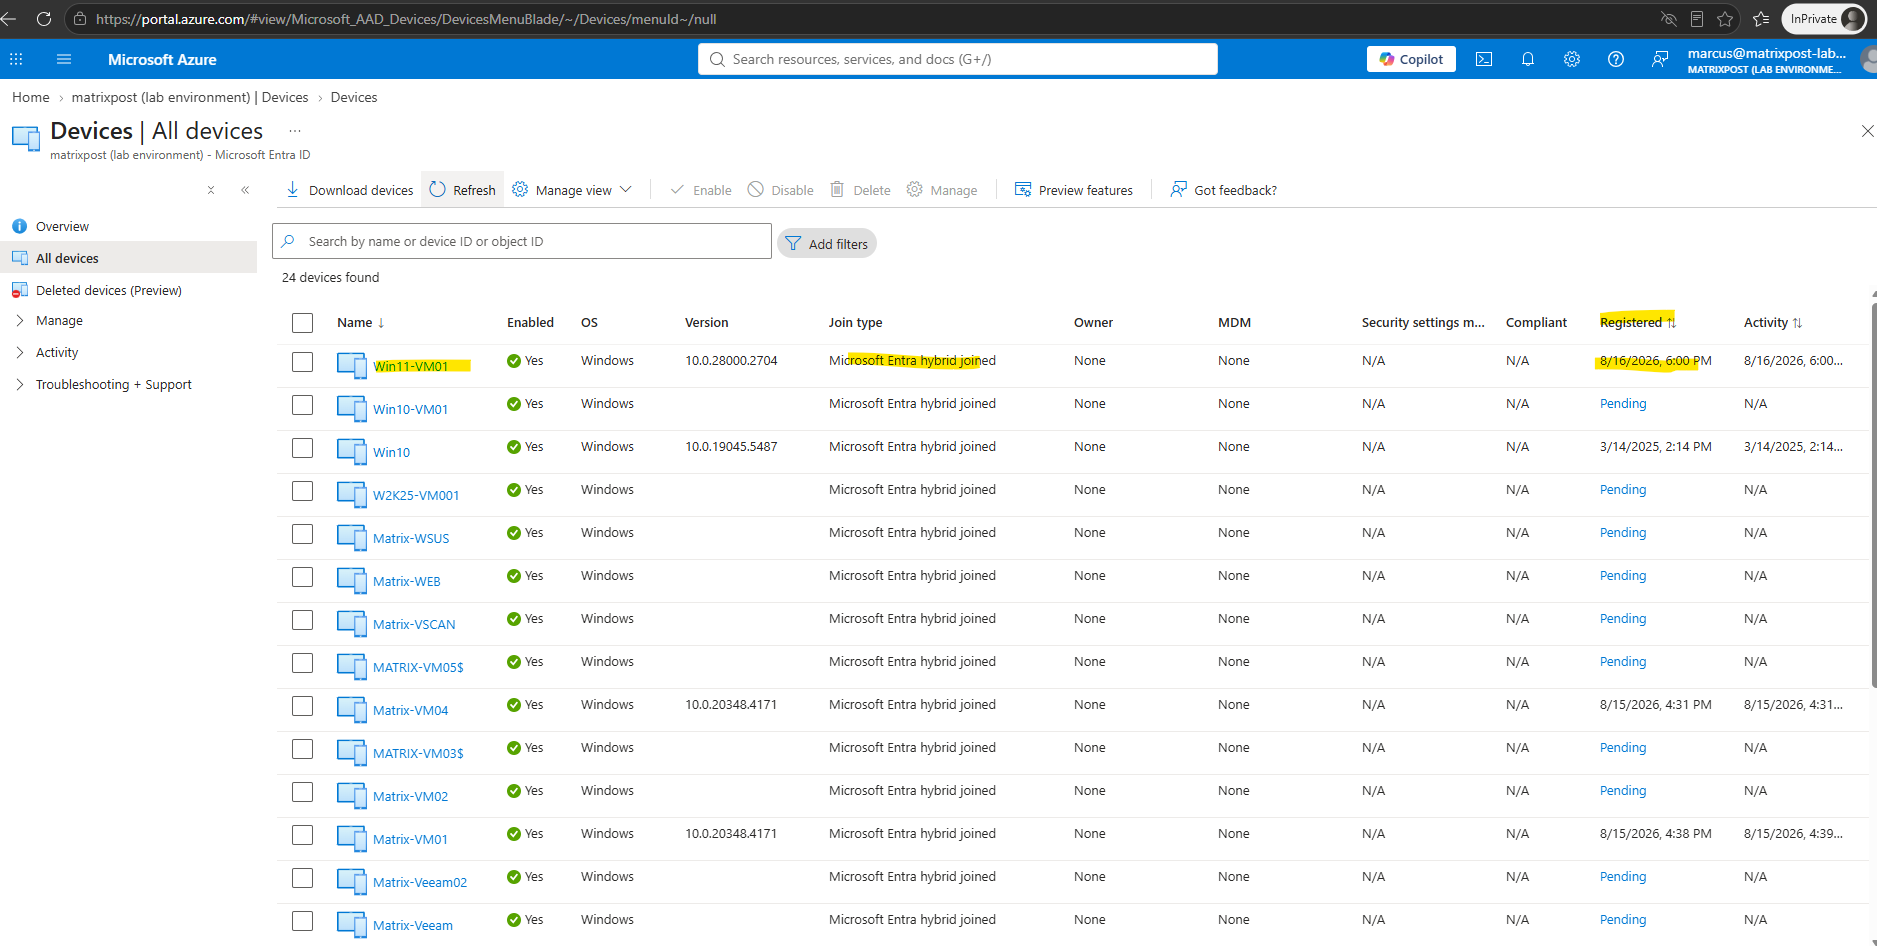
Checking Microsoft Entra ID → Devices → All devices confirmed the problem: our WIN11-VM01 device was no longer listed in Microsoft Entra ID.
This explains the
DeviceAuthStatus : FAILEDresult even though the client still locally reportedAzureAdJoined : YES.
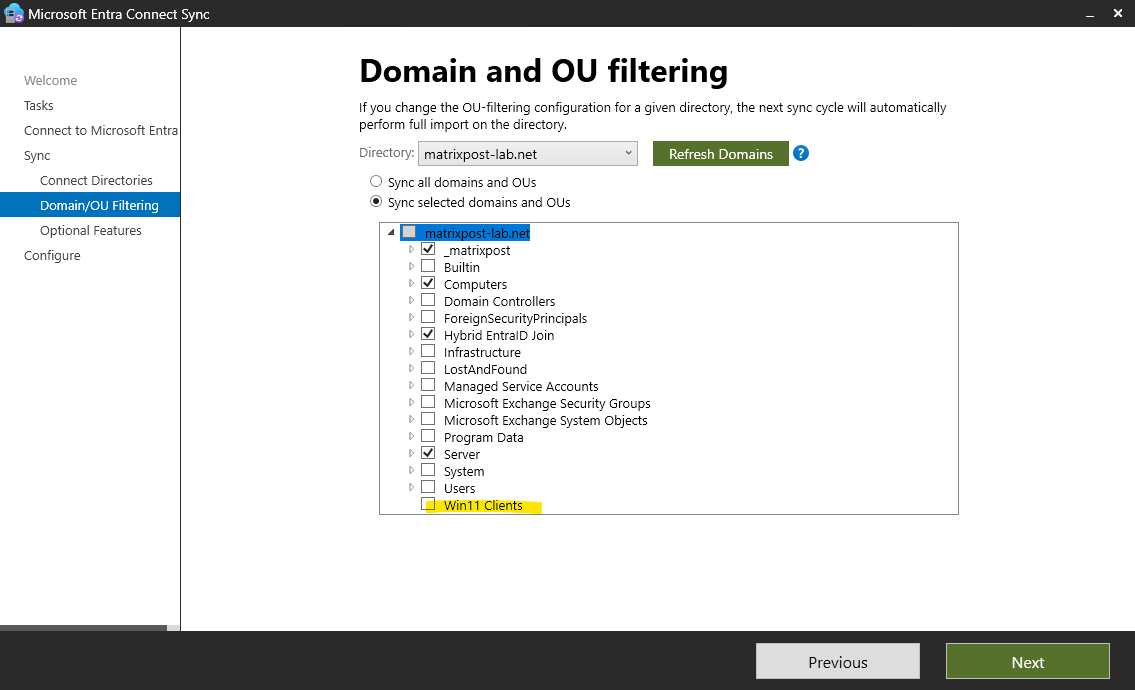
The root cause became clear when checking the Microsoft Entra Connect Sync configuration: the newly created Win11 Clients OU was not included in the configured Domain and OU filtering.
By moving
WIN11-VM01into this OU, the computer object was therefore moved outside the Microsoft Entra Connect synchronization scope, causing its corresponding device object to be removed from Microsoft Entra ID.
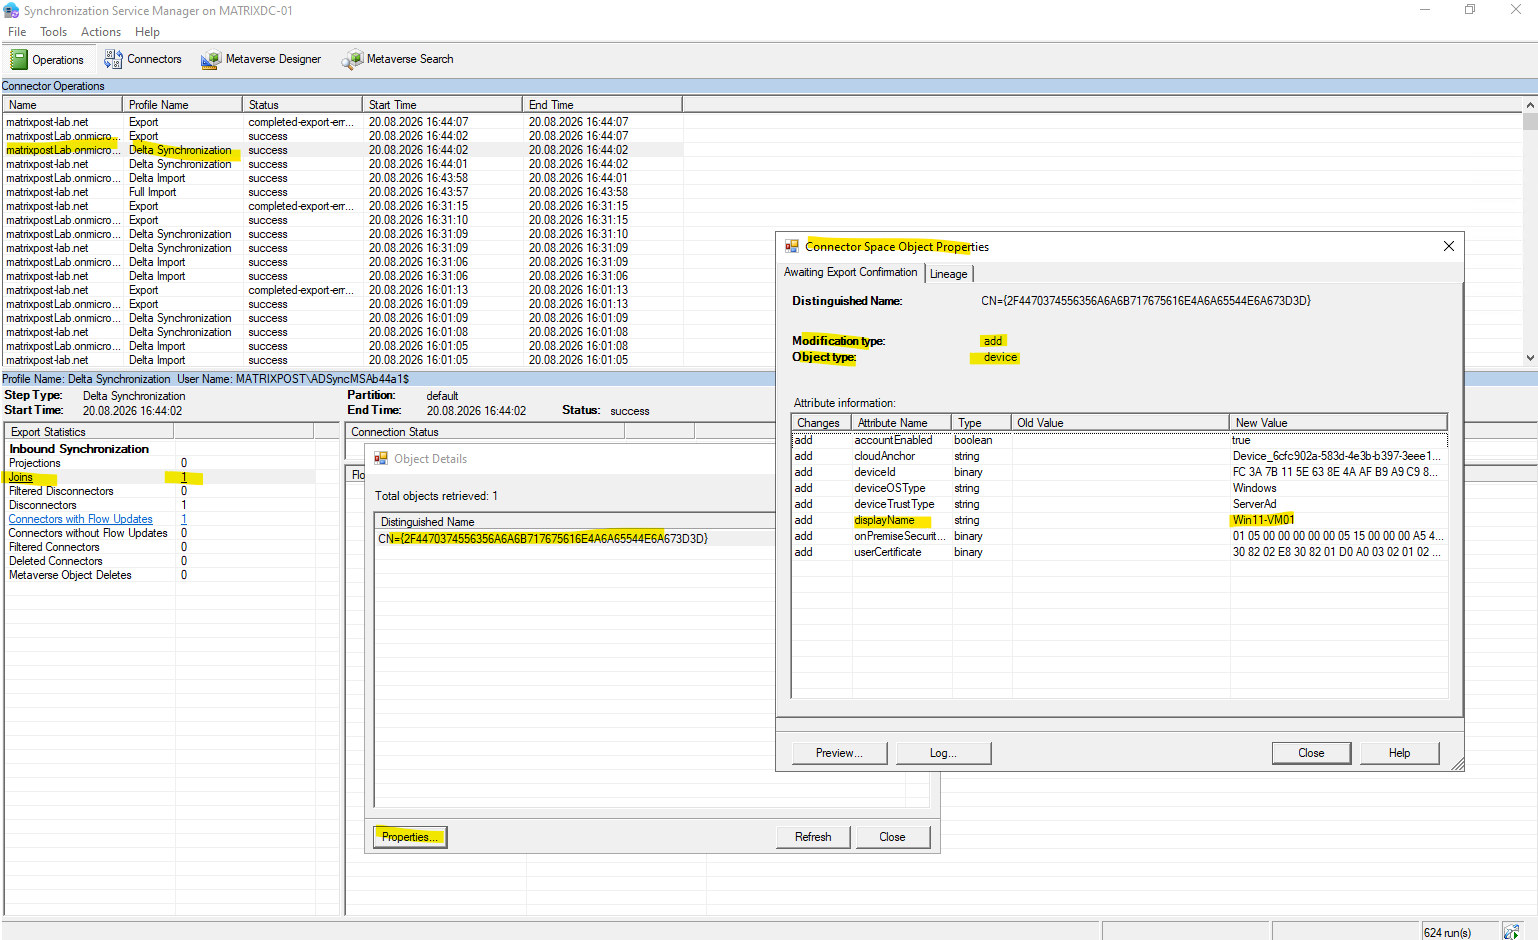
After adding the Win11 Clients OU to the Microsoft Entra Connect synchronization scope and triggering a synchronization cycle, the Synchronization Service Manager now shows Win11-VM01 as a new device object being added.
This confirms that the computer has been picked up again by Microsoft Entra Connect and is being synchronized back to Microsoft Entra ID.
The Registered timestamp (
8/16/2026, 6:00 PM) appears to have been preserved from the original Hybrid Join, rather than being reset when Entra Connect recreated/resynchronized the device object today.
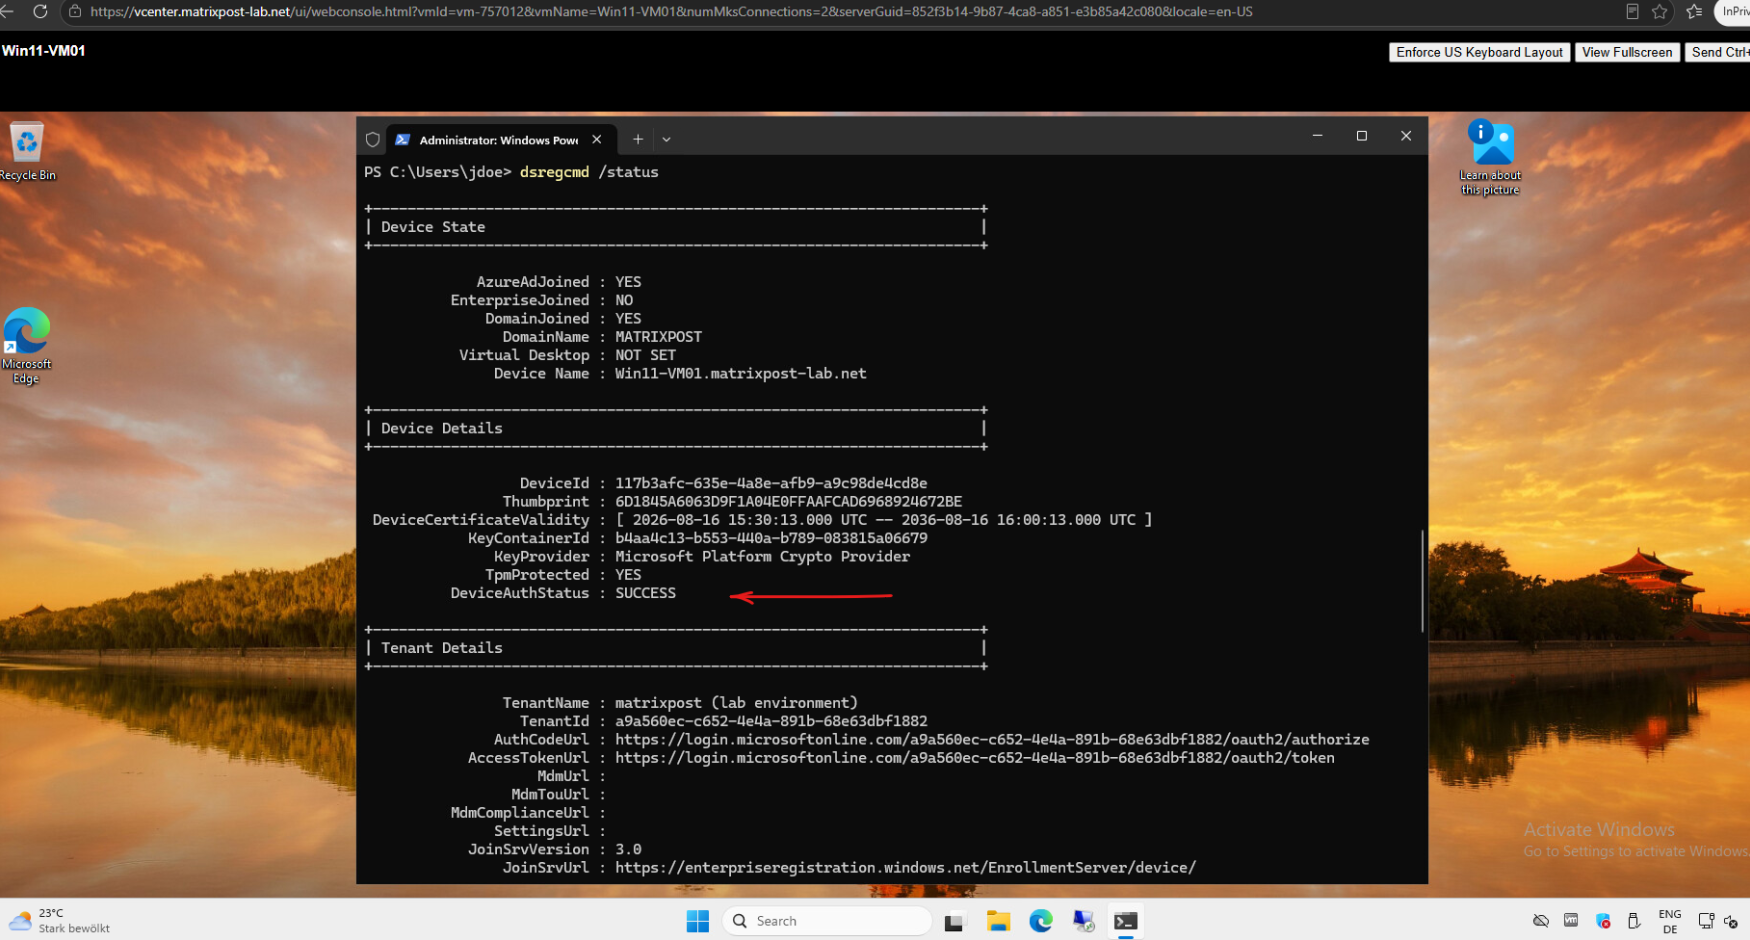
After synchronizing the computer object again, dsregcmd /status now reports DeviceAuthStatus : SUCCESS.
This confirms that our Microsoft Entra hybrid joined Windows 11 client can once again successfully authenticate its device identity against Microsoft Entra ID, allowing us to continue with the FIDO2 security key sign-in test.
dsregcmd /status
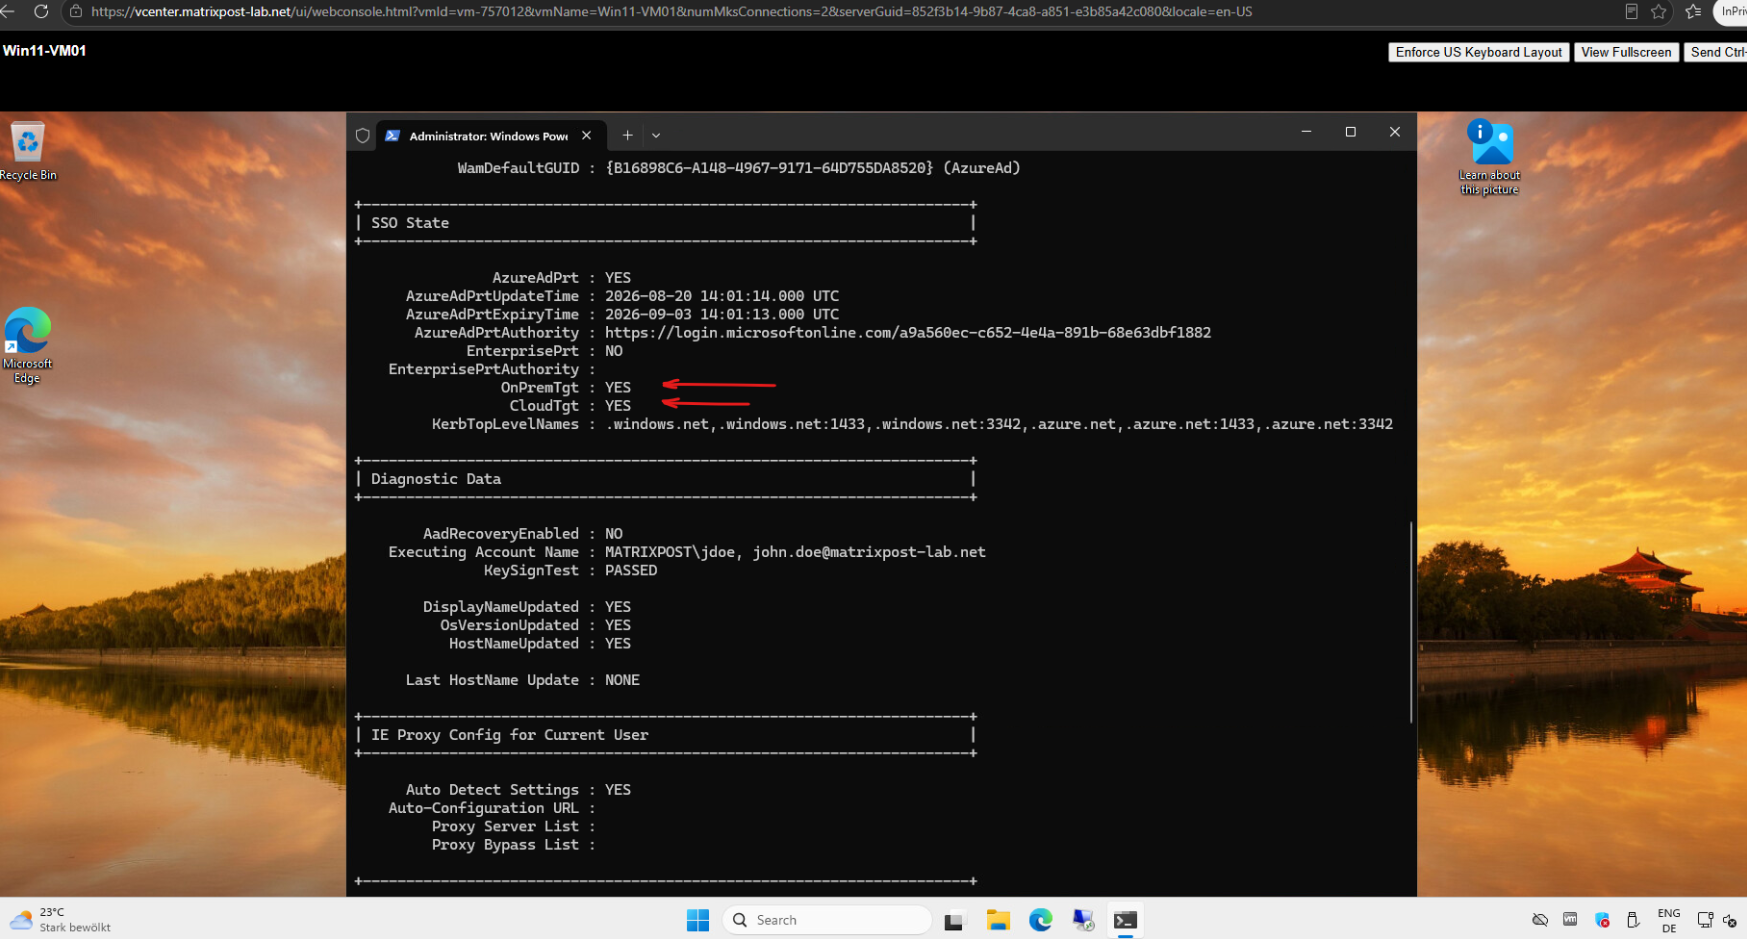
After syncing the Windows 11 client to Microsoft Entra ID (configuring it as Microsoft Entra hybrid joined or Microsoft Entra joined), the device becomes capable of issuing a Primary Refresh Token (PRT) and requesting a Cloud Kerberos TGT. This device state bridges on-premises Active Directory logon with Entra ID passkey authentication.
On the Windows 11 logon screen, select the user account (John Doe) and click the Security Key icon under Sign-in options. This instructs Windows to look for an attached FIDO2 authenticator to initiate the passkey authentication process.

After the security key is detected, Windows switches to the generic Other user credential provider and prompts for the Security Key PIN.
After typing the PIN, submit it by pressing Enter or clicking the arrow button.
This action unlocks the private key stored on the FIDO2 security key, allowing Windows to send a cryptographic challenge to the device.
After submitting the PIN, Windows briefly displays “Getting ready…” while it verifies the PIN with the FIDO2 key, initializes the CTAP protocol, and prepares the cryptographic challenge. Once the key accepts the PIN, it moves to the physical touch prompt.
Client to Authenticator Protocol (CTAP) is the protocol used by a client device, such as a Windows PC or smartphone, to communicate with an external FIDO2 authenticator, such as a YubiKey, over USB, NFC, or Bluetooth.
Together with WebAuthn, CTAP forms the core of FIDO2: WebAuthn handles communication between the application/browser and the client, while CTAP handles communication between the client and the authenticator.
Windows displays the “Touch your security key” prompt to satisfy the FIDO2 User Presence (UP) requirement.
Tapping the physical sensor instructs the security key to sign the cryptographic assertion using its hardware-protected private key, proving physical possession of the device.
Once the key’s signed assertion is validated by Microsoft Entra ID and Entra Kerberos, Windows resolves the passkey identity back to the synchronized user account (John Doe).
The UI shifts from the generic provider to the user’s tile and displays the “Welcome” screen as Windows issues the logon session tokens.

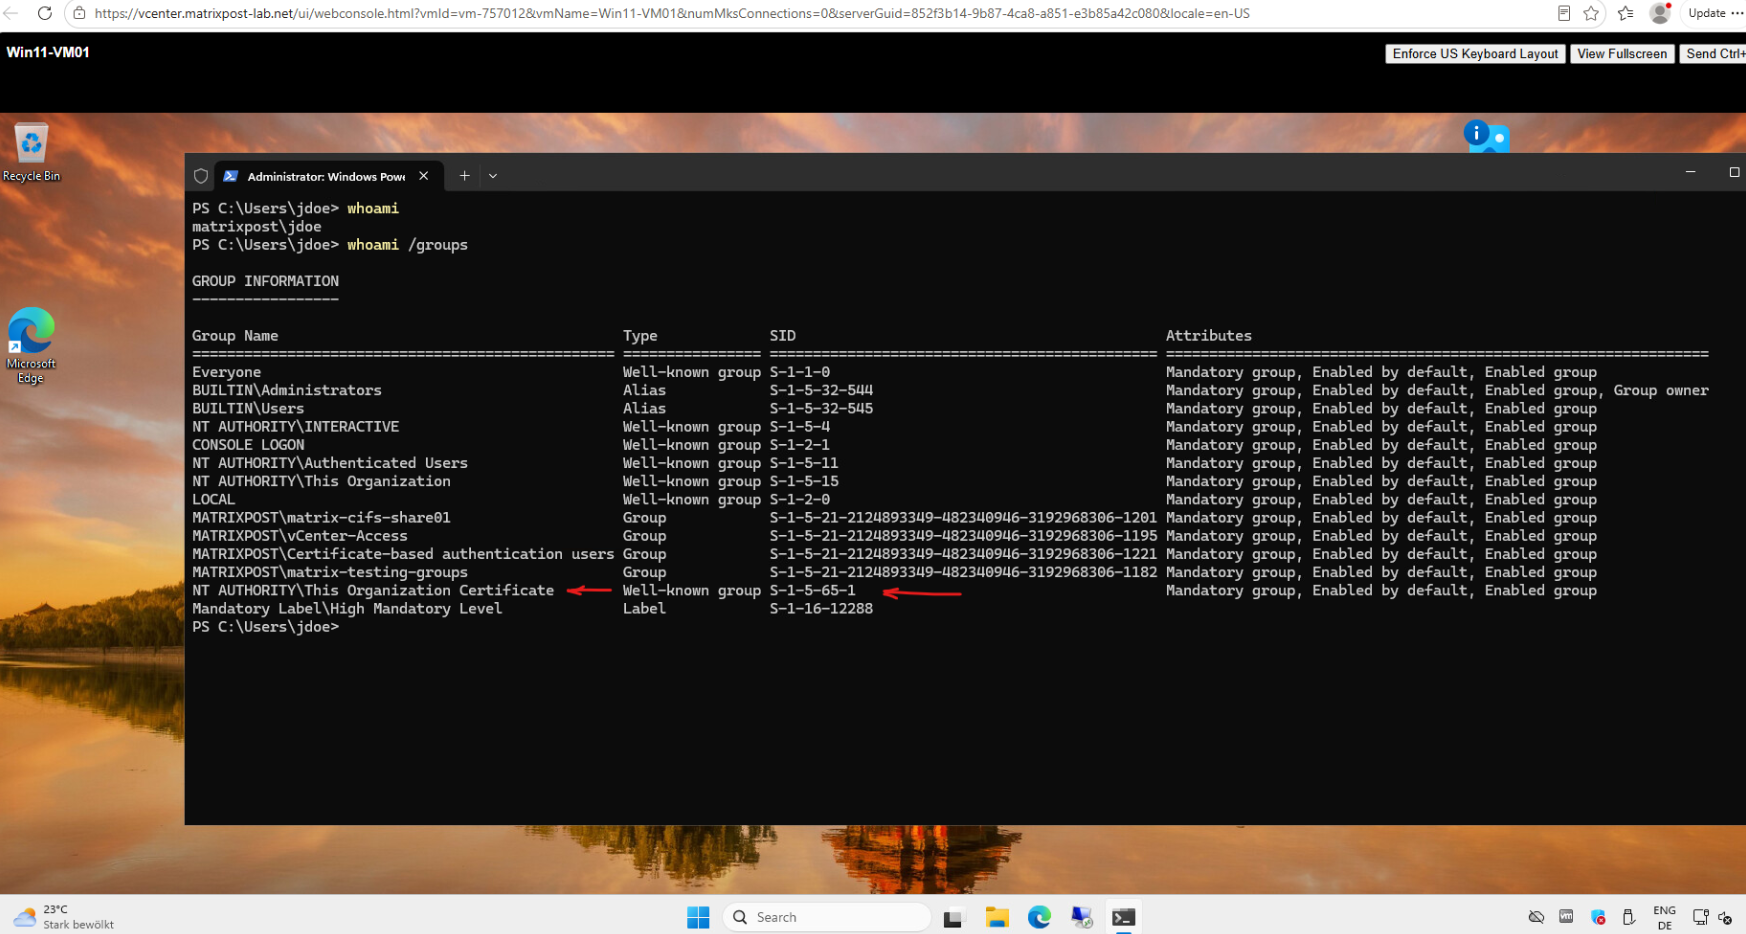
After logging in, opening PowerShell and running whoami /groups reveals the well-known SID S-1-5-65-1 (NT AUTHORITY\This Organization Certificate).
This SID is automatically injected into the user’s logon token by Active Directory/Microsoft Entra Kerberos to prove that John Doe successfully authenticated using a strong, certificate or assertion-based method (such as a FIDO2 Passkey) rather than a traditional password.
whoami
whoami /groups
Note: When testing FIDO2 security key logons in a vSphere Web Console environment, you must apply a specific workaround due to how the browser handles USB HID interrupts.
Because the Web Console does not forward real-time CTAP polling events when clicking the security key icon (or key icon), you need to disconnect and re-add the USB security key in the VM’s hardware settings while on the logon screen.
This hot-plug action forces a USB enumeration event in Windows, which correctly triggers the generic “Other user” security key PIN prompt.
Understanding the FIDO2/Passkey and Microsoft Entra Kerberos Authentication Flow
It is useful to understand how FIDO2/passkey authentication is bridged into our on-premises Active Directory Kerberos environment.
The following flow shows how Microsoft Entra ID authenticates the user with the FIDO2 security key, issues the partial OnPremTgt, and how the on-premises Kerberos infrastructure ultimately provides the regular AD Kerberos TGT required to access domain resources such as our RDP server.
Microsoft explains that the Entra-issued OnPremTgt is only a partial TGT containing the user’s SID; it isn’t sufficient by itself for normal on-prem AD access. The on-prem Kerberos infrastructure must ultimately turn that into a normal full AD TGT.
YubiKey / FIDO2
      │
      ▼
Microsoft Entra ID
      │
      │  Authenticates John
      ▼
Microsoft Entra Kerberos
      │
      │  Partial OnPremTgt
      ▼
AzureADKerberos Logical RODC
      │
      │  PRP (Password Replication Policy) check:
      │  Is this AD user allowed to use Entra Kerberos?
      ▼
On-Premises Domain Controller
      │
      │  Converts partial TGT
      ▼
Full AD Kerberos TGT
      │
      ▼
On-Premises Resource / RDP
Microsoft explicitly states that direct or indirect members of privileged built-in security groups cannot use Cloud Kerberos Trust under the default AzureADKerberos PRP. It also explicitly mentions FIDO2 security keys.
Password Replication Policy (PRP) for the
AzureADKerberoscomputer object defines which user accounts can replicate their credentials to the Read-Only Domain Controller (RODC) or cloud trust anchor representation used by Microsoft Entra Kerberos. By default, the PRP restricts high-privilege accounts from being exposed or cached for cloud-based Kerberos requests.
Why Microsoft deliberately blocks administrators
This is a security boundary. Imagine an attacker compromises your Entra tenant or obtains control over a privileged Entra identity. You don’t want that automatically becoming a path to something as powerful as: on-prem Domain Admin Kerberos credentials.
Microsoft therefore deliberately prevents high-privilege AD accounts from using this mechanism by default and specifically recommends not relaxing the AzureADKerberos PRP to make those accounts work.
Links
Set up Windows Hello for Business Hybrid Azure AD joined Devices
https://blog.matrixpost.net/set-up-windows-hello-for-business-hybrid-azure-ad-joined-devices/What are passkeys and why they matter
https://support.microsoft.com/en-us/accounts-billing/security/what-are-passkeys-why-they-matterMicrosoft Entra ID security updates: Passkeys are the default authentication method in Entra ID
https://www.microsoft.com/en-us/security/blog/2026/07/13/microsoft-entra-id-security-updates-passkeys-are-the-default-authentication-method-in-entra-id/YubiKey 5C NFC
https://www.yubico.com/de/product/yubikey-5c-nfc/Introduction to Microsoft Entra Kerberos
https://learn.microsoft.com/en-us/entra/identity/authentication/kerberosSign in to Windows virtual machine in Azure using Microsoft Entra ID and Azure Roles Based Access Control
https://learn.microsoft.com/en-us/entra/identity/devices/howto-vm-sign-in-azure-ad-windowsEnable passwordless security key sign-in to on-premises resources by using Microsoft Entra ID
https://learn.microsoft.com/en-us/entra/identity/authentication/howto-authentication-passwordless-security-key-on-premisesConsiderations for Remote Desktop Connections in a phishing-resistant passwordless authentication deployment in Microsoft Entra ID
https://learn.microsoft.com/en-us/entra/identity/authentication/how-to-plan-rdp-phishing-resistant-passwordless-authentication?tabs=rdp-session-authPermission-issue error 8344, “Insufficient access rights to perform the operation.”
https://learn.microsoft.com/en-us/troubleshoot/entra/entra-id/user-prov-sync/troubleshoot-permission-issue-sync-service-managerCloud Kerberos trust deployment guide
https://learn.microsoft.com/en-us/windows/security/identity-protection/hello-for-business/deploy/hybrid-cloud-kerberos-trustFIDO2 – User Authentication Specifications Overview
https://fidoalliance.org/specificationsIdentifying your YubiKey
https://www.yubico.com/products/identifying-your-yubikeyEnable FIDO2 security key sign-in to Windows 10 and 11 devices with Microsoft Entra ID
https://learn.microsoft.com/en-us/entra/identity/authentication/howto-authentication-passwordless-security-key-windowsWhat is CTAP?
https://www.yubico.com/resources/glossary/ctap/Client to Authenticator Protocol (CTAP)
https://fidoalliance.org/specs/fido-v2.0-id-20180227/fido-client-to-authenticator-protocol-v2.0-id-20180227.html
