

NetApp ONTAP Volume AutoSize – What Happens When You Manually Grow a Volume?
NetApp ONTAP Volume AutoSize can automatically grow or shrink a volume based on configured utilization thresholds. However, the interaction between manual volume resizing and the configured maximum AutoSize value (max-autosize) can lead to some rather unexpected results.
In this article, we will examine a real-world case where an ONTAP volume had reached its AutoSize maximum and consequently ran out of space. To provide additional capacity, an administrator manually increased the volume size, but this manual change also affected the existing AutoSize configuration in a way that was not immediately obvious.
Using the ONTAP audit and EMS logs, we will reconstruct exactly what happened and then reproduce the behavior in our lab to see how ONTAP adjusts the AutoSize boundaries when a volume is manually resized.
Enabling Volume AutoSize
For our test, we will use an existing 100 GB FlexVol volume named vol_cifs_data01. By default, AutoSize is currently disabled on this volume.
volume show -vserver svm_matrix_cifs -volume vol_cifs_data01 -fields autosize-mode

Before enabling AutoSize, we can display the currently configured AutoSize parameters.
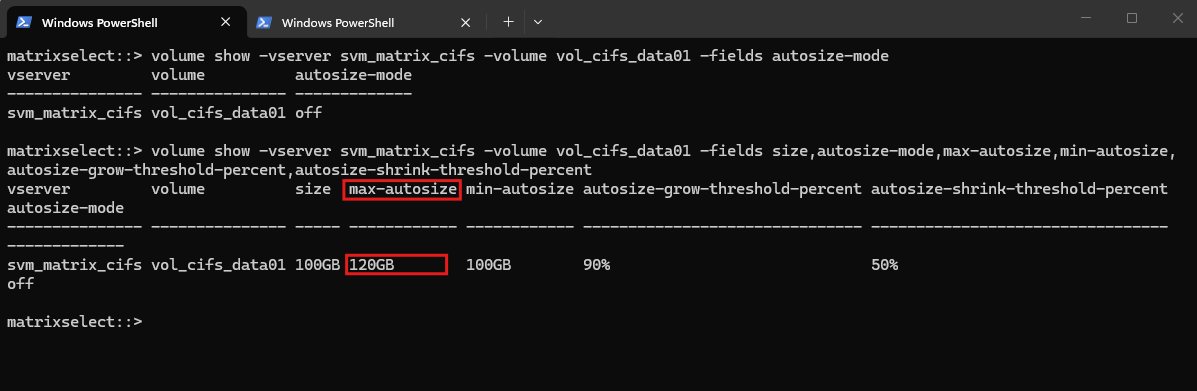
Although Volume AutoSize is currently disabled, ONTAP already maintains the corresponding AutoSize parameters. For our 100 GB volume, the default
max-autosizevalue is 120 GB, or 120% of the current volume size. This value limits automatic growth when AutoSize is enabled; it does not limit manual volume resizing.If the volume was created with
grow_shrinkAutoSize mode enabled, the default minimum size is equal to the initial volume size.
volume show -vserver svm_matrix_cifs -volume vol_cifs_data01 -fields size,autosize-mode,max-autosize,min-autosize,autosize-grow-threshold-percent,autosize-shrink-threshold-percent
We can now enable AutoSize in grow_shrink mode:
volume autosize -vserver svm_matrix_cifs -volume vol_cifs_data01 -mode grow_shrink
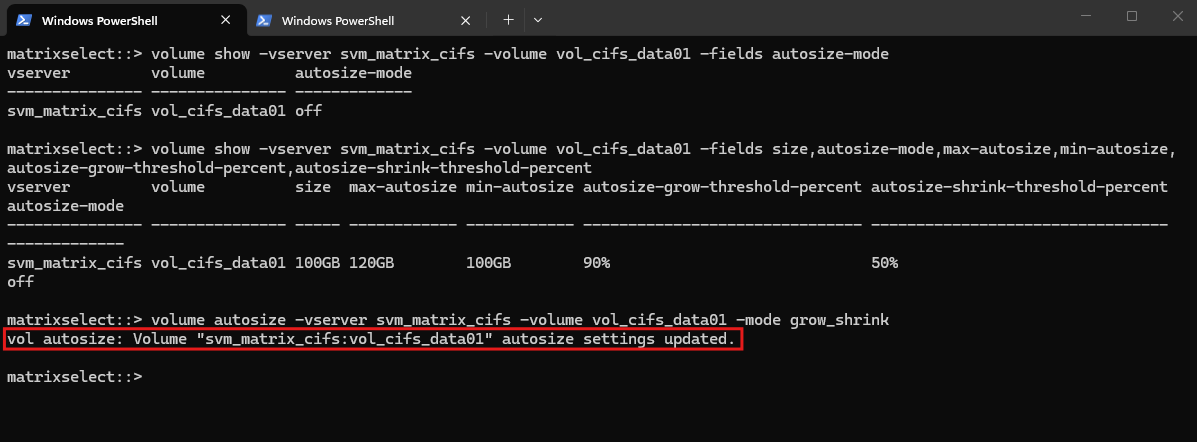
Then verify the configuration:
After enabling Volume AutoSize in
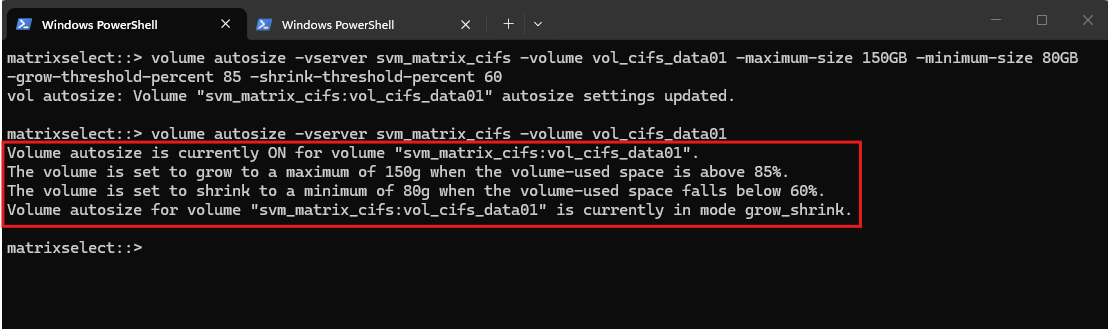
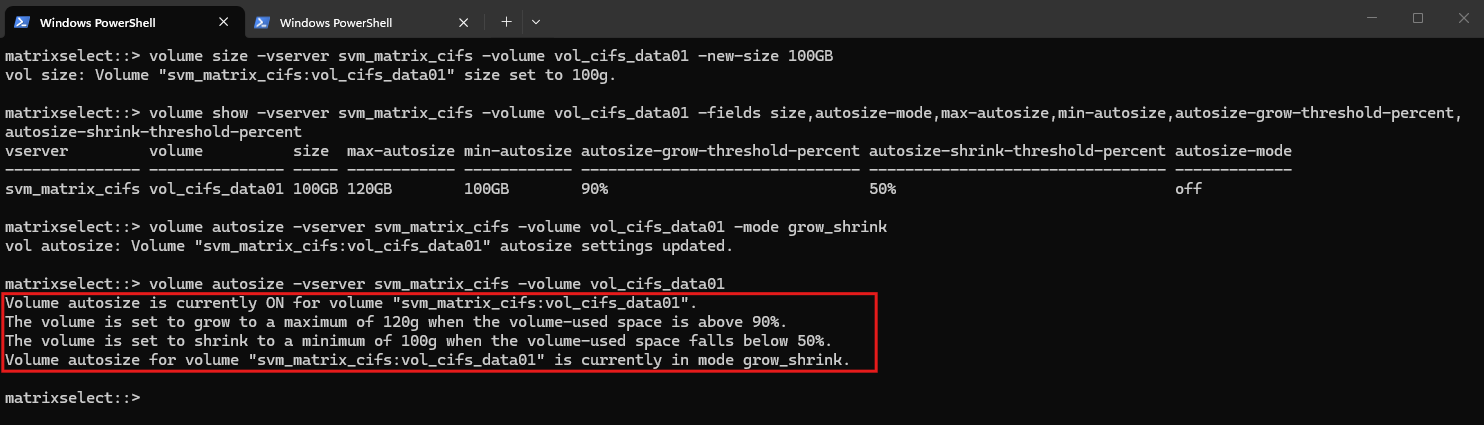
grow_shrinkmode, we can use thevolume autosizecommand without additional parameters to display the effective AutoSize configuration.In our example, ONTAP will automatically grow the 100 GB volume when utilization exceeds 90%, up to a maximum of 120 GB, and shrink it when utilization falls below 50%, but never below 100 GB.
volume autosize -vserver svm_matrix_cifs -volume vol_cifs_data01

Adjusting the AutoSize Limits and Thresholds
The default AutoSize values can be adjusted according to the expected workload and available aggregate capacity.
For example, we could change our test volume to a maximum of 150 GB, a minimum of 80 GB, and use 85%/60% as the grow and shrink thresholds:
The grow threshold must be higher than the shrink threshold, which prevents the volume from continuously bouncing between growing and shrinking. ONTAP also applies additional logic to prevent such loops when
grow_shrinkis used.
volume autosize -vserver svm_matrix_cifs -volume vol_cifs_data01 -maximum-size 150GB -minimum-size 80GB -grow-threshold-percent 85 -shrink-threshold-percent 60

Verify it with:
volume autosize -vserver svm_matrix_cifs -volume vol_cifs_data01
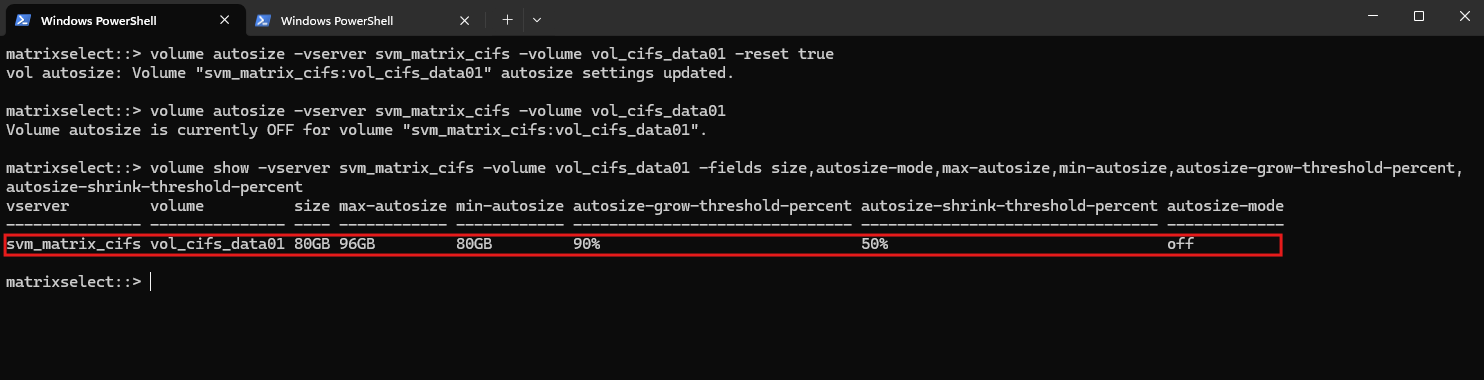
Using the -reset true option resets the AutoSize configuration to its default settings and also disables AutoSize.
As shown, querying the volume afterwards confirms that Volume AutoSize is again set to OFF.
Because the volume had already automatically shrunk from 100 GB to 80 GB, resetting AutoSize recalculates its default values based on the current volume size. Therefore,
min-autosizeis reset to 80 GB andmax-autosizeto 96 GB (120% of 80 GB).
volume autosize -vserver svm_matrix_cifs -volume vol_cifs_data01 -reset true
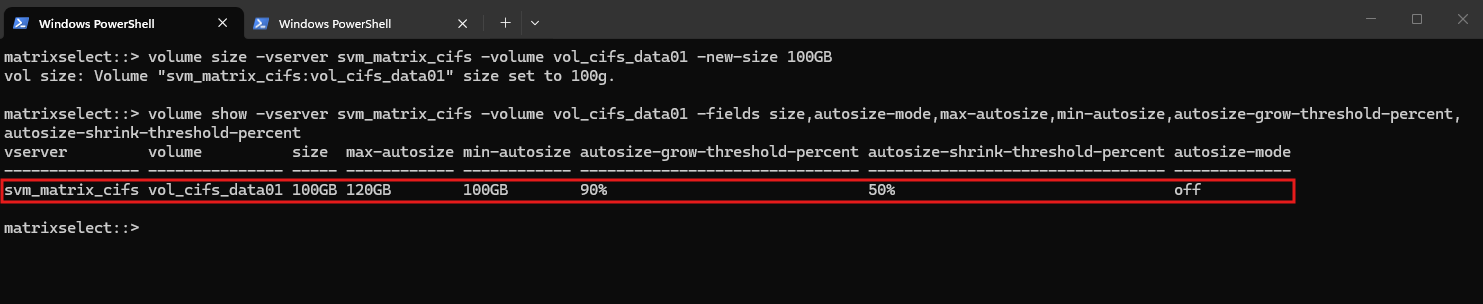
To continue with a clean baseline for our test, we will manually resize the volume back from 80 GB to 100 GB. Since the current max-autosize value of 96 GB is smaller than the new volume size, this also allows us to observe how ONTAP automatically adjusts the AutoSize maximum after a manual volume increase.
volume size -vserver svm_matrix_cifs -volume vol_cifs_data01 -new-size 100GB

We can then verify the volume size and AutoSize parameters:
After manually resizing the volume from 80 GB back to 100 GB, ONTAP automatically adjusts the AutoSize boundaries because the previous
max-autosizevalue of 96 GB would be smaller than the new volume size. The minimum is reset to the current 100 GB, while the maximum is recalculated to 120 GB (120% of the current volume size), even though AutoSize itself remains disabled.
volume show -vserver svm_matrix_cifs -volume vol_cifs_data01 -fields size,autosize-mode,max-autosize,min-autosize,autosize-grow-threshold-percent,autosize-shrink-threshold-percent
Now that we’re back at the clean 100 GB / 120 GB baseline, enable grow_shrink again:Now that we’re back at the clean 100 GB / 120 GB baseline, enable grow_shrink again:
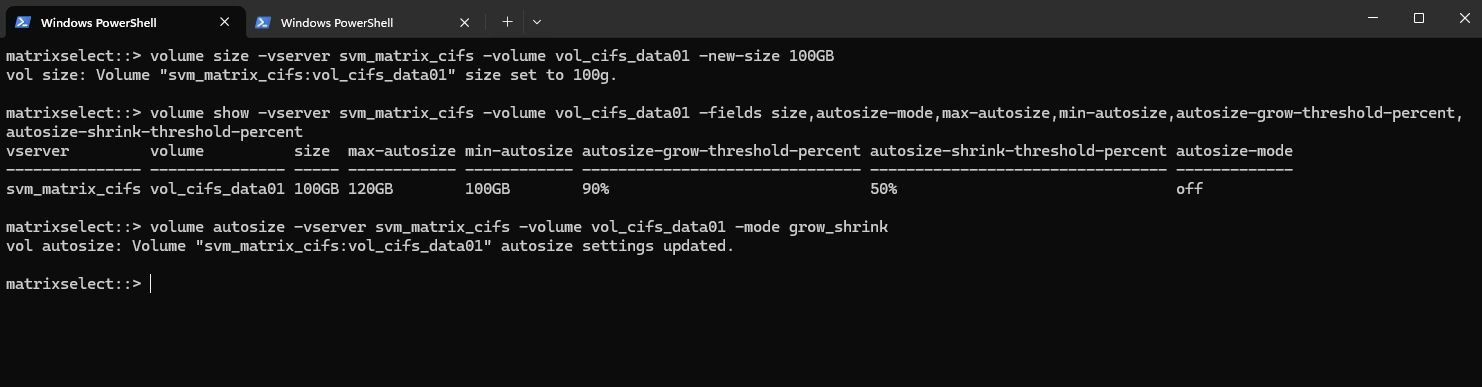
With the volume restored to 100 GB and the default AutoSize boundaries of 100 GB minimum and 120 GB maximum, we can enable AutoSize in
grow_shrinkmode. This provides the baseline for our subsequent test, where we will deliberately fill the volume and observe its automatic growth behavior.
volume autosize -vserver svm_matrix_cifs -volume vol_cifs_data01 -mode grow_shrink
And verify:
volume autosize -vserver svm_matrix_cifs -volume vol_cifs_data01
Filling the Volume to Trigger AutoSize Growth
With AutoSize enabled in grow_shrink mode, the volume will automatically grow once its used capacity exceeds the configured 90% grow threshold. Our test volume currently has a size of 100 GB and can automatically grow up to 120 GB.
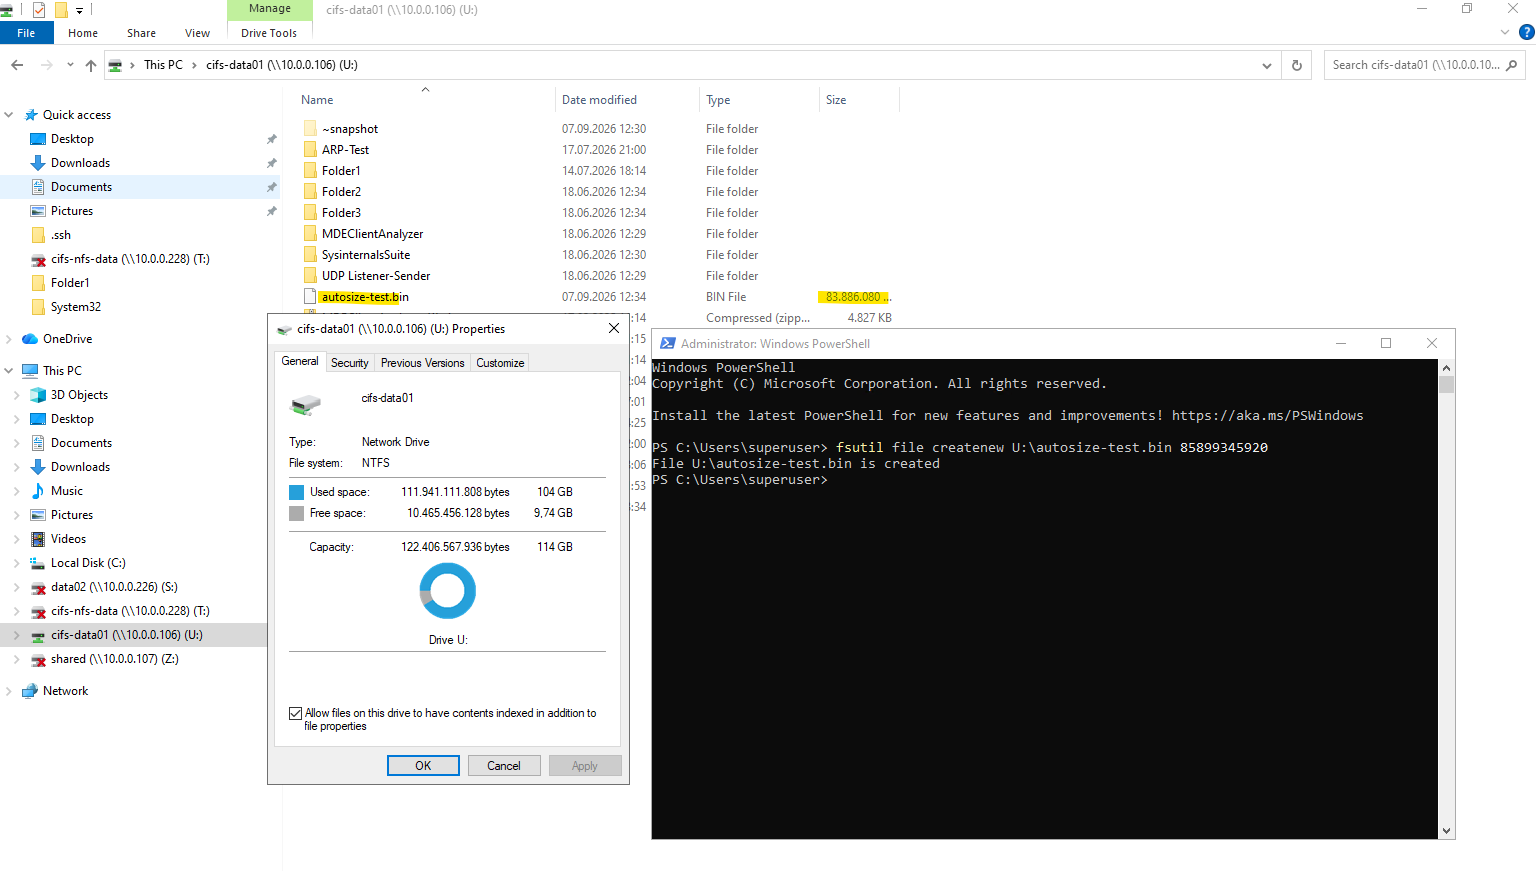
To trigger AutoSize, we can create a large test file on the mounted CIFS share until the volume usage exceeds 90%. For example, from a Windows client we can use fsutil to create a sufficiently large file:
This creates an 80 GiB file. Because the volume already contains roughly 24 GB of data, this should push the volume beyond the 90% threshold and cause ONTAP to start growing the volume automatically.
fsutil file createnew Z:\autosize-test.bin 85899345920
After creating the file, we can monitor the volume size and usage with:
After filling the volume, ONTAP automatically increased its size from 100 GB to the configured maximum of 120 GB. The volume is still 91% used (104.3 GB), but because
max-autosizehas now been reached, AutoSize cannot grow the volume any further.
volume show -vserver svm_matrix_cifs -volume vol_cifs_data01 -fields size,used,available,percent-used,max-autosize,autosize-mode

The same state is also clearly visible in ONTAP System Manager, where the volume has reached its 120 GiB size with approximately 104 GiB used and only 9.75 GiB available.
Despite AutoSize being enabled, no further automatic growth is possible because the configured maximum AutoSize limit has already been reached.
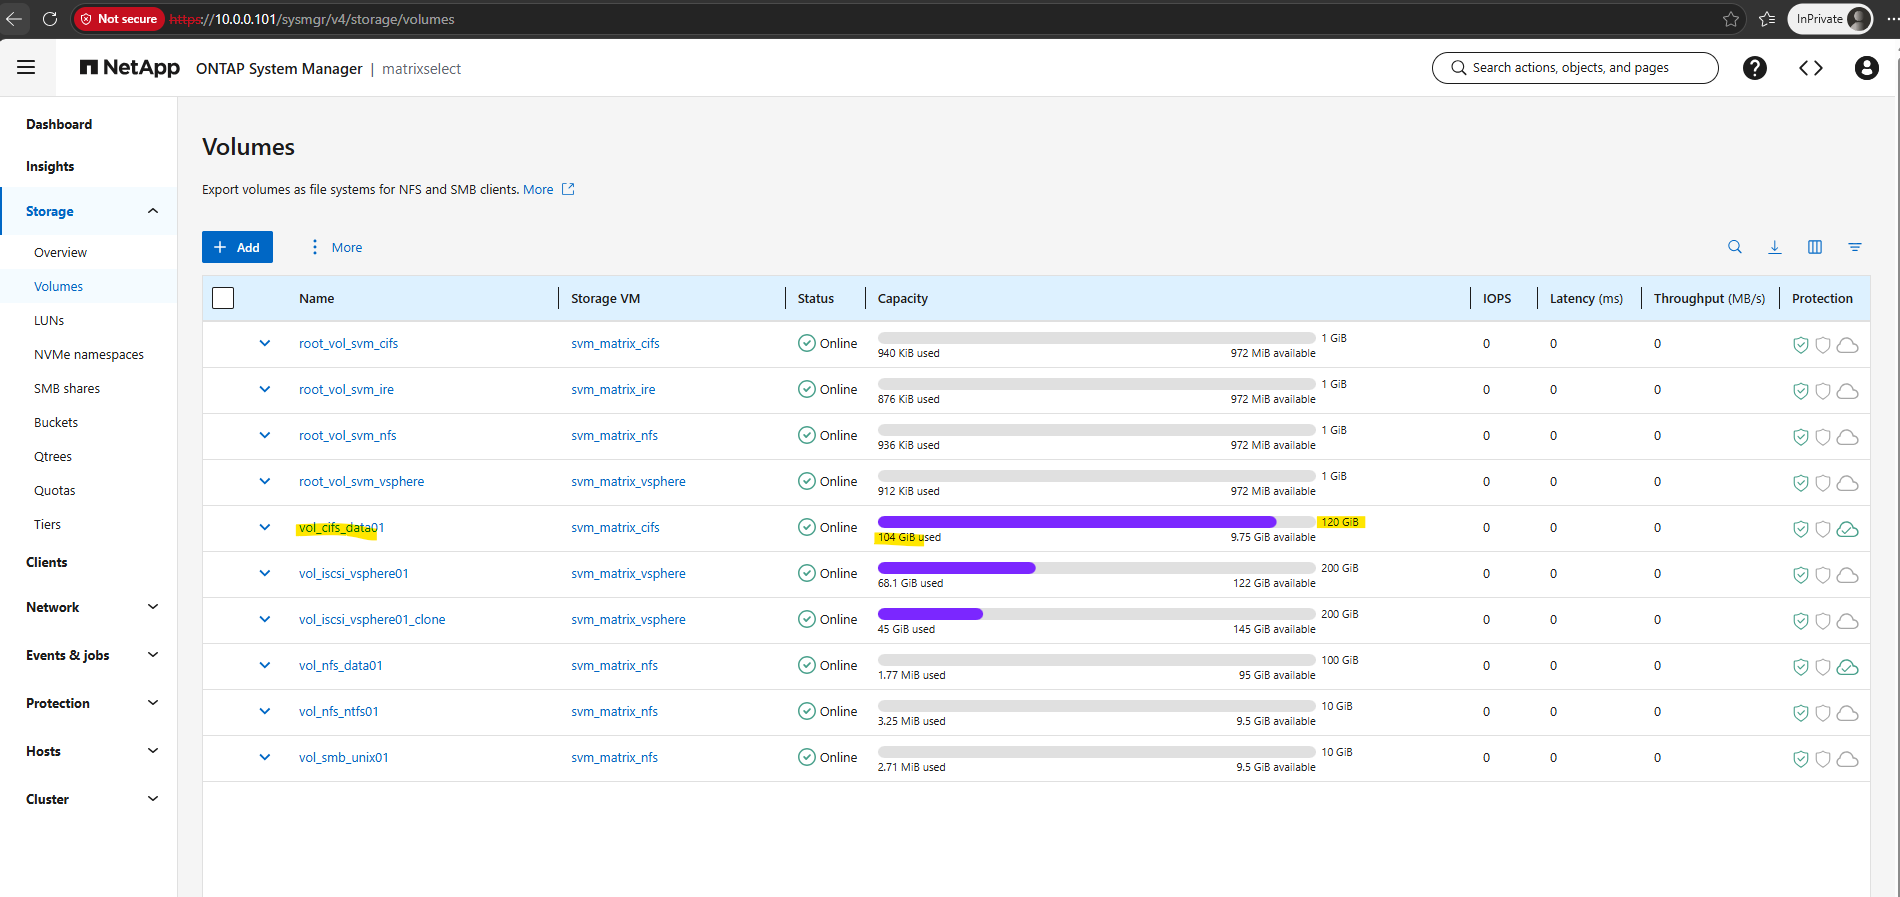
Now we will fill it further until we actually hit the 120 GB ceiling.
At the moment ONTAP reports:
Size:       120 GB
Used:       104.3 GB
Available:  9.75 GB
Used:       91%
So we add roughly 9 GiB of real data first, rather than immediately trying to write more than the available space. For example from the Windows client:
fsutil file createnew Z:\autosize-test2.bin 9663676416
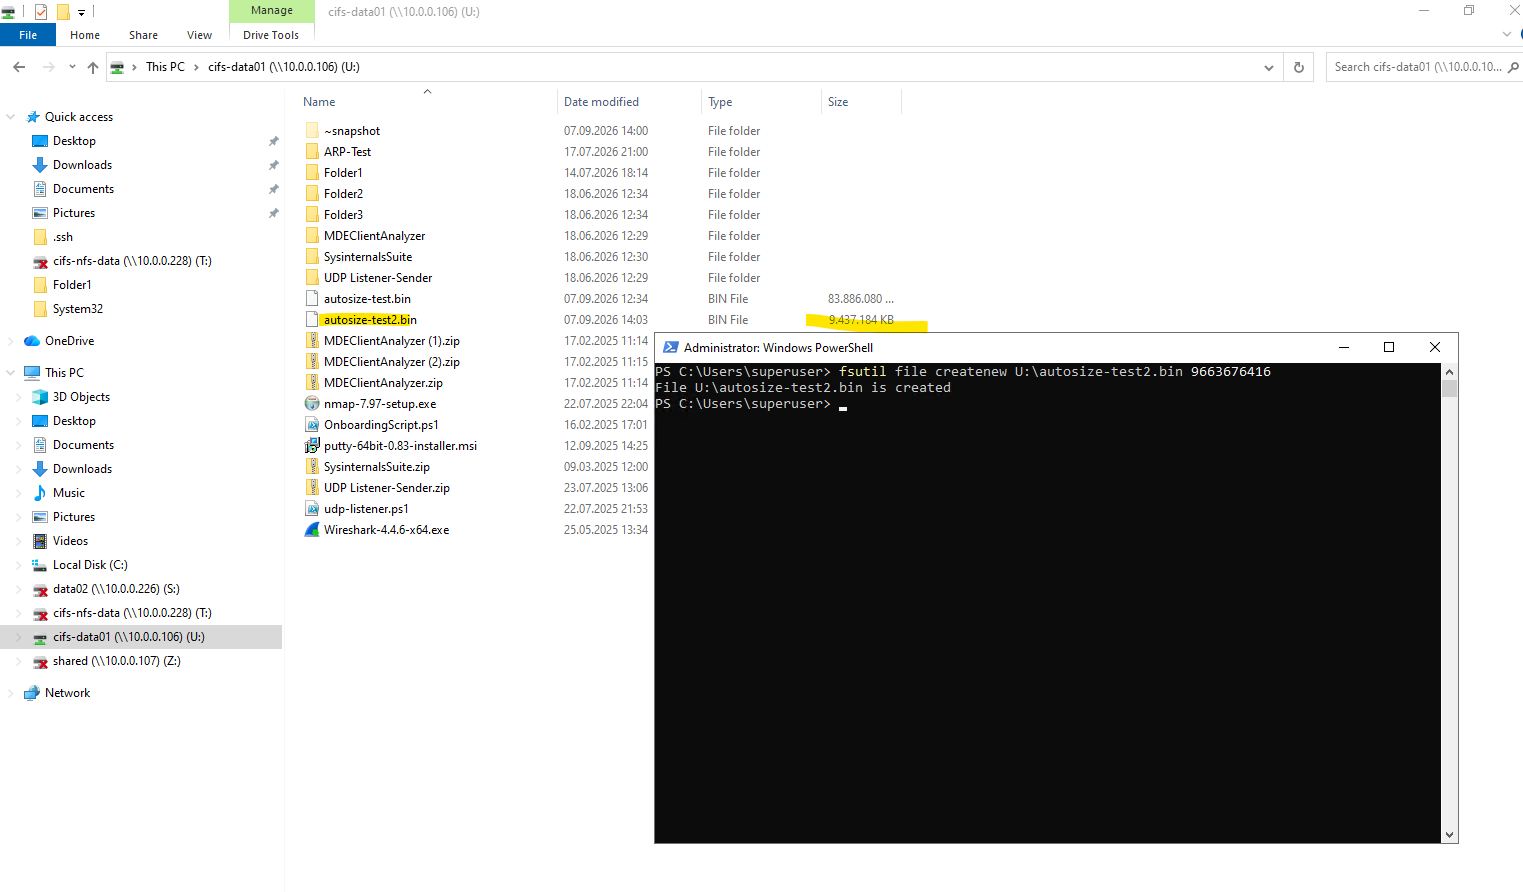
Then check:
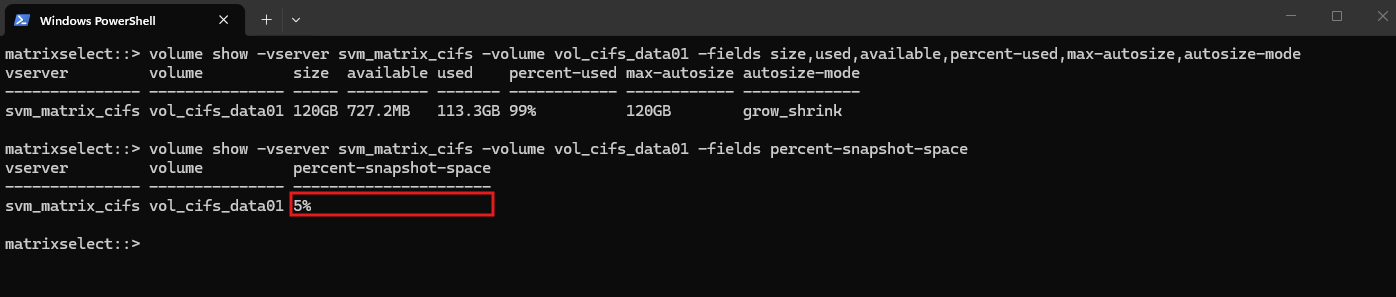
After adding additional test data, the volume has now reached 99% utilization, with only 727.2 MB of available space remaining. Because the current volume size of 120 GB already equals the configured
max-autosizevalue, ONTAP can no longer automatically grow the volume despite being well above the 90% grow threshold.Note: the reported 113.3 GB used plus 727.2 MB available does not equal the physical 120 GB volume size. This is because the volume has a 5% Snapshot reserve, leaving approximately 114 GB of user-visible capacity for the active filesystem.
volume show -vserver svm_matrix_cifs -volume vol_cifs_data01 -fields size,used,available,percent-used,max-autosize,autosize-mode

To show the configured Snapshot reserve percentage for this volume:
volume show -vserver svm_matrix_cifs -volume vol_cifs_data01 -fields percent-snapshot-space
Or to also show the actual Snapshot reserve capacity and usage:
The apparent difference between the 120 GB volume size and approximately 114 GB of user-visible capacity is caused by the configured 5% Snapshot reserve. Although Snapshot copies currently consume almost no space, approximately 6 GB remains reserved for snapshots, leaving the active filesystem with about 114 GB.
volume show -vserver svm_matrix_cifs -volume vol_cifs_data01 -fields percent-snapshot-space,snapshot-reserve-available,snapshot-space-used
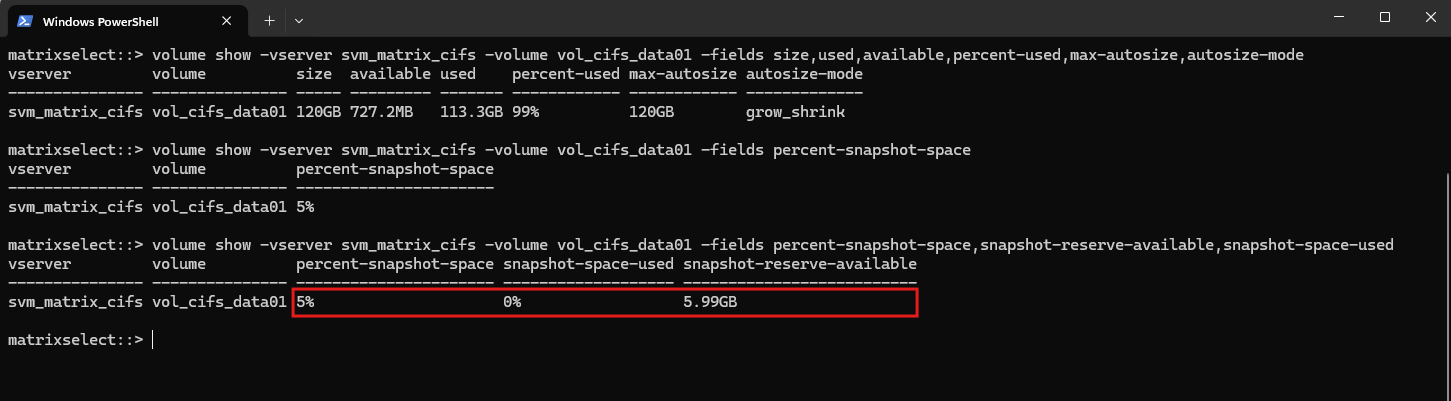
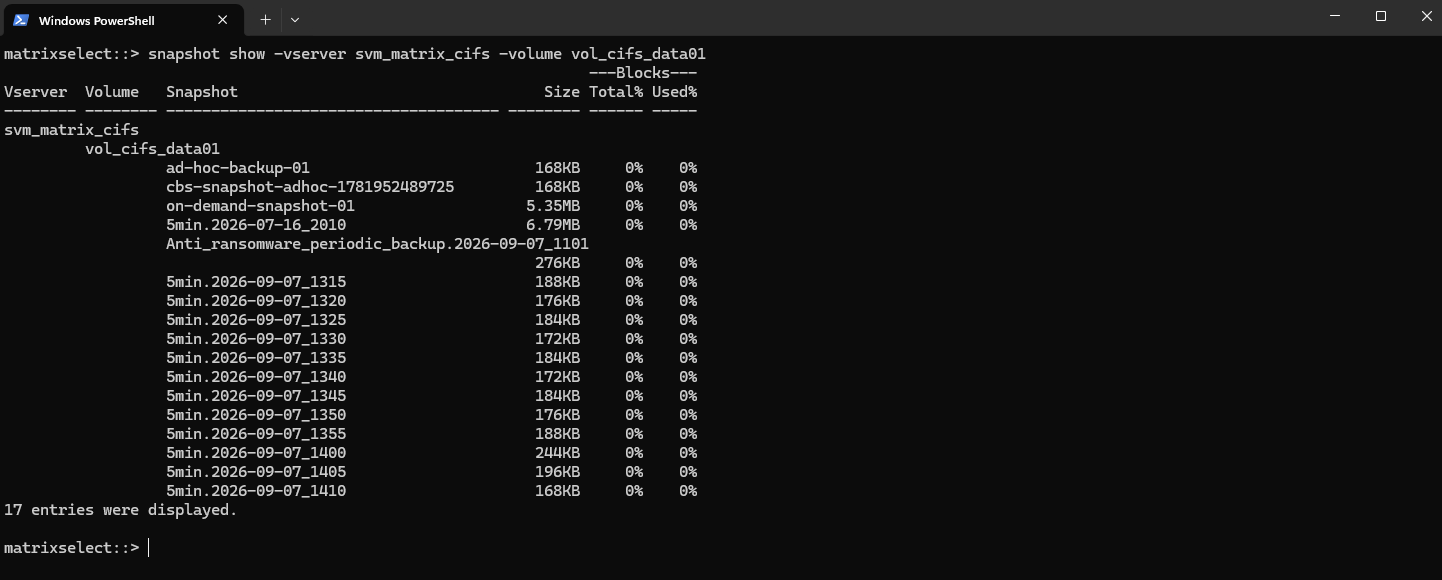
The volume currently contains 17 Snapshot copies, but they consume only a negligible amount of capacity and therefore show 0% used. Nevertheless, the configured 5% Snapshot reserve still reserves approximately 6 GB of the 120 GB volume, explaining why only around 114 GB is available to the active filesystem.
snapshot show -vserver svm_matrix_cifs -volume vol_cifs_data01
Filling the Volume to Maximum Capacity
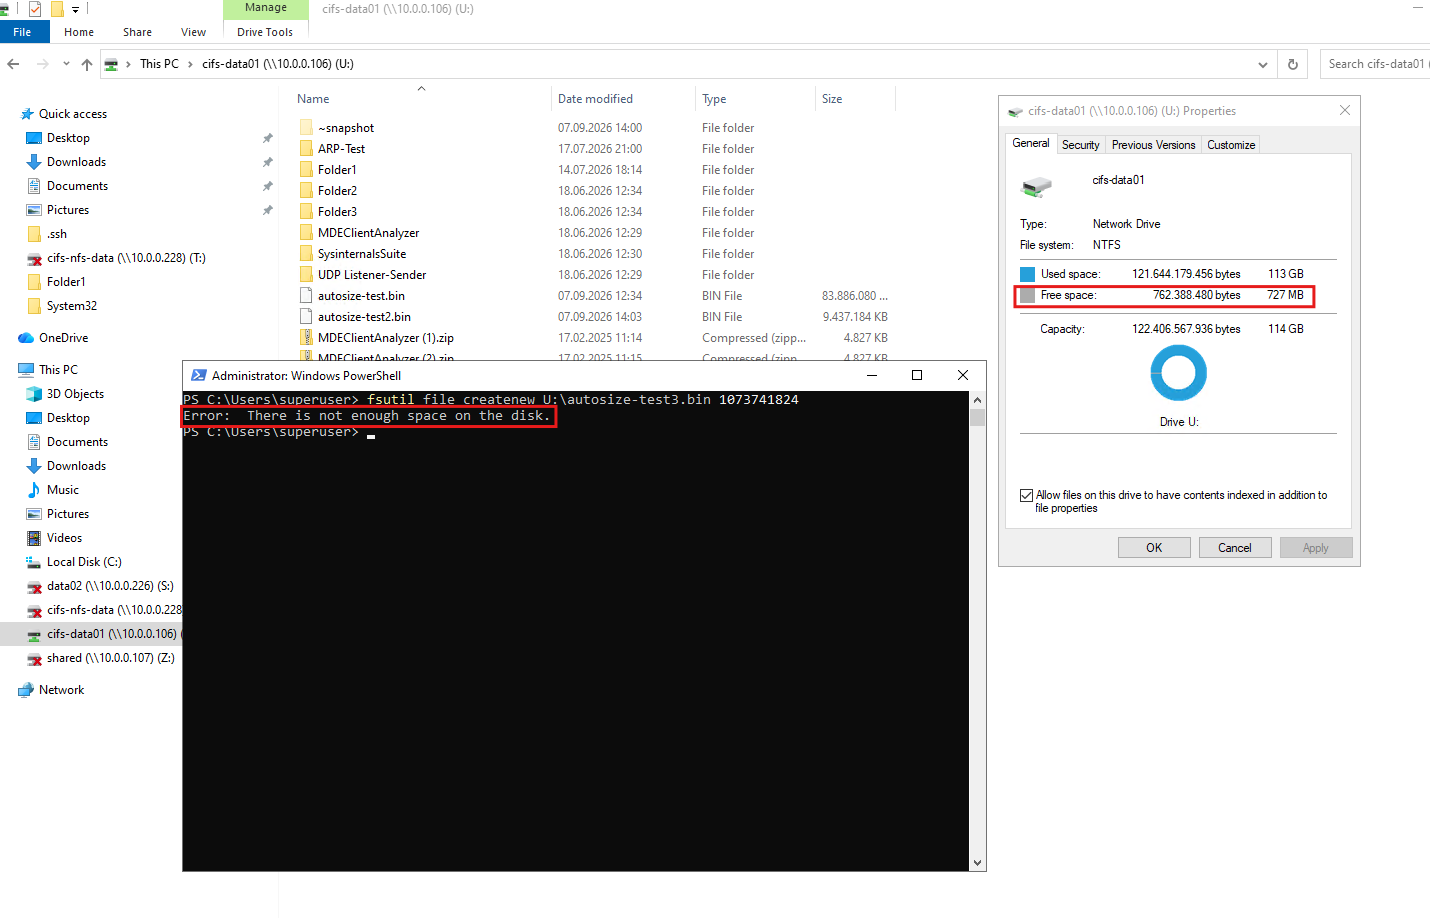
To reproduce the original scenario as closely as possible, we will now completely fill the volume. With only approximately 727 MB available and the volume already at its 120 GB max-autosize limit, we create another 1 GiB test file from the Windows client.
Once the volume has reached its 120 GB AutoSize maximum, attempting to create another 1 GiB file fails on the SMB client with
Error: There is not enough space on the disk.At this point, AutoSize can no longer provide additional capacity because the volume has already reached its configured
max-autosizelimit.
fsutil file createnew Z:\autosize-test3.bin 1073741824
Now let’s grab the ONTAP-side EMS evidence. This should give us the equivalent of what we saw in production:
The final write attempt is now also visible in the ONTAP EMS log. ONTAP reports
wafl.vol.full, showing that the client requested 1.01 GB while only 727 MB remained available in the volume.Interestingly, no
wafl.vol.autoSize.failevent was generated in this lab test, even though the volume had already reached its configured 120 GBmax-autosizelimit. The client-side failure andwafl.vol.fullEMS event are nevertheless sufficient to confirm that no additional space could be provided automatically.
event log show -time >30m -message-name wafl.vol.autoSize.fail
event log show -time >30m -message-name wafl.vol.full
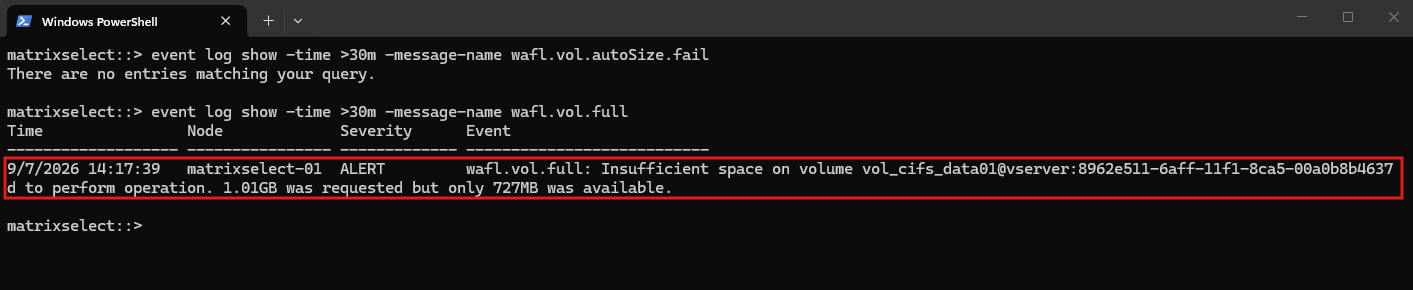
In this lab test, the failed write generated a wafl.vol.full event, while no wafl.vol.autoSize.fail event was observed during the test period.
In the production incident, however, ONTAP repeatedly generated wafl.vol.autoSize.fail events stating Volume cannot be grown beyond maximum growth limit, indicating that the exact EMS behavior can depend on when and how AutoSize growth is triggered.
In the original production incident, ONTAP explicitly logged
wafl.vol.autoSize.fail, confirming that AutoSize attempted to provide additional capacity but was prevented by the configured maximum growth limit. This provides a useful example of the EMS event that may be observed when a volume has reached itsmax-autosizevalue.
9/7/2026 07:20:06 node-01 NOTICE wafl.vol.autoSize.fail:
Unable to grow volume 'vol_...' to recover space:
Volume cannot be grown beyond maximum growth limit.
Manually Growing the Volume Beyond the AutoSize Maximum
Our volume has now reached both its current size and configured AutoSize maximum of 120 GB. To reproduce the behavior from the production incident, we manually increase the volume by 20 GB, from 120 GB to 140 GB:
When manually growing the volume using the ONTAP CLI, ONTAP explicitly notifies us that the AutoSize settings are automatically adjusted based on the new volume size.
After increasing the volume from 120 GB to 140 GB,
max-autosizeis recalculated to 168 GB (120% of 140 GB), whilemin-autosizeis adjusted to the new current size of 140 GB.
volume size -vserver svm_matrix_cifs -volume vol_cifs_data01 -new-size 140GB

Conclusion
This is exactly the behavior we wanted to demonstrate: manually growing a volume beyond its existing max-autosize value causes ONTAP to automatically recalculate the AutoSize boundaries based on the new volume size.
In our example, a manual increase from 120 GB to 140 GB automatically changed max-autosize to 168 GB (120%) and min-autosize to 140 GB, the same behavior we observed in the original production incident.
Links
volume create – Minimum Size
https://docs.netapp.com/us-en/ontap-cli/volume-create.htmlvolume modify – Maximum Size
https://docs.netapp.com/us-en/ontap-cli/volume-modify.htmlvolume autosize
https://docs.netapp.com/us-en/ontap-cli-9131/volume-autosize.htmlConfigure ONTAP volumes to automatically provide space when full
https://docs.netapp.com/us-en/ontap/volumes/configure-automatic-provide-space-when-full-task.html
