Configure Skype for Business Enterprise Voice with a SIP-Trunk (DeutschlandLAN SIP Trunk) and the Office Master Gate from Ferrari electronic AG | Step by Step
Today I want go through the steps to activate enterprise voice on Skype for Business Server with a SIP Trunk from Telekom, DeutschlandLAN SIP-Trunk.
Add a Mediation Server to your Deployment
First we had to add a Mediation Server in the Toplogy Builder from Skype for Business, in this case we add to the single Front End Server the Mediation Server Role. Right click on Mediation Pools and select New Mediation Pool.
Here put in a FQDN for this pool, in my case I use a single Front End Server and had to put in the FQDN of this Frontend Server. Also select here “This pool has one Server” as we used a single server deployment. Next you have to select the existing Frontend- and Edge Pool.
The Mediation Server is responsible for inbound and outbound calls to the Public Switched Telephone Network (PSTN) and dial-in Conferencing.
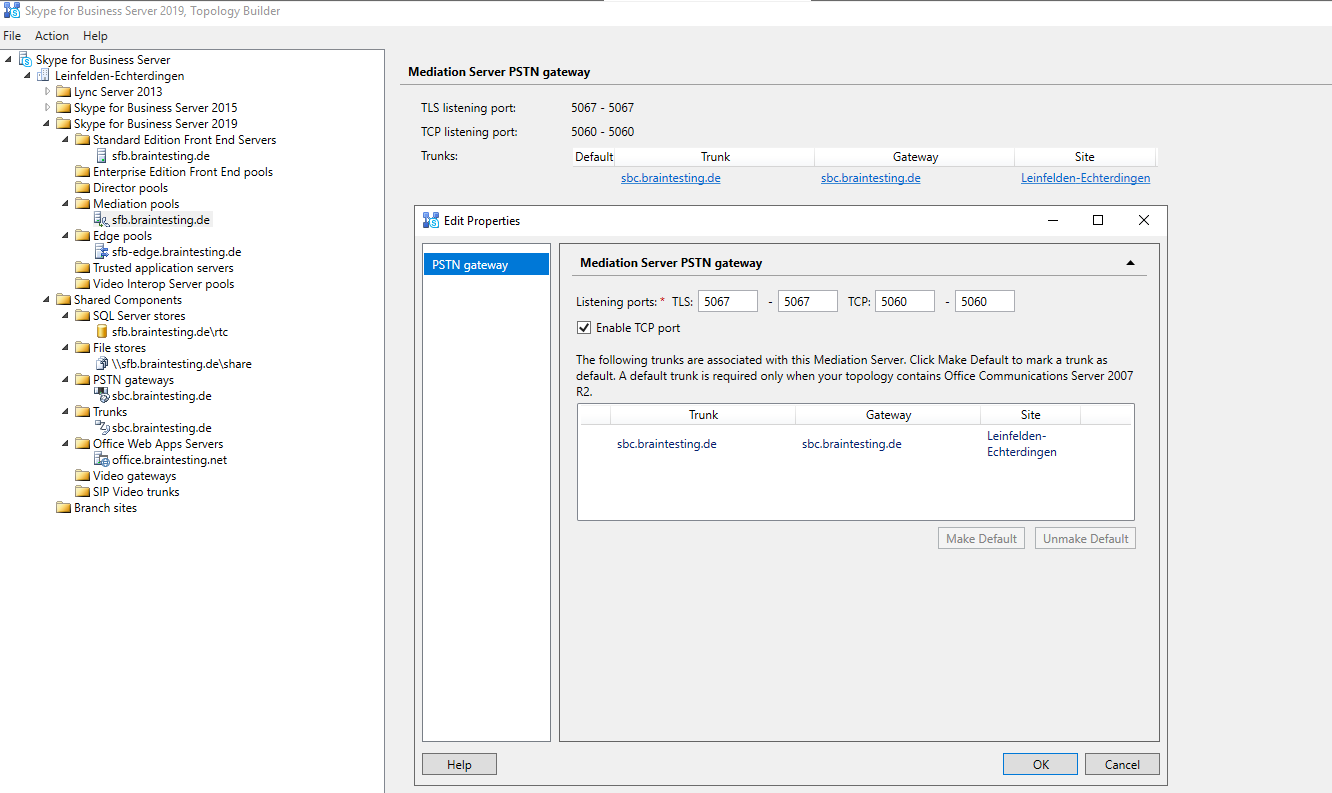
The listening ports depends on the SIP Trunk Provider or if you use a Session Border Controller (SBC) like here, you must set the ports configured on the SBC.
Under https://windowsitpro.com/lync/demystifying-mediation-server-role-lync-server-2013 is a good explanation about the Mediation Server Role.
If you have a single Front End Server Deployment, the server can handle up to 150 calls whereas a standalone Mediation Server can handle up to 1.100 calls.
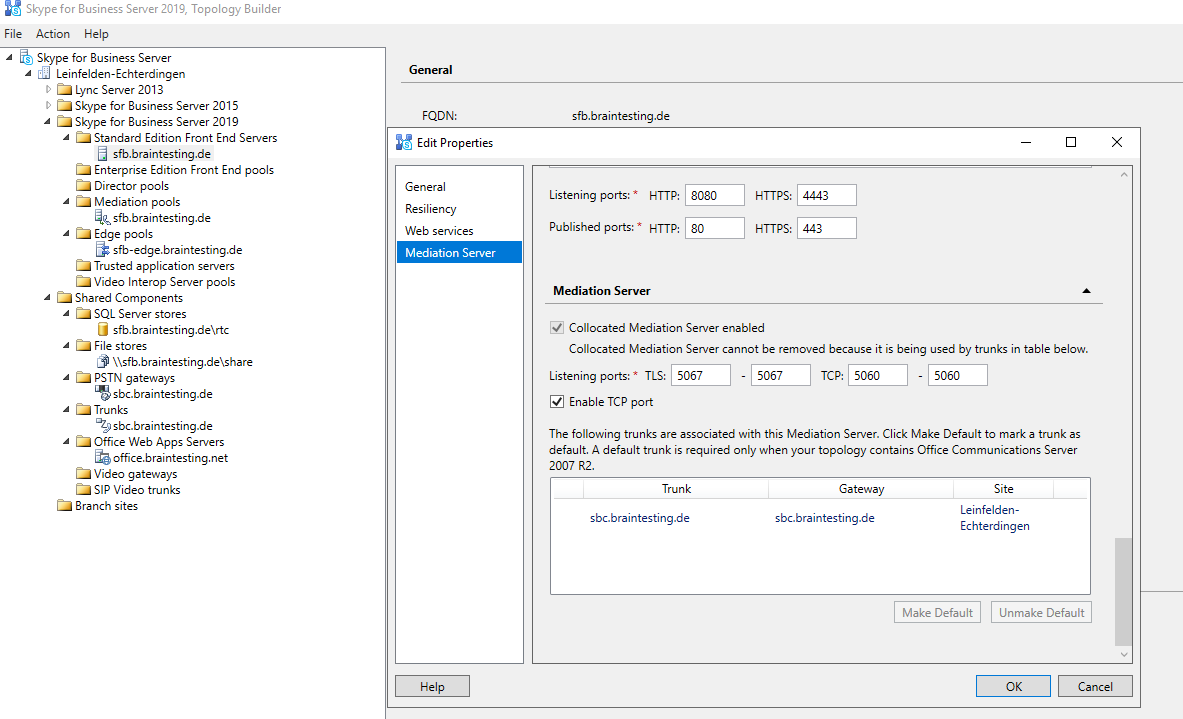
We deploy here the Mediation Server Role on the single Front End Server, in this case we go to the settings of the Standard Edition Front End Server and select at the left menue the point Mediation Server. Here select the checkbox for Collocated Mediation Server enabled. The default Port for encrypted traffic with TLS is 5067. You can also enable only TCP without encryption, default Port here is 5060. This settings depends on your SBC. In my case I use TLS Port 5067.
If you want to deploy a standalone Mediation Server you must right click on Mediation Pools and select new Mediation Pool, here you can add one standalone or multiple servers to the Pool.

Add a PSTN Gateway to your Deployment
Next we have to add a PSTN Gateway through which we route inbound/outbound calls to and from our Skype for Business Server.
You must put in a FQDN for the SBC, it is not possible to enter the ip address of the SBC, so you have to register this FQDN at your internal DNS server.
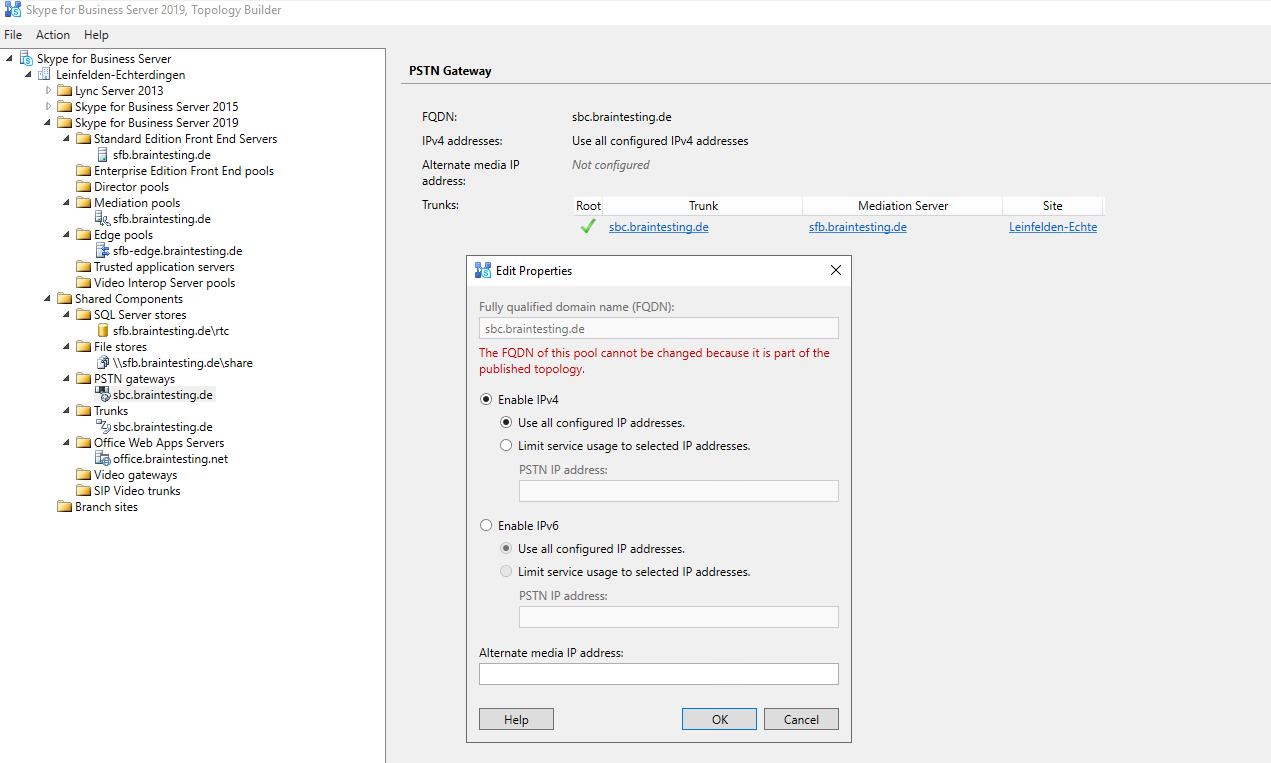
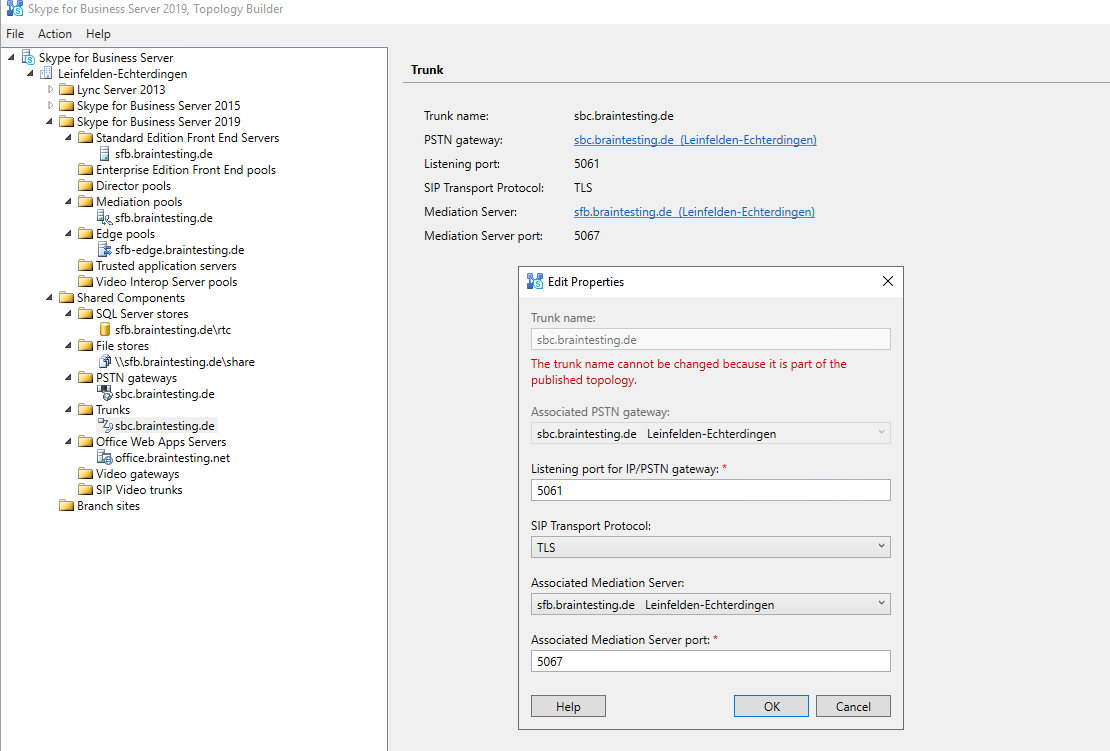
At this step also the trunk is created for this PSTN Gateway. Here we have to set a name and the ports for this trunk, I used here the FQDN of the SBC but you can use any name you want. The Trunk is the phone line with the sip protocol. And this trunk connects the SFB with the SBC.
The ports must match the ports you set on your SBC!
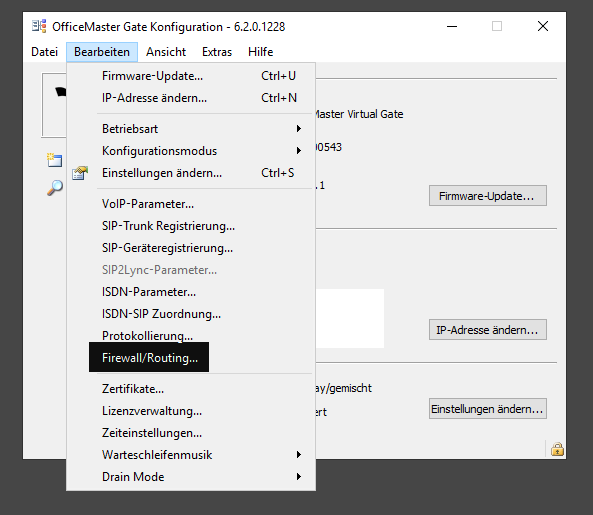
Configure your SBC
Next step is to configure the SBC in your network or of course you can configure the SBC first and than the SFB, it doesn’t matter which sequence!
In my case I use here the Office Master Gateway installation image 4.1 from Ferrari electronics.
https://www.ferrari-electronic.de/produkte/officemaster-gate
Download
https://www.ferrari-electronic.de/downloads.html
Version 4.1 and above supports DeutschlandLAN SIP Trunk
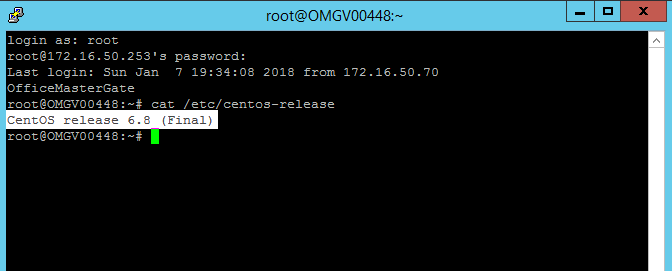
This Image is based on Linux CentOS 6.8
I run this as a hyper-v vm
A good installation guide of the OfficeMaster Gate you will find under
https://www.youtube.com/watch?v=sWciI0hX1pg
First you have to configure the network settings of the SBC. You can see the actual ip of the SBC appliance from the console when you press i for info.
Here I already had set a static IP from my test network. You can set this with the OfficeMasterGate Configuration utility which can run on a different VM in your network.
OfficeMaster Gate Konfigurations-Tool
https://www.ferrari-electronic.de/downloads/files/320002/6.1.3/Setup-OfficeMaster-Gate-Config-6.13.1102.exe
As you can see in the following figure, I already had intalled an older version and now update to the actual 6.113.1102 version. I get a warning that my installed service OfficeMaster-Syslog must deinstalled and the new version of it reinstalled in order to work with the new version of the configuration utility.
With the OfficeMaster-Syslog service you can debug the traffic of the OfficeMaster Gate when it doesn’t work as expected and is optional.
You may wonder to see the ISDN protocol in the logs when configured a sip trunk which uses VOIP with the SIP and RTP protocol, the reason is, that ferrari electronics comes from the ISDN world and used on the SBC itself for routing the calls, the ISDN protocol and translates it to VOIP when forwarding the calls to the internal Skype for Business Server and also when it forwards the calls to the SIP Trunk Provider. The benefits are that ferrari can use the existing code but will change this to native VOIP and SIP/RTP protocol in the future and further versions.
Now as we had installed the OfficeMaster Gate configuration utility, we can configure first the network settings of the SBC.
Press the connect button and enter the ip address the Appliance get from the DHCP Server and the password, default is omc and can be changed over the console menue of the Appliance.
You can put the SBC to your internal network or your perimeter network, he doesn’t need a public IP address assigned directly on the SBC. The SBC established in my case of DeutschlandLAN SIP Trunk a connection from internal to the SBC of the SIP Trunk Provider and only needs allowed traffic outbound. If your Firewall allows all outbound traffic and do not filter the traffic, you don’t have to change the configuration of the DeutschlandLAN SIP Trunk, in this case Registered Mode is per default the best choice. If your Firewall filters outbound traffic and you must allow which traffic can flow outbound, best choice is to change DeutschlandLAN SIP Trunk to Static Mode where the used outbound Ports can be set. You can change this settings in the telefonie center https://telefoniecenter.t-online.de/fcc
If your internal SFB Clients not in same Network as the OMG, you should modify the Routing on the OMG and add the Routes to the Client Subnets, otherwise if Media Bypass is enabled, the OMG can’t route traffic to the clients.
Configure the SIP Trunk
Now we have to configure the connection from the SBC to the SIP Trunk Provider, in my case DeutschlandLAN SIP Trunk.
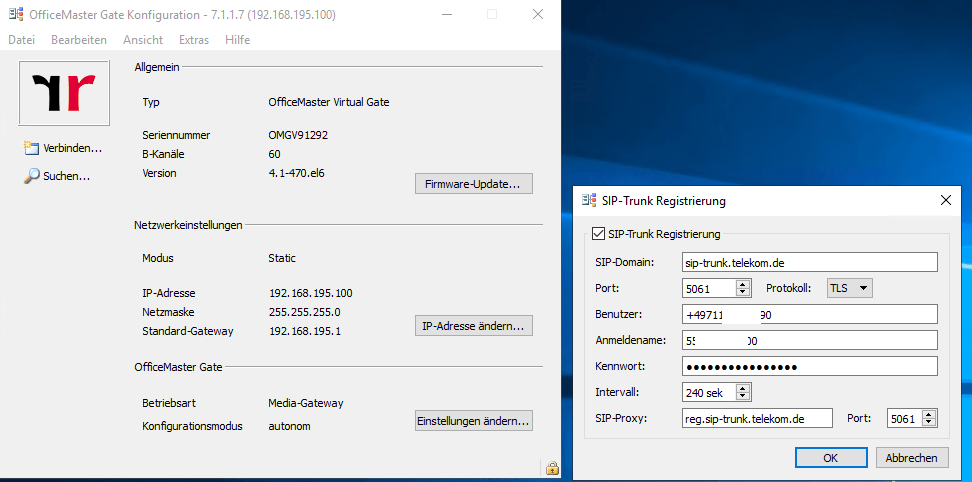
First the OfficeMaster Gate needs to register the Trunk at the SBC of the Provider.
This information you get from your SIP Trunk provider.
DEUTSCHLANDLAN SIP-TRUNK
https://www.ferrari-electronic.de/downloads/files/102004/2016/DE_QS_1TR118_w.pdf
The screenshots from Ferrari use for SIP Trunk Registration the TCP protocol on port 5060 instead the secure TLS on port 5061. A documentation from Telekom for the SIP Trunk DeutschlandLAN in combination with Skype for Business is so far not available and the support told me that they had no experience with this combination. They shipped this Trunk with a LANCOM 883 VOIP Router and had only a documentation and experience with this.
After doing a DNS NAPTR Record Lookup on the FQDN of the Registrar, I saw that their was a SRV Record entry with SIPS (SIP over TLS). So I tried to configure as you can see on the screenshots above the registration for this trunk and the voice routing resp. the trunk connection itself over tls and port 5061 (screenshots below) and it works perfect for outbound calls.
Unfortunately it works at the moment with Firmware 4.1.380 (2018-01-05) not for inbound calls over TLS and Port 5061 so far.
Ferrari electronic fixed this problem with the DeutschlandLAN SIP TRUNK and had an internal pre-release demo which works for outbound and inbound calls over TLS and Port 5061. If you need this pre-release demo and can’t wait for the next official release which will include this fix, please contact the hotline of ferrari electronic.
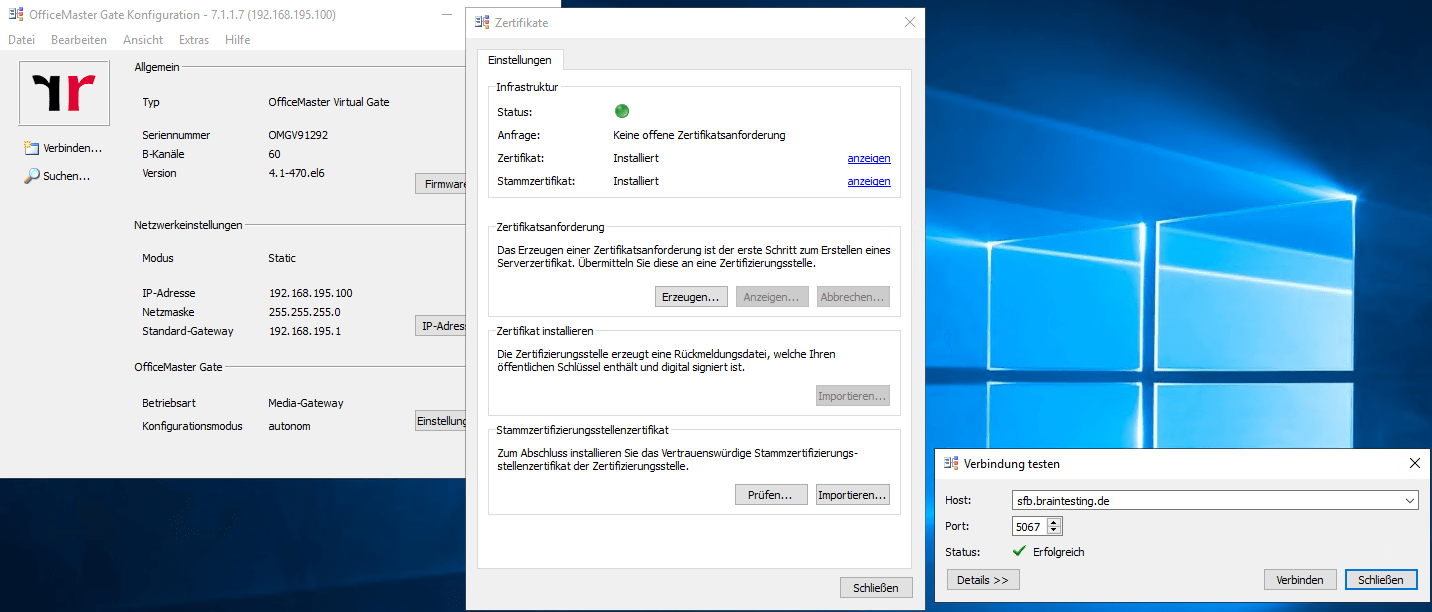
The connection from the Office Master Gate to the internal Mediation Server resp. Skype for Business FrondEnd Server works over TLS and Port 5067 or what tls port you set on the Mediation Server. The only thing to keep in mind that this works is to configure a X.509 Certificate on the Office Master Gate. In my case I also had a internal Microsoft PKI in my test network and requested a certificate with the CSR from the Office Master Gate here. You can also import a Root Certificate to the Office Master Gate to be sure that he trusts the certificate you configured on the internal Mediation Server.
This root certificate is only for trusting the certificate from the internal Mediation server. The certificate from the Office Master Gate again is only important that your internal Mediation Server can establish a secure tls connection to him. And of course you should be aware that the Mediation Server trusts the certificate on the Office Master Gate.
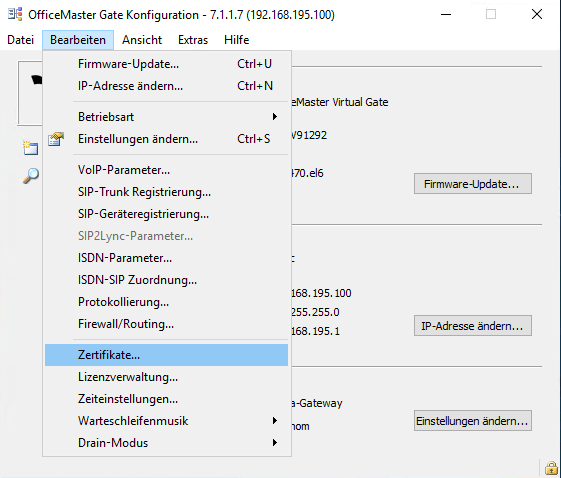
You can check the connection over tls from the Office Master Gate to the Mediation Server with the Verify … button in the Certificates menue
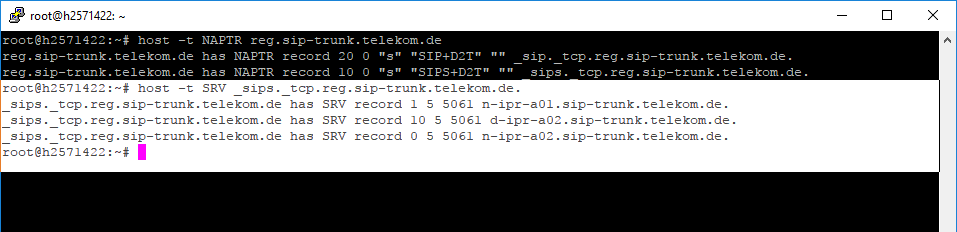
DNS NAPTR Records from the DeutschlandLAN SBC
Here you can see my tests regarding the DNS NAPTR Records for the SIP Proxy FQDN.

If you do a DNS SRV Lookup on the second NAPTR Record with the TLS SRV Records you can see that for TLS on port 5061 three SRV Records are registered.
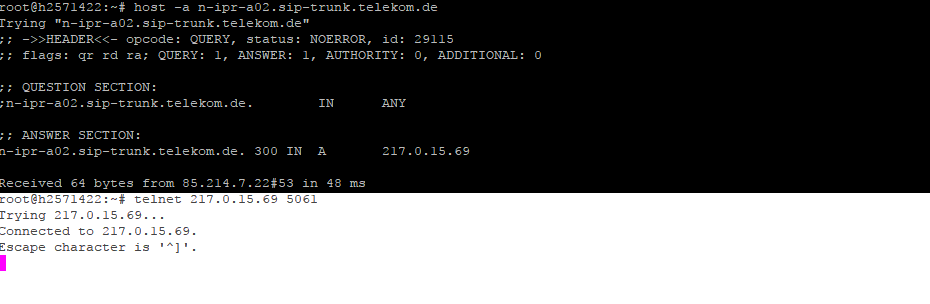
Now after a DNS A-Record Lookup on the SRV Record with the lowest priority we get the IP of one of the SBC from Telekom with the SIP registration service on TLS.
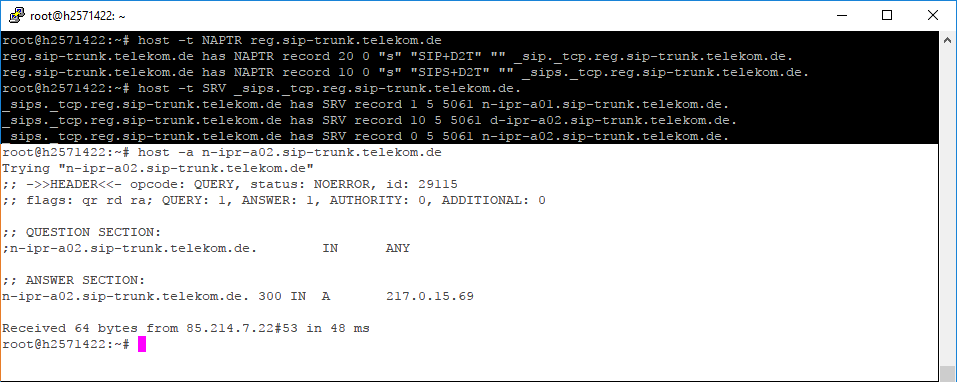
Trying to connect to this service with telnet works as you can see
Configure Rules on your SBC for Call Routing
After this you must configure the Calls for the Trunk, here click on Change Setttings …
Here you can see two network adapter symbols at the top, normally they named PCM 1 an PCM 2 and comes from the history of ferrari and their relation to the ISDN world. I changed this for a better understanding to Lync and SIP, because the first adpater is connected to the internal Skype for Business Server and the second adapter is connected to the SIP Trunk Provider. So calls to and from Skype for Business traverse to the first adapter and calls from and to the PSTN traverse to the second adapter.
For each Adapter you have to add two call processing rules, incoming and outgoing rules.
Let’s do this for the first Adapter PCM 1 in my case labeled SFB which is responsible for the connection from the OfficeMaster Gate to the Skype for Business Server.
We need to add a rule for calls from ISDN (calls from the PSTN resp. SIP Trunk Provider which converted to the ISDN protocoll from the OfficeMaster Gate).
This calls we route here to the internal Skype for Business Mediation Server resp. the Mediation Server Role.
Protocol and Port must be the same as configured on the Mediation Server.
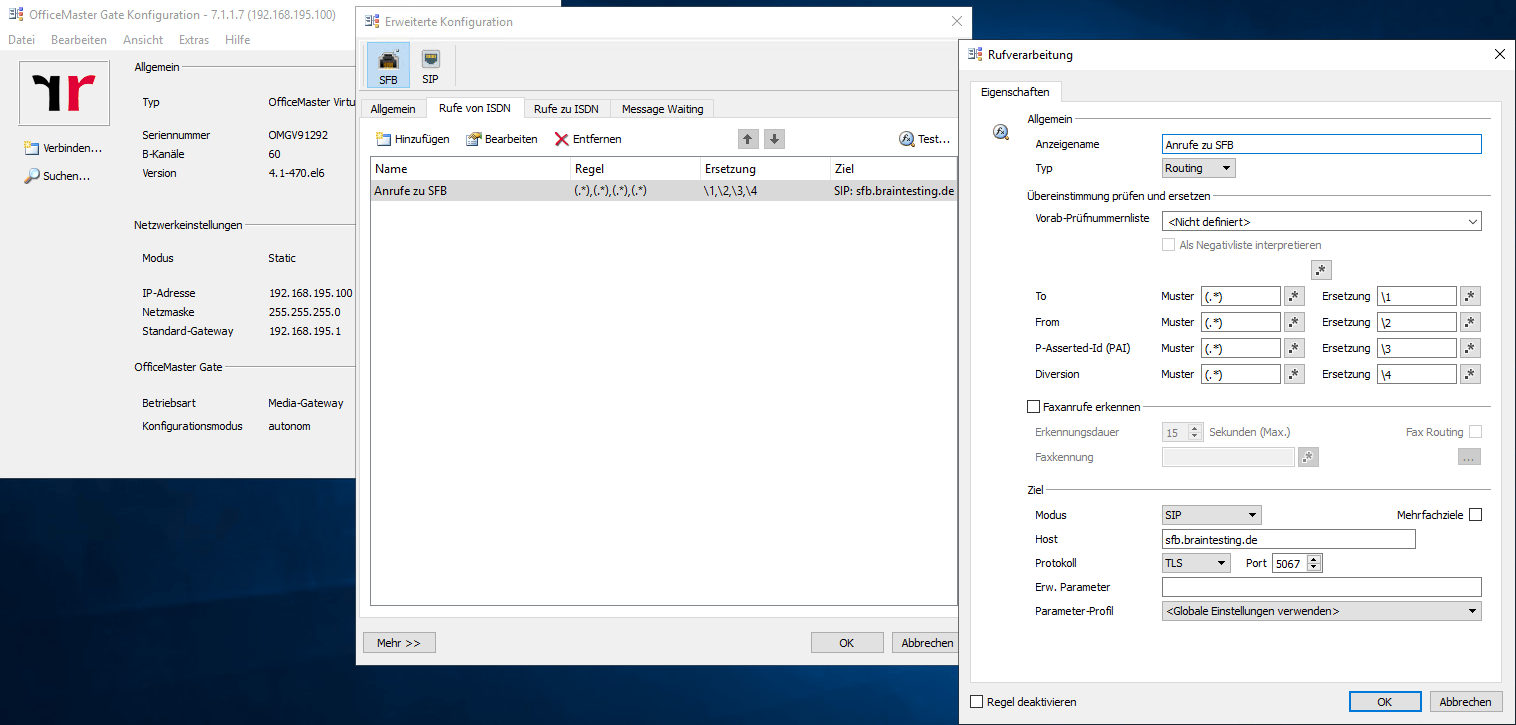
Also we need to configure at this adapter a second rule for outbound calls from our Skype for Business Server. Here you have to enter the IP Address from the Skype for Business Mediation Server or Role.
These are VOIP SIP Calls from the internal Skype for Business Server which were converted to ISDN from the OfficeMasterGate and here terminated for further routing to the SIP Trunk Provider for which the second adapter is responsible.

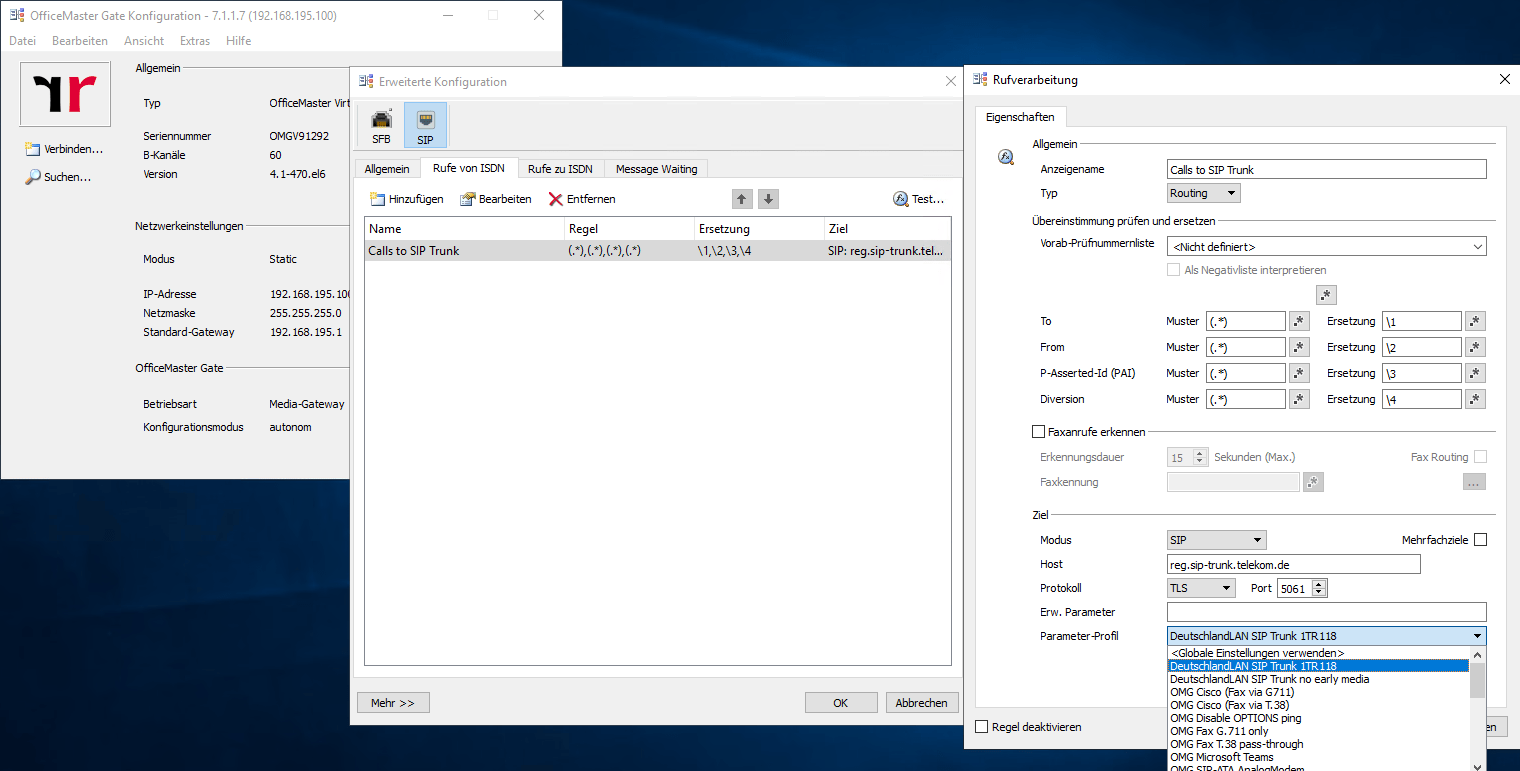
Now we come to the configuration of the second adapter PCM 2 or in my case labeled SIP.
We must also configure here two call rules, one for calls from the OfficeMaster Gate which are converted into ISDN to the SIP Trunk Provider and reconverted in VOIP SIP and one for all incoming Calls from the SIP Trunk Provider which first must converted from the OfficeMaster Gate into ISDN protocol.
First rule is for calls from the OMG to the SIP Trunk Provider. Since OMG Version 4.1 you can select the DeutschlandLAN SIP Trunk 1TR118 Profile, on which all parameter configured for this trunk or many other SIP Trunk Provider Profiles. In my case I need the DeutschlandLAN SIP Trunk Profile. As we use TLS as discussed above we need to set the protocol to TLS and the port to 5061. The FQDN of the registrar is reg.sip-trunk.telekom.de.
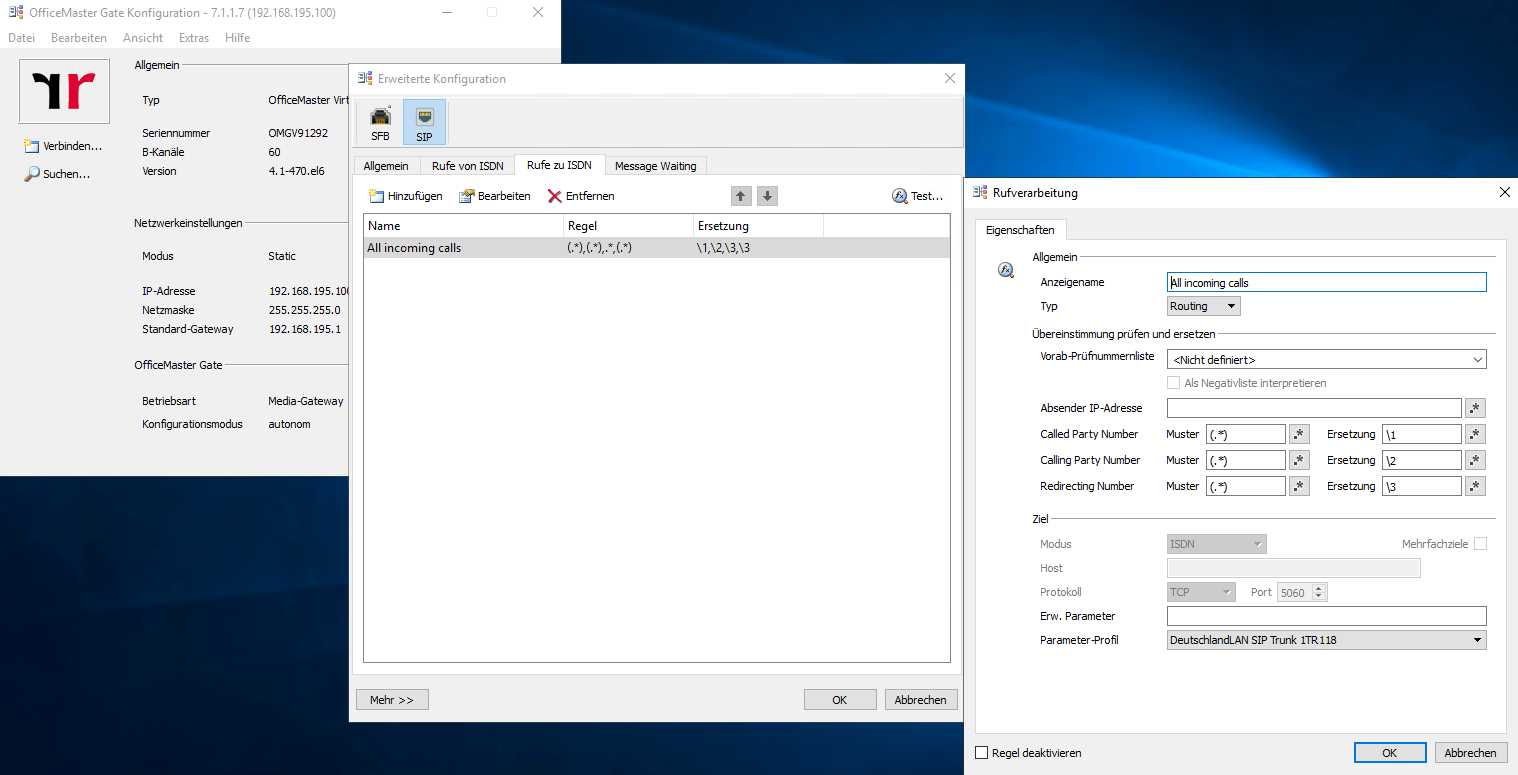
The second rule are for all incoming calls from the SIP Trunk Provider. Here you had only to select the Provider Profile in my case the DeutschlandLAN SIP Trun which also set the correct paramters for the incoming VOIP calls.
Configure Enterprise Voice in Skype for Business
Now after configuring the SBC and the connection with Skype for Business Server, we have to switch to the SFB Control Panel to configure the rest.
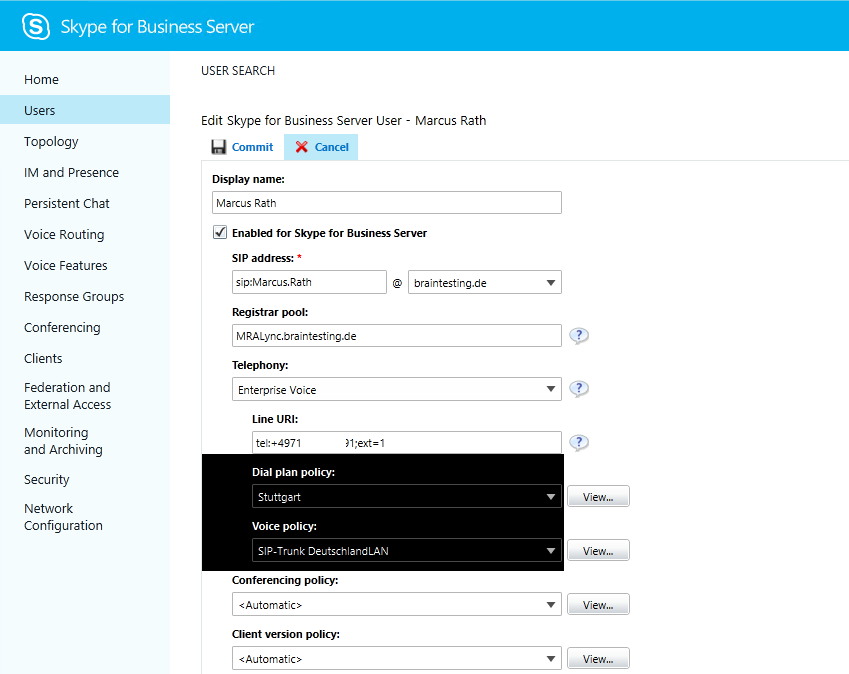
First we need to enable the users for Enterprise Voice. You can enable this in the user menu.

Also you need to enter the telephone number and the extension number in Germany the MSN (Multible Subscriber Number) number. in the E.164 format
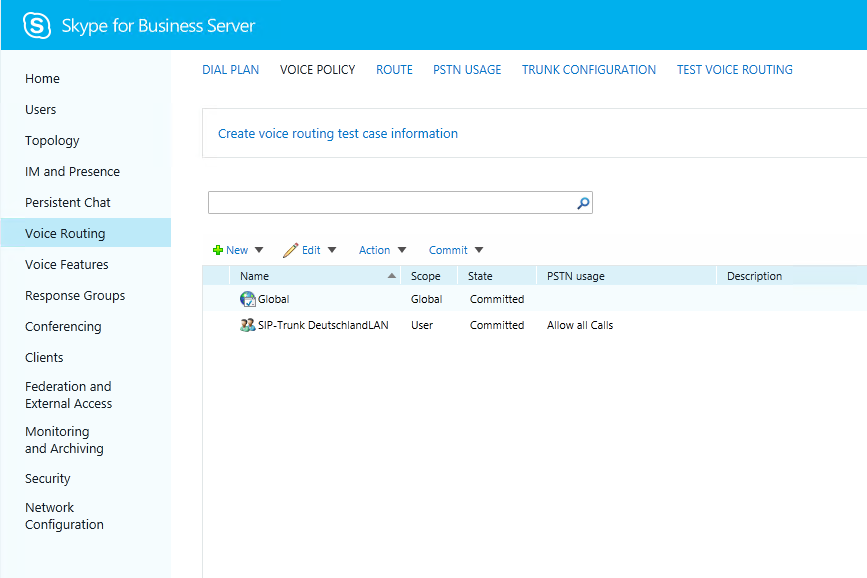
Skype for Business Server needs to know how to route calls outside to the PSTN. Therefore we go to the Voice Routing menue in the control panel.
You can edit the Global Dial Plan or create a separate Dial Plan which I prefer. In case of multiple office locations you can create here for each location a separate Dial Plan and the corresponding normalization rules.

In my test environment I only had one SIP Trunk with two lines and one phone number block so I only need one Dial Plan for the location in Stuttgart.
At this location I created 5 normalization rules, the first for international calls outside germany, the second for calls within germany, the third for calls within Stuttgart so you do not have to dial the area code +49 711, the fourth rule are for calls within the company at this location and the last rule do not normalize the dialed number.
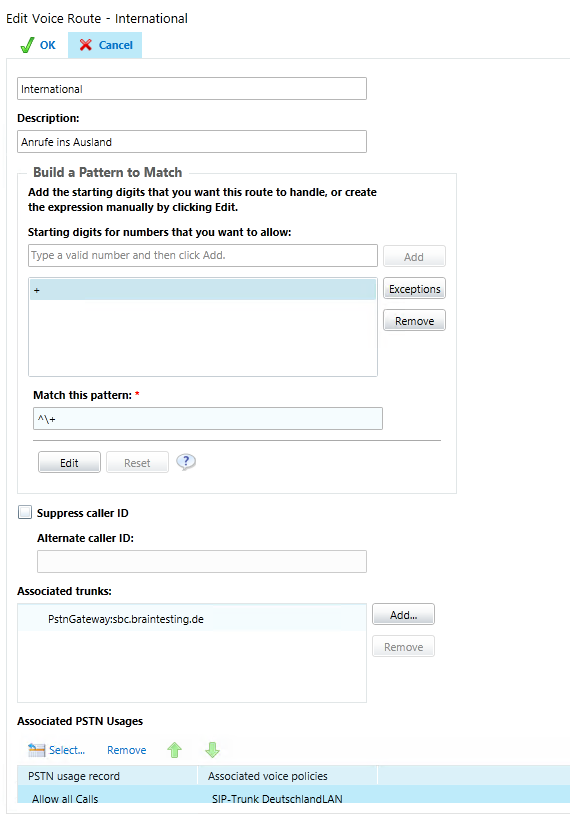
International
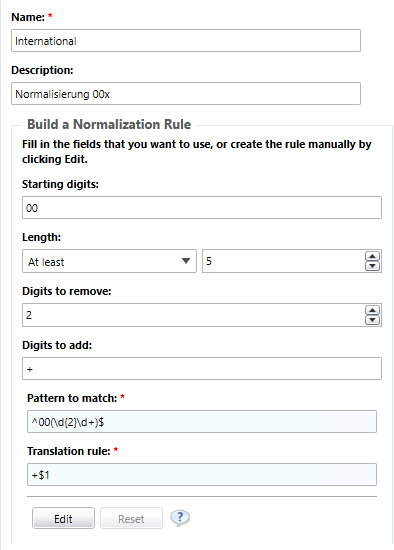
Pattern to match: ^00(d{2}d+)$
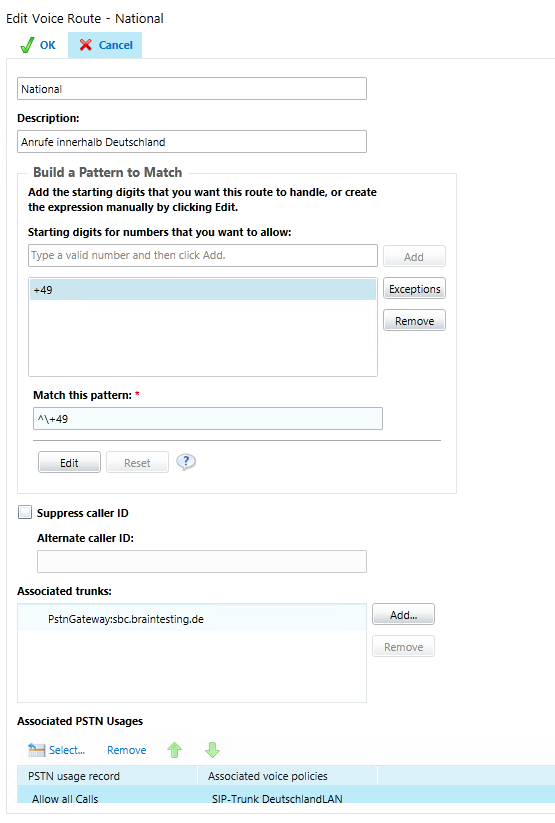
National
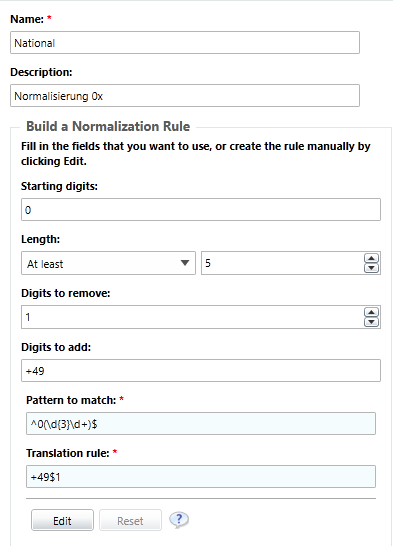
Pattern to match: ^0(d{3}d+)$
Ortskennzahl Stuttgart

Pattern to match: ^(d{3}d+)$
Intern Stuttgart
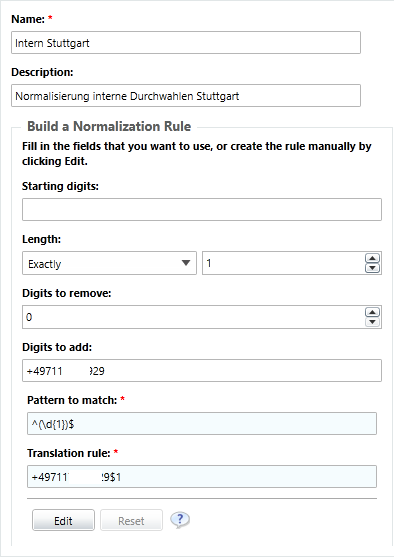
Pattern to match: ^(d{1})$
Keep All
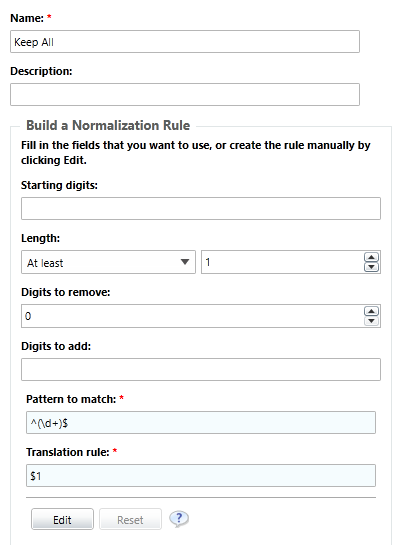
Pattern to match: ^(d+)$
We also need to modify the Global Voice Policy or create a separate one as I did. If you want to allow different features or PSTN Usages for different locations or users, you can create more Policies.
I named it like the SIP Trunk.
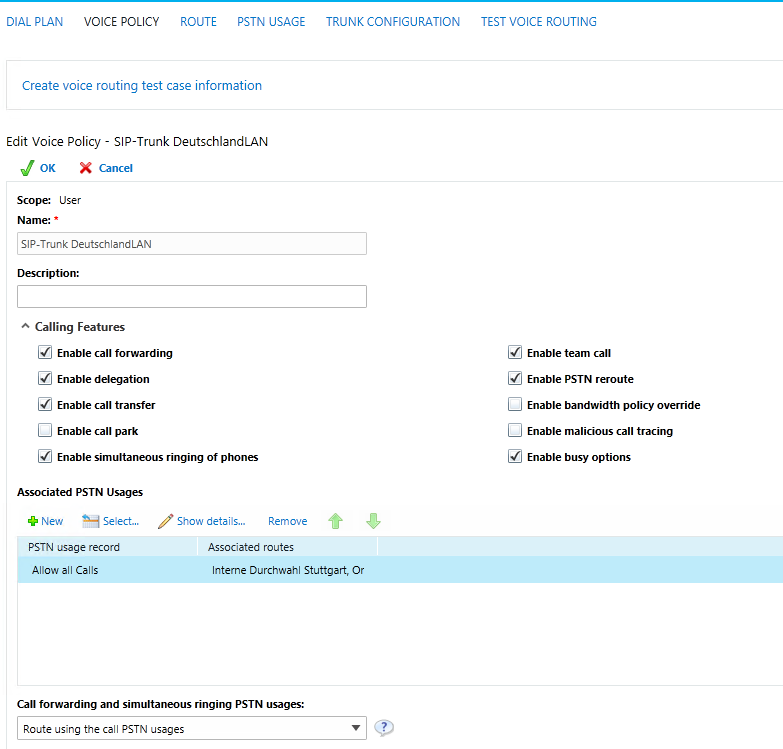
As you can see I created one PSTN usage record and named it “Allow all Calls” and so I added all created Routes to this so that all users are allowed to use all routes. Over these PSTN usages you can control which routes the users can use or are allowed to. Before you can add here the routes you must first create them, you will see this at the next step.

The Routes are created automatically from the Associated Normalization Rules you added to the Dial Plan Policy.
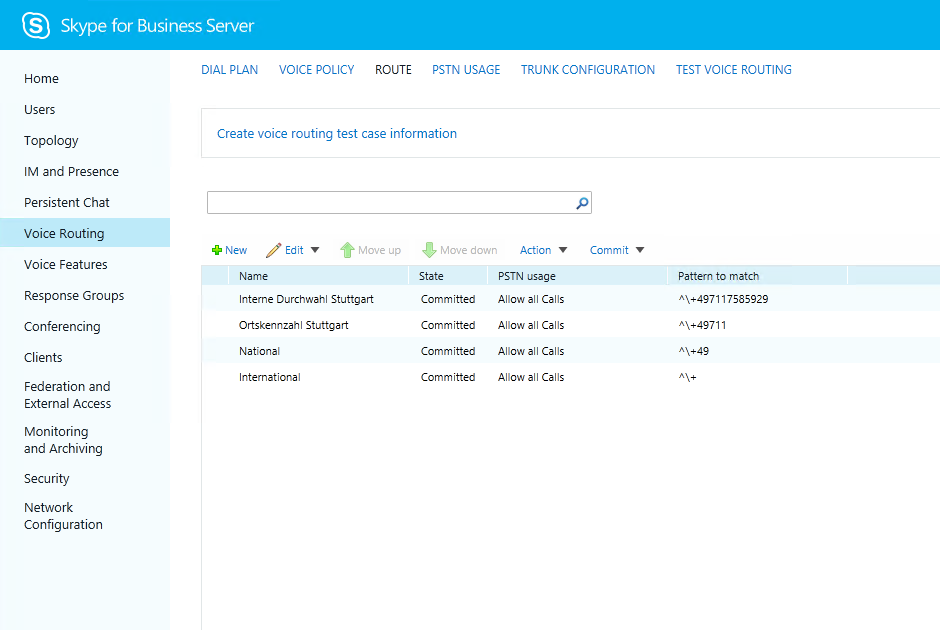
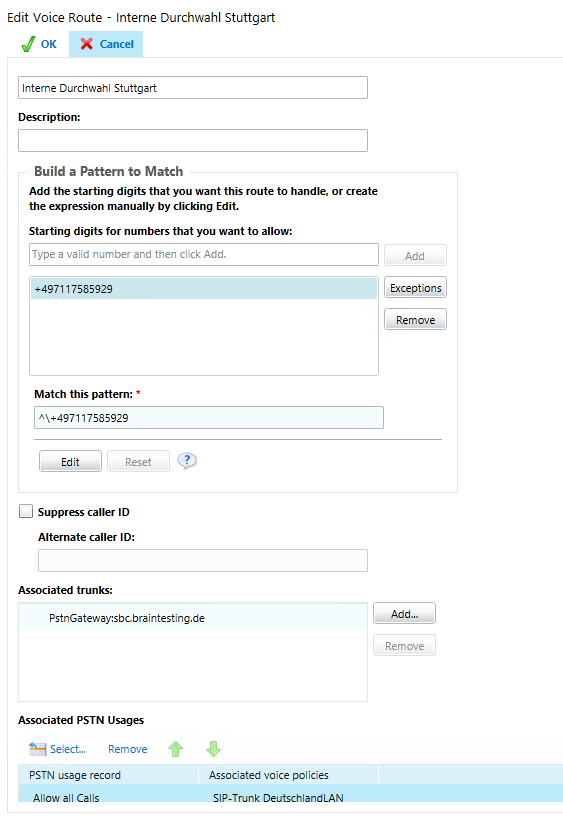
Route for Interne Durchwahl Stuttgart
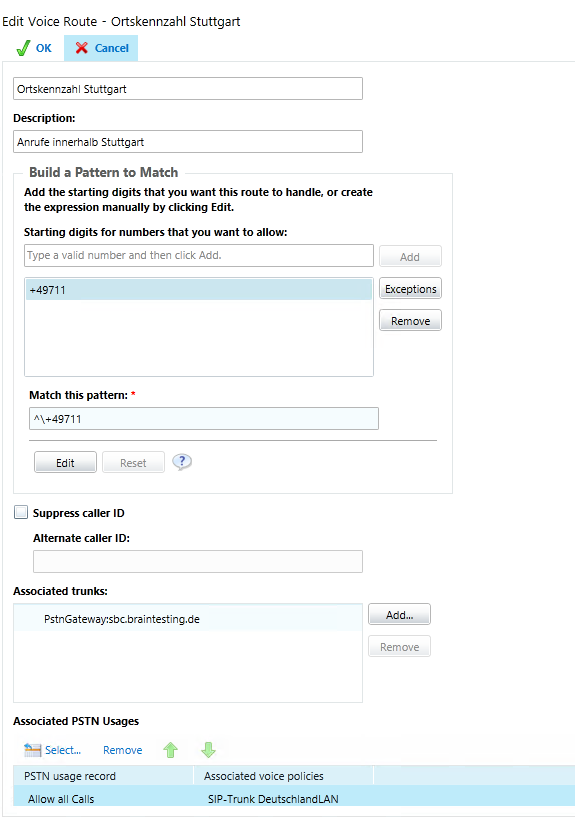
Route for Ortskennzahl Stuttgart
Route for National
Route for International
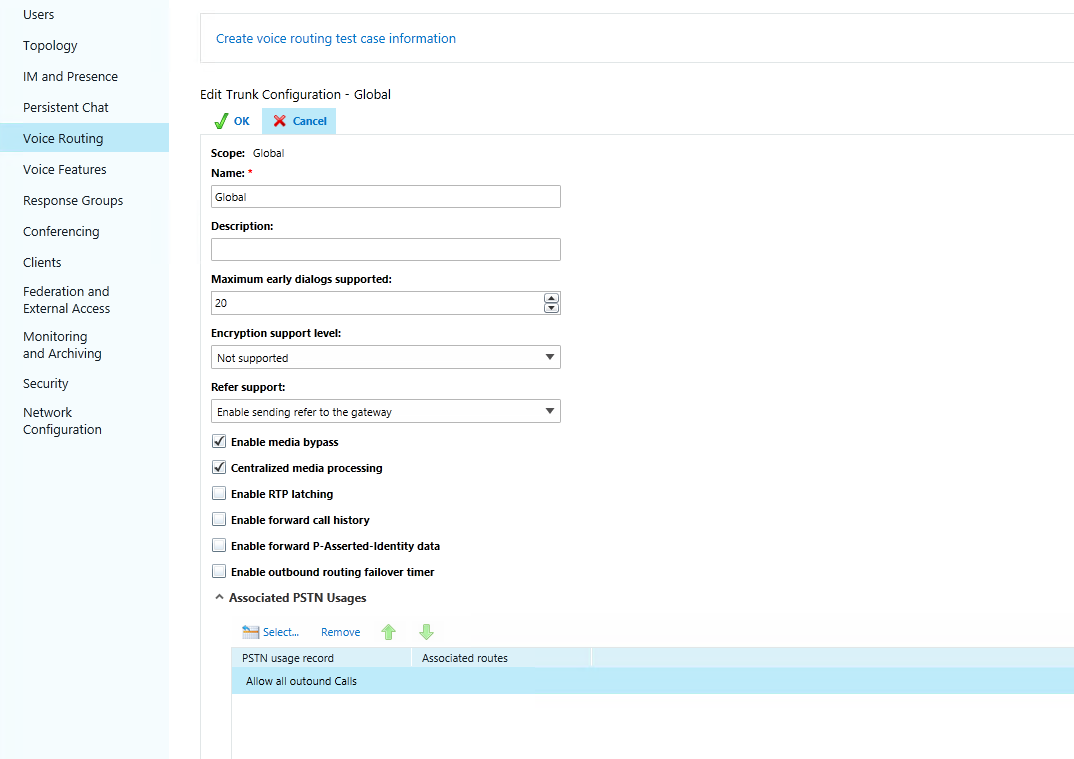
Next step is to configure in Voice Routing the register Trunk Configuration, here we can set some further options for the SIP Trunk. I will add in the Global Policy the PSTN Usages Allow all Calls which I created previously.

Don’t forget to select the configured Voice Policy and Dial Plan Policy in the steps before for the users who should use this policy and should be able to make calls to the PSTN.
Now Users are able to call from Skype for Business to the PSTN Public Switched Telephone Network and get calls from.
I will describe all the settings and options more in detail when I have time and also the normalization rules to translate the dialed numbers from the users into correct E.164 numbers.
Links
Palaver mit Telekom Deutschland zu SIP-Trunks
http://netzpalaver.de/2017/08/08/palaver-mit-telekom-deutschland-zu-sip-trunks/
Grundlegende Informationen zu STUN und NAT bei SIP-Anschlüssen der Deutschen Telekom (DeutschlandLAN)
http://faq.bintec-elmeg.com/index.php?title=Grundlegende_Informationen_zu_STUN_und_NAT_bei_SIP-Anschl%C3%BCssen_der_Deutschen_Telekom_(DeutschlandLAN)&mobileaction=toggle_view_desktop