Default outbound access for VMs in Azure will be retired on 30 September 2025 – How to transition to an explicit method of public connectivity
How default outbound access for VMs in Azure works
Why is disabling default outbound access recommended?
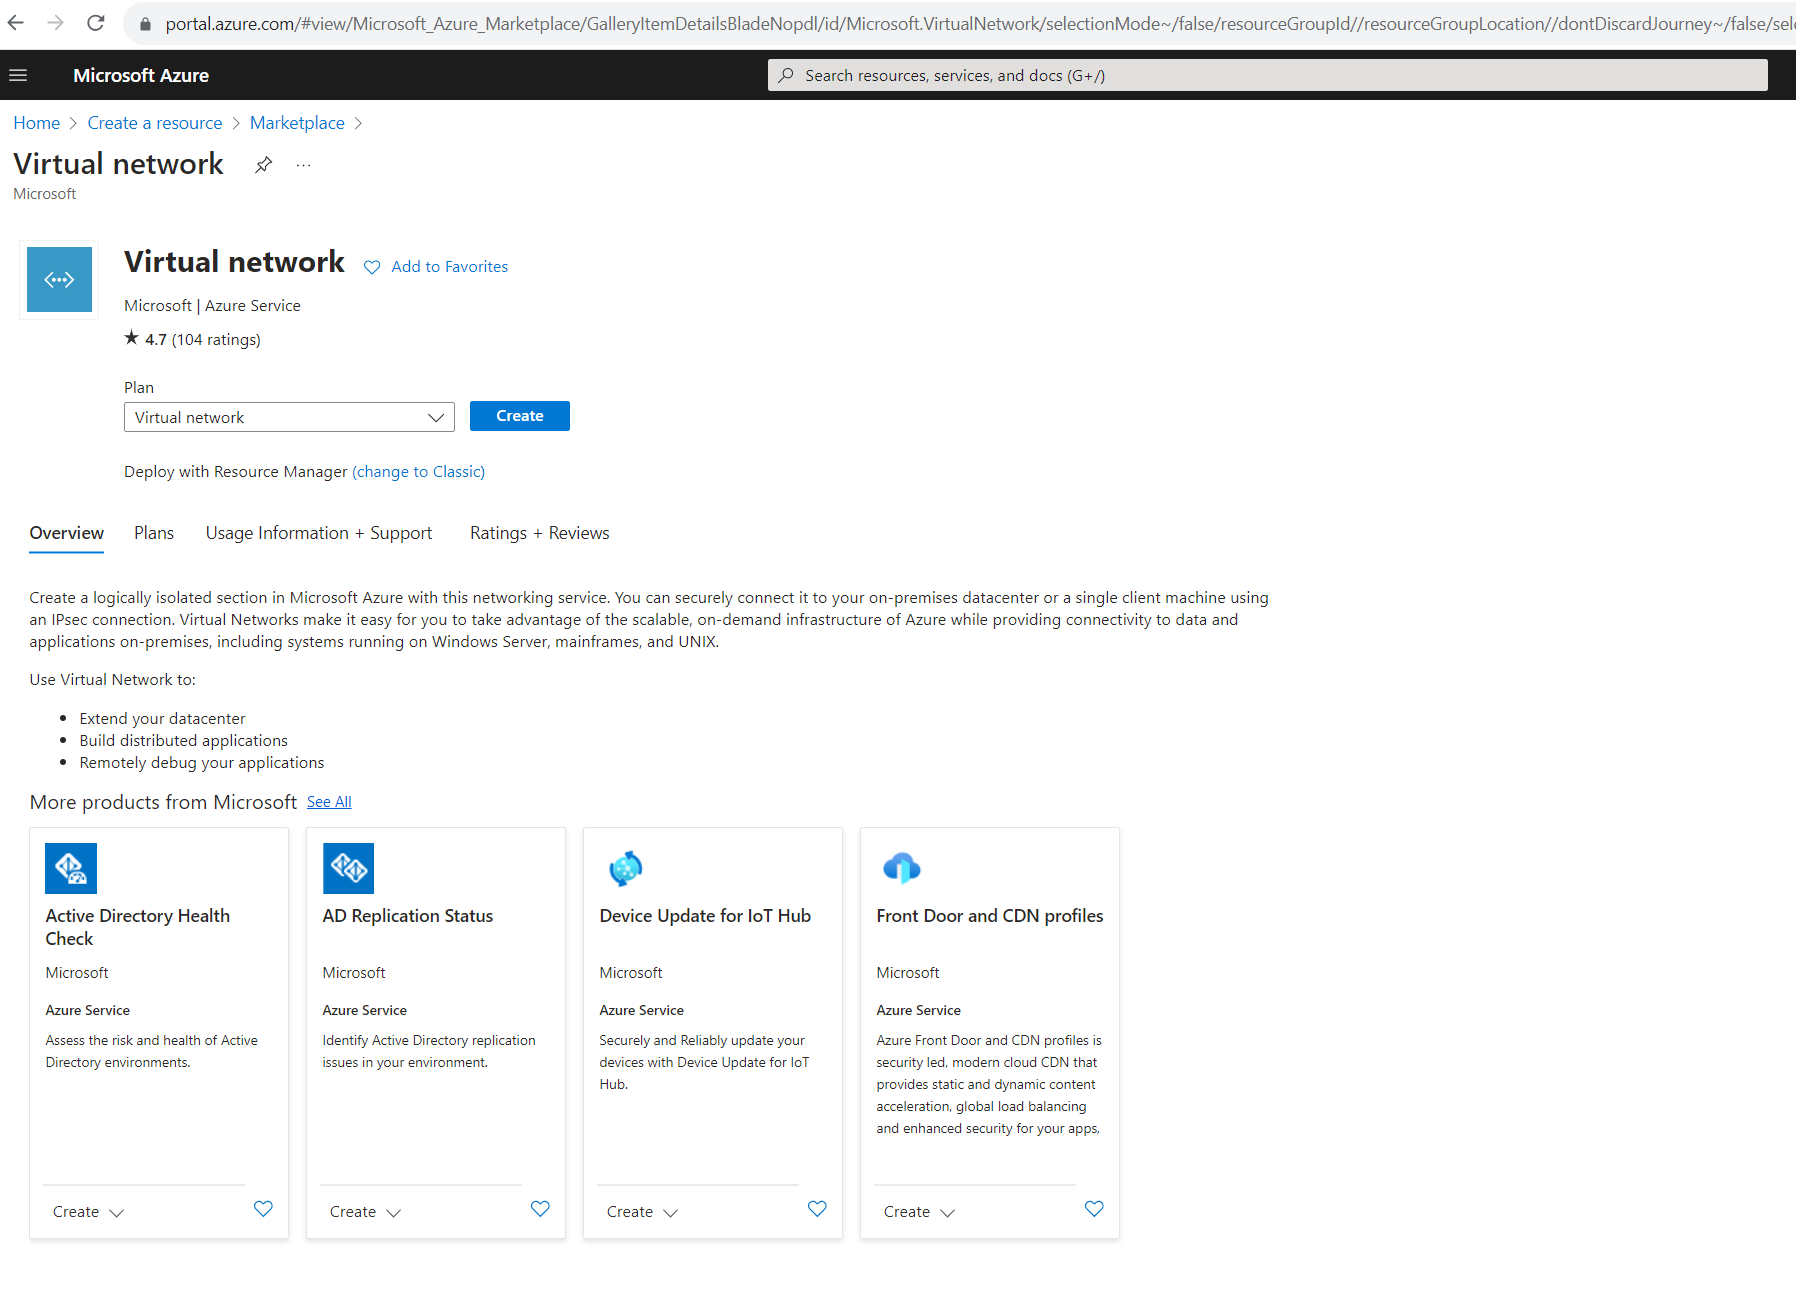
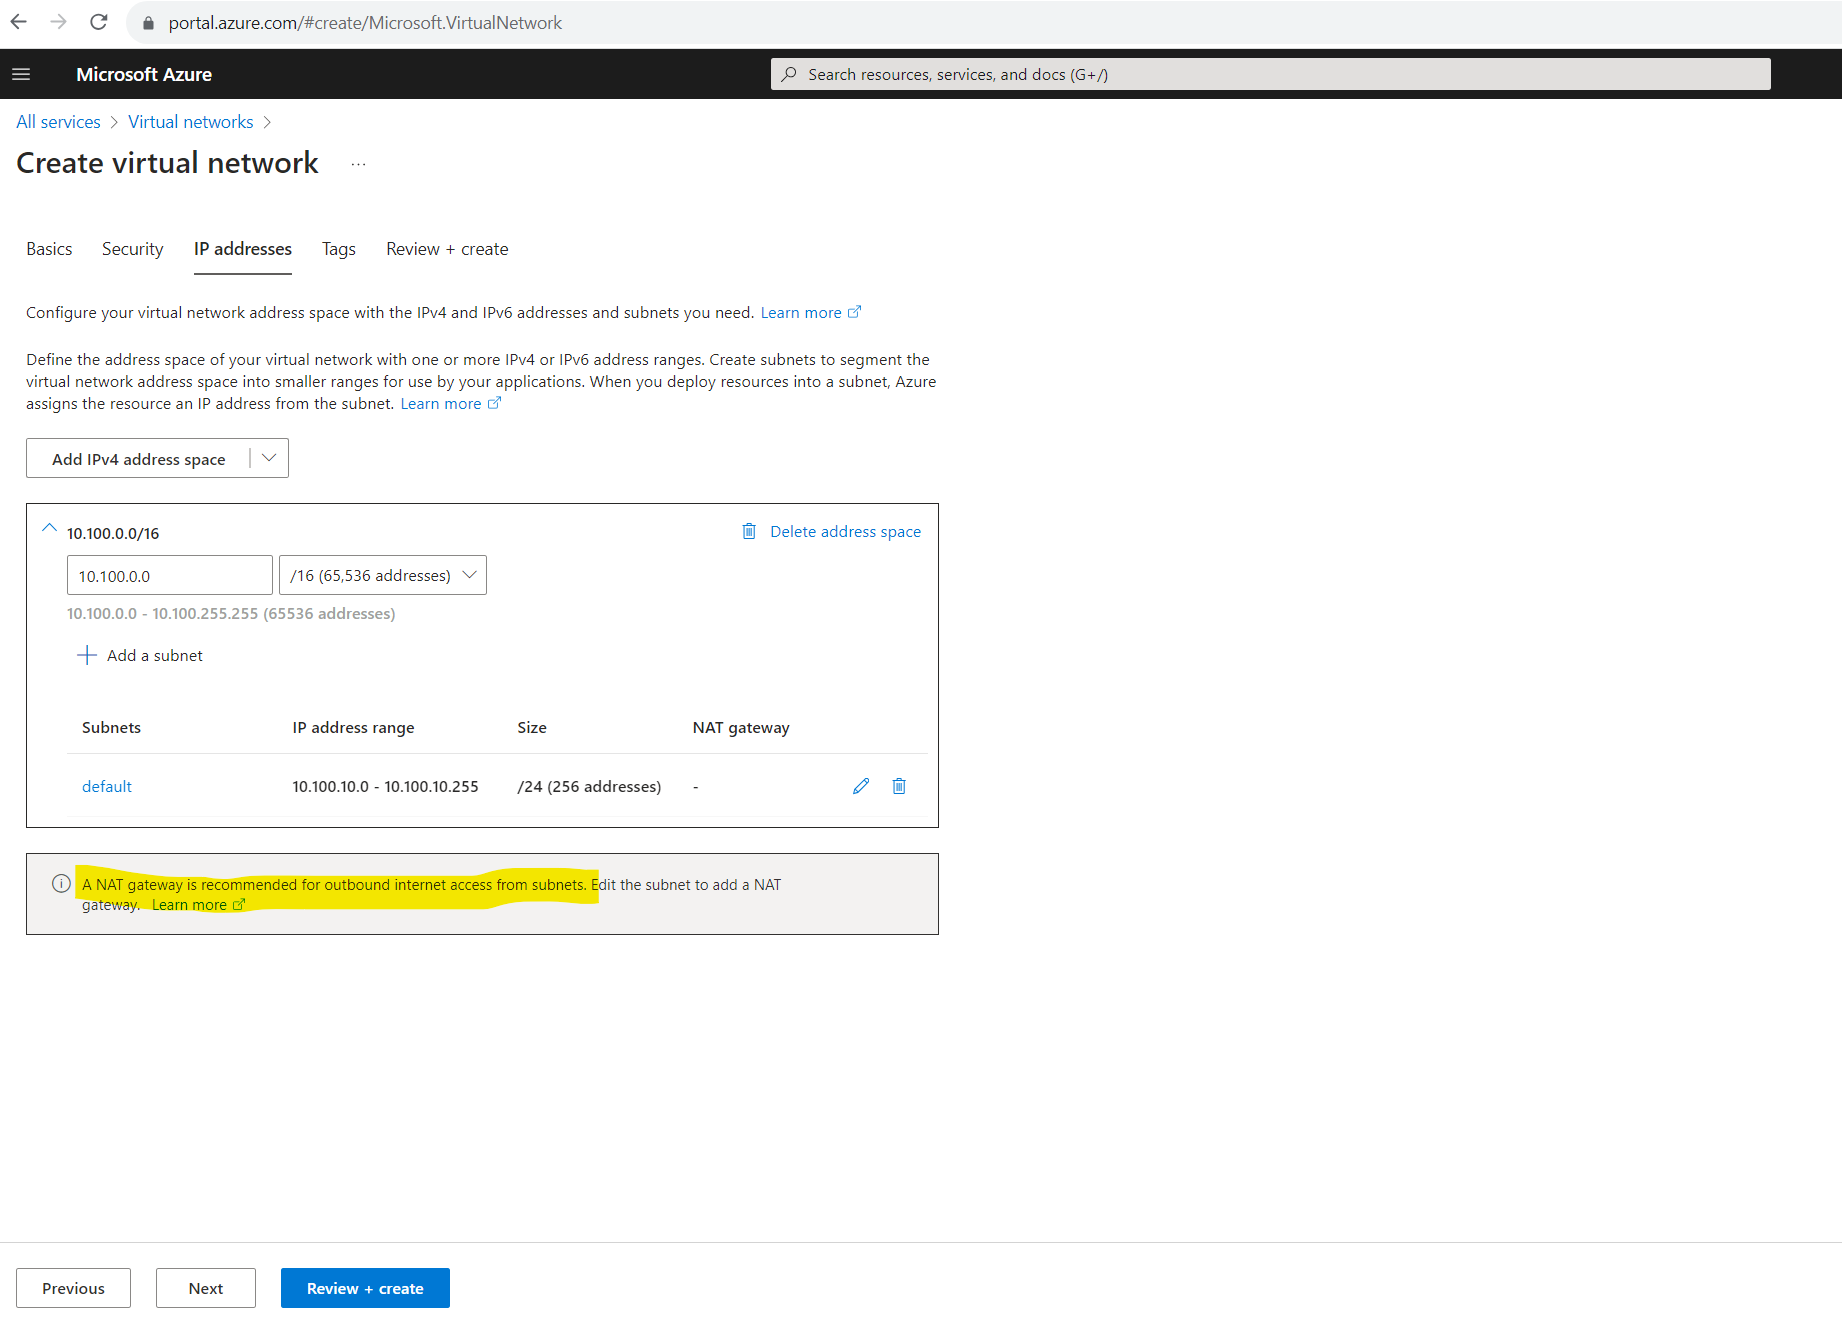
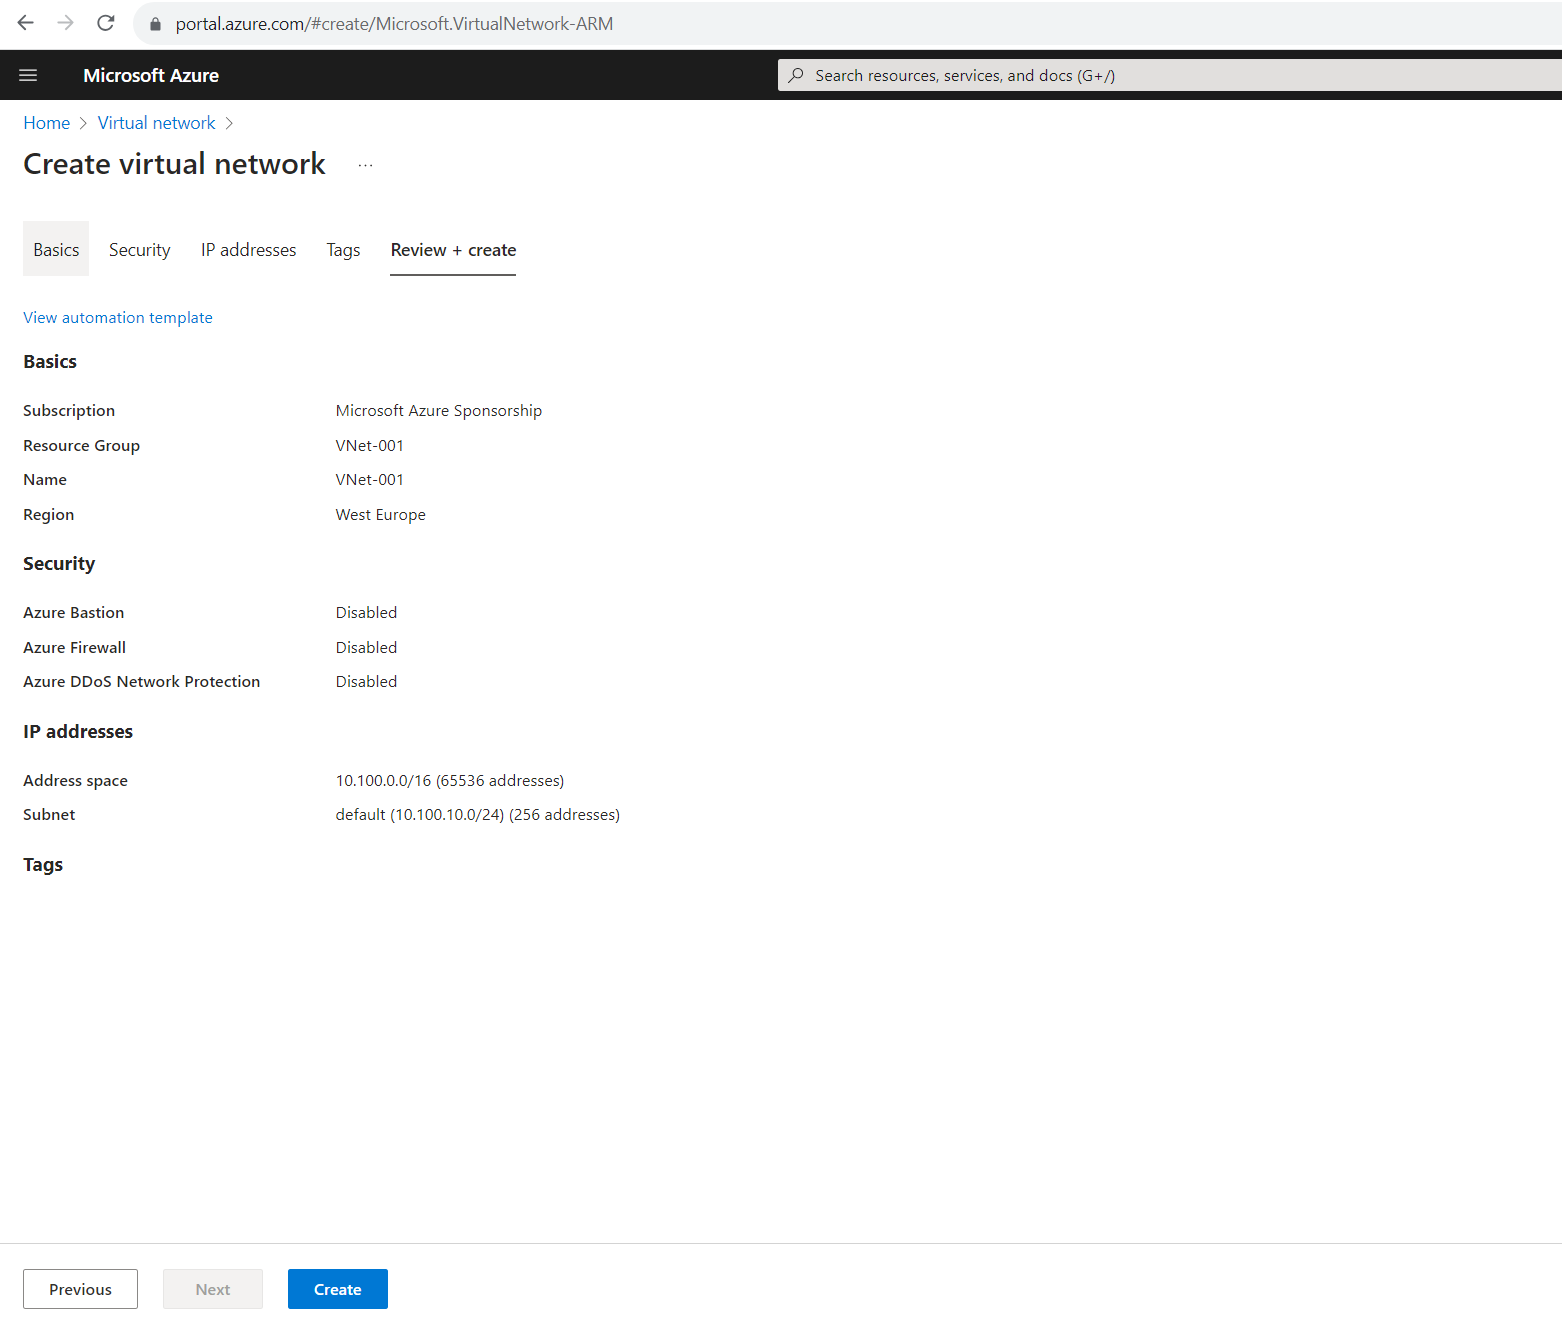
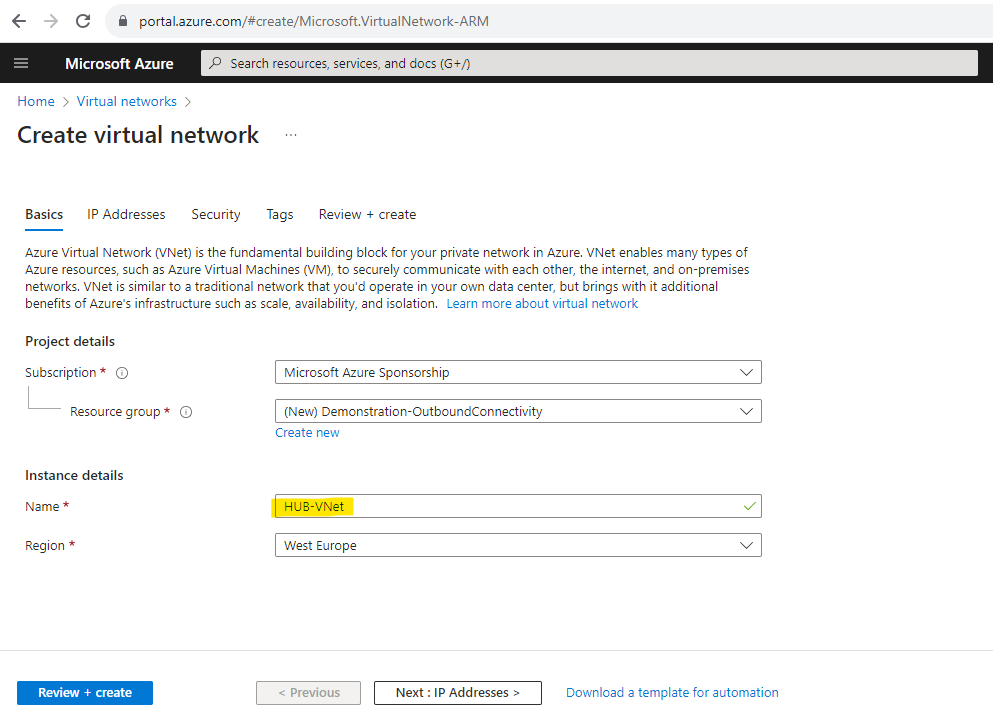
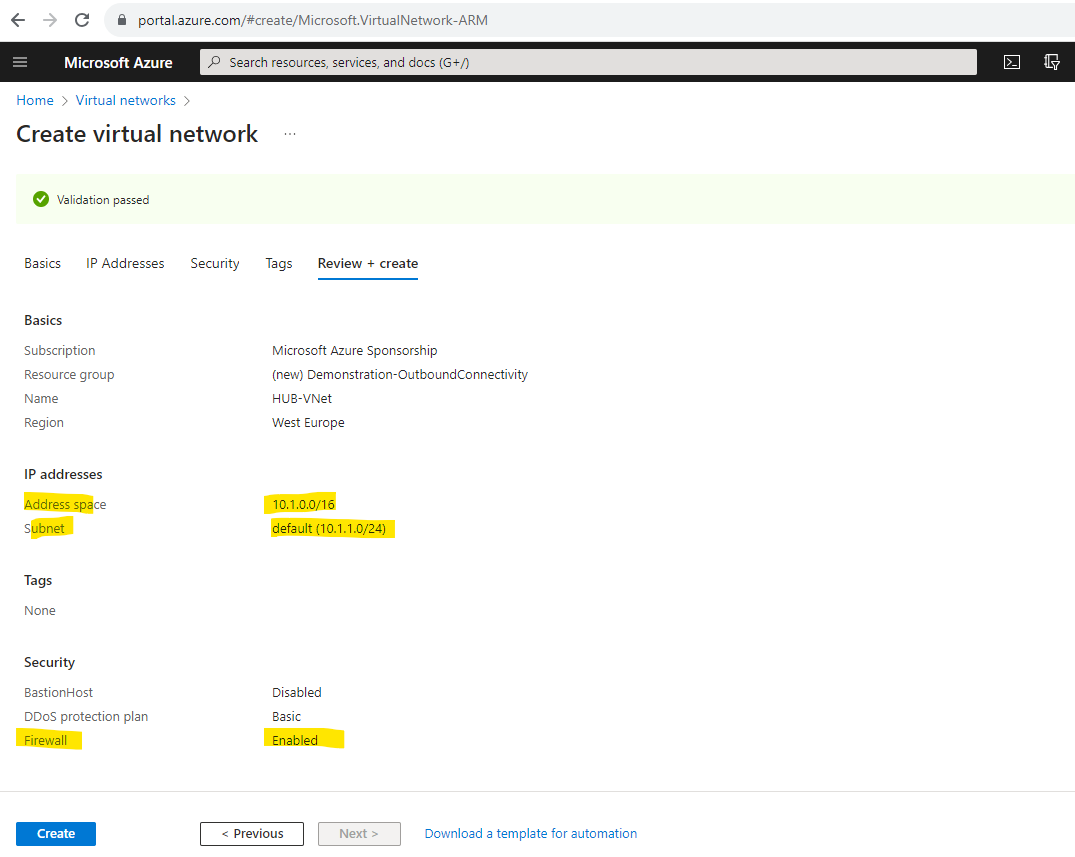
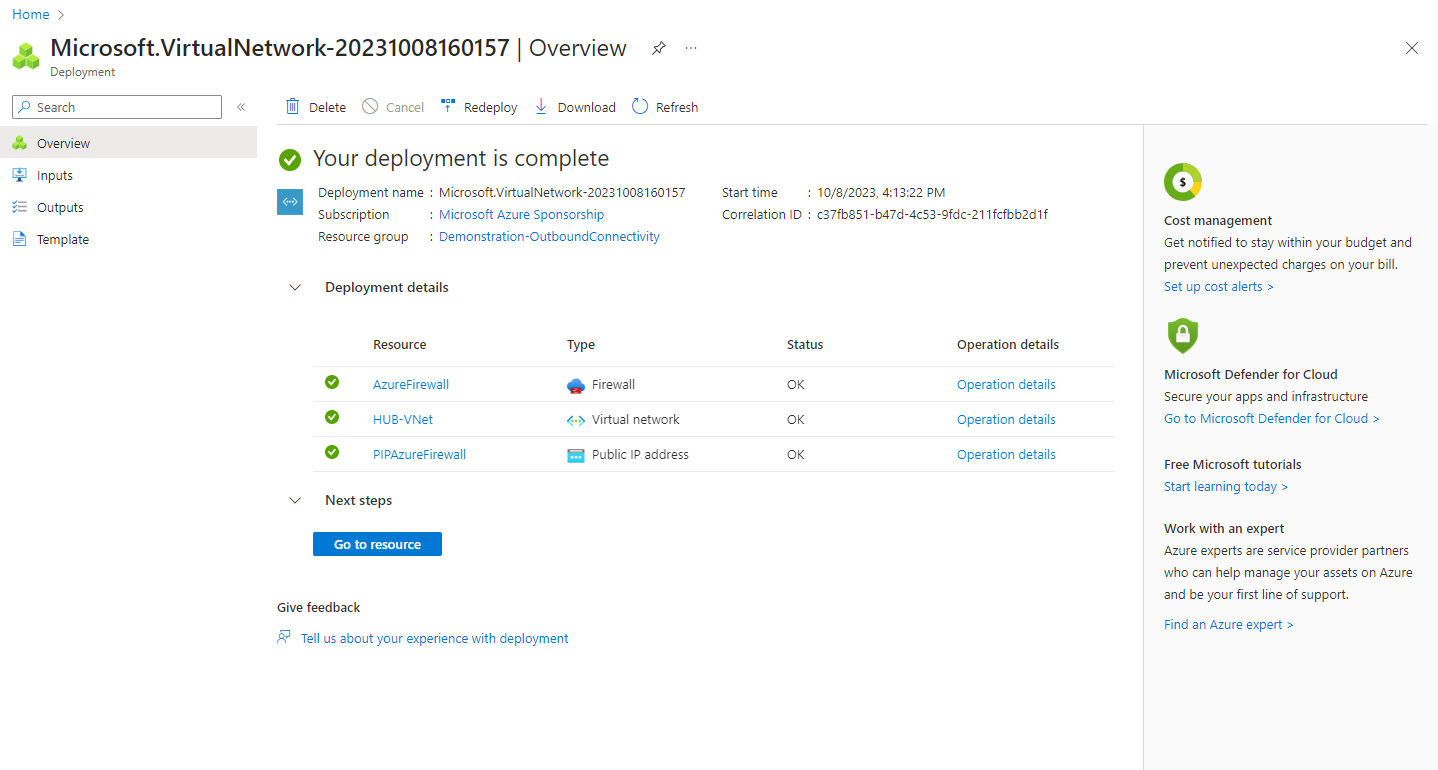
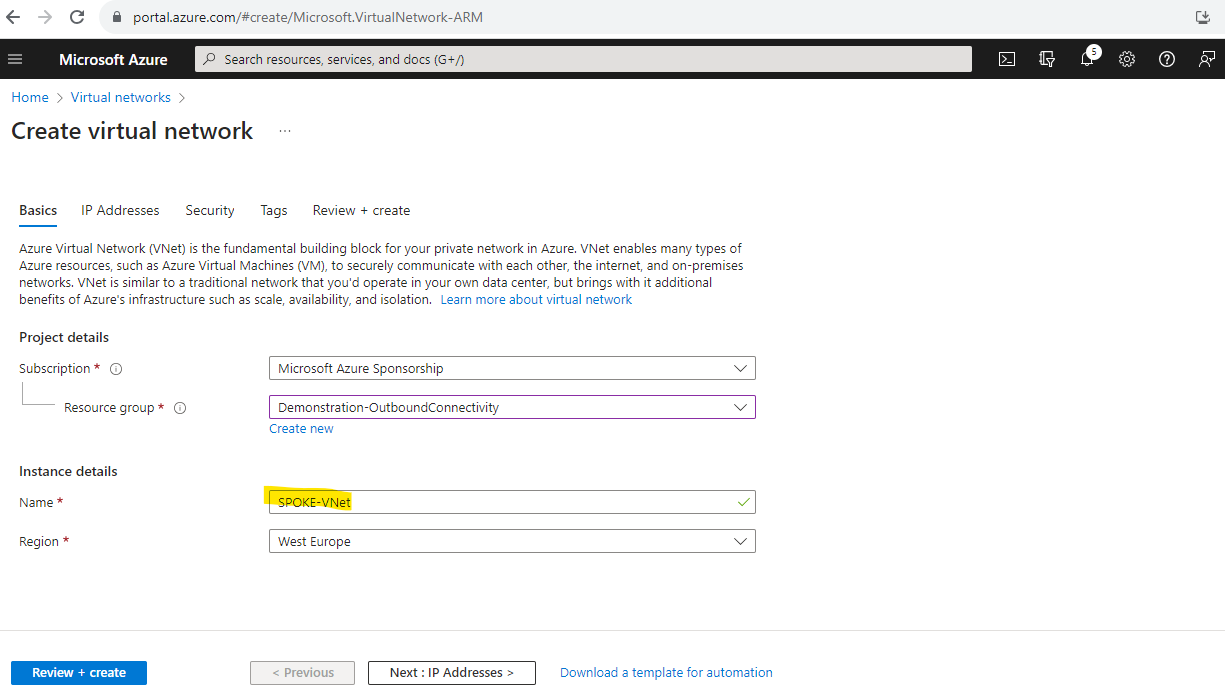
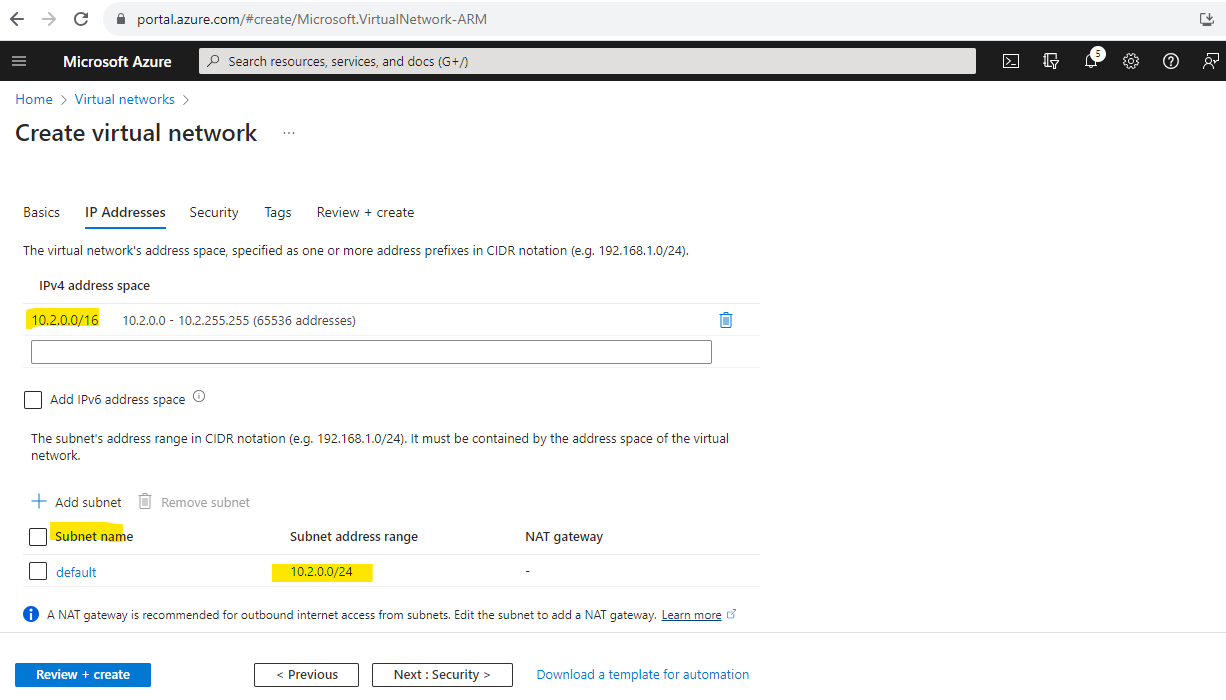
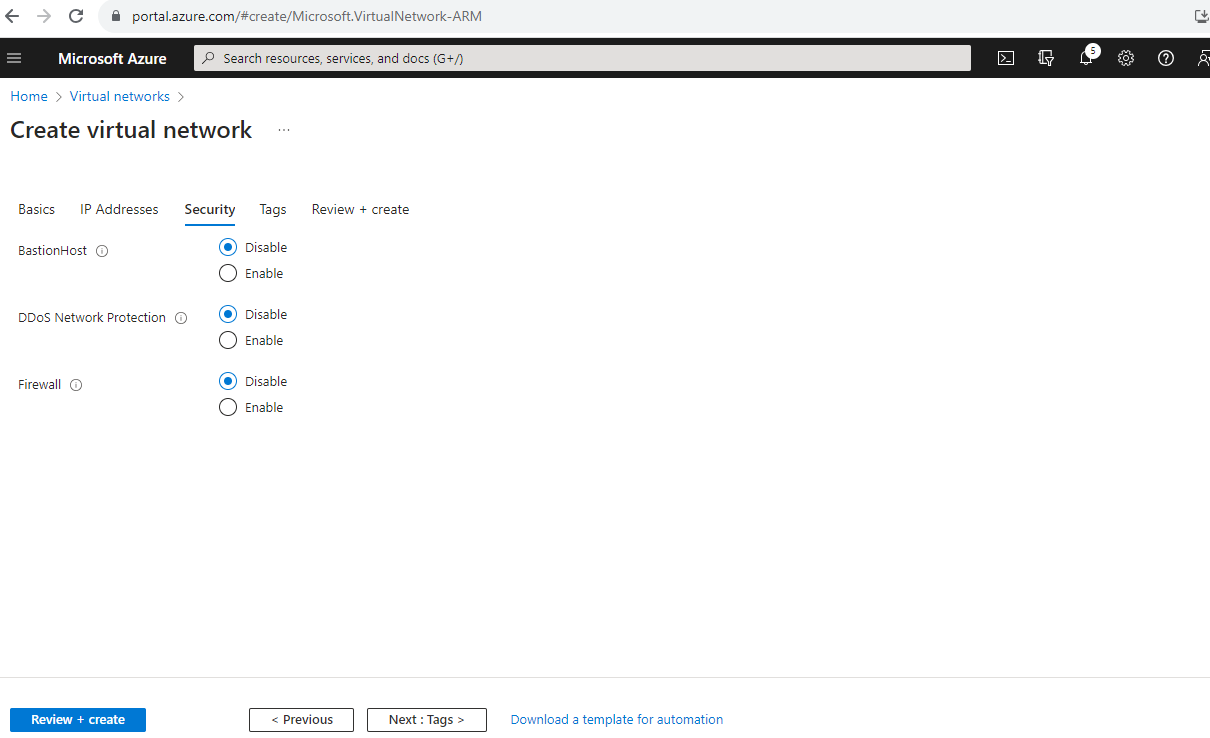
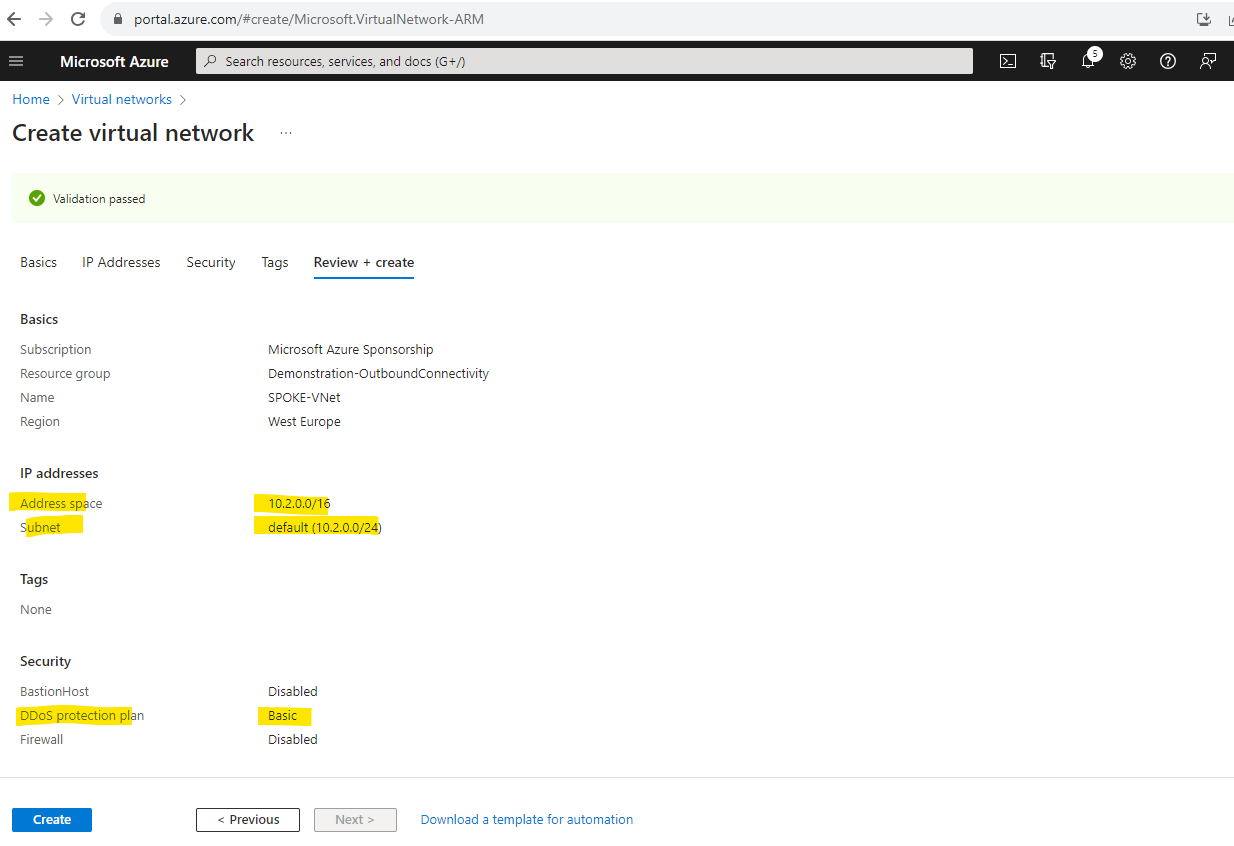
Creating a new Virtual Network
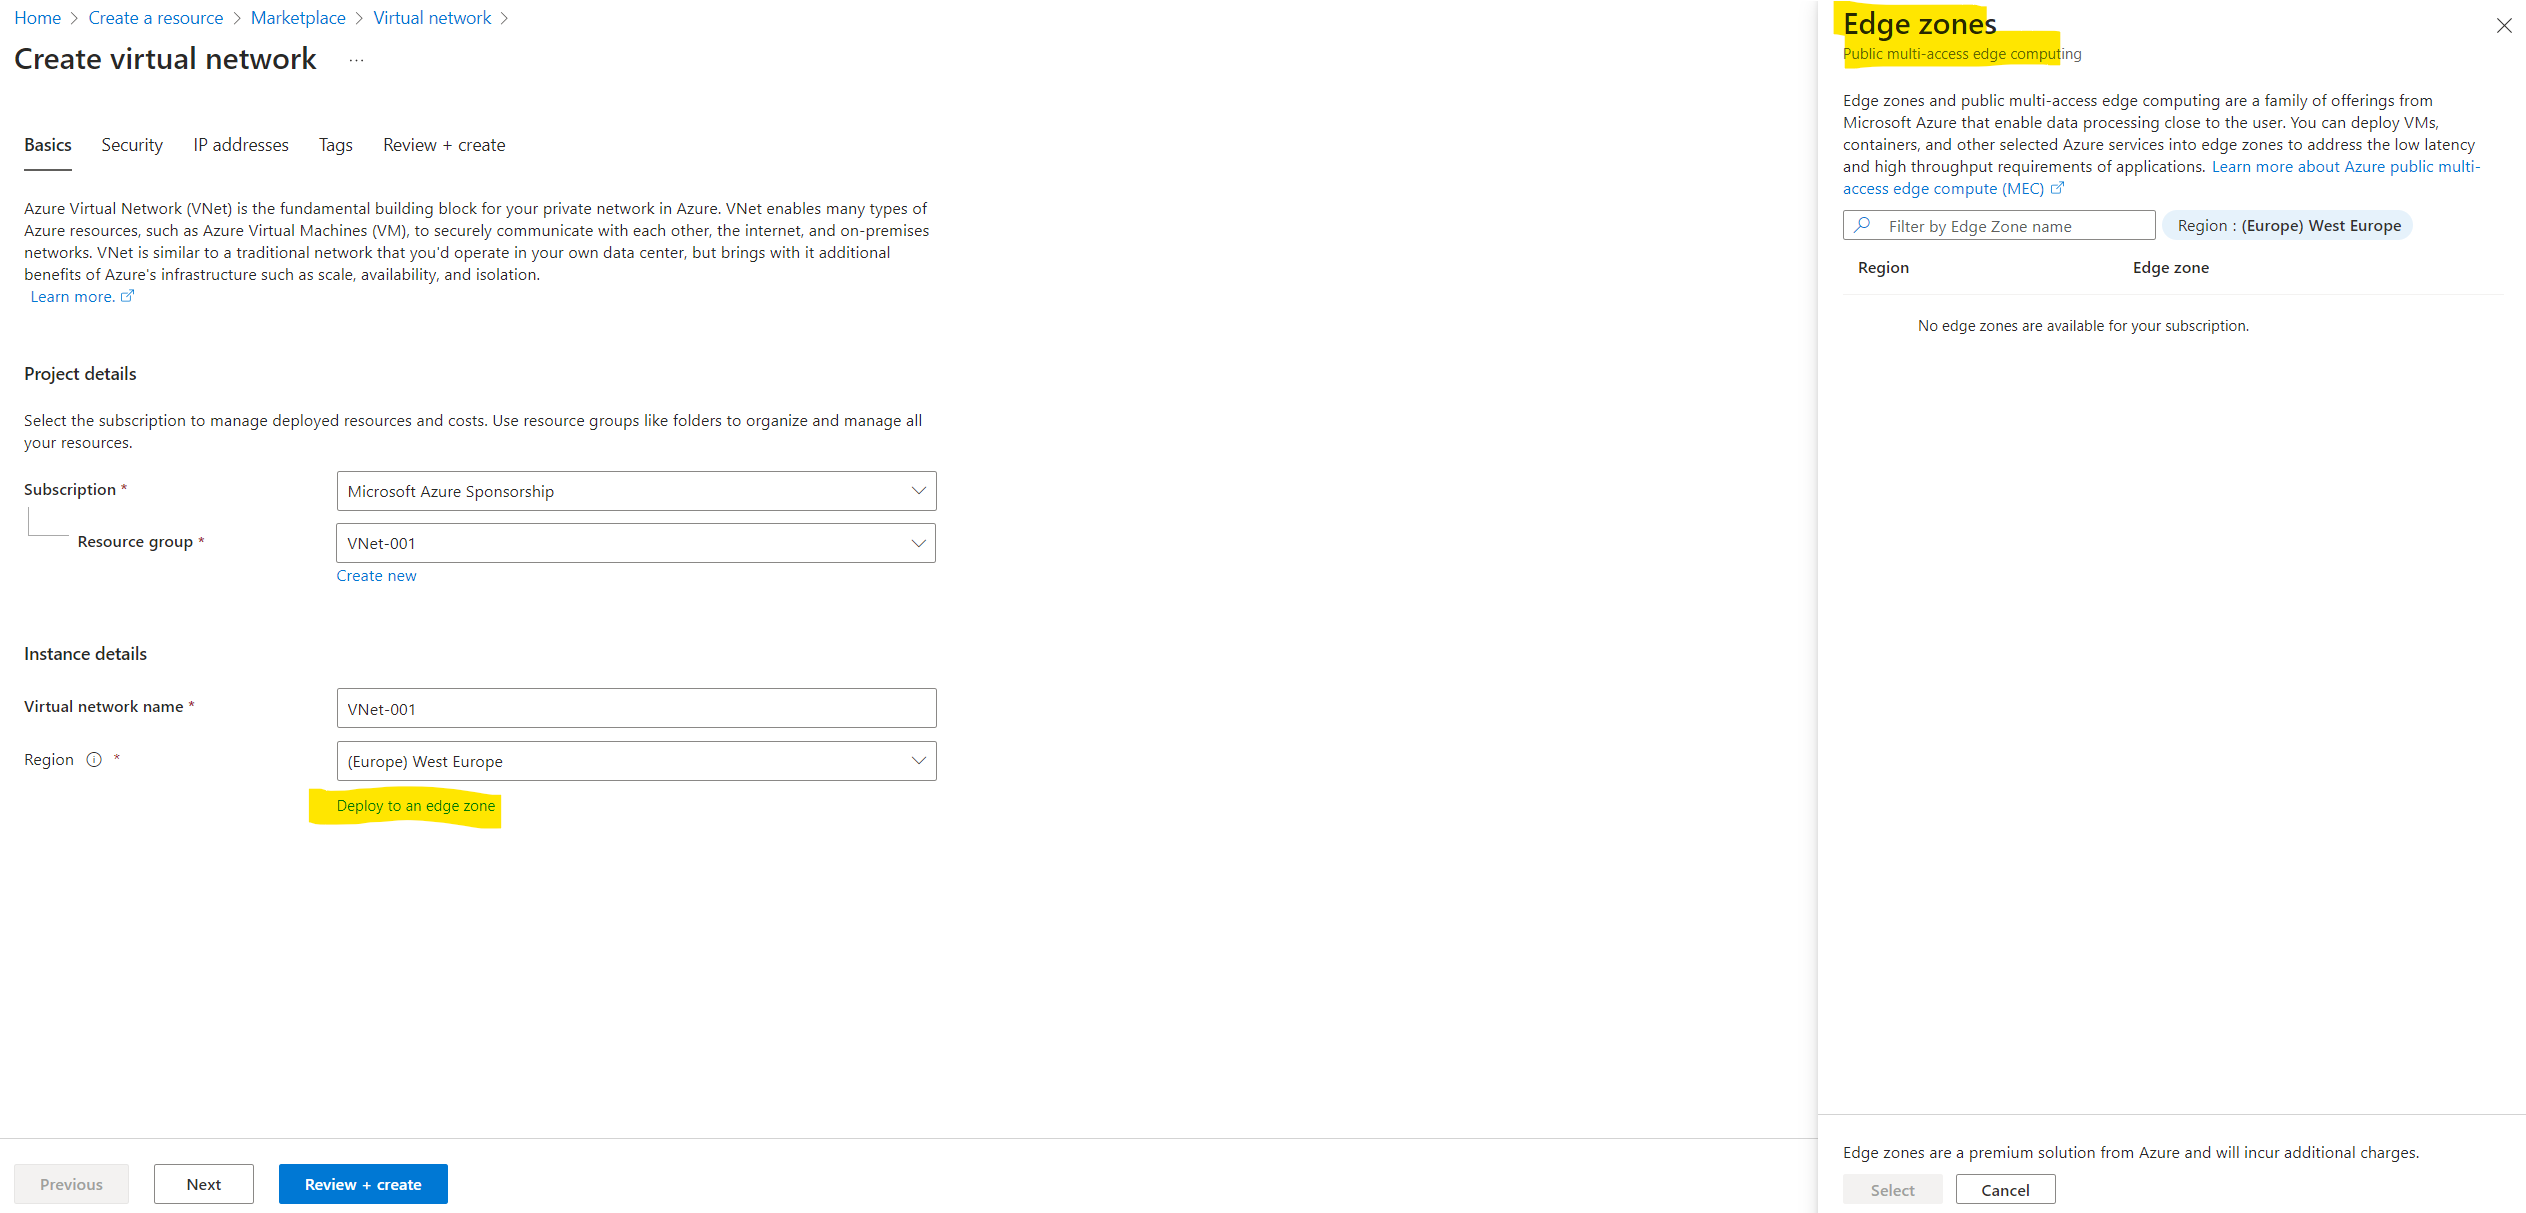
What is Azure public MEC?
Azure public multi-access edge compute (MEC) sites are small-footprint extensions of Azure. They’re placed in or near mobile operators’ data centers in metro areas, and are designed to run workloads that require low latency while being attached to the mobile network. Azure public MEC is offered in partnership with the operators. The placement of the infrastructure offers lower latency for applications that are accessed from mobile devices connected to the 5G mobile network.
https://learn.microsoft.com/en-us/azure/public-multi-access-edge-compute-mec/overview
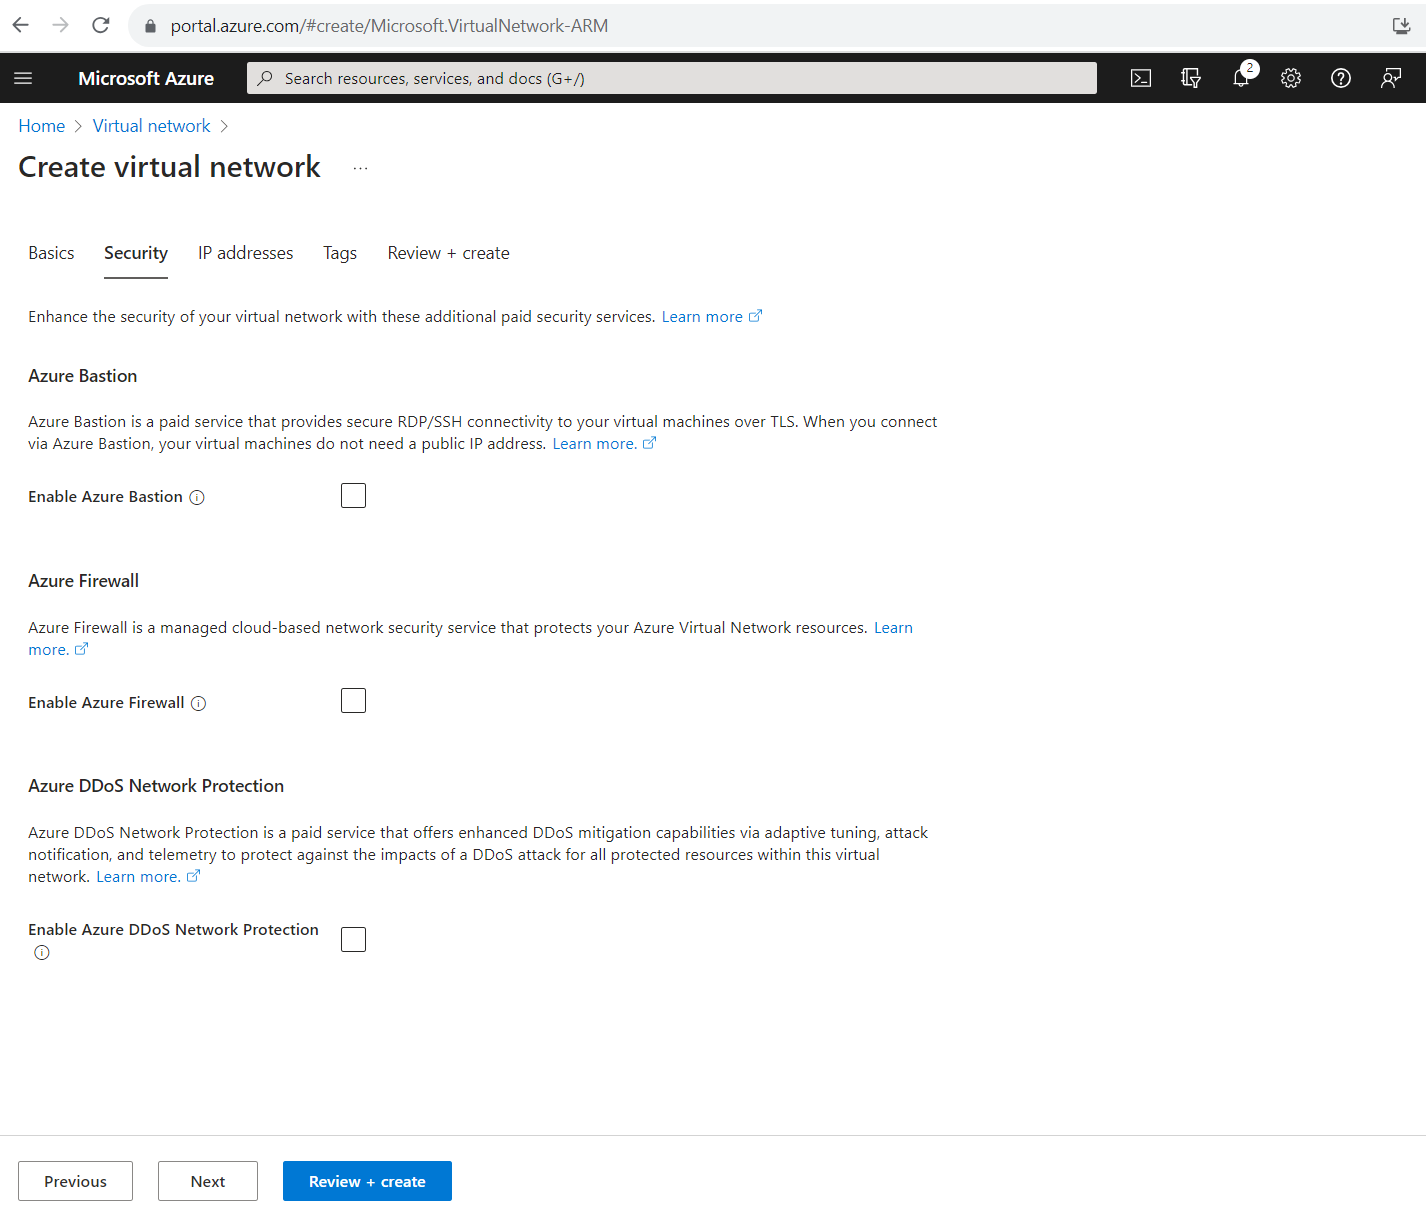
What is Azure Bastion?
https://learn.microsoft.com/en-us/azure/bastion/bastion-overviewWhat is Azure Firewall?
https://learn.microsoft.com/en-us/azure/firewall/overviewWhat is Azure DDoS Protection?
https://learn.microsoft.com/en-us/azure/ddos-protection/ddos-protection-overview
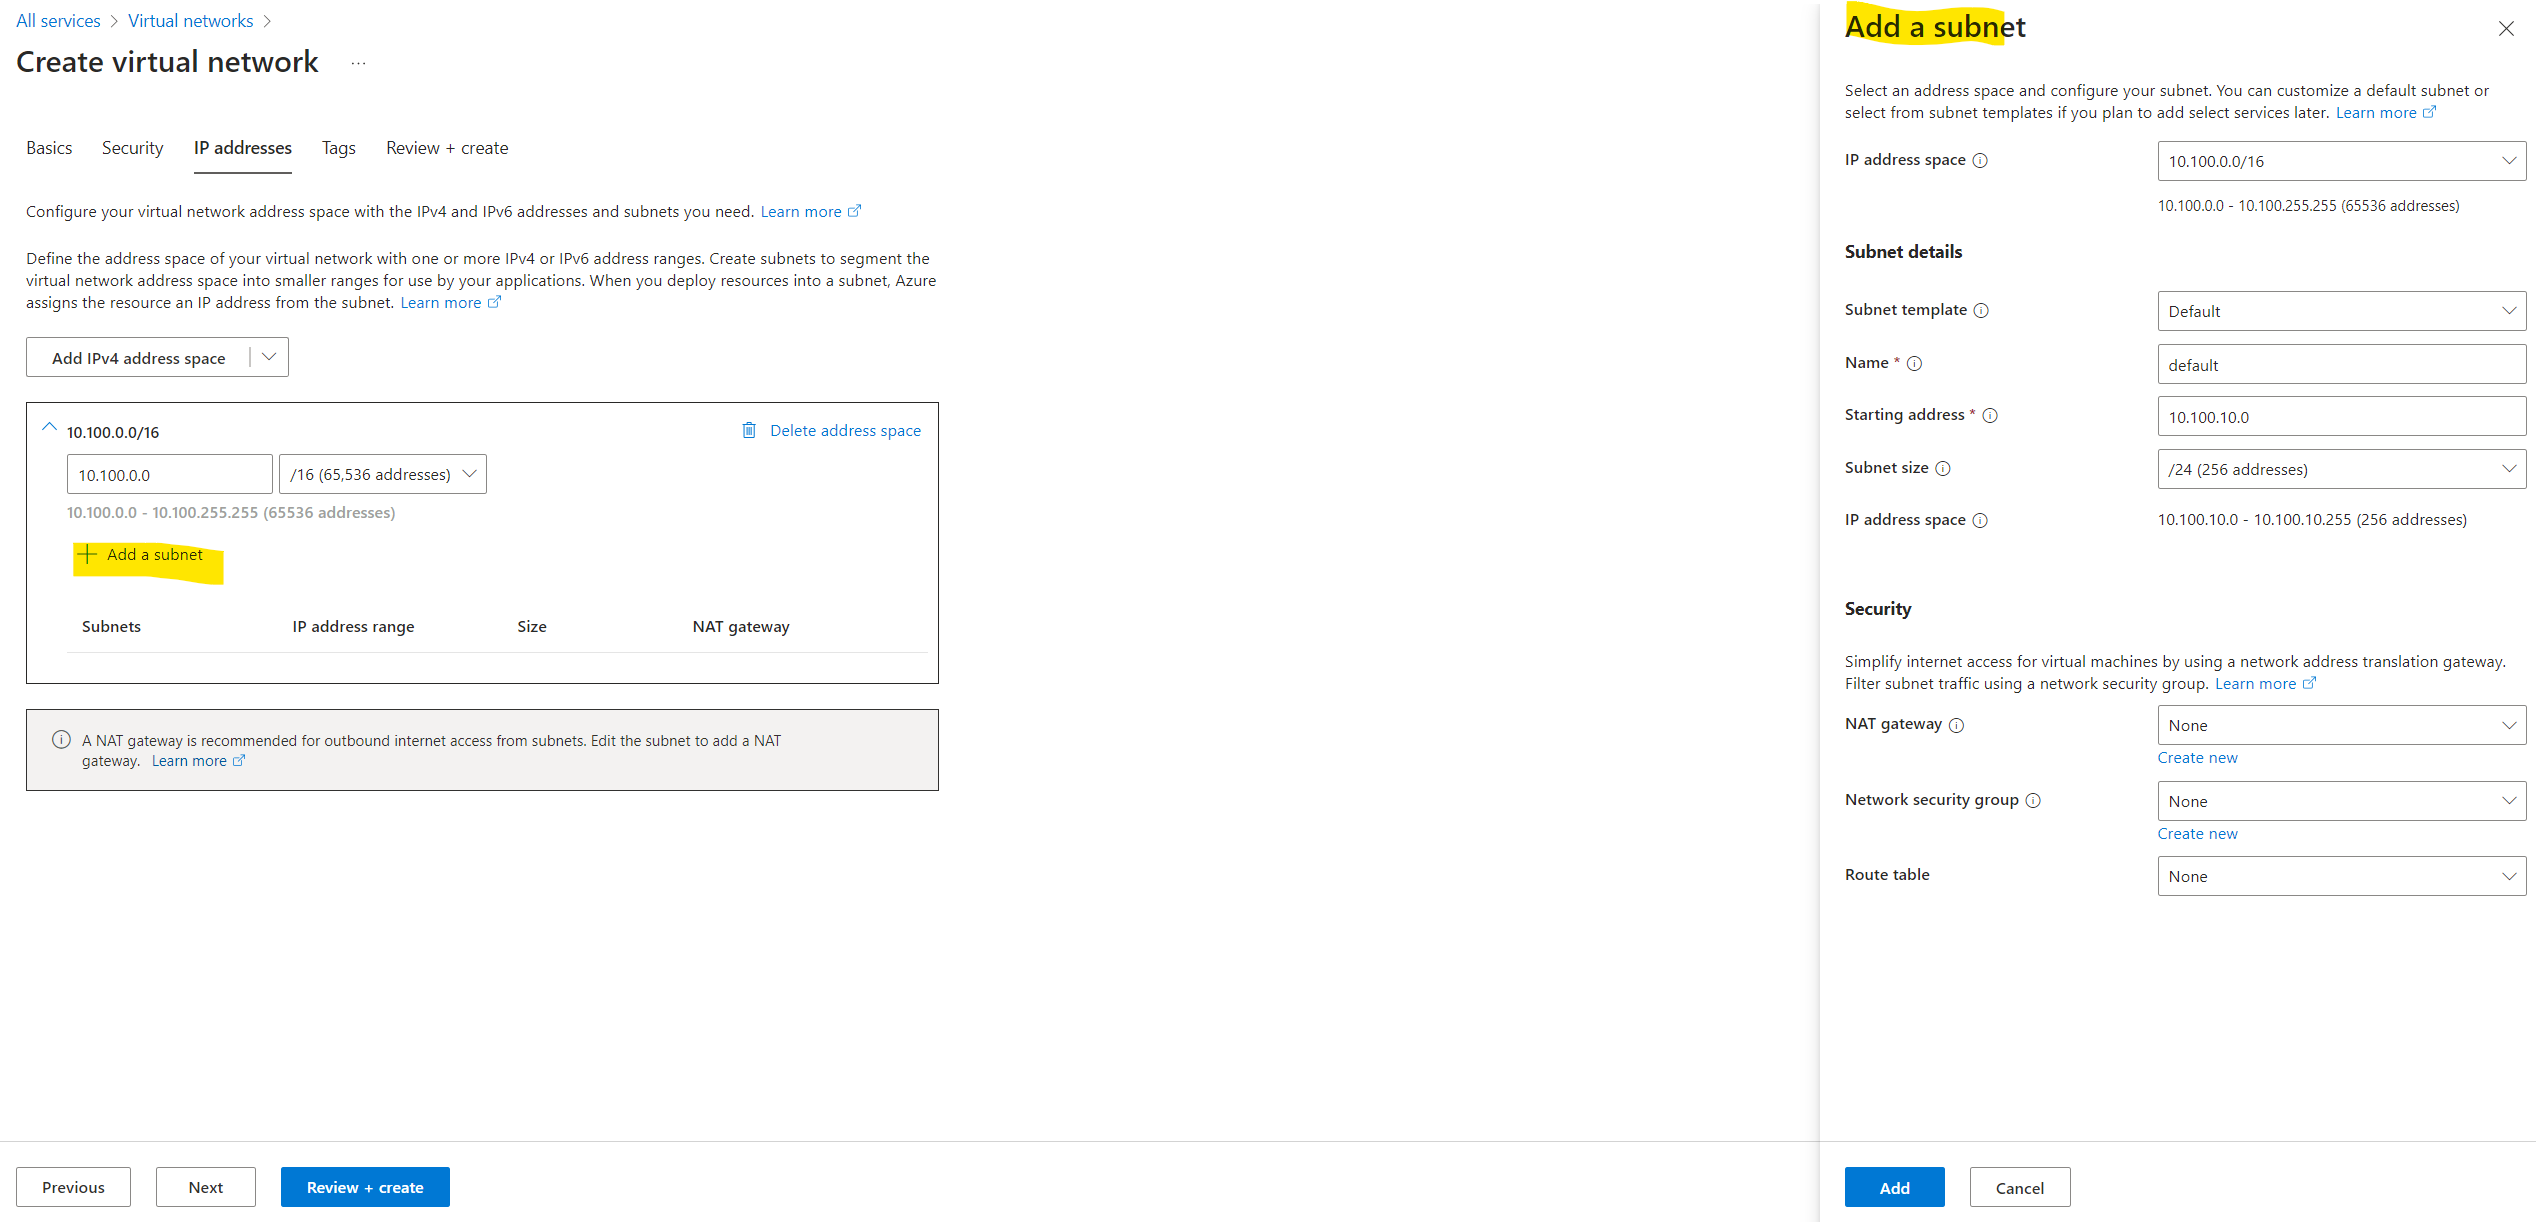
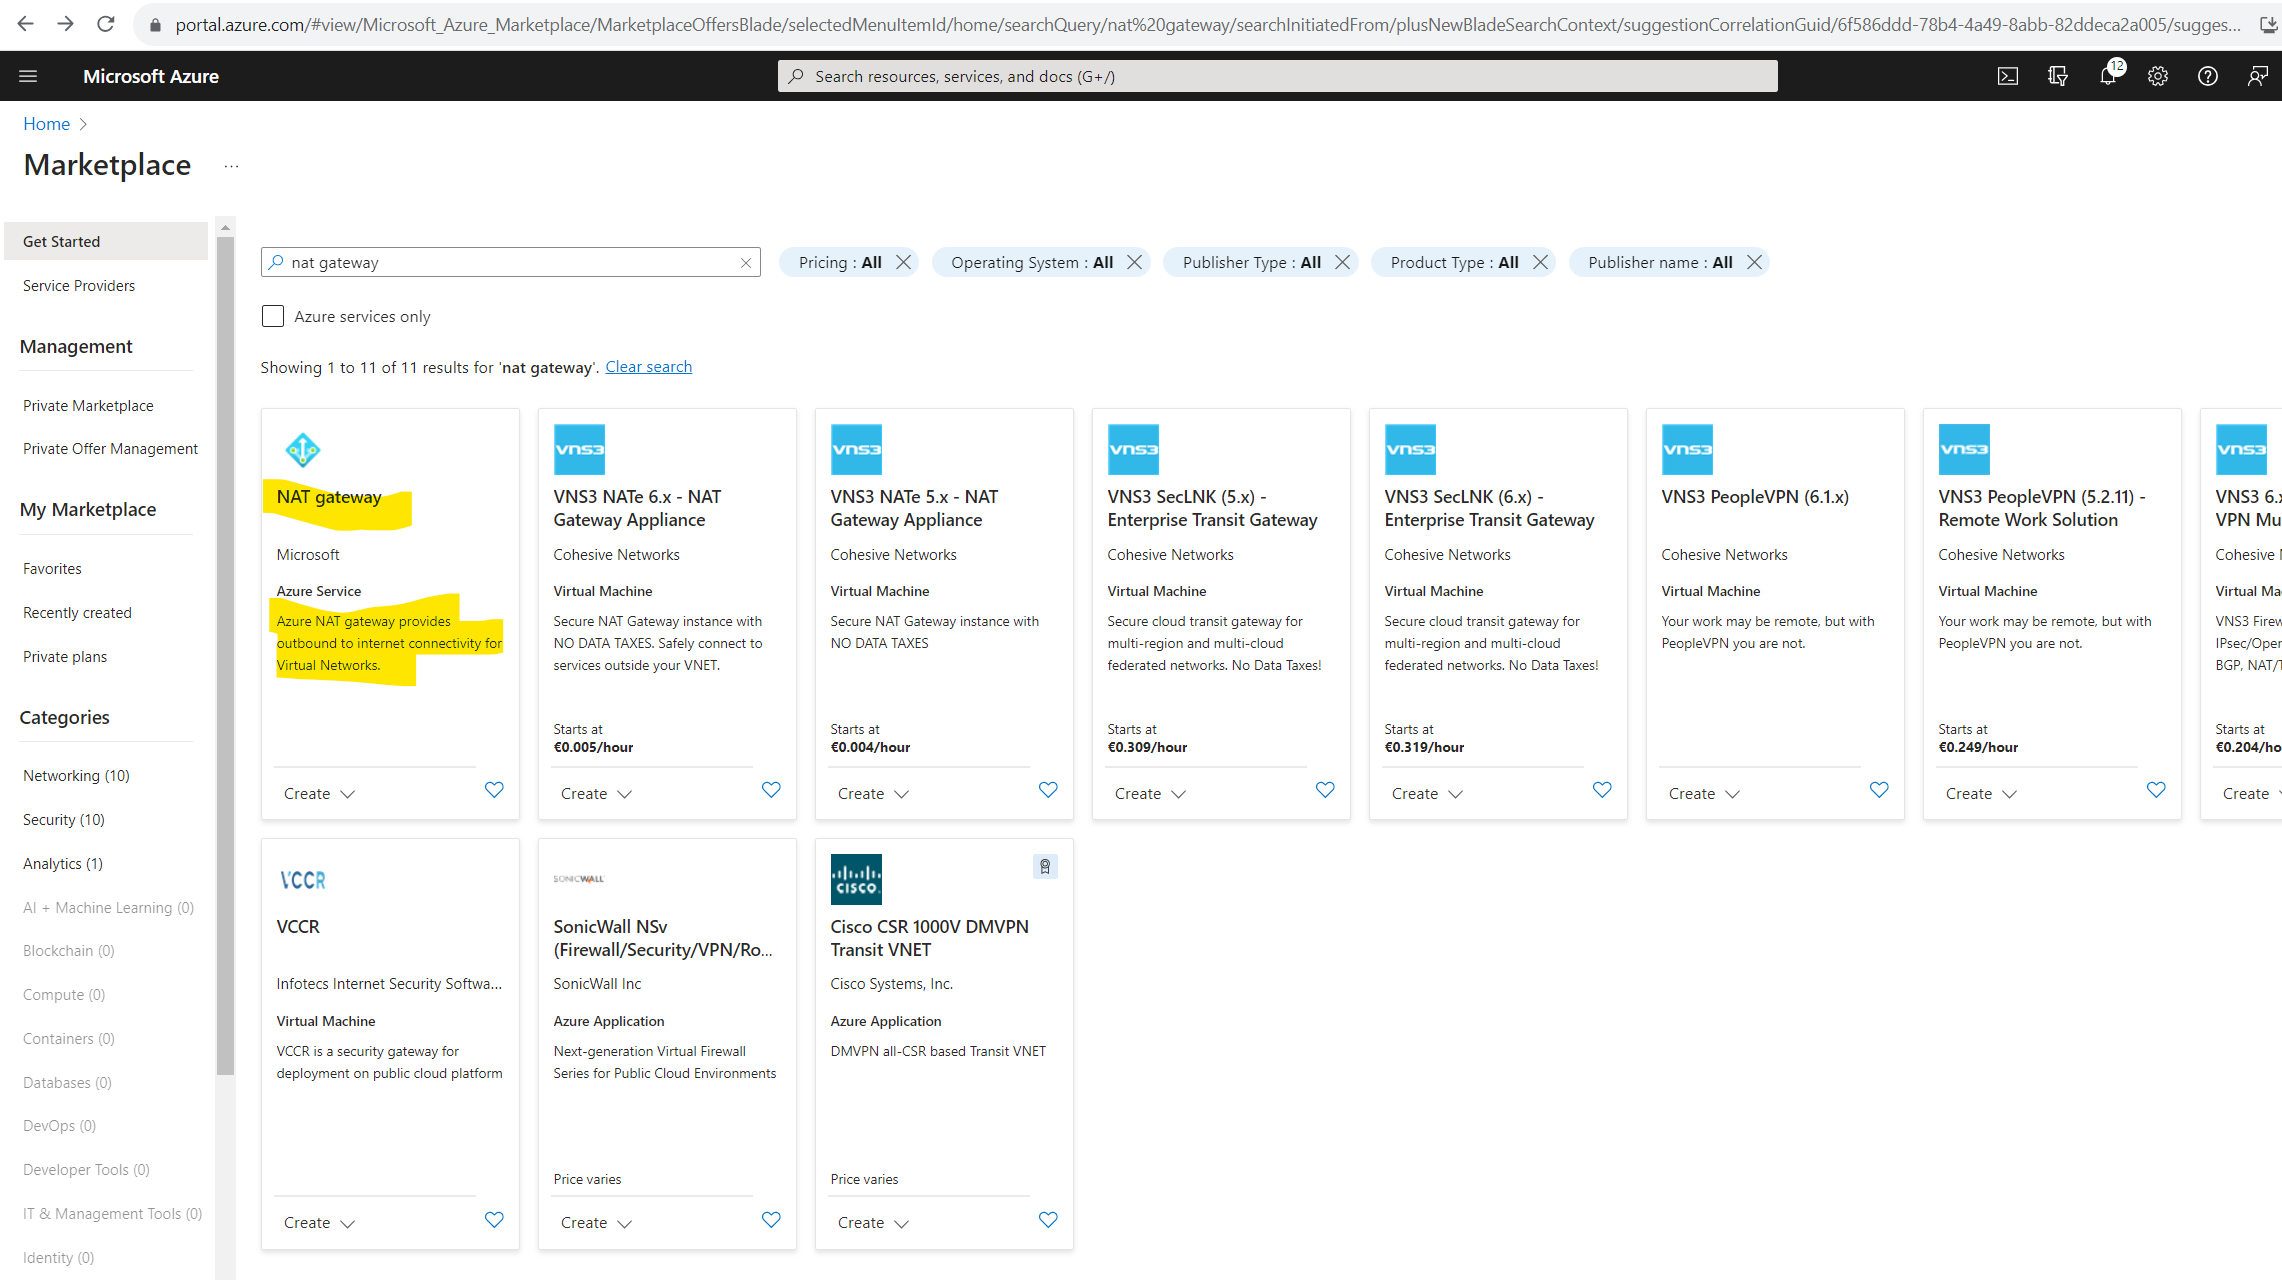
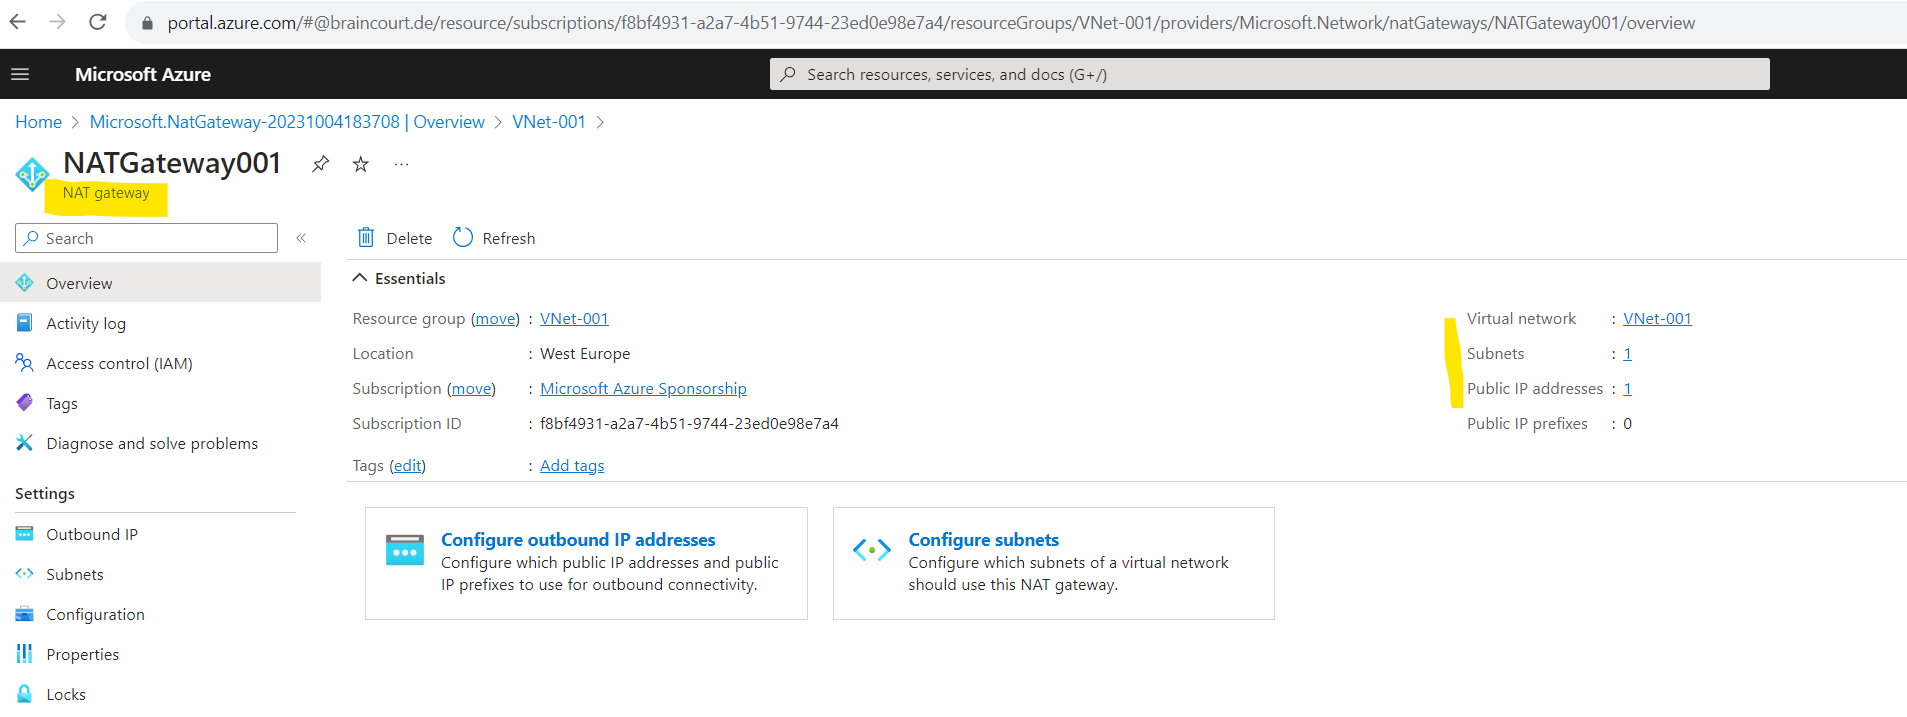
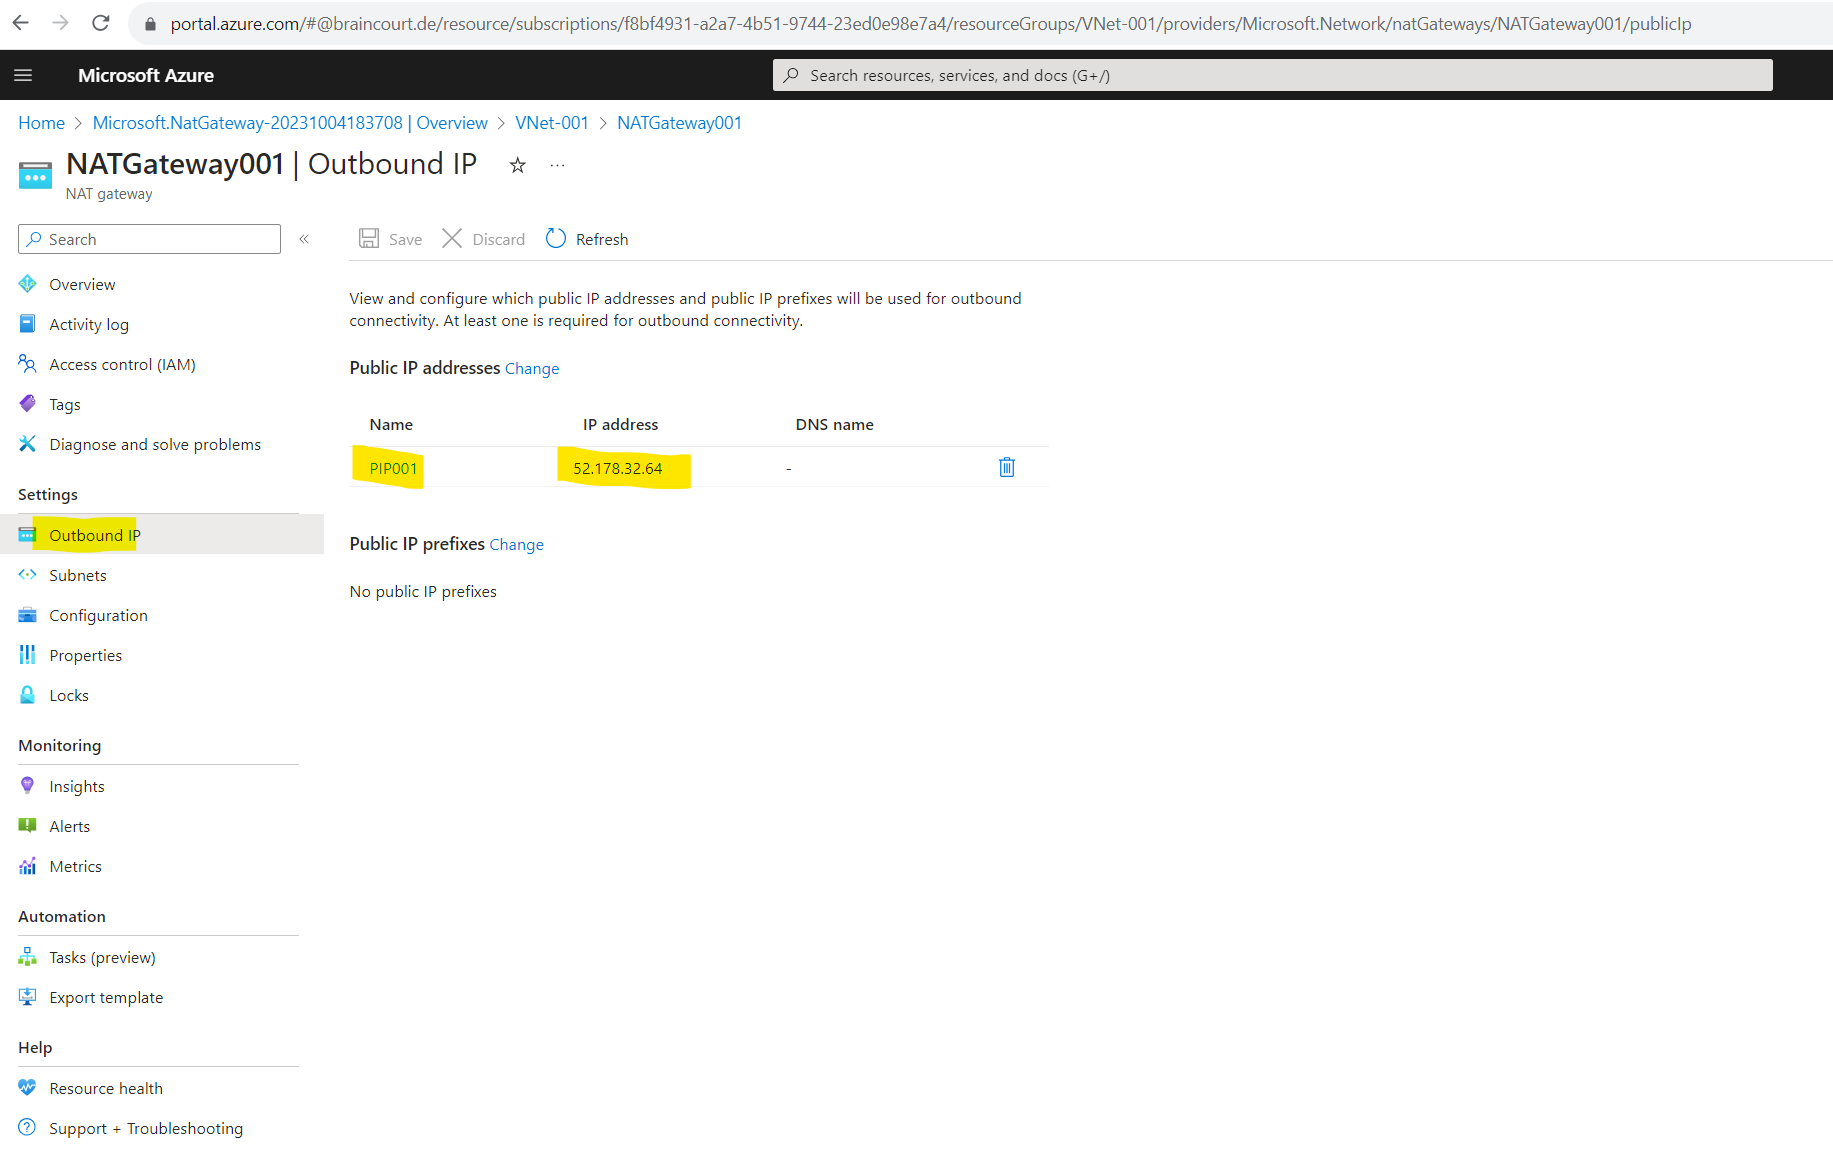
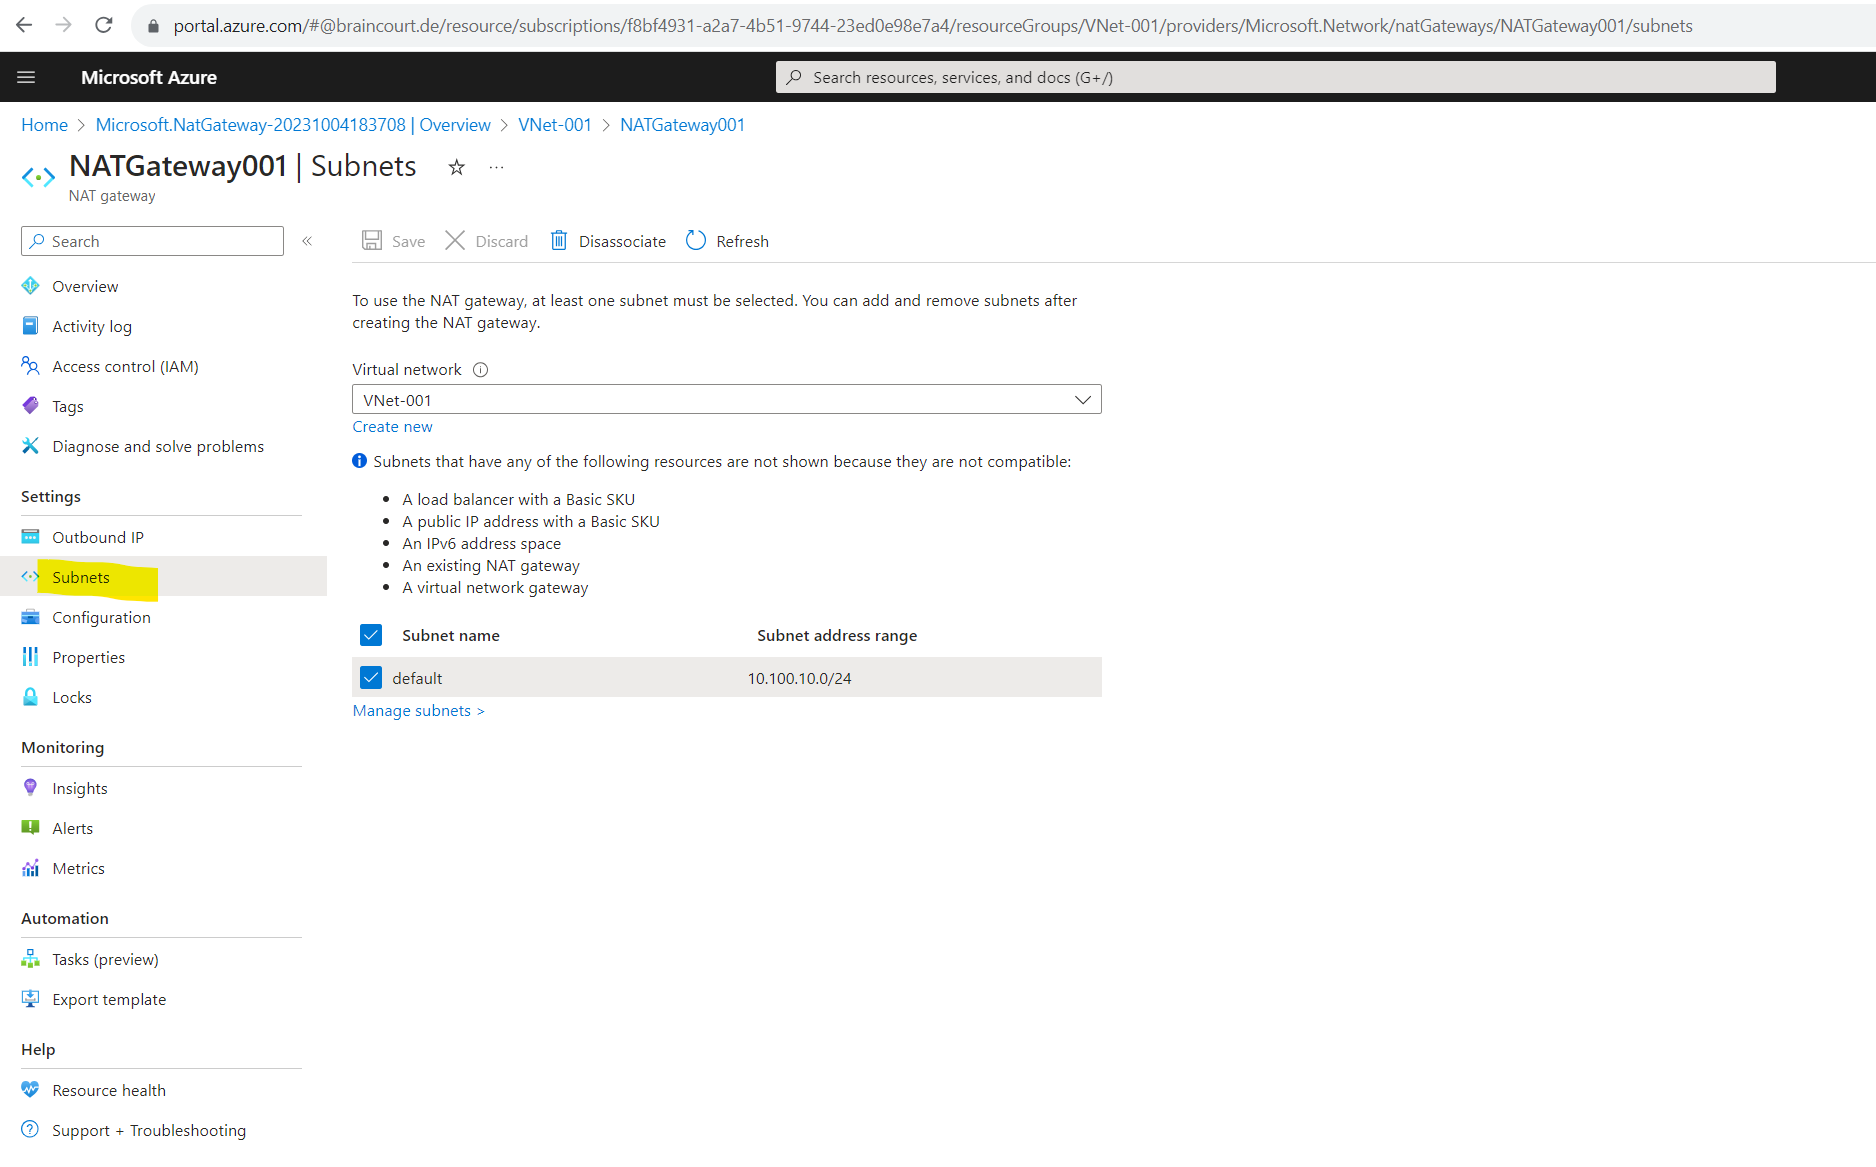
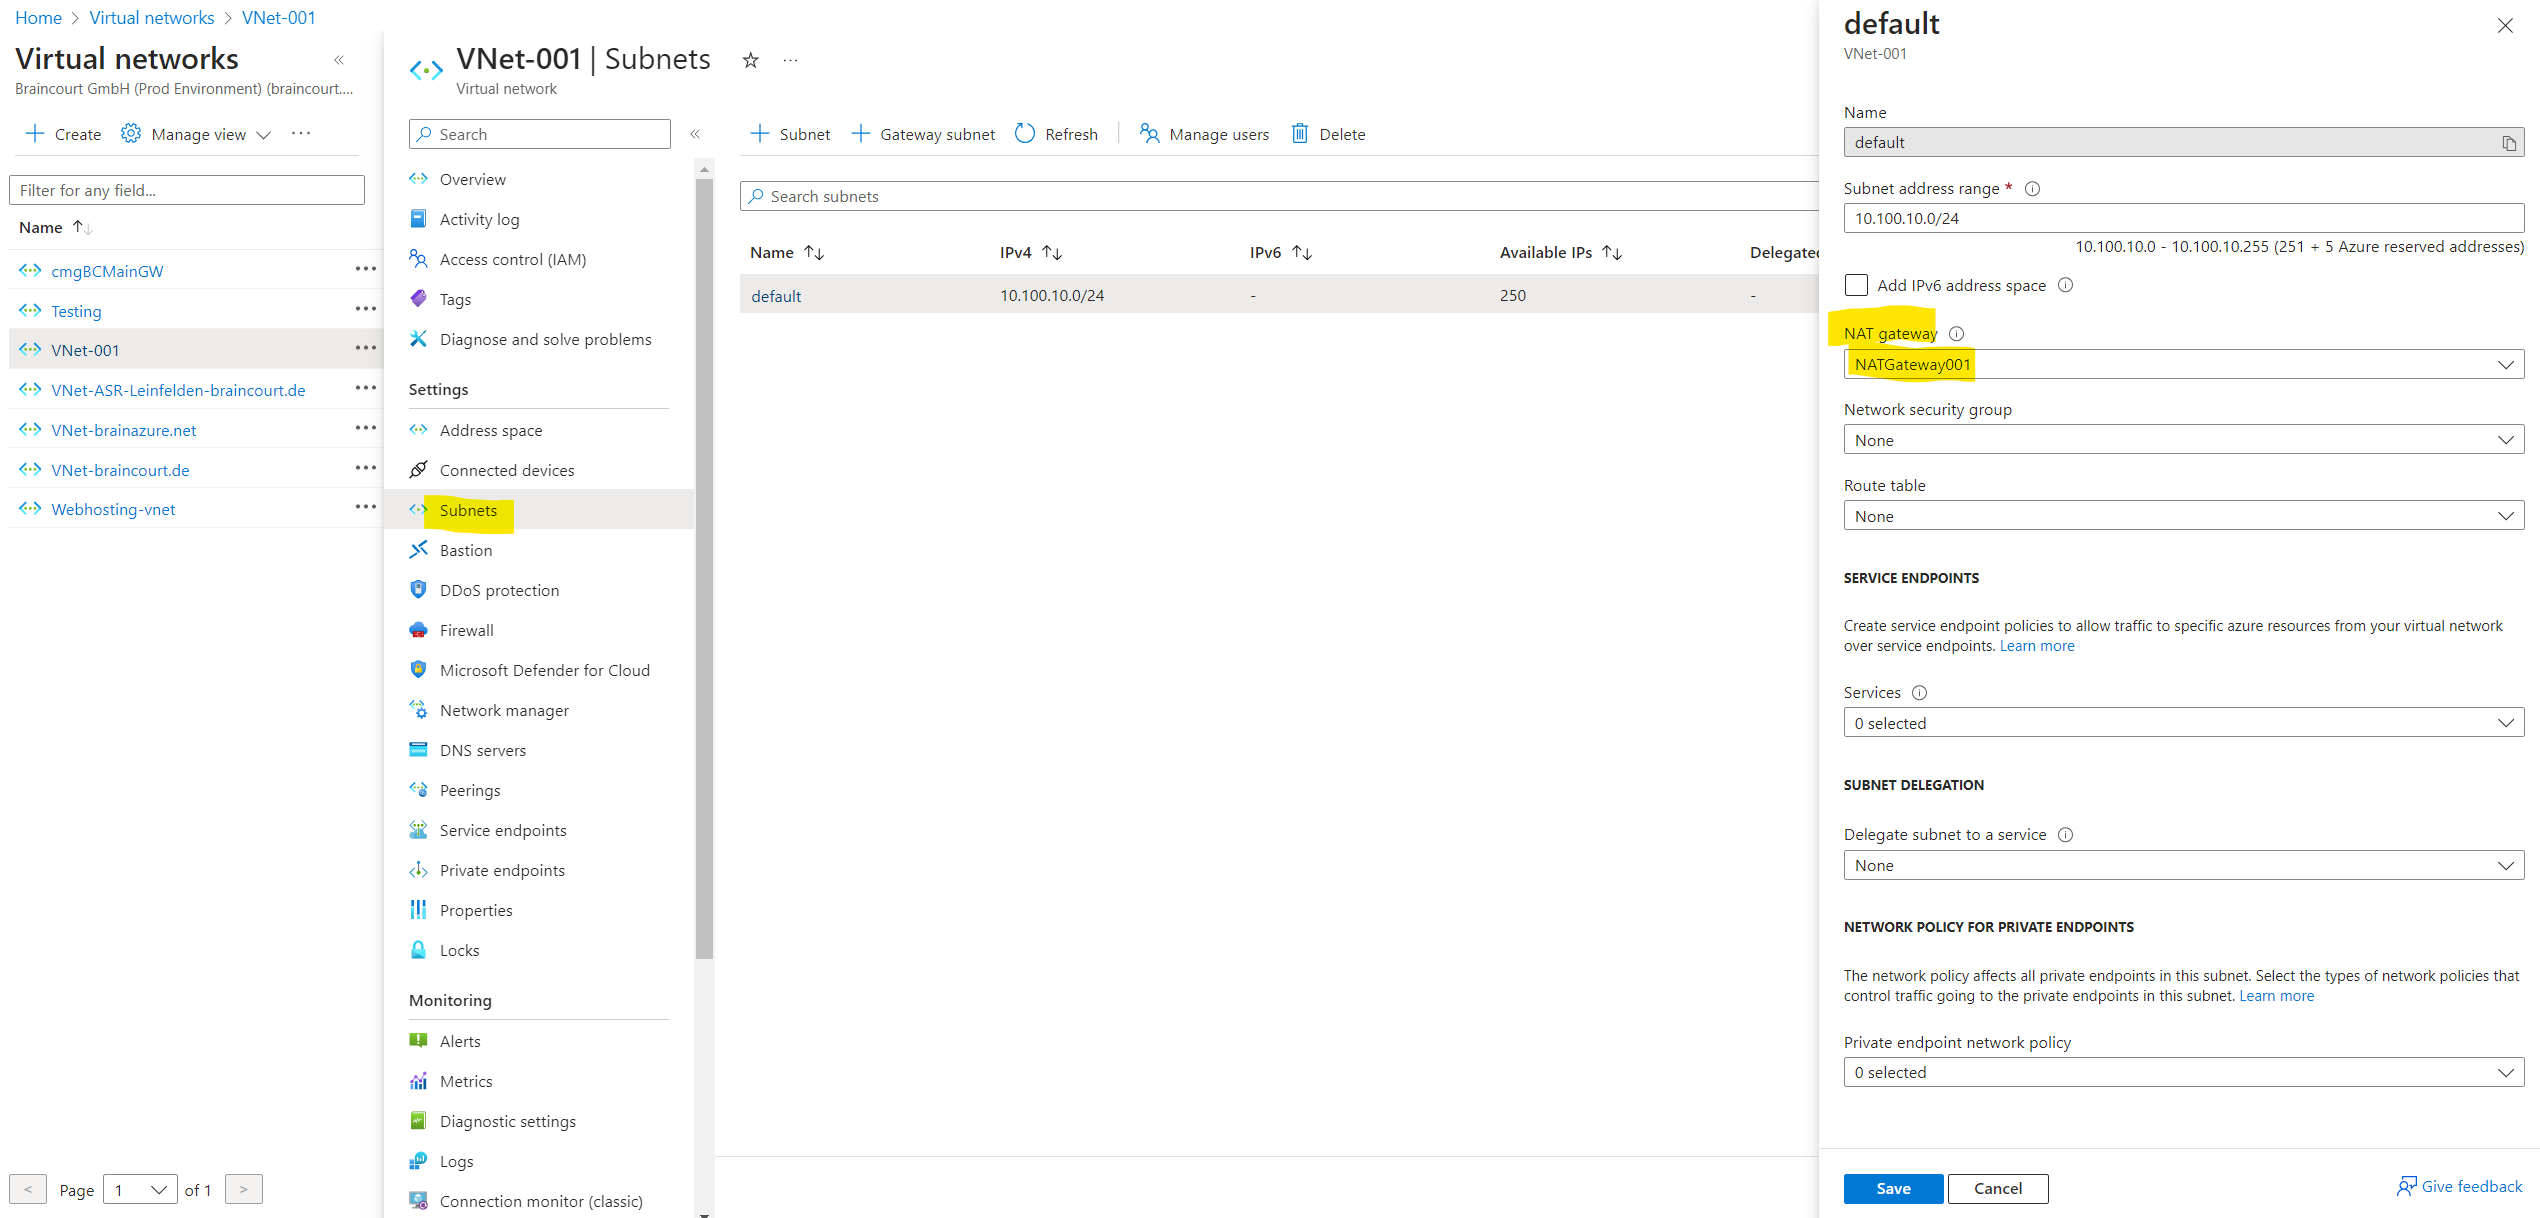
What is Azure NAT Gateway?
https://learn.microsoft.com/en-us/azure/nat-gateway/nat-overview
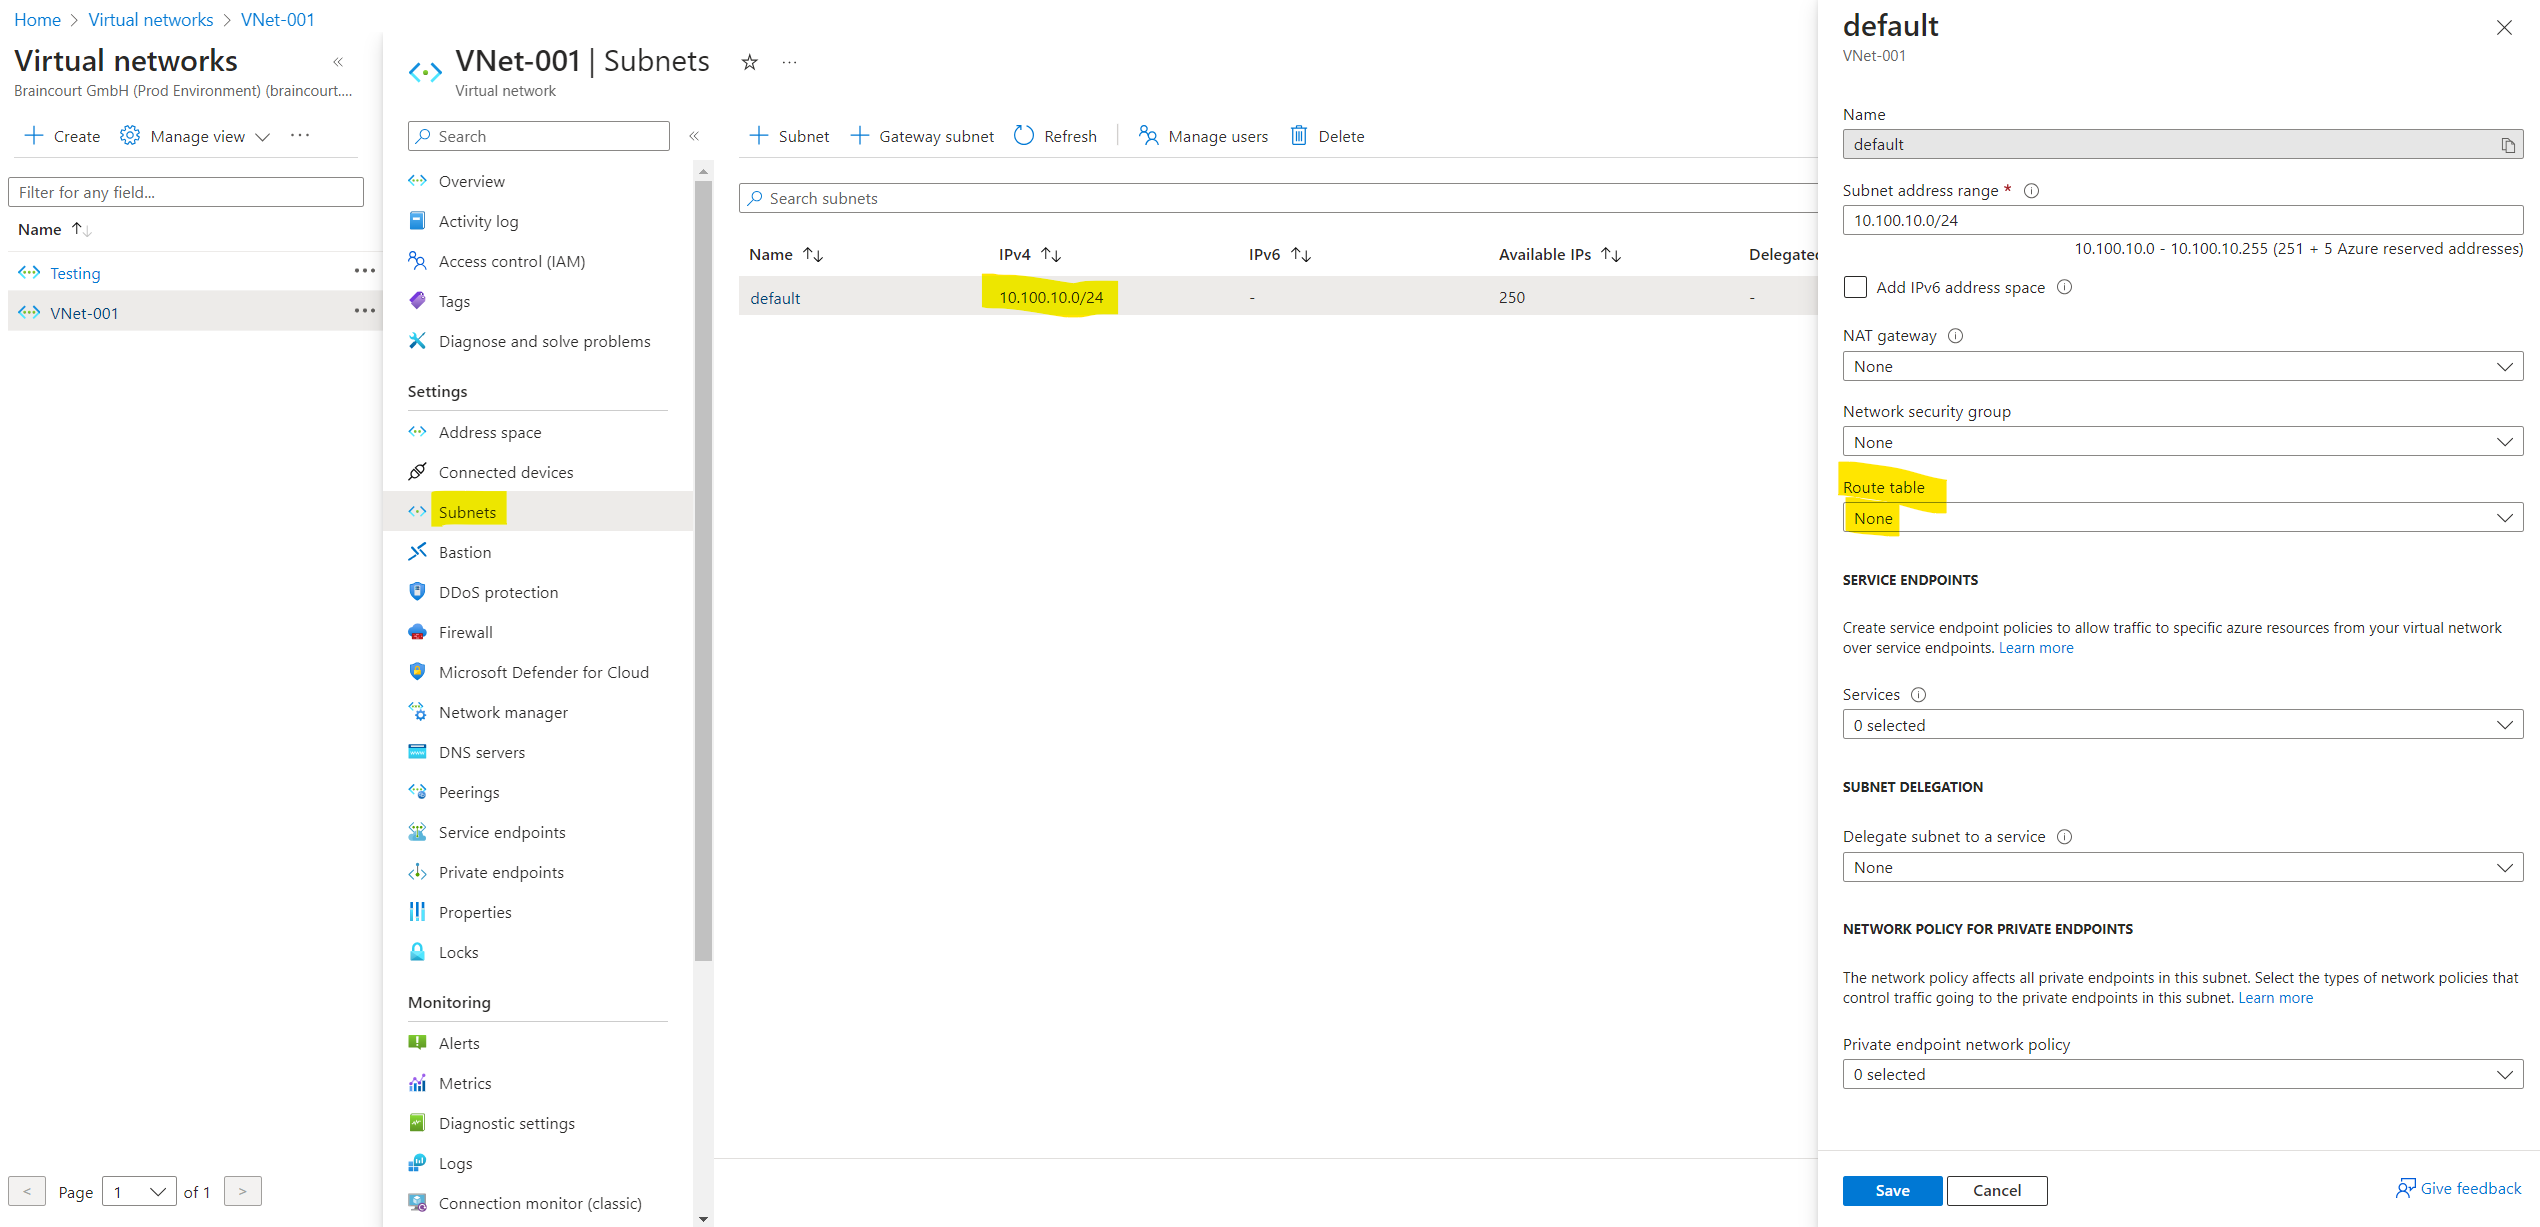
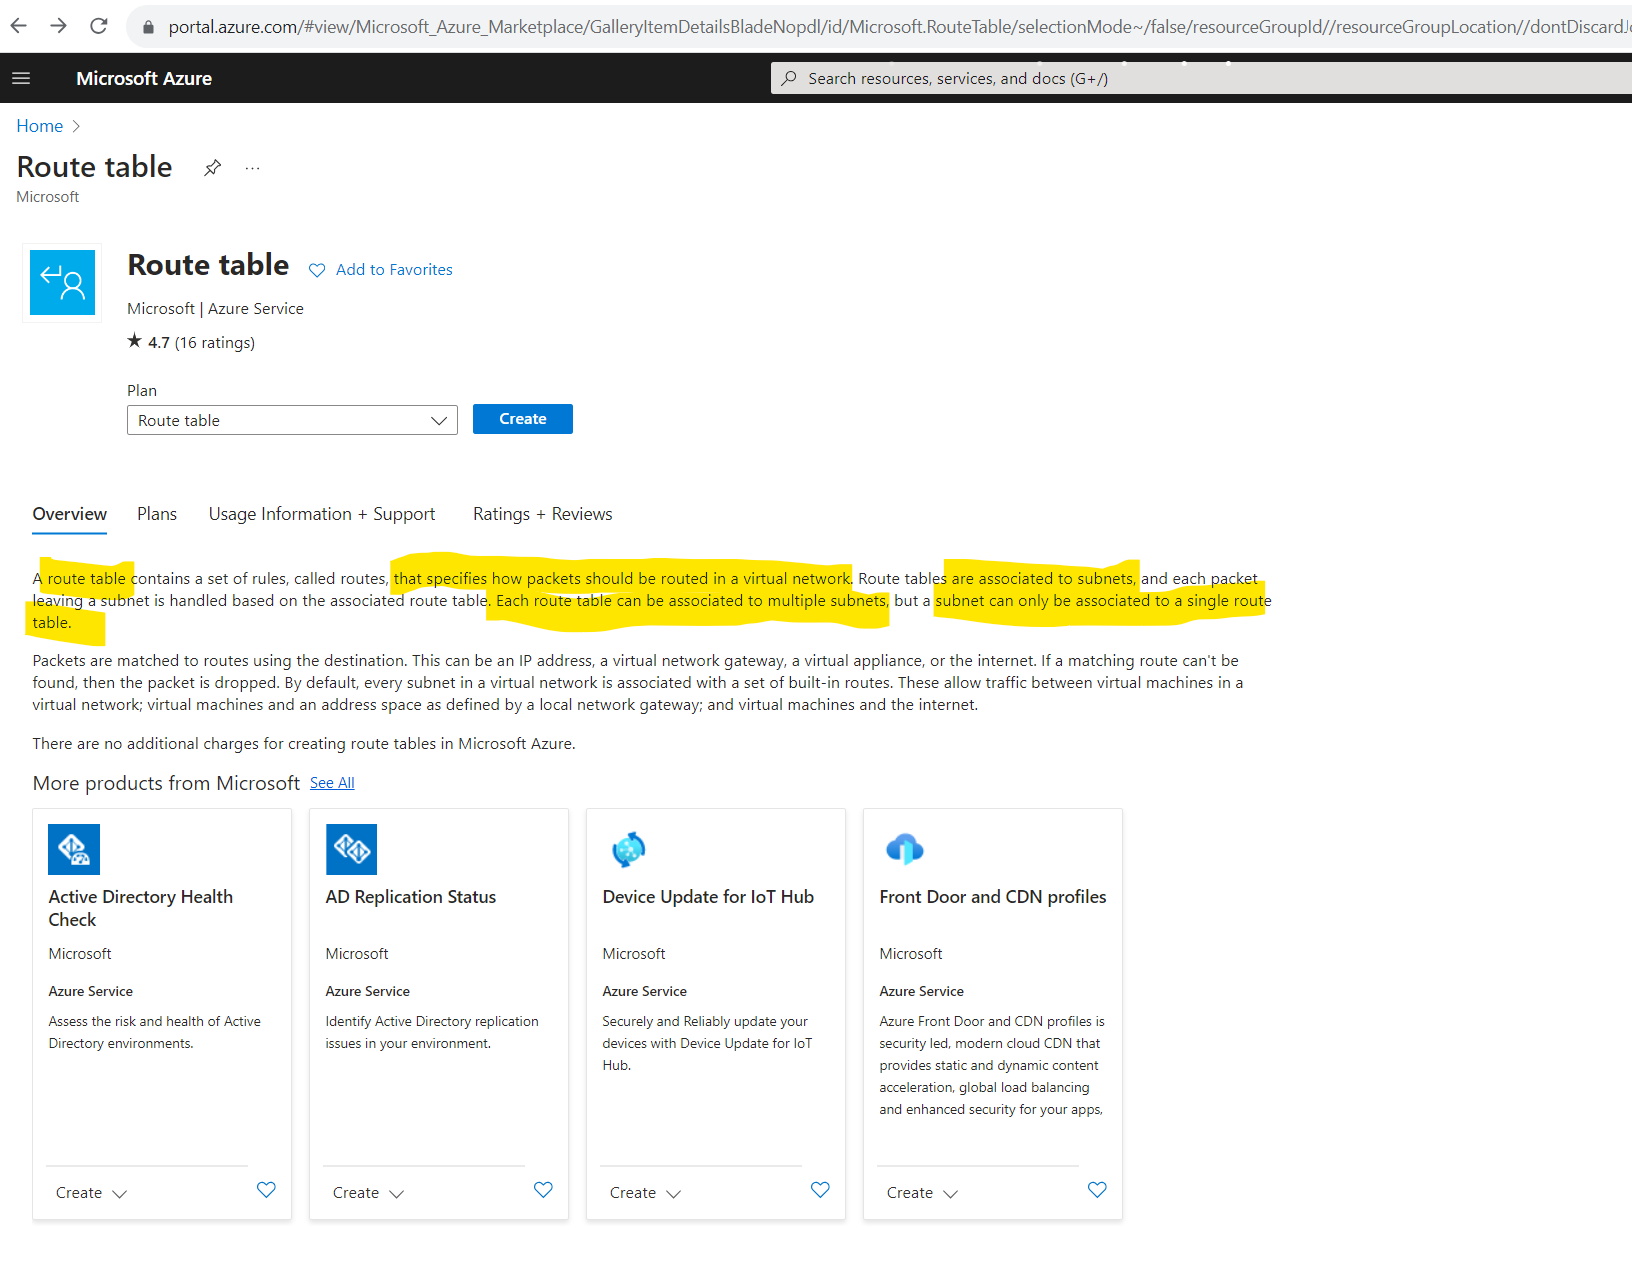
Even there is not explicitly assigned a route table for this subnet, Azure automatically creates a route table for each subnet within an Azure virtual network and adds system default routes to the table.
If there are conflicting route assignments, user-defined routes will override the default routes.
Source: https://docs.microsoft.com/en-us/azure/virtual-network/virtual-networks-udr-overview
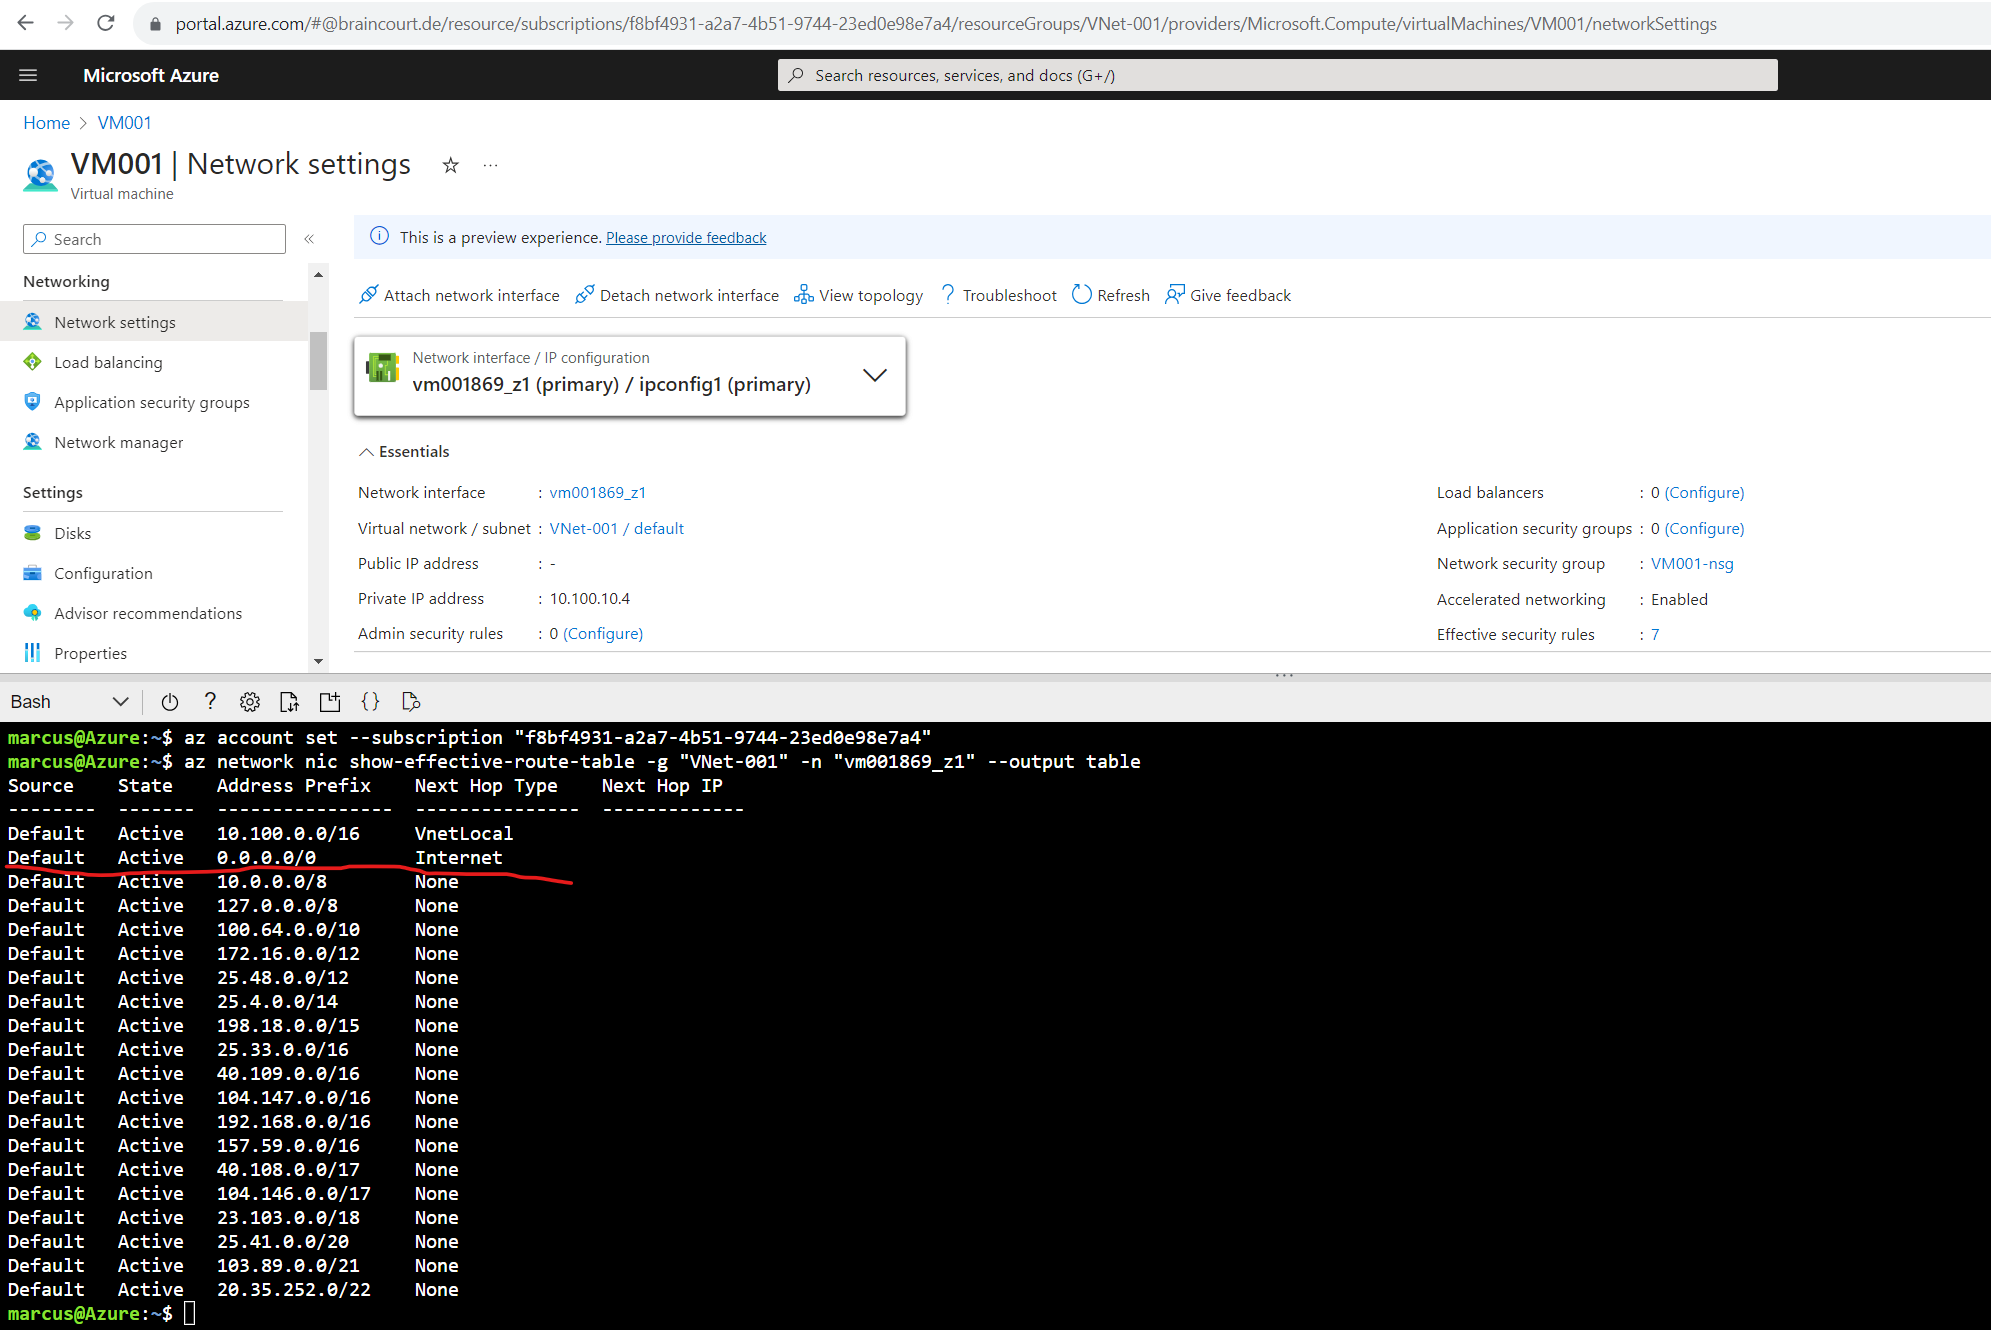
az login

# sign in with a different tenant
az login --tenant <myTenantID>

# if you have multiple subscriptions in your tenant, first set the active subscription you used for your virtual network and subnet.
az account set –subscription "xxxxxxxx-xxxx-xxxx-xxxx-xxxxxxxxxxxx"
az network nic show-effective-route-table -g MyResourceGroup -n MyNic --output table
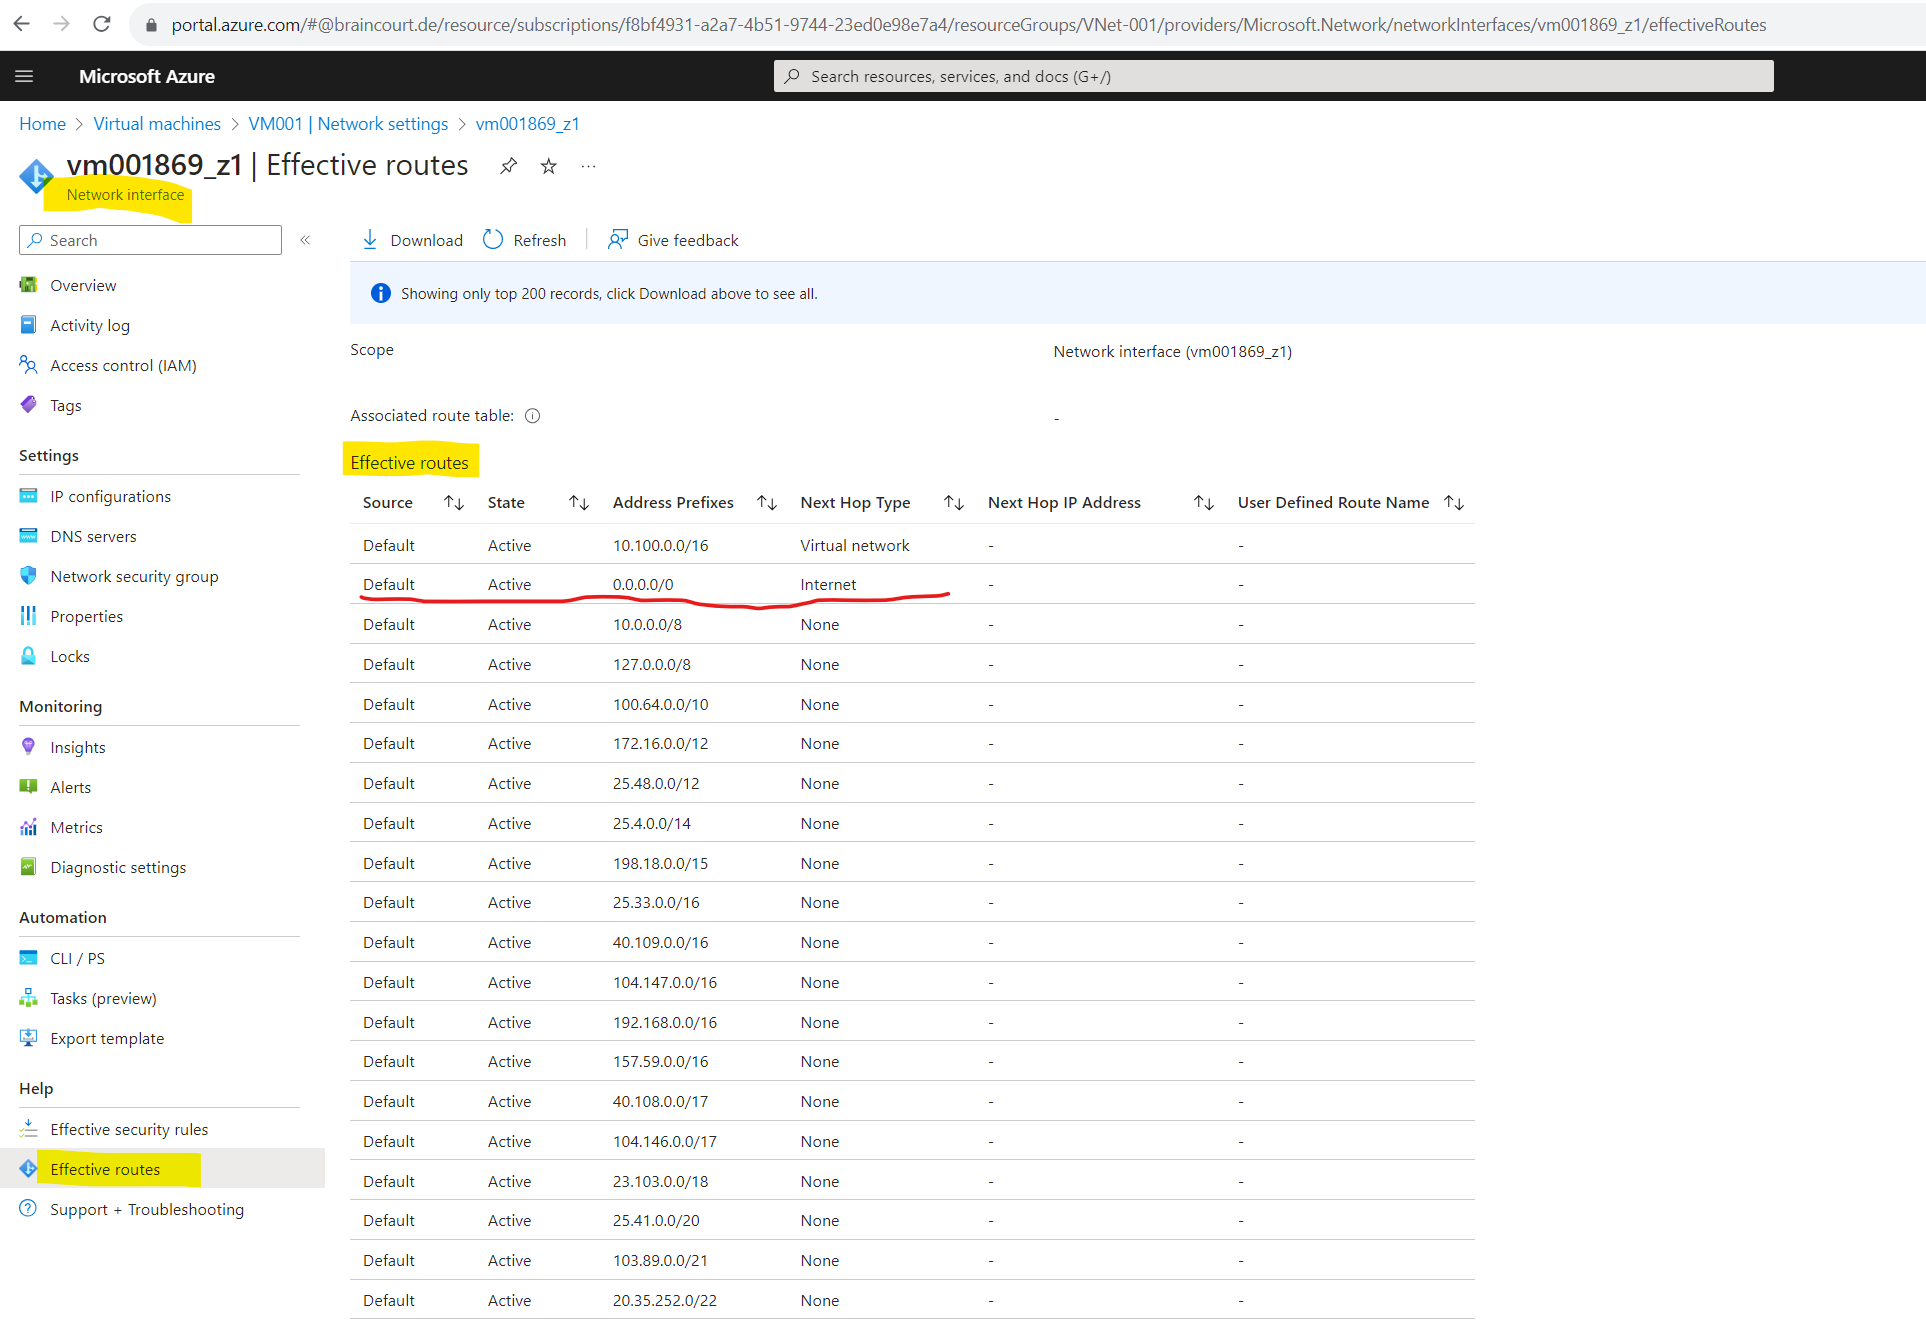
Here you can see red marked the default route with the Next Hop named Internet which is used for the default outbound access in case you didn’t associate a NAT gateway or firewall to your subnet.
In case you will use a NAT gateway here, you will btw. see the same default route with the Next Hop named Internet. Only in the background the next hop is then your associated NAT gateway. We will see this further below when adding a NAT gateway to our subnet in order to transition to an explicit method of public connectivity.
Output formats for Azure CLI commands
https://learn.microsoft.com/en-us/cli/azure/format-output-azure-cliAzure Command-Line Interface (CLI) documentation
https://learn.microsoft.com/en-us/cli/azure/
Here you can also see red marked the default route with the Next Hop named Internet which is used for the default outbound access in case you didn’t associate a NAT gateway or firewall to your subnet.
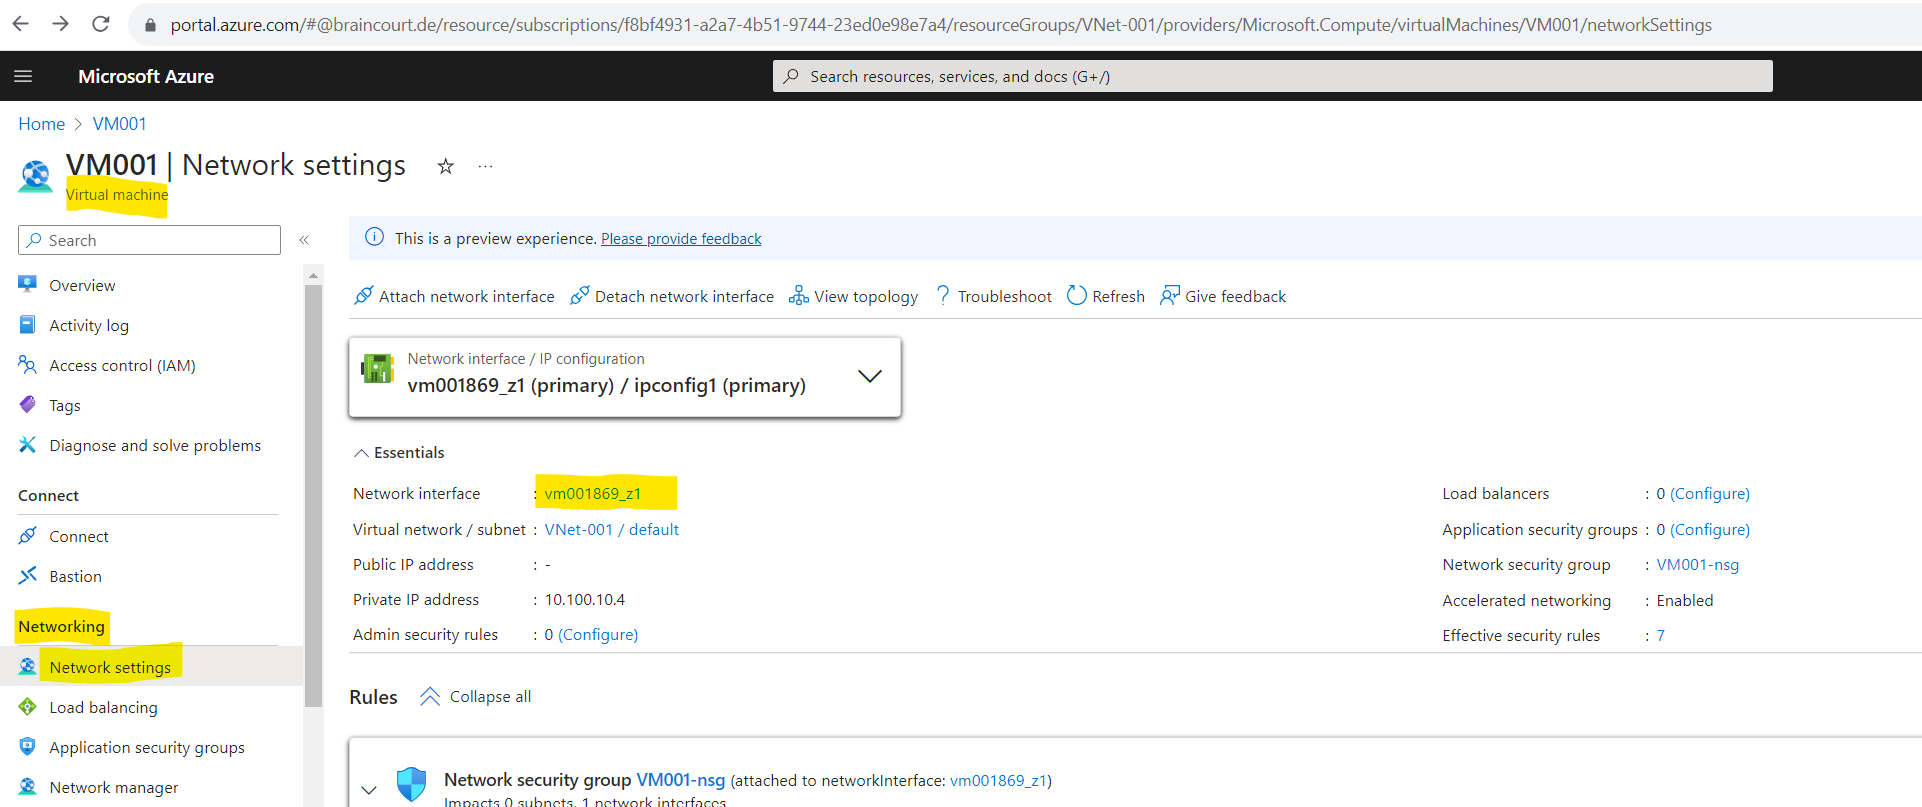
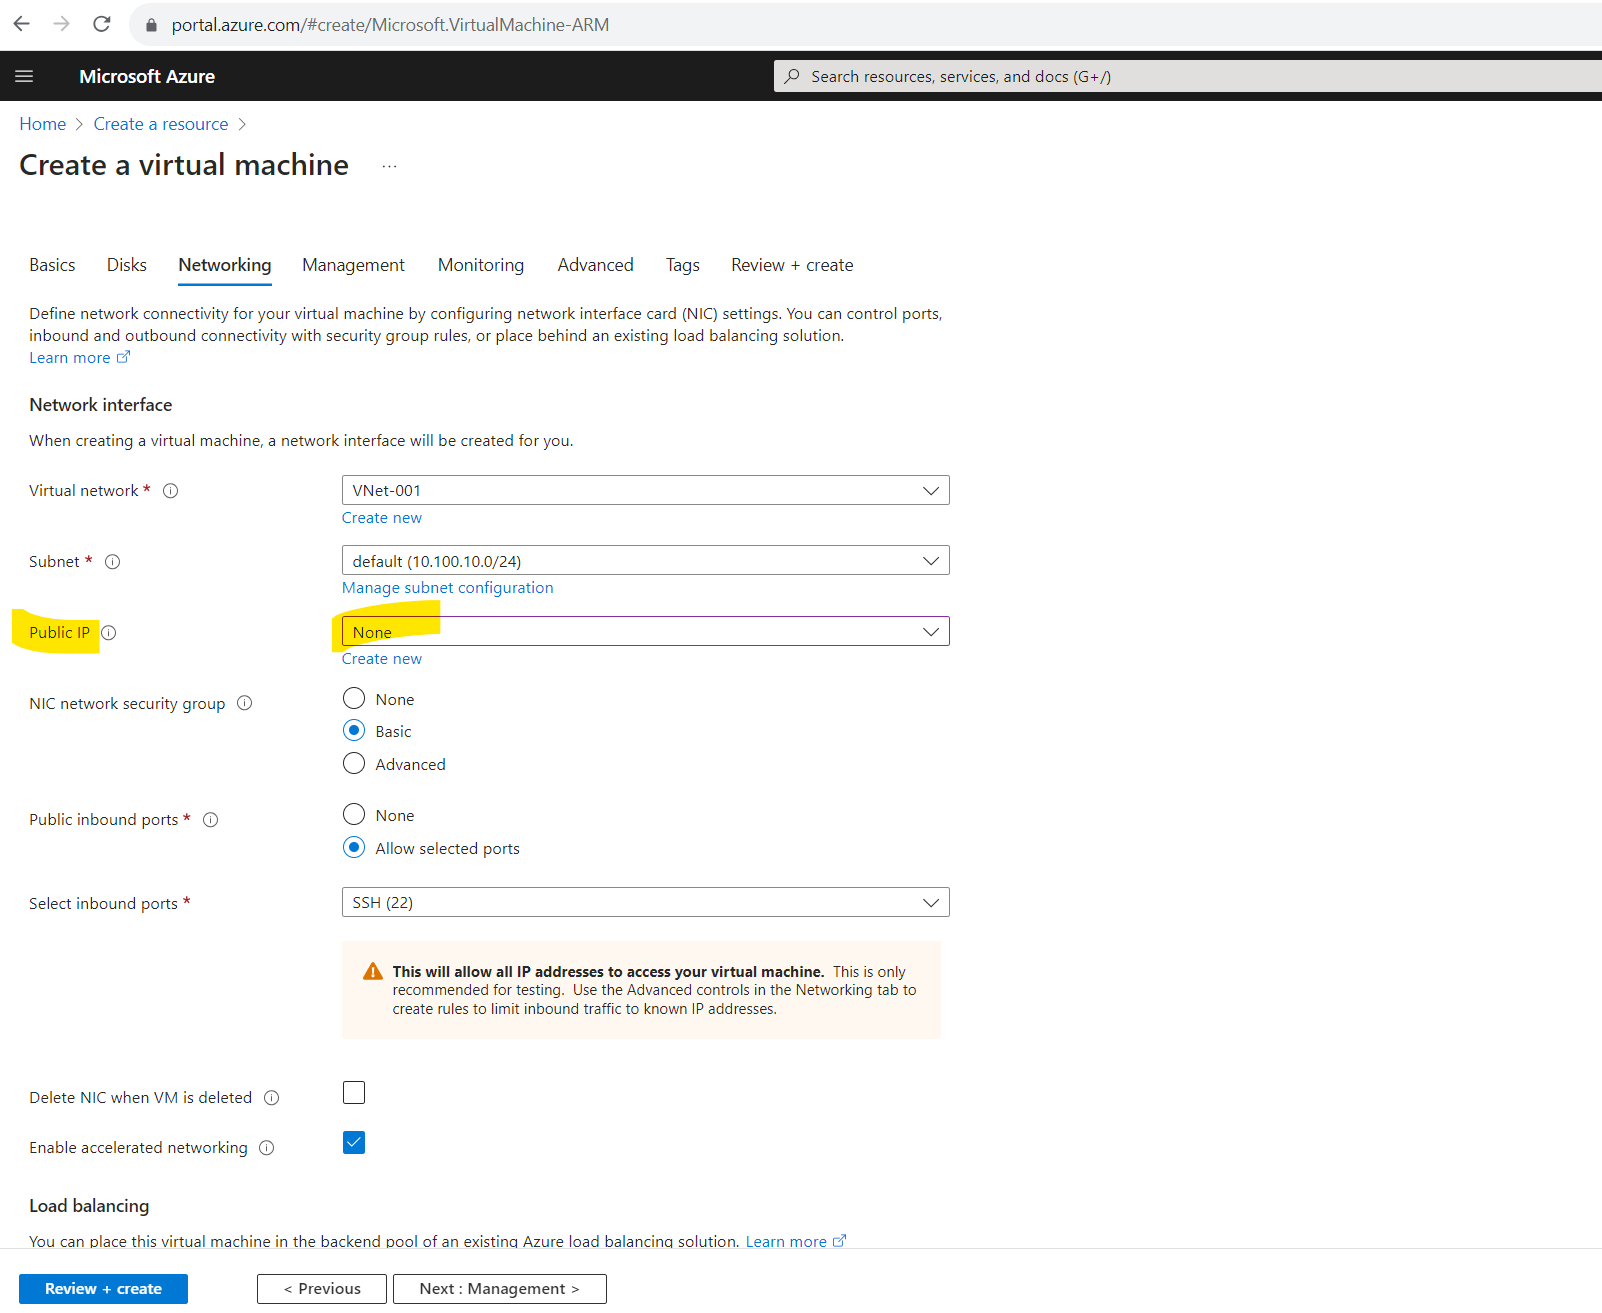
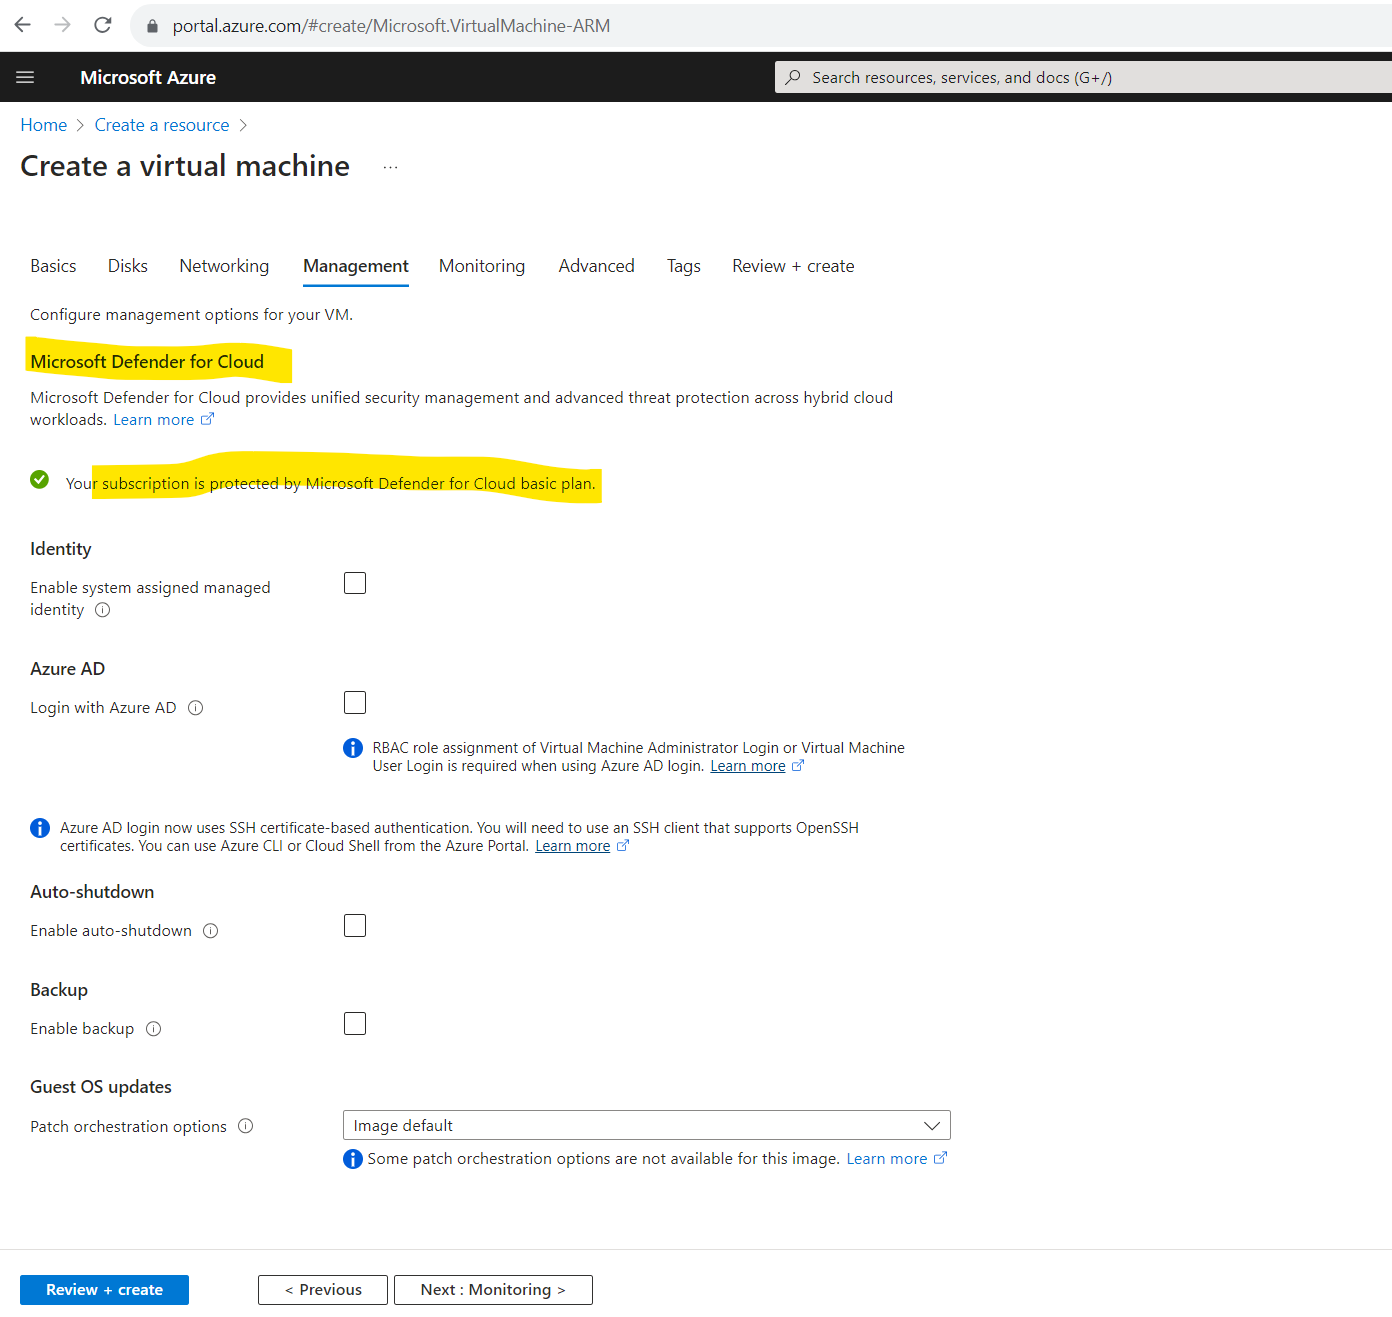
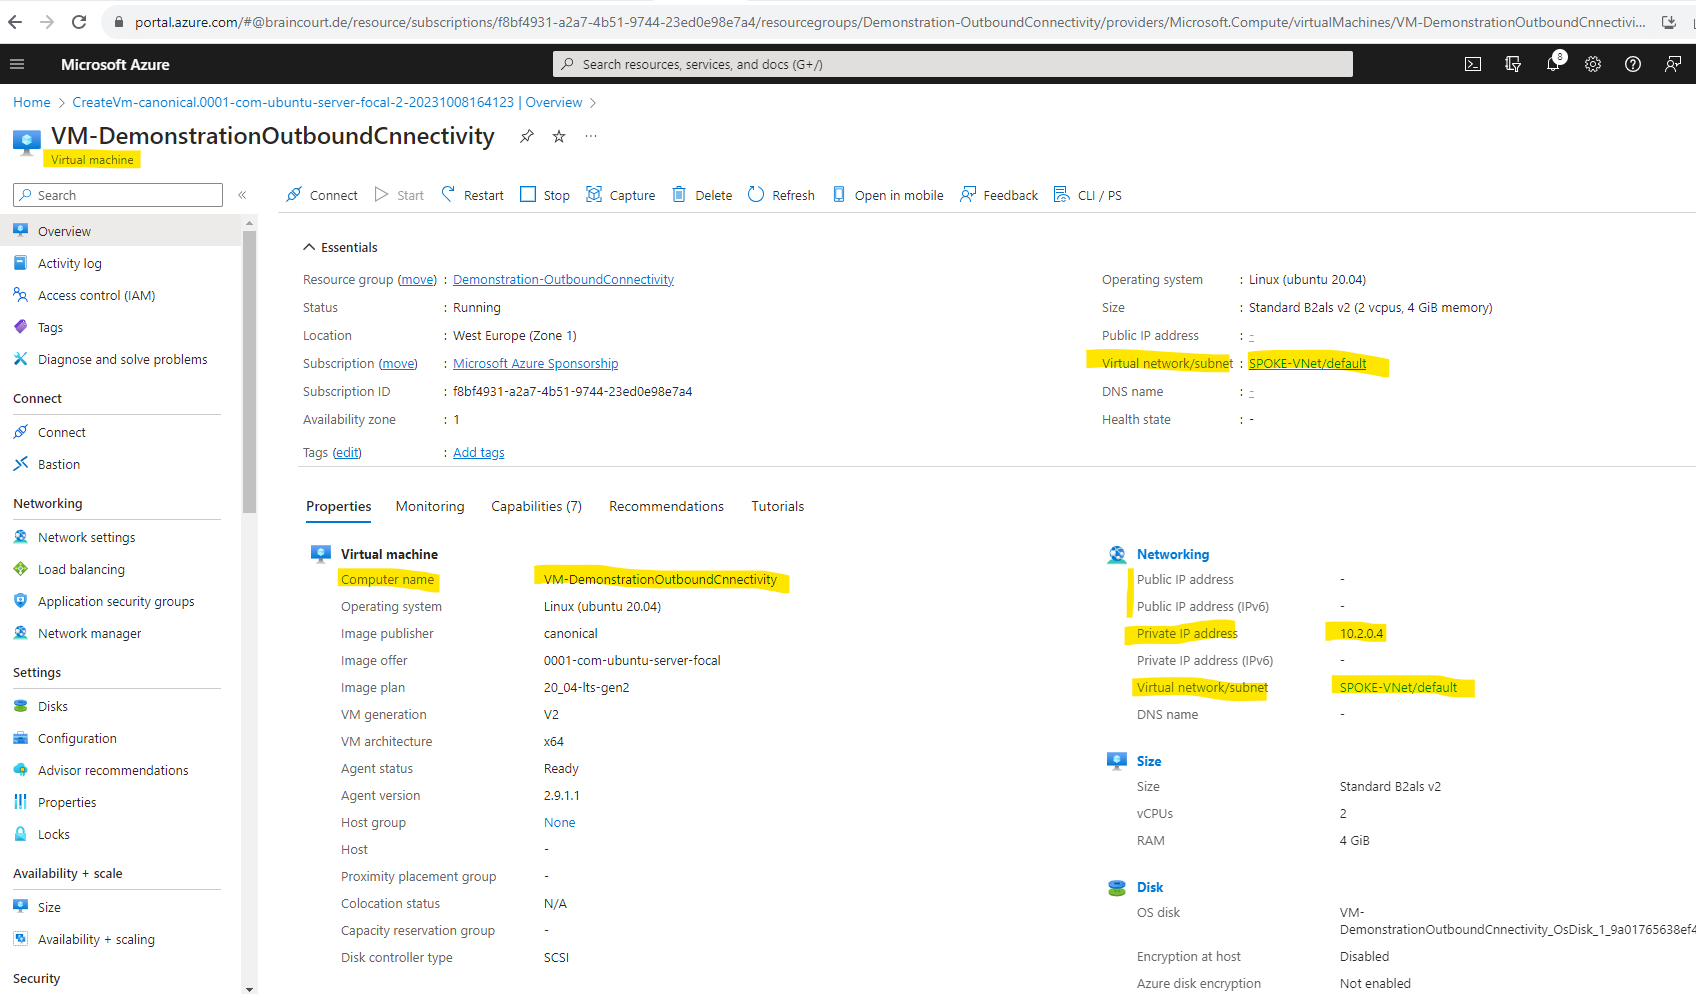
Creating a new Virtual Machine
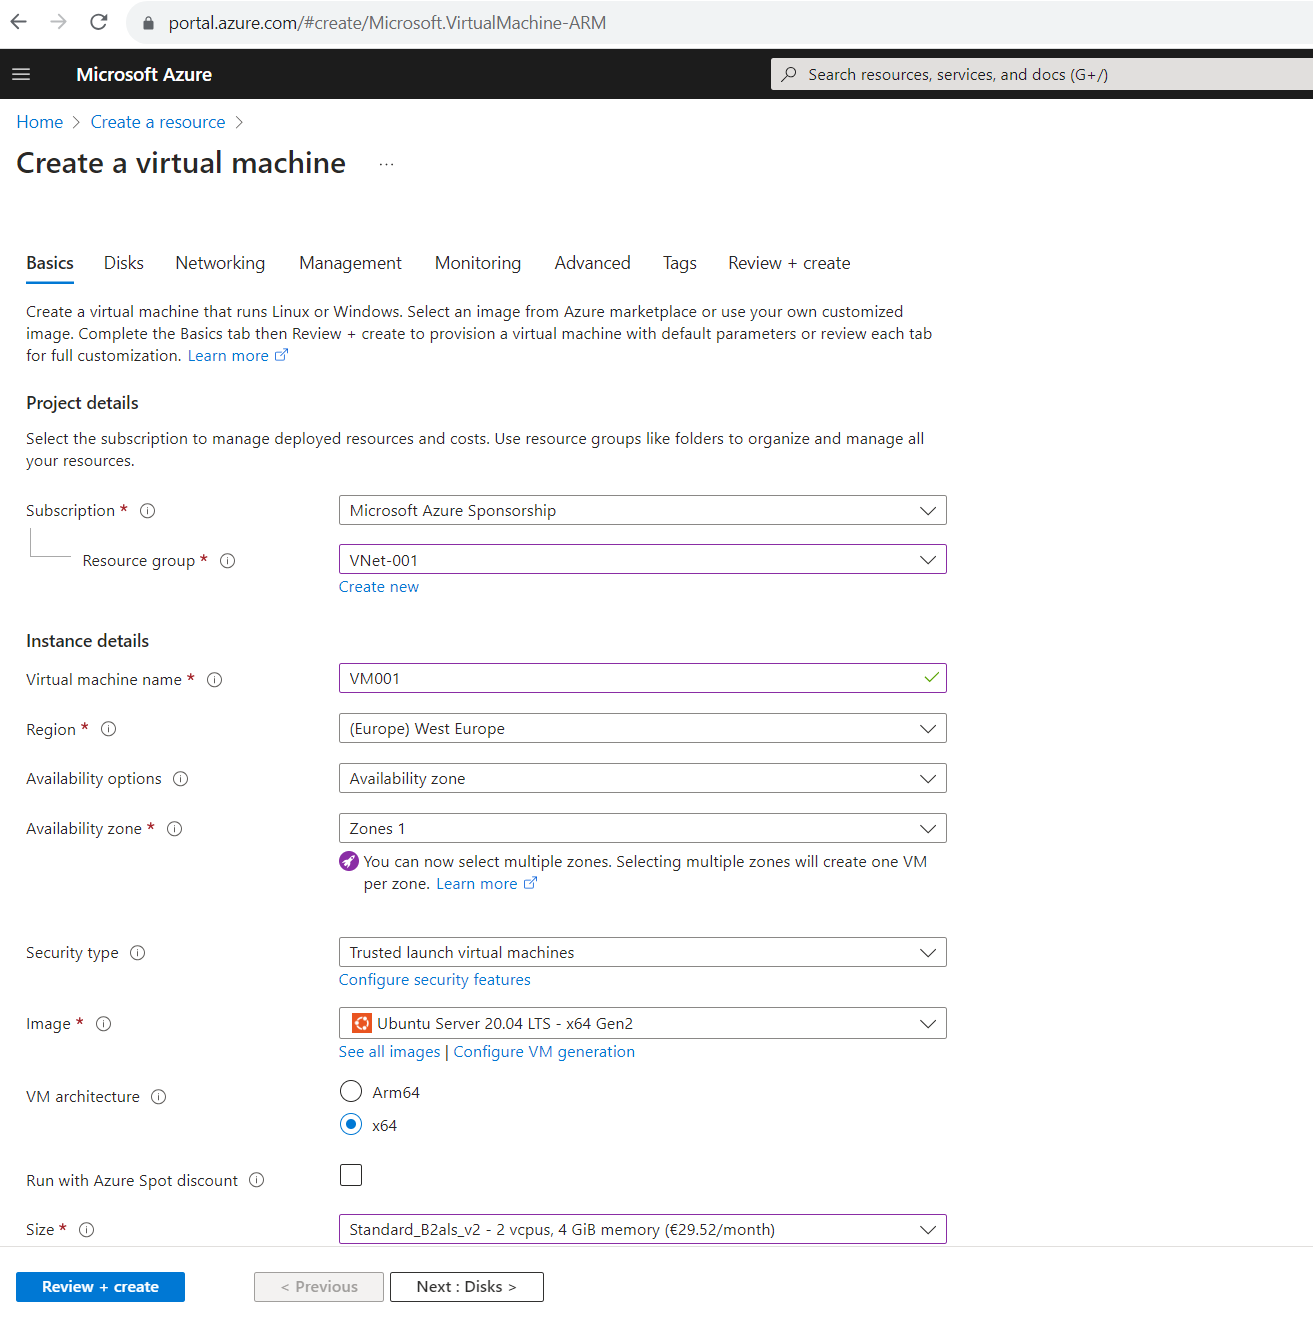
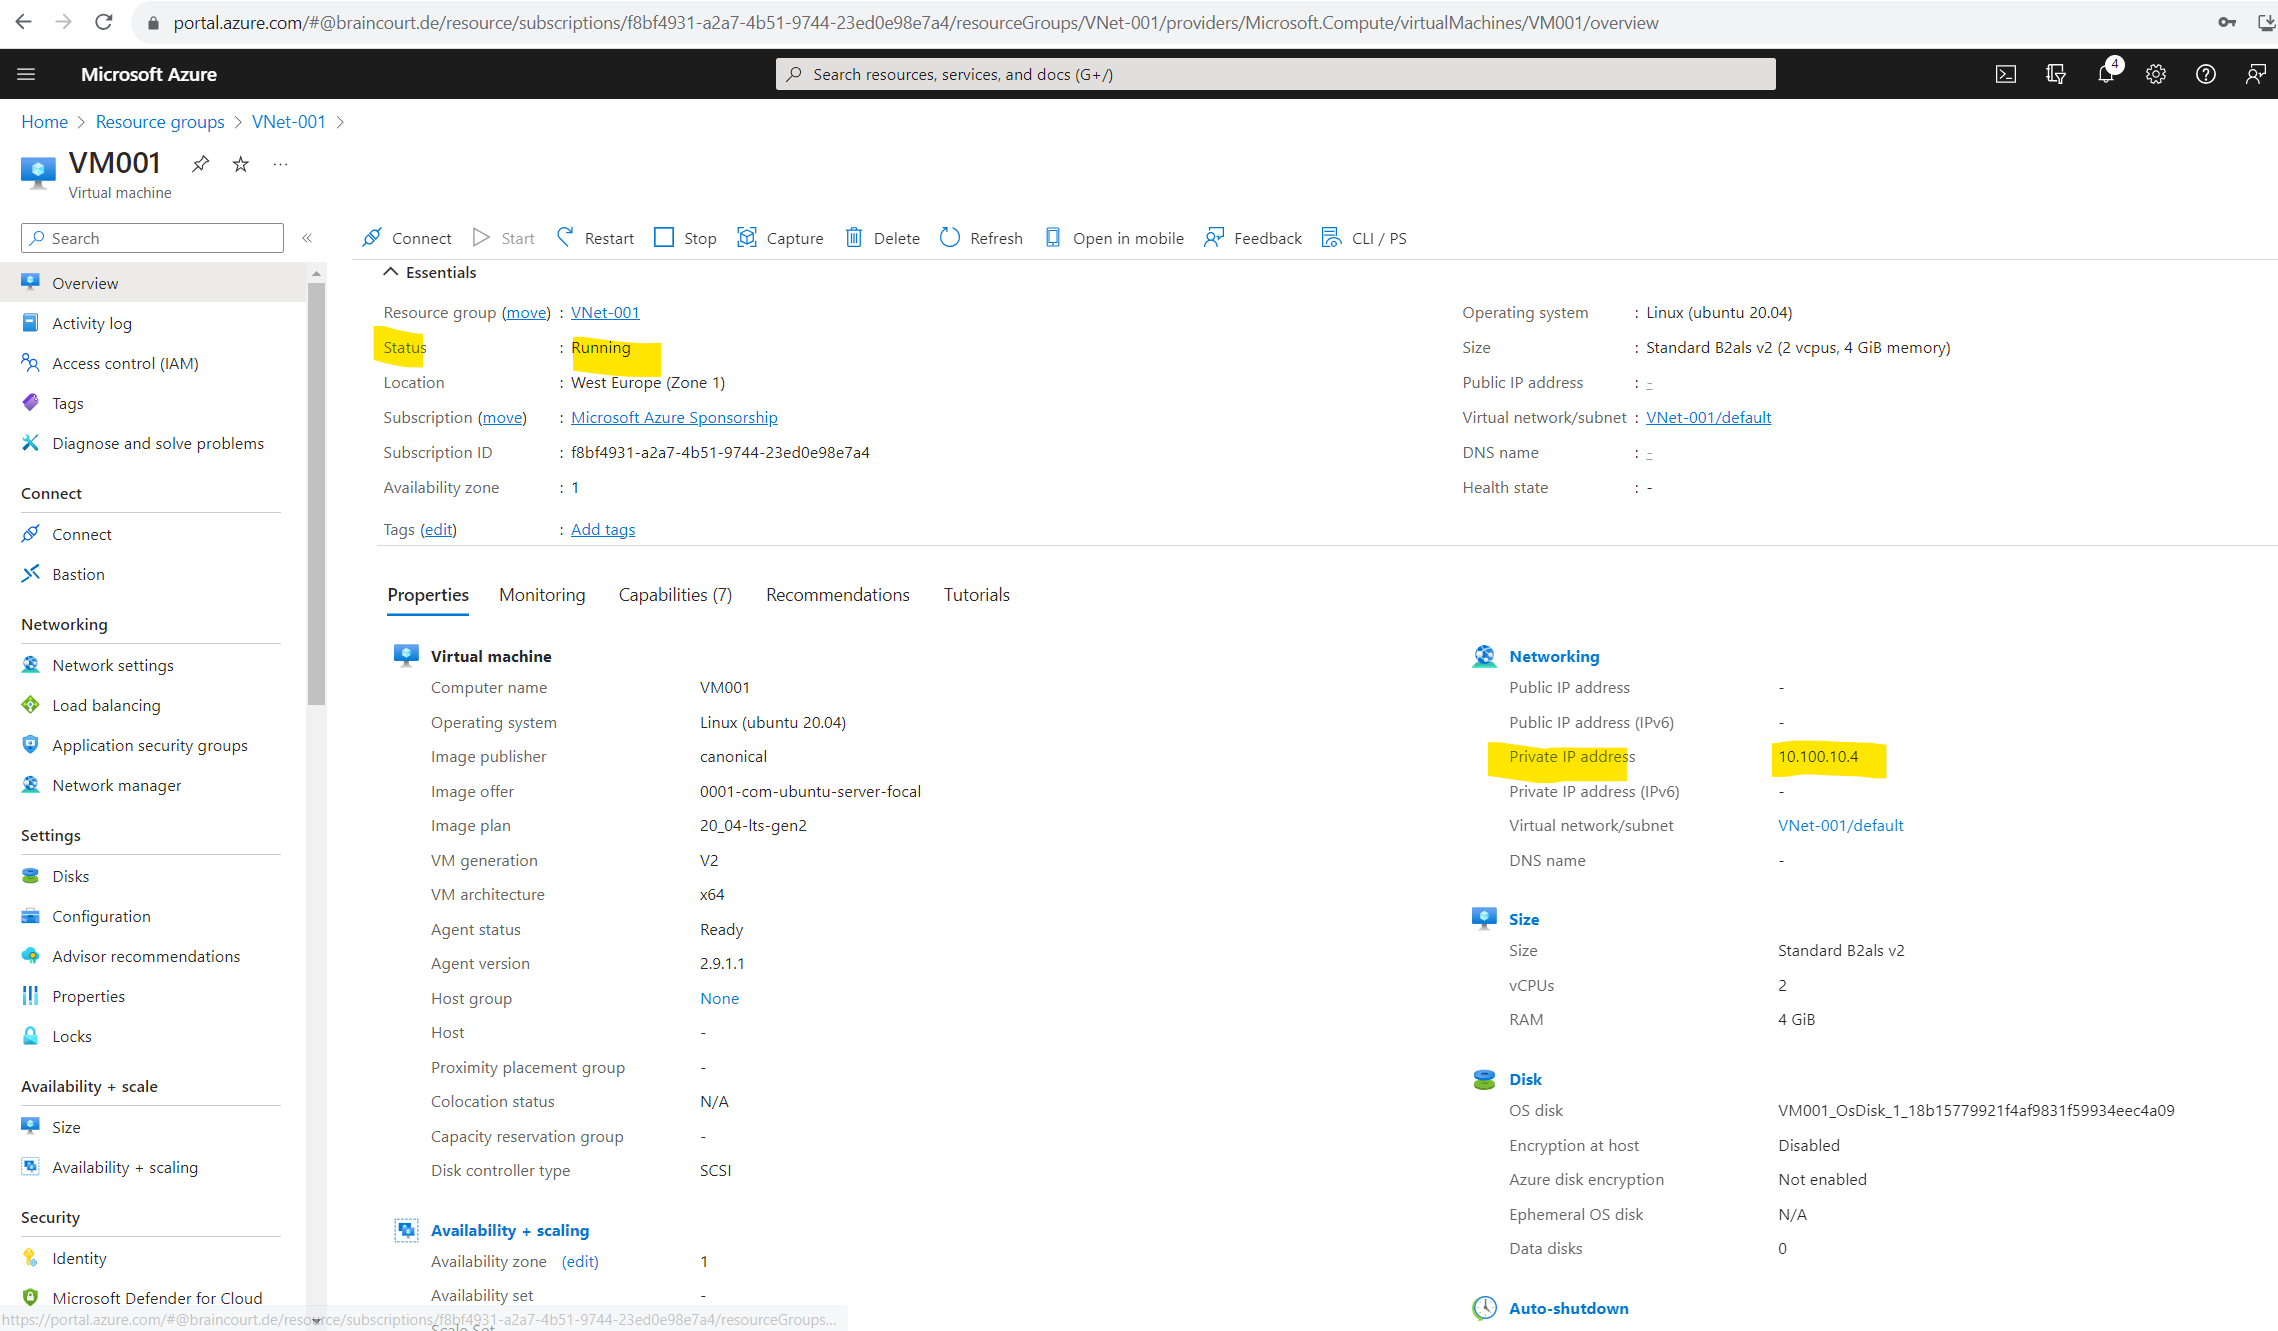
The virtual machine will have only a private IP address associated to.
TCP port 53 will be used by DNS servers for zone transfers. Telnet is here just capable to connect to the DNS server by performing a TCP 3-way handshake on the given port.
To query DNS servers by default UDP port 53 will be used.
So Telnet is always a great tool to check network connectivity for TCP based services.
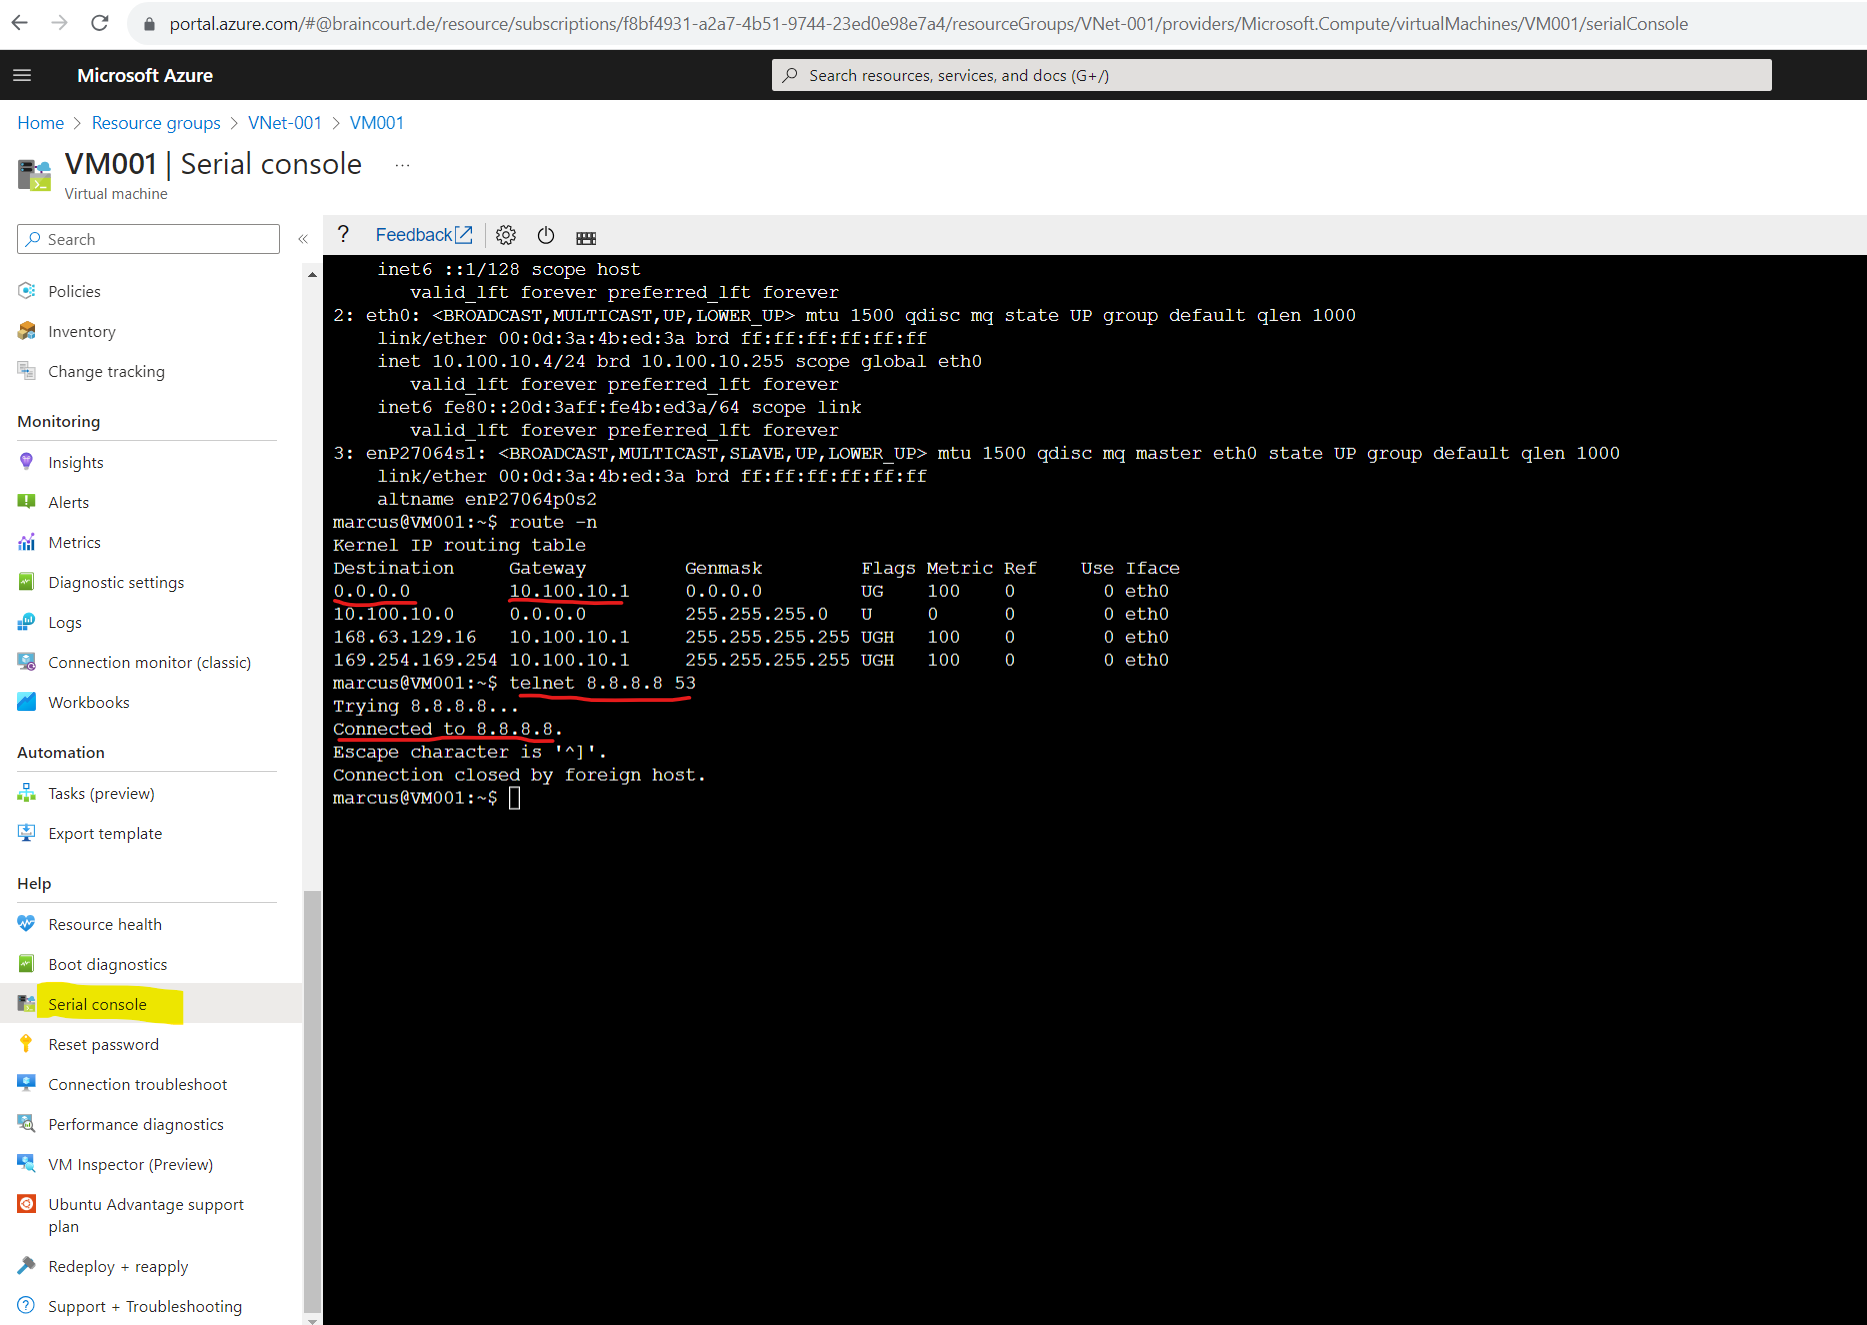
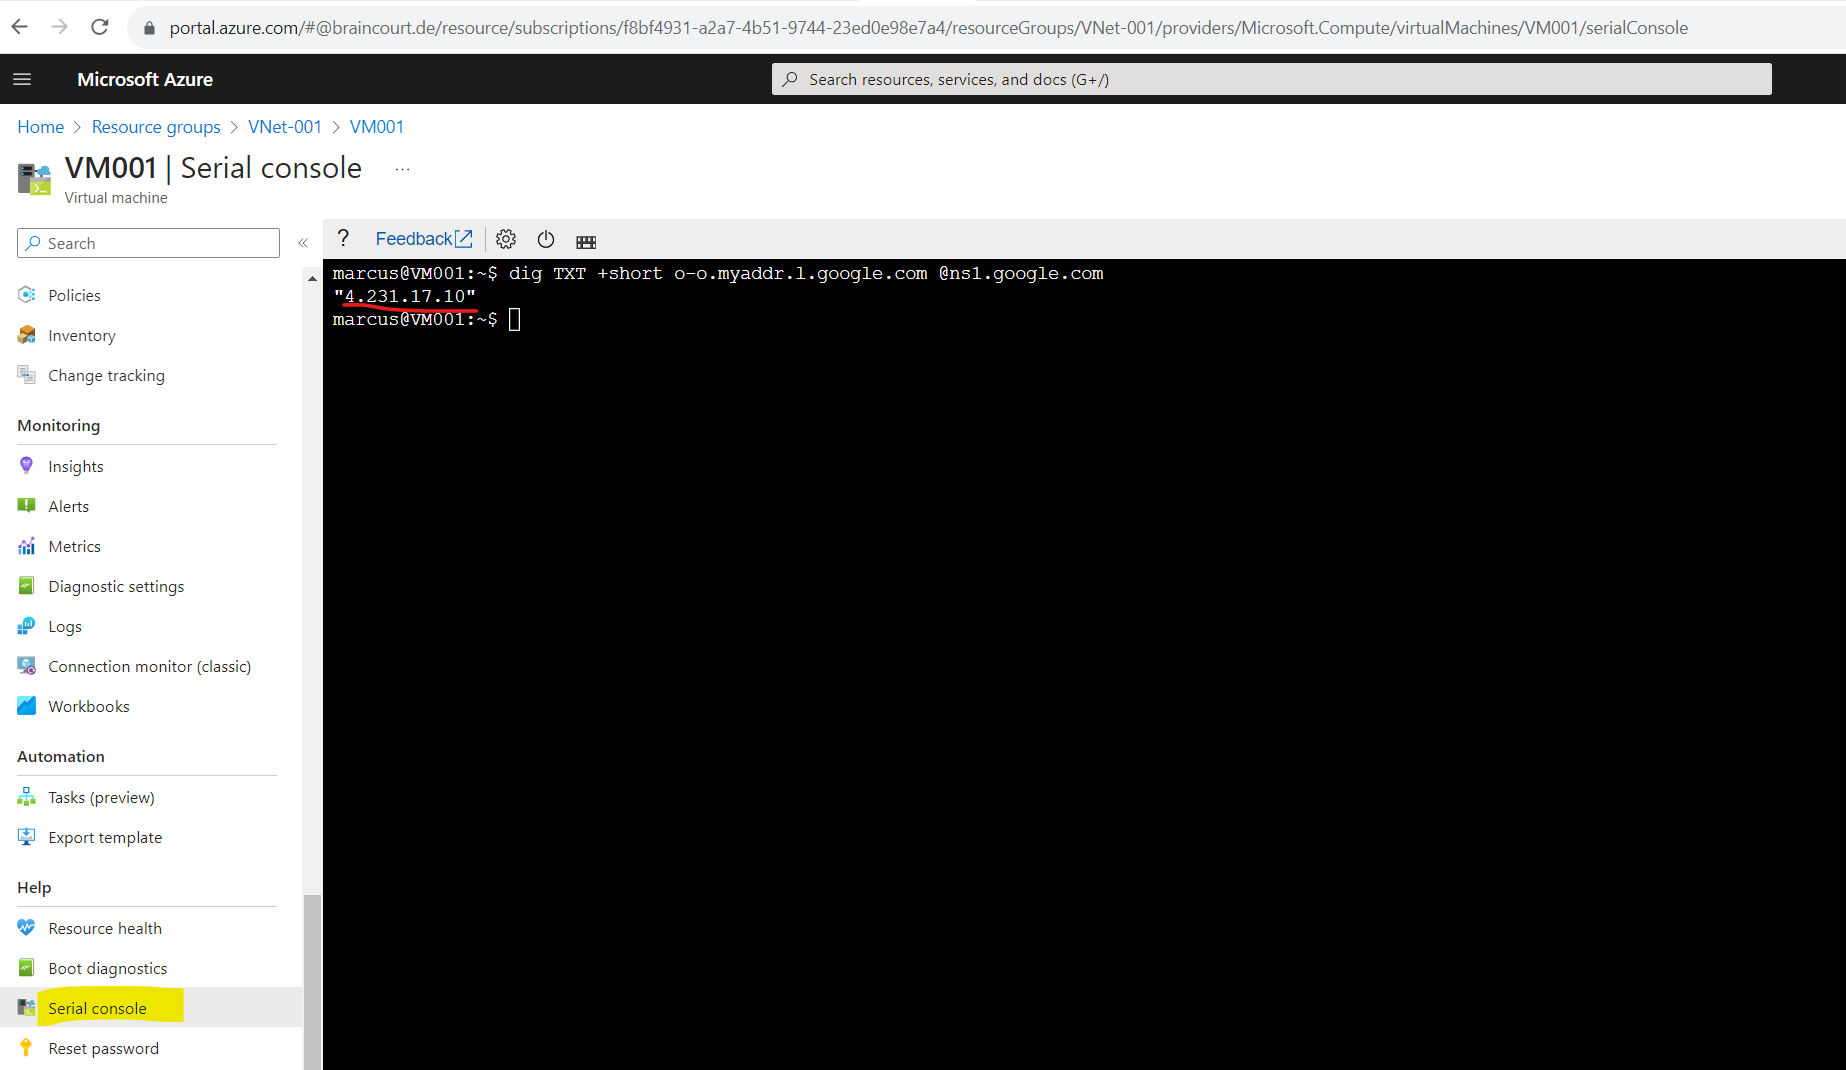
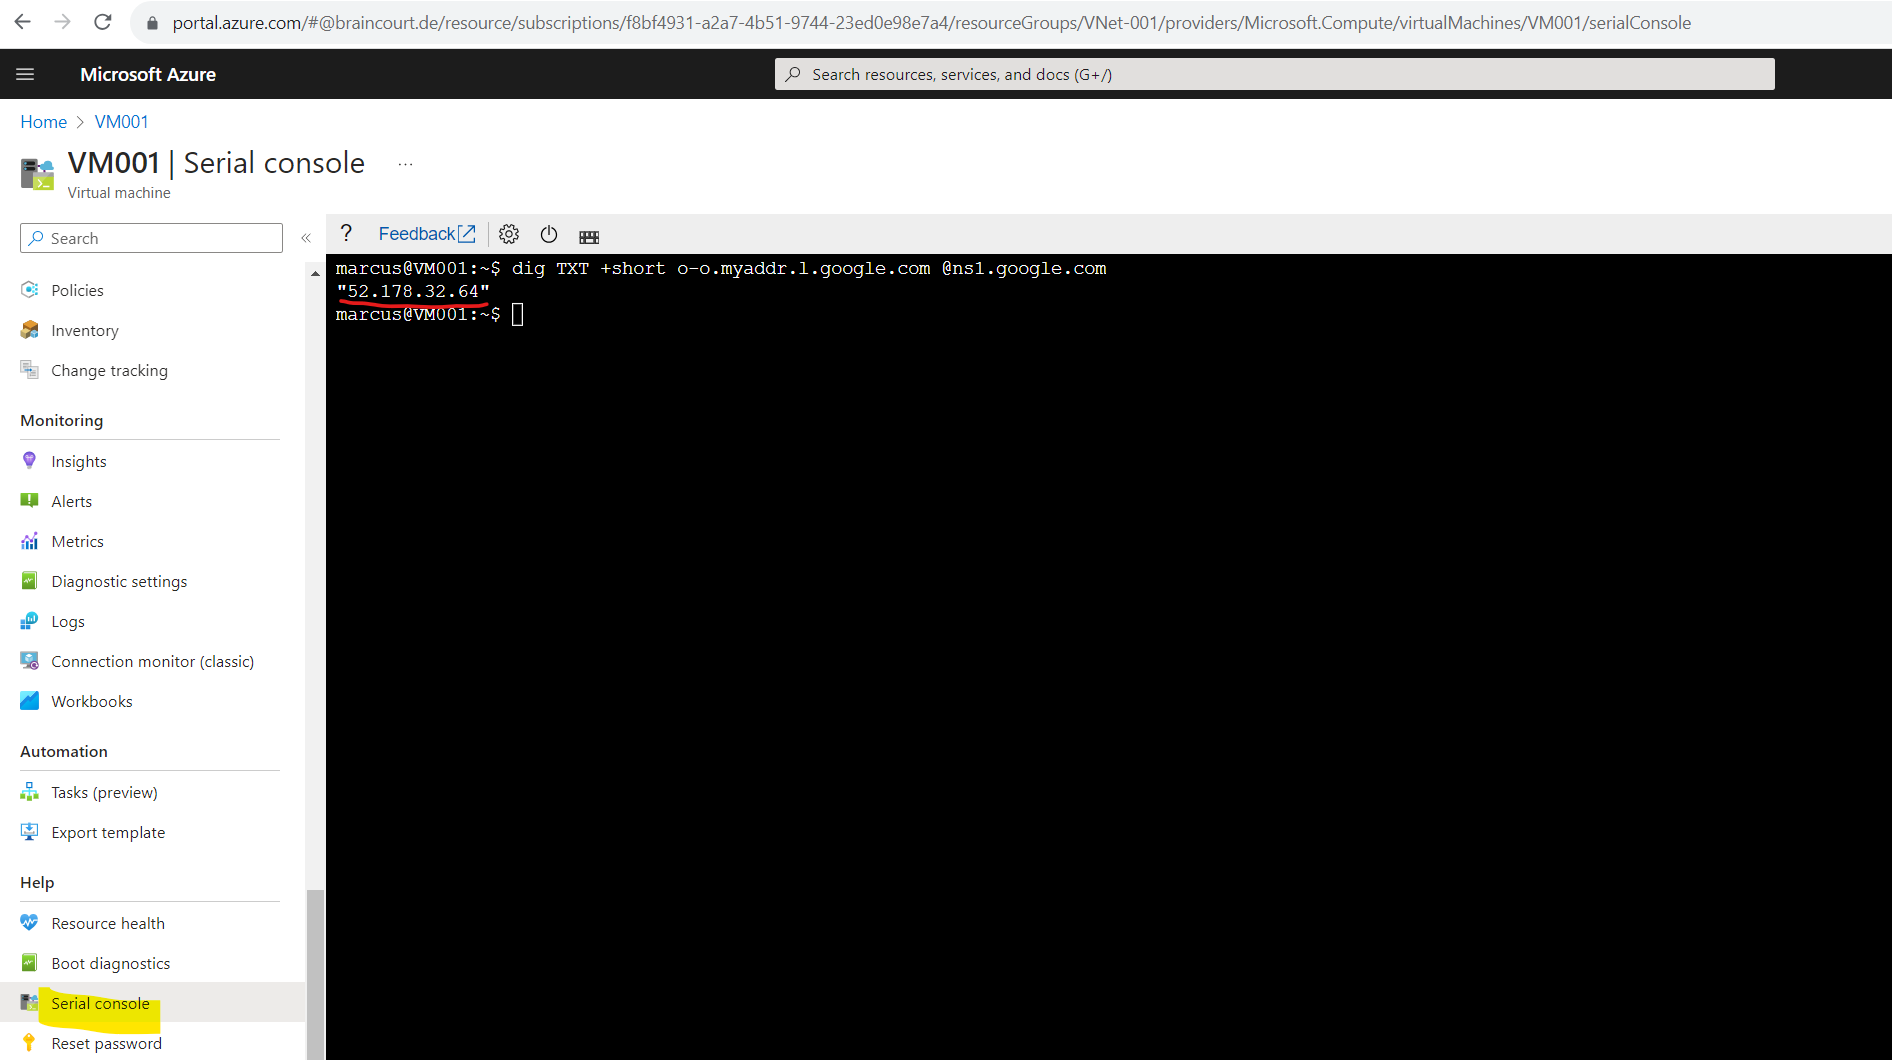
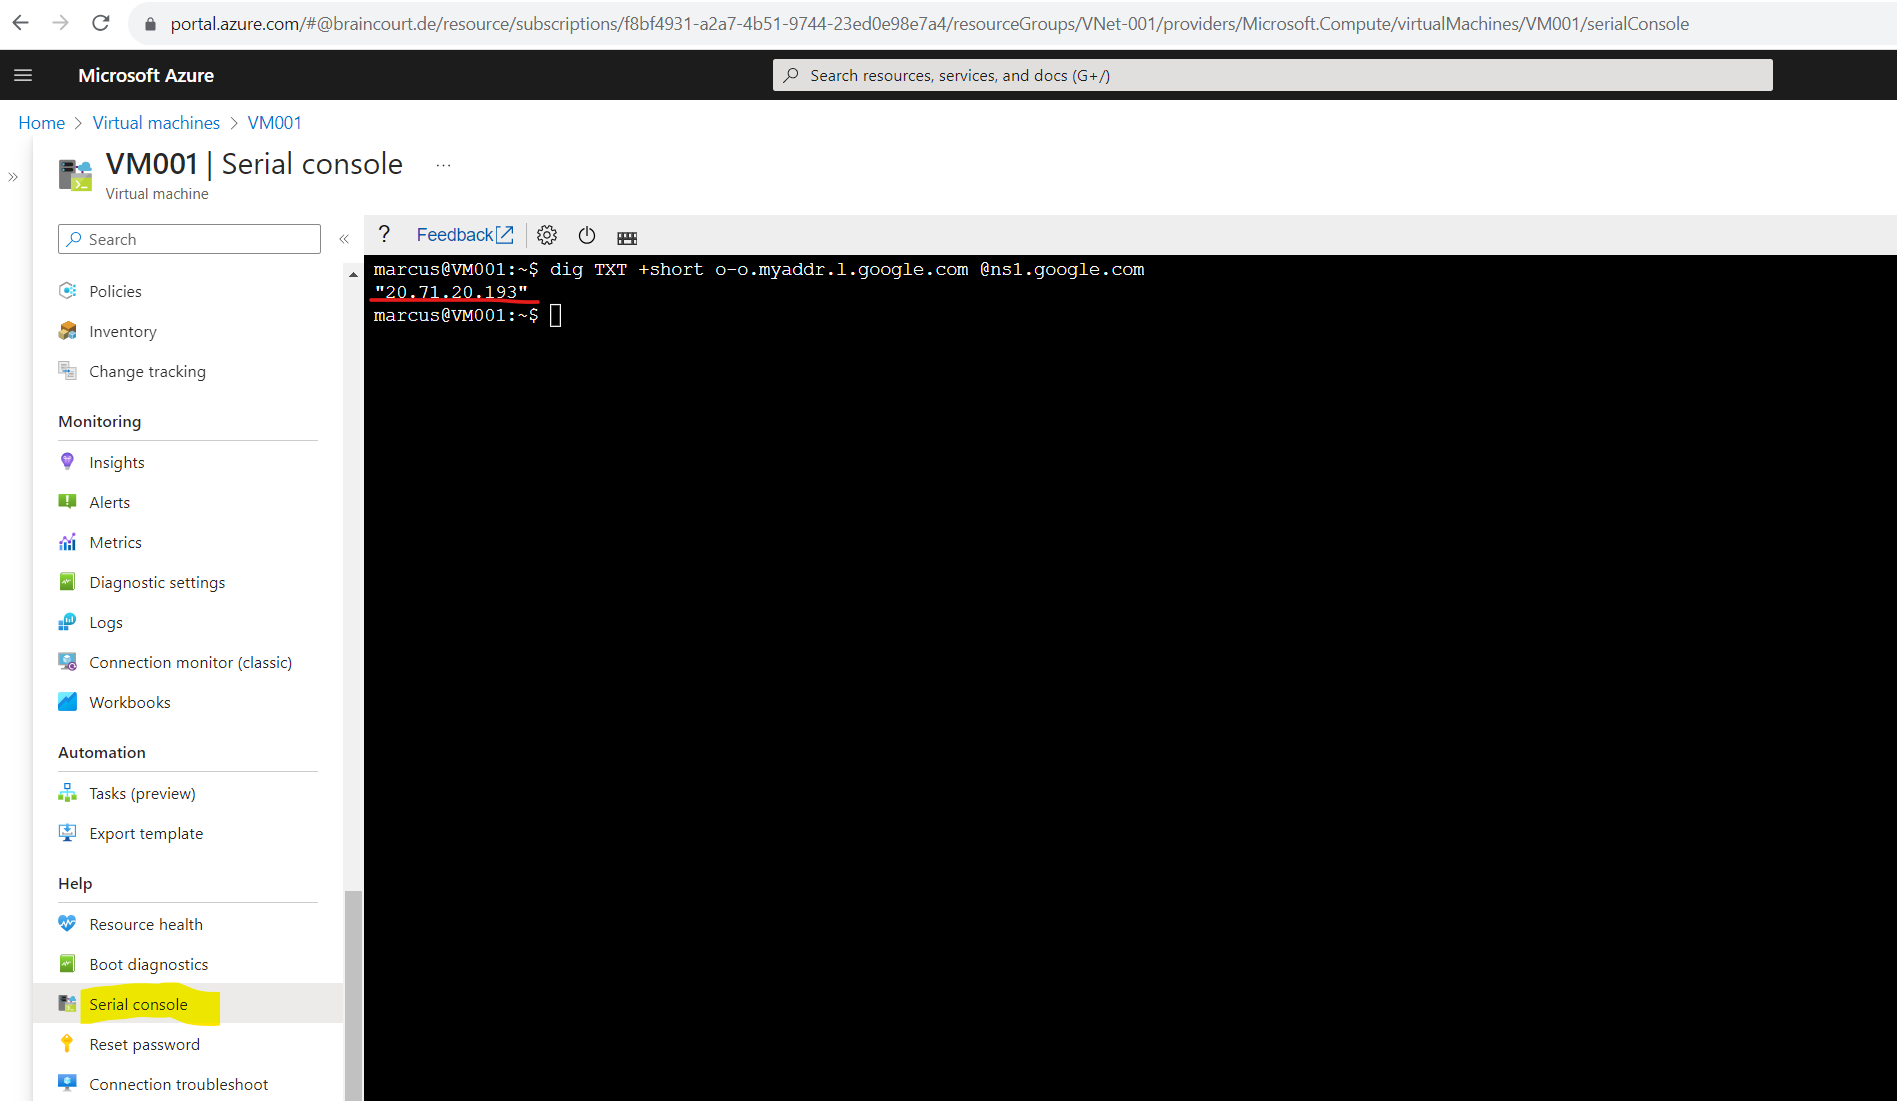
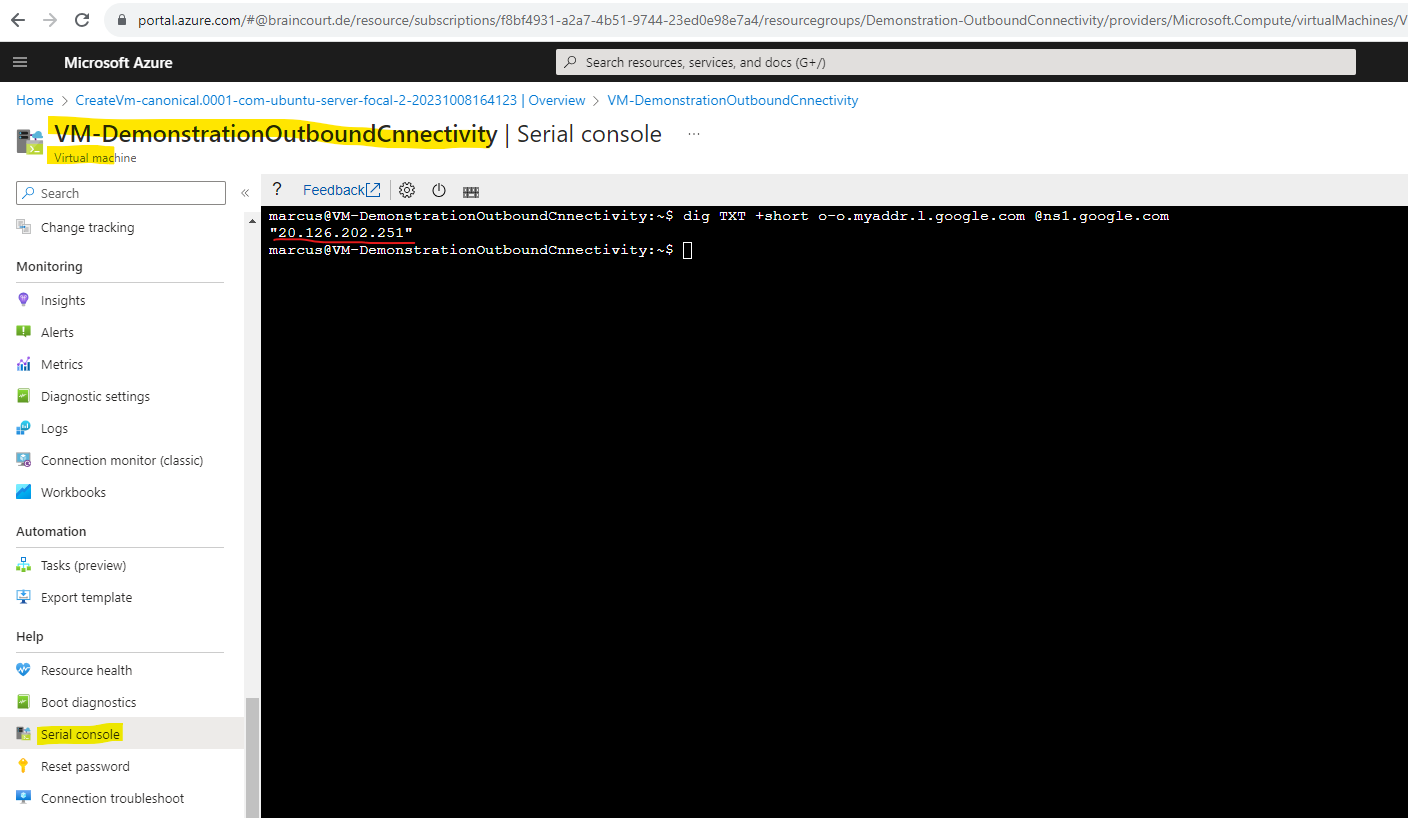
dig TXT +short o-o.myaddr.l.google.com @ns1.google.com
As mentioned to the beginning, this IP for default outbound access is implicit, belongs to Microsoft and is subject to change. Regarding my experience, the IP is changed in any case if you stop and start the virtual machine.
You can’t create system routes, nor can you remove system routes, but you can override some system routes with custom routes. Azure creates default system routes for each subnet, and adds more optional default routes to specific subnets, or every subnet, when you use specific Azure capabilities.
Source: https://learn.microsoft.com/en-us/azure/virtual-network/virtual-networks-udr-overview#system-routes
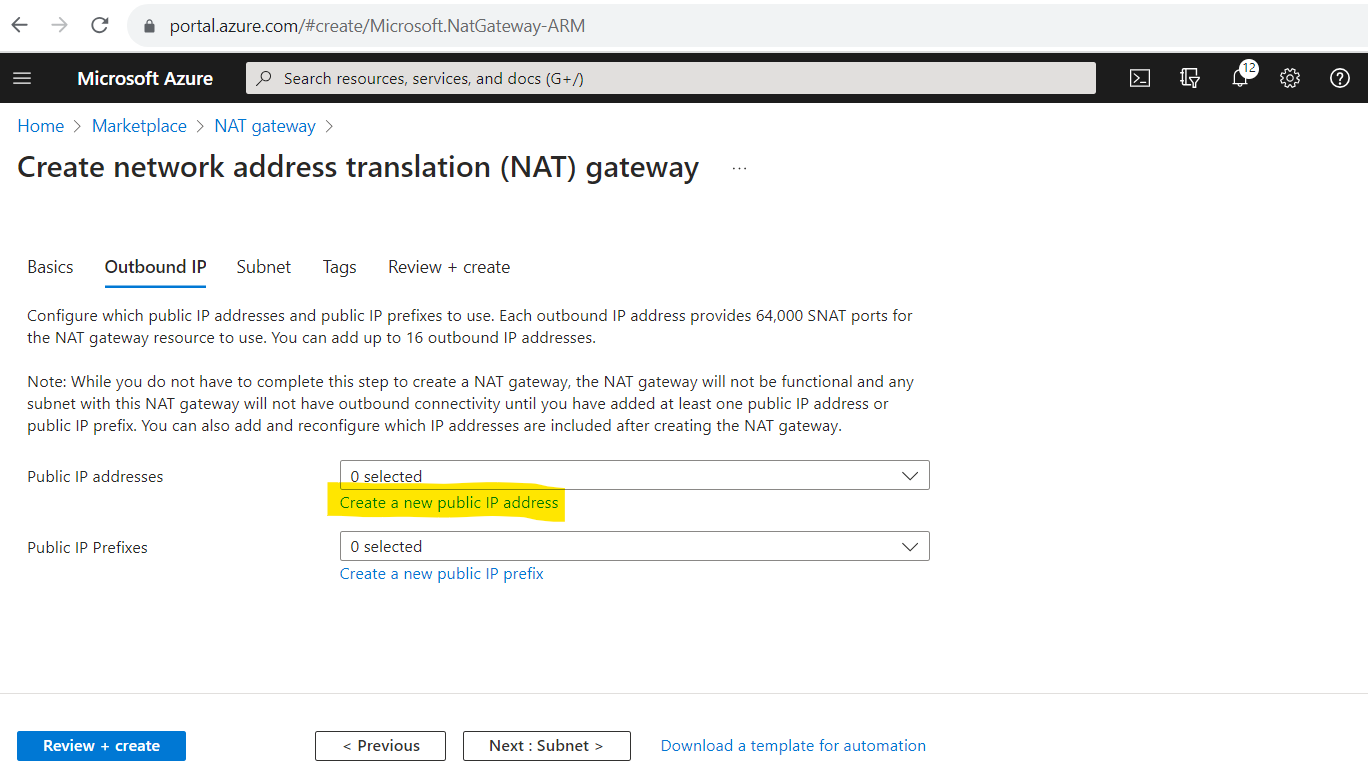
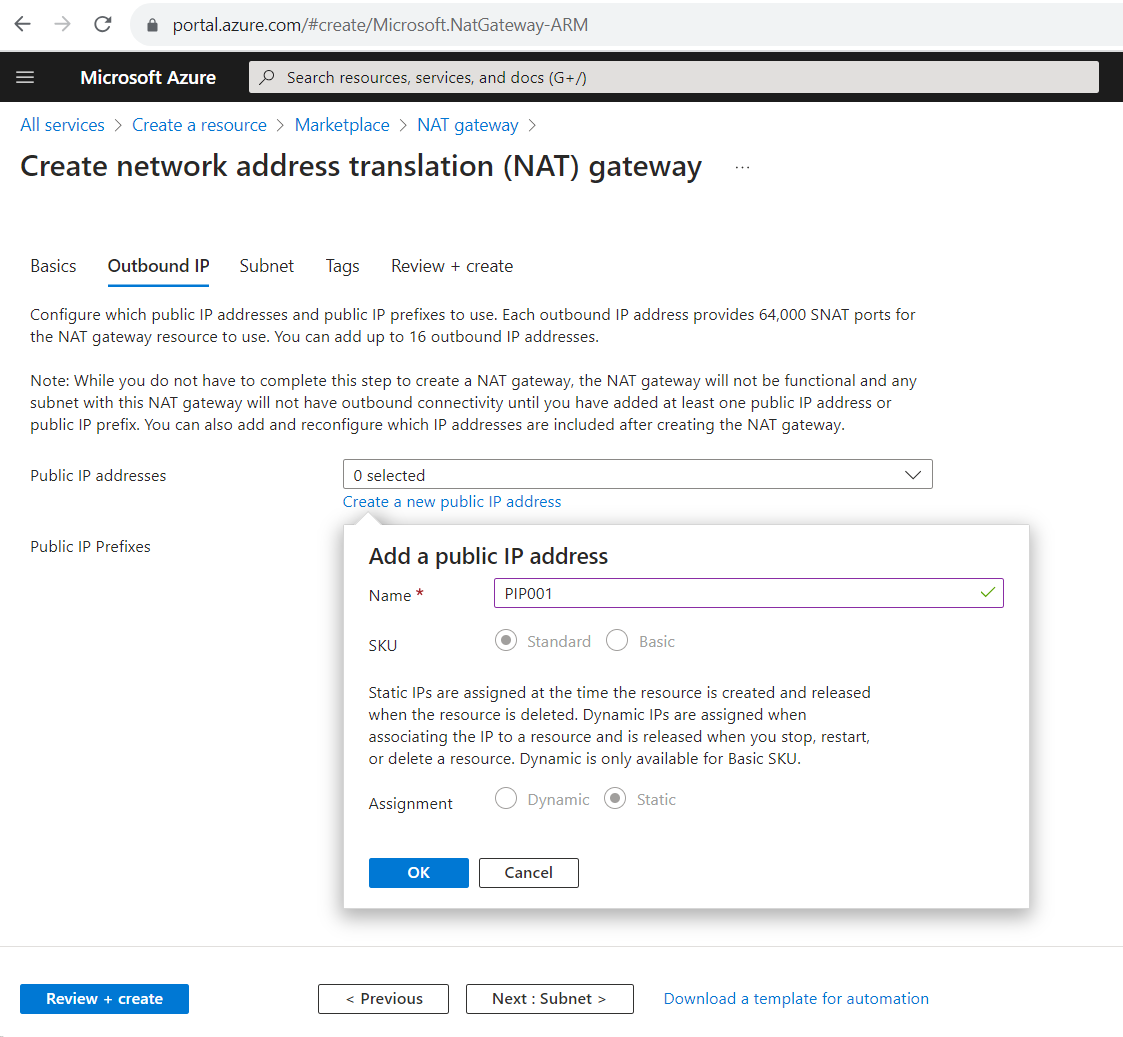
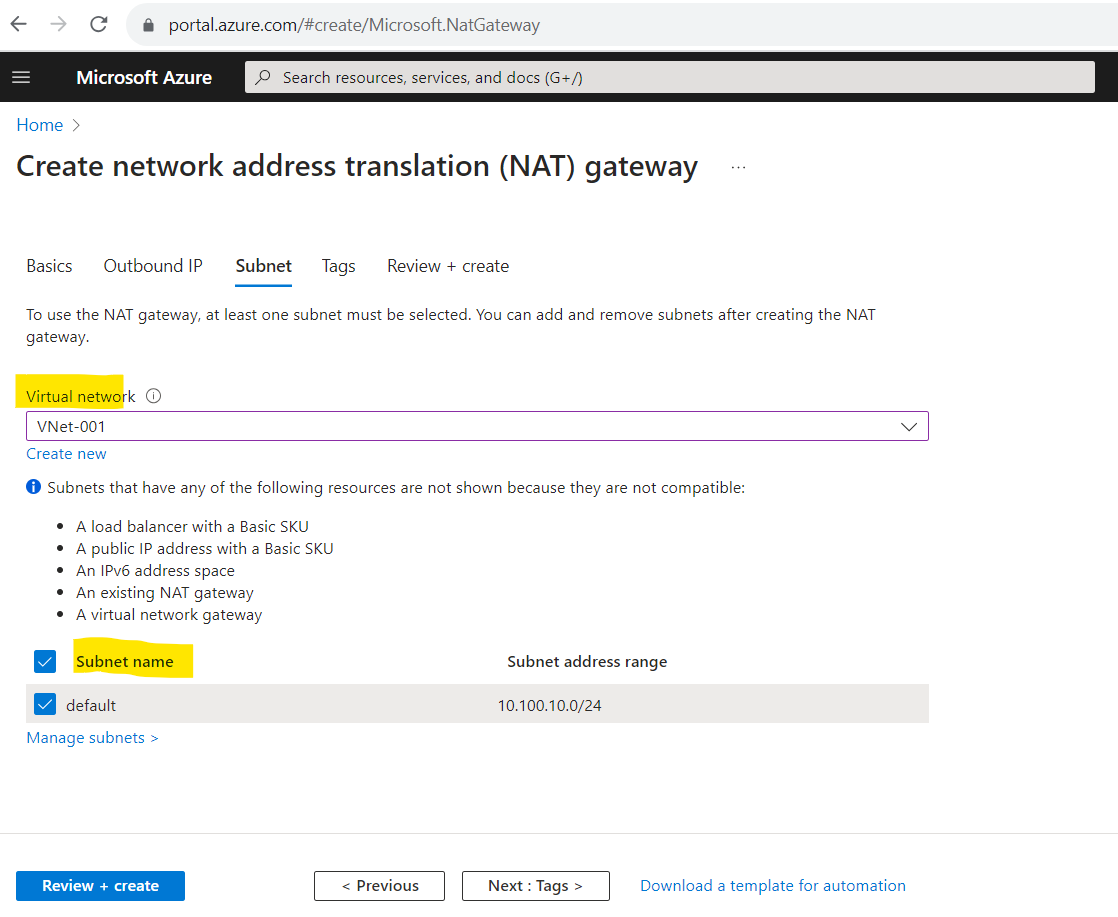
Transition to an explicit method of public connectivity
By using a NAT Gateway


dig TXT +short o-o.myaddr.l.google.com @ns1.google.com
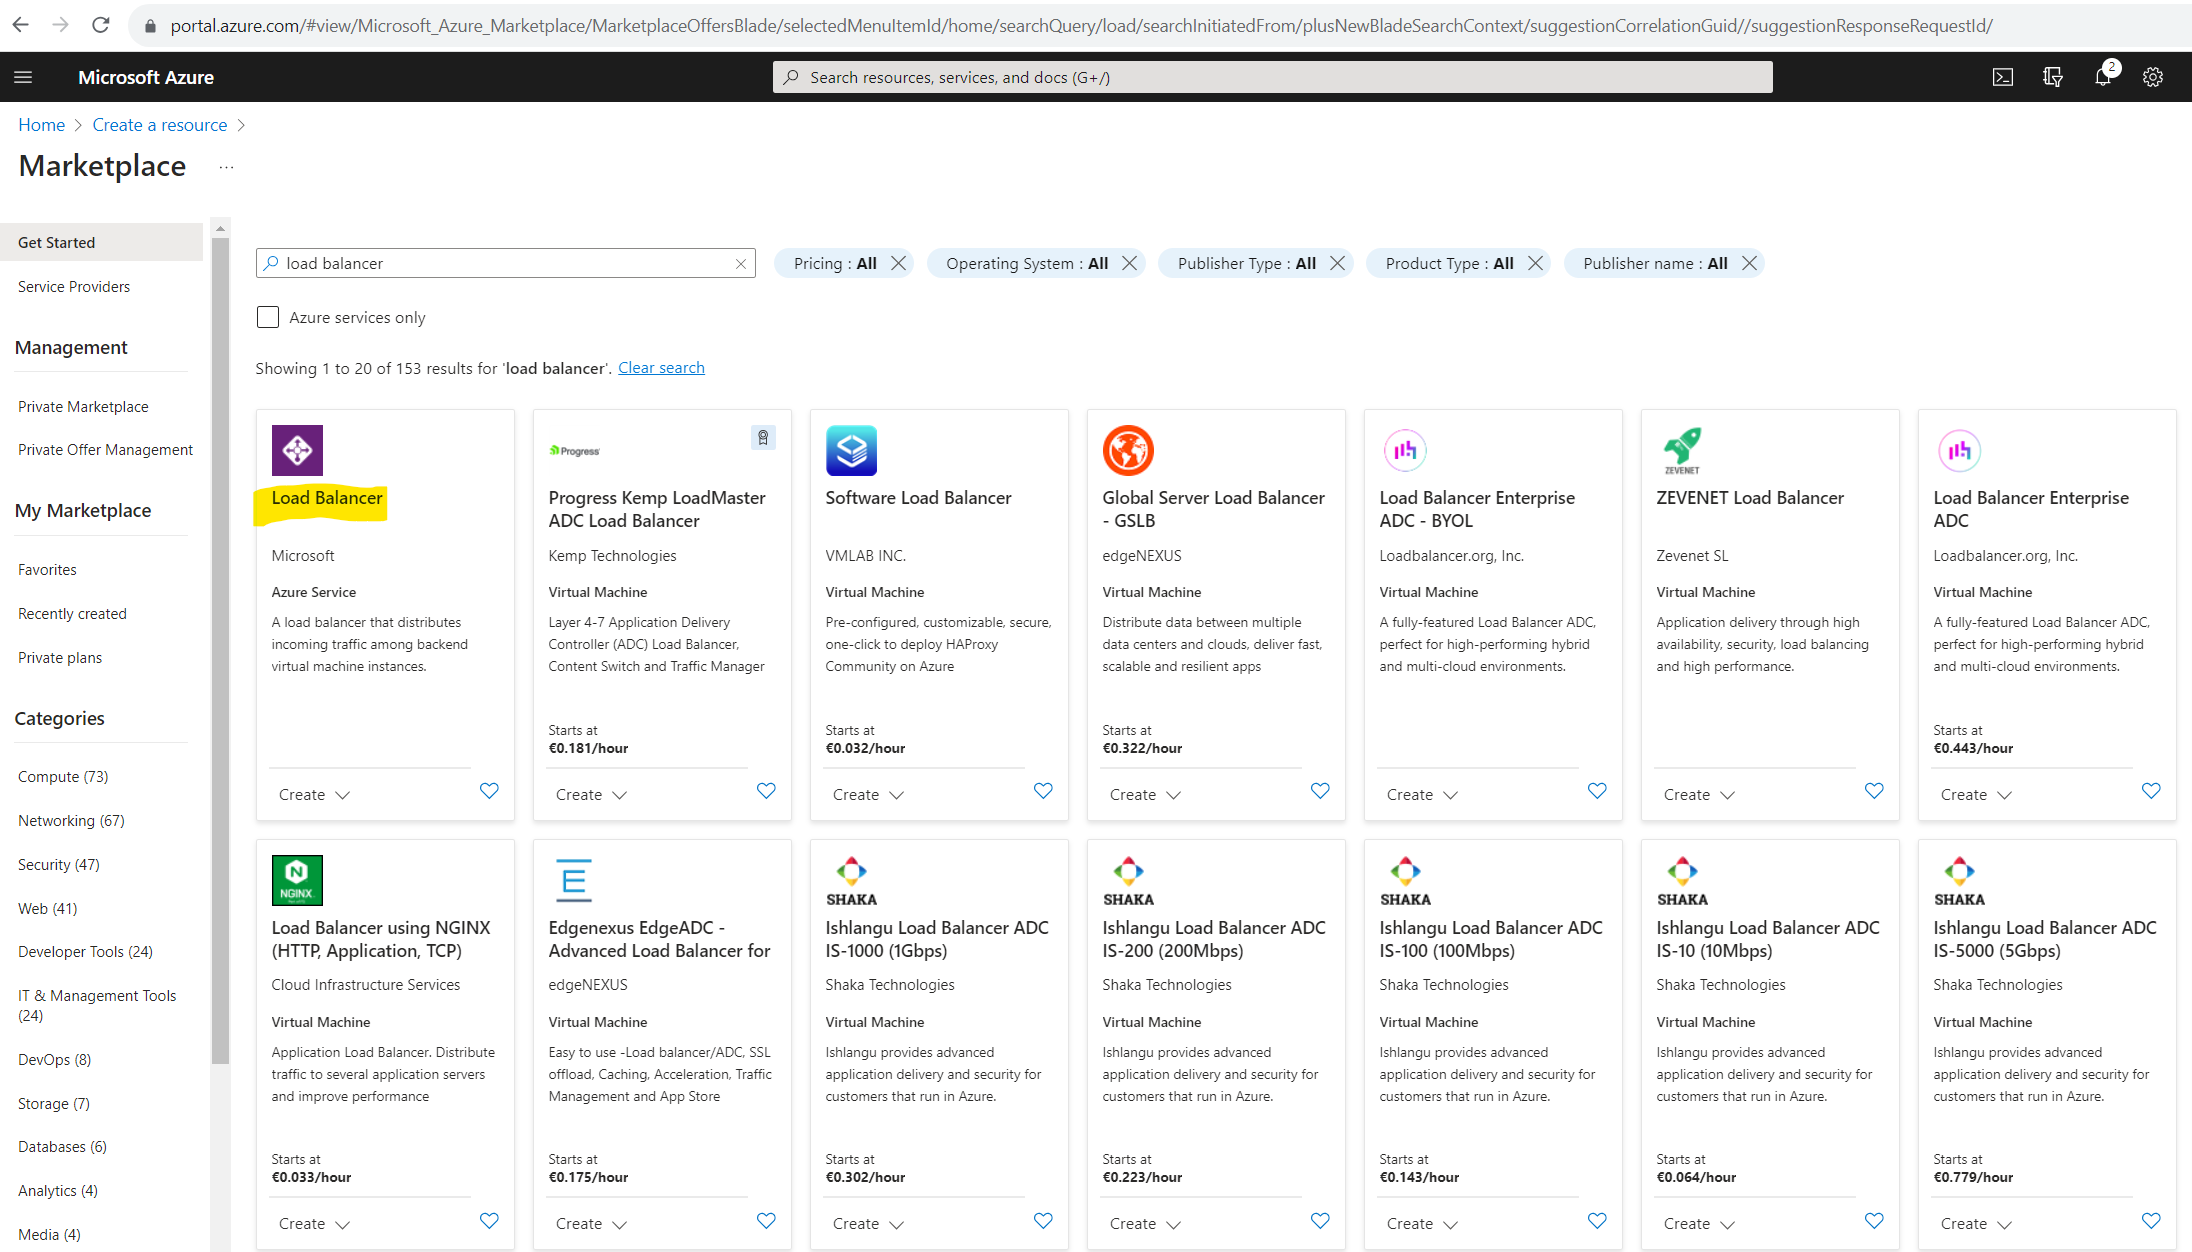
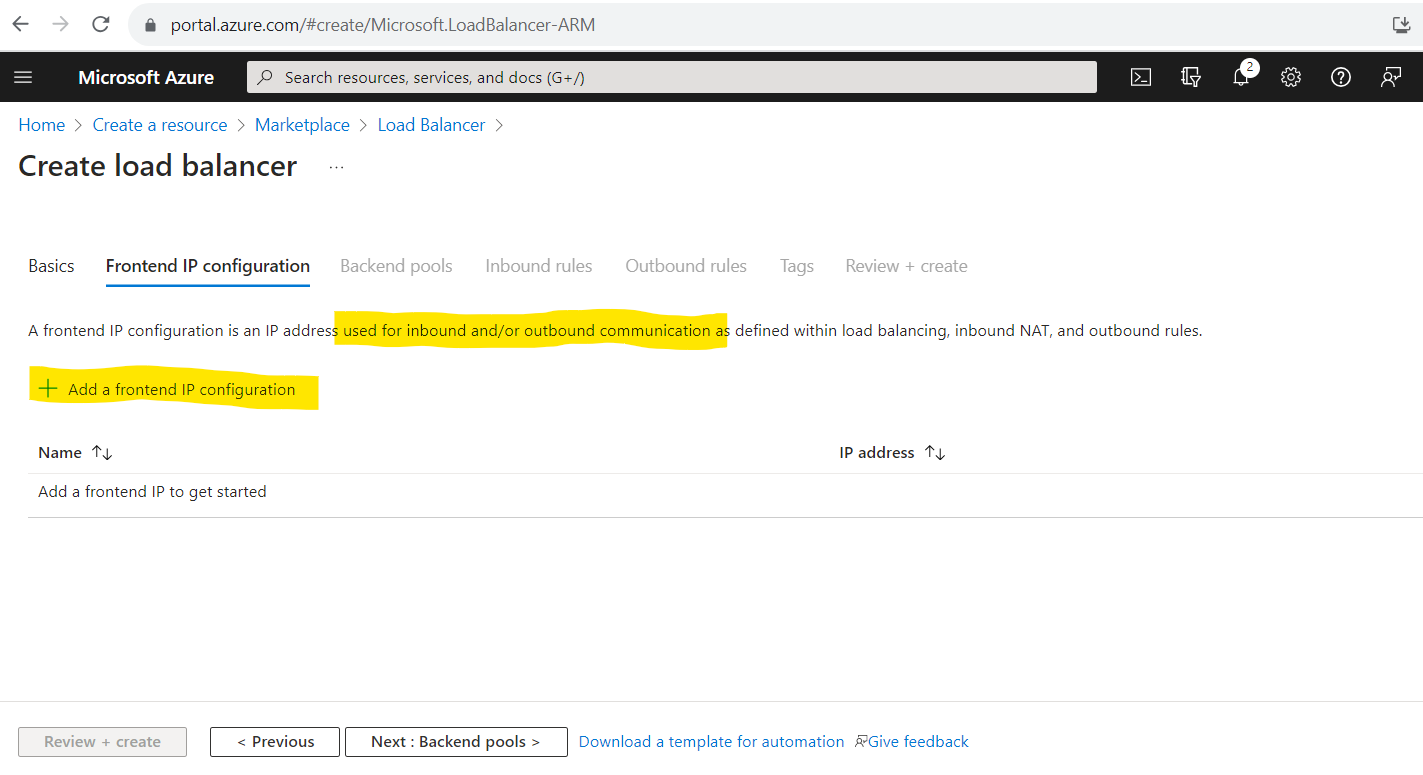
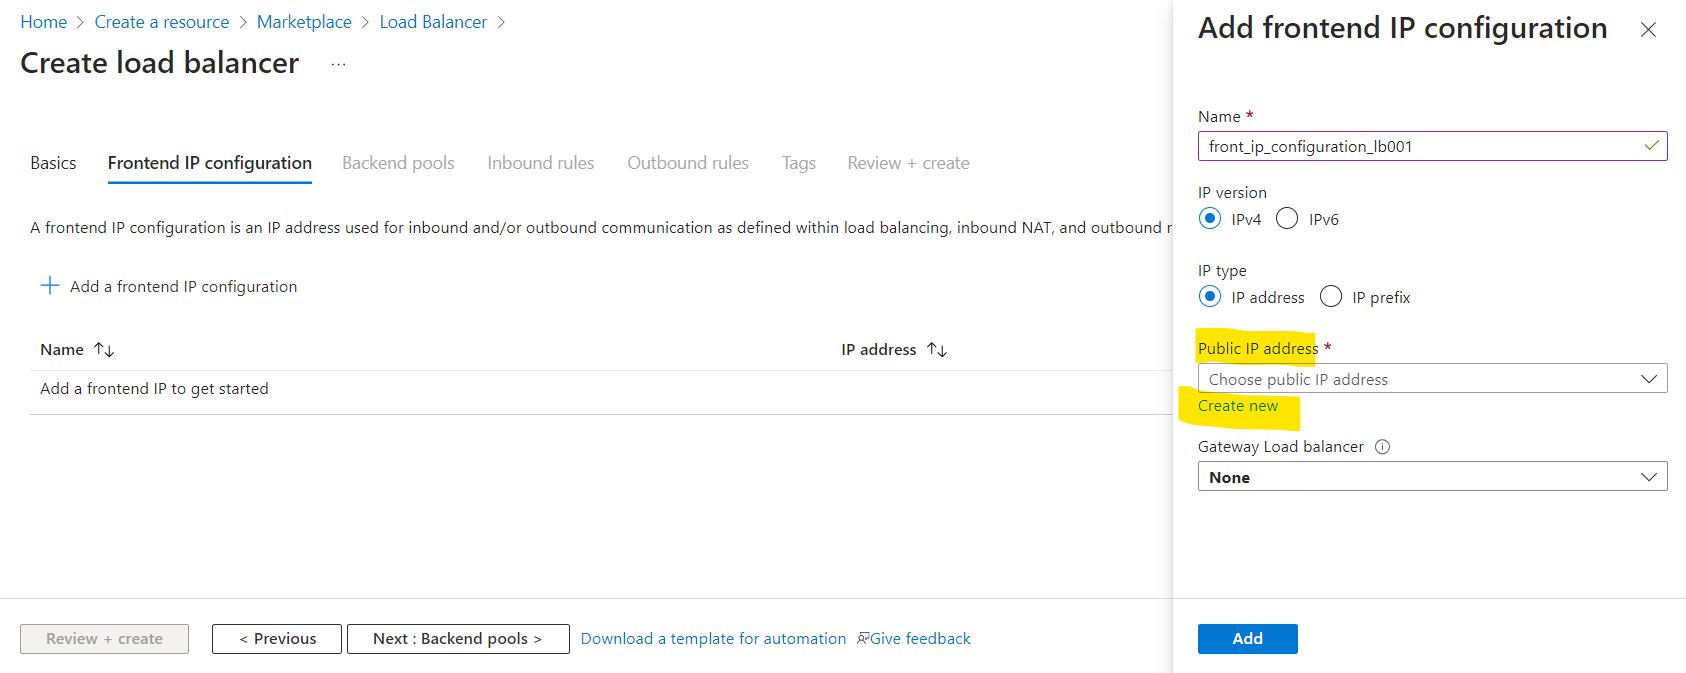
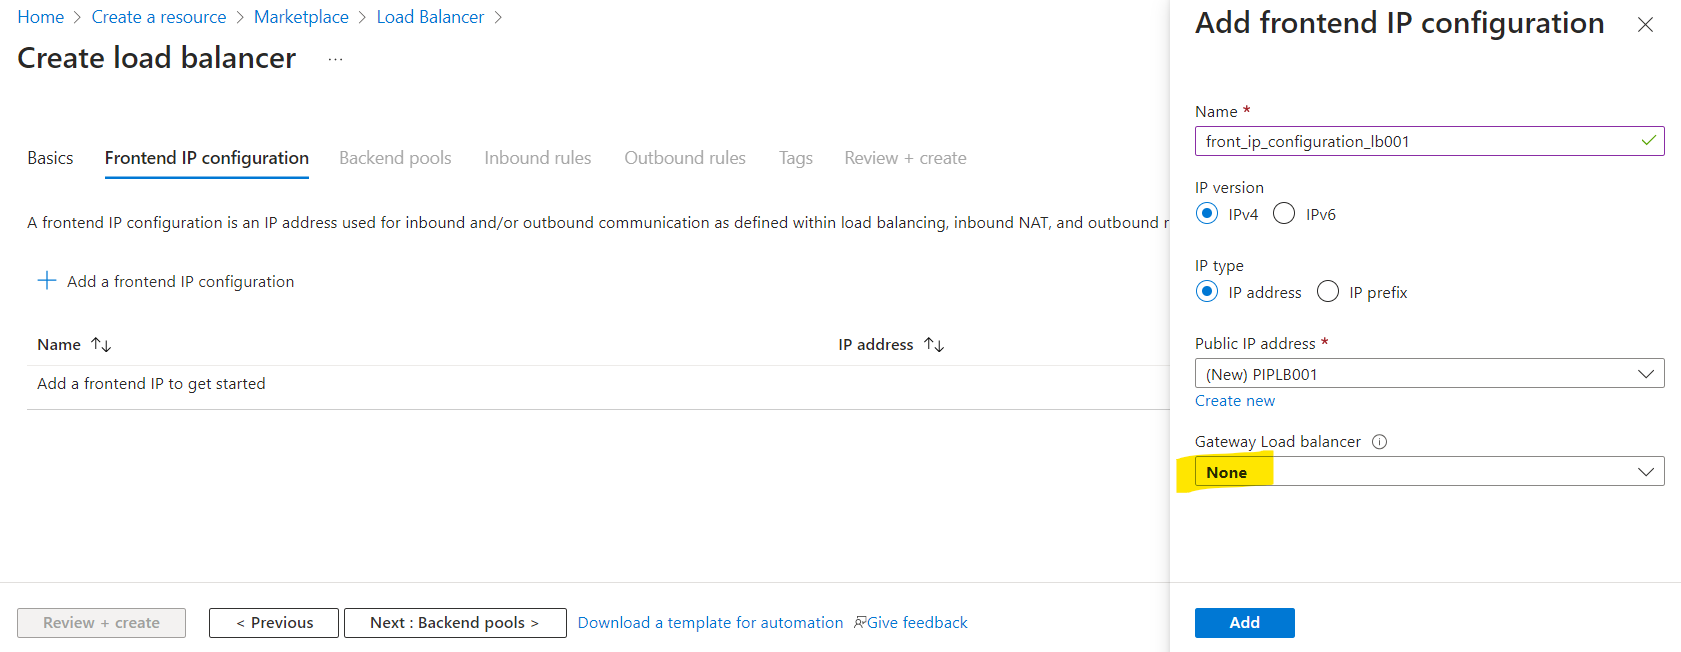
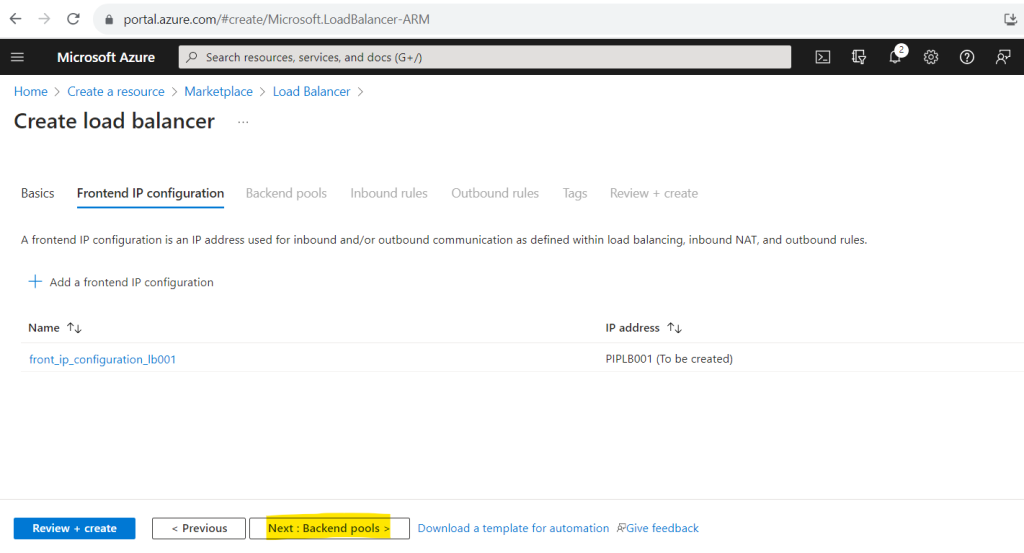
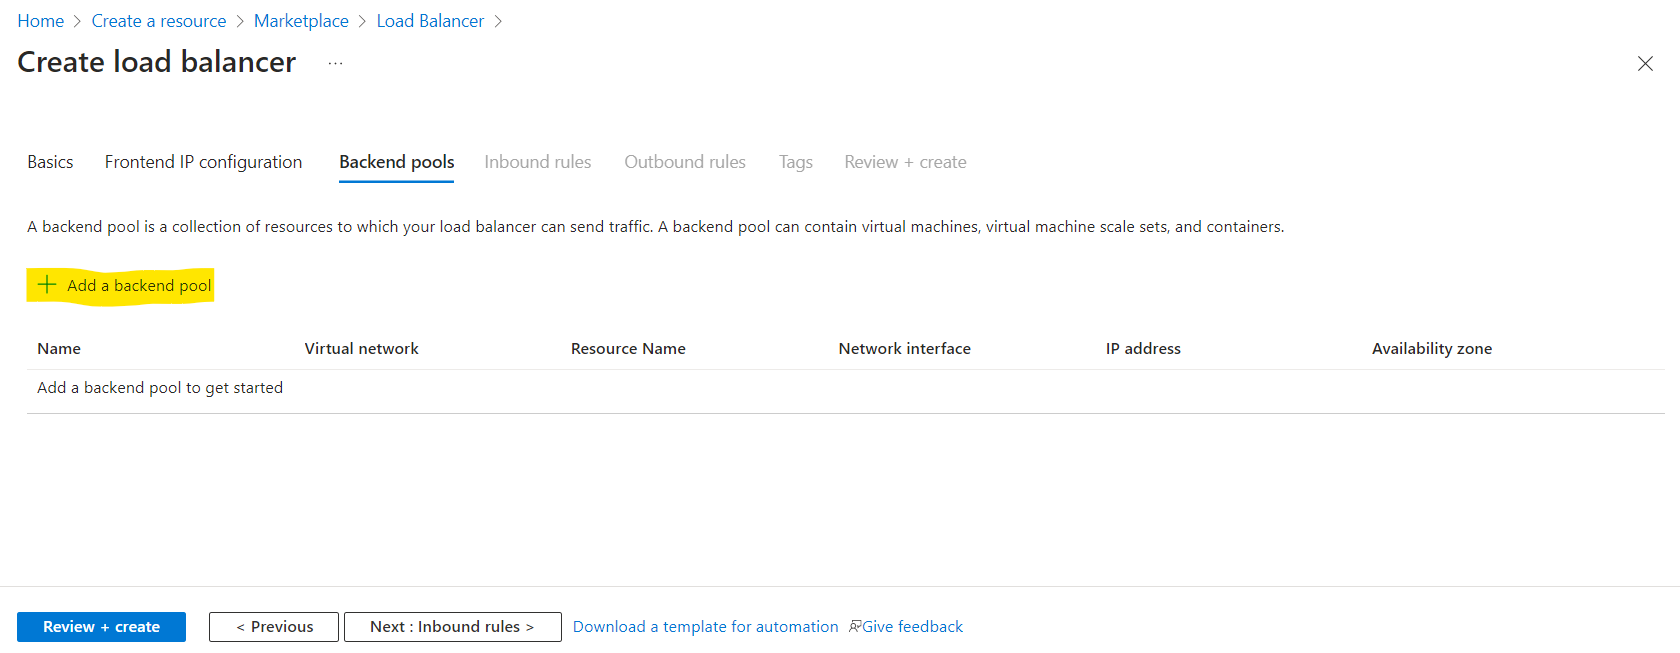
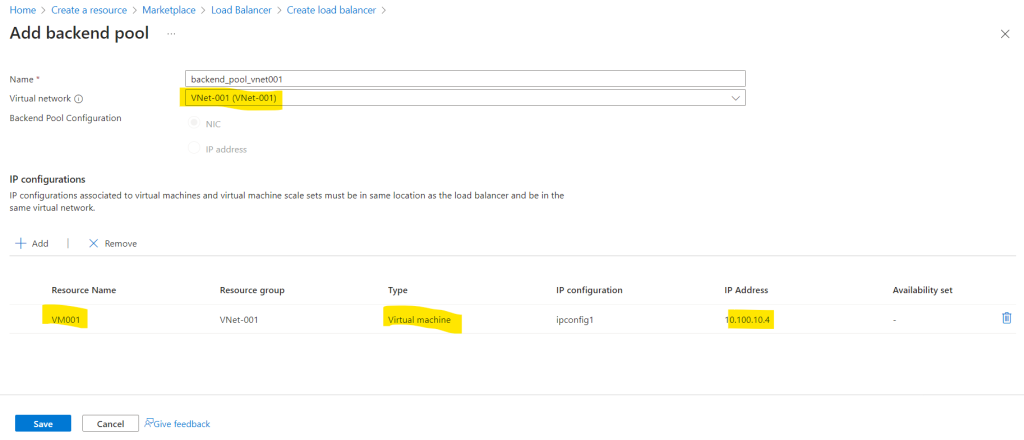
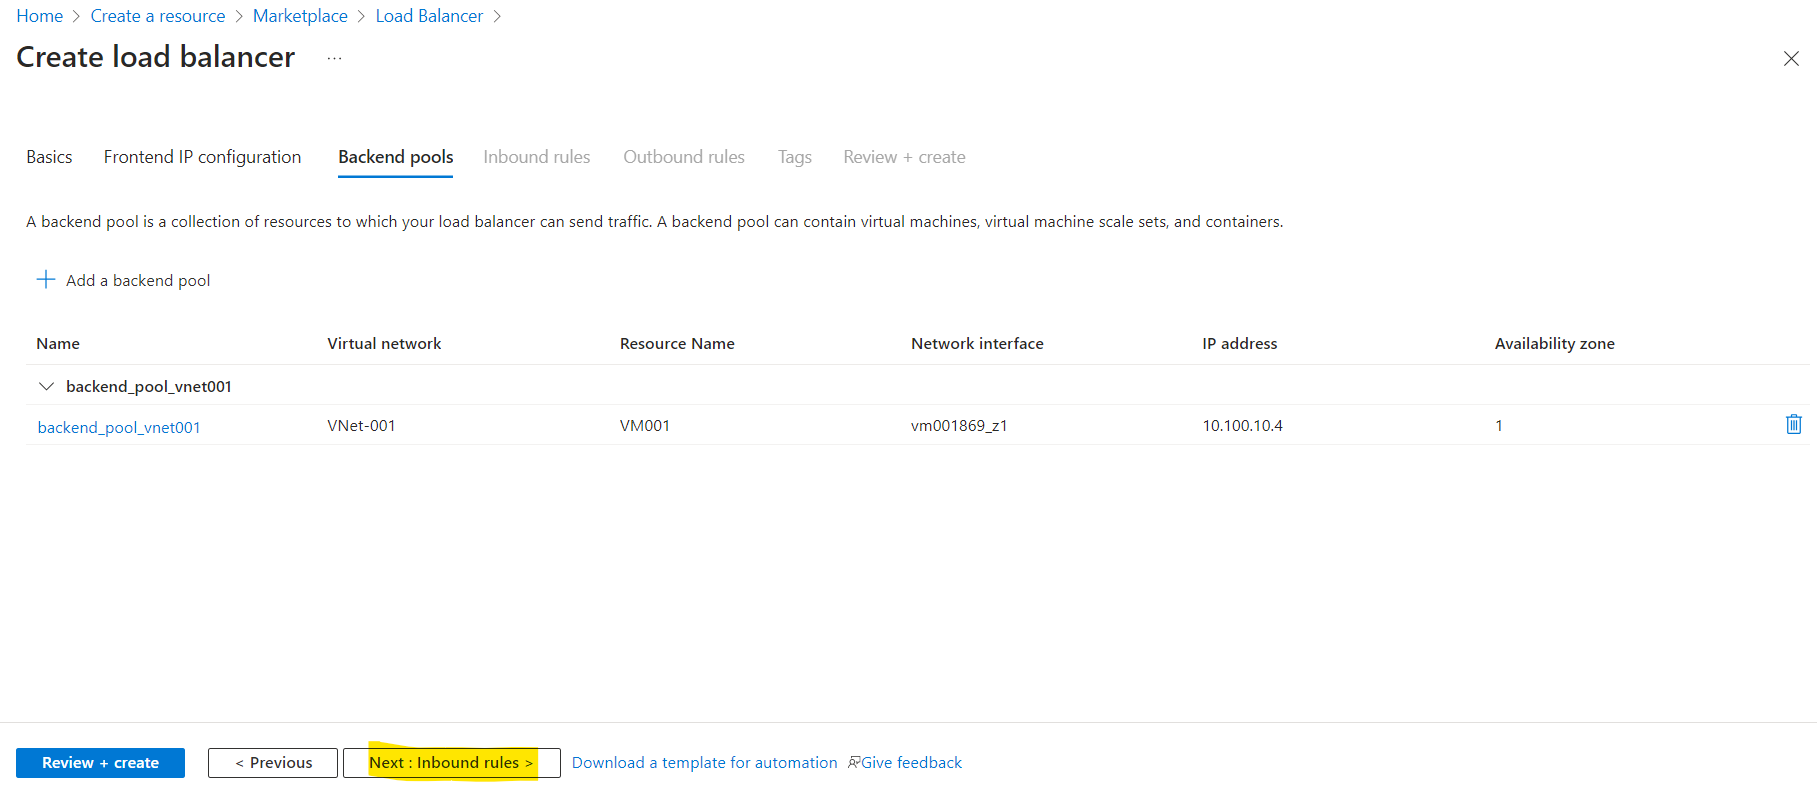
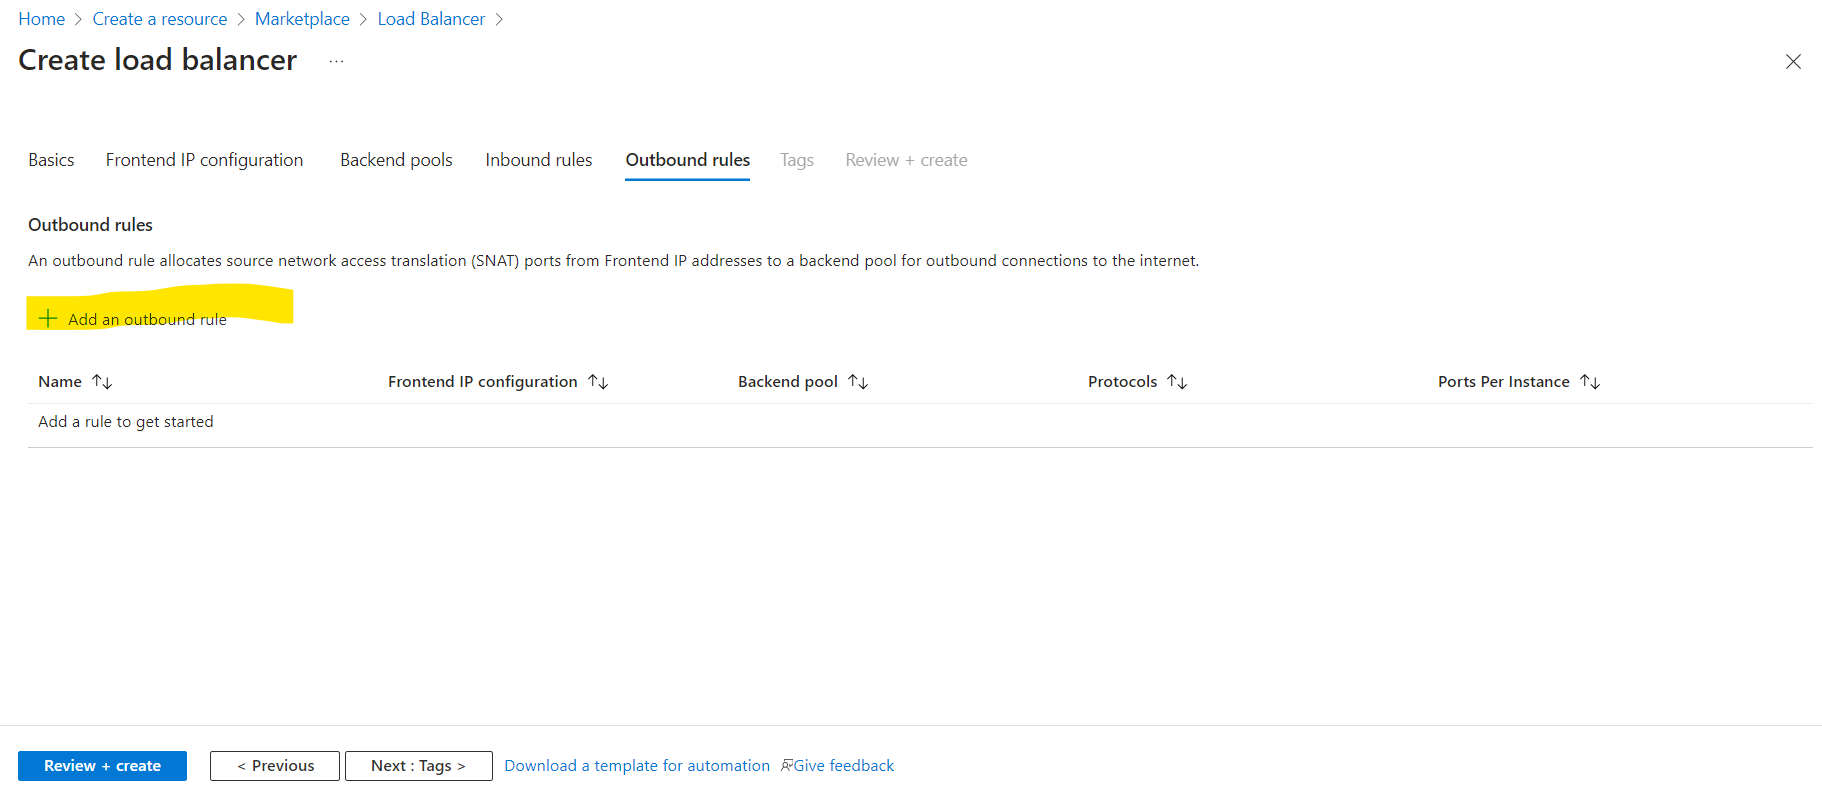
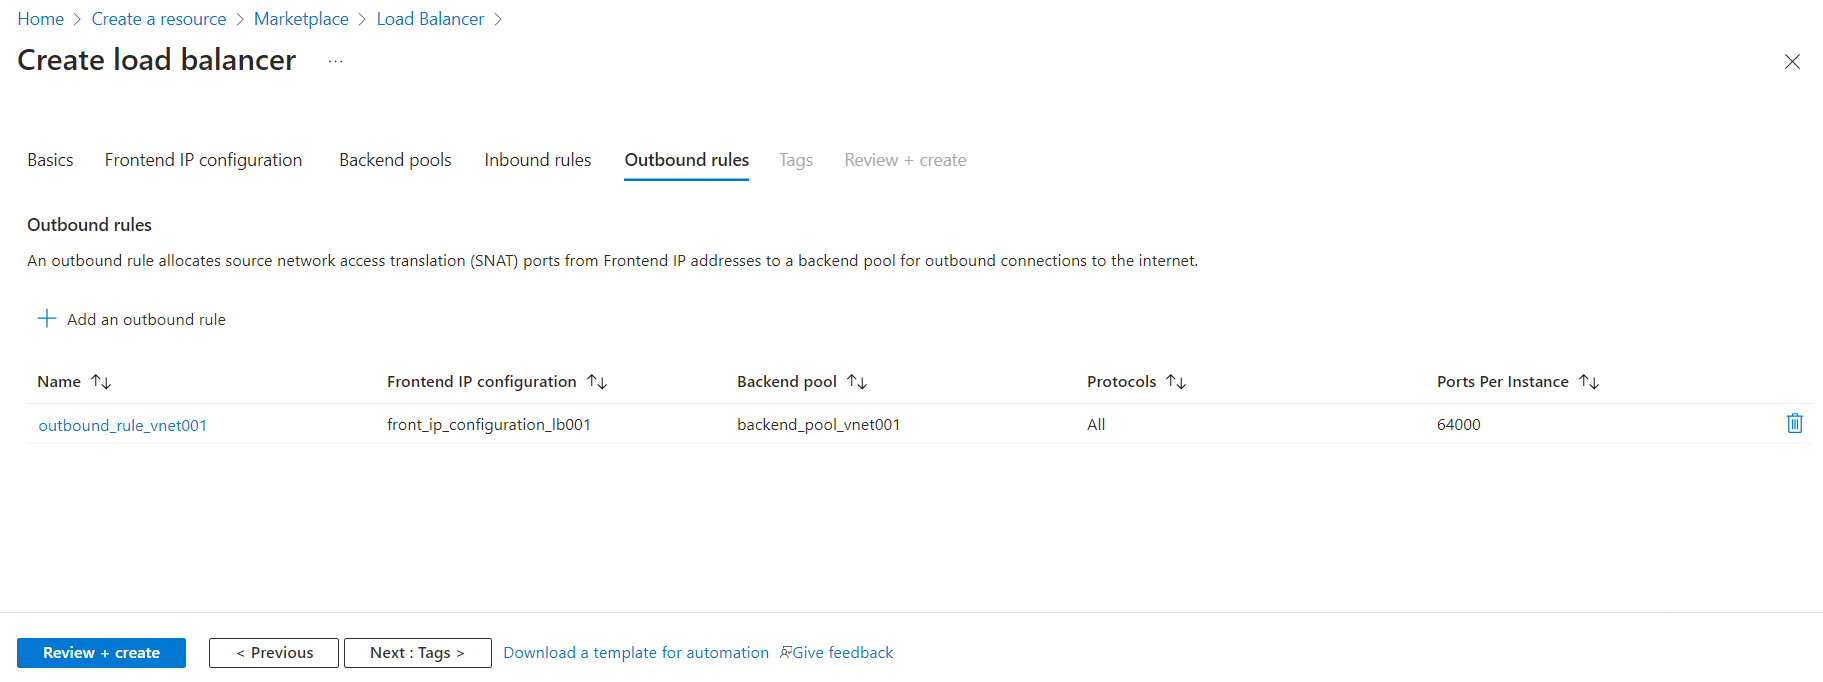
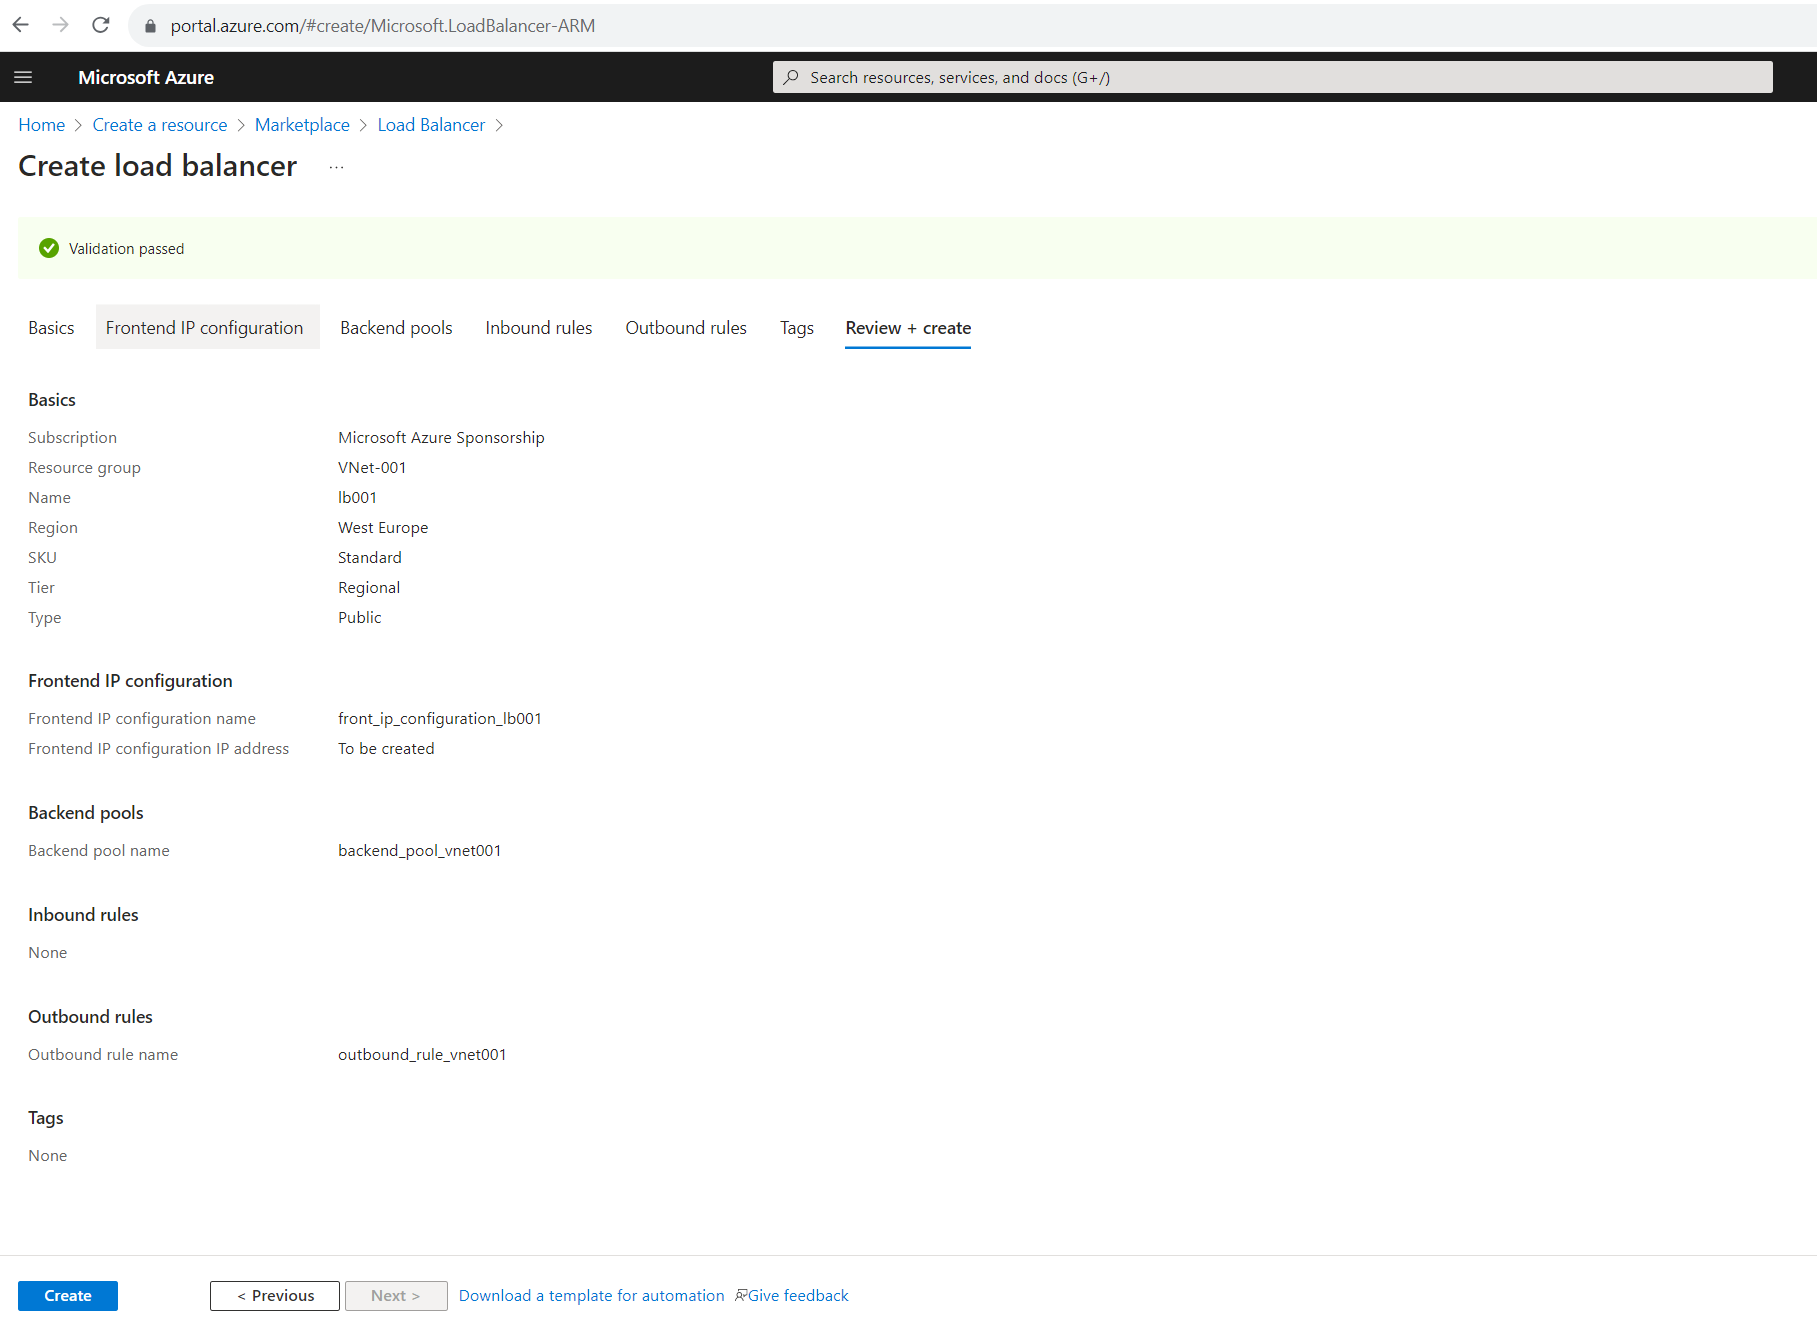
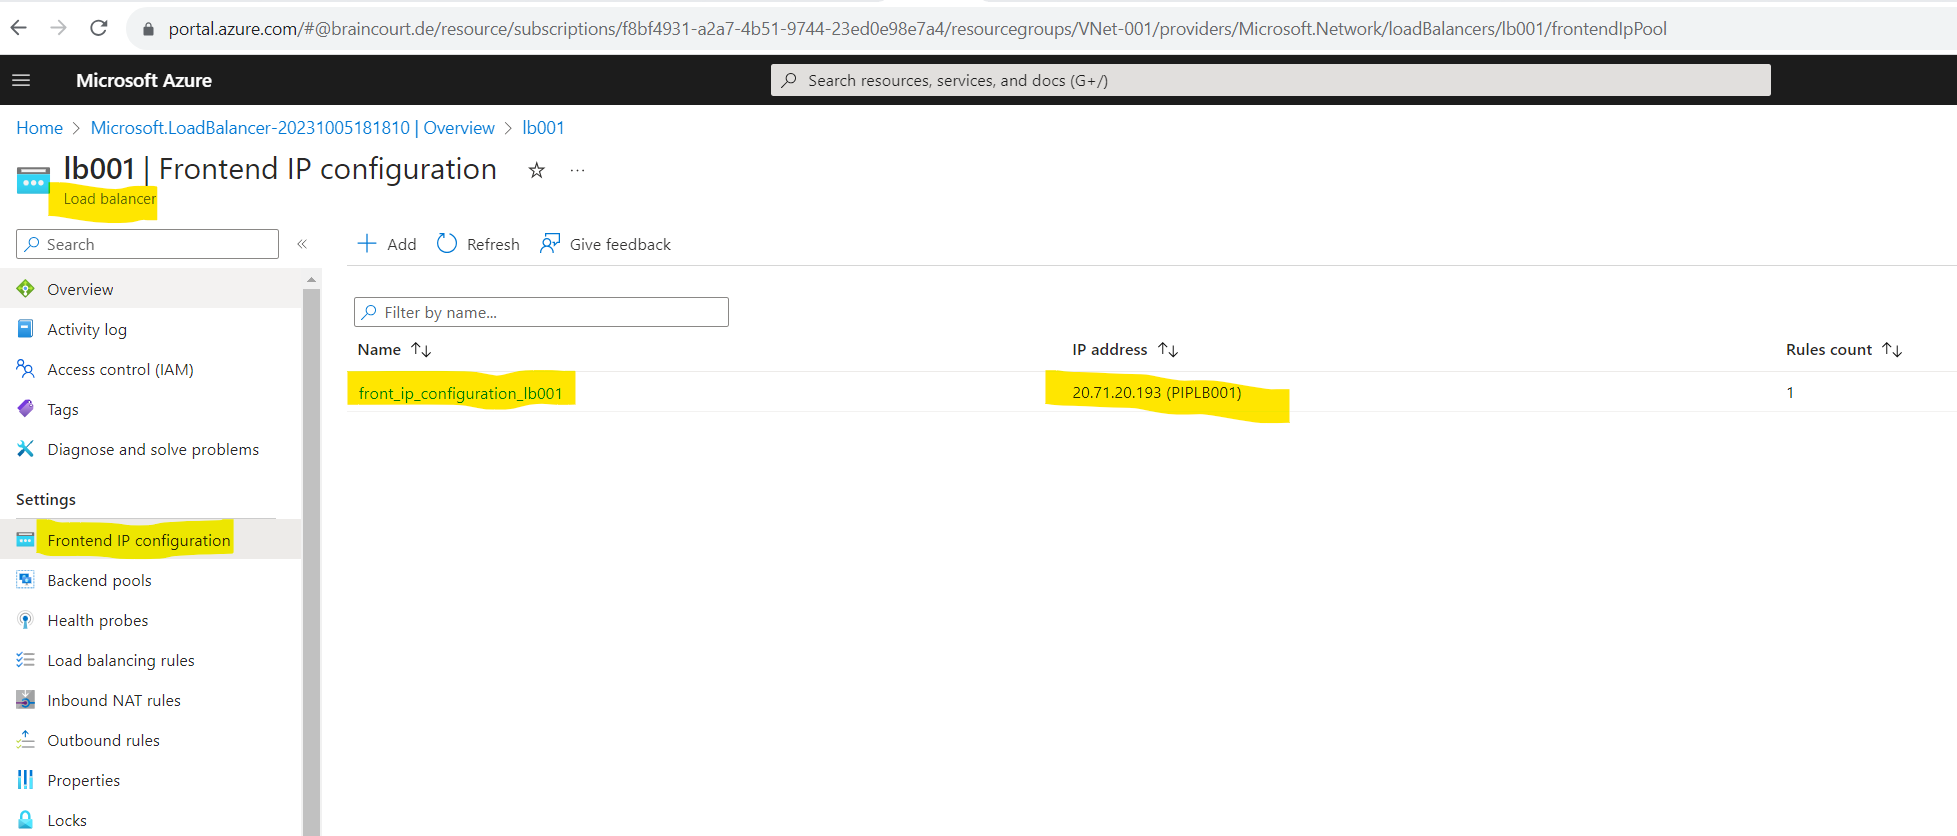
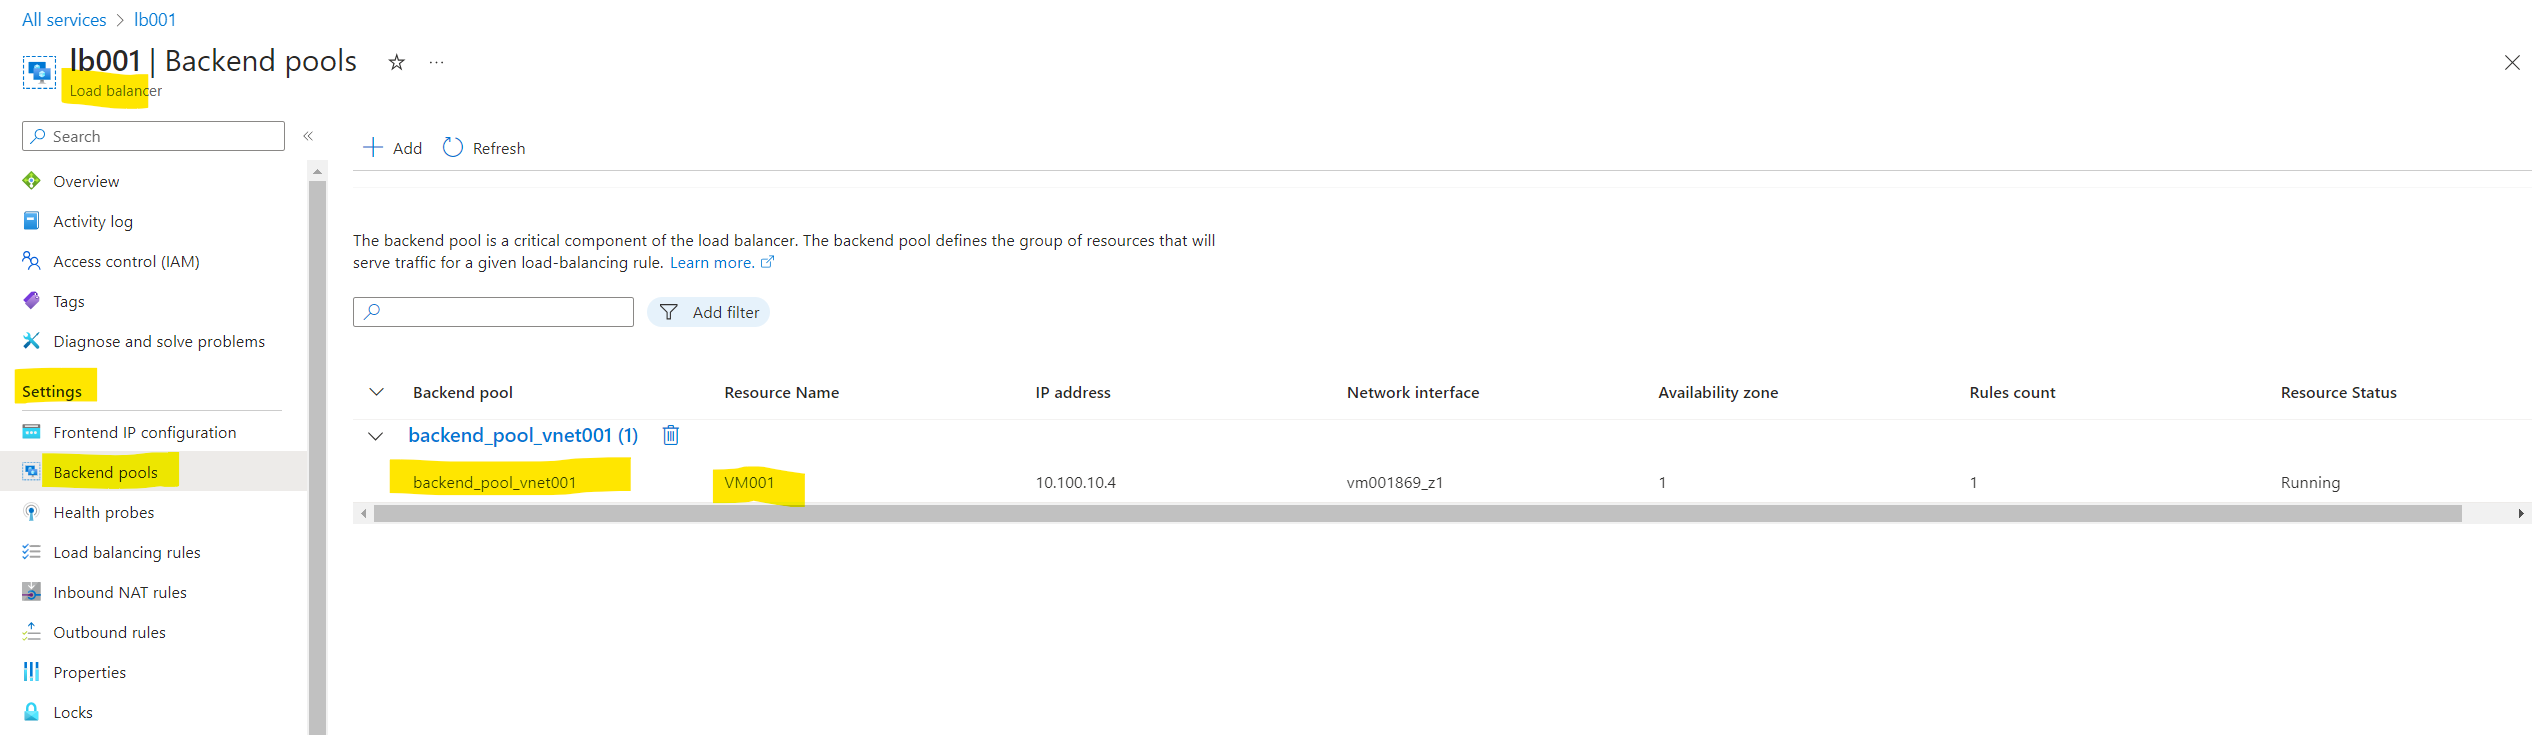
By using a Load Balancer
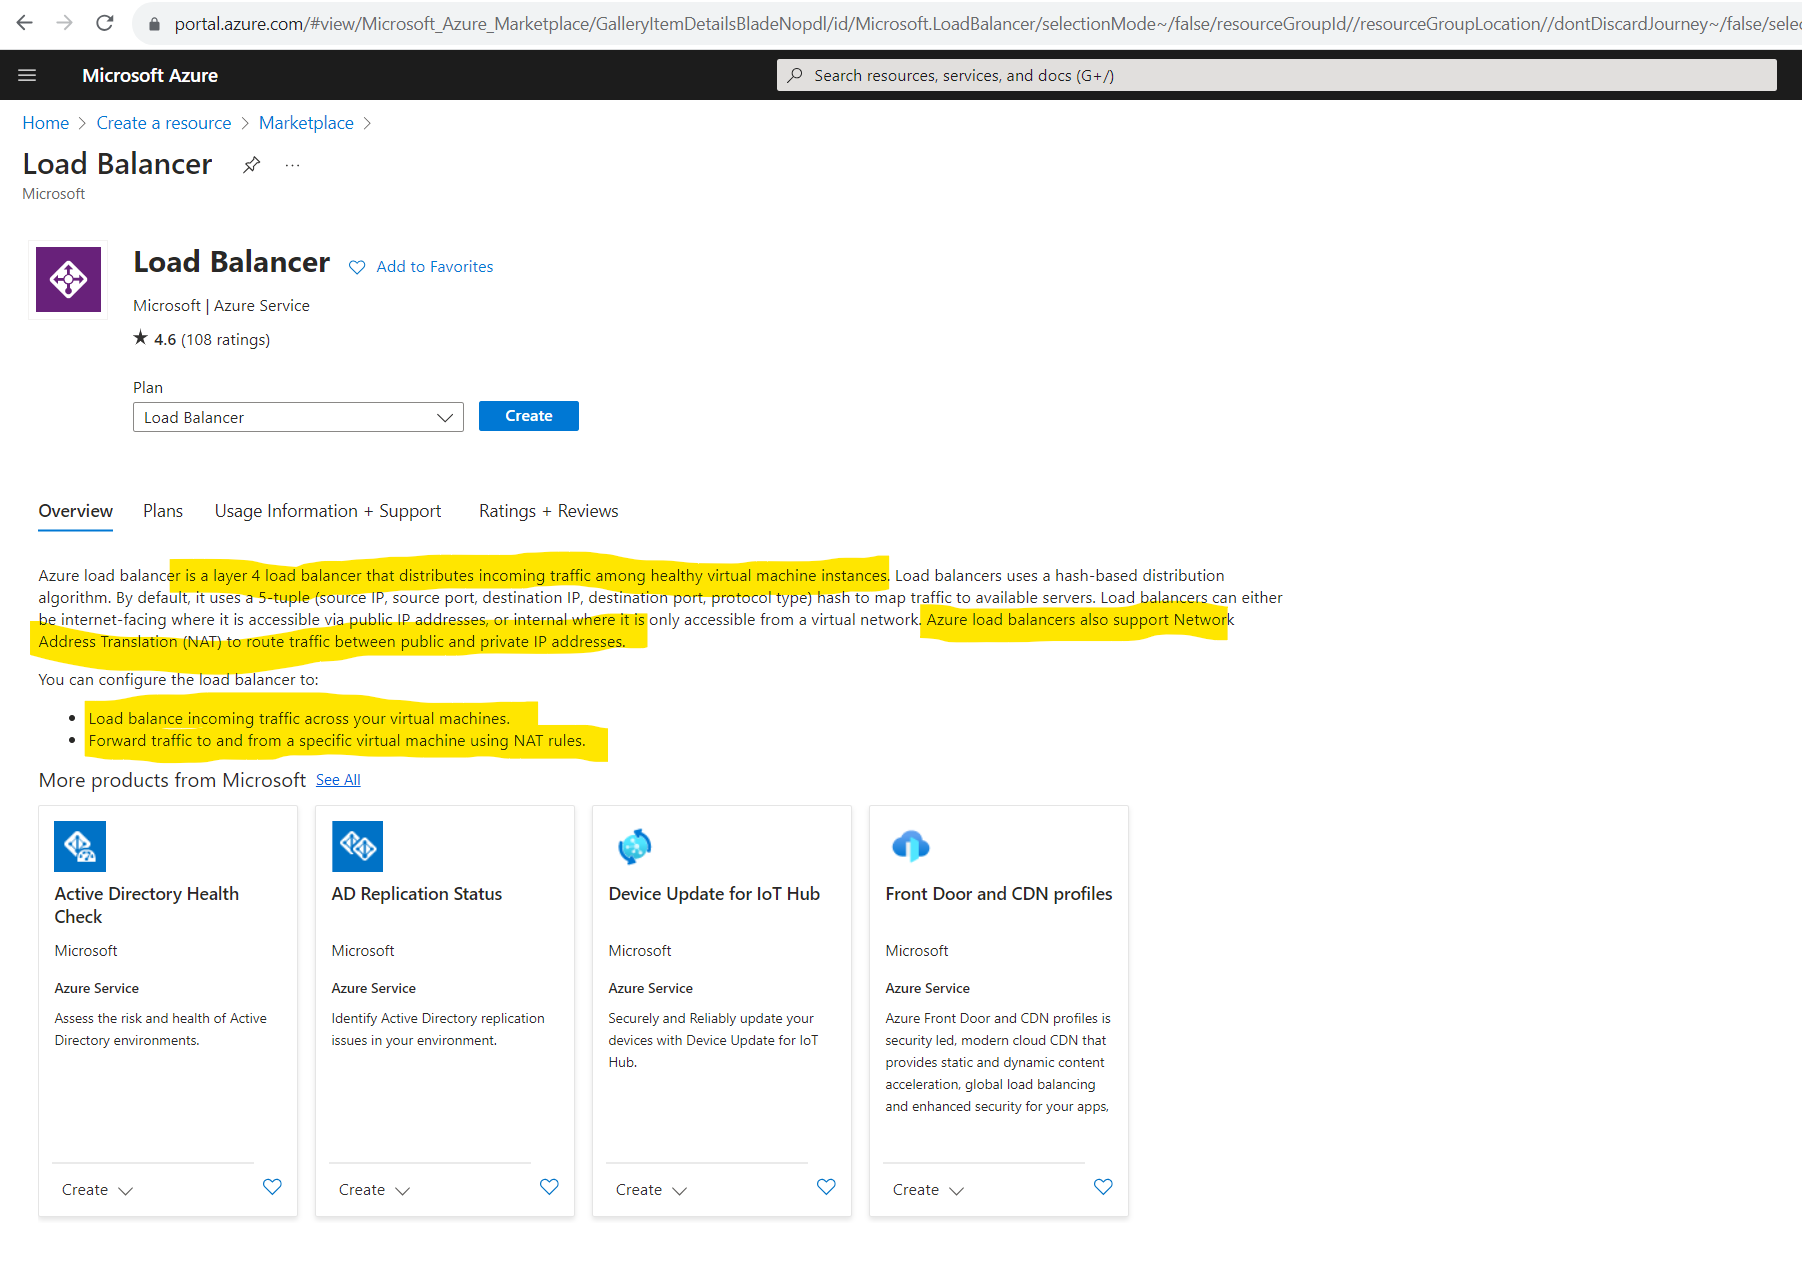
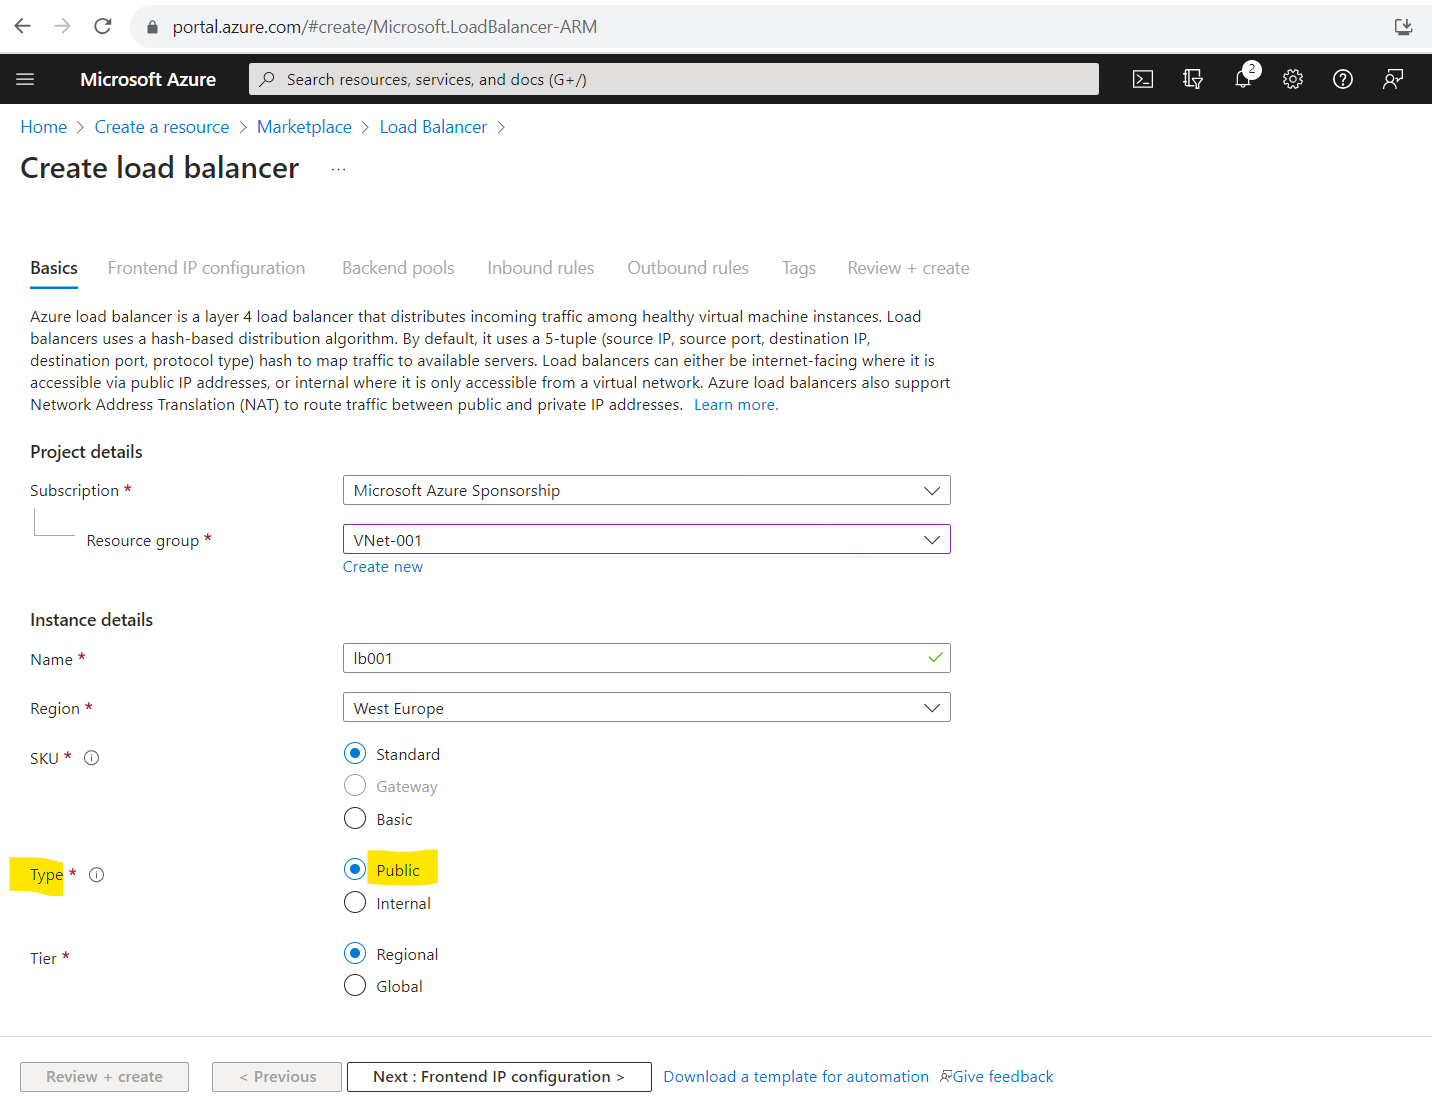
A public load balancer can provide outbound connections for virtual machines (VMs) inside your virtual network. These connections are accomplished by translating their private IP addresses to public IP addresses. Public Load Balancers are used to load balance internet traffic to your VMs.
Source: https://learn.microsoft.com/en-us/azure/load-balancer/load-balancer-overview#publicloadbalancer
What is Azure Load Balancer?
https://learn.microsoft.com/en-us/azure/load-balancer/load-balancer-overview#publicloadbalancer
Choose Standard Load Balancer network load balancing when extreme performance is required coupled with low latency. Choose Gateway Load Balancer to deploy, scale, and run third party appliances in Azure with ease.
More about Gateway Load Balancer you will find in the following article from Microsoft.
https://learn.microsoft.com/en-us/azure/load-balancer/gateway-overview
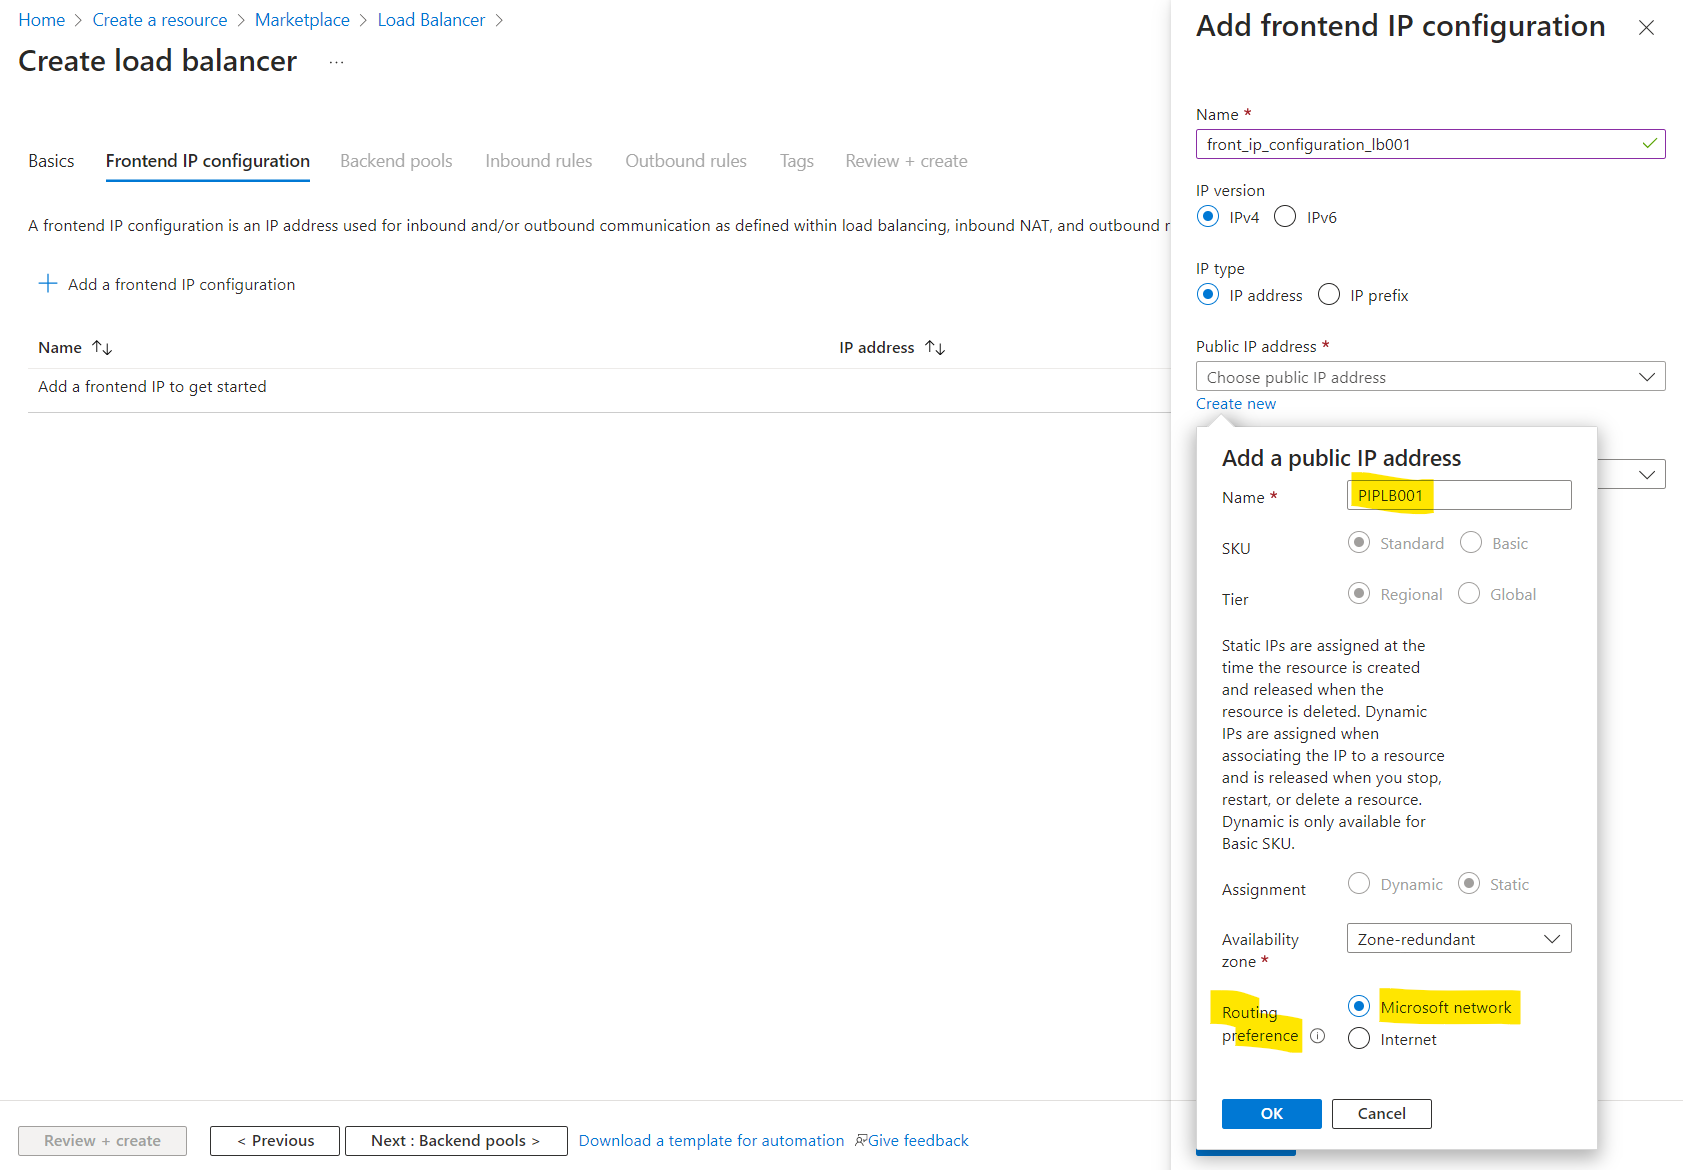
In a nutshell, Microsoft Network aka cold potato means here that the network traffic is routed as long as possible within the Microsoft network before passing it over to the destination in another network. Internet aka hot potato means here that the network traffic will be passed as quickly as possible from the Microsoft network to another network (autonomous system) and finally to the destination.
More about hot potato vs. cold potato you will find in my following post
https://blog.matrixpost.net/hot-potato-vs-cold-potato-routing/
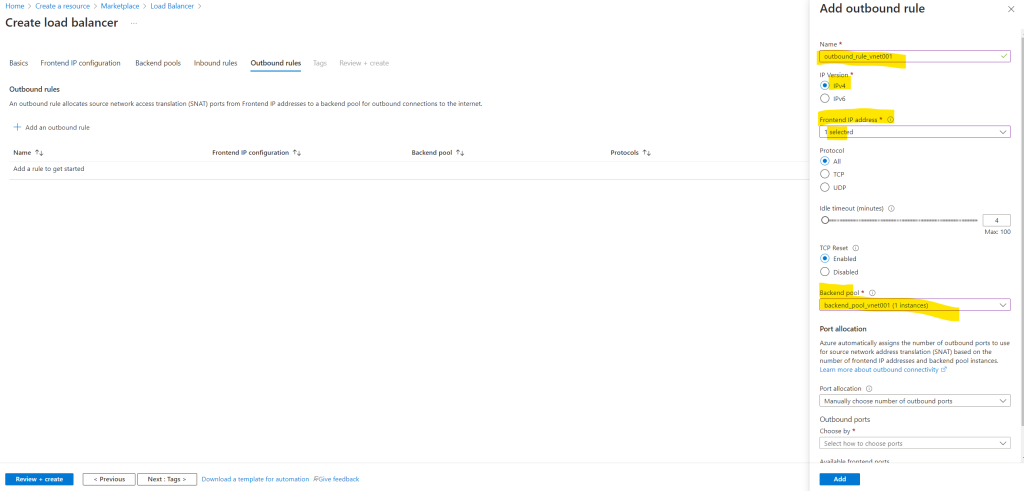
Select public IP addresses or prefixes to be used for outbound traffic. Each public IP address provides 64,000 SNAT ports. Add more IP addresses to increase the number of ports available per instance in the backend pool.
When using default port allocation, Azure may drop existing connections when you scale out. Manually allocate ports to avoid dropped connections.

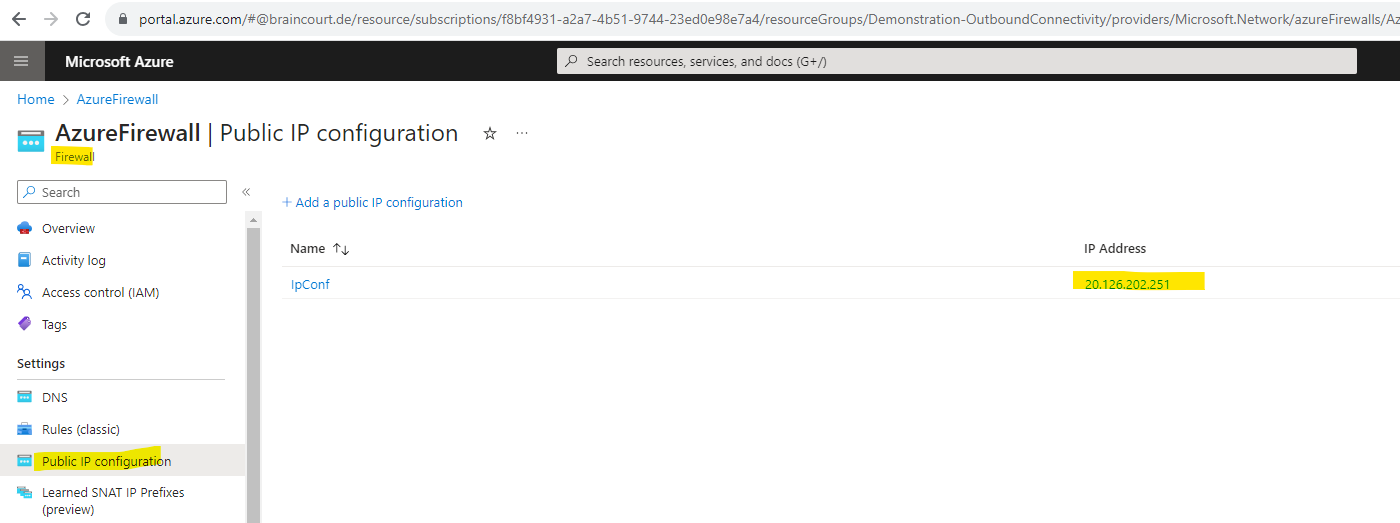
So in my case this is 20.71.20.193.
dig TXT +short o-o.myaddr.l.google.com @ns1.google.com
By using Azure Firewall (Hub-spoke network)
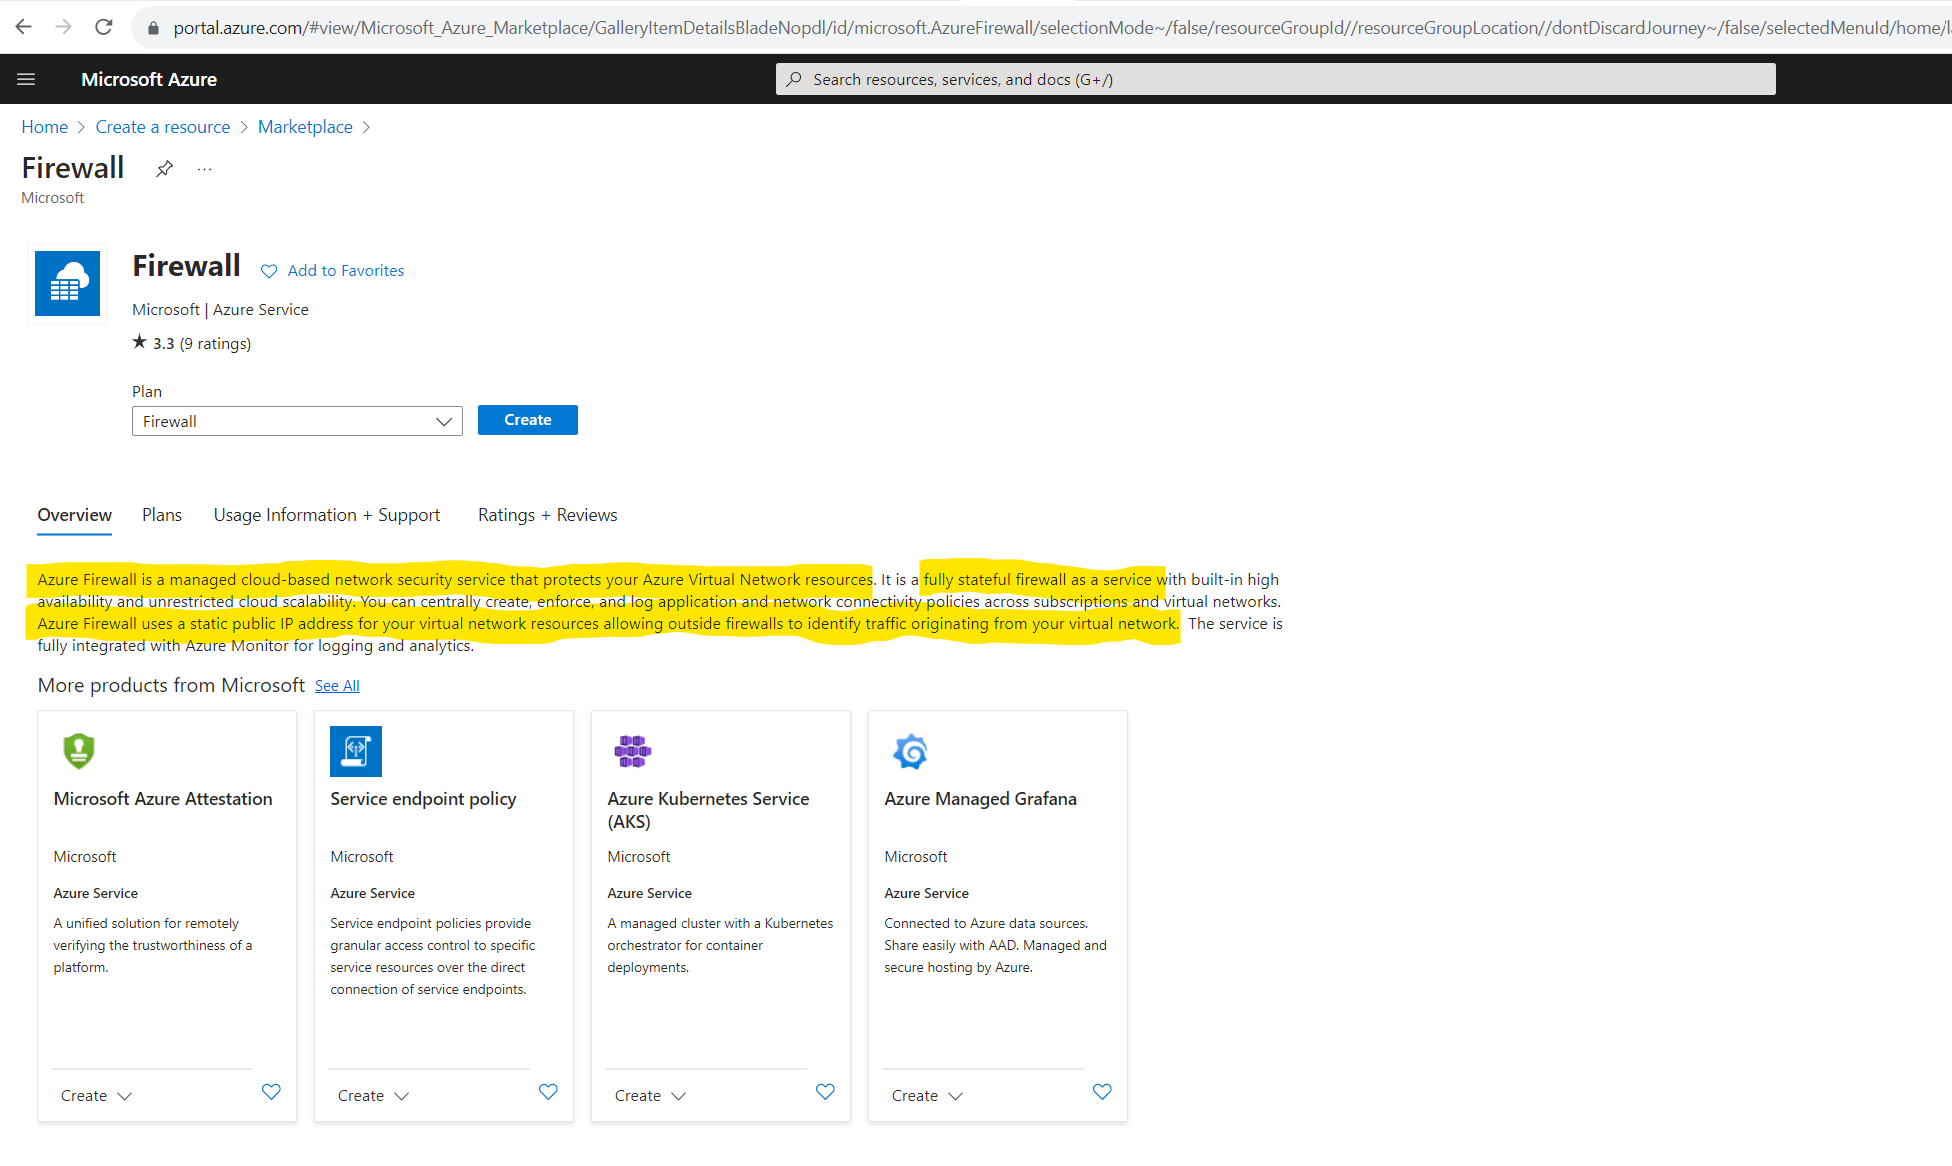
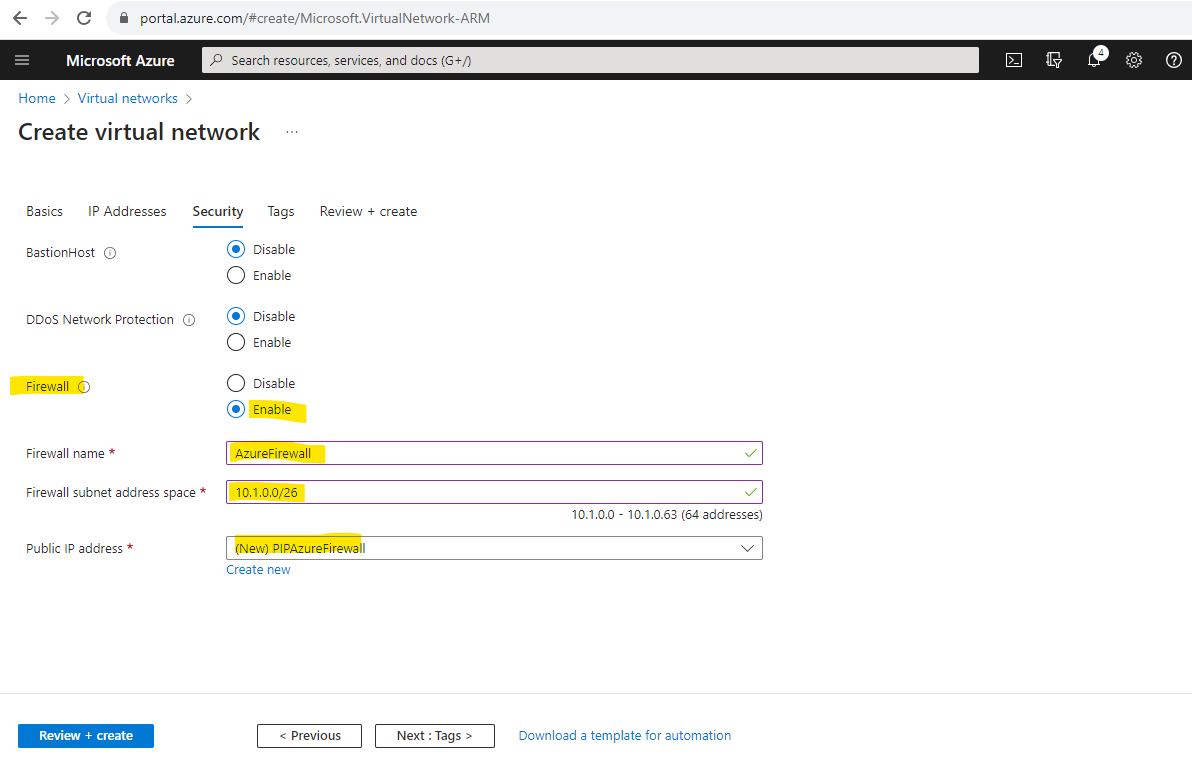
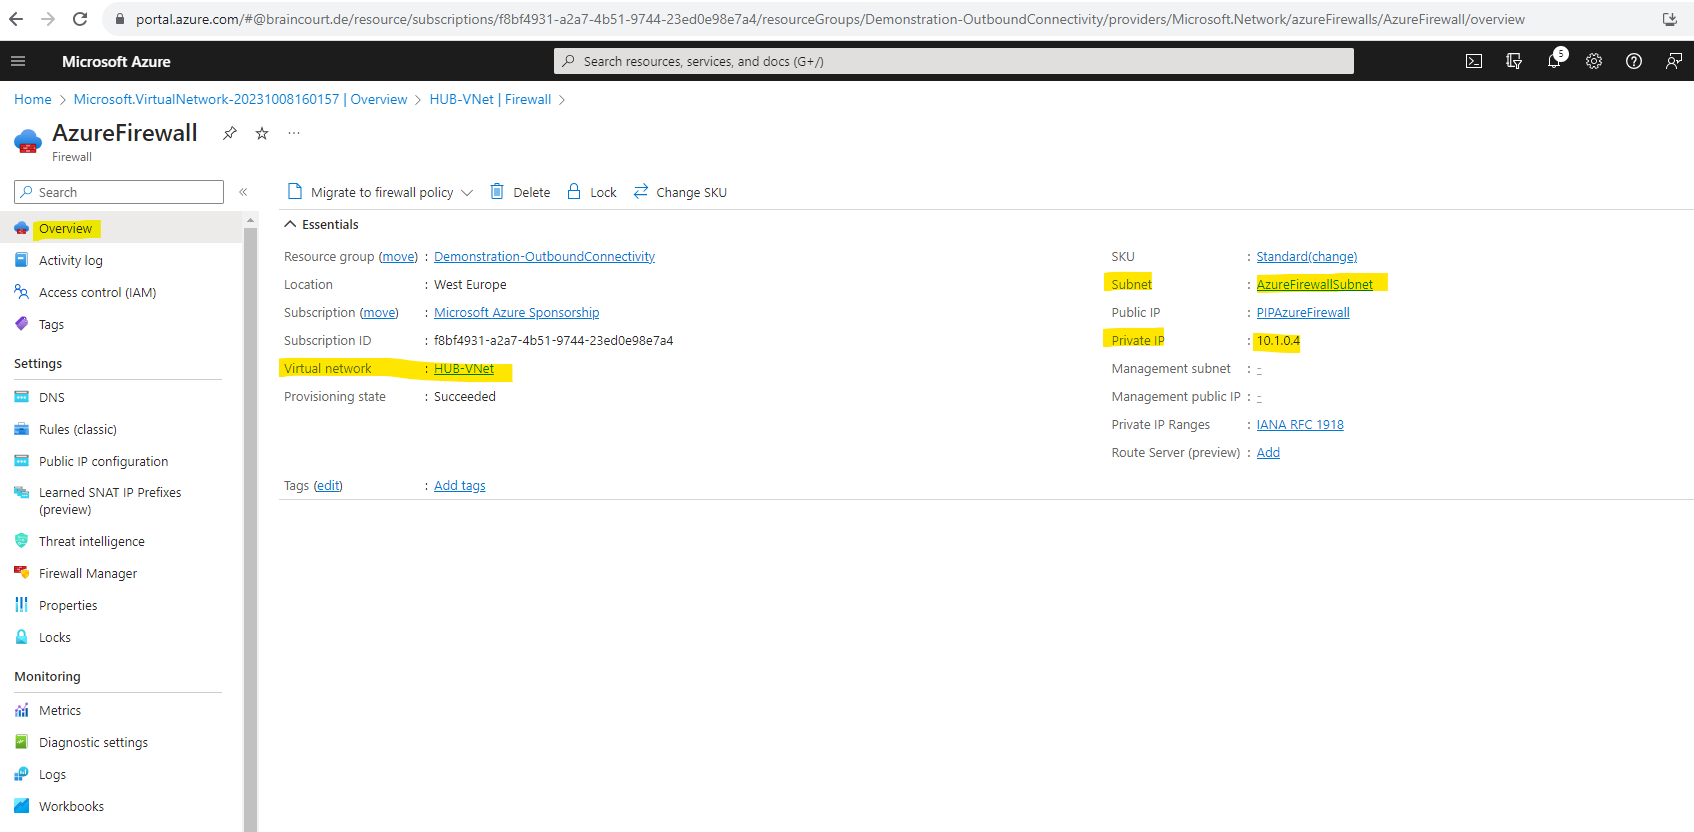
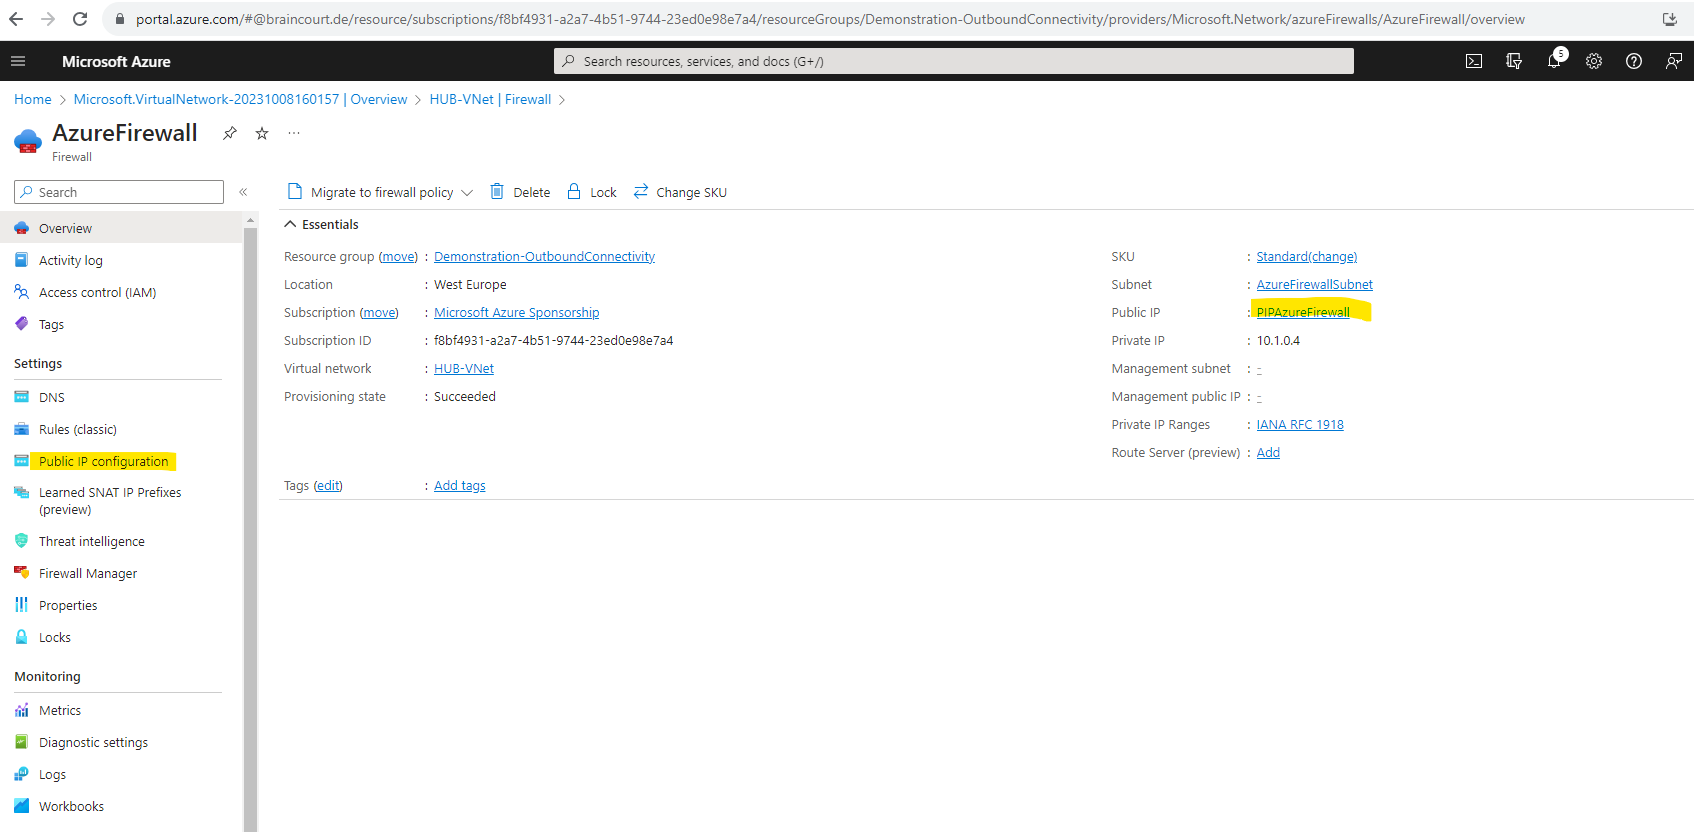
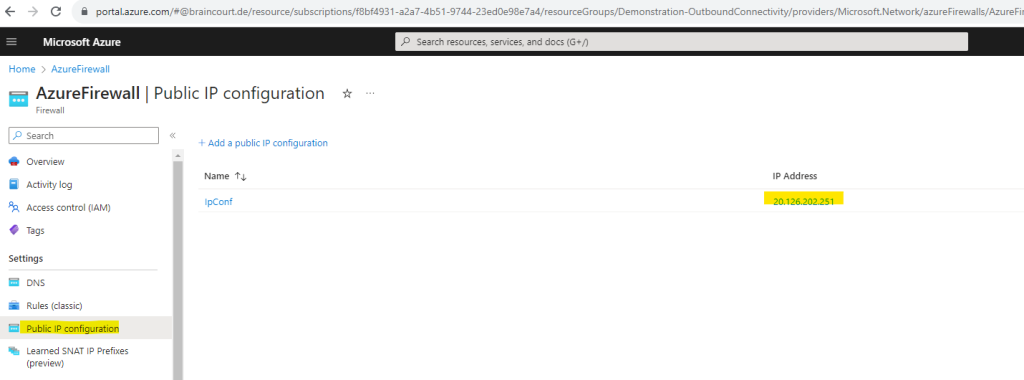
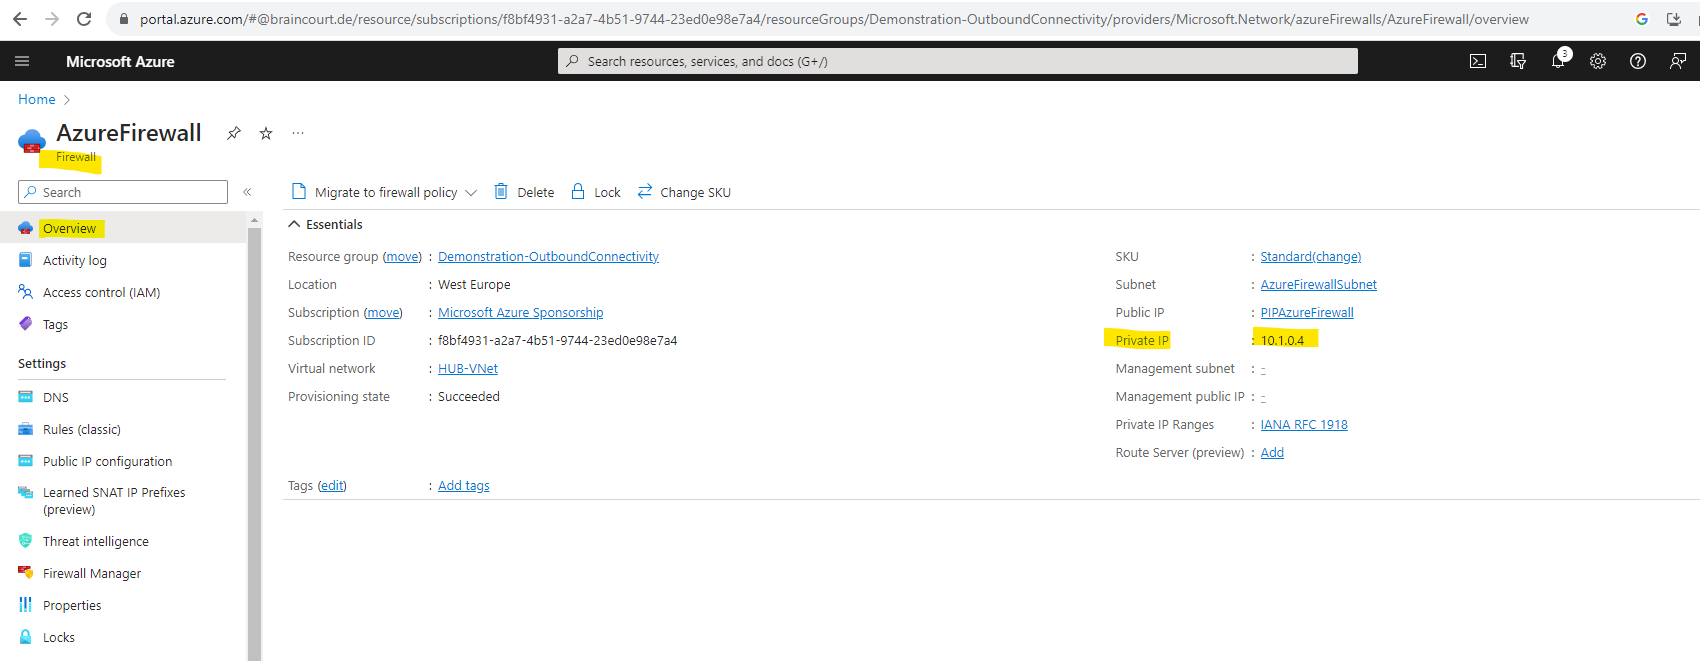
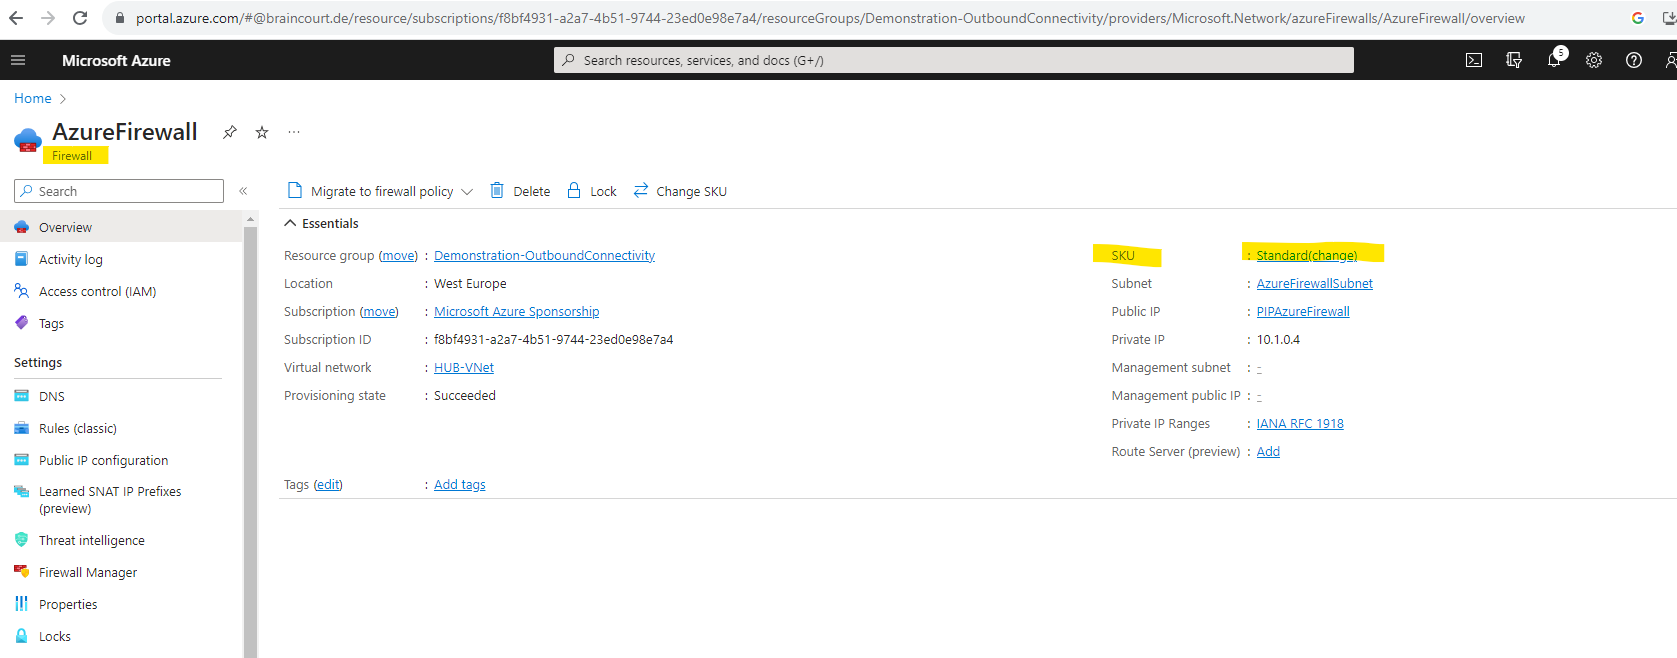
Azure Firewall uses a static public IP address for your virtual network resources allowing outside firewalls to identify traffic originating from your virtual network.
Azure Firewall’s initial throughput capacity is 2.5 – 3 Gbps and it scales out to 30 Gbps for Standard SKU and 100 Gbps for Premium SKU. It scales out automatically based on CPU usage and throughput.
Azure Firewall is a cloud-native and intelligent network firewall security service that provides the best of breed threat protection for your cloud workloads running in Azure. It’s a fully stateful firewall as a service with built-in high availability and unrestricted cloud scalability. It provides both east-west and north-south traffic inspection. To learn what’s east-west and north-south traffic, see East-west and north-south traffic.
In a nutshell, North-south refers to the traffic that flows in and out of a datacenter and East-west traffic refers to traffic between or within data centers.
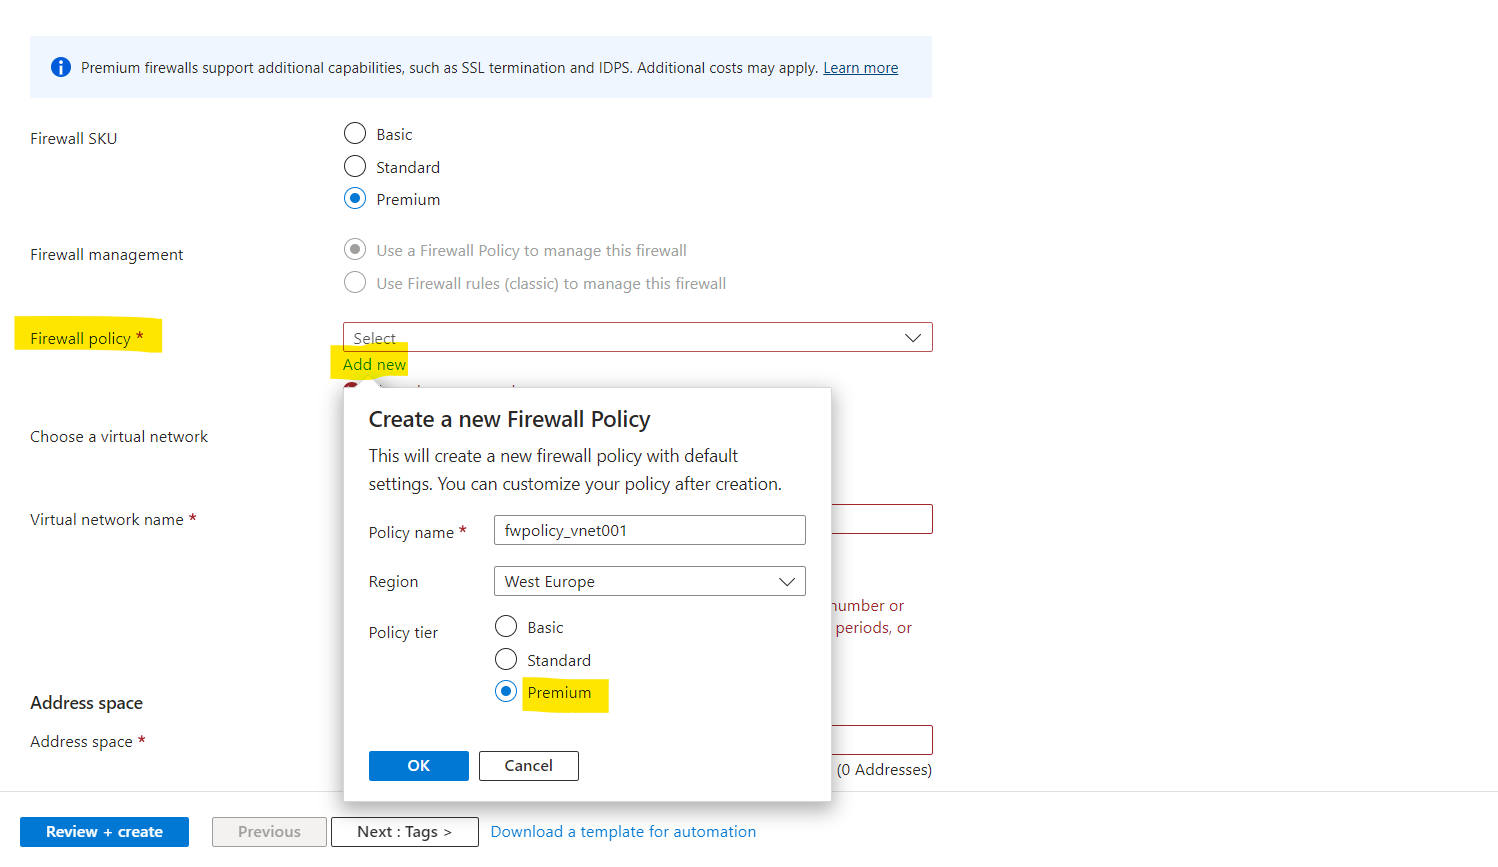
Azure Firewall is offered in three SKUs: Standard, Premium, and Basic.
Source: https://learn.microsoft.com/en-us/azure/firewall/overview
Azure Firewall supports Basic, Standard, and Premium policies.
Basic policy -> NAT rules, Application rules, IP Groups, Threat Intelligence (alerts)
Standard policy -> NAT rules, Network rules, Application rules, Custom DNS, DNS proxy, IP Groups, Web Categories, Threat Intelligence
Premium policy -> All Standard feature support, plus: TLS Insprection, Web Categories, URL Filtering, IDPS

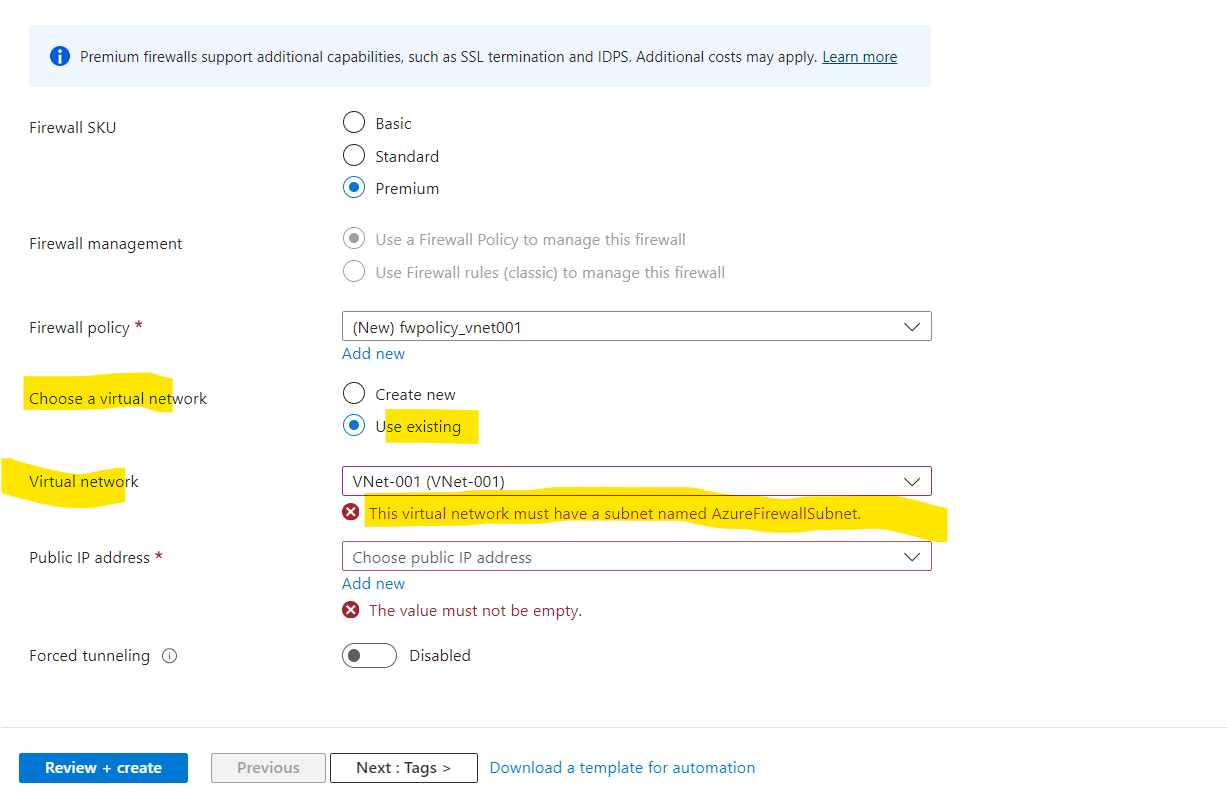
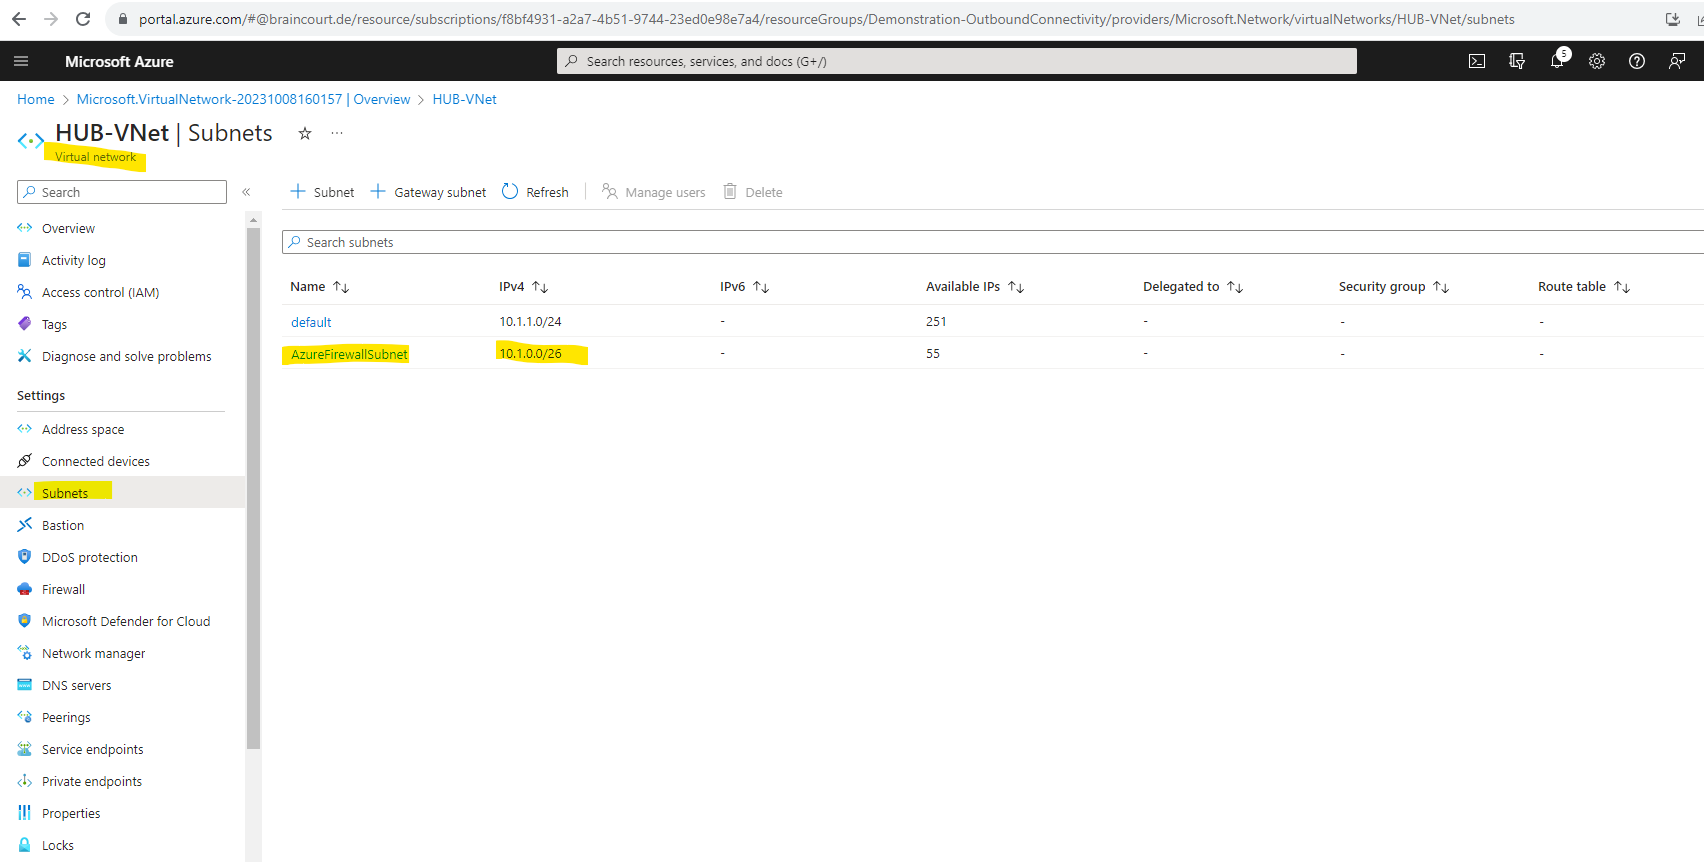
Error: The virtual network must have a subnet named AzureFirewallSubnet
We need to deploy a dedicated subnet in which we place our Azure Firewall.
Further the subnet must be named AzureFirewallSubnet.
For production deployments, a hub and spoke model is recommended, where the firewall is in its own VNet. The workload servers are in peered VNets in the same region with one or more subnets.
Source: https://learn.microsoft.com/en-us/azure/firewall/tutorial-firewall-deploy-portal
In a nutshell the hub and spoke model is:
A hub is a central network zone that controls and inspects ingress or egress traffic between zones: internet, on-premises, and spokes. The hub-and-spoke topology gives your IT department an effective way to enforce security policies in a central location. It also reduces the potential for misconfiguration and exposure.
Source: https://learn.microsoft.com/en-us/azure/cloud-adoption-framework/ready/azure-best-practices/hub-spoke-network-topologyThe Spoke is the network zone which includes your workloads and is peered with the HUB network. These workloads can be such as Production or Non-production. Systems in the Spoke network will consume common service components from the HUB network like for example the Azure Firewall, VPN Gateways, Azure Bastion, ….
Hub-spoke architecture refers to site interconnects. You’ve got a central hub (location) that all other sites connect to. All traffic between sites runs through the hub.
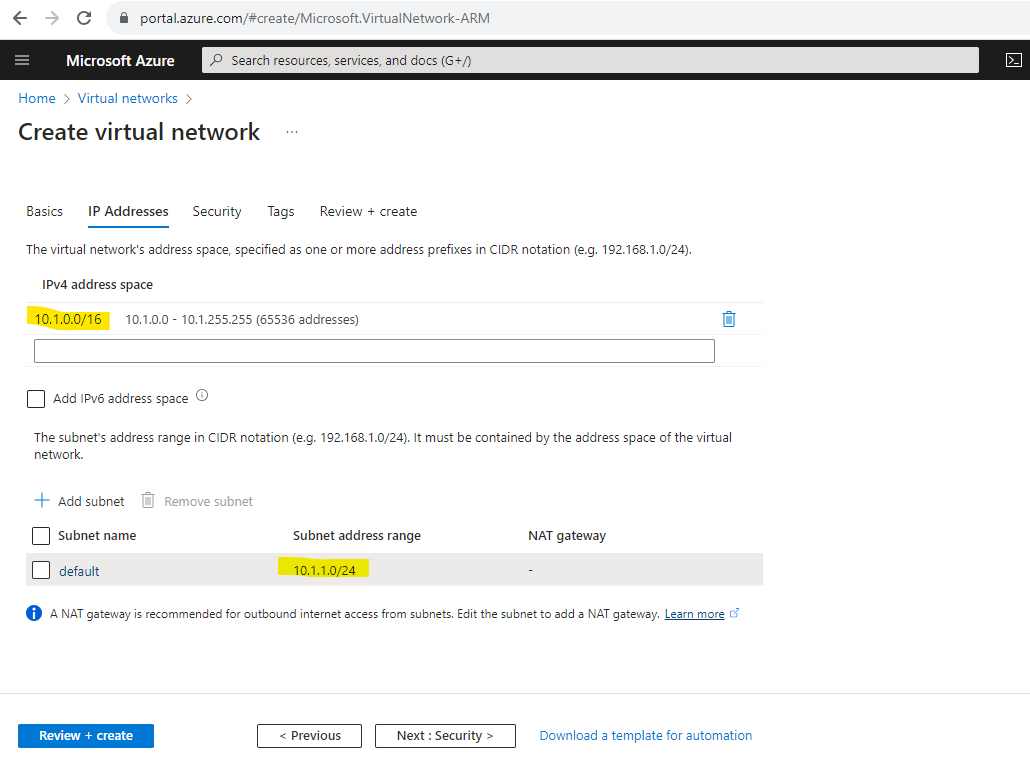
The size of the AzureFirewallSubnet subnet is /26.
Azure Firewall must provision more virtual machine instances as it scales. A /26 address space ensures that the firewall has enough IP addresses available to accommodate the scaling.For more information about the subnet size, see Azure Firewall FAQ.

What is Azure DDoS Protection?
https://learn.microsoft.com/en-us/azure/ddos-protection/ddos-protection-overviewAbout Azure DDoS Protection tier Comparison
https://learn.microsoft.com/en-us/azure/ddos-protection/ddos-protection-sku-comparison
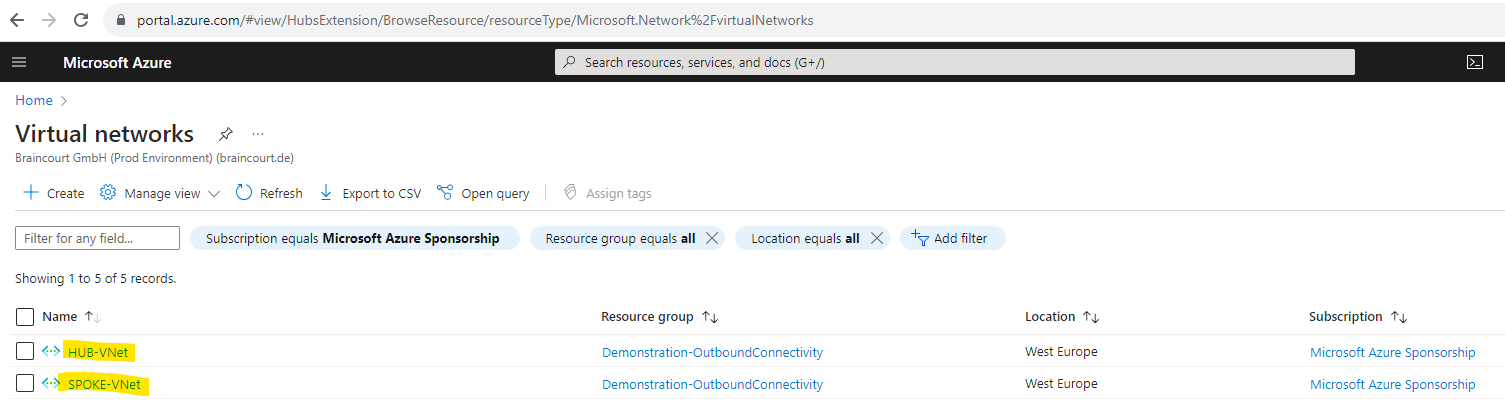
Unfortunately we also cannot just move a virtual machine from one VNet into another, but you can keep the virtual hard disk and attach it later to a new created virtual machine.
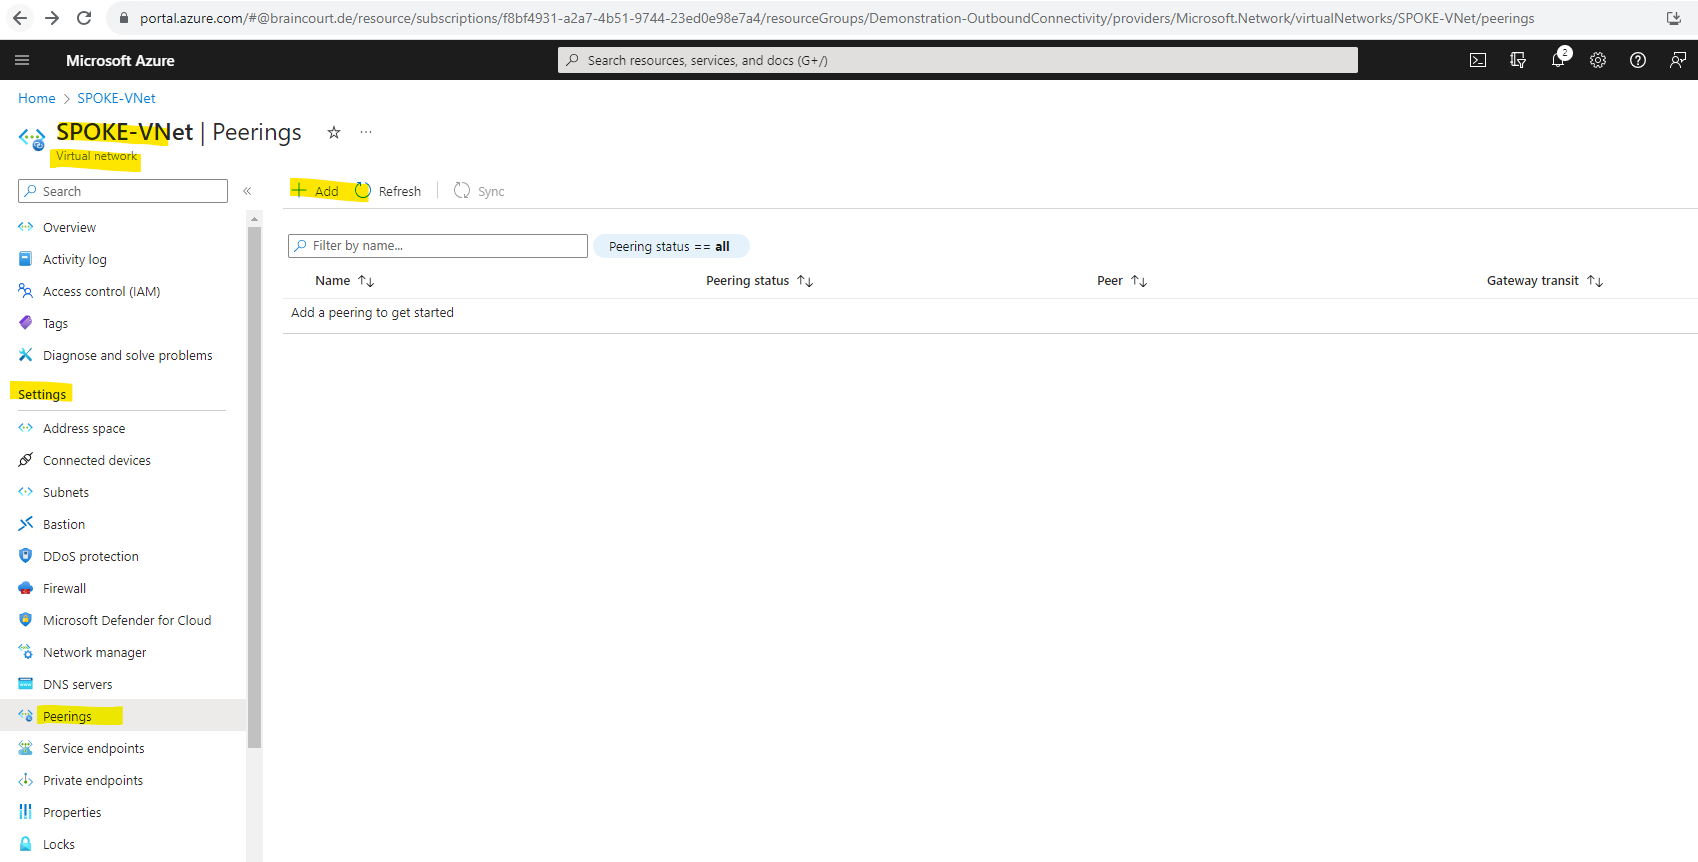
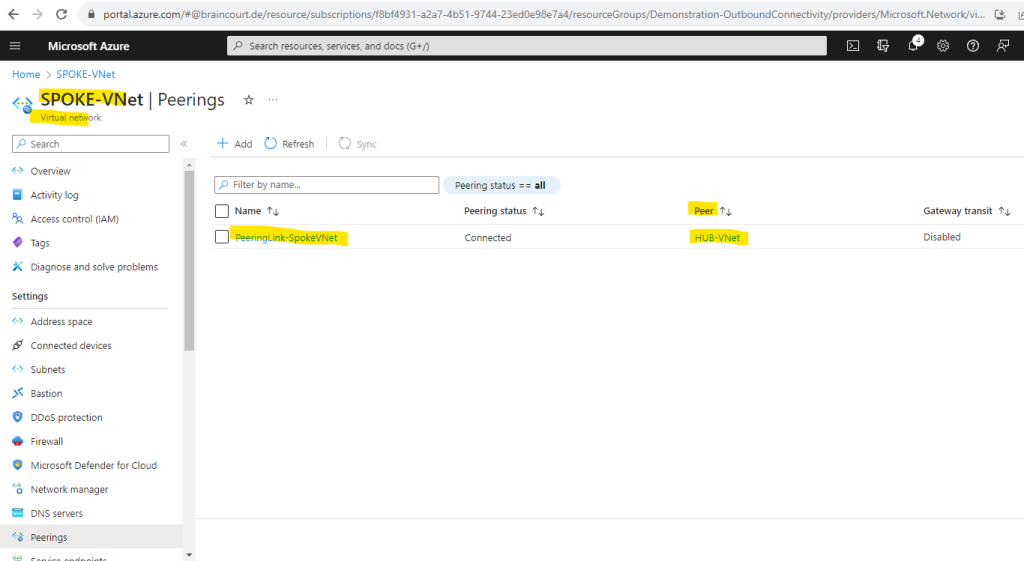
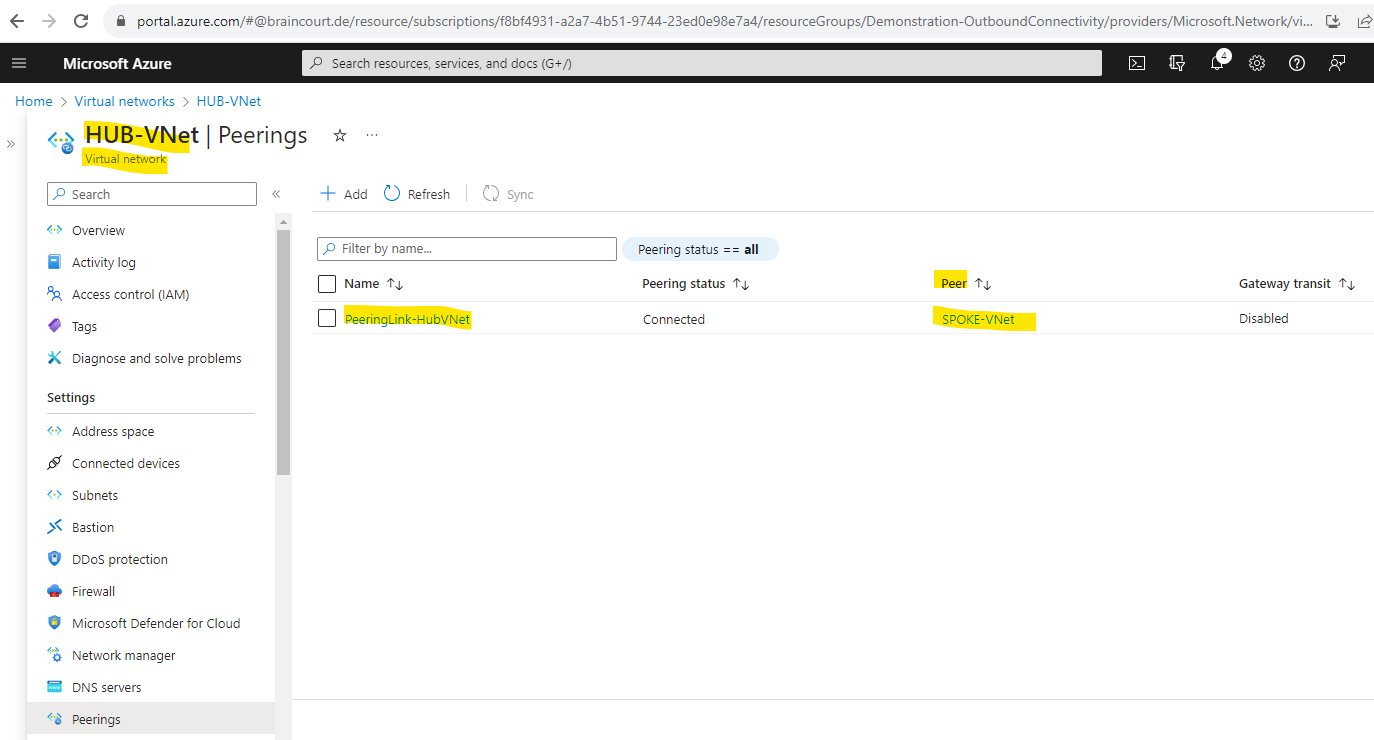
Add Peering
The traffic between virtual machines in peered virtual networks uses the Microsoft backbone infrastructure. Like traffic between virtual machines in the same network, traffic is routed through Microsoft’s private network only.
Source: https://learn.microsoft.com/en-us/azure/virtual-network/virtual-network-peering-overview
For peering to work, two peering links must be created. By selecting remote virtual network, Azure will create both peering links.
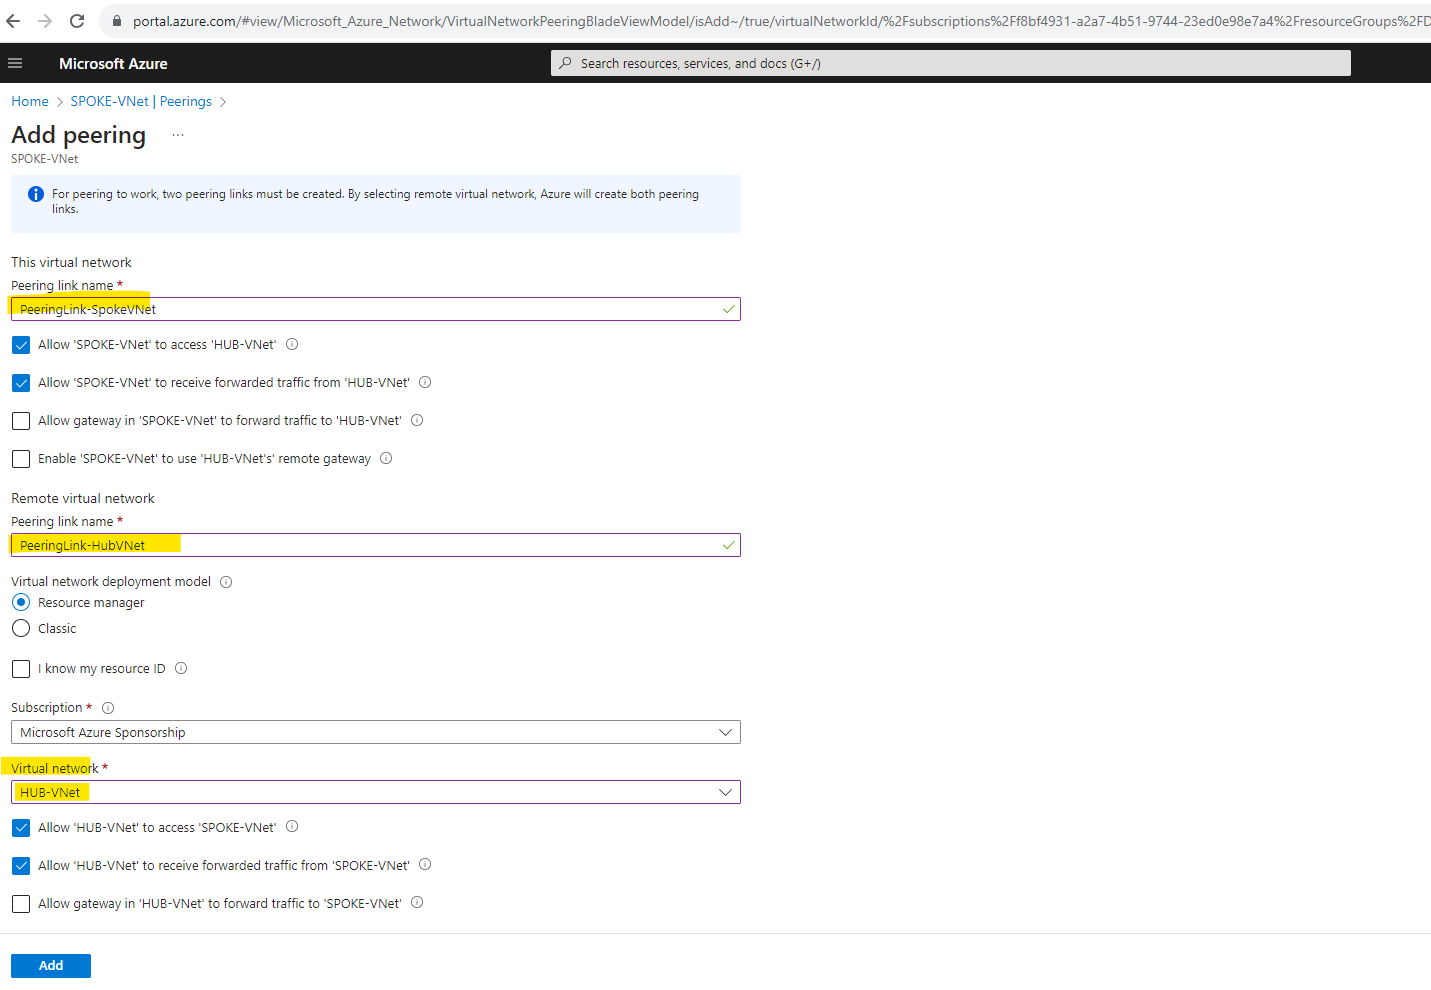
The checkboxes with the gateways we can leave blank as the Azure Firewall is not a gateway in term of Azure virtual networks. Allow gateway here is a peering property that lets one virtual network use the VPN gateway in the peered virtual network for cross-premises or VNet-to-VNet connectivity.
More under https://learn.microsoft.com/en-us/azure/vpn-gateway/vpn-gateway-peering-gateway-transit
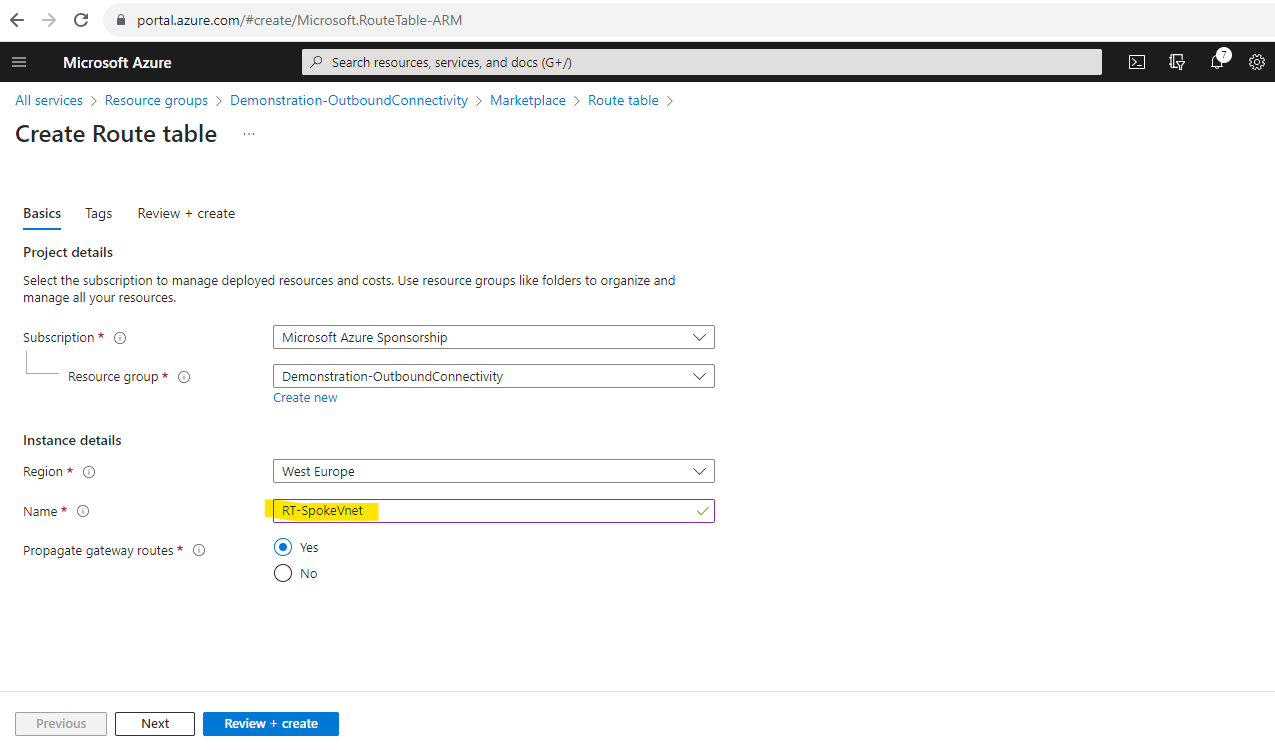
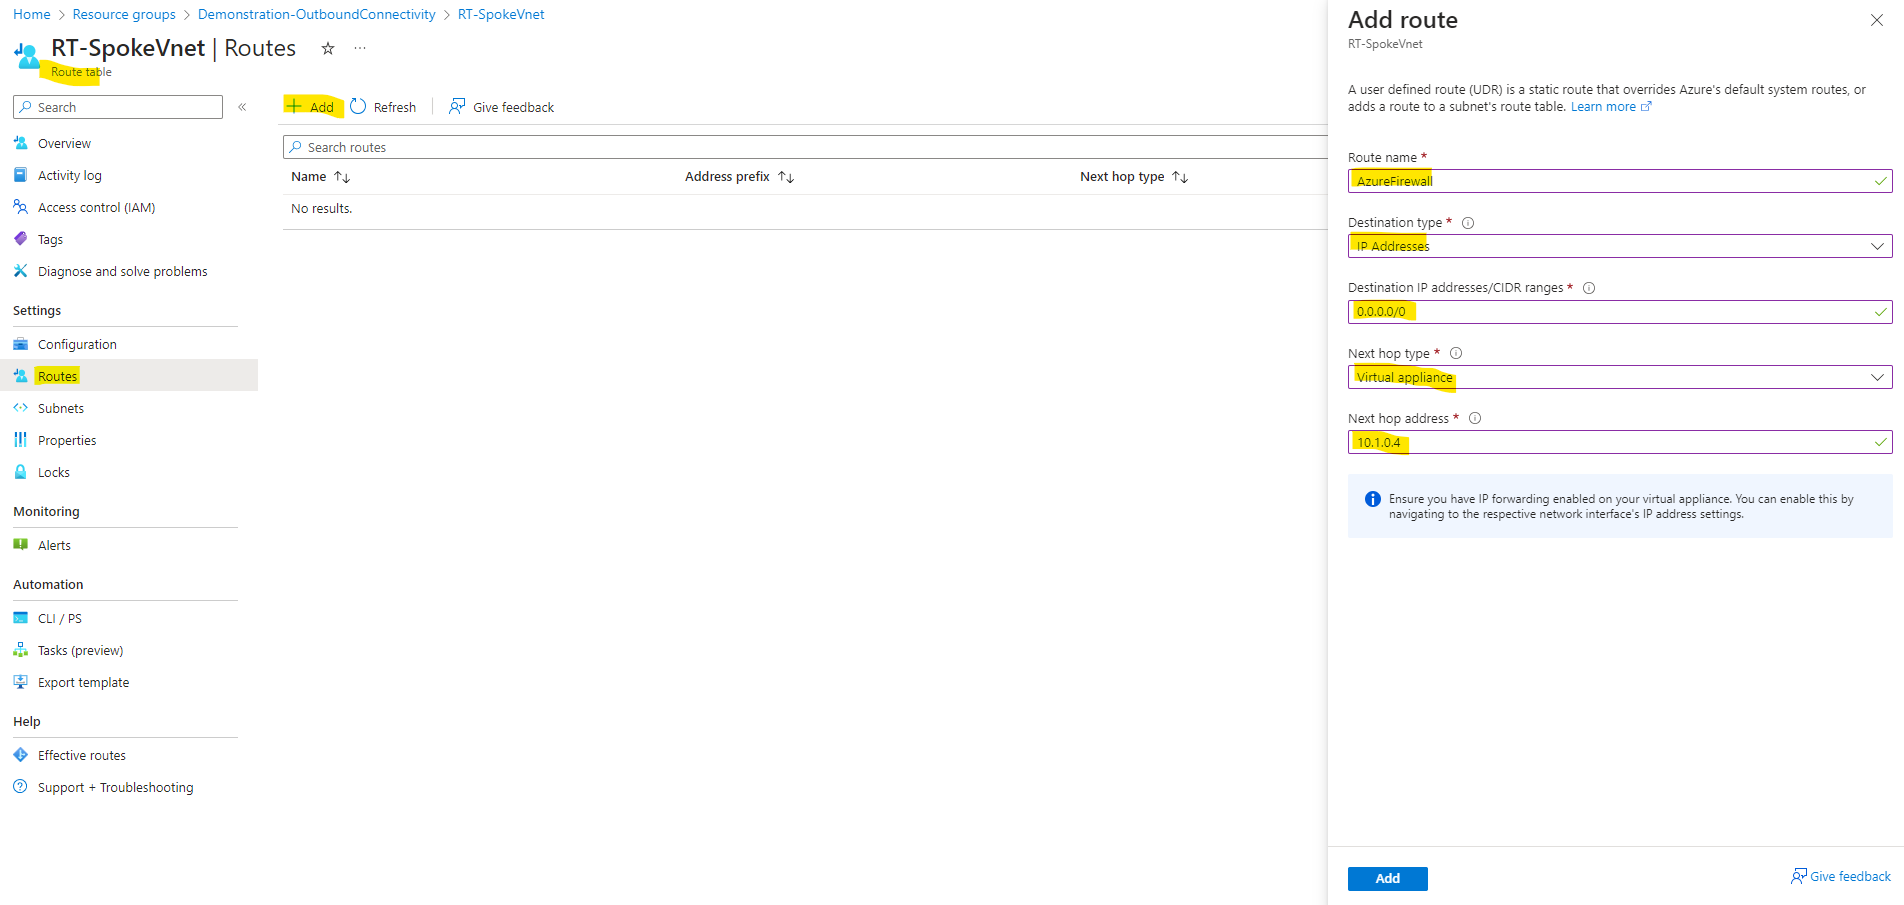
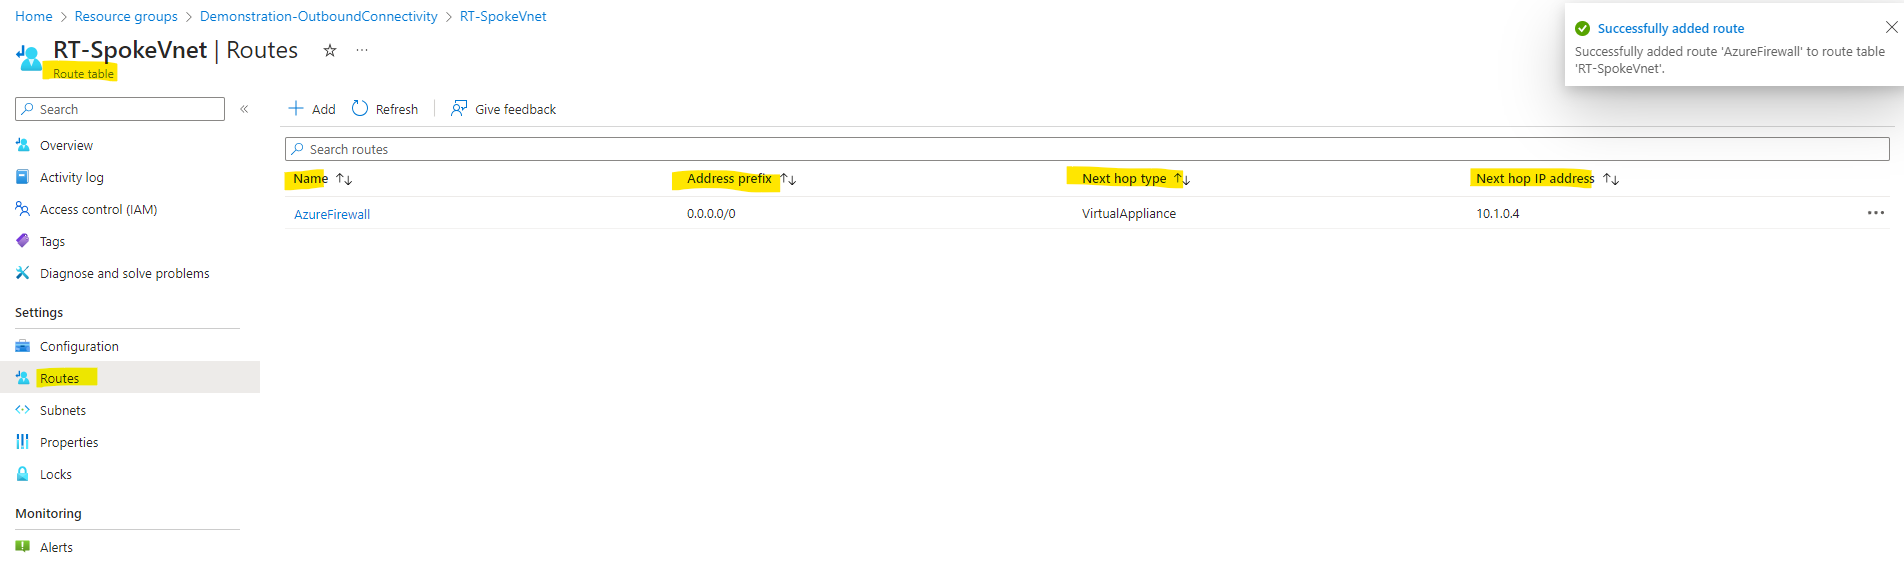
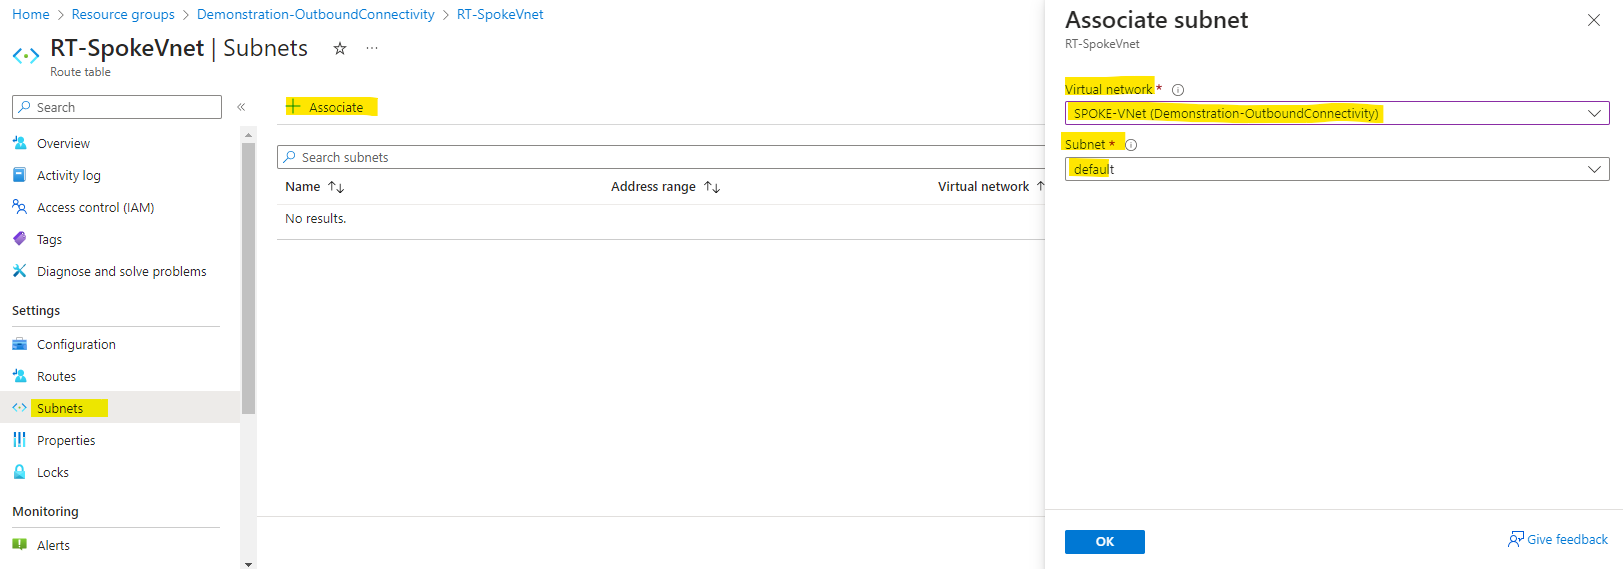
Add Route Table
When creating a route for outbound and inbound connectivity through the firewall, a default route to 0.0.0.0/0 with the virtual appliance private IP as a next hop is sufficient. This will take care of any outgoing and incoming connections to go through the firewall. As an example, if the firewall is fulfilling a TCP-handshake and responding to an incoming request, then the response is directed to the IP address who sent the traffic. This is by design.
ER and VPN Gateway route propagation can be disabled on a subnet using a property on a route table. When you disable route propagation, the system doesn’t add routes to the route table of all subnets with Virtual network gateway route propagation disabled. This process applies to both static routes and BGP routes. Connectivity with VPN connections is achieved using custom routes with a next hop type of Virtual network gateway. Route propagation shouldn’t be disabled on the GatewaySubnet. The gateway will not function with this setting disabled. For details, see How to disable Virtual network gateway route propagation.
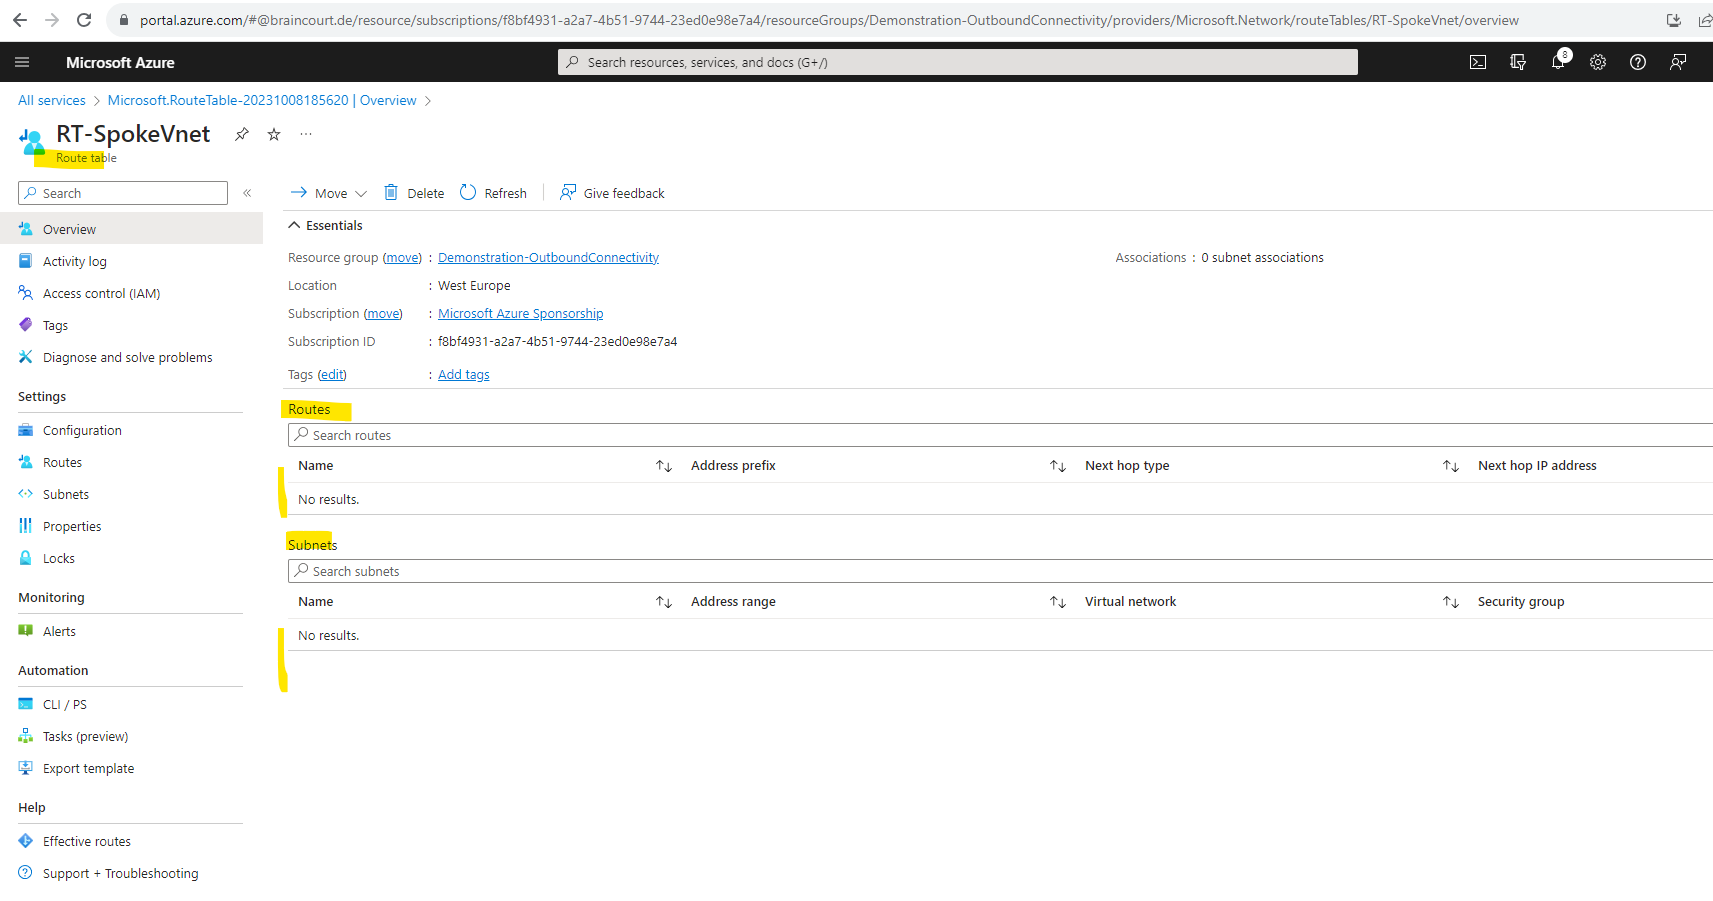
After the route table is created we have so far neither routes nor associtated subnets in it.
# determine the Azure CLI version
az --version

# first we need to install the azure-firewall extension if not already done
az extension add --name azure-firwall

# list all Azure Firewalls
az network firewall list
You shouldn’t and cannot associate the route table to the /26 subnet where the Azure Firewall service itself is placed and named AzureFirewallSubnet. This Azure Firewall service subnet itself must have the 0.0.0.0/0 route with next hop Internet.

Configure and Manage the Azure Firewall
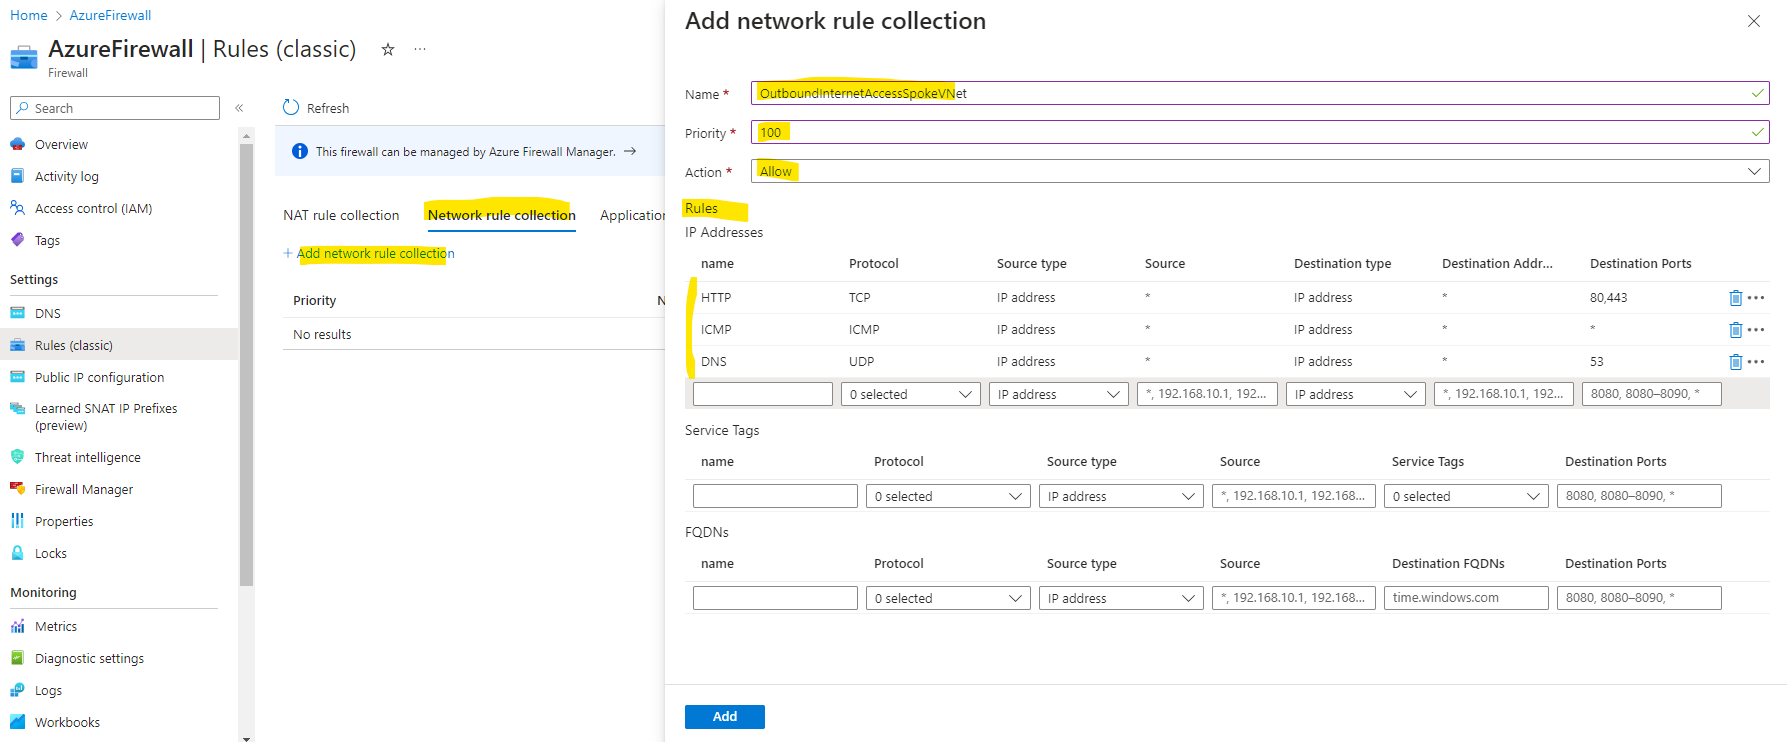
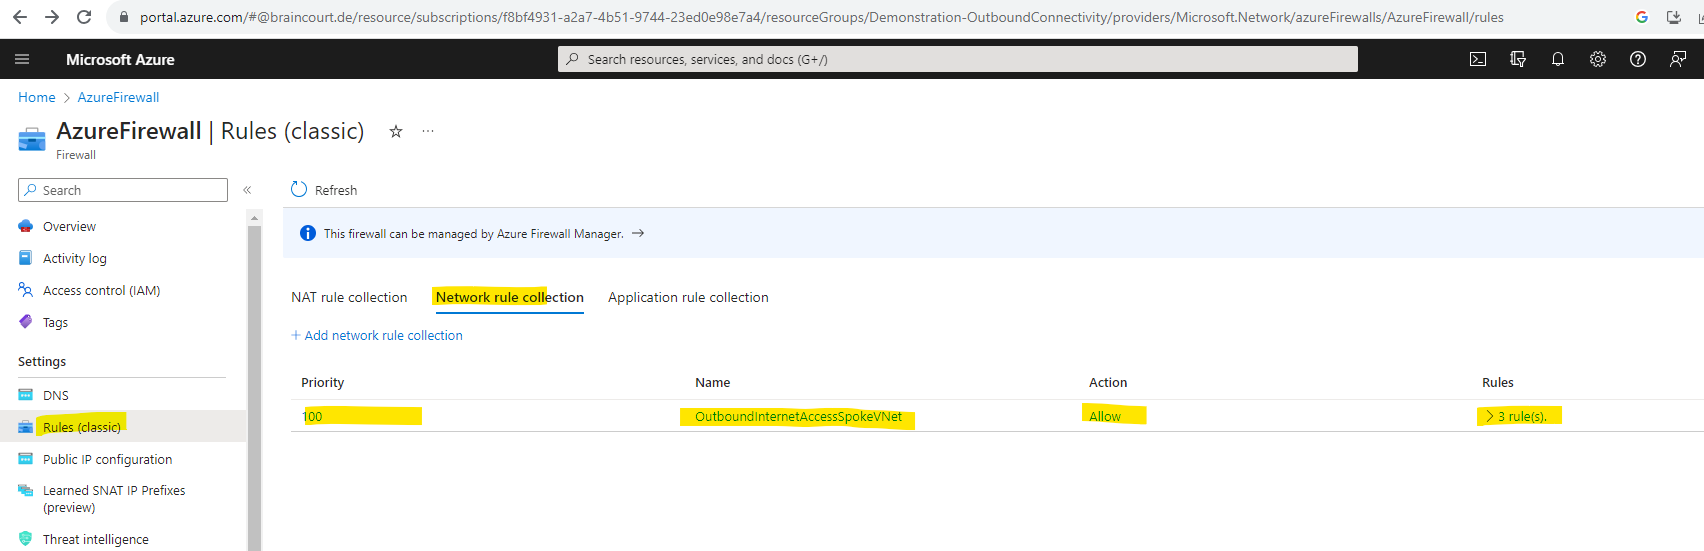
Azure Firewall doesn’t allow a connection to any target IP address/FQDN unless there is an explicit rule that allows it.
By default the dig command uses standard UDP port 53 to query DNS servers.
Source: https://www.ibm.com/docs/en/aix/7.1?topic=d-dig-command
dig TXT +short o-o.myaddr.l.google.com @ns1.google.com
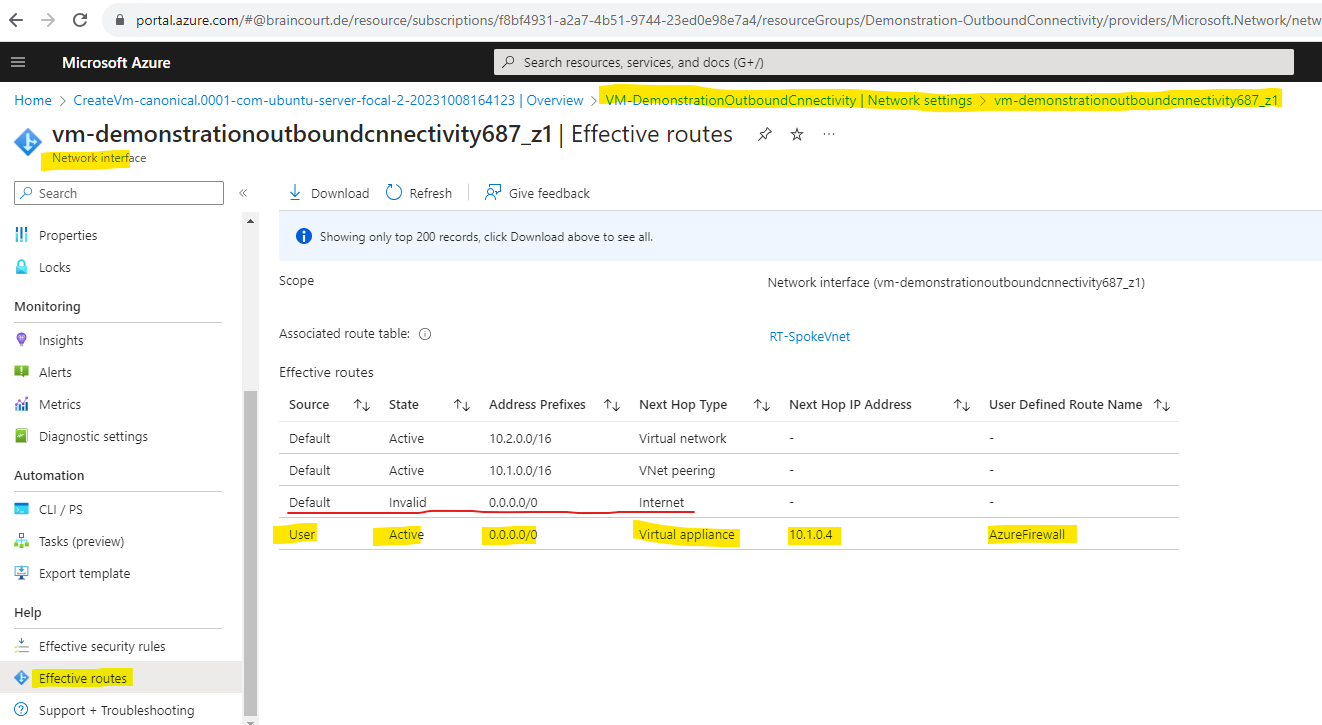
By the way, if we now check the effective routes again for our virtual machine resp. the associated network interface, which was placed in the subnet we added our route table with the custom default 0.0.0.0/0 route and next hop for the Azure Firewall, we can see that our custom route overwrites the by Azure automatically created default route 0.0.0.0/0 with the next hop Internet.
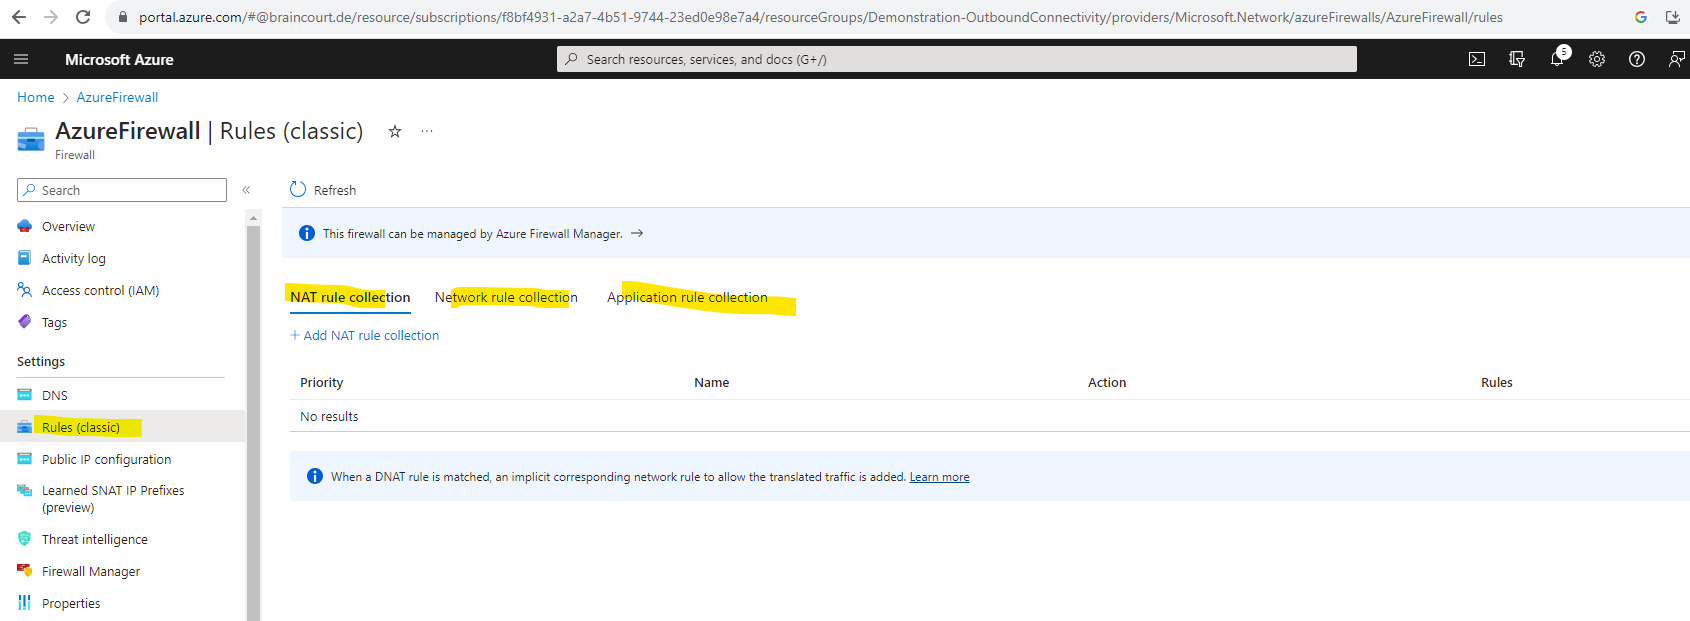
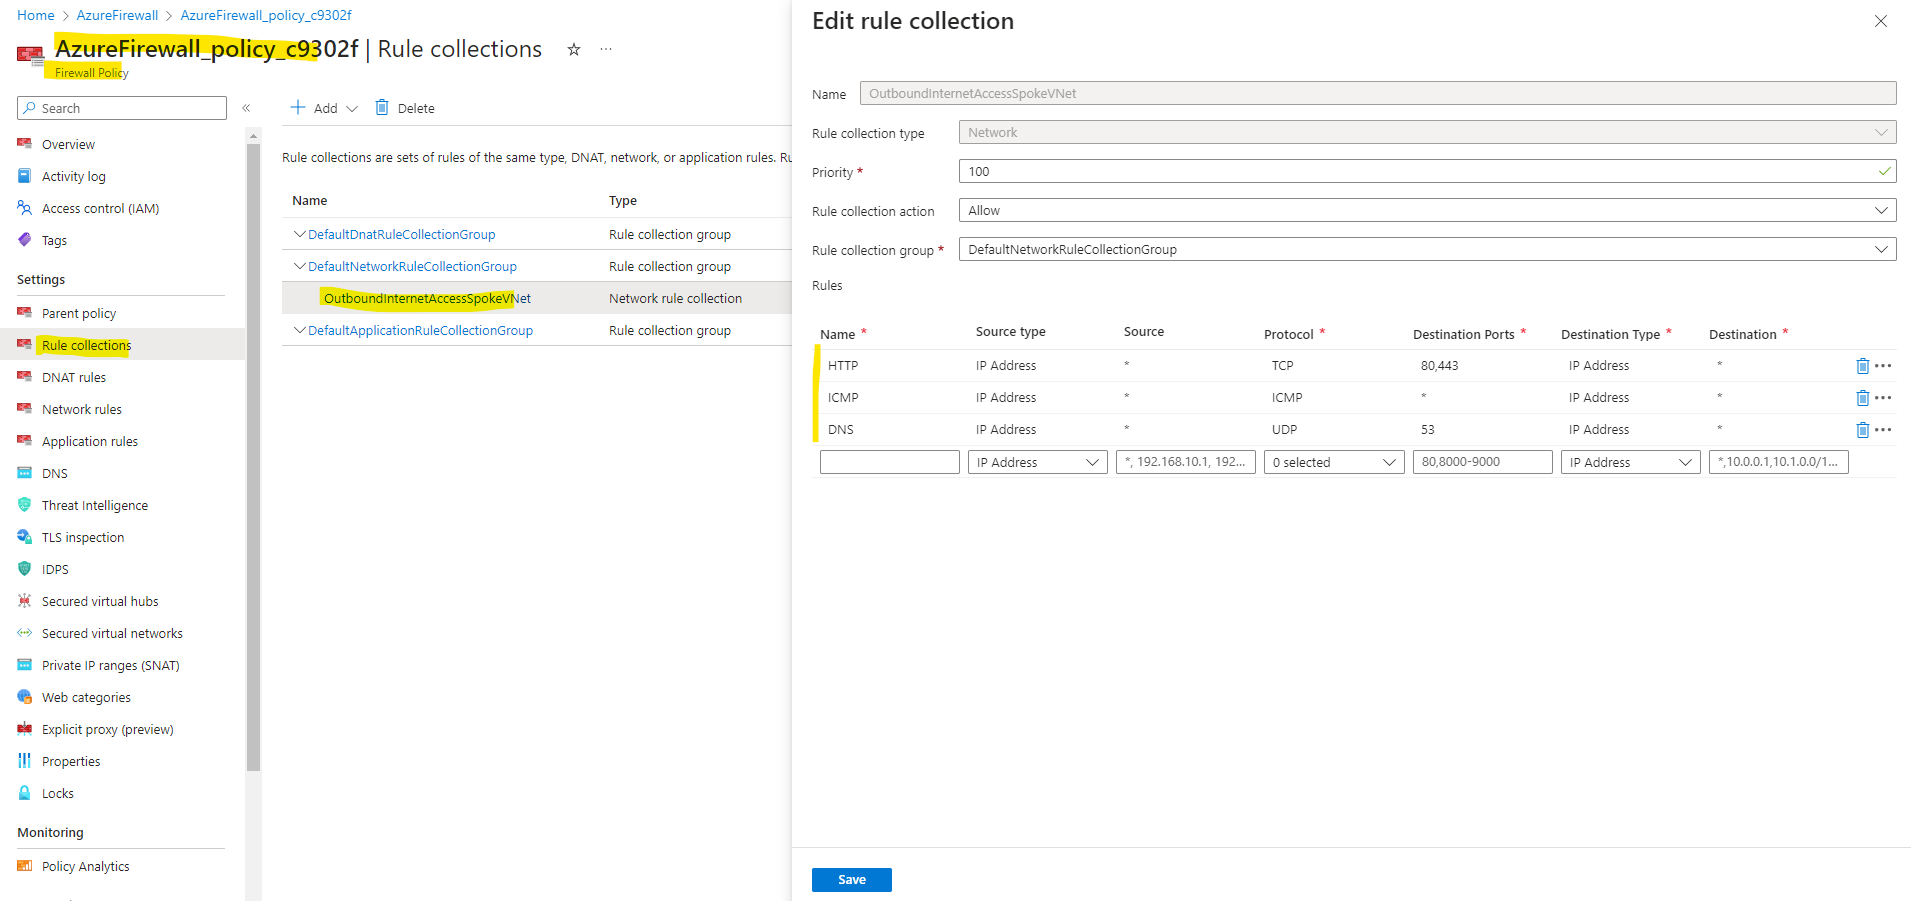
Network rules vs. Application rules vs. DNAT rules
Application rules are always processed after Network rules, which are processed after DNAT rules regardless of Rule collection group or Rule collection priority and policy inheritance.
Configure Azure Firewall rules
https://learn.microsoft.com/en-us/azure/firewall/rule-processing
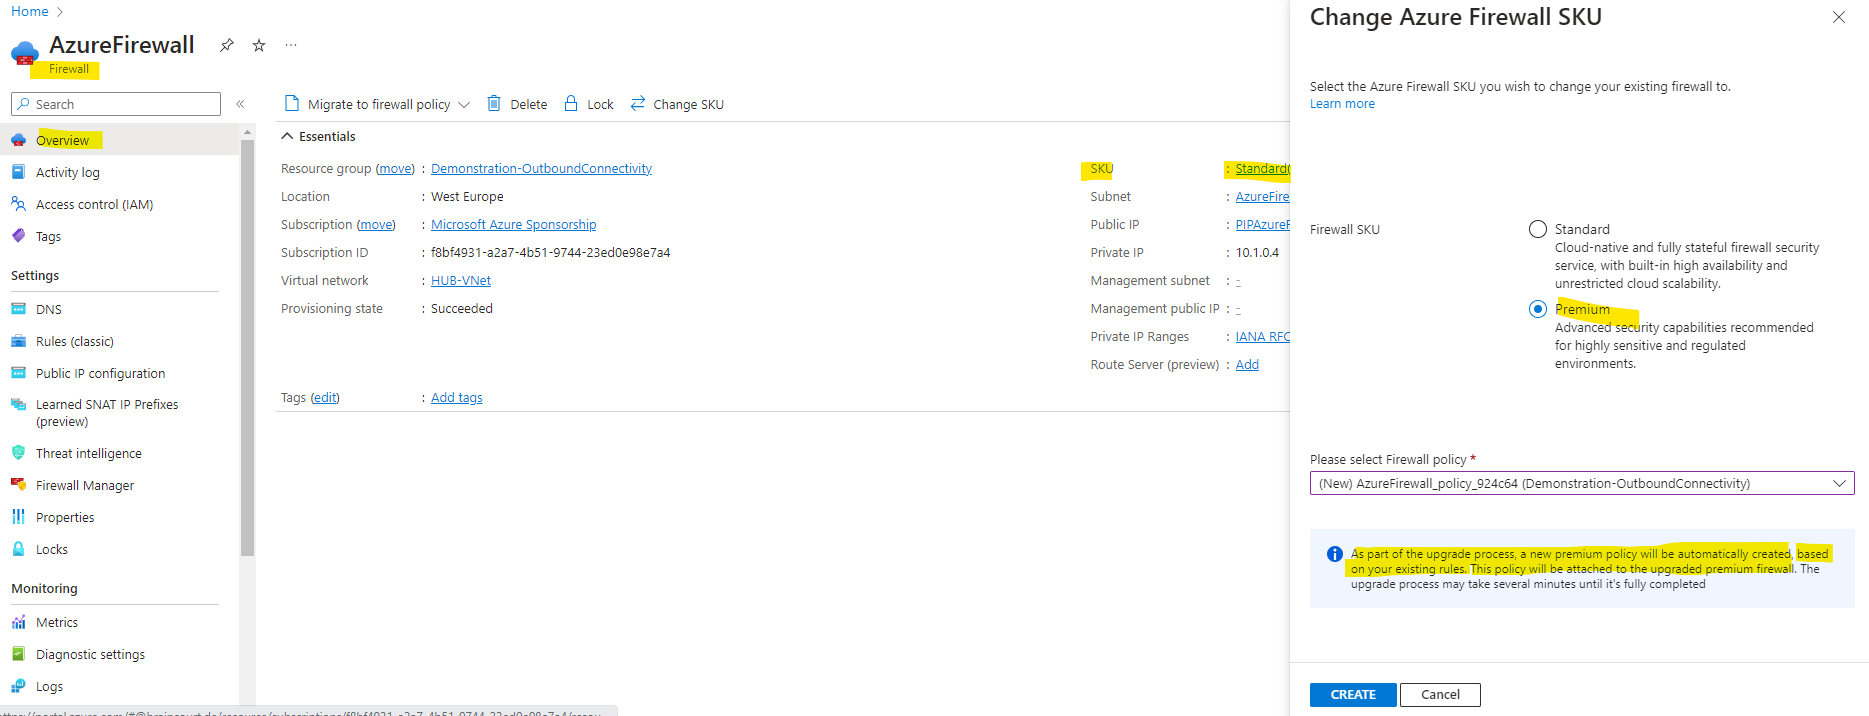
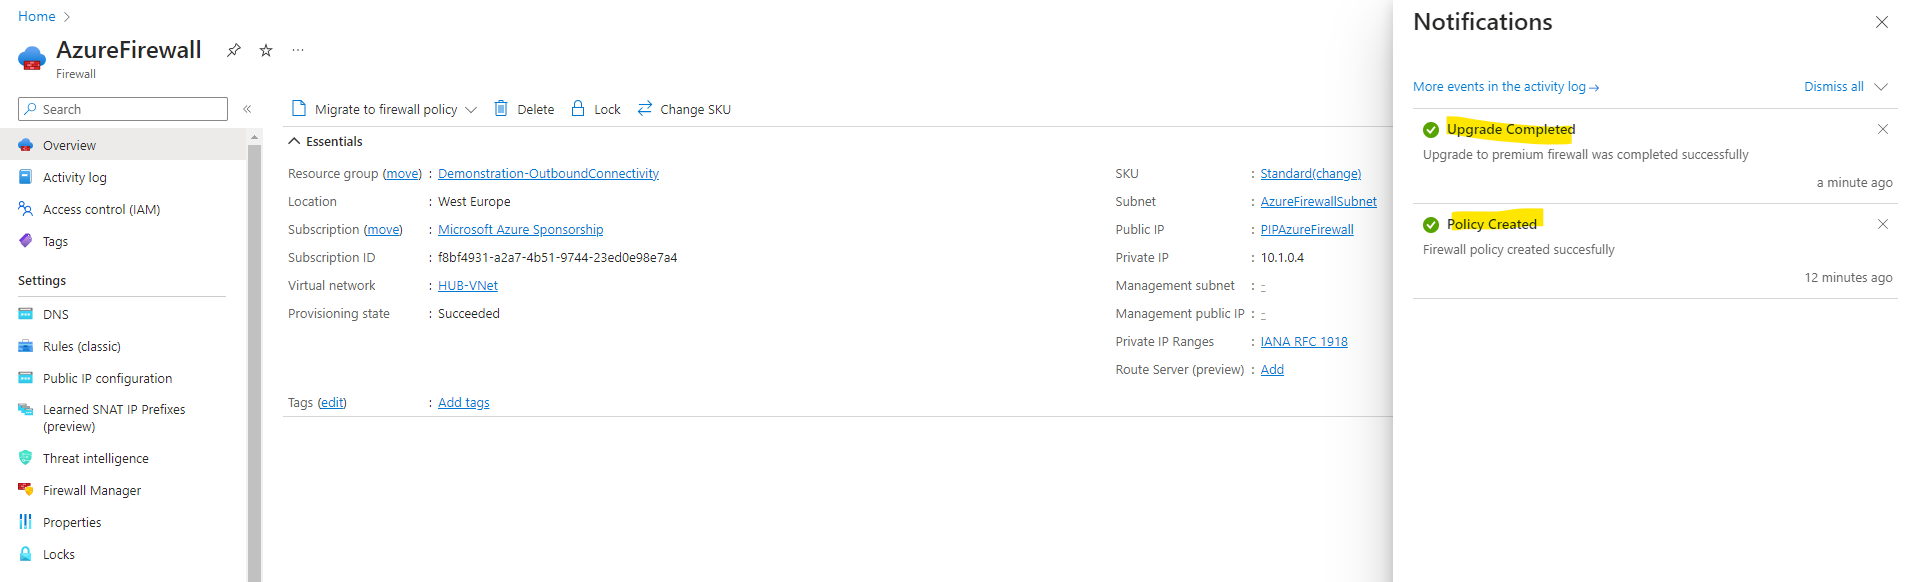
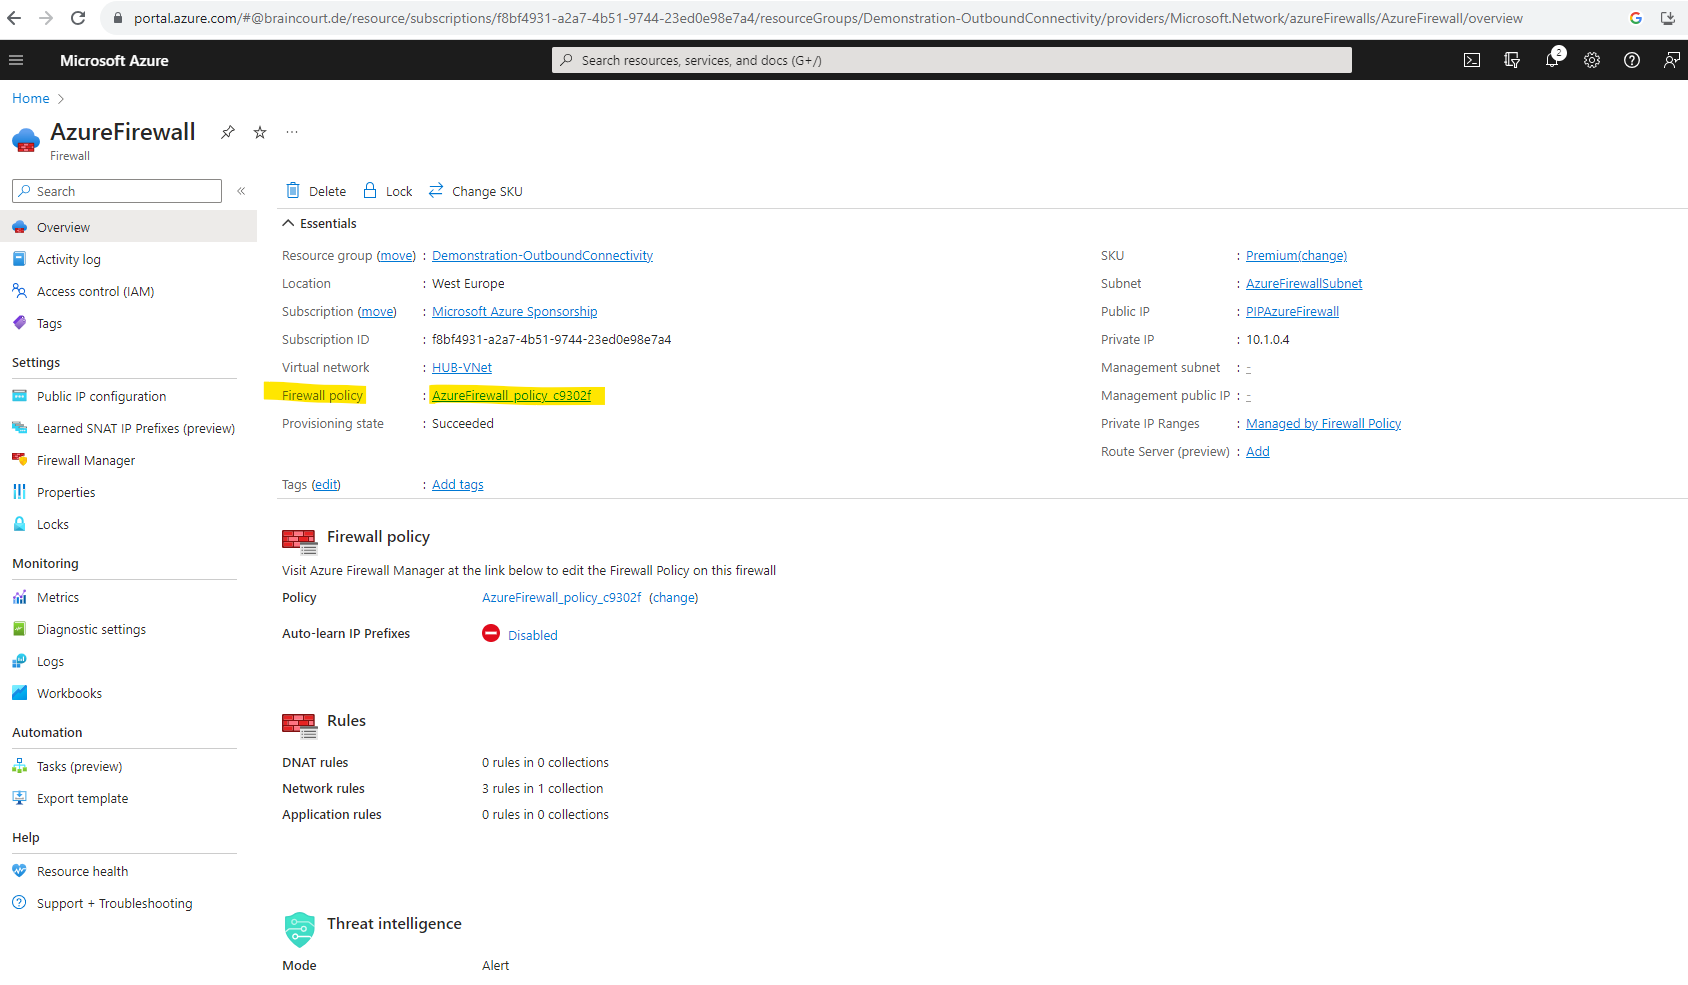
Migrate to Azure Firewall Premium
You can migrate Azure Firewall Standard to Azure Firewall Premium to take advantage of the new Premium capabilities. For more information about Azure Firewall Premium features, see Azure Firewall Premium features.
The easiest way to change your Azure Firewall SKU with no downtime is to use the Change SKU feature. For more information, see Azure Firewall easy upgrade/downgrade.
Azure Firewall easy upgrade/downgrade
You can now easily upgrade your existing Firewall Standard SKU to Premium SKU and downgrade from Premium to Standard SKU.
https://learn.microsoft.com/en-us/azure/firewall/easy-upgrade
Using the Azure Firewall Manager
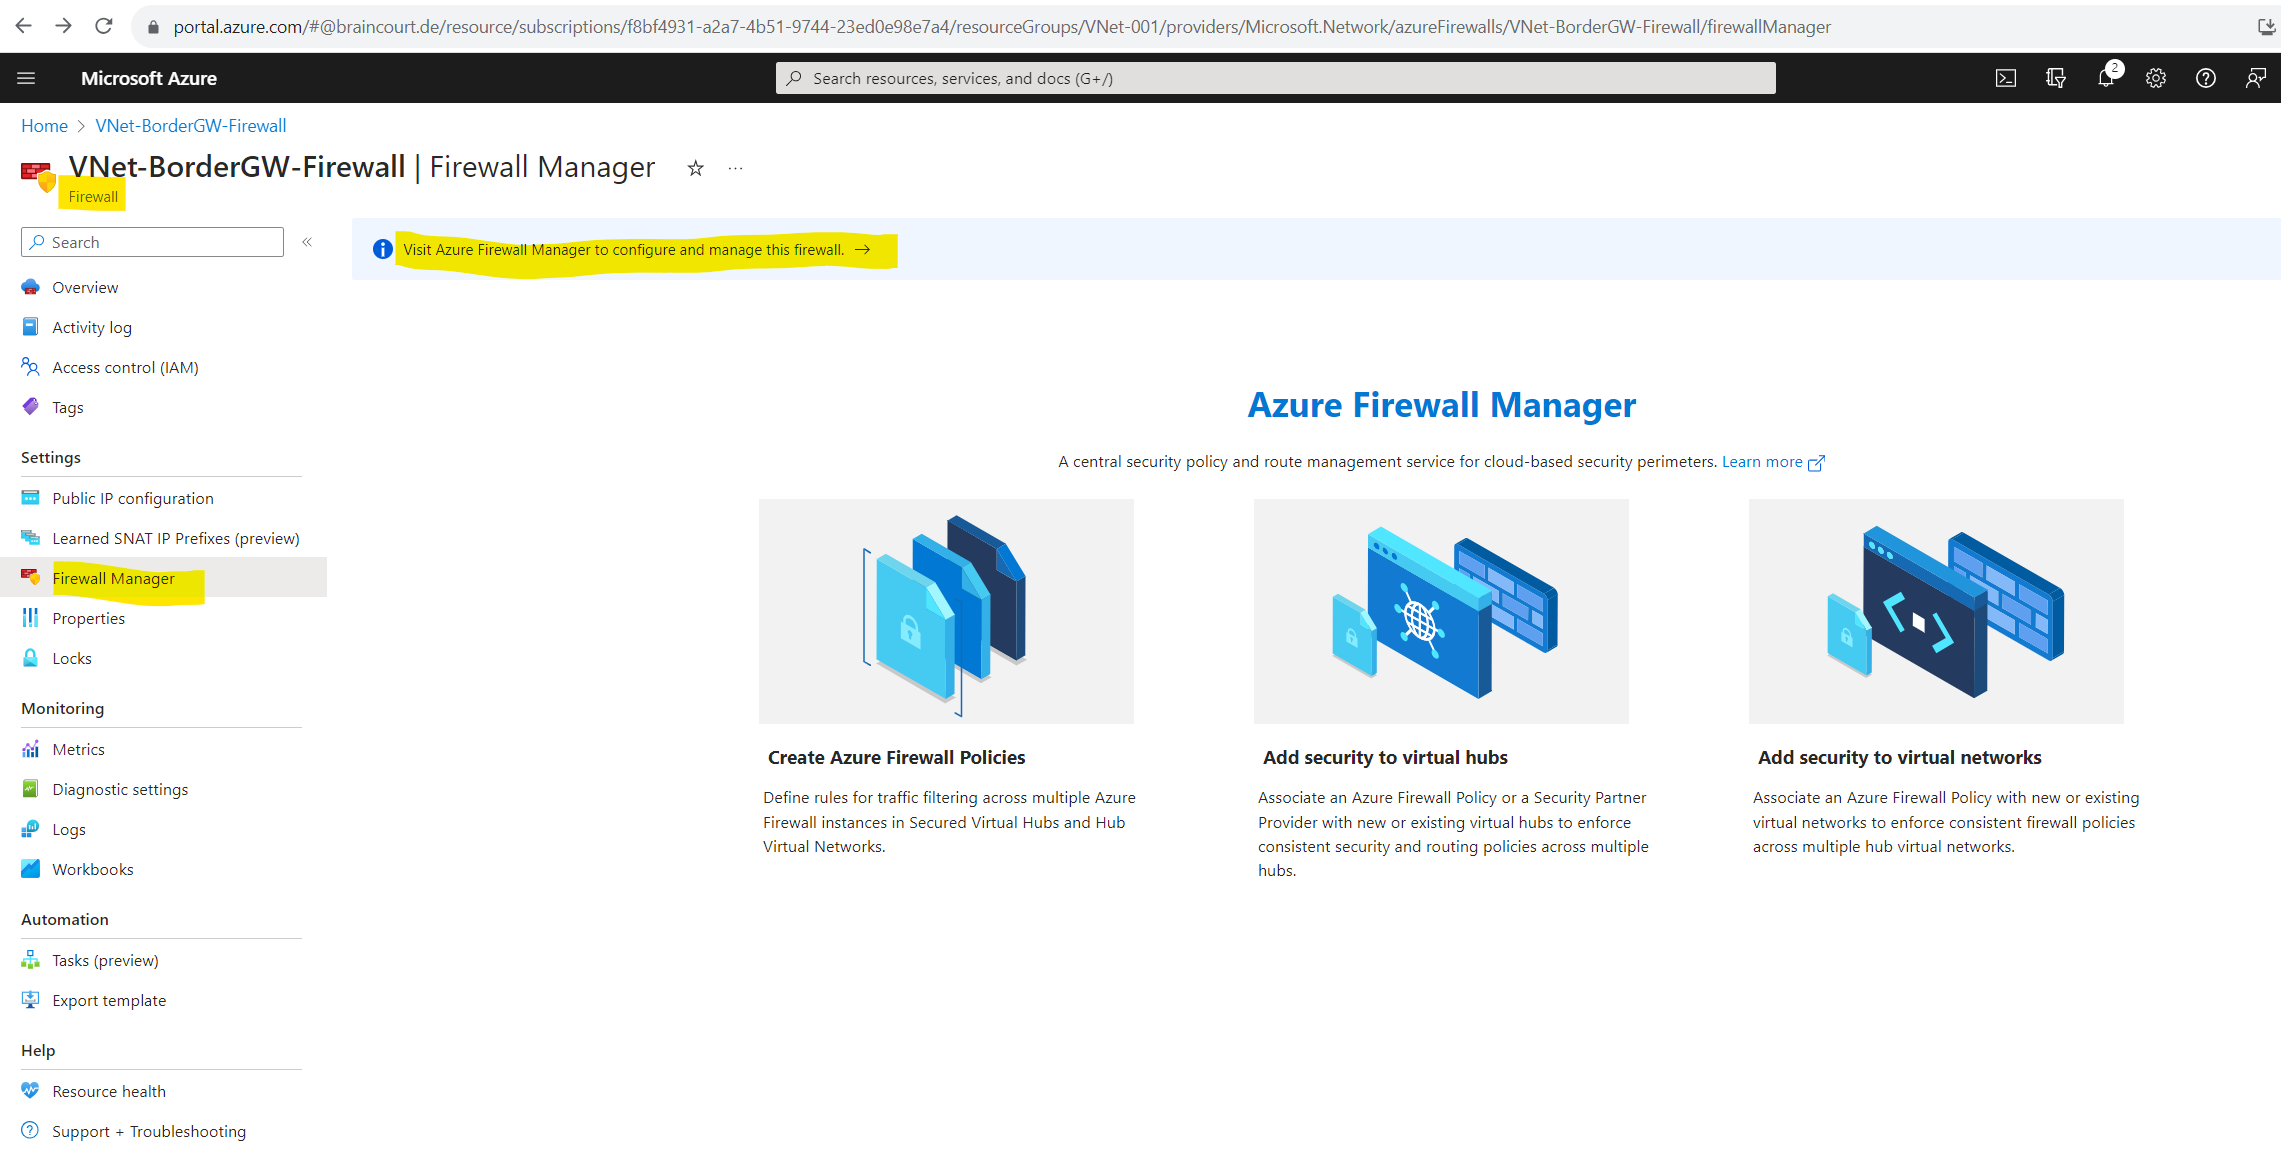
Azure Firewall Manager documentation
https://learn.microsoft.com/en-us/azure/firewall-manager/
By using pfSense (Hub-spoke network)
While Azure Firewall and NAT Gateway are strong options, deploying a dedicated appliance like pfSense can be a cost-effective alternative, especially for smaller or mid-sized deployments.
In my post below, I will show how to build this yourself, giving you full control of outbound routing, inspection, and VPN termination while keeping costs predictable.
Beyond outbound filtering, pfSense can also replace Azure VPN Gateway for hybrid connectivity.
It’s a fully capable IPSec and OpenVPN endpoint that lets you securely connect your on-premises network to Azure, often at a fraction of the cost of Azure’s managed VPN services, while still giving you complete control over routing, encryption, and monitoring.
Links
Default outbound access in Azure
https://learn.microsoft.com/en-us/azure/virtual-network/ip-services/default-outbound-accessDefault outbound access for VMs in Azure will be retired— transition to a new method of internet access
https://azure.microsoft.com/en-us/updates/default-outbound-access-for-vms-in-azure-will-be-retired-transition-to-a-new-method-of-internet-access/What is Azure NAT Gateway?
https://learn.microsoft.com/en-us/azure/nat-gateway/nat-overviewWhat is Azure Load Balancer?
https://learn.microsoft.com/en-us/azure/load-balancer/load-balancer-overview#publicloadbalancerDeploy and configure Azure Firewall using the Azure portal
https://learn.microsoft.com/en-us/azure/firewall/tutorial-firewall-deploy-portalWhat is Azure Firewall?
https://learn.microsoft.com/en-us/azure/firewall/overviewAzure Firewall FAQ
https://learn.microsoft.com/en-us/azure/firewall/firewall-faqAzure Firewall Manager documentation
https://learn.microsoft.com/en-us/azure/firewall-manager/Hub-spoke network topology in Azure
https://learn.microsoft.com/en-us/azure/architecture/networking/architecture/hub-spoke