Set up an IPSec route-based Site-to-Site VPN Tunnel between Azure and On-Premise (Home Network) where the VPN Gateway sits behind a NAT Router
Today I want to show how we can set up an IPSec route based site-to-site VPN tunnel between Azure and on-premise (home network).
For this home network scenario the on-prem VPN device (in my case a pfSense virtual machine in vSphere) is usually placed behind a NAT router which itself is connected to the ISP by having just one dynamically assigned public IPv4 address.
Home NAT Router IPSec Site-to-Site VPN Tunnel Support
For the home NAT router which is connected to the ISP (Deutsche Telekom in my case) I will use a FRITZ!Box 7590.
If you want to establish VPN connections to remote VPN servers, you do not have to configure any settings in the FRITZ!Box. By default, VPN passthrough is enabled for the VPN protocols IPsec and PPTP in the FRITZ!Box; no further settings are necessary.
Nevertheless your VPN Software/VPN Gateway, in my case pfSense, needs to support and use NAT traversal (i.e. the encapsulation of ESP in UDP packets).
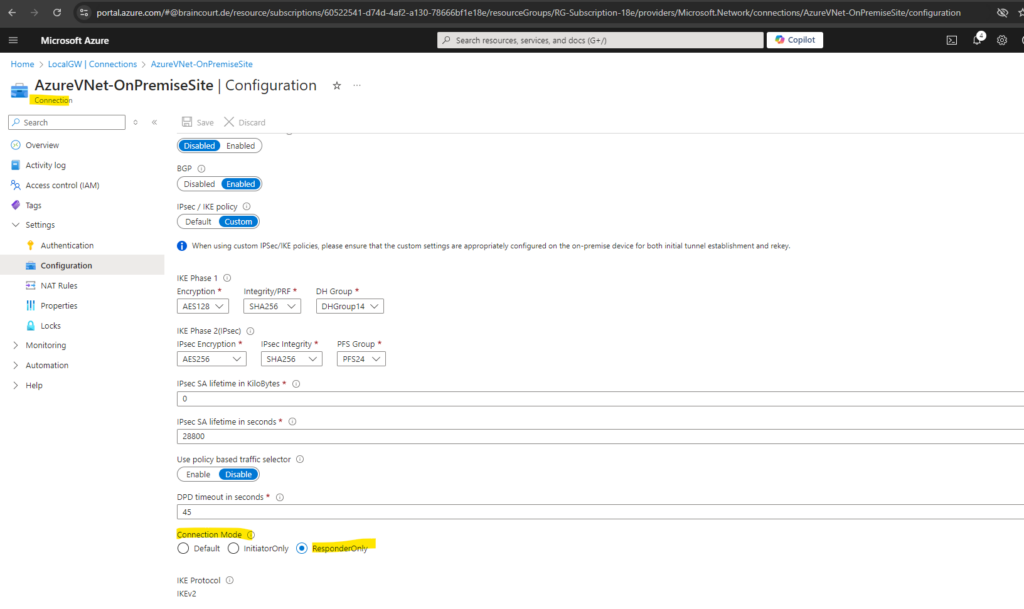
That means when you configure the IPSec tunnel in Azure as ResponderOnly like shown below, just your on-premise (home network) VPN Gateway (pfSense in my case), will initiate outbound the IPSec connection, no further settings on the NAT router are necessary when using a FRITZ!Box and your VPN Software/VPN Gateway supports NAT traversal (NAT-T).
Default for the Connection Mode in Azure will also work, in this mode both sites can initiate the connection, so when your on-premise VPN Gateway will initiate the connection, VPN passthrough outbound will be used by the FRITZ!Box and Azure will accept the connection.
Connection mode is used to decide which gateway can initiate the connection.
When this value is set to: Default -> both Azure and on-premise VPN gateway can initiate the connection.ResponderOnly -> Azure VPN gateway will never initiate the connection. On-premise VPN gateway must initiate the connection.
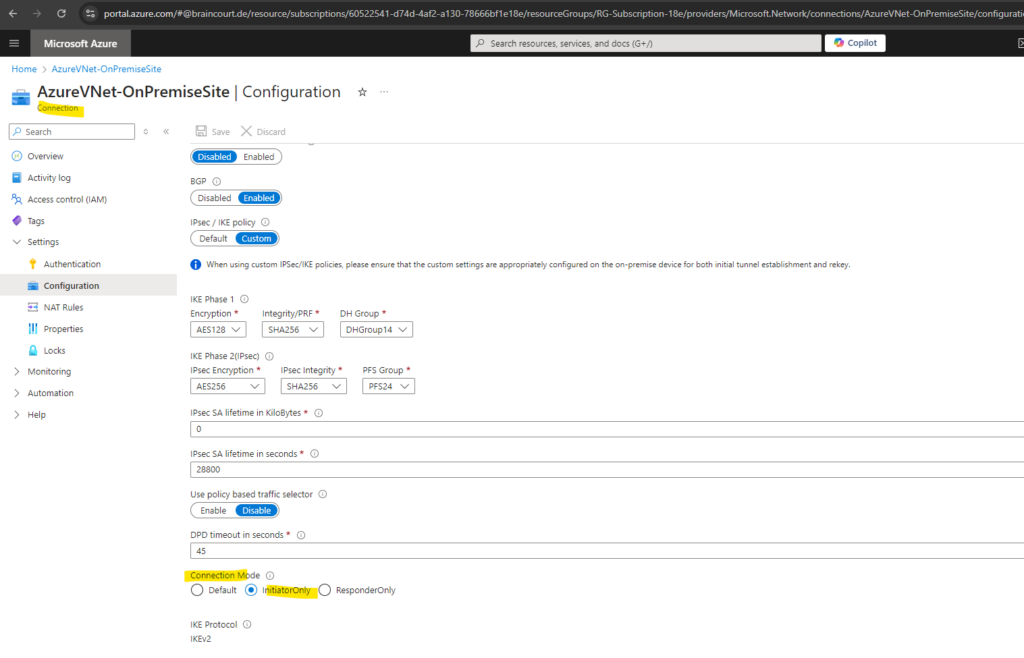
InitiatorOnly -> Azure VPN gateway will initiate the connection and reject any connection attempts from on-premise VPN gateway. Learn more
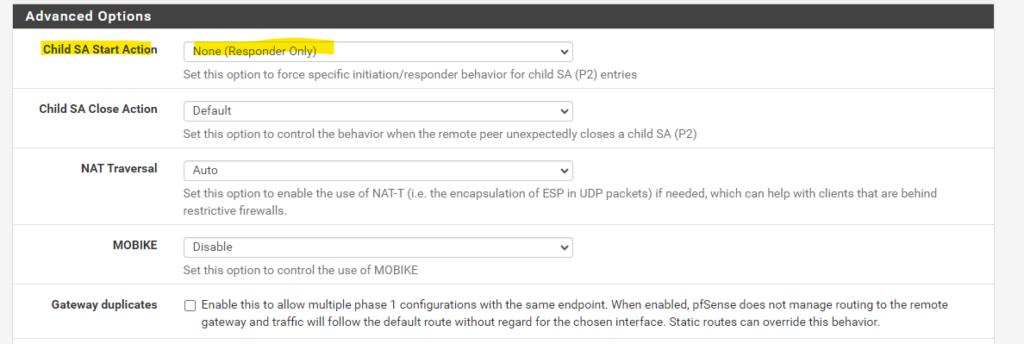
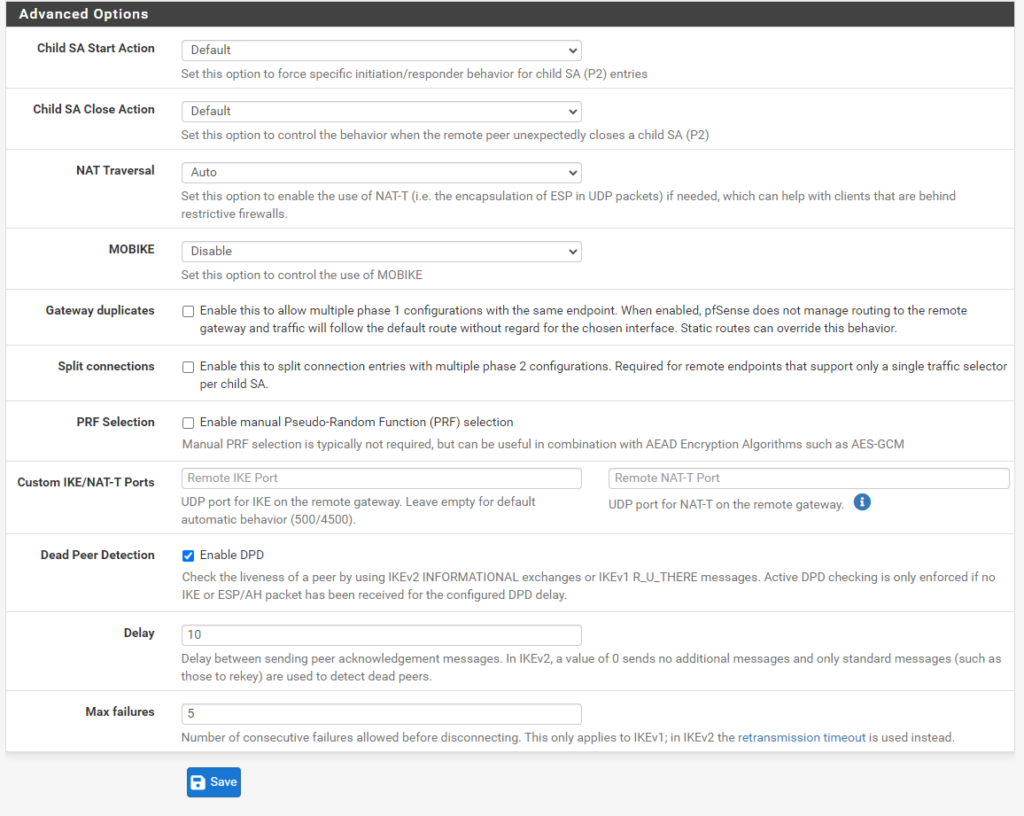
To force pfSense to initiate the IPSec VPN tunnel, you need to edit the IPSec phase 1 tunnel and under Advanced Options as shown below, for Child SA Start Action set Initiate at start (VTI or Tunnel Mode).
pfSense by default will support and use NAT-T when detecting it is placed behind a NAT router.

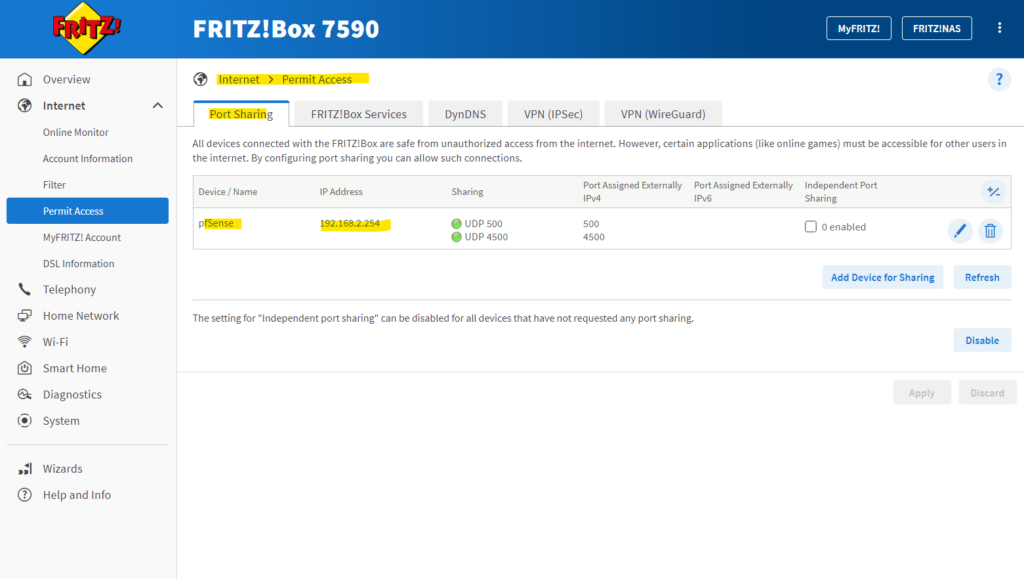
In case you will use InitiatorOnly for the Connection Mode in Azure, you first have to share the ports in your NAT router (FRITZ!Box in my case) for your VPN Gateway (pfSense in my case).
pfSense is in Responder Only mode.
IPSec Phase 1 tunnel -> Advanced Options
Because Azure also supports NAT-T, we can share the ports UDP 500 (ISAKMP) and 4500 (NAT traversal) on our NAT router with our VPN Gateway.
Therefore connections initiated from Azure and inbound to our VPN Gateway, placed behind a NAT router, will also work.
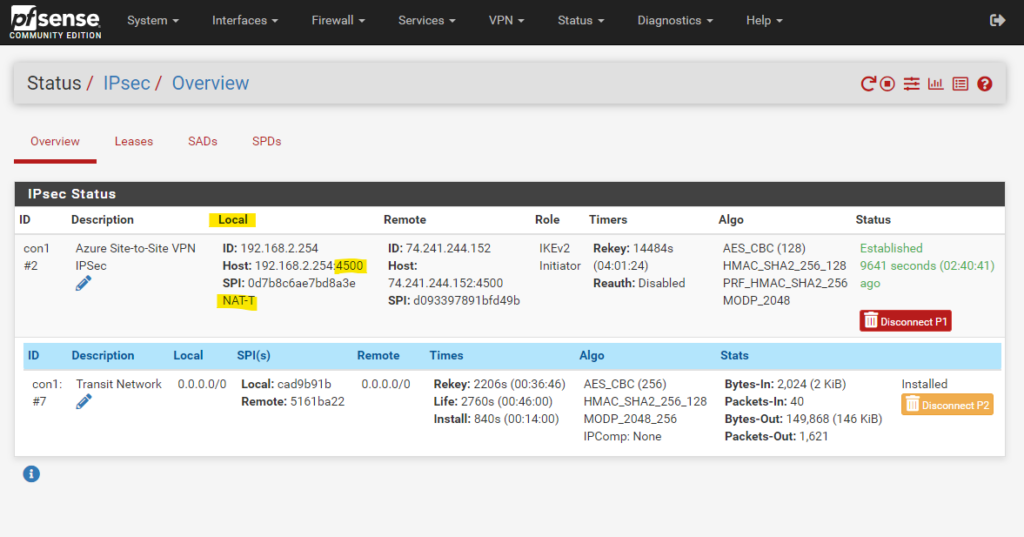
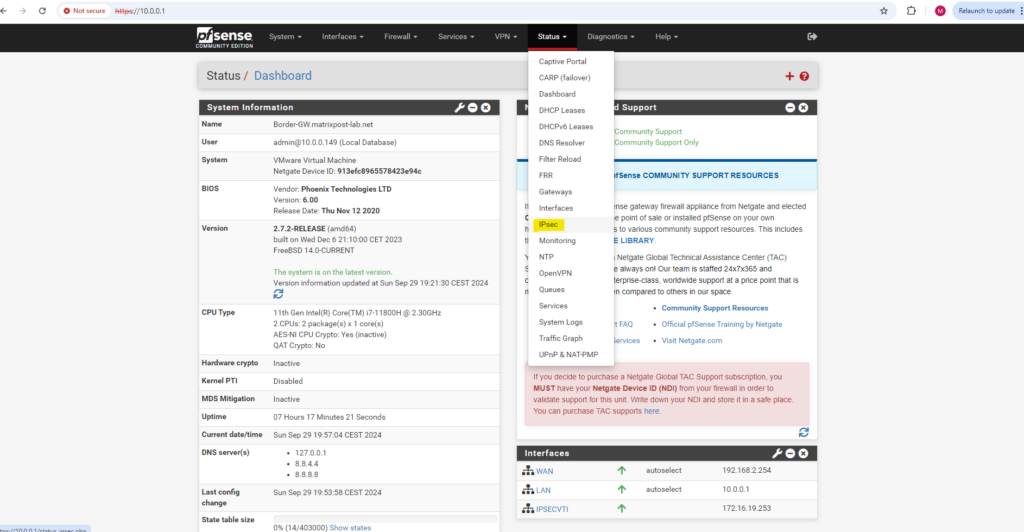
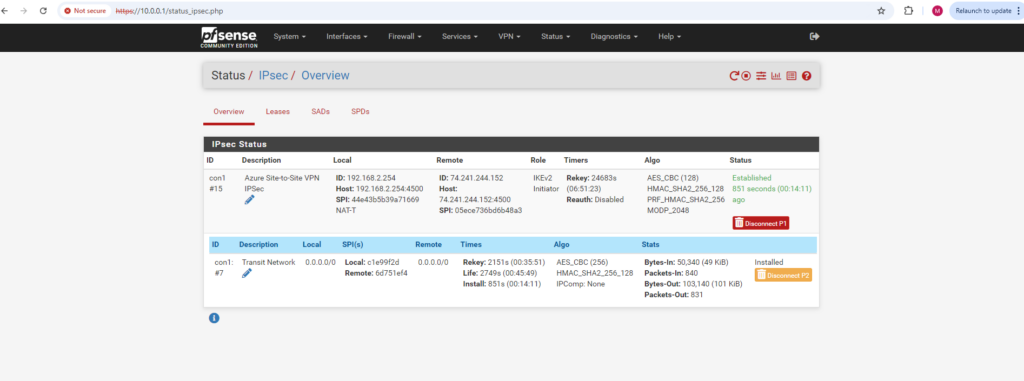
On pfSense in my home network we can later see under Status -> IPsec -> Overview, that pfSense is using NAT-T to establish the IPSec tunnel with Azure.
About NAT Traversal (NAT-T)
NAT-T (Network Address Translation Traversal) is a technique that enables the secure transmission of IPsec (Internet Protocol Security) traffic through devices that perform Network Address Translation (NAT).
NAT-T is particularly important because NAT and IPsec don’t naturally work well together, and without NAT-T, IPsec traffic may get blocked or corrupted when passing through NAT devices (like home routers or firewalls).
NAT changes IP addresses (and often port numbers) in the IP packet headers to enable multiple devices to share a single public IP address.
IPsec encrypts the payload (including headers) for security, which means NAT can’t access and modify the necessary headers without breaking the IPsec encryption.
Additionally, ESP (Encapsulating Security Payload), a common IPsec protocol, doesn’t use port numbers, which is critical for NAT devices that rely on ports for distinguishing different traffic flows.
NAT-T solves these problems by encapsulating the IPsec traffic in UDP packets, which are NAT-friendly and can traverse NAT devices without conflict.
NAT-T encapsulates the ESP-encrypted IPsec packets inside UDP packets. This adds a UDP header to the encrypted data, which includes port numbers (typically UDP port 4500) that NAT can use.
This encapsulation allows NAT devices to handle the packet like any other UDP-based traffic, making it NAT-friendly.
During the initial stages of IPsec negotiation (usually using the IKE or IKEv2 protocol), the two endpoints detect if there’s a NAT device between them. They do this by exchanging “NAT-Discovery” messages, where each side inspects the public IP address and port used by the other endpoint.
If NAT is detected, NAT-T is automatically enabled, and subsequent IPsec traffic is encapsulated in UDP packets.
Set up the Tunnel in Azure
Configure the Azure Virtual Network (VNet)
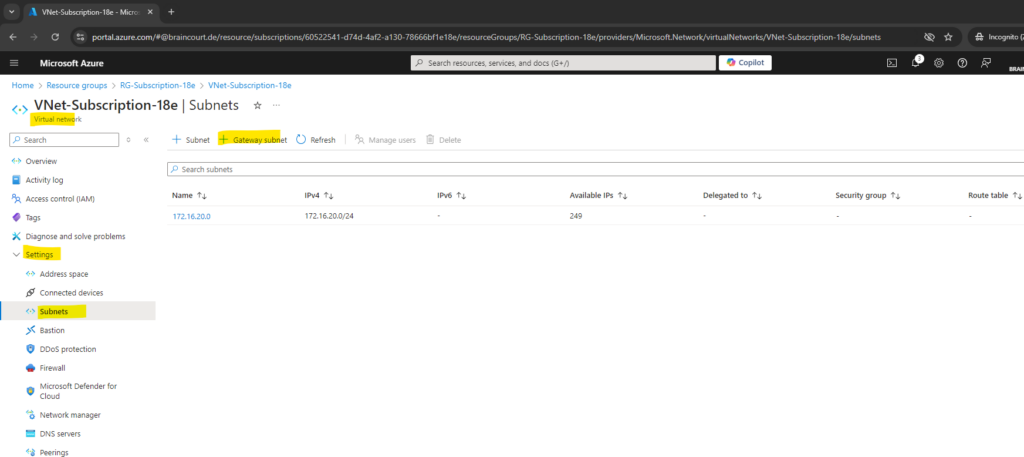
We first need to create a gateway subnet within our virtual network in Azure which we want finally connect with our on-premise (home) network.
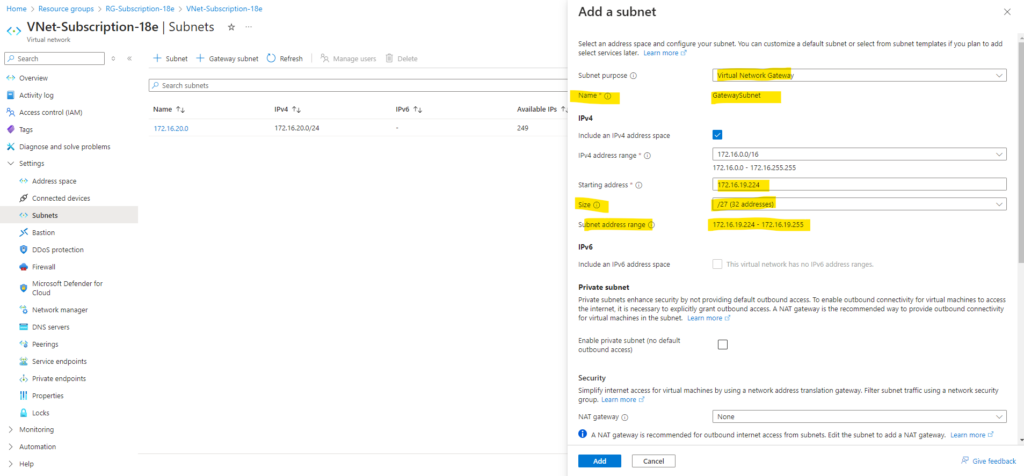
The virtual network gateway requires a specific subnet named GatewaySubnet. The gateway subnet is part of the IP address range for your virtual network and contains the IP addresses that the virtual network gateway resources and services use. Specify a gateway subnet that’s /27 or larger.
We can add the Gateway Subnet within the Subnets menu of our virtual network by clicking on the Gateway subnet link below.
Specify a gateway subnet that’s /27 or larger and click on Add.
So in my case the gateway subnet is 172.16.19.224/27
The virtual network address space is 172.16.0.0/16.
So far I just use the subnet 172.16.20.0/24 in the VNet besides the gateway subnet in which two virtual machines are running.
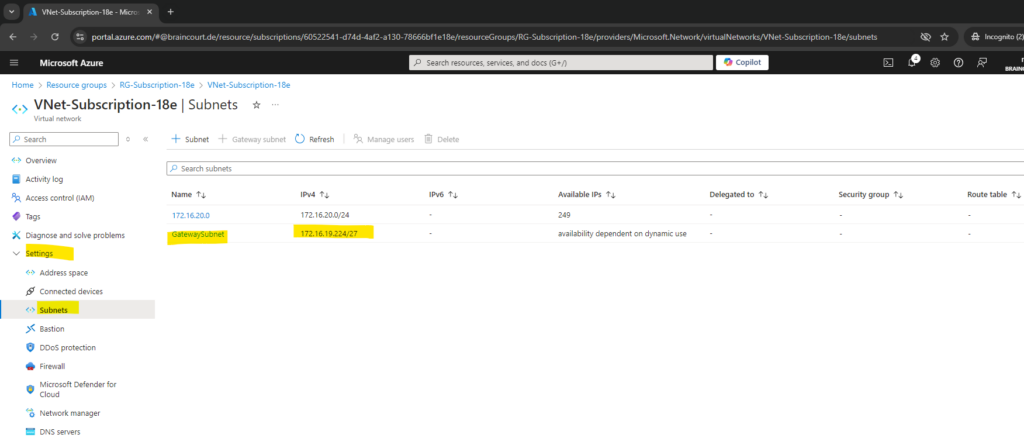
The gateway subnet contains the IP addresses that the virtual network gateway services use.
Traffic on this subnet, including IKE, IPsec, and BGP, is handled by Azure-managed gateway VMs, not subject to NSG filtering.So we do not need to configure here any NSG rules to allow traffic to establish the tunnel and its BGP session.
Further more it is not supported to create NSGs on the gateway subnet.
User-defined routes with a 0.0.0.0/0 destination and network security groups (NSGs) on the gateway subnet are not supported. Gateways with this configuration are blocked from being created. Gateways require access to the management controllers in order to function properly. Border Gateway Protocol (BGP) route propagation should be enabled on the gateway subnet to ensure availability of the gateway. If BGP route propagation is disabled, the gateway won’t function.
Create and Configure a Virtual Network Gateway in Azure
Next we need to add a virtual network gateway in Azure. You will find in the web many articles talking here about Virtual Network Gateway and VPN Gateway, so first whats the difference between these two terms?
A virtual network gateway represents the type of gateway we create within an Azure virtual network and is used to connect Azure virtual networks or on-premise networks to Azure virtual networks.
In Azure we have have here two different types of virtual network gateways, one is called VPN Gateway and we are using from now on in this post and one is called Express Route Gateway.
The VPN Gateway we will use here is used to send encrypted traffic across the public Internet. Site-to-Site, Point-to-Site, and VNet-to-VNet connections all use a VPN gateway.
ExpressRoute Gateway is also a specific type of Virtual Network Gateway. It sends network traffic on a dedicated private connection when configuring Azure ExpressRoute.
Source: https://learn.microsoft.com/en-us/azure/vpn-gateway/vpn-gateway-about-vpngateways
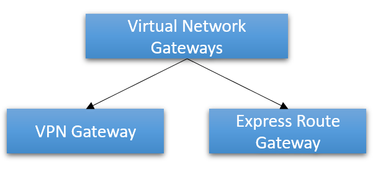
So below I will actually create a VPN Gateway, the specific gateway type we can select later.
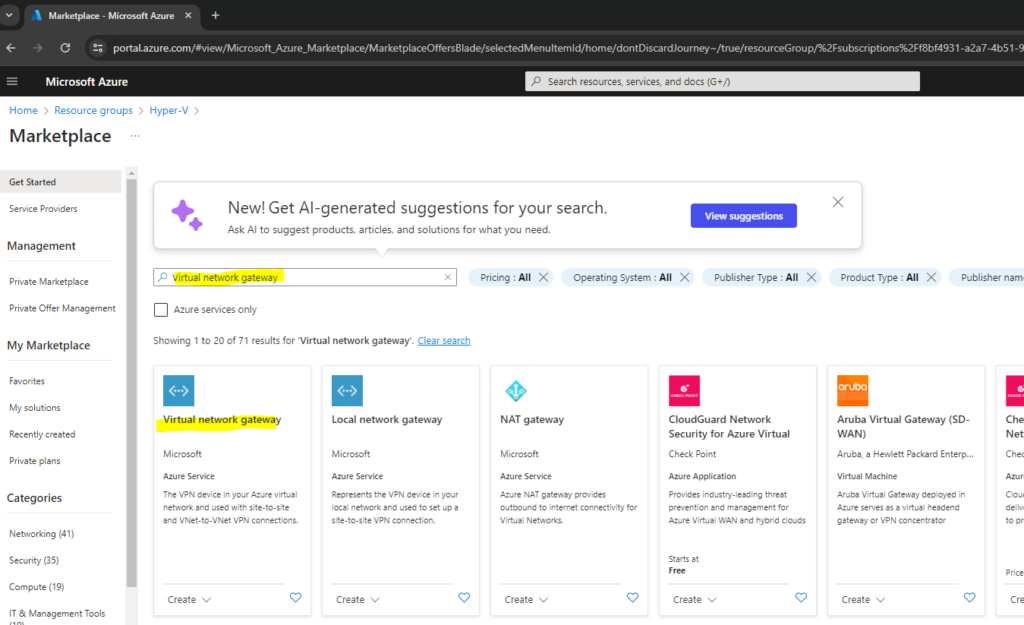
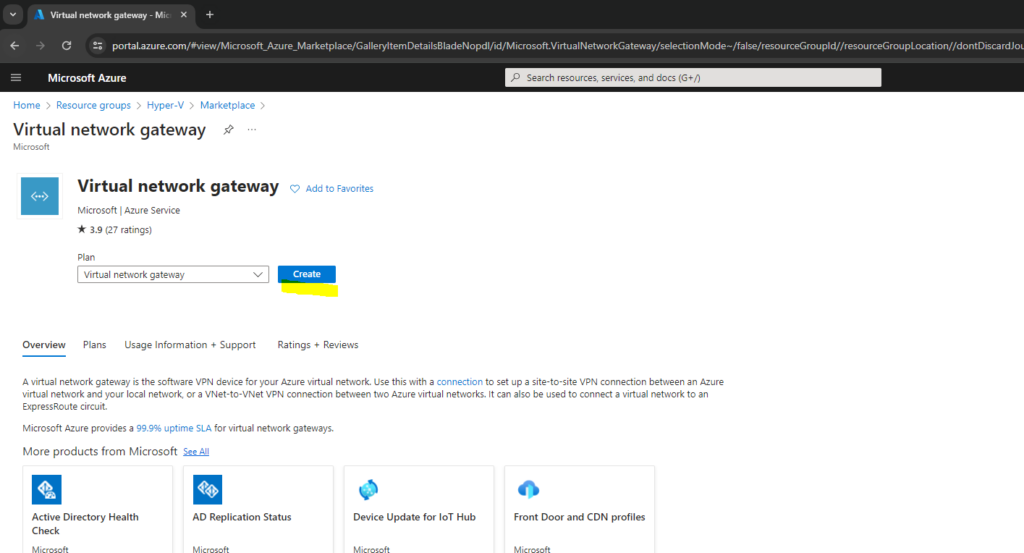
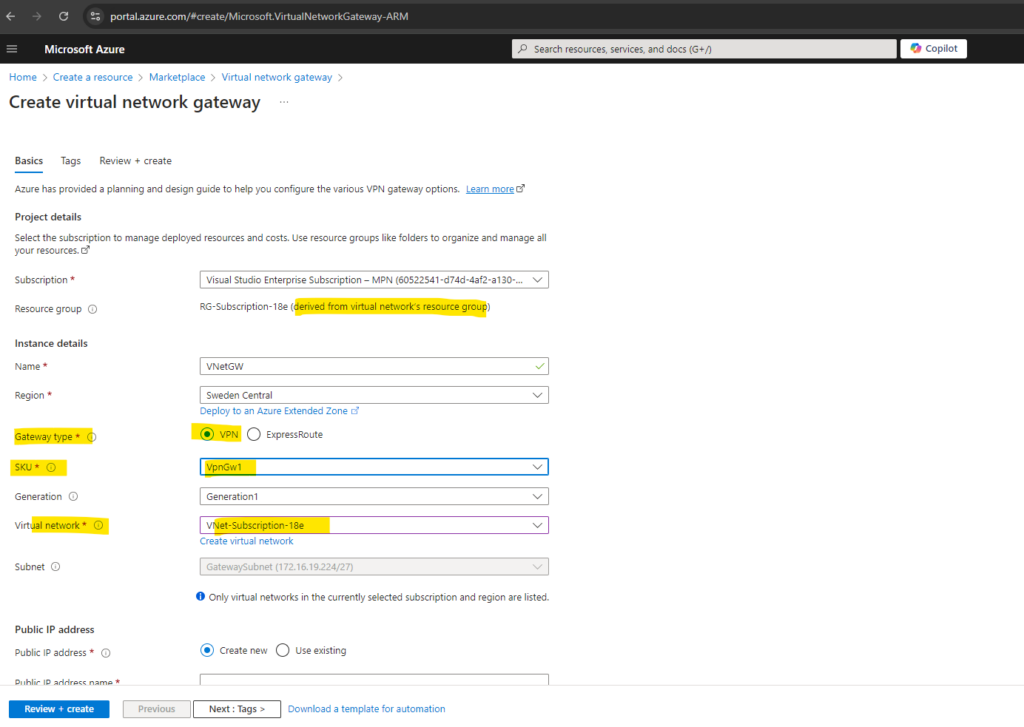
Below we need to select among other things a SKU for our VPN Gateway.
SKU: From the dropdown list, select the gateway SKU that supports the features you want to use. See Gateway SKUs. In the portal, the SKUs available in the dropdown list depend on the VPN type you select. The Basic SKU can only be configured using Azure CLI or PowerShell. You can’t configure the Basic SKU in the Azure portal.
Select the generation you want to use. We recommend using a Generation2 SKU. For more information, see Gateway SKUs.
Virtual network: From the dropdown list, select the virtual network to which you want to add this gateway. If you can’t see the virtual network for which you want to create a gateway, make sure you selected the correct subscription and region in the previous settings.
For the SKU I will select here VpnGw1 which is cost effective and nevertheless supports the BGP protocol we will use for our IPSec route-based site-to-site VPN. The supported features by the VpnGw1 are more than enough for my lab environment.
VpnGw1 -> $0.19/hour
Bandwith -> 650 Mbps
S2S Tunnels -> Max 30 (1-10 included) -> $0.015/hour per tunnel
Source: https://azure.microsoft.com/en-us/pricing/details/vpn-gateway/
The SKU VpnGw1 just supports Generation 1. Further we will select here the mentioned type of virtual network gateway, we will configure a VPN Gateway which we need to select in order to create an IPSec site-to-site VPN tunnel.
For the Region we need to select a region in which our virtual network (VNet) resides.
A virtual network is limited to a single region.
Source: https://learn.microsoft.com/en-us/azure/virtual-network/virtual-networks-faq#can-a-virtual-network-span-regions
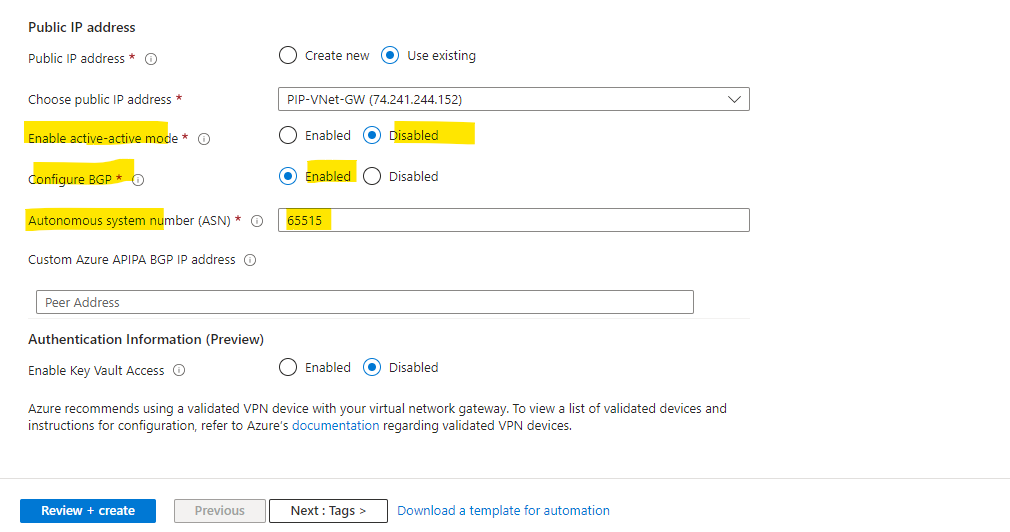
Just for my lab environment we don’t really need an active-active VPN gateway. For the IPSec route-based site-to-site VPN we will use and enable BGP above.
More about active-active mode VPN gateways
https://learn.microsoft.com/en-us/azure/vpn-gateway/about-active-active-gatewaysMore about BGP and VPN Gateway you will find in the following article.
https://learn.microsoft.com/en-us/azure/vpn-gateway/vpn-gateway-bgp-overview
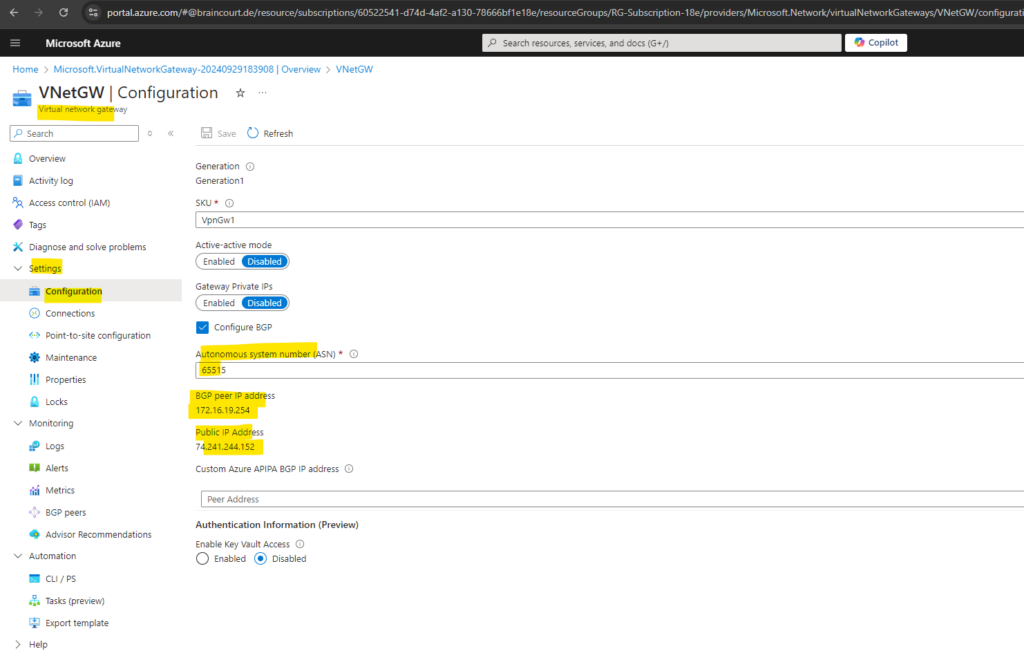
The autonomous system number (ASN) we need to note down for later when we set up the tunnel and BGP on pfSense in on-premises (home network).
To achieve high availability for cross-premises and VNet-to-VNet connectivity, you should deploy multiple VPN gateways and establish multiple parallel connections between your networks and Azure. See Highly Available cross-premises and VNet-to-VNet connectivity for an overview of connectivity options and topology.
Source: https://learn.microsoft.com/en-us/azure/vpn-gateway/active-active-portal
Finally click on Create.
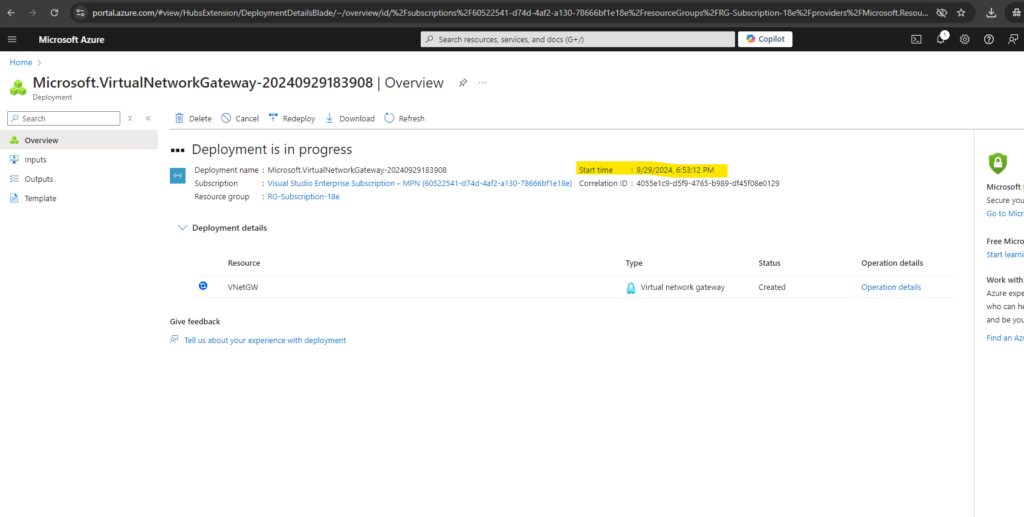
Creating a gateway can often take 45 minutes or more, depending on the selected gateway SKU.
Source: https://learn.microsoft.com/en-us/azure/vpn-gateway/tutorial-site-to-site-portal#VNetGateway!! Note !!
Below you can see also the VPN type with route based which we never selected explicit.
As of October 1, 2023, you can’t create a policy-based VPN gateway through the Azure portal. All new VPN gateways are automatically created as route-based. If you already have a policy-based gateway, you don’t need to upgrade your gateway to route-based. You can use Azure PowerShell or the Azure CLI to create the policy-based gateways.
Source: https://learn.microsoft.com/en-us/azure/vpn-gateway/vpn-gateway-vpn-faq#why-cant-i-specify-policy-based-and-route-based-vpn-types
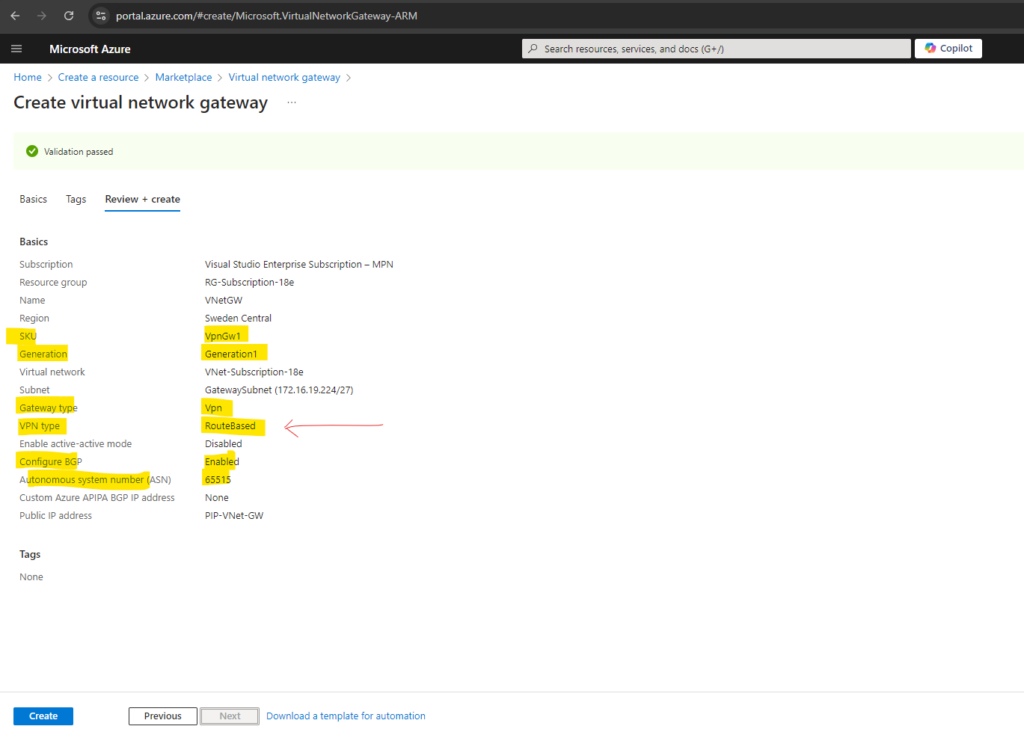
In my case it took 17 minutes to create the virtual network gateway (VPN Gateway).
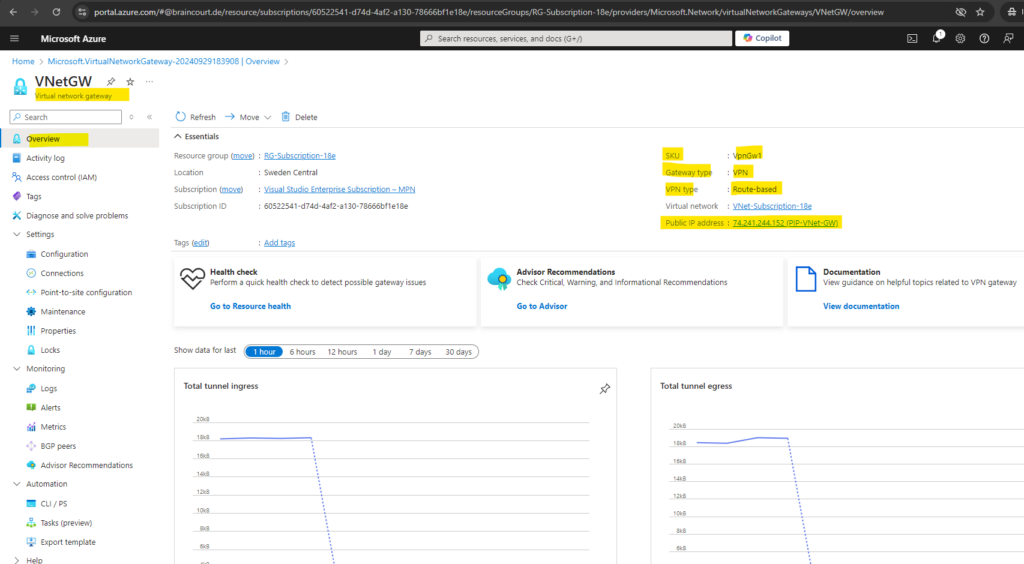
You can determine the gateway public IP address on the Overview page for your gateway.
Once the gateway is created, you can obtain the BGP Peer IP addresses on the VPN gateway as shown below within the configuration section. These addresses are needed to configure your on-premises VPN devices to establish BGP sessions with the VPN gateway.
!! Note !!
The BGP IP Address is assigned automatically from the available IPs in the Gateway subnet and cannot be changed.
Create and Configure a Local Network Gateway
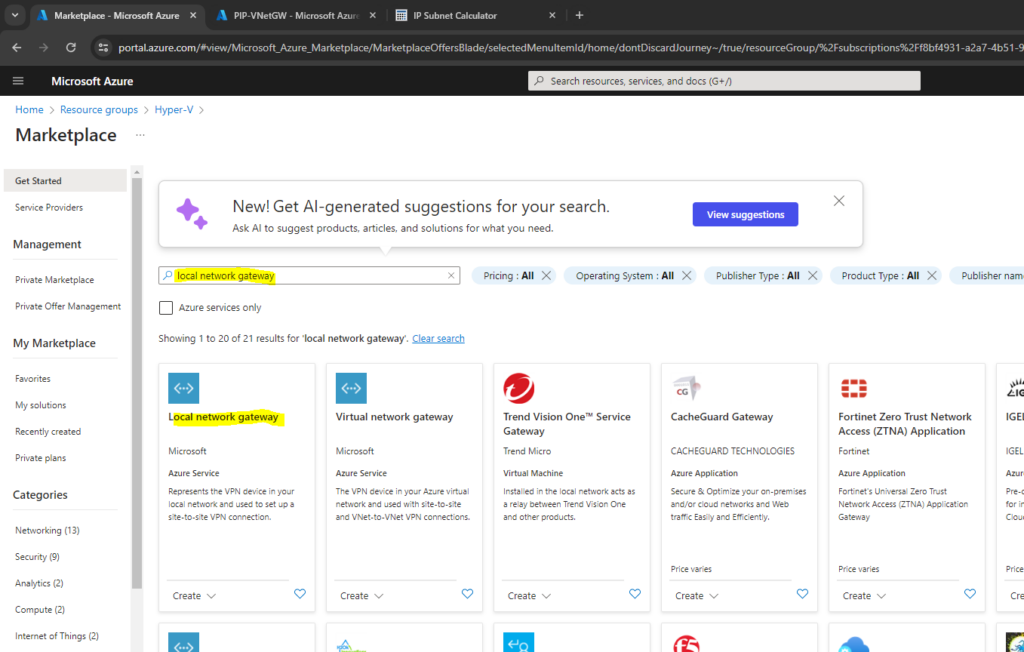
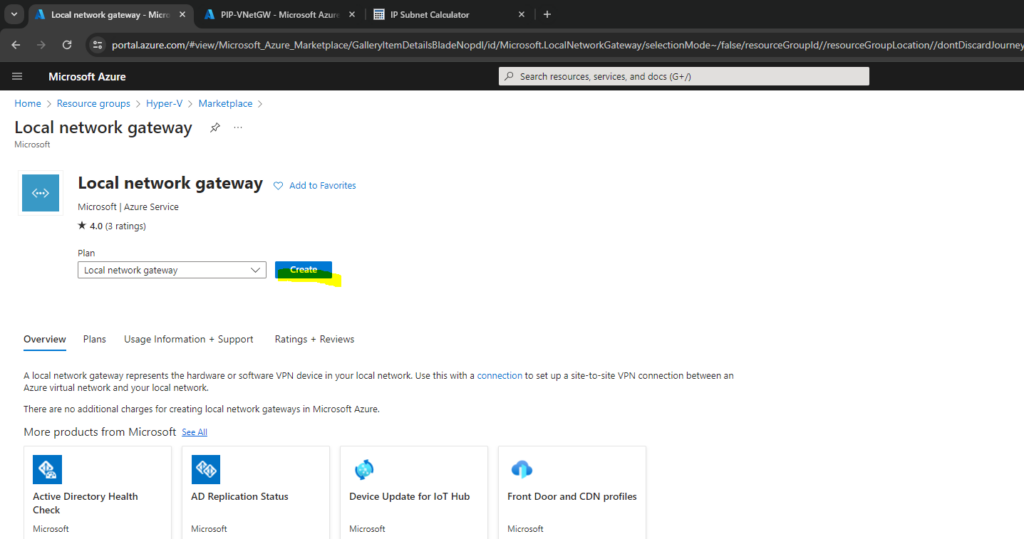
Now we also need to create a local network gateway which represents our on-premise (home network) and its VPN Gateway (in my case a pfSense appliance).
The local network gateway is a specific object that represents your on-premises location (the site) for routing purposes. You give the site a name by which Azure can refer to it, and then specify the IP address of the on-premises VPN device to which you create a connection.
Source: https://learn.microsoft.com/en-us/azure/vpn-gateway/tutorial-site-to-site-portal#LocalNetworkGateway
Because we previously configured for our virtual network gateway (VPN Gateway) to use BGP, we do not need to enter an address space below and can leave this blank. Click on Next: Advanced to enable BGP on the local network gateway.
Address Space(s)
One or more IP address ranges (in CIDR notation) that define your local network’s address space. For example: 192.168.0.0/16. If you plan to use this local network gateway in a BGP-enabled connection, then the minimum prefix you need to declare is the host address of your BGP Peer IP address on your VPN device.Address spaces: If BGP is enabled, no address space is required.
Source: https://learn.microsoft.com/en-us/azure/vpn-gateway/bgp-howto#1-create-a-local-network-gateway
Because we will set up an IPSec route-based site-to-site VPN by using dynamic public IP addresses (dynDNS) for our on-premise (home) network, below we need to select FQDN for Endpoint.
For the Dynamic DNS (DDNS or DynDNS) I will use no-ip which is free.
More about dynDNS you will find here https://en.wikipedia.org/wiki/Dynamic_DNSAbout how to configure DynDNS on FRITZ!Box you can read the following article https://en.avm.de/service/knowledge-base/dok/FRITZ-Box-7590/30_Setting-up-dynamic-DNS-in-the-FRITZ-Box/.
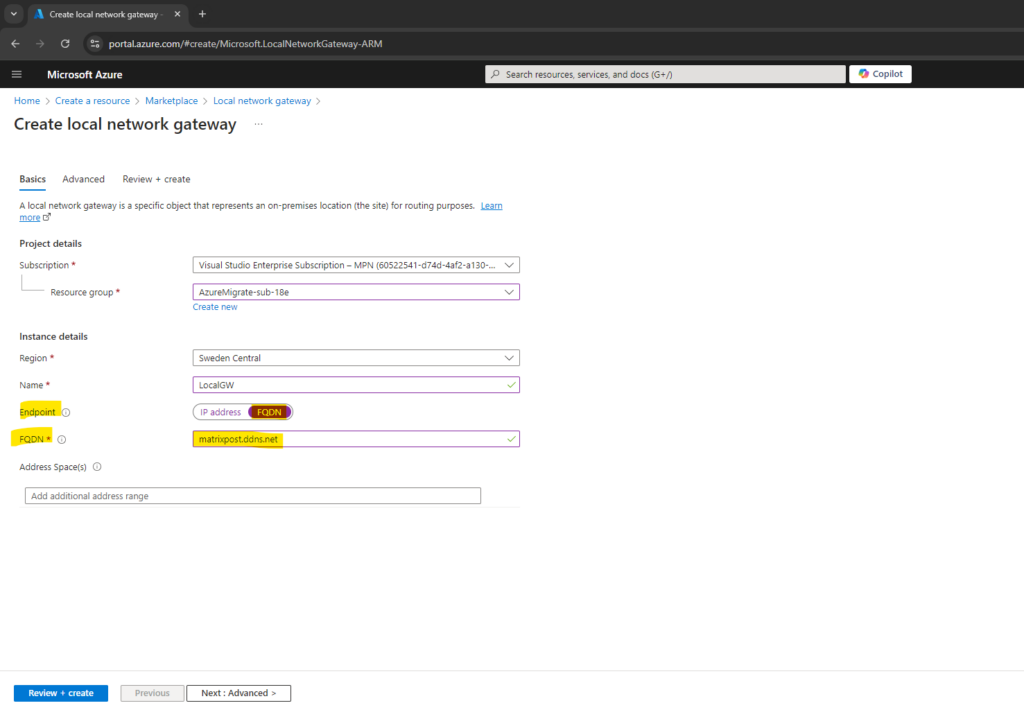
As mentioned, because we will use BGP to advertise the routes of our local network, we can leave the field for the address space(s) below blank.

In case we do not want to use BGP and therefore want to define the networks/subnets we want to route through the tunnel by hand, we need to add here all on-premise local networks which should be routed through the tunnel with Azure.
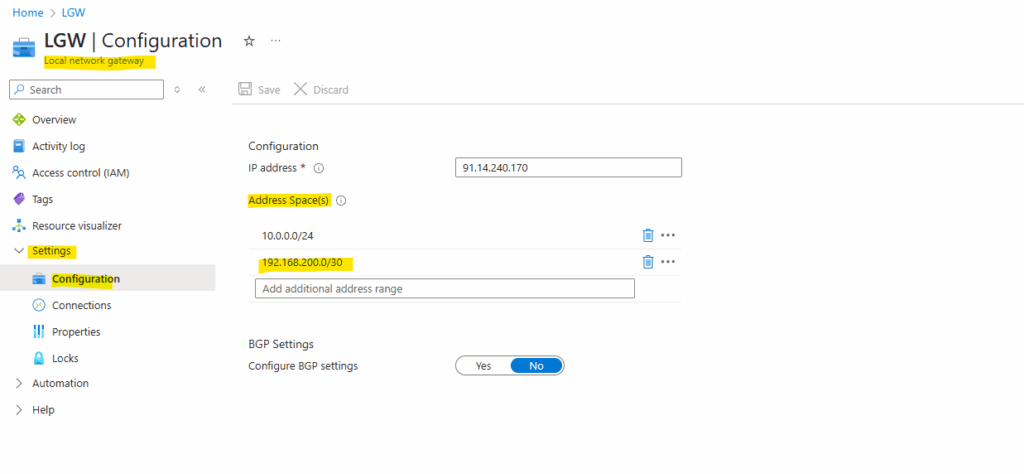
We also need to add here the transit network (IKEv2 phase 2 tunnel), configured on the local on-premise VPN device, through which the local networks and Azure networks will be routed.
For the transit network I will use below for example the network 192.168.200.0/30. This network will finally have two host addresses I can use for with 192.168.200.1 and 192.168.200.2 (192.168.200.0 is the network address and 192.168.200.3 the broadcast address.)
The transit network should not overlap with our on-premise local networks or the Azure networks.
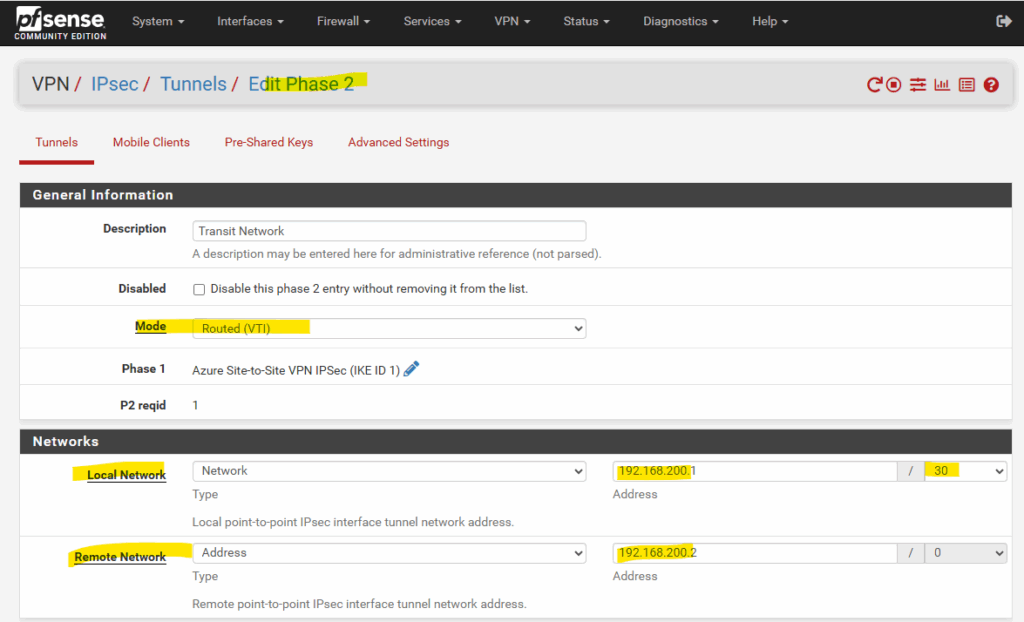
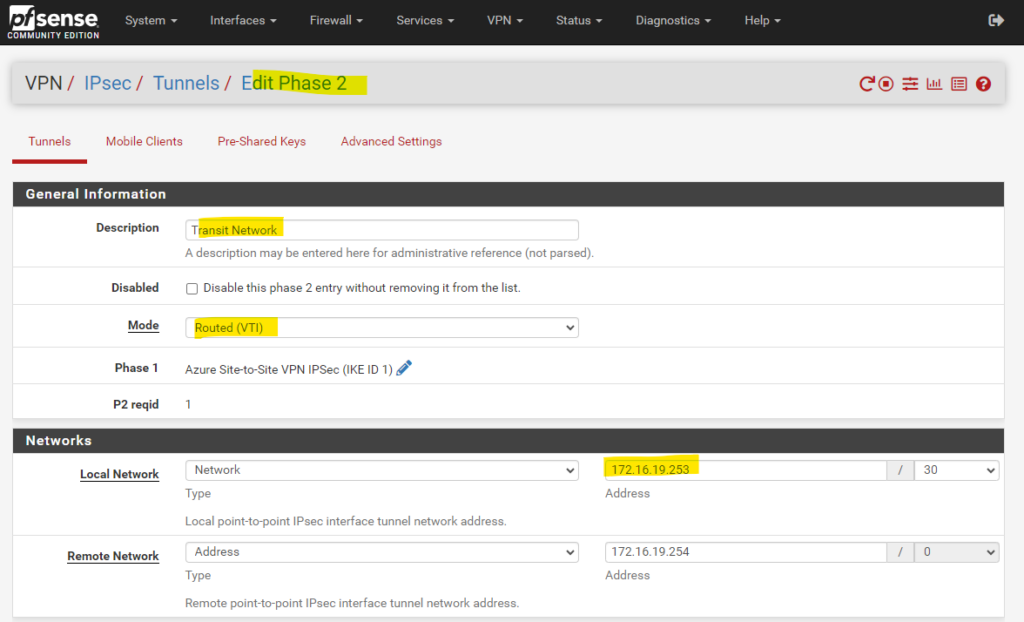
On the on-premise VPN device (in my case pfSense) the configuration for the transit network on the phase 2 tunnel will looks like this.
The remote network IP for the transit network below, we do not need to configure directly in Azure on the local network gateway, it just needs to be defined in the address space(s) field as shown above.
Now back to our configuration by using BGP.
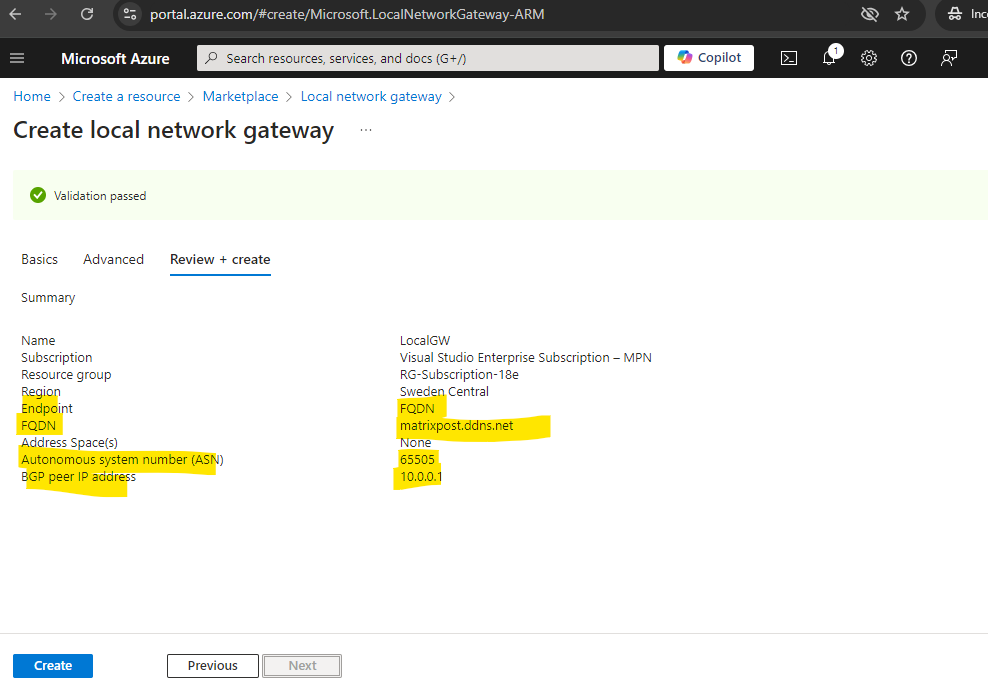
On the Advanced tab below enable BGP and enter the ASN number and BGP peer IP address of your local on-premise VPN device, in my case my pfSense appliance. Then click on Review + create.
The ASN and BGP peer IP address of the local network gateway we will get from our on-premise VPN appliance, in my case here pfSense. The configuration of the pfSense IPSec site-to-site VPN tunnel we will see further down.
The BGP peer IP address you need to enter below can be the internal IP address of your pfSense appliance (its LAN interface). So in my case this is the IP address 10.0.0.1 as shown below.
As we can’t set in Azure for the on-premise BGP peer IP the second IP of the /30 subnet used for the BGP IP in Azure, because it is located within the Azure VNet address space (172.17.0.0/16) and therefore will overlap, we can set on the local network gateway object also the internal IP address of pfSense which will also work for the BGP session.
Another way and best practices is to use instead custom Azure APIPA BGP IP addresses as shown in my following post https://blog.matrixpost.net/step-by-step-guide-setting-up-route-based-s2s-vpn-between-azure-and-on-prem-by-using-pfsense-part-2/ and next further down.
When using link-local APIPA addresses on pfSense, we must first enable them on pfSense as shown in my following post https://blog.matrixpost.net/pfsense-and-apipa-169-254-16-enabling-link-local-transit-networks-for-ipsec-vti-and-bgp/.
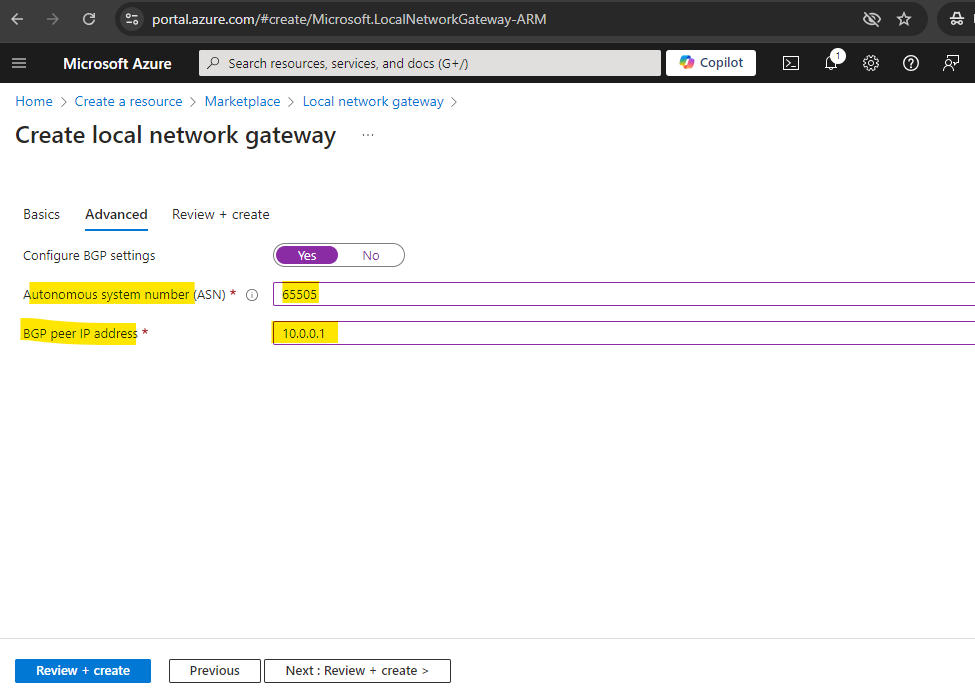
Below you can see the above mentioned BGP peer IP address which in my case is the IP address of the internal LAN interface of my on-premise (home network) VPN Gateway (pfSense).
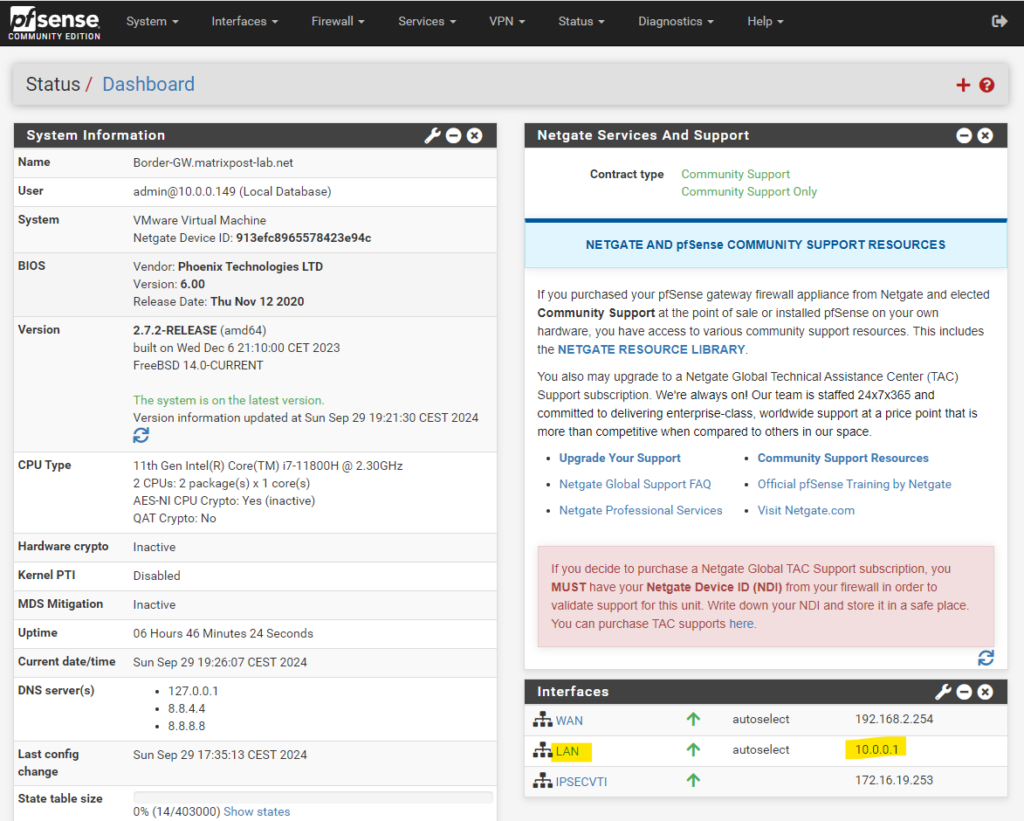
And here the above mentioned transit network IP address for the IKE-Phase 2 IPSec tunnel.
Click on Create.
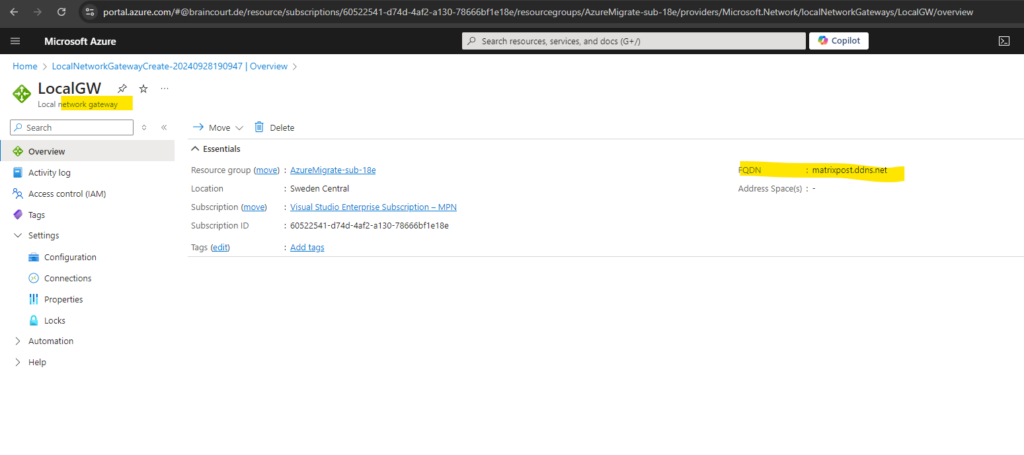
Finally the local network gateway is created.
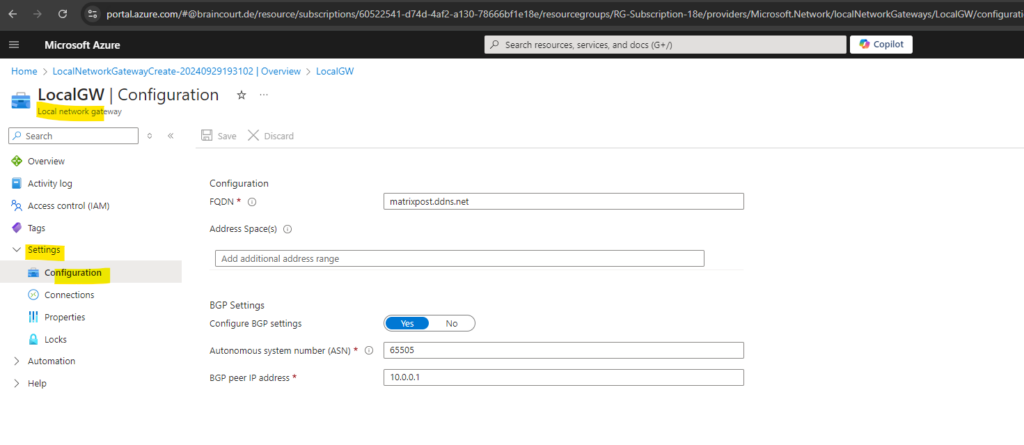
You can review and change the settings within the Configuration menu. The next step is to create the actual tunnel between your on-premise VPN device and the Azure virtual network gateway (VPN Gateway) within the Connections menu as shown in the next section.
As already mentioned above and best practices, we can also use custom Azure APIPA BGP IP addresses as shown below.
When using link-local APIPA addresses on pfSense, we must first enable them on pfSense as shown in my following post https://blog.matrixpost.net/pfsense-and-apipa-169-254-16-enabling-link-local-transit-networks-for-ipsec-vti-and-bgp/.
Also read my following post about numbering (or unnumbered supported by Juniper, Cisco, Check Point, etc. but not pfSense) the phase 2 transit network https://blog.matrixpost.net/step-by-step-guide-setting-up-route-based-s2s-vpn-between-azure-and-on-prem-by-using-pfsense-part-2/.
The screenshots (and IP addresses) below are from a different deployment by using APIPA BGP IP addresses.
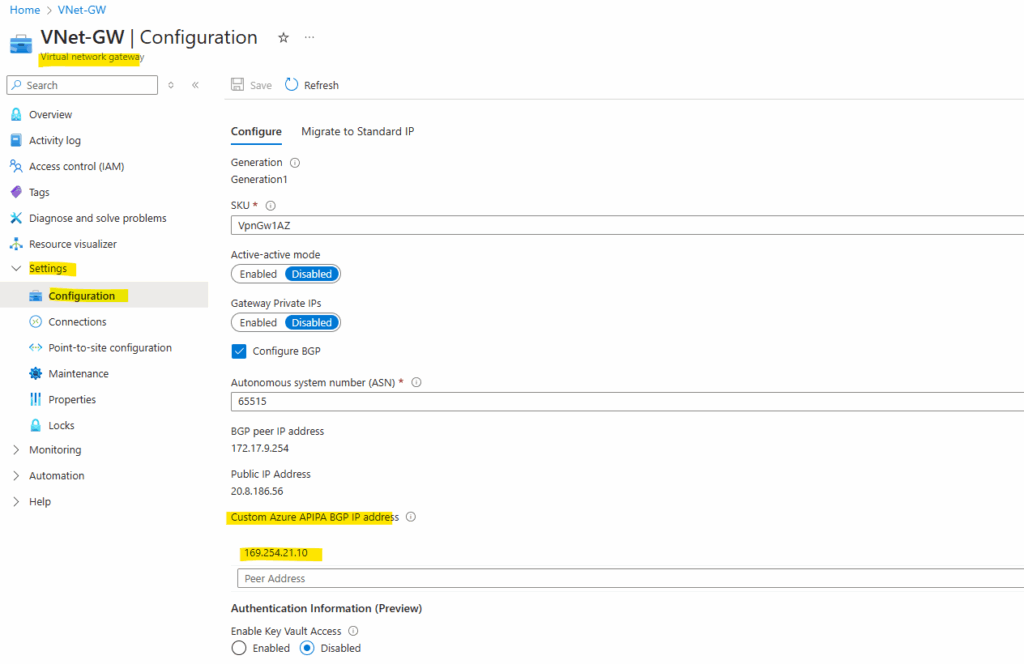
To use them we need to add it directly on the virtual network gateway as highlighted.
Azure supports BGP IP in the ranges 169.254.21.* and 169.254.22.*.
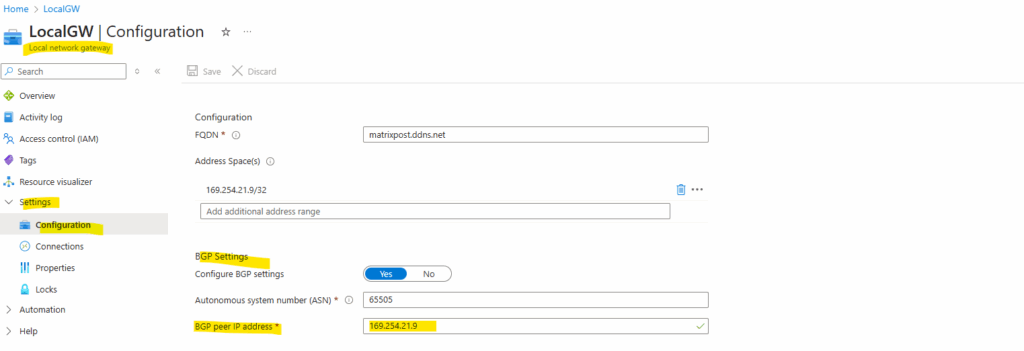
So below for the Azure side we can use e.g. 169.254.21.10 and because they will need to be configured as /30 subnet, in on-prem (here pfSense) we need to use 169.254.21.9 for the BGP peer IP.
The BGP peer IP (pfSense) with 169.254.21.9 we need to enter on the local network gateway as shown below.
These BGP IP addresses we will use to configure in pfSense the IKEv2 phase 2 tunnel (transit network).
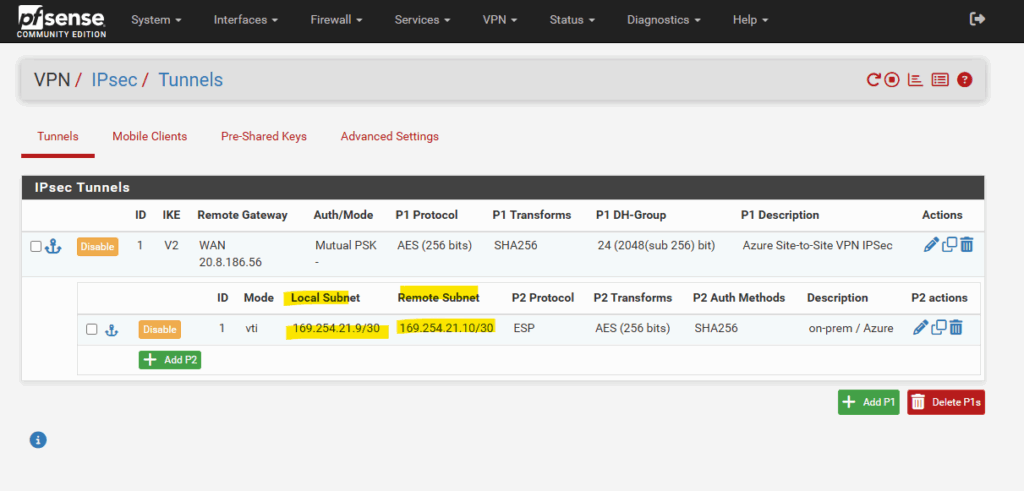
The BGP IP address will be assigned automatically to the VTI interface and therefore can be also used as BGP IP.

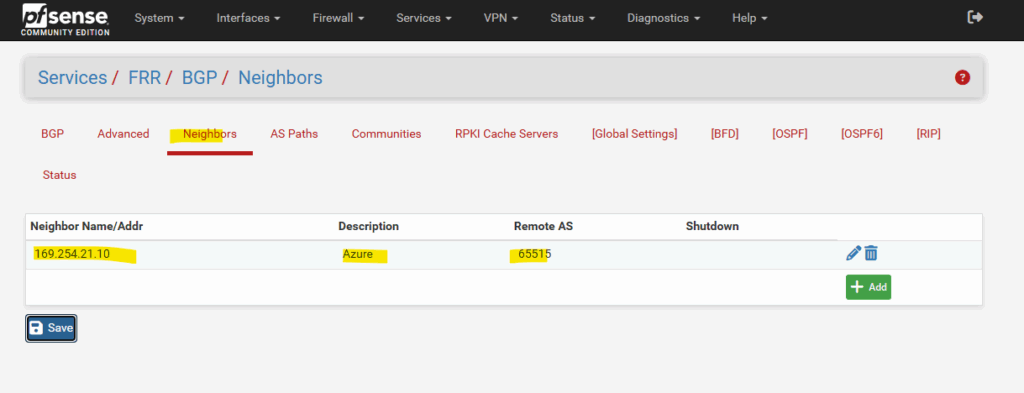
For the BGP neighbor in pfSense we use the custom Azure APIPA BGP IP address.
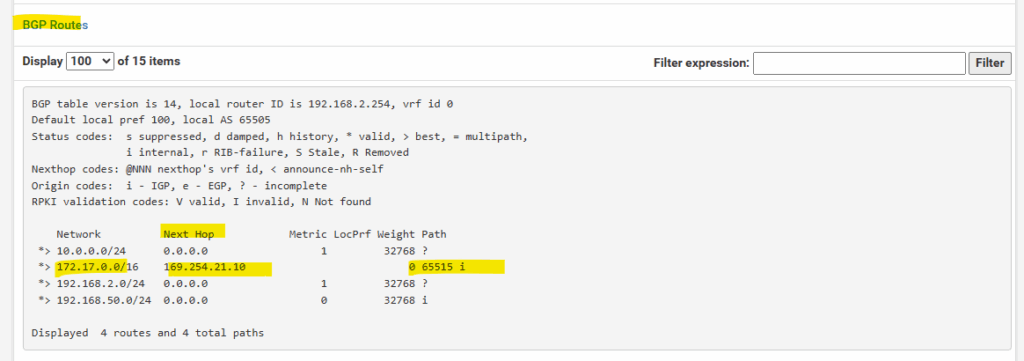
In pfSense we can already see under Status -> FRR -> BGP the advertised routes from Azure (Path 65515), here the Azure’s virtual network address space 172.17.0.0/16.
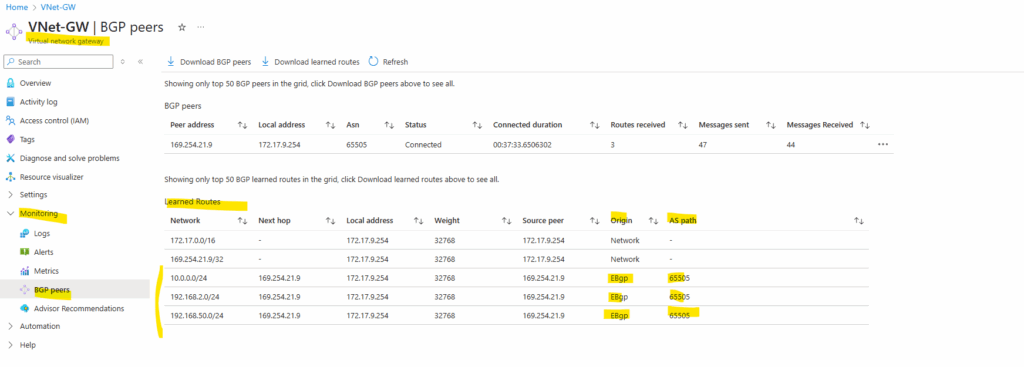
Also in Azure -> virtual network gateway -> Monitoring -> BGP peers we will see all advertised routes from on-prem by pfSense to Azure.
Configure a S2S connection with BGP enabled
Create a site-to-site VPN connection between your virtual network gateway (VPN Gateway) and your on-premises VPN device.
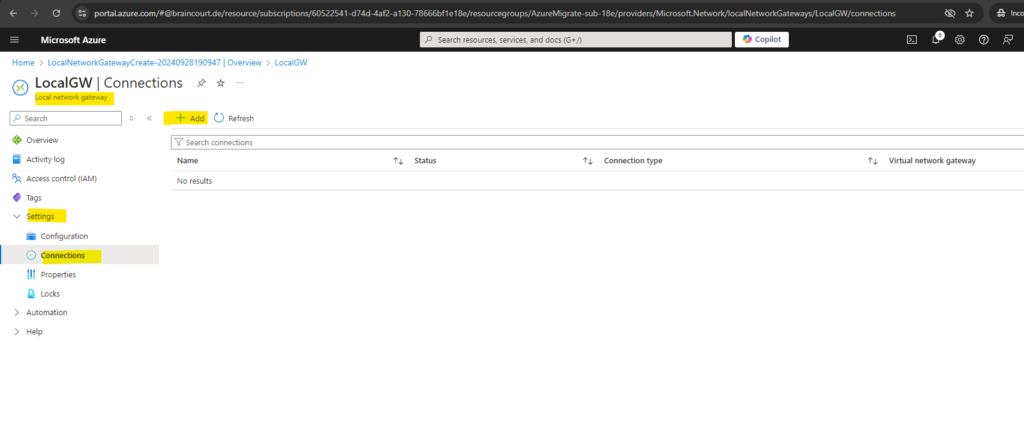
Within the Connections menu of the local network gateway click on Add.
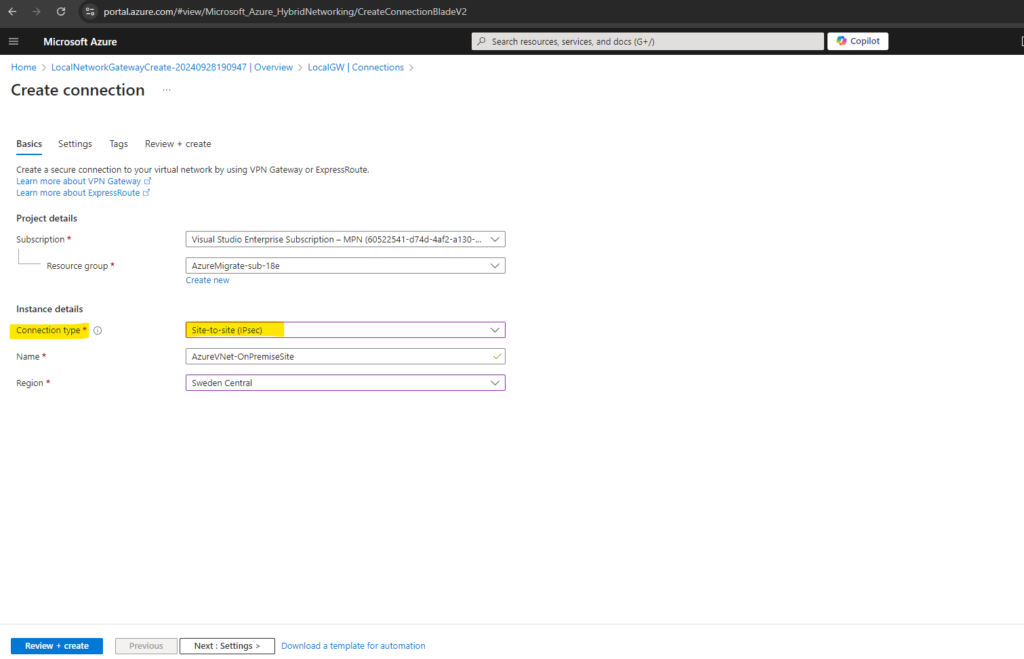
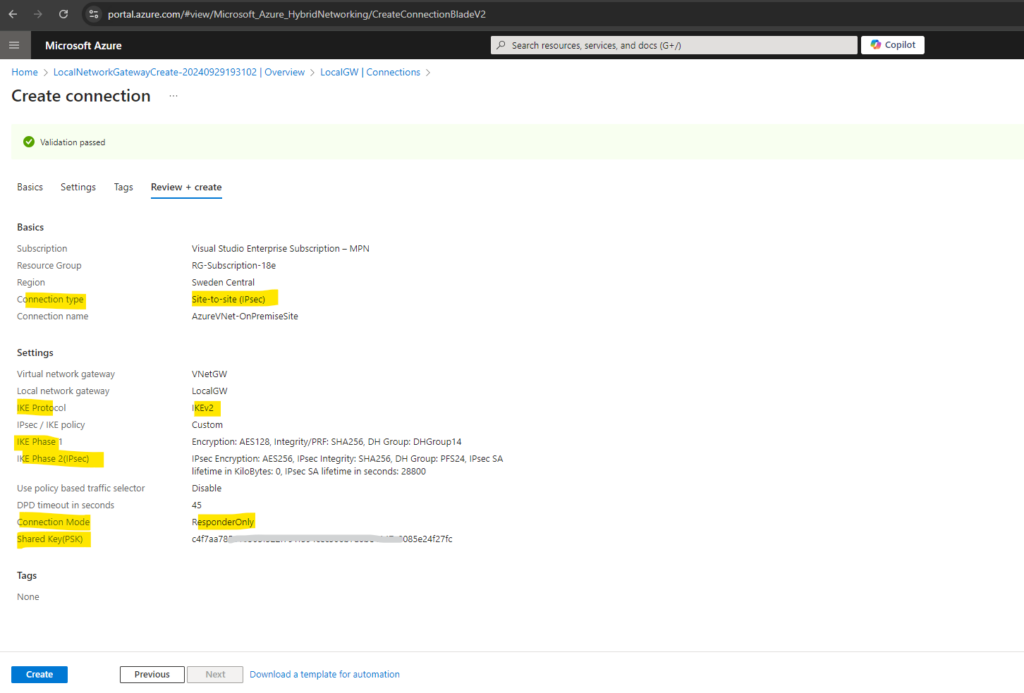
For the connection type we select Site-to-site (IPsec).
For the IPsec / IKE policy we will enable a Custom policy which we need to set identically on both sites, in Azure and on-premise (pfense). Click on Review + create.
The default policy set for Azure VPN gateway is listed in the article: About VPN devices and IPsec/IKE parameters for Site-to-Site VPN Gateway connections.
We also need to enable here BGP and entering a Shared Key (PSK), this key must be identical on both sites and I was generating a PSK on pfSense which I will using here.
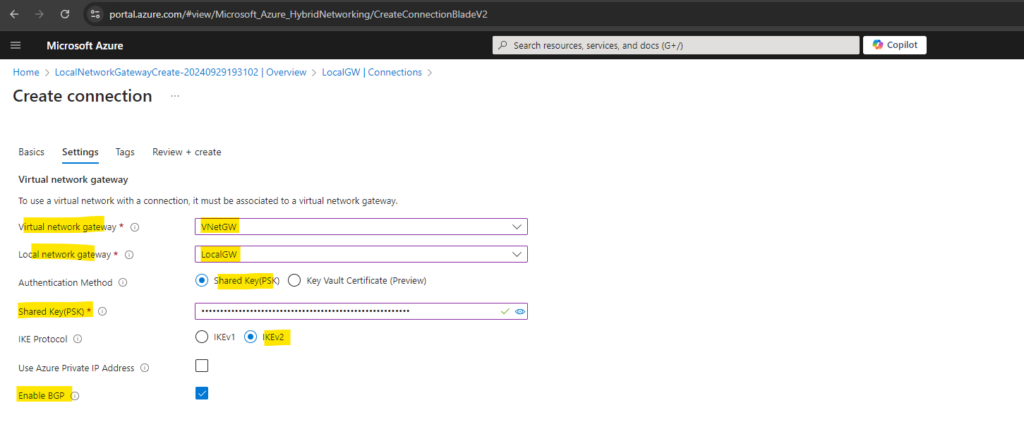
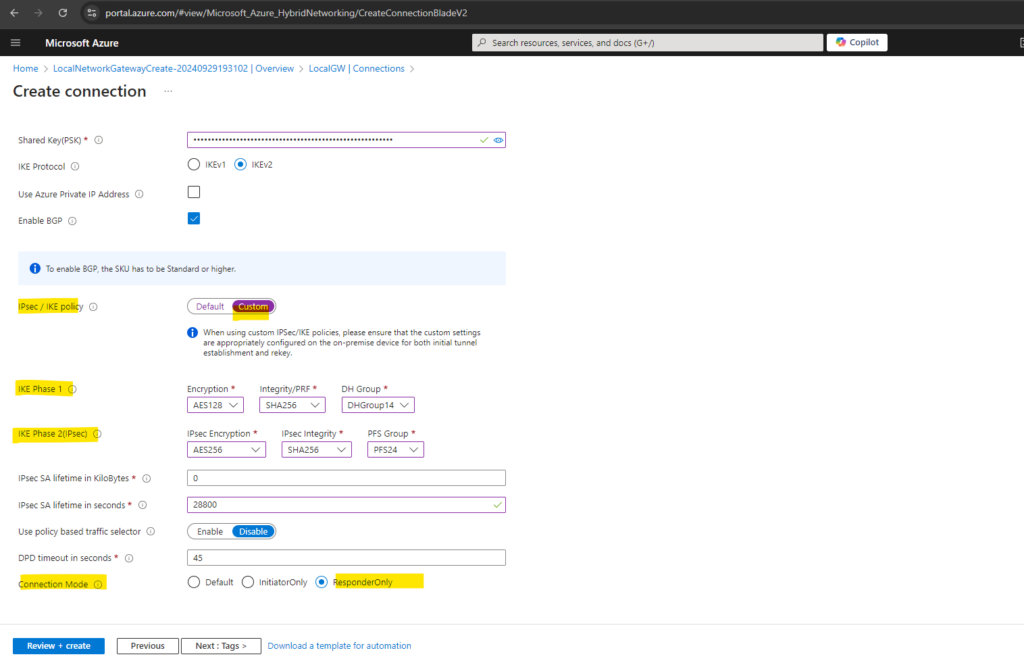
Above we also select ResponderOnly for the Connection Mode because my on-premise VPN gateway (pfSense) on which we will configure the IPSec site-to-site VPN tunnel will be sitting behind a NAT router and is the only one which needs to initiate the connection to Azure.
Connection mode is used to decide which gateway can initiate the connection.
When this value is set to: Default -> both Azure and on-premise VPN gateway can initiate the connection.ResponderOnly -> Azure VPN gateway will never initiate the connection. On-premise VPN gateway must initiate the connection.
InitiatorOnly -> Azure VPN gateway will initiate the connection and reject any connection attempts from on-premise VPN gateway. Learn more
Finally we can click on Create.
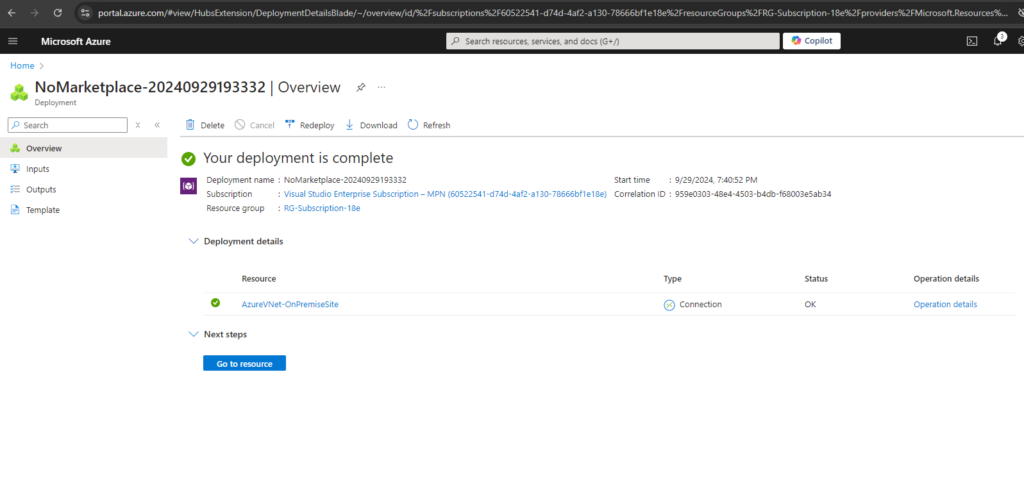
So far the tunnel is not established. We first need to set up our on-premise VPN Gateway and have to configure our NAT Router.
On the NAT Router we need to open the IPSec ports (UDP 500, UDP 4500 and ESP) and forwarding this traffic to our VPN Gateway (pfSense).
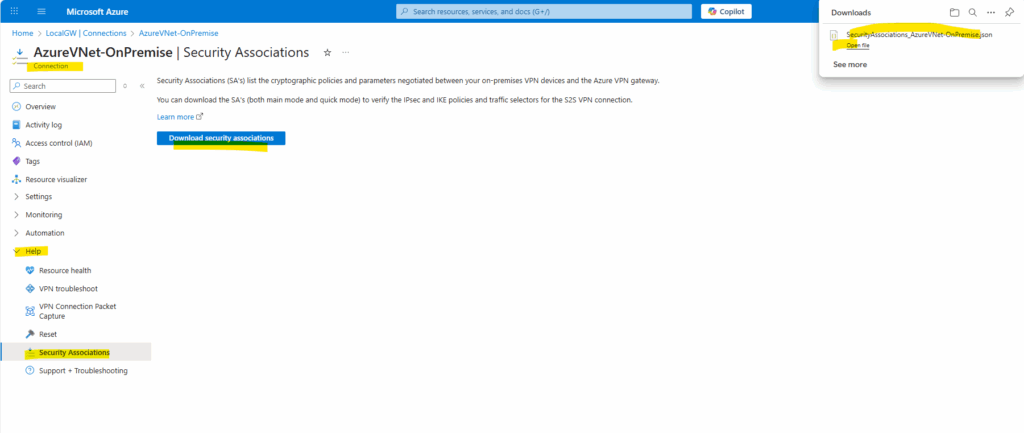
We can also download the Security Associations (SA’s) which lists the cryptographic policies and parameters negotiated between our on-premises VPN devices and the Azure VPN gateway.
Directly on the Connection under Help -> Security Associations.
Set up the IPSec Tunnel in pfSense
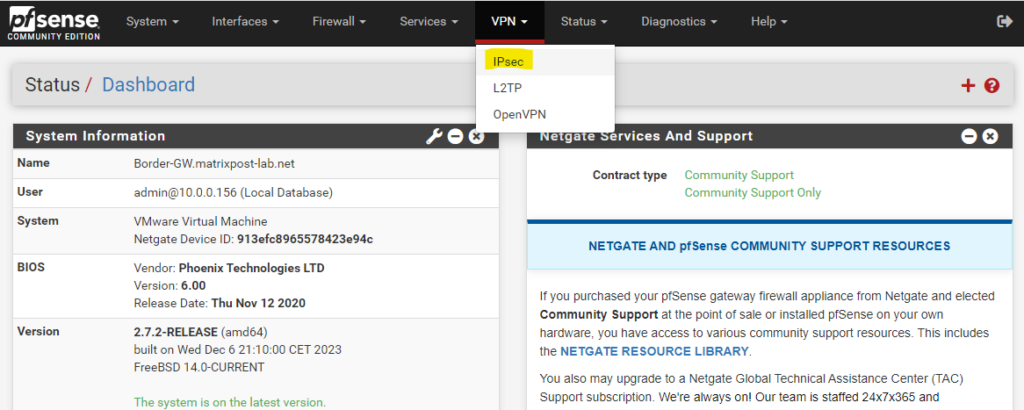
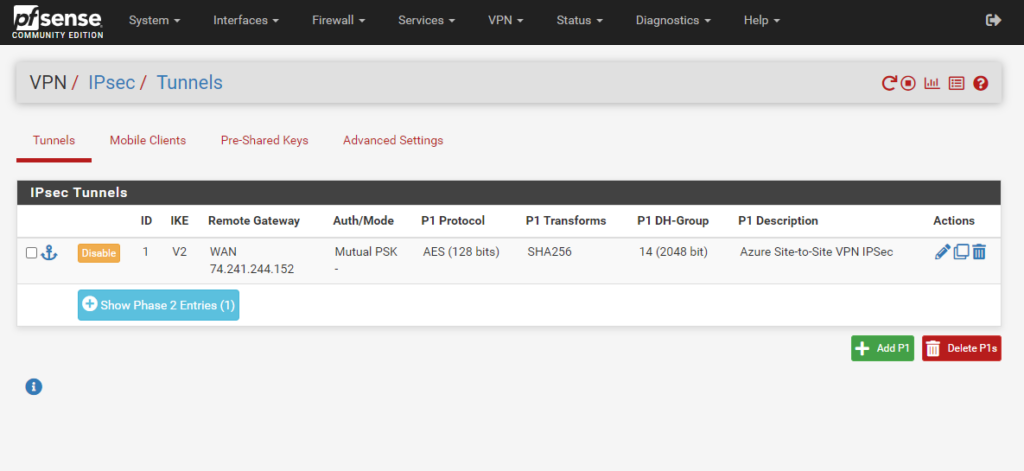
To configure the IPSec tunnel in pfSense, navigate to VPN -> IPsec.
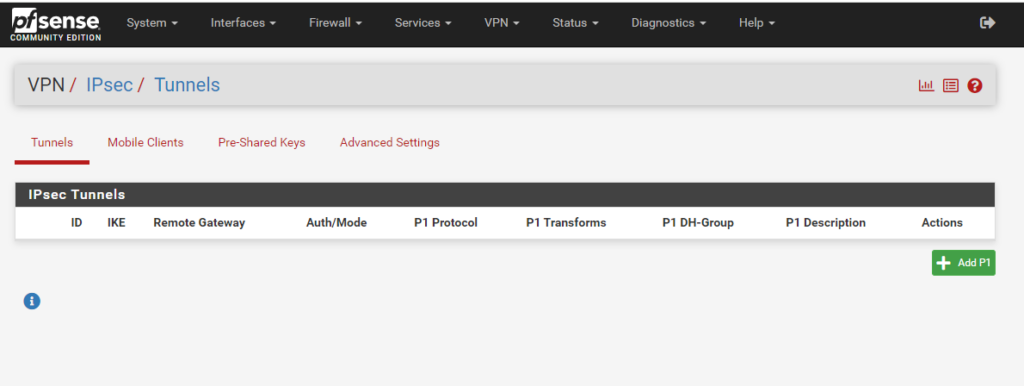
Click on Add P1 to create the IPSec phase 1 tunnel.
We will use on both sites the new IKEv2 (IPSec protocol version). For the Remote Gateway we need to enter the public IP address of our Azure virtual network gateway.
As mentioned we can generate a pre-shared key directly in pfSense which we need in both sites to authenticate and establish a secure connection between both sites.
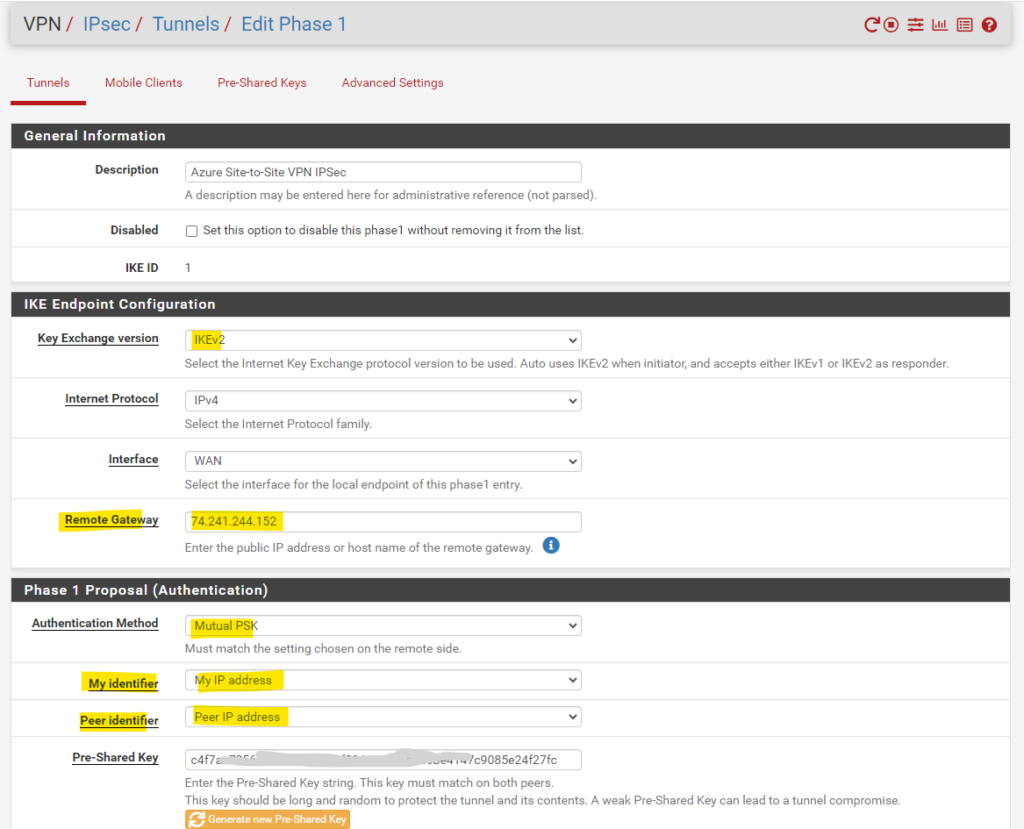
The IPsec/IKE parameters setting should match on both sites.
Supported combinations of algorithms and parameters for Azure VPN gateways we can use here in pfSense, you will find in the following article https://learn.microsoft.com/en-us/azure/vpn-gateway/vpn-gateway-about-vpn-devices#ipsec.
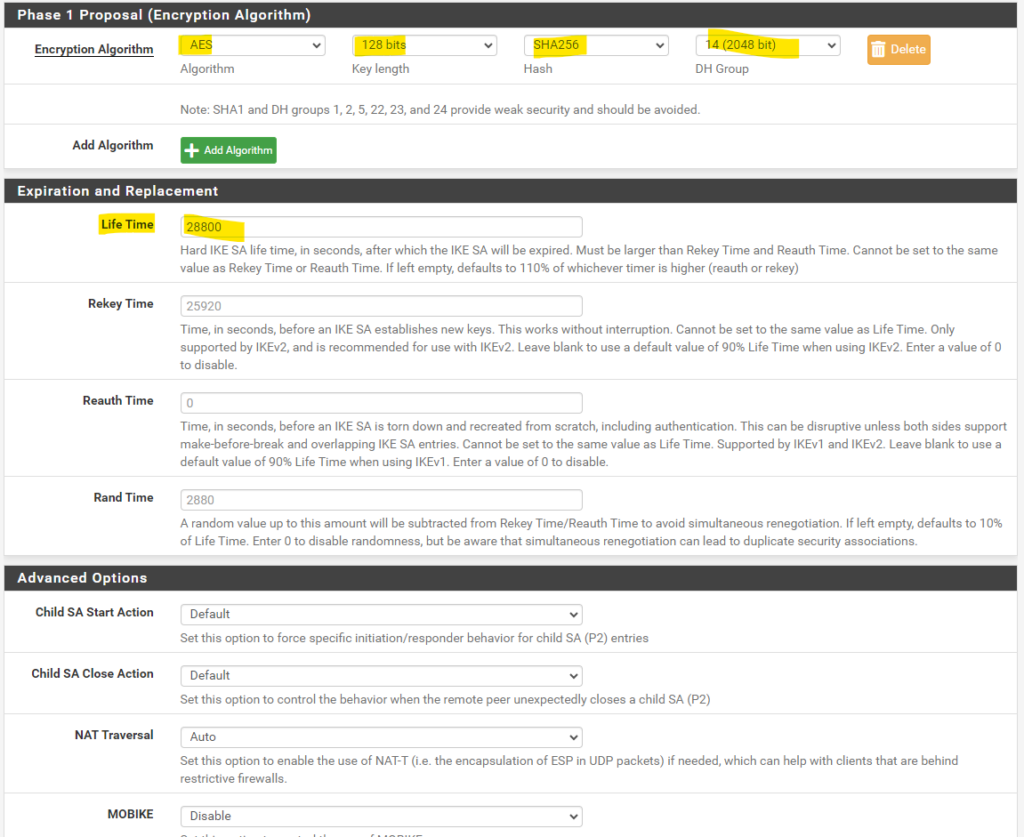
Advanced Options for phase 1 in detail:
Child SA Start Action:
This option forces specific behavior performed by the IPsec daemon when loading a phase 2 configuration (“Child SA”) during initial service startup. This happens at boot and when the service is restarted for any reason.Initiate at Start (VTI or Tunnel Mode) -> The firewall will attempt to establish the IPsec tunnel immediately when the IPsec daemon starts.
NAT Traversal:
(IKEv1 Only) Also known as NAT-T. NAT Traversal encapsulates ESP traffic for IPsec inside of UDP packets to more easily function in the presence of NAT. If this firewall or the firewall on the other end of the tunnel is behind a NAT device then NAT Traversal will likely be necessary for the tunnel to function properly.Force -> Instructs the IPsec daemon to always use NAT Traversal for the tunnel. This can help if there is a known issue detecting NAT. It can also help with issues carrying ESP traffic between the two endpoints even when neither side is behind NAT.
IKEv2 integrates NAT Traversal natively so the option is unnecessary in that case.
Source: https://docs.netgate.com/pfsense/en/latest/vpn/ipsec/configure-p1.html
We can click on Apply Changes to save the configuration of our IKE phase 1 tunnel.
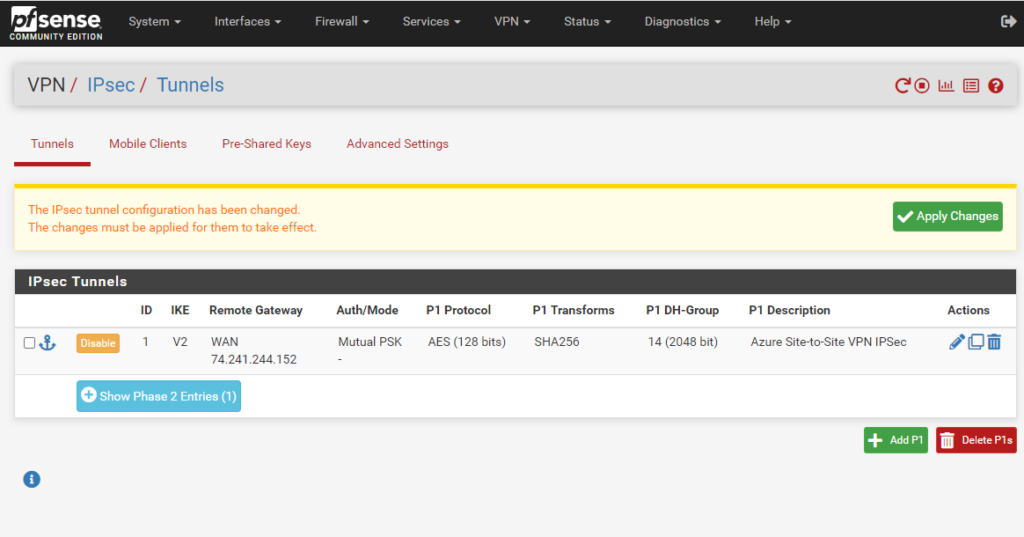
Next we need to create the phase 2 tunnel (IPSec/EPS), so first click on Show Phase 2 Entries and then click on Add P2.
As we create a route-based S2S vpn tunnel with dynamic routing using BGP, we need to use for the Mode here Routed (VTI). VTI stands for Virtual Tunnel Interface.
In this mode we create a transit network with a subnet mask of /30 which will contain exactly usable 2 IP addresses, one for each site and used by the BGP protocol to route related bgp session traffic (advertising routes).
Through this transit network we will later route our local subnets and also the BGP session. So the first benefit from a route-based S2S VPN over a policy-based S2S VPN, is that we do not have to create for each subnet, we want to route through the tunnel, a dedicated IPSec/EPS Phase 2 tunnel (aka Proxy IDs/Traffic Selectors), we just need to create one phase 2 tunnel (our transit network) on each site, through which all other subnets finally will be routed.
This BGP IP address for Azure here (172.16.19.254/30) is assigned automatically and allocated from the Azure Gateway subnet, it cannot be changed or specified by hand and is immutable.
Alternatively we can also use a custom Azure APIPA BGP IP address in Azure which will override the need for the GatewaySubnet IP in the BGP session itself and shown here.
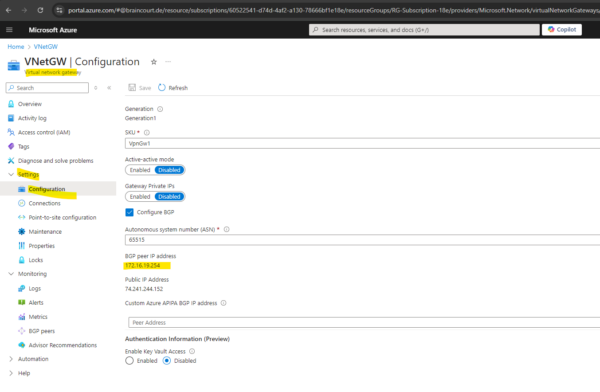
So for our on-premise BGP peer (pfSense) we need to assign here 172.16.19.253/30 if not using the alternative APIPA addresses as mentioned and shown here.
To determine IP addresses within a specific network class we can use an IP Subnet Calculator like this one here https://www.calculator.net/ip-subnet-calculator.html.
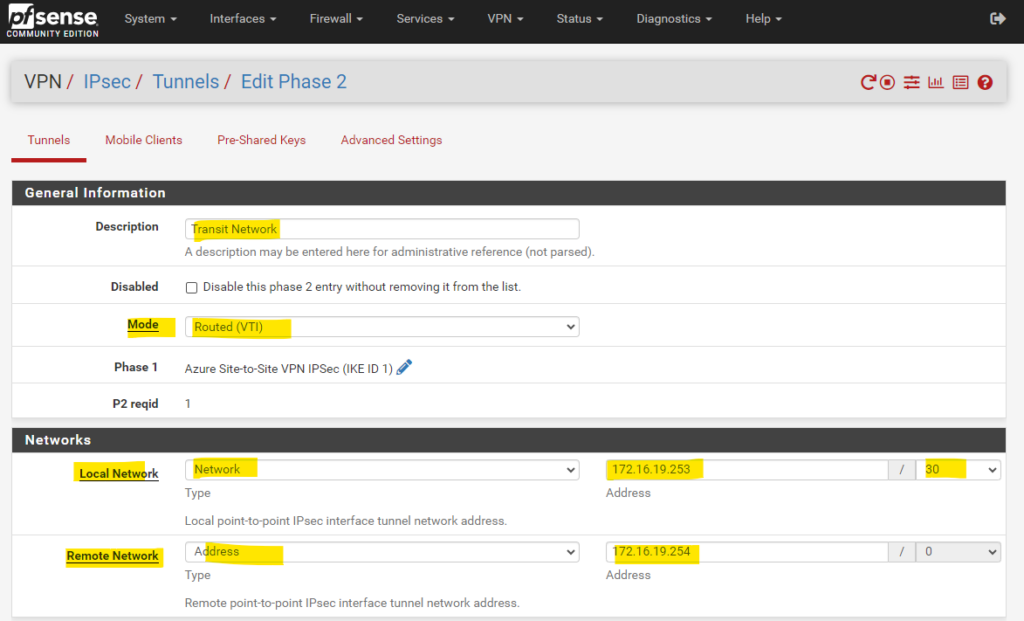
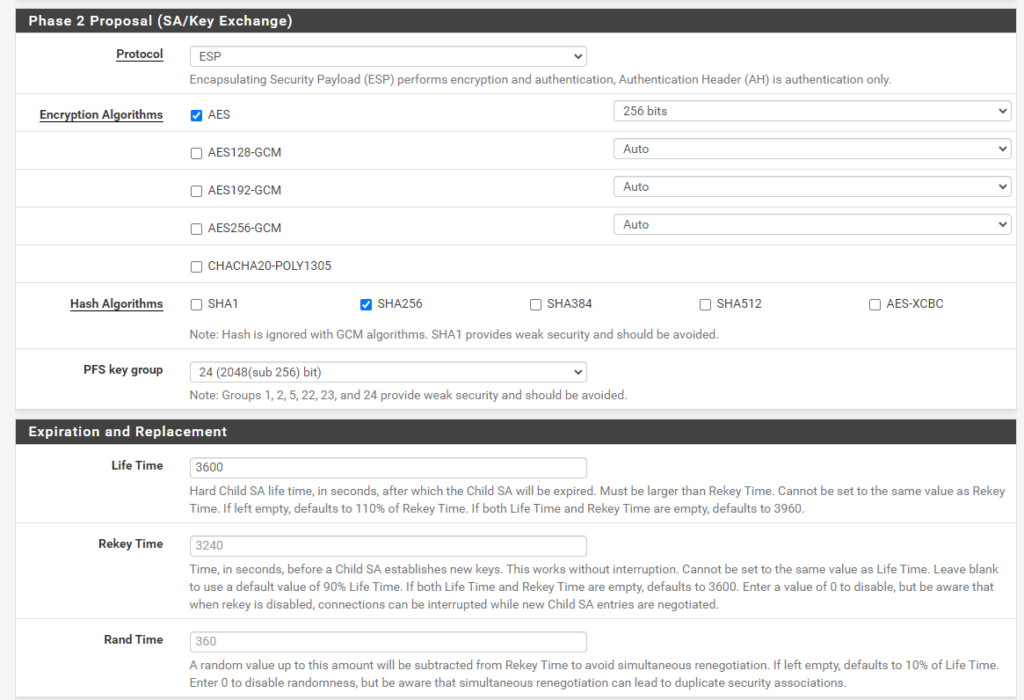

Also apply the changes for the phase 2 tunnel (our transit network).
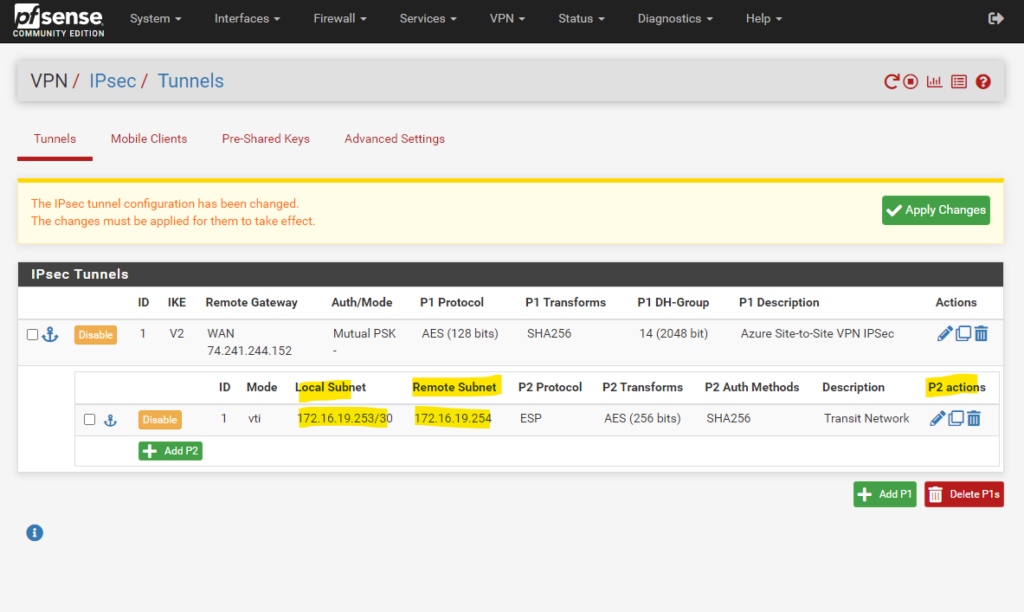
Because we set the Mode to Routed (VTI) in Phase 2, here pfSense will create a virtual tunnel interface (VTI) on which the BGP peer IP address is assigned on.
All traffic which has to be routed through the tunnel to Azure, now will be send to Azure’s BGP peer IP address (172.16.19.254/30 aka next hop), which is connected with our on-premise VTI and its assigned IP address (172.16.19.254/30). They finally build a virtual point-to-point link.
Before this happens, we first we have to assign and enable the VTI interface on pfSense.
So click on the Add button and save to assign it under Interfaces -> Assignement
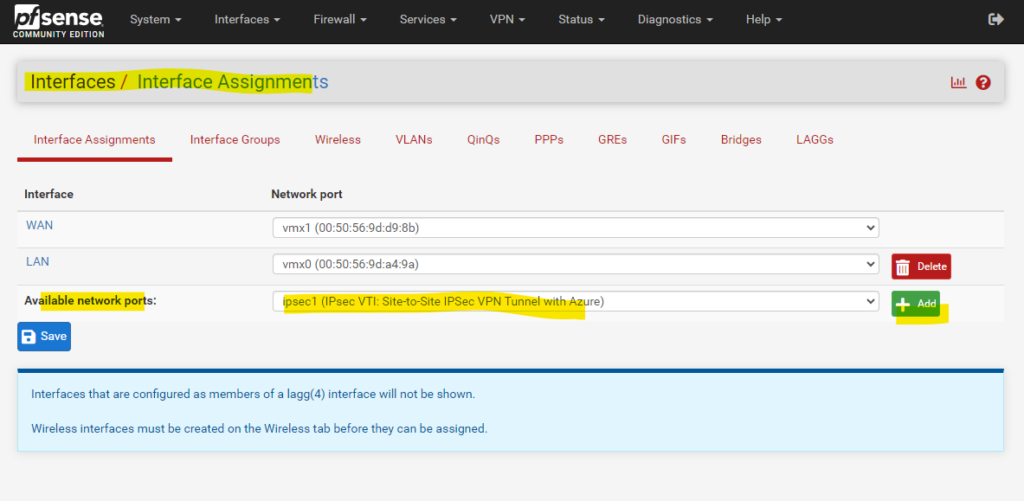
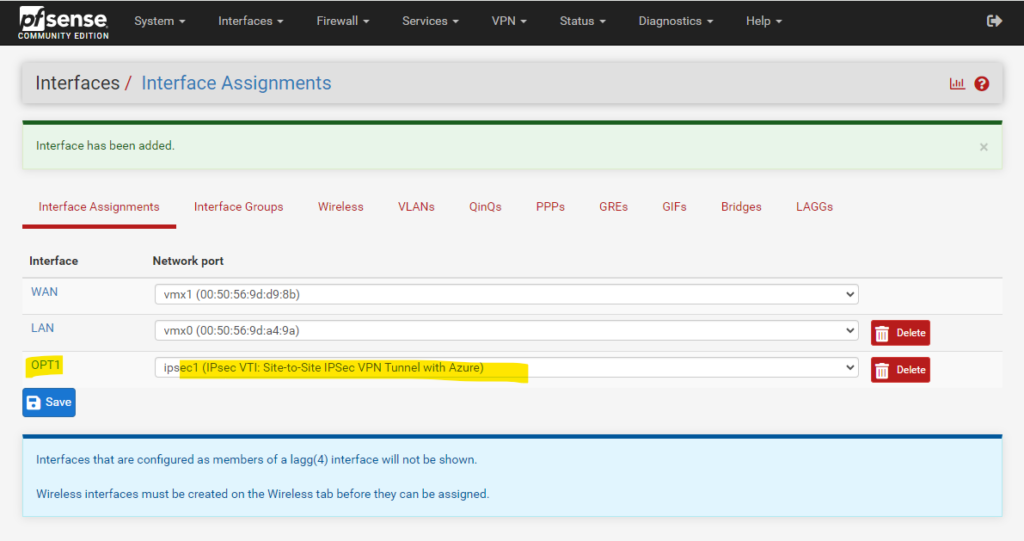
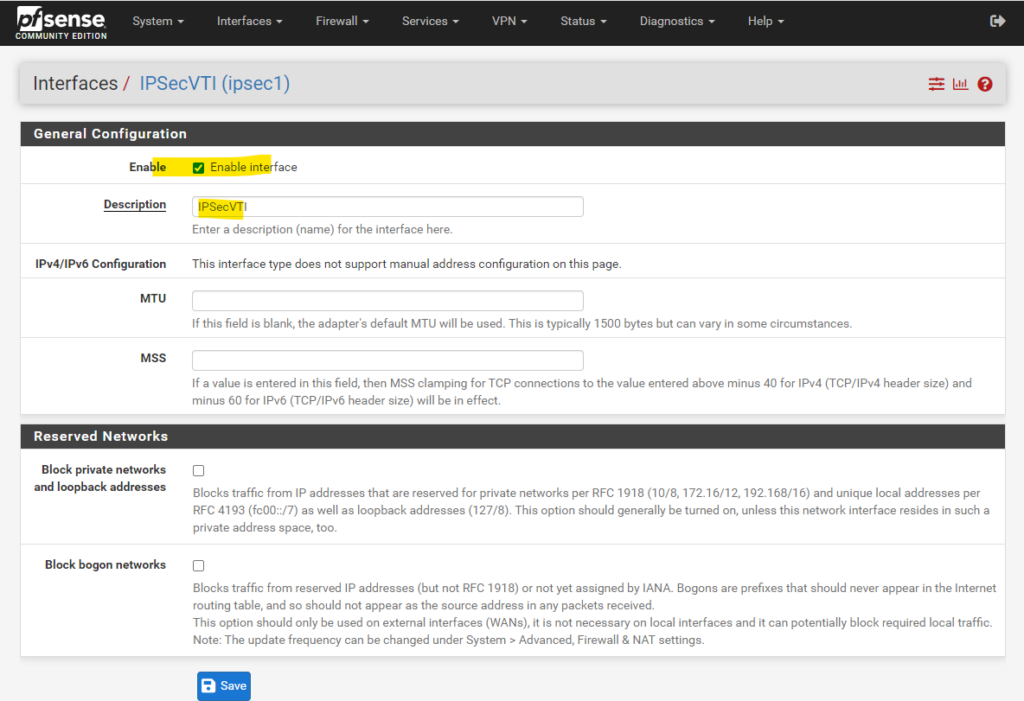
By clicking on the Interface (OPT1) above, we can rename the default name of the interface from Opt1 to IPSecVTI for a better understanding.
And don’t forget to enable the Interface!
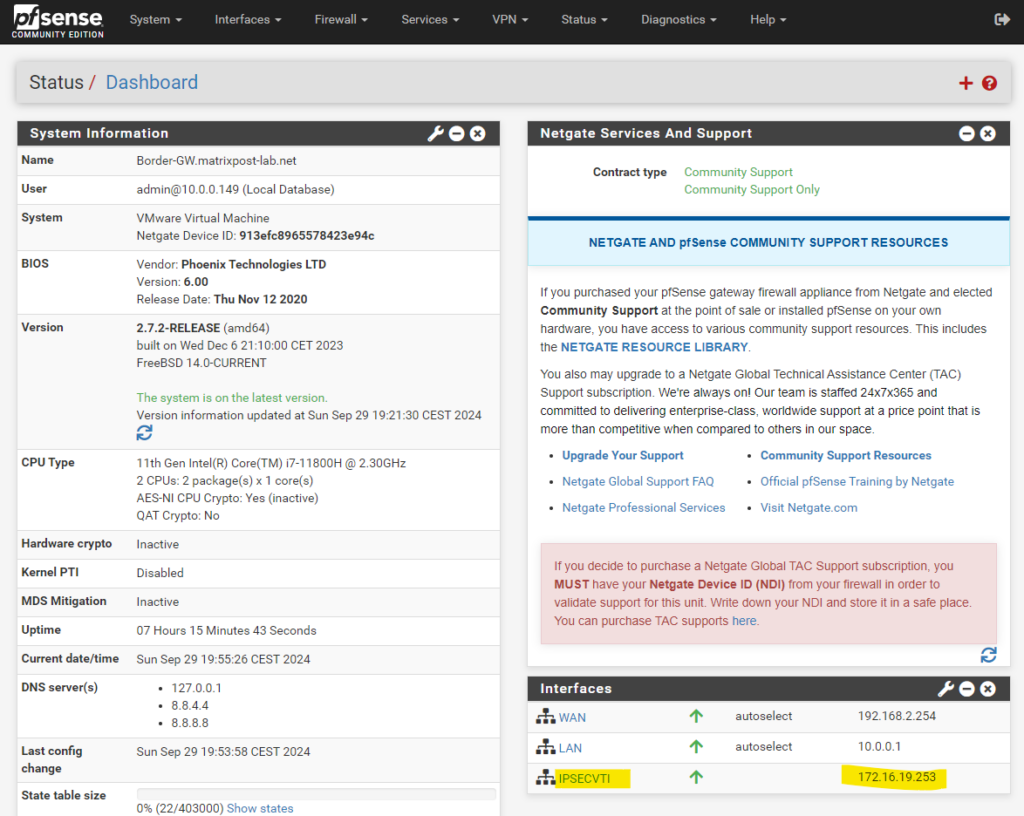
Further note that you cannot configure the IPv4 or IPv6 addresses. This interface automatically gets his IP from the previous configured transit network on Phase 2.
You can see the assigned IPSecVTI interface and its IP address on the dashboard of pfSense as shown below.
The next step is to configure BGP on pfSense. Since OpenBGPD is depricated in pfSense since version 2.5.0 and only available till version 2.4.5, we need to set up the FRR package.
Since late 2017 the FRRouting (FRR) package is available in pfSense and supports BGP, OSPF and OSPF6.
It is designed to replace the OpenBGPD and Quagga OSPF package and allows pfSense users to run both BGPD and OSPF simultaneously.
About how to set up and configure BGP on pfsense by using the FRR package please read my following post.
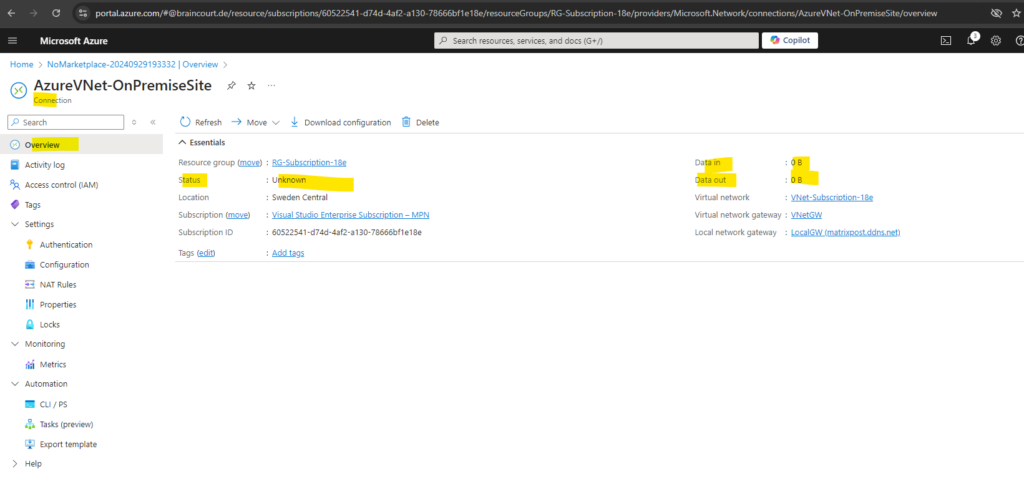
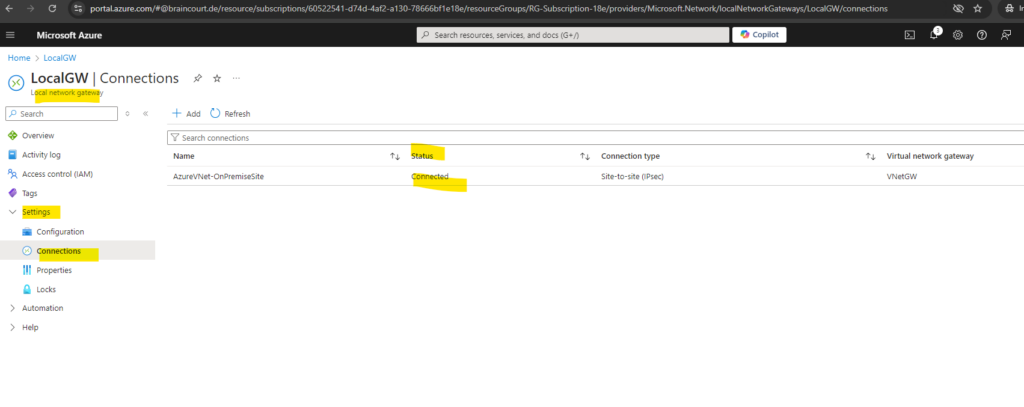
Finally the tunnel is established. We can check this in Azure at different places. Below I was checking the connection status on the local network gateway under Settings -> Connections.
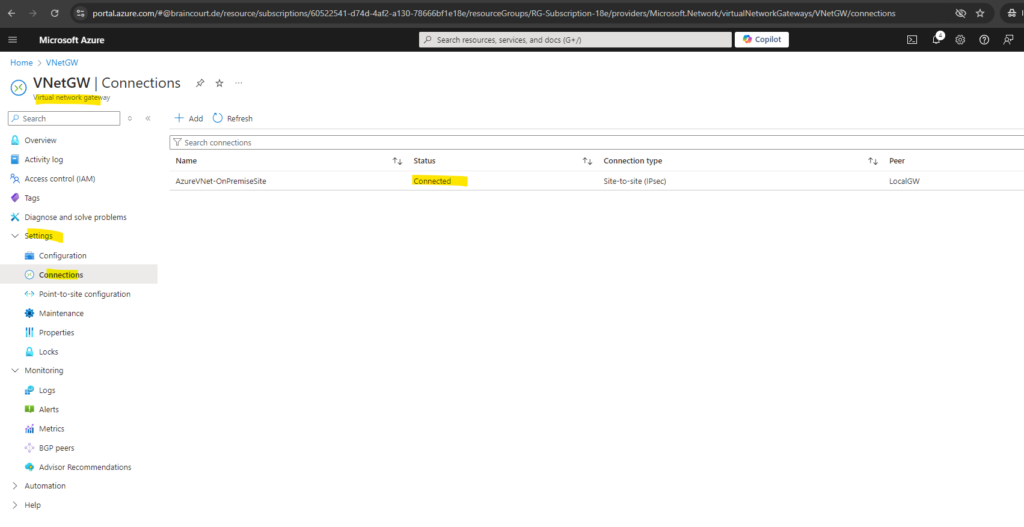
We will also see the status directly on the virtual network gateway in Azure.
Or we can check the connection status on our on-premise VPN Gateway, here in pfSense under Status -> IPSec -> Overview.
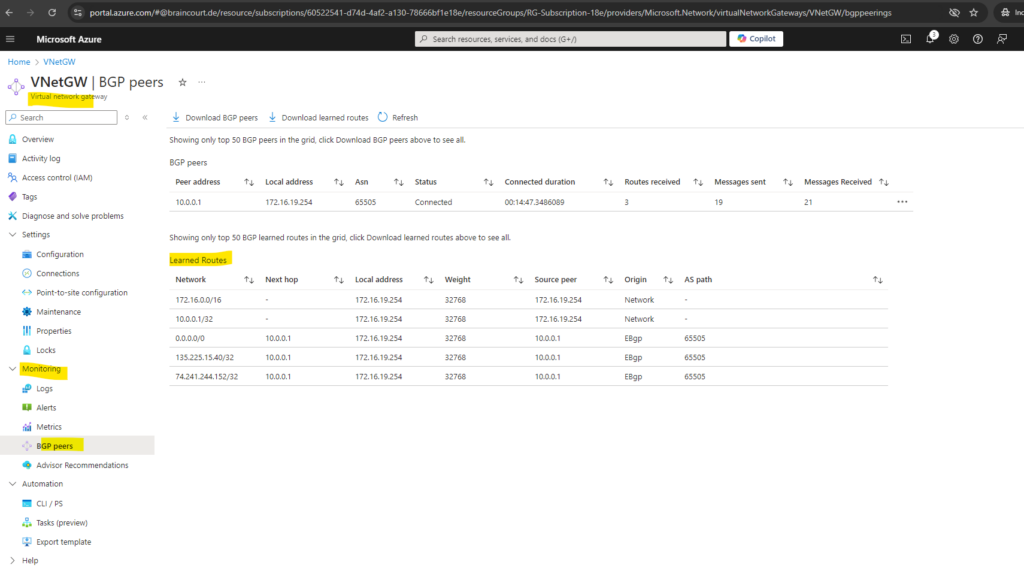
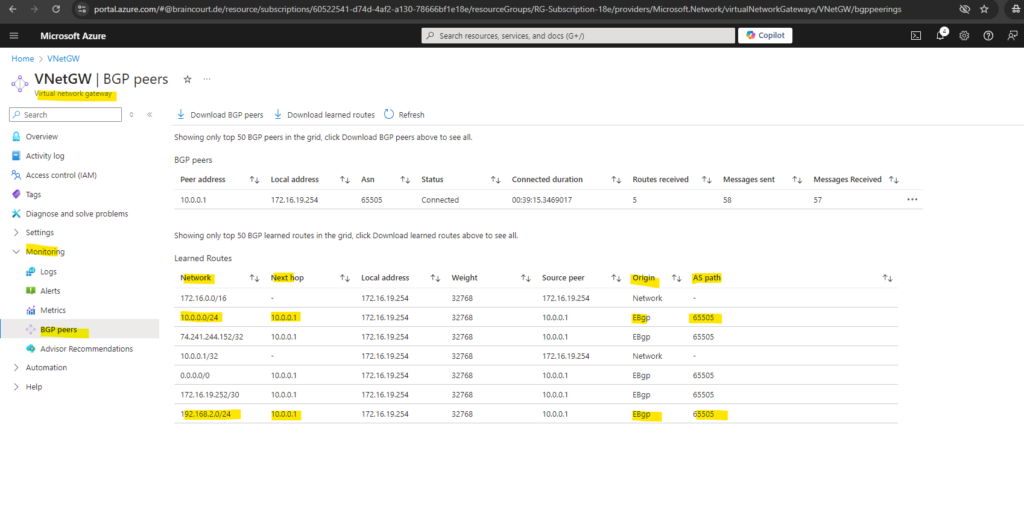
We can also see in Azure on the virtual network gateway and within the Monitoring menu under BGP peers all advertised routes by the on-premise network.
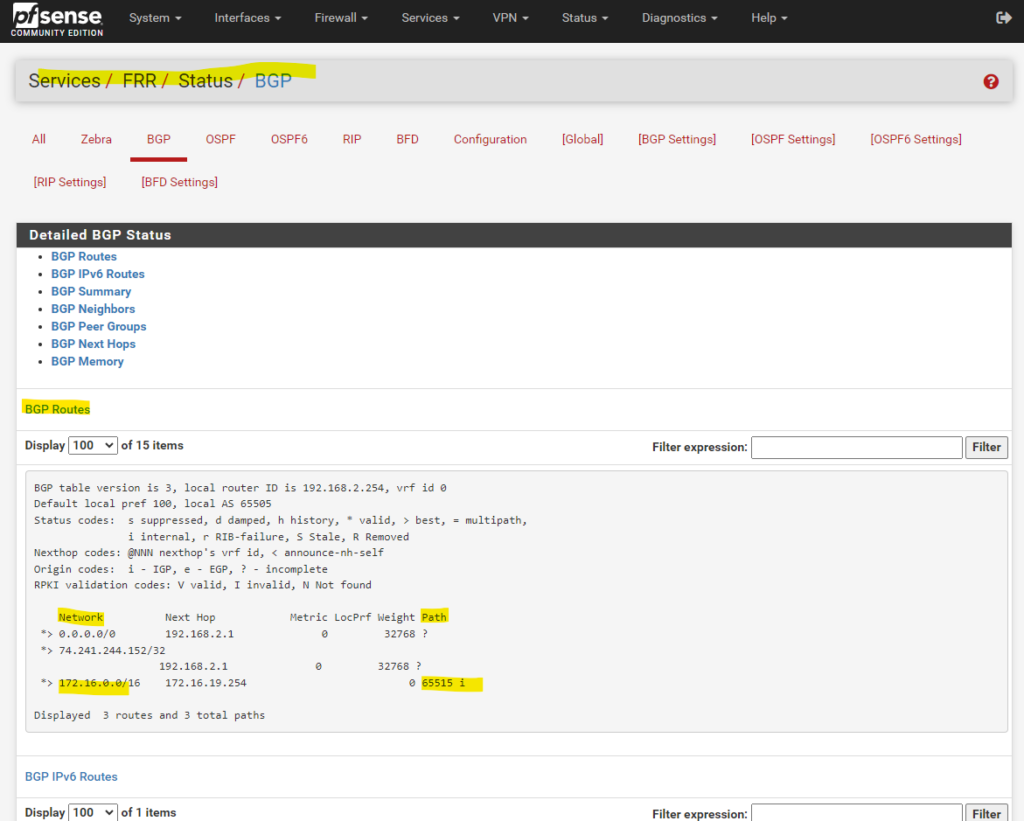
Also in pfSense we can see the advertised routes by Azure under Services -> FRR BGP -> Status.
The highlighted 172.16.0.0/14 network were advertised by Azure to pfSense.
The highlighted 10.0.0.0/24 and 192.168.2.0/24 network (subnets) were advertised by pfSense to Azure.
In pfSense we can control which networks finally will be advertised to the other peer under Services -> FRR BGP and here within the Network Distribution section.
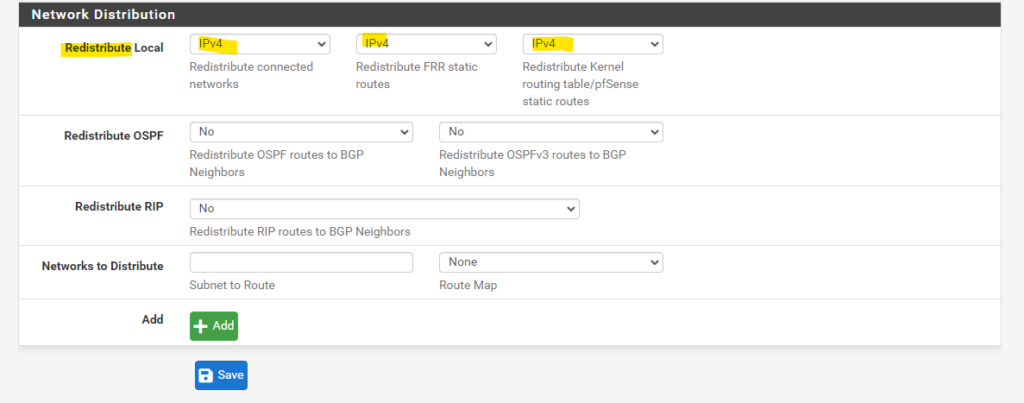
As mentioned more about BGP and how to advertise routes in pfSense you will find in my following post.
Allow Traffic for the Tunnel in pfSense
pfSense software automatically adds hidden firewall rules which allow traffic required to establish enabled IPsec tunnels. The traffic required to establish a tunnel includes:
- UDP port 500 (or a custom configured Remote IKE Port on a tunnel)
- UDP port 4500 (or a custom configured Remote NAT-T Port on a tunnel)
- The ESP protocol
The automatic rules restrict the source to the Remote Gateway IP address (where possible) destined to the Interface IP address specified in the tunnel configuration. When mobile client support is enabled the same firewall rules are added except with the source set to any.
To override the automatic addition of these rules check Disable all auto-added VPN rules under System > Advanced on the Firewall & NAT tab. When that box is checked firewall rules must be manually added to allow appropriate traffic on the correct interface(s) from the expected source(s).
Source: https://docs.netgate.com/pfsense/en/latest/vpn/ipsec/firewall-rules.html
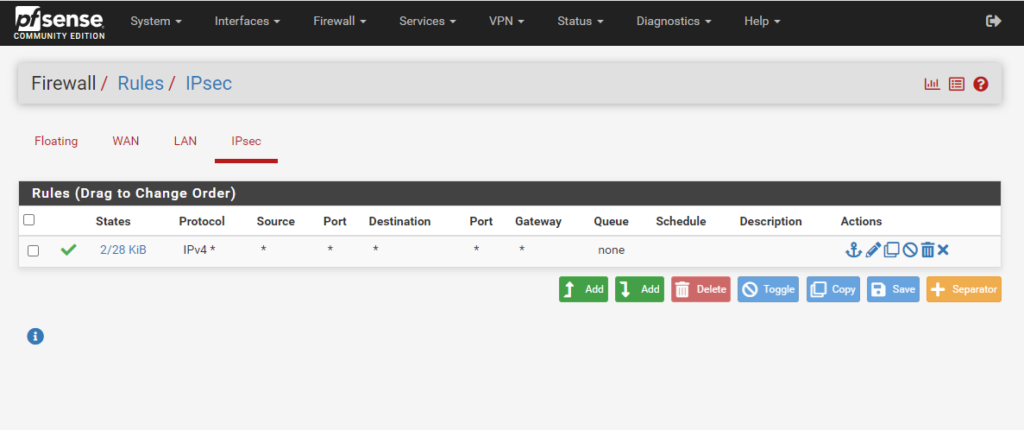
By default traffic passed inside a tunnel from the remote end is filtered by rules configured under Firewall > Rules on the IPsec tab as shown below. Those rules allow and restrict resources made accessible to remote IPsec users.
Also by default all traffic from remote VPN hosts is blocked as there are no rules on the IPsec tab until they are manually added by a firewall administrator.
For my lab environment I will add a rule to allow all IPv4 traffic between my home network and Azure.
FQDN DNS Resolution
VPN Gateway supports only one IPv4 address for each FQDN. If the domain name resolves to multiple IP addresses, VPN Gateway uses the first IP address returned by the DNS servers. To eliminate the uncertainty, we recommend that your FQDN always resolve to a single IPv4 address. IPv6 isn’t supported.
VPN Gateway maintains a DNS cache that’s refreshed every 5 minutes. The gateway tries to resolve the FQDNs for disconnected tunnels only. Resetting the gateway also triggers FQDN resolution.
Source: https://learn.microsoft.com/en-us/azure/vpn-gateway/tutorial-site-to-site-portal#LocalNetworkGateway
Troubleshooting
trap not found, unable to acquire reqid 5001
In my case on pfSense an IKE Phase1 DH Group different than in Azure was configured and the reason for this error and that the tunnel couldn’t be established. So I saw on pfSense under Status → System Logs → IPsec a bunch of these errors.
The error message “IPsec trap not found, unable to acquire reqid 5001” in pfSense typically indicates an issue with the IPsec configuration or a conflict in the IPsec Security Associations (SAs).
Incorrect settings in the IPsec Phase 1 (IKE) or Phase 2 (IPsec SA) configurations can lead to this issue.
Links
About BGP and VPN Gateway
https://learn.microsoft.com/en-us/azure/vpn-gateway/vpn-gateway-bgp-overviewCreate a site-to-site VPN connection in the Azure portal
https://learn.microsoft.com/en-us/azure/vpn-gateway/tutorial-site-to-site-portalAzure VPN Gateway vs. ExpressRoute – Quick comparison
https://techcommunity.microsoft.com/t5/fasttrack-for-azure/azure-vpn-gateway-vs-expressroute-quick-comparison/ba-p/3725670pfSense – IPsec Tunnel Design
https://docs.netgate.com/pfsense/en/latest/vpn/ipsec/configure-design.htmlIPsec and firewall rules
https://docs.netgate.com/pfsense/en/latest/vpn/ipsec/firewall-rules.htmlUsing VPN software from another manufacturer in the home network
https://en.avm.de/service/knowledge-base/dok/FRITZ-Box-7490/169_Using-VPN-software-from-another-manufacturer-in-the-home-network/
Tags In
Related Posts
Latest posts
Deploying NetApp Cloud Volumes ONTAP (CVO) in Azure using NetApp Console (formerly BlueXP) – Part 5 – Backup and Recovery
Follow me on LinkedIn


