Set up an Azure Storage Account and Blob Storage for SFTP Access
Blob storage now supports the SSH File Transfer Protocol (SFTP). This support lets you securely connect to Blob Storage by using an SFTP client, allowing you to use SFTP for file access, file transfer, and file management.
Below I will go through the separate steps to set up a new storage account and blob storage on which we enable SFTP Access and later connect to by using the SSH File Transfer Protocol (SFTP).
Introduction
Introduction to Azure Blob Storage
Azure Blob Storage is Microsoft’s object storage solution for the cloud. Blob Storage is optimized for storing massive amounts of unstructured data. Unstructured data is data that doesn’t adhere to a particular data model or definition, such as text or binary data.
Blob Storage is designed for:
- Serving images or documents directly to a browser.
- Storing files for distributed access.
- Streaming video and audio.
- Writing to log files.
- Storing data for backup and restore, disaster recovery, and archiving.
- Storing data for analysis by an on-premises or Azure-hosted service.
Users or client applications can access objects in Blob Storage via HTTP/HTTPS, from anywhere in the world. Objects in Blob Storage are accessible via the Azure Storage REST API, Azure PowerShell, Azure CLI, or an Azure Storage client library.
Clients can also securely connect to Blob Storage by using SSH File Transfer Protocol (SFTP) and mount Blob Storage containers by using the Network File System (NFS) 3.0 protocol.
Blob Storage offers three types of resources:
- The storage account
- A container in the storage account
- A blob in a container
A container organizes a set of blobs, similar to a directory in a file system. A storage account can include an unlimited number of containers, and a container can store an unlimited number of blobs.
A container name must be a valid DNS name, as it forms part of the unique URI (Uniform resource identifier) used to address the container or its blobs.
You will find a detailed introduction in the following article by Microsoft https://learn.microsoft.com/en-us/azure/storage/blobs/storage-blobs-introduction.
Introduction to SFTP Access for an Azure Storage Account and Blob Storage
Azure allows secure data transfer to Blob Storage accounts using Azure Blob service REST API, Azure SDKs, and tools such as AzCopy. However, legacy workloads often use traditional file transfer protocols such as SFTP. You could update custom applications to use the REST API and Azure SDKs, but only by making significant code changes.
Prior to the release of this feature, if you wanted to use SFTP to transfer data to Azure Blob Storage you would have to either purchase a third party product or orchestrate your own solution. For custom solutions, you would have to create virtual machines (VMs) in Azure to host an SFTP server, and then update, patch, manage, scale, and maintain a complex architecture.
Now, with SFTP support for Azure Blob Storage, you can enable SFTP support for Blob Storage accounts with a single click. Then you can set up local user identities for authentication to connect to your storage account with SFTP via port 22.
Source: https://learn.microsoft.com/en-us/azure/storage/blobs/secure-file-transfer-protocol-support
Create a new Storage Account
When you create a storage account using PowerShell, the Azure CLI, Bicep, Azure Templates, or the Azure Developer CLI, the storage account type is specified by the kind parameter (for example, StorageV2).
In the following article you will see a summary of all available storage account types we can create https://learn.microsoft.com/en-us/azure/storage/common/storage-account-create?tabs=azure-portal#storage-account-type-parameters.
Below I will use the Azure portal to create a new standard storage account, this will finally create a StorageV2 (general purpose v2).
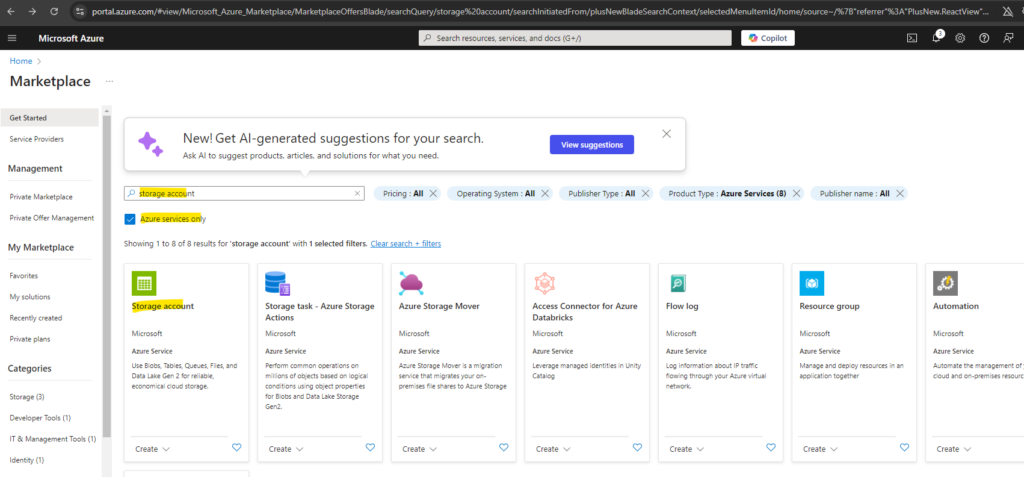
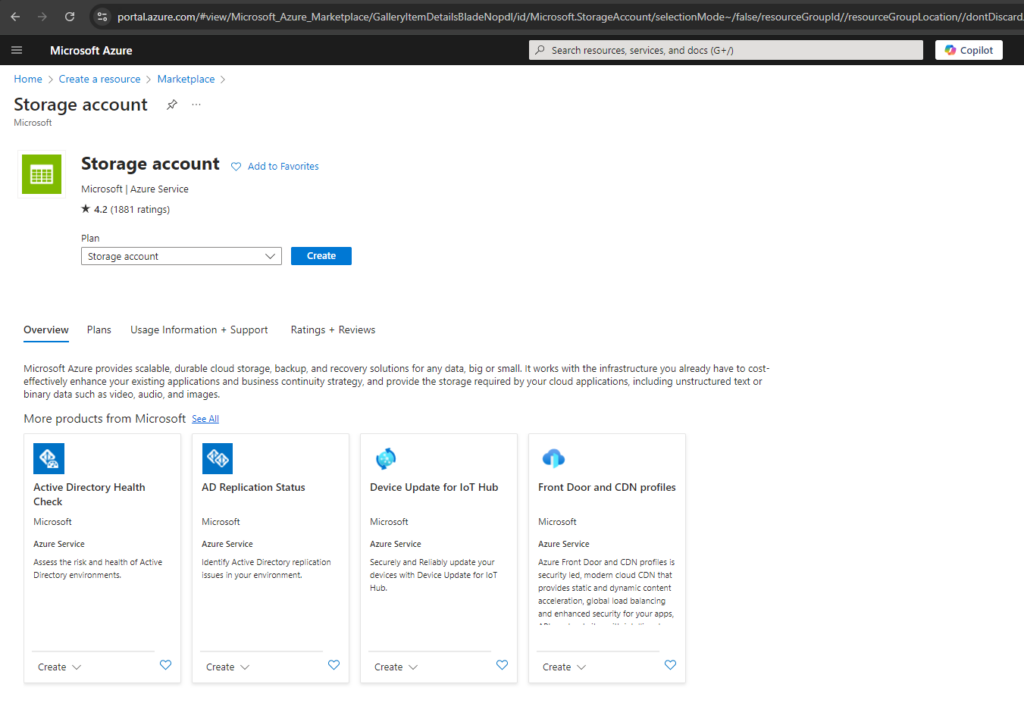
Primary Service
Depending on the option you choose, it may lead to service-specific guidance throughout the create experience to make the create process easier. The option will not limit you to exclusively using the chosen service.

Below under Performance we can choose between Standard and Premium.
Azure Storage offers several types of storage accounts. Each type supports different features and has its own pricing model. More details about you will see in the following article.
Types of storage accounts
https://learn.microsoft.com/en-us/azure/storage/common/storage-account-overview#types-of-storage-accounts
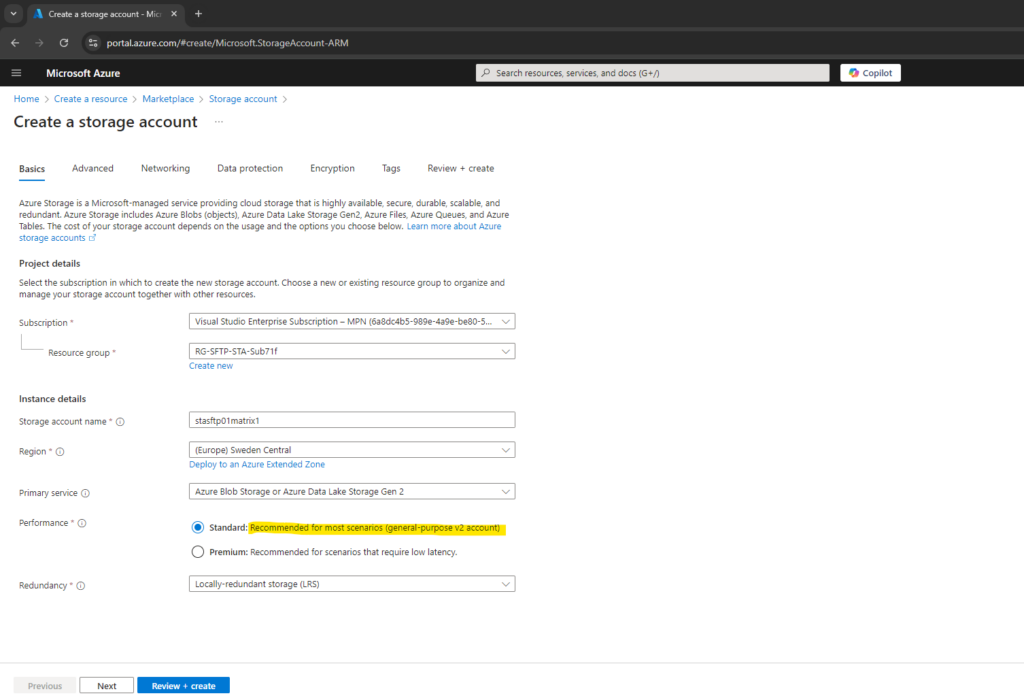
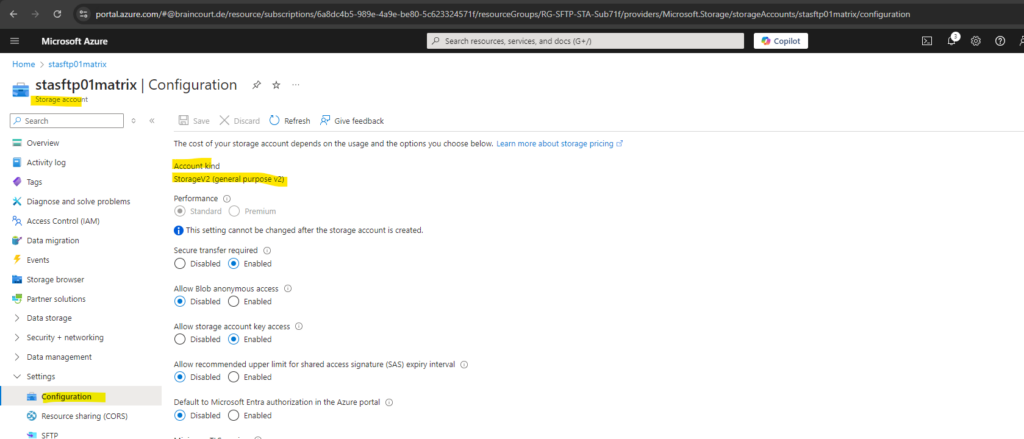
By using above the Standard storage account, this will finally as mentioned create a StorageV2 (general purpose v2) storage account as shown below.
General-purpose v2 accounts deliver the lowest per-gigabyte capacity prices for Azure Storage, as well as industry-competitive transaction prices. General-purpose v2 accounts support default account access tiers of hot or cool and blob level tiering between hot, cool, or archive.
Microsoft recommends general-purpose v2 accounts for most scenarios
Source: https://learn.microsoft.com/en-us/azure/storage/common/storage-account-upgrade?tabs=azure-portal
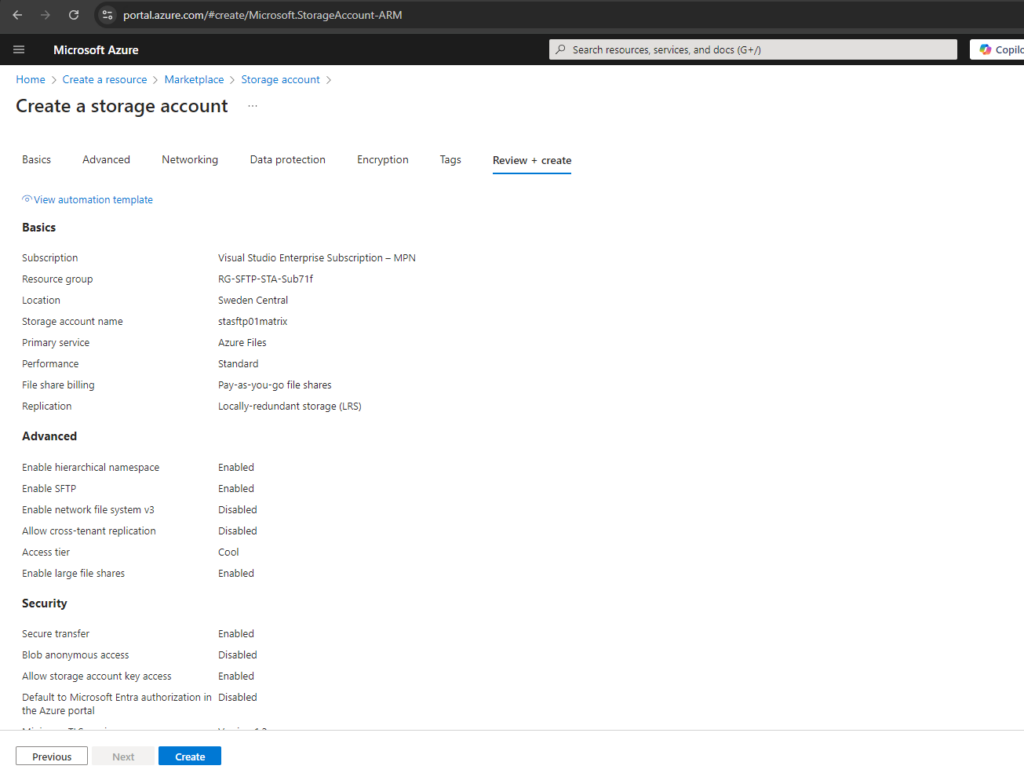
Before we can enable SFTP for our storage account we first also need to enable hierarchical namespace.
SFTP support requires hierarchical namespace to be enabled. Hierarchical namespace organizes objects (files) into a hierarchy of directories and subdirectories in the same way that the file system on your computer is organized. The hierarchical namespace scales linearly and doesn’t degrade data capacity or performance.
Different protocols are supported by the hierarchical namespace. SFTP is one of these available protocols.
Source: https://learn.microsoft.com/en-us/azure/storage/blobs/secure-file-transfer-protocol-support
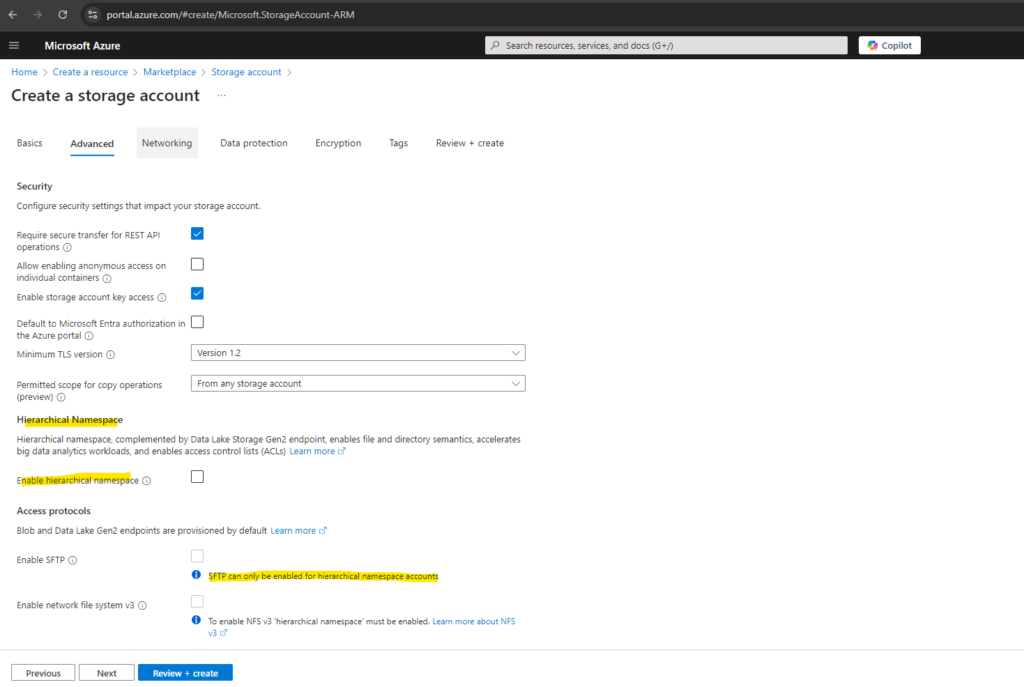
In case we also want to use the NFS protocol to access our storage account, we need to enable it during storage account creation, in my case I just want to access this storage account by using SFTP.
About how set up NFS for the storage account and block storage by using a private endpoint, you can read my following post https://blog.matrixpost.net/set-up-an-azure-storage-account-and-blob-storage-for-nfs-access-by-using-a-private-endpoint/.
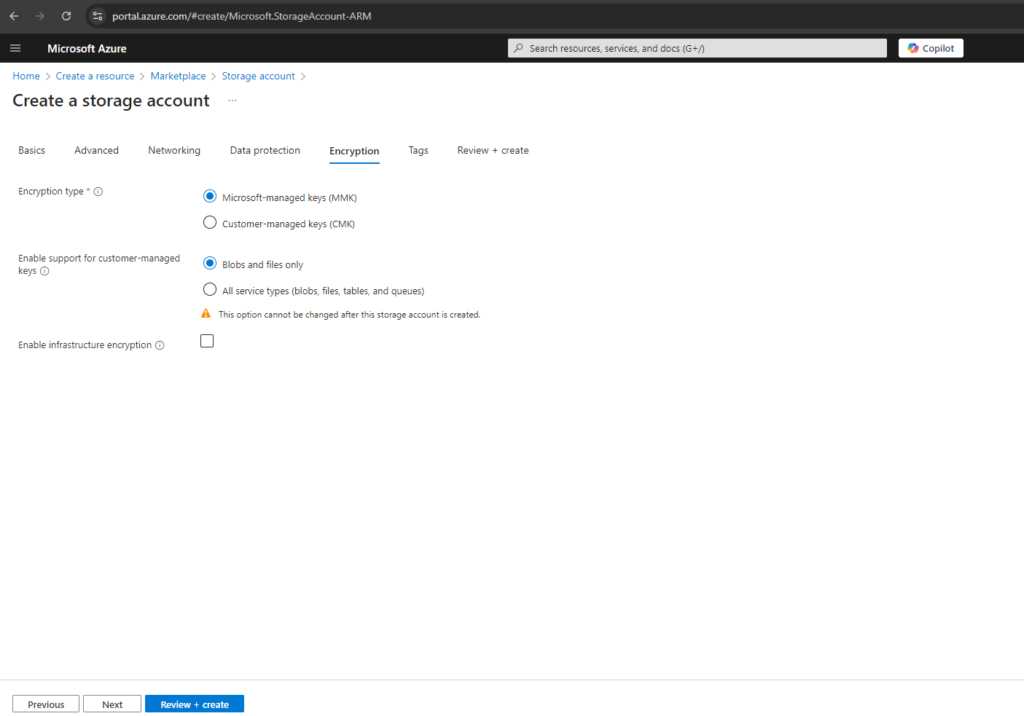
Local users feature will be enabled with SFTP. Create local user identities to access the SFTP endpoint after storage account is created.
Enable network file system v3
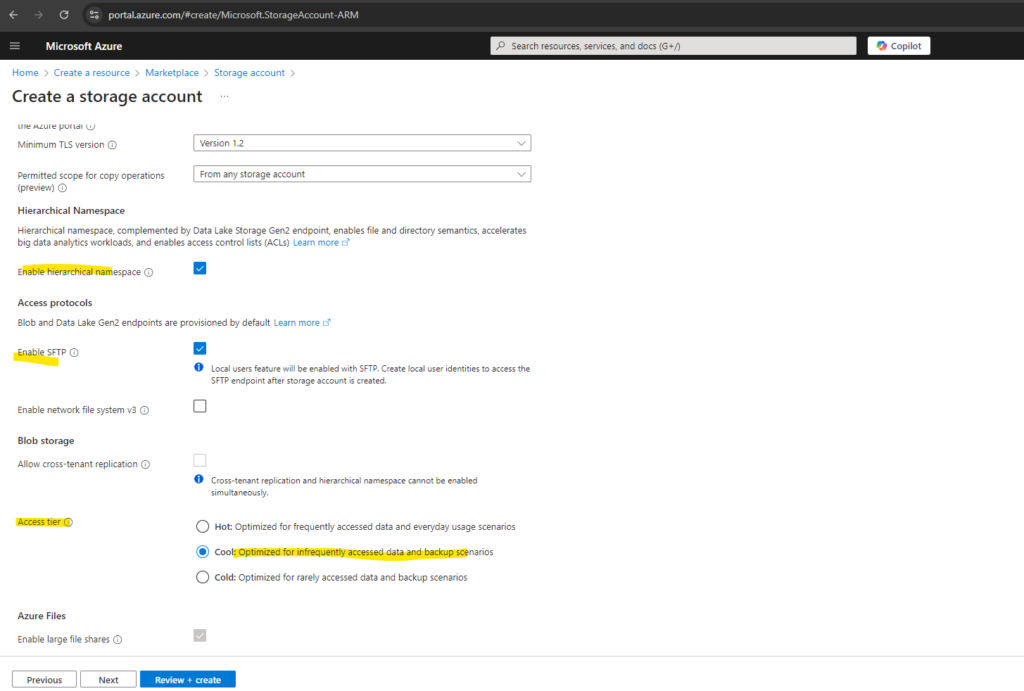
Enables the Network File System Protocol for your storage account that allows users to share files across a network. This option must be set during storage account creation.The account access tier is the default tier that is inferred by any blob without an explicitly set tier. The hot access tier is ideal for frequently accessed data, the cool access tier is ideal for infrequently accessed data, and the cold access tier is ideal for rarely accessed data. The archive access tier can only be set at the blob level and not on the account
More about access tiers for blob data you will find in the following article https://learn.microsoft.com/en-us/azure/storage/blobs/access-tiers-overview.
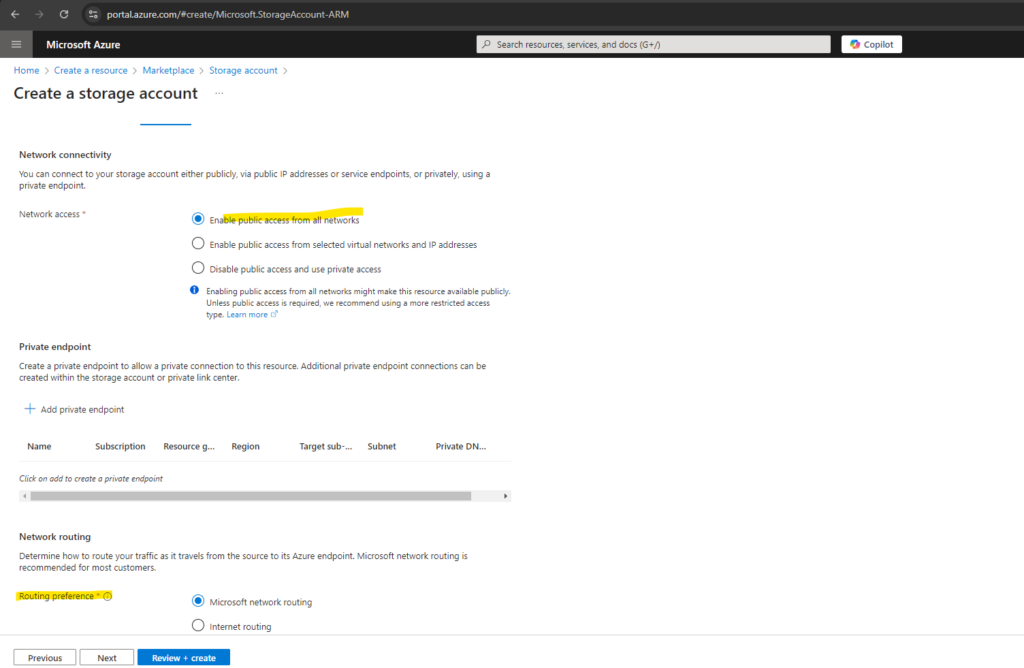
Microsoft network routing will direct your traffic to enter the Microsoft cloud as quickly as possible from its source. Internet routing will direct your traffic to enter the Microsoft cloud closer to the Azure endpoint.
By default, clients outside of the Azure environment access your storage account over the Microsoft global network. The Microsoft global network is optimized for low-latency path selection to deliver premium network performance with high reliability. Both inbound and outbound traffic are routed through the point of presence (POP) that is closest to the client.
This network routing preference is also called hot potato and cold potato routing, more about you will find in my following post https://blog.matrixpost.net/hot-potato-vs-cold-potato-routing/.
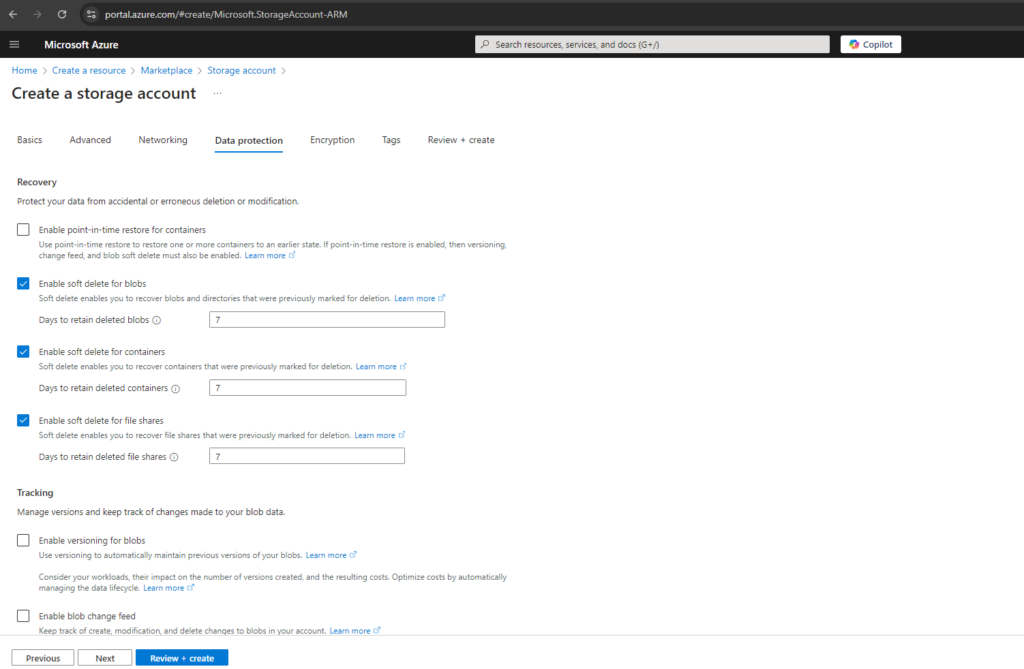

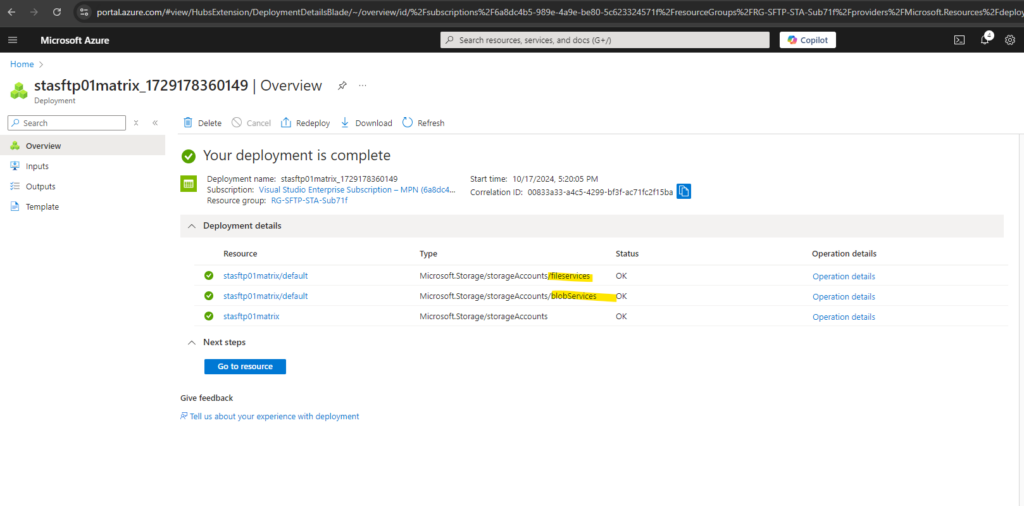
Configure SFTP
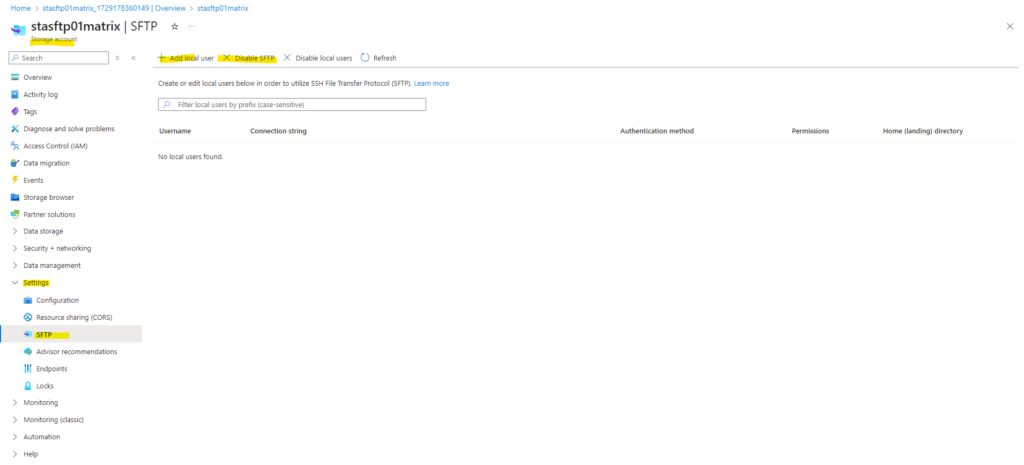
Adding users or enabling/disabling SFTP we can within the Settings -> SFTP blade of our newly created storage account.
Creating a Local User
Azure Storage doesn’t support shared access signature (SAS), or Microsoft Entra authentication for accessing the SFTP endpoint. Instead, you must use an identity called local user that can be secured with an Azure generated password or a secure shell (SSH) key pair.
To grant access to a connecting client, the storage account must have an identity associated with the password or key pair. That identity is called a local user.
Click on Add local user
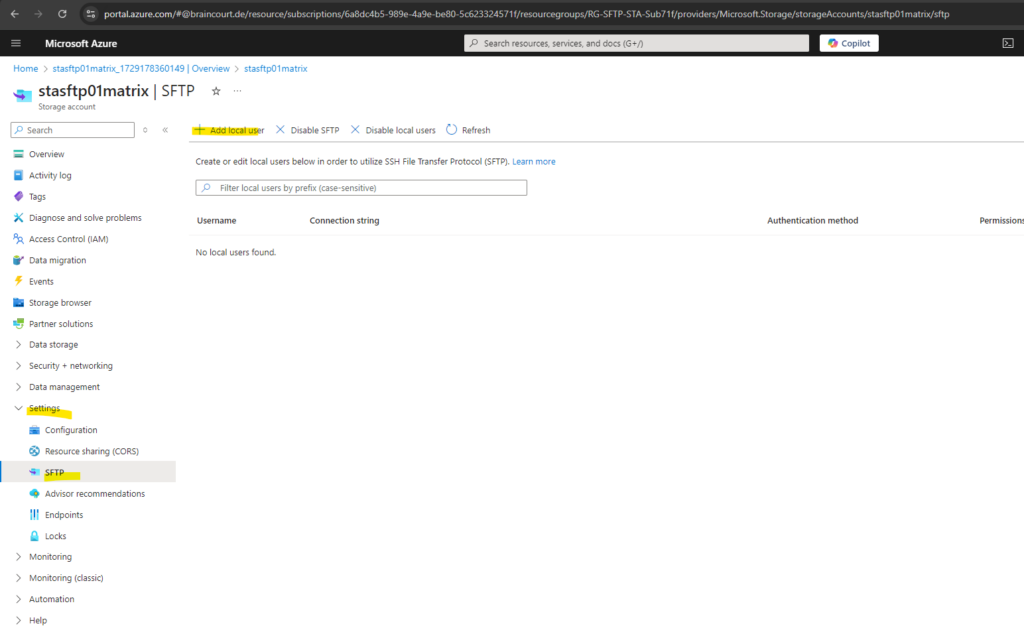
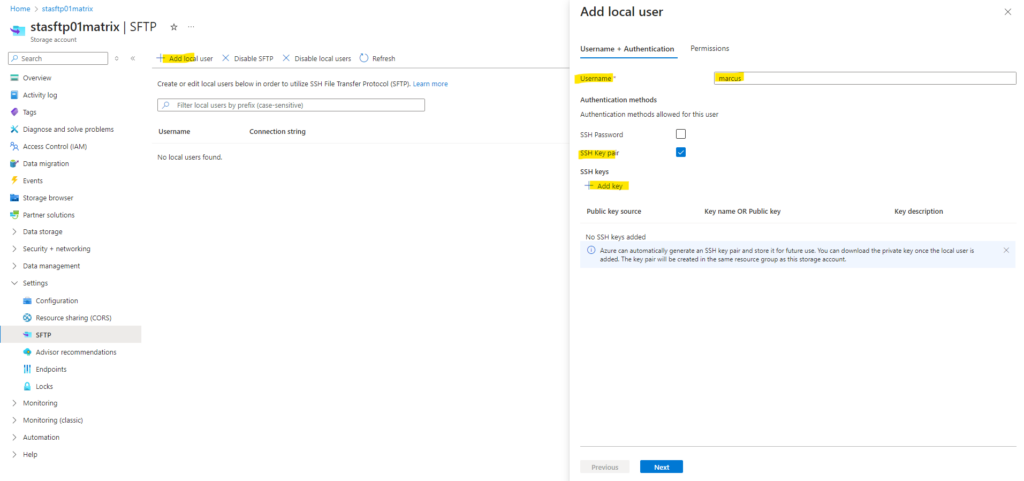
Below we need to enter a name for the user, select to use either a SSH Password or SSH Key pair to authenticate against our storage account.
In my case I will generate a new key pair below but we can also use an existing public key here.
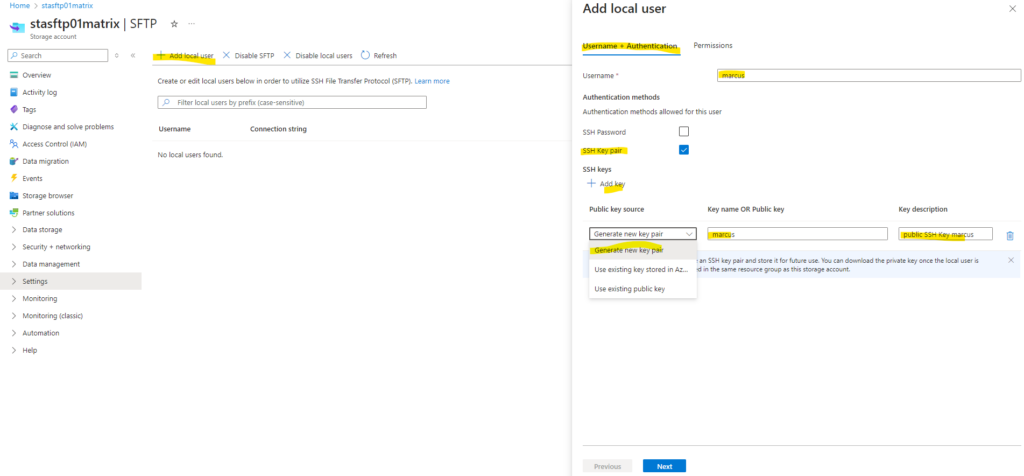
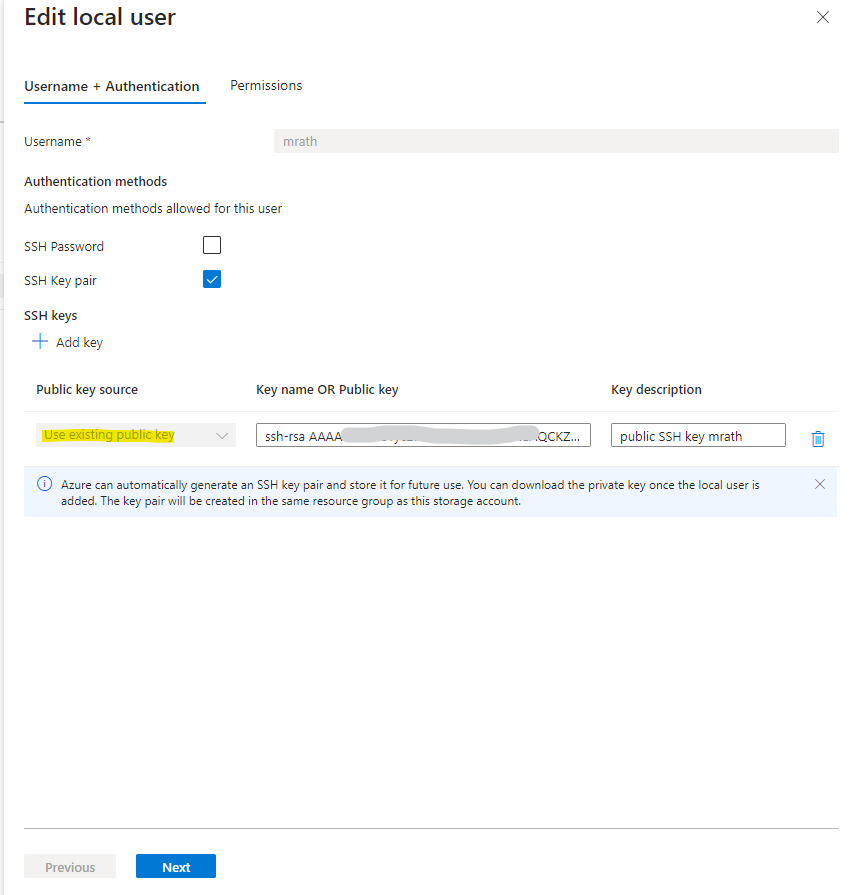
As mentioned we can use here also an existing public key.
Only OpenSSH formatted public keys are supported. The key that you provide must use this format: <key type> <key data>. For example, RSA keys would look similar to this: ssh-rsa AAAAB3N…. If your key is in another format, then a tool such as ssh-keygen can be used to convert it to OpenSSH format.
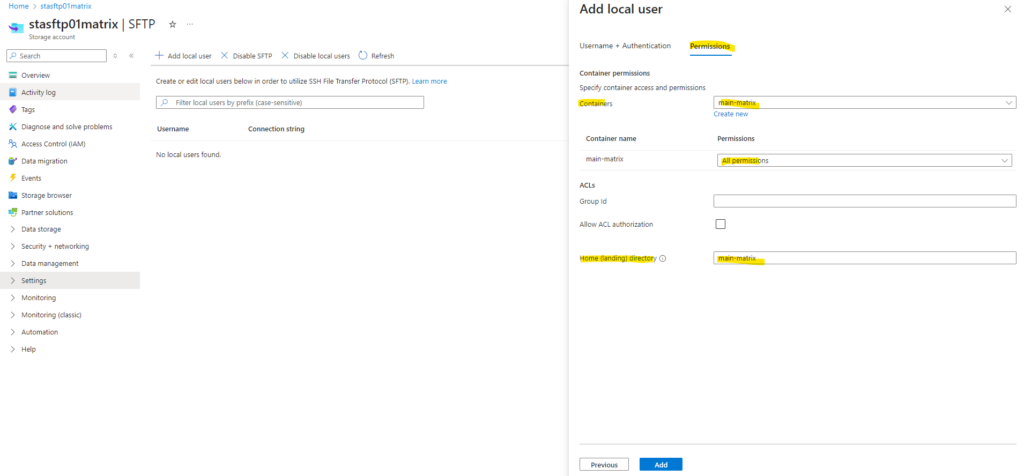
In the Permissions tab below we need to select either existing container(s) or we can create new. We can also assign here multiple containers to the user to which it should have access.
Then we can assign the desired permissions our user should have for this container, I will give my user here all permissions. Those permissions apply to all directories and subdirectories in the container.
We can also set a home directory for the local user below.
A container/directory path relative to the storage account to be considered as the landing directory for the user.
Home directory is only the landing, or initial, directory that the connecting local user is placed in. Local users can navigate to any other path in the container they are connected to if they have the appropriate container permissions.
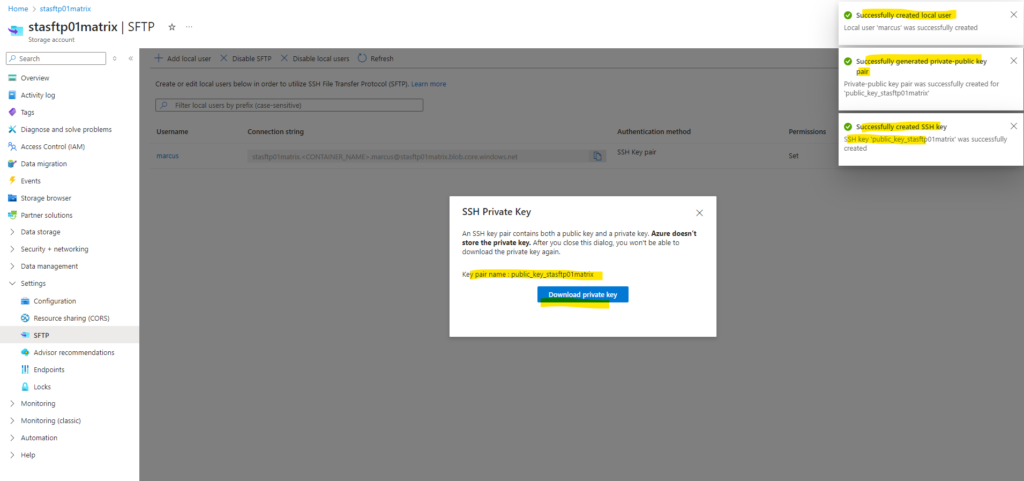
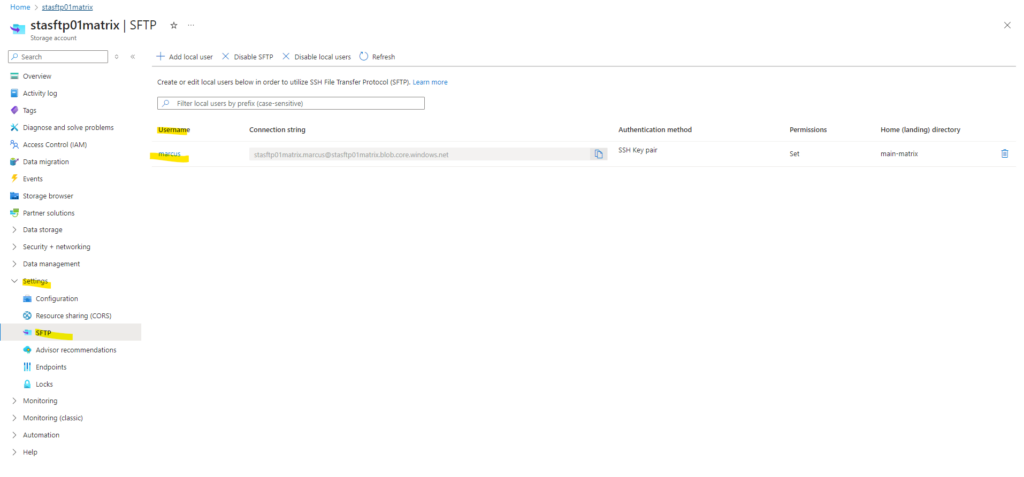
My new local user and its SSH key pair is successfully created.
Allow ACL authorization for SFTP clients
SFTP clients can’t be authorized by using Microsoft Entra identities. Instead, SFTP utilizes a new form of identity management called local users.
Local users must use either a password or a Secure Shell (SSH) private key credential for authentication. You can have a maximum of 8,000 local users for a storage account.
To set up access permissions, you create a local user, and choose authentication methods. Then, for each container in your account, you can specify the level of access you want to give that user.
Access control lists (ACLs) are supported for local users at the preview level.
To authorize a local user by using ACLs, you must first enable ACL authorization for that local user.
ACLs are evaluated only if the local user doesn’t have the necessary container permissions to perform an operation. Because of the way that access permissions are evaluated by the system, you can’t use an ACL to restrict access that has already been granted by container-level permissions. That’s because the system evaluates container permissions first, and if those permissions grant sufficient access permission, ACLs are ignored.
You can modify the permission level of the owning user, owning group, and all other users of an ACL by using an SFTP client. You can also change the ID of the owning user and the owning group.
To change the permission level of the owning user, owning group, or all other users of an ACL, the local user must have Modify Permission permission set on the container-level permissions as shown below.
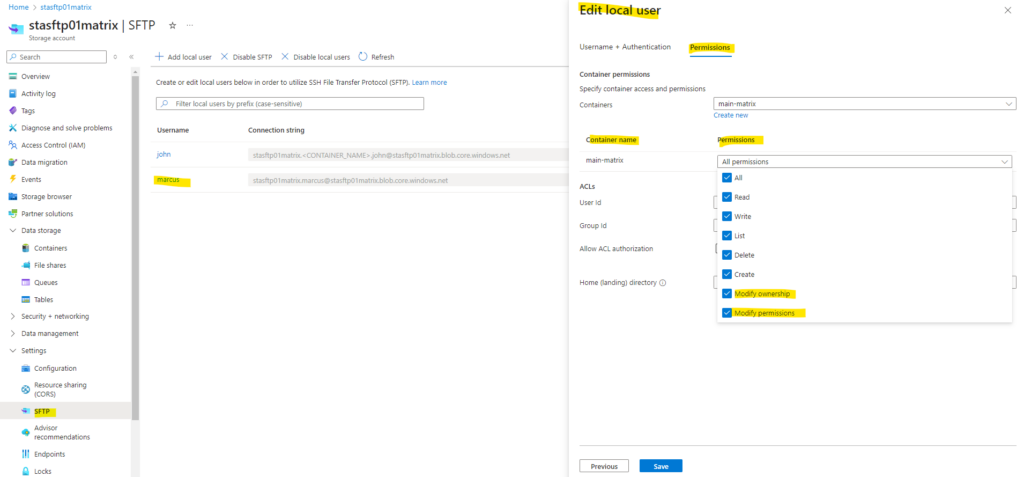
Below for example I assigned to my local user marcus (User Id 1002) the container-level permissions for the container main-matrix2 with All permissions and also checked Allow ACL authorization.
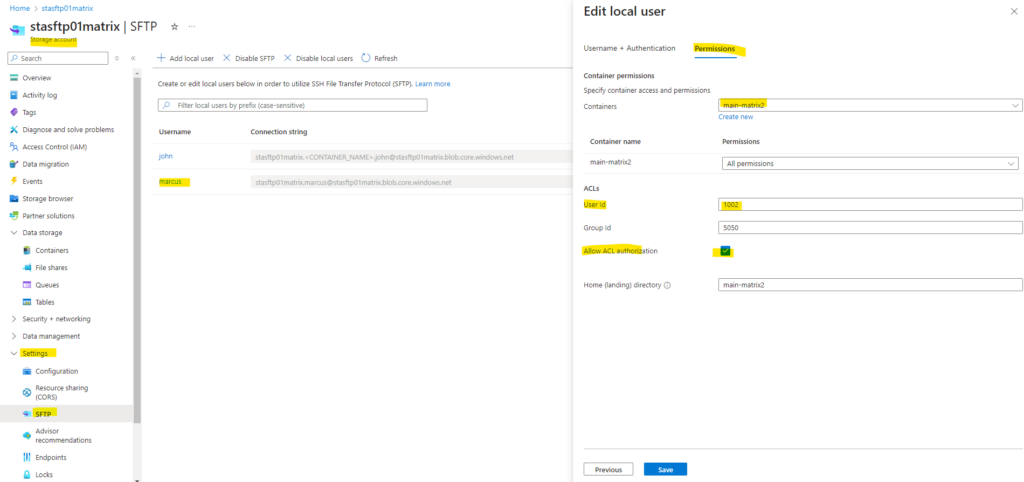
By the way regarding the User Id and Group Id here shown above within the ACLs section, when adding the first local user for SFTP access, to this user by default the User Id 1000 will be assigned to. Group IDs won’t be assigned by default and need to be set by hand if needed.
When creating another user, by default this user will be assigned to the User Id 1001 and so on.
By default, Linux systems automatically assign UIDs and GIDs to new user accounts in numerical order starting at 1000. In case of these local users for the blob storage in Azure, just UIDs will be assigned automatically.
The theory behind this arbitrary assignment is that anything below 1000 is reserved for system accounts, services, and other special accounts, and regular user UIDs and GIDs stay above 1000.
Source: https://www.redhat.com/en/blog/user-account-gid-uid
Further I created a new folder within this container by using the Azure portal to show which user id and group id will be assigned to this folder when using the Azure portal.

I will now connect to my new container by using a SFTP connection with my private SSH key file and initiated from one of my lab Linux virtual machines running in my on-premise lab environment in vSphere.
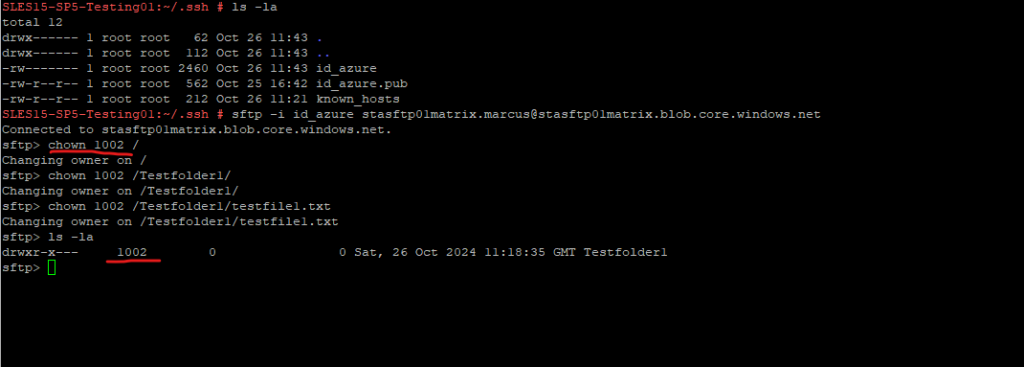
Here you can see that when we create a new folder or upload a new file by using the Azure portal, the ID of the owning user and owning group will be always 0.

So far my user (ID 1002) still have at container-level the permissions set with All permissions and therefore it also includes Modify permissions.
I will now change the owner ID of the SFTP root and also the folder and file to my own user ID with 1002.
!! Note !!
If you are granting permissions by using only ACLs (no Azure RBAC), then to grant a security principal read or write access to a file, you’ll need to give the security principal Execute permissions to the root folder of the container, and to each folder in the hierarchy of folders that lead to the file.
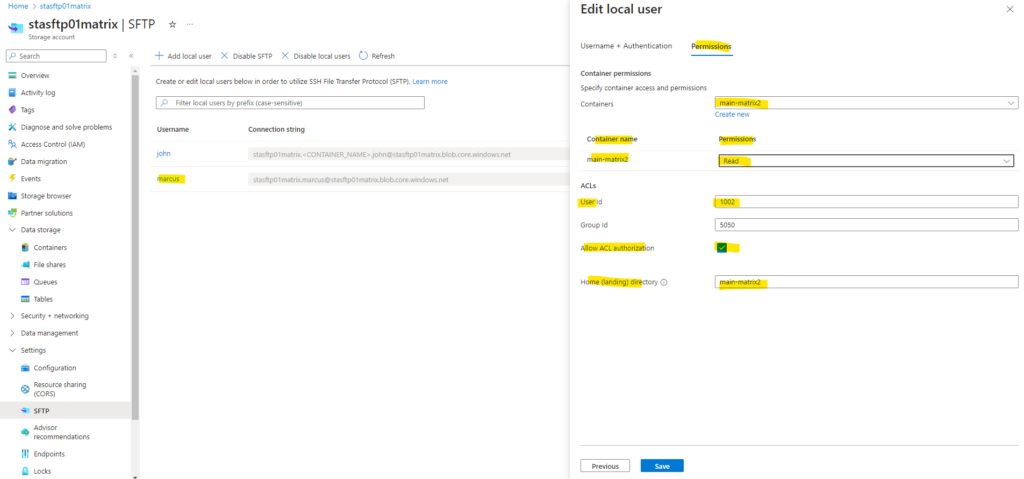
Finally I want to see, when I will next replace on container level the All permissions with just read permissions, if I will still be able to create new folders and files and modify them.
You remember? ACLs are evaluated only if the local user doesn’t have the necessary container permissions. Therefore because Allow ACL authorization is enabled for this container, I should still be able to do this because my user on ACL level is the owner on root of the container and its subfolders and files.
Here I will now change the container permissions to just have read permission for my user (User ID 1002).
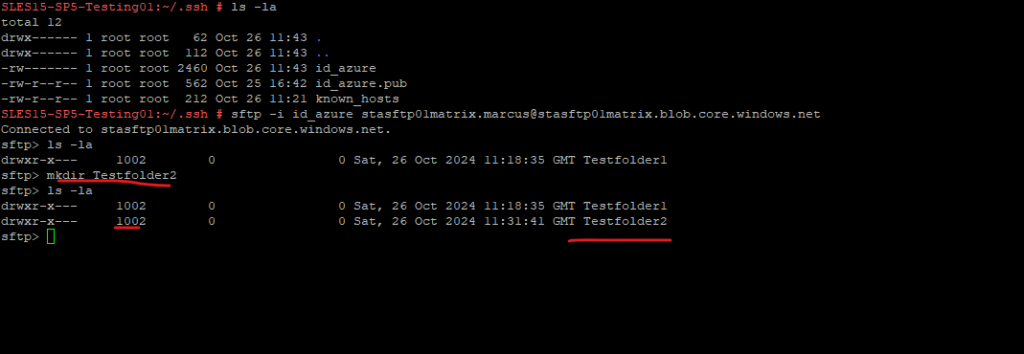
After changing permissions, we should always first sign-out from our SFTP session and then sign-in back.
Looks good! So now even my user doesn’t anymore have the necessary permissions on container level to create new folders within the SFTP root directory, but therefore the necessary ACLs, it is still be able to create new folders here.
As a last final check, I will now disable Allow ACL authorization by unchecking it below. For the container-level permissions I will just still have read permissions, not even list permissions.
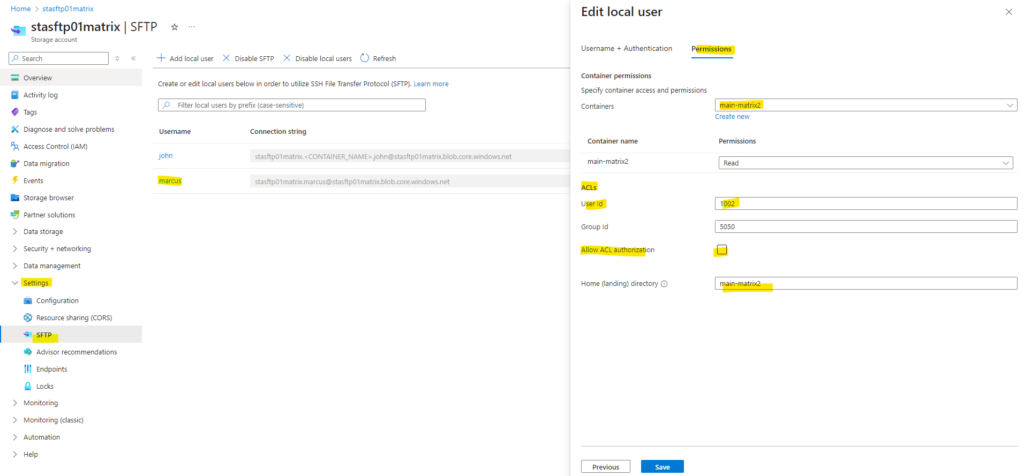
So now because my ACL permissions where I am still owner at root level are not allowed anymore for this container, I am from now on not able to even list the SFTP root folder as shown below.

More about modifying ACLs of a file or directory you will find in the following article https://learn.microsoft.com/en-us/azure/storage/blobs/secure-file-transfer-protocol-support-connect#modify-the-acl-of-a-file-or-directory
Connect to Azure Blob Storage by using the SSH File Transfer Protocol (SFTP)
After you connect, you can then upload and download files as well as modify access control lists (ACLs) on files and folders.
To connect to our storage account over the internet by using SFTP, we finally need as usual a public hostname resp. FQDN, a username and in case of using an SSH key pair our private SSH key.
The public FQDN we can already see below within the connection string of my user named marcus. The public FQDN is stasftp01matrix.blob.core.windows.net.
The username can be either in format storage_account_name.username when we assign the Home (landing) directory for the user or in format storage_account.<CONTAINER_NAME>.username in case we don’t assign the Home (landing) directory for the user.
The username we need to use to connect to is stasftp01matrix.<CONTAINER_NAME>.marcus, the CONTAINER_NAME parameter we need to replace with the previously configured container name during creation of this local user which was main-matrix.
The hostname (blob service endpoint) is <storage_account_name>.blob.core.windows.net.
So the username to connect to finally is stasftp01matrix.marcus and the hostname is stasftp01matrix.blob.core.windows.net.

To connect to we can finally use any SFTP client. As shown further above already we can natively connect to from command line by using the SFTP command or for example by using WinSCP.
Starting with Windows 10 (build 1803) and Windows Server 2019, Windows includes a native OpenSSH client that supports SFTP. You can use SFTP directly from the Windows command line (Command Prompt or PowerShell).
https://blog.matrixpost.net/set-up-a-sftp-server-on-suse-linux-enterprise-server/#windows_sftp
# sftp -i id_azure stasftp01matrix.marcus@stasftp01matrix.blob.core.windows.net

When using WinSCP.
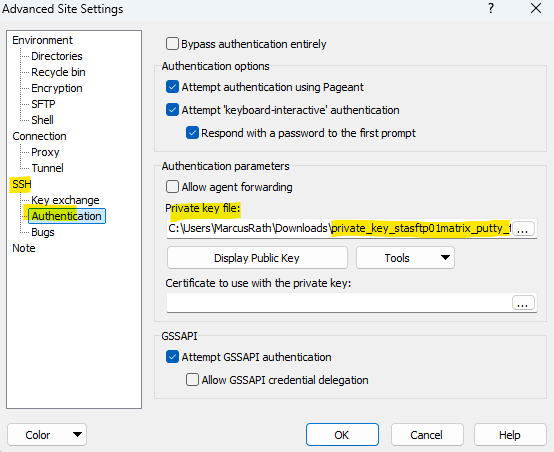
To associate my previously downloaded private SSH key we need to click here in WinSCP on Advanced.
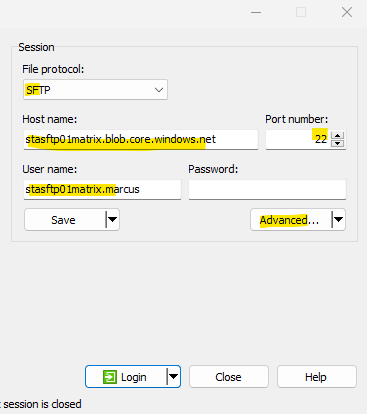
For using this private key which is in OpenSSH format, we first need to convert this into PuTTY’s own format. Therefore you can use PuTTYgen which is shown in my following post https://blog.matrixpost.net/azure_linux_vm/#puttygen.
Finally I will connect to and create a new folder and then upload a test file into.

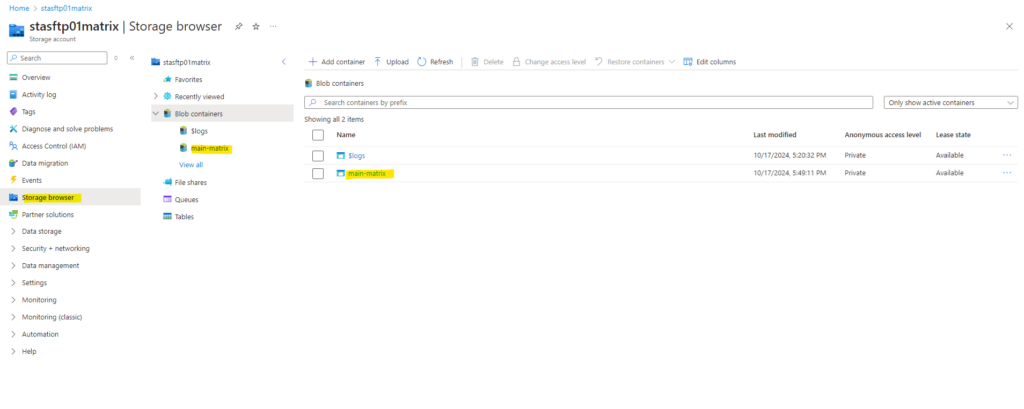
Looks good!
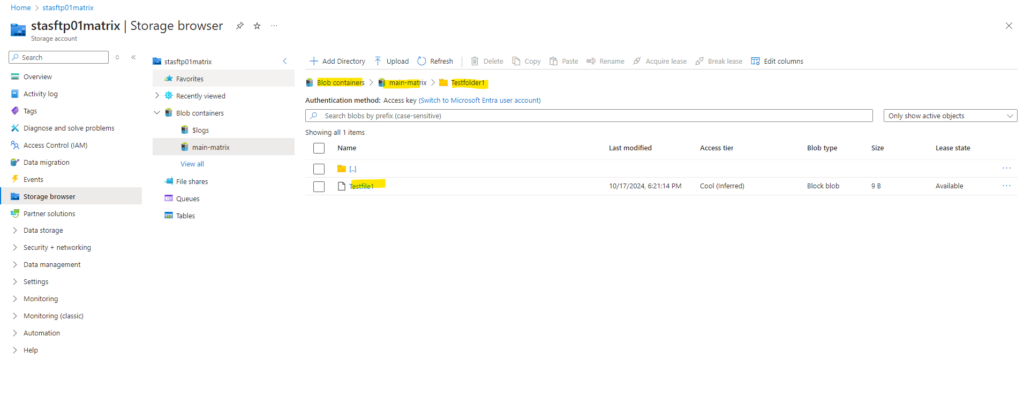
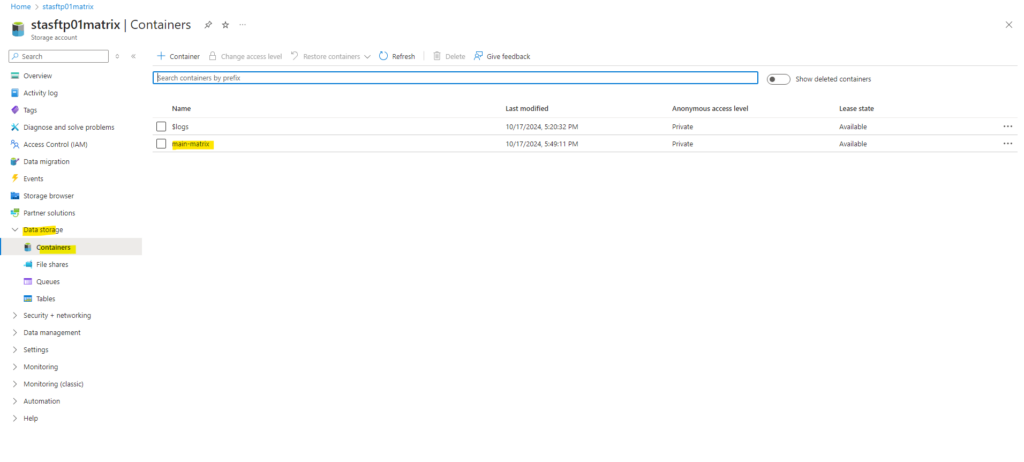
Source: https://learn.microsoft.com/en-us/azure/storage/blobs/secure-file-transfer-protocol-support-connect
Access control lists (ACLs)
Azure Data Lake Storage implements an access control model that supports both Azure role-based access control (Azure RBAC) and POSIX-like access control lists (ACLs).
You can associate a security principal with an access level for files and directories. Each association is captured as an entry in an access control list (ACL). Each file and directory in your storage account has an access control list.
When a security principal attempts an operation on a file or directory, an ACL check determines whether that security principal (user, group, service principal, or managed identity) has the correct permission level to perform the operation.
ACLs apply only to security principals in the same tenant. ACLs don’t apply to users who use Shared Key authorization because no identity is associated with the caller and therefore security principal permission-based authorization cannot be performed. The same is true for shared access signature (SAS) tokens except when a user delegated SAS token is used. In that case, Azure Storage performs a POSIX ACL check against the object ID before it authorizes the operation as long as the optional parameter suoid is used. To learn more, see Construct a user delegation SAS.
Source: https://learn.microsoft.com/en-us/azure/storage/blobs/data-lake-storage-access-control#about-acls
Security principal
A security principal is an object that represents a user, group, service principal, or managed identity that is requesting access to Azure resources. You can assign a role to any of these security principals.
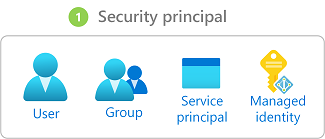
Source: https://learn.microsoft.com/en-us/azure/role-based-access-control/overview#security-principal
Levels of permission
The permissions on directories and files in a container, are Read, Write, and Execute, and they can be used on files and directories as shown below:
- Read (R) -> Can read the contents of a file. For a directory it requires Read and Execute to list the contens of the directory.
- Write (W) -> Can write or append to a file. For a directory it requires Write and Execute to create child items in a directory.
- Execute (X) -> Does not mean anything for a file in the context of Data Lake Storage. For a directory required to traverse the child items of a directory.
!! Note !!
If you are granting permissions by using only ACLs (no Azure RBAC), then to grant a security principal read or write access to a file, you’ll need to give the security principal Execute permissions to the root folder of the container, and to each folder in the hierarchy of folders that lead to the file.
RWX is used to indicate Read + Write + Execute. A more condensed numeric form exists in which Read=4, Write=2, and Execute=1, the sum of which represents the permissions. Following are some examples.
- 7 -> RWX -> Read + Write + Execute
- 5 -> R-X -> Read + Execute
- 4 -> R— -> Read
- 0 -> — -> No permissions
More about Access control lists (ACLs) in Azure Data Lake Storage you will find in the following article by Microsoft https://learn.microsoft.com/en-us/azure/storage/blobs/data-lake-storage-access-control.
Related Topics
More about SSH private/public authentication in general on Linux you will find in my following post.
About how to set up a SFTP Server on Linux you can read my following post.
Links
SSH File Transfer Protocol (SFTP) support for Azure Blob Storage
https://learn.microsoft.com/en-us/azure/storage/blobs/secure-file-transfer-protocol-supportEnable or disable SSH File Transfer Protocol (SFTP) support in Azure Blob Storage
https://learn.microsoft.com/en-us/azure/storage/blobs/secure-file-transfer-protocol-support-how-to?tabs=azure-portalAuthorize access to Azure Blob Storage for an SSH File Transfer Protocol (SFTP) client
https://learn.microsoft.com/en-us/azure/storage/blobs/secure-file-transfer-protocol-support-authorize-access?tabs=azure-portalCompare access to Azure Files, Blob Storage, and Azure NetApp Files with NFS
https://learn.microsoft.com/en-us/azure/storage/common/nfs-comparisonConnect to Azure Blob Storage by using the SSH File Transfer Protocol (SFTP)
https://learn.microsoft.com/en-us/azure/storage/blobs/secure-file-transfer-protocol-support-connect
Related Posts
Follow me on LinkedIn


