Mastering Azure Application Gateway
This post will walk you through each step of setting up the Microsoft Azure Application Gateway to finally publish two different web app’s to the internet. Both web app’s are running on two different virtual machines in Azure.
Azure Application Gateway is a web traffic (OSI layer 7) load balancer that enables you to manage traffic to your web applications. Traditional load balancers operate at the transport layer (OSI layer 4 – TCP and UDP) and route traffic based on source IP address and port, to a destination IP address and port.
Application Gateway can make routing decisions based on additional attributes of an HTTP request, for example URI path or host headers.
Source: https://learn.microsoft.com/en-us/azure/application-gateway/overview
Introduction
Azure Application Gateway is a web traffic (OSI layer 7) load balancer that enables you to manage traffic to your web applications. Traditional load balancers operate at the transport layer (OSI layer 4 – TCP and UDP) and route traffic based on source IP address and port, to a destination IP address and port.
Application Gateway can make routing decisions based on additional attributes of an HTTP request, for example URI path or host headers. For example, you can route traffic based on the incoming URL. So if /images is in the incoming URL, you can route traffic to a specific set of servers (known as a pool) configured for images. If /video is in the URL, that traffic is routed to another pool that’s optimized for videos.
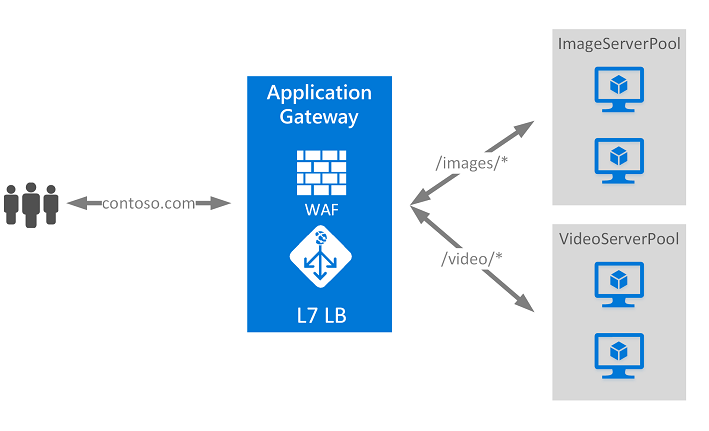
Source: https://learn.microsoft.com/en-us/azure/application-gateway/overview
This type of routing is known as application layer (OSI layer 7) load balancing.
Azure Application Gateway can do URL-based routing and more.
What is Azure Web Application Firewall on Azure Application Gateway?
The Azure Web Application Firewall (WAF) on Azure Application Gateway actively safeguards your web applications against common exploits and vulnerabilities. As web applications become more frequent targets for malicious attacks, these attacks often exploit well-known vulnerabilities such as SQL injection and cross-site scripting.
WAF on Application Gateway is based on the Core Rule Set (CRS) from the Open Web Application Security Project (OWASP).
All of the following WAF features exist inside of a WAF policy. You can create multiple policies, and they can be associated with an Application Gateway, to individual listeners, or to path-based routing rules on an Application Gateway. This way, you can have separate policies for each site behind your Application Gateway if needed. For more information on WAF policies, see Create a WAF Policy.
Application Gateway has two versions of the WAF sku: Application Gateway WAF_v1 and Application Gateway WAF_v2. WAF policy associations are only supported for the Application Gateway WAF_v2 sku.
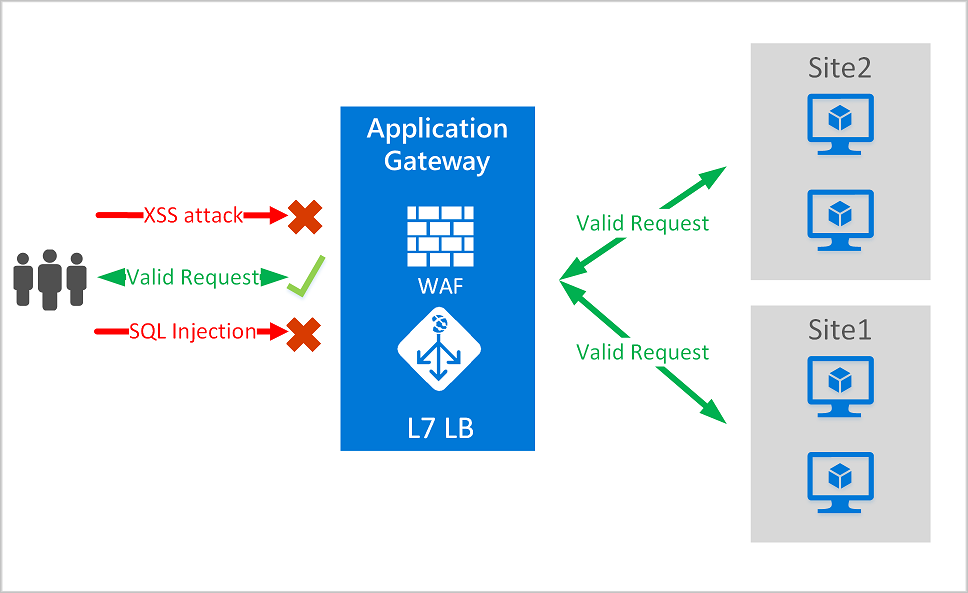
Application Gateway operates as an application delivery controller (ADC). It offers Transport Layer Security (TLS), previously known as Secure Sockets Layer (SSL), termination, cookie-based session affinity, round-robin load distribution, content-based routing, ability to host multiple websites, and security enhancements.
Application Gateway enhances security through TLS policy management and end-to-end TLS support. By integrating WAF into Application Gateway, it fortifies application security. This combination actively defends your web applications against common vulnerabilities and offers a centrally manageable, easy-to-configure location.
Creating the Backend Pools
For the backend pools I will use two virtual machines on which the IIS is installed to run a web app on each.
Backend pools are groups of resources that handle the incoming traffic directed by the gateway. These resources, which can be virtual machines (VMs), virtual machine scale sets, App Services, or even containerized applications (e.g., in Azure Kubernetes Service), serve as the endpoints for web applications or services that the Application Gateway distributes traffic to.
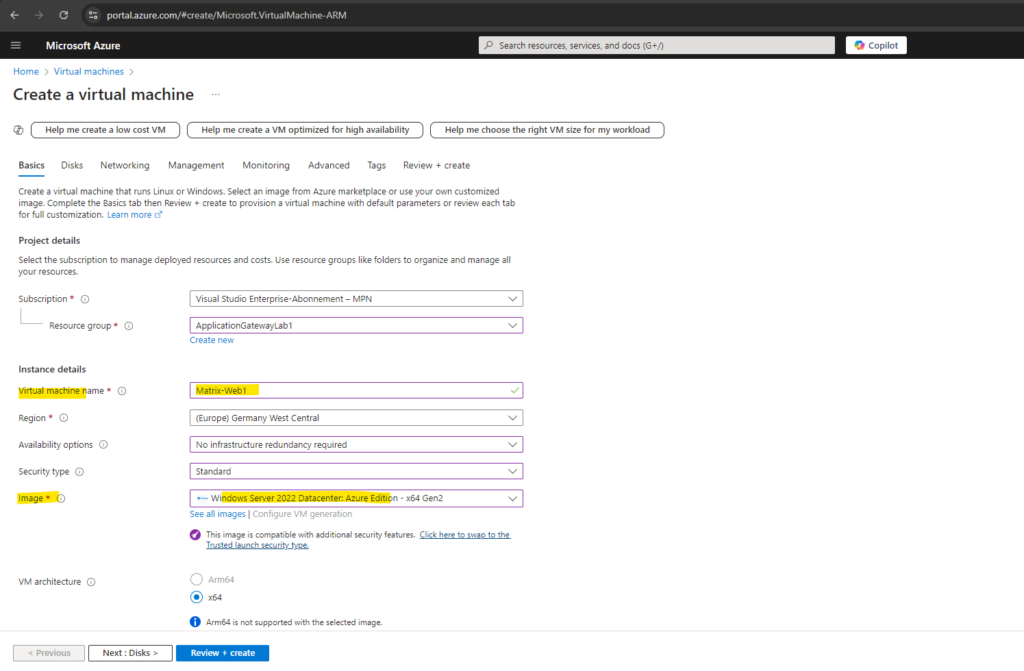
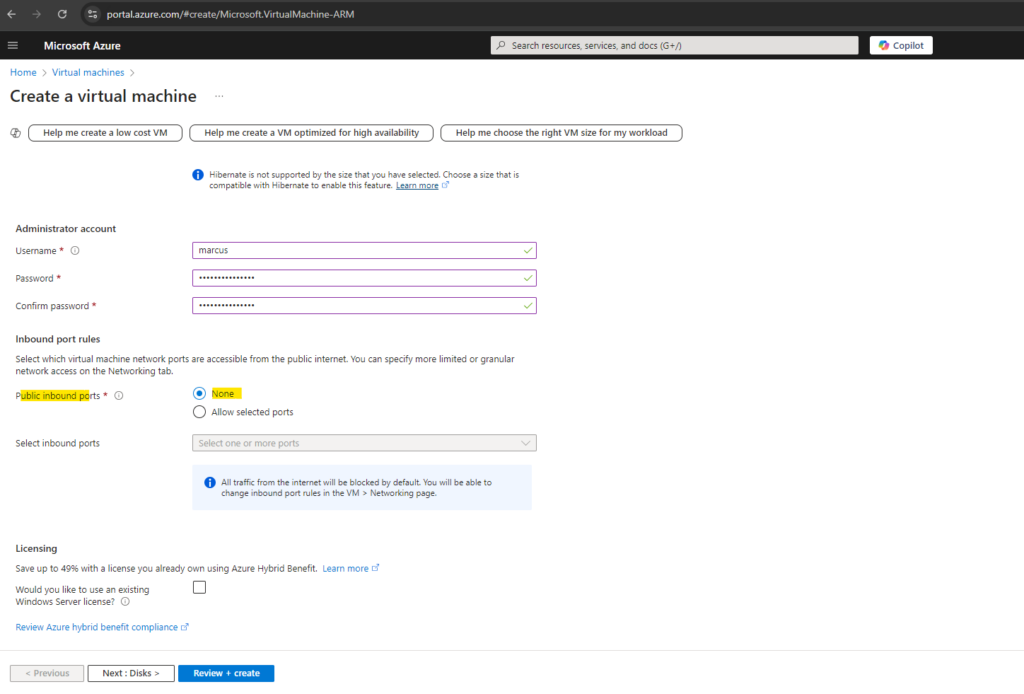
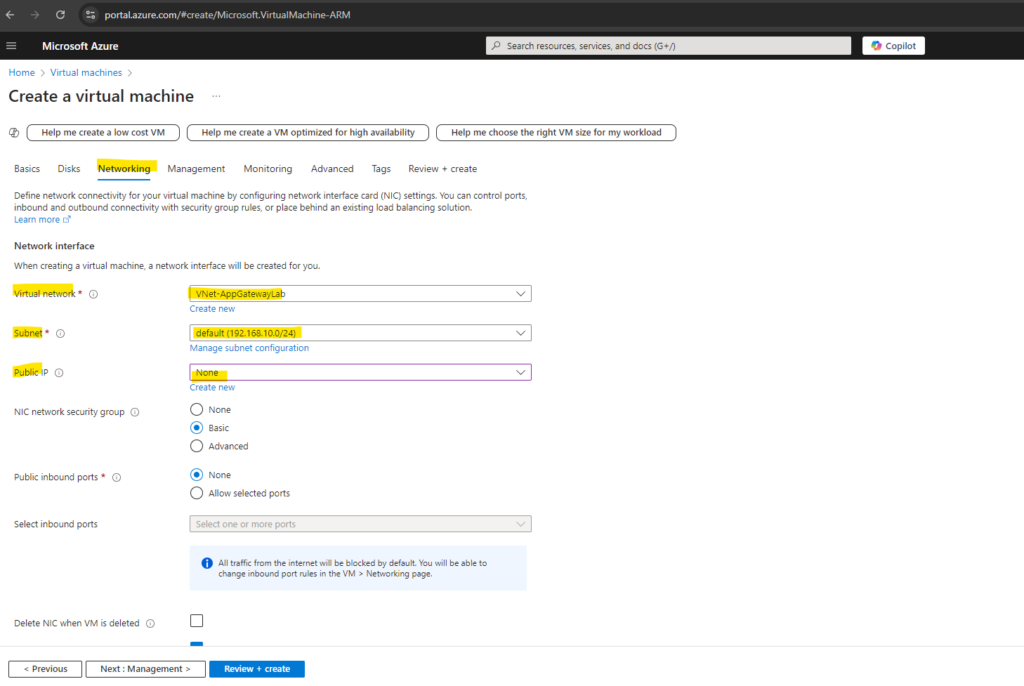
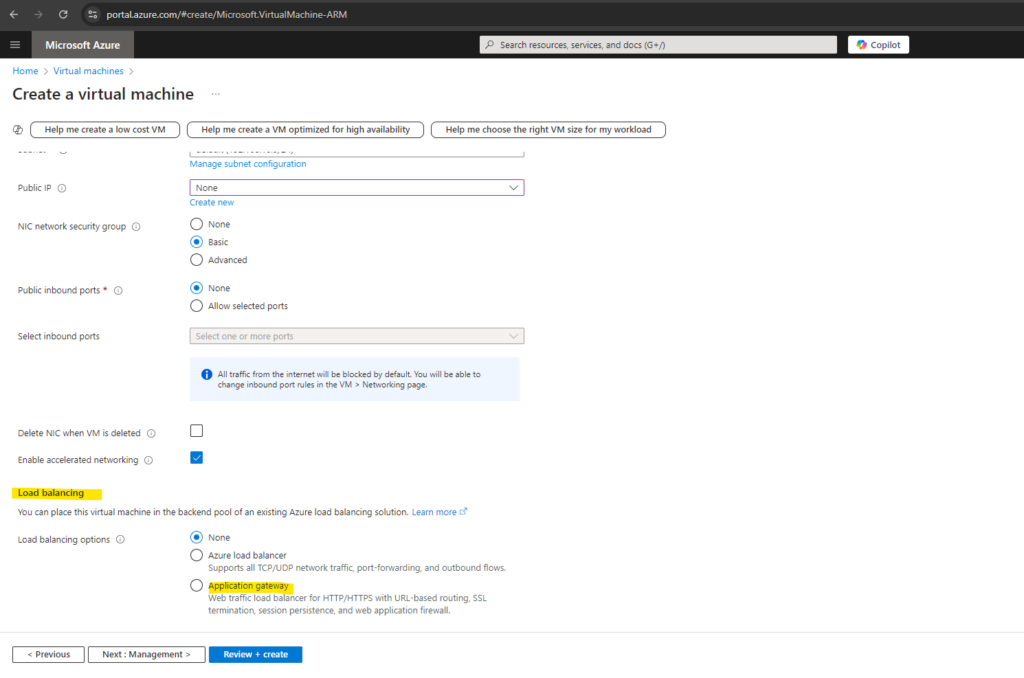
Under Load balancing we can also select here to use an application gateway. So far I will left this to none because we first need to create and set up the application gateway further down in this post.
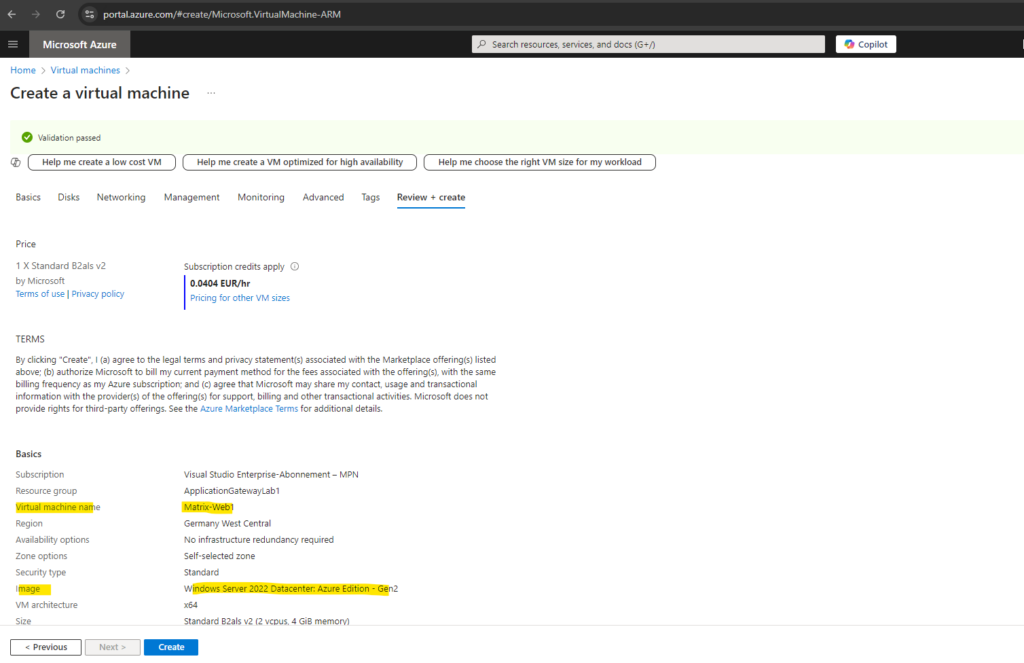
For testing the application gateway with multiple different web app’s on different virtual machines, I will also create a second virtual machine using the same settings and named Matrix-Web2.

Creating a Private DNS Zone in Azure
We will later further down configure backend pools on the application gateway which will be used to route requests to the backend servers that serve the request.
Backend pools can be NICs, virtual machine scale sets, public IPs, internal IPs, fully qualified domain names (FQDN), and multi-tenant backends like Azure App Service.
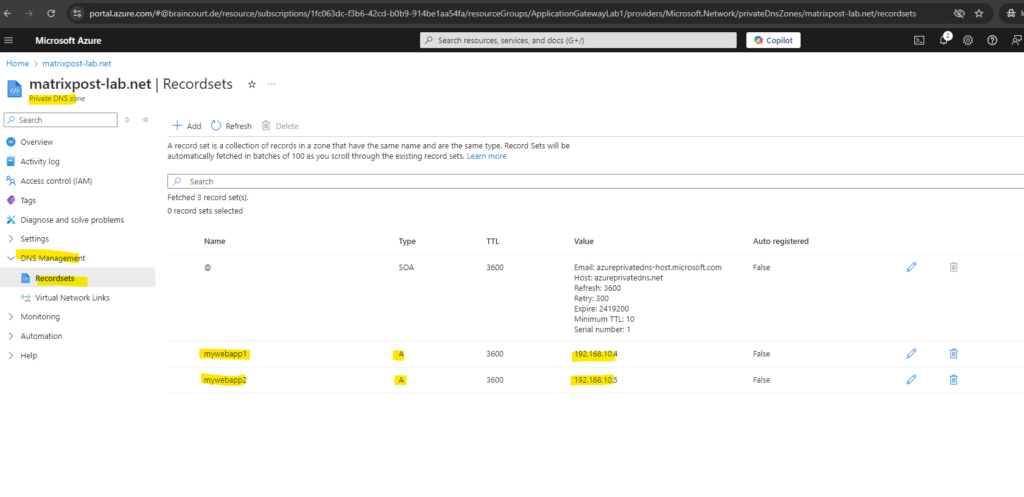
I will later configure here two FQDNs (MyWebApp1.matrixpost-lab.net & MyWebApp2.matrixpost-lab.net) which should be resolved in the internet to the public IP address of the application gateway and internal on the application gateway itself into the private IP addresses of my virtual machines we previously configured above and will finally host these web app’s.
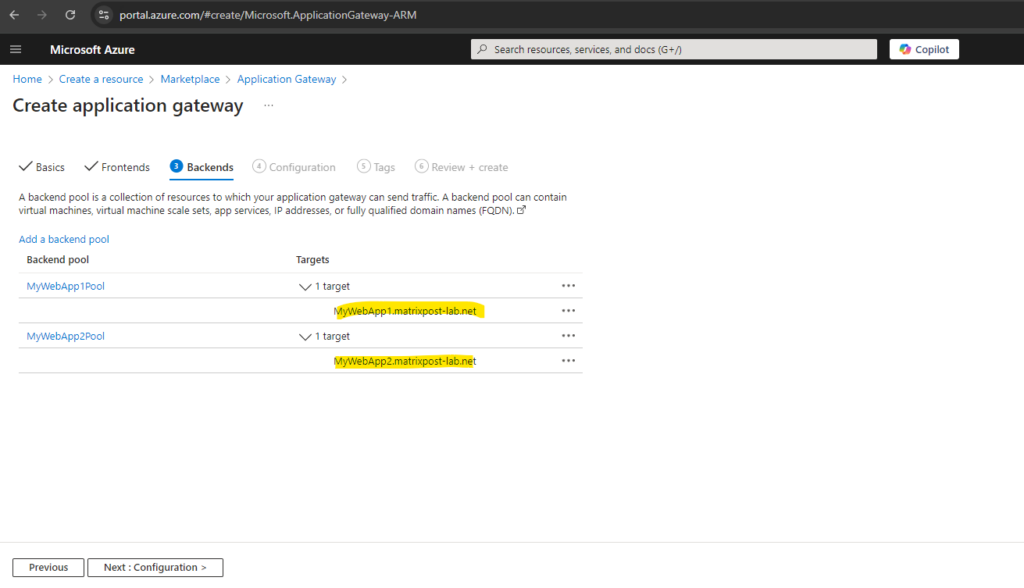
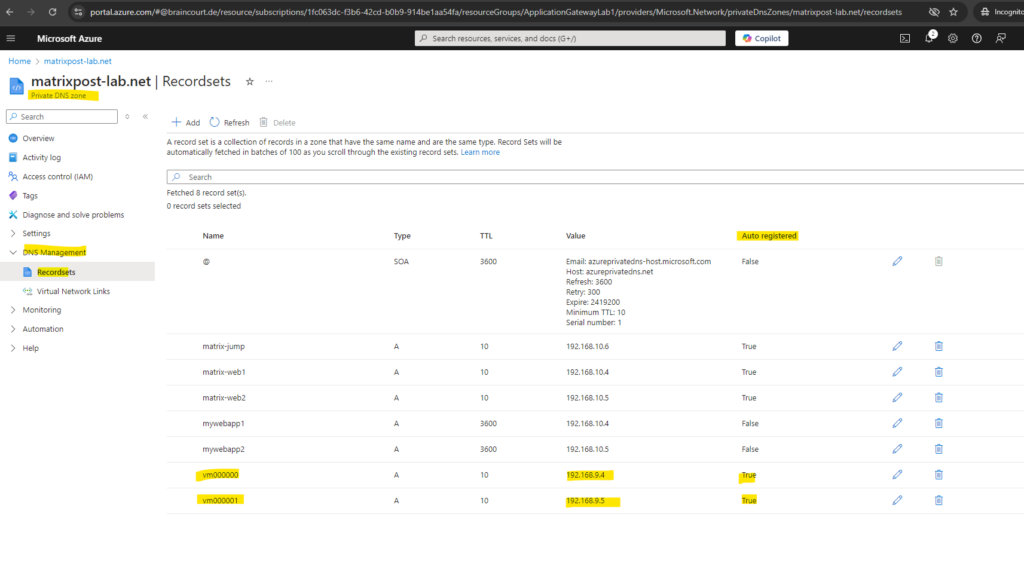
In order the application gateway can resolve these FQDNs into the private IP addresses of the virtual machines our web app’s will run, we also need to create a private DNS zone in Azure and link it to the virtual network in which the application gateway will run.
Here we need to create two DNS A-records which will point to the virtual machines IP addresses.
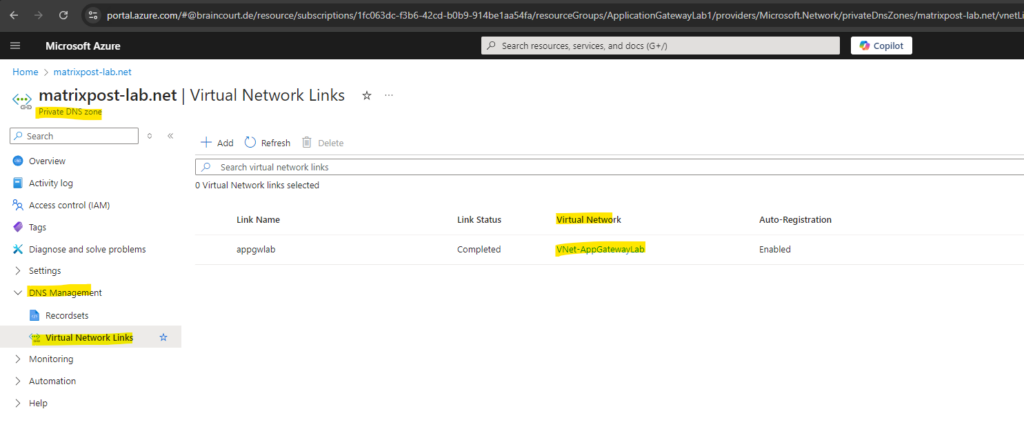
Finally we need to link this zone to our virtual network in which we placed the application gateway. By doing this all resources within this virtual network can resolve DNS names which are registered here.
Set up Azure Application Gateway by using the Azure Portal
To set up the application gateway we will first create a new resource in the Azure Portal by selecting the Application Gateway below.
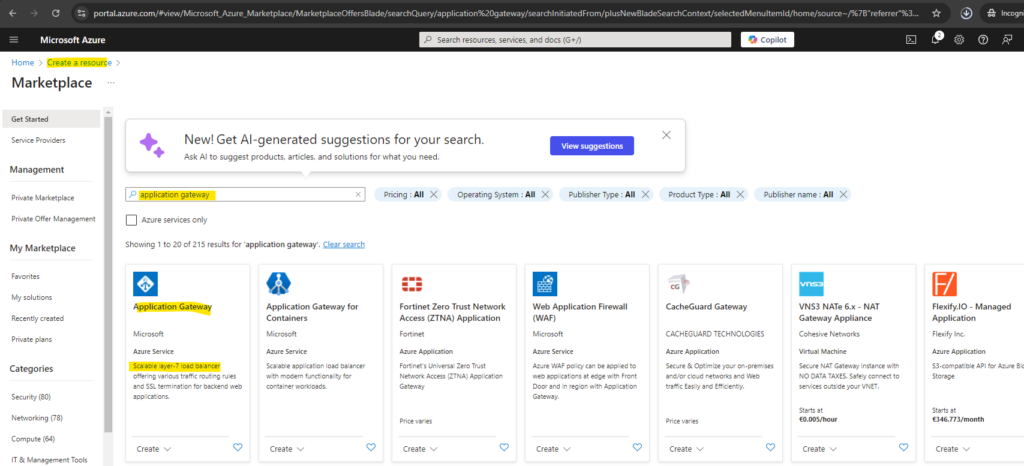
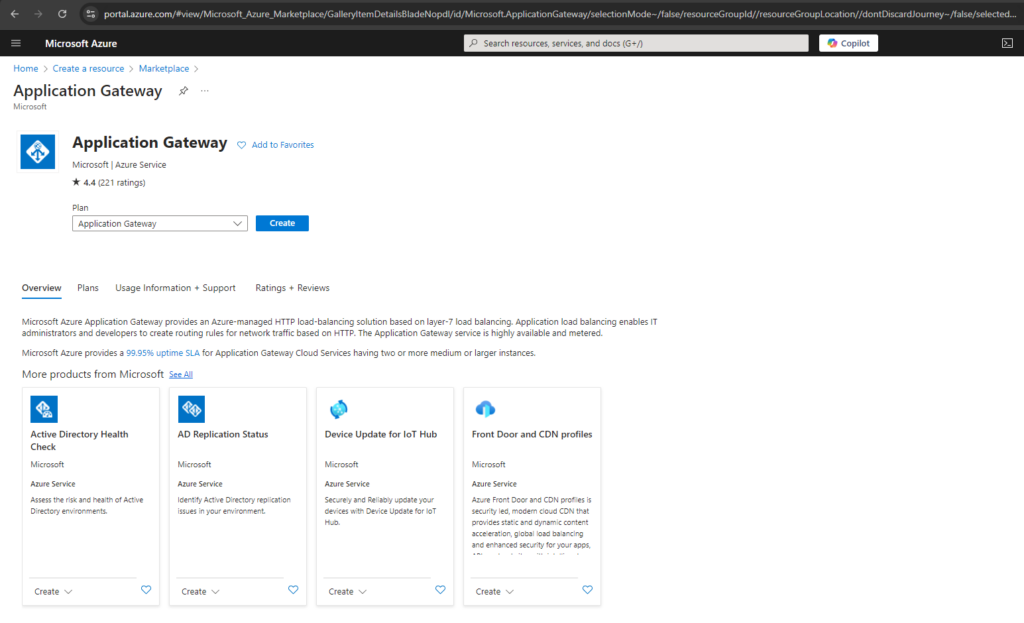
Click on Create.
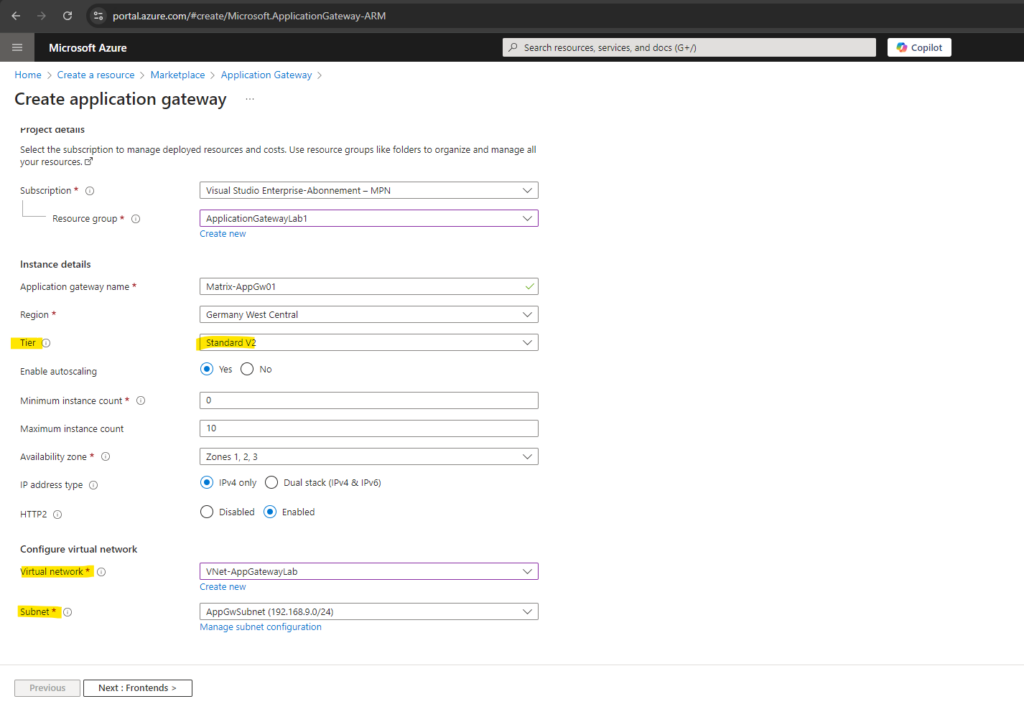
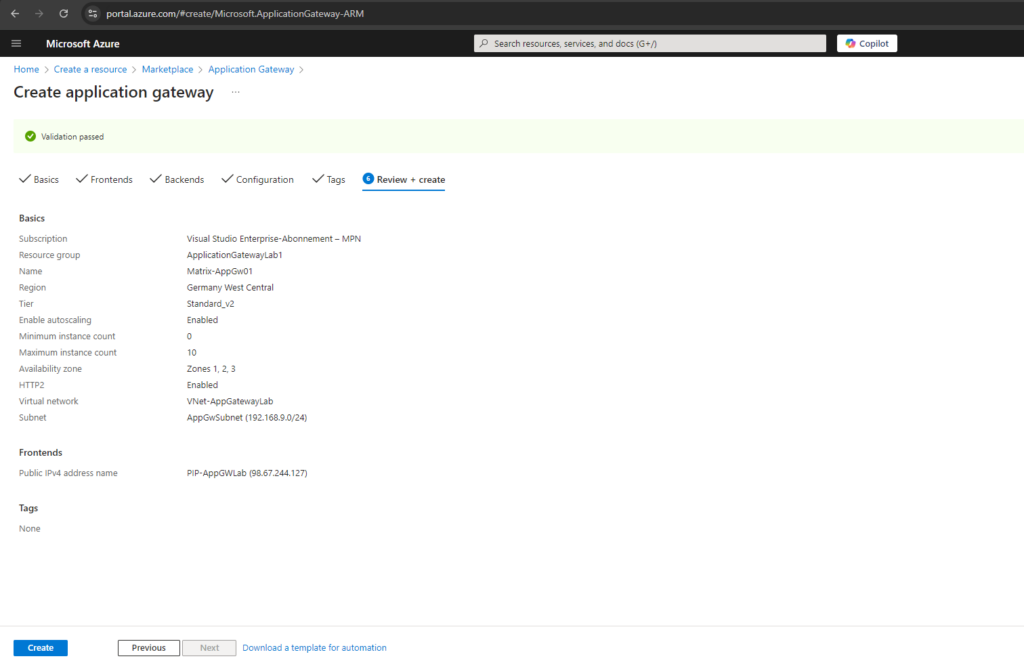
For application gateway I will use here a Standard V2 tier and autoscaling (increase instances based on the incoming workload) enabled. We also need to select a virtual network and subnet where we want to place the application gateway. Microsoft recommends a /24 subnet for the application gateway. This subnet must be dedicated for the application gateway and no other resources can be placed to.
Although a /24 subnet isn’t required per Application Gateway v2 SKU deployment, we highly recommend it. A /24 subnet ensures that Application Gateway v2 has sufficient space for autoscaling expansion and maintenance upgrades.
The v2 tiers offer performance enhancements and support for some critical new features. Choose a WAF tier to support Web Application Firewall on this application gateway. You can upgrade to a WAF tier after the application gateway has been created. Learn more about tier difference.
- Basic (preview): The Basic SKU is designed for applications that have lower traffic and SLA requirements, and don’t need advanced traffic management features.
- Standard_v2 SKU: The Standard_v2 SKU is designed for running production workloads and high traffic. It also includes autoscaling, which can automatically adjust the number of instances to match your traffic needs.
Configure the Frontend
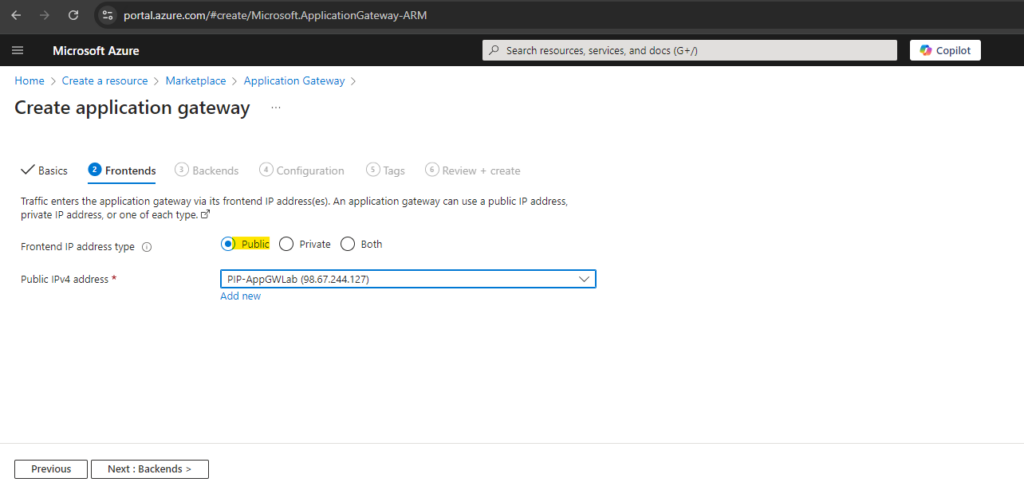
On the Frontends tab, to publish the web app’s in the internet, we need to select either an existing public IP address or create a new one.
For the application gateway v2 SKU, you can only choose Public frontend IP configuration. Use of a private frontend IP address configuration is currently in public preview. For more information, see Private Application Gateway deployment.
Configure the Backend Pool
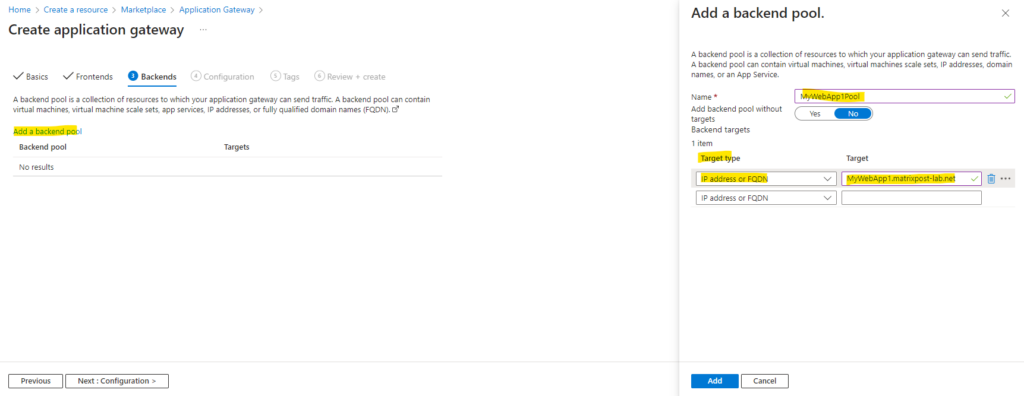
The backend pool is used to route requests to the backend servers that serve the request. Backend pools can be NICs, virtual machine scale sets, public IPs, internal IPs, fully qualified domain names (FQDN), and multi-tenant backends like Azure App Service.
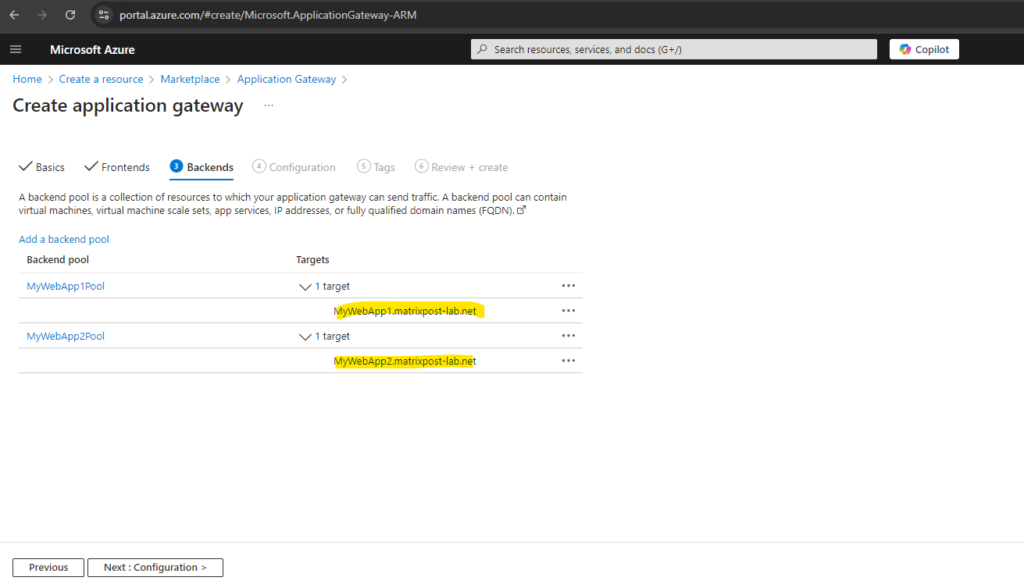
Below I will create two Backend pools to publish finally two different web app’s running each on different virtual machines.
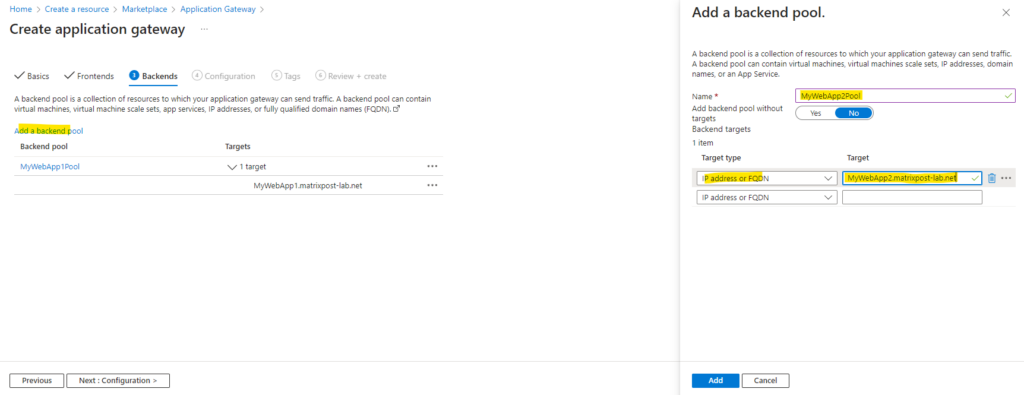
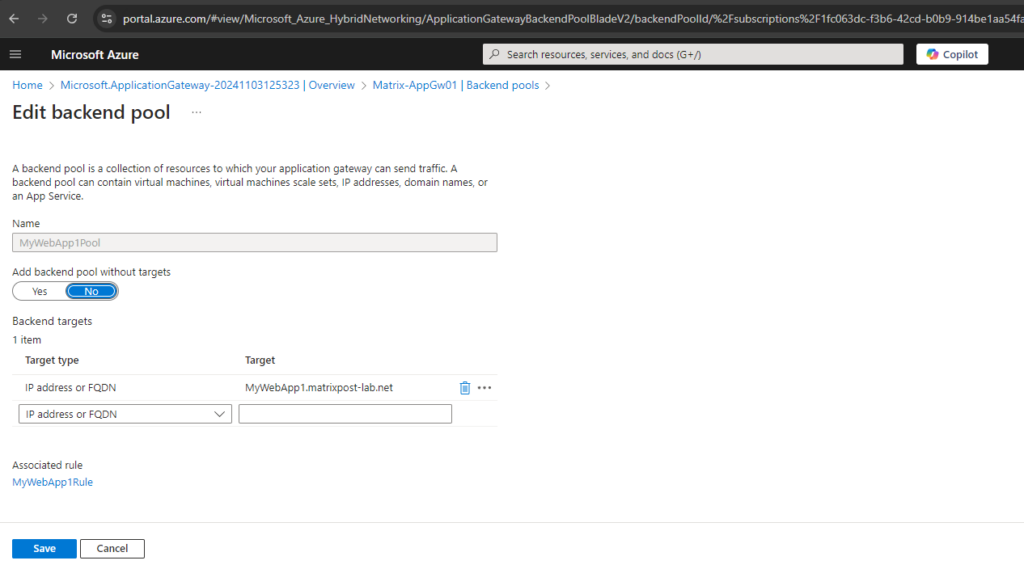
For the backend pools I will use the FQDNs of my web app’s I want to publish to the internet. Finally the FQDNs are resolved to the private IP address of the virtual machines they will run on.
MyWebApp1.matrixpost-lab.net will run on the virtual machine named Matrix-Web1 (192.168.10.4) and MyWebApp2.matrixpost-lab.net will run on Matrix-Web2 (192.168.10.5).
Next I will create my second backend pool for MyWebApp2.matrixpost-lab.net.
Click on Next.
Configure Routing Rules
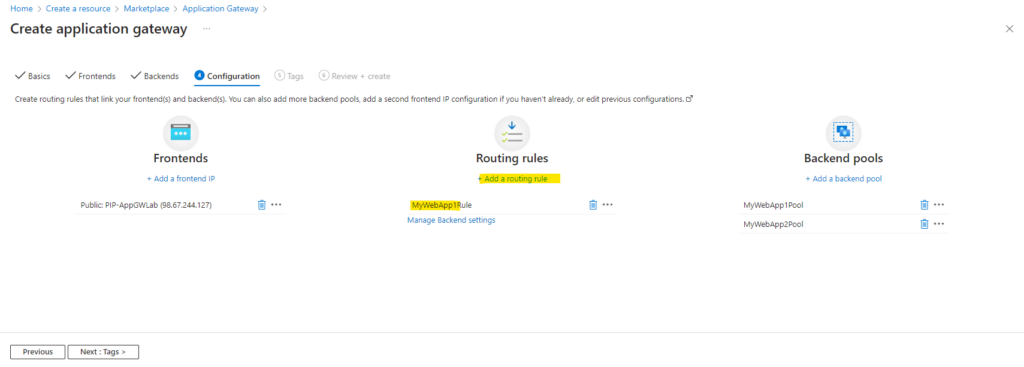
On the Configuration tab, you’ll connect the frontend and backend pools you created using a routing rule.
Click on Add a routing rule.
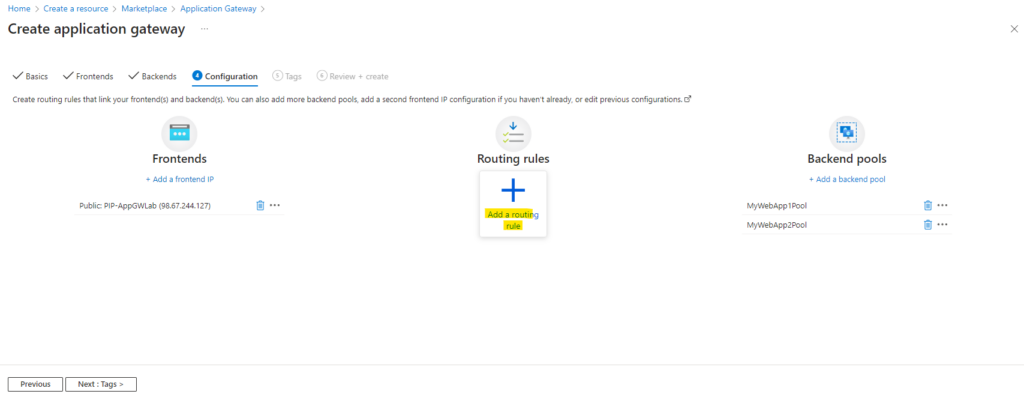
A routing rule must contain a listener and at least one backend target. So first we configure the listener below. I will configure here a HTTPS listener to encrypt the traffic between clients and the application gateway.
This is so called end-to-end TLS configuration as described in the following article by Microsoft https://learn.microsoft.com/en-us/azure/application-gateway/end-to-end-ssl-portal.
In order to use HTTPS we also need to upload an certificate in PFX file format. A PFX file (also known as PKCS #12 or .p12 file) is a file format that stores a certificate along with its associated private key and, optionally, the entire certificate chain (intermediate and root certificates).
Further I will select here Multi site and Single, and in the Host name field I will enter the FQDN of my first web app. For the custom error pages I will leave the default settings. We can also enable Multiple/Wildcards instead of Single, then we can add multiple host names including wildcards on which our listener will accept incoming requests.
Finally this is the TCP/IP socket (IP/protocol/port) the application gateway is listening for incoming requests on the public IP address.
When enabling below Multi site for the listener, we are able to create multiple listeners all using the same TCP/IP socket, below e.g. we can then create multiple listeners on TCP port 443. In case we create a listener and Basic is enabled, we can’t create any further listeners using the same TCP/IP socket, here TCP on port 443.
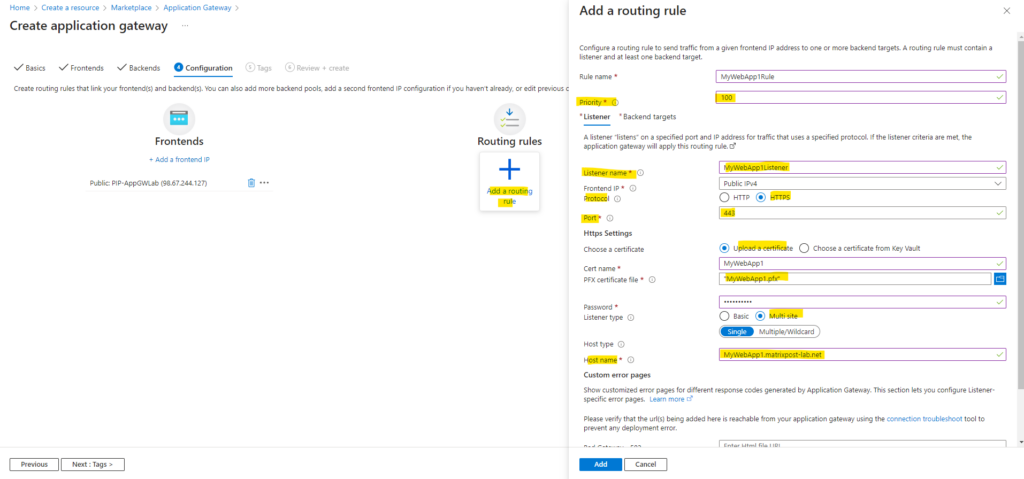
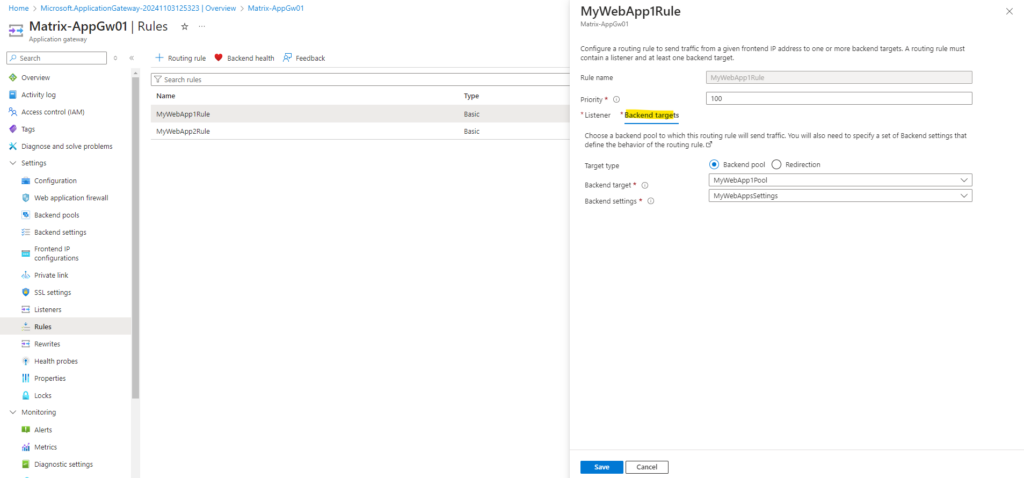
Next we need to go to the Backend targets tab. Here we need to choose a backend pool to which this routing rule will send traffic. We will also need to specify a set of Backend settings that define the behavior of the routing rule.
To create new backend settings, click on Add new below.
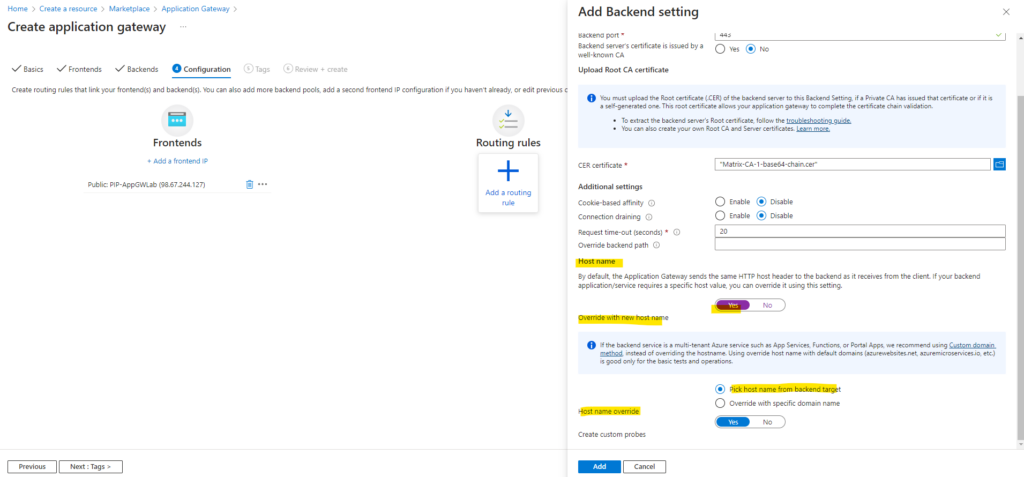
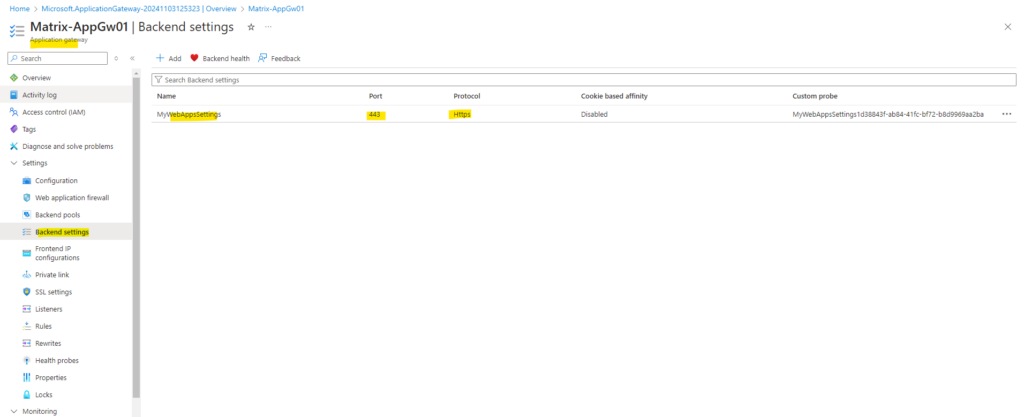
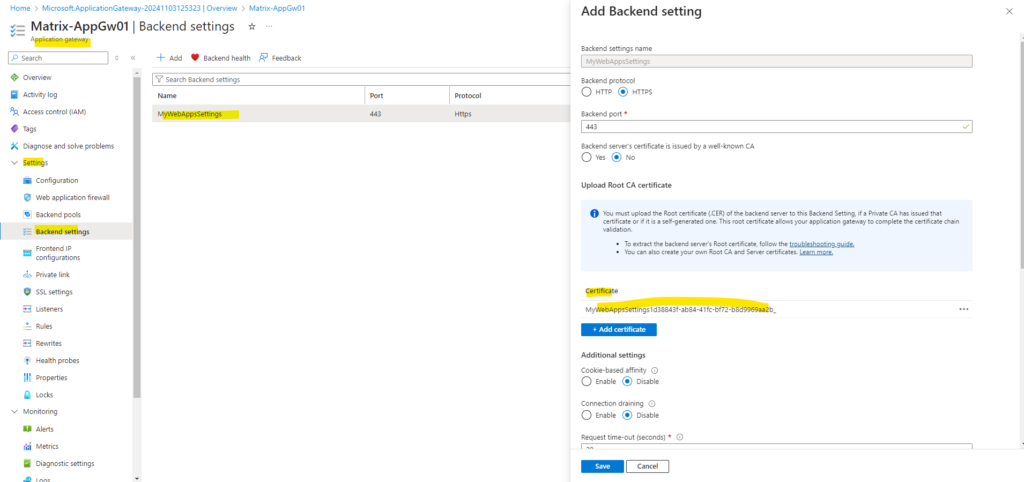
On the Backend setting I will select HTTPS and tcp port 443 to also encrypt the traffic between the application gateway and my backend servers.
Because the certificate above for the listener configuration I was uploading were issued by my private PKI (AD CS), the application gateway by default will not trust this certificate and therefore we need to upload also the root certificate of the private PKI.
For Application Gateway v2 SKU, the root certificate requires to be Base-64 encoded X.509(.CER) format.
My private PKI is consisting of a standalone offline Root CA and one enterprise online subordinate CA, therefore I have to upload the root certificate below (Matrix-CA-base64-chain.cer) which will contain both certificates, the root and subordinate certificate.

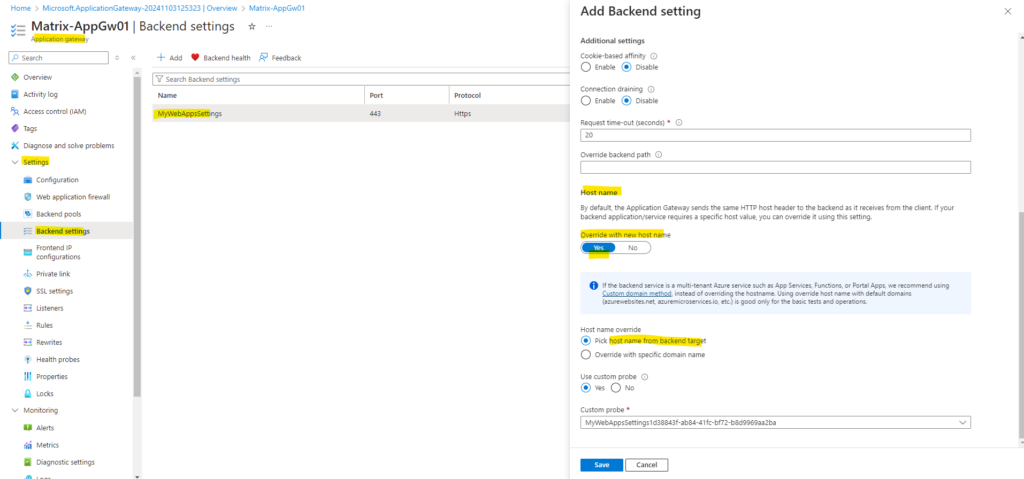
We also need to enable Host name override and selecting Pick host from backend target.
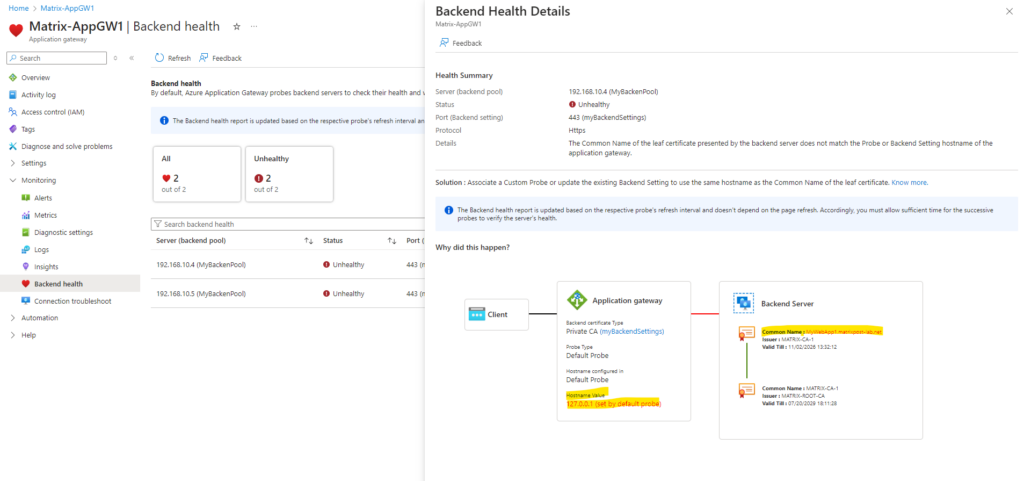
By selecting Host name override and Pick host from backend target we want to be sure that the common name of the default probe or backend settings on the application gateway will use the same hostname as the common name of the leaf certificate (assigned certificate directly on the web server for the web app).
In case the application gateway will use here a different custom name (localhost address 127.0.0.1 by default), you will run into the following error:
The Common Name of the leaf certificate presented by the backend server does not match the Probe or Backend Setting hostname of the application gateway.
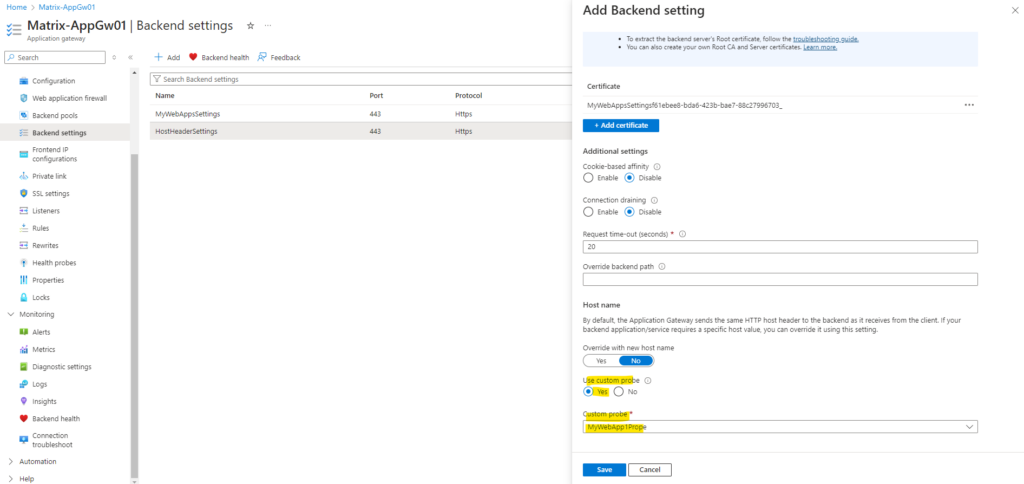
For the backend settings we can also leave the Override with new host name settings on No, but then we need to add and use a custom probe with the FQDN of our web app like shown below.
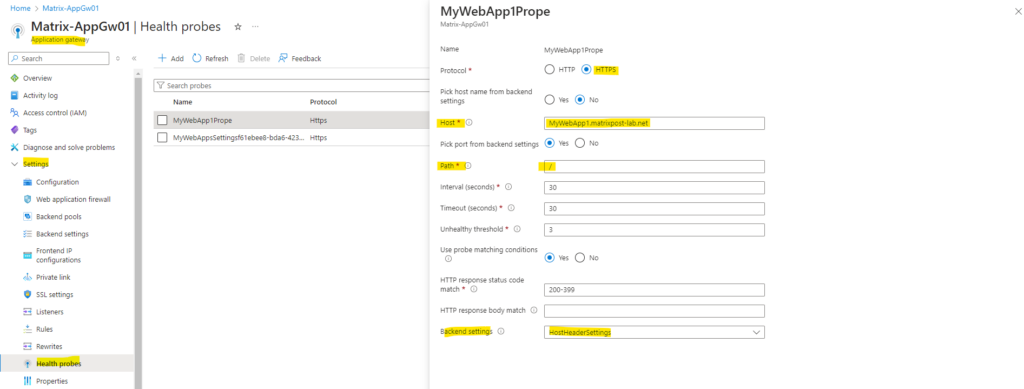
On the custom probe we can now enter the correct FQDN under Host which should be used to probe.
Now select Add to first return from the backend settings to the listener configuration and one more to return to the Add a routing rule window.
Now we have created the first routing rule for my web app MyWebApp1.matrixpost-lab.net. We also need to add a second routing rule for my web app MyWebApp2.matrixpost-lab.net, so we need to click again on Add a routing rule below.
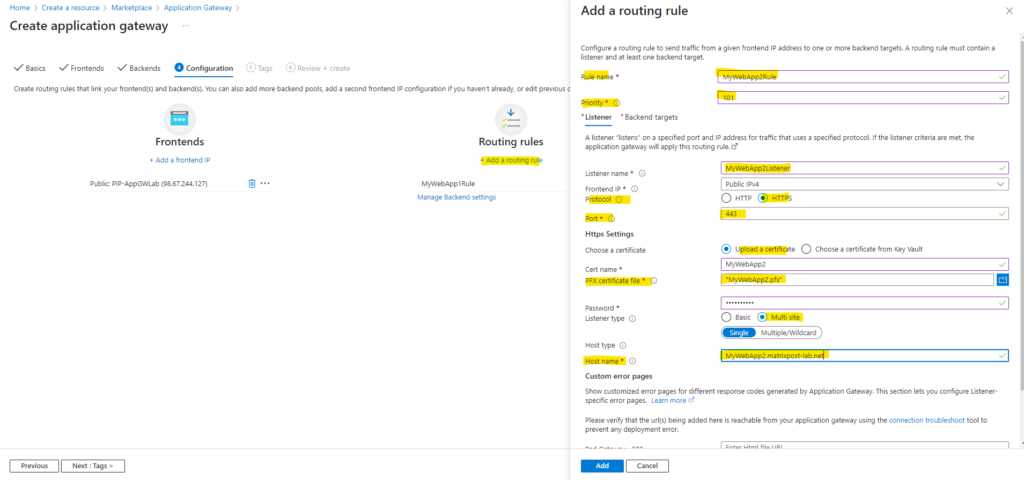
For the priority I will use this time a higher one with 101. I will also upload the pfx certificate file for my second web app. Further I will also as previously for the first web app select here Multi site and Single and in the Host name field I will enter the FQDN of my second web app. For the custom error pages I will leave the default settings as previously.
Rule priority defines the order in which the rules are processed.
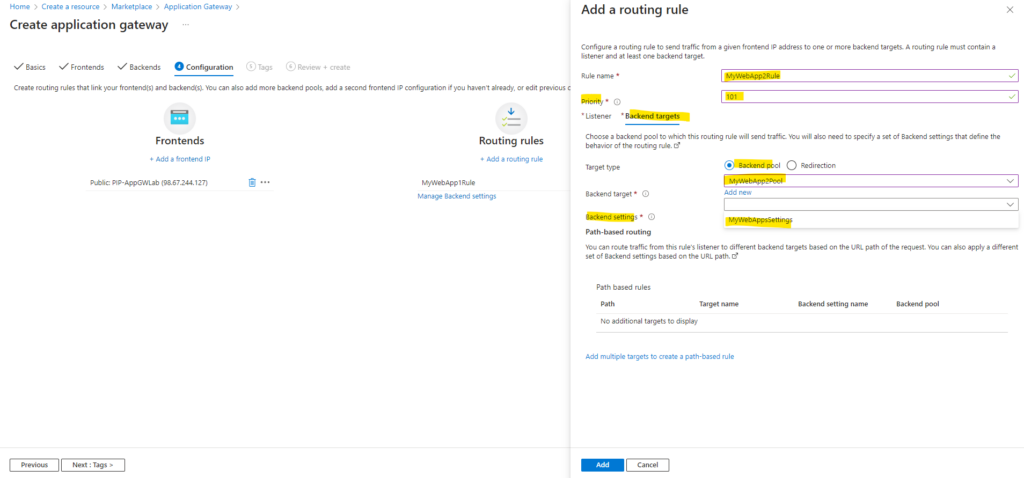
Next we also need to configure the backend settings as for the first routing rule previously.
Here we need to choose this time our second backend pool to which this routing rule will send traffic.
Further we also need to specify this time a set of Backend settings that defines the behavior of our second routing rule, but this time we can and need to use the already created one from the first routing rule, here named MyWebAppsSettings.
The reason for is that the backend settings are identical for both web app’s, both listening on HTTPS tcp port 443 and both using certificates issued by the same Root CA. In case you would create here another backend settings and uploading the same root certificate twice, you would run into an error as this by design not supported on the application gateway.
Above I was using as mentioned my private PKI (AD CS) in my on-premise vSphere lab environment to issue certificates to the application gateway and also previously also for my two web servers (Matrix-Web1 + Matrix-Web2).
More about how to set up a PKI in Active Directory Certificate Services (AD CS) you will find in my following post.
Trigger the final Creation
Most are now done and we can click on Next: Tags >
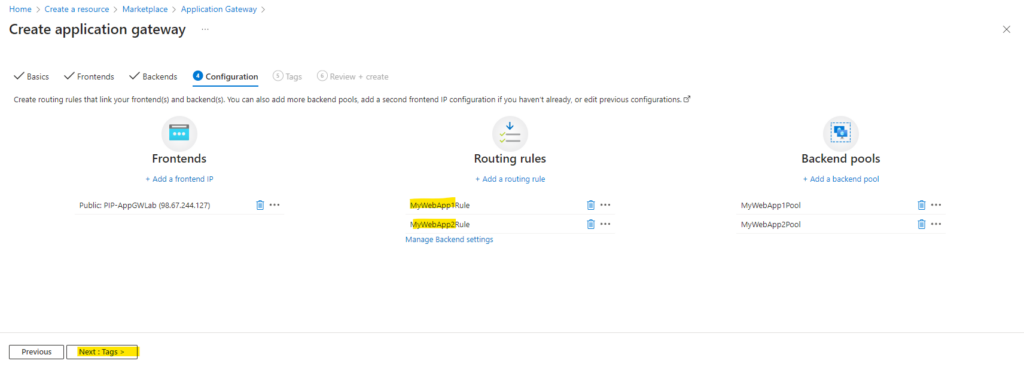
Finally we can click on Create.
Checking the Backend Health
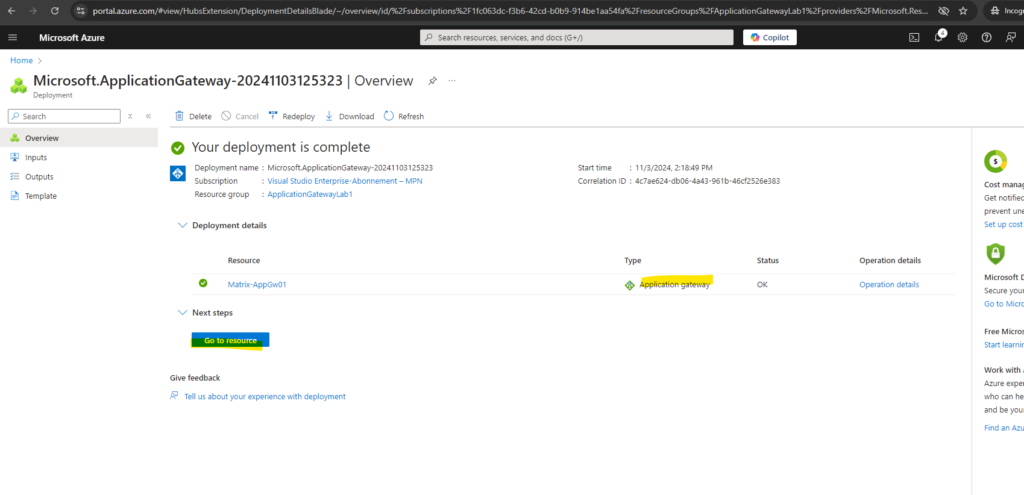
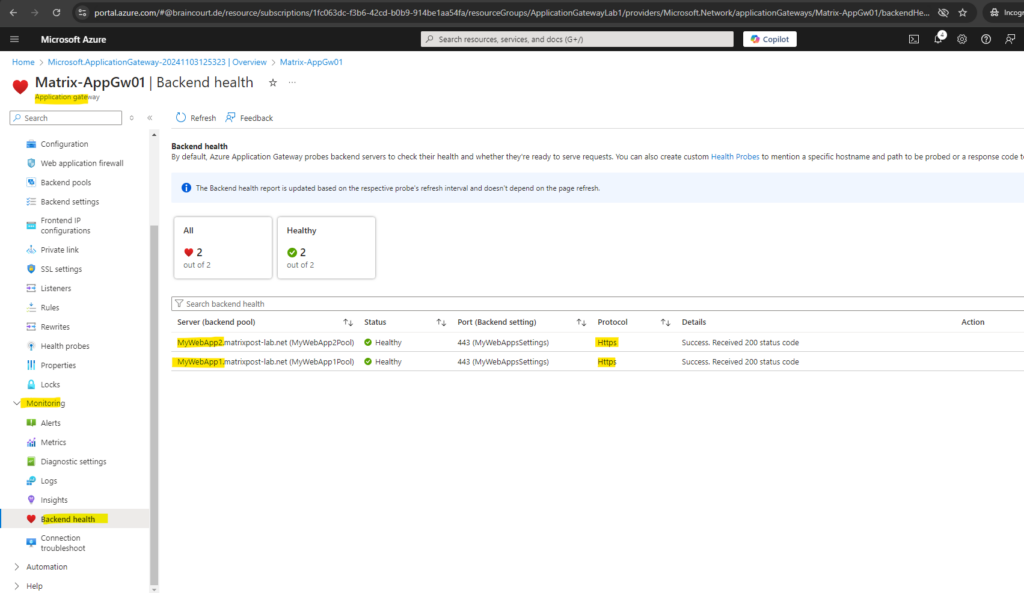
Click on Go to resource to first check the backend health of our our two web app’s we published to the internet.
Looks good! Make sure that on the backend servers the TCP port 443 (HTTPS) inbound is allowed from the application gateway.
By default, Azure Application Gateway probes backend servers to check their health and whether they’re ready to serve requests. You can also create custom Health Probes to mention a specific hostname and path to be probed or a response code to be accepted as Healthy.
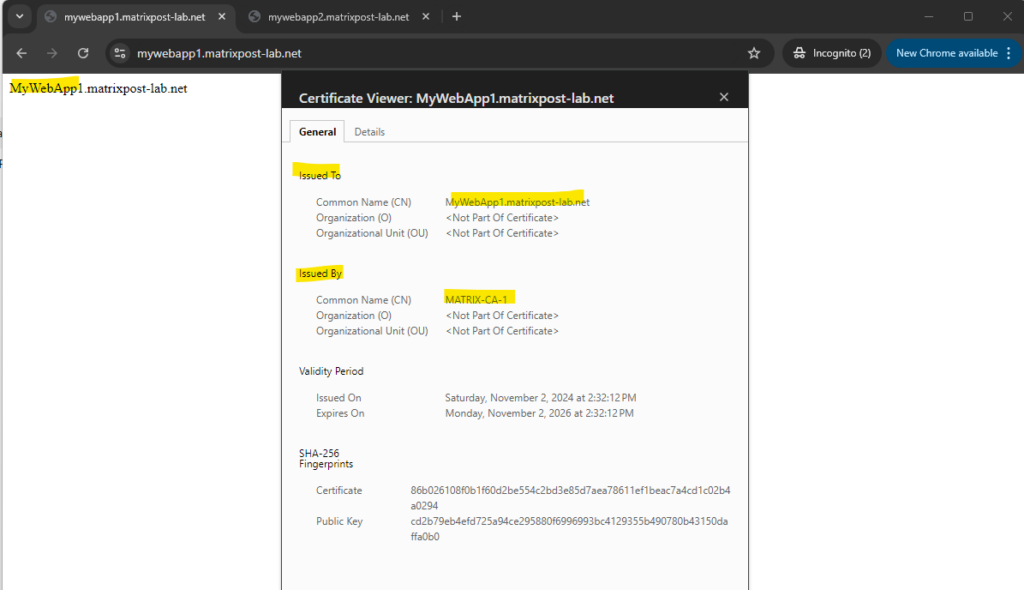
Further I will of course check if I can browse the web app’s over the internet. Also looks good!
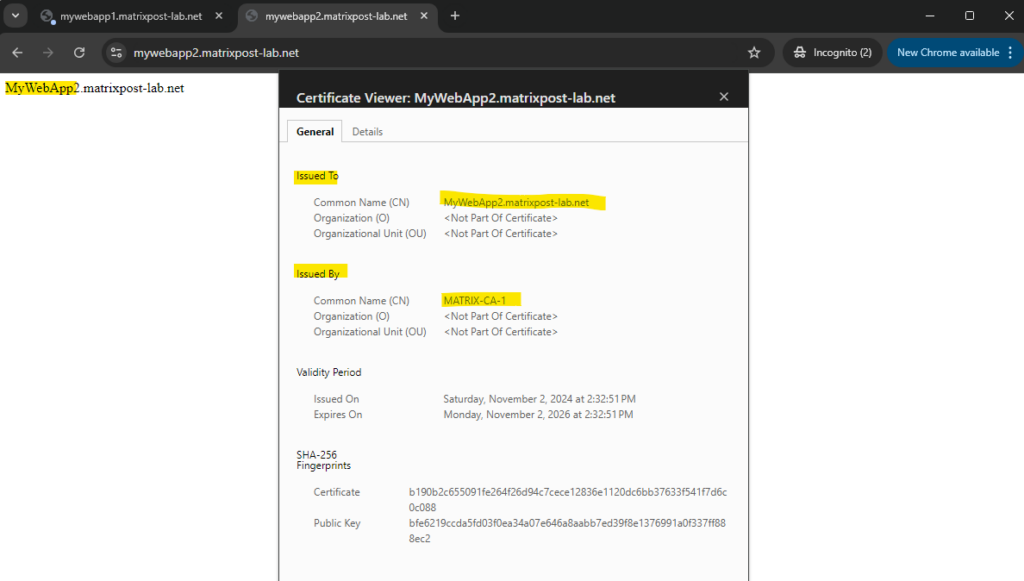
Below you will see the virtual machine named Matrix-Web1 which will run the MyWebApp1.matrixpost-lab.net web app.
When running the good old netstat command we can also see that currently an instance of the application gateway (vm000000) is connected to our web server on tcp port 443 (HTTPS), which is finally running the MyWebApp1.matrixpost-lab.net web app.
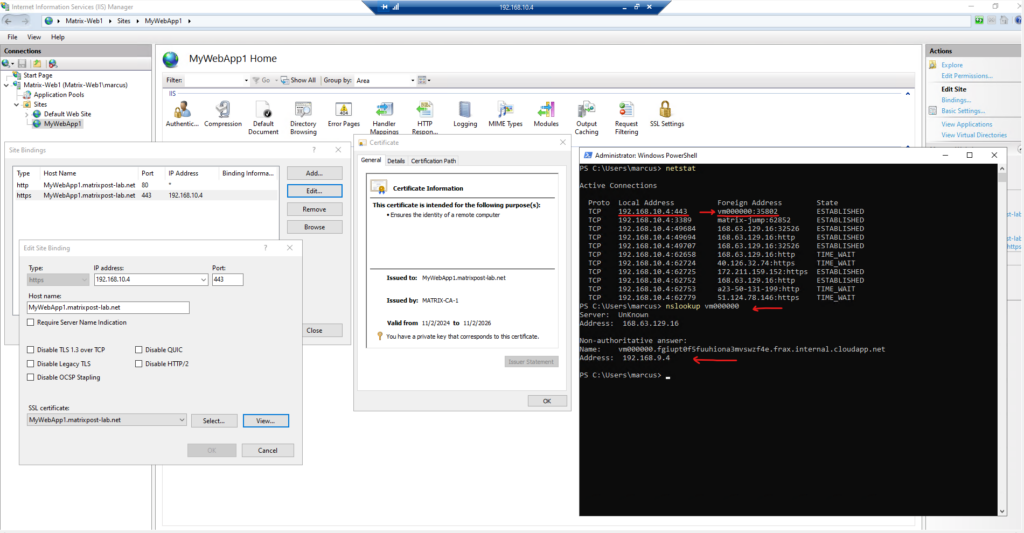
Because I will use a private DNS zone for the virtual network and Auto registered is enabled, within the application gateway instances (dedicated subnet 192.168.9.0/24) will run, I will see here also the amount of instances so far that had registered in DNS. We can now ping them to see if they finally are all running.
Unfortunately there is currently as far as I know no direct way to determine the current amount of instances the application gateway is scaling.
On the application gateway so far I am using autoscale for the amount of instances which should be running.

HTTP to HTTPS redirection
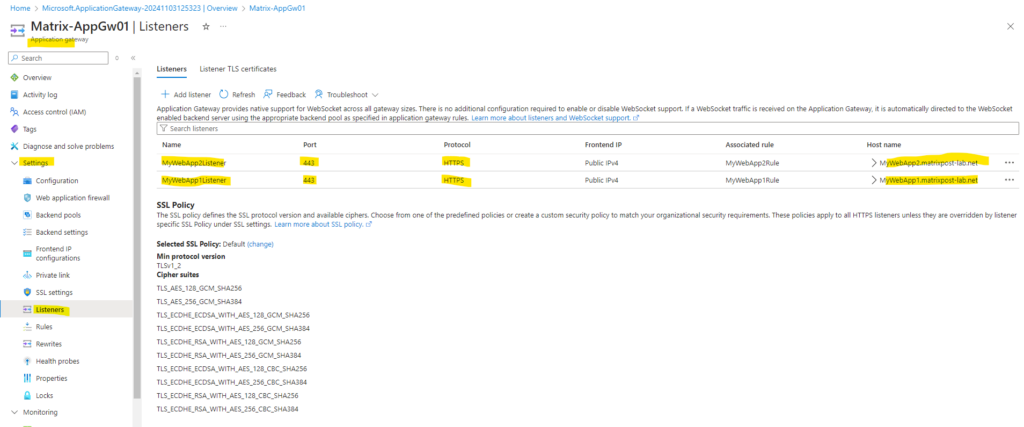
So far the application gateway is just listening on TCP port 443 (HTTPS) for incoming requests by using the following two listeners shown below.
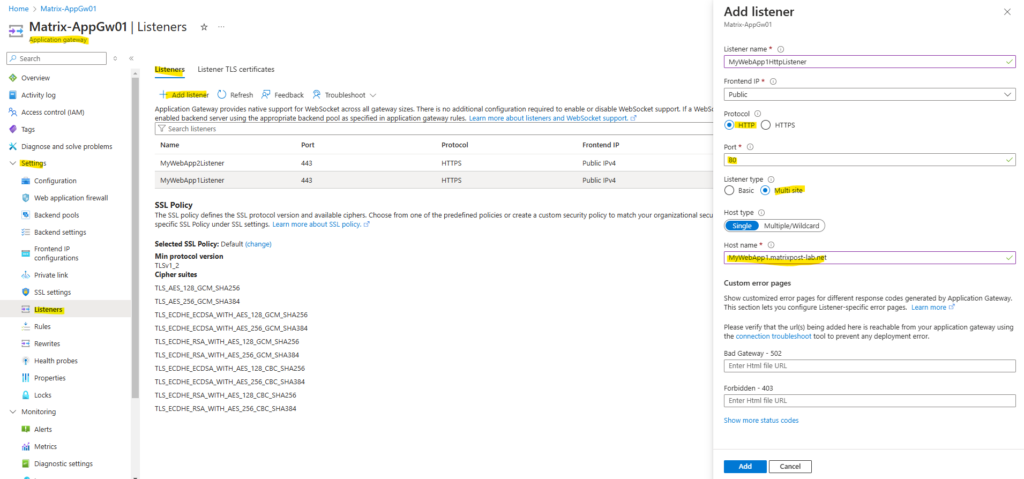
In order to redirect client requests from HTTP to HTTPS, we also need to add two more listeners which will listening on TCP port 80 for incoming requests.
So click on Add listener.
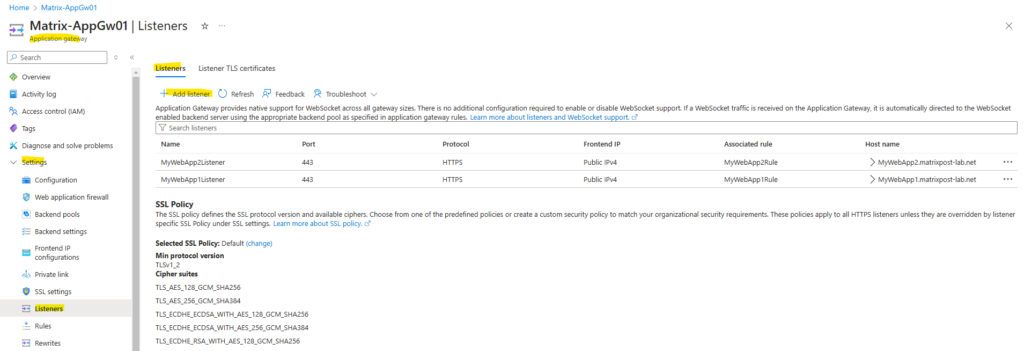
First I will configure the HTTP listener for MyWebApp1.matrixpost-lab.net. Under protocol this time we use HTTP and port 80. The rest we configure like previously for the HTTPS listener.
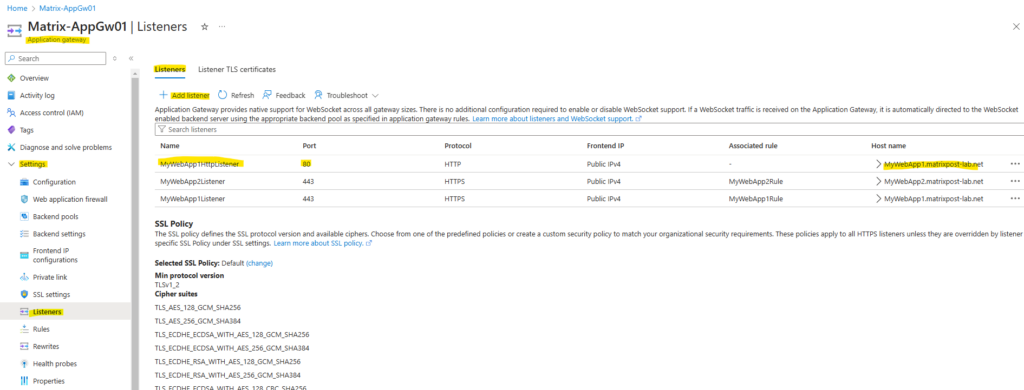
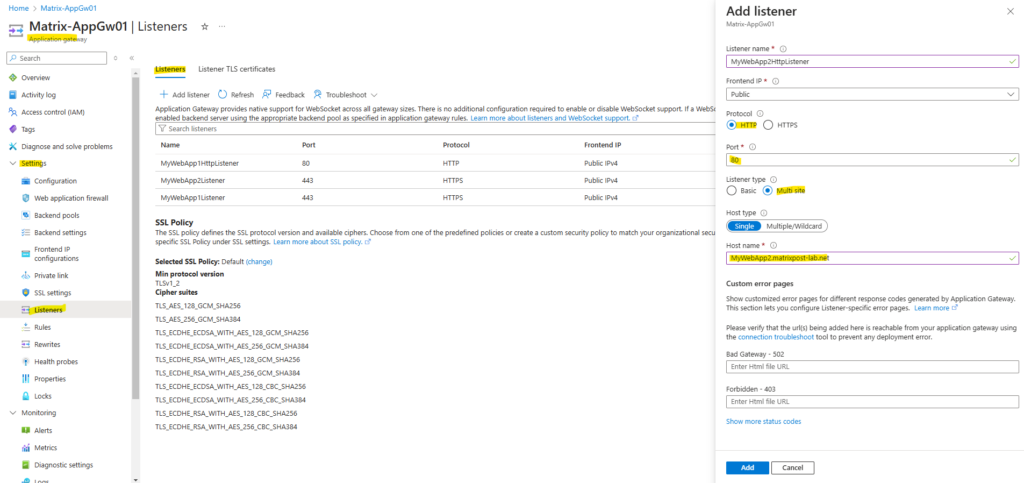
Second we need to configure the same for MyWebApp2.matrixpost-lab.net.
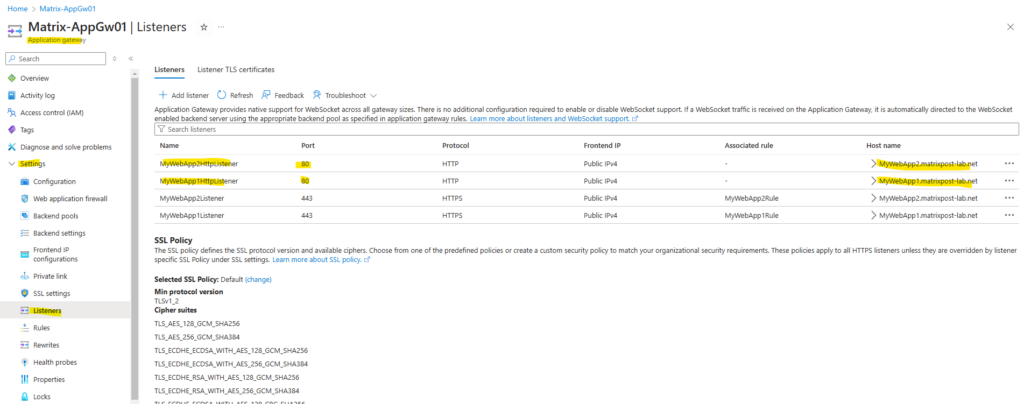
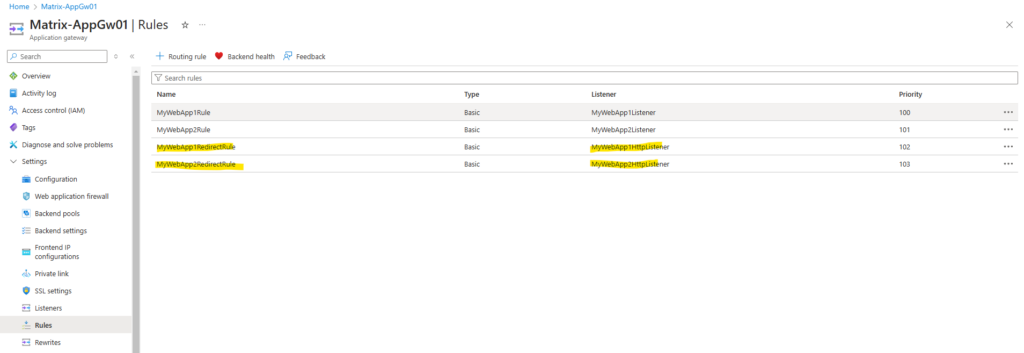
So now we have for both web apps a HTTP and HTTPS listener configured which are listening for incoming requests by clients on the internet.
The final step to redirect HTTP request to HTTPS is to add for each web app a further routing rule.
So click on + Routing rule.
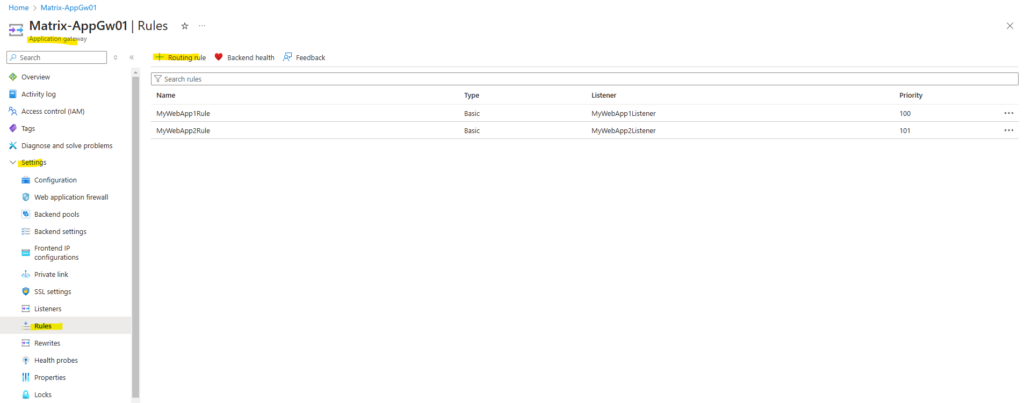
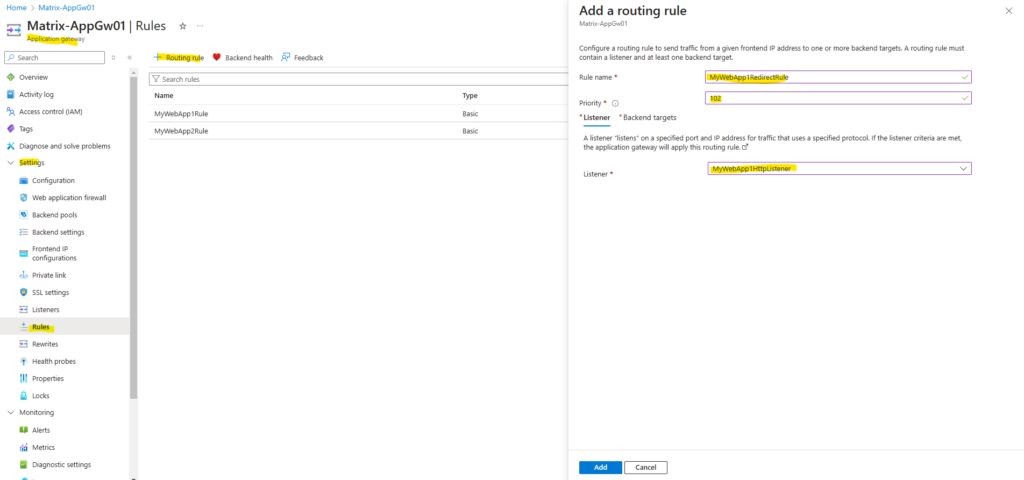
First I will create the redirect routing rule for MyWebApp1.matrixpost-lab.net.
We need to enter a priority which is higher than the previous and we need to select our newly created HTTP listener for web app1.
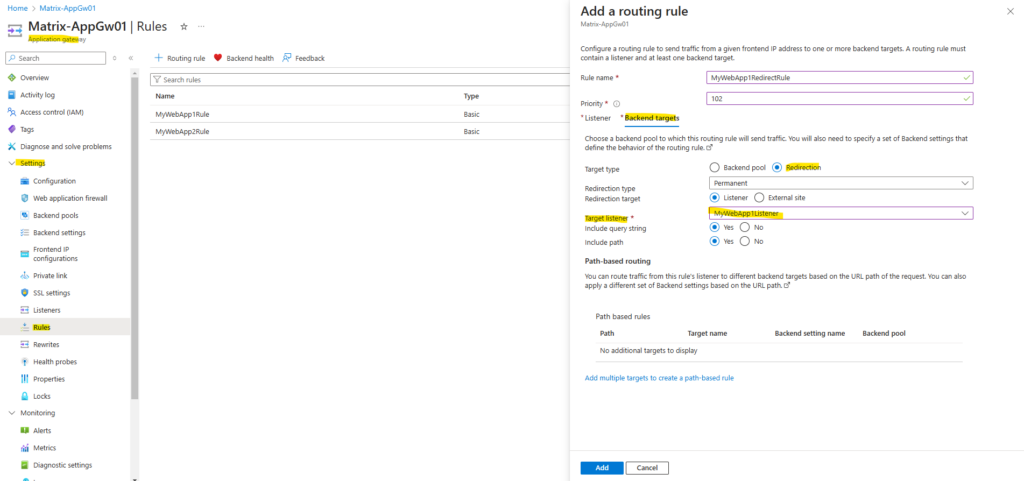
Within the backend settings this time we select Redirection for the Target type and for the Target listener we select the HTTPS listener for web app1.
Finally click on Add.
From now on incoming HTTP requests for web app1 will be redirected to HTTPS.
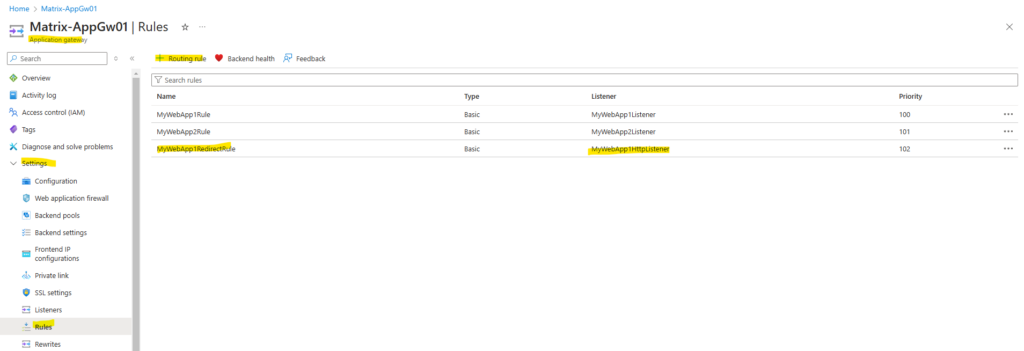
The same we will now configure for web app2.
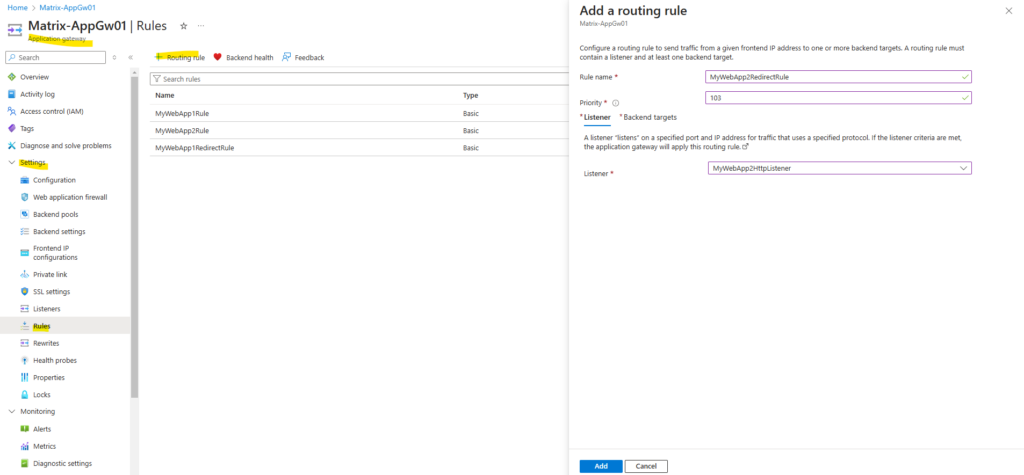
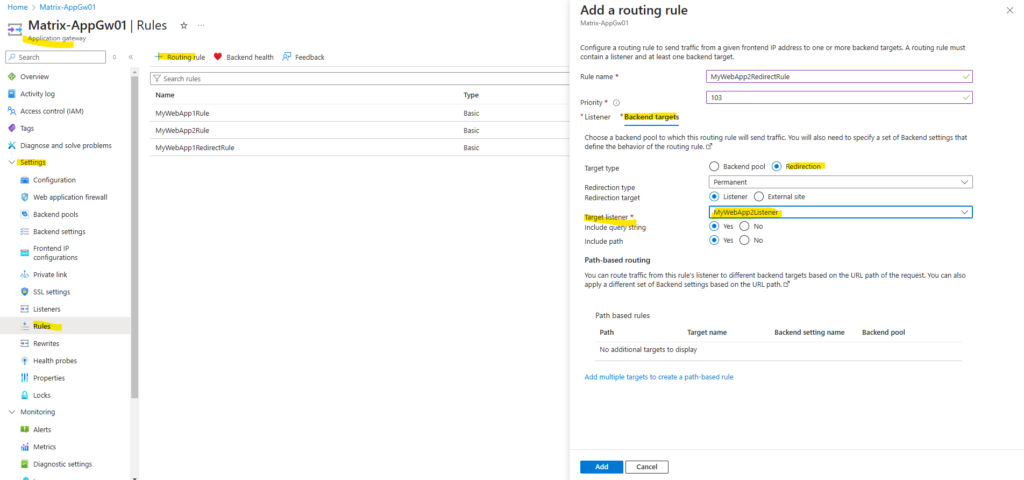
From now on incoming HTTP requests for both web app’s will be redirected to HTTPS.
Upgrade to the WAF tier
To increase the security for our web app’s we can either when creating the application gateway enable the WAF V2 tier or also afterwards within the Web application firewall menu shown below.
Malicious attacks such as SQL Injection, Cross Site Scripting (XSS), and other OWASP top 10 threats could cause service outage or data loss, and pose a big threat to web application owners.
Web Application Firewall (WAF) protects your web applications from common web attacks, keeps your service available and helps you meet compliance requirements. WAF policy will be created in the detection mode. Learn more
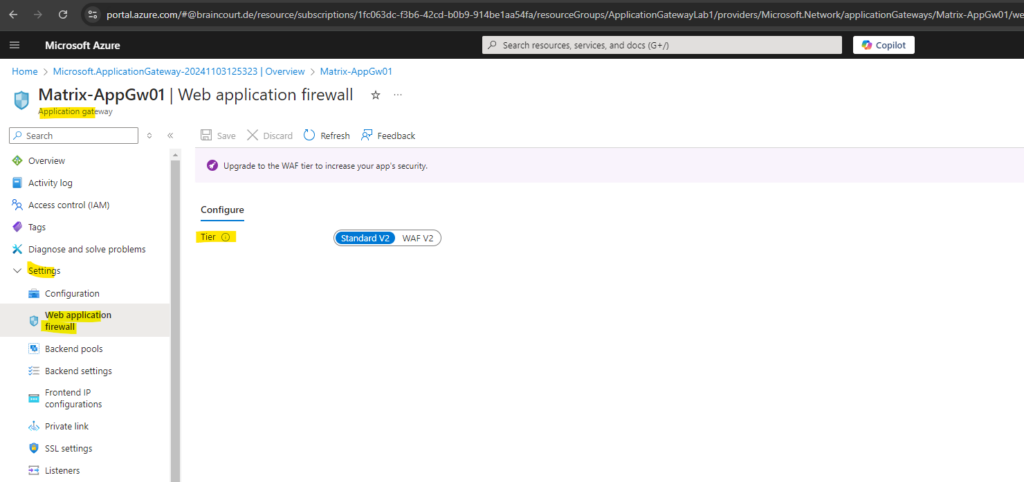
We can also create here a new WAF policy.
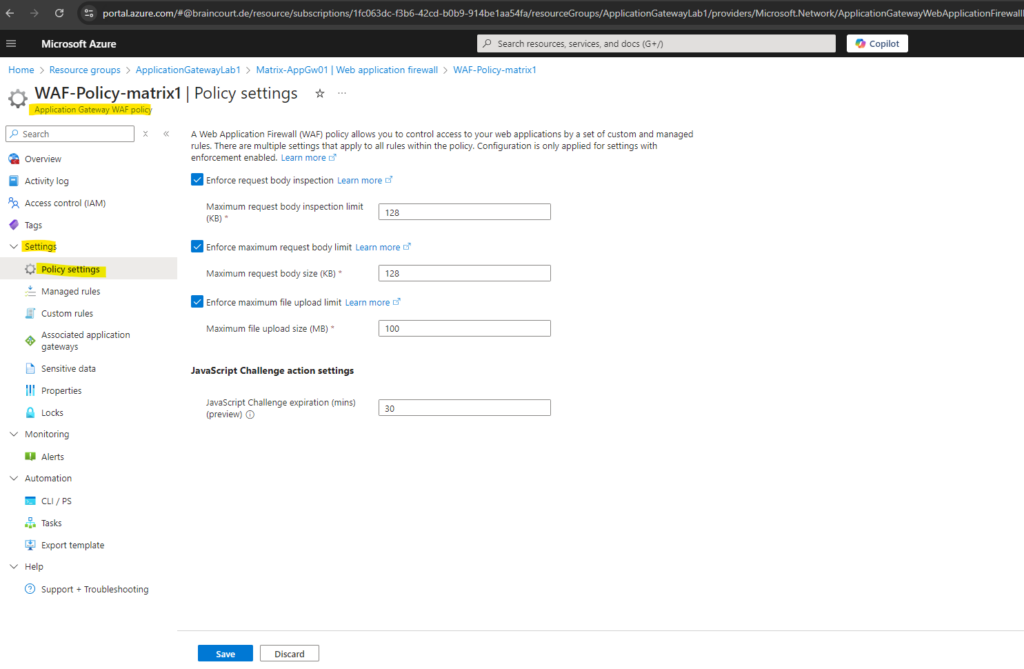
To enable a Web Application Firewall on Application Gateway, you must create a WAF policy. This policy is where all of the managed rules, custom rules, exclusions, and other customizations such as file upload limit exist.
You can configure a WAF policy and associate that policy to one or more application gateways for protection.
A WAF policy consists of two types of security rules:
-> Custom rules that you create
-> Managed rule sets that are a collection of Azure-managed preconfigured set of rules
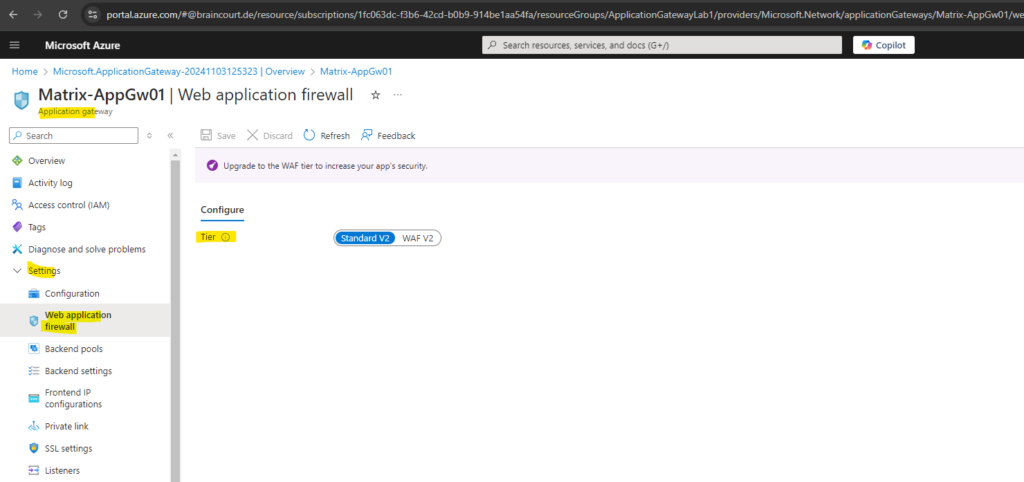
Enable WAF V2.
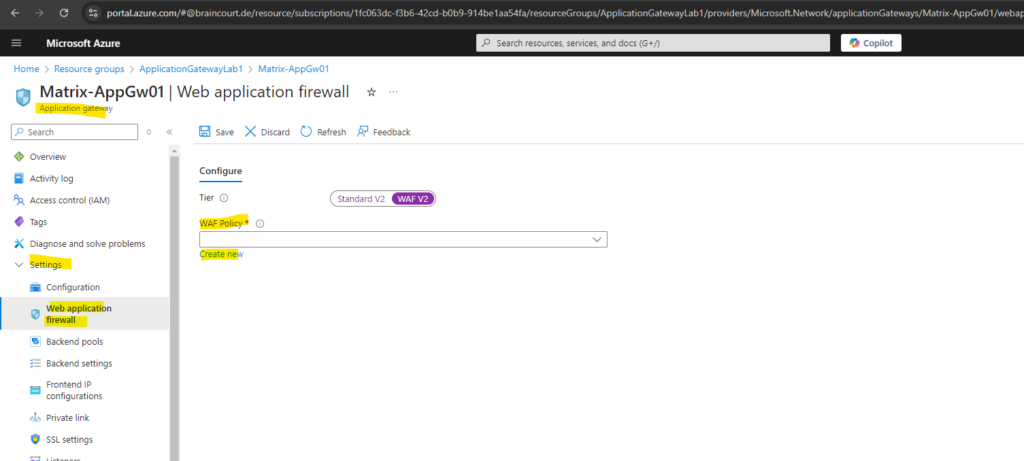
In addition to default settings, turn on Bot Protection for protection against malicious bots.
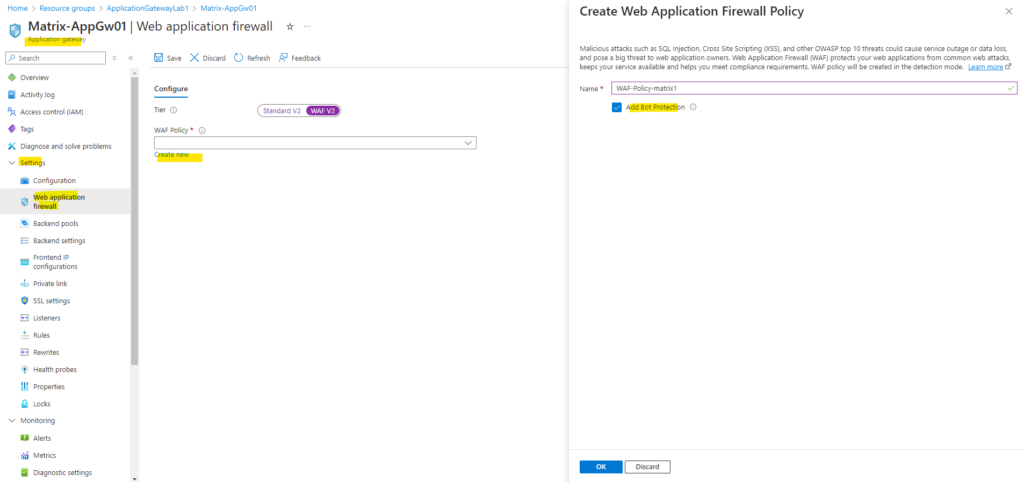
Click on Save.
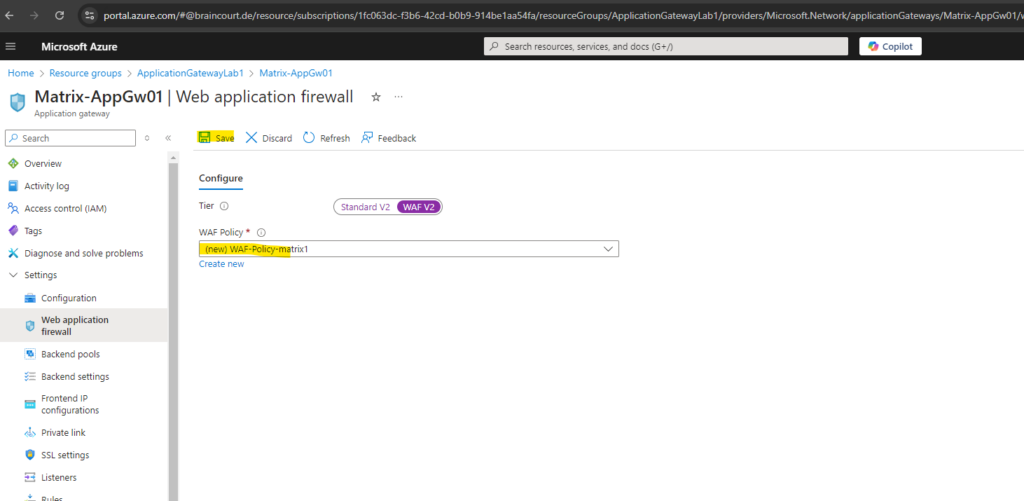
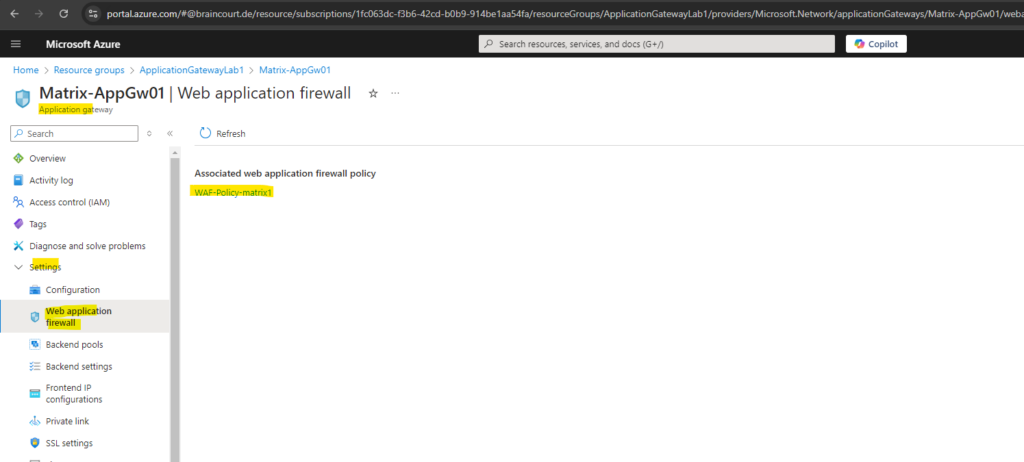
To review and change the policy settings, manged rules and custom rules, click on the policy below.
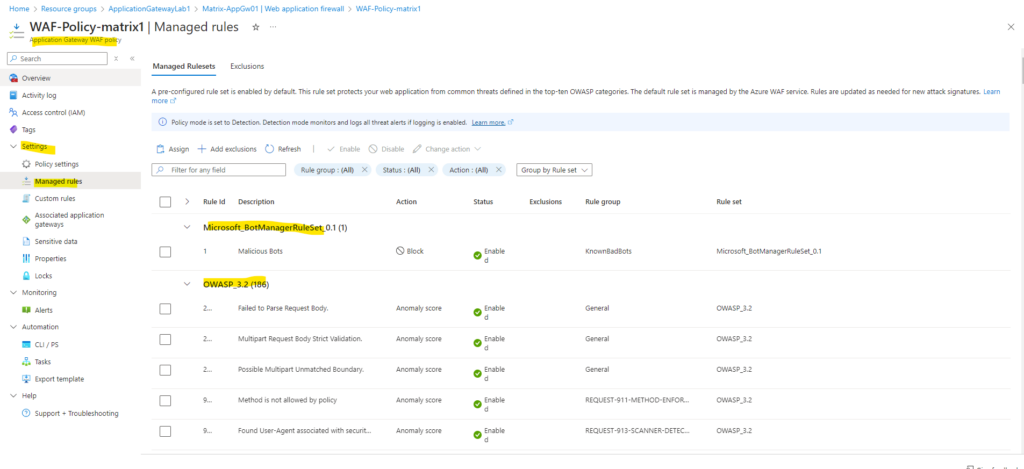
A pre-configured rule set is enabled by default. This rule set protects your web application from common threats defined in the top-ten OWASP categories. The default rule set is managed by the Azure WAF service. Rules are updated as needed for new attack signatures. Learn more
Configure a policy with custom-authored rules. Once a rule is matched, the corresponding action defined in the rule is applied to the request. Once such a match is processed, rules with lower priorities are not processed further. A smaller integer value for a rule denotes a higher priority. Learn more

Associate this WAF policy with a specific application gateway, listener, or route path. A WAF policy can be associated with multiple listeners, route paths, and application gateways. Associating with an application gateway will remove and replace existing WAF policy associations with the selected application gateway. Learn more about managed rule sets

Review/Edit the Configuration
Below we can review or edit the configuration of the application gateway we initial configured when creating it.
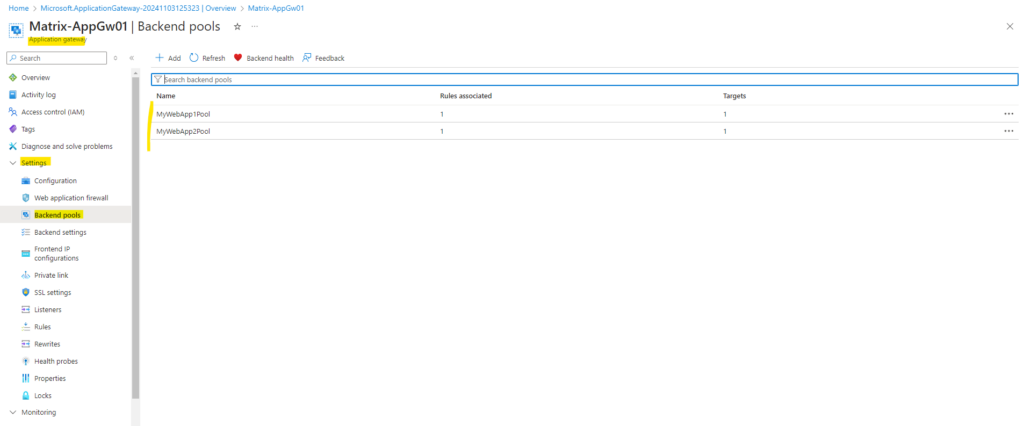
Backend pools
Backend settings
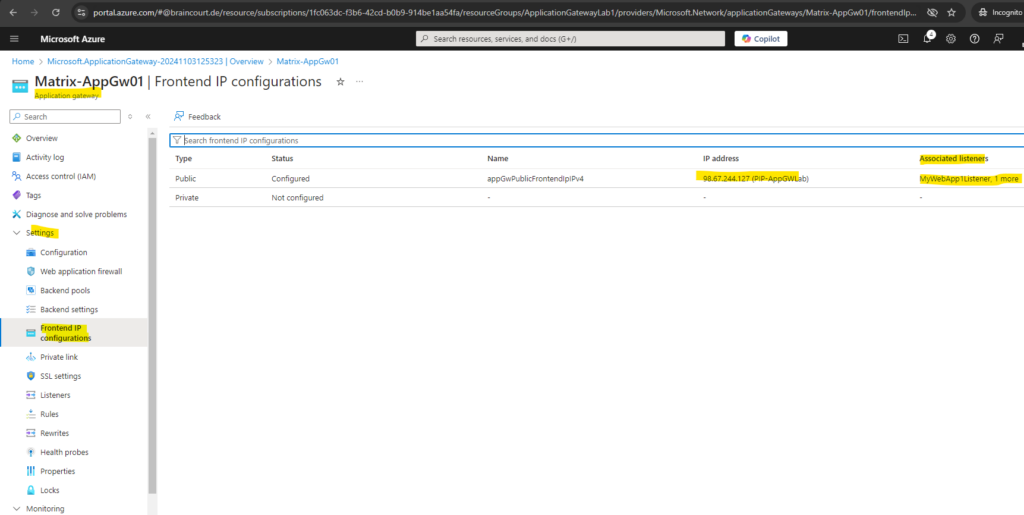
Frontend IP Configuration
Listeners
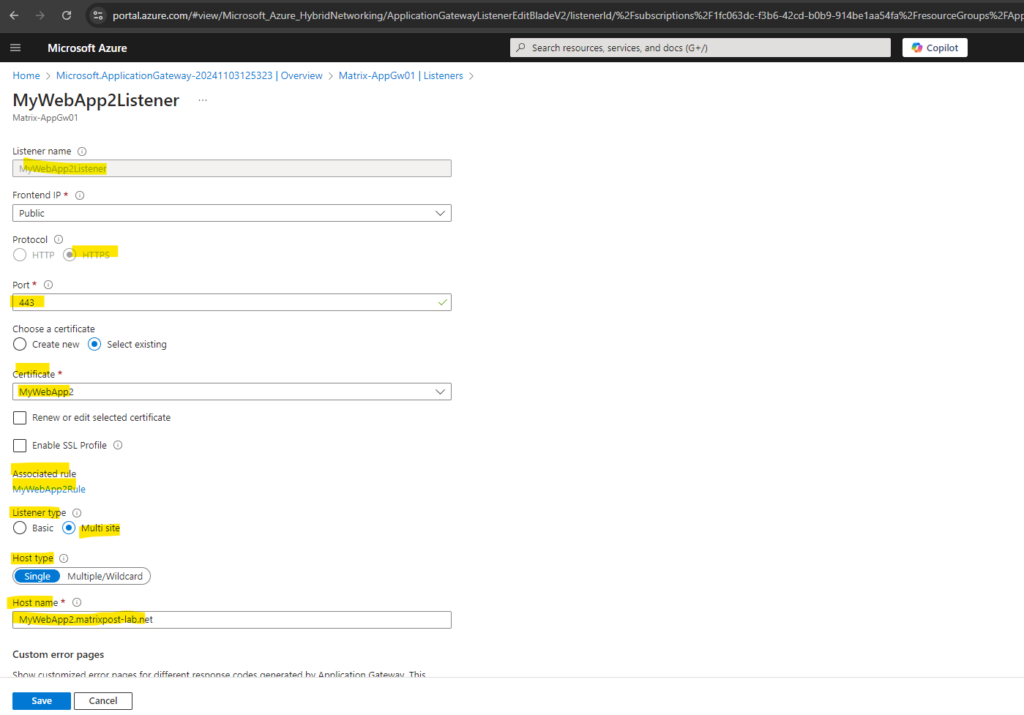
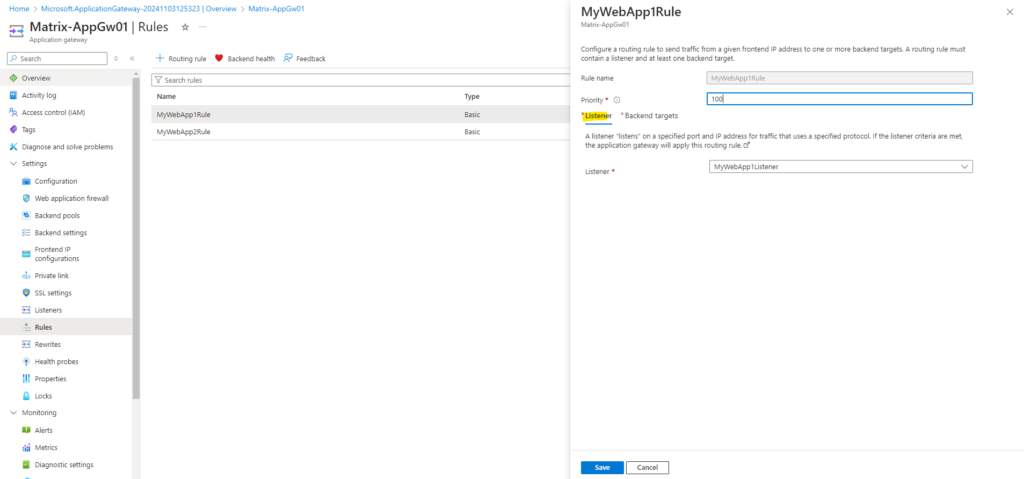
Routing Rules
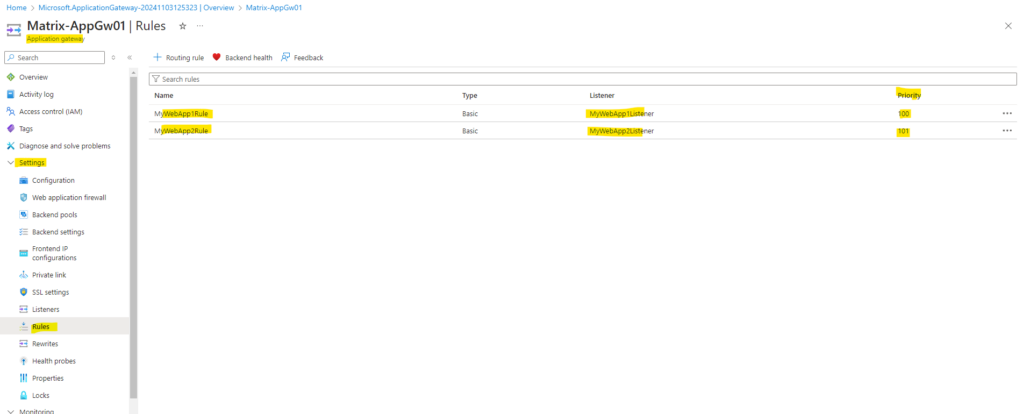
Links
What is Azure Application Gateway?
https://learn.microsoft.com/en-us/azure/application-gateway/overviewWhat is Azure Application Gateway v2?
https://learn.microsoft.com/en-us/azure/application-gateway/overview-v2What is Azure Web Application Firewall on Azure Application Gateway?
https://learn.microsoft.com/en-us/azure/web-application-firewall/ag/ag-overview?WT.mc_id=Portal-Microsoft_Azure_HybridNetworkingLoad-balancing options
https://learn.microsoft.com/en-us/azure/architecture/guide/technology-choices/load-balancing-overviewCreate certificates to allow the backend with Azure Application Gateway
https://learn.microsoft.com/en-us/azure/application-gateway/certificates-for-backend-authenticationApplication Gateway multi-site hosting
https://learn.microsoft.com/en-us/azure/application-gateway/multiple-site-overviewCreate and configure an application gateway to host multiple web sites using the Azure portal
https://learn.microsoft.com/en-us/azure/application-gateway/create-multiple-sites-portalCreate an application gateway that hosts multiple web sites using Azure PowerShell
https://learn.microsoft.com/en-us/azure/application-gateway/tutorial-multiple-sites-powershellFrequently asked questions about Application Gateway
https://learn.microsoft.com/en-us/azure/application-gateway/application-gateway-faqCommon questions on V1 retirement
https://learn.microsoft.com/en-us/azure/application-gateway/retirement-faqApplication Gateway HTTP settings configuration
https://learn.microsoft.com/en-us/azure/application-gateway/configuration-http-settingsApplication Gateway redirect overview
https://learn.microsoft.com/en-us/azure/application-gateway/redirect-overview
Related Posts
Latest posts
Deploying NetApp Cloud Volumes ONTAP (CVO) in Azure using NetApp Console (formerly BlueXP) – Part 5 – Backup and Recovery
Follow me on LinkedIn


