Azure Migrate – How to migrate on-premises VMware vSphere Virtual Machines to Azure – Part 3
In Part 2 we saw how to deploy the Azure Migrate Appliance in our on-premise vSphere environment.
We also already configured the Azure Migrate appliance by using its configuration manager.
This part will show how to first assess VMware VMs for migration to Azure VMs and then replicate and migrate them to Azure.
Assess VMware VMs for migration to Azure VMs
https://learn.microsoft.com/en-us/azure/migrate/vmware/tutorial-assess-vmware-azure-vm
Below we will now assess our on-premises workloads to measure cloud readiness, identify risks, and estimate costs and complexity.
Later and shown further down we need to decide whether we want to run an assessment using sizing criteria based on server configuration data/metadata that’s collected as-is on-premises, or on dynamic performance data.
- As-is on-premises -> Assess based on server configuration data/metadata. -> Recommended Azure VM size is based on the on-premises VM size. The recommended Azure disk type is based on what you select in the storage type setting in the assessment.
- Performance-based -> Assess based on collected dynamic performance data. -> Recommended Azure VM size is based on CPU and memory utilization data. The recommended disk type is based on the IOPS and throughput of the on-premises disks.
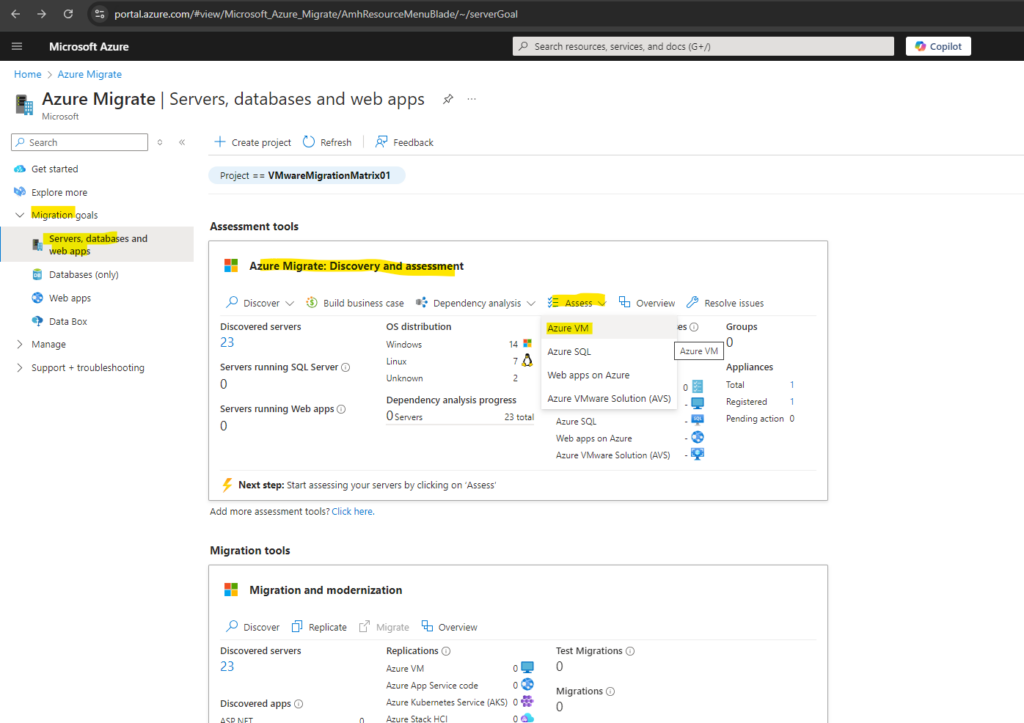
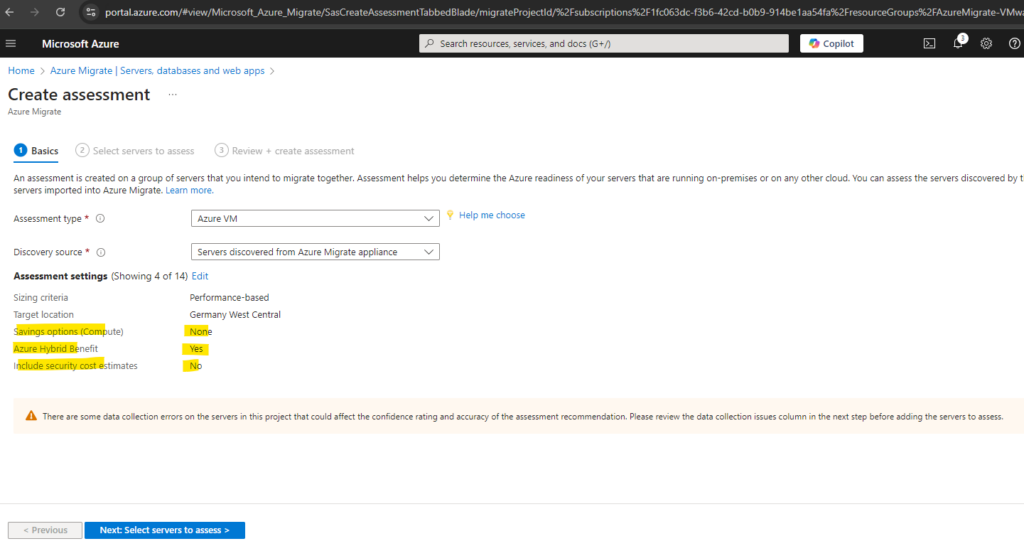
In Azure Migrate: Discovery and assessment, select Assess and select Azure VM.
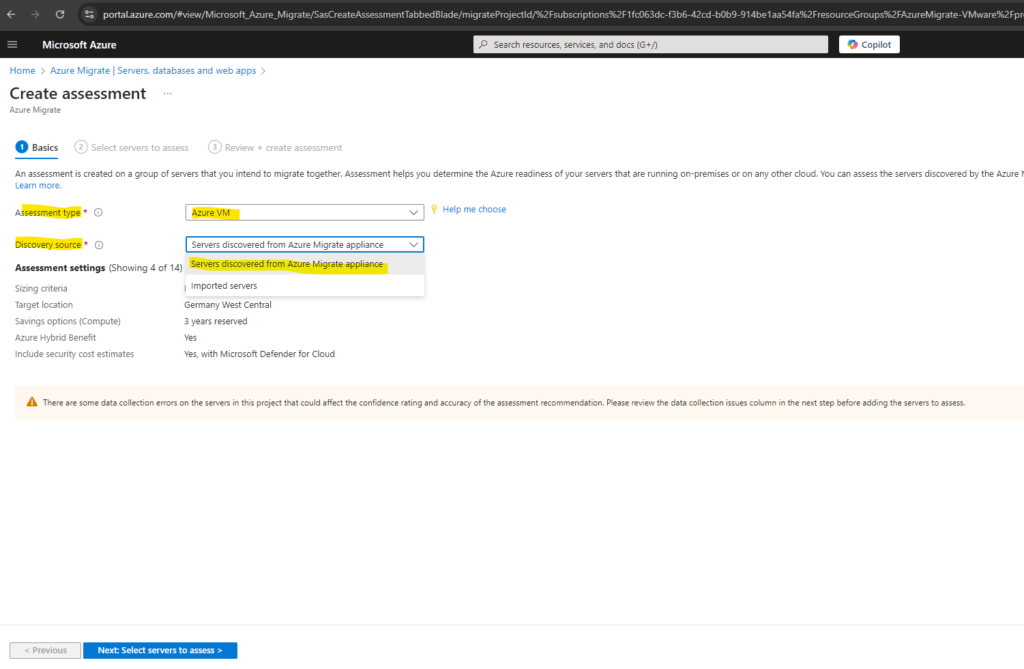
Select Servers discovered from Azure Migrate appliance.
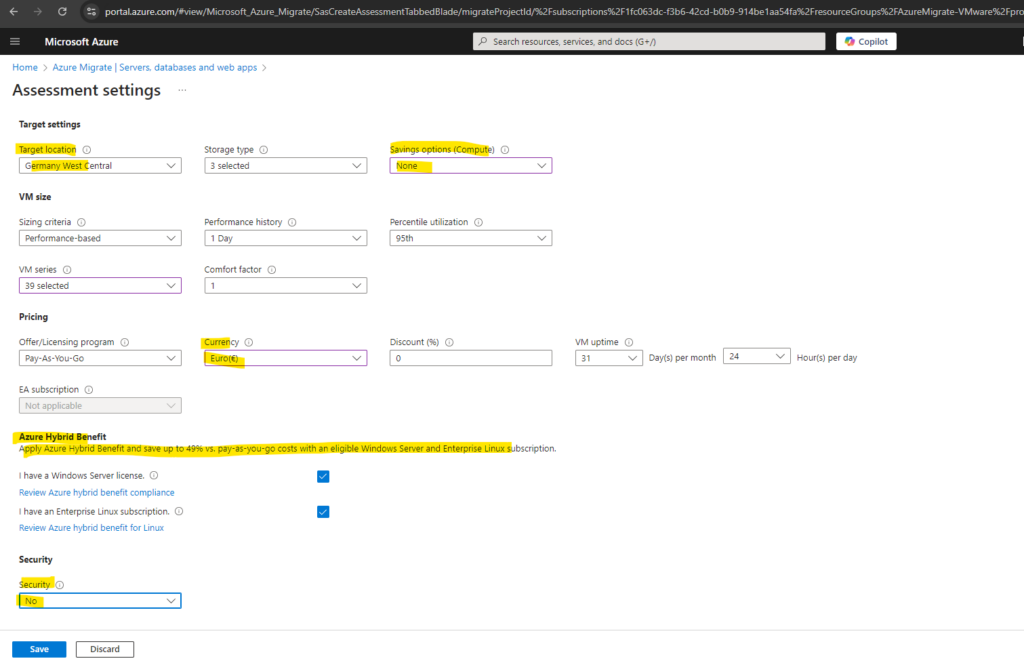
Select Edit to review the assessment properties.
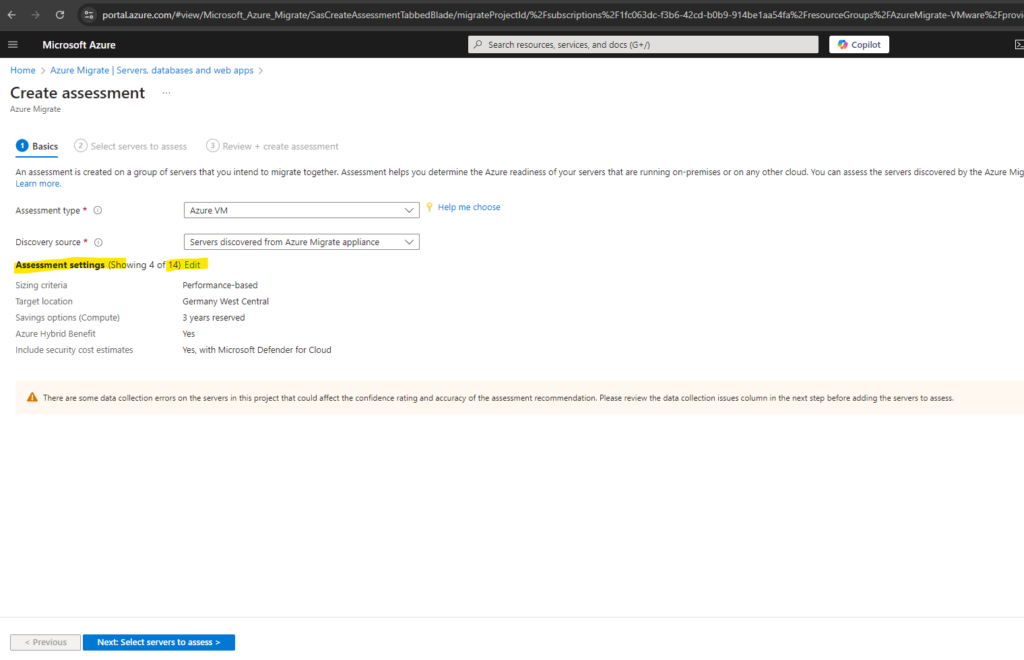
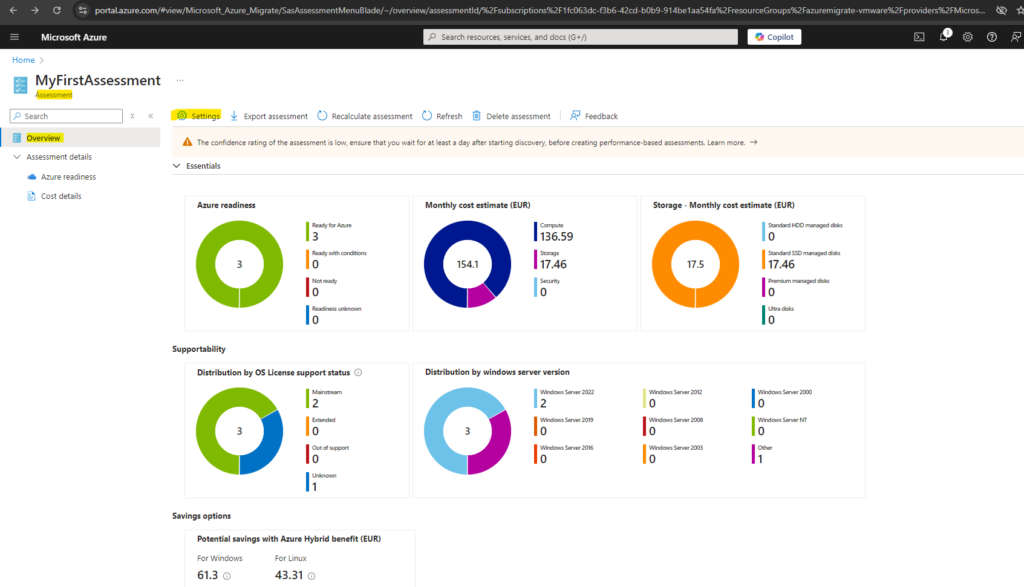
You can also edit these settings later by opening the assessment and clicking the ‘Settings’ command on top.
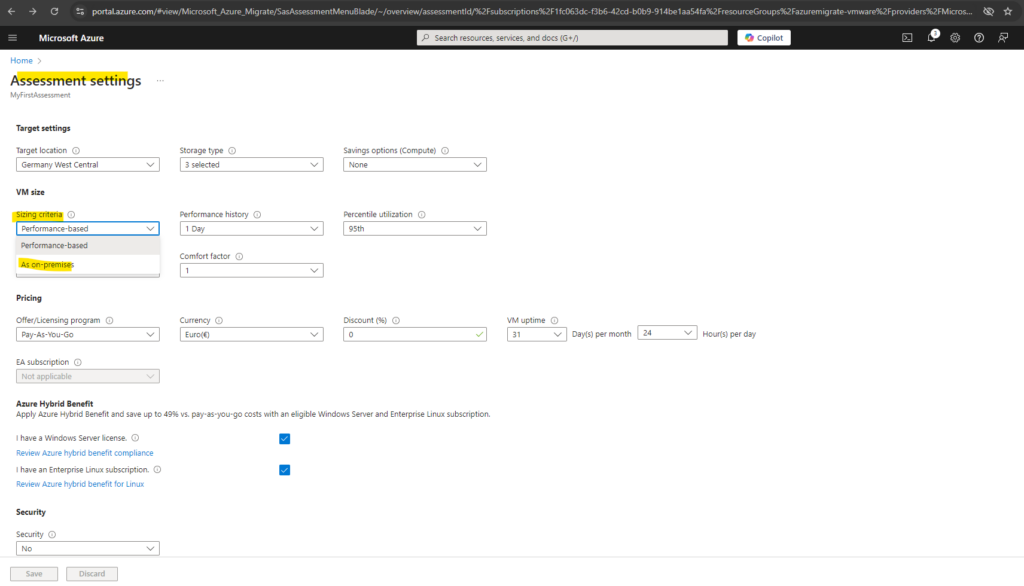
Here under Sizing criteria we can now choose between the already mentioned assessment method with As-is on-premises or Performance-based.
For performance-based assessments, we recommend that you wait at least a day after starting discovery before you create an assessment. This provides time to collect performance data with higher confidence. Ideally, after you start discovery, wait for the performance duration you specify (day/week/month) for a high-confidence rating.
Details about each setting you will find here https://learn.microsoft.com/en-us/azure/migrate/vmware/tutorial-assess-vmware-azure-vm#run-an-assessment.
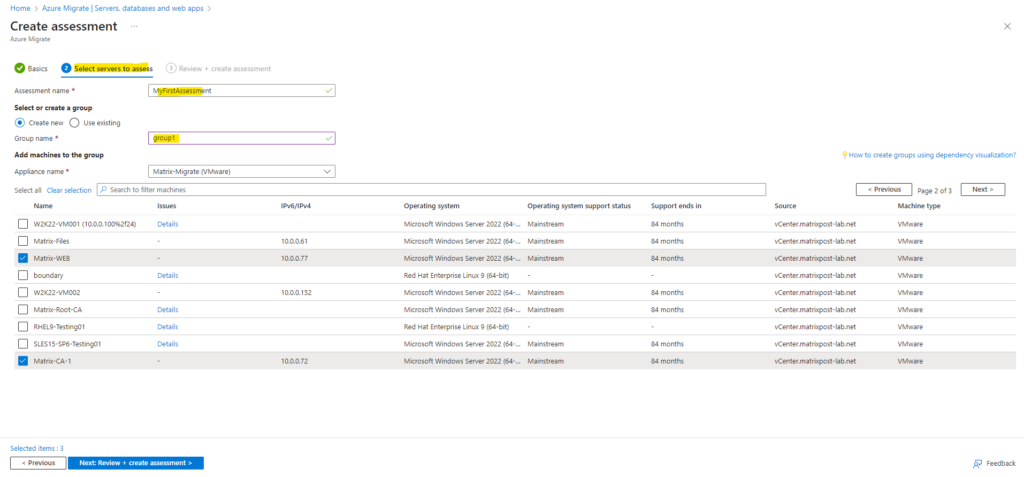
In Select servers to assess > Assessment name, specify a name for the assessment. In Select or create a group, select Create New and specify a group name.
You gather servers into groups to assess whether they’re suitable for migration to Azure, and to get Azure sizing and cost estimations for them.
More about these groups for assessment you will find in the following article by Microsoft https://learn.microsoft.com/en-us/azure/migrate/how-to-create-a-group.
Select the appliance, and select the VMs you want to add to the group. Then select Next.
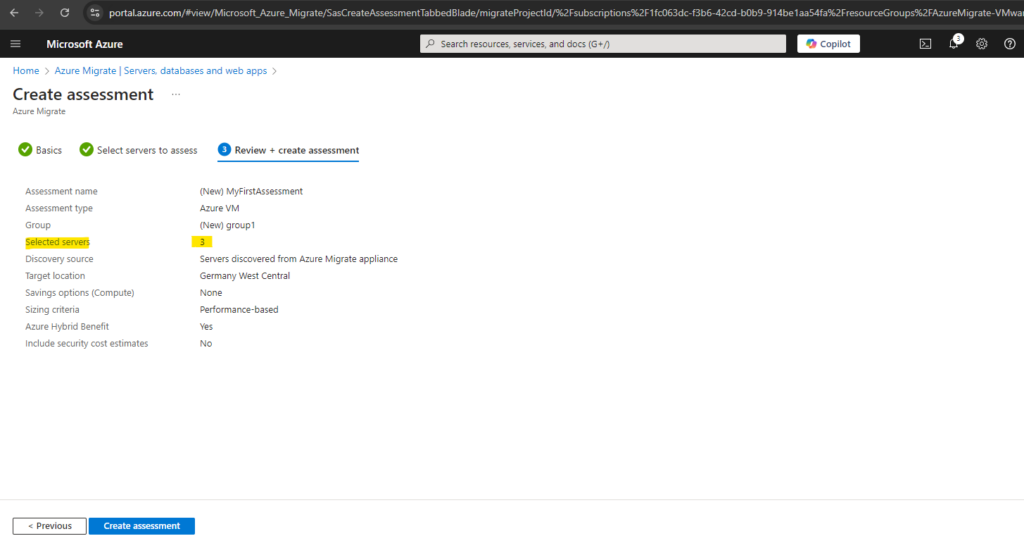
In Review + create assessment, review the assessment details, and select Create Assessment to create the group and run the assessment.
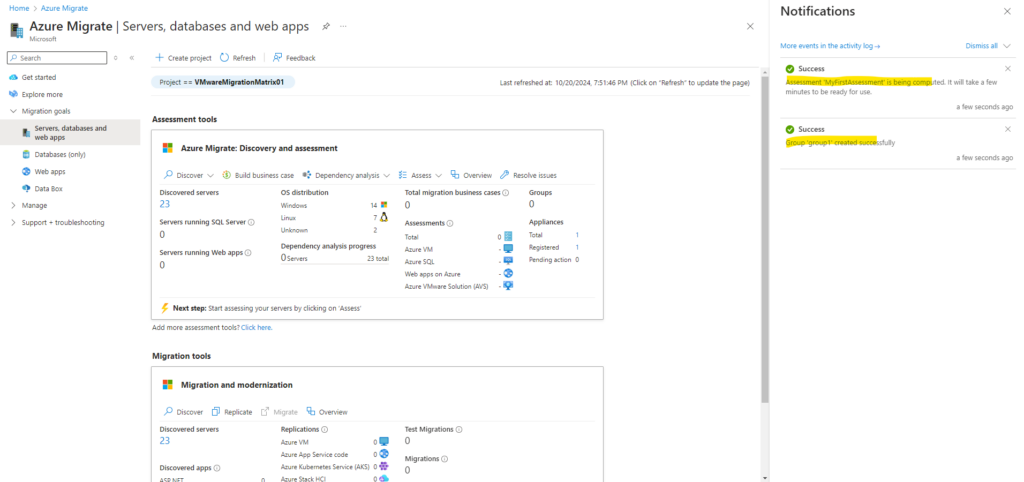
After the assessment is created, view it in Servers, databases and web apps > Azure Migrate: Discovery and assessment > Assessments (click on the digit shown in Assessments Total)
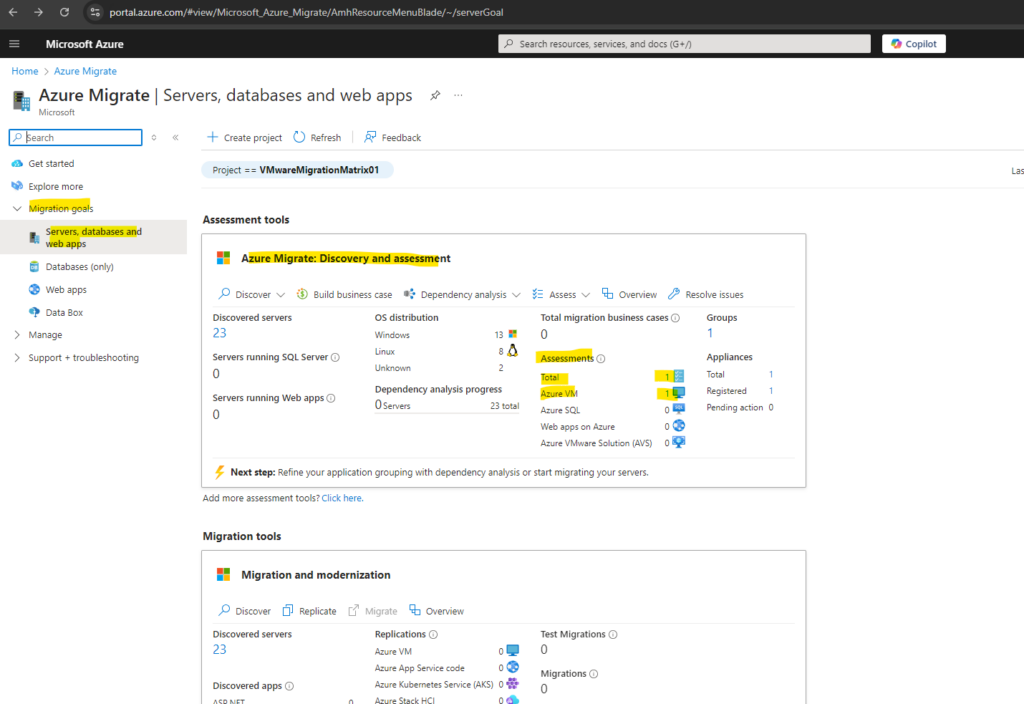
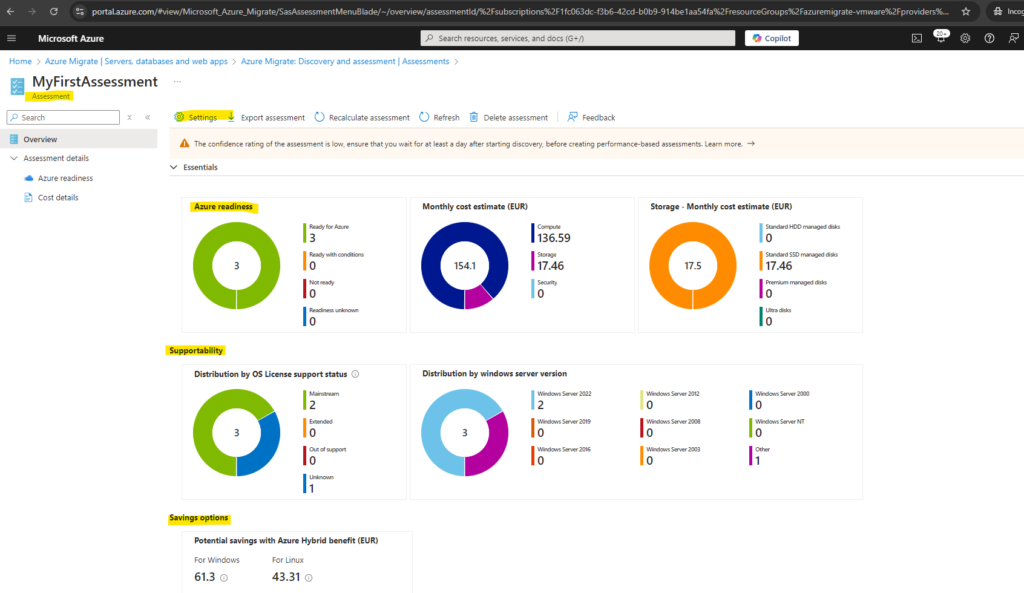
Click on the assessment, in my case here MyFirstAssessment.

Select Export assessment, to download it as an Excel file.
For performance-based assessments, we recommend that you wait at least a day after starting discovery before you create an assessment. This provides time to collect performance data with higher confidence. Ideally, after you start discovery, wait for the performance duration you specify (day/week/month) for a high-confidence rating.
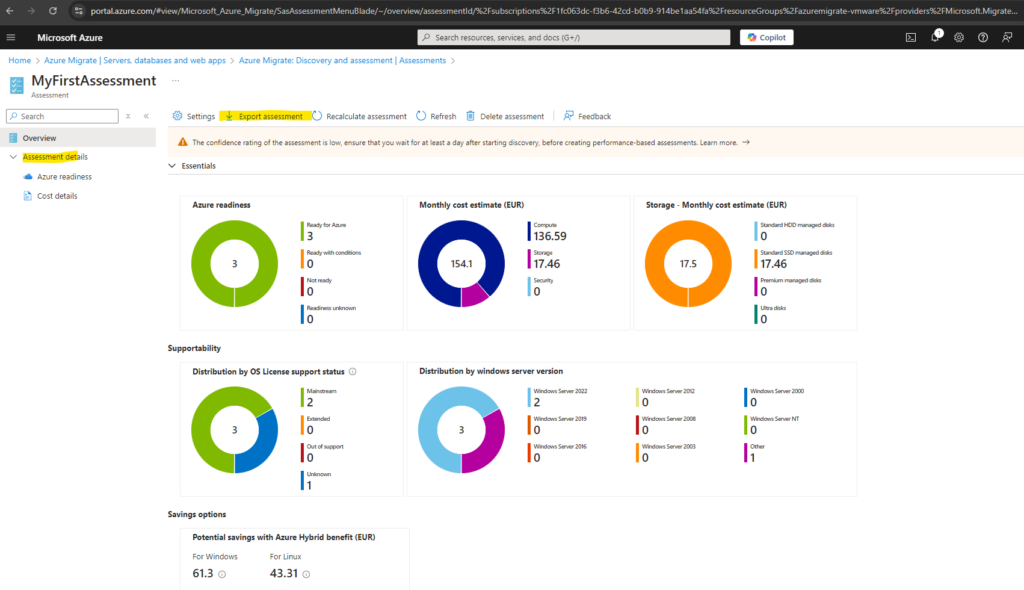
We can also edit the assessment properties, or recalculate the assessment anytime by clicking below on Settings on the overview page of our assessment.
Here for example we can now switch the assessment from performance based to as on-premise.
Review an assessment
An assessment describes:
- Azure readiness: Whether VMs are suitable for migration to Azure.
- Monthly cost estimation: The estimated monthly compute and storage costs for running the VMs in Azure.
- Monthly storage cost estimation: Estimated costs for disk storage after migration.
To view an assessment:
In Servers, databases and web apps > Azure Migrate: Discovery and assessment, select the number next to Azure VM assessment.
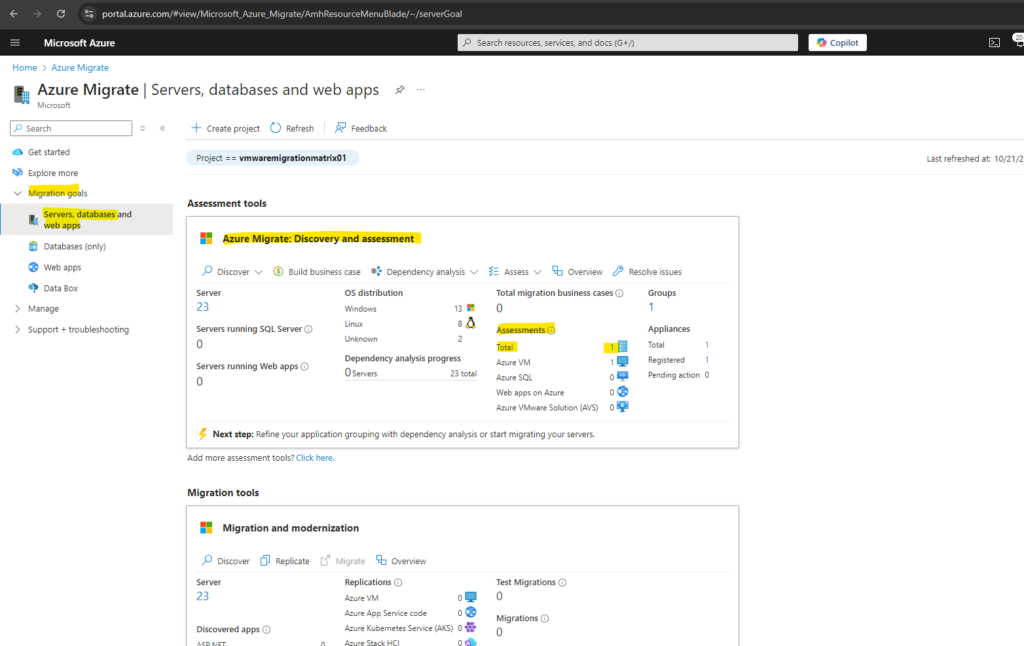
In Assessments, select an assessment to open it.

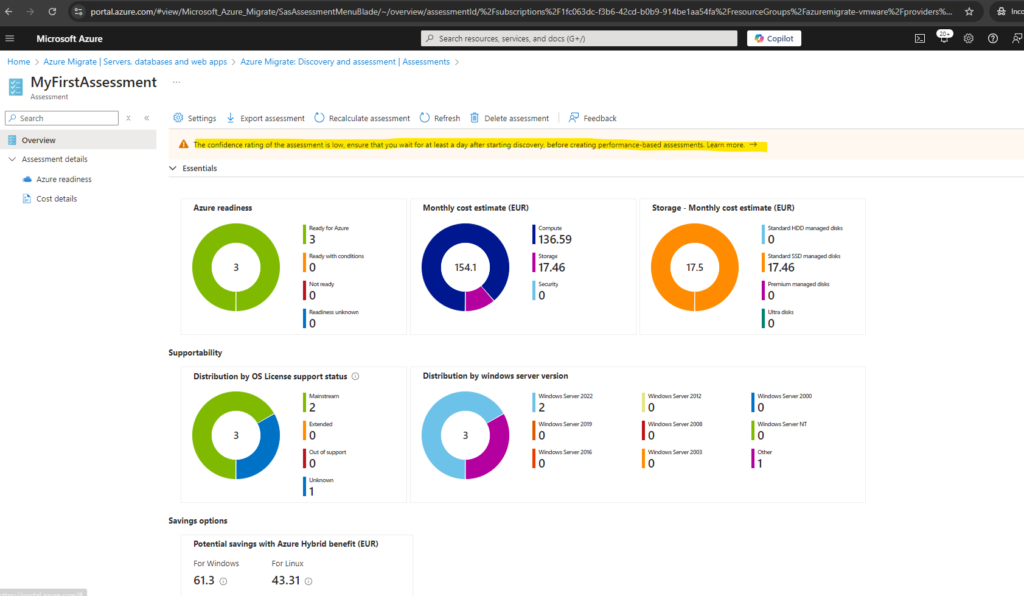
Review the assessment summary. You can also edit the assessment properties (Settings below), or recalculate the assessment.
-> The Azure readiness graph displays the status of the VM.
-> The Supportability section displays the distribution by OS license support status and the distribution by Windows Server version.
-> The Savings option section displays the estimated savings on moving to Azure.
Review readiness
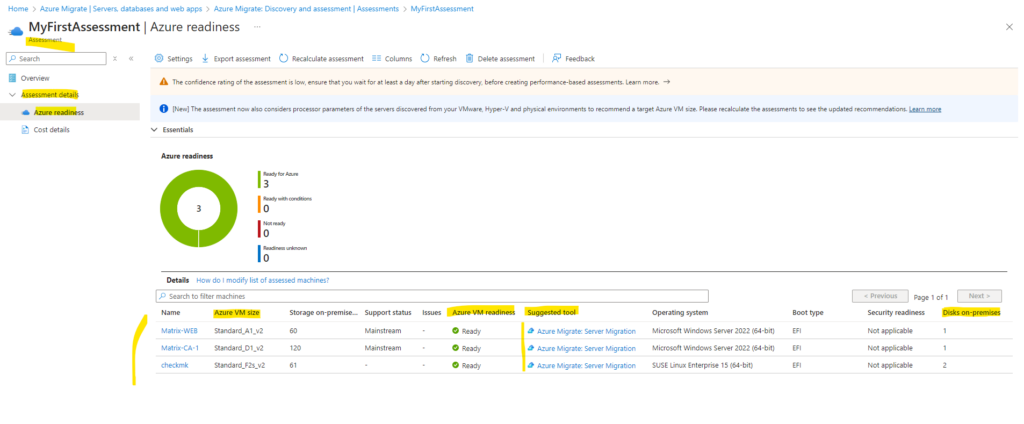
Select Azure readiness.
In Azure readiness, review the VM status.
-> Ready for Azure: Used when Azure Migrate recommends a VM size and cost estimates, for VMs in the assessment.
-> Ready with conditions: Shows issues and suggested remediation.
-> Not ready for Azure: Shows issues and suggested remediation.
-> Readiness unknown: Used when Azure Migrate can’t assess readiness, because of data availability issues.
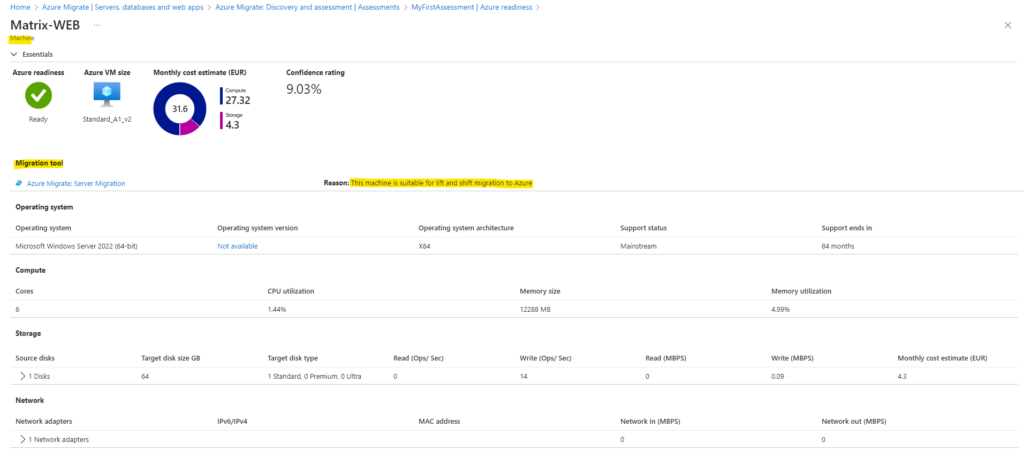
Select an Azure readiness status. You can view VM readiness details. You can also drill down to see VM details, including compute, storage, and network settings.
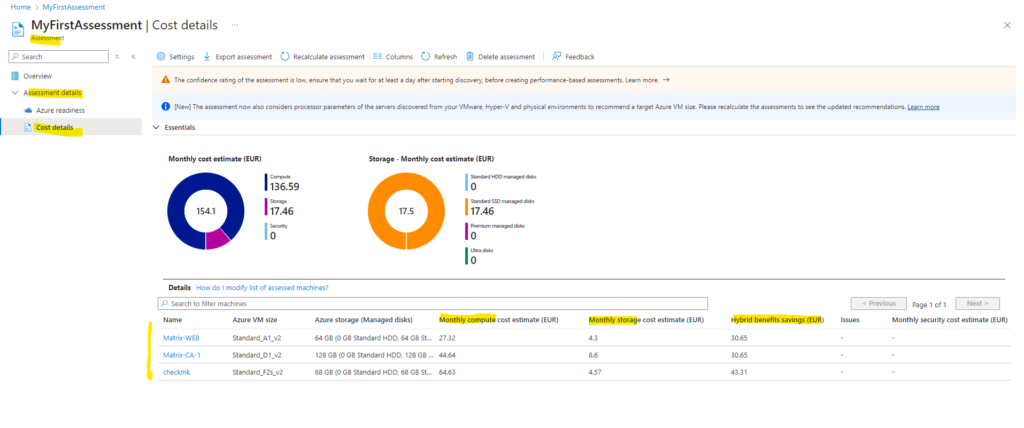
Review cost estimates
The assessment summary shows the estimated compute and storage cost of running VMs in Azure.
Review the monthly total costs. Costs are aggregated for all VMs in the assessed group.
-> Cost estimates are based on the size recommendations for a server, its disks, and its properties.
-> Estimated monthly costs for compute and storage are shown.
->The cost estimation is for running the on-premises VMs on Azure VMs. The estimation doesn’t consider PaaS or SaaS costs.
-> Review monthly storage costs. The view shows the aggregated storage costs for the assessed group, split over different types of storage disks.Azure Hybrid Benefit for Windows Server
Azure Hybrid Benefit enables commercial customers to use their qualifying on-premises licenses to get Windows virtual machines (VMs) on Azure at a reduced cost.
https://learn.microsoft.com/en-us/windows-server/get-started/azure-hybrid-benefit?tabs=azure
Review confidence rating
Azure Migrate assigns a confidence rating to performance-based assessments. Rating is from one star (lowest) to five stars (highest).
In my case for my on-premise vSphere lab environment the confidence rating is so low, because the virtual machines are just running a few hours per day and therefore the performance-based assessment cannot be finalized in time.

Migrate VMware VMs to Azure (agentless)
We can migrate VMware VMs to Azure by using the Migration and modernization tool. This tool offers a couple of options for VMware VM migration:
- Migration using agentless replication. Migrate VMs without needing to install anything on them.
- Migration with an agent for replication. Install an agent on the VM for replication.
As already mentioned at the beginning, I will show below how to migrate VMware Virtual Machines to Azure by using the agentless replication.
Agentless replication is also compatible with Azure Site Recovery.
About how to decide which method is the best in your case, you will find a comparison in the following article by Microsoft https://learn.microsoft.com/en-us/azure/migrate/vmware/server-migrate-overview#compare-migration-methods.
Introduction
The agentless replication option works by using VMware snapshots and VMware changed block tracking (CBT) technology to replicate data from virtual machine disks. The following block diagram shows you various steps involved when you migrate your virtual machines using the Migration and modernization tool.

When replication is configured for a virtual machine, it first goes through an initial replication phase. During initial replication, a VM snapshot is taken, and a full copy of data from the snapshot disks is replicated to managed disks in your target subscription.
After initial replication for the VM is complete, the replication process transitions to an incremental replication (delta replication) phase. In the incremental replication phase, data changes that have occurred since the beginning of the last completed replication cycle are replicated and written to the replica managed disks, thus keeping replication in sync with changes happening on the VM.
VMware changed block tracking (CBT) technology is used to keep track of changes between replication cycles. At the start of the replication cycle, a VM snapshot is taken and changed block tracking is used to get the changes between the current snapshot and the last successfully replicated snapshot. Only the data that has changed since the previous completed replication cycle is replicated to keep replication for the VM in sync. At the end of each replication cycle, the snapshot is released, and snapshot consolidation is performed for the virtual machine.
When you perform the migrate operation on a replicating virtual machine, there’s an on-demand delta replication cycle that replicates the remaining changes since the last replication cycle. After the on-demand cycle completes, the replica managed disks corresponding to the virtual machine are used to create the virtual machine in Azure. Right before triggering migrate/failover, you must shut down the on-premises virtual machine. Shutting down the virtual machine ensures zero data loss during migration.
Once the migration is successful and the VM boots up in Azure, ensure that you stop the replication of the VM. Stopping the replication will delete the intermediate disks (seed disks) that were created during data replication, and you’ll also avoid incurring extra charges associated with the storage transactions on these disks.
The Azure Migrate appliance compresses data and encrypts before uploading. Data is transmitted over a secure communication channel over https and uses TLS 1.2 or later. Additionally, Azure Storage automatically encrypts your data when it’s persisted it to the cloud (encryption-at-rest).
Azure Migrate supports concurrent replication of 500 virtual machines. When you’re planning to replicate more than 300 virtual machines, you must deploy a scale-out appliance. The scale-out appliance is similar to an Azure Migrate primary appliance but consists only of gateway agent to facilitate data transfer to Azure.
Prerequisites
When you start replication for the first time, the logged-in user must be assigned the following roles:
- Owner or Contributor and User Access Administrator on the Azure Migrate project’s Resource Group and the target Resource Group.
For the subsequent replications, the logged-in user must be assigned the following roles:
- Owner or Contributor on the Azure Migrate project’s Resource Group and the target Resource Group.
In addition to the roles described above, the logged-in user would need the following permission at a subscription level – Microsoft.Resources/subscriptions/resourceGroups/read.
Replicate VMs
When using the Azure portal we can select up to 10 VMs at once for migration. To migrate more machines, add them to groups in batches of 10.
!! Note !!
Azure Migrate doesn’t support agentless migration of VMware VMs with VMDK containing non-ASCII characters.
Enable replication as follows:
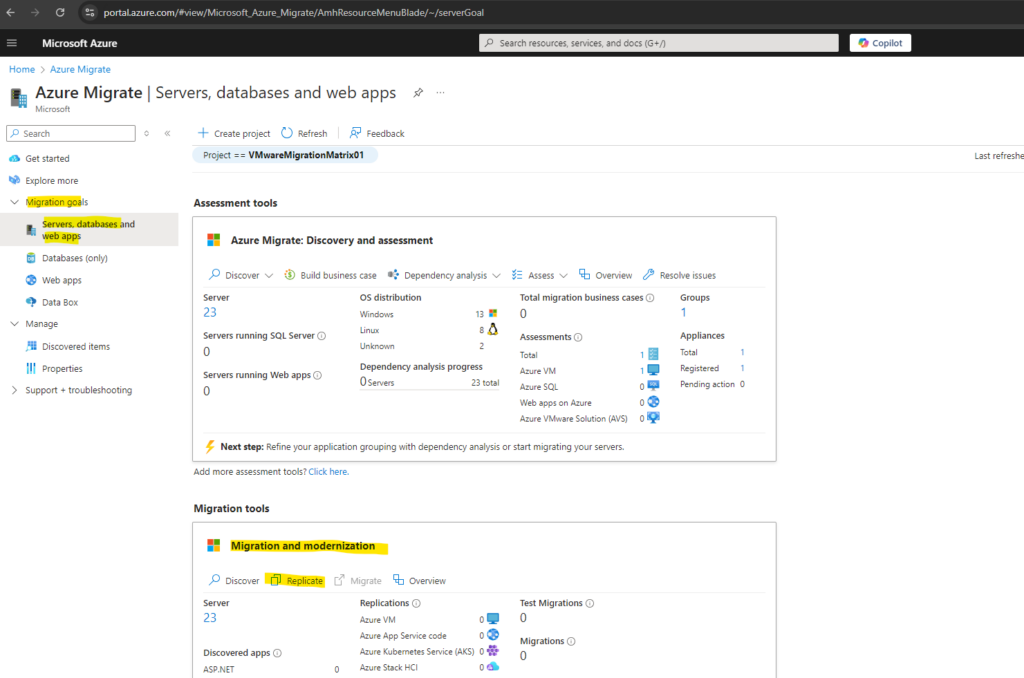
In the Azure Migrate project > Servers, databases and web apps > Migration and modernization, select Replicate as shown below.
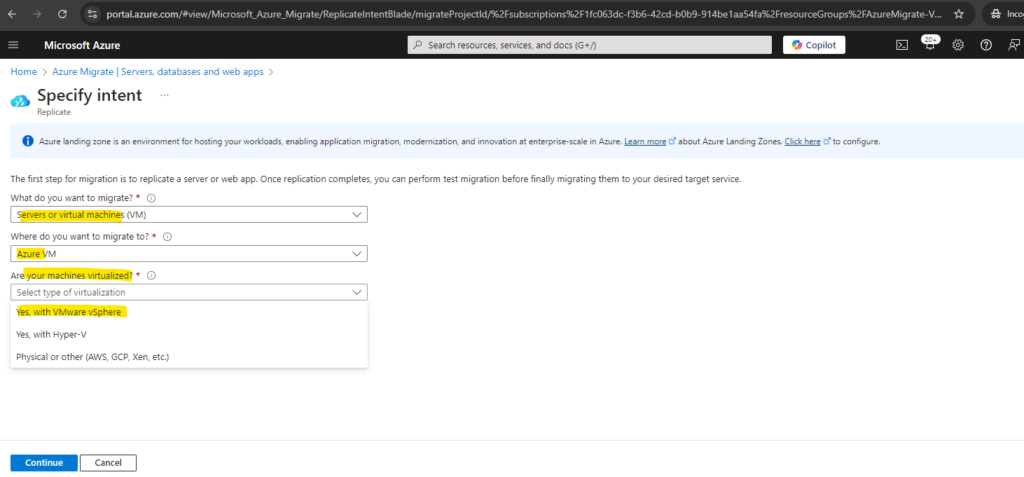
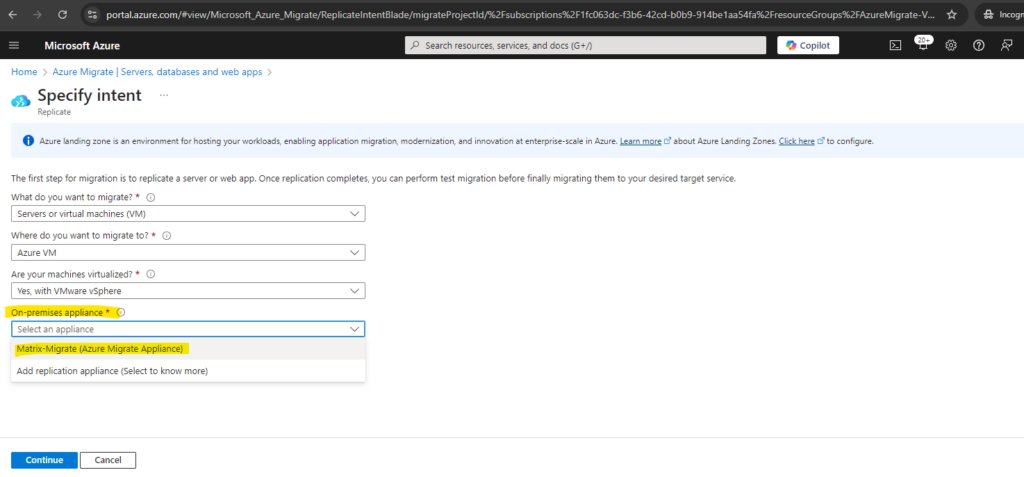
In Replicate, > Basics > Are your machines virtualized?, select Yes, with VMware vSphere.
In On-premises appliance, select the name of the Azure Migrate appliance that you set up > OK.
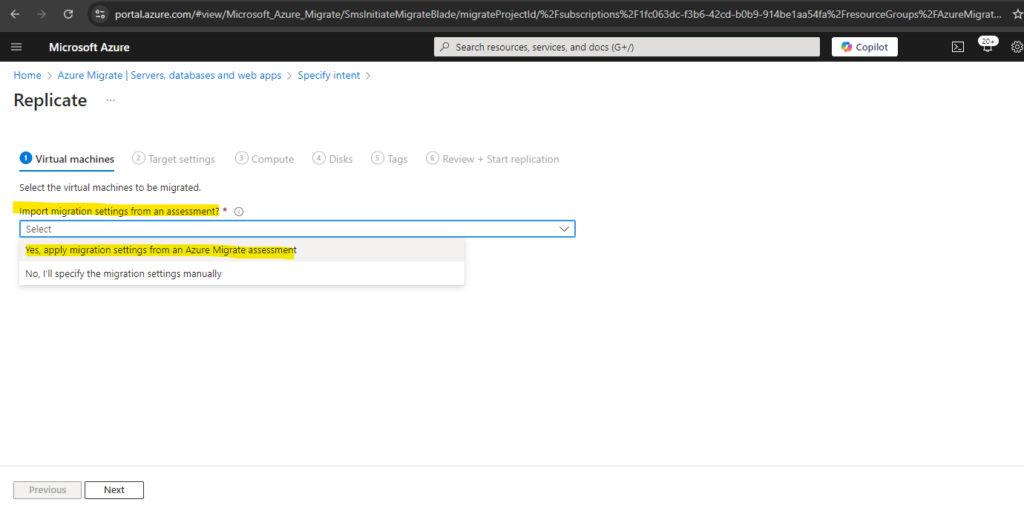
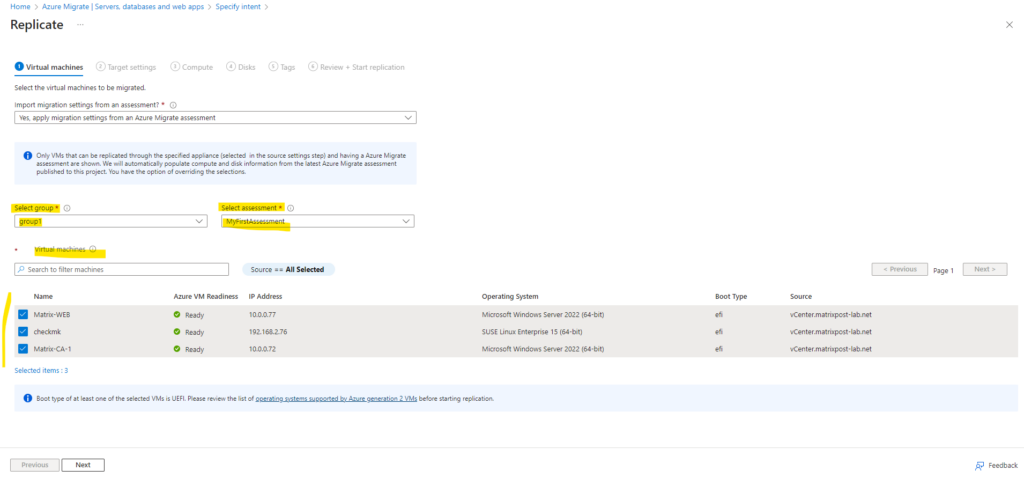
In Virtual machines, select the machines you want to replicate. To apply VM sizing and disk type from an assessment if you’ve run one, in Import migration settings from an Azure Migrate assessment?, select Yes, and select the VM group and assessment name. If you aren’t using assessment settings, select No.
In Virtual machines, select VMs you want to migrate. Then click Next: Target settings.
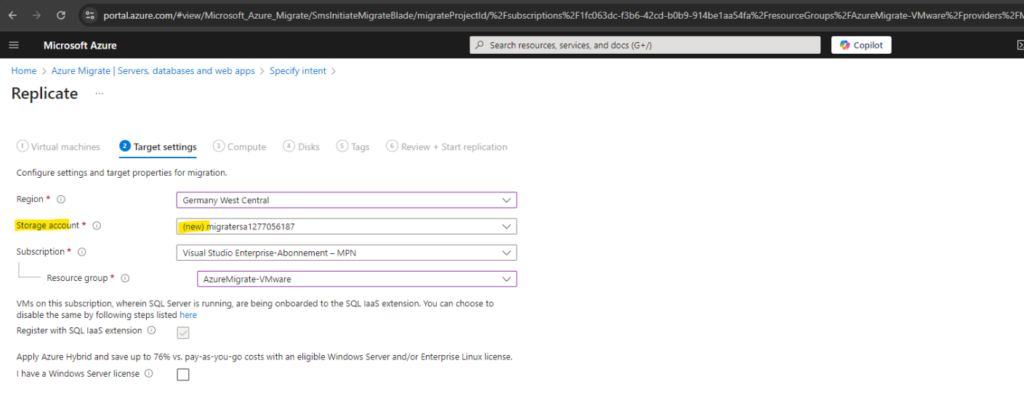
In Target settings, select the subscription, target region, and Storage account.
!! Note !!
Storage accounts on which the feature hierachical namespace is enabled are not supported.
After starting first replication of a VM, the storage account cannot be changed. The default option selected in drop down will be used to create a new storage account. If the option is not selected, the storage account will be created in final step of enabling replication.We can also not just delete this storage account later and create a new one for our Azure Migrate project. The only way is to create a new Azure Migrate project, download a new Azure Migrate appliance, and retry which we want to avoid!
Azure Migrate will use the storage account to upload replication logs and store state information for the VMs being replicated. Only the storage accounts in the project subscription and target region are shown.
In Virtual Network, select the Azure VNet/subnet, which the Azure VMs join after migration. We can’t create here a new one and just select an existing.

For test migrations I will use the same VNet.

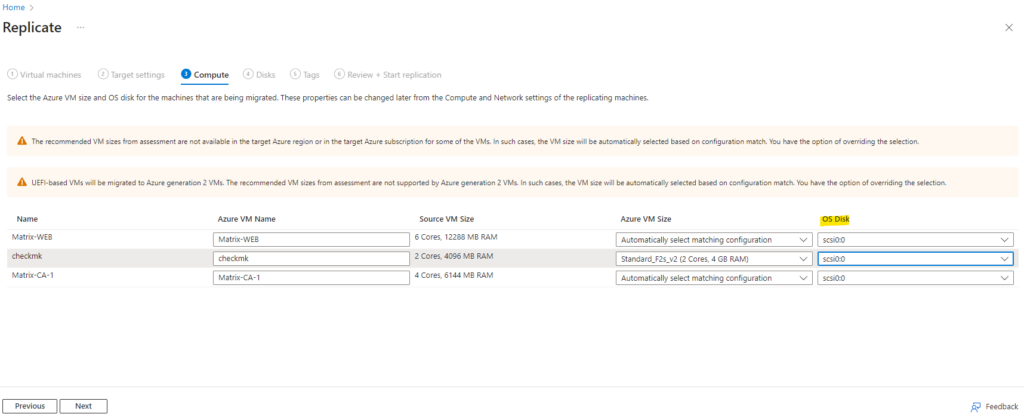
In Compute, review the VM name, size, OS disk type, and availability configuration (if selected in the previous step). VMs must conform with Azure requirements.
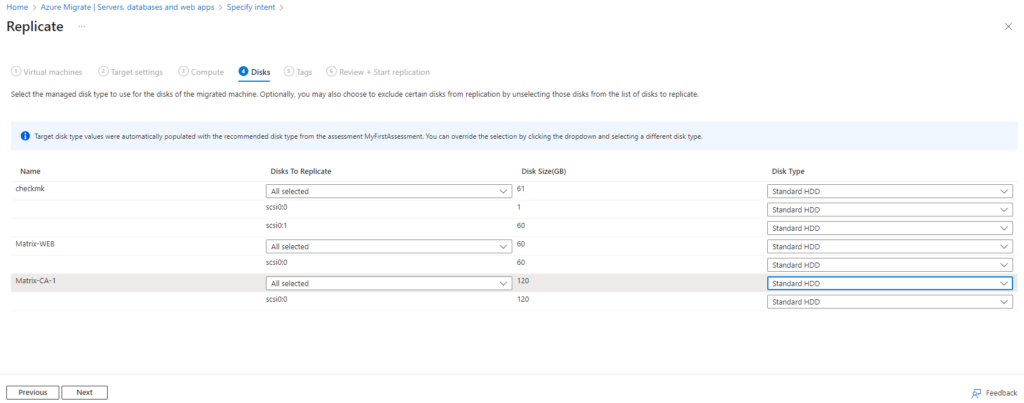
In Disks, specify whether the VM disks should be replicated to Azure, and select the disk type (standard SSD/HDD or premium-managed disks) in Azure. Then click Next.
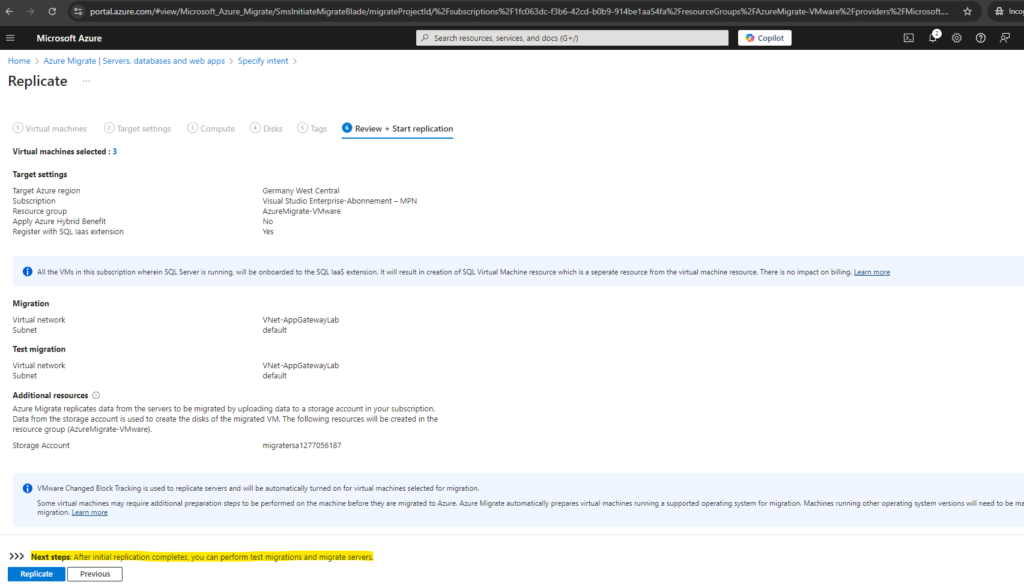
In Review and start replication, review the settings, and click Replicate to start the initial replication for the servers
Track and monitor
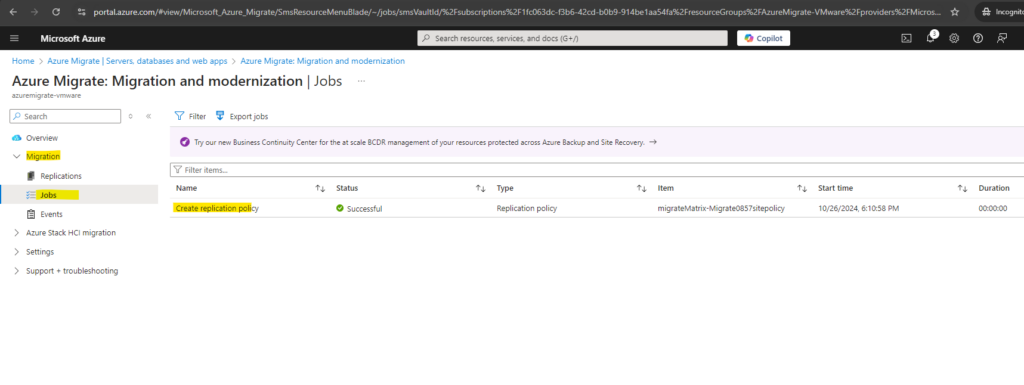
Track job status in the portal notifications.
Monitor replication status by clicking on the numerical value next to Azure VM in Migration and modernization.
So far in my case for Azure VM there no replications. So I will first click on Overview.
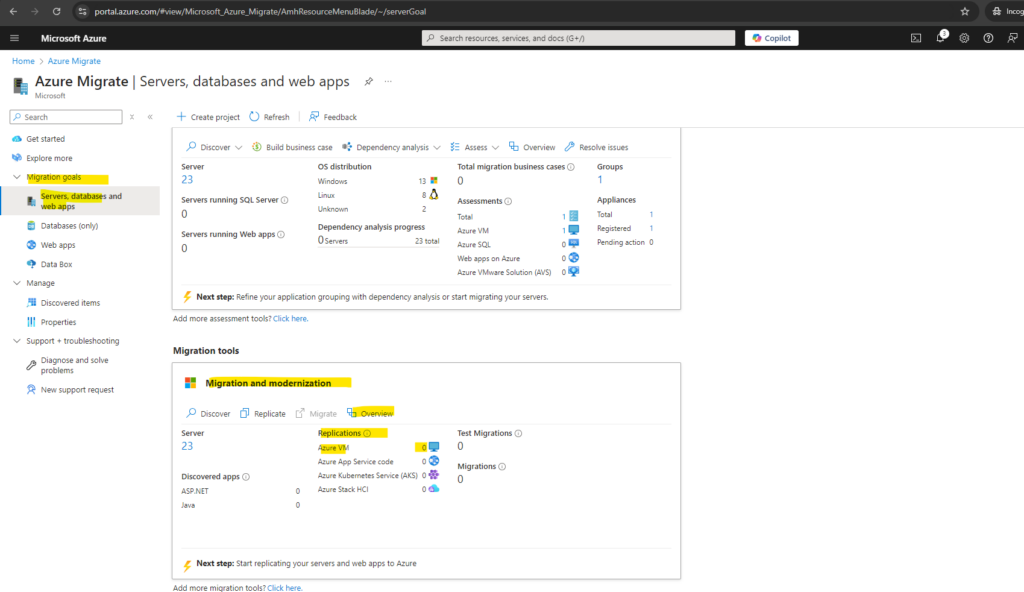
Here after a few minutes I could at least already see the replication job shown up.
A few minutes later the replication starts.

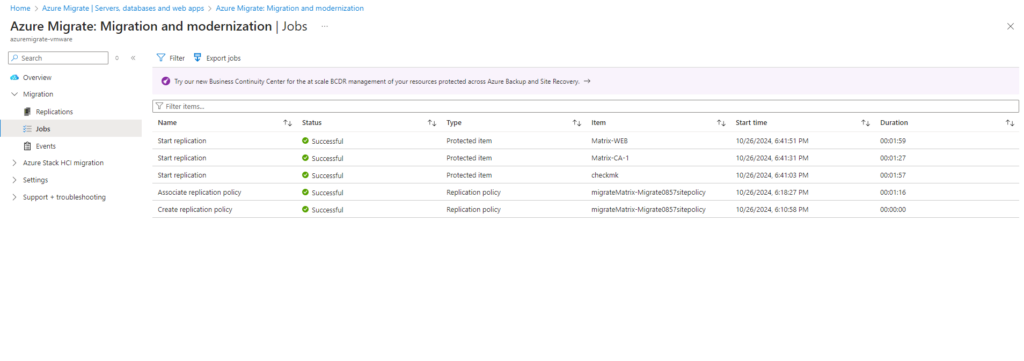
-> When the Start Replication job finishes successfully, the machines begin their initial replication to Azure.
-> During initial replication, a VM snapshot is created. Disk data from the snapshot is replicated to replica managed disks in Azure.
-> After initial replication finishes, delta replication begins. Incremental changes to on-premises disks are periodically (around each hour) replicated to the replica disks in Azure.

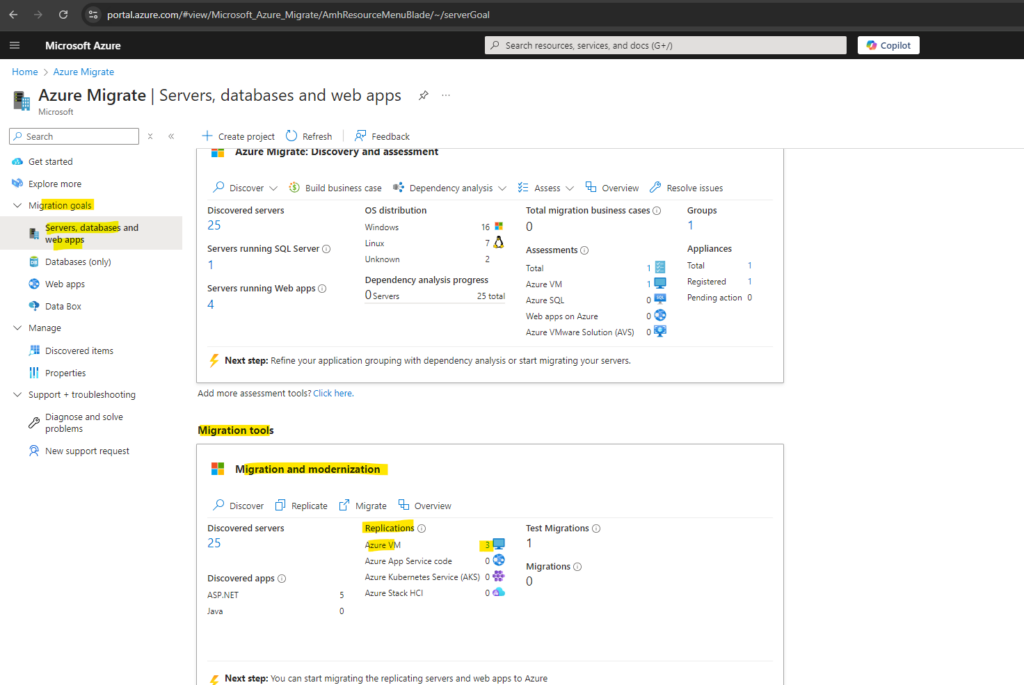
We will now also see how many virtual machines will be replicated to Azure within Azure Migrate project > Servers, databases and web apps > Migration and modernization as shown below.
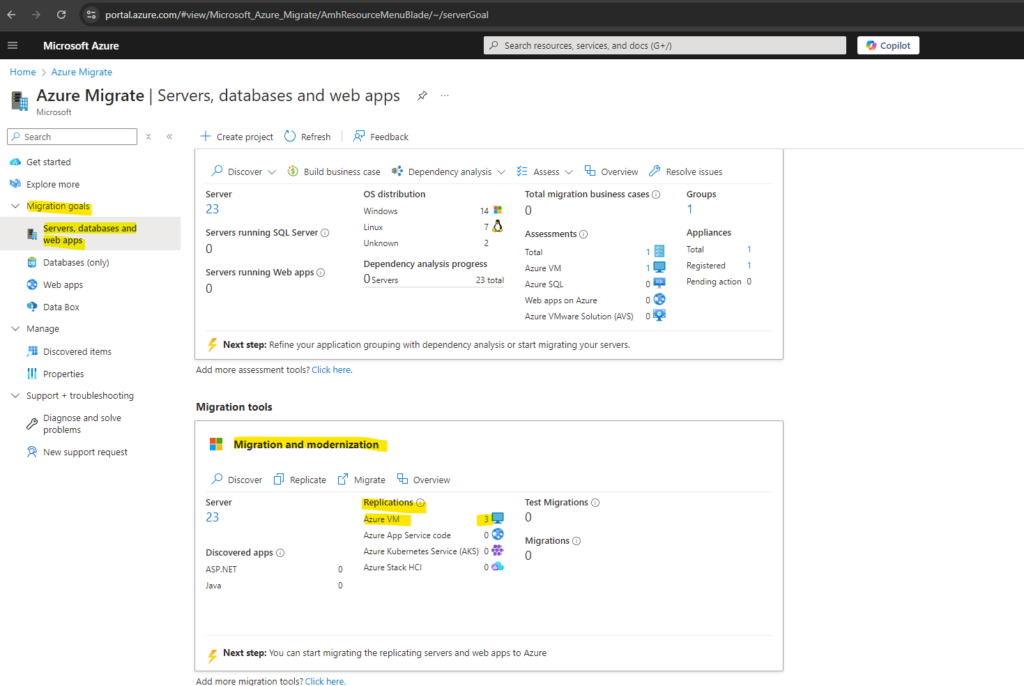
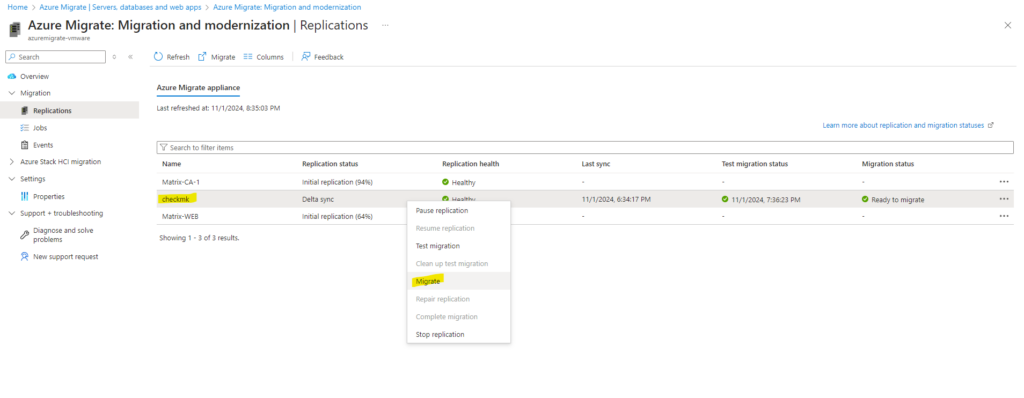
When clicking on the numeric value above we will get forwarded to the replications blade in Azure Migrate: Migration and modernization.
So far the replication state is still at Initial replication queued.

Within my dedicated resource group for this Azure Migrate project we can see that the replicated disks are already created.
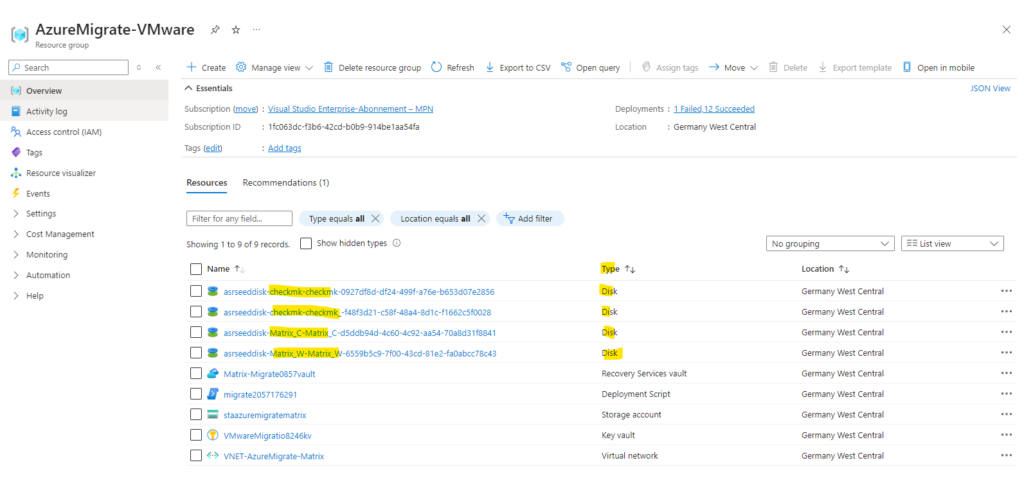
During the replication process triggered in Azure we can also see in our local vSphere environment as mentioned, that Azure Migrate will create VM snapshots in vSphere and a full copy of data from the snapshot disks is replicated to managed disks in your target subscription.
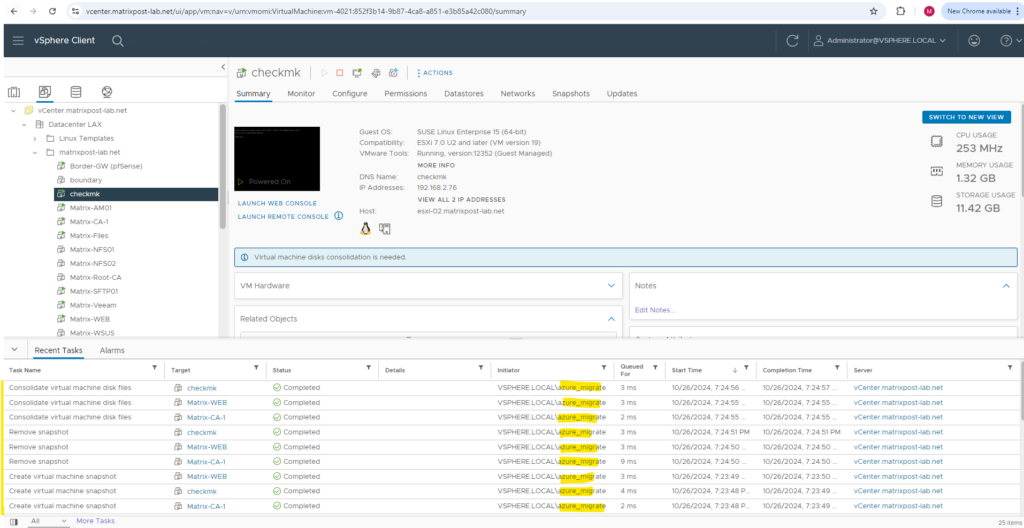
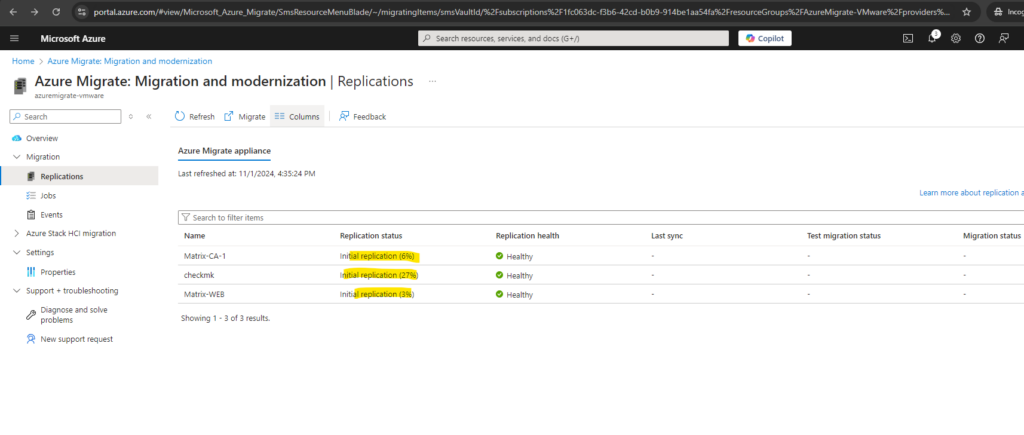
So far the initial replication is still running.
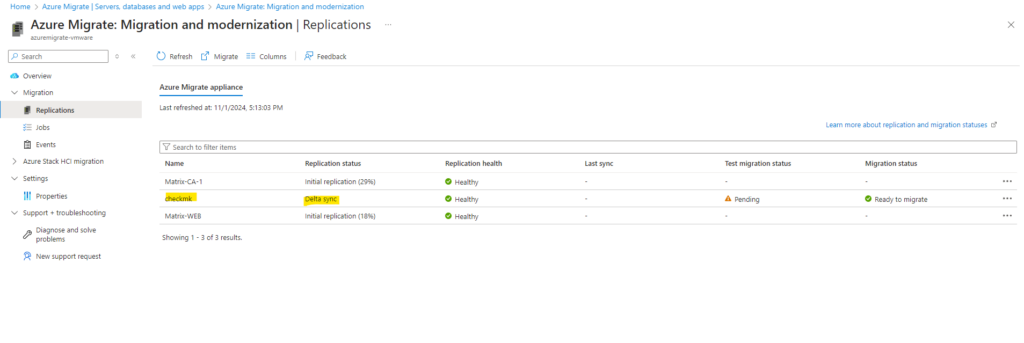
After initial replication finishes, delta replication begins. Incremental changes to on-premises disks are periodically replicated to the replica disks in Azure.
Run a test migration
When delta replication begins, we can run a test migration for the VMs, before running a full migration to Azure. We highly recommend that you do this at least once for each machine, before you migrate it.
- Running a test migration checks that migration will work as expected, without impacting the on-premises machines, which remain operational, and continue replicating.
- Test migration simulates the migration by creating an Azure VM using replicated data (usually migrating to a non-production VNet in your Azure subscription).
- Test migration simulates the migration by creating an Azure VM using replicated data (usually migrating to a non-production VNet in your Azure subscription).
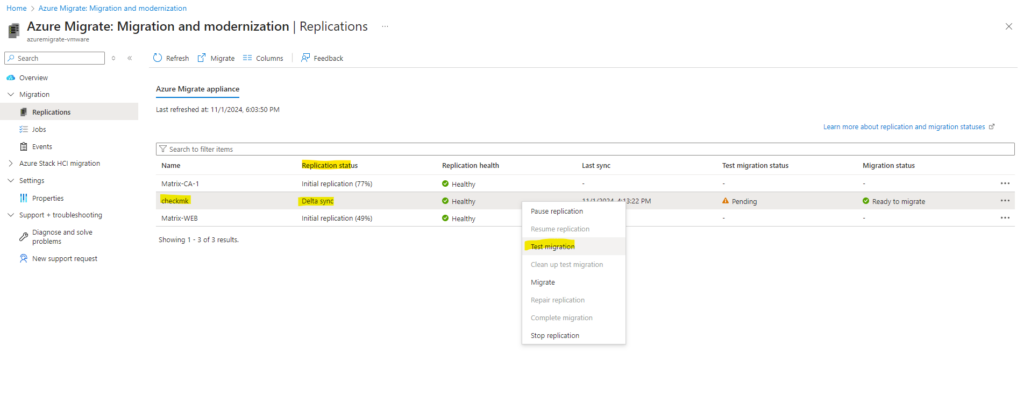
In Migration goals > Servers, databases and web apps > Migration and modernization, select the numerical value next to Azure VM as shown below.
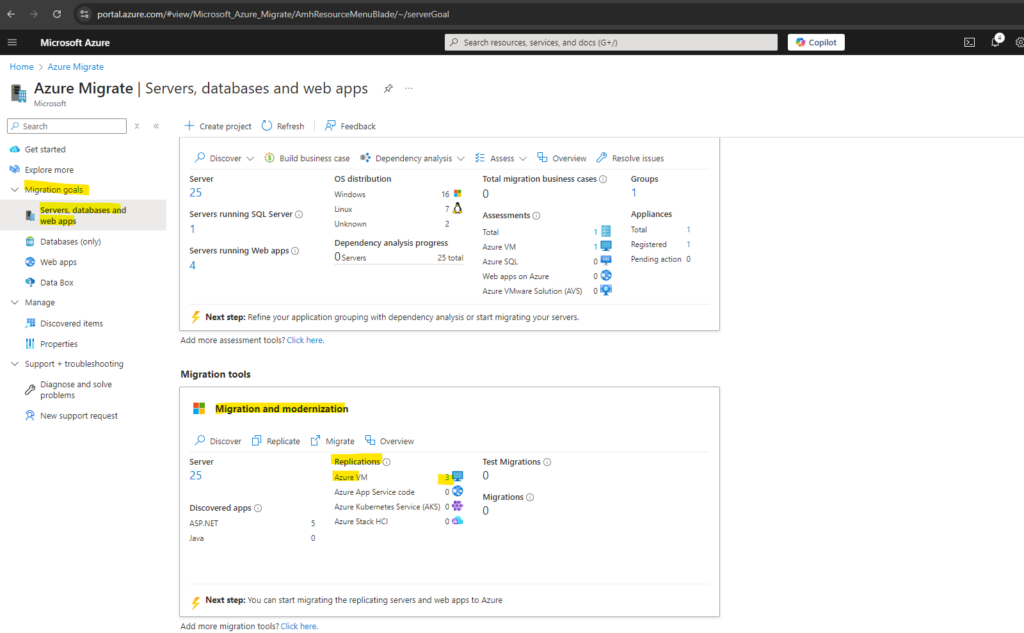
Right-click the VM or click on the three dots on the right side to test, and click Test migrate.
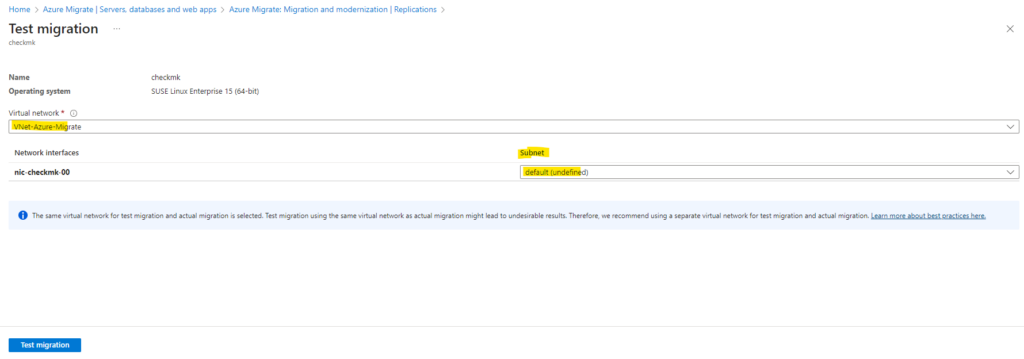
In Test migration, select the Azure VNet in which the Azure VM will be located during testing. We recommend you use a non-production VNet. Choose the subnet to which you would like to associate each of the Network Interface Cards (NICs) of the migrated VM.
For my lab-environment I will use the same VNet and subnet for both, test migration and productive.
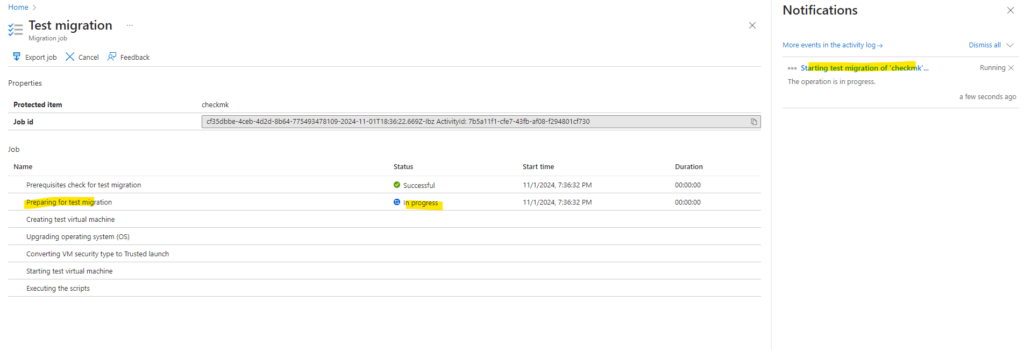
You have an option to upgrade the Windows Server OS during test migration. To upgrade, select the Upgrade available option. In the pane that appears, select the target OS version that you want to upgrade to and select Apply. Learn more.
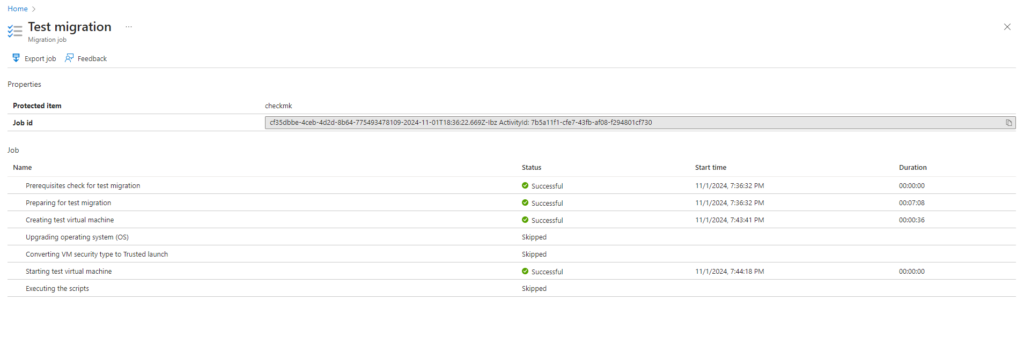
After the migration finishes, view the migrated Azure VM in Virtual Machines in the Azure portal.
The machine name has a suffix -Test.
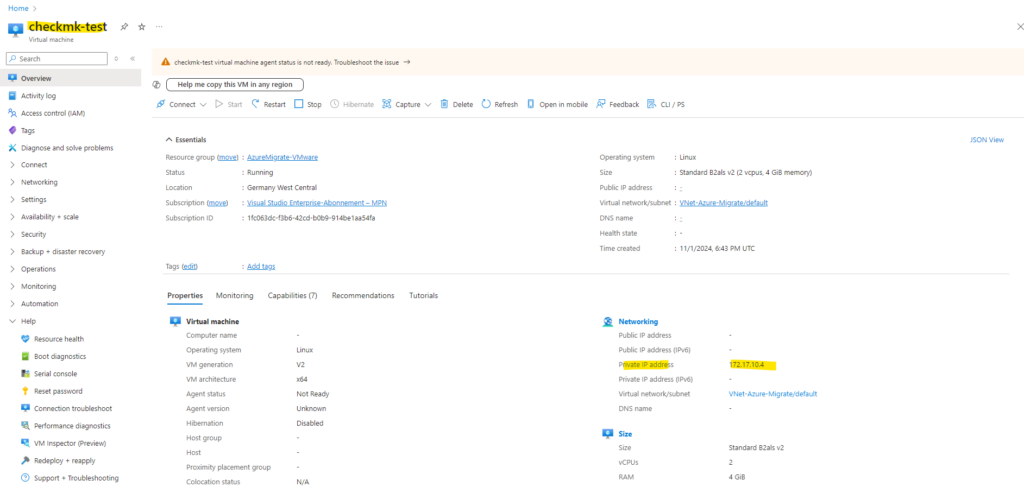
Because the virtual machine is just having a private IP address assigned to, I will use a Windows Server, deployed natively in Azure and the same VNet and subnet as jumphost with an assigned public IP address.
Looks good and I can connect to my migrated Linux virtual machine by using SSH.
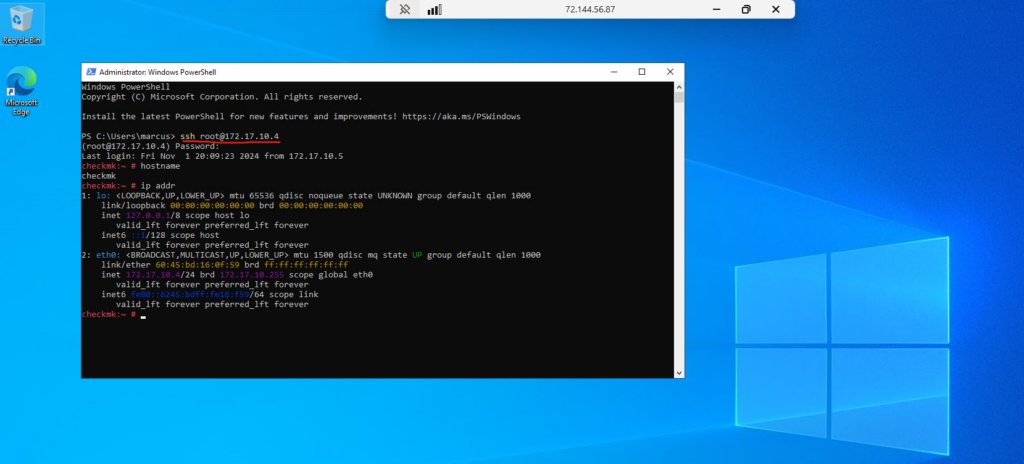
There are of course much better and secure ways to connect to your migrated virtual machines in this virtual network.
One is to connect your on-premise network to Azure and this virtual network by using an IPSec site-to-site VPN tunnel like shown in my following posts.
You can also set up an IPSec site-to-site VPN tunnel for your home network mostly placed behind a NAT router.
Another option when you doesn’t want to use your on-premise network to initiate connections to the migrated virtual machines in Azure, is to use Azure Bastion which provides a secure way to connect to your Azure virtual machines without exposing them to the public internet.
After the test is done, right-click the Azure VM in Replicating machines, and click Clean up test migration.
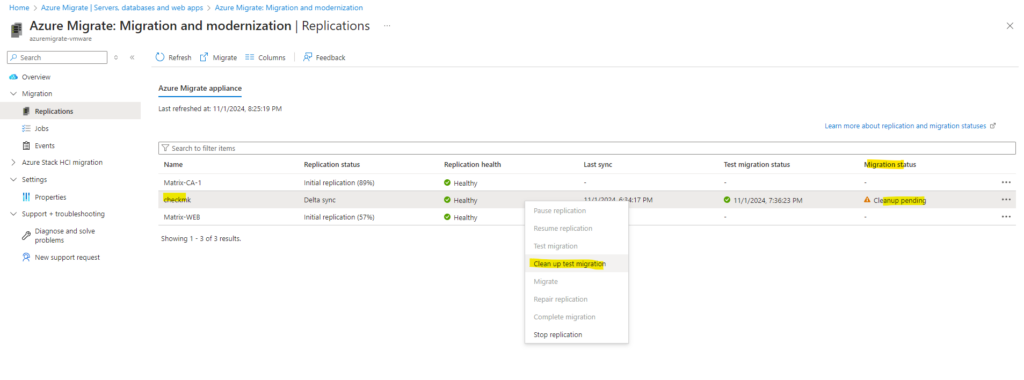
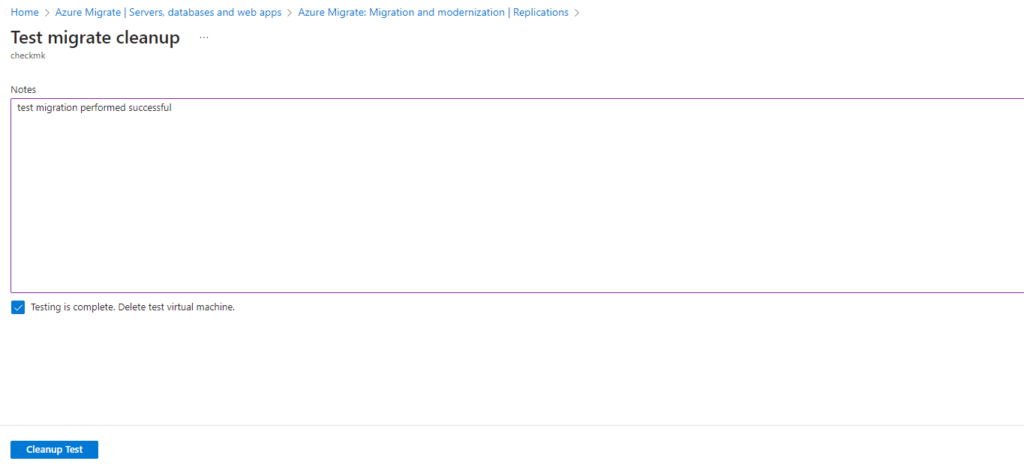

We can now migrate the virtual machine to Azure in the next section below.

Migrate VMs
After you’ve verified that the test migration works as expected, you can migrate the on-premises machines.
In the Azure Migrate project > Servers, databases and web apps > Migration and modernization, select numerical value next to Azure VM and shown below.
In Replicating machines, right-click the VM > Migrate.
In Migrate > Shut down virtual machines and perform a planned migration with no data loss, select Yes > OK.
By default Azure Migrate shuts down the on-premises VM, and runs an on-demand replication to synchronize any VM changes that occurred since the last replication occurred. This ensures no data loss.
If you don’t want to shut down the VM, select No

You have an option to upgrade the Windows Server OS during migration. To upgrade, select the Upgrade available option. In the pane that appears, select the target OS version that you want to upgrade to and select Apply. Learn more.
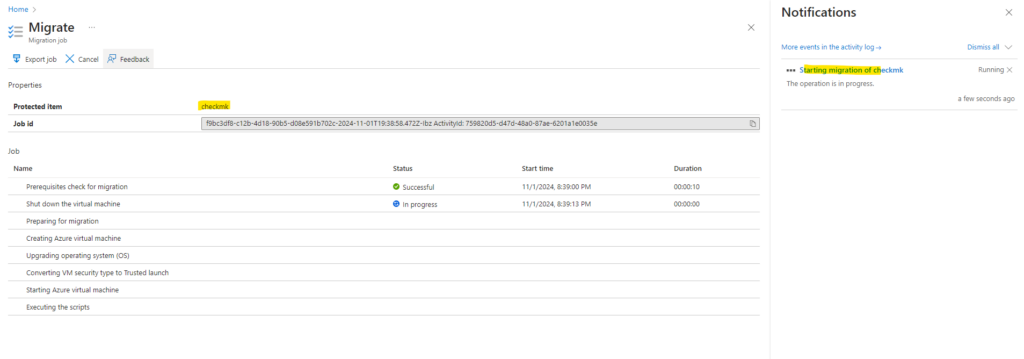
A migration job starts for the VM. Track the job in Azure notifications.
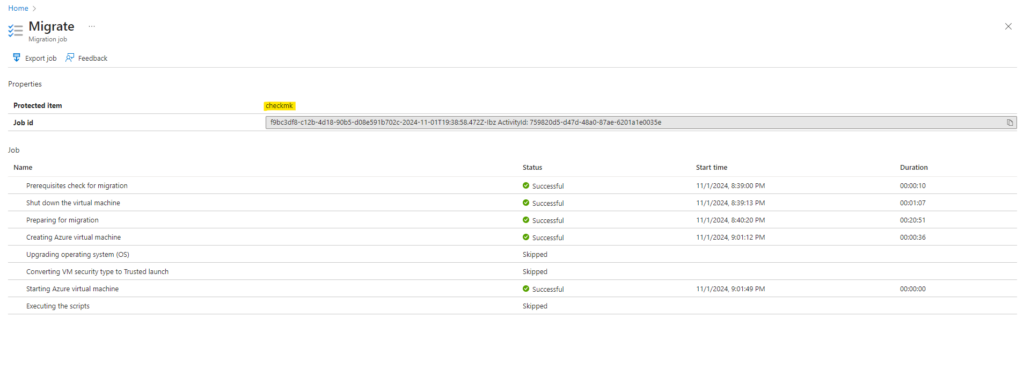
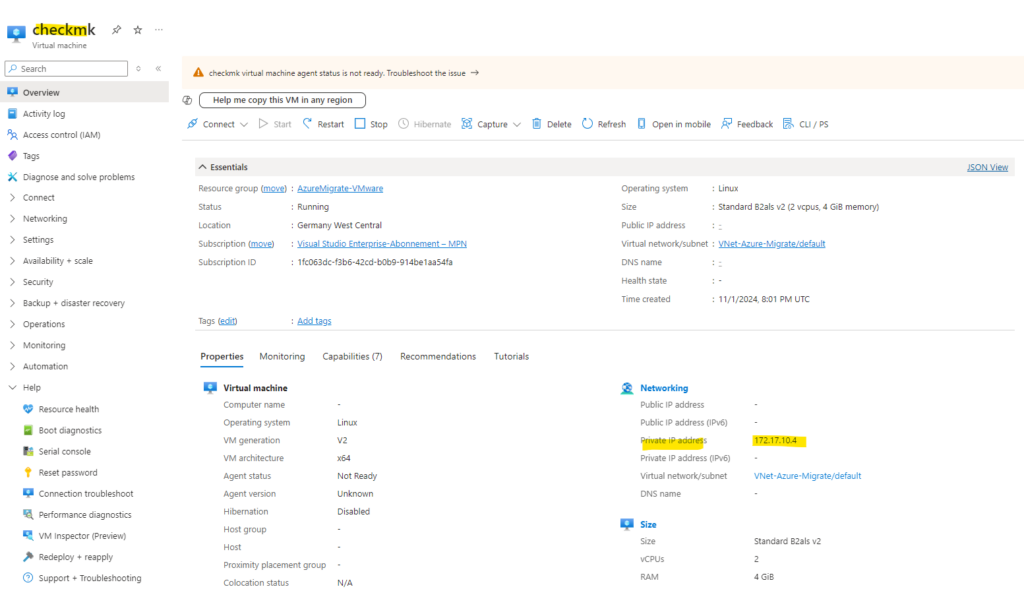
After the job finishes as shown above, we can view and manage the VM from the Virtual Machines page.
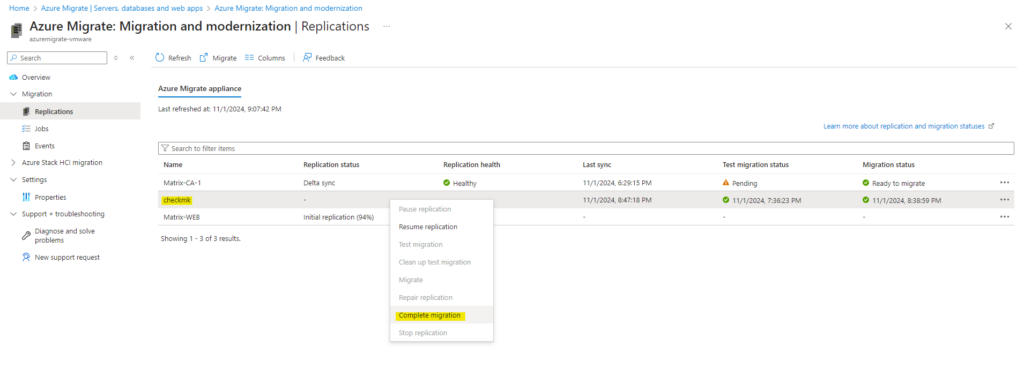
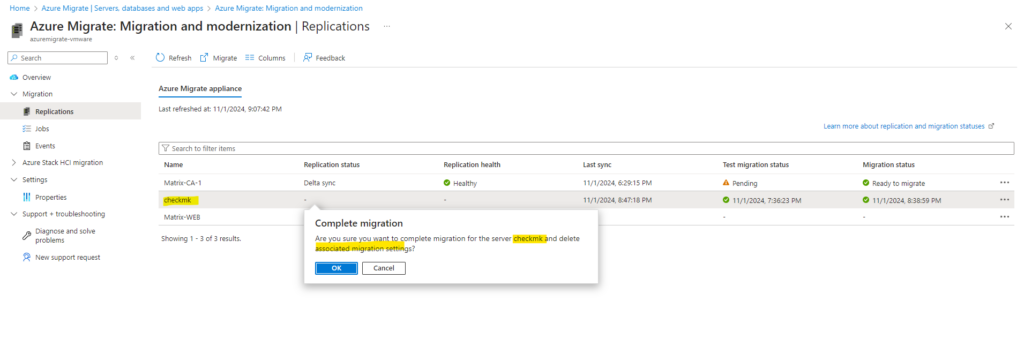
After the migration is done, right-click the VM > Complete migration. This stops replication for the on-premises machine, and cleans up replication state information for the VM.
Azure will automatically install the VM agent for Windows VMs and Linux during migration.

After successfully migrated to Azure, we need to perform some post-migration tasks depending on your on-premise environment.
- Perform any post-migration task such as updating host names, database connection strings, and web server configurations.
- Perform final application and migration acceptance testing on the migrated application now running in Azure.
- Cut over traffic to the migrated Azure VM instance.
- Remove the on-premises VMs from your local VM inventory.
- Remove the on-premises VMs from local backups.
- Update any internal documentation to show the new location and IP address of the Azure VMs.
Source: https://learn.microsoft.com/en-us/azure/migrate/vmware/tutorial-migrate-vmware
In Part 4 will see some troubleshooting in case something doesn’t work as expected.
Links
Azure Migrate appliance
https://learn.microsoft.com/en-us/azure/migrate/migrate-applianceAbout Azure Migrate
https://learn.microsoft.com/en-us/azure/migrate/migrate-services-overviewMigrate on-premises machines to Azure
https://learn.microsoft.com/en-us/azure/site-recovery/migrate-tutorial-on-premises-azureMigrate VMware VMs to Azure (agentless)
https://learn.microsoft.com/en-us/azure/migrate/vmware/tutorial-migrate-vmwareMigrate VMware vSphere VMs to Azure (agent-based)
https://learn.microsoft.com/en-us/azure/migrate/vmware/tutorial-migrate-vmware-agentTutorial: Discover servers running in a VMware environment with Azure Migrate
https://learn.microsoft.com/en-us/azure/migrate/vmware/tutorial-discover-vmwareGrouping servers
https://learn.microsoft.com/en-us/azure/migrate/how-to-create-a-group
Related Posts
Latest posts
Deploying NetApp Cloud Volumes ONTAP (CVO) in Azure using NetApp Console (formerly BlueXP) – Part 4 – Antivirus VSCAN Configuration
Follow me on LinkedIn


