Step-by-Step Guide Part 2: How to build your own NetApp ONTAP 9 LAB
In part 1 we saw how to get the ONTAP Simulate appliance and how to deploy it in vSphere. Further we saw the initial cluster setup by using a 2-node cluster (virtual appliances).
Now in this second part we will building the foundational storage setup: aggregates, Storage Virtual Machines (SVMs), logical interfaces (LIFs), and volumes.
Once a volume is created on a NetApp system, it can be exposed over various protocols depending on your use case.
You can export it via NFS or share it using CIFS/SMB for file-based access, or present it as block storage using iSCSI or Fibre Channel, ideal for applications like shared datastores in vSphere or file servers.
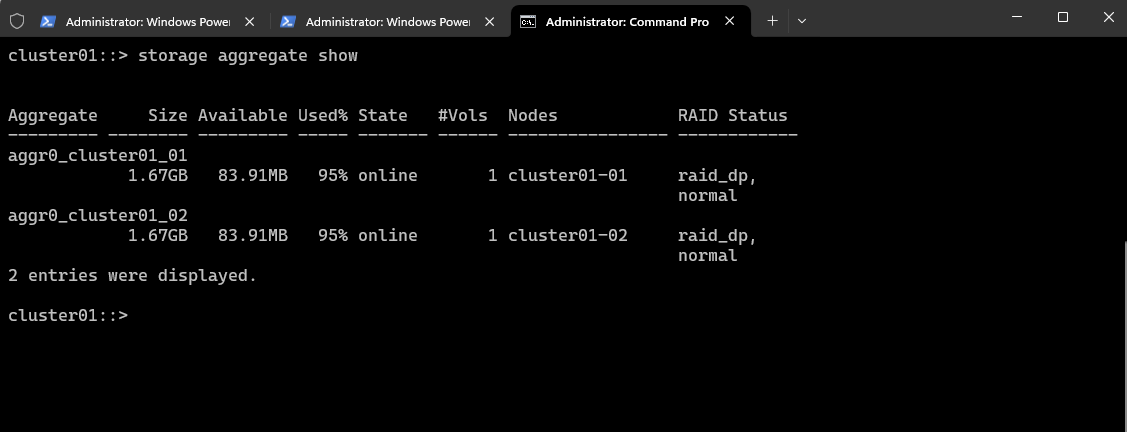
Show all Aggregates
An aggregate is a collection of physical disks that have been grouped together into a RAID group to form a single pool of storage.
From this pool, NetApp creates flexible volumes that store actual data.
An aggregate is a RAID-protected logical storage container composed of one or more RAID groups, created from physical or virtual disks. It provides the space and performance backing for ONTAP volumes and Storage Virtual Machines (SVMs).
To show aggregates in NetApp ONTAP (CLI), use the following commands.
cluster01::> storage aggregate show
So far we just see here the root aggregates of both cluster nodes.
Root aggregates should generally not be used for user data or additional volumes.
Root aggregate is reporting 95 percent space utilization
This is normal behavior, root aggregate comes with 95% utilization after its creation, because the root volume is thick provisioned.
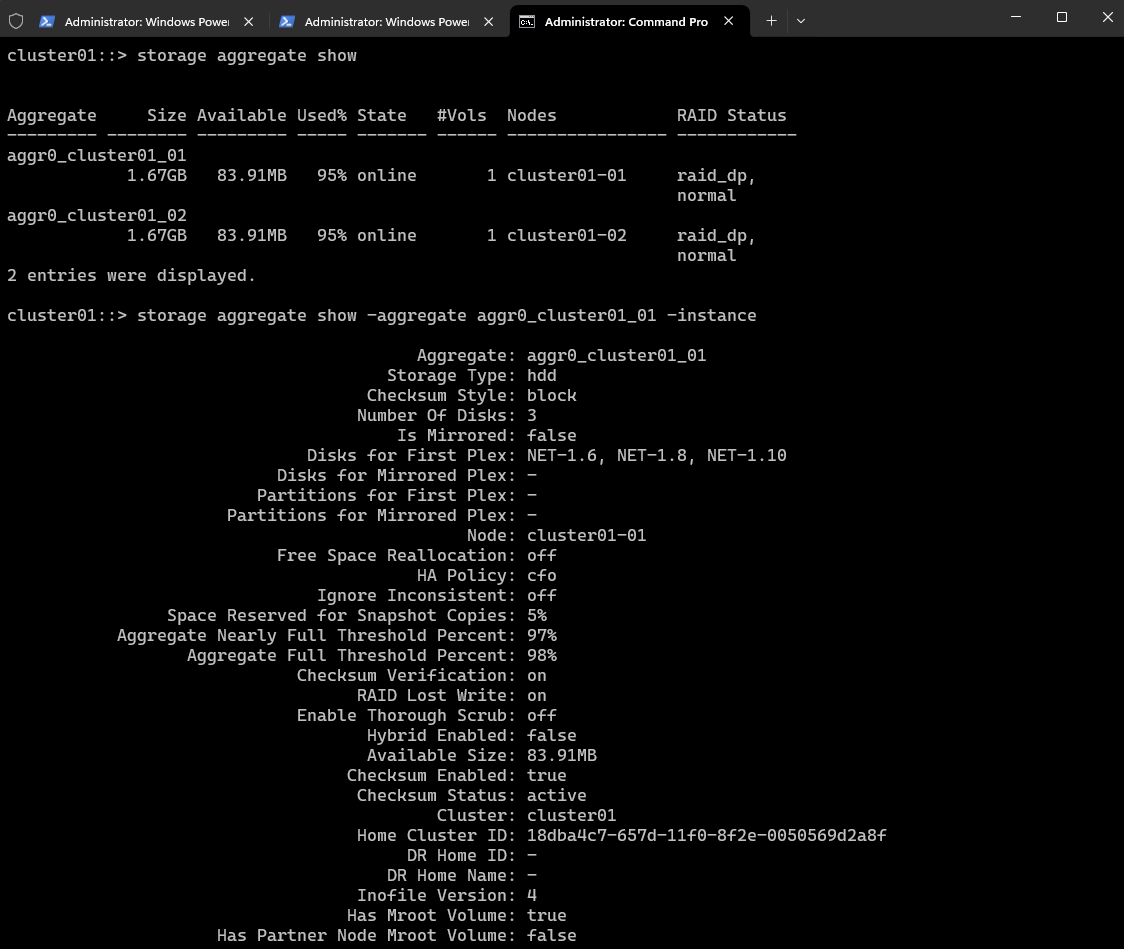
To show a detailed view of one aggregate.
cluster01::> storage aggregate show -aggregate <aggr_name> -instance
cluster01::> storage aggregate show -aggregate aggr0_cluster01_01 -instance
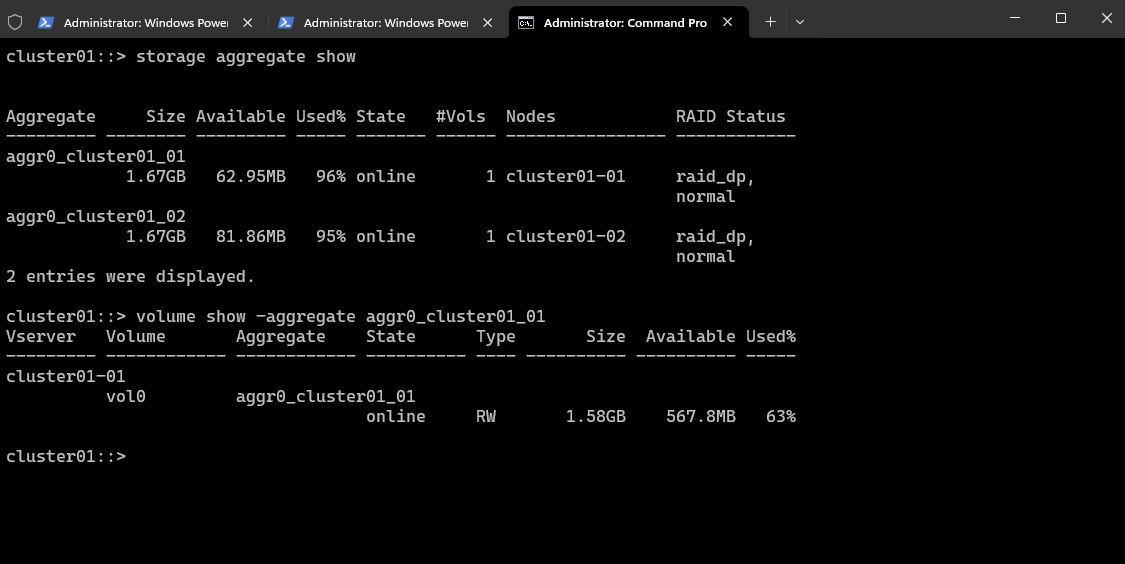
Show which volumes are in an aggregate.
volume show -aggregate <aggr_name>
cluster01::> volume show -aggregate <aggr_name>
cluster01::> volume show -aggregate aggr0_cluster01_01
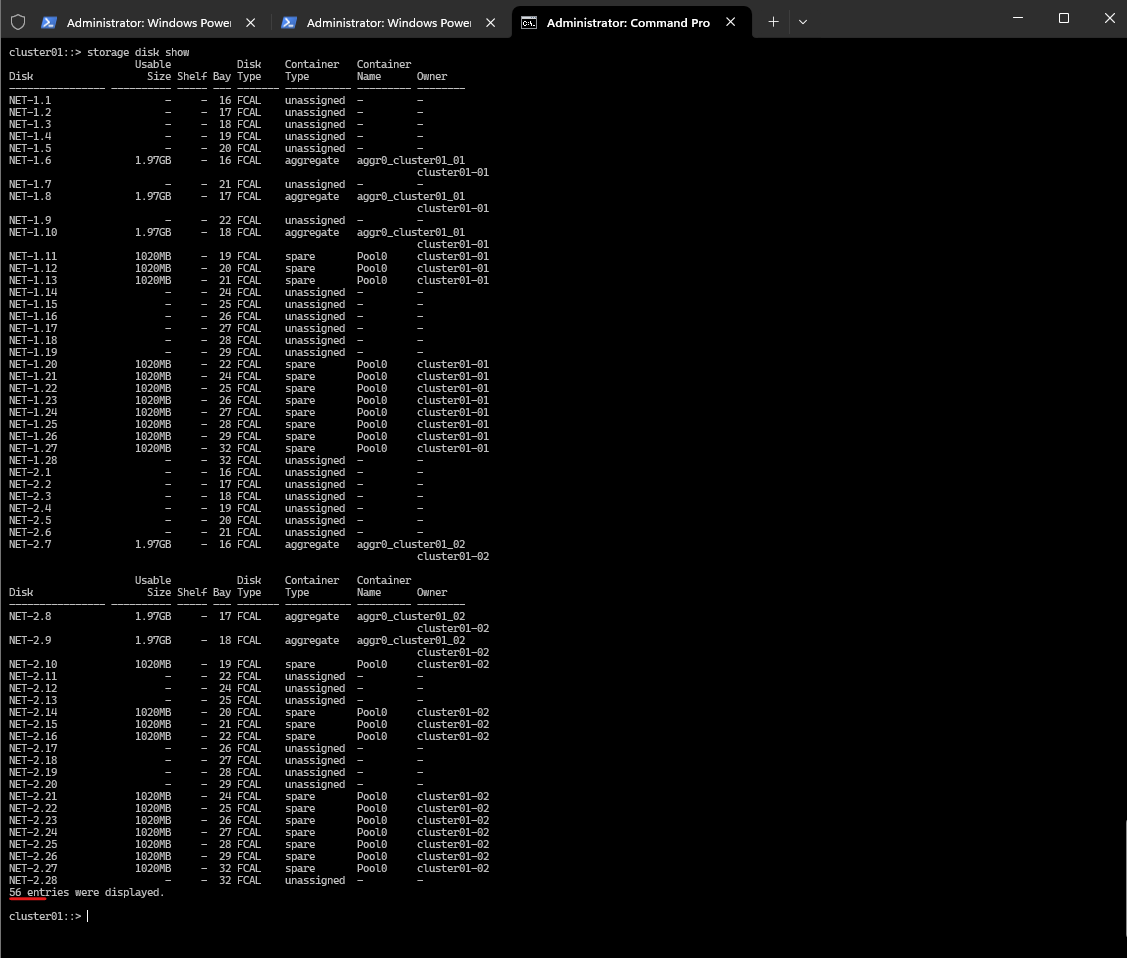
Show which disks are in an aggregate
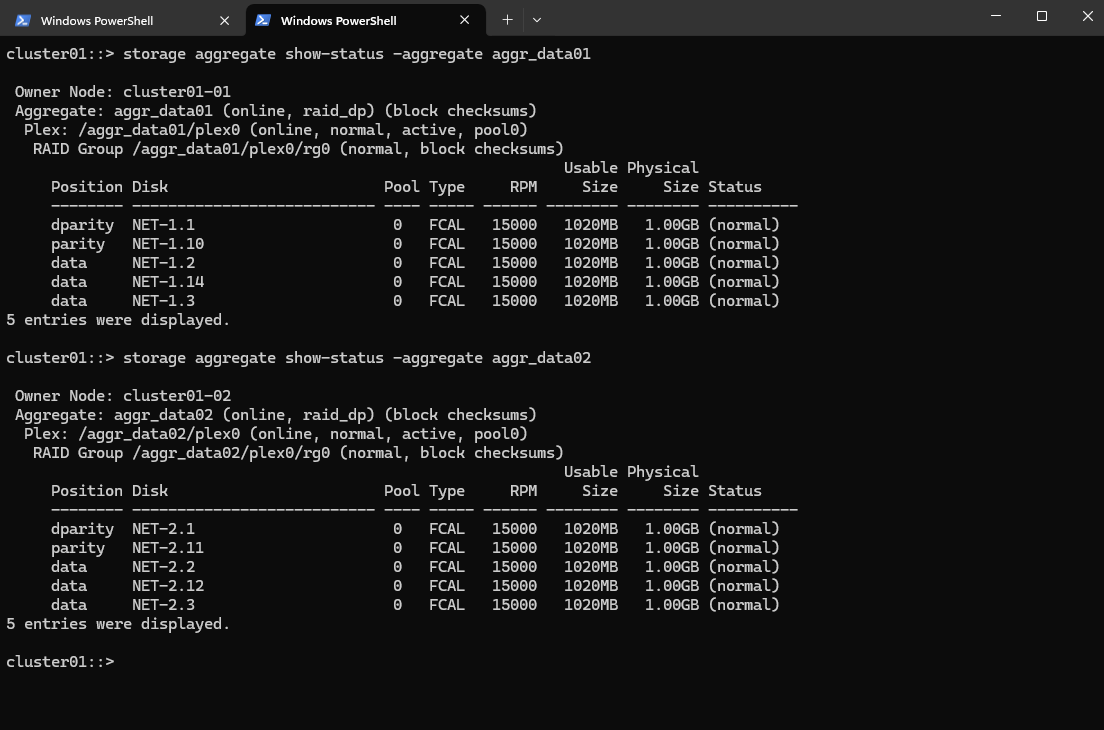
cluster01::> storage aggregate show-status -aggregate <aggr_name>
cluster01::> storage aggregate show-status -aggregate aggr0_cluster01_01
This output shows the RAID layout and disk status for the aggregate aggr0_cluster01_01 on our NetApp cluster.
RAID Type: raid_dp (NetApp’s RAID 6 double parity)
This is a very minimal RAID-DP layout, typical for root aggregates on ONTAP simulators.
In production, RAID-DP usually has at least 3–16 data disks, not just one.
All disks are FCAL (Fibre Channel Arbitrated Loop) and appear healthy.

If we plan to create data aggregates, we will need to use additional (simulated) disks not assigned to aggr0.
Assign Disks to an Aggregate (ONTAP CLI)
To assigning disks to an aggregate, we first need to determine unused (spare) disks with the following command.
cluster01::> storage disk show -container-type spare
We have 22 spare disks available across both nodes (cluster01-01 and cluster01-02), each with a usable size of 1020MB, which is enough for creating a data aggregate in the ONTAP simulator (sim disks are typically limited to ~1 GB each).

Or to see all disks:
cluster01::> storage disk show
This is a full list of all our simulator’s disks.
Assigned (in aggregates)
Spare ==> Already owned by a node (e.g., cluster01-01). Available for immediate use by the system for aggregate creation or disk replacement (e.g., failed disk). Usually pre-zeroed and ready for use. Automatically picked up by ONTAP when adding to aggregates or during RAID rebuilds.
Unassigned ==> No node owns the disk yet. Cannot be used until assigned to a node. Might not be zeroed yet. We need to manually assign these disks before use.
By leaving disks unassigned, we retain flexibility and can assign them later to any node we want or need to.
Spare disks in contrast are ready for immediate use by its node (for aggregates, RAID rebuilds).
When should we leave disks unassigned?
- During initial setup, lab environments, or before you finalize your HA layout.
- When you’re still deciding which node gets which storage.
- In multi-tenant clusters where different teams may own different nodes.
When should we assign and use disks as spares?
- Once we’ve planned our storage layout.
- When we’re ready to create aggregates or want disks available for automatic RAID rebuilds.
- For the ONTAP simulator, it’s generally better to assign and use disks as spares since:
- We already know which node will use them.
- We want minimal friction when creating aggregates.
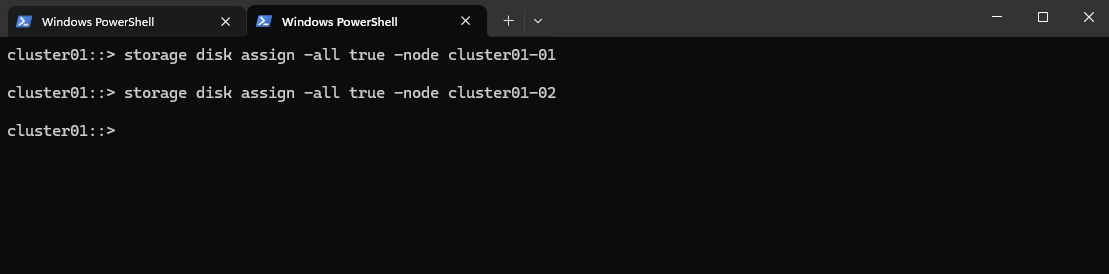
One-liner to assign disk
One-liner to assign all unassigned disks to cluster01-01 and cluster01-02. To assign all unowned disks visible to a node, just run:
cluster01::> storage disk assign -all true -node cluster01-01
cluster01::> storage disk assign -all true -node cluster01-02
The first command line only assigns unowned disks that are physically visible (i.e., connected) to cluster01-01 and the second analogous to cluster01-02.
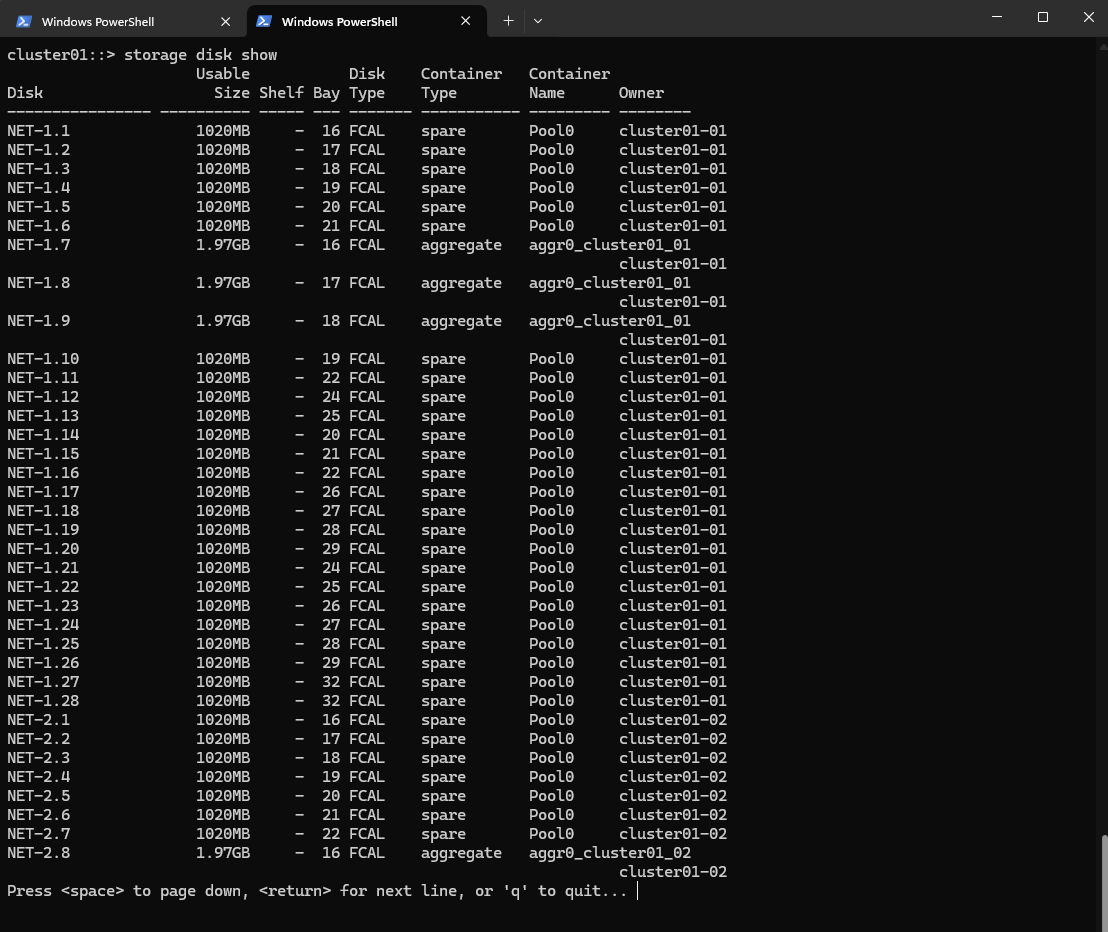
cluster01::> storage disk show
Now each node will own the disks it’s physically connected to and automatically placed in spare state.
Create new Data Aggregates
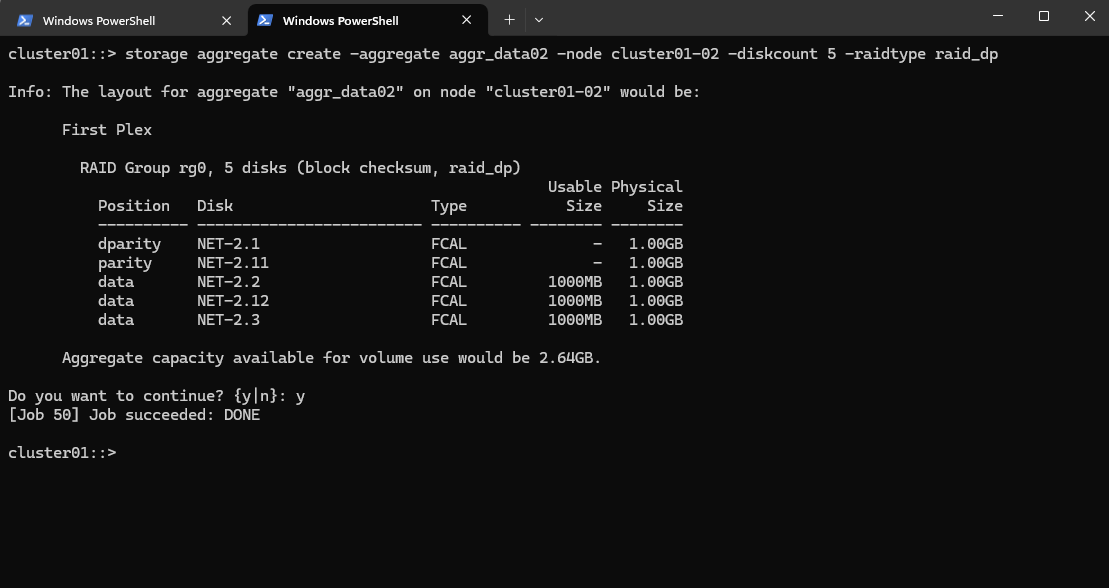
We will now create data aggregates on both nodes by using our spare disks we all assigned previously.
We will assume we’re using RAID-DP (NetApp default, 2 parity disks). We build aggregates with 5 disks each (3 data + 2 parity), which is a good size for ONTAP Simulator.
For cluster01-01:
cluster01::> storage aggregate create -aggregate aggr_data01 -node cluster01-01 -diskcount 5 -raidtype raid_dp
If we have more spare disks, we can increase -diskcount (e.g., 7, 9, etc.).
ONTAP will automatically select disks from the spare pool of the specified node.
If you want full manual control, you can use -disklist to specify exact disks (optional for now).

For cluster01-02:
cluster01::> storage aggregate create -aggregate aggr_data02 -node cluster01-02 -diskcount 5 -raidtype raid_dp
If we have more spare disks, we can increase -diskcount (e.g., 7, 9, etc.).
ONTAP will automatically select disks from the spare pool of the specified node.
If you want full manual control, you can use -disklist to specify exact disks (optional for now).
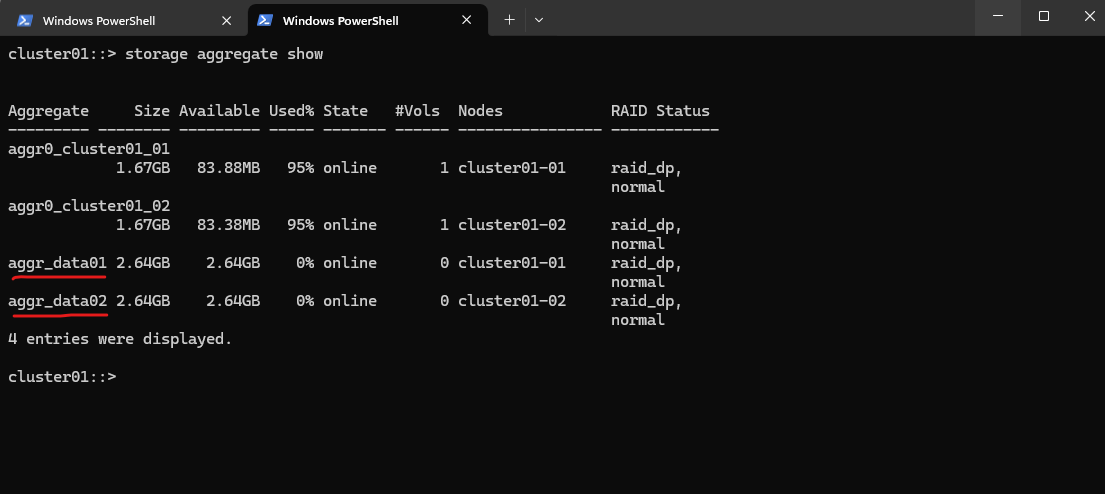
We can now verify our new created data aggregates.
cluster01::> storage aggregate show
Or more detailed.
cluster01::> storage aggregate show-status -aggregate aggr_data01
cluster01::> storage aggregate show-status -aggregate aggr_data02
The next step is now to create a storage virtual machine (SVM).
Create a Storage Virtual Machine (SVM)
A Storage Virtual Machine (SVM) is a core concept in NetApp ONTAP and is key to its multi-tenant, multi-protocol, and software-defined design.
A Storage Virtual Machine (SVM) is a secure, isolated namespace and management domain that provides access to storage resources (volumes, LIFs, etc.) within a NetApp cluster.
You can think of an SVM as a “virtual NAS/SAN controller” inside a physical ONTAP cluster.
We will now create a Storage Virtual Machine (SVM), then a volume on our new aggregate, and finally enabling access via CIFS (SMB) and/or NFS.
To create a new storage VM execute.
cluster01::> vserver create -vserver svm_data -aggregate aggr_data01 -rootvolume root_vol_svm_data -rootvolume-security-style unix
-aggregate: Which aggregate will host the SVM root volume (small internal vol)
-rootvolume-security-style: Use unix for NFS, ntfs for CIFS, or mixed for both, we can also change this later

Or by using the Web UI.
Create a Volume
A volume in NetApp ONTAP is a logical, mountable unit of storage that resides inside an aggregate, is served by a Storage Virtual Machine (SVM), and is accessible to clients via NFS, SMB, iSCSI, or FC.
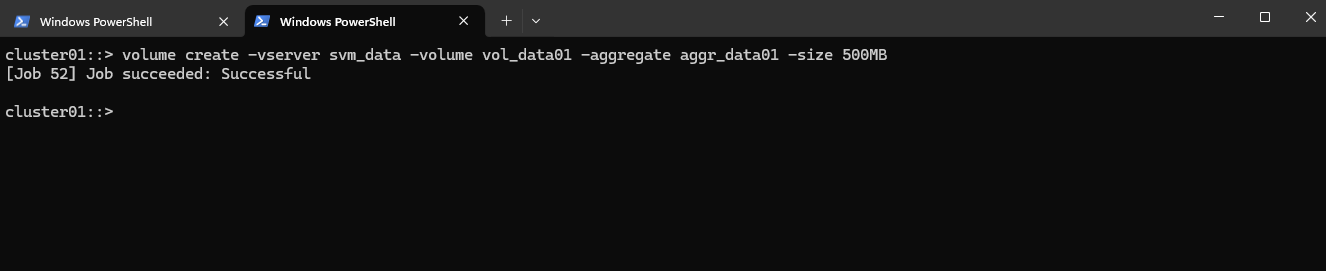
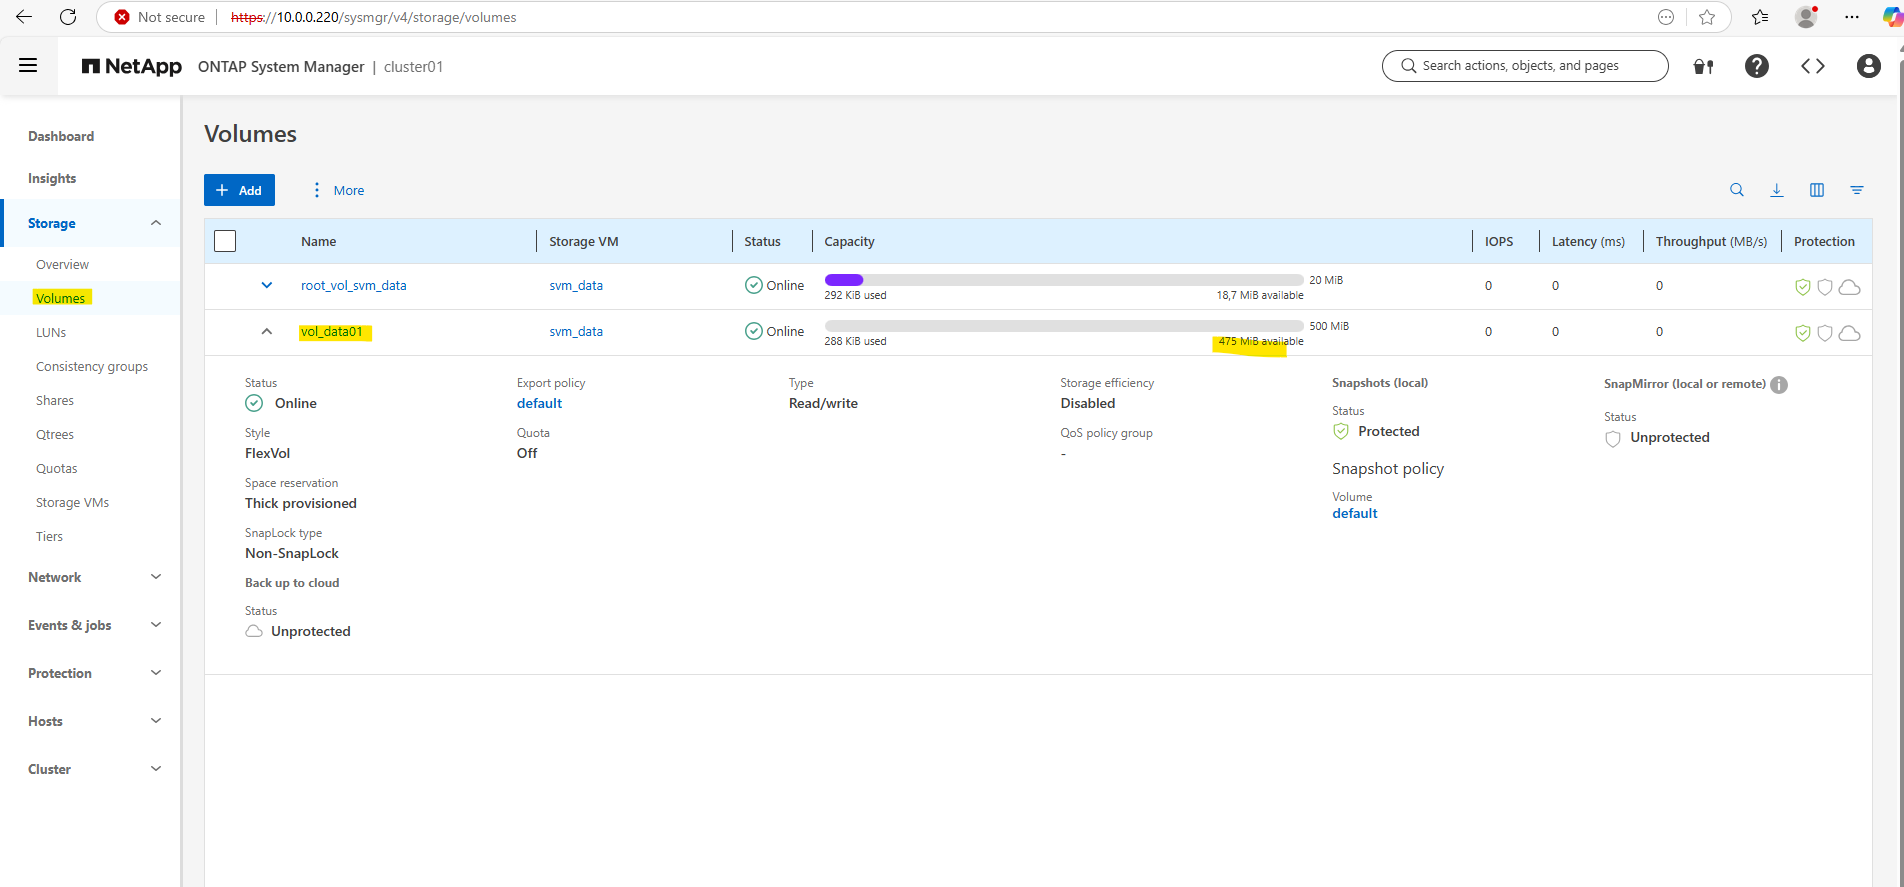
Below we will create a 500MB data volume called vol_data01 on aggr_data01.
cluster01::> volume create -vserver svm_data -volume vol_data01 -aggregate aggr_data01 -size 500MB
Create a Logical Interface (LIF)
A LIF (Logical Interface) in NetApp ONTAP is a virtual network interface, an IP address or FC/IB WWPN that clients use to access storage. It is bound to a SVM (not the node directly).
It’s how NFS, SMB, iSCSI, and FC traffic enters and leaves the ONTAP system.
A LIF (Logical Interface) is always bound to a node and a specific port, but it’s associated with an SVM (Storage Virtual Machine) for its operational identity and purpose.
To access data via network protocols, we need a LIF on a physical port.
cluster01::> network interface create -vserver svm_data -lif lif_data01 -role data -home-node cluster01-01 -home-port e0c -address 10.0.0.226 -netmask 255.255.255.0
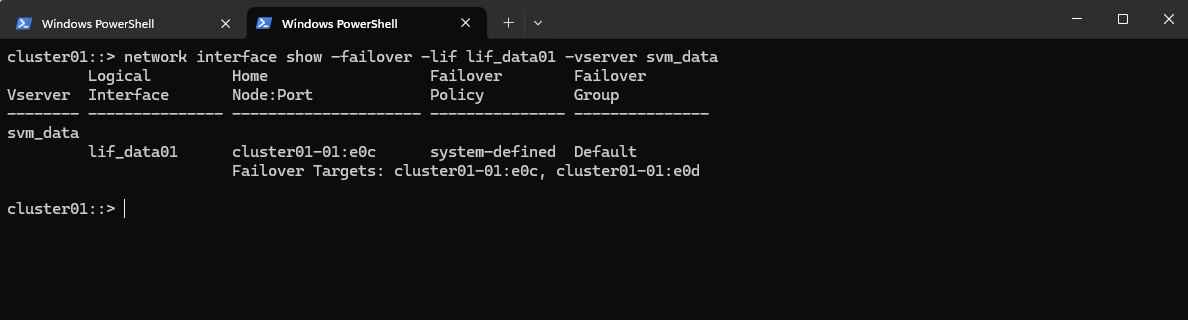
That warning is expected and harmless in many lab/simulator environments.
ONTAP tried to set a failover-policy (usually system-defined) that expects more than one port on different nodes in the same broadcast domain.
But our LIF was created on port e0c of cluster01-01, and ONTAP didn’t find a matching failover target on cluster01-02.
So the LIF is created, but it doesn’t have a valid failover path to another node, which would be important for HA in production.

We can see LIF failover targets with:
cluster01::> network interface show -failover -lif lif_data01 -vserver svm_data
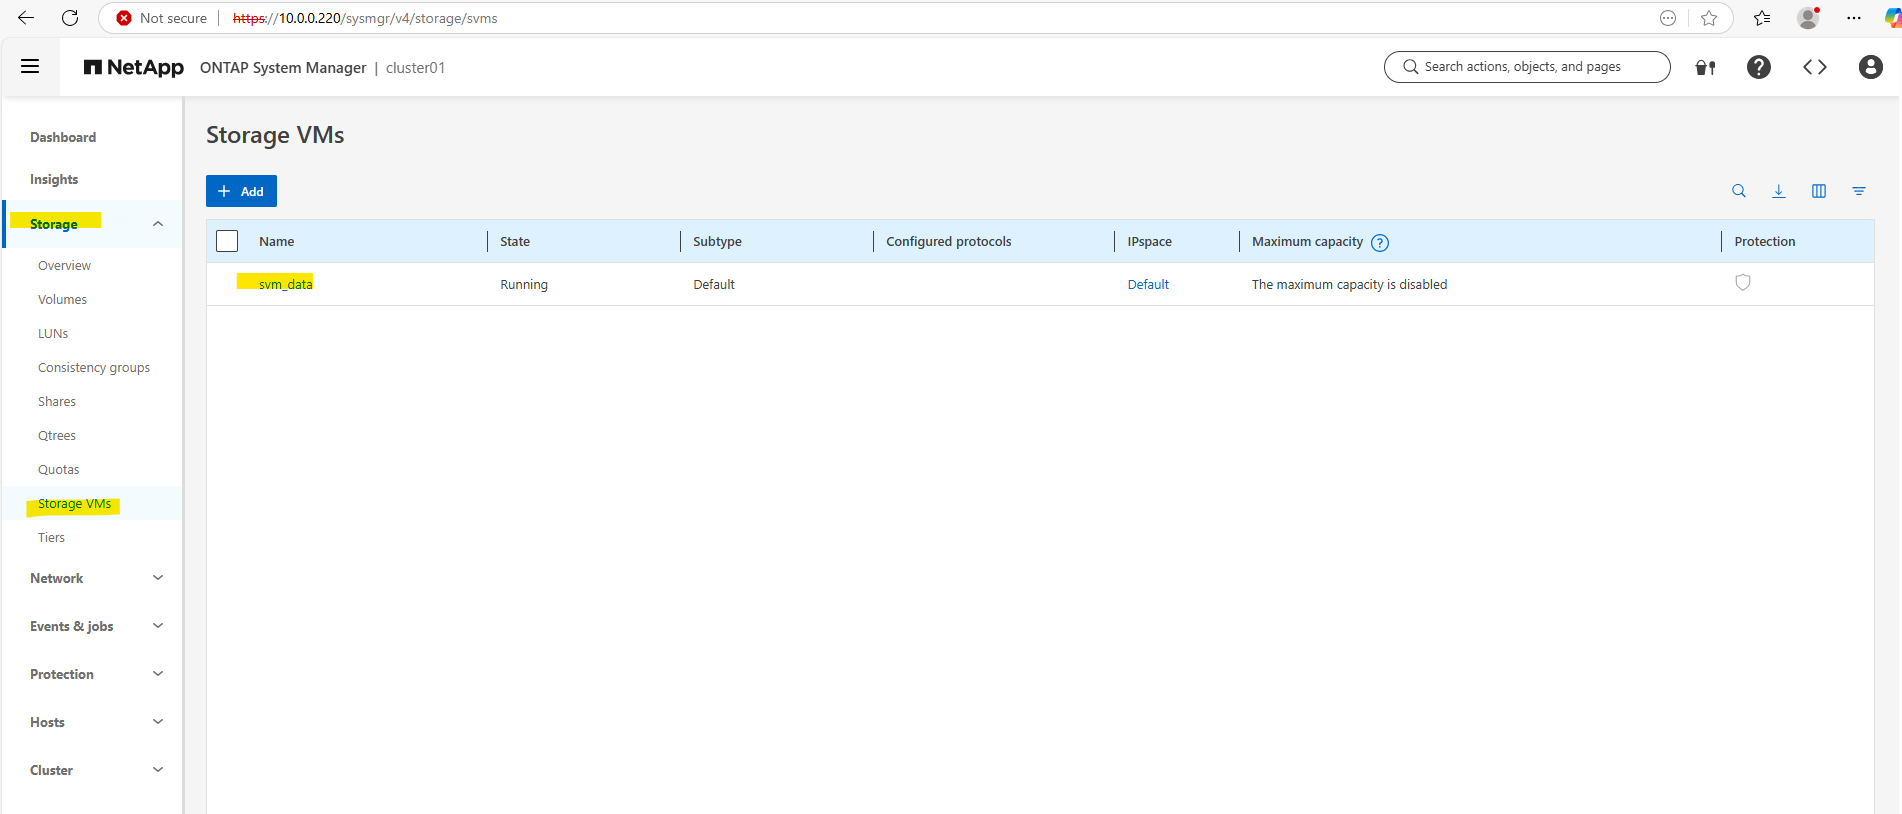
Checking the Creation of the SVM, Volume and LIF in the Web UI
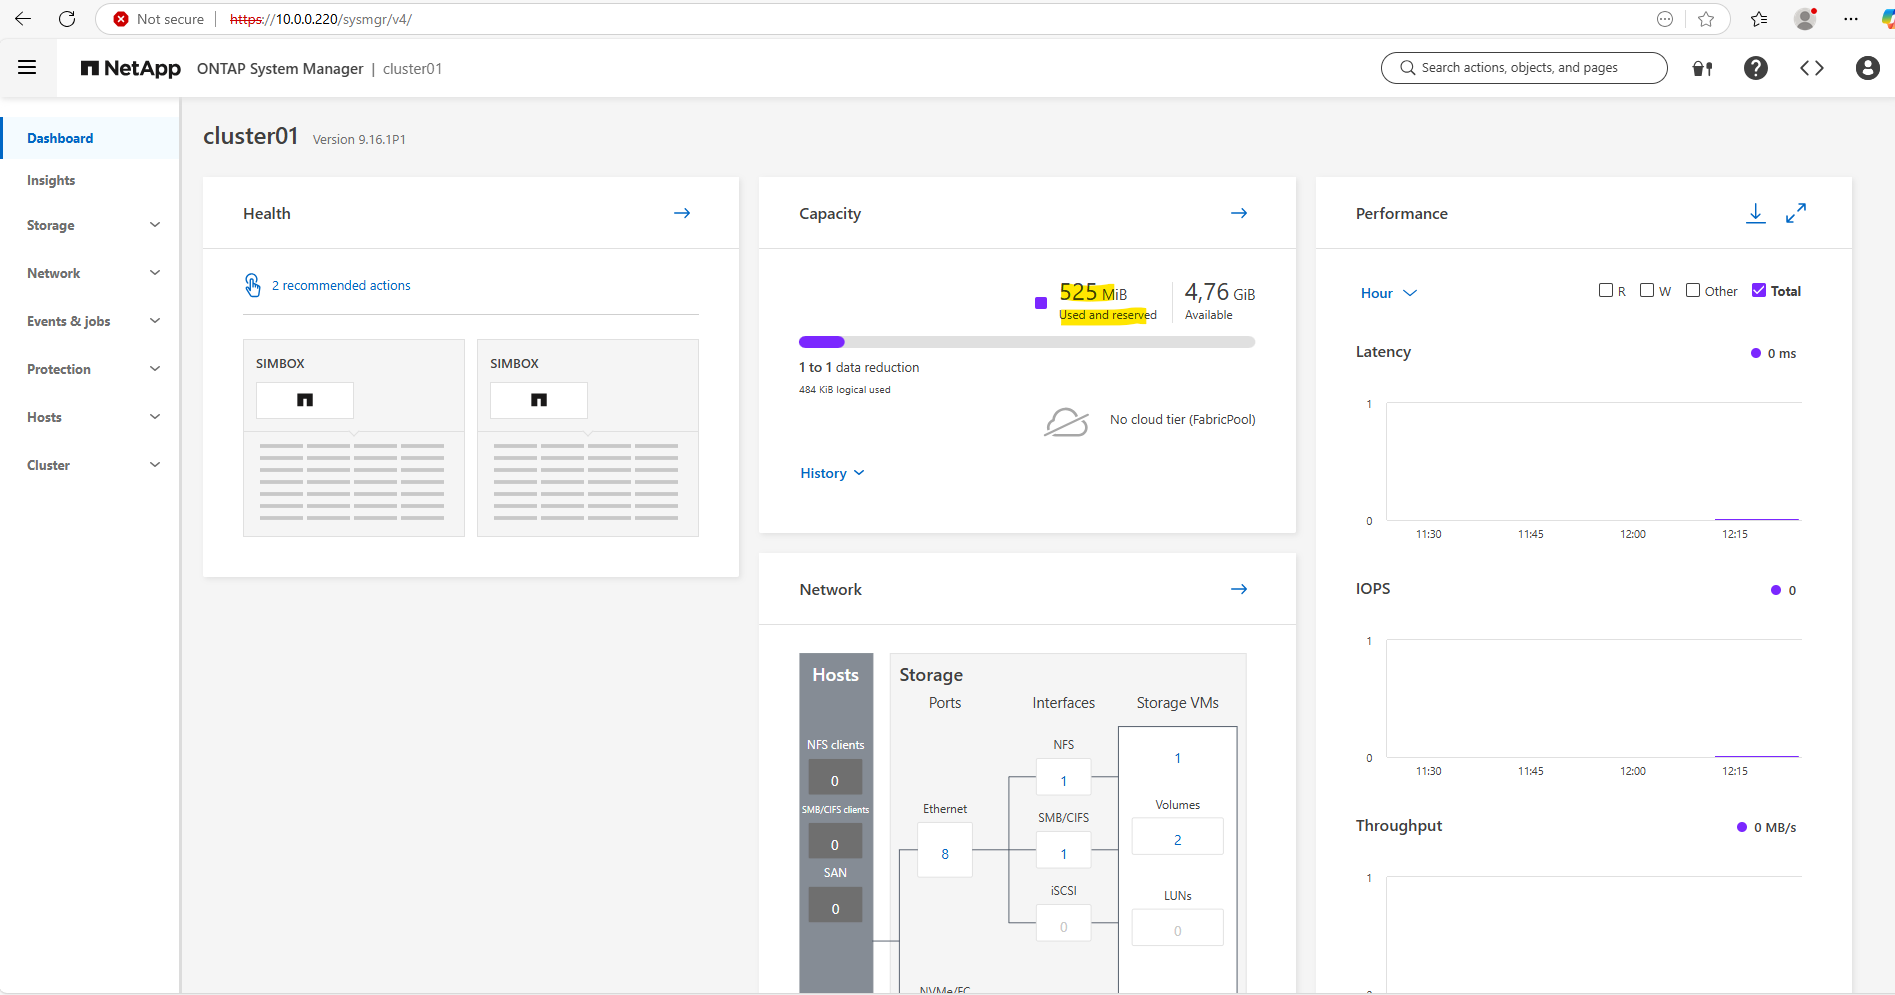
We can see our storage VM now also in the Web UI.
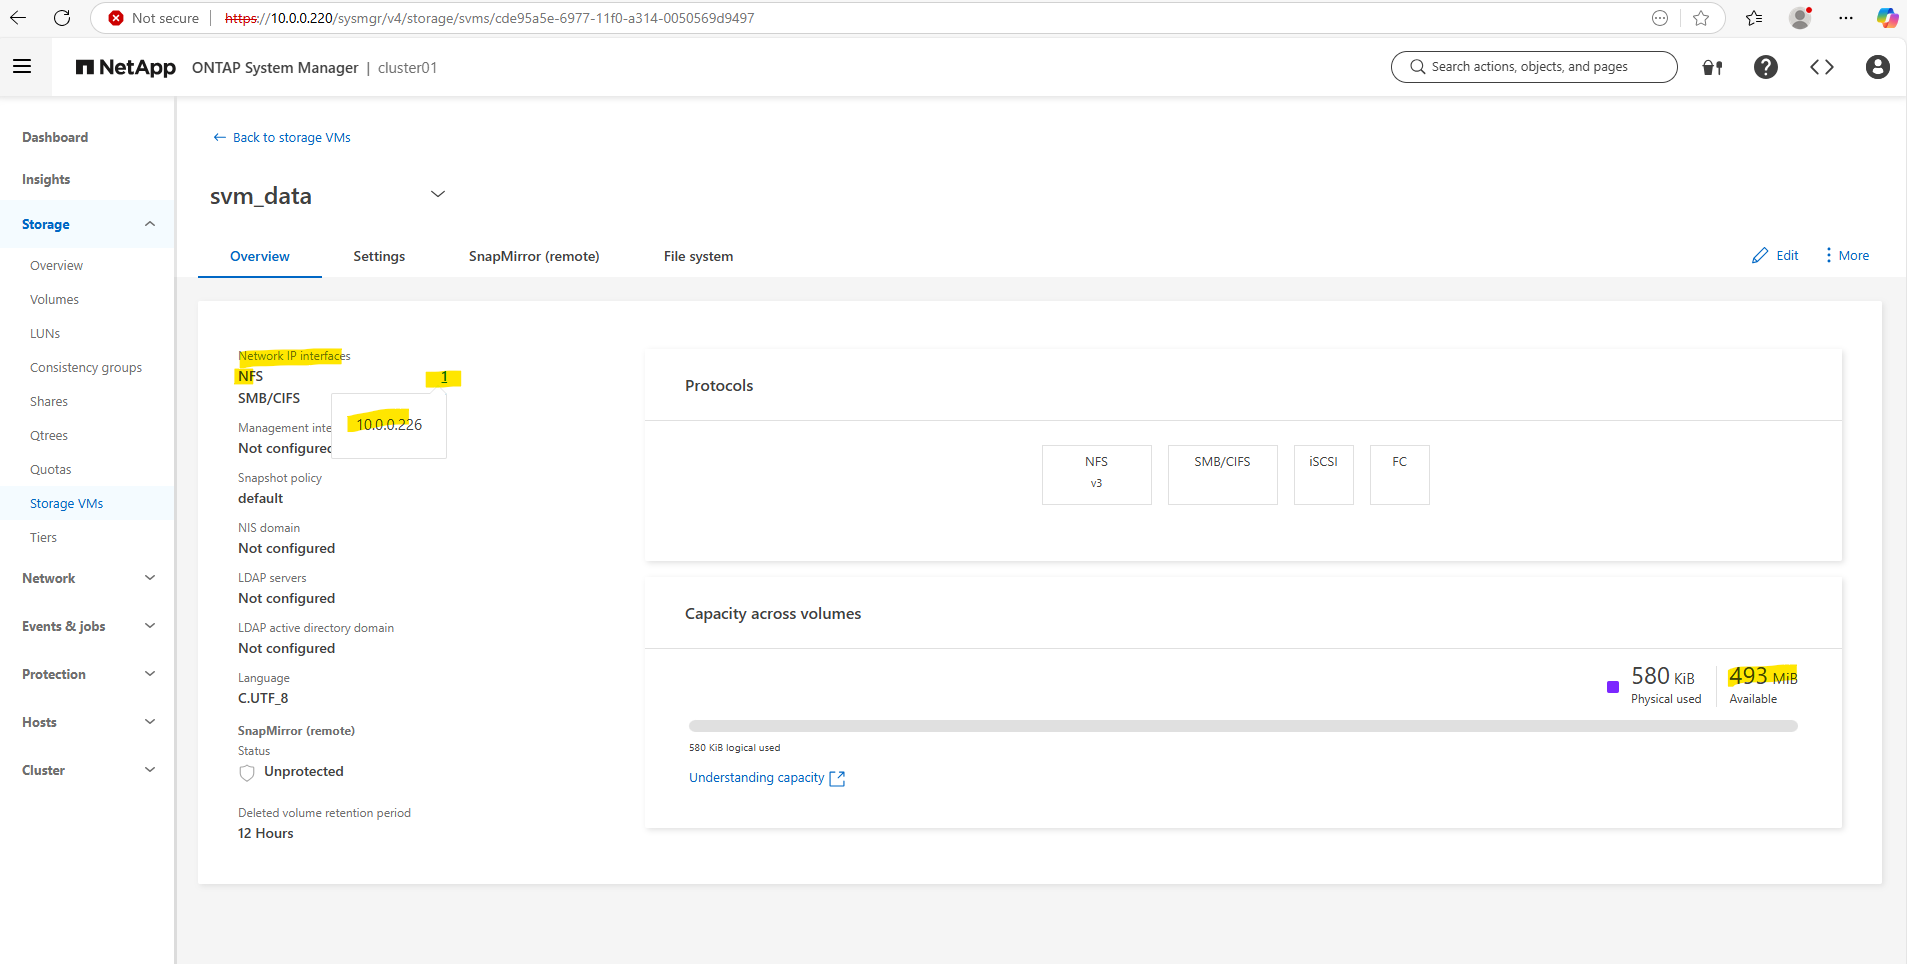
On the dashboard we can now also see the available and used storage.
Configure NFS Export on ONTAP
An NFS export in NetApp is a volume (or path) made accessible to NFS clients through an SVM, using a combination of:
- a mounted volume (junction path)
- a logical interface (LIF)
- and an export policy
Unlike in Linux where /etc/exports defines NFS access, NetApp uses export policies and rules at the volume level to control who can access what, and how.
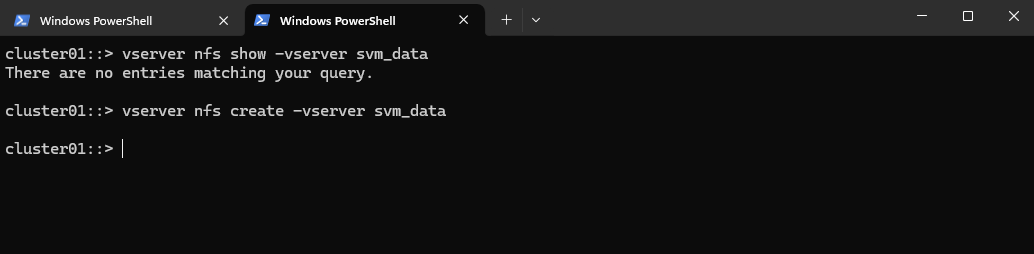
We will first check if NFS is enabled on the Storage Virtual Machine (SVM) we use to expose the volume to our clients.
cluster01::> vserver nfs show -vserver svm_data
If not already enabled, do this:
cluster01::> vserver nfs create -vserver svm_data
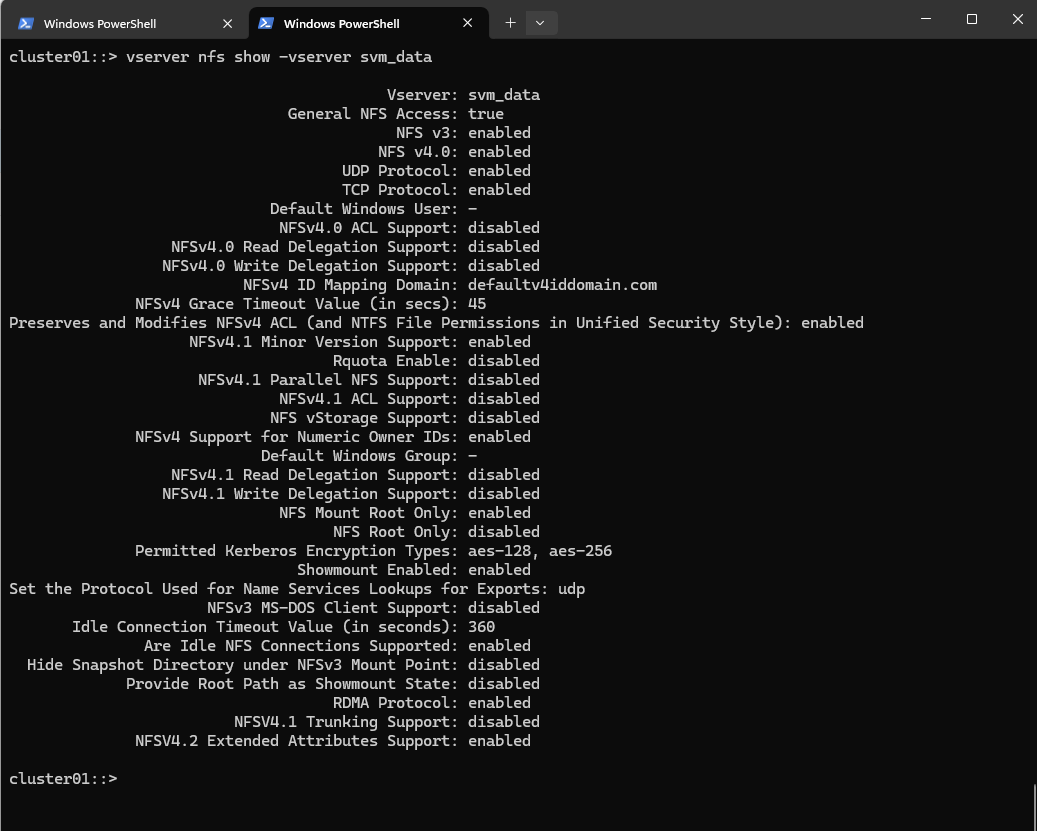
Checking again if NFS is now enabled, looks good.
cluster01::> vserver nfs show -vserver svm_data
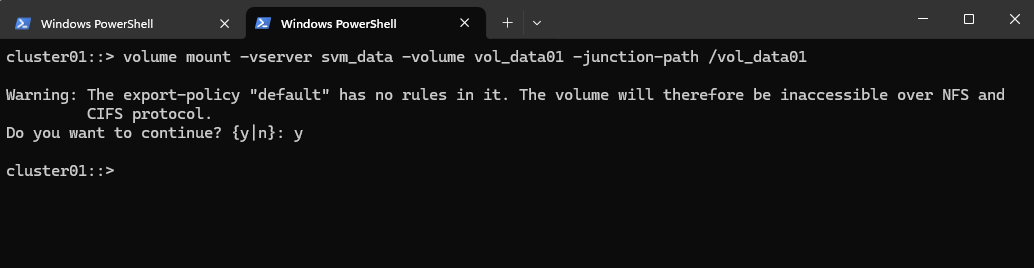
Next we need to mount the ONTAP volume to a path within our SVM.
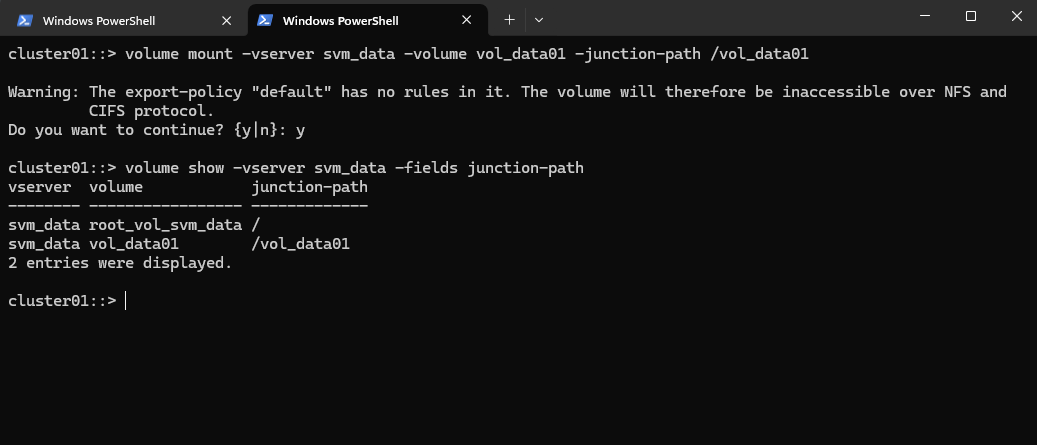
cluster01::> volume mount -vserver svm_data -volume vol_data01 -junction-path /vol_data01
Checking the mount.
cluster01::> volume show -vserver svm_data -fields junction-path
As shown in the warning message during the mount above, so far no rules are created in the SVM’s default policy. So even if we create a new dedicated export policy for our volume, the NFS access won’t work.
In ONTAP, every volume exists in the namespace hierarchy of the SVM. Even though you’re mounting a specific volume, ONTAP still checks the export policy on the root volume to allow traversal to the volume’s junction point.
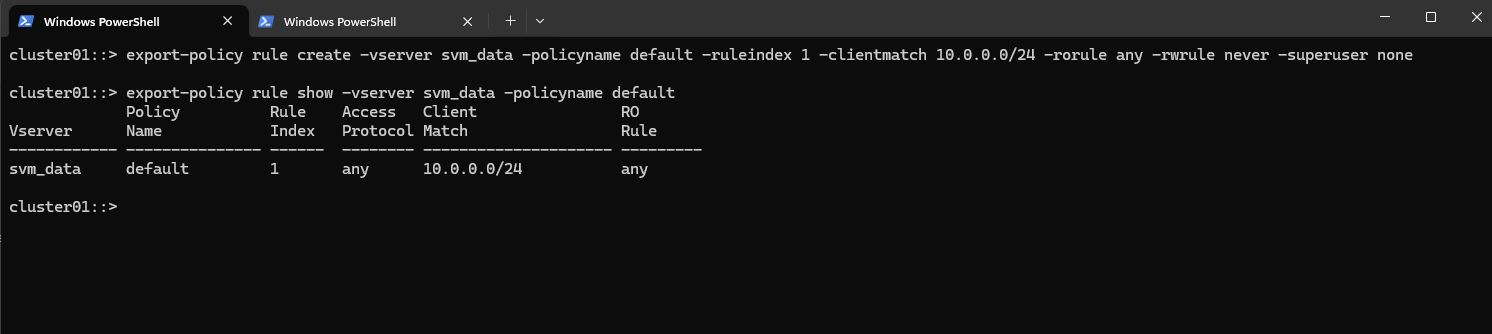
To ensure traversal from the namespace root to volumes (even when those volumes use their own export policies), the default export policy assigned to the SVM’s root volume must allow at least read-only access for the client by running the following command.
cluster01::> export-policy rule create -vserver svm_data -policyname default -ruleindex 1 -clientmatch 10.0.0.0/24 -rorule any -rwrule never -superuser none
cluster01::> export-policy rule show -vserver svm_data -policyname default
Clients matching this rule (IP address within my internal subnet 10.0.0.0/24) will be granted read-only access regardless of their authentication type. This includes sys (UNIX), krb5 (Kerberos), ntlm (NTLM), or even none (unauthenticated).
So No explicit authentication is required by this rule’s rorule. The any option means that the client can use any authentication method (or no authentication at all) and still be granted read-only access.
The primary verification for this read-only access is just the client IP address (which must matching to be within the subnet 10.0.0.0/24).
-superuser none: Any client attempting to access the volume as UID 0 (root) will not be granted superuser privileges. Instead, they will be “squashed” to the anonymous user ID.
To allow access to a volume with its own export policy, the SVM root volume’s export policy (typically default) must:
- Allow read-only (ro=sys) access
- Match the client’s IP
- Be applied to the correct root volume
Now we can create our own policy here and adding a rule to allow NFS clients also read-write access to the NFS export.
cluster01::> export-policy create -vserver svm_data -policyname nfs_policy

We can delete it again with
cluster01::> export-policy delete -vserver svm_data -policyname nfs_policy
Add a rule (e.g., allow all NFS clients). Here I will allow in general all users on the NFS client with the IP address 10.0.0.89 read-write access to the volume (we first need to apply the policy to our volume).
# by default root squash is enabled
cluster01::> export-policy rule create -vserver svm_data -policyname nfs_policy -ruleindex 1 -clientmatch 10.0.0.89 -rorule any -rwrule any

# to avoid (disable) root squash, adding here ==> -superuser any ==> More about root squash in Part 5
cluster01::> export-policy rule create -vserver svm_data -policyname nfs_policy -ruleindex 1 -clientmatch 10.0.0.89 -rorule any -rwrule any -superuser any

# to enable root squash explicitly use
-superuser none

# in some instances if null authentication (sec=null) is used (more about sec=null in Part 5), it would be required to use the uid configured in the anon=<user id> field. Using -anon 0 for example maps anonymous users all to UID 0 (root)
cluster01::> vserver export-policy rule modify -vserver svm_data -policyname nfs_policy -ruleindex 1 -anon 0
Root squash is a security feature in NFS that maps root (UID 0) from the NFS client to a non-privileged user on the server, typically nobody (UID 65534).
This prevents root users on NFS clients from having full control over files on the server. Usually will result in permission denied for write access for the root user. More about root squash in Part 5.
The -anon <user id> flag above maps anonymous users to the UID specified here, by using -anon 0 it will map all anonymous user to the UID 0 (root) instead of the default 65534 (nobody). Can be used as workaround when AUTH_NULL is used in NFSv3 or NFSv4 for whatever reason. More about in Part 5.

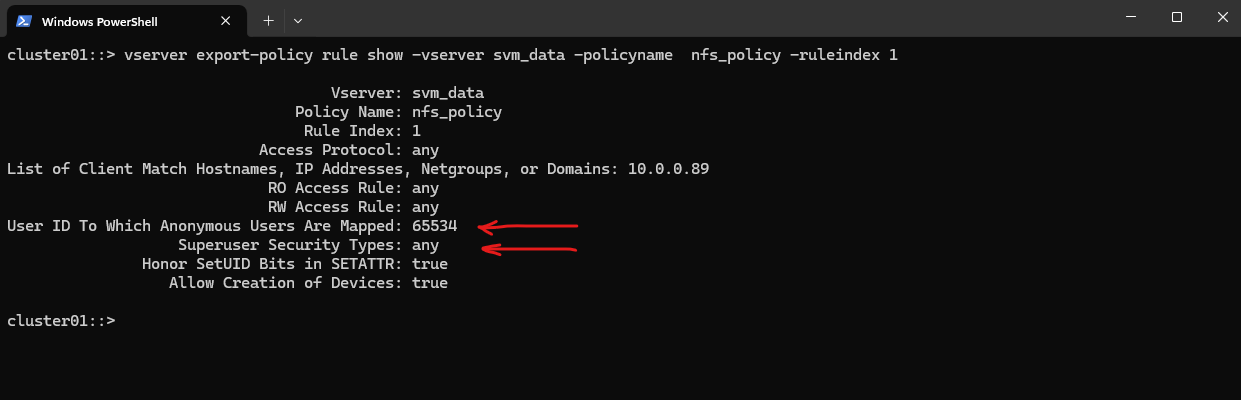
By running the following command we can determine if root squash is enabled.
cluster01::> vserver export-policy rule show -vserver svm_data -policyname nfs_policy -ruleindex 1
Superuser Security Types:
none (default) ==> Root is squashed (UID 0 → UID 65534)
any ==> Root is not squashed; retains UID 0
krb5 ==> Root not squashed for Kerberos-auth NFSUser ID To Which Anonymous Users Are Mapped:
0 ==> map anonymous users to UID 0 (root)
65535 ==> map anonymous users to UID 65534 (nobody)
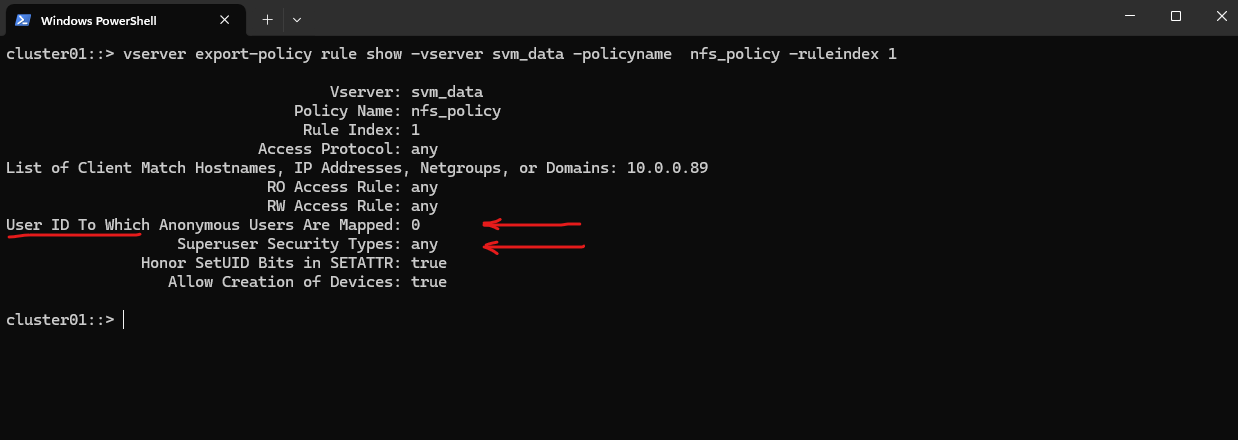
After also running the -anon 0 command above to map anonymous users to UID 0 (root) instead of the default 65534 (nobody).
vserver export-policy rule show -vserver svm_data -policyname nfs_policy -ruleindex 1
Finally applying the export policy to our new volume.
For qtrees, the export policy must be assigned explicitly using the
-export-policyparameter, as the shorthand-policyis not supported at this level. This applies the policy directly to the qtree and overrides the volume-level configuration if set.
cluster01::> volume modify -vserver svm_data -volume vol_data01 -policy nfs_policy

# e.g. to apply an export policy to a qtree
cluster01::> volume qtree modify -vserver svm_data -volume vol_data01 -qtree <Qtree Name> -export-policy nfs_policy

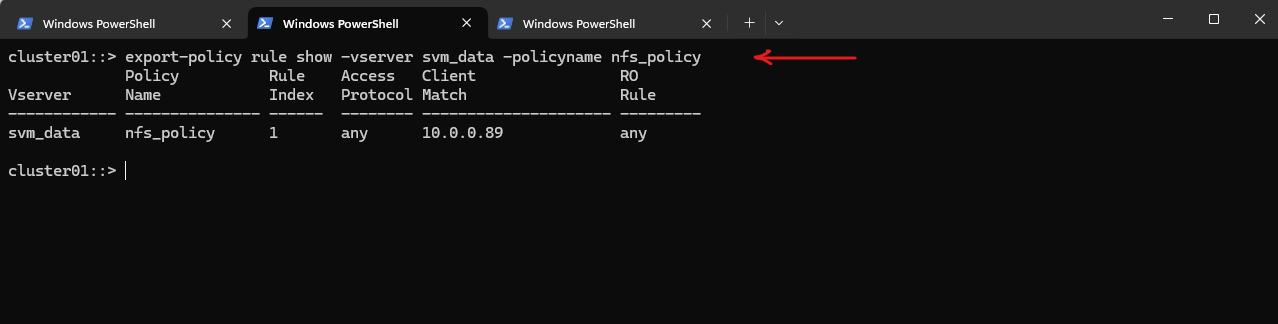
We can verify the export status of a SVM’s export policy by running.
cluster01::> export-policy rule show -vserver svm_data -policyname nfs_policy
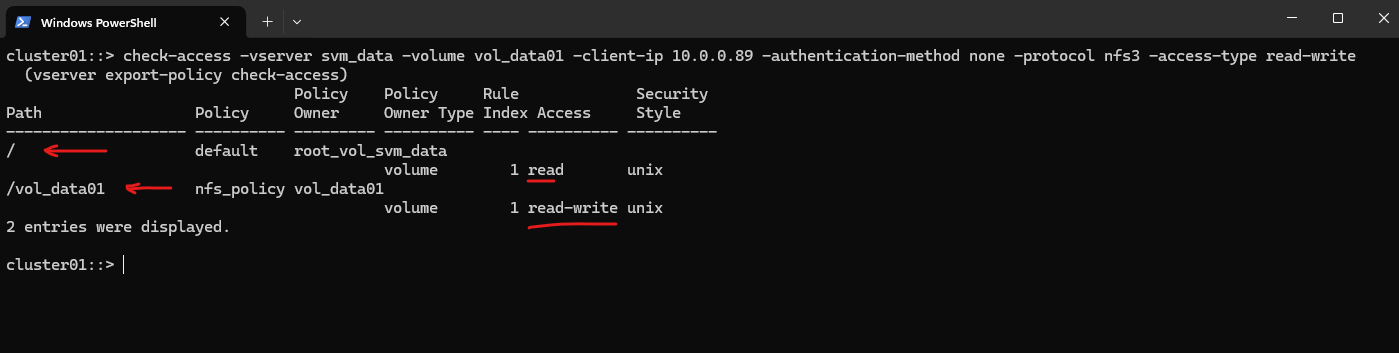
In ONTAP we can also simulate an access to check if a specific client can access the NFS export by using the following command.
cluster01::> check-access -vserver svm_data -volume vol_data01 -client-ip 10.0.0.89 -authentication-method none -protocol nfs3 -access-type read-write
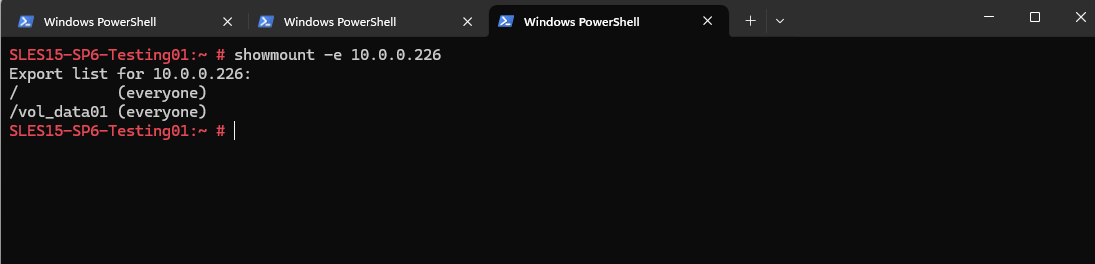
We can now also check from a client which exports exposed by running the showmount command below. The IP address is from our Storage Virtual Machine (SVM) which exposes the NFS export.
# showmount -e <NFS Server>
# showmount -e 10.0.0.226
-e stands for exports. It asks the NFS server’s mountd daemon for a list of currently available shared directories (exports).
showmount is a client-side tool querying an NFSv2 or NFSv3 server. It won’t work for NFSv4 servers, as NFSv4 doesn’t use mountd for exporting filesystems.
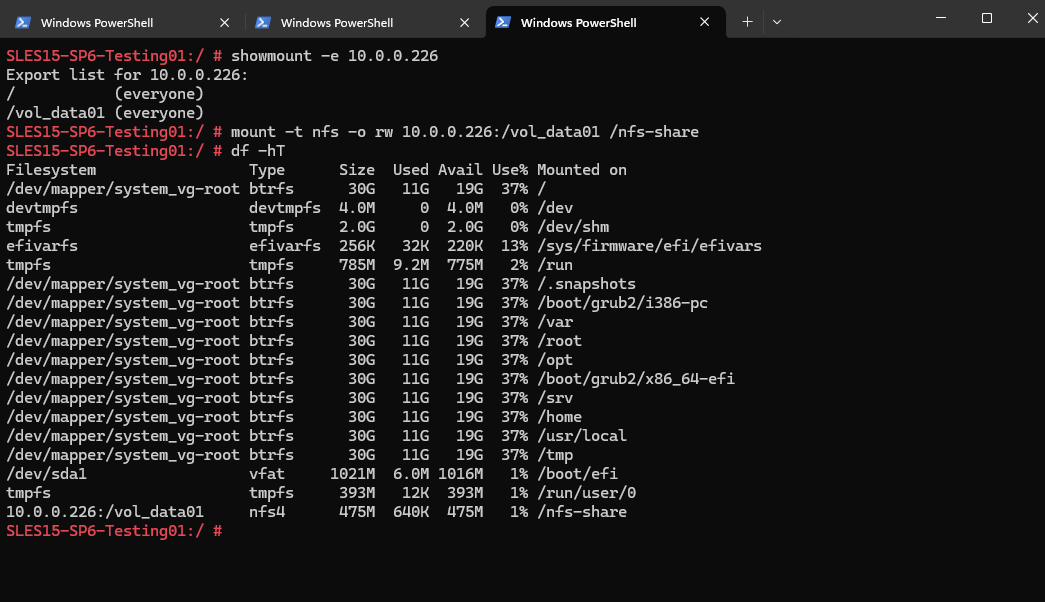
And finally mount the volume to access and write to.
SLES15-SP6-Testing01:~ # mount -t nfs -o rw 10.0.0.226:/vol_data01 /nfs-share
The mount command will mount the exports by default as read-write, just to see immediately if permissions set correctly.
More about how to mount volumes with a specific protocol version you will find in my following post https://blog.matrixpost.net/mastering-the-different-nfs-protocol-versions-and-its-traffic/#mounting_specific_protocol_version
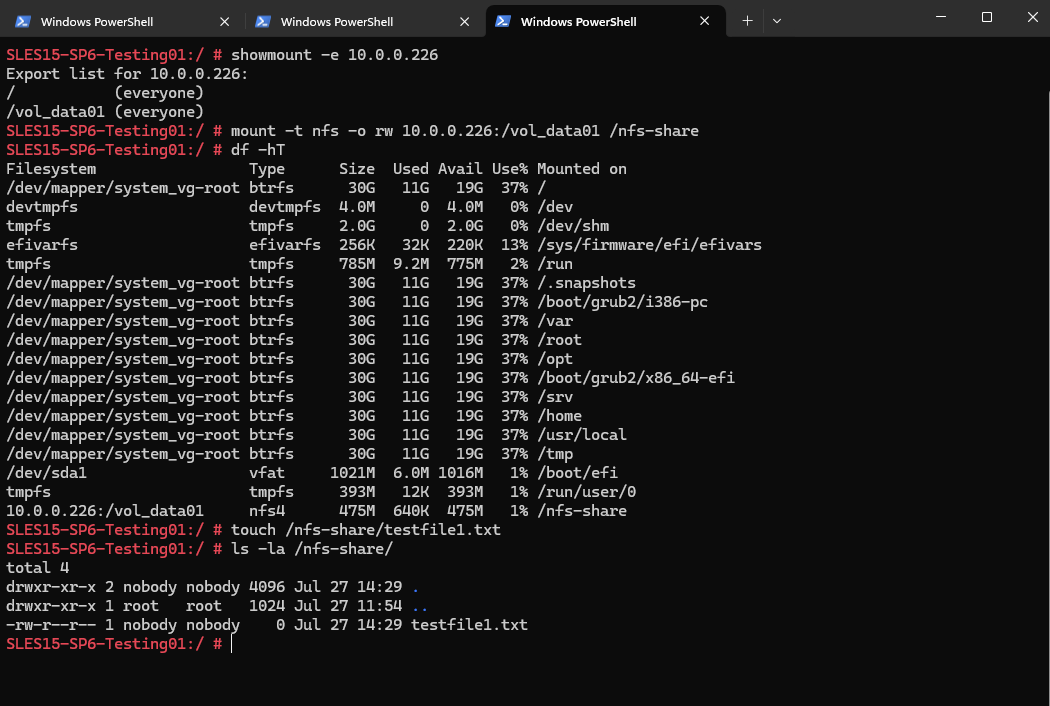
We are also able to create a new file on the mounted NFS export.
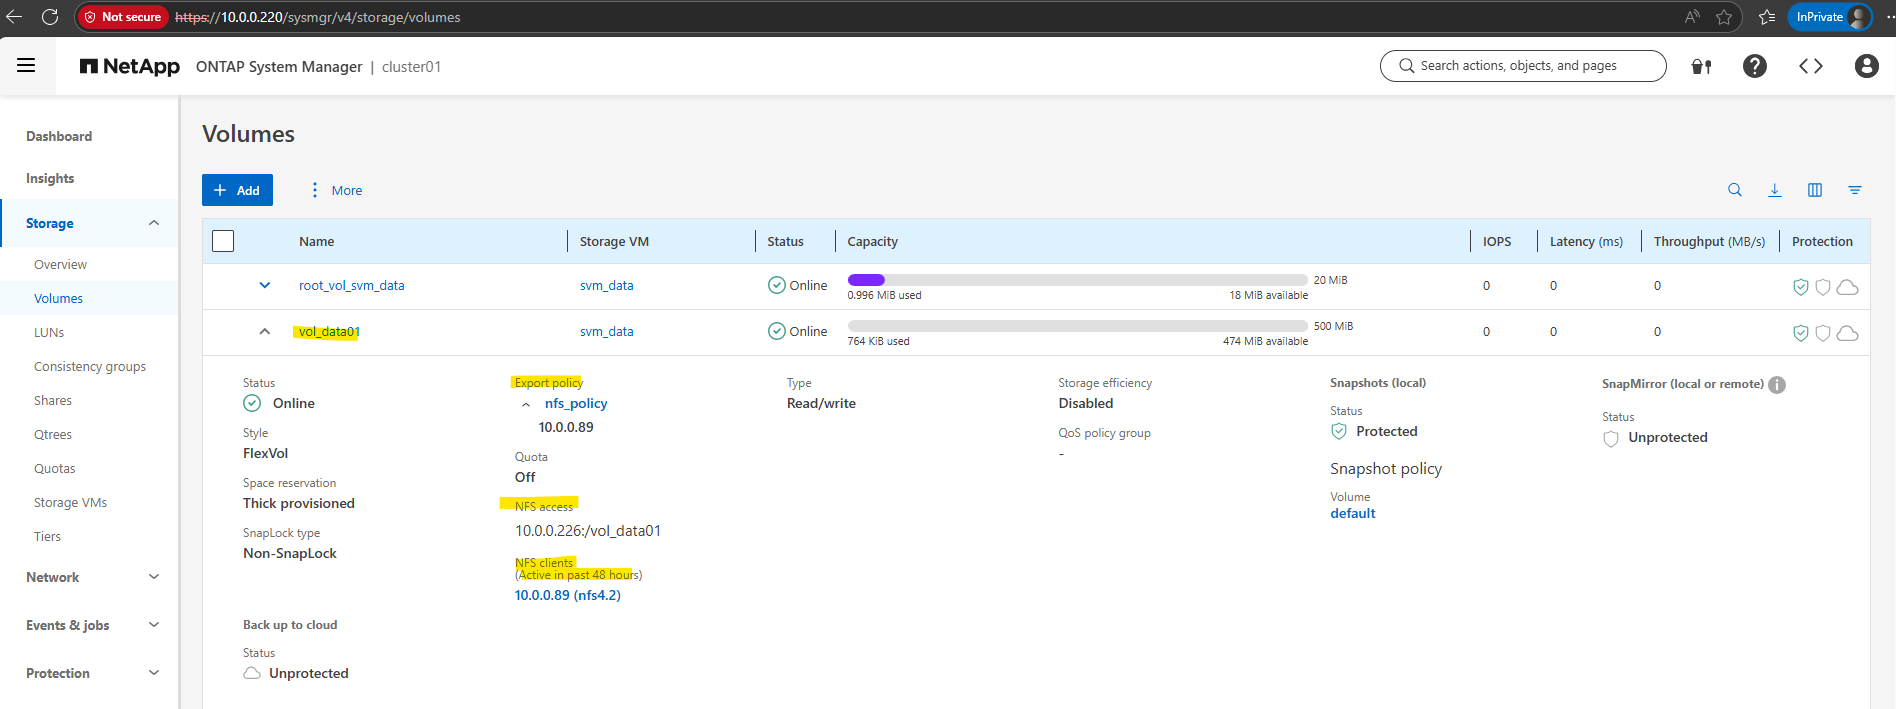
By using the Web UI we can now also see our newly created NFS export.
We can also see here the NFS clients connected the past 48 hours to this NFS export.
More about the NFS protocol you will find in my following post.
In part 3, we will see step by step how to provide block-based storage from a NetApp ONTAP system to VMware vSphere using iSCSI.
Links
NetApp ONTAP 9 simulator download and support
https://kb.netapp.com/on-prem/ontap/Ontap_OS/OS-KBs/Where_can_the_NetApp_ONTAP_9_Simulator_be_downloadedONTAP 9 Documentation
https://docs.netapp.com/us-en/ontap/index.htmlONTAP licensing overview
https://docs.netapp.com/us-en/ontap/system-admin/manage-licenses-concept.html#licenses-included-with-ontap-one