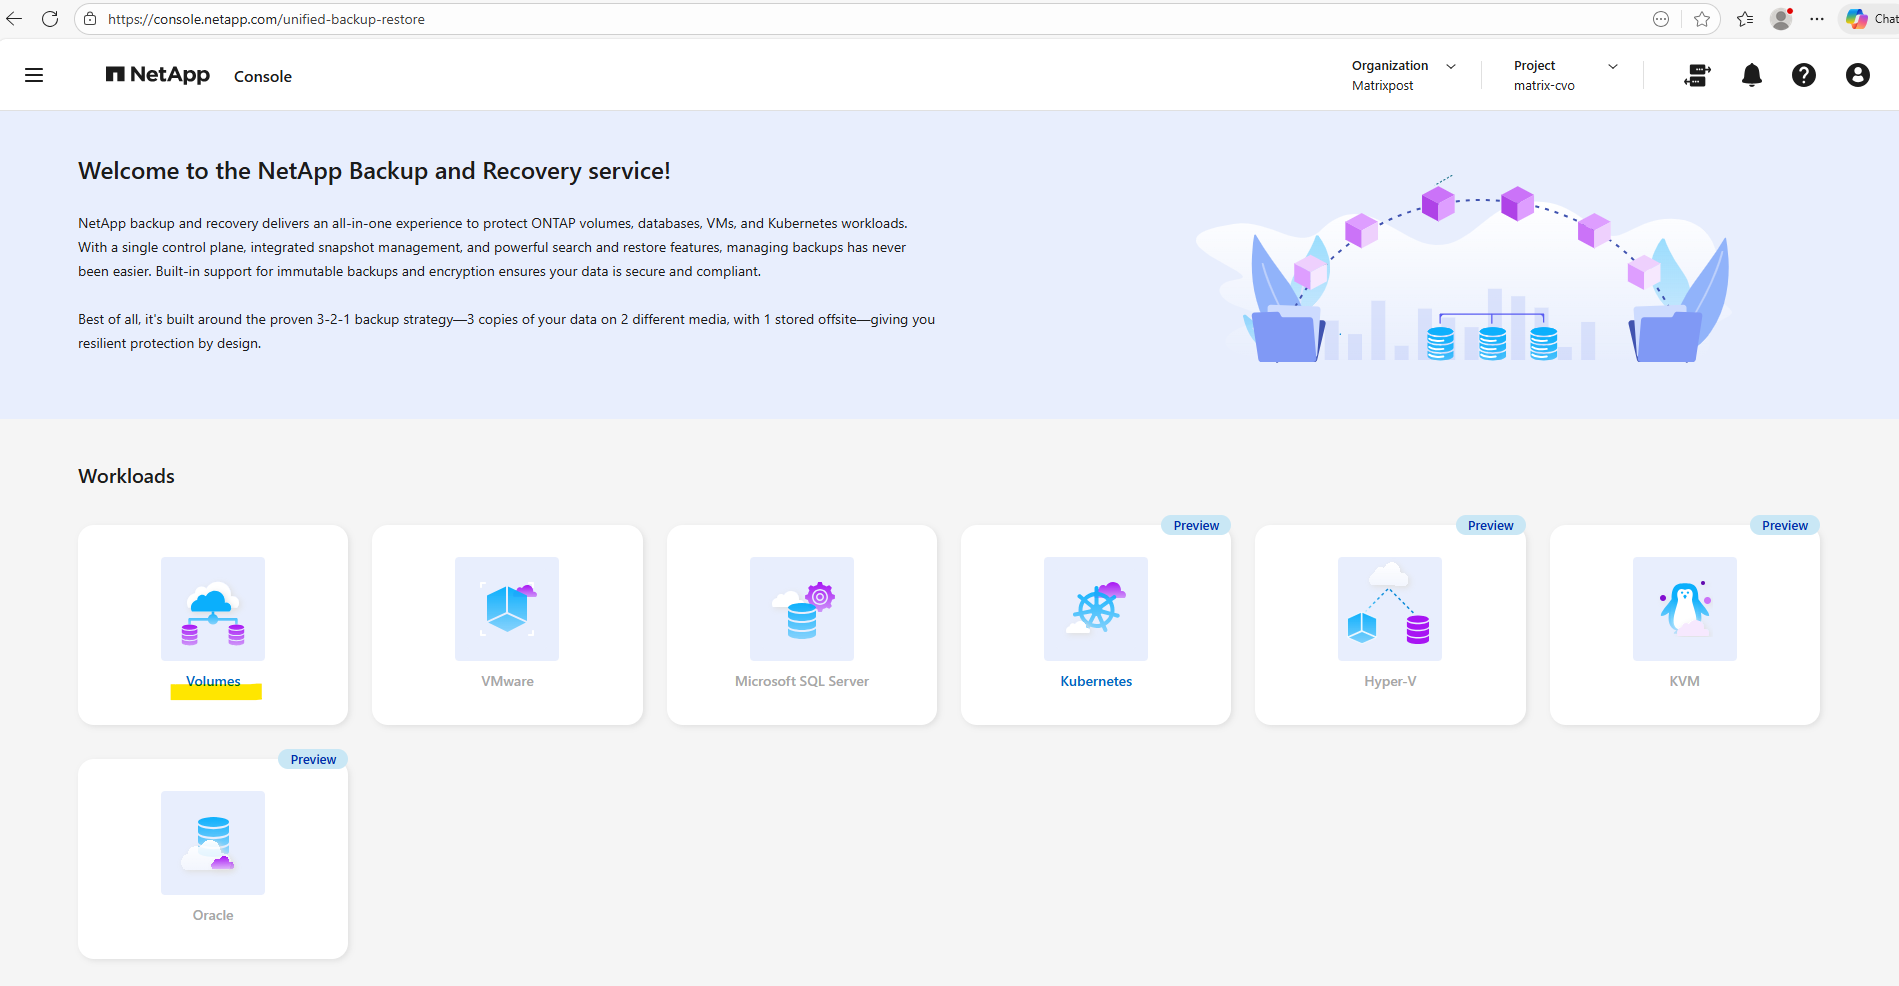
Deploying NetApp Cloud Volumes ONTAP (CVO) in Azure using NetApp Console (formerly BlueXP) – Part 5 – Backup and Recovery
In the previous parts of this series, we successfully stood up our Cloud Volumes ONTAP (CVO) environment and configured our data protocols. However, a storage solution is only as good as its last backup. In this part we dive into the deployment of NetApp Backup and Recovery (formerly Cloud Backup Service).
In this part we will configure snapshot and backup policies, validate protection workflows, and perform real restore operations to ensure data can be recovered quickly and reliably.
Understanding these capabilities is essential for designing storage environments that remain predictable even in failure scenarios.
In Part 6 we walk through the process of performing a Non-Disruptive Upgrade (NDU) of a NetApp Cloud Volumes ONTAP (CVO) HA pair in Microsoft Azure.
In Part 7 we dive into NetApp AutoSupport, the critical telemetry system that acts as the heartbeat of our CVO instance.
In Part 8 we focus on Disaster Recovery and explore how to protect Cloud Volumes ONTAP in Azure against outages and unexpected failures.
Enable Backup and Recovery
First we need to enable Backup and Recovery in the NetApp Console (formerly BlueXP) to establish a comprehensive data protection strategy for our Cloud Volumes ONTAP deployment.
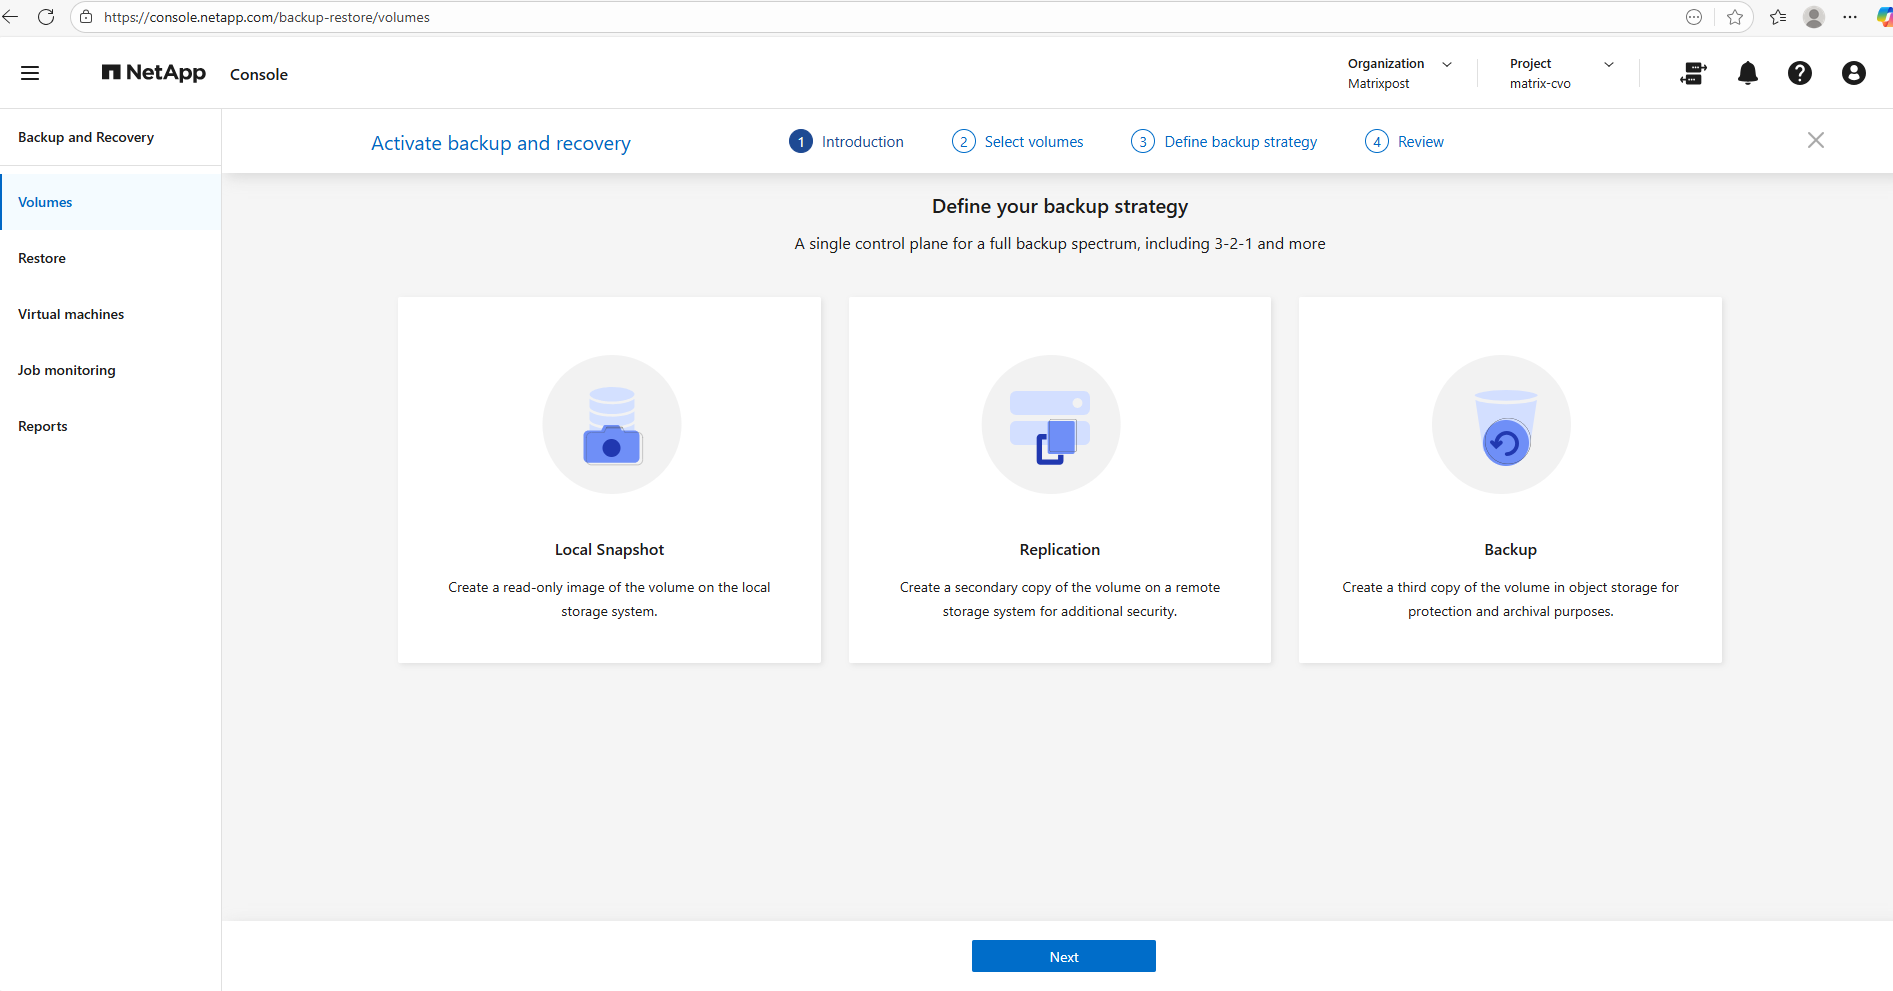
We configure local Snapshot copies for fast, space-efficient restores and define backup policies to object storage for long-term retention and protection against data loss.
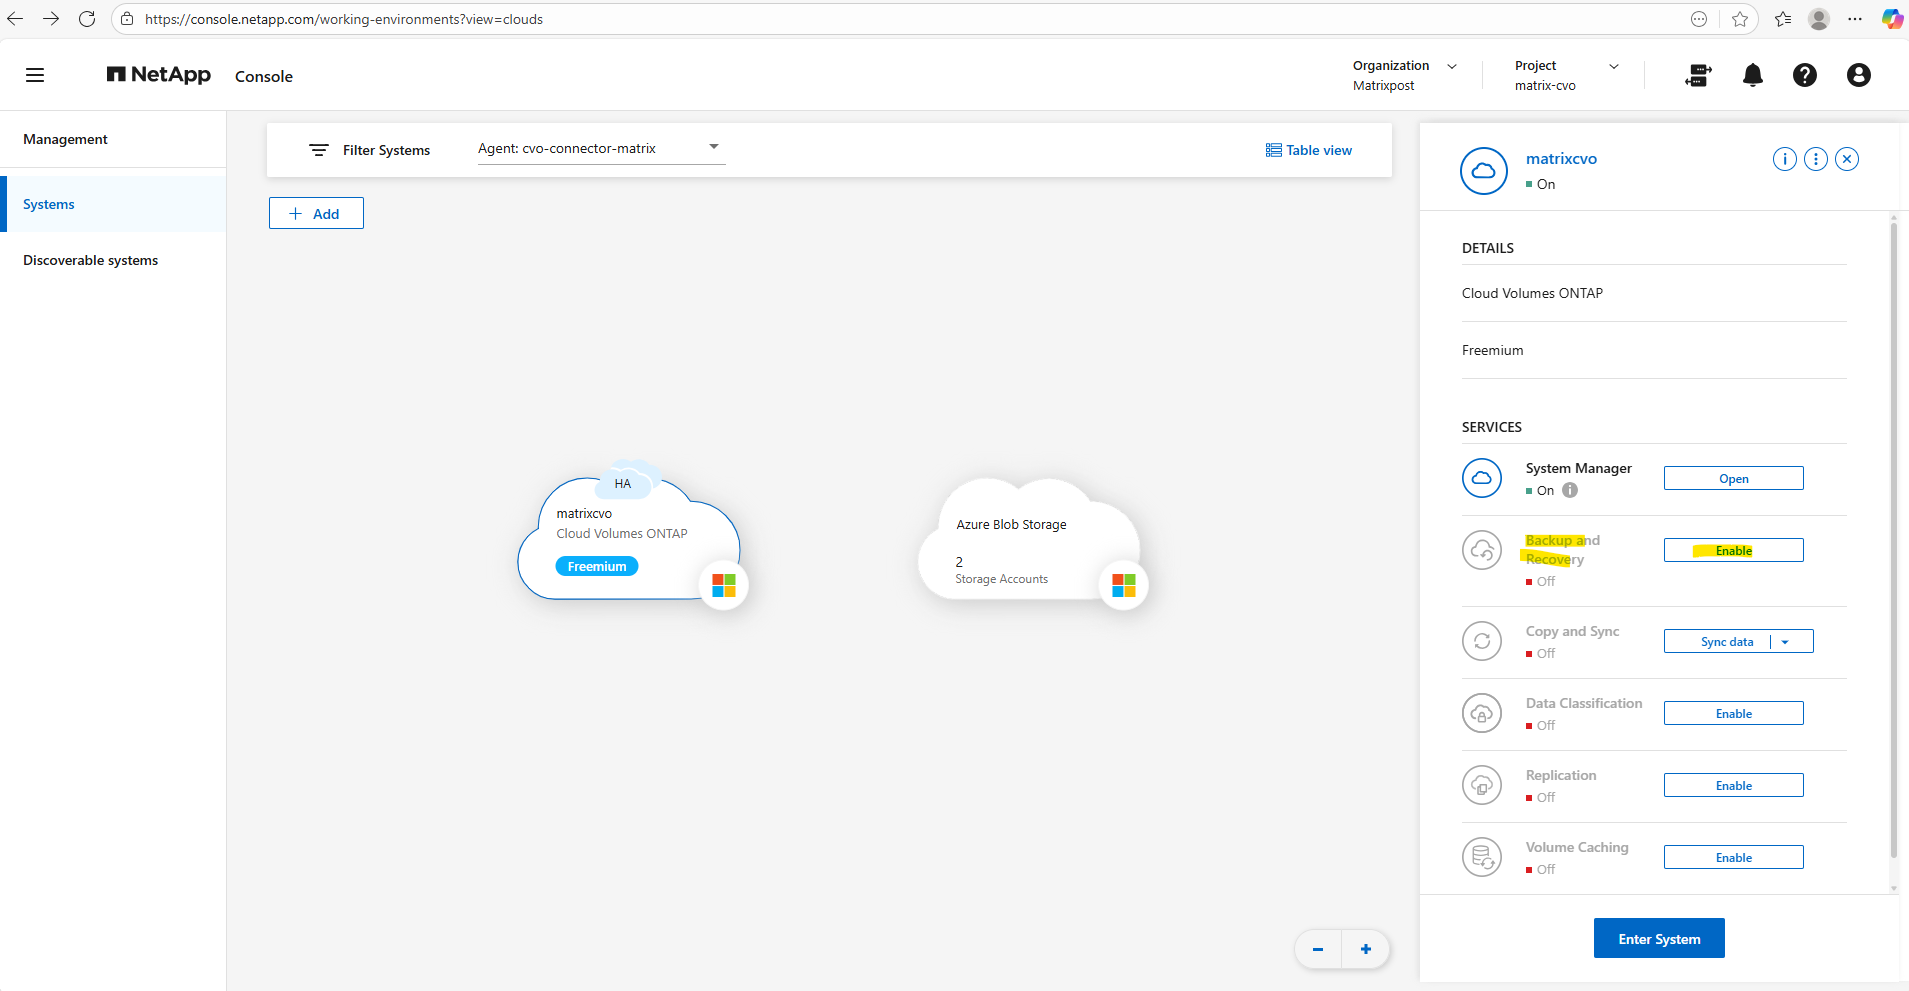
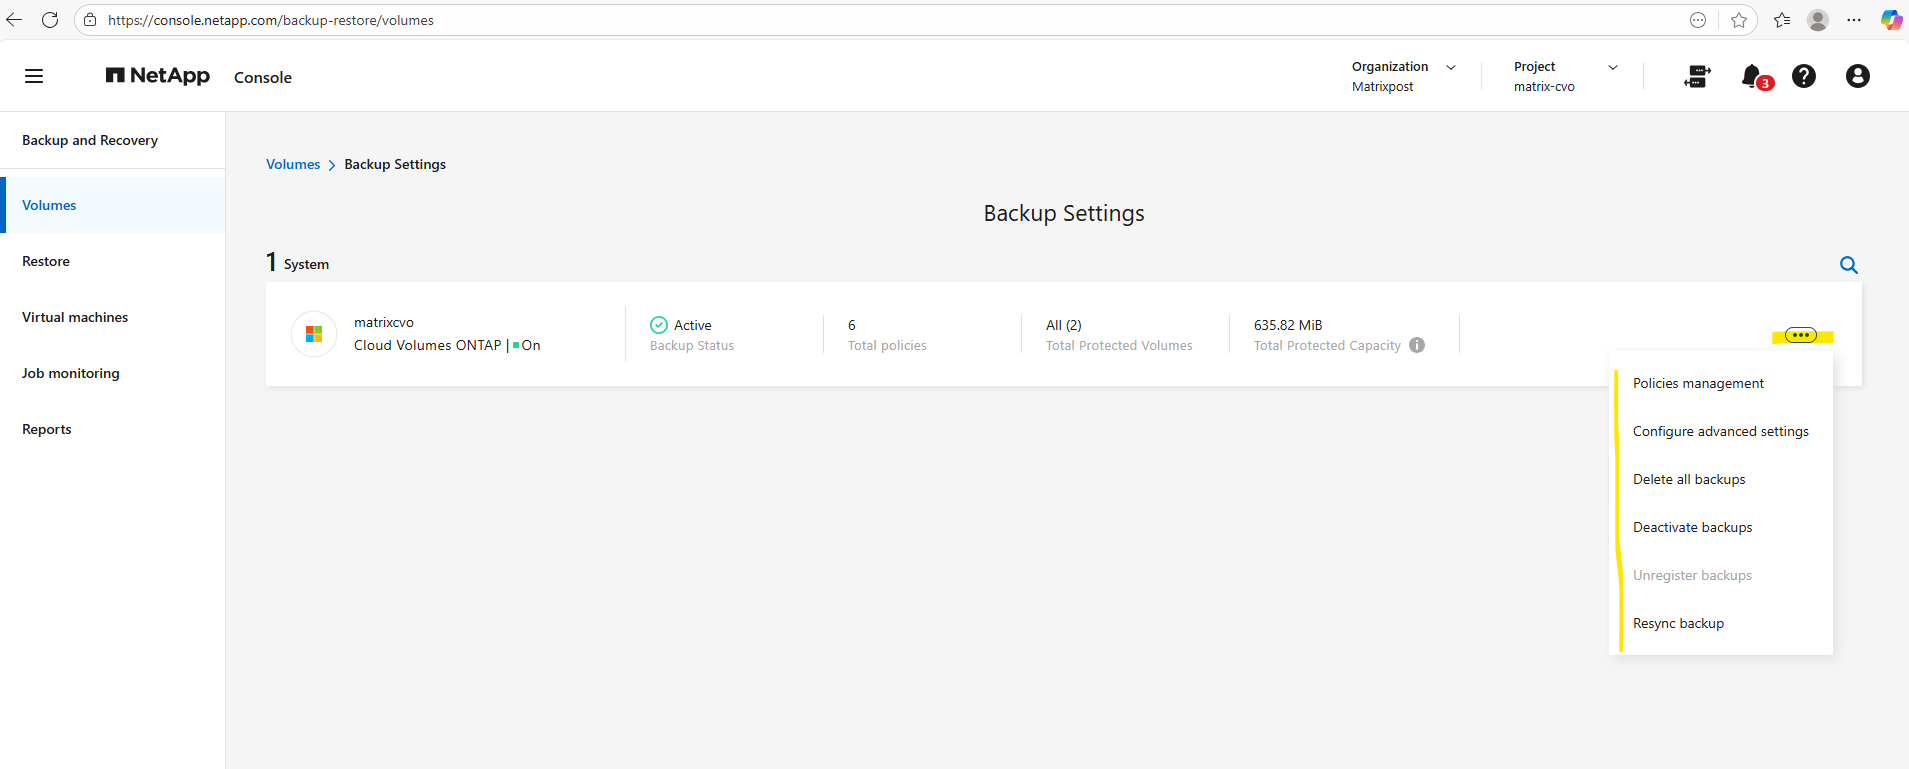
In the NetApp console navigate to Storage -> Management, select the CVO system you want to enable Backup and Recovery and on the shown up right bar click on Enable for Backup and Recovery as shown below.
Select the volumes you want to protect and click on Next.
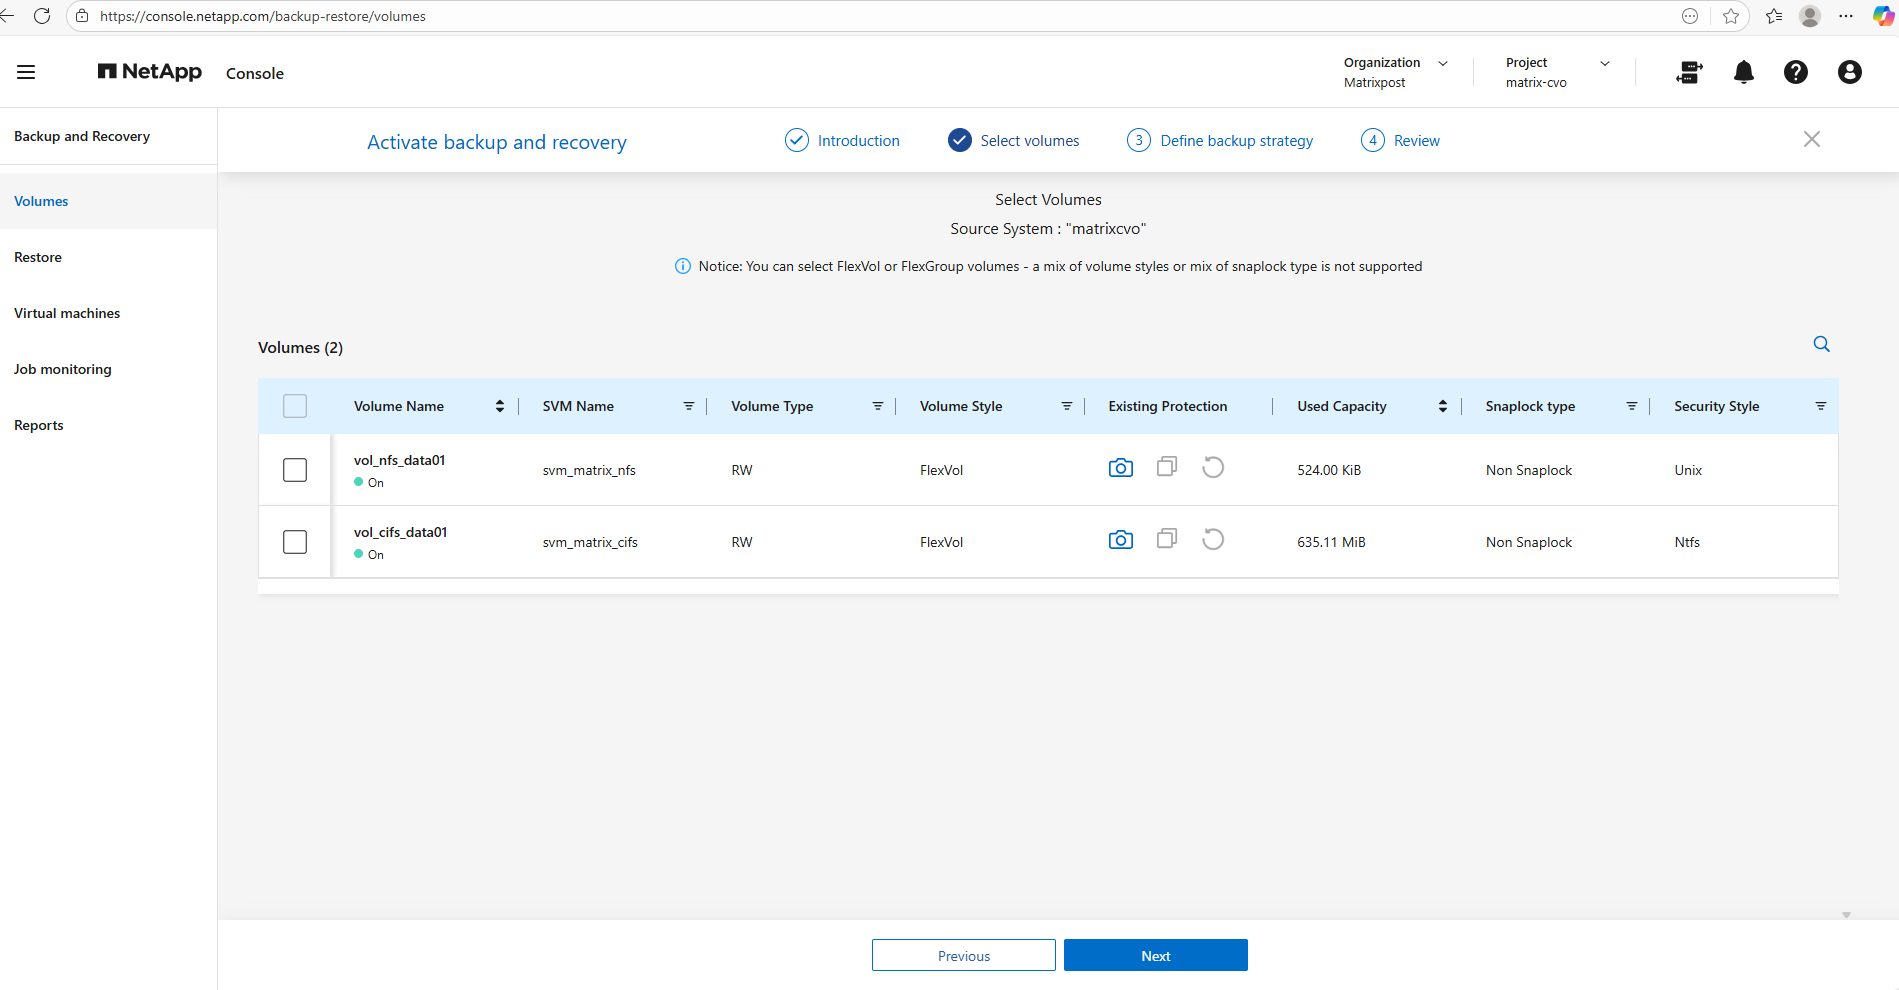
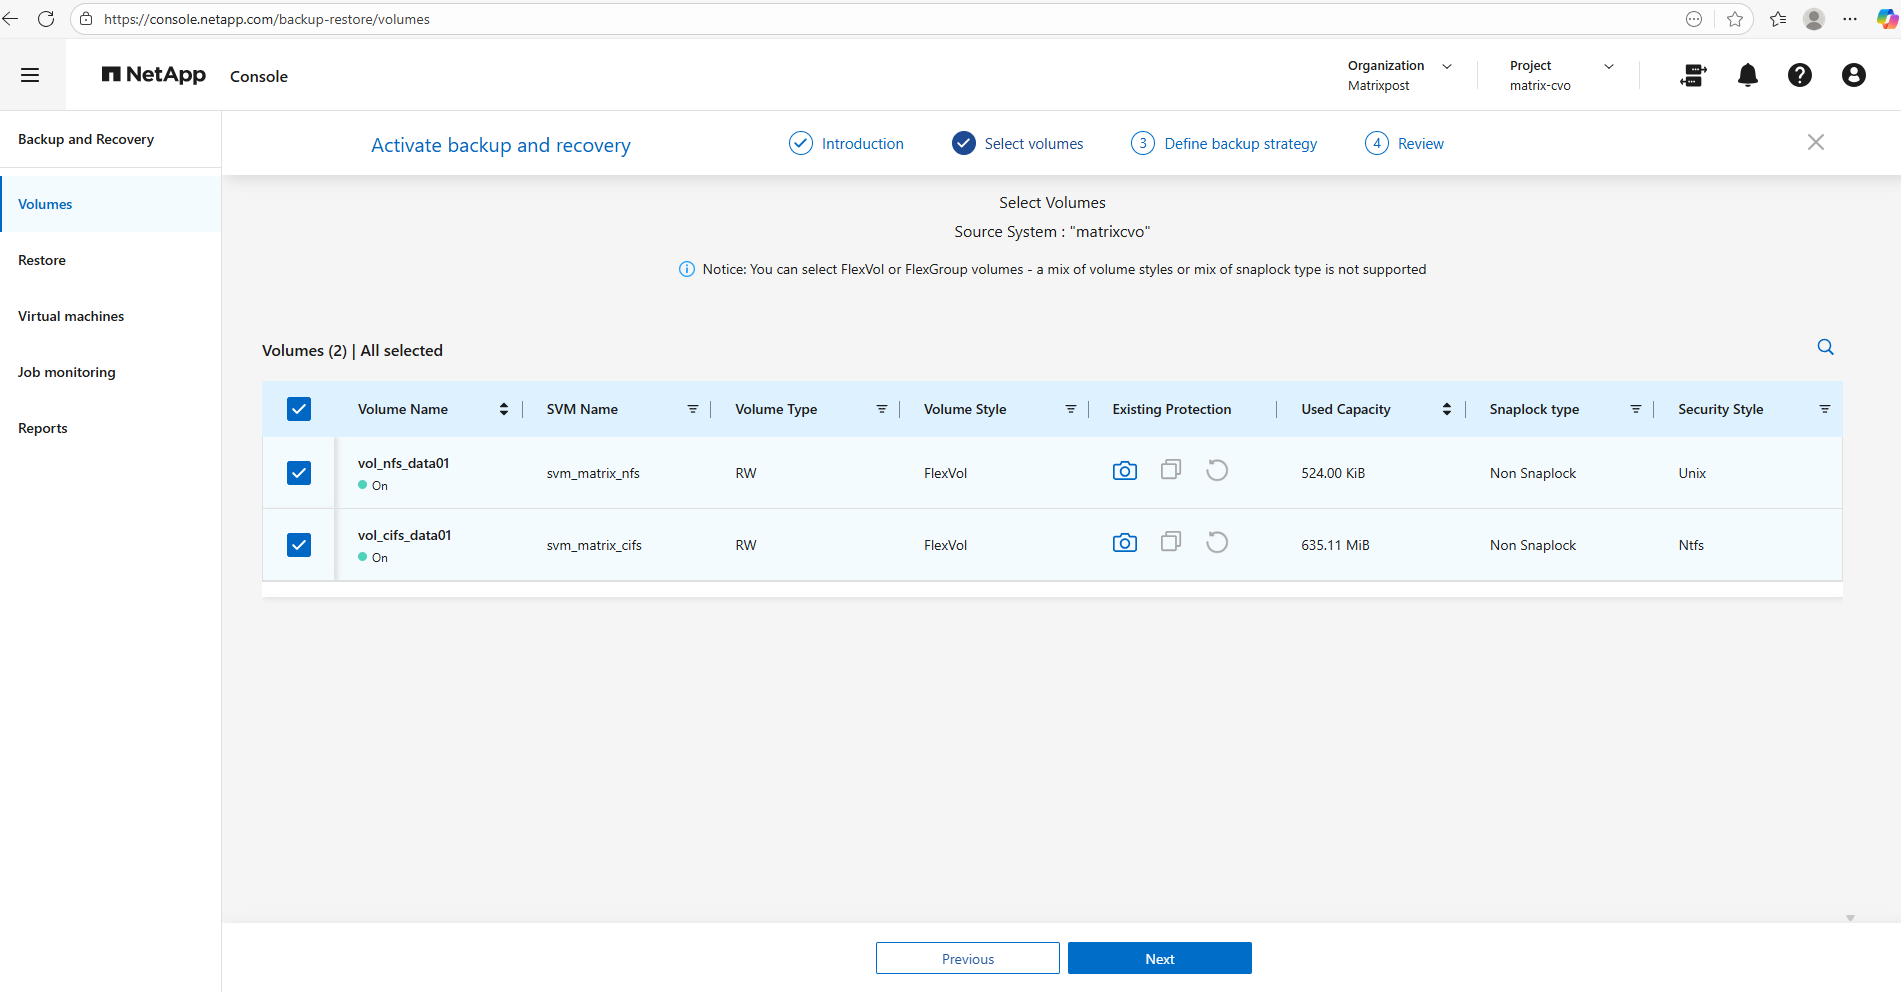
I will select both volumes below I created so far, the volume for NFS exports and the volume for CIFS shares.
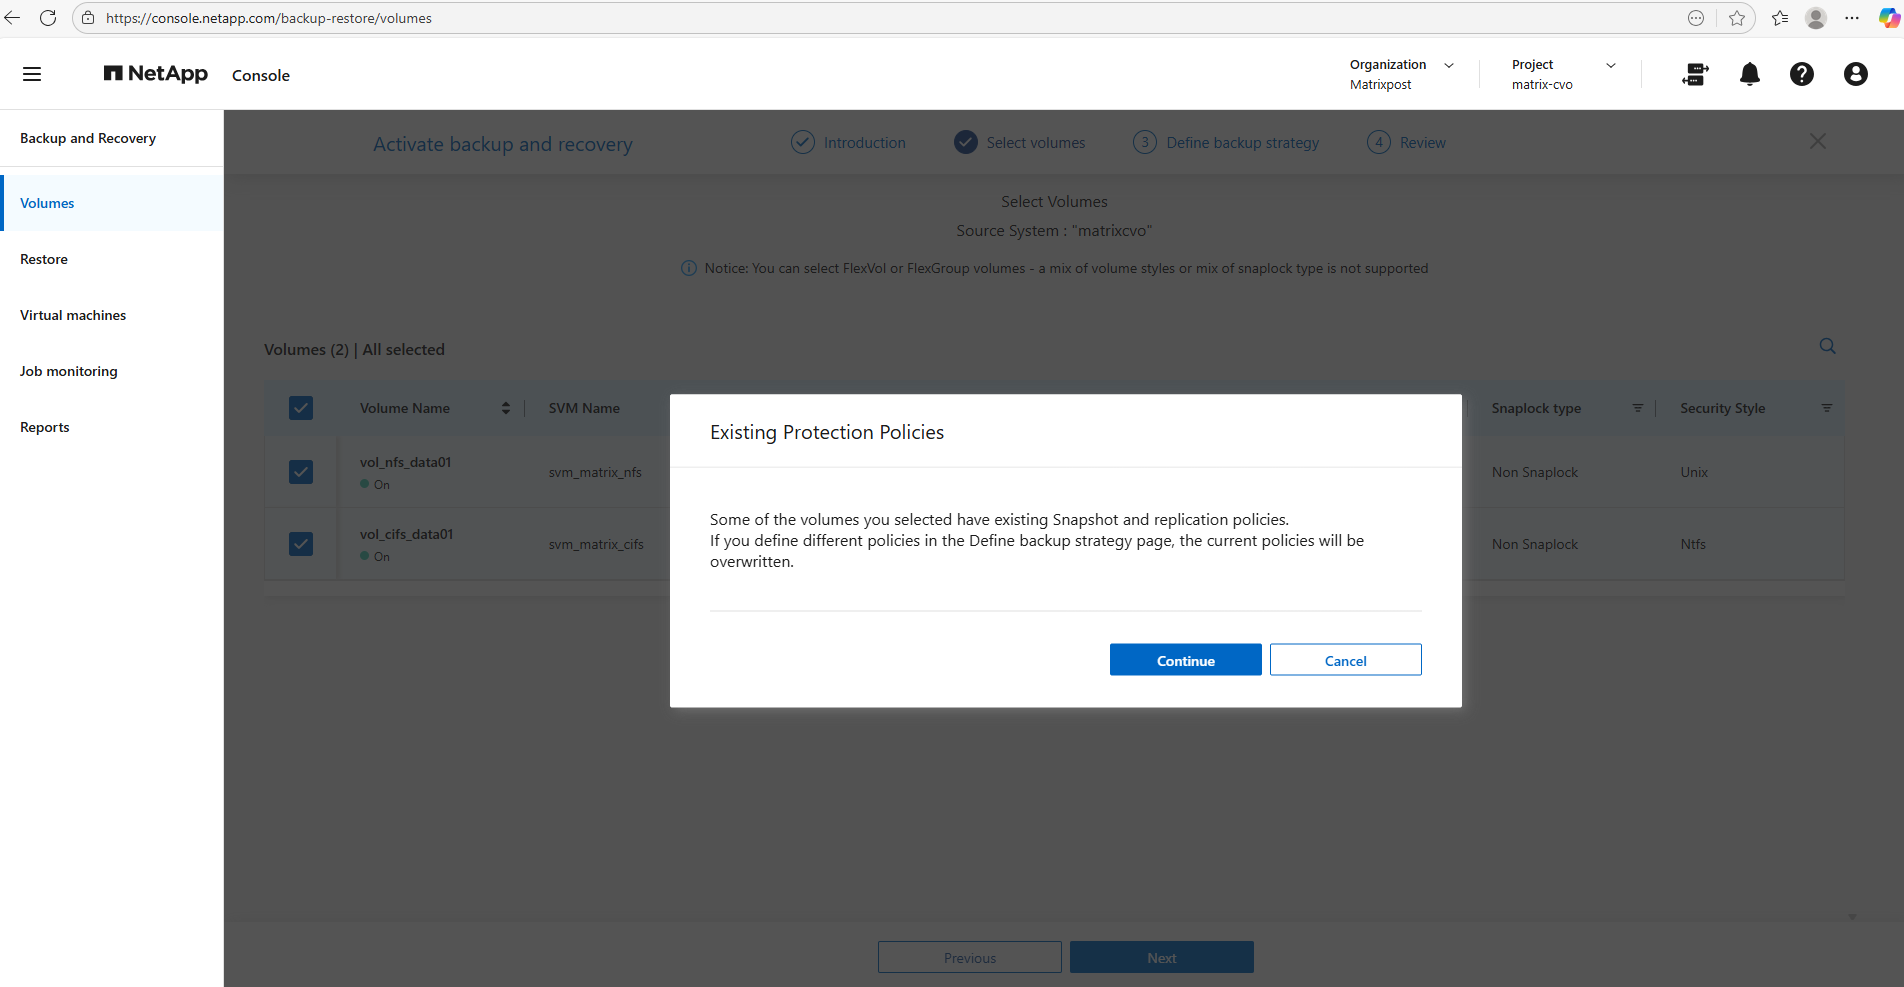
When selecting the volumes above to protect, we may see a notification like below stating that some volumes already have Snapshot and replication policies assigned.
This warning indicates that any policies defined in the Define Backup Strategy step will replace the existing configurations, ensuring that the selected volumes follow a consistent protection model.
Before proceeding, it is recommended to review the current policies to avoid unintentionally changing retention settings or overwriting an established data protection approach.
- Local Snapshots: If you already had a policy (e.g., “keep 5 daily snapshots”), the wizard will overwrite that with whatever you select in the “Local Snapshots” step of the wizard.
- Backup (Cloud): This adds the rule to send those snapshots to Azure Blob storage (the part that costs ~$0.05/GiB).
- Policy Conflict: If you click Continue and finish the wizard, the NetApp console will push a new configuration to the CVO instance. Existing snapshots aren’t usually deleted immediately, but the schedule that creates them will change
The “Backup” vs. “Snapshot” Distinction: * Snapshots are local (stored on the CVO disks). They are fast but don’t protect you if the CVO disk/instance fails.
Backups are the ones sent to Azure Blob. This is what triggers the extra billing.
CIFS/NFS Differences: * For your CIFS (SMB) shares, snapshots are what allow Windows users to use the “Previous Versions” tab to recover files. If you change the policy here, just ensure you keep enough “Local Snapshots” so users can still do self-service recovery without you having to pull data back from the Cloud (which costs money).
Configure and Activate Backups and Local Snapshots
Now we need to choose which protection methods to enable, local Snapshots, replication, and backup, and either assign existing policies or create new ones aligned with our retention requirements.
We also provide the necessary details for the NetApp Console to automatically deploy the Azure Storage account, configure network access such as a private endpoint, and finalize the setup by activating the backup.
All protection options are selected by default. Select the options that you want to use for this system.
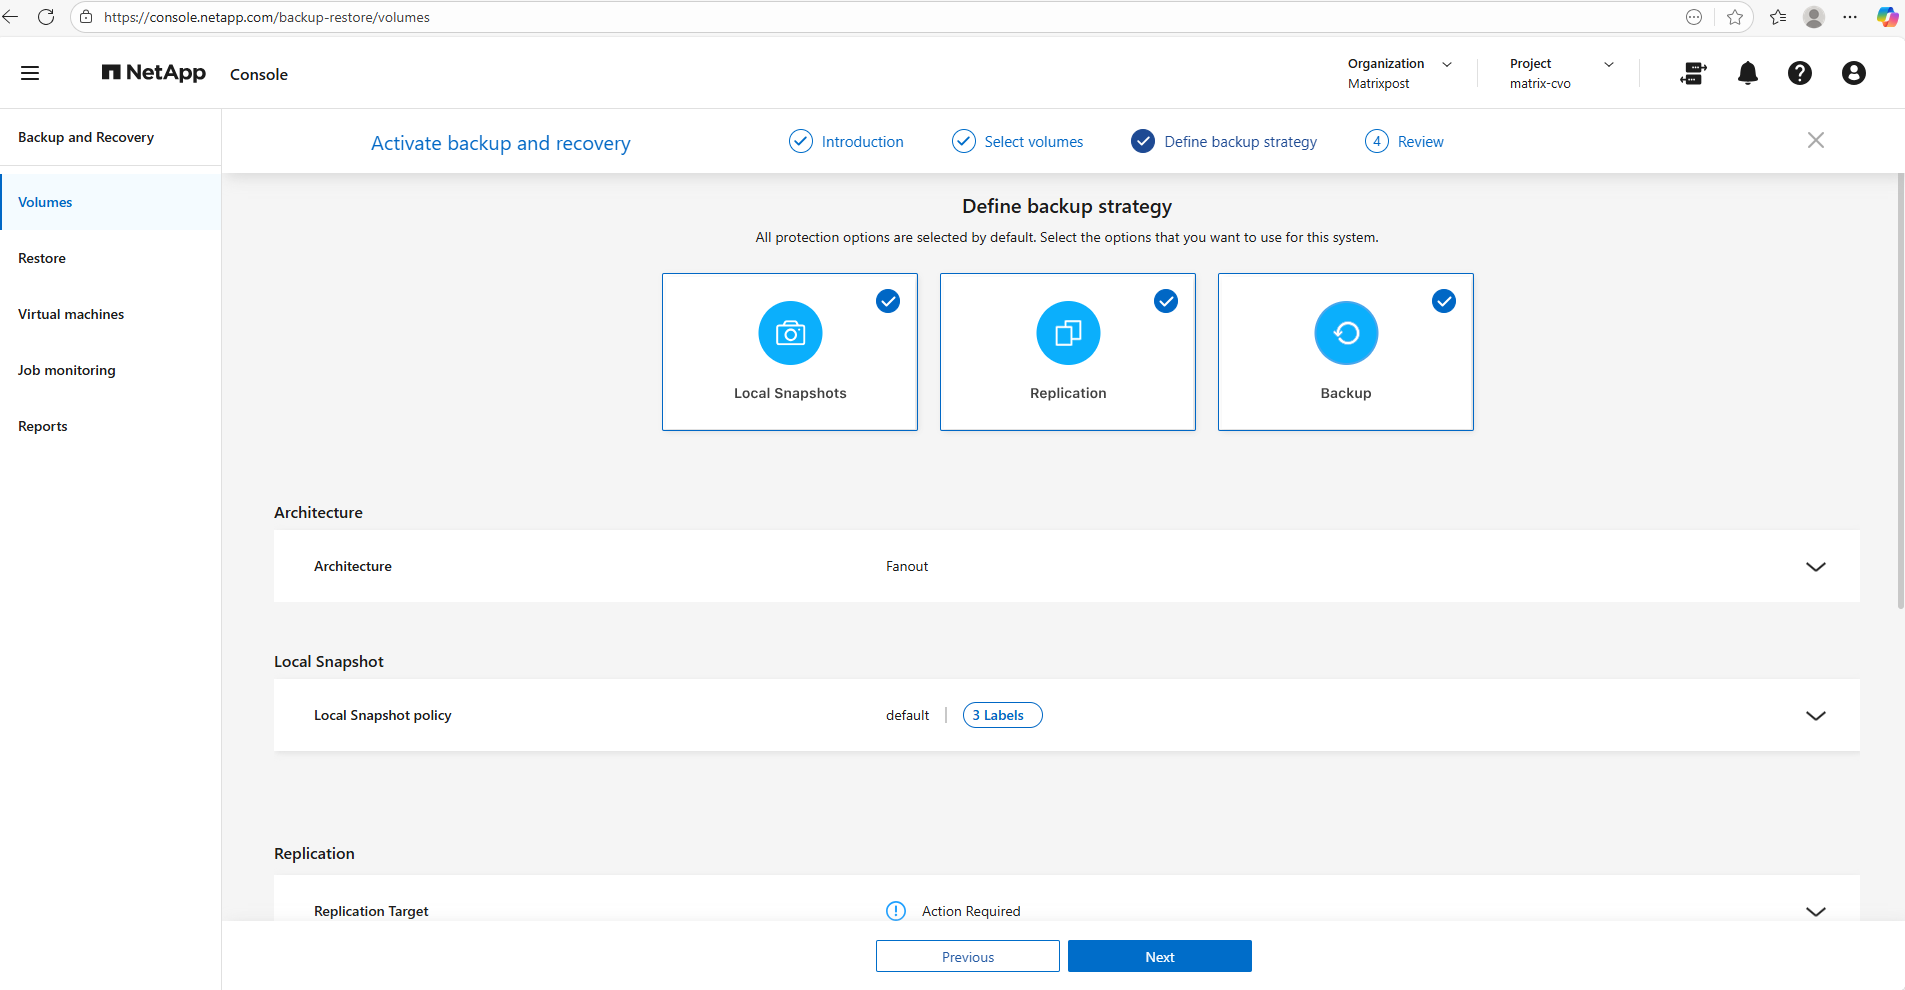
I will just use local snapshots and backups below.
Replication is intentionally skipped in this lab, as it is typically used for cross-system disaster recovery scenarios and our setup currently consists of a single CVO instance.
If you uncheck Local Snapshots but leave Backup checked, ONTAP will still create a snapshot temporarily to move the data to the cloud, but it won’t keep a permanent copy on your CVO disks for fast recovery.
Replication: This is for sending data to another ONTAP system (DR). Since you likely only have one CVO instance, you should uncheck this one to keep things simple.
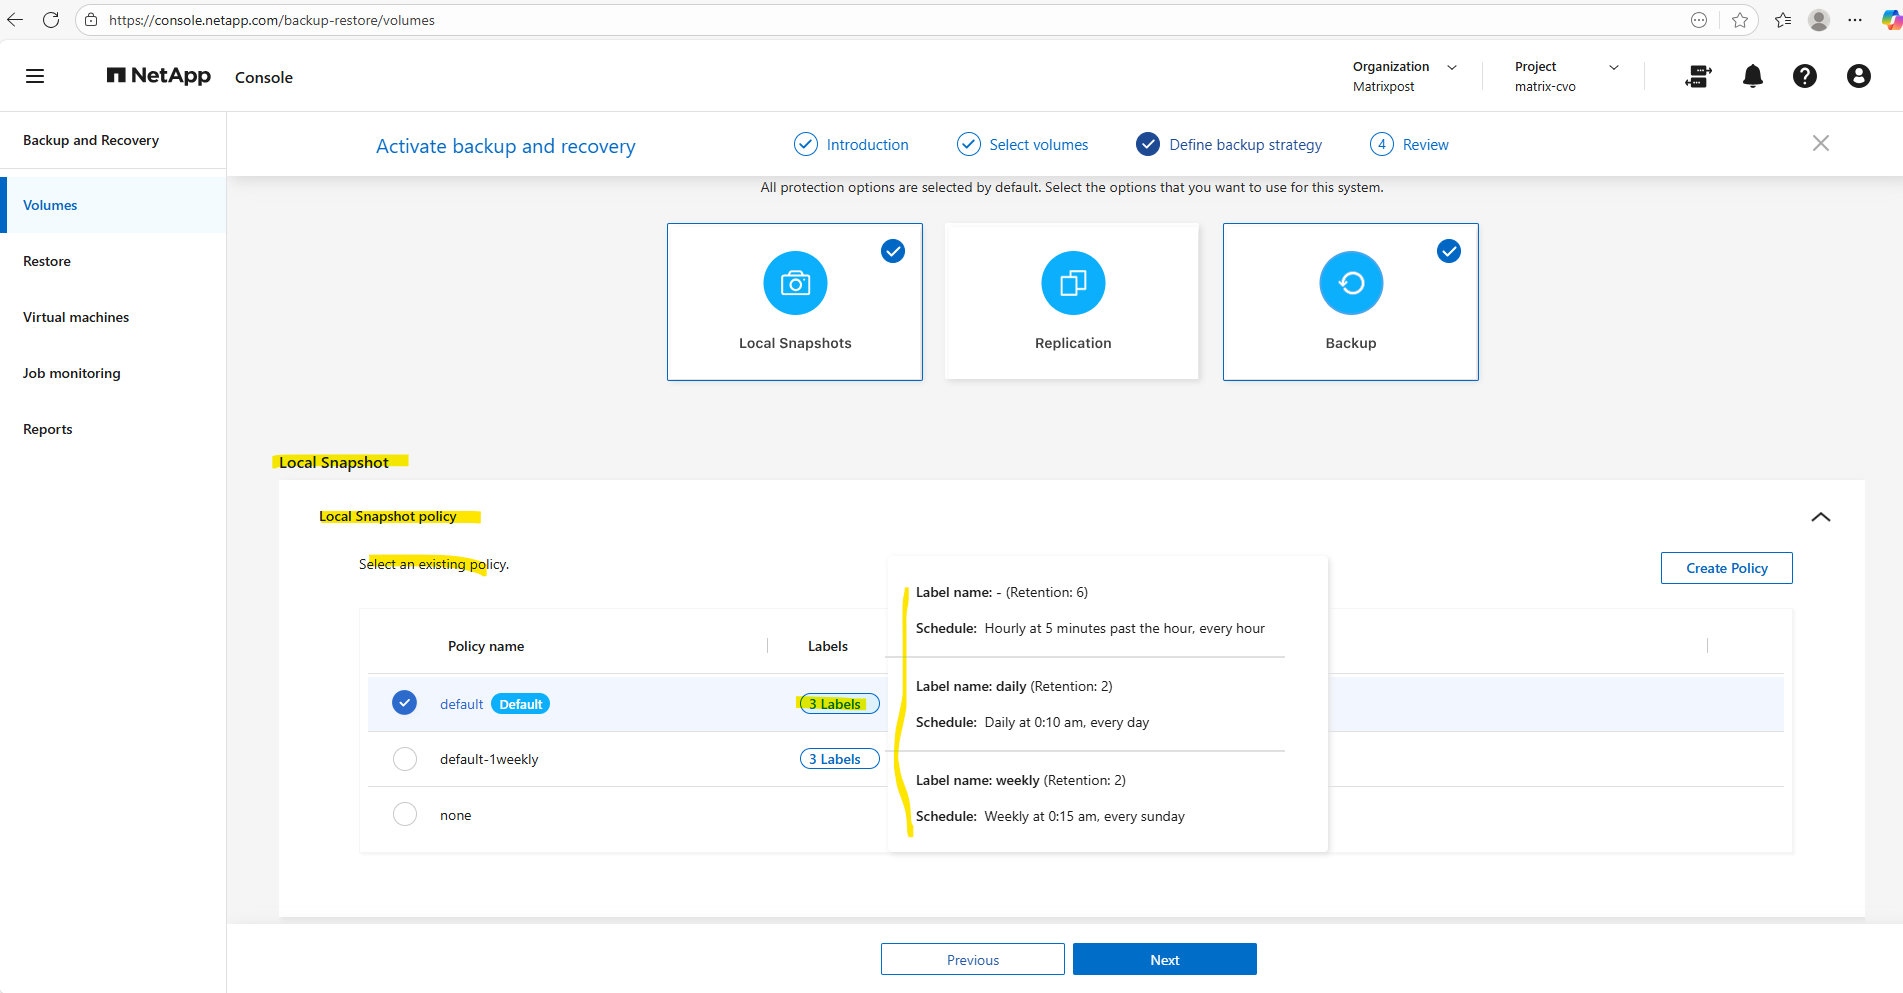
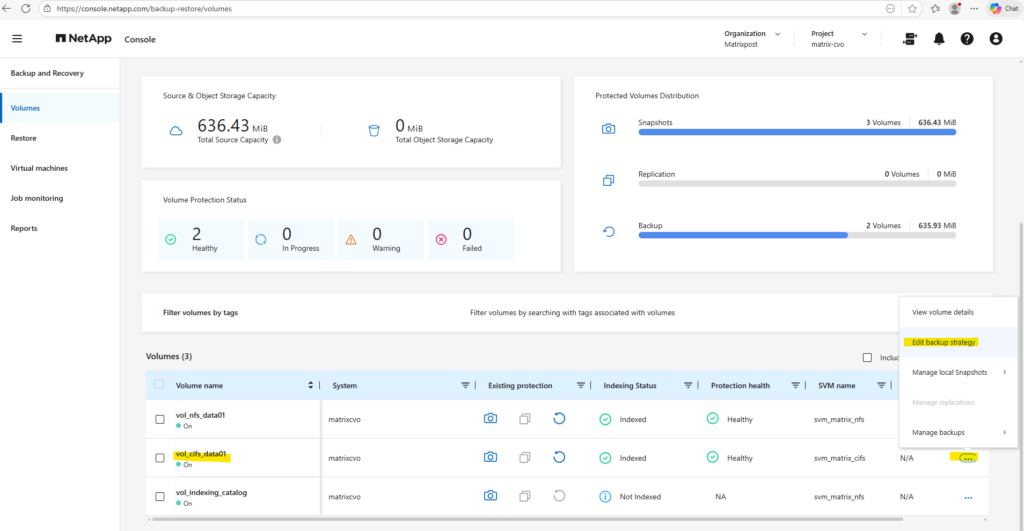
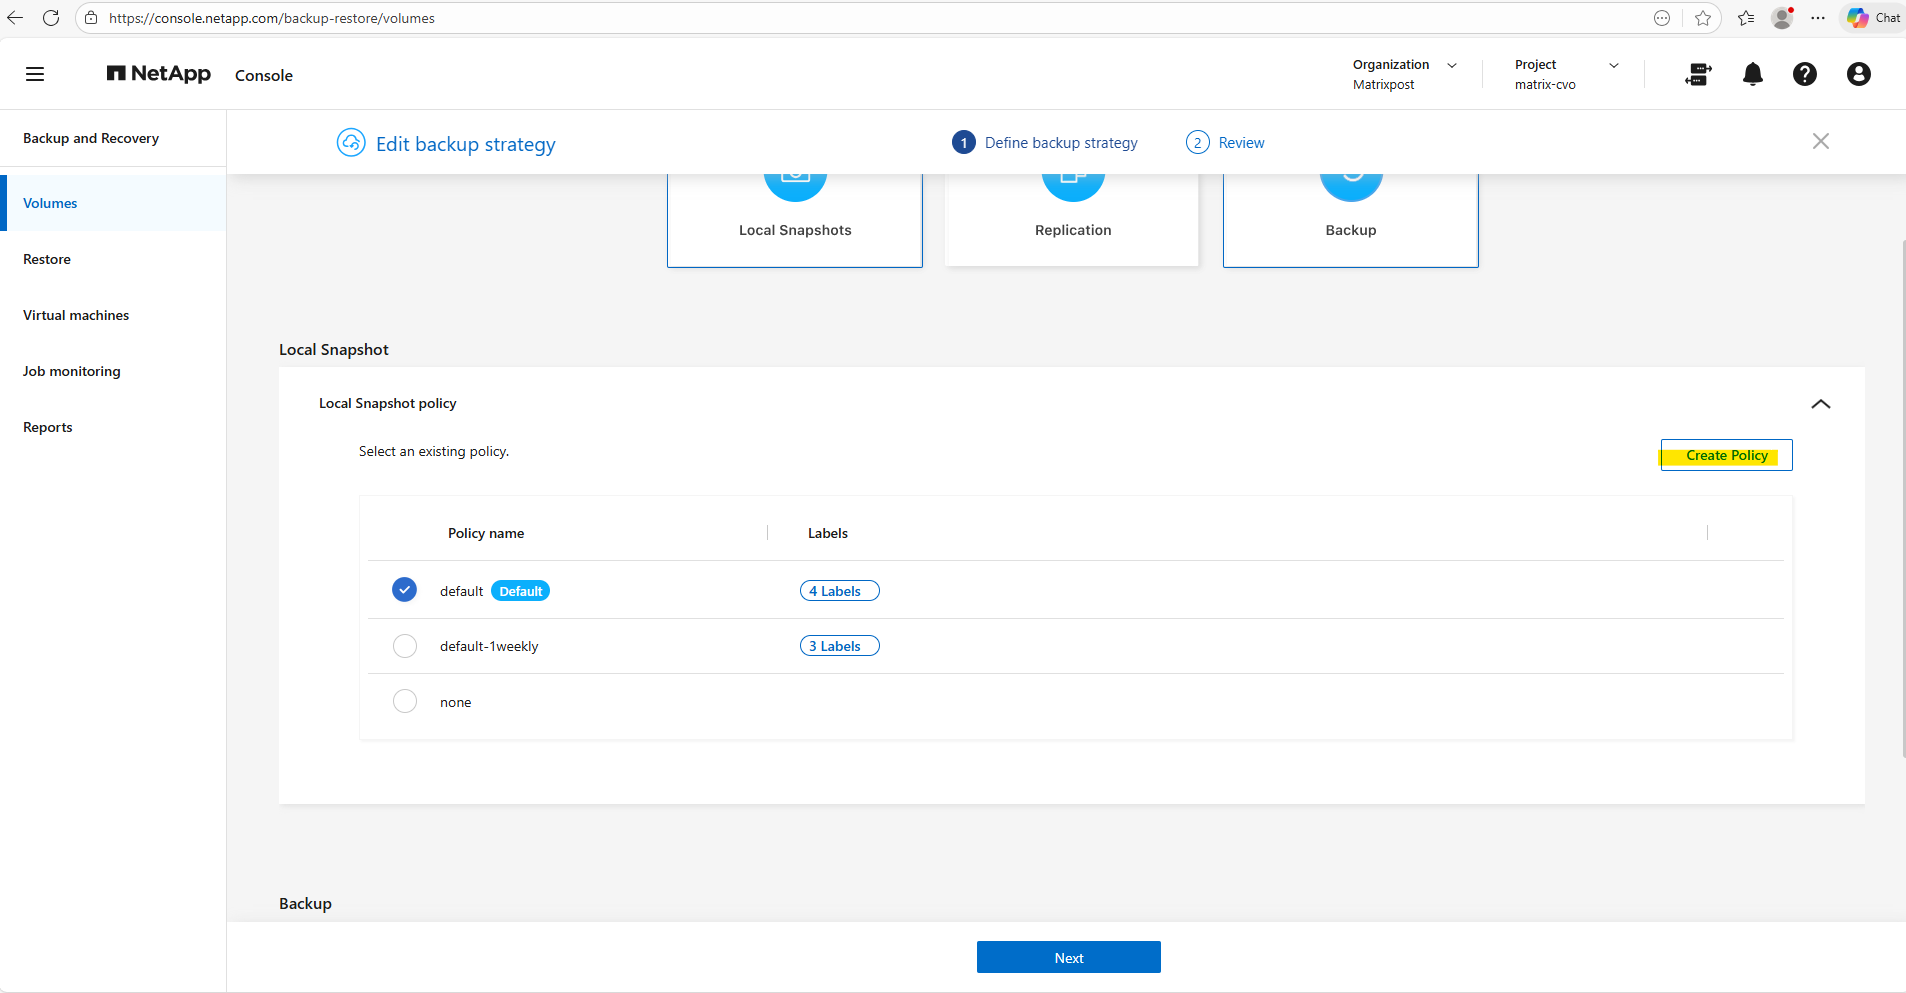
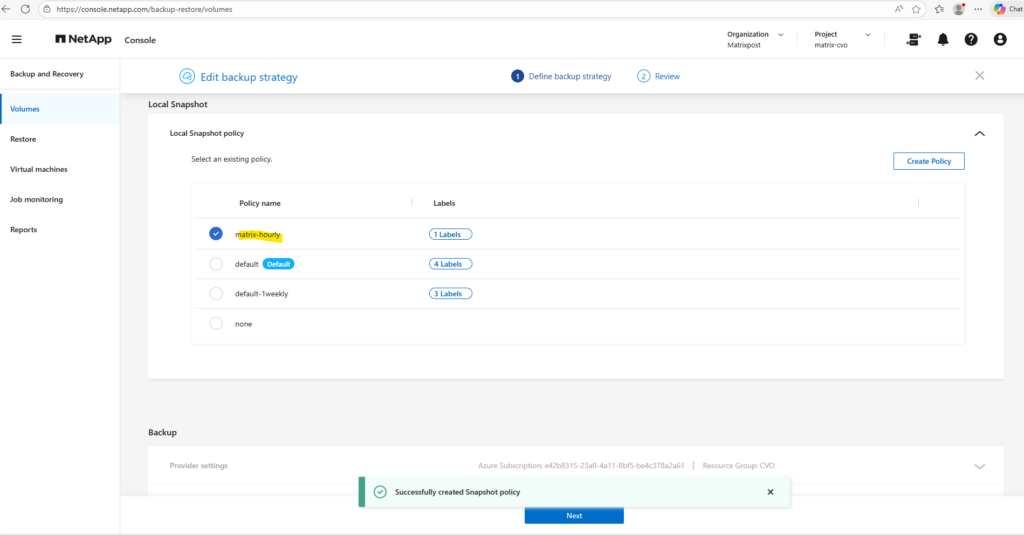
I will leave the default policy with the settings you can see below when moving the mouse over the corresponding label. By clicking on the Create Policy button on the right, we can create a new custom policy.
Those labels are how ONTAP links a specific schedule (when it runs) to a retention (how many it keeps).
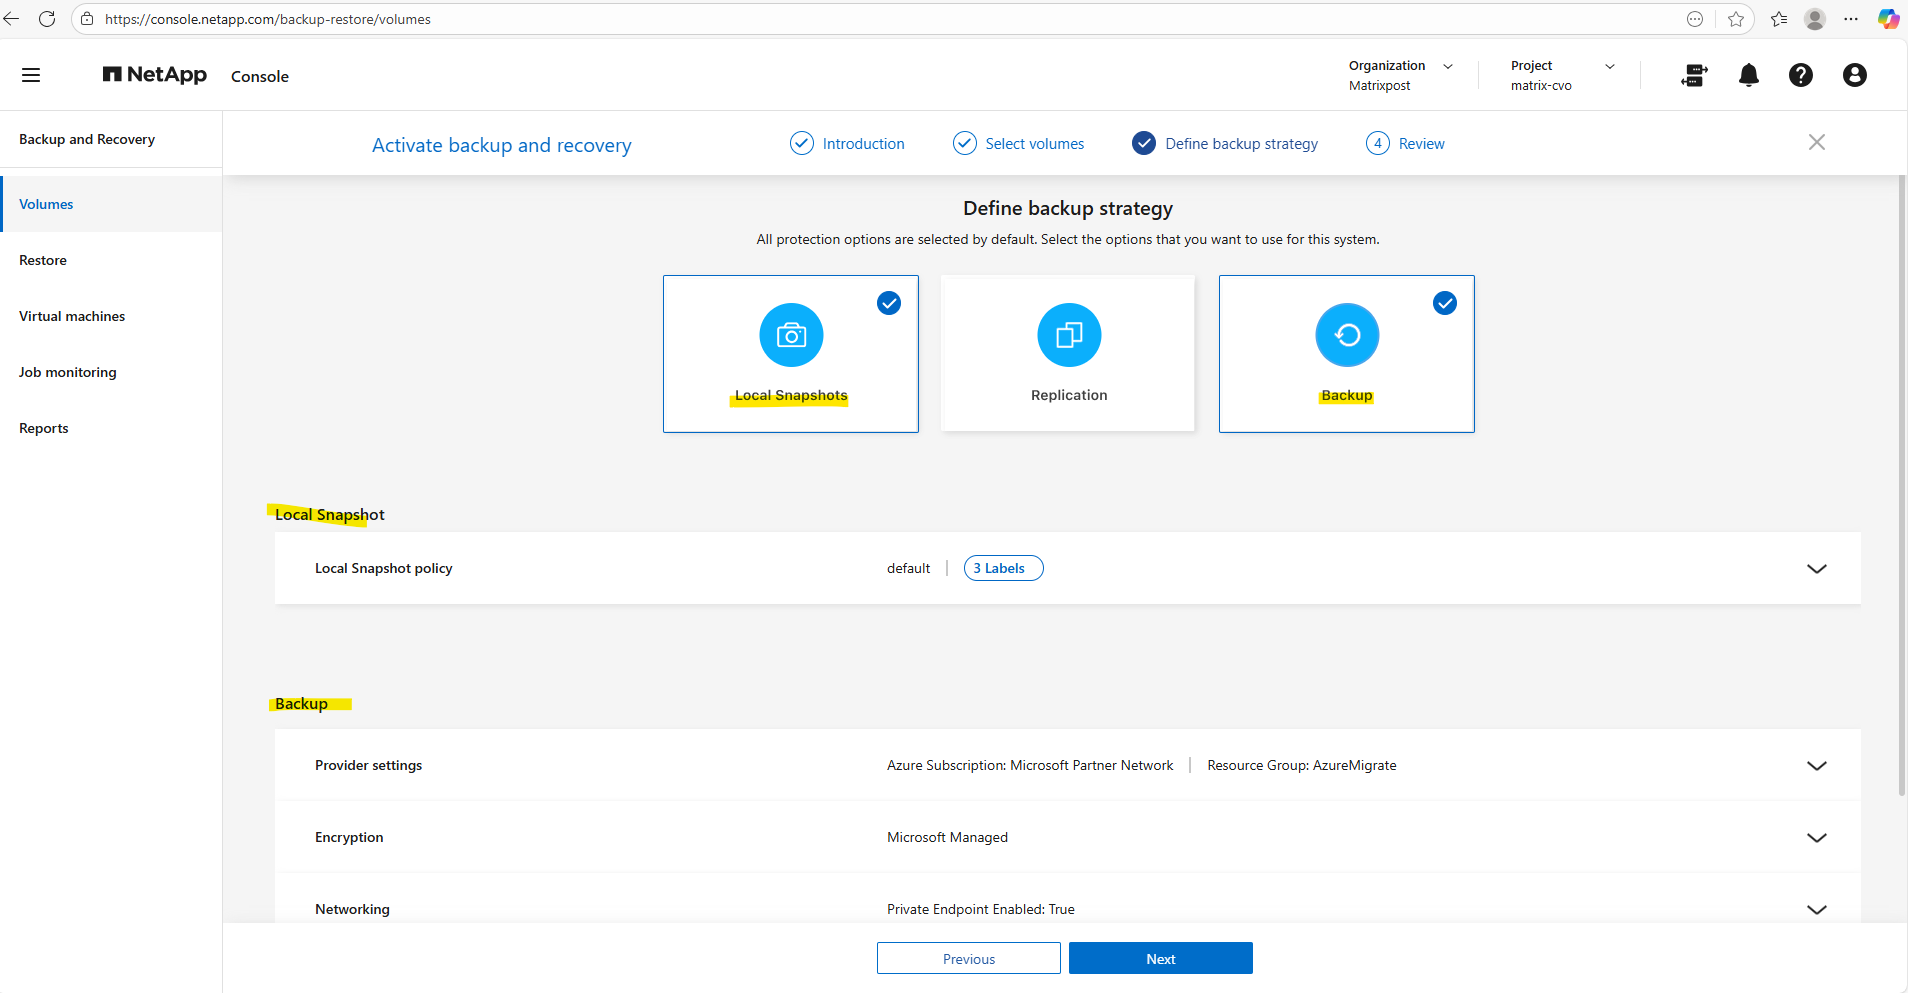
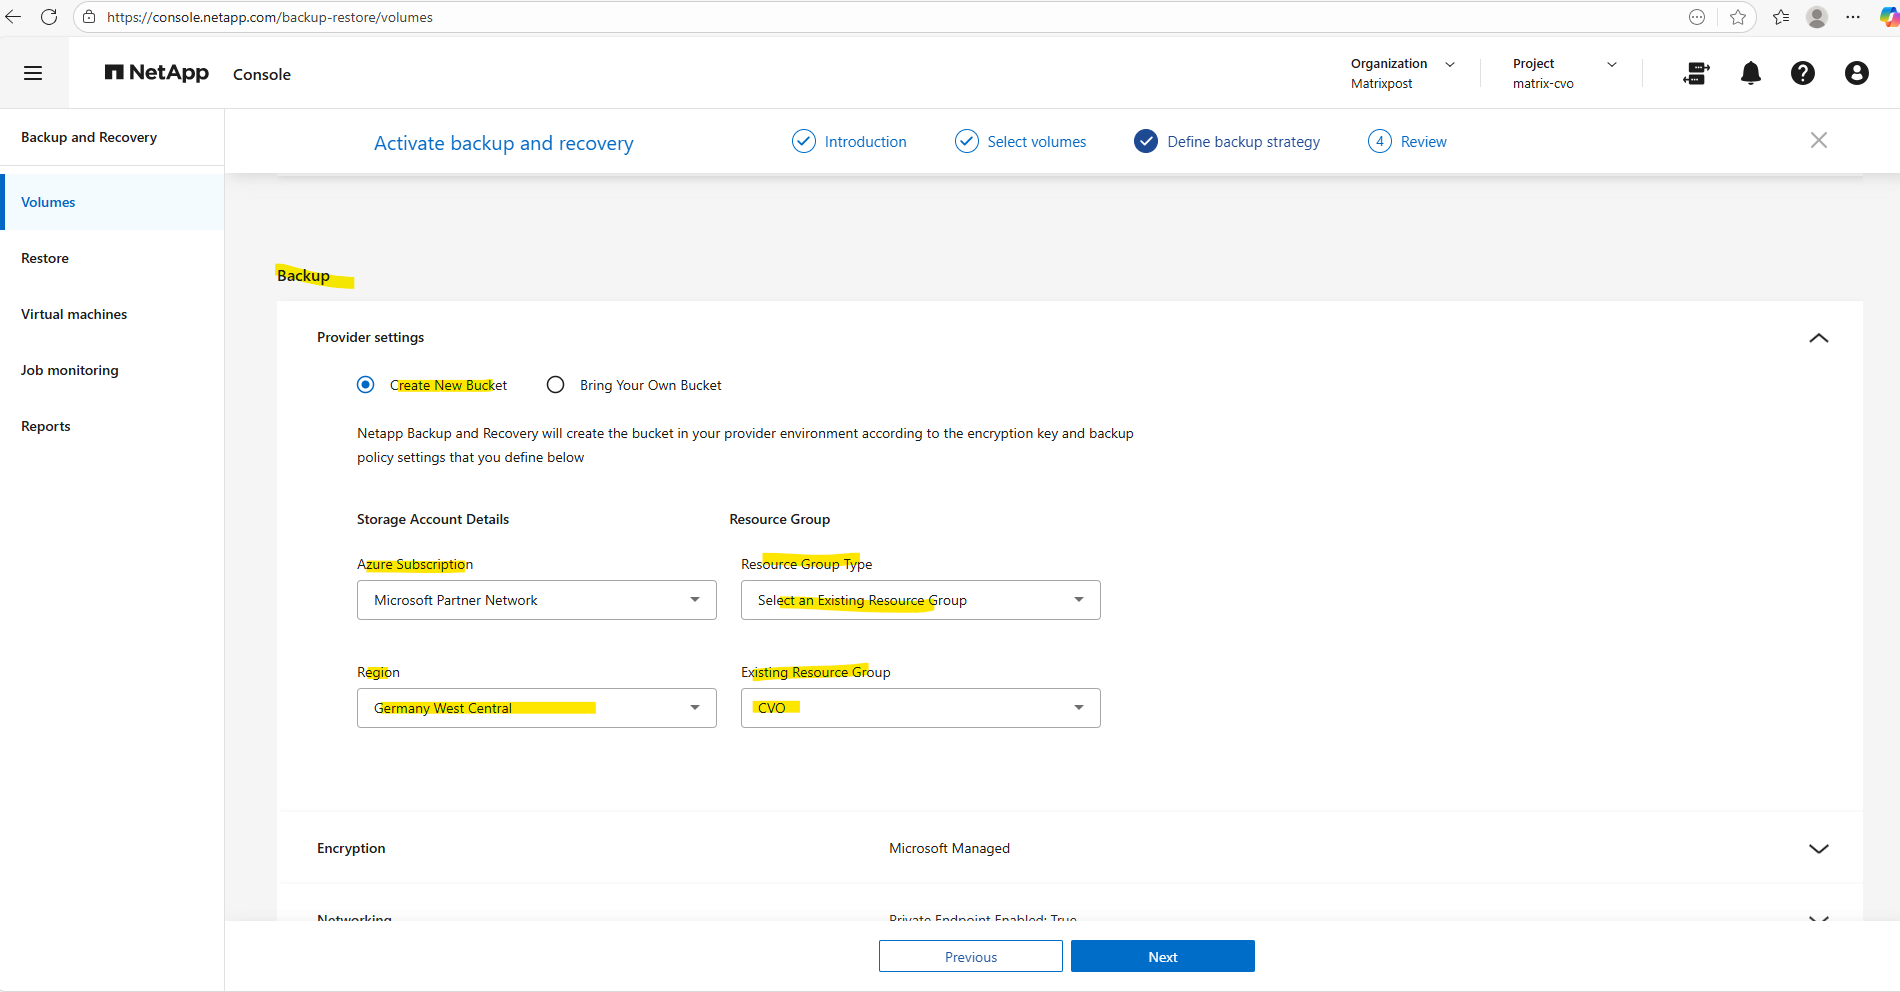
For the backup settings we first need to configure the cloud backup target.
In this step, I linked my Cloud Volumes ONTAP instance to an Azure Blob storage account, which serves as the secure, off-site repository for all volume backups.
I opted for NetApp console to automatically create a new storage account, ensuring it was provisioned with cost-optimized Locally Redundant Storage (LRS) and the “Cool” access tier to match my lab environment requirements.
This setup ensures that even on a Freemium tier, my data is protected by a true 3-2-1 backup strategy while keeping infrastructure costs minimal.
The term “bucket” remains fixed in the interface because NetApp console is a cross-cloud platform; NetApp uses this universal storage industry term (originally popularized by AWS S3) to provide a consistent management experience whether you are backing up to Azure Blob, AWS S3, or Google Cloud Storage.
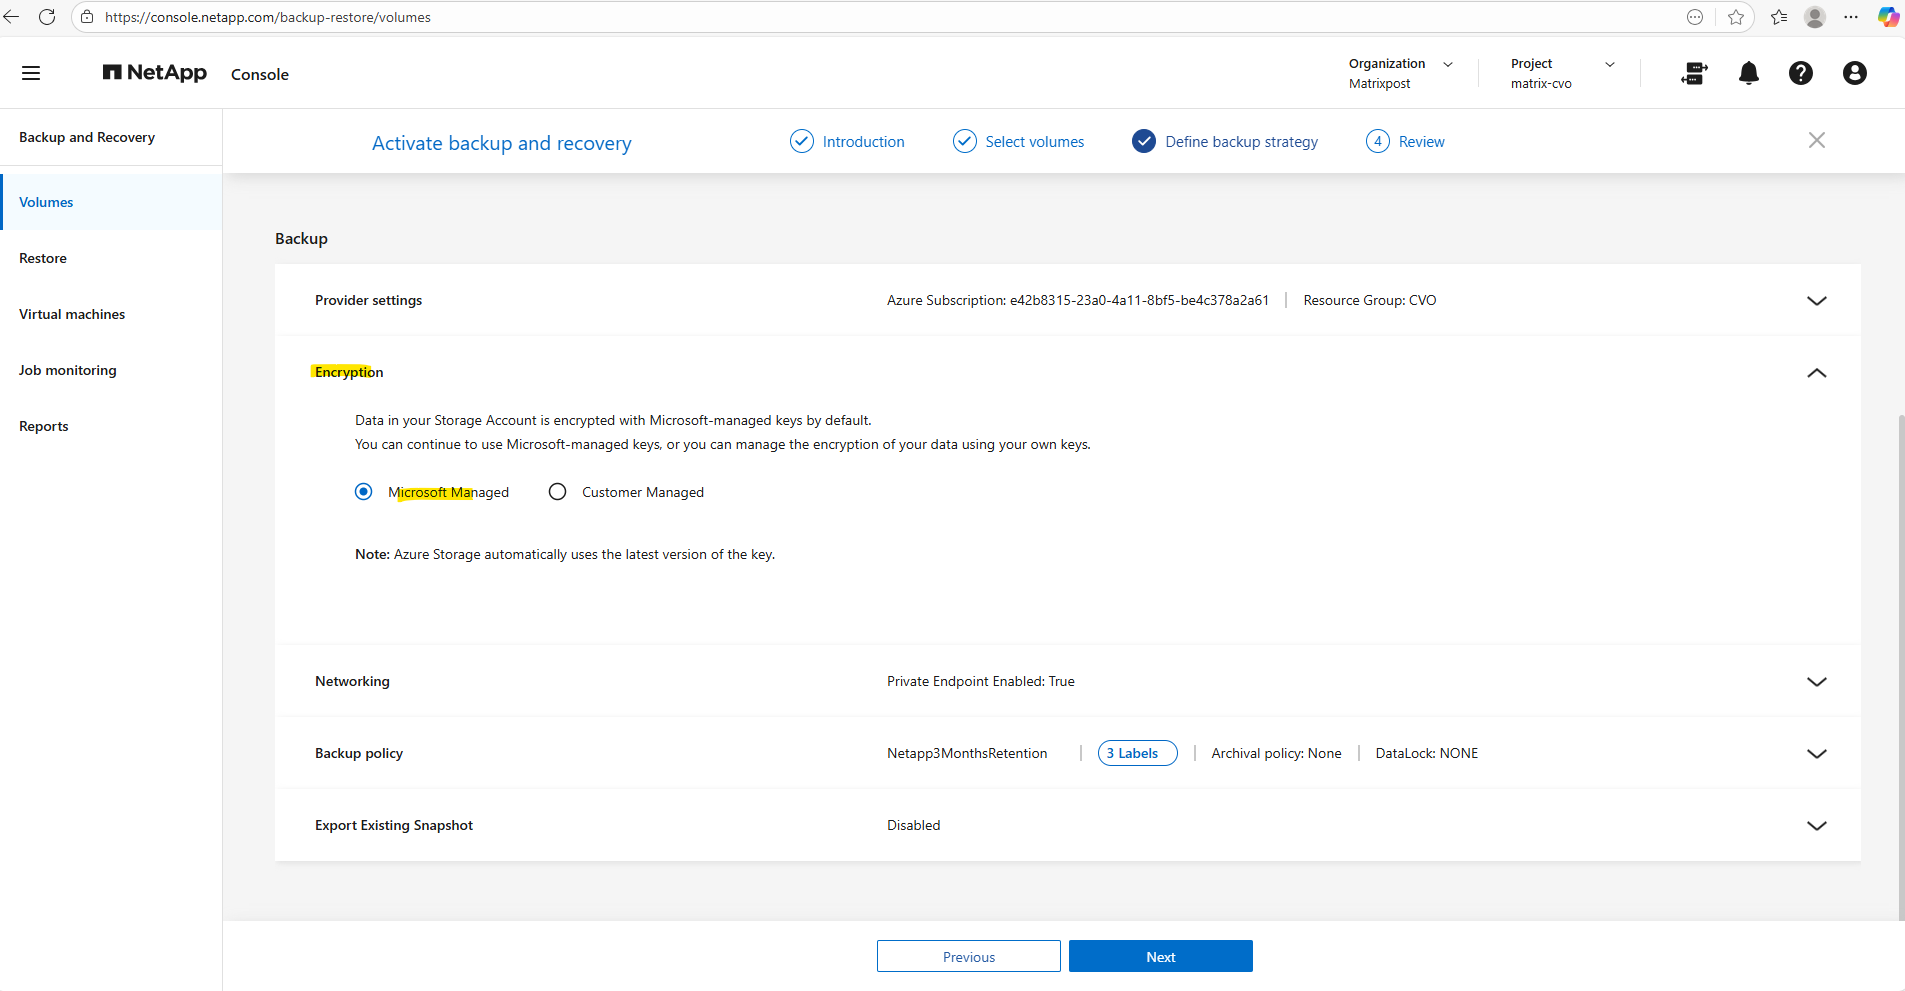
In the Encryption section, by default, Microsoft-managed keys are used, meaning Azure automatically handles the encryption and rotation of keys for your Storage Account, providing a seamless, no-maintenance security layer that is perfect for most test or standard environments.
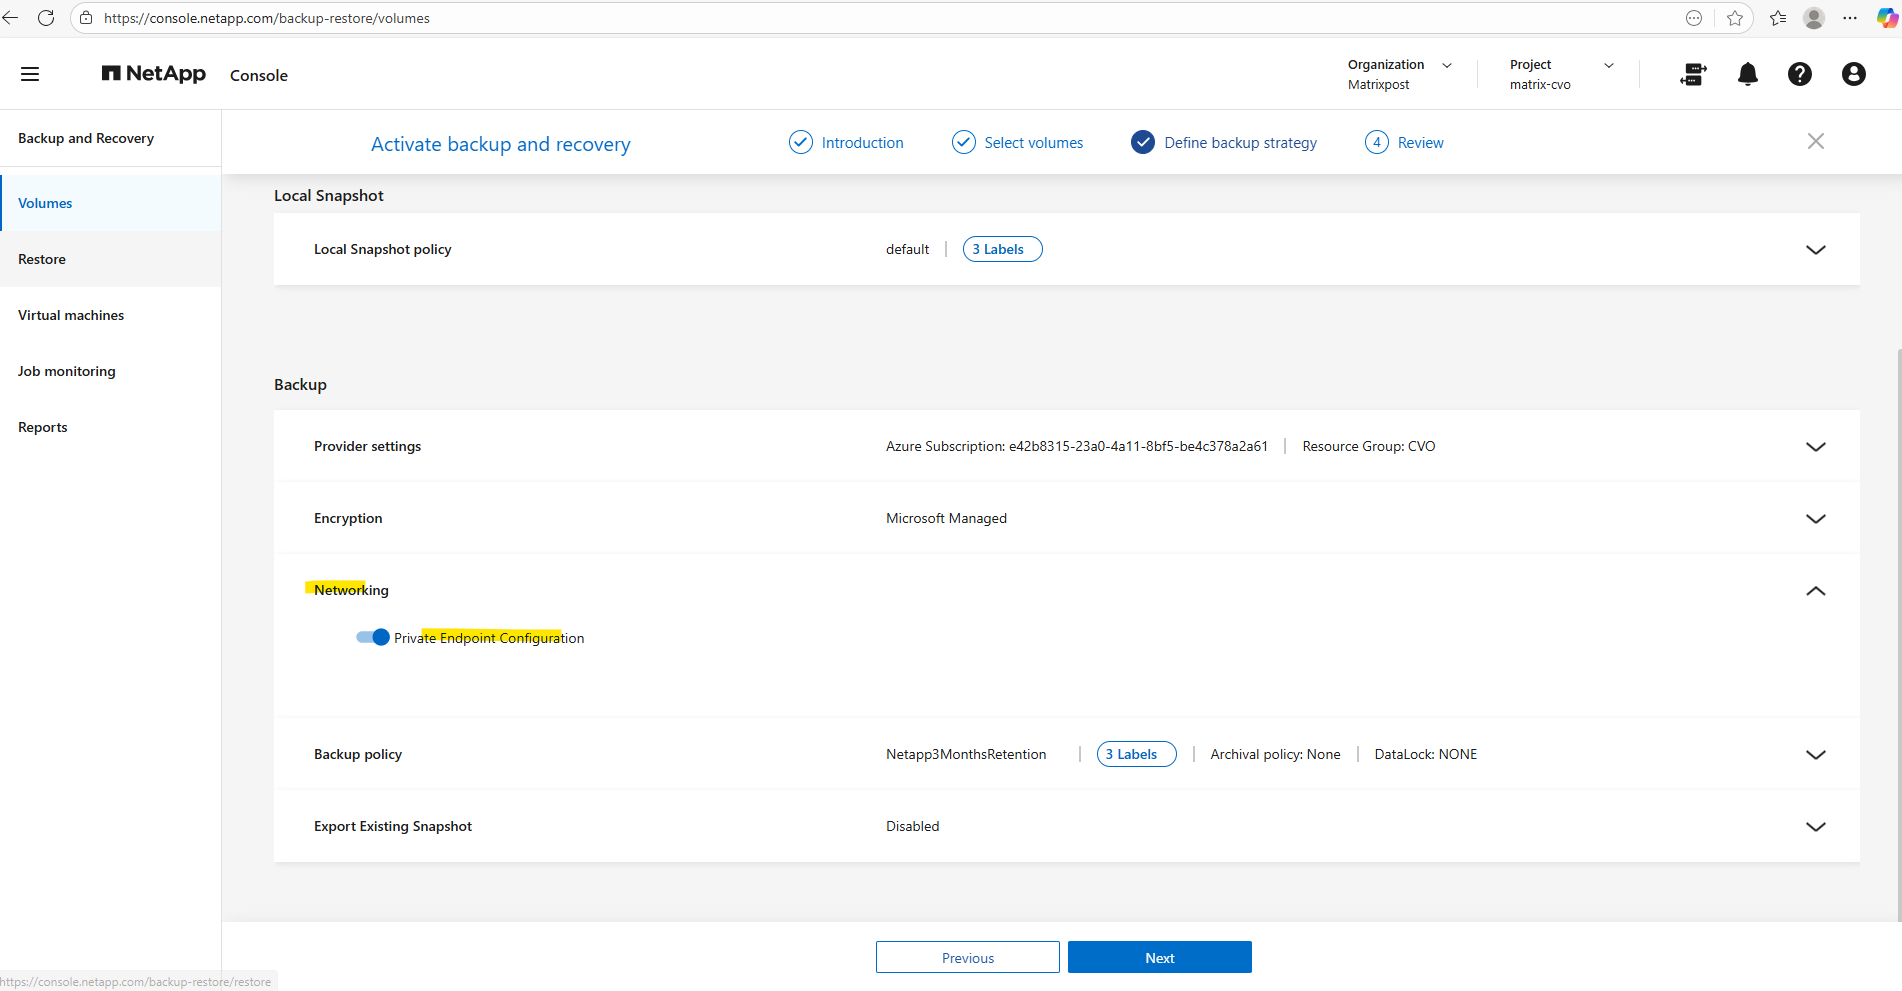
By enabling the Private Endpoint Configuration (enabled by default), the backup traffic between Cloud Volumes ONTAP and Azure Blob storage is routed entirely through the Microsoft Azure backbone network using a private IP address, rather than traversing the public internet.
This significantly hardens the security posture by ensuring the storage account remains inaccessible from outside the virtual network, while also providing a more stable and predictable data path for backup operations.
A major benefit of this setup is that the NetApp console automatically orchestrates the entire deployment, including the creation of the Private Endpoint, the private DNS zones, and the necessary network interface in Azure. This eliminates the need for manual networking configuration in the Azure Portal, ensuring a seamless and error-free connection between my storage and backup target.
More about Azure private endpoints you will also find in my following post.
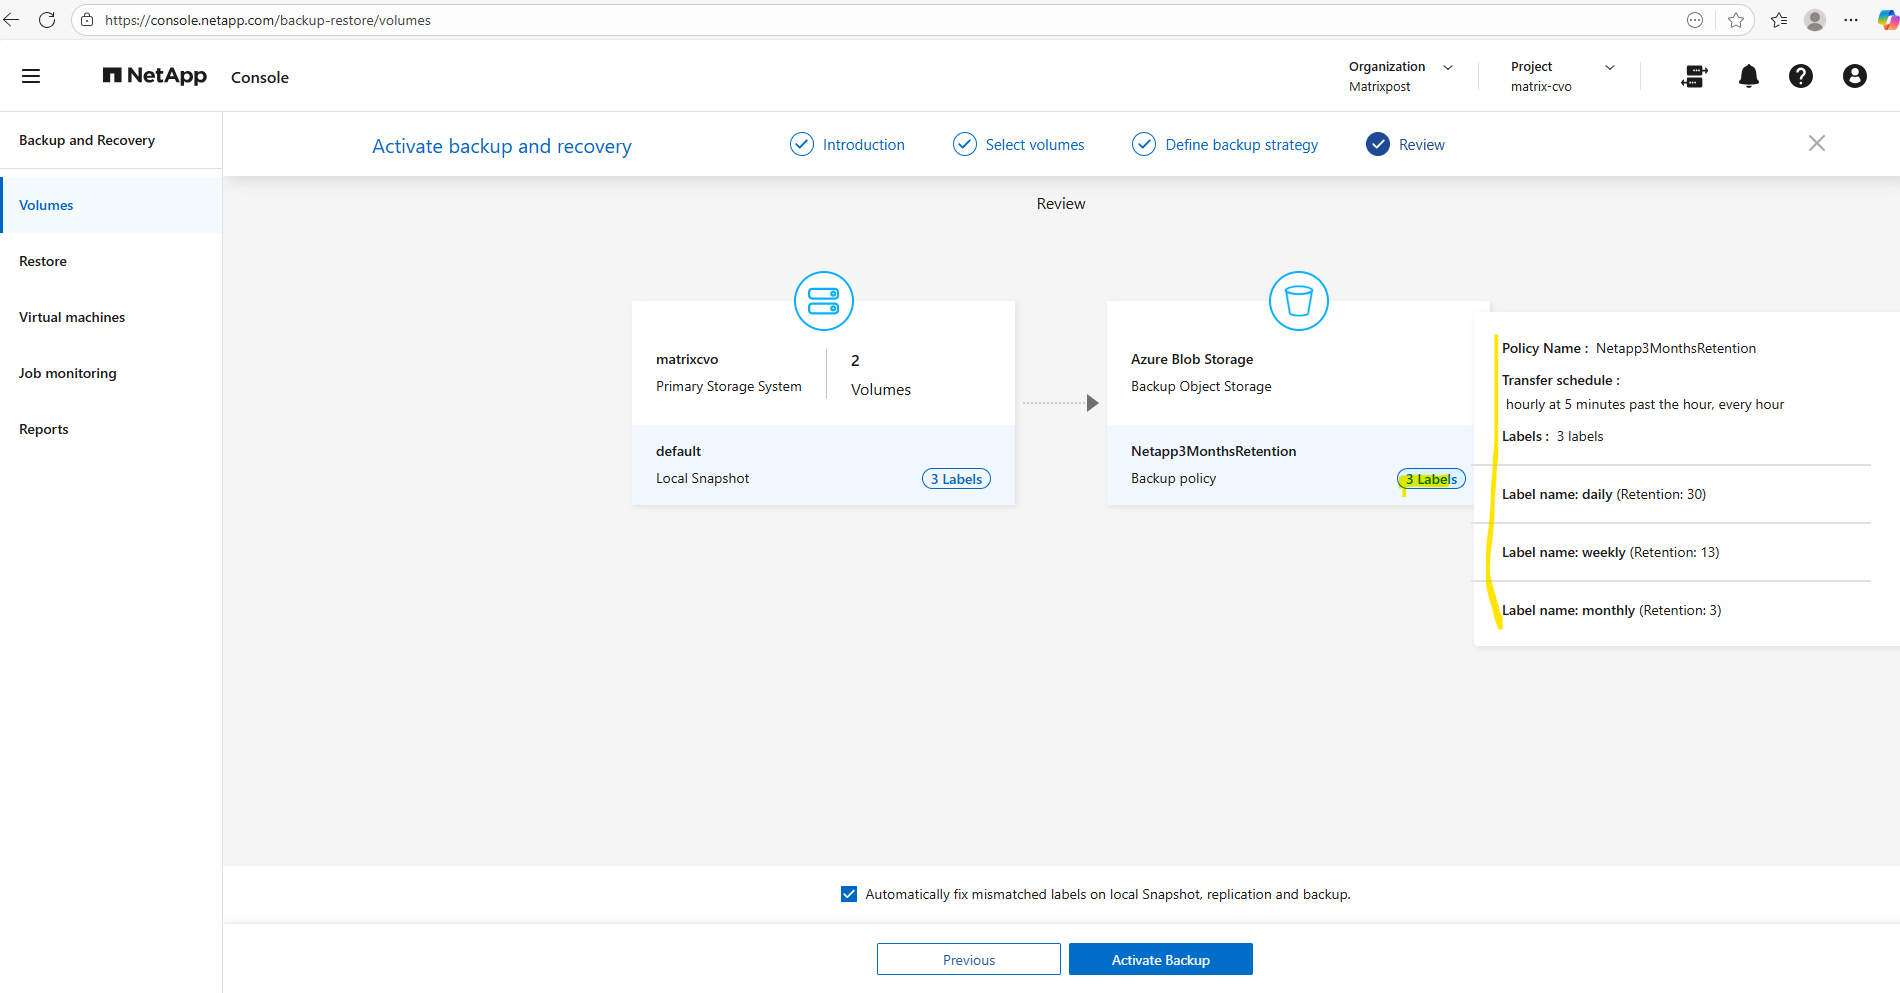
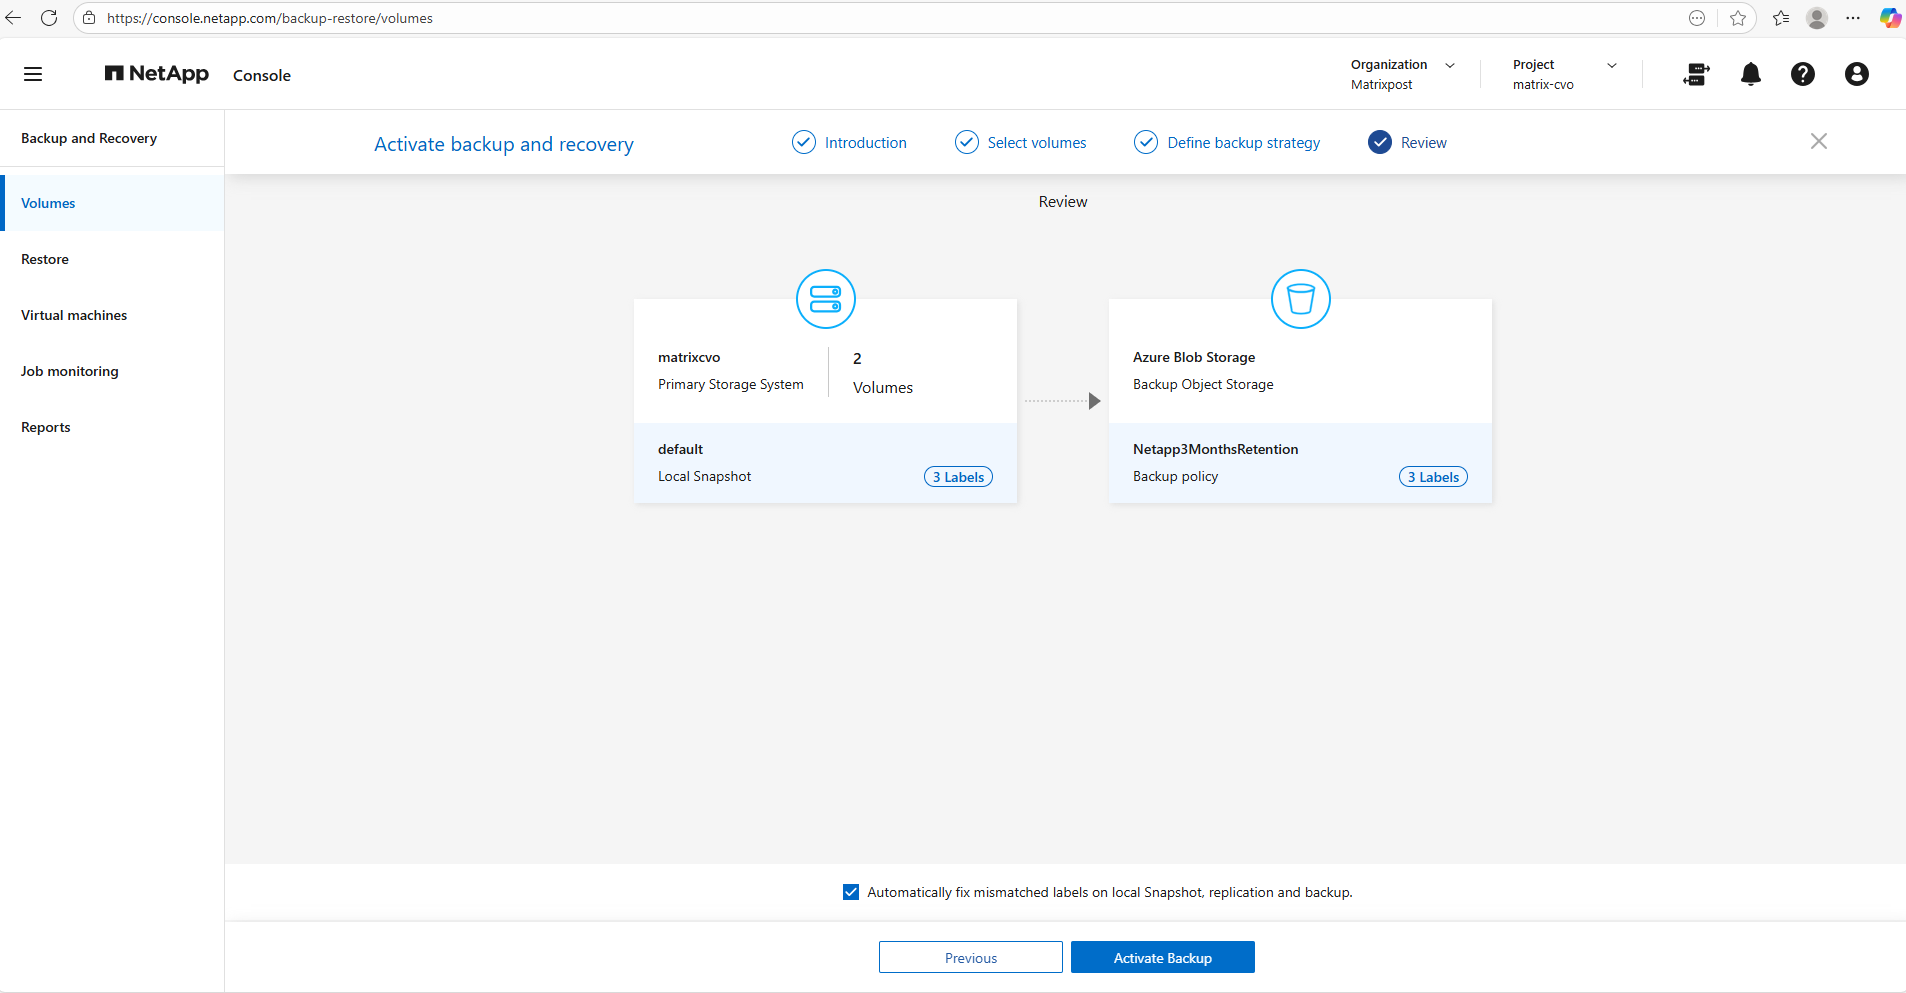
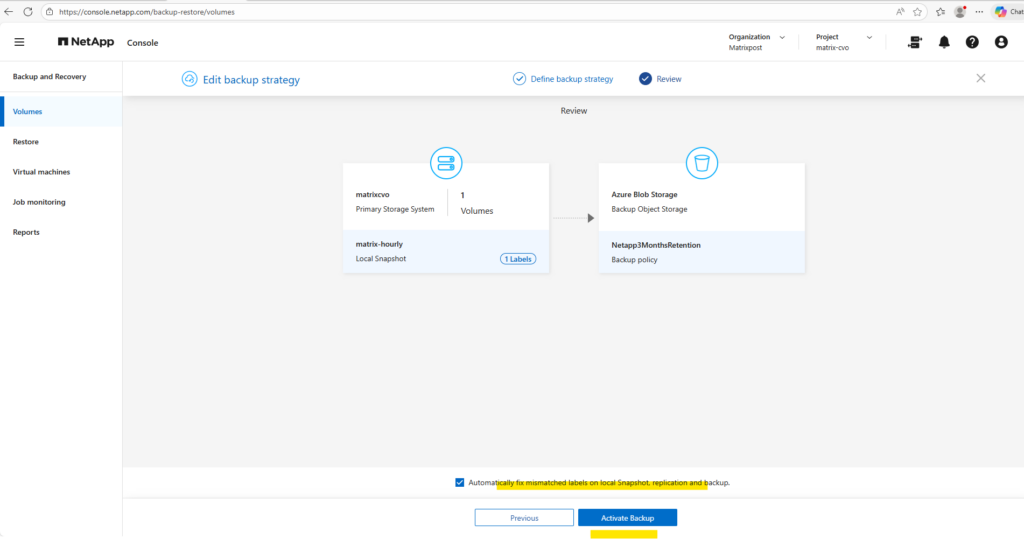
Before activating the backup, we can hover the mouse over the local snapshots and backup policy labels to finally check these settings as shown below.
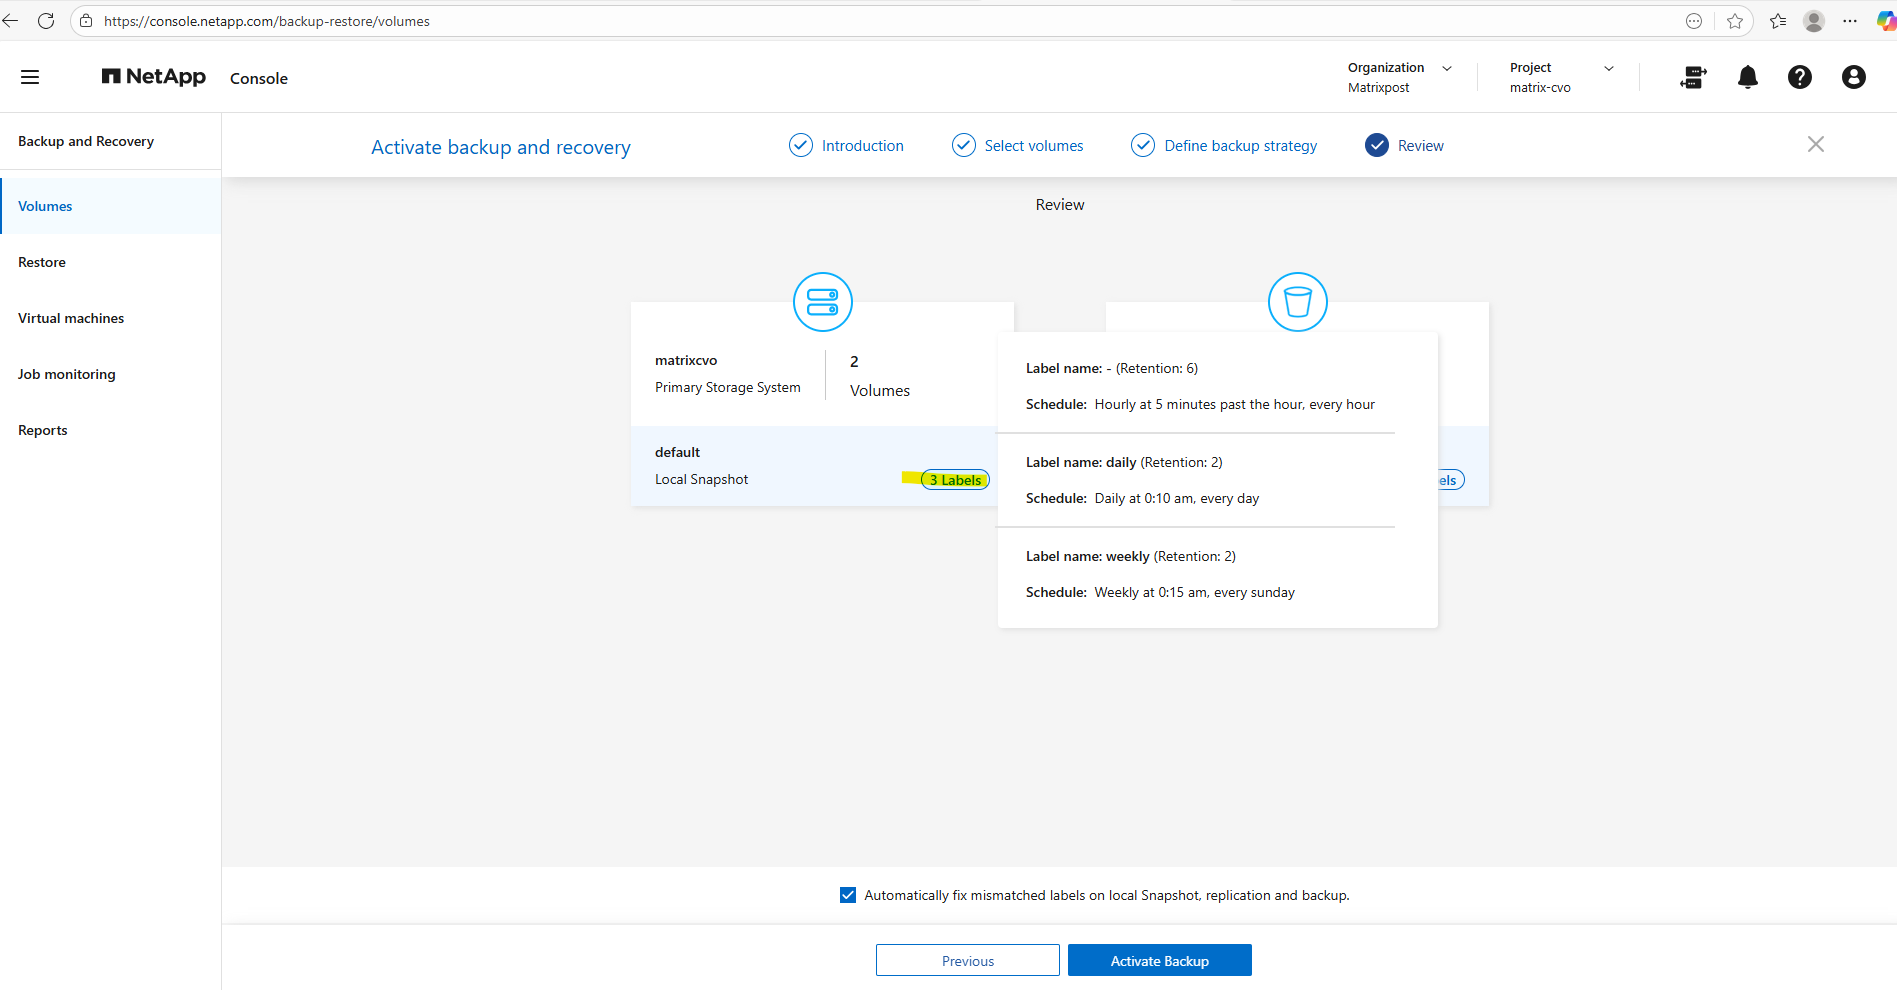
The backup policy settings.
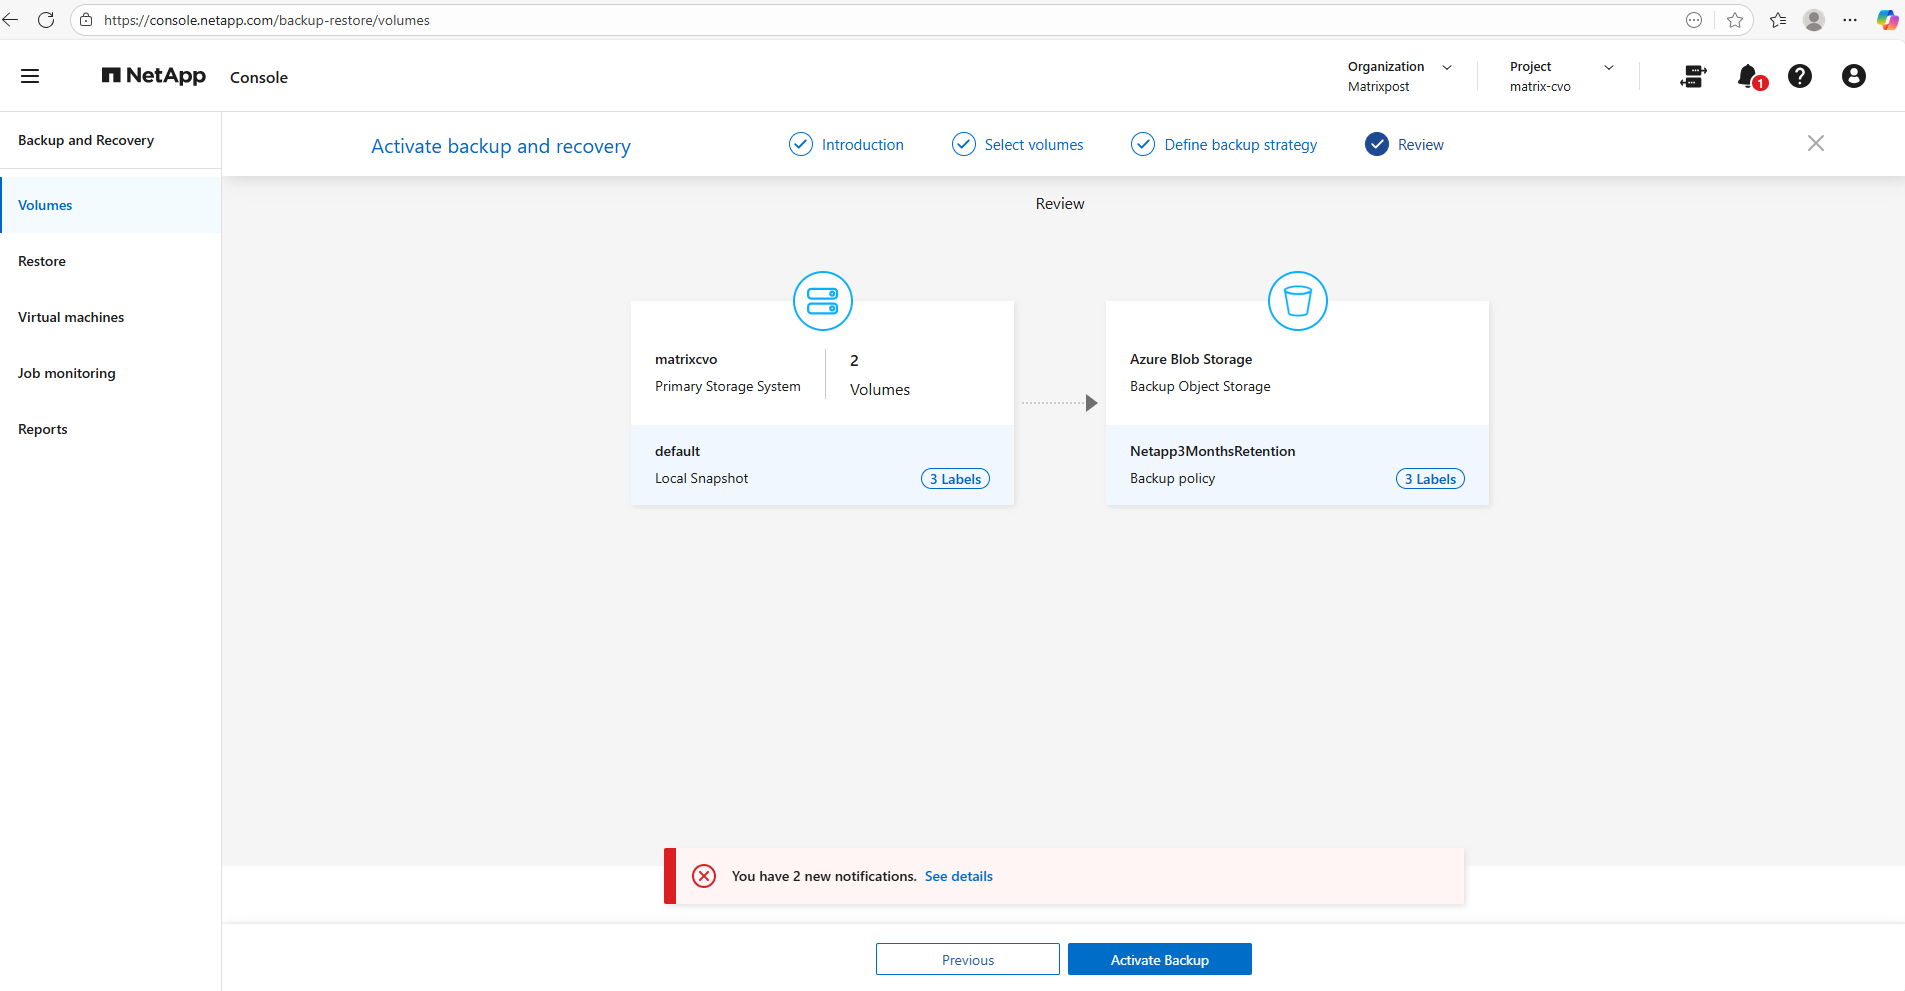
Finally we can activate the backup by clicking on the button Activate Backup below.
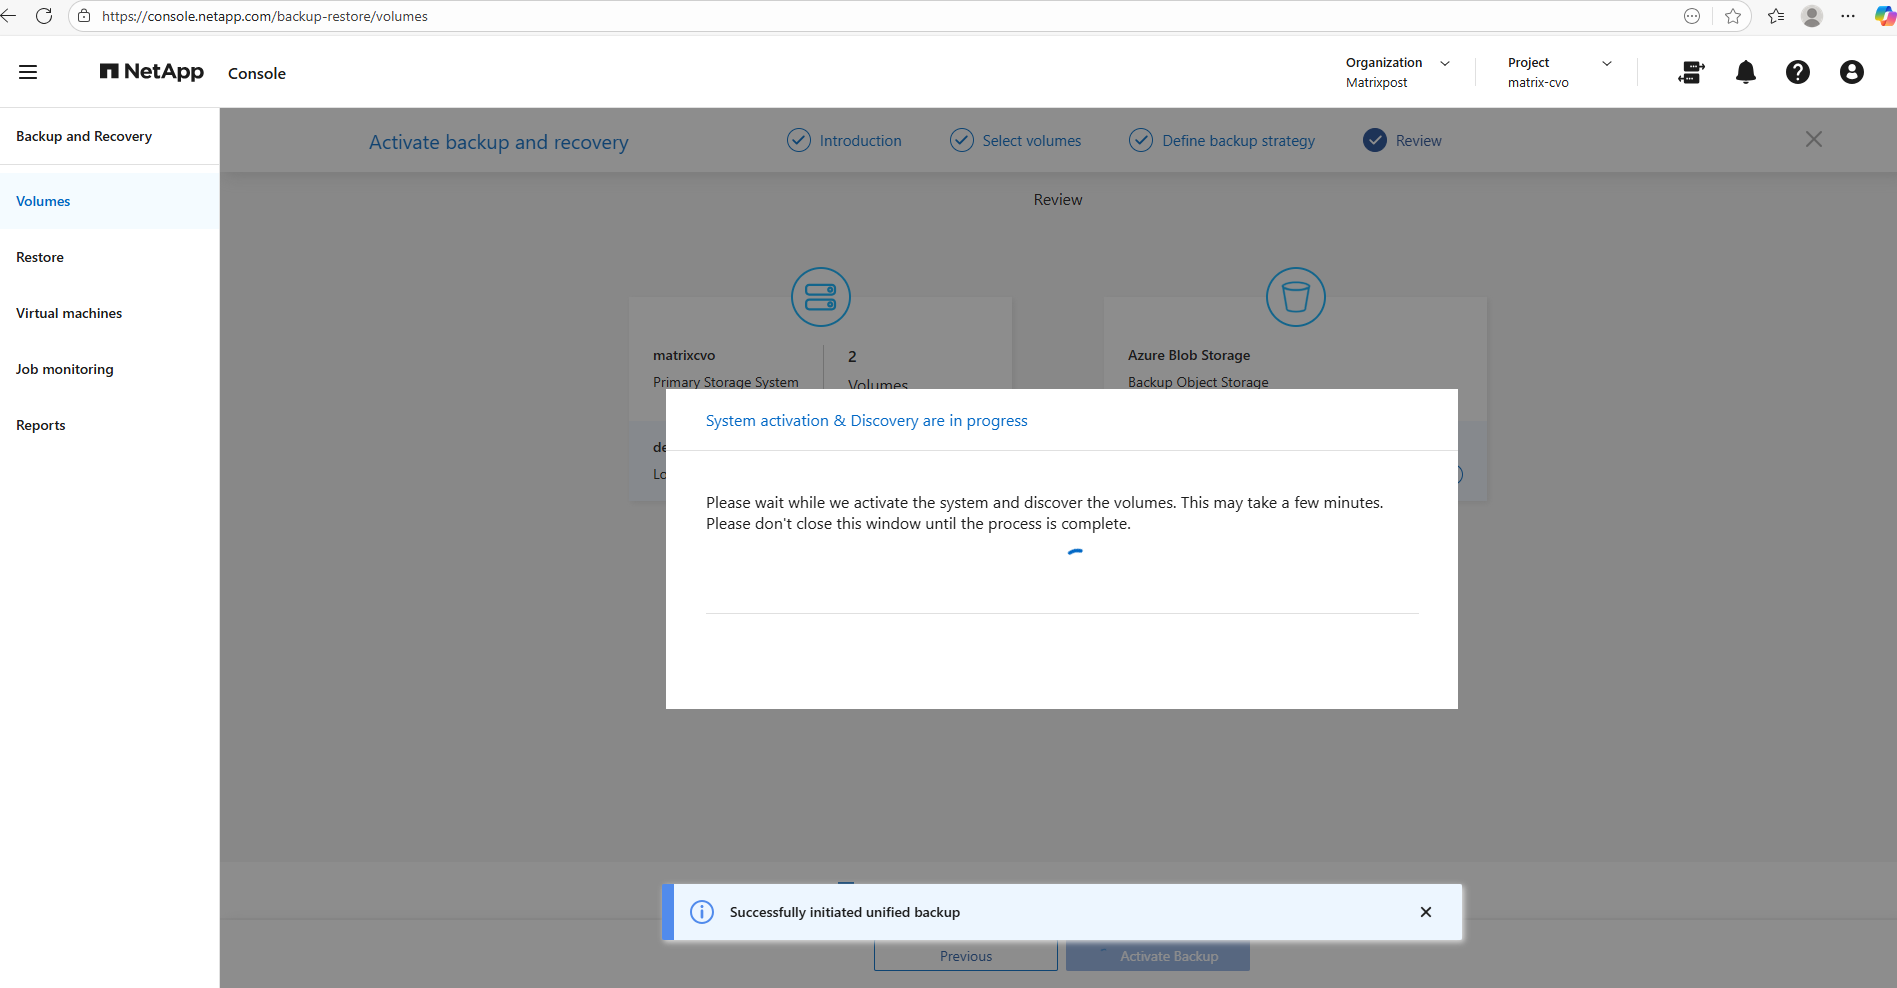
Please wait while we activate the system and discover the volumes. This may take a few minutes. Please don’t close this window until the process is complete.
The new created bucket (Azure Storage account), I can see already in the corresponding resource group.
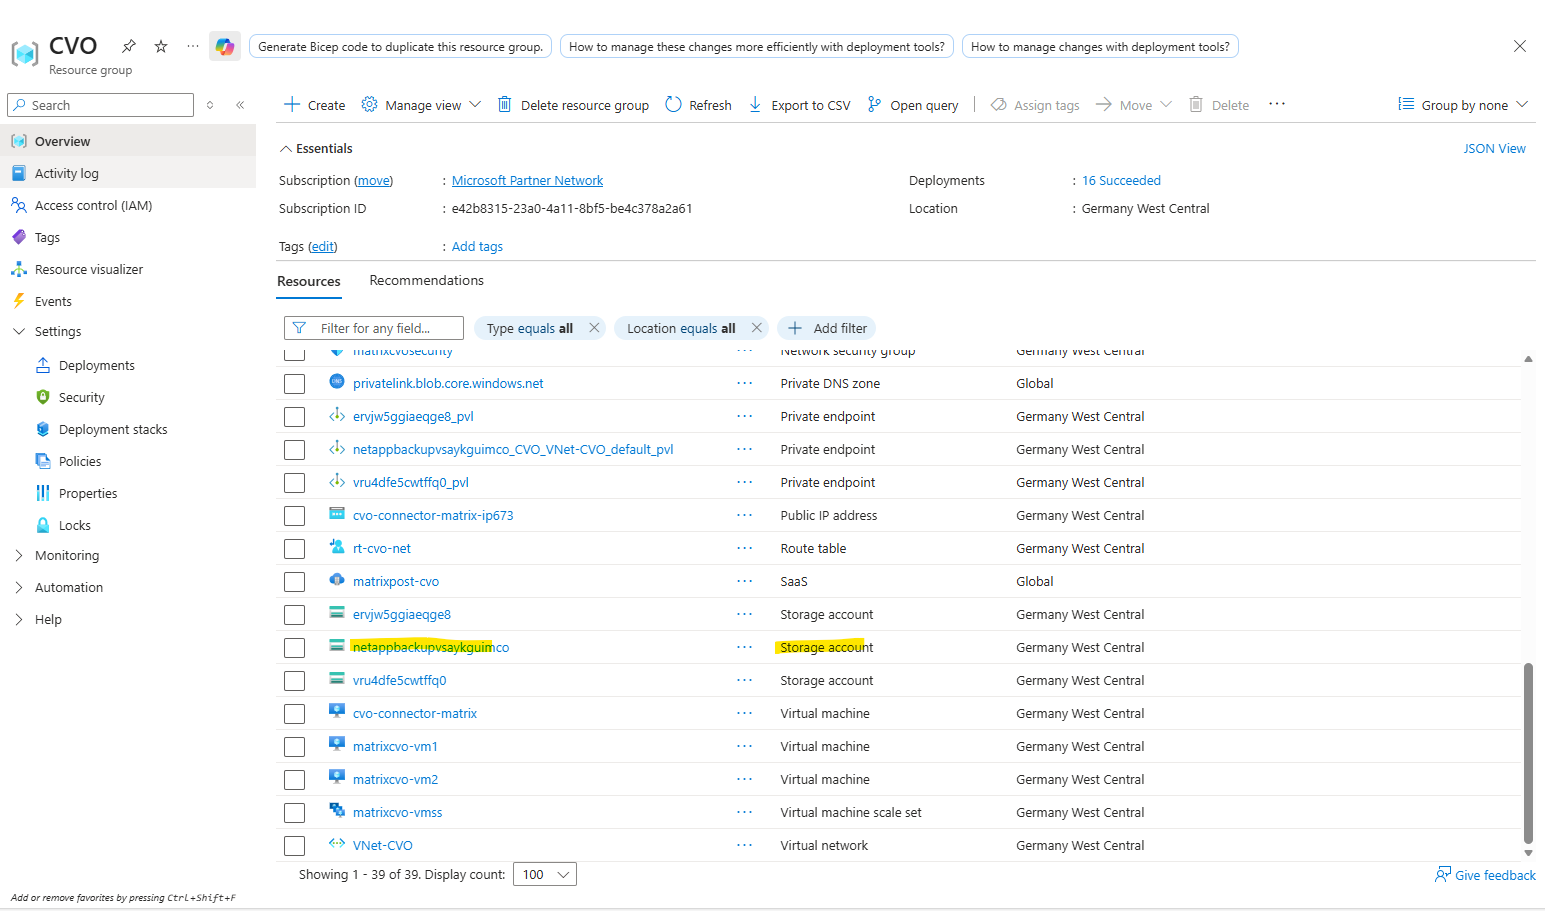
The automatically created Azure Storage account uses Blob Storage, which Cloud Volumes ONTAP leverages as object storage for cost-efficient, scalable long-term backups.
Azure Blob Storage is Microsoft’s implementation of object storage, meaning it follows the same architectural principles of storing data as objects within a highly scalable and durable platform.
The difference is primarily in naming, object storage describes the technology model, while Blob Storage is Azure’s service that delivers it. In practice, there is no functional difference, as Cloud Volumes ONTAP simply uses Azure Blob Storage as its object storage backend for backups.
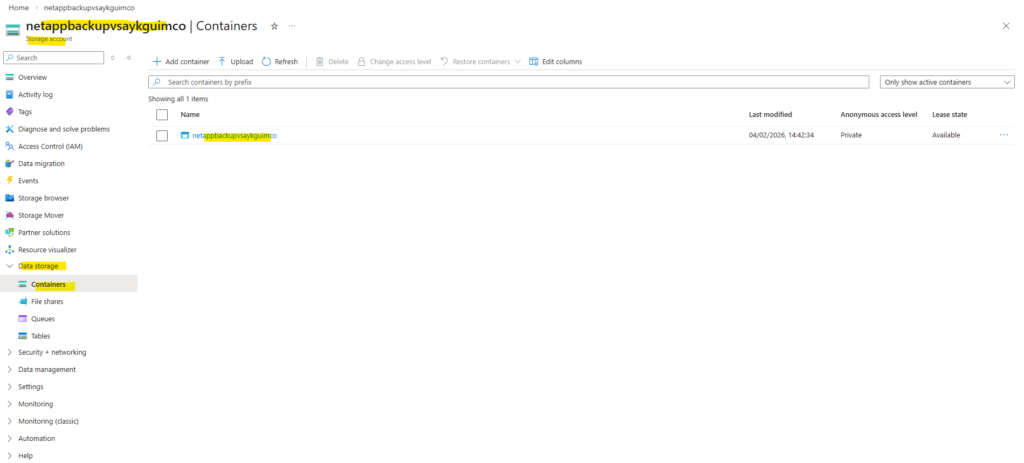
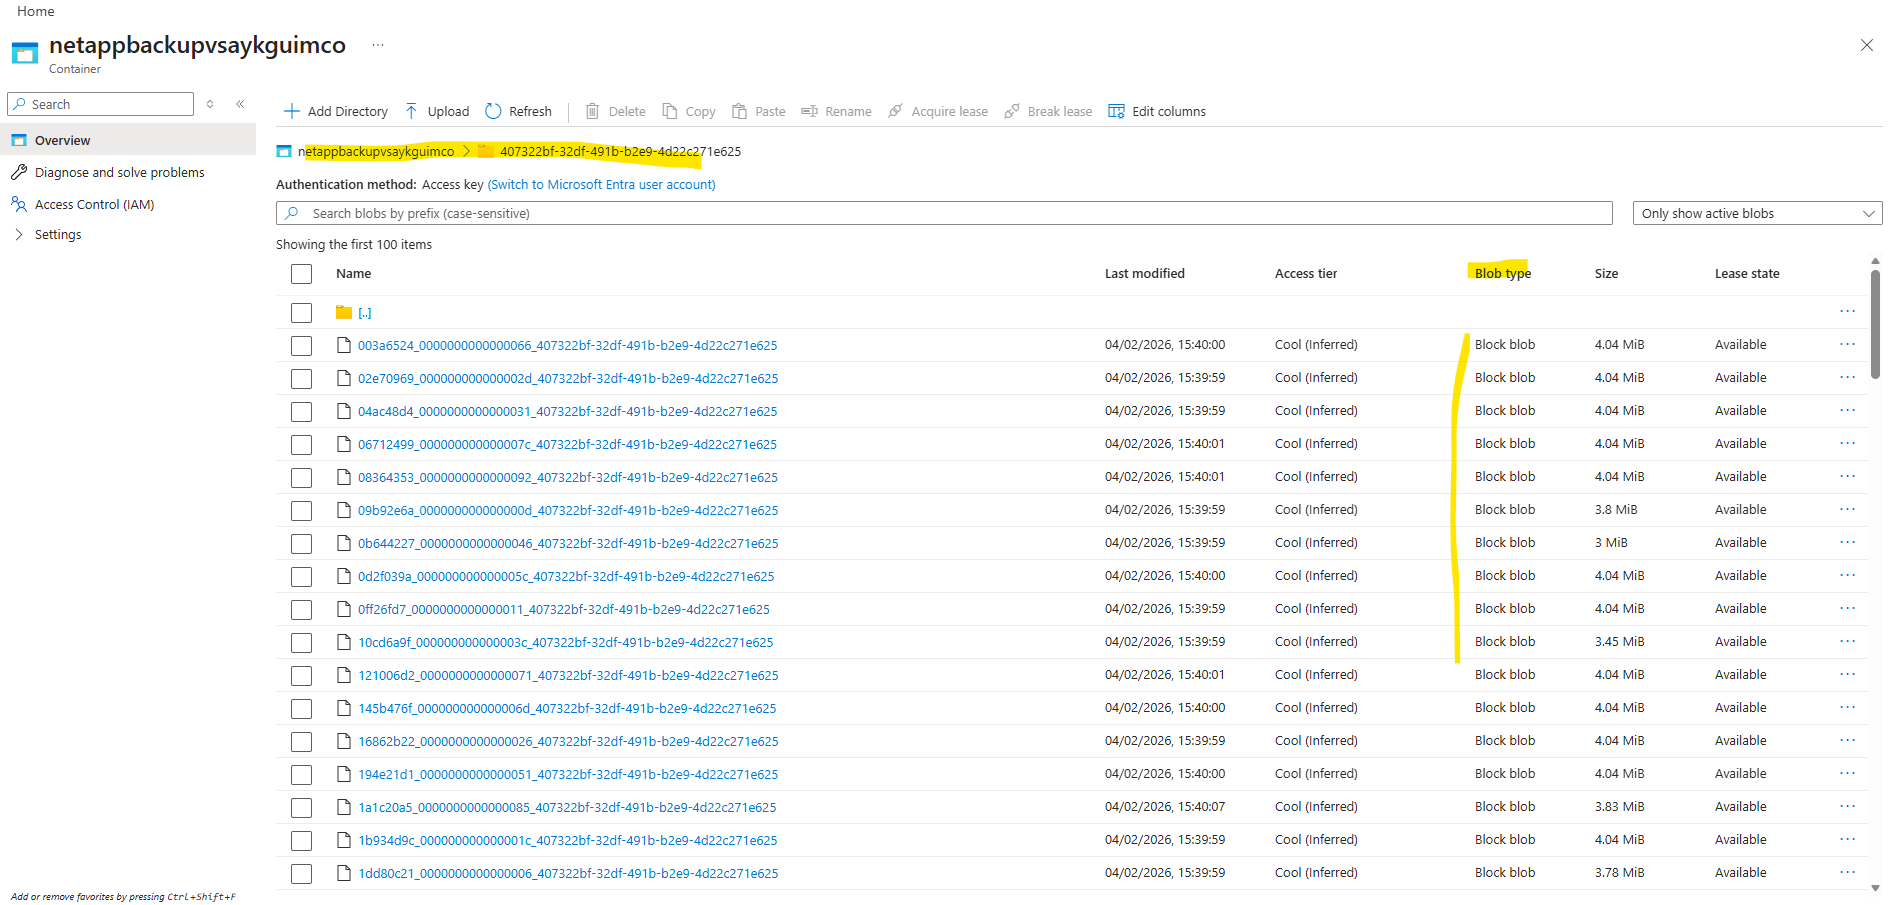
Later when Backup and Recovery is activated successfully and the first backups runs, navigate to Data storage → Containers, the presence of a container confirms that the backups are stored in Azure Blob Storage. Containers are the top-level namespace for blobs, which aligns with the object storage model that Cloud Volumes ONTAP uses for backup data.
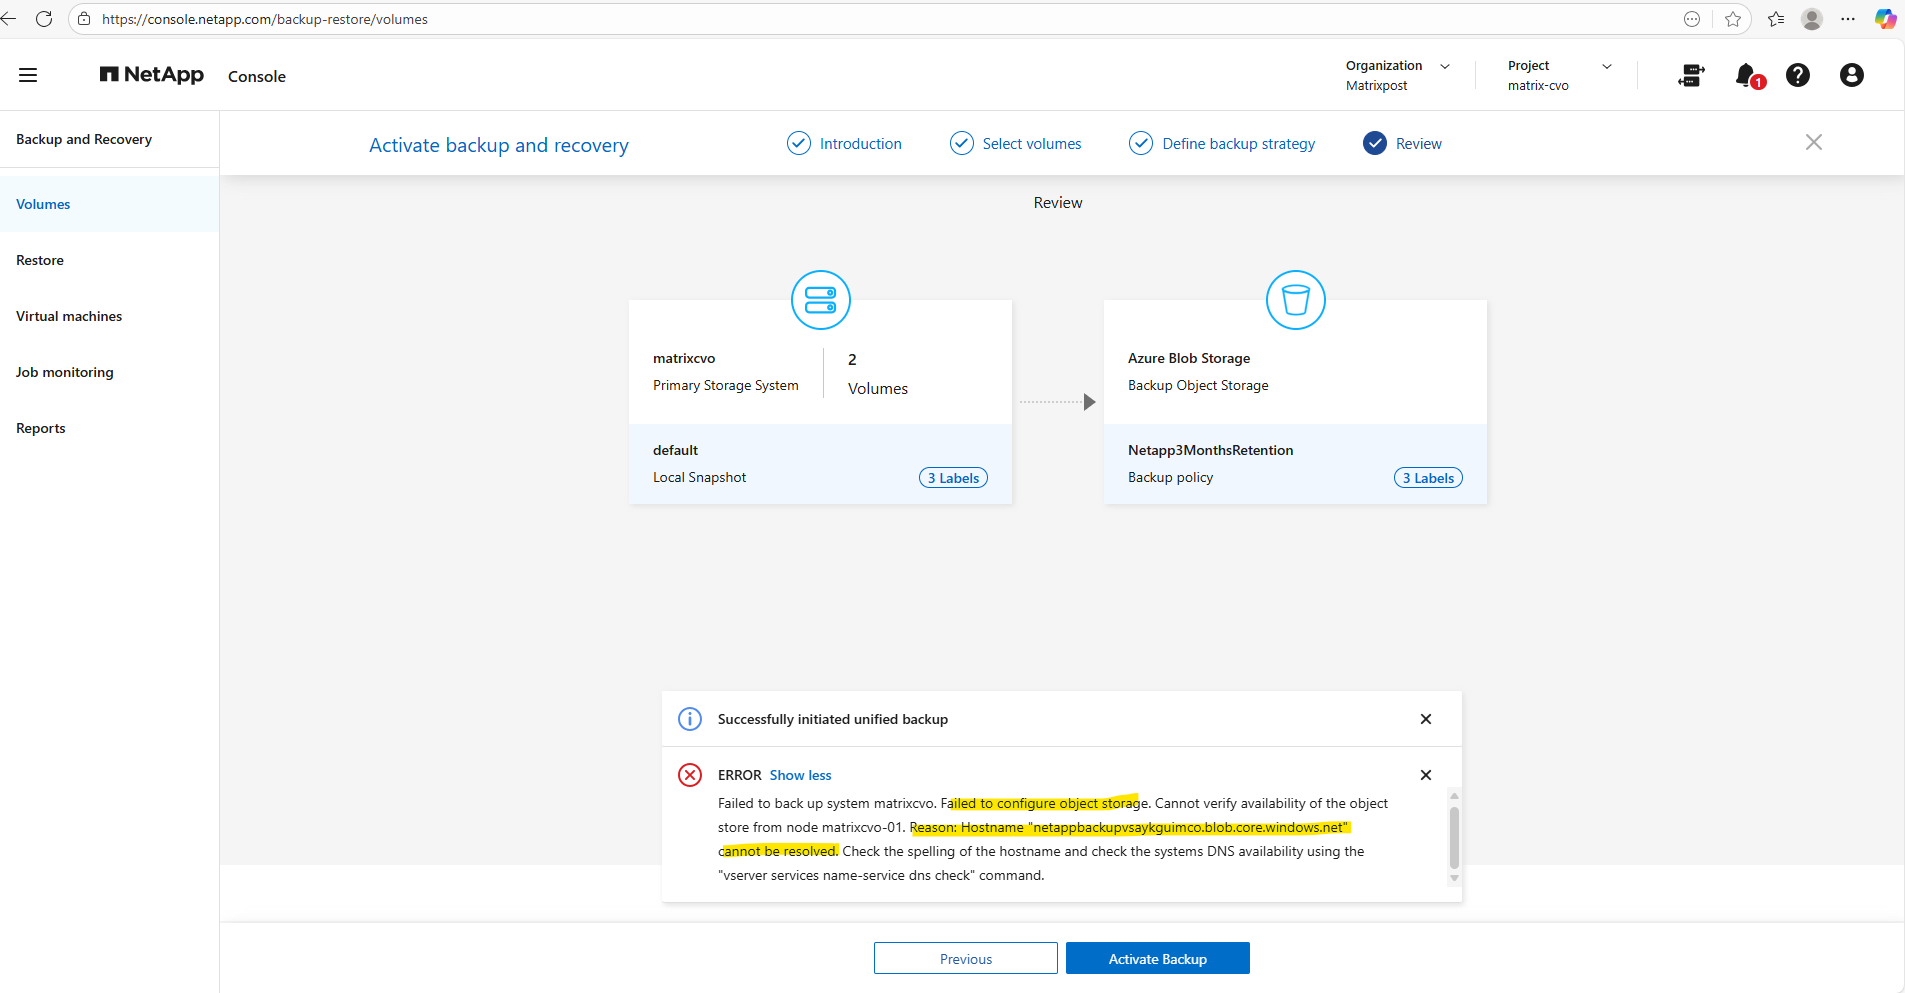
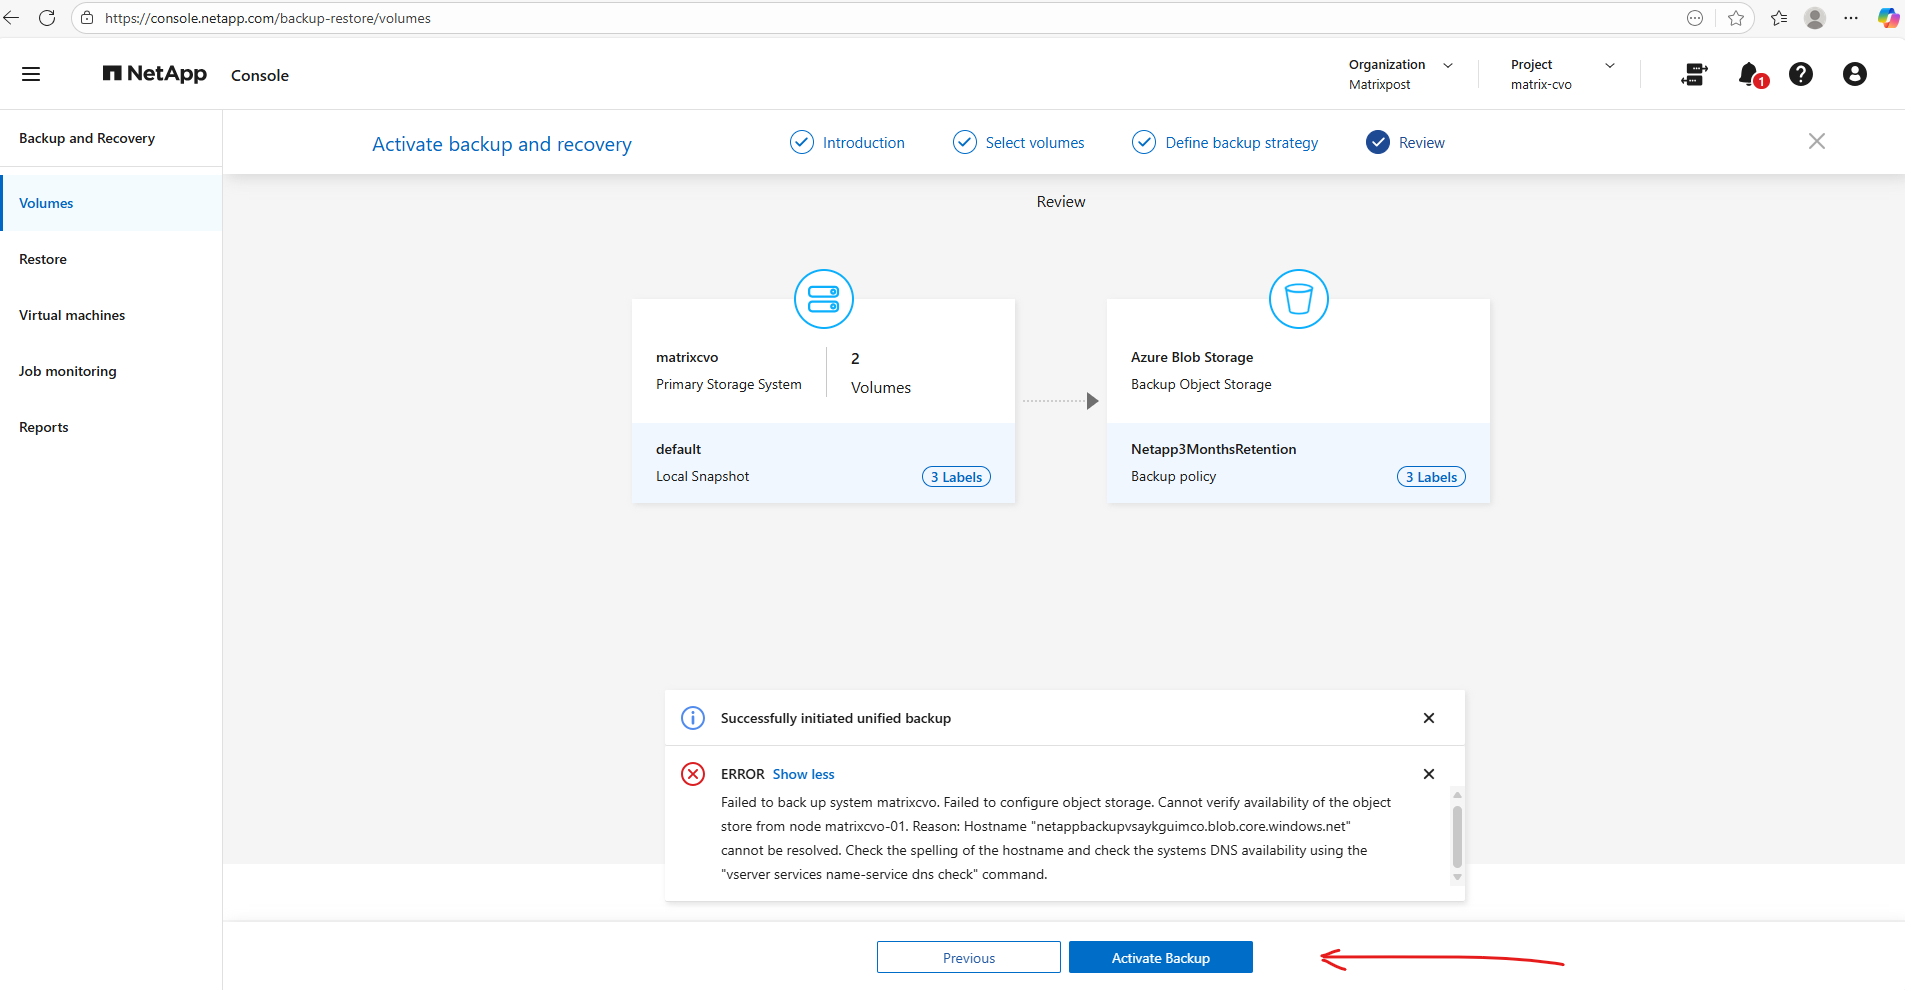
During activation I was running into an error as shown below.
When you use a Private Endpoint, the storage account gets a new, private internal IP.
When NetApp Backup is configured for Cloud Volumes ONTAP using a private endpoint, the DNS resolution for this private endpoint must be configured at the cluster level rather than on individual data SVMs.
Backup traffic is generated directly from the ONTAP nodes via intercluster LIFs, which must be able to resolve the storage account’s private endpoint FQDN.
Data SVM DNS settings are not used for this communication.
In my case the ONTAP nodes couldn’t resolve the FQDN of the new private endpoint attached to the storage account and therefore the activation failed.
Failed to back up system matrixcvo. Failed to configure object storage. Cannot verify availability of the object store from node matrixcvo-01.
Reason: Hostname “netappbackupvsaykguimco.blob.core.windows.net” cannot be resolved. Check the spelling of the hostname and check the systems DNS availability using the
vserver services name-service dns checkcommand.
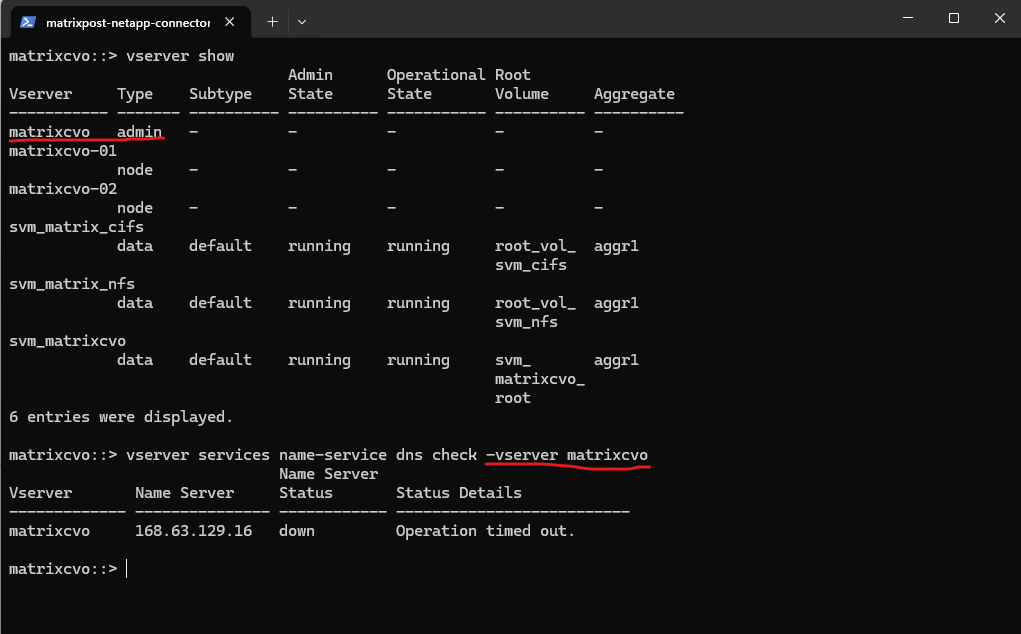
To troubleshoot this issue I first want to know the name of the Admin SVM, so I will run the following command to list all SVMs in my CVO cluster. Next I will check which DNS server is configured for the Admin SVM.
In Azure, 168.63.129.16 is a “Magic IP” – a virtual public IP address that acts as the communication bridge between your resources (VMs and appliances) and the Azure fabric. It is not a real server sitting in a rack; it is an abstraction of the Azure Software Defined Network (SDN).
More about here https://learn.microsoft.com/en-us/azure/virtual-network/what-is-ip-address-168-63-129-16.
Unfortunately the CVO nodes cannot connect to this DNS service by using TCP/UDP 53 as shown below.
CVO uses multiple NICs and IP addresses; the Azure WireServer DNS only responds to queries sourced from the VM’s primary NIC/IP. When ONTAP sends DNS queries from a secondary NIC, the WireServer silently drops them, causing DNS timeouts shown below.
matrixcvo::> vserver show
matrixcvo::> vserver services name-service dns check -vserver matrixcvo
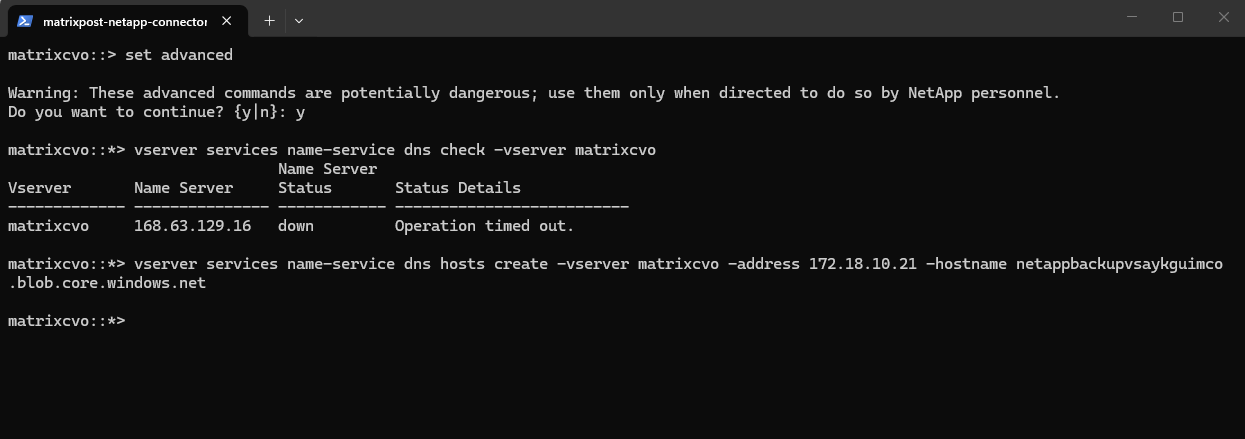
As workaround I implemented a Local Host Table Entry on the Admin SVM. This surgically resolved the hostname for the Azure Private Endpoint without impacting other cluster management traffic, successfully clearing the ‘Hostname cannot be resolved’ error that was blocking the backup activation.”
The
vserver services name-service dns hosts createcommand is fully persistent.
matrixcvo::*> vserver services name-service dns hosts create -vserver matrixcvo -address 172.18.10.21 -hostname netappbackupvsaykguimco.blob.core.windows.net
matrixcvo::*> vserver services name-service getxxbyyy getaddrinfo -node local -vserver matrixcvo -hostname netappbackupvsaykguimco.blob.core.windows.net
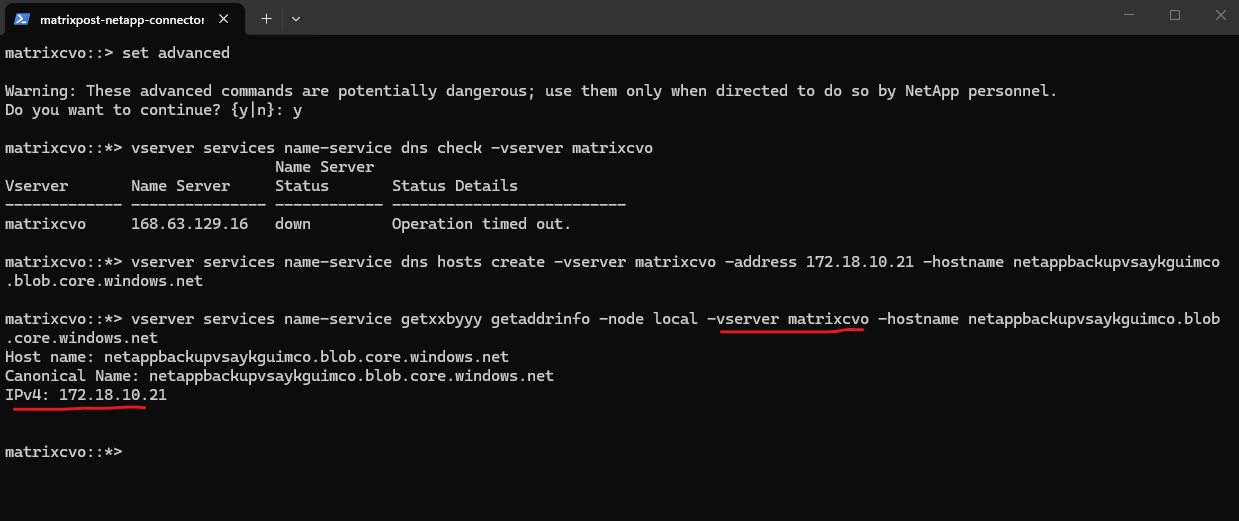
We can verify our newly set DNS record in ONTAP.
This command functions as the ONTAP equivalent of opening the
etc/hostsfile on a Linux or Windows machine. It lists the static, local mappings of IP addresses to hostnames for a specific Vserver.
matrixcvo::> vserver services name-service dns hosts show -vserver matrixcvo

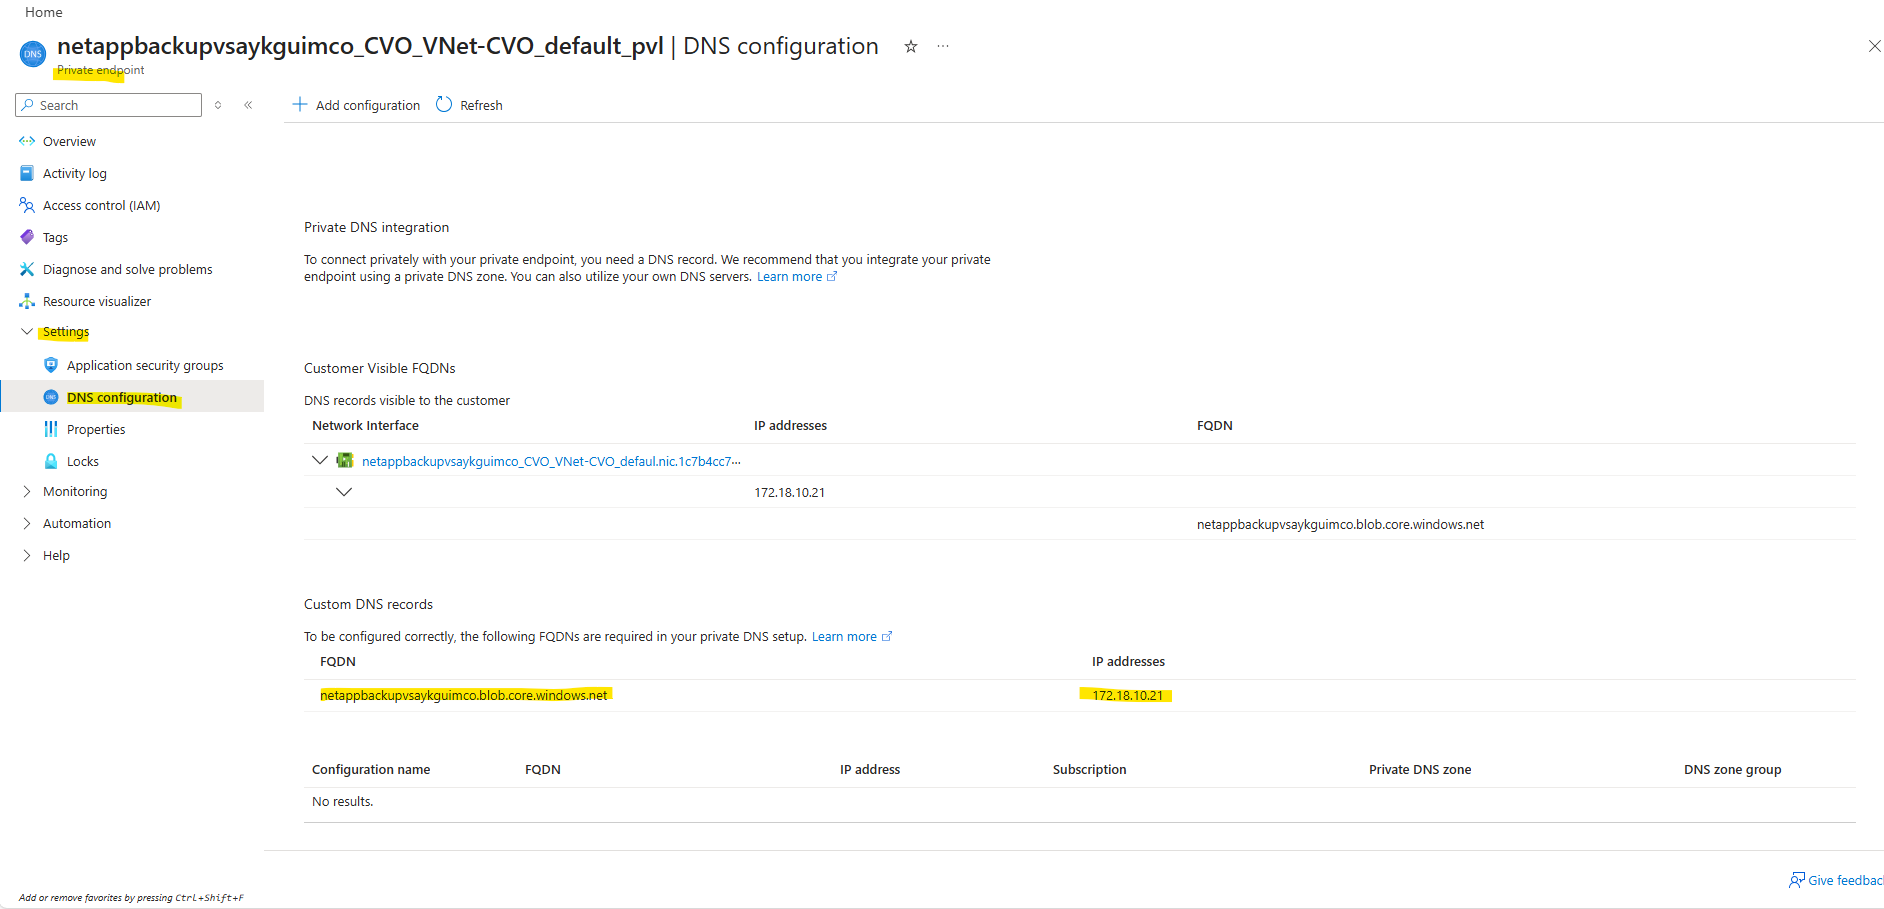
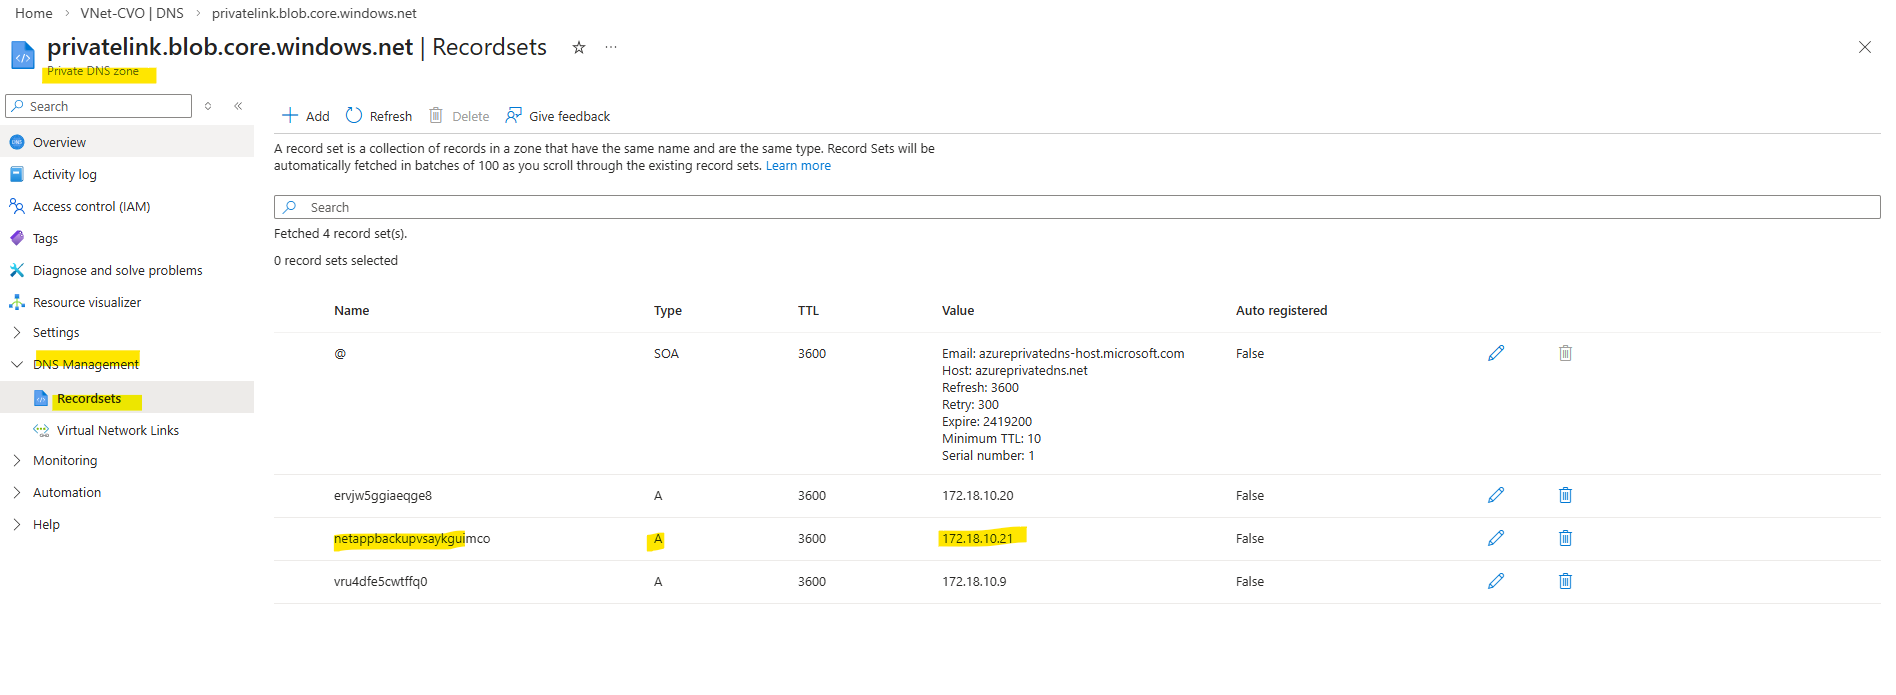
To set the DNS record above on the Admin SVM we can first obtain the required information from the created private endpoint on the storage account.
On the storage account navigate to Security + networking -> Private endpoints and click on the private endpoint as shown below.
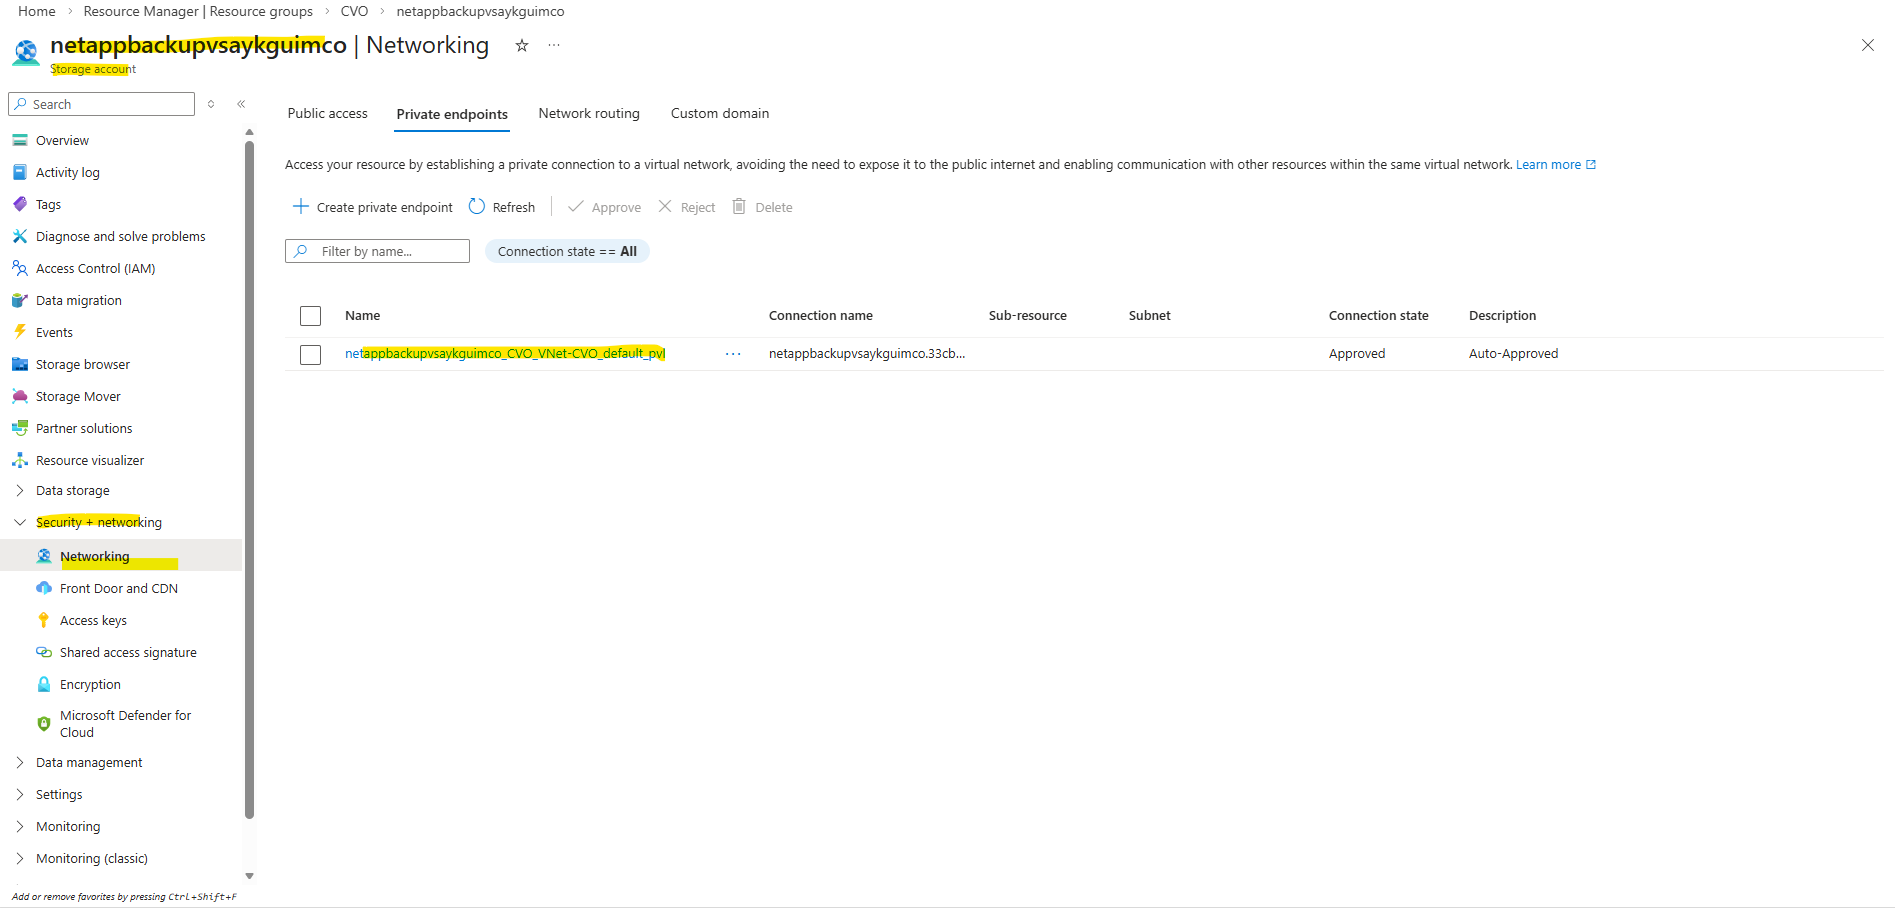
On the private endpoint navigate to Settings -> DNS configuration. Here we can obtain the storage accounts FQDN and private IP address we need to use to create a new DNS record on the Admin SVM.
More about this DNS resolution issue you will find in the troubleshooting section further down.
More about Azure private endpoints as already mentioned you will also find in my following post.
Click again on Activate Backup to see if it now works.
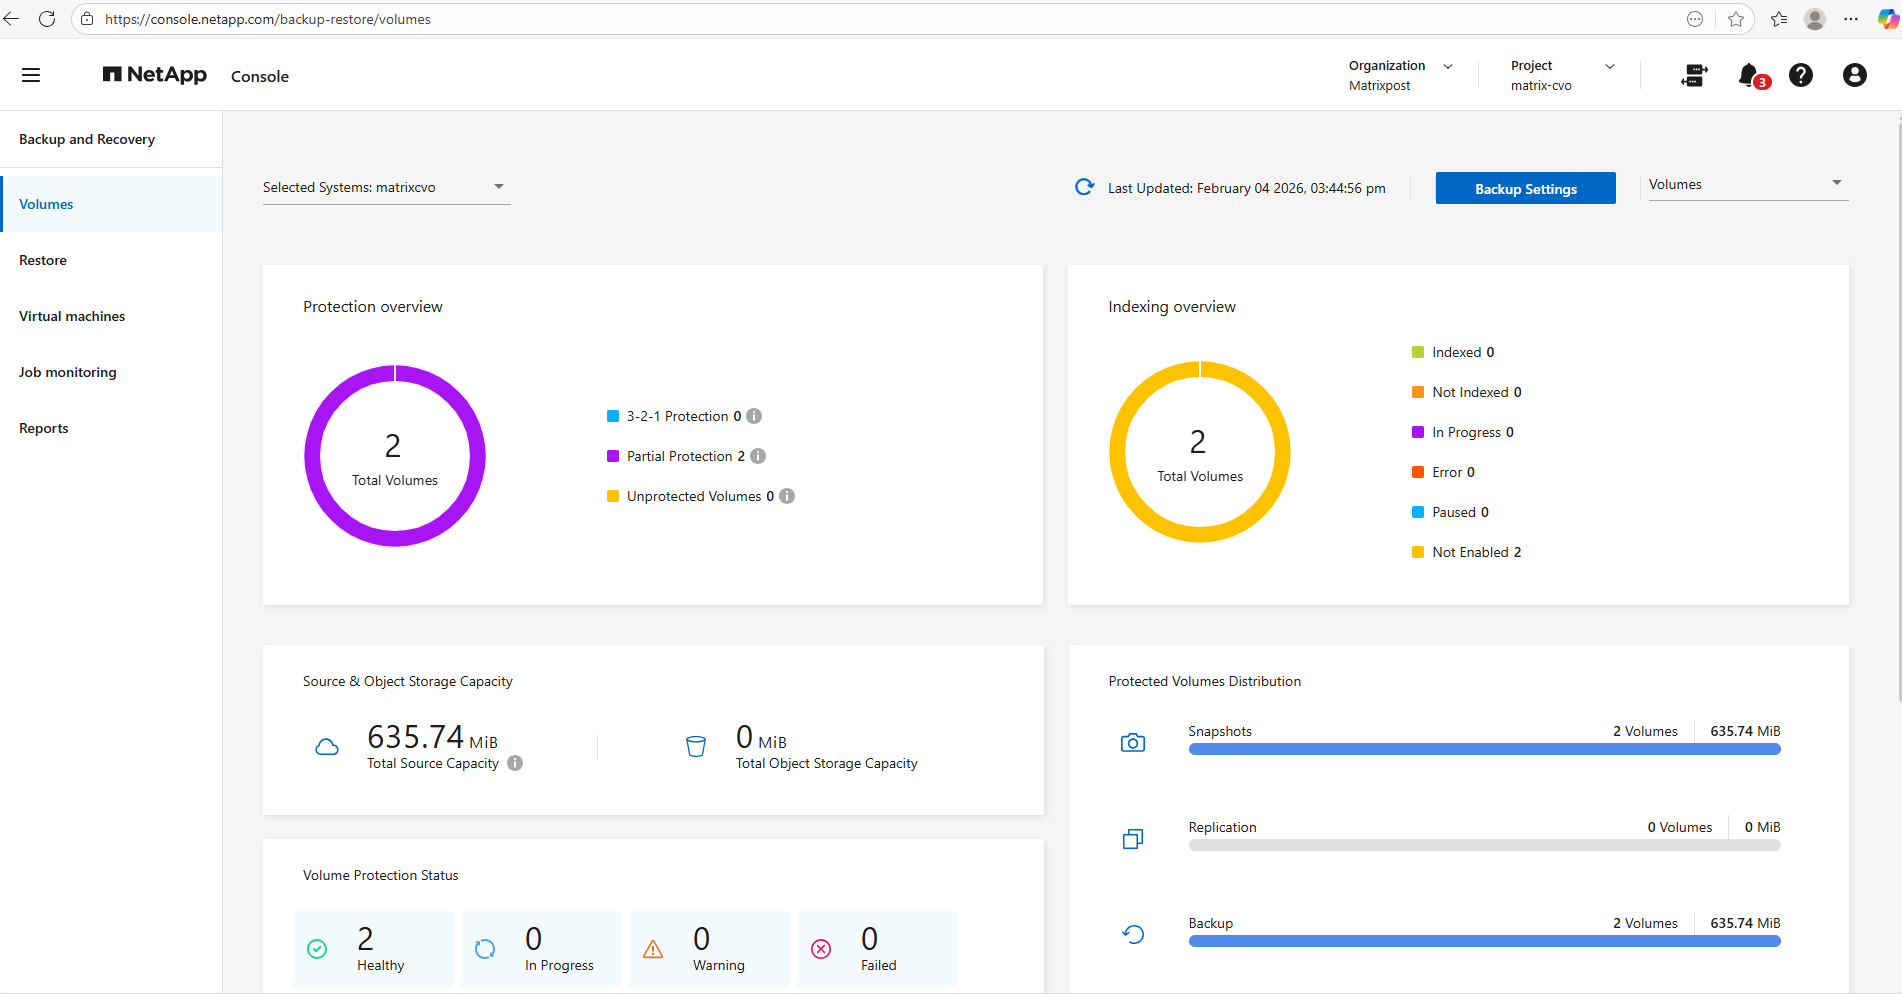
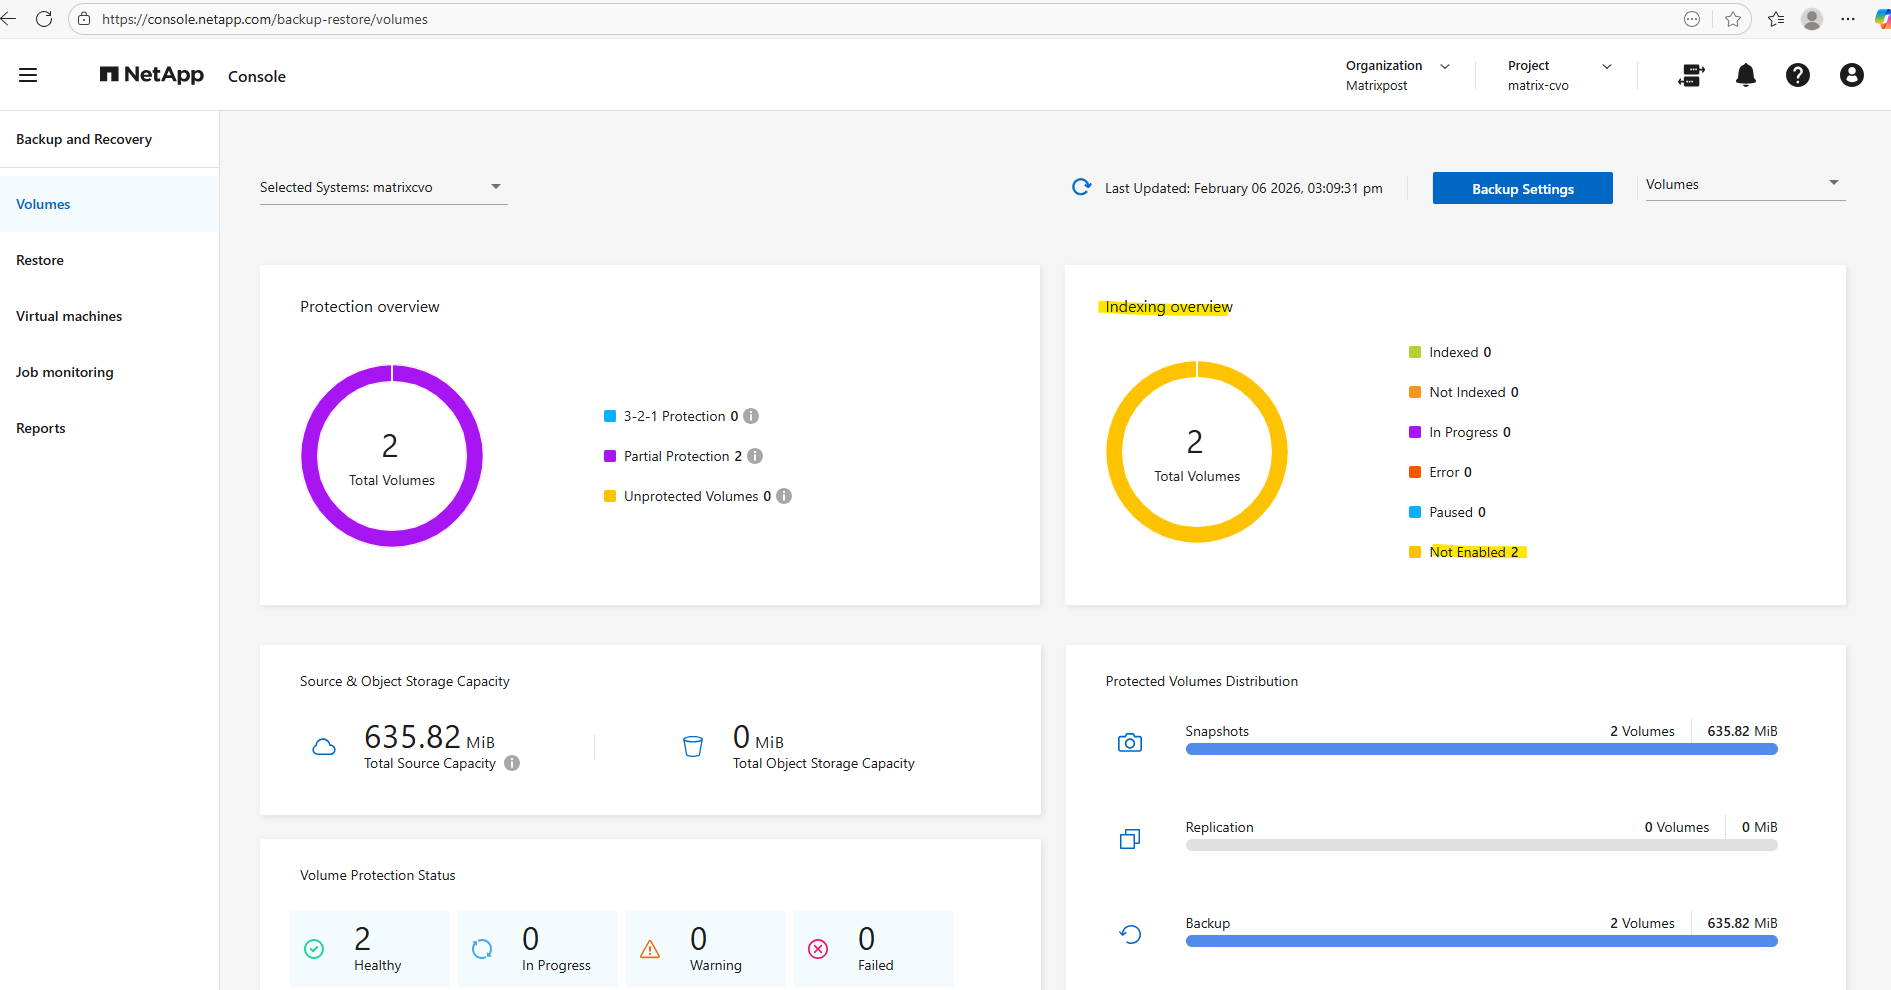
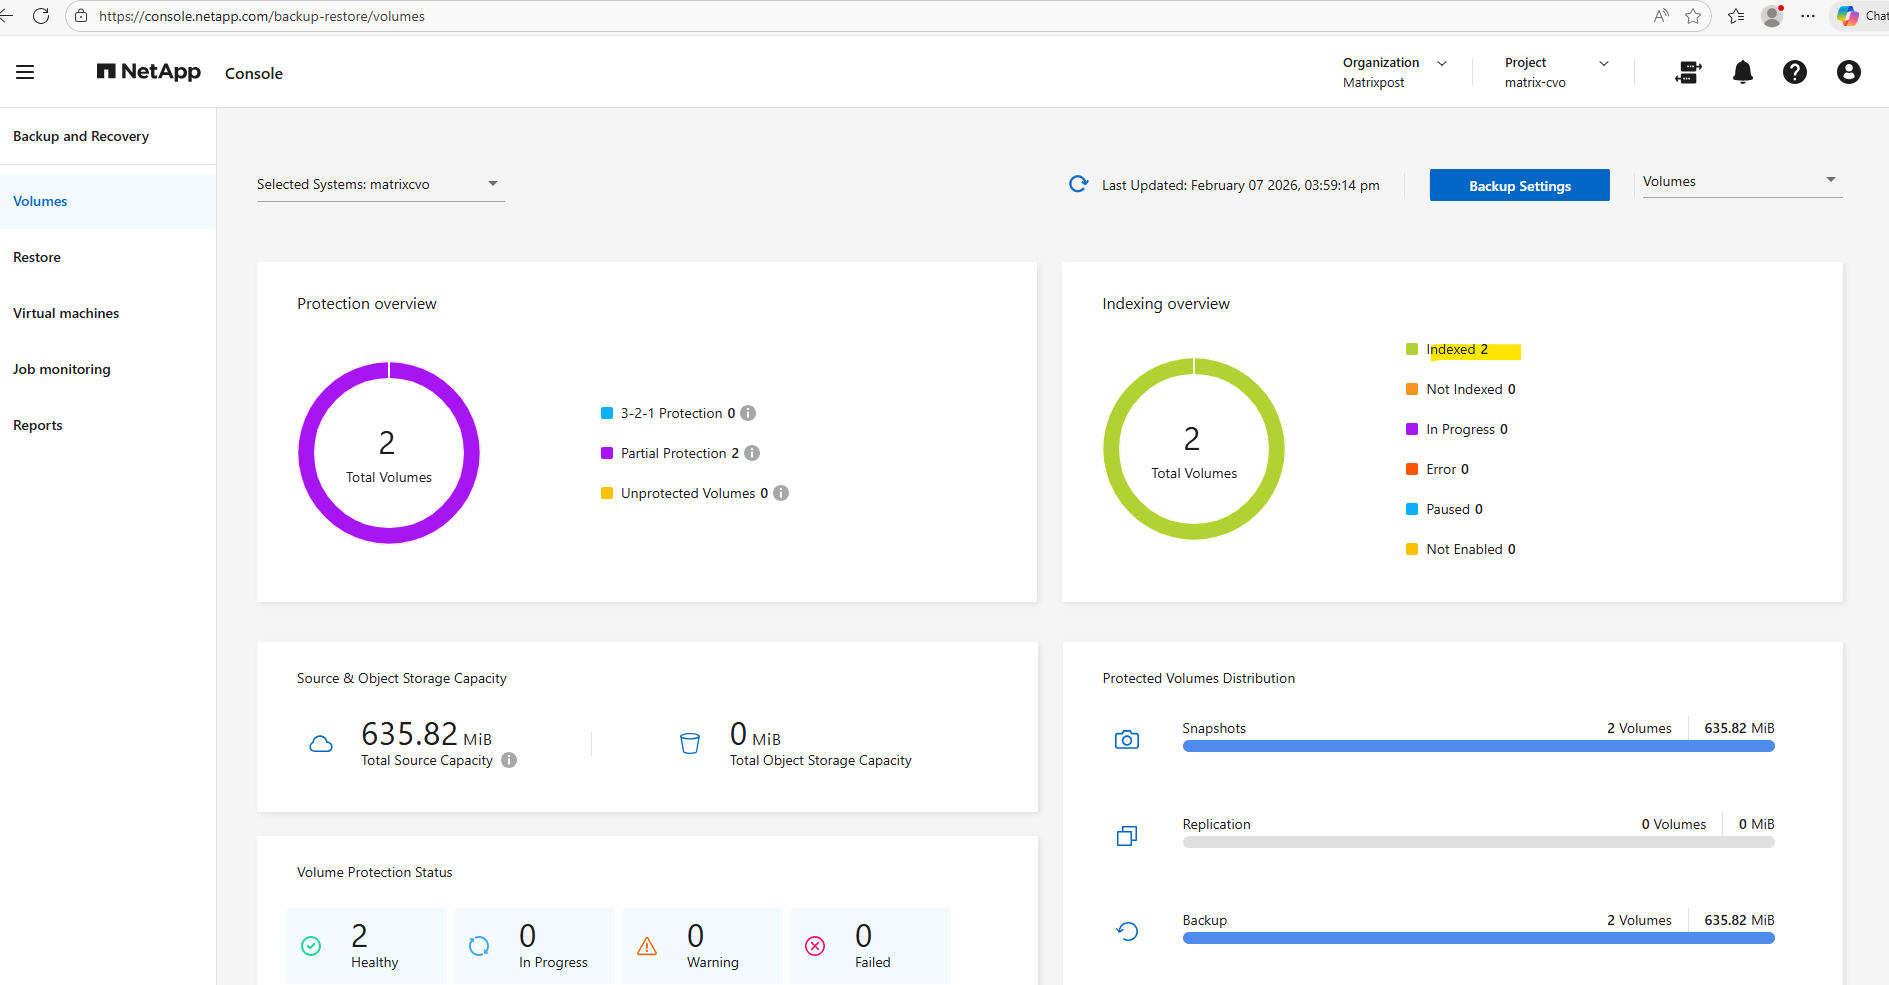
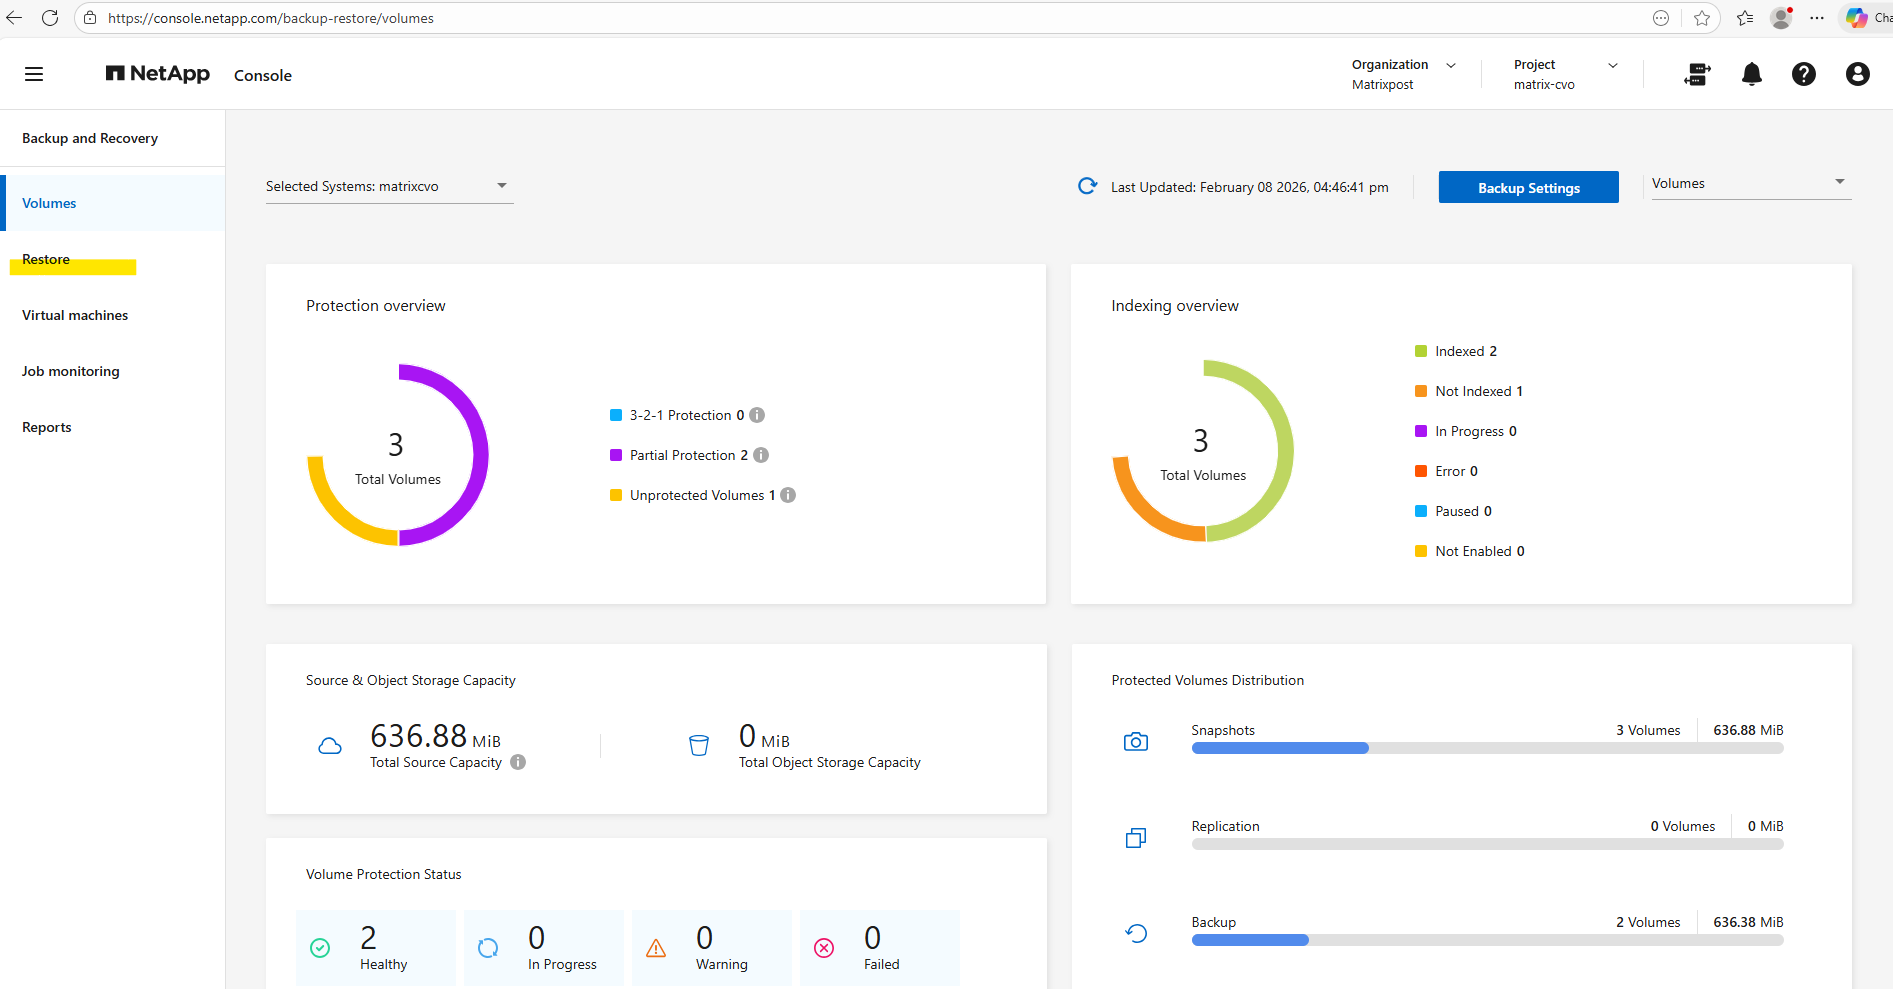
Looks good, after a few minutes we will get redirected to the Backup and Recovery -> Volumes page as shown below.

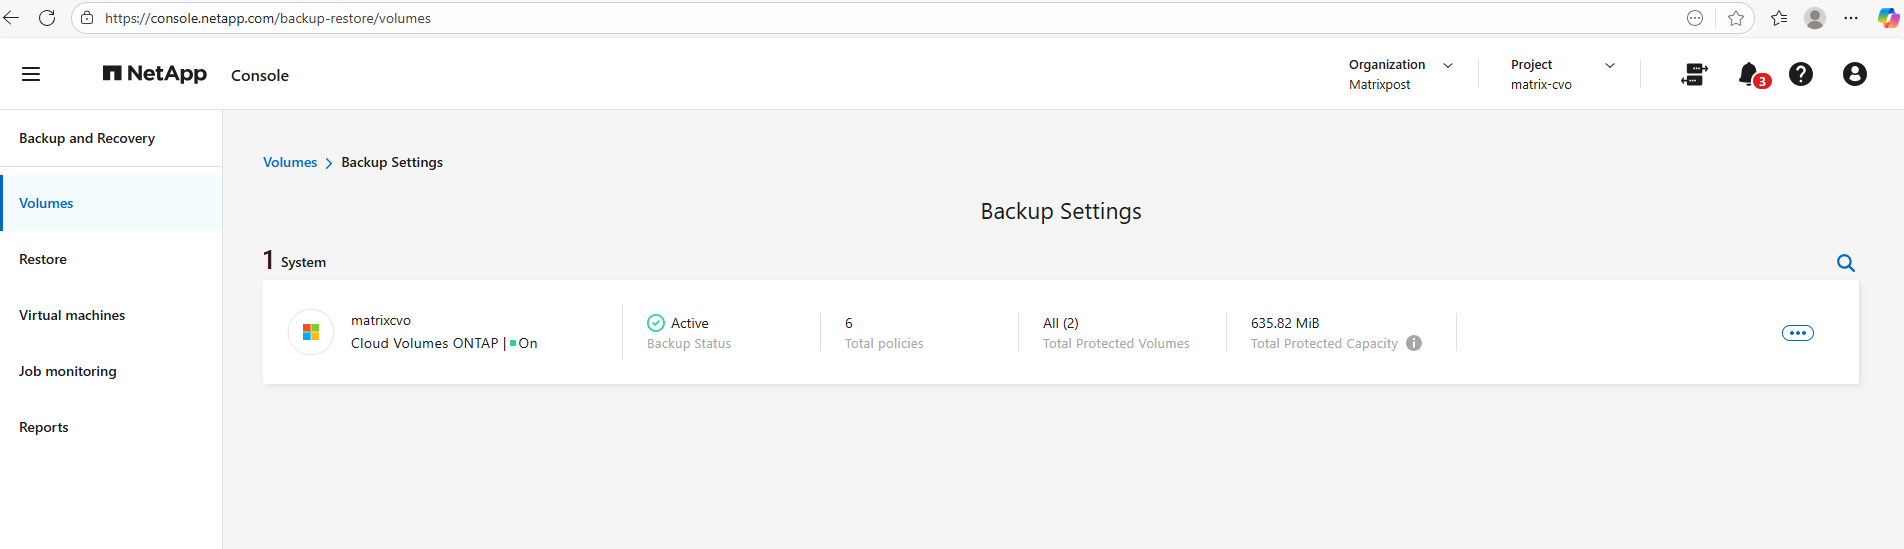
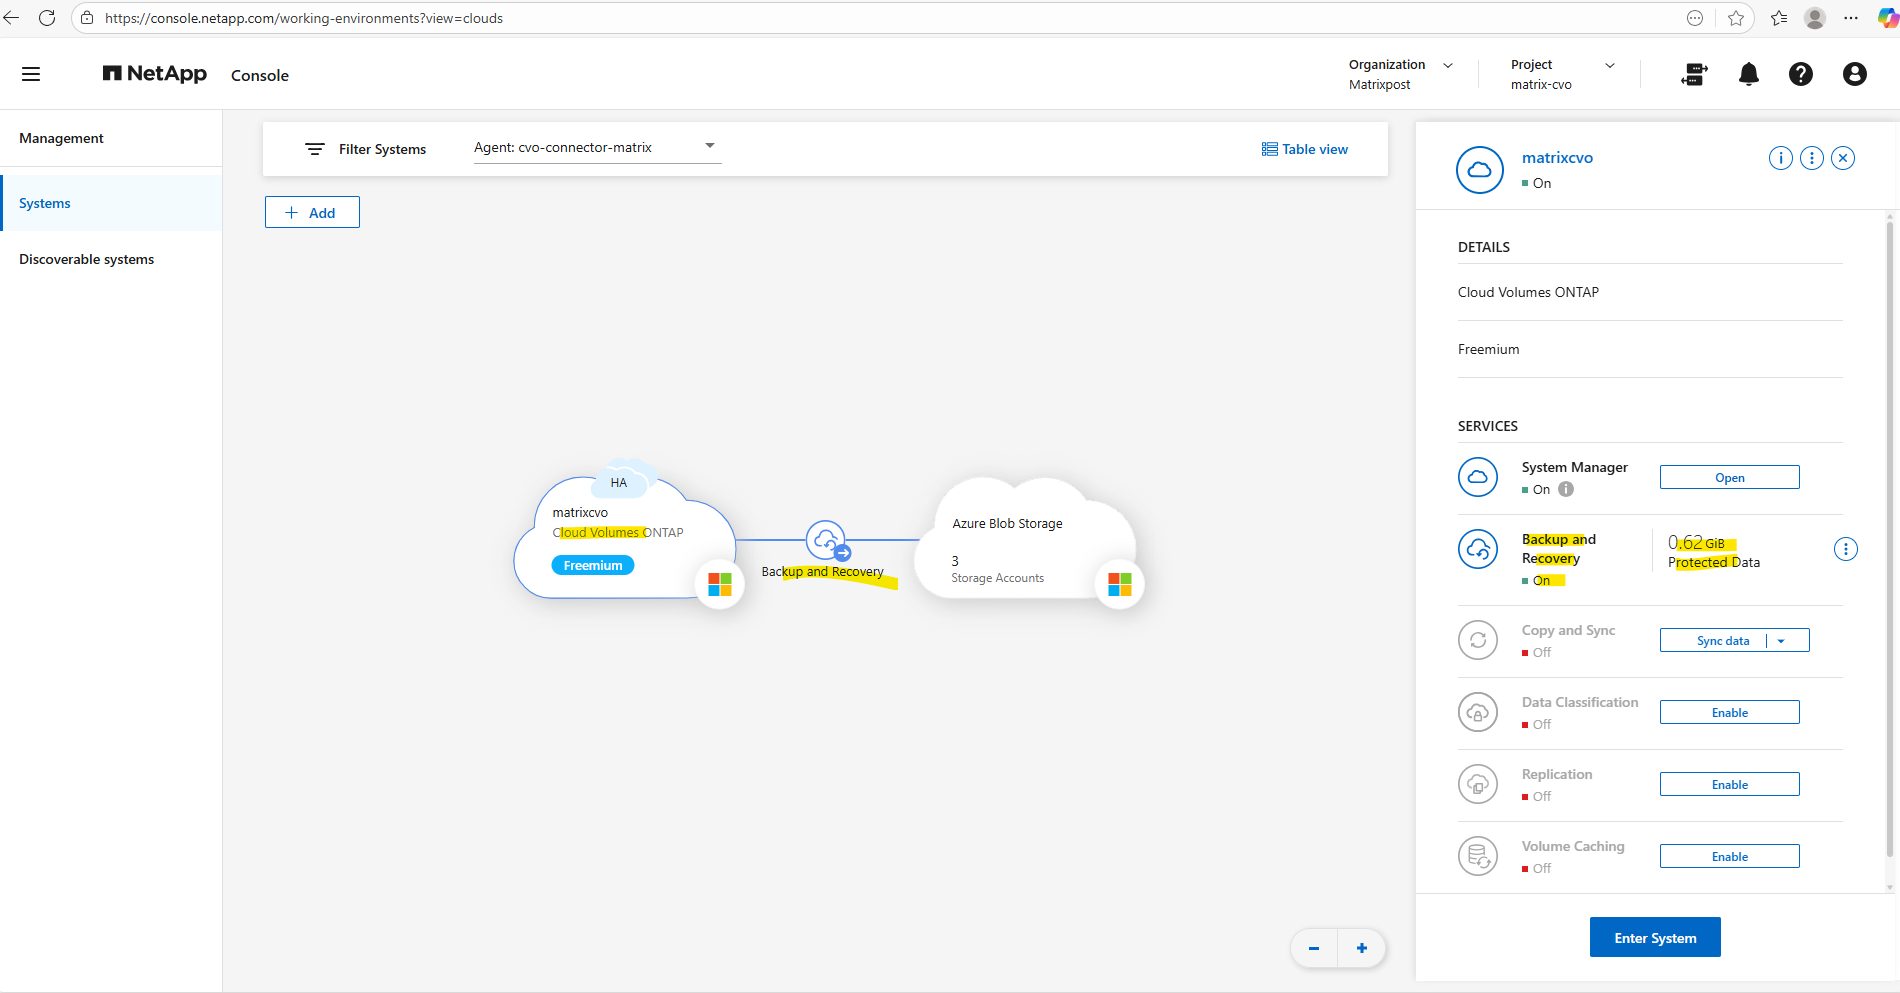
When moving the mouse over the Cloud Volume ONTAP cloud below, we will now also see here that we enabled Backup and Recovery which will be stored to our newly created storage account (before in my case just 2 accounts were shown here).
Snapshots and Backups
Snapshots and backups form the foundation of a resilient data protection strategy in ONTAP, enabling rapid local recovery while ensuring an additional off-site copy for disaster scenarios.
In this section, we will configure snapshot policies, align them with SnapMirror backup rules, and validate that retention behaves as expected across both local storage and object storage.
Understanding how these components interact is essential for building predictable and reliable protection workflows.
Snapshots provide fast, space-efficient local recovery points stored on the same system by leveraging redirect-on-write technology, where only changed data blocks are written after the snapshot is taken rather than duplicating the entire dataset.
Backups, in contrast, replicate these snapshots to object storage as an independent copy of the data, ensuring long-term retention and protection against system-level failures.
Snapshot and backup policies in ONTAP are protocol-independent and operate at the volume level, meaning the protection mechanism is identical whether the data is accessed via CIFS, NFS, or other protocols.
ONTAP captures block-level changes rather than protocol-specific data, ensuring consistent protection across workloads. Only the restore process may differ depending on how clients access the data.
Below I will show this for a volume which stores a cifs share, but as mentioned, for a volume which stores a nfs export this will be the same.
The snapmirror show -instance command provides a verbose view of SnapMirror relationships, exposing detailed configuration and status information that is especially useful for troubleshooting replication.
This is SnapMirror to object storage used by NetApp Console (formerly BlueXP) Backup & Recovery.
XDP in ONTAP SnapMirror stands for Extended Data Protection. It is the modern, unified replication type that replaces older modes like DP (Data Protection) and allows NetApp to support multiple replication use cases with a single engine.
XDP enables policy-driven replication such as vault backups, mirrors, and mirror-vault combinations, while also supporting more efficient transfers and newer Snapshot technologies. When you see
Relationship Type: XDPlike shown below, it simply means the relationship is using the current-generation SnapMirror framework designed for flexible, policy-based data protection.
matrixcvo::> snapmirror show -instance
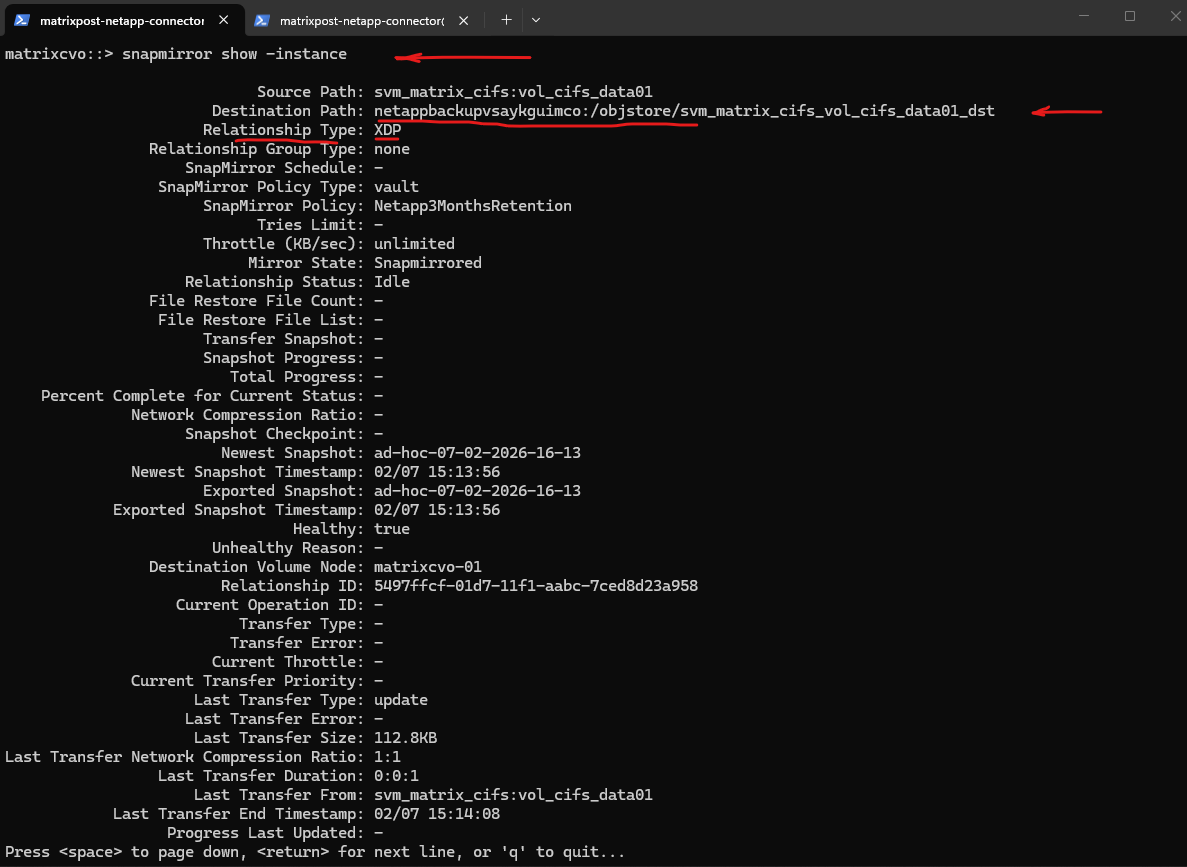
Our destination path with :
netappbackupvsaykguimco:/objstore/...
That is the automatically created object store endpoint in Azure Blob.
So internally, the NetApp Console uses SnapMirror technology to vault snapshots into object storage.
Although the backups are stored in Azure Blob object storage, Cloud Volumes ONTAP leverages SnapMirror vault technology in the background to efficiently transfer Snapshot copies.
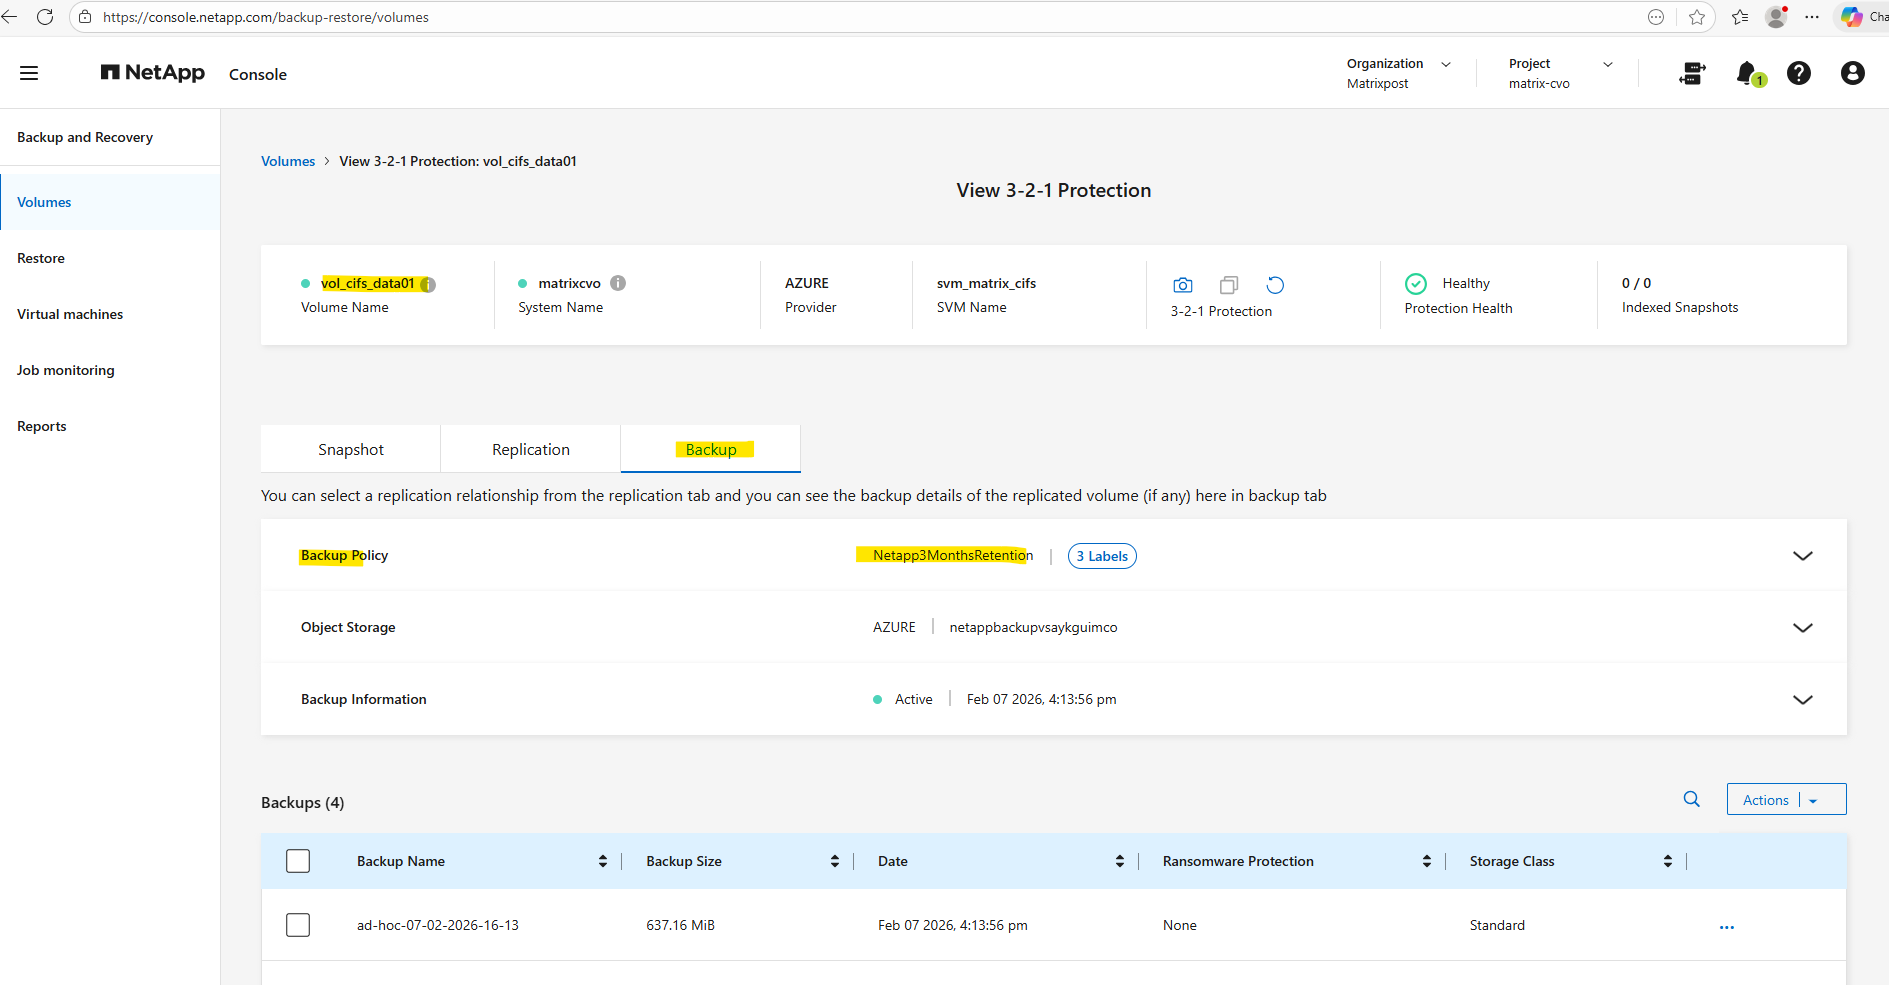
The Netapp3MonthsRetention policy in the NetApp console assigned to my cifs volume above, is actually mapped internally to a SnapMirror vault policy shown below.
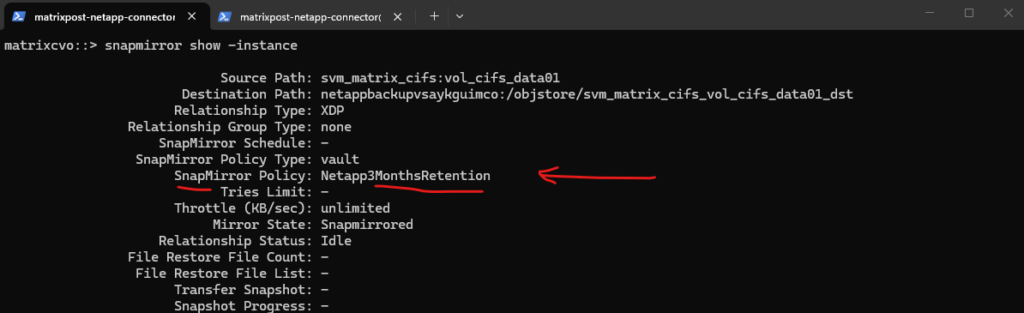
This is EXPECTED when backups are orchestrated by BlueXP Backup & Recovery.
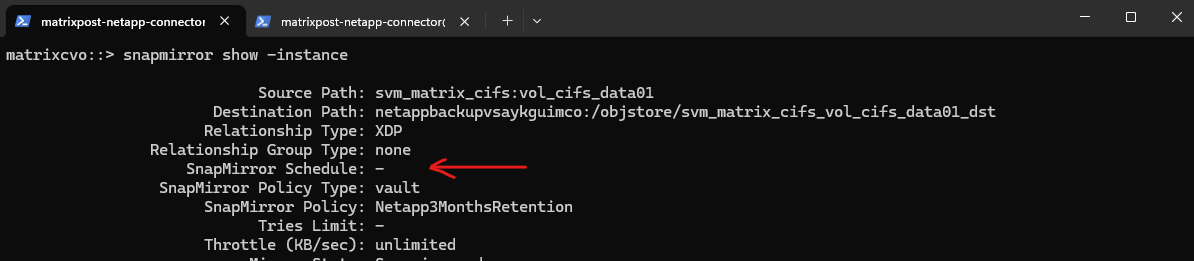
When backups are managed through the NetApp console, the SnapMirror schedule is not displayed in the ONTAP CLI because the scheduling logic is handled externally by the NetApp console control plane.
ONTAP simply executes the transfer operations when triggered via API, which is why the relationship shows no schedule. This behavior is expected and confirms that the backup orchestration is centralized in the NetApp console rather than managed locally on the cluster.
SnapMirror Schedule: -
matrixcvo::> cluster date show
matrixcvo::> snapmirror show -fields source-path,status,total-progress
matrixcvo::> snapmirror show -fields destination-path,state,healthy,lag-time,last-transfer-end-timestamp
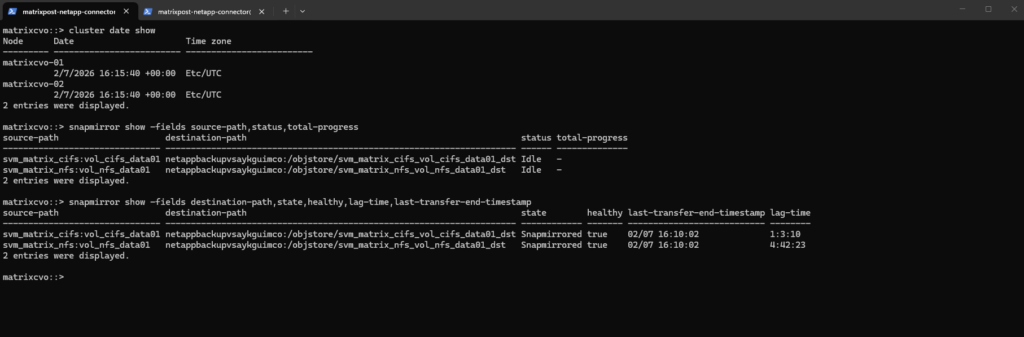
The above transferred timestamp with
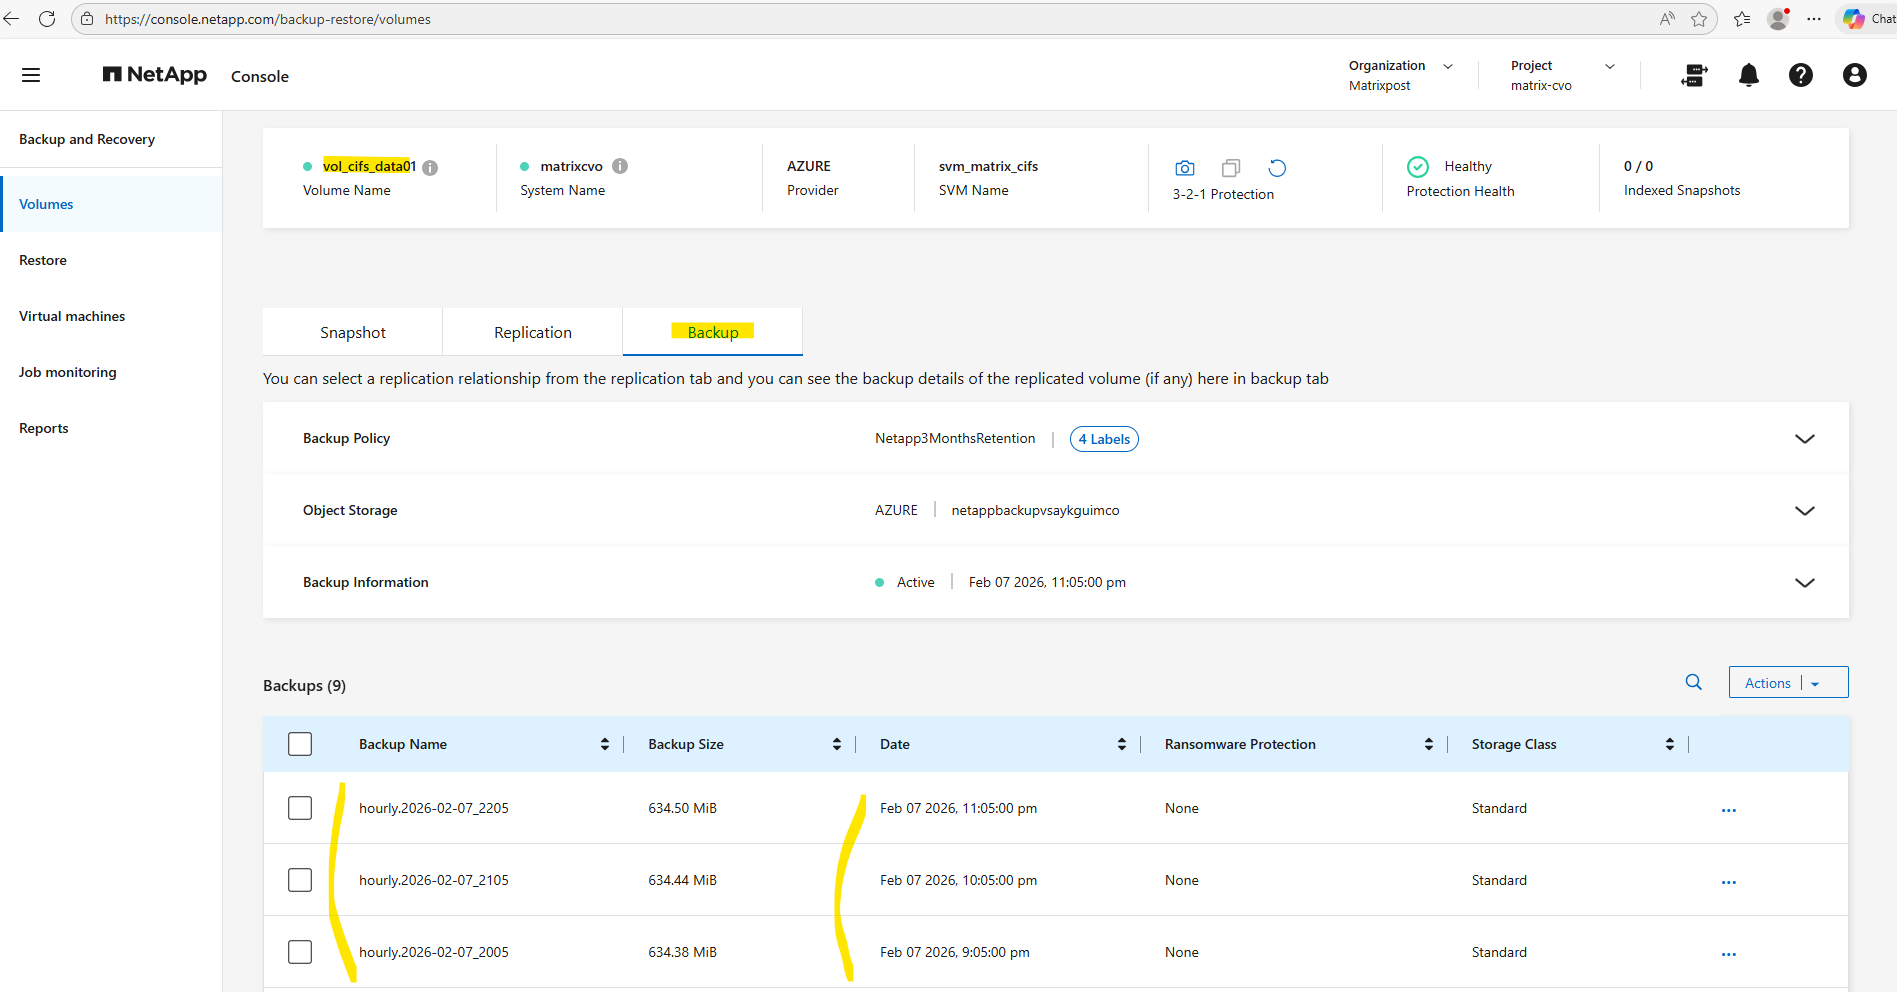
16:10:02 (UTC time)would be in the NetApp console below17:10:02 CET time. The time right now is17:22 CET, but in the NetApp console I can’t see this new backup showing up, the last is from16:13:56 CETtime (my ad-hoc triggered backup).
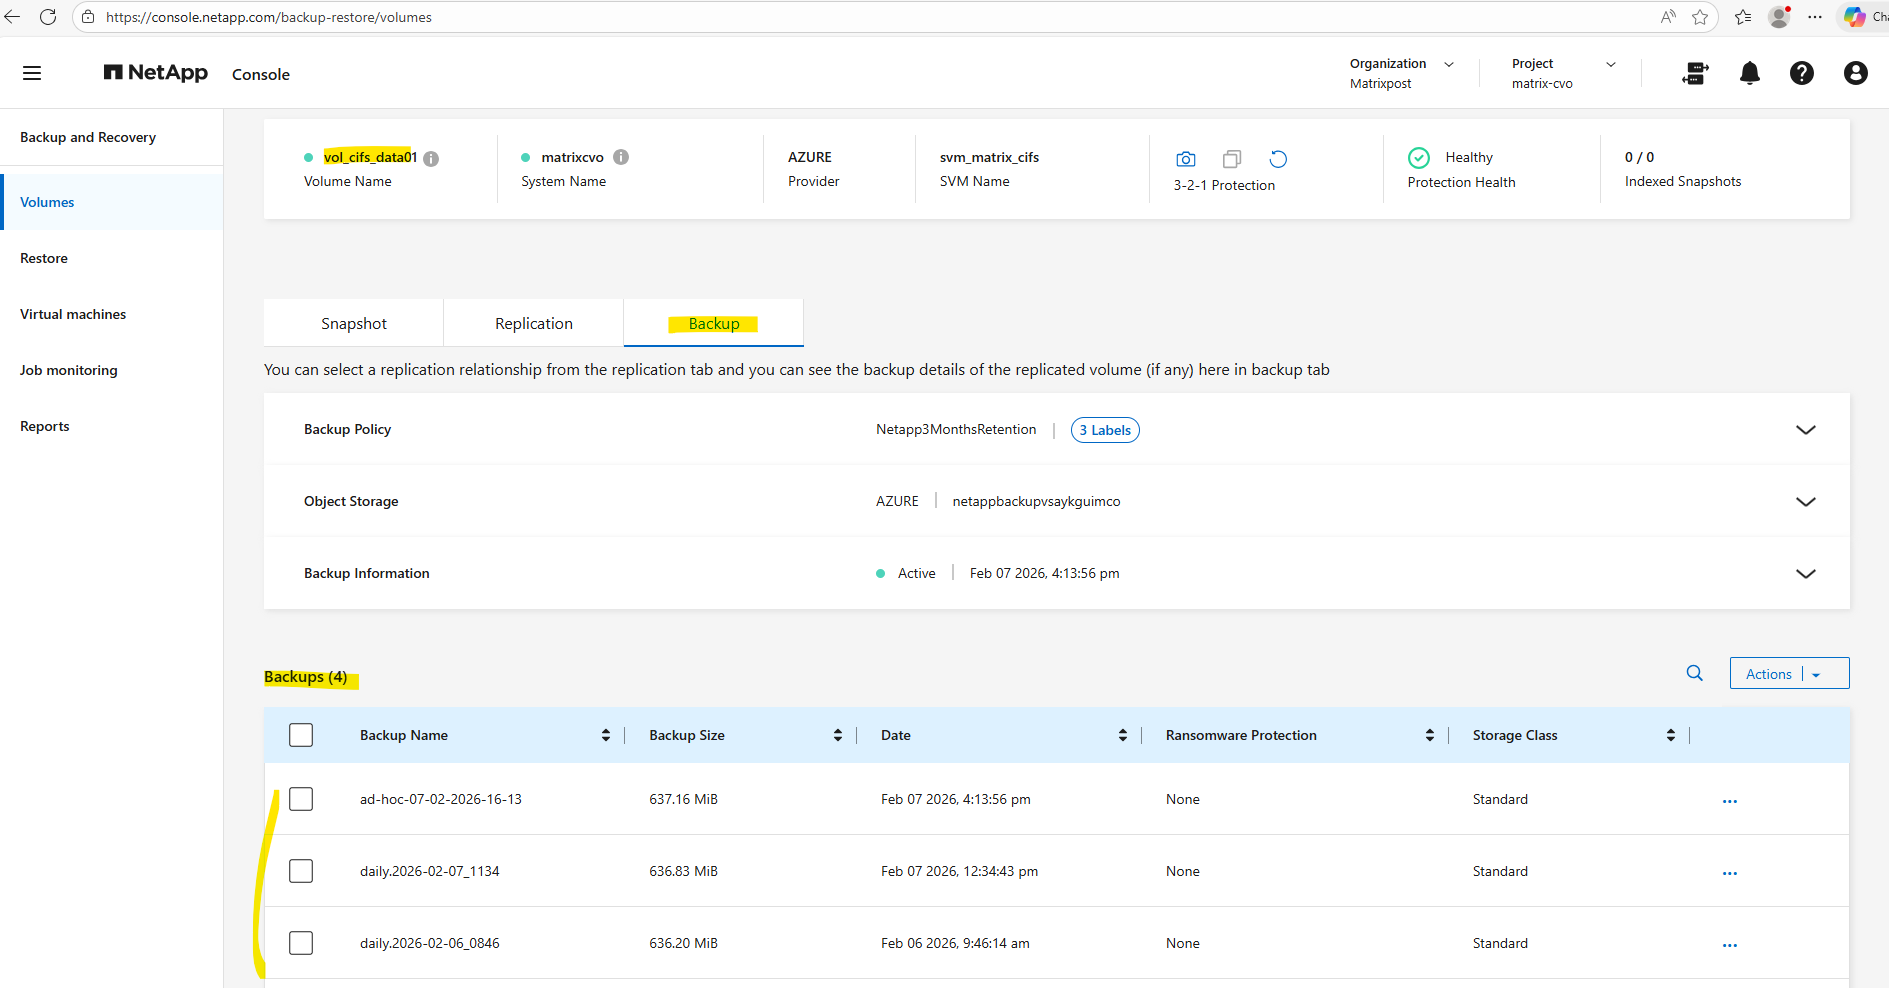
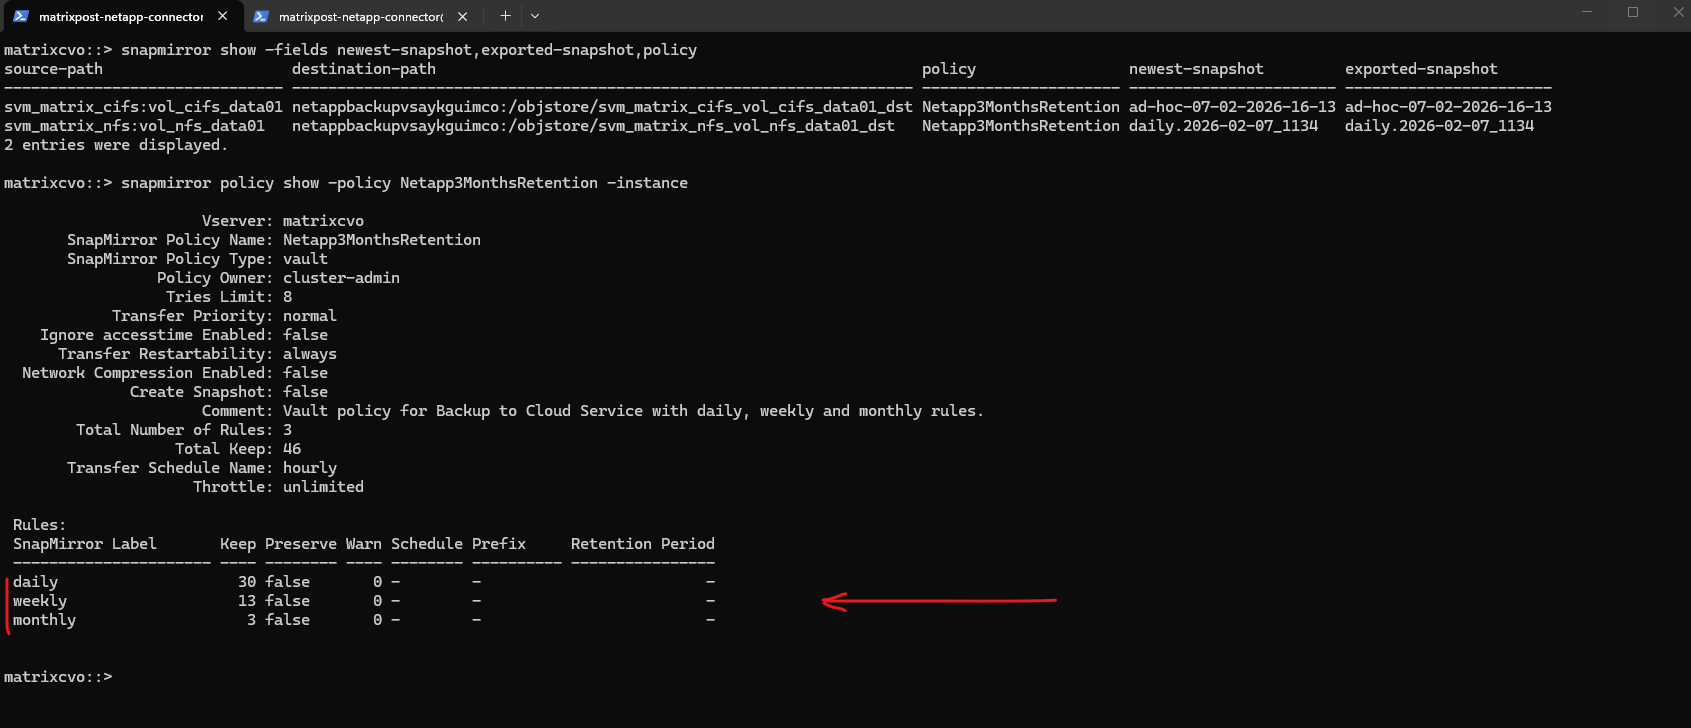
Although hourly Snapshot copies are created locally, the SnapMirror vault policy only transfers snapshots labeled daily, weekly, and monthly to object storage.
This tiered approach balances fast local recovery with cost-efficient long-term retention, which is why only daily backups appears in the NetApp console above, despite an hourly transfer schedule.
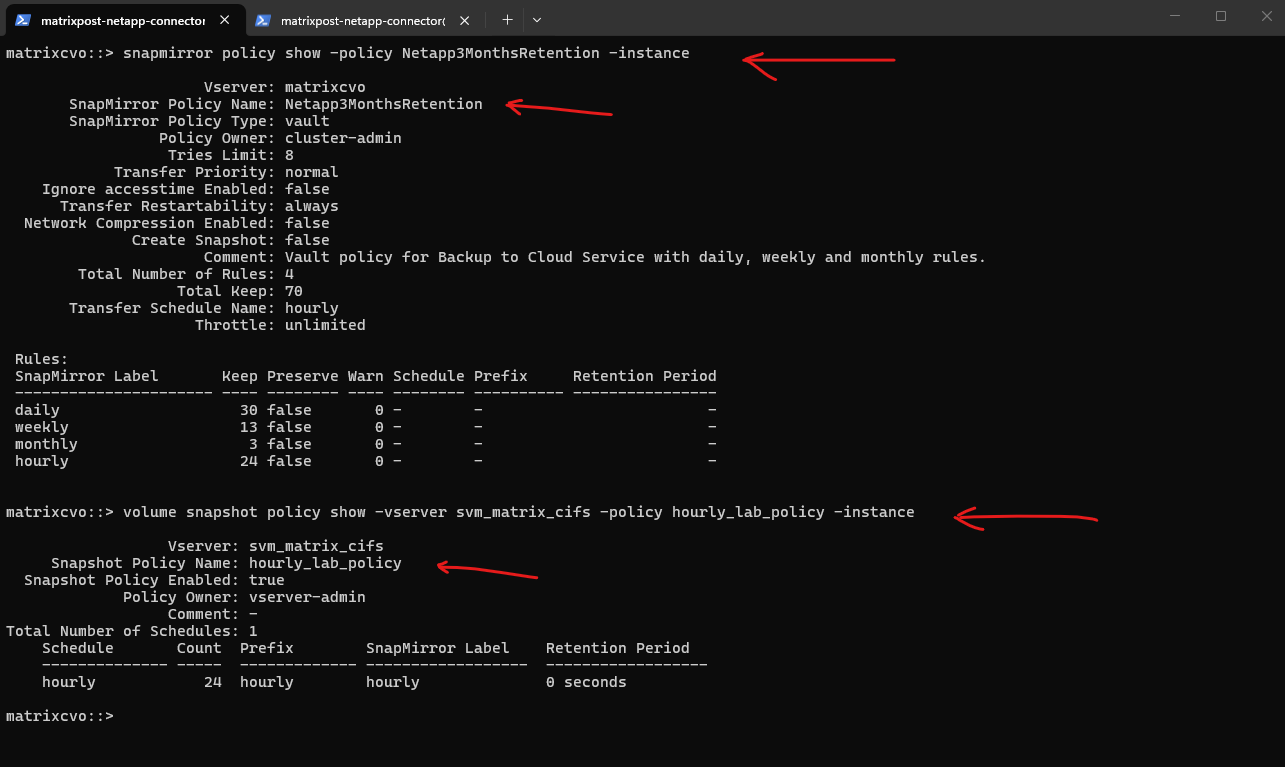
matrixcvo::> snapmirror show -fields newest-snapshot,exported-snapshot,policy
matrixcvo::> snapmirror policy show -policy Netapp3MonthsRetention -instance
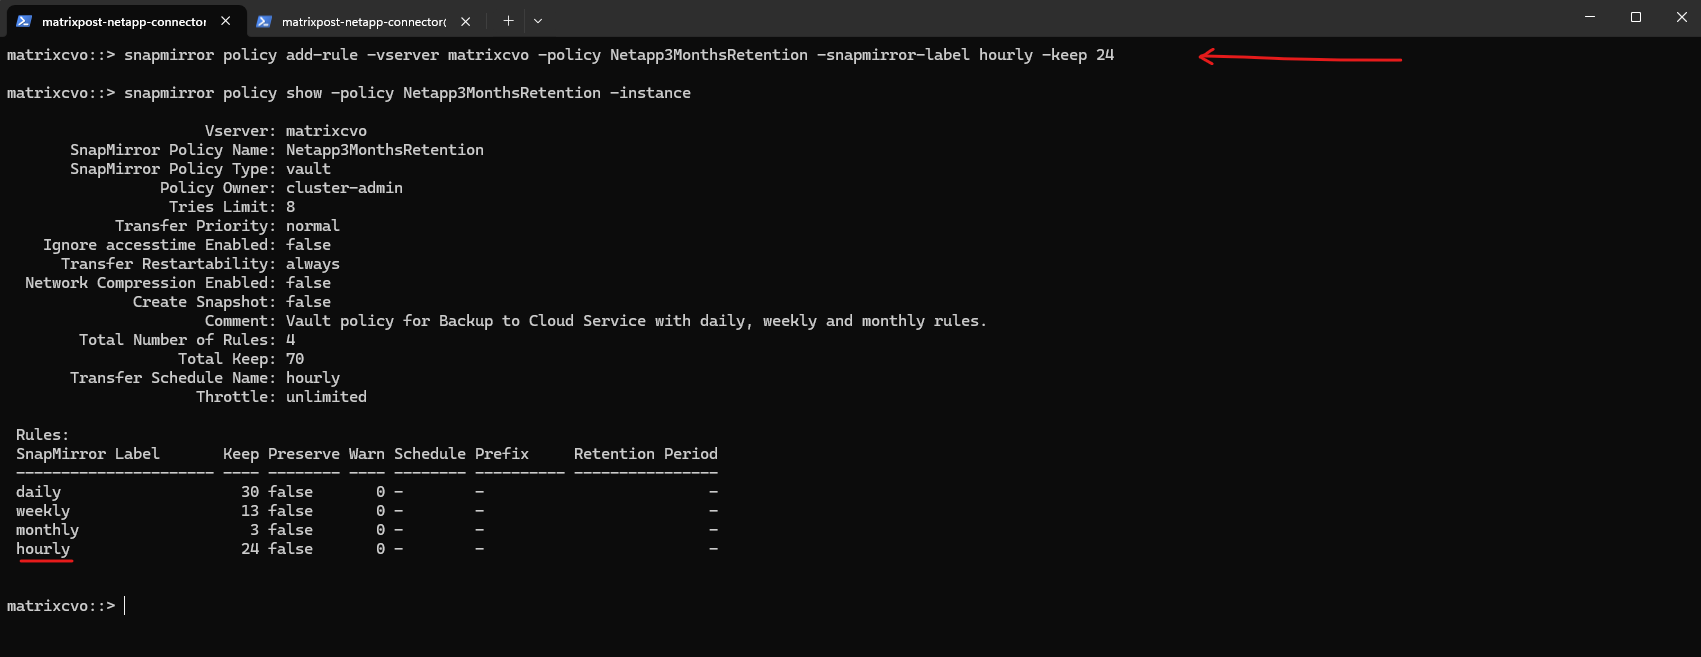
The command below extends the existing vault policy by allowing snapshots labeled hourly to be replicated and retained for the last 24 copies. I will add hourly labeled snapshots just for demonstration purpose in my lab environment, hourly labeled snapshots are enabled to illustrate how SnapMirror selects and transfers snapshots based on policy-defined labels.
Because SnapMirror evaluates these labels when selecting snapshots for transfer, newly created hourly snapshots are now also automatically backed up to Azure object storage during the next scheduler run.
matrixcvo::> snapmirror policy add-rule -vserver matrixcvo -policy Netapp3MonthsRetention -snapmirror-label hourly -keep 24

# verify
matrixcvo::> snapmirror policy show -policy Netapp3MonthsRetention -instance
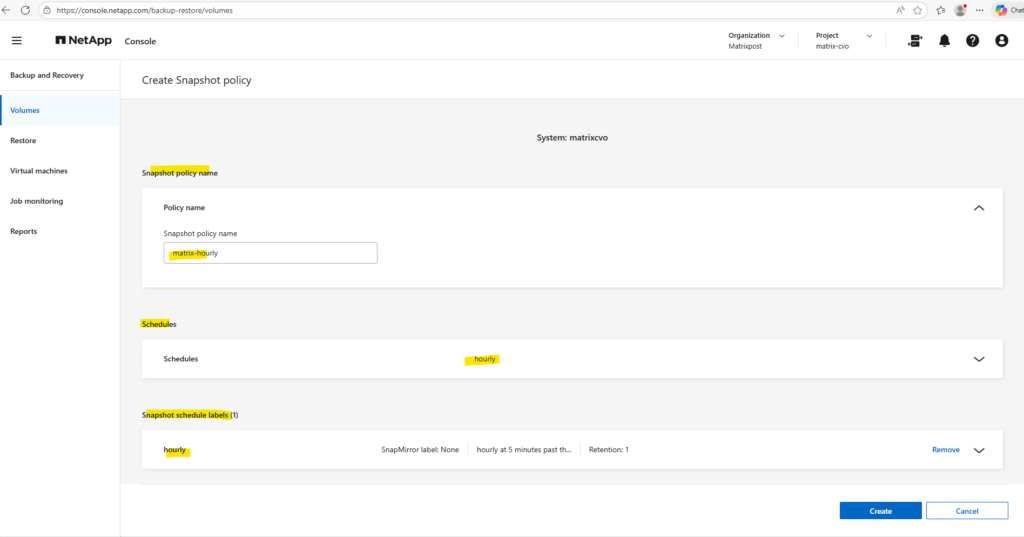
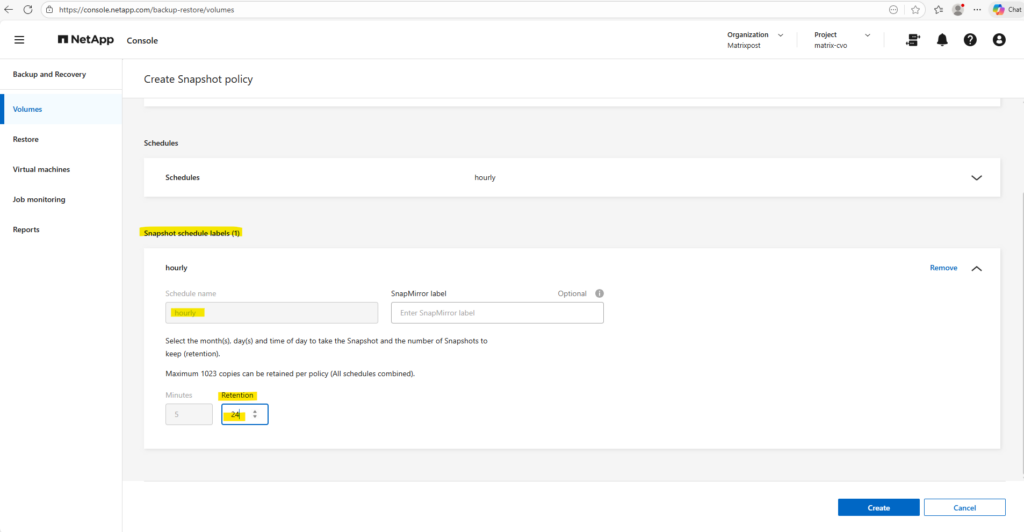
Next we also need to create a proper snapshot policy with our new hourly label.
This runs every hour, keeps 24 snaphots and labels them hourly.
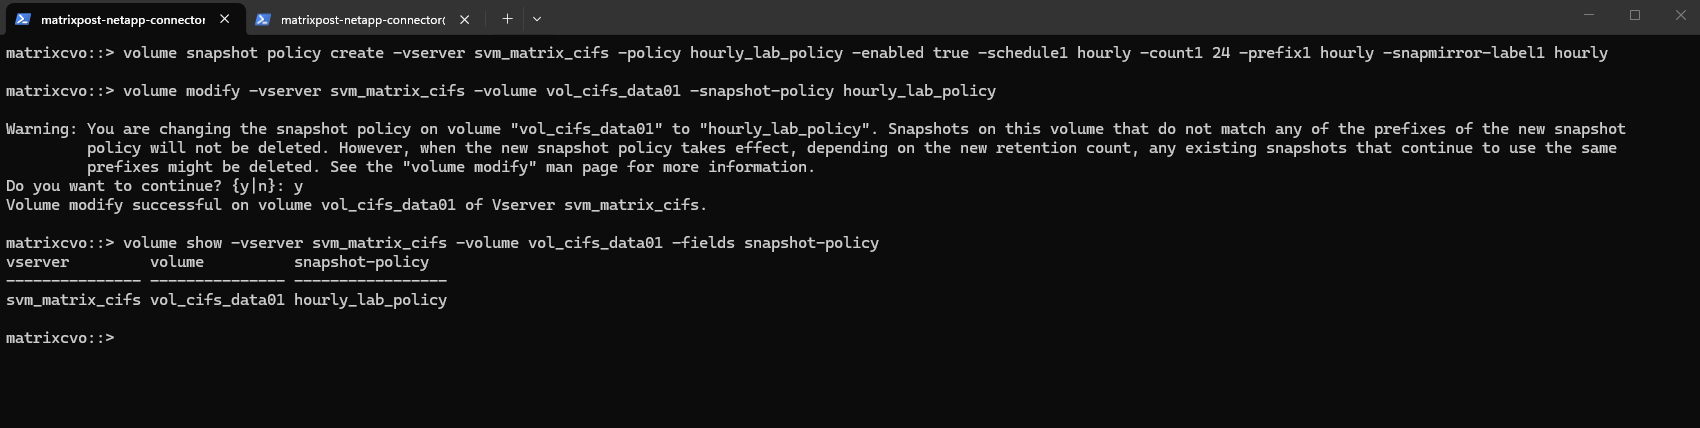
matrixcvo::> volume snapshot policy create -vserver svm_matrix_cifs -policy hourly_lab_policy -enabled true -schedule1 hourly -count1 24 -prefix1 hourly -snapmirror-label1 hourly

Finally we need to assign the policy to the volume we want to protect.
When assigning a new snapshot policy to a volume, the existing snapshots that do not match the prefixes defined in the new policy are not automatically deleted.
ONTAP only manages snapshots created under the active policy, leaving previously generated copies untouched unless they are removed manually. This behavior prevents unintended data loss and allows administrators to clean up older snapshots in a controlled manner if required.
volume modify -vserver svm_matrix_cifs -volume vol_cifs_data01 -snapshot-policy hourly_lab_policy

After assigning the new snapshot policy with an hourly label, previously created hourly, daily, weekly, monthly snapshots that do not have a SnapMirror label are no longer governed by the active policy and therefore will not be deleted automatically.
ONTAP only applies retention rules to snapshots created under the current policy, meaning older copies remain until they are manually removed. In contrast, the existing daily and weekly snapshots continue to follow their respective policy rules as long as those schedules are still defined, and they will be automatically rotated according to the configured retention.
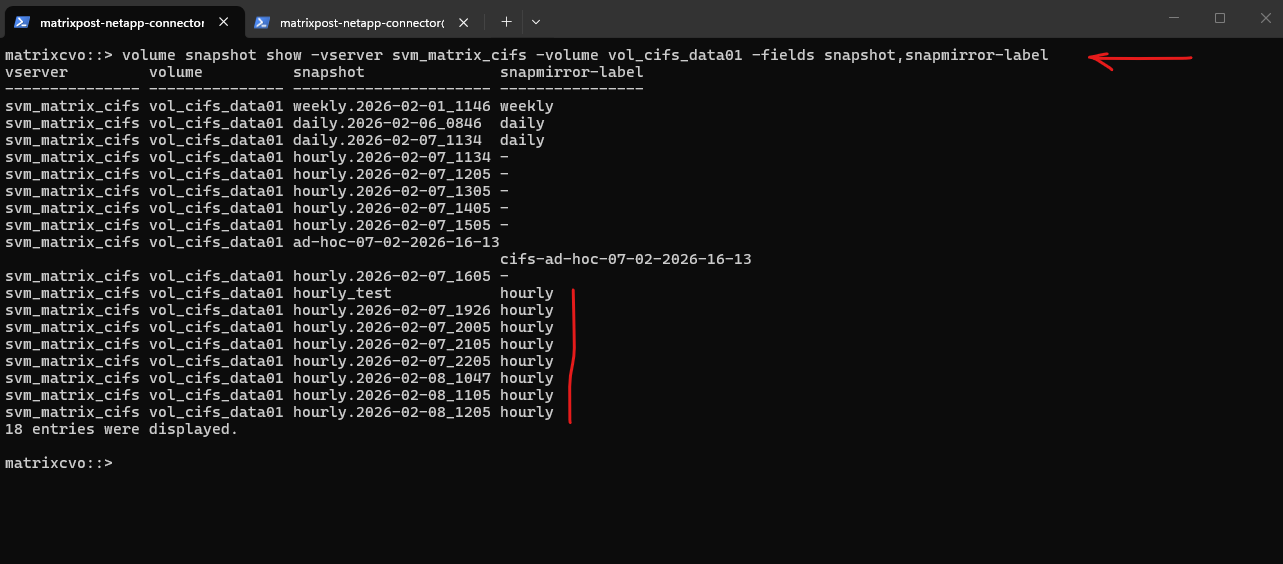
To check which snapshots were created previously and identify their SnapMirror labels, you can list them directly from the ONTAP CLI with the relevant metadata fields:
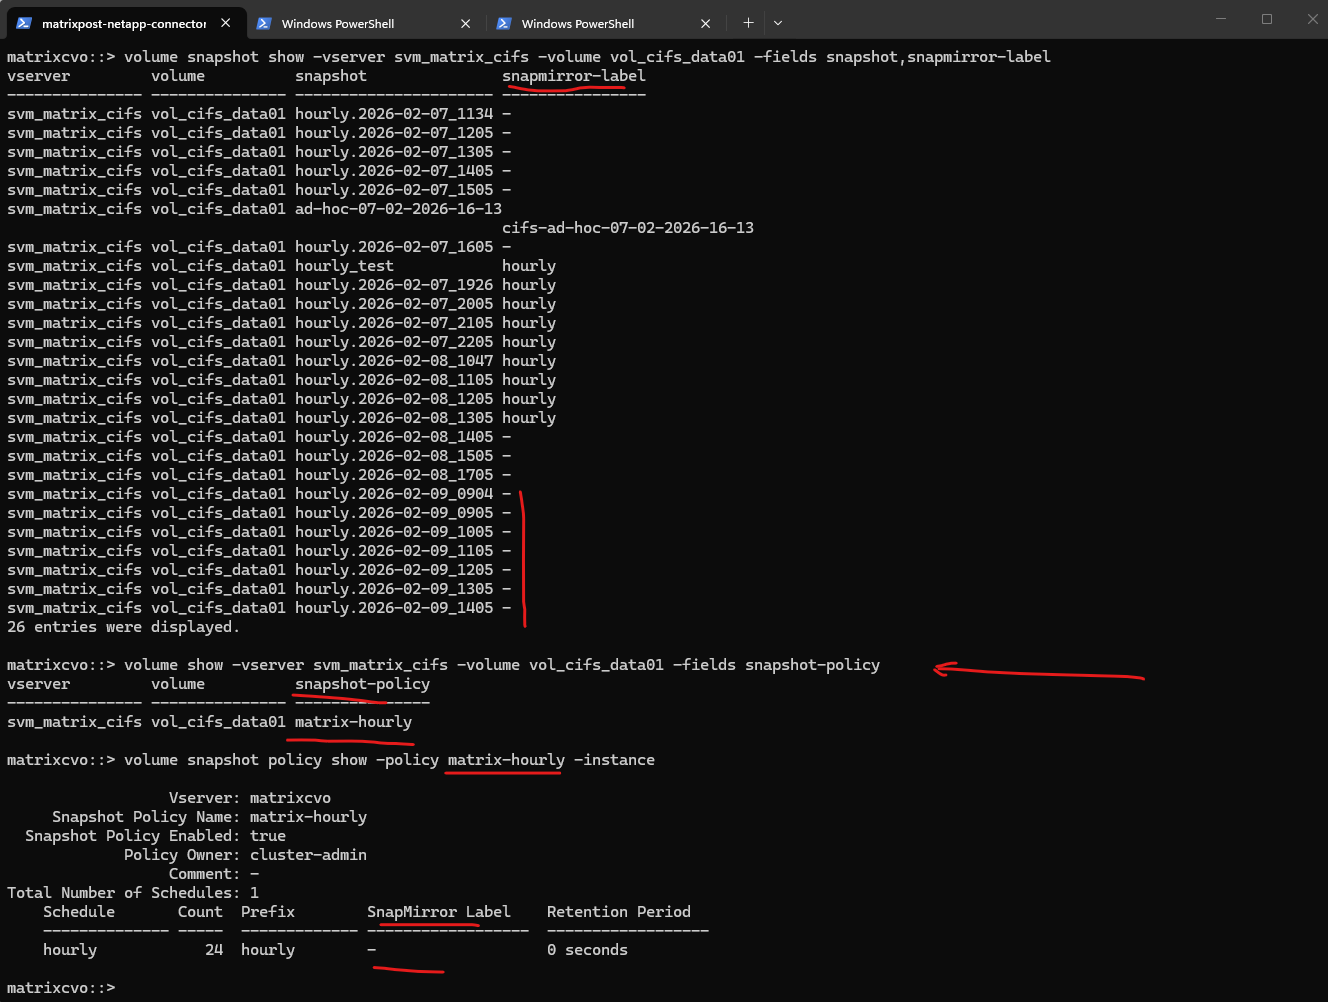
matrixcvo::> volume snapshot show -vserver svm_matrix_cifs -volume vol_cifs_data01 -fields snapshot,snapmirror-label
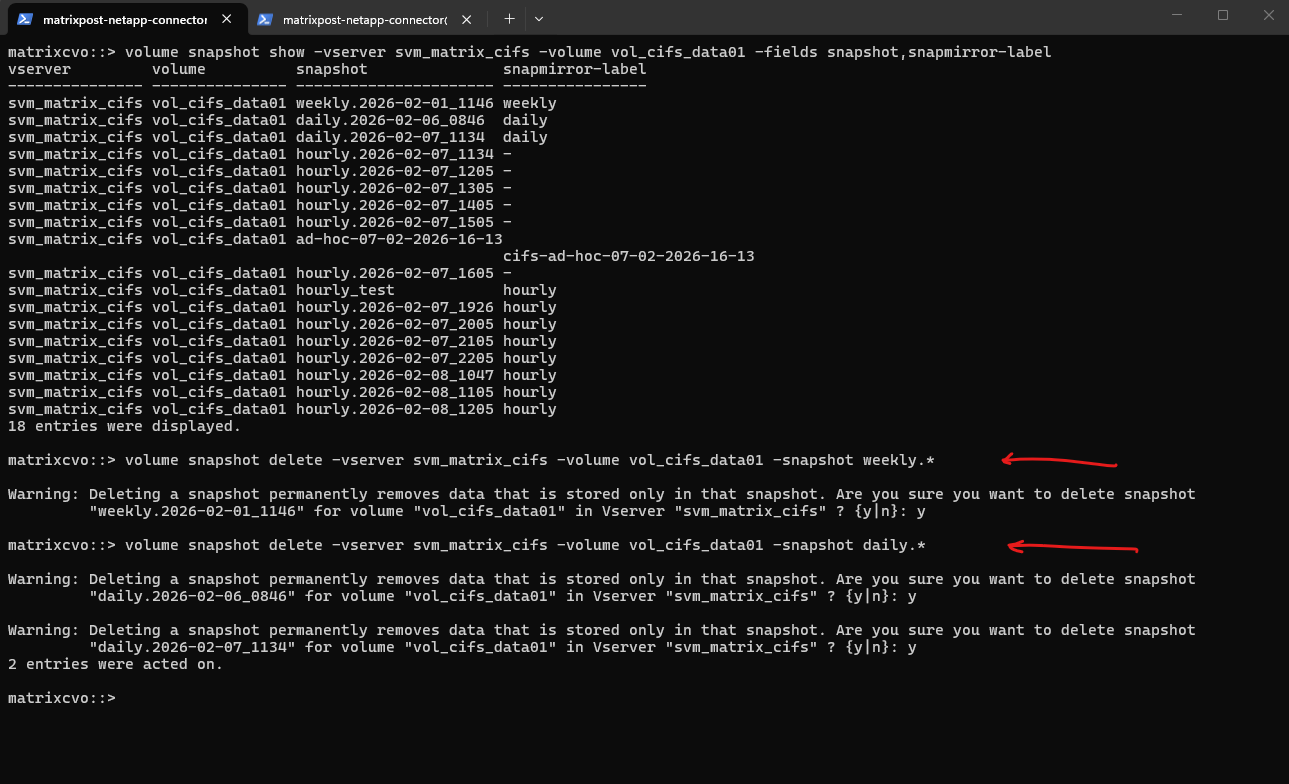
So previously created snapshots that are no longer governed by an active retention schedule should be reviewed and removed manually to prevent unnecessary storage consumption. Deleting obsolete snapshots ensures that the volume aligns with the new policy and maintains predictable capacity usage.
matrixcvo::> volume snapshot delete -vserver svm_matrix_cifs -volume vol_cifs_data01 -snapshot weekly.*
matrixcvo::> volume snapshot delete -vserver svm_matrix_cifs -volume vol_cifs_data01 -snapshot daily.*
Snapshot and SnapMirror policies operate independently and must be aligned to achieve the desired retention behavior. In this configuration below, the snapshot policy retains the last 24 hourly snapshots locally, while the vault policy keeps the most recent 24 replicated backups in object storage, automatically removing older copies once the limit is exceeded.
Because SnapMirror can only transfer existing snapshots, additional schedules such as daily or weekly backups require corresponding entries in the snapshot policy, so far just hourly snapshots (labeled) will be created locally from the cifs volume and therefore just these will be tranferred to Azure object storage.
# SnapMirror policy
matrixcvo::> snapmirror policy show -policy Netapp3MonthsRetention -instance

# Snapshot policy
matrixcvo::> volume snapshot policy show -vserver svm_matrix_cifs -policy hourly_lab_policy -instance
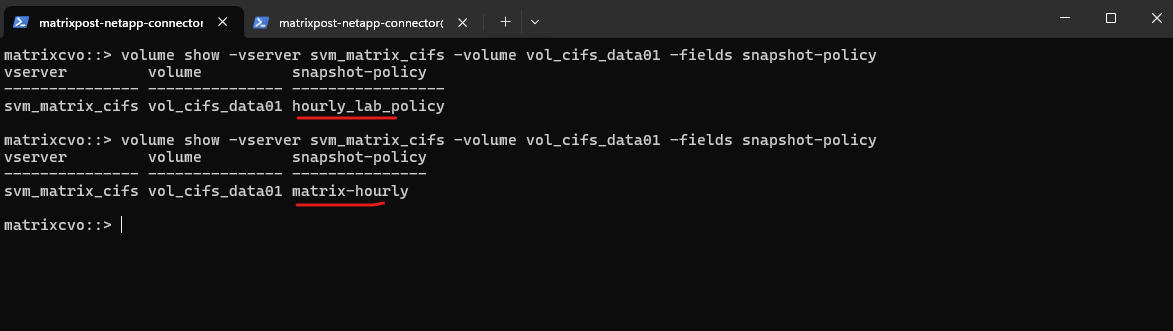
So back to our newly hourly assigned local snapshot policy, verify if OK.
matrixcvo::> volume show -vserver svm_matrix_cifs -volume vol_cifs_data01 -fields snapshot-policy
Also check the policy again:
Because the snapshot policy now contains only an hourly schedule, ONTAP will no longer create daily or weekly snapshots for this volume.
Policy changes affect only future snapshot creation, meaning previously generated snapshots remain available until they are manually removed. This results in a streamlined retention model focused exclusively on hourly recovery points.
matrixcvo::> volume snapshot policy show -policy hourly_lab_policy -instance
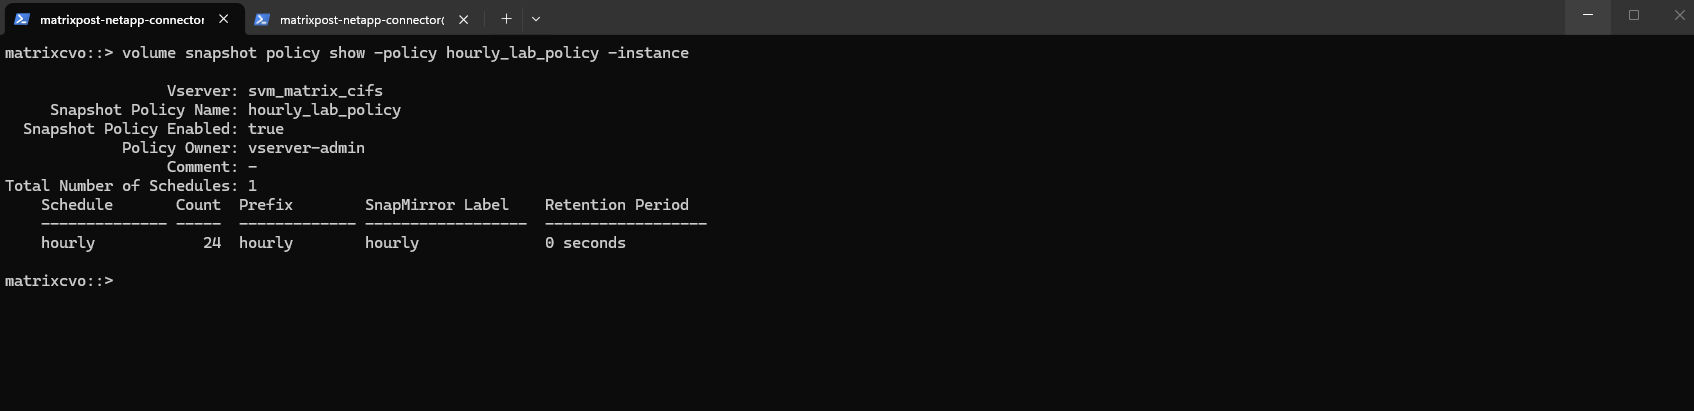
Our new policy is now a real hourly snapshot policy and it will create snapshots with a proper SnapMirror label = hourly, making them eligible for your new vault rule Netapp3MonthsRetention.
If you want the quickest proof without waiting for the next hour, trigger one labeled snapshot now:
matrixcvo::> volume snapshot create -vserver svm_matrix_cifs -volume vol_cifs_data01 -snapshot hourly_test -snapmirror-label hourly

# Then confirm the label:
matrixcvo::> volume snapshot show -vserver svm_matrix_cifs -volume vol_cifs_data01 -fields snapshot,snapmirror-label

# And if you want to immediately push it to Azure for testing:
# The destination-path we can first obtain by running:
matrixcvo::> snapmirror show -fields newest-snapshot,exported-snapshot,policy

# push it to Azure
matrixcvo::>snapmirror update -destination-path netappbackupvsaykguimco:/objstore/svm_matrix_cifs_vol_cifs_data01_dst

Below we see the triggered manual push to Azure from the snapmirror update -destination-path command above.
matrixcvo::> snapmirror show -fields destination-path,state,healthy,lag-time,last-transfer-end-timestamp

So from now on each hour also the backup in the Azure Storage account (object storage) is created.
The snapmirror show command can be used to verify which snapshots have been successfully exported to the object storage destination, effectively confirming that backups were created in the Azure storage account.
When
newest-snapshotandexported-snapshotmatch insnapmirror show, it confirms that the most recent eligible snapshot has been successfully transferred to the object store and the backup relationship is fully synchronized.
matrixcvo::> snapmirror show -fields source-path,destination-path,policy,exported-snapshot,exported-snapshot-timestamp,newest-snapshot,newest-snapshot-timestamp

Also keep in mind!
When creating or editing a backup strategy for a volume in the NetApp Console, any newly defined local snapshot policy automatically replaces the policy currently assigned to the volume, even if it was originally configured through the ONTAP CLI.
While the existing policy object remains available in the system, the volume immediately begins using the newly assigned policy, which can alter retention behavior and snapshot labeling.
Administrators should therefore verify the active policy after making changes in the console to ensure it aligns with the intended protection strategy.
When you edit the backup strategy in BlueXP / NetApp Console, it does overwrite the snapshot policy assignment on the volume, but not the policy object itself.
After activating the new backup strategy above, the assigned snapshot policy changes.
In my case for the backups created in Azure object storage, this will not break it because the label is still
hourly.
matrixcvo::> volume show -vserver svm_matrix_cifs -volume vol_cifs_data01 -fields snapshot-policy
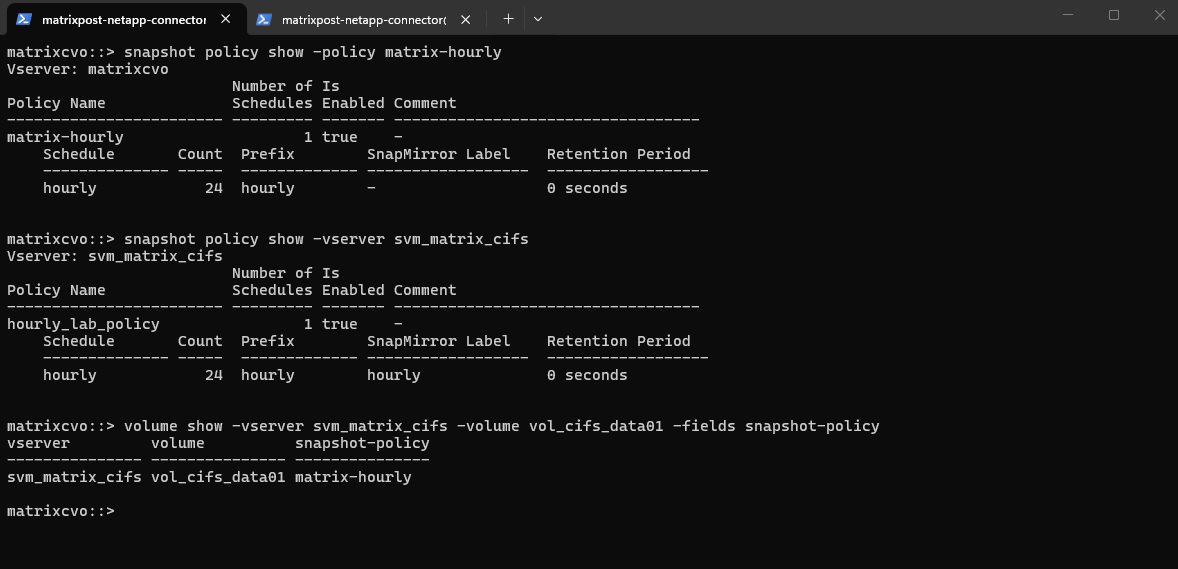
Snapshot policies in ONTAP can be created either at the cluster level or within a specific SVM.
Policies created through BlueXP are often cluster-scoped to promote reuse and centralized management, whereas CLI-created policies may be SVM-scoped for greater administrative isolation.
Volumes can consume policies from either scope, but understanding this distinction helps prevent confusion when reviewing configurations.
matrixcvo::> snapshot policy show -policy matrix-hourly
matrixcvo::> snapshot policy show -vserver svm_matrix_cifs
matrixcvo::> volume show -vserver svm_matrix_cifs -volume vol_cifs_data01 -fields snapshot-policy
How to Suspend SnapMirror
While NetApp recommends suspending SnapMirror transfers before a Cloud Volumes ONTAP (CVO) update to prevent “stuck” relationships, this rule primarily applies to ONTAP-to-ONTAP (Volume-to-Volume) replication.
For your Cloud Backup (SnapMirror Cloud) jobs going to Azure Blob, the process is “stateless”—meaning the system is designed to natively handle reboots by simply retrying or resuming from a checkpoint once the node is back online.
f the destination is an Object Store (Azure Blob), ONTAP doesn’t need to coordinate “state” with a partner node, making it resilient to interruptions.
Even though the system is designed to “self-heal” after an interruption, you might want to take manual control over SnapMirror Cloud (SMC).
To identify active backup transfers we can run the command below.
Before suspending anything, check which backups are currently moving data to Azure. Since these are backups to object storage, look for the
/objstore/destination.
# Display all relationships with their type and status
matrixcvo::> snapmirror show -fields type, status, destination-path

# Filter for only those currently transferring data
matrixcvo::> snapmirror show -status transferring

To suspend (quiesce) the relationships we can run the command below.
“Quiescing” is the proper way to suspend. It allows the current data block to finish and then puts the relationship into a “Quiesced” state, preventing new transfers from starting.
# to suspend a specific backup
matrixcvo::> snapmirror quiesce -destination-path <backup_target>:/objstore/<backup_name>

matrixcvo::> snapmirror quiesce -destination-path netappbackupvsaykguimco:/objstore/svm_matrix_cifs_vol_cifs_data01_dst

# to suspend ALL backups on the cluster
matrixcvo::> snapmirror quiesce -destination-path *
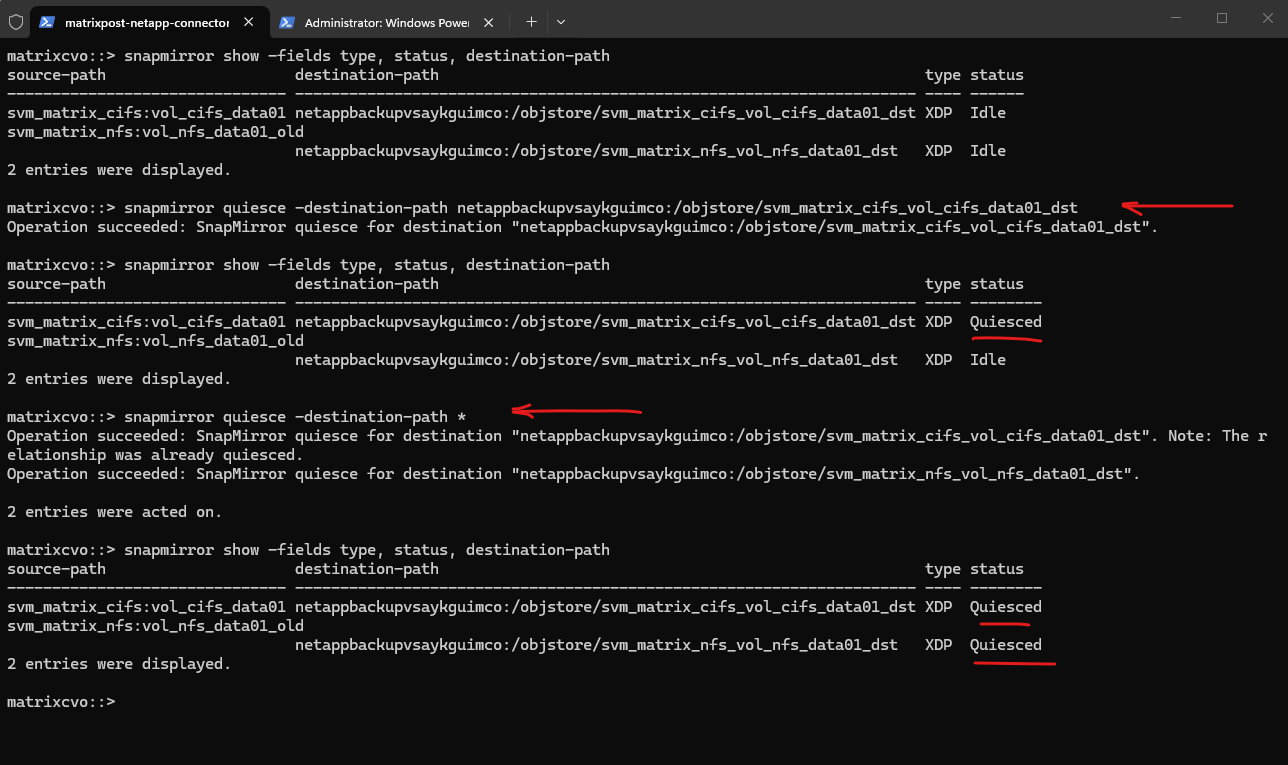
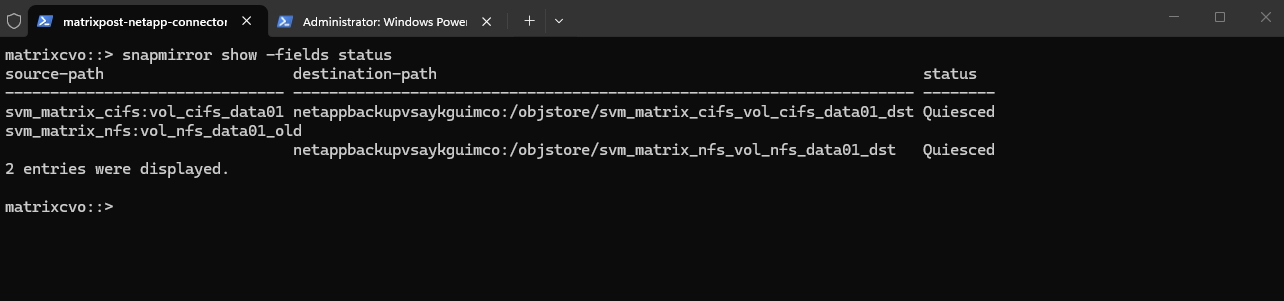
To confirm the Quiesced status we can also just run.
matrixcvo::> snapmirror show -fields status
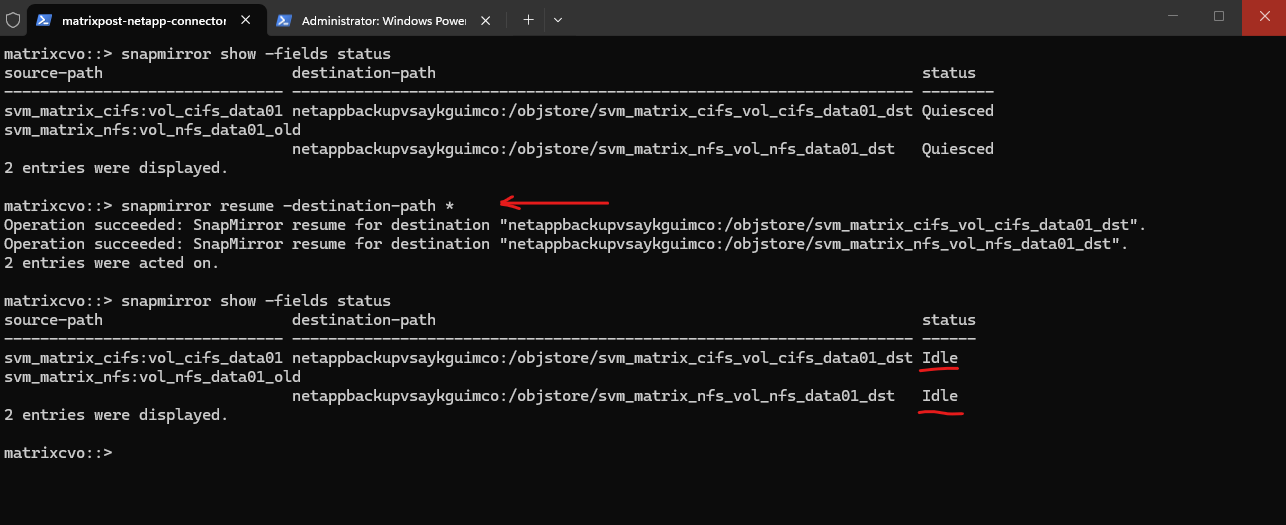
To resume and bring backups back online we can run.
Once our maintenance or troubleshooting is complete, we must manually resume the transfers to restart the backup schedules.
# to resume a specific backup
matrixcvo::> snapmirror resume -destination-path <backup_target>:/objstore/<backup_name>

matrixcvo::> snapmirror resume -destination-path netappbackupvsaykguimco:/objstore/svm_matrix_cifs_vol_cifs_data01_dst

# to resume ALL backups on the cluster
matrixcvo::> snapmirror resume -destination-path *
Restore
The restore capabilities in NetApp Backup and Recovery provide flexible options to recover data quickly and efficiently in case of accidental deletion, corruption, or ransomware events.
Depending on the recovery scenario, data can be restored either from long-term backups stored in object storage or from local Snapshot copies.
Understanding the differences between these restore methods helps you choose the fastest and most appropriate recovery strategy.
From Backup
Restoring from backups allows you to recover data that has been securely stored in object storage, providing an additional layer of protection beyond the primary storage system.
This option is particularly valuable for disaster recovery scenarios or when local Snapshot copies are no longer available.
While restores from backups may take longer than Snapshot-based recoveries, they ensure that your data remains recoverable even in the event of a major system failure.
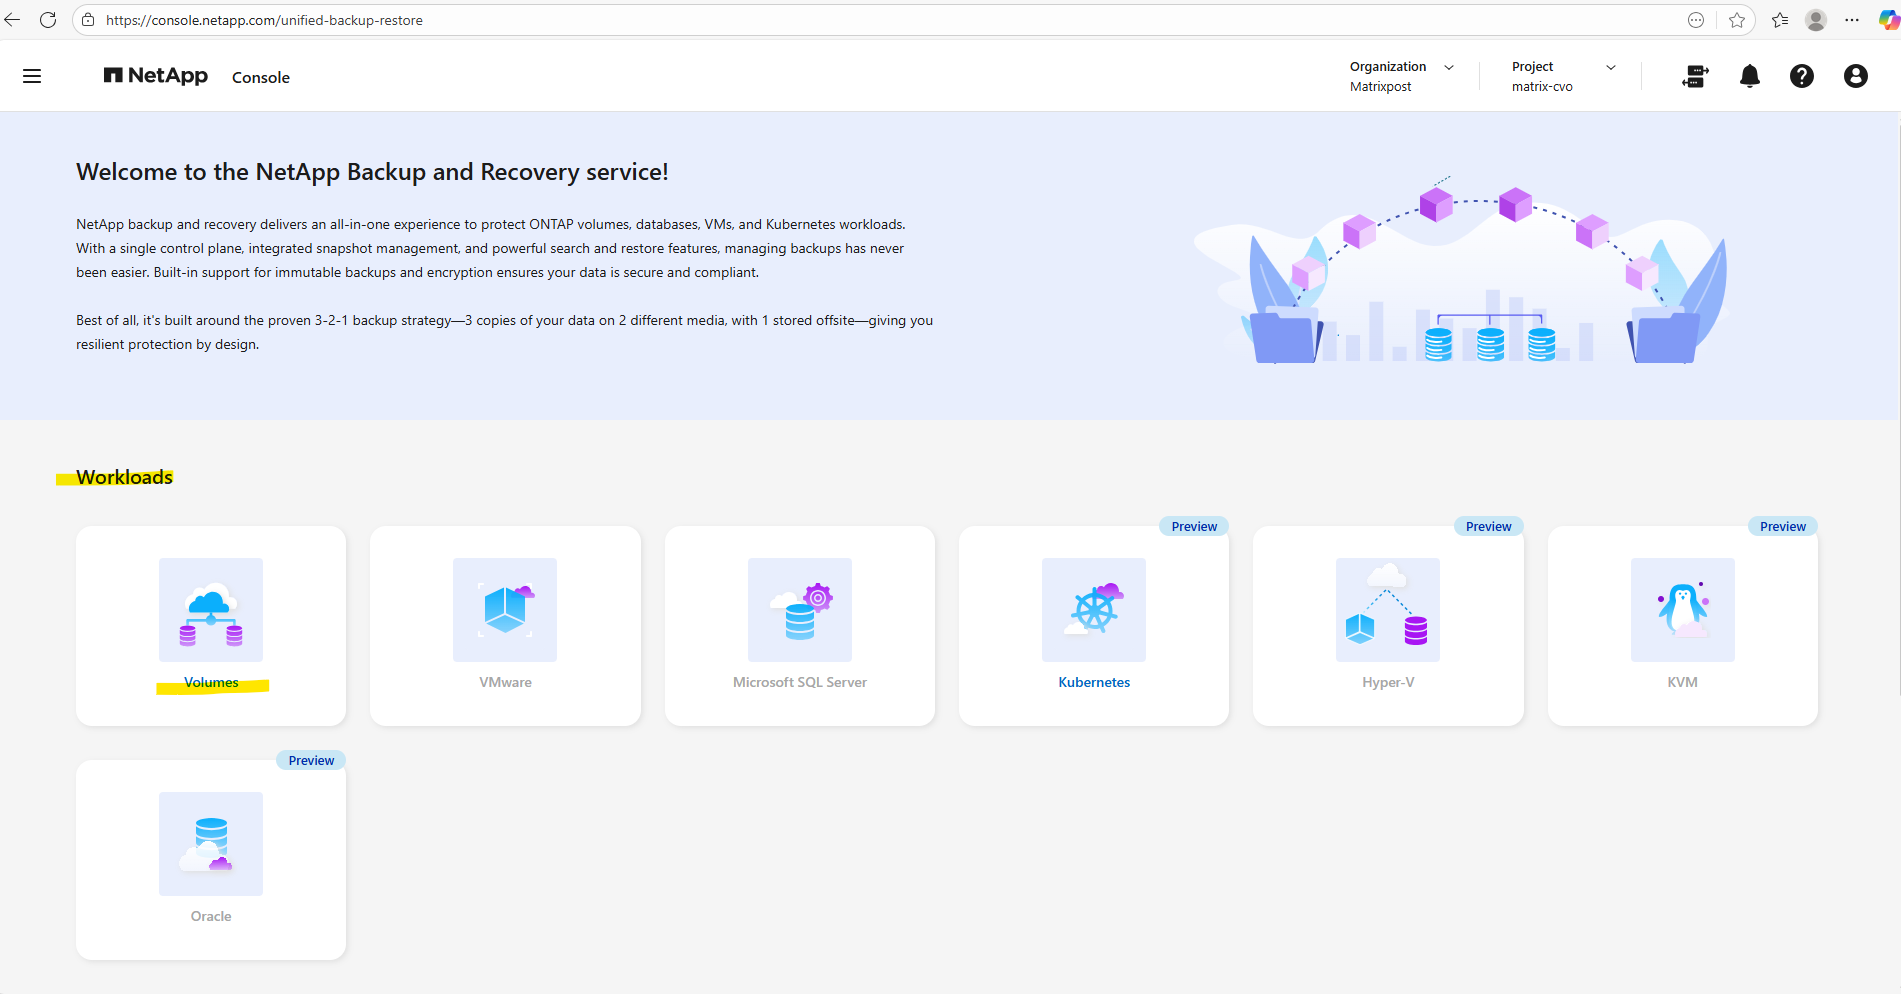
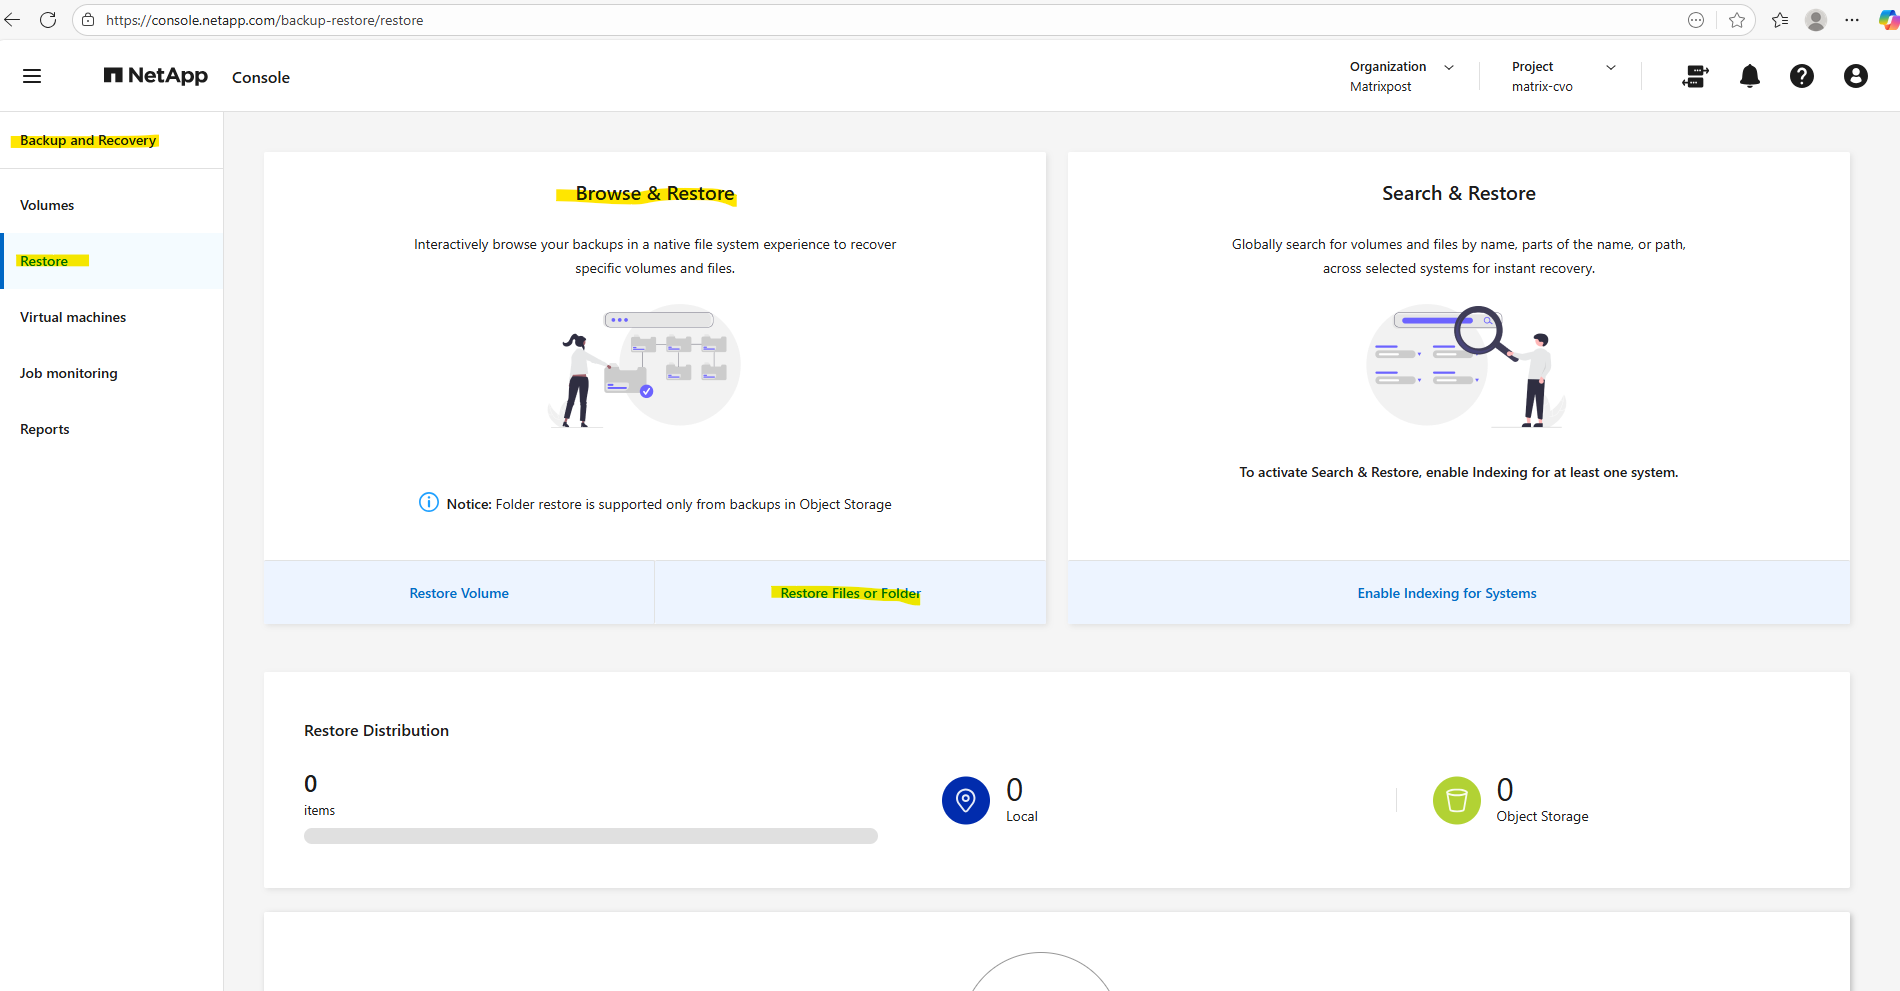
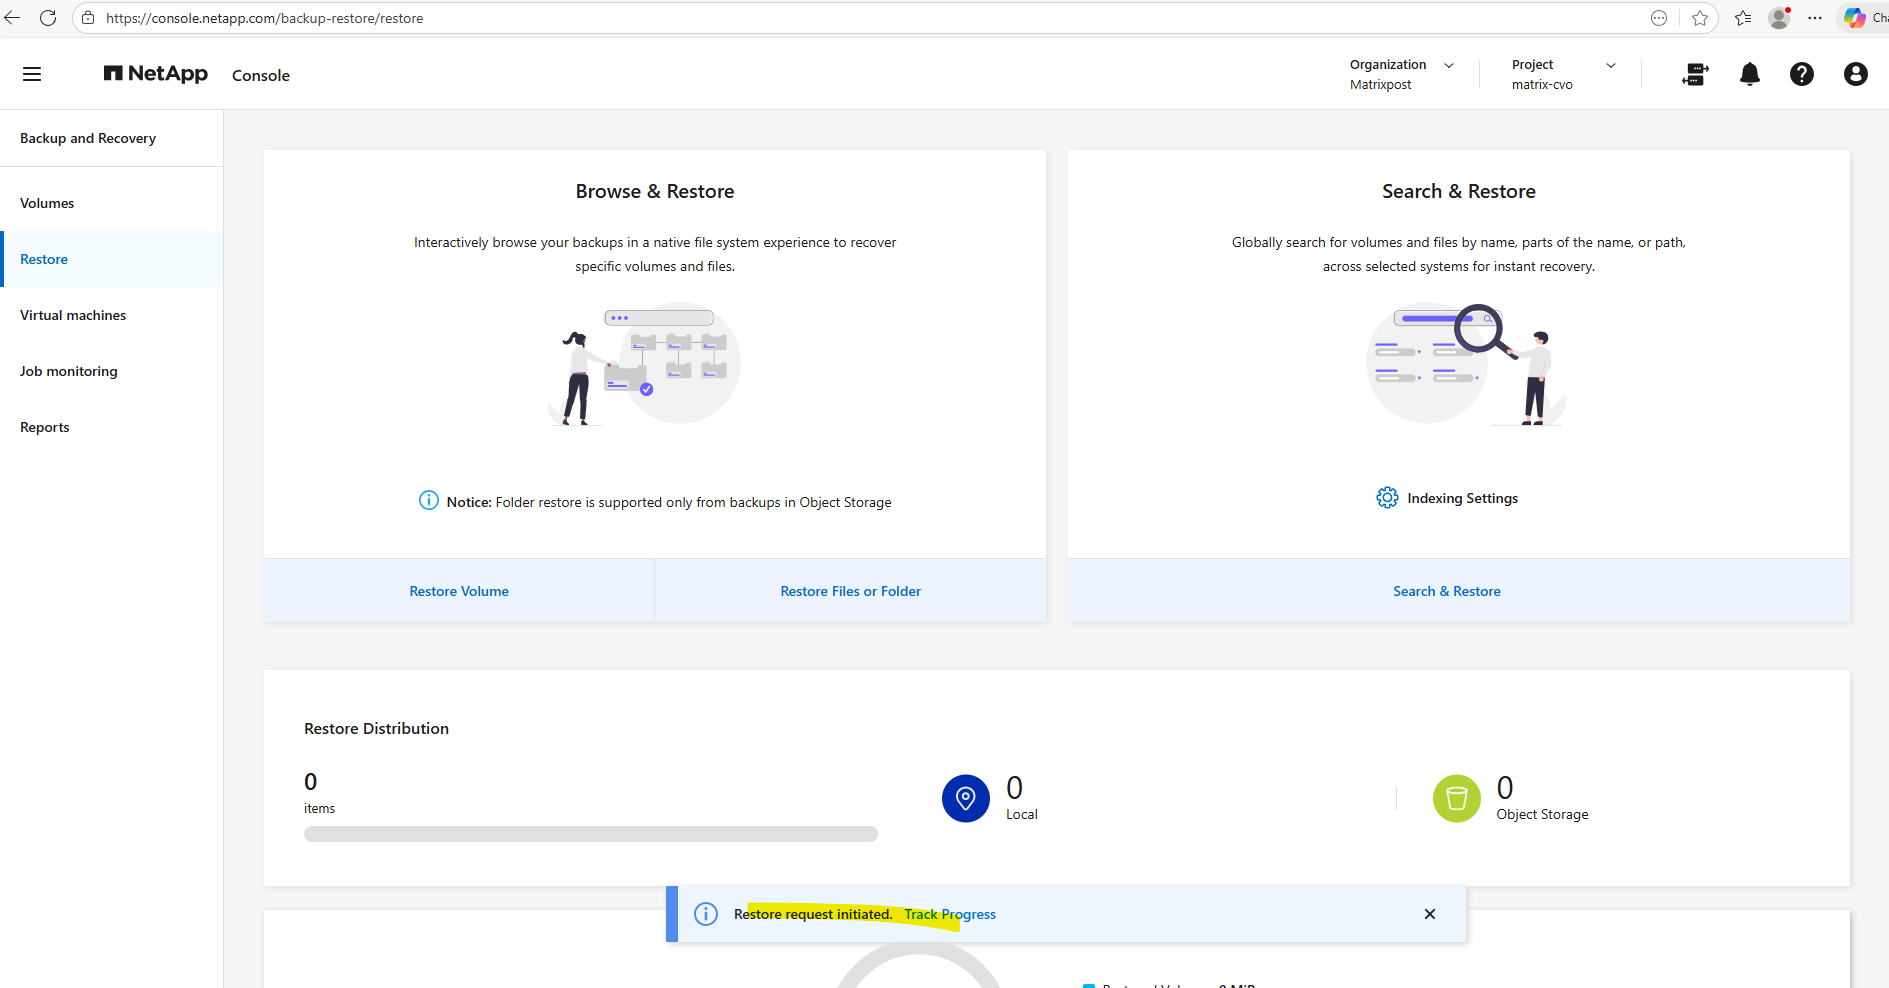
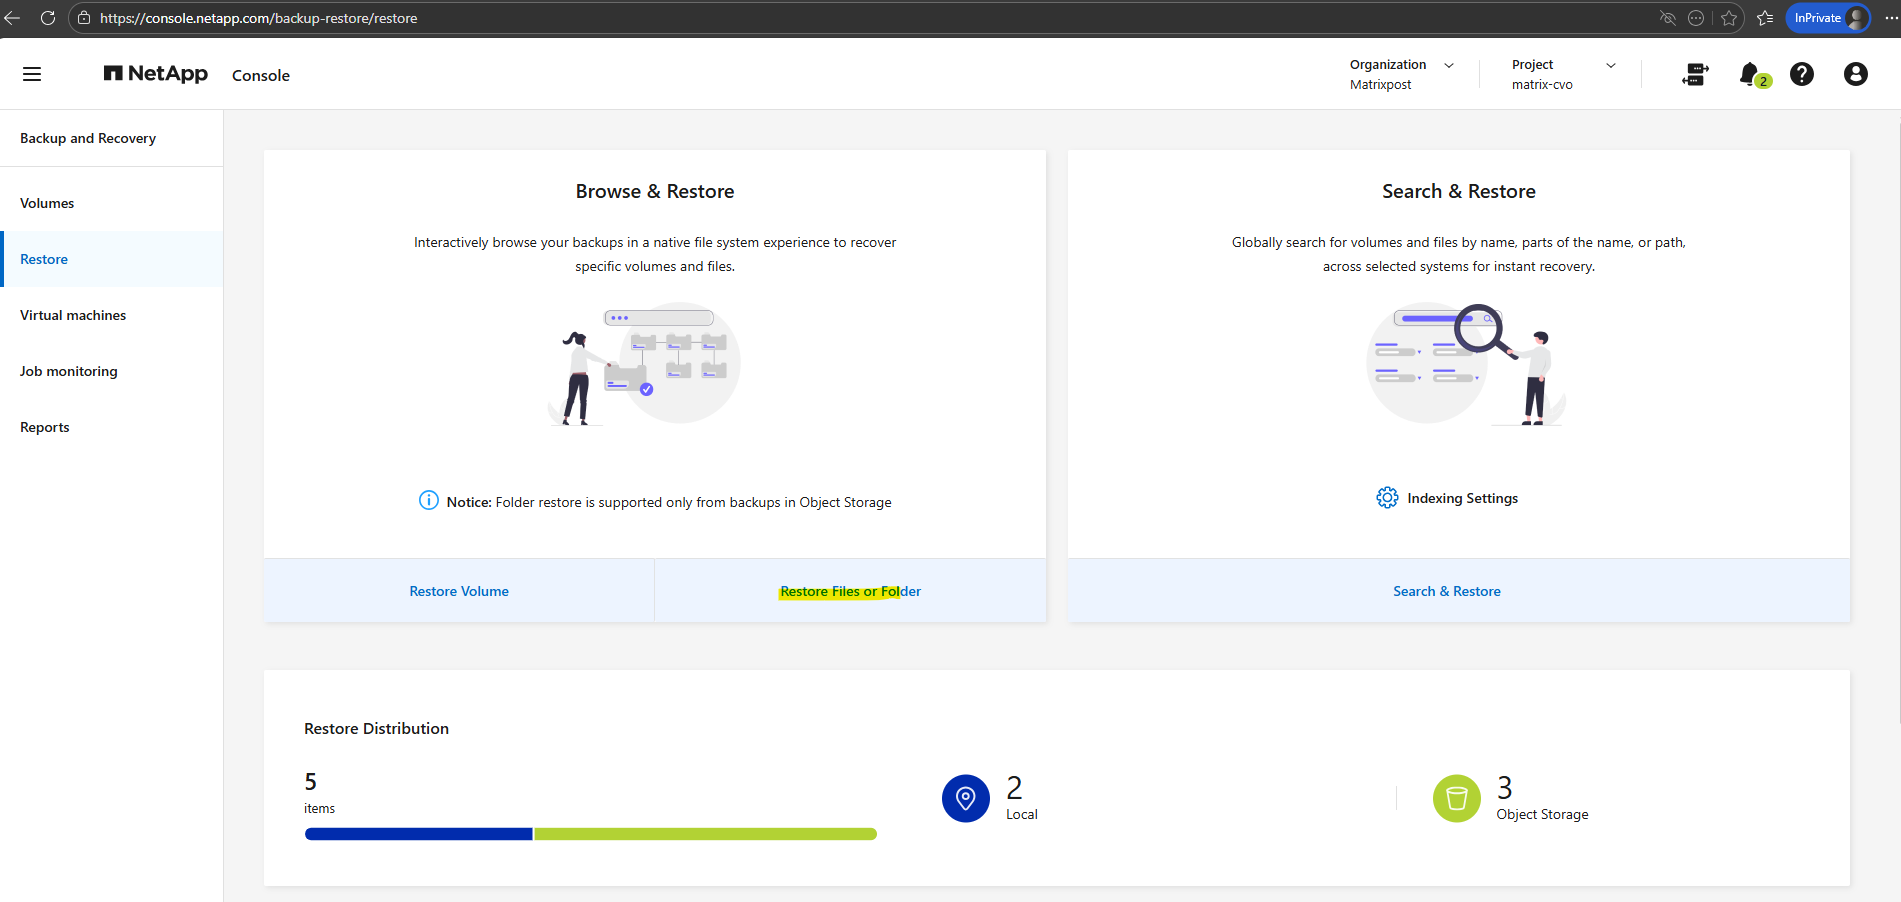
To restore files from backups, in the NetApp console click on Protection -> Backup and Recovery as shown below.

For the workloads to restore click on Volumes.
To restore individual files or folder, within the Restore page click below on Restore Files or Folder.
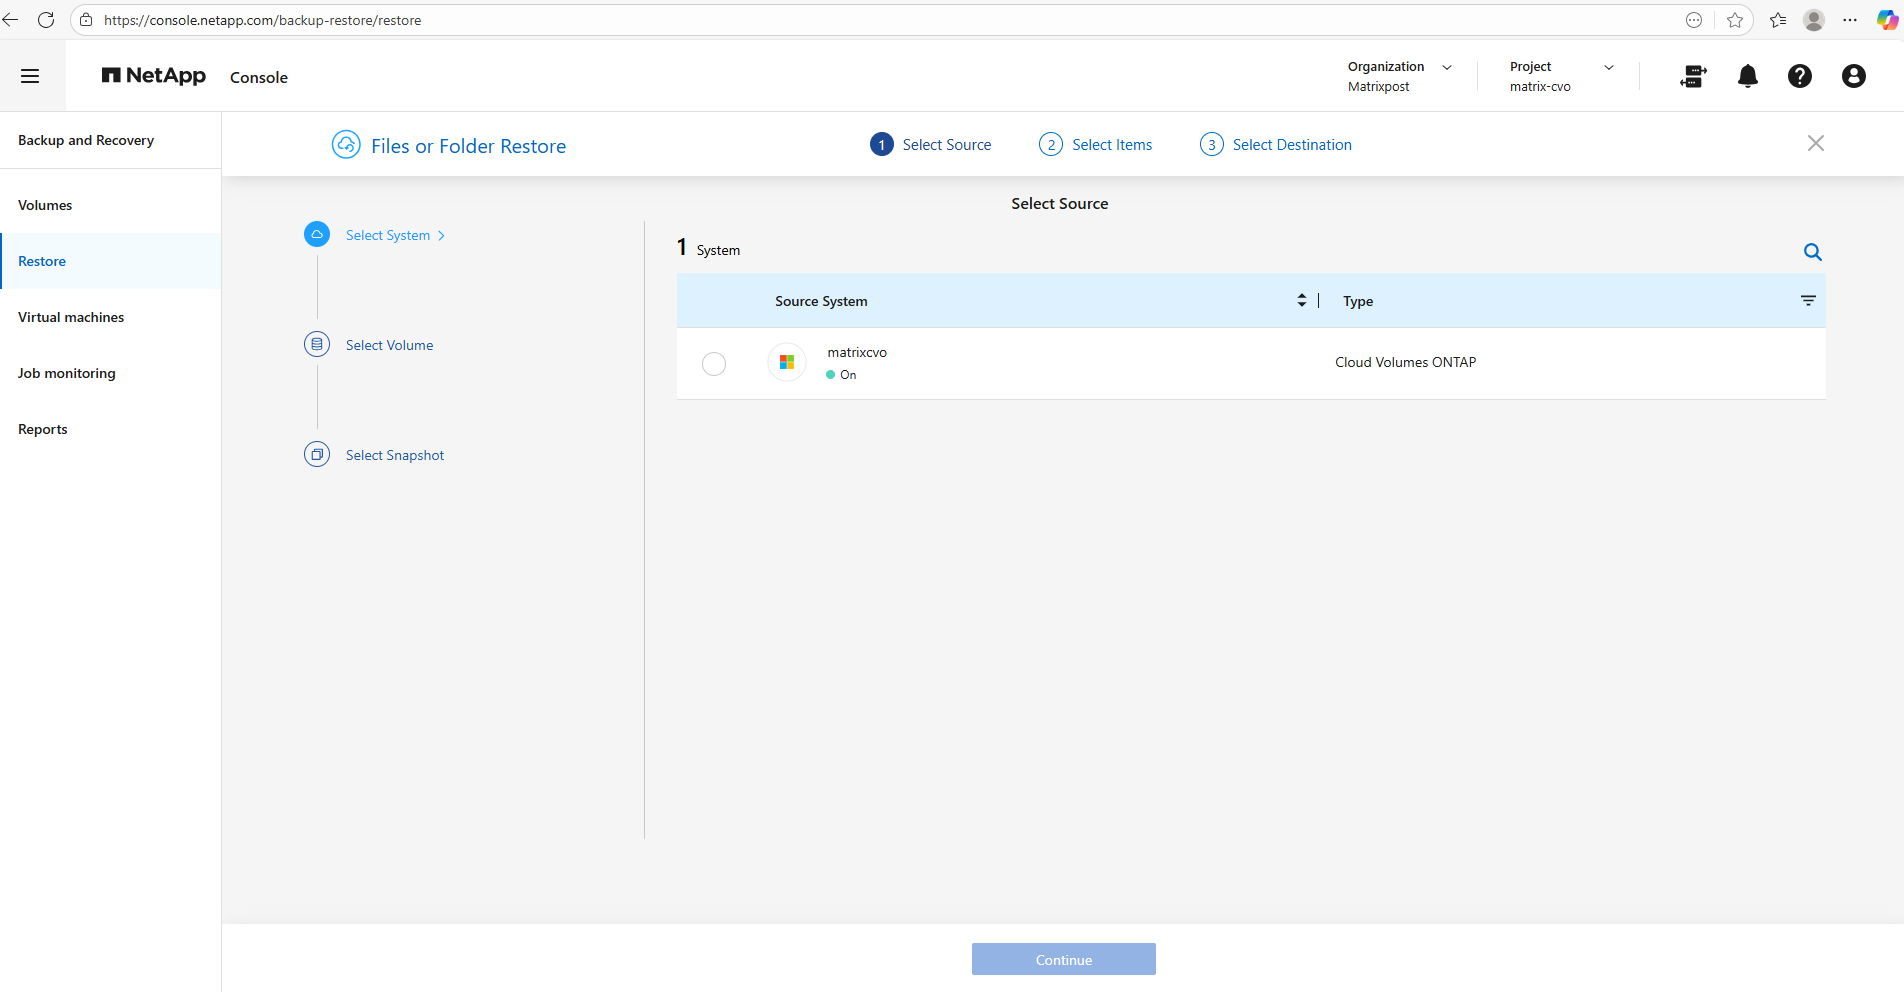
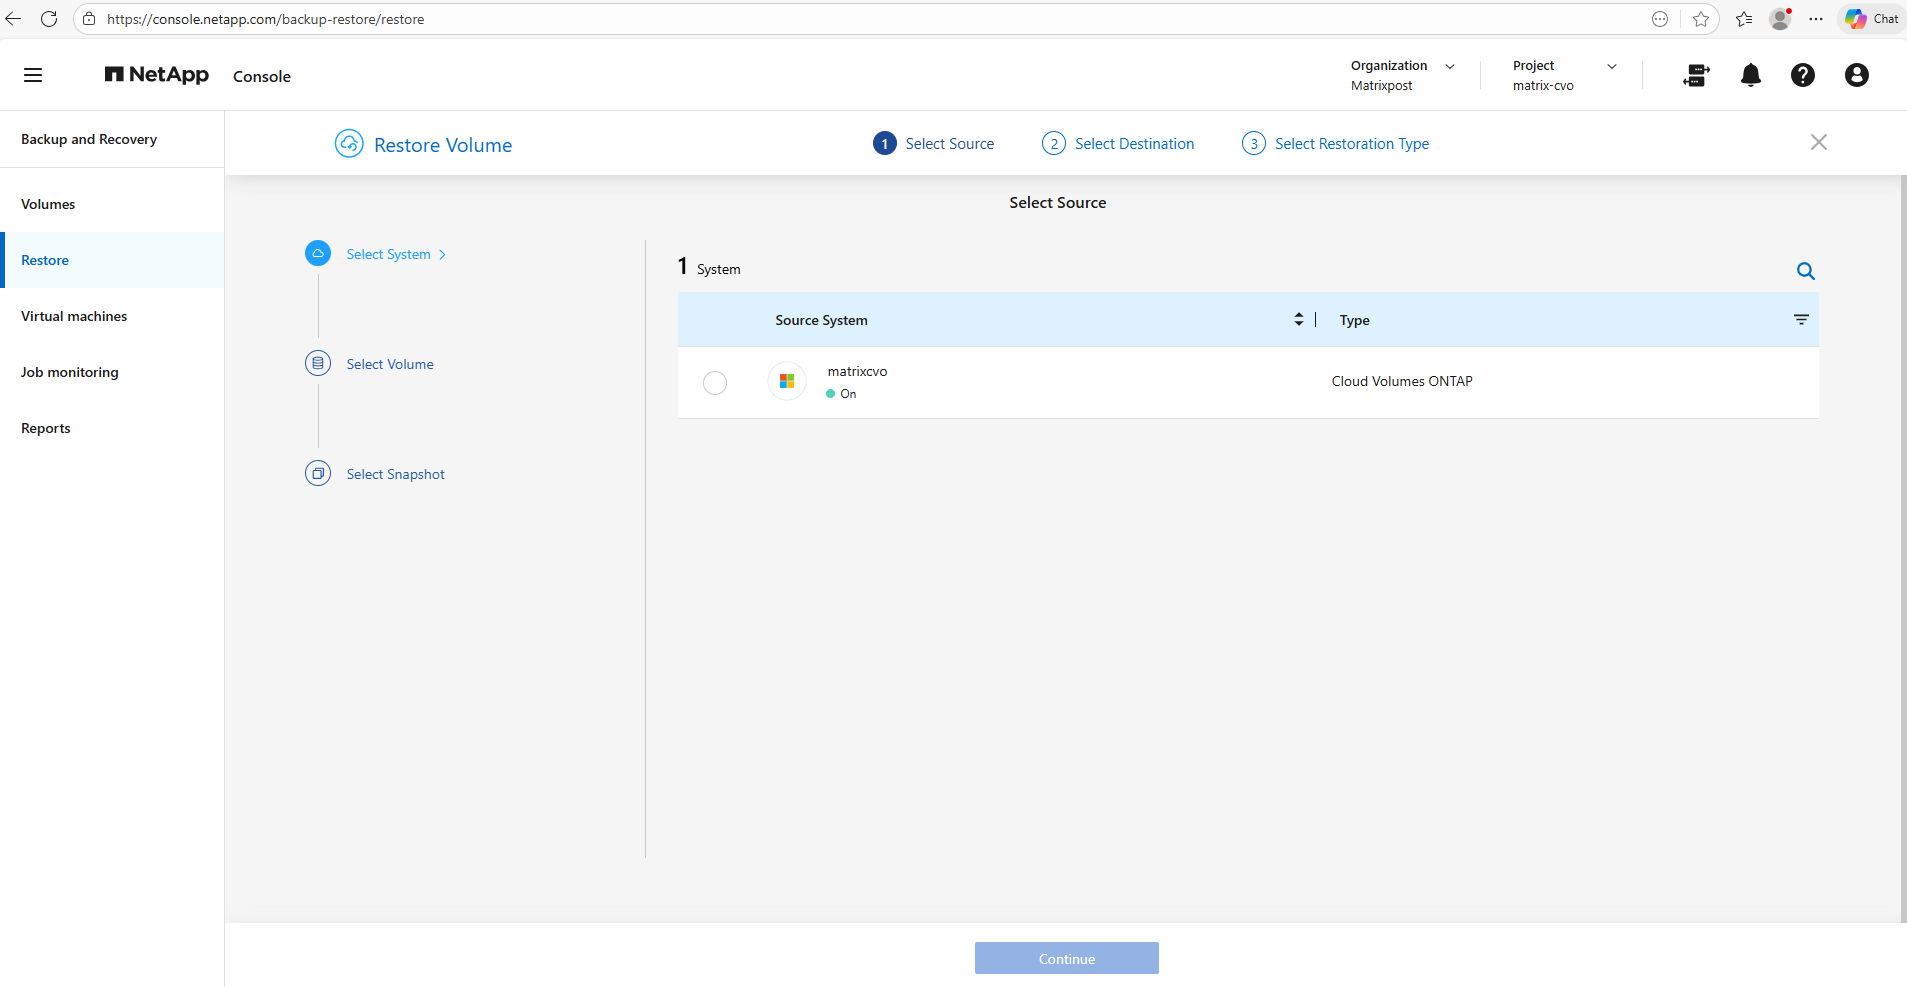
Select the source system (our Cloud Volume ONTAP nodes).
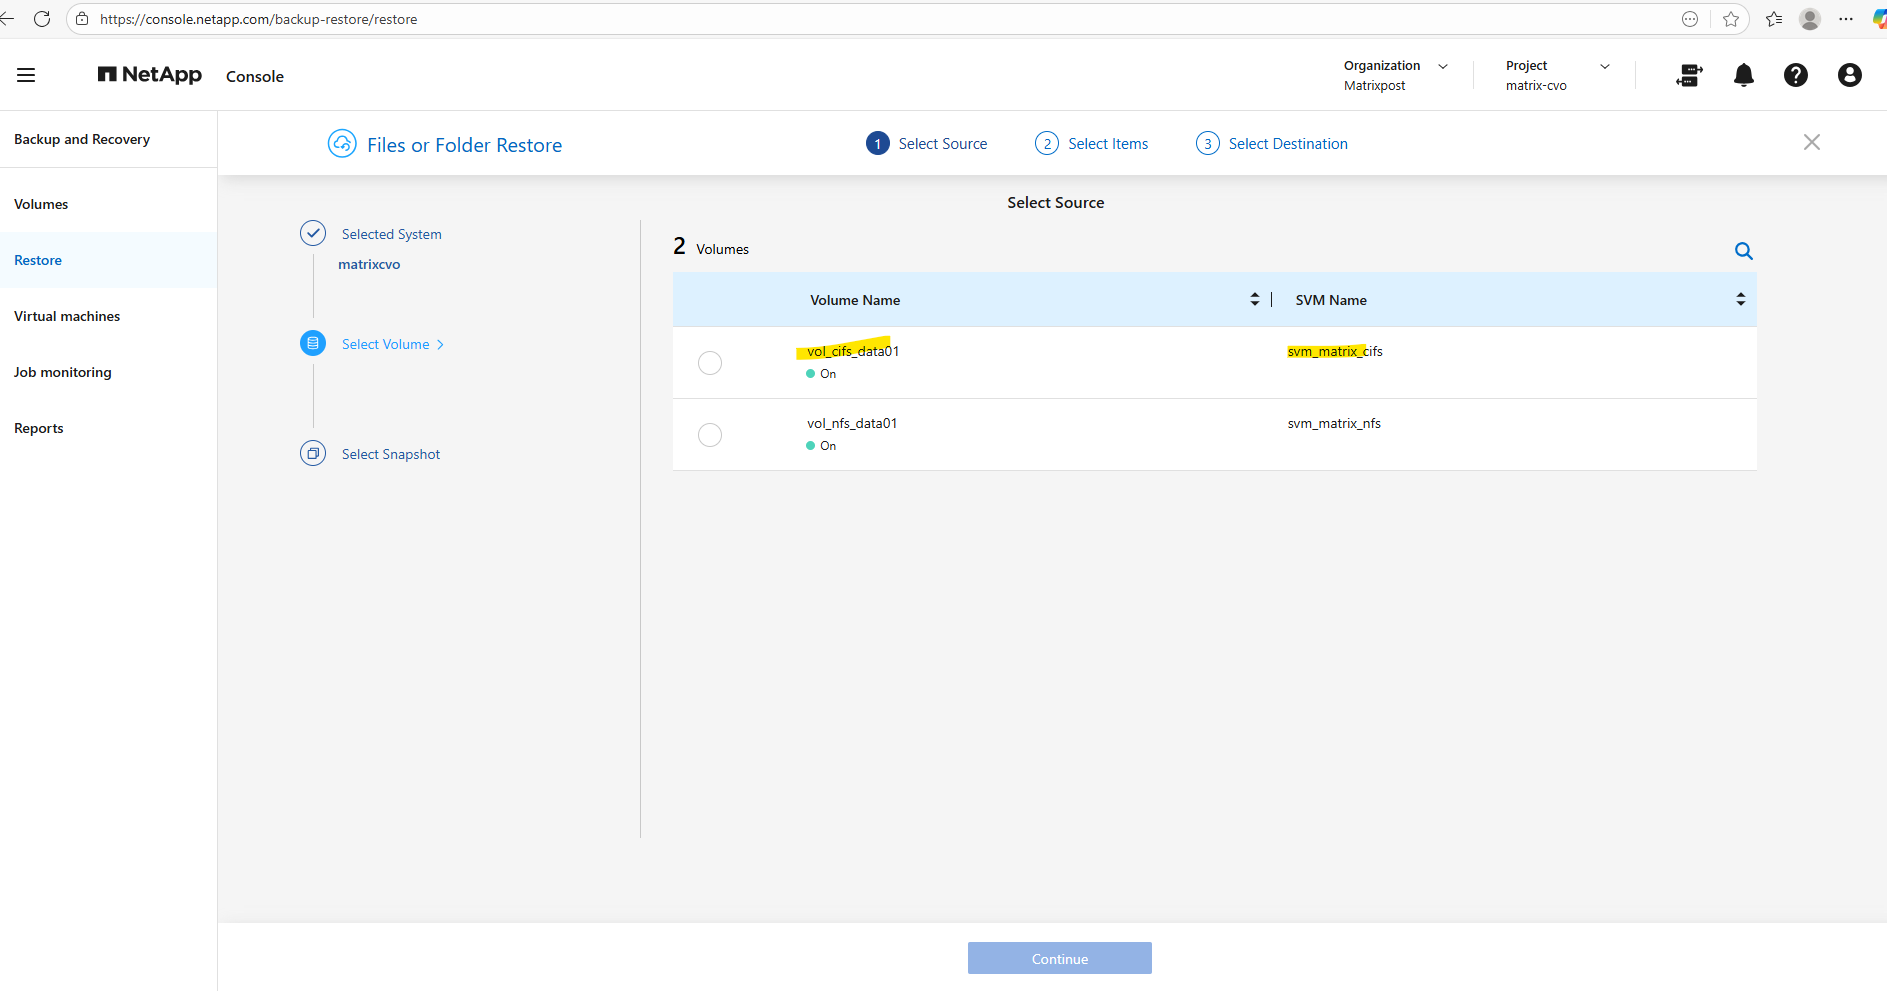
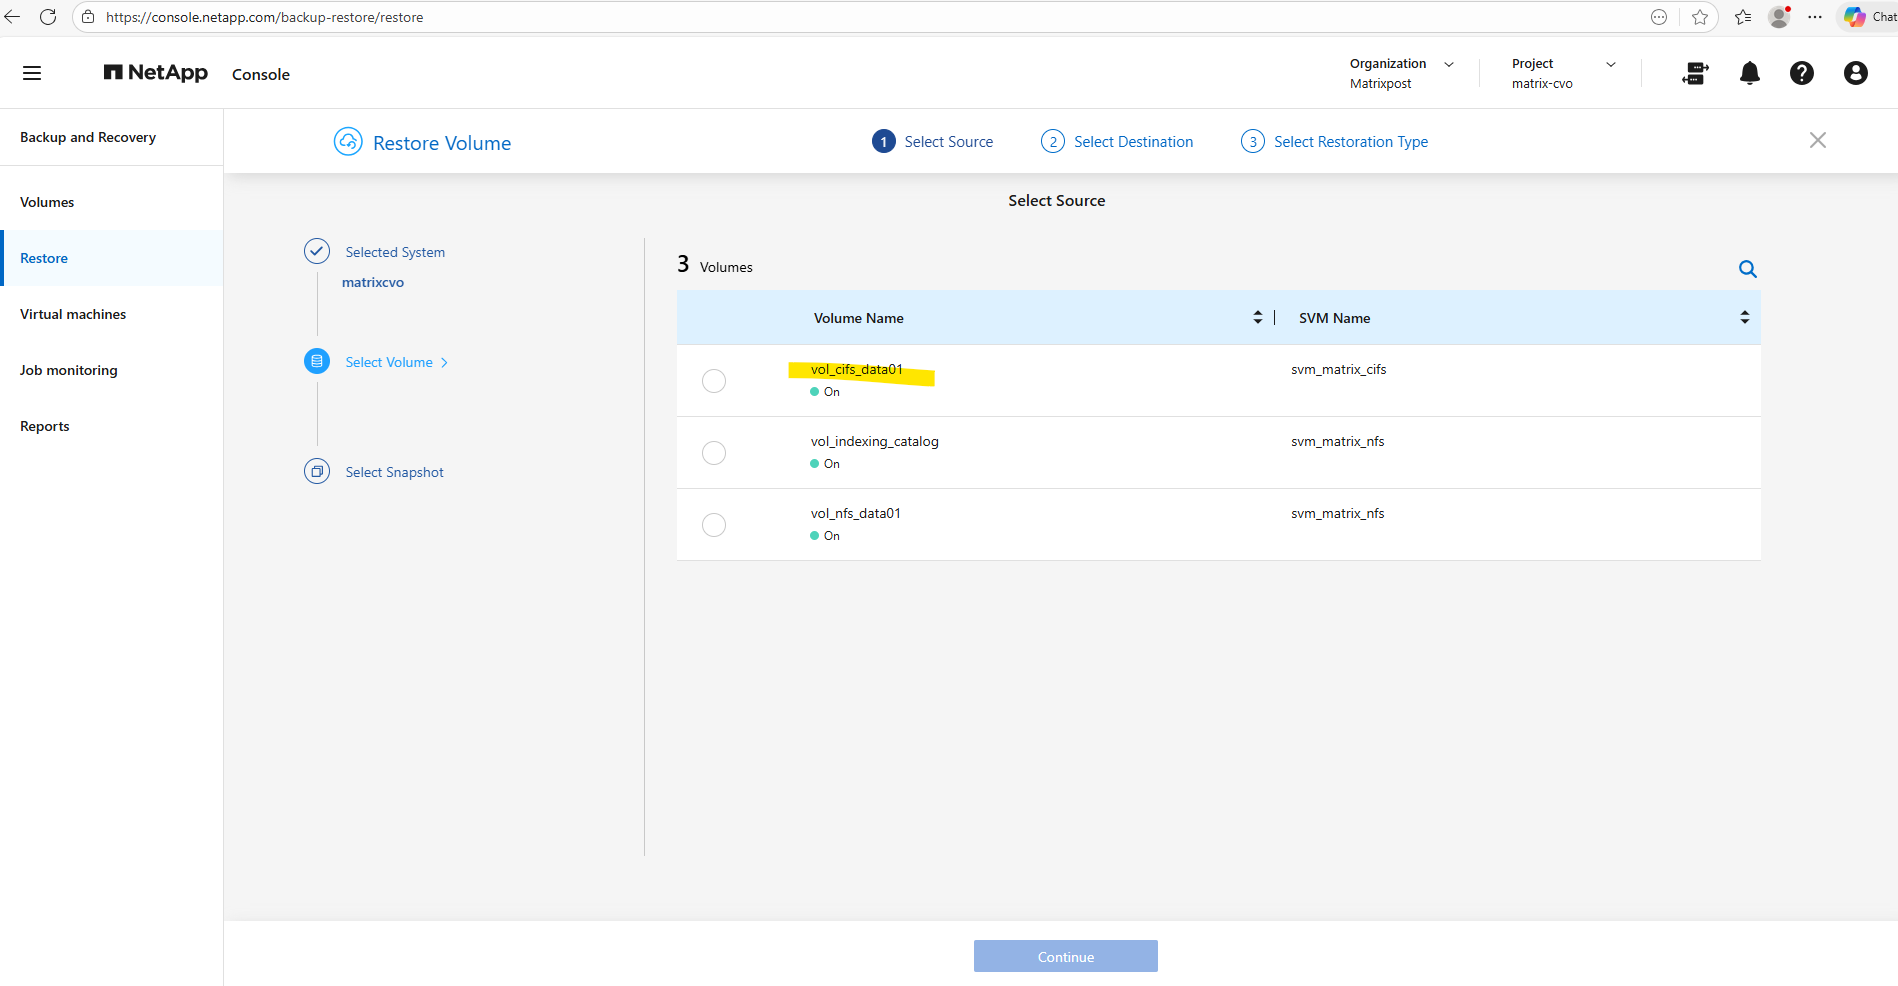
Select the volume on which the files and folders were stored you want to restore. I want to restore SMB files mounted on Windows clients they are stored on the volume named vol_cifs_data_01 below.
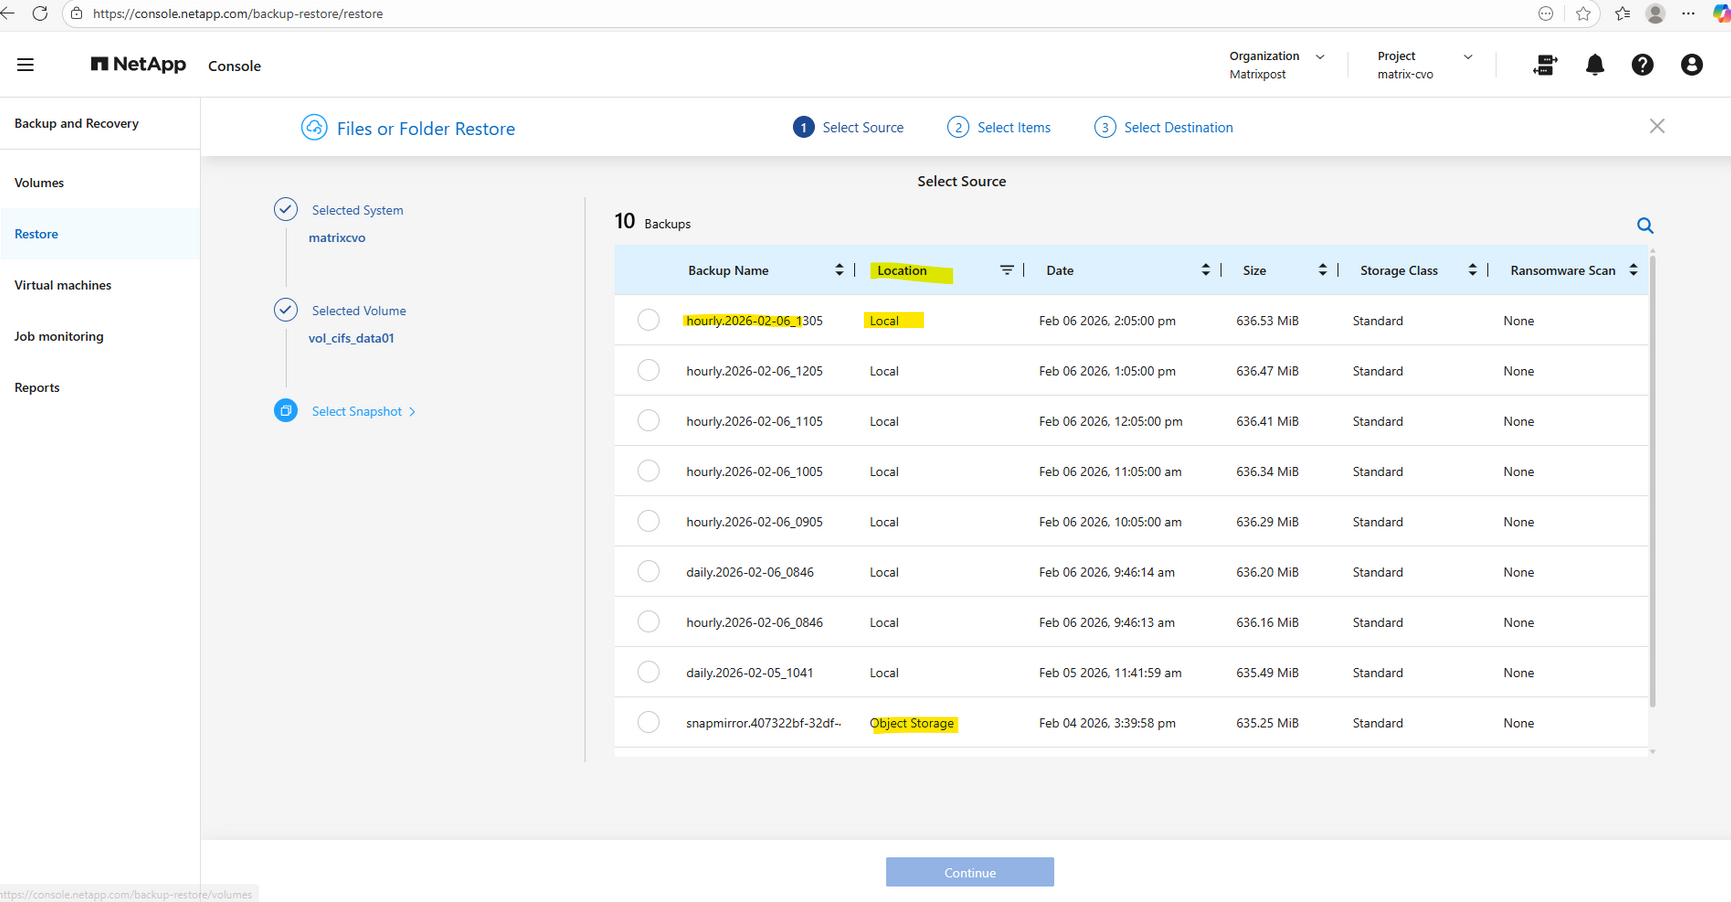
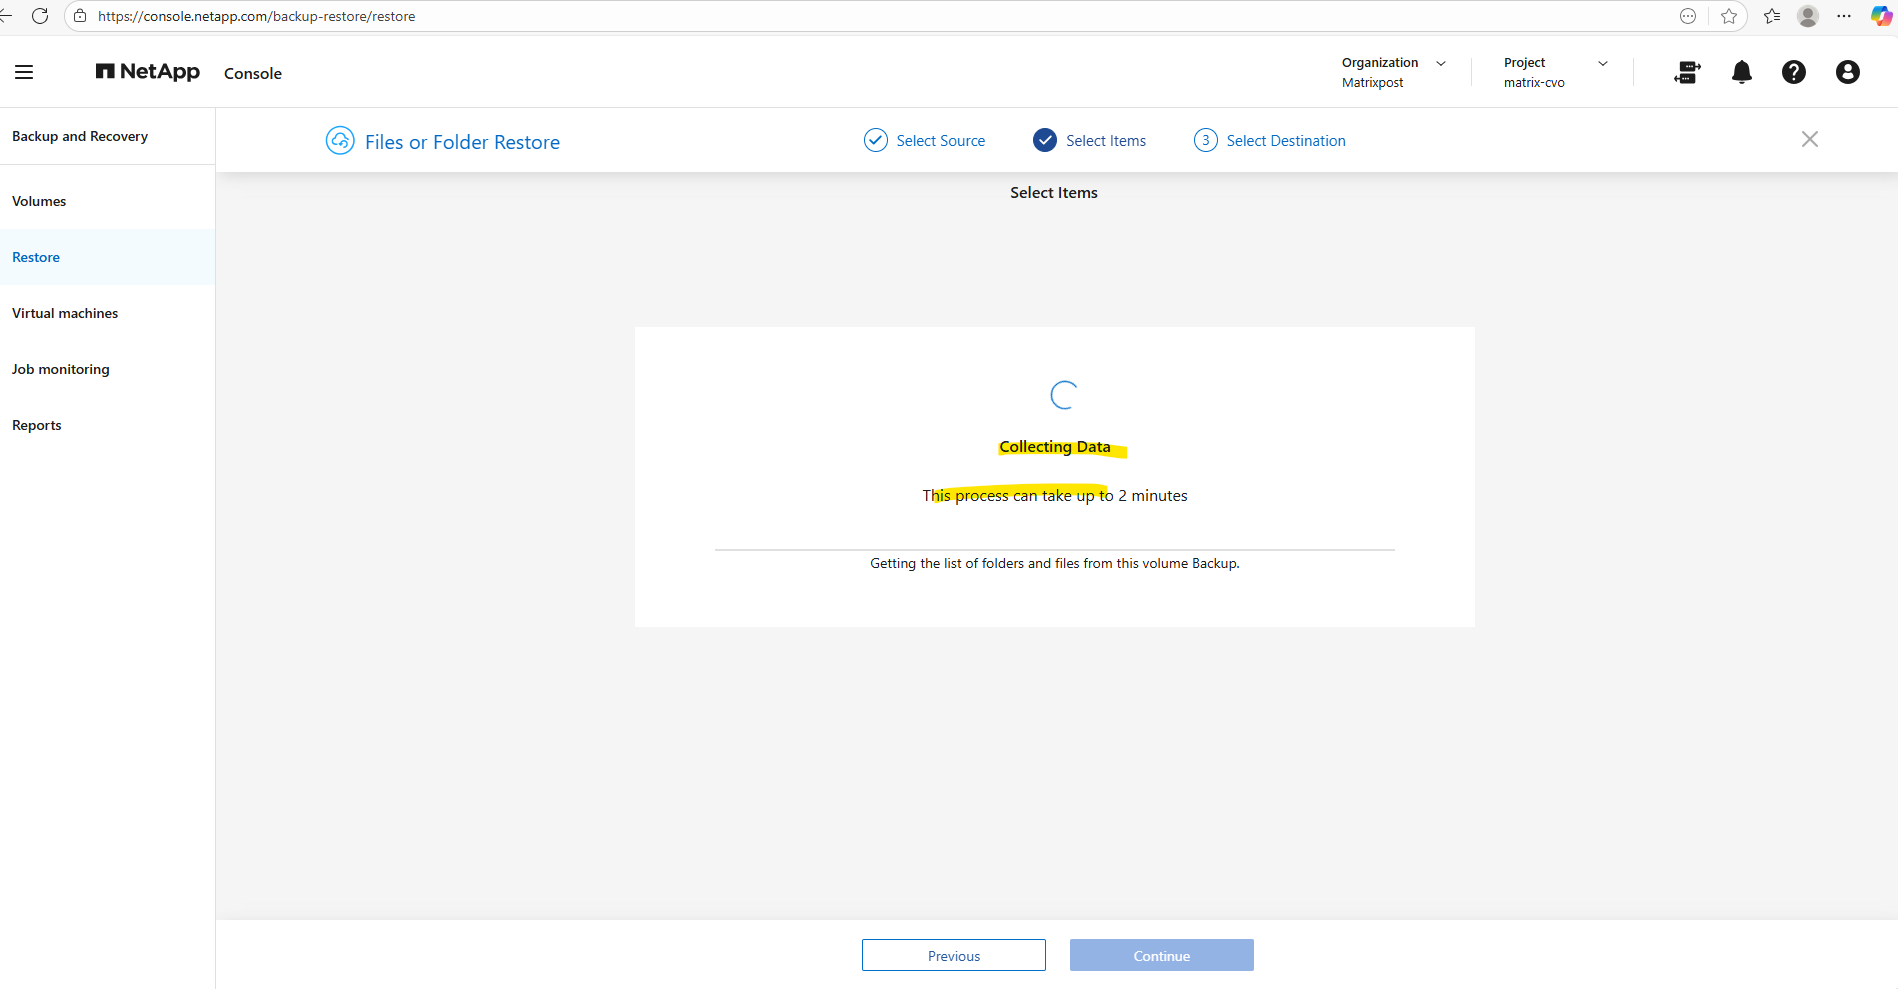
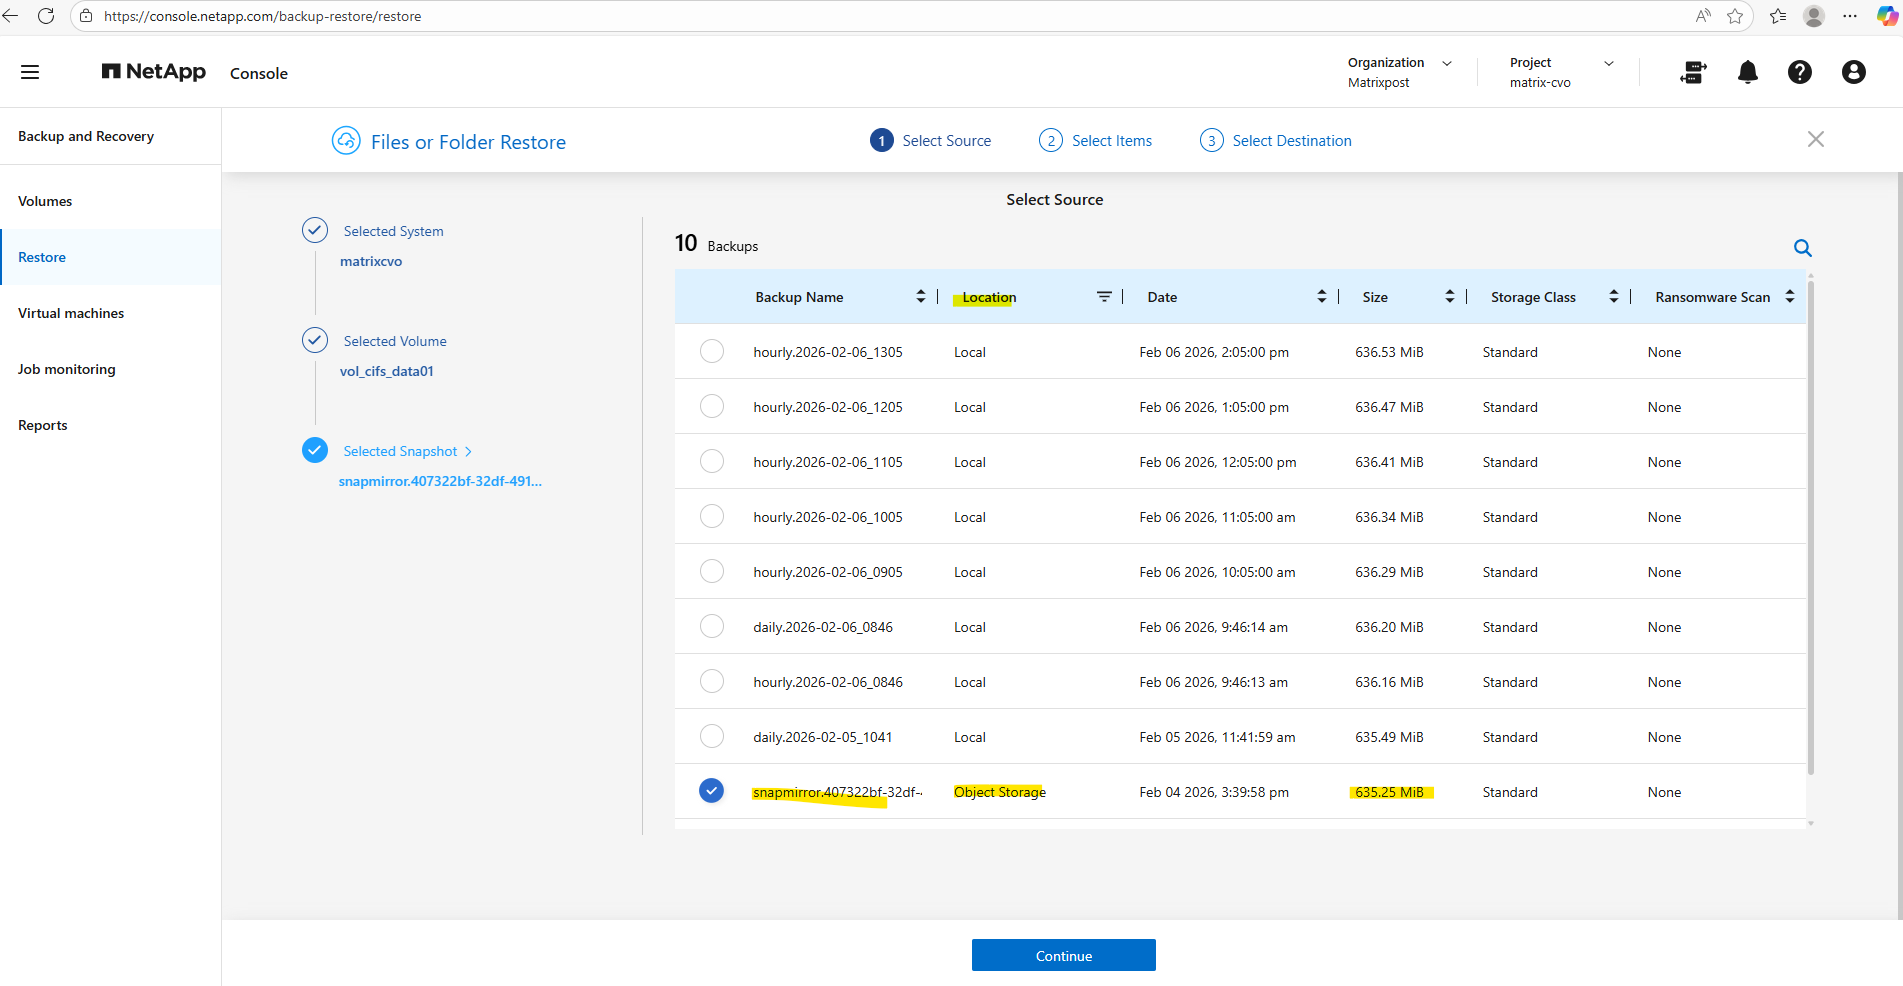
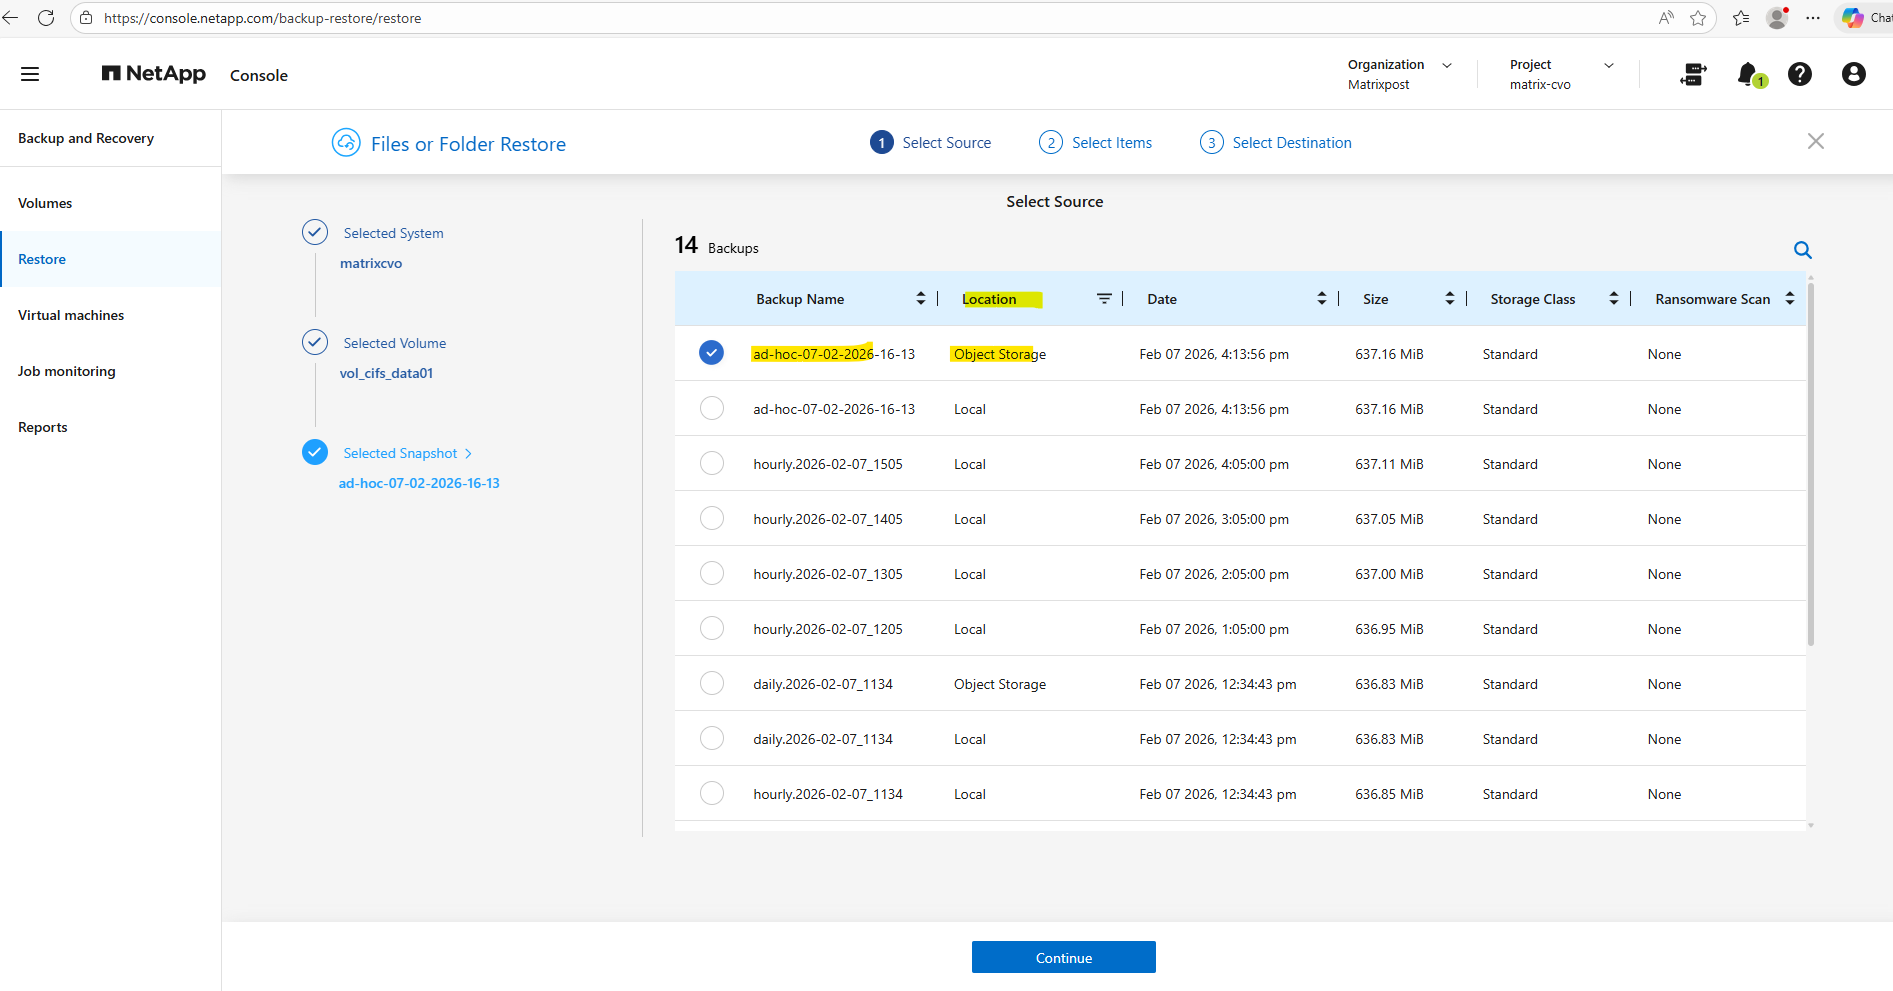
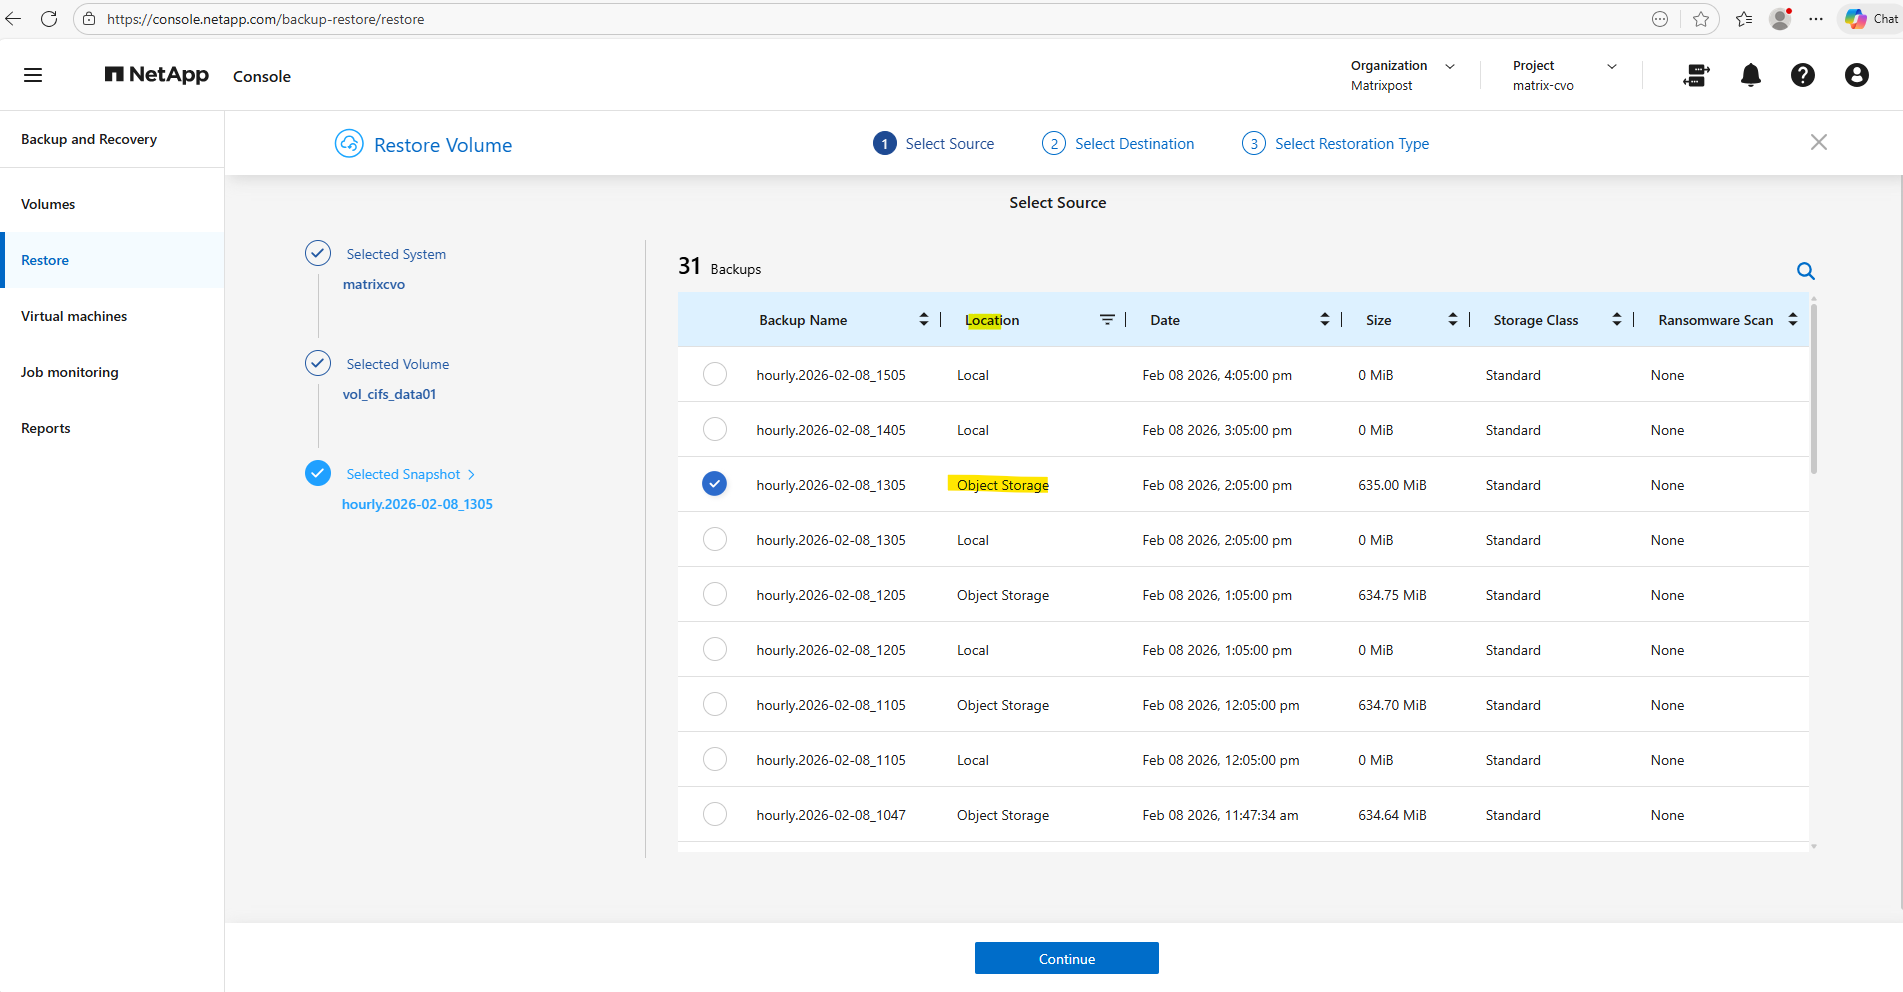
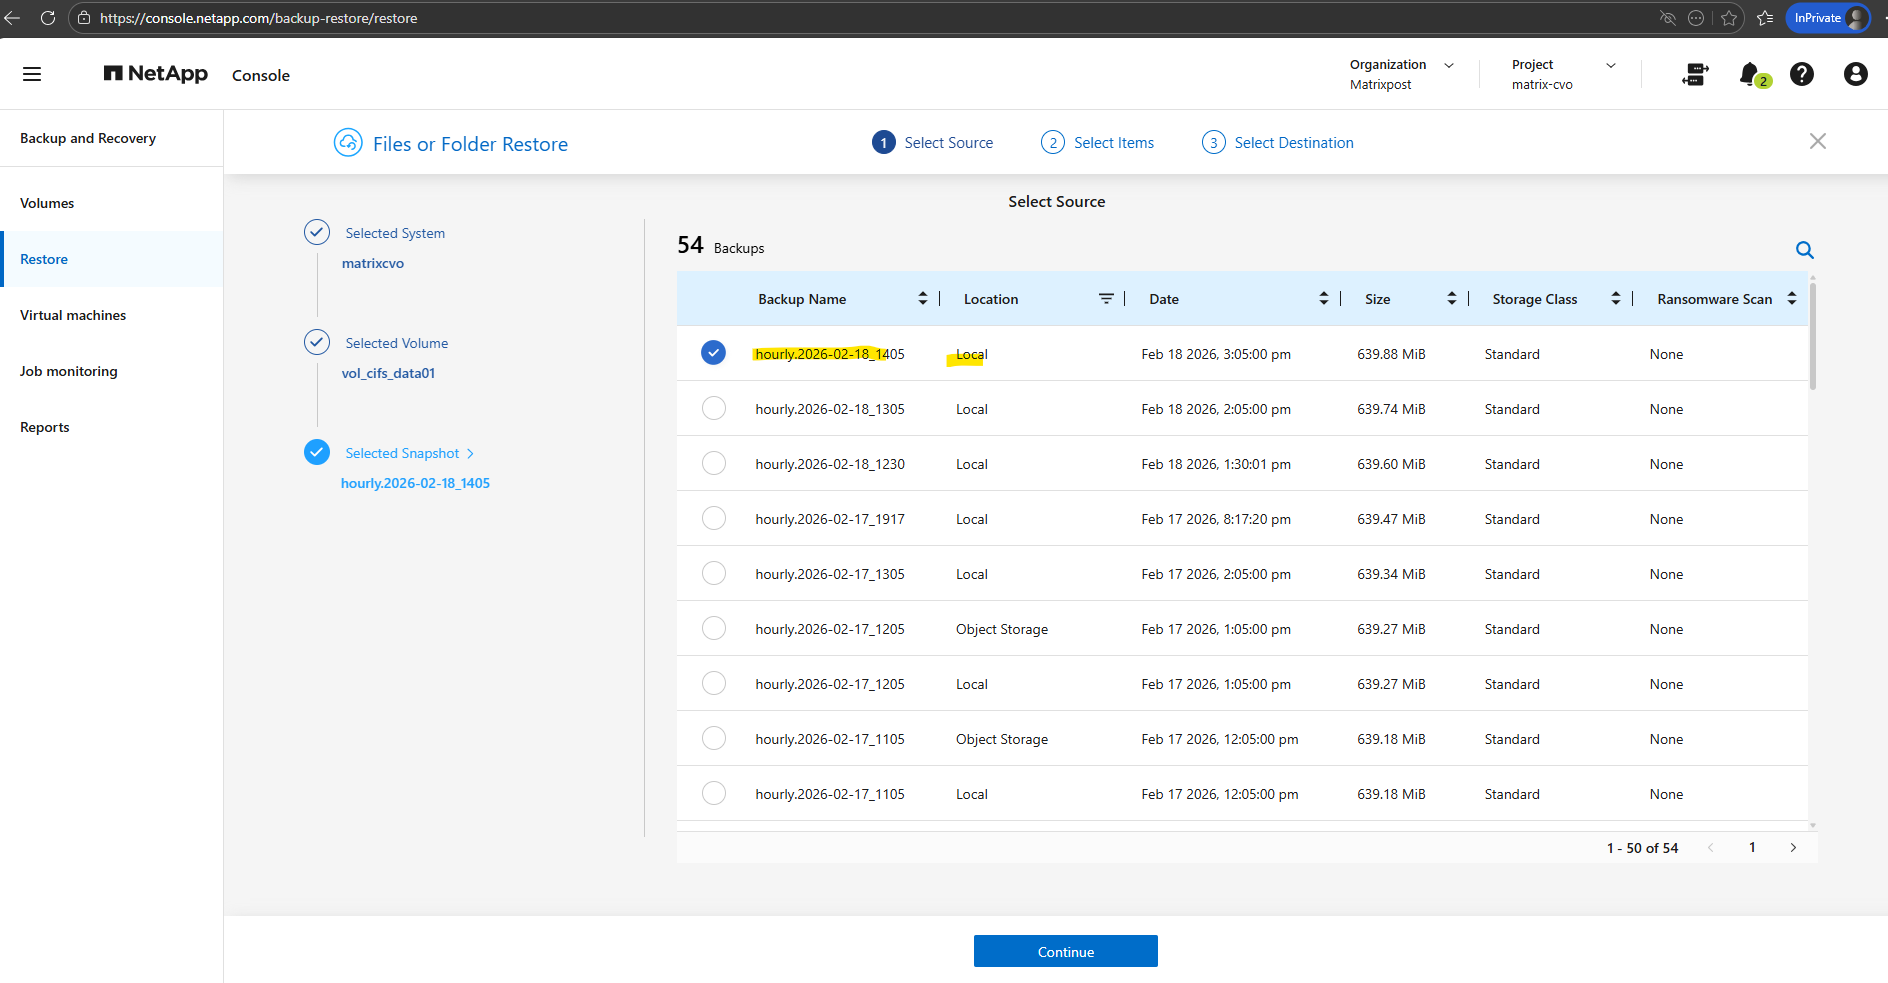
Select the desired backup and click on Continue. I will select the latest hourly.
The latest hourly below is finally a snapshot and not a backup, under location you will see here Local, for real backups here you will see Object Storage instead.
When restoring data through the NetApp Console, both local snapshots and off-site backups are available as selectable sources.
Snapshots enable rapid recovery directly from the storage system, while backups allow restores from object storage if the local copies are no longer available. This flexibility ensures that administrators can choose the most appropriate recovery point based on the failure scenario.
When restoring data through the NetApp Console, both local snapshots and backups appear as available sources; however, folder-level restores are only supported from backups stored in object storage.
Local snapshots allow recovery of entire volumes or individual files, but not complete directories via the console.
The ONTAP CLI provides greater flexibility and allows folder-level restores directly from local snapshots. Administrators can access the snapshot namespace and copy specific directories or files back to the active filesystem without requiring a full volume restore. This makes the CLI particularly useful for granular recovery operations when speed is critical and object storage restores are unnecessary.

So far just one backup exists.

So I will try to restore from this backup.
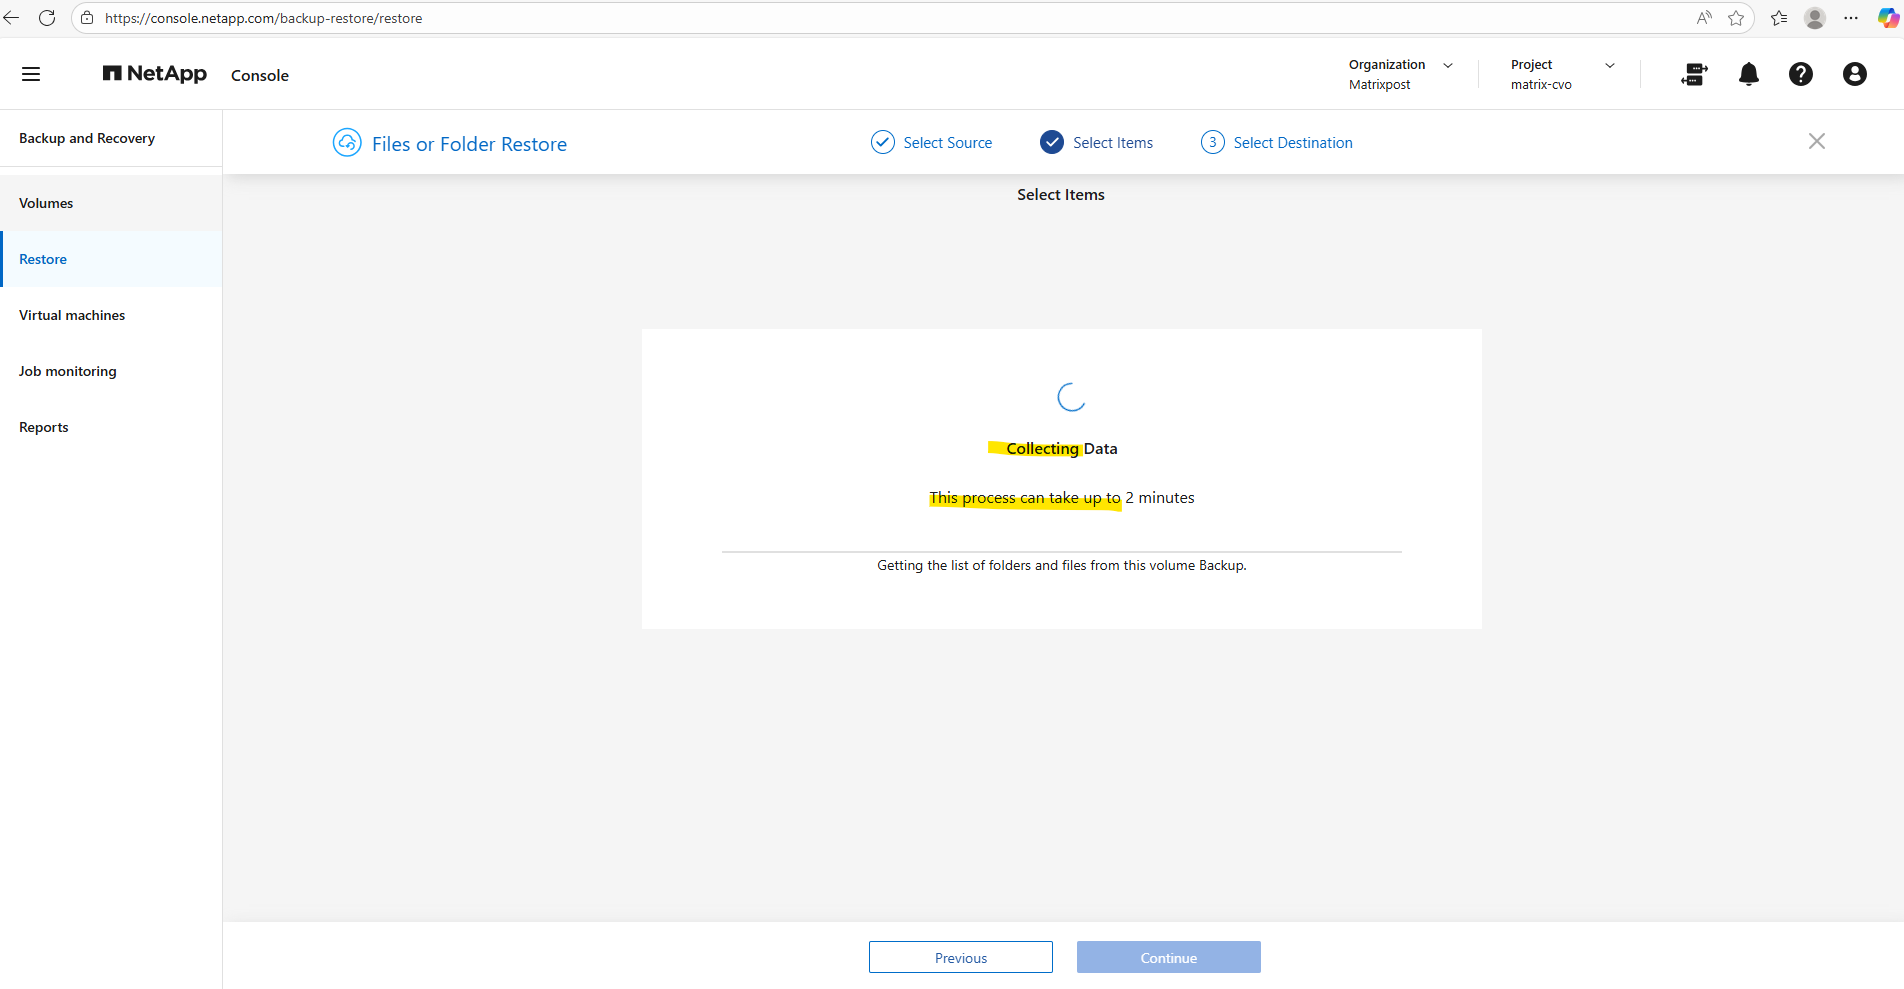
To restore individual files or folders through the NetApp Console, indexing must first be enabled for the protected volumes. The indexing service builds a searchable catalog of the backup contents, allowing administrators to quickly locate and recover specific data without performing a full restore. Without indexing, file-level and directory-level recovery from backups is not available
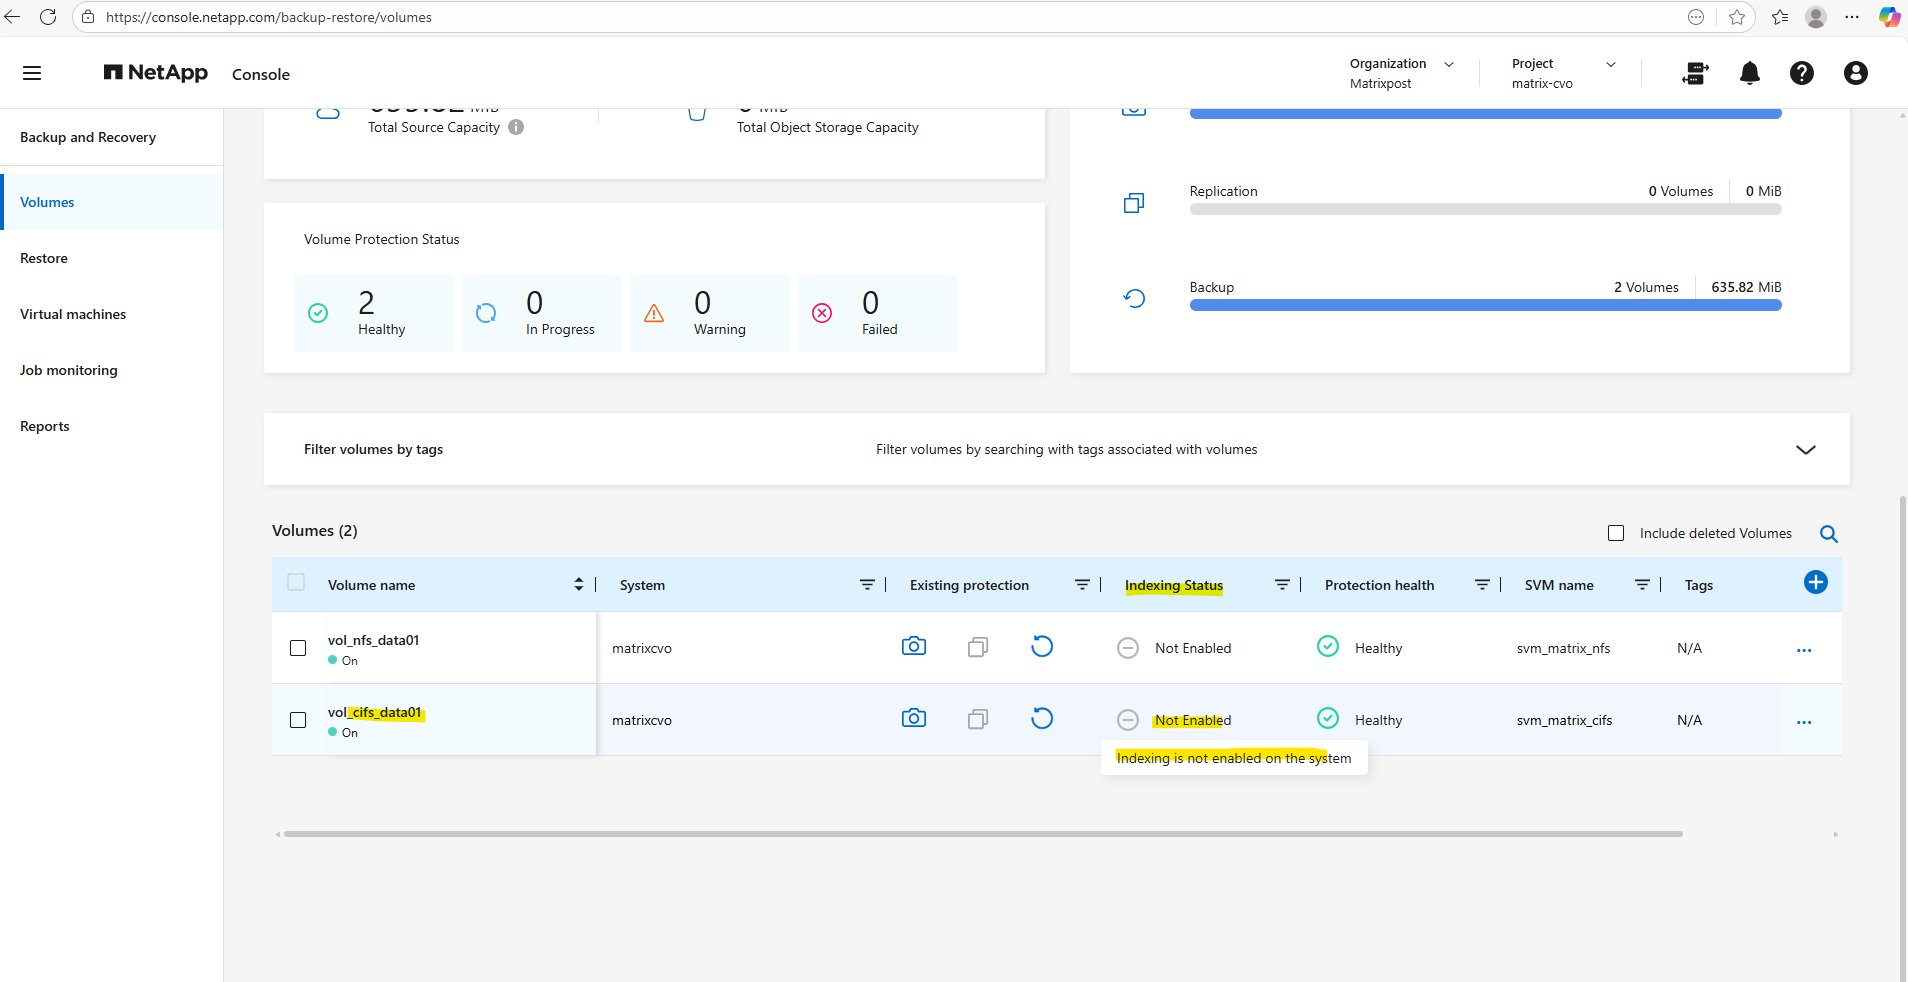
So far Indexing is on both of my volumes not enabled.
Enable Indexing on the CVO System
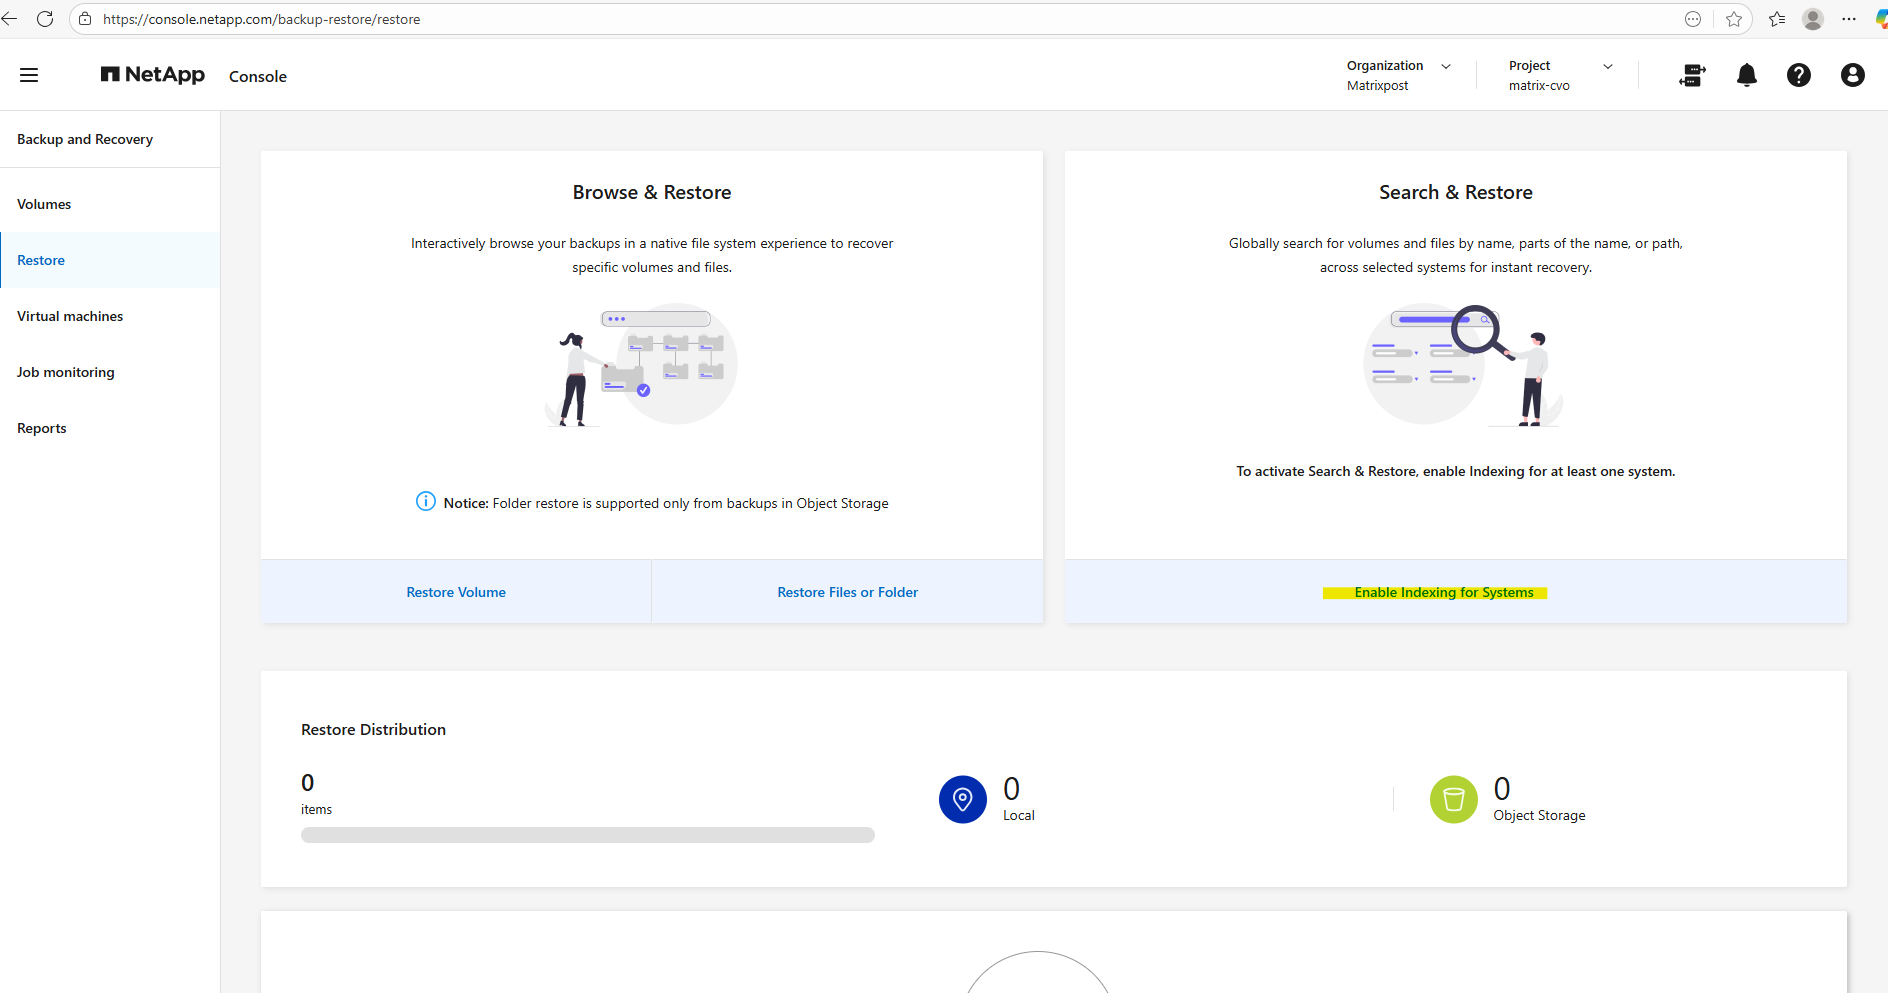
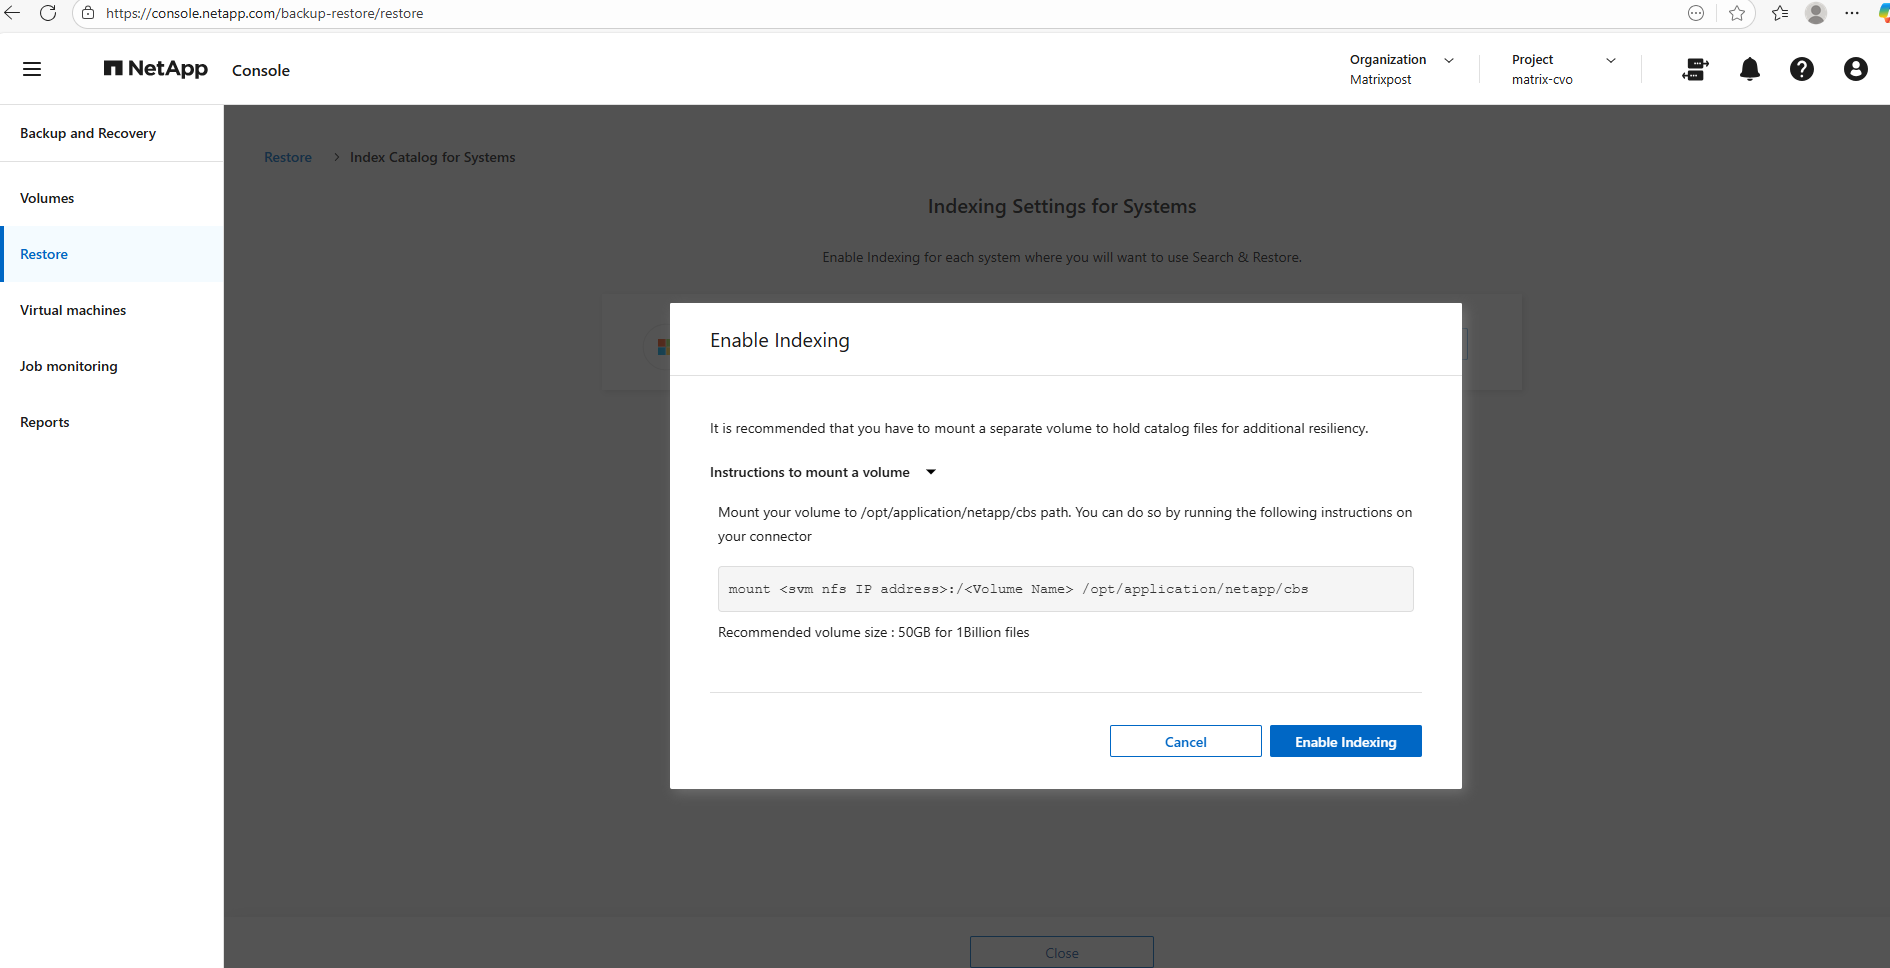
To restore individual files and folders we first need to enable indexing below.
It is recommended that we have mounted a separate volume to hold the catalog files for additional resliency.
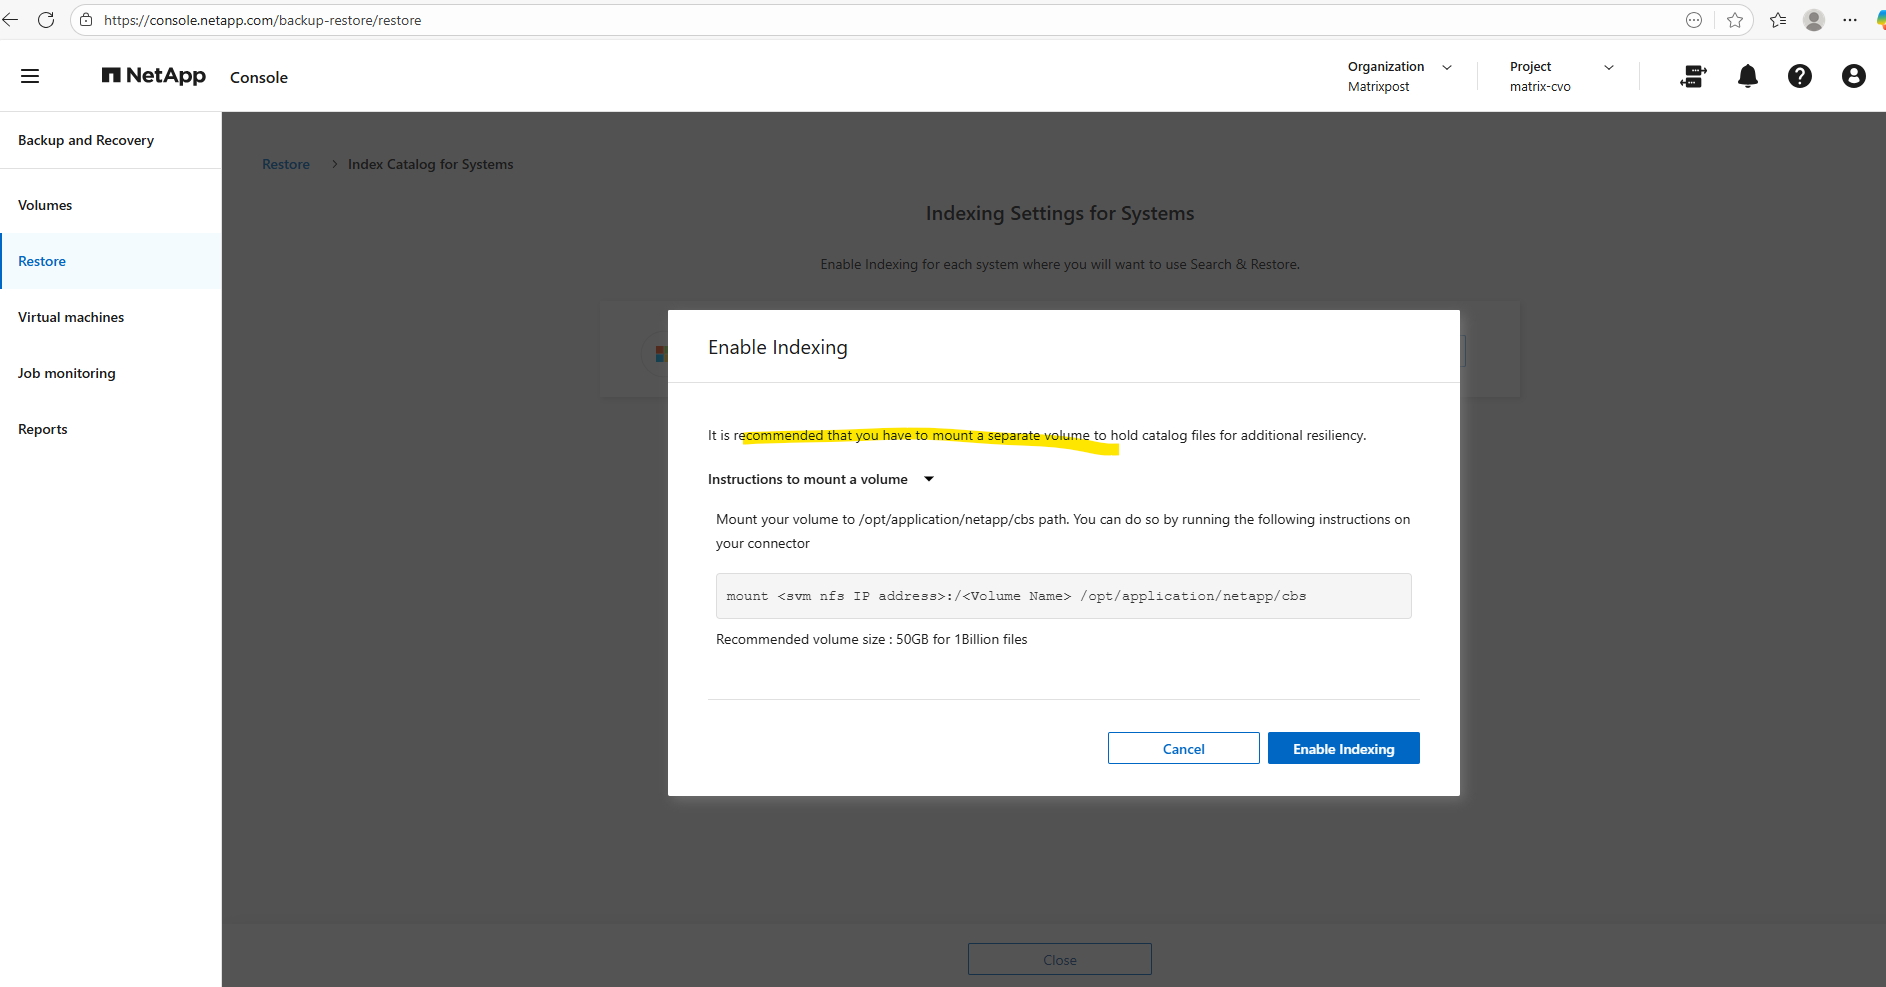
If we do not configure a dedicated volume for the indexing catalog, the NetApp Console stores the catalog by default on the Connector VM’s local filesystem, typically under:
/opt/application/netapp/cbs/
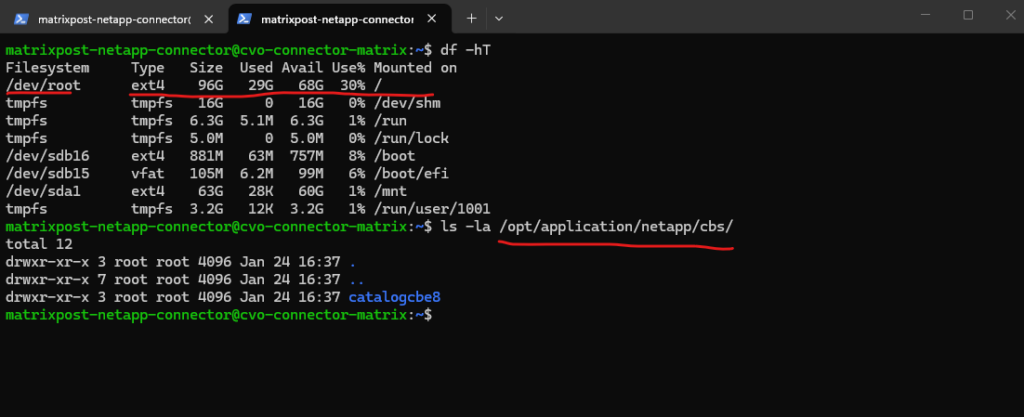
Since this path resides on the root disk (/dev/root), the catalog will consume space on the OS volume. While this may work fine in small lab environments, it is not recommended for production, because large backup catalogs can grow quickly and potentially impact the Connector’s stability or available disk capacity.
For improved resilience and predictable capacity management, it is strongly recommended to mount a dedicated volume specifically for the catalog files rather than relying on the system disk.
Create a Dedicated Volume for the Backup Index Catalog
To ensure the Connector VM remains performant and avoids unexpected disk space issues, it is recommended to store the backup indexing catalog on a dedicated volume rather than the root filesystem.
Below we will create a new volume on Cloud Volumes ONTAP and mount it to the Connector VM, providing a scalable and operationally safer location for the catalog. This approach follows best practices by separating application data from the operating system and supporting future backup growth without impacting the Connector.
I will create a small 5 GB volume named vol_indexing_catalog on the SVM where NFS is already enabled, providing a dedicated storage location for the backup indexing catalog in my lab environment.
While this size is sufficient for testing purposes, production deployments should allocate significantly more capacity to accommodate catalog growth over time.
matrixcvo::> volume create -vserver svm_matrix_nfs -volume vol_indexing_catalog -aggregate aggr1 -size 5GB

Next we need to mount the ONTAP volume to a path within our SVM.
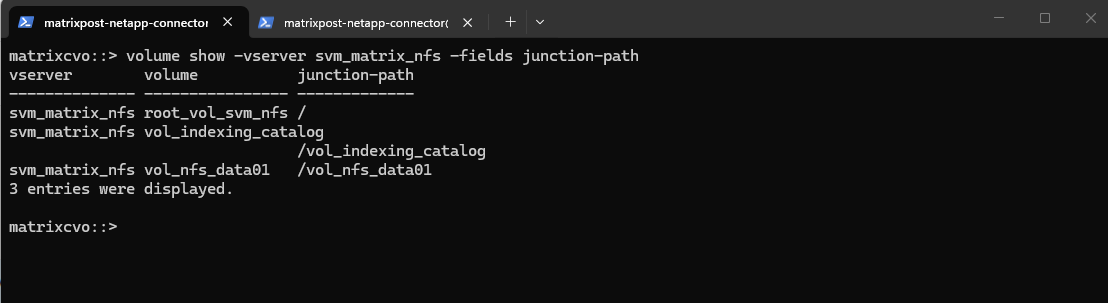
matrixcvo::> volume mount -vserver svm_matrix_nfs -volume vol_indexing_catalog -junction-path /vol_indexing_catalog

Checking the mount.
matrixcvo::> volume show -vserver svm_matrix_nfs -fields junction-path
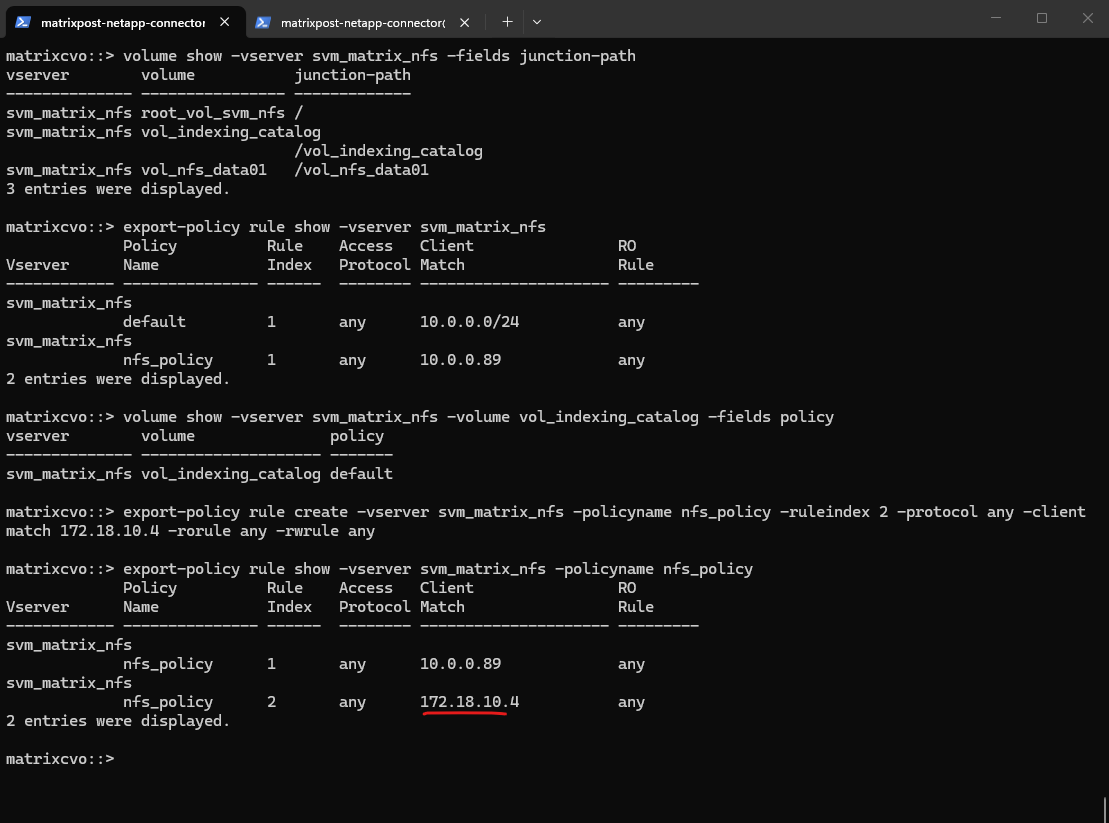
Because the existing export policy only allowed access from an on-premises VM (10.0.0.89), the Connector could not mount the volume using its Azure IP address (172.18.10.4).
We therefore added an additional rule to the policy to permit the Connector, ensuring it can write to the indexing catalog while maintaining controlled and least-privilege access.
matrixcvo::> export-policy rule create -vserver svm_matrix_nfs -policyname nfs_policy -ruleindex 2 -protocol any -clientmatch 172.18.10.4 -rorule any -rwrule any

# verify
matrixcvo::> export-policy rule show -vserver svm_matrix_nfs -policyname nfs_policy
We also need to a read-only rule for the Connector to the root volume’s export policy, ONTAP could traverse the namespace and then apply the volume policy for /vol_indexing_catalog, which finally allowed read-write access. The vserver export-policy check-access command is the quickest way to validate both checks and pinpoint where access is blocked.
matrixcvo::> vserver export-policy rule create -vserver svm_matrix_nfs -policyname nfs_policy -ruleindex 2 -protocol any -clientmatch 172.18.10.4 -rorule any -rwrule any -superuser any

# verify access
matrixcvo::> vserver export-policy check-access -vserver svm_matrix_nfs -volume vol_indexing_catalog -client-ip 172.18.10.4 -protocol nfs3 -authentication-method sys -access-type read-write

Force ONTAP to also show the hidden columns:
matrixcvo::> vserver export-policy rule show -vserver svm_matrix_nfs -policyname nfs_policy -fields rwrule,superuser,clientmatch

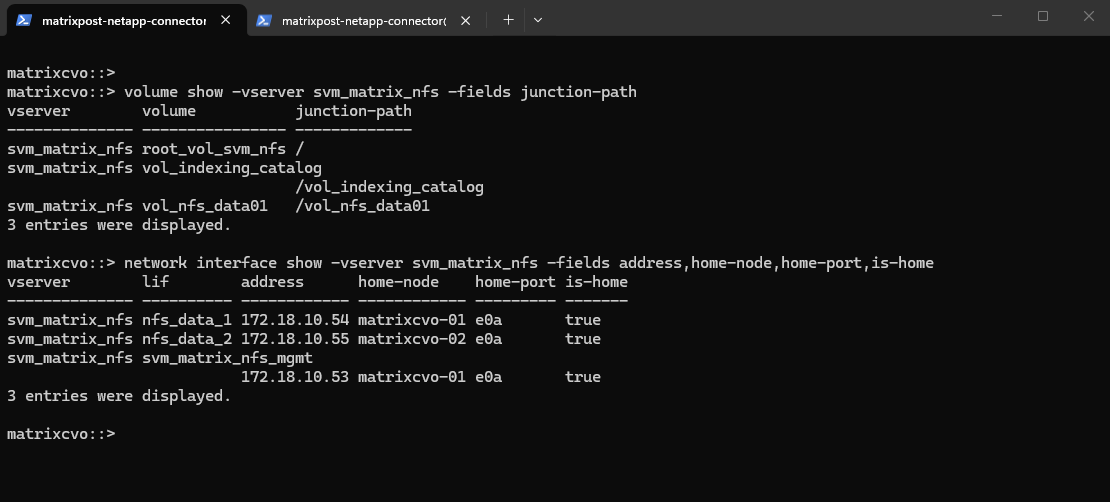
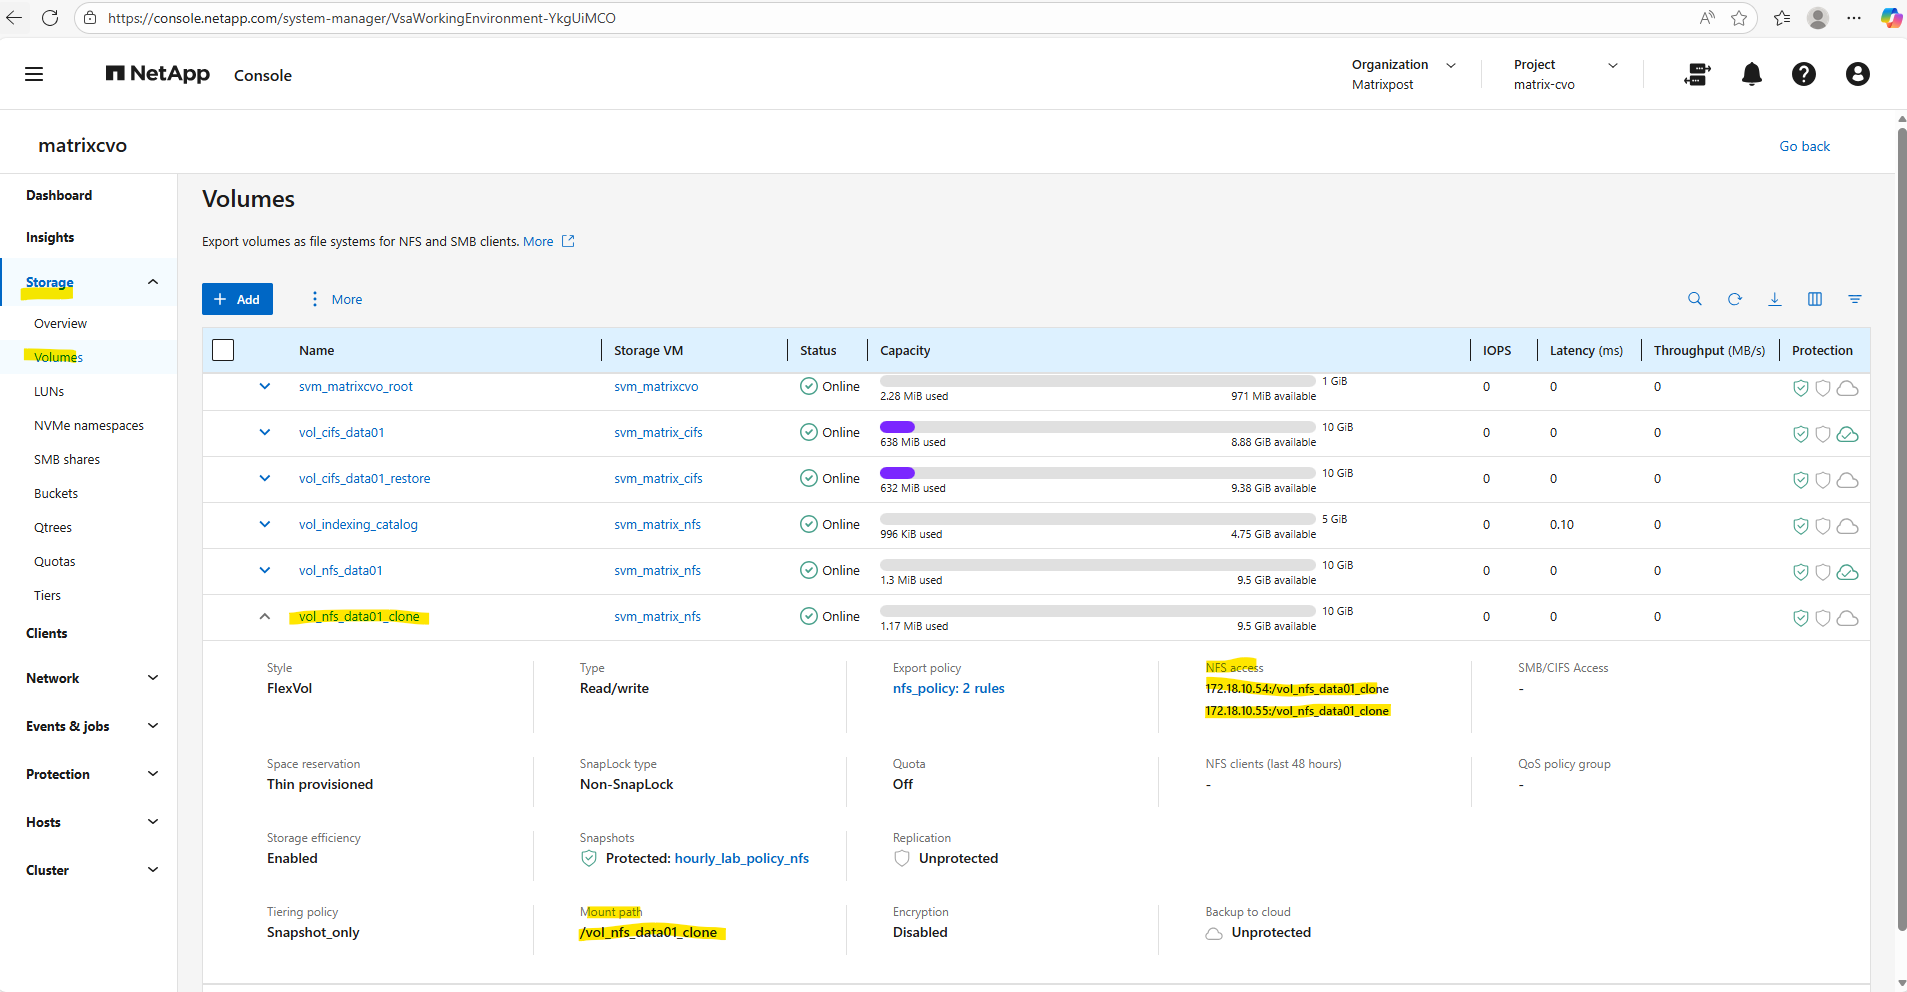
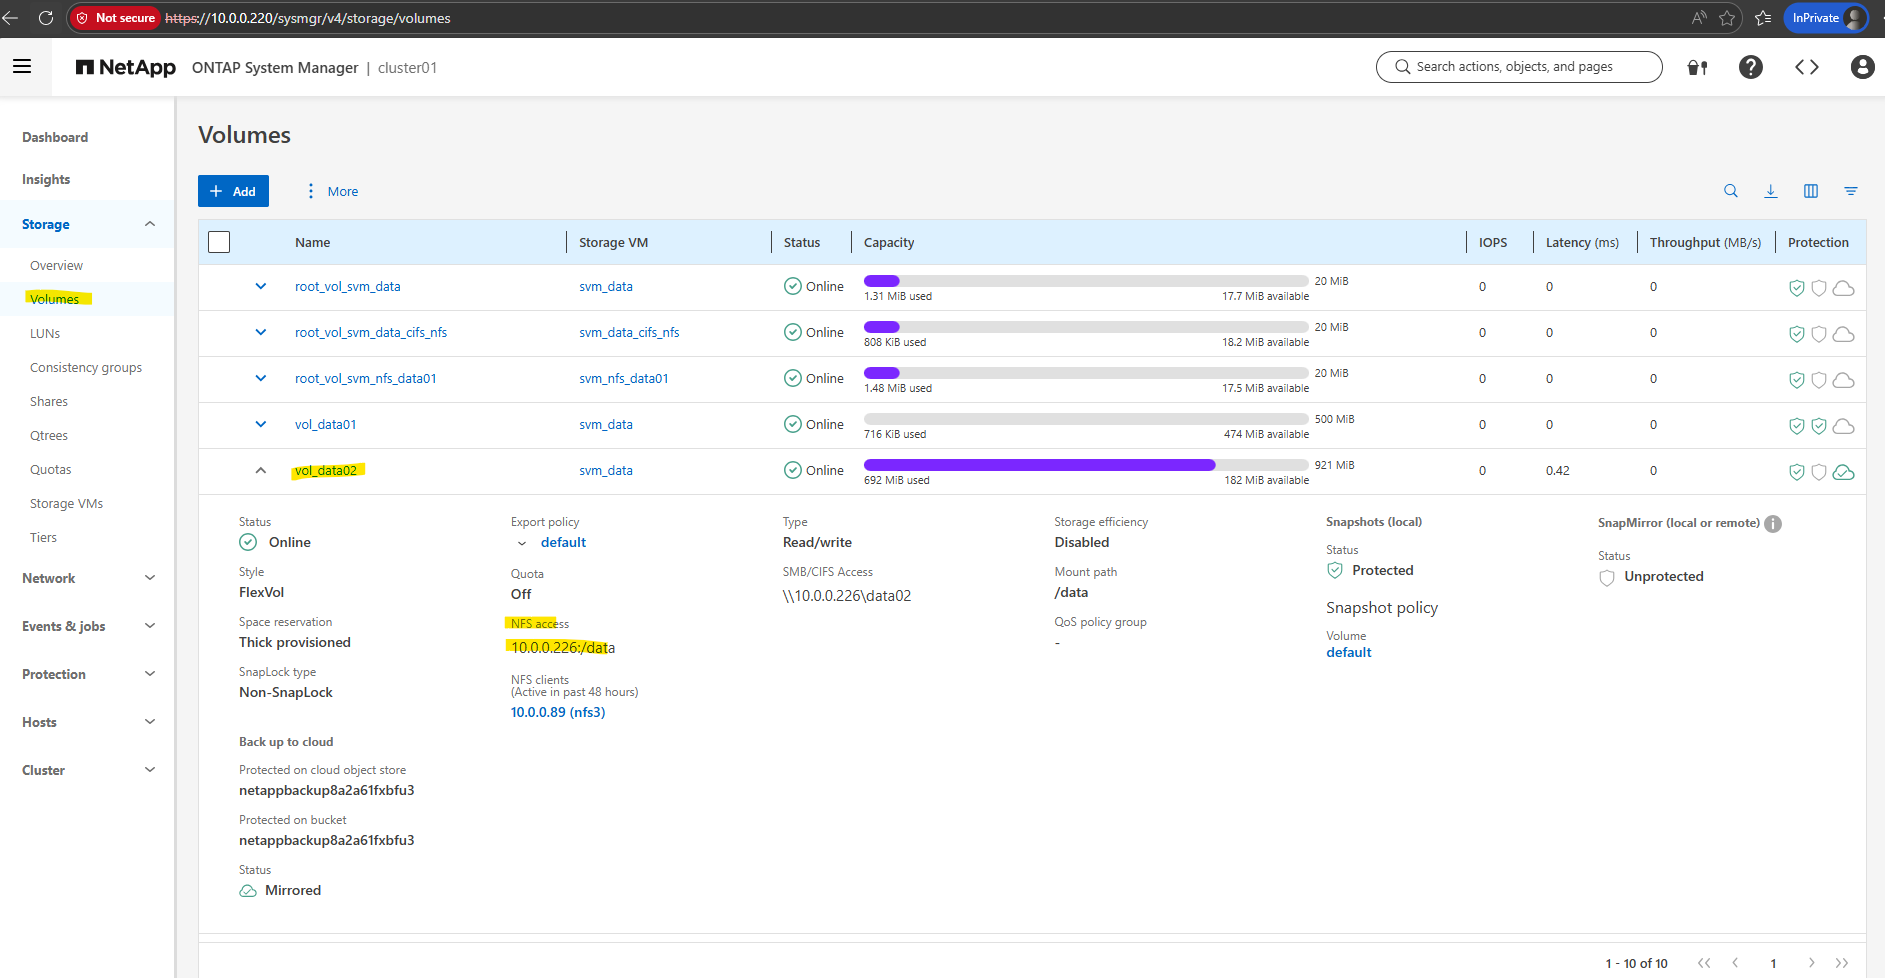
We can retrieve the junction path using the ONTAP CLI with volume show -vserver <svm_name> -volume <volume_name> -fields junction-path and combine it with the NFS data LIF IPs obtained via network interface show -vserver <svm_name> -role data -fields address to form the full mount path (for example, 172.18.10.54:/vol_indexing_catalog)
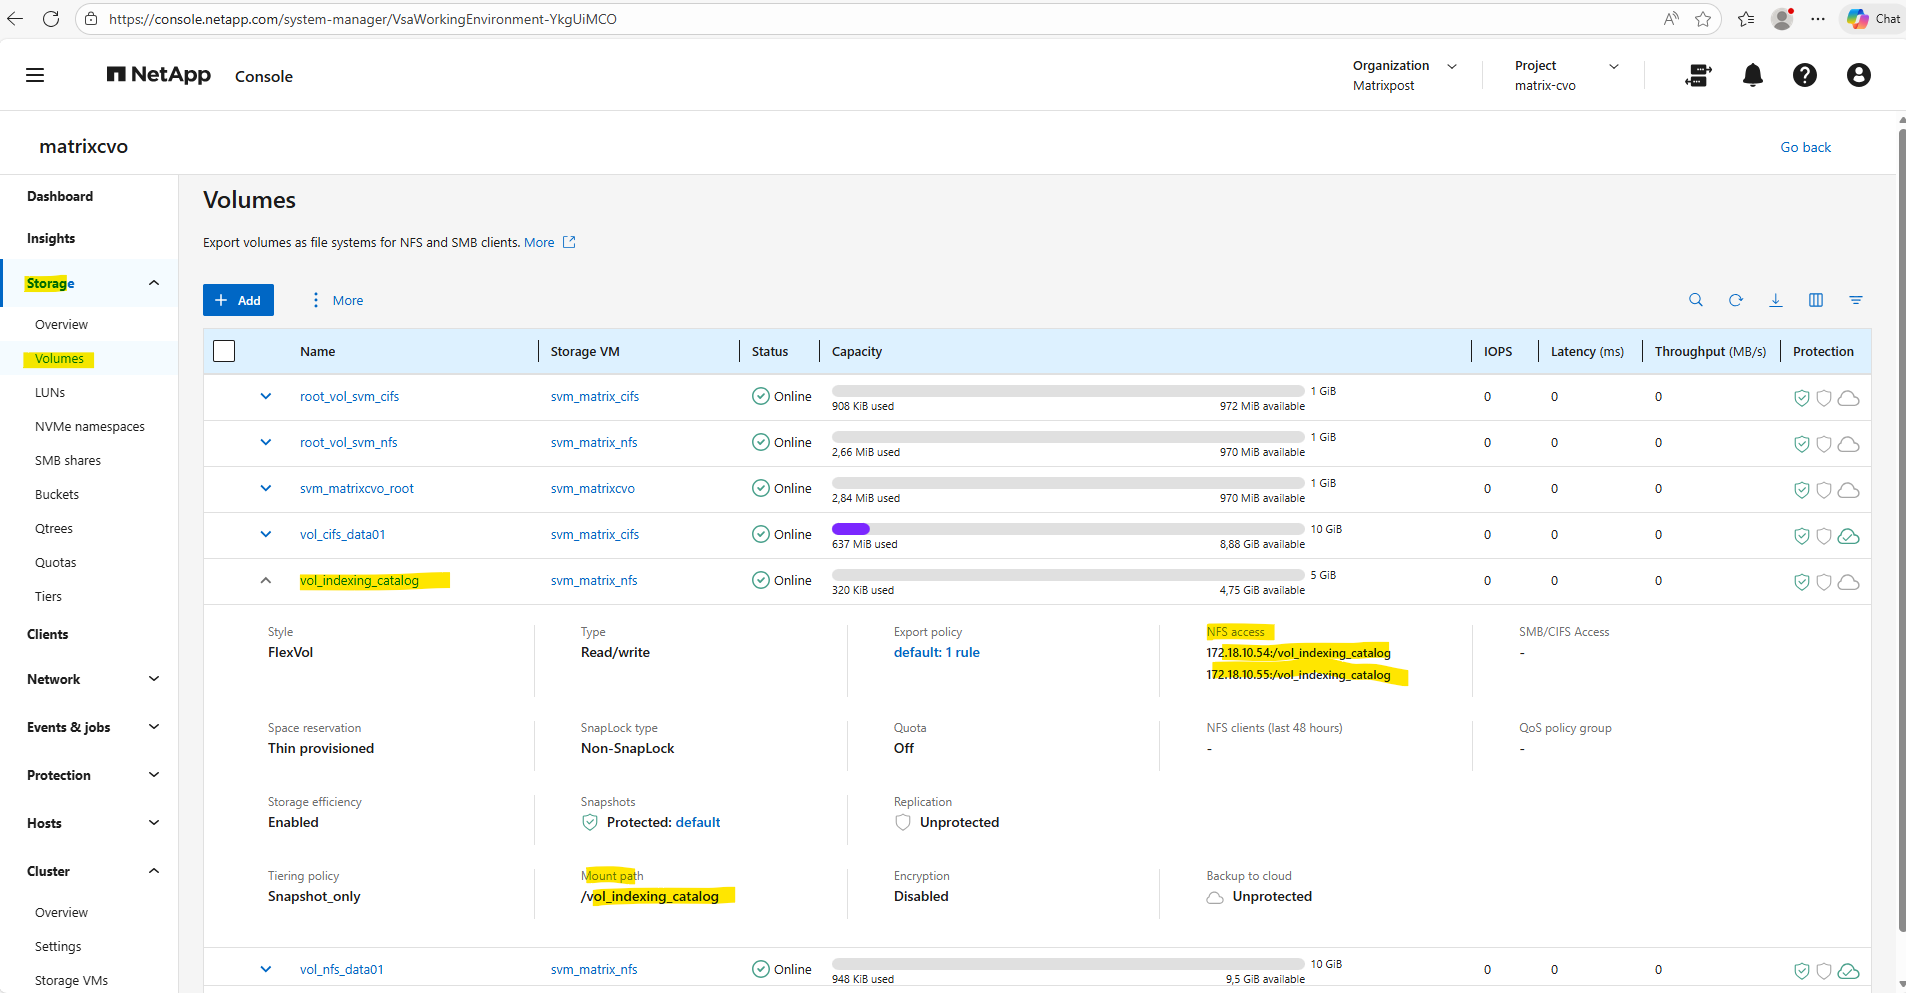
In System Manager, navigate to Storage → Volumes, select the volume, and view the Junction Path and NFS access field in the volume details to obtain the same information through the web interface as shown below.
matrixcvo::> volume show -vserver svm_matrix_nfs -fields junction-path
matrixcvo::> network interface show -vserver svm_matrix_nfs -fields address,home-node,home-port,is-home
To mount the volume we first need to intall the nfs tools on the connector VM.
$ sudo apt update
$ sudo apt-get install nfs-common -y
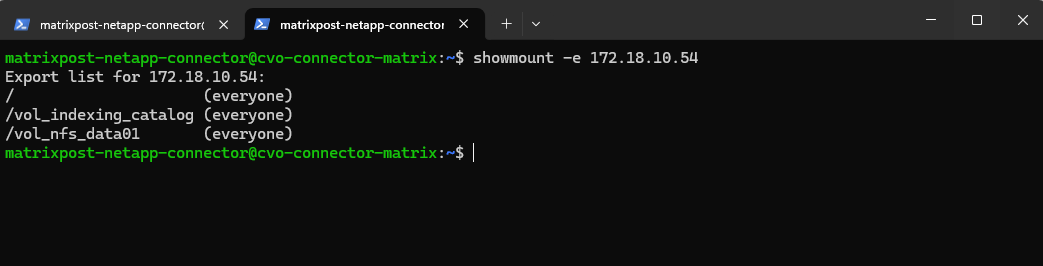
We can now also check from a client which exports exposed by running the showmount command below. The IP address is from our Storage Virtual Machine (SVM) which exposes the NFS export.
-e stands for exports. It asks the NFS server’s mountd daemon for a list of currently available shared directories (exports).
showmount is a client-side tool querying an NFSv2 or NFSv3 server. It won’t work for NFSv4 servers, as NFSv4 doesn’t use mountd for exporting filesystems.
# showmount -e <NFS Server>
# showmount -e 172.18.10.54
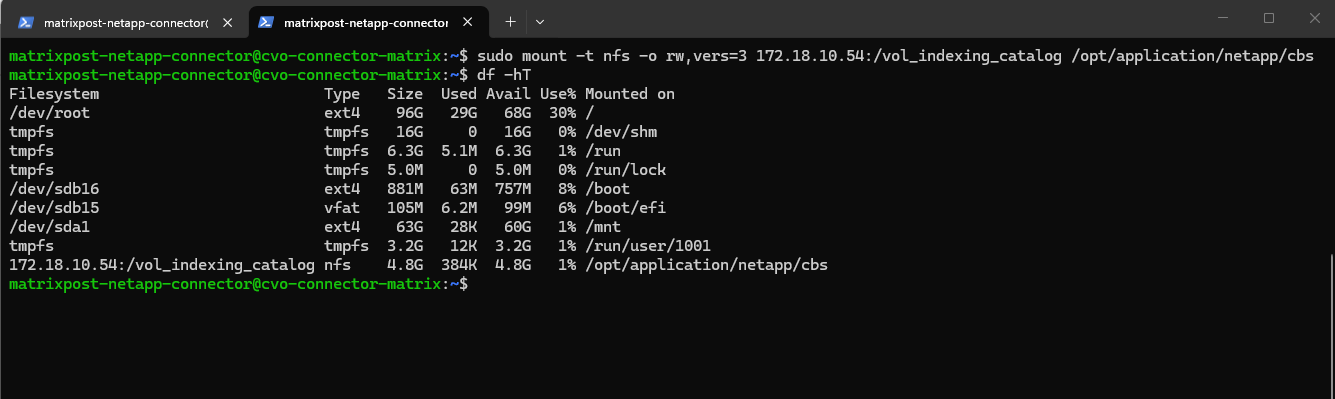
And finally mount the volume to access and write to.
By explicitly setting
vers=3in the mount options, you bypass the NFSv4 identity mapping entirely, ensuring root and application users maintain their permissions every time the environment powers back on.
$ sudo mount -t nfs -o rw,vers=3 172.18.10.54:/vol_indexing_catalog /opt/application/netapp/cbs
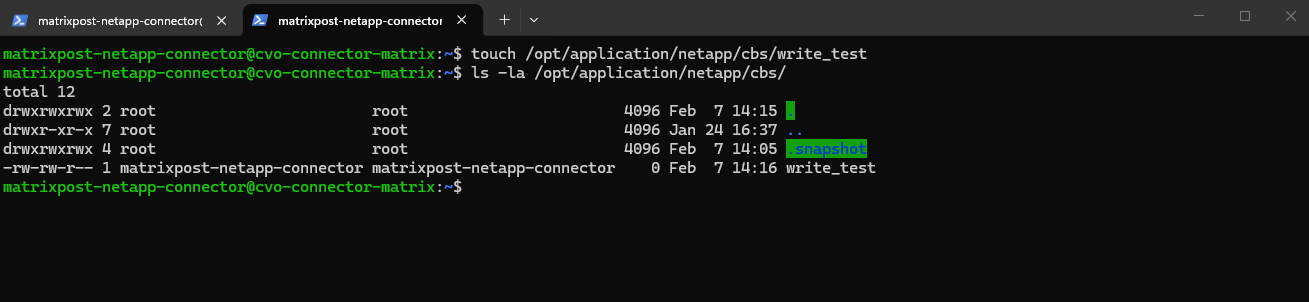
Before we head back to the NetApp console, we make sure the Connector can actually write to that mount. This ensures the indexing service won’t fail when it tries to save the catalog:
$ sudo touch /opt/application/netapp/cbs/write_test
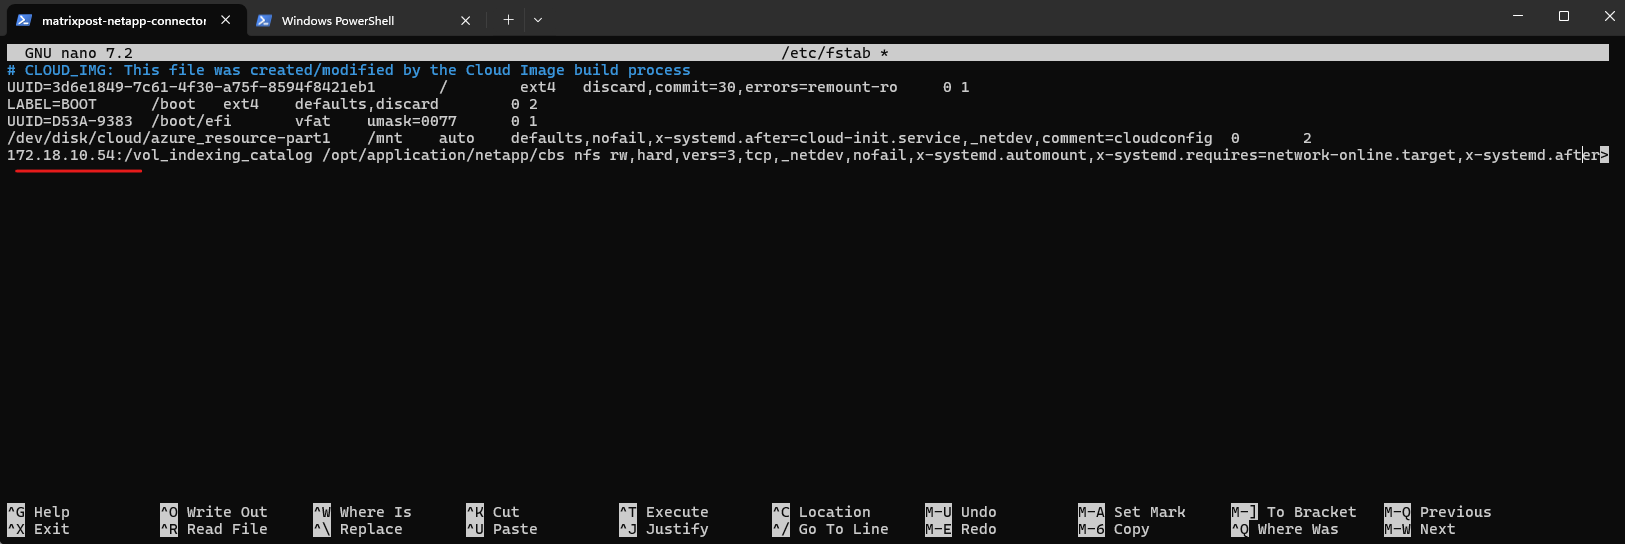
To ensure our backup indexing catalog survives a lab reboot, add an entry to /etc/fstab using a systemd automount with a timeout + nofail.
If the CVO nodes are not yet online, the Connector VM can stall in the boot process because a hard NFS mount blocks startup until the mount either succeeds or times out.
By explicitly setting
vers=3in the mount options, you bypass the NFSv4 identity mapping entirely, ensuring root and application users maintain their permissions every time the environment powers back on.
$ sudo nano /etc/fstab

172.18.10.54:/vol_indexing_catalog /opt/application/netapp/cbs nfs rw,hard,vers=3,tcp,_netdev,nofail,x-systemd.automount,x-systemd.requires=network-online.target,x-systemd.after=network-online.target,x-systemd.mount-timeout=30,timeo=5,retrans=3 0 0
x-systemd.automount→ boot continues; mount happens on first accessnofail→ don’t fail boot if mount isn’t possiblex-systemd.mount-timeout=30,timeo=5,retrans=3→ don’t wait forever during mount attemptsnetwork-online.targetordering → reduces early-boot race conditions
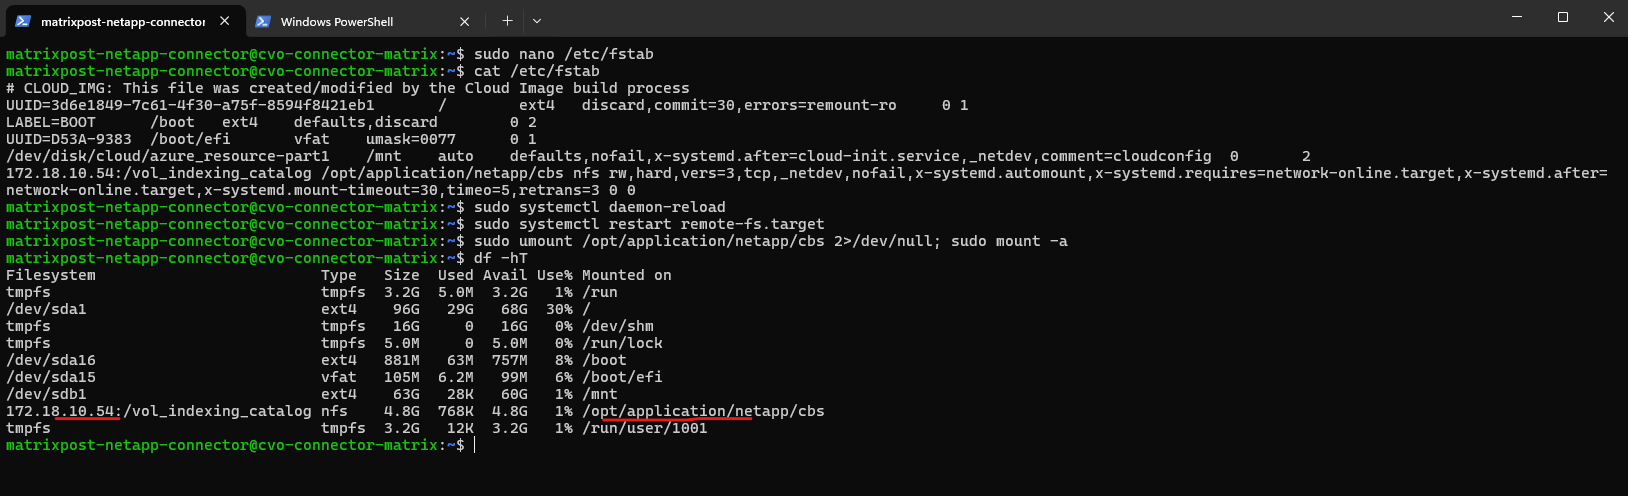
Verify the new mount entry.
$ cat /etc/fstab

After adding run:
sudo systemctl daemon-reload
sudo systemctl restart remote-fs.target

# quick test without reboot
sudo umount /opt/application/netapp/cbs 2>/dev/null; sudo mount -a
Now after mounting our dedicated volume to this path, we can move on in the NetApp console wizard.
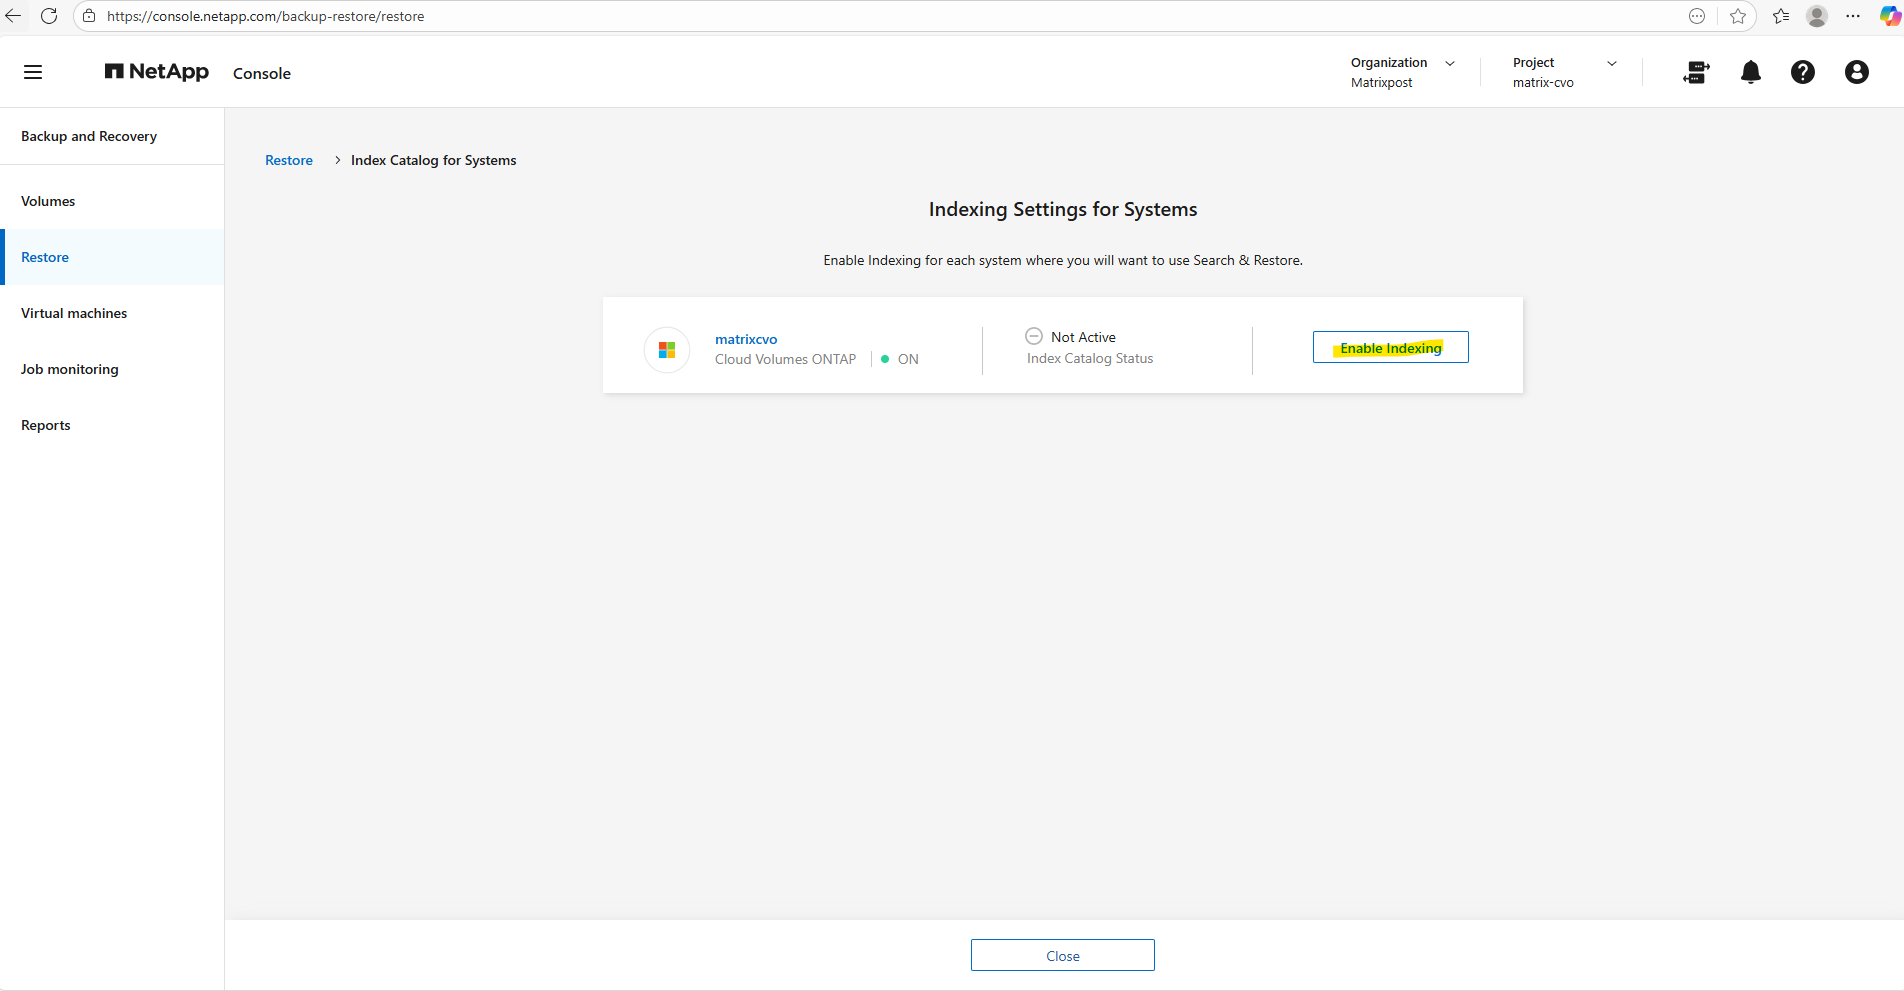
Finally back on the NetApp console, click on Enable Indexing.
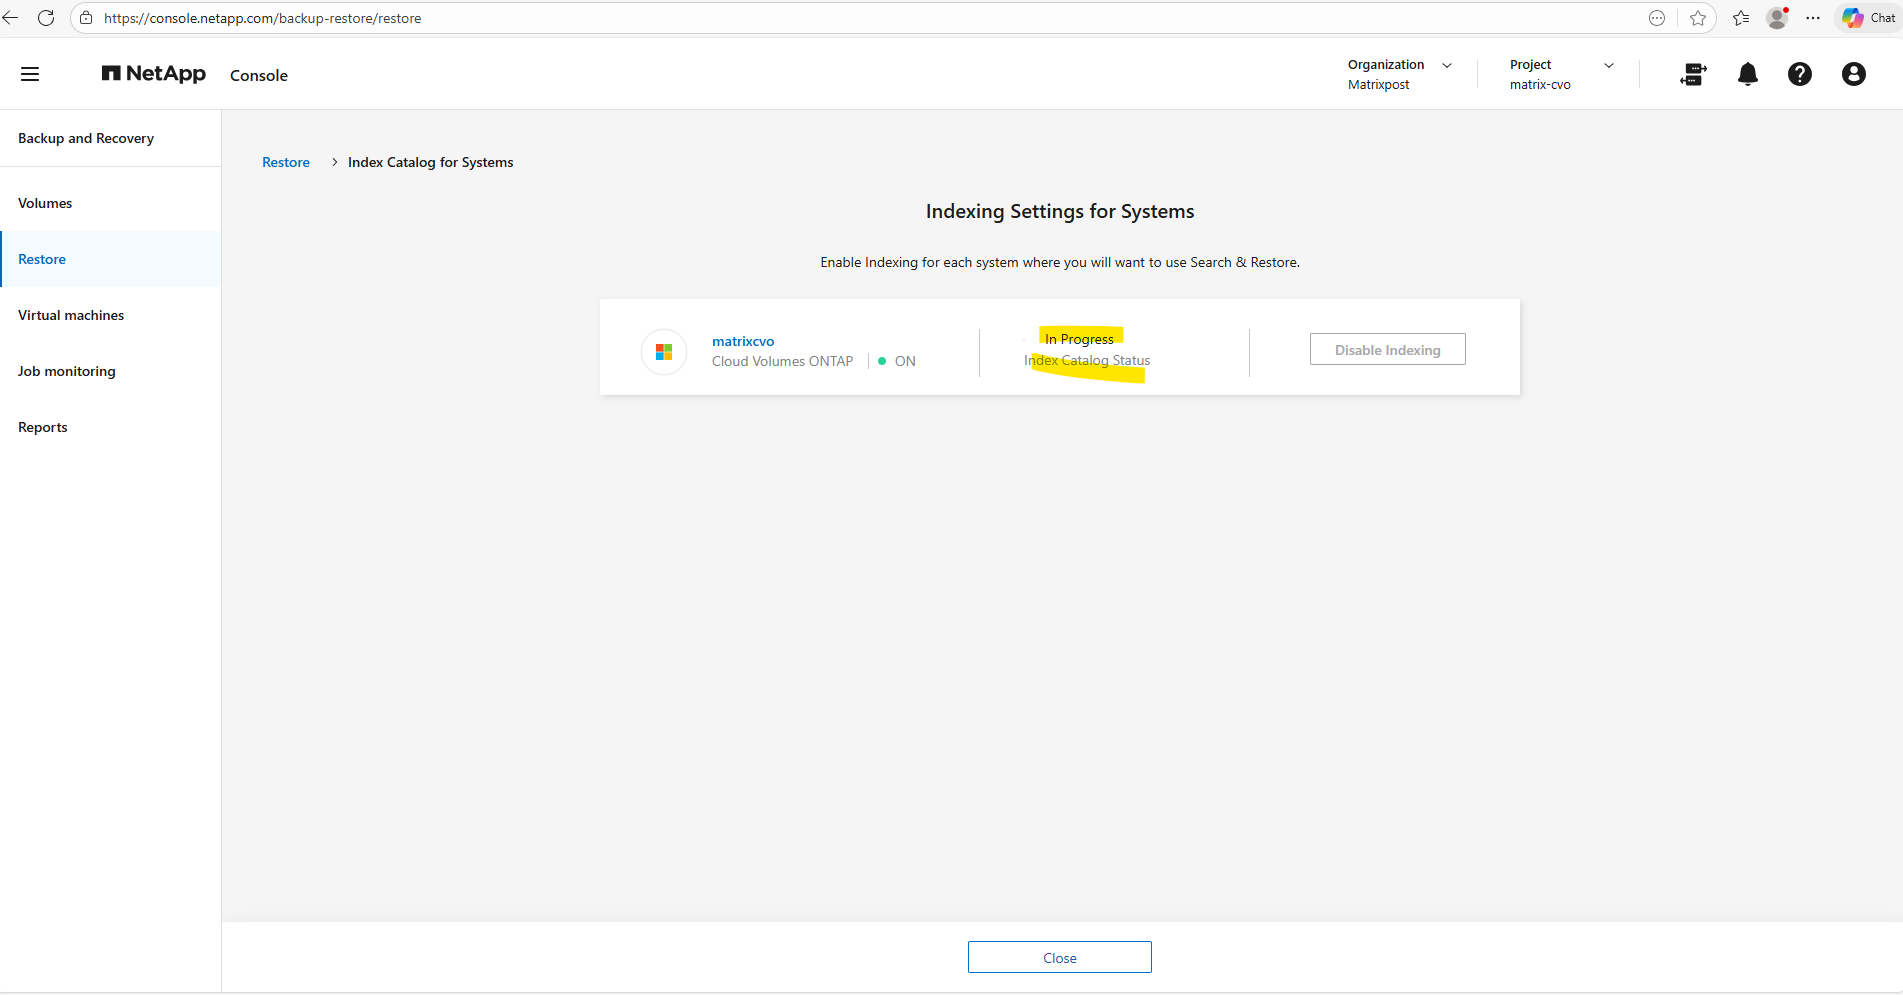
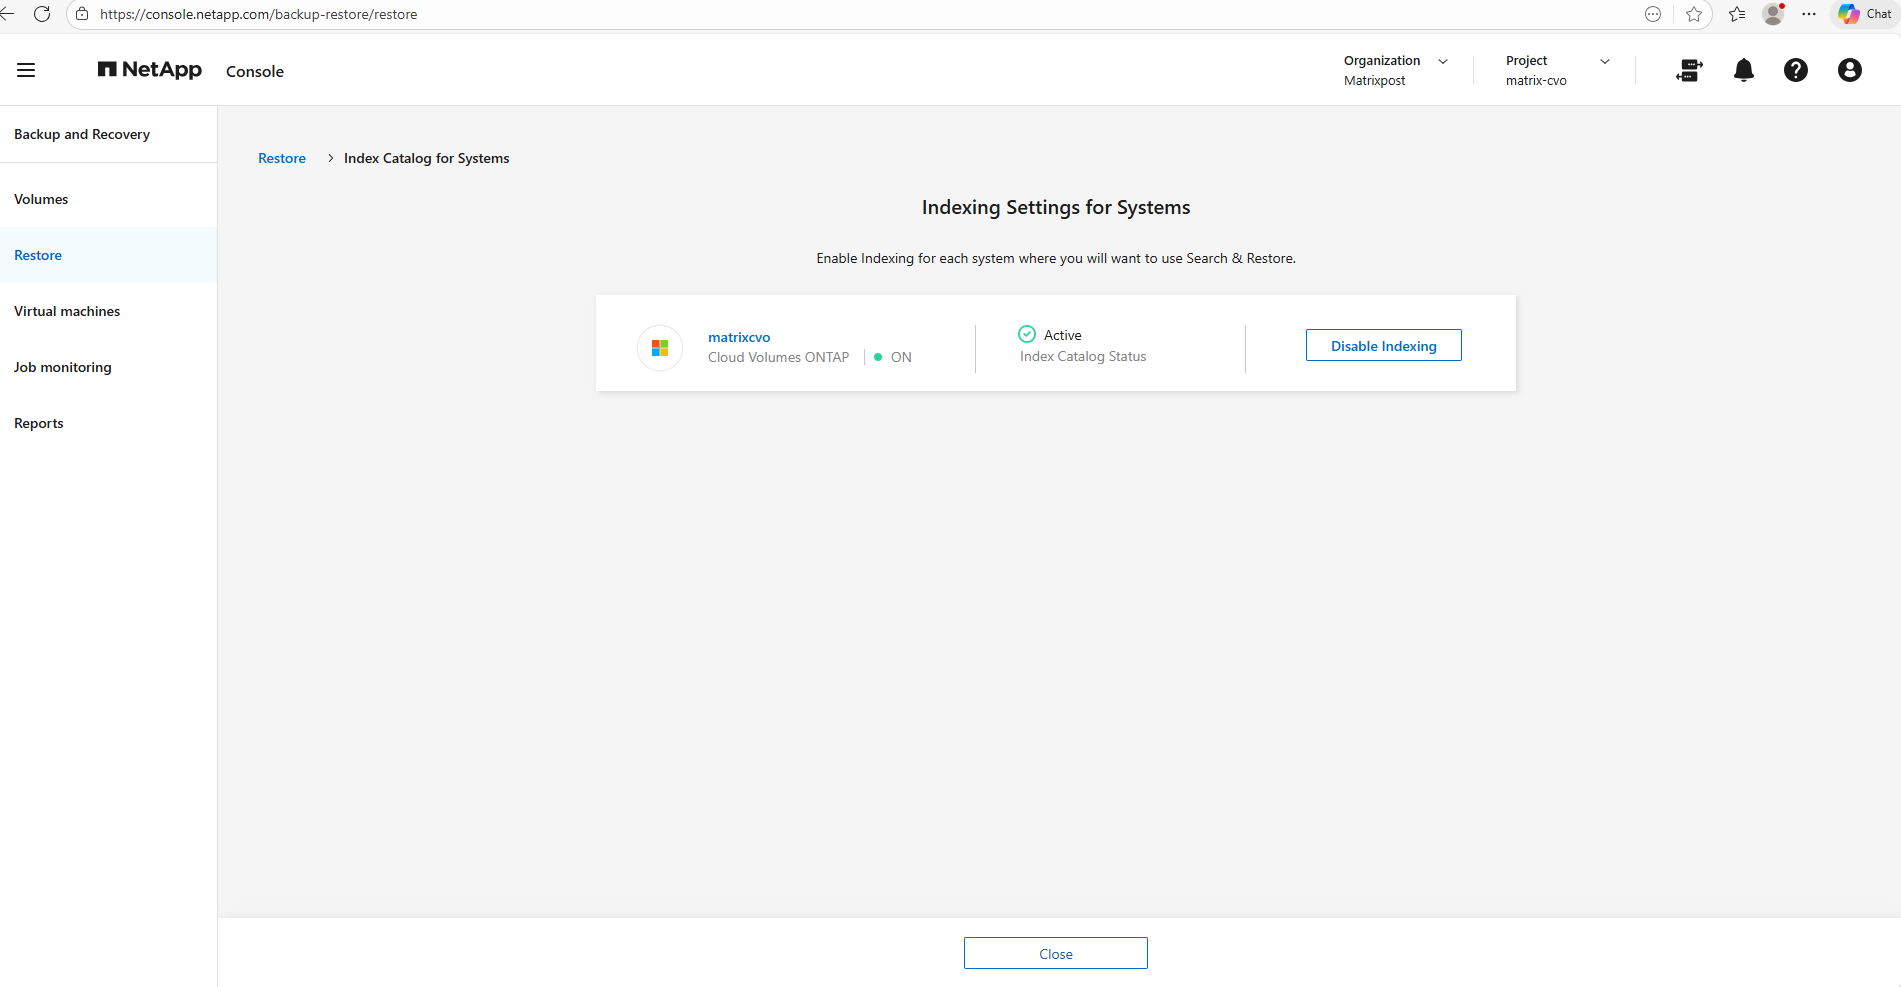
In my case for my small lab environment a few seconds later the index catalog was created.
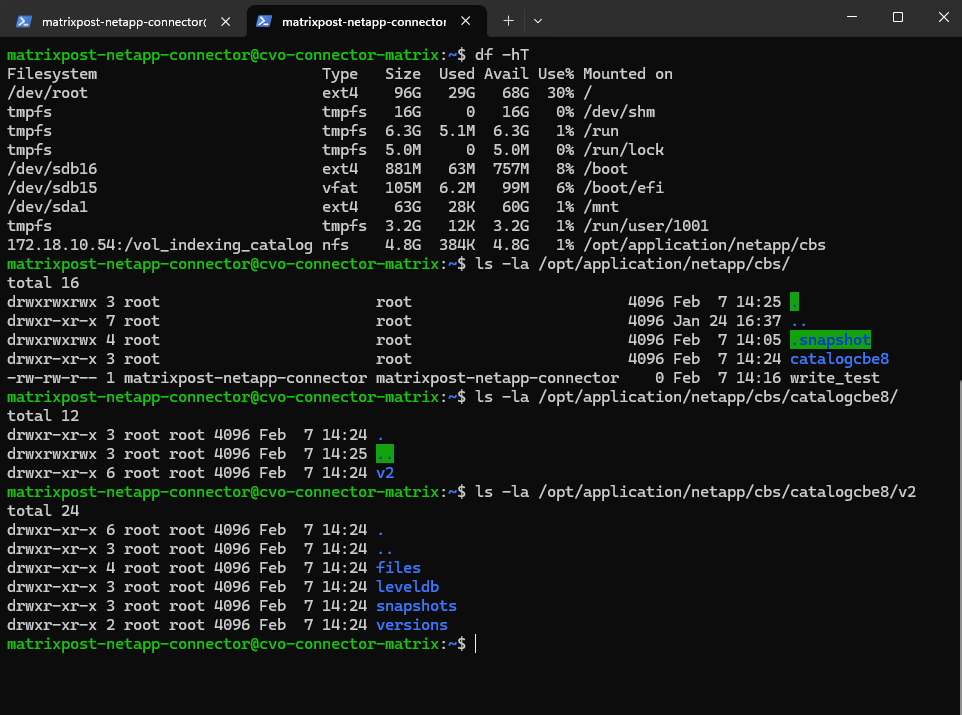
On the connector VM and our mounted dedicated volume we can now see that some new folders for the catalog where created.
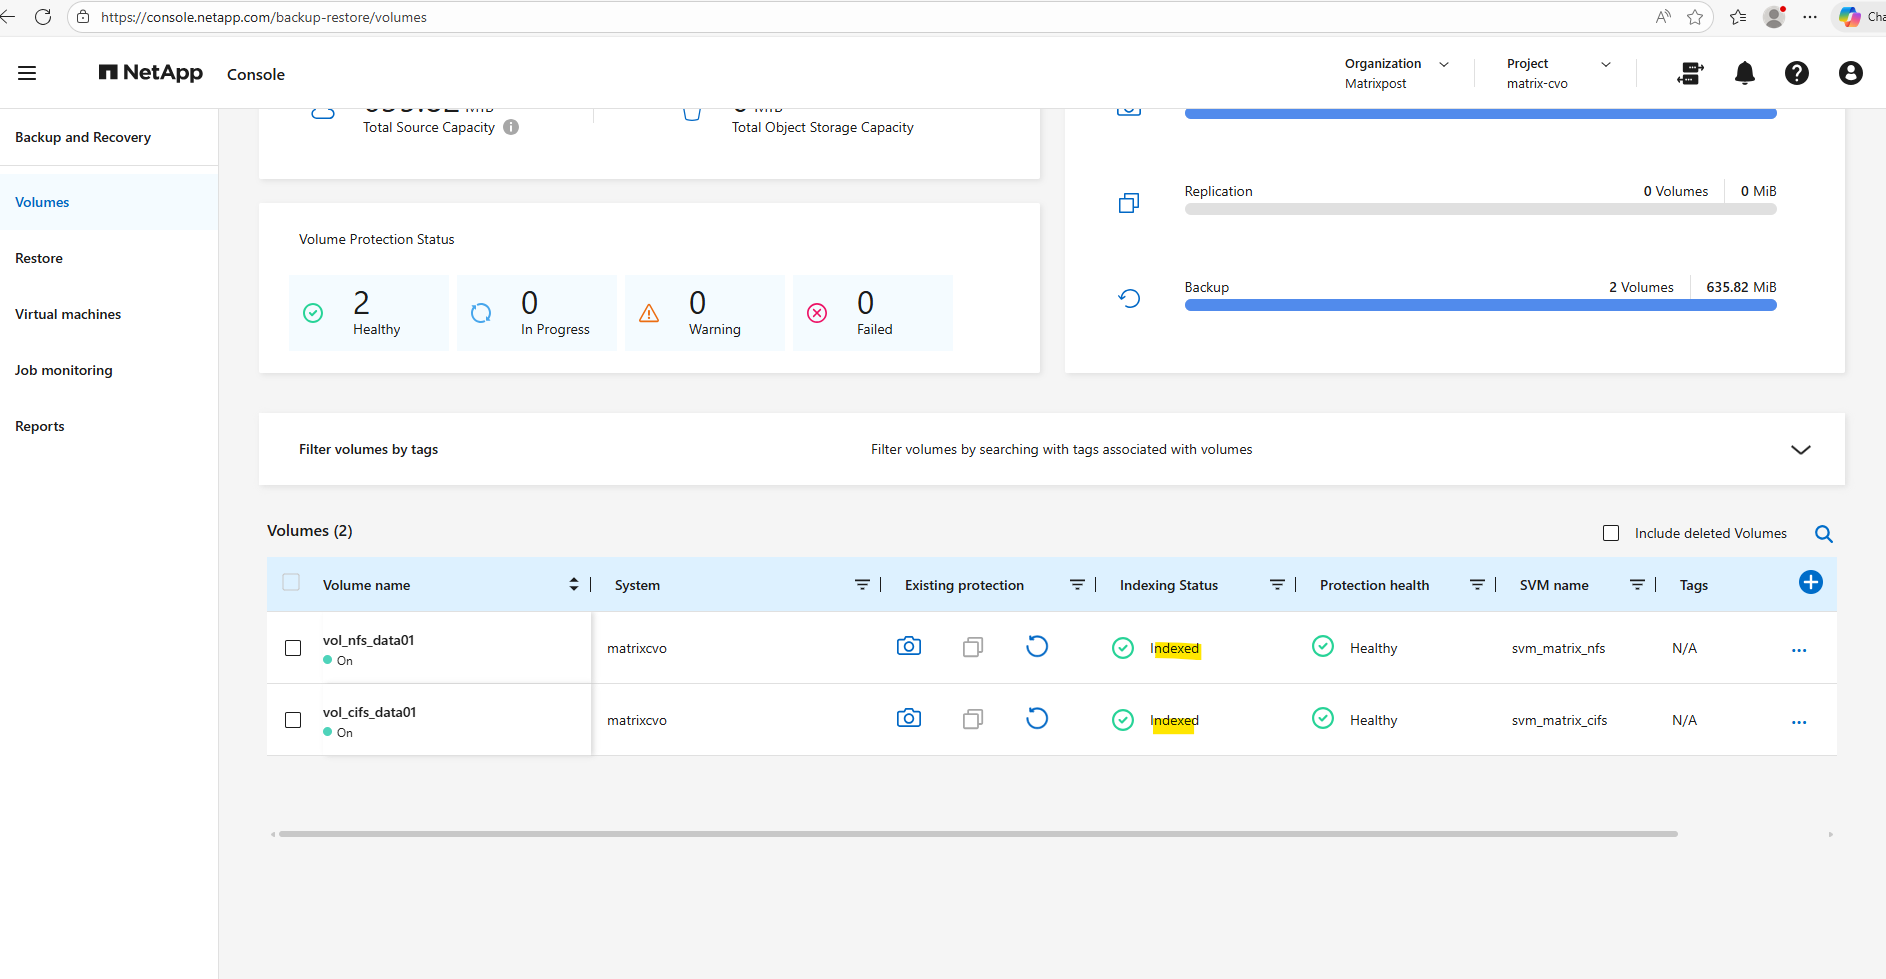
In the NetApp console we can now see that indexing for both volumes is enabled.
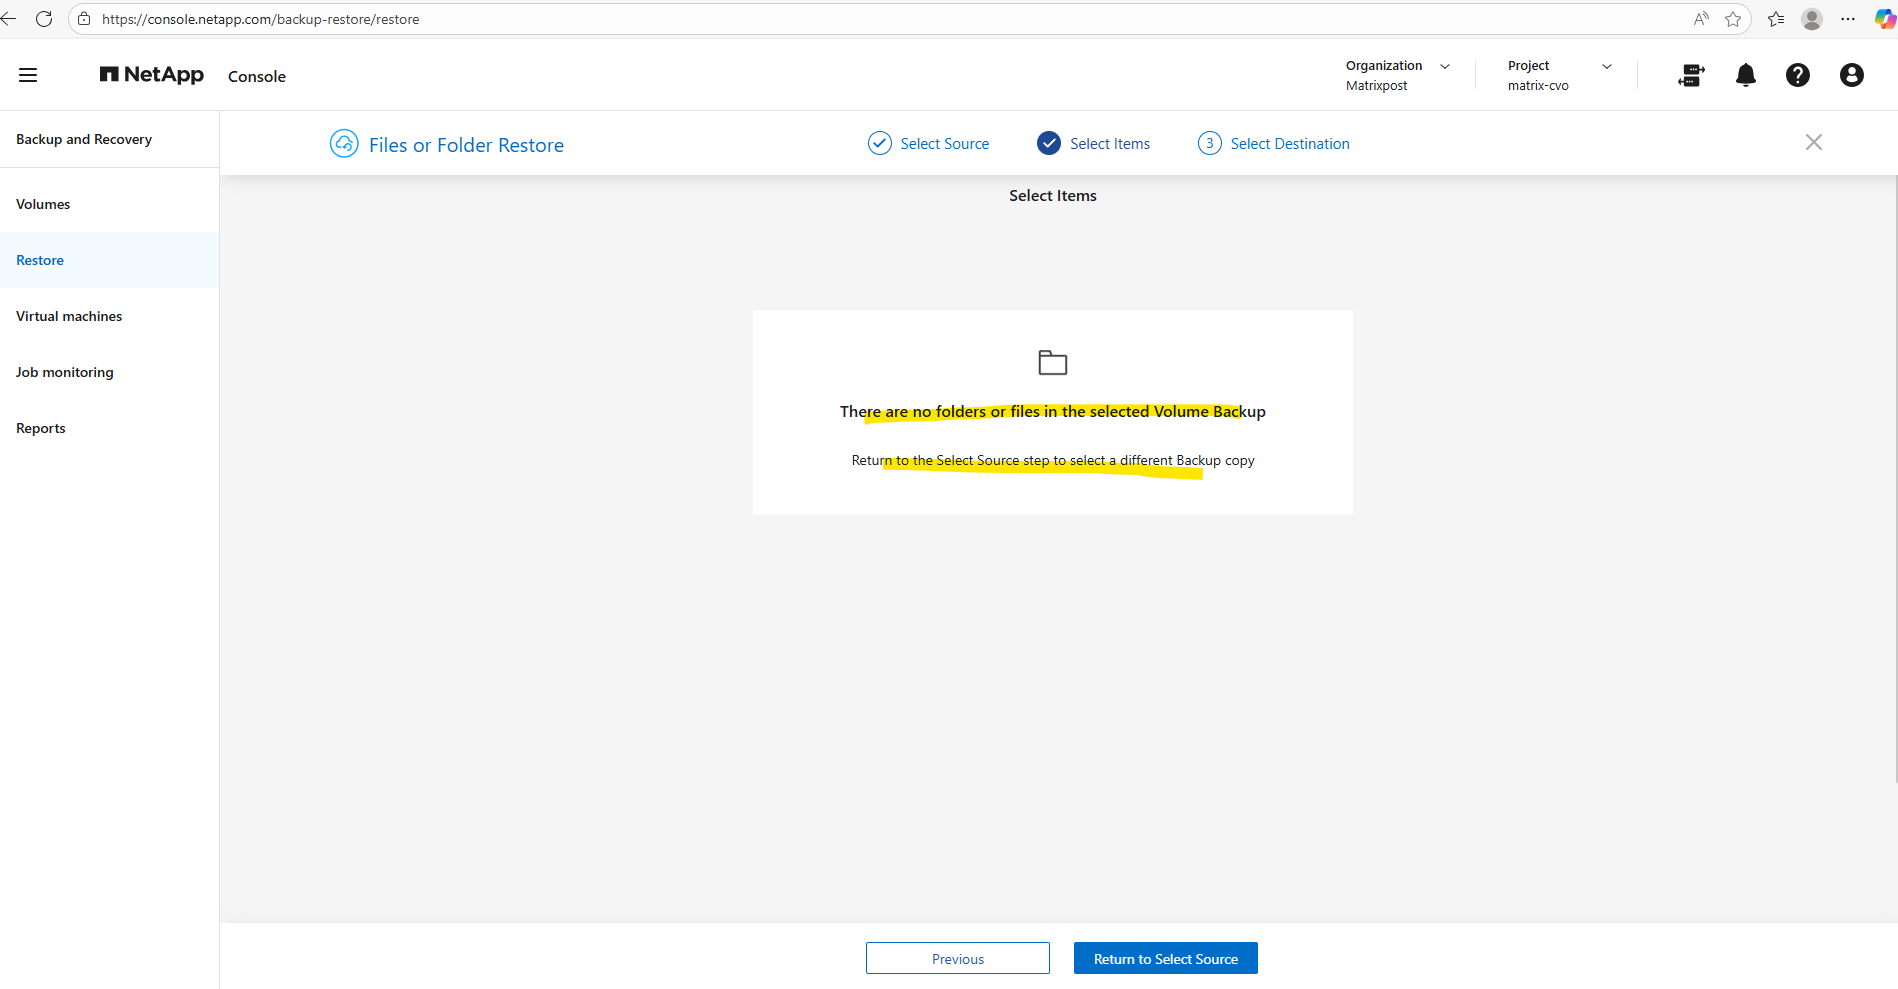
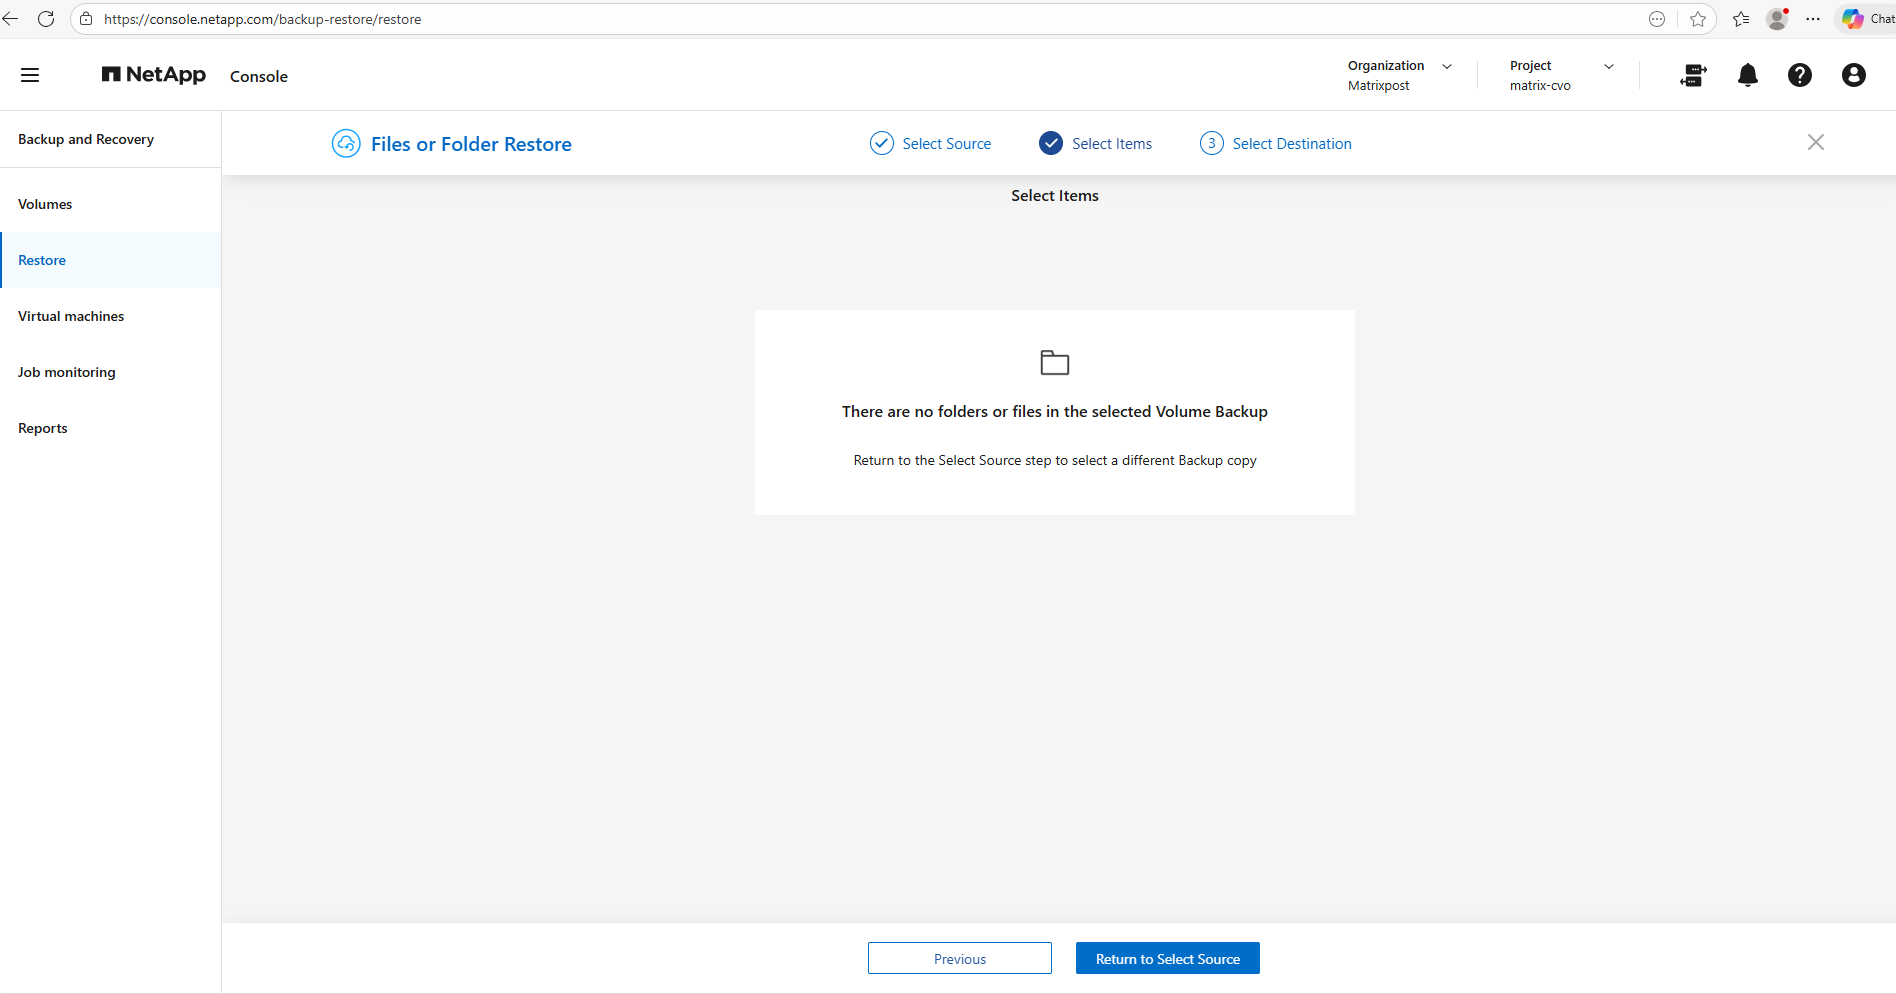
Already created backups can still not find any files or folders.
It is critical to note that enabling the indexing catalog is not retroactive; any backups created while indexing was disabled will remain ‘unsearchable’ for individual file and folder recovery.
To gain granular restore capabilities for existing data, a fresh backup must be triggered once the indexing service and the underlying NFS catalog mount are fully operational.
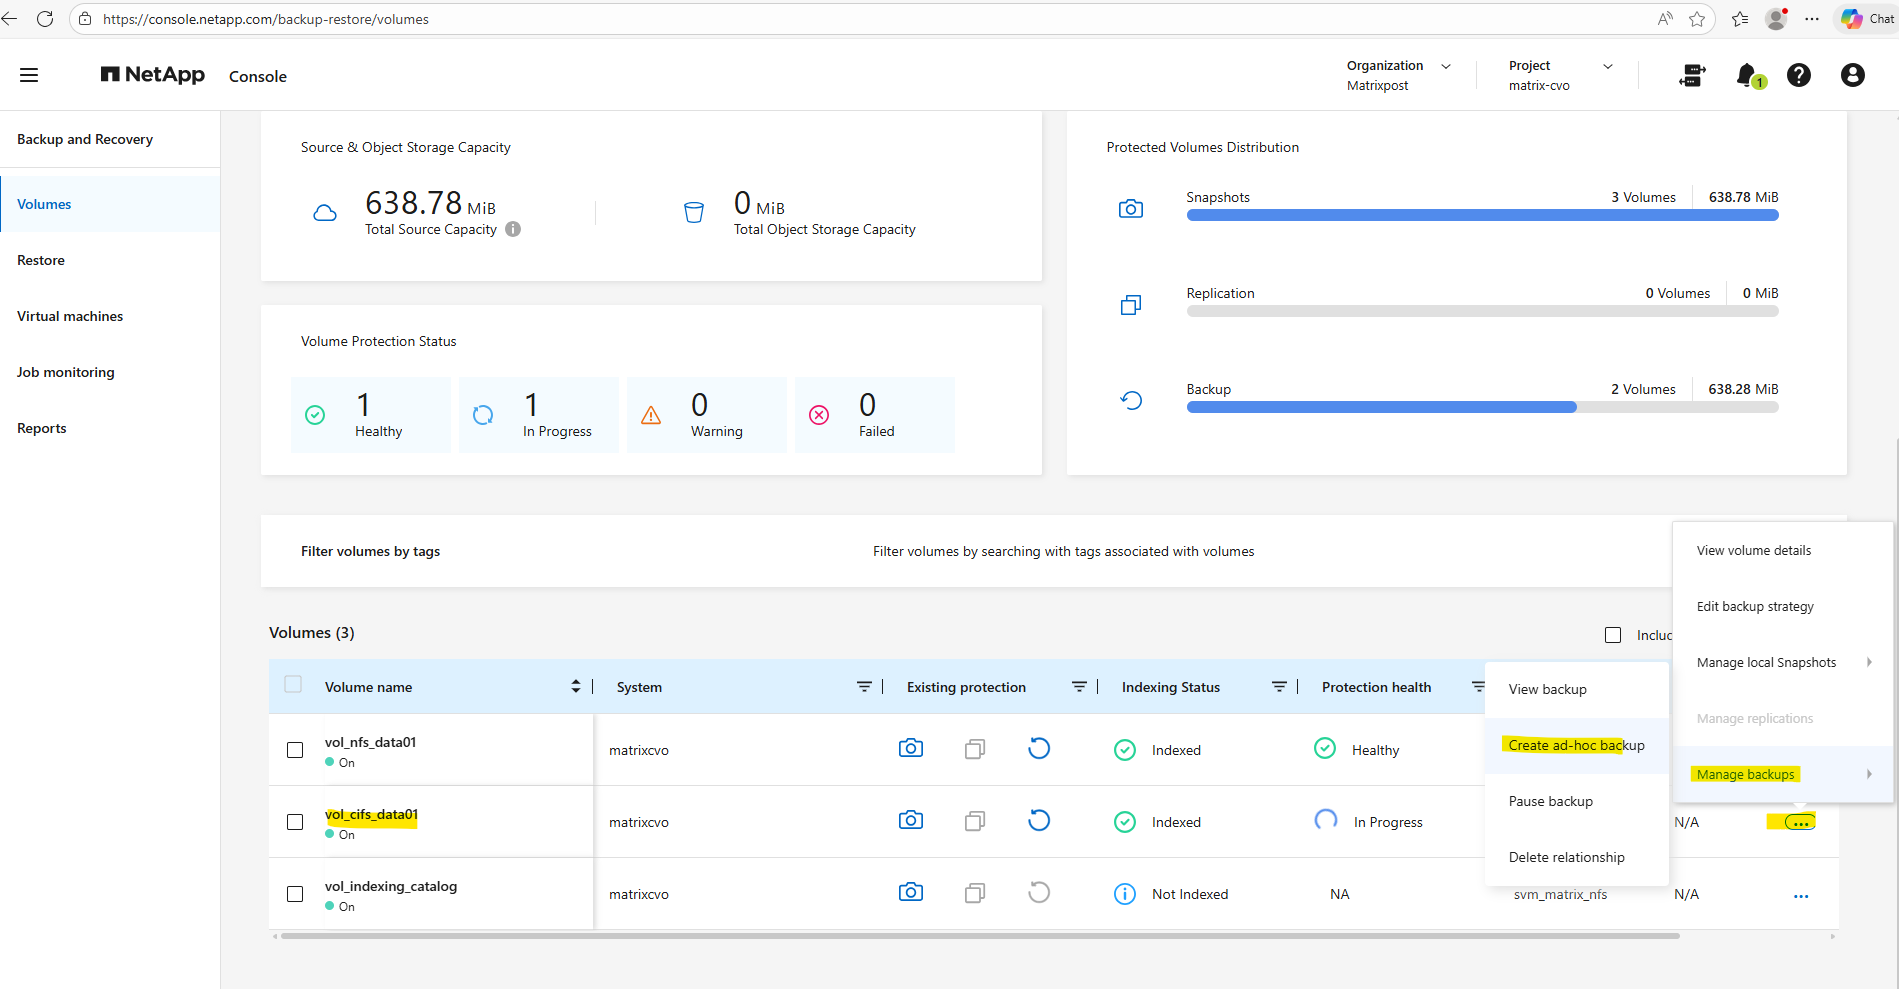
Therefore I will trigger an ad-hoc backup to check if we are able to restore files and folders from now on.
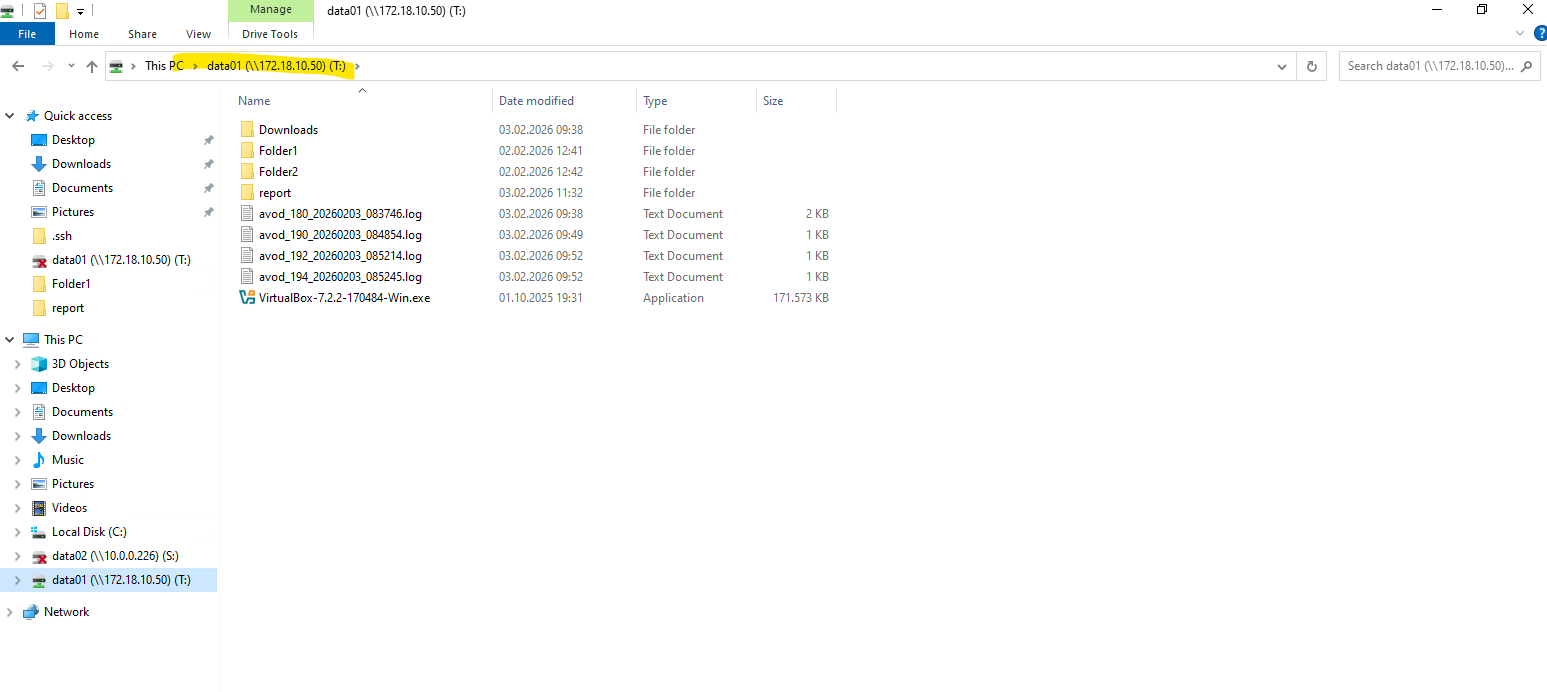
Looks good, we are now able to restore individual files and folders.
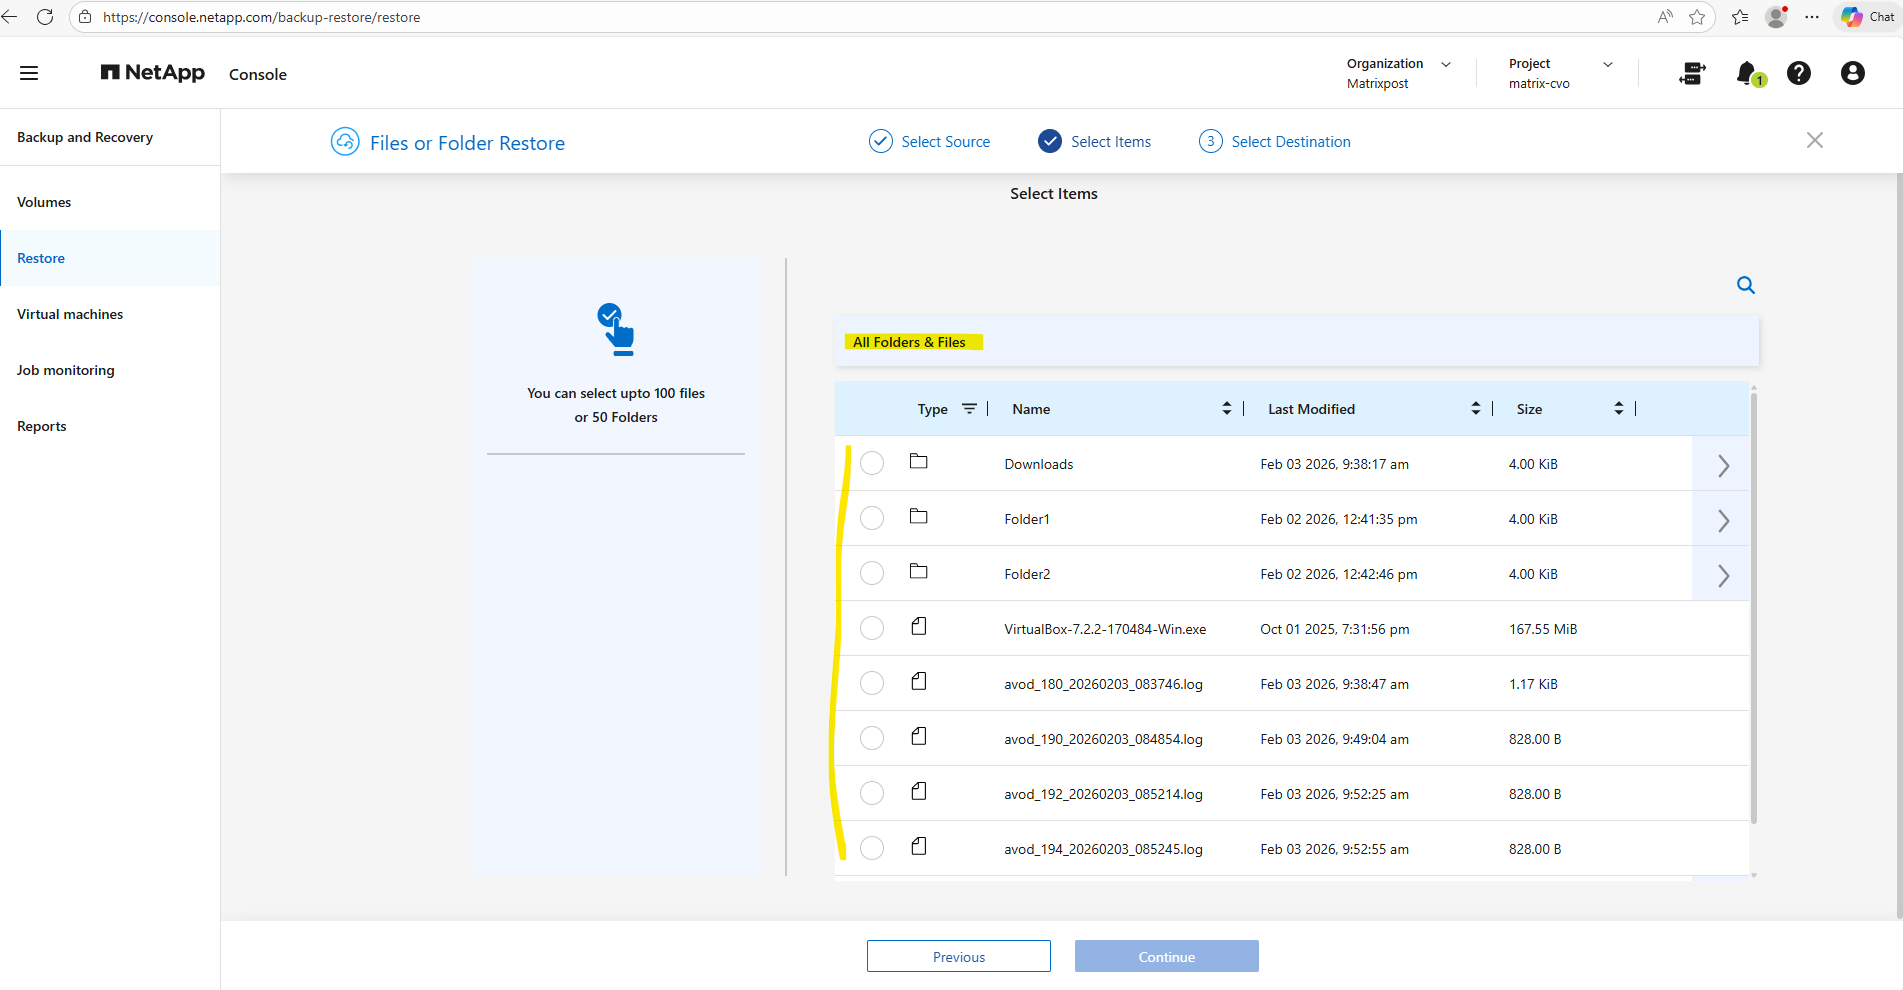
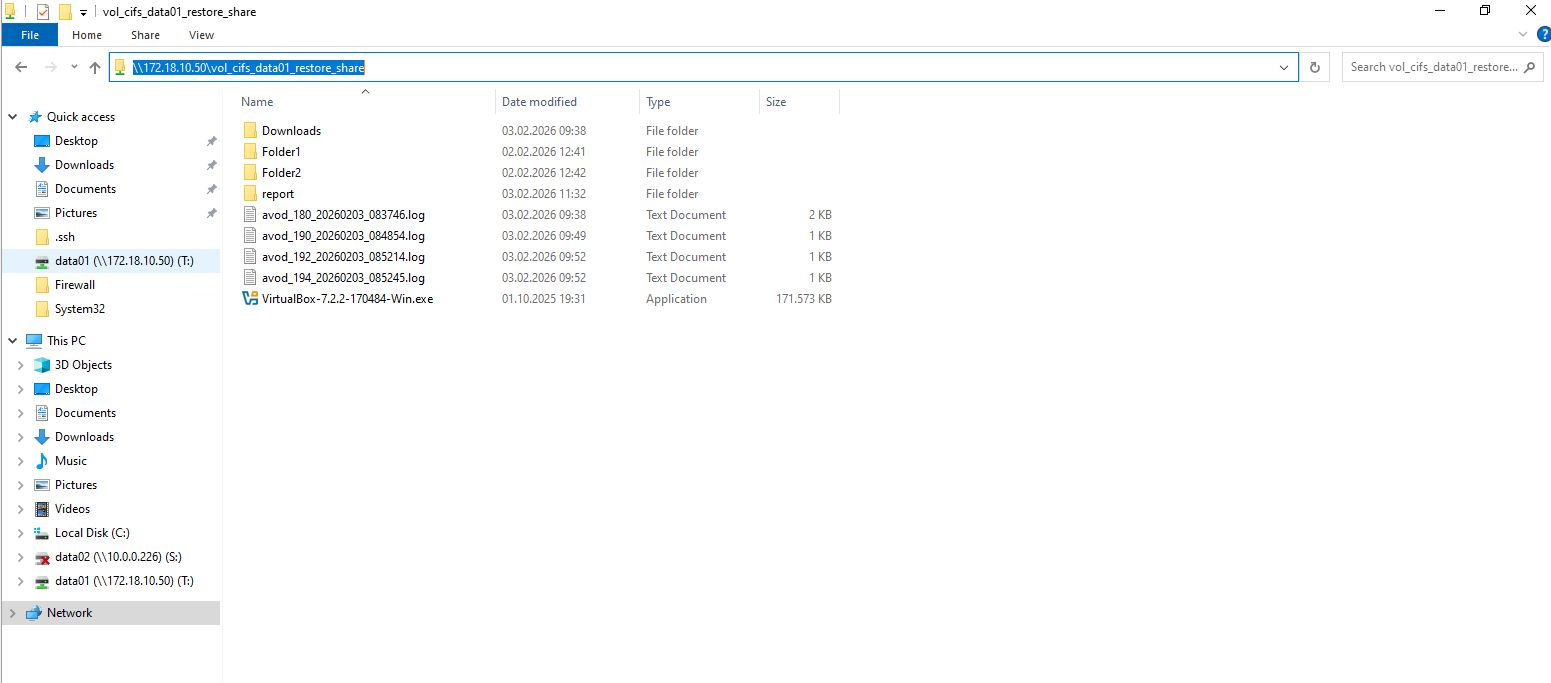
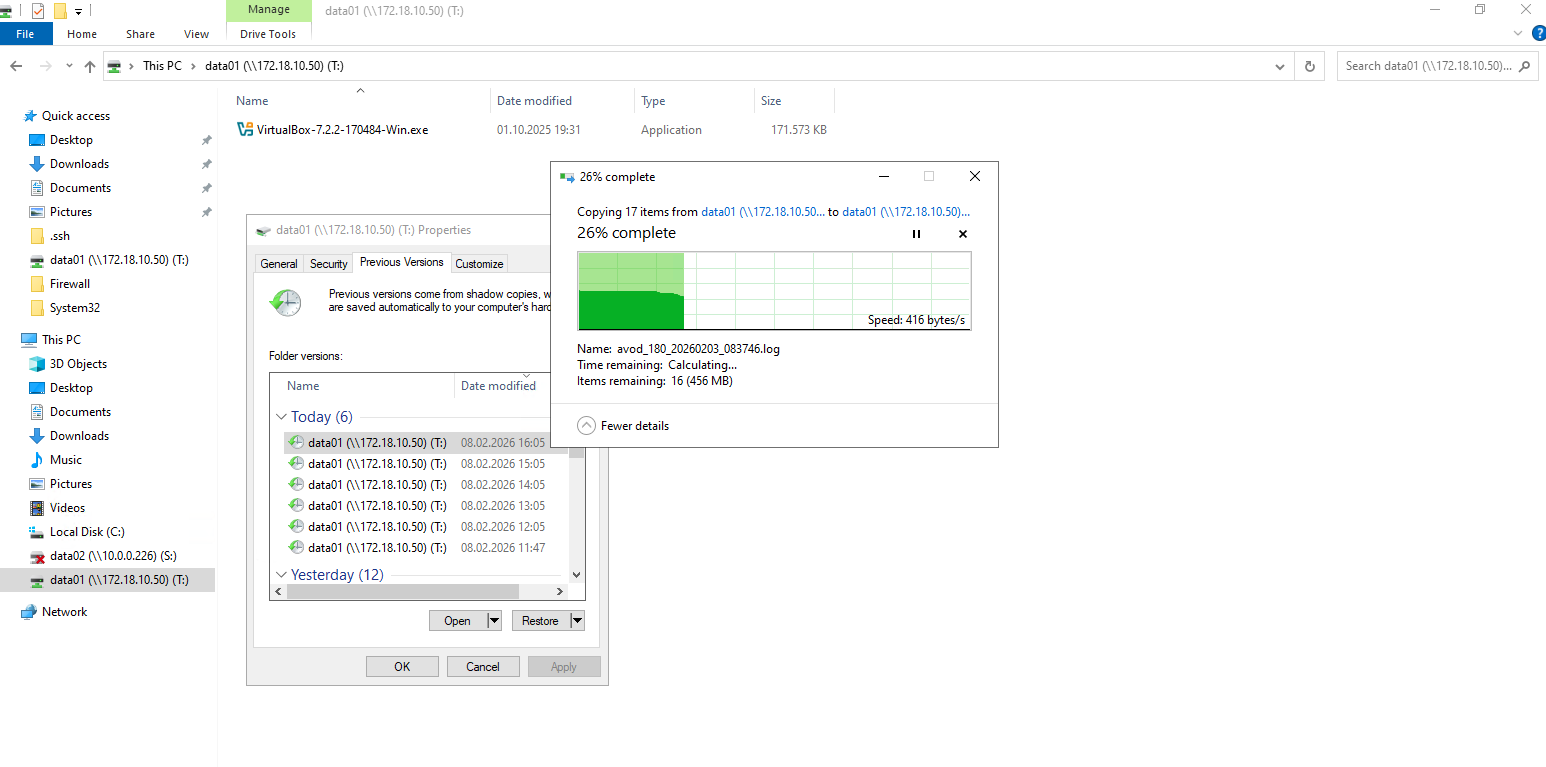
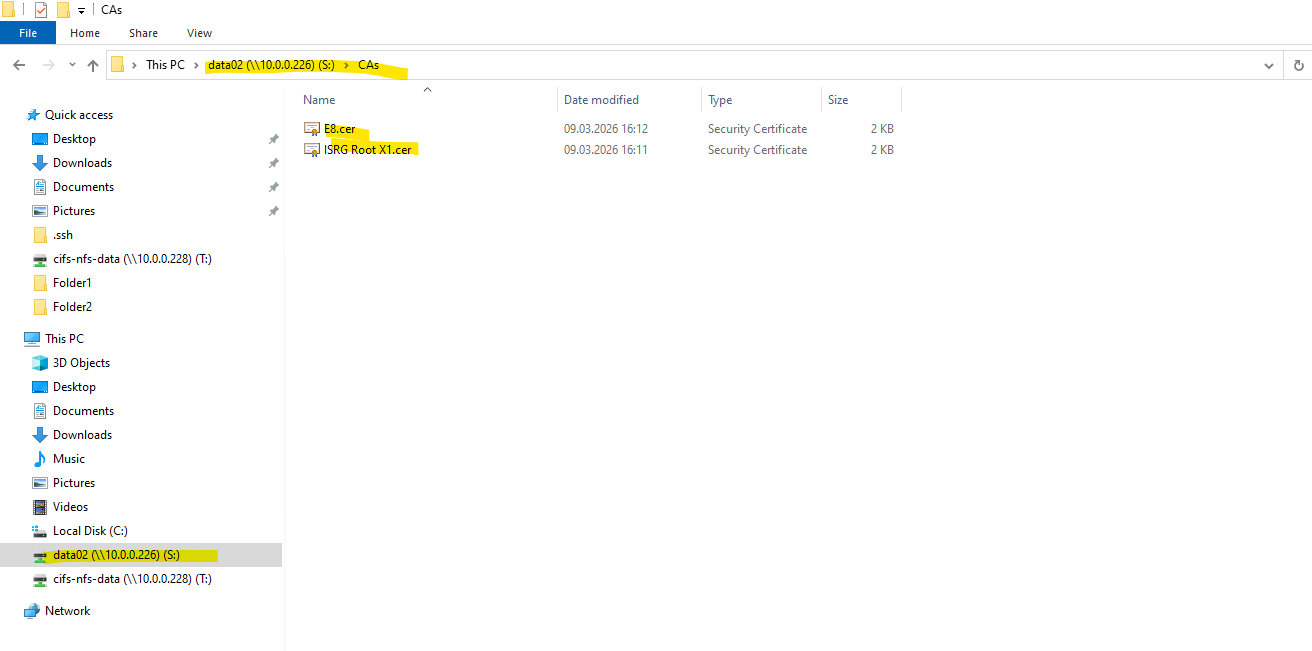
The protected files and folders shown above in the backup (Azure Storage Account – blob storage) are finally as expected the same as shown below when mounting the cifs share stored on this volume on a Window client.
Restore Files and Folders from Backups
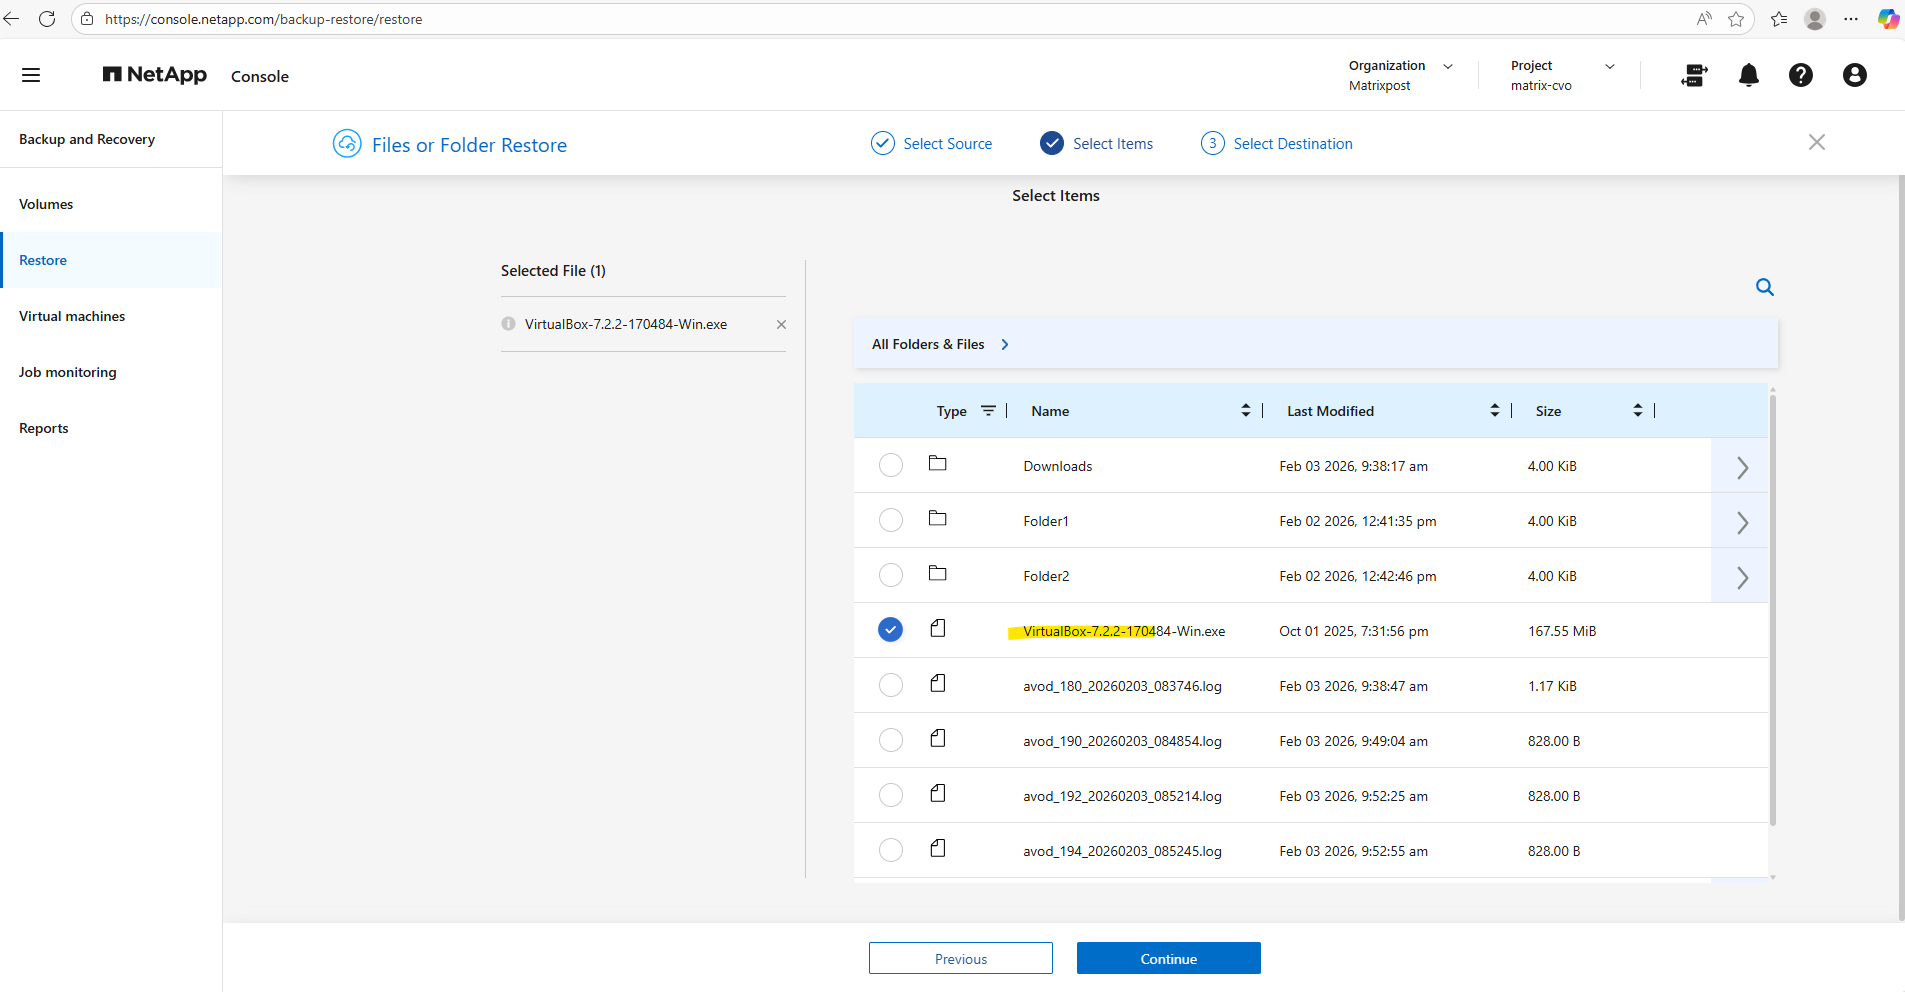
I will now try to restore a file from a backup as shown below.
The location with Object Storage tells us that this is a real backup stored in the Azure Storage Account and Blob Storage (Object Storage).
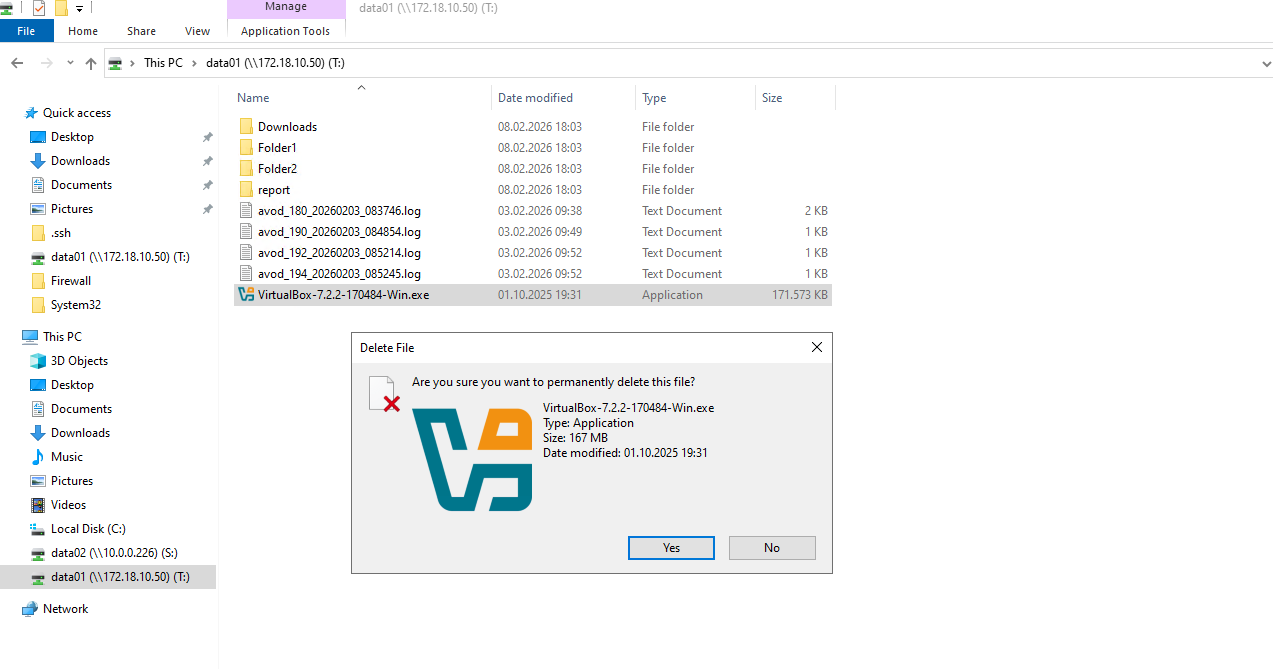
I want to restore the selected VirtualBox-7.2.2-170484-Win.exe file.
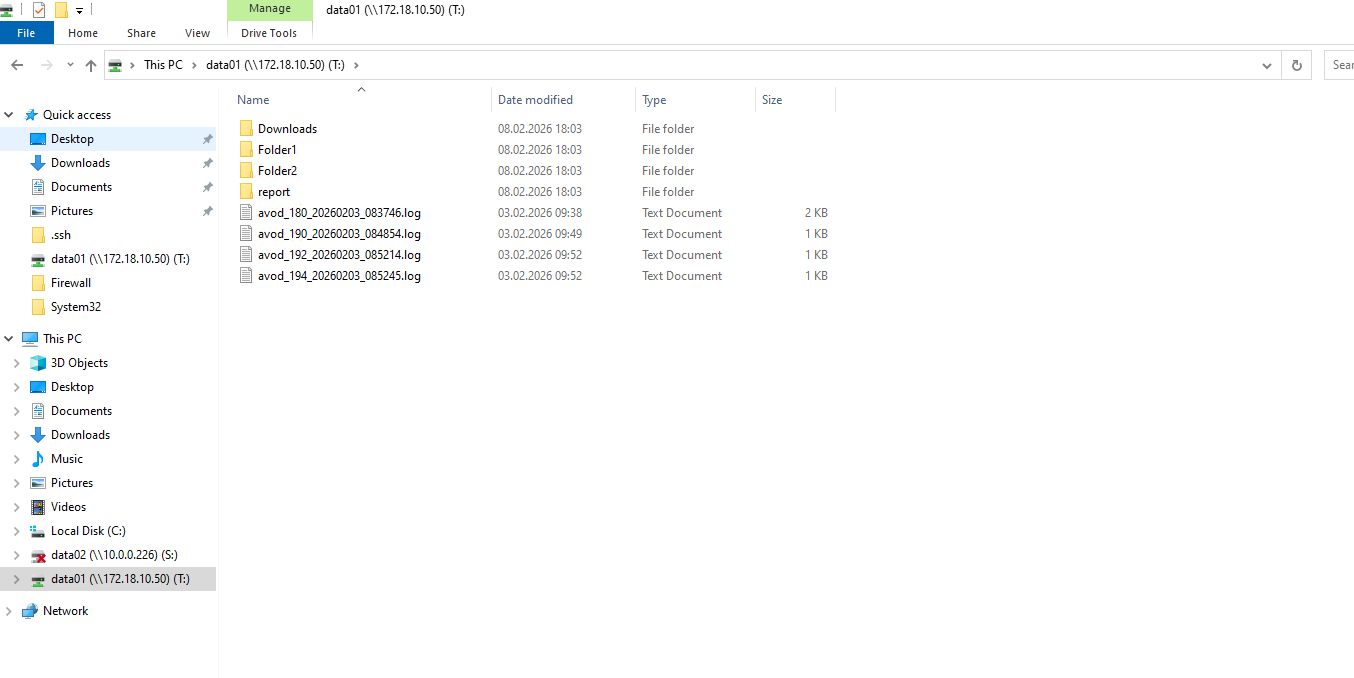
Therefore I will first delete this file on a Windows Client where the cifs share the file is stored on is mounted.
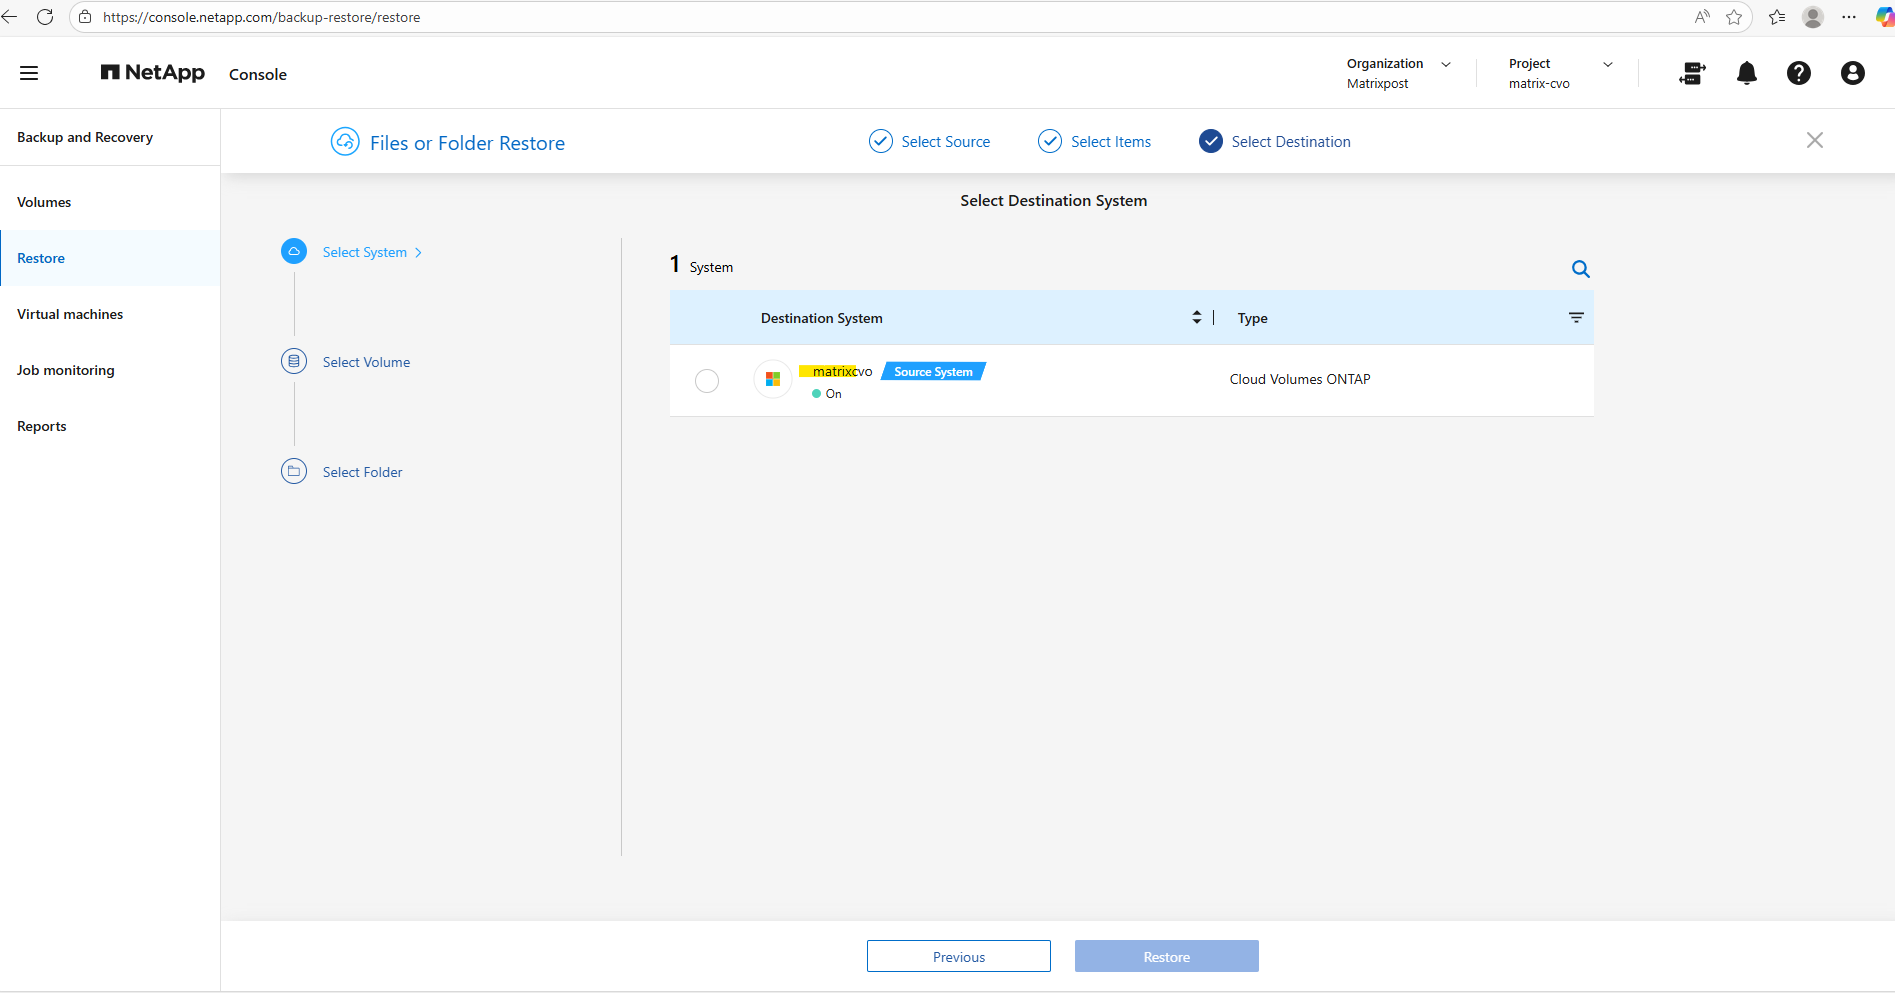
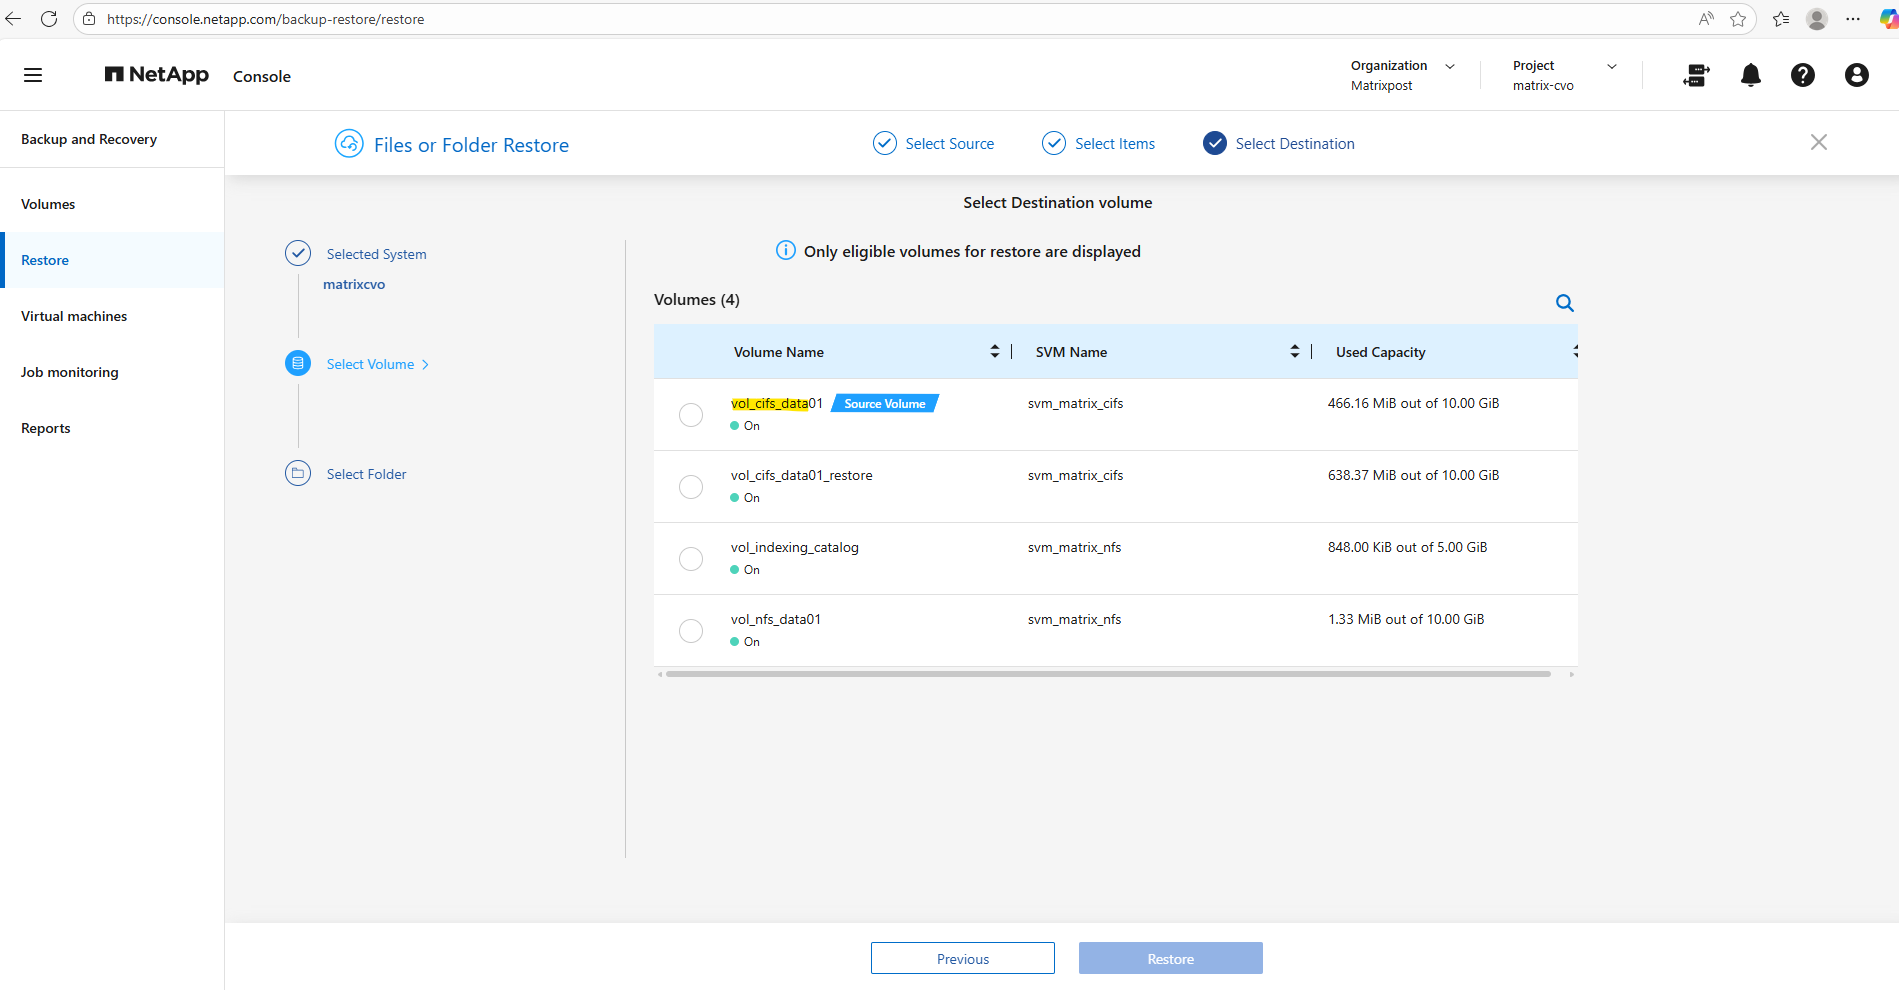
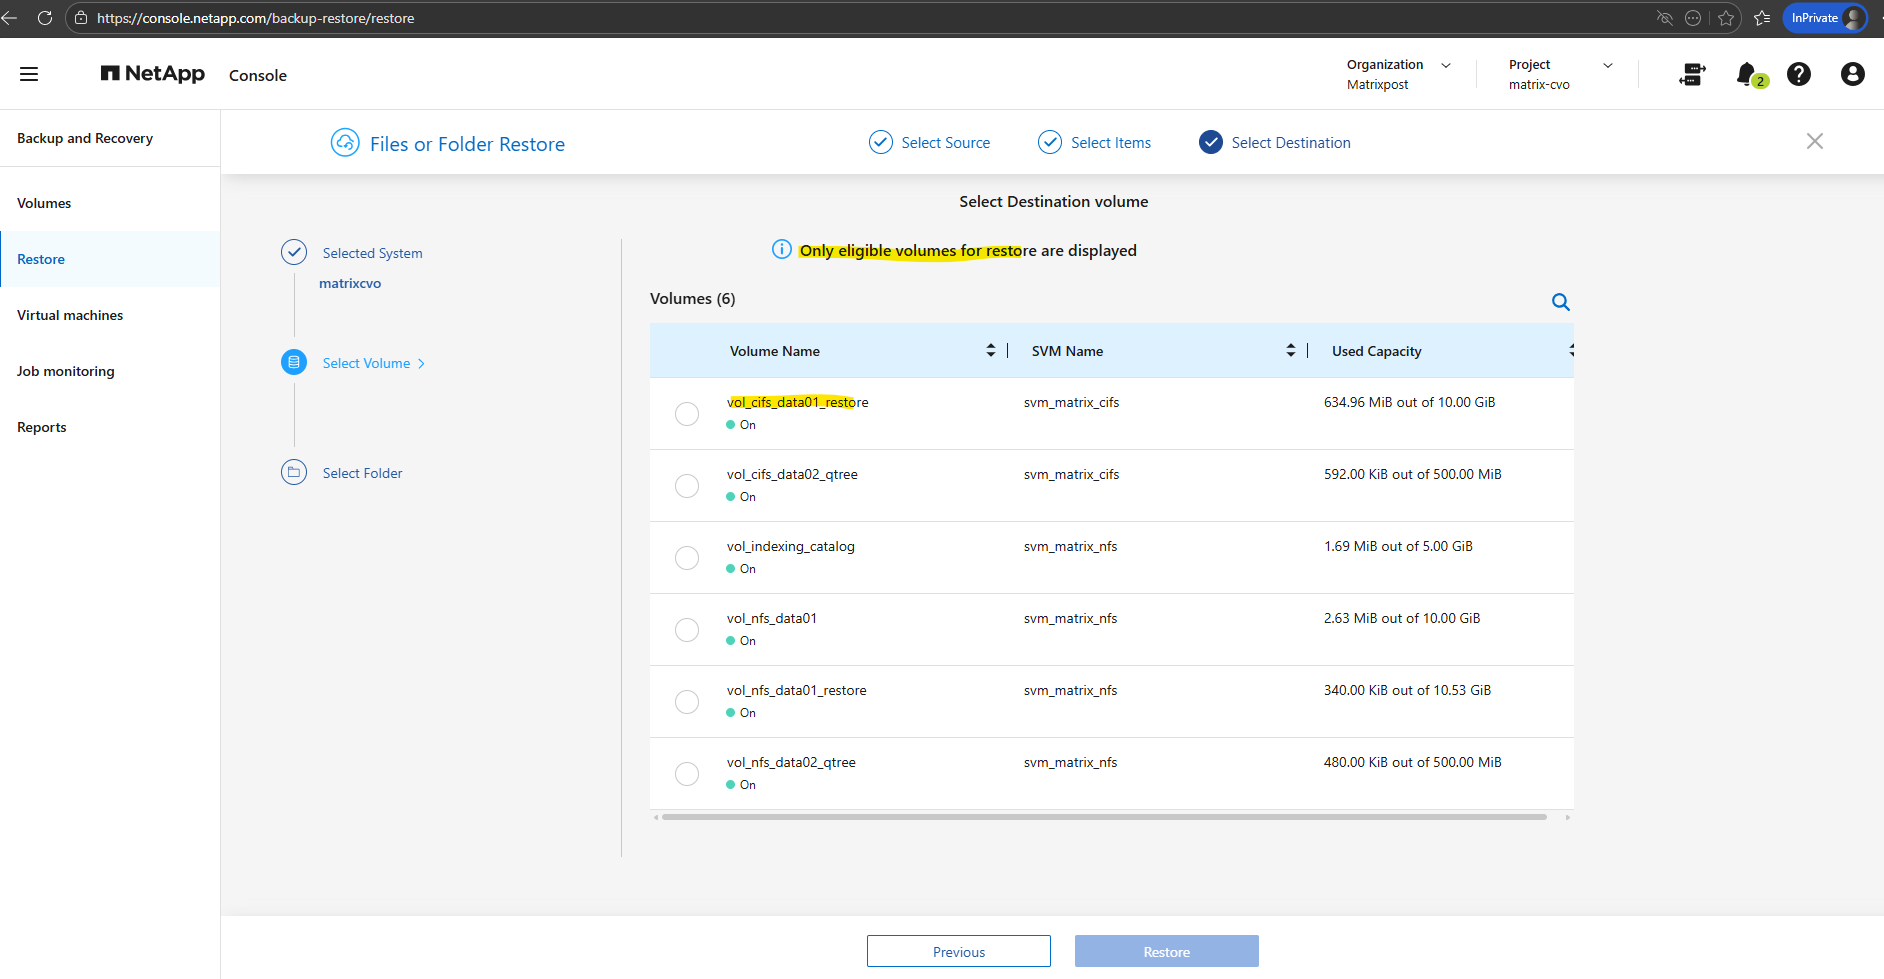
Select the destination system we want to restore the file.
Select the destination volume to restore the file. In my case I want to restore the file to the original cifs share and therefore selecting the source volume.
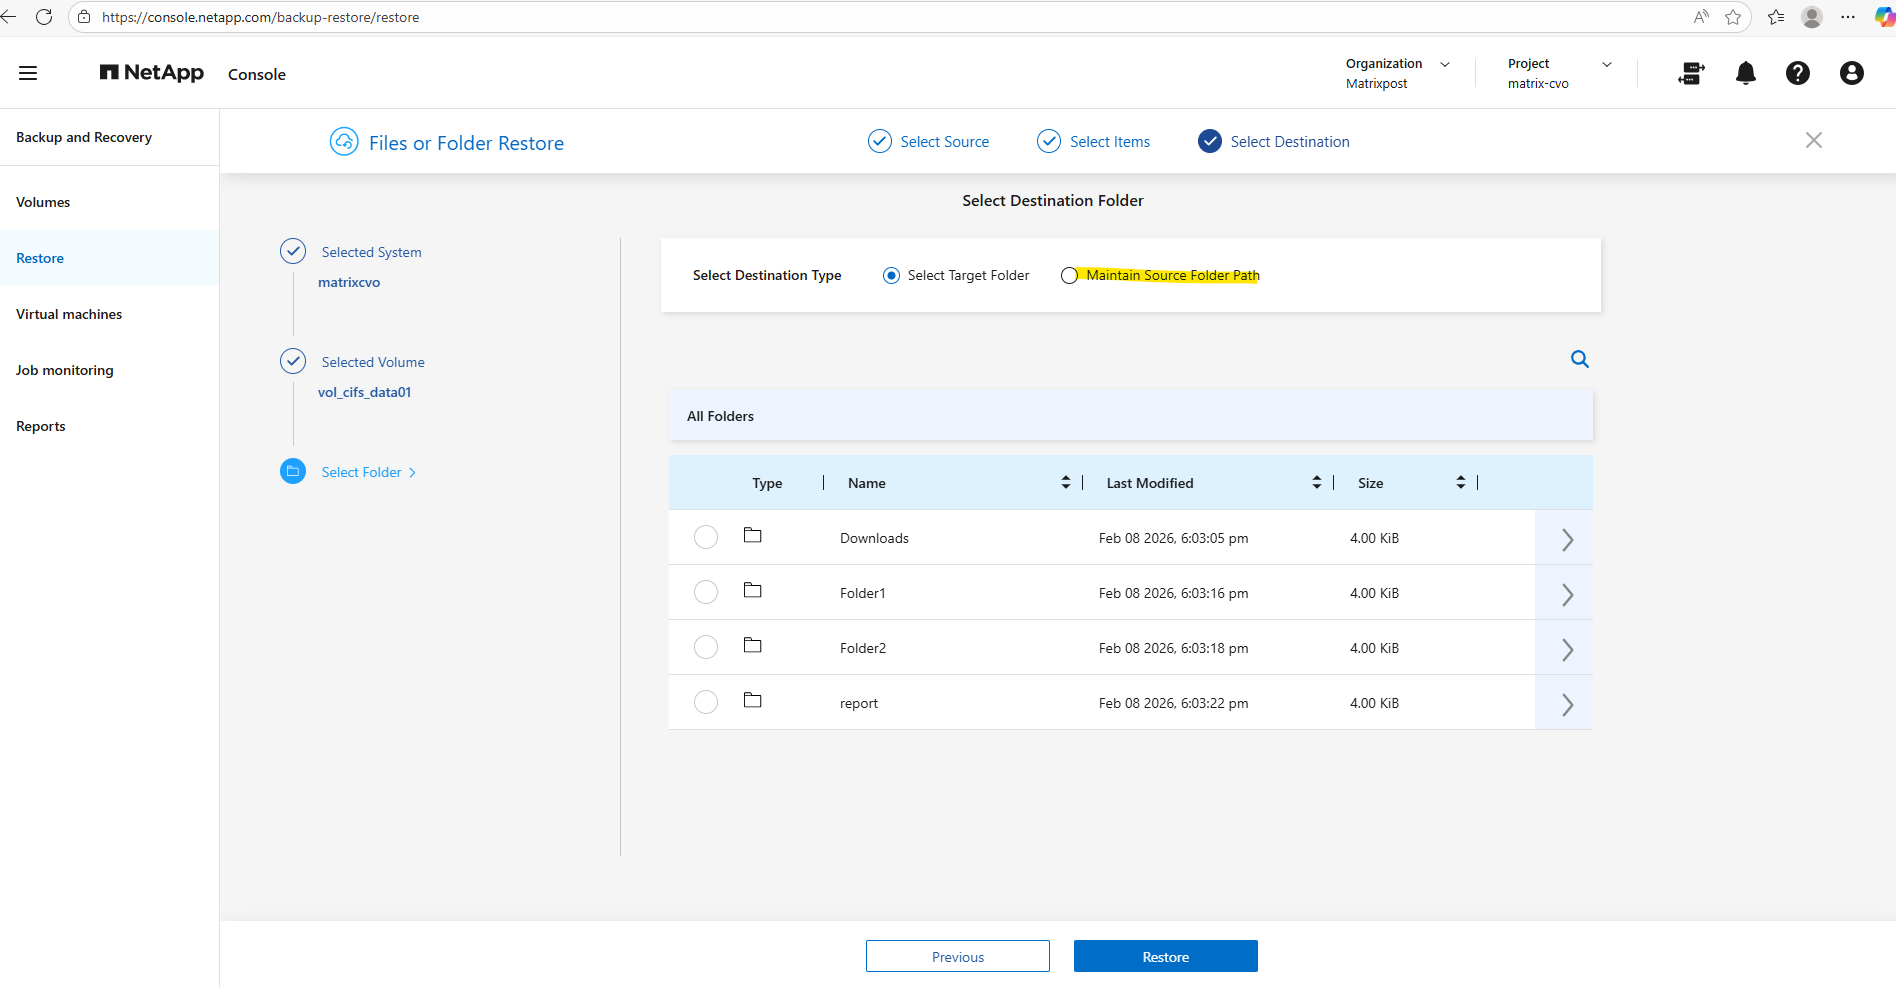
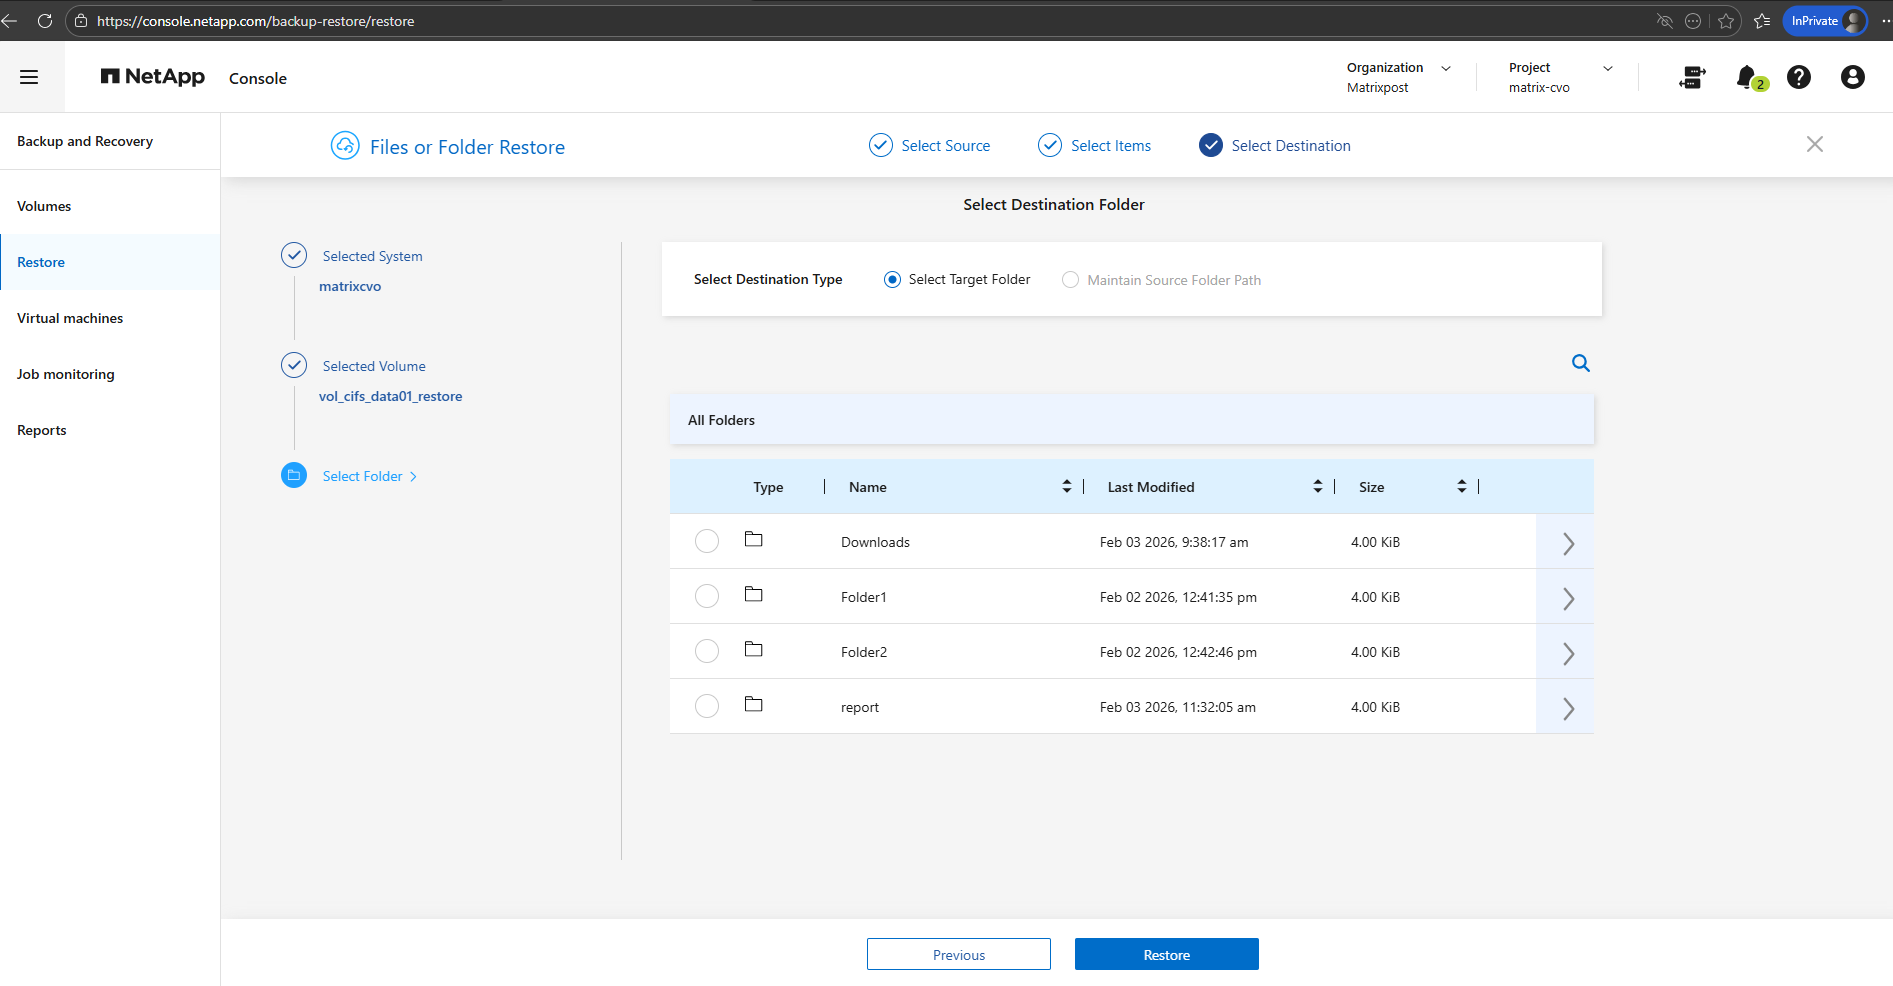
Next we need to select the destination folder we want to restore our file, in my case the file was stored directly in the root path of the cifs share, therefore I need to select Maintain source folder path, in general in case we want to restore the file to the origin location, we need to select this.
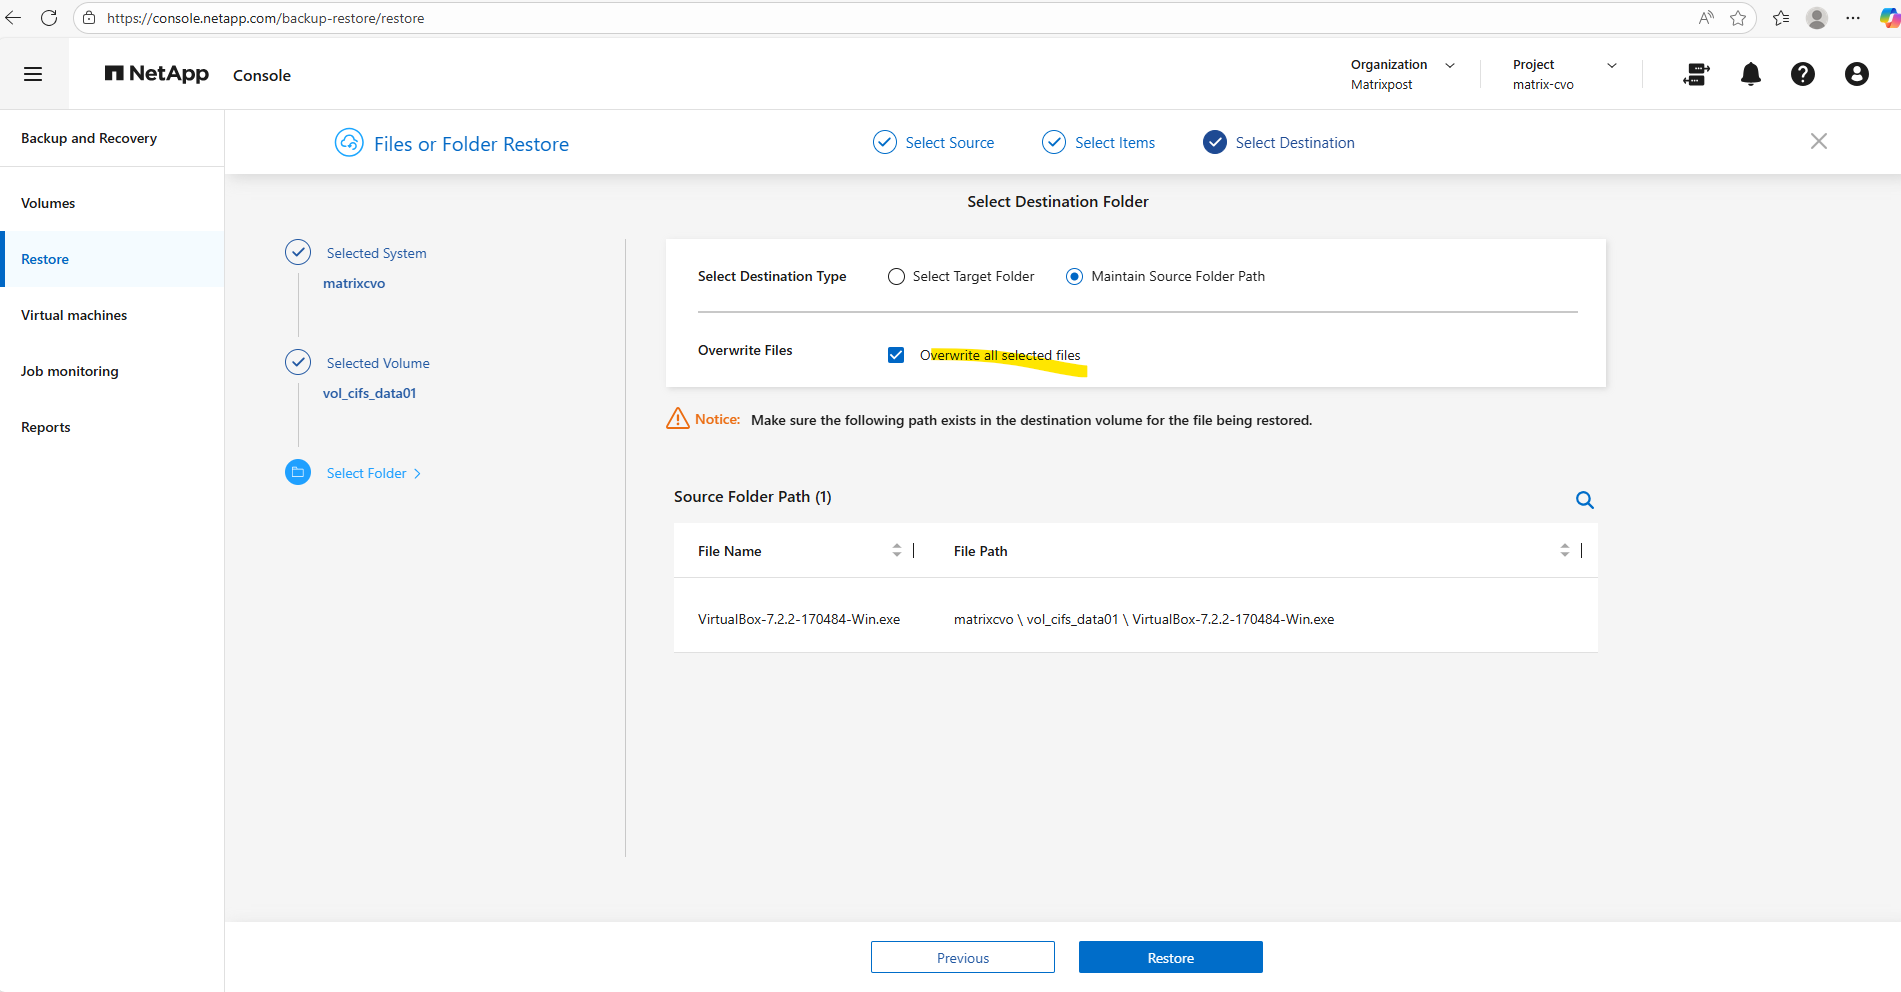
To restore a file to its original location, whether it still exists or has already been deleted, select Overwrite all selected files.
When enabled, the restore process preserves the original file name and path, automatically replacing any existing files on the volume. This option is particularly useful when you want to seamlessly roll back to a known good version without leaving duplicate files behind.
!! Note !!
When restoring from a local Snapshot copy, the original source volume cannot be selected as the destination. Instead, you must restore the data to a different eligible volume and, if required, manually copy the files back to the original location. This behavior prevents unintended in-place overwrites and adds an additional safety layer during snapshot-based restores.
Finally click on Restore.
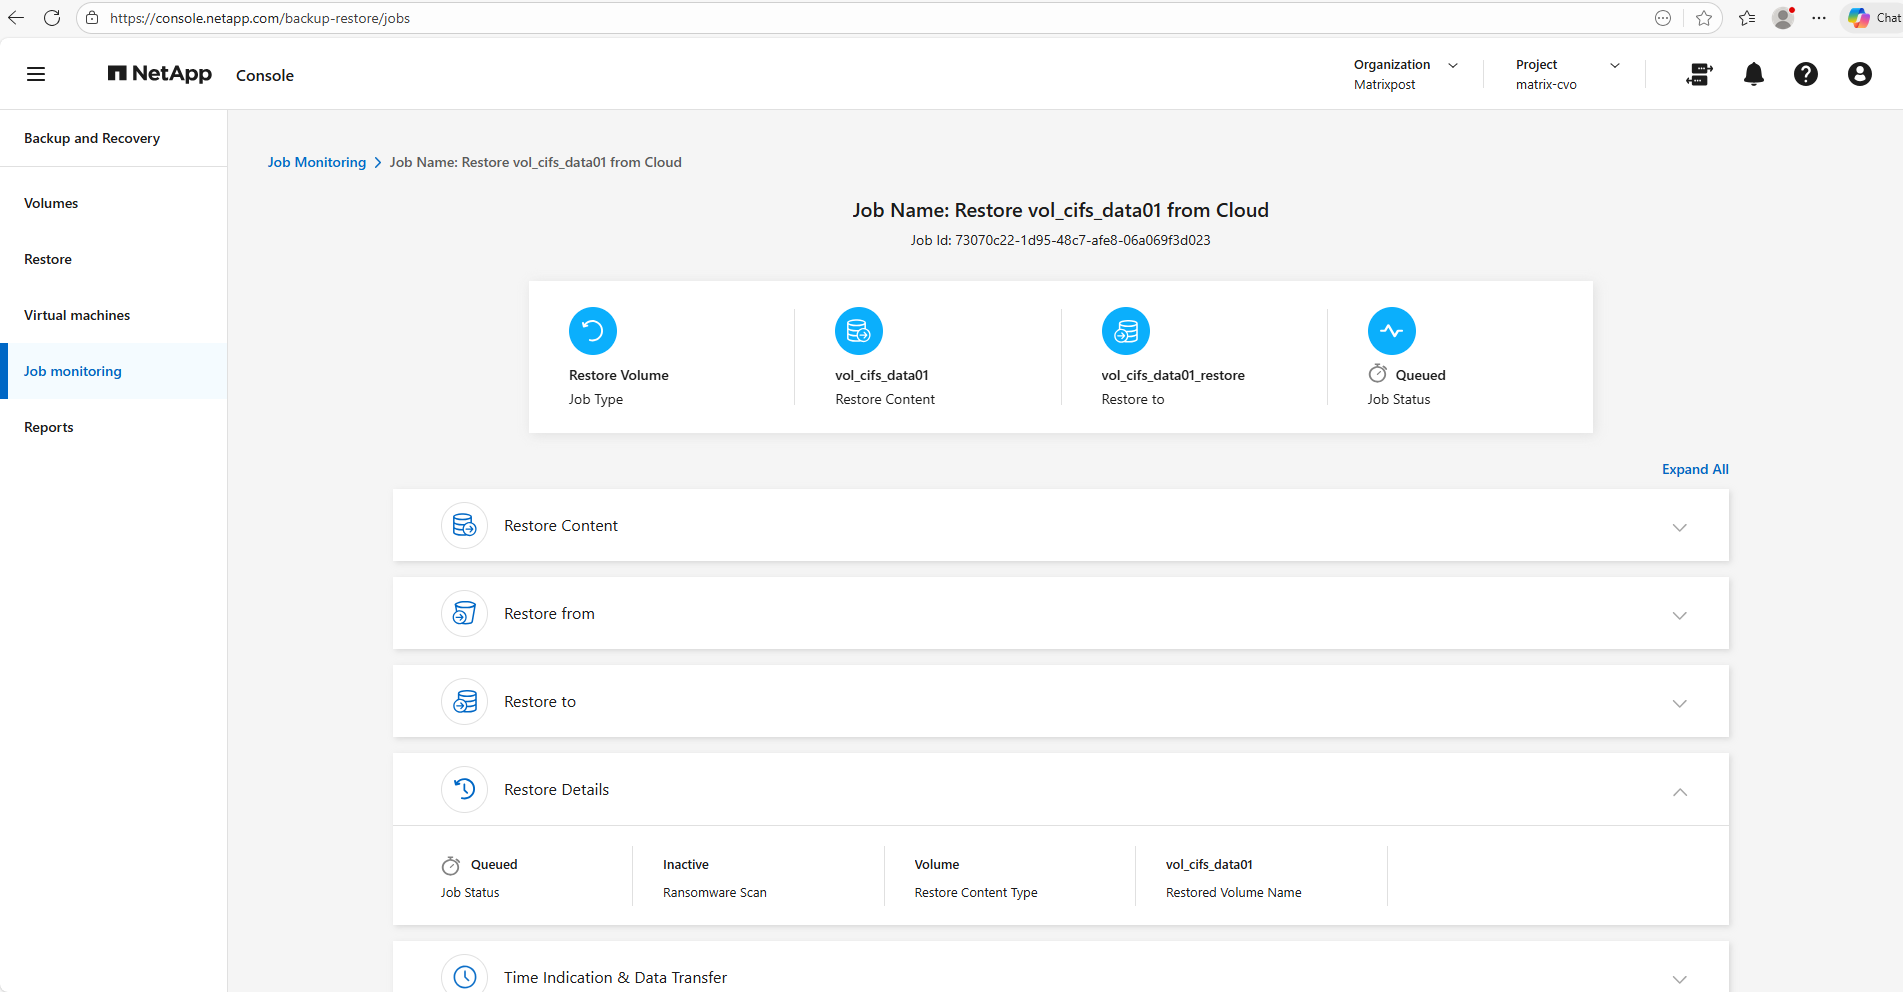
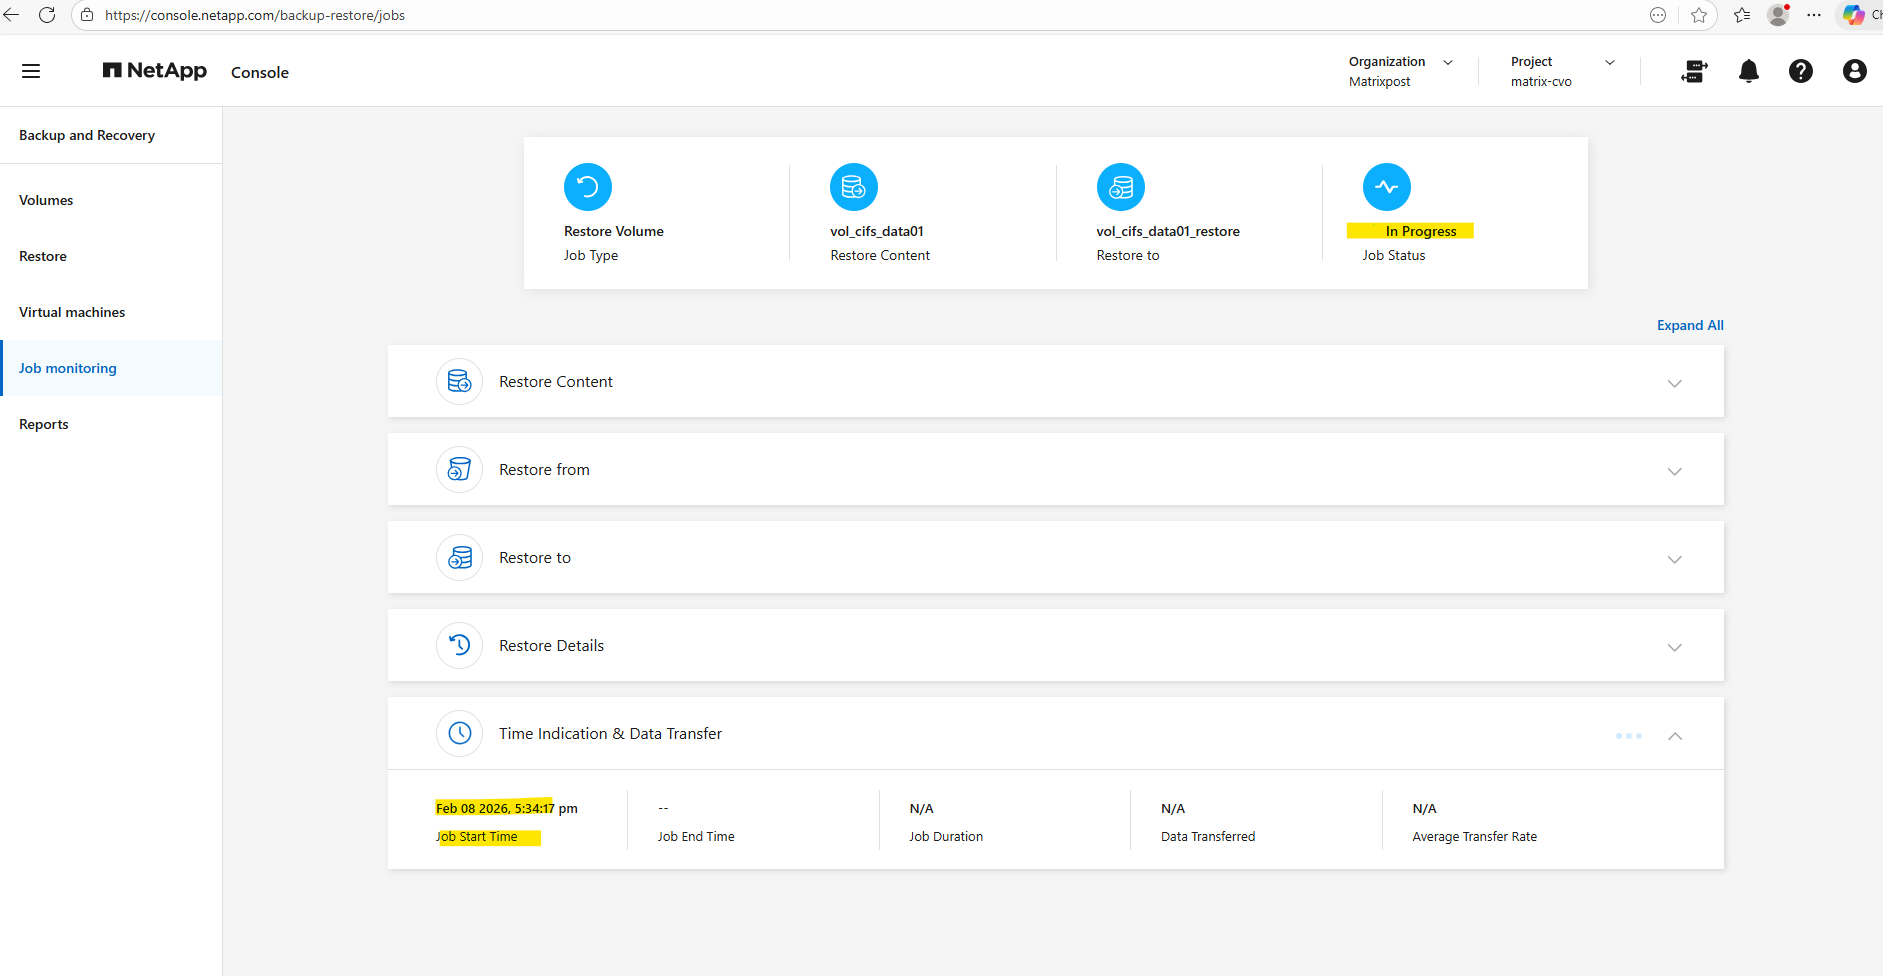
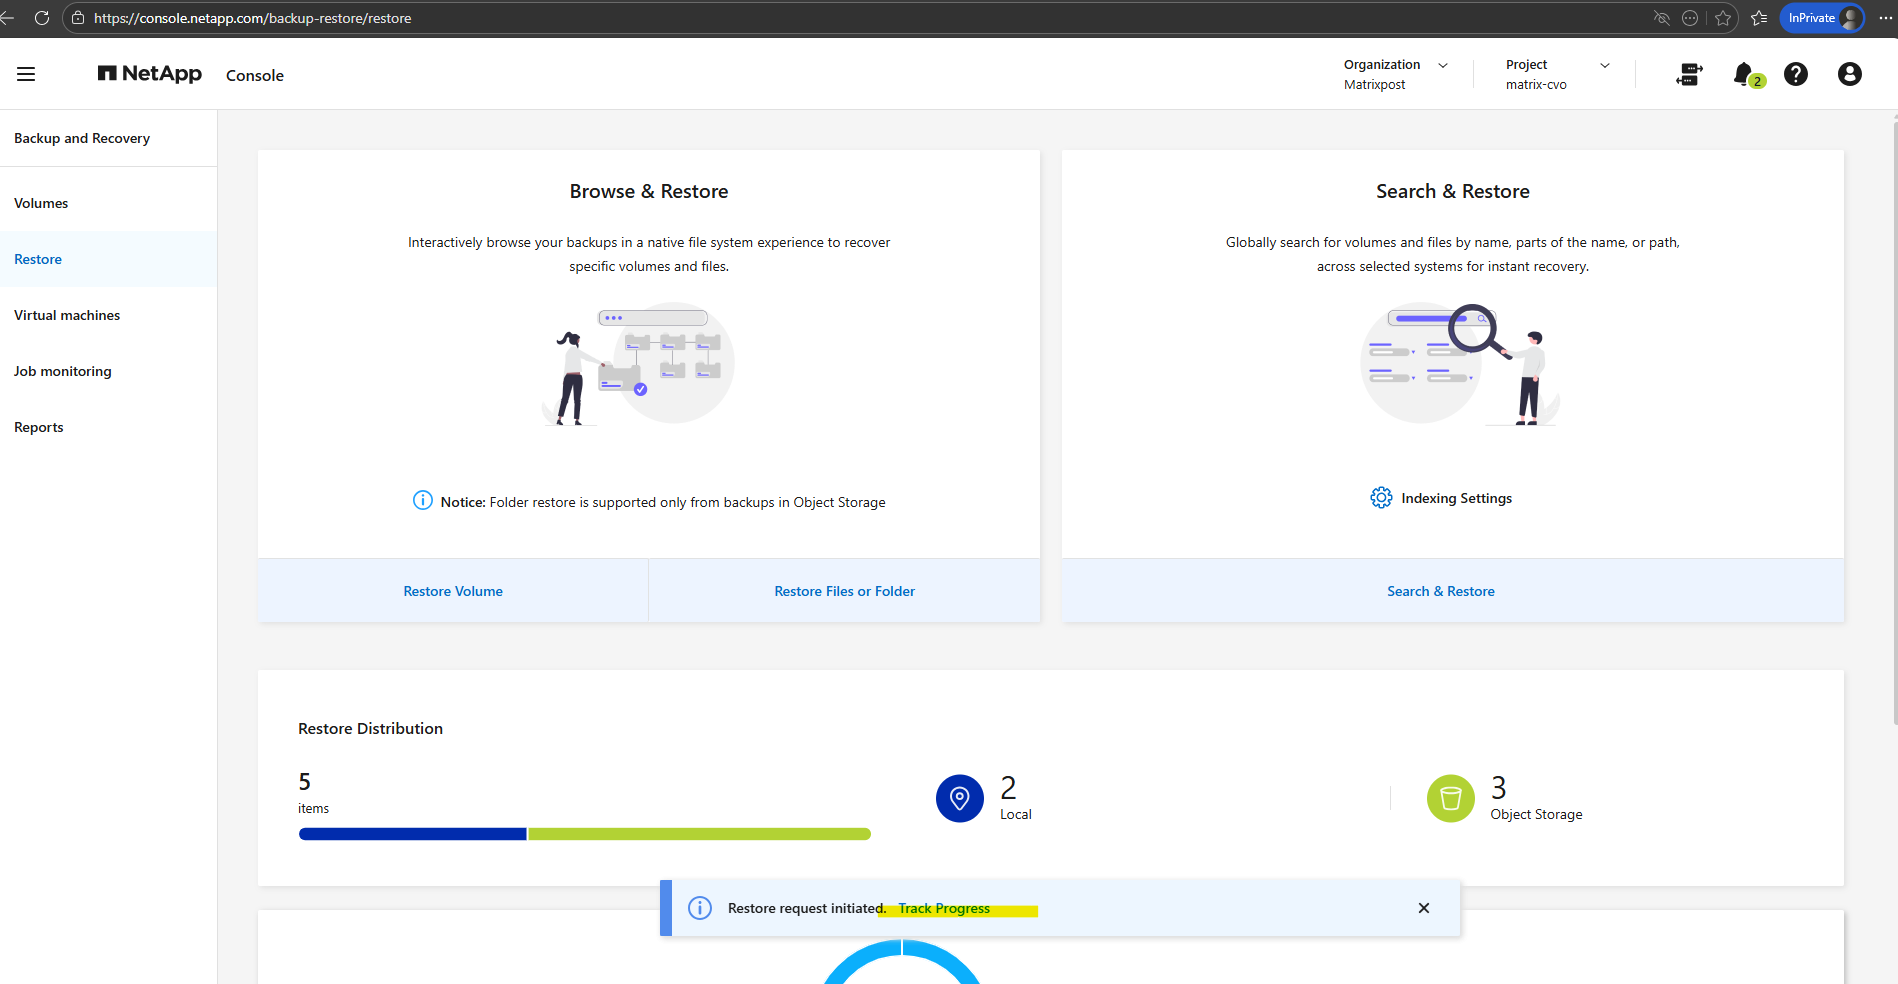
Click on Track Progress to see the actual state of the restore.
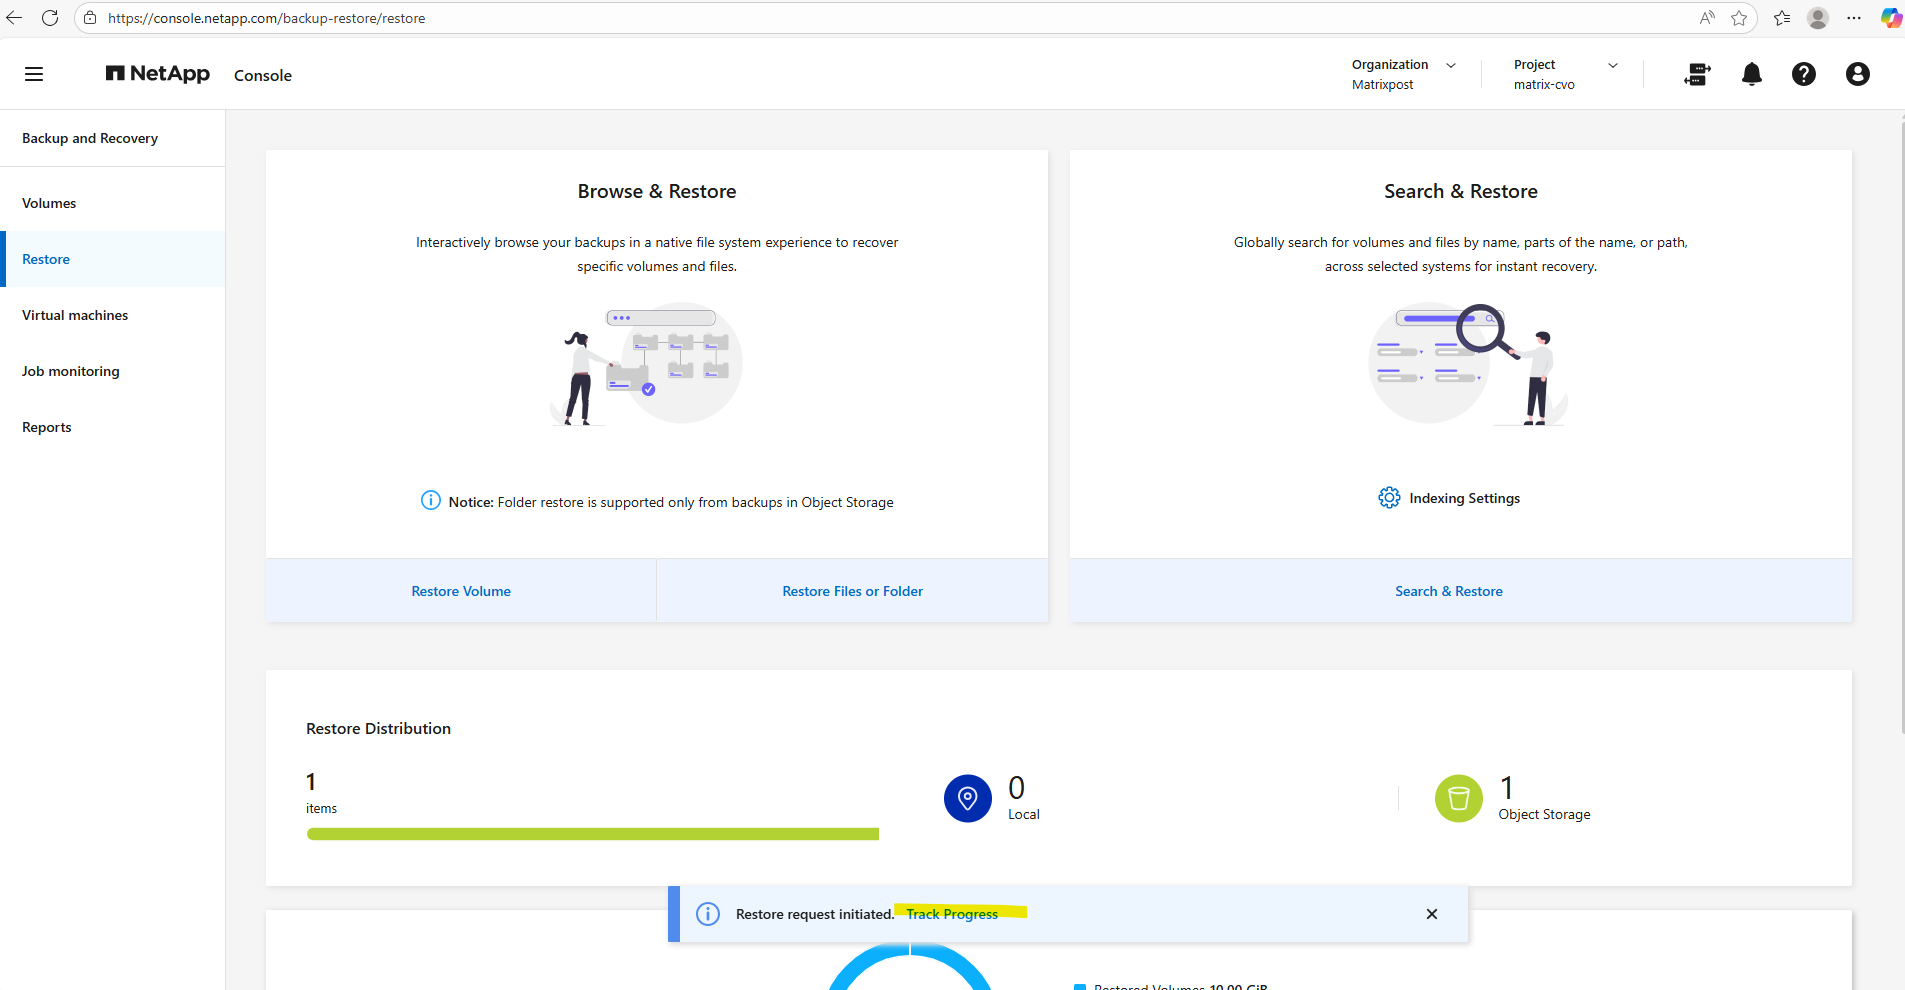
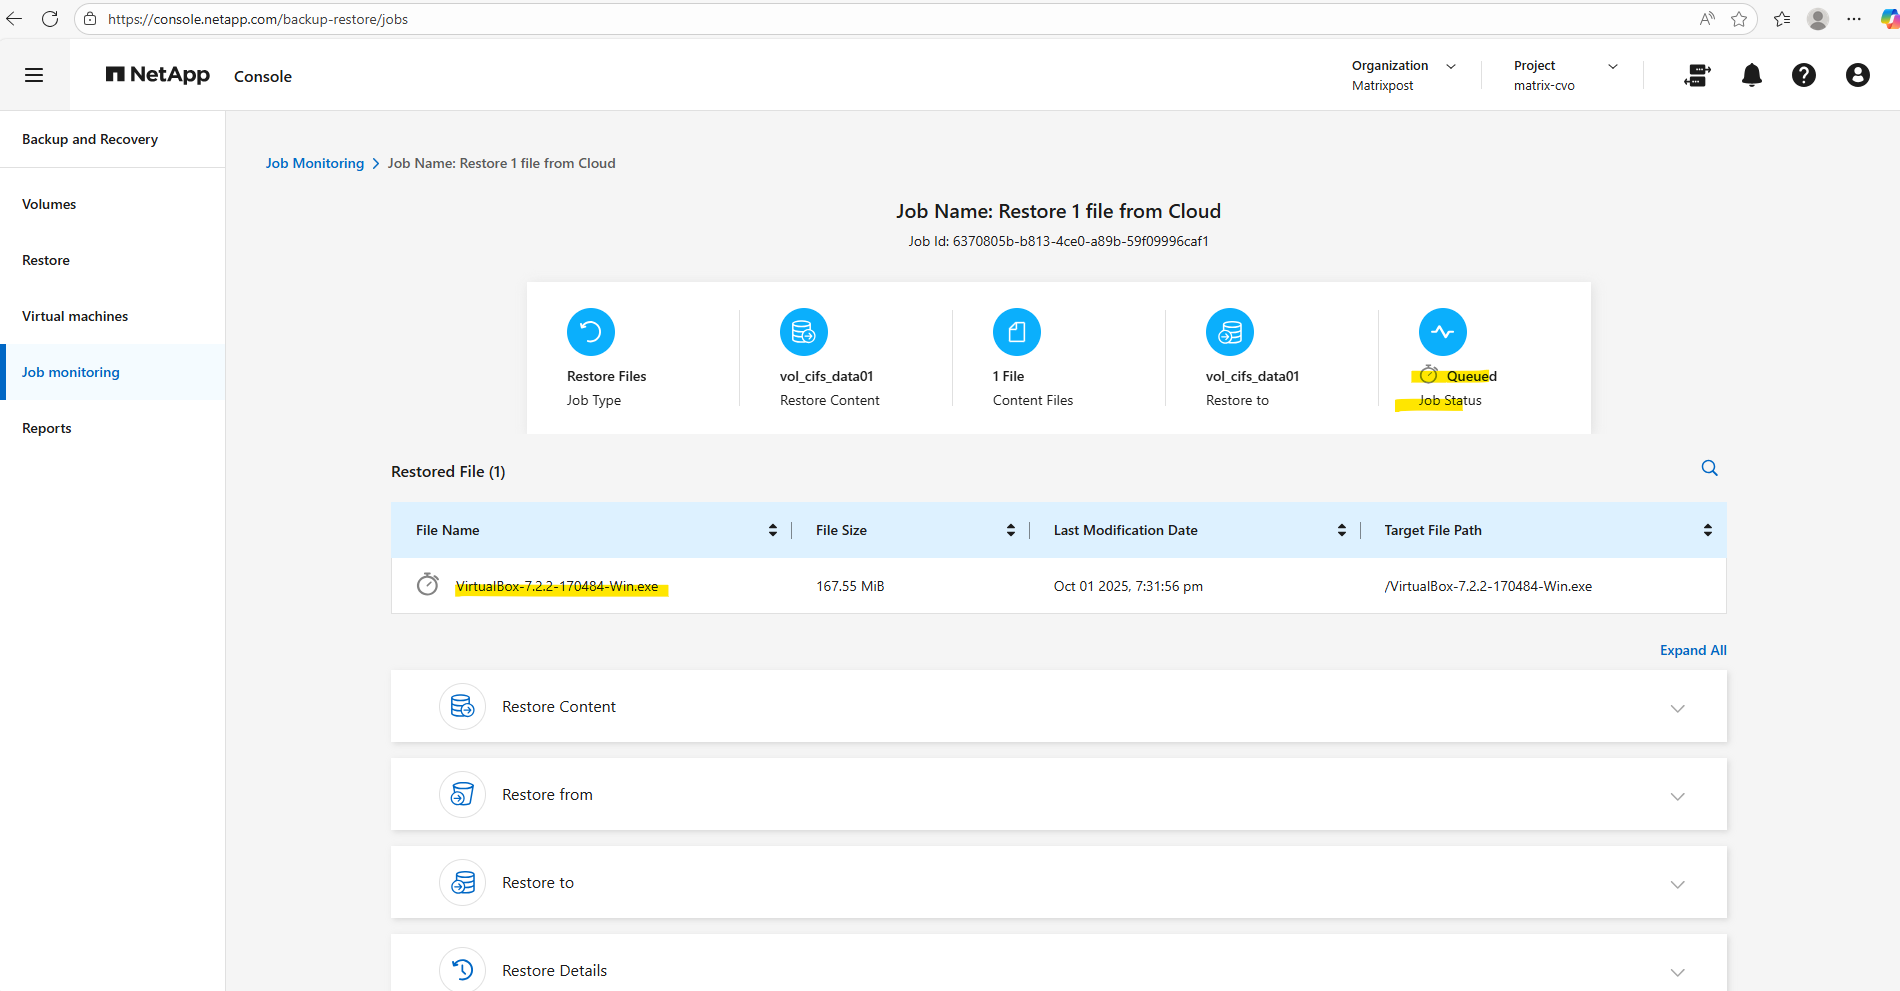
So far just queued.
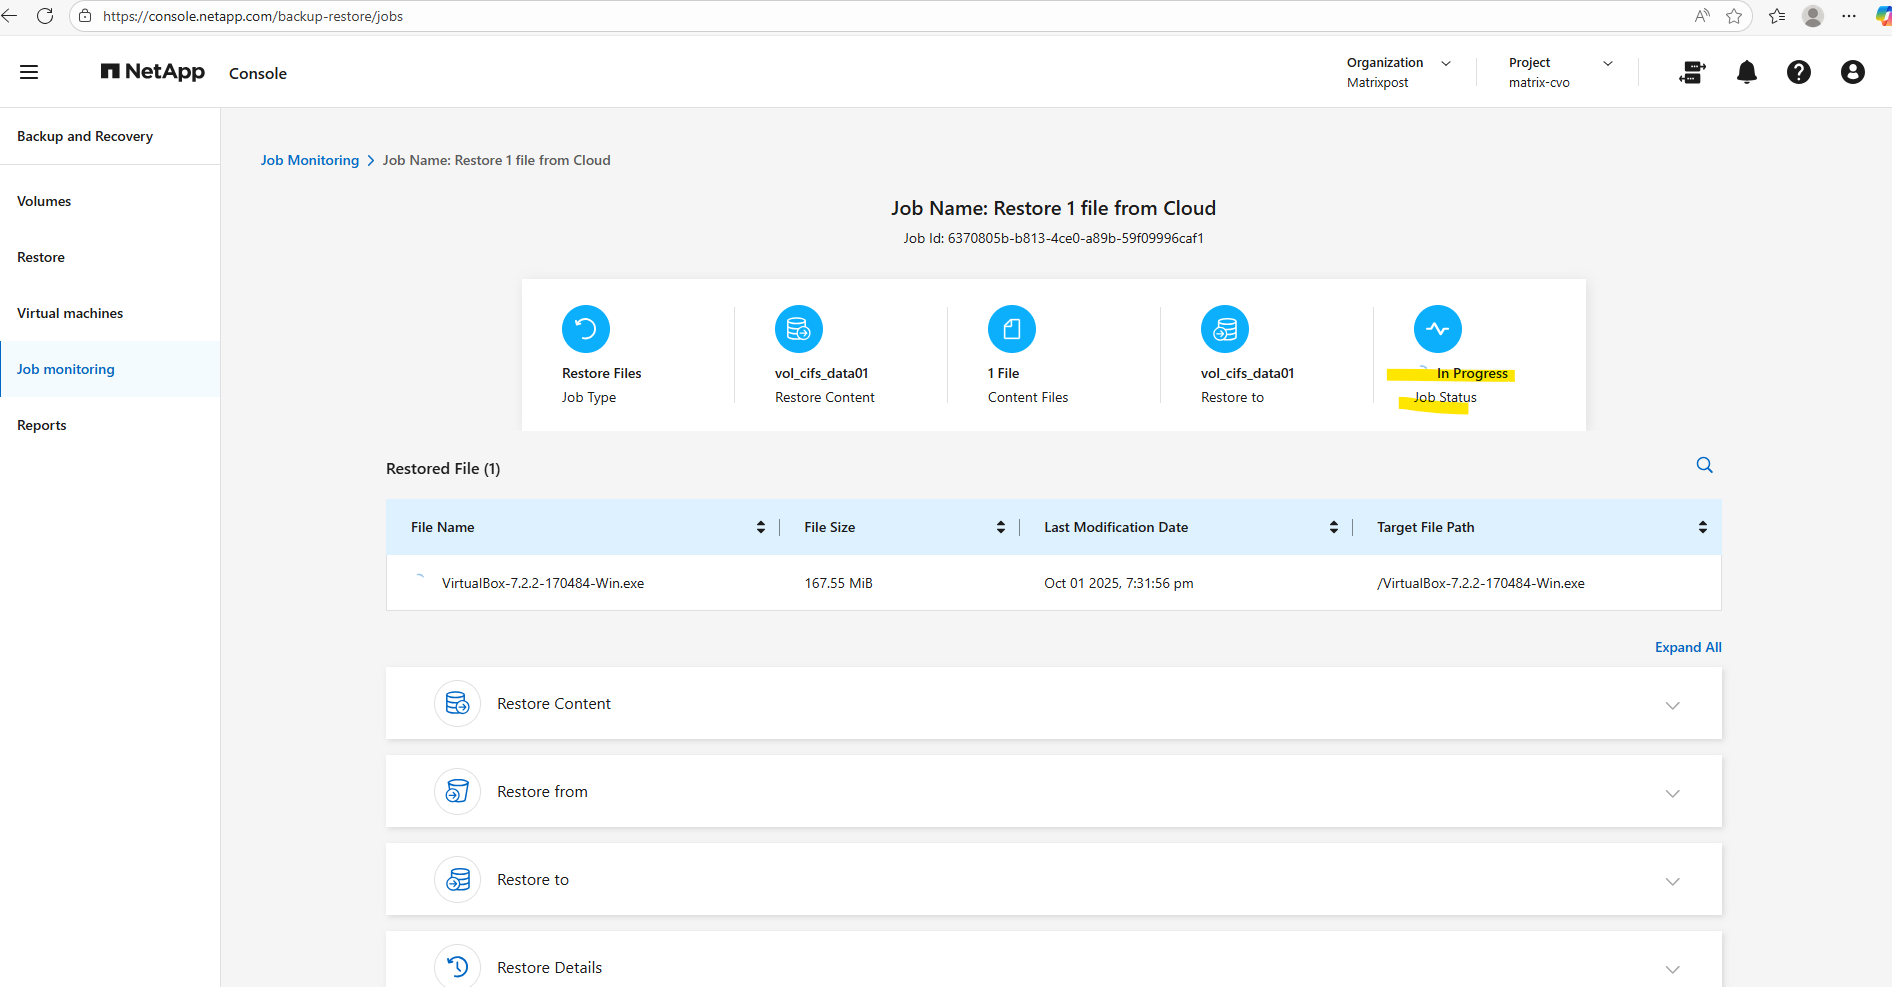
A few seconds later the restore is in progress.
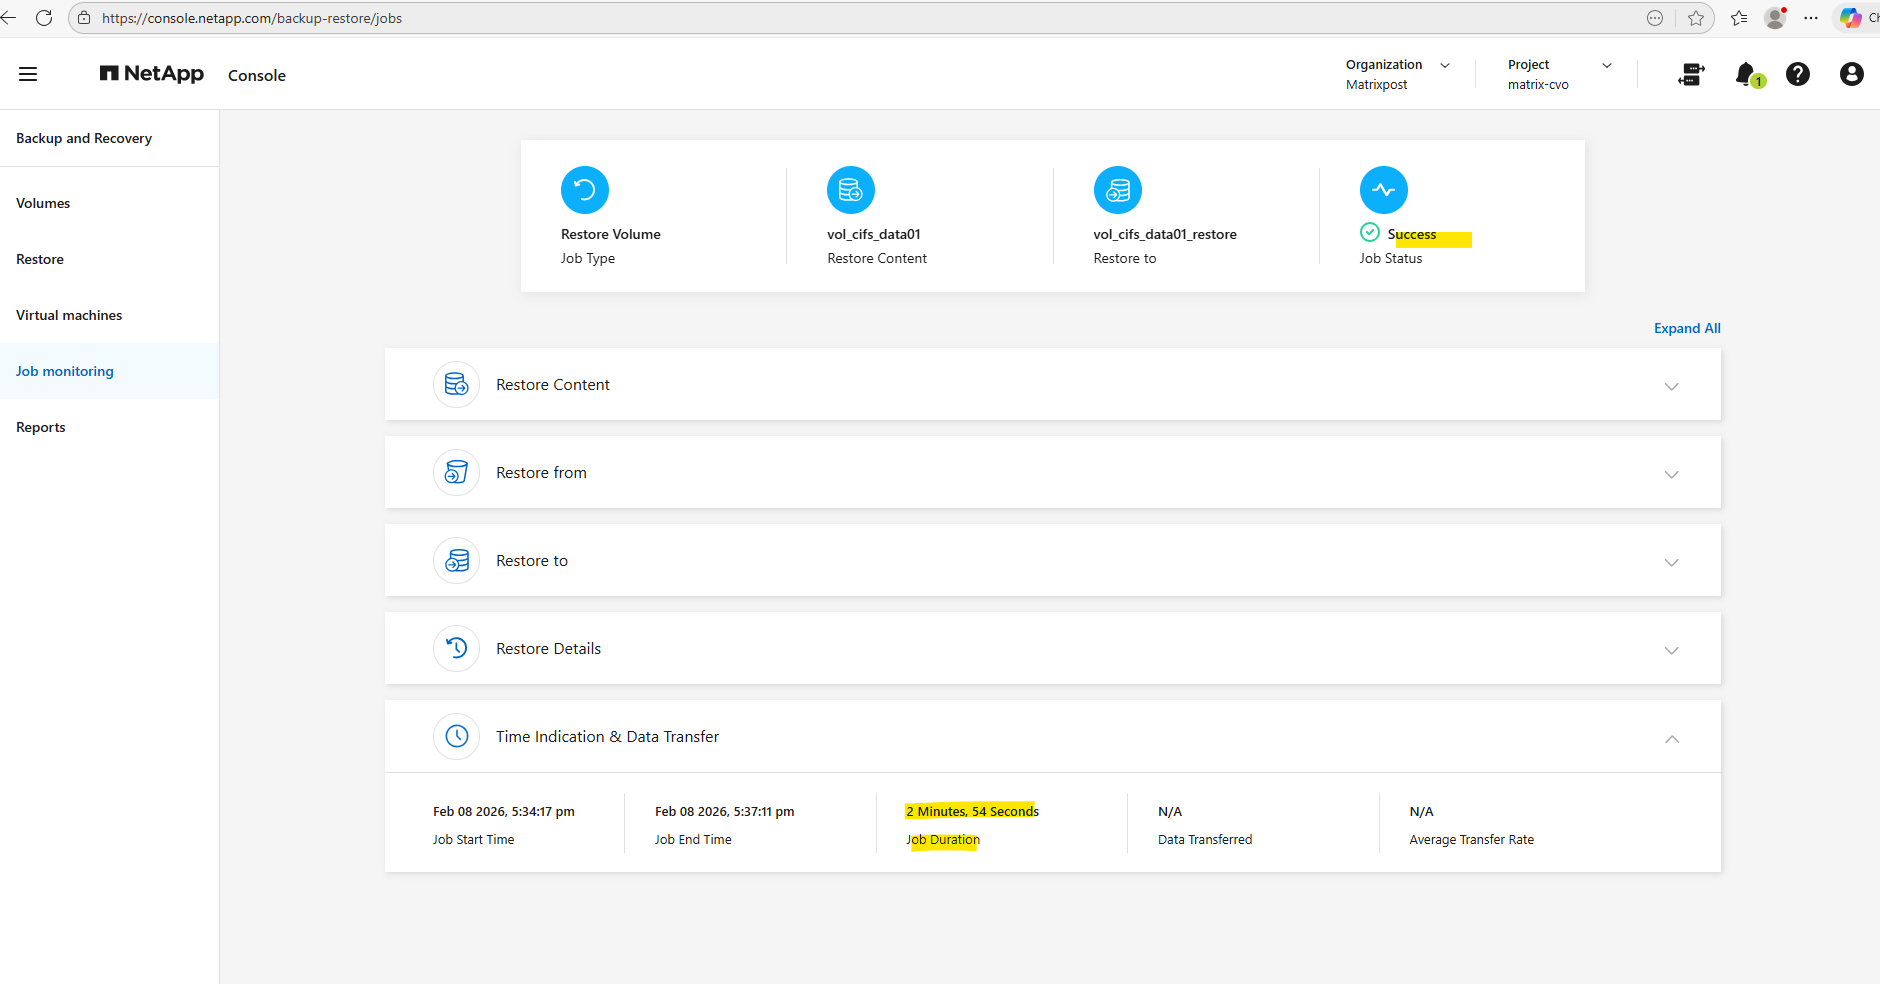
Restore finished successfully.
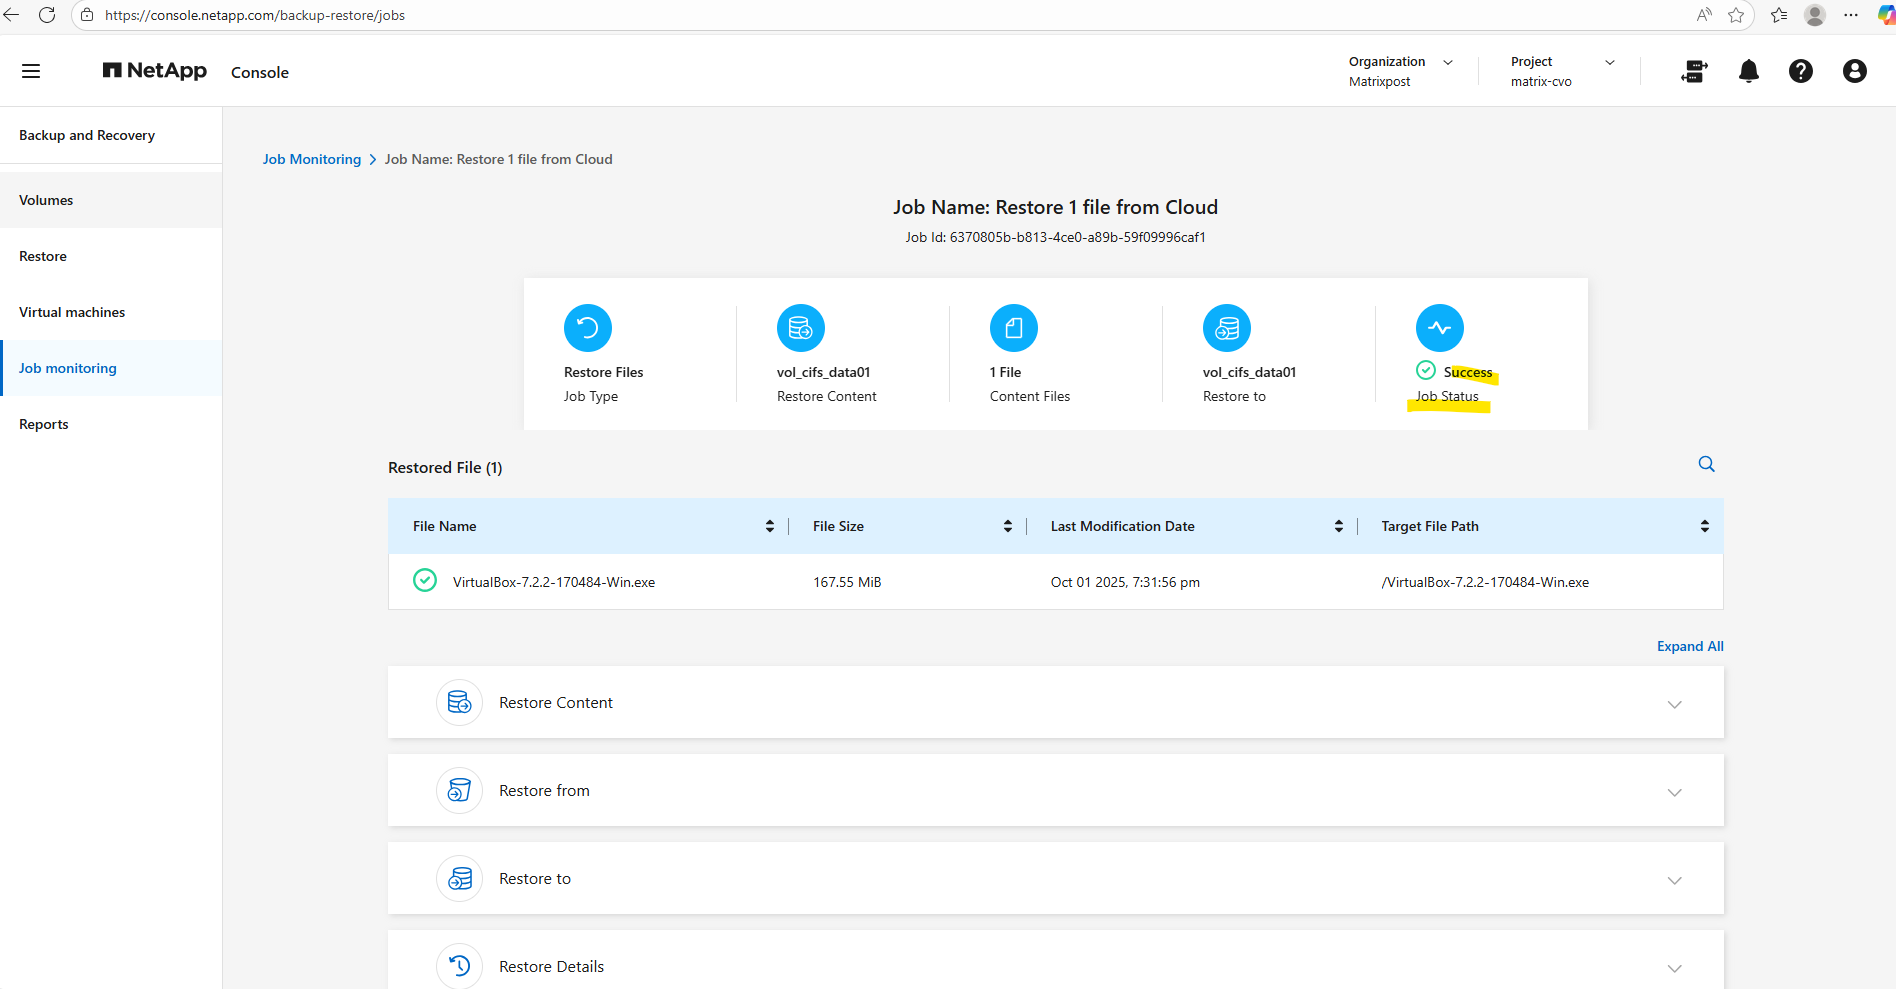
In the Time indication & Data Transfer section we can see the duration time for our restore.
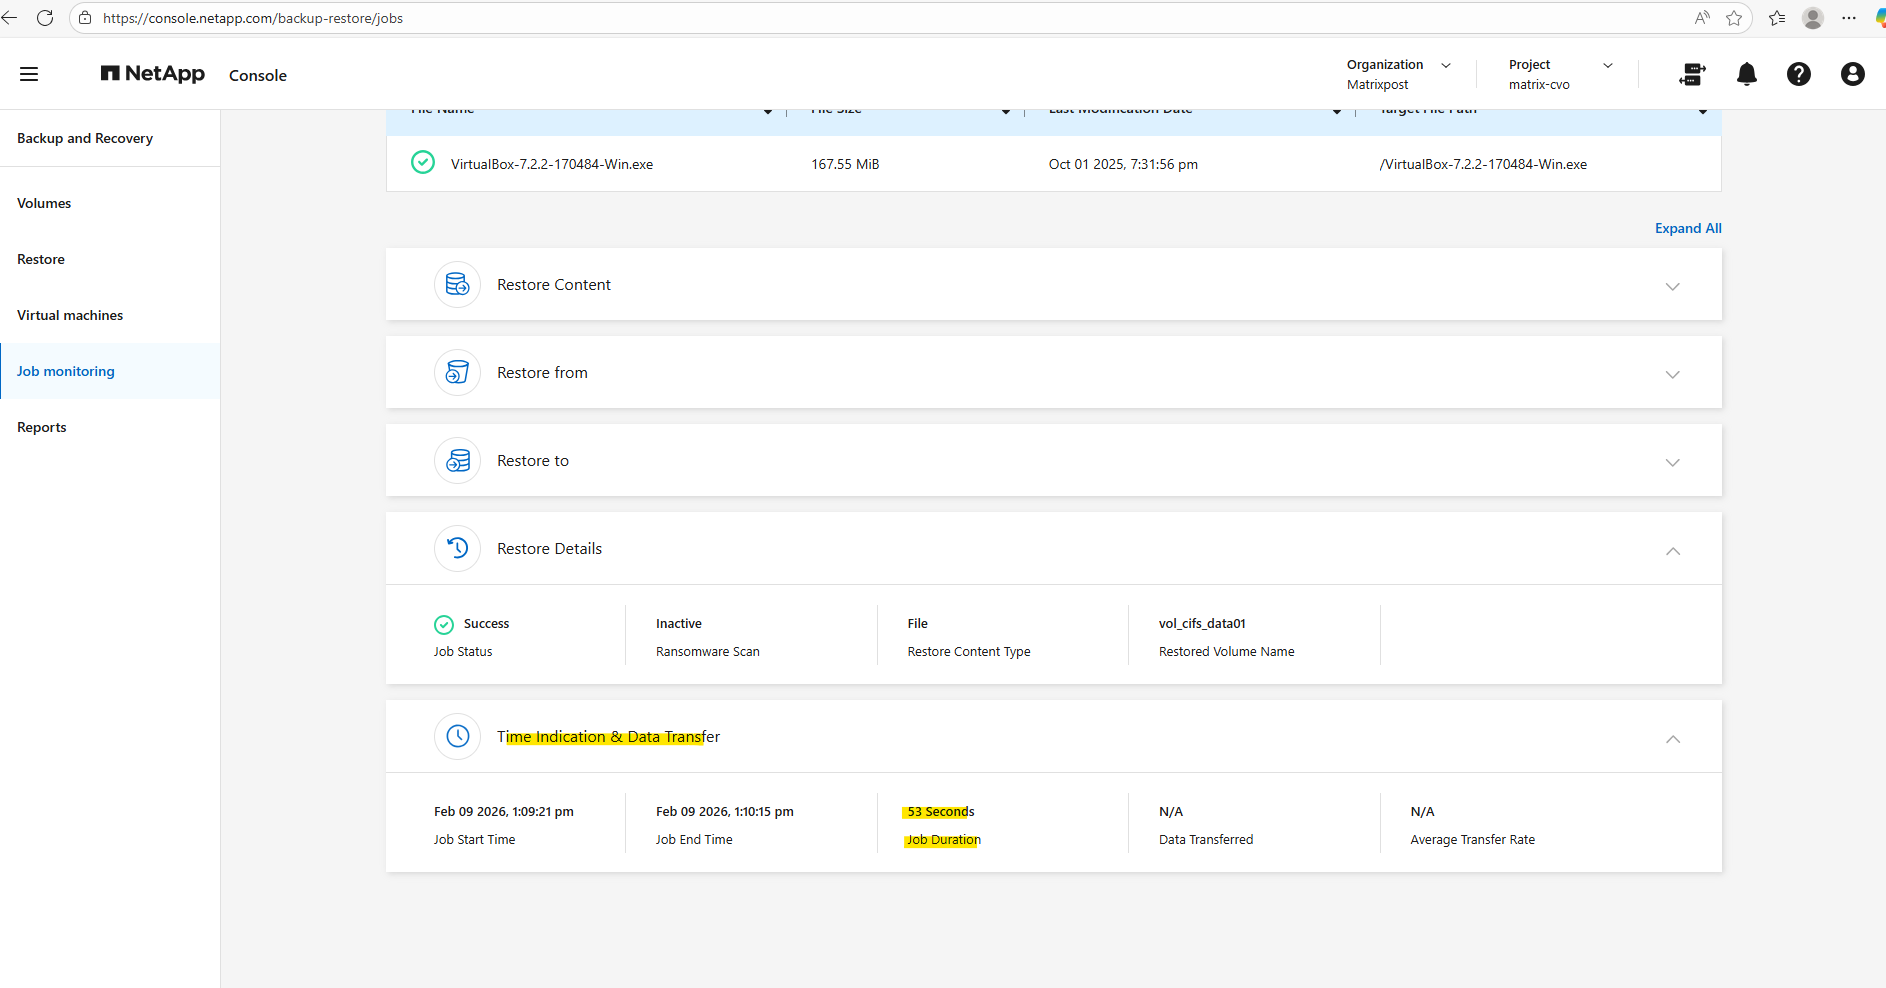
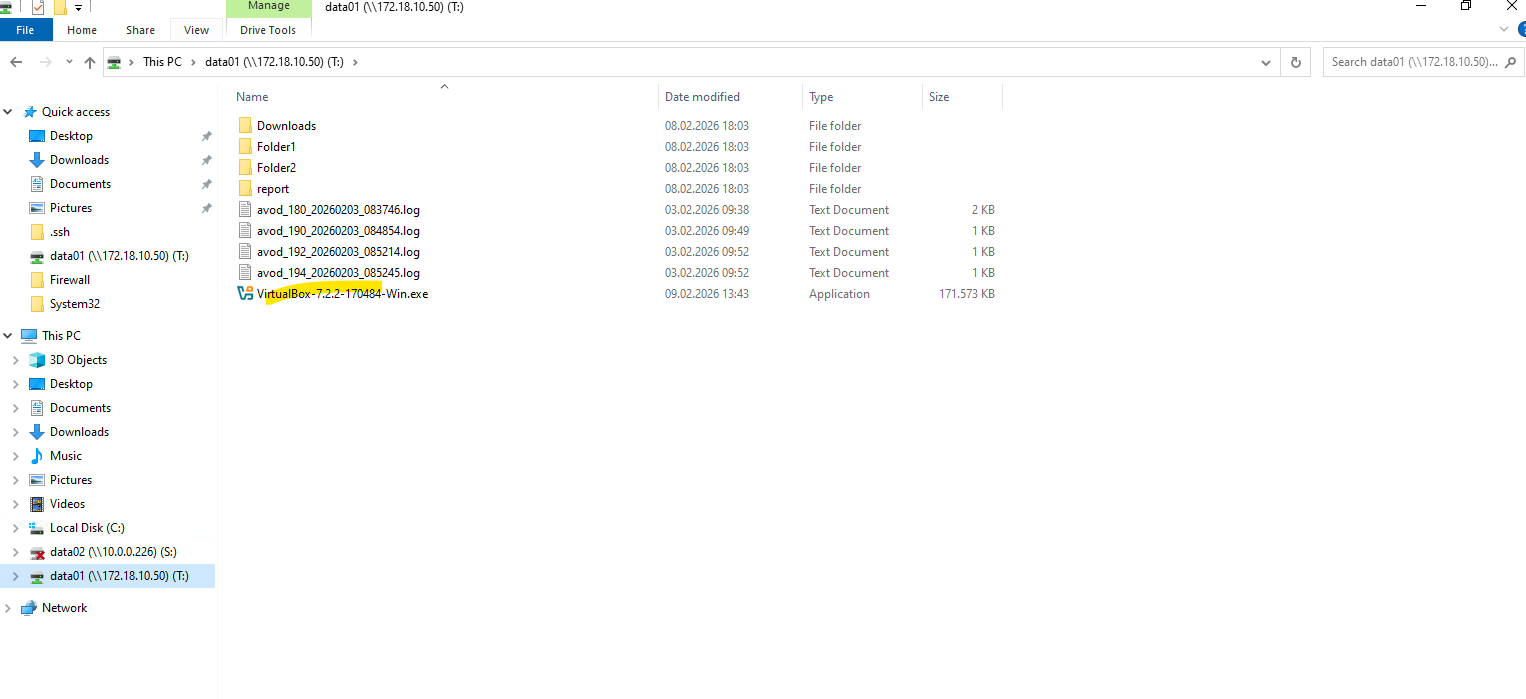
On a Windows client which has mounted the volume/cifs share we can see that our file was restored successfully with the origin name.
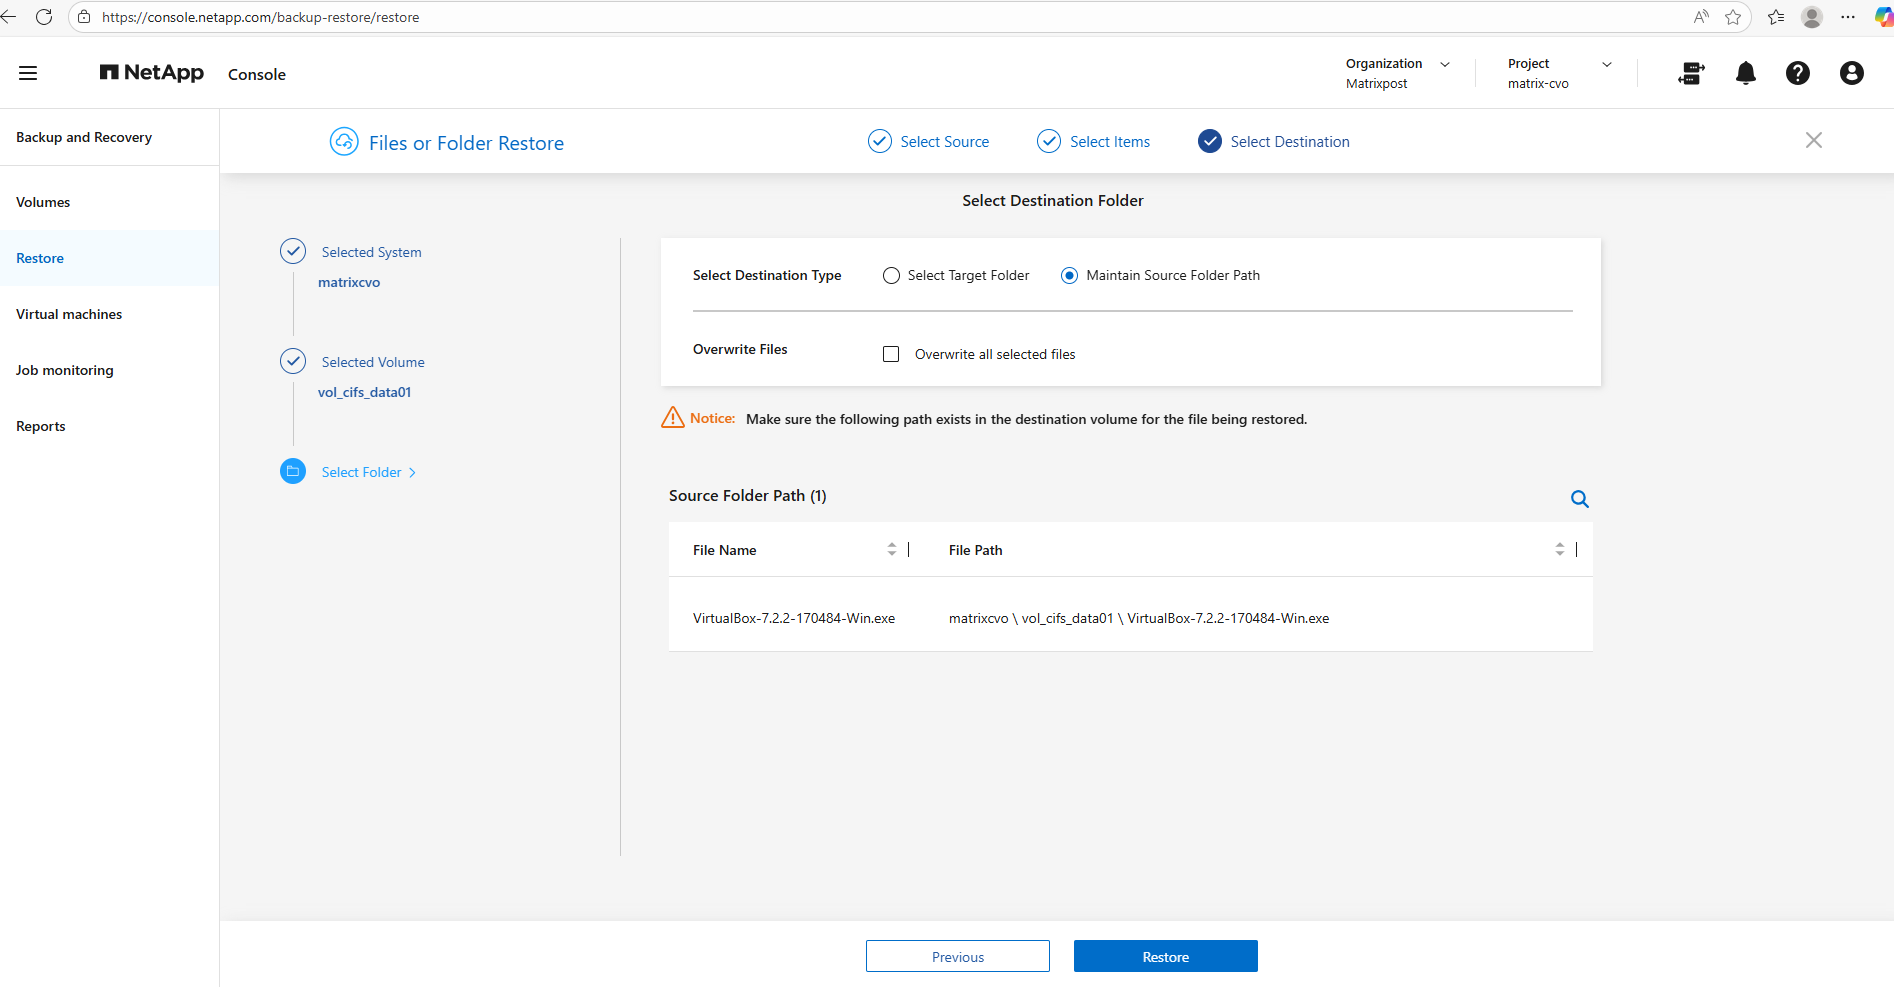
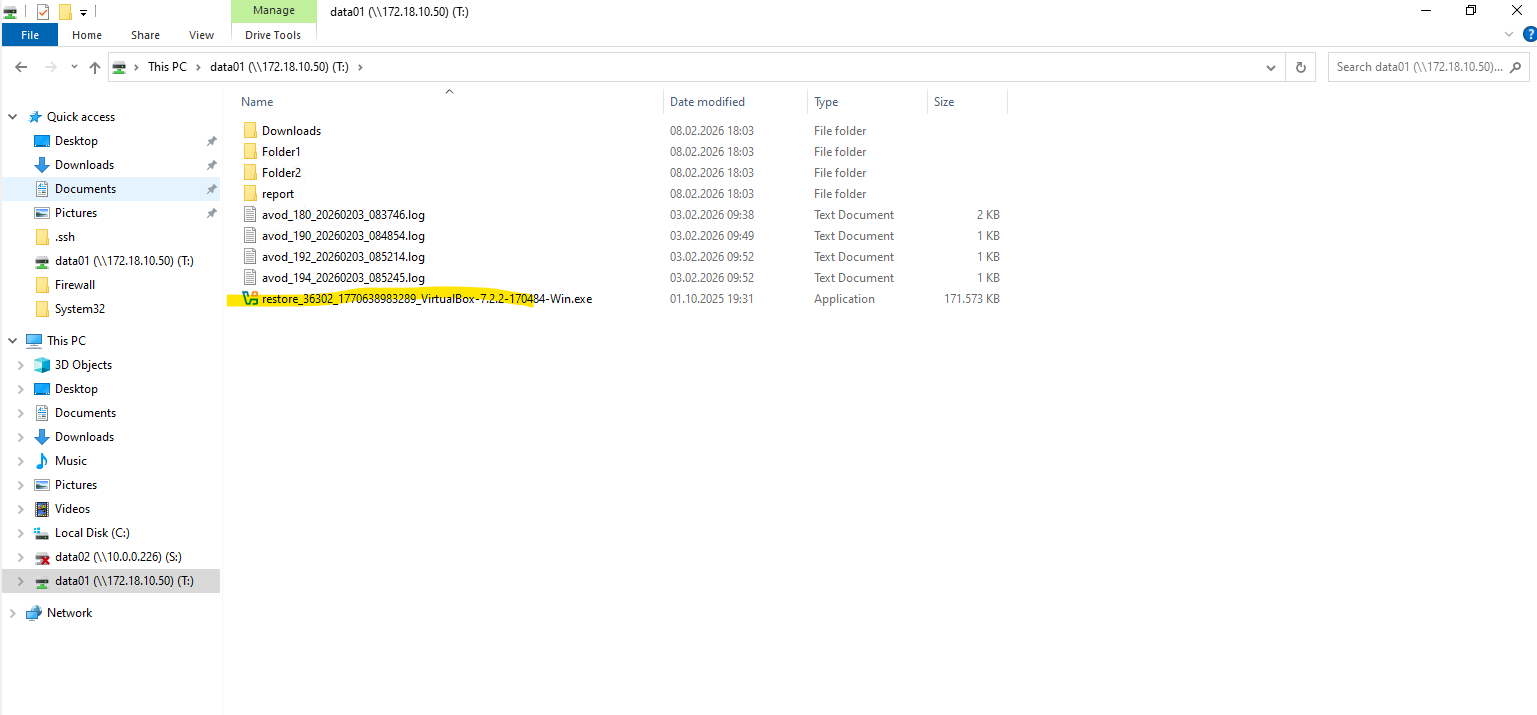
If Overwrite all selected files is not enabled, the restored file is saved with a
restore_prefix added to its name like shown below, regardless of whether the original file still exists or has been deleted. This prevents accidental overwrites and allows administrators to compare versions before deciding which copy to keep.
Restore a Volume from Backups
I will now restore a volume from a backup to demonstrate the recovery workflow.
By selecting the most recent backup stored in object storage, we can contrast the near-instant recovery of snapshots (shown in the next section) with a full cloud-based restore, which typically requires more time as the data must first be transferred back to the storage system.
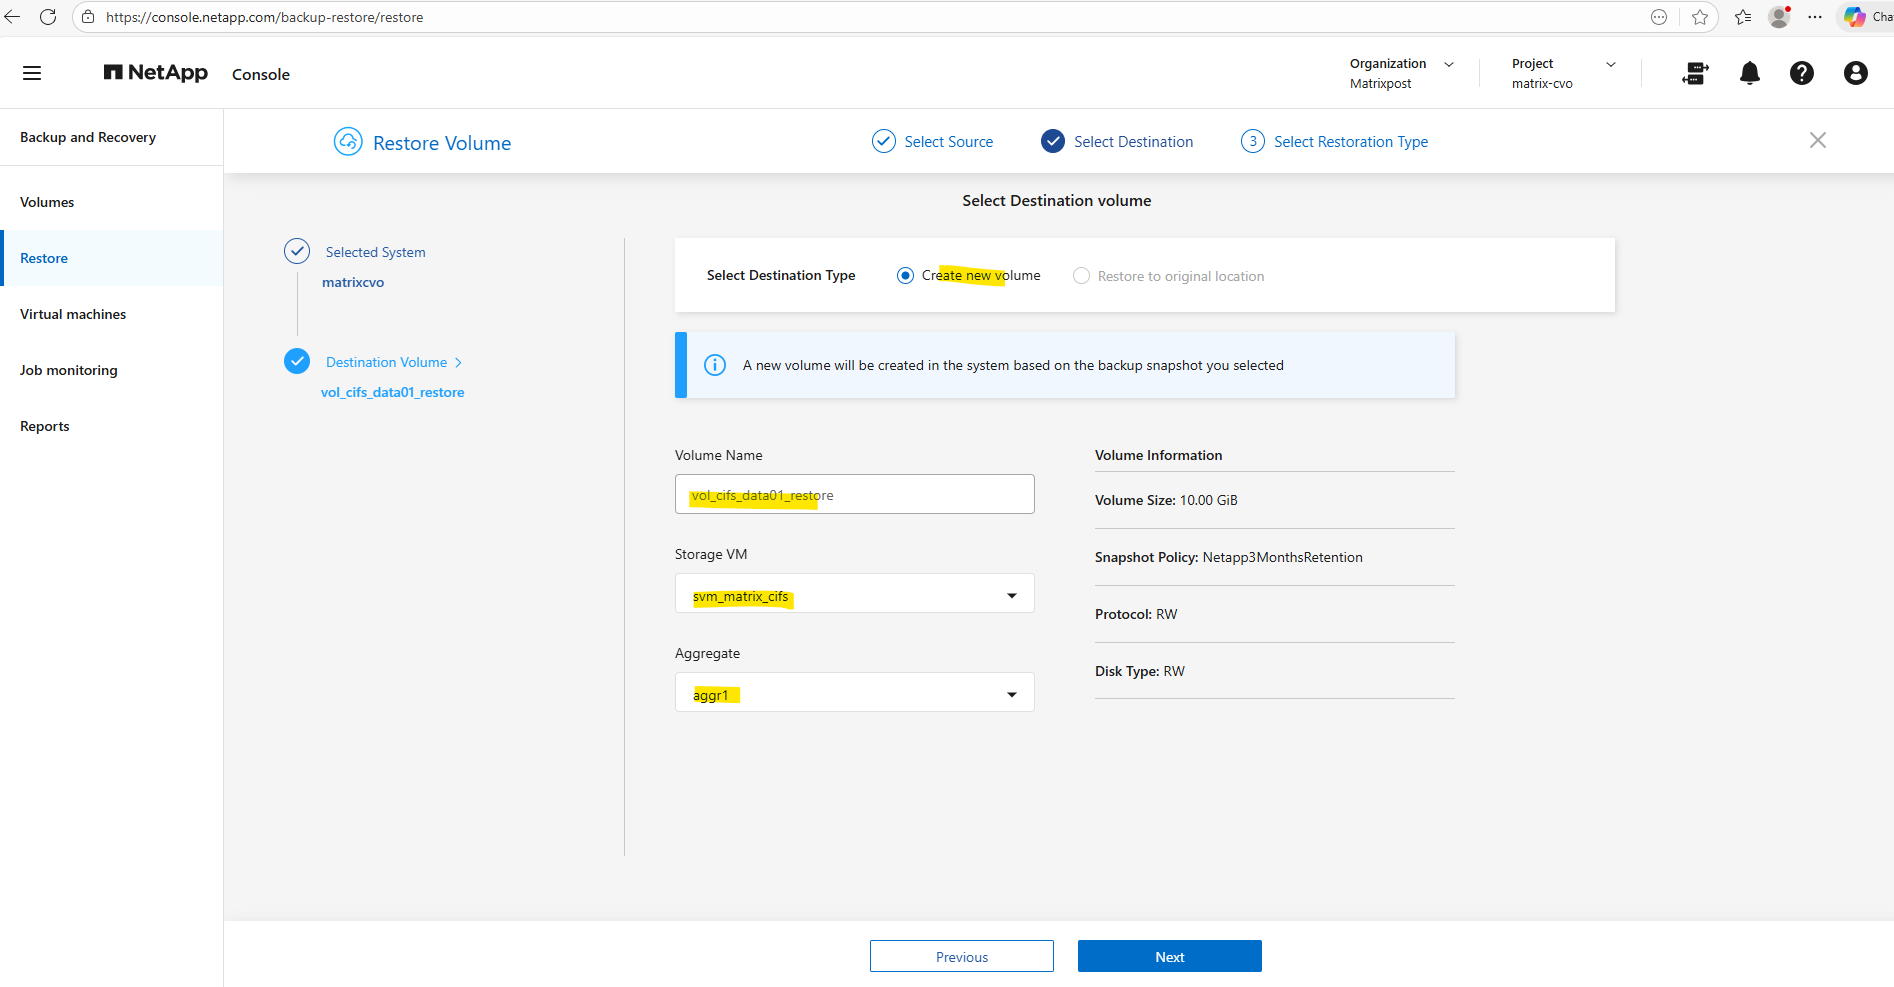
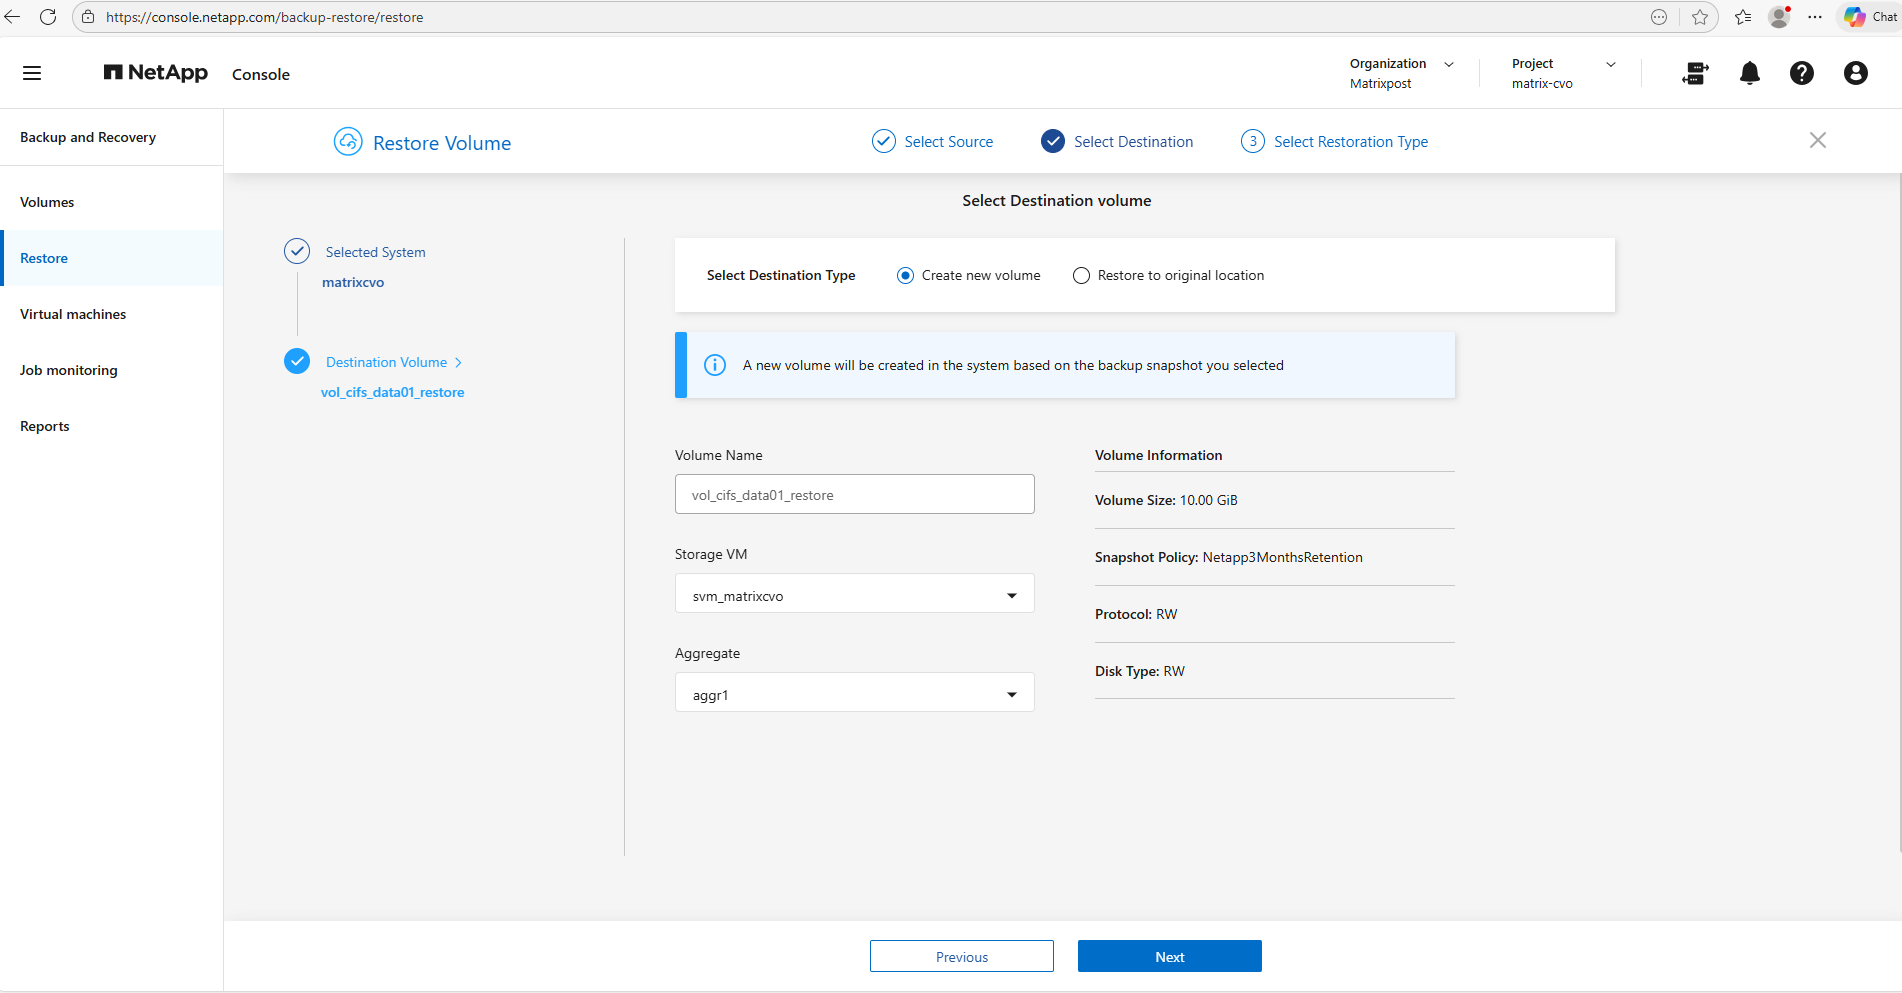
When restoring from a backup, ONTAP always provisions a new volume rather than overwriting the existing one.
A name for the new volume must be specified along with the target Storage VM and aggregate. In most cases, selecting the same Storage VM as the source volume is the simplest approach, as it preserves the existing network and access configuration while streamlining the recovery workflow.
This is the only supported restore method and ensures the original data remains protected while administrators validate the recovered dataset before performing a cutover.
The restore wizard warns that volumes are not accessible during the restore process; however, this message primarily applies to in-place restores where an existing production volume is temporarily taken offline.
When restoring to a new volume, the dataset is not yet mounted or exposed to clients, making the warning largely informational rather than operationally impactful.
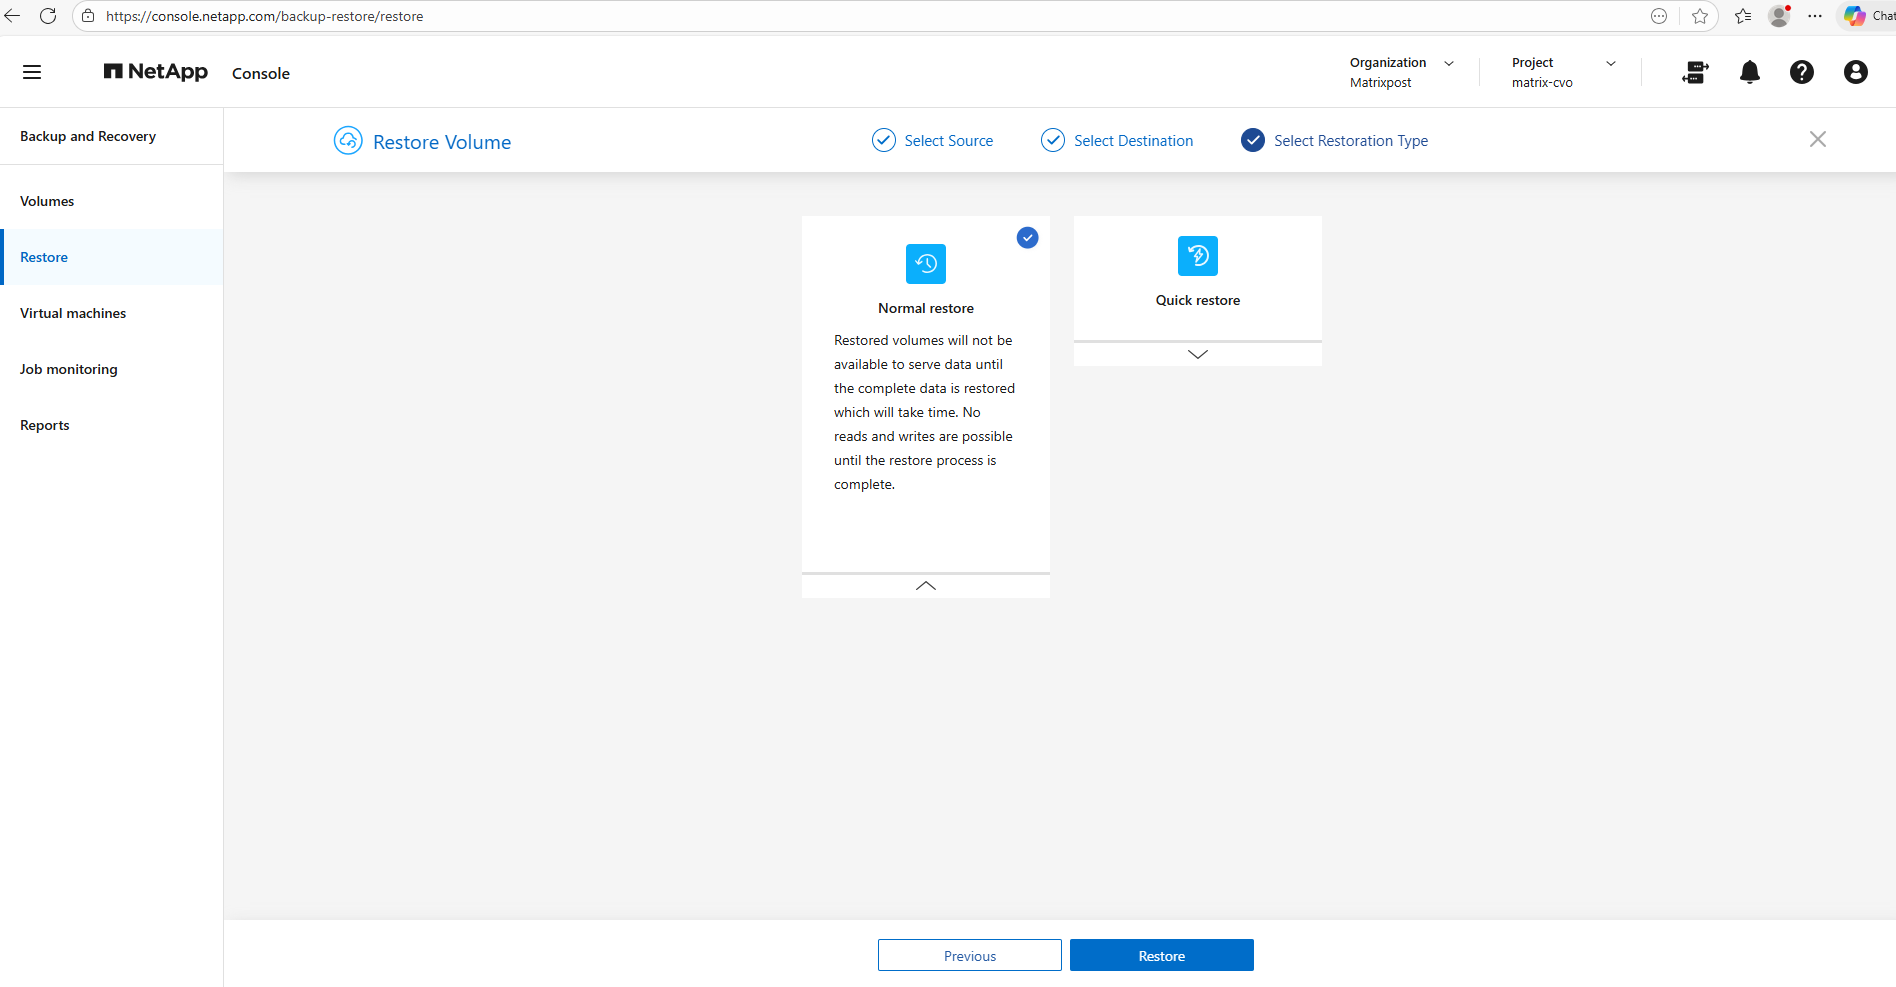
Below I will select normal restore and clicking on Restore.
Quick restore enables faster volume availability by rehydrating data in the background, but it may temporarily impact performance. A normal restore, in contrast, delivers a fully restored volume with predictable performance from the start. The preferred option therefore depends on whether rapid recovery or consistent performance is the primary objective.
The restore is in progress.
The restore completed in 2 minutes and 54 seconds, even though the volume contained only about 654 MB of data.
Unlike snapshot restores, which simply revert metadata pointers, the backup restores require the data to be transferred from object storage back to the volume.
This highlights the inherent difference in recovery speed between snapshot-based and backup-based restores.
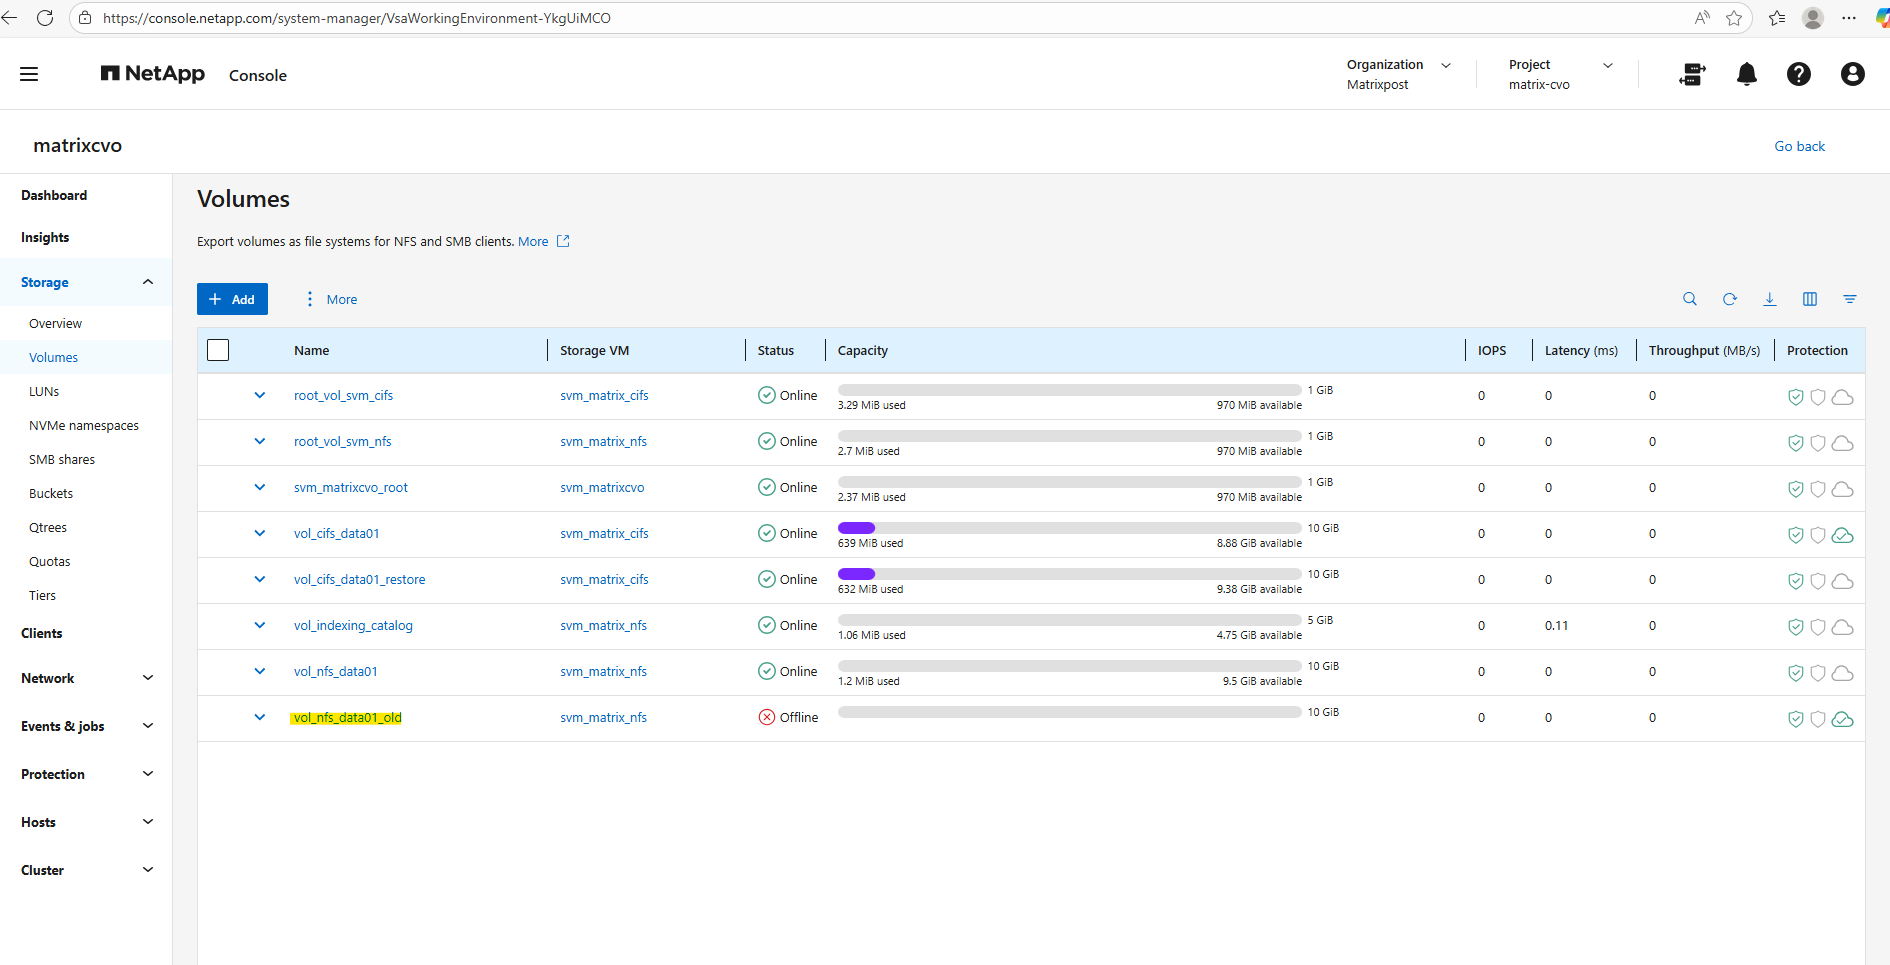
We will see the new volume in the NetApp console and also in the ONTAP System Manager.
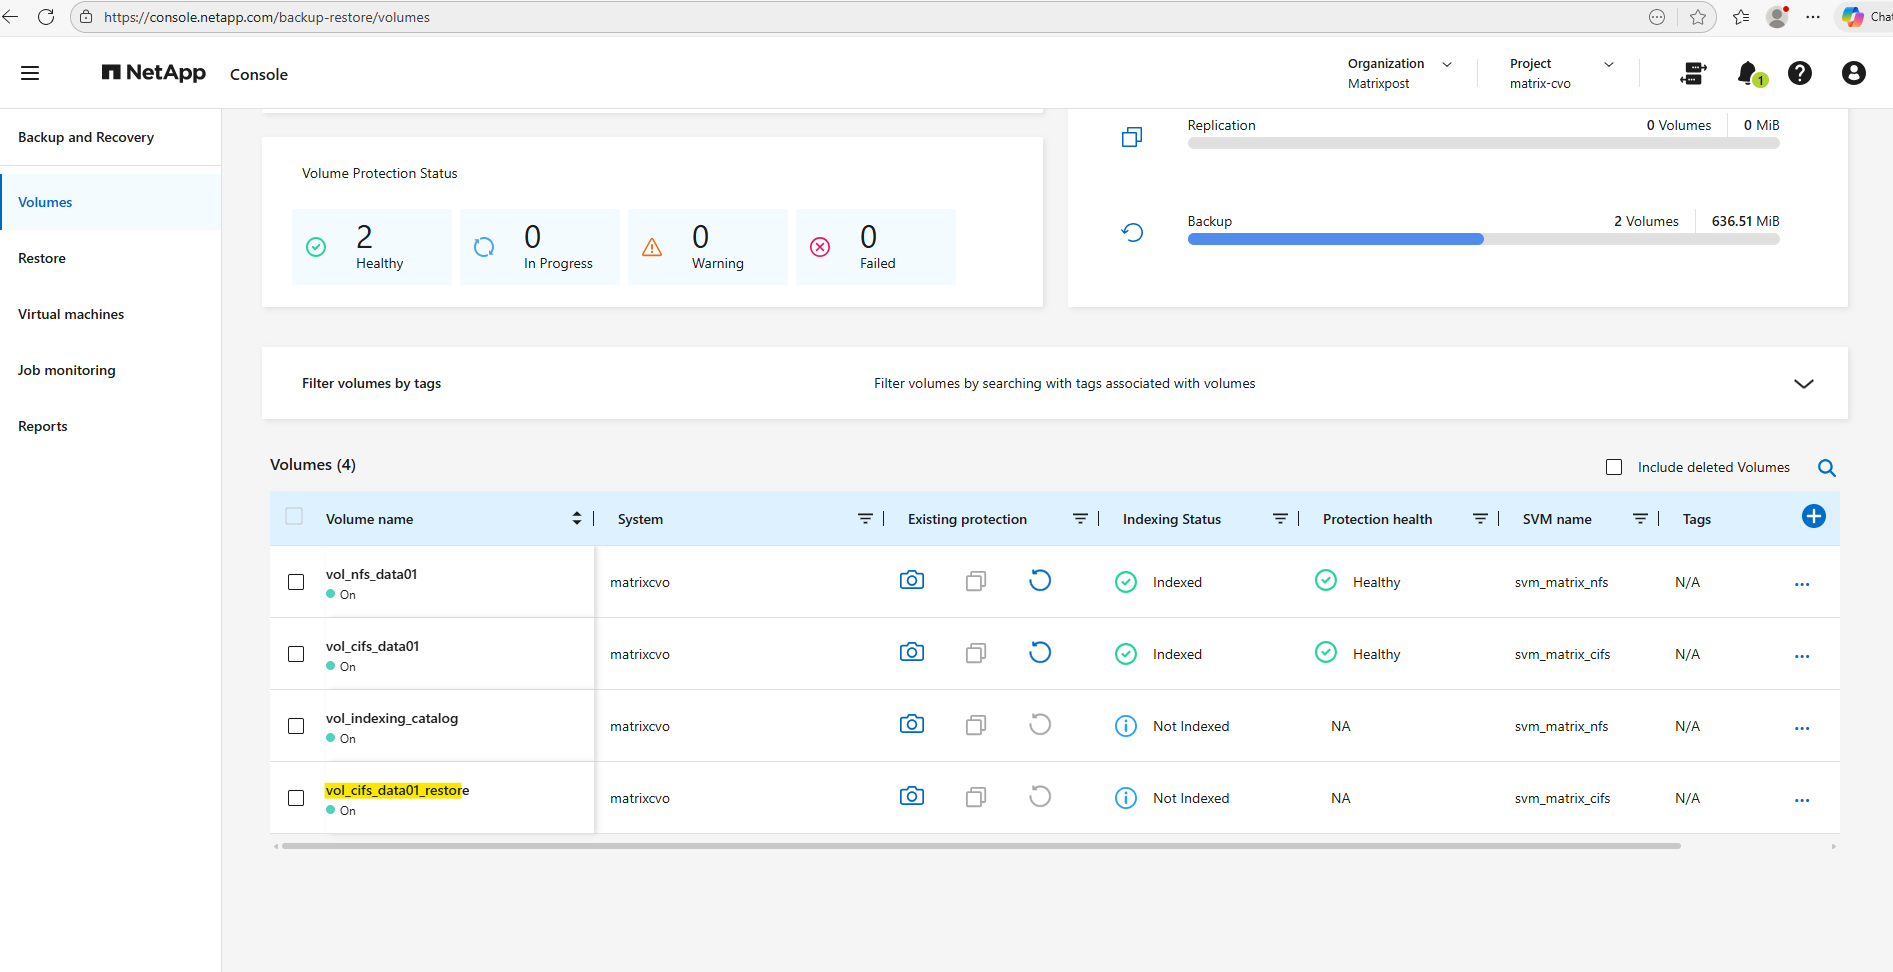
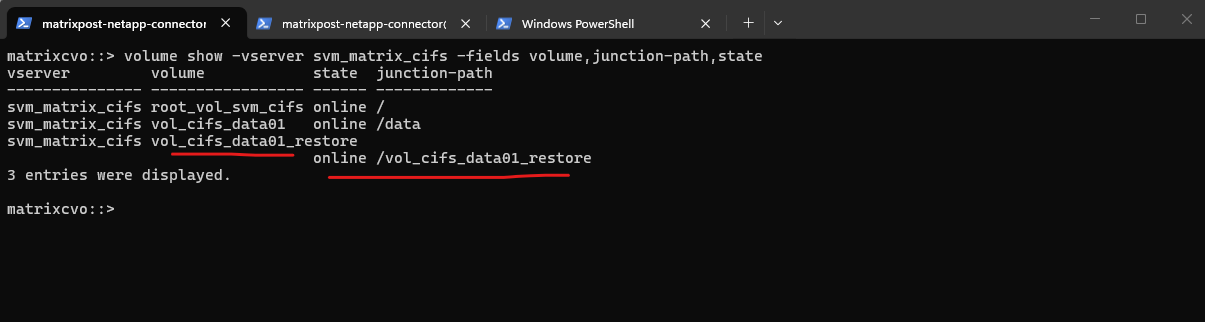
After the restore completed, the new volume was automatically mounted and brought online with a junction path derived from its name.
While this makes the volume immediately available within the namespace, the client access still requires the appropriate share or export configuration. This behavior streamlines validation while maintaining controlled data exposure.
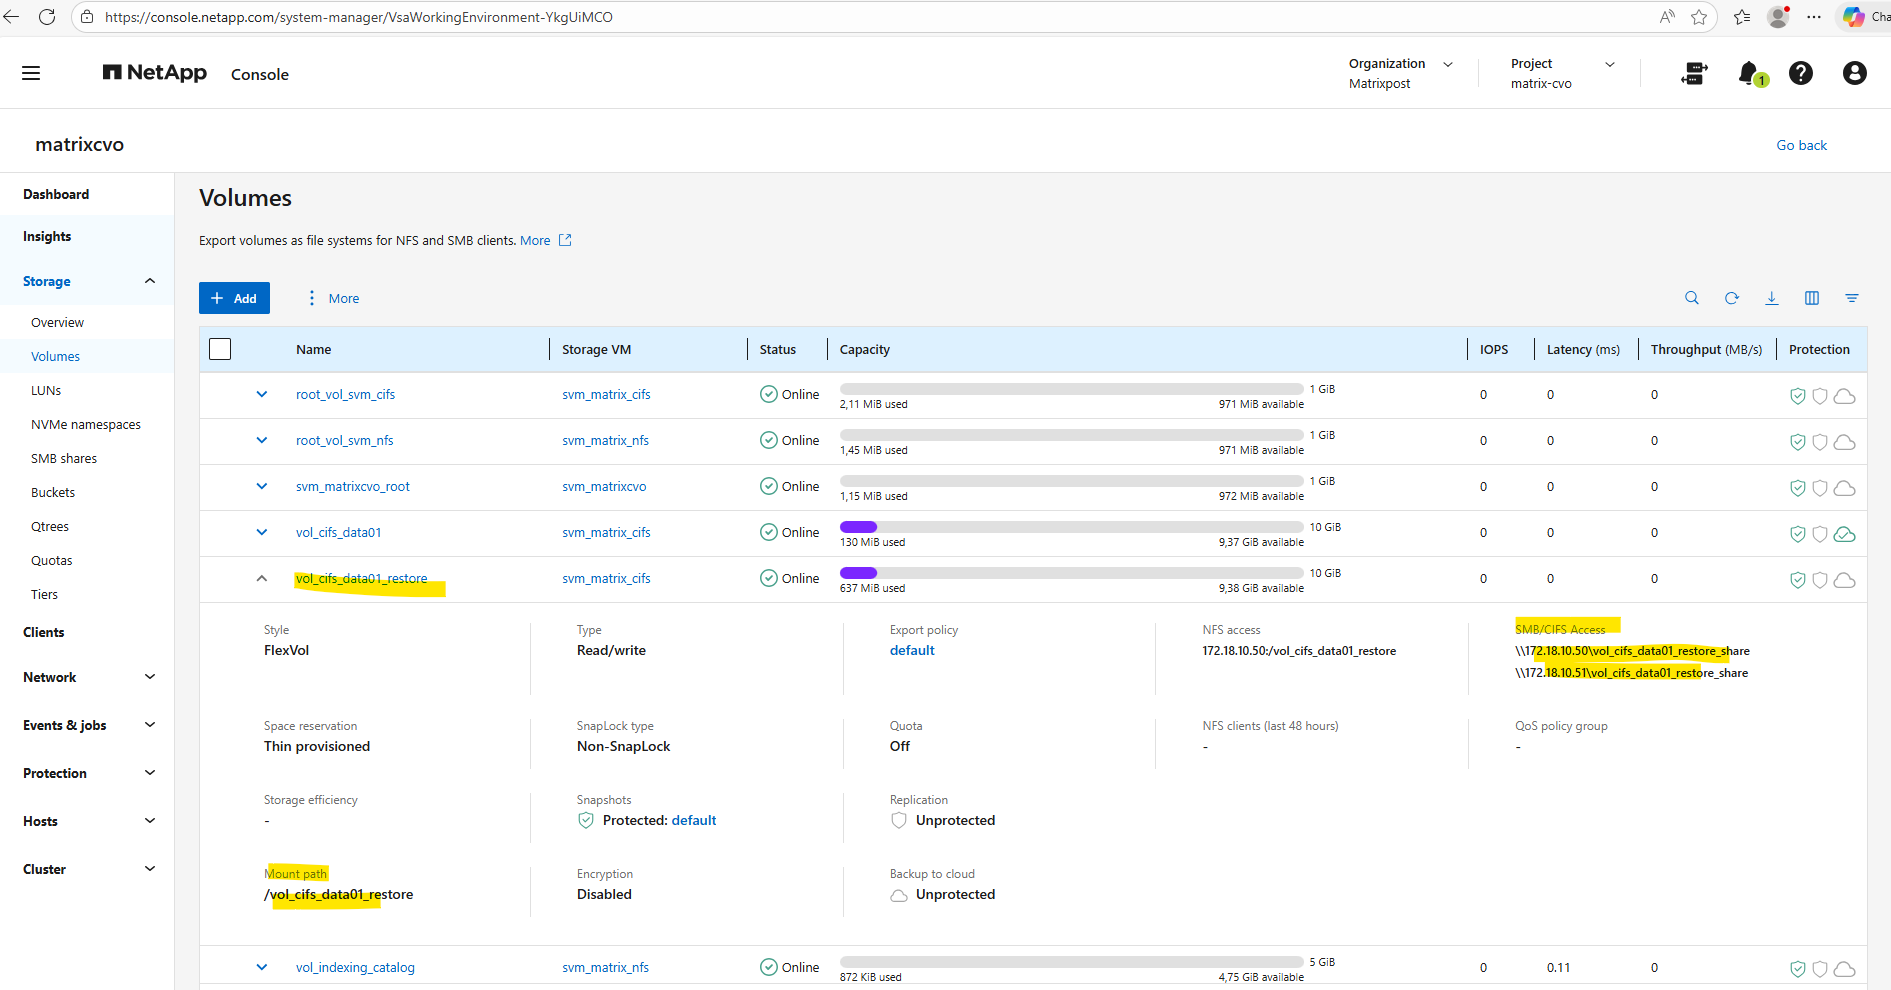
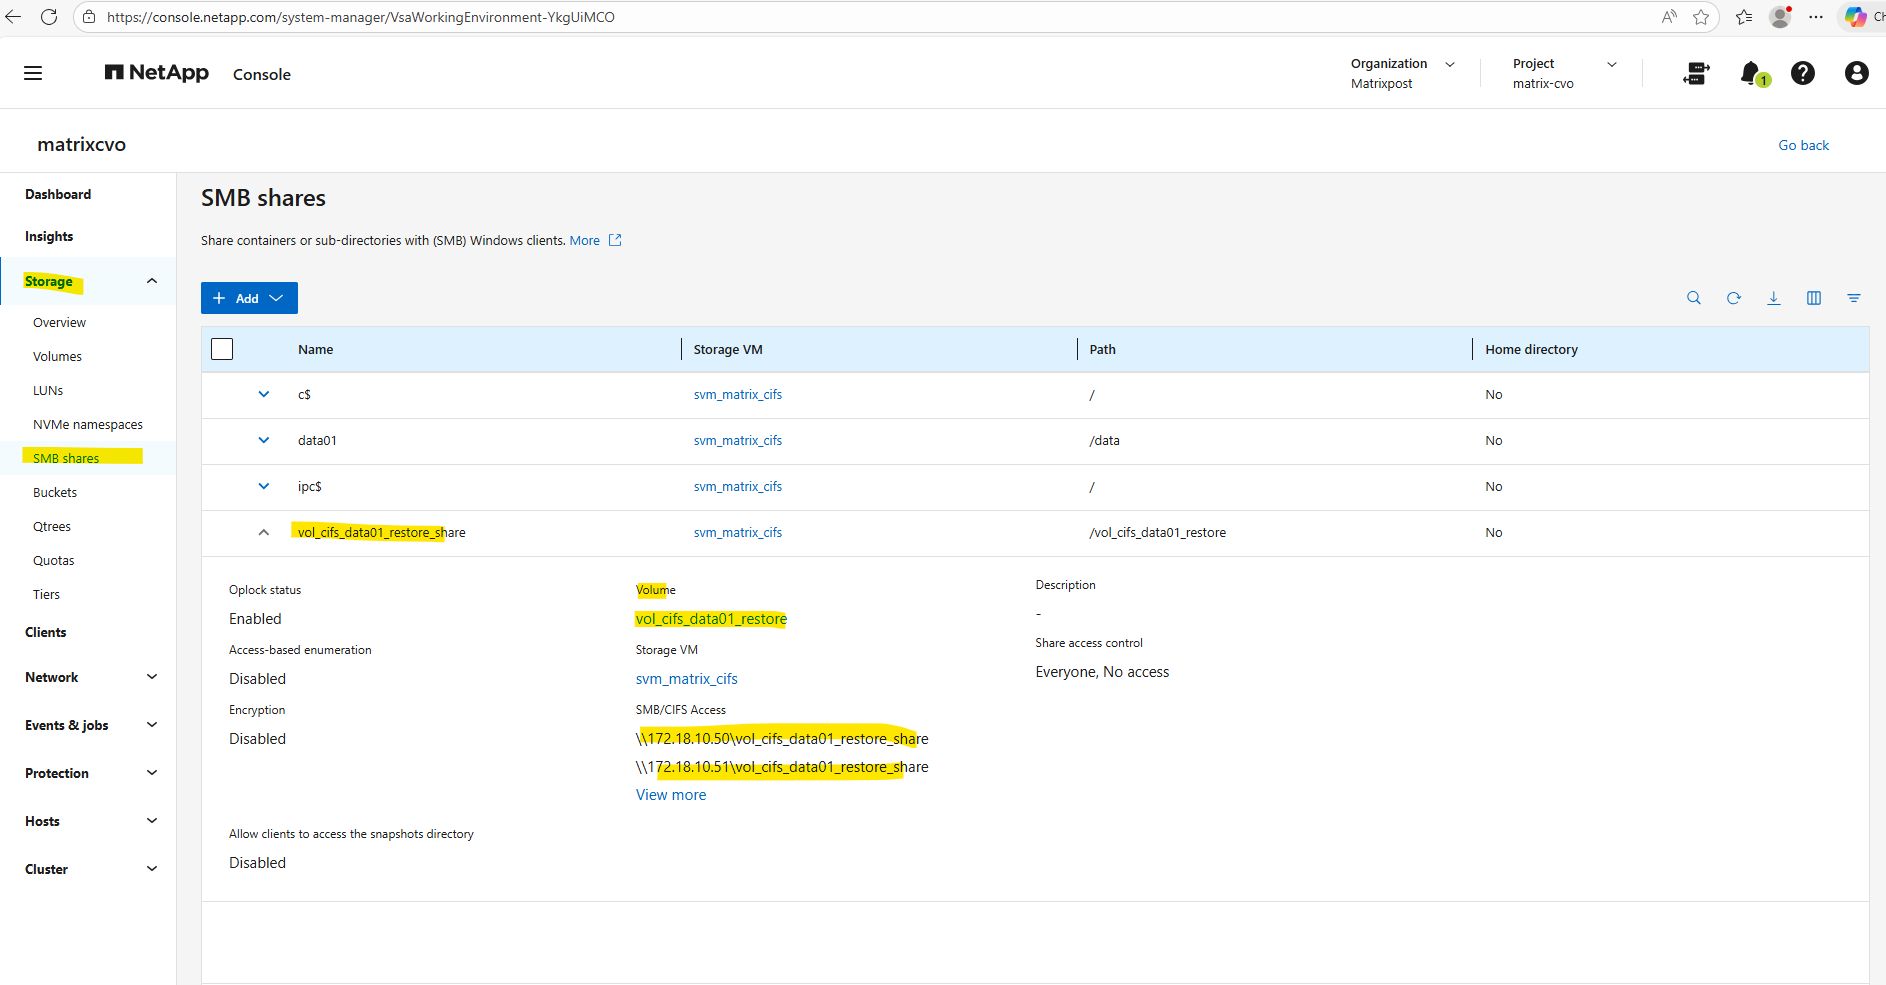
matrixcvo::> volume show -vserver svm_matrix_cifs -fields volume,junction-path,state
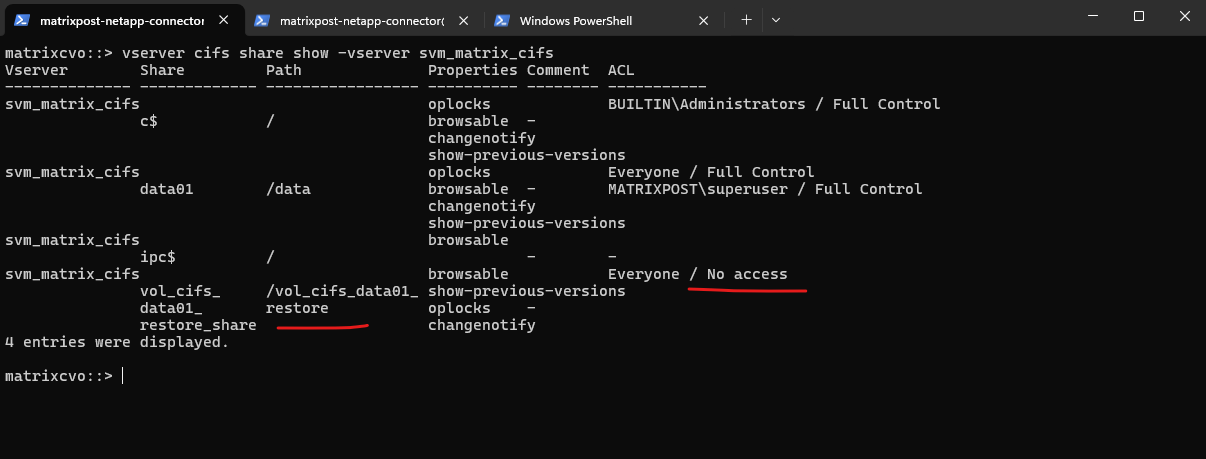
After the restore, the automatically created SMB share was configured with Everyone / No access, which is a security-first default in ONTAP.
This prevents restored data from being unintentionally exposed before administrators review the permissions. Access can be enabled by adjusting the share ACL to align with the desired security model.
matrixcvo::> vserver cifs share show -vserver svm_matrix_cifs
Updating the share ACL to Full Control immediately enabled client connectivity while allowing permissions to be aligned with the intended security model.
# first remove the existing share access control
matrixcvo::> vserver cifs share access-control create -vserver svm_matrix_cifs -share vol_cifs_data01_restore_share -user-or-group "Everyone" -permission Full_Control

# grant full control
matrixcvo::> vserver cifs share access-control create -vserver svm_matrix_cifs -share vol_cifs_data01_restore_share -user-or-group Everyone -permission Full_Control

# verify
matrixcvo::> vserver cifs share show -vserver svm_matrix_cifs

Looks good!
From Snapshot
Restoring from Snapshots is typically the fastest way to recover data, as Snapshot copies are stored locally within the storage system and require no data transfer from external locations.
This method is ideal for operational recoveries such as accidentally deleted files or unwanted changes.
Because Snapshots consume minimal storage space and can be created frequently, they provide a powerful first line of defense for rapid data restoration.
To demonstrate restoring from a snapshot, I will first delete all files on the data01 cifs share which is mounted below on a Windows client.
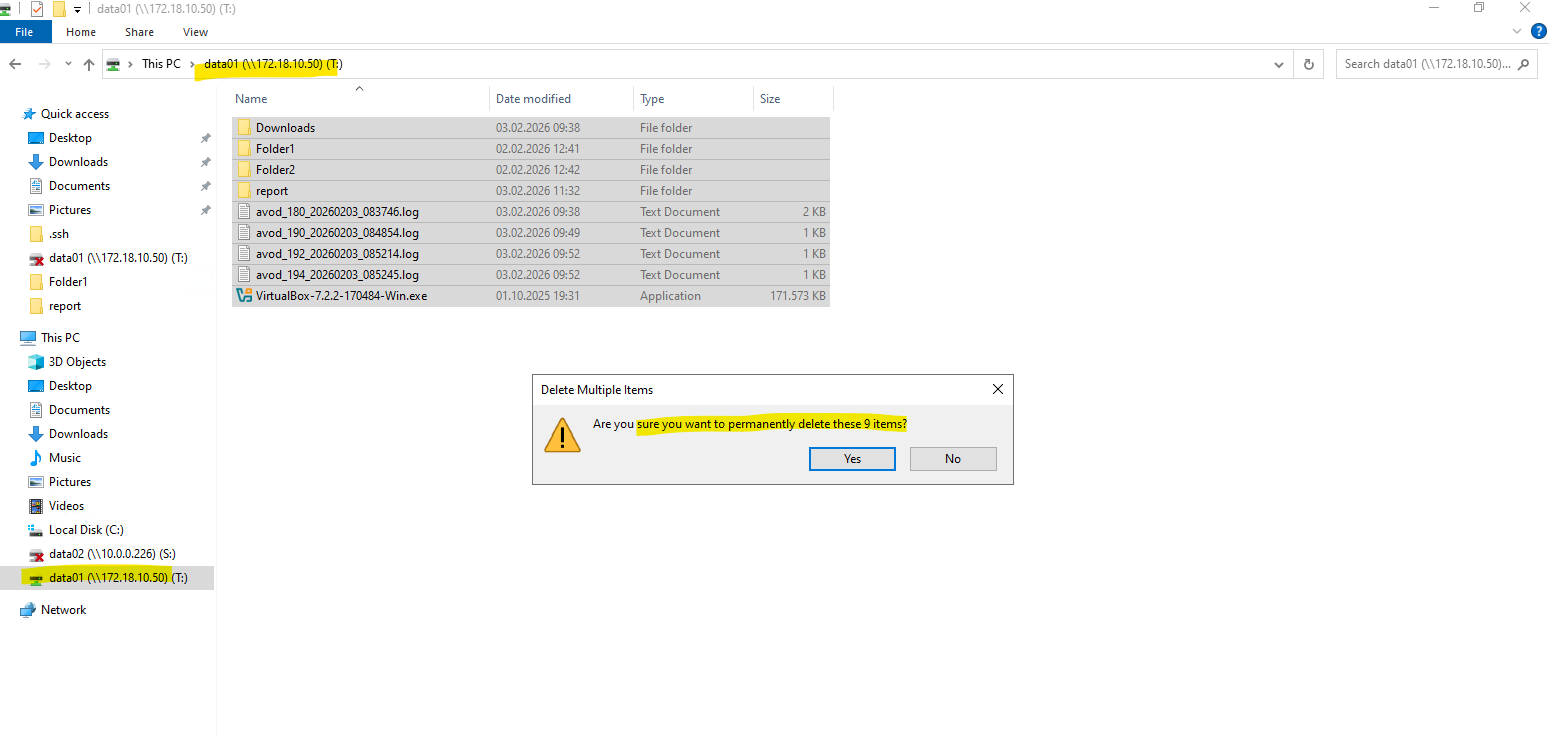
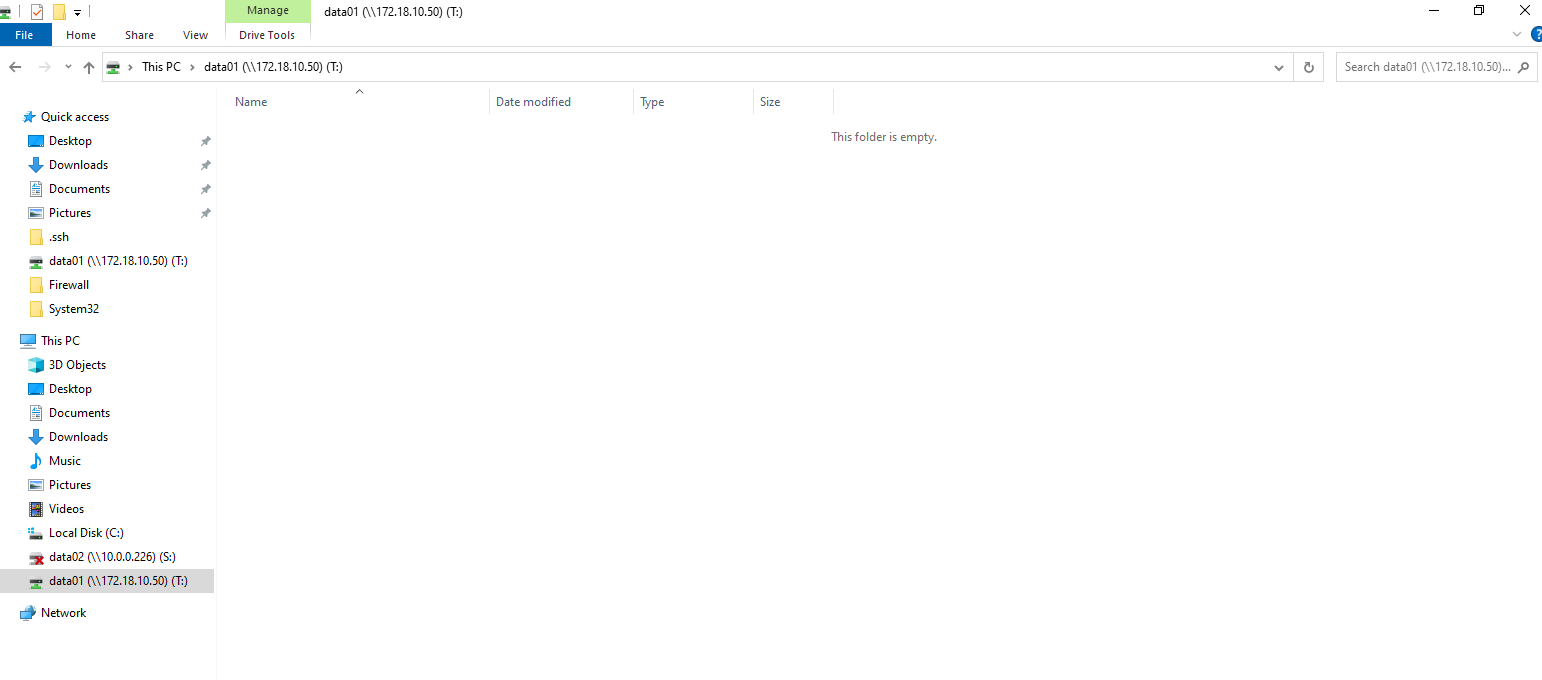
All files and folder are now deleted.
ONTAP offers multiple ways to restore data from snapshots, providing flexibility depending on the protocol and recovery scenario.
Whether leveraging the familiar Previous Versions feature in Windows File Explorer, performing guided restores through the NetApp Console, or using the ONTAP CLI for NFS workloads, each method is optimized for fast and efficient recovery. Understanding these options helps administrators choose the most appropriate restore path while minimizing downtime.
Restore via Windows Previous Versions (SMB)
For SMB shares, snapshots can be accessed directly through Windows File Explorer using the built-in Previous Versions tab. This provides a fast and user-friendly way for administrators, and even end users to recover earlier versions of files or folders without involving storage management tools.
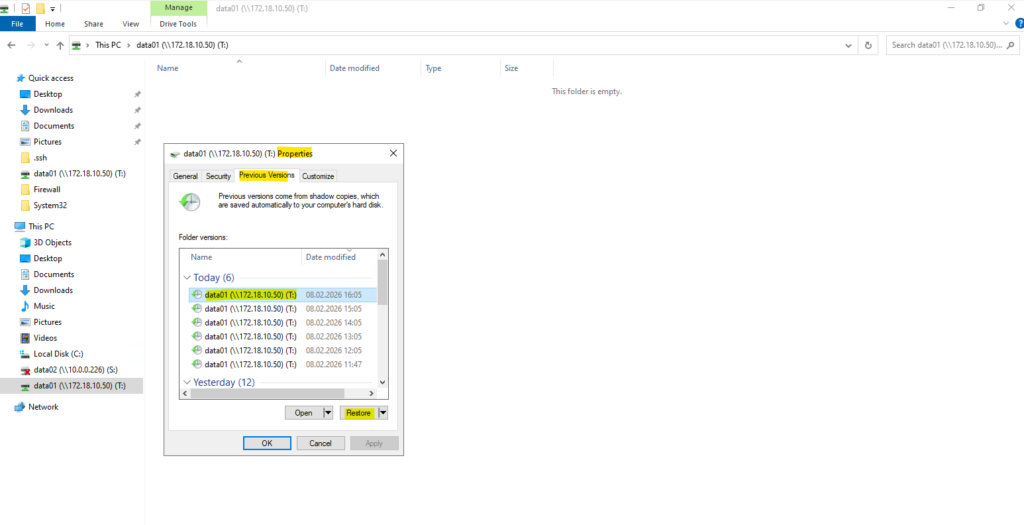
Just right-click on the mounted share (volume) and select the Previous Versions tab as shown below.
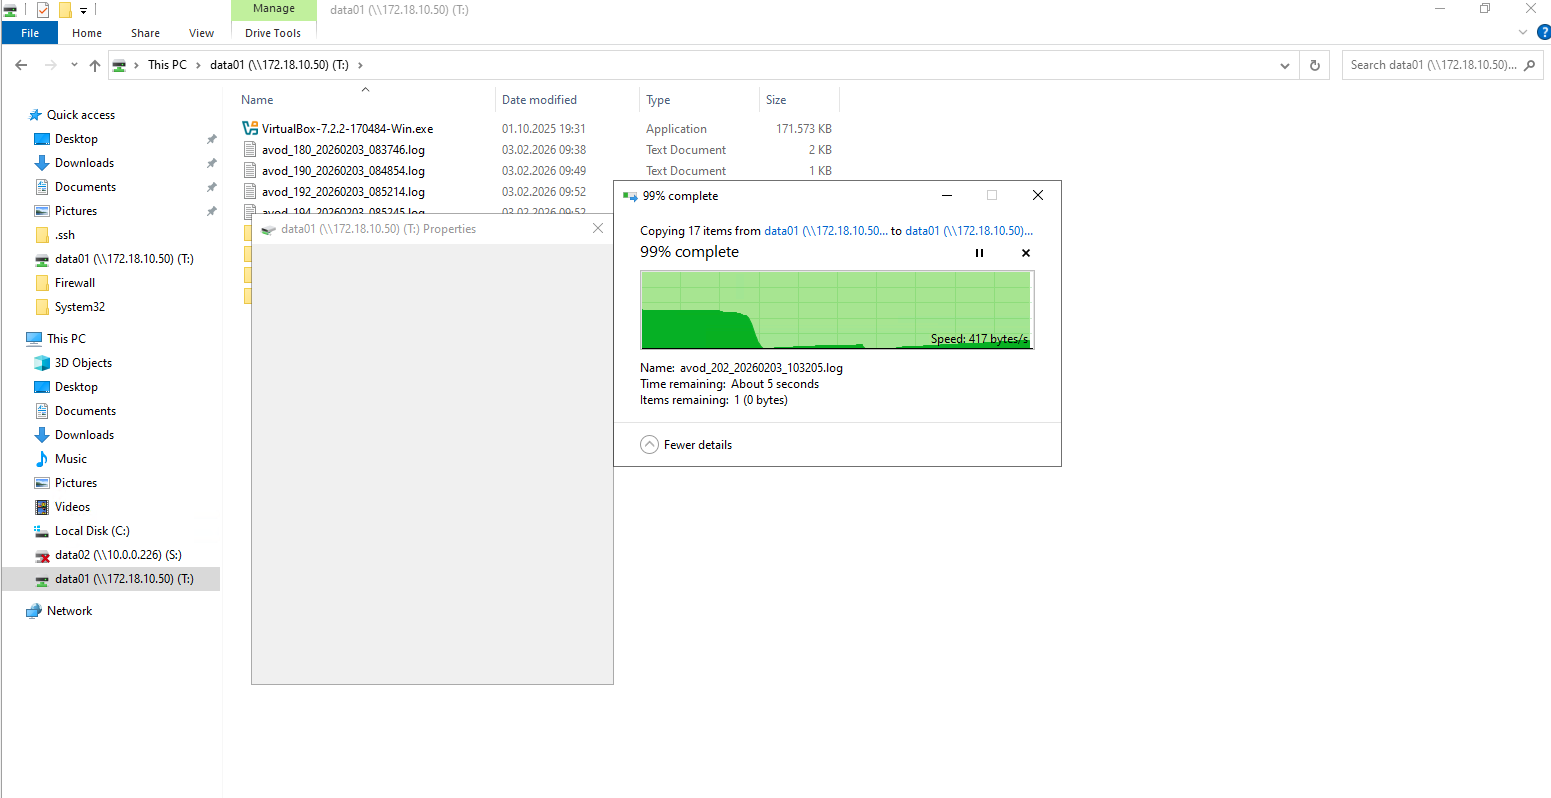
Select the version you want to restore and click on the restore button.
Confirm by clicking on Restore if you are sure you have selected the correct version.
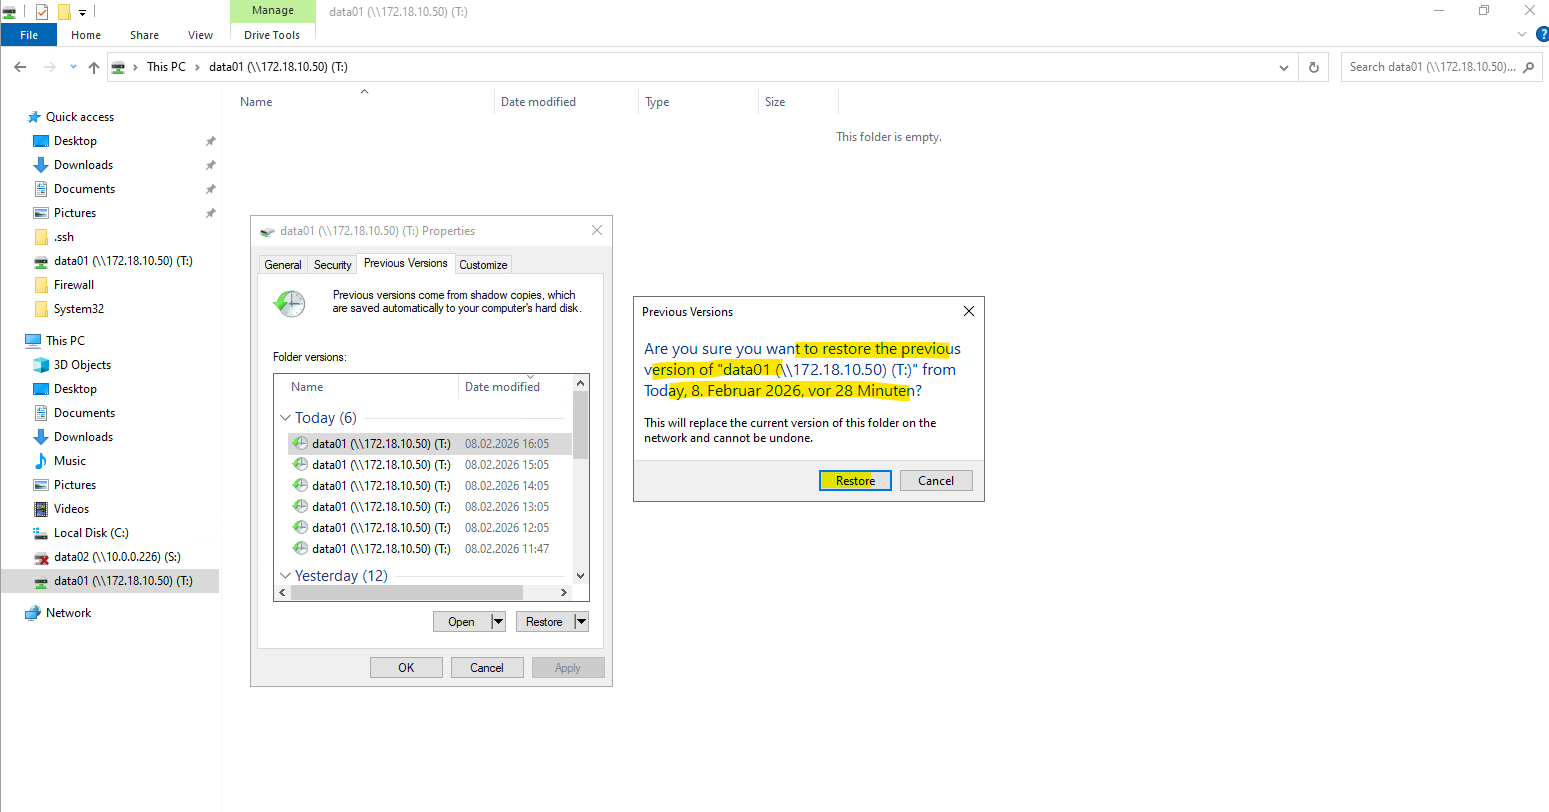
All files and folders will be copied from the selected snapshot version back to the active volume and share.
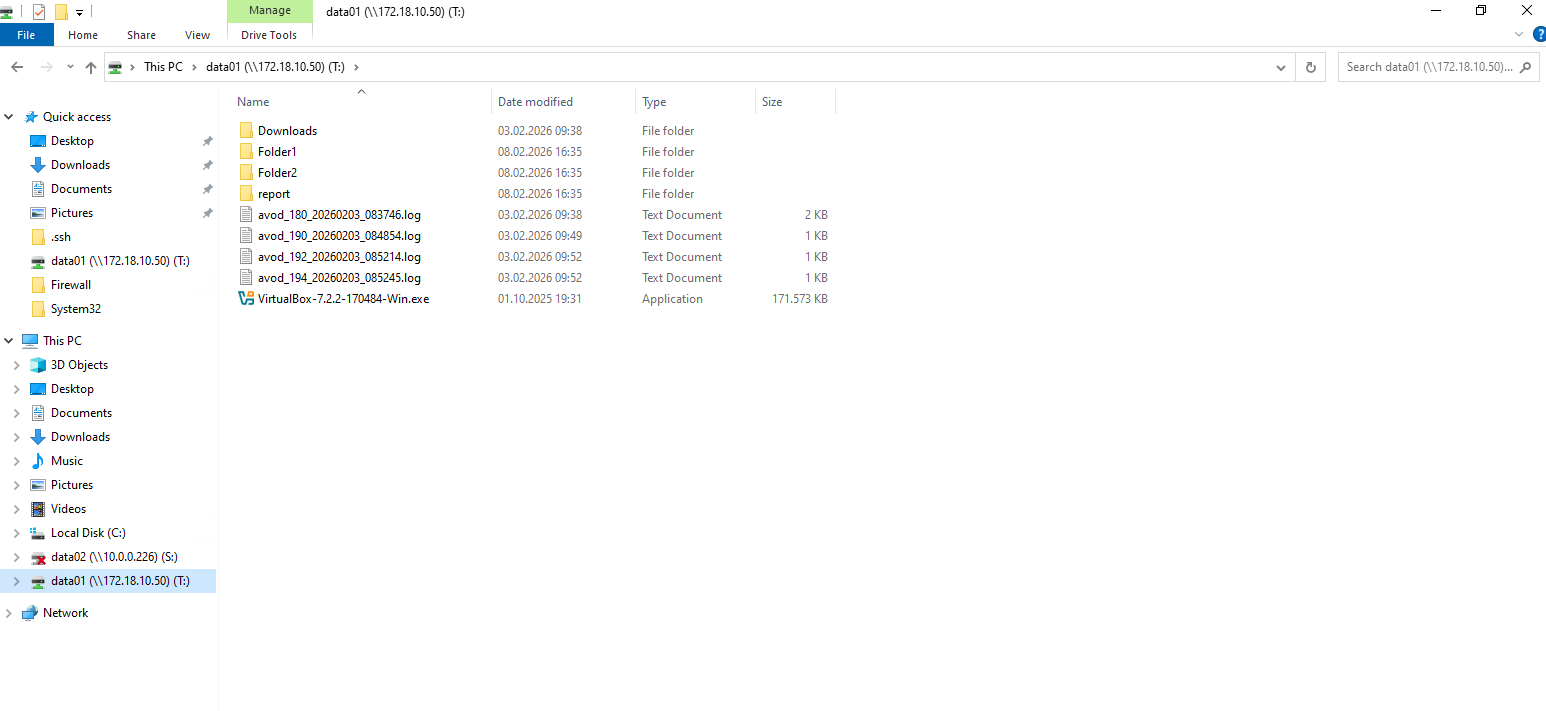
Finally all files and folders has been successfully restored to the selected version.

Restore Using the NetApp Console
The NetApp Console offers a guided restore workflow that allows administrators to recover files, folders, or entire volumes from snapshots through a centralized interface.
This approach is ideal when more control or visibility is required during the recovery process.
I will delete all files and folder again to demonstrate restoring them by using the NetApp console and either also local snapshots or backups.
In the NetApp console navigate to Protection -> Backup and Recovery.

For the Workload select Volumes below.
Click on the Restore menu below.
We can here either restore files or folders or a complete volume, below we will see both options.
Restore Files and Folder
Below we will see how to restore Files and Folder.
Click on Restore Files or Folder below.
Select your CVO system you want to restore the volume for.
Select the volume you want to restore, I will select the cifs volume.
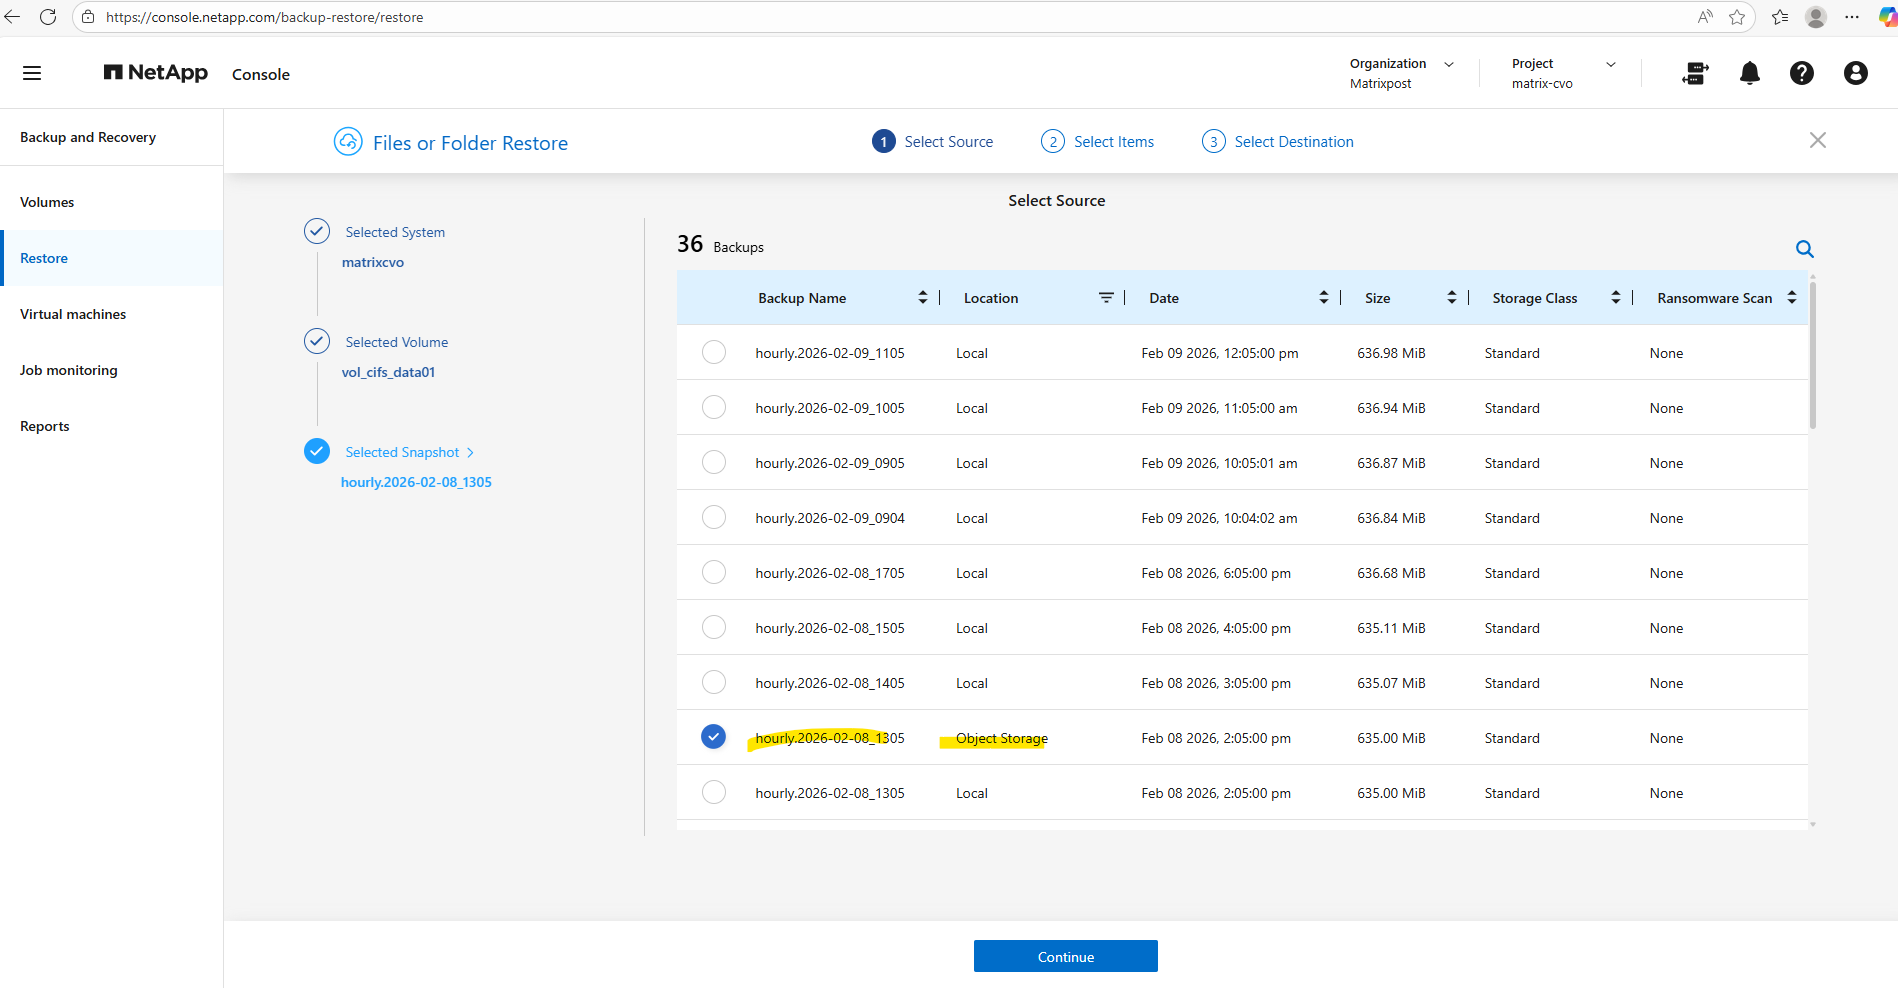
Below we need to select the source (snapshot or backup) from which we want to restore the volume. Because I want to show how to restore the volume and its files and folders from a snapshot, I will select the first entry below which is the latest snapshot.
Click on Continue.
Snapshots are all where Location is set to Local and backups where Location is set to Object Storage.
Select the file you want to restore below. When selecting above a snapshot (Location local) instead backup (Location Oject Storage), we can only restore files.
Folder we need to restore from a backup.
Folder Restore is not allowed from local snapshots.
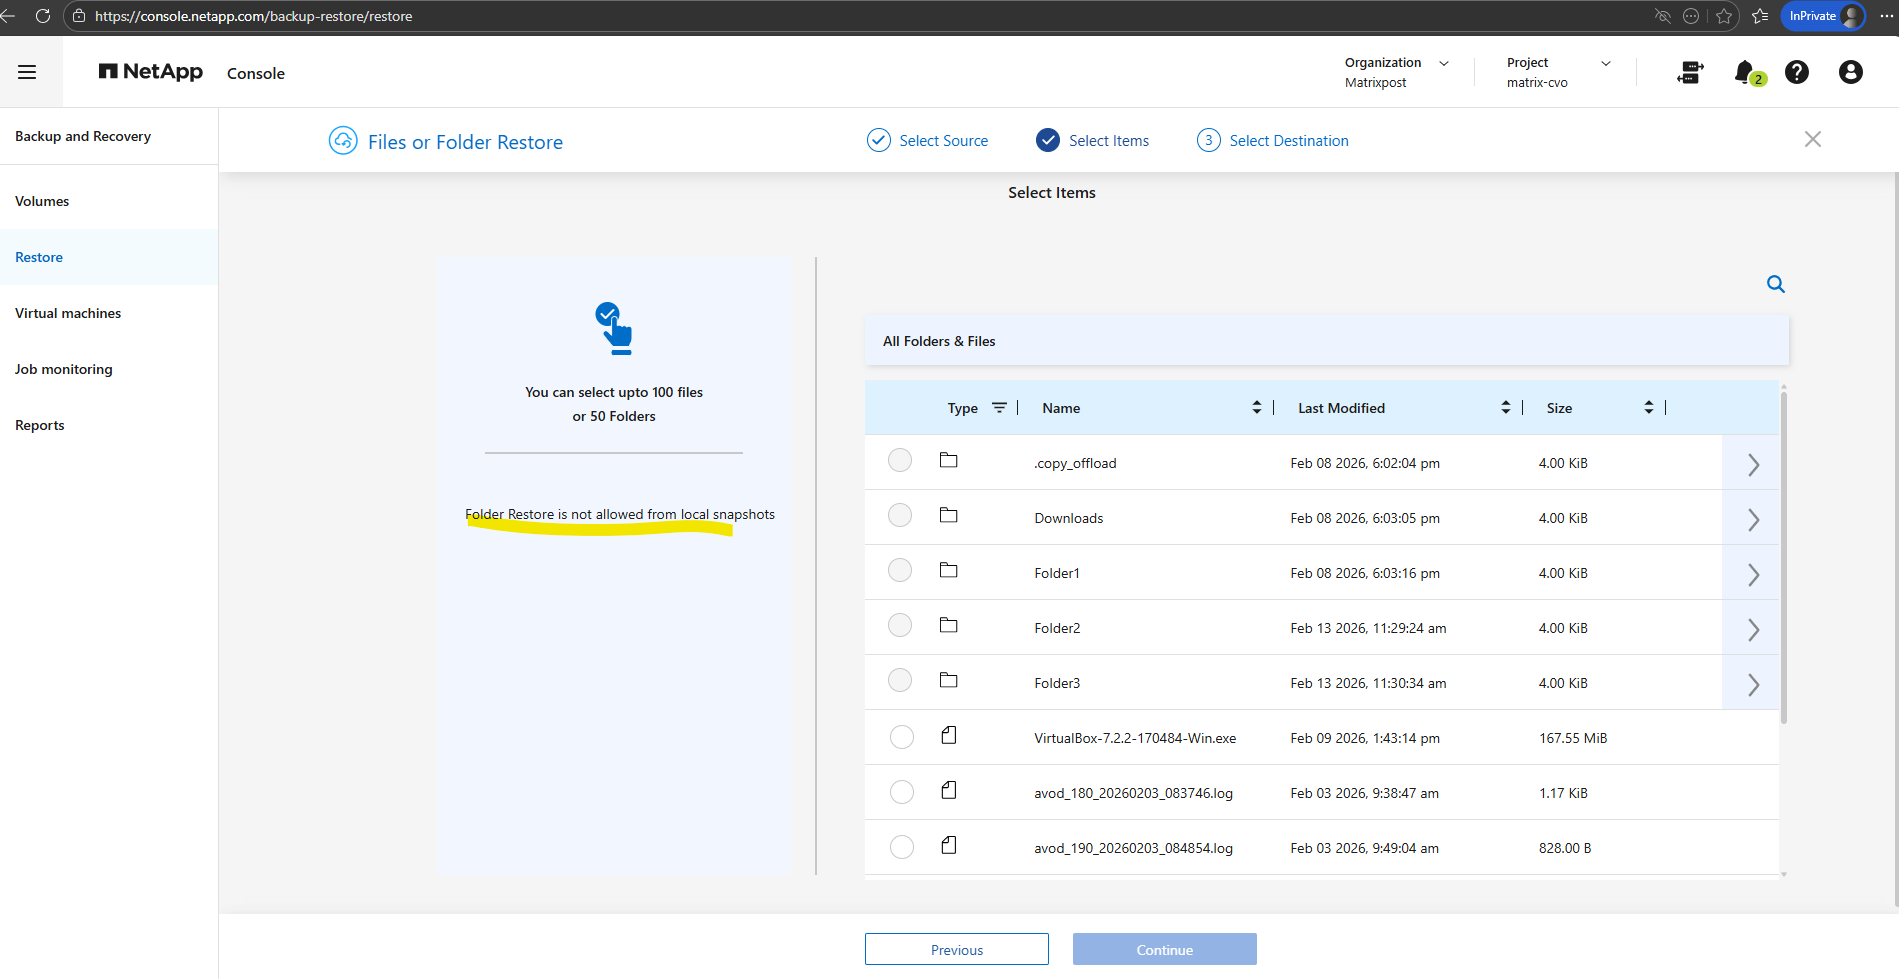
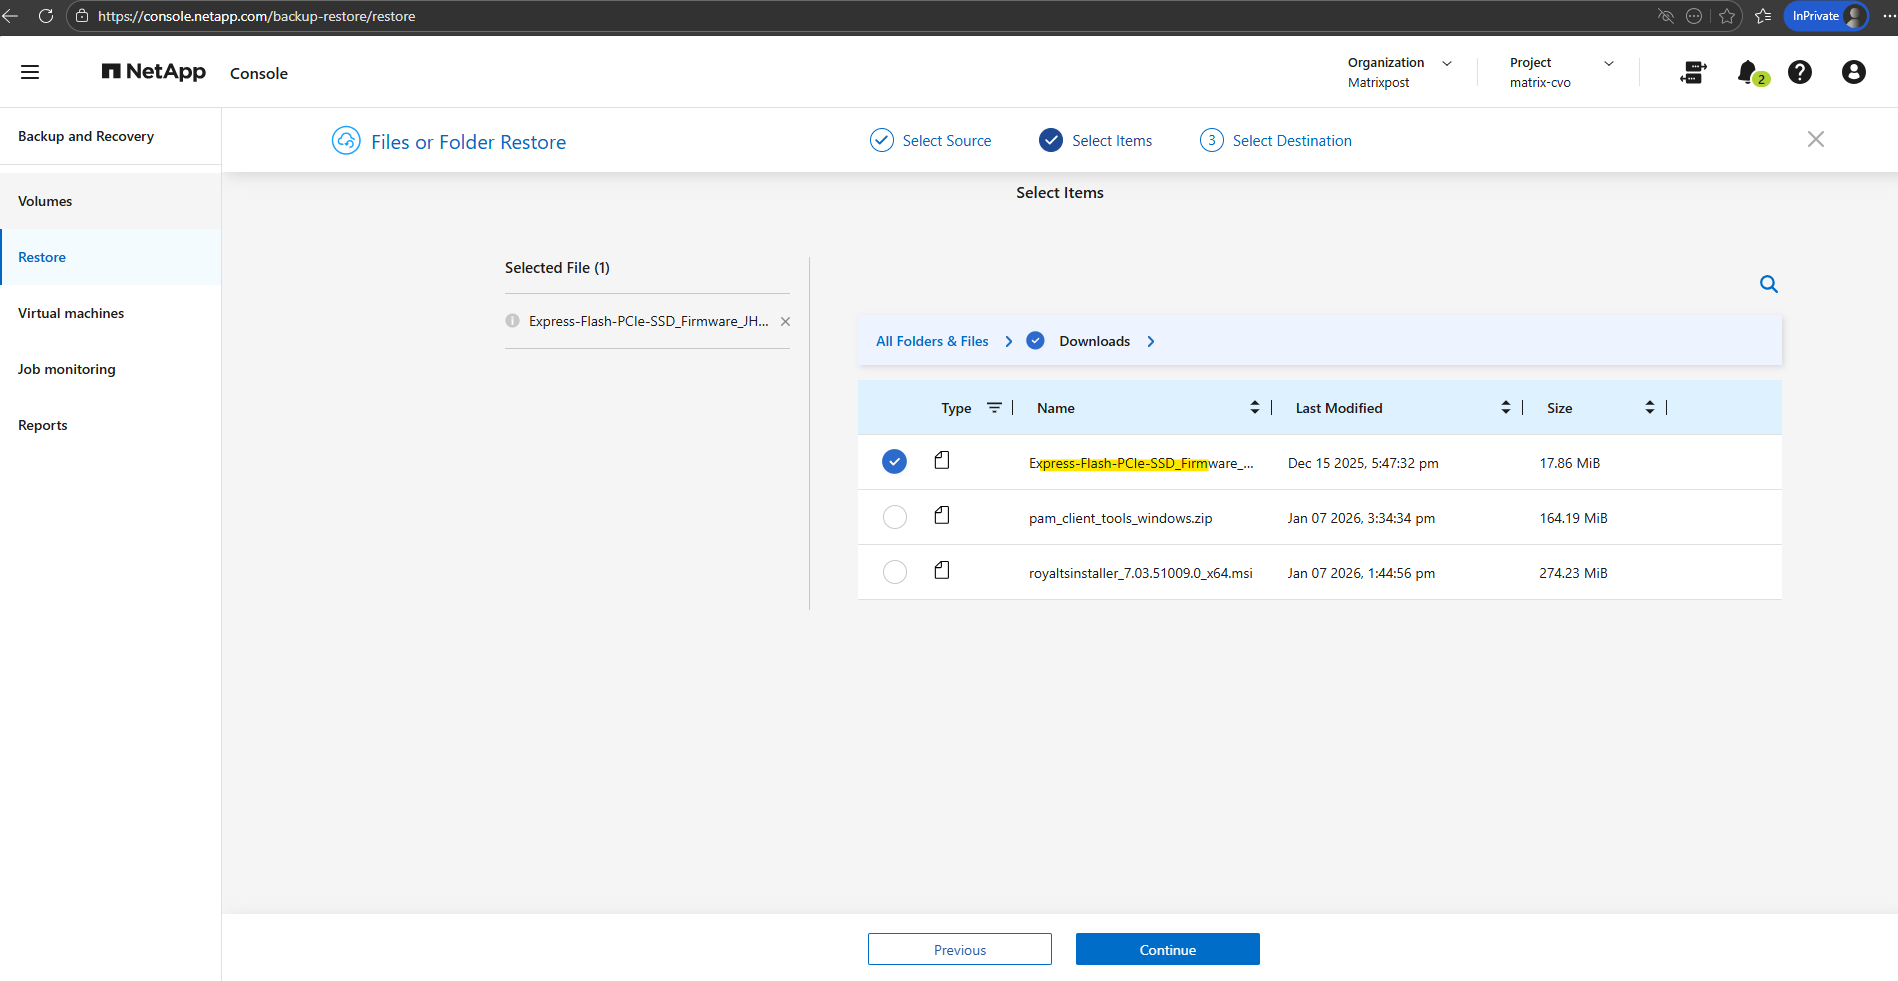
I will navigate to the firmware file below to select it for the restore.
Click on Continue.
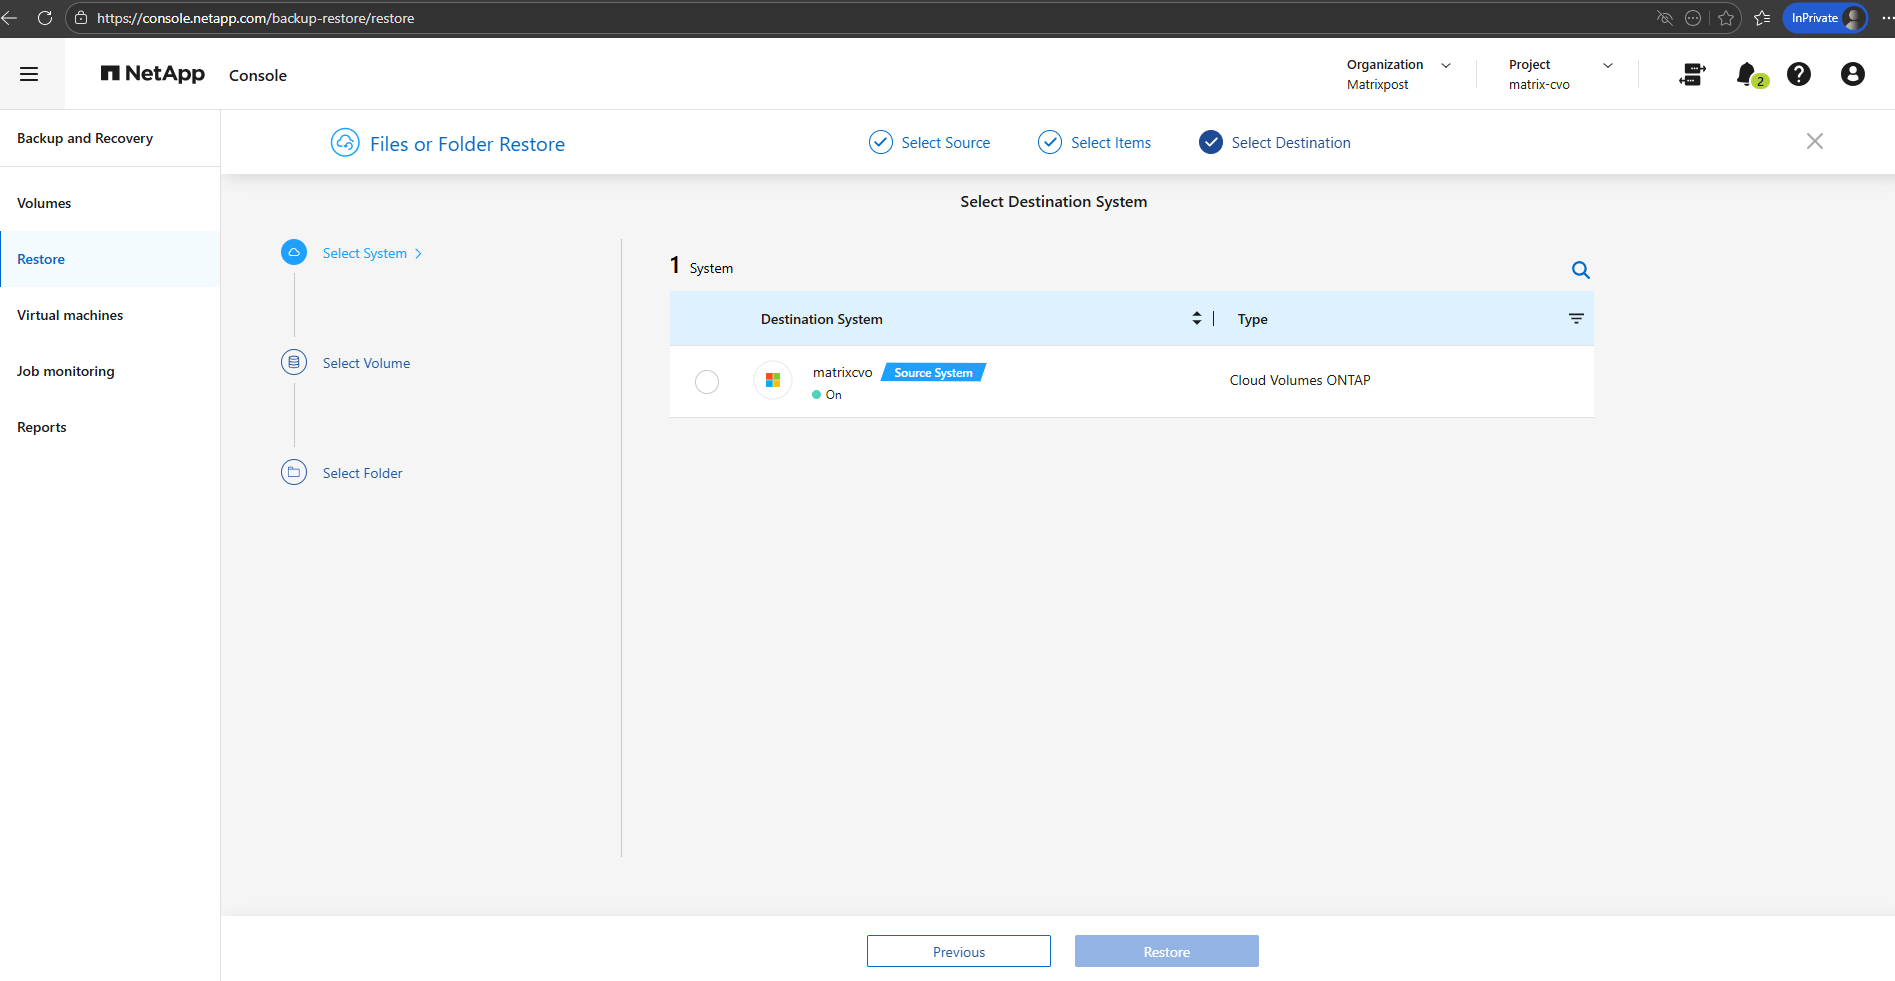
Select the destination system.
Select the destination volume to restore the file to. I will select a dedicated restore volume therefore.
When restoring from a local Snapshot copy, the original source volume cannot be selected as the destination. Instead, you must restore the data to a different eligible volume and, if required, manually copy the files back to the original location. This behavior prevents unintended in-place overwrites and adds an additional safety layer during snapshot-based restores.
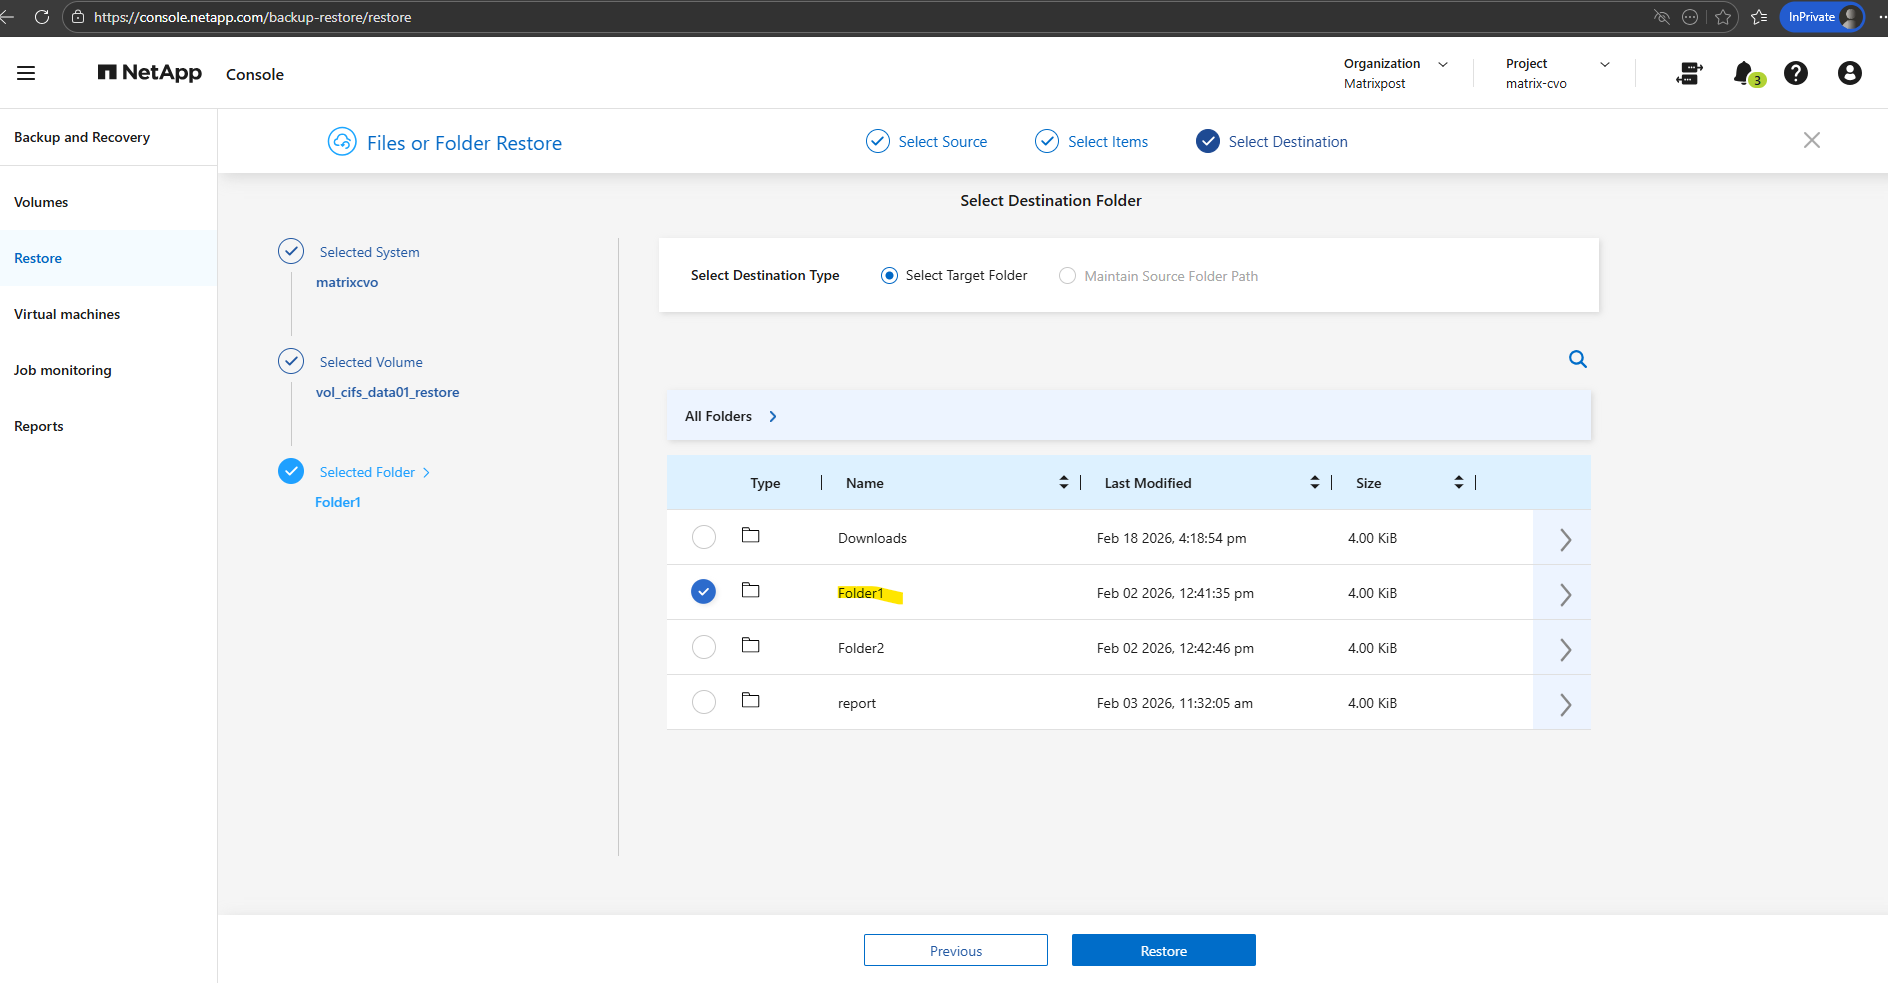
Select the destination folder to restore the file to.
The folder structure for the destination volume in my case is the same as the source volume because already all folders and files were restored to in past.
I will restore the file to Folder1. Finally click on Restore.
Click on Track Progress.
The restore job is queued and will start immediately.
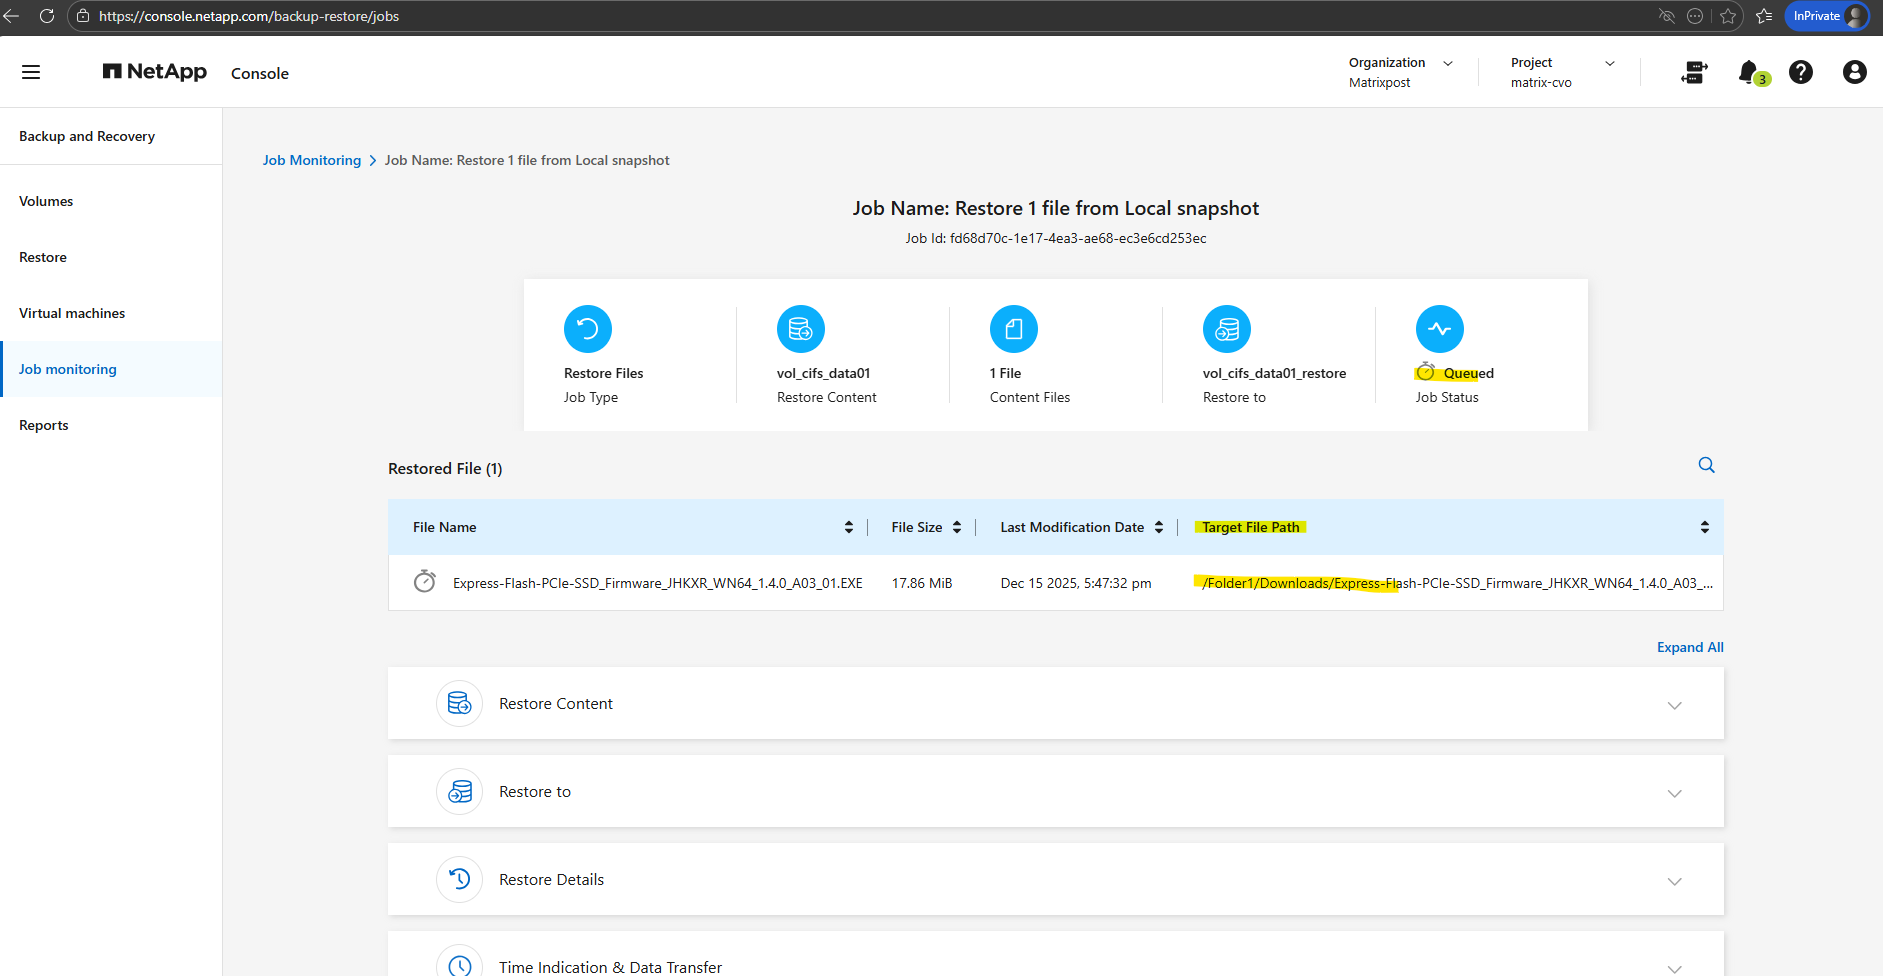
The restore job is in progress.
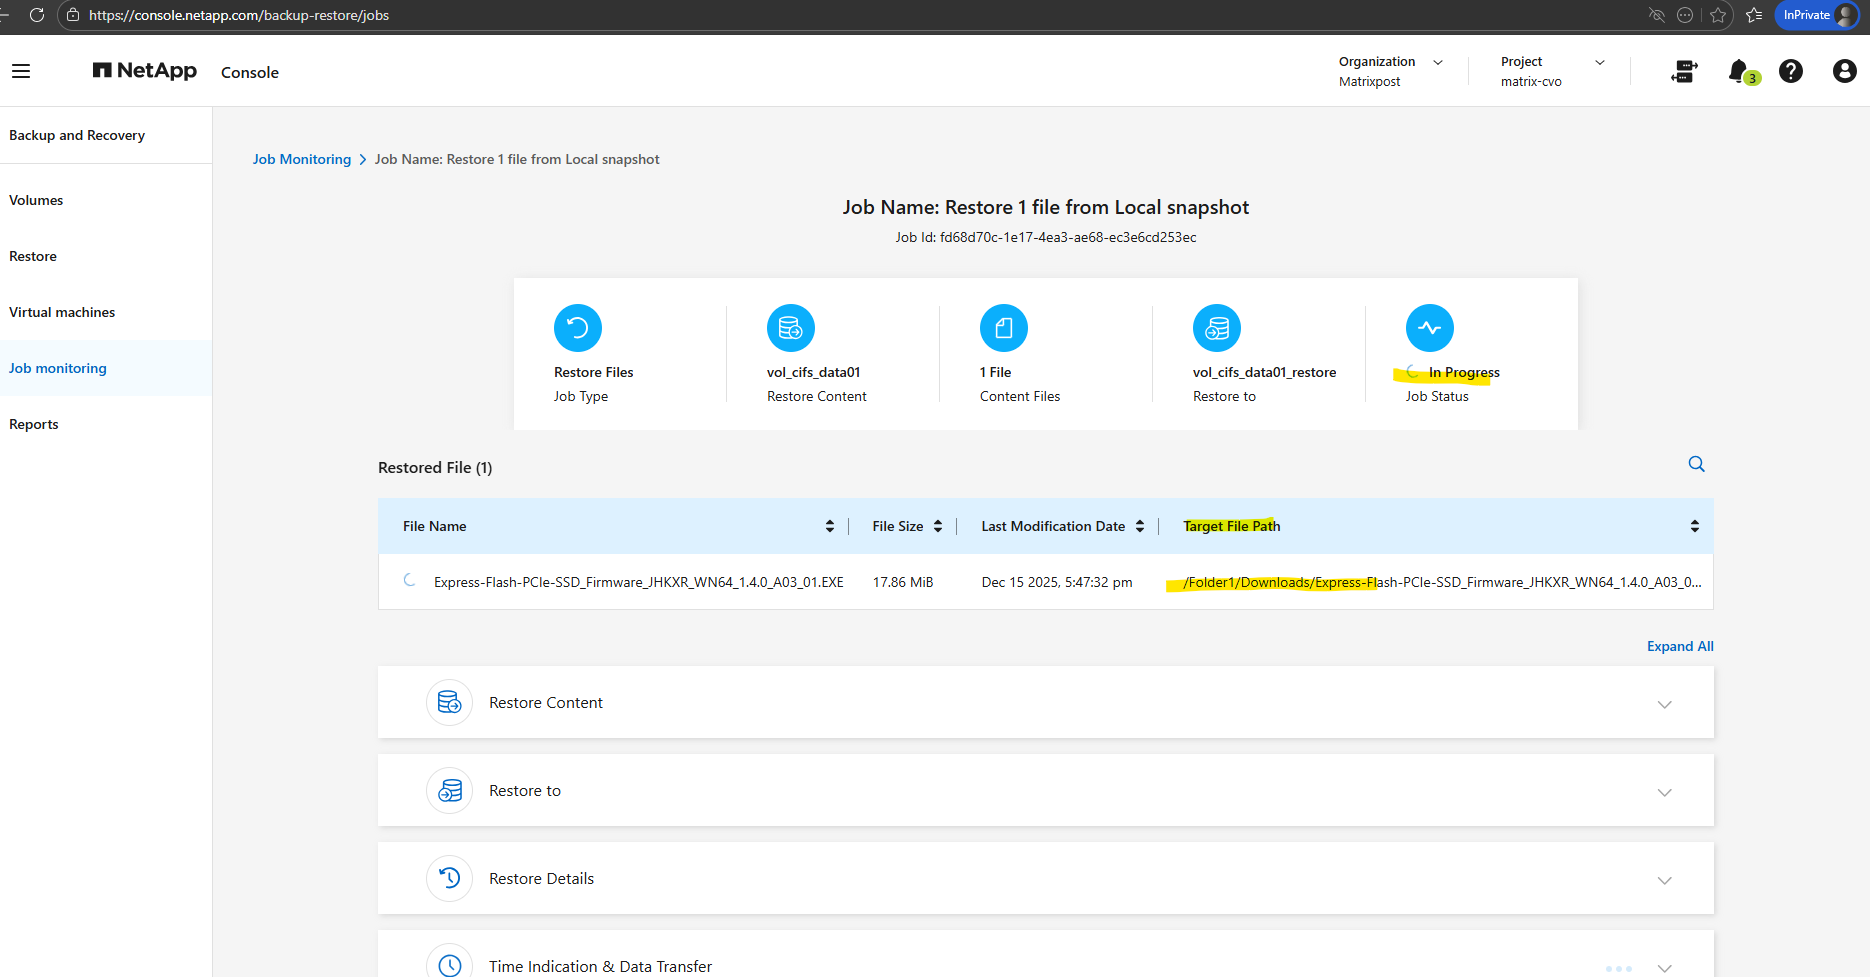
And finally successfully restored.
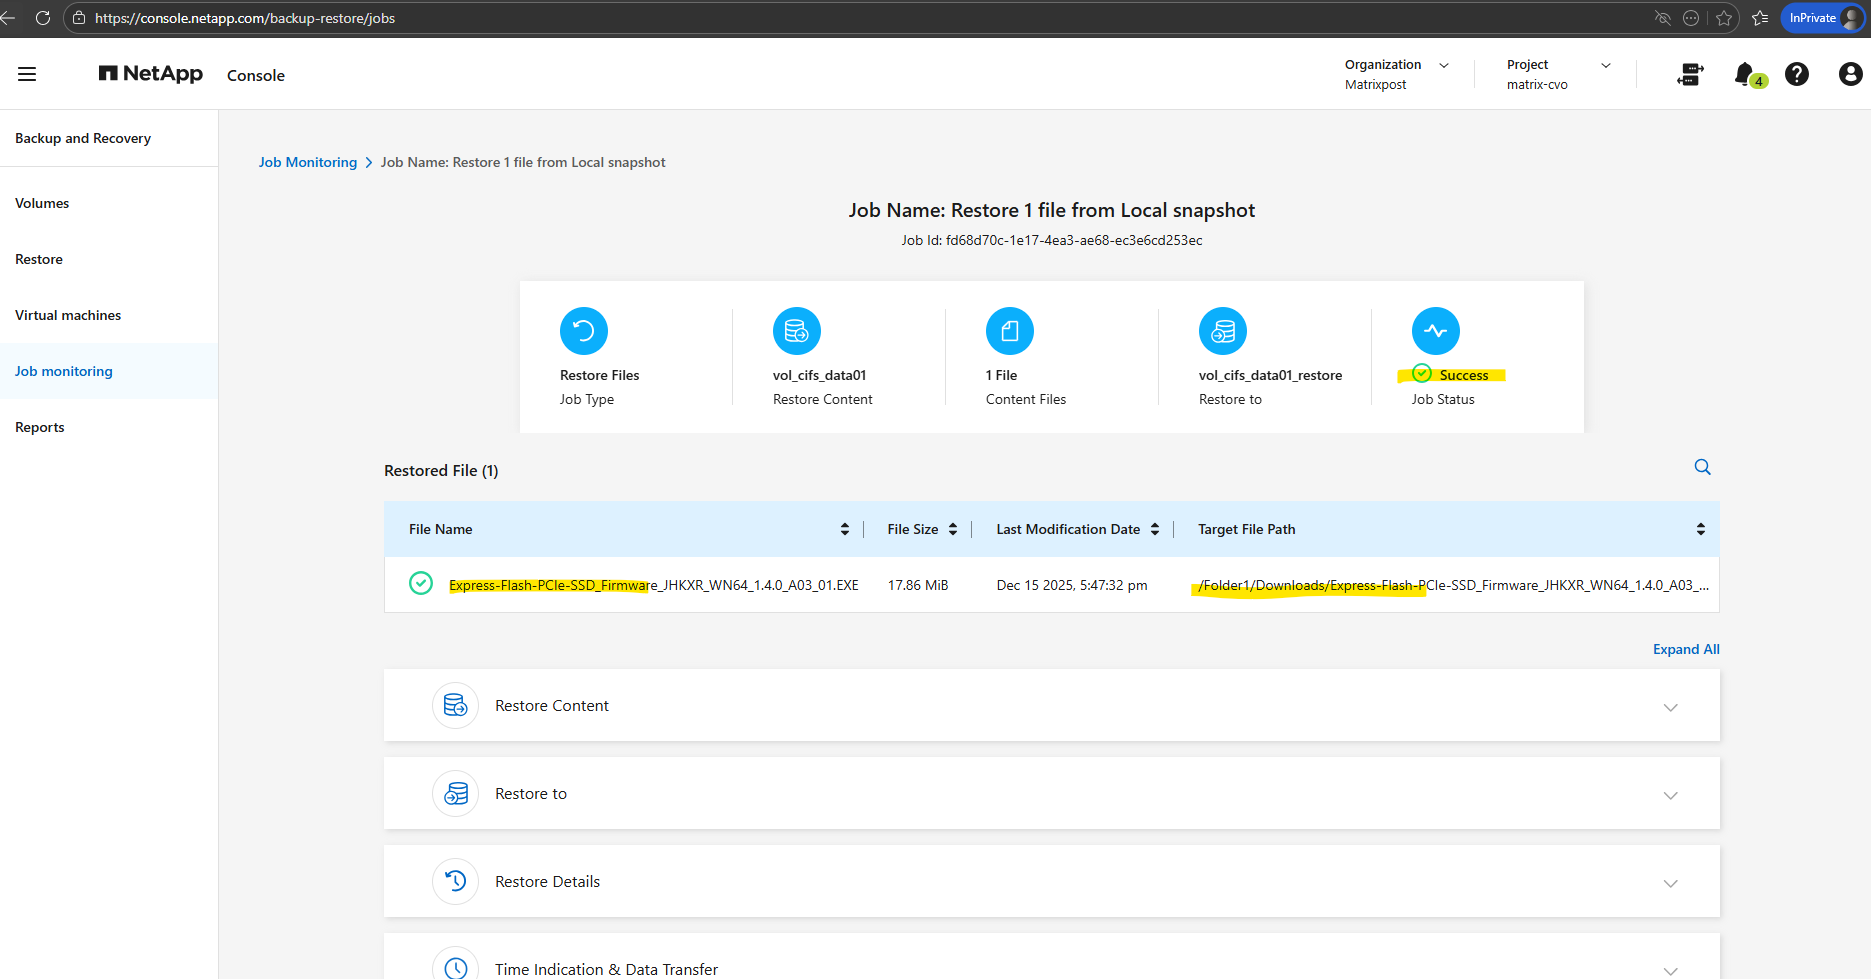
Within the Time Indication & Data Transfer section we will see the job duration for the restore.

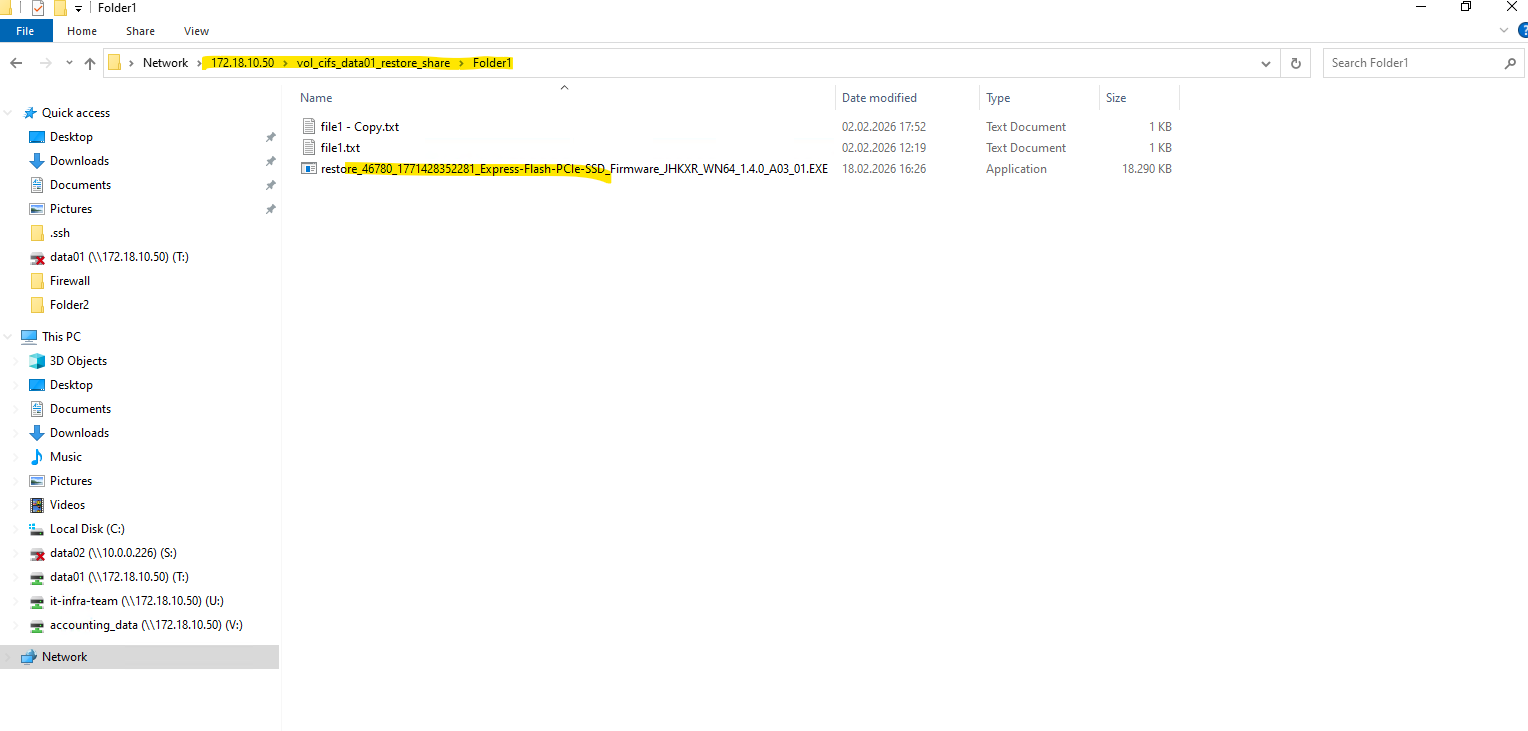
A quick validation on a client with the restored volume mounted confirms everything looks as expected.
When restoring a file from a local Snapshot using the NetApp Console, the restored file is automatically created with a prefixed name (for example,
restore_46780_1771428352281_OriginalFileName). The prefix serves as an internal restore identifier and ensures the restored file can be clearly distinguished from existing data in the destination volume.
Restore a Volume
Below we will see how to restore a volume.
Click on Restore Volume below.
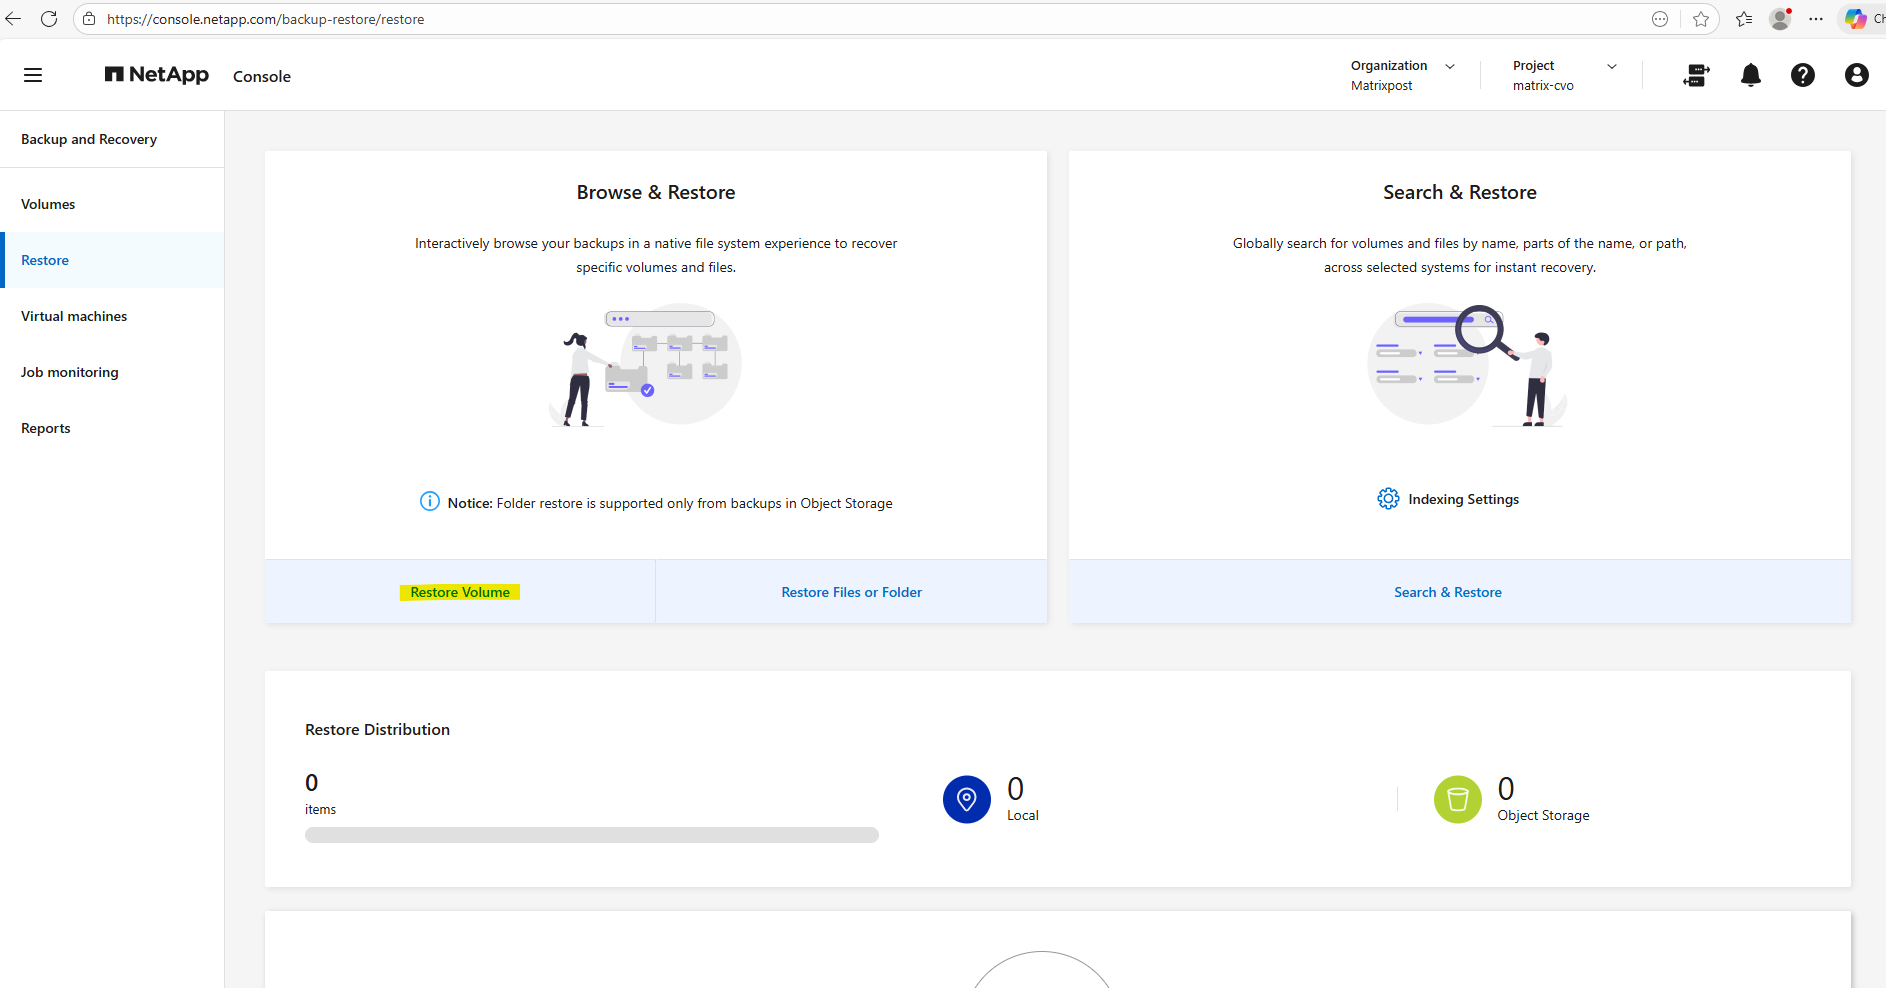
Select your CVO system you want to restore the volume for.
Select the volume you want to restore, I will select the cifs volume.
Below we need to select the source (snapshot or backup) from which we want to restore the volume. Because I want to show how to restore the volume and its files and folders from a snapshot, I will select the first entry below which is the latest snapshot.
Click on Continue.
Snapshots are all where Location is set to Local and backups where Location is set to Object Storage.

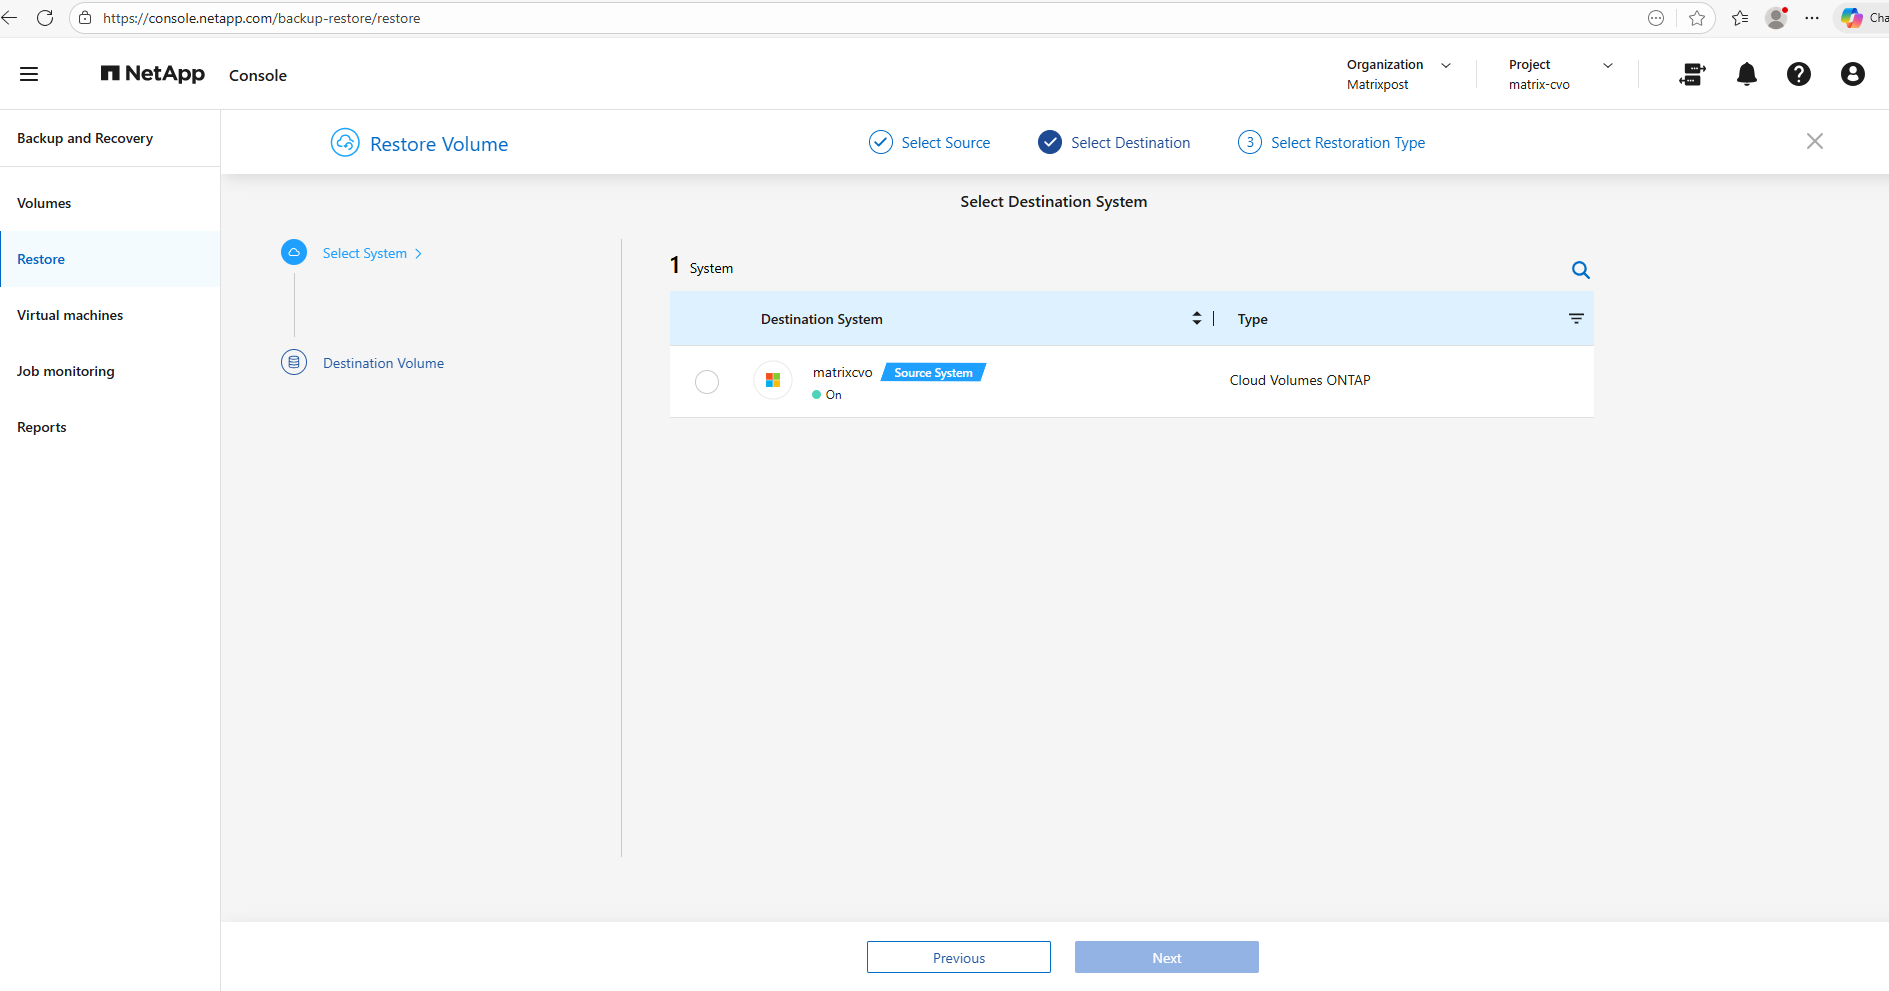
Select the destination CVO system, which is here also the source CVO system.
The NetApp Console also allows restores to an alternate Cloud Volumes ONTAP (CVO) system, providing additional flexibility during recovery operations.
Volumes, as well as individual files and folders, can be restored to a different CVO instance managed by the console, which is particularly useful for test restores, migrations, or disaster recovery scenarios. This capability helps validate backups without impacting the production environment.
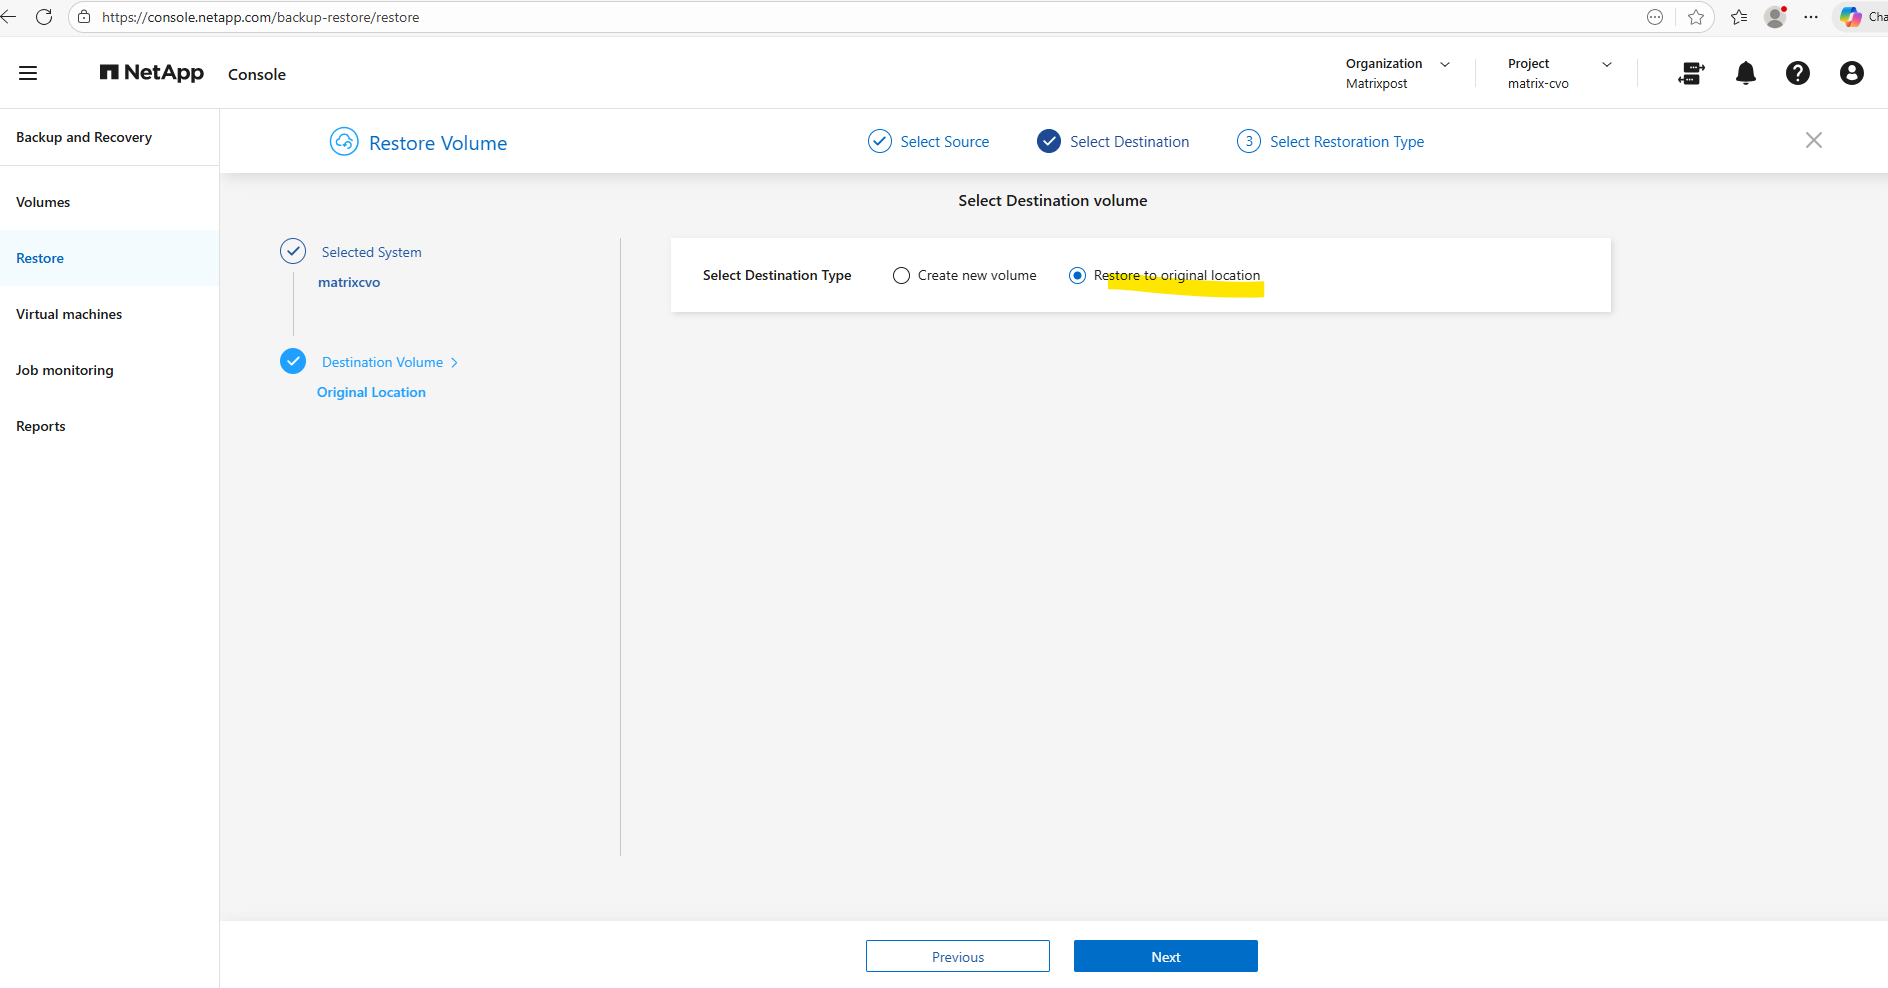
When selecting the destination for a restore, administrators can either create a new volume or choose Restore to original location to place the data back into its source volume.
Restoring to a new volume is ideal for validation, testing, or side-by-side comparisons, while restoring to the original location supports rapid operational recovery. This flexibility allows recovery workflows to be aligned with the specific requirements of the incident.
I want to restore to the original location. Click on Next.
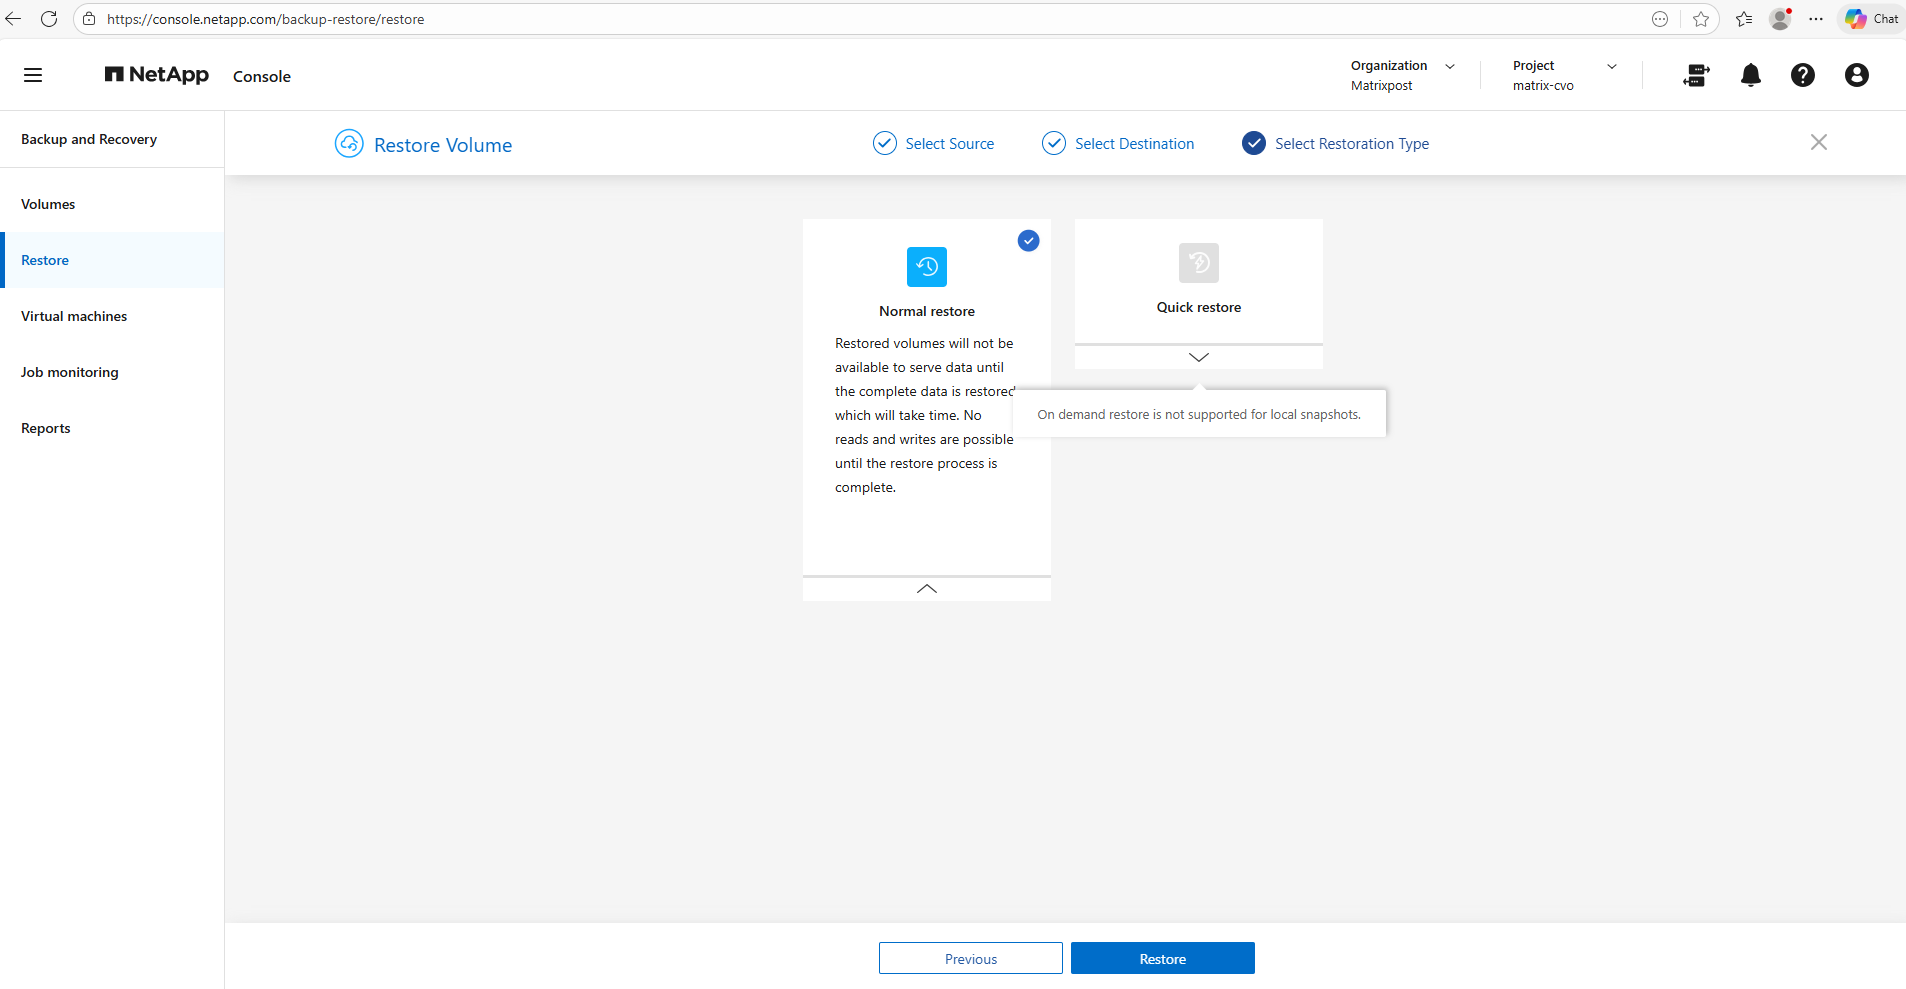
On the final page of the restore wizard, administrators can choose between a Normal restore and a Quick restore option.
Finally click on Restore.
The Quick restore feature is unavailable for local snapshots because on-demand restores are only supported for backups stored in object storage.
As a result, restores from local snapshots must use the normal restore process, which still provides fast recovery directly from the storage system.
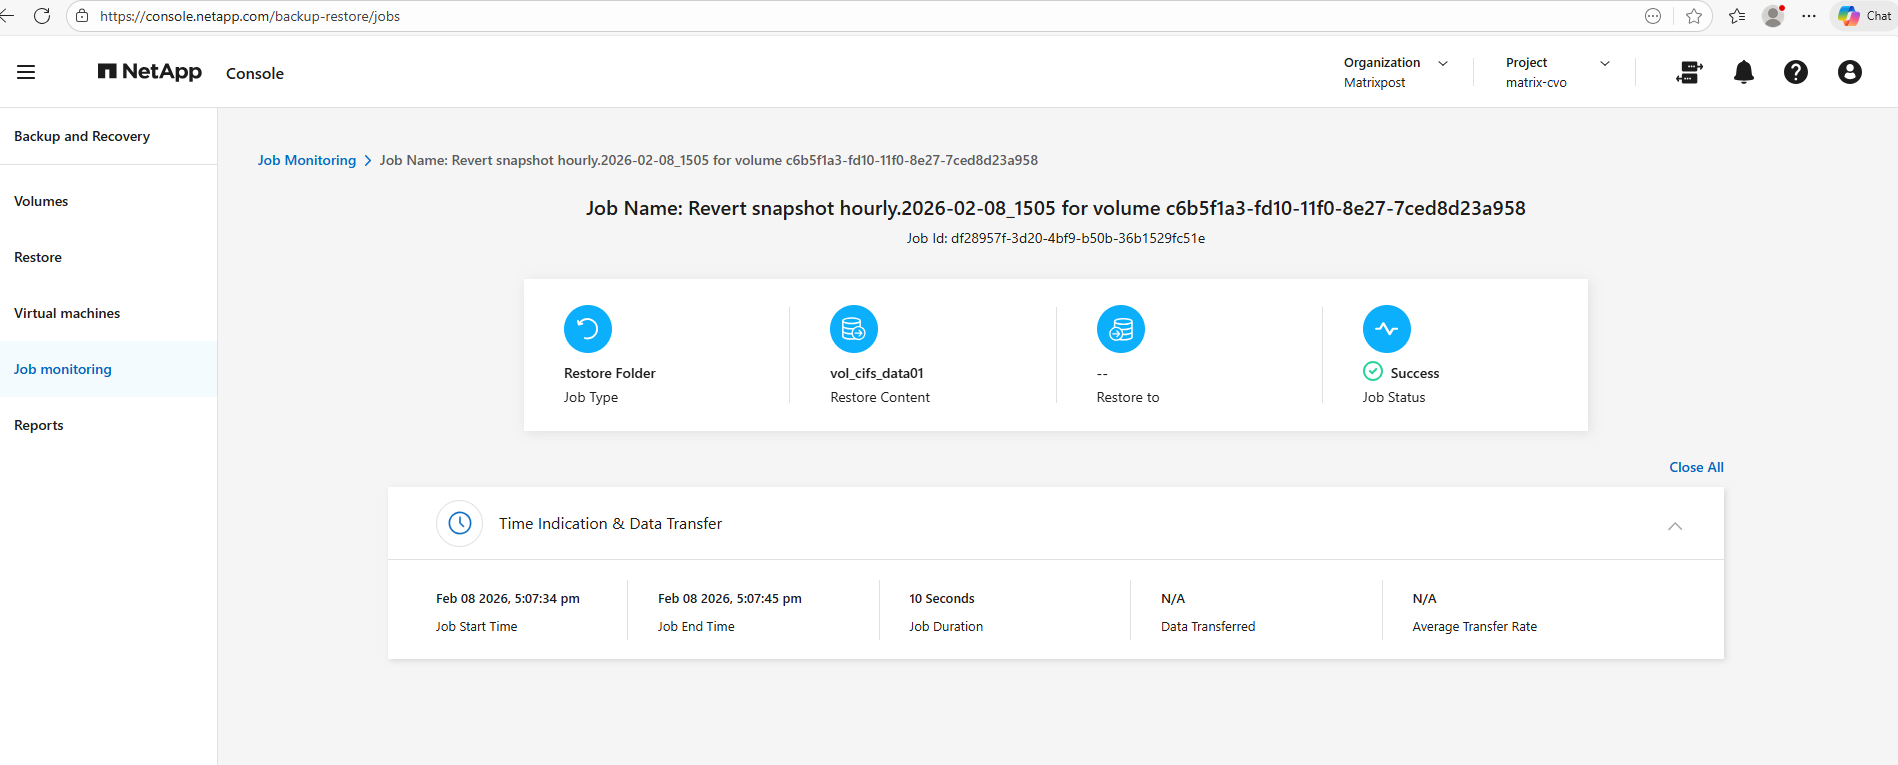
The restored volume will not be available to serve data until the recovery process has fully completed. During this time, no read or write operations are permitted, as ONTAP must first reconstruct the entire dataset to ensure consistency. Depending on the volume size, this process can take some time and should be considered when planning recovery operations.

Snapshot-based restores are typically extremely fast because ONTAP reverts the volume to a previous point-in-time instead of copying the entire dataset.
In this lab environment, restoring approximately 600 MB completed in about 10 seconds, highlighting the near-instant recovery capability that makes snapshots such an efficient data protection mechanism.
Restore via ONTAP CLI
Restores can be performed directly through the ONTAP CLI by accessing the snapshot namespace. This method provides maximum flexibility and is particularly useful for granular recovery operations or advanced troubleshooting scenarios.
Individual Files and Folders
Below I will first restore a file stored on a CIFS/SMB share and next on a NFS export. Both follows the same underlying process since ONTAP performs the recovery at the storage layer independent of the access protocol.
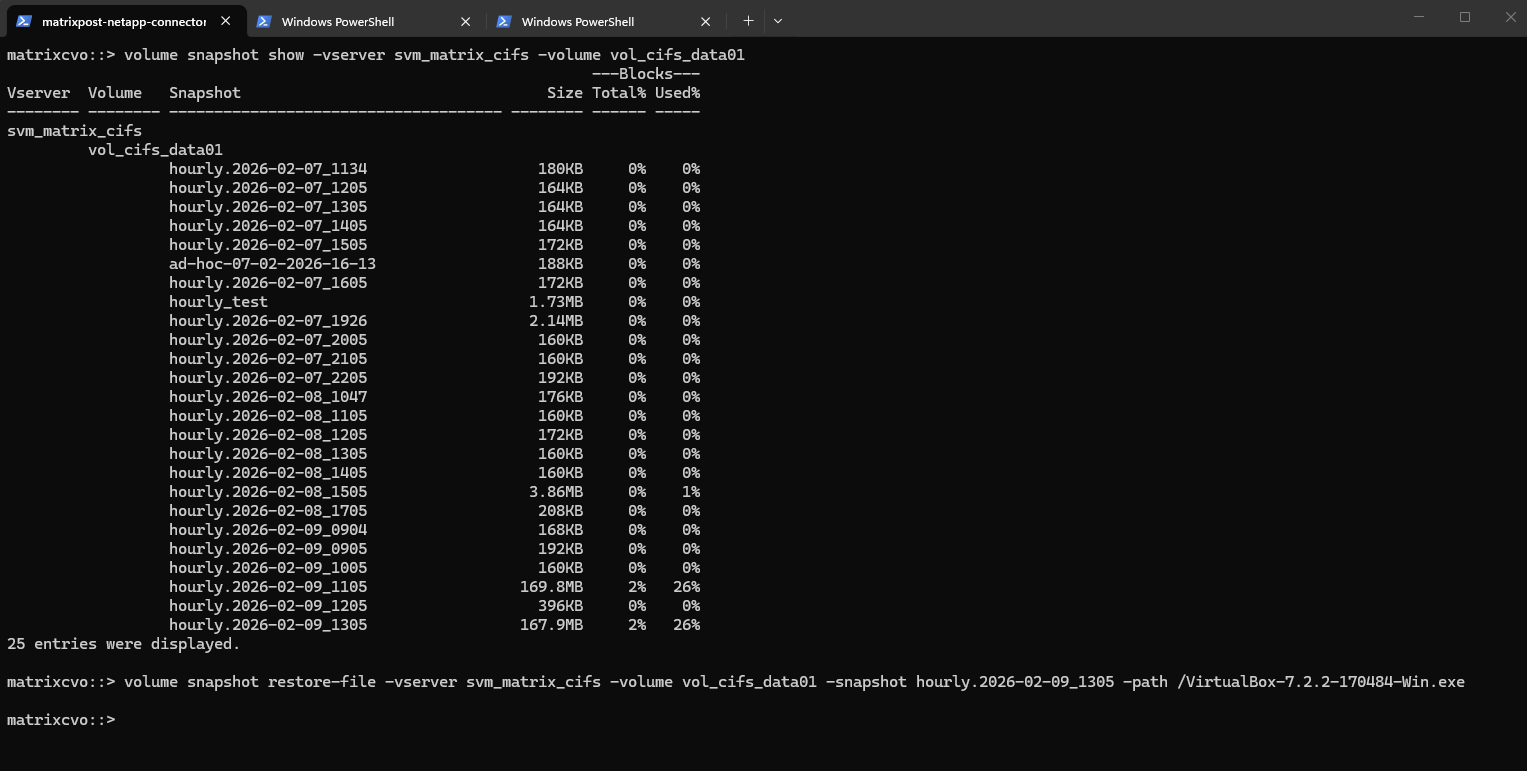
First, the available snapshots for the volume are listed to identify a suitable recovery point. Next, the
volume snapshot restore-filecommand is used to restore a specific file directly from the selected snapshot, enabling fast and granular recovery without reverting the entire volume.The
-pathparameter specifies the file path relative to the volume, starting immediately after the junction path where the volume is mounted.
# List the snapshots in a specific volume:
matrixcvo::> volume snapshot show -vserver svm_matrix_cifs -volume vol_cifs_data01

# Restore a file from a snapshot: (as you remember because oth the -path, the file is placed directly on the root of the cifs share)
matrixcvo::> volume snapshot restore-file -vserver svm_matrix_cifs -volume vol_cifs_data01 -snapshot hourly.2026-02-09_1305 -path /VirtualBox-7.2.2-170484-Win.exe
Next I will do the same but this time I will recover a NFS export file.
As already mentioned, restoring files from an NFS export follows the same underlying process as with CIFS/SMB shares, since ONTAP performs the recovery at the storage layer independent of the access protocol.
By listing the available snapshots and executing a file-level restore, individual files can be recovered quickly without impacting the rest of the volume.
The
-pathparameter specifies the file path relative to the volume, starting immediately after the junction path where the volume is mounted.
matrixcvo::> volume snapshot show -vserver svm_matrix_nfs -volume vol_nfs_data01
matrixcvo::> volume snapshot restore-file -vserver svm_matrix_nfs -volume vol_nfs_data01 -snapshot hourly.2026-02-09_1205 -path /testfile2.txt
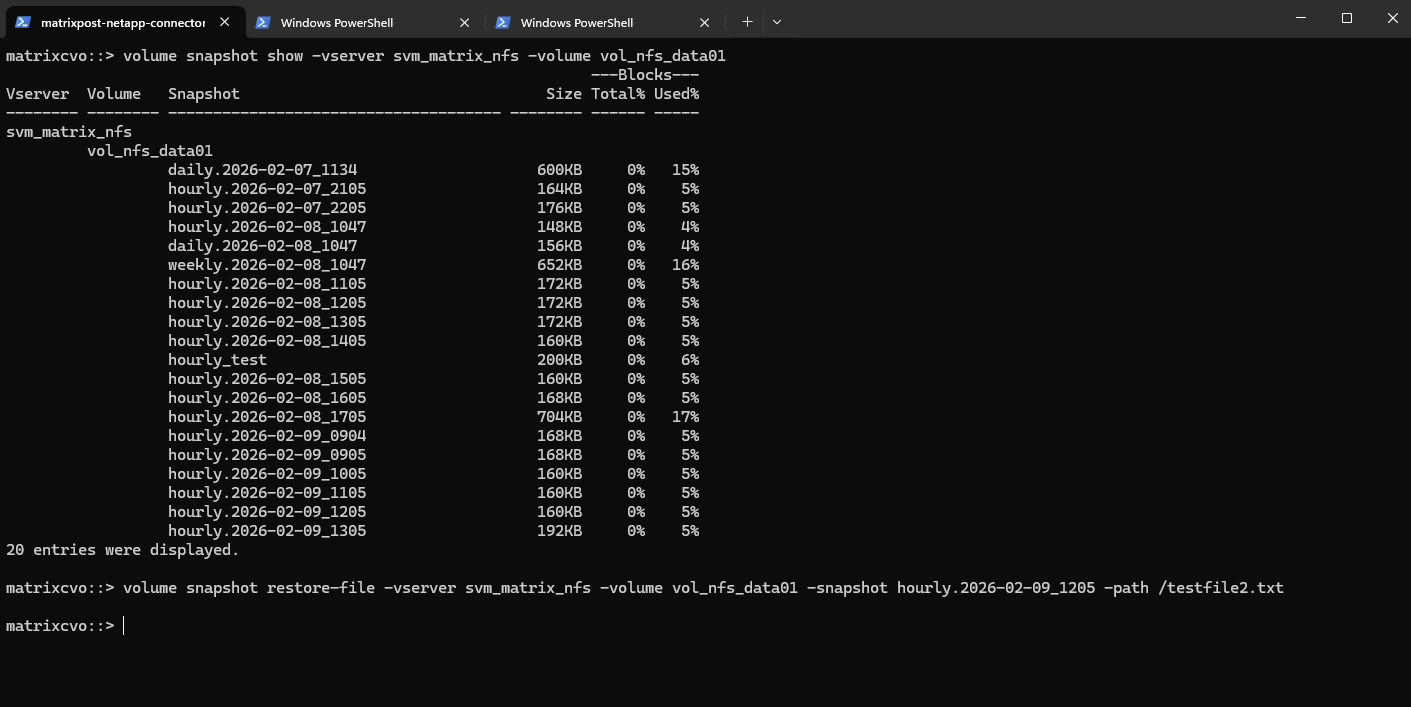
For testing purposes, I deleted the file testfile2.txt and then restored it from the snapshot to validate the recovery workflow. A quick verification confirmed that the file was successfully restored.
More about you will also find here https://docs.netapp.com/us-en/ontap/data-protection/restore-single-file-snapshot-task.html.
A complete Volume
Restoring an entire volume from a snapshot allows you to quickly revert the filesystem to a previous point in time, effectively undoing unwanted changes such as accidental deletions or data corruption.
Because NetApp snapshots are metadata-based, the restore operation completes almost instantly regardless of volume size.
!! Note !!
However, since this process replaces the active filesystem, it should be used with caution and ideally validated beforehand using a FlexClone as shown in the next section below.
The volume snapshot restore command does NOT create a new volume. It performs an in-place revert of the existing volume to the selected snapshot.
The current active filesystem is replaced, all changes made after the snapshot are lost. The volume name stays exactly the same.
This is fundamentally different from the NetApp console / backup-to-object-storage restores, where NetApp intentionally creates a new volume (for safety and side-by-side recovery).
ONTAP will usually require confirmation because the operation is disruptive and irreversible.
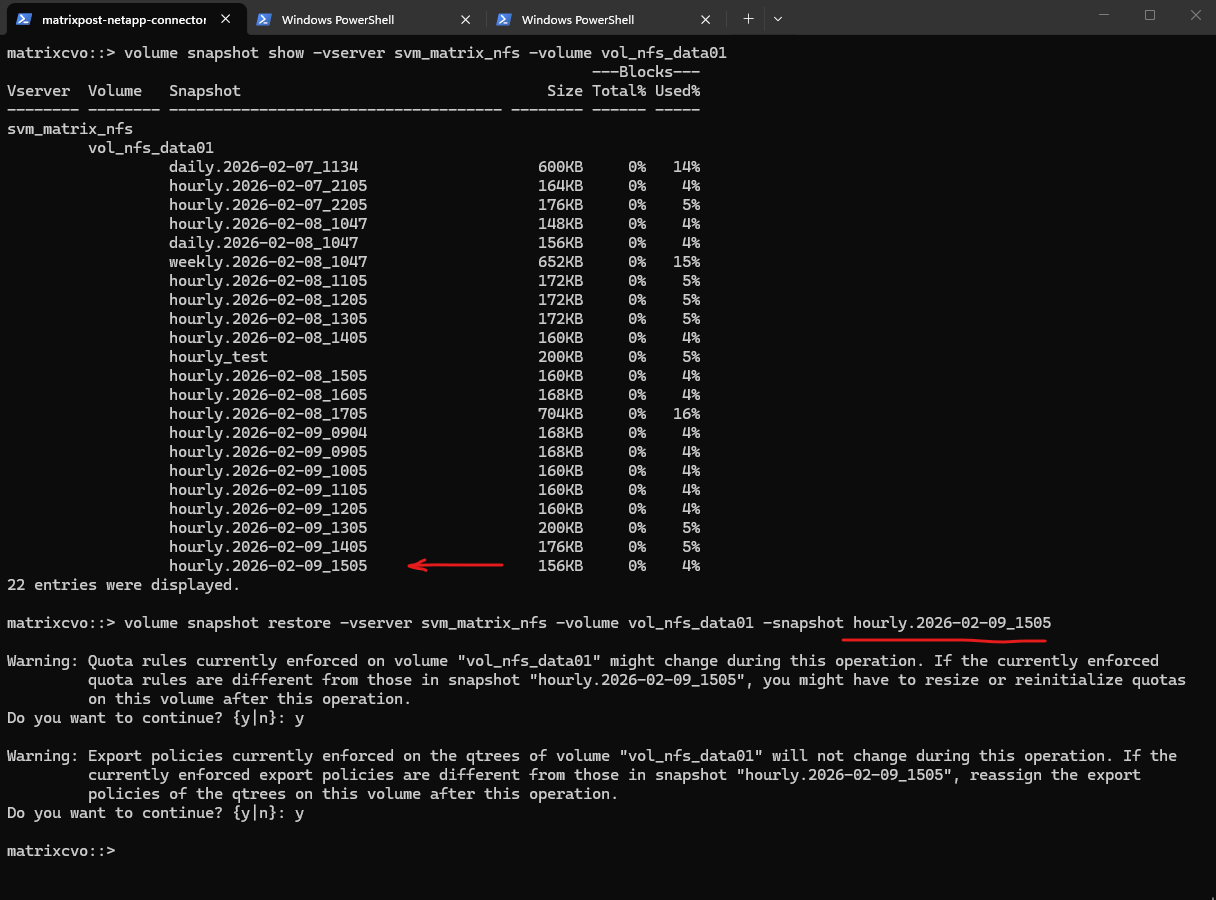
matrixcvo::> volume snapshot show -vserver svm_matrix_nfs -volume vol_nfs_data01
matrixcvo::> volume snapshot restore -vserver svm_matrix_nfs -volume vol_nfs_data01 -snapshot hourly.2026-02-09_1505
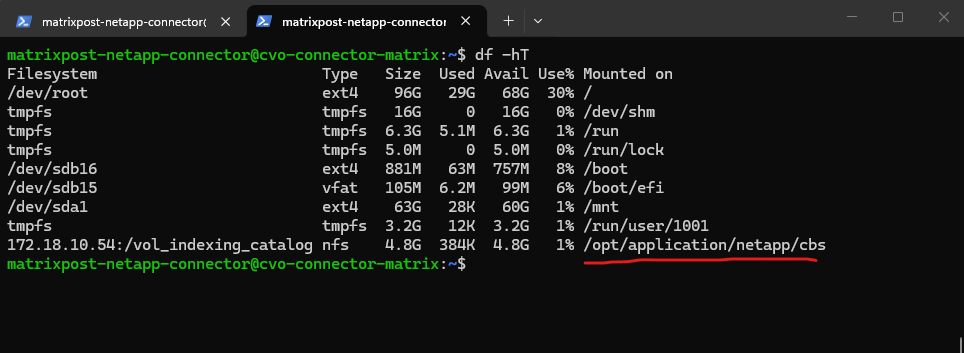
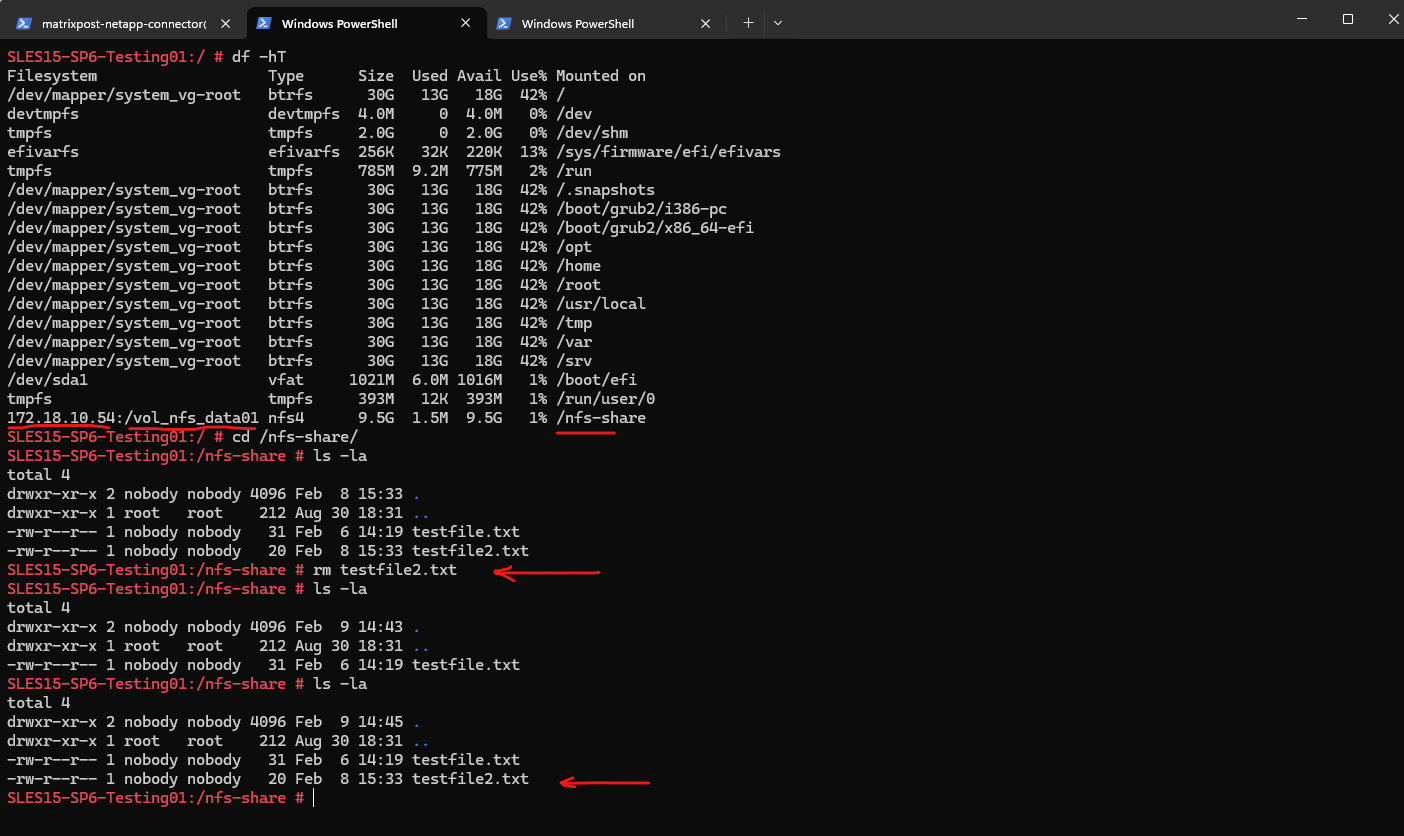
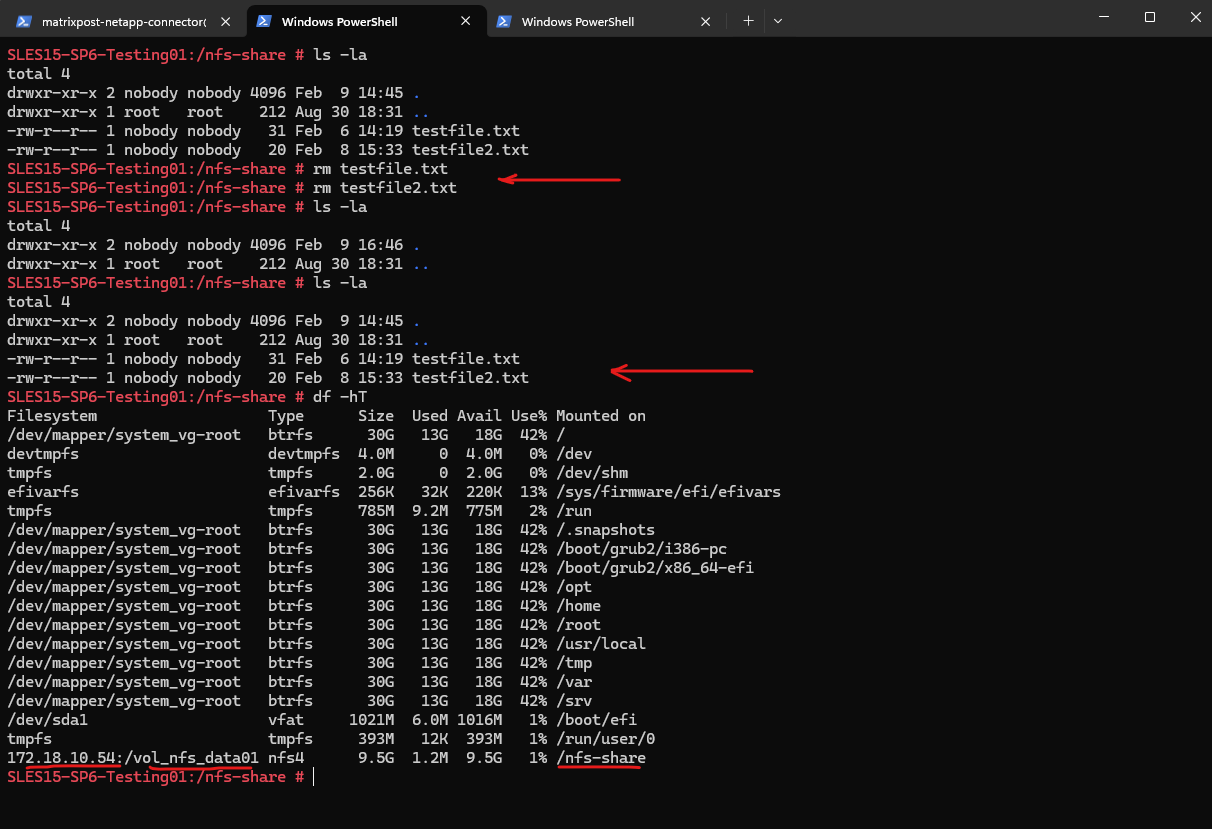
To verify the restore, both test files were deleted from the mounted NFS share and the directory was confirmed to be empty.
After reverting the volume to the selected snapshot, the files immediately reappeared with their original timestamps, proving that the filesystem had been successfully rolled back.
The
df -hToutput further confirmed that the client was still properly mounted to the NFS volume, validating end-to-end data availability after the restore.
Test Before a Complete Volume Restore with FlexClone
Before performing a potentially destructive volume restore, it is often safer to validate the snapshot first. Using a FlexClone allows you to inspect and test the recovery state without impacting the active production volume.
First, identify the desired snapshot for the volume and create a FlexClone from it to obtain a writable copy that can be safely validated without impacting the active production data.
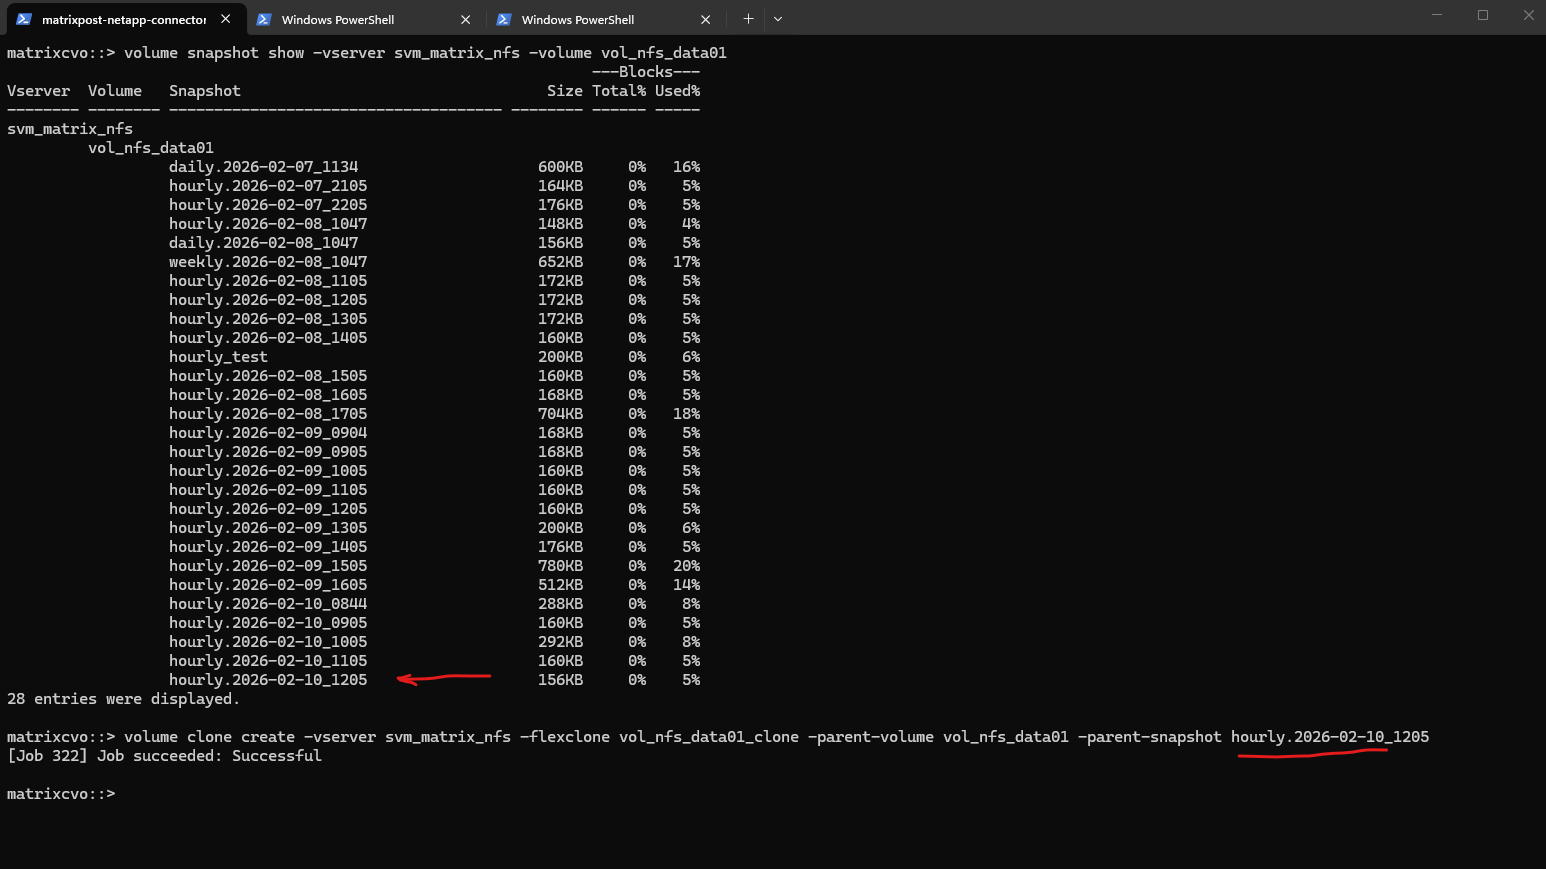
# checking available snapshots for a specific volume
matrixcvo::> volume snapshot show -vserver svm_matrix_nfs -volume vol_nfs_data01

# create the FlexClone
matrixcvo::> volume clone create -vserver svm_matrix_nfs -flexclone vol_nfs_data01_clone -parent-volume vol_nfs_data01 -parent-snapshot hourly.2026-02-10_1205
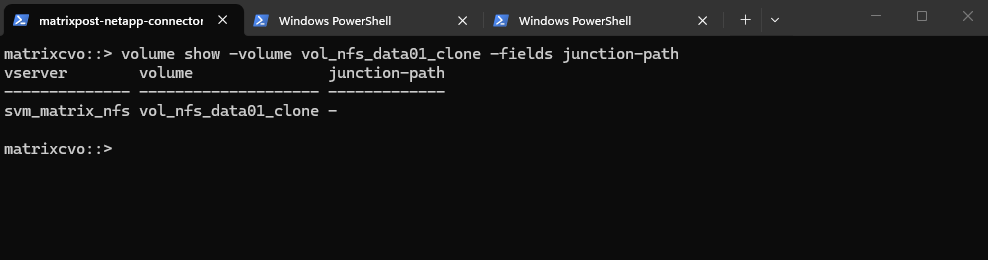
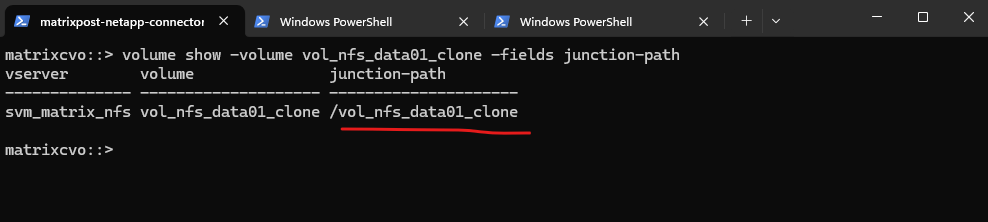
Check if it our new FlexClone volume is already auto-mounted, usually not like shown below.
matrixcvo::> volume show -volume vol_nfs_data01_clone -fields junction-path
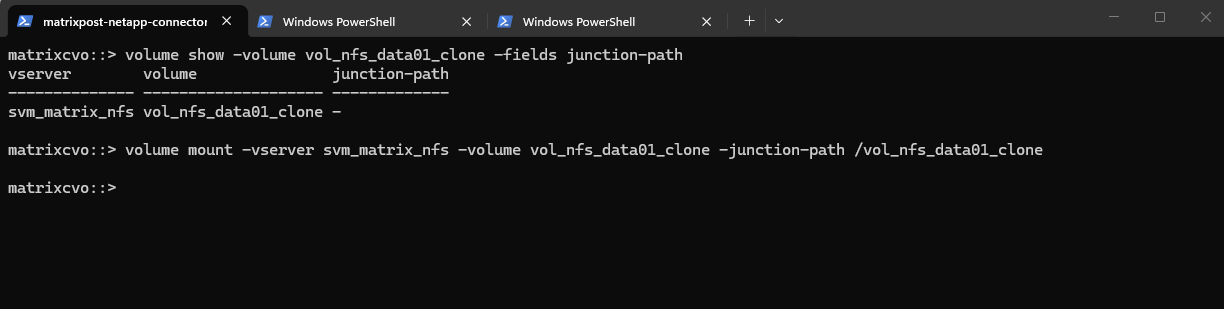
If not auto-mounted we can mount the FlexClone volume by running:
matrixcvo::> volume mount -vserver svm_matrix_nfs -volume vol_nfs_data01_clone -junction-path /vol_nfs_data01_clone
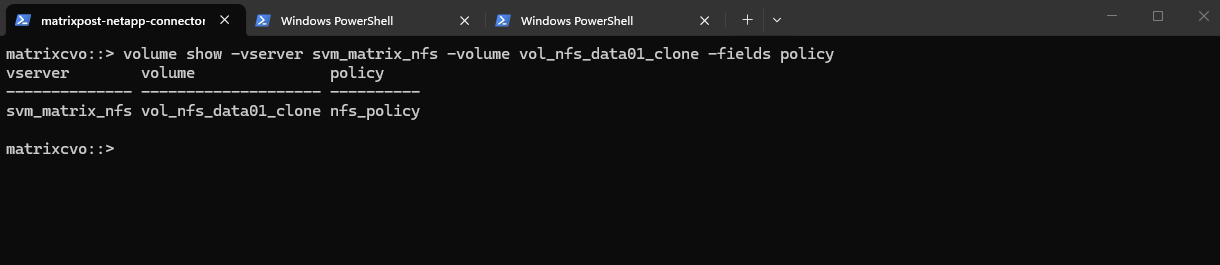
The clone inherits the parent export policy, to verify:
The clone inherited the export policy because a FlexClone is basically a metadata copy of the parent volume at a specific snapshot point.
matrixcvo::> volume show -vserver svm_matrix_nfs -volume vol_nfs_data01_clone -fields policy
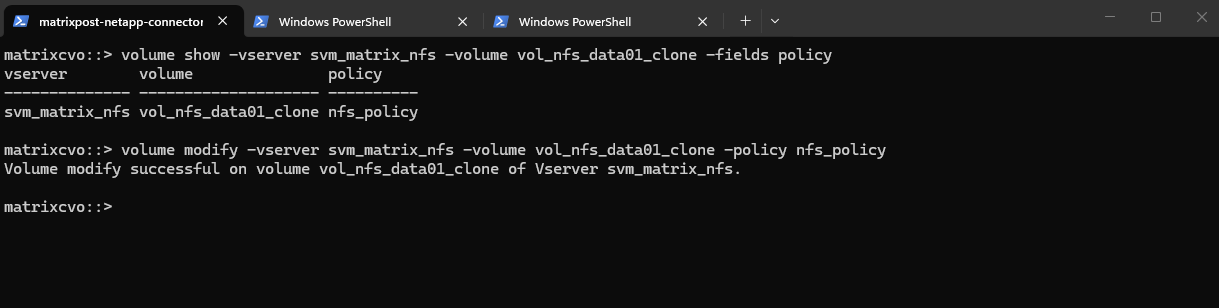
If not inherited we can explicitly assign it by running:
matrixcvo::> volume modify -vserver svm_matrix_nfs -volume vol_nfs_data01_clone -policy nfs_policy
We can now mount the FlexClone volume on a test host, first I want to obtain the mount path by checking the junction-path for the volume again.
matrixcvo::> volume show -volume vol_nfs_data01_clone -fields junction-path
The full mount path we can obtain by using the System Manager.
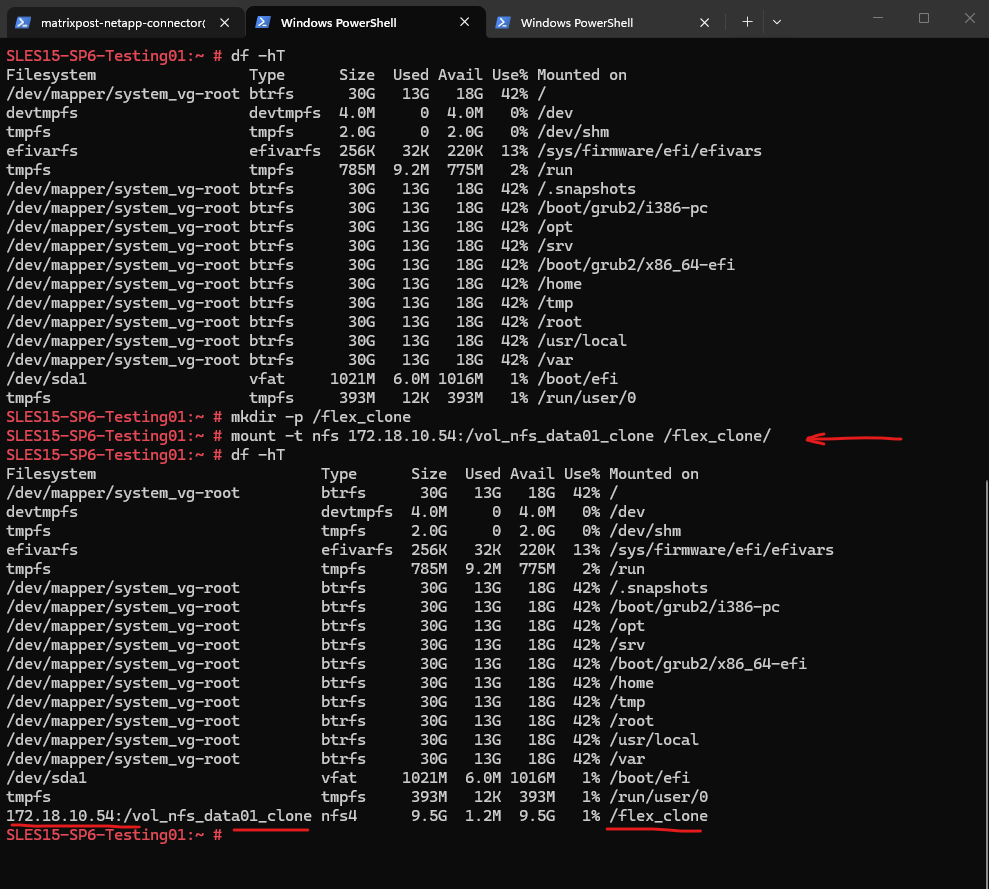
We can now mount the FlexClone volume to a dedicated folder on the test system to validate the content.
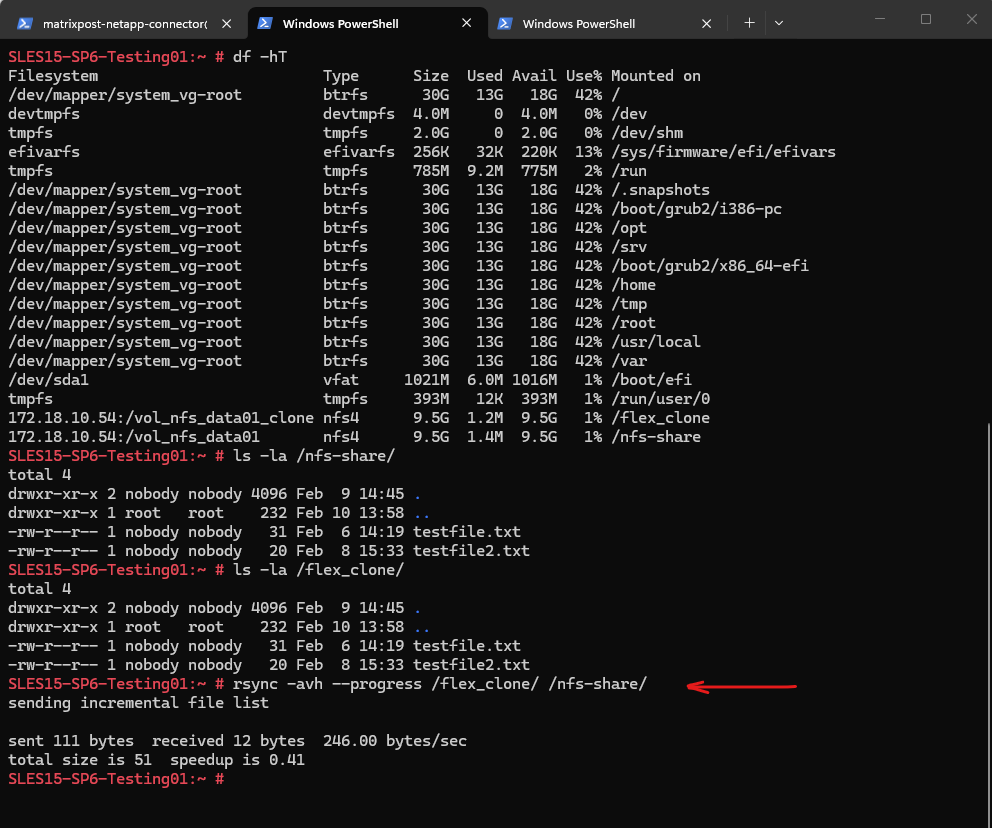
# mount -t nfs 172.18.10.54:/vol_nfs_data01_clone /flex_clone/
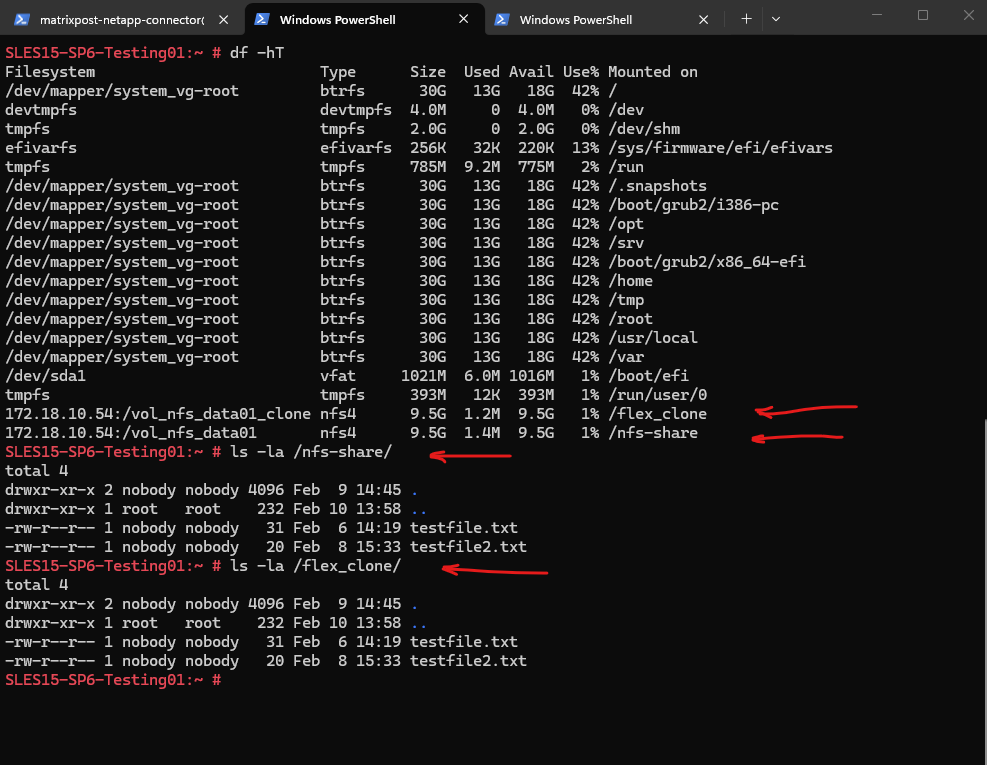
In my case the validation for my lab environment is easy as I just stored two files on the origin nfs volume.
Once the FlexClone is mounted and you have verified that the snapshot contains the desired data, you have two recommended recovery paths depending on the situation.
The right choice mainly depends on whether you want a granular recovery or a full rollback while preserving a safety net.
Option A – Copy Data Back (Most Common)
Use this method when only specific files or folders need to be recovered and the production volume should remain online.
Mount the FlexClone to a test host, locate the required data, and copy it back to the active volume using tools such as rsync (Linux), cp (Linux), or robocopy (Windows).
- Zero disruption to production
- No client reconnects
- Very low operational risk
- Ideal for accidental deletions
- Allows surgical recovery instead of full rollback
Source:
/flex_clone/(FlexClone, snapshot data)
Destination:/nfs-share/(active production volume)We are synchronizing from the clone into production, which is precisely what you want for recovery.
# rsync -avh --progress /flex_clone/ /nfs-share/

# Dry Run by using the -n flag -> no changes made
# rsync -avhn /flex_clone/ /nfs-share/
Option B – Replace Production with the Clone
If the snapshot clearly represents the desired state of the entire dataset, you can promote the FlexClone to become the new production volume. Instead of performing a destructive snapshot restore, simply swap the volumes.
When promoting a FlexClone to production, the volume name and the NAS namespace must be handled separately. Unmounting the clone before renaming and remounting it at the original junction path ensures existing NFS client mounts continue to work without stale handles.
# take the origin volume we want to replace with our FlexClone volume offline
matrixcvo::> volume offline -vserver svm_matrix_nfs -volume vol_nfs_data01

# rename it
matrixcvo::> volume rename  -vserver svm_matrix_nfs -volume vol_nfs_data01 -newname vol_nfs_data01_old

# unmount the FlexClone volume
matrixcvo::> volume unmount -vserver svm_matrix_nfs -volume vol_nfs_data01_clone

# rename the FlexClone volume into the name of the origin name of the volume we want to replace
matrixcvo::> volume rename  -vserver svm_matrix_nfs -volume vol_nfs_data01_clone -newname vol_nfs_data01

# mount the FlexClone volume to the origin junction-path to not break existing mounts on clients
matrixcvo::> volume mount -vserver svm_matrix_nfs -volume vol_nfs_data01 -junction-path /vol_nfs_data01
- The original volume remains available as a fallback
- Recovery is reversible
- Enables additional file restores if needed later
- Reduces operational risk
After some time, once all stakeholders have confirmed that the volume swap was successful and no additional recovery is required, the old volume can be safely removed. Since the original volume was kept offline and renamed, it serves as a rollback option until final confirmation.
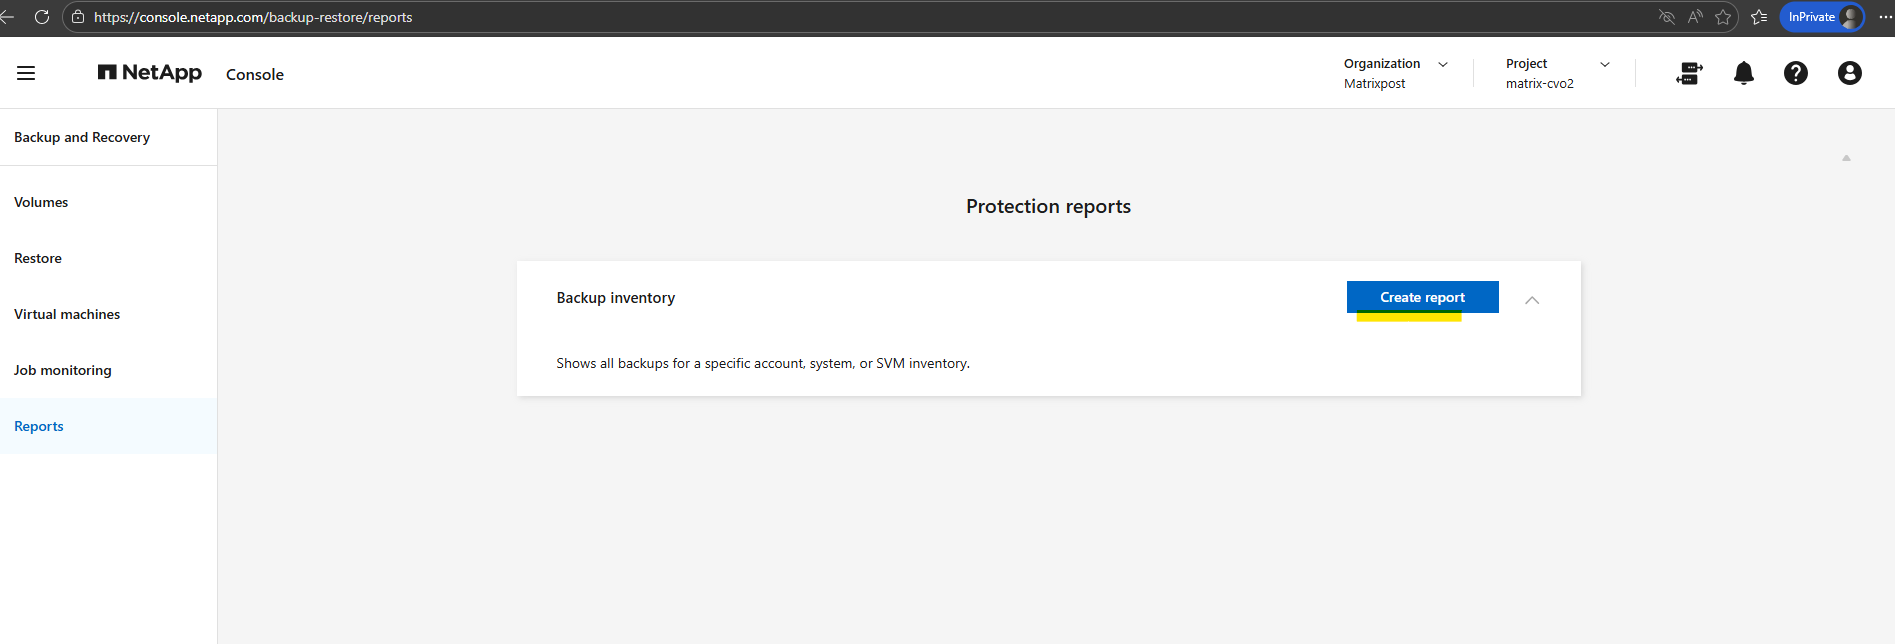
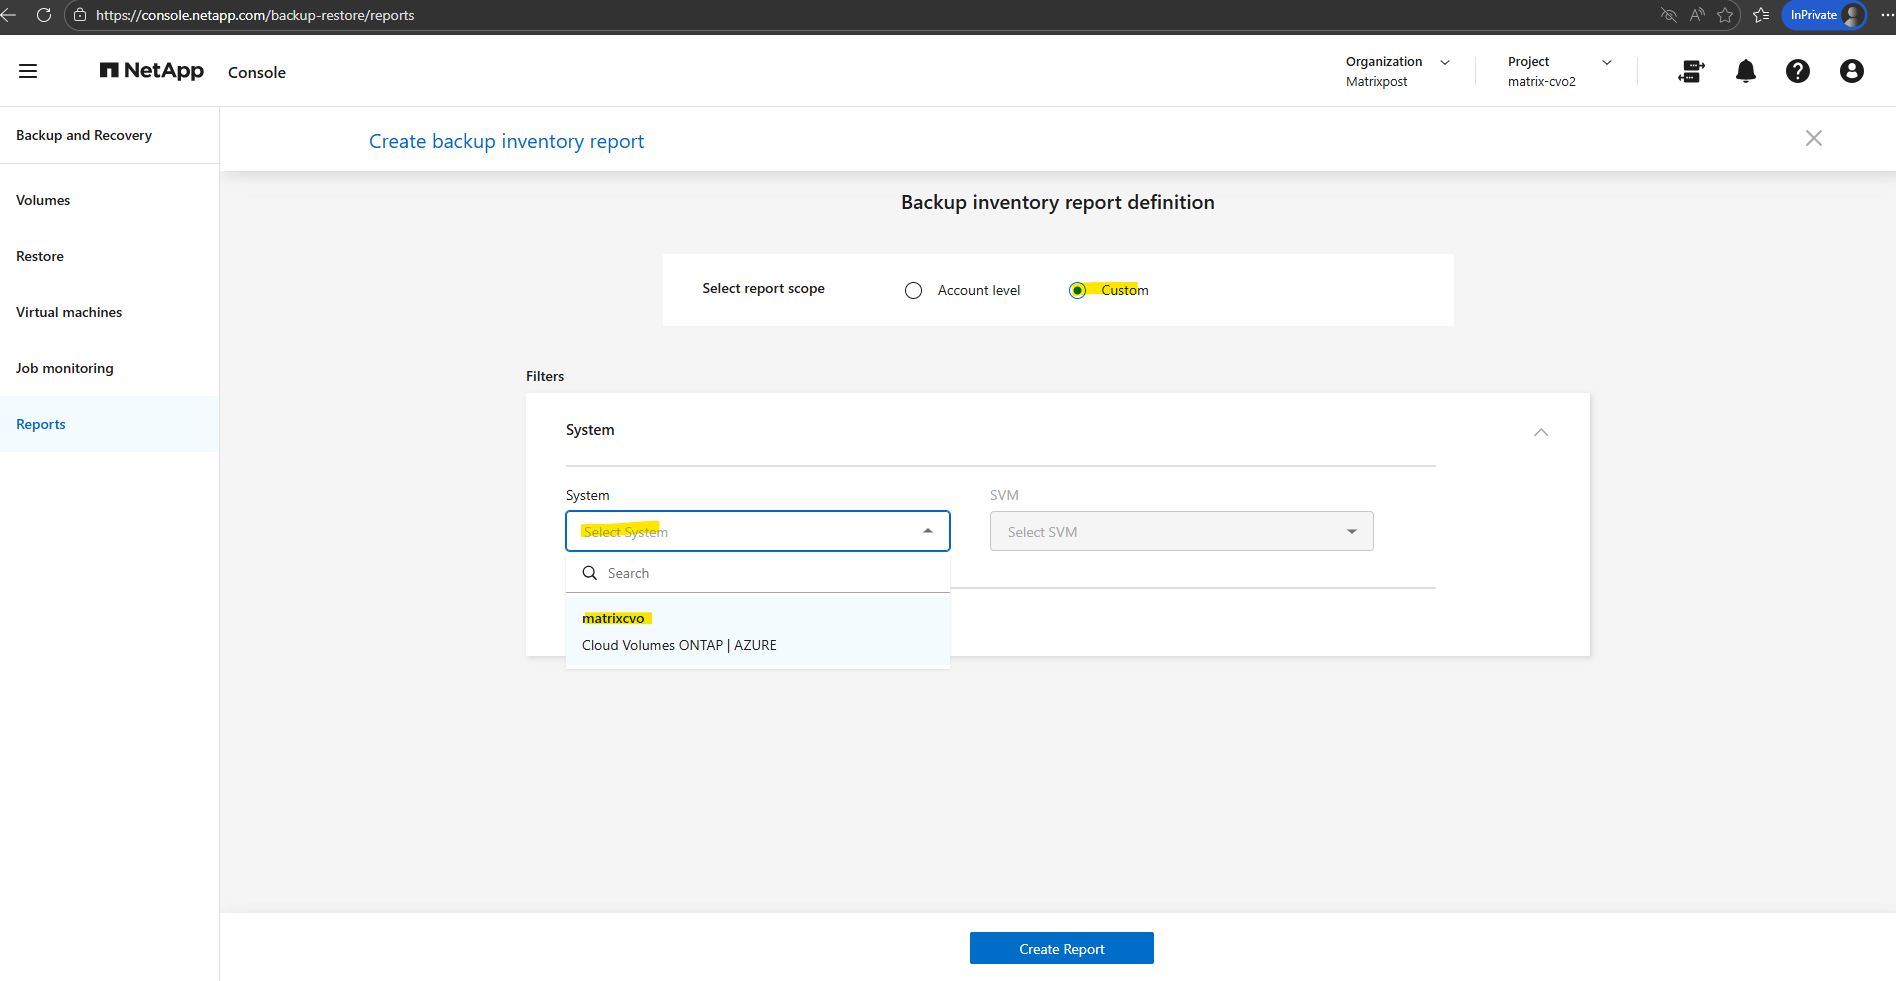
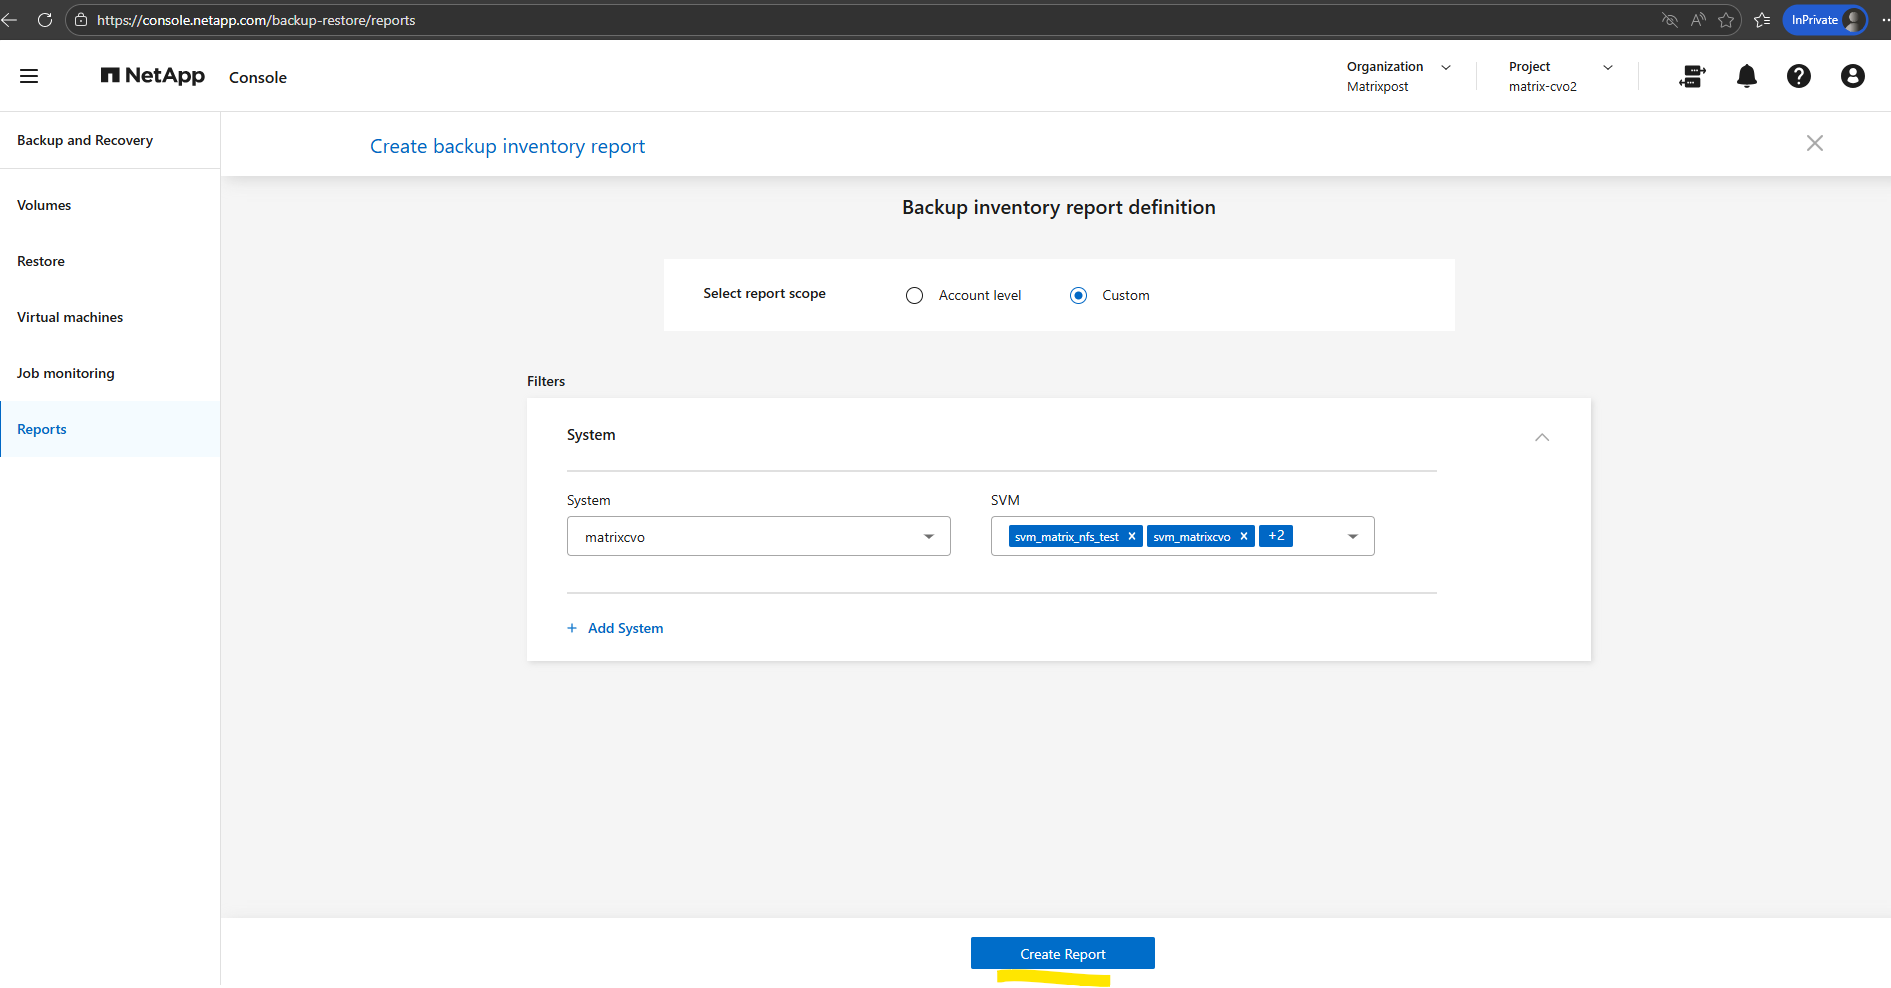
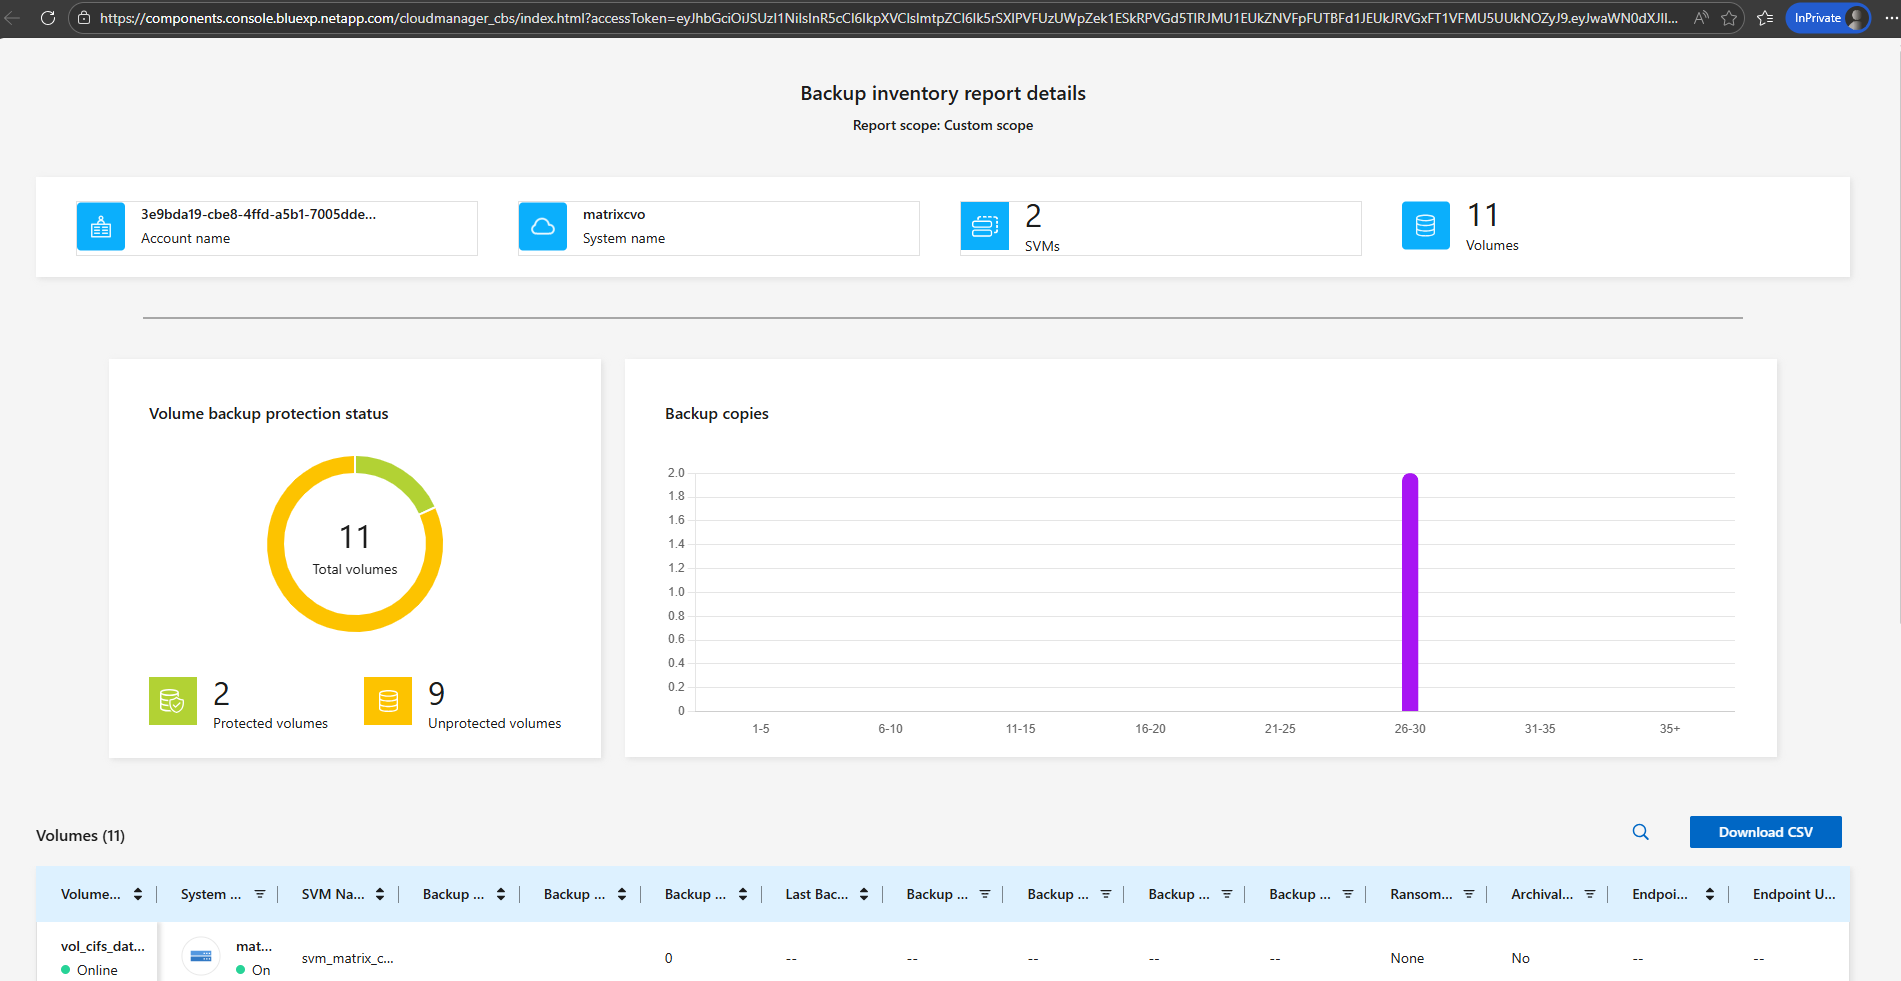
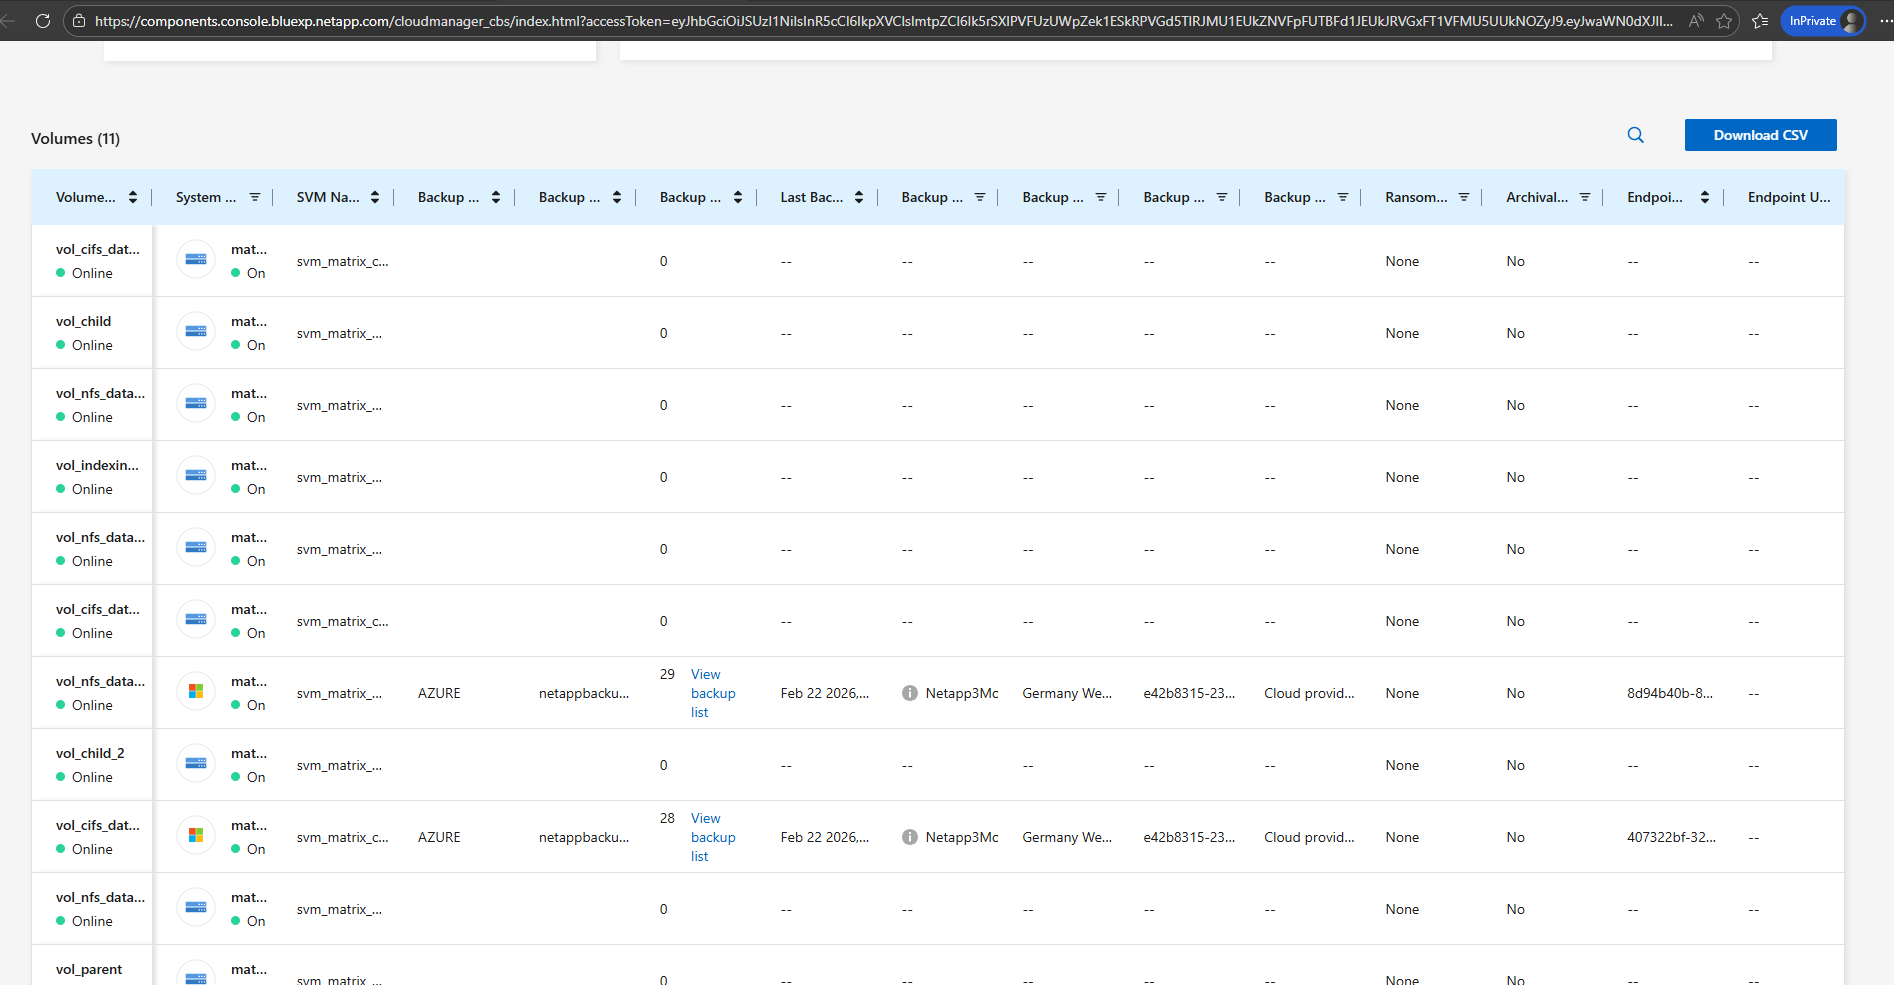
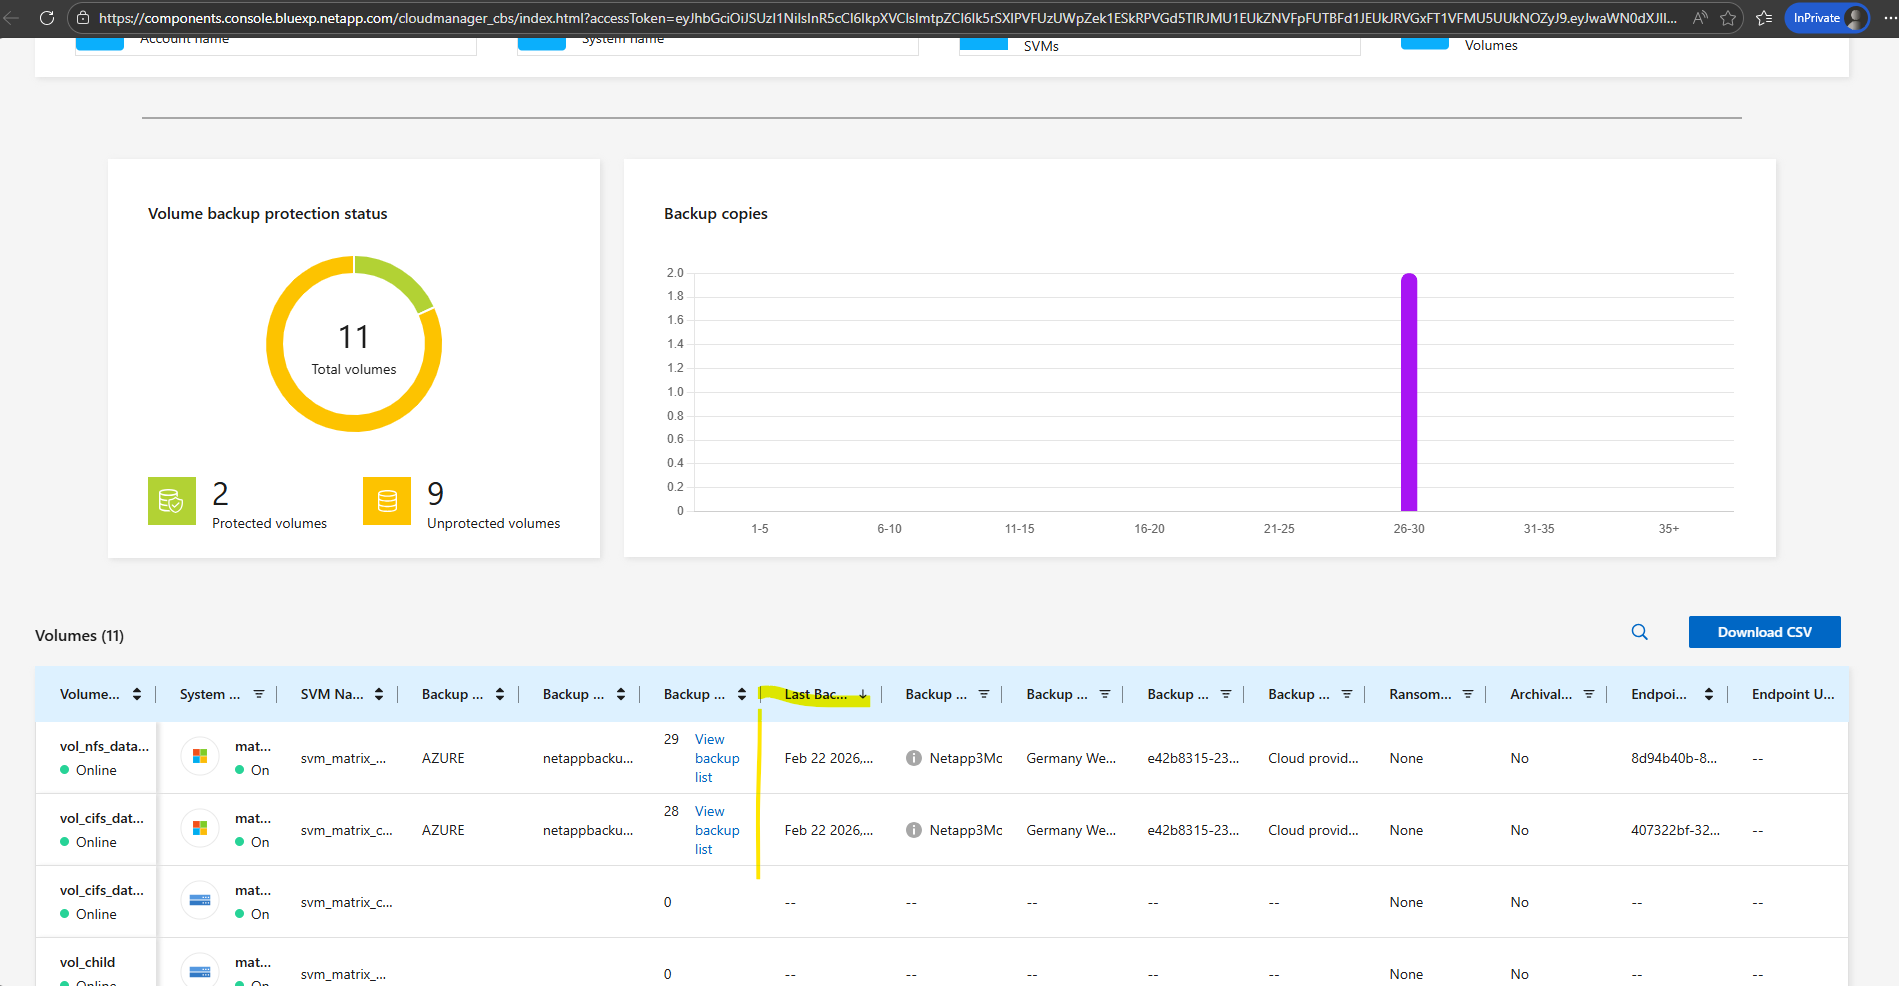
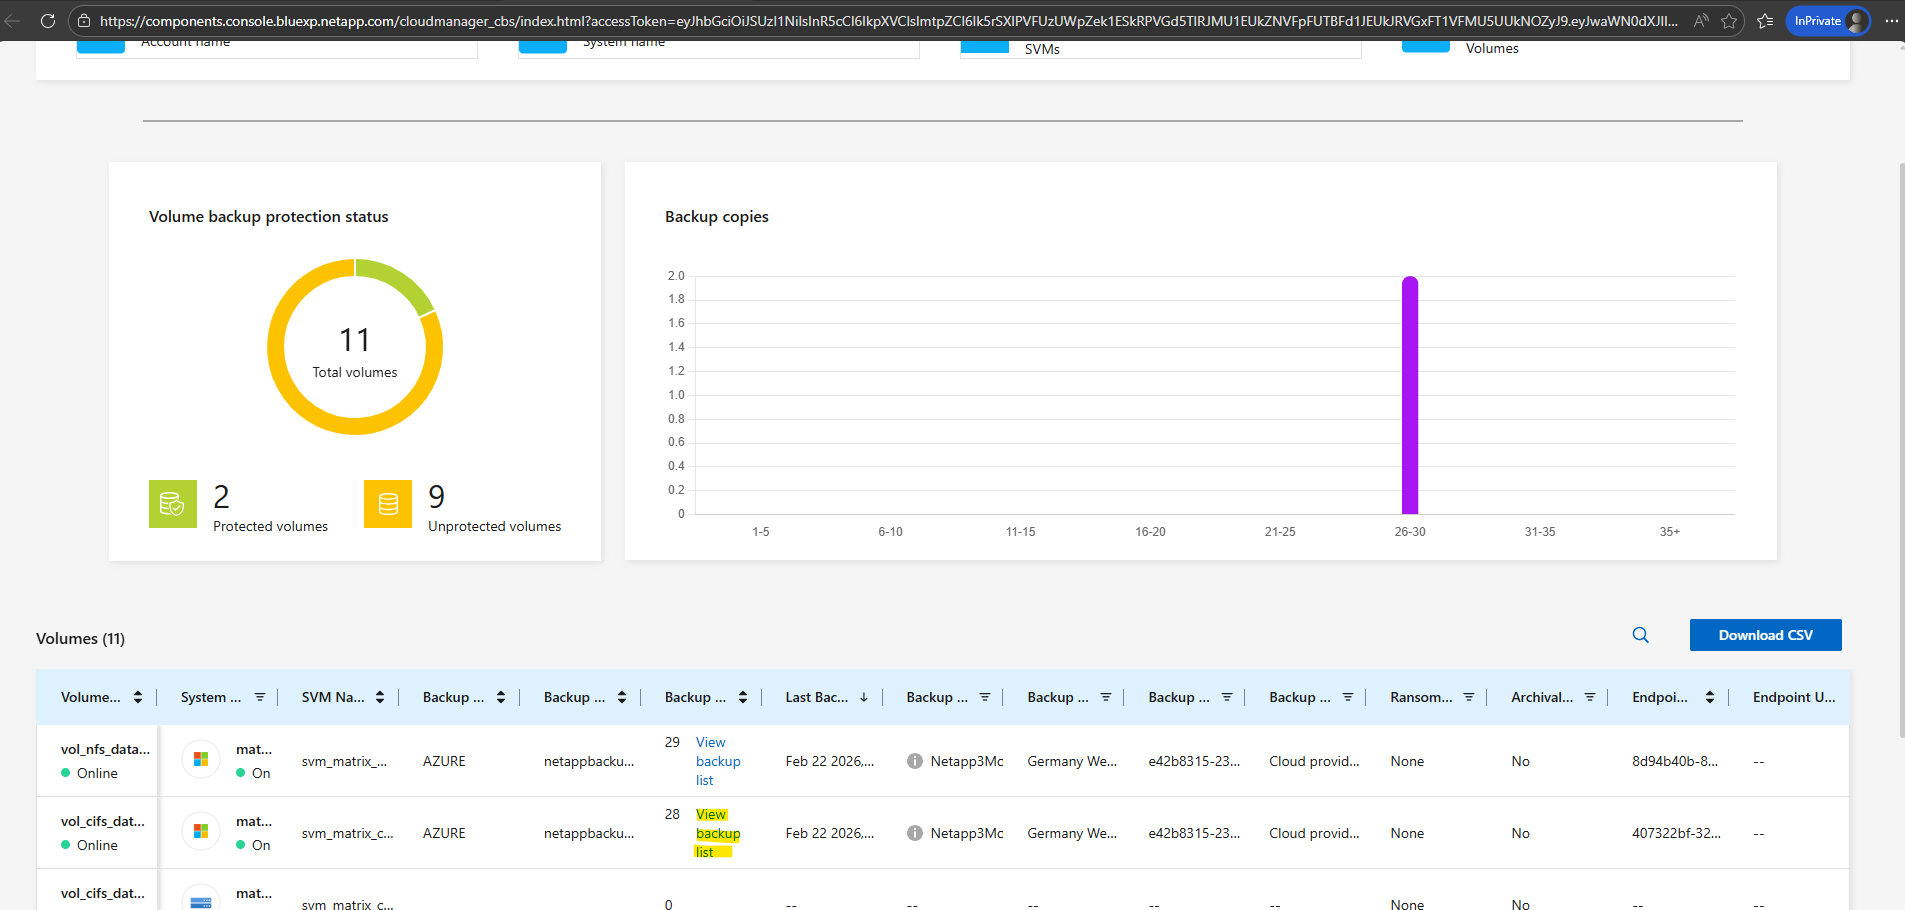
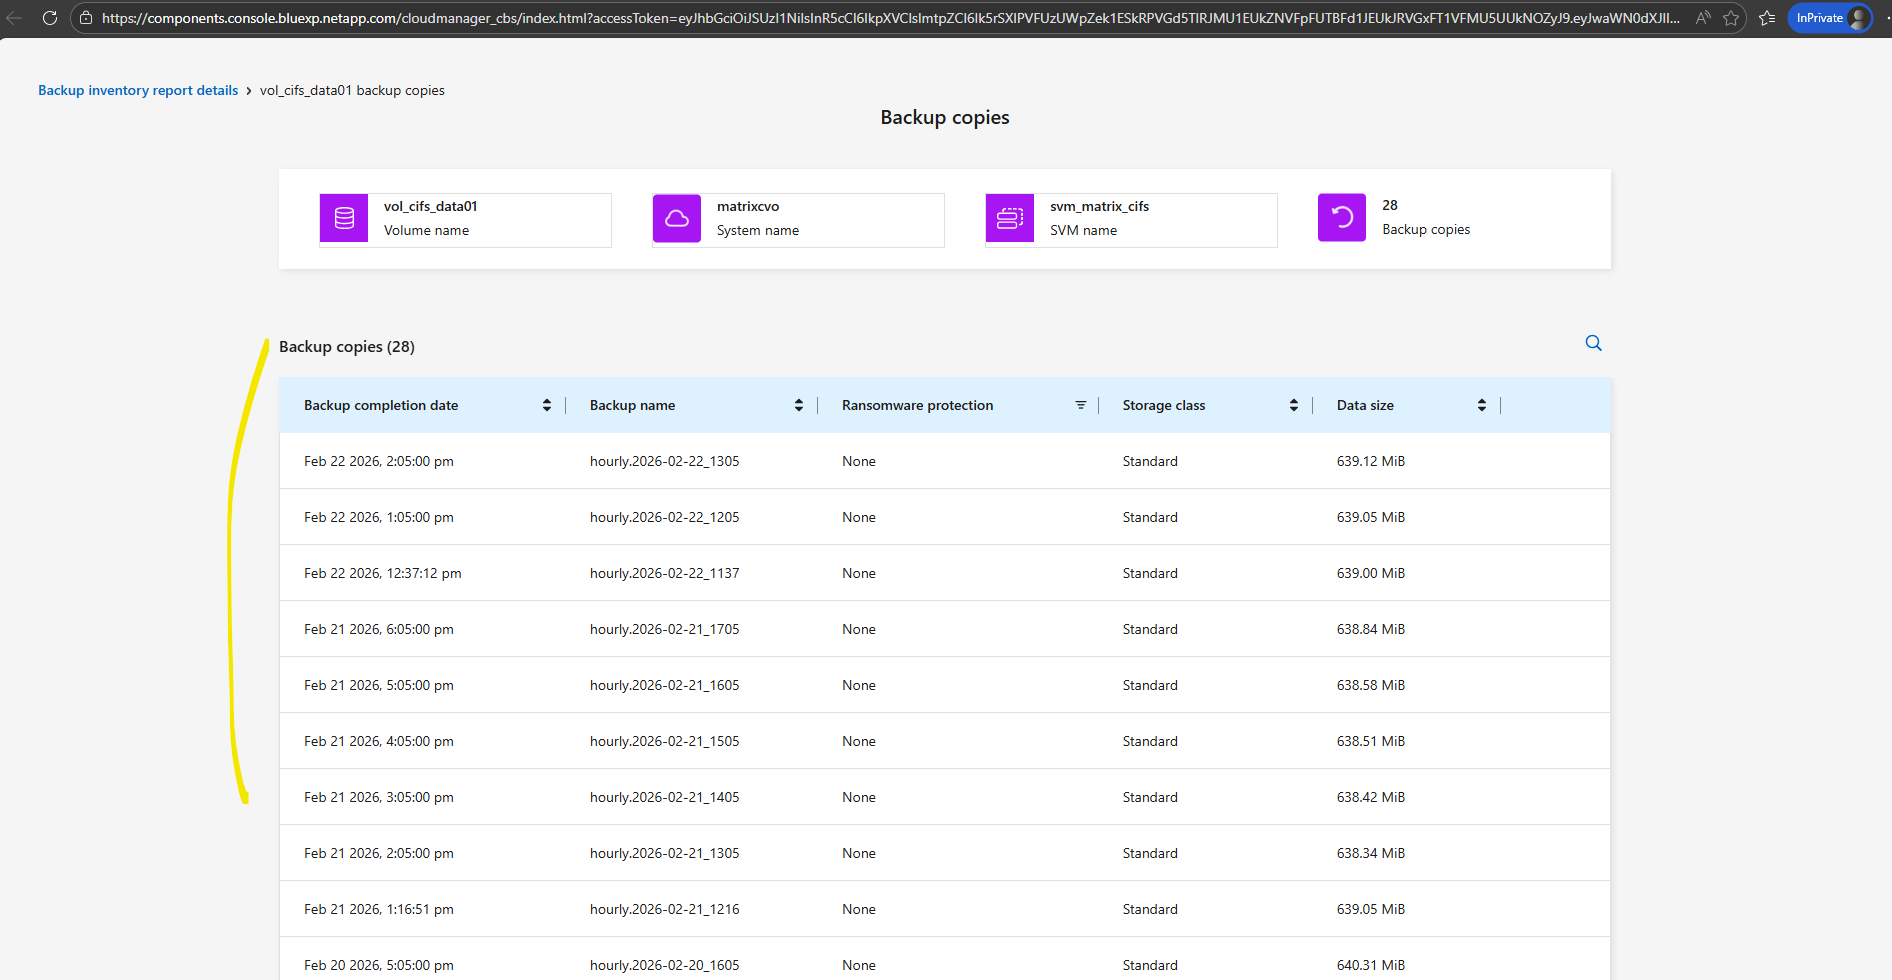
Monitoring Backup Compliance with Reports in NetApp Console
In addition to configuring backup policies and restore workflows, the NetApp Console provides built-in reporting capabilities to monitor backup compliance and protection status across all working environments.
The Reports section offers a centralized overview of backups, helping administrators quickly verify that their Cloud Volumes ONTAP systems are properly protected.

Troubleshooting
Backups not triggered due to missing SnapMirror Label in Snapshot Policy
Backups were not created because the assigned snapshot policy generated hourly snapshots without a SnapMirror label.
Since backup and replication policies rely on this label to identify eligible snapshots, the transfers were skipped even though local snapshots existed.
After correcting the policy to include the proper label like shown below, backups were triggered as expected.
SnapMirror labels act as identifiers that tell ONTAP which snapshots should be transferred to a secondary destination such as Azure object storage.
Backup and replication policies reference these labels to automatically select the appropriate snapshots, ensuring that only those matching the defined retention rules are exported.
If a label is missing or incorrect like in my case here, the snapshots remain local and are ignored by the backup process, even though they were successfully created.
The backups from today (9. February) are not listed below, just from yesterday.
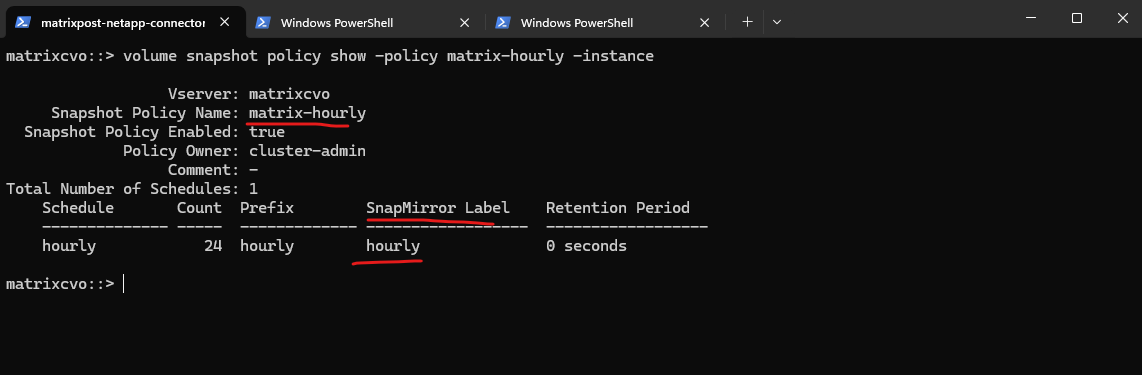
Run volume snapshot show to verify whether the created snapshots contain a SnapMirror label, if the field is empty, they will not be considered by backup or replication policies.
Next, use volume show to confirm which snapshot policy is currently assigned to the volume.
Finally, check the policy details with volume snapshot policy show to identify whether the configured schedule includes the required SnapMirror label.
matrixcvo::> volume snapshot show -vserver svm_matrix_cifs -volume vol_cifs_data01 -fields snapshot,snapmirror-label
matrixcvo::> volume show -vserver svm_matrix_cifs -volume vol_cifs_data01 -fields snapshot-policy
matrixcvo::> volume snapshot policy show -policy matrix-hourly -instance
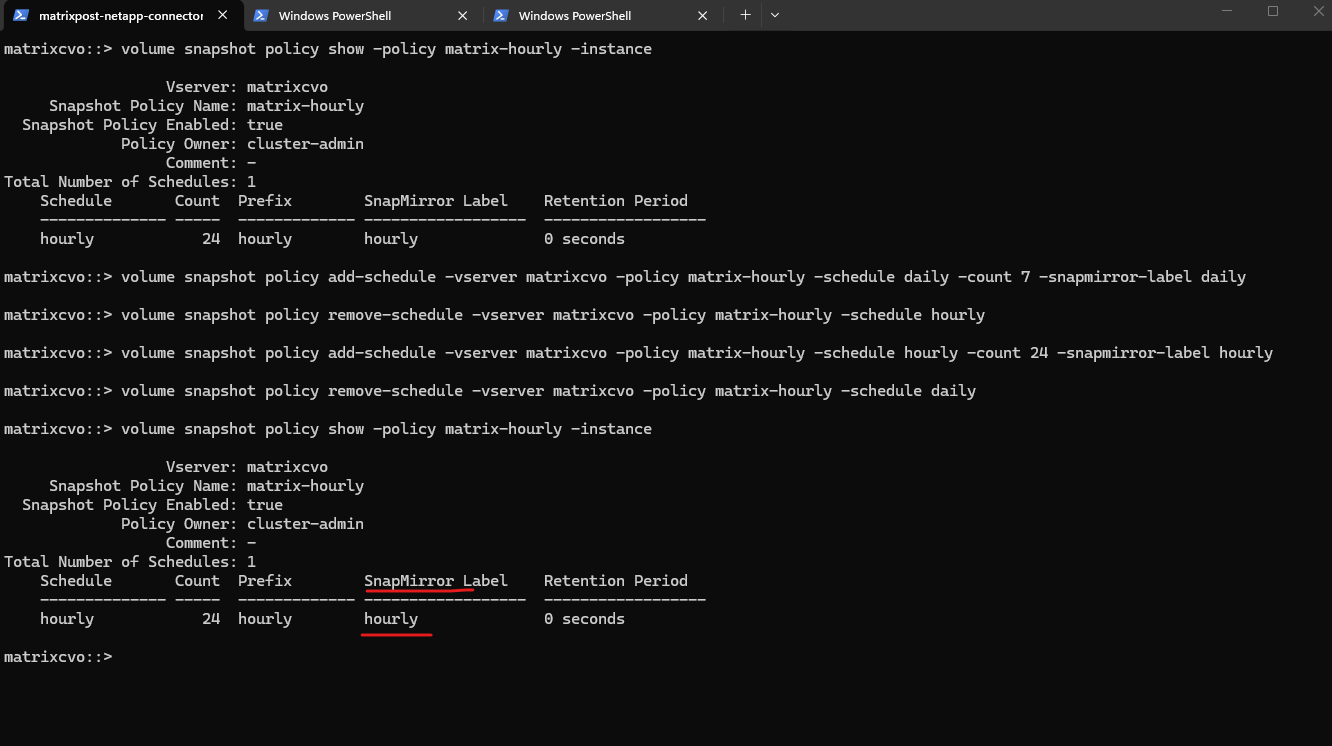
A SnapMirror label must be added to an existing snapshot policy schedule, the System Manager does not allow modifying the entry directly.
Instead, create a temporary schedule, delete the original schedule, and then recreate it with the desired settings before removing the temporary one.
This replacement approach works because ONTAP treats schedule properties like the SnapMirror label as immutable once created.
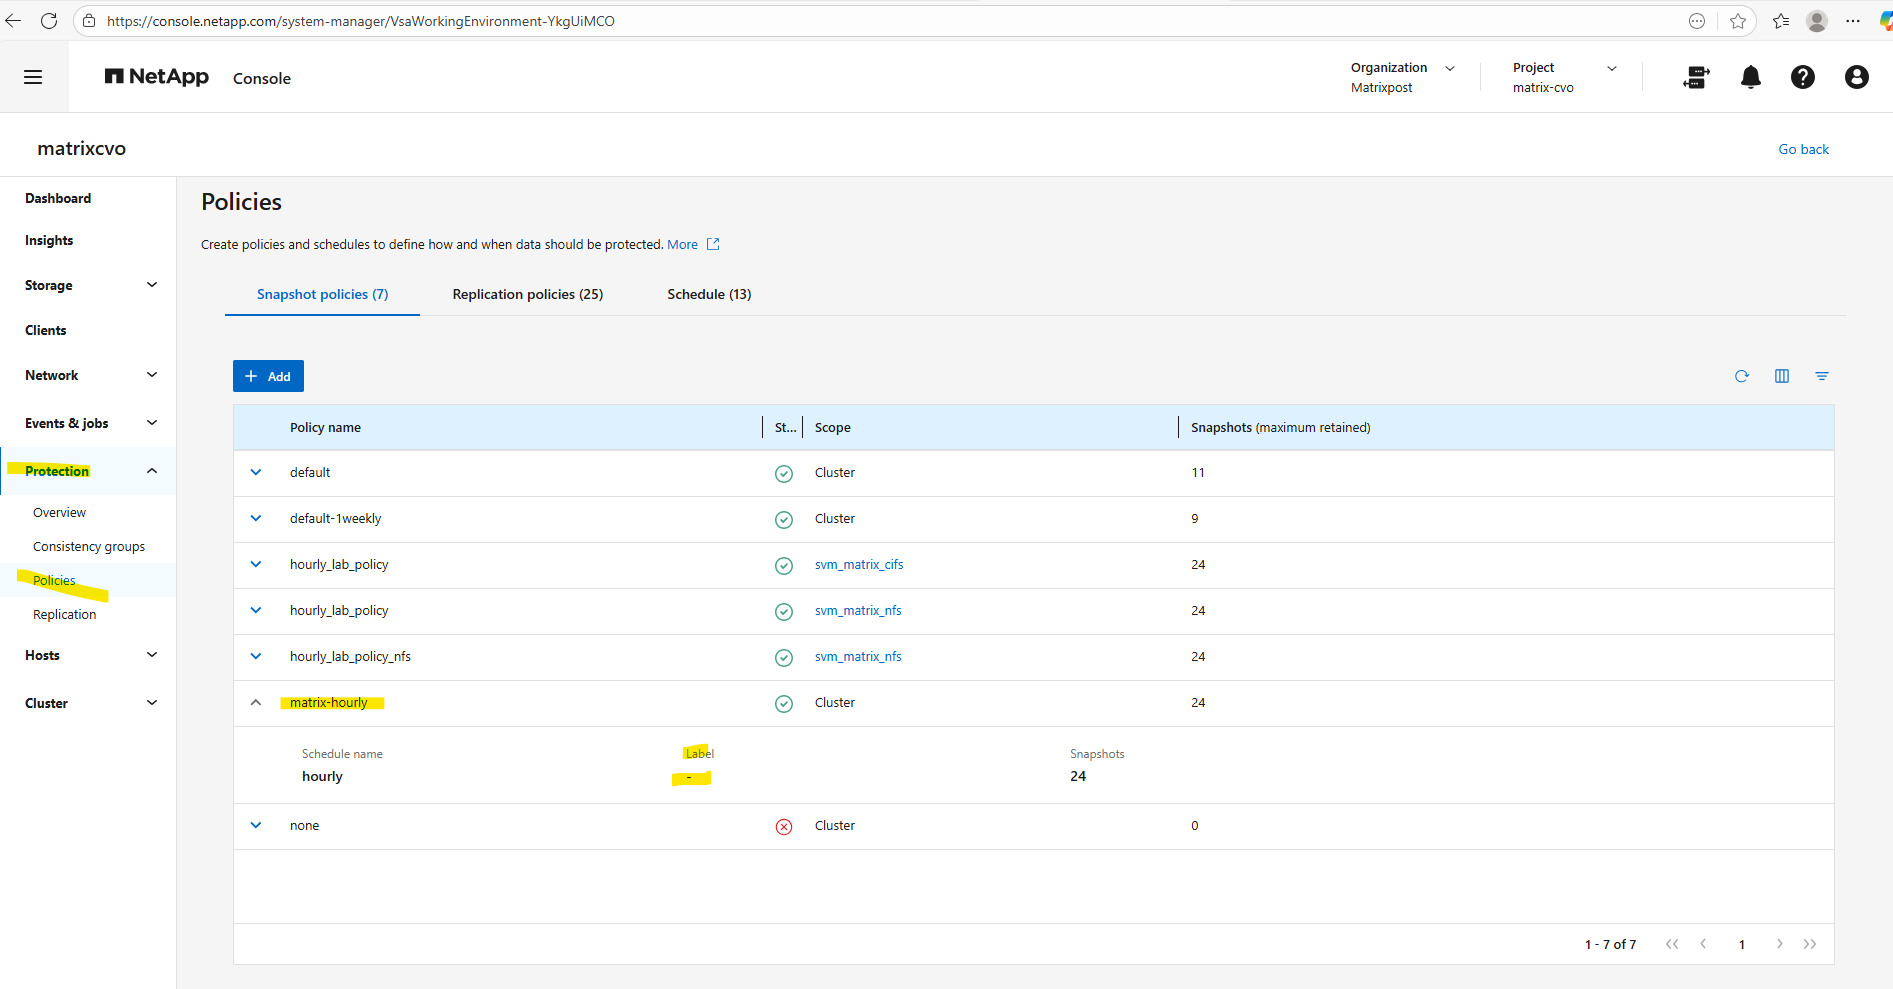
Click on Edit.

Adding a temporary schedule beforer deleting the original hourly without the label.
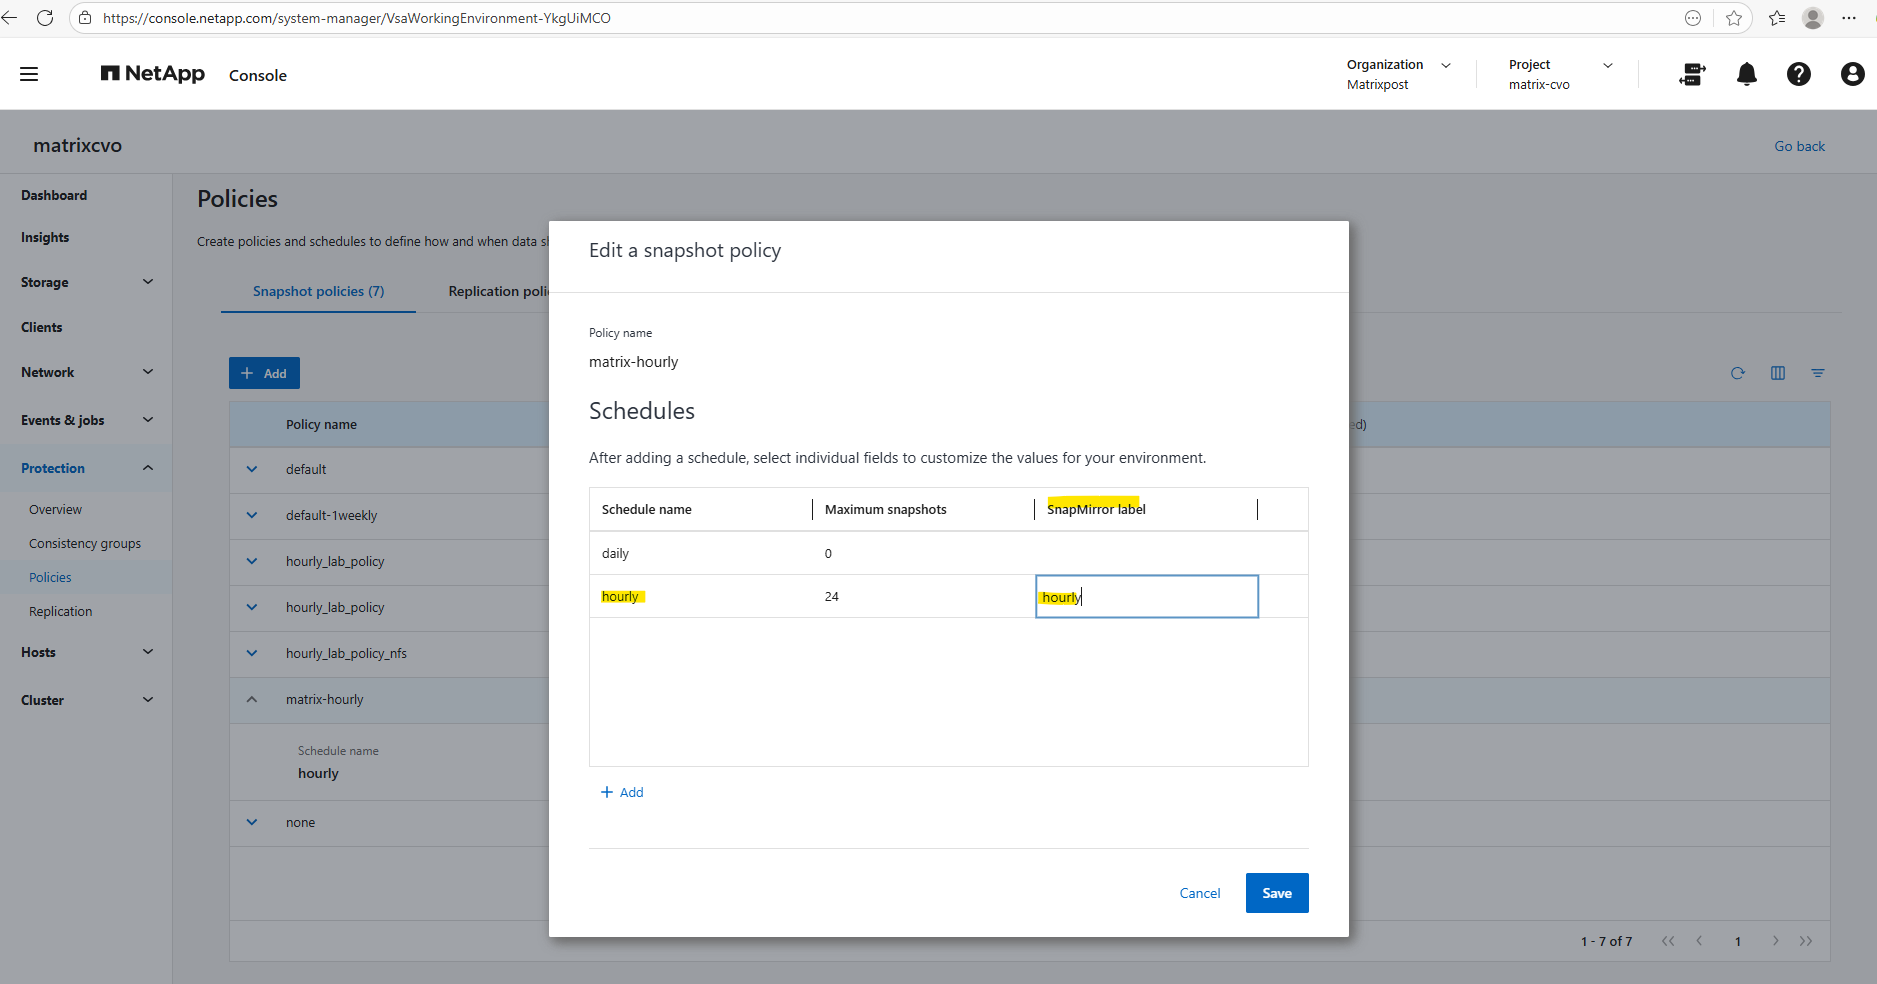
Adding a new hourly schedule and enter for the label here hourly.

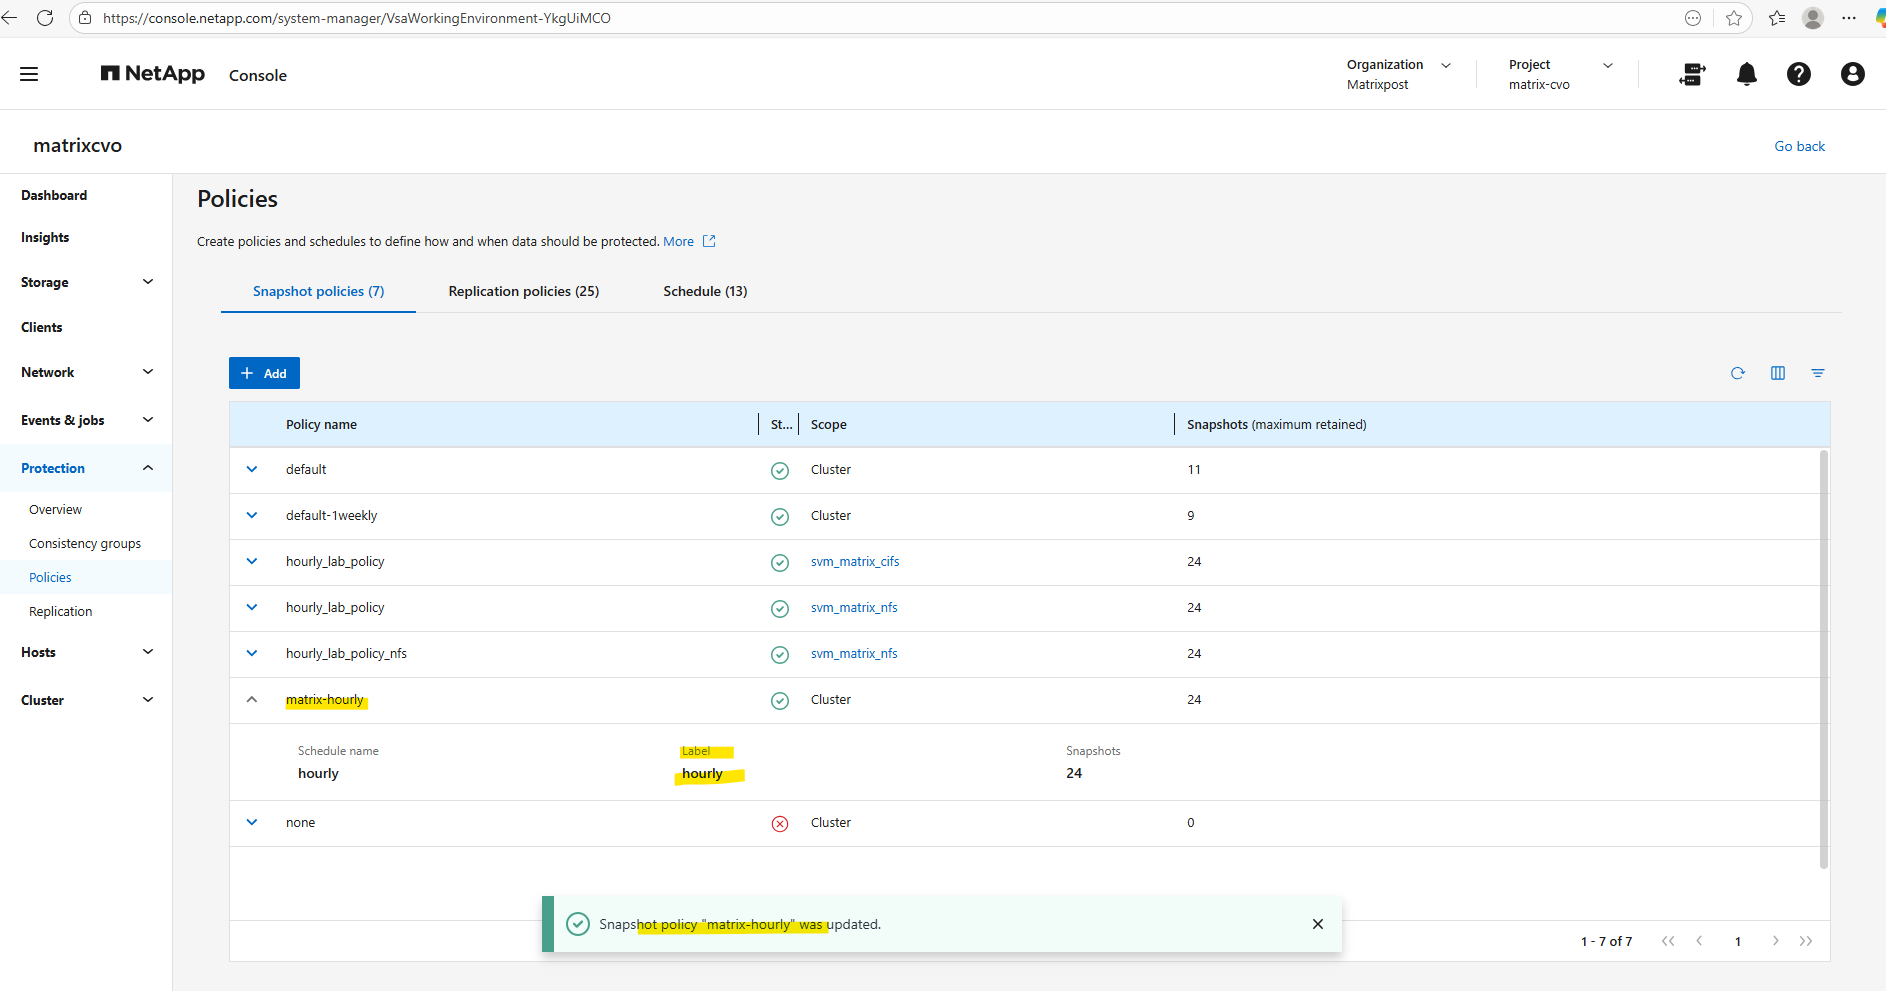
A quick check by using the console.
matrixcvo::> volume snapshot policy show -policy matrix-hourly -instance
We can of course also use the ONTAP CLI for this workaround to add a label hourly to our schedule.
# Create a temporary daily schedule with a SnapMirror label so the policy stays active while the faulty schedule is replaced.
matrixcvo::> volume snapshot policy add-schedule -vserver matrixcvo -policy matrix-hourly -schedule daily -count 7 -snapmirror-label daily

# Remove the original hourly schedule that was missing the SnapMirror label.
matrixcvo::> volume snapshot policy remove-schedule -vserver matrixcvo -policy matrix-hourly -schedule hourly

# Recreate the hourly schedule and assign the correct SnapMirror label to ensure snapshots are picked up by backup and replication policies.
matrixcvo::> volume snapshot policy add-schedule -vserver matrixcvo -policy matrix-hourly -schedule hourly -count 24 -snapmirror-label hourly

# Delete the temporary daily schedule to restore the policy to its intended state.
matrixcvo::> volume snapshot policy remove-schedule -vserver matrixcvo -policy matrix-hourly -schedule daily
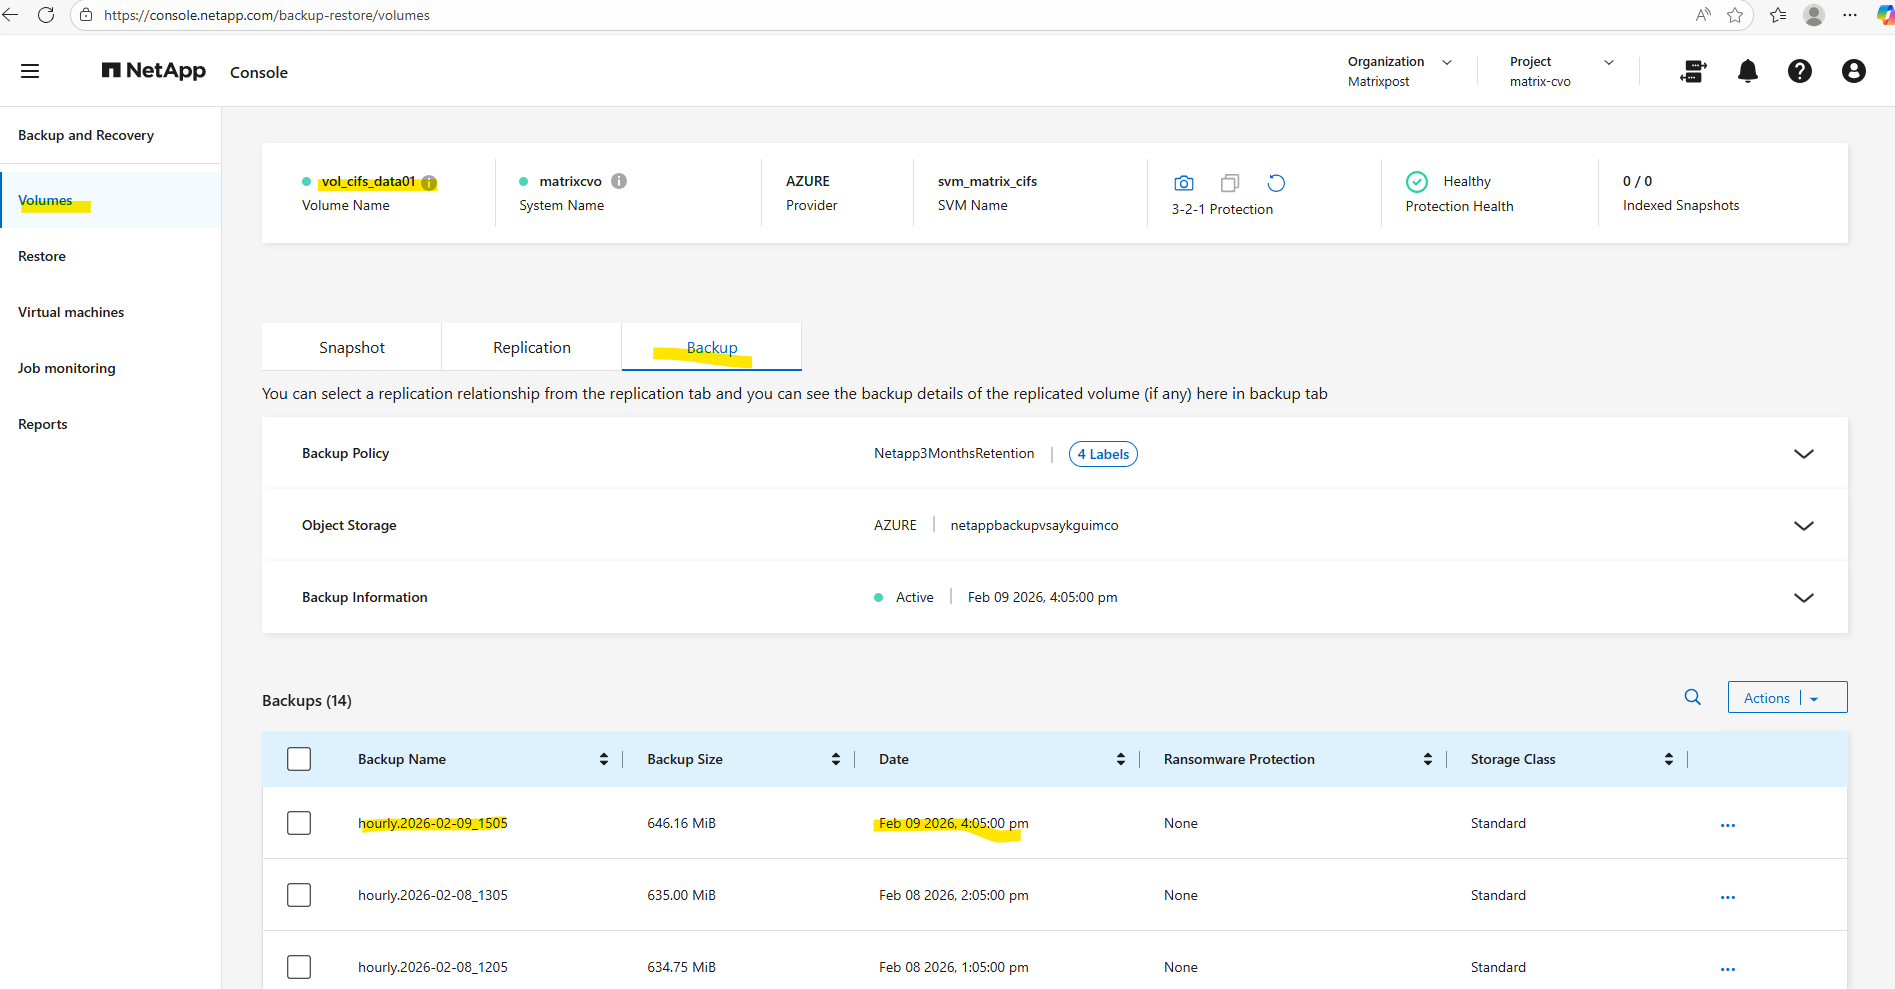
With the next hourly cycle, the export was triggered successfully after the SnapMirror label was corrected.
The backup is now visible in the NetApp Console like shown below, confirming that the policy is selecting and transferring snapshots as expected.
The entry hourly.2026-02-09_1505 indicates that the snapshot labeled hourly was created and exported during the most recent cycle.
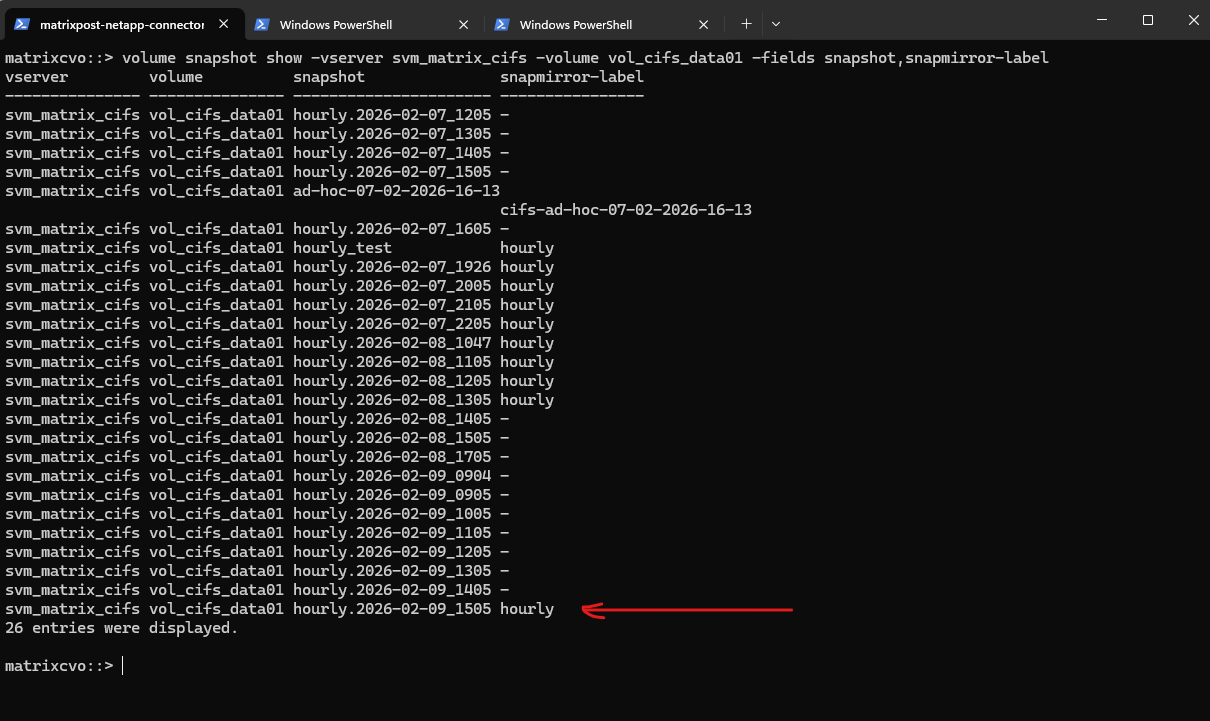
We can also use the following command to verify that newly created snapshots contain the expected SnapMirror label required for backup and replication.
If the
snapmirror-labelfield displays the configured value (for example, hourly), it confirms that the snapshot is eligible for export to the backup destination. An empty label would indicate that the snapshot will remain local and be ignored by the backup policy.
matrixcvo::> volume snapshot show -vserver svm_matrix_cifs -volume vol_cifs_data01 -fields snapshot,snapmirror-label
DNS resolution for Backup and Recovery Private Endpoint Storage Account not working
During the configuration of Backup and Recovery, connectivity to the storage account via its Private Endpoint initially failed due to missing DNS resolution.
Because private endpoints rely entirely on internal name resolution, the Connector was unable to resolve the storage account FQDN to the corresponding private IP address.
As a temporary workaround in this lab environment, a local DNS entry was created to ensure reliable connectivity and allow the backup services to function correctly.
I already showed above how to fix this issue, below just a few more details about this issue.
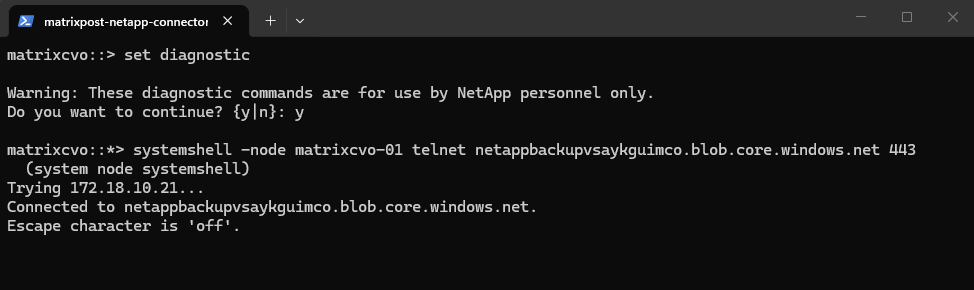
We can also use the telnet command to test if we can reach the storage account through the network. More about the command in ONTAP you will find here https://kb.netapp.com/on-prem/ontap/da/NAS/NAS-KBs/How_to_test_tcp_udp_port_connectivity_from_systemshell.
NetApp Backup and Recovery relies exclusively on TCP port 443 for data orchestration and transfer. By establishing a secure HTTPS handshake between the Cloud Volumes ONTAP nodes and the Azure Blob storage endpoint, the system ensures that backup traffic remains encrypted and routable across private subnets.
matrixcvo::> set diagnostic
matrixcvo::*> systemshell -node matrixcvo-01 telnet netappbackupvsaykguimco.blob.core.windows.net 443
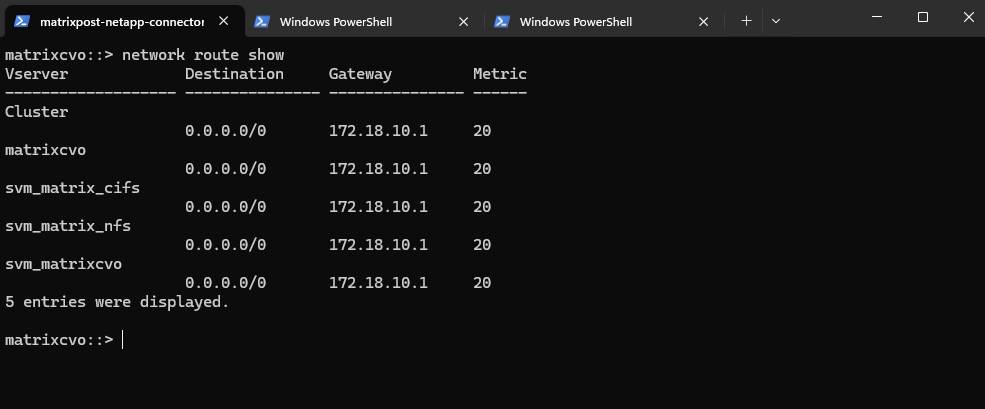
Verify ONTAP routing information by running:
matrixcvo::> network route show
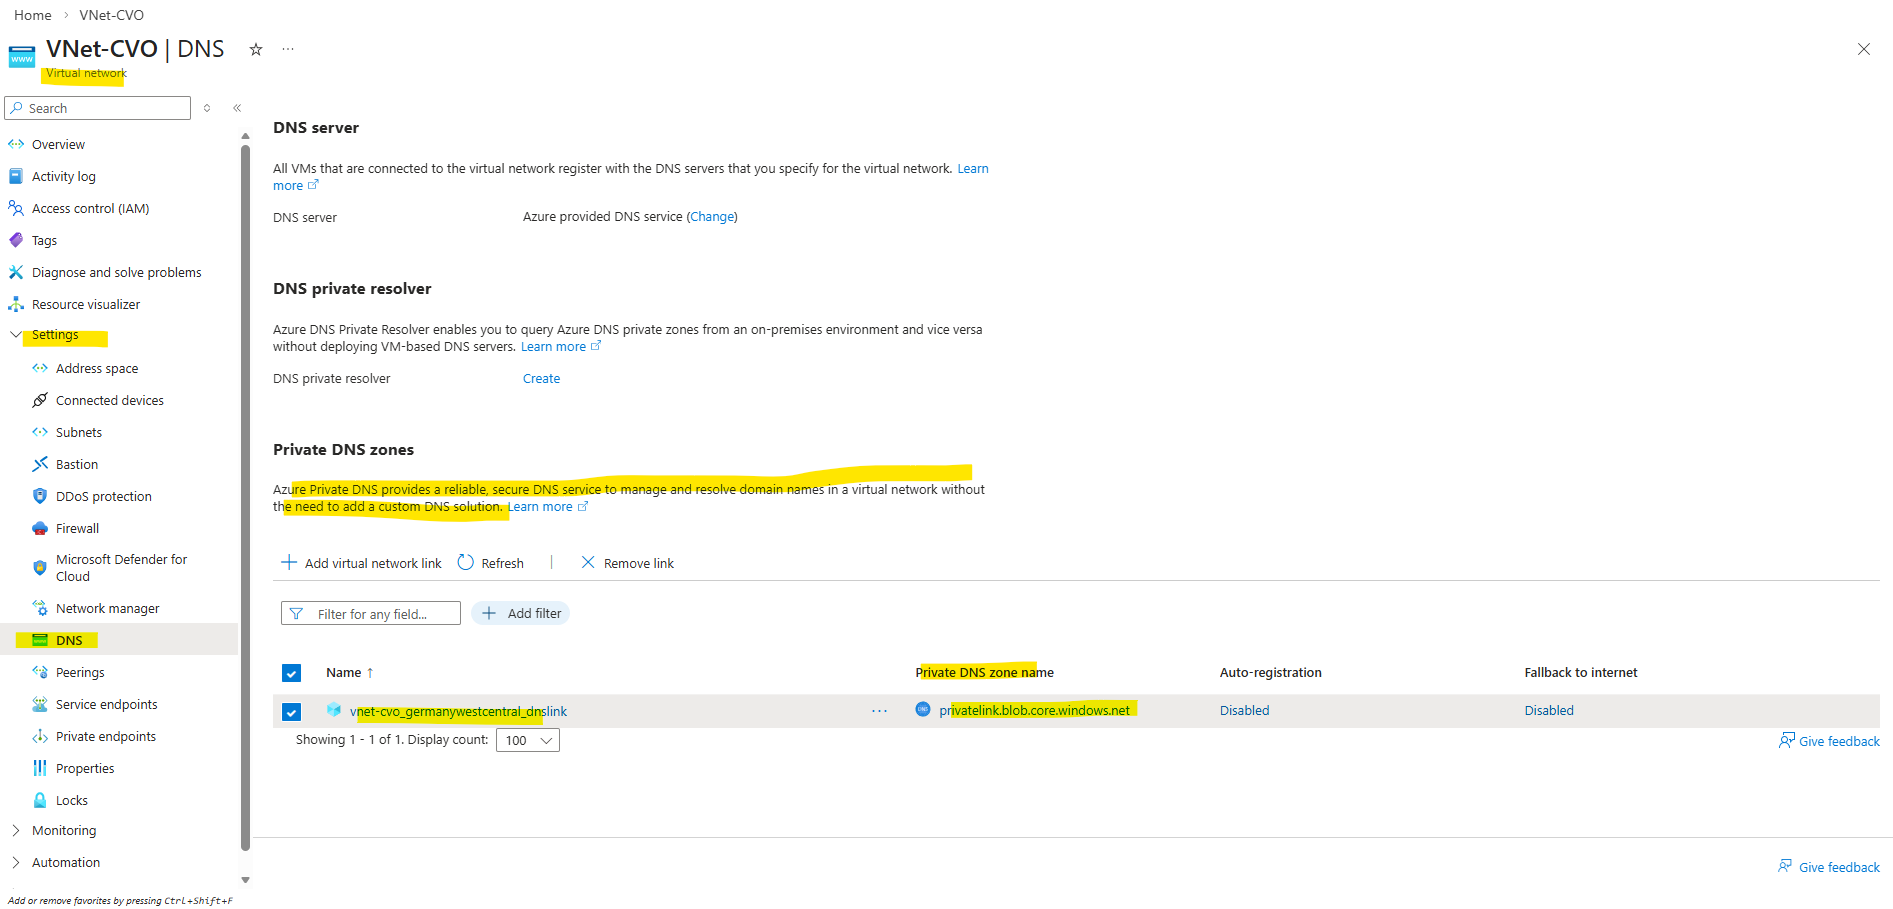
The connector VM is using the private DNS zone directly but not by the OS itself and instead handled by Azure’s fabric.
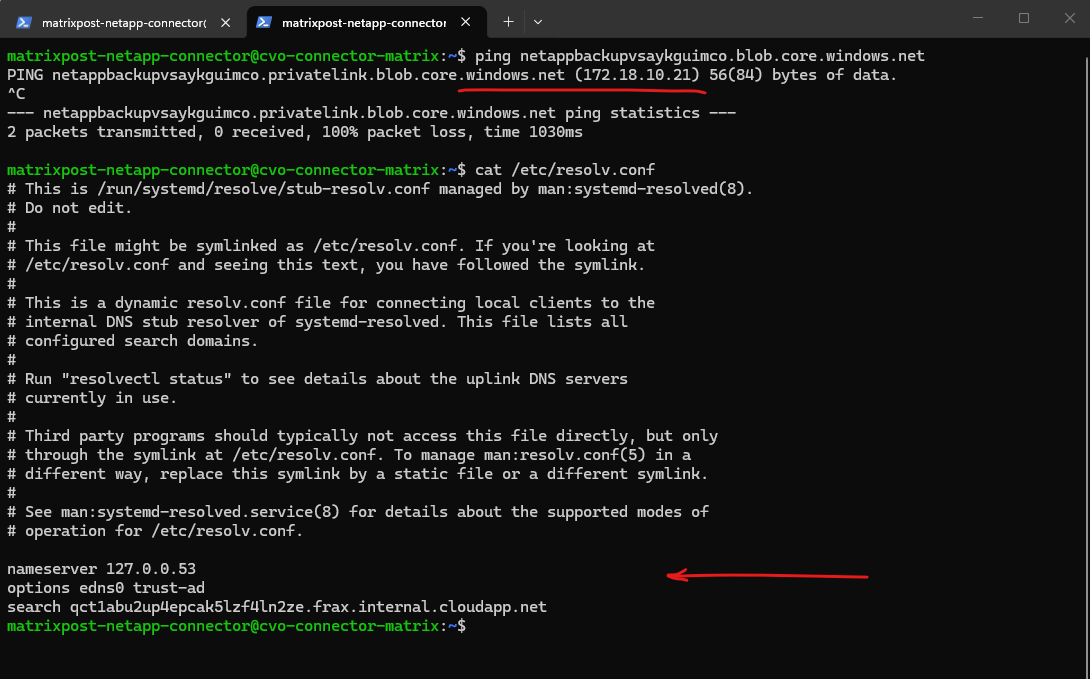
Application
   ↓
127.0.0.53 (local stub)
   ↓
Azure DNS (168.63.129.16)
   ↓
Private DNS zone
   ↓
172.18.10.21
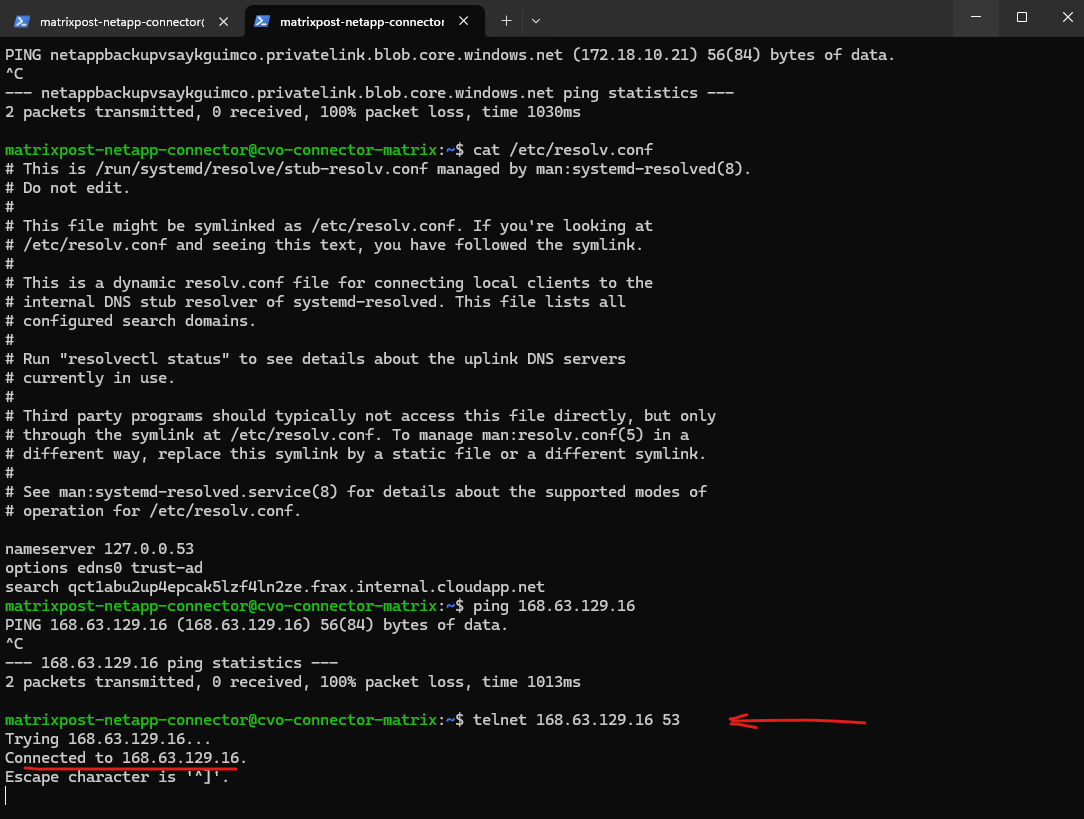
The CVO nodes cannot reach Azure DNS (168.63.129.16) on port 53.
matrixcvo::> set diagnostic
matrixcvo::*> systemshell -node matrixcvo-01 telnet 168.63.129.16 53

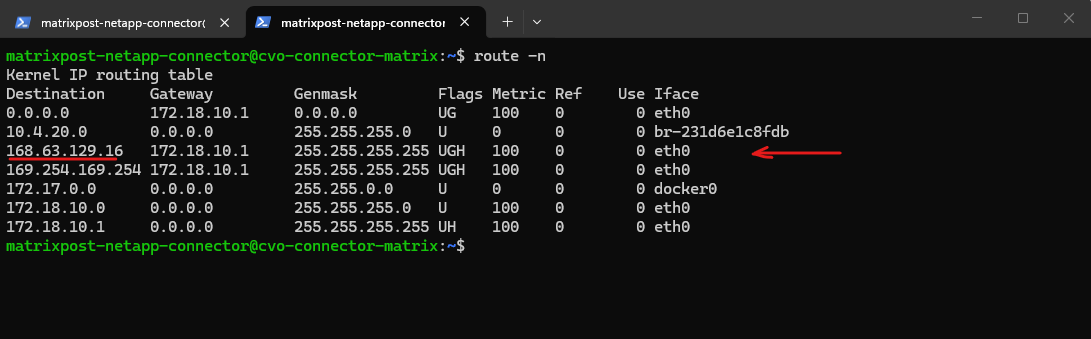
The connector VM had a dedicate route for the DNS service’s IP address 168.63.129.16.
The host route (/32) is automatically injected into the VM.
Azure injected it via DHCP / fabric networking.
Same for: 169.254.169.254 → Azure Instance Metadata Service.
These are platform IPs.
Azure fabric is explicitly ensuring that traffic to168.63.129.16stays local.
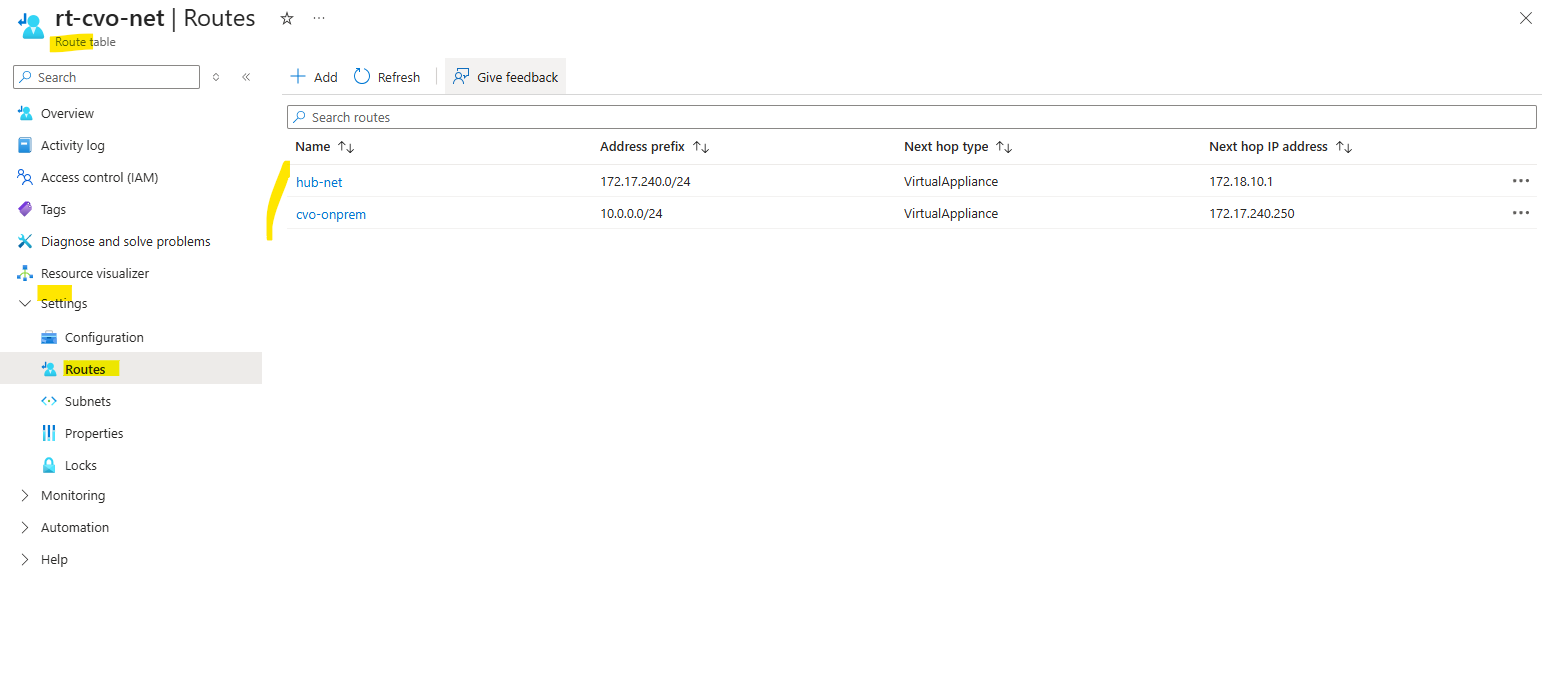
Route table assigned to the cvo subnet.
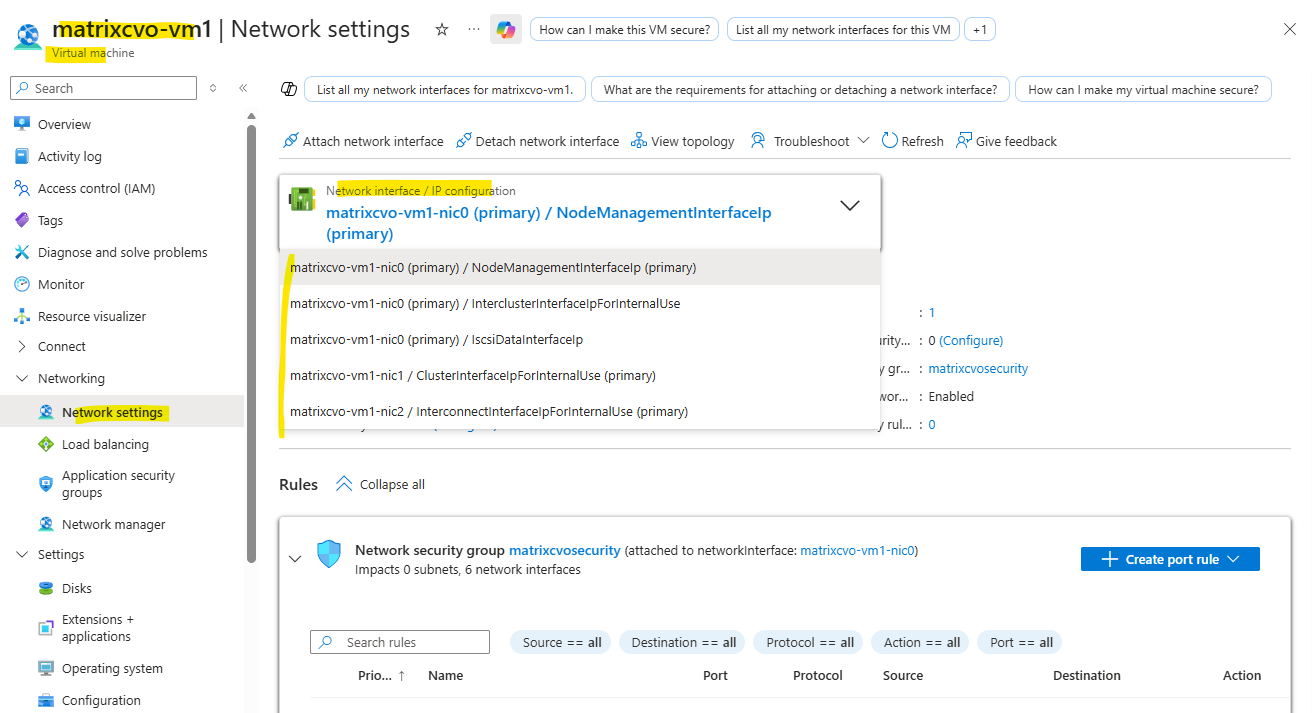
CVO nodes use multiple NICs (e.g., eth0 for Management/Cluster, eth1 for Data) like shown below.
The WireServer only responds to requests on the Primary NIC (NIC0).
If ONTAP tries to route the DNS request out of a secondary interface or if the source IP doesn’t align with what Azure expects on that specific virtual wire, the WireServer will ignore it.
The Azure Connector VM could reach the WireServer via Telnet on port 53 without issue. However, the CVO node in the exact same subnet timed out. This highlights a critical CVO quirk: because ONTAP manages its own networking stack and LIFs on top of Azure’s NICs, the platform’s ‘Special’ IPs (like
168.63.129.16) often fail to recognize the traffic as legitimate.
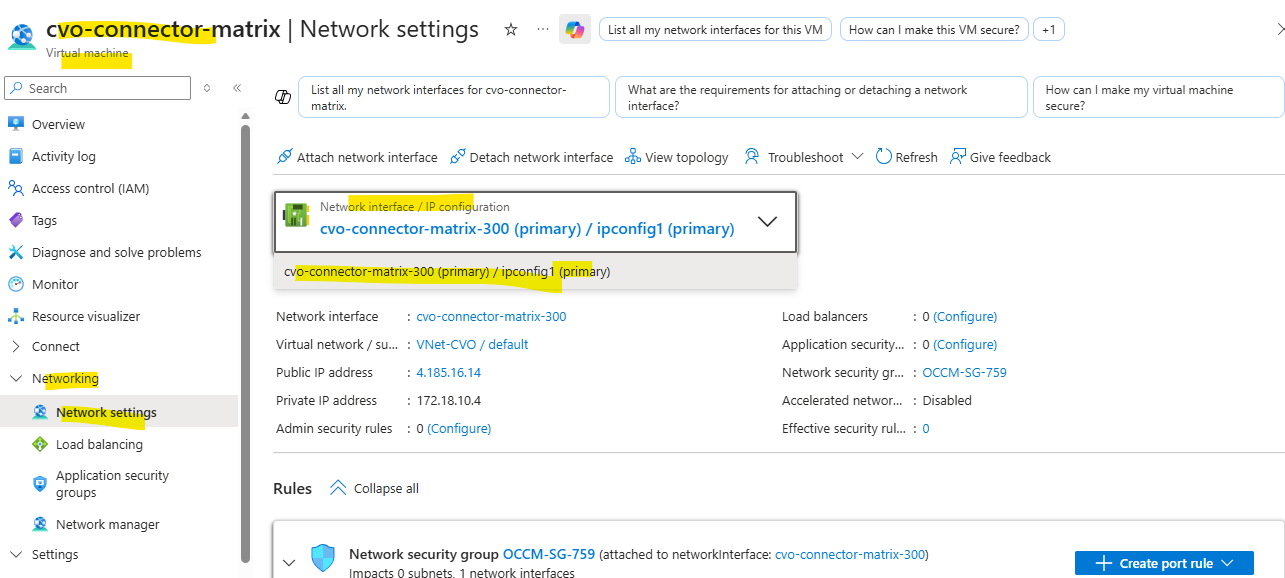
Connector VM just using one NIC.
Troubleshooting: Missing Object Storage Restore Points Despite Successful Backup
In some situations, a backup job to object storage appears to run successfully, but no new restore point is visible in the NetApp Console. This can be confusing because ONTAP shows a successful SnapMirror update while the latest object backup in the UI still refers to an older date.
In many cases, the reason is simply that no data has changed in the volume since the previous backup, resulting in a transfer size of 0 bytes. In this section, we take a closer look at this behavior and how to verify it using the ONTAP CLI.
We can use the following command to verify which snapshot was transferred to object storage and how much data was actually sent during the last backup operation.
In this example, the snapshot daily.2026-03-10_0928 was successfully processed, but the transfer size is 0B, indicating that no data blocks had changed since the previous backup.
cluster01::> snapmirror show -destination-path netappbackup8a2a61fxbfu3:/objstore/svm_data_vol_data02_dst -fields newest-snapshot,exported-snapshot,last-transfer-end-timestamp,last-transfer-size

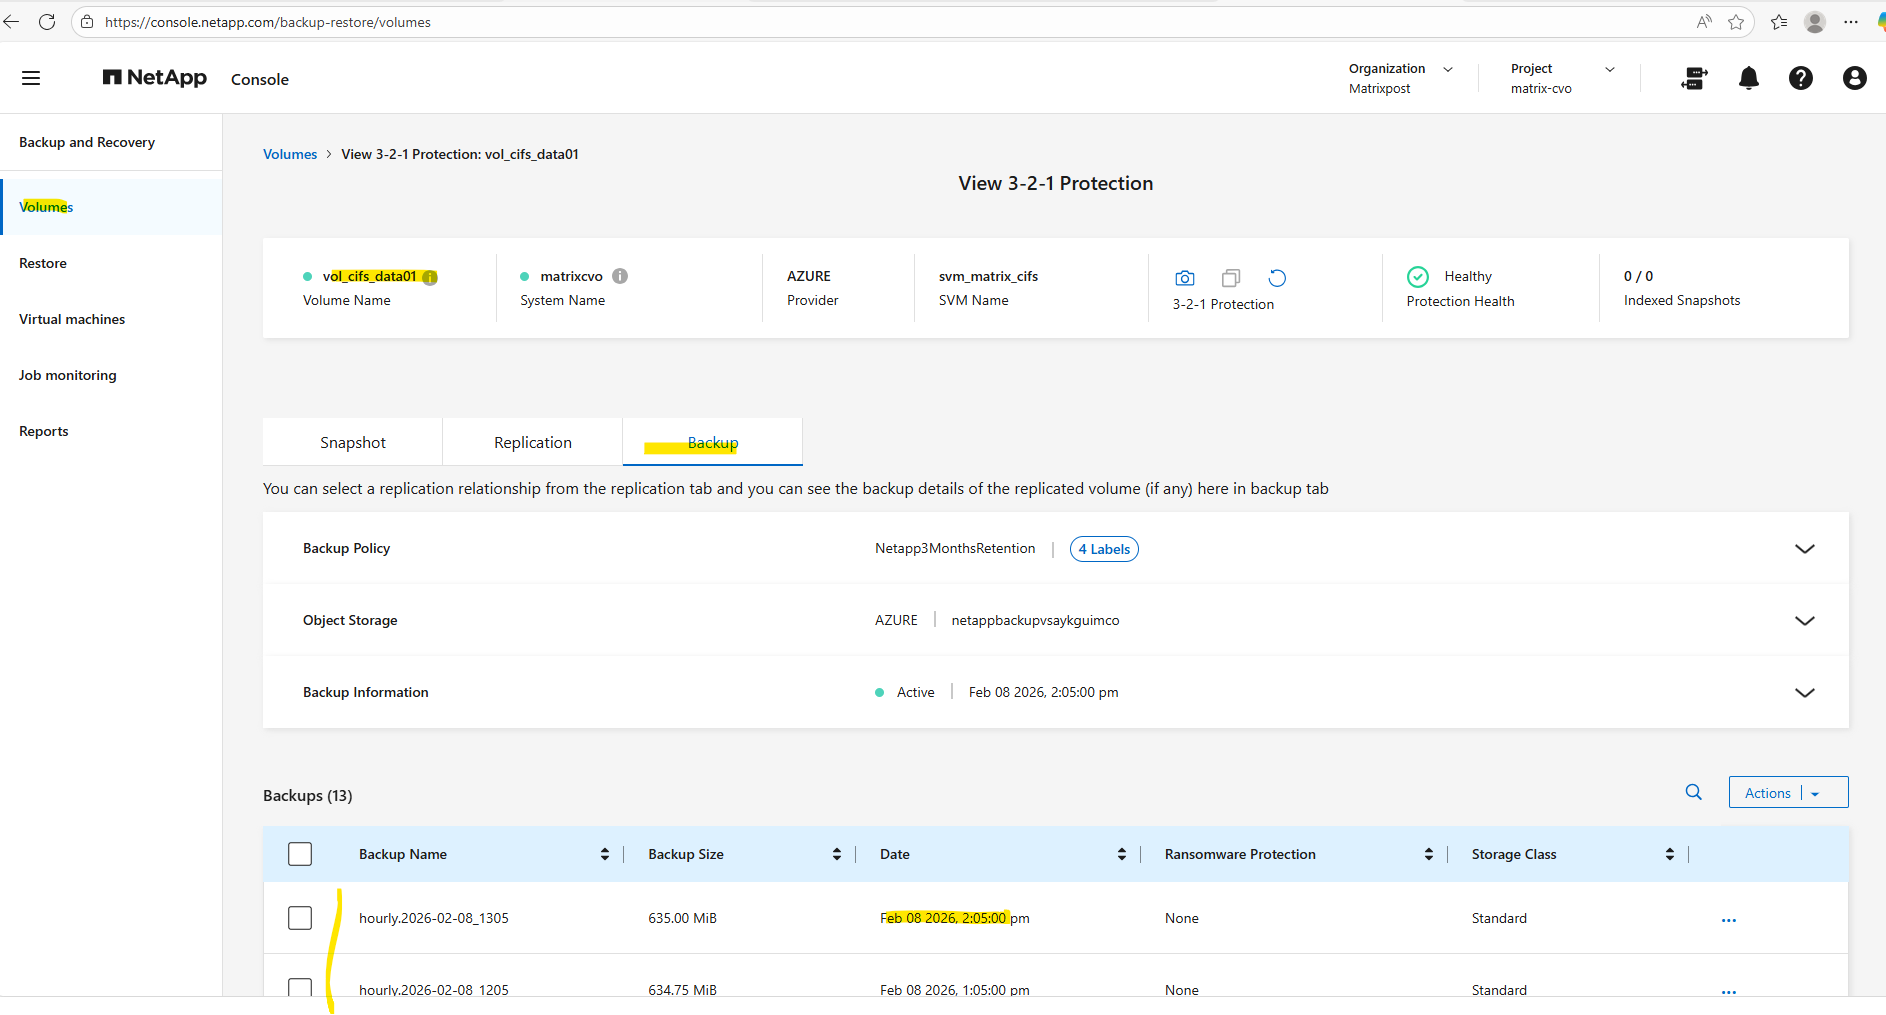
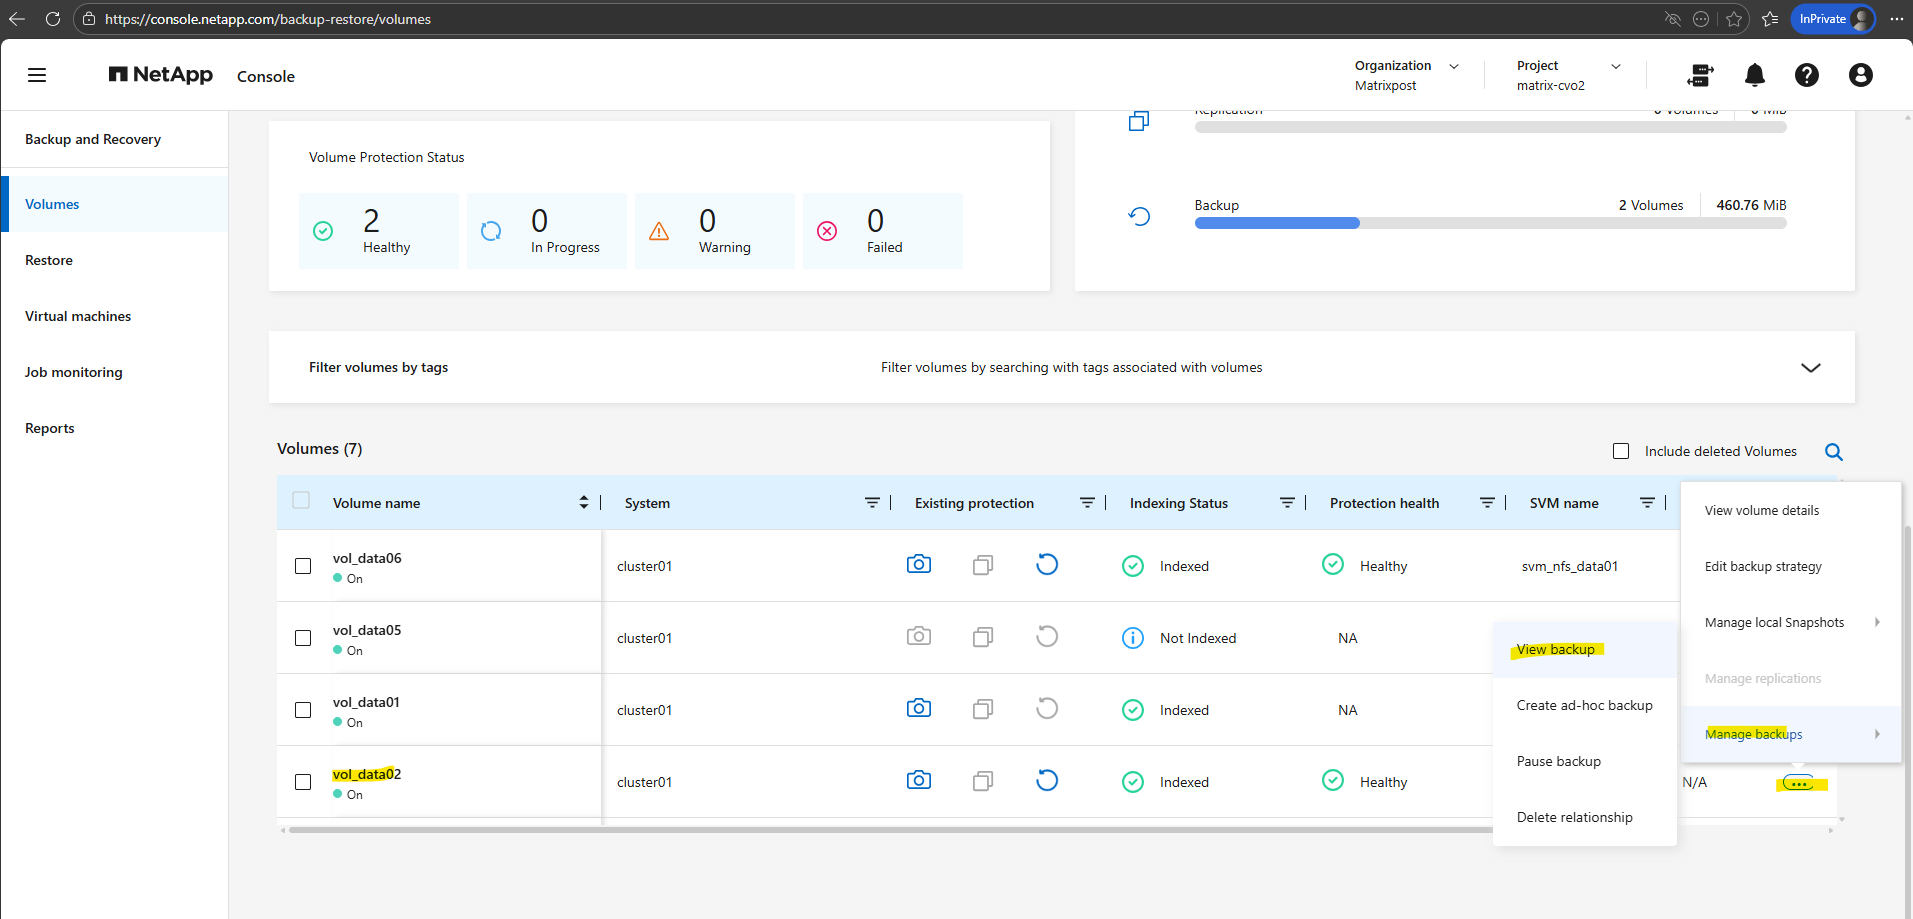
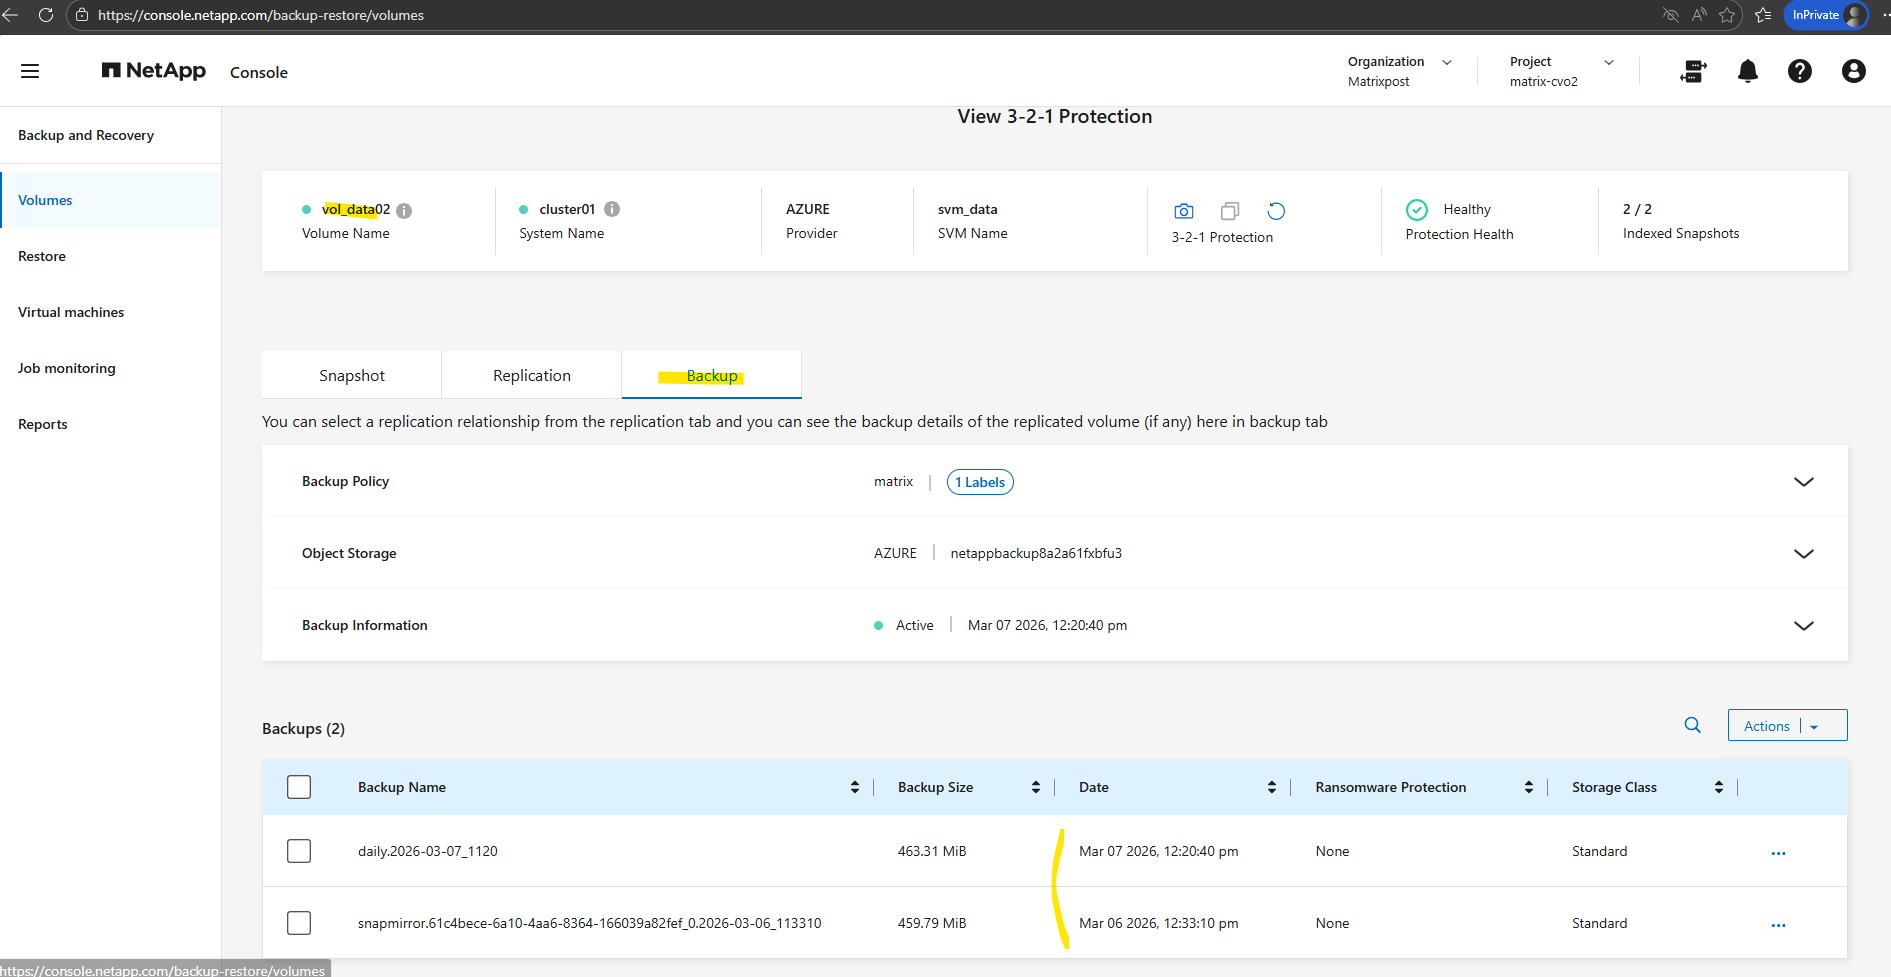
After verifying the latest transfer on the ONTAP CLI, we can now navigate in the NetApp Console to Protection → Backup and Recovery → Volumes, select the corresponding volume, and open Manage Backups → View Backups to review the available object storage backups and restore points.
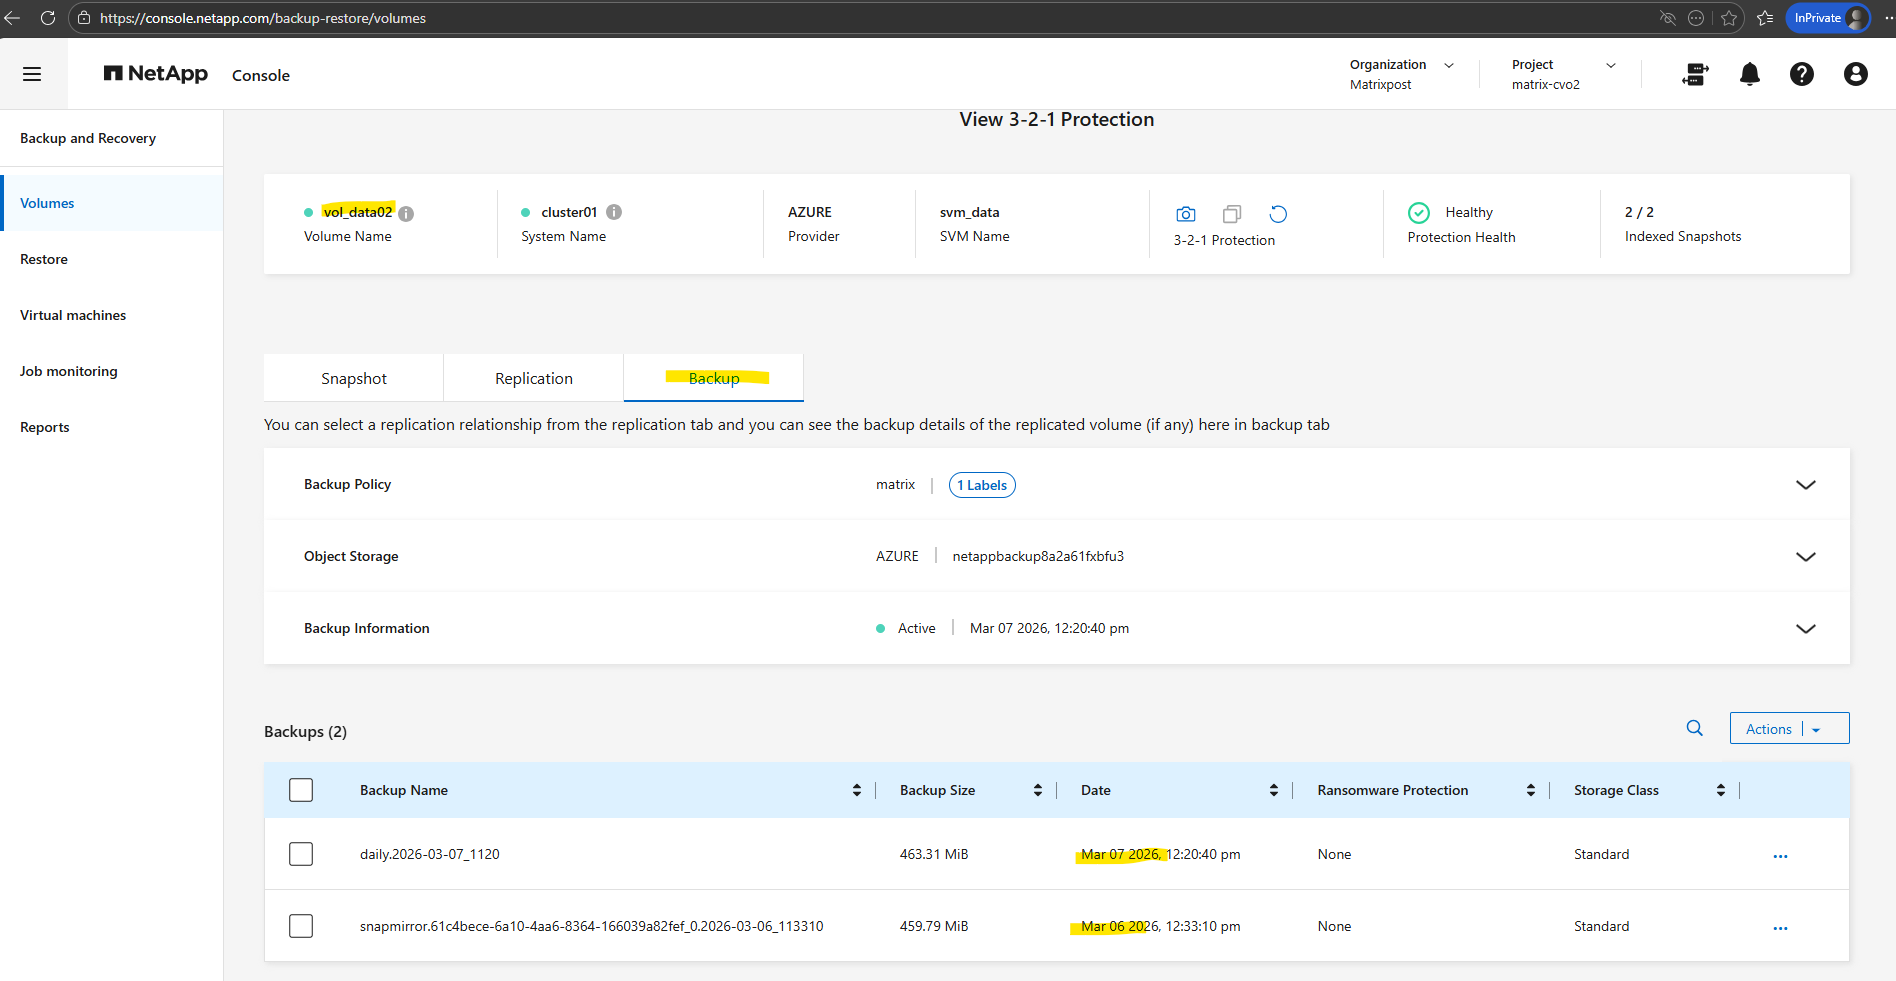
Even though a new snapshot daily.2026-03-10_0928 was created and processed by the SnapMirror relationship, no additional backup entry appears in the NetApp Console for March 10 shown below.
This is because the last transfer size was 0 bytes, meaning no data blocks had changed since the previous backup, so no new objects were written to the object storage and therefore no new restore point was created in the backup catalog.
To prove this behavior I will write some data into the volume.
I will add a new folder and these two certificates.
We can now either wait for the next snapshot / backup cycle or running the following comand:
# create a new snapshot (with the correct SnapMirror label)
cluster01::> volume snapshot create -vserver svm_data -volume vol_data02 -snapshot daily.manual_test -snapmirror-label daily

# Trigger the object backup
cluster01::> snapmirror update -destination-path netappbackup8a2a61fxbfu3:/objstore/svm_data_vol_data02_dst

We can now verify the transfer by running:
After creating a new snapshot with the SnapMirror label daily, we manually triggered a SnapMirror update above to export this snapshot to object storage.
The output confirms that the snapshot daily.manual_test was successfully transferred and that 236.2 KB of changed data were written to the backup destination (Azure object storage).
cluster01::> snapmirror show -destination-path netappbackup8a2a61fxbfu3:/objstore/svm_data_vol_data02_dst -fields newest-snapshot,exported-snapshot,last-transfer-size,last-transfer-end-timestamp

The local snapshot created manually we can already see in the NetApp console as shown below.
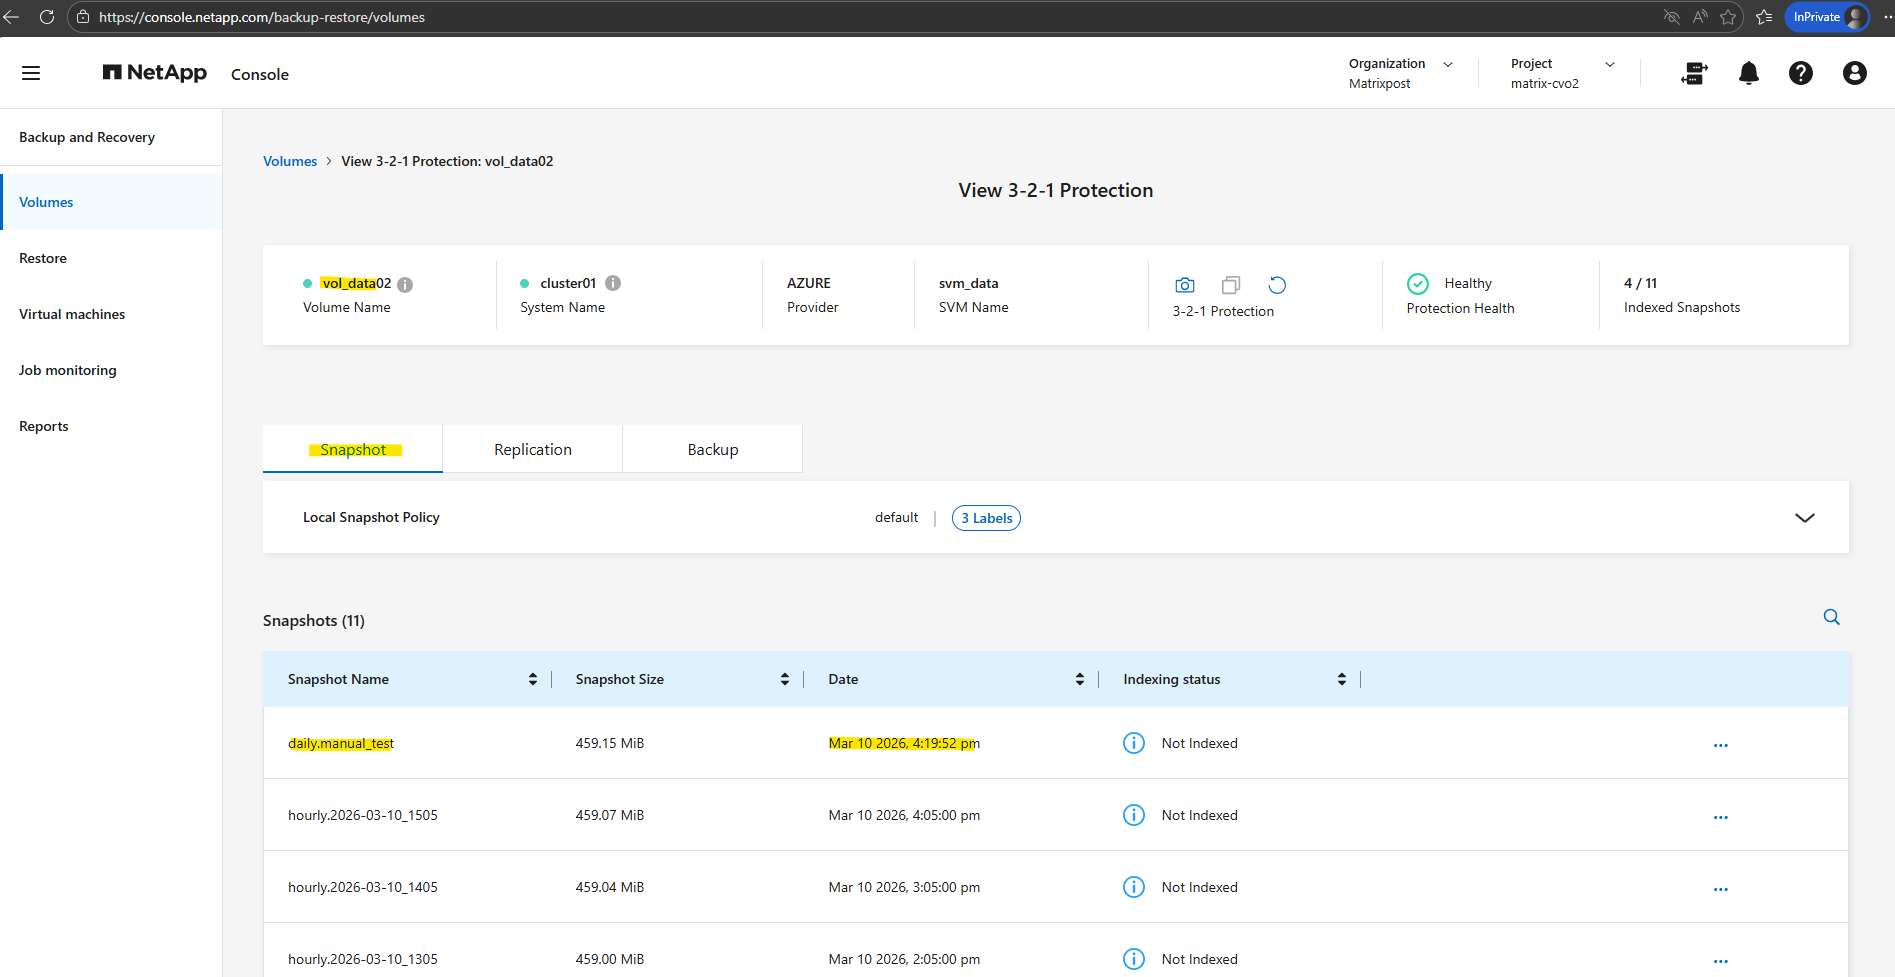
But still no new backup for 10 March.
Even if a snapshot is successfully exported to object storage using a manual SnapMirror update, the backup may not immediately appear in the NetApp Console. Restore points are registered according to the backup policy transfer schedule, and the UI is typically updated during the next scheduled backup cycle.
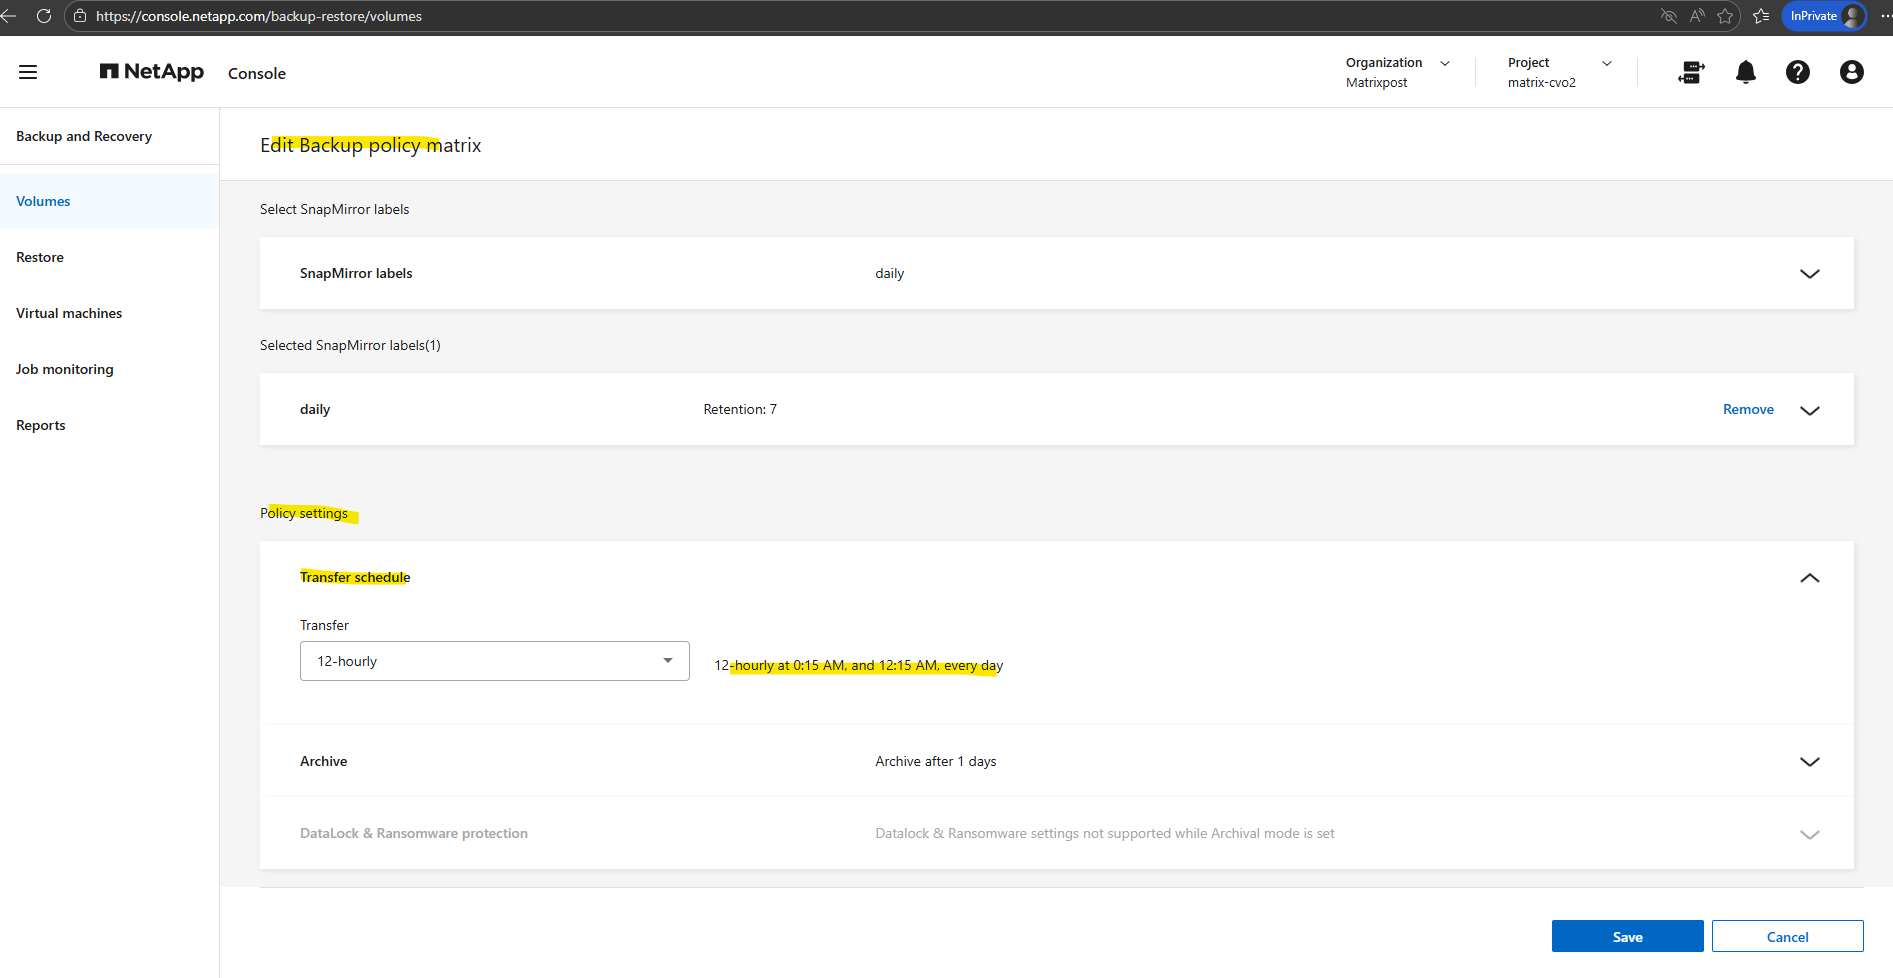
The transfer schedule shown in the NetApp Console may appear confusing because the UI mixes 24-hour and AM/PM notation. A schedule shown as
12-hourly at 0:15 AM and 12:15 AMactually corresponds to 00:15 and 12:15 in 24-hour time.For testing purposes, the archive threshold was temporarily set to 1 day so that backups are quickly moved to the archive tier. This allows verifying the restore behavior and the available Standard and High priority retrieval options without waiting several weeks. More about here.
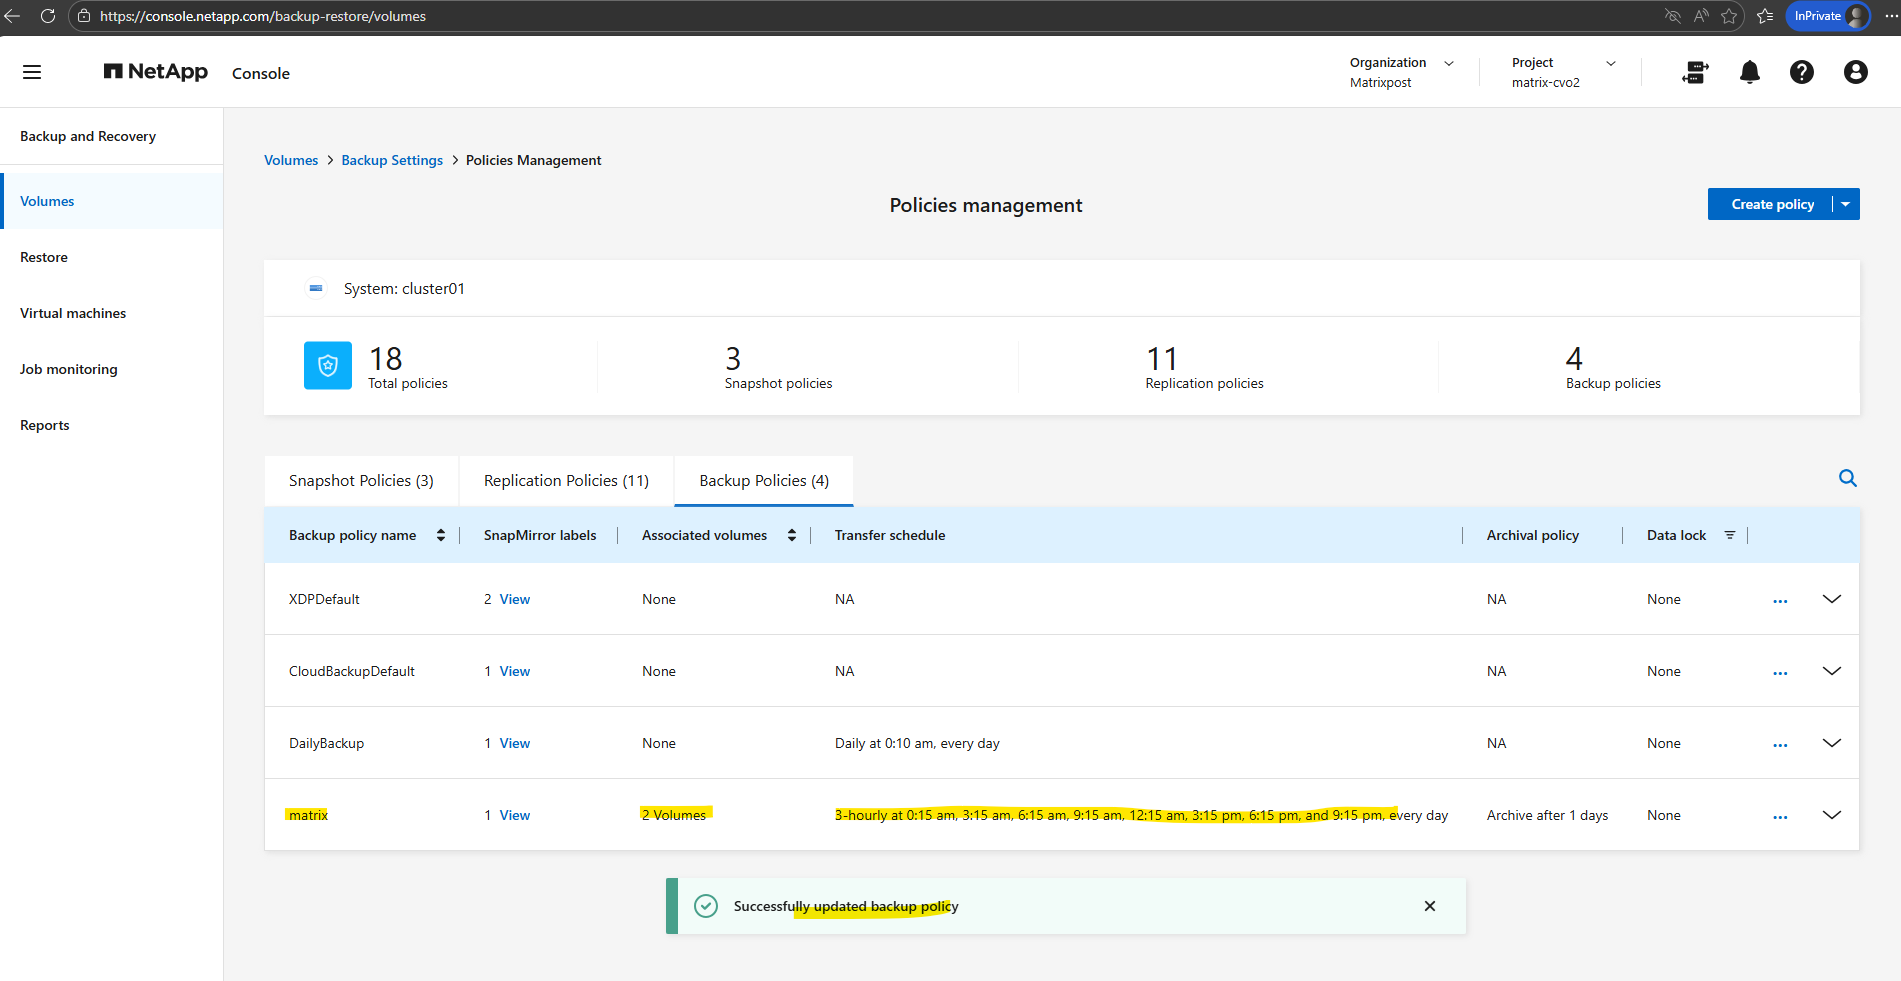
To observe the result more quickly, the backup policy was temporarily adjusted to run every three hours instead of the default schedule.
This allows a new backup cycle to be triggered shortly after creating a snapshot, making it easier to verify the behavior and outcome without waiting for the next daily backup window.
In Part 6 we walk through the process of performing a Non-Disruptive Upgrade (NDU) of a NetApp Cloud Volumes ONTAP (CVO) HA pair in Microsoft Azure.
Links
NetApp Backup and Recovery documentation
https://docs.netapp.com/us-en/data-services-backup-recovery/Protect your ONTAP volume data using NetApp Backup and Recovery
https://docs.netapp.com/us-en/data-services-backup-recovery/prev-ontap-protect-overview.htmlBack up Cloud Volumes ONTAP data to Azure Blob storage with NetApp Backup and Recovery
https://docs.netapp.com/us-en/data-services-backup-recovery/prev-ontap-backup-cvo-azure.htmlBack up on-premises ONTAP data to Azure Blob storage with NetApp Backup and Recovery
https://docs.netapp.com/us-en/data-services-backup-recovery/prev-ontap-backup-onprem-azure.htmlConfigure DNS services for the ONTAP network
https://docs.netapp.com/us-en/ontap/networking/configure_dns_services_auto.htmlSnapshots
https://docs.netapp.com/us-en/ontap/concepts/snapshot-copies-concept.htmlNetApp Snapshot Operation
https://www.flackbox.com/netapp-snapshot-operationNetApp ONTAP working with Snapshots
https://www.samuraj-cz.com/en/article/netapp-ontap-working-with-snapshots/Manage backup-to-object storage options in NetApp Backup and Recovery Advanced Settings
https://docs.netapp.com/us-en/data-services-backup-recovery/prev-ontap-policy-object-advanced-settings.html