Introduction to Azure Service Principals and Managed Identities and how to create them
In Azure, secure access to resources is a top priority. Two essential tools for achieving this are Service Principals and Managed Identities.
- Service Principals act as application identities that can be granted specific permissions in Azure Entra ID. They are often used when applications, scripts, or services need to authenticate and interact with Azure resources.
- Managed Identities build on this concept by providing an automatically managed identity for Azure services to use when accessing other Azure resources. This eliminates the need to manage secrets or credentials manually.
Instead of creating a service principal, consider using managed identities for Azure resources for your application identity.
If your code runs on a service that supports managed identities and accesses resources that support Microsoft Entra authentication, managed identities are a better option for you.
To learn more about managed identities for Azure resources, including which services currently support it, see What is managed identities for Azure resources? and below in this post.
Source: https://learn.microsoft.com/en-us/entra/identity-platform/howto-create-service-principal-portal
Both approaches follow the principle of least privilege, giving applications and services only the permissions they need to operate.
While Service Principals require manual secret management (like client secrets or certificates), Managed Identities simplify authentication by integrating directly with Azure’s identity platform.
Automated tools that use Azure services should always have restricted permissions to ensure that Azure resources are secure.
Therefore, instead of having applications sign in as a fully privileged user, Azure offers service principals.
An Azure service principal is an identity created for use with applications, hosted services, and automated tools. This identity is used to access resources.
Source: https://learn.microsoft.com/en-us/cli/azure/azure-cli-sp-tutorial-1?tabs=bash
In this post we will see how to create Service Principals and Managed Identities and how to use them to secure access to resources in Azure.
- Introduction – Application and service principal objects in Microsoft Entra ID
- Create an Azure service principal with Azure CLI
- Create an Azure service principal with Azure PowerShell
- Create an Azure service principal by using the Azure Portal
- Create a Certificate on an internal PKI (AD CS)
- What are managed identities for Azure resources?
- Links
Introduction – Application and service principal objects in Microsoft Entra ID
First about application registration, application objects, and service principals in Microsoft Entra ID, what they are, how they’re used, and how they’re related to each other.
A multitenant example scenario is also presented to illustrate the relationship between an application’s application object and corresponding service principal objects.
Application registration
To delegate identity and access management functions to Microsoft Entra ID, an application must be registered with a Microsoft Entra tenant. When you register your application with Microsoft Entra ID, you’re creating an identity configuration for your application that allows it to integrate with Microsoft Entra ID. When you register an app, you choose whether it’s a single tenant, or multitenant, and can optionally set a redirect URI. For step-by-step instructions on registering an app, see the app registration quickstart.
When you’ve completed the app registration, you have a globally unique instance of the app (the application object) that lives within your home tenant or directory. You also have a globally unique ID for your app (the app/client ID). You can add secrets or certificates and scopes to make your app work, customize the branding of your app in the sign-in dialog, and more.
If you register an application, an application object and a service principal object are automatically created in your home tenant. If you register/create an application using the Microsoft Graph APIs, creating the service principal object is a separate step.
Application object
A Microsoft Entra application is defined by its one and only application object, which resides in the Microsoft Entra tenant where the application was registered (known as the application’s “home” tenant). An application object is used as a template or blueprint to create one or more service principal objects. A service principal is created in every tenant where the application is used. Similar to a class in object-oriented programming, the application object has some static properties that are applied to all the created service principals (or application instances).
The application object describes three aspects of an application:
- How the service can issue tokens in order to access the application
- The resources that the application might need to access
- The actions that the application can take
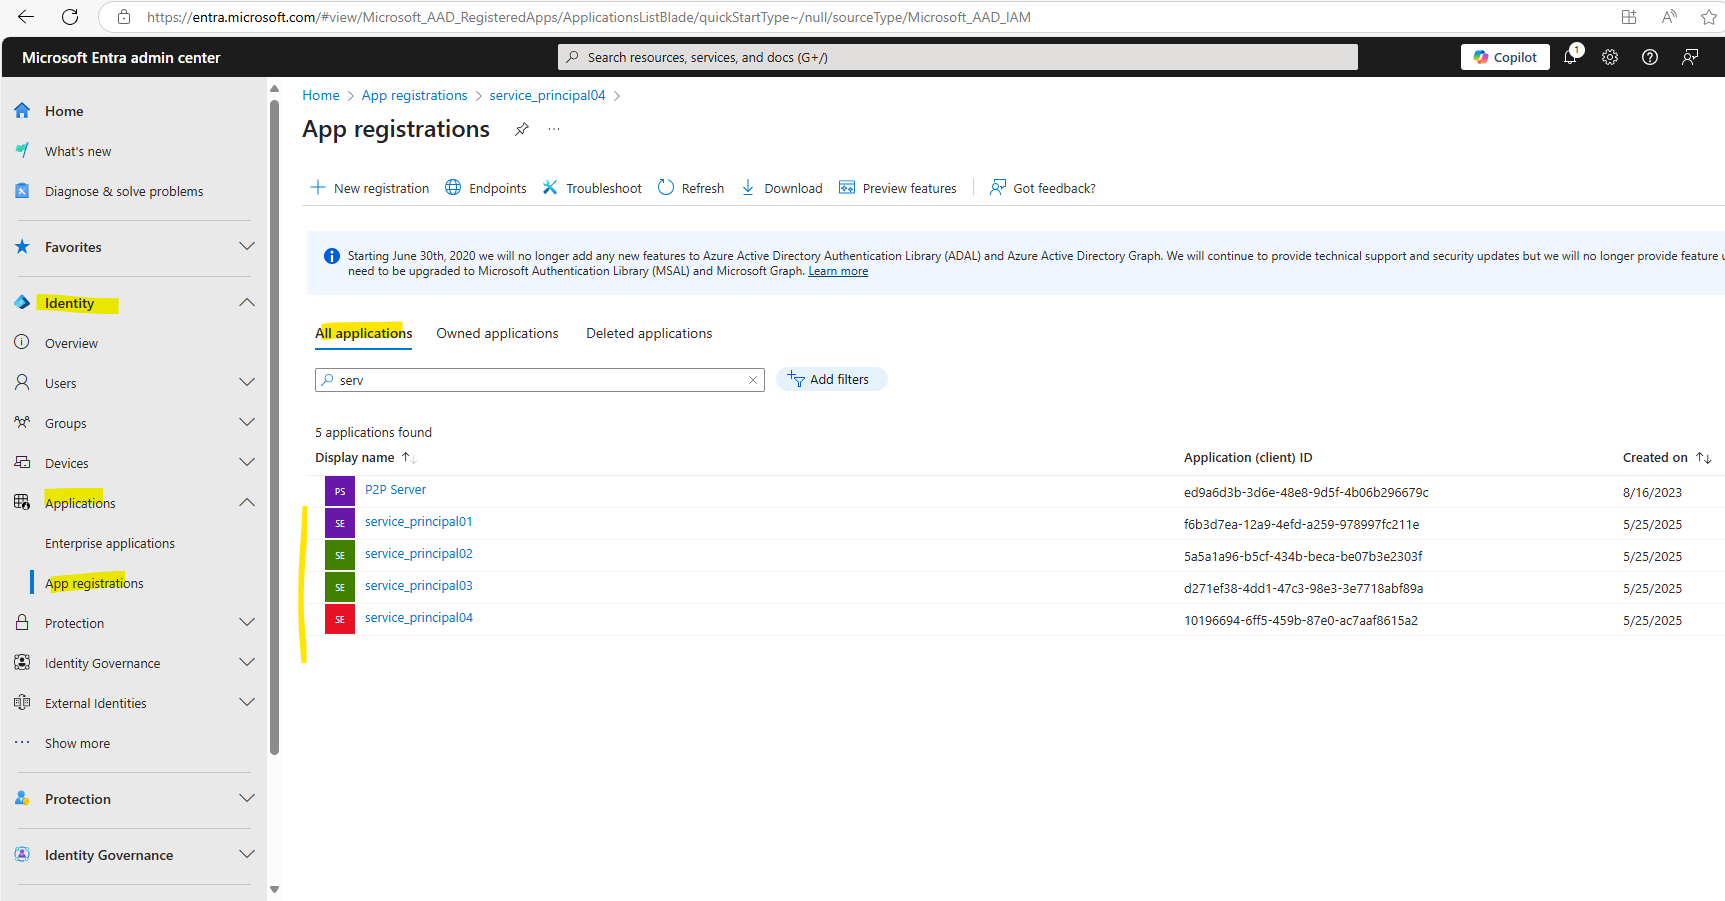
You can use the App registrations page in the Microsoft Entra admin center to list and manage the application objects in your home tenant.
Service principal object
To access resources that are secured by a Microsoft Entra tenant, the entity that requires access must be represented by a security principal. This requirement is true for both users (user principal) and applications (service principal). The security principal defines the access policy and permissions for the user/application in the Microsoft Entra tenant. This enables core features such as authentication of the user/application during sign-in, and authorization during resource access.
There are three types of service principal:
- Application – This type of service principal is the local representation, or application instance, of a global application object in a single tenant or directory. In this case, a service principal is a concrete instance created from the application object and inherits certain properties from that application object. A service principal is created in each tenant where the application is used and references the globally unique app object. The service principal object defines what the app can actually do in the specific tenant, who can access the app, and what resources the app can access. When an application is given permission to access resources in a tenant (upon registration or consent), a service principal object is created. When you register an application, a service principal is created automatically. You can also create service principal objects in a tenant using Azure PowerShell, Azure CLI, Microsoft Graph, and other tools.
- Managed identity – This type of service principal is used to represent a managed identity. Managed identities eliminate the need for developers to manage credentials. Managed identities provide an identity for applications to use when connecting to resources that support Microsoft Entra authentication. When a managed identity is enabled, a service principal representing that managed identity is created in your tenant. Service principals representing managed identities can be granted access and permissions, but can’t be updated or modified directly. A service principal representing a managed identity doesn’t have an associated app object (unlike the Application type above).
- Legacy – This type of service principal represents a legacy app, which is an app created before app registrations were introduced or an app created through legacy experiences. A legacy service principal can have credentials, service principal names, reply URLs, and other properties that an authorized user can edit, but doesn’t have an associated app registration. The service principal can only be used in the tenant where it was created.
The Microsoft Graph ServicePrincipal entity defines the schema for a service principal object’s properties.
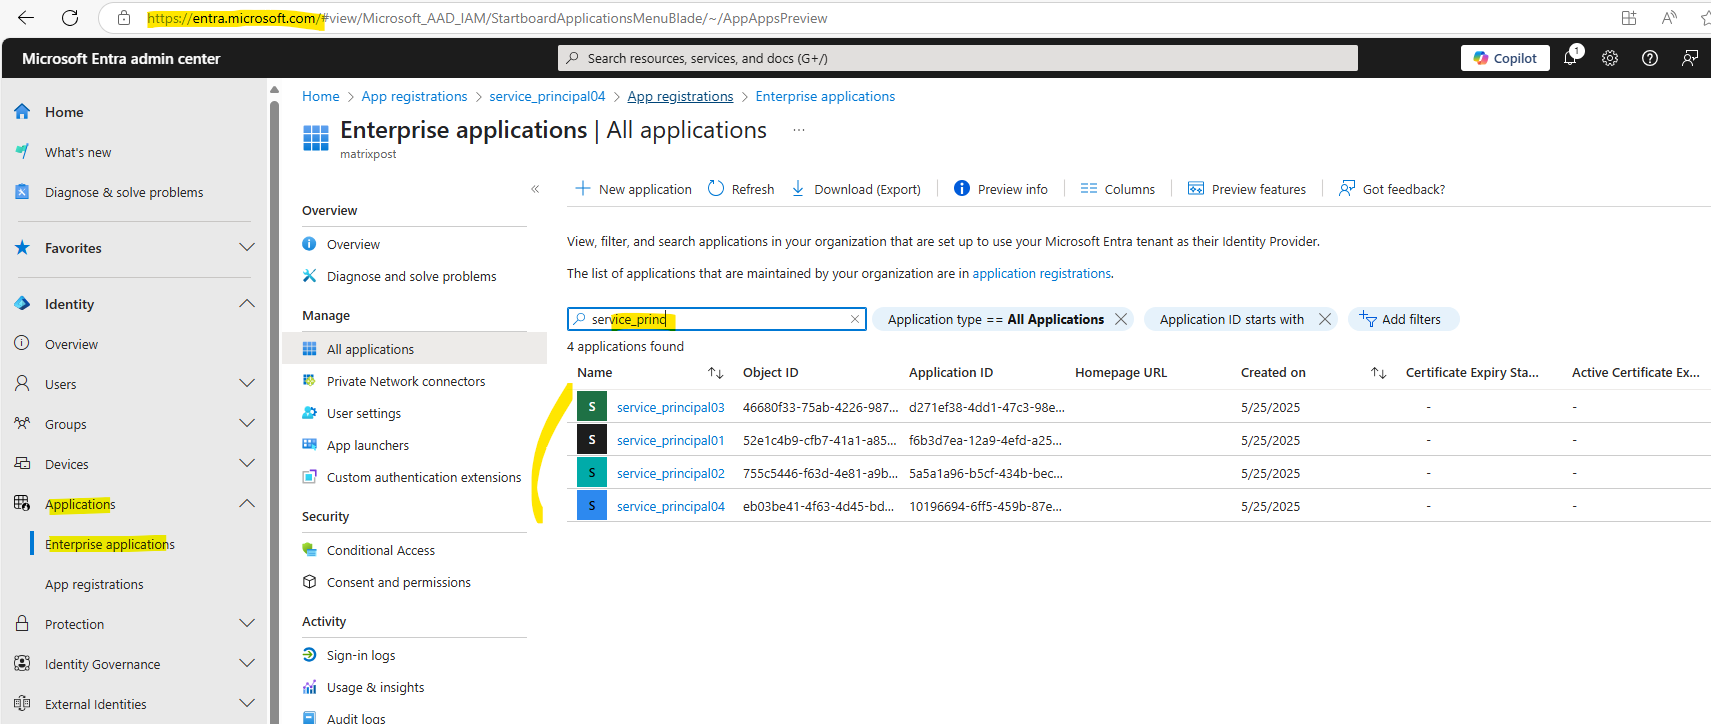
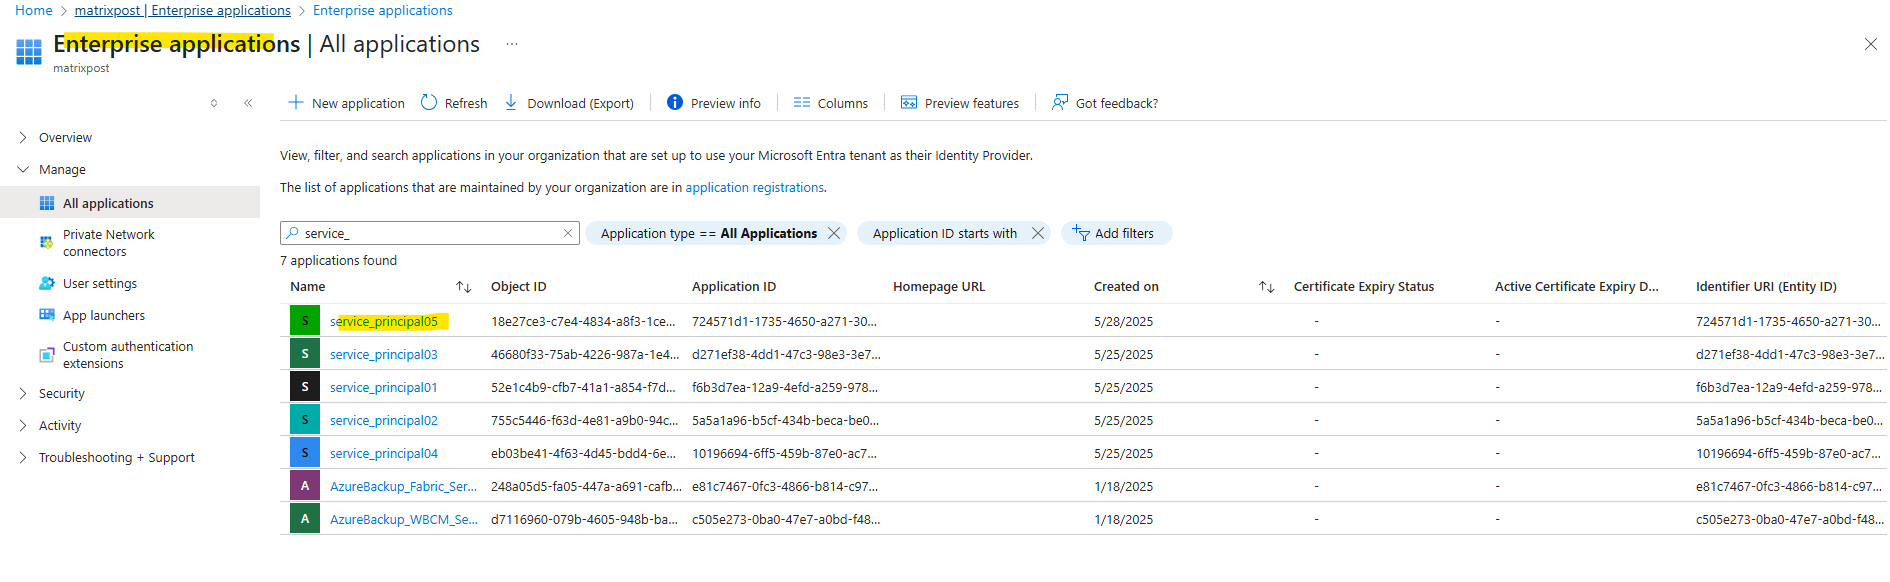
You can use the Enterprise applications page in the Microsoft Entra admin center to list and manage the service principals in a tenant. You can see the service principal’s permissions, user consented permissions, which users have done that consent, sign in information, and more.
Create an Azure service principal with Azure CLI
To create an Azure service principal we can use the Azure portal, the Azure CLI or Azure PowerShell. Below we will see how to create the service principal by using the Azure CLI.
First login to Azure by using the following command.
> az login
or
> az login --tenant <tenant id>

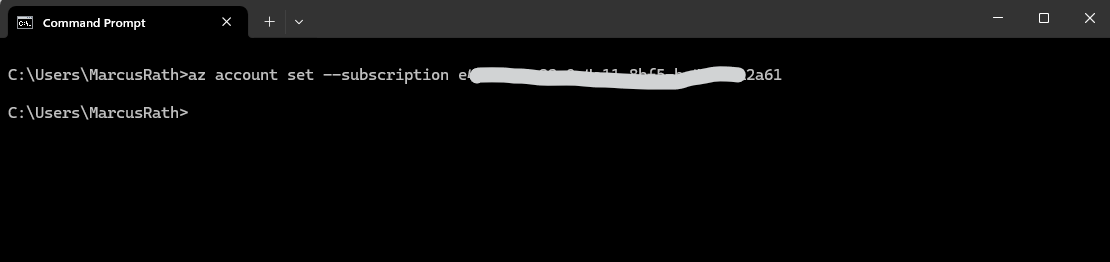
After you sign in, CLI commands are run against your default subscription. If you have multiple subscriptions, change your default subscription using az account set –subscription.
> az account set --subscription "<subscription ID or name>"
Password-based authentication
When creating a service principal, you choose the type of sign-in authentication it uses. There are two types of authentication available for Azure service principals: password-based authentication and certificate-based authentication.
Password-based authentication is good to use when learning about service principals, but we recommend using certificate-based authentication for applications.
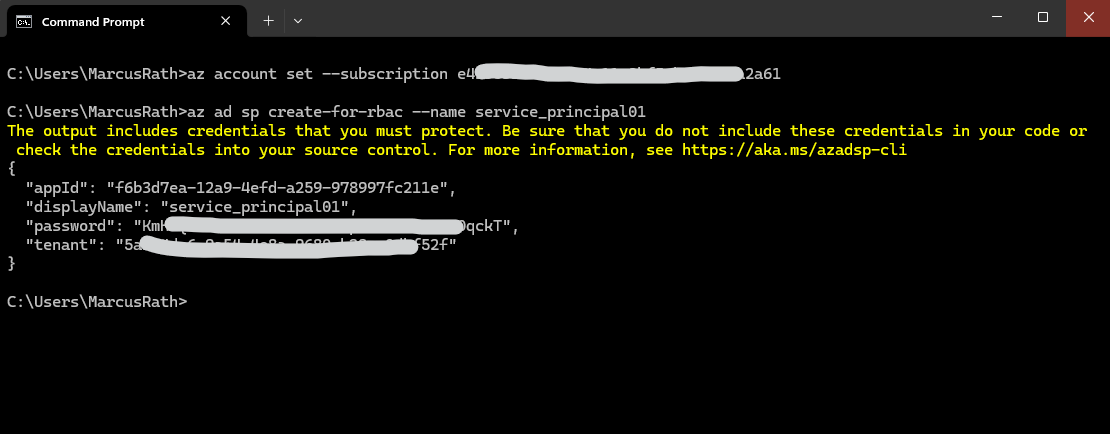
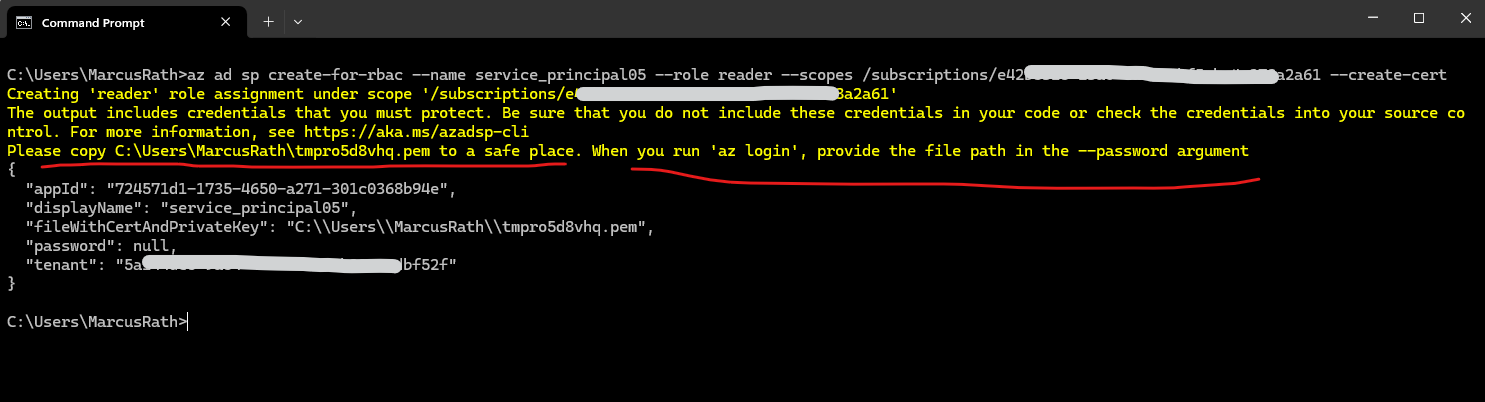
Use the az ad sp create-for-rbac Azure CLI reference command to create a service principal.
> az ad sp create-for-rbac --name service_principal01
The default behavior of az ad sp create-for-rbac is to create a service principal with a random password.
Make sure you copy this value – it can’t be retrieved. If you lose the password, reset the service principal credentials.
As mentioned, the password for the client secret (value below) can’t be retrieved after creation. In case we lost it we need to remove the client secret and create a new one.
If you aren’t adhering to resource naming conventions and plan to create a role and scope for your new service principal later, the az ad sp create-for-rbac command without parameters is an acceptable solution. However, without a role and scope, the new service principal doesn’t have access to resources.
It just exists.
Record your system-assigned password as you can’t retrieve it again. If you lose the password, reset it using az ad sp credential reset as explained in Reset service principal credentials or the Azure portal to remove and create a new client secret.
Set the role assignment for your new service principal by using az role assignment create as explained in Manage service principal roles.
As a best practice, always assign a specific –role and –scopes when you create a service principal. Follow these steps:
When determining role, always use the principle of least privilege. For example, don’t give your service principal contributor permissions to a subscription if the service principal only needs to access Azure storage within a resource group.
Consider a specialize role like storage blob data contributor. For a complete list of available roles in Azure RBAC, see Azure built-in roles.
Find and copy the Resource ID of the Azure resource the new service principal needs to access. This information is usually found in the Azure portal’s Properties or Endpoints page of each resource. Here are common –scopes examples, but rely on your Resource ID for an actual format and value.
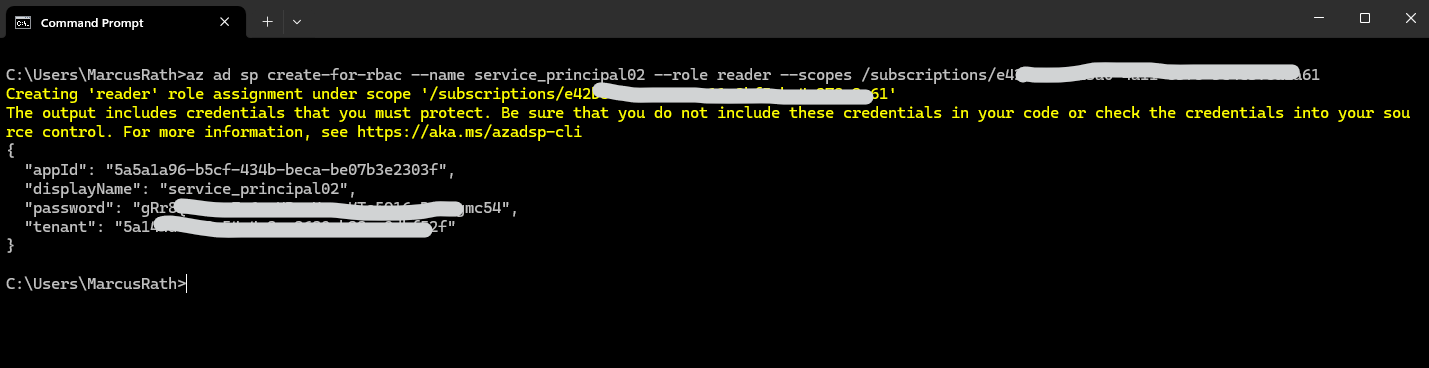
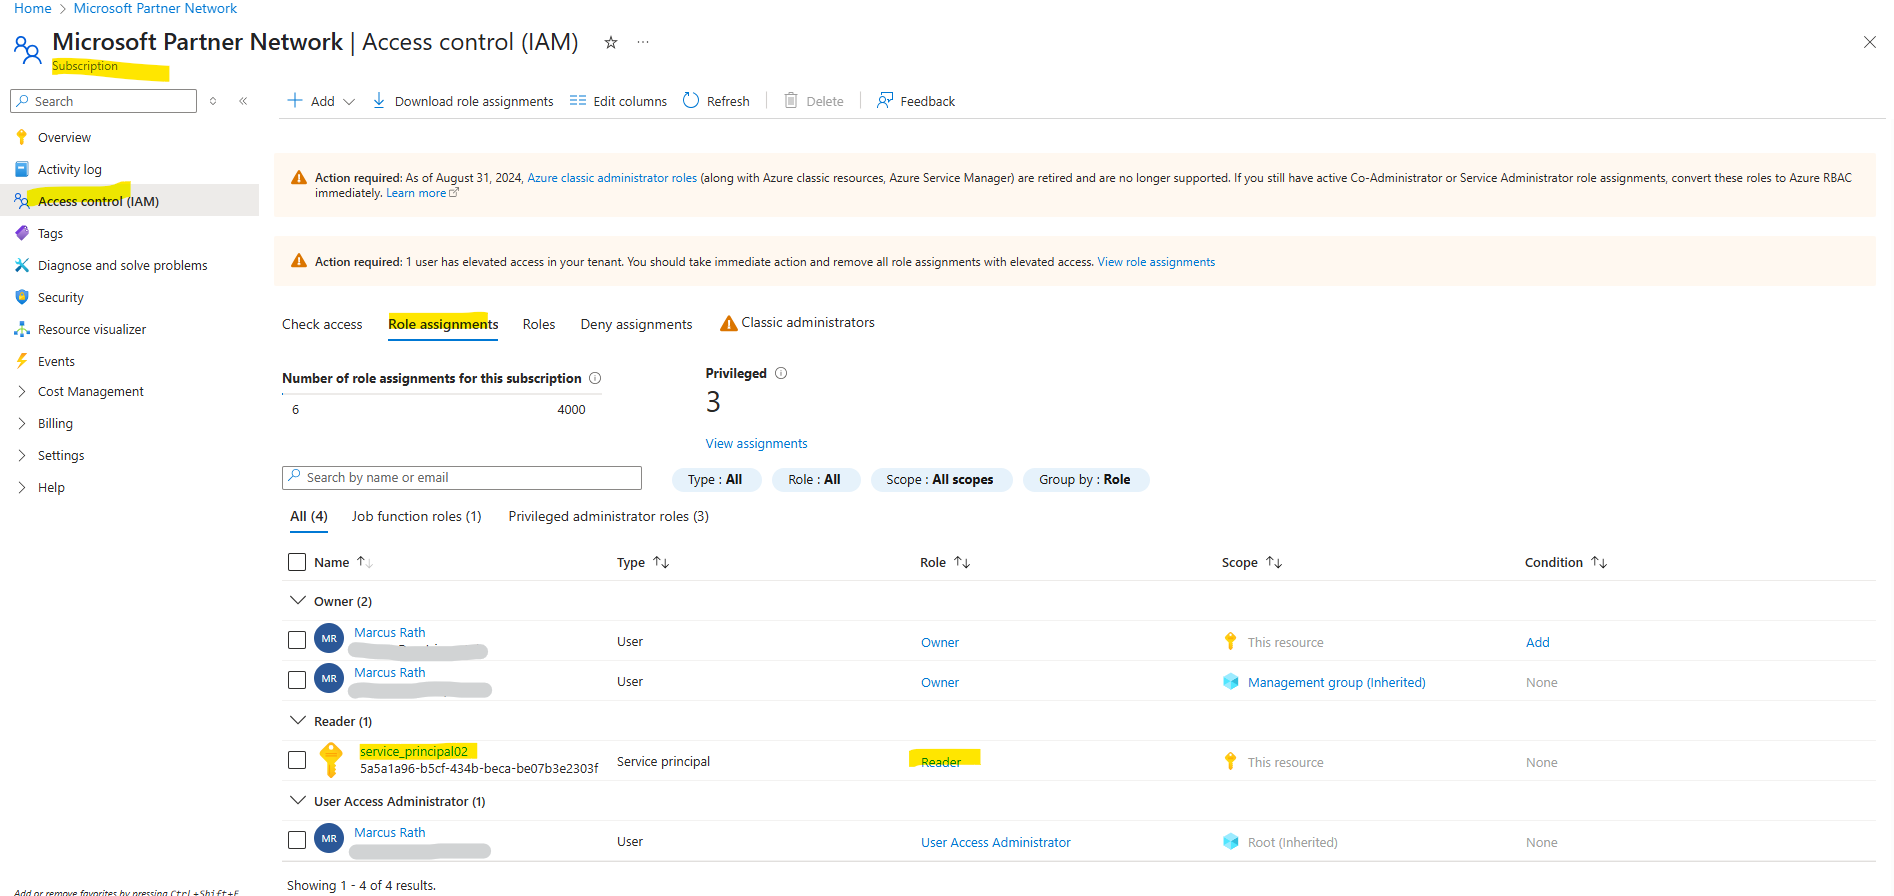
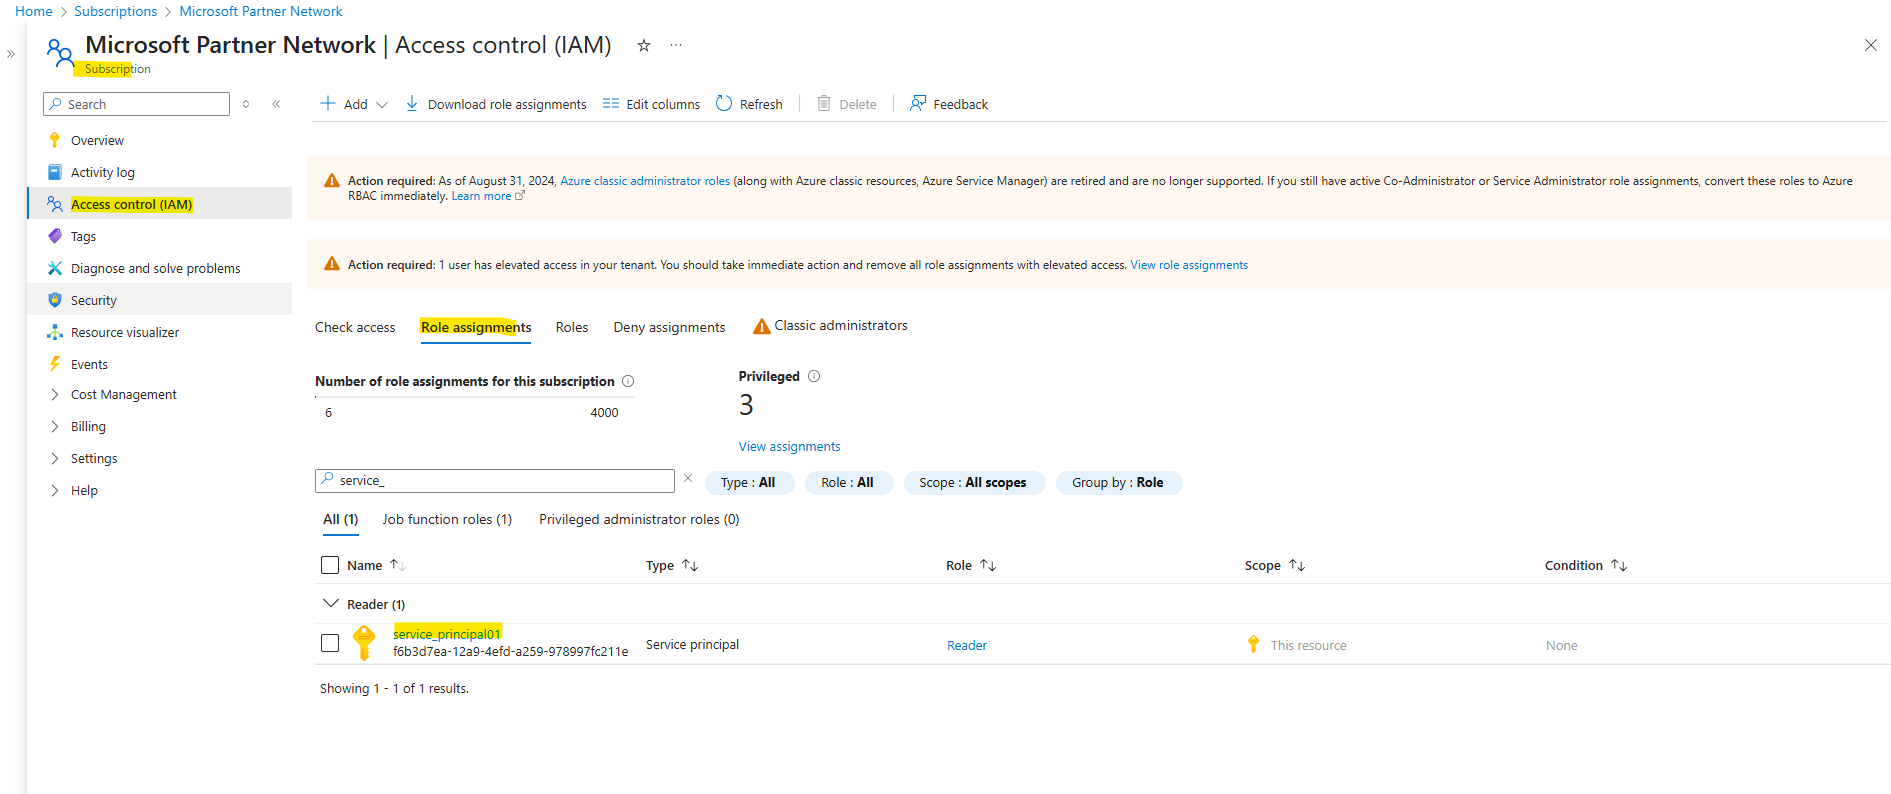
In this example, a new service principal named service_principal01 is created with reader permissions to all resources in the subscription with this ID.
> az ad sp create-for-rbac --name service_principal02 --role reader --scopes /subscriptions/<subscription id>
More here https://learn.microsoft.com/en-us/cli/azure/azure-cli-sp-tutorial-1?tabs=bash
Certificate-based authentication
When creating a service principal, you choose the type of sign-in authentication it uses. There are two types of authentication available for Azure service principals: password-based authentication and certificate-based authentication.
Microsoft recommends using certificate-based authentication due to the security restrictions of password-based authentication.
Certificate-based authentication enables you to adopt a phishing resistant authentication by using conditional access policies, which better protects Azure resources. To learn more about why certificate-based authentication is more secure, see Microsoft Entra certificate-based authentication.
Source: https://learn.microsoft.com/en-us/cli/azure/azure-cli-sp-tutorial-3?view=azure-cli-latest
By using a self-signed certificate
To create a self-signed certificate for authentication, use the --create-cert parameter:
> az login --tenant <tenant id>

> az ad sp create-for-rbac --name myServicePrincipalName --role roleName --scopes /subscriptions/mySubscriptionID --create-cert
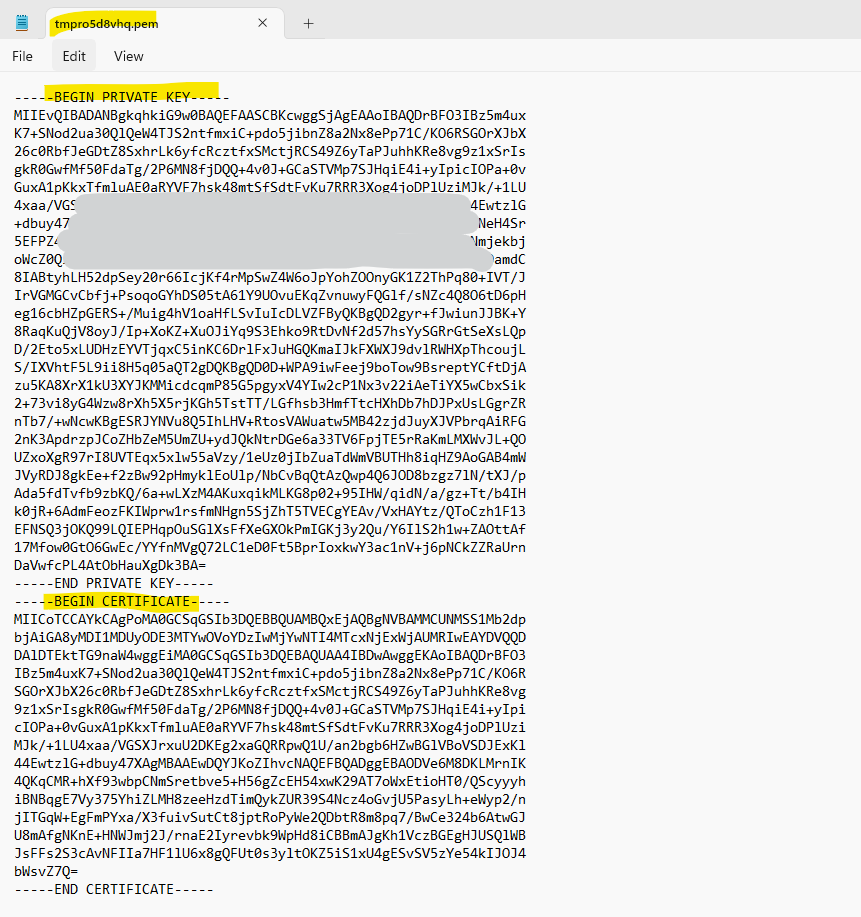
Unless you store the certificate in Key Vault, the output includes the fileWithCertAndPrivateKey key. This key’s value tells you where the generated certificate is stored. Copy the certificate to a secure location. The certificate contains the private key and the public certificate that can be used in az login. If you lose access to a certificate’s private key, reset the service principal credentials.
The generated certificate stored on the computer we run the command.

Including the private and public key.
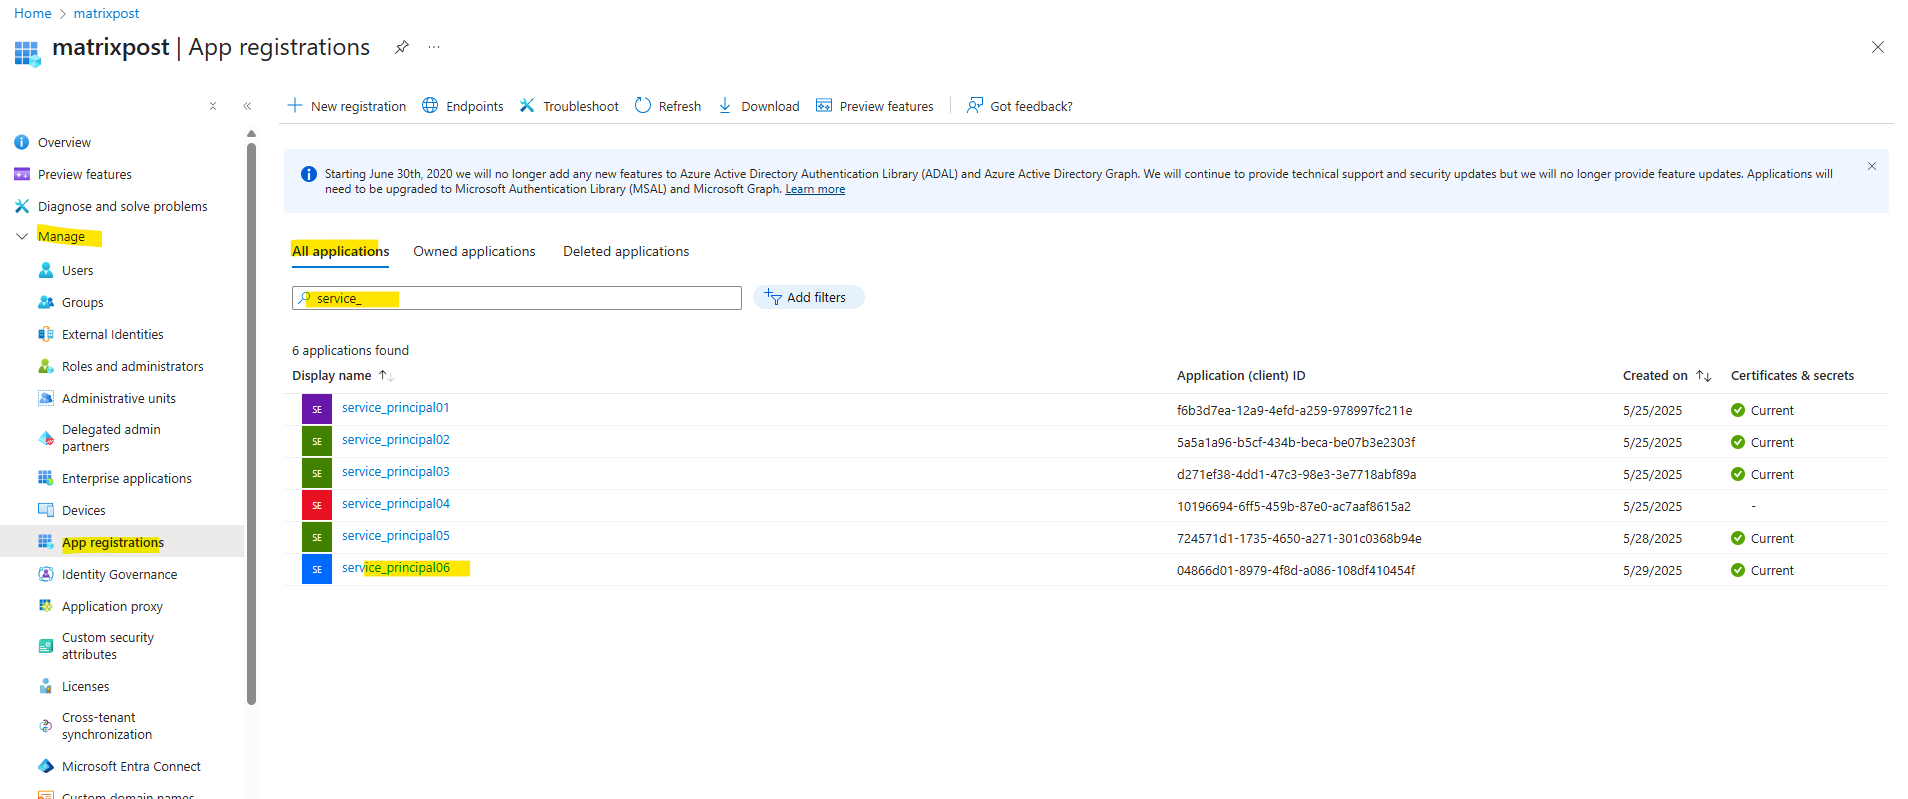
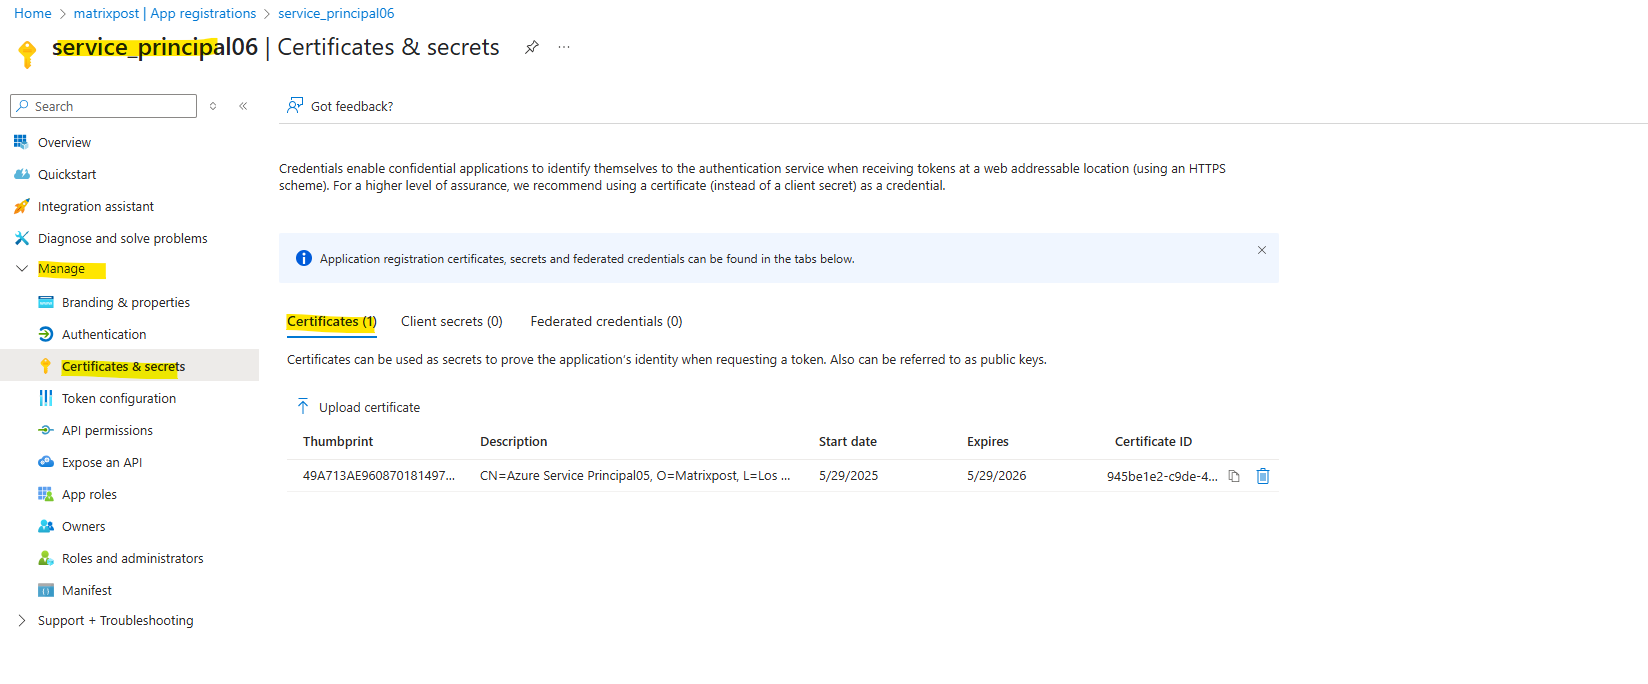
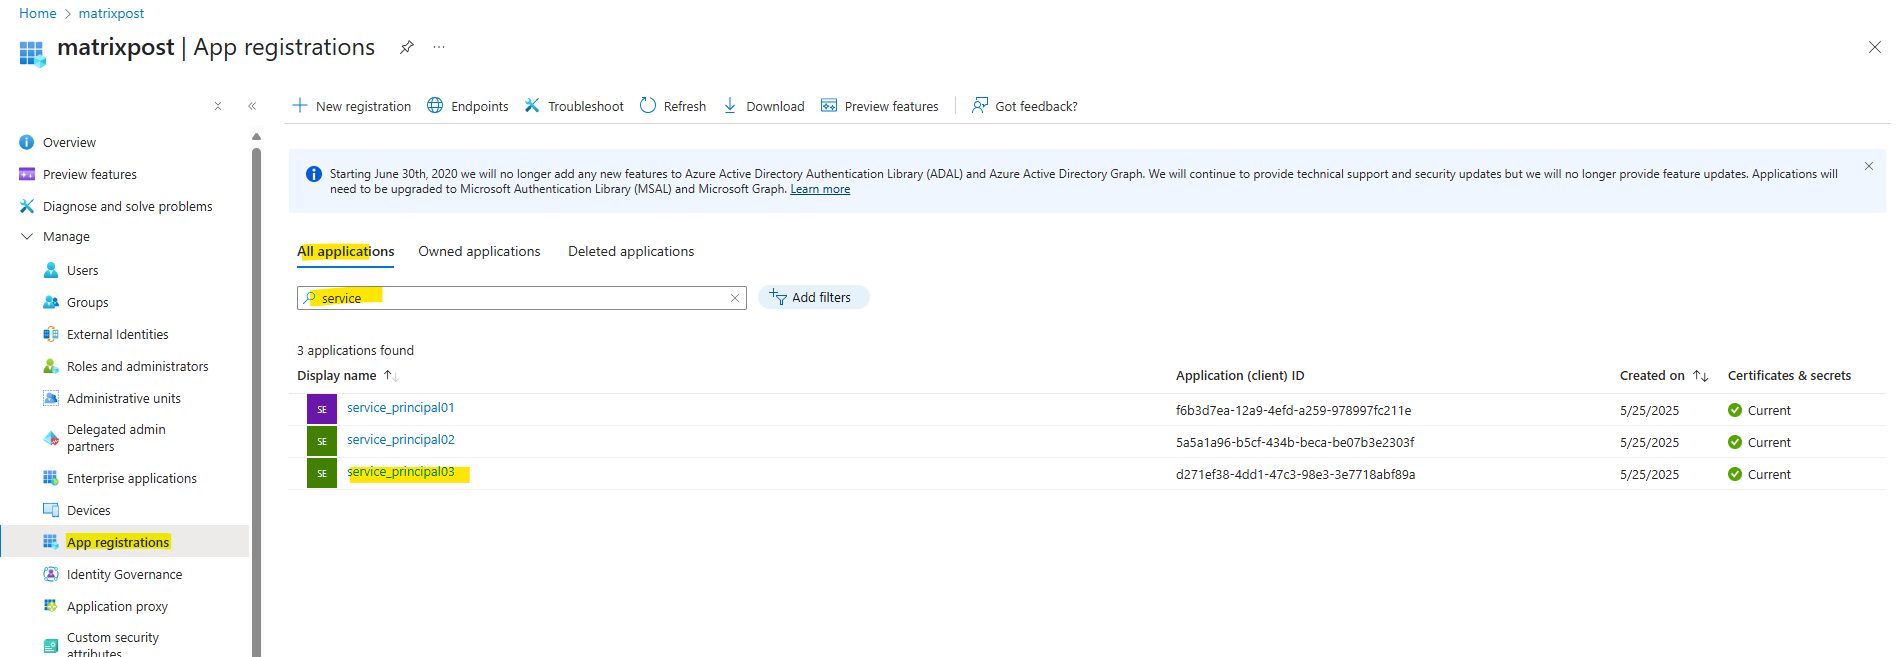
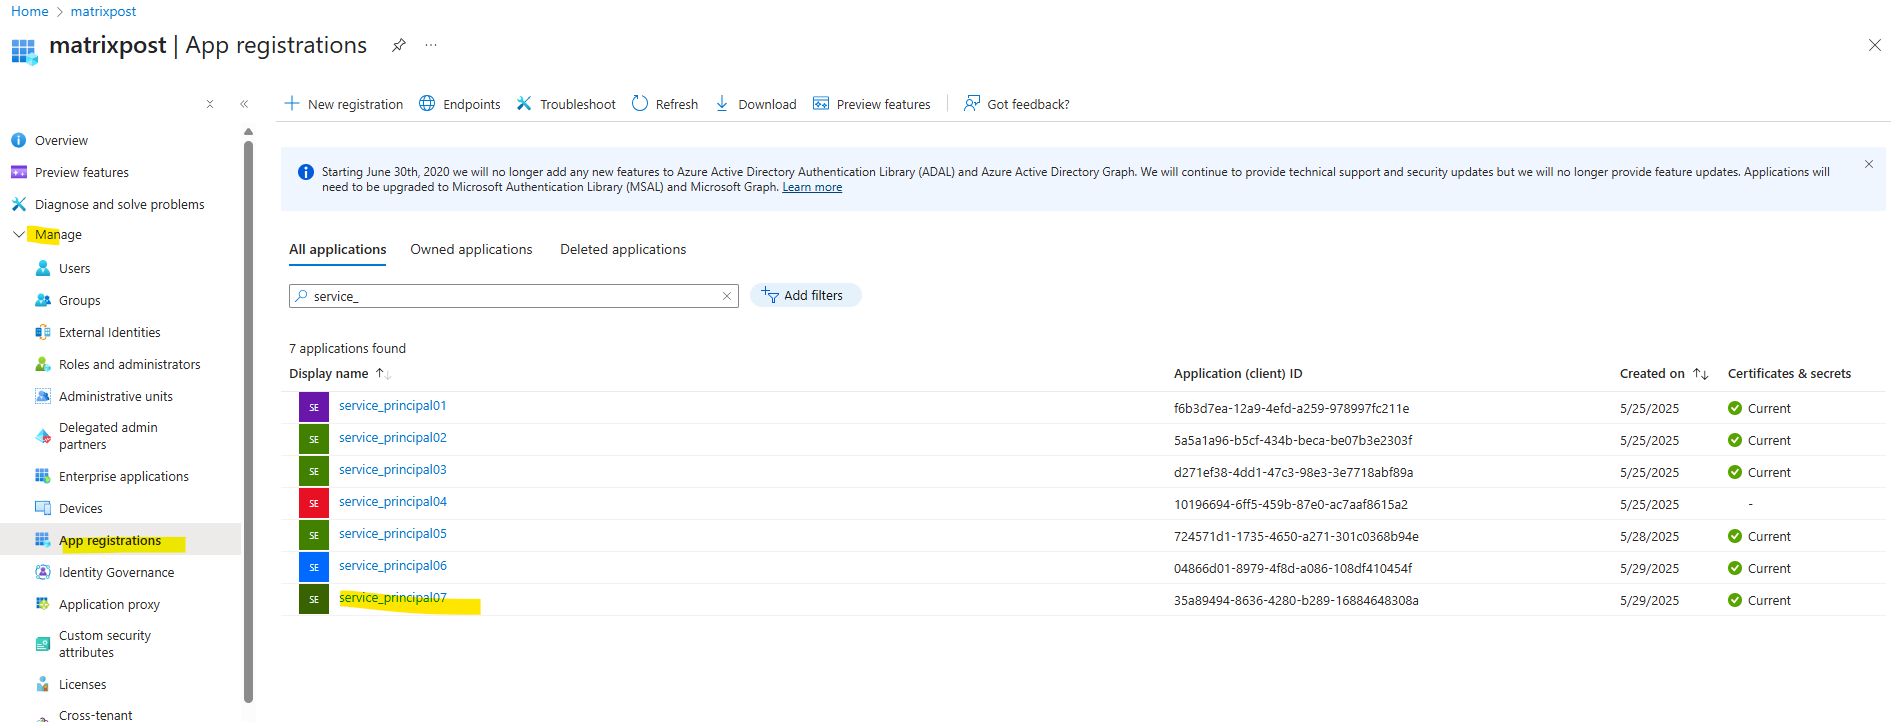
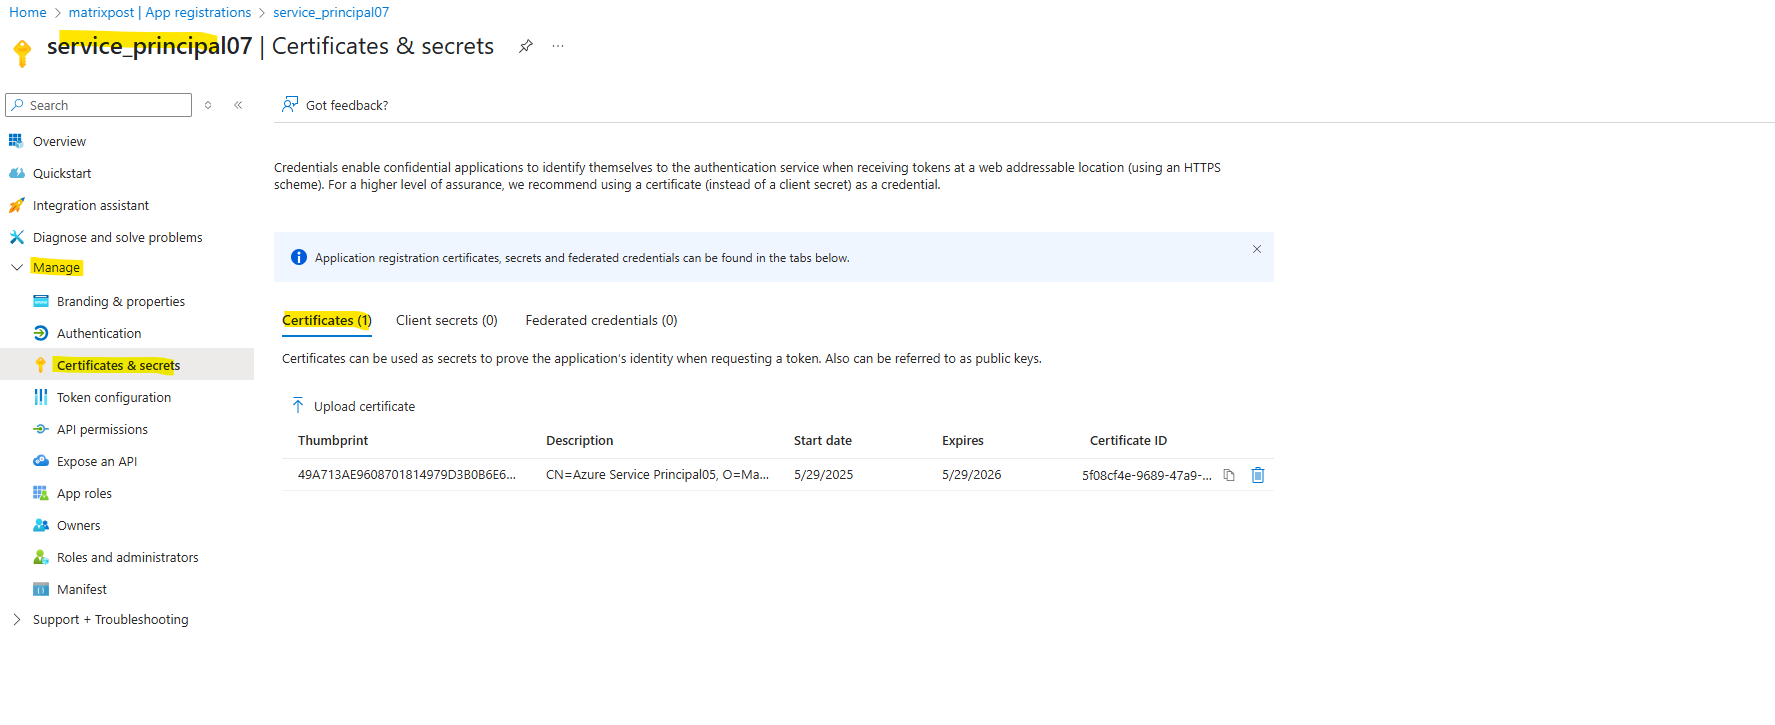
The created service principal is shown up under App registrations (application object) and the Enterprise applications (service principal).

Previously the password for the service principal was shown up below on the Client secret tab and now by using certificate-based authentication the certificates public key is shown up here on the Certificates tab.

By using an existing certificate
Create a service principal with an existing certificate by using the --cert parameter.
Any tool that uses this service principal must have access to the certificate’s private key.
Certificates should be in an ASCII format such as PEM, CER, or DER. Pass the certificate as a string, or use the @path format to load the certificate from a file. When uploading a certificate, only the public certificate is needed. For optimal security, do not include the private key. The -----BEGIN CERTIFICATE----- and -----END CERTIFICATE----- lines are optional.
# create a service principal with the certificate as a string
az ad sp create-for-rbac --name myServicePrincipalName --role roleName --scopes /subscriptions/mySubscriptionID/resourceGroups/myResourceGroupName --cert "MIICoT..."


# or provide -----BEGIN CERTIFICATE----- and -----END CERTIFICATE----- lines
az ad sp create-for-rbac --name myServicePrincipalName --role roleName --scopes /subscriptions/mySubscriptionID/resourceGroups/myResourceGroupName --cert "-----BEGIN CERTIFICATE-----
MIICoT...
-----END CERTIFICATE-----"
I will use below the option by set the file location to the certificate file.
The certificate I used was issued by my internal PKI and shown below.
# create a service principal with the certificate file location
az ad sp create-for-rbac --name myServicePrincipalName --role roleName --scopes /subscriptions/mySubscriptionID/resourceGroups/myResourceGroupName --cert @/path/to/cert.pem
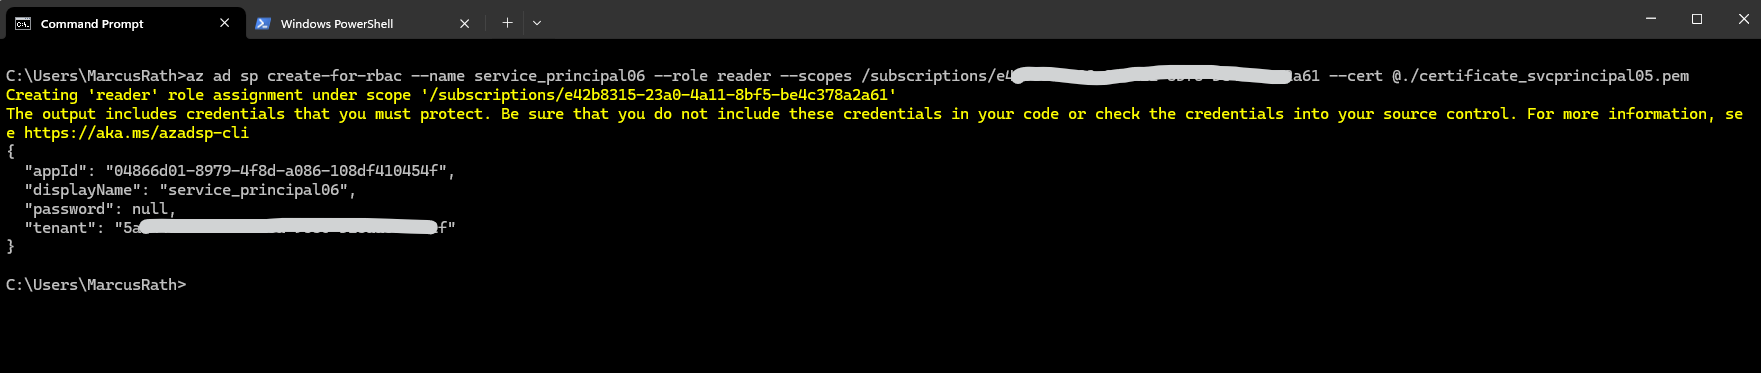
I will finally assign the reader role directly to the subscription instead just a specific resource group.
> az ad sp create-for-rbac --name service_principal06 --role reader --scopes /subscriptions/<subscription id> --cert @./certificate_svcprincipal05.pem
Create an Azure service principal with Azure PowerShell
Nex we will see how to create the service principal by using the Azure PowerShell.
First login to Azure by using the following command.
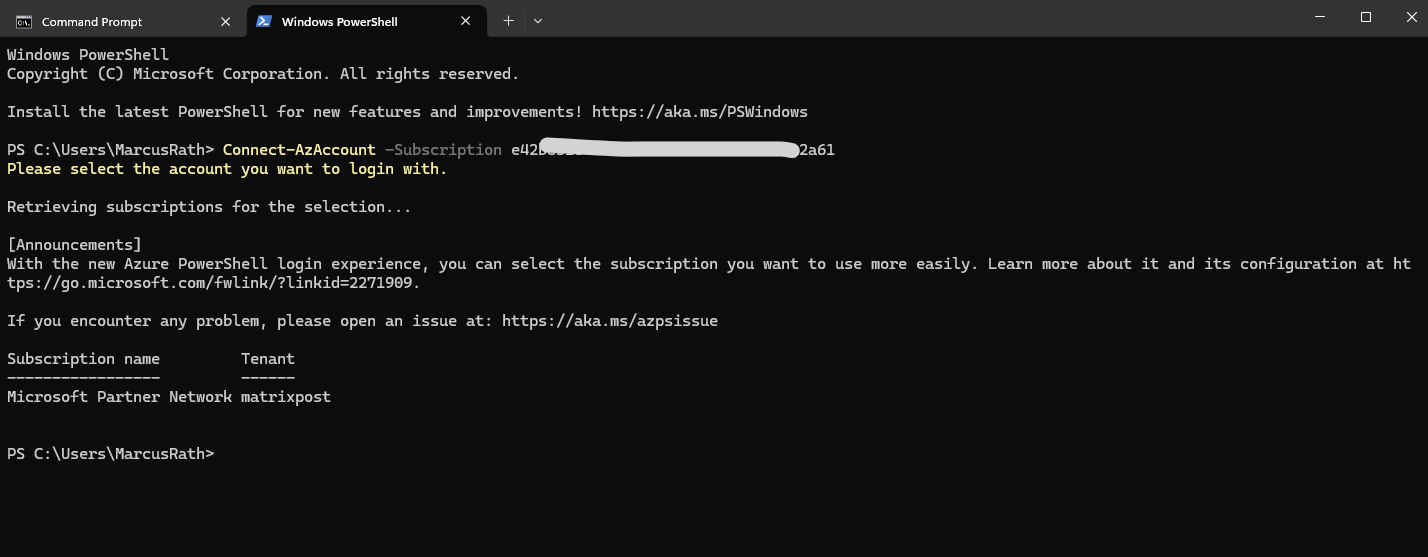
PS> Connect-AzAccount

or by already setting the active subscription
PS> Connect-AzAccount -Subscription <subscription ID>
Create a service principal with the New-AzADServicePrincipal cmdlet. When creating a service principal, you choose the type of sign-in authentication it uses.
Beginning with Az PowerShell module version 7.x, New-AzADServicePrincipal no longer assigns the Contributor role to the service principal by default. To assign a specific role to a service principal, see Steps to add a role assignment.
PS> (Get-InstalledModule -Name 'Az' -AllVersions -ErrorAction SilentlyContinue).Version | Sort-Object -Desc | Select-Object -First 1

Password-based authentication
Without any other authentication parameters, password-based authentication is used and a random password created for you. If you want password-based authentication, this method is recommended.
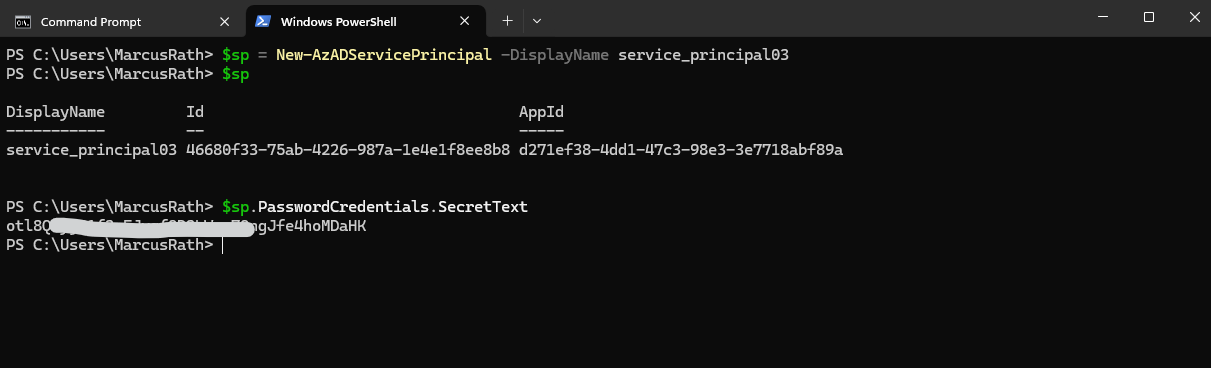
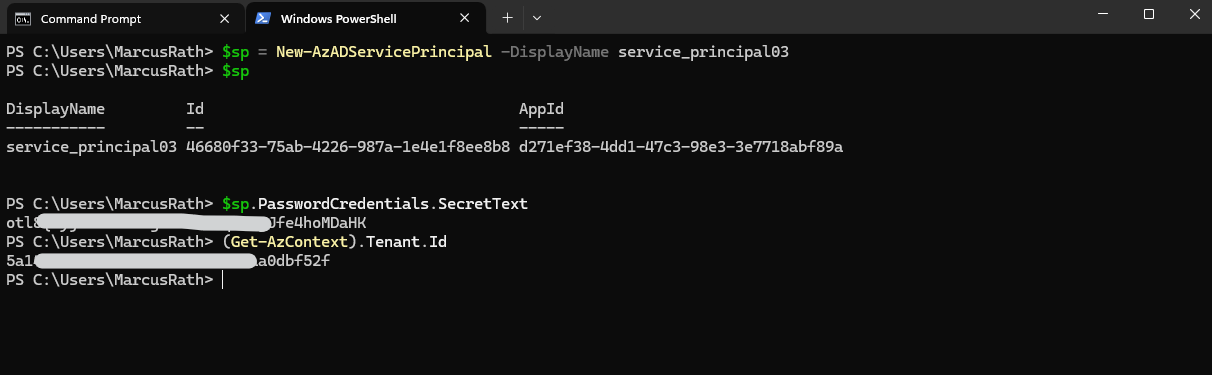
PS> $sp = New-AzADServicePrincipal -DisplayName <ServicePrincipalName>

The object returned from New-AzADServicePrincipal contains the Id and DisplayName members, either of which can be used for sign in with the service principal.
Also the returned object contains the PasswordCredentials.SecretText property containing the generated password. Make sure that you store this value somewhere secure to authenticate with the service principal. Its value won’t be displayed in the console output. If you lose the password, reset the service principal credentials.
PS> $sp
PS> $sp.PasswordCredentials.SecretText
Signing in with a service principal requires the tenant ID which the service principal was created under. To get the active tenant when the service principal was created, run the following command immediately after service principal creation:
(Get-AzContext).Tenant.Id
Certificate-based authentication
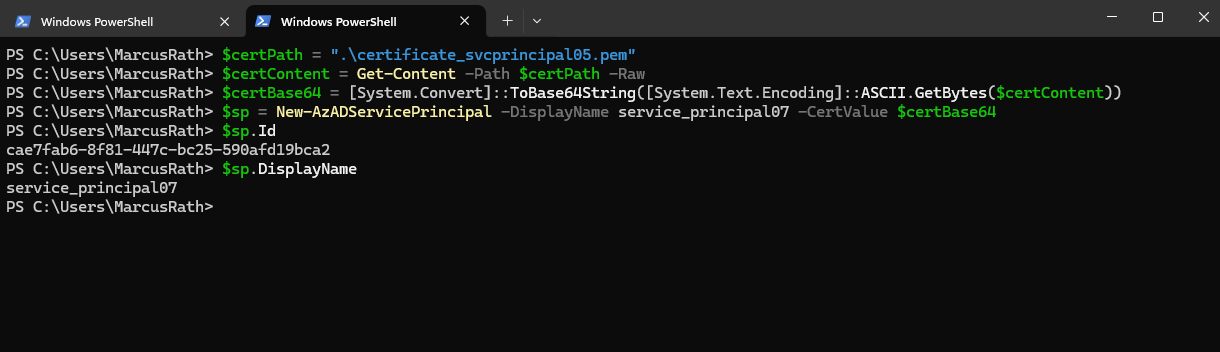
Service principals using certificate-based authentication are created with the CertValue parameter. This parameter takes a base64-encoded ASCII string of the public certificate. This is represented by a PEM file, or a text-encoded CRT or CER.
Binary encodings of the public certificate aren’t supported. These instructions assume that you already have a certificate available.
PS> $certPath = "C:\path\to\your\certificate.cer"
PS> $certContent = Get-Content -Path $certPath -Raw
PS> $certBase64 = [System.Convert]::ToBase64String([System.Text.Encoding]::ASCII.GetBytes($certContent))
PS> $sp = New-AzADServicePrincipal -DisplayName service_principal07 -CertValue $certBase64
I will use here the same certificate as previously for the service_principal05 for convenience.
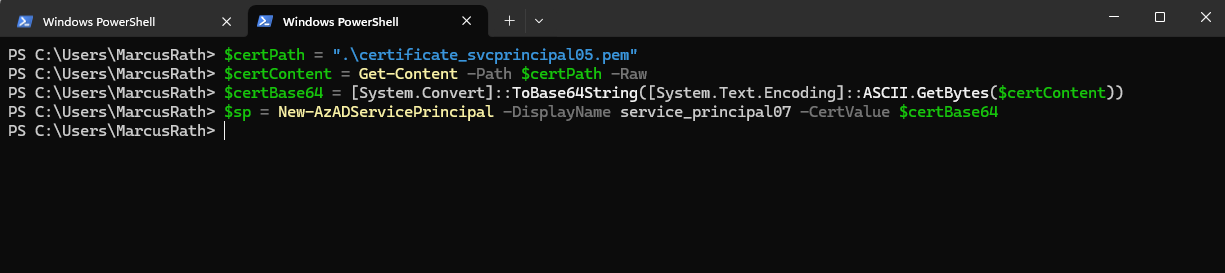
The object returned from New-AzADServicePrincipal contains the Id and DisplayName properties, either of which can be used for sign in with the service principal. Clients which sign in with the service principal also need access to the certificate’s private key.
Create an Azure service principal by using the Azure Portal
When you register a new application in Microsoft Entra ID, a service principal is automatically created for the app registration.
The service principal is the app’s identity in the Microsoft Entra tenant. Access to resources is restricted by the roles assigned to the service principal, giving you control over which resources can be accessed and at which level.
For security reasons, it’s always recommended to use service principals with automated tools rather than allowing them to sign in with a user identity.
To register an application in your Microsoft Entra tenant, you need:
- A Microsoft Entra user account
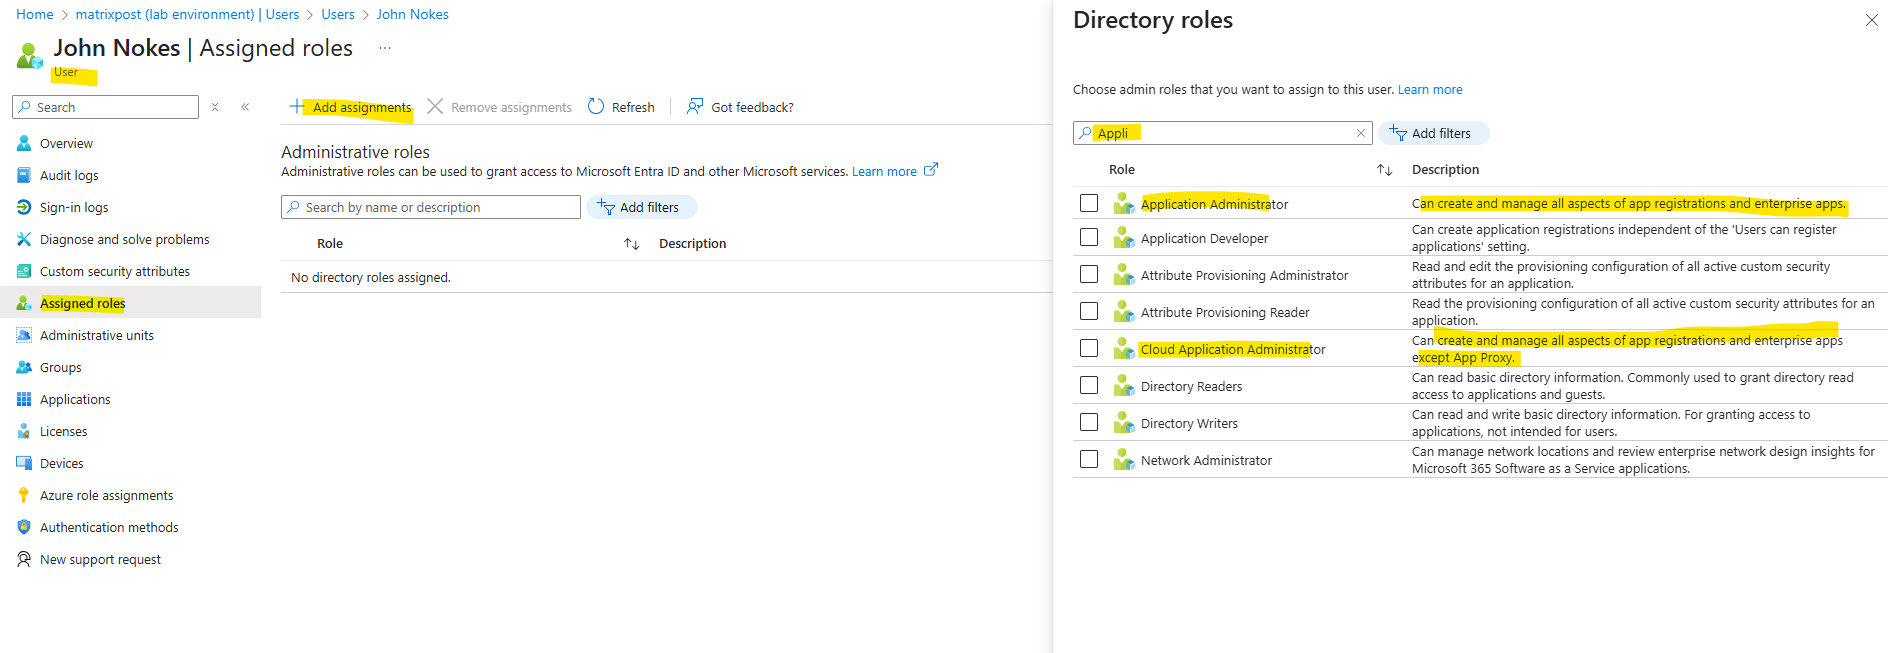
- Sufficient permissions to register an application with your Microsoft Entra tenant, and assign to the application a role in your Azure subscription. To complete these tasks, you’ll need the Application.ReadWrite.All permission
The Application.ReadWrite.All permission the users have in case the following option is enabled in Entra ID.
Users can register applications yes

If app registrations are disabled, a user will need the following role:
- Application Administrator
- Cloud Application Administrator
These roles allow users to:
- Register and manage all applications (app registrations).
- Manage application permissions.
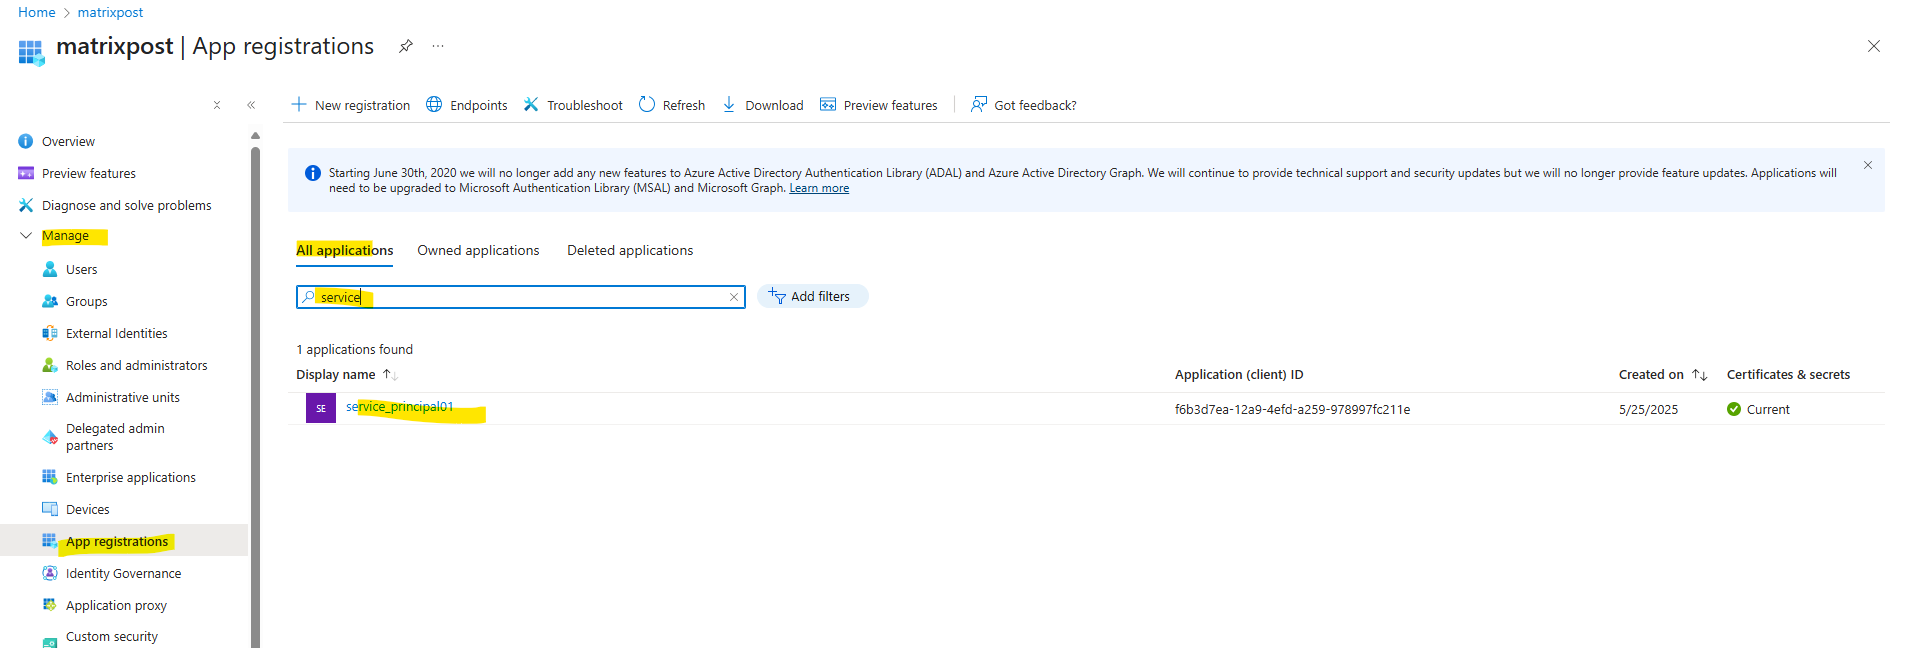
We can either use the Microsoft Entra admin center or the Azure portal here. When using the Microsoft Entra admin center browse to Identity > Applications > App registrations then select New registration.
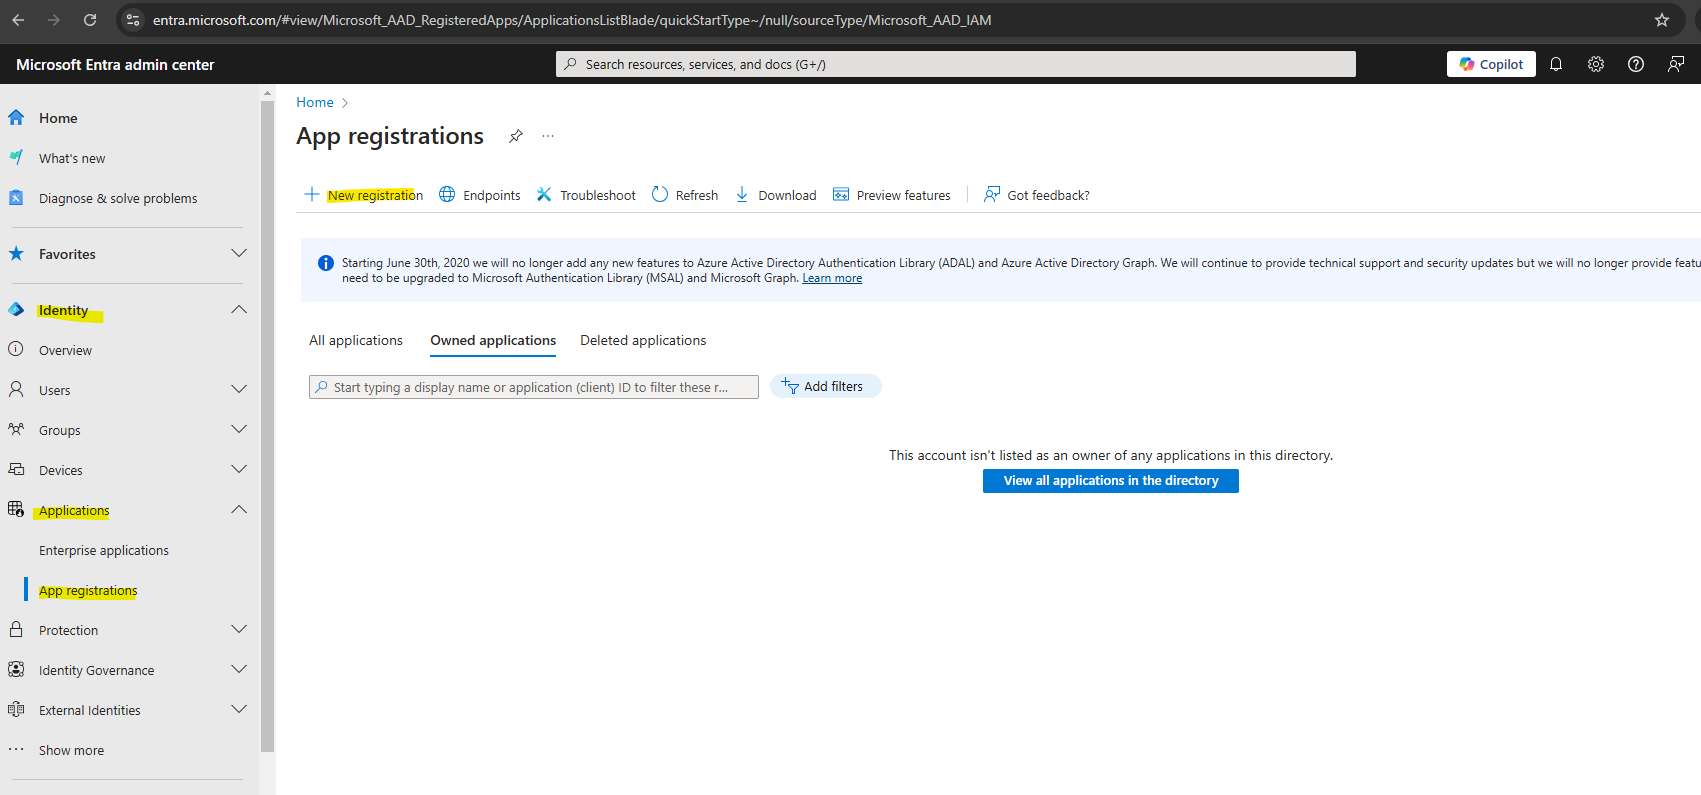
When using the Azure portal, navigate to Entra ID -> Manage -> app registrations and click on New registration.

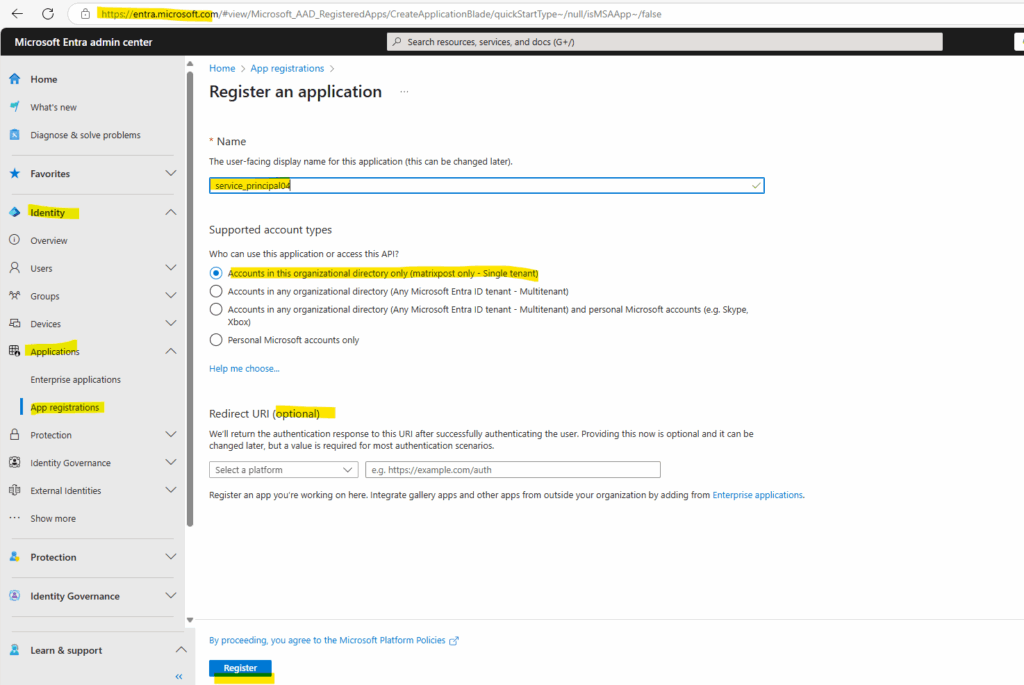
Name the application, for example service_principal04.
Under Supported account types, select Accounts in this organizational directory only.
Under Redirect URI, select Web for the type of application you want to create. Enter the URI where the access token is sent to. This is optional in case we want to authenticate users for a web application like shown in my following post.
Select Register.

Assign a role to the application
To access resources in your subscription, you must assign a role to the application. Decide which role offers the right permissions for the application. To learn about the available roles, see Azure built-in roles.
You can set the scope at the level of the subscription, resource group, or resource. Permissions are inherited to lower levels of scope.
Select the level of scope you wish to assign the application to. For example, to assign a role at the subscription scope, search for and select Subscriptions. If you don’t see the subscription you’re looking for, select global subscriptions filter. Make sure the subscription you want is selected for the tenant.
Select Access control (IAM). Select Add, then select Add role assignment.
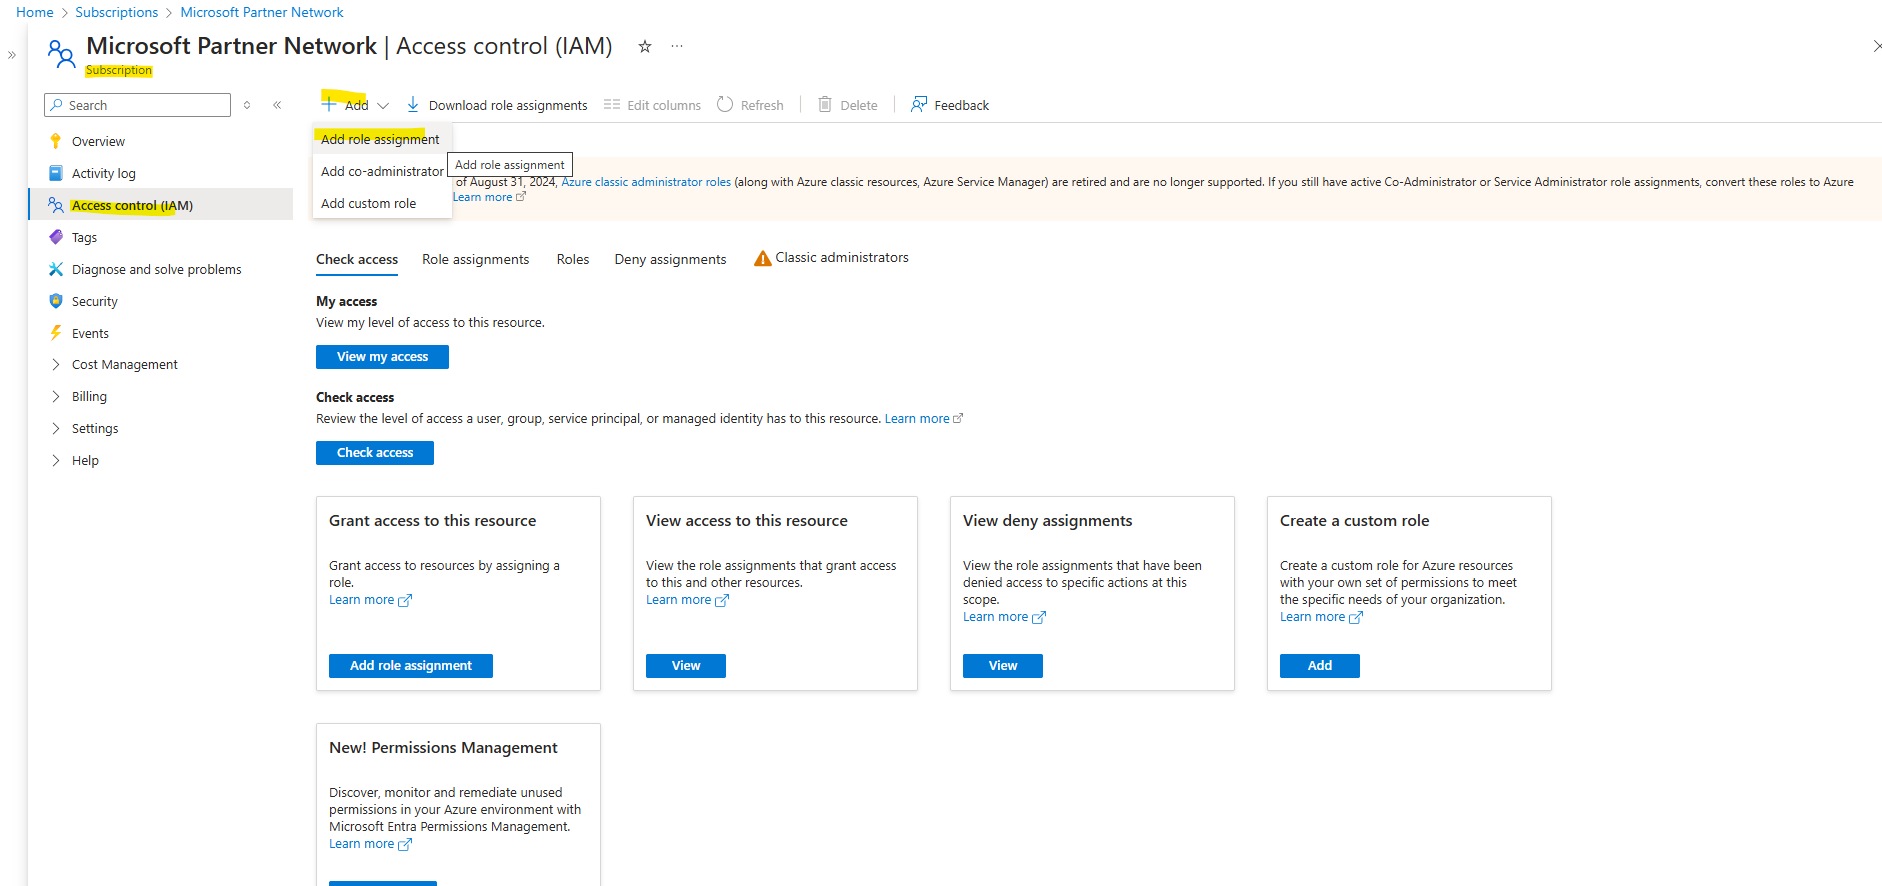
In the Role tab, select the role you wish to assign to the application in the list. Select Next.

On the Members tab, for Assign access to, select User, group, or service principal.
Select Select members. By default, Microsoft Entra applications aren’t displayed in the available options. To find your application, search for it by name.

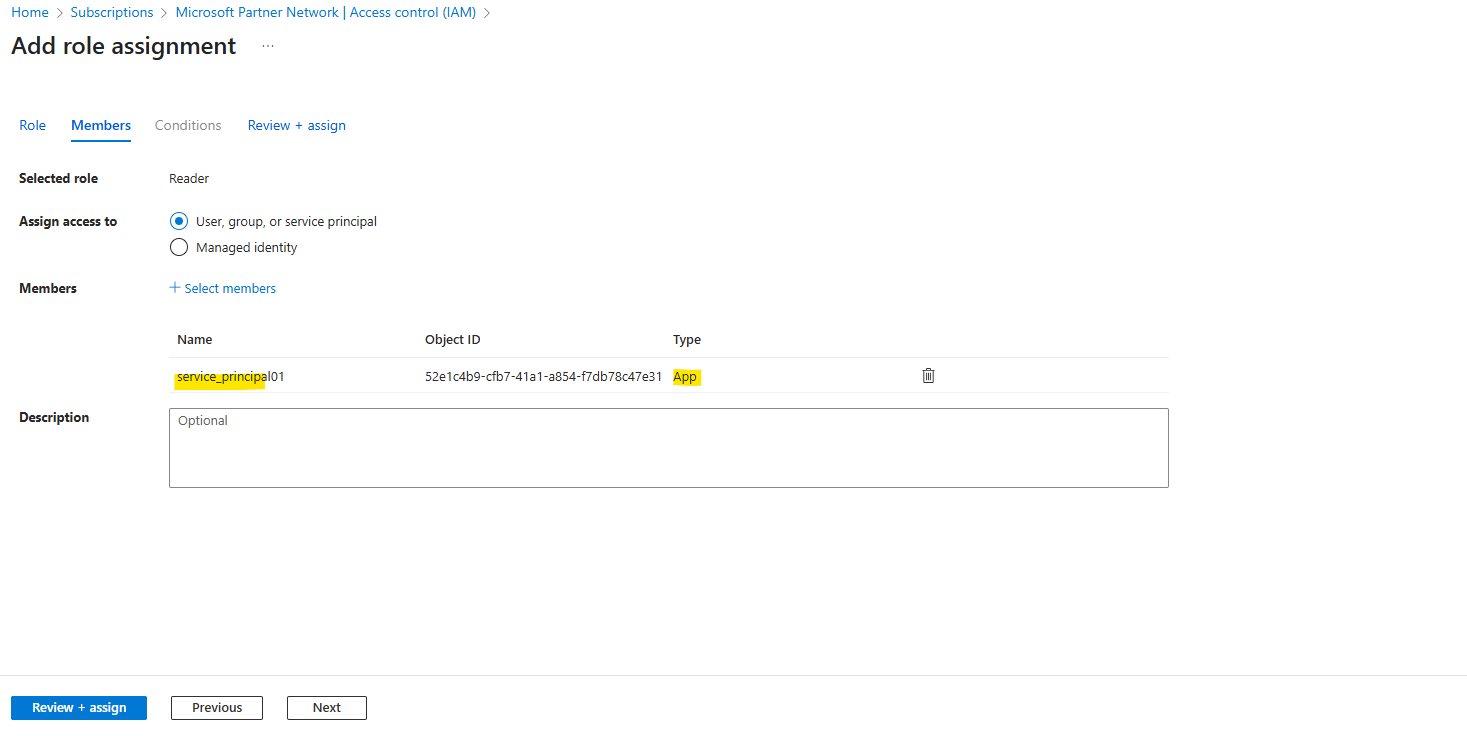
Your service principal is set up. You can start using it to run your scripts or apps. To manage your service principal (permissions, user consented permissions, see which users have consented, review permissions, see sign in information, and more), go to Enterprise applications.
Sign in to the application
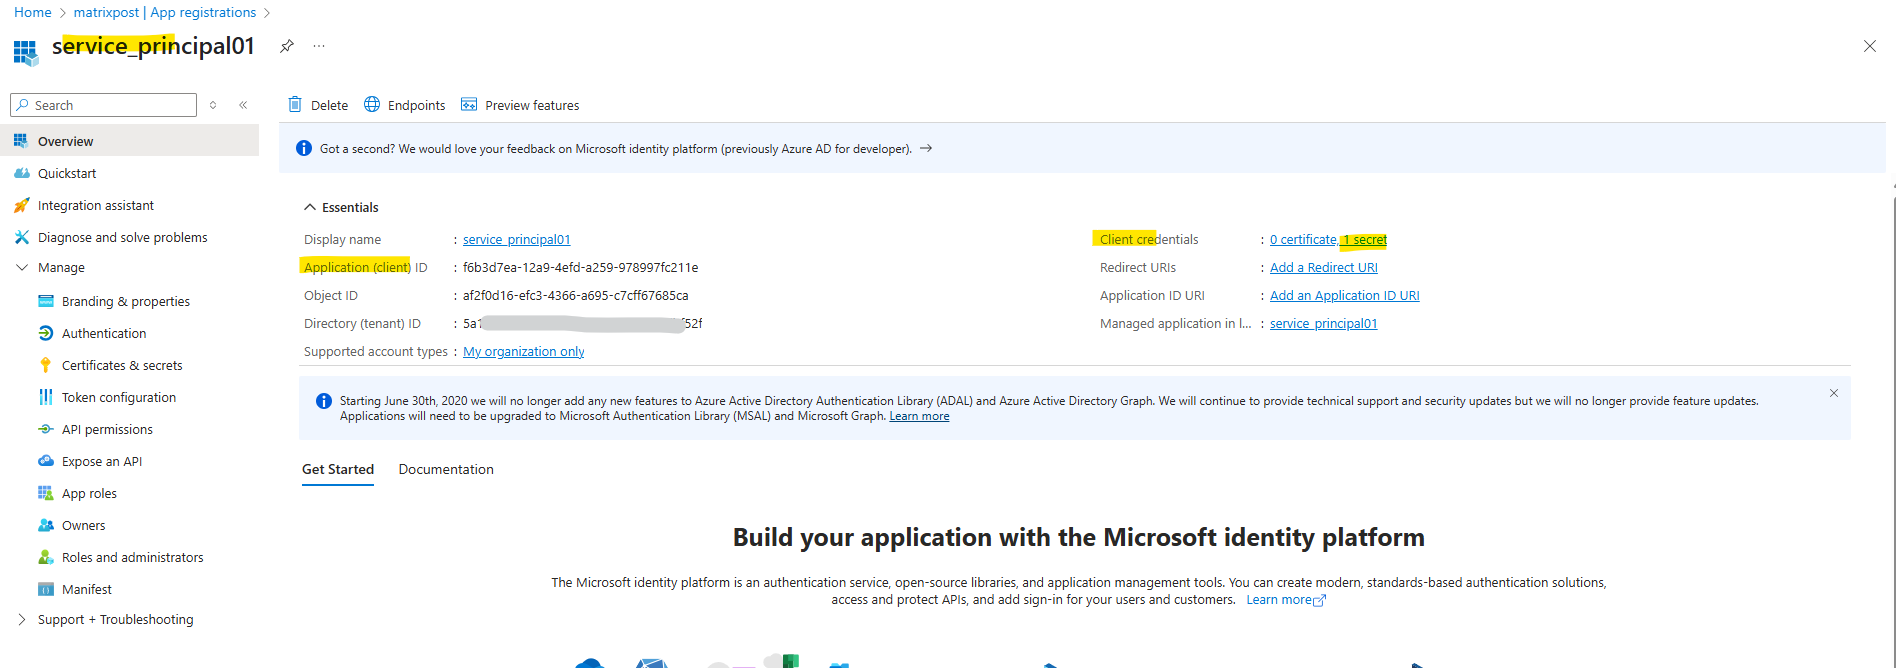
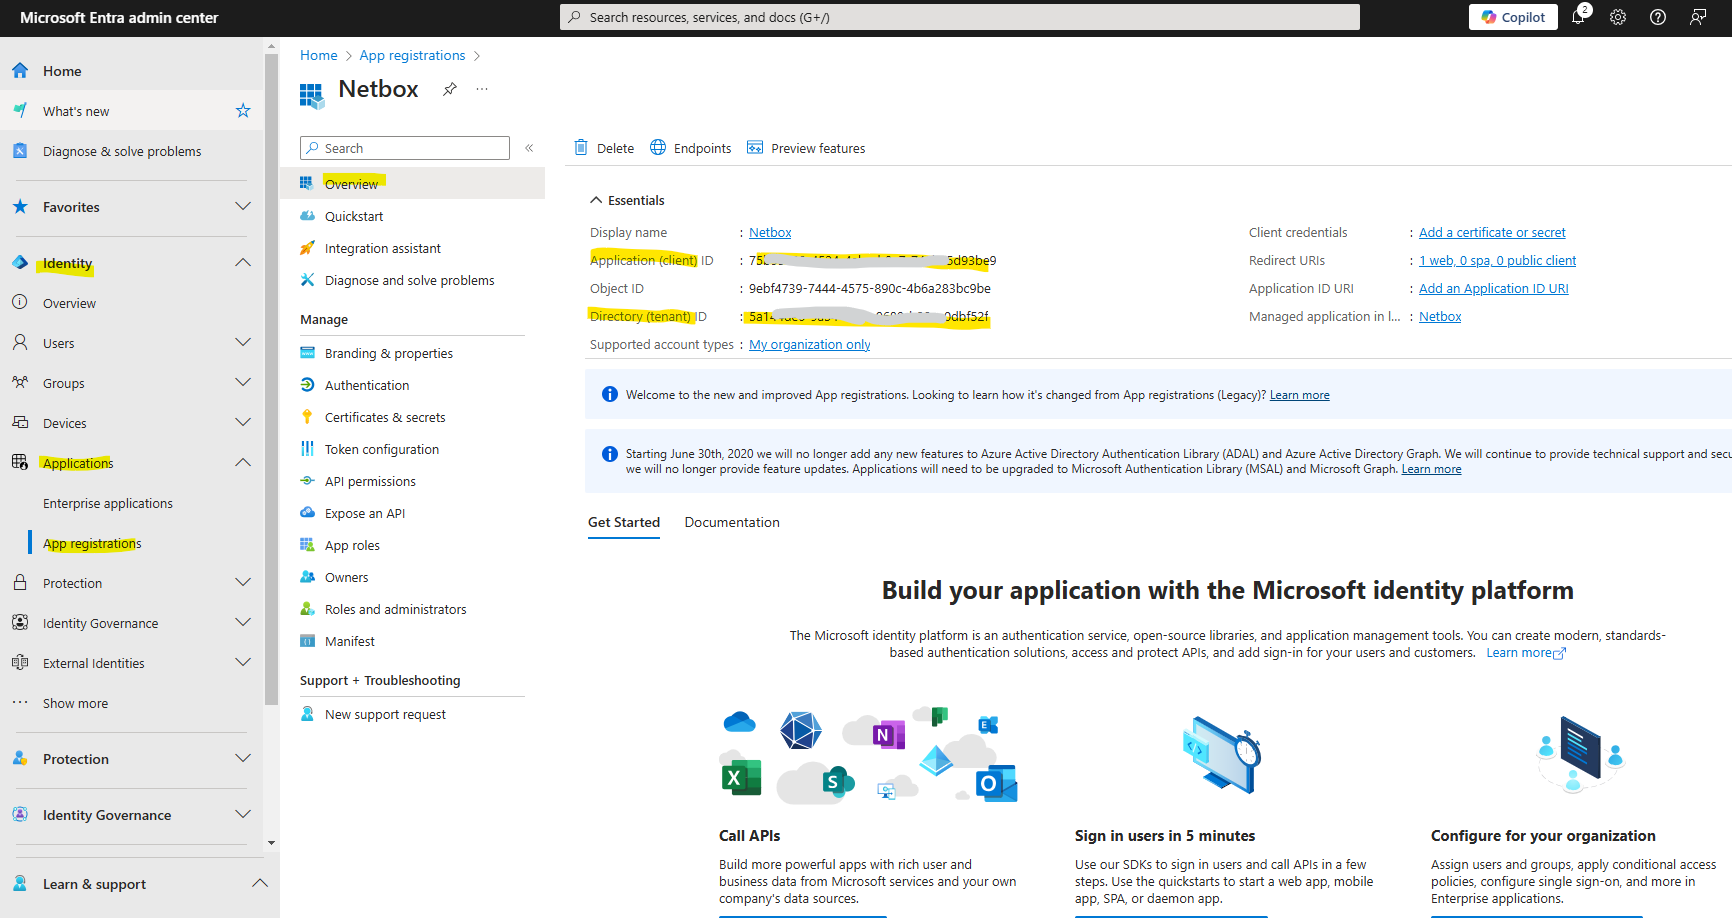
When programmatically signing in, you pass the directory (tenant) ID and the application (client) ID in your authentication request. You also need a certificate or an authentication key. To obtain the directory ID and application ID:
- Open the Microsoft Entra admin center Home page.
- Browse to Identity > Applications > App registrations, then select your application.
- On the app’s overview page, copy the Directory (tenant) ID value and store it in your application code.
- Copy the Application (client) ID value and store it in your application code.
There are two types of authentication available for service principals: password-based authentication (application secret) and certificate-based authentication. We recommend using a trusted certificate issued by a certificate authority, but you can also create an application secret or create a self-signed certificate for testing.
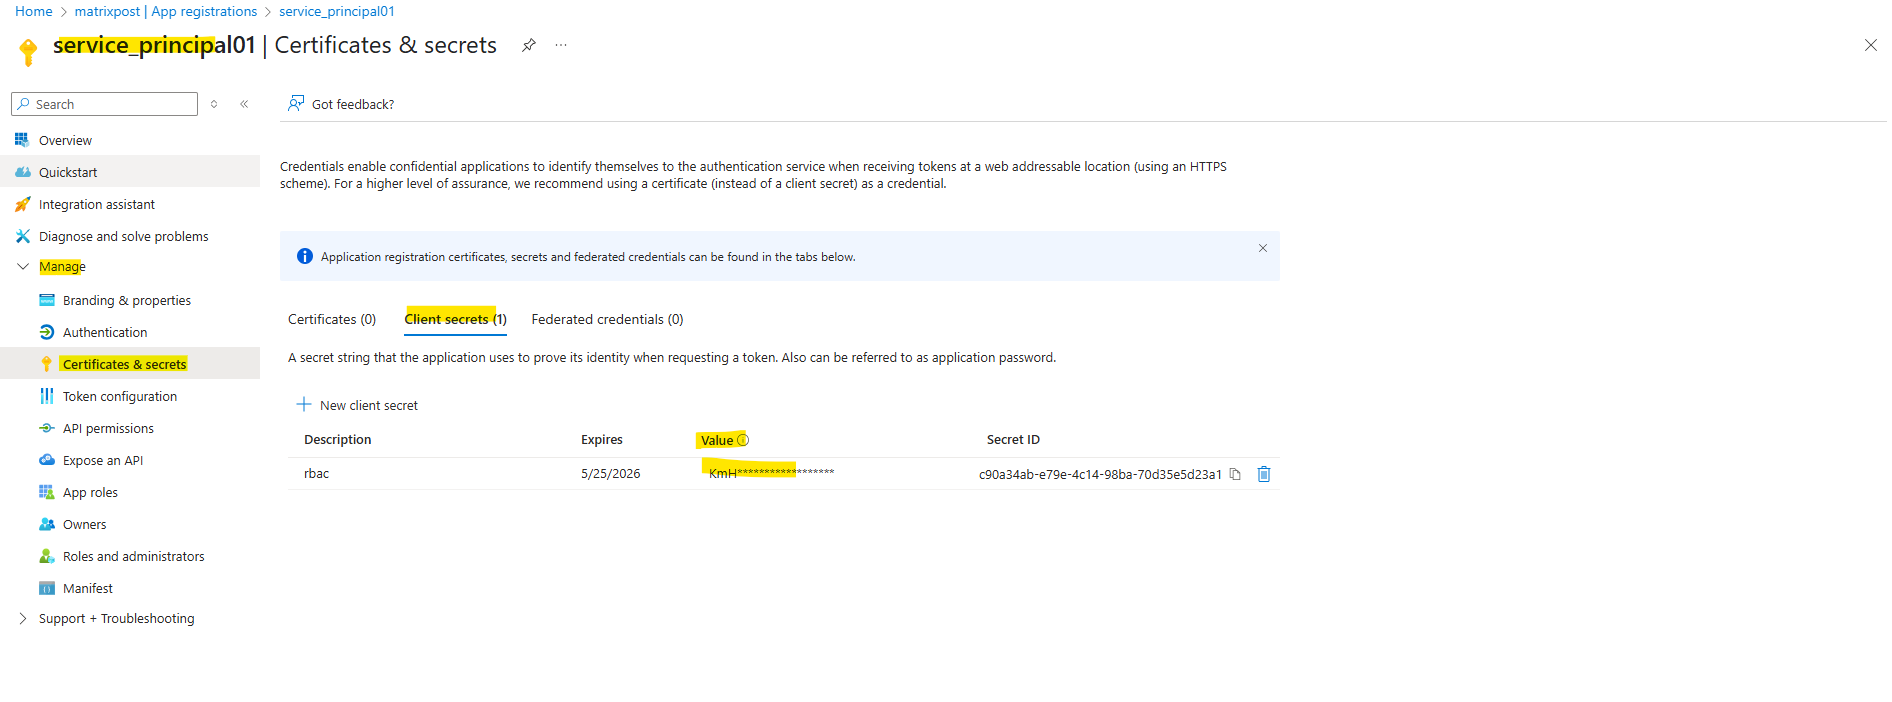
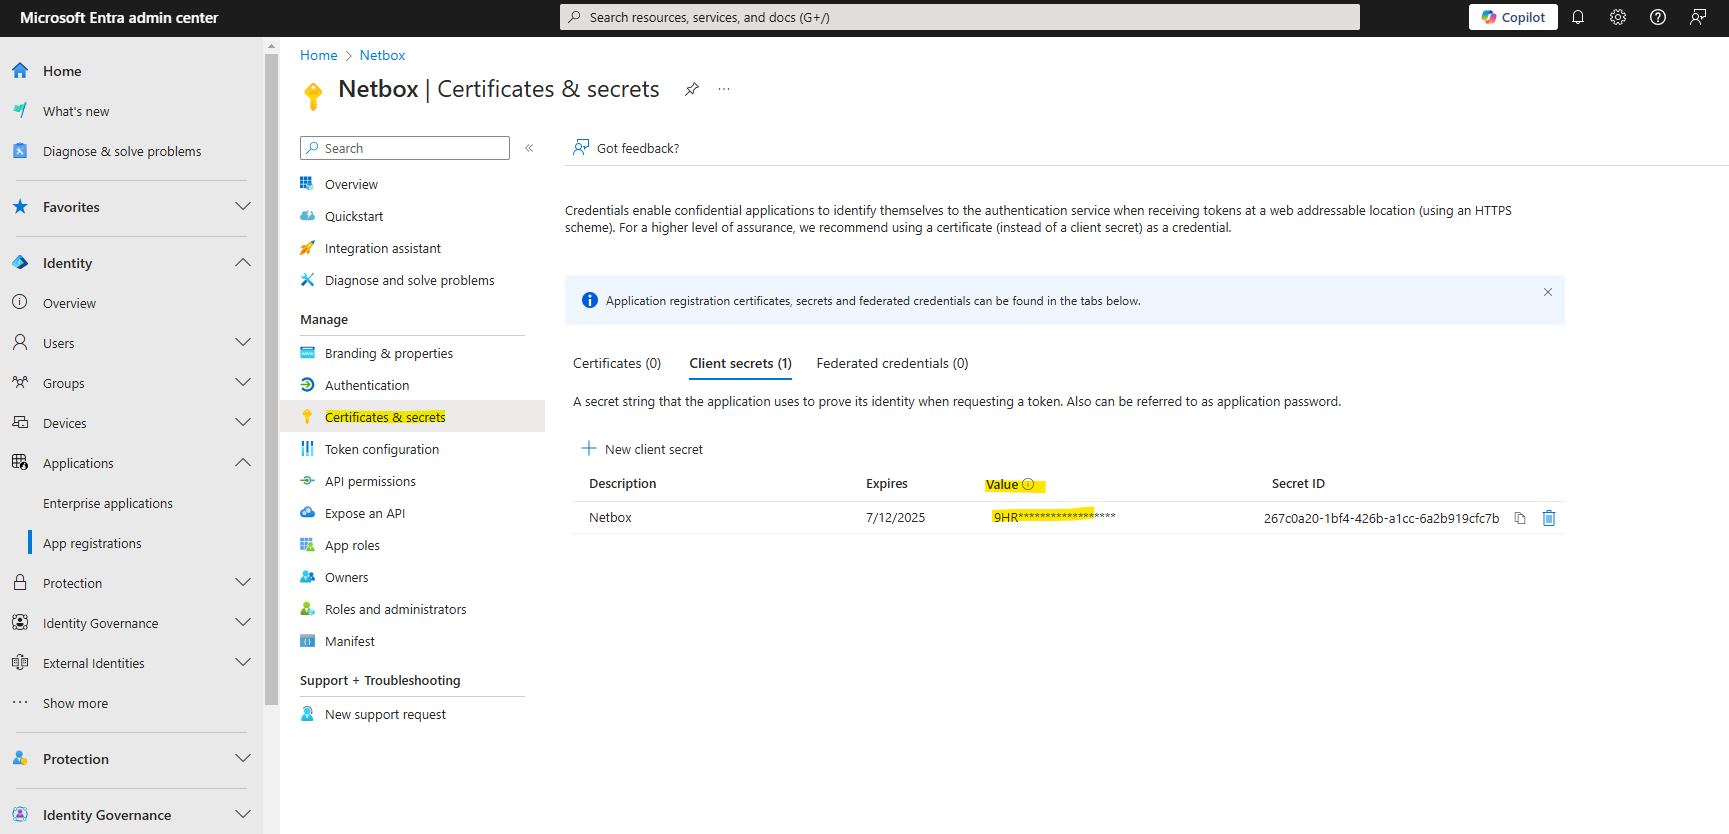
If you choose not to use a certificate, you can create a new client secret.
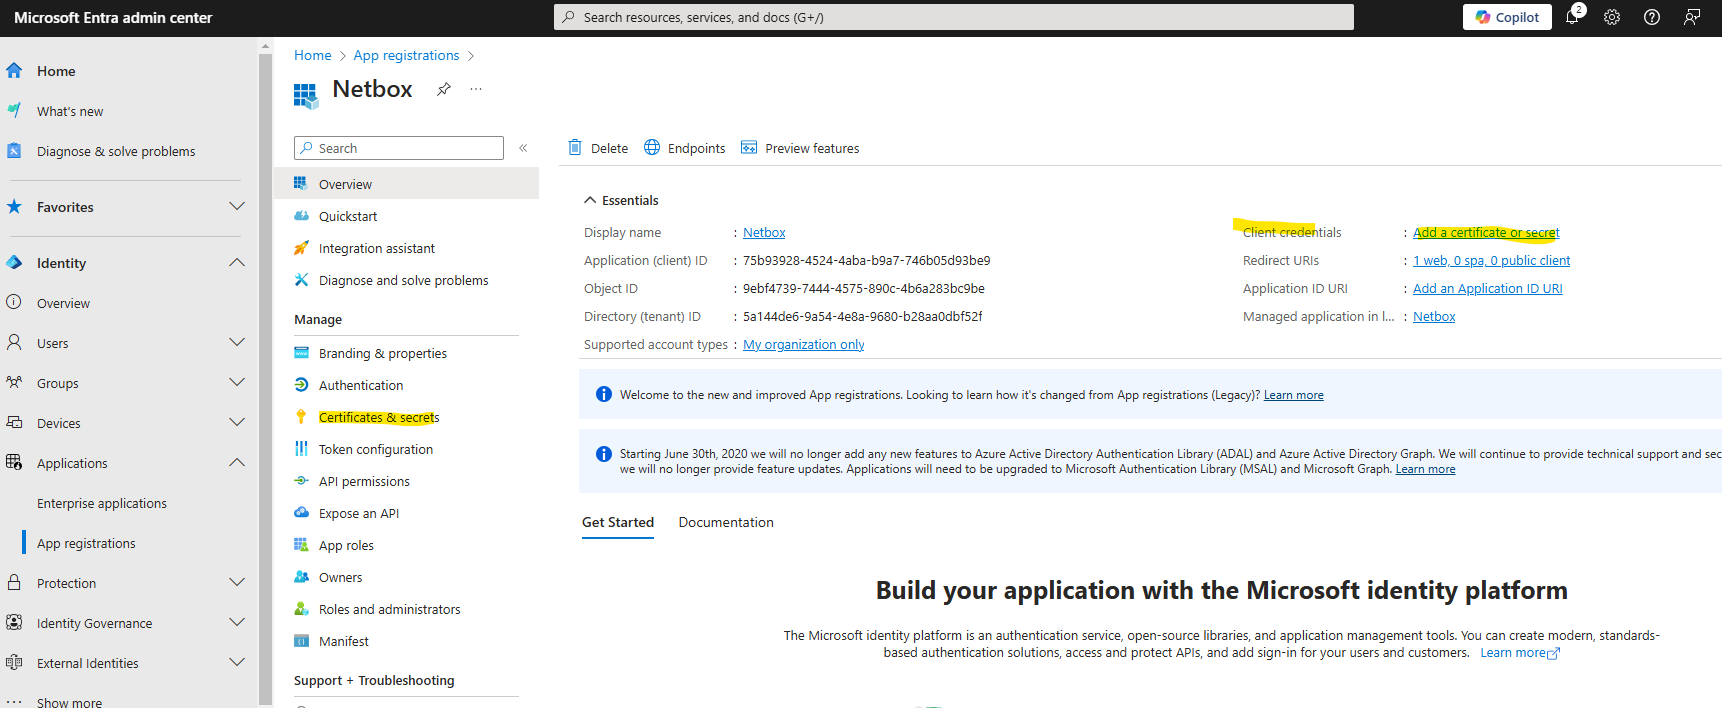
- Browse to Identity > Applications > App registrations, then select your application.
- Select Certificates & secrets.
- Select Client secrets, and then select New client secret.
- Provide a description of the secret, and a duration.
- Select Add.
Once you’ve saved the client secret, the value of the client secret is displayed. This is only displayed once, so copy this value and store it where your application can retrieve it, usually where your application keeps values like clientId, or authority in the source code. You’ll provide the secret value along with the application’s client ID to sign in as the application.
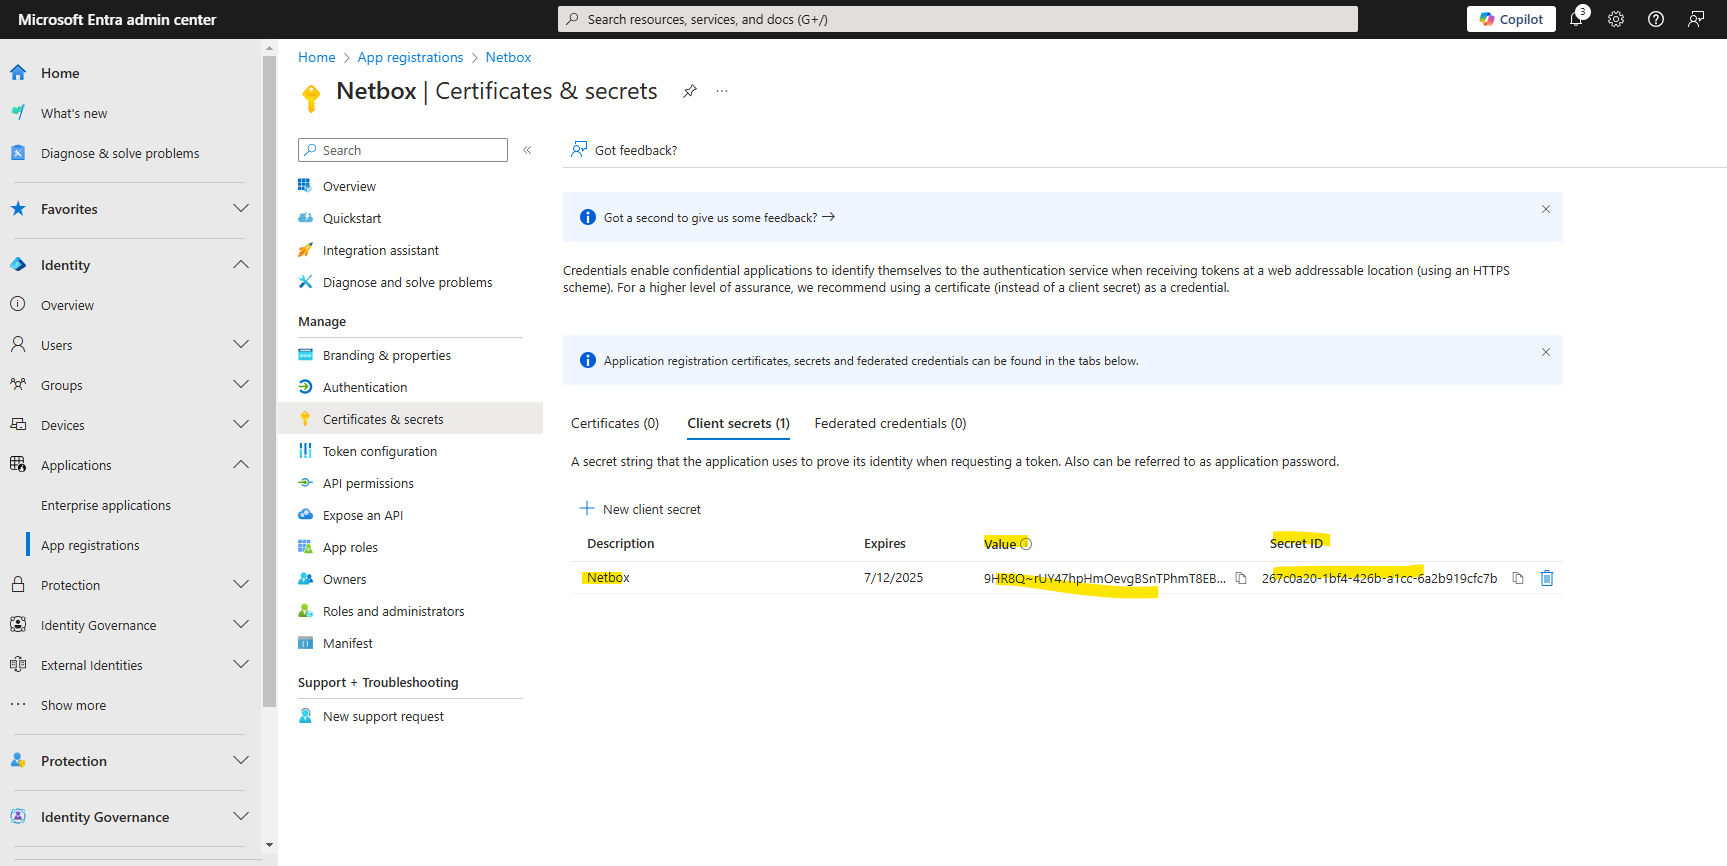
As mentioned, the client secret value is only displayed directly after the creation.
Source: https://learn.microsoft.com/en-us/entra/identity-platform/howto-create-service-principal-portal
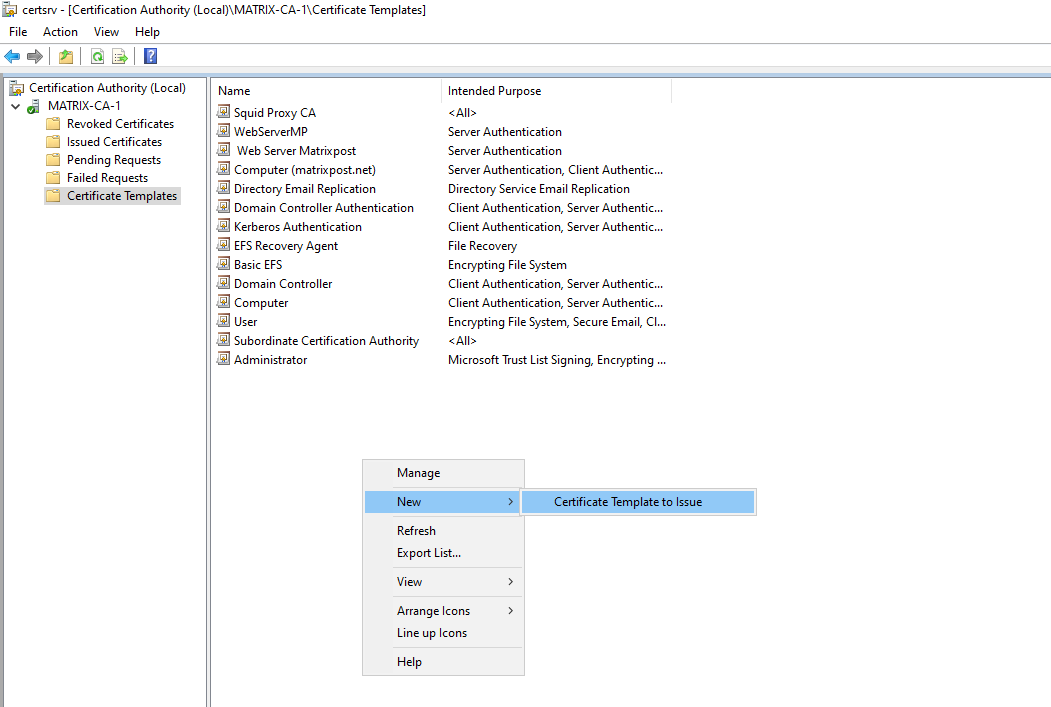
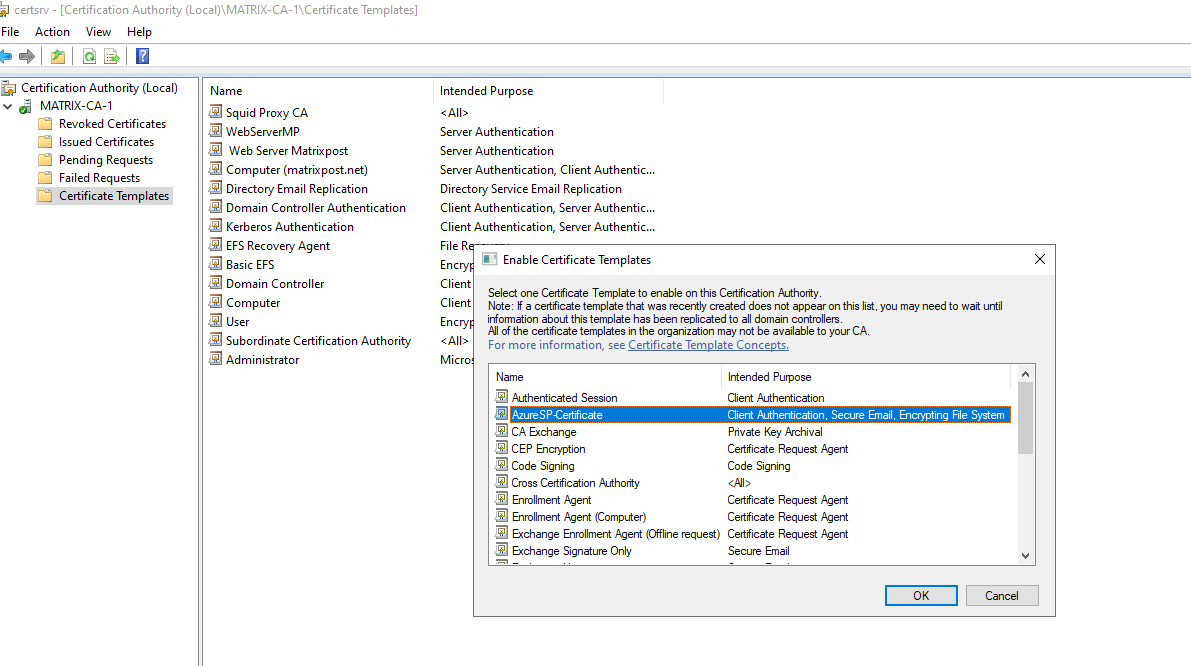
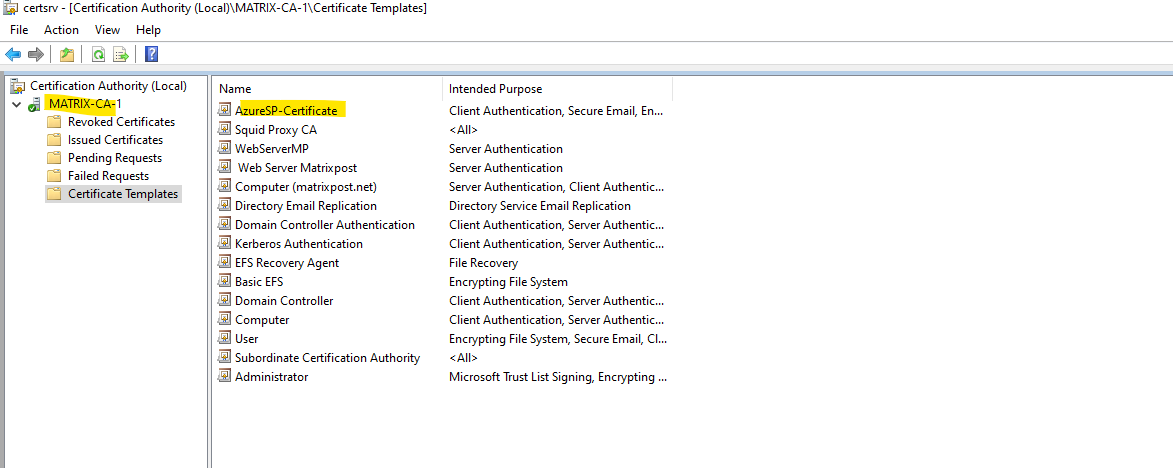
Create a Certificate on an internal PKI (AD CS)
When creating a service principal with an existing certificate, we can also create therefore a new certificate which is issued by our internal PKI.
About how to set up an internal Active Directory Certificate Services (AD CS) PKI you can read my following post.
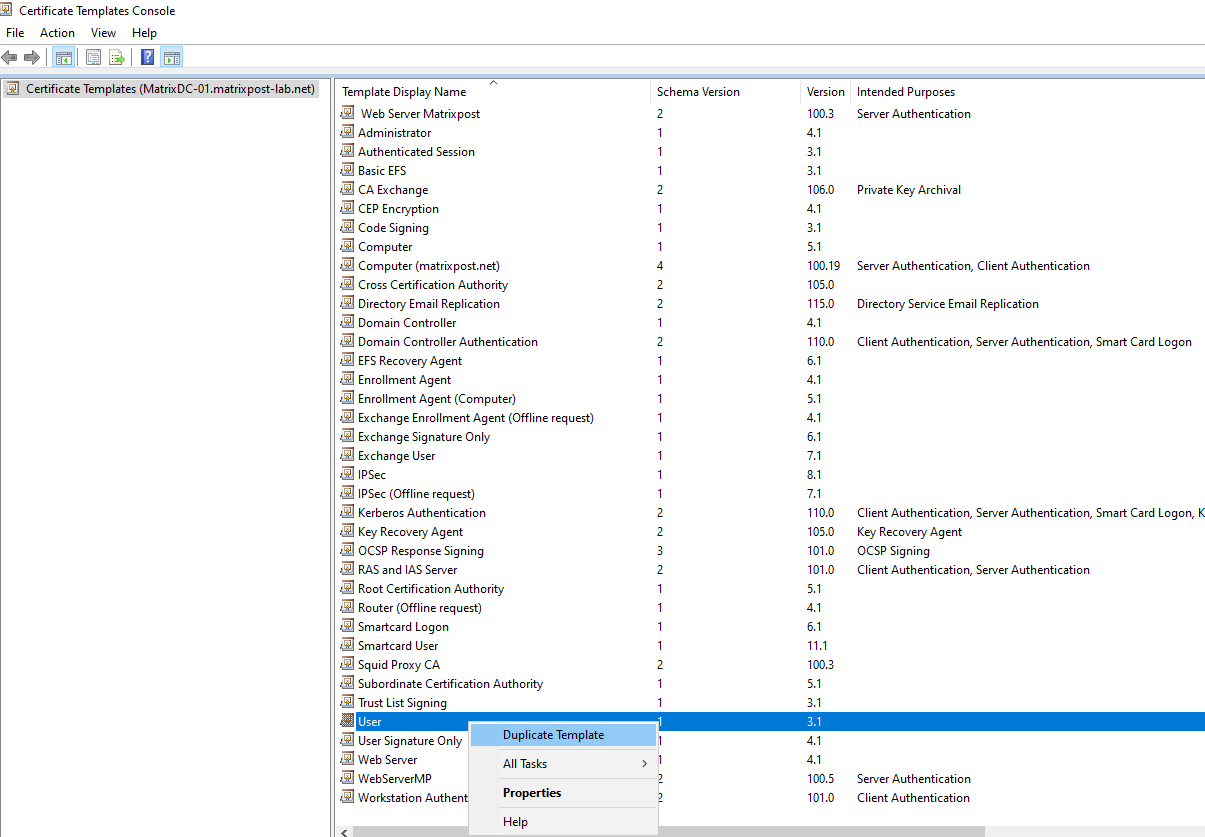
For the template you can use the User or Computer template or better you create a dedicated template for Azure Service Principals.
On the Certificate Template console right-click an existing template like User or Computer, select Duplicate Template.
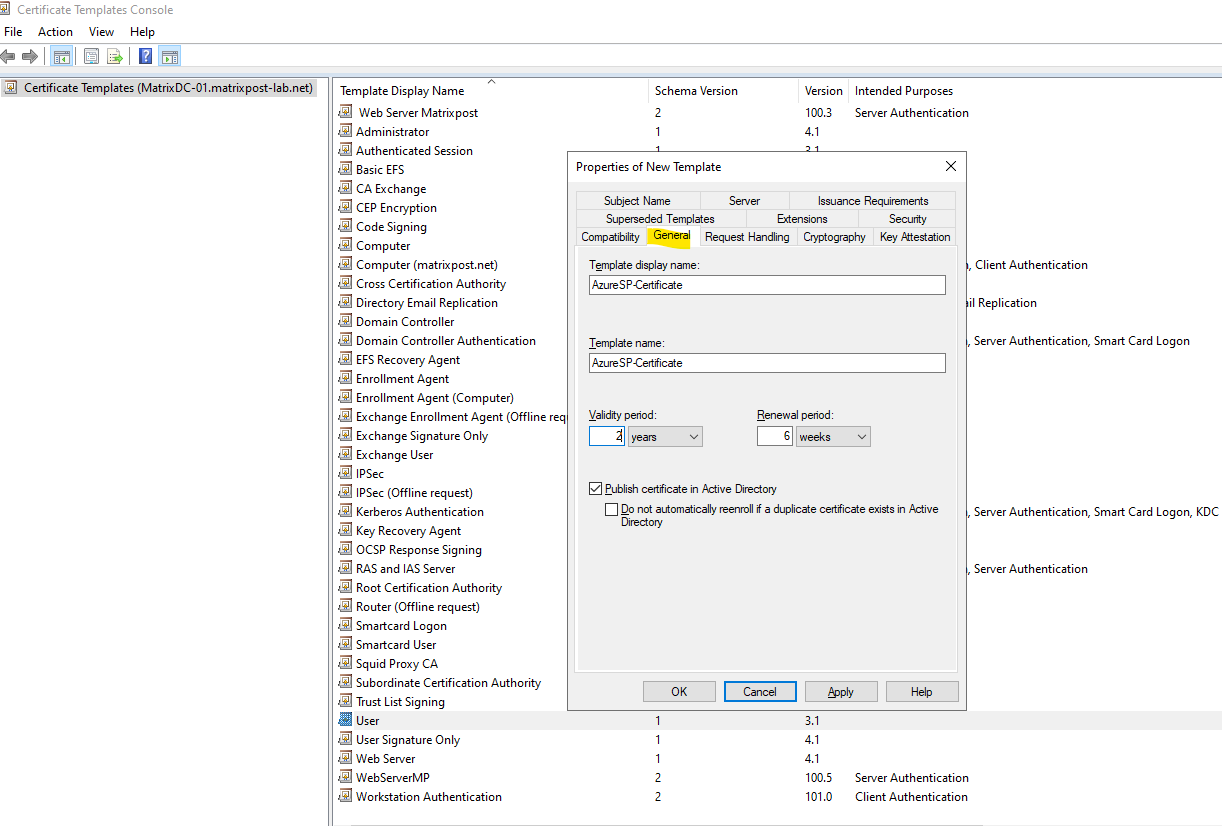
Under the general tab name it and set a validity period.
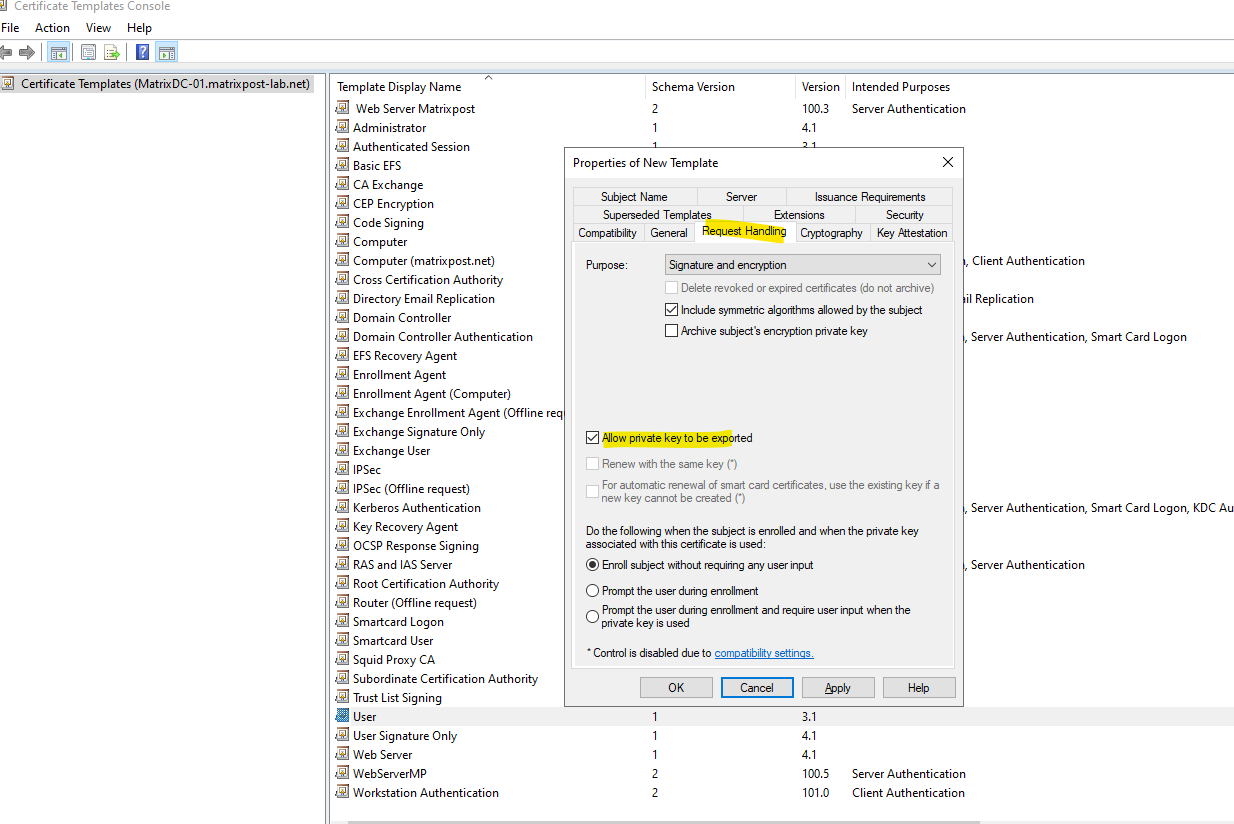
Under Request Handling allow private key to be exported.
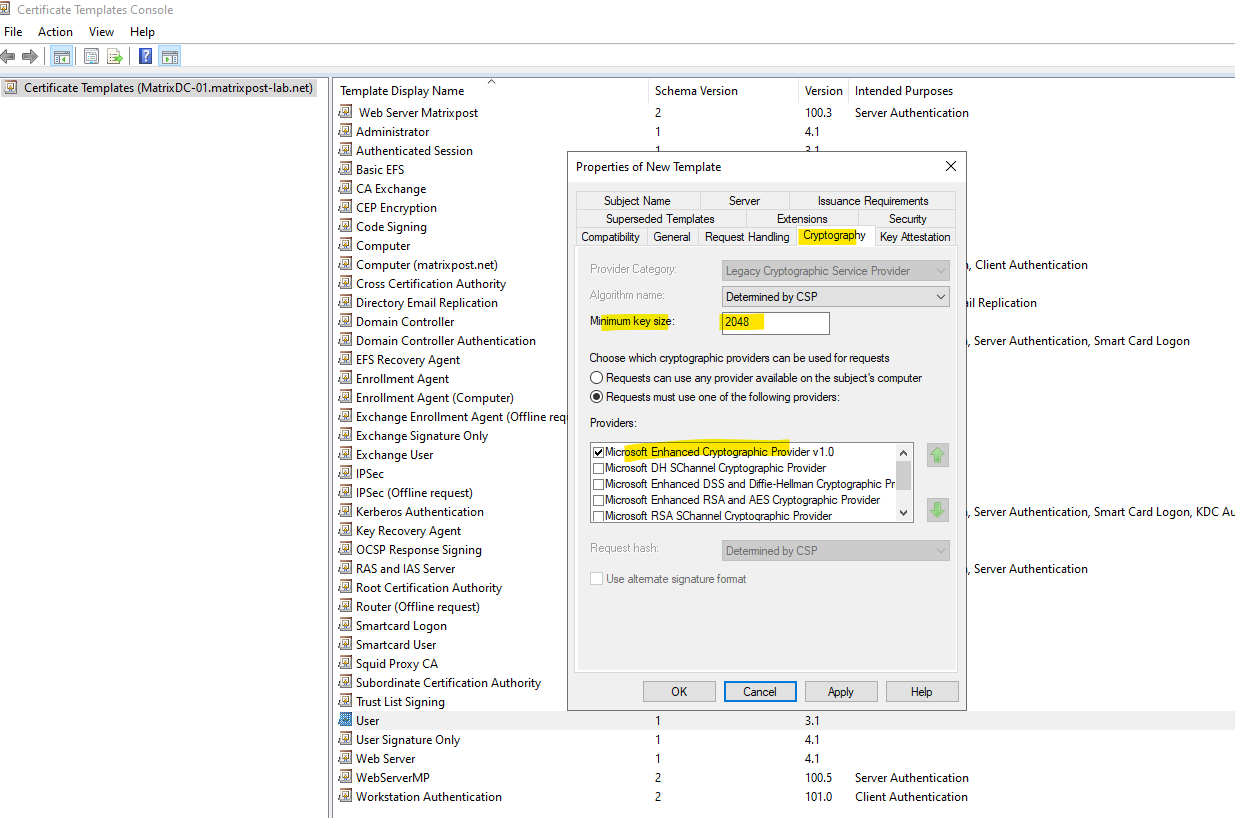
Under Cryptography choose 2048 or higher.
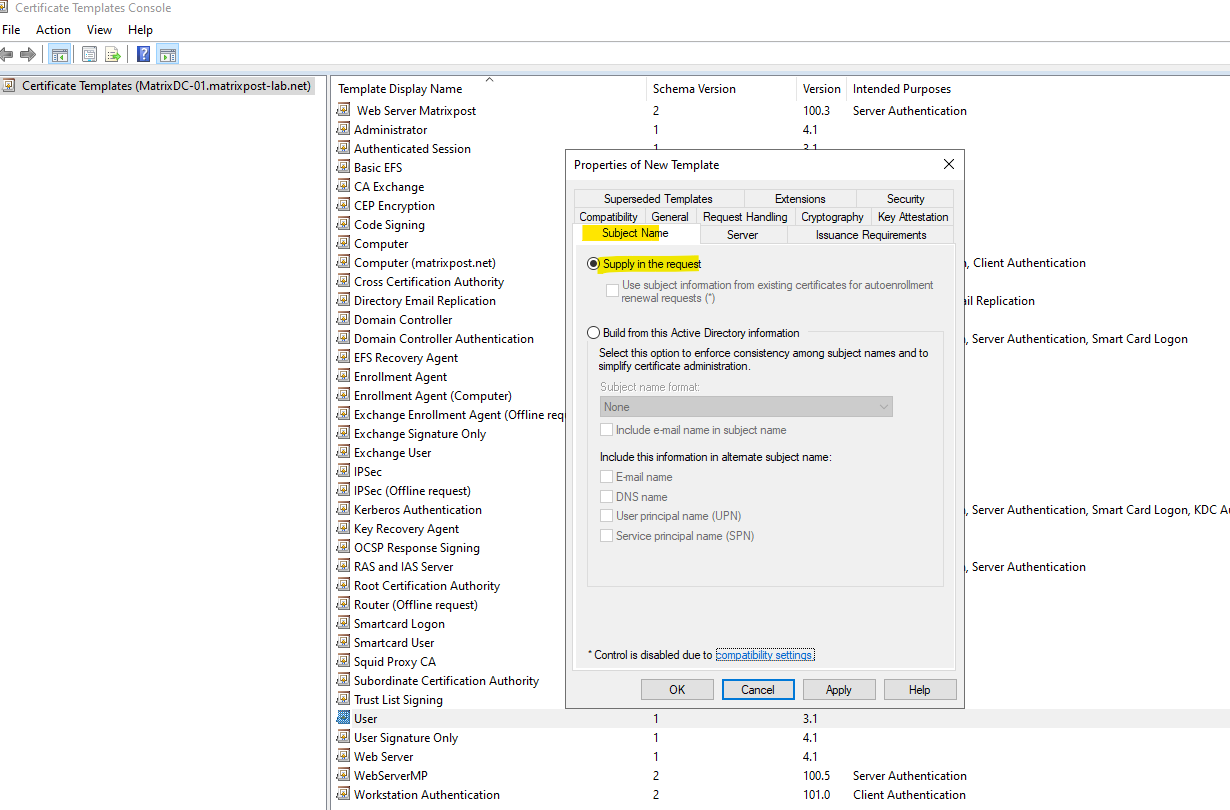
Under Subject Name set to Supply in the request.
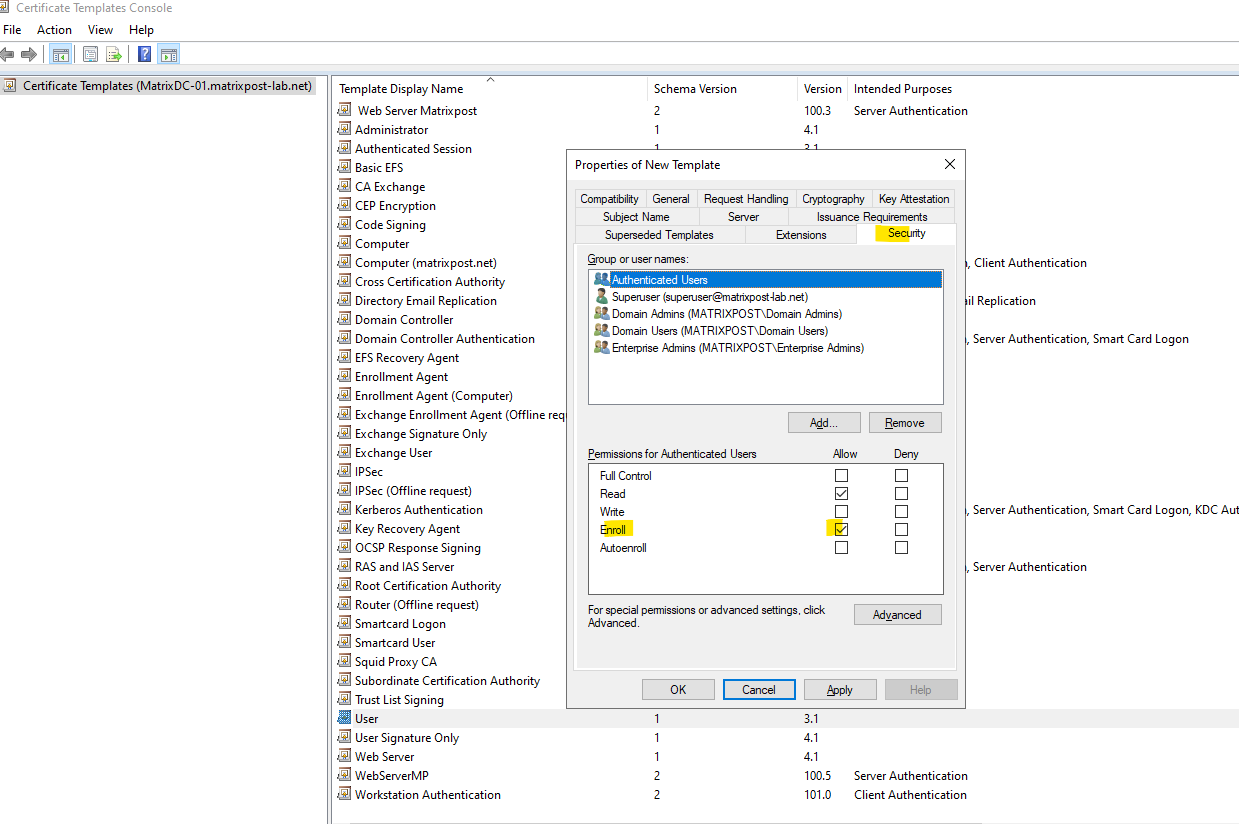
Under Security assign Enroll permissions to the user creating the certificate. I will assign the permission to all authenticated users. Finally click Apply and OK.
We can now close the certificate template console.
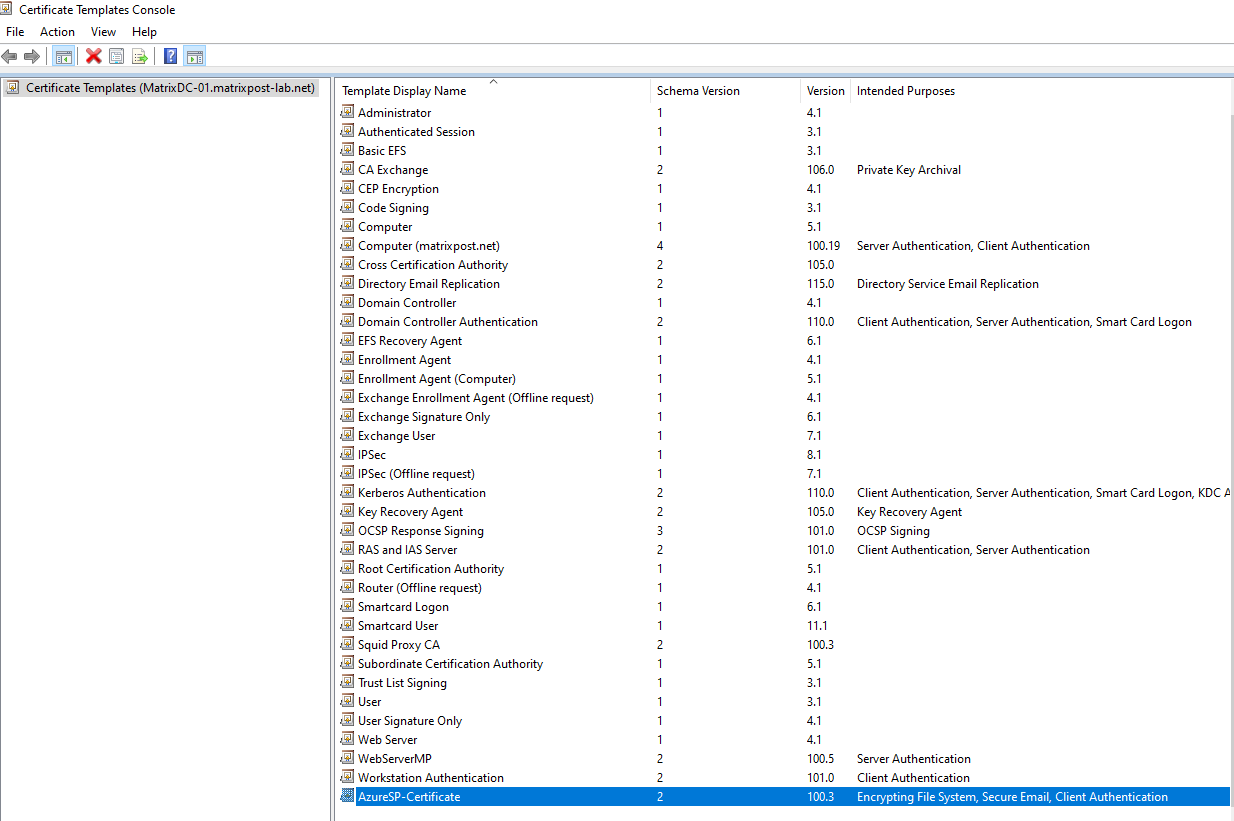
We can now issue the certificate template on our CA.
About how create a new CSR to finally request a new certificate you can read my following post.
PS> certreq.exe -new request.ini request.csr
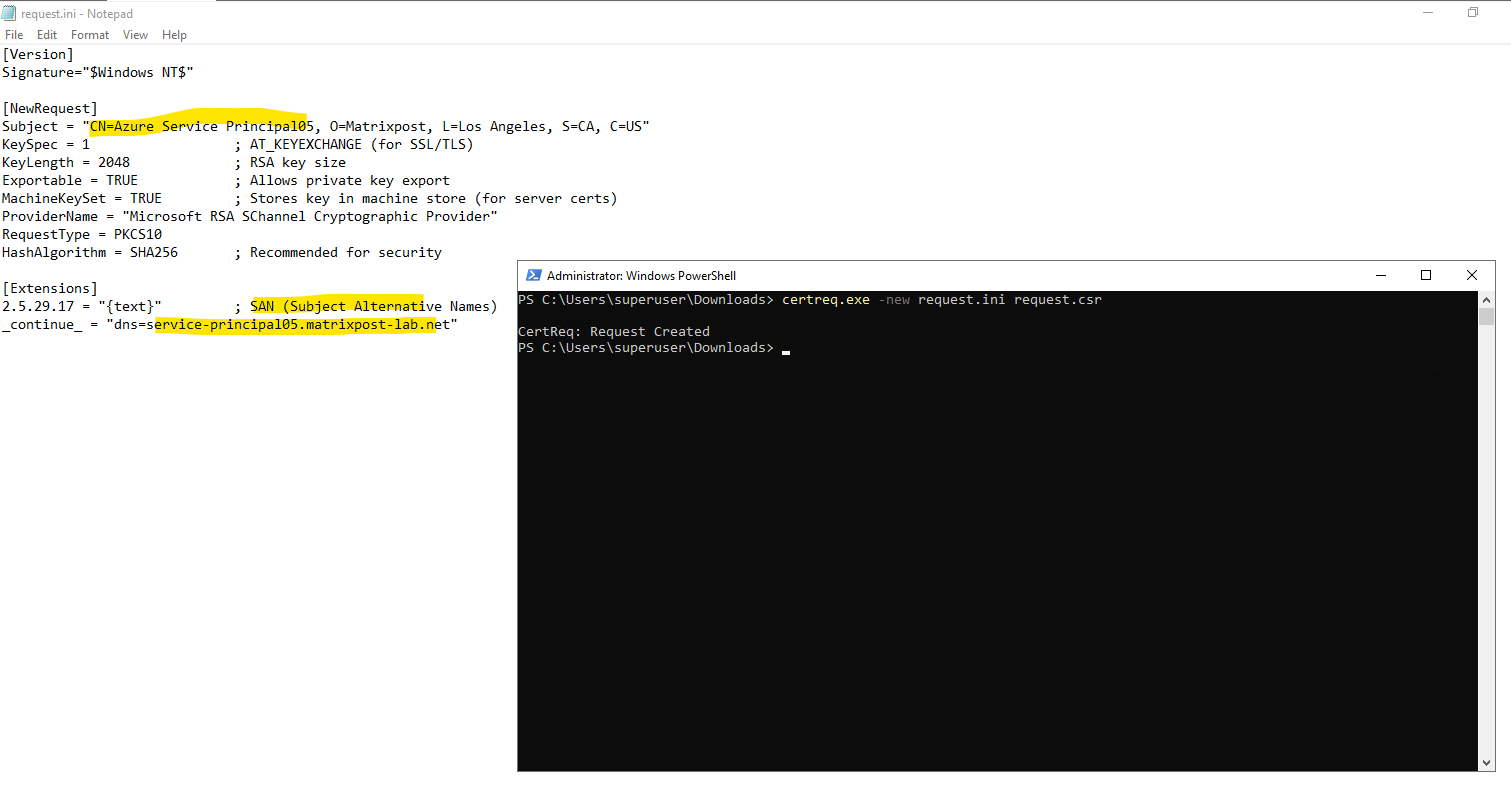
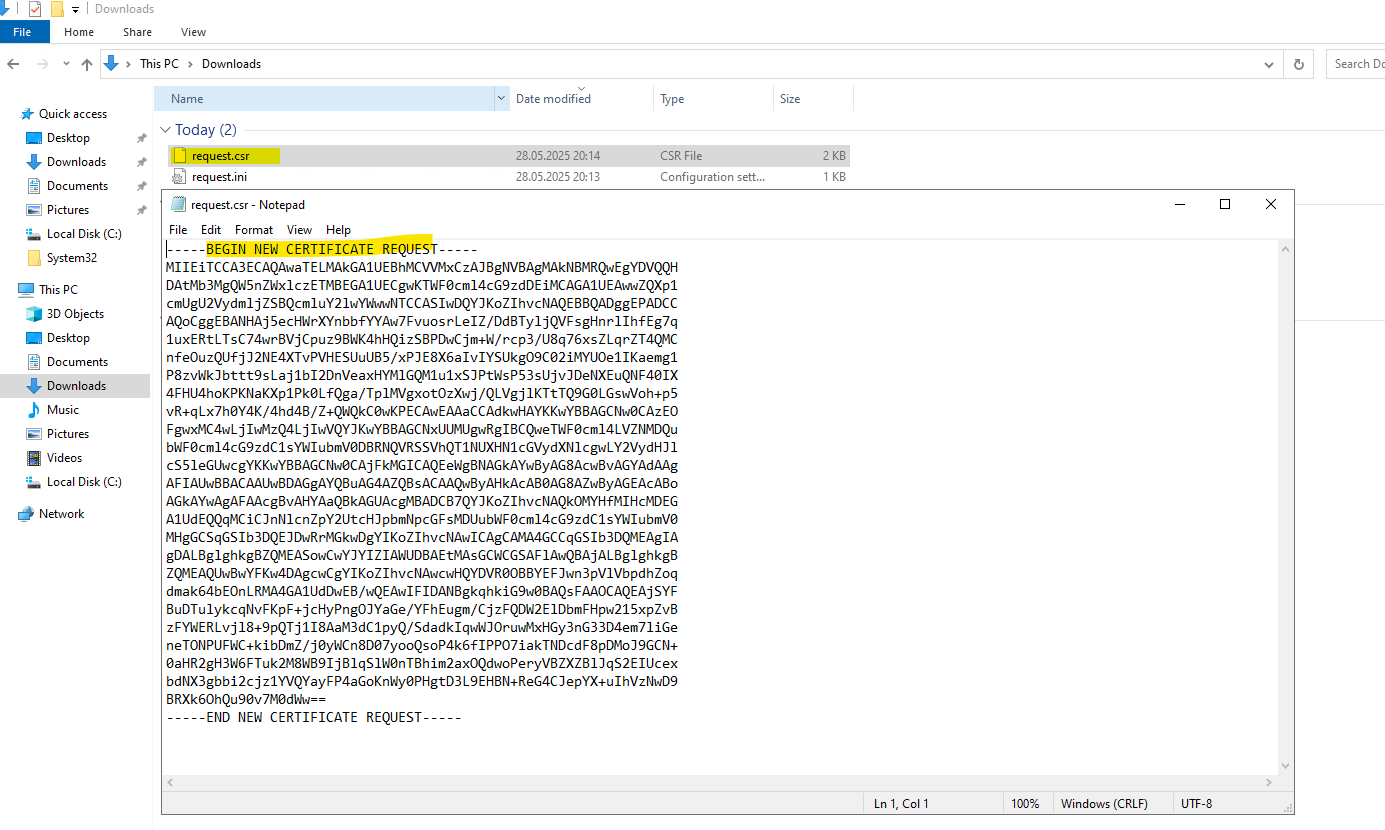
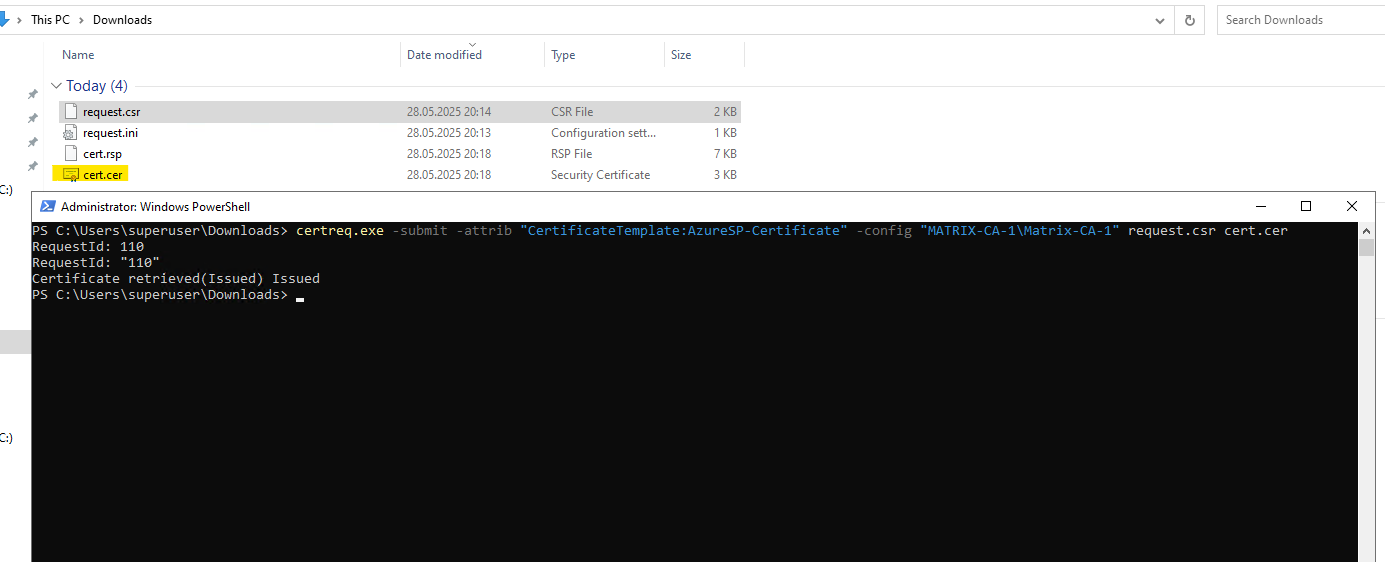
PS> certreq.exe -submit -attrib "CertificateTemplate:AzureSP-Certificate" -config "MATRIX-CA-1\Matrix-CA-1" request.csr cert.cer
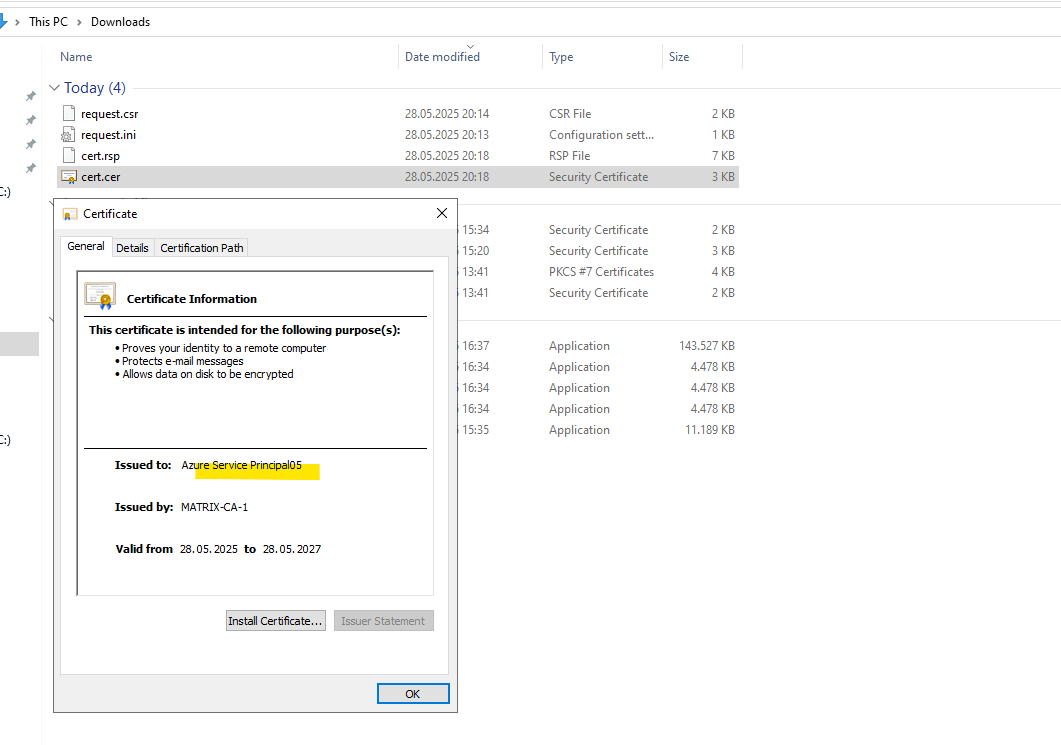
To export the certificate and its corresponding private key, import the certificate on the machine you requested the certificate by using the certreq utility above, the private key was created and stored here during the execution of the certreq utility.
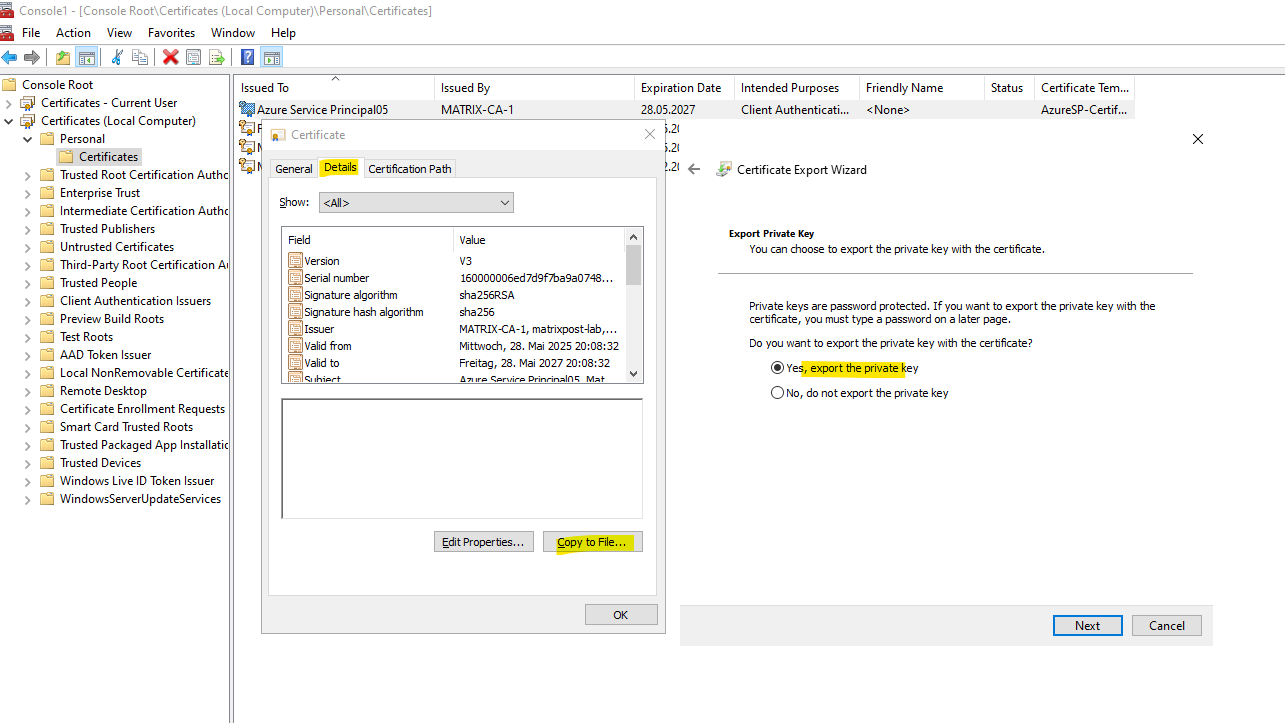
Because the certificates should be in an ASCII format and base64-encoded such as PEM, CER, or DER, we need to export the private key and public key (certificate) by using openssl.
> openssl pkcs12 -in yourfile.pfx -nocerts -out private_key.pem

-nocerts tells OpenSSL to export only the private key.
You’ll be asked for the PFX password

unencrypt the passphrase.
> openssl rsa -in private_key.pem -out private_key_no_pass.pem

Extract Certificate (PEM format)
> openssl pkcs12 -in yourfile.pfx -clcerts -nokeys -out certificate.pem


We can also extract the CA Certificates but not needed here.
> openssl pkcs12 -in yourfile.pfx -cacerts -nokeys -out ca_certs.pem
What are managed identities for Azure resources?
At a high level, there are two types of identities: human and machine/non-human identities.
Machine / non-human identities consist of device and workload identities. In Microsoft Entra, workload identities are applications, service principals, and managed identities. For more information on workload identities, see workload identities.
A managed identity is an identity that can be assigned to an Azure compute resource (Virtual Machine (VM), Virtual Machine Scale Set (VMSS), Service Fabric Cluster, Azure Kubernetes cluster) or any App hosting platform supported by Azure.
Once a managed identity is assigned on the compute resource, it can be authorized, directly or indirectly, to access downstream dependency resources, such as a storage account, SQL database, CosmosDB, and so on.
Managed identity replaces secrets such as access keys or passwords. In addition, managed identities can replace certificates or other forms of authentication for service-to-service dependencies.
Here are some of the benefits of using managed identities:
- You don’t need to manage credentials. Credentials aren’t even accessible to you.
- You can use managed identities to authenticate to any resource that supports Microsoft Entra authentication, including your own applications.
- Managed identities can be used at no extra cost.
Source: https://learn.microsoft.com/en-us/entra/identity/managed-identities-azure-resources/overview
Create a Managed Identity
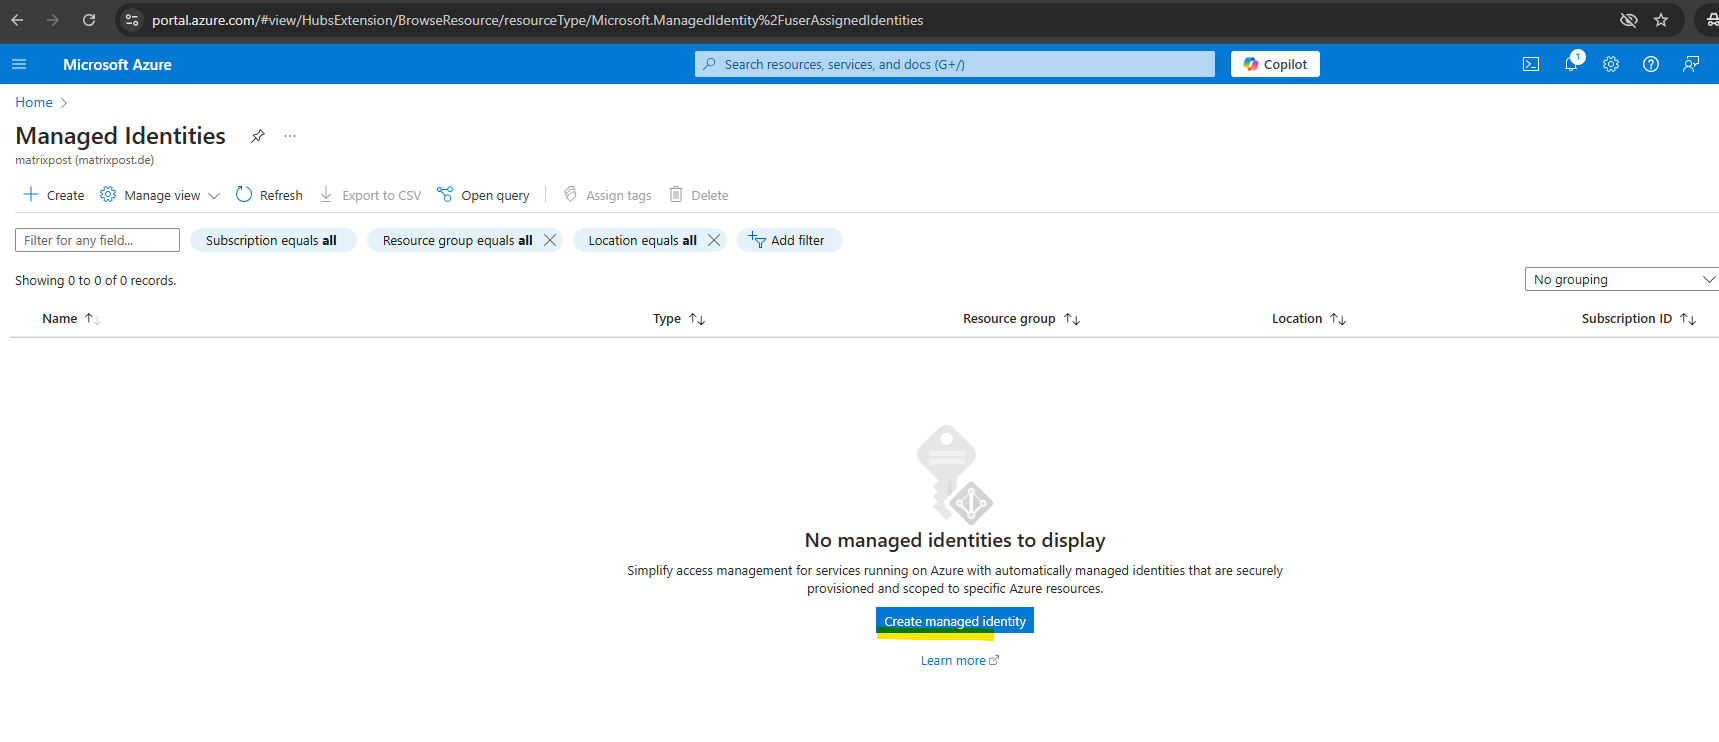
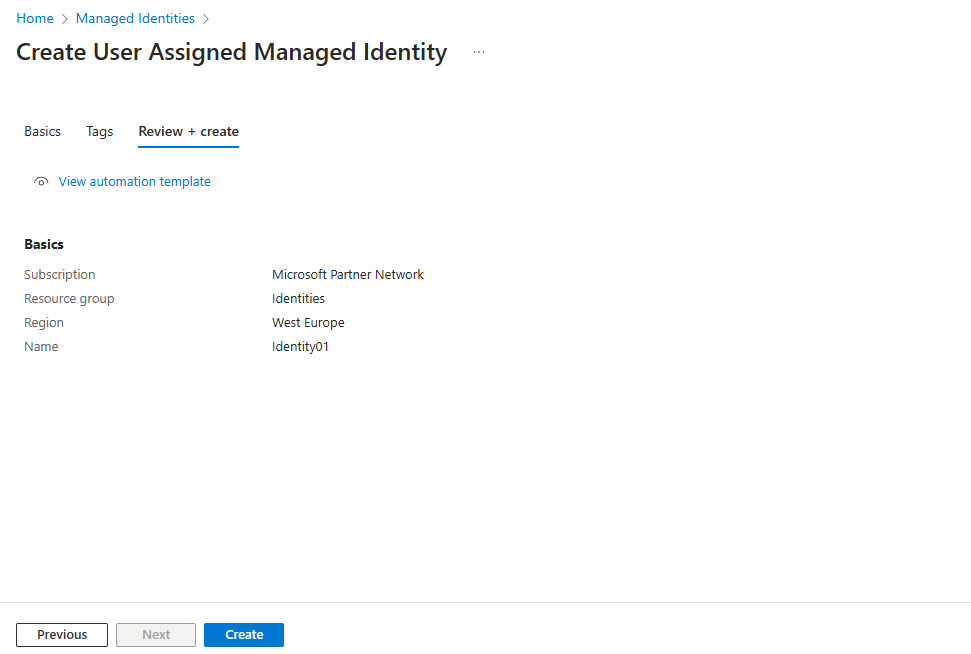
To create a user-assigned managed identity, your account needs the Managed Identity Contributor role assignment.
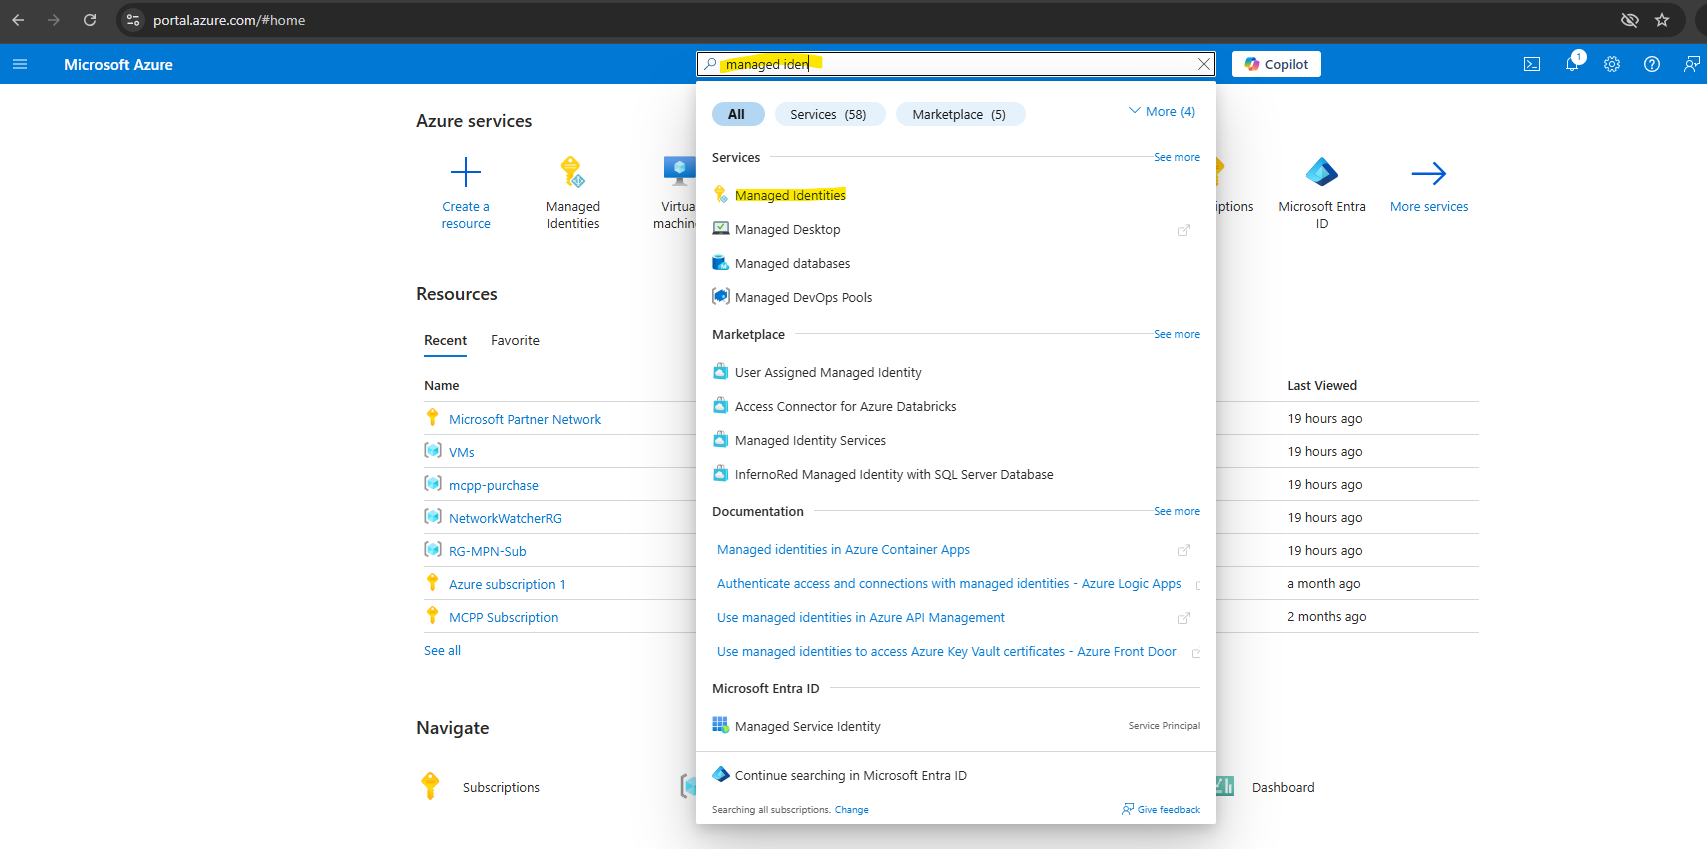
In the search box, enter Managed Identities. Under Services, select Managed Identities.

To list or read a user-assigned managed identity, your account needs to have either Managed Identity Operator or Managed Identity Contributor role assignments.
In the search box, enter Managed Identities. Under Services, select Managed Identities.
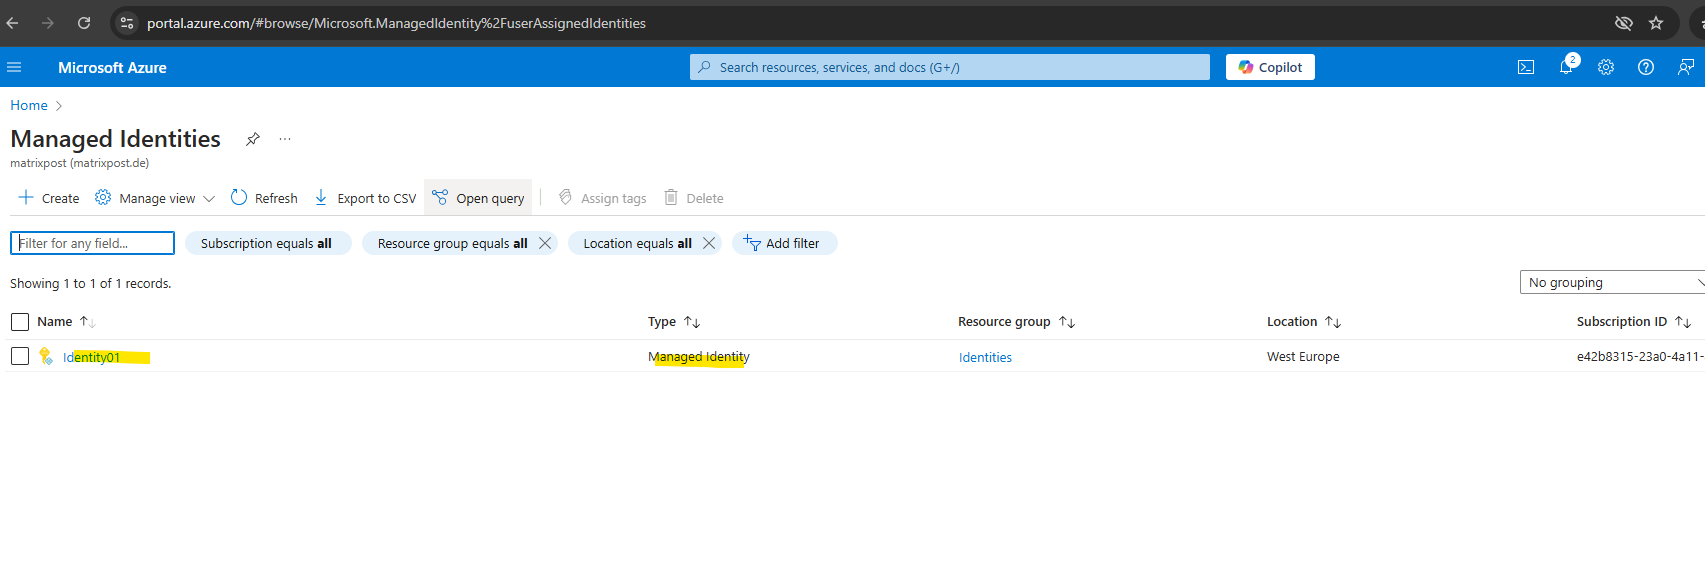
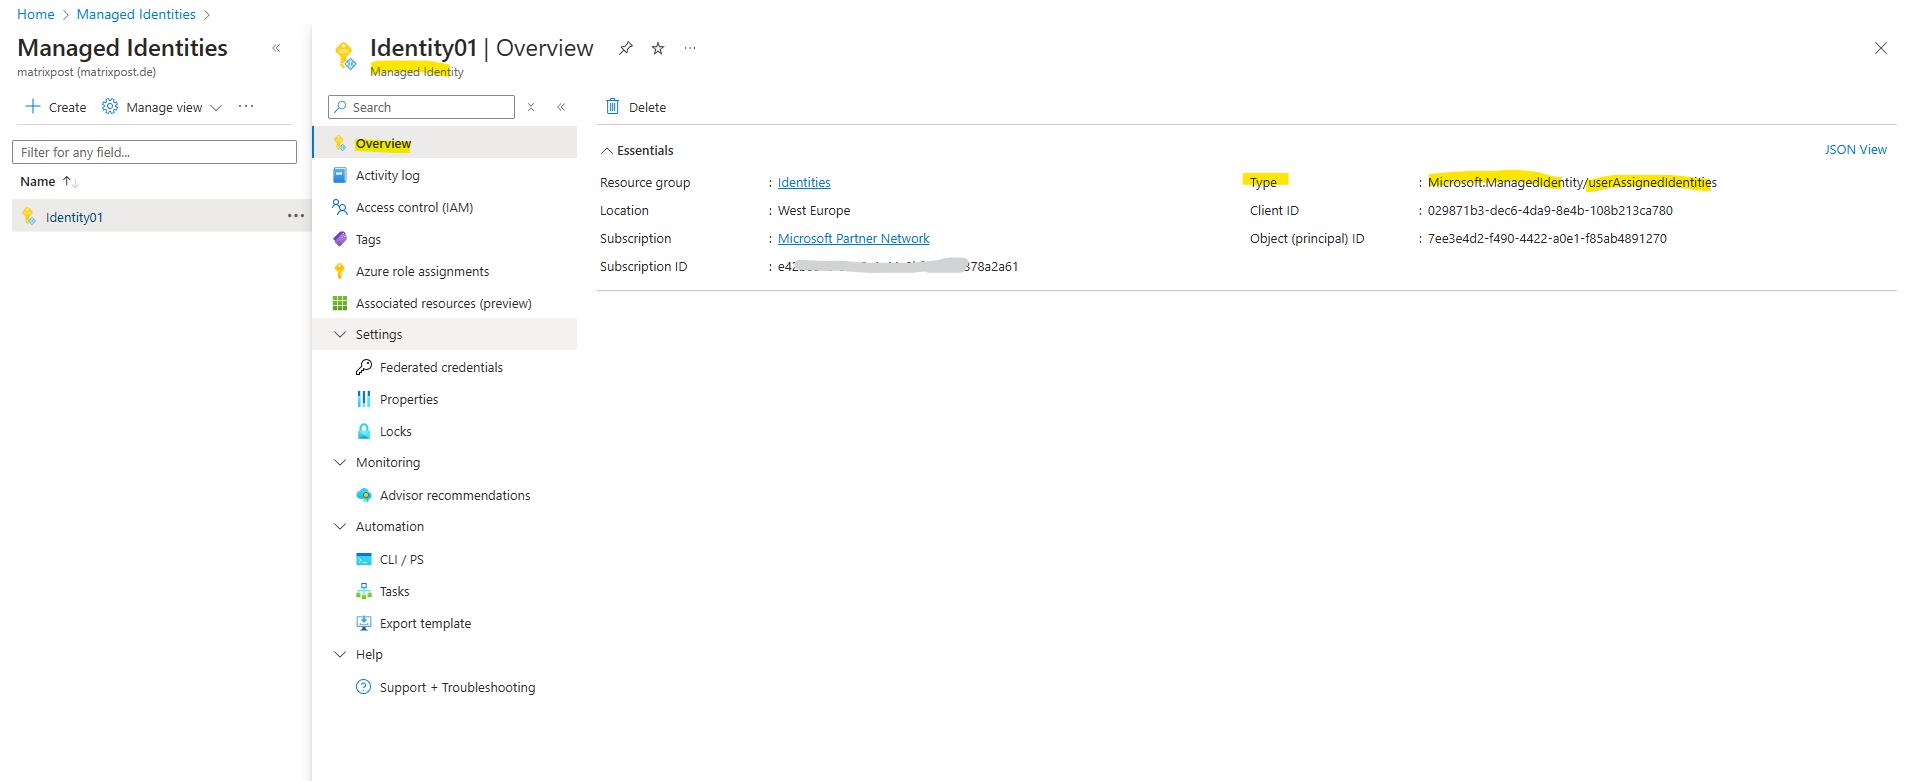
A list of the user-assigned managed identities for your subscription is returned. To see the details of a user-assigned managed identity, select its name.
Links
Register a Microsoft Entra app and create a service principal
https://learn.microsoft.com/en-us/entra/identity-platform/howto-create-service-principal-portalWhat are managed identities for Azure resources?
https://learn.microsoft.com/en-us/entra/identity/managed-identities-azure-resources/overviewApplication and service principal objects in Microsoft Entra ID
https://learn.microsoft.com/en-us/entra/identity-platform/app-objects-and-service-principals