

Linux Cheat Sheet for essential Network Commands
Whether troubleshooting connectivity issues, analyzing network traffic, verifying DNS resolution, or checking listening services, Linux provides a powerful set of built-in networking tools for day-to-day administration and debugging.
In this cheat sheet, we will look at some of the most essential Linux network commands commonly used for diagnostics, monitoring, and troubleshooting in enterprise and lab environments.
I will update this post on a regular basis.
Checking Listening Ports and Active Network Connections
The ss command is a modern and powerful replacement for legacy tools like netstat on Linux systems.
It can be used to quickly inspect listening TCP/UDP ports, active network connections, associated processes, and socket statistics, which is especially useful for troubleshooting network services such as SMTP, web servers, or SSH daemons.
For checking if Postfix is listening on TCP 25 e.g, the most useful ss command is:
# ss -tlnp | grep :25

Flags:
-t→ TCP sockets-l→ listening sockets only-n→ numeric ports/IPs-p→ show process using the socket
The following ss commands can be used to verify whether a DNS service is actively listening on UDP port 53 and to identify the associated process handling incoming DNS requests.
# ss -ulnp | grep :53

Flags:
-u→ UDP sockets-l→ listening sockets-n→ numeric output-p→ show associated process
Determine Public IP Address from Clients behind NAT by using DNS
The dig command can query Google’s public DNS service to determine the public IP address currently used for outbound internet connections.
This method is useful on Linux systems where external web services are unavailable or when troubleshooting NAT, firewalls, VPNs, and cloud networking configurations.
# dig TXT +short o-o.myaddr.l.google.com @ns1.google.com

For Windows systems we can use:
PS> (Invoke-RestMethod -Uri "https://api.ipify.org")
Display the global and per-link DNS settings in Ubuntu
The resolvectl status command displays the global and per-link DNS settings, routing domains, and protocol configurations (DNSSEC, LLMNR, MulticastDNS) currently handled by the systemd-resolved service. It is the updated utility (introduced in systemd 239) for the older systemd-resolve --status command.
$ resolvectl status

or for a specific interface:
$ resolvectl status ens192
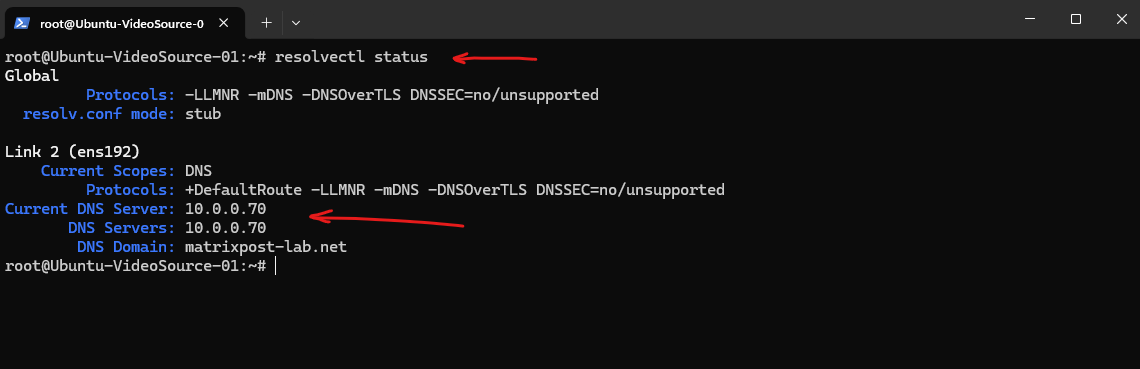
Historically, /etc/resolv.conf was the definitive file where Linux looked to find its DNS servers. However, in modern Ubuntu systems, systemd-resolved handles DNS.
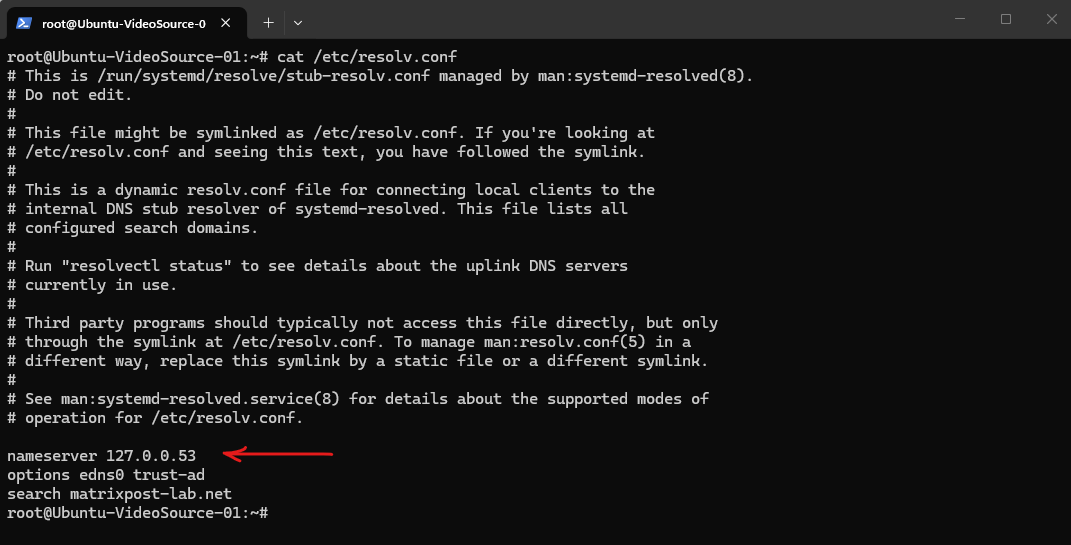
When you run cat /etc/resolv.conf as shown below, you are looking at a stub file generated by systemd-resolved to keep legacy applications happy.
nameserver 127.0.0.53: This is a local loopback address. Your applications aren’t talking directly to the internet for DNS; they are talking to a local “stub resolver” daemon running right on your machine (systemd-resolved).
# cat /etc/resolv.conf
SLES (SUSE Linux Enterprise Server) still uses /etc/resolv.conf, but it handles DNS management completely differently than Ubuntu.
While Ubuntu relies on systemd-resolved (using the 127.0.0.53 loopback), SLES uses a proprietary SUSE tool called netconfig to manage this file.
Unlike Ubuntu, which hides the real DNS behind
127.0.0.53, SLES writes your actual, real upstream DNS server IP (10.0.0.70) directly into/etc/resolv.conf. There is no local caching stub resolver running by default. Applications query10.0.0.70directly.
# cat /etc/resolv.conf
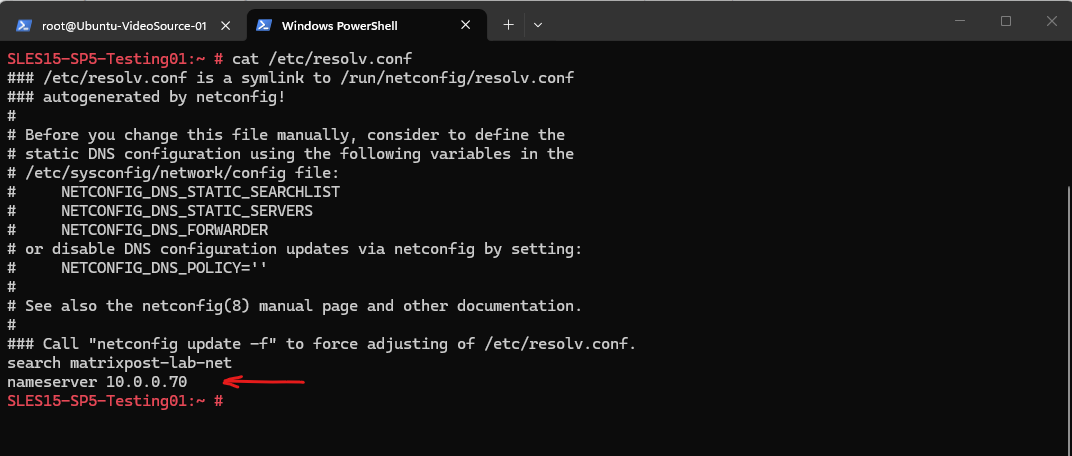
In the SUSE ecosystem, netconfig is a modular tool that gathers network settings from various sources (like DHCP leases, Wi-Fi connections, or static configuration files) and merges them into a single, cohesive network state.
It then automatically outputs the final result to /run/netconfig/resolv.conf, which /etc/resolv.conf points to via a symlink.
As the header text warns you, do not manually edit /etc/resolv.conf because netconfig will overwrite it the next time your network restarts or DHCP renews.
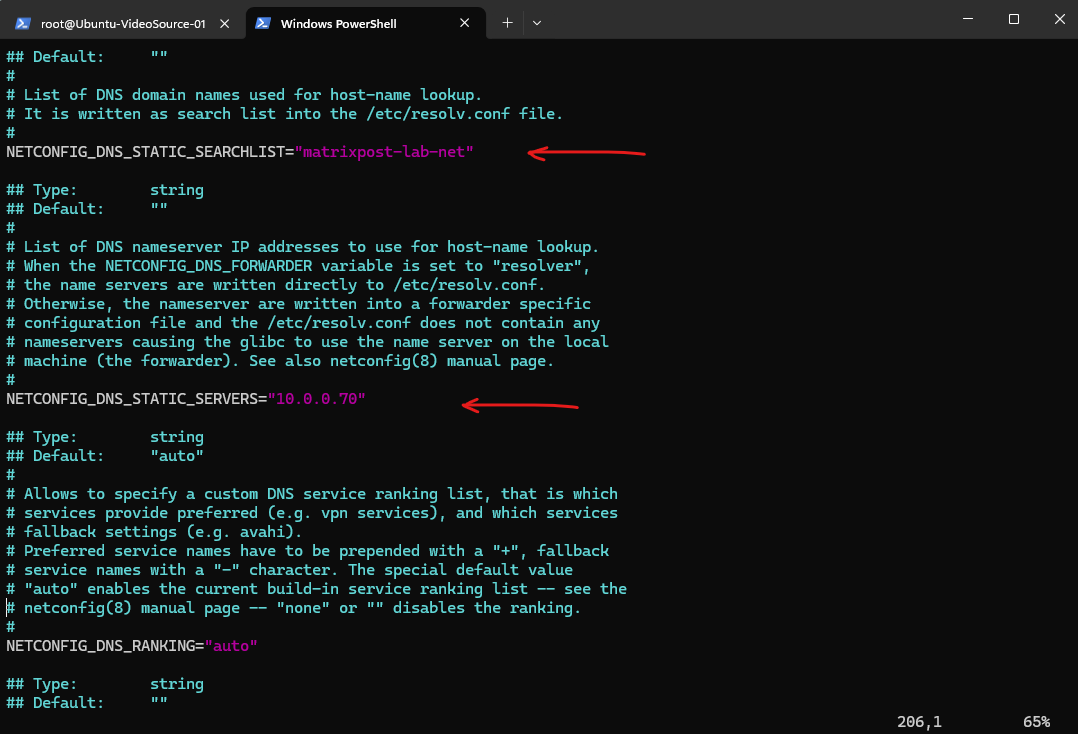
If you want to add static DNS servers in SLES use the Yast utility or open the network configuration file. Find and modify these exact variables (as mentioned in your file’s header):
NETCONFIG_DNS_STATIC_SERVERS="10.0.0.70"
NETCONFIG_DNS_STATIC_SEARCHLIST="matrixpost-lab-net"
# vi /etc/sysconfig/network/config
Force netconfig to apply your changes immediately by running:
# netconfig update -f
arping – Test IPv4 Reachability Using ARP
arping sends ARP requests instead of ICMP Echo Requests. Unlike ping, it does not require IP routing and therefore tests direct Layer-2 connectivity to a host on the local subnet.
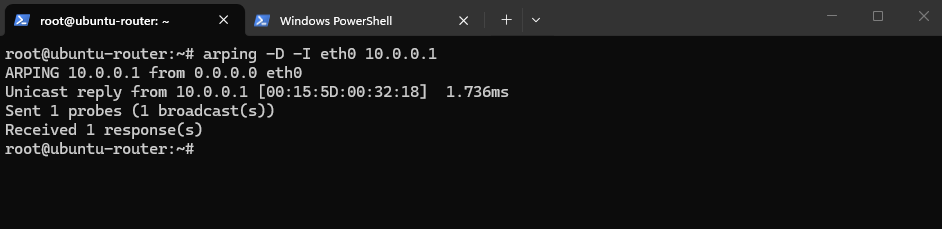
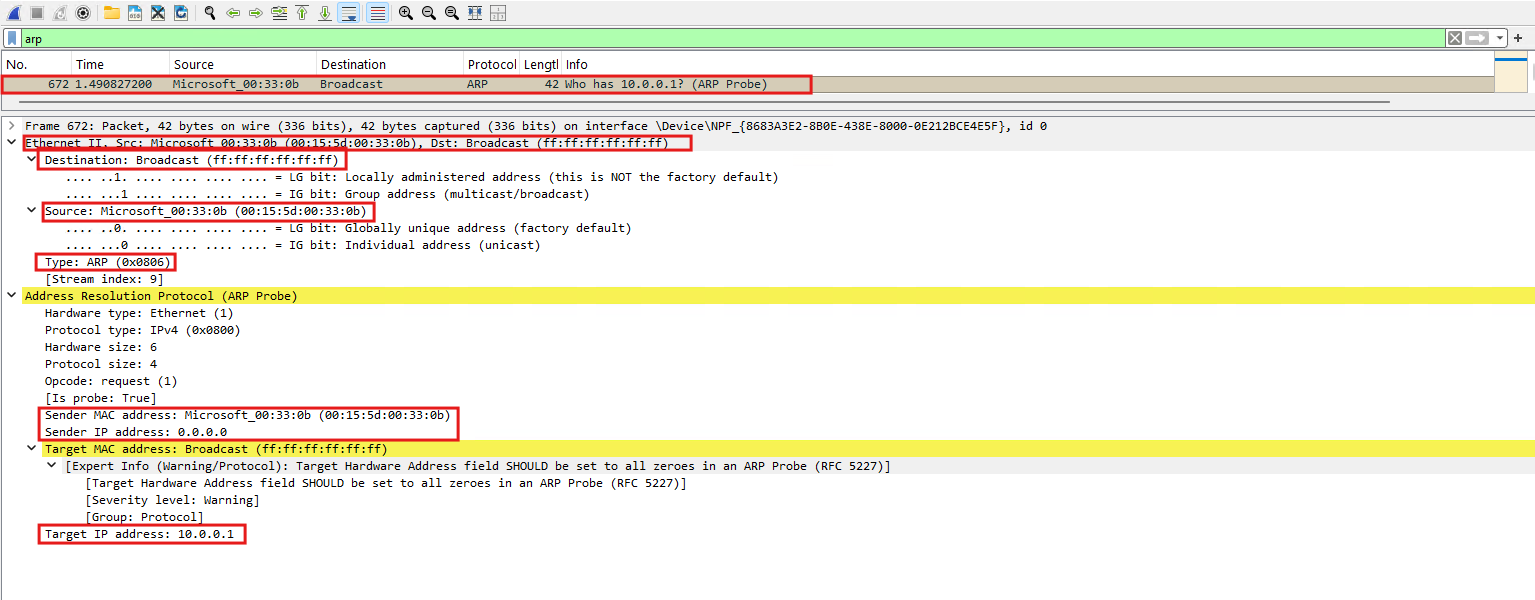
Duplicate Address Detection (DAD) mode (-D) is used to check whether an IPv4 address is already in use before assigning that address to the local interface. This is especially useful when the host does not yet have an IPv4 address configured; therefore, the ARP probe uses 0.0.0.0 as the sender IP (shown below in the Wireshark captures) instead of claiming an existing address.
-I eth0→ use interfaceeth0-D→ Duplicate Address Detection (DAD) mode
It asks essentially: “Is anybody already using 10.0.0.1?”
arping -I eth0 10.0.0.1
Because
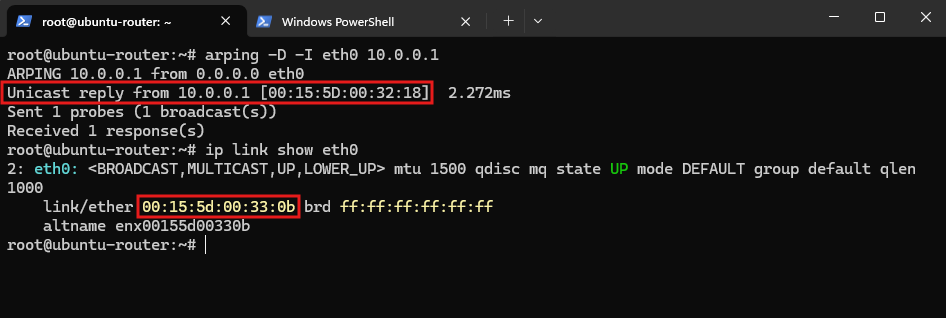
10.0.0.1is already in use,arpingreceives a response and even tells us the owner’s MAC address:00:15:5D:00:32:18.
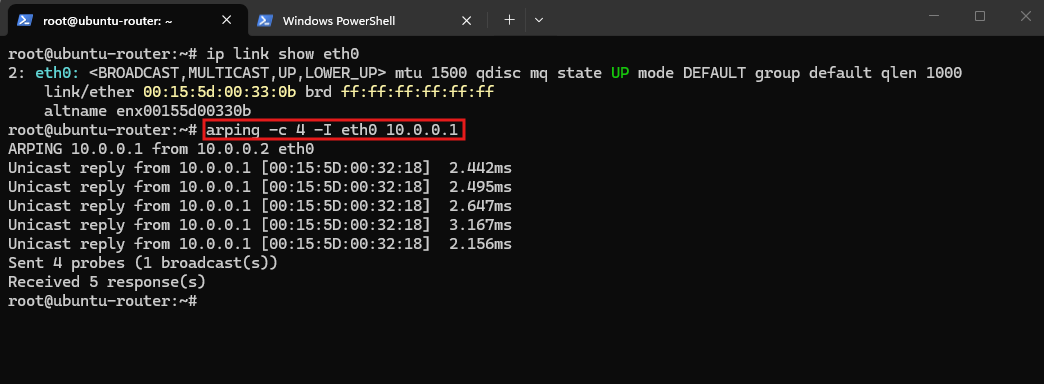
The ip link show eth0 output confirms that Ubuntu’s eth0 interface is UP and uses the MAC address 00:15:5d:00:33:0b. The same MAC address can then be seen as the source of the subsequent ARP probe in Wireshark below.
The ARP probe is sent as an Ethernet broadcast from Ubuntu’s eth0 MAC address 00:15:5d:00:33:0b, asking whether 10.0.0.1 is already in use.
Because this is a duplicate-address probe, the sender IP is
0.0.0.0.
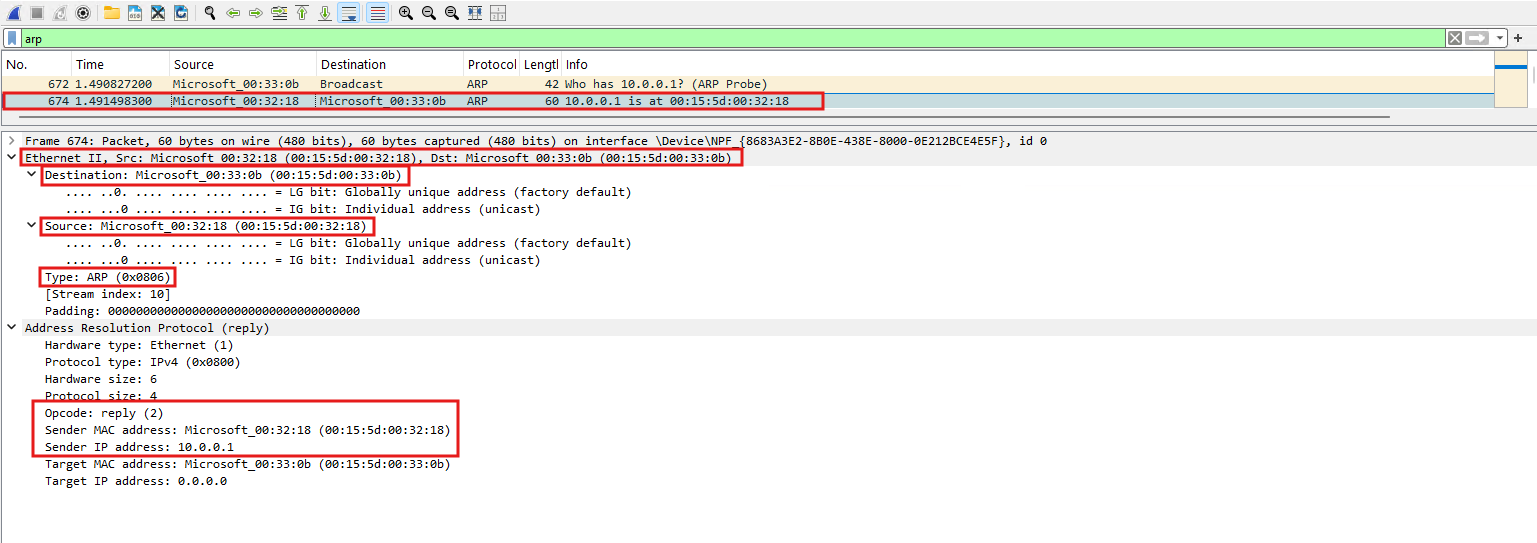
The device owning 10.0.0.1 responds with a unicast ARP reply, identifying itself with MAC address 00:15:5d:00:32:18. The successful response confirms that 10.0.0.1 is already in use on the local Layer-2 network.
This time arping is used without the -D (Duplicate Address Detection) option, sending four normal ARP requests from eth0 to resolve 10.0.0.1. The replies identify 10.0.0.1 with MAC address 00:15:5d:00:32:18.
arping -c 4 -I eth0 10.0.0.1
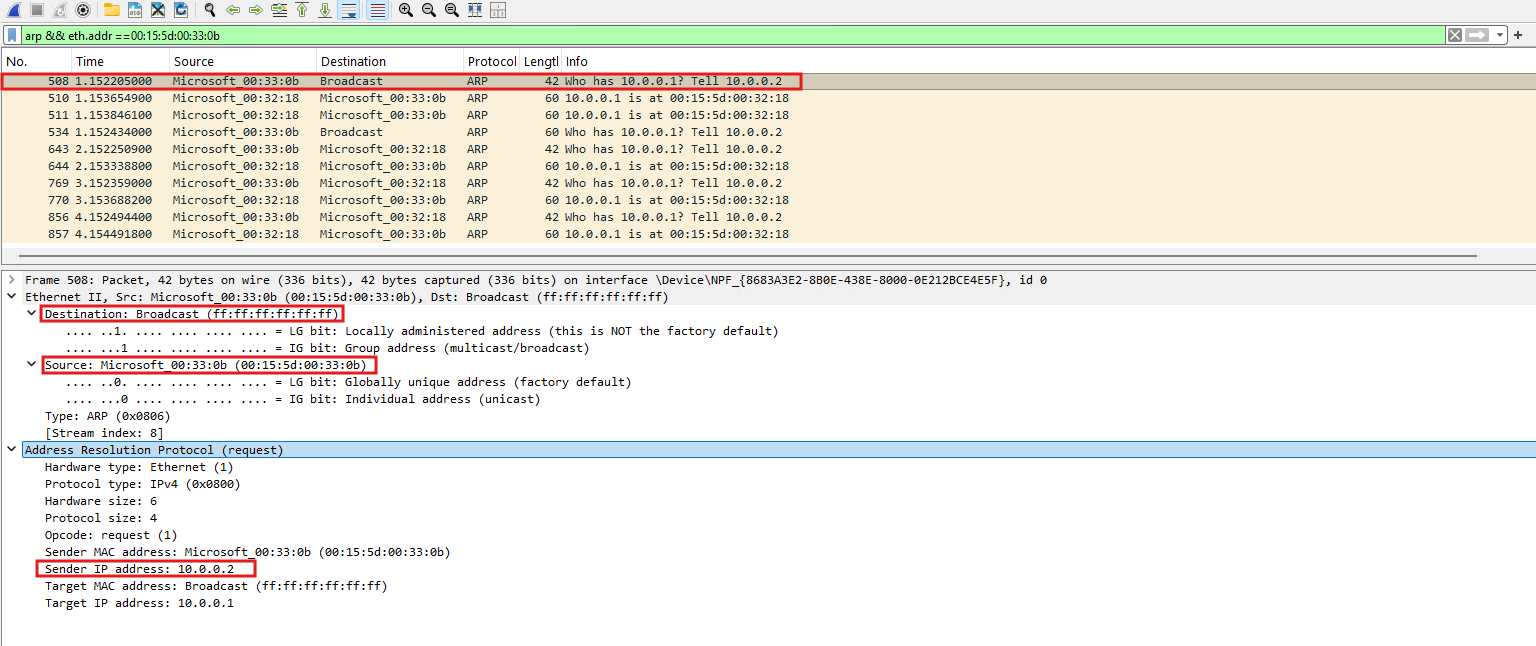
Without -D, the ARP request contains the configured local IP 10.0.0.2 as its sender address, shown as “Who has 10.0.0.1? Tell 10.0.0.2”. The request is broadcast within the Layer-2 domain, while the ARP reply is sent back to the requesting host.
Linux vs. Windows
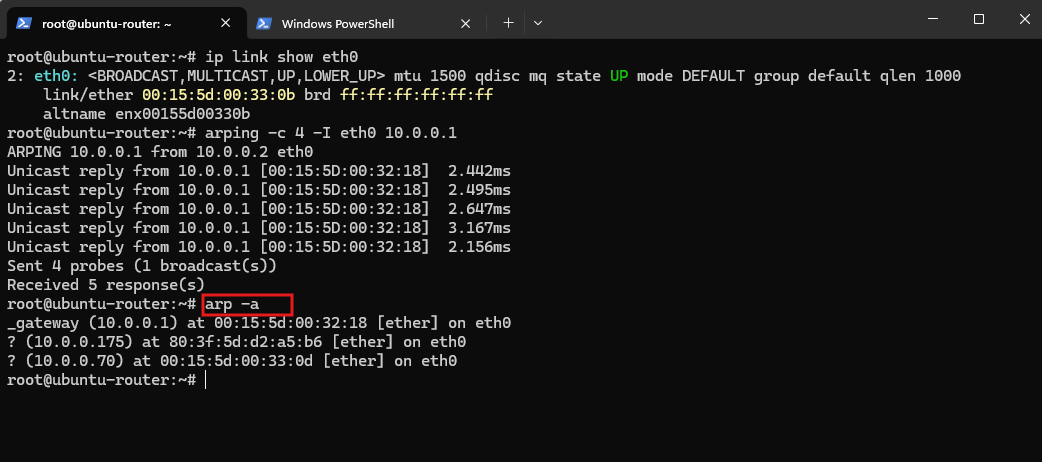
Linux provides arping for actively generating ARP requests and arp -a for displaying the learned ARP cache.
Windows has no built-in equivalent to
arping; typically,pingis used to trigger ARP resolution andarp -ato inspect the resulting cache, which means a valid IPv4 address must already be configured on the Windows interface.
arp -a
Display IP Addresses in Brief Format
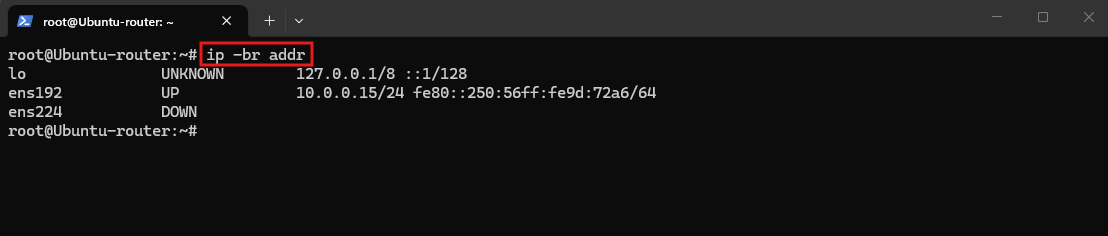
Use the -br (brief) option to display a compact overview of all network interfaces, their state, and assigned IP addresses.
Much cleaner than the full
ip addroutput when you just need a quick overview.
ip -br addr
Links
ss -Linux manual page
https://man7.org/linux/man-pages/man8/ss.8.html
