Mastering BGP between Juniper and Azure
Establishing seamless hybrid connectivity between on-premises networks and the cloud is a cornerstone of modern IT infrastructure.
While IPsec tunnels can provide the transport layer, dynamic routing with BGP (Border Gateway Protocol) ensures scalable and resilient route management, especially in environments where subnets change or grow over time.
This post shows step by step setting up BGP on the Juniper vSRX3 and Azure, finally we will also see how to verify BGP is working and some troubleshooting.
About how to setup the tunnel step by step, you will see in my following post.
Or about how to set up the Juniper vSRX3 appliance in vSphere.
Enable BGP in Azure
Below we will see the steps to enable BGP on the already created and working tunnel in Azure.
Finally we need to enable BGP in Azure for the VPN gateway, the local network gateway object and the connection object.
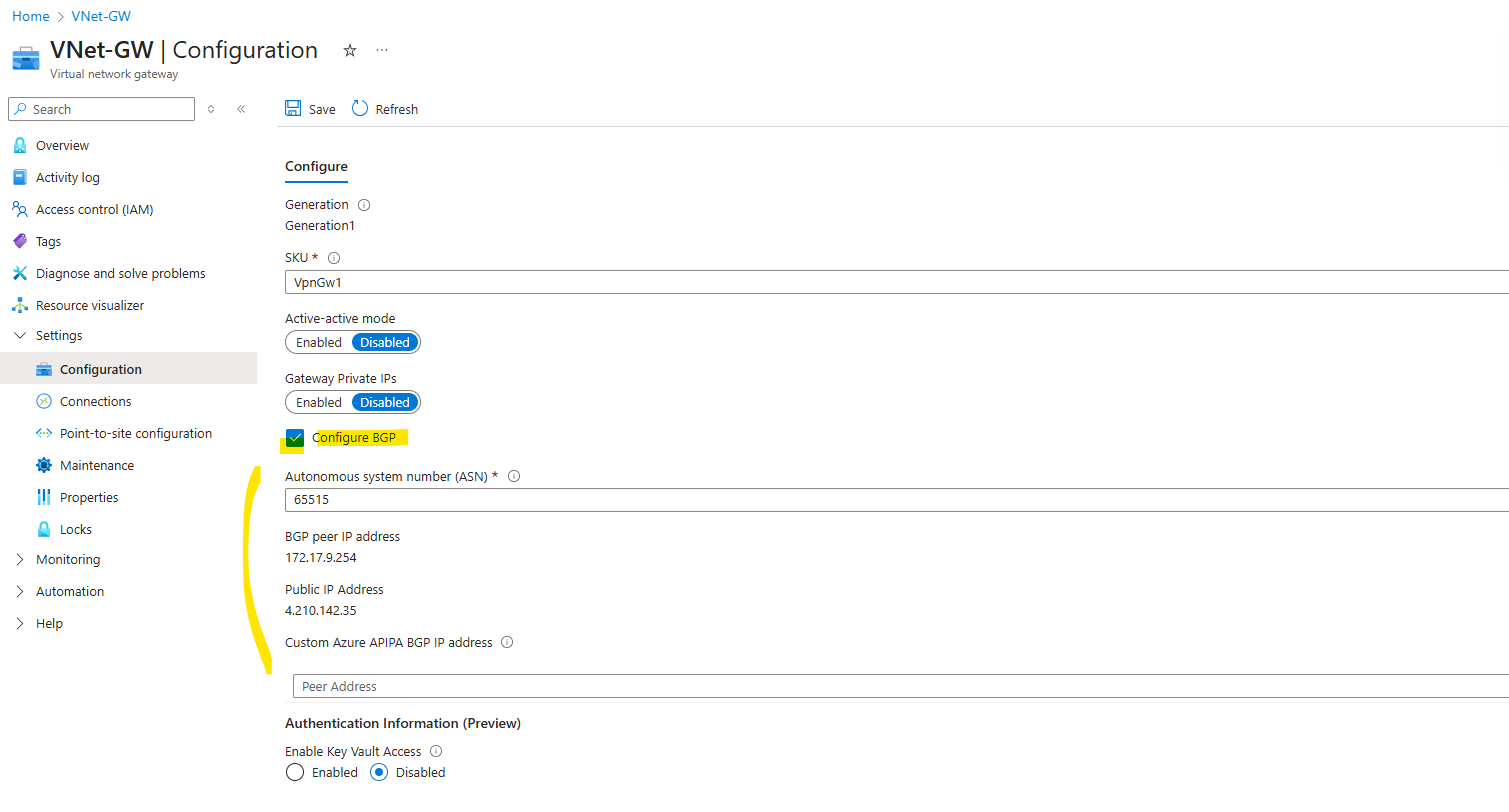
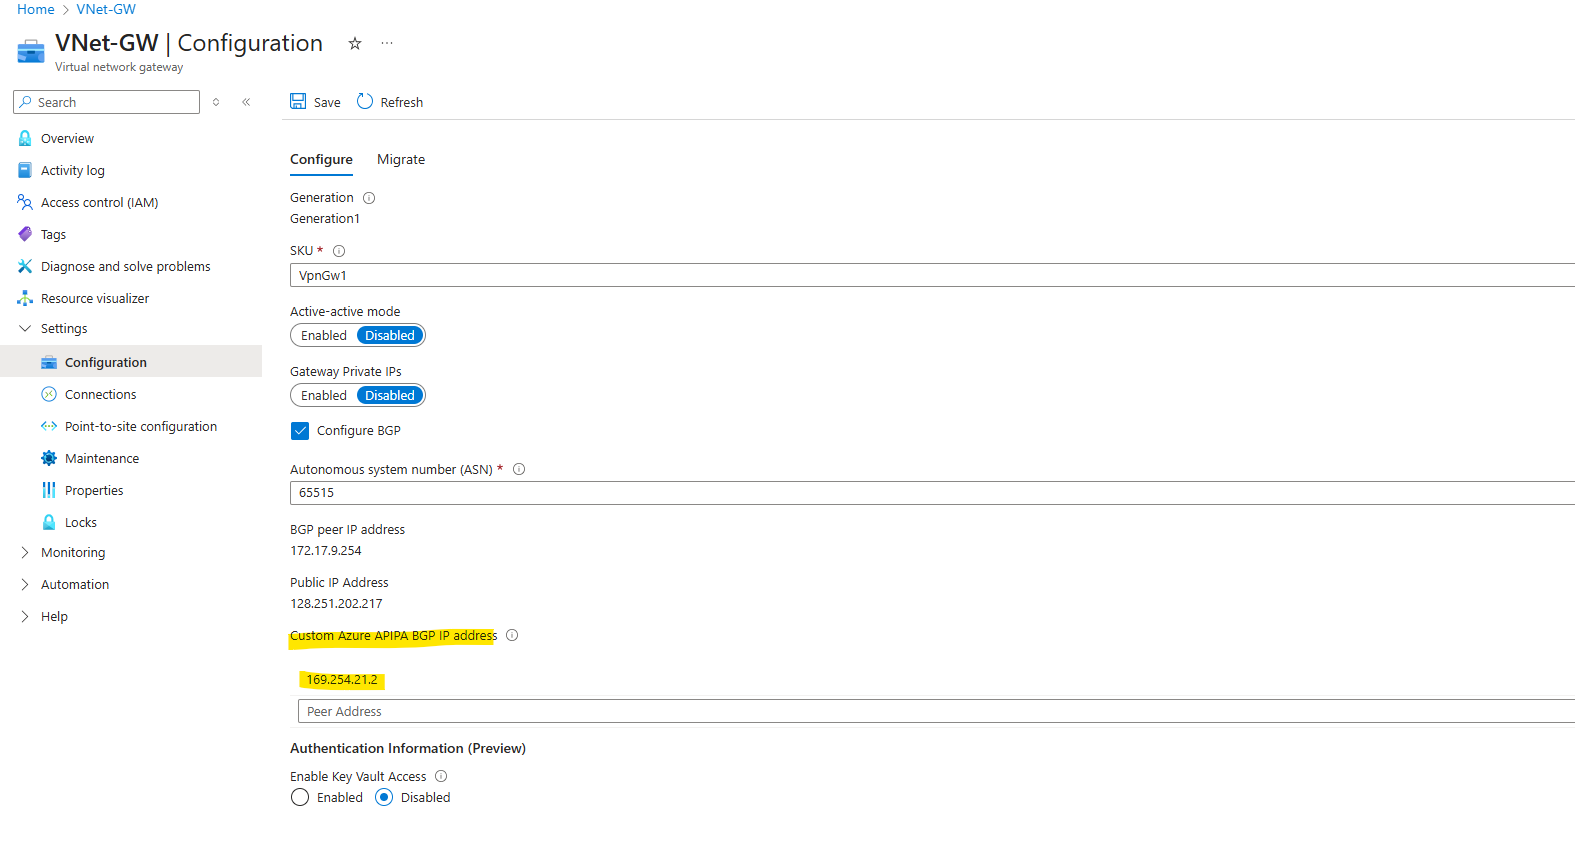
Enable BGP on the Virtual Network Gateway
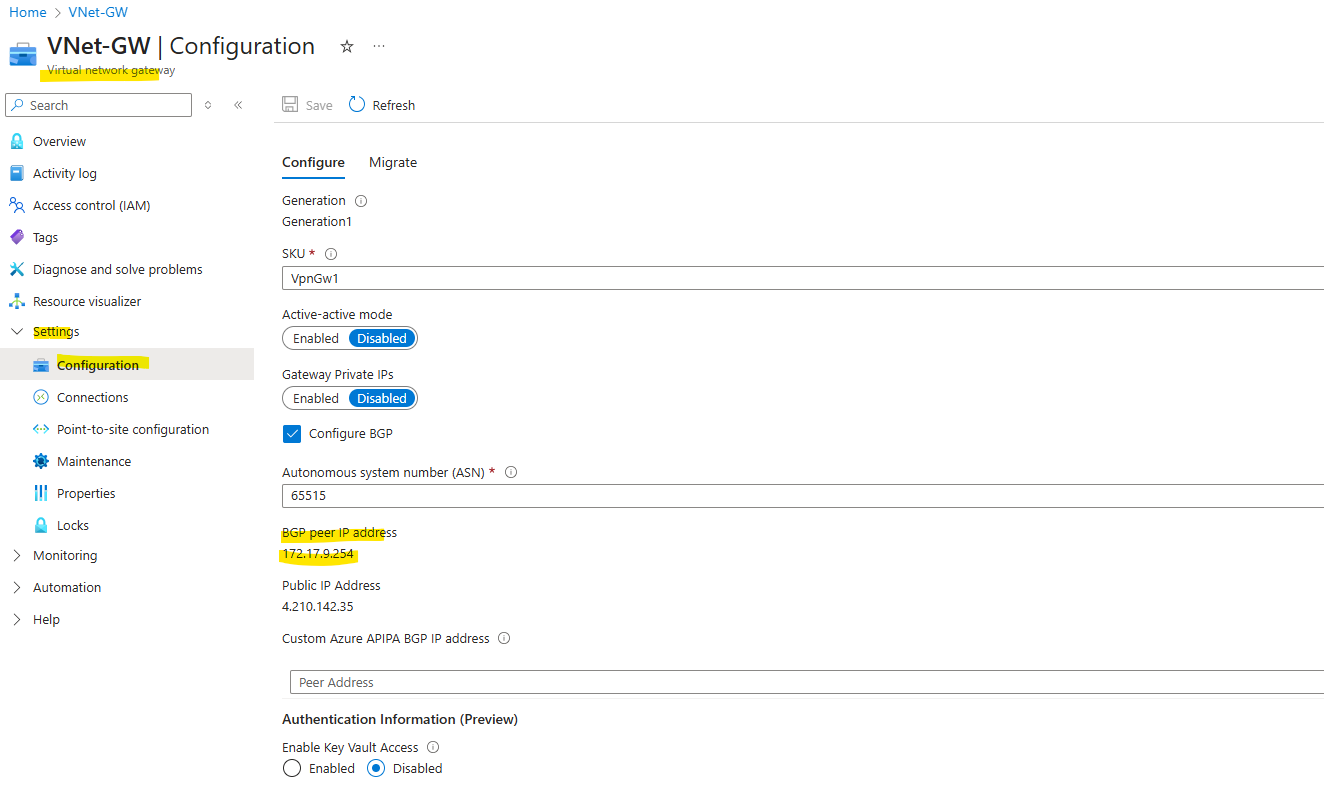
To enable it on the virtual network gateway, go to Settings -> Configuration and check Configure BGP.
Azure by default will use here the ASN 65515 which is a reserved private ASN (Autonomous System Number) used by Microsoft Azure.
A BGP-enabled connection between two network gateways requires that their ASNs be different. Additionally, the following ASNs are reserved by Azure: 8075, 8076, 12076 (public), 65515, 65517, 65518, 65519, 65520 (private). You cannot specify these ASNs for your on-premises VPN devices when connecting to Azure VPN gateways. While setting up IPsec connectivity from virtual network gateways to Azure virtual WAN VPN, the ASN for Local Network Gateway is required to be 65515.
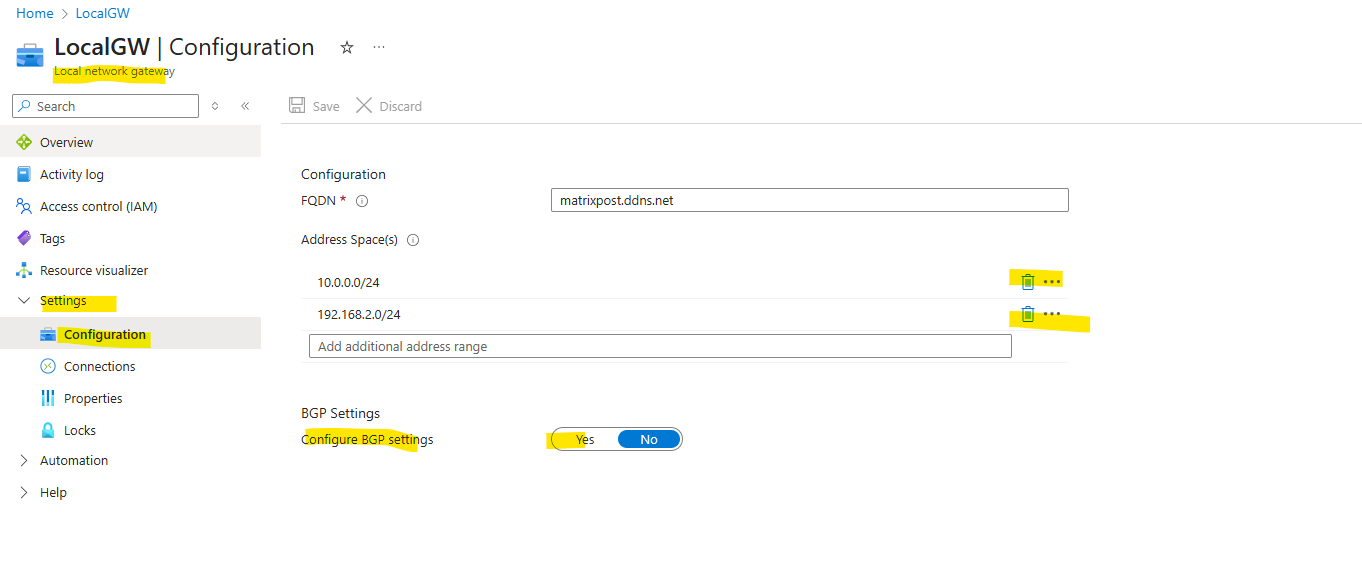
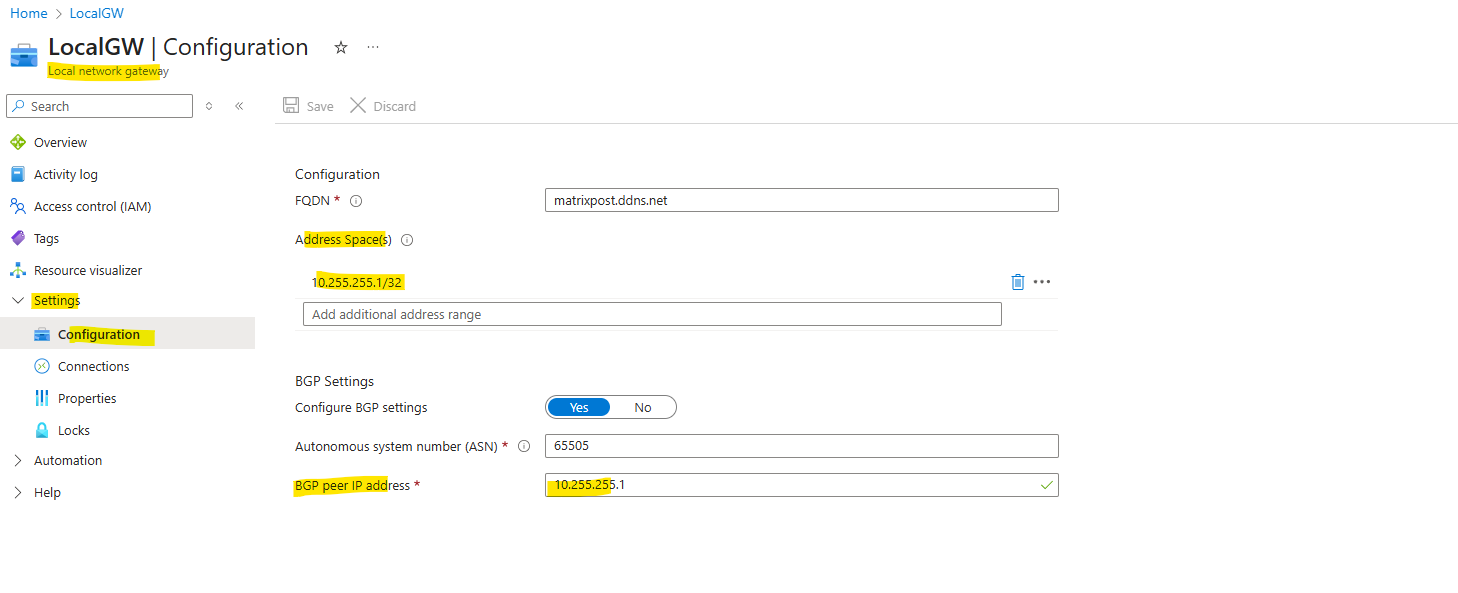
Enable BGP on the Local Network Gateway
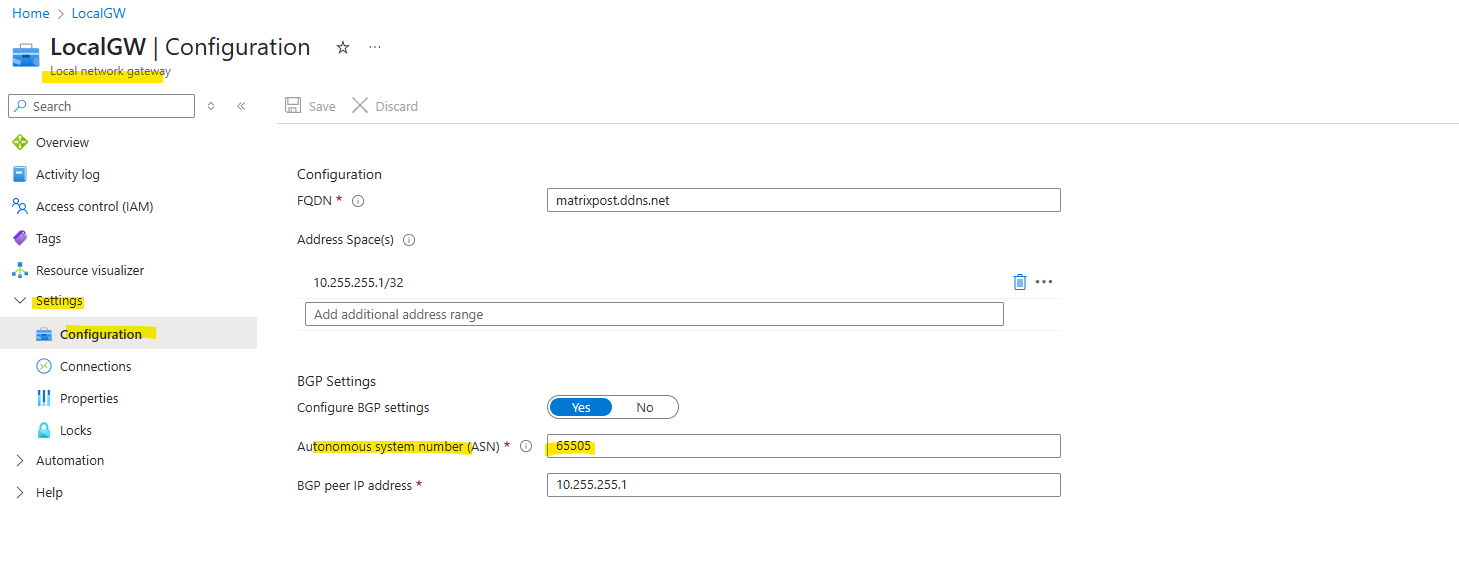
To enable BGP on the local network gateway object also navigate to Settings -> Configuration and switch the BGP Settings toggle button to Yes.
Further I will now remove the configured static routes on the local gateway object in Azure as they will be advertised from now by BGP on both sides.
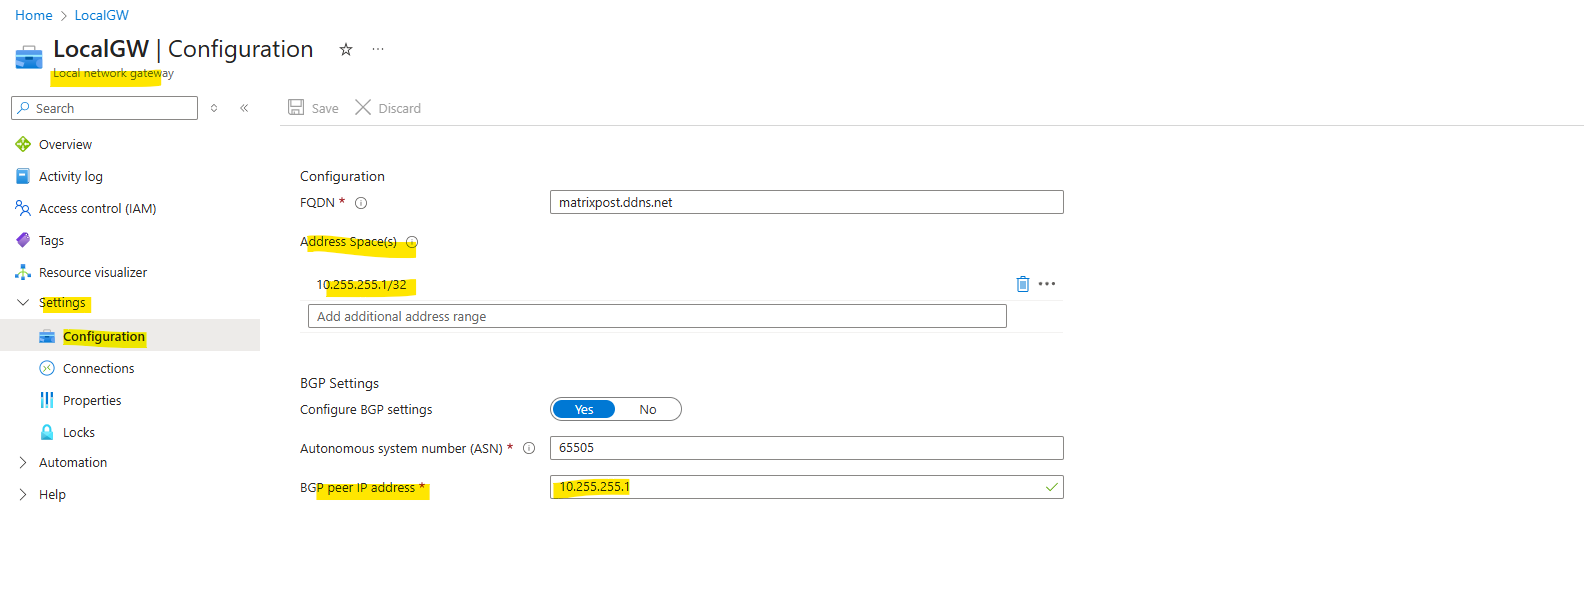
When enabling BGP we need to enter the Autonomous system number (ASN) from on-premise configured on Juniper and also the BGP Peer IP address .
The static routes we now have removed besides the host address for our BGP Peer IP address (10.255.255.1/32).
If you plan to use this local network gateway in a BGP-enabled connection, then the minimum prefix you need to declare is the host address of your BGP Peer IP address on your VPN device.
Don’t use a BGP peer IP inside the Azure VNet address space (172.17.0.0/16) on your Juniper side.
Set your Juniper BGP peer IP to something like 10.255.255.1, finally a host address that you control, is not inside any Azure VNet CIDR, is routed over the IPSec tunnel and can be included in the local network gateway without causing overlap.
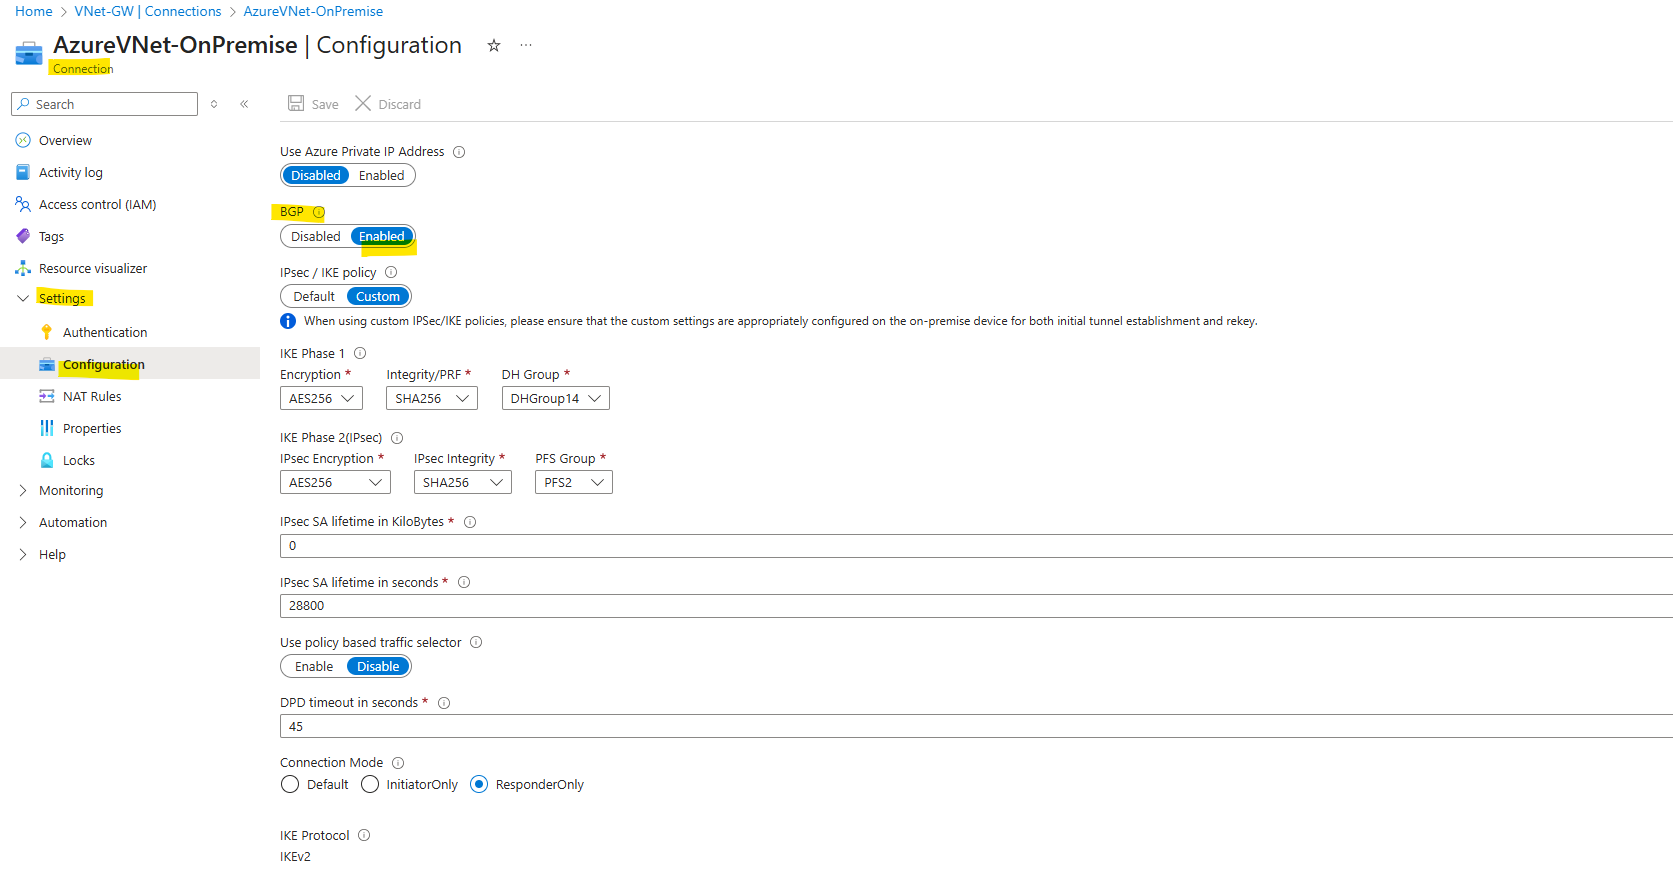
Enable BGP on the Connection
No finally in Azure we also need to enable BGP on the connection object. So here navigate also to Settings -> Configuration and switch the BGP toggle button to Enabled.
That’s all on Azure side, next we enable and configure BGP on Juniper vSRX3.
Enable BGP on Juniper vSRX3
Add BGP peer IPs on the st0.0 tunnel interface
The tunnel interface so far we left unnumbered because no reason to assign an IP address when BGP/OSPF is not enabled as shown in my previous post.
We will now assign the BGP peer IP addresses used for the BGP session and already set previously also on the Azure local network gateway object resp. assigned by Azure automatically when enabling BGP.
Azure requires BGP peering to occur over IP addresses that do not overlap with its VPN gateway subnet.
As we can’t set in Azure for the on-premise BGP peer IP the second IP of the /30 subnet used for the BGP IP in Azure, because it is located within the Azure VNet address space (172.17.0.0/16) and therefore will overlap, we need to create on Juniper and its tunnel interface a different one.
Set your Juniper BGP peer IP to something like 10.255.255.1 (In my case already set previously on the Azure local network gateway object), finally a host address that you control, is not inside any Azure VNet CIDR, is routed over the IPSec tunnel and can be included in the local network gateway without causing overlap.
Further nevertheless Azure needs that we also assign the second IP of the /30 subnet which is 172.17.9.253/30 to our tunnel interface in order to establish the BGP session between both.
Alternatively to avoid using this combination of the immutable by default assigned BGP IP in Azure and second different IP to avoid overlapping, we can also use APIPA addresses for both BGP peers just like in GCP HA VPN and shown here.
Using a custom Azure APIPA BGP IP address will override the need for the GatewaySubnet IP in the BGP session itself.
# Counterpart IP of Azure's BGP peer IP which is in my case 172.17.9.254/30
set interfaces st0 unit 0 family inet address 172.17.9.253/30

# on-premise (Juniper) BGP peer IP address set in Azure on the local network gateway object
set interfaces st0.0 family inet address 10.255.255.1/32
As mentioned, the BGP peer IP Address (Juniper) set on the local network gateway object in Azure.
Or as mentioned by using APIPA addresses like in GCP HA VPN and shown here.
Configuration on the virtual network gateway by using APIPA.
This field is reserved for APIPA (Automatic Private IP Addressing). Azure supports BGP IP in the ranges 169.254.21.* and 169.254.22.*.
Configuration on the local network gateway by using APIPA.
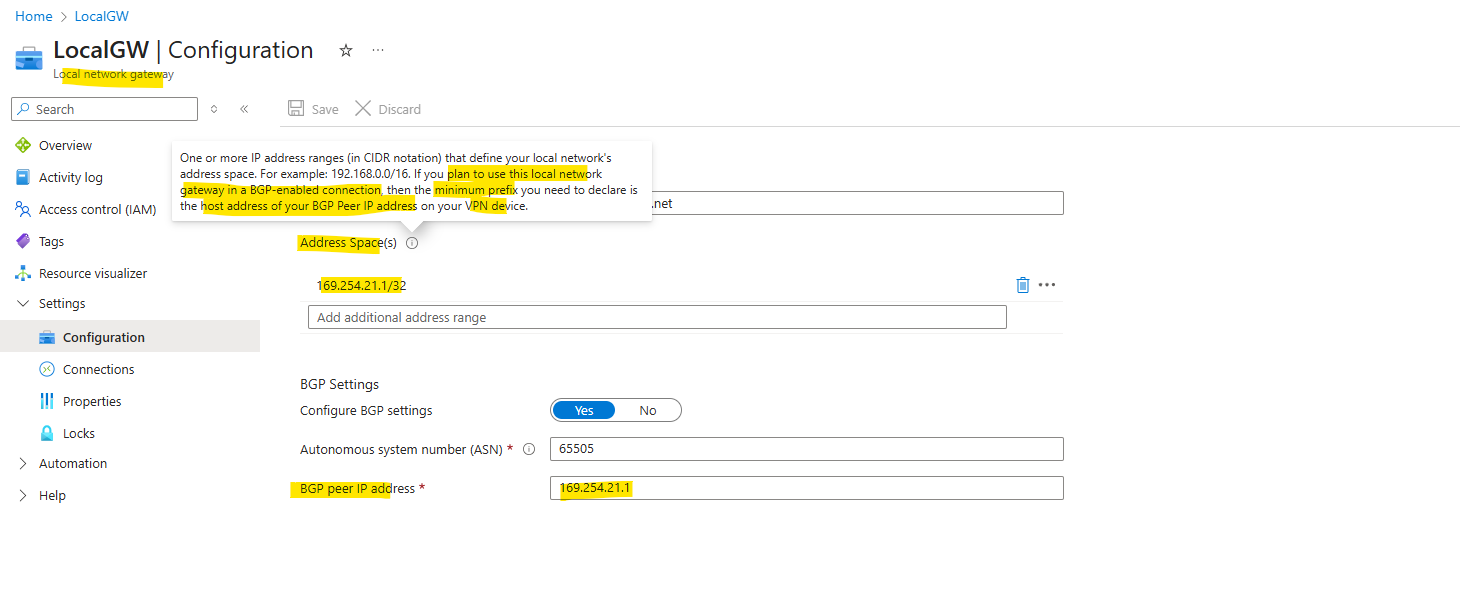
When using this APIPA addresses we need to configure on Juniper as mentioned just the APIPA address used for the on-premise BGP peer IP above like this:
# Counterpart IP of the custom Azure APIPA BGP IP address
set interfaces st0 unit 0 family inet address 169.254.21.1/30

# Azure BGP peer IP (custom Azure APIPA BGP IP address)
set protocols bgp group AZURE neighbor 169.254.21.2

# Juniper st0.0 IP - sets the source IP for BGP TCP connections (on port tcp 179)
set protocols bgp group AZURE local-address 169.254.21.2
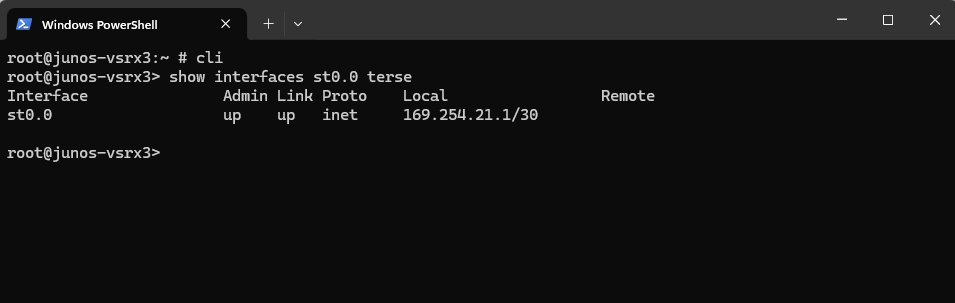
Only the APIPA address is bound to our tunnel interface st0.0 .
root@junos-vsrx3> show interfaces st0.0 terse
Loopback Interface and Router ID
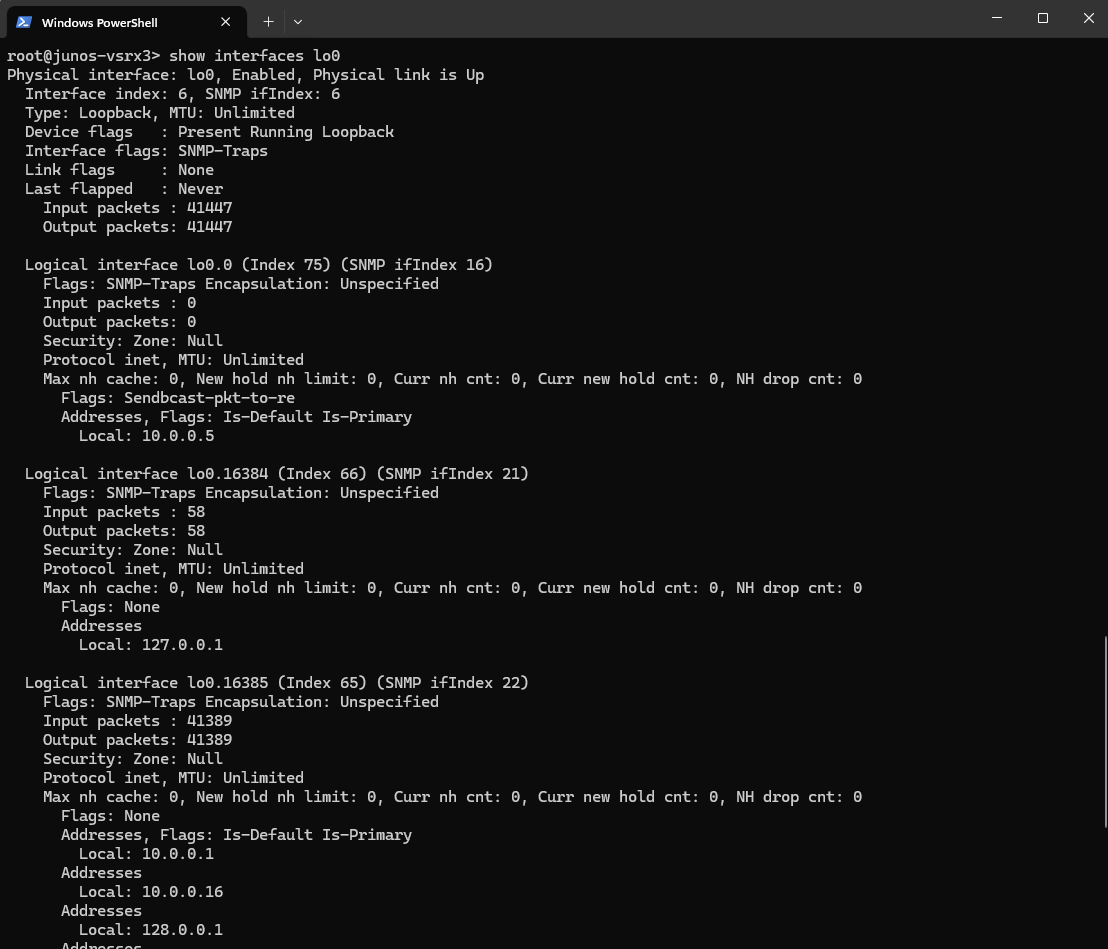
The loopback interface (lo0) always exists by default on Juniper devices. It’s a special internal interface used by the routing engine, you can optionally configure its logical units and IP addresses but usually not necessary and done automatically.
We also didn’t have to configure it here explicitly to work with Azure.
Verify the looback interface by running.
show interfaces lo0
Set BGP group and peer
set protocols bgp group AZURE type external
set protocols bgp group AZURE peer-as 65515                      # Azure ASN
set protocols bgp group AZURE neighbor 172.17.9.254              # Azure BGP peer IP
The BGP peer IP and ASN from Azure we will find on the virtual network gateway in Azure.
Define your local ASN
set routing-options autonomous-system 65505 # Your ASN
Must match with the one we set on the local network gateway object in Azure.
Enable BGP on st0.0 tunnel interface
This command tells the Juniper vSRX3 which local IP address to use when establishing the BGP session with its peer, in my case here, Azure’s BGP peer IP (172.17.9.254).
We will set here the IP address we also entered in Azure on the local network gateway object for the BGP peer IP address (on-premise device our Juniper) on the st0.0 tunnel interface.
It sets the source IP for BGP TCP connections (on port tcp 179) originating from the Juniper firewall toward Azure.
Without this line, Junos would automatically pick the IP of the egress interface used to reach the BGP peer. This might be ambiguous or incorrect, especially on st0.0, which can have multiple IP addresses (as in my case here when not using APIPA addresses: both 172.17.9.253/30 (2nd IP /30 net of Azure’s BGP IP) and 10.255.255.1/32 to avoid address overlapping in Azure.
set protocols bgp group AZURE local-address 10.255.255.1 # Juniper st0.0 IP
Create a Export Policy
The export policy in Juniper BGP configuration defines which routes your device advertises to its BGP peers, in this case, Azure.
term 1 from protocol [ static direct ] ==> Matches routes learned via static or direct means. These are your local networks/subnets (e.g., LANs, loopbacks, default routes, etc.)
term 1 then accept ==> Advertises all matched routes (static and direct) to Azure
term 2 then reject ==> A fallback: reject any other routes that don’t match the above (like dynamic/BGP-learned routes from other neighbors)
set policy-options policy-statement EXPORT-TO-AZURE term 1 from protocol [ static direct ]
set policy-options policy-statement EXPORT-TO-AZURE term 1 then accept
set policy-options policy-statement EXPORT-TO-AZURE term 2 then reject

# Apply the policy to the BGP Group
set protocols bgp group AZURE export EXPORT-TO-AZURE
And finally commit the configuration.
commit
We do not need an import policy on Juniper to accept Azure’s advertised routes, by default JunOS accepts all BGP routes unless you configure an explicit import policy to filter them.
When you might need an import policy, filter or restrict prefixes received from Azure (e.g., only accept 172.17.0.0/16 and reject others)
set policy-options policy-statement IMPORT-FROM-AZURE term 1 from route-filter 172.17.0.0/16 exact
set policy-options policy-statement IMPORT-FROM-AZURE term 1 then accept
set policy-options policy-statement IMPORT-FROM-AZURE term 2 then reject
set protocols bgp group AZURE import IMPORT-FROM-AZURE
Verify BGP is working
Below some commands we can use to verify if BGP works correctly.
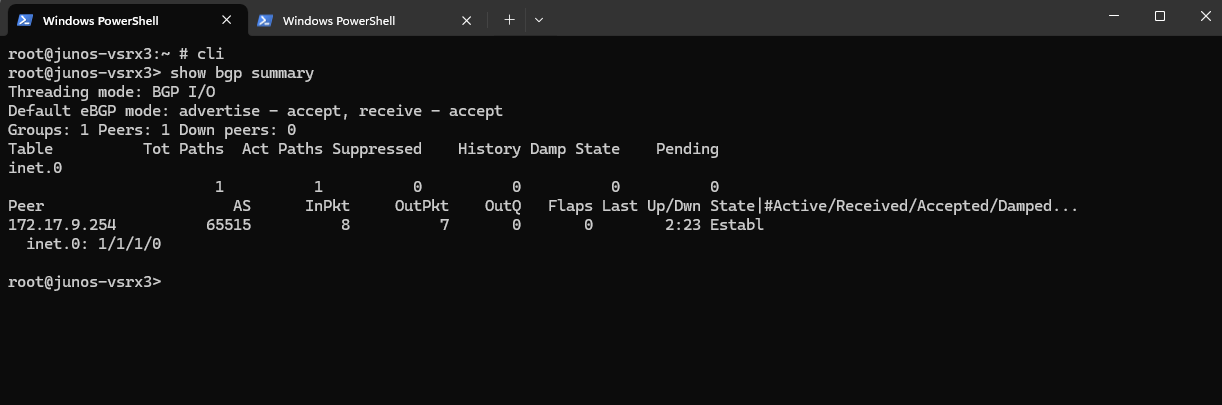
show bgp summary
This command show all relevant information about the BGP session.
A BGP session is a TCP connection (usually over port 179) established between two BGP speaking routers aka BGP peers or neighbors for the purpose of exchanging routing information.
show bgp summary
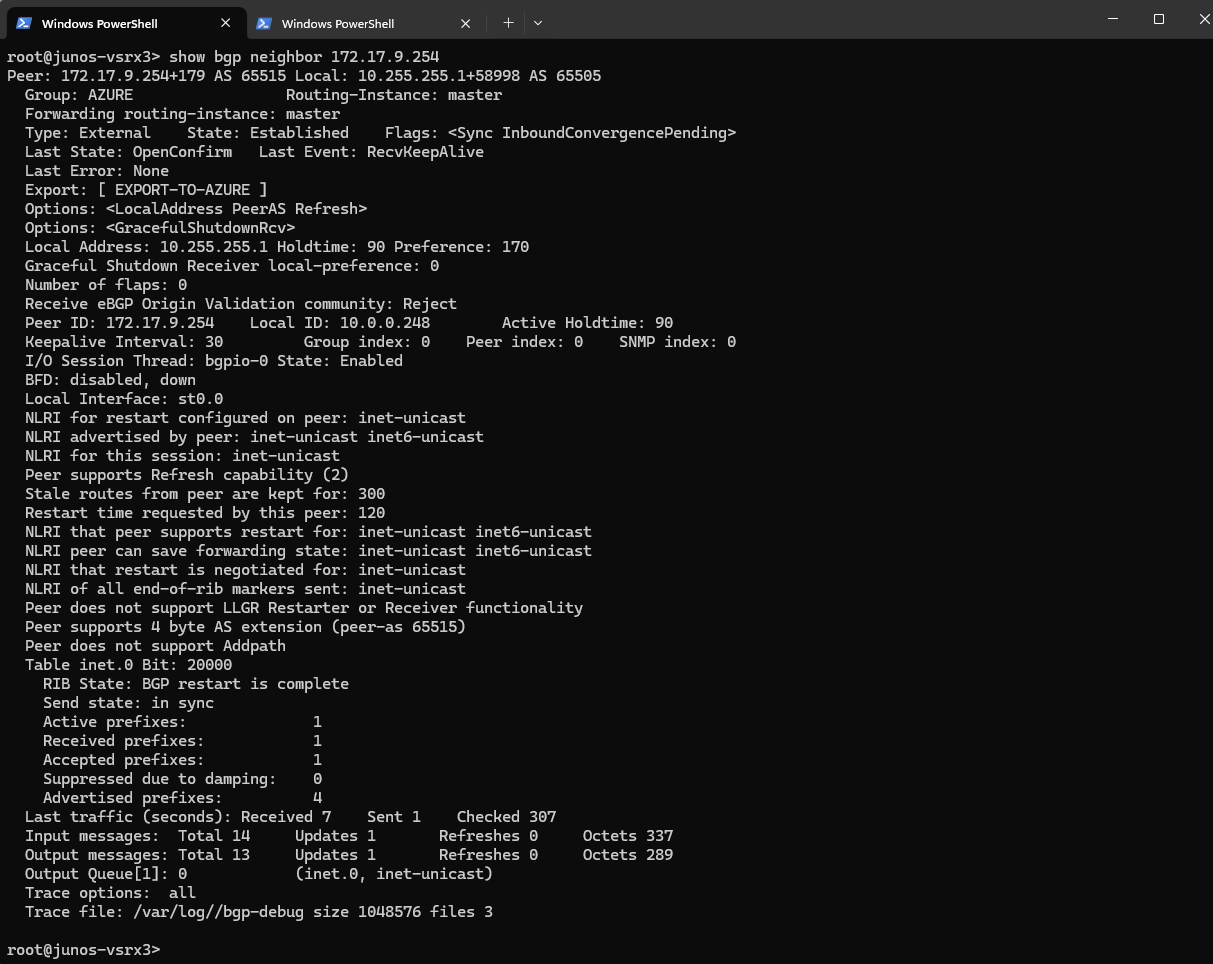
show bgp neighbor
This command displays detailed information about a BGP neighbor in Junos OS.
show bgp neighbor 172.17.9.254
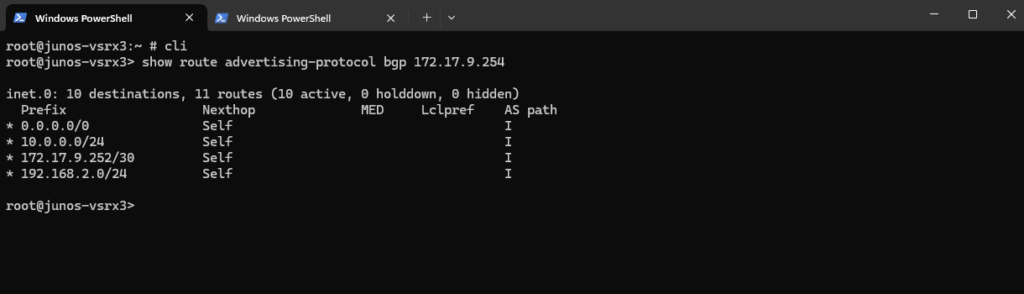
Show advertised Routes by Juniper to Azure
This command shows the routes that your Juniper device is advertising to the BGP peer at IP 172.17.9.254 (here the Azure VPN Gateway).
show route advertising-protocol bgp 172.17.9.254
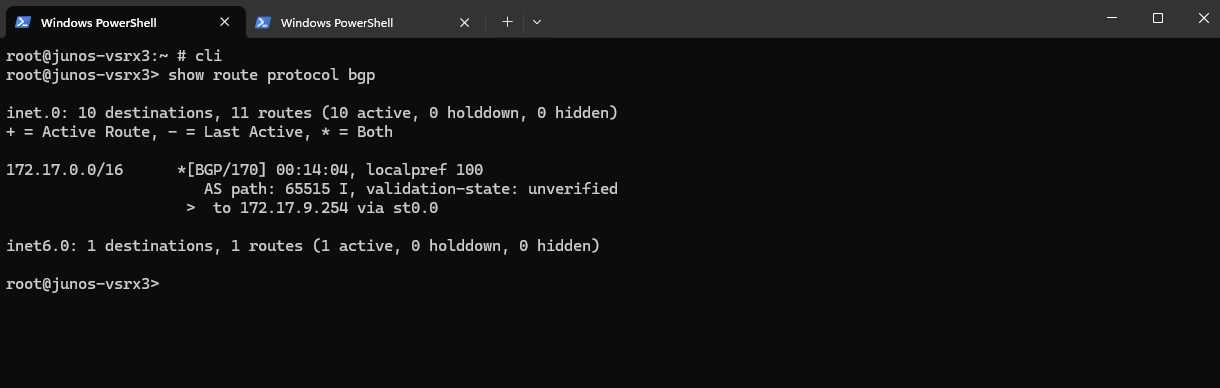
Show advertised Routes by Azure
This command displays all routes learned via BGP on your Juniper vSRX, meaning these are routes received from BGP peers (here from Azure).
show route protocol bgp
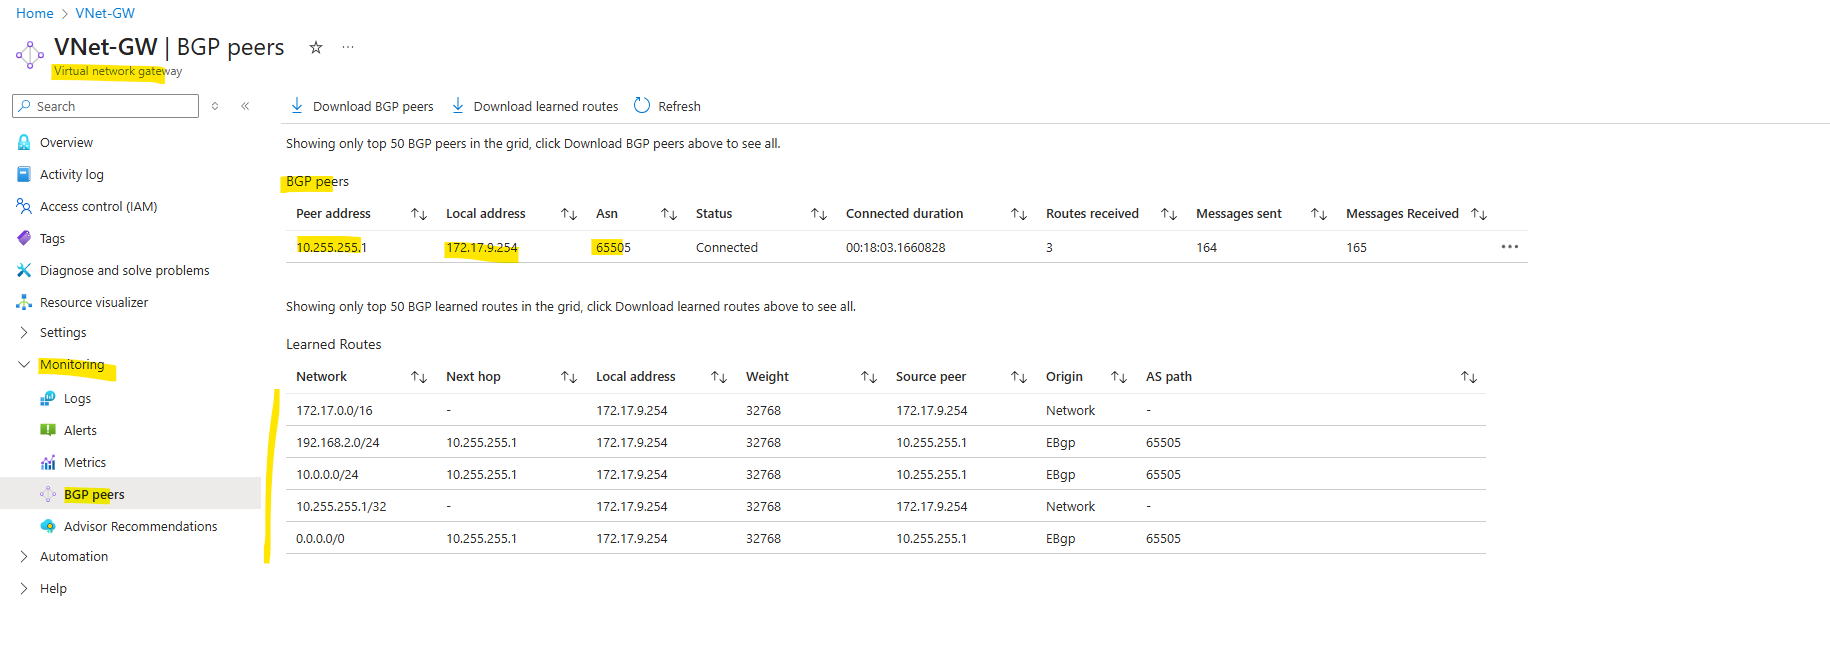
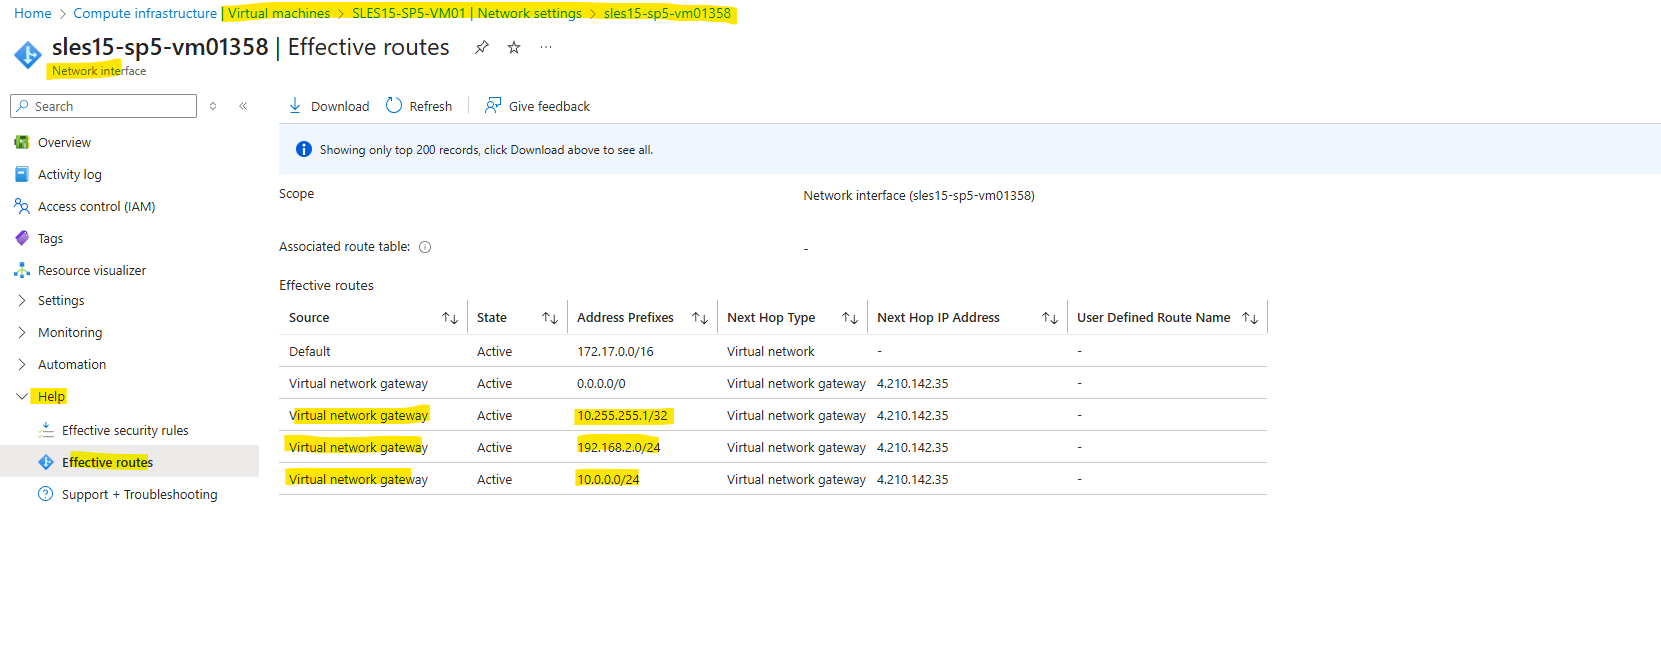
Show advertised Routes by Juniper using the Azure Portal
On the virtual network gateway under Monitoring -> BGP peers.
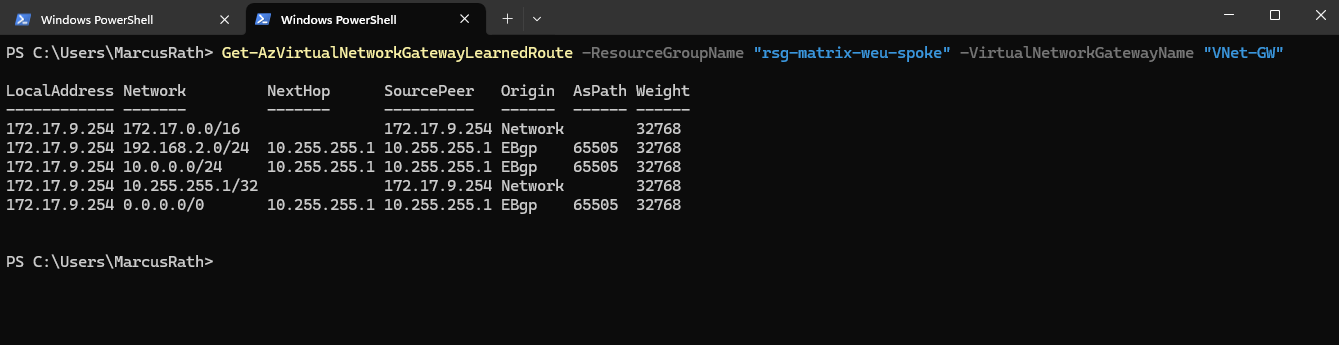
Here we will see all routes Azure learned including my two on-premise subnets (10.0.0.0/24 and 192.168.2.0/24 plus the host address of the BGP peer IP).
On the virtual machines Network interface -> Help -> Effective routes we will also see these advertised routes.
Or by using Azure PowerShell.
PS> Get-AzVirtualNetworkGatewayLearnedRoute -ResourceGroupName "rsg-matrix-weu-spoke" -VirtualNetworkGatewayName "VNet-GW"
Clear BGP session to reestablish it
To clear (reset) the BGP session with a specific neighbor on a Juniper vSRX device, use the following operational command.
This will tear down and re-establish the BGP session with the neighbor 172.17.9.254. Useful when you’ve made config changes or want to force re-advertisement of routes.
clear bgp neighbor 172.17.9.254
If you just want to refresh routing information without tearing down the session, use:
clear bgp neighbor 172.17.9.254 soft
Or the following command which lets routing information persist across a session reset without full disruption to the forwarding plane.
clear bgp neighbor 172.17.9.254 graceful
Troubleshooting
In case the BGP is not working as expected we can first enable BGP debug logging on Juniper and then using the monitor command to analyze the logs.
Enable BGP Debug Logging
set protocols bgp traceoptions file bgp-debug size 1m files 3
set protocols bgp traceoptions flag all
Start Debugging
monitor start bgp-debug
show log bgp-debug | last 50
Checking all active sessions where the destination port is TCP 179 (i.e., BGP sessions)
show security flow session destination-port 179
To monitor traffic on the st0.0 interface matching a specific host (e.g., 172.16.x.x), use this command:
monitor traffic interface st0.0 matching "host 172.16.x.x"
Links
BGP Configuration Overview
https://www.juniper.net/documentation/us/en/software/junos/bgp/topics/task/routing-protocol-bgp-security-configuring.htmlSRX Series Firewalls
https://www.juniper.net/us/en/products/security/srx-series.htmlJuniper vSRX Setup & Initial Configuration Guide
https://journey2theccie.wordpress.com/2021/02/04/juniper-vsrx-setup-initial-configuration-guide/