Mastering Nested Junction Paths: Qtrees and Export Policies in NetApp Cloud Volumes ONTAP (CVO)
When managing complex enterprise workloads in Azure, a one-size-fits-all approach to storage permissions rarely cuts it.
While volumes are the primary unit of storage in Cloud Volumes ONTAP, Qtrees provide a secondary layer of granularity that is essential for both organization and security.
It is important to note that while we are exploring this within Azure, these concepts are not CVO-specific; they represent the core power of NetApp ONTAP in general, whether running in the cloud or on-premises.
In this post, we’re diving into the mechanics of Qtree-level Export Policies, exploring how to ‘nest’ permissions to create secure, multi-tenant environments within a single Azure-backed volume.
Navigating the Hierarchy: Multi-Layered Security with Nested Volume Junctions
Before diving into qtrees, it is essential to understand how ONTAP evaluates access through a series of nested volume junction paths.
In this setup, each volume acts as an independent security gate, requiring a “Permit” from every export policy in the hierarchy, from the root of the SVM down to the deepest child volume, before a client can successfully traverse the path.
Creating the Volumes
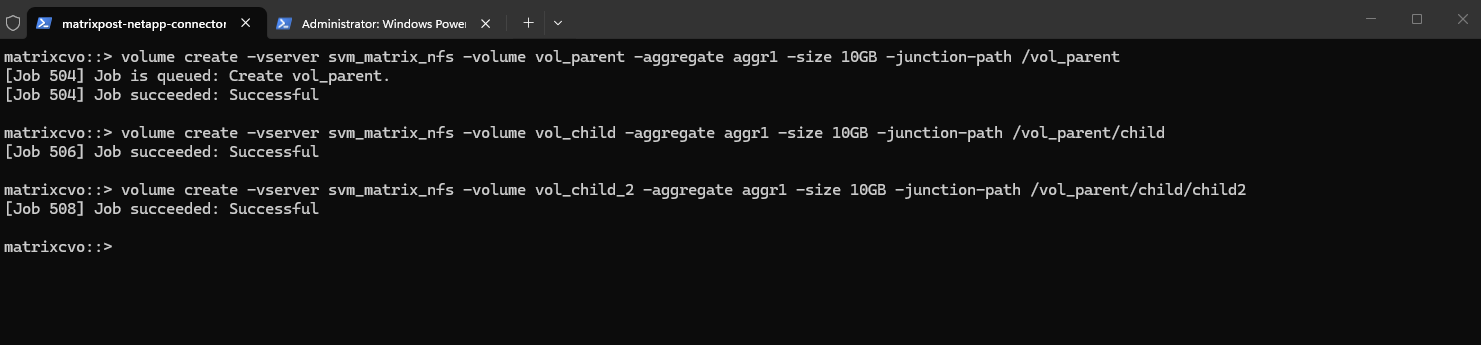
First create the “Parent” Volume.
matrixcvo::> volume create -vserver svm_matrix_nfs -volume vol_parent -aggregate aggr1 -size 10GB -junction-path /vol_parent
Next create the “Child” Volume (The middle layer).
Instead of a Qtree, create this as a volume and mount it inside the parent’s path.
matrixcvo::> volume create -vserver svm_matrix_nfs -volume vol_child -aggregate aggr1 -size 10GB -junction-path /vol_parent/child
And finally create the “Child2” Volume (The deep layer).
Mount this one inside the “child” path.
matrixcvo::> volume create -vserver svm_matrix_nfs -volume vol_child_2 -aggregate aggr1 -size 10GB -junction-path /vol_parent/child/child2
Creating the Export Policies and Rules
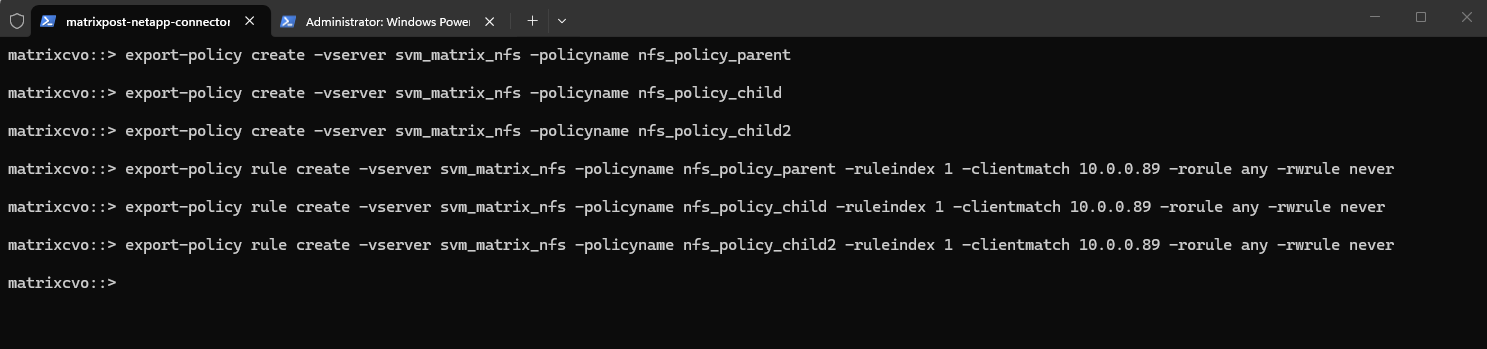
Now we create for each of the new three volumes a dedicated export policy.
# For the parent volume
matrixcvo::> export-policy create -vserver svm_matrix_nfs -policyname nfs_policy_parent

# For the first child volume
matrixcvo::> export-policy create -vserver svm_matrix_nfs -policyname nfs_policy_child

# For the second child volume
matrixcvo::> export-policy create -vserver svm_matrix_nfs -policyname nfs_policy_child2

We also create a export policy rule for each of the three export policies.
# Export policy rule for the first parent volume export policy
matrixcvo::> export-policy rule create -vserver svm_matrix_nfs -policyname nfs_policy_parent -ruleindex 1 -clientmatch 10.0.0.89 -rorule any -rwrule never

# Export policy rule for the first child volume export policy
matrixcvo::> export-policy rule create -vserver svm_matrix_nfs -policyname nfs_policy_child -ruleindex 1 -clientmatch 10.0.0.89 -rorule any -rwrule never

# Export policy rule for the second child volume export policy
matrixcvo::> export-policy rule create -vserver svm_matrix_nfs -policyname nfs_policy_child2 -ruleindex 1 -clientmatch 10.0.0.89 -rorule any -rwrule never
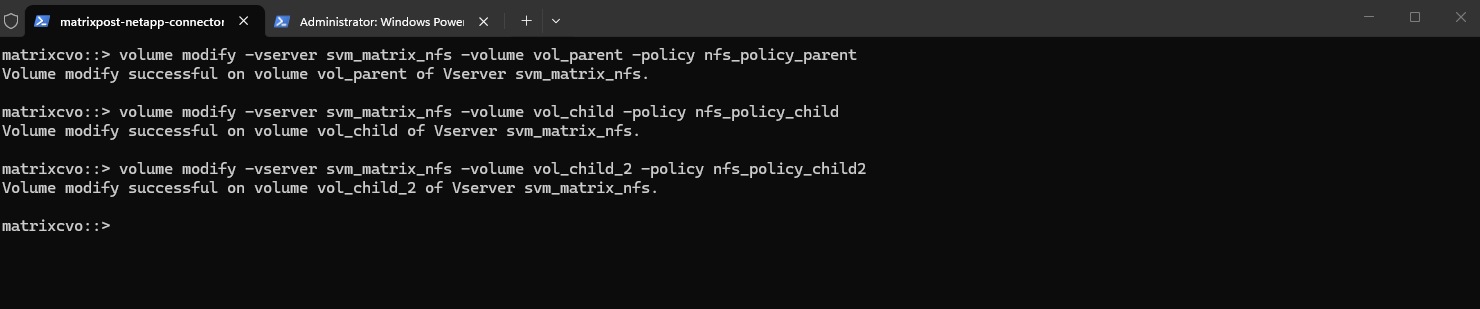
Finally we need to apply the export policies to our new three volumes.
# applying the parent policy to the parent volume
matrixcvo::> volume modify -vserver svm_matrix_nfs -volume vol_parent -policy nfs_policy_parent

# applying the first child policy to the first child volume
matrixcvo::> volume modify -vserver svm_matrix_nfs -volume vol_child -policy nfs_policy_child

# applying the second child policy to the second child volume
matrixcvo::> volume modify -vserver svm_matrix_nfs -volume vol_child_2 -policy nfs_policy_child2
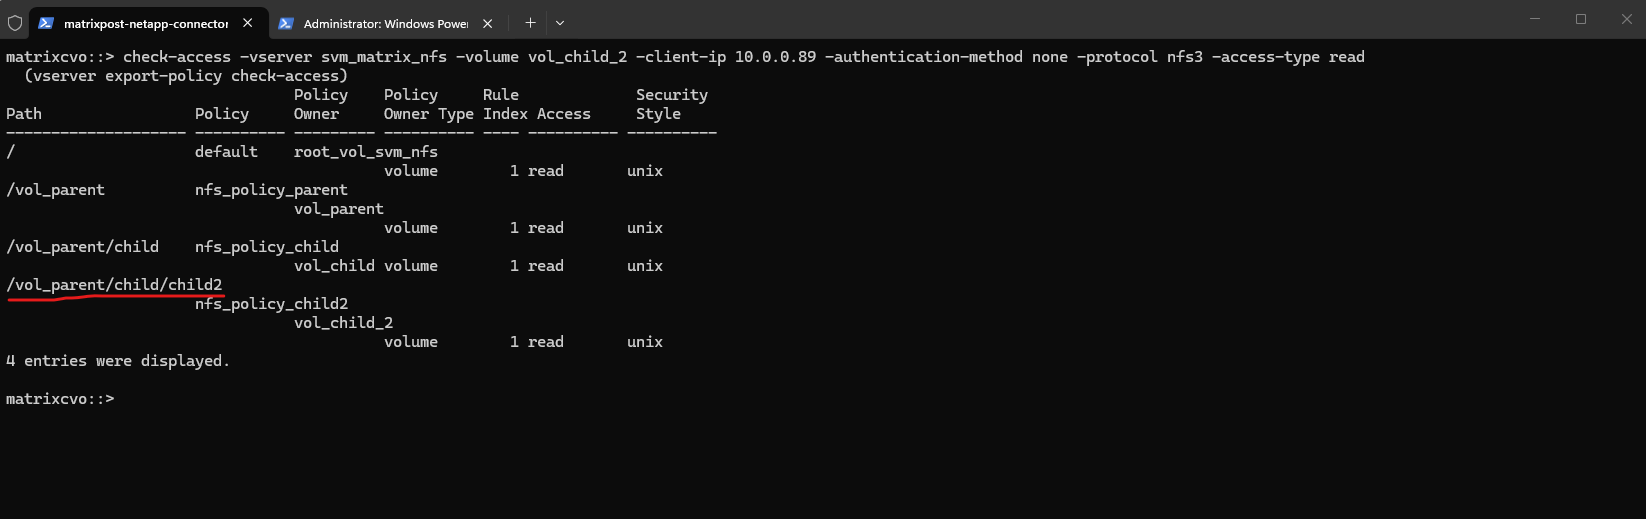
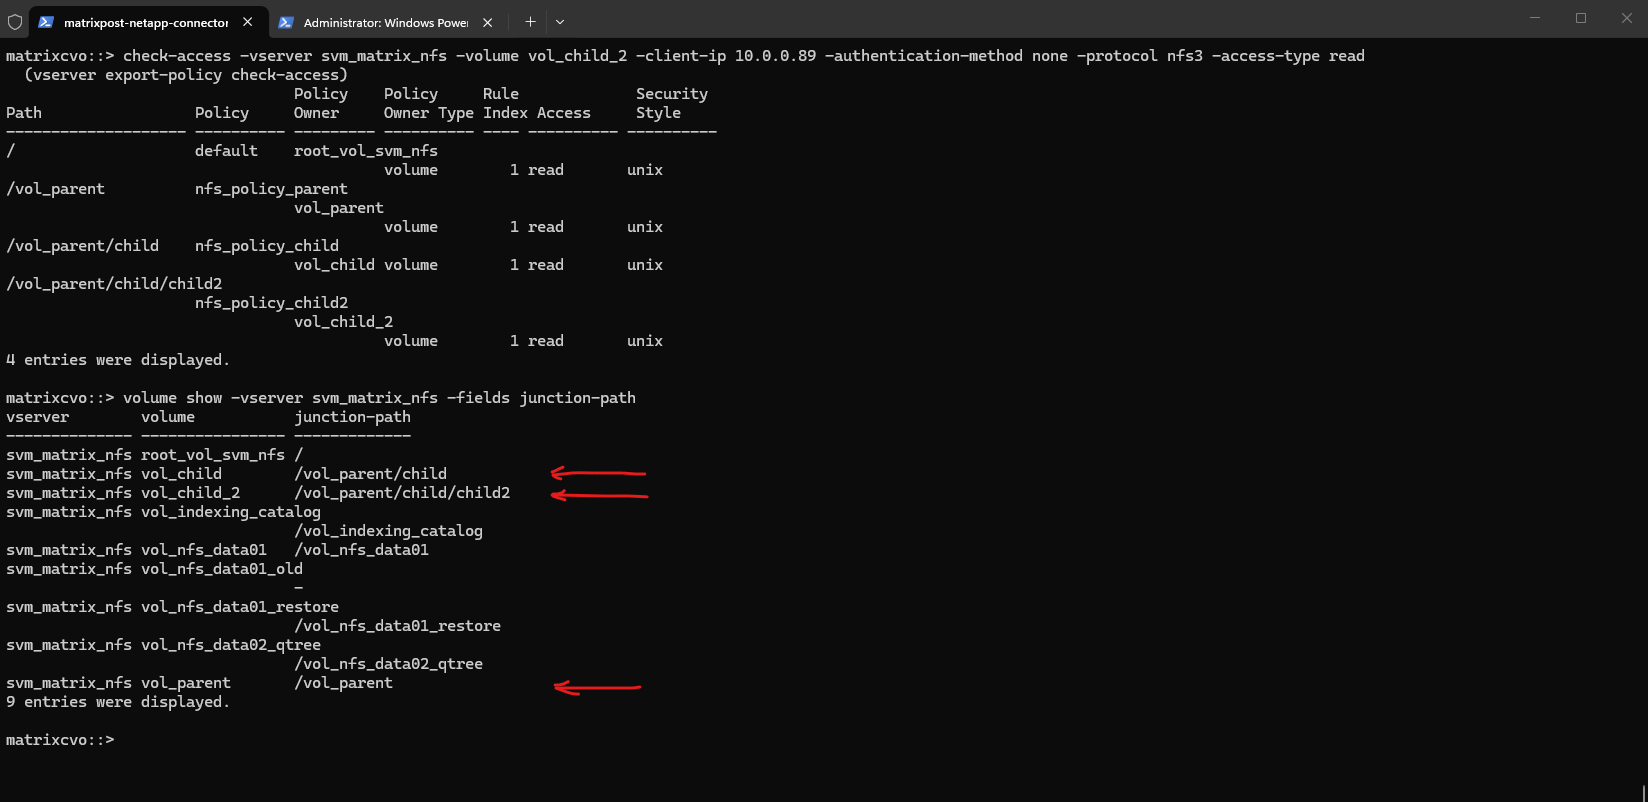
We can now use the check-access command to validate the end-to-end permissions for our nested volume, vol_child_2, ensuring that every security boundary in the path is correctly configured.
This output illustrates the “walking” of the junction path, where ONTAP verifies that the client at
10.0.0.89has the necessary rights to traverse each volume layer before reaching the final destination.So far I just have assigned read permission on each export policy rule for the client with the IP 10.0.0.89.
While the output visually resembles a standard directory structure with inherited permissions, it actually represents four distinct volumes linked together through nested junction paths.
Each entry in the list, from the SVM root down to
vol_child_2, is a separate storage entity with its own independent export policy, requiring the client to successfully “hop” through each volume’s security gate to reach the data.
matrixcvo::> check-access -vserver svm_matrix_nfs -volume vol_child_2 -client-ip 10.0.0.89 -authentication-method none -protocol nfs3 -access-type read
The
volume showoutput confirms the structural “magic” behind the previous access check, revealing thatvol_childandvol_child_2are physically independent volumes mounted at nested mount points within the/vol_parenthierarchy.By defining the junction-path of one volume as a sub-directory of another, you create a seamless unified namespace for the client while retaining the ability to manage each volume’s snapshot schedule, tiering policy, and export rules individually.
matrixcvo::> volume show -vserver svm_matrix_nfs -fields junction-path
Granular Authority: Overriding Volume Security with Qtree-Level Export Policies
Building on the nested volume structure, we can introduce an even finer layer of control by implementing Qtree-level export policies.
This allows us to define specific access rules for sub-directories within a volume, effectively allowing a Qtree to “own” its security and override the policy of its parent volume for any client reaching that specific logical boundary.
Creating the Qtrees
By creating a Qtree within each of those specific volumes, we can now see how ONTAP manages security at the “micro” level (Qtree) inside each “macro” level (Volume) of our nested path.
# creating the parent Qtree
matrixcvo::> volume qtree create -vserver svm_matrix_nfs -volume vol_parent -qtree q_parent

# creating the first child Qtree
matrixcvo::> volume qtree create -vserver svm_matrix_nfs -volume vol_child -qtree q_child

# creating the second child Qtree
matrixcvo::> volume qtree create -vserver svm_matrix_nfs -volume vol_child_2 -qtree q_child_2

Creating the Export Policies and Rules
We now create and assign dedicated Qtree policies for our newly created Qtrees.
This allows us to show an even more complex check-access output, where we have both volume owners and Qtree owners in the same path.
matrixcvo::> export-policy create -vserver svm_matrix_nfs -policyname policy_q_parent
matrixcvo::> export-policy create -vserver svm_matrix_nfs -policyname policy_q_child
matrixcvo::> export-policy create -vserver svm_matrix_nfs -policyname policy_q_child2

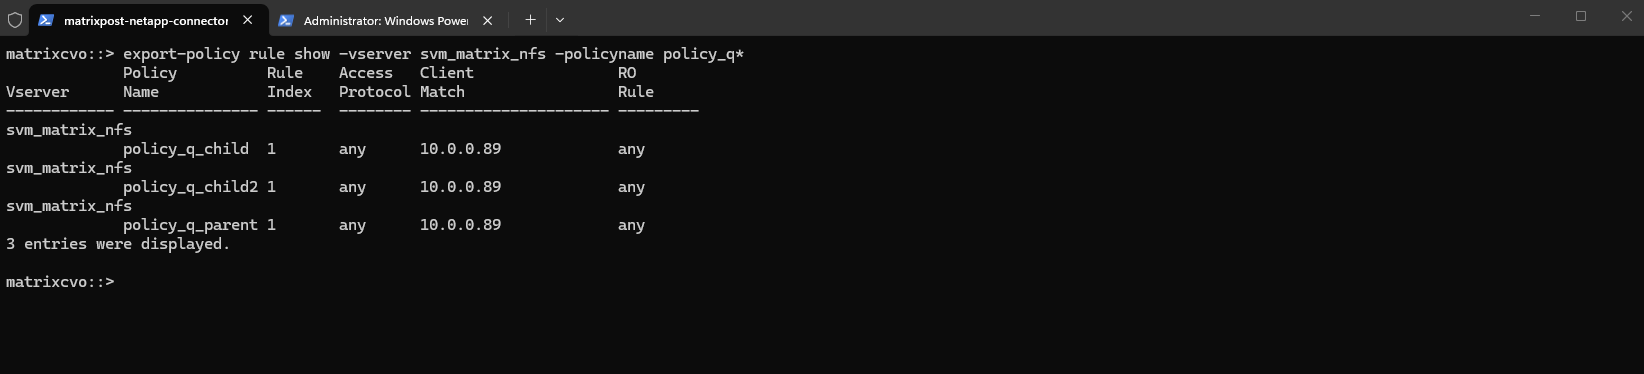
We also create a rule for each policy, so far just read permissions for the client with the IP 10.0.0.89.
matrixcvo::> export-policy rule create -vserver svm_matrix_nfs -policyname policy_q_parent -ruleindex 1 -clientmatch 10.0.0.89 -rorule any -rwrule none
matrixcvo::> export-policy rule create -vserver svm_matrix_nfs -policyname policy_q_child -ruleindex 1 -clientmatch 10.0.0.89 -rorule any -rwrule none
matrixcvo::> export-policy rule create -vserver svm_matrix_nfs -policyname policy_q_child2 -ruleindex 1 -clientmatch 10.0.0.89 -rorule any -rwrule none

# verify
matrixcvo::> export-policy rule show -vserver svm_matrix_nfs -policyname policy_q*
Next we need to apply the policies to the Qtrees.
matrixcvo::> volume qtree modify -vserver svm_matrix_nfs -volume vol_parent -qtree q_parent -export-policy policy_q_parent
matrixcvo::> volume qtree modify -vserver svm_matrix_nfs -volume vol_child -qtree q_child -export-policy policy_q_child
matrixcvo::> volume qtree modify -vserver svm_matrix_nfs -volume vol_child_2 -qtree q_child_2 -export-policy policy_q_child2

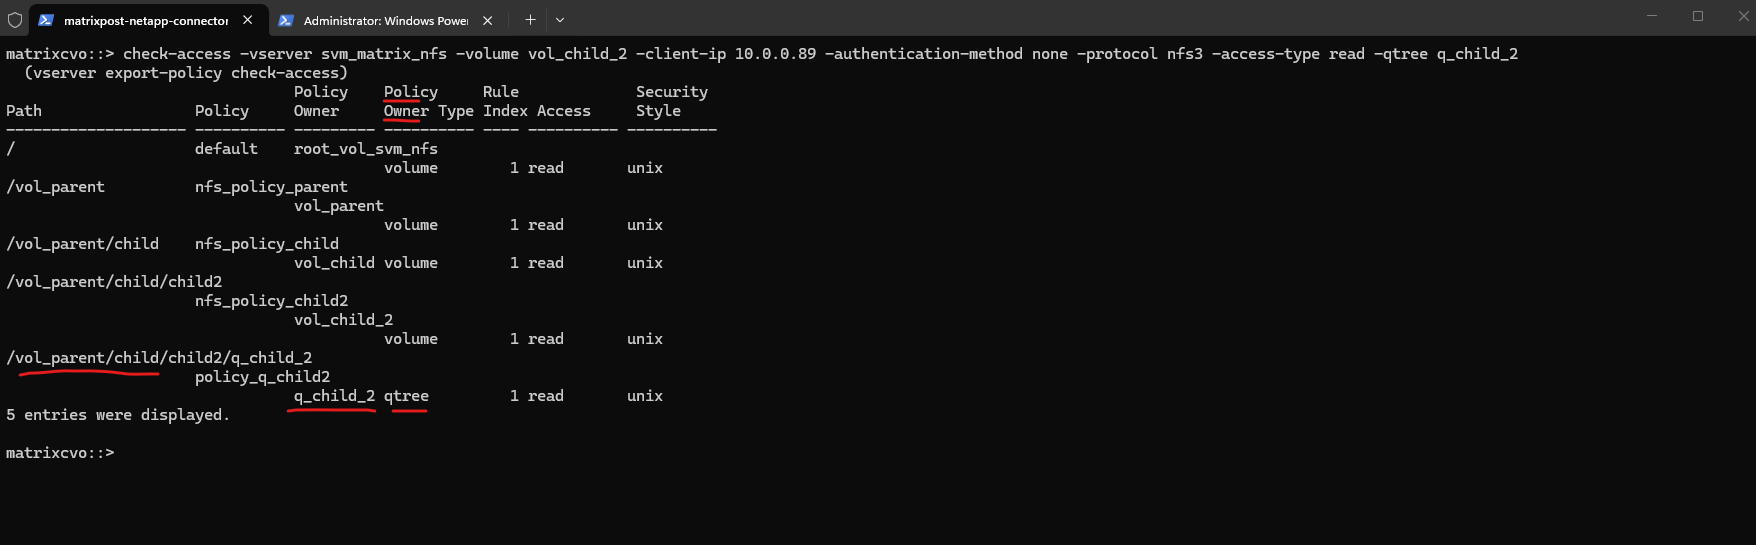
When we run the check against the deepest path, our output will now show the transition from Volume security to Qtree security at every level.
In this ultimate visibility test, we see the true power of ONTAP’s Export Policy engine. By nesting volumes and then applying a Qtree-level policy at the destination, we’ve created a multi-tenant security model.
The client at
10.0.0.89is validated at every hop. This architecture is ideal for Enterprise Data Lakes or Shared Services environments where you might need general access to a parent volume for a department, but restricted, audit-ready access to a specific Sensitive Data Qtree or Secure Project folder nested within it.”
matrixcvo::> check-access -vserver svm_matrix_nfs -volume vol_child_2 -client-ip 10.0.0.89 -authentication-method none -protocol nfs3 -access-type read -qtree q_child_2
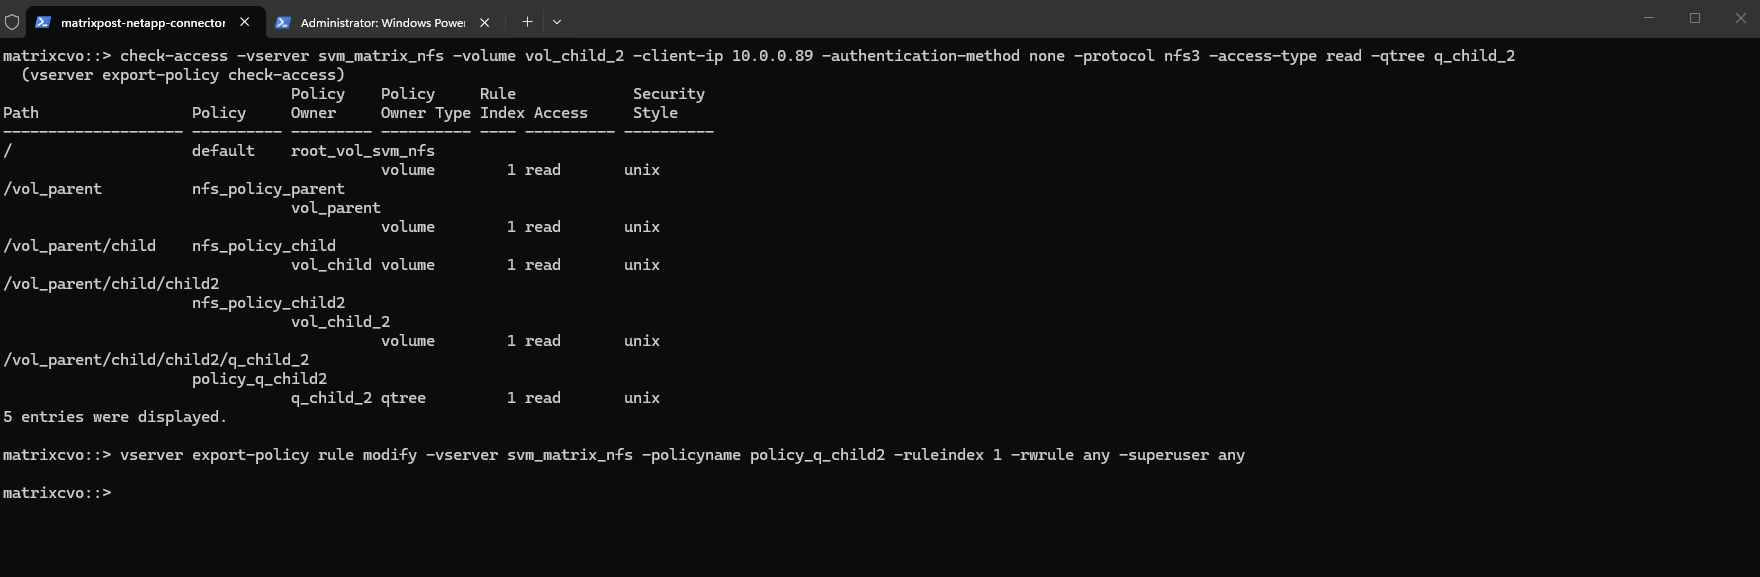
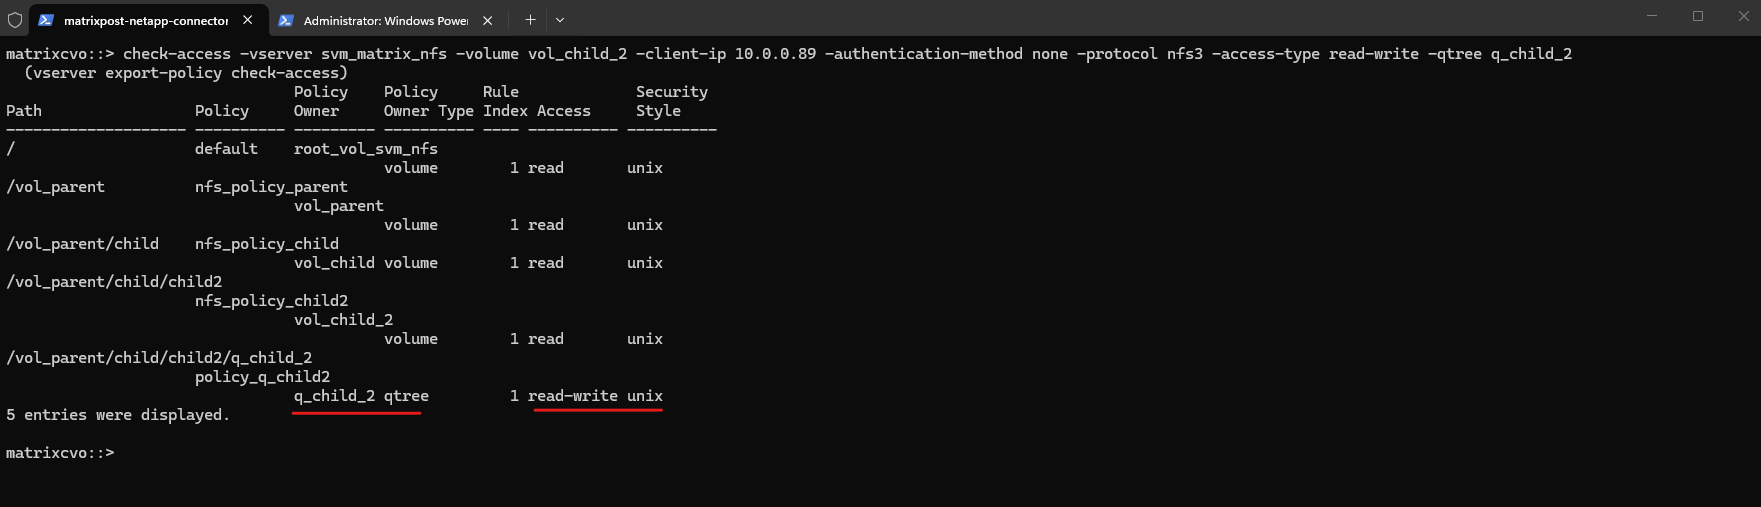
To finalize the configuration, we are modifying the rule for policy_q_child2 to grant full write and superuser privileges specifically at the deepest level of our path.
This demonstrates how you can maintain a “Read-Only” stance for the transit volumes while opening “Read-Write” access only when the client reaches the designated qtree destination.
matrixcvo::> vserver export-policy rule modify -vserver svm_matrix_nfs -policyname policy_q_child2 -ruleindex 1 -rwrule any -superuser any
From Policy to Production: Validating the Nested Qtree Mount
With the infrastructure in place, it’s time to move from the ONTAP CLI to the client side. By mounting the deepest Qtree in our hierarchy and performing a write test, we can verify that the multi-layered security gates we’ve built, and the protocol adjustments we made, provide the exact access our enterprise environment requires.
By mounting the specific path directly on the SLES host, we see the seamless integration of ONTAP’s nested architecture, where the client treats the deep junction-path as a single, standard NFS mount point.
The
df -hToutput confirms that the host correctly identifies the 10GB volume (vol_child_2) and its associated Qtree, providing the user with a transparent view of the storage despite the complex multi-layered export policies protecting it.
SLES15-SP6-Testing01:~ # mount -t nfs 172.18.10.54:/vol_parent/child/child2/q_child_2/ /child2/
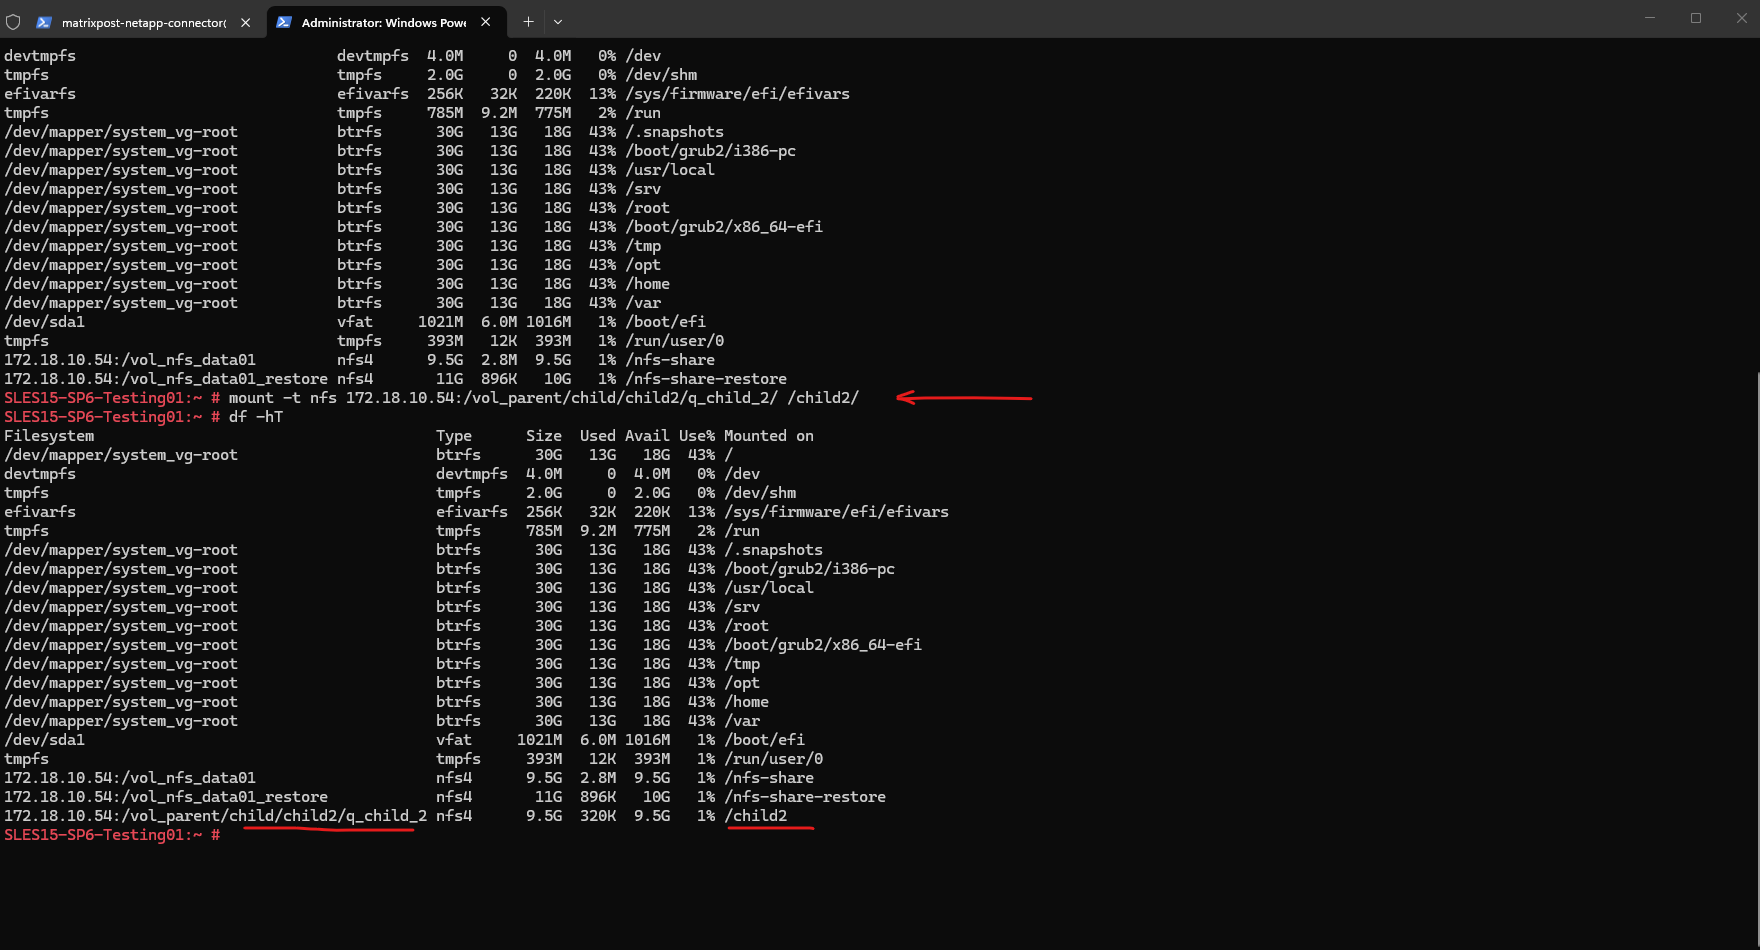
In my case I will first run into an Permission denied error as shown below when trying to write on the volume.
SLES15-SP6-Testing01:/child2 # touch testfile1

The export policy will already allow read-write access on the mounted Qtree.
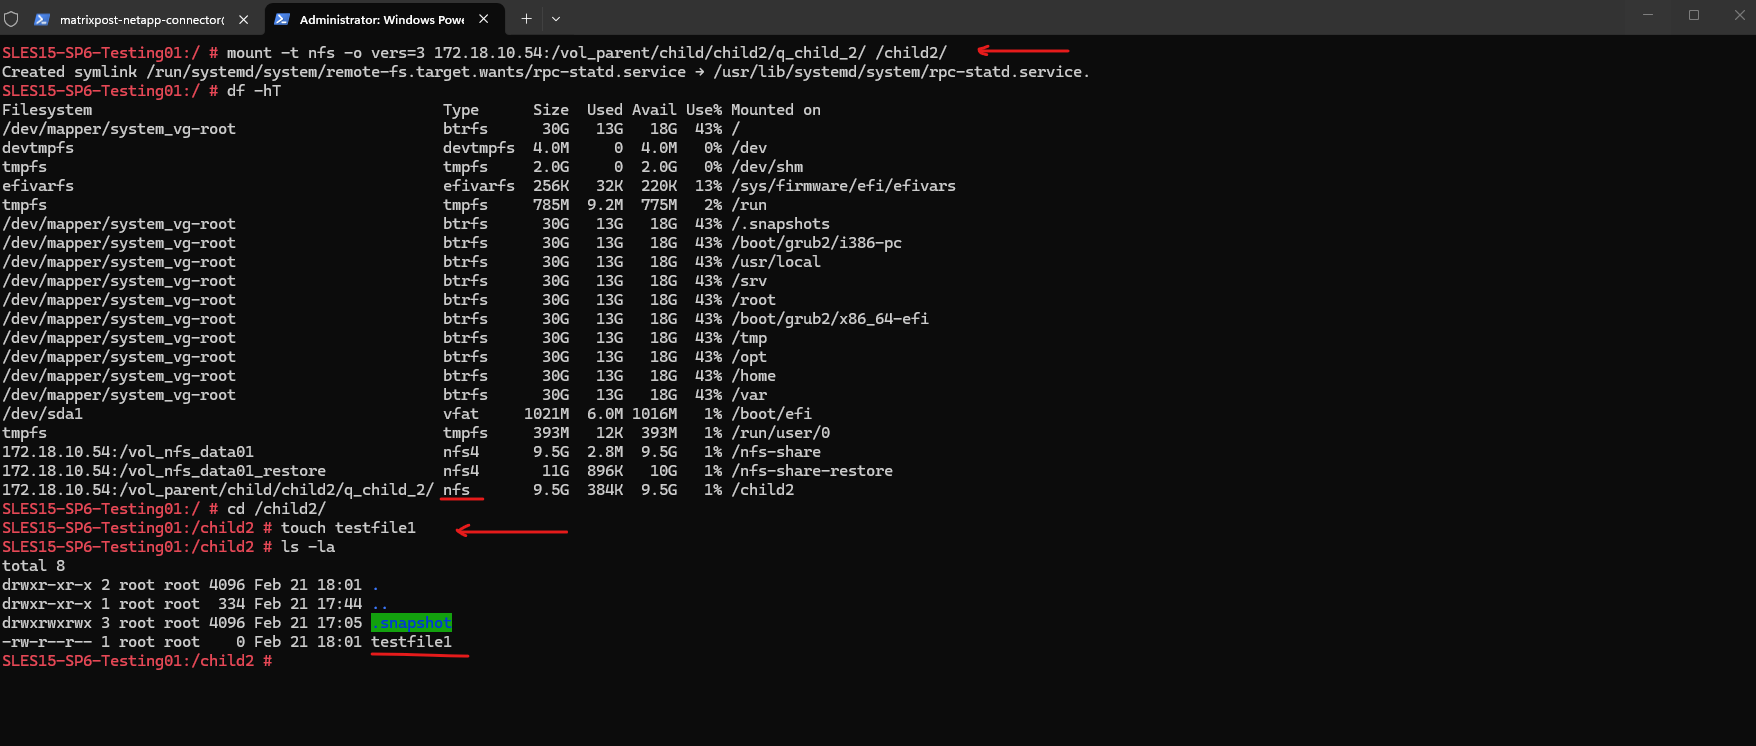
To wrap things up, the Permission Denied error was ultimately caused by the Qtree being mounted as NFSv4 by default, which triggered ID mapping issues.
Once we forced the mount to NFSv3, the client correctly identified the root user, proving that our multi-layered export policy and nested junction path configuration were working perfectly.
matrixcvo::> check-access -vserver svm_matrix_nfs -volume vol_child_2 -client-ip 10.0.0.89 -authentication-method none -protocol nfs3 -access-type read-write -qtree q_child_2
I will now mount the Qtree by using NFSv3.
Even when the Export Policy grants read-write access, NFSv4’s default ID mapping can result in ‘Permission Denied’ if the client and SVM don’t agree on user identity, often manifesting as
nobody:nobodyownership.To bypass this for testing, forcing the mount to NFSv3 confirms that the Export Policy is working correctly by relying on direct UID/GID validation.
SLES15-SP6-Testing01:/ # mount -t nfs -o vers=3 172.18.10.54:/vol_parent/child/child2/q_child_2/ /child2/
While forcing an NFSv3 mount solved our immediate “Permission Denied” issue, it is important to note that the complex user mapping required for NFSv4 can also be fully configured within ONTAP, a deep-dive topic I will be covering in a future post.
Links
Volumes, qtrees, files, and LUNs
https://docs.netapp.com/us-en/ontap/concepts/volumes-qtrees-files-luns-concept.htmlCreate an ONTAP NFS export policy
https://docs.netapp.com/us-en/ontap/nfs-config/create-export-policy-task.html