Protecting On-Prem ONTAP with NetApp Console Backup and Recovery
Once an on-premises ONTAP system is connected to the NetApp Console, additional cloud services can be enabled for the cluster.
One of these services is Backup and Recovery, which allows ONTAP volumes to be backed up to object storage for long-term protection and disaster recovery. In my case, the backups are stored in Azure object storage.
In this post, I’ll show how to enable Backup and Recovery for an on-premises ONTAP system and configure the first backup policy.
About bringing ONTAP On-Prem into NetApp Console, you can also read my following post.
About setting up Backup and Recovery for Cloud Volume ONTAP (CVO), you can read my following post.
Prerequisite: Configuring Azure Credentials for Backup and Recovery
First we need to enable Backup and Recovery in the NetApp Console (formerly BlueXP) to establish a comprehensive data protection strategy for our on-premises ONTAP (in my case just a simulator) system.
We configure local Snapshot copies for fast, space-efficient restores and define backup policies to object storage for long-term retention and protection against data loss.
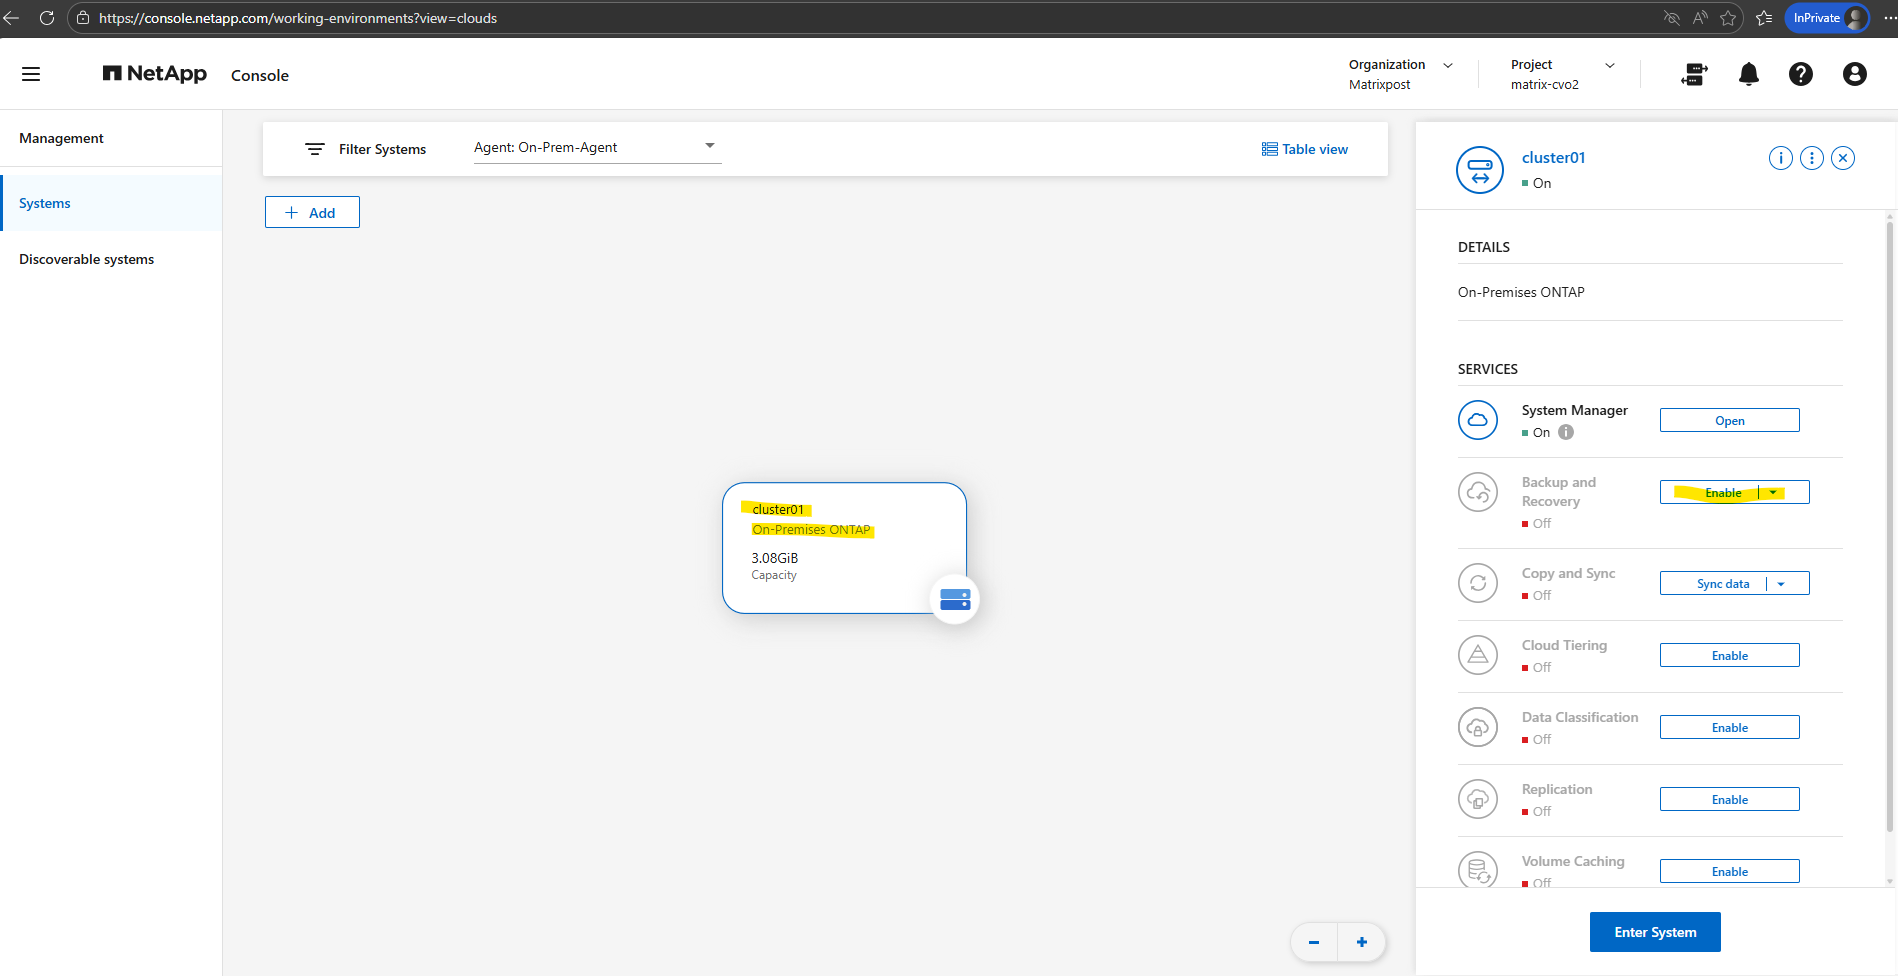
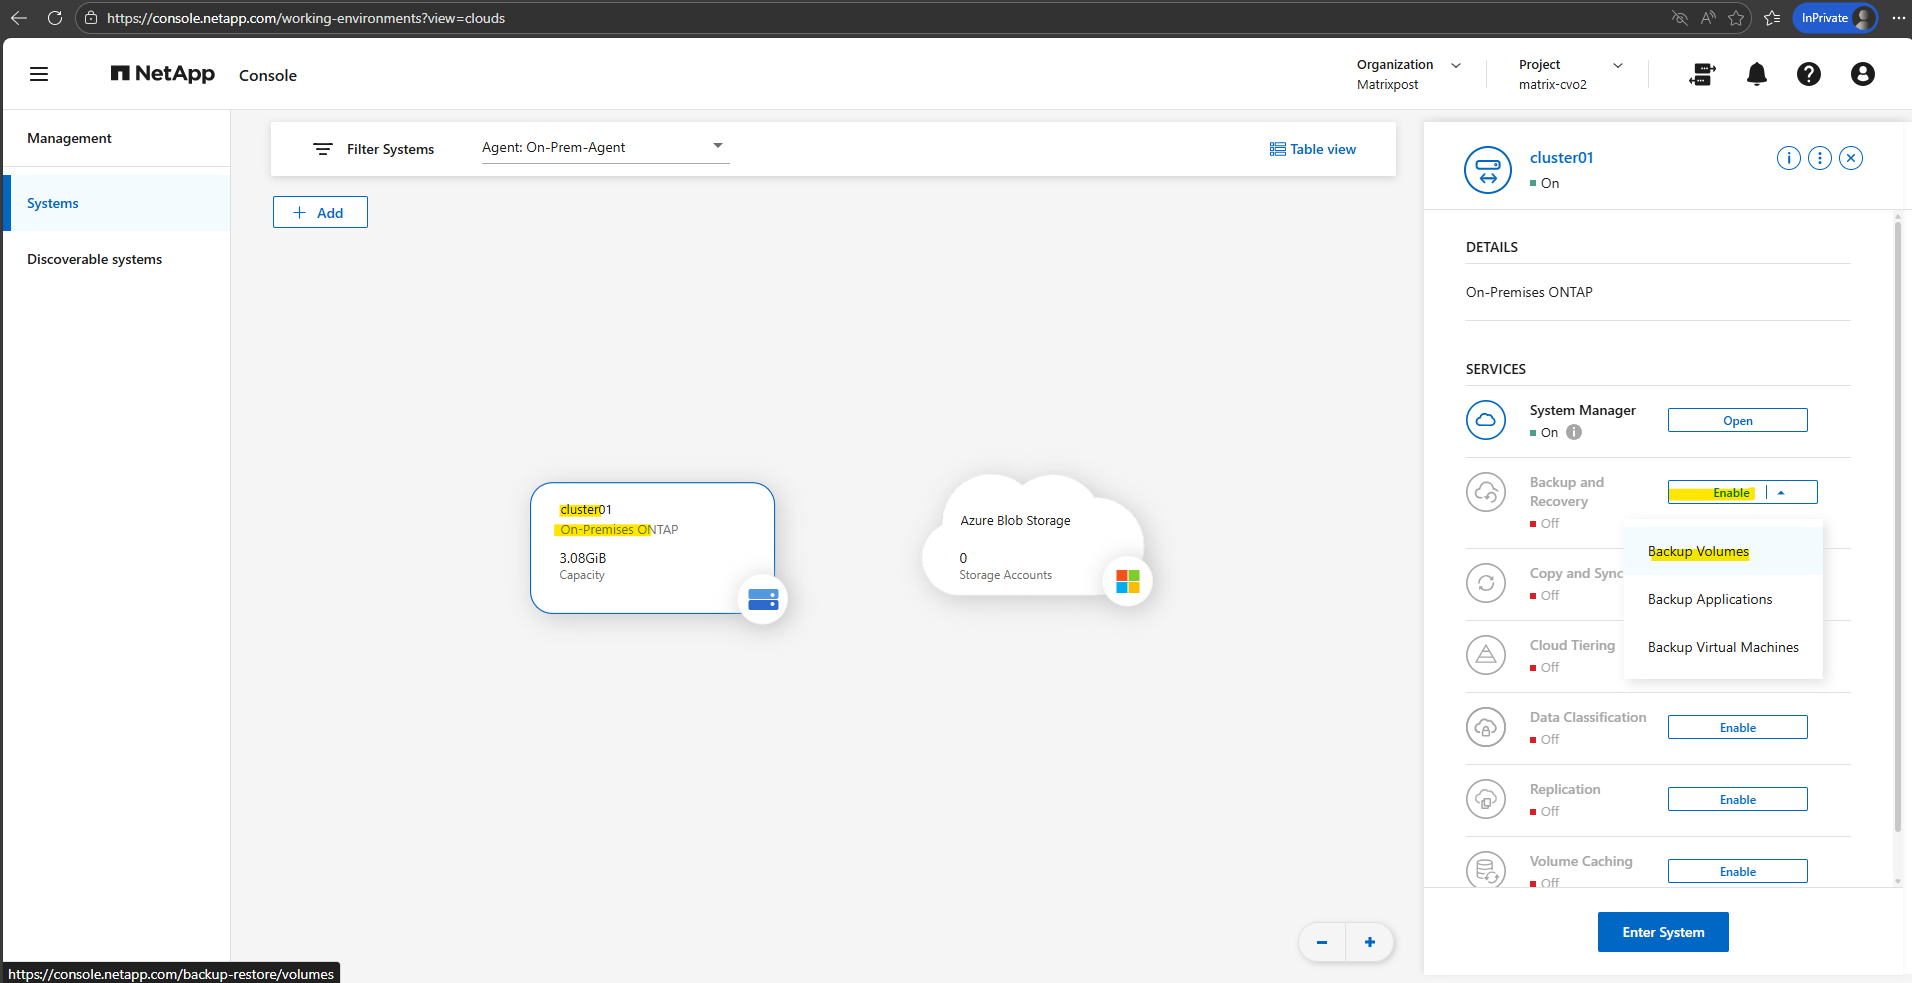
In the NetApp console navigate to Storage -> Management, select the OnPrem ONTAP system you want to enable Backup and Recovery and on the shown up right bar click on Enable for Backup and Recovery as shown below.
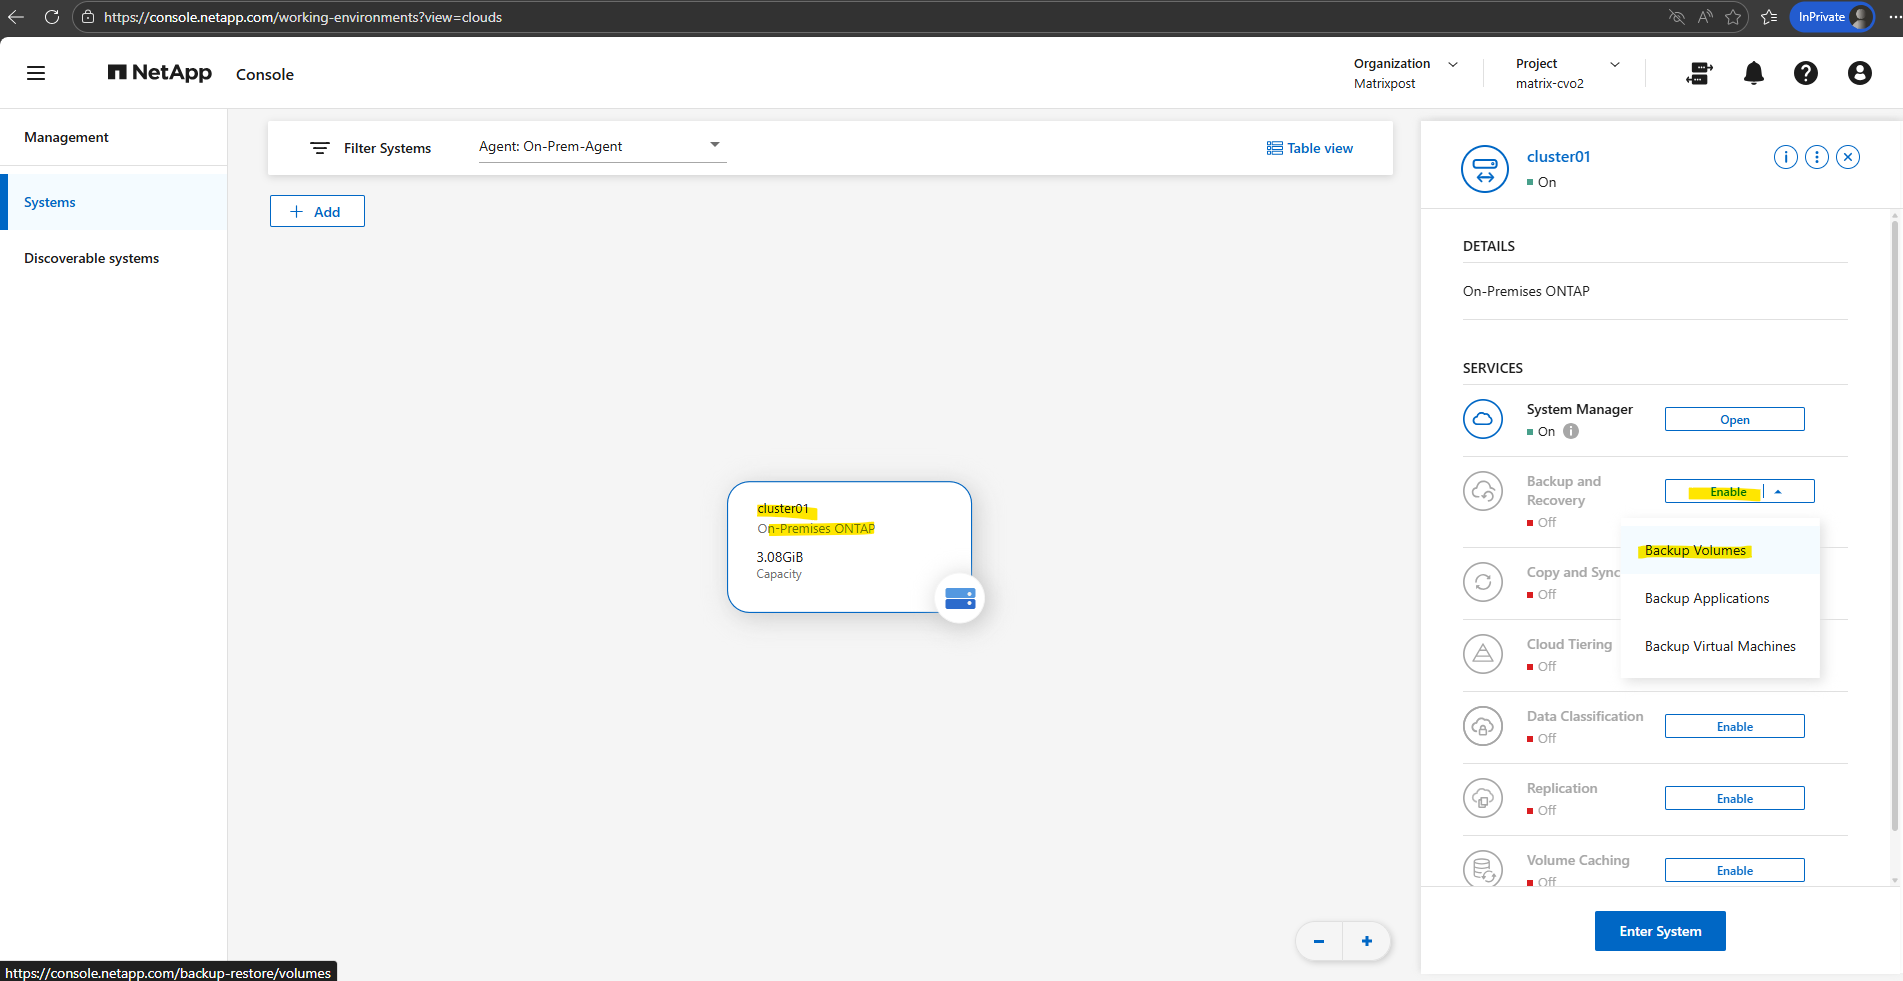
Select Backup Volumes.
Backup and Recovery in the NetApp Console is not limited to protecting individual ONTAP volumes. The service also supports protecting applications and virtual machines, enabling consistent backups for workloads such as databases or VM environments in addition to standard volume-level protection.
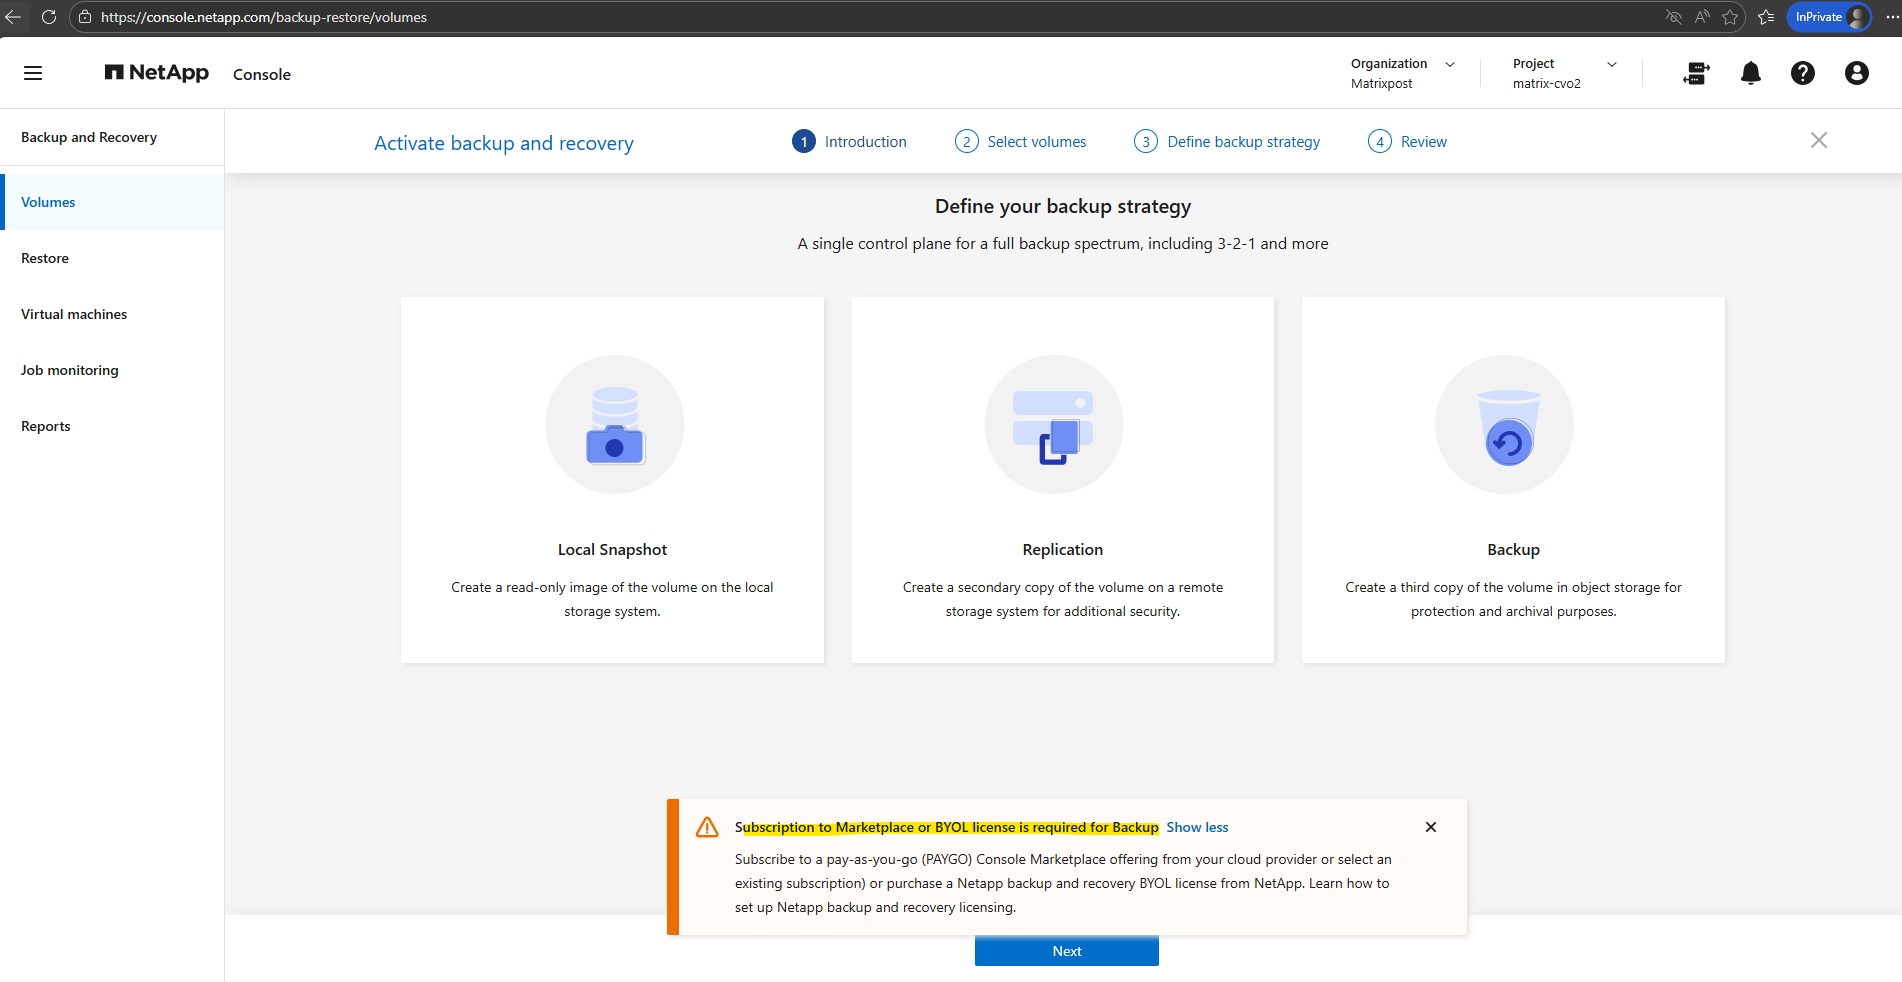
During the initial configuration, the wizard returned the error shown below. This occurred because no Azure credentials were configured yet, so the on-premise Console Agent was unable to access the Azure subscription.
Before continuing with the Backup and Recovery setup, these Azure credentials must first be configured in the NetApp Console. This allows the on-prem Console Agent to authenticate with Azure and access the required subscription and resources.
Subscribe to a pay-as-you-go (PAYGO) Console Marketplace offering from your cloud provider or select an existing subscription) or purchase a Netapp backup and recovery BYOL license from NetApp.
Configuring the Microsoft Entra ID App Registration and Custom Role
Before the NetApp Console Agent can interact with Azure resources, an App Registration (Service Principal) must be created in Microsoft Entra ID. In addition, a custom Azure role with the required permissions must be assigned so the Agent can access and manage the resources needed for Backup and Recovery.
When the Console agent is installed on-premises like in our case, we need to provide the Console agent with Azure permissions by setting up a service principal in Microsoft Entra ID and obtaining the Azure credentials that the Console agent needs.
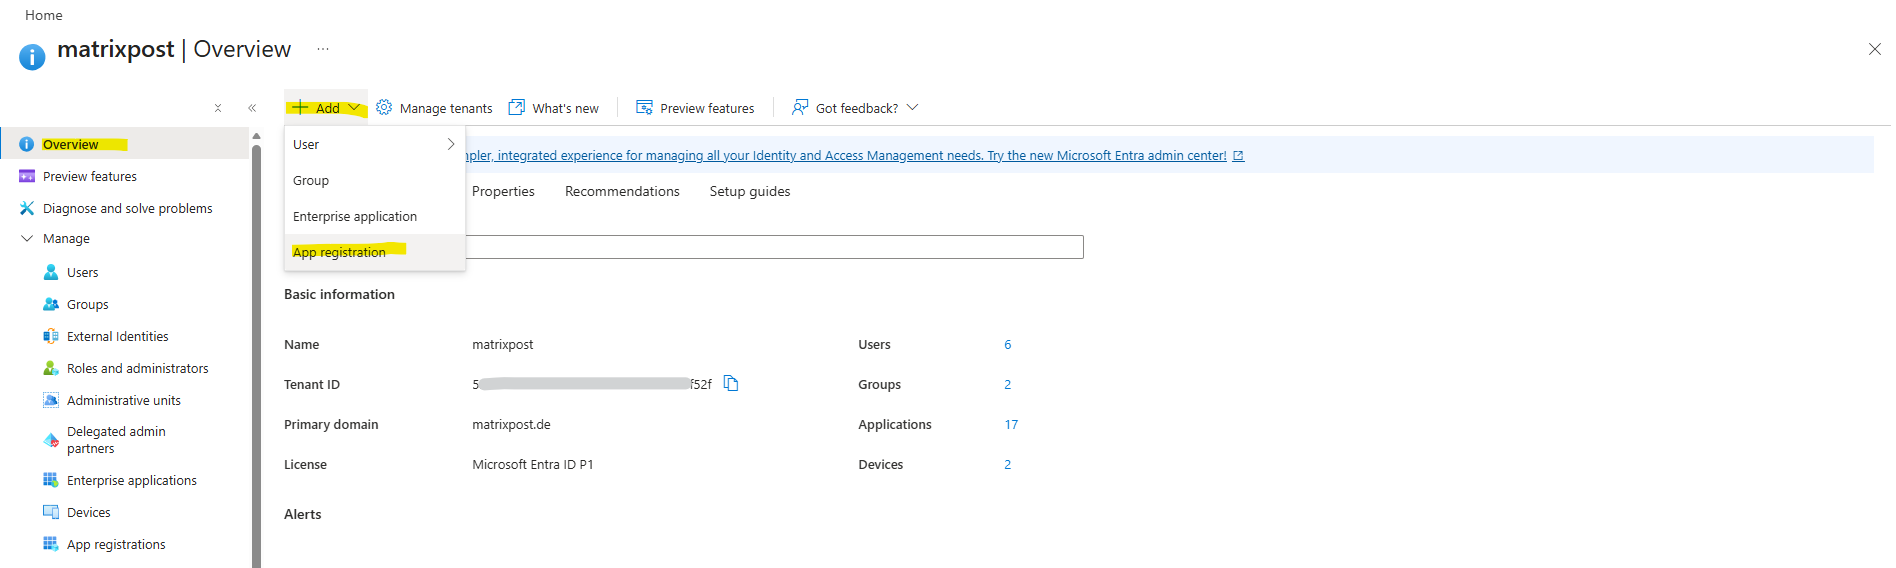
From the Azure portal, open the Microsoft Entra ID service. In the menu, select App registrations and there click on + New registration.
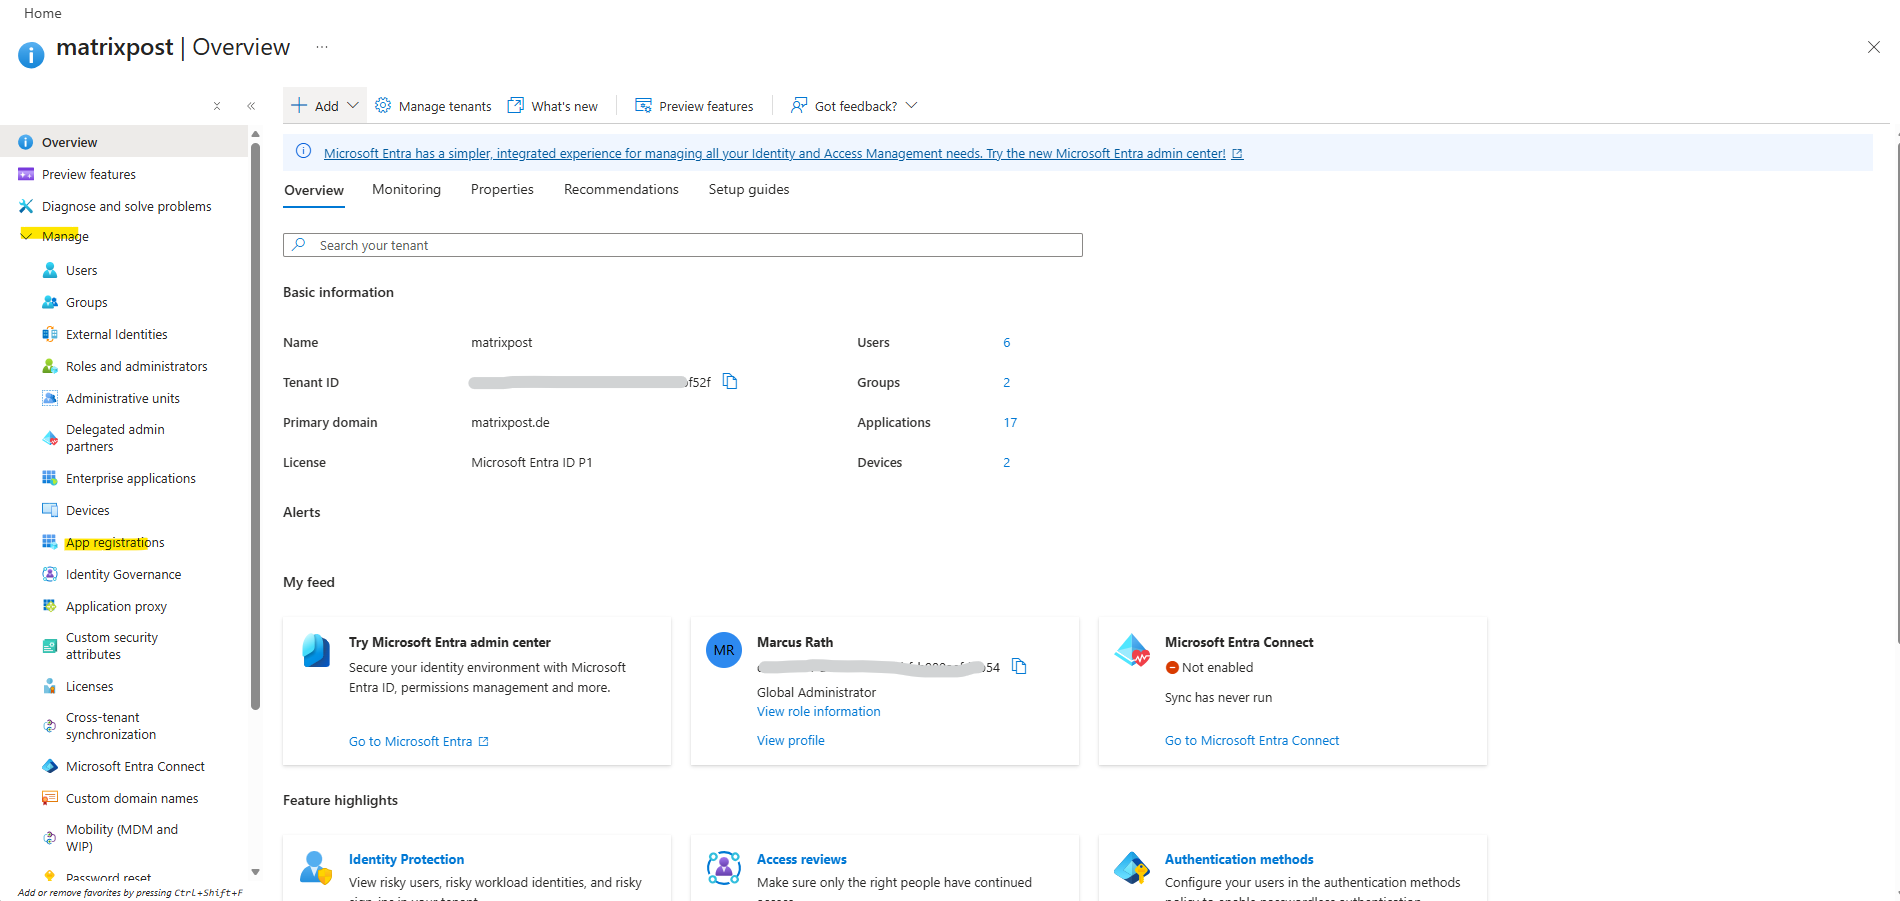
Or directly on the Entra ID overview page click on + Add -> App registration as shown below.
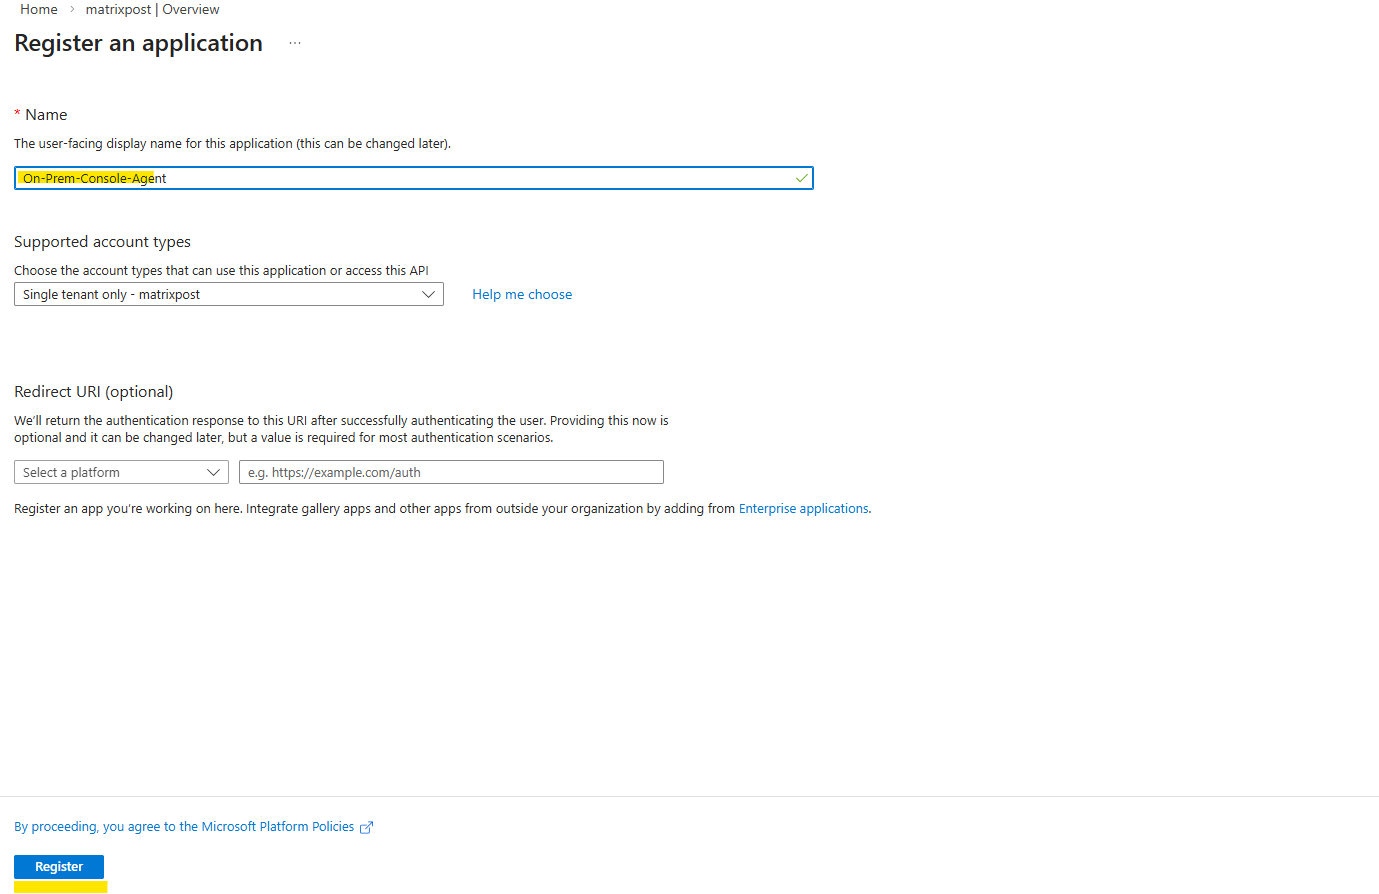
Specify details about the application: Enter a name for the application and select an account type (any will work with the NetApp Console). The Redirect URI we can leave blank.
Click on Register.
The Application (client) ID and Directory (tenant) ID shown below we can already note down and need them later.
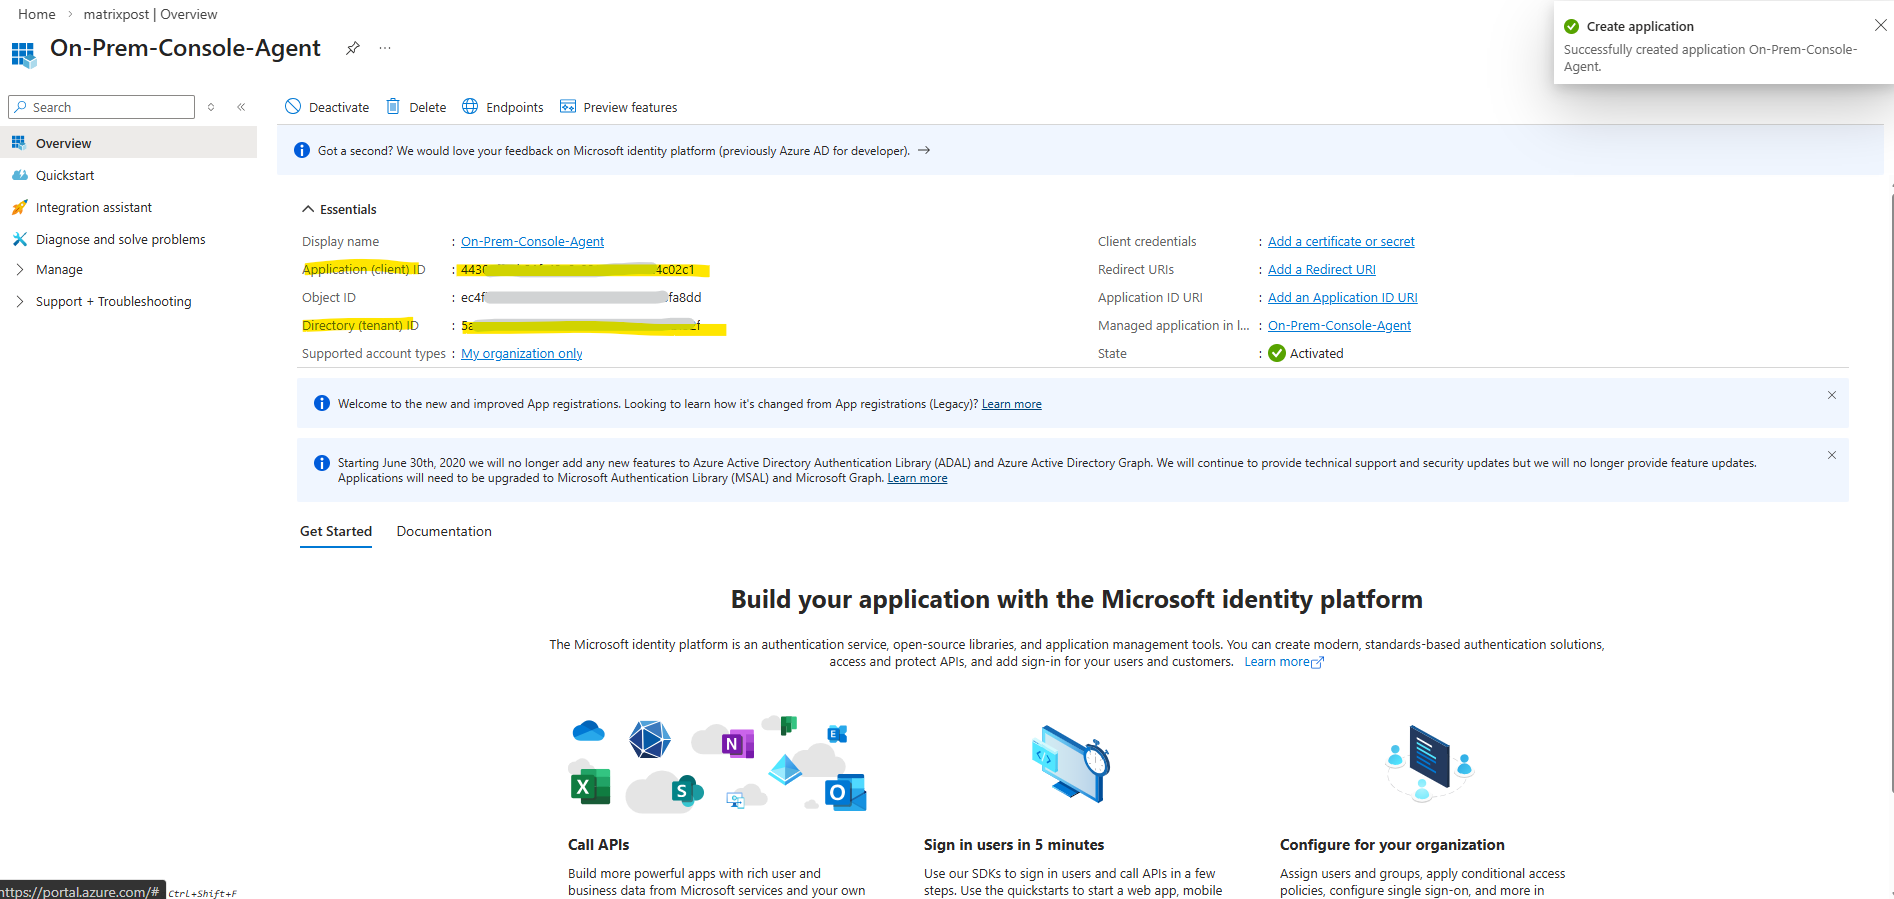
We now have created the AD application and service principal.
Next we need to create a custom role.
Creating the Azure Custom Role for the On-Prem Console Agent
When deploying the on-prem Console Agent and enabling cloud services like Backup and Recovery, NetApp recommends creating a custom role in Azure that grants the permissions required for the Agent to manage resources within the subscription.
This role allows the Agent to perform operations such as creating and managing storage and other cloud resources needed by the NetApp Console services.
Source: https://docs.netapp.com/us-en/console-setup-admin/reference-permissions.html
In my case, this configuration was essentially the same as the custom role and permissions I already created for the Agent used with my Cloud Volumes ONTAP deployment in a previous post.
Note that you can create an Azure custom role using the Azure portal, Azure PowerShell, Azure CLI, or REST API. The following steps show how to create the role using the Azure CLI. If you would prefer to use a different method, refer to Azure documentation.
Copy the contents of the custom role permissions for the Console agent and save them in a JSON file.
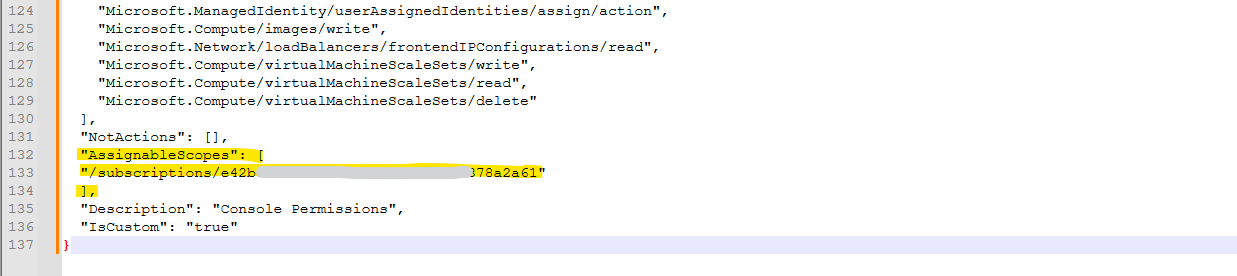
Modify the JSON file by adding Azure subscription IDs to the assignable scope.
You should add the ID for each Azure subscription from which users will create Cloud Volumes ONTAP systems. (In our case here On-Premises ONTAP systems, my ONTAP simulator).
Use the JSON file to create a custom role in Azure.
Open the Azure Cloud Shell and select the Bash.
Choose or create a storage account if prompted for.
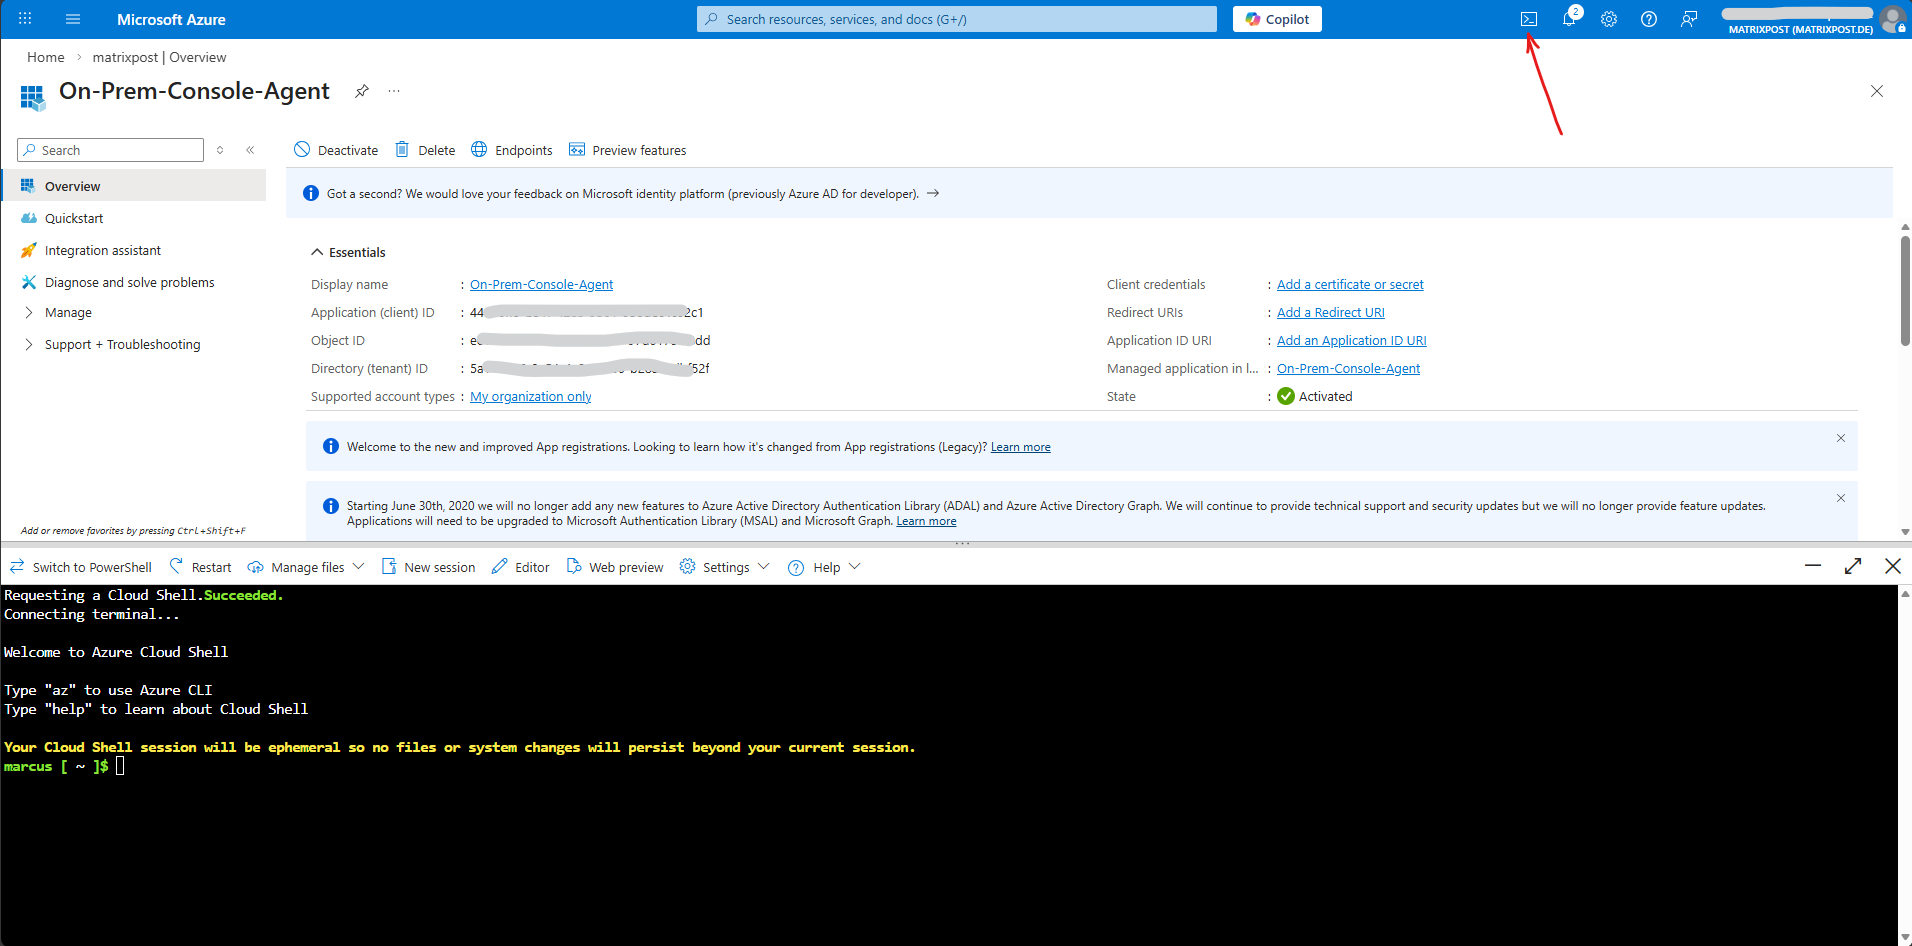
Click on Manage files -> Upload.
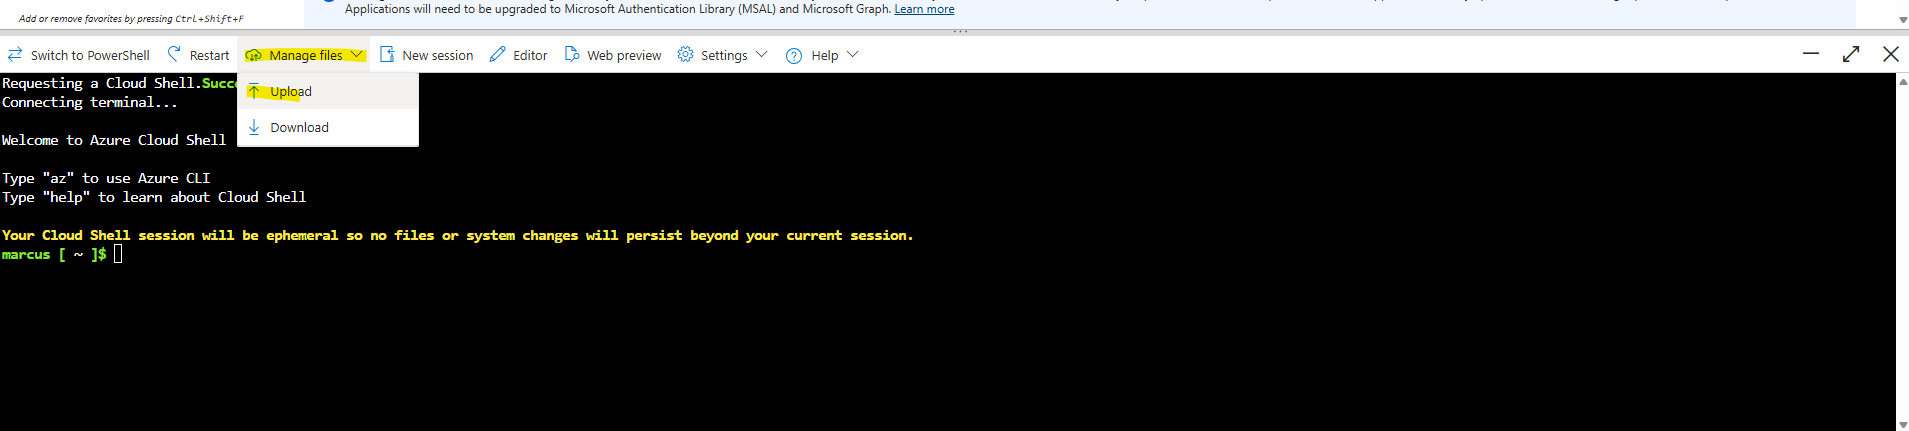
Select the adjusted JSON file.
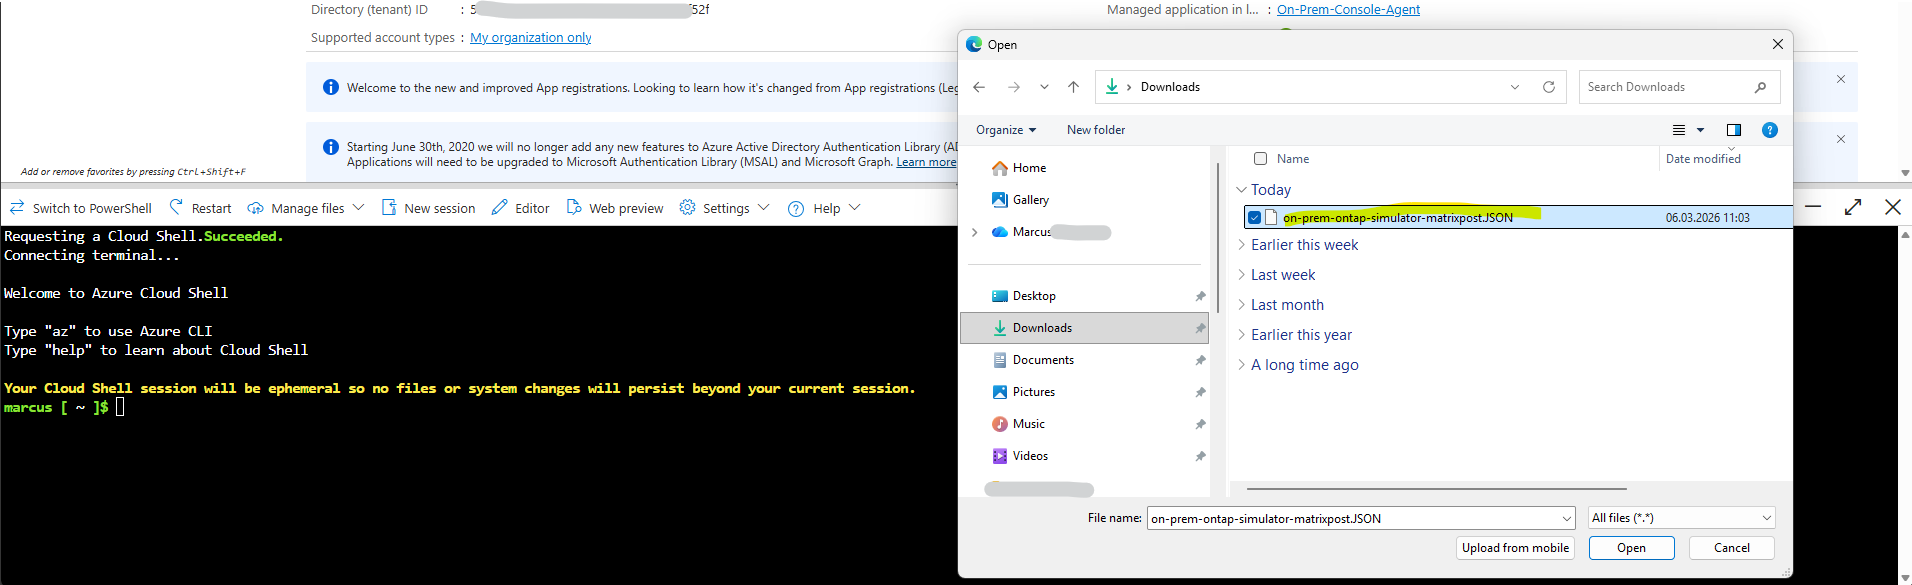
The JSON file was successfully uploaded.
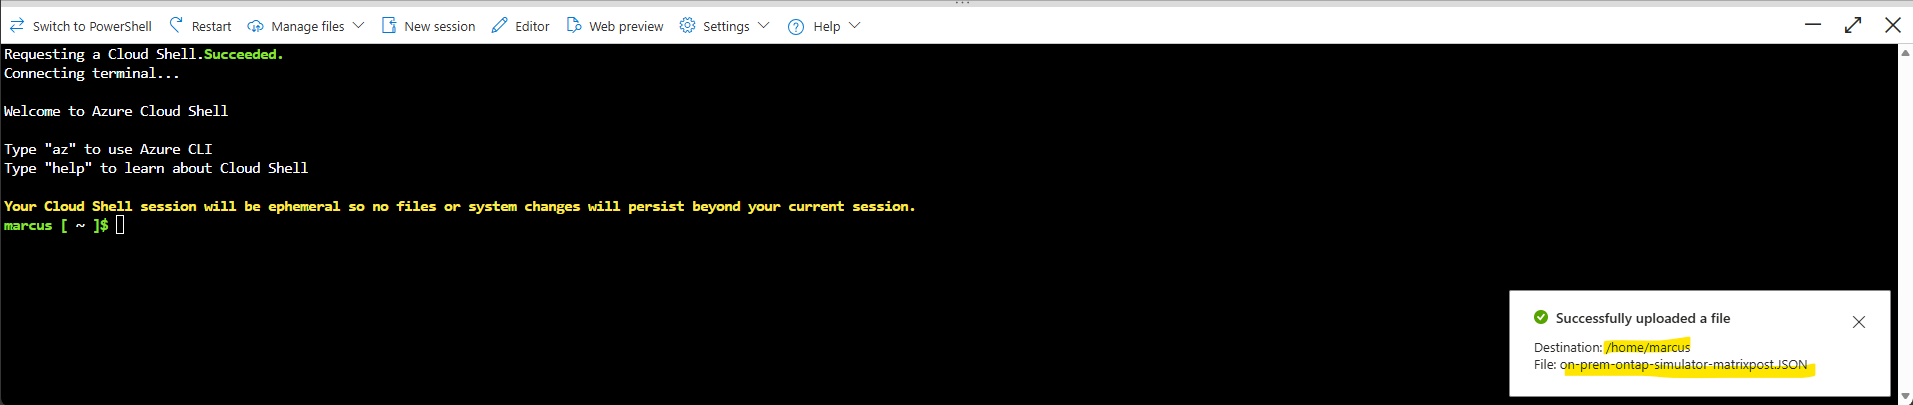
Now run this command:
Adjust the path and JSON file name to your environment.
$ az role definition create --role-definition /home/marcus/on-prem-ontap-simulator-matrixpost.JSON
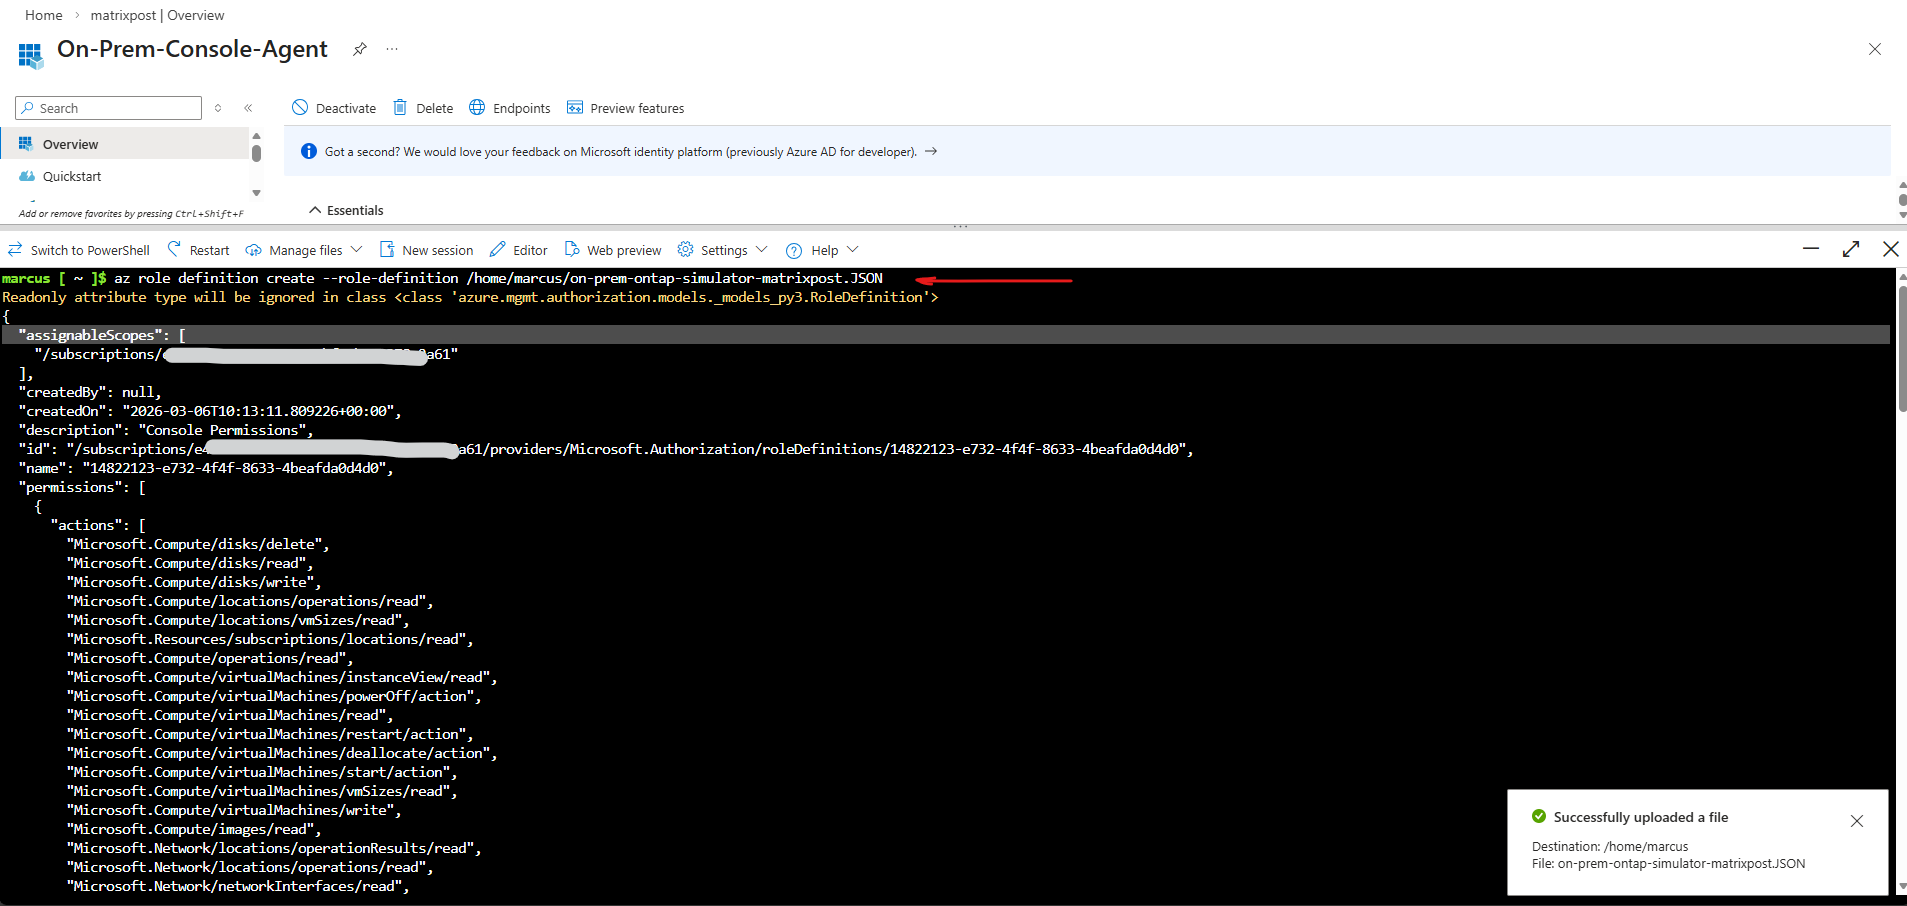
The custom role was created successfully.
We should now have a custom role called Console Operator that we can assign to the Console agent virtual machine.
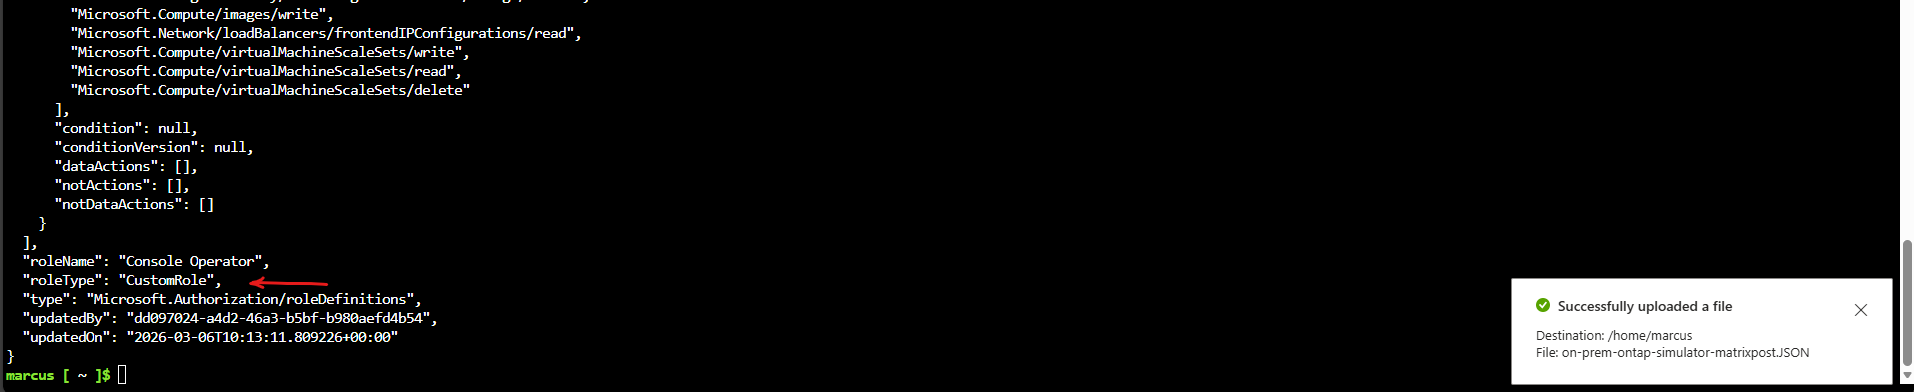
Next we need to assign the application to the role.
Assigning the Custom Role to the Service Principal
After creating the custom role, it must be assigned to the App Registration (Service Principal) within the Azure subscription. This allows the on-prem Console Agent to use the application identity to access and manage the Azure resources required for Backup and Recovery.
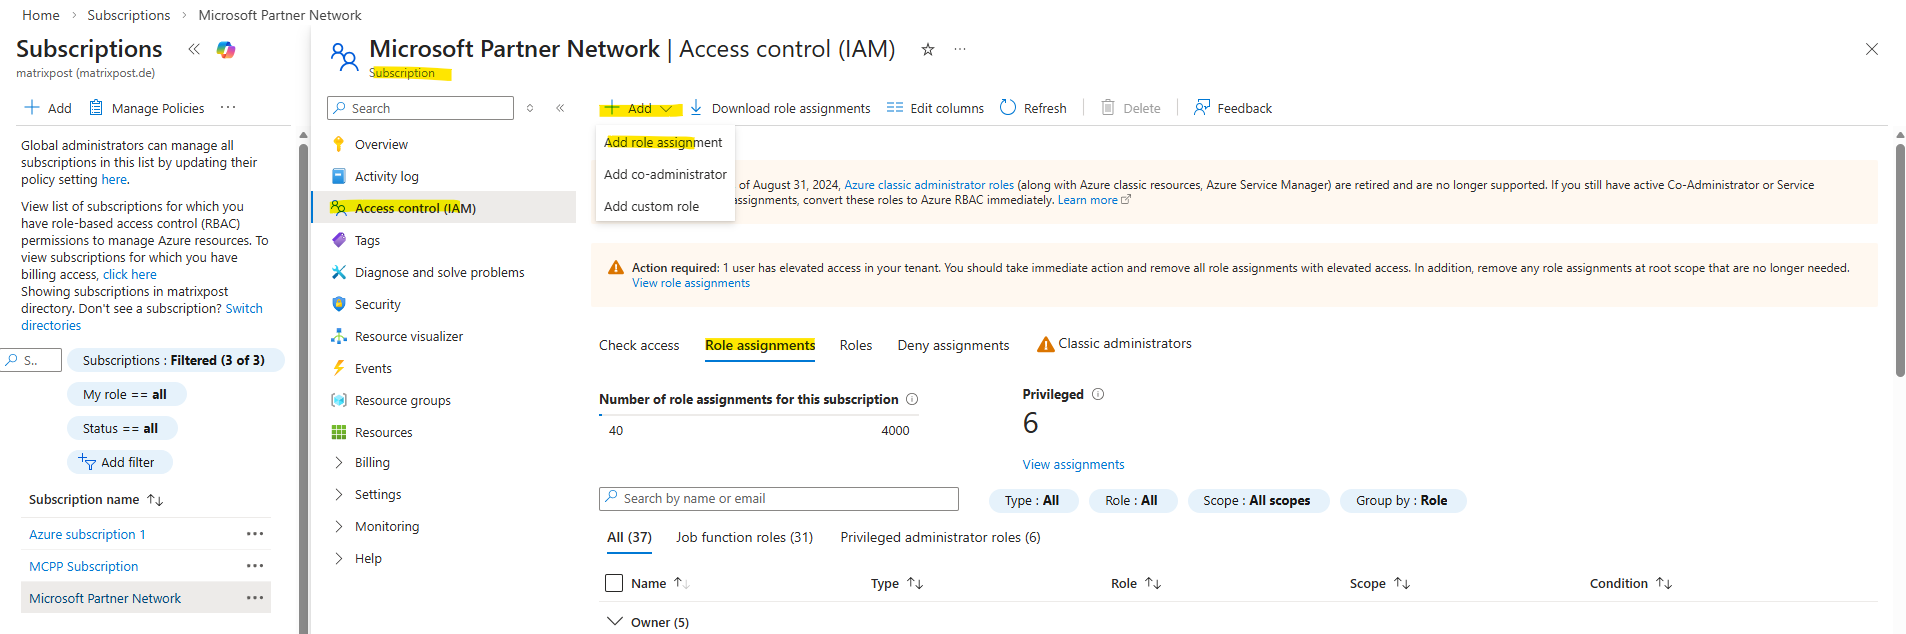
From the Azure portal, navigate to your subscription and the Access control (IAM) blade.
Within the Role assignments tab click on + Add -> Add role assignment as shown below.
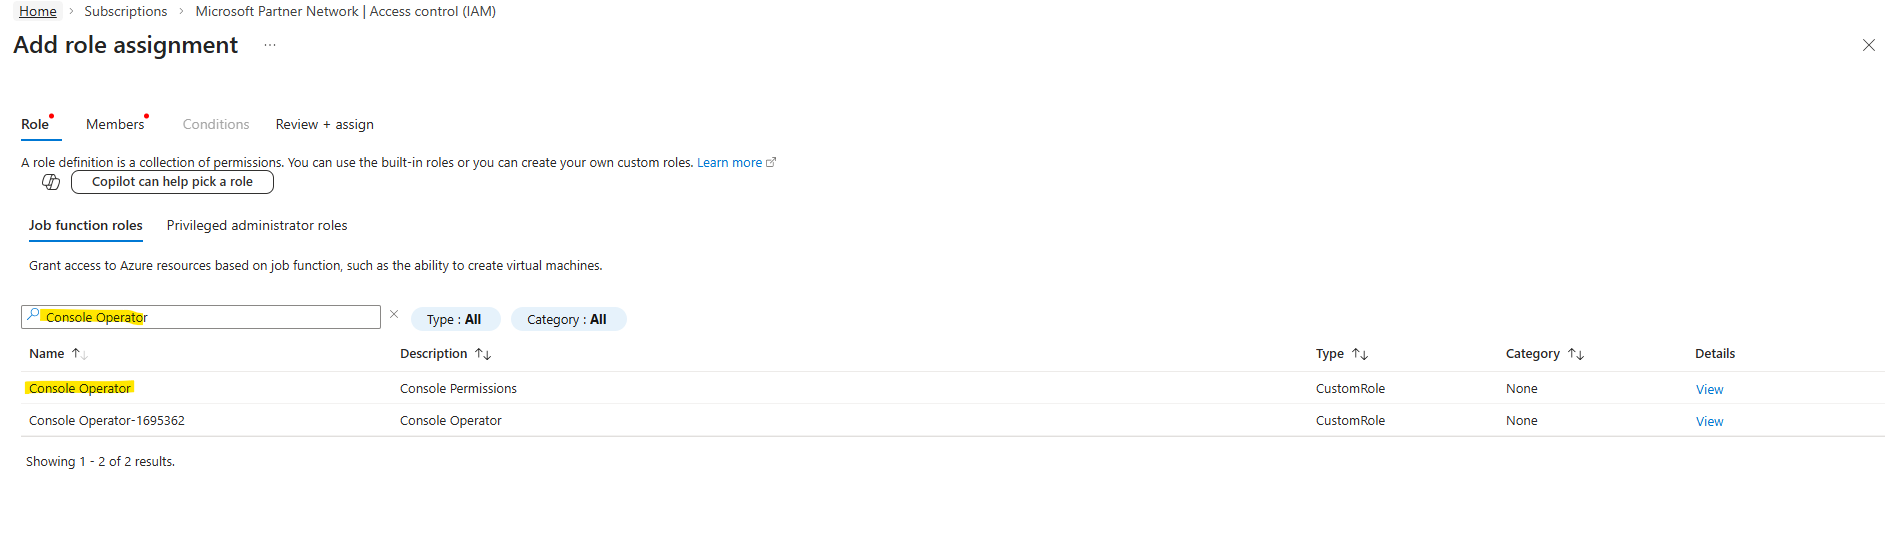
In the Role tab, search for our newly created custom role named Console Operator, select the role and click on Next.
In my case we see also a further custom role named Console Operator-1695362, this is the role which I was creating for a Azure Agent (connector VM) to deploy Cloud Volume ONTAP (CVO) in Azure and shown here.
In the Members tab, keep User, group, or service principal selected, click on + Select members and search for our previously created Entra ID application (app registration).
Select the application and click on Select.
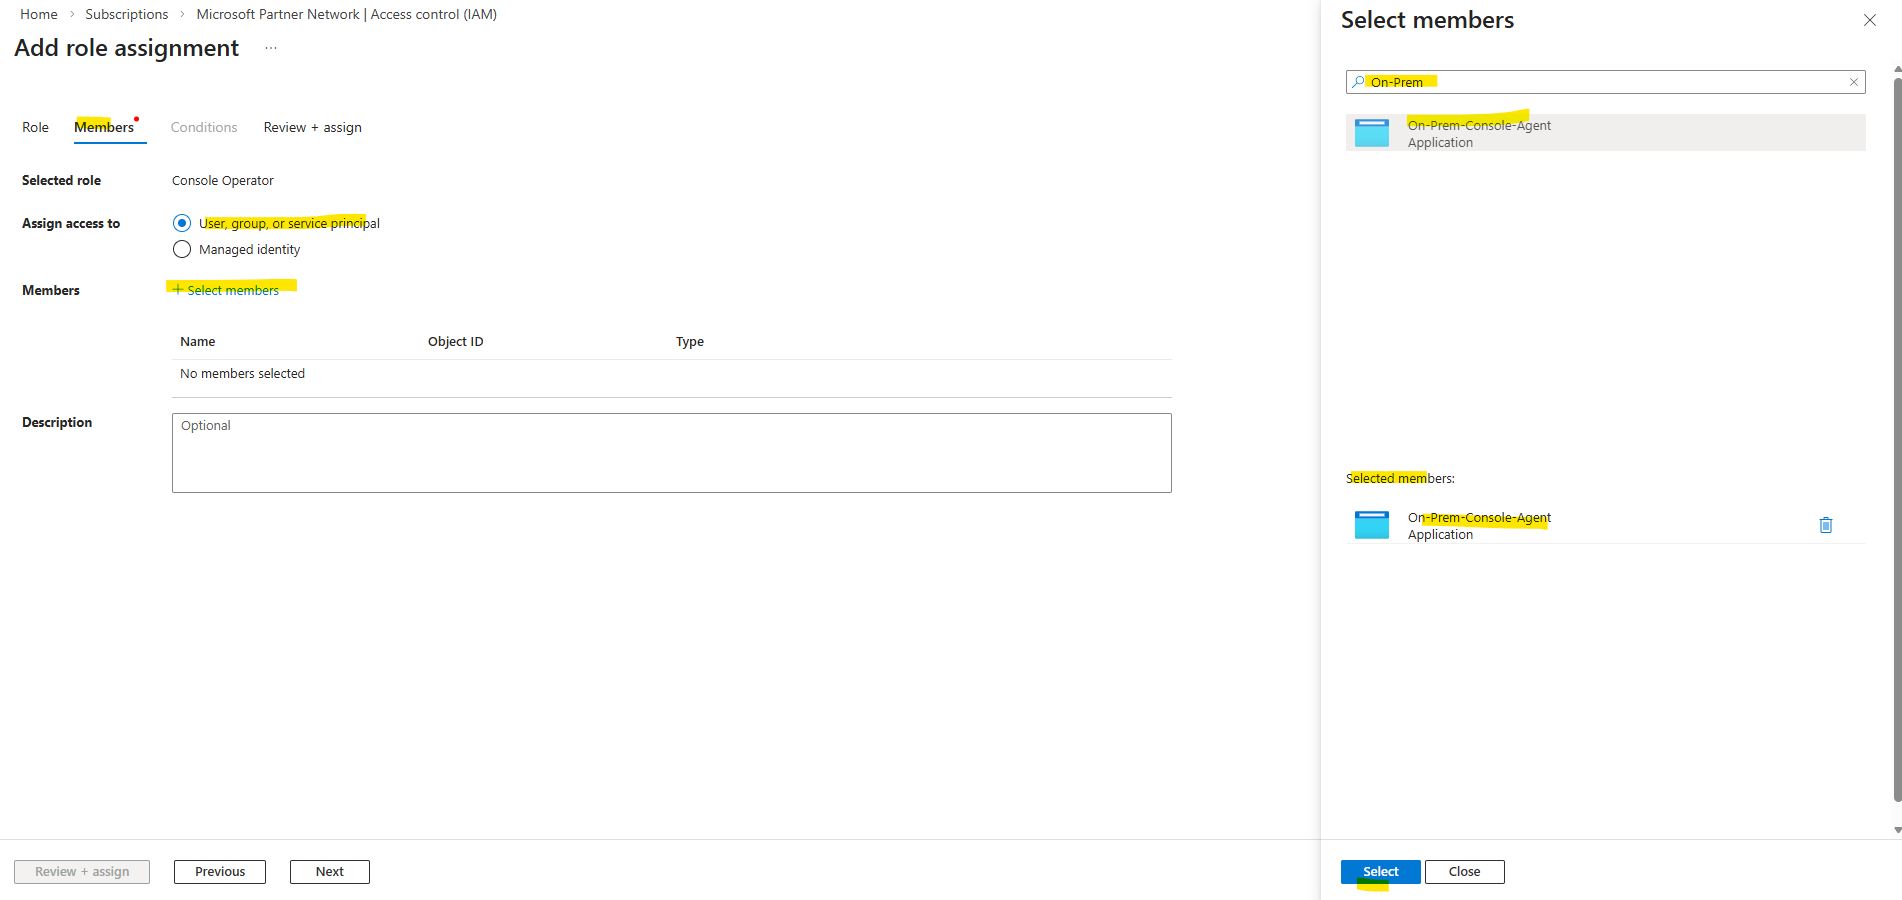
Click on Review + assign.
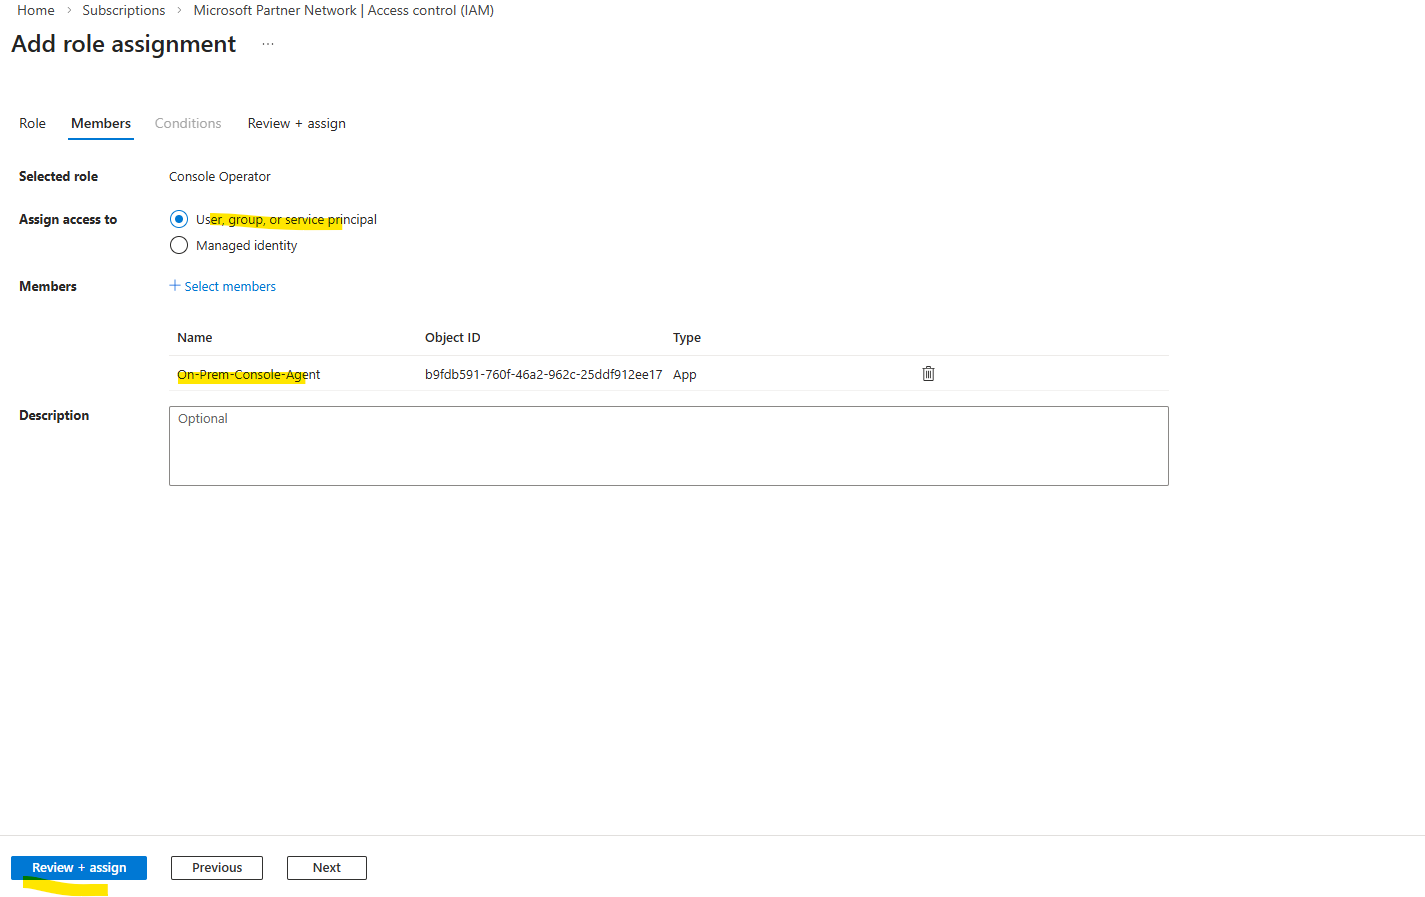
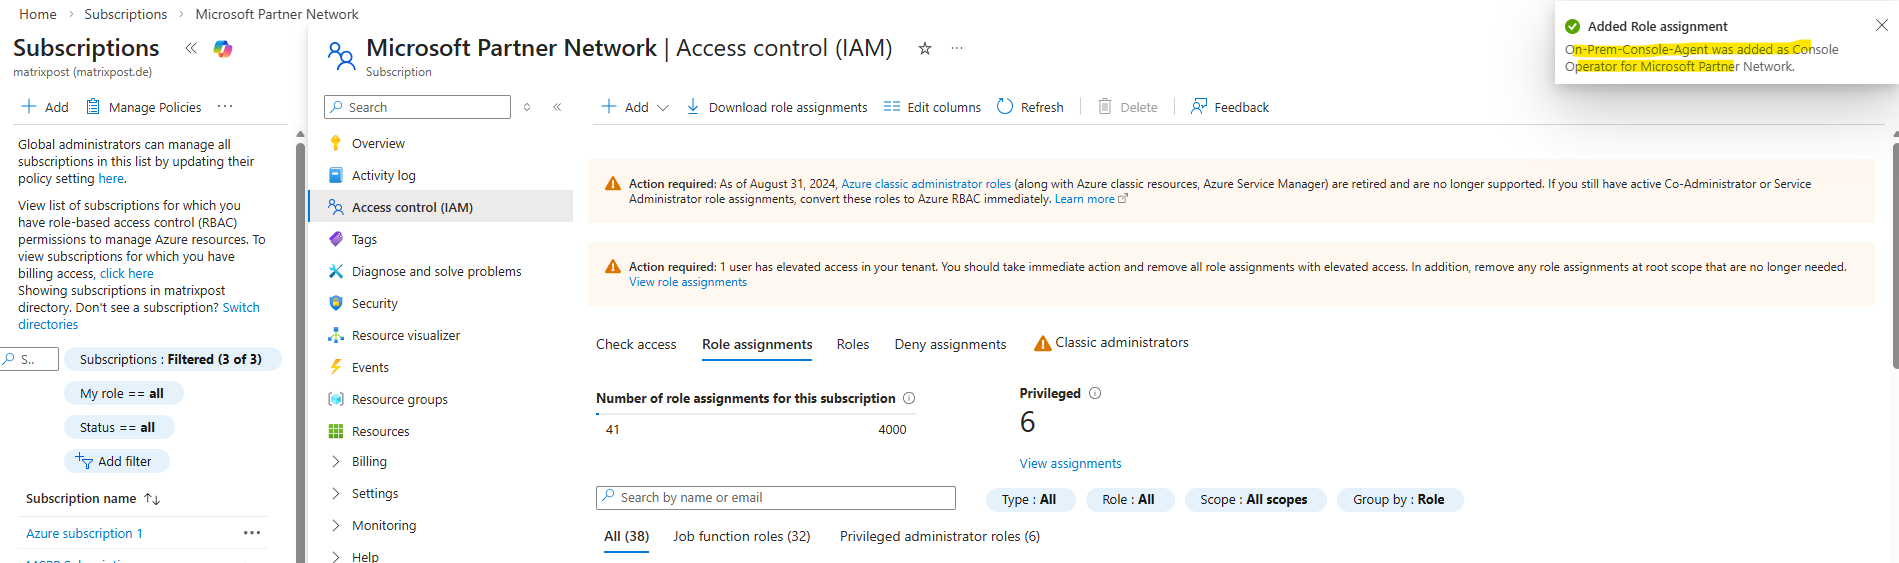
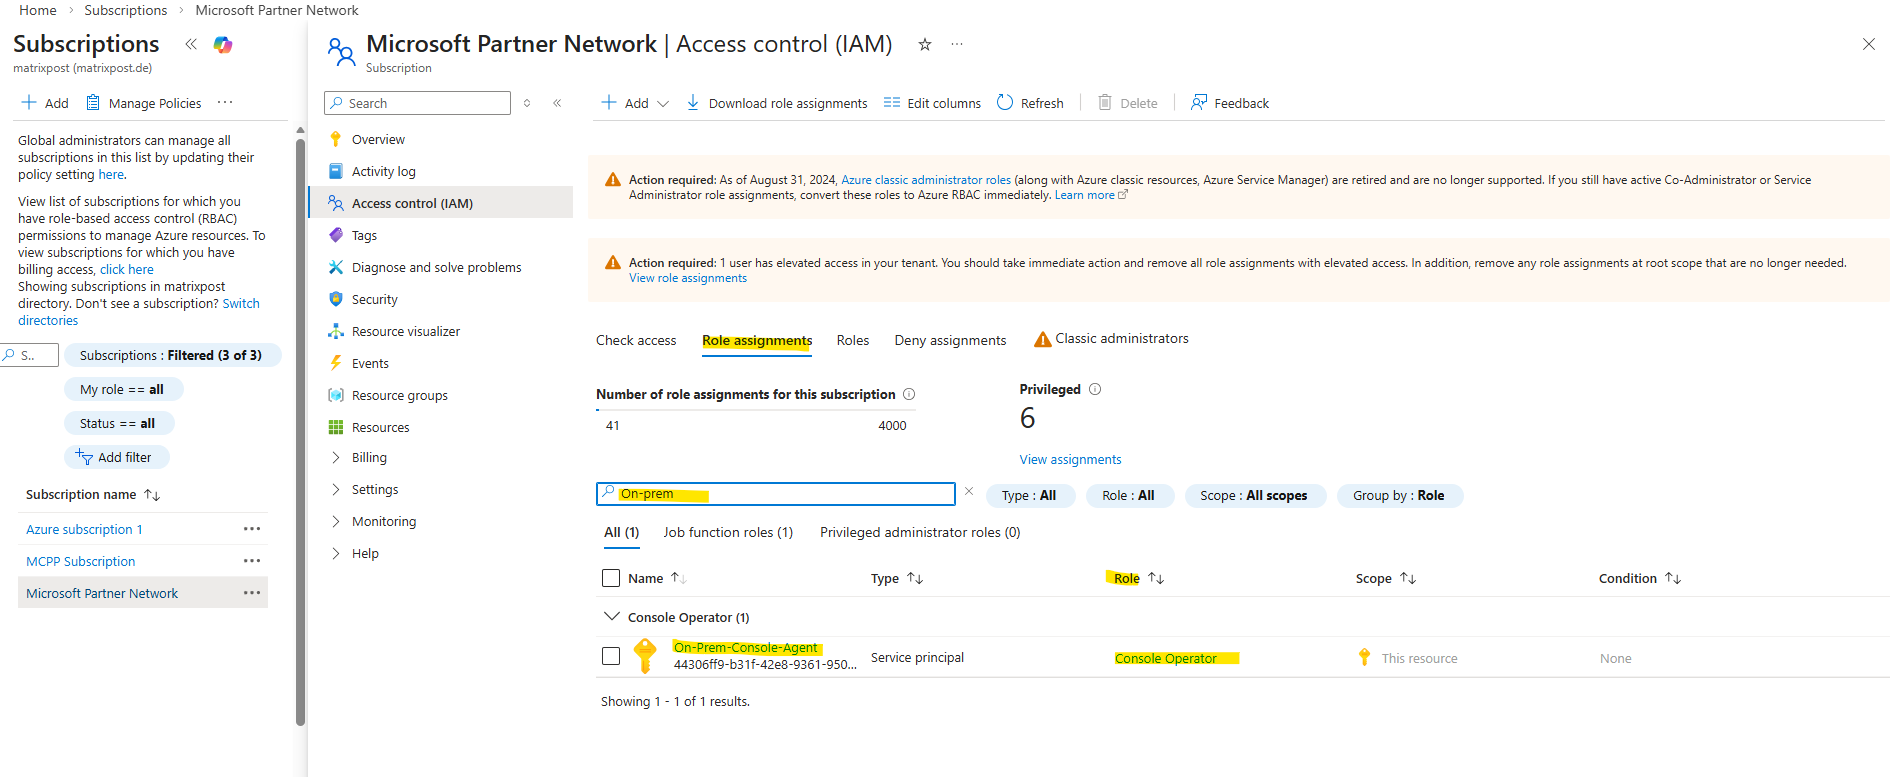
Our new custom role was successfully assigned to the application (service principal).
The service principal now has the required Azure permissions for our on-premises console agent.
If not already noted, we now need to obtain the application ID and directory ID for the application (service principal).
Navigate to Entra ID -> Manage -> App registrations -> All applications and search for our newly created application (service principal) and click on it.
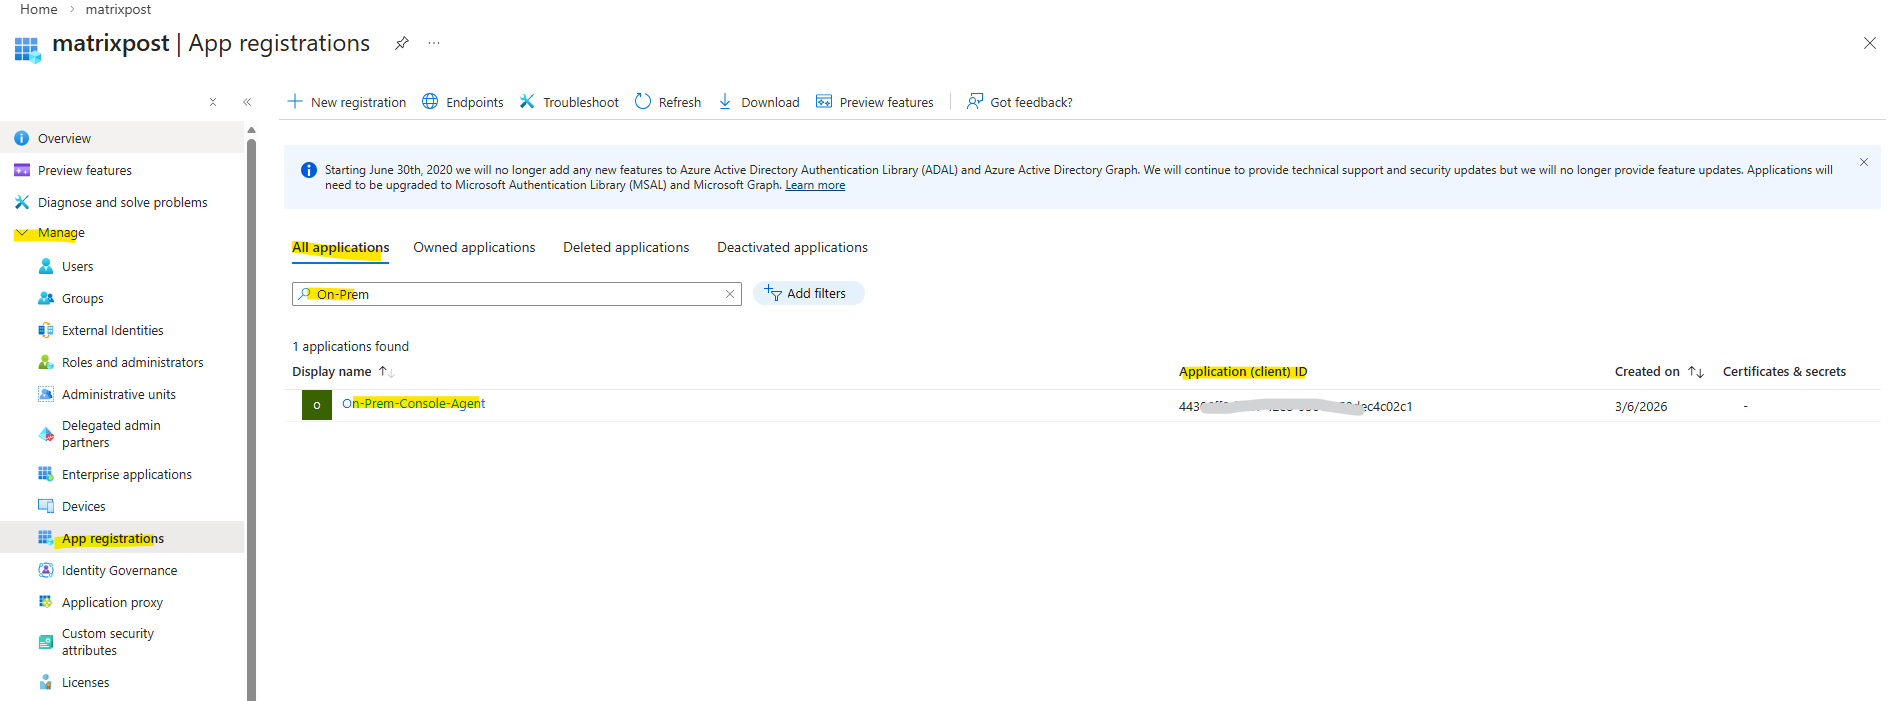
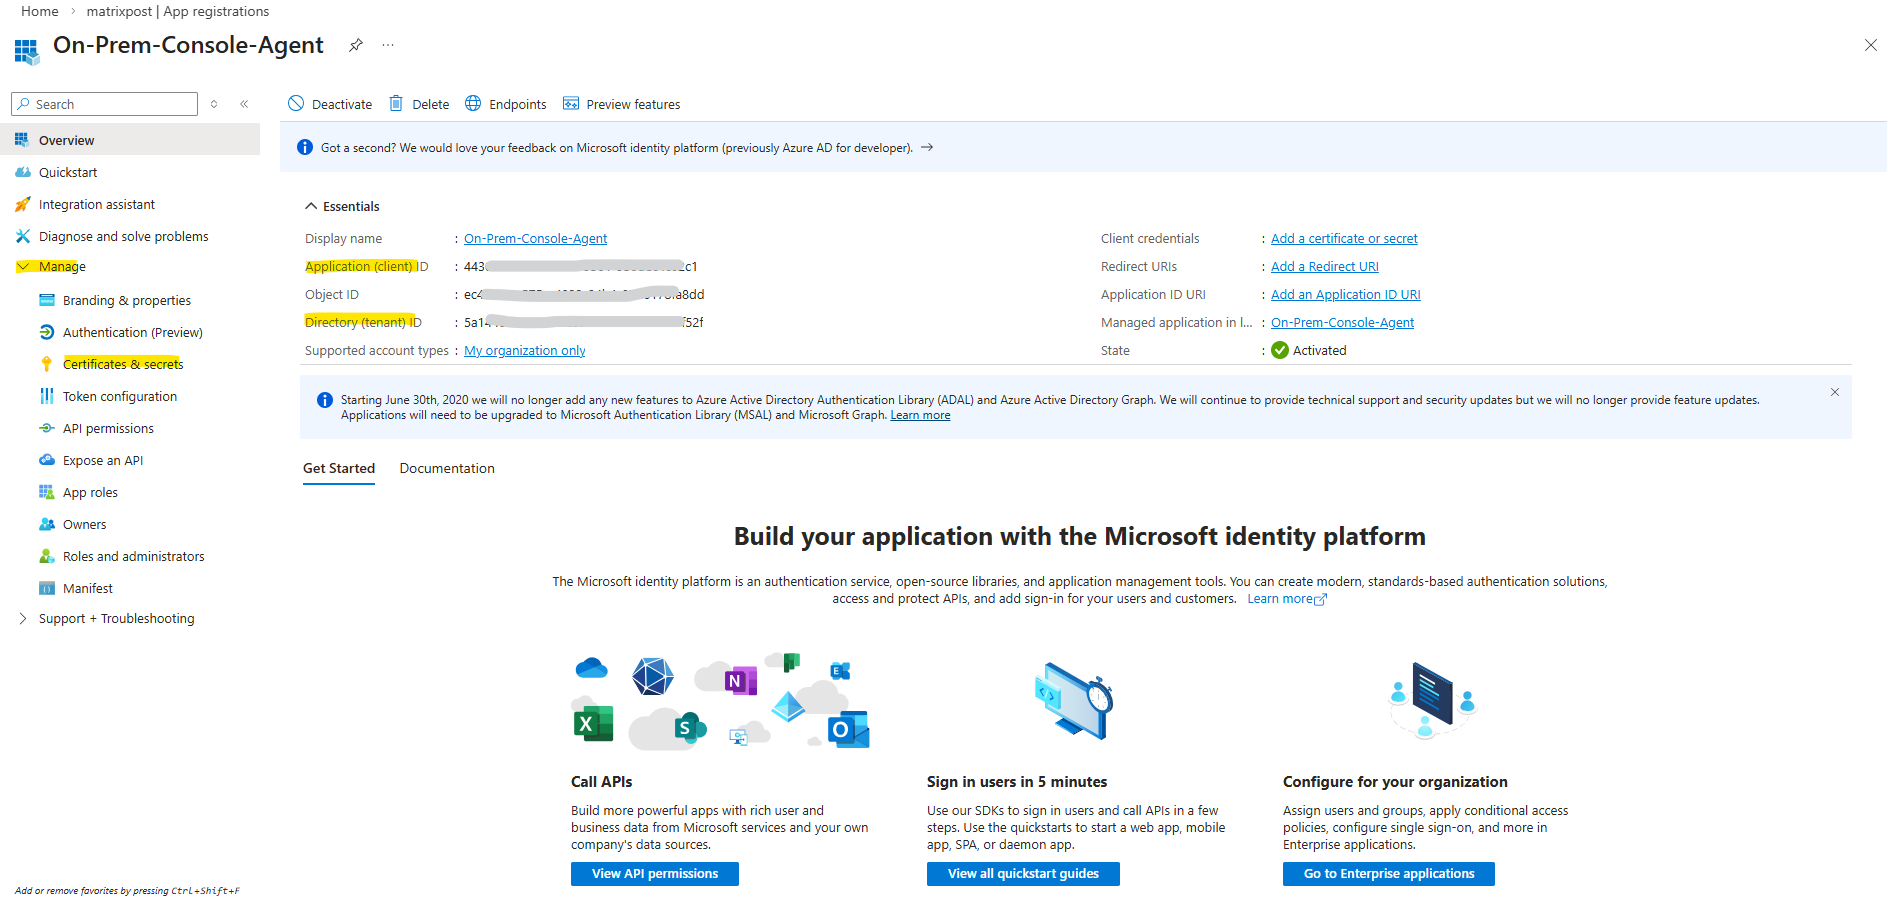
Copy the Application (client) ID and the Directory (tenant) ID. Next we also need to create a new client secret for the application, therefore navigate to Manage -> Certificates & secrets.
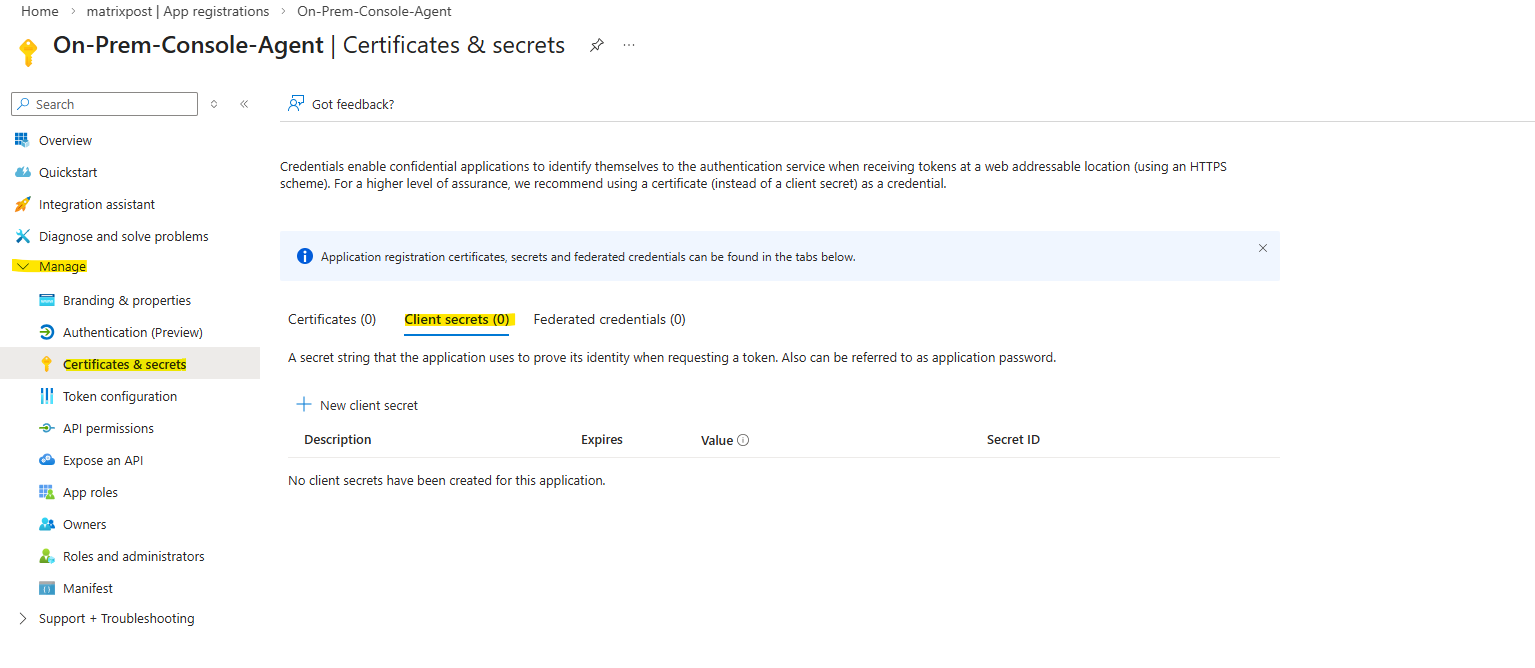
Within Client secrets tab click on + New client secret below.
Provide a description of the secret and a duration. Select Add.
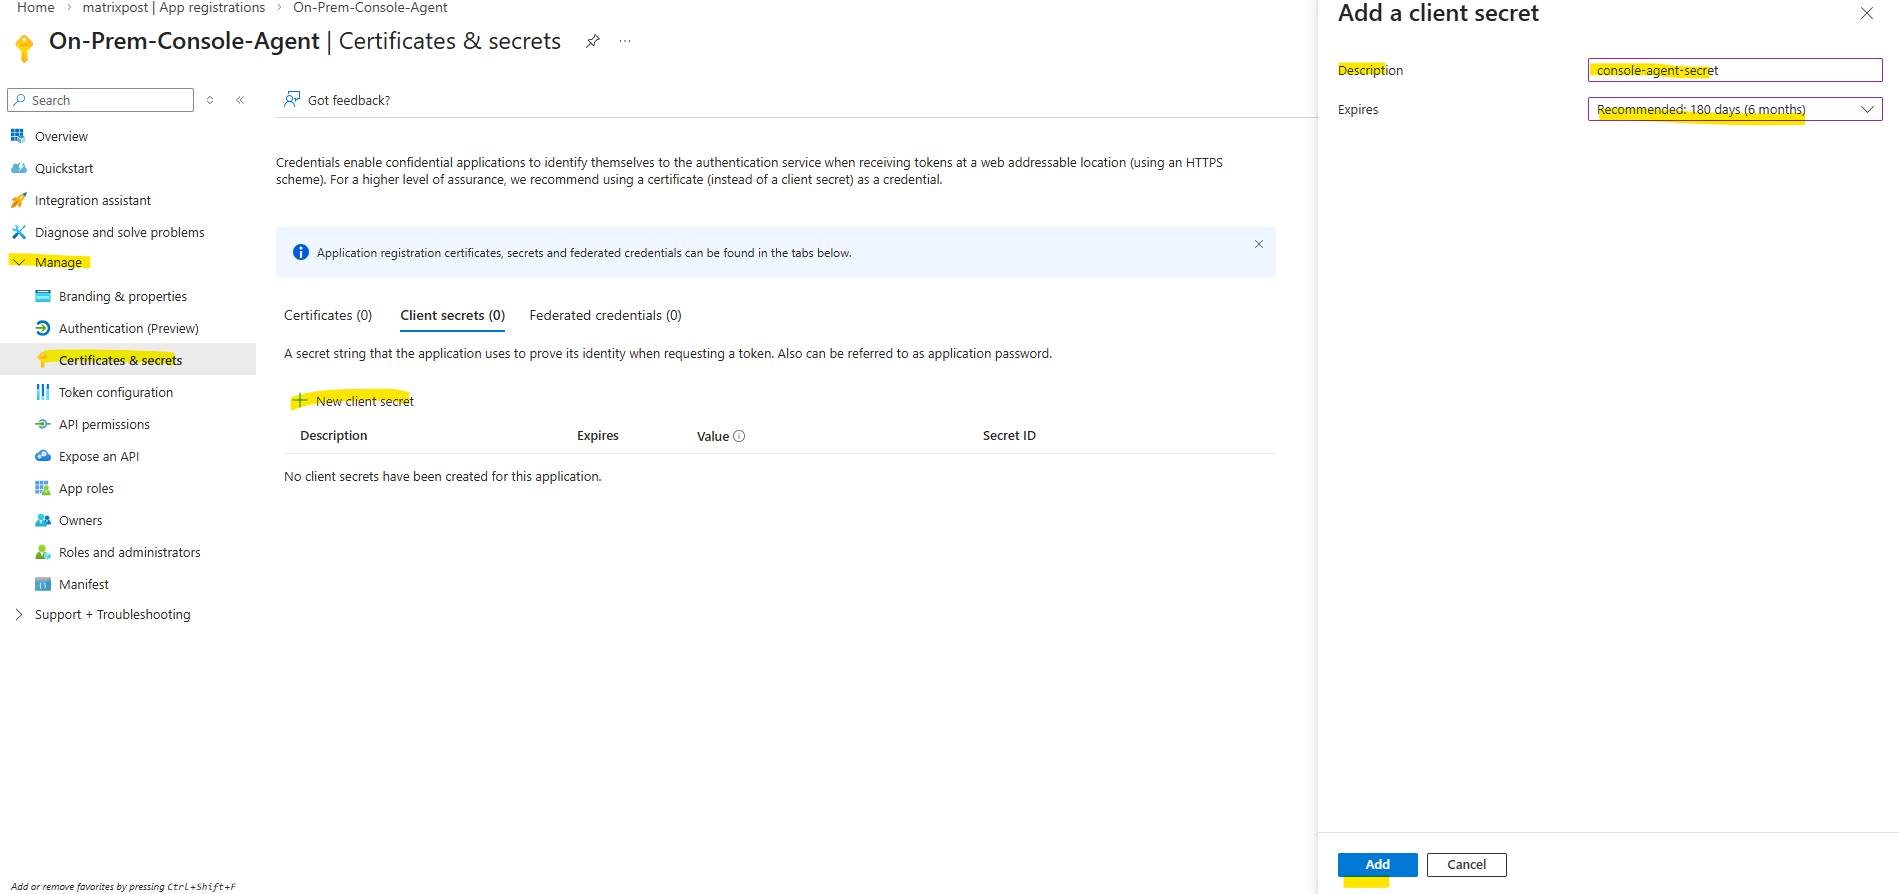
Copy the value of the client secret.
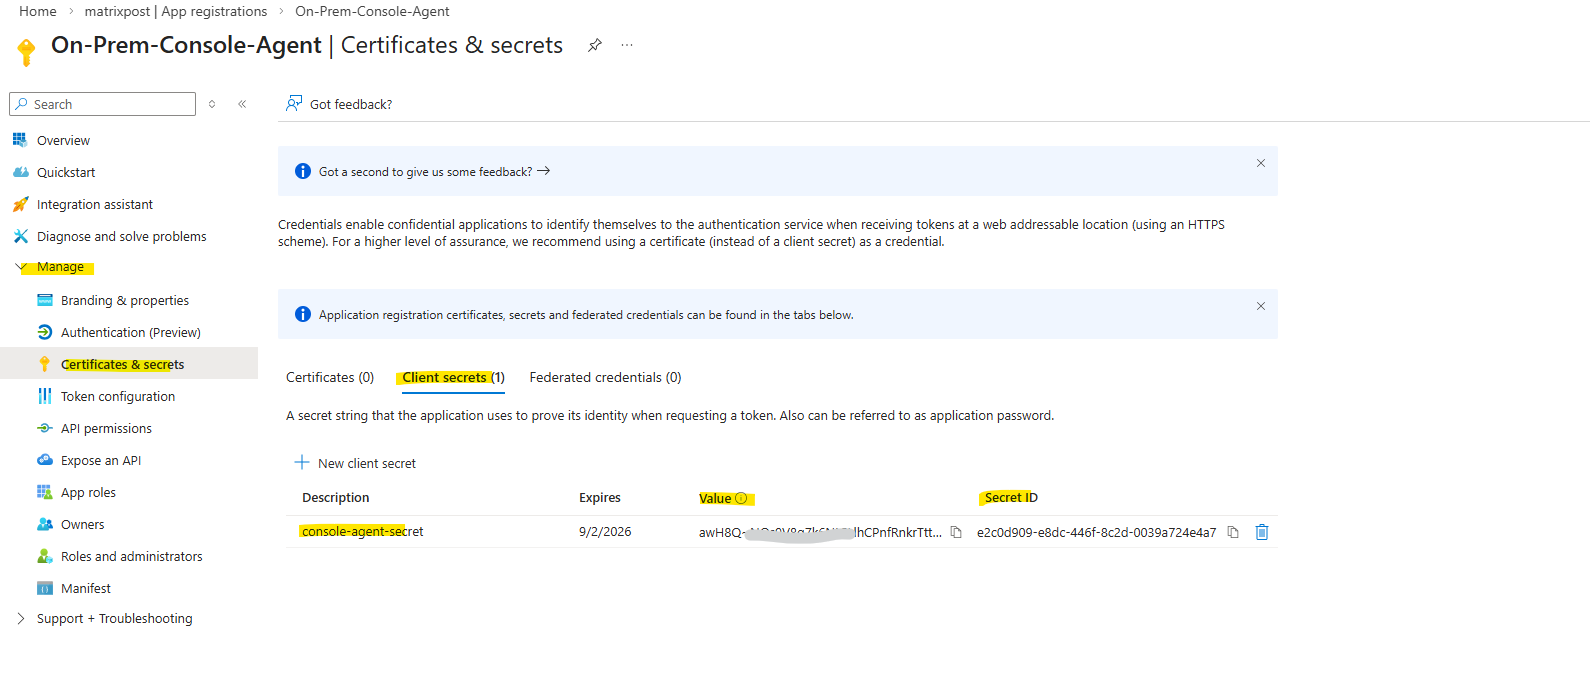
Now we can provide our newly created cloud provider credentials to NetApp Console and our on-premise Console agent.
Adding the Azure Credentials (Service Principle) in the NetApp Console
Before the Backup and Recovery service can access Azure resources, the Service Principal credentials must be added to the NetApp Console.
These credentials allow the on-prem Console Agent to authenticate with Azure and manage the required resources within the selected subscription.
In the NetApp console navigate to Administration -> Credentials.
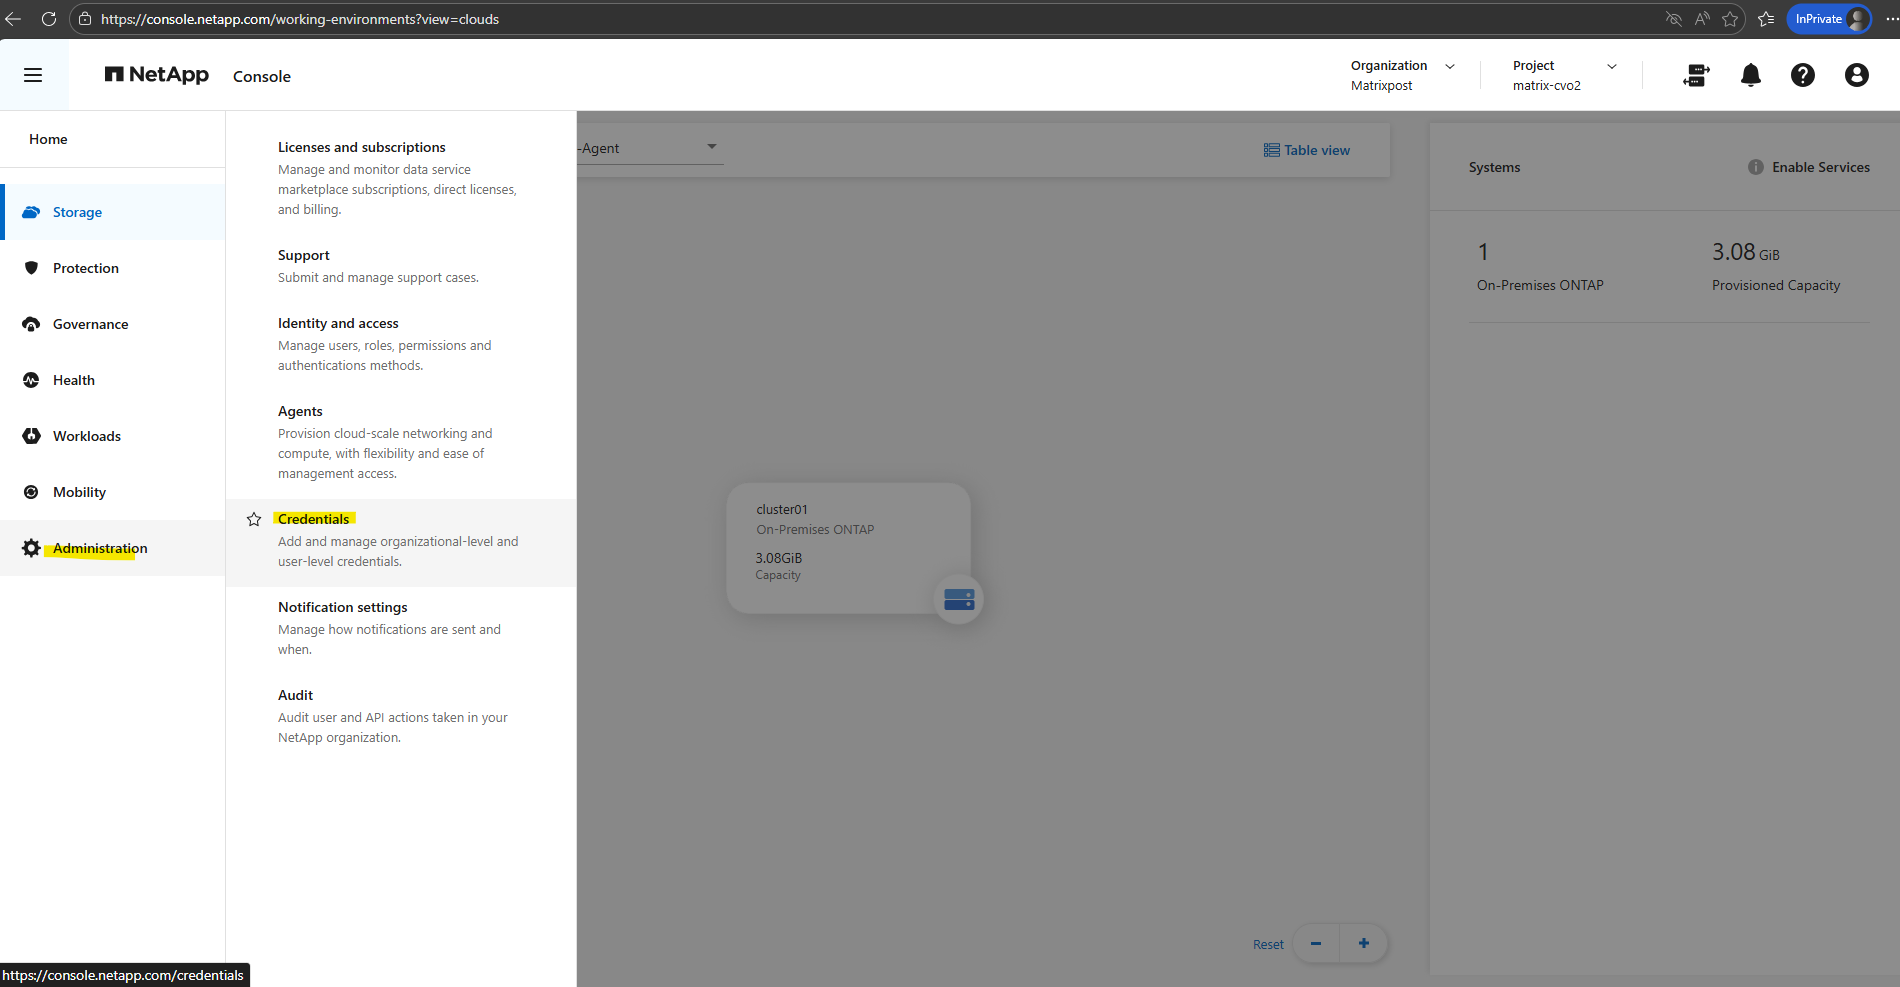
Click on Add Credentials.
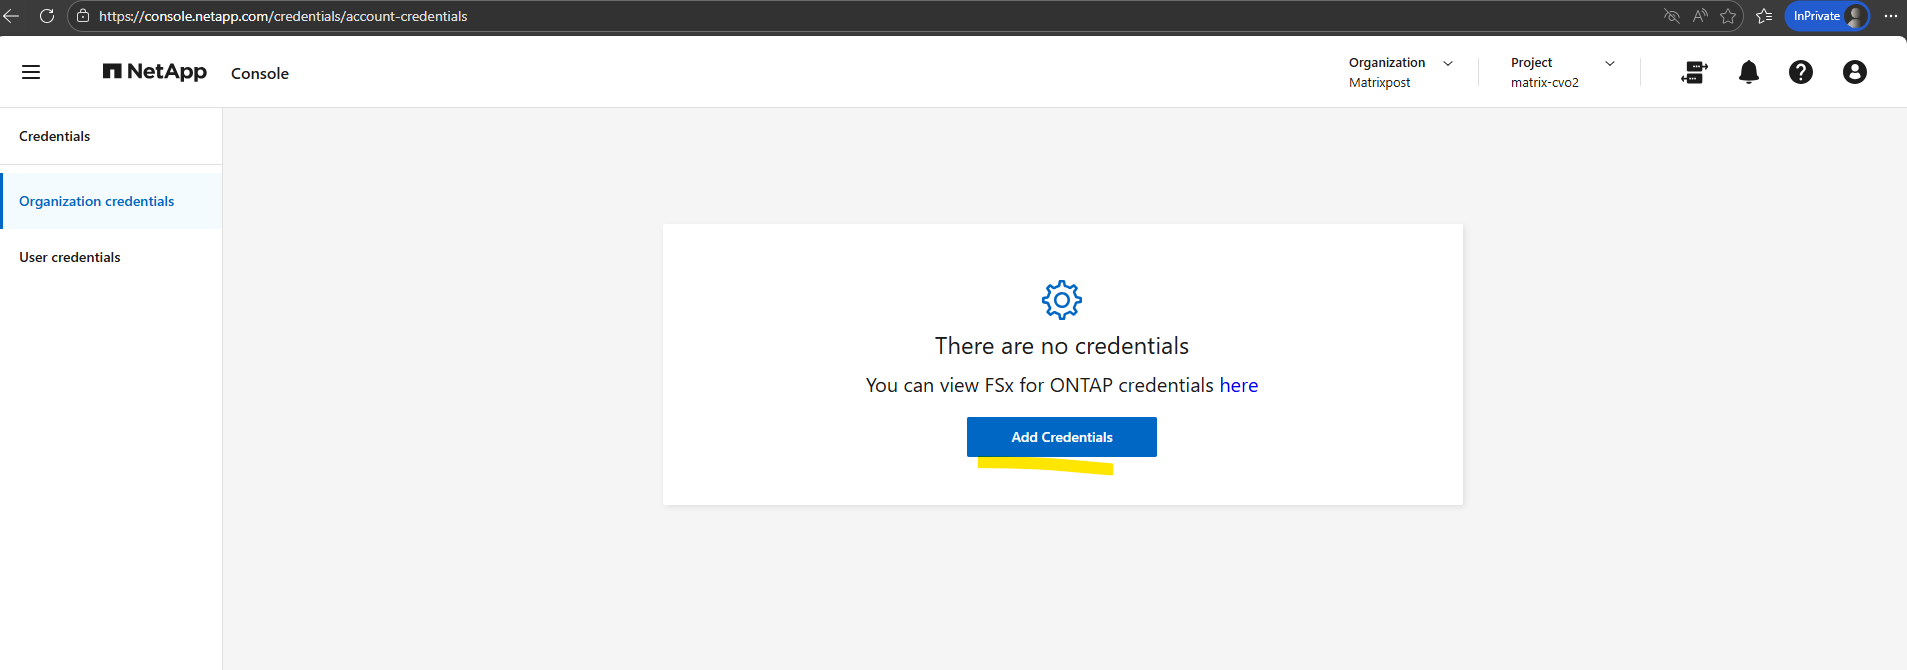
For the Credentials Location: Select Microsoft Azure > Agent. Click on Next.
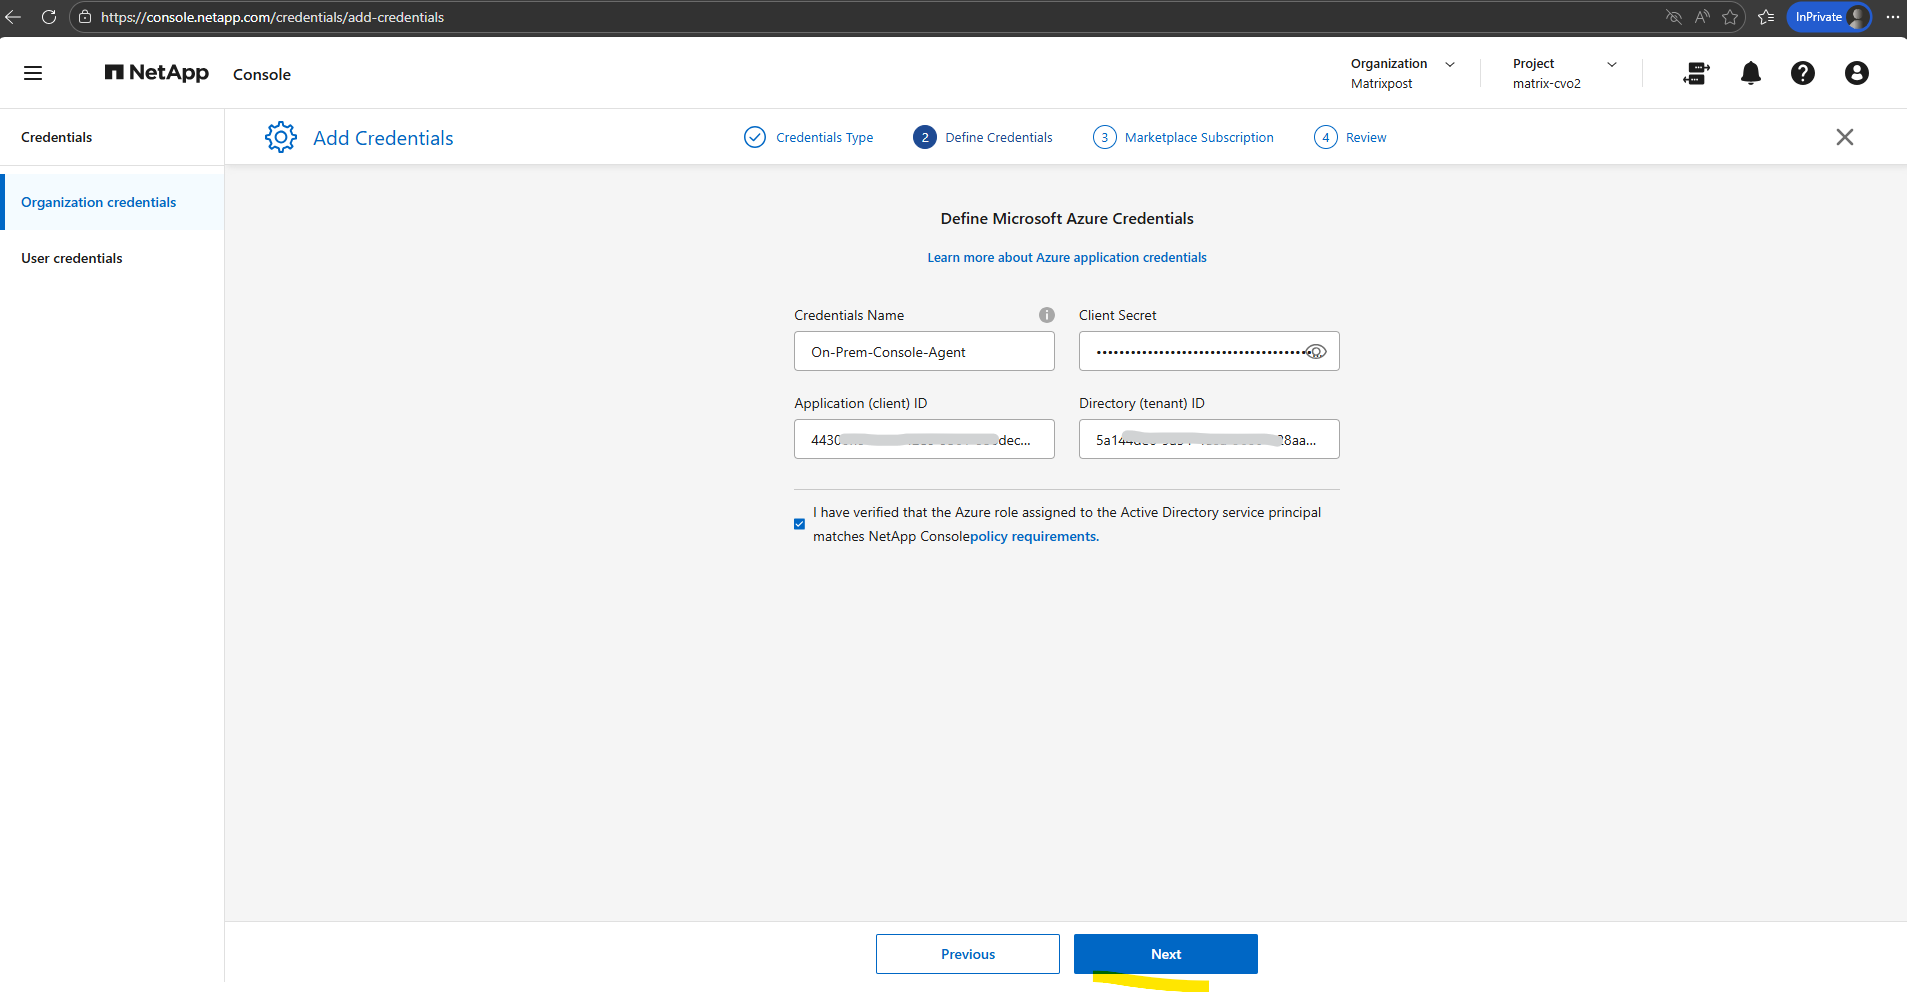
Define Credentials: Enter information about the Microsoft Entra service principal that grants the required permissions:
- Application (client) ID
- Directory (tenant) ID
- Client Secret
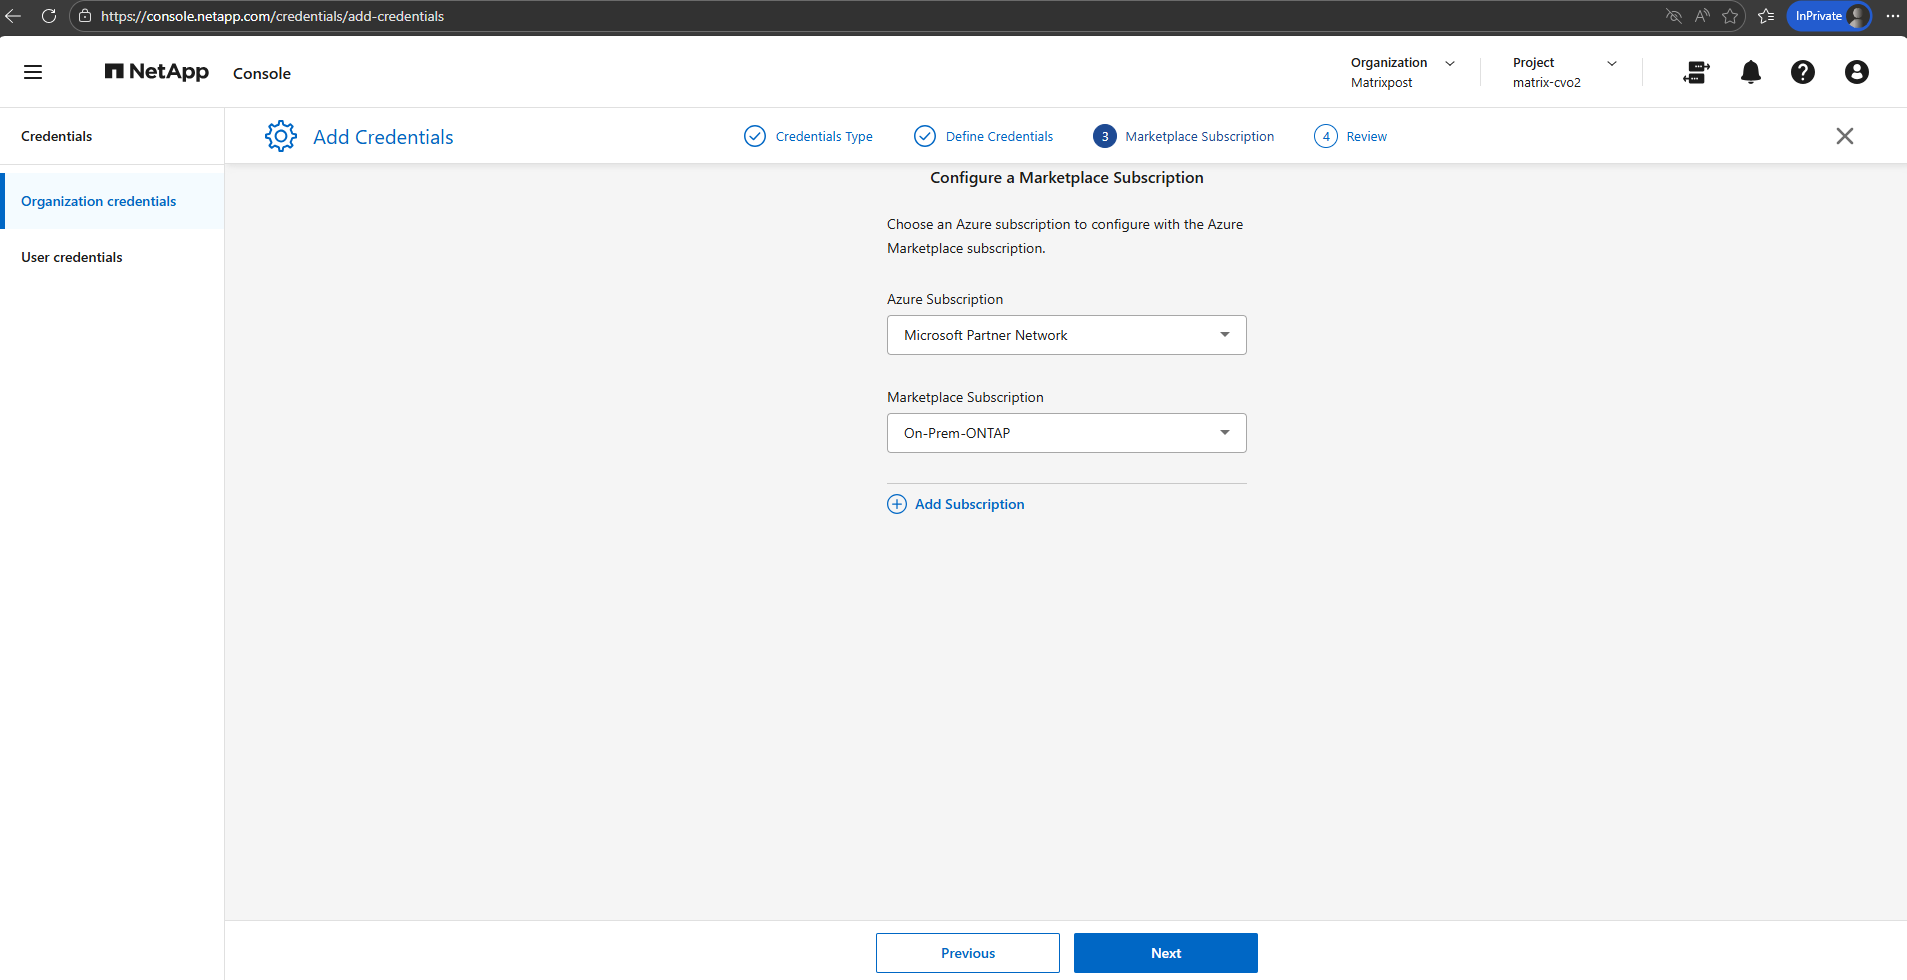
Associate a Marketplace subscription with these credentials by subscribing now or by selecting an existing subscription.
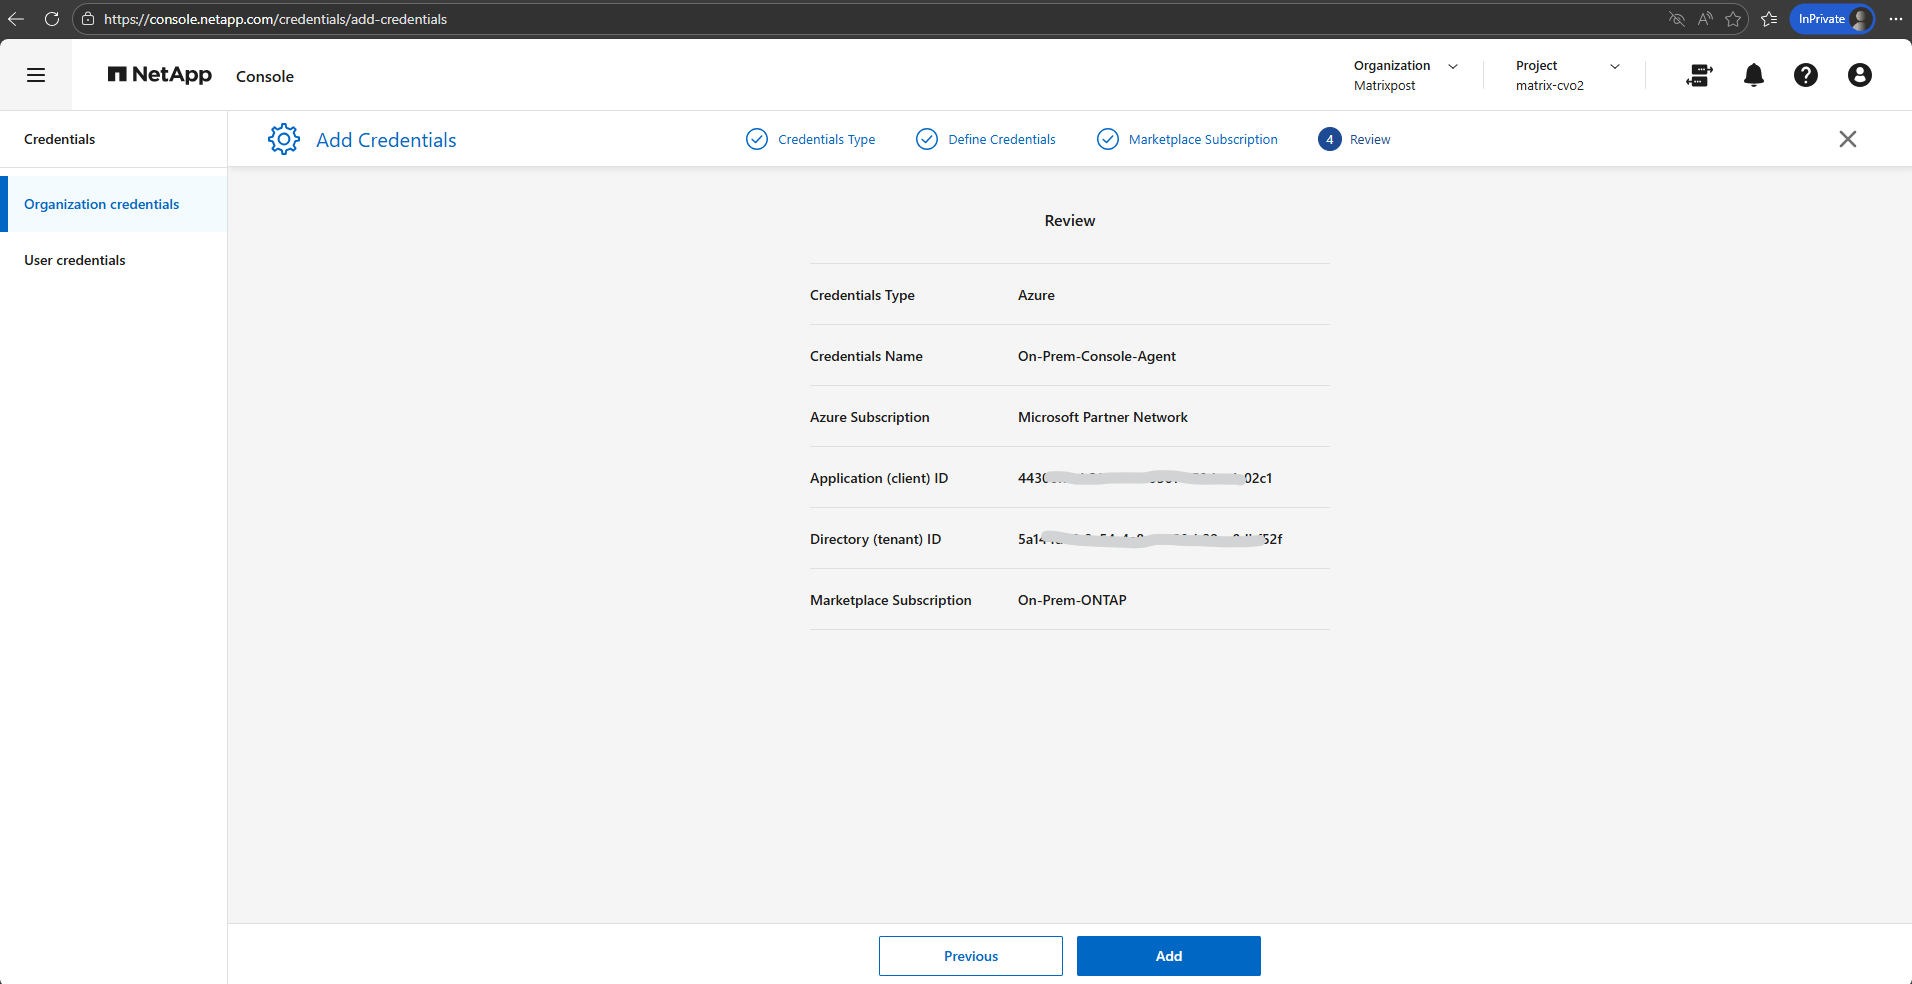
Confirm the details about the new credentials and select Add.
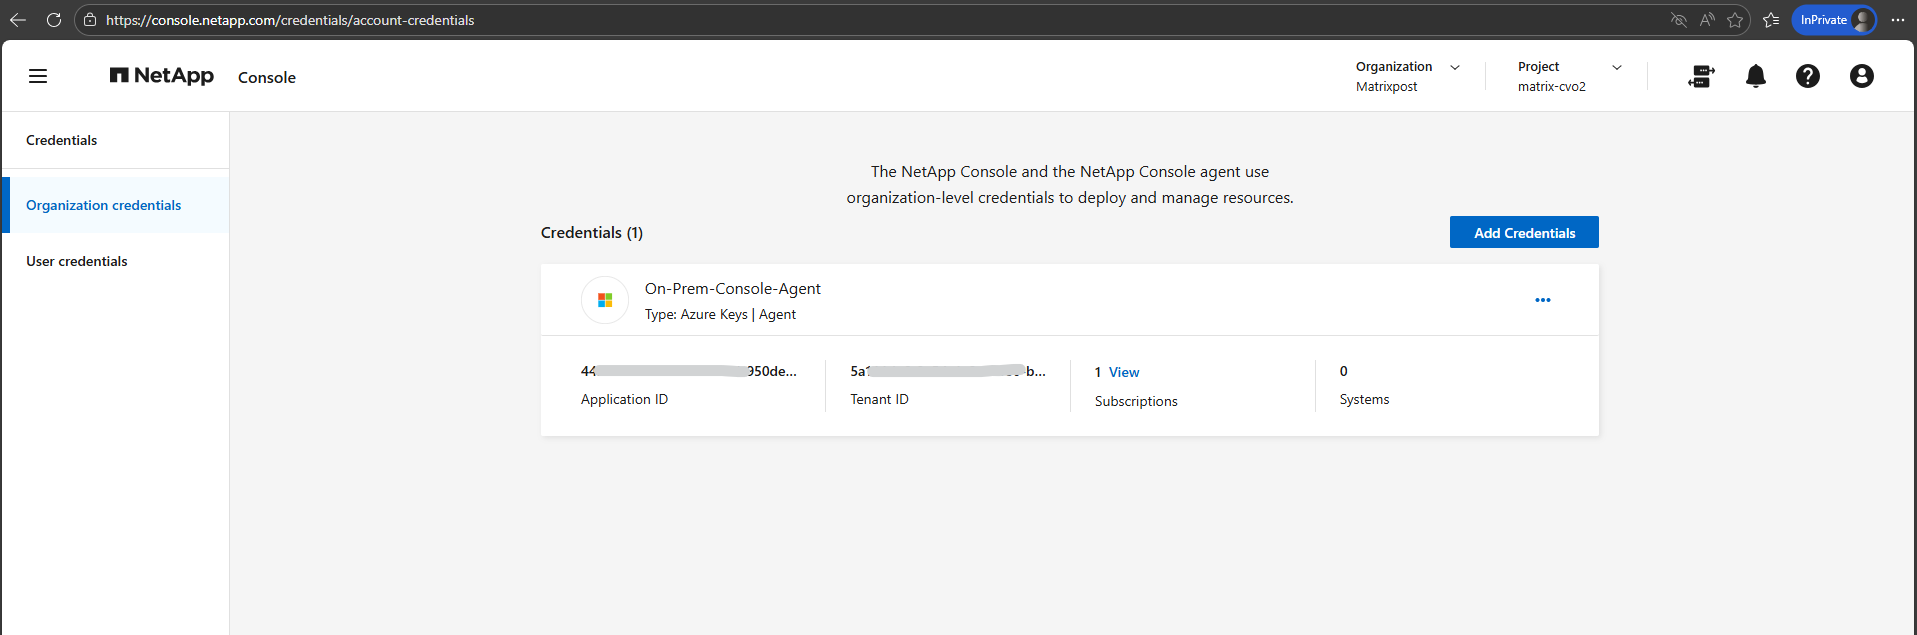
The Console agent now has the permissions that it needs to perform actions in Azure on your behalf. You can now go to the NetApp Console to start using the Console agent.
Enable Backup and Recovery
Finally we can now enable Backup and Recovery in the NetApp Console (formerly BlueXP) to establish a comprehensive data protection strategy for our on-premises ONTAP (in my case just a simulator) system.
We configure local Snapshot copies for fast, space-efficient restores and define backup policies to object storage for long-term retention and protection against data loss.
In the NetApp console navigate to Storage -> Management, select the OnPrem ONTAP system you want to enable Backup and Recovery and on the shown up right bar click on Enable for Backup and Recovery as shown below.
Select Backup Volumes.
Backup and Recovery in the NetApp Console is not limited to protecting individual ONTAP volumes. The service also supports protecting applications and virtual machines, enabling consistent backups for workloads such as databases or VM environments in addition to standard volume-level protection.
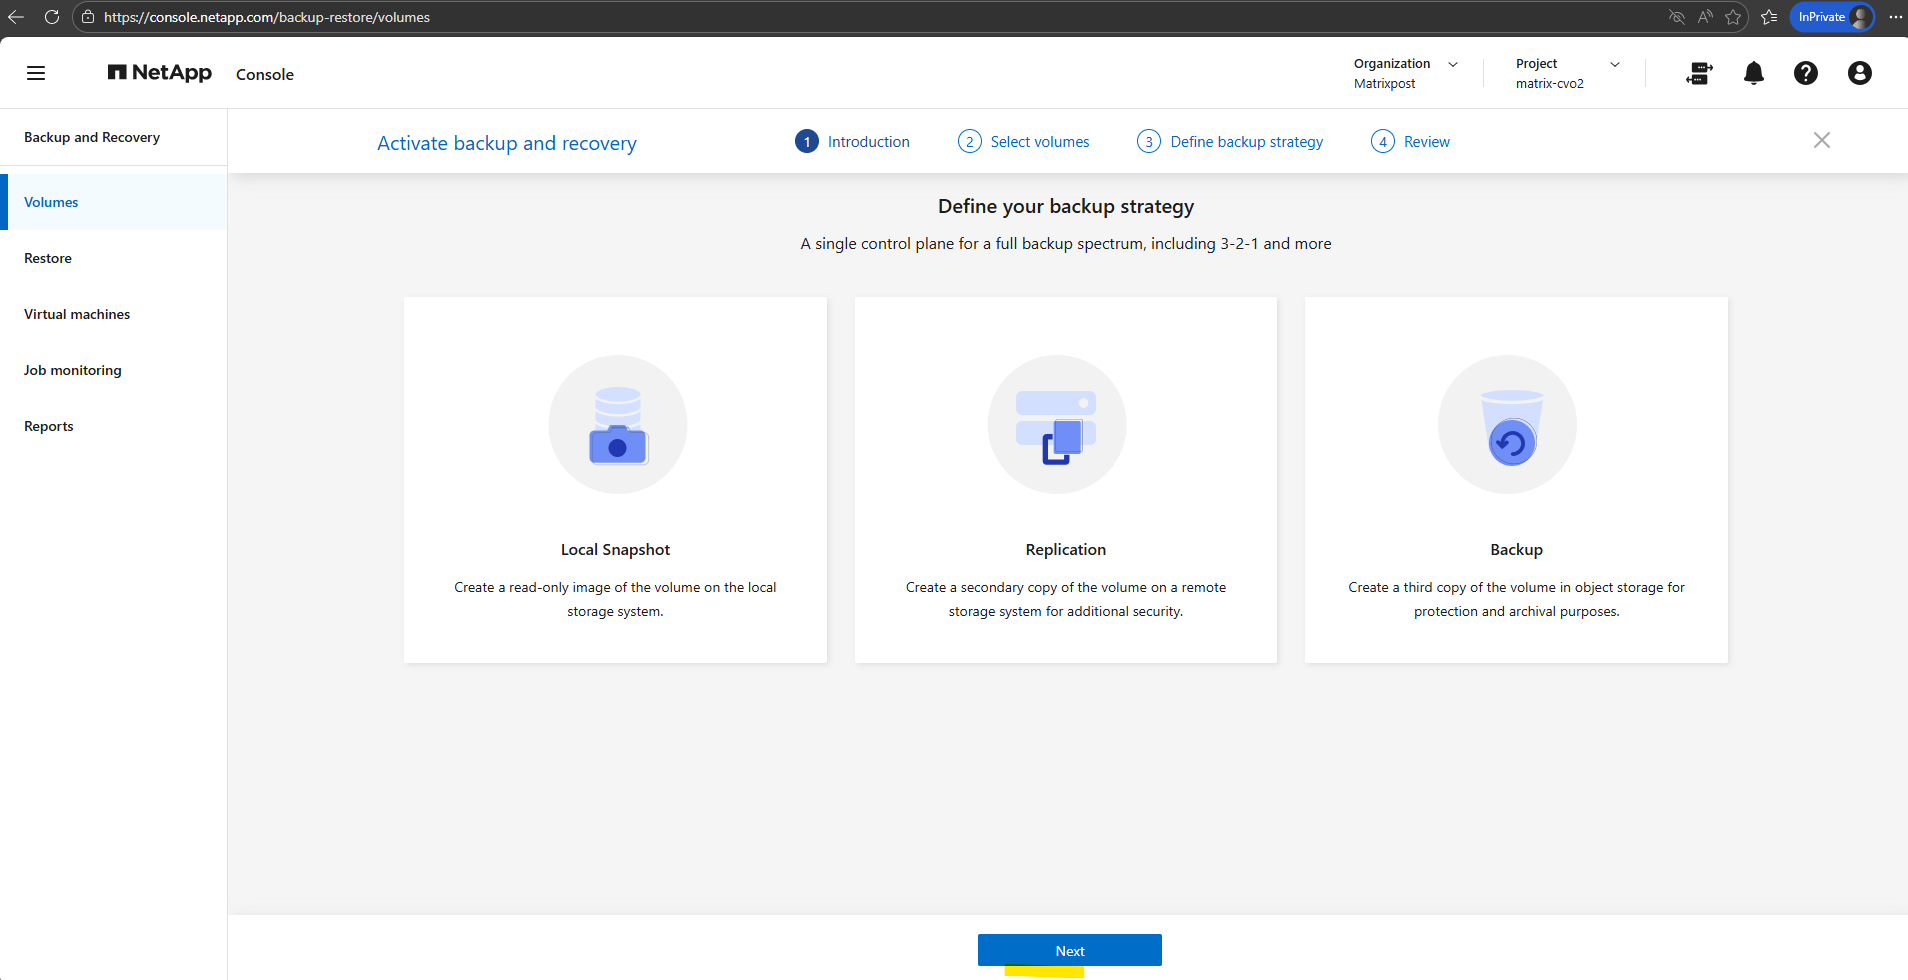
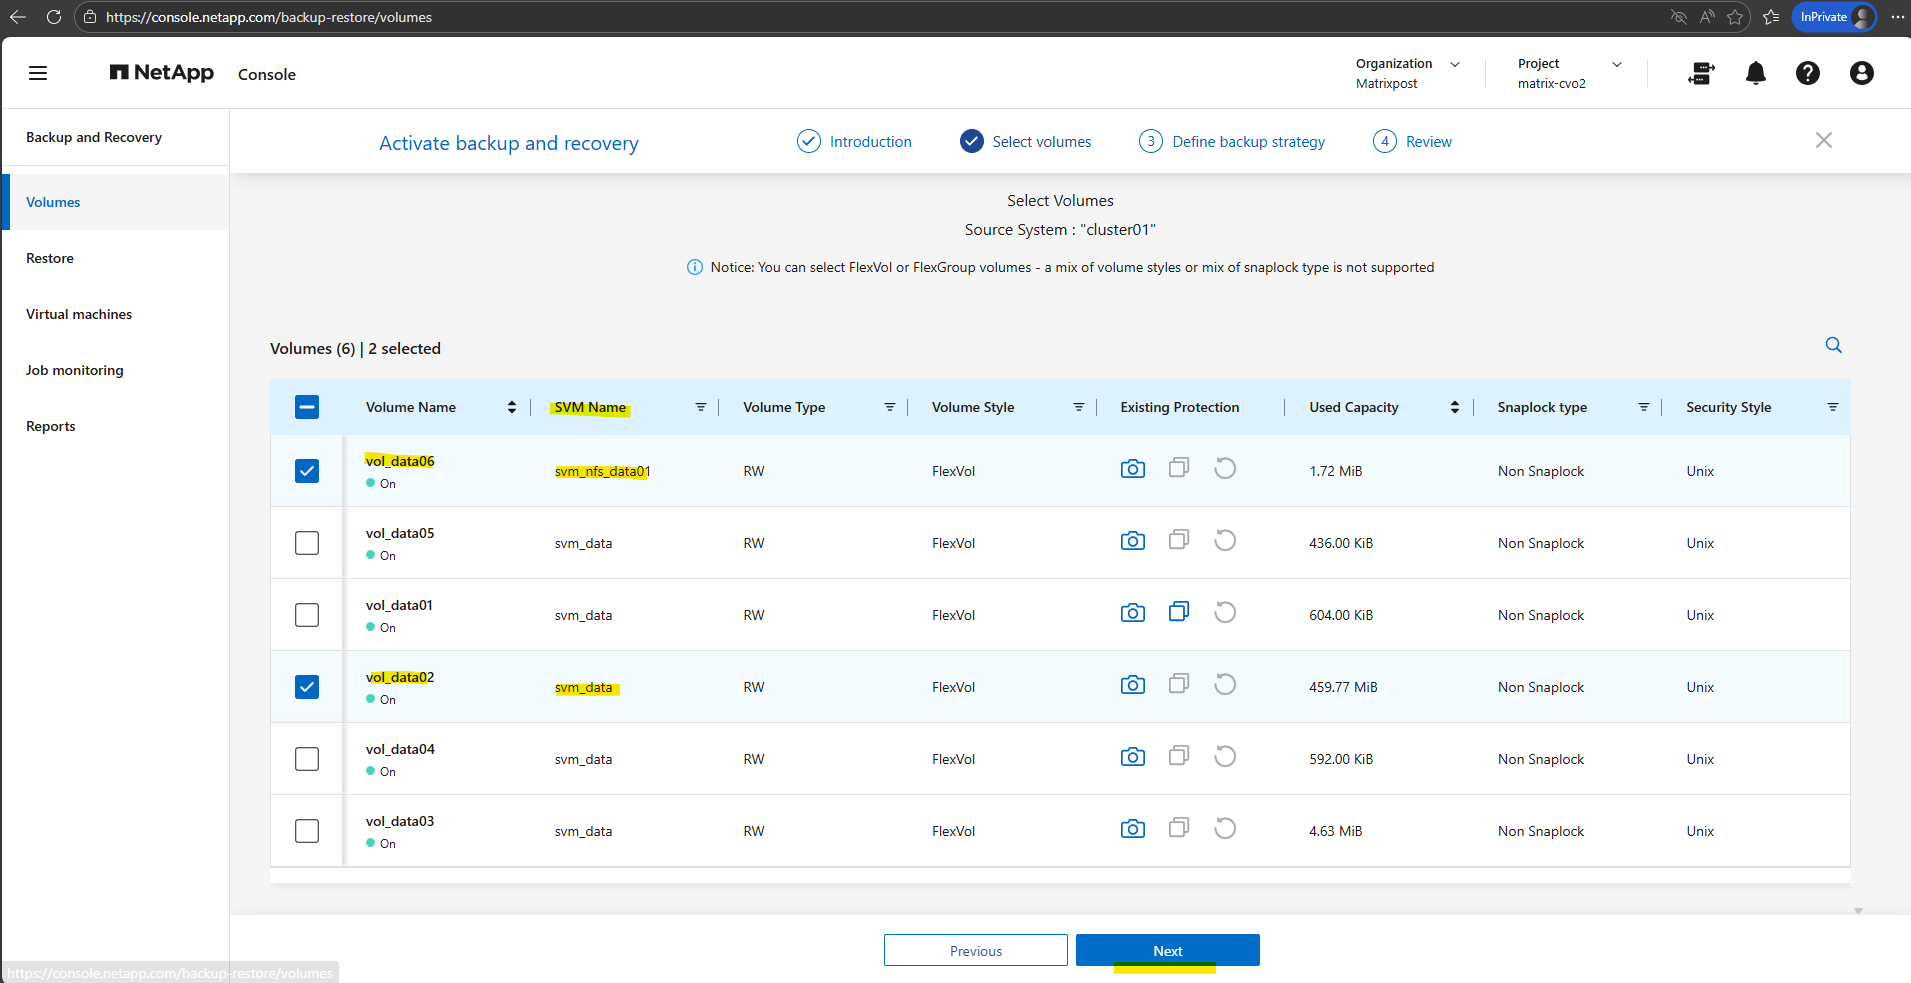
Select the volumes you want to protect and click on Next. I will select below the two highlighted volumes, the volume for NFS exports and the volume for CIFS shares.
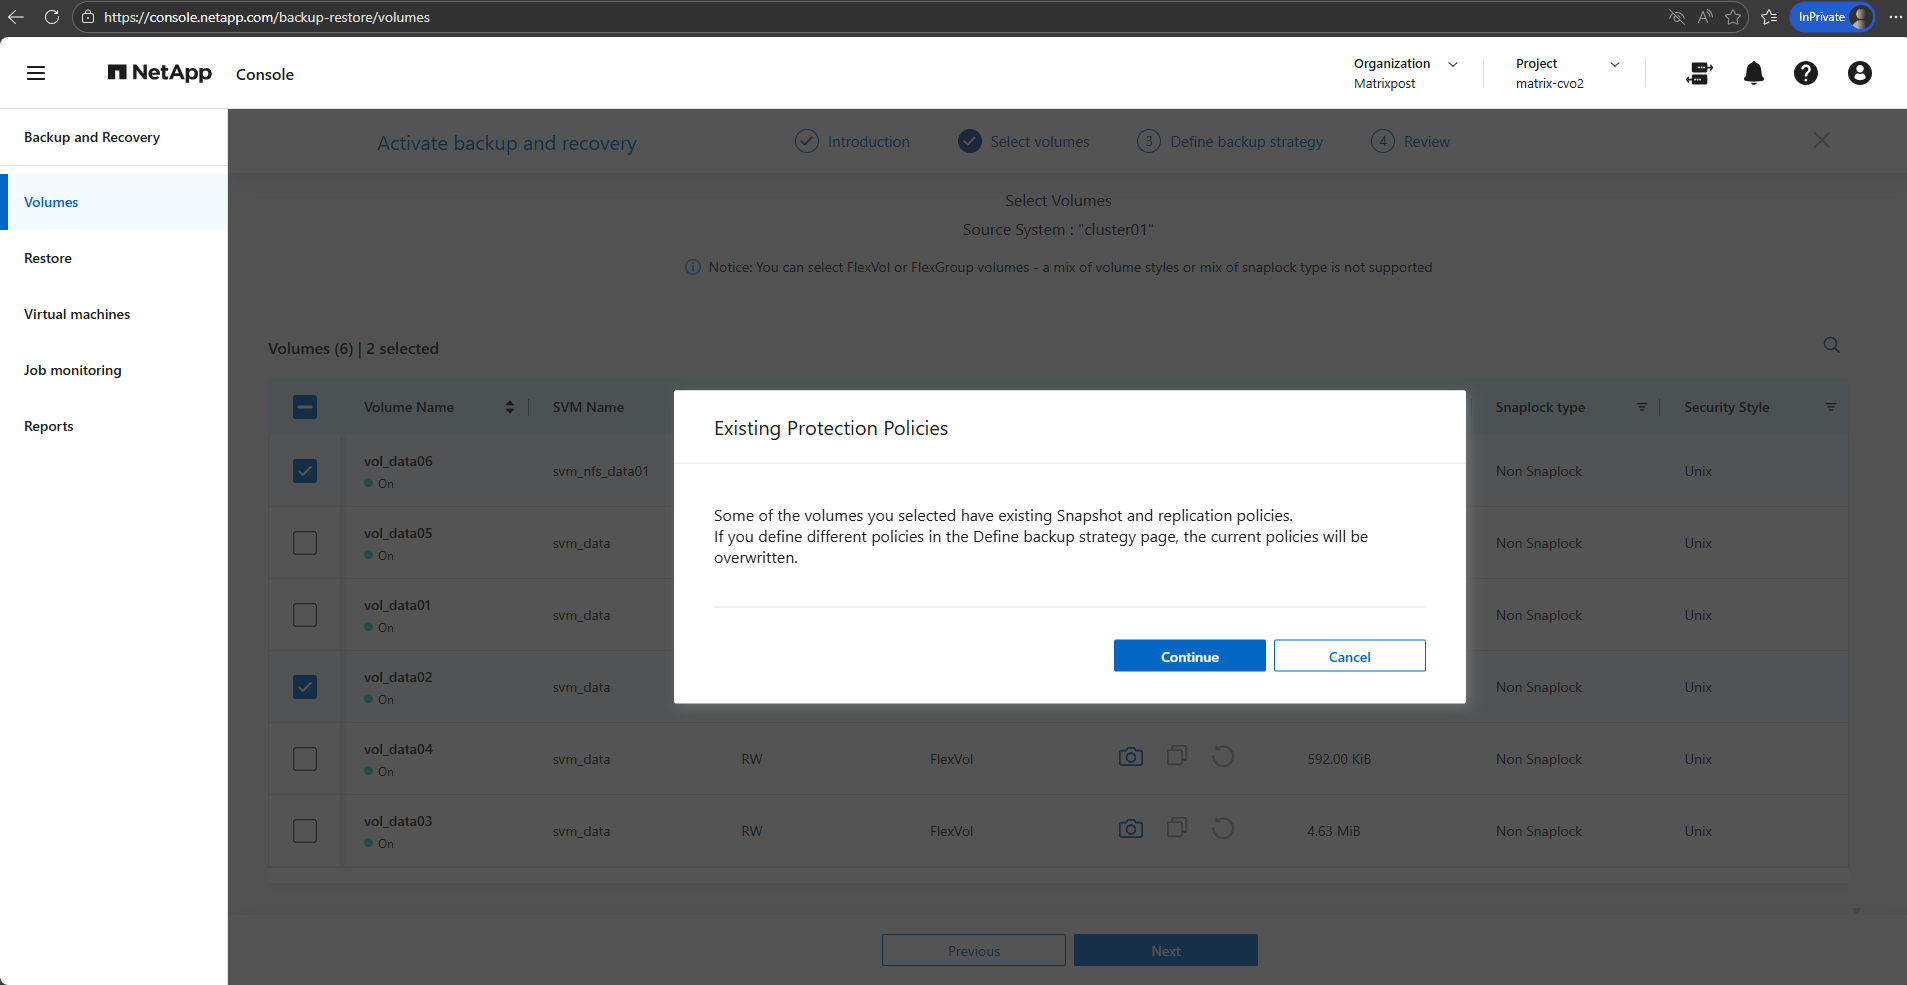
When selecting the volumes above to protect, we may see a notification like below stating that some volumes already have Snapshot and replication policies assigned.
This warning indicates that any policies defined in the Define Backup Strategy step will replace the existing configurations, ensuring that the selected volumes follow a consistent protection model.
Before proceeding, it is recommended to review the current policies to avoid unintentionally changing retention settings or overwriting an established data protection approach.
- Local Snapshots: If you already had a policy (e.g., “keep 5 daily snapshots”), the wizard will overwrite that with whatever you select in the “Local Snapshots” step of the wizard.
- Backup (Cloud): This adds the rule to send those snapshots to Azure Blob storage (the part that costs ~$0.05/GiB).
- Policy Conflict: If you click Continue and finish the wizard, the NetApp console will push a new configuration to the OnPrem ONTAP instance. Existing snapshots aren’t usually deleted immediately, but the schedule that creates them will change
The “Backup” vs. “Snapshot” Distinction: * Snapshots are local (stored on the OnPrem ONTAP system disks). They are fast but don’t protect you if the OnPrem ONTAP system disk/instance fails.
Backups are the ones sent to Azure Blob. This is what triggers the extra billing.
CIFS/NFS Differences: * For your CIFS (SMB) shares, snapshots are what allow Windows users to use the “Previous Versions” tab to recover files. If you change the policy here, just ensure you keep enough “Local Snapshots” so users can still do self-service recovery without you having to pull data back from the Cloud (which costs money).
Configure and Activate Backups and Local Snapshots
Now we need to choose which protection methods to enable, local Snapshots, replication, and backup, and either assign existing policies or create new ones aligned with our retention requirements.
We also provide the necessary details for the NetApp Console to automatically deploy the Azure Storage account and finalize the setup by activating the backup.
All protection options are selected by default. Select the options that you want to use for this system.
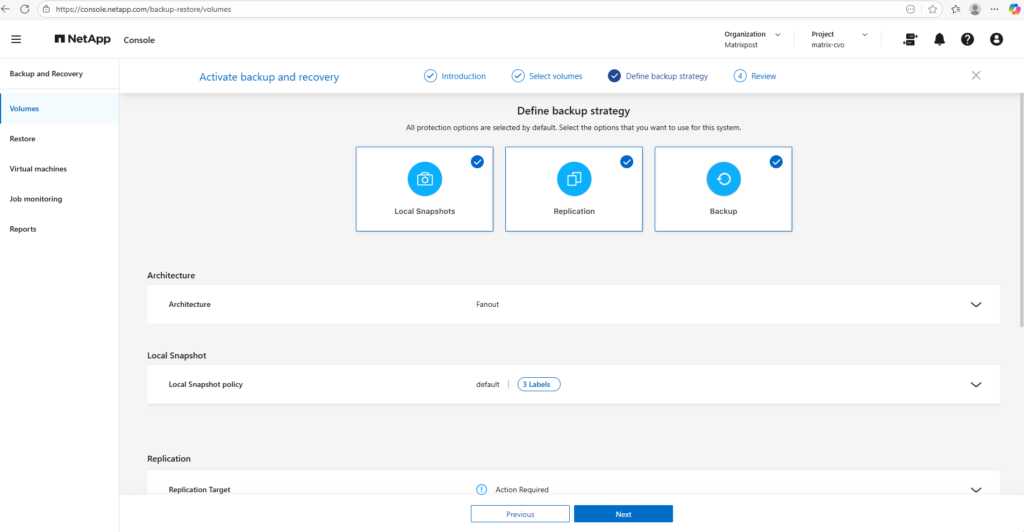
I will just use local snapshots and backups below.
Replication is intentionally skipped in this lab, as it is typically used for cross-system disaster recovery scenarios and our setup currently consists of a single OnPrem ONTAP system instance.
If you uncheck Local Snapshots but leave Backup checked, ONTAP will still create a snapshot temporarily to move the data to the cloud, but it won’t keep a permanent copy on your OnPrem ONTAP system disks for fast recovery.
Replication: This is for sending data to another ONTAP system (DR). Since you likely only have one OnPrem ONTAP system instance, you should uncheck this one to keep things simple.
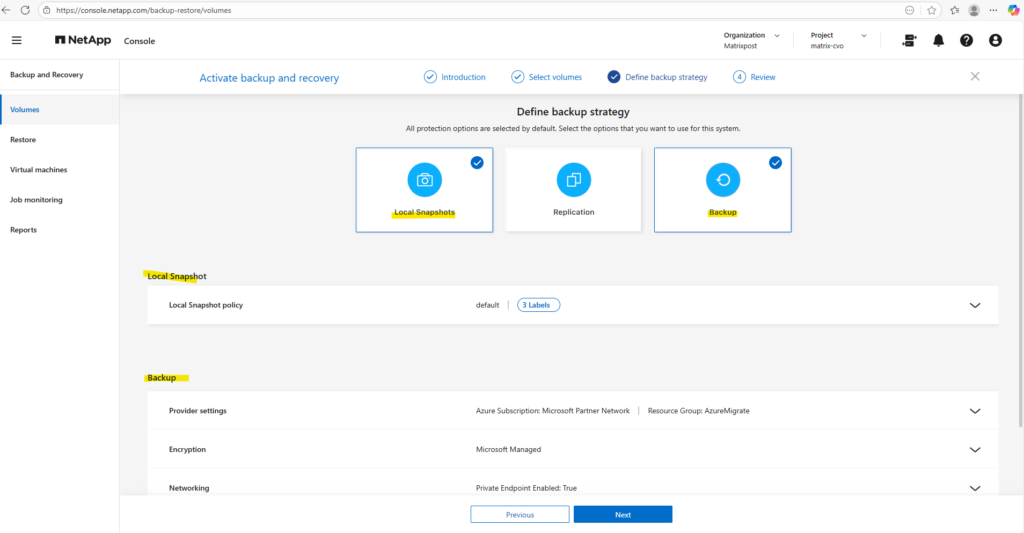
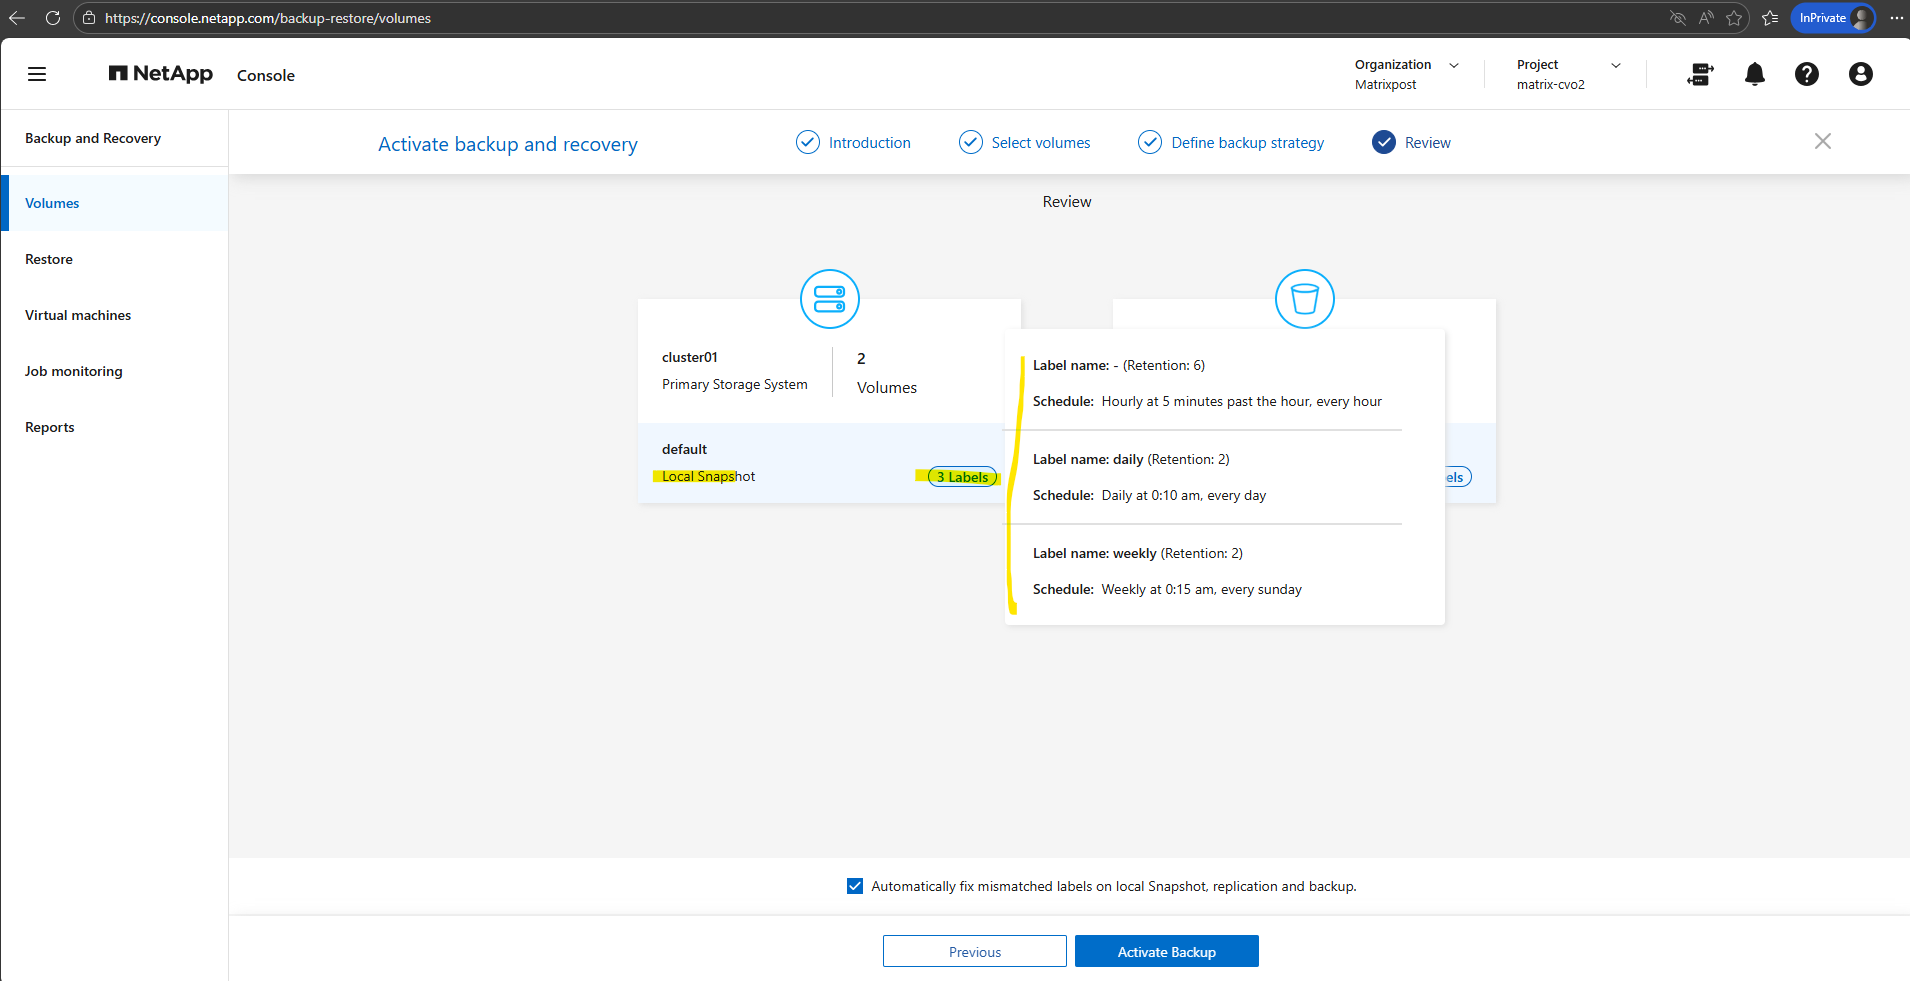
I will leave the default policy with the settings you can see below when moving the mouse over the corresponding label. By clicking on the Create Policy button on the right, we can create a new custom policy.
Those labels are how ONTAP links a specific schedule (when it runs) to a retention (how many it keeps).
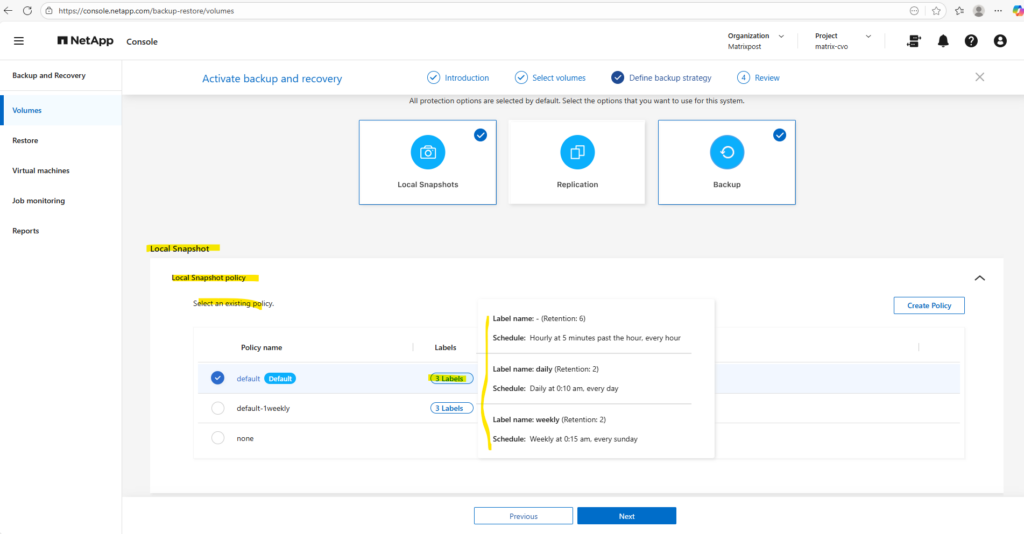
For the backup settings we first need to configure the cloud backup target.
In this step, I linked my On-Premises ONTAP instance to an Azure Blob storage account, which serves as the secure, off-site repository for all volume backups.
I opted for NetApp console to automatically create a new storage account, ensuring it was provisioned with cost-optimized Locally Redundant Storage (LRS) and the “Cool” access tier to match my lab environment requirements.
After adding the Azure credentials and linking the subscription, they become available in the Enable Backup and Recovery wizard under Backup → Provider Settings.
The wizard can now list the Azure subscription, region, and resource group, allowing the backup destination to be configured.
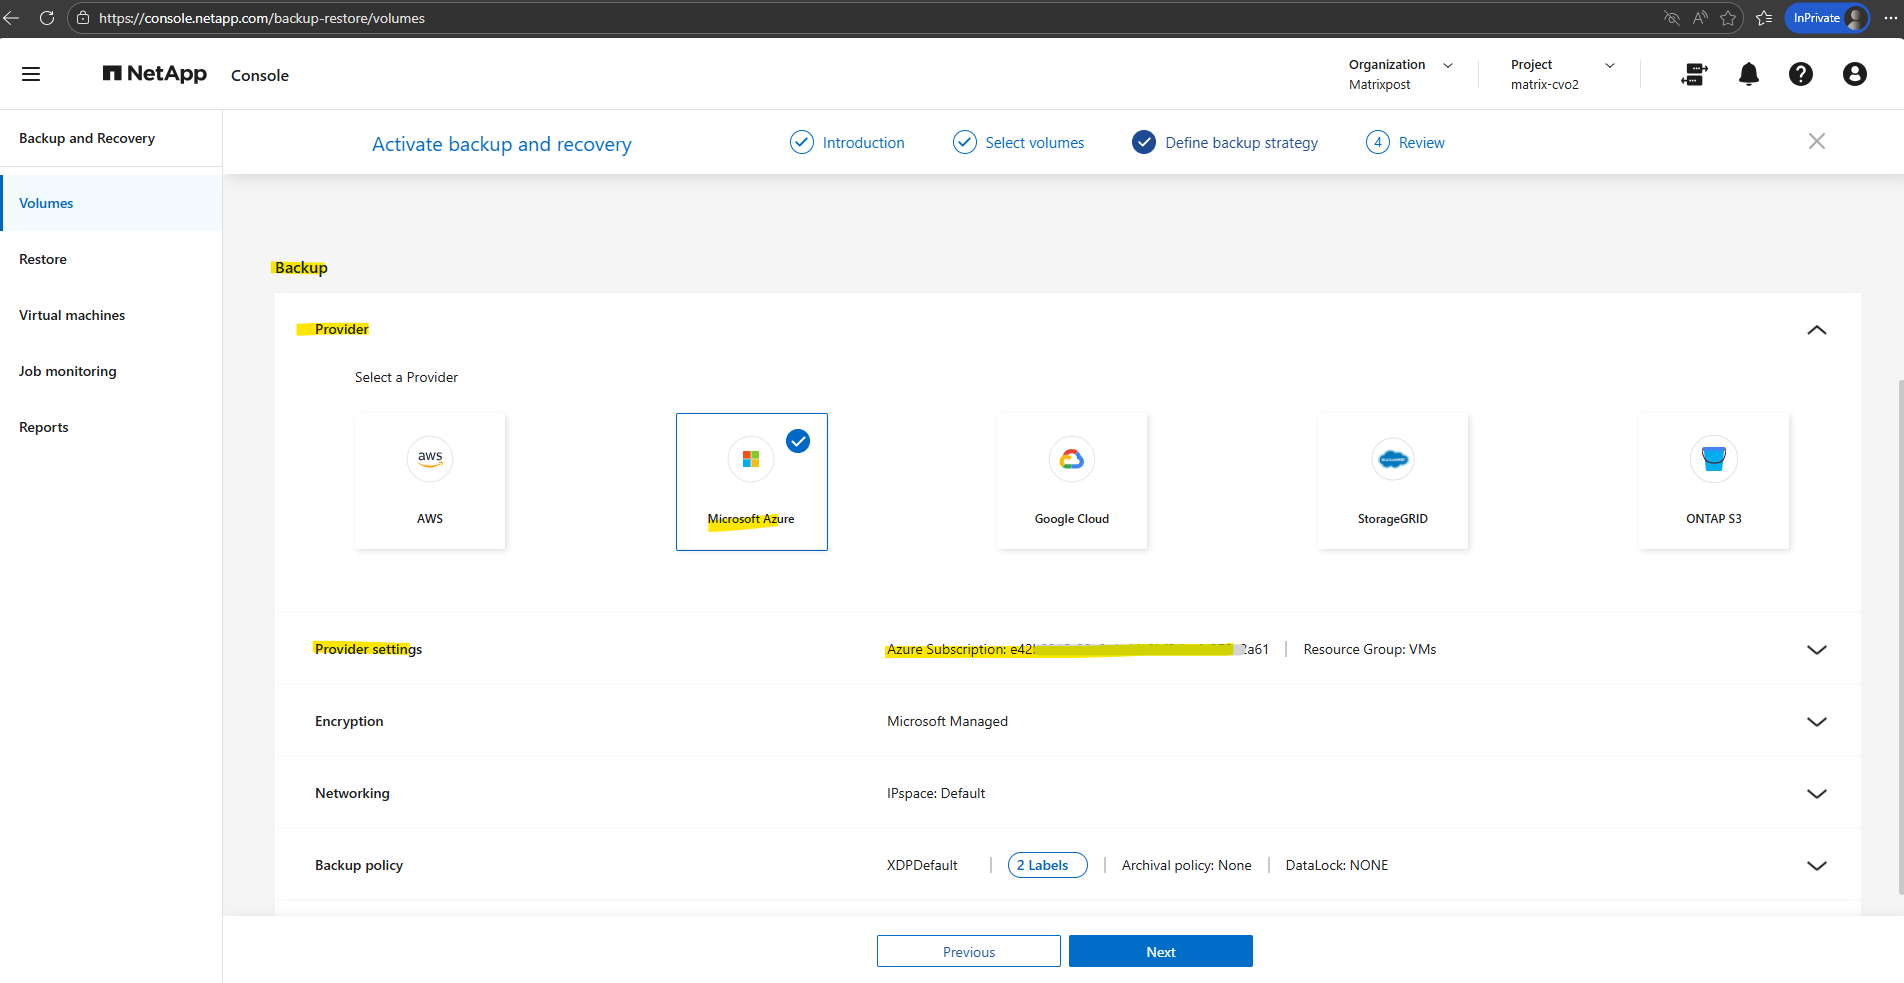
The term “bucket” remains fixed in the interface because NetApp console is a cross-cloud platform; NetApp uses this universal storage industry term (originally popularized by AWS S3) to provide a consistent management experience whether you are backing up to Azure Blob, AWS S3, or Google Cloud Storage.
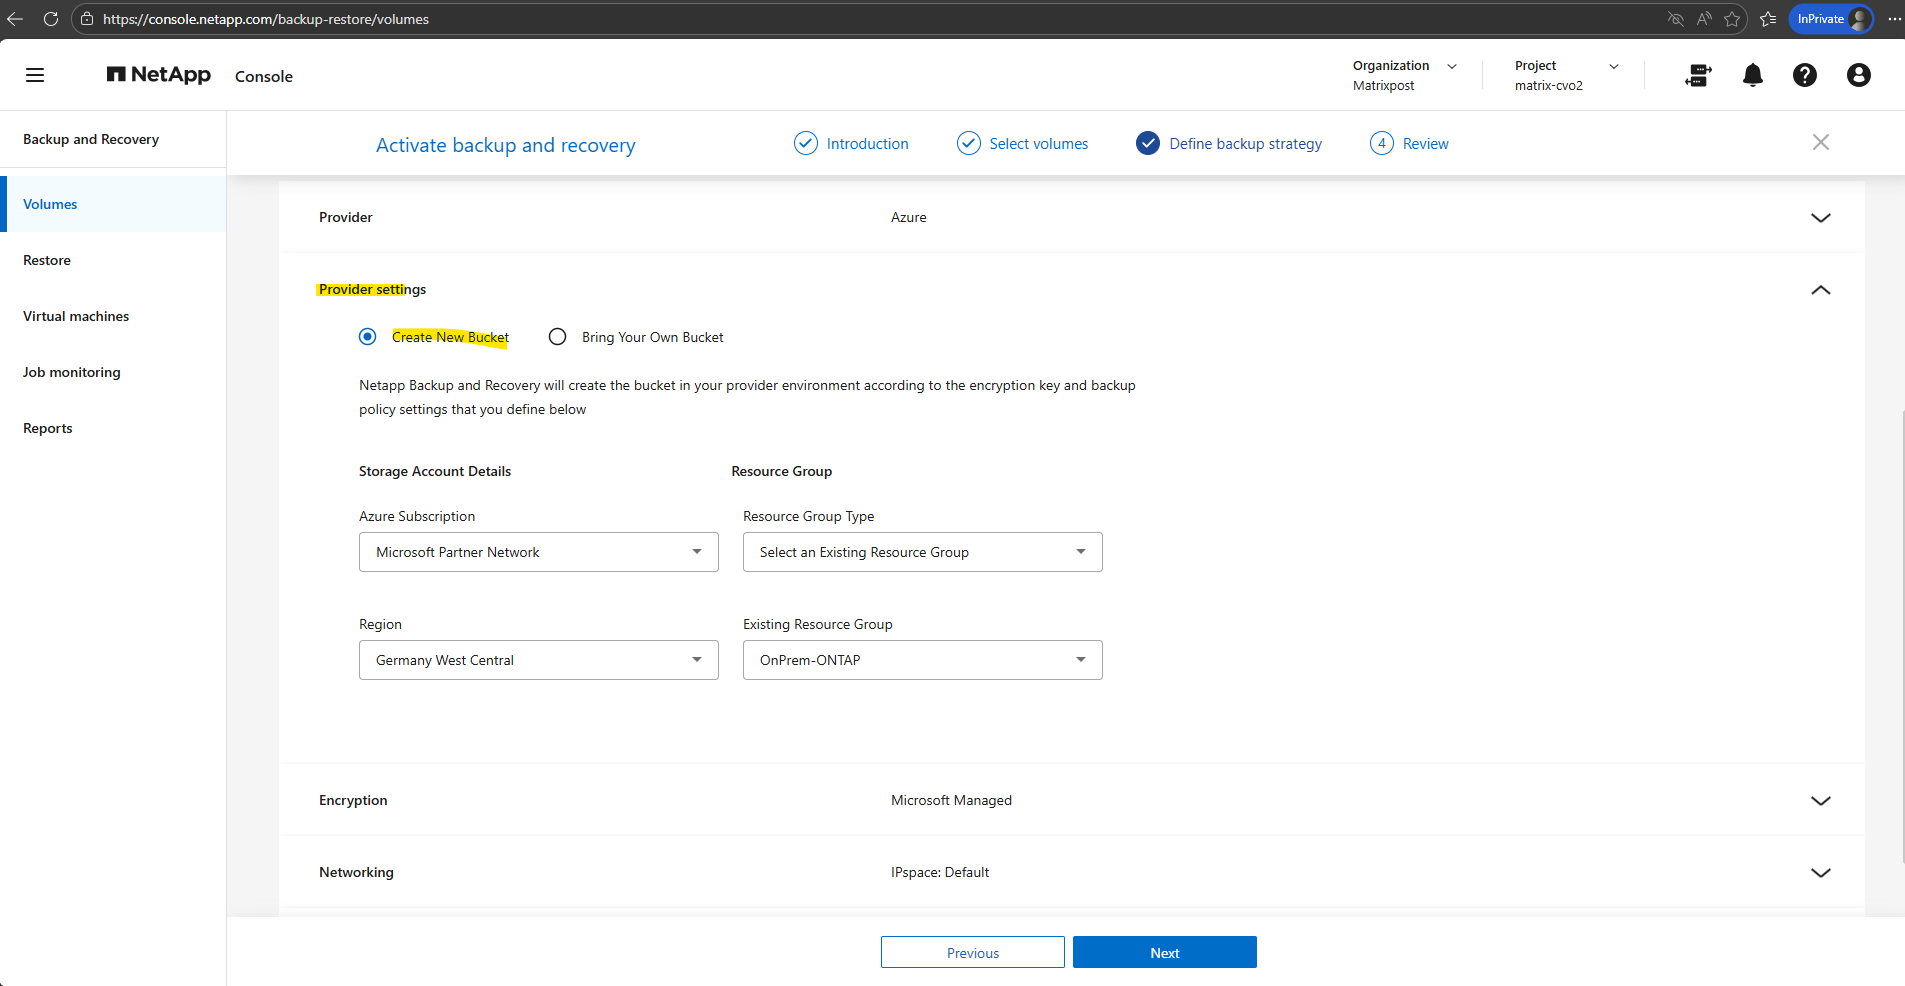
In the Encryption section, by default, Microsoft-managed keys are used, meaning Azure automatically handles the encryption and rotation of keys for your Storage Account, providing a seamless, no-maintenance security layer that is perfect for most test or standard environments.
For this lab environment I will not use private endpoints and instead backup traffic is traversing the public internet.
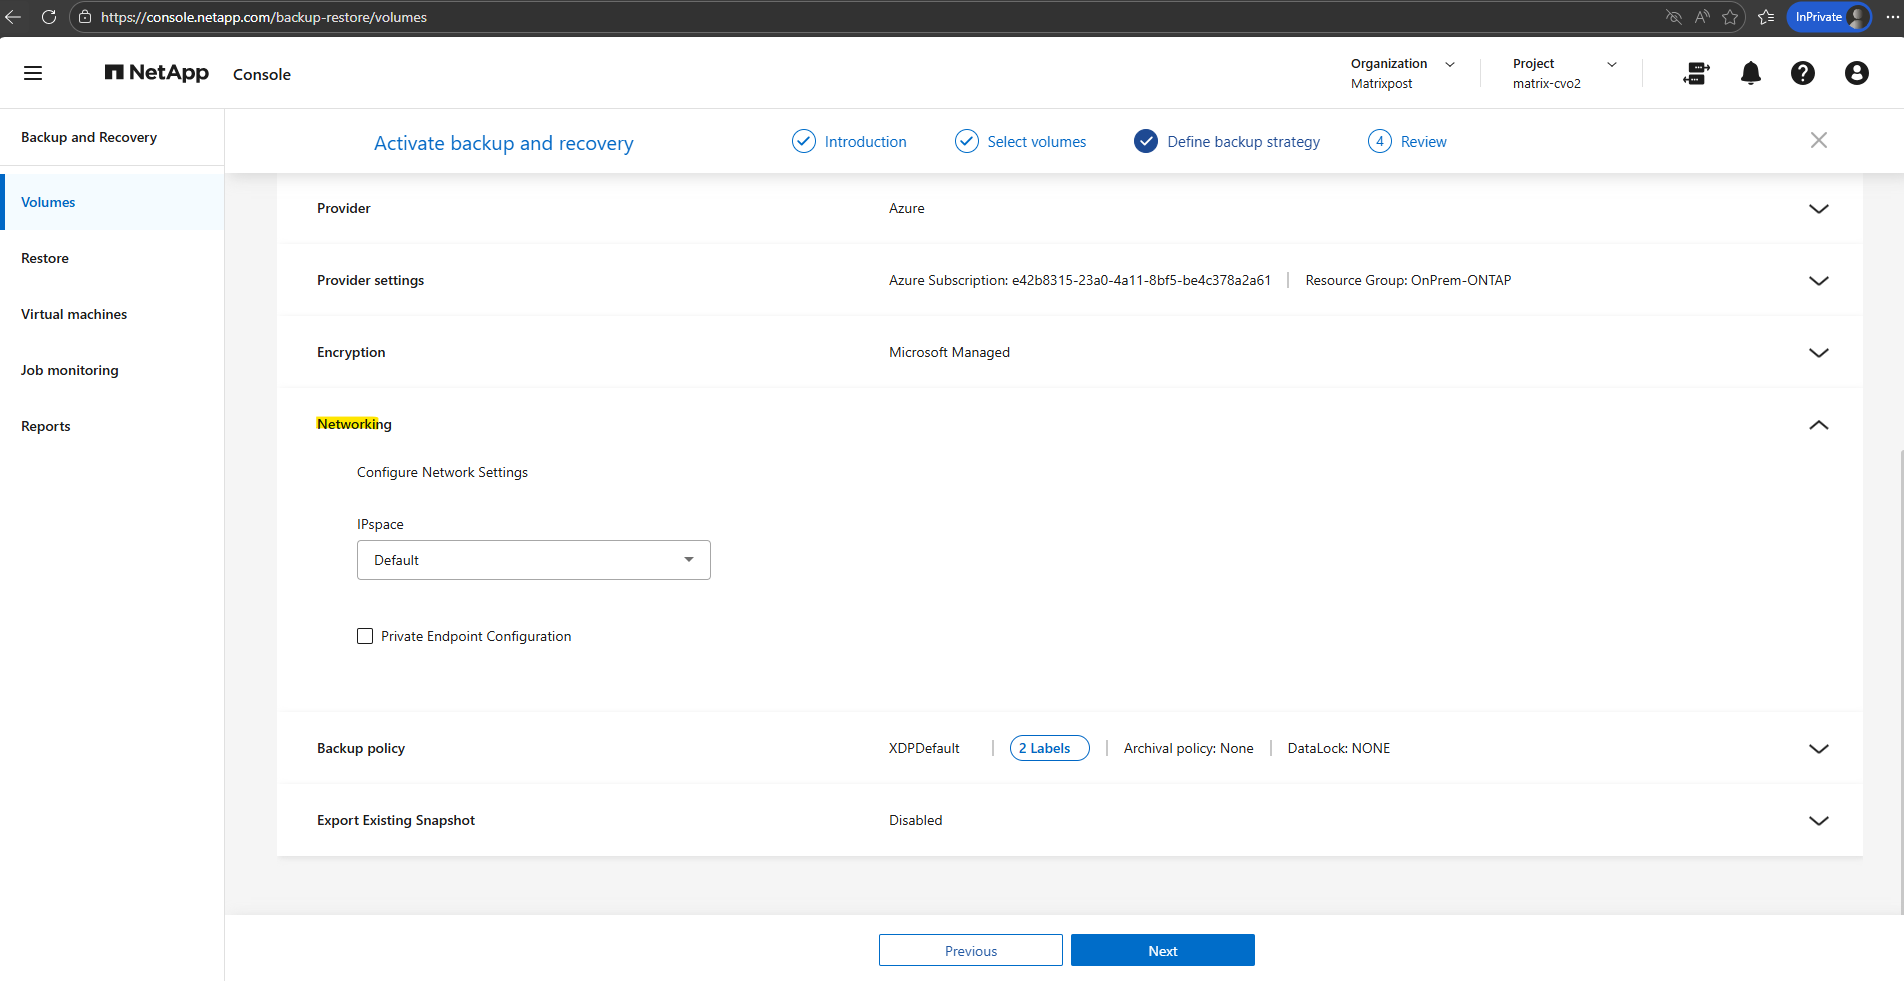
More about Azure private endpoints you will also find in my following post.
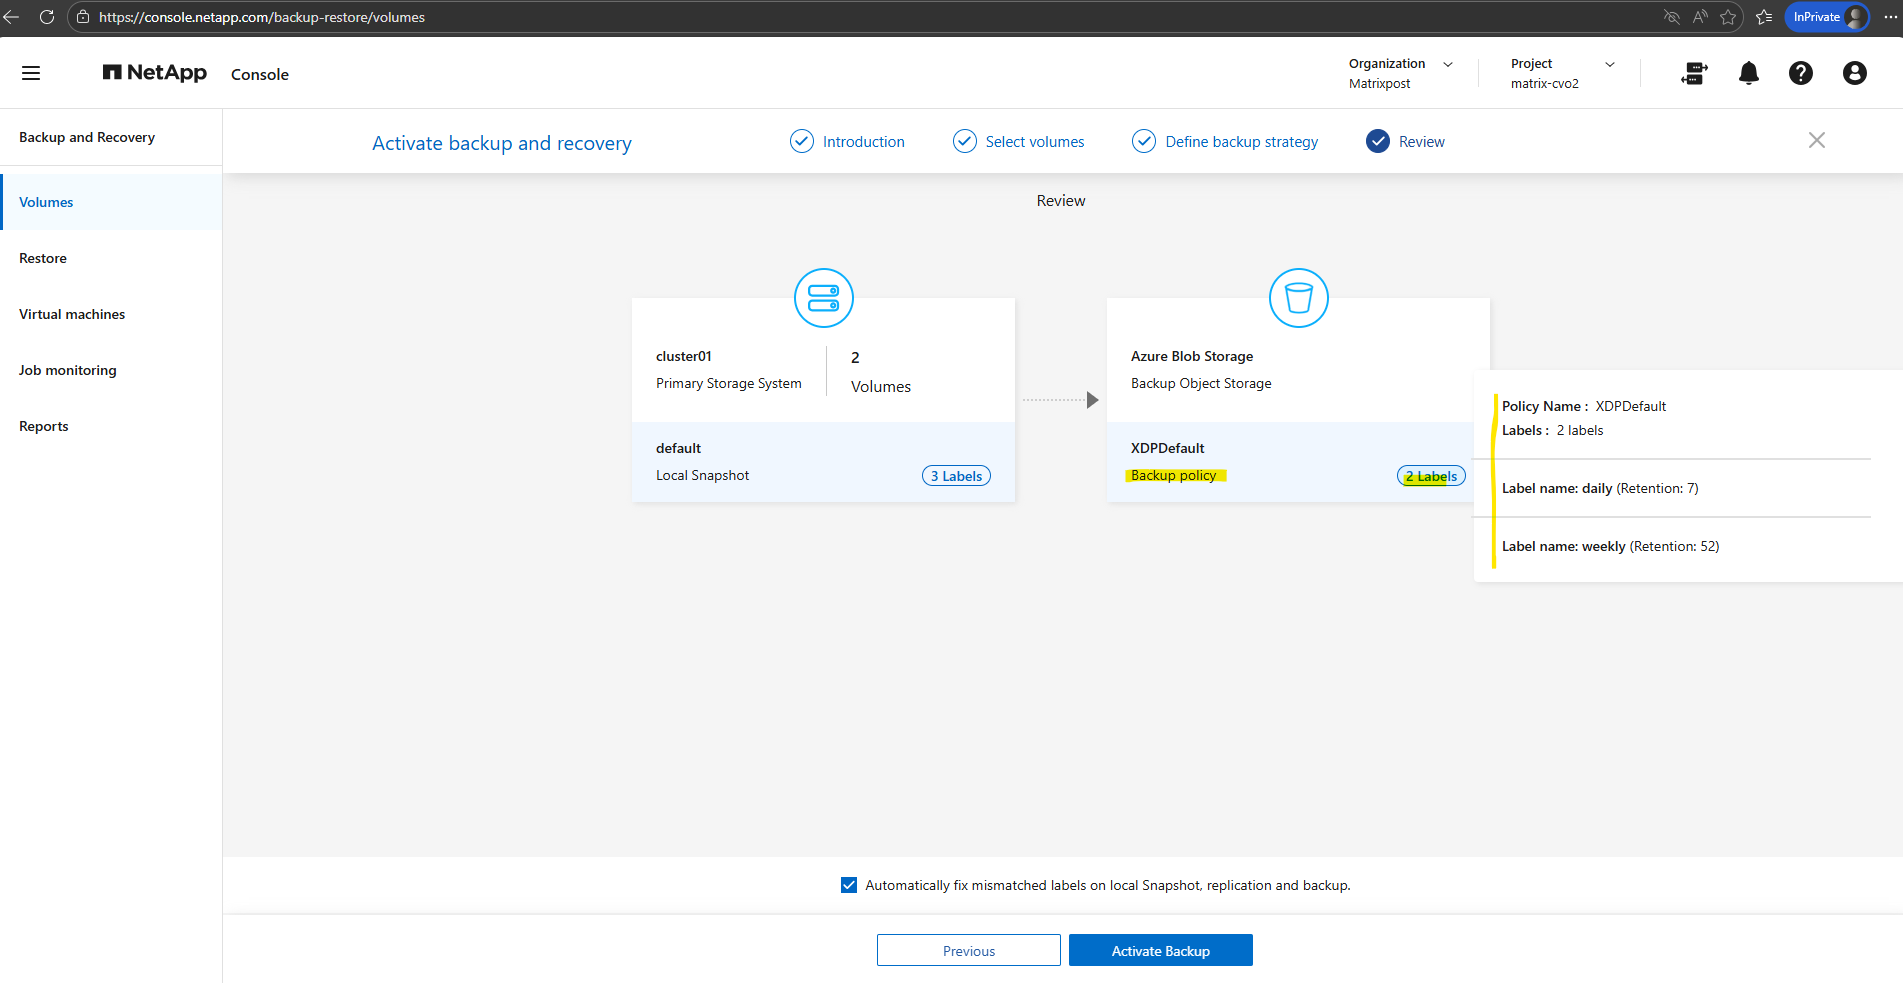
Before activating the backup, we can hover the mouse over the local snapshots and backup policy labels to finally check these settings as shown below.
The backup policy settings.
Finally we can activate the backup by clicking on the button Activate Backup below.
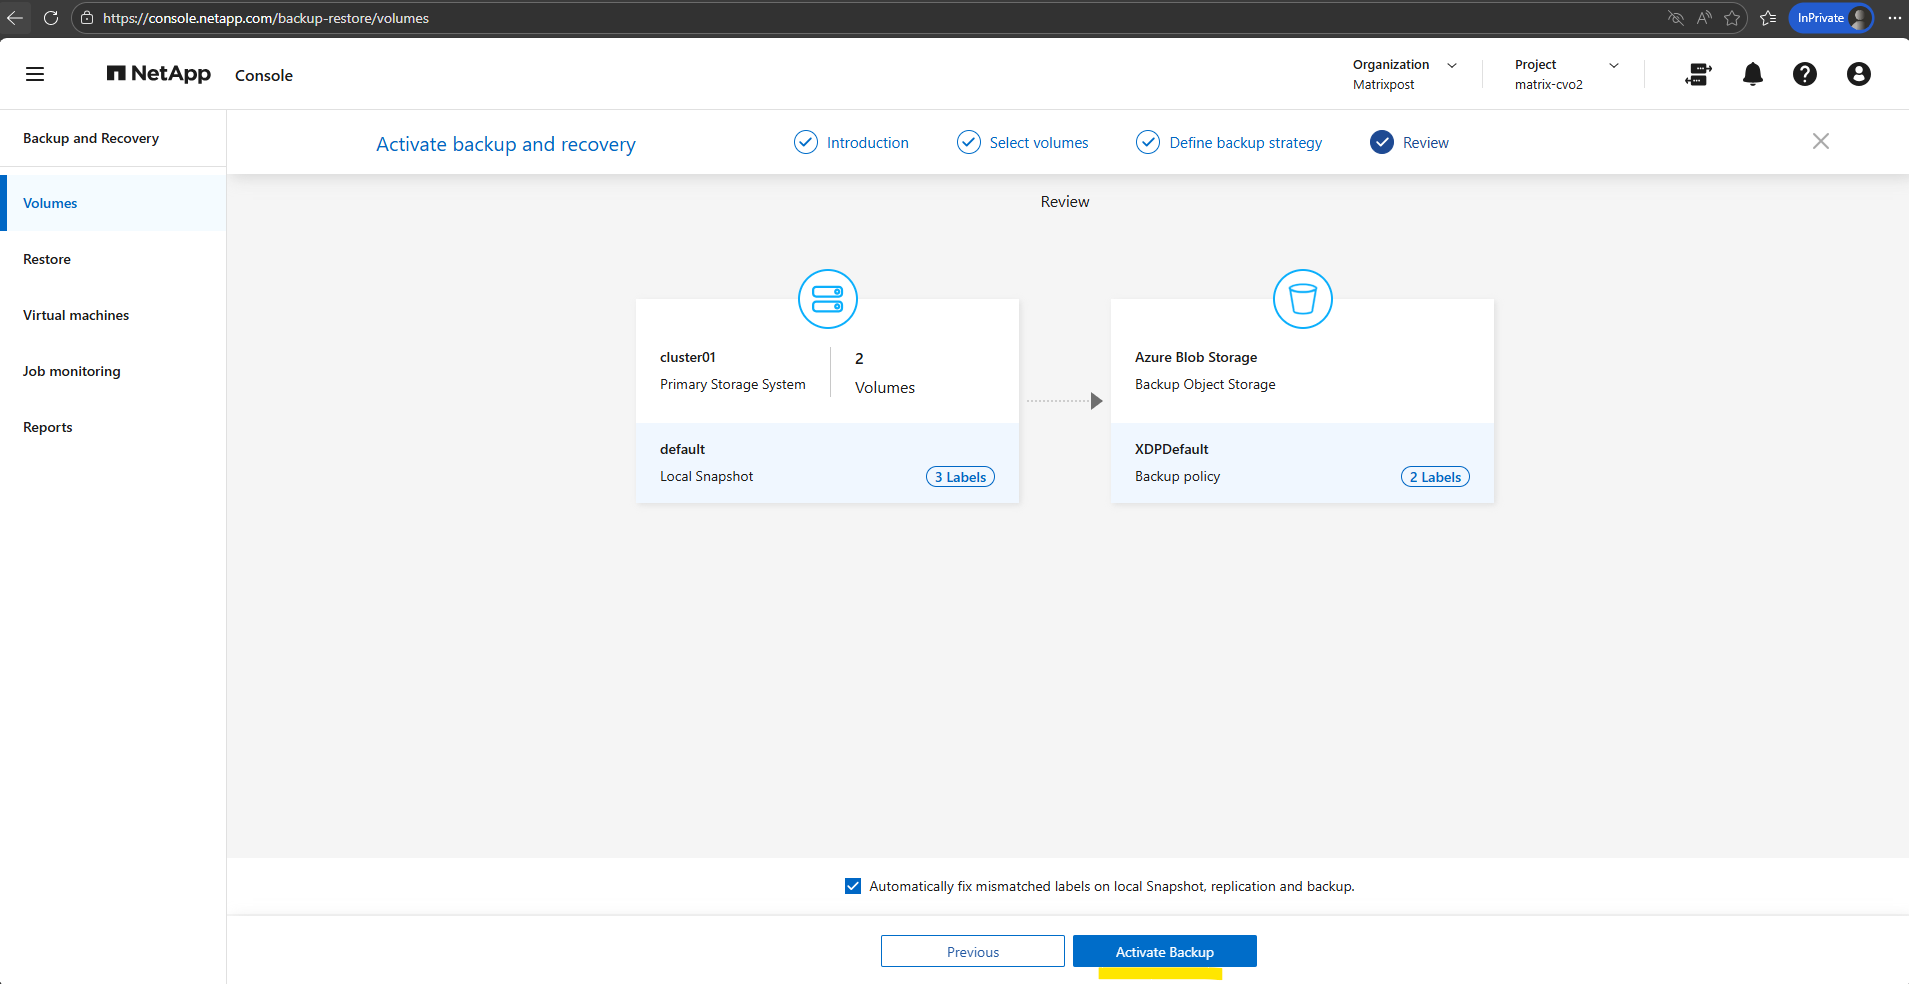
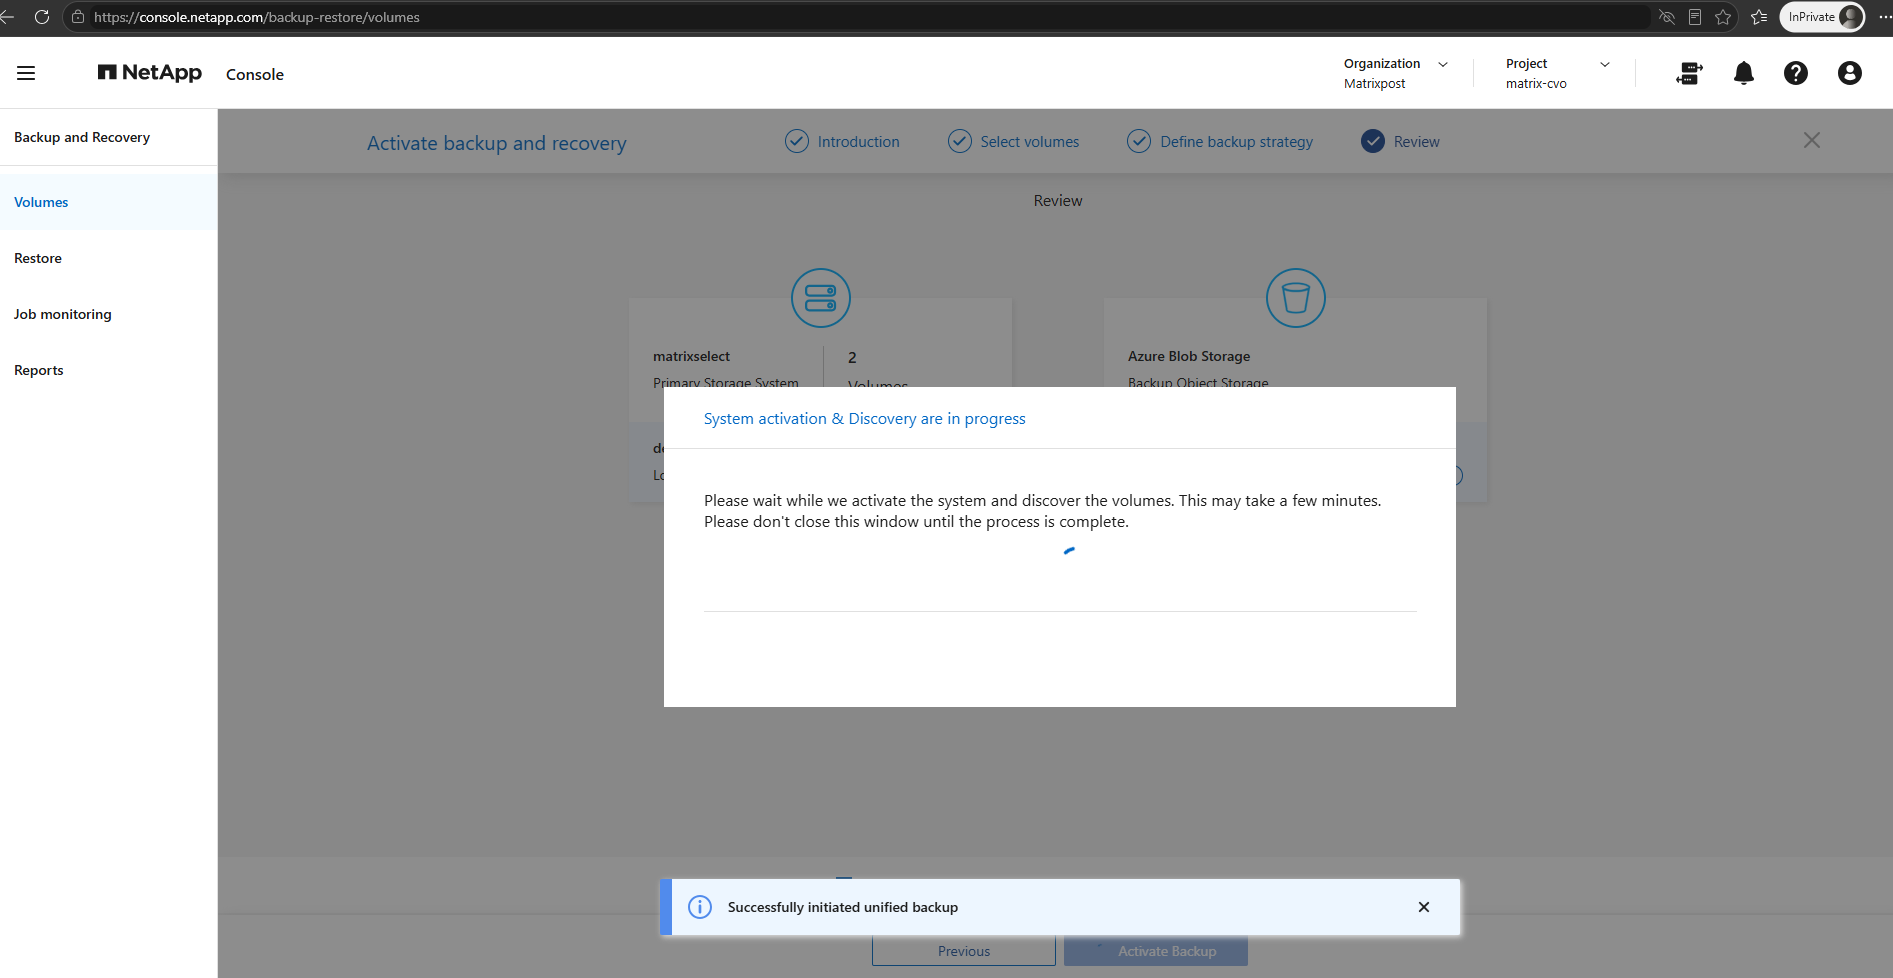
Please wait while we activate the system and discover the volumes. This may take a few minutes. Please don’t close this window until the process is complete.
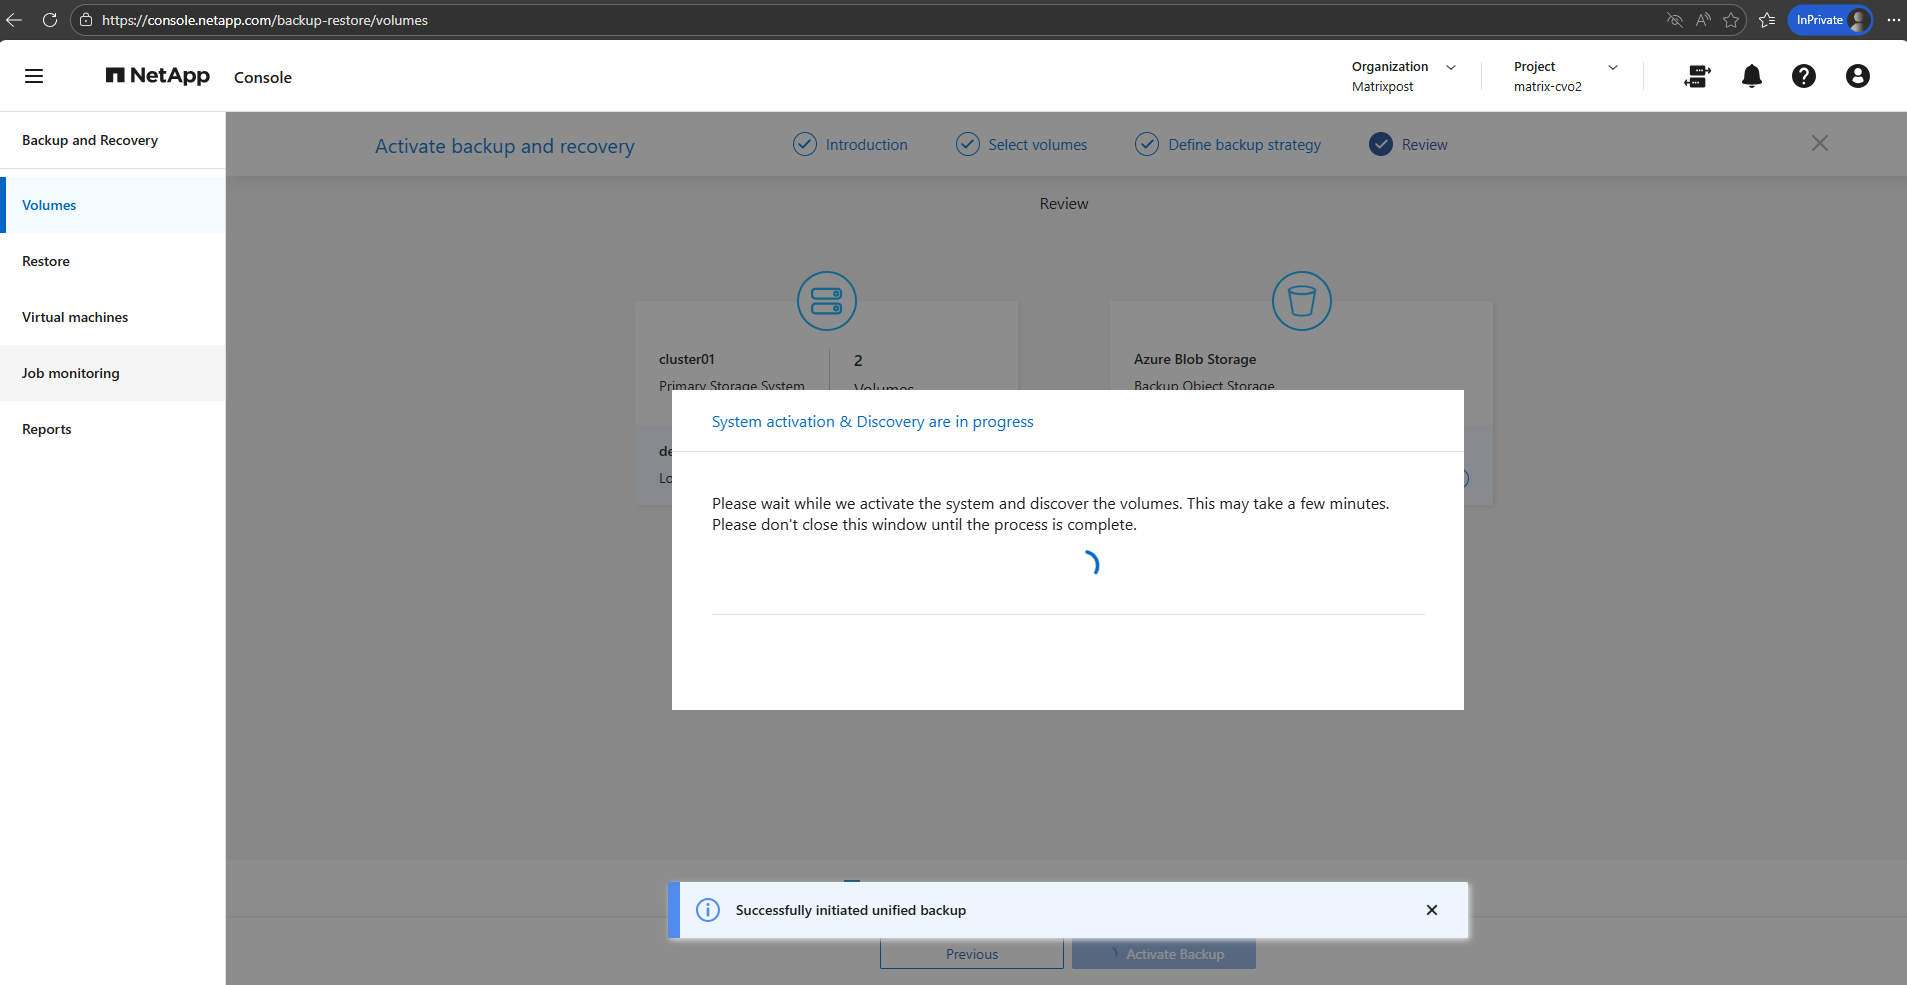
Looks good, after a few minutes we will get redirected to the Backup and Recovery -> Volumes page as shown below.
I will also trigger a initial backup for our selected volumes.
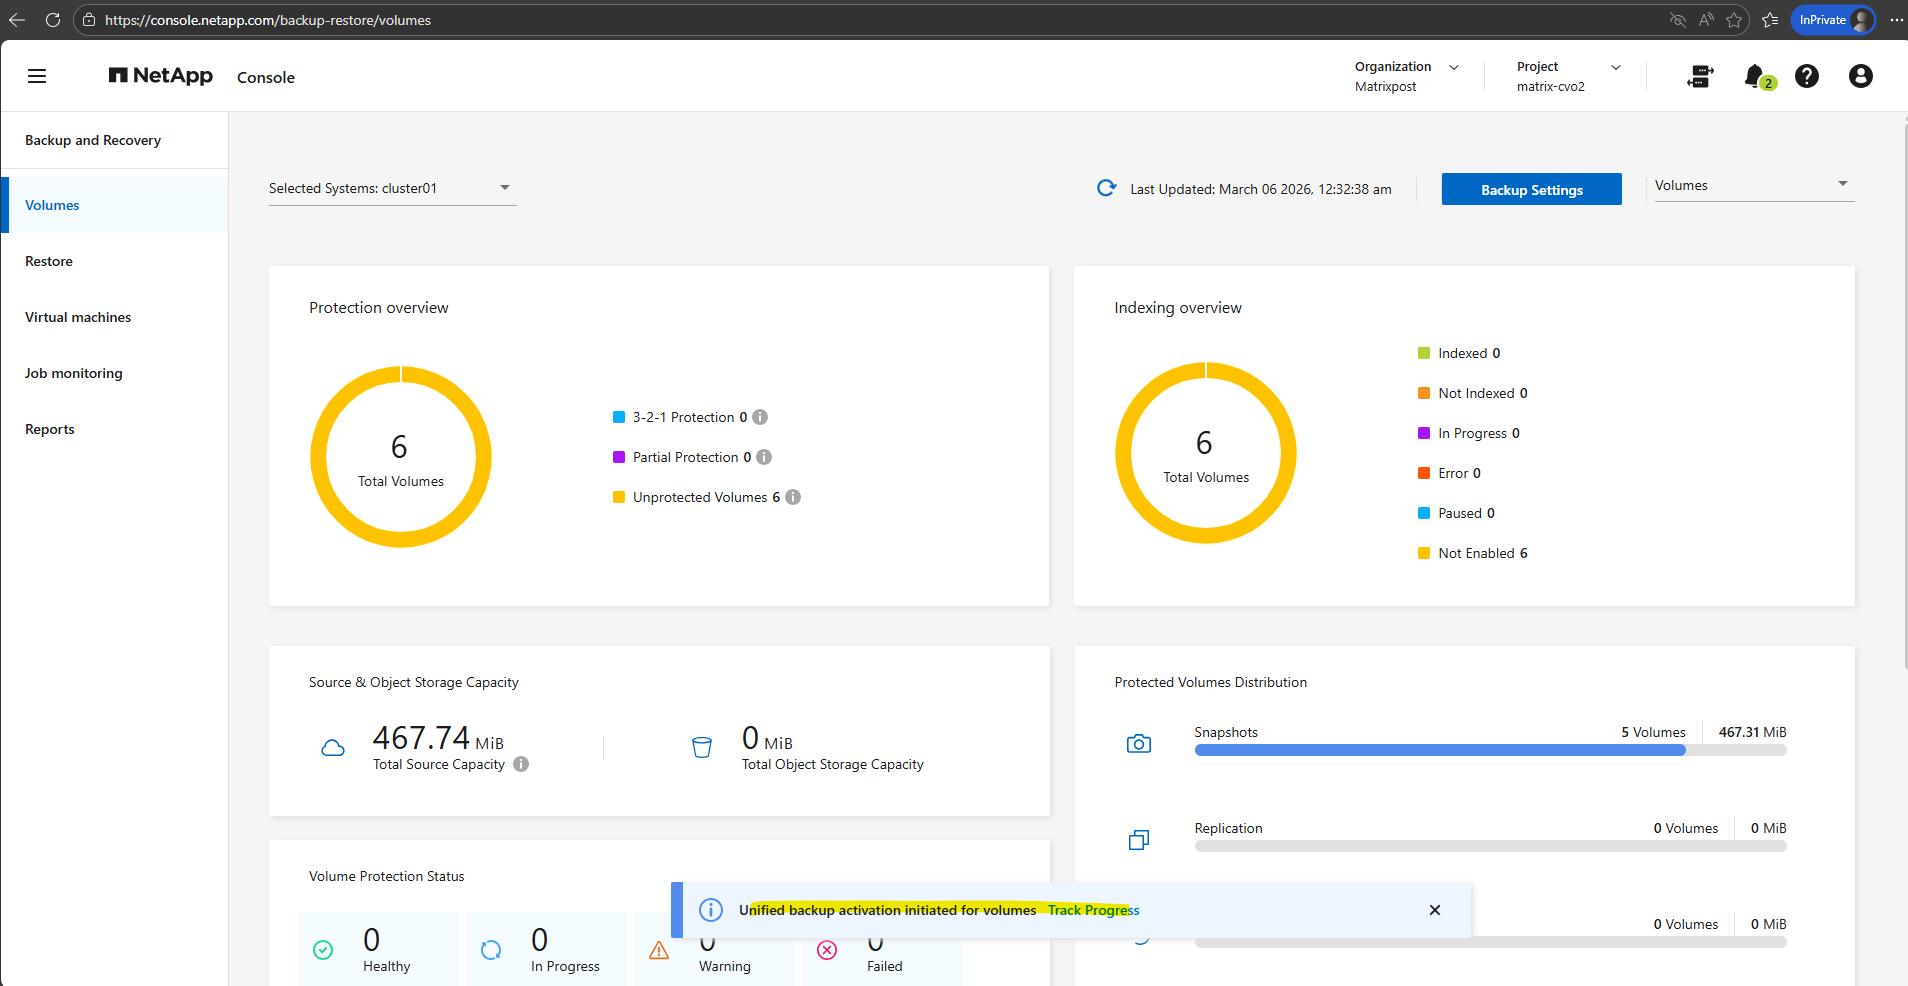
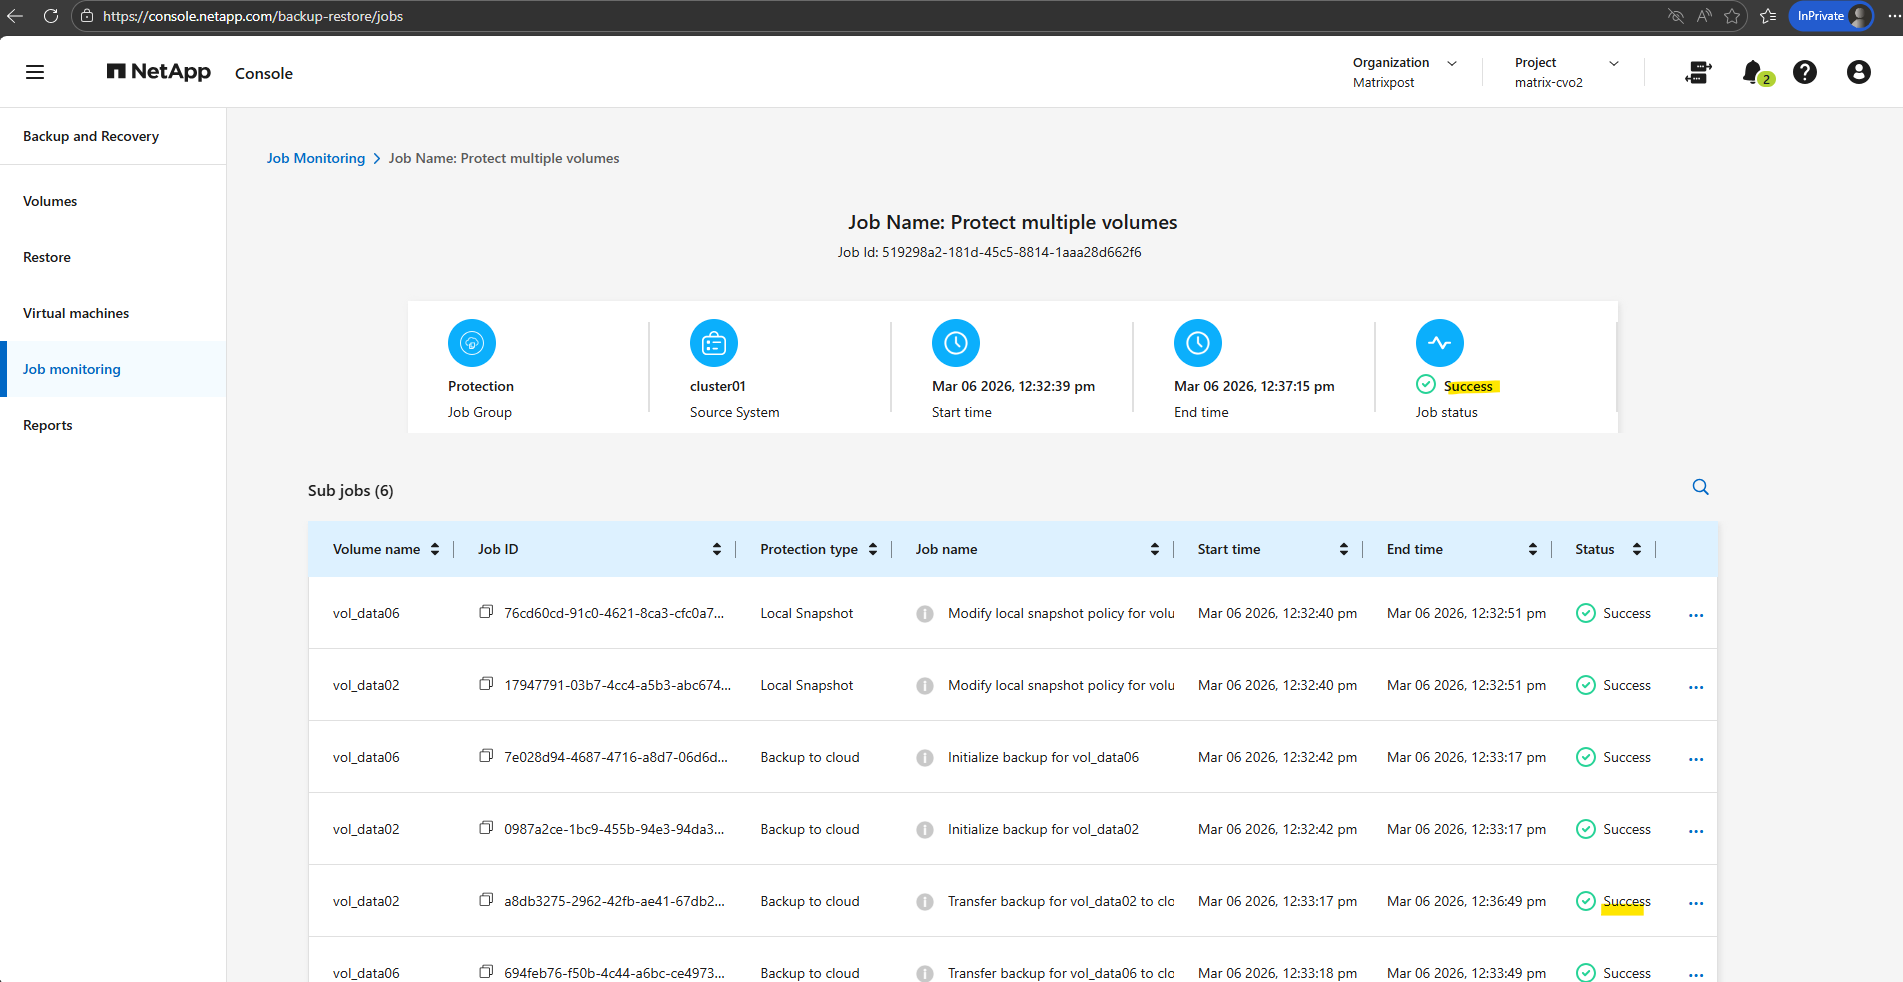
Currently the transfer to the object storage (Azure storage account – blob storage) is running for my cifs volume.
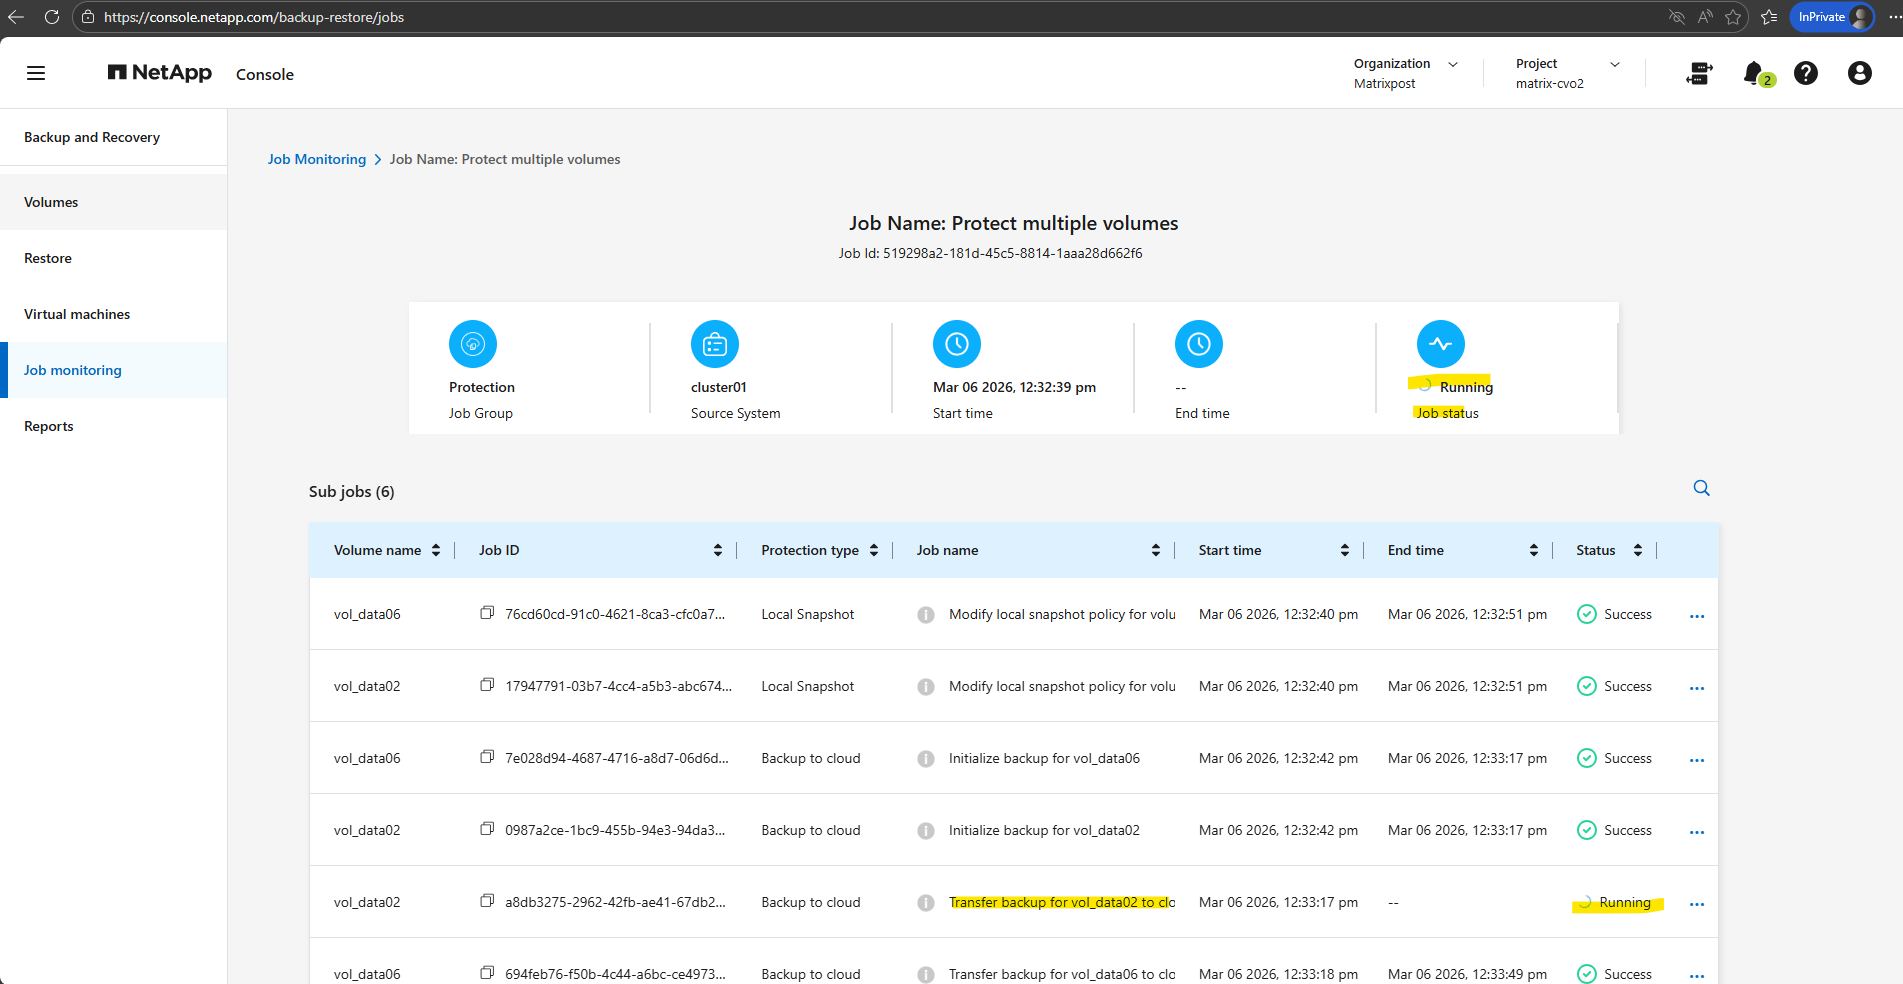
A few minutes later successfully transferred.
The new created bucket (Azure Storage account), I can see the corresponding resource group.
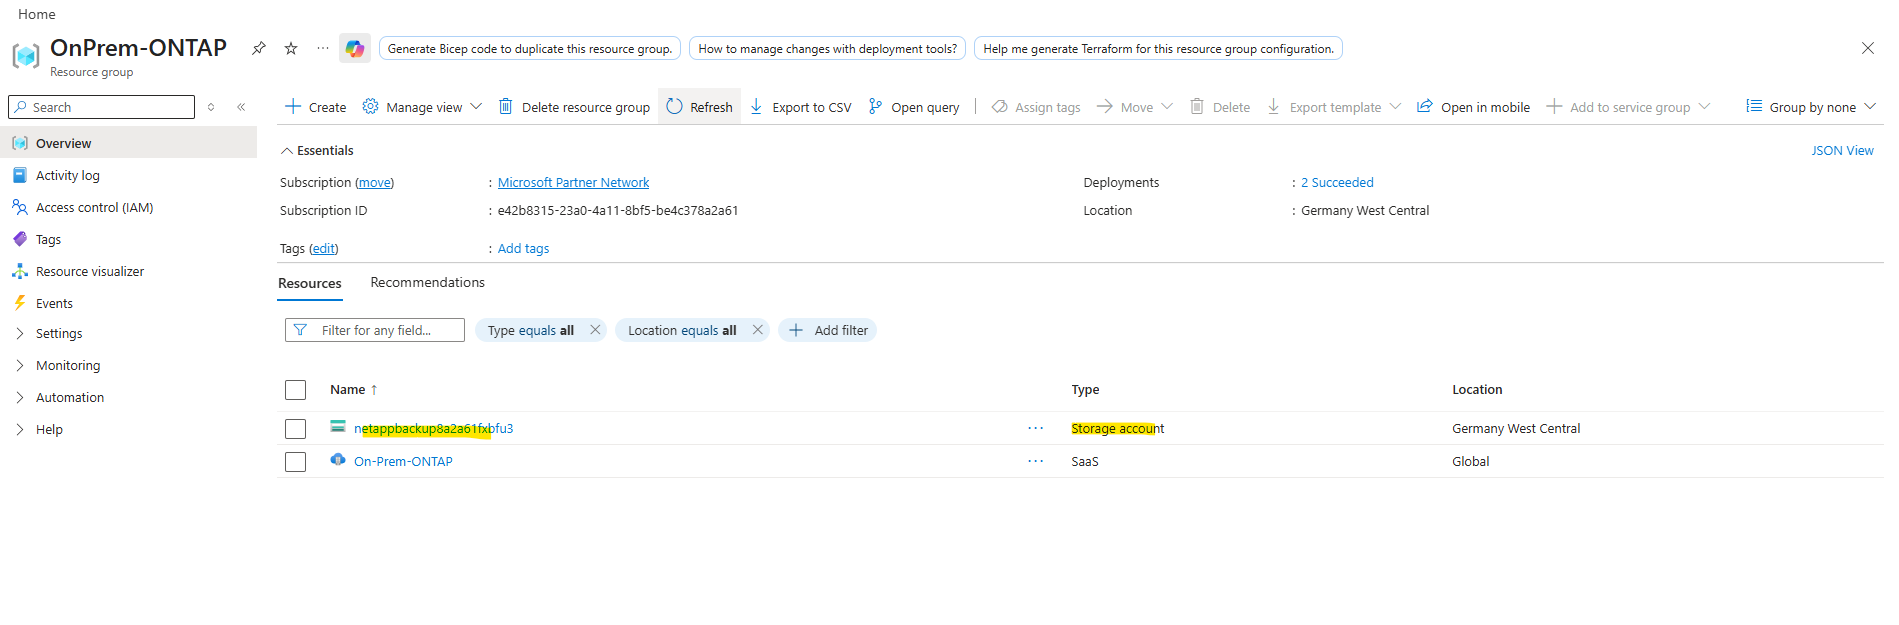
The automatically created Azure Storage account uses Blob Storage, which my On-Premises ONTAP (simulator) system leverages as object storage for cost-efficient, scalable long-term backups.
Azure Blob Storage is Microsoft’s implementation of object storage, meaning it follows the same architectural principles of storing data as objects within a highly scalable and durable platform.
The difference is primarily in naming, object storage describes the technology model, while Blob Storage is Azure’s service that delivers it. In practice, there is no functional difference, as Cloud Volumes ONTAP simply uses Azure Blob Storage as its object storage backend for backups.
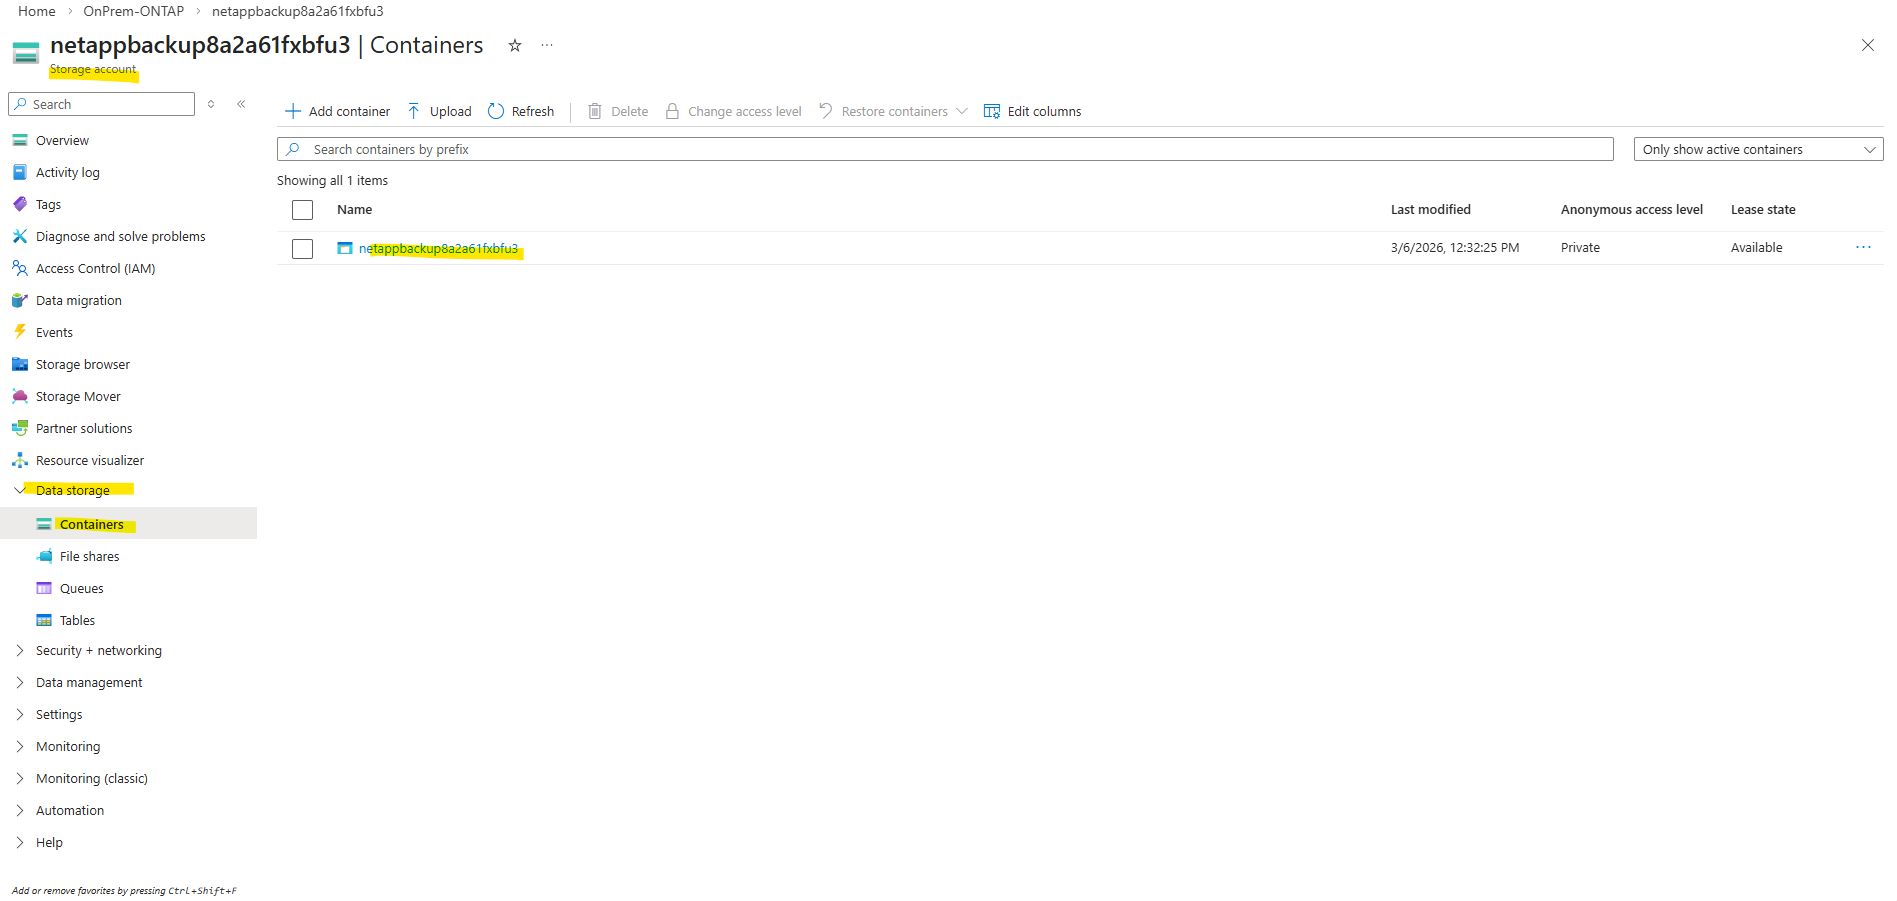
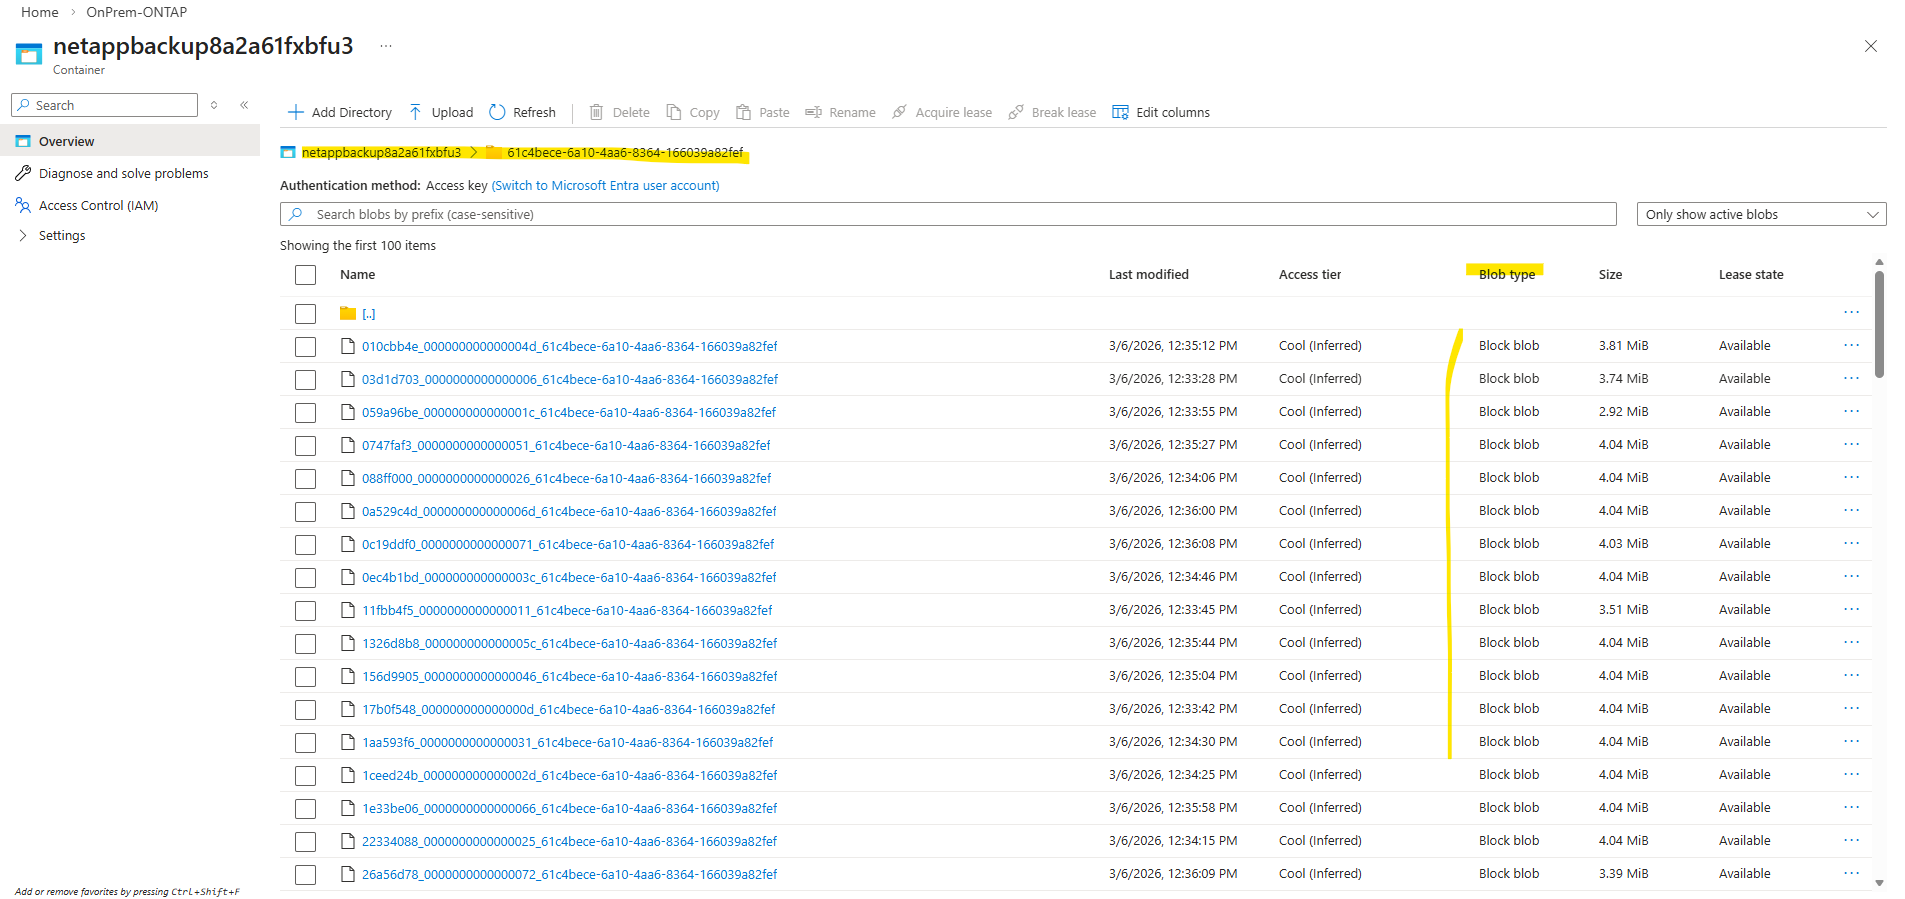
After Backup and Recovery was activated successfully and the first backups runs, navigate to Data storage → Containers, the presence of a container confirms that the backups are stored in Azure Blob Storage. Containers are the top-level namespace for blobs, which aligns with the object storage model that my On-Premises ONTAP (simulator) system uses for backup data.
When moving the mouse over the On-Premises ONTAP cloud below, we will now also see here that we enabled Backup and Recovery which will be stored to our newly created storage account (before in my case just 2 accounts were shown here).
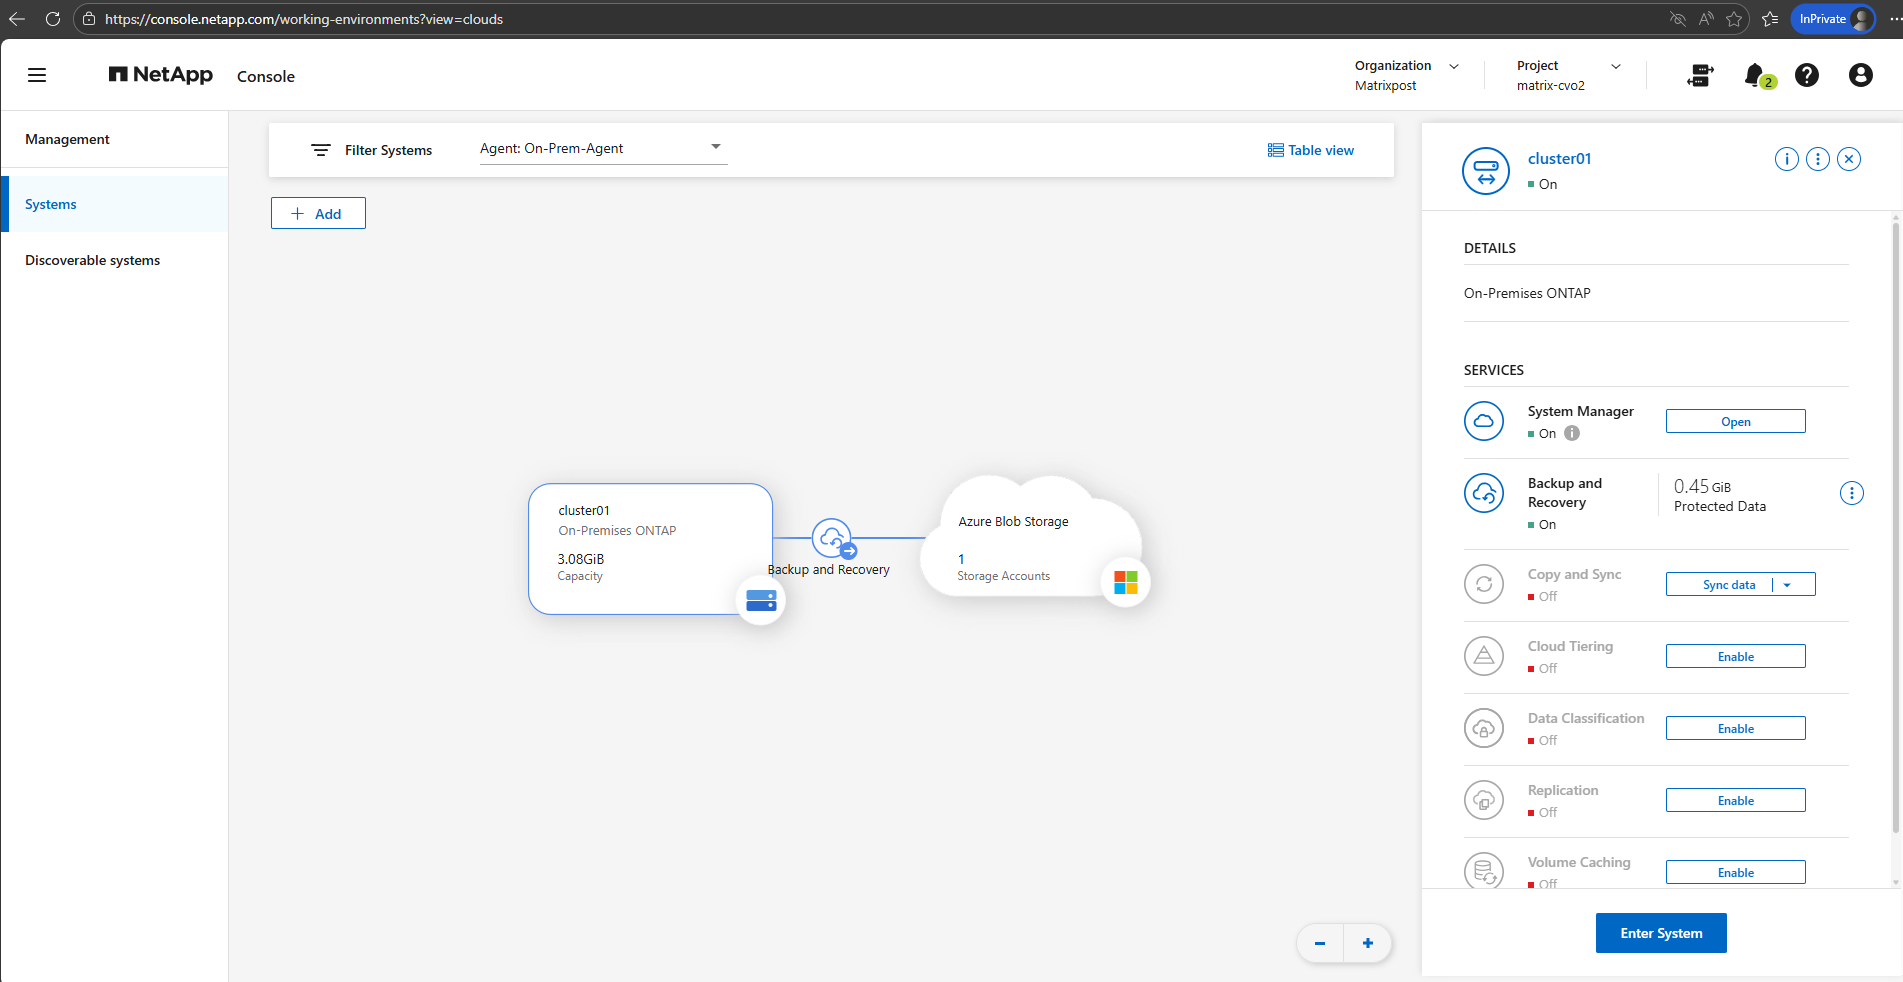
With the provider settings configured and the required Azure credentials in place, Backup and Recovery is now be successfully enabled for the on-prem ONTAP system.
From this point on, selected volumes can be protected by sending backups to the configured object storage in Azure.
If you are interested in how to restore data from these backups, you can find a detailed walkthrough in my following post: https://blog.matrixpost.net/deploying-netapp-cloud-volumes-ontap-part-5/.
You will also see in this post about how to enable indexing on the ONTAP system.
To restore individual files or folders through the NetApp Console, indexing must first be enabled for the protected volumes. The indexing service builds a searchable catalog of the backup contents, allowing administrators to quickly locate and recover specific data without performing a full restore. Without indexing, file-level and directory-level recovery from backups is not available
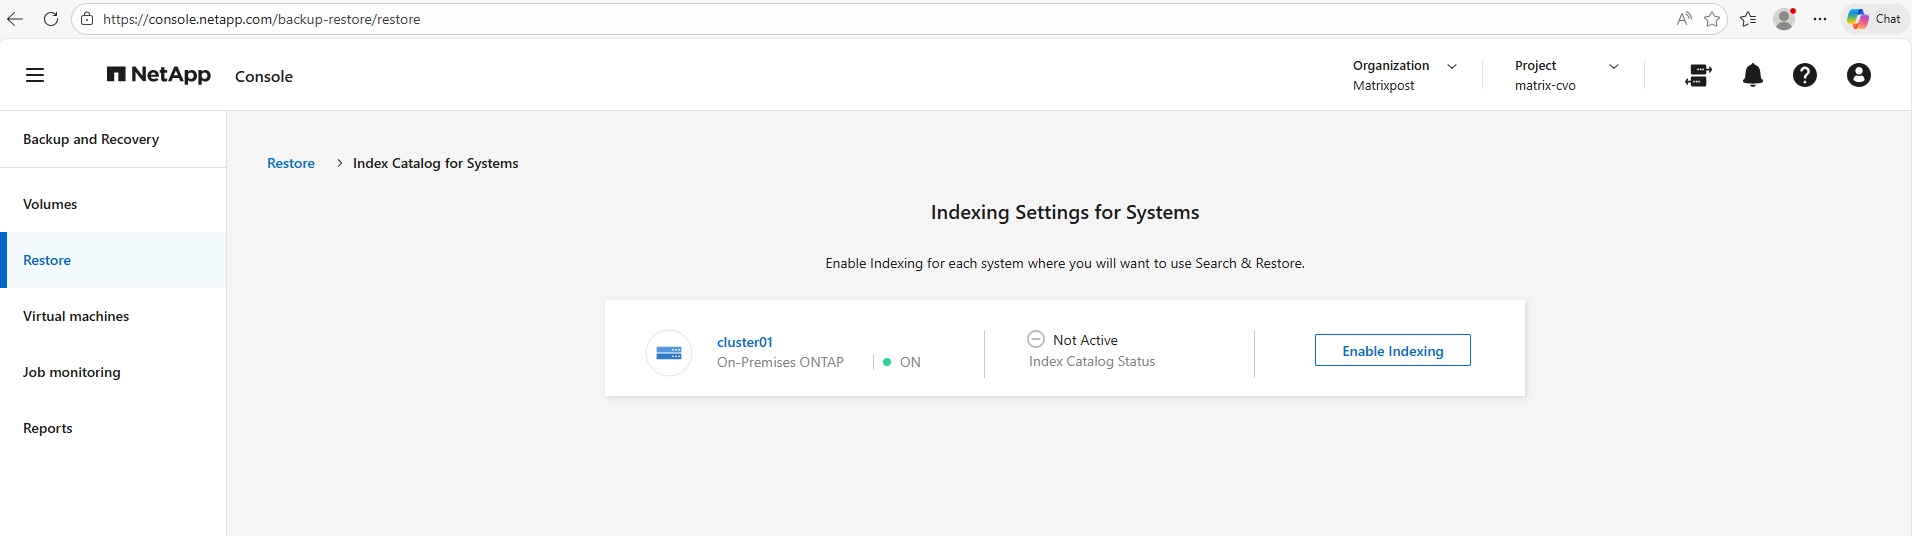
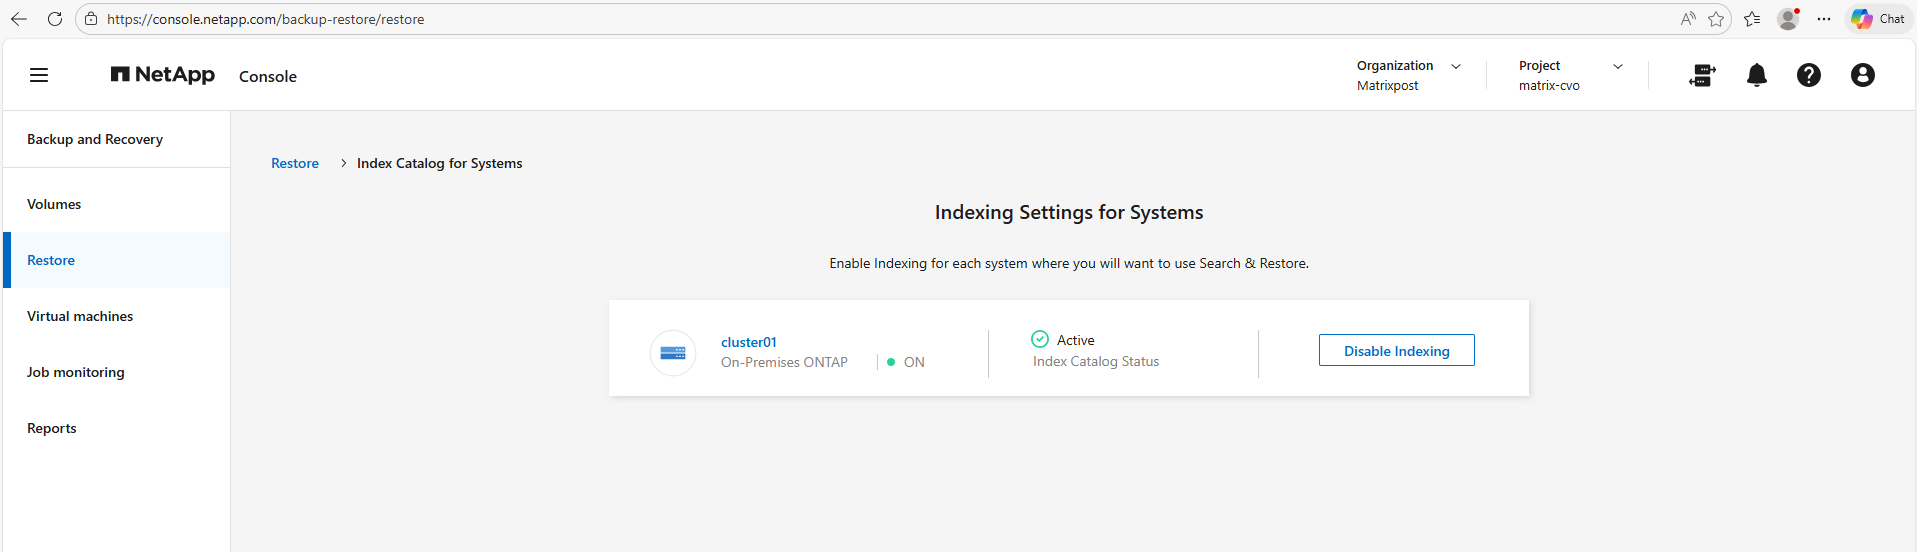
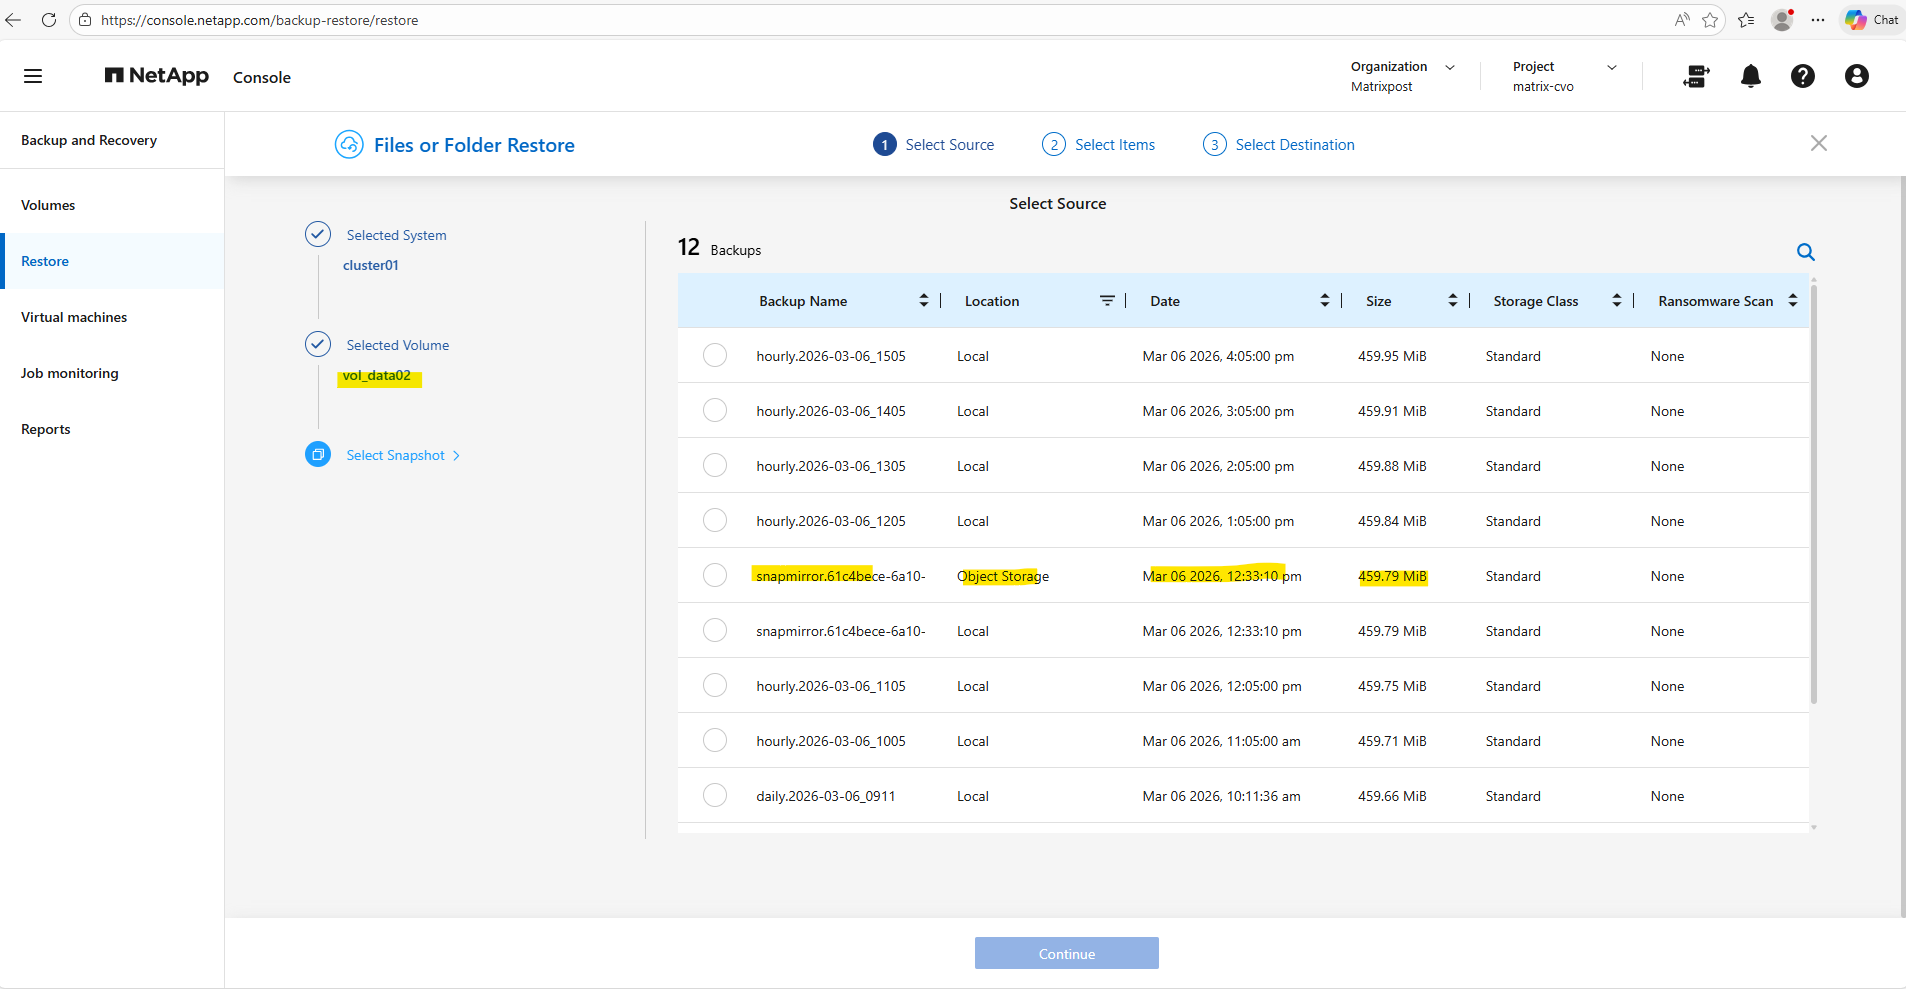
To address one thing up front, below when restoring files or folders, we can choose either between local Snapshots stored on the On-Premises ONTAP system (in my case the simulator), or backups stored in Object Storage (in my case an Azure Storage Account – Blob Storage) and highlighted below. This is by the way our first previously transferred backup when we enabled and configured Backup and Recovery in the NetApp console.
The other hourly backups are finally the local Snapshots stored on the On-Premises ONTAP system.
When restoring data through the NetApp Console, both local snapshots and off-site backups are available as selectable sources.
Snapshots enable rapid recovery directly from the storage system, while backups allow restores from object storage if the local copies are no longer available. This flexibility ensures that administrators can choose the most appropriate recovery point based on the failure scenario.
Configuring a Custom Backup Transfer Schedule
By default, NetApp Console Backup and Recovery uses predefined transfer schedules for backing up ONTAP snapshots to object storage. However, custom transfer schedules can also be configured to control when these backup transfers are initiated.
In this example, we create a custom daily schedule directly in ONTAP using the CLI and subsequently assign it to a backup policy in NetApp Console.
First, we create a new cron schedule that runs every day at 01:30 AM.
job schedule cron create -name backup-0130 -minute 30 -hour 1
Verify the newly created schedule:
job schedule cron show -name backup-0130
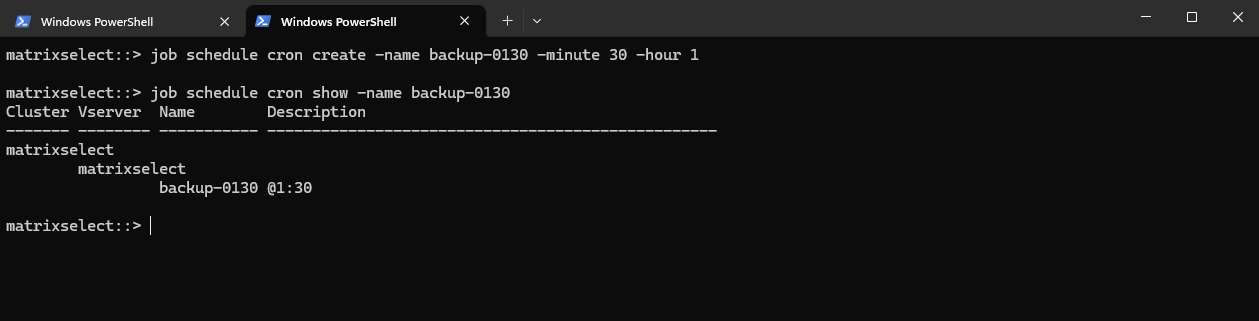
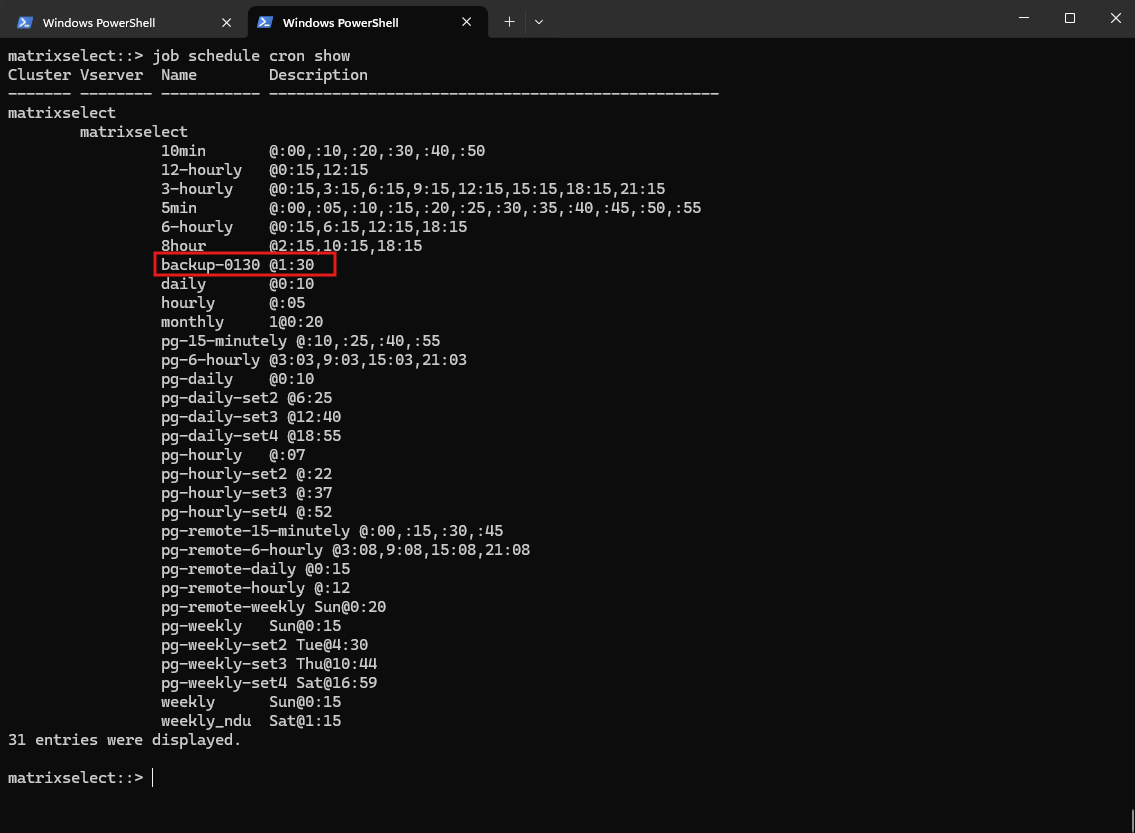
To display all configured cron schedules on the ONTAP cluster, including our newly created backup-0130 schedule, we can run the following command:
job schedule cron show
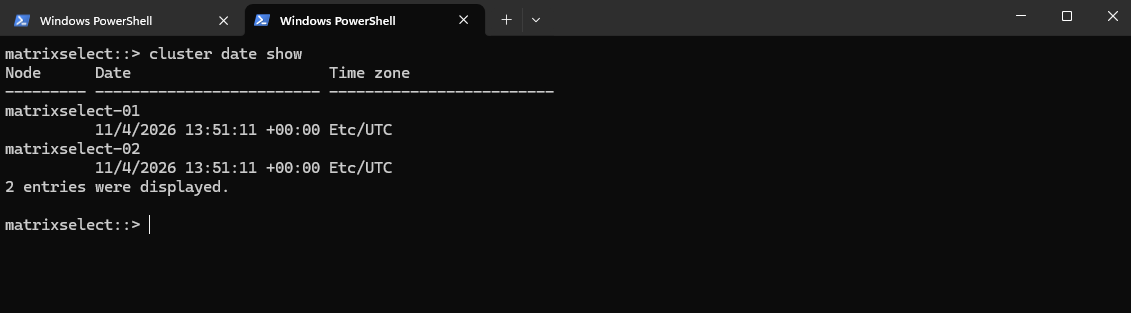
To verify the current date, time, and configured time zone on each ONTAP cluster node, use the following command.
Cron schedules are executed according to the cluster’s configured time zone.
cluster date show
Next, navigate to NetApp Console → Backup and Recovery → Volumes → Backup Policies, edit the desired backup policy, and expand Transfer Schedule.
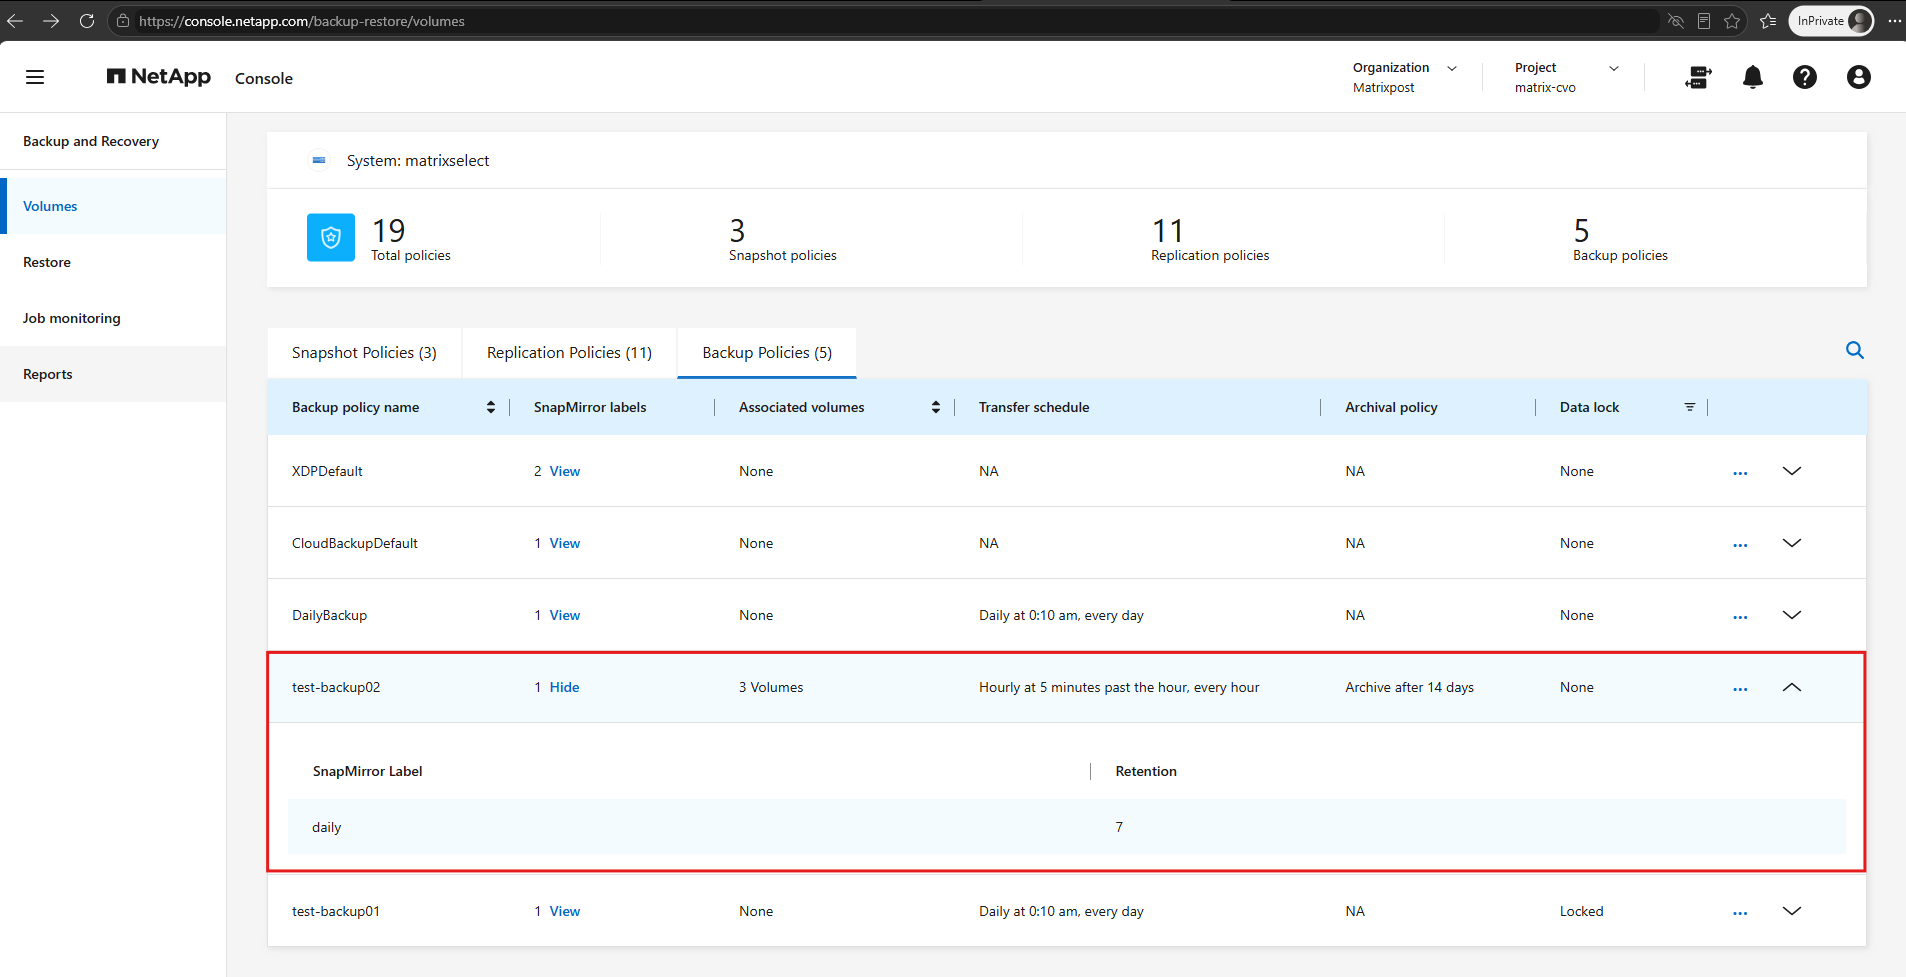
Select the newly created backup-0130 schedule from the dropdown menu and save the policy.
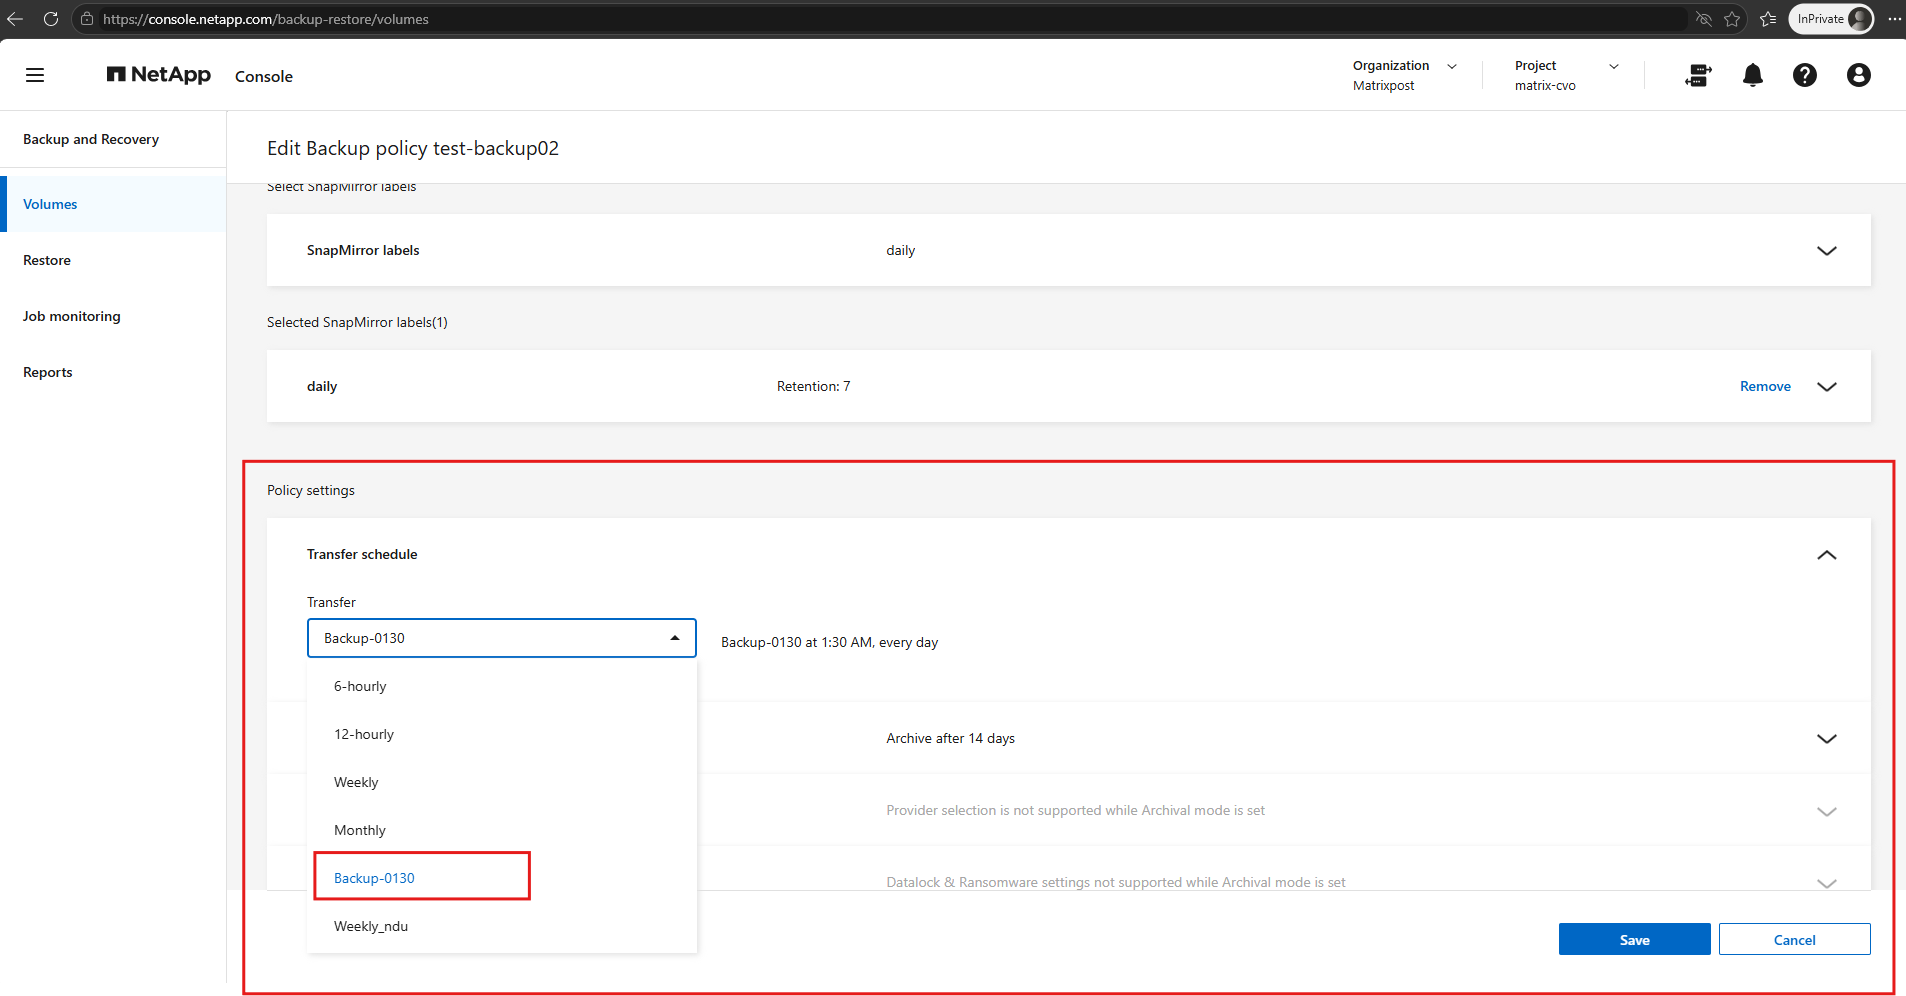
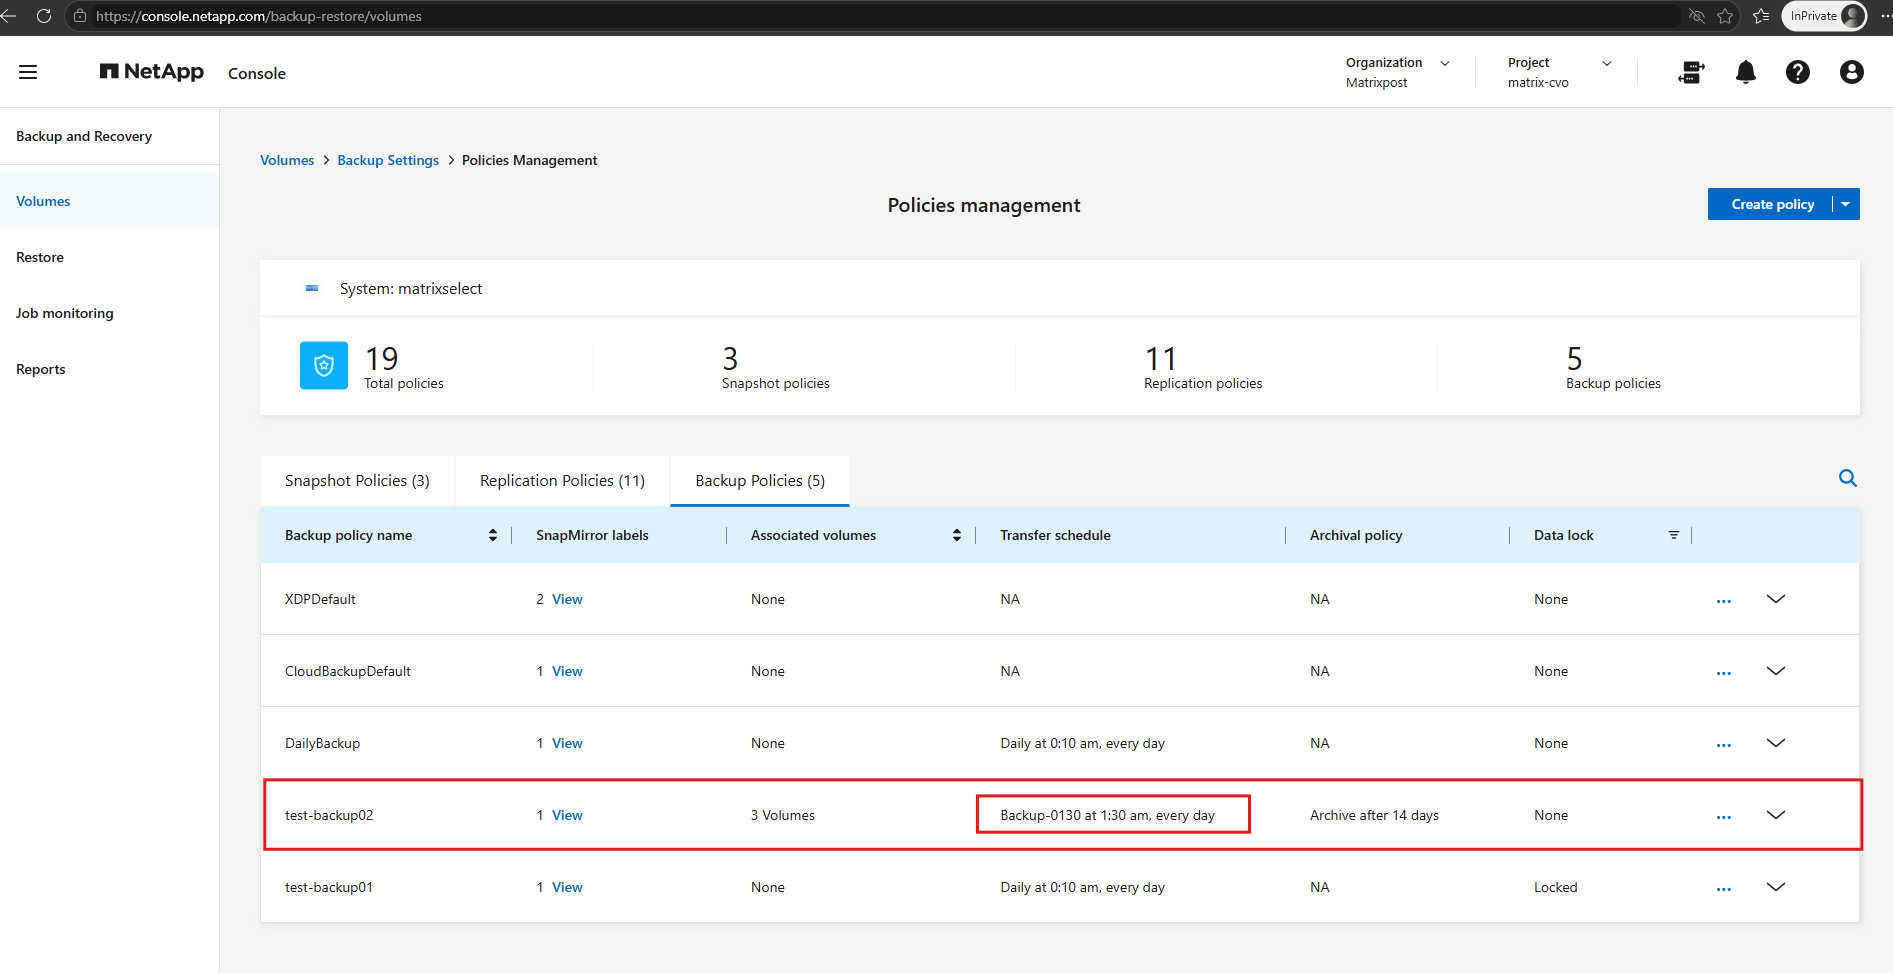
The backup transfer schedule can therefore be configured independently of the local ONTAP snapshot creation schedule. This allows sufficient time for local snapshots to be created before their transfer to object storage.
Note: The transfer schedule dropdown is scrollable, and custom schedules may appear further down the list even when no scrollbar is visible.
Configuring DataLock and Ransomware Protection
When creating a new backup policy in NetApp Console, we can optionally enable DataLock and Ransomware Protection to provide additional protection for backups stored in Azure Blob Storage.
The following DataLock protection modes are available:
- None: DataLock protection is disabled.
- Unlocked: Backup retention can be increased or decreased.
- Locked: Backup retention can be increased but cannot be decreased, providing stronger protection for compliance requirements.
NetApp Console explicitly states that the DataLock protection mode cannot be changed after the policy has been created. Additionally, DataLock-protected backups are subject to a minimum locking period of 30 days.
For this lab, I will create a new backup policy named test-backup01 using Locked mode and investigate whether this setting also restricts the DataLock modes available for subsequently created backup policies on the same ONTAP cluster.
Note that DataLock cannot be combined with the Archive option in the same backup policy. Therefore, the choice between immutable backup protection and long-term archival storage should be considered during the initial backup design.
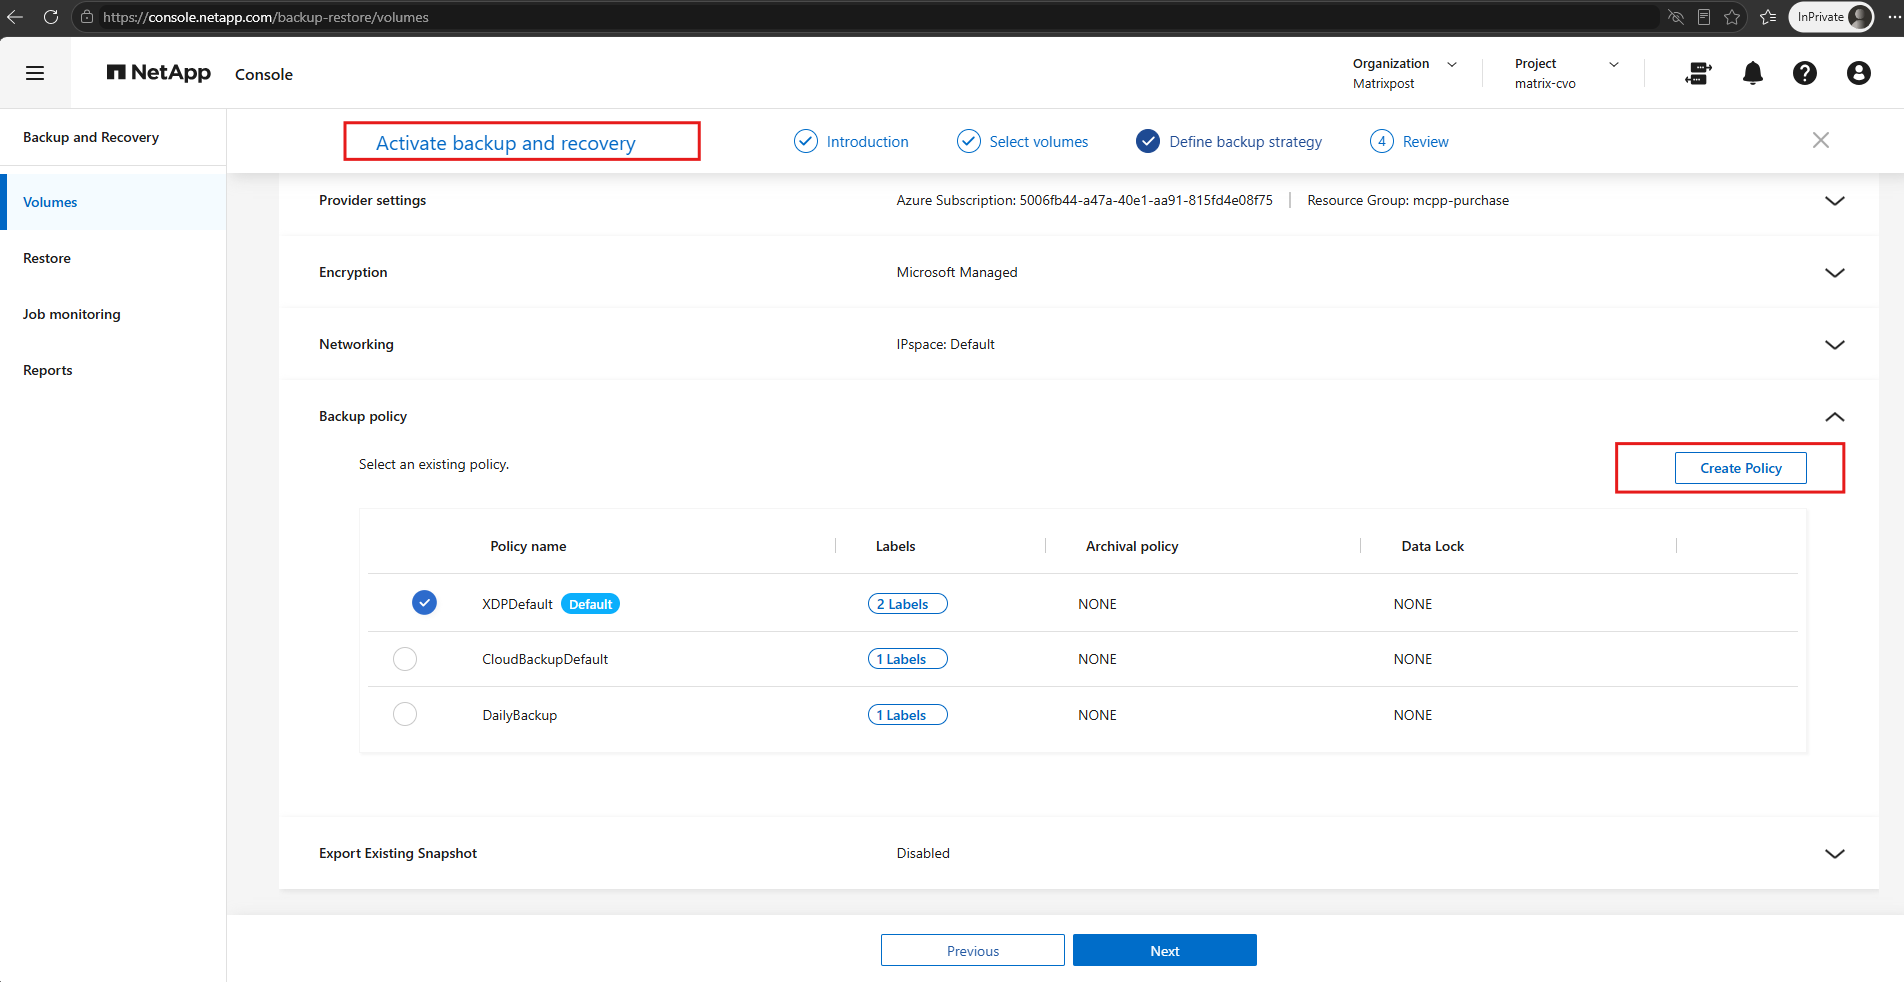
During the initial activation of NetApp Console Backup and Recovery, we can select an existing backup policy or create a new one using Create Policy.
The policy configuration includes SnapMirror labels, retention settings, transfer schedules, archival options, and DataLock & Ransomware Protection.
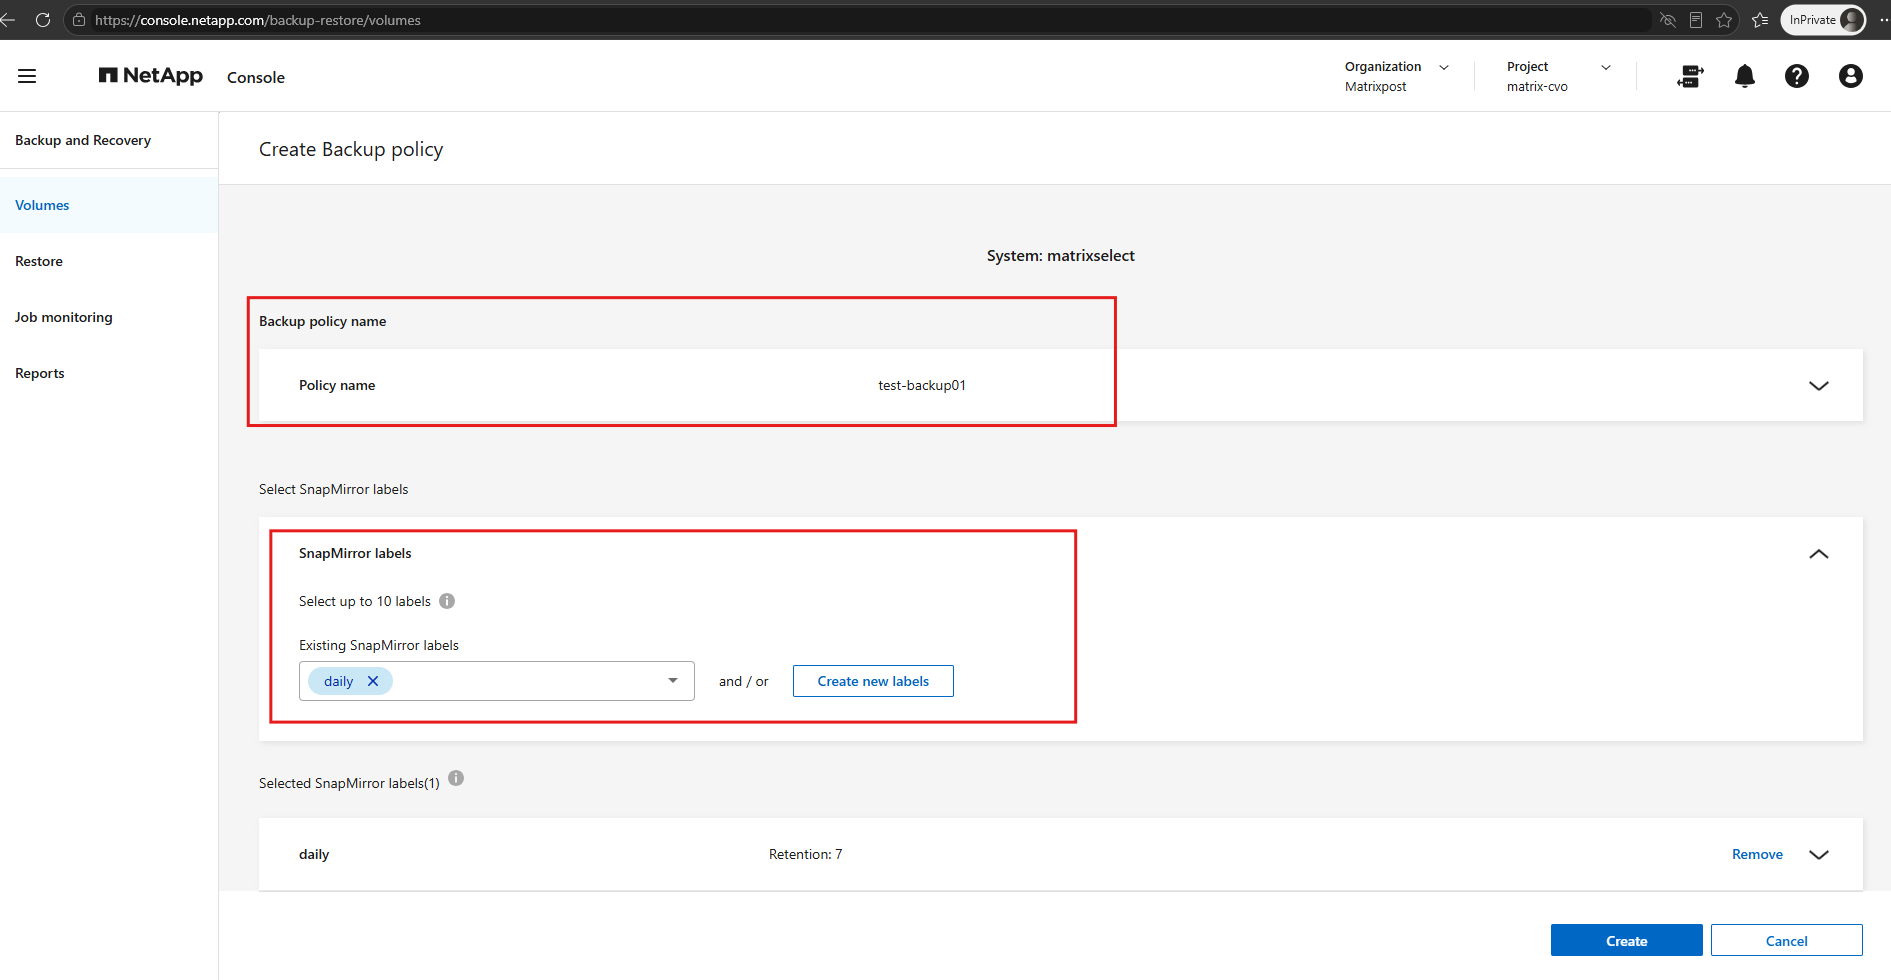
We create a new backup policy named test-backup01 and select the existing daily SnapMirror label with a retention of seven backups.
SnapMirror labels determine which ONTAP snapshots are included in the cloud backup policy, and additional labels can be selected or created as required.
Under Policy settings, we configure the backup transfer schedule independently of the SnapMirror label.
For our daily backups, we select Daily instead of the default hourly schedule, ensuring that backup transfers run once per day.
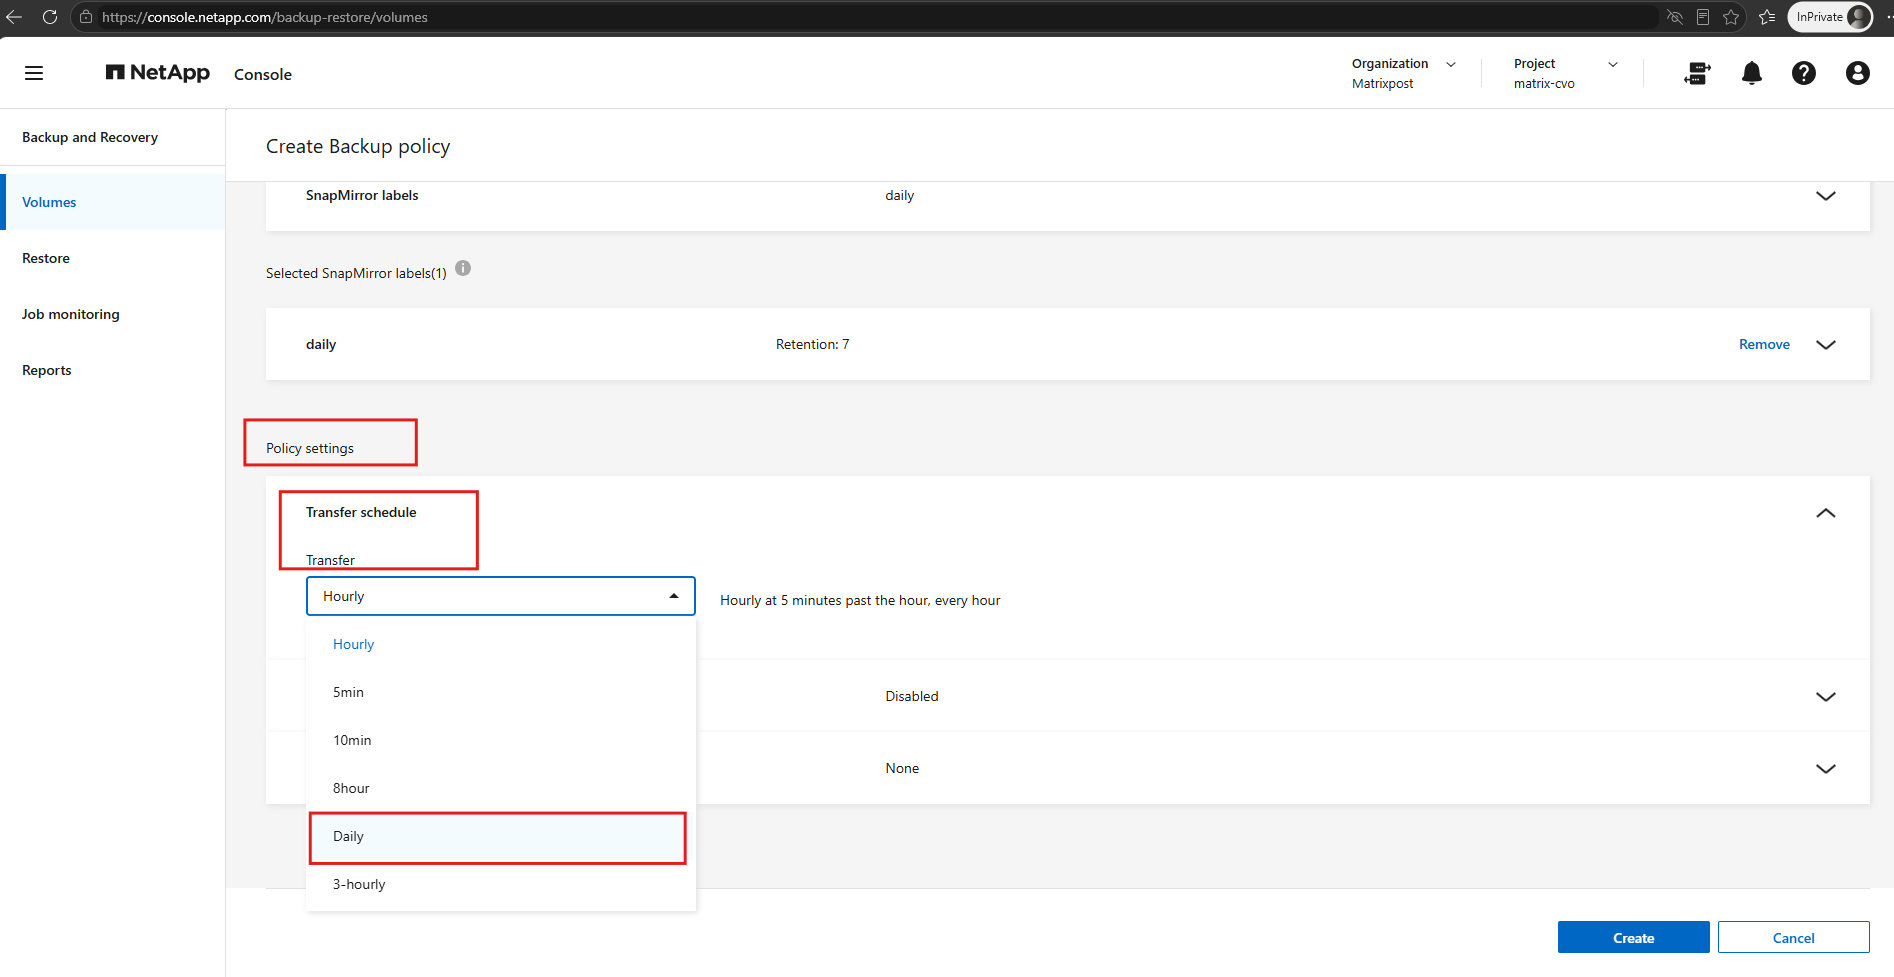
The Daily transfer schedule is configured to run at 00:10 every day.
This schedule controls when backup transfers to Azure Blob Storage are initiated, independently of the local ONTAP snapshot retention settings.
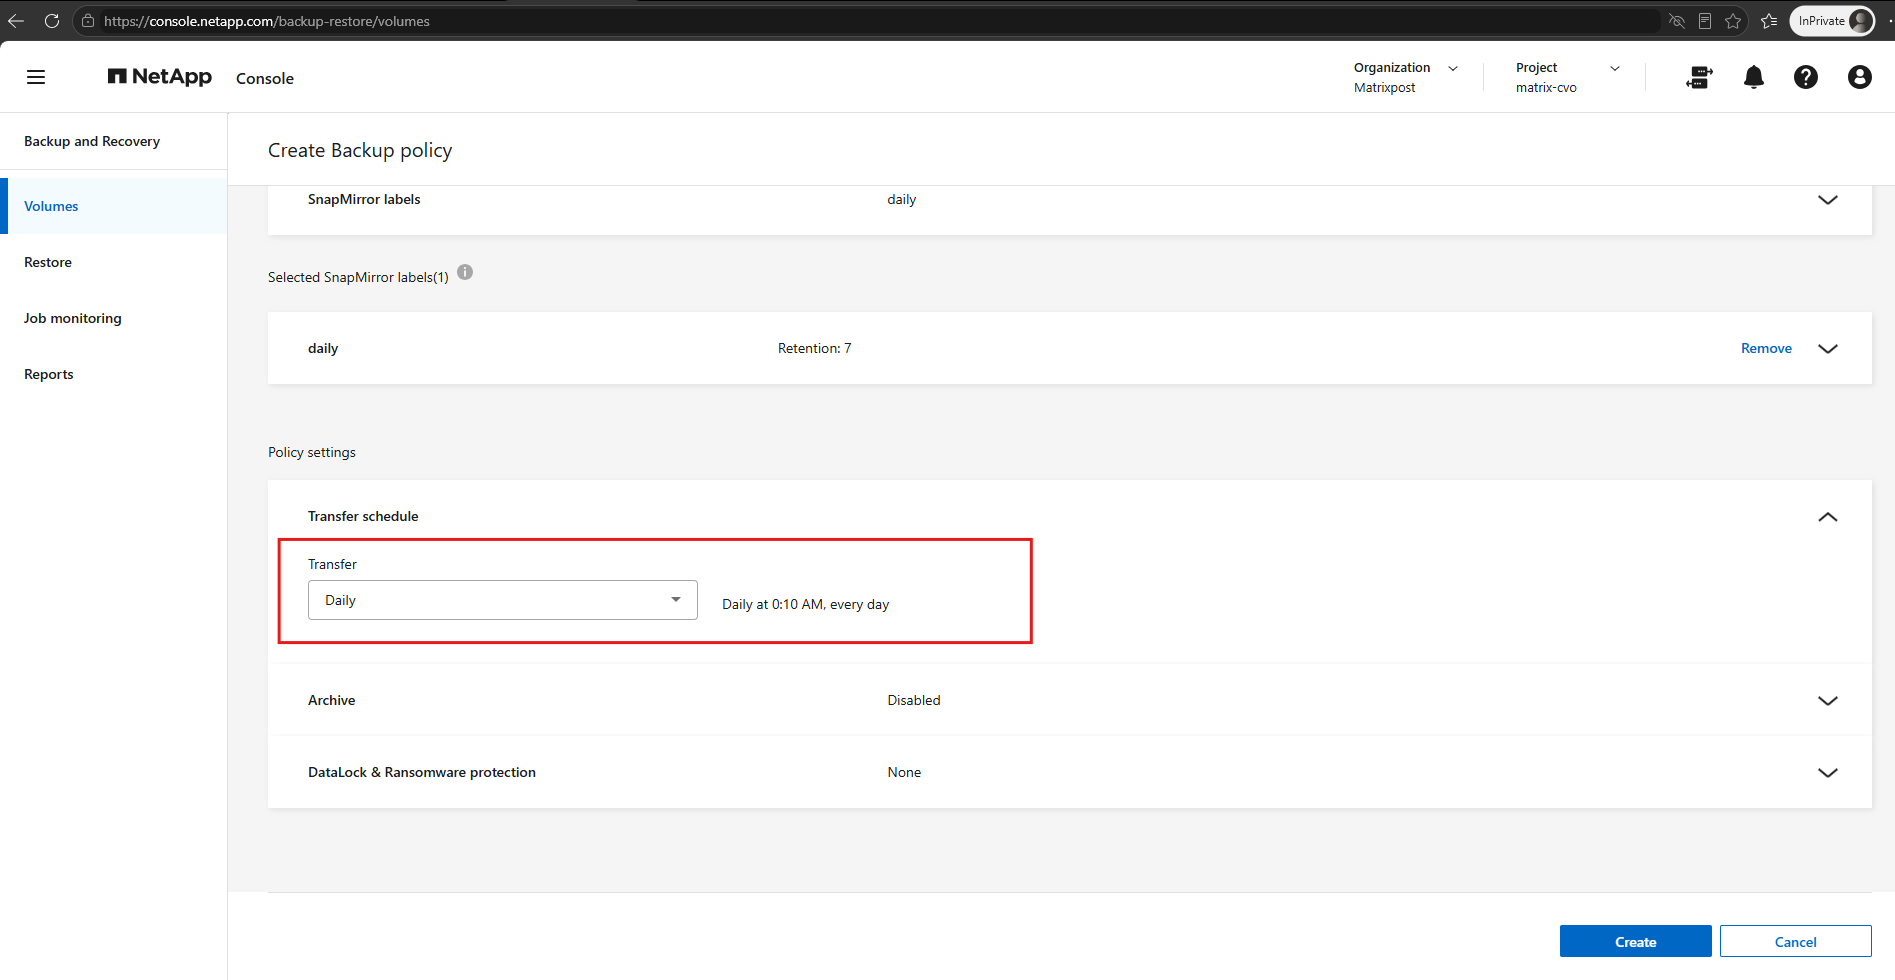
For demonstration purposes, enabling Tier Backups to Archival disables the DataLock & Ransomware Protection settings, as both options cannot be combined.
Since we want to configure DataLock for this lab, we leave archival tiering disabled.
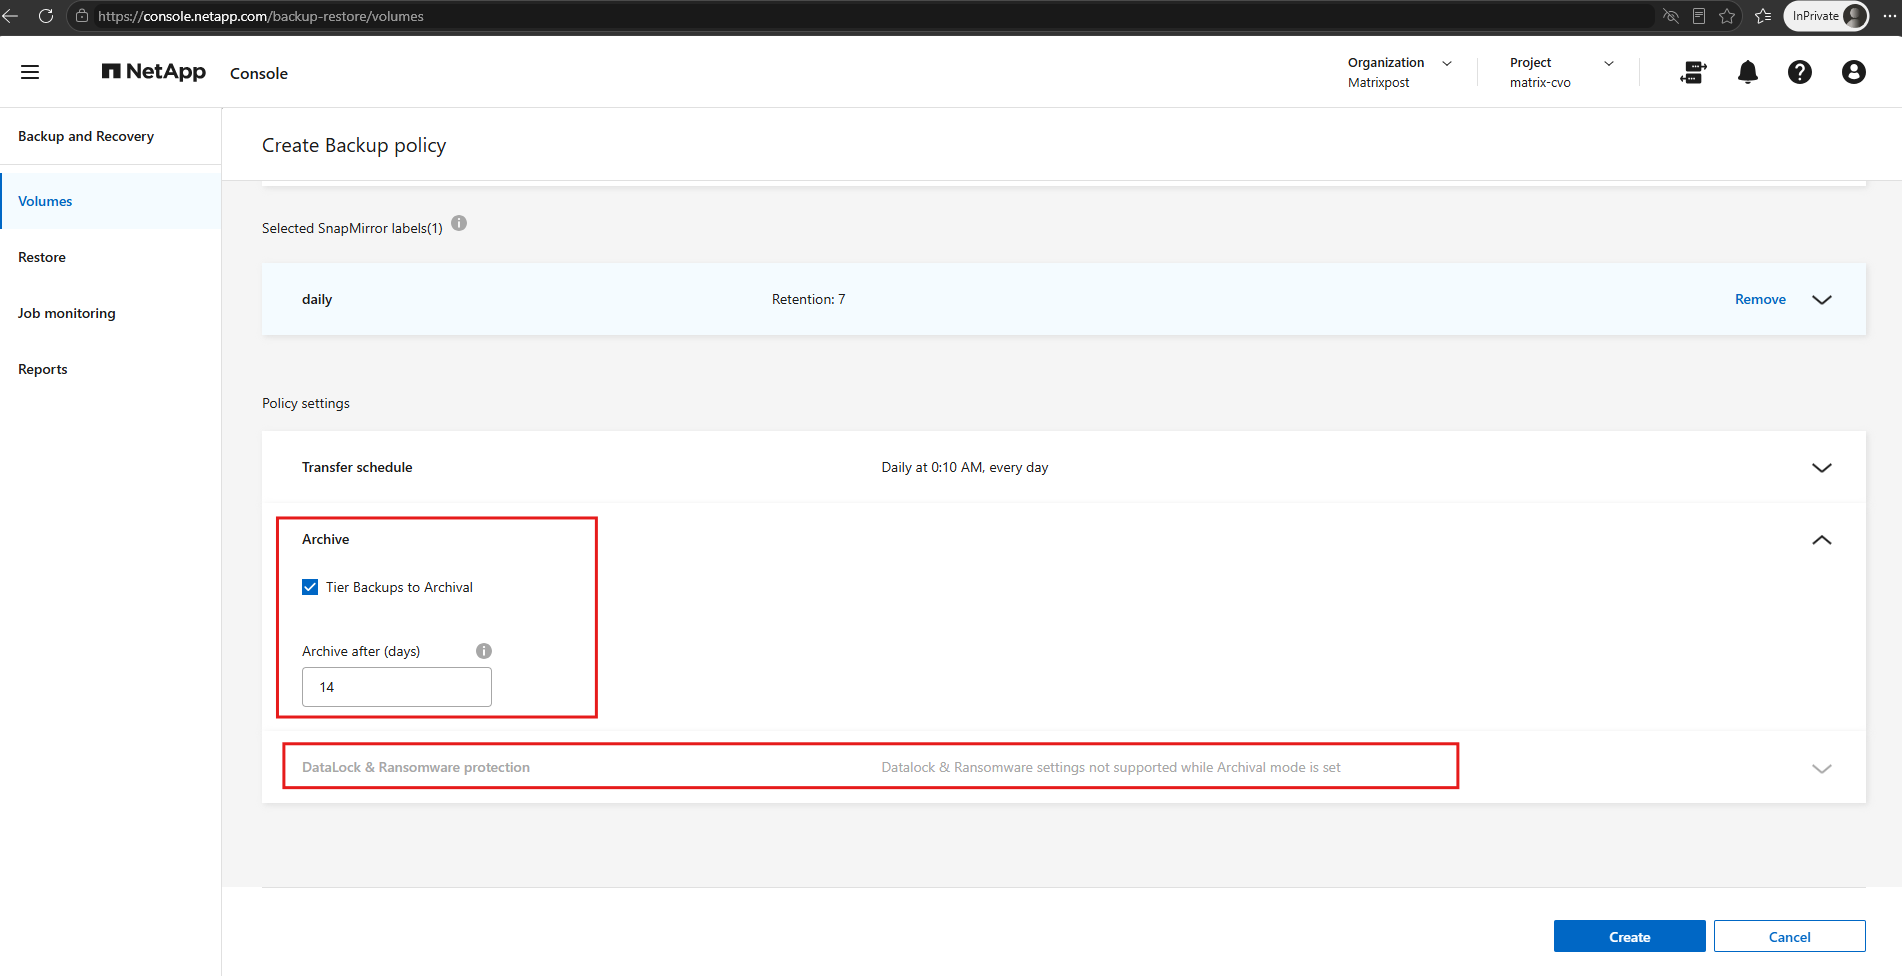
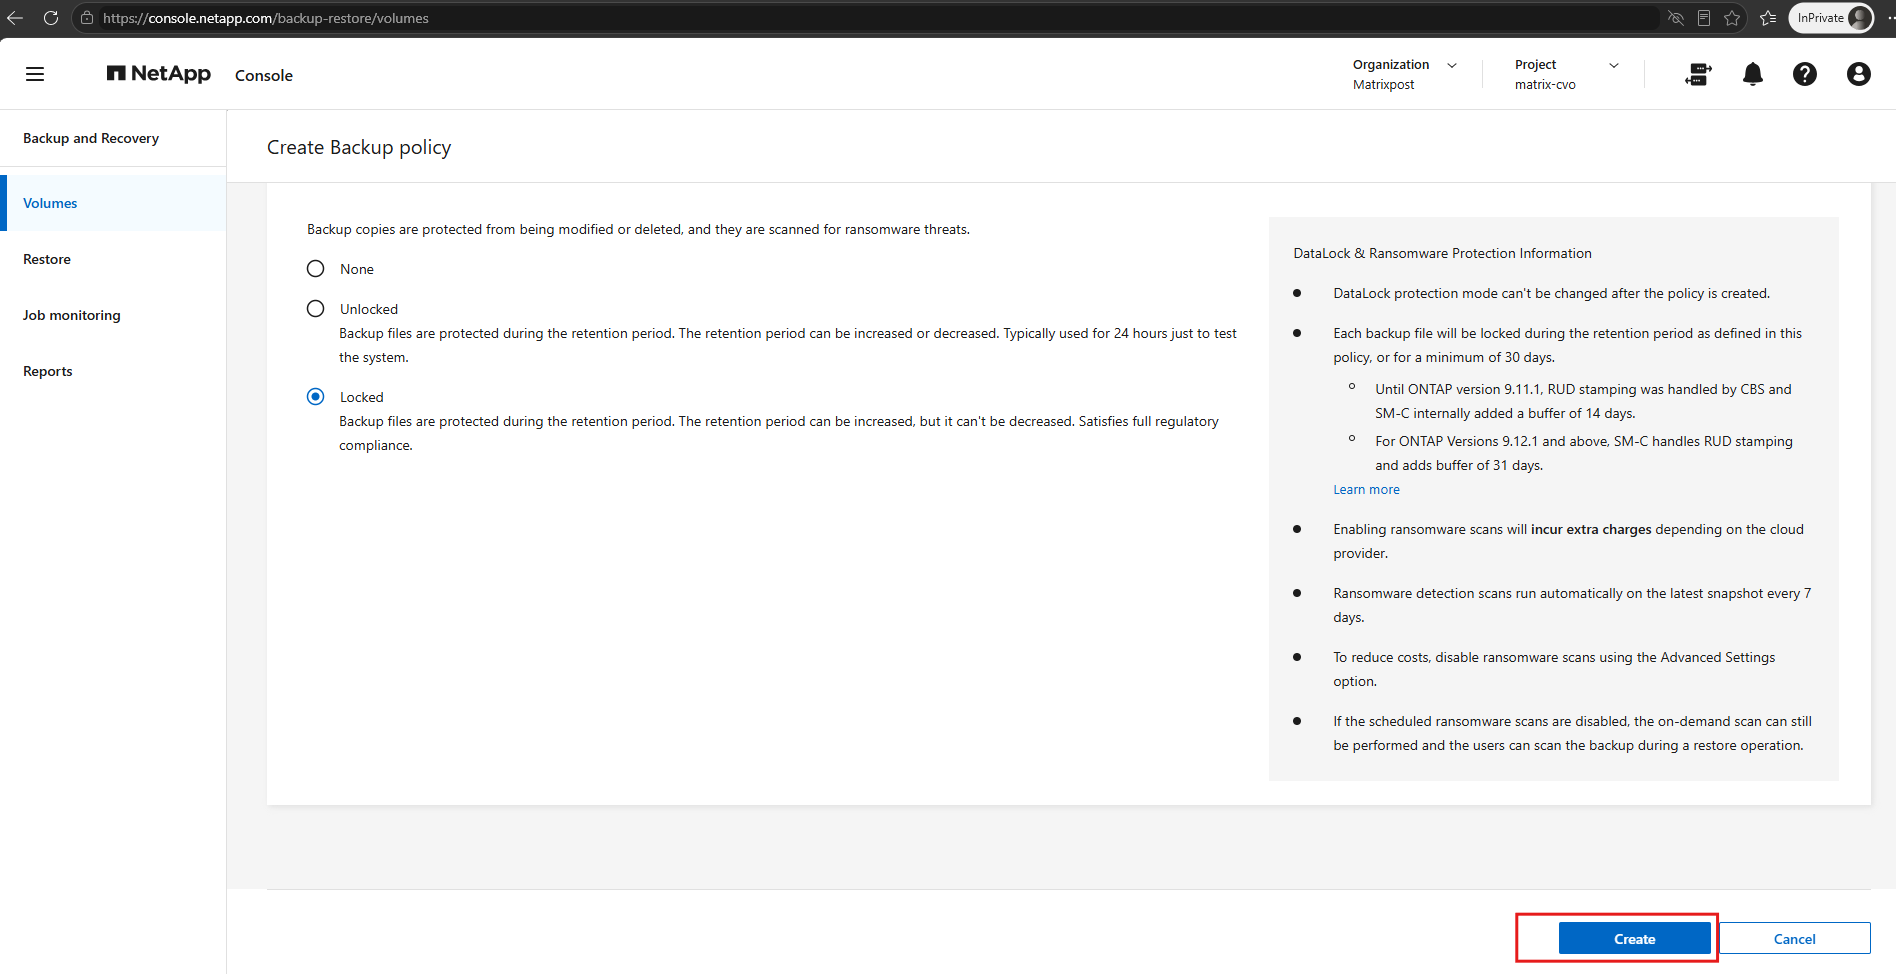
For our lab, we select Locked under DataLock & Ransomware Protection, providing immutable cloud backups whose retention period can be increased but not decreased.
NetApp Console also indicates that the DataLock protection mode cannot be changed after policy creation and that backup copies are subject to a minimum locking period of 30 days.
Additionally, ransomware detection scans run automatically every seven days and may incur additional cloud provider charges.
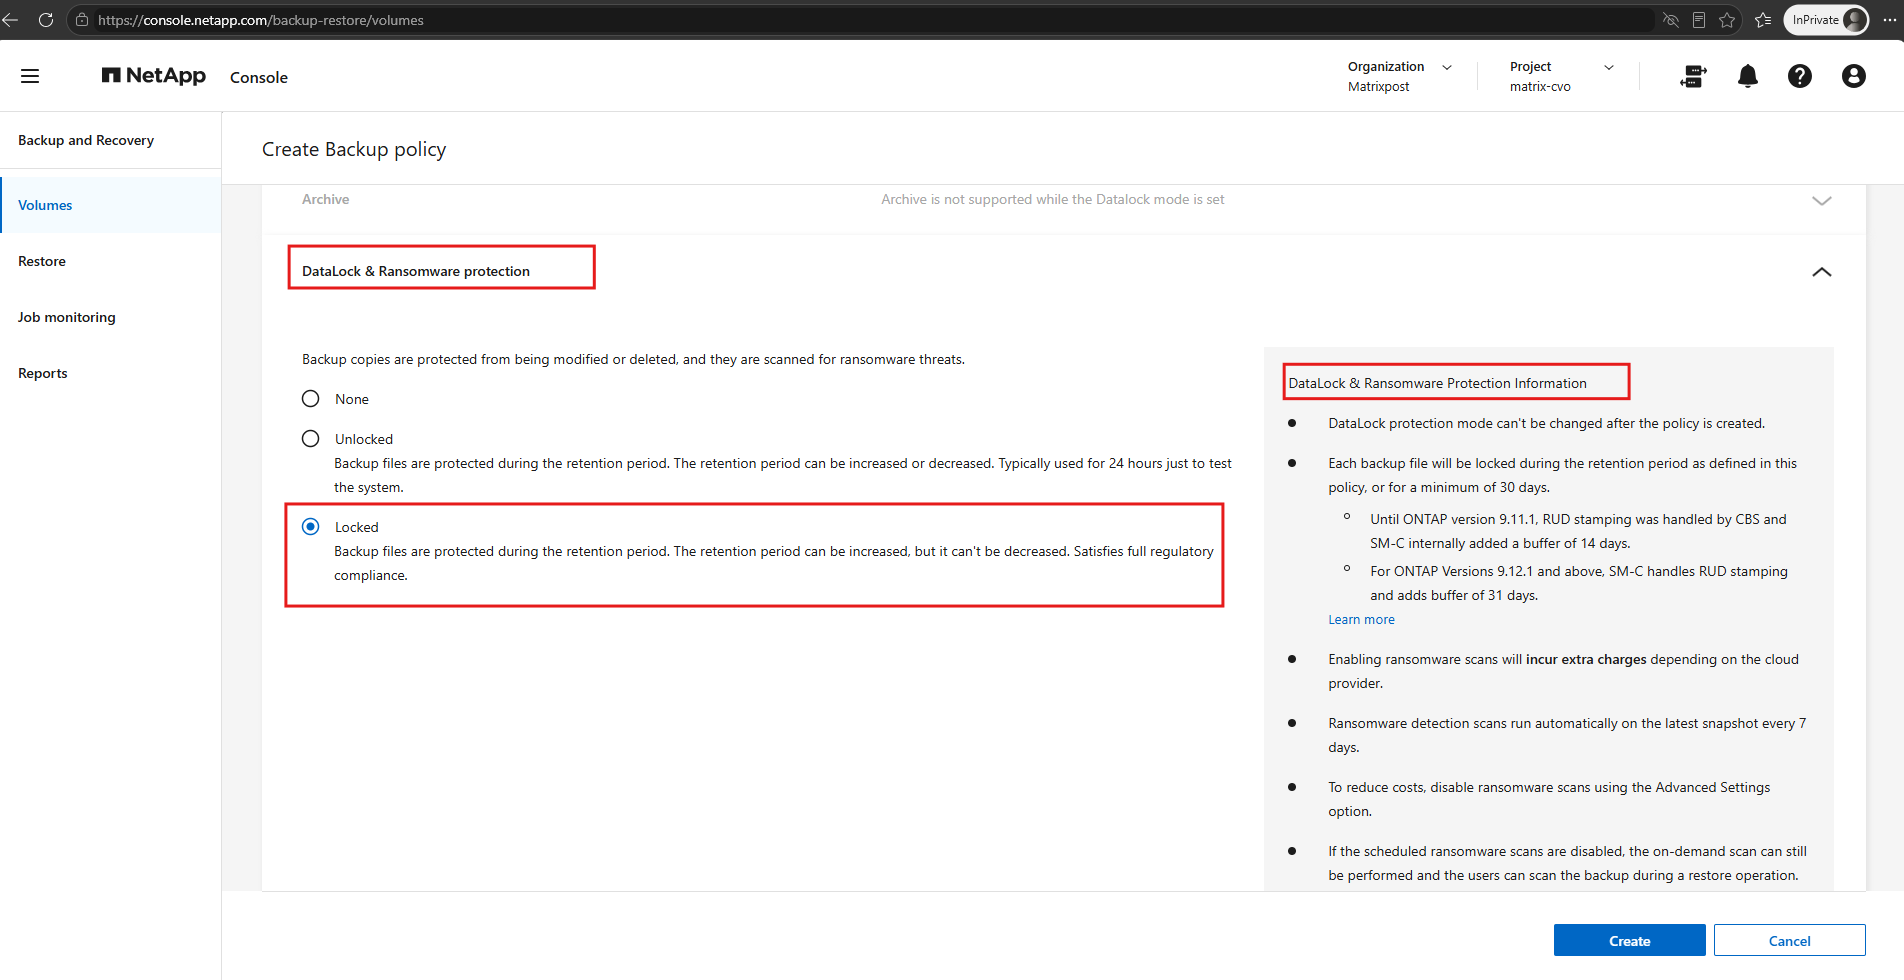
With DataLock set to Locked, we create the backup policy test-backup01.
This configuration enables immutable cloud backups and cannot be changed to another DataLock mode after policy creation.
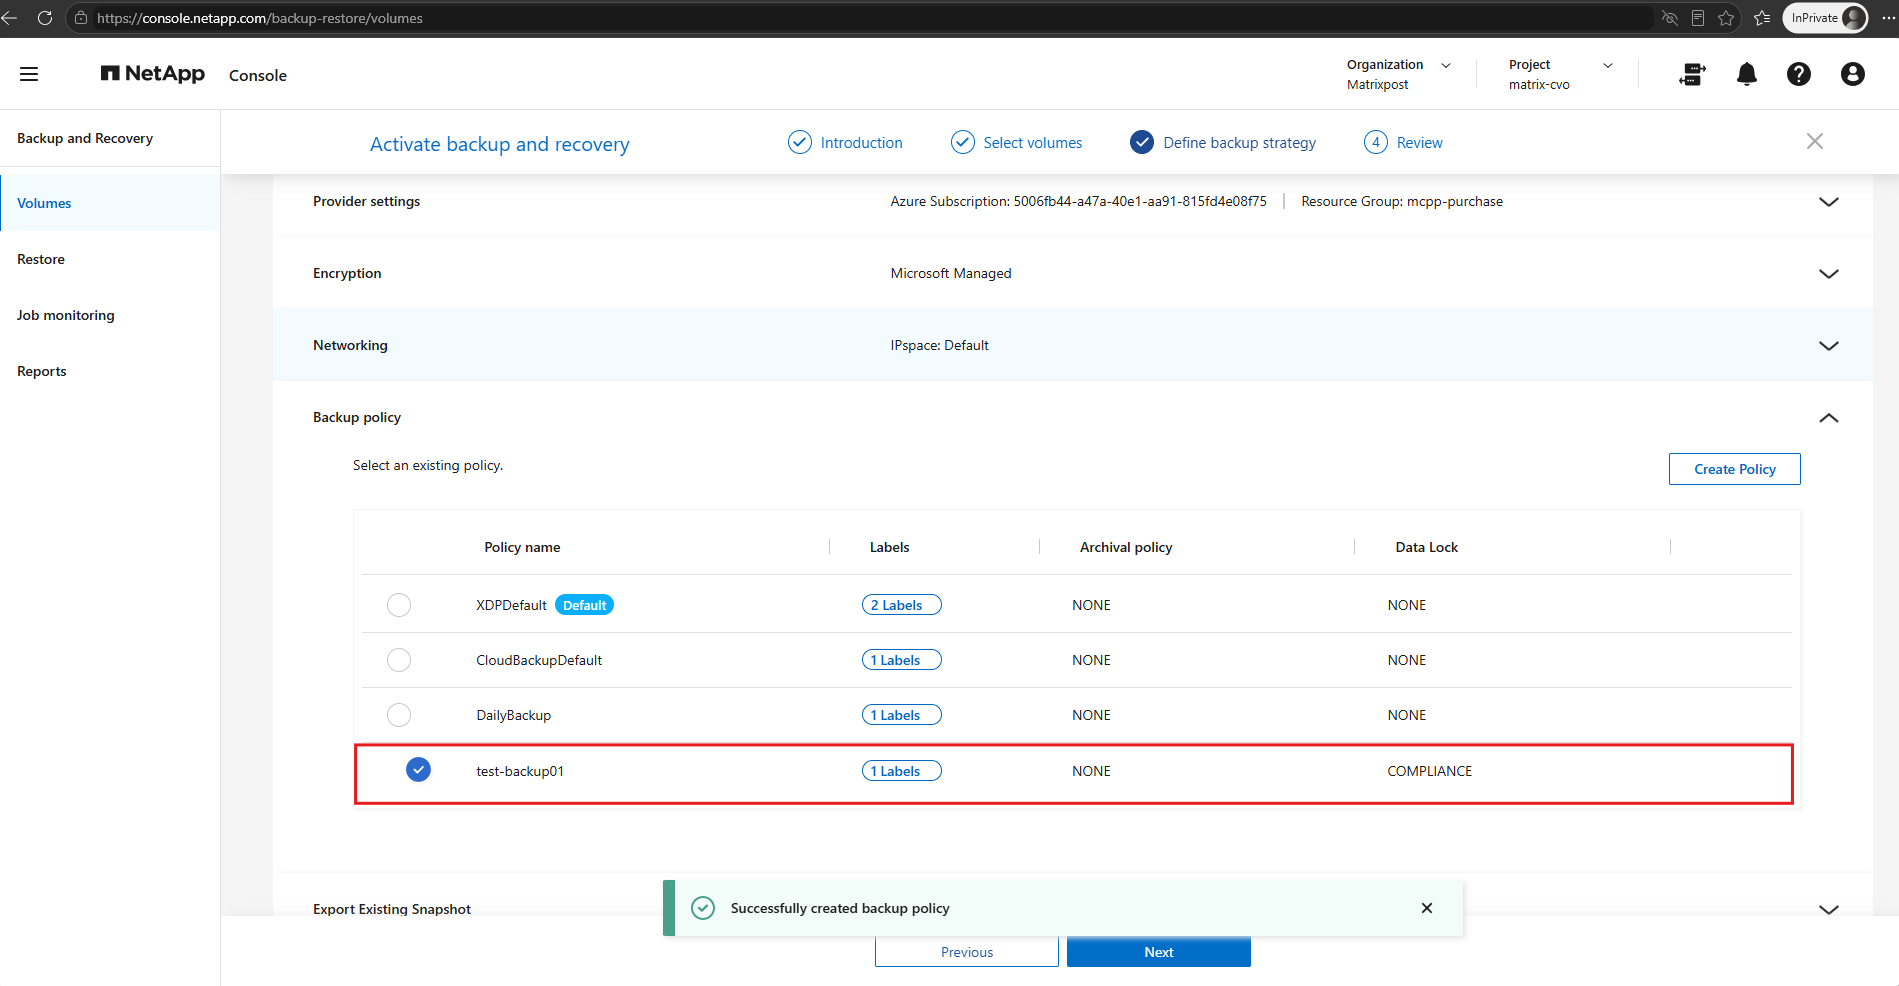
The backup policy test-backup01 was successfully created with DataLock in Compliance (Locked) mode, as confirmed by the COMPLIANCE designation in NetApp Console. We select this policy to continue activating Backup and Recovery for our ONTAP Select volumes and click on Next.
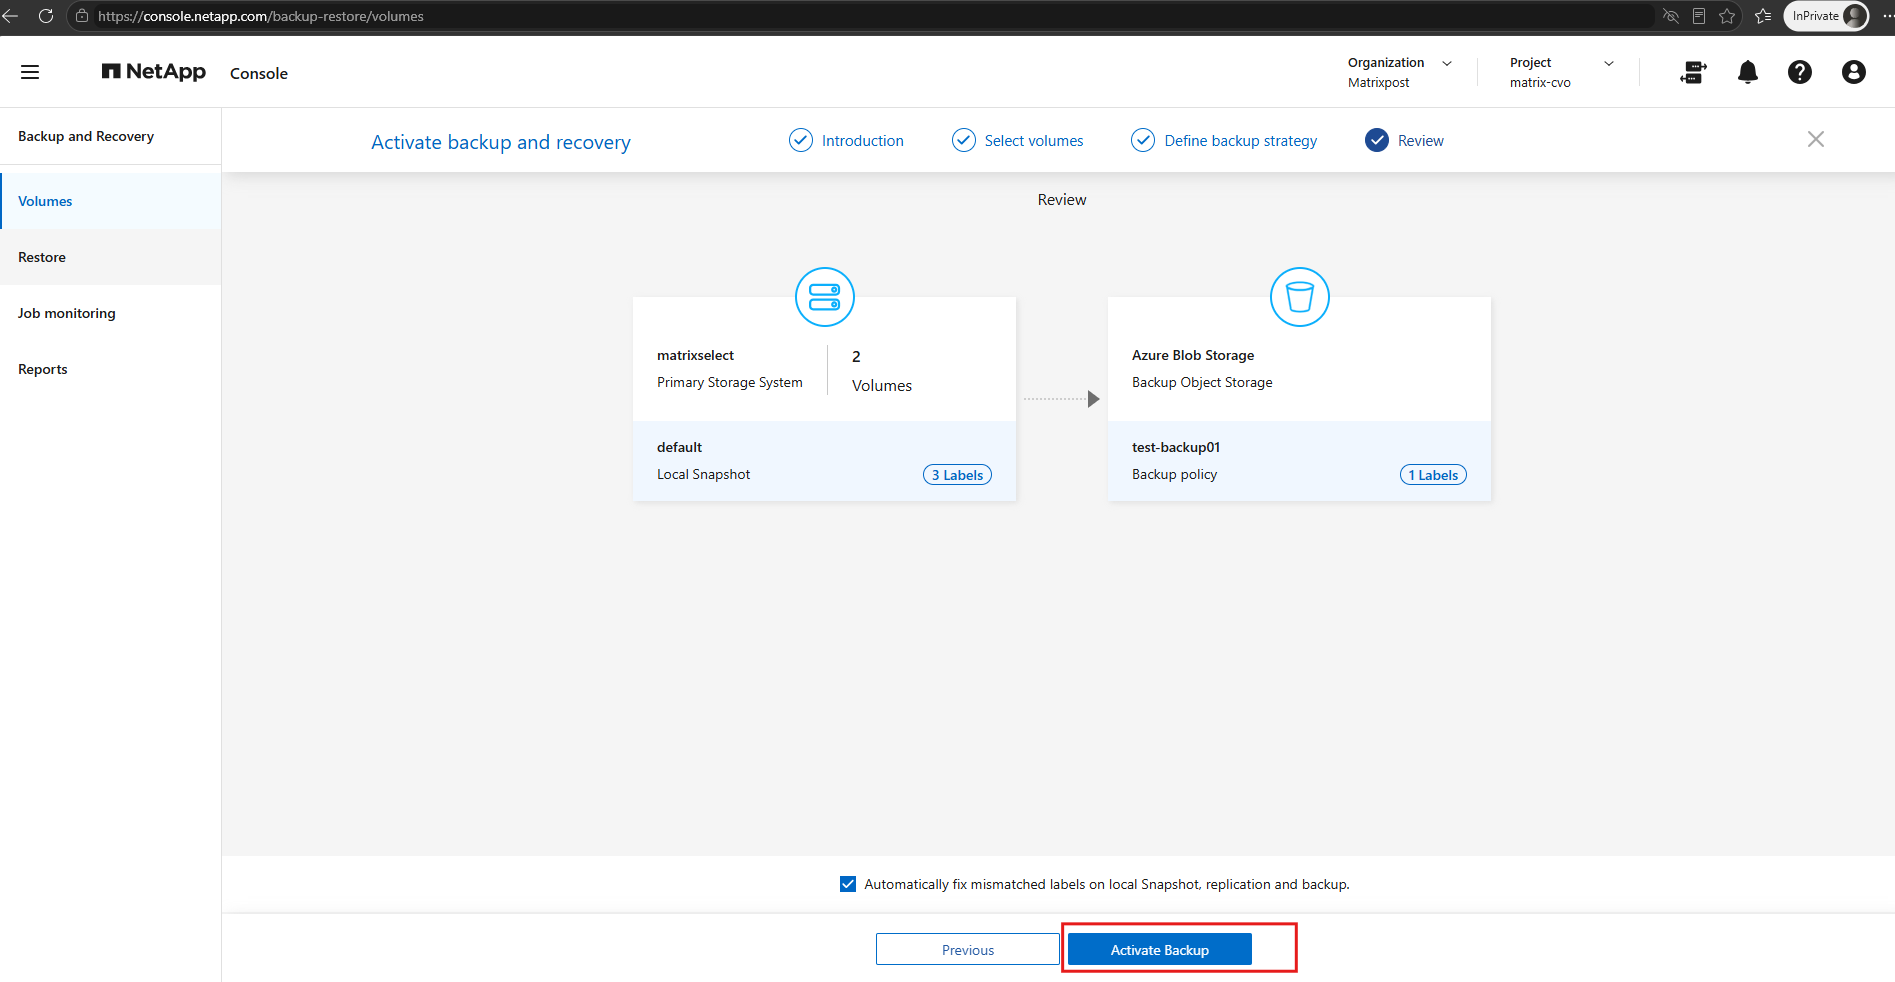
The final review summarizes our backup configuration: two volumes from the on-premises ONTAP Select system matrixselect will be protected using local snapshots and Azure Blob Storage backups with the newly created test-backup01 policy and DataLock Compliance mode.
We can now start the configuration by clicking Activate Backup.
After clicking Activate Backup, NetApp Console successfully initiates the Backup and Recovery activation process. The system activation and volume discovery are now running in the background and may take several minutes to complete.
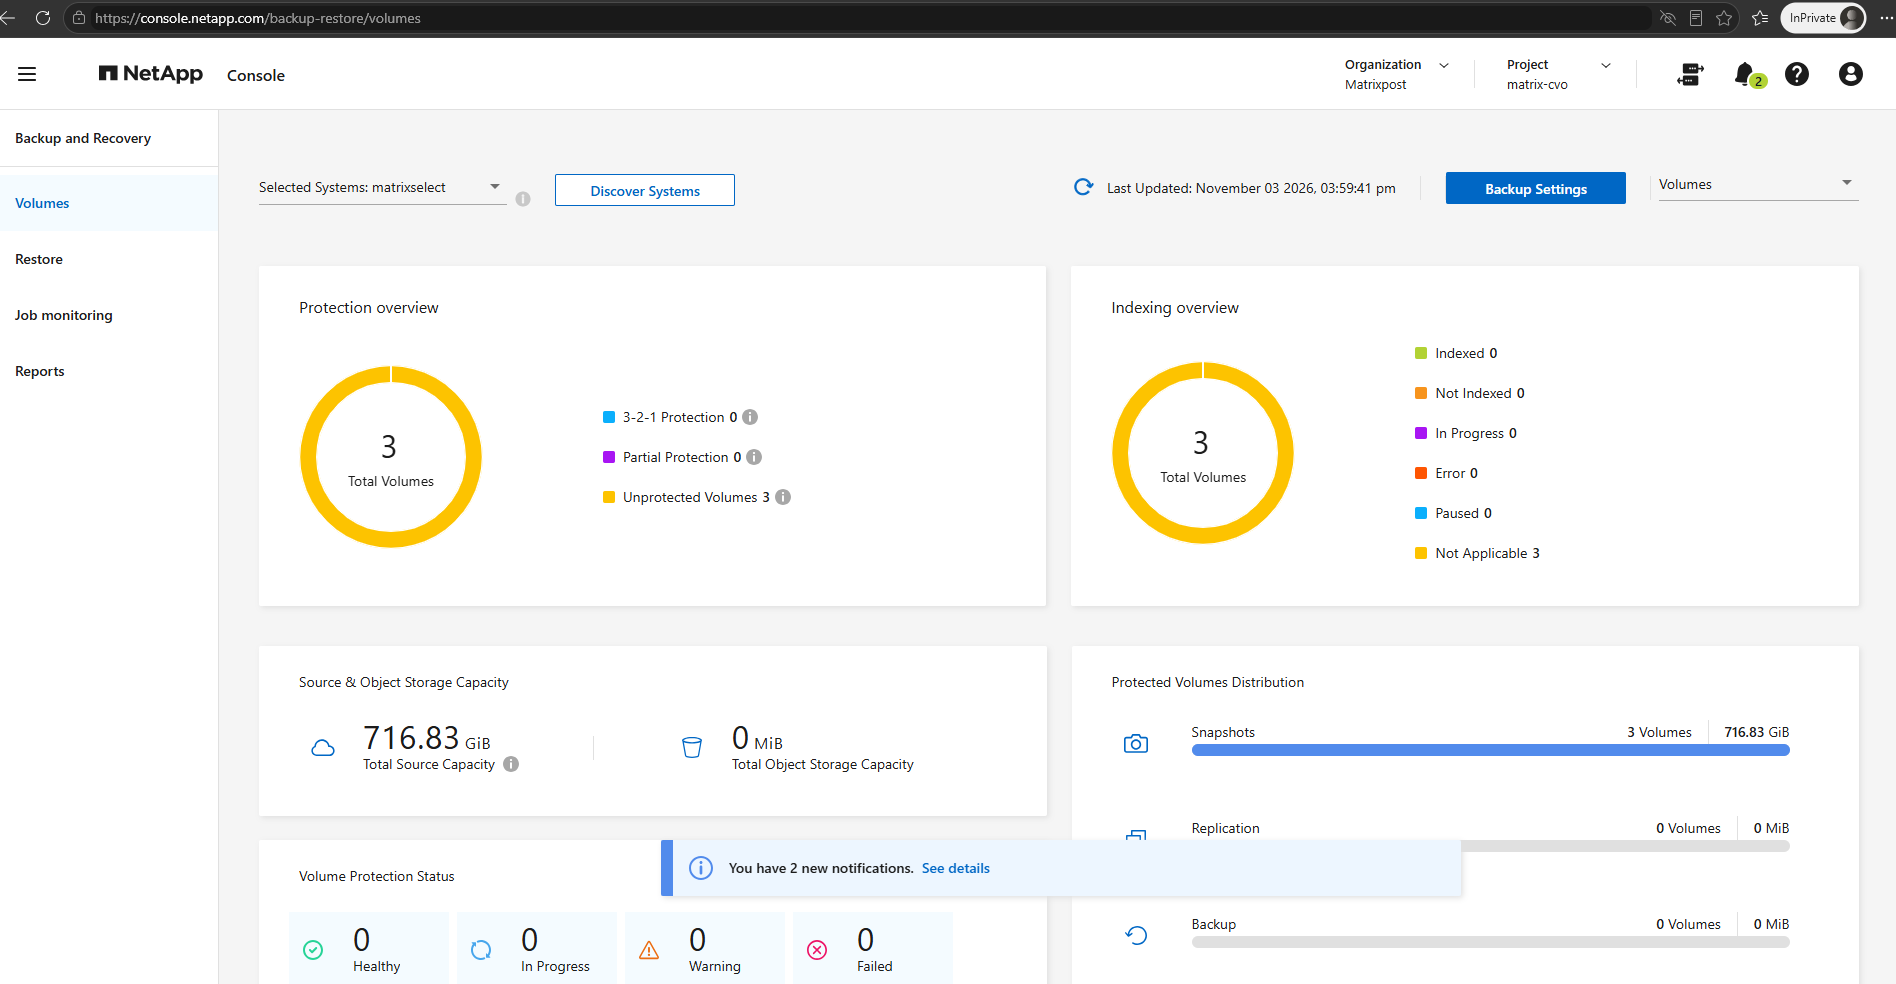
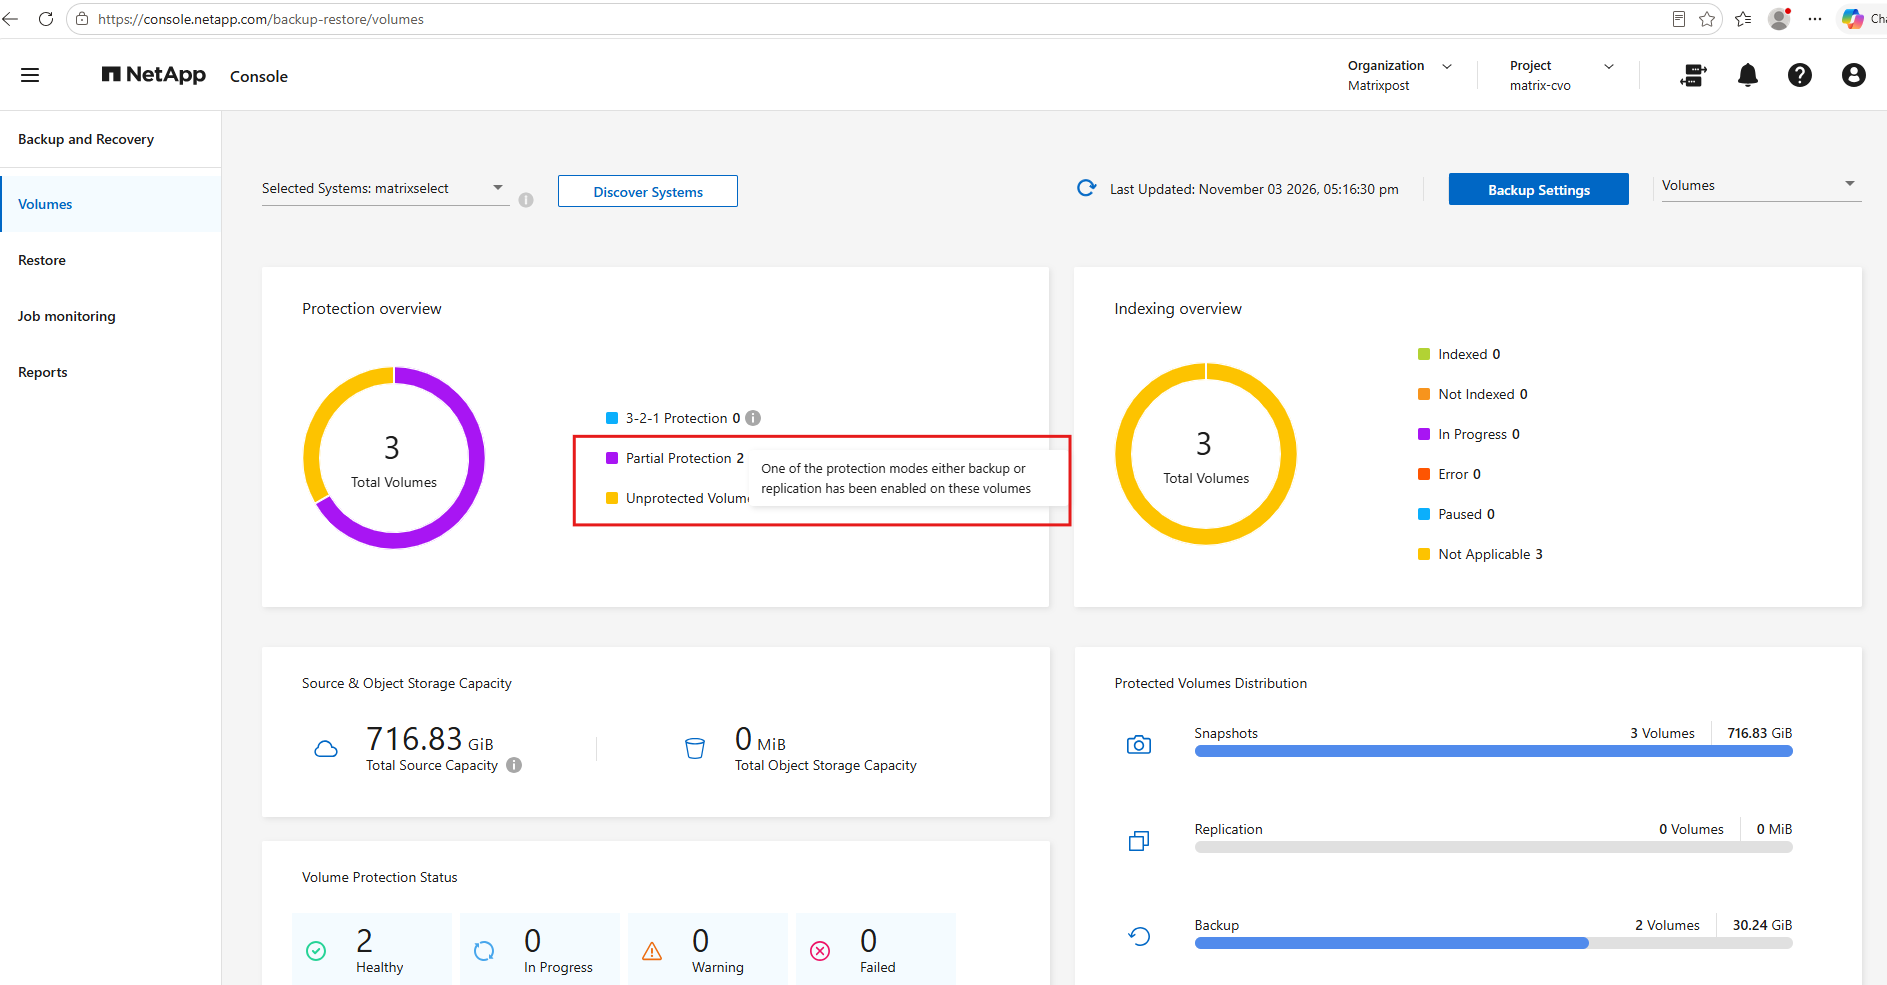
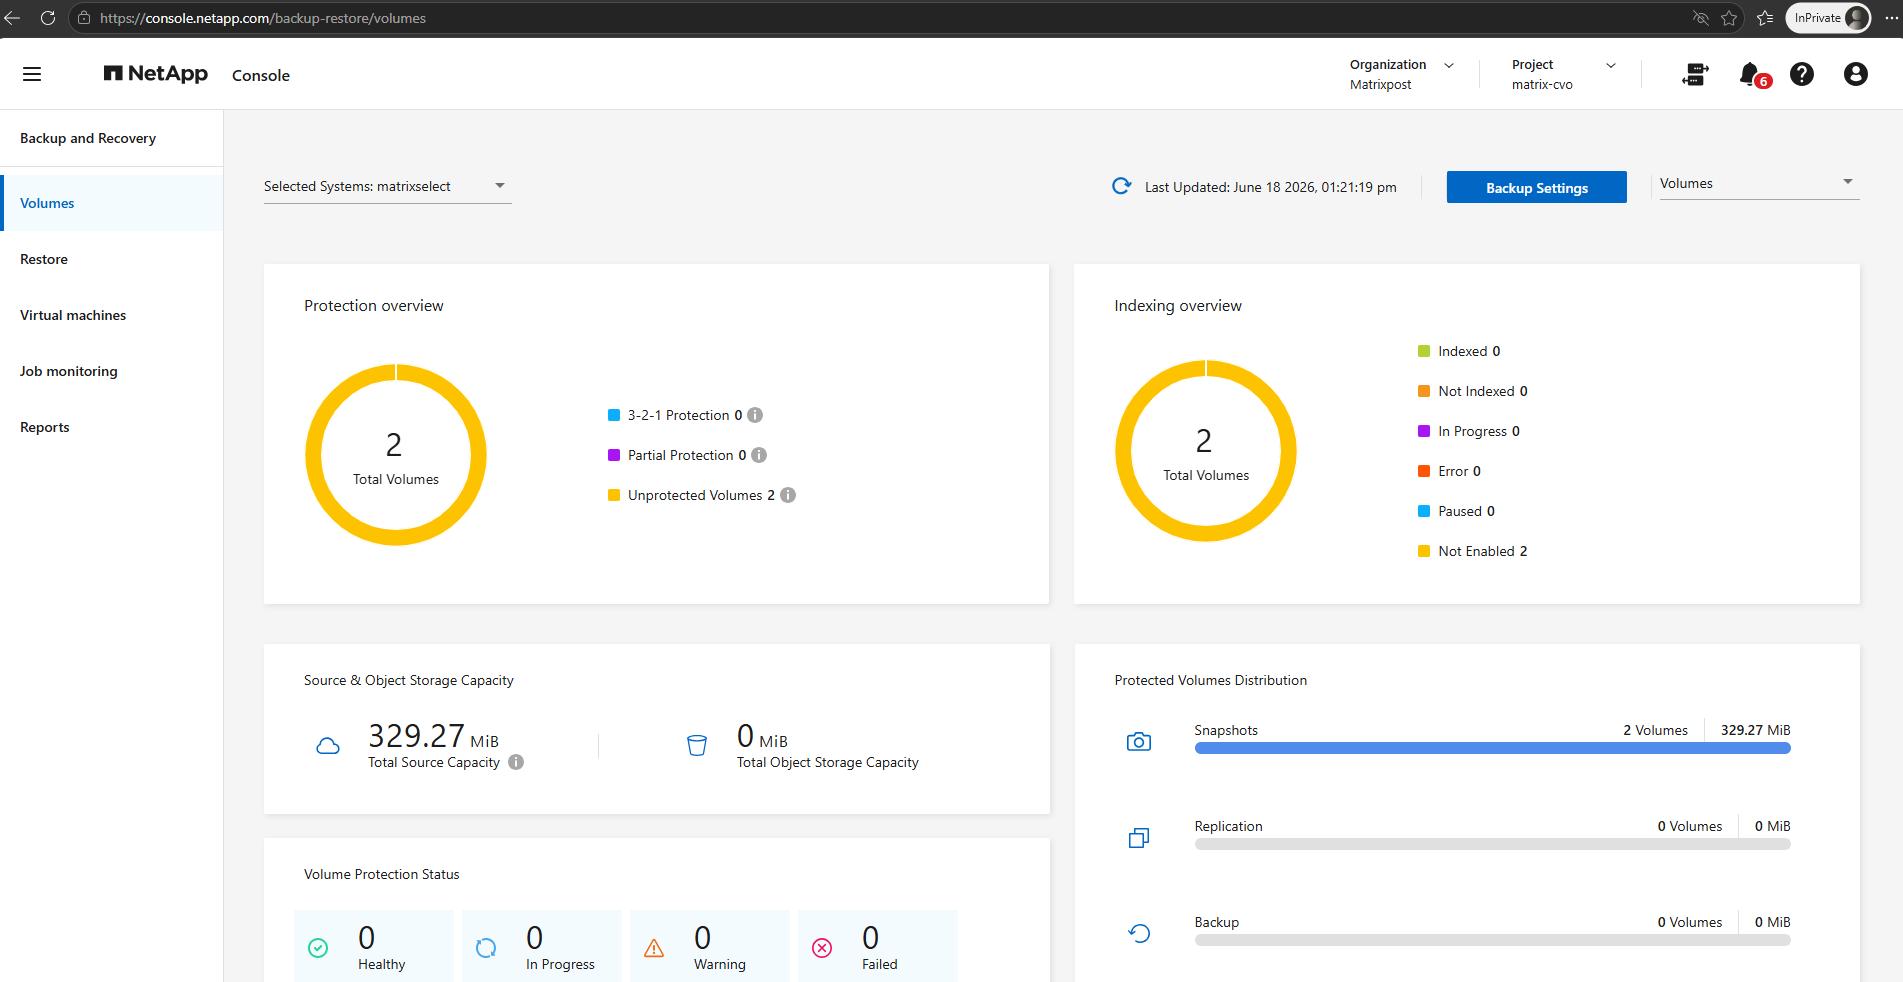
After initiating Backup and Recovery activation, NetApp Console returns to the protection dashboard for matrixselect.
The dashboard initially shows three unprotected volumes and no cloud backup capacity, indicating that the backup configuration and protection status still need to be verified.
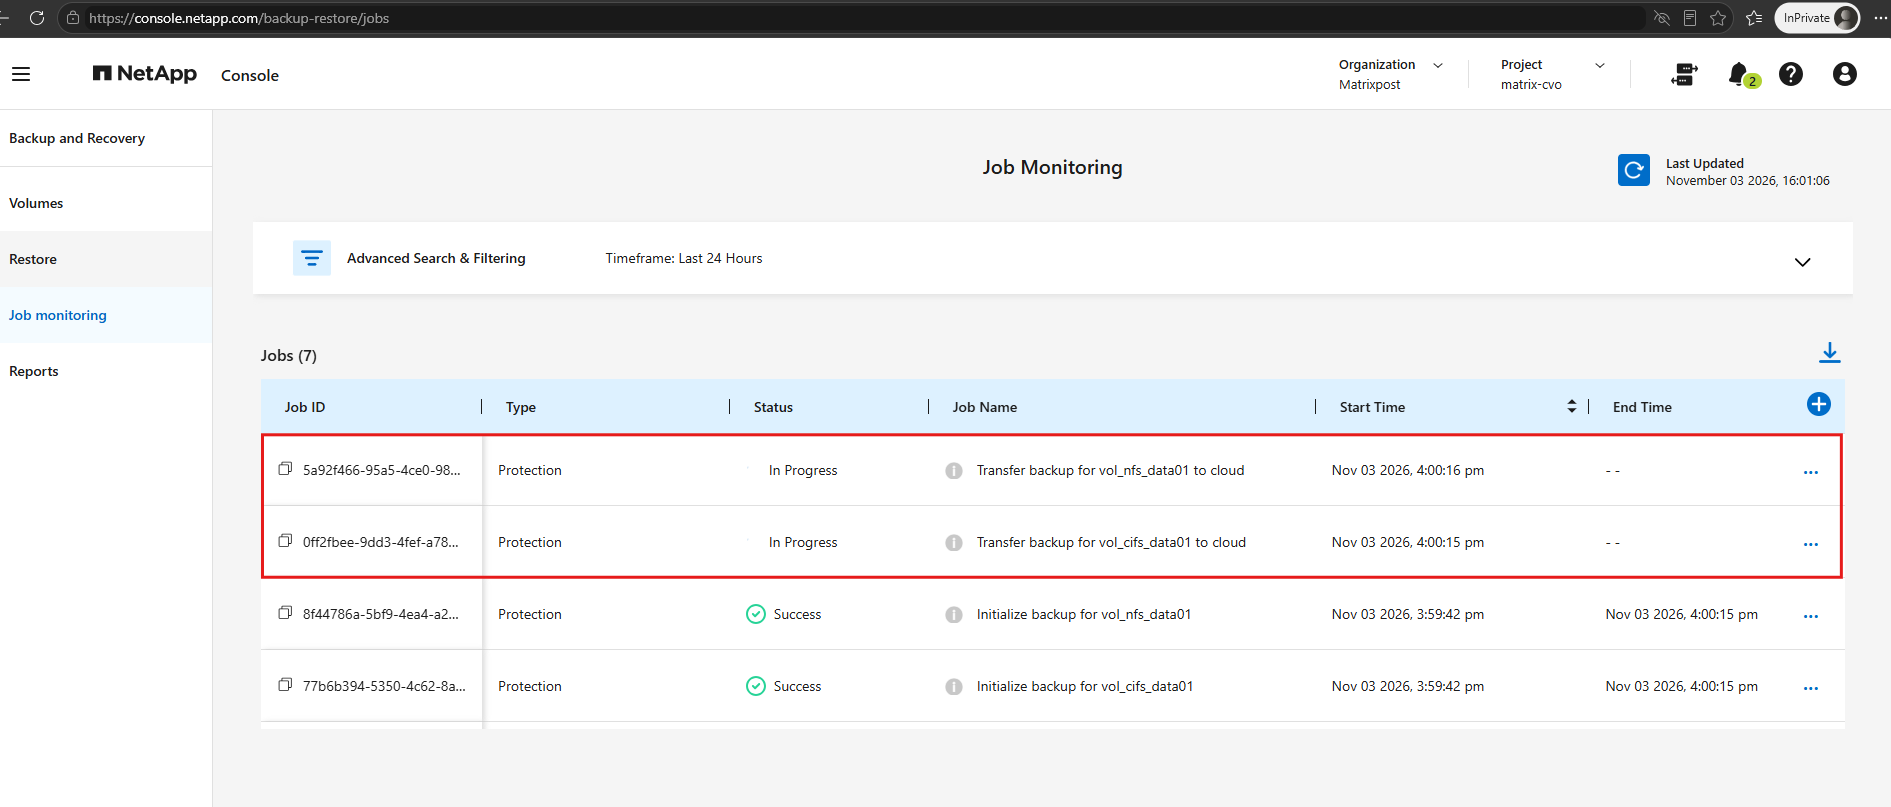
Under Job Monitoring, we can verify that backup initialization completed successfully for both selected ONTAP Select volumes, vol_cifs_data01 and vol_nfs_data01.
The initial backup transfers to Azure Blob Storage have also started and are currently in progress.
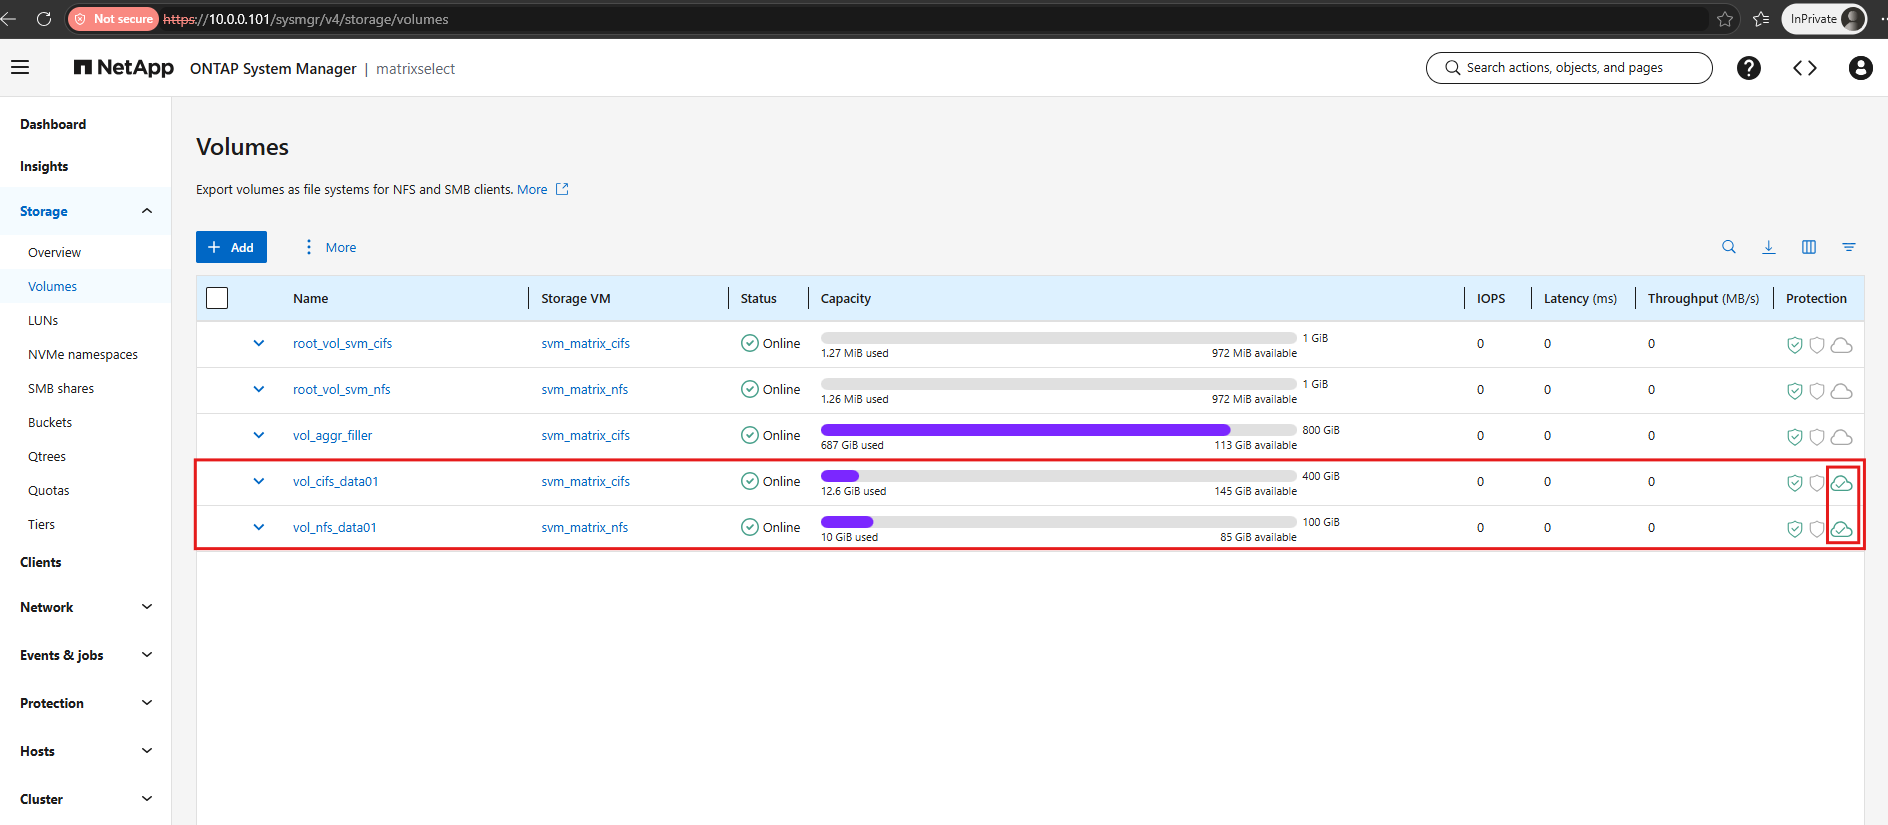
In ONTAP System Manager, both selected volumes, vol_cifs_data01 and vol_nfs_data01, now display the cloud backup protection icon, indicating that backup protection to Azure Blob Storage has been configured.
The initial backup transfers from my on-premises ONTAP Select lab to Azure are currently in progress.
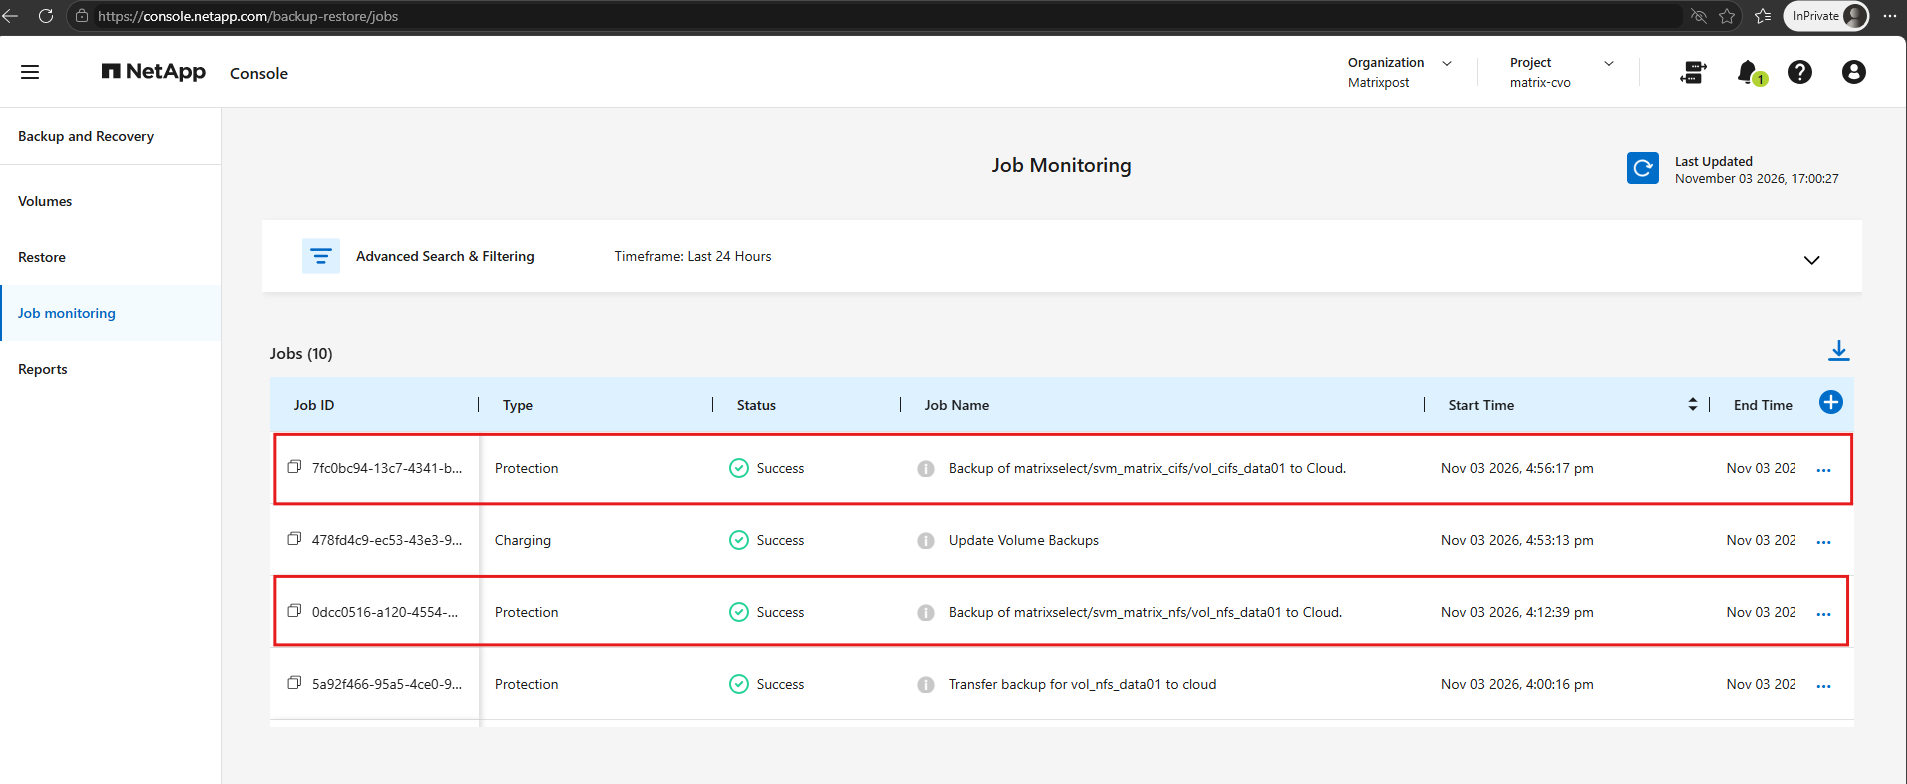
Under Job Monitoring, we can confirm that the initial backups of both ONTAP Select volumes,
vol_cifs_data01andvol_nfs_data01, to Azure Blob Storage completed successfully using our newly configured DataLock Compliance backup policy.
NetApp Console reports Partial Protection because only cloud backup is enabled, without additional replication. Both ONTAP Select volumes now show a Healthy protection status, confirming successful backup operations to Azure Blob Storage.
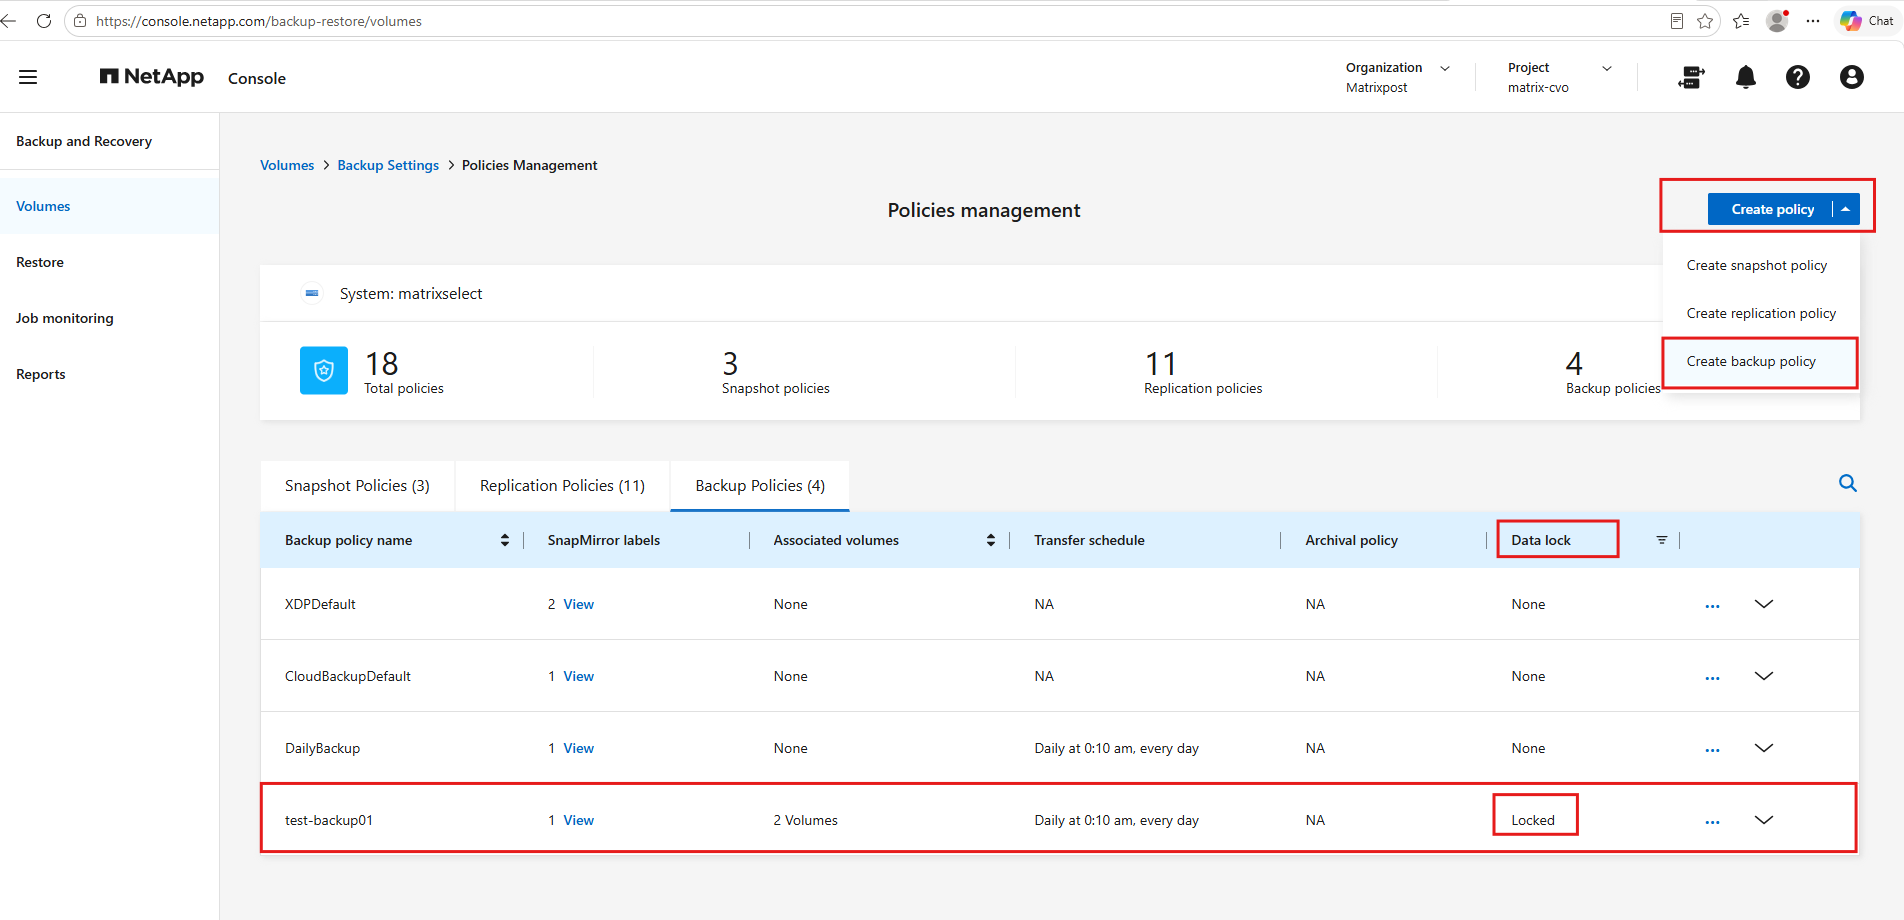
Under Policies Management, we can verify that our new backup policy test-backup01 uses DataLock in Locked mode and protects two volumes.
We will now create a second backup policy without DataLock to test whether different protection modes can coexist on the same ONTAP system.
Testing DataLock Restrictions with Different Backup Policies
To verify whether different DataLock configurations can coexist, we created a second backup policy, test-backup02, with DataLock disabled and Azure archival tiering enabled after 14 days.
NetApp Console successfully created the policy alongside our existing DataLock Locked policy, demonstrating that both configurations can coexist at the policy level.
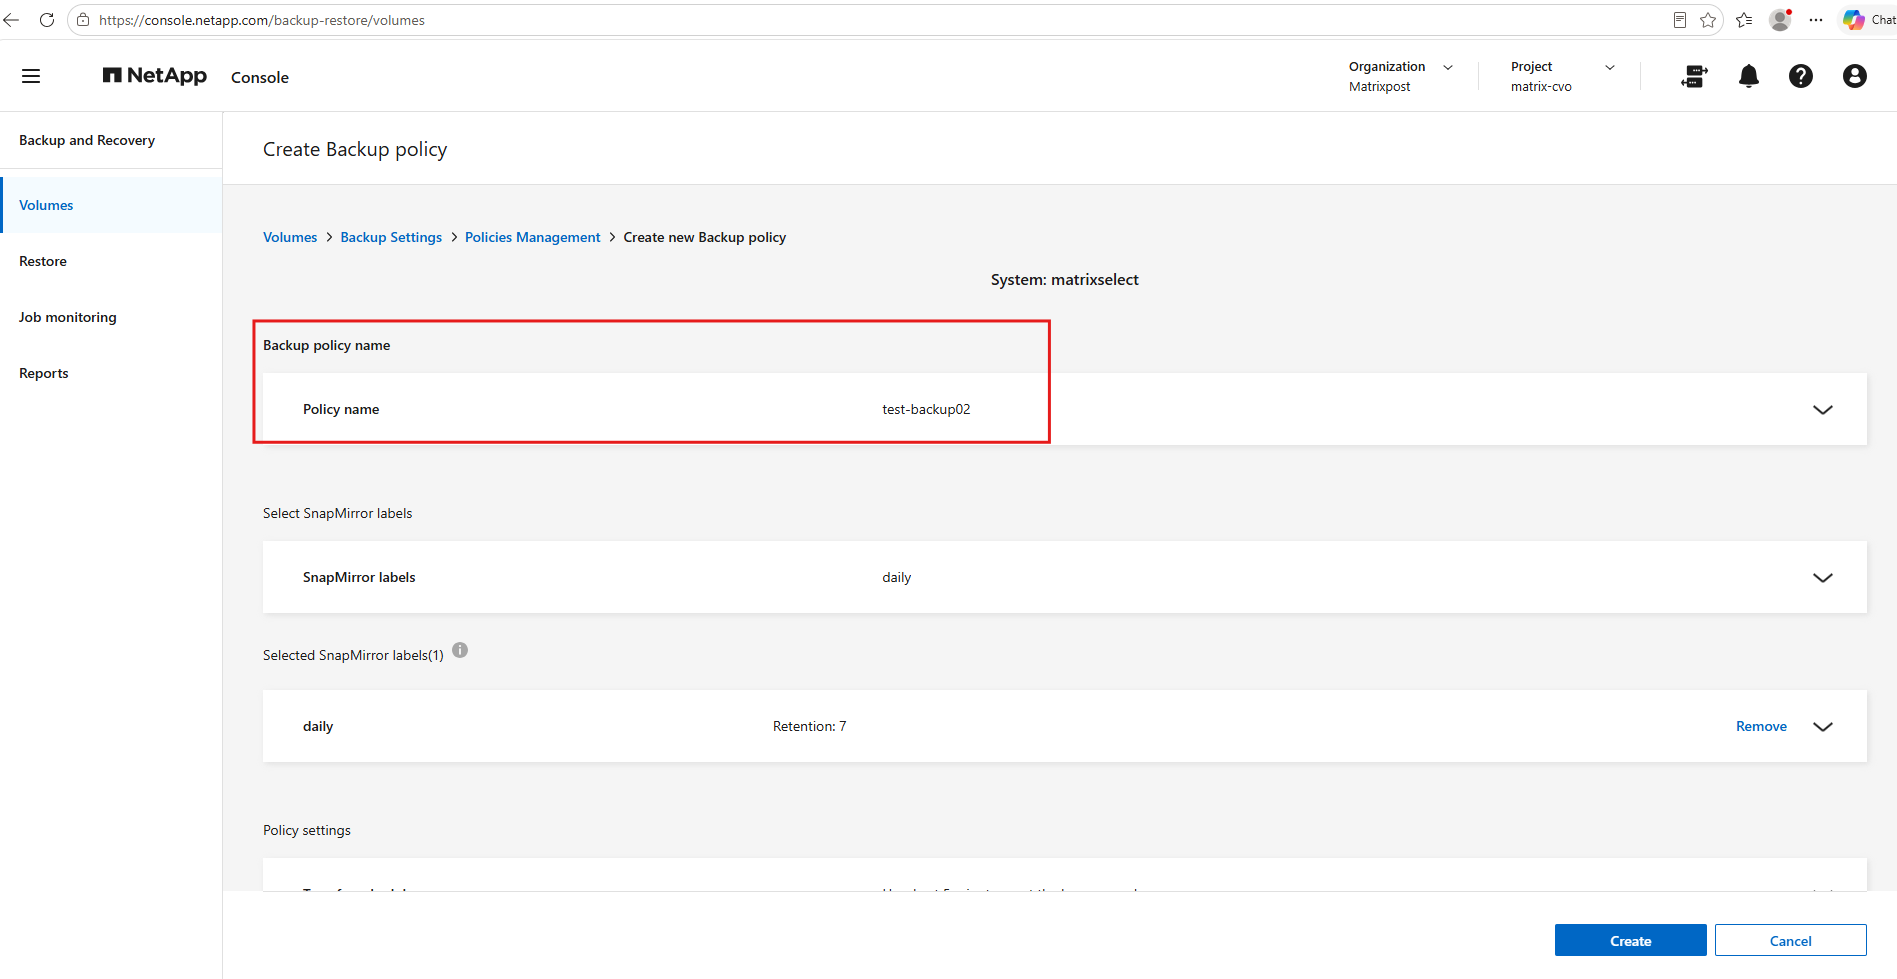
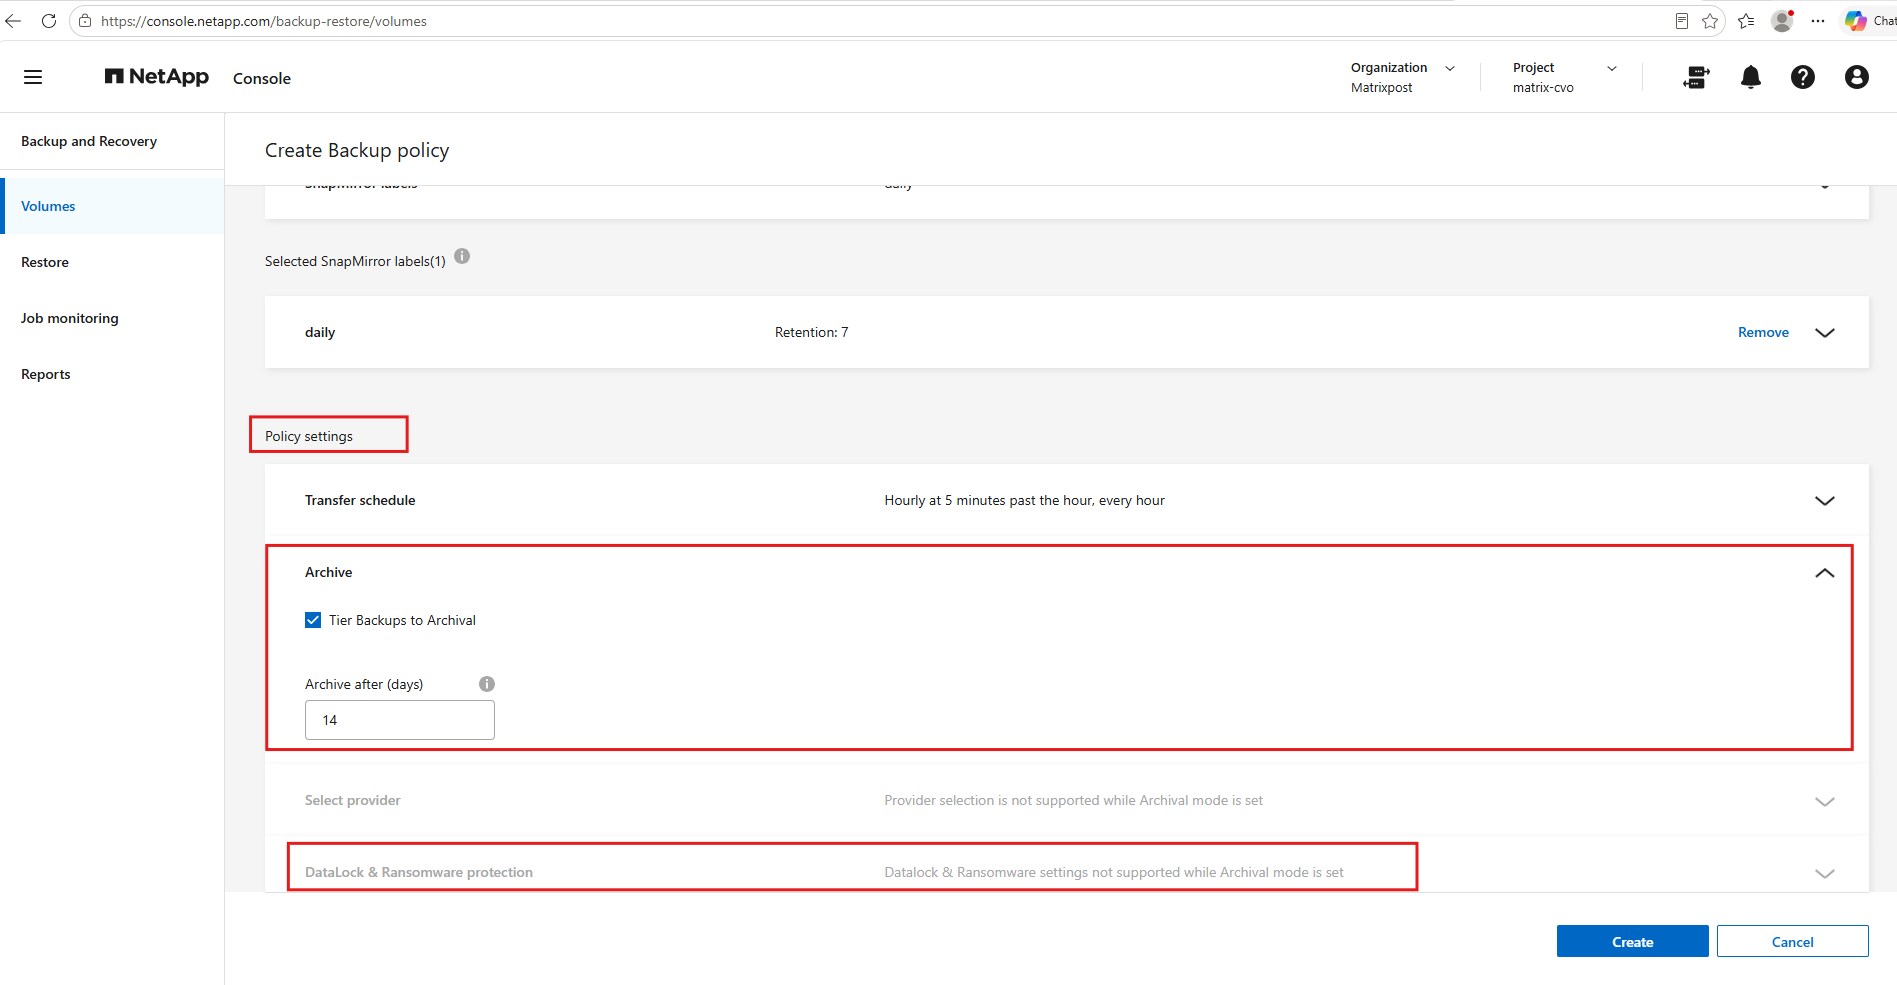
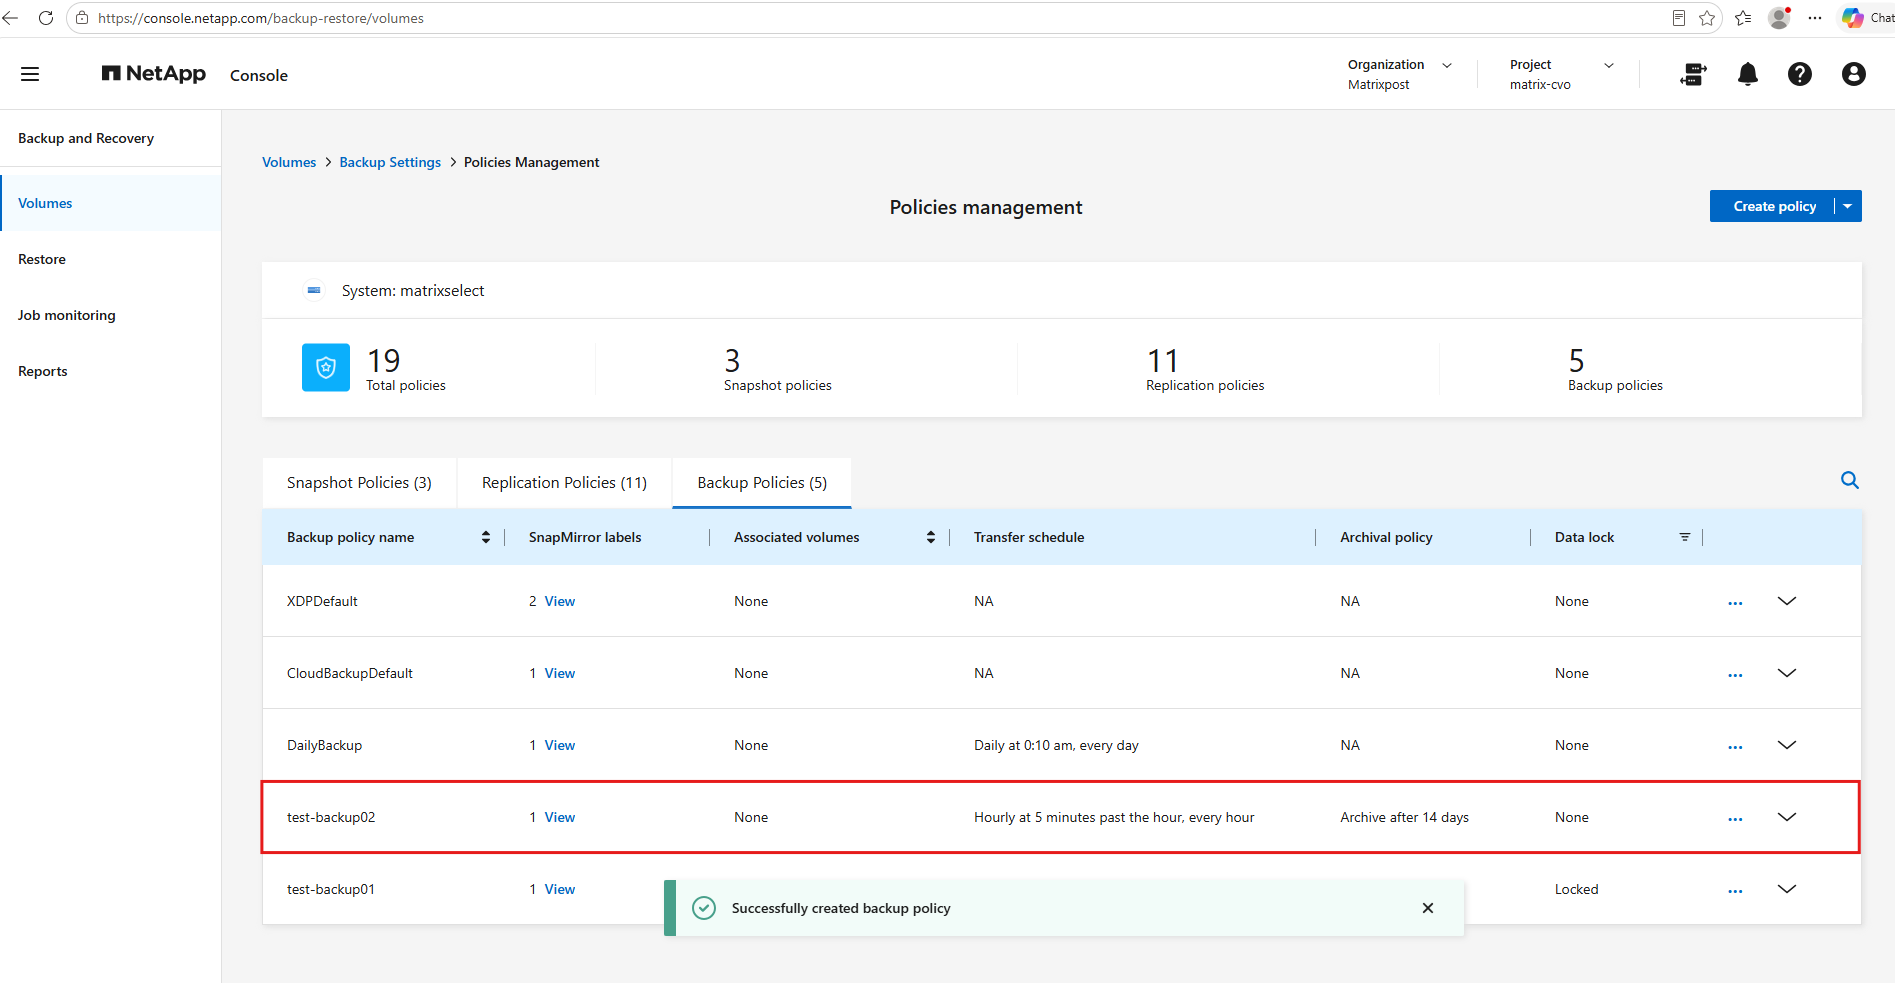
Although NetApp Console allows creating backup policies with different DataLock settings on the same ONTAP system, the newly created policy without DataLock is not offered when editing an existing DataLock-protected volume. Only the original Locked policy is available, indicating a restriction on policy assignment within the activated backup environment.
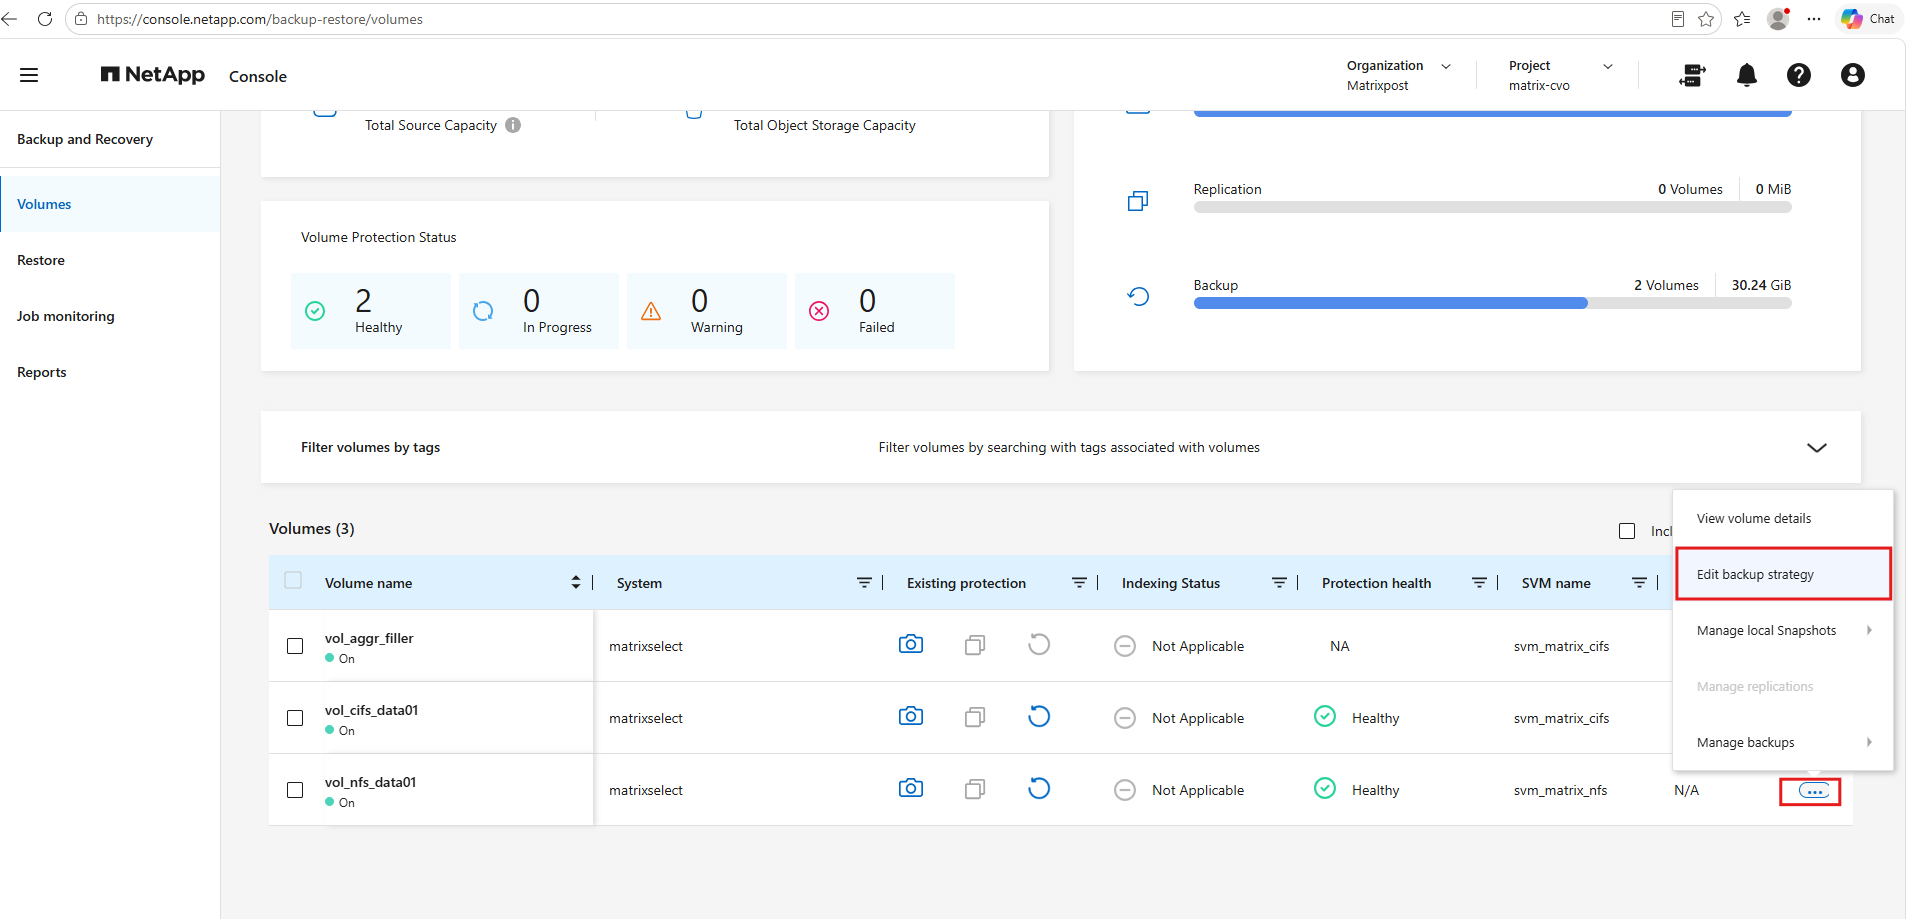
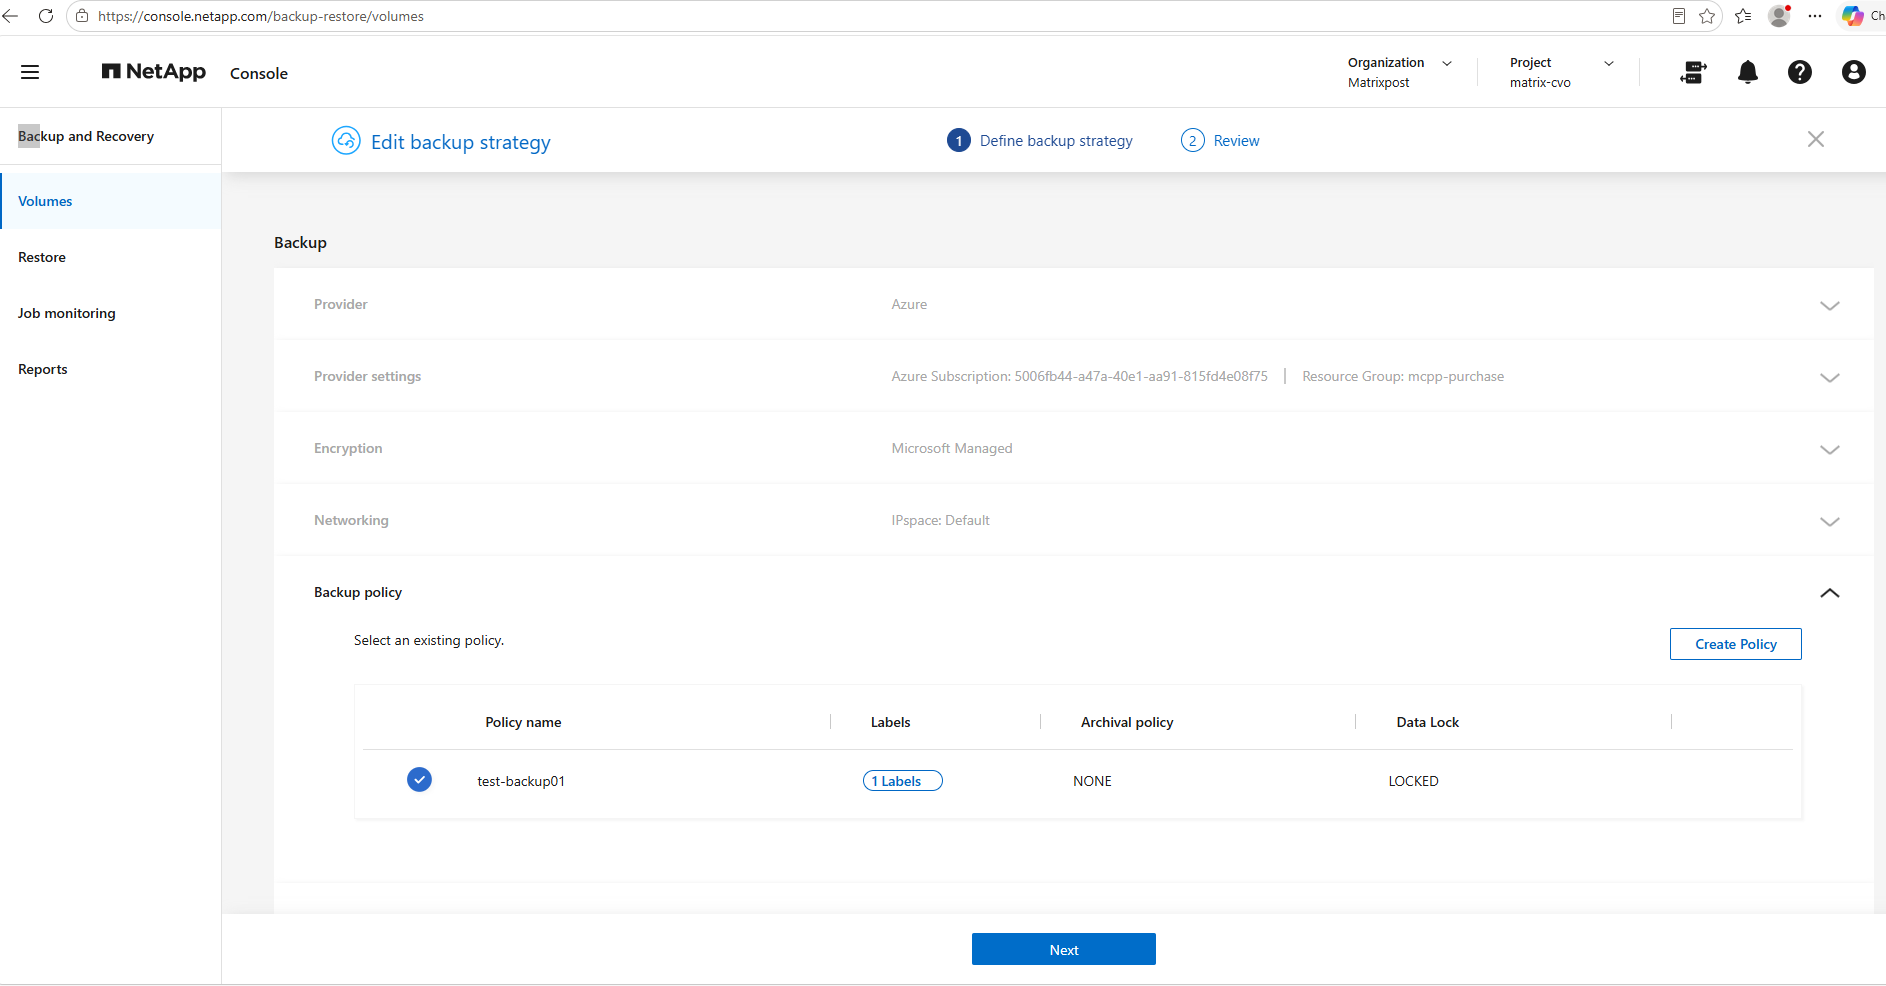
We created an additional test volume, vol_cifs_datalock_test, on our ONTAP Select system to verify whether a backup policy without DataLock can be assigned alongside the existing DataLock-protected volumes. We will now edit its backup strategy and check which policies are available.
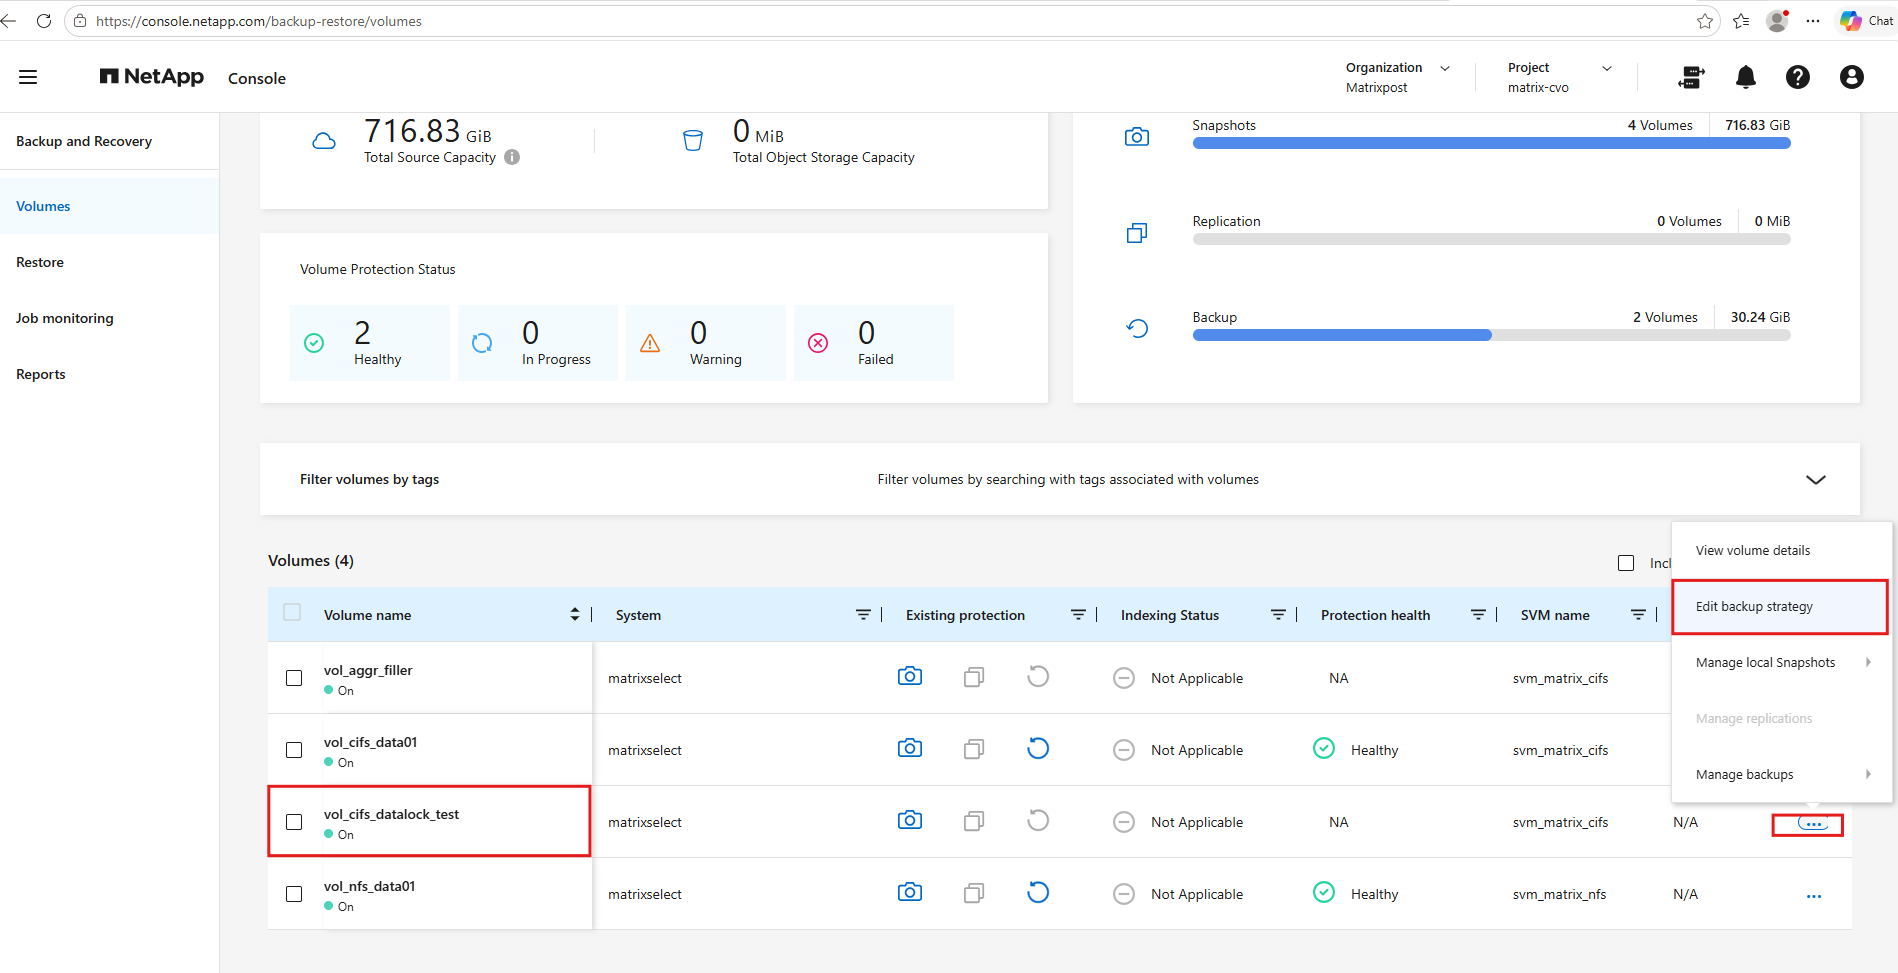
The test confirms that although backup policies with different DataLock settings can be created on the same ONTAP system, only the original DataLock Locked policy is available when enabling cloud backup for a newly created volume.
This demonstrates that the DataLock configuration established during initial backup activation restricts subsequent policy assignments.
If you enable DataLock, all volume backups will be locked. You can’t mix locked and non-locked volume backups for a single cluster.
Source: https://docs.netapp.com/us-en/data-services-backup-recovery/prev-ontap-policy-object-options.html#restrictions
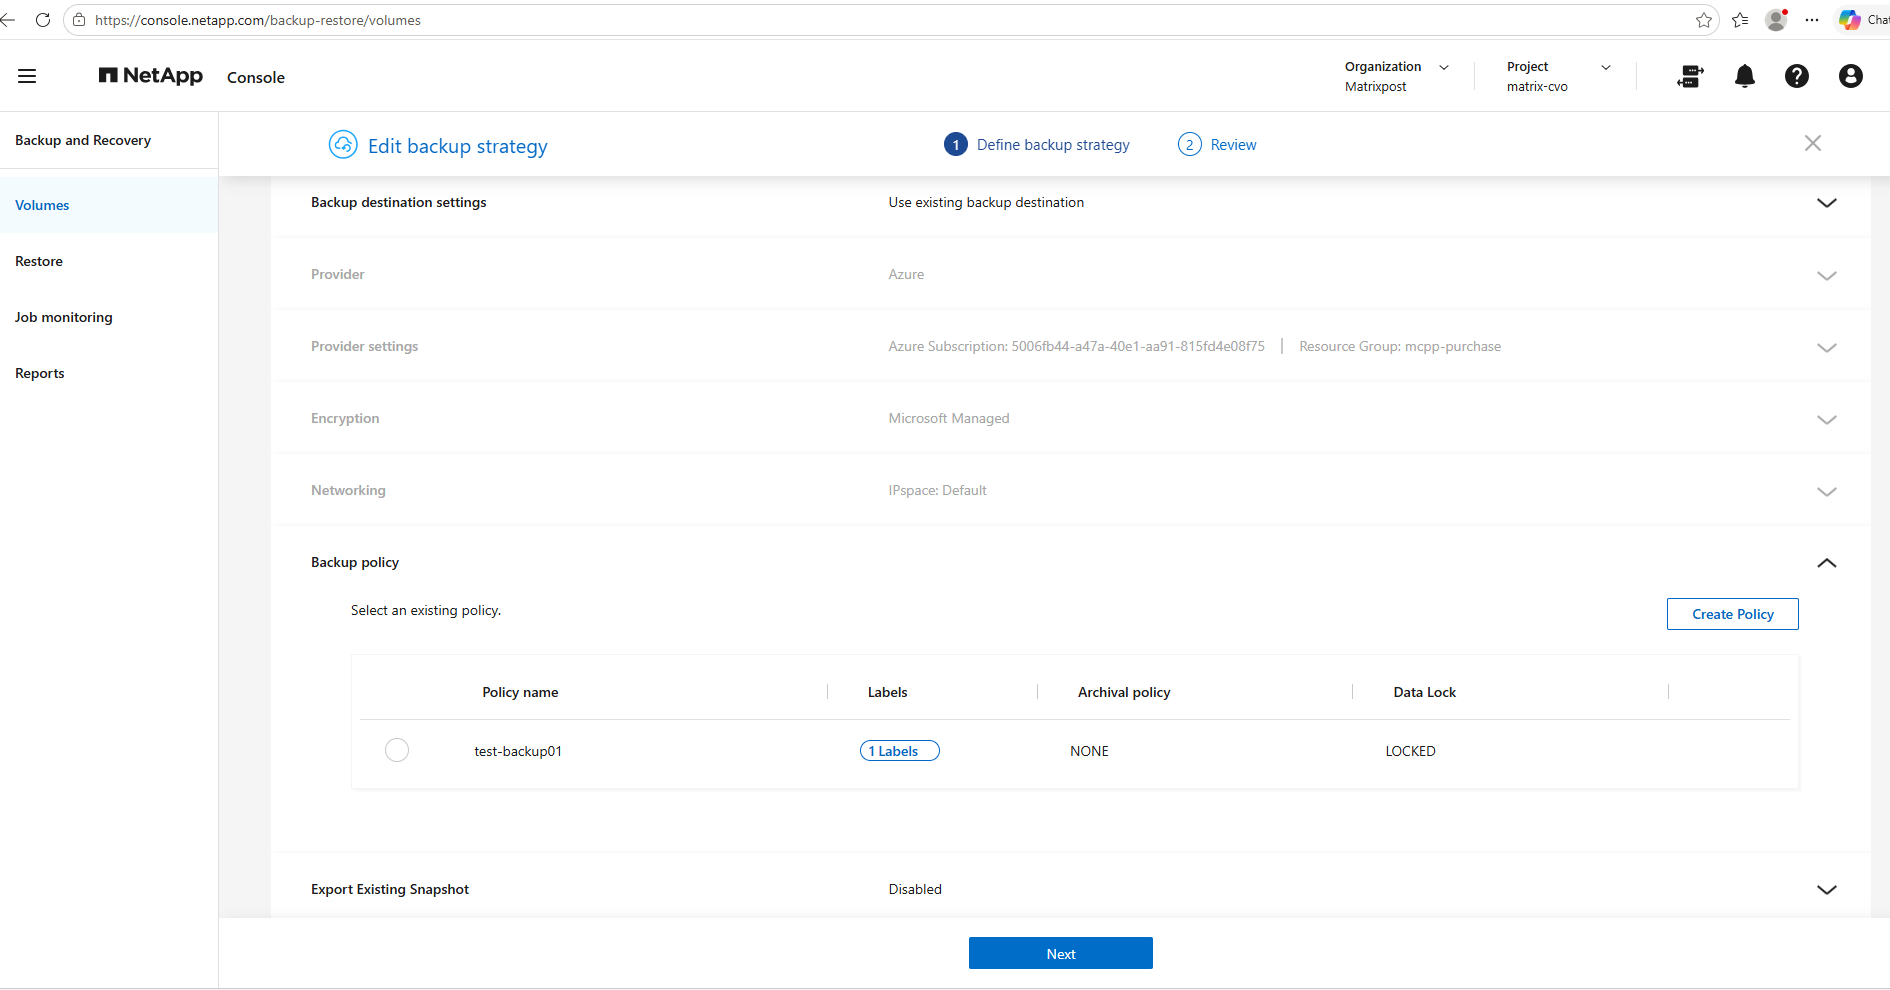
Enabling DataLock on an Existing Backup Configuration Without DataLock
As we will see below, enabling DataLock on an existing backup configuration without DataLock is not supported. Nevertheless, we will test this scenario to demonstrate how NetApp Console handles the policy change and why it ultimately fails.
To prepare for this test, we are removing the existing backup relationships. NetApp Console warns that the backups will remain in Azure object storage, but resynchronization will no longer be possible.
Reprotecting the volumes would create new relationships without access to the previous backups. Since our existing backups use DataLock Compliance, their immutable backup objects remain protected until the applicable retention period expires.
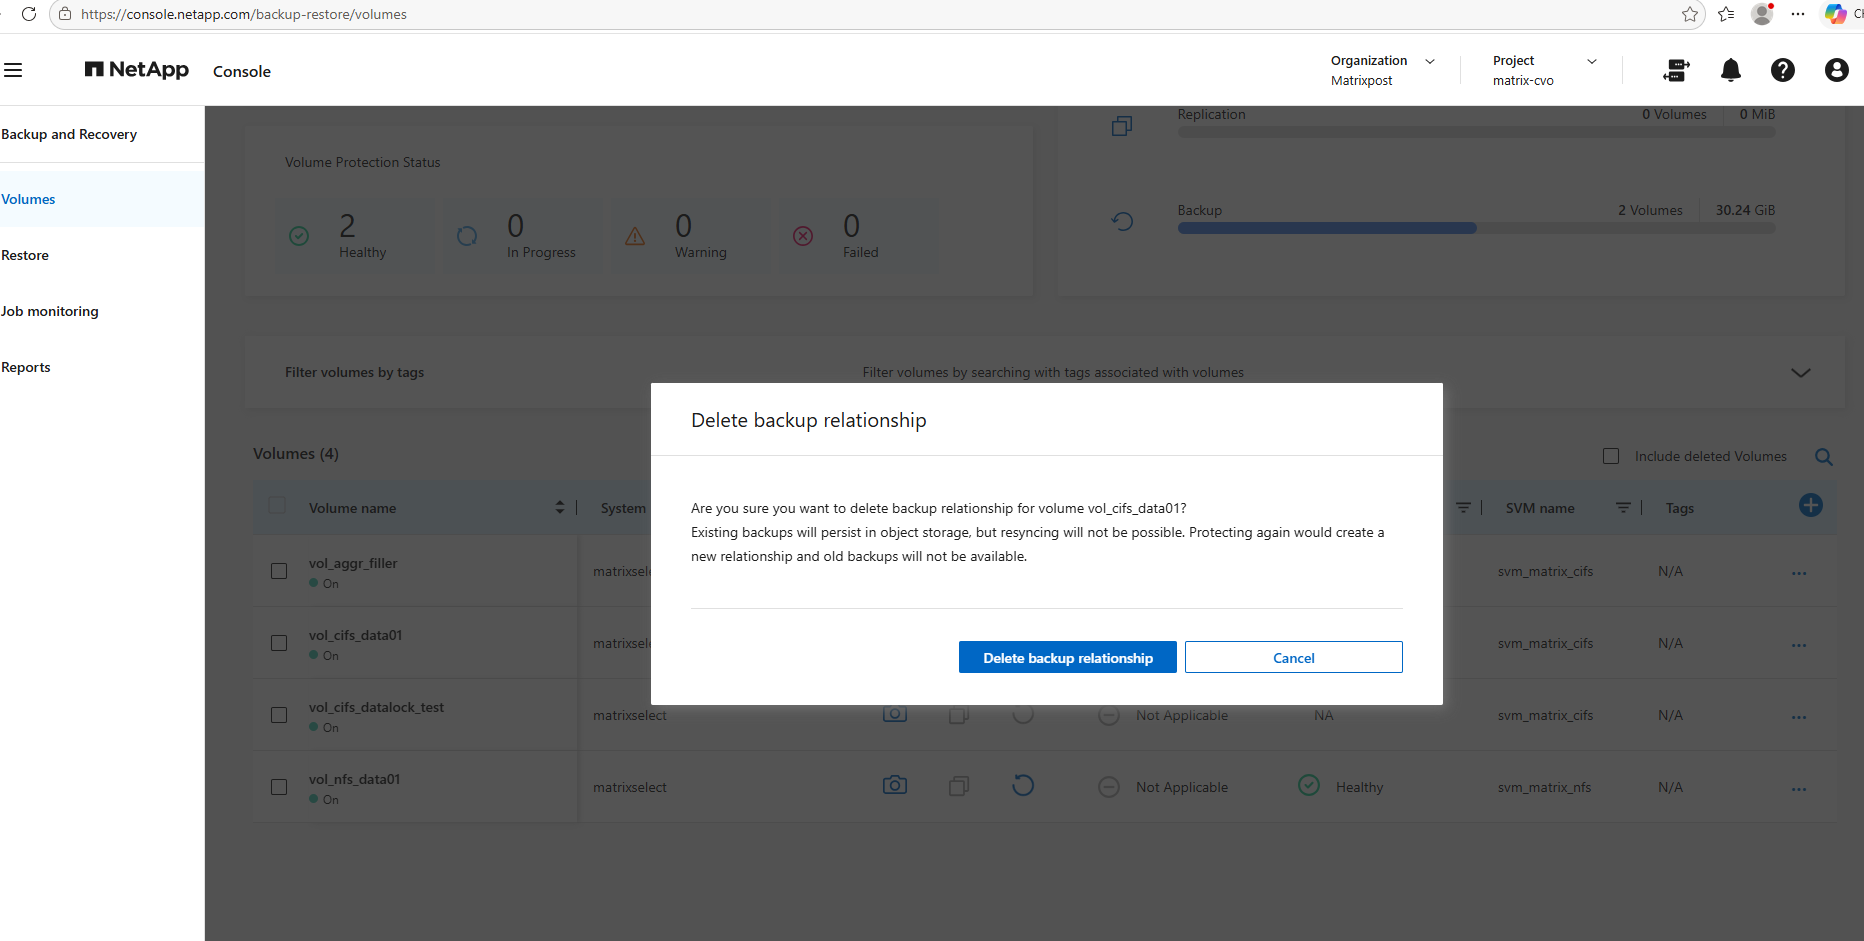
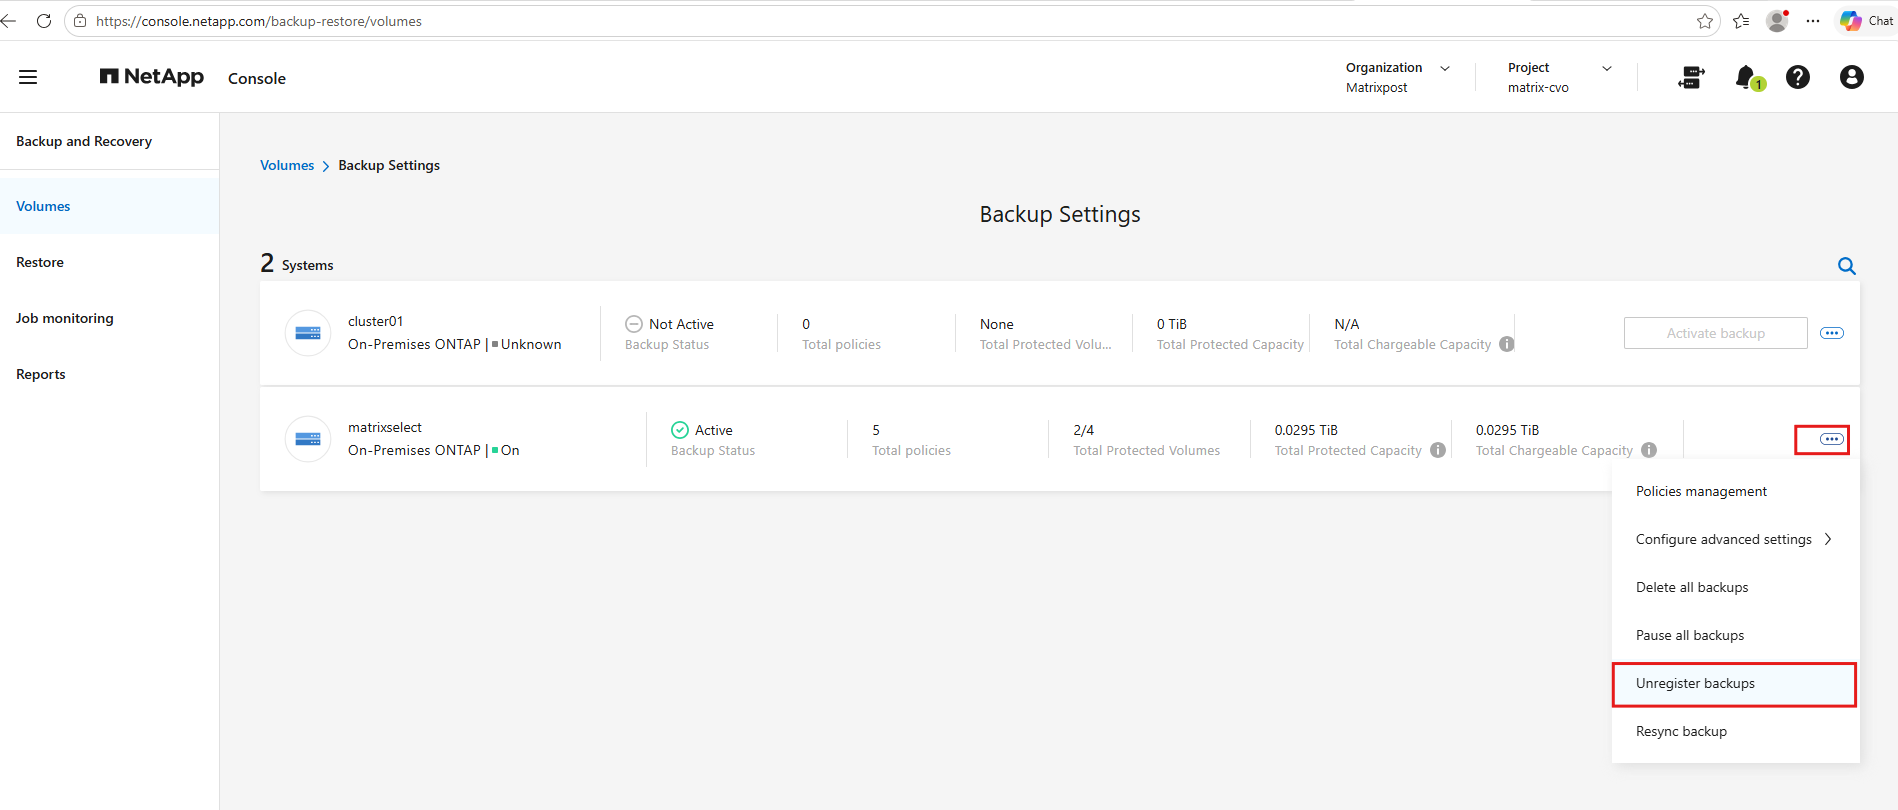
To prepare for our reverse test, we will unregister Backup and Recovery for matrixselect to remove the existing backup registration and allow a fresh activation with DataLock disabled.
This will enable us to investigate whether DataLock can subsequently be introduced into an environment initially configured without it, while checking how the existing immutable backups are handled.
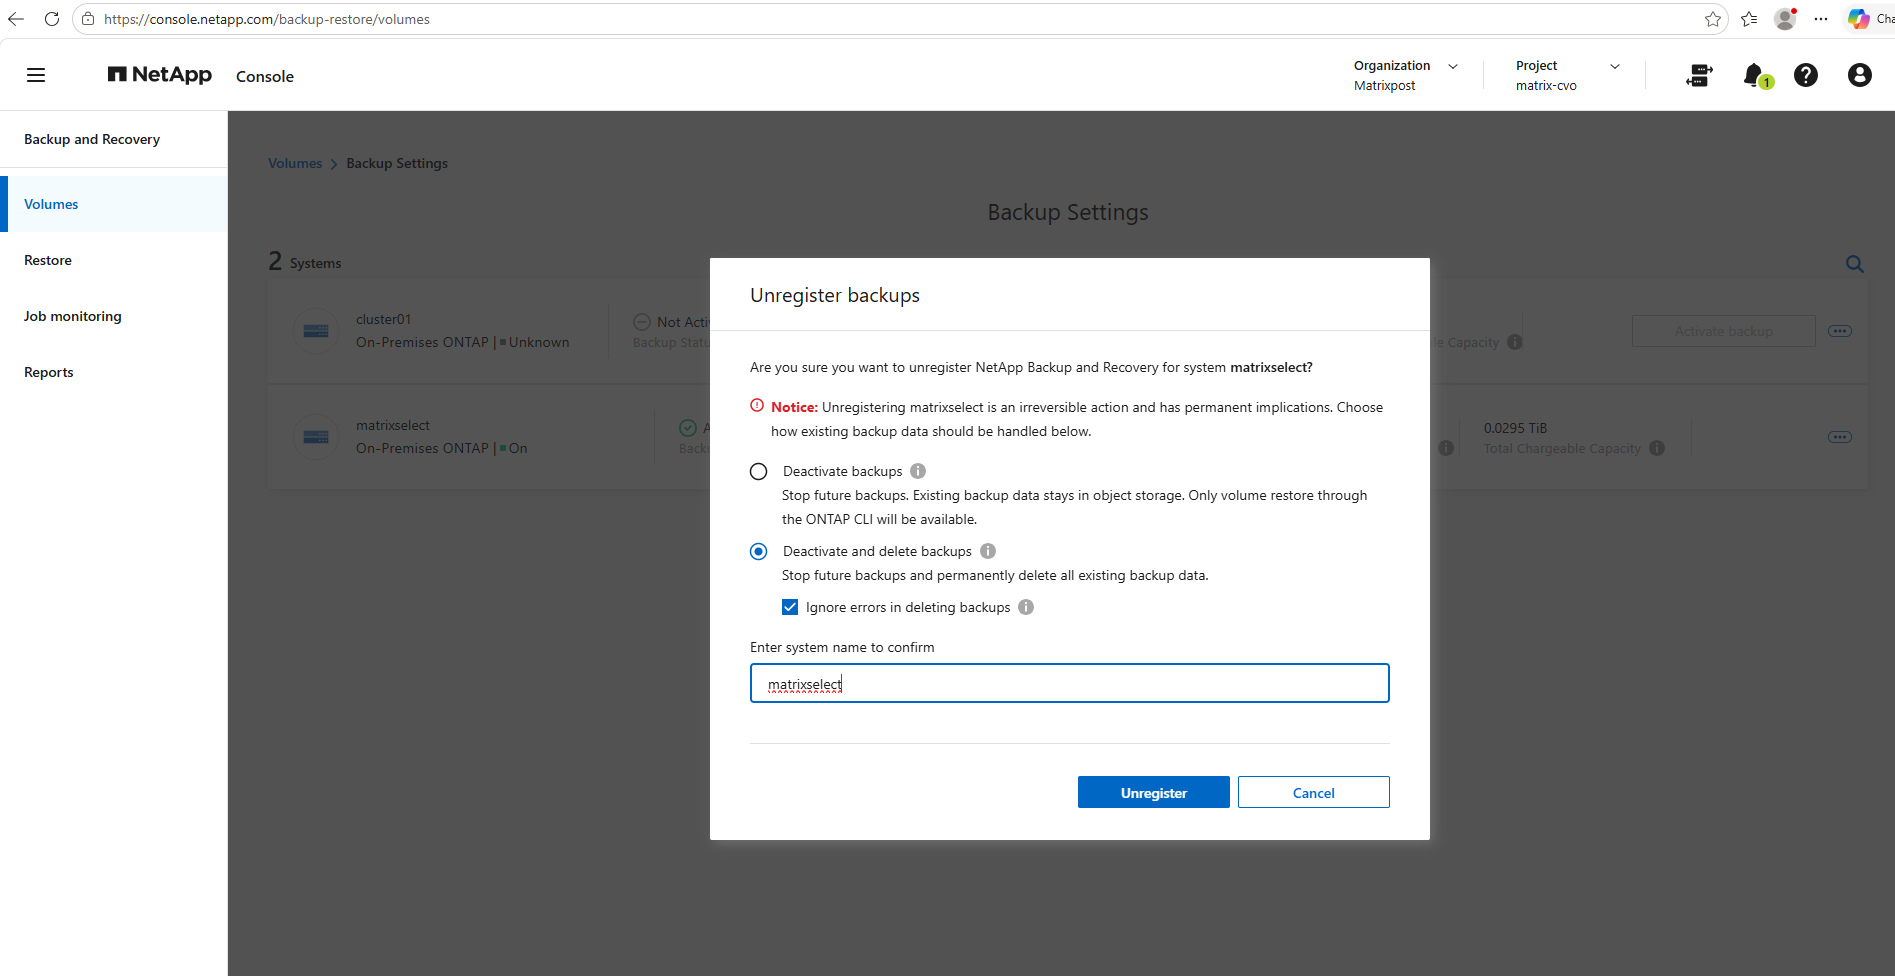
When unregistering Backup and Recovery, we select Deactivate and delete backups, with Ignore errors in deleting backups enabled.
Since our existing backups are protected by DataLock Compliance, immutable Azure Blob objects cannot be deleted before their retention period expires. NetApp Console can therefore proceed with unregistering the backup configuration even if deletion of the protected objects fails.
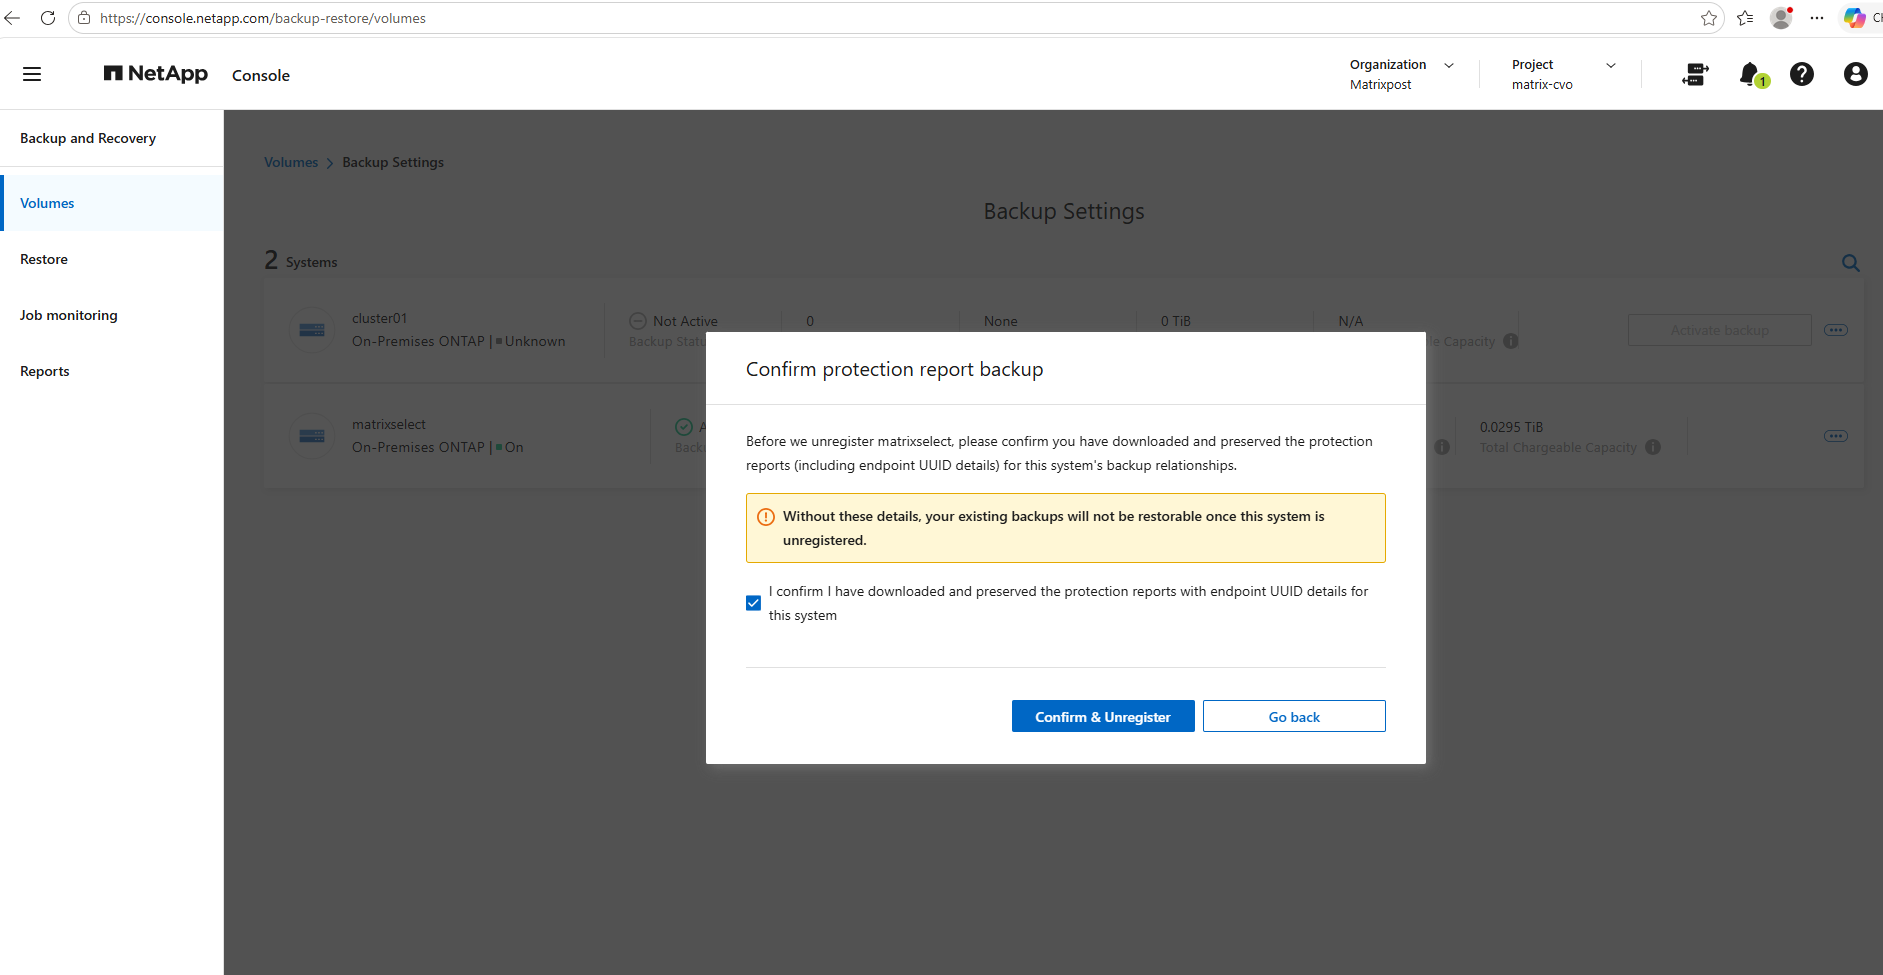
Before unregistering Backup and Recovery, NetApp Console requires confirmation that the protection reports, including endpoint UUID details, have been preserved.
These details are essential for restoring existing backups after unregistering the system, even if the immutable backup objects remain in Azure Blob Storage.
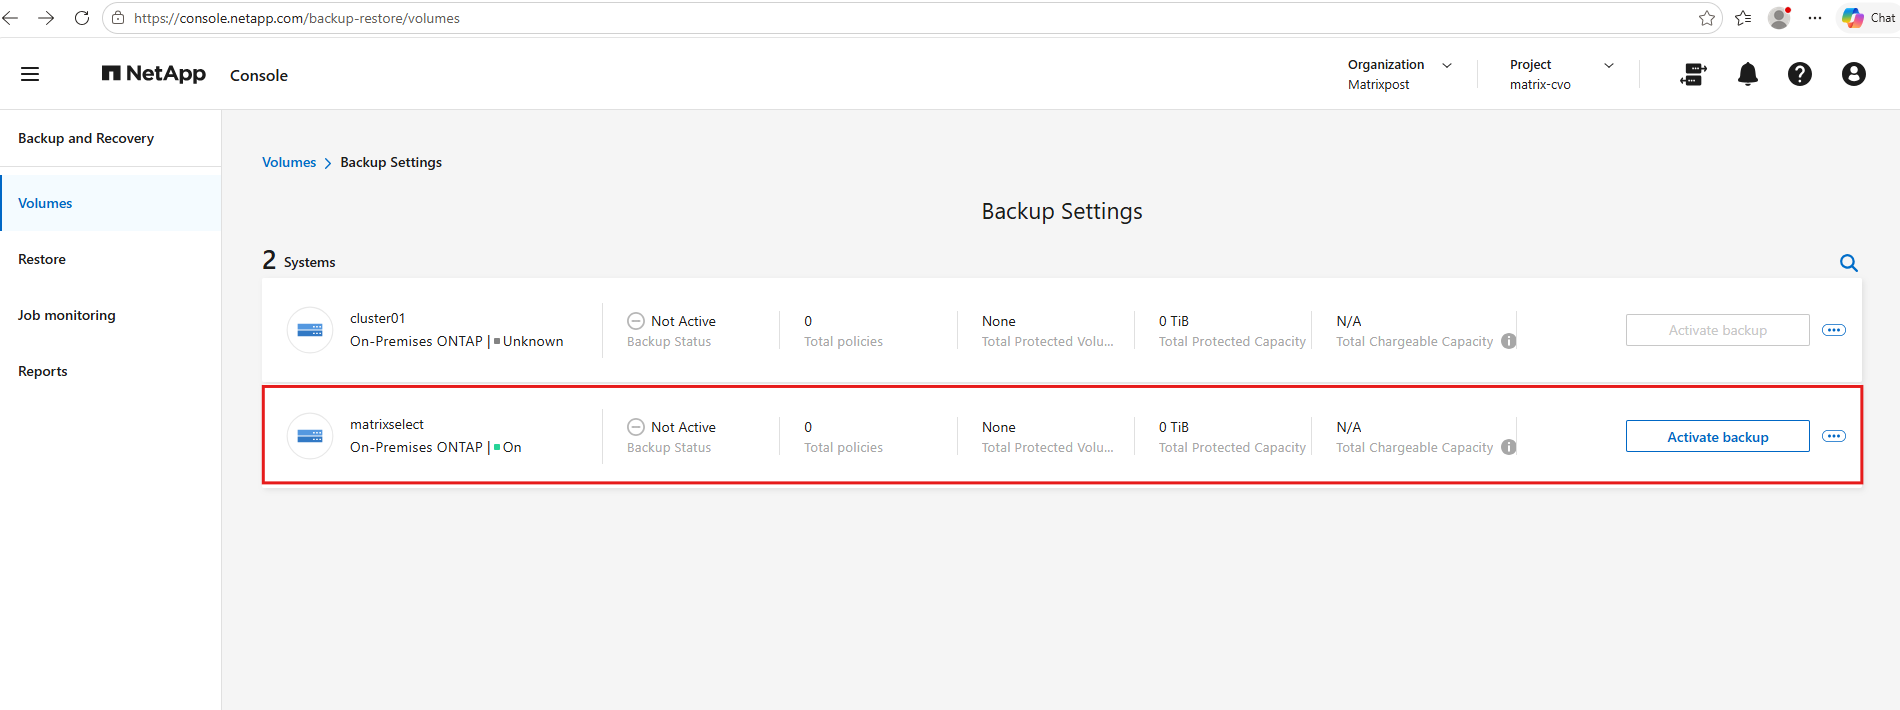
NetApp Backup and Recovery was successfully unregistered from matrixselect.
The system now shows Not Active, with zero backup policies and no protected volumes, allowing us to reactivate cloud backups without DataLock for our reverse test.
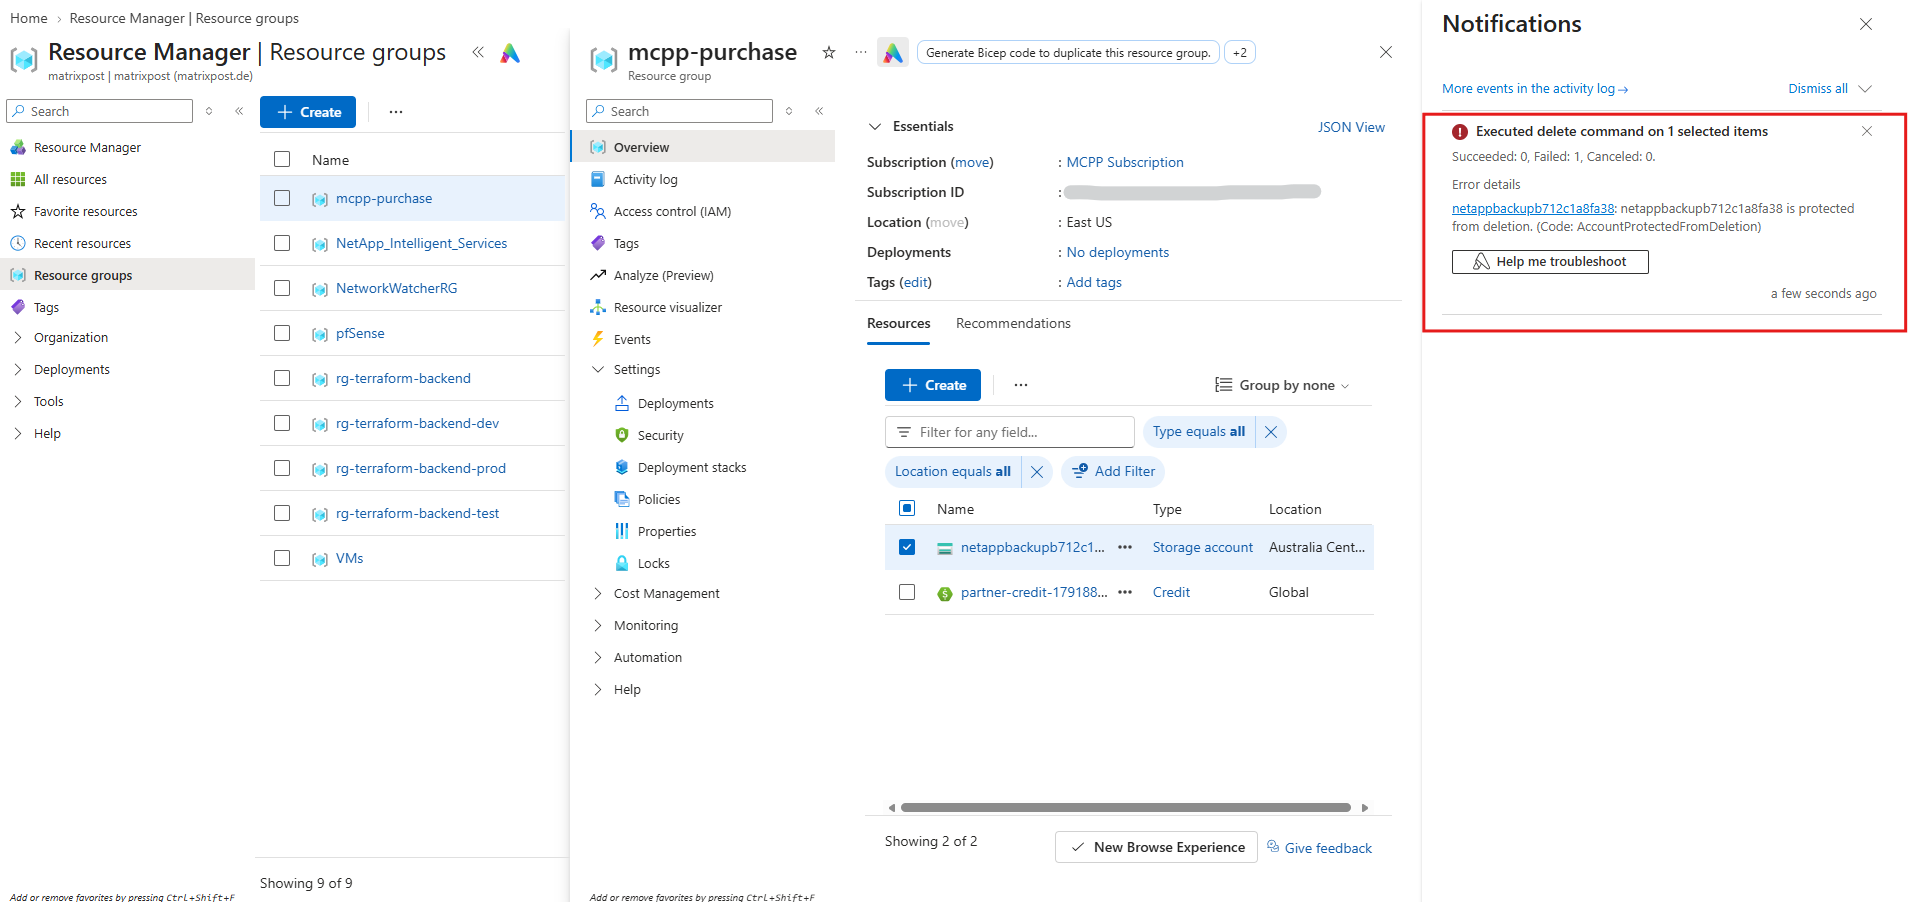
To verify that DataLock Compliance remains effective after unregistering Backup and Recovery, we attempted to delete the associated Azure storage account.
Azure rejected the operation with
AccountProtectedFromDeletion, confirming that the storage acc.
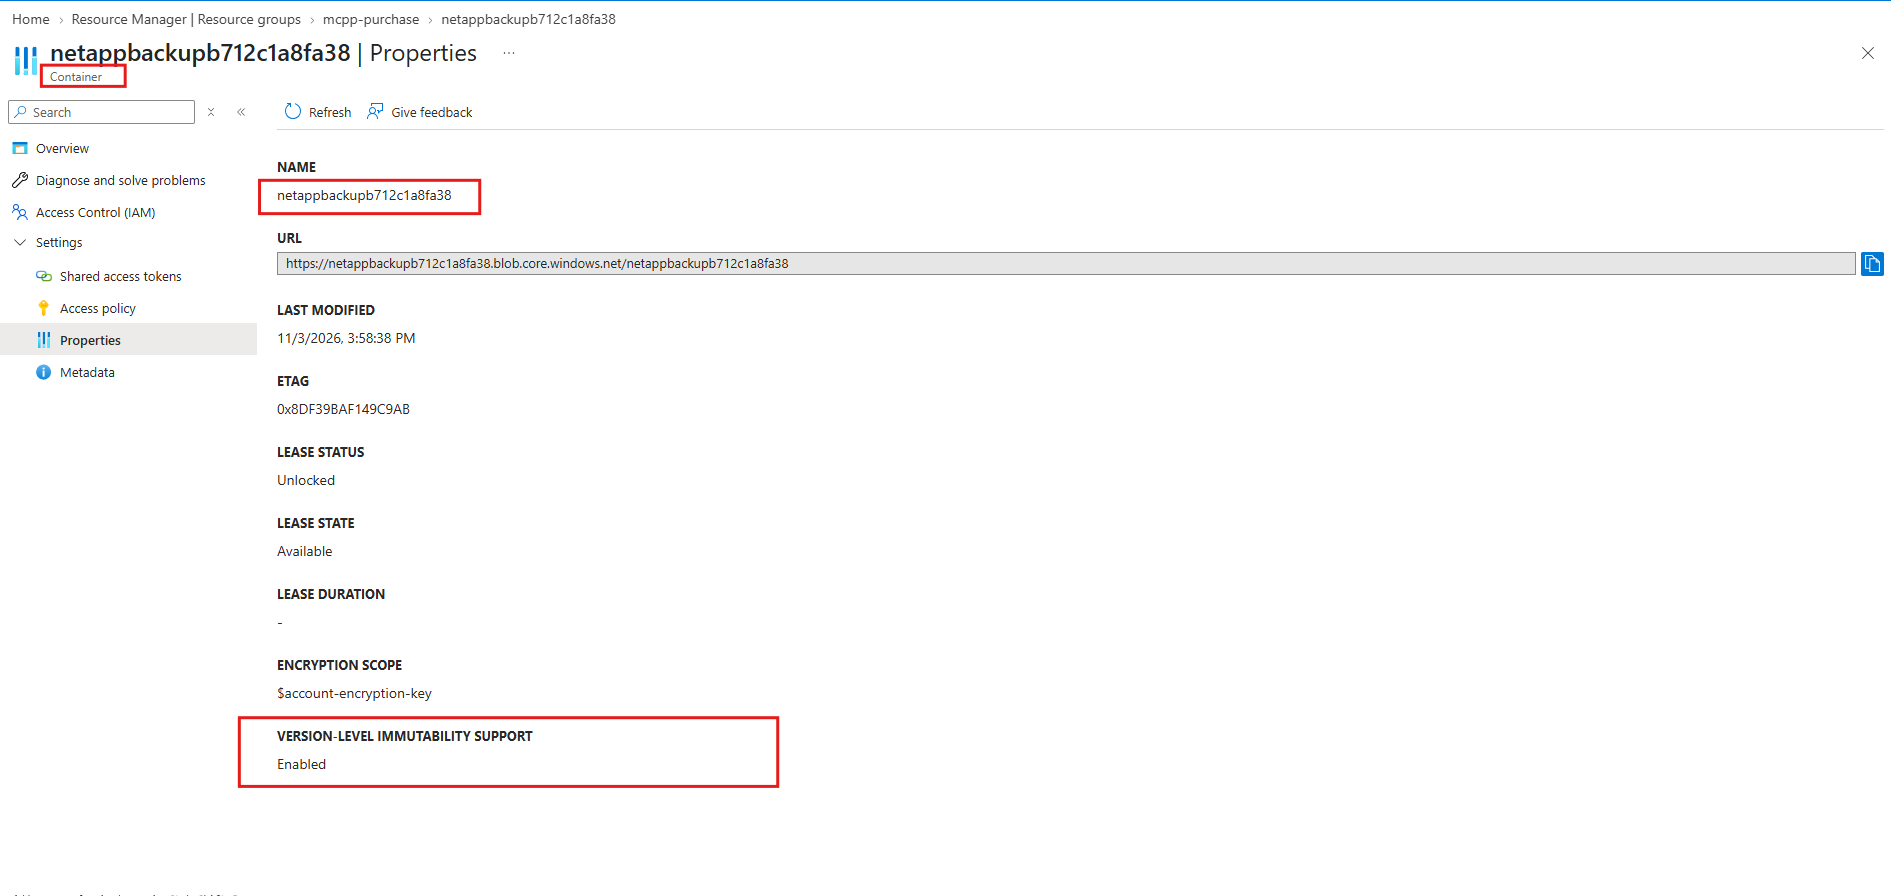
The Azure Blob Storage container remains accessible after unregistering NetApp Backup and Recovery, with Version-Level Immutability Support enabled.
This confirms that the container supports immutable blob versions, although the actual retention policies must be verified separately.
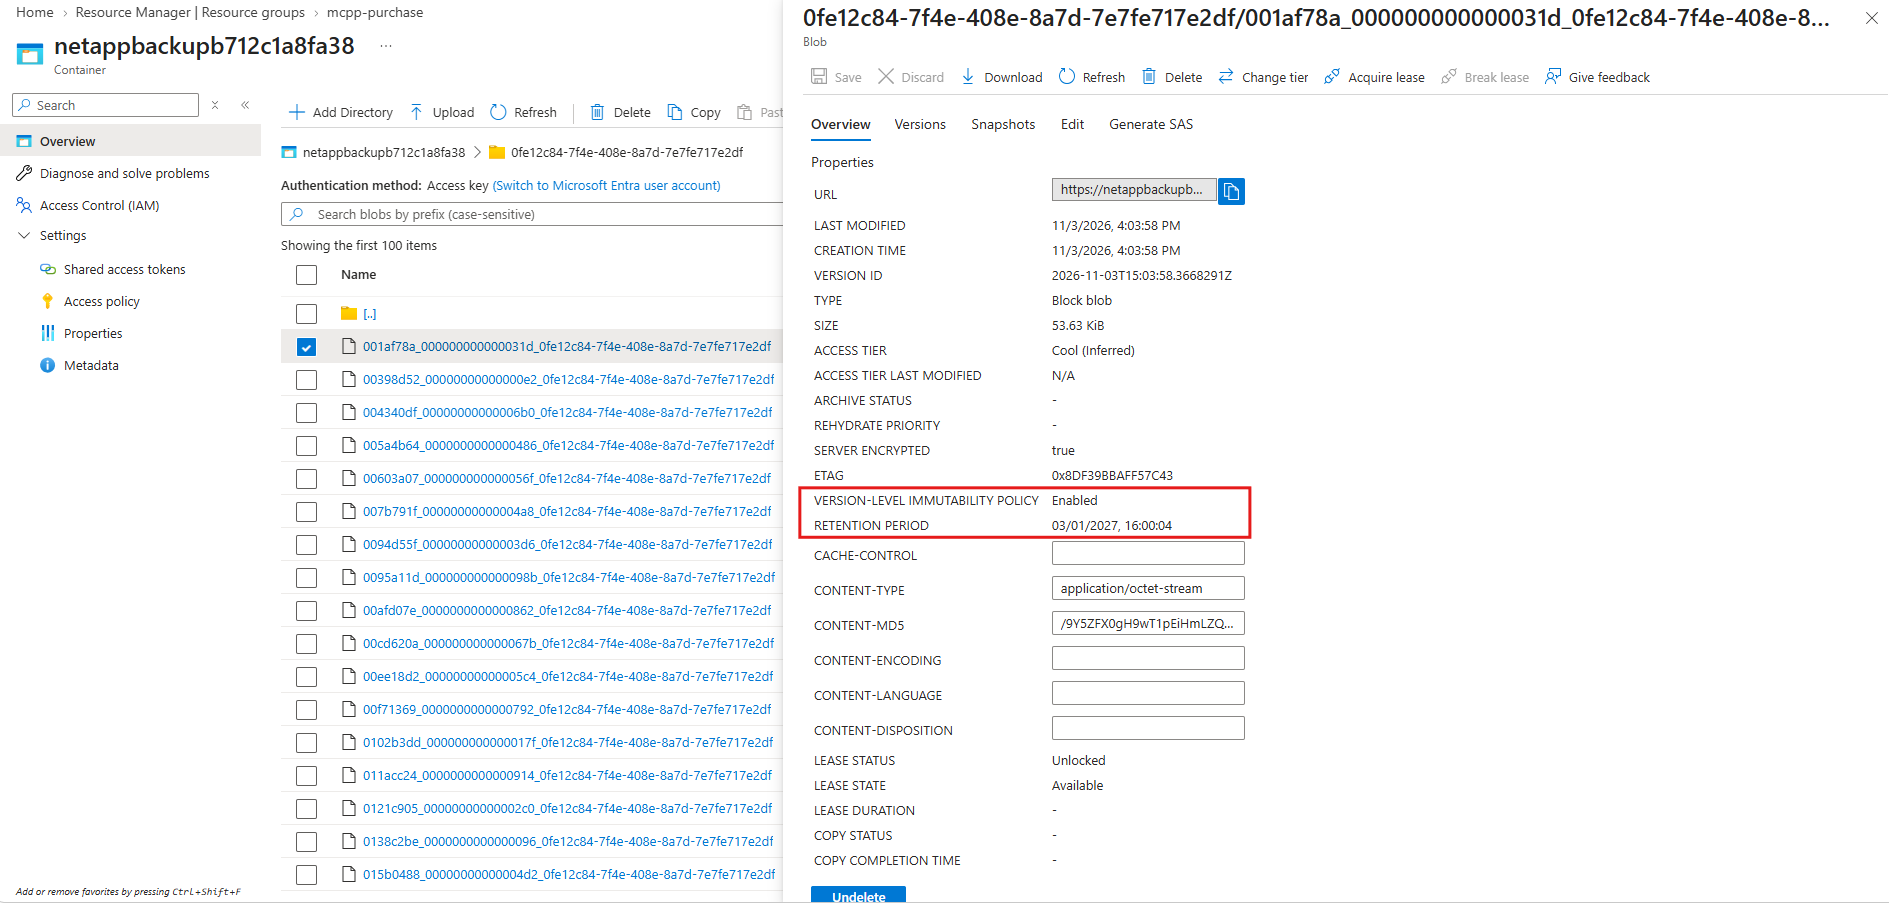
Inspecting an individual Azure Blob confirms that Version-Level Immutability remains enabled, with retention enforced until March 1, 2027.
This demonstrates that unregistering NetApp Backup and Recovery does not remove the underlying Azure Blob immutability protection.
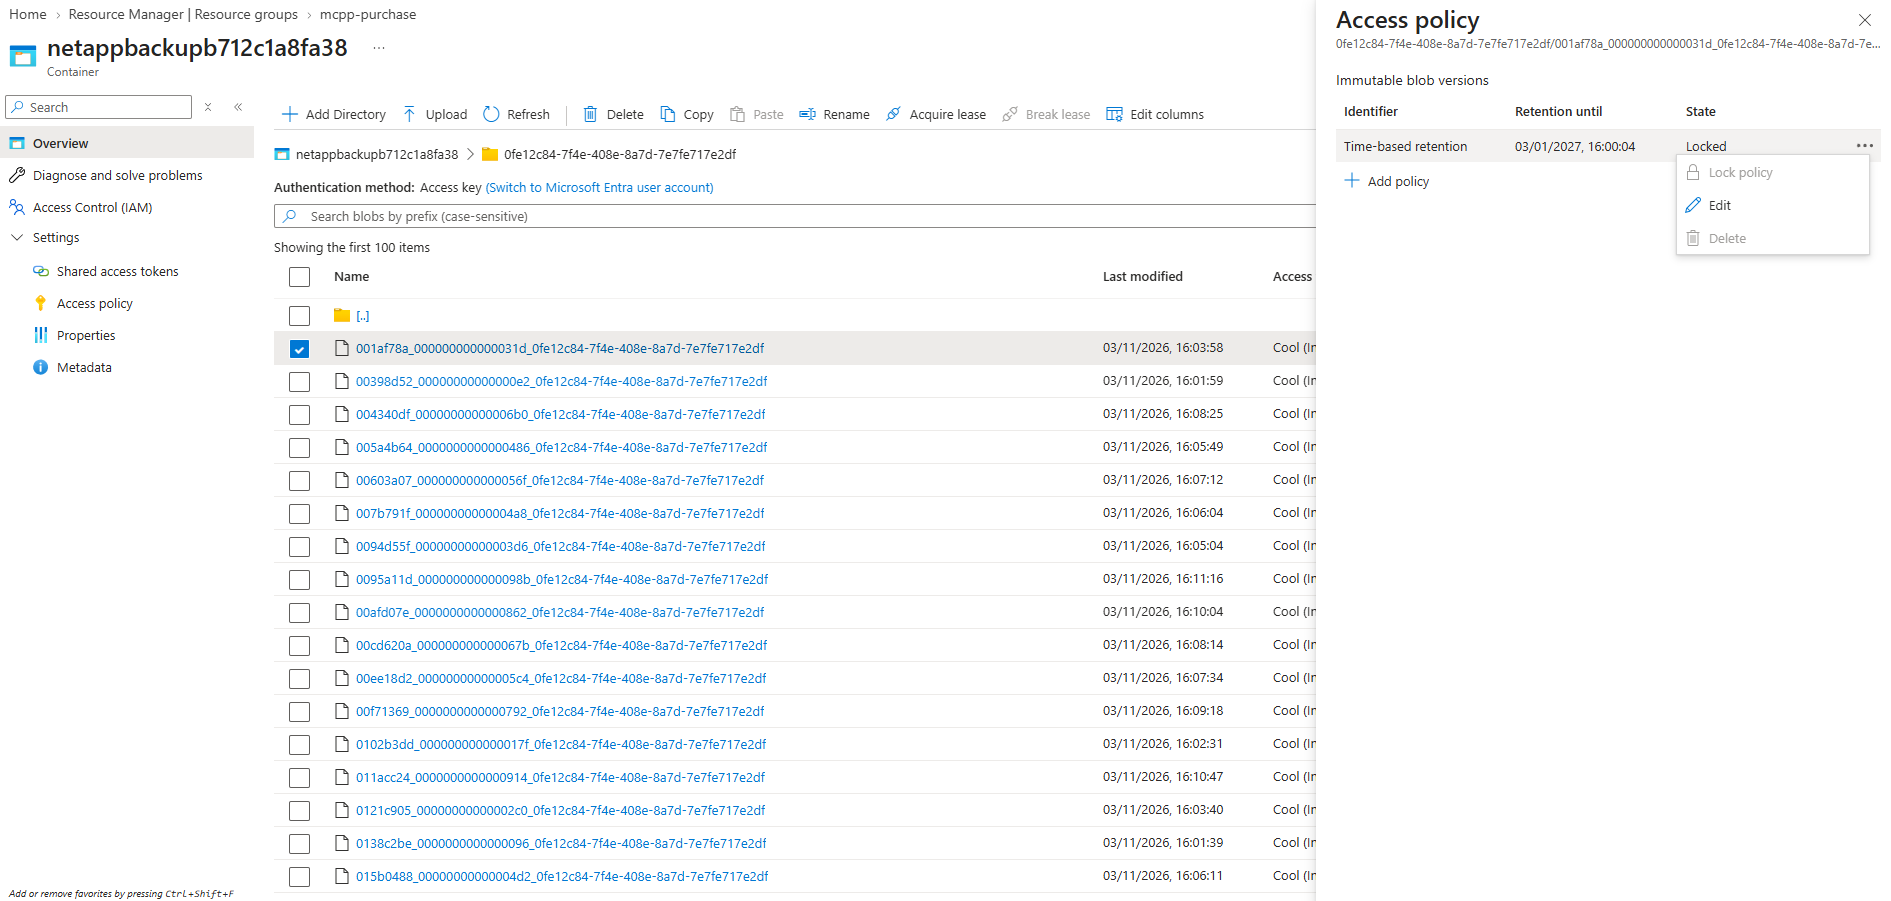
The Azure Blob access policy confirms that DataLock Compliance created a locked, version-level immutability policy with retention until March 1, 2027.
The policy cannot be deleted or its retention shortened, even by an Azure subscription Owner, despite NetApp Backup and Recovery having been unregistered.
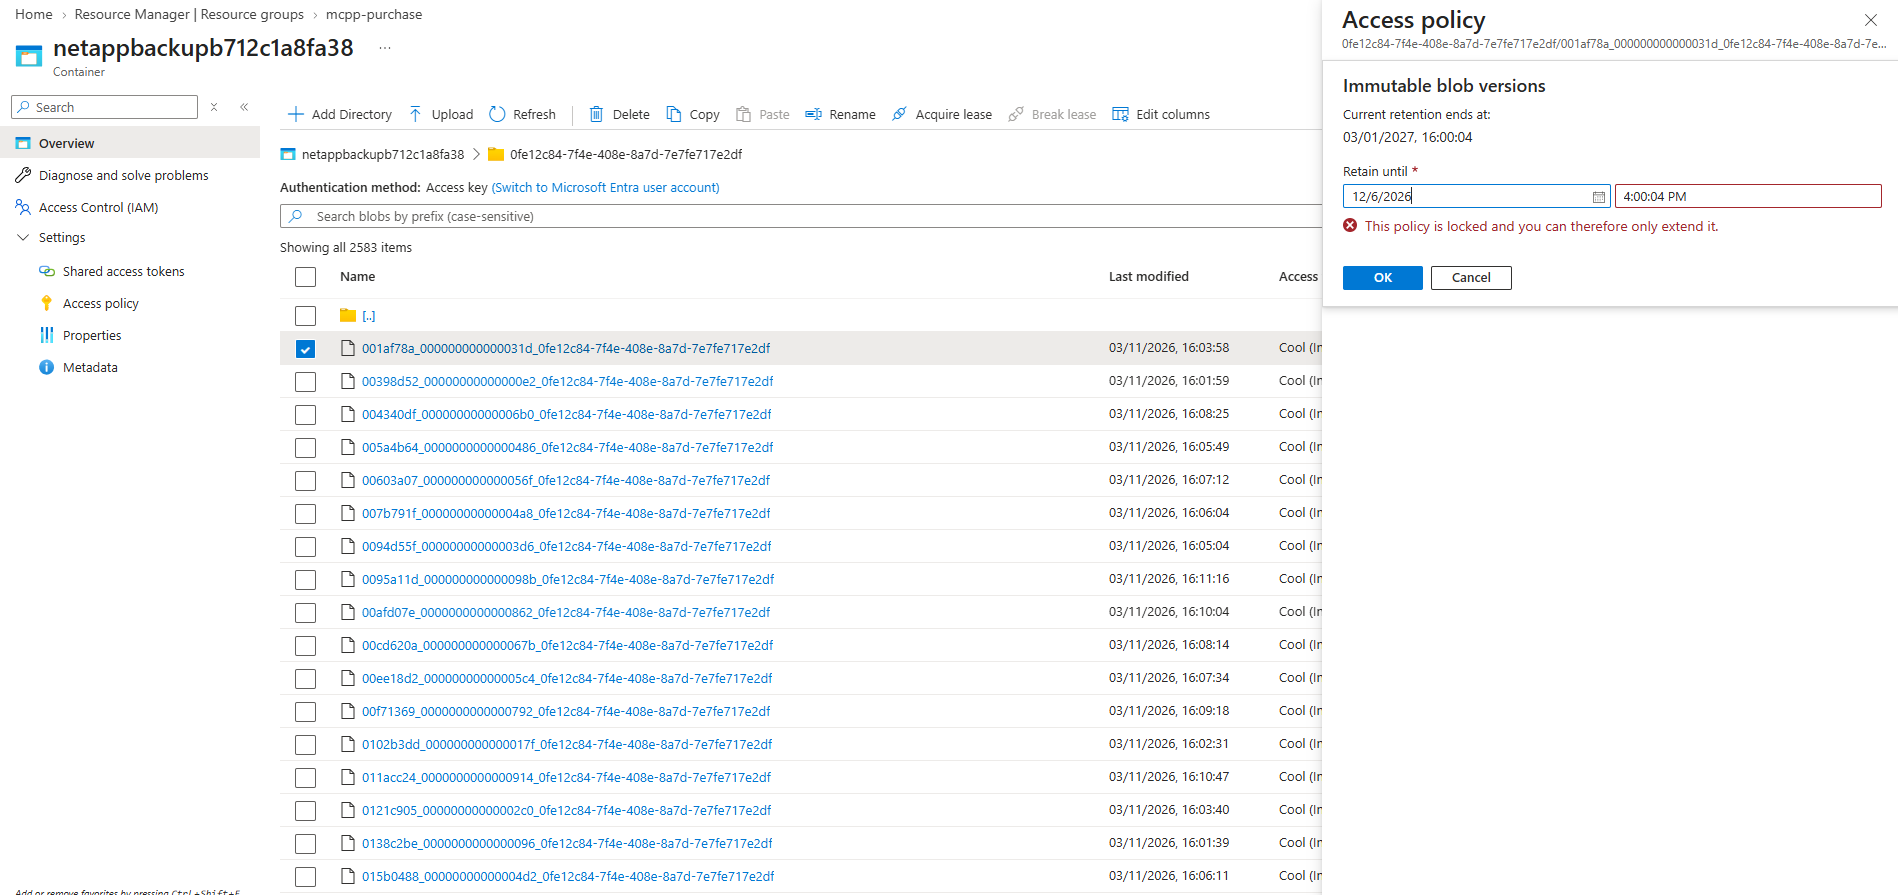
Attempting to shorten the retention period of an immutable Azure Blob explicitly confirms that locked DataLock Compliance policies can only be extended, never shortened.
Azure rejects the change, enforcing the original retention expiration of March 1, 2027, even for subscription Owners.
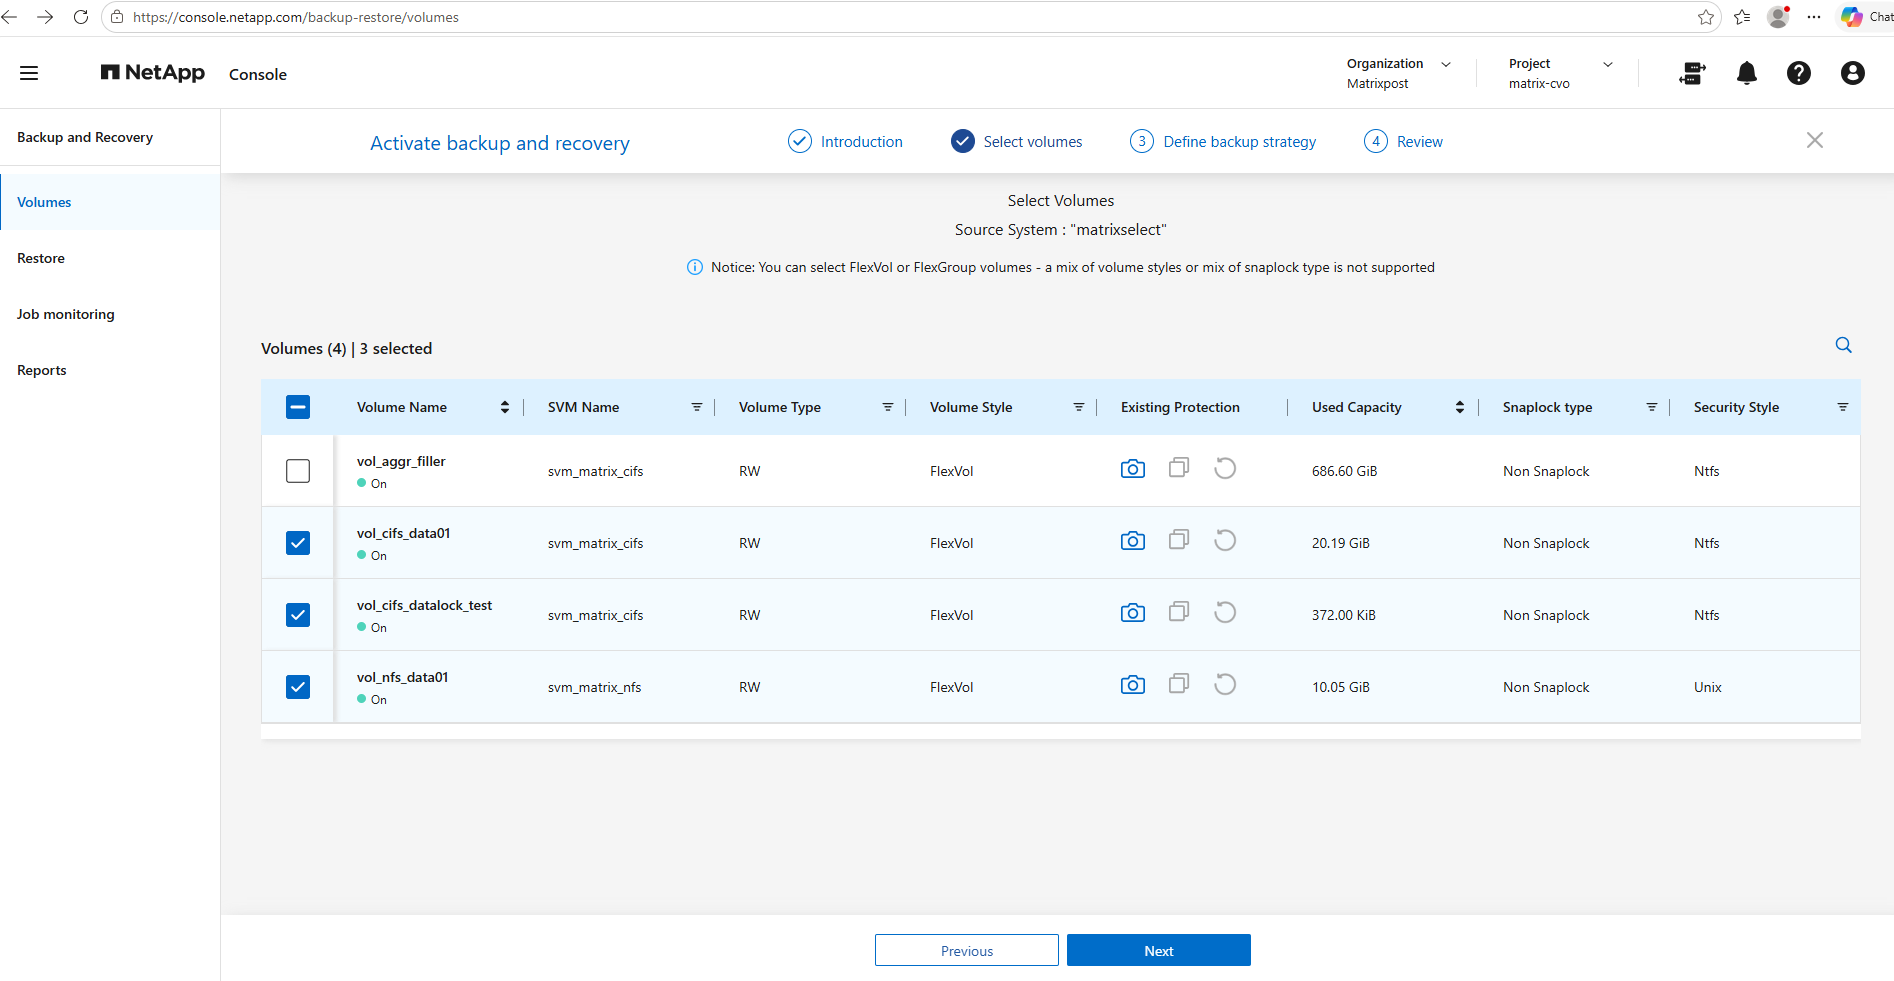
For our reverse test, we select all three data volumes (vol_cifs_data01, vol_cifs_datalock_test, and vol_nfs_data01) and activate Azure Blob backups without DataLock.
Once protection is active, we will create a second backup policy with DataLock Locked and attempt to assign it to an already protected volume.
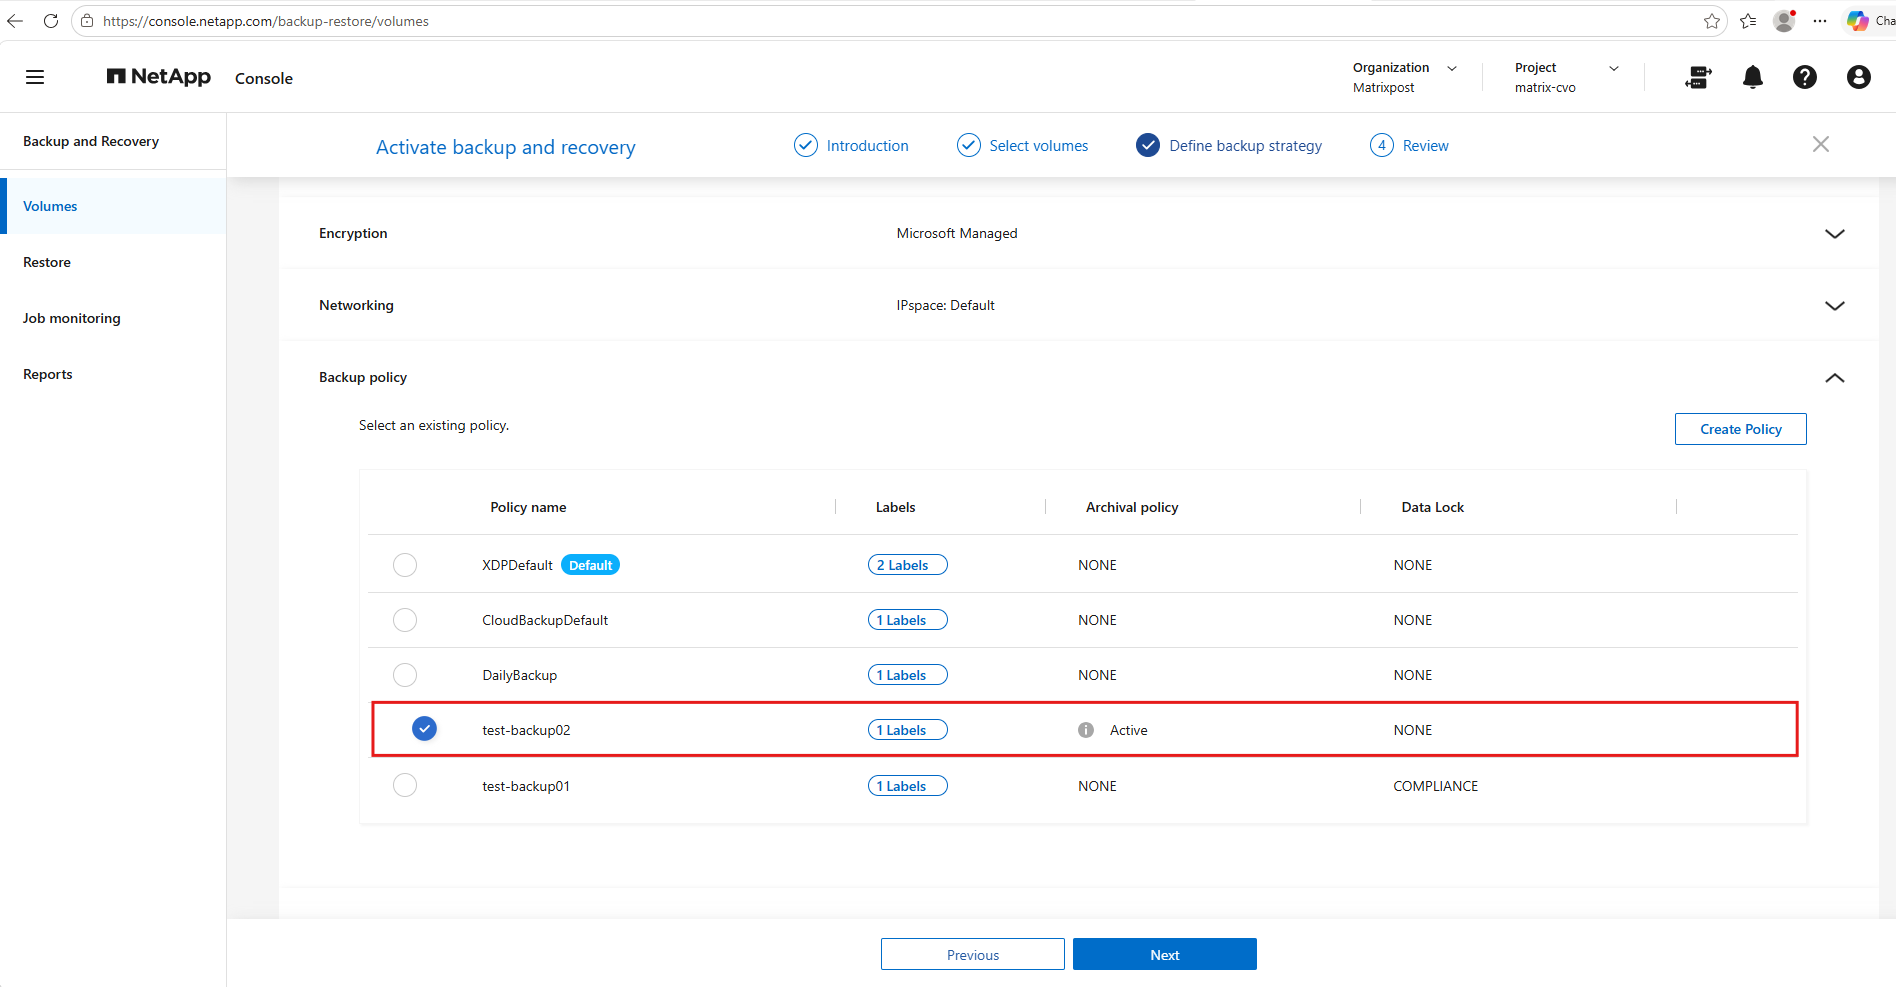
For our reverse test, we select the existing backup policy test-backup02, which has DataLock disabled and Azure archival enabled.
Once the three volumes are protected, we will attempt to apply the existing DataLock Compliance policy
test-backup01to determine whether immutable backups can be introduced afterward.
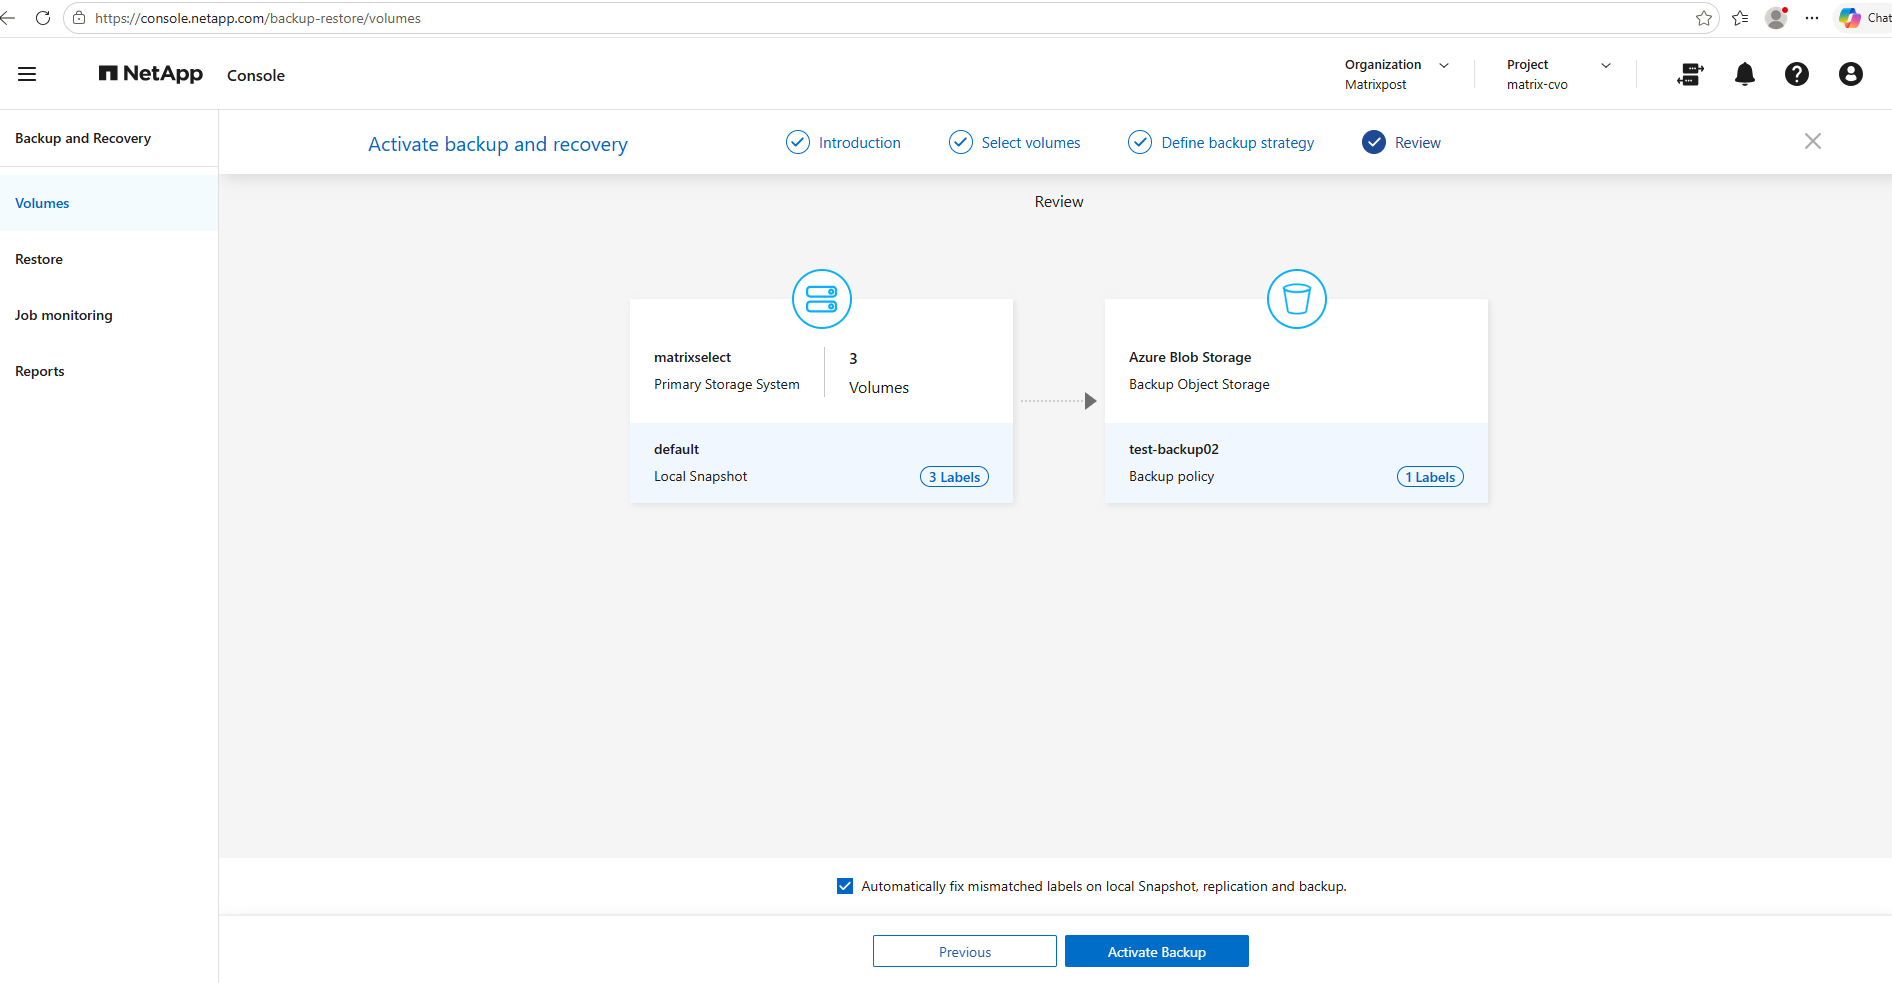
The final review confirms that all three volumes on matrixselect will be backed up to Azure Blob Storage using policy test-backup02, with DataLock disabled. We can now activate backup protection and subsequently test whether the existing DataLock Compliance policy can be assigned.
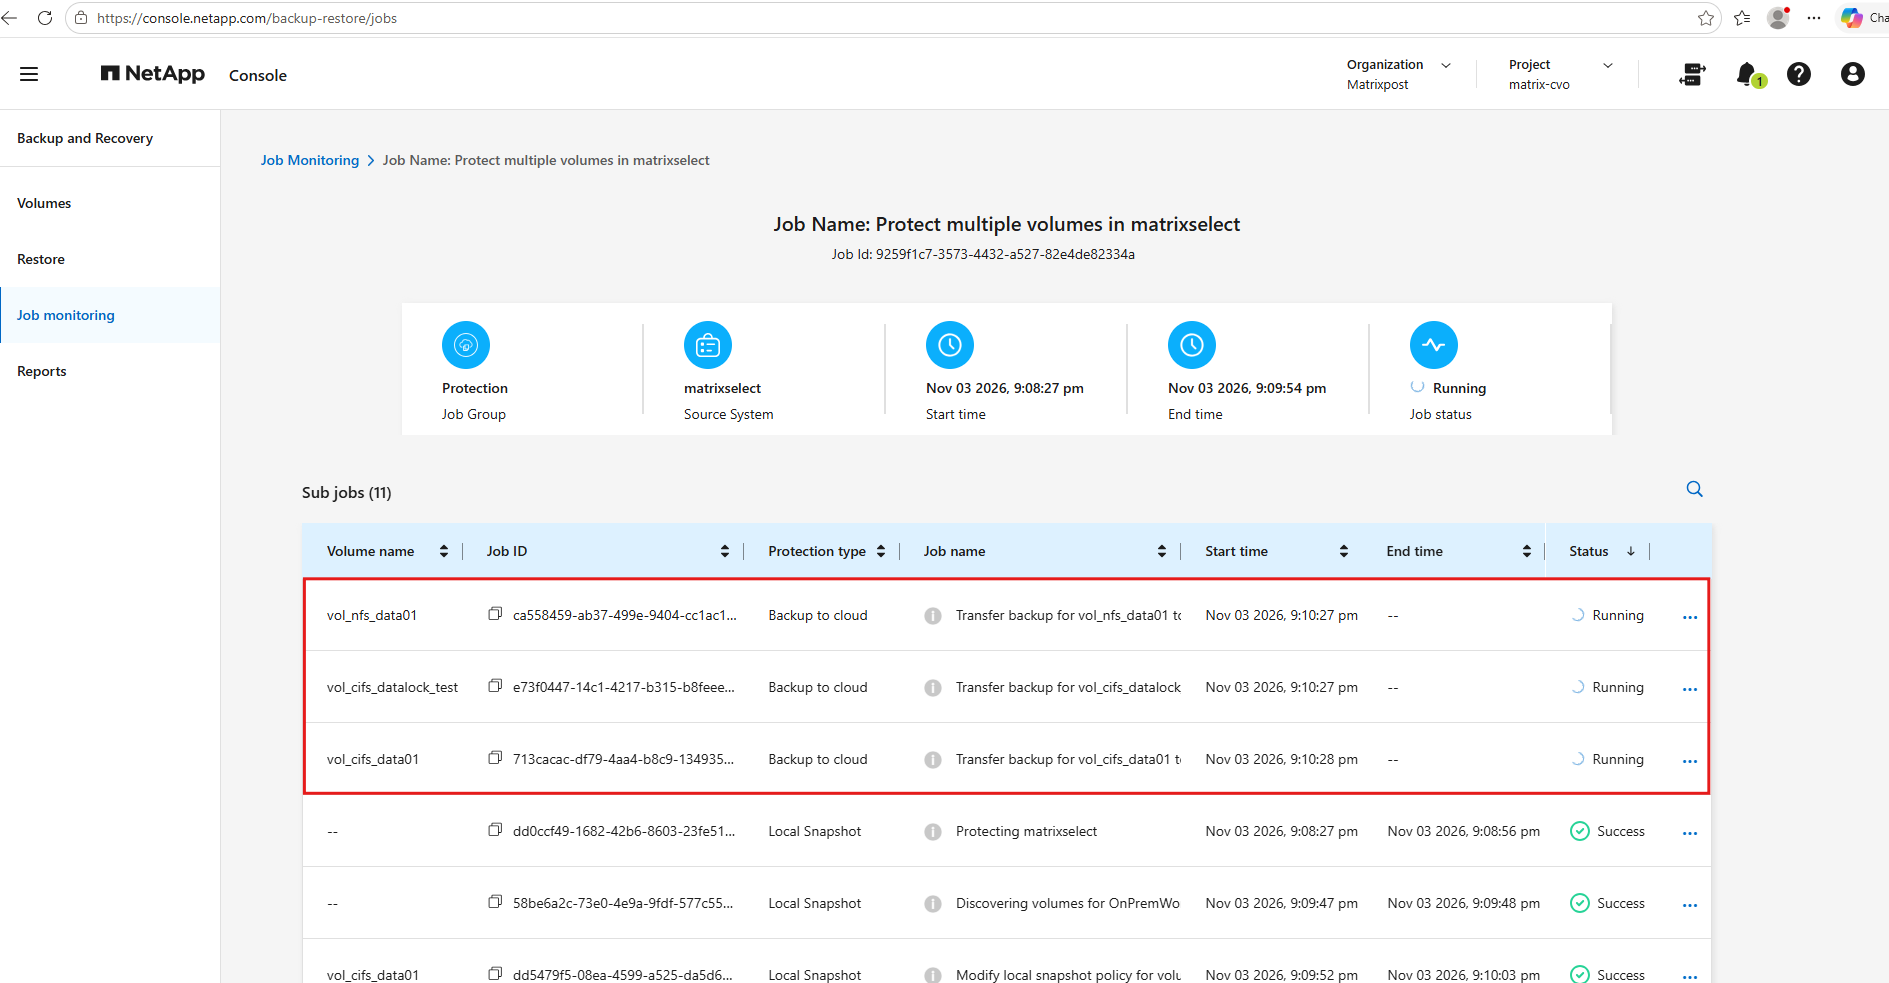
NetApp Backup and Recovery has started the initial Azure Blob backup transfers for all three selected volumes using the policy without DataLock.
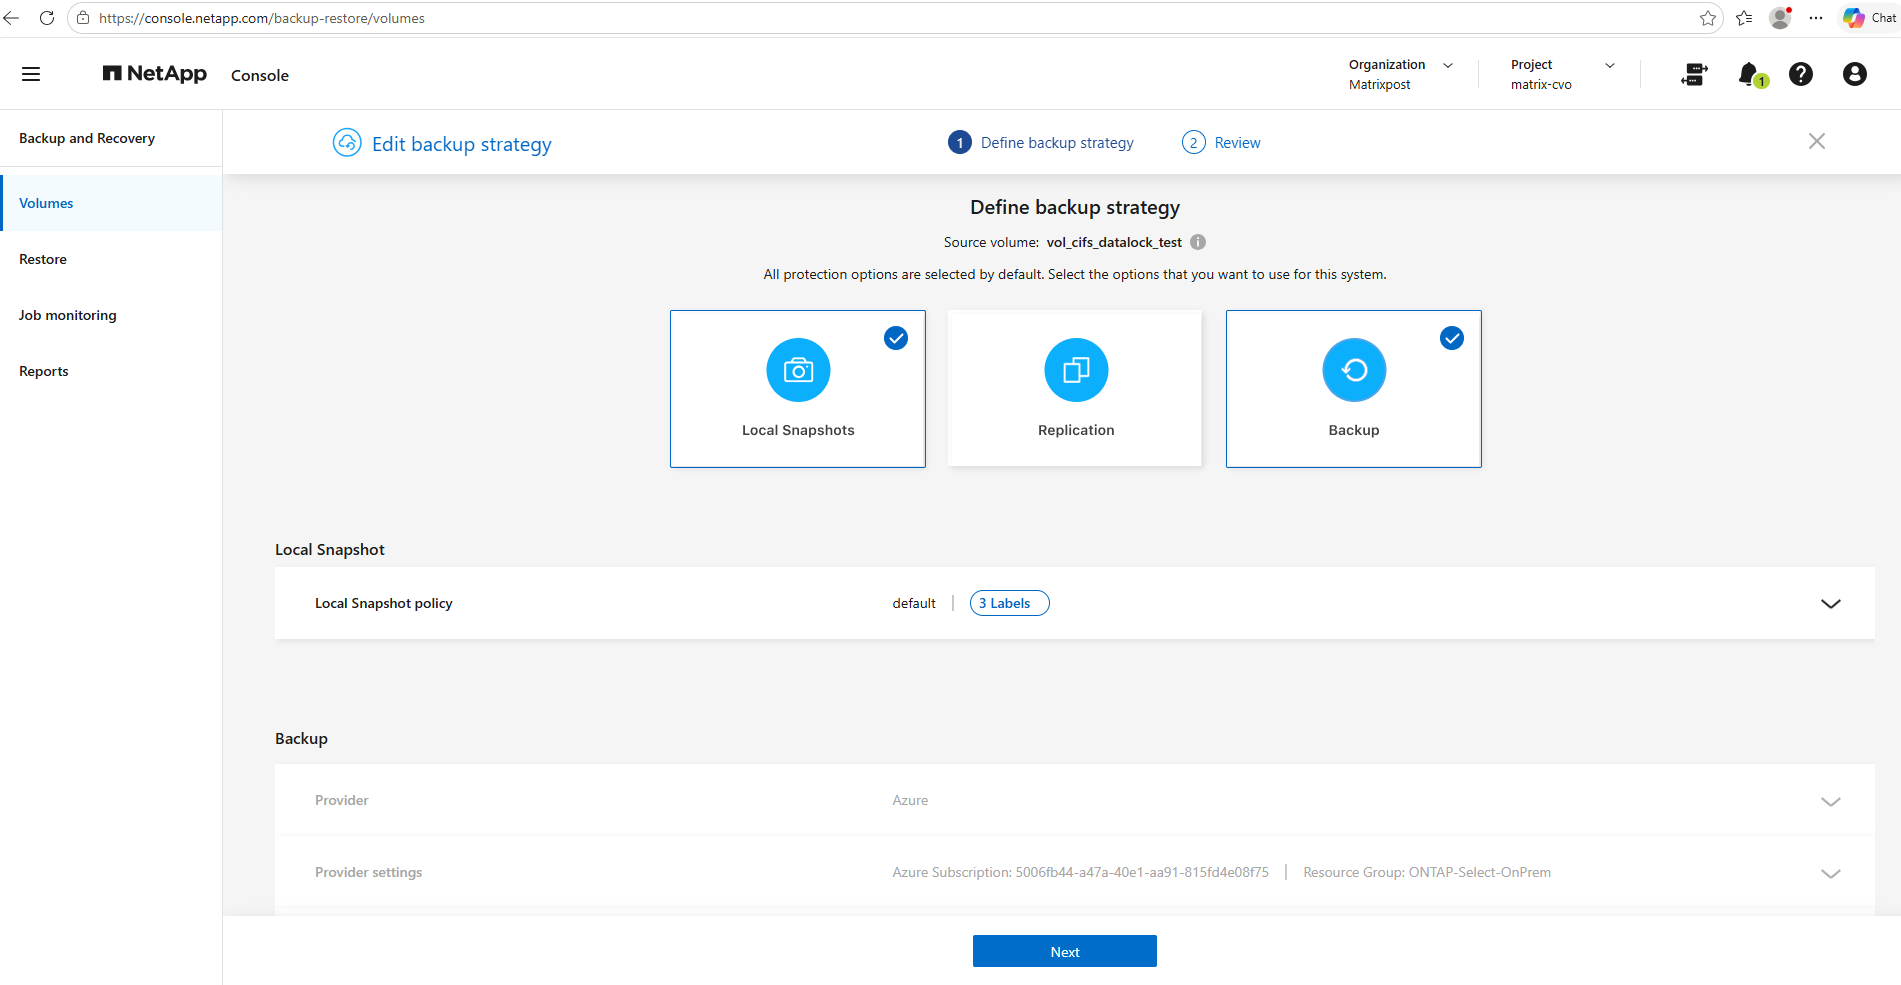
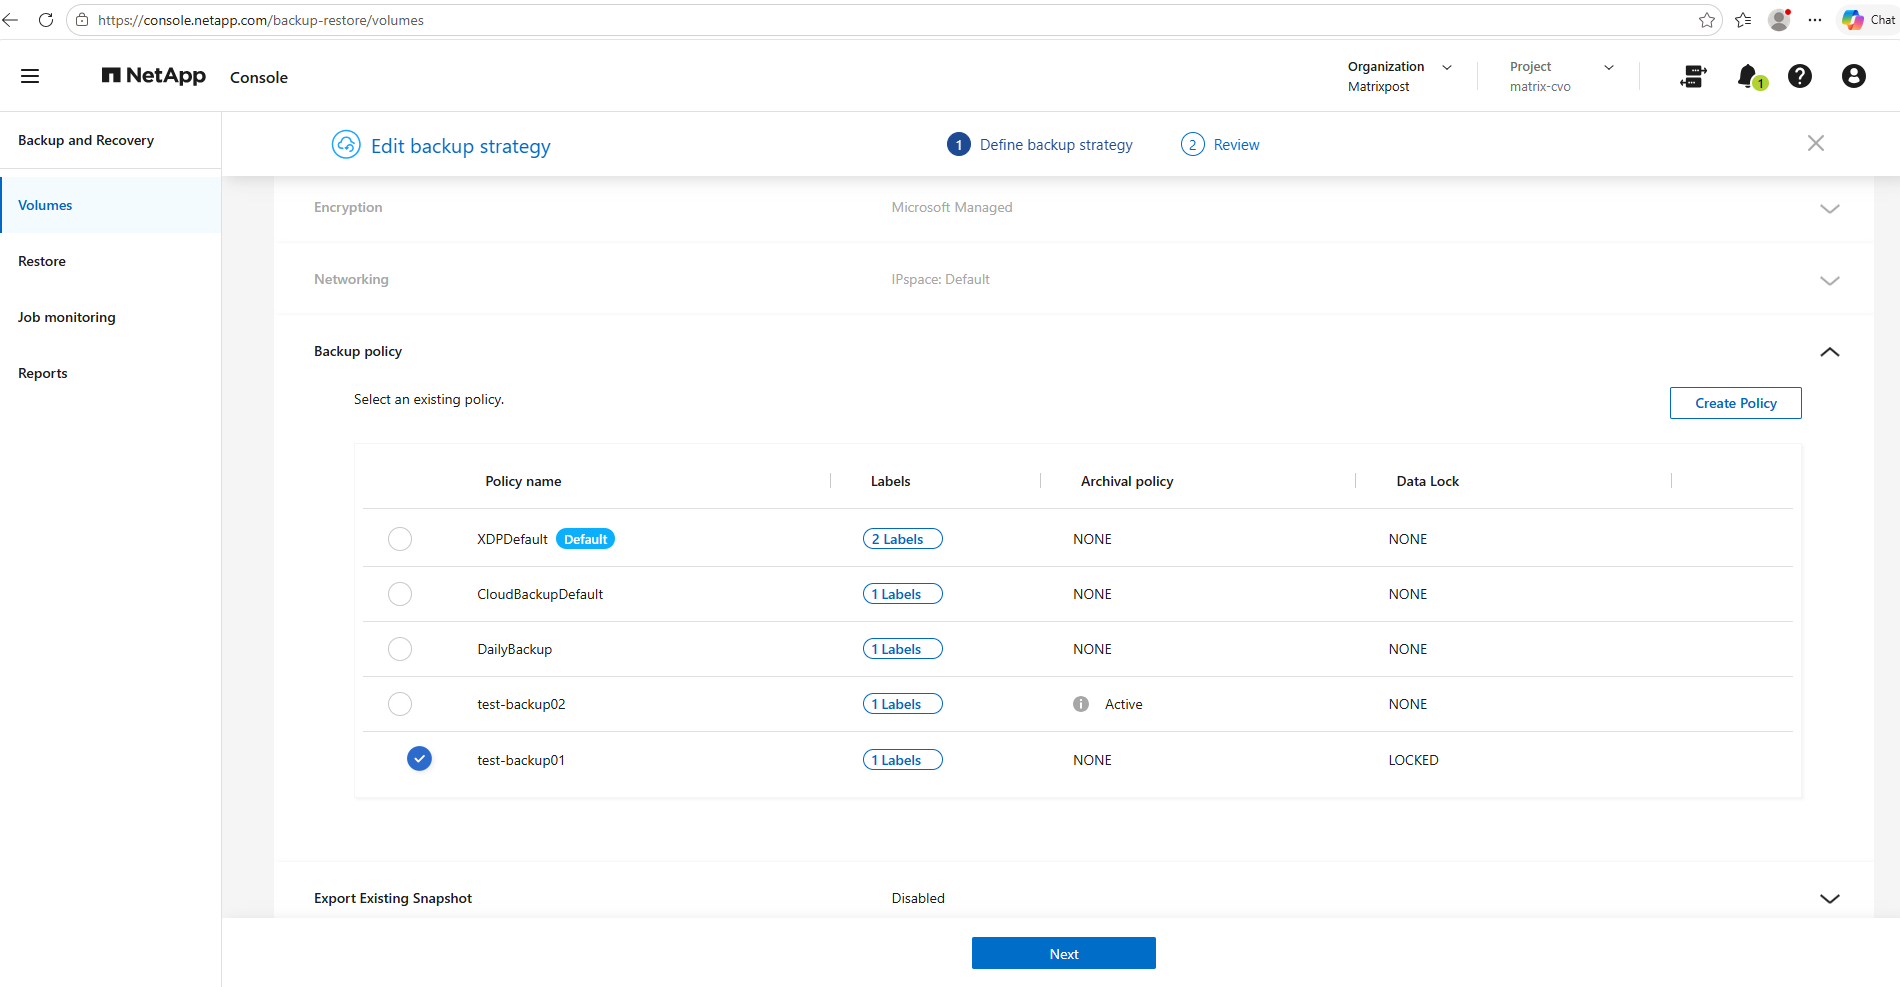
With the initial backup of vol_cifs_datalock_test completed successfully, we open Edit backup strategy to check whether the existing DataLock Compliance policy test-backup01 can now be assigned to a volume already protected without DataLock.
Unlike our previous test, NetApp Console now allows us to select the existing DataLock Compliance policy test-backup01 for vol_cifs_datalock_test, which is already protected without DataLock. We will proceed with the policy change to verify whether NetApp actually accepts and applies it.
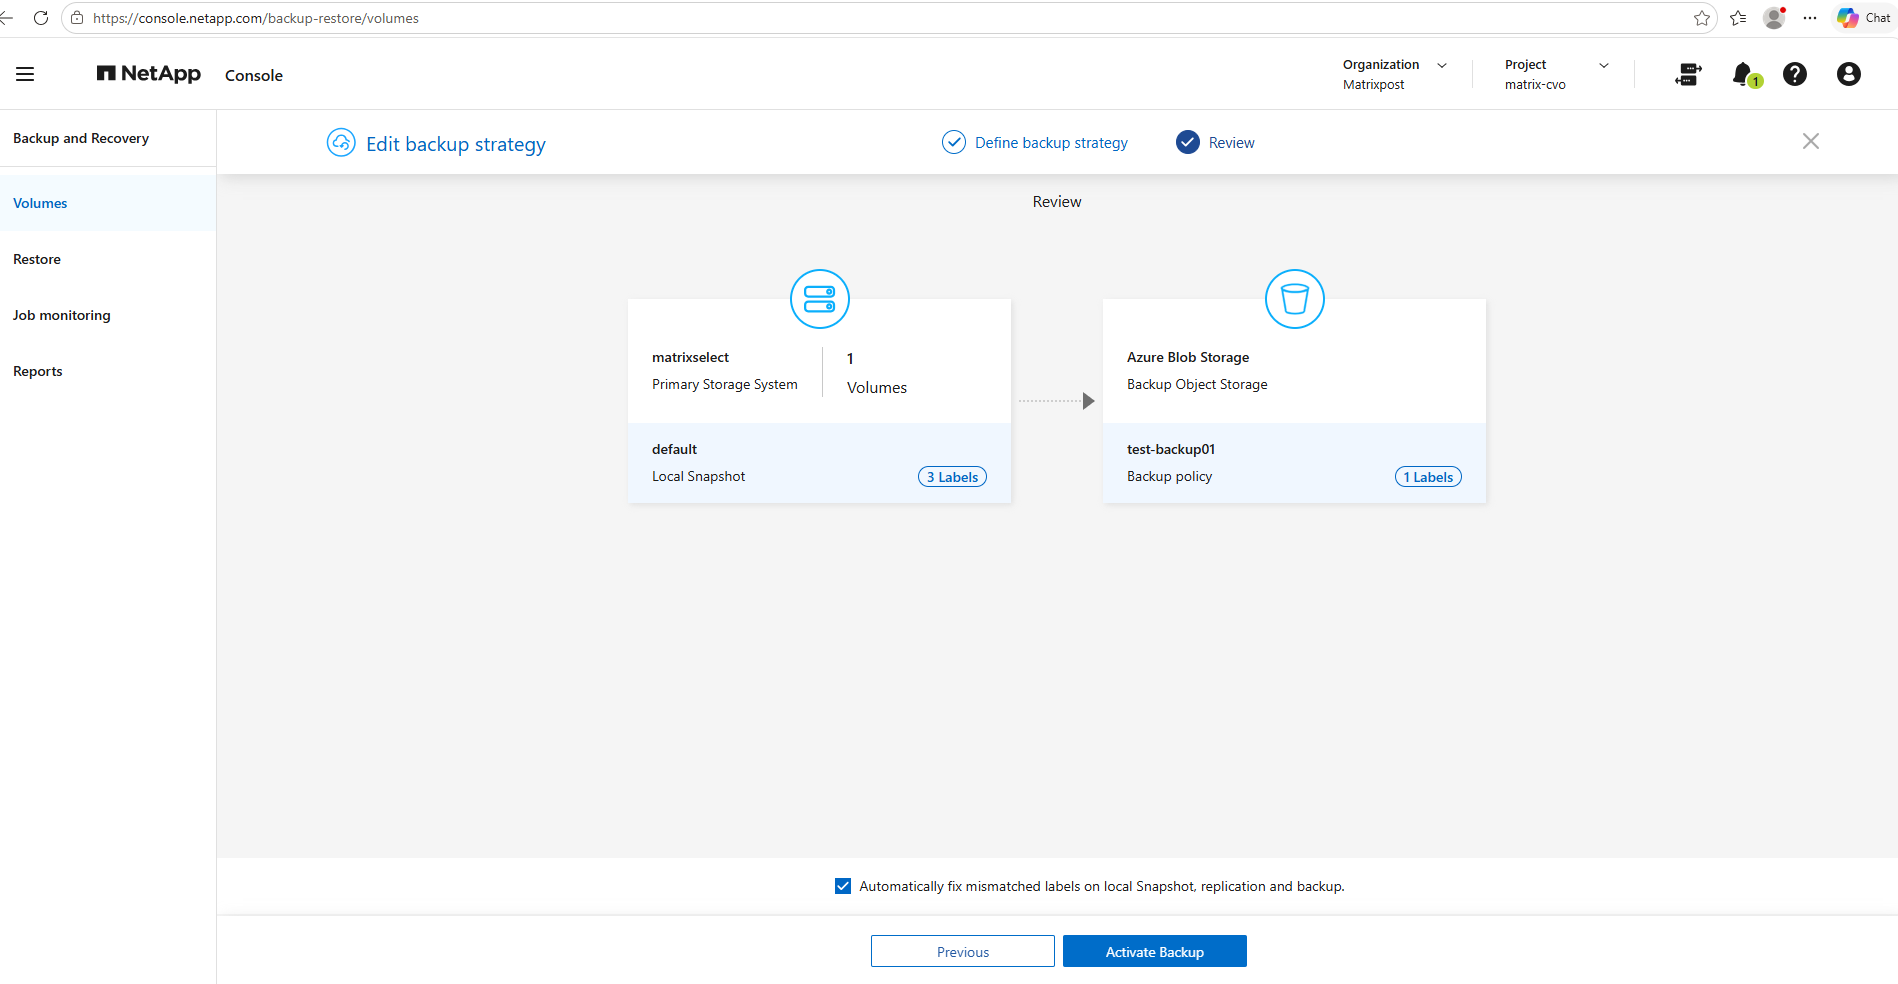
The final review shows vol_cifs_datalock_test selected for backup to Azure Blob Storage using the DataLock Compliance policy test-backup01.
We will now activate the updated backup strategy to determine whether NetApp permits switching an existing volume from non-immutable to immutable backups.
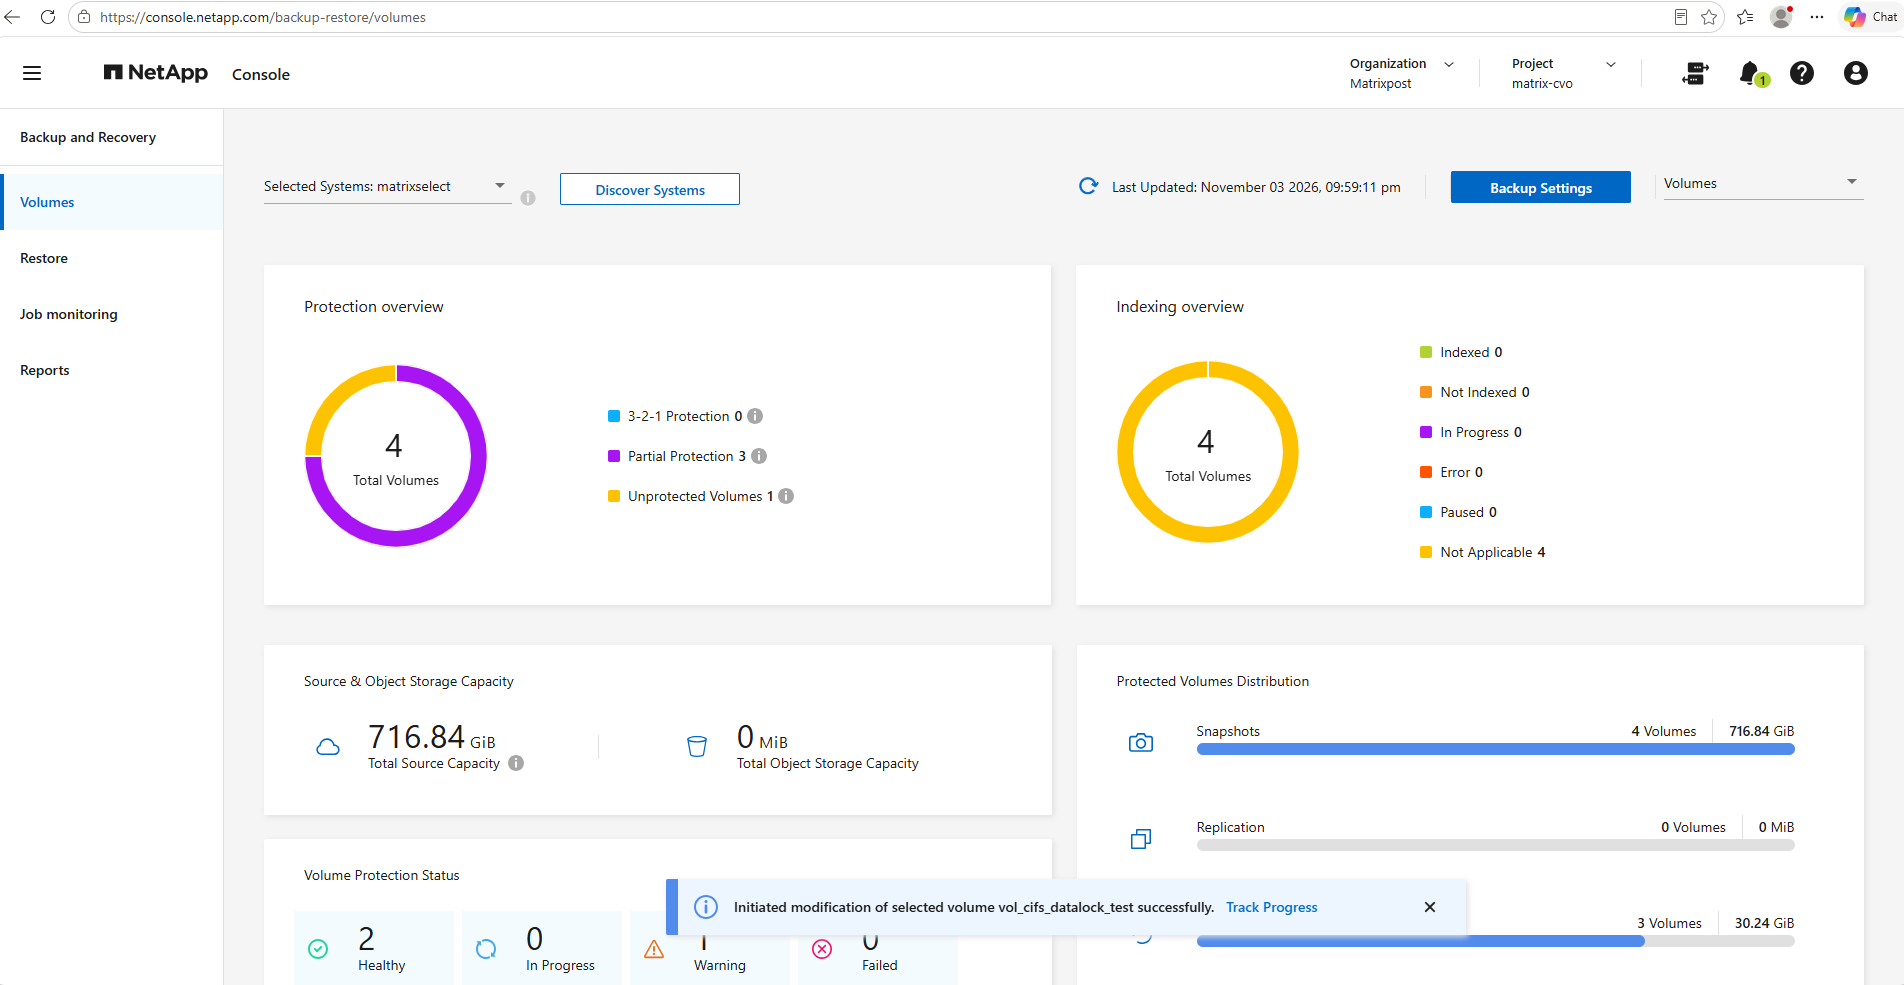
NetApp Console successfully initiated the modification of vol_cifs_datalock_test to use the DataLock Compliance policy test-backup01.
The modification job has started, but we still need to verify whether the policy change completes successfully and immutable backups are actually created.
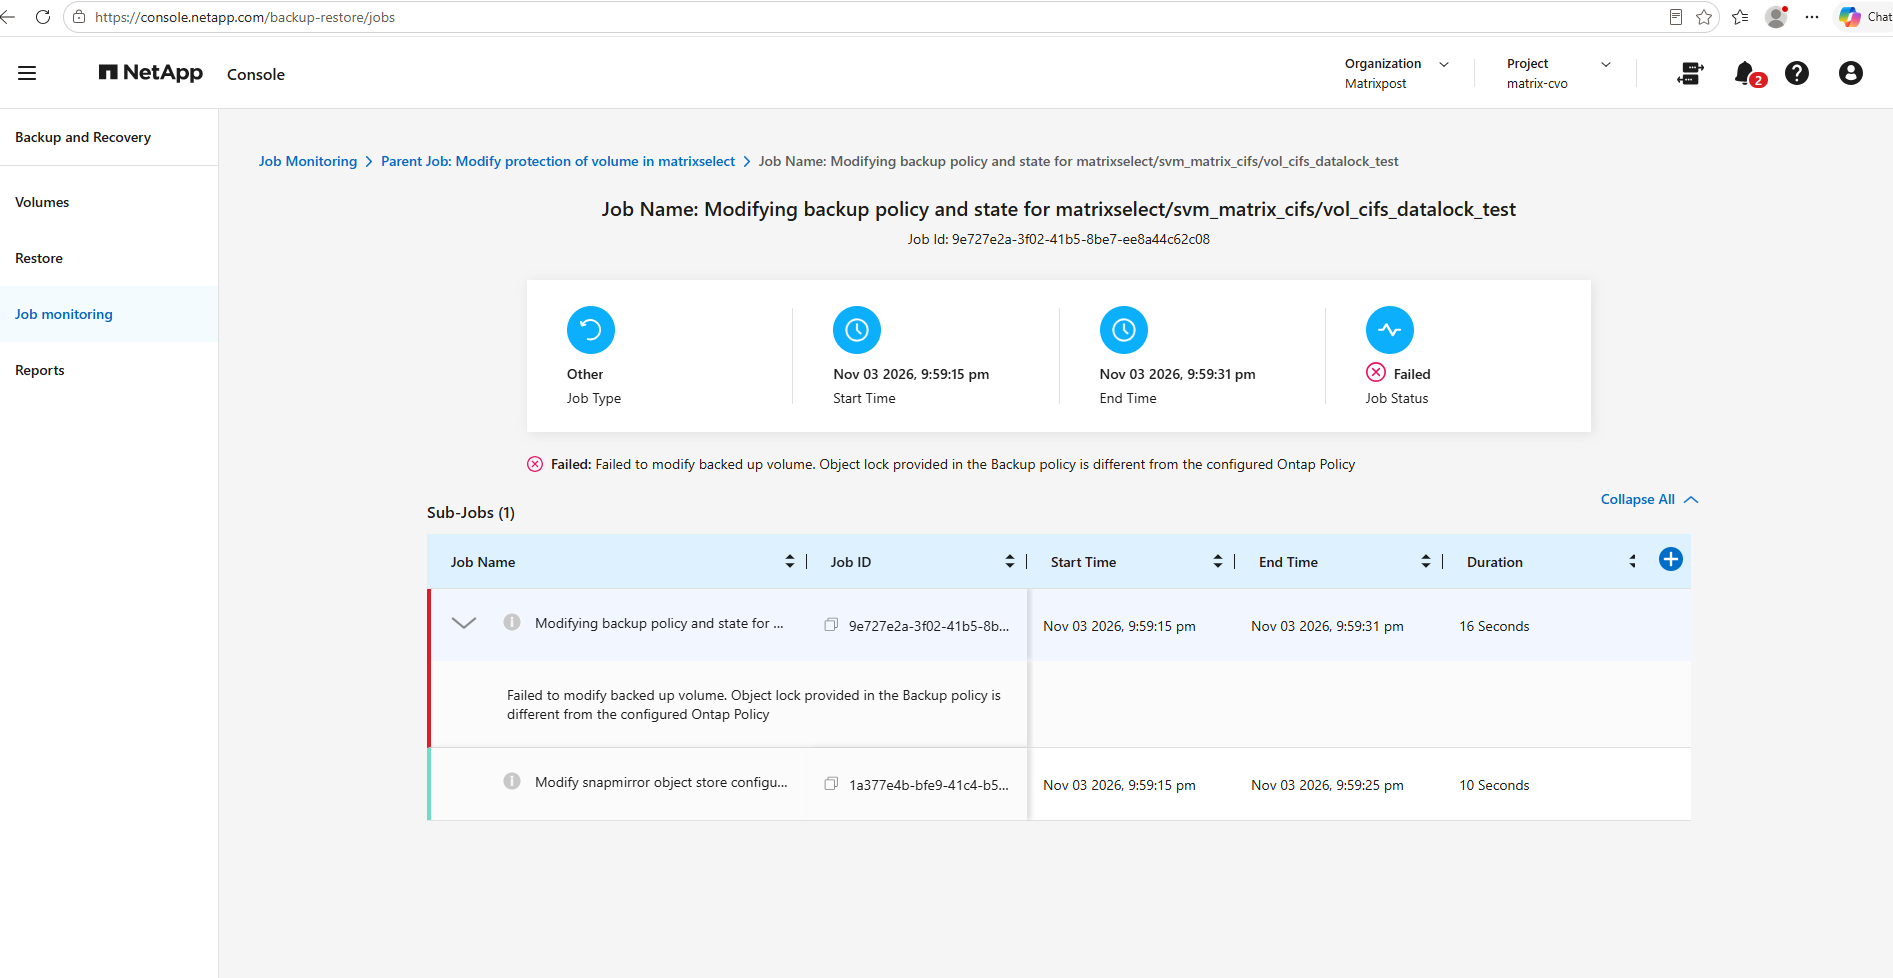
The attempt to switch vol_cifs_datalock_test from a non-DataLock backup policy to DataLock Compliance failed with the error: “Object lock provided in the Backup policy is different from the configured Ontap Policy.”
This confirms that selecting a different DataLock mode in NetApp Console does not mean the policy can actually be applied.
NetApp explicitly says that when Backup and Recovery was initially activated with DataLock
None, DataLock cannot subsequently be enabled by assigning a different backup policy. This is a cluster-level restriction, not merely a restriction on the individual volume.If you enabled DataLock and Ransomware protection in the initial policy when activating NetApp Backup and Recovery for this cluster,
anypolicies that you edit must be configured with the same DataLock setting (Governance or Compliance). And if youdid not enableDataLock and Ransomware protection when activating NetApp Backup and Recovery, you can’t enable DataLock now.
Switching an existing ONTAP backup configuration from DataLock None to DataLock Compliance requires deleting the existing cloud backups and backup relationships, completely unregistering Backup and Recovery, and reactivating protection with DataLock
enabled.This process removes the existing backup history and requires new baseline backups.
Troubleshooting
Failed to perform panoramic protection for System OnPremWorkingEnvironment-<id>. Failed to backup System <ONTAP Select System>
For Backup & Recovery, ONTAP requires intercluster LIFs even when you’re not replicating to another ONTAP cluster over a VPN.
The service uses the intercluster networking stack to communicate with the object storage endpoint (Azure Blob Storage in my case). Without intercluster LIFs, the Backup & Recovery activation fails, and NetApp Console surfaces the rather cryptic error message with “Failed to perform panoramic protection for ….. “ as shown below.
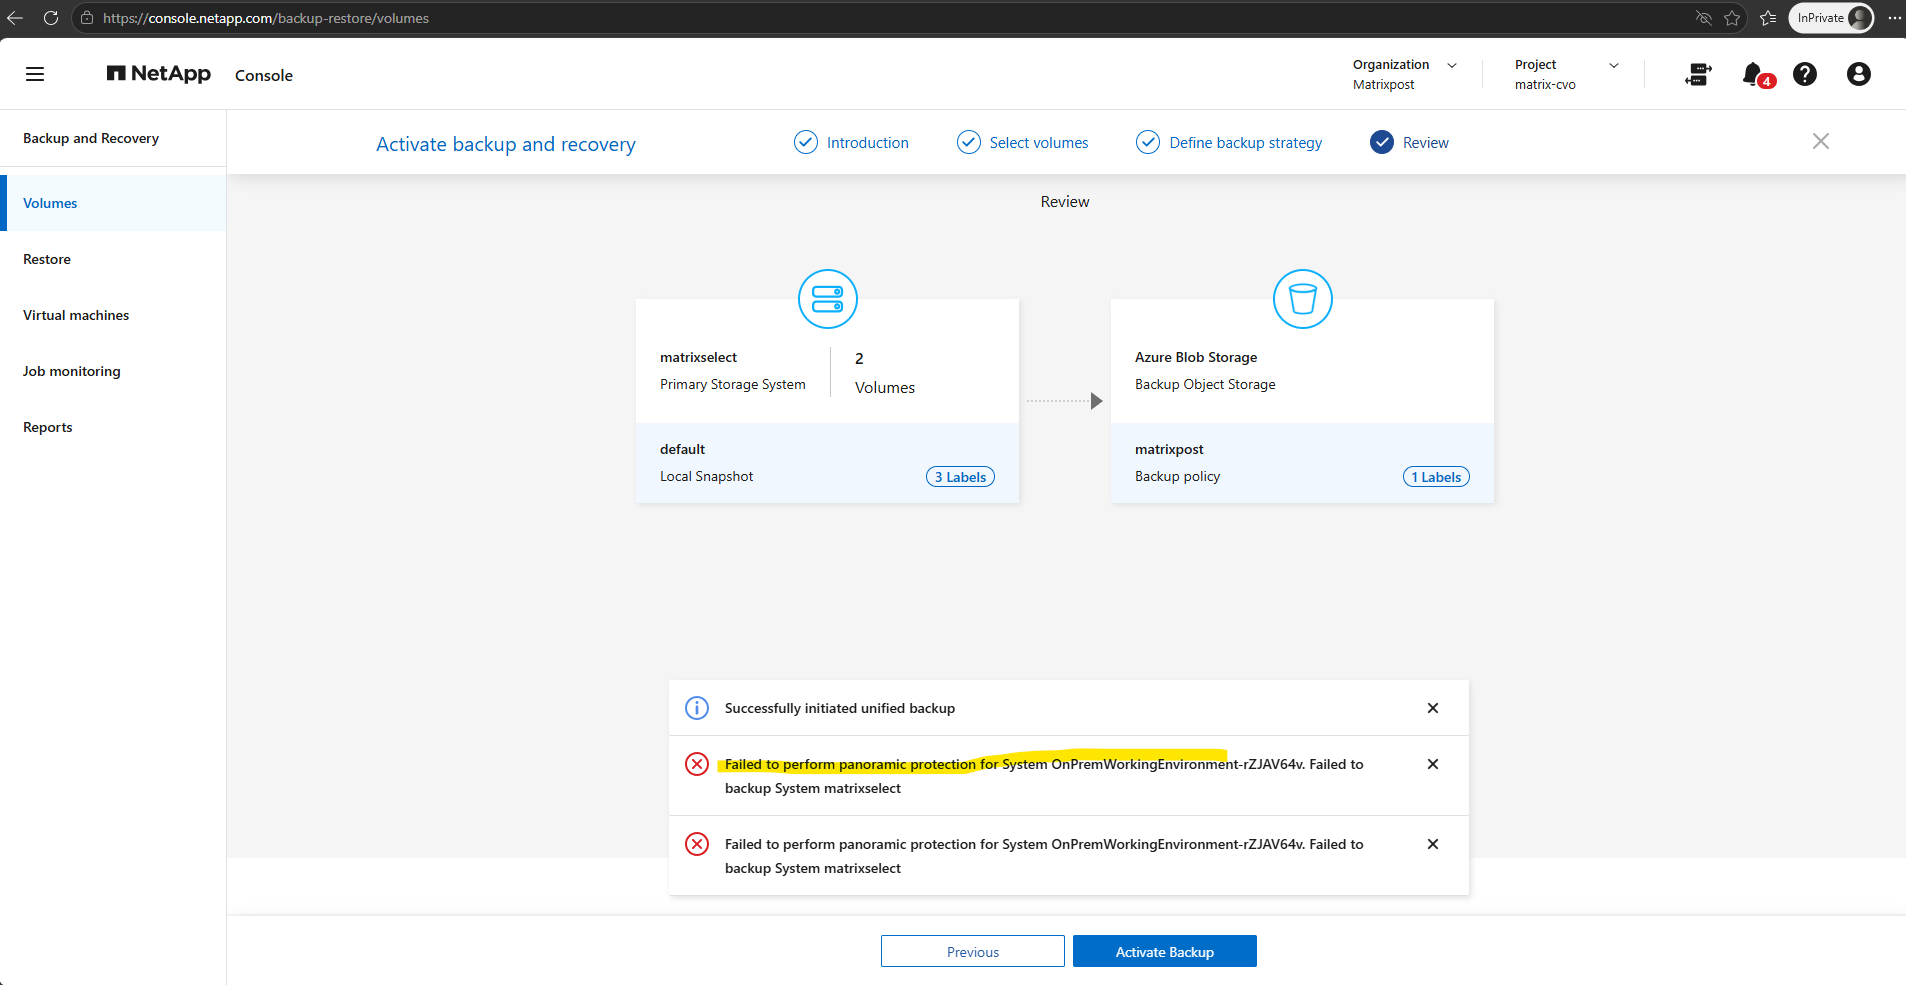
First, verify whether intercluster LIFs are already configured on the cluster by running the following command.
If no entries are returned like in my environment as shown below, intercluster LIFs have not yet been created and must be configured before Backup & Recovery can communicate with the object storage endpoint.
matrixselect::> network interface show -role intercluster

Before creating the intercluster LIFs, determine the appropriate network configuration by reviewing the existing ports, IPspaces, broadcast domains, routes, and logical interfaces.
The following commands help identify the correct home ports, IPspace, subnet, and gateway settings to use for the new intercluster LIFs.
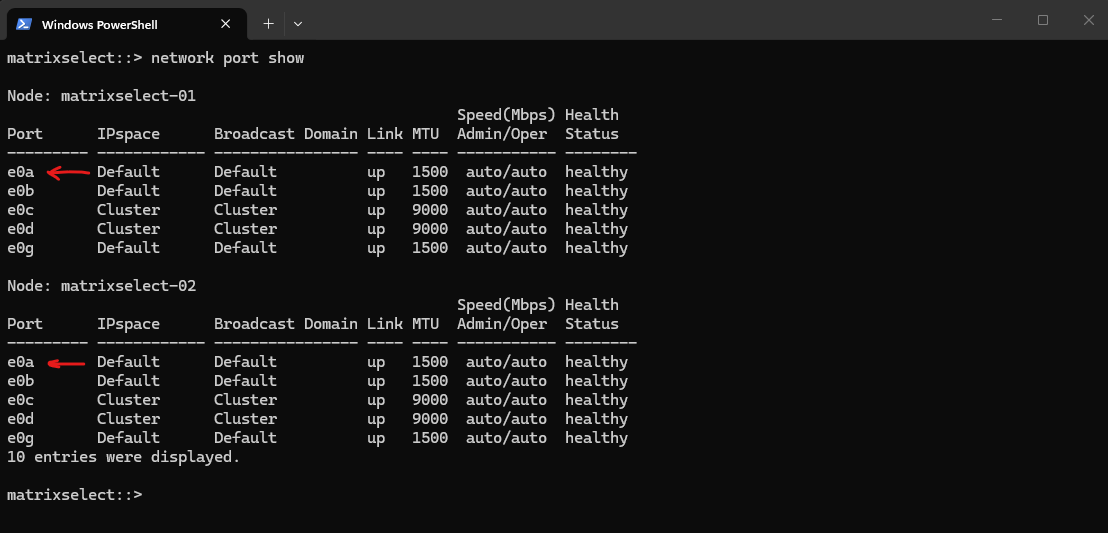
To determine the home port we use for the intercluster LIFs run:
In my lab environment, I will use port
e0abecause it is already connected to the Default IPspace and Default broadcast domain, where the cluster management, node management, and data LIFs are configured. Since the intercluster LIFs need connectivity to the 10.0.0.0/24 network and outbound access to Azure Blob Storage over HTTPS, reusinge0ais a simple and appropriate choice.
matrixselect::> network port show
Review the existing logical interfaces to identify the network configuration already in use by the cluster.
In this environment, the cluster management, node management, and data LIFs are all configured on port e0a within the 10.0.0.0/24 subnet, making it an appropriate choice for the new intercluster LIFs.
matrixselect::> network interface show
Verify that the cluster has a default route configured to reach external networks.
In this environment, all traffic destined for networks outside the local subnet is forwarded to the gateway 10.0.0.1 (my on-prem pfSense appliance), allowing the intercluster LIFs to communicate with external services such as Azure Blob Storage over the Internet.
matrixselect::> network route show
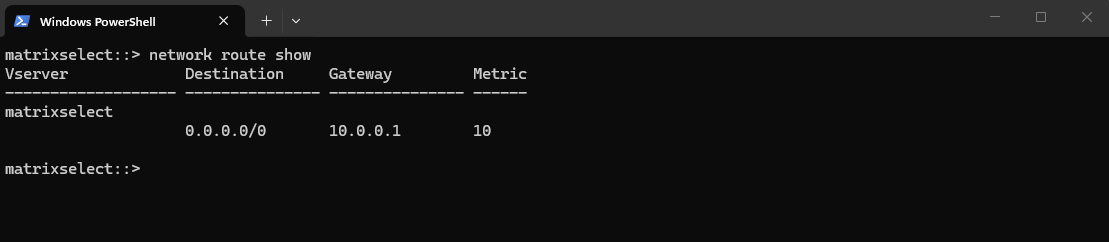
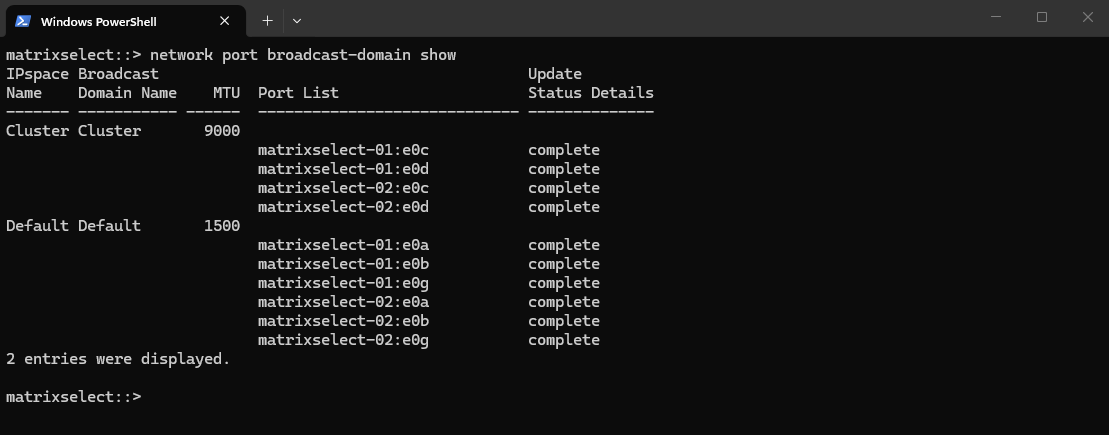
Review the broadcast domain configuration to identify which ports belong to the network used for external communication.
In this environment, port
e0ais part of theDefaultbroadcast domain, which is also used by the management and data LIFs, making it a suitable choice for hosting the new intercluster LIFs.
matrixselect::> network port broadcast-domain show
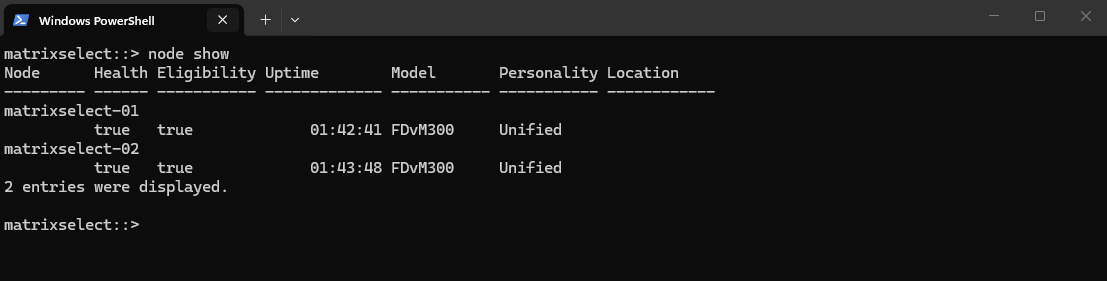
Finally, verify the cluster node status to ensure that all nodes are healthy and eligible to participate in cluster operations.
In this environment, both ONTAP Select nodes are online, healthy, and eligible, providing a suitable foundation for configuring and using intercluster LIFs.
matrixselect::> node show
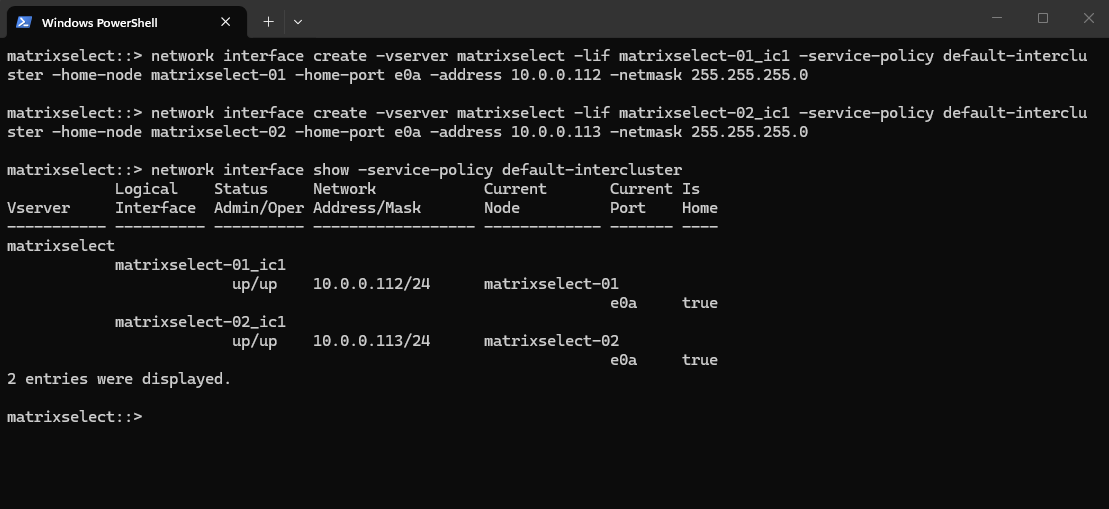
After identifying suitable ports, IP addresses, and routing information, create one intercluster LIF per node using the default-intercluster service policy.
Once the LIFs have been created, verify their status to ensure they are online and available for communication with external services such as Azure Blob Storage, which is required for Backup & Recovery operations.
matrixselect::> network interface create -vserver matrixselect -lif matrixselect-01_ic1 -service-policy default-intercluster -home-node matrixselect-01 -home-port e0a -address 10.0.0.112 -netmask 255.255.255.0

matrixselect::>network interface create -vserver matrixselect -lif matrixselect-02_ic1 -service-policy default-intercluster -home-node matrixselect-02 -home-port e0a -address 10.0.0.113 -netmask 255.255.255.0

matrixselect::> network interface show -service-policy default-intercluster
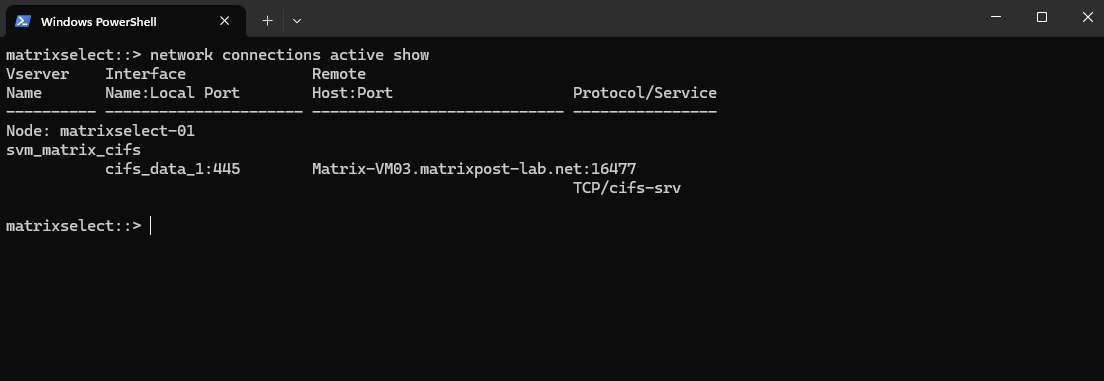
After creating the intercluster LIFs, you can review active network connections to verify that the cluster is successfully communicating with external systems and services.
Depending on the current workload and timing, connections related to Backup & Recovery may not always be visible as shown below, but the command can still be useful when troubleshooting connectivity issues.
The output shows that the client Matrix-VM03.matrixpost-lab.net currently has an active SMB/CIFS session to the storage virtual machine. Specifically, the client is connected to the CIFS data LIF on TCP port 445, indicating that a CIFS share hosted on the cluster is in use.
matrixselect::> network connections active show
I will now try again to activate the backup by clicking on the Activate Backup button below.
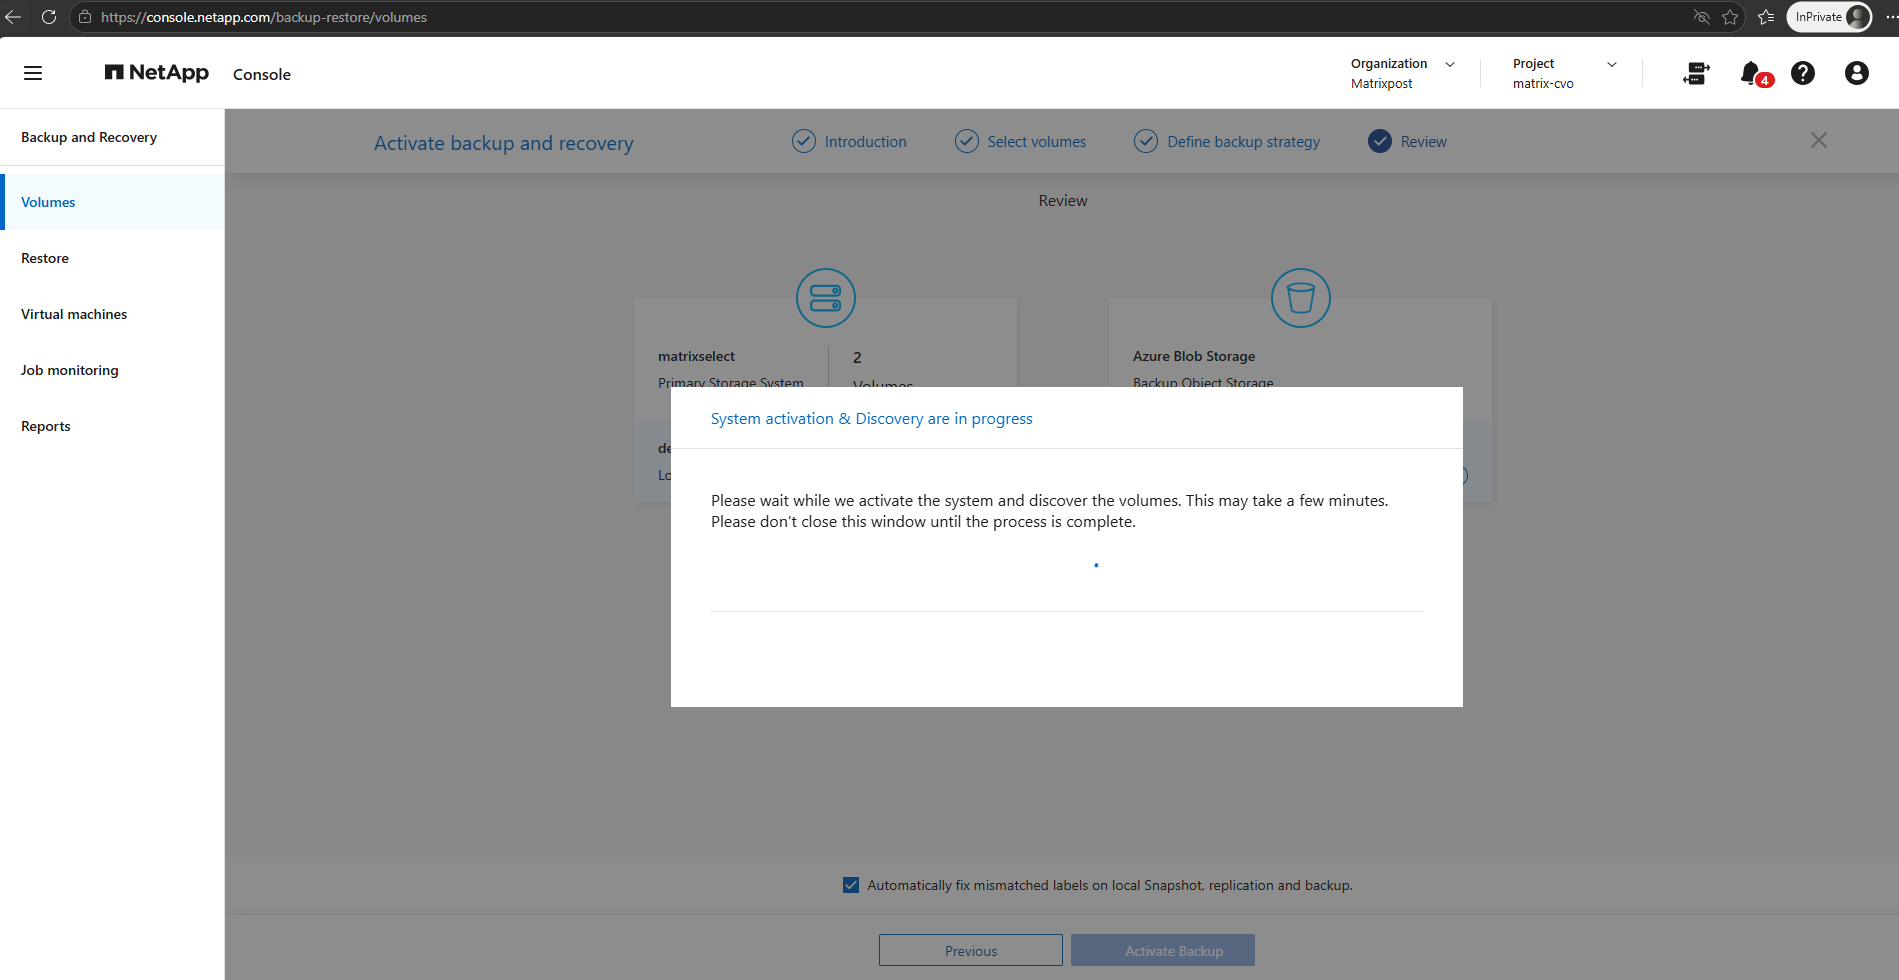
This time after creating the intercluster LIFs the activation was successfully.
Links
Protect your ONTAP volume data using NetApp Backup and Recovery
https://docs.netapp.com/us-en/data-services-backup-recovery/prev-ontap-protect-overview.htmlBack up on-premises ONTAP data to Azure Blob storage with NetApp Backup and Recovery
https://docs.netapp.com/us-en/data-services-backup-recovery/prev-ontap-backup-onprem-azure.htmlManually install a Console agent on-premises
https://docs.netapp.com/us-en/console-setup-admin/task-install-agent-on-prem.htmlInstall a Console agent on-premises using VCenter
https://docs.netapp.com/us-en/console-setup-admin/task-install-agent-on-prem-ova.htmlCreate Console agent cloud permissions for AWS or Azure
https://docs.netapp.com/us-en/console-setup-admin/task-install-agent-on-prem.html#agent-permission-aws-azure