Mastering the mitmproxy (MITM interactive HTTPS Proxy) on Linux
In this post I want to show step by step how we can install the mitmproxy on different Linux distributions and how to start examine and monitoring HTTP/HTTPS traffic with.
mitmproxy is a set of tools that provide an interactive, SSL/TLS-capable intercepting proxy for HTTP/1, HTTP/2, and WebSockets.
mitmproxy is a console tool that allows interactive examination and modification of HTTP traffic.
mitmproxy is your swiss-army knife for debugging, testing, privacy measurements, and penetration testing.
It can be used to intercept, inspect, modify and replay web traffic such as HTTP/1, HTTP/2, HTTP/3, WebSockets, or any other SSL/TLS-protected protocols.
You can prettify and decode a variety of message types ranging from HTML to Protobuf, intercept specific messages on-the-fly, modify them before they reach their destination, and replay them to a client or server later on.
Source: https://mitmproxy.org/
- Introduction
- Installing mitmproxy on Ubuntu
- Installing mitmproxy on SUSE Linux Enterprise Server 15 SP5
- Installing mitmproxy on Red Hat Enterprise Linux
- Installing mitmproxy on Oracle Linux
- Installing mitmproxy on all Linux Distributions by using the Pip
- Installing the mitmproxy CA Certificate
- Getting Started with mitmproxy
- Monitoring Linux Update Traffic by using the mitmproxy
- Troubleshooting
- Links
Introduction
The mitmproxy project’s tools are a set of front-ends that expose common underlying functionality. When we talk about “mitmproxy” we usually refer to any of the three tools – they are just different front-ends to the same core proxy.
- mitmproxy is an interactive, SSL/TLS-capable intercepting proxy with a console interface for HTTP/1, HTTP/2, and WebSockets.
- mitmweb is a web-based interface for mitmproxy.
- mitmdump is the command-line version of mitmproxy. Think tcpdump for HTTP.
The mitmproxy provides the following features.
- Intercept HTTP & HTTPS requests and responses and modify them on the fly
- Save complete HTTP conversations for later replay and analysis
- Replay the client-side of an HTTP conversation
- Replay HTTP responses of a previously recorded server
- Reverse proxy mode to forward traffic to a specified server
- Transparent proxy mode on macOS and Linux
- Make scripted changes to HTTP traffic using Python
- SSL/TLS certificates for interception are generated on the fly
- And much, much more…
Source: https://docs.mitmproxy.org/stable/
Installing mitmproxy on Ubuntu
On newer Ubuntu releases, below for example Ubuntu 22.04, we can install the mitmproxy utility out of the box by just executing the apt package manager command apt install <package>.
# sudo apt update
# sudo apt upgrade

# sudo apt install mitmproxy
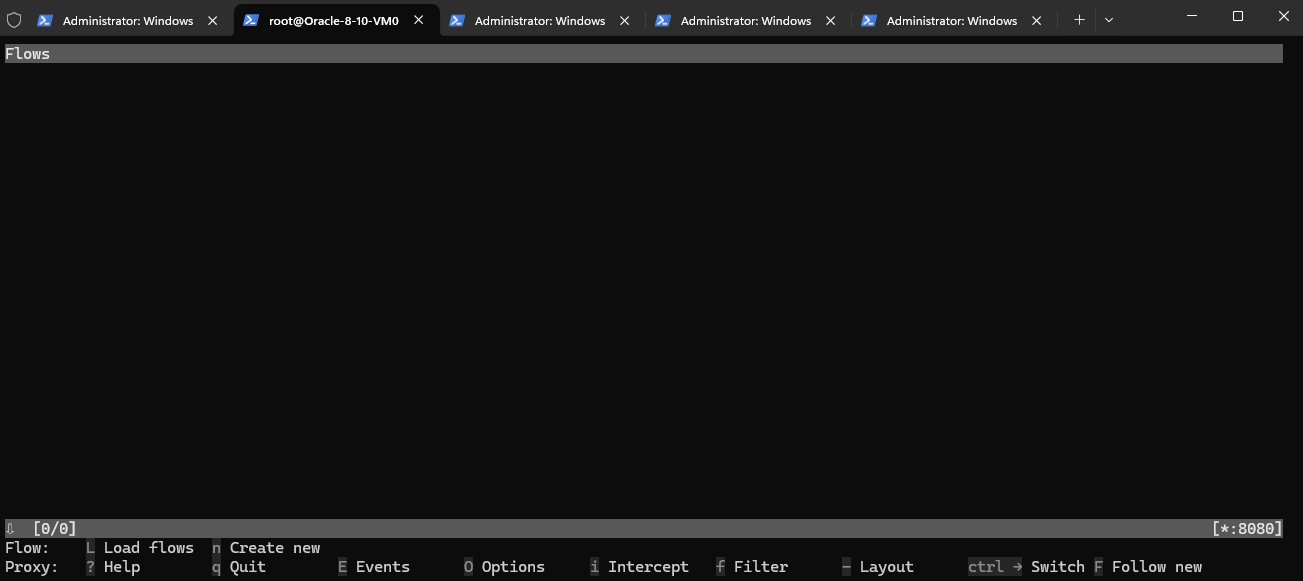
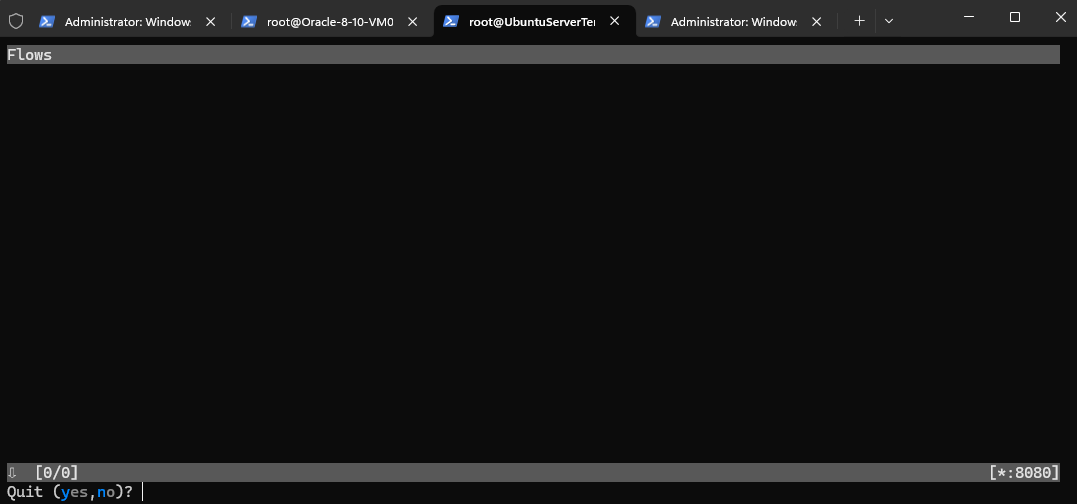
Start mitmproxy.
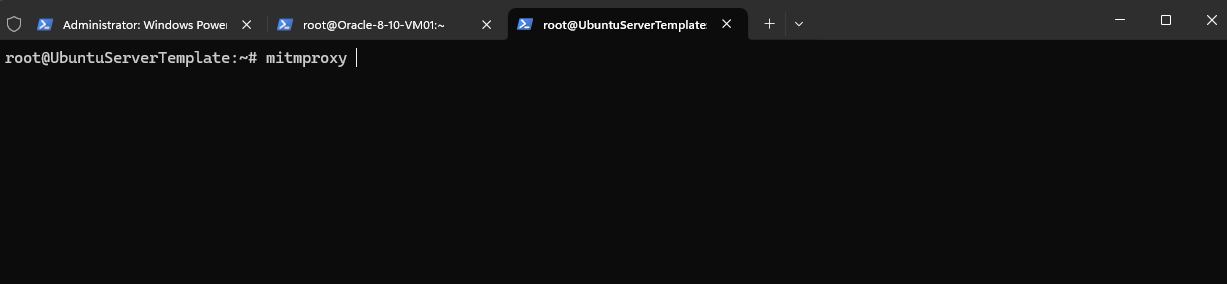
Looks good, this is the default view of mitmproxy. The mitmproxy adds rows to the view as new requests come in.

Installing mitmproxy on SUSE Linux Enterprise Server 15 SP5
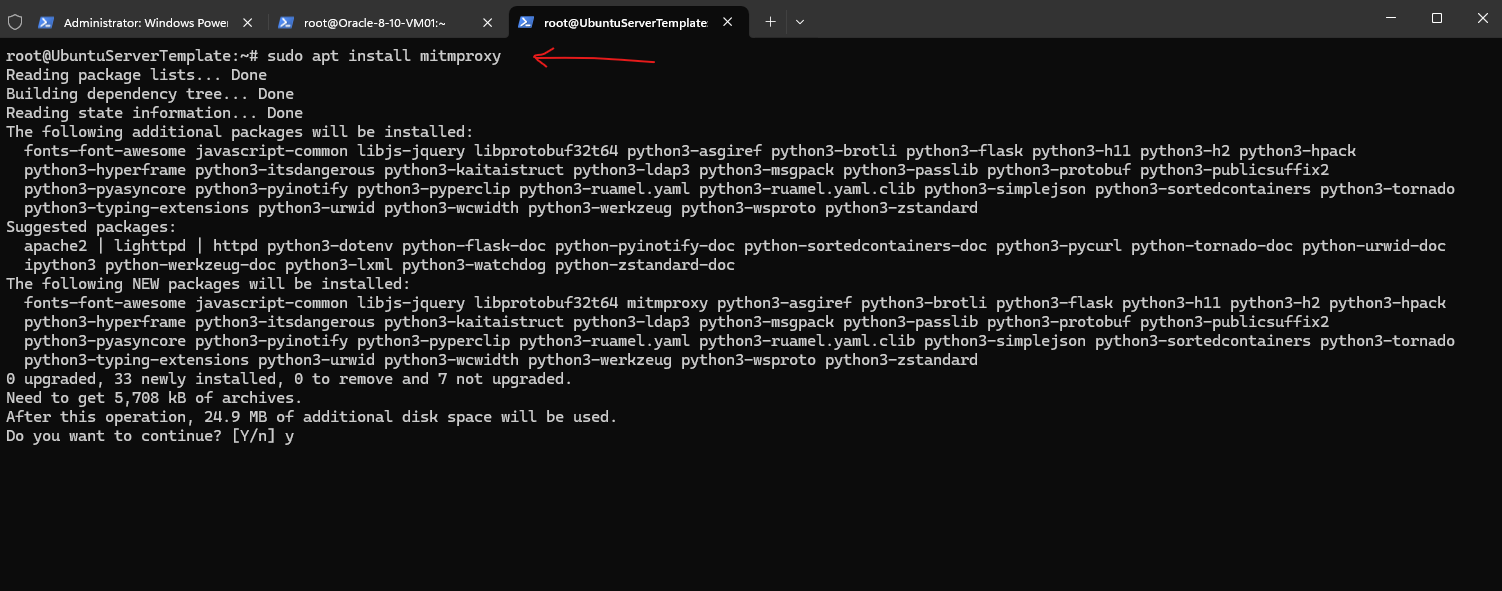
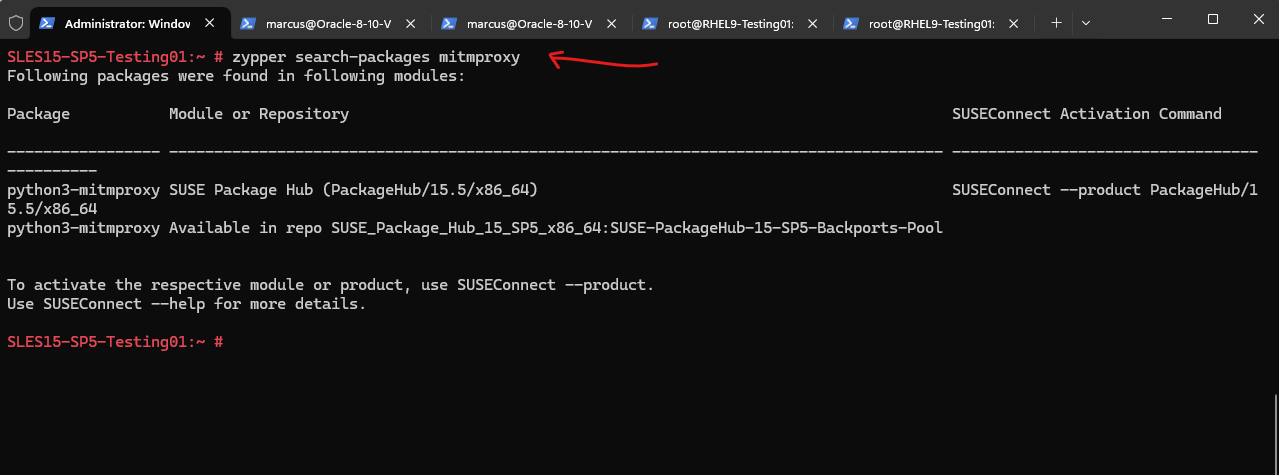
For SUSE Linux Enterprise 15 SP5 there are some mitmproxy packages available but in my case a bunch of other packages also needs to be installed and finally I was running into an error when trying to start the mitmproxy.
Therefore I was installing the mitmproxy on SUSE Linux Enterprise 15 by using the pip (package installer for Python) and shown below.
On SUSE Linux Enterprise 15 SP5 we first need to upgrade the python3 version from 3.6.15 to at least 3.8.
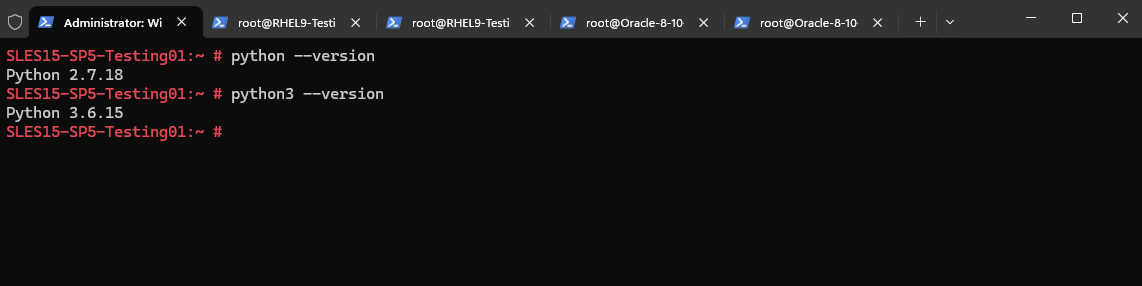
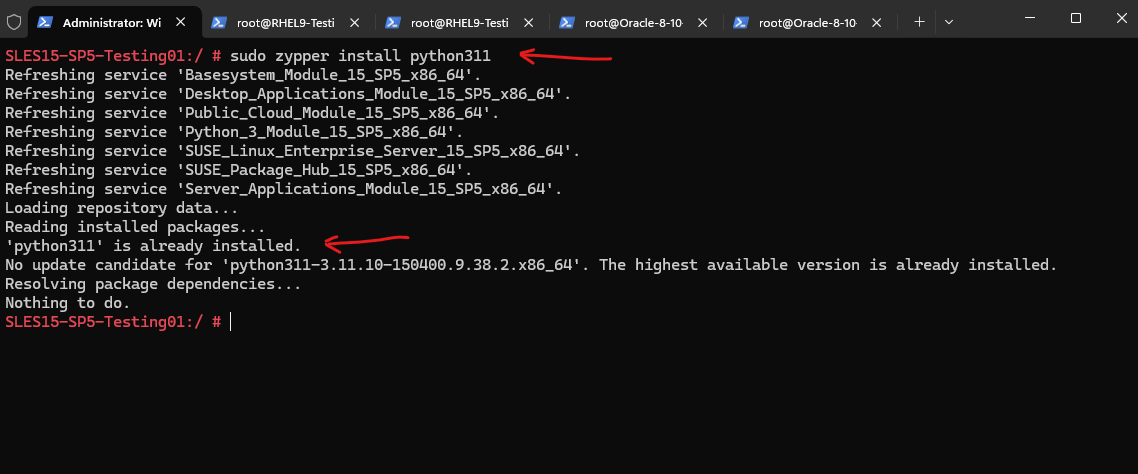
To upgrade python we will first check for available modules.
# sudo zypper refresh

search for available python versions:
# zypper search python3

Install an new version:
# zypper install python311
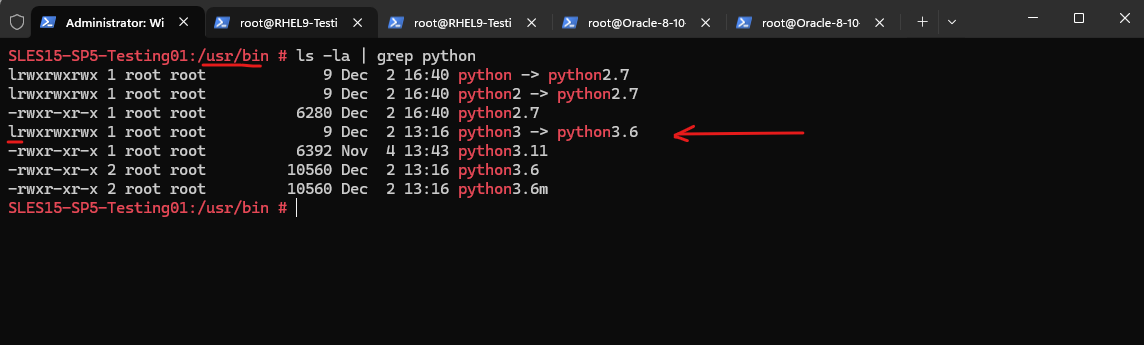
A newer version is already installed.
But so far not the default version and the python3 symbolic link is referring to version 3.6.
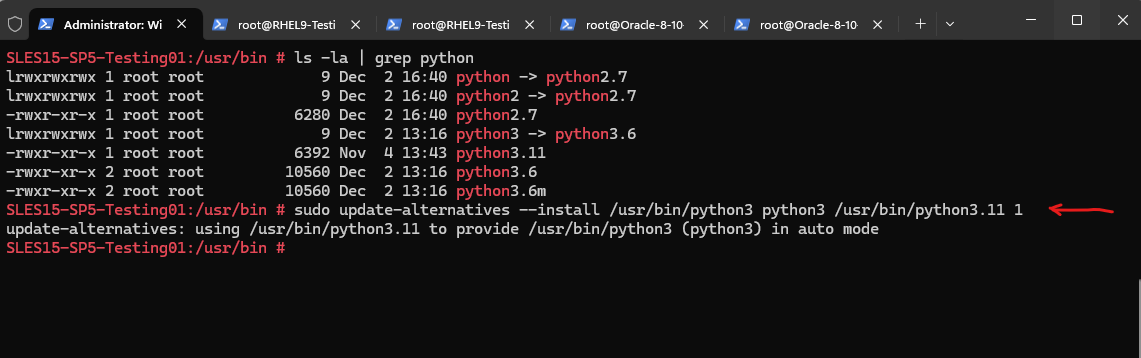
If you want the newly installed Python version to be the default, you can update the symbolic link:
# sudo update-alternatives --install <link> <name> <path> <priority>
# sudo update-alternatives --install /usr/bin/python3 python3 /usr/bin/python3.11 1
Checking the symbolic link update.
# sudo update-alternatives --config python3
--config <name>  ==> show alternatives for the <name> group and ask the user to select which one to use.
More about the updates-alternatives command you will find here https://linux.die.net/man/8/update-alternatives
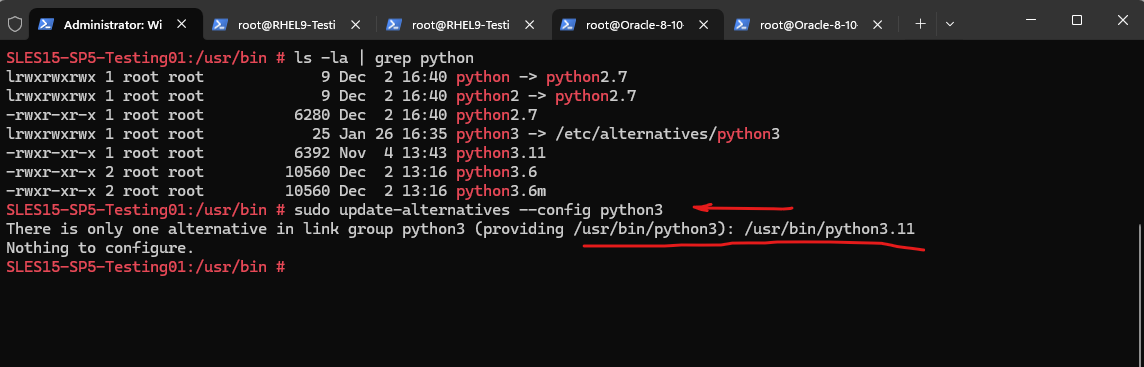
A final check which version is now the default.
# python3 --version

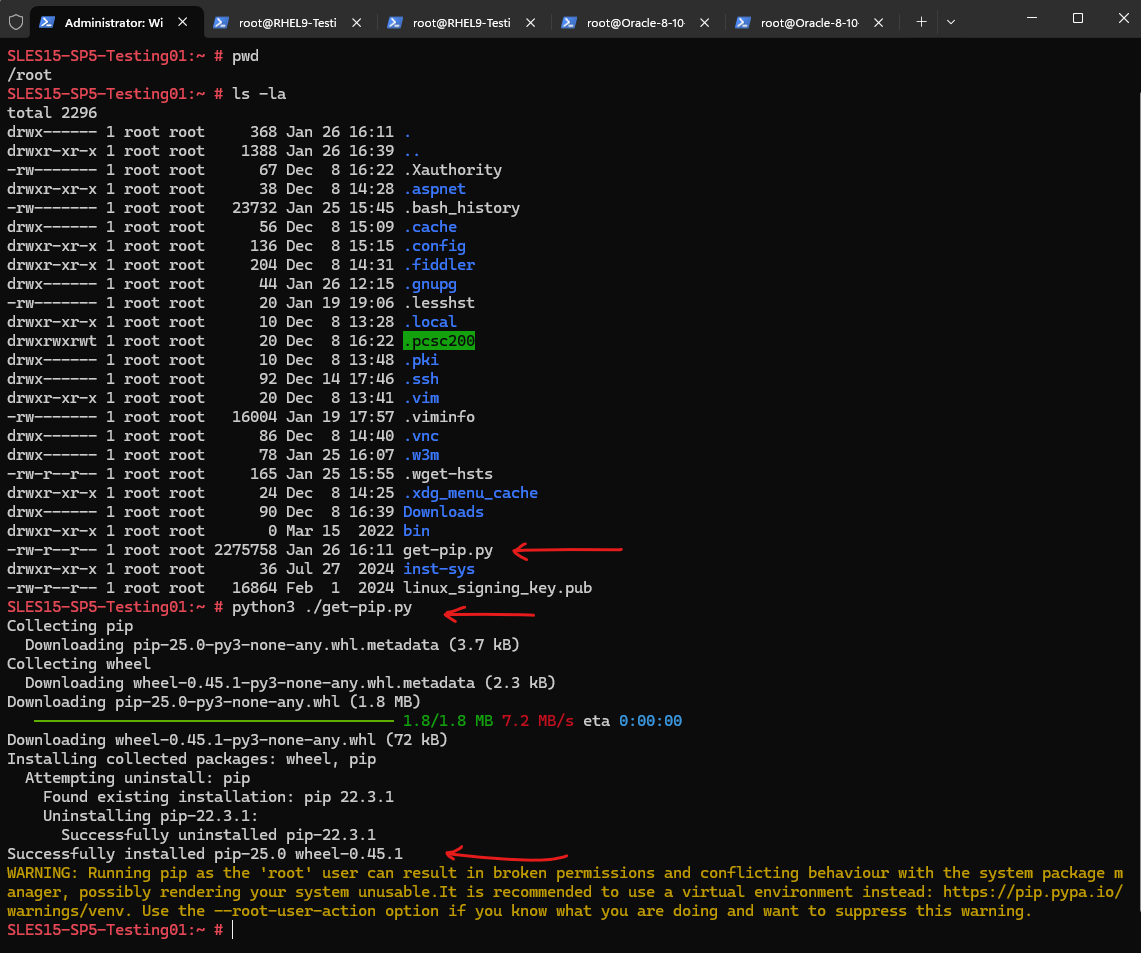
From now we can install the pip (package installer for Python) also on SUSE Linux Enterprise 15 SP5, but more here.
# curl -O https://bootstrap.pypa.io/get-pip.py
# python3 ./get-pip.py
Installing mitmproxy on Red Hat Enterprise Linux
On Red Hat Enterprise Linux 9.4 I couldn’t find any packages about the mitmproxy.
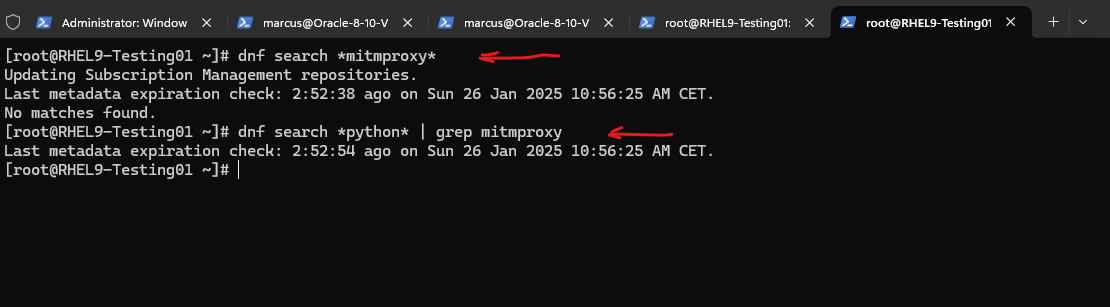
I will use therefore here also the pip (package installer for Python) and shown below.
Installing mitmproxy on Oracle Linux
Same as for Red Hat Enterprise Linux, I will also use here the pip (package installer for Python) and shown below.
Installing mitmproxy on all Linux Distributions by using the Pip
We can also install the mitmproxy on Linux by using the pip (package installer for Python).
pip is the package installer for Python. You can use pip to install packages from the Python Package Index and other indexes.
With pip, developers can easily access thousands of pre-built Python packages hosted on the Python Package Index (PyPI) or custom repositories.
The Python Package Index (PyPI) is a repository of software for the Python programming language. PyPI helps you find and install software developed and shared by the Python community. Package authors use PyPI to distribute their software.
Source: https://pypi.org/
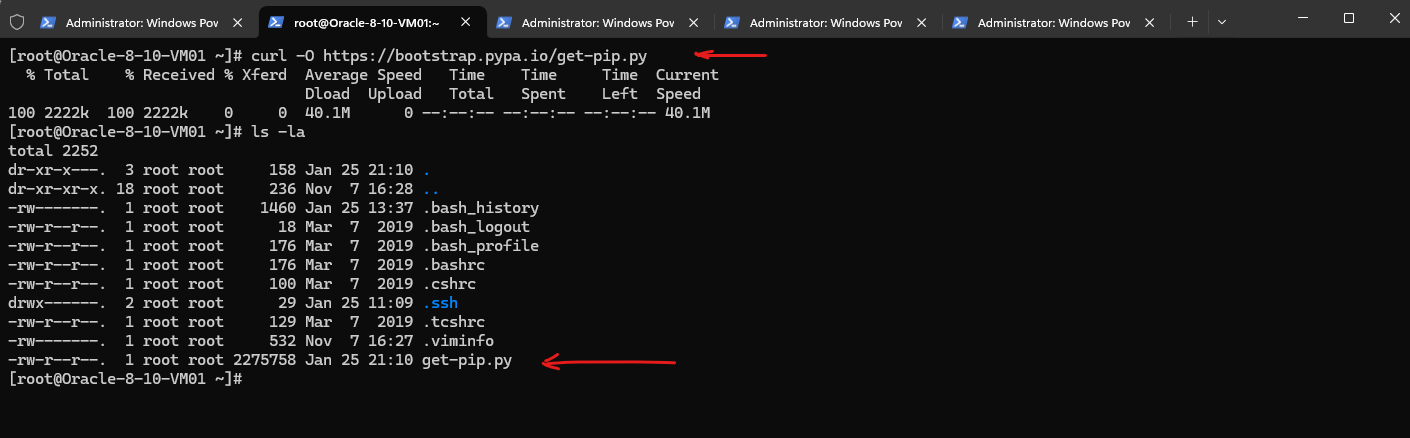
Below I will install the mitmproxy by using pip on Oracle Linux.
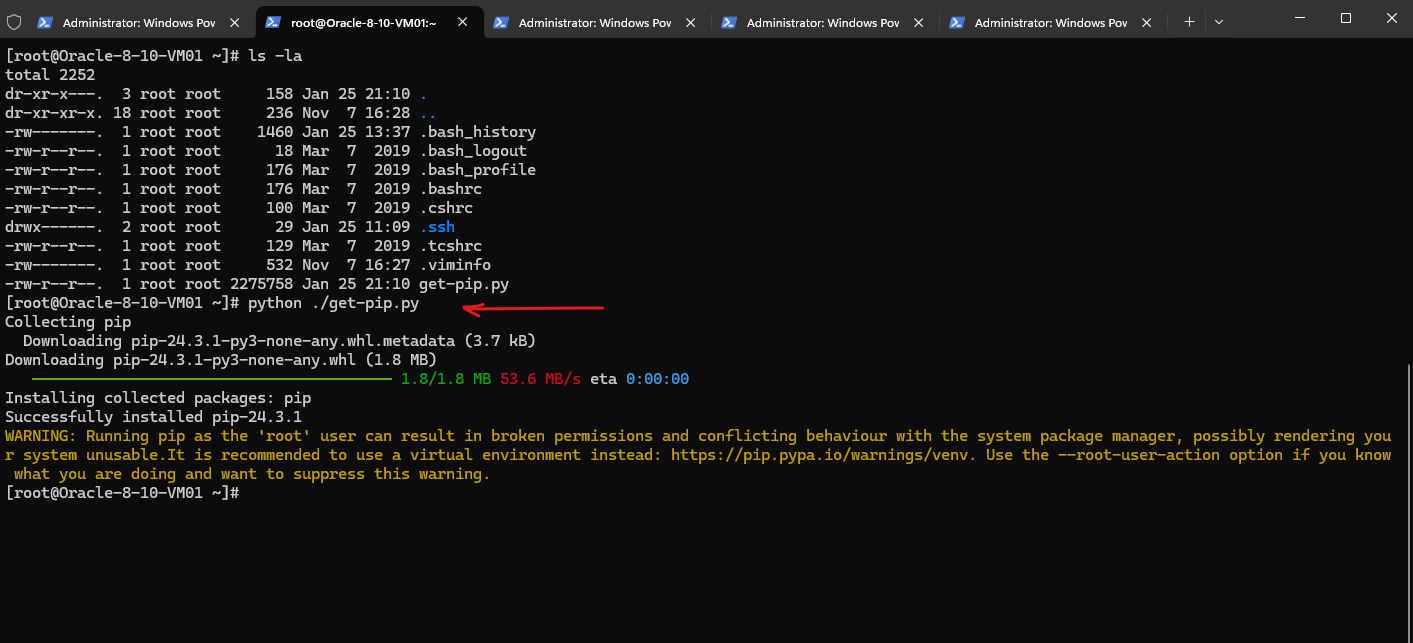
Download the pip installer script by using the curl utility and -O flag to download a remote file.
# curl -O https://bootstrap.pypa.io/get-pip.py

-O flag saves the file with its original name as specified in the URL.
-o flag lets you specify a custom name for the downloaded file. For example curl -o myfile.txt https://example.com/sample.txt
Execute the downloaded python script named get-pip.py to install the pip (package installer for Python).
!! Note !!
The minimum supported Python version is 3.8.
# python ./get-pip.py
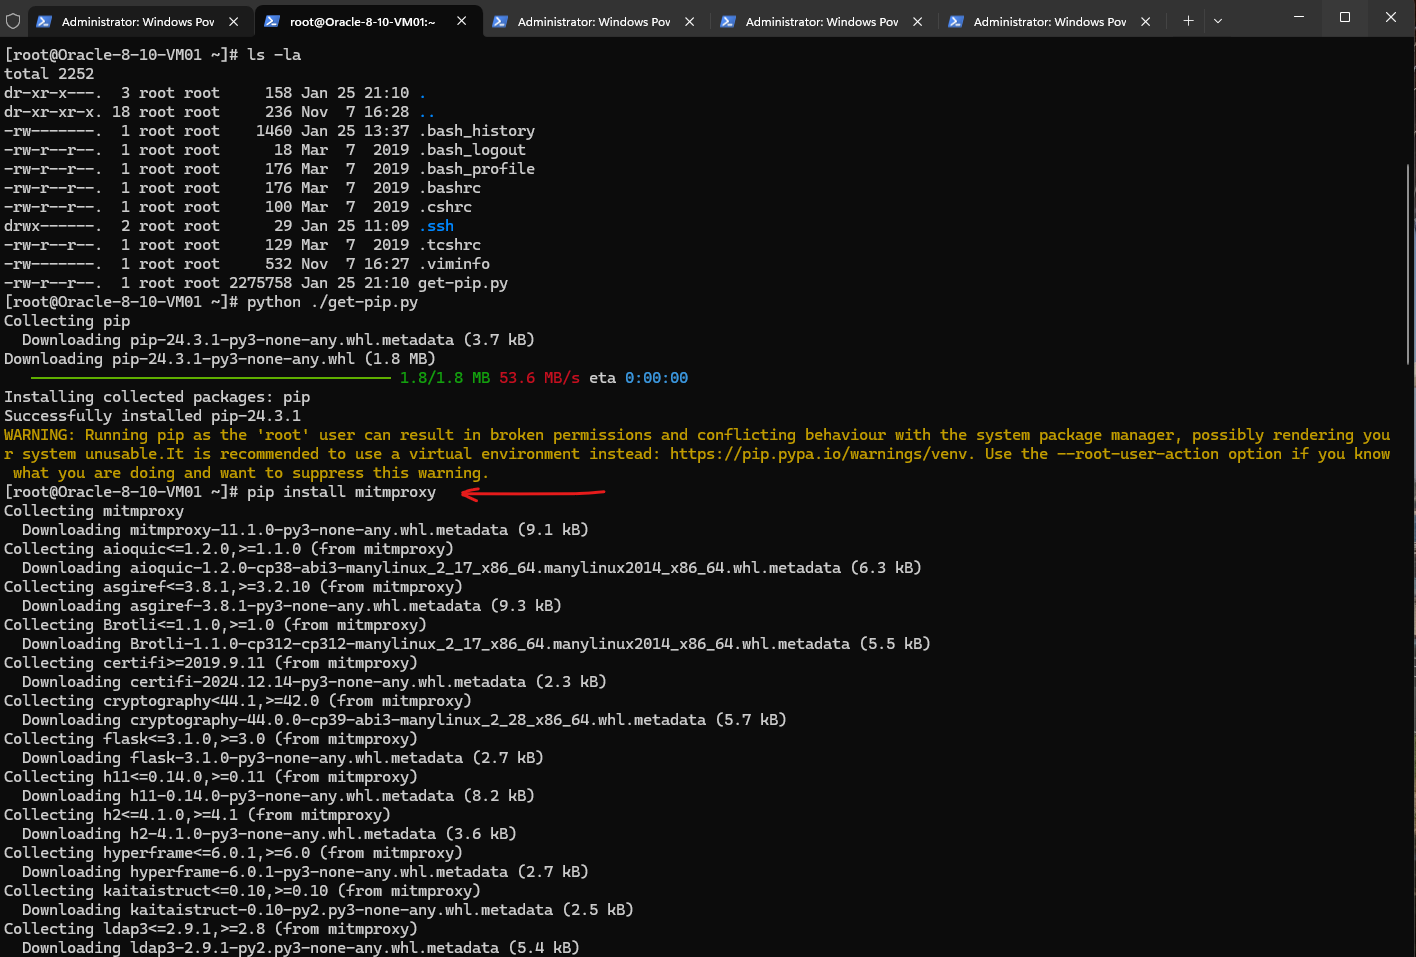
Now after we successfully installed the pip (package installer for Python), we can finally install the mitmproxy by using the pip command as shown below.
# pip install mitmproxy
Now we can start the mitmproxy as usual.
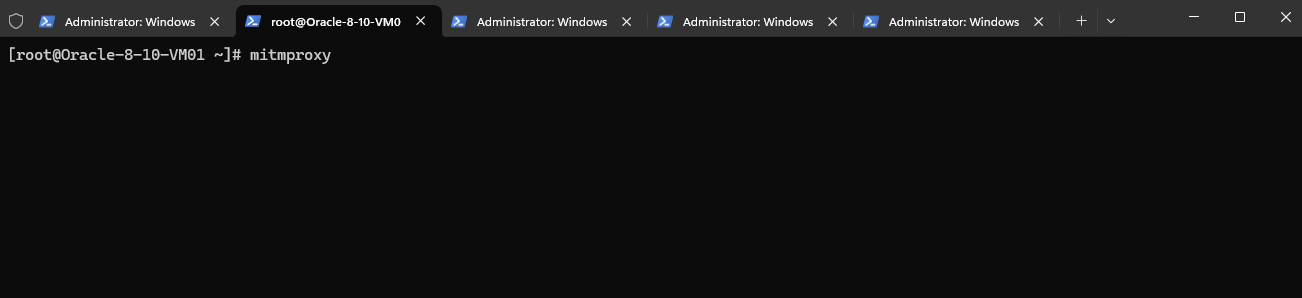
Looks good!
Installing the mitmproxy CA Certificate
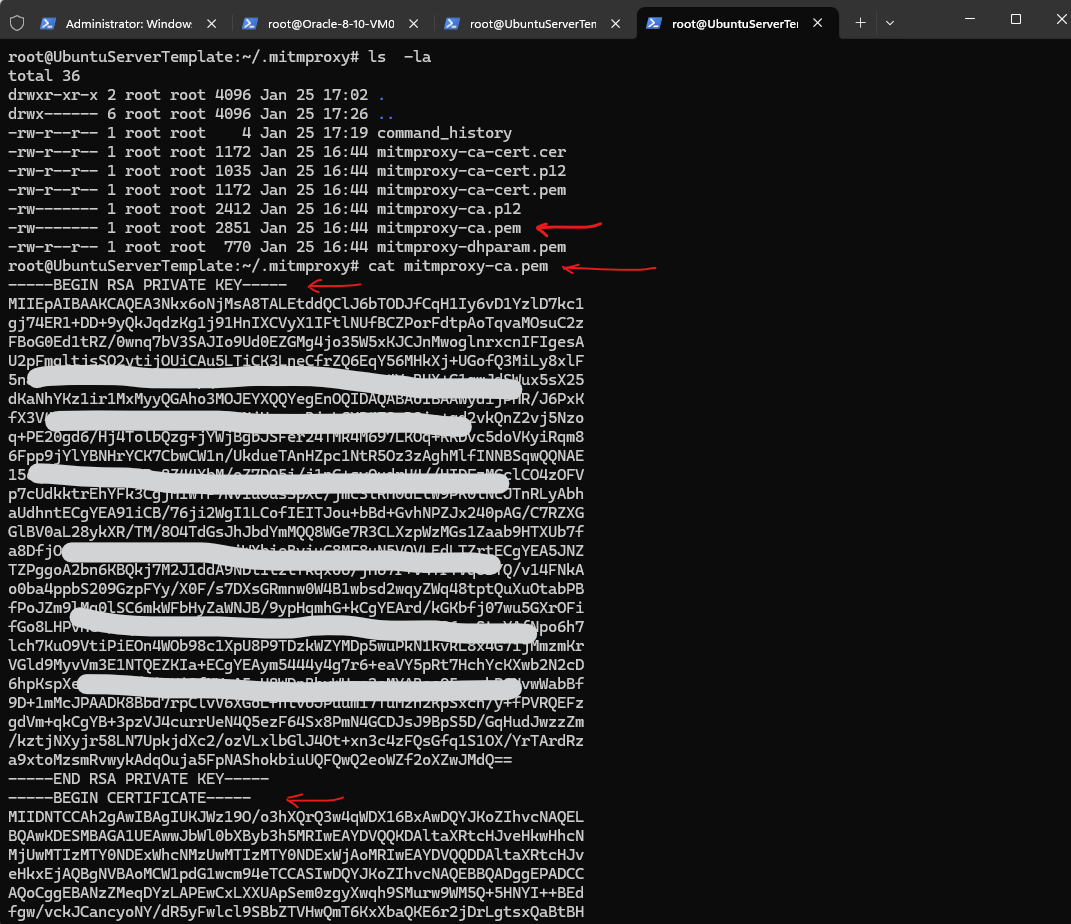
The first time mitmproxy is run, it creates the keys for a certificate authority (CA) in the config directory (~/.mitmproxy by default).
This CA is used for on-the-fly generation of dummy certificates for each visited website. Since your browser won’t trust the mitmproxy CA out of the box, you will either need to click through a TLS certificate warning on every domain, or install the CA certificate once so that it is trusted.
The following files are created:
- mitmproxy-ca.pem -> The certificate (public key) and the private key in PEM format.
- mitmproxy-ca-cert.pem -> The certificate in PEM format. Use this to distribute on most non-Windows platforms.
- mitmproxy-ca-cert.p12 -> The certificate in PKCS12 format. For use on Windows.
- mitmproxy-ca-cert.cer ->Same file as .pem, but with an extension expected by some Android devices.

For security reasons, the mitmproxy CA is generated uniquely on the first start and is not shared between mitmproxy installations on different devices. This makes sure that other mitmproxy users cannot intercept your traffic.
As mentioned above, the mitmproxy-ca.pem includes the certificate and the private key in PEM format.
On SUSE Linux Enterprise Server (SLES) and Ubuntu
To install root certificates in SUSE Linux Enterprise Server, we first need to copy them into the /etc/pki/trust/anchors/ folder.
The certificates needs to be in PEM format and the file extension like .pem, .cert or something different, SUSE doesn’t really care about and finally accept all.
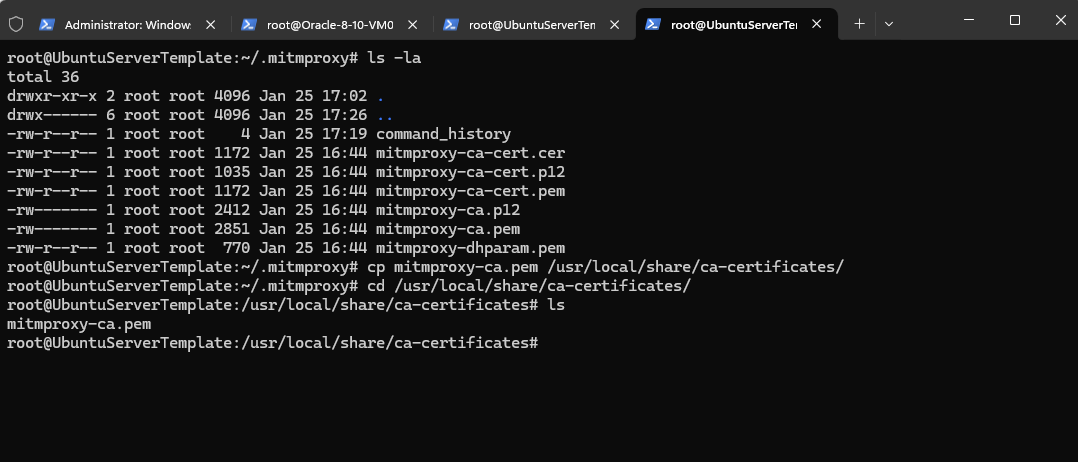
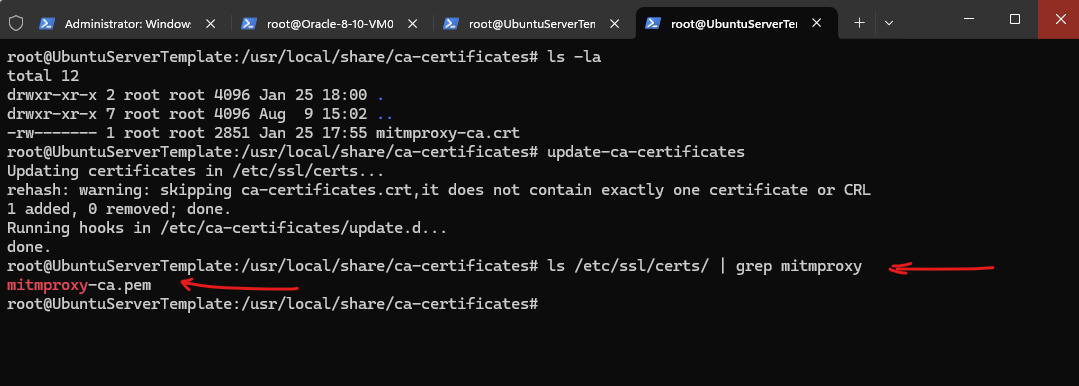
For Ubuntu these certificates also needs to be in PEM format but here they need the file extension to be .crt and must be copied to a different path /usr/local/share/ca-certificates.
On my Ubuntu 22.04 virtual machine I will copy the root CA therefore to the /usr/local/share/ca-certificates path.
:~/.mitmproxy$ sudo cp mitmproxy-ca.pem /usr/local/share/ca-certificates/
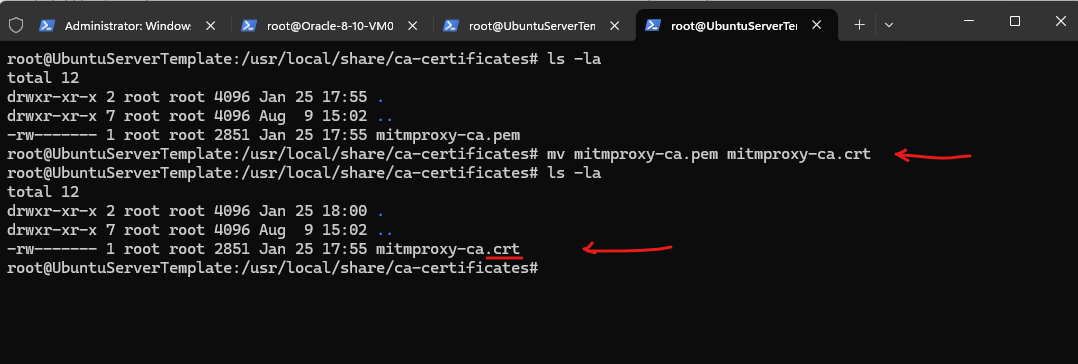
For Ubuntu as mentioned we also need to rename the certificate file extension by using the .cert file extension which is required for Ubuntu.
# mv mitmproxy-ca.pem mitmproxy-ca.crt
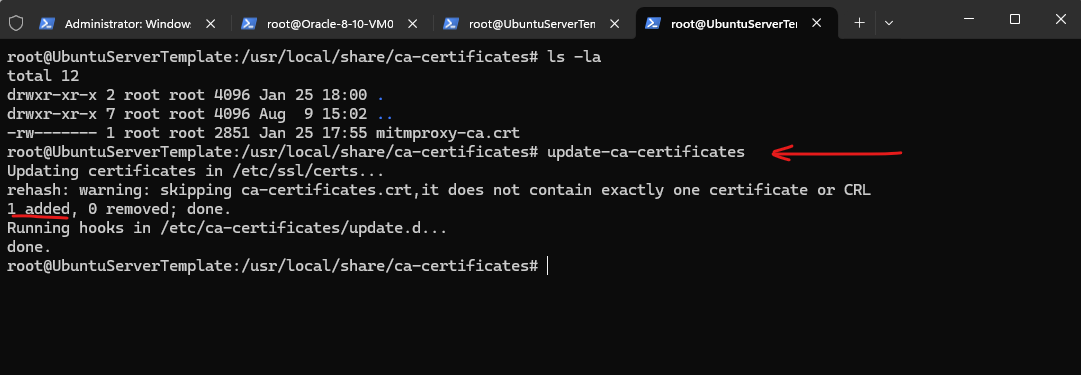
Now we need to run the following command, this command also works for Ubuntu.
update-ca-certificates is a program that updates the directory /etc/ssl/certs to hold SSL certificates and generates ca-certificates.crt, a concatenated single-file list of certificates.
Source: https://manpages.ubuntu.com/manpages/xenial/man8/update-ca-certificates.8.html
# sudo update-ca-certificates
Below we can check if the certificate was installed successfully in /etc/ssl/certs, also the same in Ubuntu.
Looks good.
# ls /etc/ssl/certs/ | grep mitmproxy
From now on we can browse to https websites through the mitmproxy in order to capture and monitor secured https traffic.
On Red Hat Linux Enterprise (RHEL), Oracle Linux, CentOS and Fedora
Below I will show this on Red Hat Linux Enterprise (RHEL) 9.4, finally the steps are also the same for Oracle Linux, CentOS and Fedora.
Under /etc/pki/ca-trust/source there is a README file in which the steps are explained. We just need to copy the certificate in PEM or DER file format to the list of CAs trusted on the system.
So we need to copy it to the /etc/pki/ca-trust/source/anchors/ subdirectory and run the update-ca-trust command.
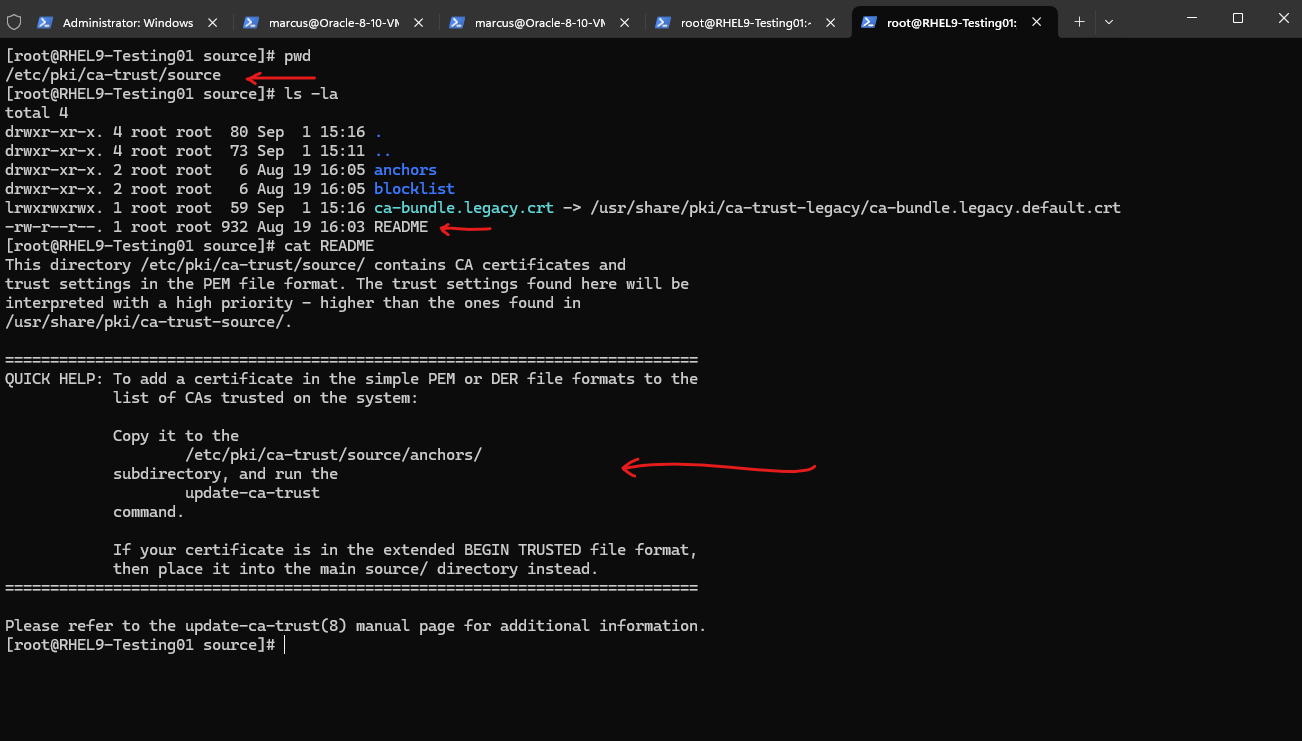
As also mentioned above in the README file, if your certificate is in the extended BEGIN TRUSTED file format, then place it into the main source/ directory instead.
Extended BEGIN TRUSTED file format means it is encoded with additional metadata such as trust settings, which is used by some systems or tools (like OpenSSL or certain embedded Linux environments). These certificates typically look like this:
-----BEGIN TRUSTED CERTIFICATE-----
<Encoded certificate data>
<Metadata or trust attributes>
-----END TRUSTED CERTIFICATE-----
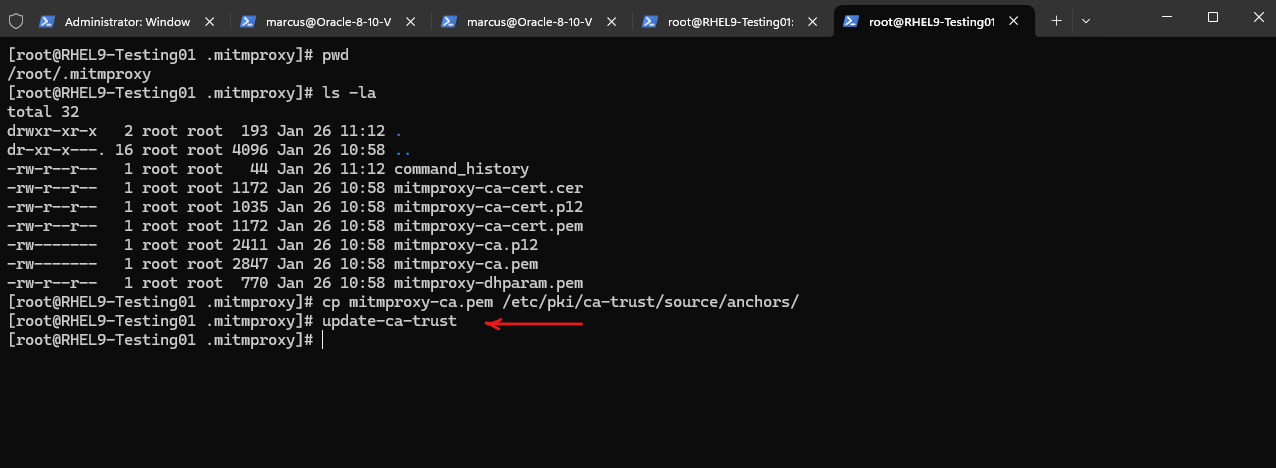
So I will now copy the mitmproxy-ca.pem certificate to the /etc/pki/ca-trust/source/anchors/ subdirectory and then run the update-ca-trust command.
# cp mitmproxy-ca.pem /etc/pki/ca-trust/source/anchors/

Finally I need to run.
# update-ca-trust
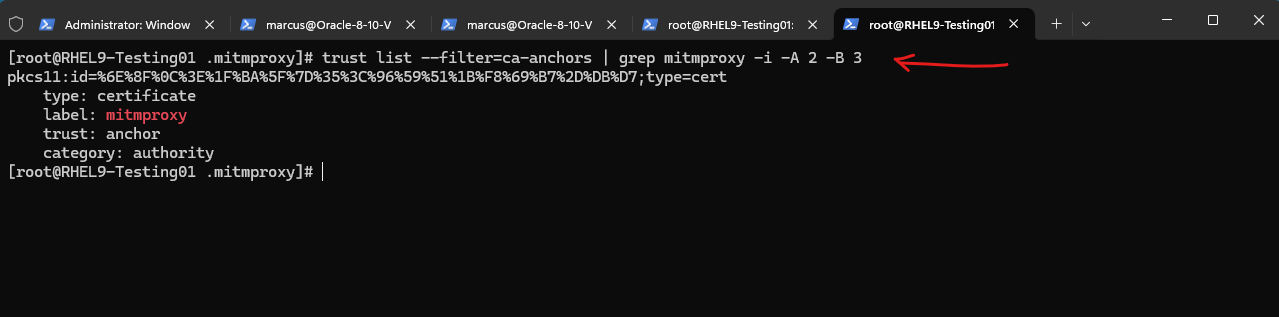
We can also verify whether a CA can be trusted by looking at the anchor value in the trust key:
# trust list --filter=ca-anchors | grep mitmproxy -i -A 2 -B 3
From now on we can browse to https websites through the mitmproxy in order to capture and monitor secured https traffic.
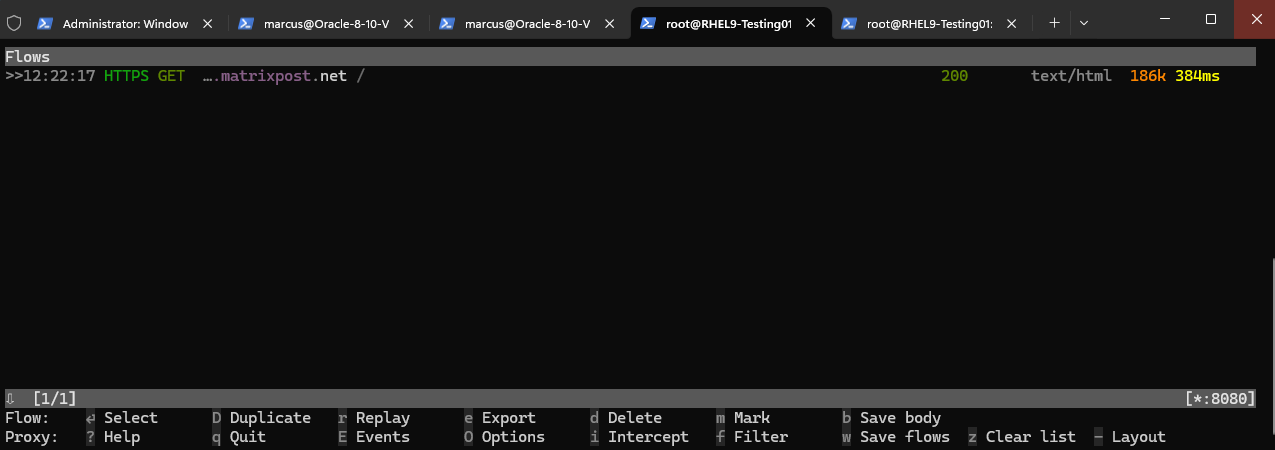
When we now switch back to our ssh session with the mitmproxy console, we can see the captured https connection to my blog.
About how to install root certificates on Linux, you can also read my following post.
Getting Started with mitmproxy
You can start any of the following three tools from the command line / terminal.
- mitmproxy gives you an interactive command-line interface
- mitmweb gives you a browser-based GUI
- mitmdump gives you non-interactive terminal output
By using the Command-Line Interface
Start the mitmproxy. Just enter:
# mitmproxy
Looks good, this is the default view of mitmproxy. The mitmproxy adds rows to the view as new requests come in. By default the mitmproxy is listening on the *:8080 socket.
To exit mitmproxy, press on the q key and confirm with the y key.
Use the ? shortcut key to view, context-sensitive documentation from any mitmproxy screen.

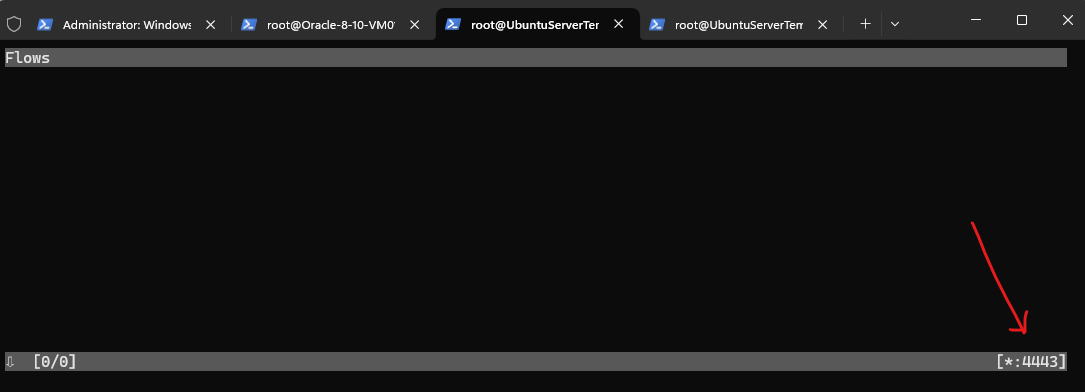
As mentioned, by default the mitmproxy is listening on the *:8080 socket. We can change this by using the following flag and custom port we want to use for.
# mitmproxy --listen-port 4443
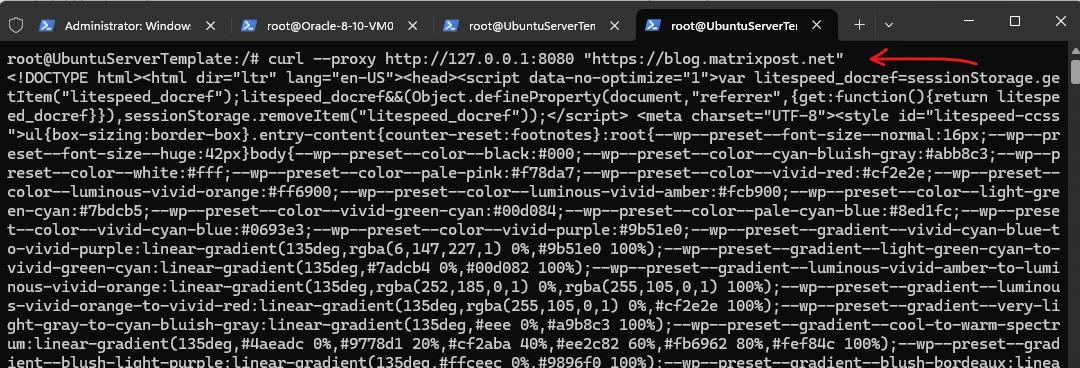
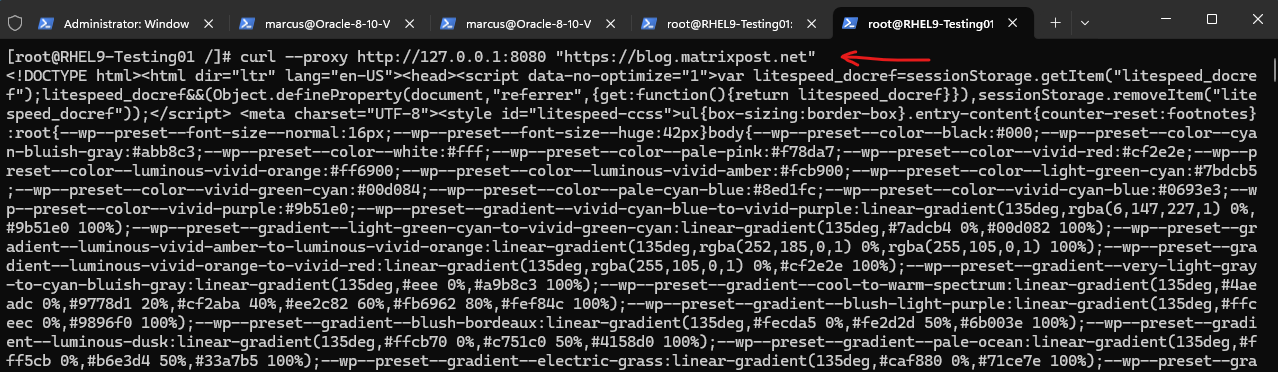
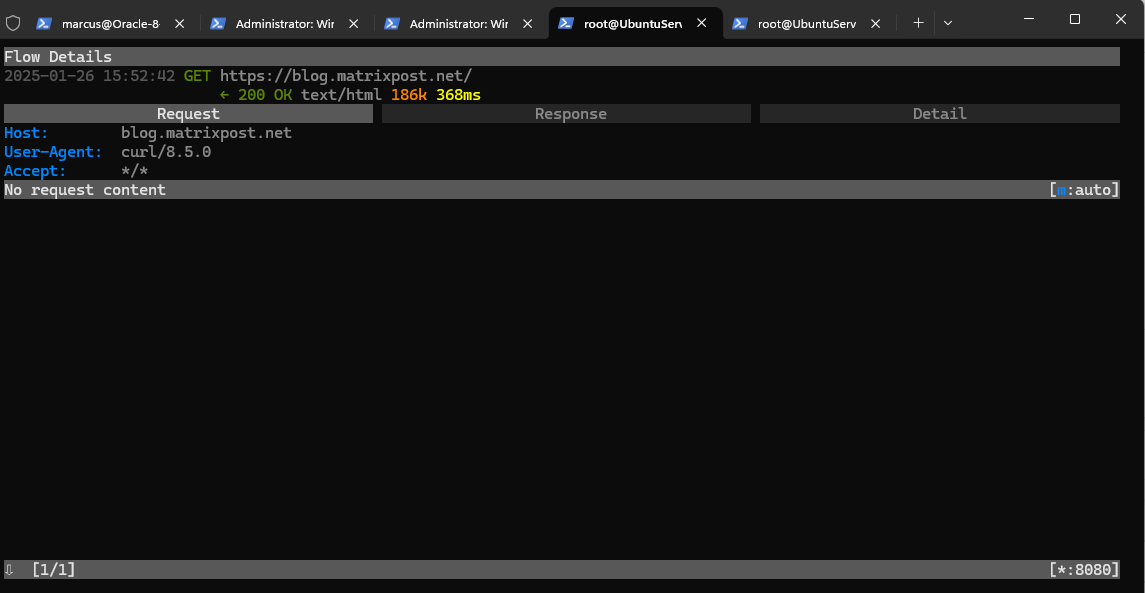
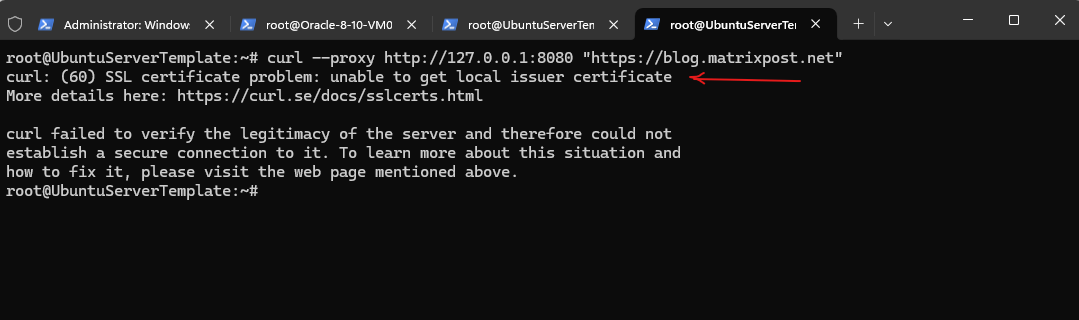
I will now generate some requests by using the curl utility in a new separate terminal and browse to my own blog under https://blog.matrixpost.net. So far we don’t see any traffic in the mitmproxy console.
For the curl utility and command we can use the proxy flag to route and capture the https traffic by using the mitmproxy as shown below.
# curl --proxy http://127.0.0.1:8080 "https://blog.matrixpost.net"

-x, --proxy [protocol://]host[:port] Use this proxy
When we now switch back to our ssh session with the mitmproxy console, we can see the captured https connection to my blog.

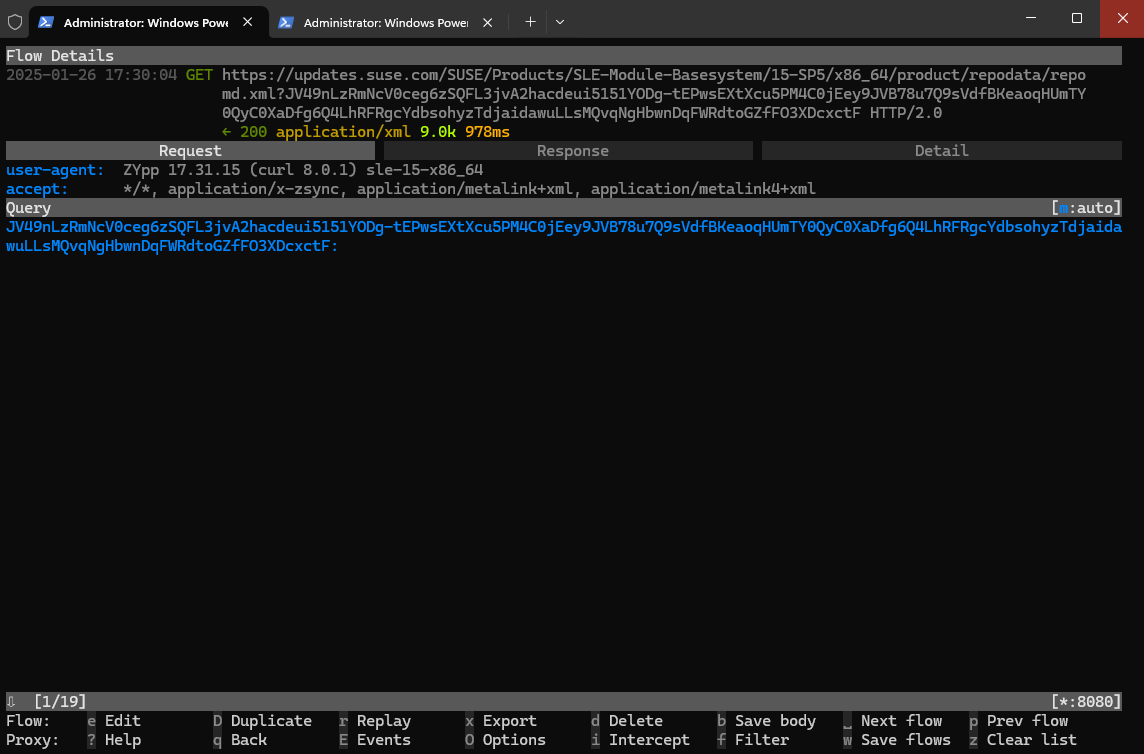
To get more information (Flow Details) we can click on the rows and will get the following screen and information. By pressing the ESC or q key we get back to the initial Flows screen.
Monitoring Linux Update Traffic by using the mitmproxy
Below I will use the mitmproxy to monitor the update traffic on different Linux distributions.
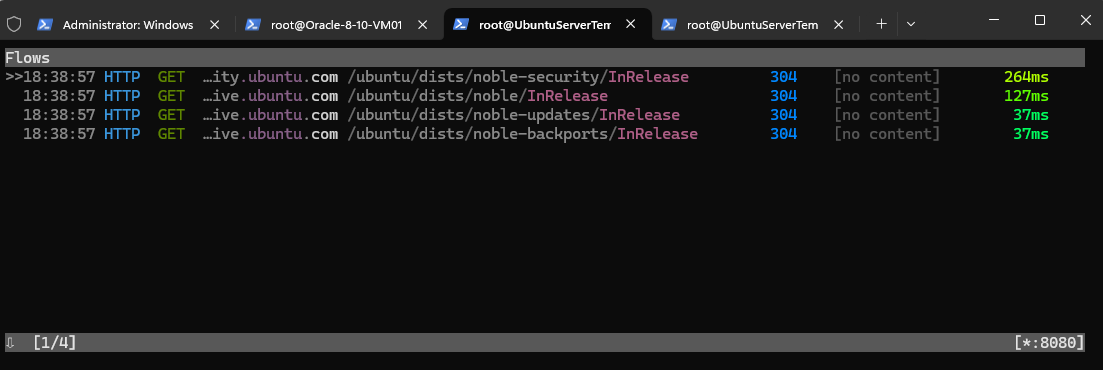
In Ubuntu
In Ubuntu we can set the mitmproxy through which all the update traffic should be routed by set the following parameters directly for the apt update command.
# sudo apt update -o Acquire::http::proxy="http://127.0.0.1:8080/"
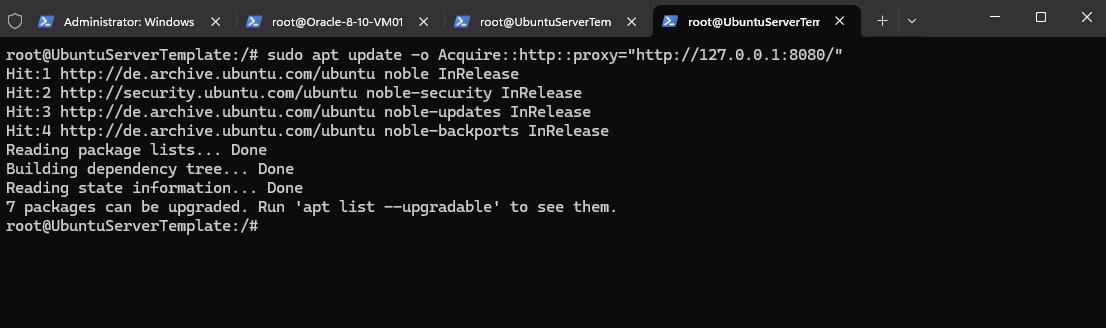
When we now switch back to our ssh session with the mitmproxy console, we can see the captured https connection to my blog.
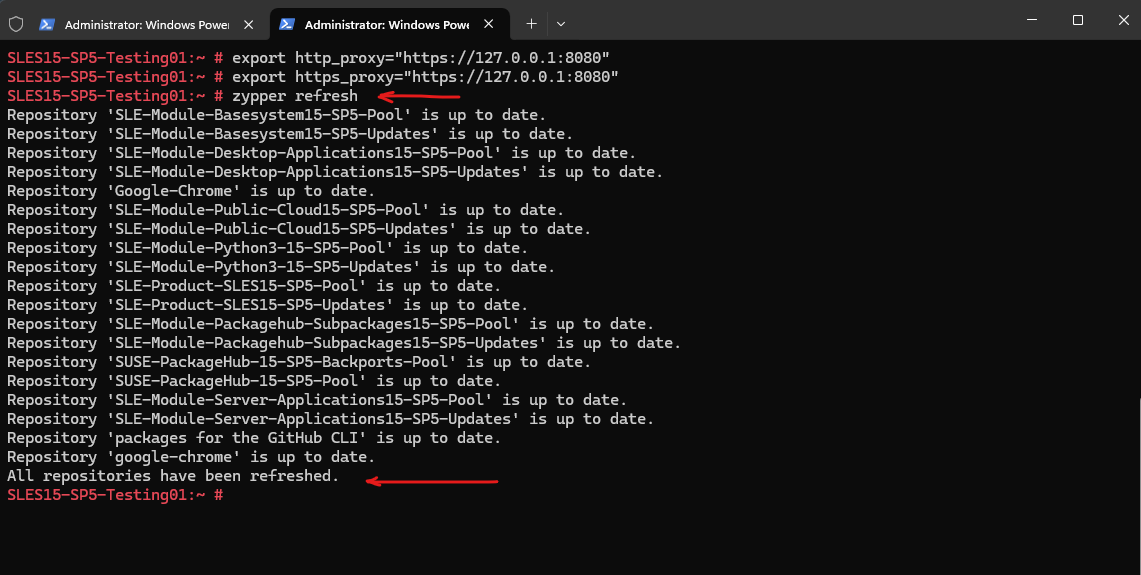
In SUSE Linux Enterprise
On SLES we can temporarily enable to route HTTP traffic through the mitmproxy by exporting the proxy variables for a single user as shown below. They will take effect immediately.
# export http_proxy="https://127.0.0.1:8080"
# export https_proxy="https://127.0.0.1:8080"
Or globally by editing the /etc/sysconfig/proxy file.
PROXY_ENABLED="yes"
HTTP_PROXY="http://127.0.0.1:8080"
HTTPS_PROXY="http://127.0.0.1:8080"
We can then first trigger a repository refresh by executing.
# zypper refresh
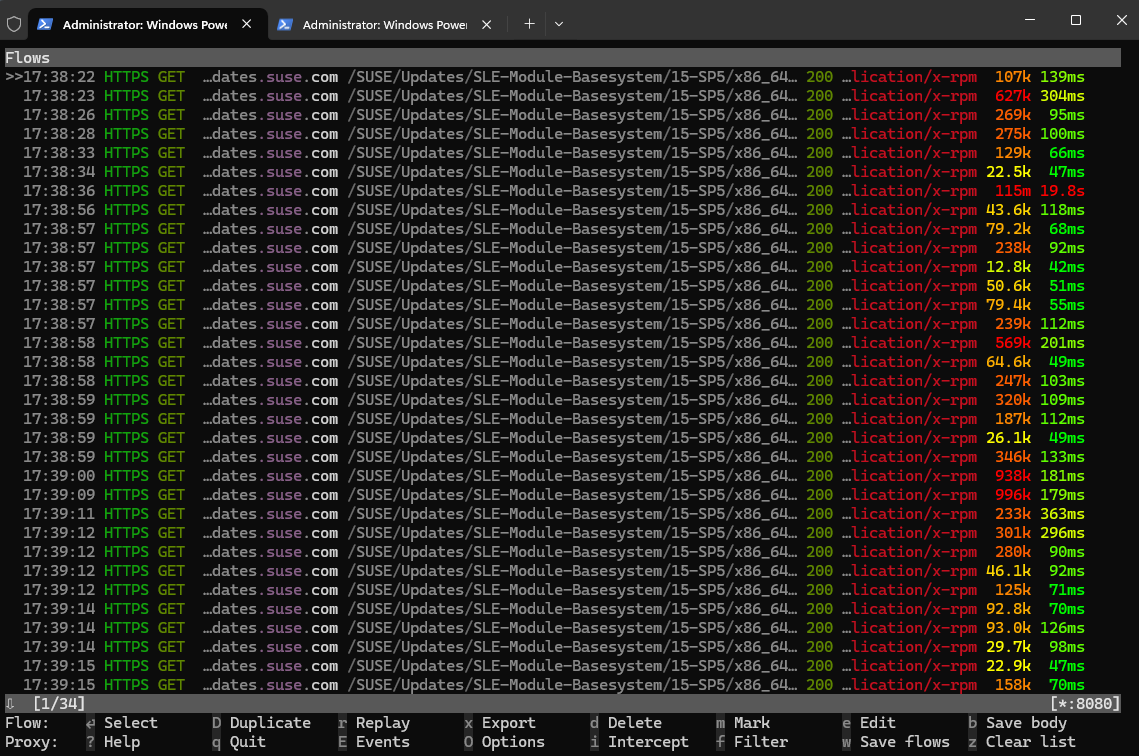
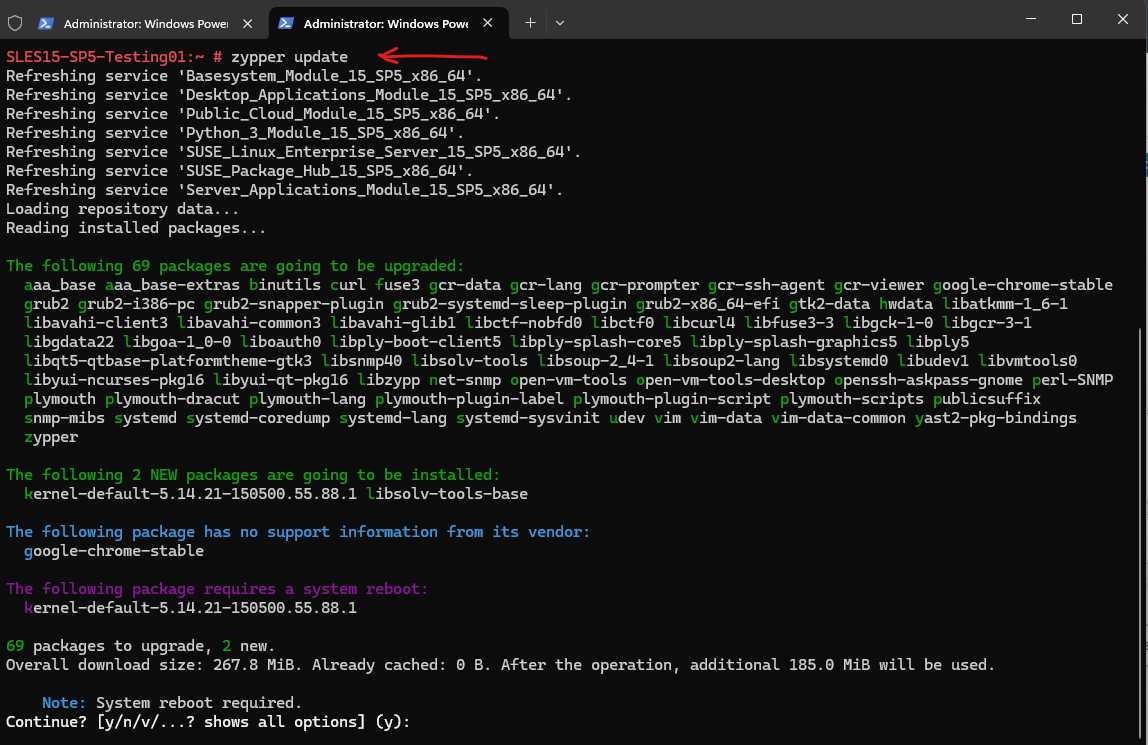
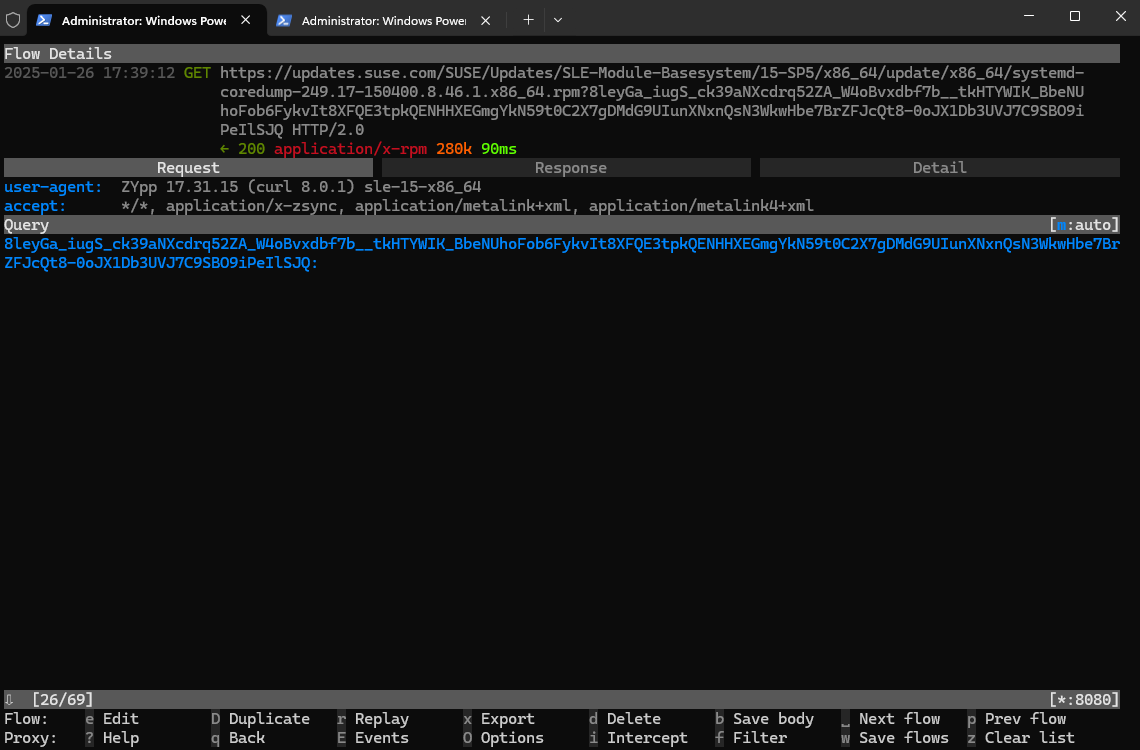
When we now switch back to our ssh session with the mitmproxy console, we can see the captured https connection to the SUSE repositories.
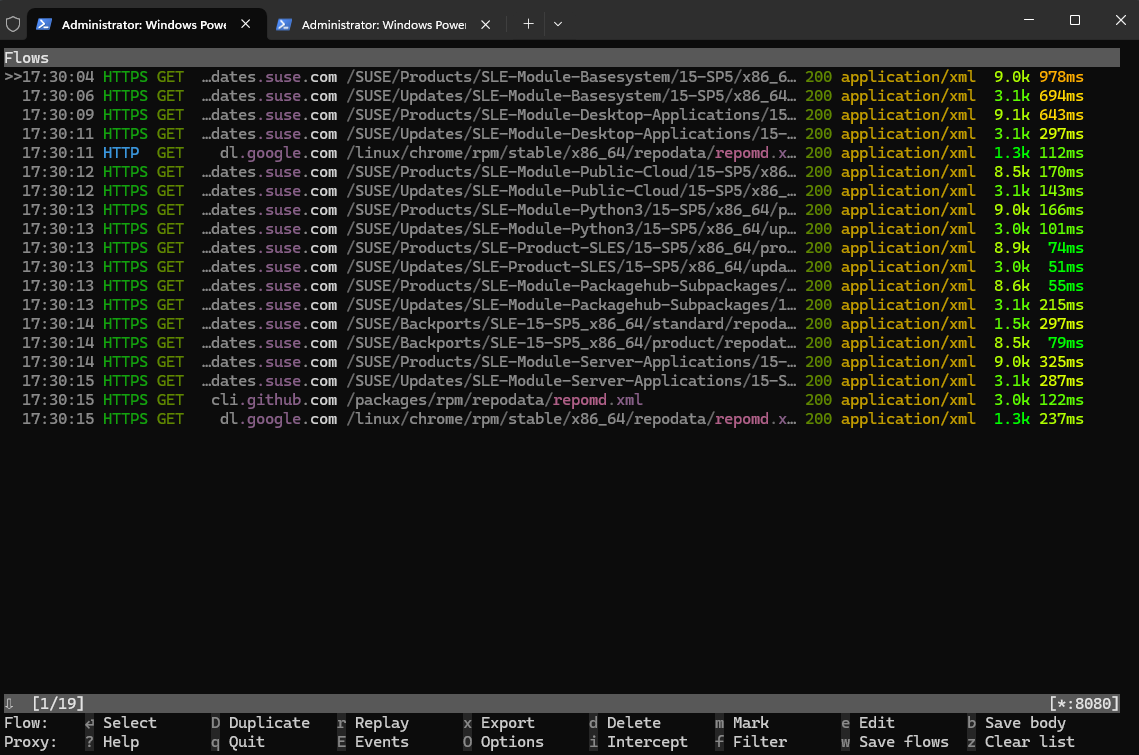
To get more information (Flow Details) we can click on the rows and will get the following screen and information. By pressing the ESC or q key we get back to the initial Flows screen.
And also when updating the system.
# zypper update
or
# zypper up
In Red Hat Linux Enterprise (RHEL), Oracle Linux, CentOS and Fedora
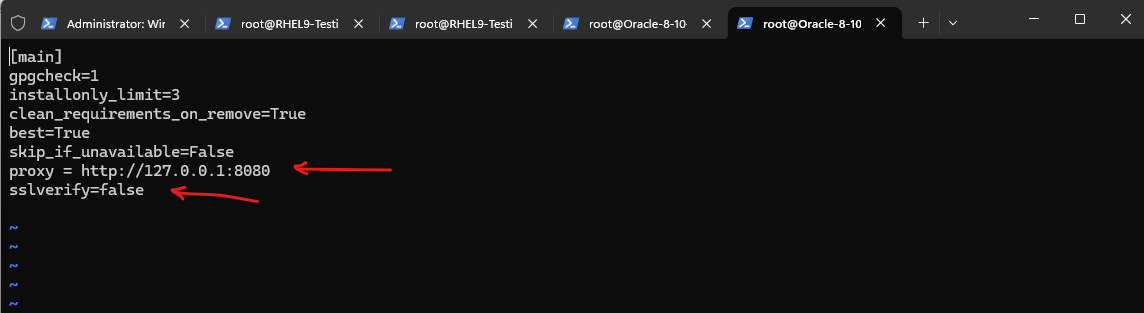
For these operating systems, in order to capture and monitor the update traffic, we first need to configure the dnf package manager by editing the dnf.conf file.
To demonstrate this I will use here Oracle Linux.
# vi /etc/dnf/dnf.conf

Here we need to add the following two lines, first we tell dnf to use the mitmproxy to connect to the repositories and we also need to disable ssl verification, otherwise we will run into into an SSL error.
proxy = http://127.0.0.1:8080
sslverify=false
I can now start to update Oracle Linux by executing the following command.
# sudo dnf update
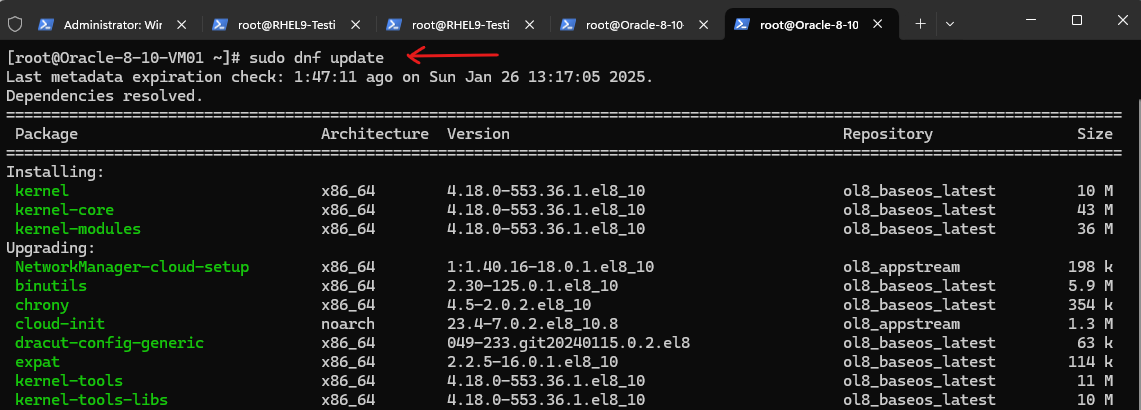
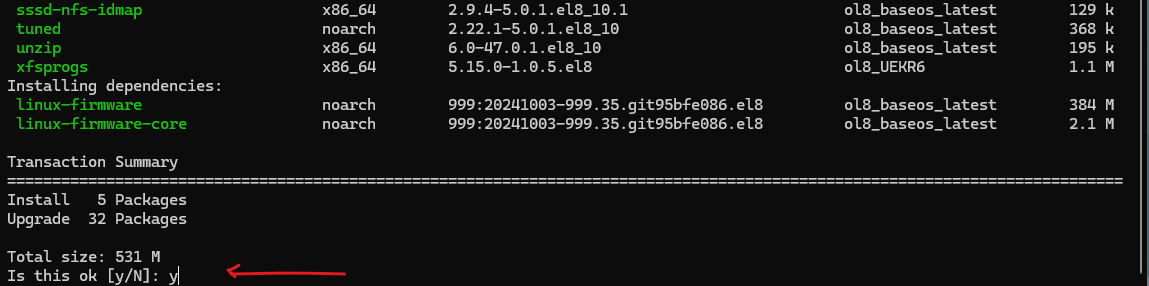
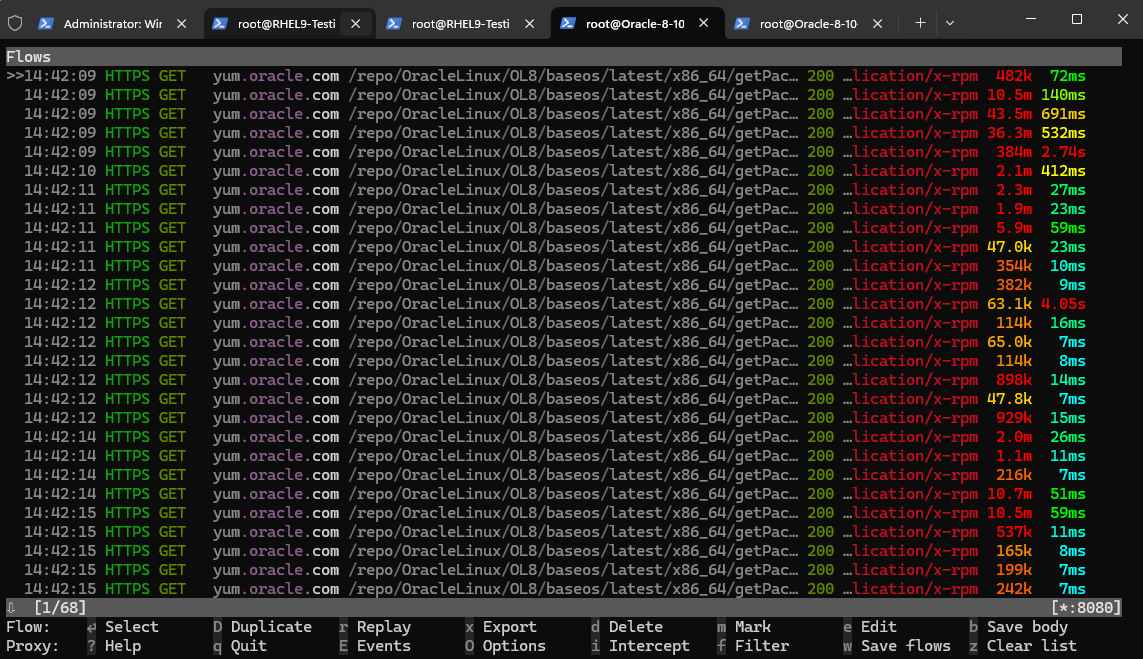
When we now switch back to our ssh session with the mitmproxy console, we can see the captured https connection to the Oracle Linux repositories.
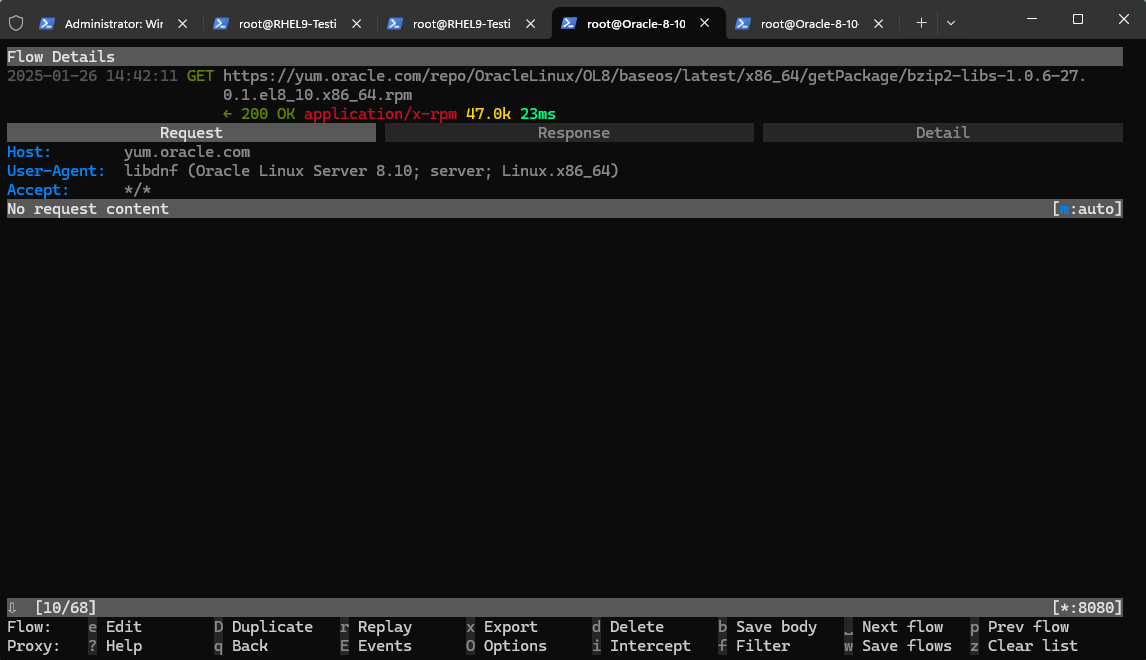
To get more information (Flow Details) we can click on the rows and will get the following screen and information. By pressing the ESC or q key we get back to the initial Flows screen.
Troubleshooting
SSL Certificate Problem: Unable to get local issuer Certificate
Mitmproxy can decrypt encrypted traffic on the fly, as long as the client trusts mitmproxy’s built-in certificate authority. Usually this means that the mitmproxy CA certificate has to be installed on the client device.
About how to install the mitmproxy CA certificates on the client device and its trusted CA store, you will find further above in this post.
Links
mitmproxy
https://mitmproxy.org/mitmproxy docs – Introduction
https://docs.mitmproxy.org/stable/mitmproxy options
https://docs.mitmproxy.org/stable/concepts-options/Intercept Requests
https://docs.mitmproxy.org/stable/mitmproxytutorial-interceptrequests/About Certificates
https://docs.mitmproxy.org/stable/concepts-certificates/How to configure your CA trust list in Linux
https://www.redhat.com/en/blog/configure-ca-trust-listpip
https://pypi.org/project/pipSUSE Linux Enterprise : How to setup a Proxy manually
https://www.suse.com/support/kb/doc/?id=000017441