Set up Azure Site Recovery for On-Premise VMware Virtual Machines (Modernized) – Part 3
In Part 2 of this blog post series we saw how to prepare the infrastructure which is finally setting up the ASR appliance in on-premise (vSphere).
Further we saw how to deploy the ASR appliance in vSphere and how to configure it in order to later orchestrate the connection and replication between on-premise (vSphere) and Azure.
This part will show how we can enable the replication of virtual machines in on-premise (vSphere) which we want to protect and replicate to Azure.
We will also see how to perform a failover from on-premise to Azure and how to re-protect the virtual machine to on-premise back after the failover to Azure.
Enable Replication of VMware VMs to Azure
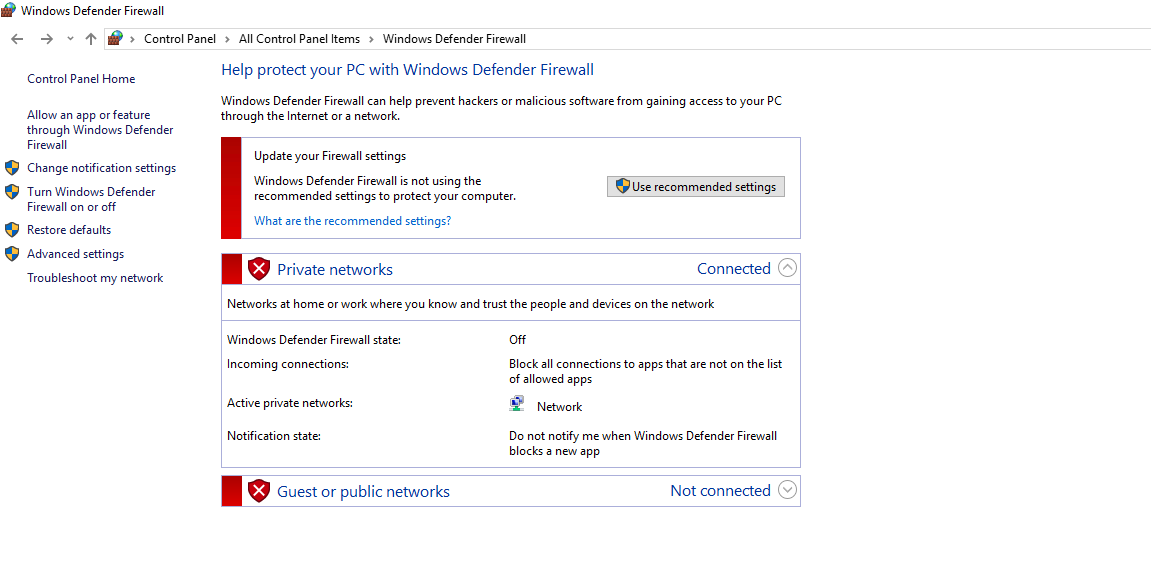
Before we enable the replication of virtual machines from on-premise (vSphere) to Azure, we first need to adjust the local firewall on the ASR appliance.
Disable local firewall on the ASR appliance or just allow necessary traffic.
In Part 4 we will see what traffic we need to allow here finally.
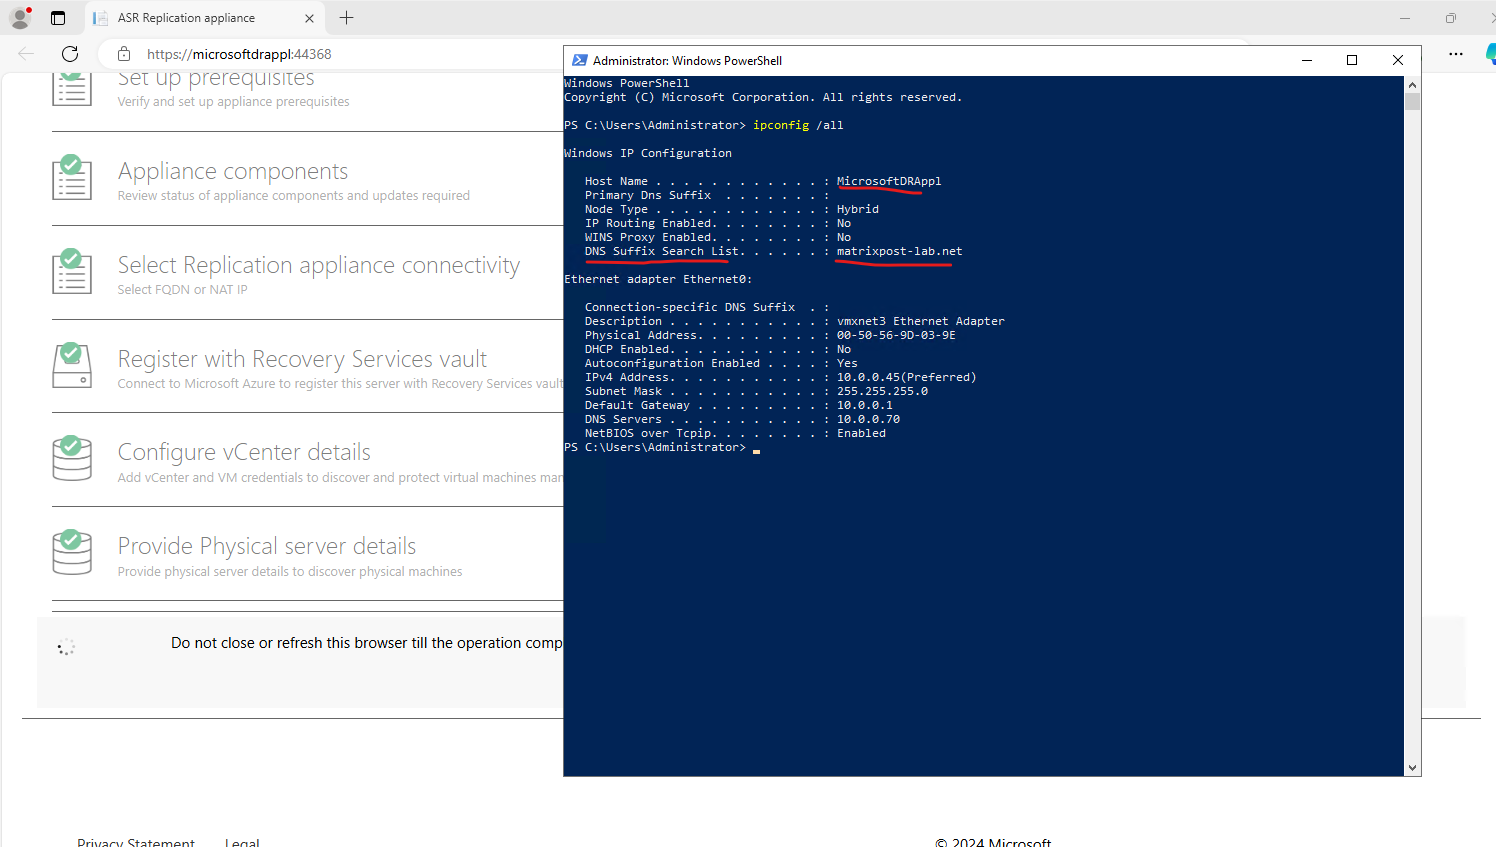
And we also need to make sure name resolution between the ASR appliance and the virtual machines (protected VMs) we want to replicate to Azure works as mentioned already further above.
So create a corresponding DNS record on the DNS Server in your on-premise network.
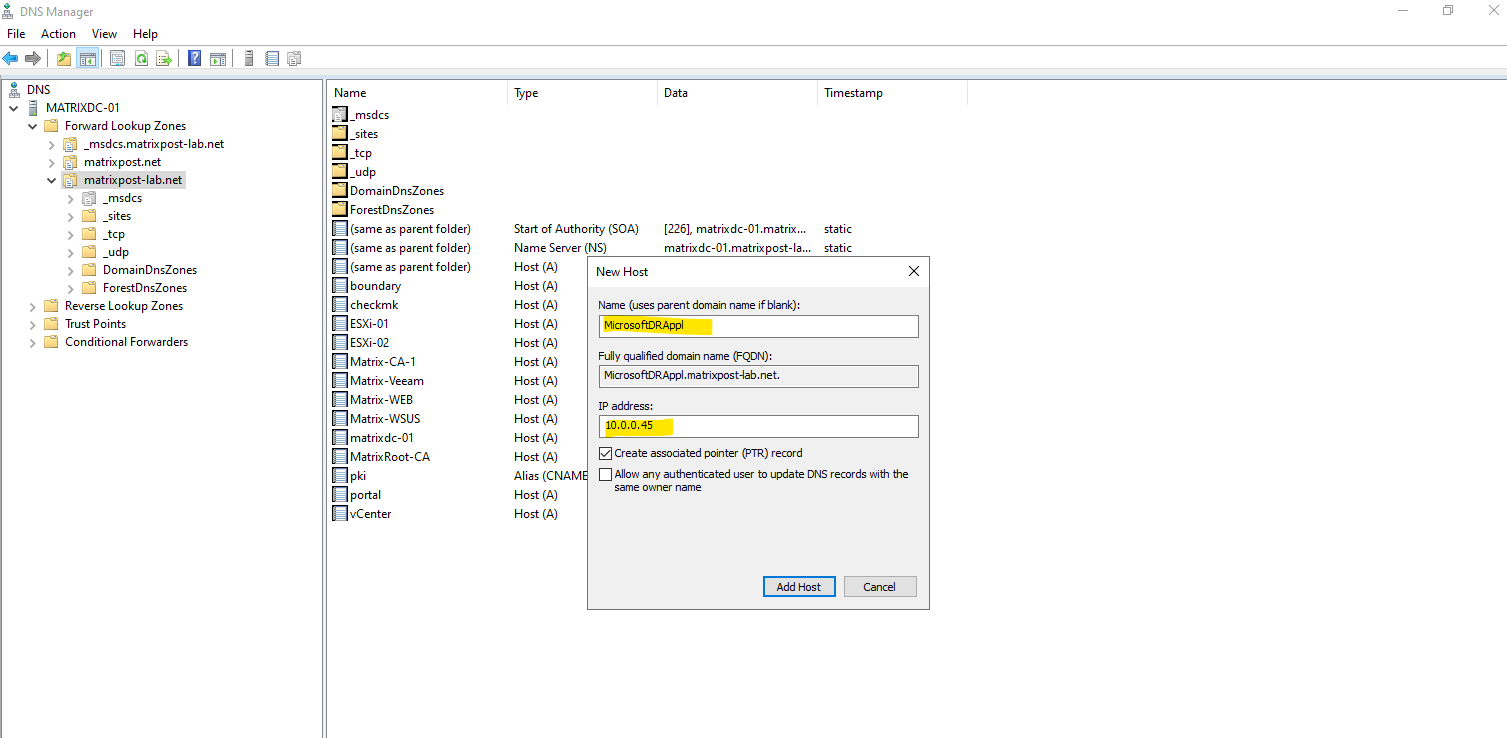
As set to the beginning on the vSphere VM Customization Specification, the domain suffix from my internal network/domain was set on the ASR appliance.
Now we can start to enable the replication for the desired virtual machines in our on-premise network.
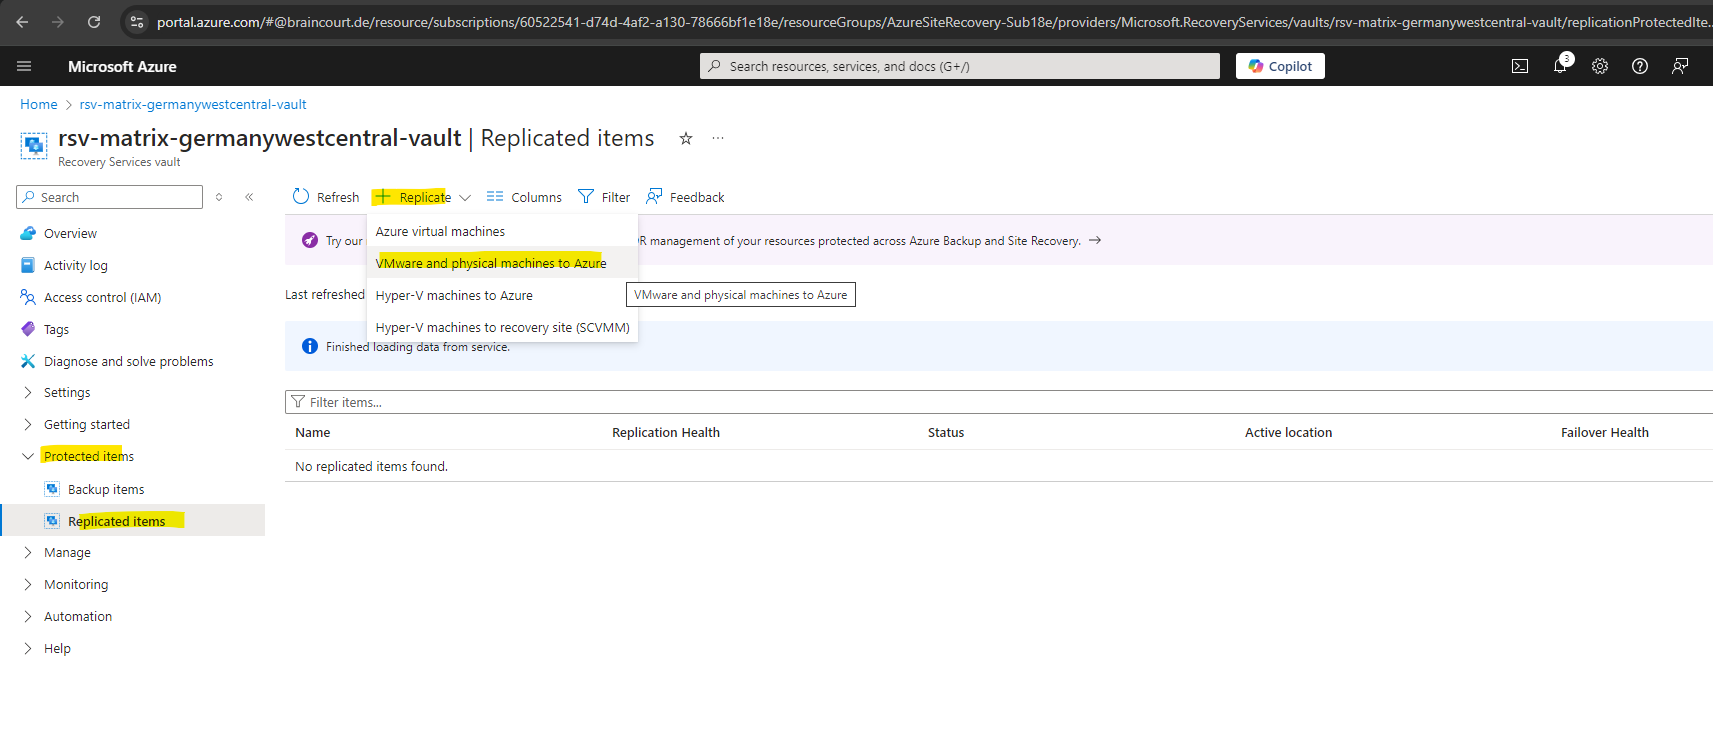
On the recovery services vault navigate to Getting started -> Site Recovery and within the VMware machines to Azure section click on Enable replication.
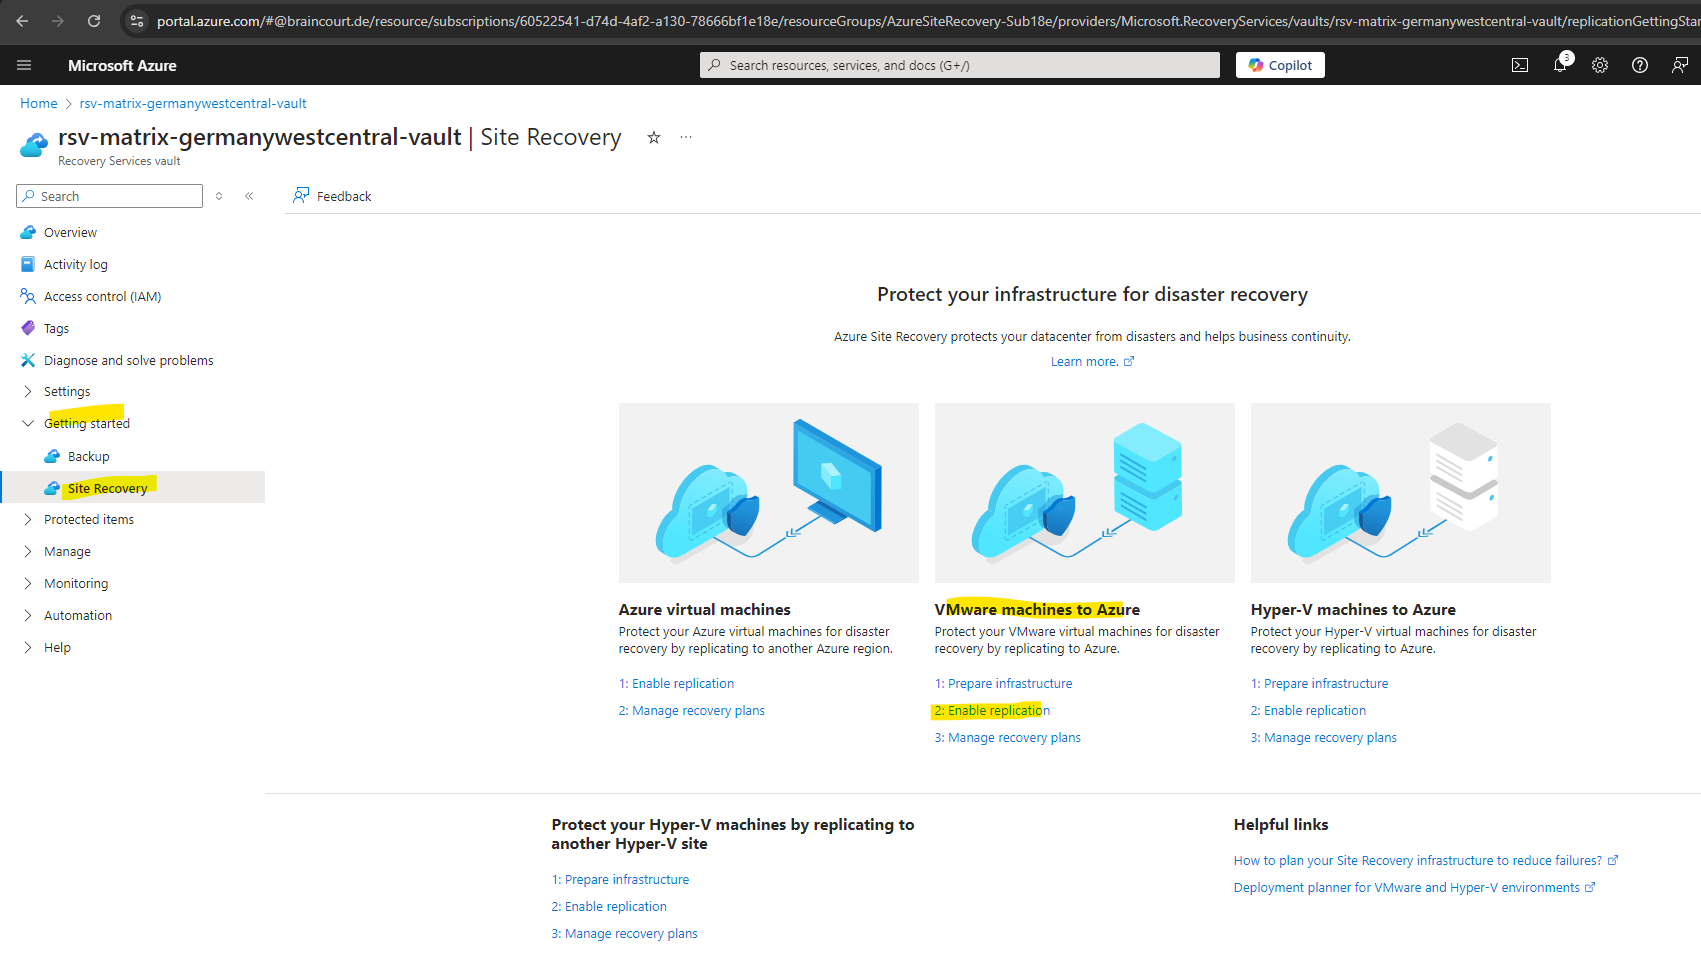
We can also navigate on the our recovery services vault to Protected items -> Replicated items and click on + Replicate and select VMware and physical machines to Azure.
The virtual machines we want to replicate to Azure needs to be running in our on-premise vSphere environment. In case we have multiple vCenter’s we can select the desired environment below.
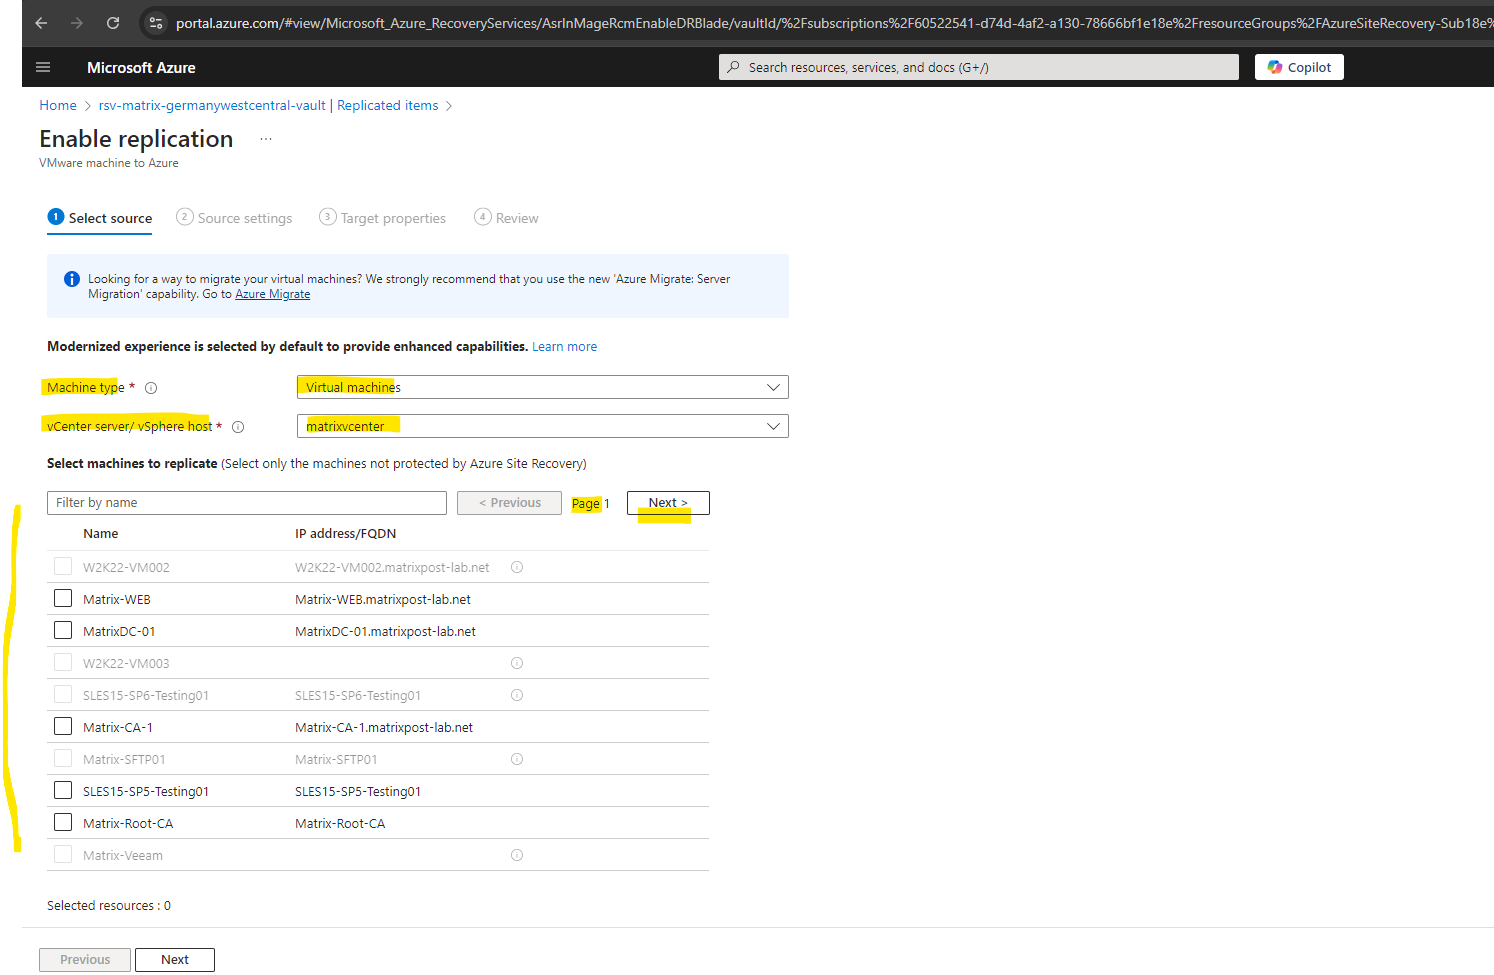
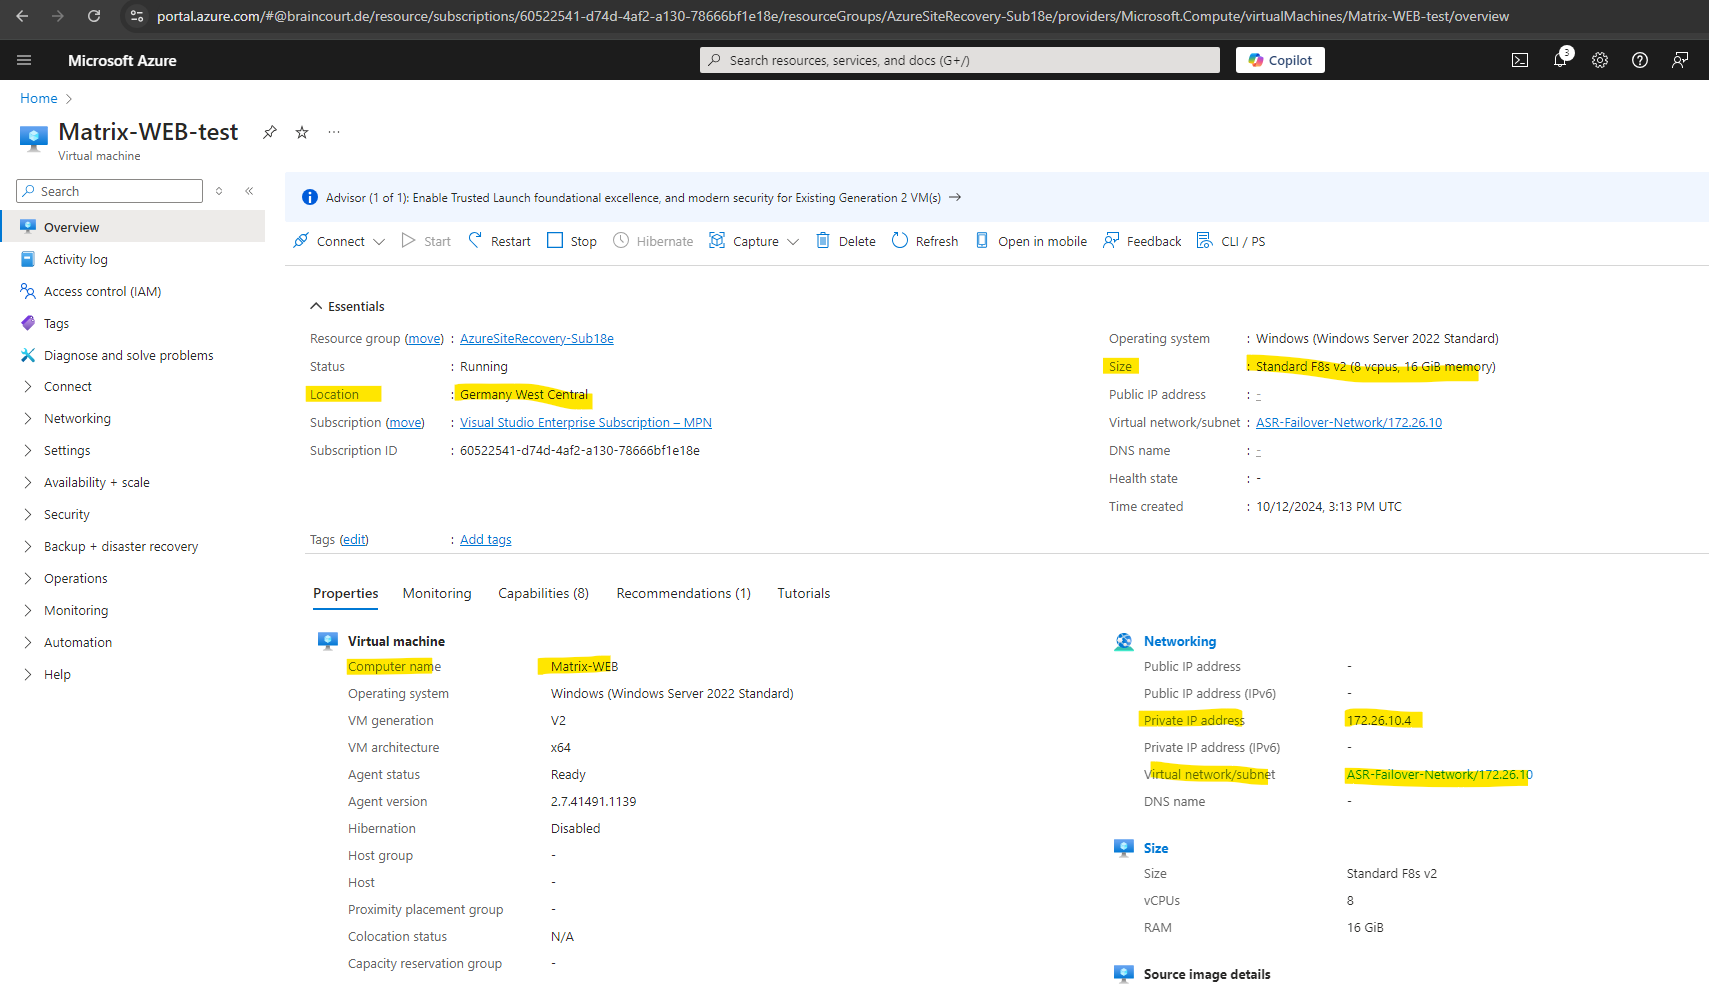
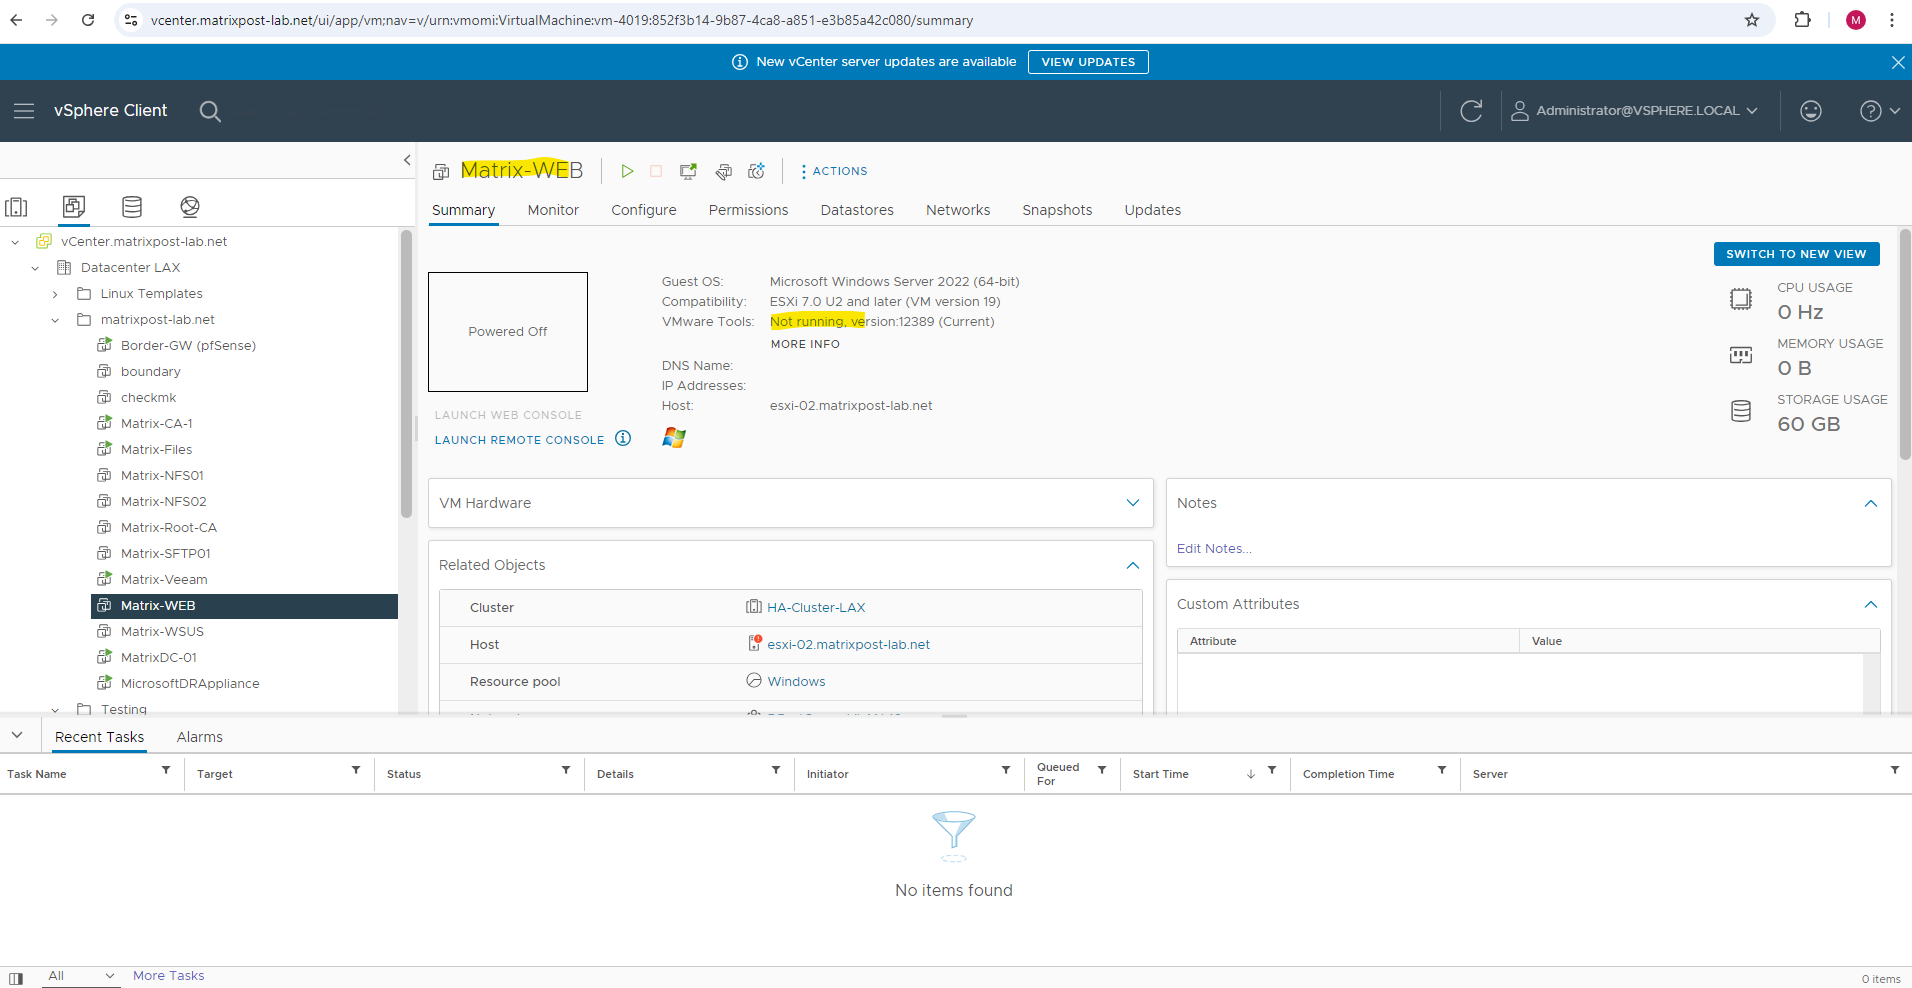
To test Azure Site Recovery (ASR) I will first replicate my virtual machine named Matrix-WEB from my vSphere lab environment to Azure.
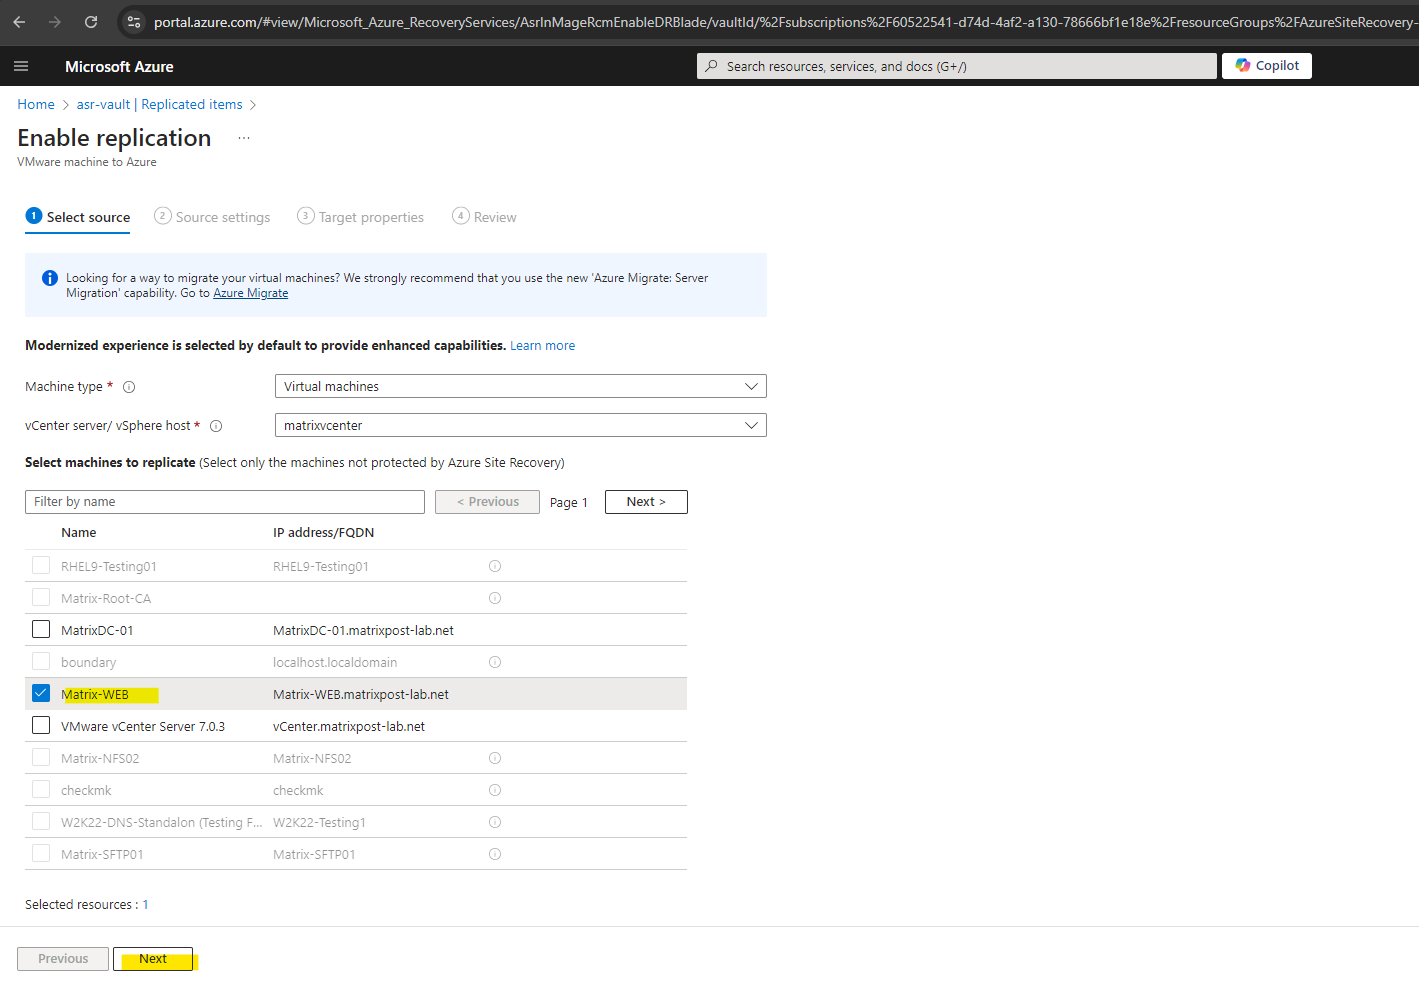
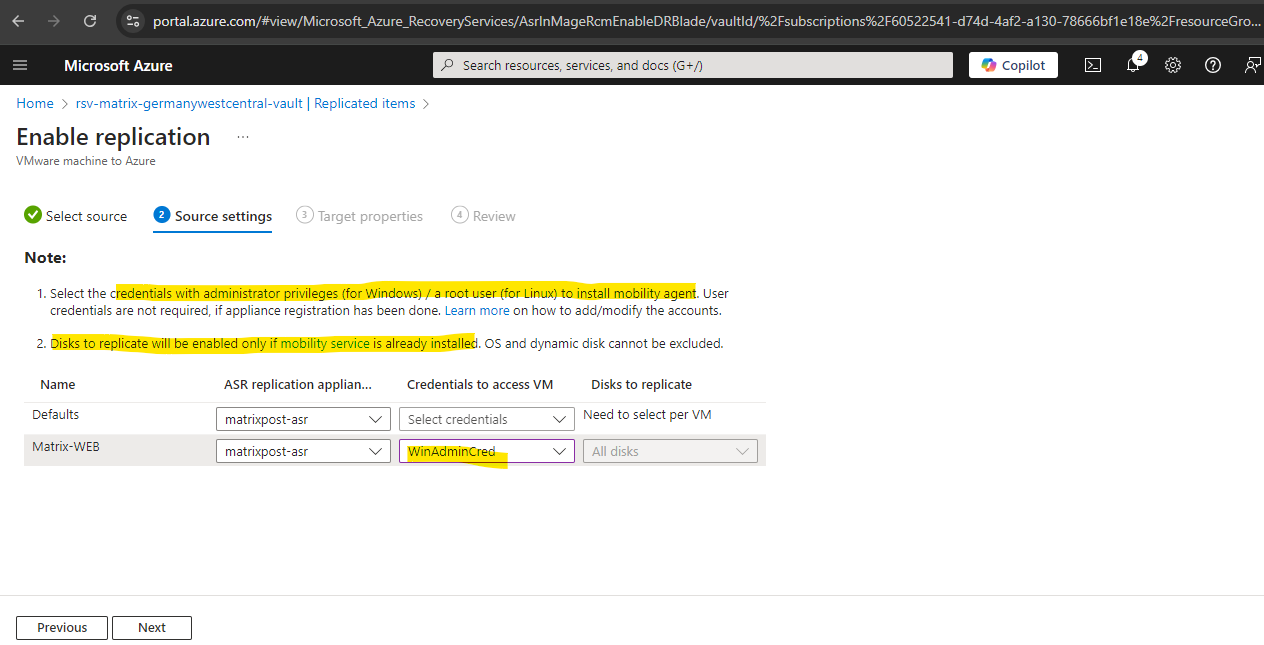
Because its a Windows VM I need to select below my previously created Windows credentials for.
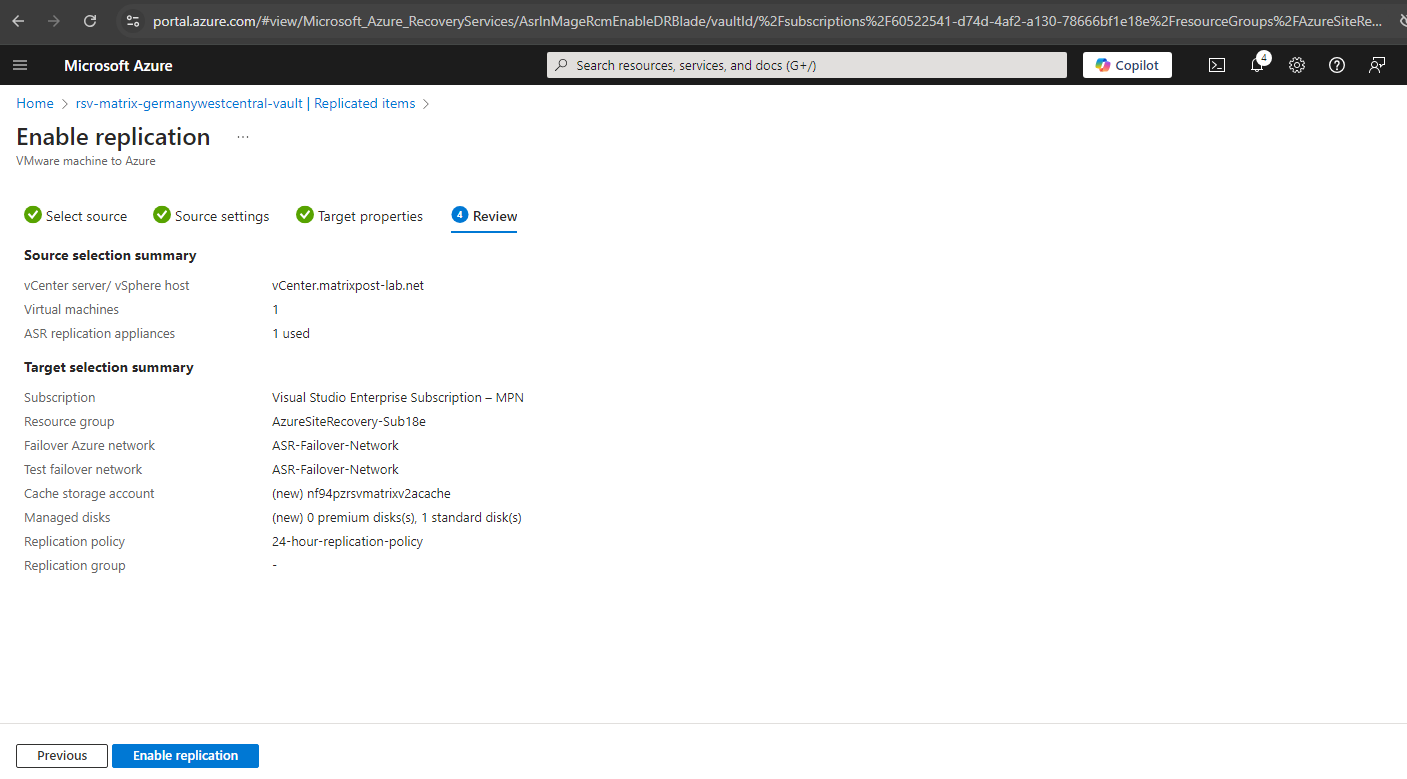
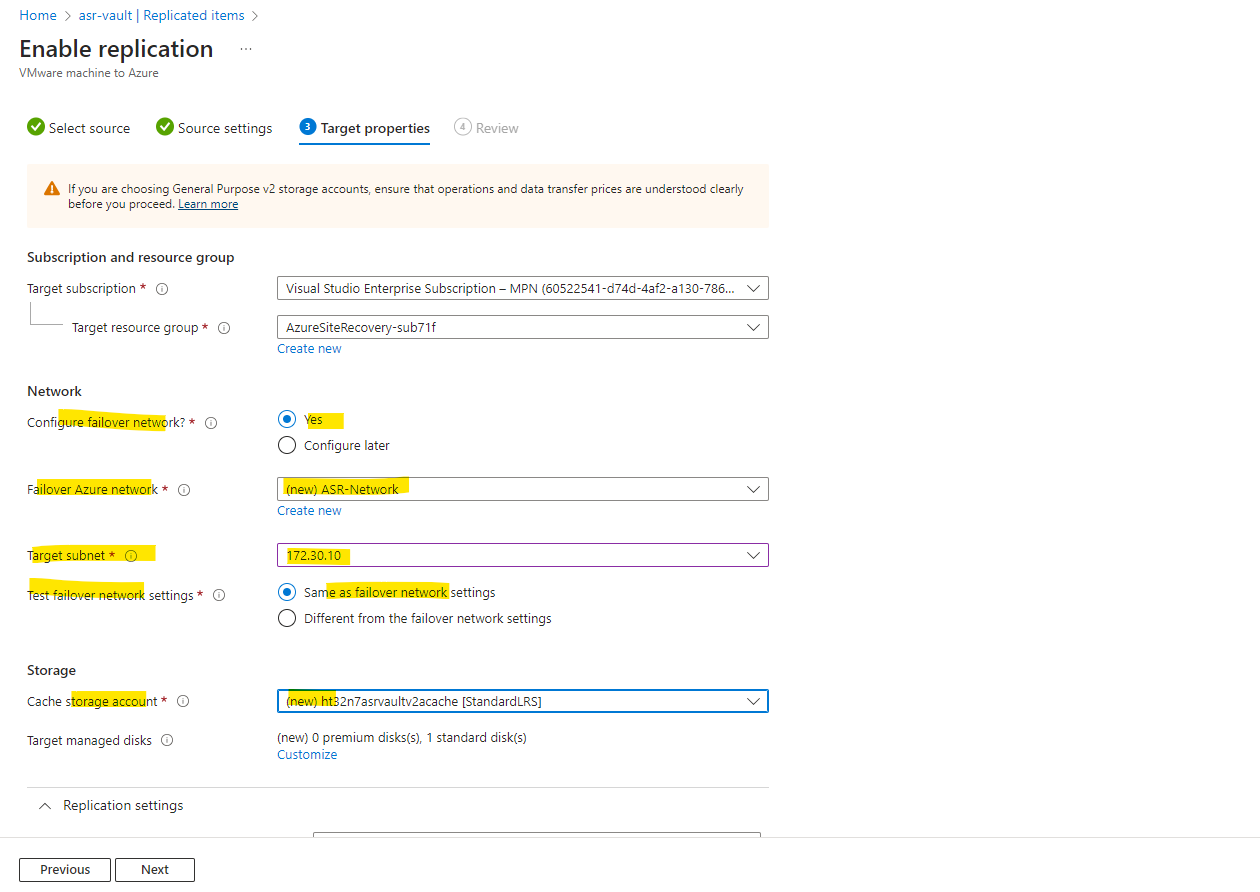
On the next tab we need to configure the target properties. Here besides the target subscription we also need to select or create our failover network in Azure.
Therefore we can select an existing network or we can directly create a new one. I will have in this subscription already a virtual network. Because this existing virtual network is located in a different region as my recovery services vault, I can’t use it and have to create a new one.
Only virtual networks in the currently selected subscription and vault location are listed.
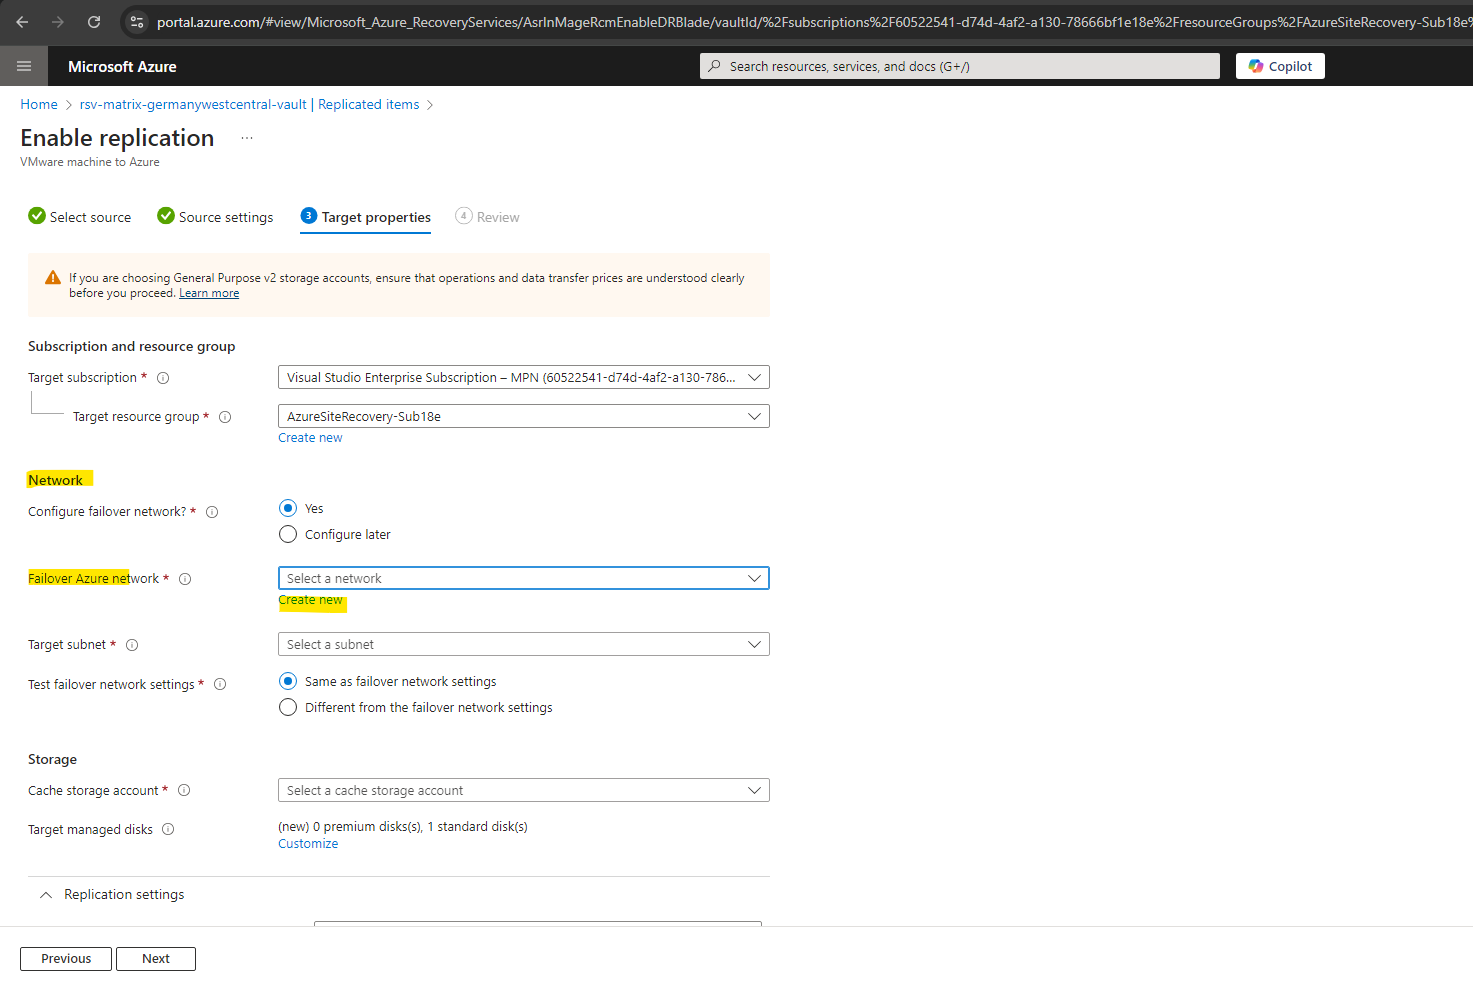
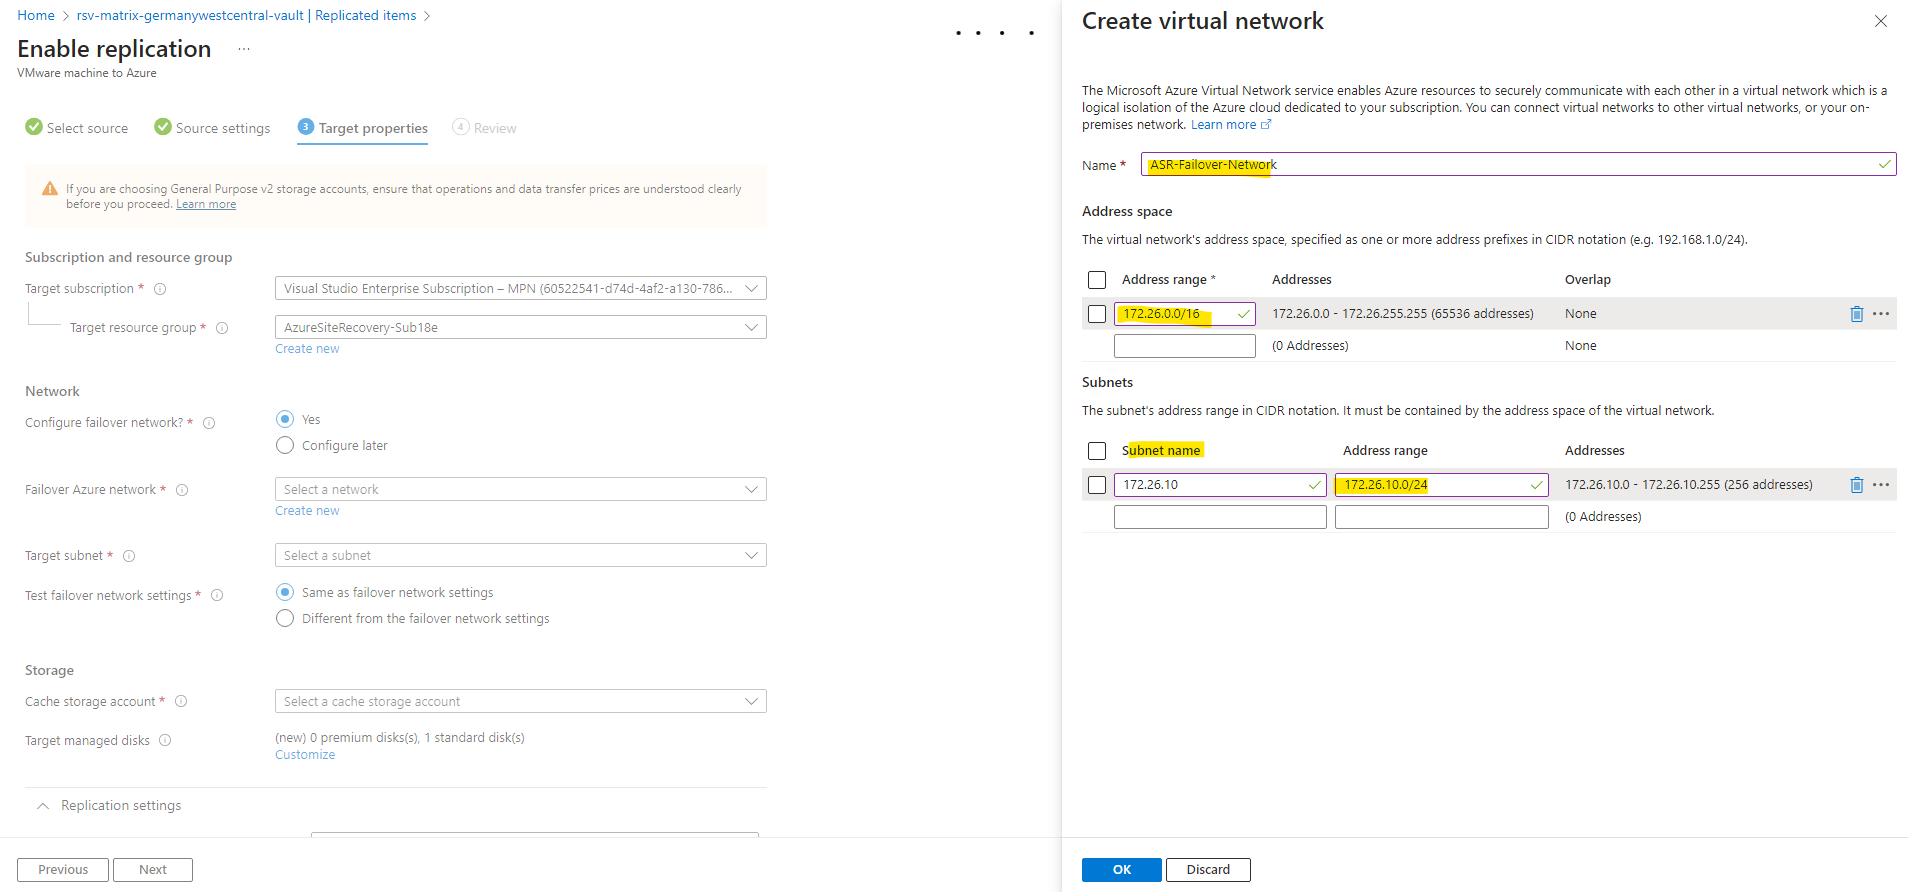
So I will click on Create new above to create a new failover network for the replicated machines from my vSphere lab environment.
I will create a new 172.26.0.0/16 virtual network and one subnet within (its range) 172.26.10.0/24 to which my on-premise virtual machines finally will placed after triggering a failover.
For a test failover It is recommended that the networks selected for test failover and failover operations are different. So not jut the subnets, it is recommended to take a whole different network.
For my lab environment I will use here the same as failover network setting.
If you later want to test failover this virtual machine in a different virtual network, you must either also create here a new different virtual network or if already created select the different network for test failover.
We also need to select or create a cache storage account to temporarily stage source machine changes.
Only standard types of cache storage accounts are allowed.
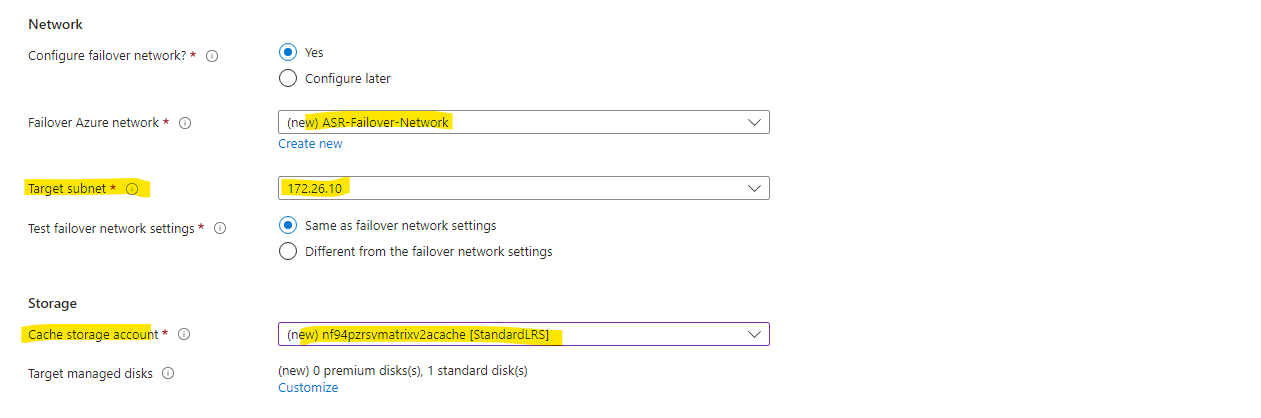
Next we need to select a target managed disk type for our replicated virtual machine. For my lab environment I will choose just Standard HDD.
When you set up disaster recovery for your VMs using Azure Site Recovery, data from the source disks (whether they are on-premises or from VMs in another region) is replicated to the target region in Azure. Azure Site Recovery automatically creates target managed disks in the target region to hold the replicated data from these VMs.
Azure managed disks are block-level storage volumes that are managed by Azure and used with Azure Virtual Machines. Managed disks are like physical disks in an on-premises server, but they’re virtualized. With managed disks, all you have to do is specify the disk size, specify the disk type, and provision the disk. After you provision the disk, Azure handles the rest.
The available types of managed disks are ultra disks, premium solid-state drives (SSDs), standard SSDs, and standard hard disk drives (HDDs). For information about each disk type, see Azure managed disk types.
Source: https://learn.microsoft.com/en-us/azure/virtual-machines/managed-disks-overview

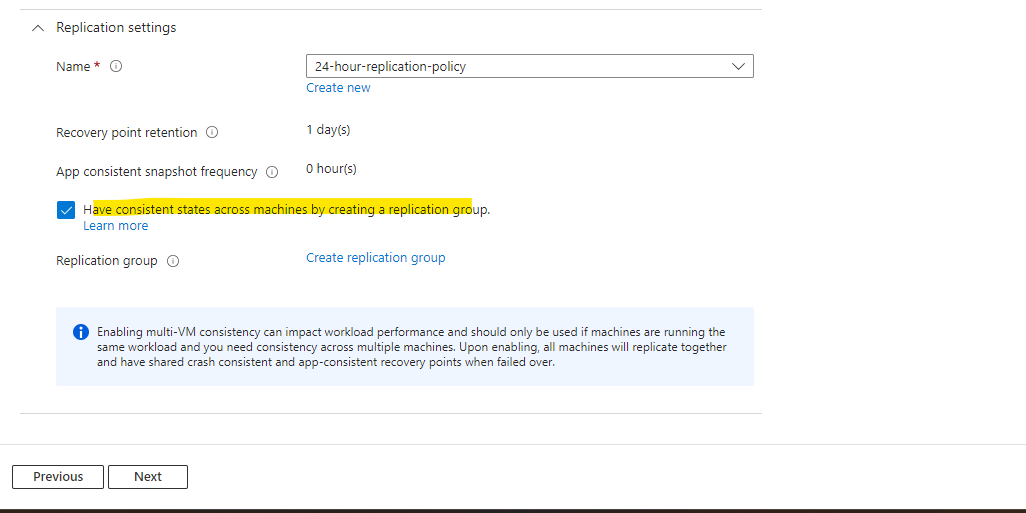
For the replication settings I will first leave the default settings, we will look after these in detail later.
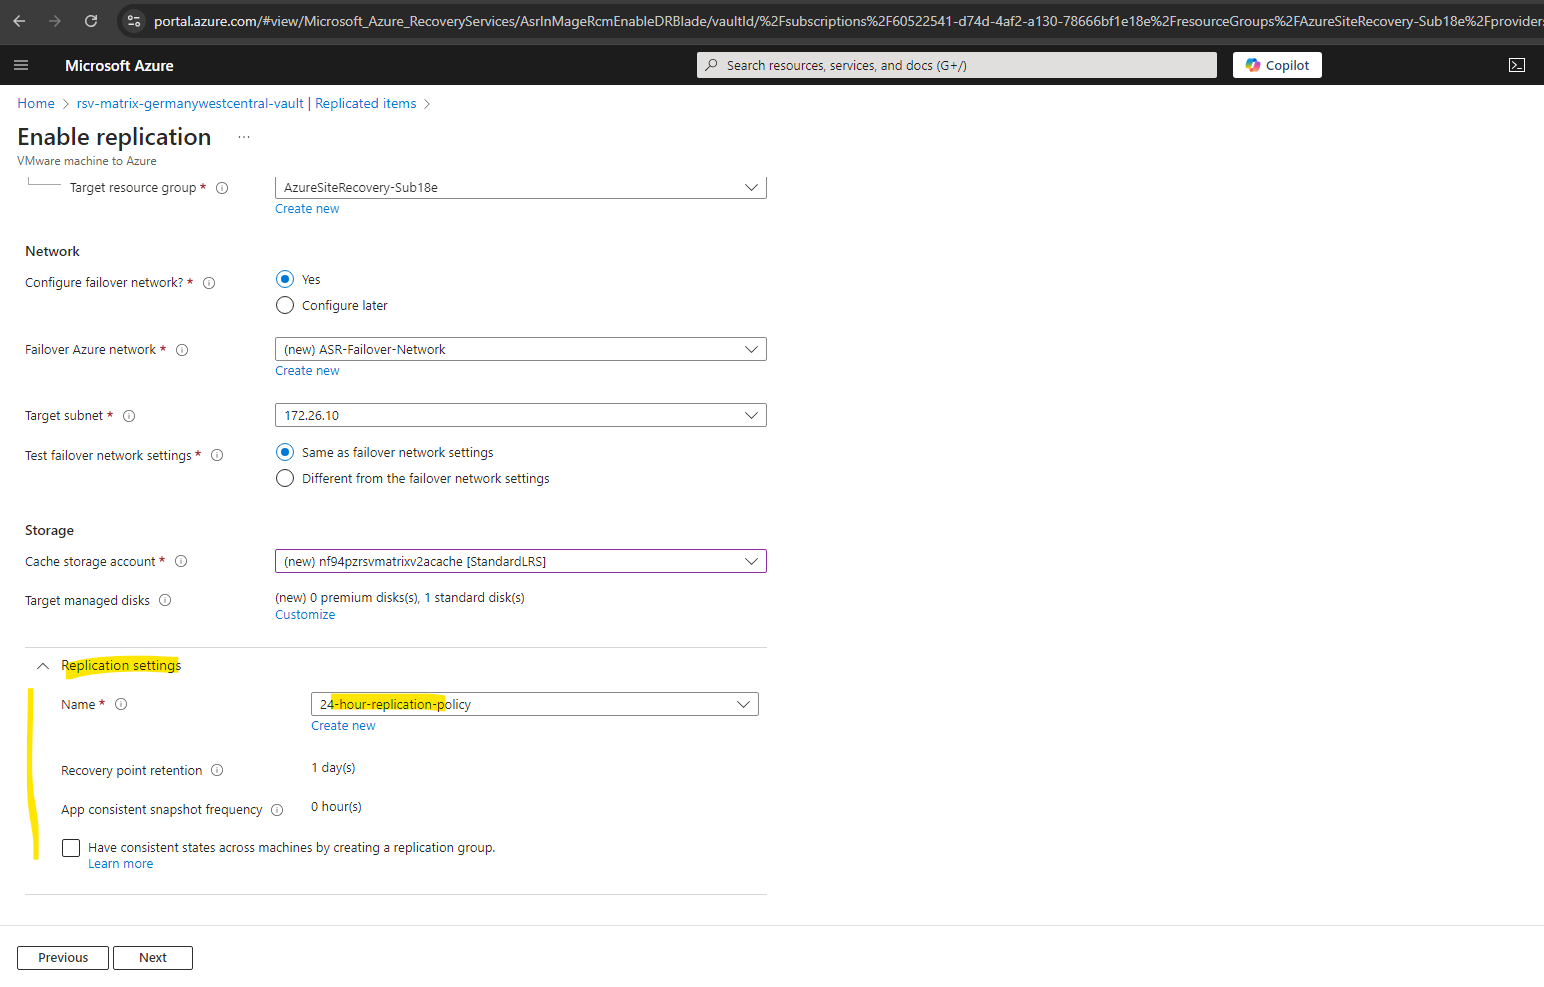
We can also check the point Have consistent states across machines by creating a replication group which will support multi-VM consistency.
Enabling multi-VM consistency can impact workload performance and should only be used if machines are running the same workload and you need consistency across multiple machines. Upon enabling, all machines will replicate together and have shared crash consistent and app-consistent recovery points when failed over.
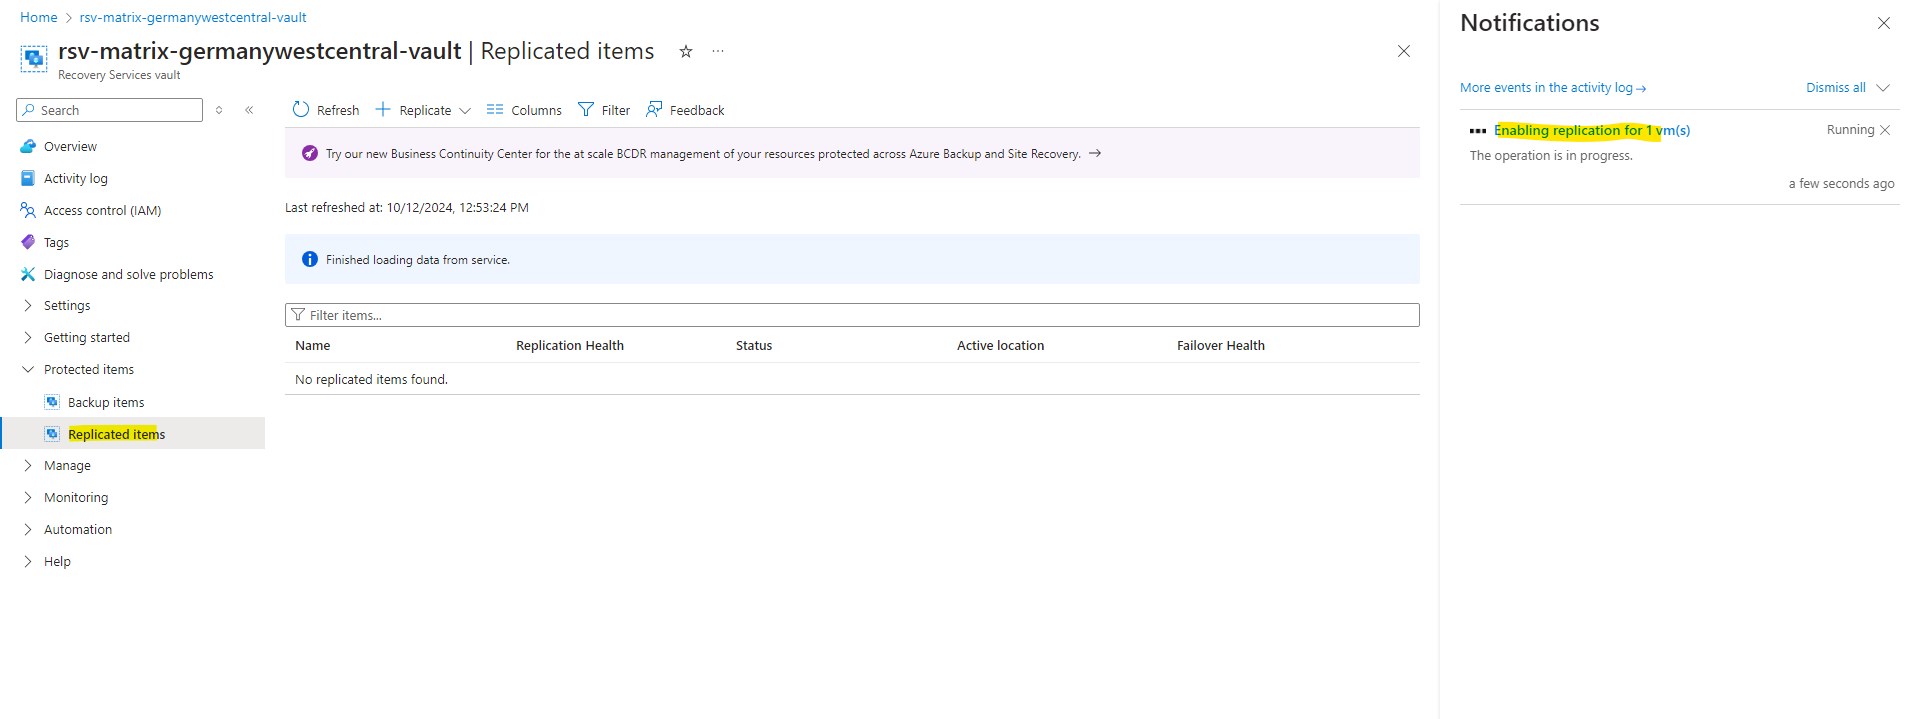
Finally we can enable replication.
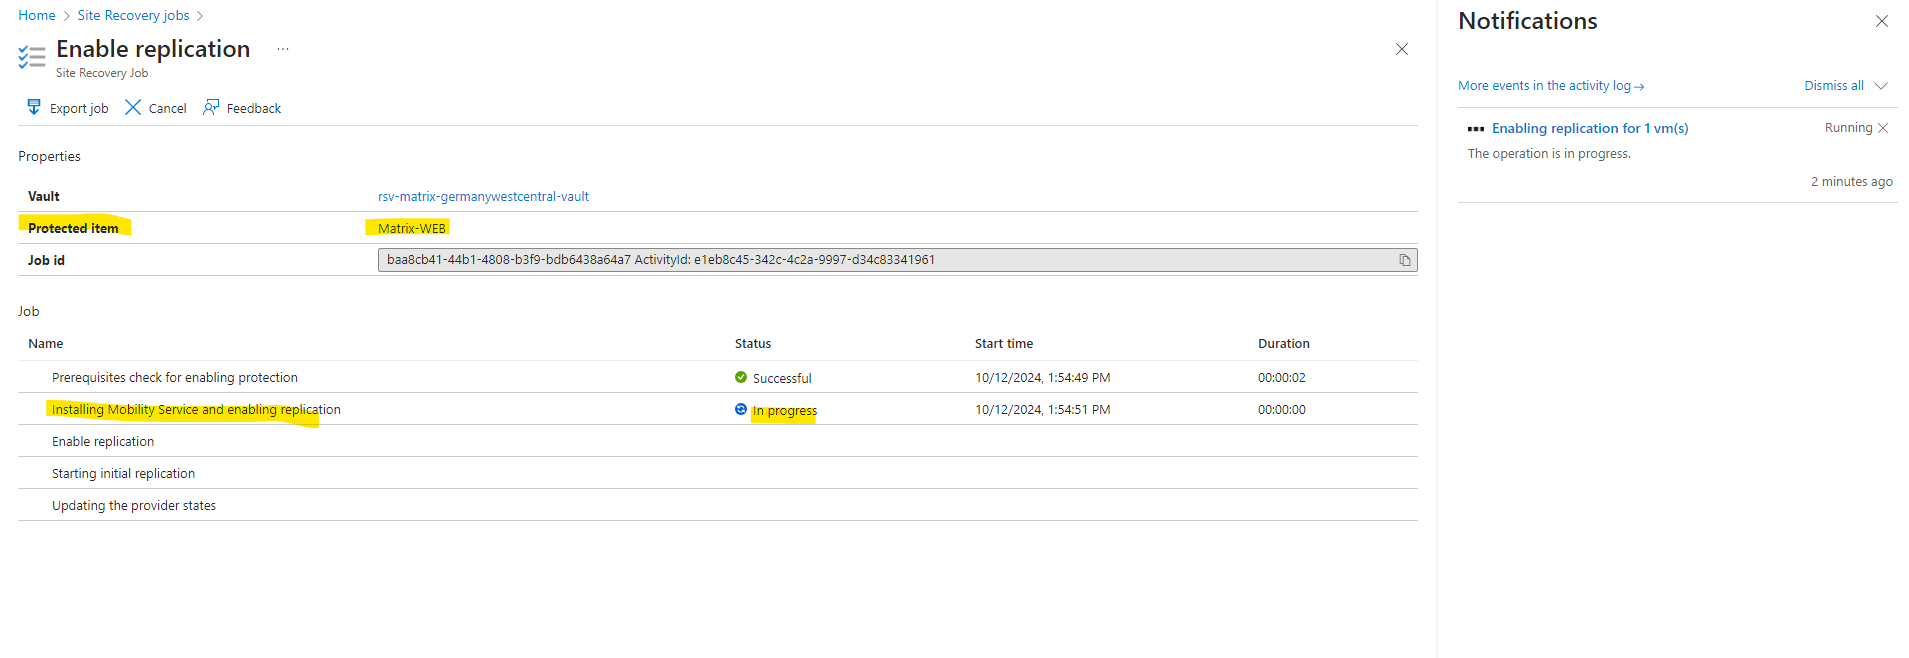
Below we can click on … Enabling replication for 1 vm(s) to see more details about the process.
Click also on this to finally see all details about the replication process.
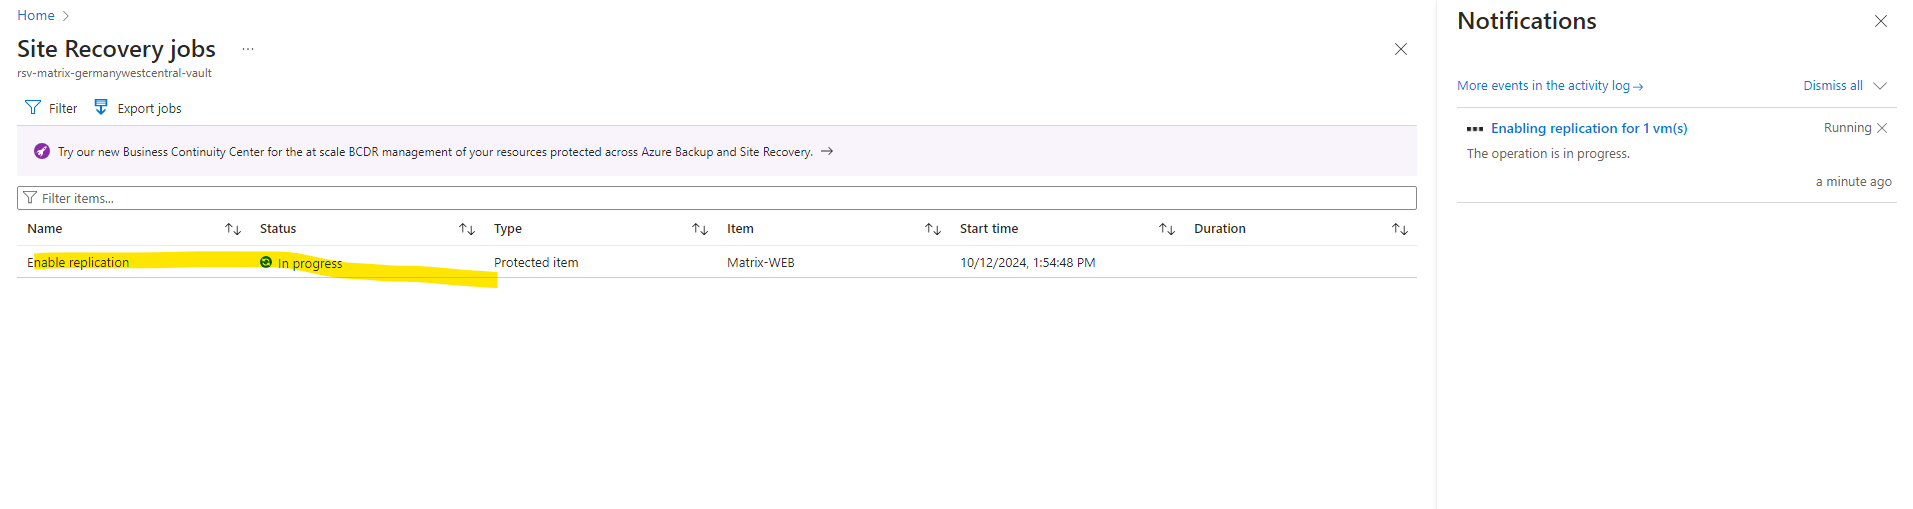
So at the moment the ASR appliance running my vSphere lab environment is installing (pushing) the Mobility Services Agent on the virtual machine for which I will enable replication.
This can last a while, in my case it was usually around 20 minutes.
The ASR appliance will first copy the ASR Mobility Agent to the virtual machine we want to protect.
In Part 4 you will see how the ASR appliance is establishing a new SMB TCP 445 connection to the protected virtual machine to copy the files of the ASR Mobility Agent to the protected virtual machine.
Finally the enable replication process was running successfully.

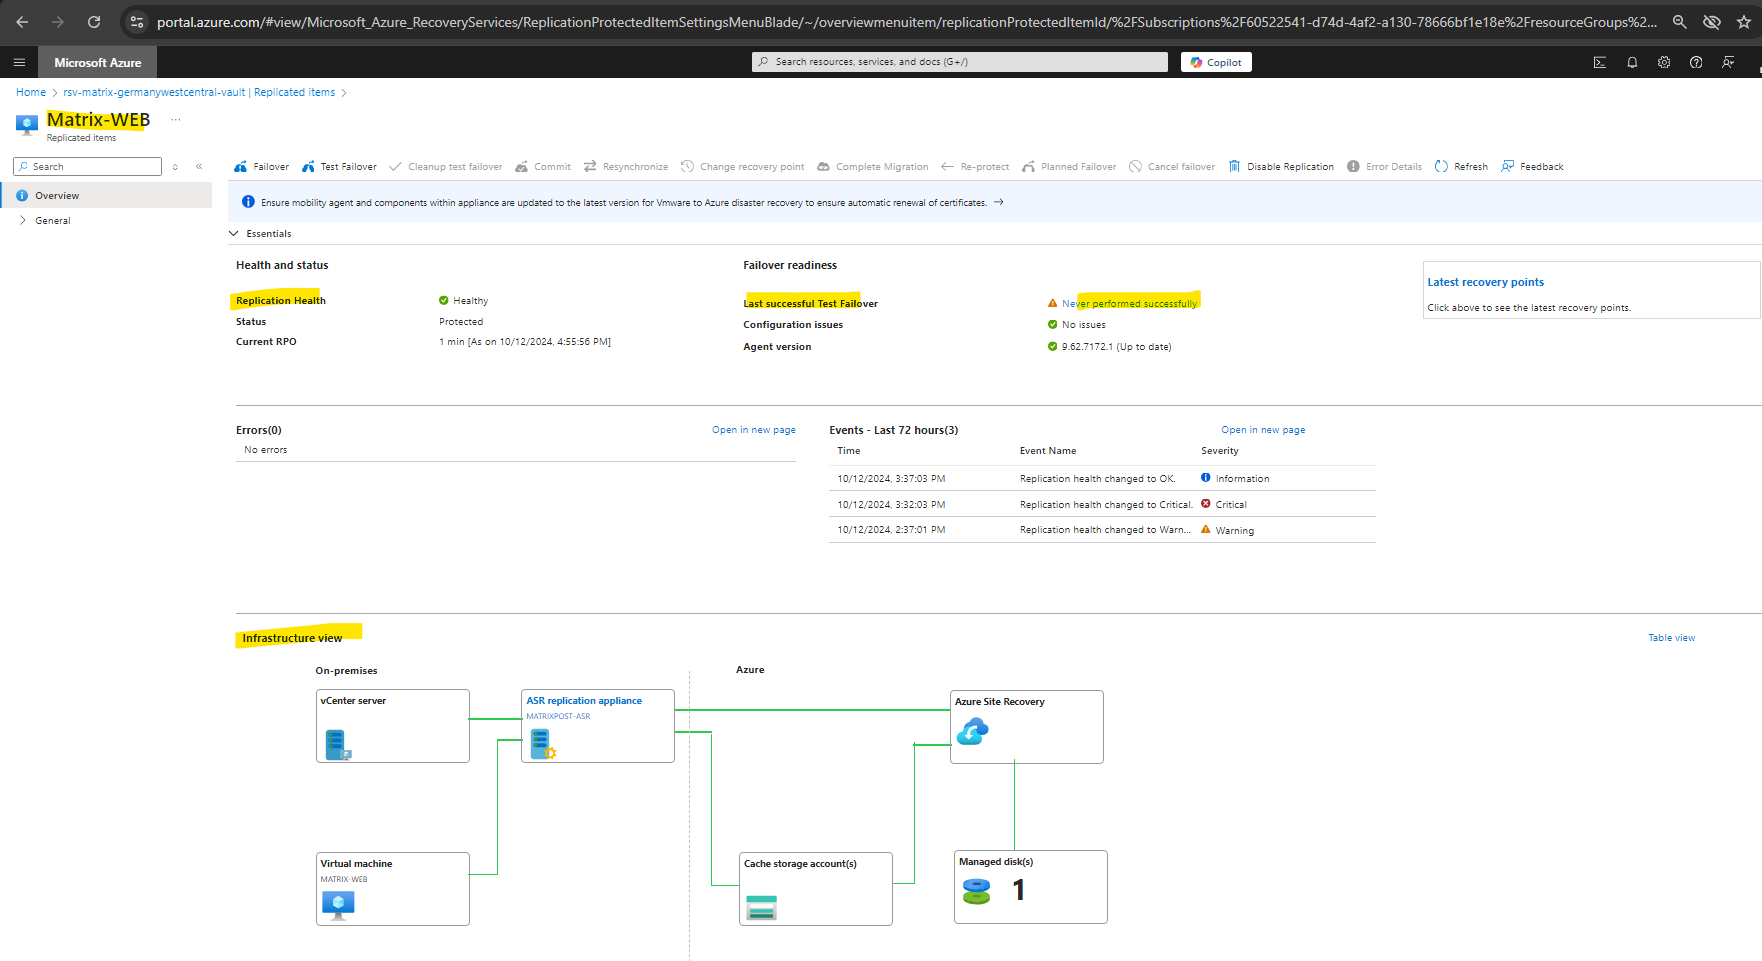
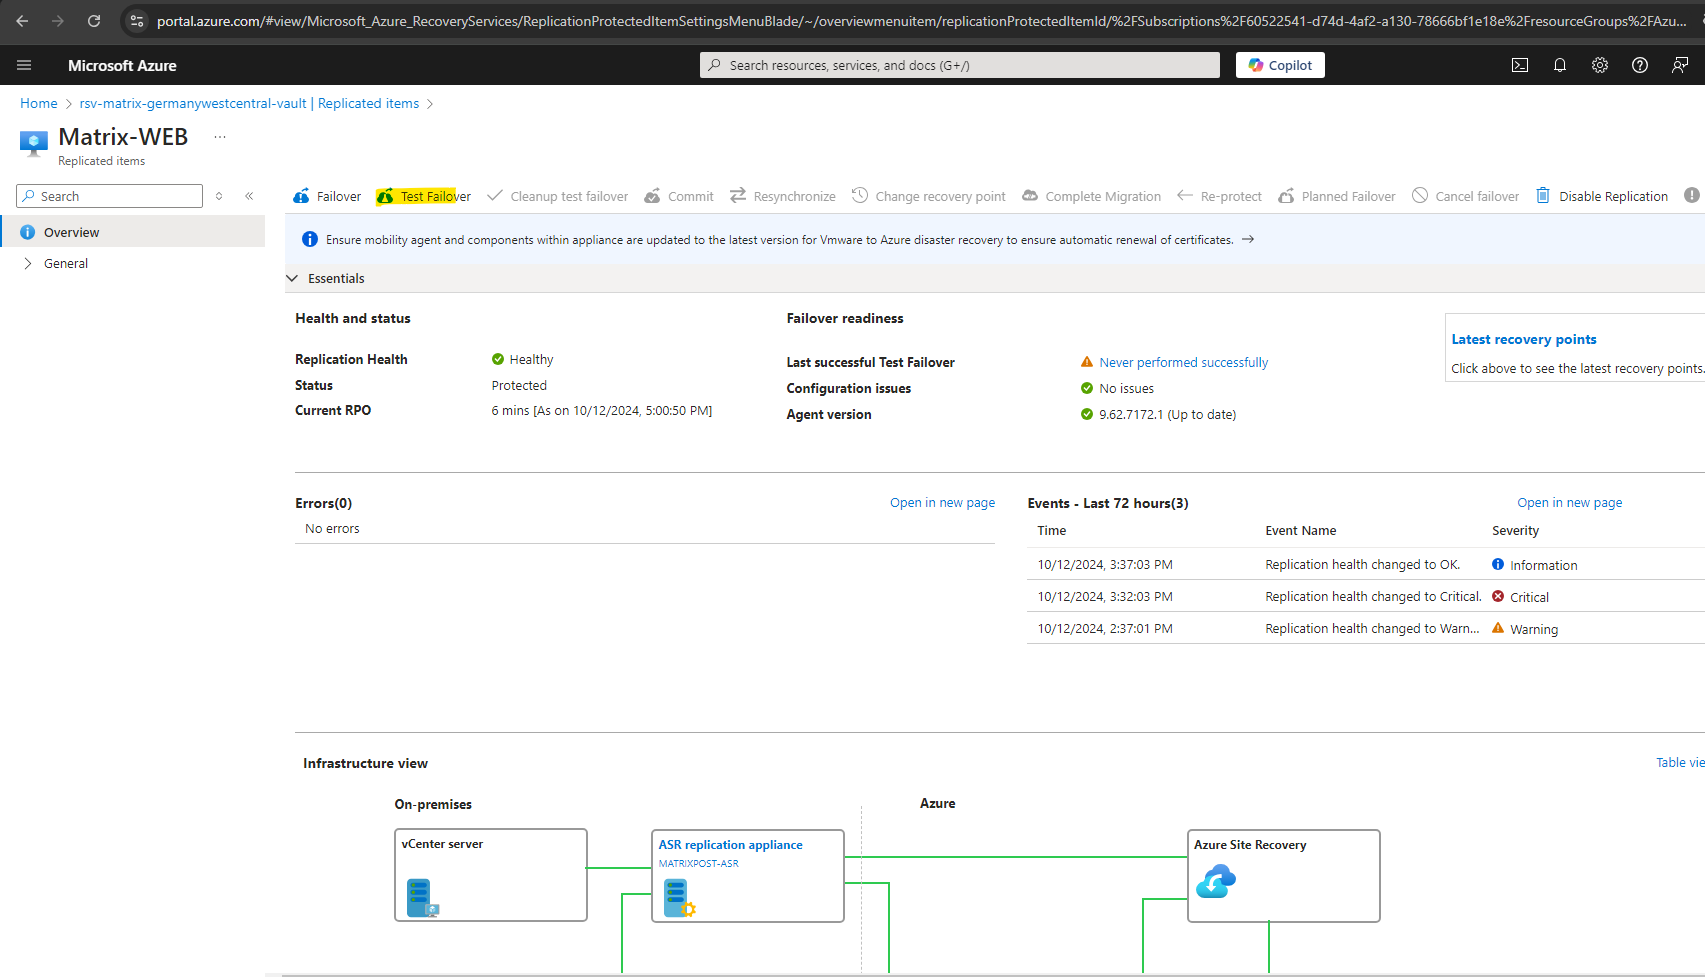
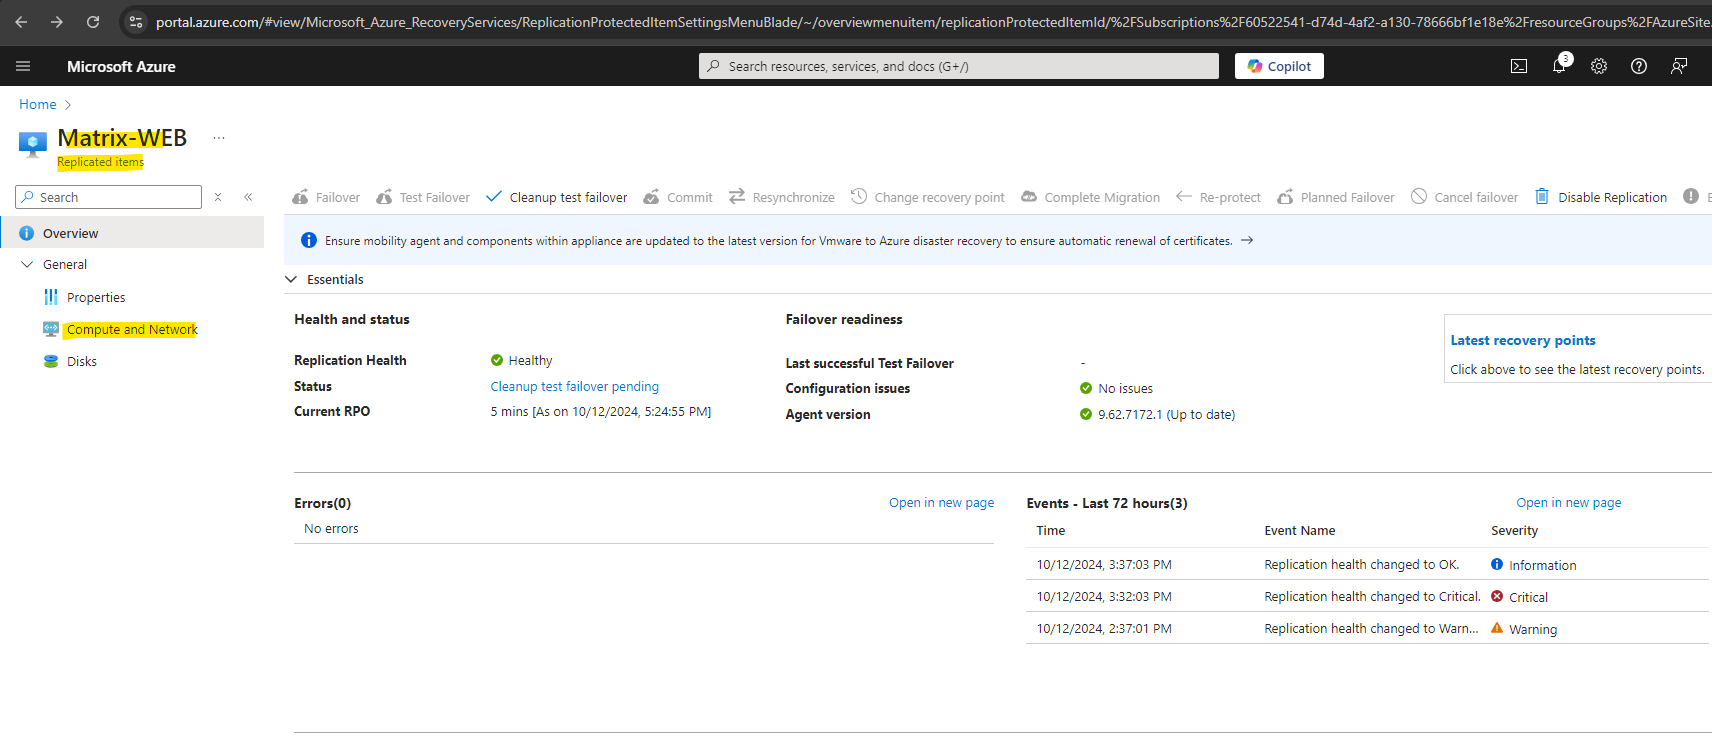
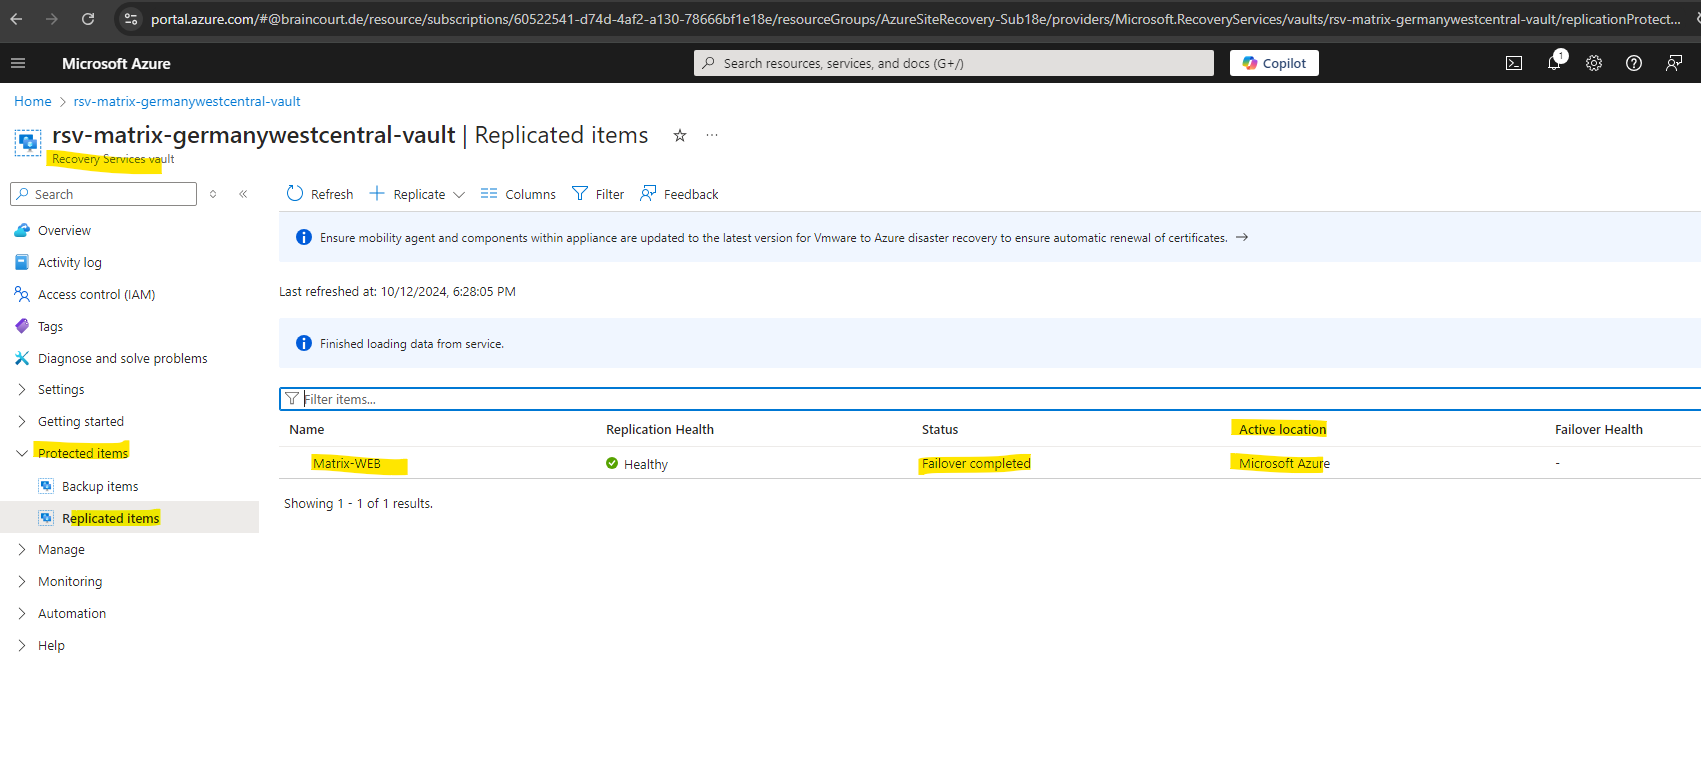
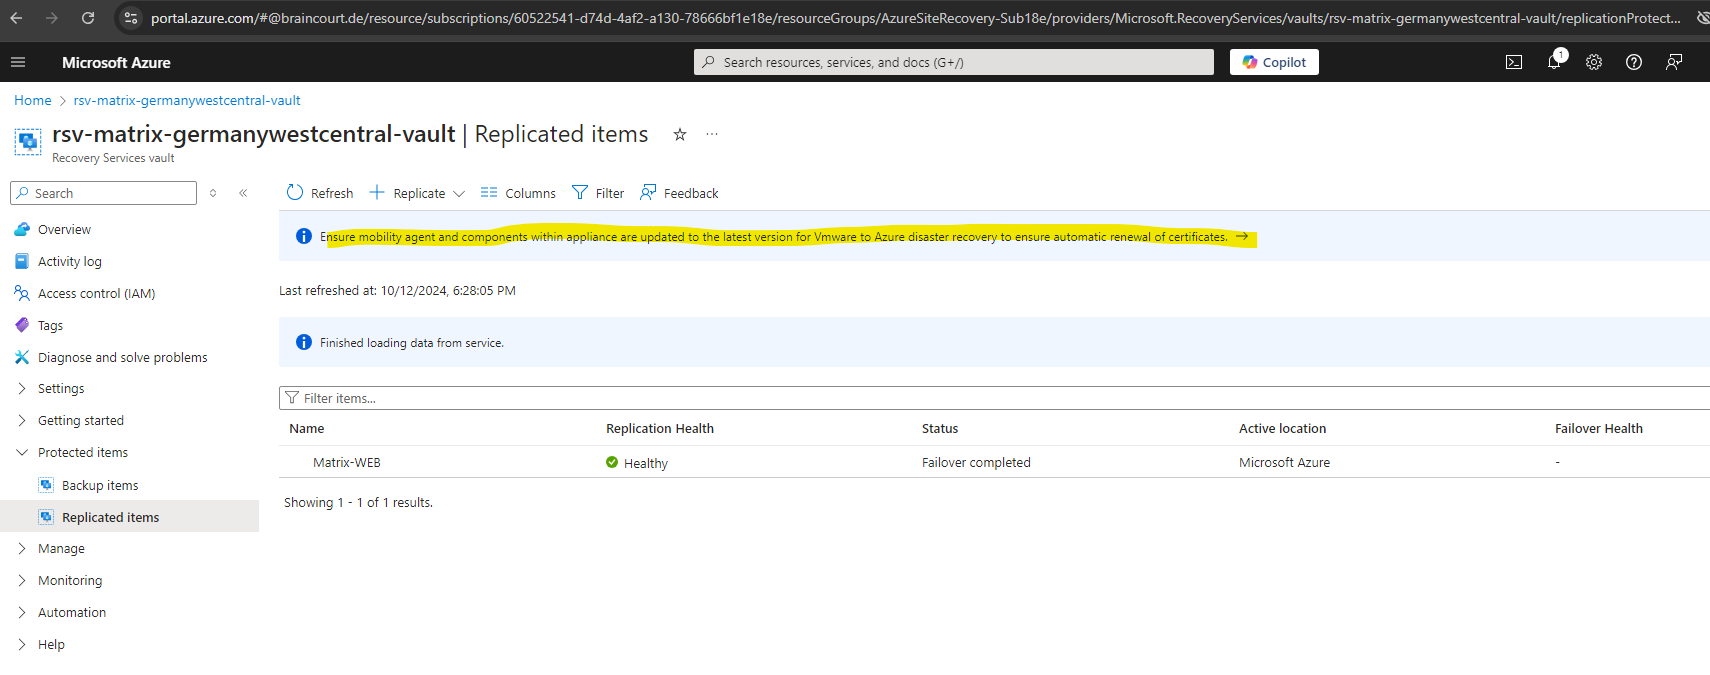
We will now see our protected virtual machine is shown up under Protected items -> Replicated items.
At the moment the data of the source virtual machine in my on-premise vSphere lab environment will be replicated to Azure.
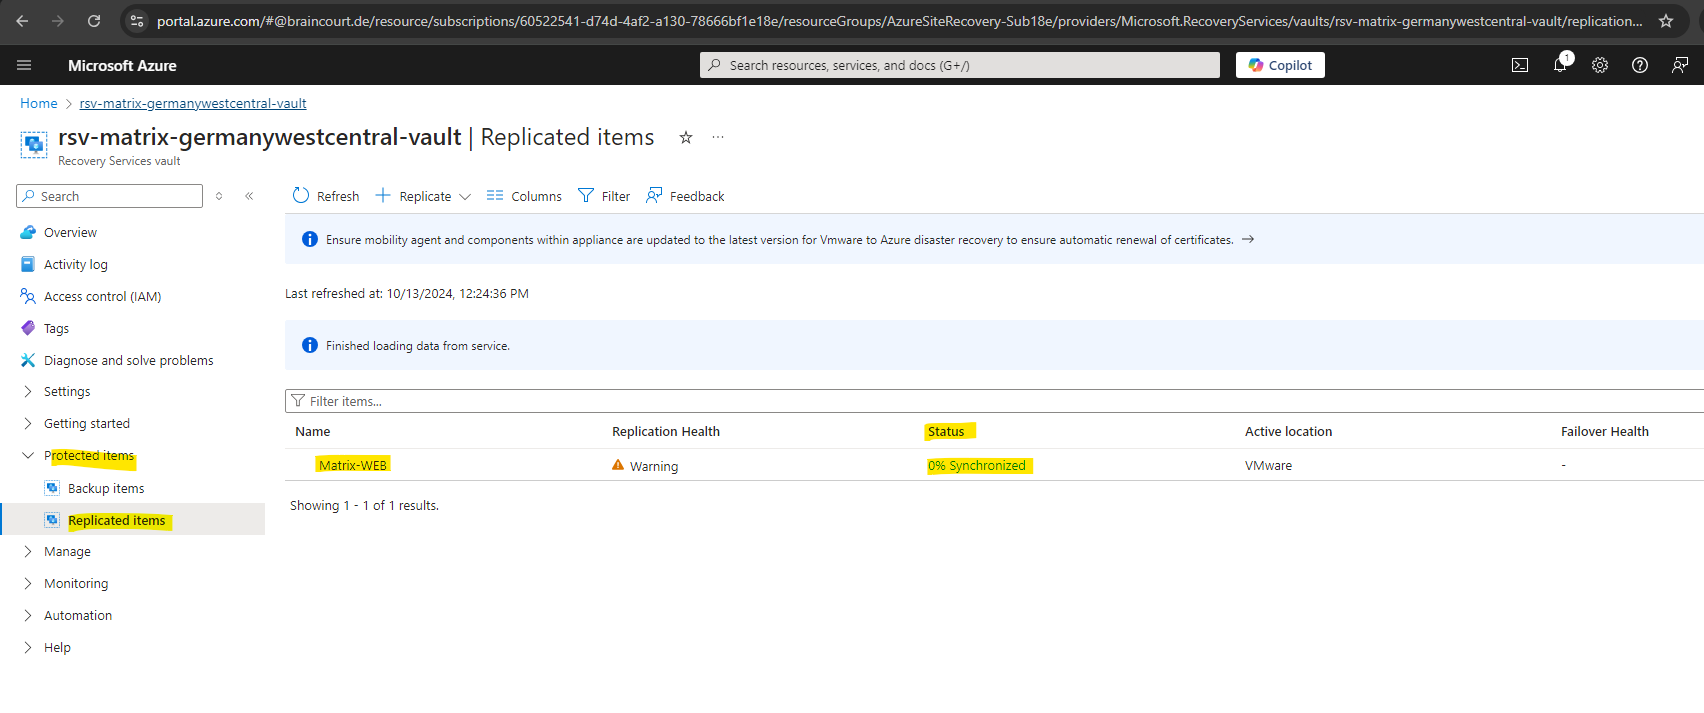
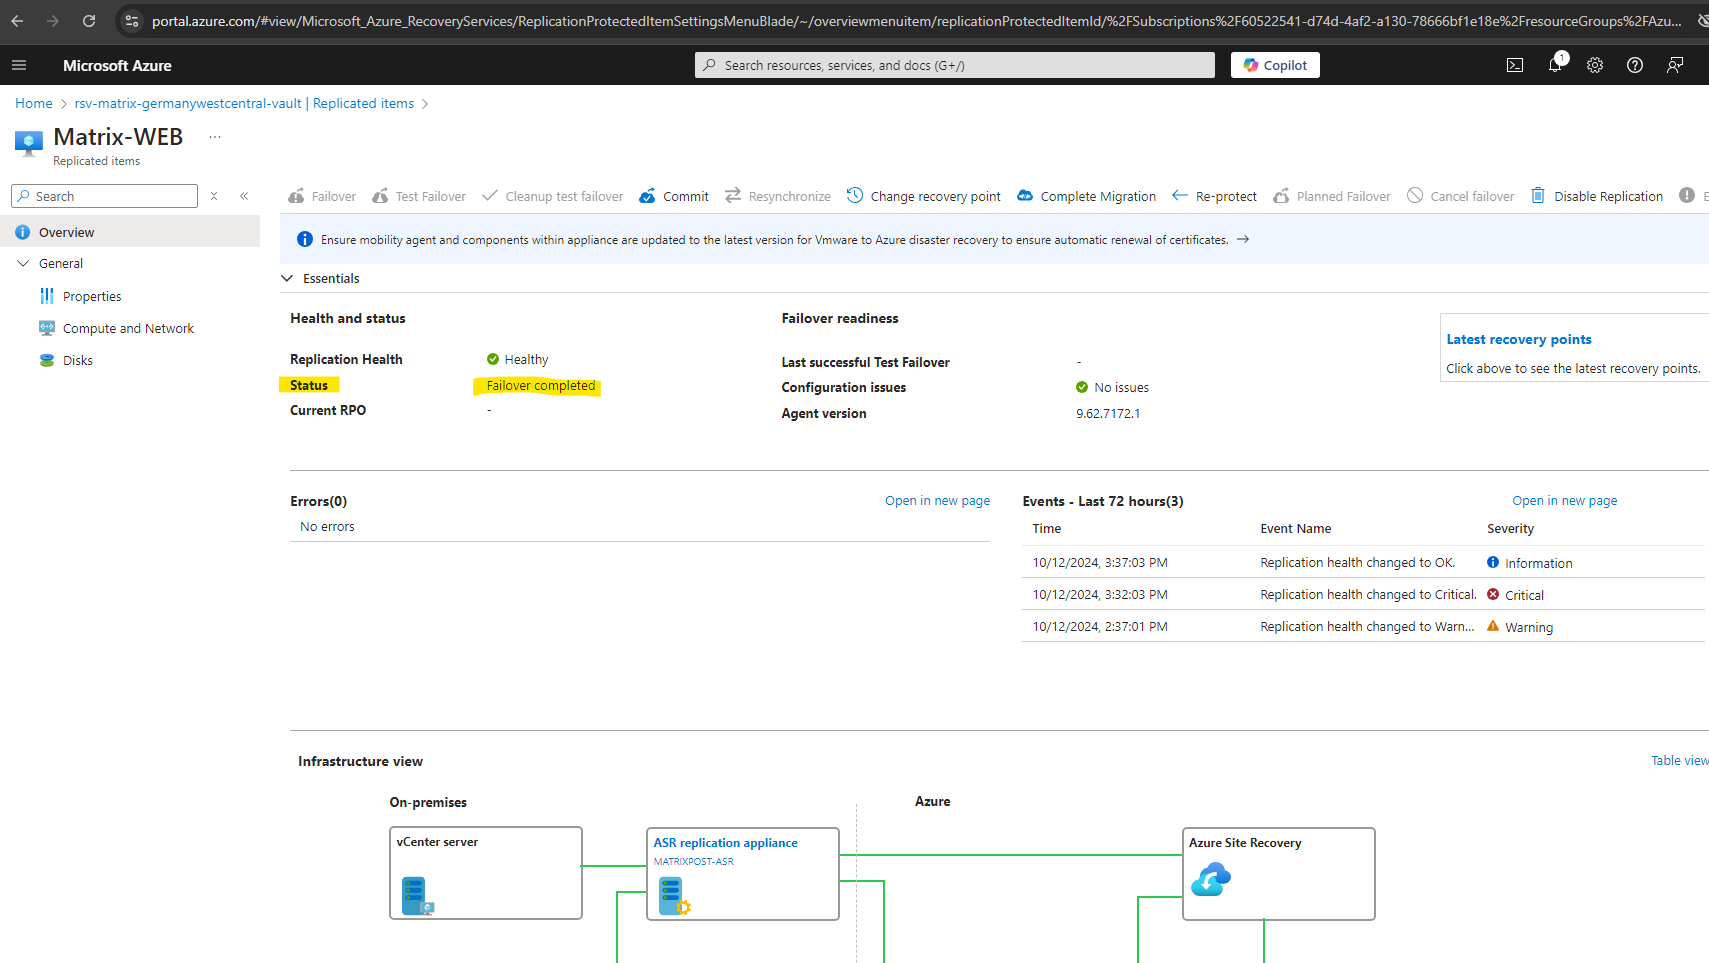
By clicking on it we see an overview of the replicated virtual machine in Azure. So first we need to wait till the synchronization is finished and all data of the source virtual machine is successfully replicated to Azure.
Azure Site Recovery provides continuous replication (by using the Mobility Services Agent on the protected machine) for Azure VMs and VMware VMs, in contrast Azure Migrate (agentless) just periodically (around each hour) replicate incremental changes to on-premise disks to the replica disks in Azure.
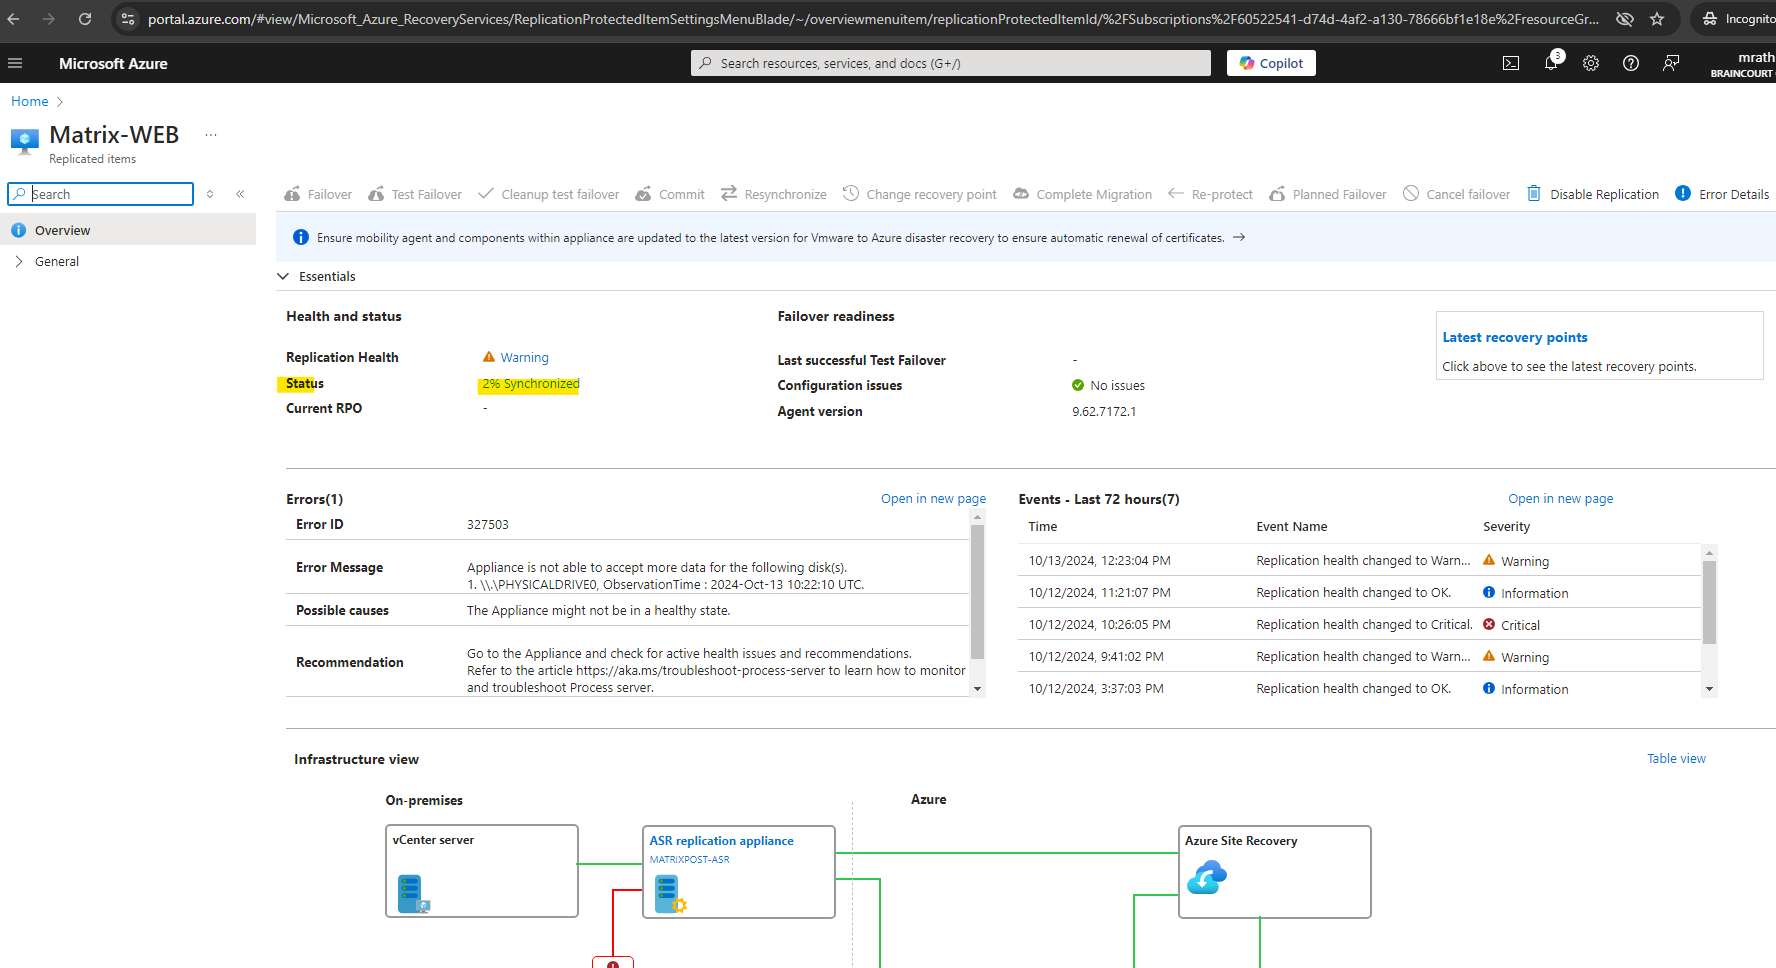
Even after the synchronization successfully finished, the virtual machine is still not immediately protected and we first need to wait for the first recovery point is created as shown below.
In Azure Site Recovery (ASR), creating the first recovery point for a protected virtual machine (VM) is a crucial step in the replication process. This recovery point represents the initial state of the VM that can be used to restore the machine in case of a disaster.
Once the initial full replication (synchronization) is complete, ASR automatically creates the first recovery point. This recovery point represents a consistent state of the VM’s data at a specific point in time.
The recovery point ensures that you can fail over to this point if necessary, bringing the system back to a known good state.
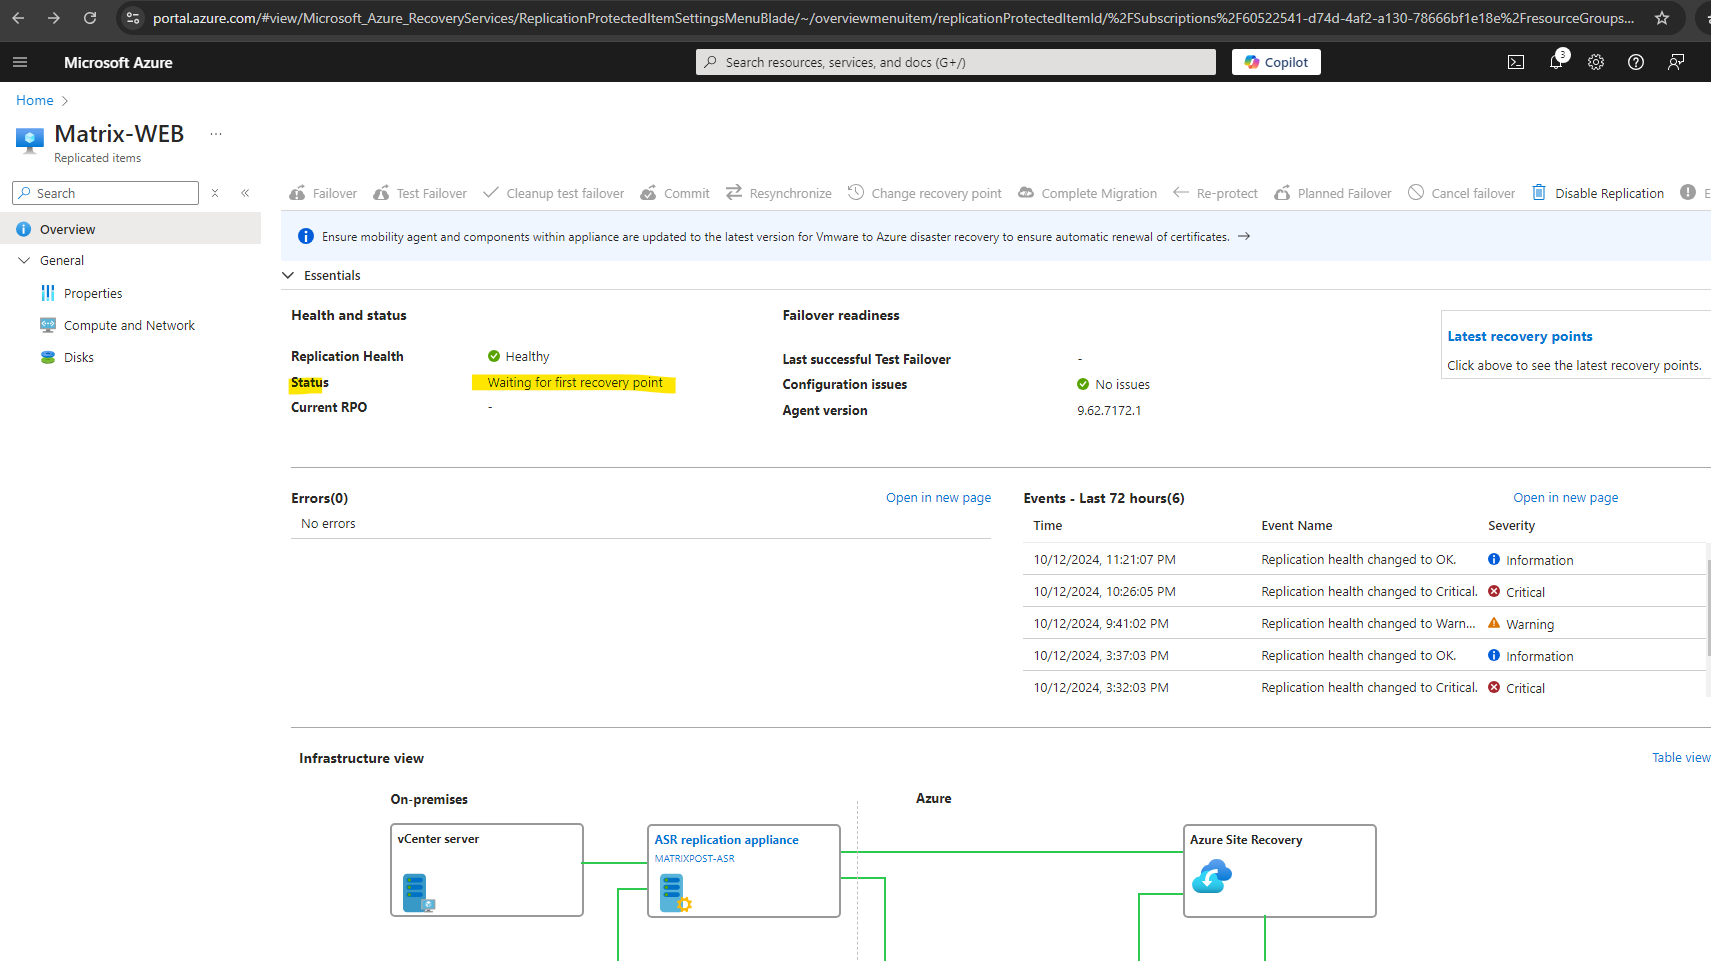
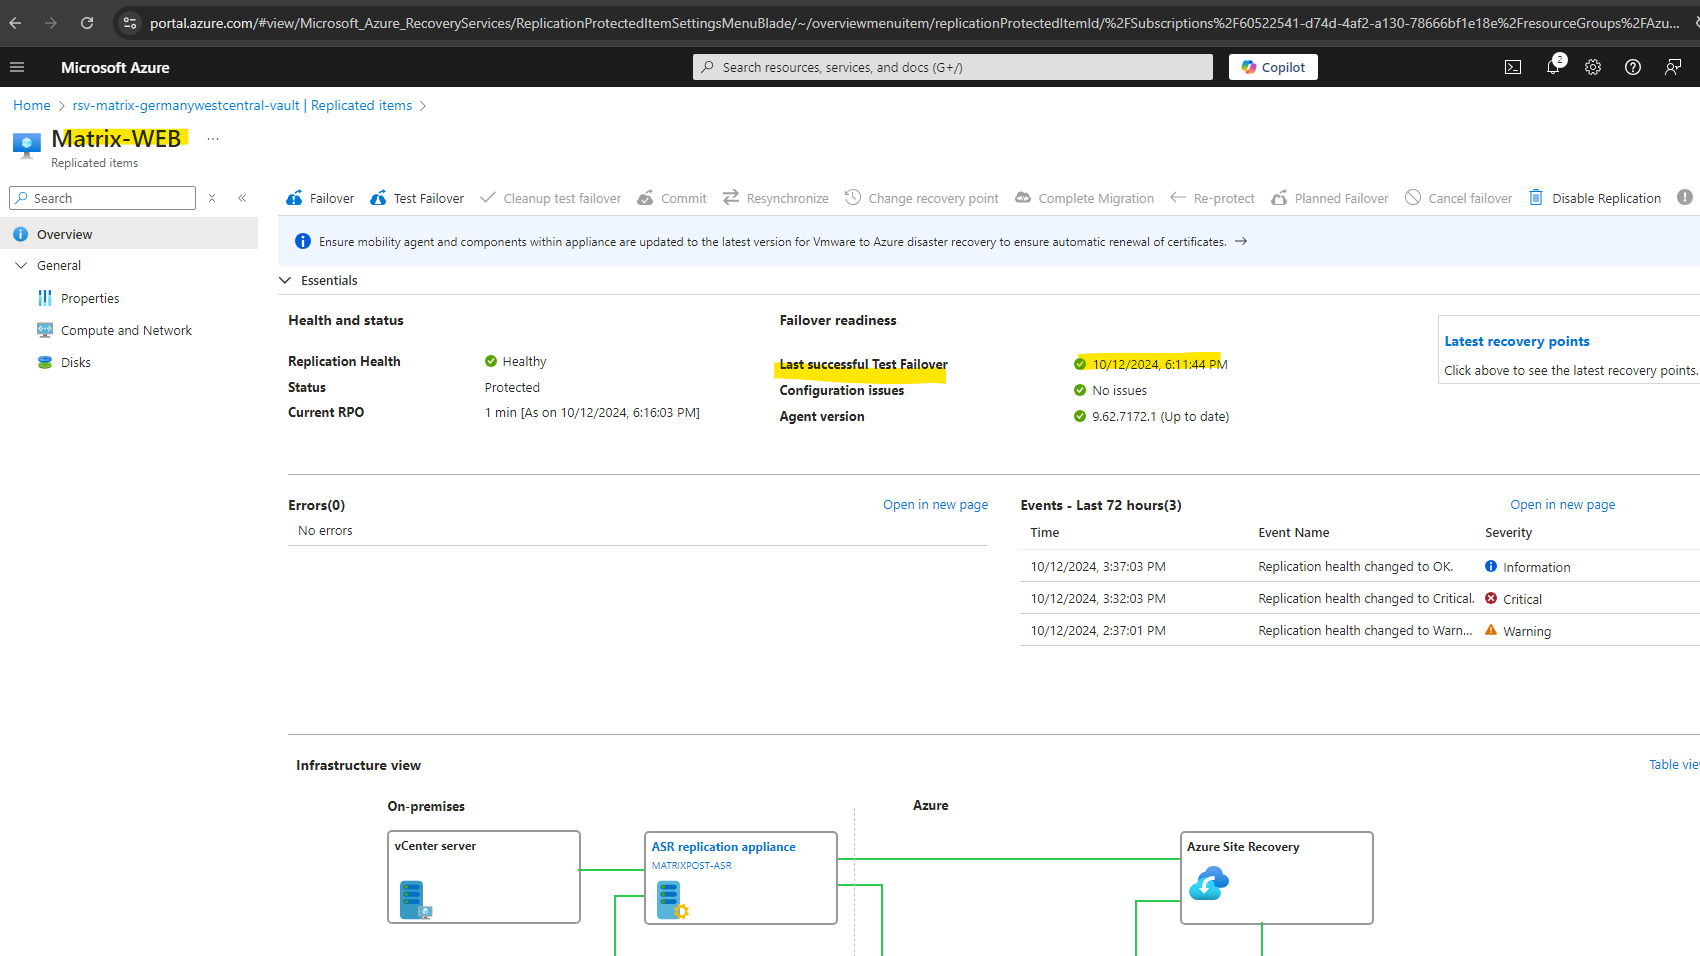
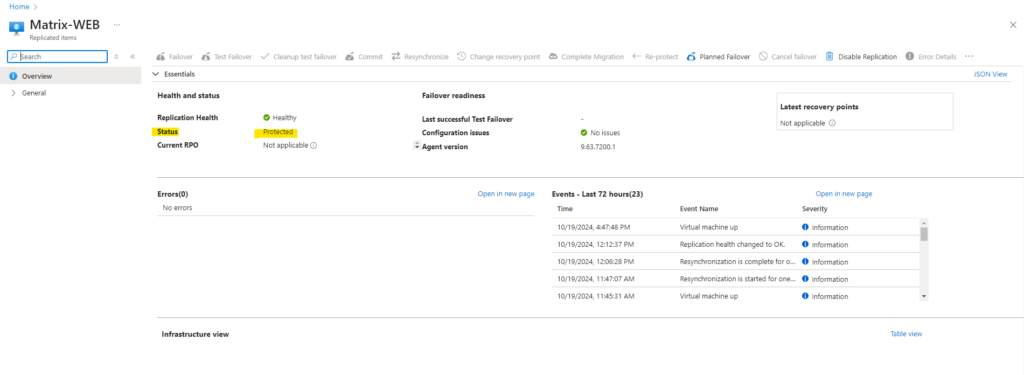
After successful creation of the first recovery point, our virtual machine is finally protected and we can perform a failover.
So far we get a notification that the last successful test failover never performed successfully. We will see how to do this in the next section.
Run a failover to Azure
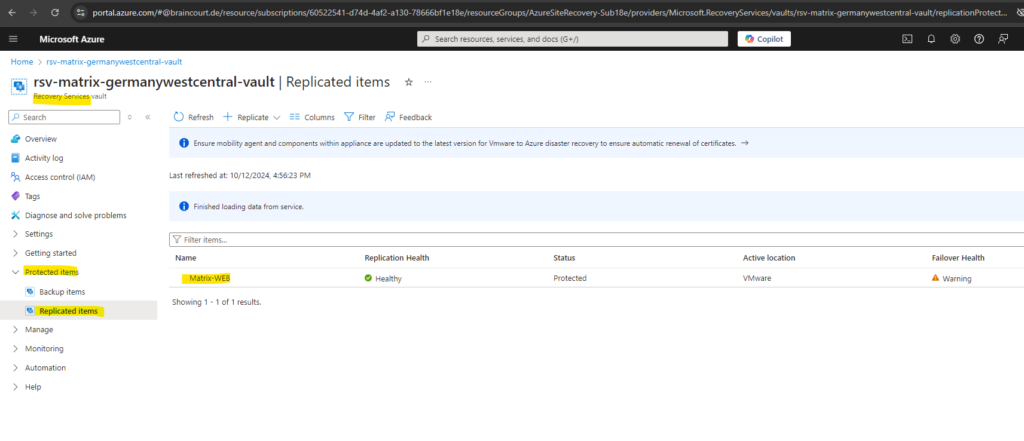
Navigate to your recovery services vault and expand the Protected items menu. Here select Replicated items as shown below and select the virtual machine you want to failover to Azure.
So far I just have replicated Matrix-Web which is a Windows Server 2022 running in my on-premise vSphere lab environment. So I will click on it below.
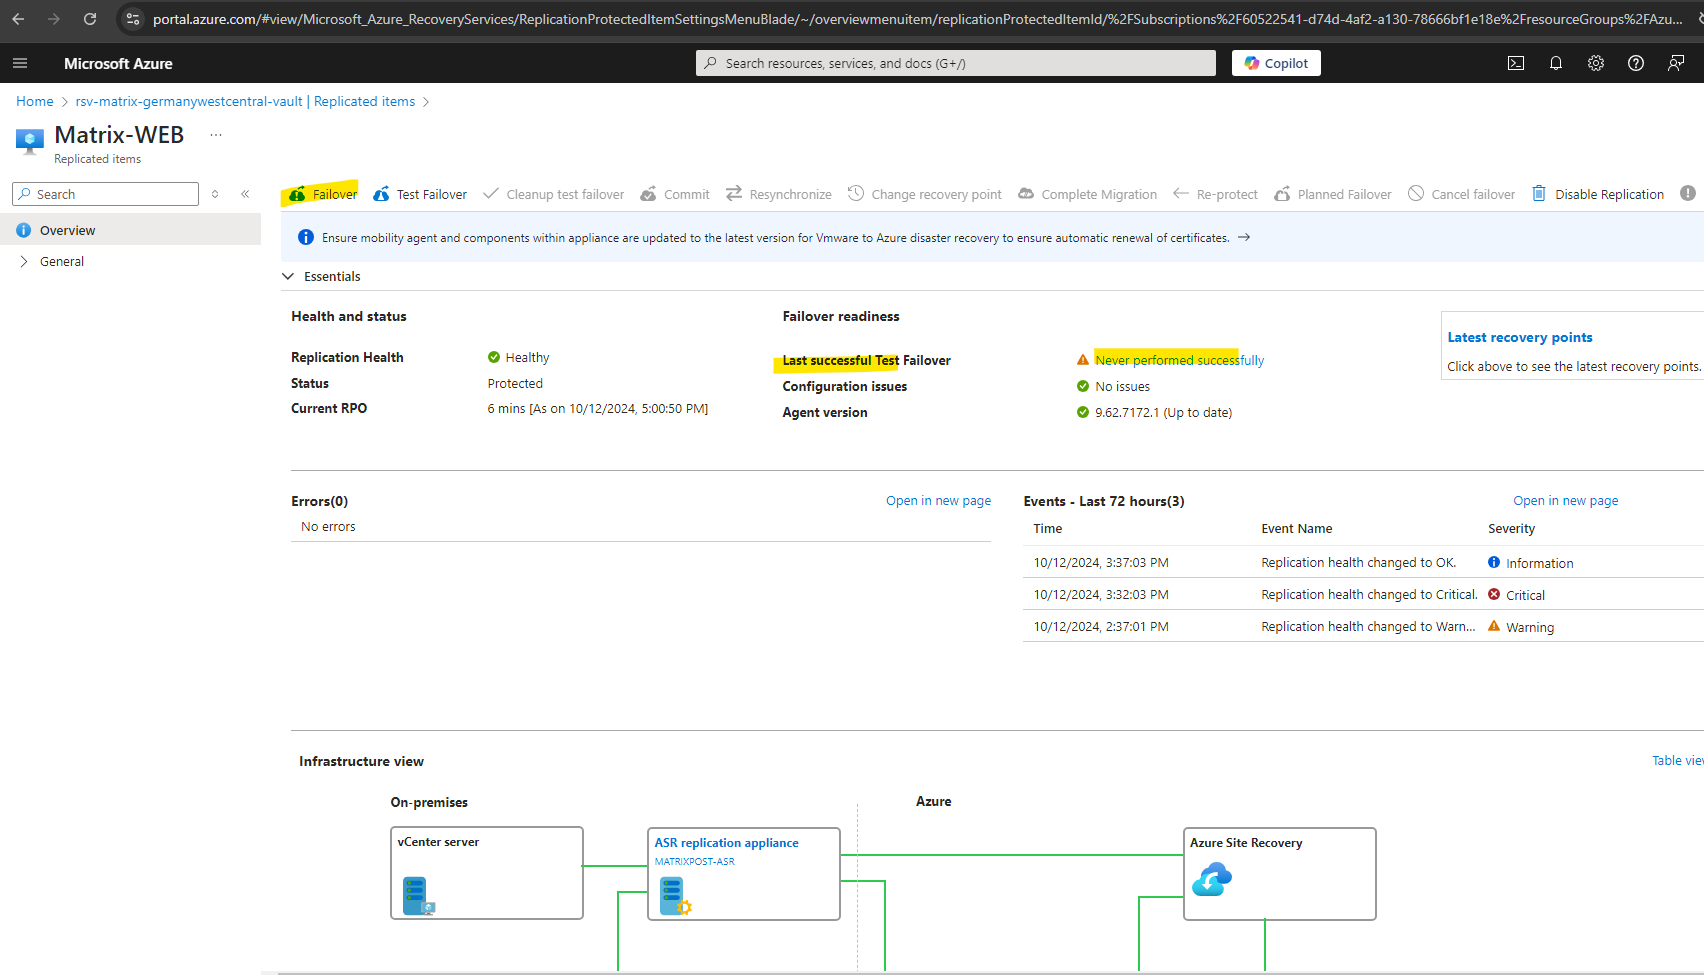
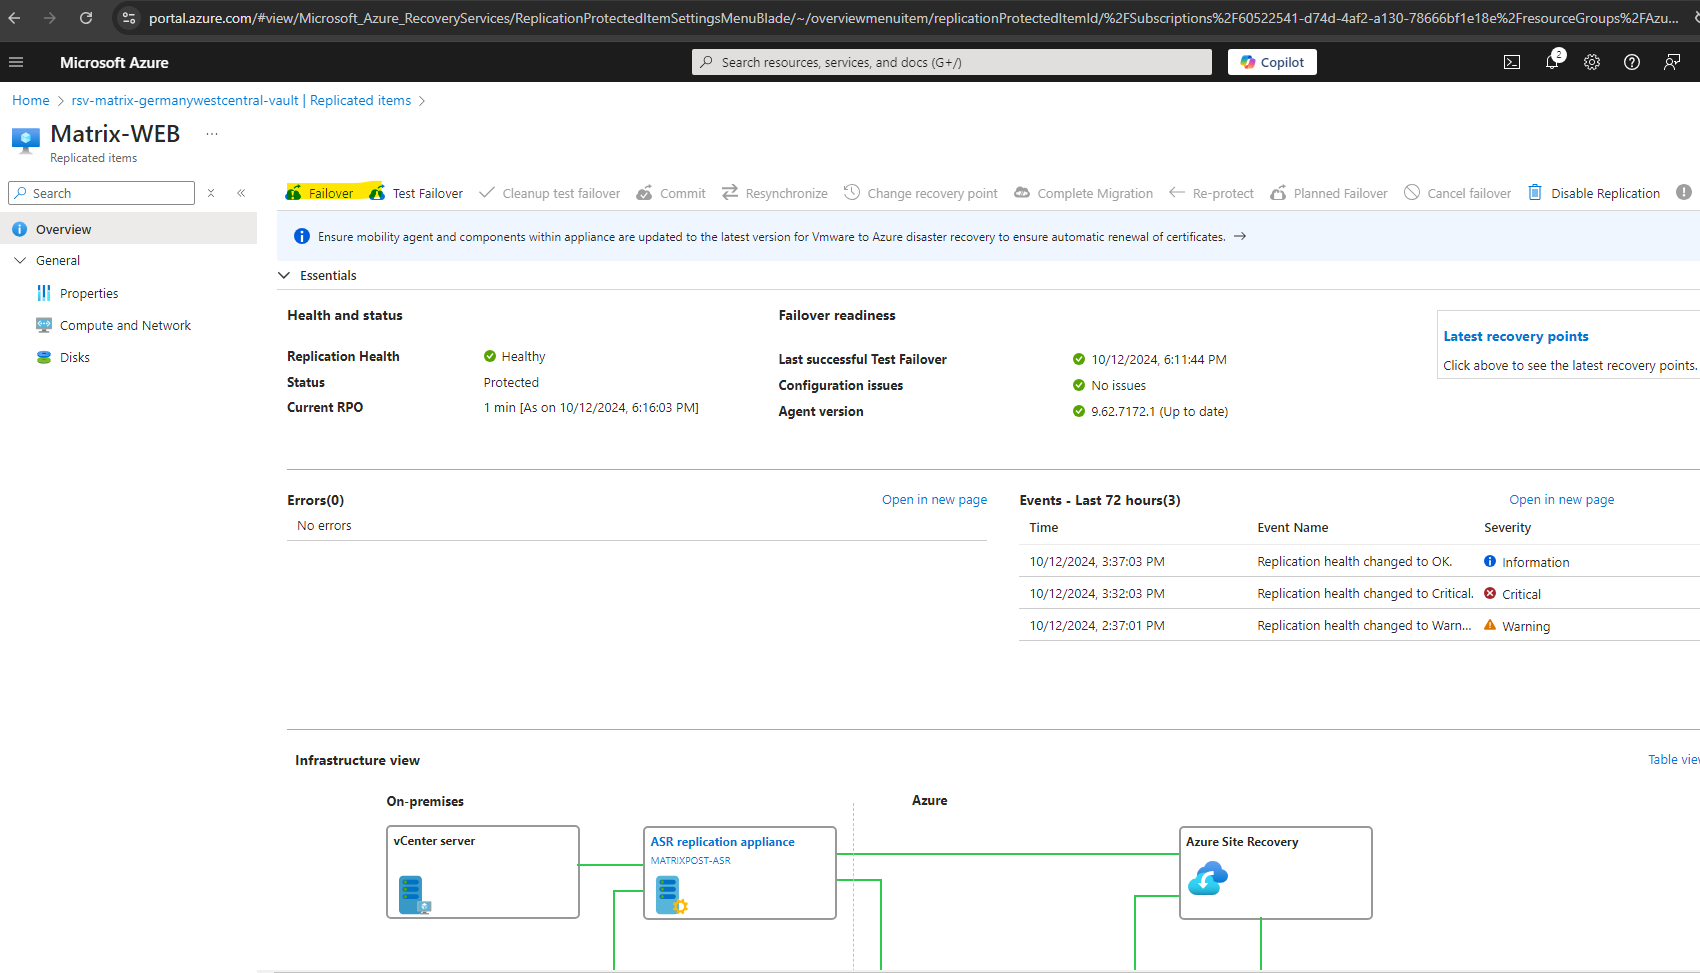
To failover the virtual machine we can click on Failover located at the to bar below.
Below we can also run a test failover to validate your replication and disaster recovery strategy, without any data loss or downtime. A test failover doesn’t impact ongoing replication, or your production environment. You can run a test failover on a specific virtual machine (VM), or on a recovery plan containing multiple VMs.
Source: https://learn.microsoft.com/en-us/azure/site-recovery/site-recovery-test-failover-to-azure
First perform a Test Failover
In case we never performed a test failover or its more than 180 days in past, it is recommended to first perform a test failover.
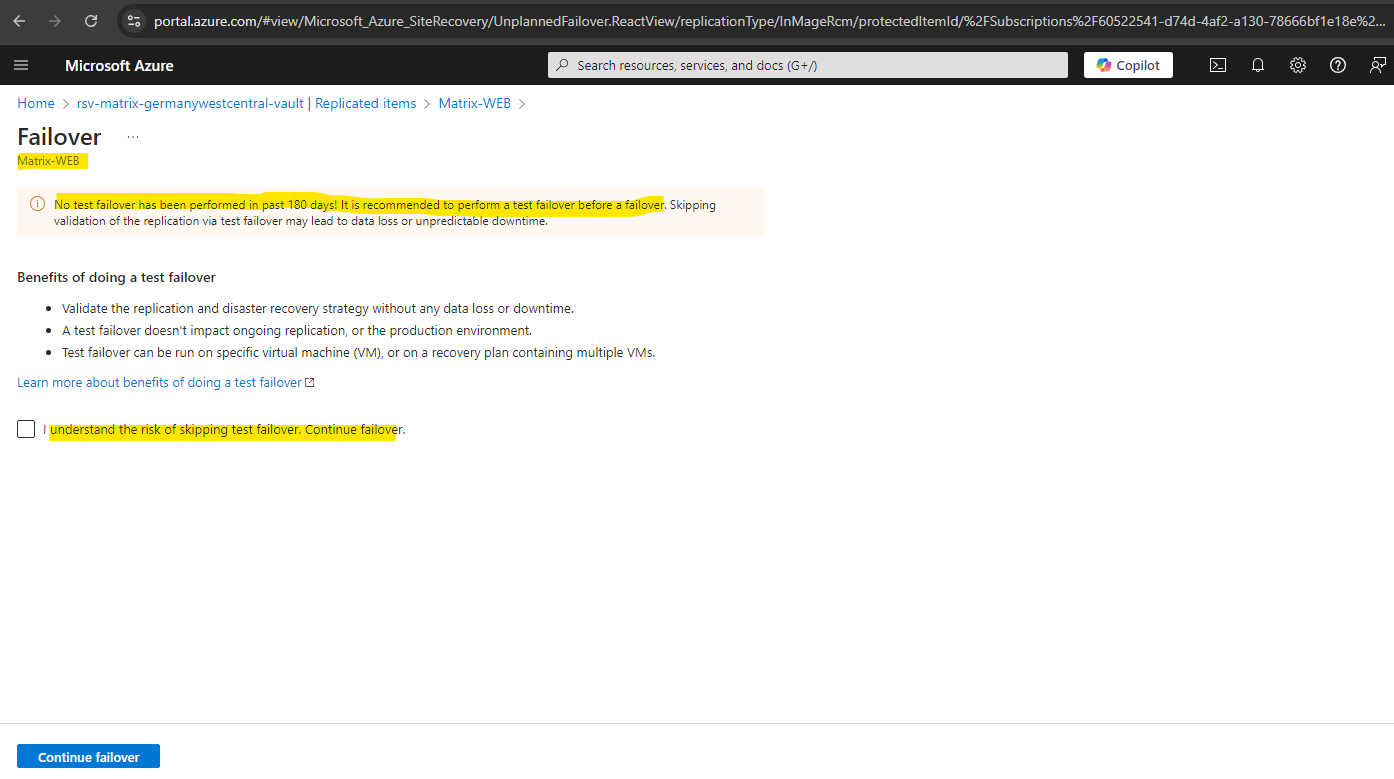
Actually just for my lab environment I could skip this test failover, but to see this in action will also first perform a test failover.
So I will click on Test Failover below.
For a test failover It is recommended that the networks selected for test failover and failover operations are different. So not jut the subnets, it is recommended to take a whole different network.
For my lab environment I will use the same network.
Even it is possible to select here a different virtual network for the test failover, when the previously created replication for this virtual machine was set to use the same virtual network also for test failover, it will ignore this and nevertheless put the test failover virtual machine into the productive virtual network.
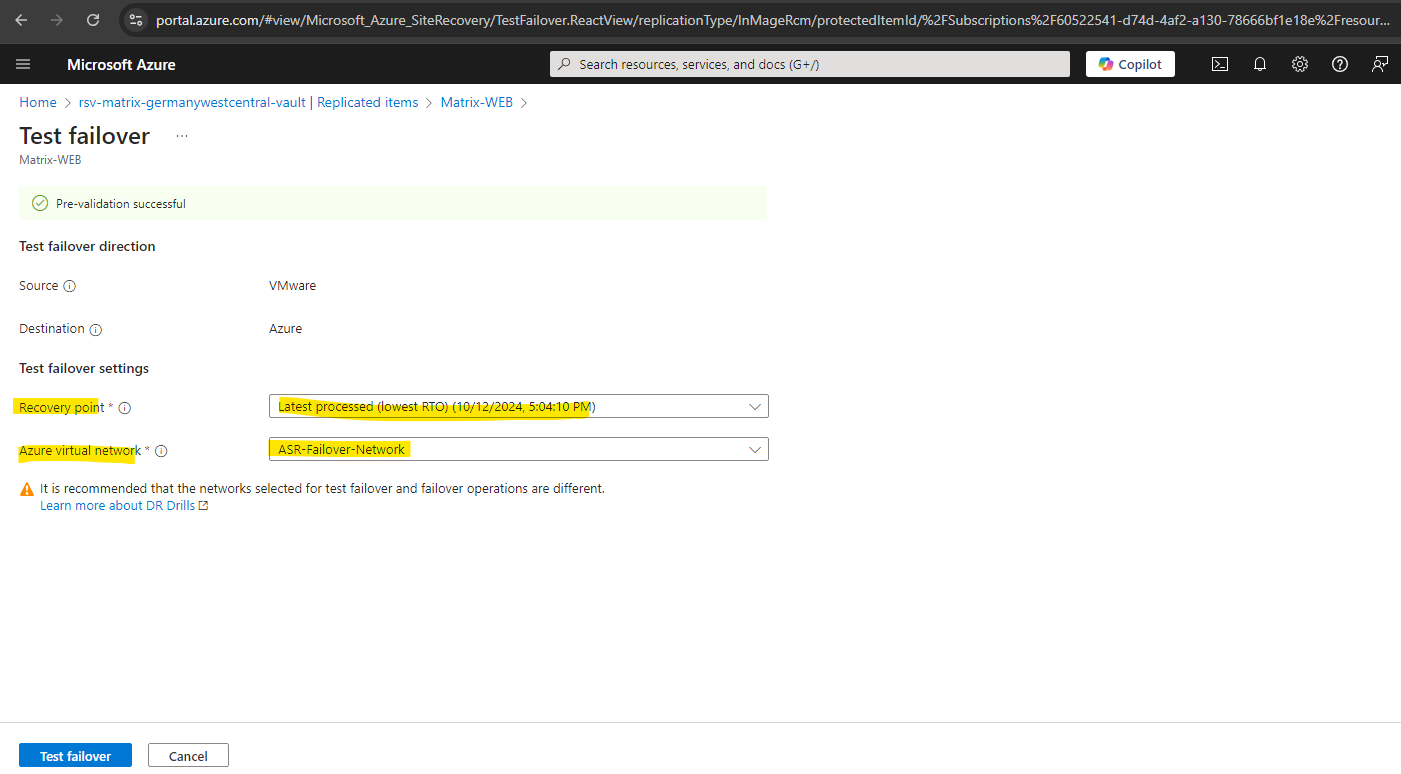
As mentioned, when you configure for the replication the settings below to use the same network also for test failover, it will ignore the different selected virtual network above.
Finally the test failover was performed successful.
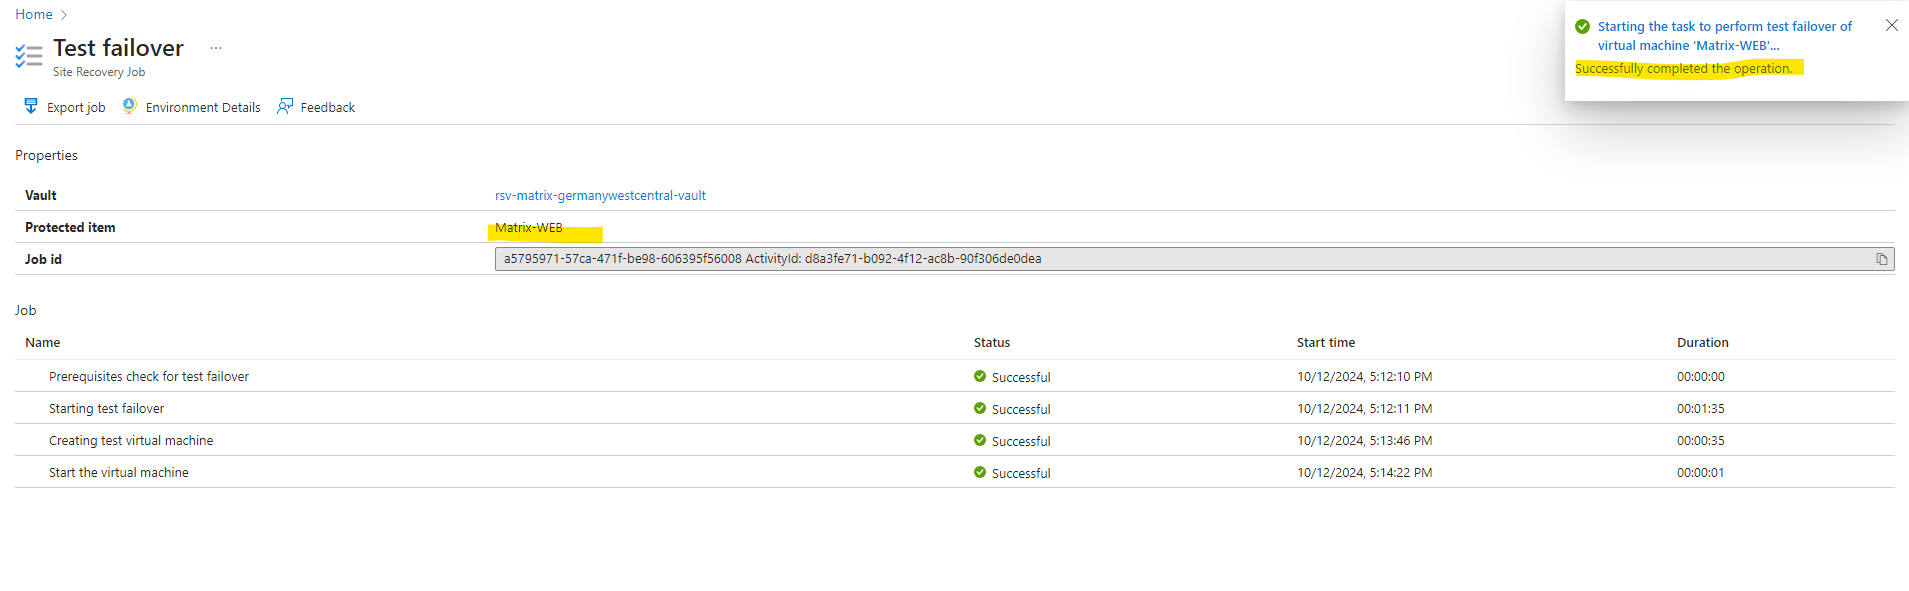
The virtual machine we should now see running in Azure.
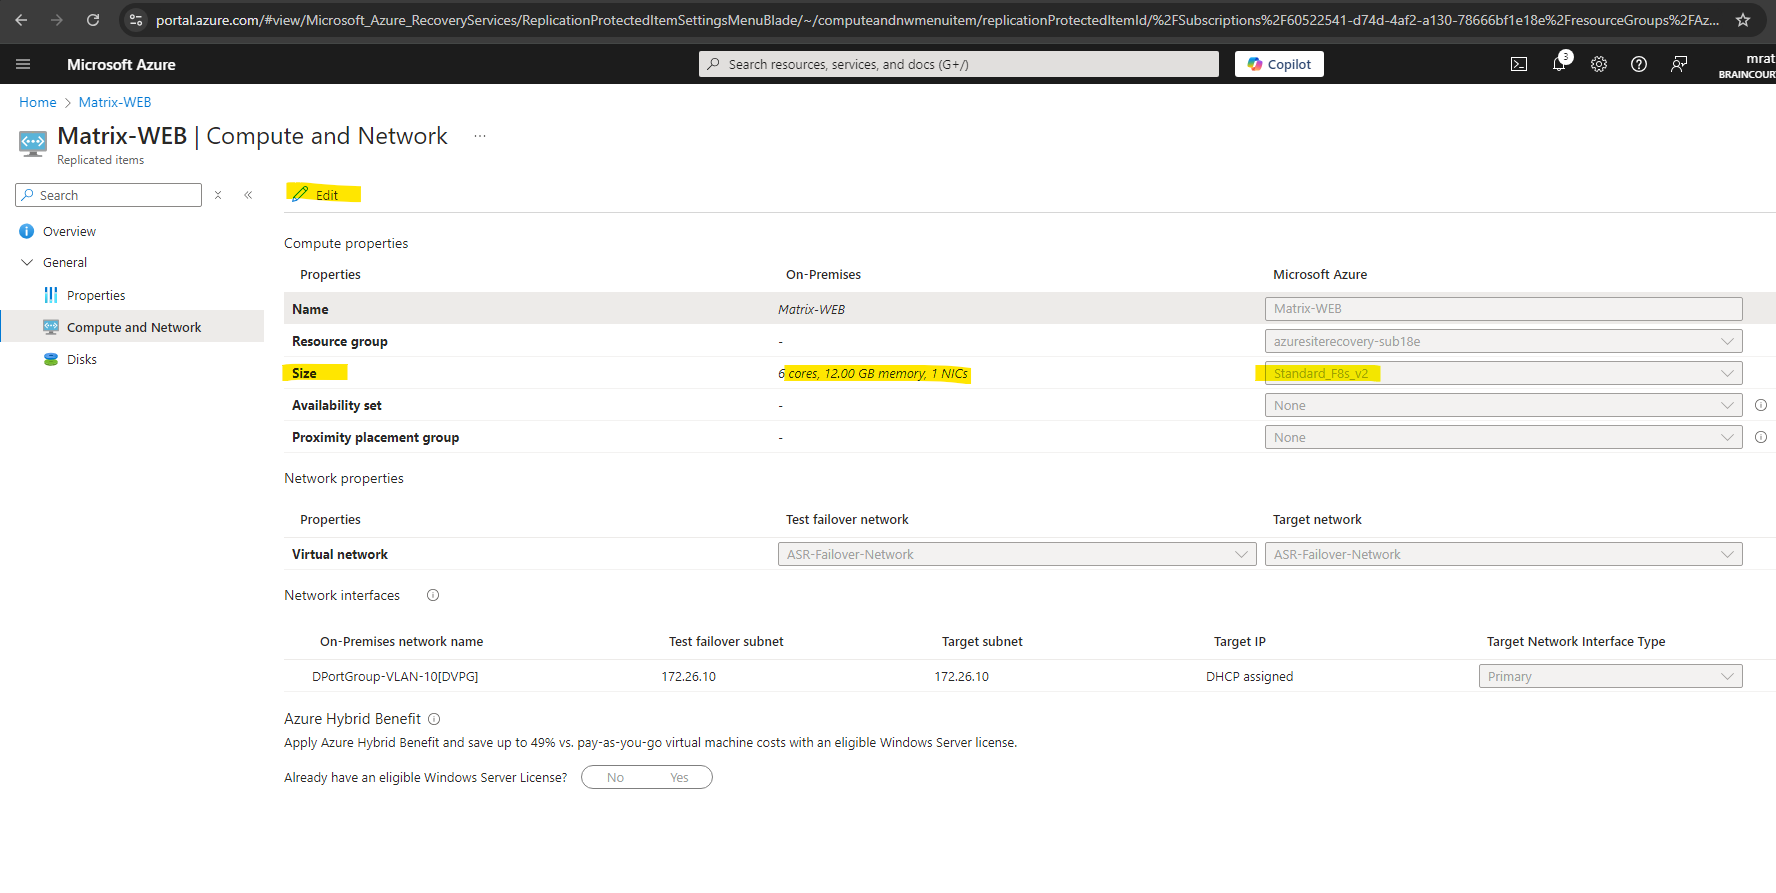
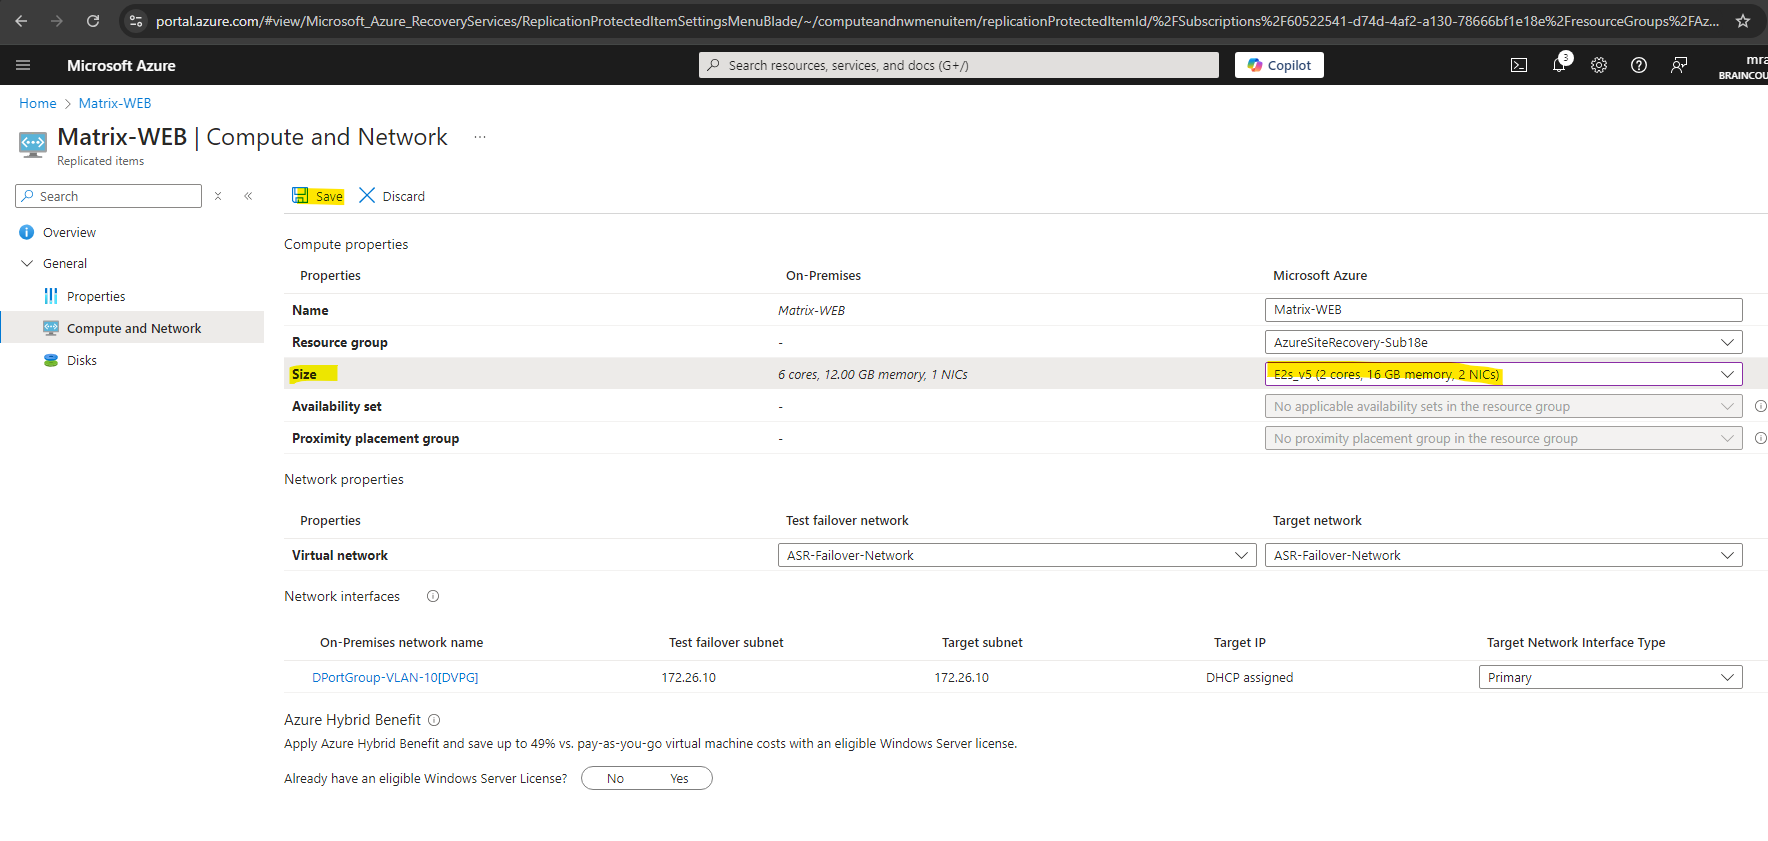
ASR is choosing by default a VM size for the failover virtual machine in Azure. We can change this before the failover as shown below.
To change the VM size of the failover virtual machine we need to click on Computer and Network on the replicated virtual machine as shown below.
Click on Edit.
I will switch here to the VM size E2_v5.
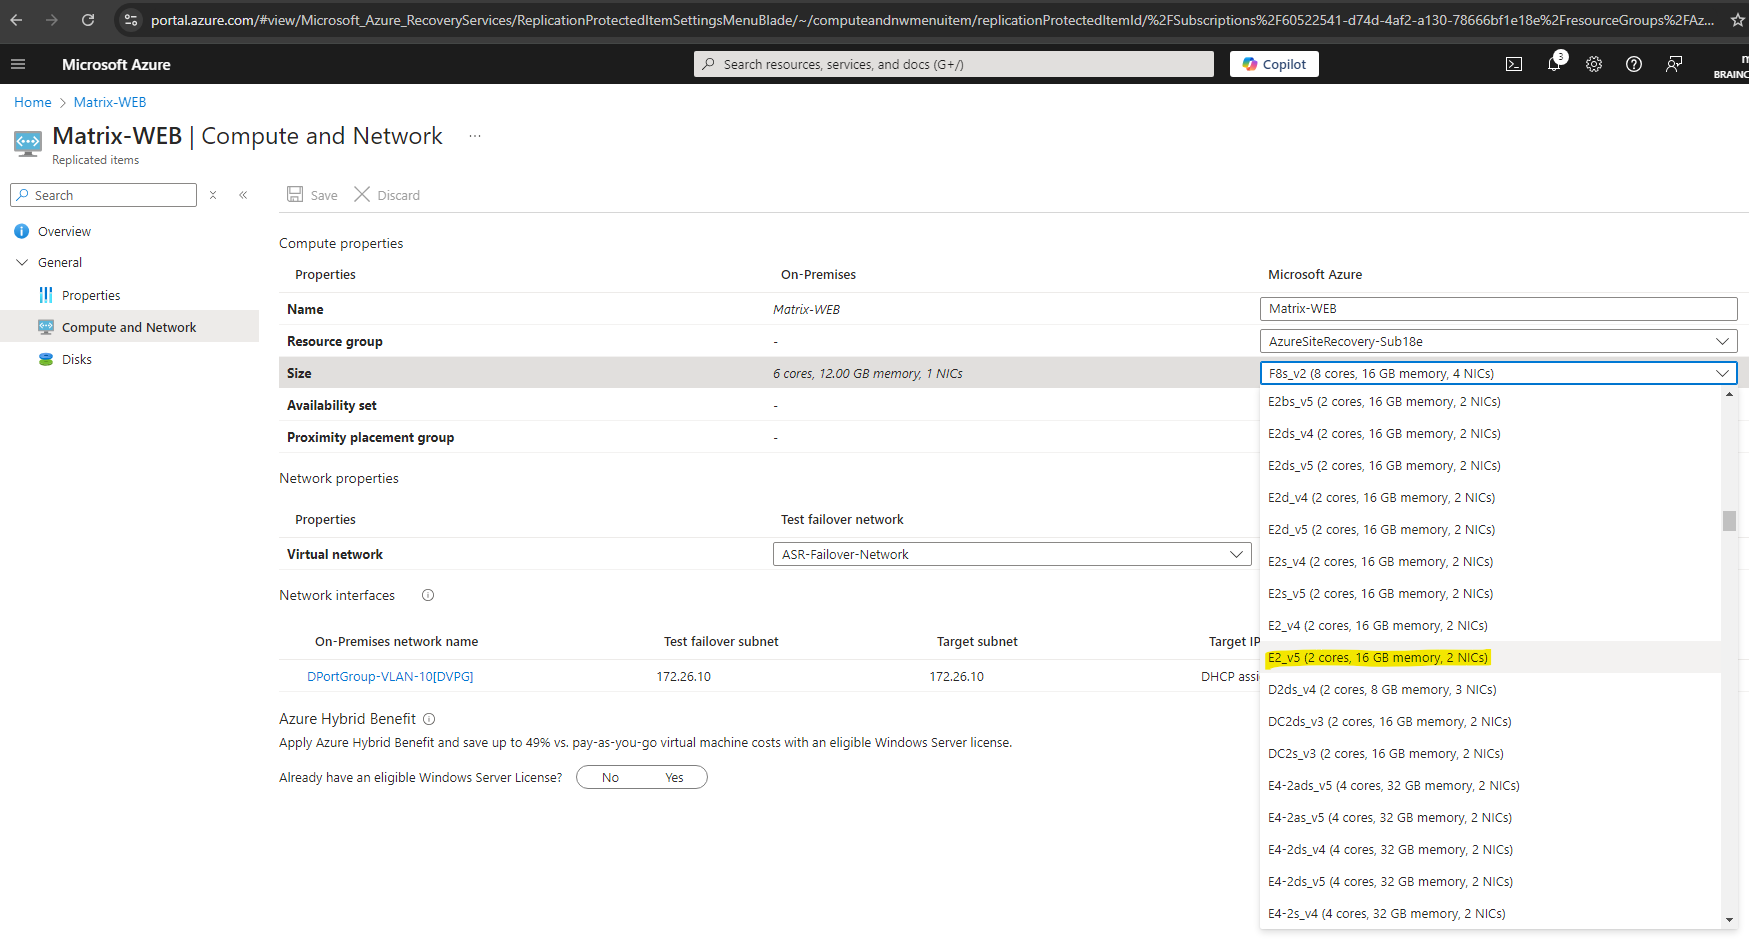
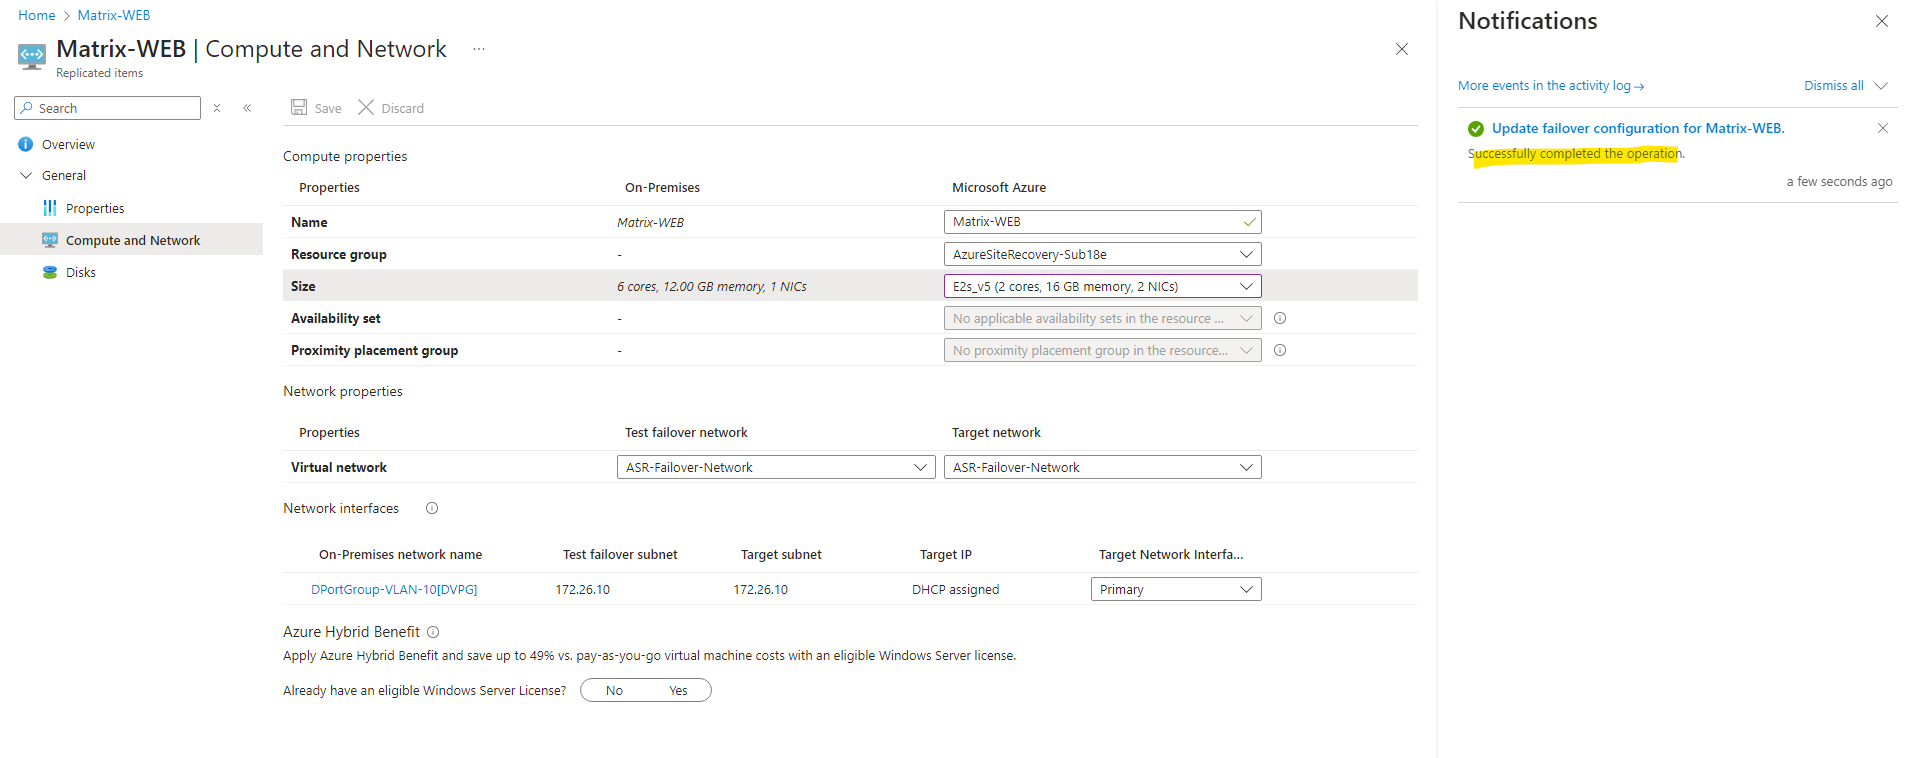
Click on Save.
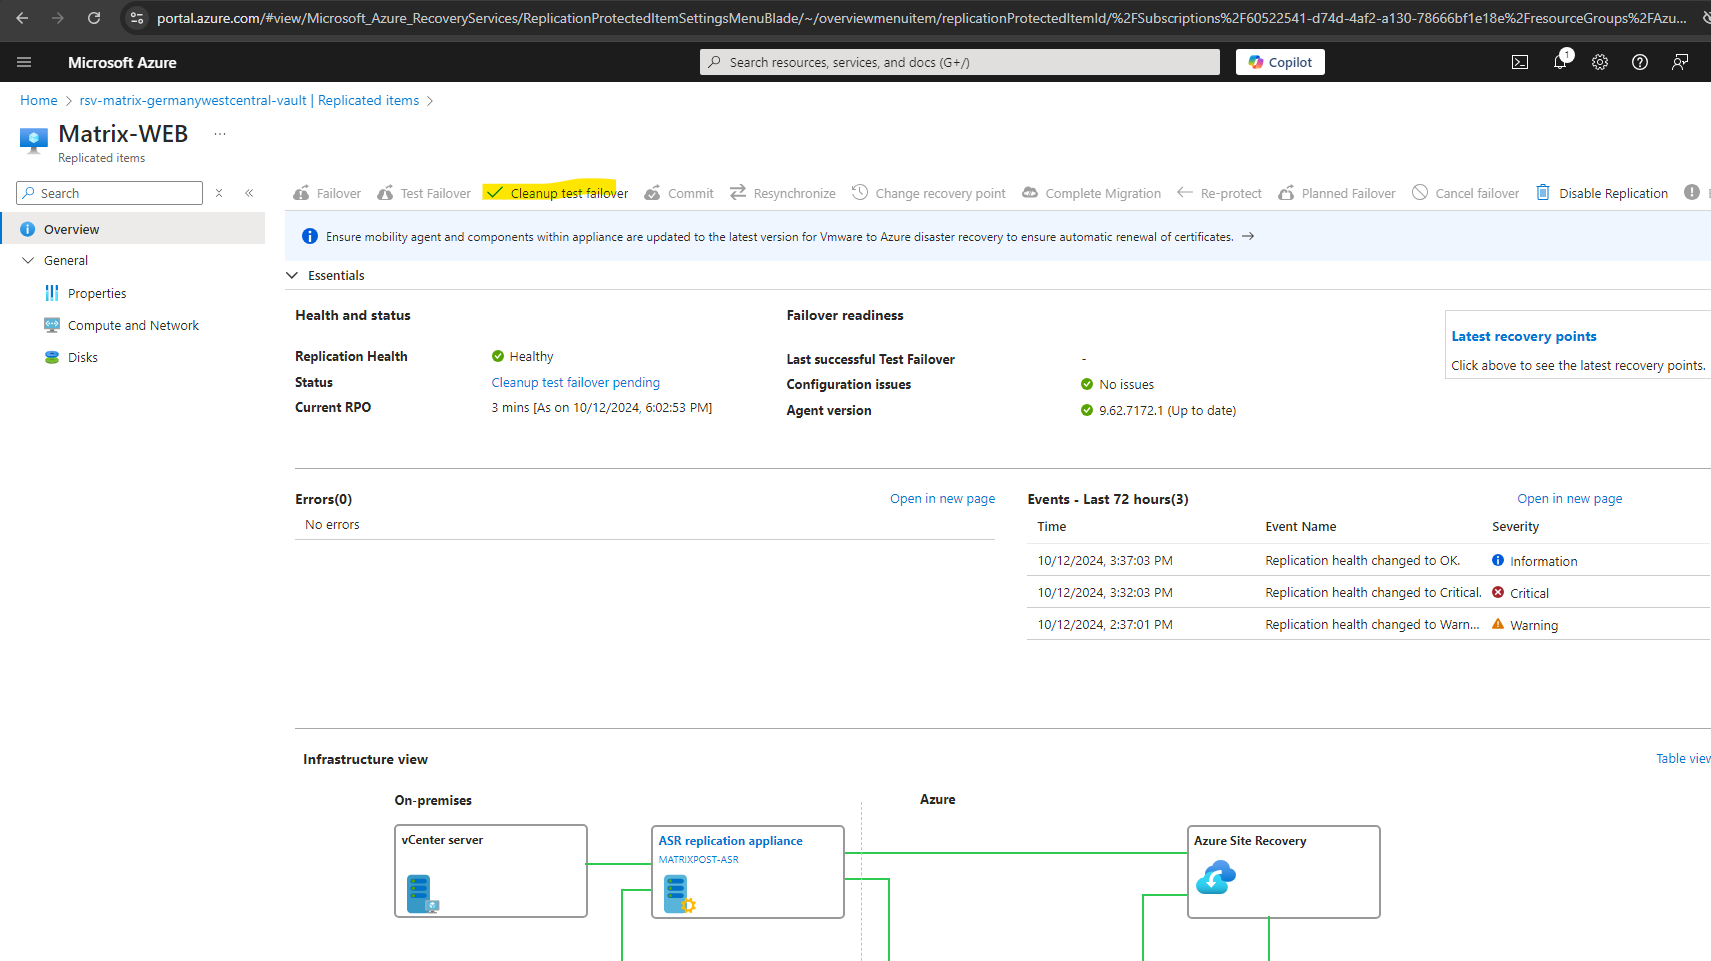
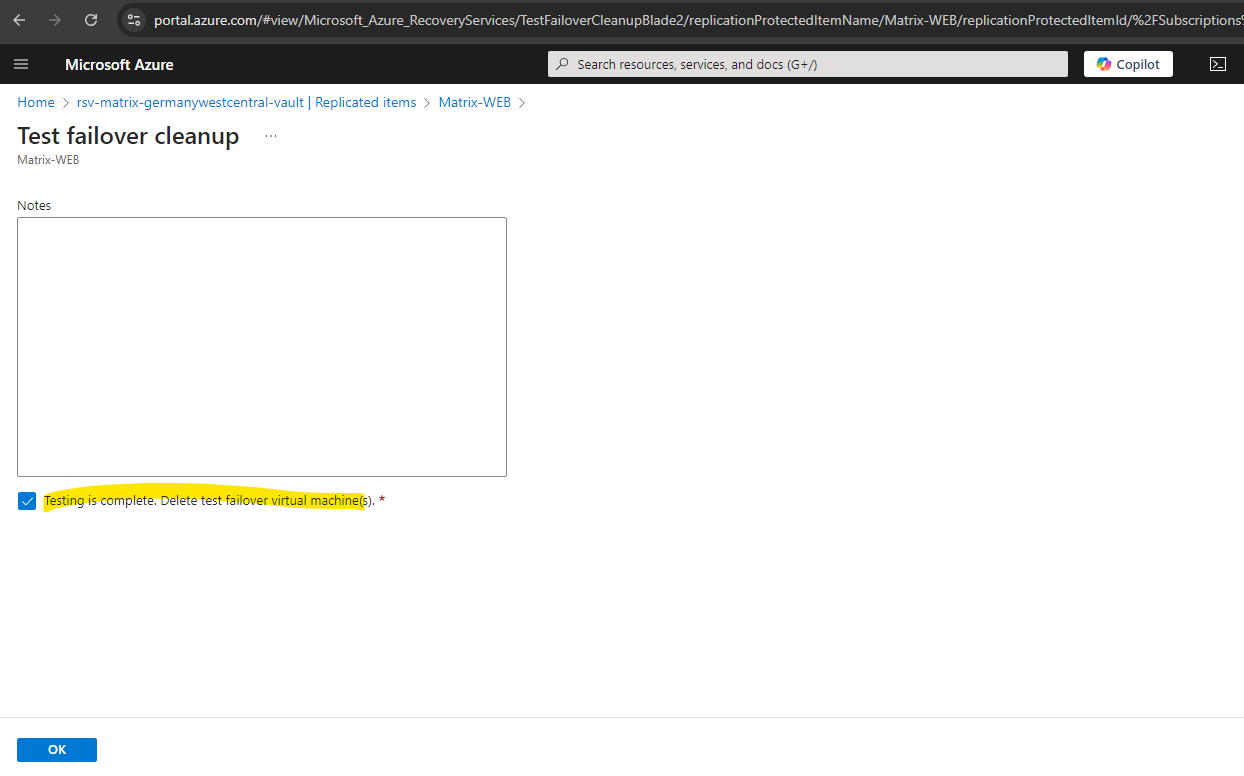
If a test failover was successfully we can afterwards perform a cleanup by clicking on Cleanup test failover.
This will remove the running test failover virtual machine in Azure.
Perform a productive Failover
So now as our test failover was running successful, we can finally perform the productive failover.
We can now also see below the notification about the last successful test failover changed from never performed to the date of our running test failover previously.
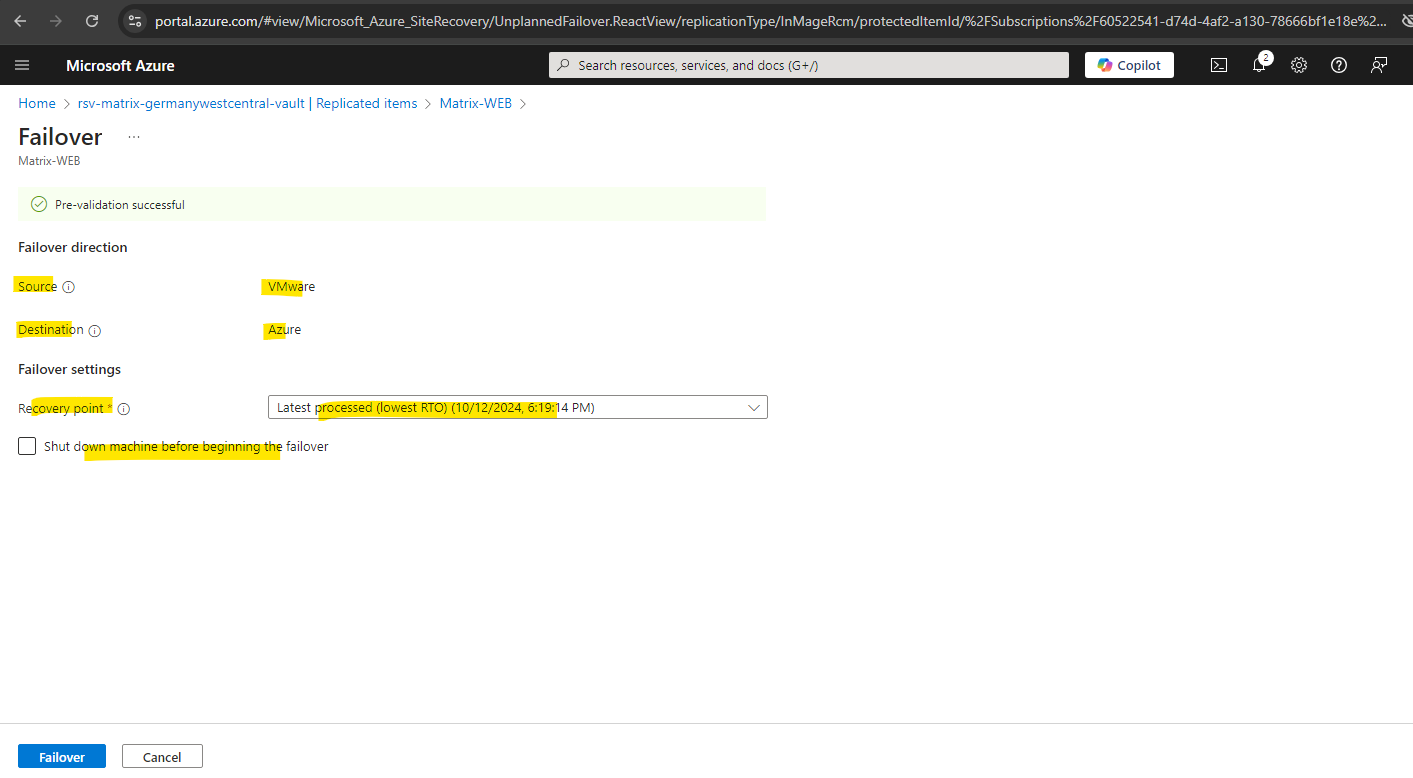
So now I will click on Failover.
Recovery Point Objective (RPO) is the maximum duration of acceptable data loss. RPO is measured in units of time, not volume, such as “30 minutes of data” or “four hours of data.” RPO is about limiting and recovering from data loss, not data theft.
Recovery Time Objective (RTO) is the maximum duration of acceptable downtime, where “downtime” is defined by your specification. For example, if the acceptable downtime duration in a disaster is eight hours, then the RTO is eight hours.
More about Recovery Point Objective (RPO) and Recovery Time Objective (RTO) you will find in the following article.
What is disaster recovery?
https://learn.microsoft.com/en-us/azure/reliability/disaster-recovery-overview
For my lab environment I don’t expect data loss and therefore will perform the failover when the source virtual machine is still running. So I just click on Failover below.
Select Shut down machine before beginning failover if you want Site Recovery to try to shut down the source VMs before starting failover.
Shutdown helps to ensure no data loss. Failover continues even if shutdown fails.
As you can see, first the prerequisites for the failover will be checked, shutting down the virtual machine I was not checking above and therefore will be skipped, then the failover will be performed and finally the virtual machine will be started.
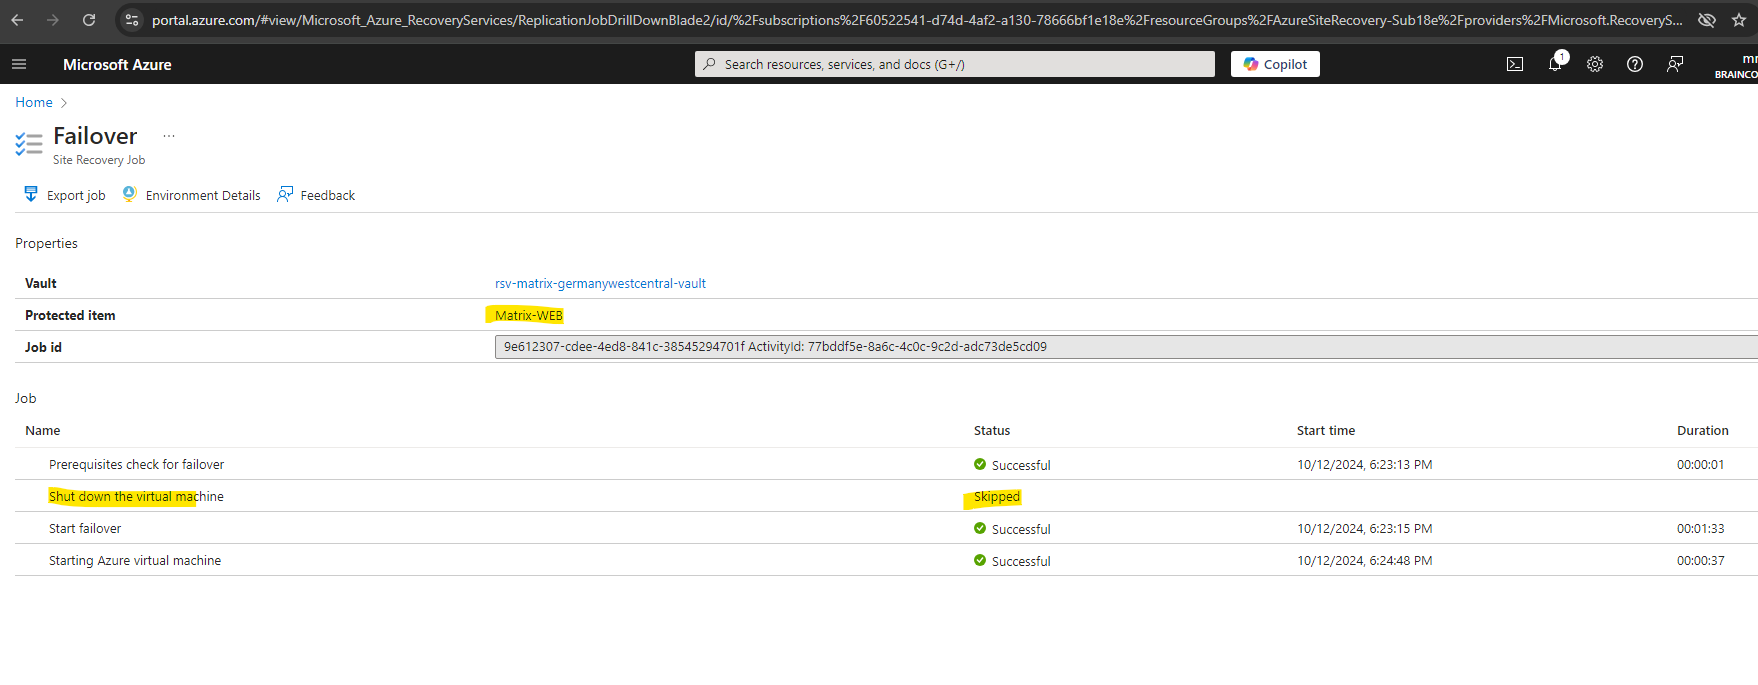
In my case because I was not checking to shutdown the source virtual machine, the virtual machine is still running fine in on-premise (vSphere lab environment) and now also in Azure.
Ensure the following for the VM, after it is failed over to Azure:
- The VM in Azure should always be switched on.
- Ensure mobility agent services service 1 and service 2 are running on the VM. This is to ensure mobility agent in the VM can communicate with Azure Site Recovery services in Azure.
- The URLs mentioned here are accessible from the VM.
Also take a note to ensure to keep the mobility agent and components within the ASR appliance updated to the latest version as shown below.
Generally Available: Auto-renewal of certificates for on-premises to Azure Site Recovery
Azure Site Recovery has introduced automatic renewal of certificates for on-premises to Azure disaster recovery.Azure Site Recovery uses various components for doing disaster recovery (DR) from on-premises to Azure. Certificates are essential for communication between components and need regular renewal to avoid disruptions in Azure Site Recovery operations (like data replication, etc.).
With public preview of Modernized VMWare to Azure disaster recovery announced in August 2021, certificates used for VMWare to Azure disaster recovery will start expiring from August 2024.
This new capability ensures automatic renewal of certificates without affecting ongoing replication. For auto-renewal, customers need to ensure mobility agent and components within appliance are updated to the latest version.
If certain components are not updated or cannot communicate, automatic renewal may fail leading to appliance health errors or agent health errors. Customers should follow the documentation to manually renew the certificates if needed.
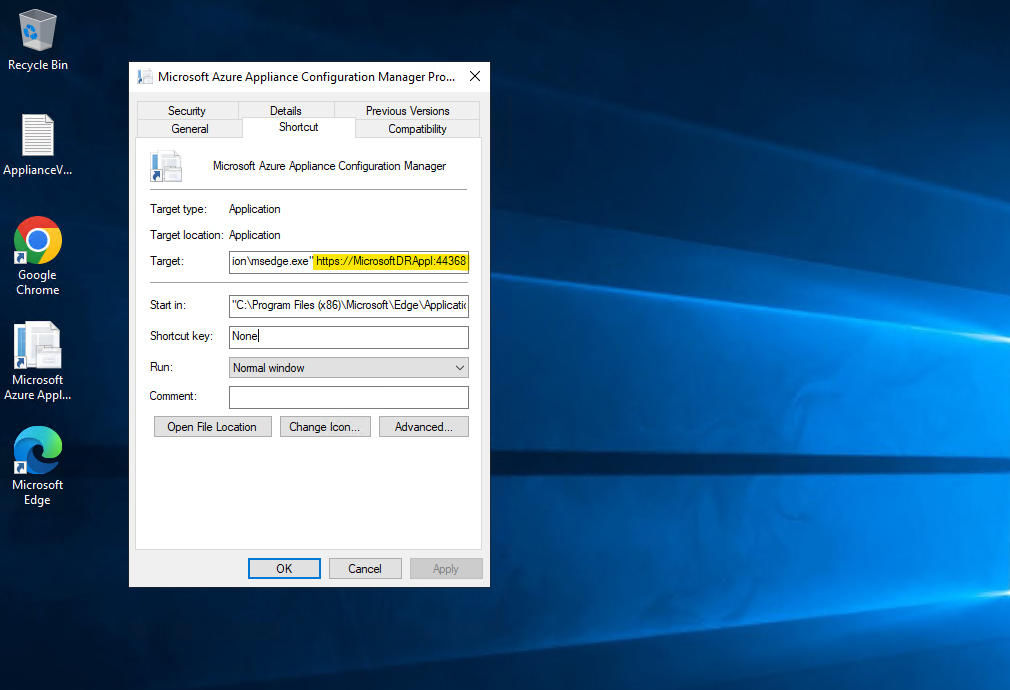
The appliance components we can update directly on the ASR appliance by using the WebGUI wizard which is automatically opened after booting the appliance.
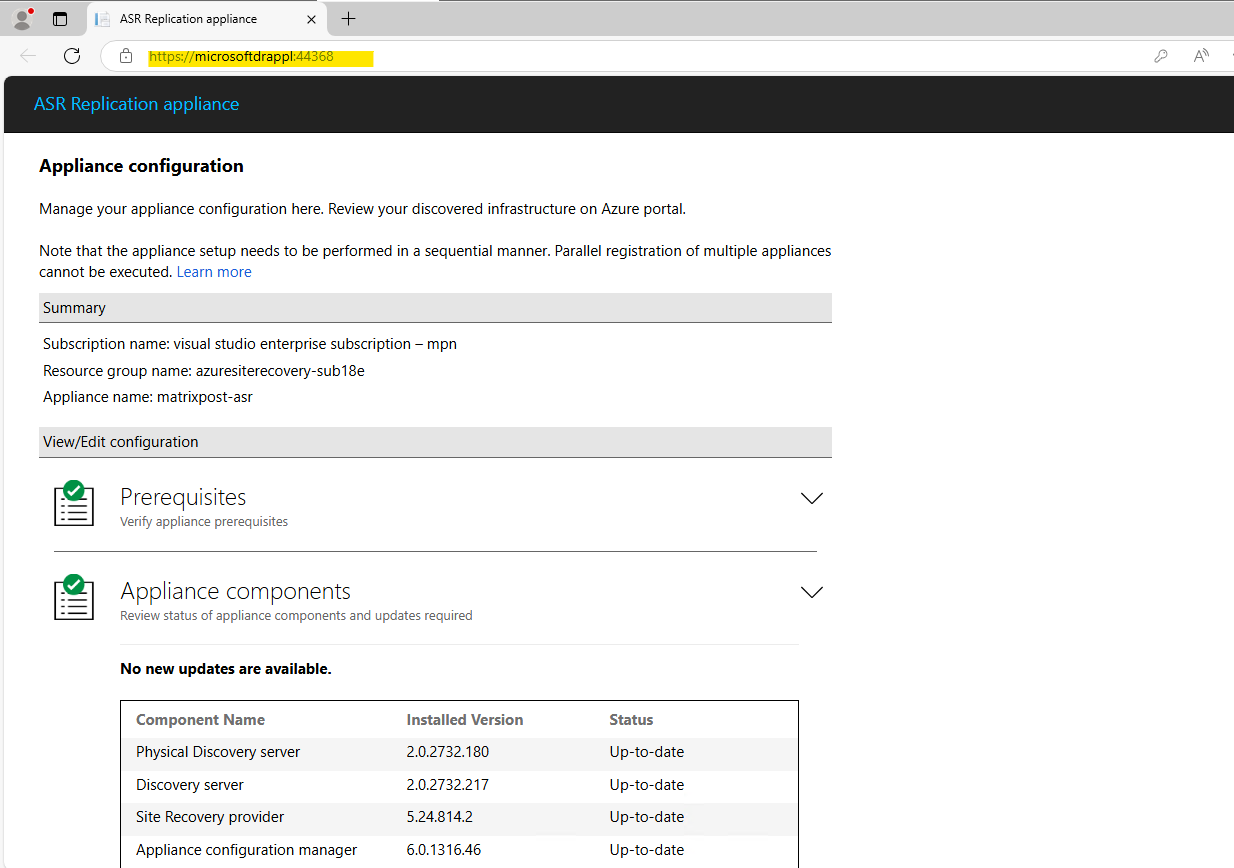
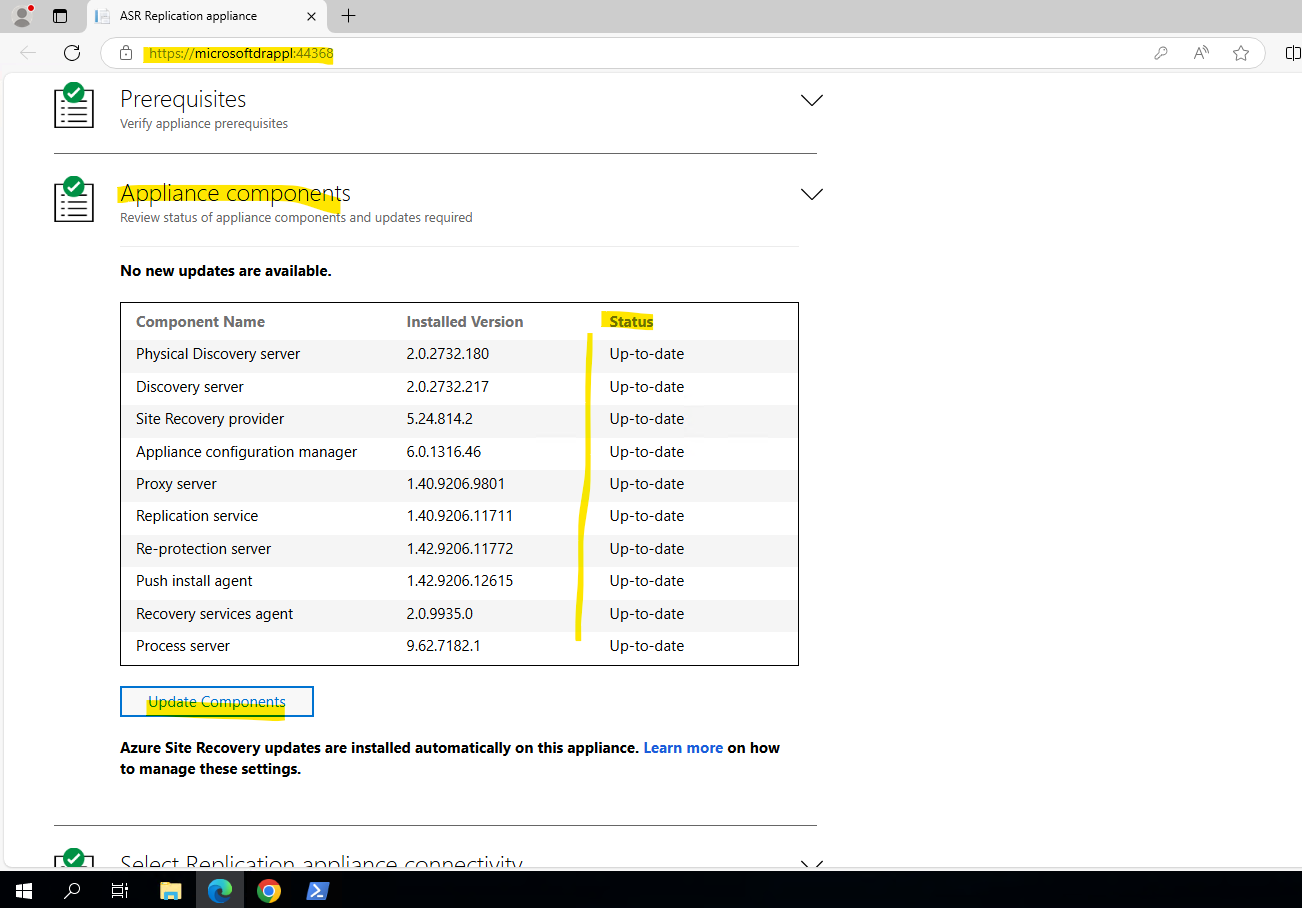
As mentioned the WebGUI of the wizard will be started automatically after the sign-in to the appliance, in case not you will also have a shortcut on the desktop where you can open the wizard manually.
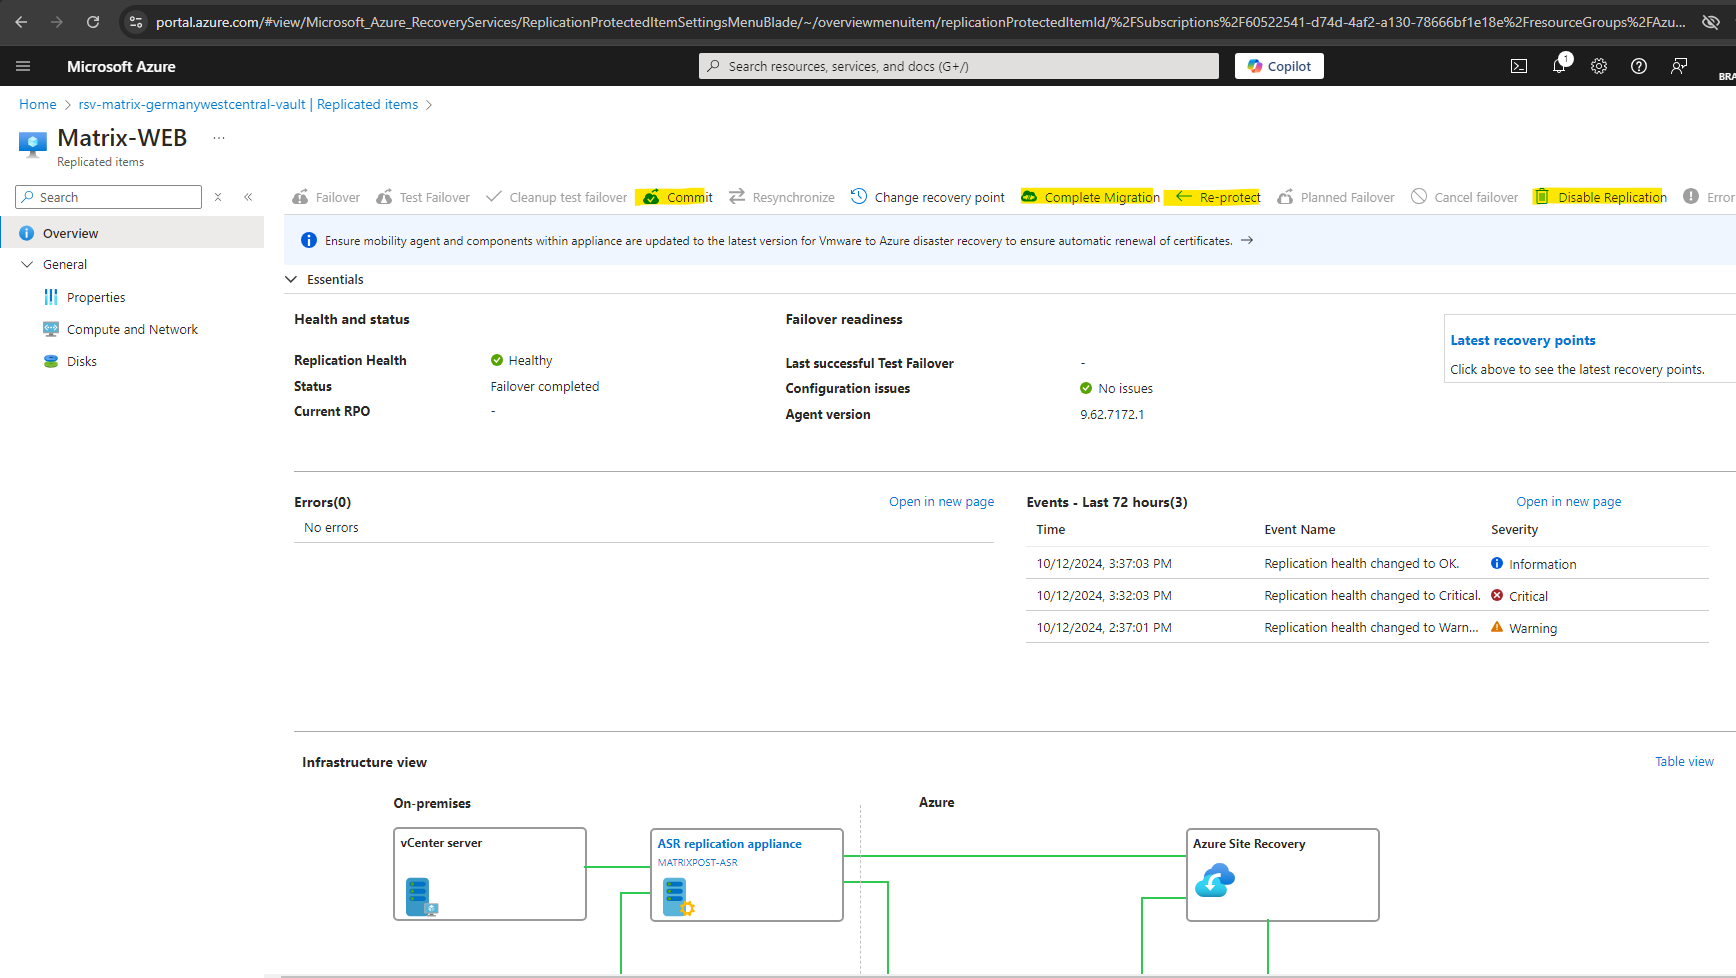
Commit vs. Complete Migration vs. Re-Protect vs. Disable Replication
Once a machine from source location has been failed over to the target location then there are three new options available for you to choose from. All three serve different purposes.
- Complete Migration means that you won’t go back to the source location anymore. You migrated over to the target region and now you’re done. Clicking on Complete Migration triggers Commit and then Disable Replication, internally. This will remove the machine, and it will no longer be protected by Azure Site Recovery. Protection configuration and settings for this machine will be cleaned up automatically. Azure Site Recovery billing for the machine will be stopped.
- Commit -> After verifying the VM after the failover in Azure, when everything looks good, we can click on Commit which finally deletes all the recovery points available with the service. The recovery point option then will no longer be available after the commit.
- Disable Replication will disable the replication and remove all the related configuration. It won’t affect the already existing machine in the target region.
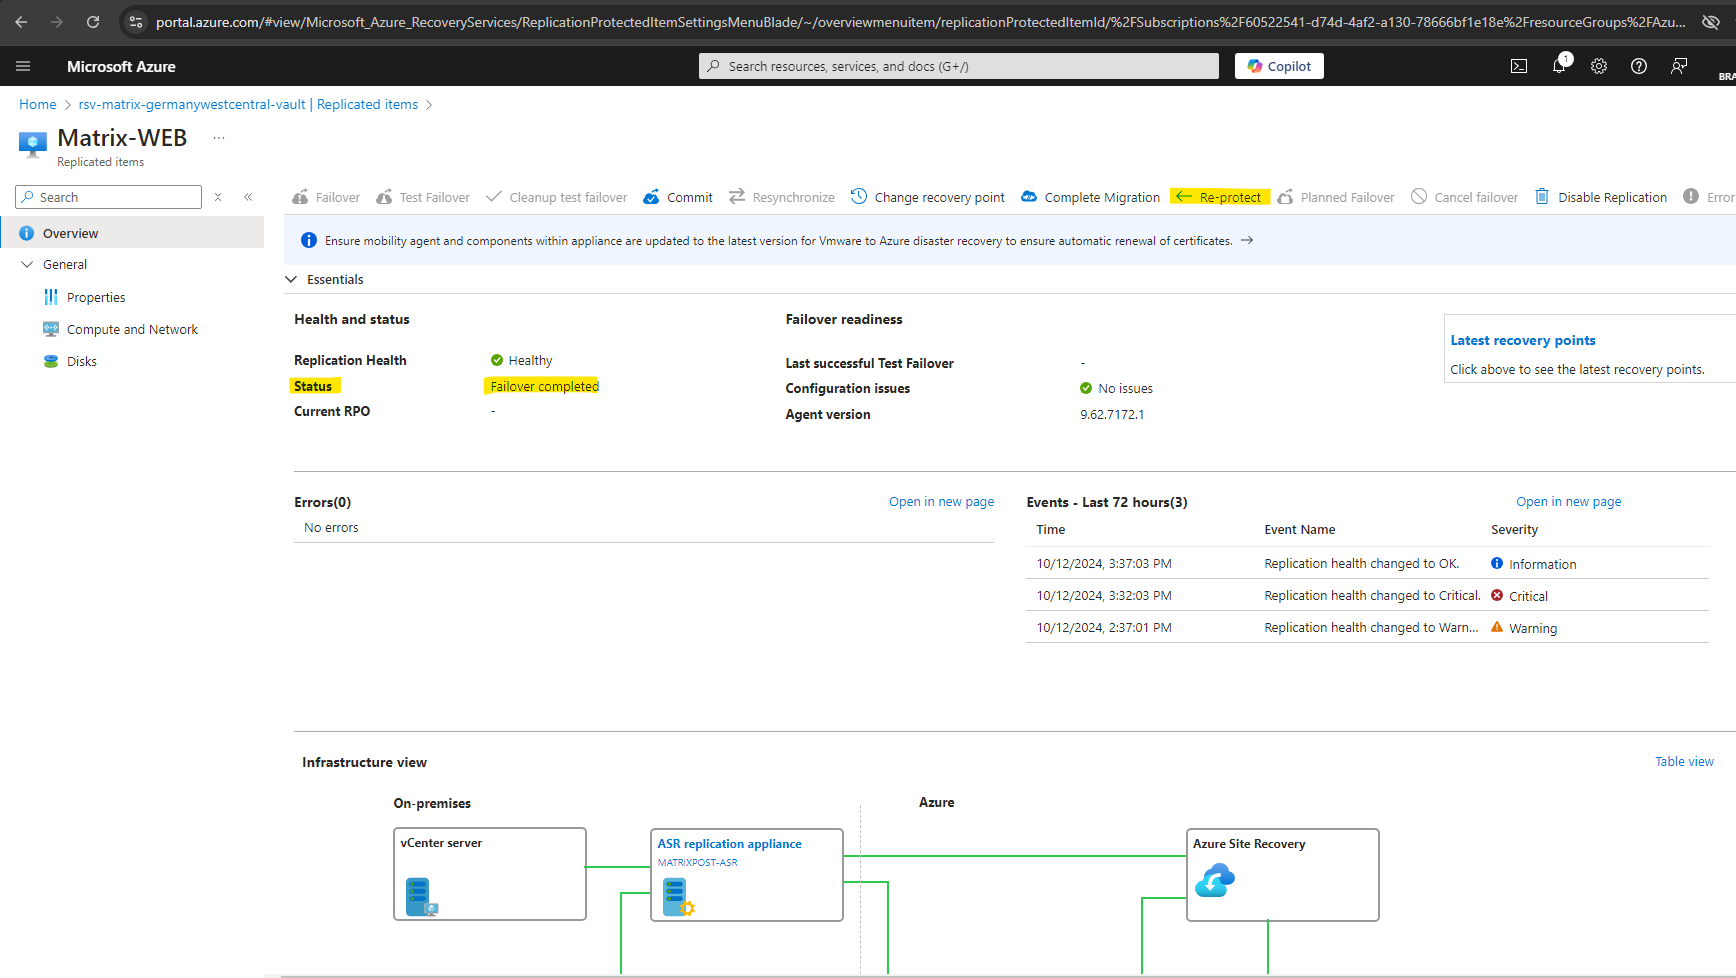
Re-protect failed over Azure virtual machines to the primary region
When you fail over Azure virtual machines from one region to another using Azure Site Recovery, the virtual machines boot up in the secondary region in an unprotected state. If you want to fail back the virtual machines to the primary region, do the following tasks:
- Re-protect the virtual machines in the secondary region, so that they start to replicate to the primary region.
- After re-protection completes and the virtual machines are replicating, you can fail over from the secondary to primary region.
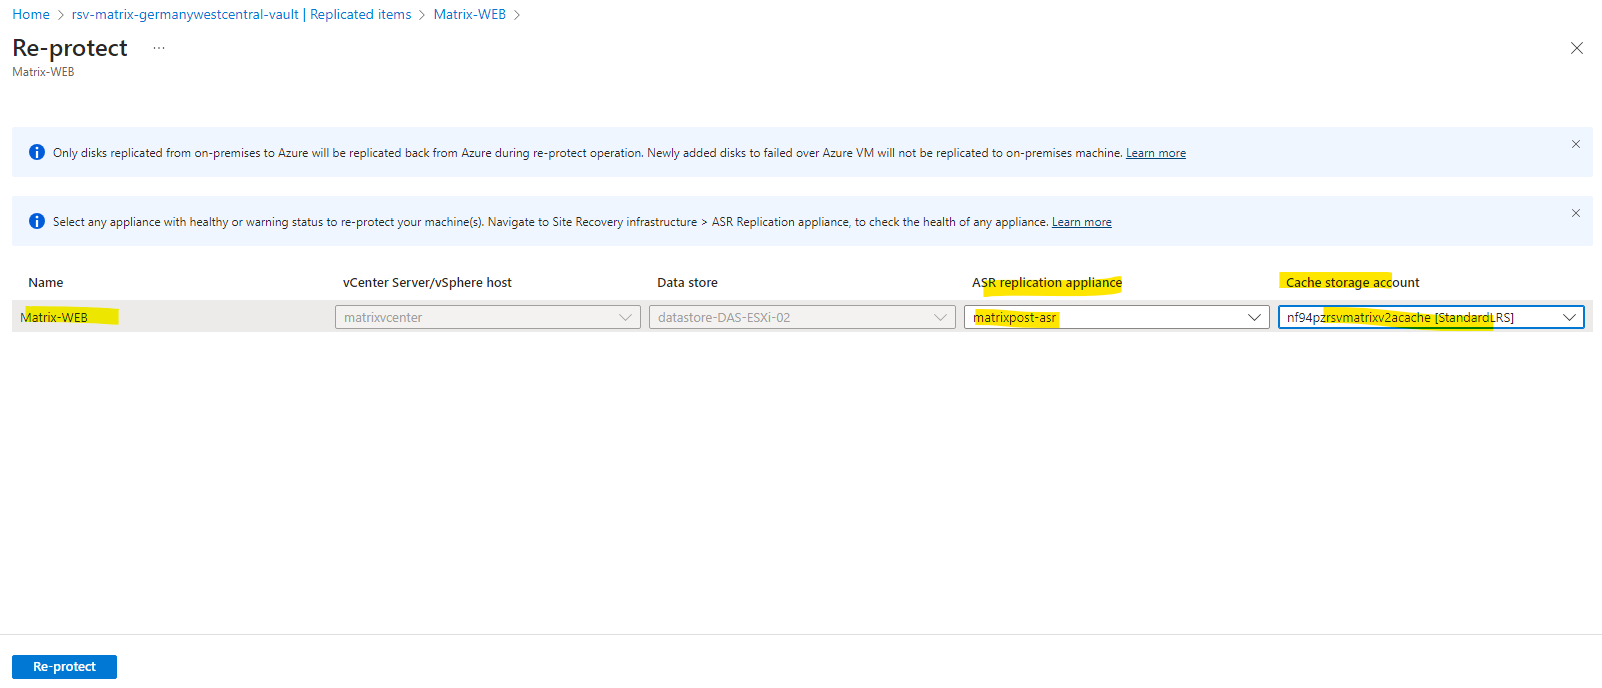
For my previously virtual machine Matrix-Web which I was failover from on-premise (vSphere lab environment) to Azure, I now have to click on Re-protect below to enable the replication back to the source region, in my case on-premise and my vSphere lab environment.
We need to select a cache storage account to re-protect the virtual machine.
In case we previously didn’t shutdown the source virtual machine in vSphere when failover to Azure, at least now for re-protecting the machine to vSphere back it will be powered off there.
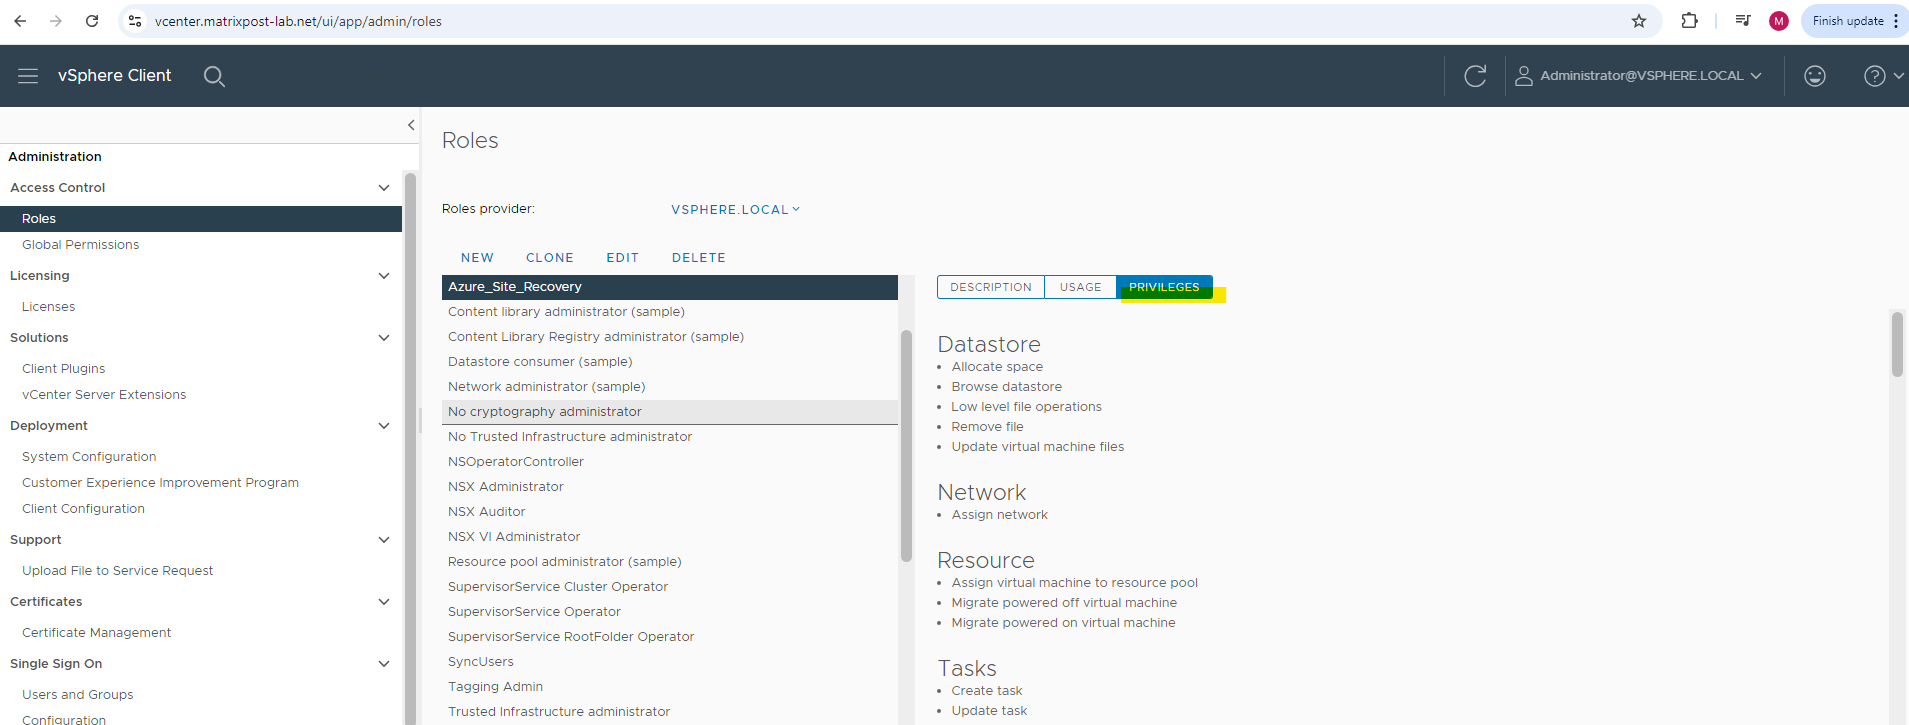
Remember about the permissions our vSphere account we created in Part 1 needs to perform re-protect the failover virtual machine in Azure by enabling replication back to on-premise vSphere.
- VM discovery -> Automatically discover VMs. At least a read-only account is required.
- Full replication, failover, failback -> Orchestrate replication, failover, and failback. You need an account that can run operations such as creating and removing disks, and powering on VMs.
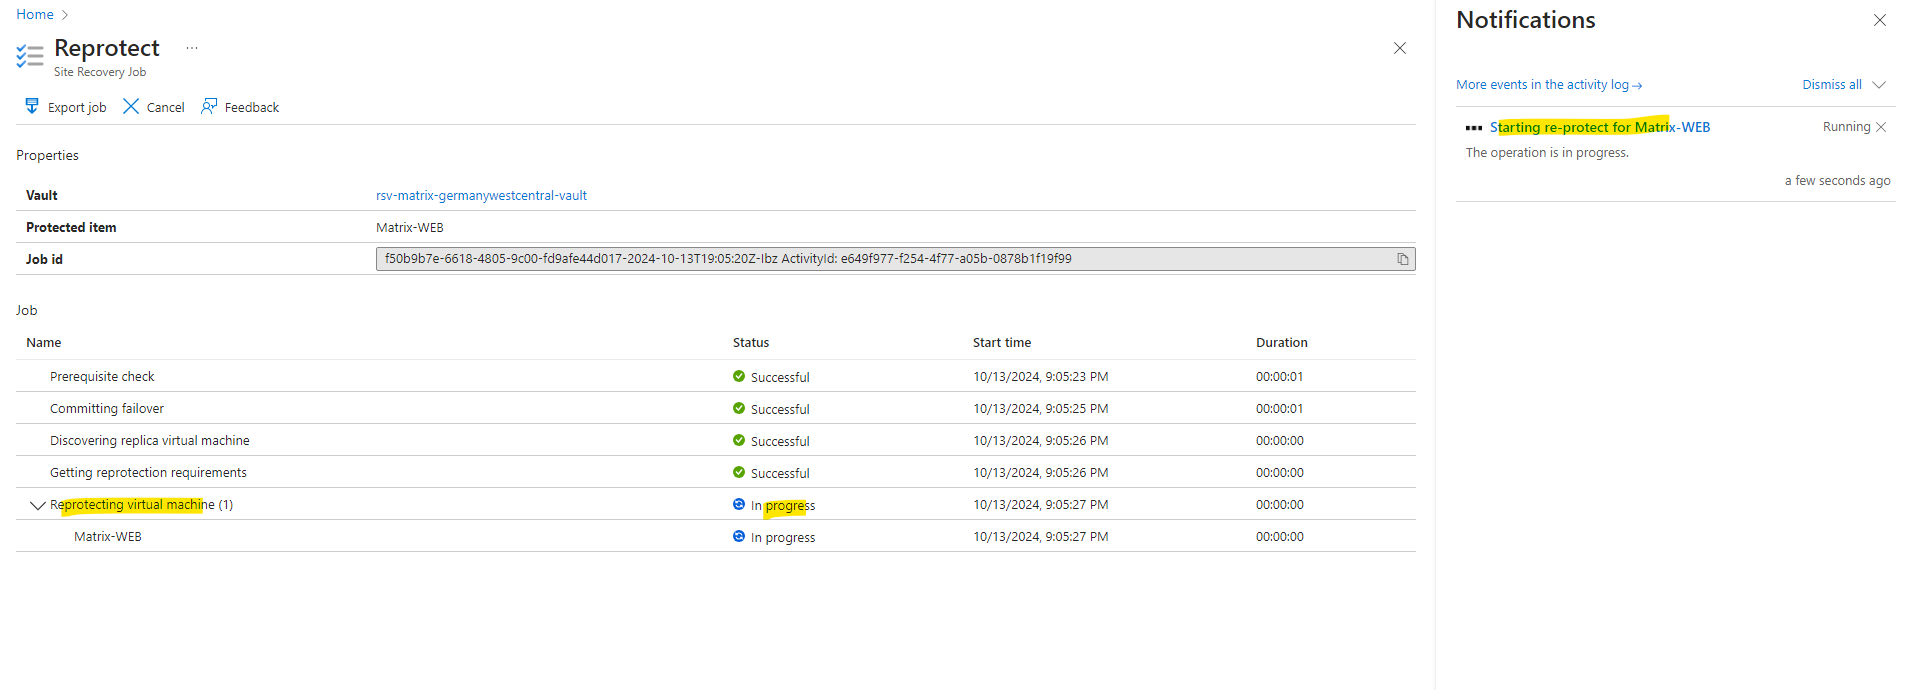
The re-protect process was running successfully.

Now the data will be replicated (synchronized) to on-premise vSphere back.
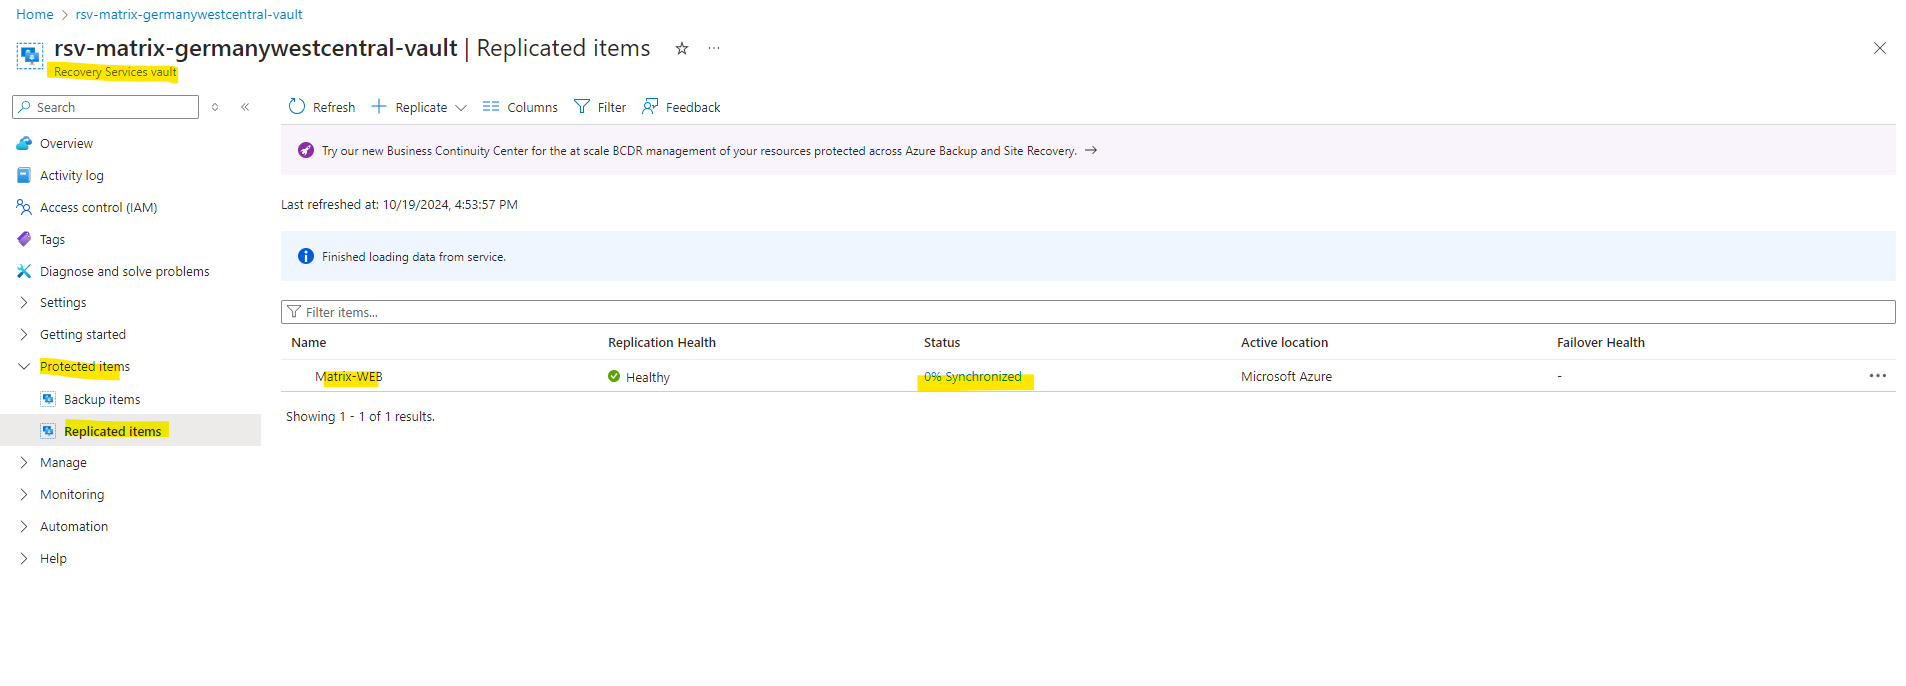
As mentioned the virtual machine in vSphere was powered off by Azure for the re-protecting process to replicate (synchronize) the data back.
Finally the synchronization successfully completed and our virtual machine in Azure we triggered previously the failover is now also protected but this time in on-premises (vSphere).
In Part 4 we will see which traffic between the ASR Appliance and our protected virtual machines will occur and we finally need to allow. Further we will see some troubleshooting in case something doesn’t work as expected.
Links
Prepare source machine for push installation of mobility agent
https://learn.microsoft.com/en-us/azure/site-recovery/vmware-azure-install-mobility-serviceWhat is disaster recovery?
https://learn.microsoft.com/en-us/azure/reliability/disaster-recovery-overviewAbout Site Recovery
https://learn.microsoft.com/en-us/azure/site-recovery/site-recovery-overviewGeneral availability: Simplified disaster recovery for VMware machines using Azure Site Recovery
https://techcommunity.microsoft.com/t5/azure-compute-blog/general-availability-simplified-disaster-recovery-for-vmware/ba-p/3645694