Set up the Squid Proxy Server as a Transparent Proxy on SUSE Linux Enterprise
In my previous post we saw the basics about how to setup Squid on SUSE Linux Enterprise (SLES 15 SP5).
Now in this post we will see step by step how to configure the Squid proxy as a transparent proxy and how to intercept SSL/TLS traffic which is required in transparent mode.
A Squid transparent proxy (also known as an intercepting proxy) is a deployment mode where Squid intercepts network traffic without requiring clients to configure proxy settings in their browsers or applications.
It works by redirecting HTTP or HTTPS requests usually via firewall or router rules directly to the Squid server.
In this mode, users are often unaware that their traffic is being proxied, making it ideal for network-wide content filtering, logging, or access control without manual client configuration.
Transparent proxying requires careful network and SSL handling, especially when intercepting encrypted HTTPS traffic.
Squid Forward Proxy Subtypes supported
As already mentioned, Squid supports two subtypes of forward proxies, the explicit (aka non-transparent proxy) and implicit (aka transparent proxy), and two ways of proxy SSL/TLS traffic, intercepting and non-intercepting.
The explicit proxy needs to be configured on the client with our without authentication and therefore the client is aware of using the proxy. When we configure the proxy on the client, the client is using CONNECT messages to establish a TCP tunnel with the proxy to route HTTP/HTTPS traffic through.
The CONNECT HTTP method requests that a proxy establish a HTTP tunnel to a destination server, and if successful, blindly forward data in both directions until the tunnel is closed.
Source: https://developer.mozilla.org/en-US/docs/Web/HTTP/Reference/Methods/CONNECT
CONNECT www.example.com:443 HTTP/1.1
Host: www.example.com:443
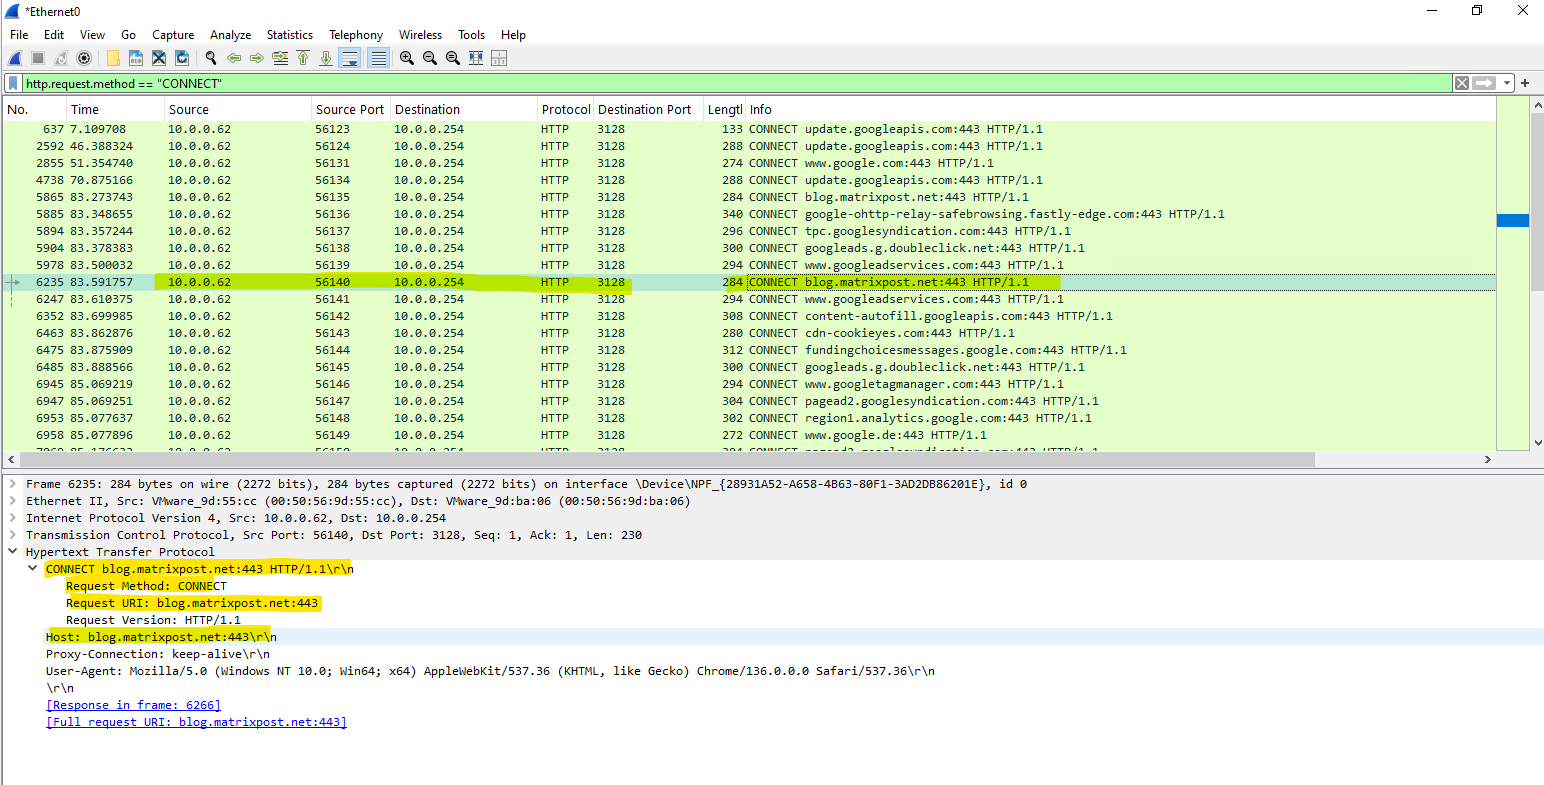
On the client you can also capture the traffic by using WireShark to see these HTTP CONNECT messages.
Display filter
http.request.method == “CONNECT”
When deploying an implicit aka transparent proxy in the network, we doesn’t need to configure this on the clients, therefore the client finally is not aware of using a proxy to connect to remote HTTP/HTTPS sites.
The clients just needs to be configured to route traffic through the proxy.
The proxy here intercepts the HTTP/HTTPS traffic like man-in-the-middle scenarios, it performs decrypting and re-encrypting the traffic between the client and destination.
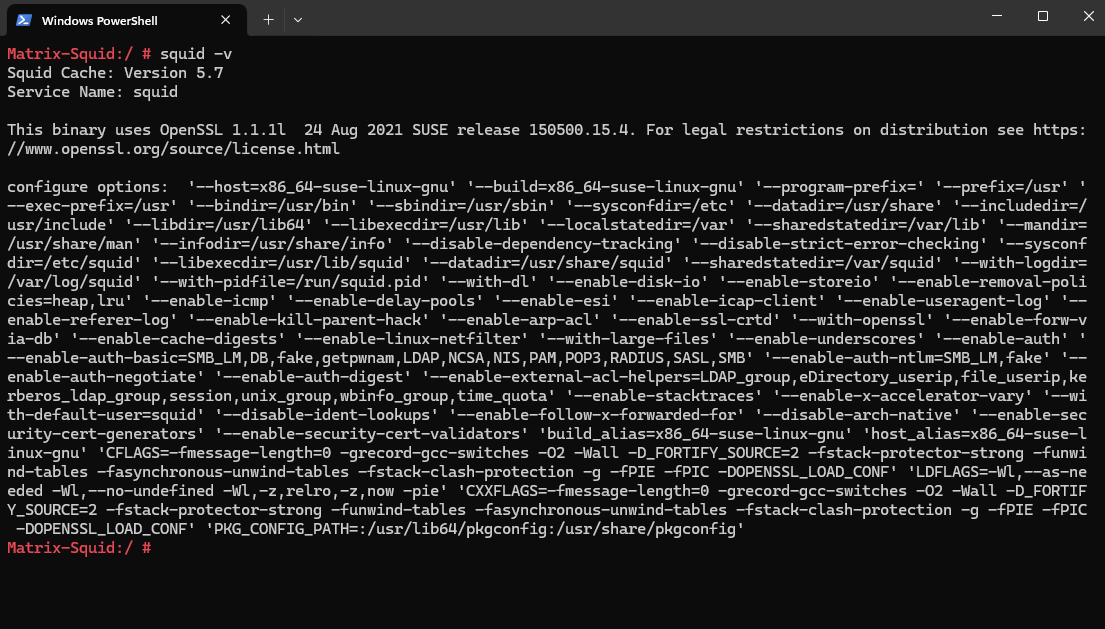
Determine Squid Version and Configure Options
To determine the installed version of Squid, we can run the following command.
# squid -v
This will also print the configure options (flags) as shown below. These flags define Squid’s features and dependencies.
Prerequisites
Linux Netfilter
Further above we saw how to determine the installed version of Squid by using the squid -v command. This command will also print the configure options (flags). These flags define Squid’s features and dependencies.
To configure Squid as transparent proxy we need to make sure the following options are enabled which we can also see when using this command.
Netfilter is Linux’s powerful firewall framework that enables packet filtering, network address translation (NAT), and packet mangling.
- For Linux configure Squid with the
--enable-linux-netfilteroption
On SUSE Linux Enterprise when installing Squid as shown in my previous post, the Linux netfilter option is enabled by default.
Enable IP Forwarding
In transparent proxy mode, Squid intercepts and redirects traffic without requiring client-side proxy settings.
For this to work we need to allow and enable IP forwarding. Therefore we need to add or uncomment the following line in /etc/sysctl.conf. Better create a new file in /etc/sysctl.d/ which ends with a .conf suffix.
If IP forwarding is disabled, the Linux kernel drops packets not destined for its own IP. In contrast for explicit or non-transparent mode, the client established a direct connection to Squid by using CONNECT messages.
Finally reboot the machine.
net.ipv4.ip_forward=1
We can also enable IP forwarding adhoc by just entering the following line into the shell. But they are not persisted and are lost after a system reboot.
# sudo sysctl net.ipv4.ip_forward=1
Sysctl (system control) variables control certain kernel parameters that influence the behavior of different parts of the operating system, for example the Linux network stack.
These parameters can be looked up in the proc file system, in /proc/sys. Many kernel parameters can be changed directly by writing a new value into a parameter pseudo file.
However, these changes are not persisted and are lost after a system reboot. Therefore, we recommend configuring all changes in a sysctl configuration file to have them applied at every system start.
Source: https://documentation.suse.com/de-de/sles/15-SP6/html/SLES-all/cha-sec-sysctl.html
Configure Squid as Transparent Proxy
I will focus in this post just on the configuration of a transparent proxy, about the installation and configuration in general, you can read my previous post.
By default we seen in the configuration file just http_port 3128 which tells Squid to listen for incoming HTTP traffic on port 3128.
This is used by clients they have explicit configured Squid as forward proxy. It will define the socket addresses where Squid will listen for HTTP client requests. You may specify multiple socket addresses.
There are three forms: port alone, hostname with port, and IP address with port. If you specify a hostname or IP address, Squid binds the socket to that specific address. Most likely, you do not need to bind to a specific address, so you can use the port number alone.
Source: https://www.squid-cache.org/Doc/config/http_port/
!!! Note !!!
When configuring Squid in transparent proxy mode we still need the http_port <port number> directive (socket address) without the intercept flag. The port number here finally doesn’t matter and can be changed, it is not used by external clients but for Squid as a valid internal endpoint for routing post-decrypted requests after SSL-Bump (Interception) completes.For each CONNECT request allowed by ssl_bump ACLs, establish secure connection with the client and with the server, decrypt HTTPS messages as they pass through Squid, and treat them as unencrypted HTTP messages, becoming the man-in-the-middle.
To configure and enable Squid as a transparent proxy, we need to add another http_port configuration directive and the intercept flag here as shown below. Restart the Squid service to apply the changes:
Also the client machines needs to be configured of course to route outbound internet traffic through the Squid Proxy, by setting the Squid proxy on the clients as gateway or one of the next hops before finally leaving the internal network.
This configuration is just for unencrypted HTTP traffic, the configuration for encrypted HTTPS traffic we will see further down.
http_port 3129 intercept
As mentioned do not remove the default existing http_port 3128 directive for the minimal configuration below, the port can be changed and is not used by external clients, just internally used by Squid as a valid internal endpoint for routing post-decrypted requests after SSL-Bump (Interception) completes. The Port as also mentioned can be changed and is not used by external clients.
Removing it would break the flow and Squid couldn’t initialize the core HTTP processing subsystem.
Next we need to redirect incoming traffic on Squid to TCP port 3129 for HTTP traffic to intercept. Therefore we can use the iptables command as shown below. Adjust the eth0 network interface to your machine, this is the network interface on which Squid is listening for incoming requests from internal clients.
# iptables -t nat -A PREROUTING -i eth0 -p tcp --dport 80 -j REDIRECT --to-port 3129
If at any point you make a mistake with your configuration, you can flush all existing iptables NAT rules:
# iptables -t nat -F
Or list any existing rules using:
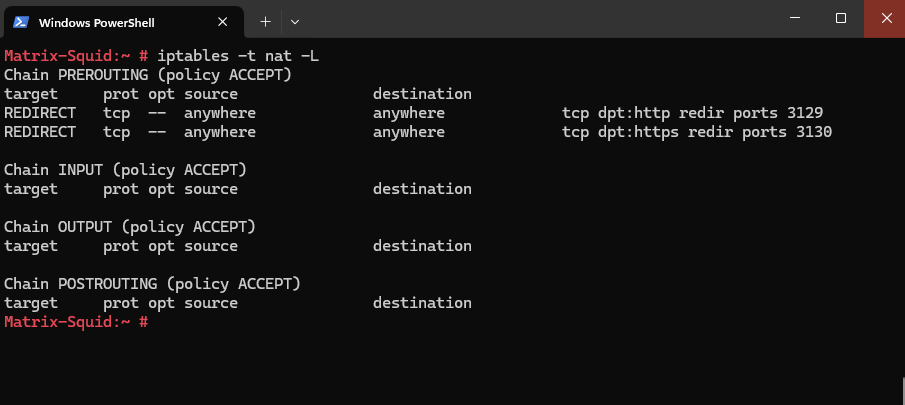
# iptables -t nat -L
To make the iptables NAT rules persistent (so far after a reboot they are gone), we can use different options. At the end of this post I will show how we can do this by creating a systemd daemon.
From now on we can use Squid already as a transparent proxy for pure HTTP traffic which is not encrypted by SSL/TLS.
Browsing to http://neverssl.com/ for example which is using just HTTP.
To configure Squid as a transparent proxy also for TLS (HTTPS) traffic requires SSL interception (MITM) to decrypt, inspect, and re-encrypt traffic.
SSL Bumping below refers to the process of intercepting SSL/TLS connections to decrypt and inspect the content of secure traffic.
First we need to add the following configuration to the /etc/squid/squid.conf file. As previously for the HTTP traffic we now need to add another port for incoming HTTPS traffic, below I will use therefore TCP port 3130 for the new https_port directive.
We also need to define a Certificate Authority (CA) for Squid’s SSL interception (SSL Bump) which will generate dynamic host certificates for the requested destinations of the clients. Below we will see how to create therefore a self-signed certificate which we need to deploy later to our clients as trusted root certificate, otherwise they won’t trust the dynamically generated host certificates.
About how to use a SubCA Certificate therefore and issued by our internal AD CS PKI, you can read my following post.
# Squid default minimal configuration directive - as mentioned do not remove it, the port can be change and is not used by external clients in transparent mode, Squid using it as a valid internal endpoint for routing post-decrypted requests after SSL-Bump (Interception) completes.
http_port 3128

# intercept HTTP traffic (transparent proxy)
http_port 3129 intercept


# Transparent Proxy mode configuration
# Squid HTTPS Explicit
https_port 3130 intercept ssl-bump \
  cert=/etc/squid/ssl/ca.crt \
  key=/etc/squid/ssl/ca.key \
  generate-host-certificates=on dynamic_cert_mem_cache_size=20MB


# Define SSL bumping rules
ssl_bump server-first all
sslproxy_cert_error allow all


# Required ACLs
acl step1 at_step SslBump1
acl step2 at_step SslBump2
acl step3 at_step SslBump3


# Bump all SSL traffic
ssl_bump peek step1
ssl_bump bump step2
ssl_bump splice step3

# Path to Squid's certificate generation helper binary
sslcrtd_program /usr/lib/squid/security_file_certgen -s /var/cache/squid/ssl_db -M 4MB

# Bypass all SSL certificate verification errors from upstream servers
sslproxy_cert_error allow all
To create the Certificate Authority (CA) certificate which Squid is using to generate and issue dynamic host certificates, I will use as mentioned a self-signed certificate.
I was creating therefore the dedicated folder /etc/squid/ssl.
# openssl req -new -newkey rsa:2048 -days 3650 -nodes -x509 -subj "/CN=Squid Proxy CA/O=Matrixpost/OU=IT" -keyout /etc/squid/ssl/ca.key -out /etc/squid/ssl/ca.crt
Set the proper permissions to the /etc/squid /ssl folder, the private key and public certificate.
# chown squid:squid /etc/squid/ssl/*
# chmod 600 /etc/squid/ssl/ca.key
# chmod 644 /etc/squid/ssl/ca.crt
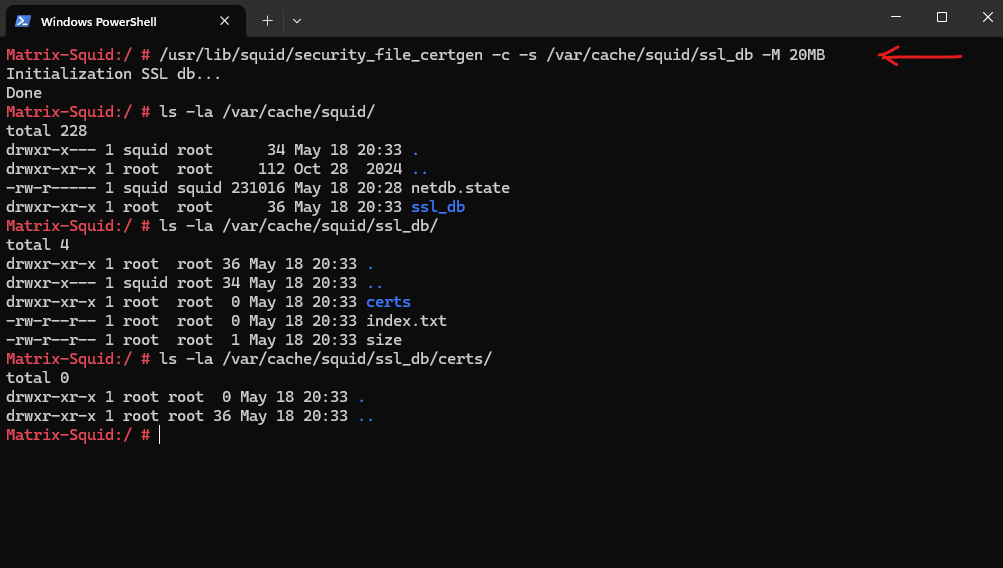
Next we need to generate the SSL Certificate Database.
Run the follwoing security_file_certgen command to create the database:
# /usr/lib/squid/security_file_certgen -c -s /var/cache/squid/ssl_db -M 20MB
-c: Create a new SSL certificate database.
-s /var/cache/squid/ssl_db: Specify the directory where the SSL database will be stored.
-M 4MB: Set the size of the in-memory cache to 20MB. You can adjust this value based on your system’s memory and performance requirements.
After running the command, check that the SSL database files have been created in /var/cache/squid/ssl_db.
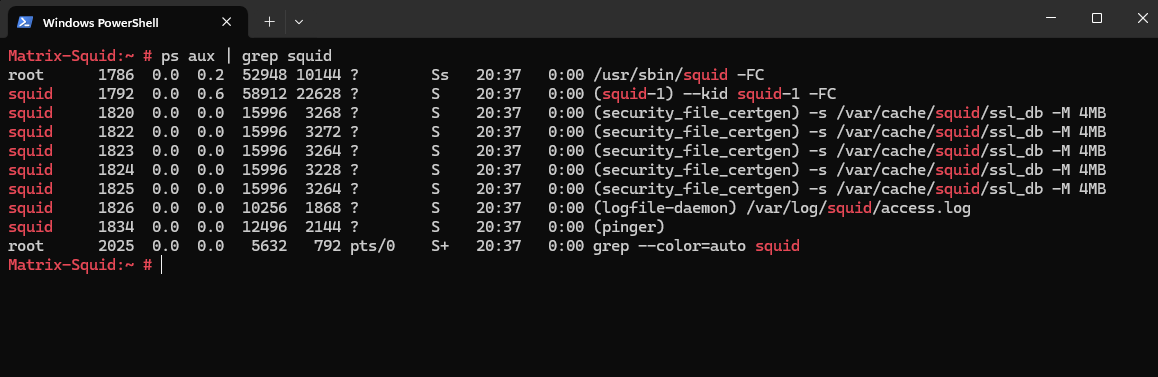
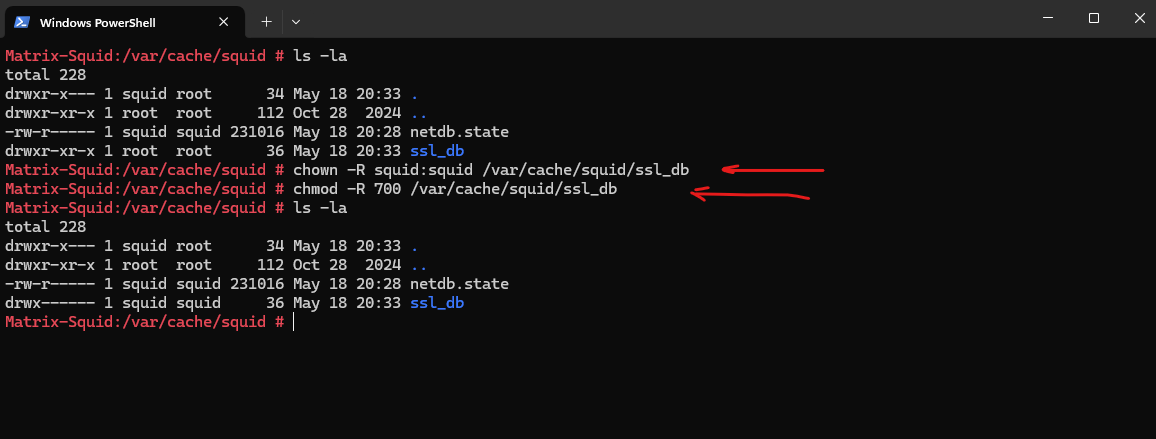
Ensure the directory /var/cache/squid/ssl_db exists and is writable by the Squid user. The ssl_db folder will be created by security_file_certgen command we executed previously.
We can first determine under which user Squid is running.
# ps aux | grep squid
Set the proper permissions to /var/cache/squid/ssl_db.
# chown -R squid:squid /var/cache/squid/ssl_db
# chmod -R 700 /var/cache/squid/ssl_db
Finally we also need to redirect incoming HTTPS traffic on Squid to TCP port 3130 to intercept.
# iptables -t nat -A PREROUTING -i eth0 -p tcp --dport 443 -j REDIRECT --to-port 3130
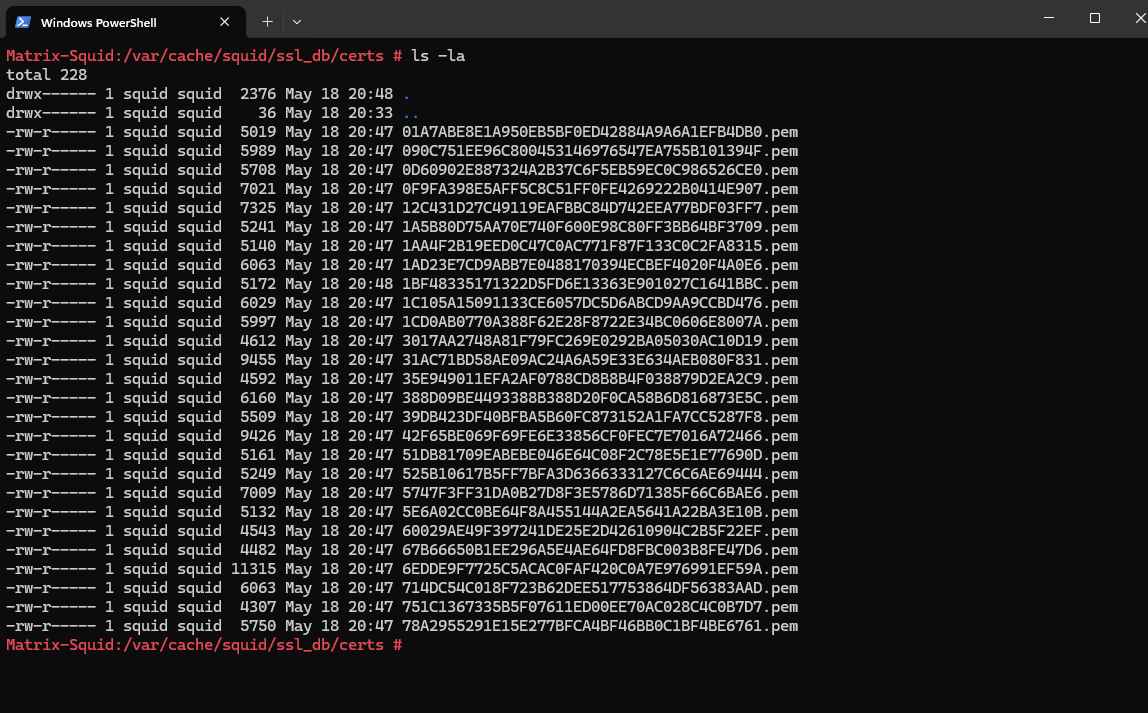
From now on the clients should be able to also browse to HTTPS sites by using the transparent proxy. In the /var/cache/squid/ssl_db/certs path I can already see a bunch of dynamic generated host certificates.
In Squid transparent mode with SSL Bump, dynamically generated host certificates are on-the-fly certificates that Squid creates to impersonate HTTPS websites for inspection.
When a client tries to access https://example.com, Squid: Intercepts the TLS connection (via SSL Bump), Generates a fake certificate for example.com, signed by Squid’s internal CA and presents it to the client to establish a decrypted connection.
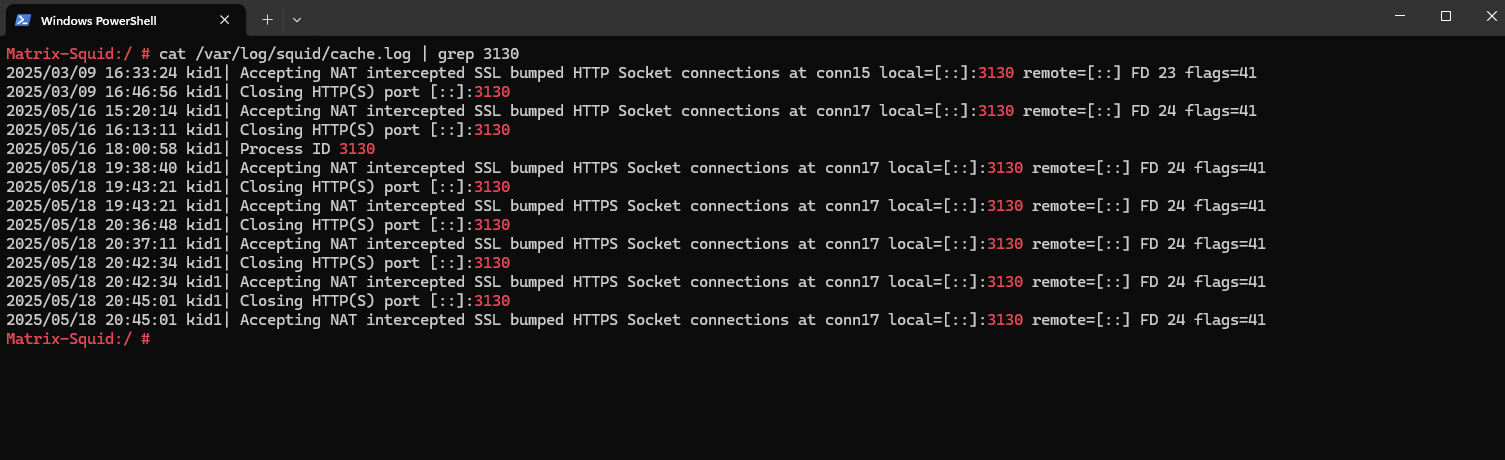
The intercepted connections we can also see in the /var/log/squid/cache.log file.
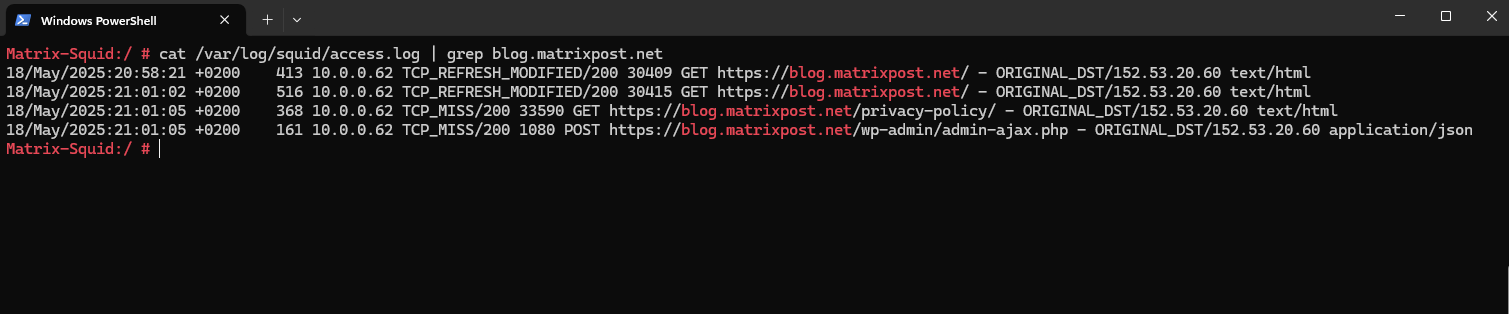
Further we can also check the /var/log/squid/access.log file.
The Squid access log records all client requests processed by the proxy server.
TCP_MISS ==> The content wasn’t in cache and was fetched from origin.
Make the iptables rules persistent
To make these iptables rules persistent, that they are also after a reboot loaded into the kernel, we can use as mentioned different options, below I will show how we can do this by creating a new systemd daemon therefore..
First we need to create a bash script which finally runs both iptables commands we previously executed by hand.
# vi /usr/local/bin/squid-iptables.sh
#!/bin/bash
iptables -t nat -A PREROUTING -i eth0 -p tcp --dport 80 -j REDIRECT --to-port 3129
iptables -t nat -A PREROUTING -i eth0 -p tcp --dport 443 -j REDIRECT --to-port 3130
Then we need to create the new systemd service (daemon).
vi /etc/systemd/system/squid-iptables.service
[Unit]
Description=set Squid iptables rules
After=network.target

[Service]
Type=oneshot
ExecStart=/usr/local/bin/squid-iptables.sh
RemainAfterExit=true

[Install]
WantedBy=multi-user.target
Finally we need to enable and start the new systemd service.
# systemctl enable squid-iptables.service
# systemctl start squid-iptables.service
From now on also after a reboot, the iptables rules are loaded into the kernel.
We can check this by running the following command.
# iptables -t nat -L
Troubleshooting
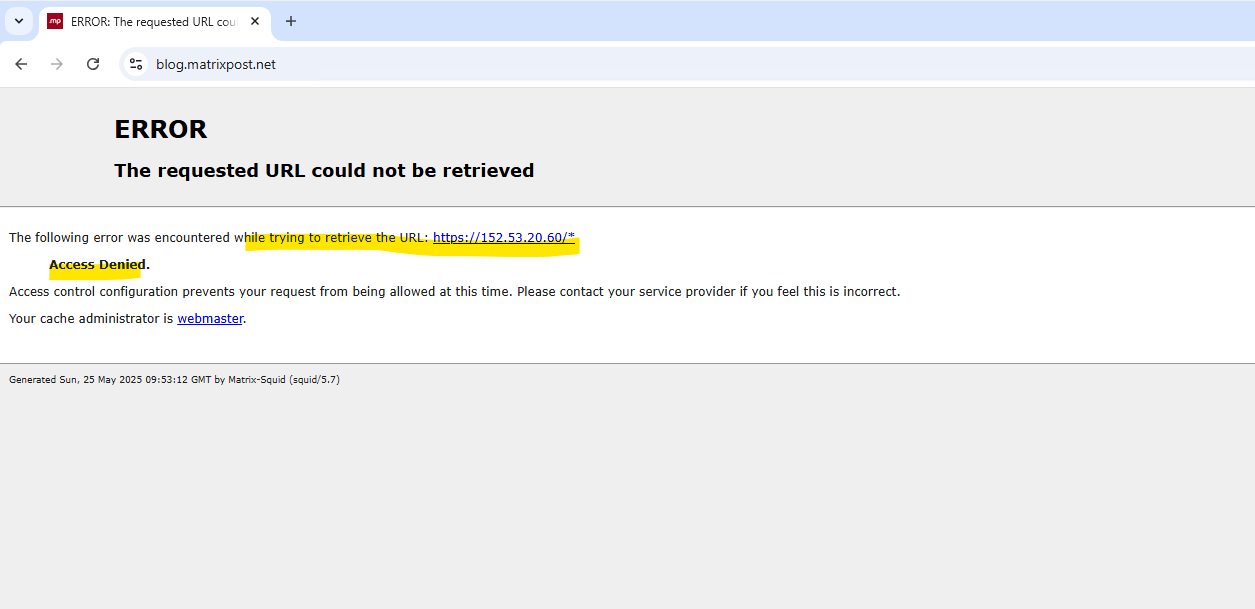
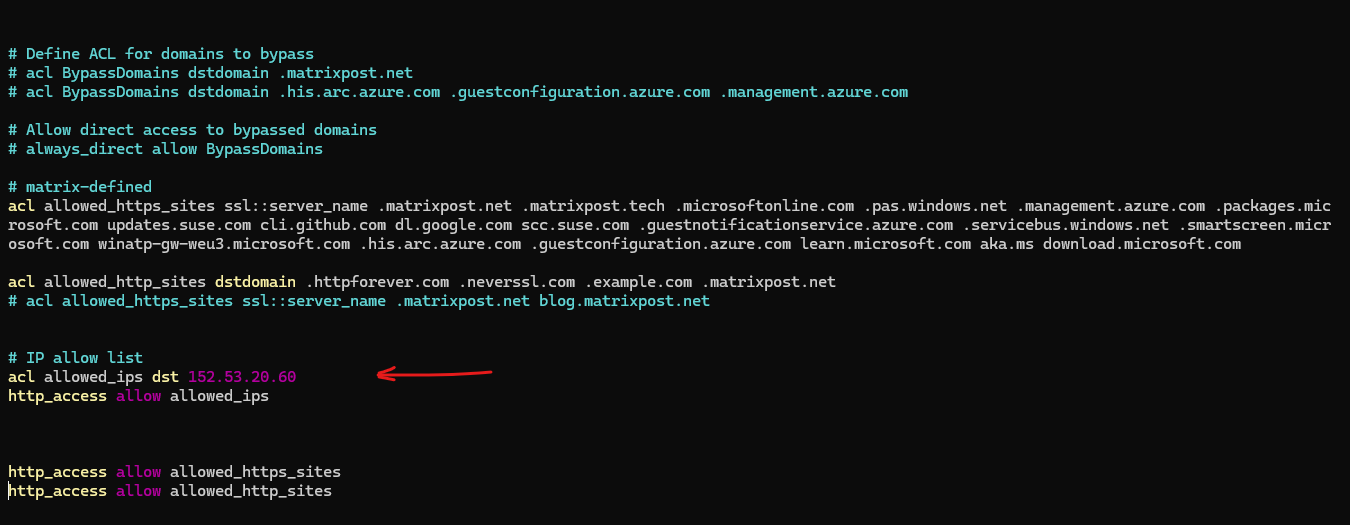
acl allowed_https_sites ssl::server_name | The following error was encountered while trying to retrieve the URL: https://<ip address>/*
When Squid is in forward proxy mode when using SSL bumping and you have configured access control by using the acl allowed_https_sites ssl::server_name directive, you will run into this error in case you have not explicitly allowed the IP address of the destination.
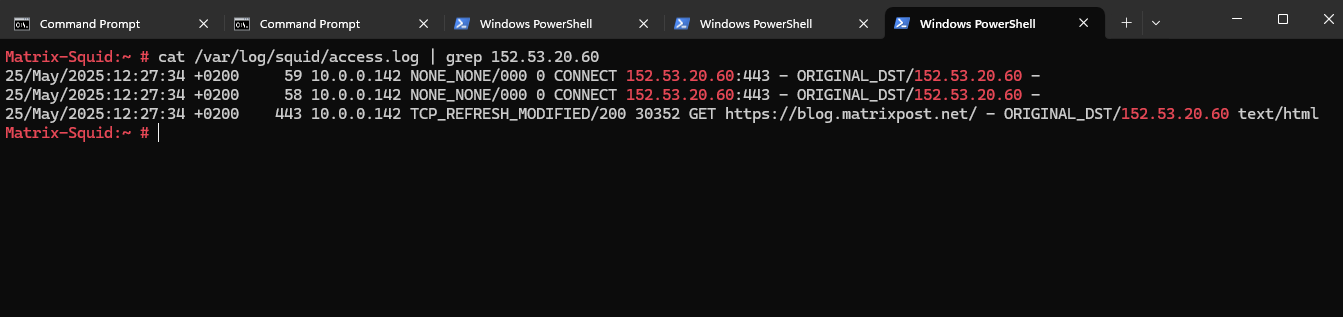
In Squid’s logfile /var/log/squid/access.log we can see the following logs with the TCP_DENIED messages to the destination IP address.
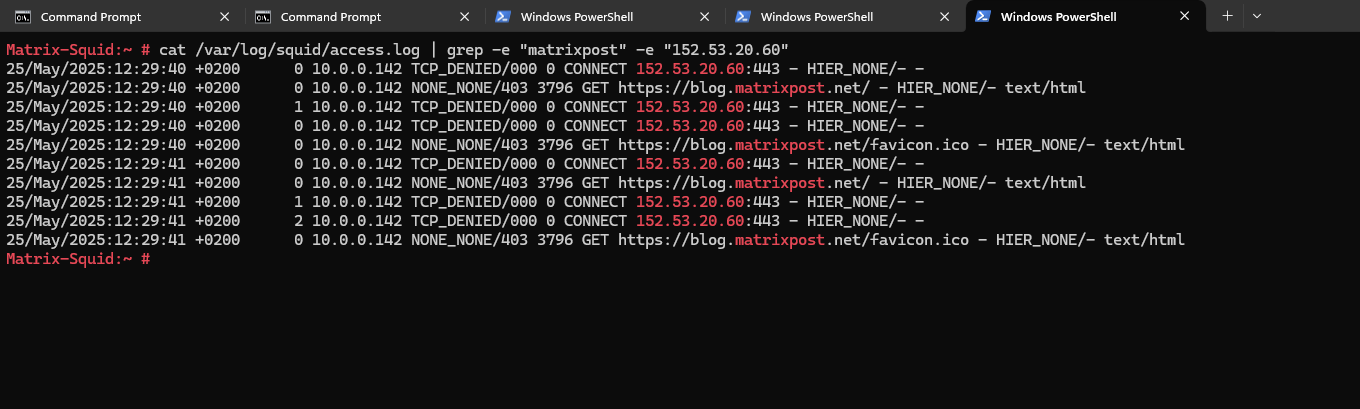
Below I just configured the acl allowed_https_sites ssl::server_name directive to allow access to the wildcard domain .matrixpost.net but not the IP address in which the FQDN finally gets resolved, here 152.53.20.60.
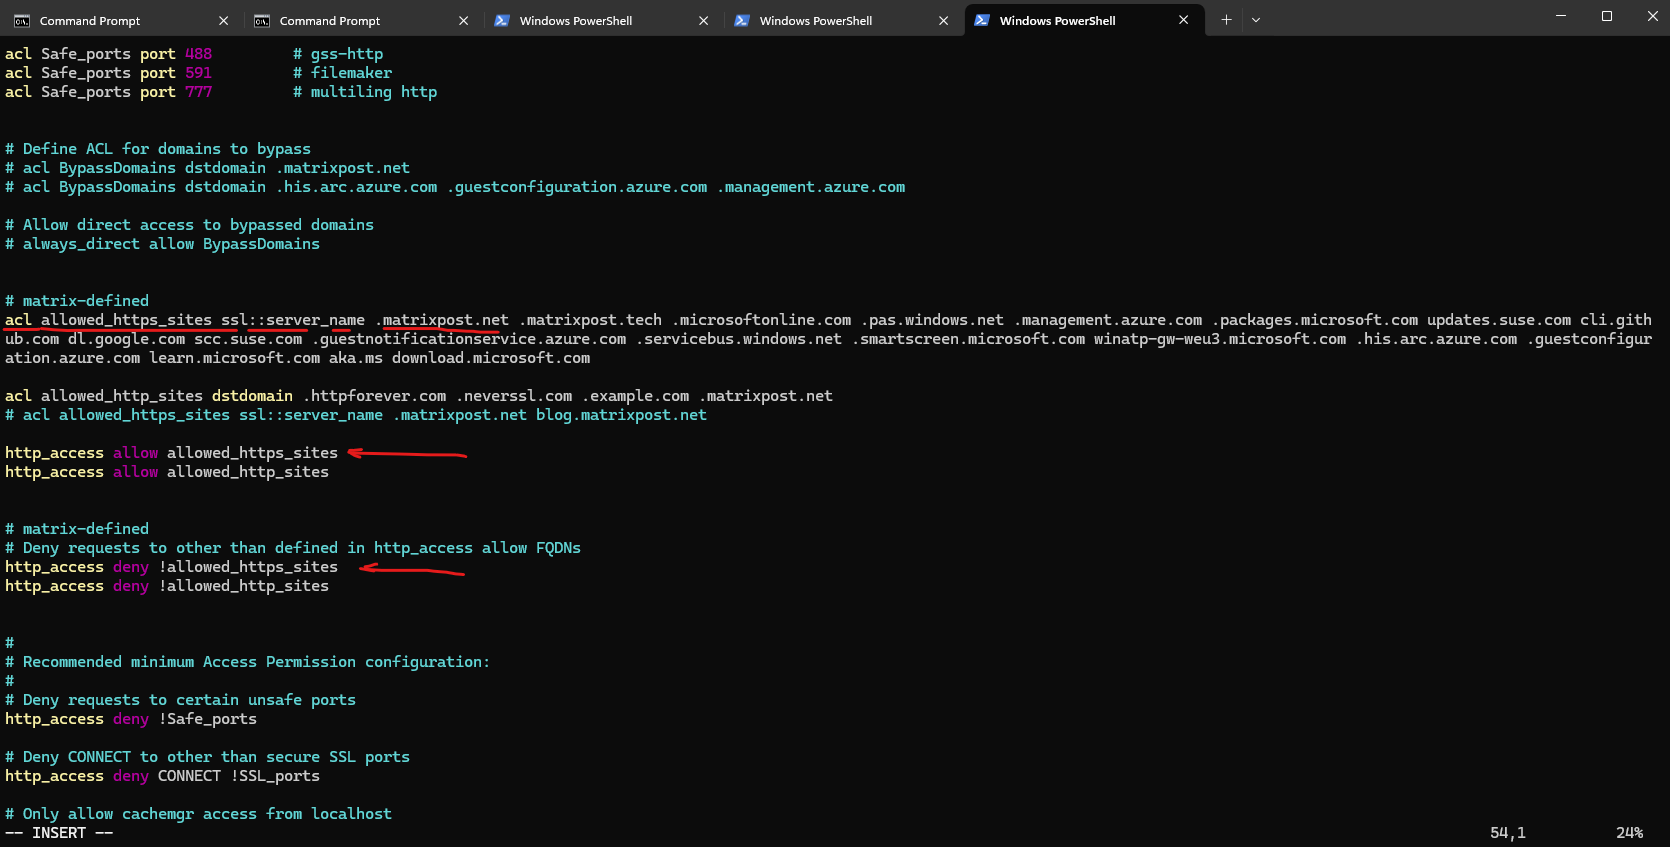
This ACL relies on the ssl::server_name field, meaning Squid can only make an allow/deny decision based on the Server Name Indication (SNI) field sent during the TLS handshake.
Squid checks the domain name, not the IP
Squid cannot resolve hostnames in an ACL like ssl::server_name to automatically allow their IPs in forward proxy mode.
In forward proxy mode, Squid is designed to pass through traffic based on what the client sends (domain or IP). It doesn’t inherently resolve the domain in your ACL to an IP and then compare it to the requested IP.
To workaround this issue we can configure the following IP allow ACLs.
acl allowed_ips dst 152.53.20.60

# or by allowing subnets or network ranges by using CIDR notation
acl allowed_ips dst 152.53.20.0/24

http_access allow allowed_ips
Now it looks good and the client could receive the page.
Links
SSL-Bump using an intermediate CA
https://wiki.squid-cache.org/ConfigExamples/Intercept/SslBumpWithIntermediateCASquid configuration directive ssl_bump
https://www.squid-cache.org/Doc/config/ssl_bump/Feature: Squid-in-the-middle SSL Bump
https://wiki.squid-cache.org/Features/SslBump