Step-by-Step Guide Part 5: How to build your own NetApp ONTAP 9 LAB – Root Squashing
If you’ve ever tried as root to chown, chmod, or just create a file on an NFS-mounted share and were slapped with a “Permission denied” or “Read-only file system” error, welcome to the wonderful world of root squashing.
Originally designed as a security measure in NFS to prevent root users on clients from having root access on the server, root squash maps UID 0 (root) to an unprivileged user like nobody (UID 65534).
While this behavior makes perfect sense for shared or multi-user environments, it becomes a major pain when you’re testing, automating, or just trying to get basic permissions sorted.
This post dives into how root squash affects NFS access in general, and especially how it manifests in NetApp ONTAP environments. We’ll look at what it actually does, how it silently hijacks your access, and how to temporarily or permanently work around it, the safe way.
Whether you’re building out exports in ONTAP or dealing with classic Linux-based NFS servers, knowing when and how root squash applies can save you from hours of head-scratching and broken deployments.
Finally we will also see how to analyze NFSv3 traffic using AUTH_SYS as security flavor for authentication by using TShark and WireShark.
What Exactly Is Root Squash?
Root squash is a long-standing NFS security mechanism that remaps requests coming from UID 0 (the root user) on a client to a non-privileged UID, usually 65534 (aka nobody), when accessing files on the NFS server.
When root squash is active in ONTAP, the root user (UID 0) from the client gets remapped to an anonymous user defined in the SVM. To understand who that is, we can check the Unix users defined inside the SVM.
cluster01::> vserver services unix-user show -vserver <svm name>
cluster01::> vserver services unix-user show -vserver svm_data

So even if you’re root on your Linux box, your actions are neutered on the NFS share, you can’t change ownership, can’t write to certain directories, and certainly can’t chmod your way out of a permission issue. All those actions are done as “nobody”, unless explicitly allowed.
This is designed to prevent privilege escalation or misconfiguration disasters when multiple systems mount the same share, especially in environments where user namespaces aren’t strictly aligned.
Why it matters (and hurts)
- Breaks automation scripts: Anything expecting root access via NFS suddenly fails.
- Hinders initial setup: You can’t set permissions or ownership unless you jump through hoops.
- Silently applies: No big warning, just “permission denied” when you least expect it.
- Painfully NetApp-flavored: In ONTAP and shown further down in this post, it’s enforced via export policies and -superuser settings, which aren’t always intuitive.
Root Squashing enabled on ONTAP Volumes (NFS Exports)
Root squash does not prevent the root user from mounting an NFS share. Even if root squash is enabled, the root user on a client can still mount the exported file system as long as the first option mentioned next will be allowed for the host trying to mount the exported file system.
Traditionally, NFS has given two options in order to control access to exported files.
First, the server restricts which hosts are allowed to mount which file systems either by IP address or by host name.
In case the host on which you want to mount the exported file system is not allowed here, you will run into an mount.nfs: access denied by server while mounting error as shown below.

Second, the server enforces file system permissions for users on NFS clients in the same way it does local users. Traditionally it does this using AUTH_SYS (also called AUTH_UNIX) which relies on the client to state the UID and GID’s of the user. More about securing NFS here.
More about how to mount volumes with a specific protocol version you will find in my following post https://blog.matrixpost.net/mastering-the-different-nfs-protocol-versions-and-its-traffic/#mounting_specific_protocol_version
SLES15-SP6-Testing01:~ # mount -t nfs -o vers=3,proto=udp,rw 10.0.0.226:/vol_data01 /nfs-share
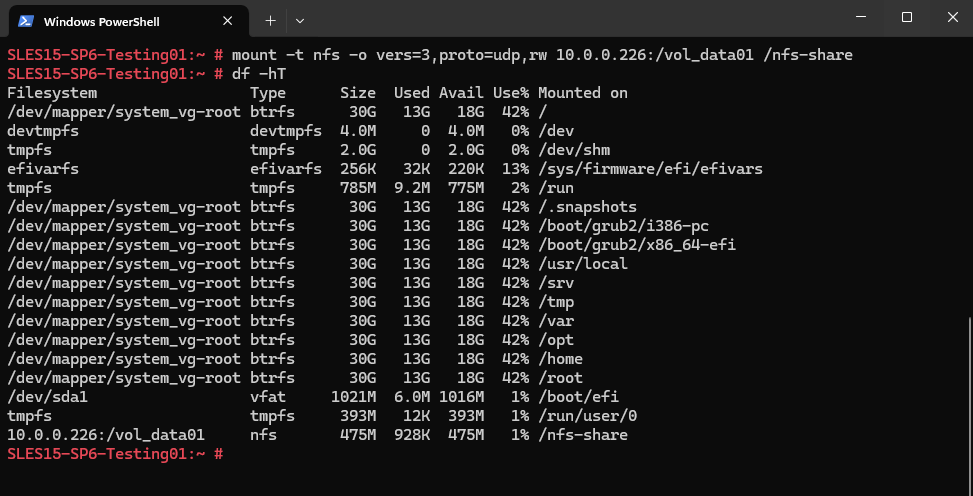
An interesting point to mention, even if above for the mount command not set explicitly, the so called security flavor for NFSv3 is set by default to sec=sys as highlighted below.
If this would be set to null instead, NFSv3 would silently fall back to AUTH_NULL which means the client sends no UID/GID info.
ONTAP (or any NFS server) would then treat the request as coming from an anonymous user (typically UID/GID 65534). That maps to nobody, causing permission denied or incorrect ownership.

So finally Root squash does not prevent the root user from mounting the exported file system because mounting an NFS export is controlled by:
- Export policy (-clientmatch field),
- RO / RW rules, and
- Network-level access not file system access
If the client IP is allowed and RW access is granted, the NFS share can be mounted, regardless of who is running the command.
The export policy below e.g. will allow the client with the IP address 10.0.0.89 network-level access (RO / RW).
cluster01::> export-policy rule create -vserver svm_data -policyname nfs_policy -ruleindex 1 \
  -clientmatch 10.0.0.89 -rorule any -rwrule any

# root squash disabled by adding the -superuser any or sys flag
cluster01::> export-policy rule create -vserver svm_data -policyname nfs_policy -ruleindex 1 \
  -clientmatch 10.0.0.89 -rorule any -rwrule any -superuser any
Once mounted, any file operations performed by UID 0 (i.e., root) are executed as the anonymous user (usually UID 65534), unless explicitly allowed via disabling root squash (-superuser any or -superuser sys).
-superuser any ==> Root access is preserved regardless of authentication method
-superuser sys ==> Root access is preserved only if the client authenticates using UNIX auth (AUTH_SYS)AUTH_SYS is the default authentication method for traditional NFS (v3 and v4), it passes UID/GID info over the wire without encryption.
If a client uses something like Kerberos (e.g., AUTH_KRB5), then even with -superuser sys, root won’t be preserved, you’d need -superuser any for that.
When accessing a NetApp NFS export, two distinct layers of access control come into play (already above mentioned two options):
- Layer 1 ==> Export Policy ==> Who can connect, and how (read/write, root squash, etc.) defined in NetApp (ONTAP)
- Layer 2 ==> UNIX File Permissions ==> What that user can do once connected.
Both layer need to allow access for operations like reading, writing, or modifying files to succeed. Once the export policy lets the client in, the actual access to files and directories is determined by standard UNIX permissions.
How to mount Volumes (NFS Exports) without needing sudo (non-root users)
So in case we enable root squash as security measure, we can still mount the exported file systems as root user. By default, only the root user can perform mount operations on most Linux systems. But with a few safe adjustments, we can also allow normal users to mount NFS volumes.
One method to allow non root user to mount NFS volumes is to use the /etc/fstab file as shown below. This is the most common and cleanest approach. Add the entry marked below.
10.0.0.226:/vol_data01 /nfs-share nfs noauto,user,rw,vers=3 0 0
rw: Read-write access
user: Allows a single non-root user to mount it
noauto: Prevents auto-mounting at boot, user must run the mount manually. Also mount -a will not mount the exported file system. More about more -a here.
sec=sys as mentioned will be set by default under the hood for NFSv3.
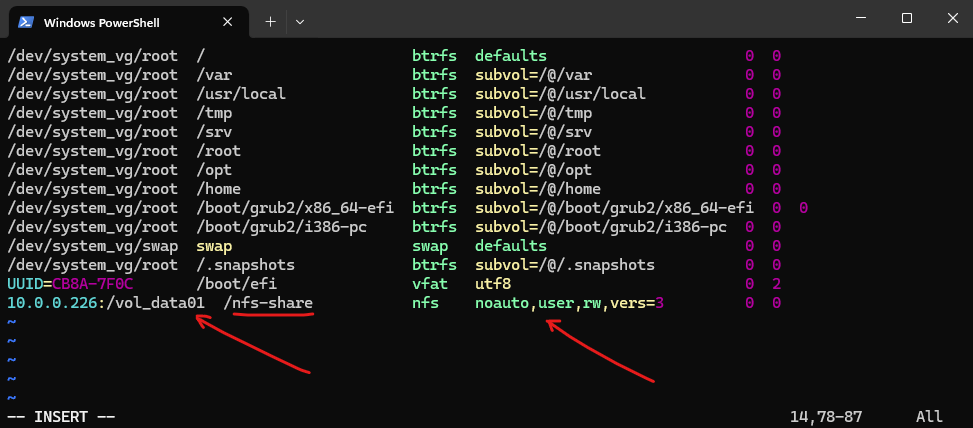
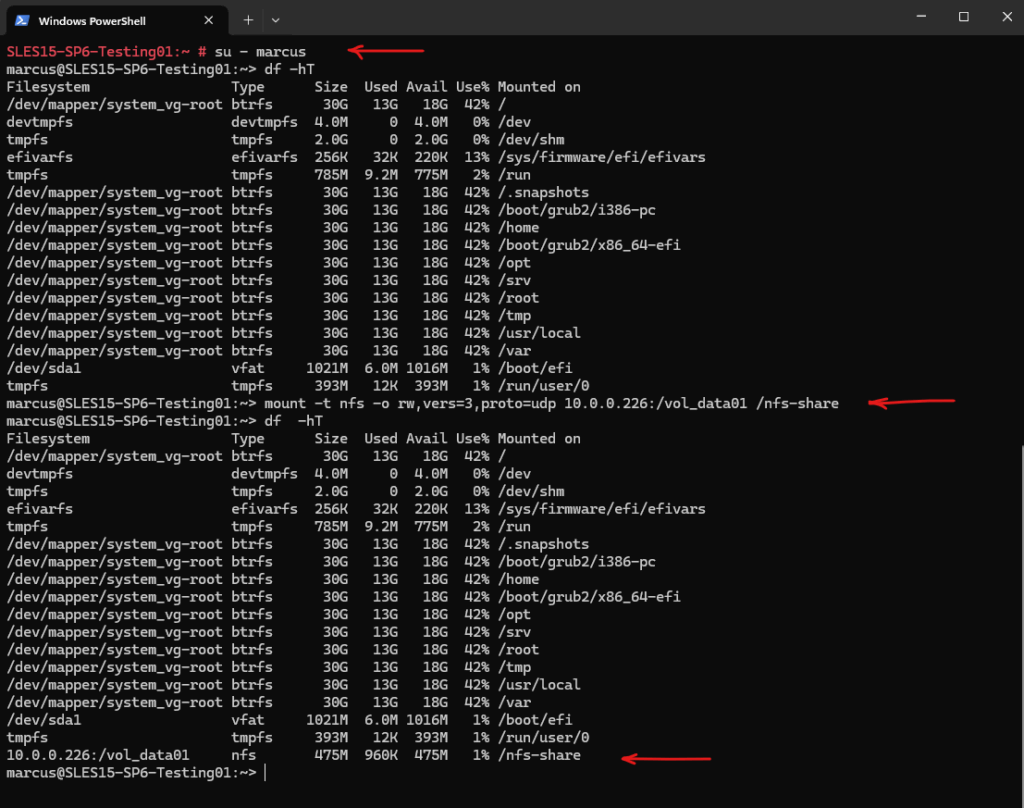
To try if it works I will now switching to my non-privileged user marcus with a full login shell (su – username). Looks good and works.
# su - marcus
:~> df -hT
:~> mount -t nfs -o rw,vers=3,proto=udp 10.0.0.226:/vol_data01 /nfs-share
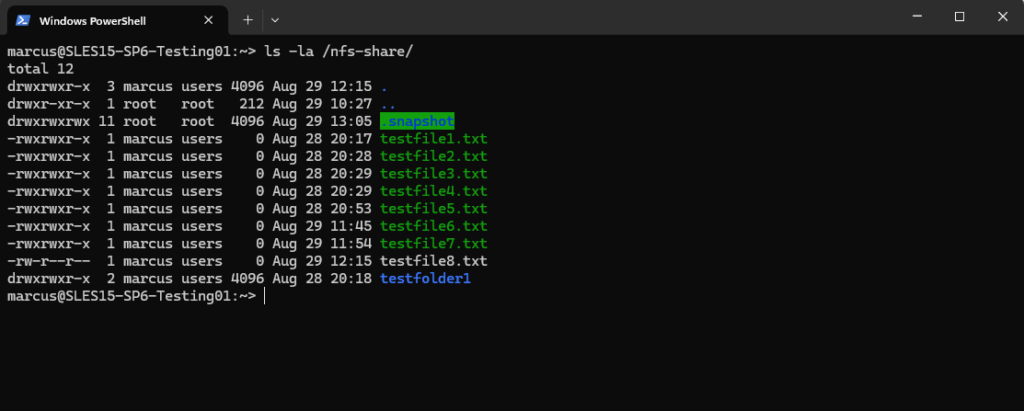
Btw. you will see that all files and the folder already owned by my user marcus and the group users, I was adjusting them by first disable root squash as shown below.
Changing Ownership and Permissions for Volumes by temporarily allow root access
In case of root squash is enabled, we need to change the ownership and permissions of the exported file system files and folders to some users and groups different from root if not already done.
Change owner and permission directly on the client where the exported file system is mounted. First allow temporarily root access by disabling root squash. We can then use the root user to modify the owner and permissions for our desired volume we want to change.
To disable root squash run one of the following commands for the SVM which exports our desired file system.
-superuser any ==> Root access is preserved regardless of authentication method
-superuser sys ==> Root access is preserved only if the client authenticates using UNIX auth (AUTH_SYS)
cluster01::> vserver export-policy rule modify -vserver svm_data -policyname nfs_policy -ruleindex 1 -superuser any

or by setting -superuser sys
cluster01::> vserver export-policy rule modify -vserver svm_data -policyname nfs_policy -ruleindex 1 -superuser sys

I will first change the ownership from root:root to marcus:users.
# chown -R marcus:users /nfs-share/
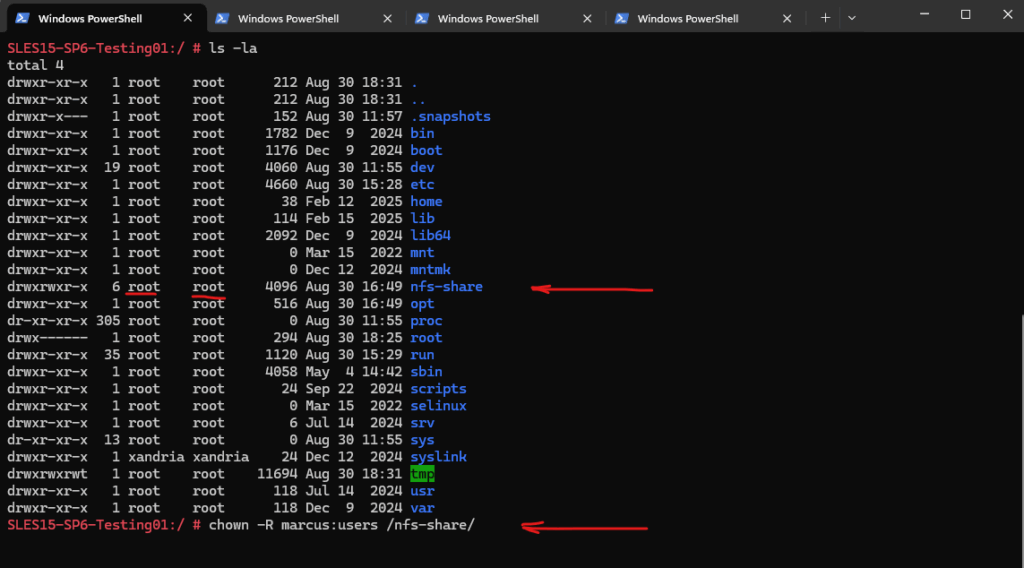
Next I will change the permissions to 755.
# chmod -R 775 nfs-share/
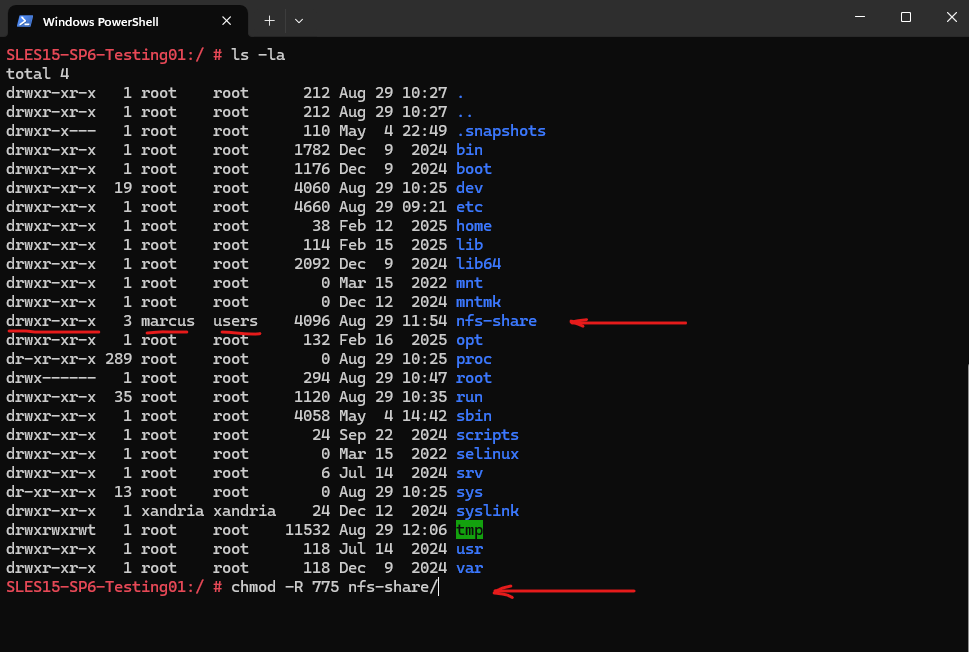
Finally we changed successful the ownership and permission for our volume (NFS export).
# ls -la
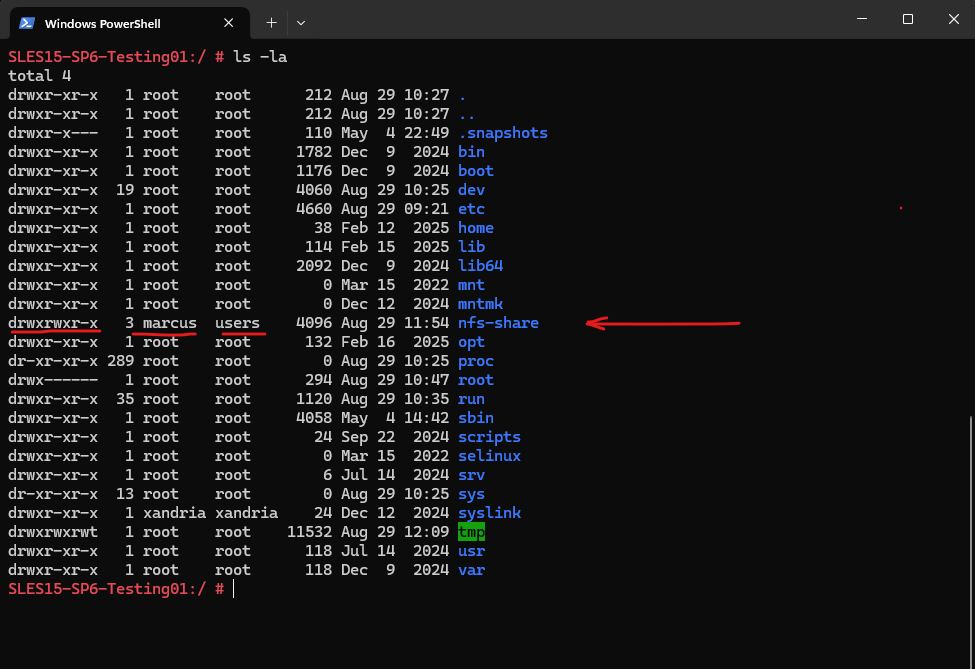
We can enable root squash again if wanted or required.
cluster01::> vserver export-policy rule modify -vserver svm_data -policyname nfs_policy -ruleindex 1 -superuser none

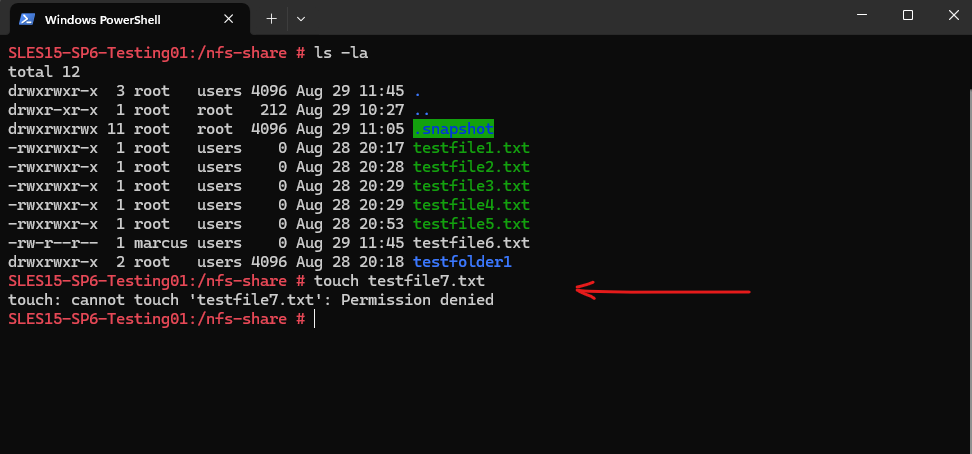
Looks good, the root user doesn’t have anymore write permissions on the volume.
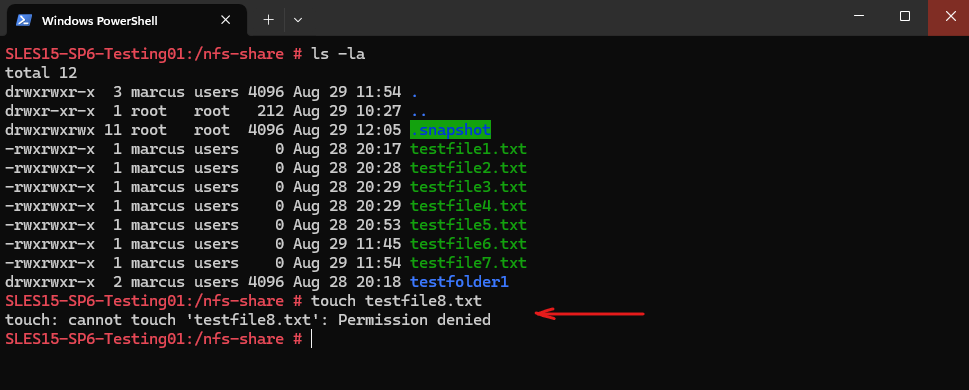
My user marcus in contrast will have write permissions and is also the owner of the volume and therefore from now on is also able to adjust the permissions.
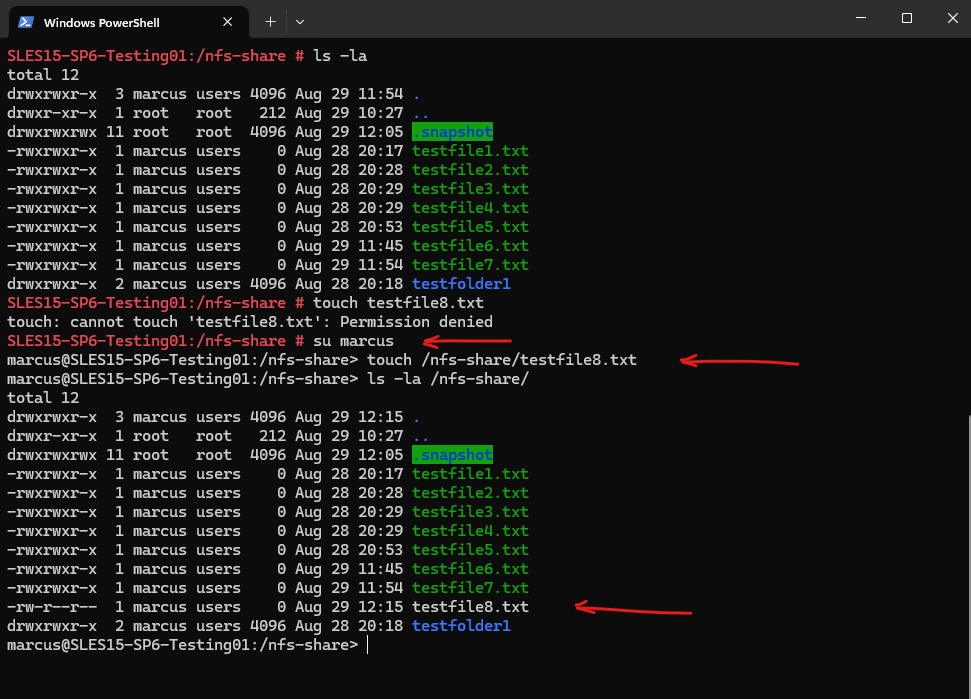
Check the volume’s security style and permissions in ONTAP. The new owner and permissions are set successfully on the volume.
cluster01::> vserver security file-directory show -vserver svm_data -path /vol_data01
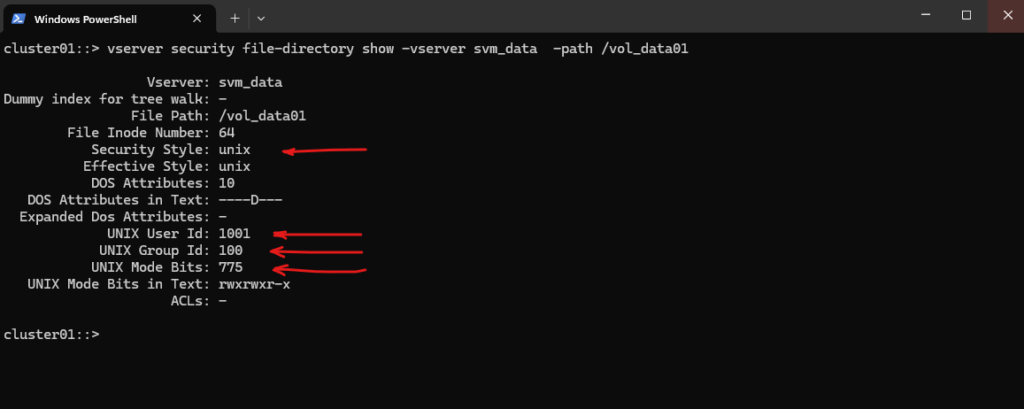
Unix User Id 0 ==> root user
Unix User Id 1001 ==> marcus user
Unix Group Id 100 ==> users group
Unix Group Id 0 == root group

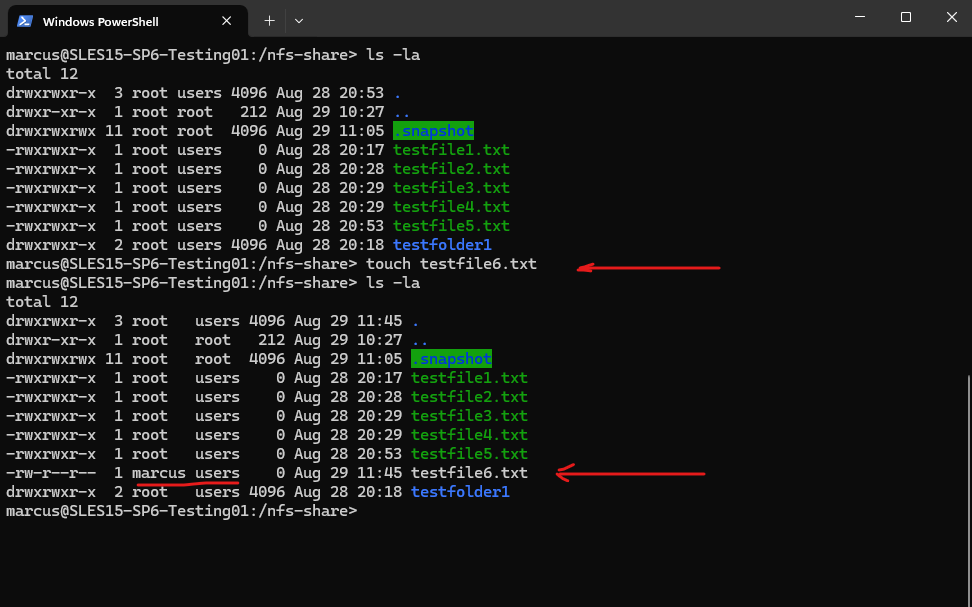
The user marcus (Unix User Id 1001 / Unix Group Id 100) now can create new files on the volume.
The root user doesn’t have write access because of root squash enabled.
Analyzing NFSv3 Traffic using TShark to see AUTH_SYS authentication in Action
To see how AUTH_SYS works under the hood we can use TShark, the command-line version of Wireshark, a powerful tool for capturing and analyzing network traffic on Linux.
On the machine I have mounted the NFS exported file system by ONTAP, I will open a second SSH session to capture all traffic from ONTAP’s SVM (IP 10.0.0.226).
# tshark -i eth0 -f "host 10.0.0.226" -w /opt/capture14.pcapng

Then I will create on this machine a new folder (testfolder4) on the exported file system by ONTAP.
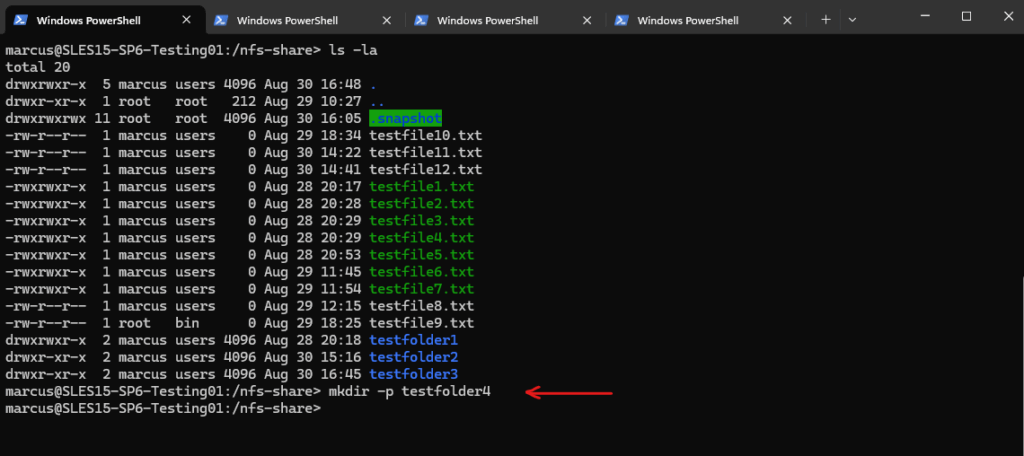
Next I will download the capture file to my Windows notebook to open it with WireShark in order to analyze the traffic.
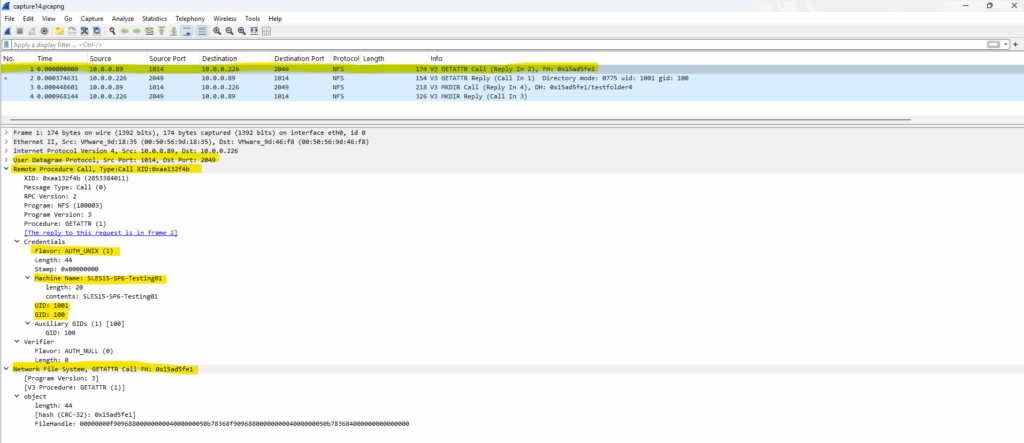
The first packet/frame (No.) shown below in WireShark is send from my Linux client (IP 10.0.0.89) where the NFS export is mounted to my NetApp ONTAP’s SVM (IP 10.0.0.226) where the volume is mounted to a path within the VM, here /vol_data01 as shown in Part 2.
GETATTR is a Remote Procedure Call (RPC) method in the NFSv3 protocol used to retrieve metadata about a file or directory.
NFS uses file handles (opaque binary tokens) instead of pathnames, below shown as FH: 0x15ad5fe1. All subsequent operations use file handles, this makes NFS stateless. The client is querying attributes (like permissions, ownership) of a file or directory identified by the given File Handle.
We also see below the already mentioned security flavor with Flavor: AUTH_UNIX (1). Also known as AUTH_SYS is what we actually wanted to analyze here.
The client sends here its UID (user ID) and GID (group ID) directly in the RPC header, below shown listed with UID: 1001 (user marcus) and GID: 100 (group users).
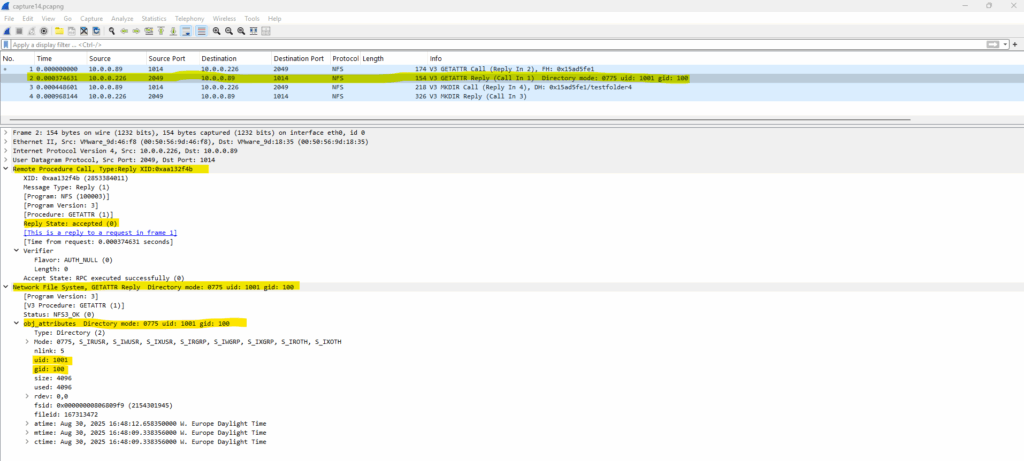
The second packet/frame (No.) is the reply from ONTAP’s SVM where the volume (NFS Export) is mounted to a path within the SVM.
The GETATTR Reply we’re seeing in the NFS response provides important metadata about a file or directory.
Directory mode: 0775 uid: 1001 gid: 100 means the NetApp NFS server (SVM) is returning the POSIX attributes for the file or directory requested in the GETATTR call.
So the directory is accessible by the owner and group (full permissions), and readable/executable by others.
The UID 1001 and GID 100 is the user id and group id of my user marcus which I was set as owner for the exported file system previously further above.
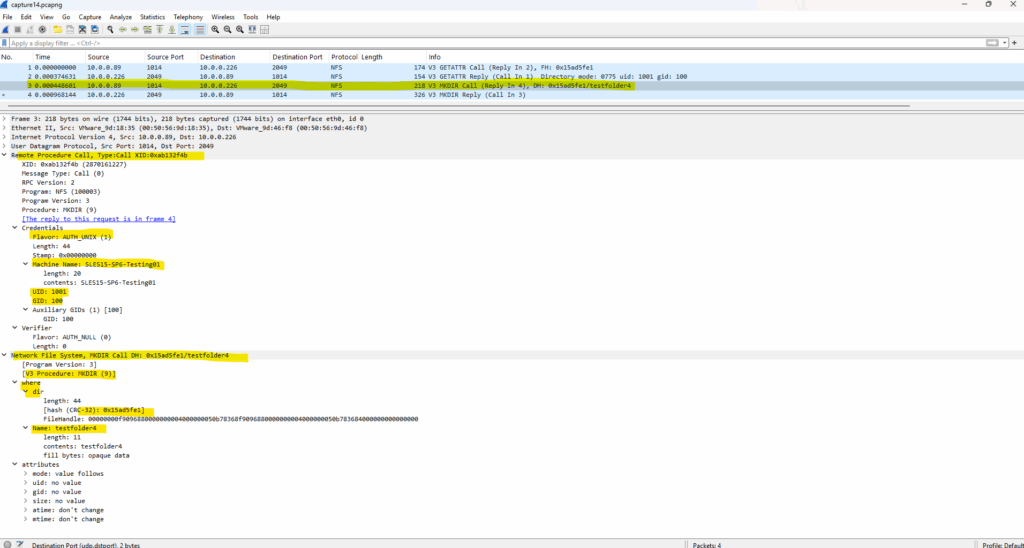
The third packet/frame (No.) is again from my Linux client (IP 10.0.0.89) send to ONTAP’s SVM and is used to request the creation of a new directory on the server.
MKDIR is an NFSv3 RPC procedure used to request the creation of a new directory on the server. DH stands for Directory Handle, which is the file handle of the parent directory where we’re trying to create the new folder.
The hex value, here 0x15ad5fe, is a shortened representation of that NFS file handle (FH) shown already in packet/frame (No. 1) which is used for all subsequent operations as mentioned.
Finally the client is saying: “Hey NFS server, in the directory identified by file handle 0x15ad5fe previously, please create a subdirectory called testfolder4.”
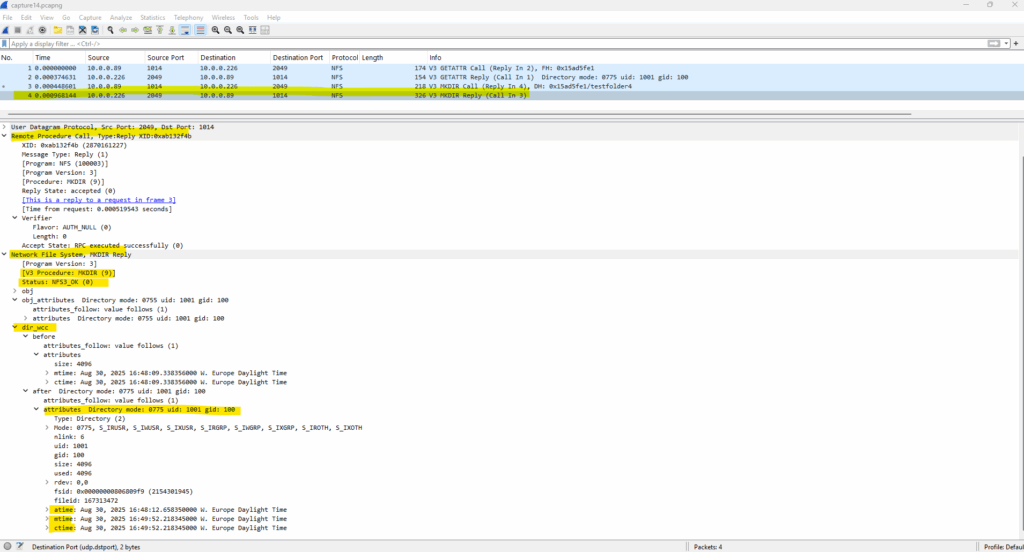
Finally the last packet/frame (No.) is the reply from ONTAP’s SVM about the successful directory creation via NFSv3.
NFS3_OK (0) is the status code for a successful operation in the NFSv3 protocol. In this context here “The server successfully created the directory testfolder4 under the specified parent directory.”
atime → last access time
mtime → last modification time
ctime → last metadata change time
More about capturing and analyzing network traffic on Linux by using TShark and WireShark, you will find in my following post.
In Part 6 we will see some pitfalls when mounting NFSv4 shares.
Links
NFS Security with AUTH_SYS and Export Controls
https://docs.redhat.com/en/documentation/red_hat_enterprise_linux/7/html/storage_administration_guide/s1-nfs-securityConfigure root squash for Azure Files
https://learn.microsoft.com/en-us/azure/storage/files/nfs-root-squash?tabs=azure-portal
Related Posts
Latest posts
Deploying NetApp Cloud Volumes ONTAP (CVO) in Azure using NetApp Console (formerly BlueXP) – Part 5 – Backup and Recovery
Follow me on LinkedIn


