Step-by-Step Guide Part 6: How to build your own NetApp ONTAP 9 LAB – NFSv4 Pitfalls
When you switch from NFSv3 to NFSv4, things definitely change under the hood, and suddenly your permissions or ownership mappings may break, even if everything looks perfect on paper.
Why NFSv4 behaves differently, why it breaks UID/GID-based access, and how to solve it specifically for NetApp ONTAP environments we will see in this post.
Introduction
AUTH_SYS (formerly known as AUTH_UNIX) is the default authentication mechanism used in traditional NFS (Network File System) environments, particularly NFSv3 and optionally in NFSv4.
Instead of relying on central authentication servers or cryptographic verification, AUTH_SYS uses simple Unix-style identity checks: the client includes the UID (User ID) and GID (Group ID) of the local user in each RPC (Remote Procedure Call) request.
The NFS server then evaluates access based on those numeric IDs, trusting that the client is correctly identifying the user. Because of this, AUTH_SYS is considered a trust-based and non-secure mechanism. It works well in controlled, homogeneous environments where all systems share the same UID/GID assignments, such as those managed via NIS or LDAP.
However, because there’s no cryptographic validation, it’s vulnerable to spoofing and thus unsuitable for untrusted networks without additional security layers (like Kerberos).
While NFSv4 retains backward compatibility with AUTH_SYS, it introduces more advanced and secure authentication options, such as Kerberos (sec=krb5). But even when AUTH_SYS is used with NFSv4, the behavior changes significantly.
Unlike NFSv3, where UIDs and GIDs are directly transmitted in the RPC requests, NFSv4 requires string-based identities in the form of username@domain (e.g., marcus@matrixpost-lab.net).
This means that the NFS client must perform ID-to-name mapping (usually via idmapd) before sending the request, and the server must map that string back to a UID/GID.
This change enhances cross-platform compatibility and better supports centralized identity management, but it also introduces complexity.
If the client and server aren’t aligned in domain settings or name resolution (e.g., /etc/idmapd.conf and local /etc/passwd entries), users may be mapped to nobody (UID 65534), resulting in permission denied errors.
NFS Security Flavors (a.k.a. Authentication Methods)
Regardless of NFS version (v3 or v4), clients can negotiate the security flavor (aka sec= option), which determines how authentication is done.
| Security Flavor | Description | Supported In | Notes |
|---|
AUTH_SYS (sec=sys) | Default method using UID/GID (numeric) | NFSv2, v3, v4 | Simple, legacy. Relies on matching UID/GID across systems. |
AUTH_KRB5 (sec=krb5) | Kerberos authentication (user ID proof) | NFSv4 (often backported to v3 in some stacks) | Requires a KDC, proper client/server keytabs. |
AUTH_KRB5i (sec=krb5i) | Kerberos + integrity (message signing) | NFSv4 | Prevents tampering. |
AUTH_KRB5p (sec=krb5p) | Kerberos + privacy (encryption) | NFSv4 | Provides encryption for data in transit. |
| AUTH_NULL | No authentication at all | Mostly v2/v3, rarely used in practice | Effectively anonymous access; extremely insecure. |
Mount NFS Exports in NFSv4
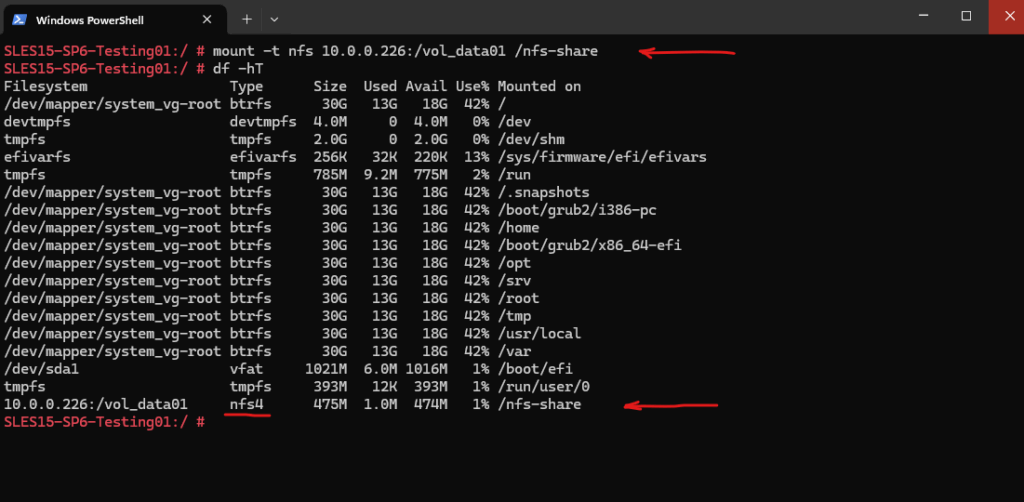
The first pitfall is when we want to use NFSv4 and still stick to AUTH_SYS for authentication. Below for example I will just mount the exported file system by NetApp ONTAP (SVM) by using the -t flag but no further options using the -o flag.
# mount -t nfs 10.0.0.226:/vol_data01 /nfs-share
In case both, the NFS server and client will support NFS version 4, this command will mount the share by using NFSv4 protocol in case we will not set explicitly the option -o vers=3 flag.
Now our permissions and ownership mappings we set in Part 4 seems to be broke like shown below, we run into a permission denied error when trying to create a new file or folder (using my user marcus which actually is owner here).
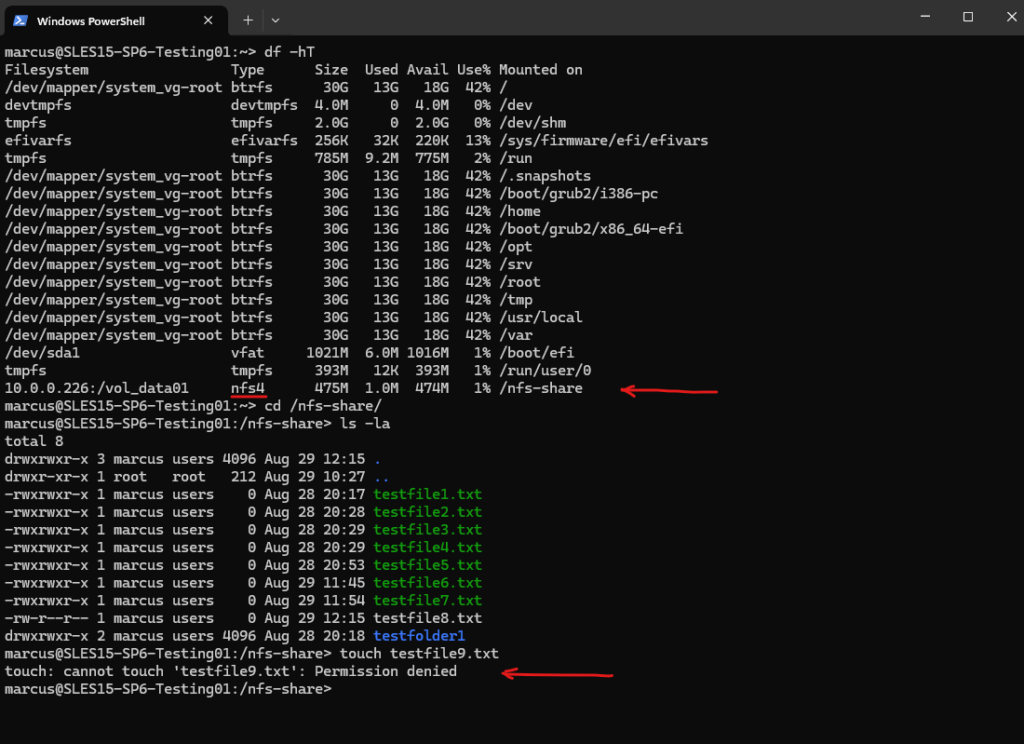
The reason for is that we mounted the exported file system previously without any mount options specified by the -o options flag. Finally this command will set implicitly the sec=null flag for NFSv4 which will break UID/GID-based access (AUTH_SYS authentication).
Unlike NFSv3, NFSv4 doesn’t assume AUTH_SYS (aka sec=sys) by default because NFSv4 was designed with stronger security in mind.
NFSv4 was created with Kerberos-based authentication (sec=krb5) in mind as the default and preferred mechanism. sec=sys is considered legacy and insecure, since clients can fake UID/GID.
Certain Linux distributions (especially SUSE, Debian/Ubuntu) do not automatically apply sec=sys when mounting NFSv4 unless explicitly set.
# mount -t nfs 10.0.0.226:/vol_data01 /nfs-share
As mentioned in case both, the NFS server and client will support NFS version 4, by default this command without the -o vers=3 flag will mount the share by using NFSv4 protocol.
For NFSv3, by default the sec=sys flag will be set without the need to set this explicit for the mount command.
NFSv3 mounts by default with sec=sys, this means the client sends UID and GID values using AUTH_SYS in RPC headers, and the server (like ONTAP) uses those for access control and file ownership.

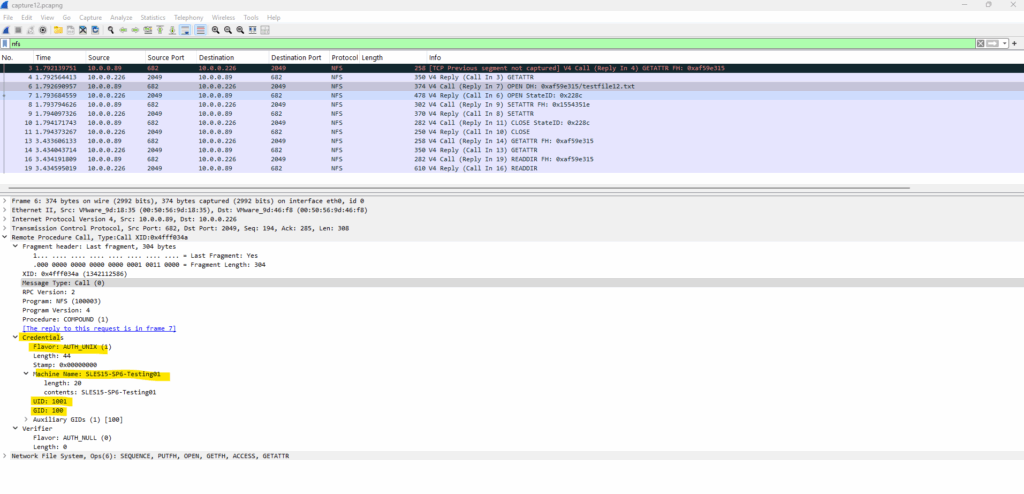
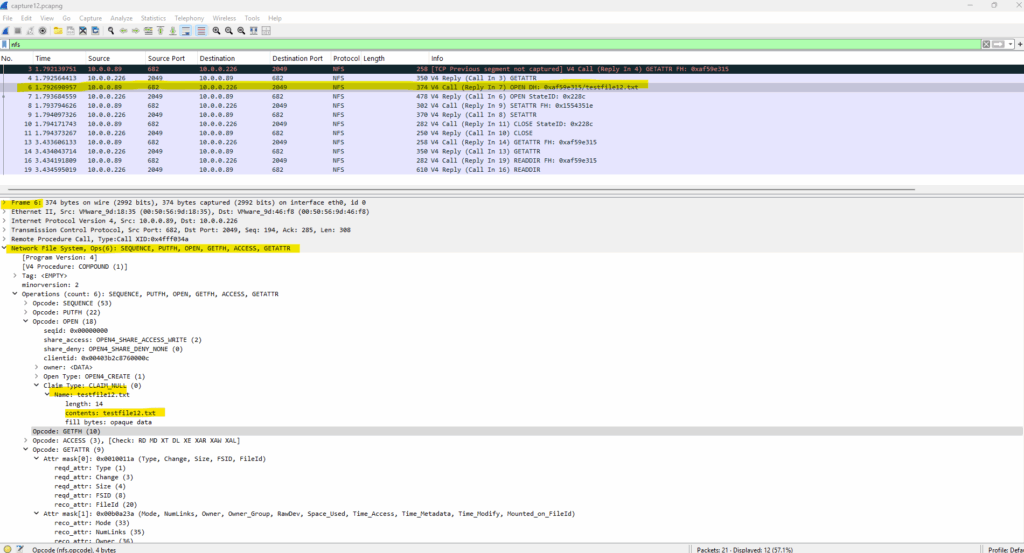
This AUTH_SYS UID and GID used in the RPC headers which will be send to the NFS server (ONTAP’s SVM in my case), we can see when capturing NFS traffic between the client and NFS server like shown in detail in Part 5 and here in the screenshot below.
We can see here that my client machine SLES15-SP6-Testing01 is sending the UID 1001 and GID 100 inside the RPC header to NetApp’s ONTAP SVM with the IP 10.0.0.226 which finally is exporting the file system (aka NFS export).
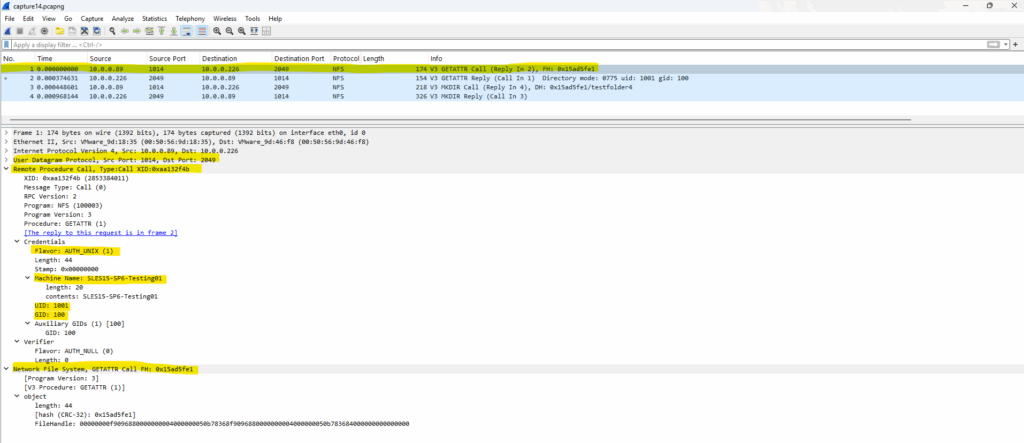
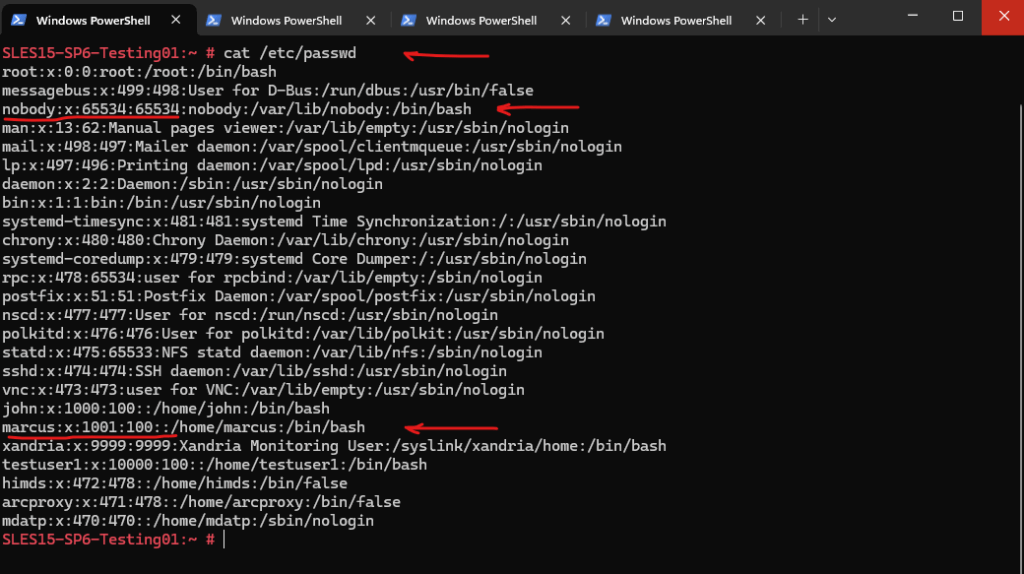
UID 1001 is my user marcus on the client and GID 100 is its group membership. We can determine them by running the id command on the client.
# id <username>
# id marcus

Or to see all local users UIDs and GIDs by running.
# cat /etc/passwd
The /etc/passwd file is a fundamental configuration file on Unix and Linux systems that stores essential information about user accounts. Each line represents one user and contains details like username, user ID (UID), group ID (GID), home directory, and login shell. Although it used to store password hashes directly, modern systems typically store those in the more secure /etc/shadow file.
The nobody user (UID 65534) is a special unprivileged account used by Unix/Linux systems, and also by NetApp ONTAP, for mapping users who do not have a valid user identity on the system. In the context of NFS, particularly with root squash or failed identity mappings (like missing user name resolution), remote users can be mapped to nobody as a security measure to prevent unauthorized access or privilege escalation.
In contrast when using NFSv4, by default the sys flag will be set to null.
NFSv4, however, introduces a more complex security and identity mapping model. Unlike NFSv3, it does not always default to AUTH_SYS and can silently fall back to AUTH_NULL if the sec=sys option isn’t explicitly set during mount like we do above.
AUTH_NULL means the client sends no UID/GID info. ONTAP (or any NFS server) treats the request as coming from an anonymous user (typically UID/GID 65534). That maps to nobody, causing permission denied or incorrect ownership.

Same behavior on Ubuntu.

To see what happens under the hood when the exported file system is mounted as NFSv4 and implicit with sec=null by just running the following command (as mentioned both, server and client needs to support NFSv4). I will capture the traffic when trying to create a new file on the share.
I will mount the exported file system without any -o vers and sec flag.
# mount -t nfs 10.0.0.226:/vol_data01 /nfs-share

On a different SSH session I will start TShark to capture traffic between the client and NetApp ONTAP’s SVM.
# tshark -i eth0 -f "host 10.0.0.226" -w /opt/capture15.pcapng

Because root squash is enabled as shown in Part 5, I will first switch to my normal on the client unprivileged user marcus which is owner on the exported file system and actually should have full permissions here.
# su - marcus
:~> touch /nfs-share/testfile15.txt
Get a permission denied error when trying to create a file on ONTAP’s SVM exported files system as expected with sec=null which results in AUTH_NULL.

Now lets see what TSharek captured here.
Because of sec=null now the security flavor is set to AUTH_NULL where the client sends no UID/GID info and ONTAP (or any NFS server) treats the request as coming from an anonymous user (typically UID/GID 65534). That maps to nobody, causing permission denied or incorrect ownership.
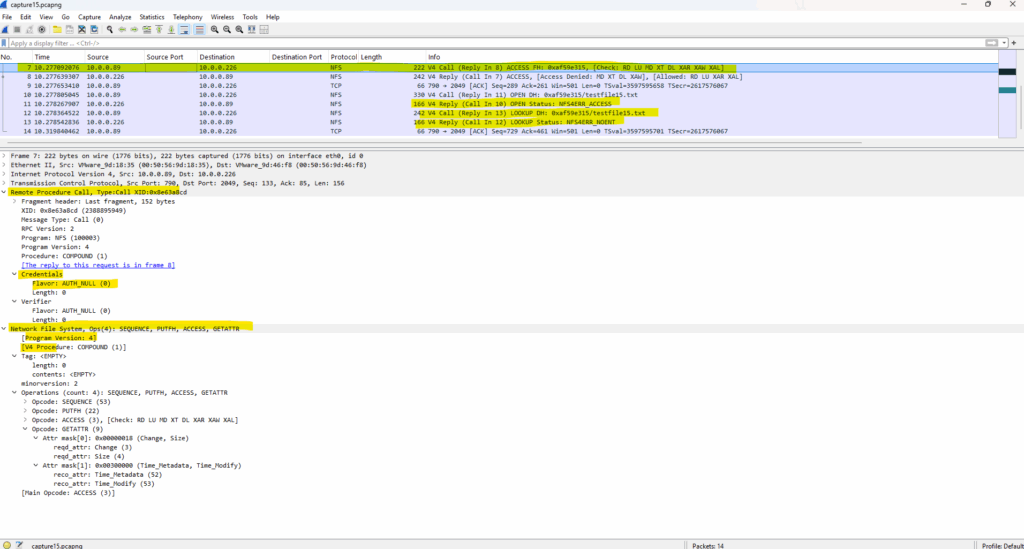
To finally solve this isse we need to explicit set the -o sec=sys flag as shown next below or we can use on NetApp ONTAP the -anon <users id> flag for the export policy to map all anonymous users to a specific UID which will have the required permissions on the exported file system.
More about TShark, the command-line version of Wireshark, which is a powerful tool for capturing and analyzing network traffic on Linux you will find in my following post.
Mount NFS Exports in NFSv4 by using the -o sec=sys Flag for (AUTH_SYS)
So when using NTFSv4 with AUTH_SYS as security flavor, we need to explicit set the -o sec=sys flag.
# mount -t nfs -o sec=sys 10.0.0.226:/vol_data01 /nfs-share

Now with AUTH_SYS (also called AUTH_UNIX), the client sends its UID/GID info to ONTAP (or any NFS server) when accessing the exported file system and because this user (marcus id 1001) is owner on the file system, the new file (here testfile15.txt) is created successfully.
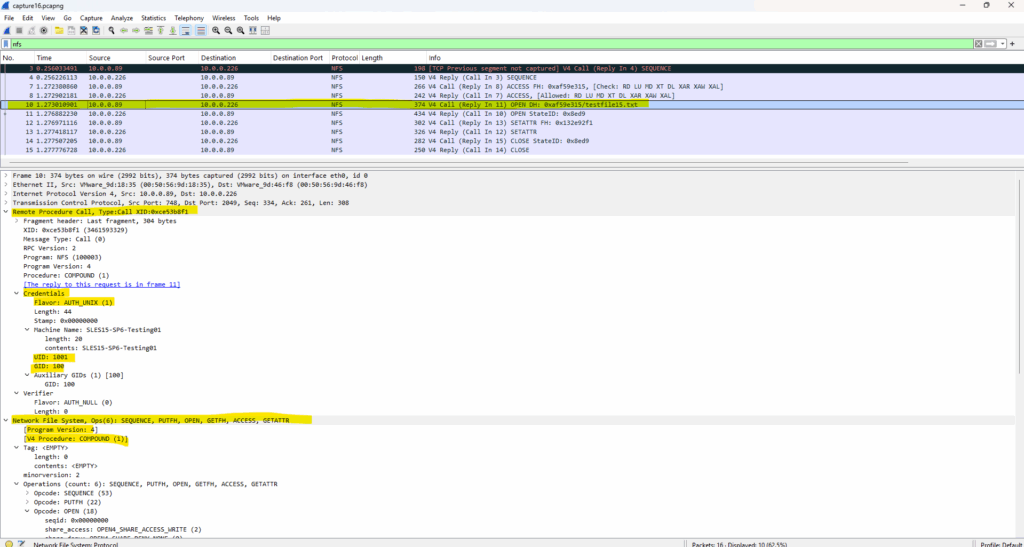
As already mentioned we can also modify the export policy on NetApp ONTAP to map all anonyomous users to a specific UID as shown next.
Modify the Export Policy on NetApp ONTAP to use the -anon <users id> flag to map all Anonymous Users to a specific UID
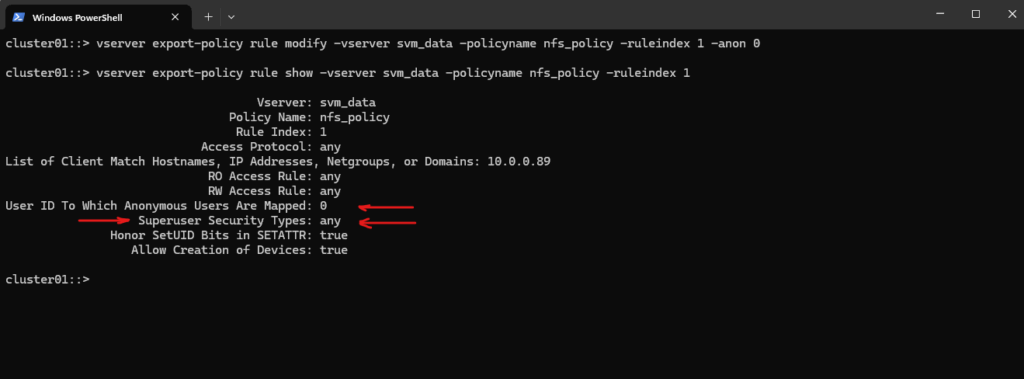
The following command will modify my existing export policy named nfs_policy which is applied to the volume vol_data01 (the exported files system), to map all anonymous users to the UID 0 (root account). For this to work root squash as seen in Part 5 of course needs to be disabled or we map instead e.g. to UID 1001 (my user marcus which is owner on the exported file system).
cluster01::> vserver export-policy rule modify -vserver svm_data -policyname nfs_policy -ruleindex 1 -anon 0

We can check this setting by showing the modiefied export policy rule with the following command. We can see here that all anonymous users will be mapped to UID 0 (root user) an that root squash is disabled (Superuser Security Types: any).
cluster01::> vserver export-policy rule show -vserver svm_data -policyname nfs_policy -ruleindex 1

# superuser security (aka root squash) I disabled also by first running
cluster01::> vserver export-policy rule modify -vserver svm_data -policyname nfs_policy -ruleindex 1 -superuser any
We can try to create a new file on the exported file system, despite it is mounted as NFSv4 and the security flavor is implicit set to sec=null (AUTH_NULL).
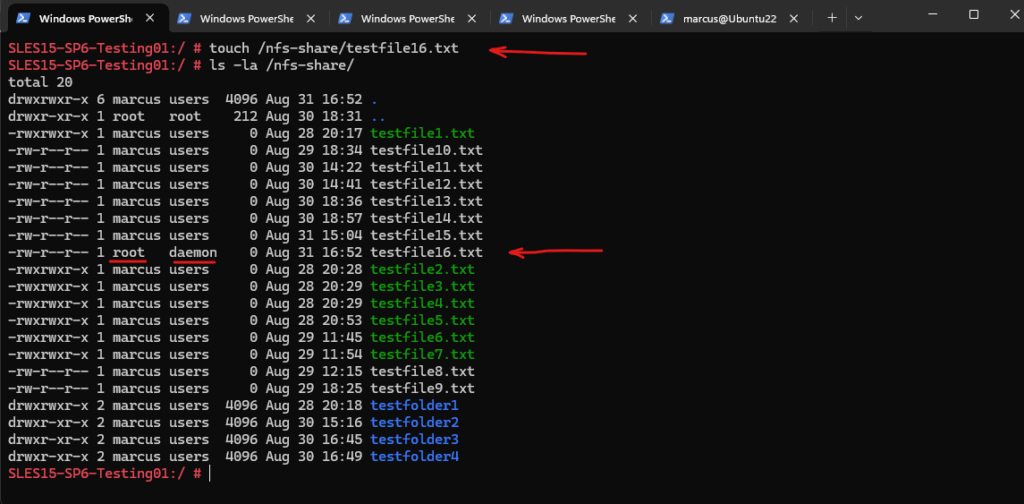
Besides the group (here daemon) for the new file created with owner root (anonymous mapped to UID 0), is exactly what we expected. The group here actually should be also root (GID 1 on ONTAP) but on the client the root GID is 0, so there’s a mismatch.
NFSv4 Security Flavor krb5* (GSS-API-based)
As already seen above, even for NFSv4 when AUTH_SYS security is used, RPC only sends the uid/gid (just like in previous releases of NFS). You could actually consider this to be more a limitation of RPC where AUTH_SYS is being used.
NFSv4 itself add additional metadata like owner = marcus@domain and group = users@domain. This string-based metadata must be resolved on both sides using ID mapping (idmapd). These new string-based metadata are just used for the krb5* (GSS-API-based) flavors.
So when using NFSv4 with AUTH_SYS, you will need to ensure that the uid/gid for a user match across systems if you want consistency with the user name across environments.
Source: https://www.ibm.com/support/pages/nfsv4-ibm-i-user-profile-uid-mapping
Umask
When a user like marcus creates a file on an NFS-mounted filesystem, the default permissions are determined by:
- The user’s umask setting.
- The NFS server honoring the requested mode.
- The mount options and export policy.
umask (short for user file-creation mode mask) is a setting in Unix/Linux systems that controls the default permissions assigned to new files and directories when they’re created.
When you create a file or directory, the OS starts with a base set of permissions and then subtracts the umask value to determine the final permissions.
The umask utility is used to control the file-creation mode mask, which determines the initial value of file permission bits for newly created files. The behaviour of this utility is standardized by POSIX and described in the POSIX Programmer’s Manual. Because umask affects the current shell execution environment, it is usually implemented as built-in command of a shell.
We can display the current mask on a Linux system by just running umask without specifying any arguments.
# umask

When the -S option, standardized by POSIX, is used, the mask will be displayed using symbolic notation. However, the symbolic notation value will always be the logical complement of the octal value, i.e. the permission bits to be set on the newly created file:

More about you will find here https://wiki.archlinux.org/title/Umask.
Troubleshooting
NFS Client Utilities not installed by default on Ubuntu
mount: /nfs-share: bad option; for several filesystems (e.g. nfs, cifs) you might need a /sbin/mount. helper program.

$ sudo apt update
$ sudo apt install nfs-common
$ sudo mount -t nfs 10.0.0.226:/vol_data01 /nfs-share/
mount.nfs: access denied by server while mounting 10.0.0.226:/vol_data01
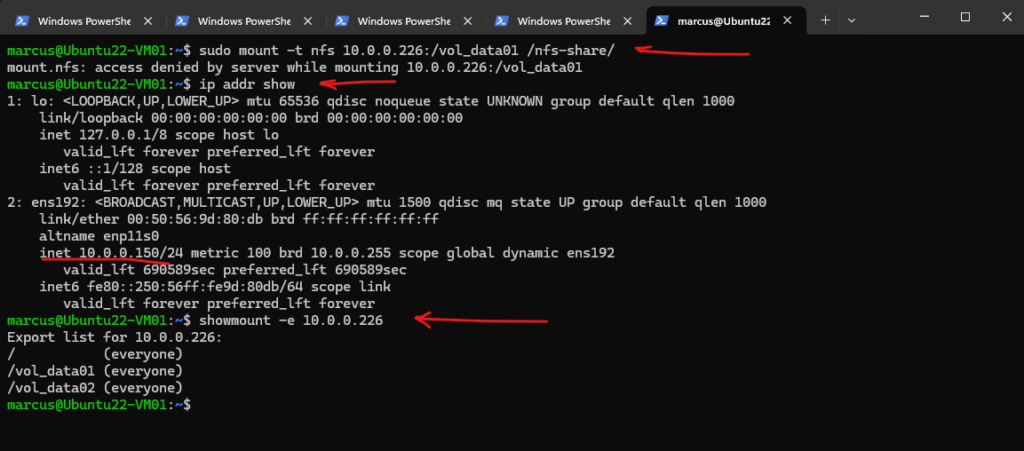
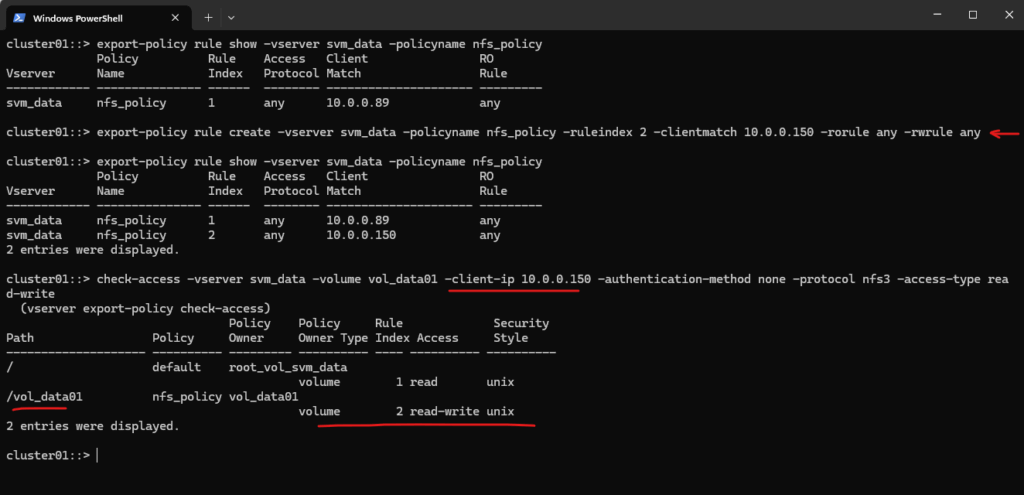
cluster01::> check-access -vserver svm_data -volume vol_data01 -client-ip 10.0.0.150 -authentication-method none -protocol nfs3 -access-type read-write

cluster01::> export-policy rule show -vserver svm_data -policyname nfs_policy
cluster01::> export-policy rule create -vserver svm_data -policyname nfs_policy -ruleindex 2 -clientmatch 10.0.0.150 -rorule any -rwrule any
cluster01::> check-access -vserver svm_data -volume vol_data01 -client-ip 10.0.0.150 -authentication-method none -protocol nfs3 -access-type read-write
To delete a export policy we can use:
cluster01::> export-policy rule delete -vserver <svm name> -policyname <policy name> -ruleindex <rule index>
cluster01::> export-policy rule delete -vserver svm_data -policyname nfs_policy -ruleindex 2

In the next part coming soon we will see how to use the already mentioned NFSv4 krb5* (GSS-API-based) authentication.
Links
NFS Security with AUTH_SYS and Export Controls
https://docs.redhat.com/en/documentation/red_hat_enterprise_linux/7/html/storage_administration_guide/s1-nfs-securityNVSv4 UID Mapping
https://www.ibm.com/support/pages/nfsv4-ibm-i-user-profile-uid-mapping
Tags In
Latest posts
Deploying NetApp Cloud Volumes ONTAP (CVO) in Azure using NetApp Console (formerly BlueXP) – Part 5 – Backup and Recovery
Follow me on LinkedIn


