

Troubleshooting a Btrfs Root Filesystem Forced Read-Only by ENOSPC During a Balance Operation
In this article, we will troubleshoot a Btrfs root filesystem that suddenly became read-only, even though df still reported several gigabytes of available disk space.
The underlying problem turned out to be a Btrfs metadata ENOSPC condition during a balance operation. ENOSPC (Error NO SPaCe) is the Linux/POSIX error code for “No space left on device” and is returned when the filesystem cannot allocate the space required to complete an operation.
The balance exhausted the currently usable metadata space, causing Btrfs to abort the transaction and force the filesystem into read-only mode to protect its consistency.
In Btrfs, metadata includes the filesystem structures required to describe and manage stored data, such as directory entries, file attributes, extent mappings, checksums, and Btrfs tree structures.
We will examine why the remaining free space reported by df could not simply be used for metadata, how a persisted Btrfs balance caused the problem to reappear during every boot, and how we recovered the system using the SUSE Linux Enterprise Server Rescue System, LVM, and an online Btrfs filesystem resize.
- What Is Btrfs Metadata?
- Understanding Btrfs Space Allocation and Balance
- Understanding Btrfs Balance
- Reproducing the Btrfs ENOSPC Condition
- Starting the Btrfs Balance
- Triggering the Metadata ENOSPC Failure
- Attempting Recovery Using the Built-In Boot Options
- Recovering the Btrfs Root Filesystem Using the SLES Rescue System
- Accessing the Installed System Using chroot
- Links
What Is Btrfs Metadata?
In Btrfs, Data primarily means the actual contents of files, whereas Metadata contains the filesystem structures Btrfs needs to describe, locate, organize, and protect that data.
Metadata includes, among other things:
- Directory structures and directory entries
- File and directory information such as ownership, permissions, timestamps, and attributes
- Extent information describing where file data is stored
- Checksums used to verify data integrity
- Btrfs tree structures and their nodes
- References between extents, files, and snapshots/subvolumes
- Snapshot and subvolume metadata
- Free-space and allocation-related filesystem structures
A simplified view is:
Btrfs filesystem
│
├── DATA
│    │
│    └── Actual file contents
│         ├── document.pdf
│         ├── database.db
│         └── logfile.log
│
└── METADATA
     │
     ├── Where is document.pdf stored?
     ├── Which directory contains it?
     ├── Who owns it?
     ├── What are its permissions?
     ├── Which extents belong to it?
     ├── What are the checksums?
     ├── Which subvolume/snapshot references it?
     └── Btrfs tree structures tying this together
The important thing for our ENOSPC incident is that writing or relocating Data can also require new Metadata.
For example, during a balance:
Relocate file extent
       │
       ├── write/move Data
       │
       └── update Metadata
              ├── extent references
              ├── Btrfs trees
              ├── checksums/references
              └── allocation information
So even though there may still be plenty of space available inside Data block groups, an operation can fail if Btrfs cannot obtain the metadata space/reservations necessary to describe and commit those changes.
Understanding Btrfs Space Allocation and Balance
Before reproducing the issue, it is important to understand how Btrfs manages disk space differently from traditional filesystems such as ext4.
Btrfs does not simply treat all available filesystem space as one common pool. Instead, it allocates larger regions called block groups, commonly also referred to as chunks, for different purposes. The most relevant allocation types are Data, Metadata, and System.
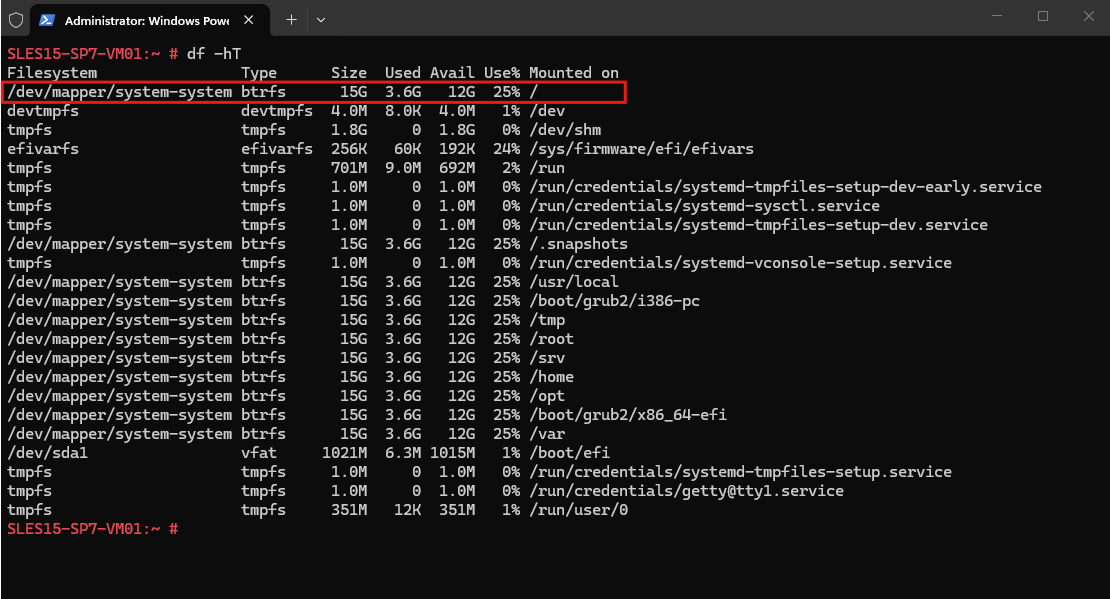
We can first use the common df command to display the filesystem type, size, used space, and available space in a human-readable format.
For our 15 GiB Btrfs root filesystem,
dfreports approximately 3.6 GiB used and 12 GiB available, resulting in only 25% utilization. At first glance, this suggests that plenty of free space is available on the filesystem.
df -hT
However, with Btrfs, the free space reported by df does not tell the complete story.
Btrfs internally divides the available device space into separate block groups for Data, Metadata, and System. To get a more detailed view of this internal space allocation, we can use the following command:
btrfs filesystem usage /
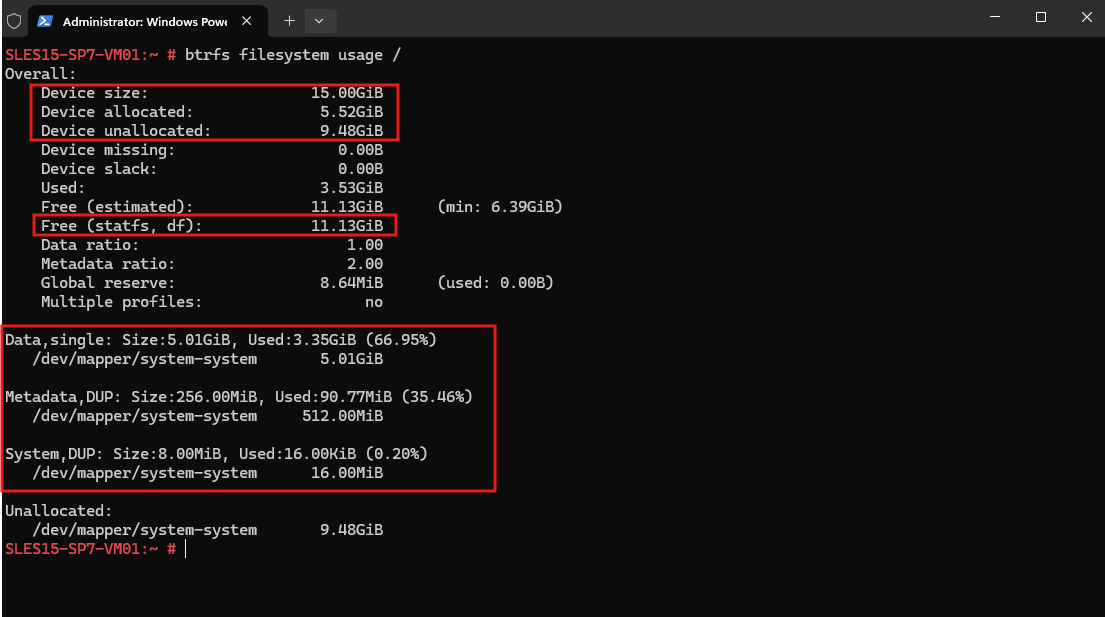
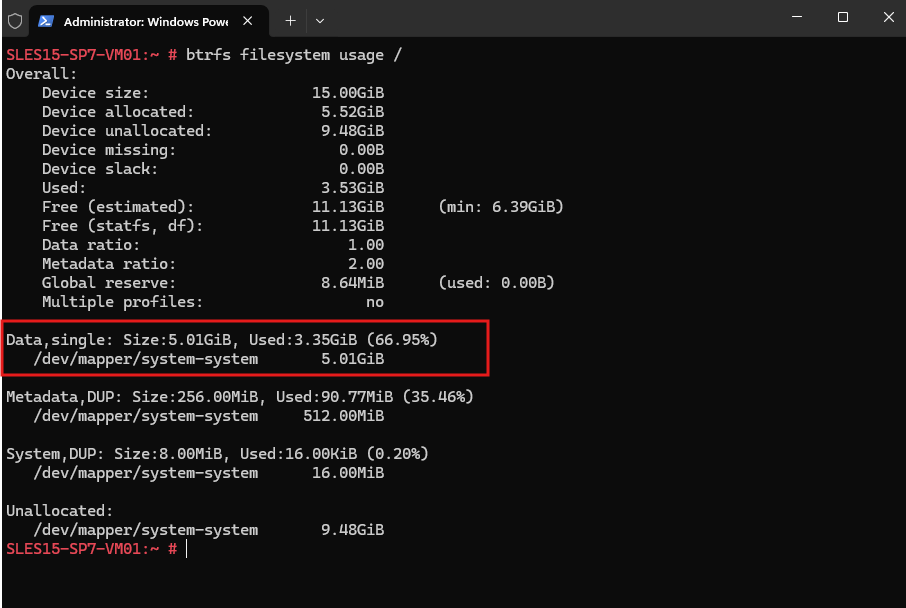
The output above clearly distinguishes between allocated, unallocated, and actually used space. Of the 15 GiB Btrfs filesystem, only 5.52 GiB has currently been allocated to block groups, while 9.48 GiB remains unallocated and can be assigned to new Data or Metadata block groups as required.
Notice that the 11.13 GiB reported as free by statfs/df is not the same as the 9.48 GiB of unallocated device space.
Note: The free space reported by
dfalso includes usable free space within block groups that Btrfs has already allocated, whereas Device unallocated represents space that has not yet been assigned to any Btrfs block group.Device unallocated: 9.48 GiB Data block groups: Size: 5.01 GiB Used: 3.35 GiB Free inside allocated Data BGs: ~1.66 GiB --------- Approximately available for file data: ~11.14 GiB Free (statfs, df): 11.13 GiBThe important part is that
Device allocated: 5.52 GiBis not 5.52 GiB thatdfregards as consumed. It means Btrfs has already assigned those physical regions to Data/Metadata/System block groups.In our example, the 5.01-GiB Data block-group allocation contains only 3.35 GiB of actual data, leaving ~1.66 GiB available for further file data. Therefore
dfstill counts that ~1.66 GiB as available.
The allocated space is further divided into Data, Metadata, and System block groups. Metadata and System use the DUP profile, meaning Btrfs stores two copies on the same device. Therefore, the logical 256 MiB Metadata allocation consumes 512 MiB of physical device space.
Understanding Btrfs Block Groups
Think of the 15 GiB LV initially as a large pool of raw space:
15 GiB Btrfs device
┌────────────────────────────────────────────────────┐
│                available device space              │
└────────────────────────────────────────────────────┘
Btrfs doesn’t allocate individual files directly from that entire 15 GiB. It first allocates large regions from it , block groups, and assigns them a type:
15 GiB Btrfs device
┌──────── DATA ────────┬─ META ─┬ SYS ┬───────────────┐
│                      │        │     │  UNALLOCATED  │
└──────────────────────┴────────┴─────┴───────────────┘
In my current VM, btrfs filesystem usage / tells us:
Device size:          15.00 GiB
Device allocated:      5.52 GiB
Device unallocated:    9.48 GiB

Data,single:           5.01 GiB
Metadata,DUP:        256.00 MiB logical
System,DUP:            8.00 MiB logical
What happens when we create a file?
Suppose Btrfs has already allocated a Data block group. When you write a file, its contents consume free extents inside that Data block group.
So you have two levels of free space:
DEVICE
│
├── Allocated to DATA block groups
│     ├── file data
│     ├── file data
│     └── FREE SPACE ← free, but already assigned to DATA
│
├── Allocated to METADATA block groups
│     ├── metadata
│     └── FREE SPACE ← assigned to METADATA
│
└── UNALLOCATED SPACE
      └── not assigned yet → Btrfs can create new block groups from this
And that is exactly why our production problem was so interesting.
There were still roughly 2 GiB free inside already allocated Data space, so df said there was free capacity. But most of the device had already been allocated to block groups, leaving only about 513 MiB truly unallocated. During the balance, Btrfs needed additional metadata reservations/allocation and got into ENOSPC trouble.
A Btrfs block group is a large region of device space that Btrfs has allocated for storing a particular type of filesystem content, such as Data or Metadata. Free space inside an allocated Data block group is therefore different from completely unallocated device space that Btrfs can still assign to new block groups.
What Is a Btrfs Allocation Profile?
A Btrfs allocation profile determines how the contents of a block group are physically stored across the available device or devices, including how many copies are maintained.
On our single-device SLES system:
Data,single
     │
     └── One copy
          5.01 GiB logical
              ↓
          5.01 GiB physical


Metadata,DUP
     │
     └── Two copies on the same device
          256 MiB logical
              ↓
          512 MiB physical


System,DUP
     │
     └── Two copies on the same device
            8 MiB logical
              ↓
           16 MiB physical
Btrfs supports additional profiles, particularly with multiple devices, such as RAID0, RAID1, RAID10, RAID5, RAID6, RAID1C3, and RAID1C4.
So this:
Metadata,DUP: Size:256.00MiB, Used:90.77MiB (35.46%)
   /dev/mapper/system-system     512.00MiB
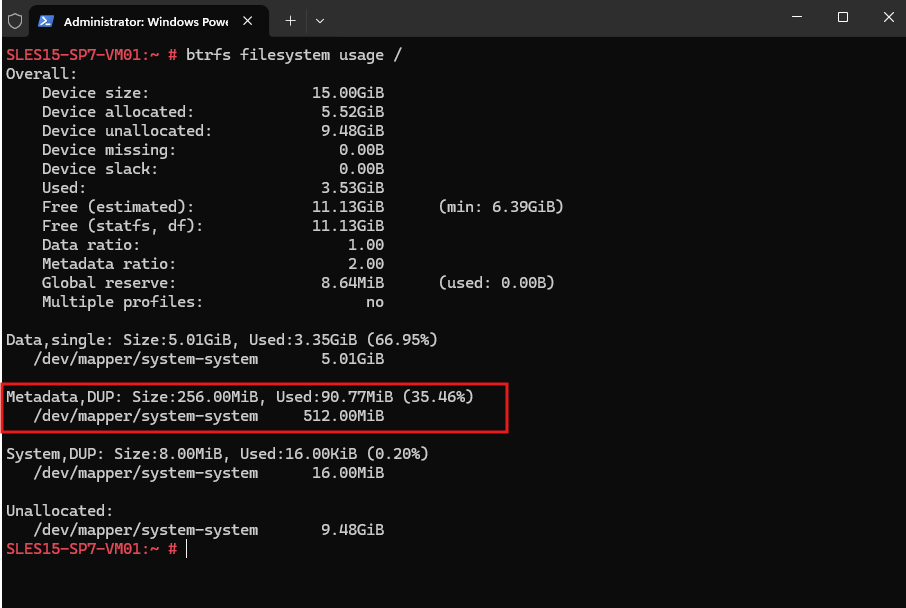
means:
Btrfs currently has 256 MiB of logical Metadata block-group capacity using the DUP allocation profile. Because DUP maintains two copies, those Metadata block groups occupy 512 MiB of physical space on the device.
And the same applies to:
System,DUP: Size:8.00MiB
   /dev/mapper/system-system      16.00MiB
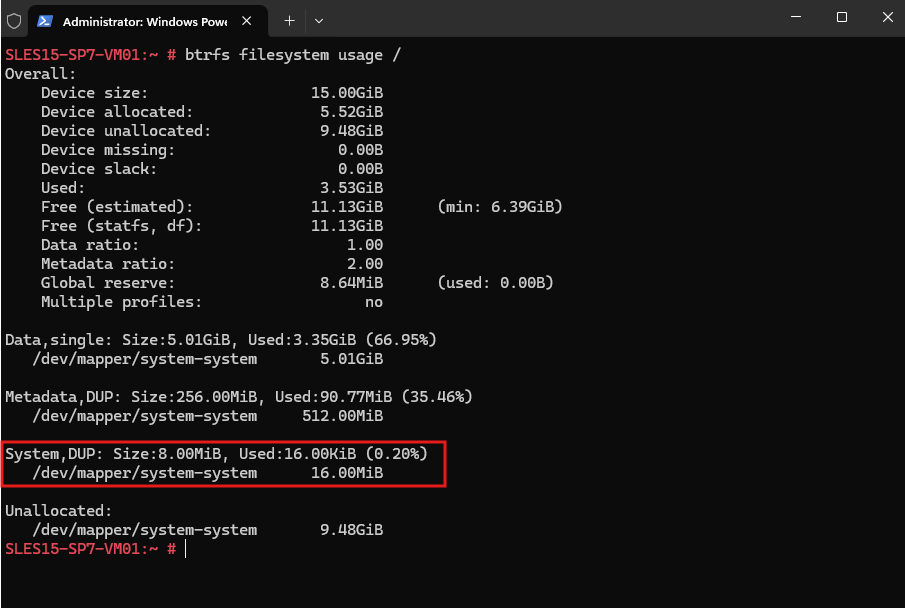
The single allocation profile stores one copy of each block and therefore has a 1:1 relationship between logical and physical space consumption.
In our example, the 5.01 GiB of Data block-group capacity consumes 5.01 GiB on the underlying device. Unlike
DUP, thesingleprofile does not provide an additional Btrfs-managed copy of the stored blocks.
Data,single: Size:5.01GiB, Used:3.35GiB (66.95%)
   /dev/mapper/system-system       5.01GiB
How Btrfs Allocates New Block Groups
When new data or metadata is written, Btrfs can first use available space within the corresponding existing block groups.
For our current filesystem, this can be simplified as:
15 GiB Btrfs filesystem
│
├── Existing Data block groups
│      5.01 GiB allocated
│      ├── 3.35 GiB used
│      └── ~1.66 GiB free
│
├── Existing Metadata block groups
│      256 MiB logical
│      ├── ~91 MiB used
│      └── ~165 MiB free
│
├── Existing System block groups
│
└── 9.48 GiB DEVICE UNALLOCATED
       │
       └── Not assigned to any block group yet
As additional capacity of a particular type is required, Btrfs can allocate new block groups from the remaining unallocated device space:
                    DEVICE UNALLOCATED
                         9.48 GiB
                             │
             ┌───────────────┼───────────────┐
             │               │               │
             ▼               ▼               ▼
       New Data BG     New Metadata BG    New System BG
        as required       as required       as required
For example, as more file data is written:
Existing Data block groups
          │
          ├── free space available → use existing space
          │
          ▼
   increasingly utilized
          │
          ▼
additional Data capacity required
          │
          ▼
take space from DEVICE UNALLOCATED
          │
          ▼
allocate another Data block group
Btrfs does not normally enlarge an existing block group. Instead, when additional capacity is required, it allocates another block group from the remaining unallocated device space.
The same principle applies when the filesystem itself is extended: the newly added capacity initially becomes device unallocated space, which Btrfs can later assign to new Data, Metadata, or System block groups according to demand.
Btrfs vs. ext3/ext4 Space Allocation
Unlike Btrfs, ext3 and ext4 do not dynamically divide the remaining device space into separate Data, Metadata, and System block groups.
In simplified form:
Btrfs
│
├── Data block groups
├── Metadata block groups
├── System block groups
└── Unallocated device space
       │
       └── New block groups allocated as required
Compared with:
ext3 / ext4
│
├── Block Group 0
│   ├── Metadata structures
│   ├── Inode table
│   └── Data blocks
│
├── Block Group 1
│   ├── Metadata structures
│   ├── Inode table
│   └── Data blocks
│
└── Block Group ...
Although ext3/ext4 also use the term block group, these block groups serve a different architectural purpose. They organize the filesystem into manageable regions containing both filesystem metadata structures and space for file data.
Therefore, ext3/ext4 do not have the same Data-versus-Metadata block-group allocation problem that we are going to encounter with Btrfs.
However, ext3/ext4 can still run out of other filesystem resources while disk capacity remains available, for example, exhausting all available inodes.
Understanding Btrfs Balance
A Btrfs balance is a maintenance operation that relocates the contents of existing block groups. Despite its name, it is not simply a process that evenly distributes free space across the filesystem.
During a balance, Btrfs selects block groups, relocates their contents to other block groups, and can subsequently free the original block groups. This can help reclaim allocated device space and change allocation profiles.
Simplified:
BEFORE BALANCE

Data BG #1           Data BG #2           Data BG #3
┌──────────────┐     ┌──────────────┐     ┌──────────────┐
│ 20% USED     │     │ 40% USED     │     │ 40% USED     │
│ 80% FREE     │     │ 60% FREE     │     │ 60% FREE     │
└──────────────┘     └──────────────┘     └──────────────┘


                     BALANCE
                        │
                        │
          Move USED extents from
             BG #1 and BG #2
                        │
                        ▼
                 into free space
                    in BG #3


AFTER RELOCATION

Data BG #1           Data BG #2           Data BG #3
┌──────────────┐     ┌──────────────┐     ┌──────────────┐
│    EMPTY     │     │    EMPTY     │     │ 100% USED    │
└──────────────┘     └──────────────┘     └──────────────┘
       │                    │
       └─────────┬──────────┘
                 │
          release empty BGs
                 │
                 ▼

          DEVICE UNALLOCATED
        ┌─────────────────────┐
        │  released capacity  │
        └─────────────────────┘
                 │
                 ▼
        Can later be used for
        ┌────────┼─────────┐
        ▼        ▼         ▼
      Data    Metadata   System
       BG        BG        BG
A balance does not simply free unused space inside a block group, that space was already free, but still assigned to that block-group type.
Instead, Btrfs relocates the used extents so that selected block groups can become completely empty.
Those empty block groups can then be released back to Device unallocated, where the space becomes available for creating new block groups of any required type.
On SUSE Linux Enterprise Server, Btrfs balance operations can also be automated using the btrfsmaintenance tooling.
The package provides a btrfs-balance.timer, but the timer must be enabled/configured before it will periodically start balance operations. Its configuration is stored in /etc/sysconfig/btrfsmaintenance.
systemctl status btrfs-balance.timer
systemctl is-enabled btrfs-balance.timer
grep '^BTRFS_BALANCE_' /etc/sysconfig/btrfsmaintenance
Therefore, a balance observed on a SLES system does not necessarily have to have been started manually. When troubleshooting an unexpected balance, the configured Btrfs maintenance timer and /etc/sysconfig/btrfsmaintenance should also be checked.
Source: https://documentation.suse.com/sles/15-SP7/single-html/SLES-storage/
Checking the Current Btrfs Balance Status
We can use the following command to determine whether a balance operation is currently running, paused, or otherwise associated with the filesystem:
On our freshly installed SLES 15 SP7 system, the command returns:
No balance found on '/'
btrfs balance status /

This is the normal state and simply means that no balance operation is currently running or paused for the root filesystem.
A balance is not required for normal Btrfs operation and therefore does not normally need to be active.
Reproducing the Btrfs ENOSPC Condition
Now that we understand Btrfs block groups, unallocated device space, and balance operations, we can try to reproduce a condition similar to the one encountered on the affected SLES 15 SP7 system.
Our freshly installed test VM currently provides the following baseline:
Device size:                  15.00GiB
Device allocated:              5.52GiB
Device unallocated:            9.48GiB

Data,single: Size:5.01GiB, Used:3.35GiB (66.95%)
Metadata,DUP: Size:256.00MiB, Used:90.77MiB (35.46%)
The objective is not simply to fill / until df reaches 100%. Instead, we want to create a situation similar to the original incident where most device space has already been allocated to Btrfs block groups, while some free space remains inside those block groups.
For comparison, the affected system was approximately:
Device size:                  15.00GiB
Device allocated:             14.50GiB
Device unallocated:          513.00MiB

Data,single: Size:13.94GiB, Used:11.91GiB (85.49%)
Metadata,DUP: Size:256.00MiB, Used:142.52MiB (55.67%)
Once our lab filesystem approaches a similar allocation state, we can start a filtered balance and observe what happens.
Increasing the Data Allocation
To move our test filesystem toward the allocation state of the affected system, we first create a 7 GiB test file containing random data:
dd if=/dev/urandom of=/var/tmp/btrfs-testdata.bin bs=1M count=7168 status=progress
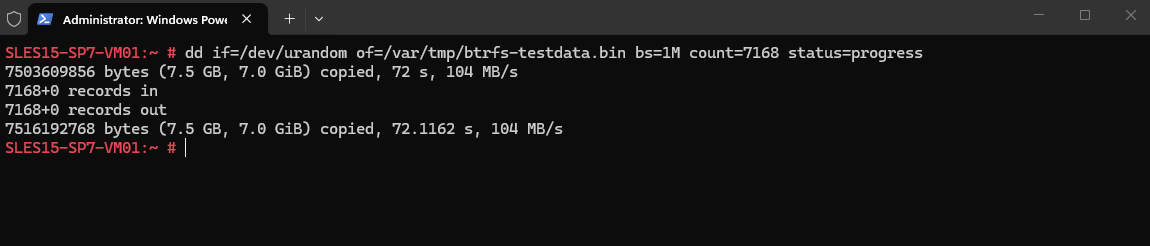
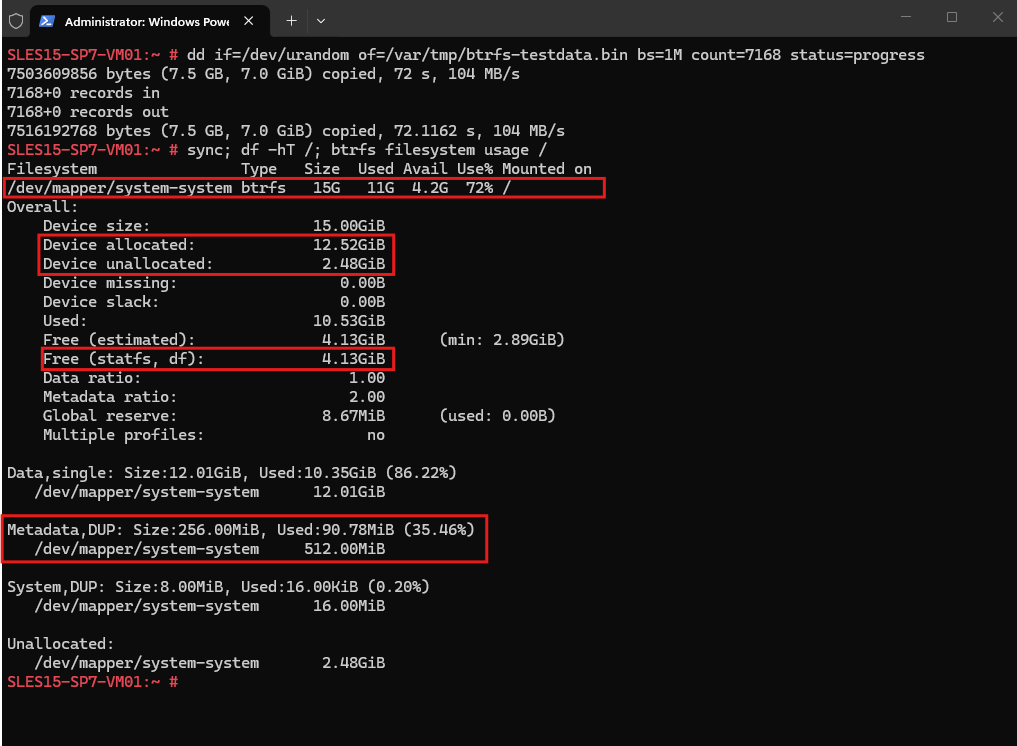
Before checking the filesystem utilization below, we use sync to flush pending filesystem writes to storage. This ensures that the subsequent df and Btrfs allocation statistics reflect the completed test-data write as closely as possible.
After writing the test data, df now reports approximately 11 GiB used and 4.2 GiB available, increasing the utilization of the root filesystem from 25% to 72%.
More interesting, however, is how Btrfs handled the additional data internally. The Device allocated value increased from 5.52 GiB to 12.52 GiB, while Device unallocated decreased from 9.48 GiB to 2.48 GiB.
Btrfs automatically allocated additional Data block groups from the previously unallocated device space as more Data capacity was required.
Note: Although we added 7 GiB of file data, the Metadata usage barely changed from 90.77 MiB to 90.78 MiB. This is because we created a single large file, which requires relatively little additional filesystem metadata compared with creating a large number of small files, while still consuming a significant amount of Data space.
sync; df -hT /; btrfs filesystem usage /
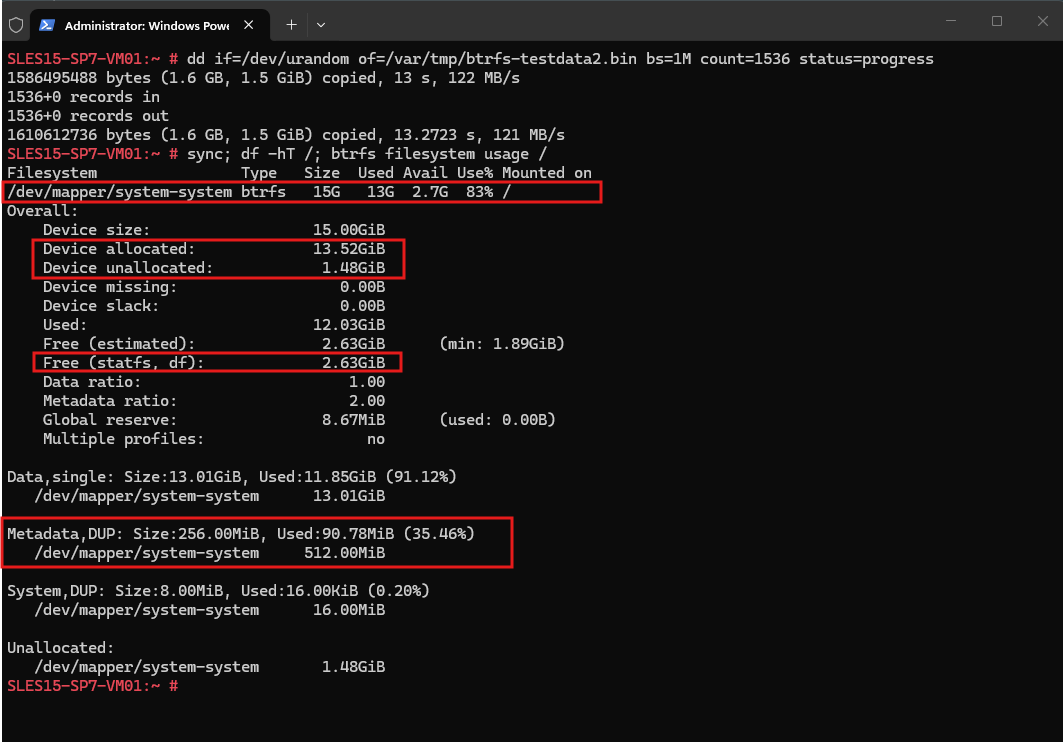
To move the lab filesystem even closer to the allocation state of the affected system, we add another 1.5 GiB of random data:
dd if=/dev/urandom of=/var/tmp/btrfs-testdata2.bin bs=1M count=1536 status=progress

The second write brings the lab filesystem very close to the original incident in terms of Data usage and free space reported by df. However, the internal Btrfs allocation still differs, especially in the amount of Device unallocated space and Metadata usage.
sync; df -hT /; btrfs filesystem usage /
Filesystem                Type   Size  Used Avail Use% Mounte
Increasing Metadata Usage
To bring the Metadata usage closer to the affected system without significantly increasing Data usage, we can create a large number of empty files.
Each file requires Btrfs metadata for its directory entry, inode information, attributes, and other filesystem structures, while consuming essentially no file Data.
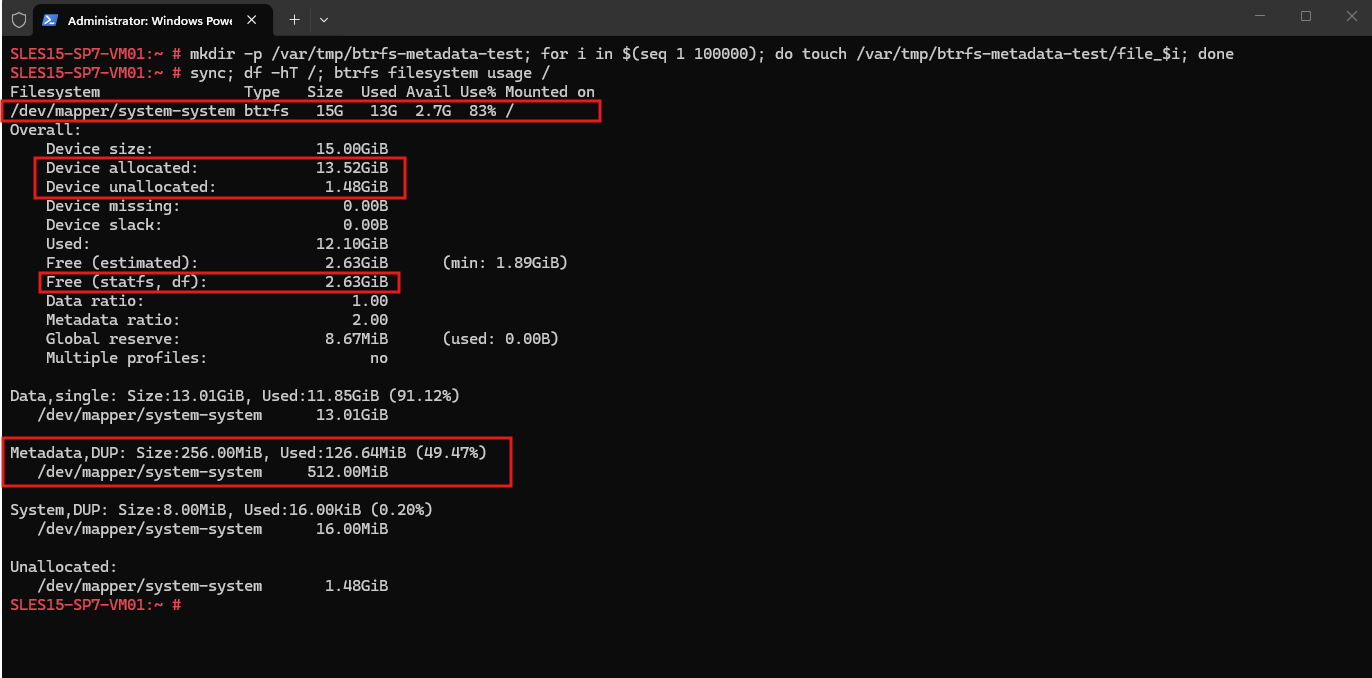
Let’s start conservatively with 100,000 empty files:
mkdir -p /var/tmp/btrfs-metadata-test; for i in $(seq 1 100000); do touch /var/tmp/btrfs-metadata-test/file_$i; done

Then check the result:
After creating 100,000 empty files, Metadata usage increased significantly from 90.78 MiB to 126.64 MiB, while Data usage remained unchanged at 11.85 GiB. This clearly demonstrates how workloads containing large numbers of files and directories can increase Btrfs metadata consumption independently of the actual file Data.
sync; df -hT /; btrfs filesystem usage /
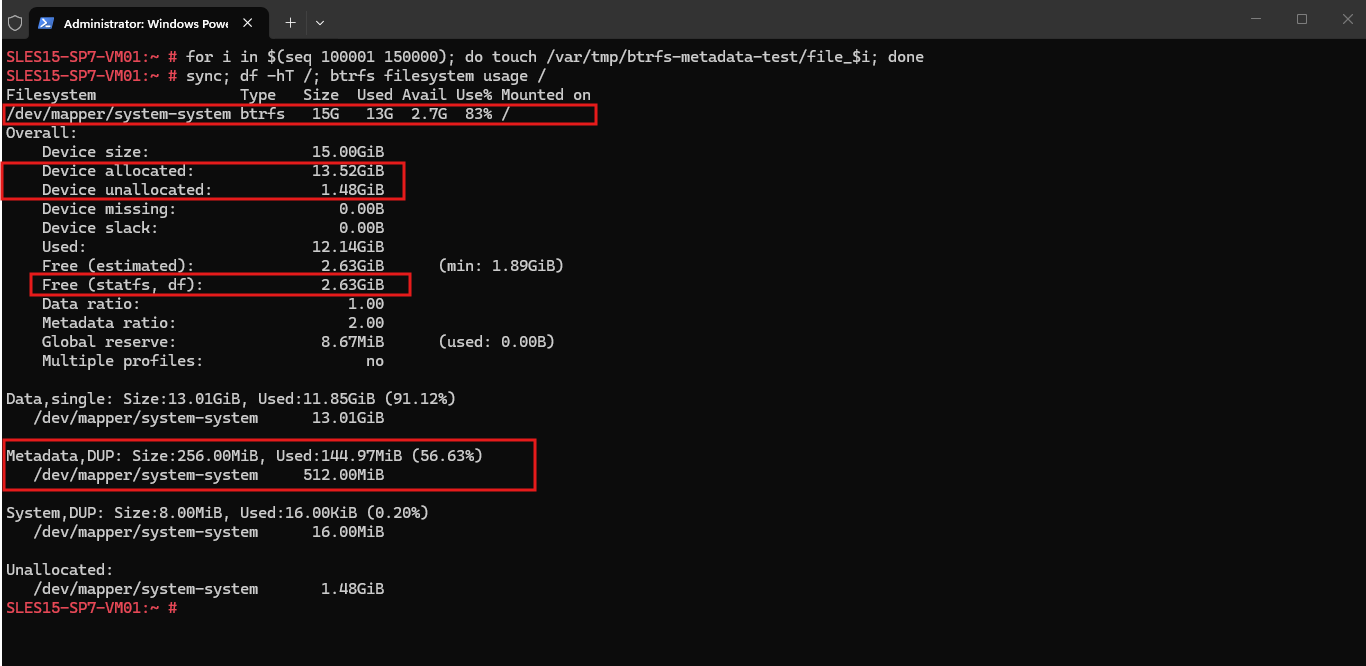
We add another 50,000 empty files next. Based on the first batch, that should bring metadata somewhere around the production value without going crazy:
for i in $(seq 100001 150000); do touch /var/tmp/btrfs-metadata-test/file_$i; done
Then check the result:
After creating another 50,000 empty files, Metadata usage increased to 144.97 MiB, which is almost identical to the 142.52 MiB observed on the affected system. At the same time, Data usage remains at 11.85 GiB and
dfstill reports approximately 2.7 GiB available, giving us a very similar filesystem utilization from the user’s perspective.
sync; df -hT /; btrfs filesystem usage /
With the Metadata usage now closely matching the affected system, we leave the metadata workload unchanged and focus on increasing the Data usage. We add another 256 MiB of incompressible test data to move the filesystem slightly closer to the original state.
dd if=/dev/urandom of=/var/tmp/btrfs-testdata3.bin bs=1M count=256 status=progress
Afterwards, we again flush pending writes and inspect the resulting Btrfs allocation:
sync; df -hT /; btrfs filesystem usage /
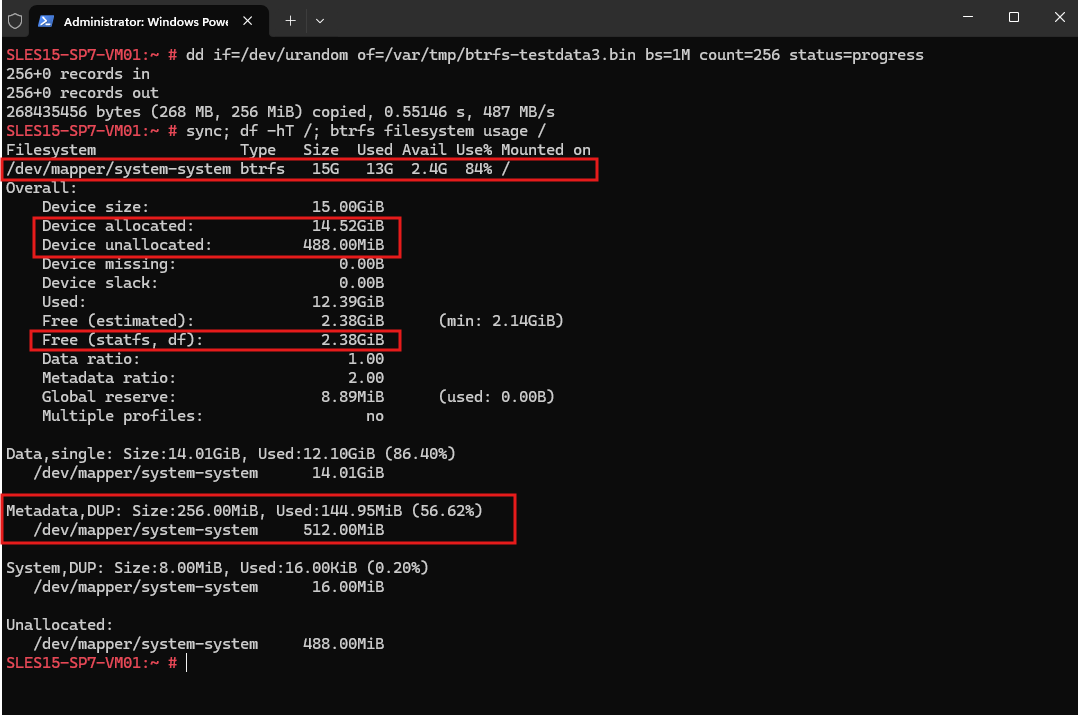
The additional write caused Btrfs to allocate another Data block group, increasing Device allocated from 13.52 GiB to 14.52 GiB and reducing Device unallocated from 1.48 GiB to only 488 MiB.
At this point, the lab filesystem closely resembles the affected system: Data and Metadata utilization are nearly identical, only about 500 MiB of device space remains unallocated, while
dfstill reports approximately 2.4 GiB of available filesystem space.This gives us the conditions required to investigate how a Btrfs balance can encounter ENOSPC despite apparently having gigabytes of free space.
Starting the Btrfs Balance
With the lab filesystem now closely matching the allocation state of the affected system, we start a balance using the same 90% usage filters observed in the original incident:
The
dusage,musage, andsusagefilters select Data, Metadata, and System block groups with a utilization of 90% or less for relocation.
usage=90is only the selection criterion: Btrfs selects block groups that are currently 90% utilized or less and relocates their used extents elsewhere. The objective is to empty selected block groups completely where possible so their entire allocation can be returned to Device unallocated.
btrfs balance start -dusage=90 -musage=90 -susage=90 /
For example:
BEFORE

Data BG #1       Data BG #2       Data BG #3
┌───────────┐    ┌───────────┐    ┌───────────┐
│ 30% USED  │    │ 70% USED  │    │ 85% USED  │
│ 70% FREE  │    │ 30% FREE  │    │ 15% FREE  │
└───────────┘    └───────────┘    └───────────┘
      ▲                ▲                ▲
      └──── all selected by dusage=90 ──┘


BALANCE

Move USED extents from selected block groups
                  │
                  ▼
Consolidate them into available suitable space


POSSIBLE RESULT

Data BG #1       Data BG #2       Data BG #3
┌───────────┐    ┌───────────┐    ┌───────────┐
│   EMPTY   │    │  ~FULL    │    │  ~FULL    │
└───────────┘    └───────────┘    └───────────┘
      │
      ▼
entire BG released
      │
      ▼
DEVICE UNALLOCATED
Because the command explicitly includes
System block groupswith-susage=90,btrfs-progsrefuses to start the balance by default as a safety precaution.Since the affected system used the same System filter, we repeat the command with
--forceto reproduce the original balance configuration.

To reproduce the same condition in the lab, we therefore keep the System filter and repeat the command with --force, which is required by btrfs-progs when explicitly operating on System chunks.
In Btrfs terminology, these System block groups are also referred to as System chunks. They contain a small amount of critical internal metadata and are typically stored using the
DUPprofile as an additional safety measure, keeping two copies on the same device.
btrfs balance start --force -dusage=90 -musage=90 -susage=90 /
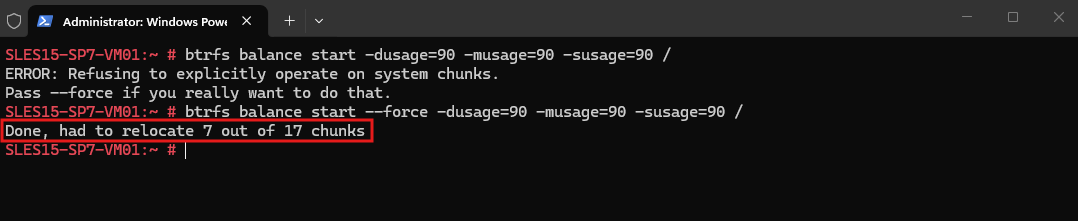
After confirming the operation with --force, the balance completes successfully and reports that 7 out of 17 chunks were relocated.
Unlike the affected system, our first reproduction attempt therefore does not yet trigger the metadata ENOSPC condition.
Now run:
btrfs filesystem usage /; btrfs balance status /; btrfs device stats /
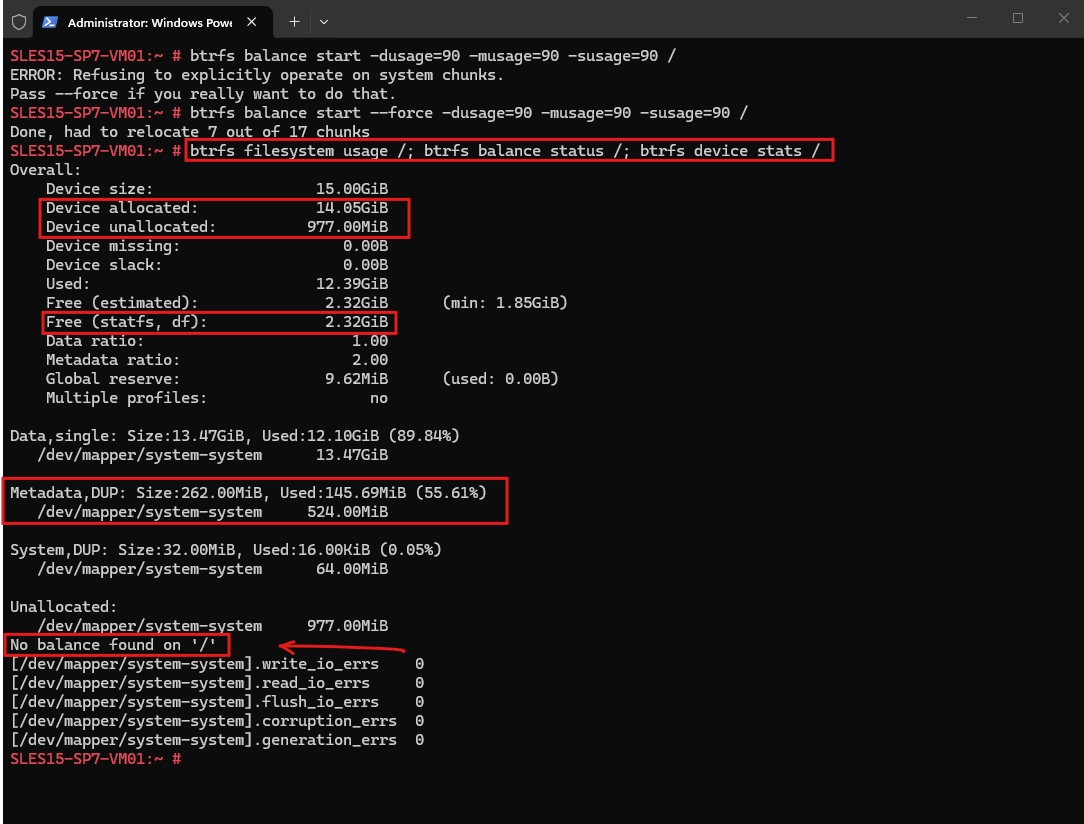
The successful balance demonstrates its intended effect very clearly. Although the amount of actual Data remains unchanged at 12.10 GiB, Btrfs consolidates the used extents into fewer block groups, reducing the allocated Data capacity from 14.01 GiB to 13.47 GiB and increasing Device unallocated from 488 MiB to 977 MiB.
The remaining Data block groups are consequently more densely utilized, increasing their overall utilization from 86.40% to 89.84%. The balance therefore returned approximately 489 MiB of previously allocated device capacity to the unallocated space pool.
Although the first balance completed successfully, the affected system did not fail during a newly started balance. Its kernel log showed that an existing balance was being resumed, so we restore our pre-balance snapshot and next attempt to reproduce this persisted balance state.
Before trying to create a persisted balance, we verify the snapshot really restored our expected state:
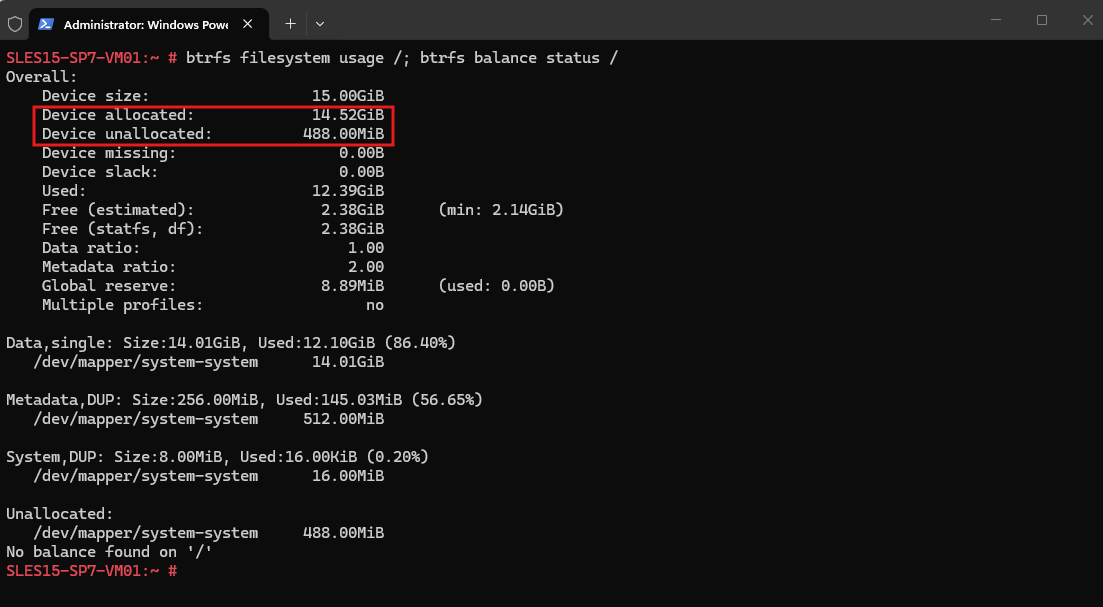
After reverting to the pre-balance snapshot, the filesystem is back in the intended starting condition, with only 488 MiB of Device unallocated space remaining and no active balance operation.
This provides a clean baseline for the next test, where we will deliberately create an interrupted balance and observe how Btrfs behaves when that balance is resumed.
btrfs filesystem usage /; btrfs balance status /
We fill up the metadata usage to nearly 90% (232.39 MiB of 262 MiB used) by generating thousands of empty files and nested directories to rapidly inflate B-tree leaf nodes, while leaving device unallocated space locked at 488 MiB.
This creates the exact allocation impasse where Btrfs cannot allocate another required 512 MiB physical
Metadata,DUPblock group.The python command creates roughly 10,000 tiny files.
python3 -c "import os; [os.makedirs(f'/var/tmp/meta_push/{i}', exist_ok=True) or open(f'/var/tmp/meta_push/{i}/f_{j}', 'w').write('x') for i in range(20) for j in range(500)]" && sync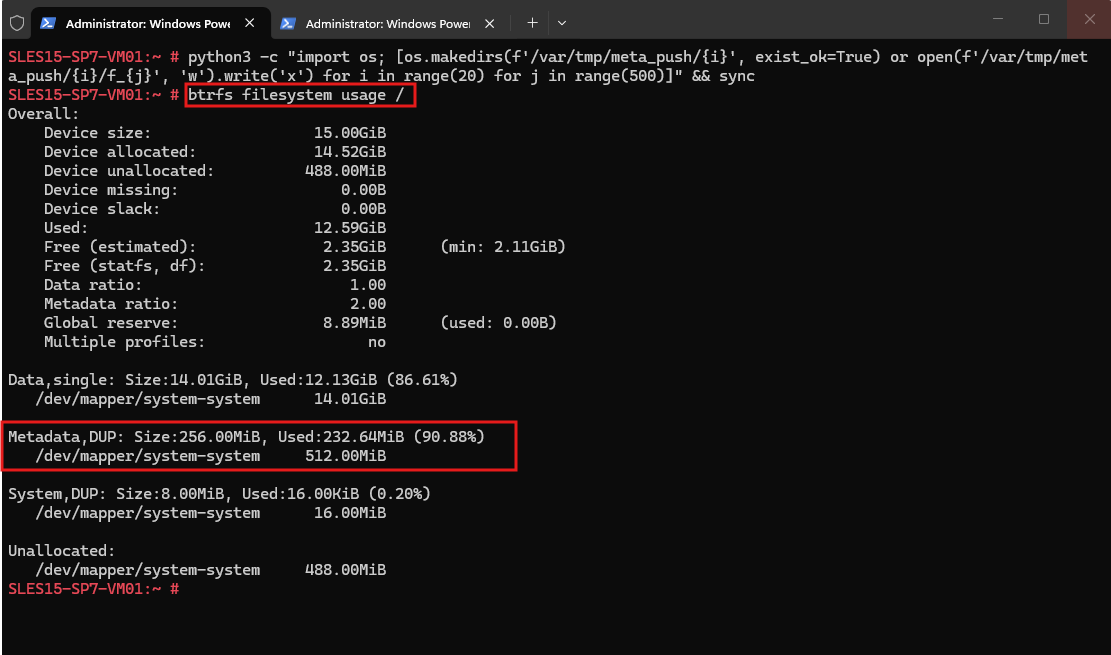
Triggering the Metadata ENOSPC Failure
After reducing the remaining Device unallocated space to only a few megabytes, we started the same filtered balance that had been observed on the affected production system:
btrfs balance start --force -dusage=90 -musage=90 -susage=90 /
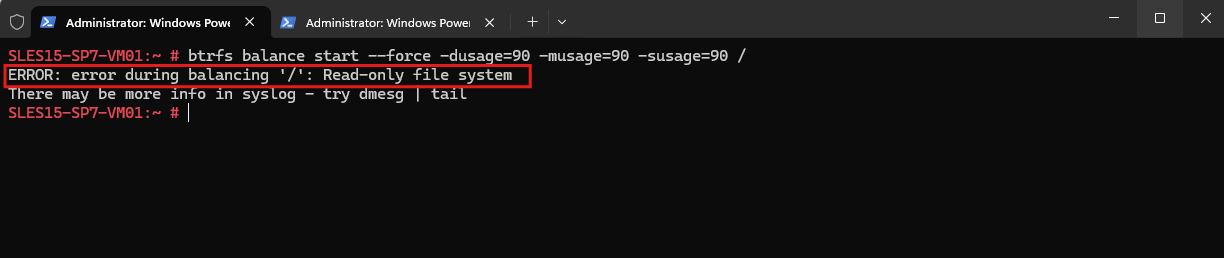
The balance successfully relocated several Data block groups before reaching a Metadata block group.
At that point, Btrfs could no longer satisfy the required metadata reservations and aborted the transaction with ENOSPC (-28).
journalctl -k | grep -Ei 'ENOSPC|error -28|errno=-28|No space left|space_info|forced readonly'
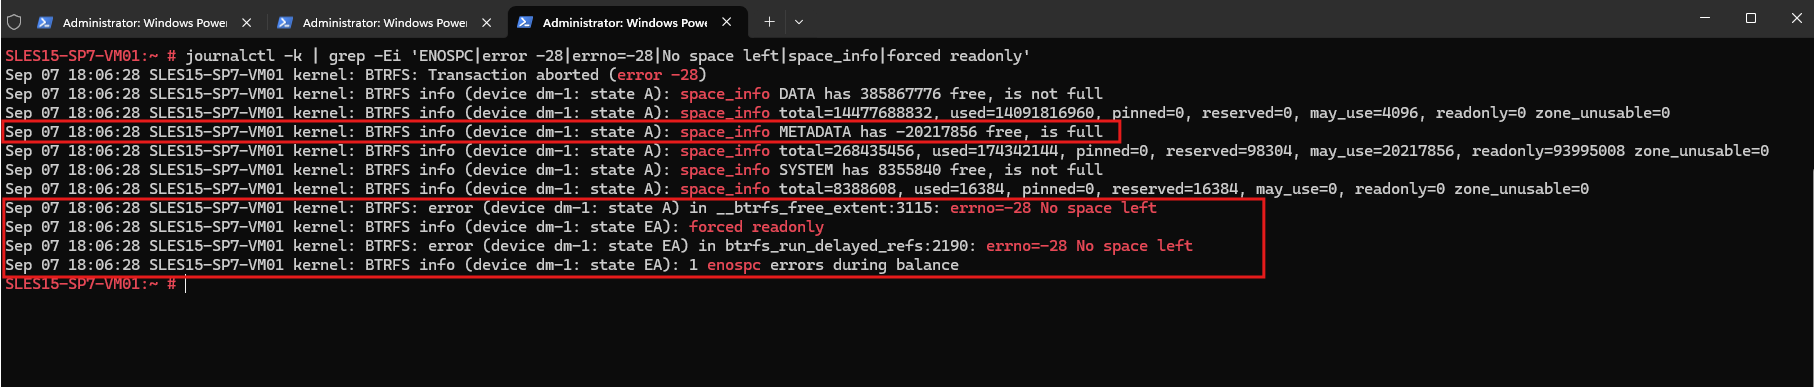
The kernel log clearly shows the sequence that caused the filesystem to become read-only. Although the Data space still had approximately 368 MiB available and was explicitly reported as not full, the Metadata space was reported as full.
Btrfs was therefore unable to obtain the metadata space required to continue the balance transaction.
This resulted in errno=-28 (ENOSPC), after which Btrfs forced the filesystem into read-only mode to prevent further modifications and protect filesystem consistency.
This demonstrates why the remaining free space reported by
dfcannot be used as the sole indicator of available Btrfs space.The failure was not caused by the complete filesystem reaching 100% utilization, but by Btrfs being unable to satisfy a metadata allocation/reservation requirement while the balance was relocating block groups.
sync; btrfs filesystem usage /
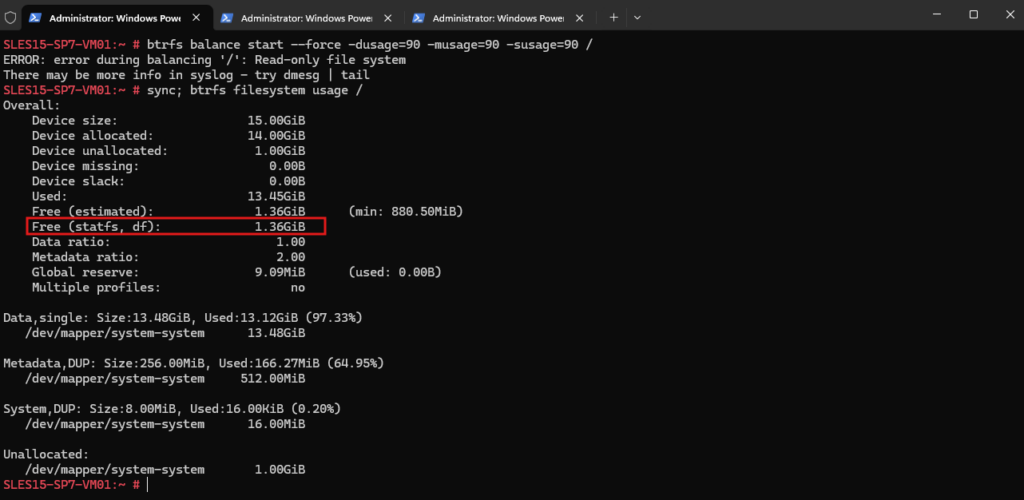
Although the Metadata block groups were only approximately 65% occupied by persistent metadata, the kernel reported the Metadata space as
is fullfrom the allocator’s perspective during the failing transaction.A significant amount of Metadata space was temporarily marked read-only and unavailable for new allocations during relocation, while additional metadata reservations also had to be satisfied. Consequently, Btrfs could no longer obtain the usable Metadata space required to continue the transaction and returned ENOSPC (
-28).
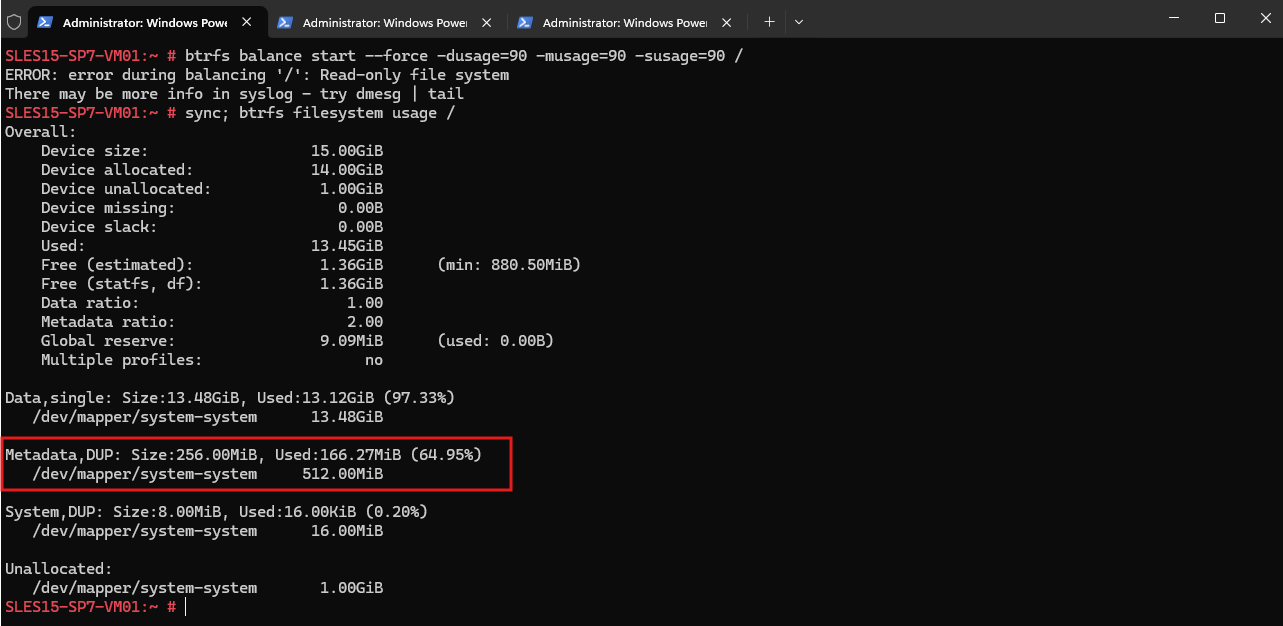
Verifying That the Root Filesystem Is Read-Only
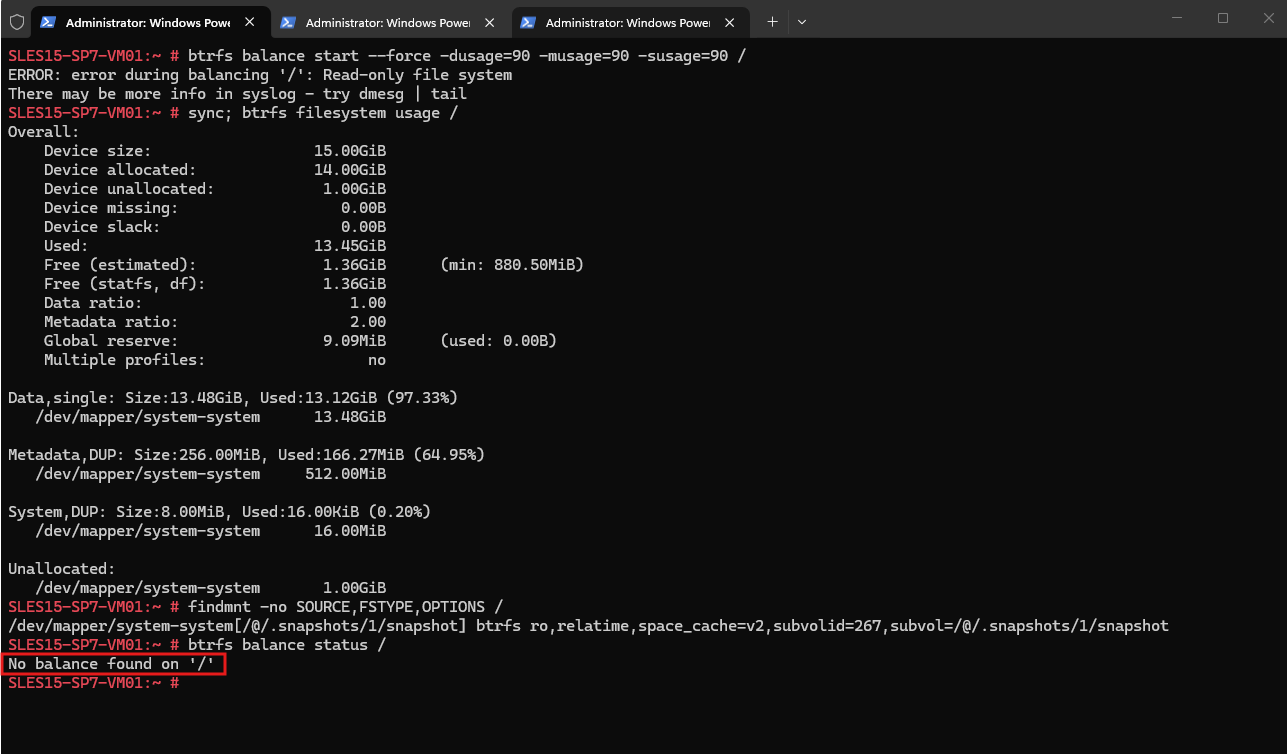
The failed balance command itself already indicates that the filesystem has become read-only:
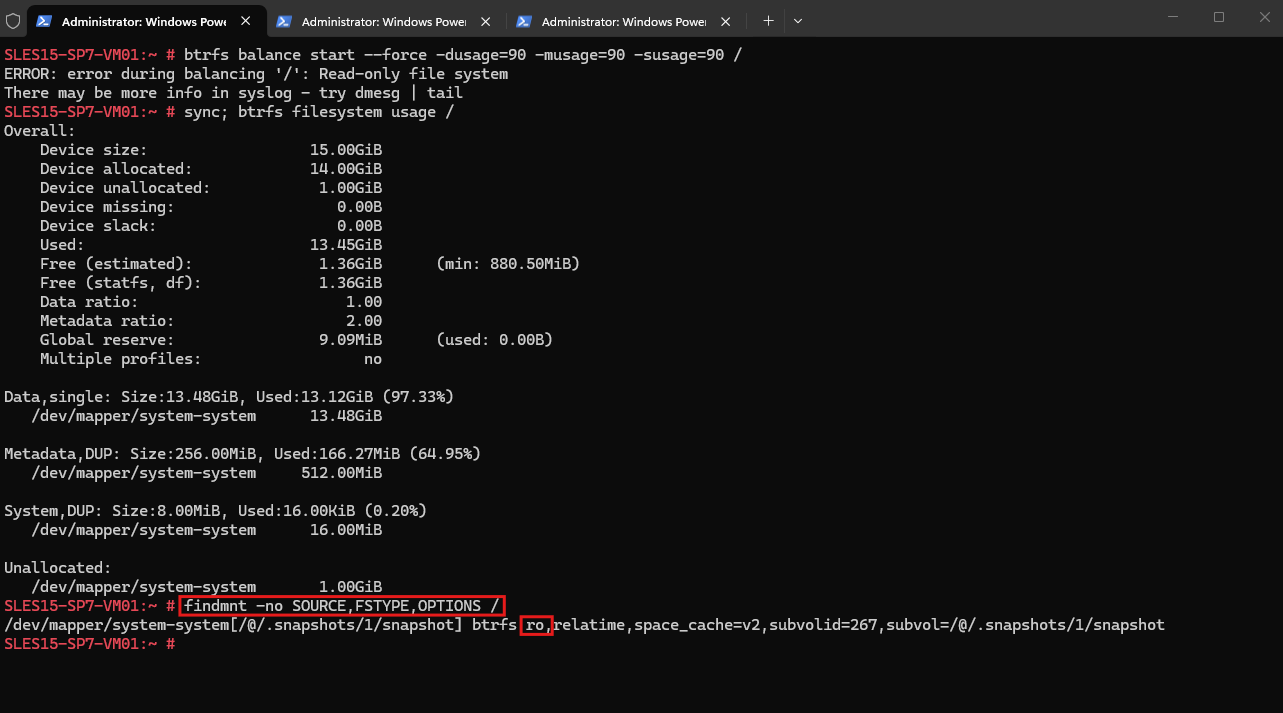
We can confirm the actual mount state of the root filesystem using:
The output confirms that the root filesystem is now mounted read-only (
ro).This confirms that the
forced readonlymessage observed in the kernel log represents an actual change to the filesystem state: Btrfs has switched the root filesystem to read-only mode, preventing further filesystem modifications to protect its consistency.
findmnt -no SOURCE,FSTYPE,OPTIONS /
Checking the Balance Status
We can also check whether a balance operation is still associated with the filesystem:
This shows that although the balance failed with ENOSPC and forced the filesystem read-only, there is currently no running or paused balance operation reported by Btrfs.
btrfs balance status /
Testing the Behavior After a Reboot
Before rebooting, we confirmed that the root filesystem was read-only and that no balance operation was currently running or paused. We will now reboot the system to determine whether the filesystem can recover normally or whether a balance operation is automatically resumed during the subsequent mount.
reboot
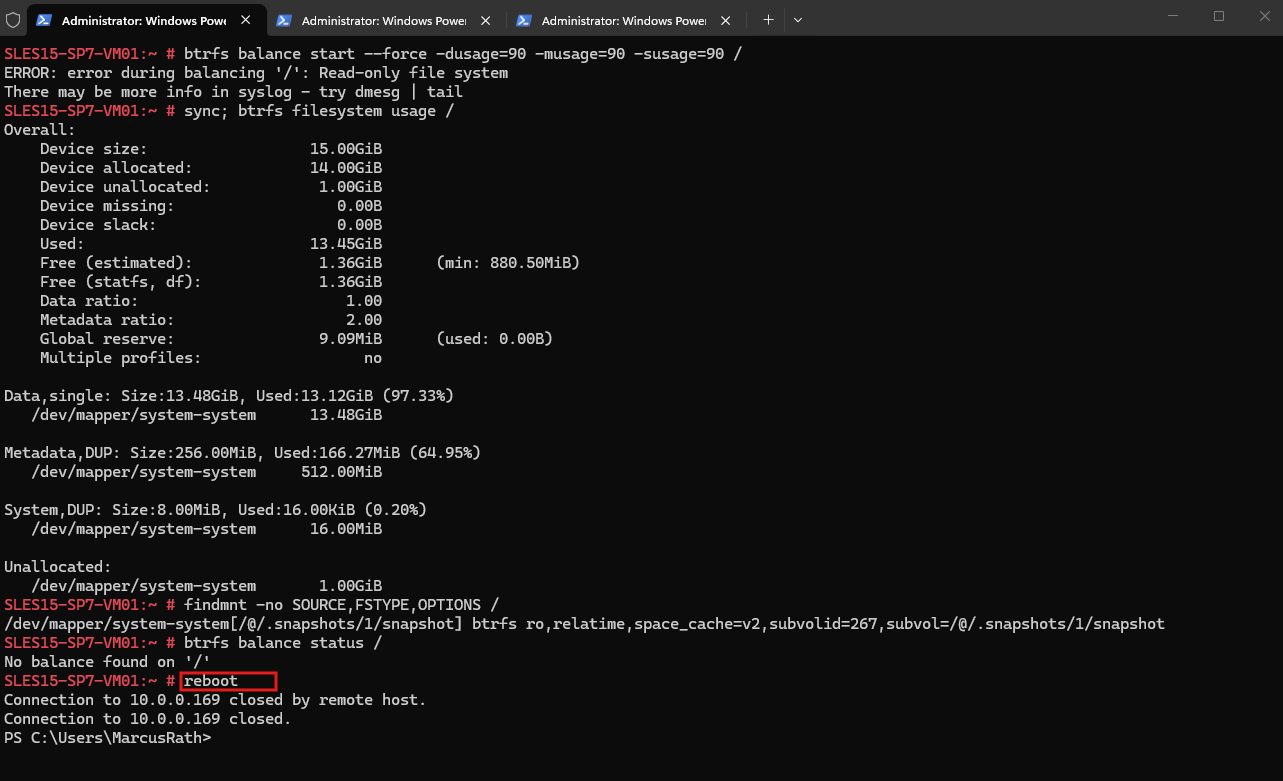
In my lab, the system still reached the normal login prompt after reboot, although the Btrfs root filesystem remained read-only.
This differs from the production system, which could not complete a normal boot.
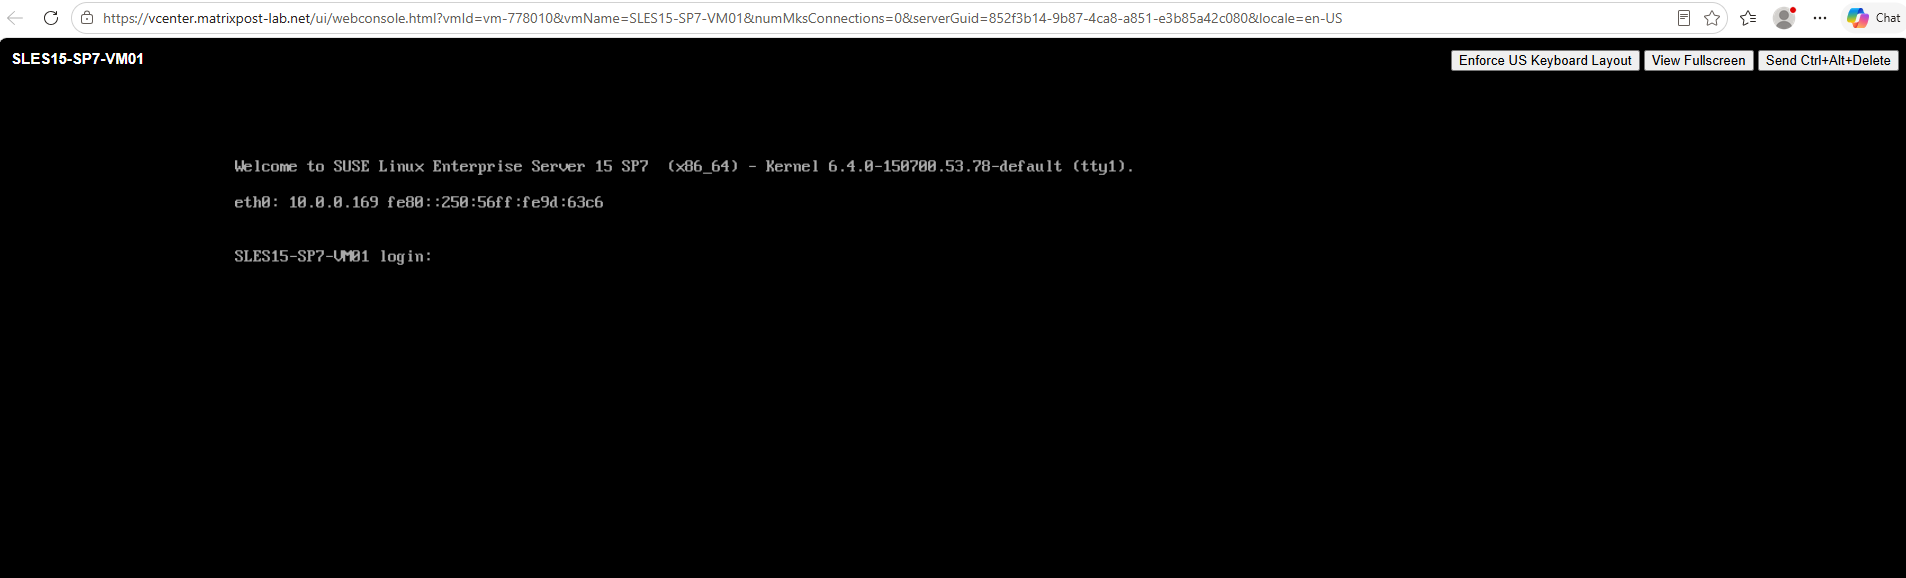
A read-only root filesystem does not necessarily prevent Linux from booting. Much of the operating system can be loaded and started by reading existing files.
However, the boot process and system services normally also need to write to locations such as /var, /run, /tmp, system logs, databases, state files, lock files, and other runtime data.
On SLES with Btrfs, several of these directories may be separate Btrfs subvolumes, but they still belong to the same Btrfs filesystem and therefore become read-only when the filesystem itself is forced read-only.
Whether the system ultimately reaches a usable login prompt therefore depends on which services require persistent writes during that particular boot and how they handle write failures.
In our minimal lab VM, enough of the boot process can apparently continue despite the read-only root filesystem. On the production system, additional services and applications required writable filesystem locations and the boot could not complete normally.
The production system also had an additional complication: a Btrfs balance was resumed when the filesystem was mounted again, reintroducing the allocation pressure and ENOSPC condition during subsequent boots.
Immediately before rebooting our lab system,
btrfs balance status /reportedNo balance found on '/'. However, as we will see further below under Attempting Recovery Using the Built-In Boot Options, , Btrfs performs balance relocation work again during a subsequent Recovery Mode boot.This demonstrates an important diagnostic detail:
btrfs balance status /only describes the balance state visible at the time the command is executed. After a balance has already terminated with an error, the command can reportNo balance foundeven though balance activity occurred earlier during that boot.
After the reboot, the root filesystem remains mounted read-only (ro), confirming that the reboot itself did not restore the filesystem to a writable state.
findmnt -no SOURCE,FSTYPE,OPTIONS /

Attempting to Remount the Root Filesystem Read-Write
Since the system successfully booted but the root filesystem remains read-only, we can first attempt to restore normal write access by remounting / as read-write:
mount -o remount,rw /

Now let’s get the actual Btrfs kernel reason, which should be more informative than the generic mount error:
The kernel log provides the actual reason for the failed remount. Because Btrfs had previously encountered a filesystem error and entered its protected read-only state, it explicitly refuses to remount the filesystem read-write.
journalctl -k -b | grep -Ei 'remount|read-write|readonly|read-only'
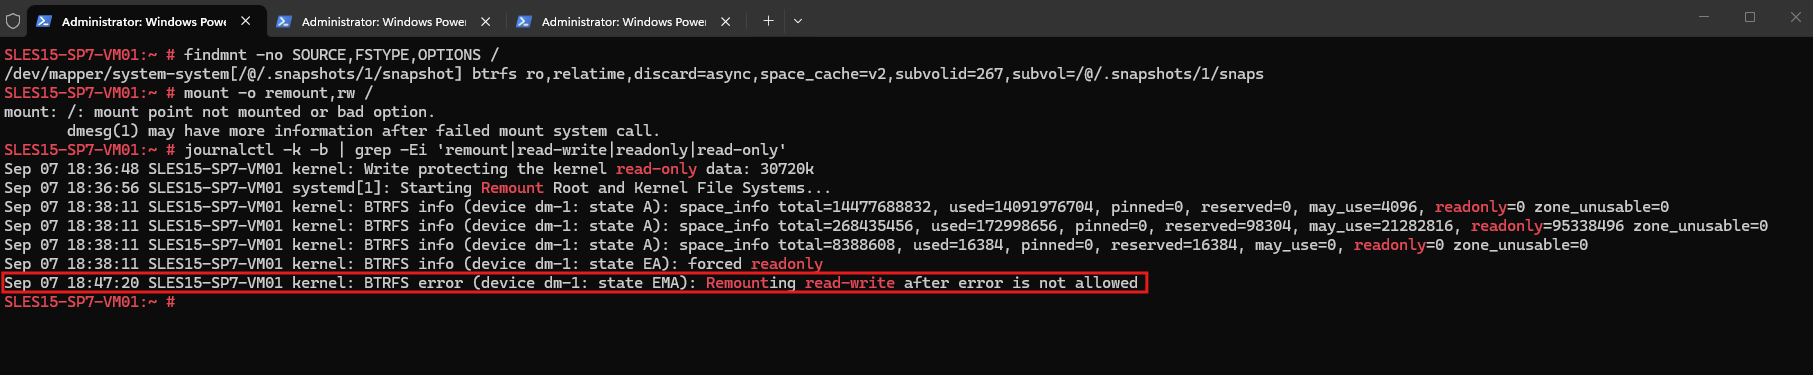
Therefore, simply rebooting the system or attempting mount -o remount,rw / does not clear the Btrfs error state.
At this point, recovery requires addressing the underlying space condition rather than forcing the existing mounted filesystem back into read-write mode.
Attempting Recovery Using the Built-In Boot Options
Before booting from external SLES installation media, we first attempted to recover the system using the built-in boot options provided by SLES.
This allows us to determine whether the filesystem can be repaired from the installed operating system without requiring separate rescue media.
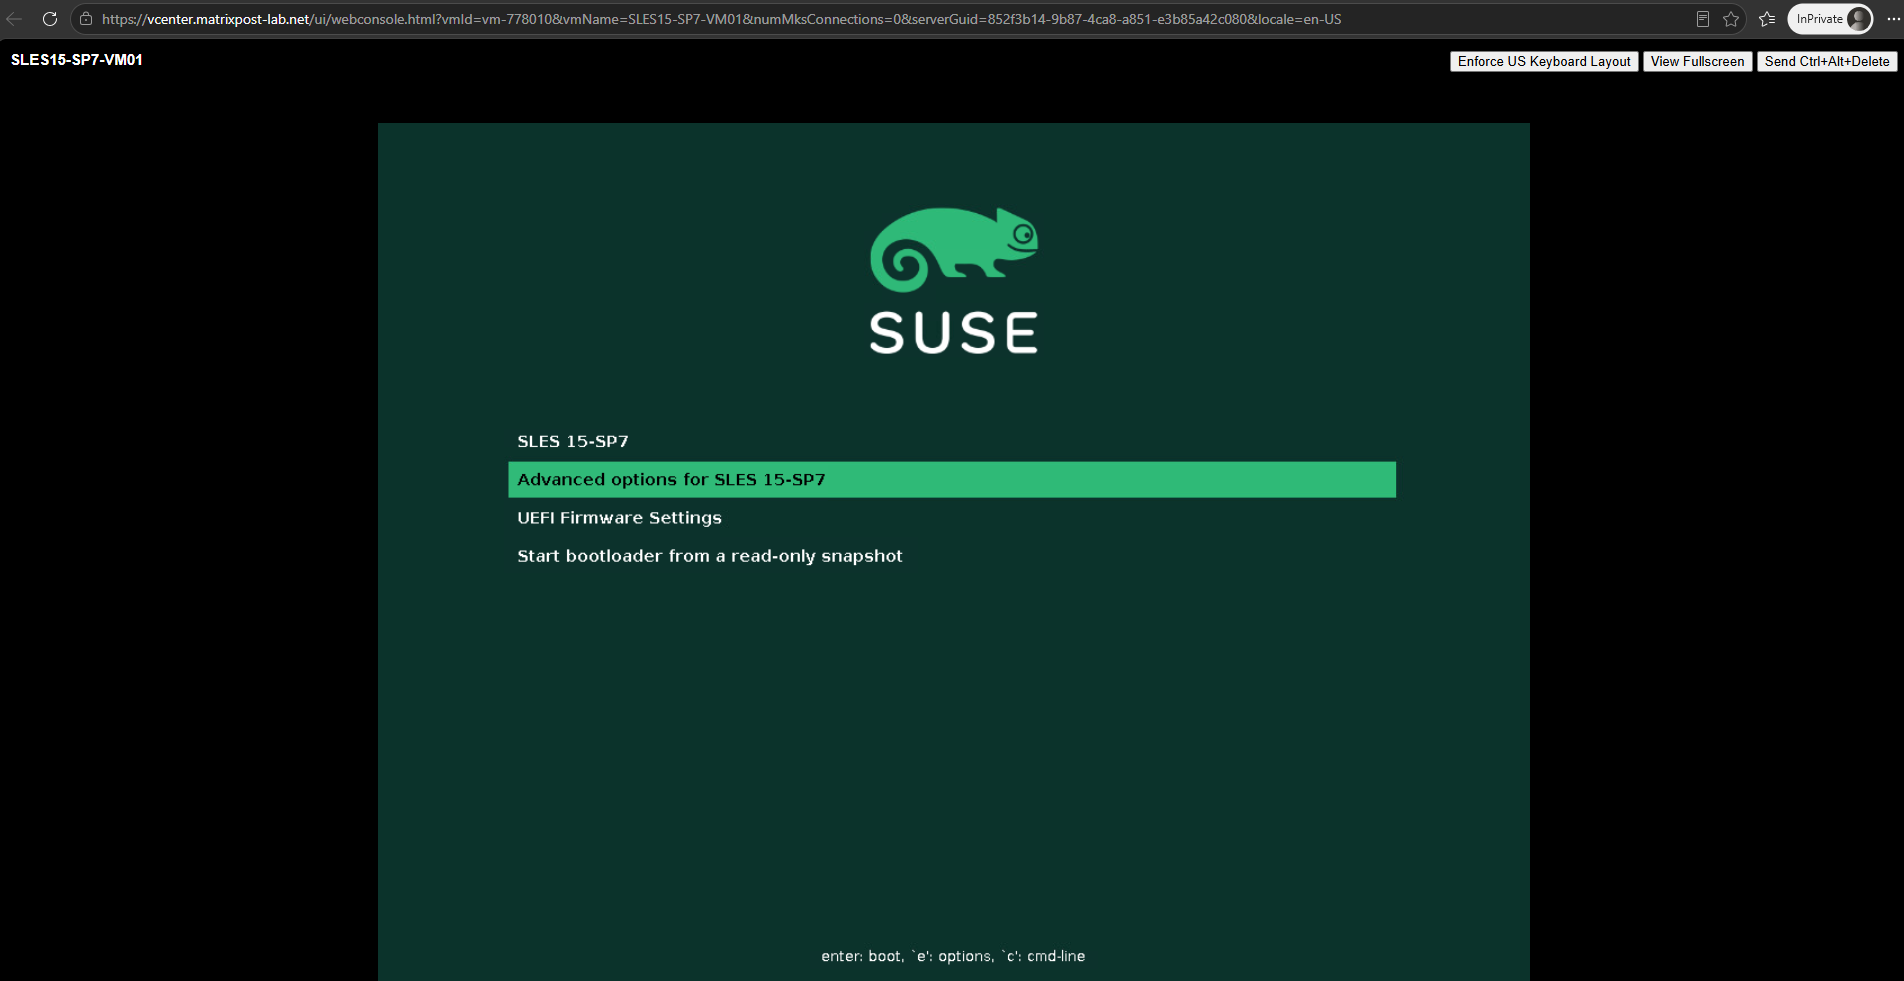
Select Advanced options for SLES 15-SP7 when booting the system.
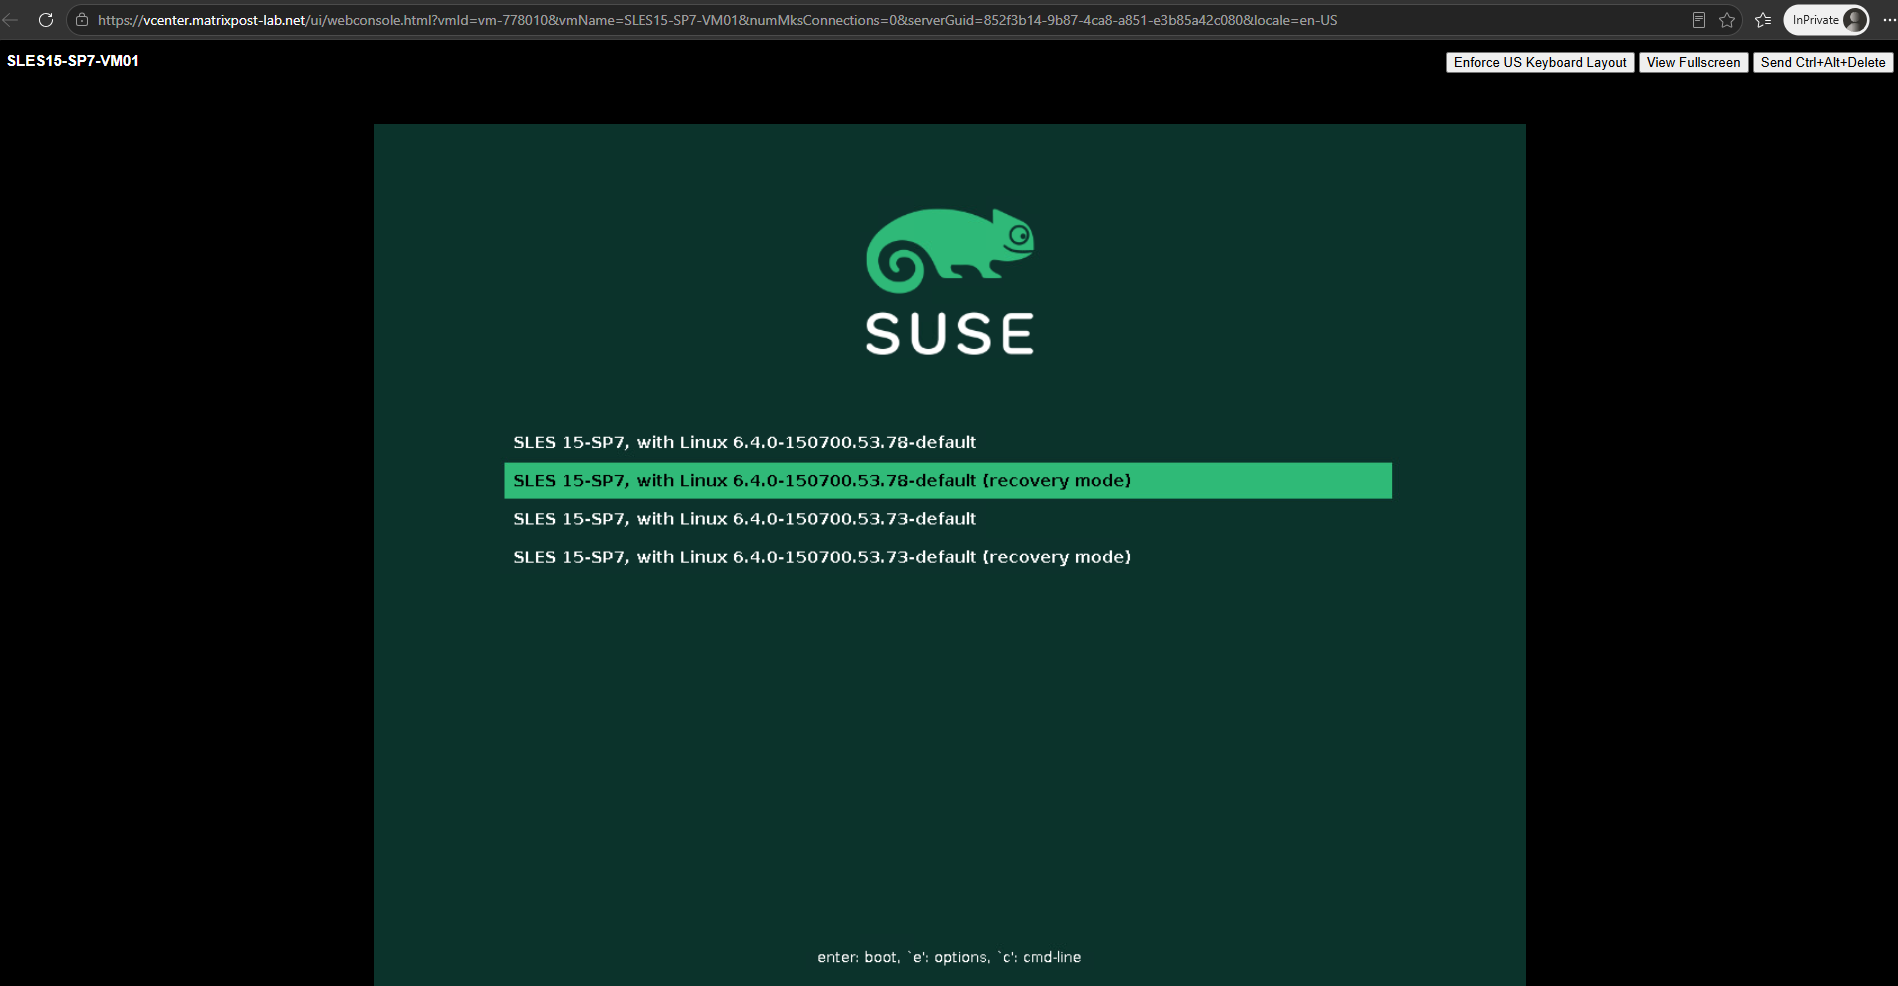
We select the recovery entry for the same kernel version currently installed and used during our reproduction: SLES 15-SP7, with Linux 6.4.0-150700.53.78-default (recovery mode).
Recovery Mode still boots the installed operating system and its existing root filesystem, but starts the system in a reduced recovery-oriented environment with fewer services.
This can be useful for troubleshooting boot problems, configuration errors, and filesystem-related issues.
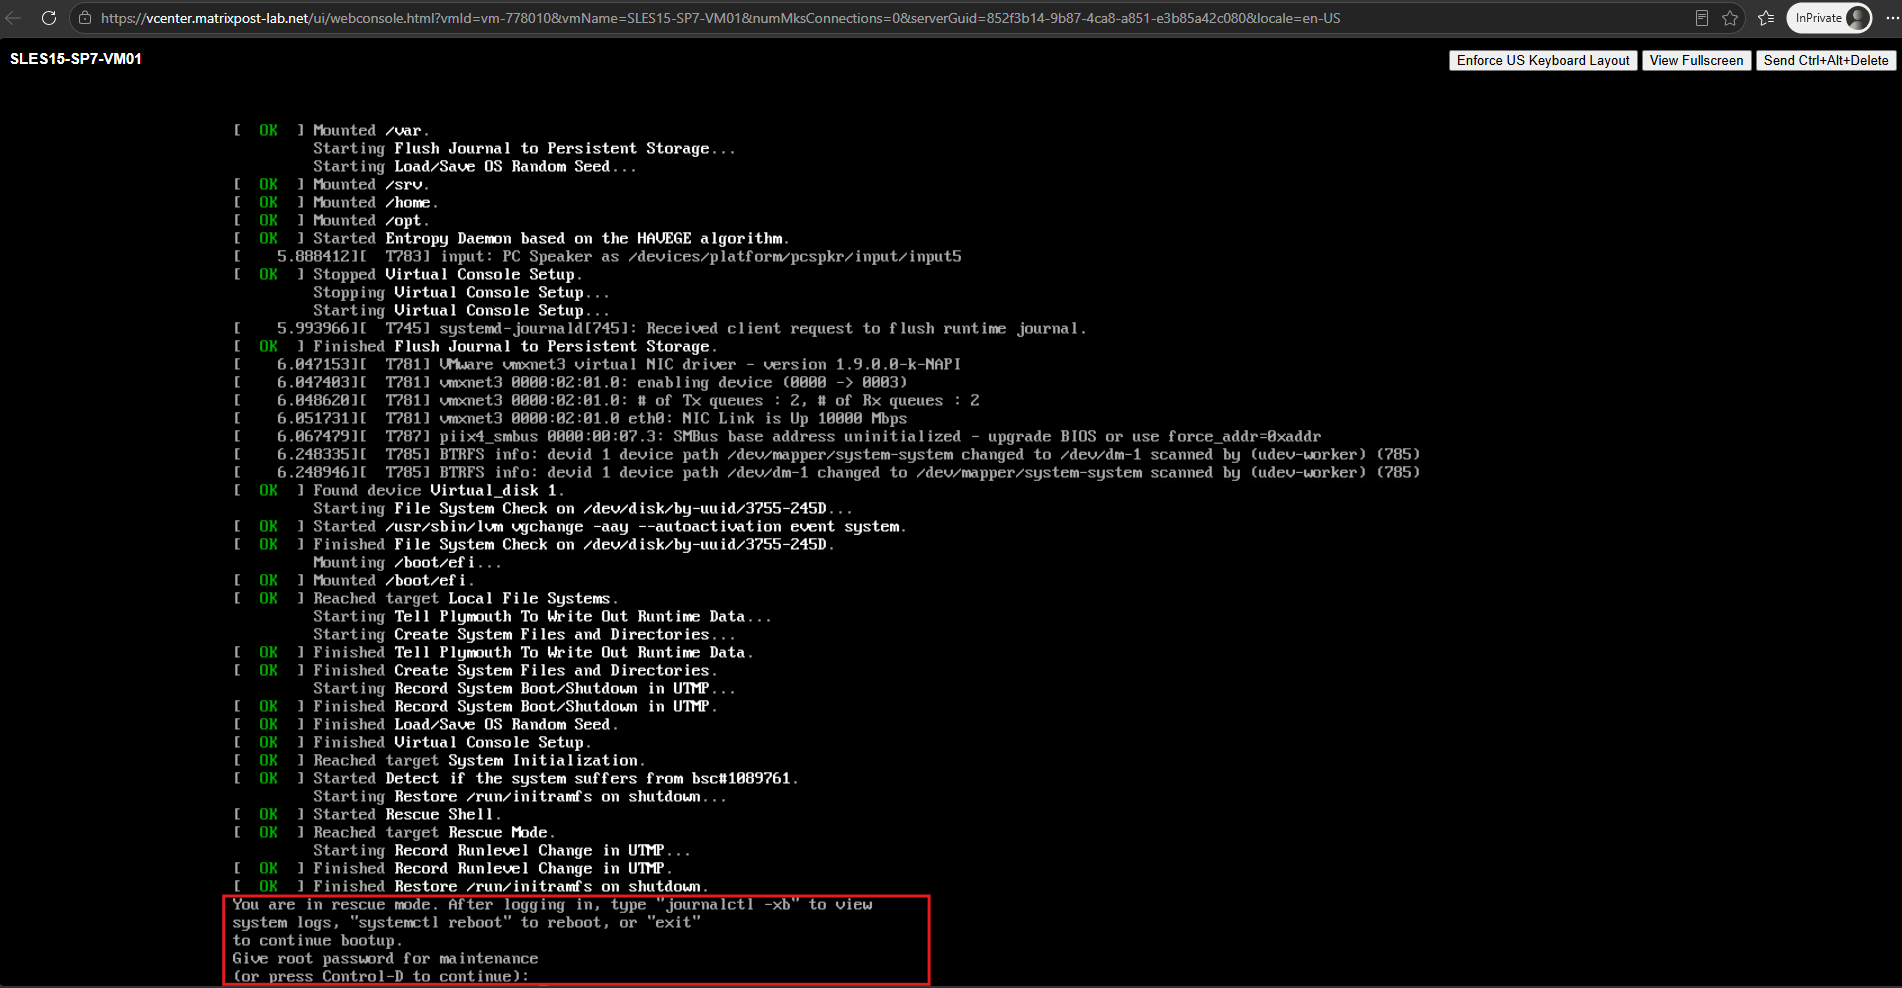
SLES Recovery Mode starts the installed system in a reduced systemd rescue environment and stops at a maintenance prompt instead of continuing with the normal multi-user boot.
After entering the root password, we obtain a root shell from which we can inspect the affected filesystem and attempt recovery operations with most normal services stopped.
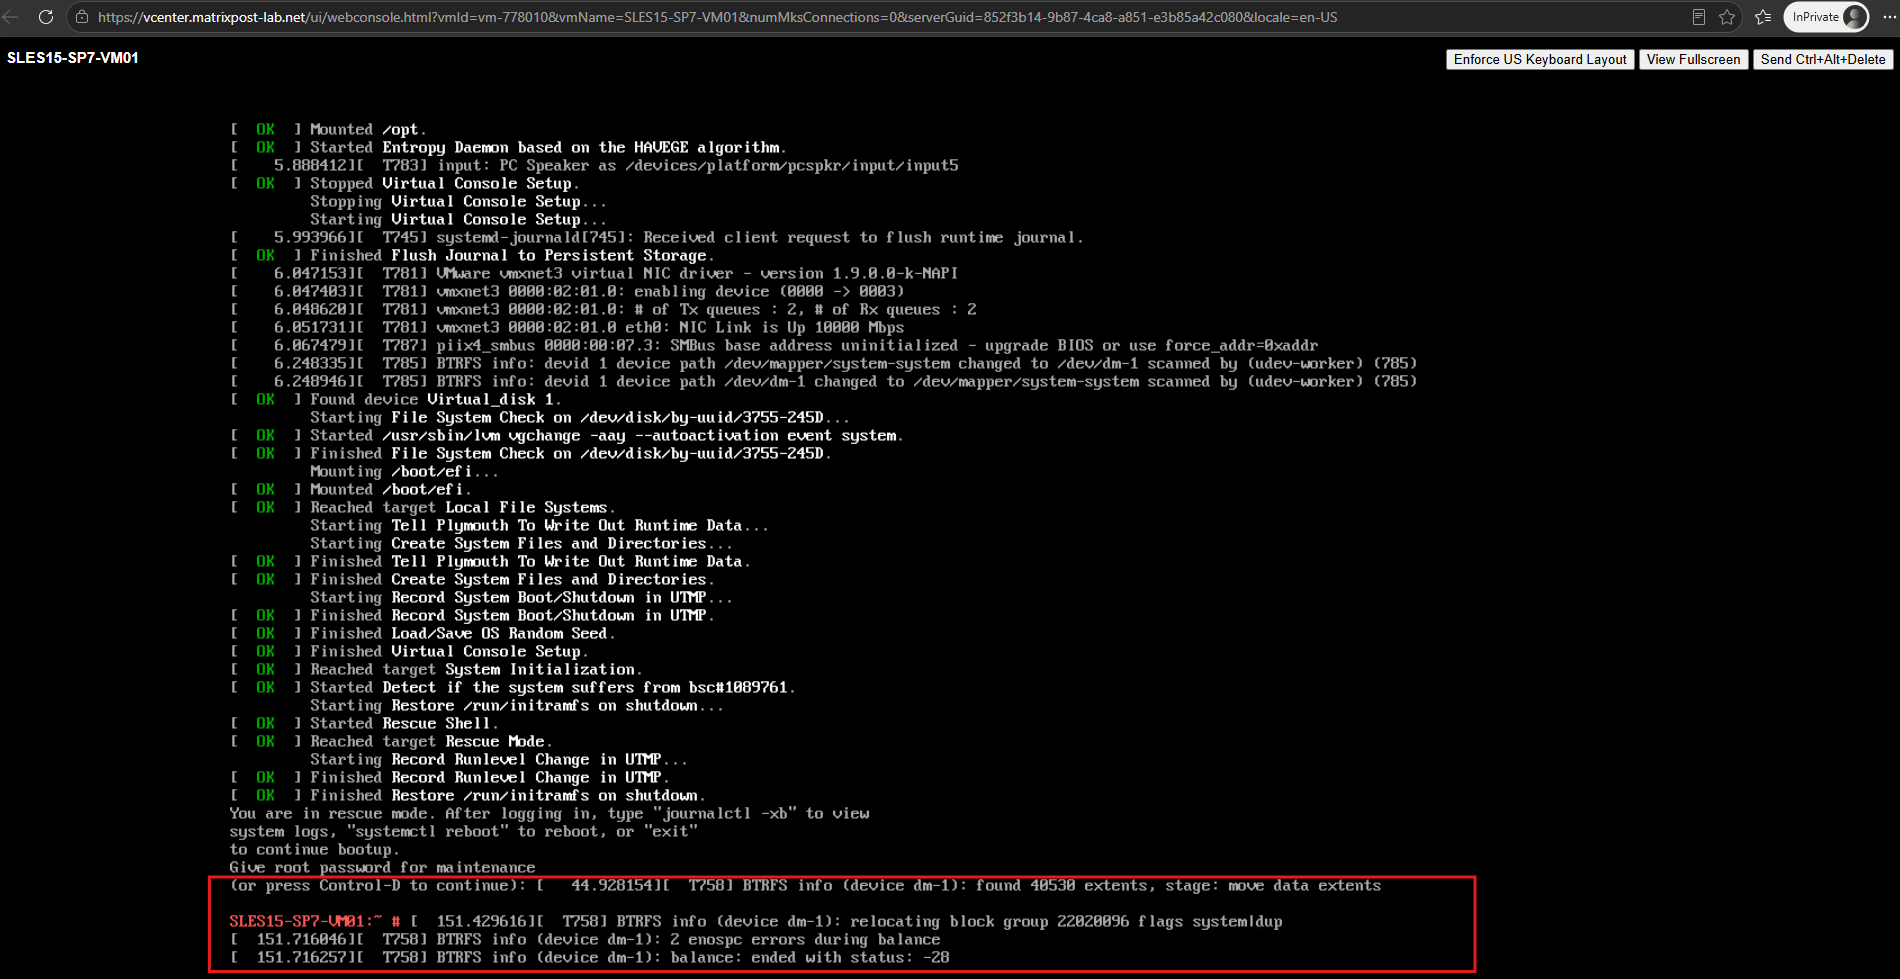
After entering the root password, Btrfs messages appear on the console showing that balance relocation work is taking place during the Recovery Mode boot. The operation attempts to relocate additional block groups but again encounters ENOSPC:
The balance then encounters two ENOSPC errors and terminates with status
-28, corresponding to “No space left on device”:
When we subsequently query the balance status, Btrfs reports No balance found on '/'.
This is not contradictory: the console already shows that the balance ended with status
-28before we executed the status command. Therefore, there is no longer an active or paused balance forbtrfs balance statusto report.
btrfs balance status /
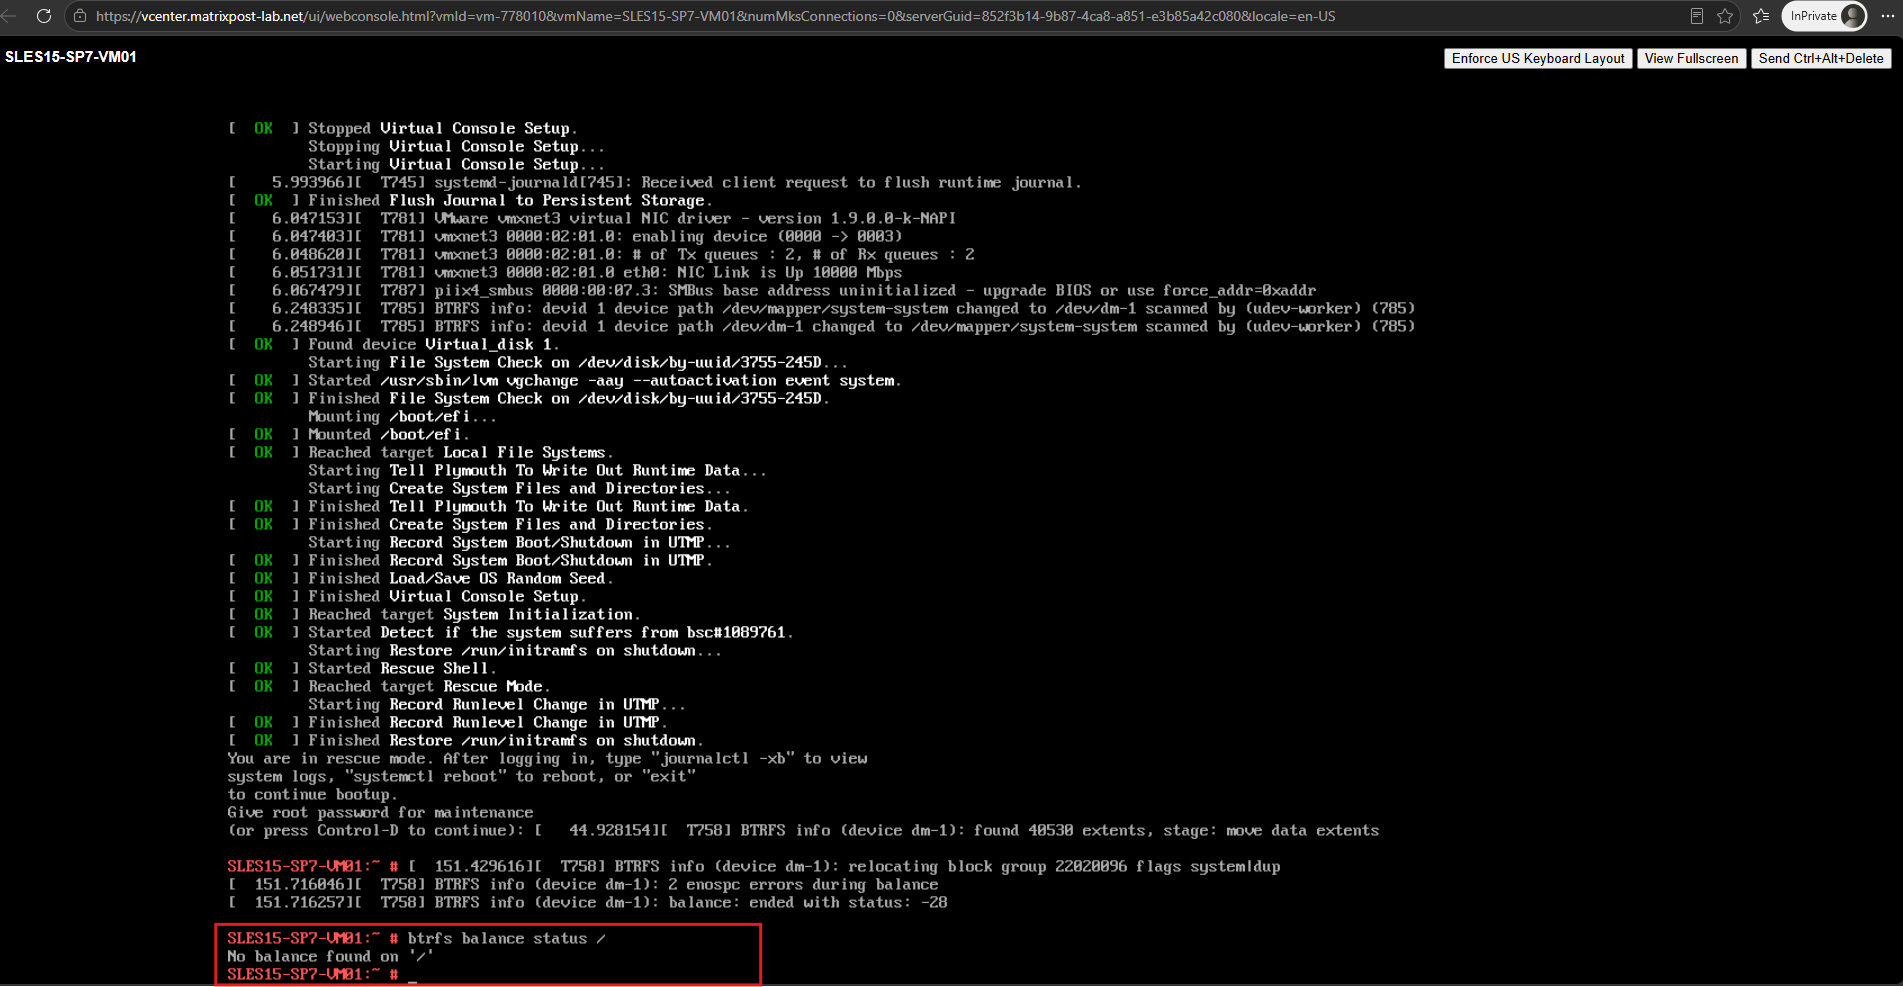
Although btrfs balance status / currently reports no balance, the console clearly showed balance relocation during boot. We can inspect the kernel log to determine whether Btrfs explicitly resumed a previously stored balance operation:
This confirms that the previous balance operation had been persisted by Btrfs and automatically resumed when the filesystem was mounted again. The resumed balance encountered the same space-allocation problem and again terminated with ENOSPC (
-28).The subsequent
btrfs balance status /output ofNo balance found on '/'is therefore not contradictory. By the time the status command was executed, the resumed balance had already terminated with an error, leaving no currently running or paused balance for the command to report.
journalctl -k -b | grep -Ei 'BTRFS.*(balance|relocat|ENOSPC|error -28|errno=-28|forced readonly)'
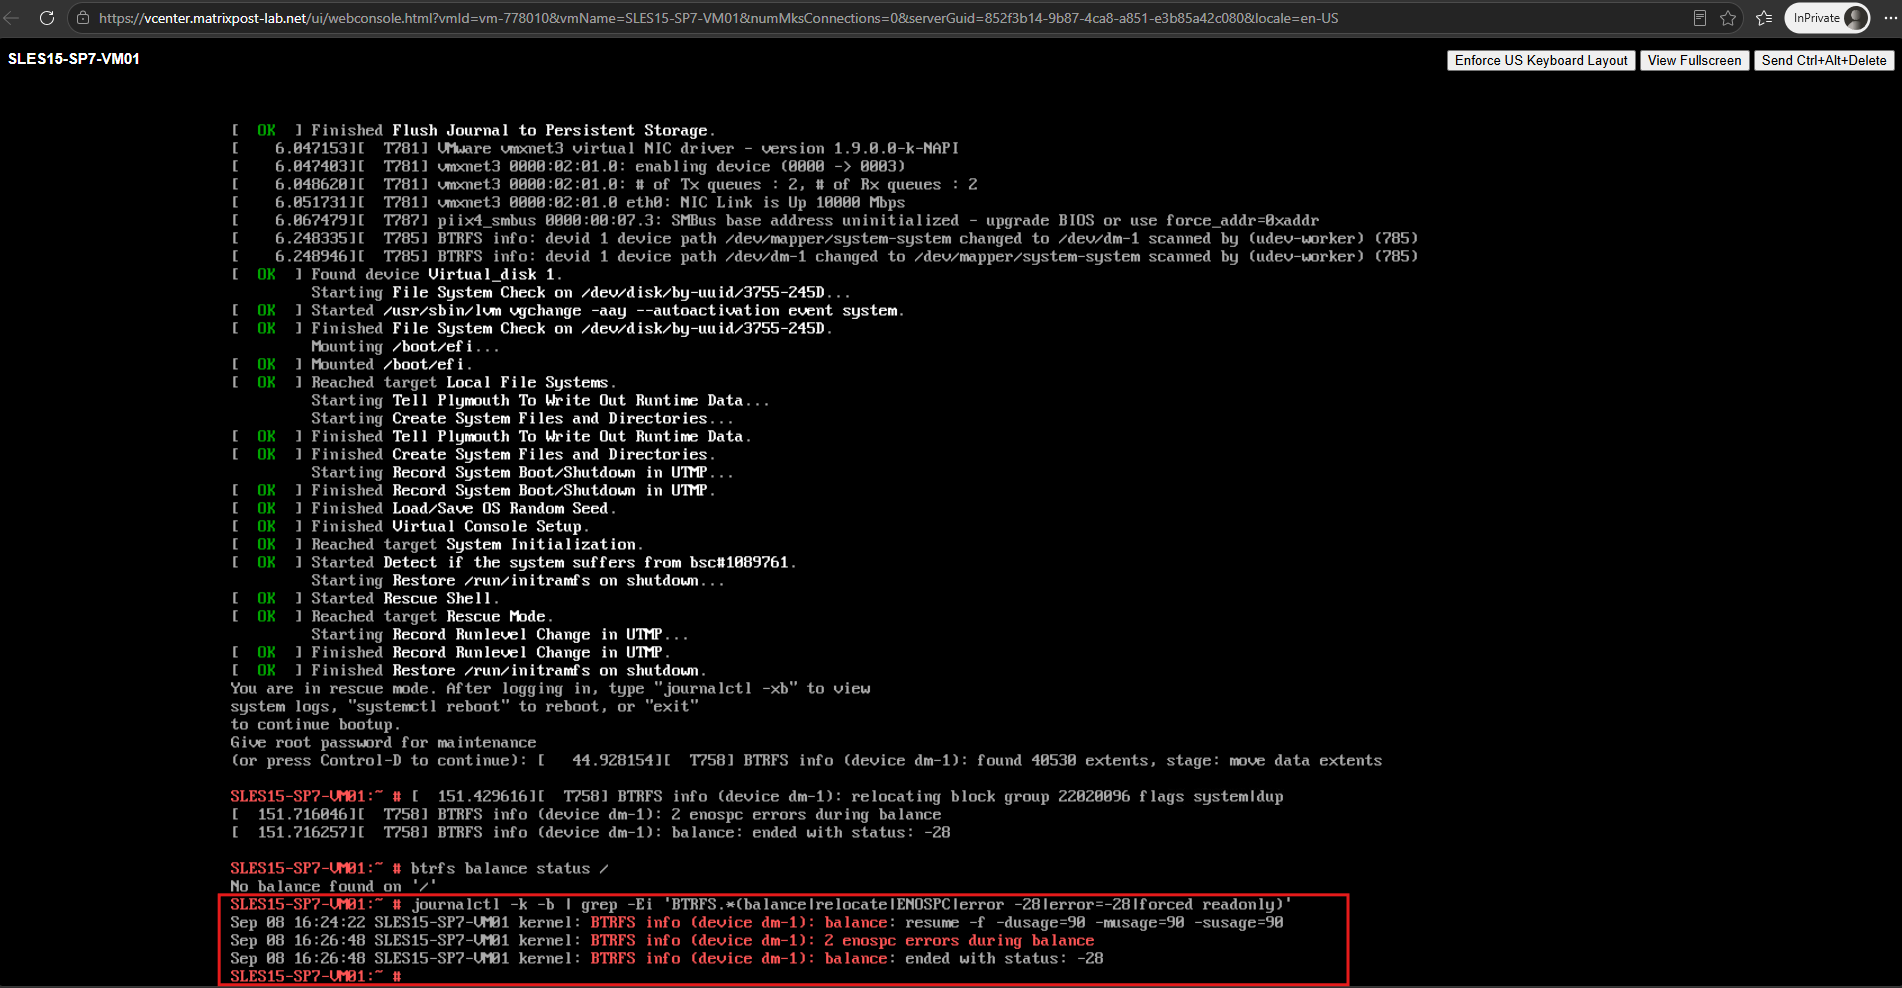
Attempting to Remount the Filesystem in Recovery Mode
Because Recovery Mode uses the installed Btrfs root filesystem, let’s first verify its current state:
Interestingly, after the resumed balance had terminated with ENOSPC, checking the root filesystem reveals that it is now mounted read-write (
rw).This differs from the previous normal boot, where the root filesystem remained read-only. Although the persisted balance was resumed and again encountered ENOSPC, the kernel log for this Recovery Mode boot does not show another
forced readonlyevent, and the root filesystem is currently writable.
findmnt -no SOURCE,FSTYPE,OPTIONS /
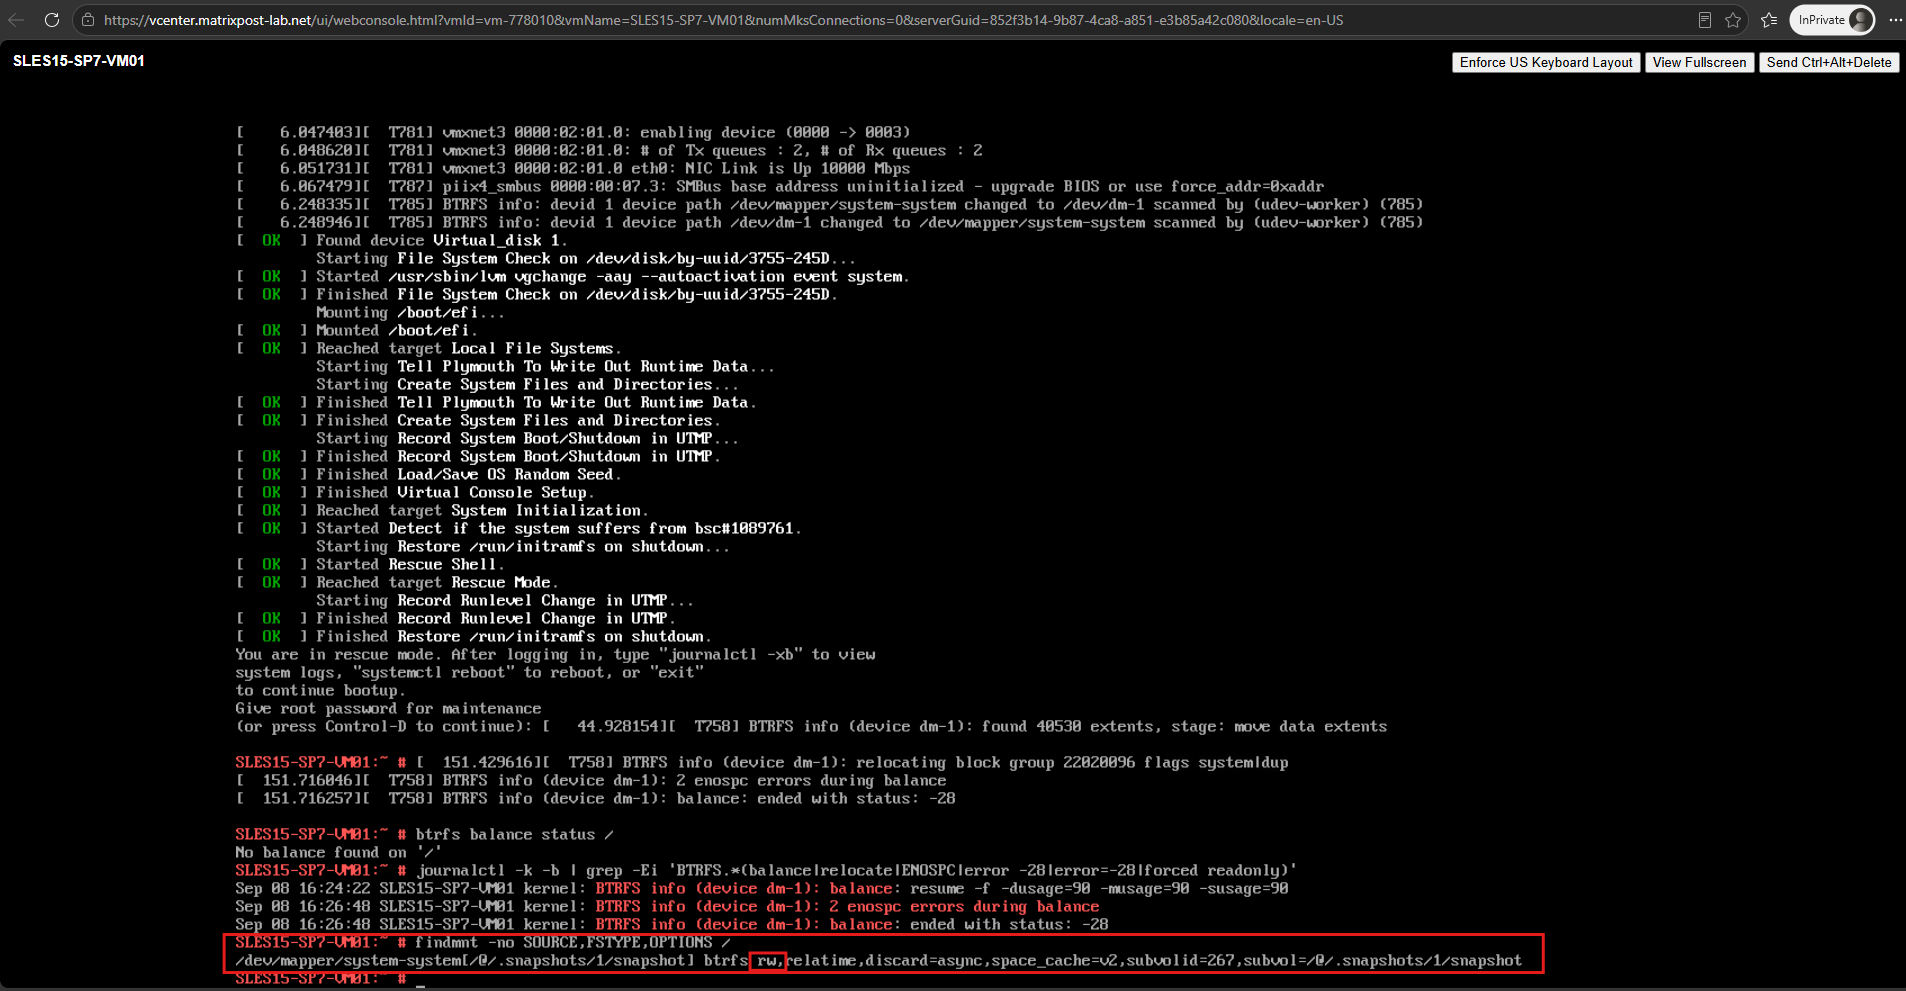
Although the root filesystem is currently mounted read-write, the underlying Btrfs space condition has not been resolved. The resumed balance has reduced the remaining Device unallocated space to only 1 MiB, while
statfs/dfstill reports approximately 1.35 GiB of free space.This once again illustrates the distinction between ordinary filesystem free space and unallocated device space available to Btrfs for additional block-group allocation. With essentially no unallocated device space remaining, the filesystem remains under severe allocation pressure and another balance or metadata-intensive operation could again encounter ENOSPC.
btrfs filesystem usage /
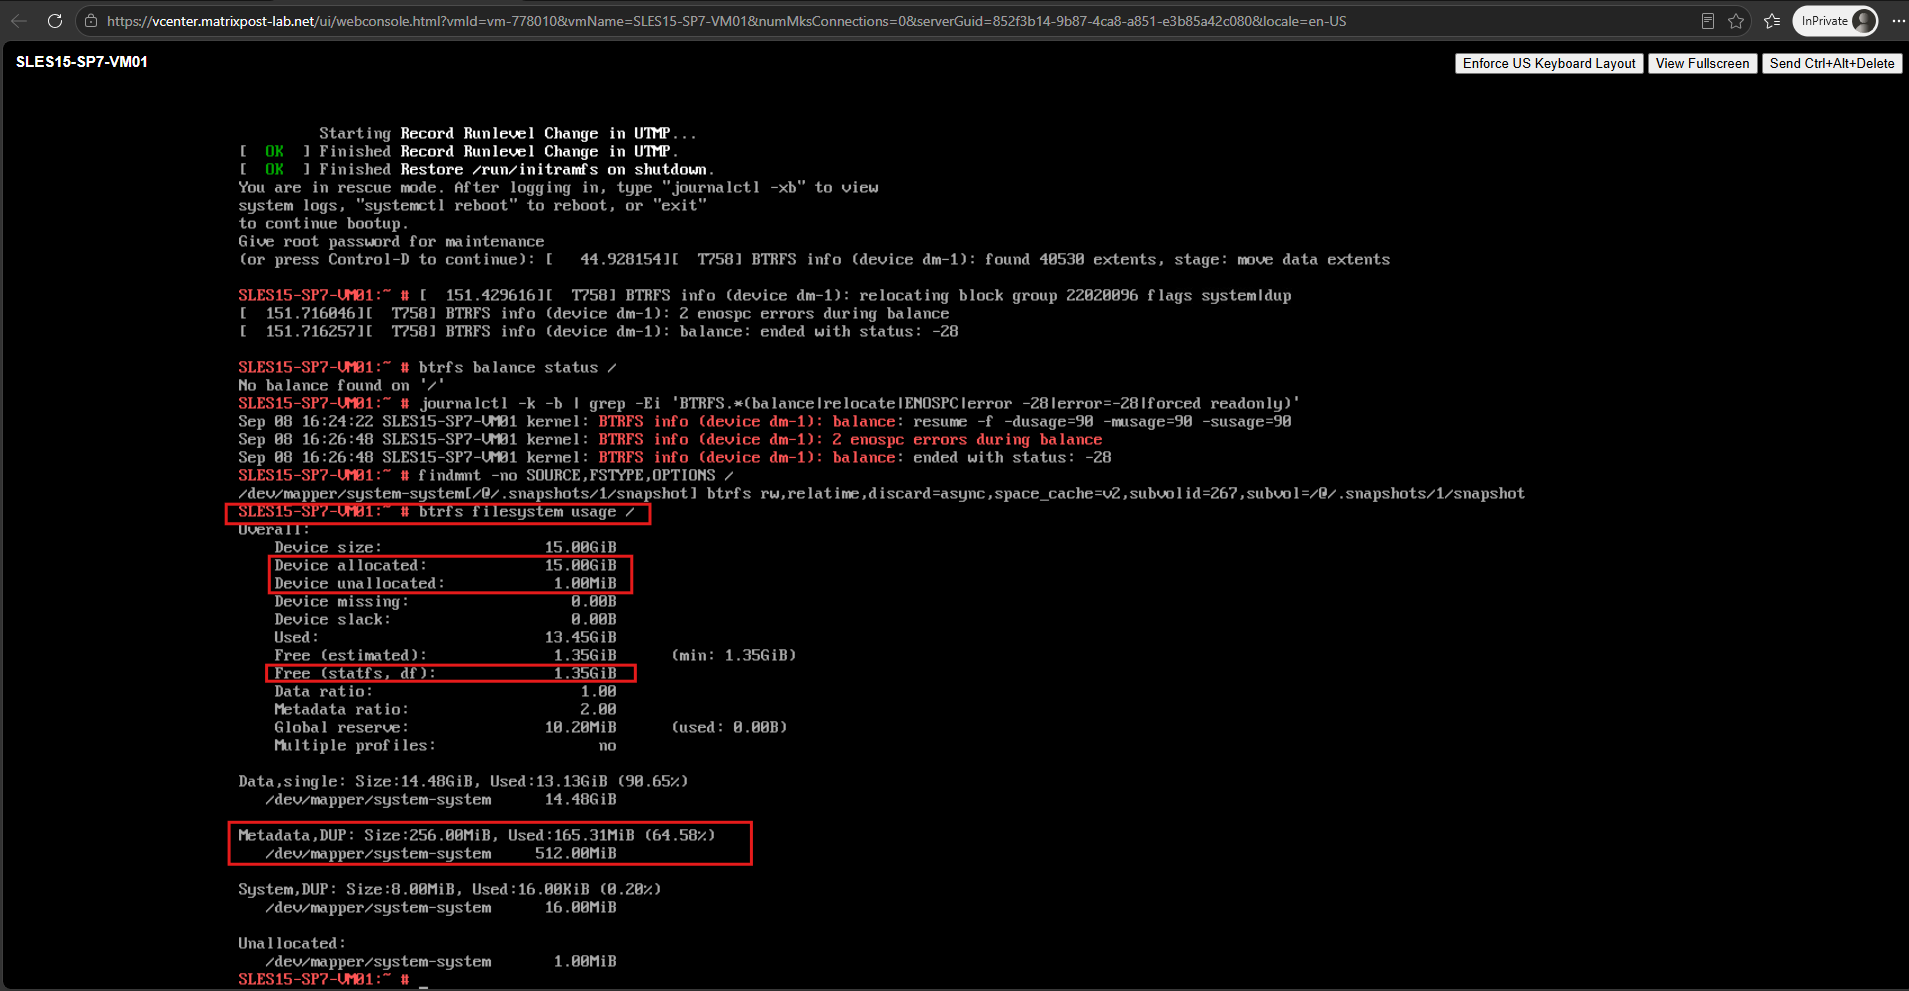
Recovery Mode therefore gives us temporary read-write access to the filesystem in our case, but it does not resolve the underlying capacity problem.
Rather than continuing to operate the filesystem in this state, we will increase the underlying storage capacity and perform the recovery from an independent SLES Rescue System.
Recovery Directly from Recovery Mode
In our lab, the root filesystem is now mounted read-write, despite the resumed balance having terminated again with ENOSPC. This means that, in this particular situation, we could potentially perform the complete storage extension directly from the built-in Recovery Mode.
Assuming the underlying VMware virtual disk has first been increased from 36 GiB to 46 GiB, the recovery would conceptually consist of the following steps:
Increase VMware virtual disk
        36 GiB → 46 GiB
               │
               ▼
Linux detects larger /dev/sdb
               │
               ▼
pvresize /dev/sdb
               │
               ▼
Additional capacity becomes free in VG "system"
               │
               ▼
lvextend -L +10G /dev/system/system
               │
               ▼
Root LV grows
        15 GiB → 25 GiB
               │
               ▼
btrfs filesystem resize max /
               │
               ▼
Btrfs Device size
        15 GiB → 25 GiB
               │
               ▼
Additional capacity becomes
Btrfs Device unallocated space
The corresponding commands would be approximately:
pvresize /dev/sdb
lvextend -L +10G /dev/system/system
btrfs filesystem resize max /
btrfs filesystem usage /
However, Recovery Mode does not guarantee that the affected Btrfs root filesystem will become writable. Depending on the filesystem error and the point at which Btrfs entered its error state, the root filesystem may remain read-only and refuse a read-write remount.
We therefore will not perform the actual recovery from Recovery Mode in this example. Instead, we will boot the SLES Rescue System from the installation media and perform the storage extension from an independent operating environment shown below.
This approach also reflects the recovery method used on the original production system and remains applicable when the installed root filesystem cannot be mounted read-write.
Recovering the Btrfs Root Filesystem Using the SLES Rescue System
Because Btrfs had forced the root filesystem into read-only mode and initially refused to remount it read-write after the filesystem error, recovery from the normally booted operating system was not possible at that point.
As demonstrated above, SLES Recovery Mode may provide a writable filesystem in some situations, potentially allowing the storage extension to be performed directly from there. However, this behavior cannot be assumed after a Btrfs filesystem has entered an error state.
We will therefore perform the actual recovery using the SUSE Linux Enterprise Server installation media and its Rescue System. This provides an independent Linux environment and also reproduces the recovery approach used on the affected production system.
From this environment, we can activate the existing LVM volumes, increase the underlying storage capacity, extend the root logical volume, mount the affected Btrfs filesystem, and finally expand Btrfs to use the additional capacity.
Boot SLES installation ISO
        │
        ▼
Start Rescue System
        │
        ▼
Identify and activate LVM
        │
        ▼
Increase underlying storage capacity
        │
        ▼
Extend PV and root LV
        │
        ▼
Mount Btrfs filesystem
        │
        ▼
Resize Btrfs filesystem
        │
        ▼
Verify filesystem
        │
        ▼
Boot installed SLES normally
Booting the VM from the SLES Installation Media
After increasing the virtual disk capacity in vSphere and attaching the SLES 15 SP7 installation ISO, we configure the VM to enter the UEFI firmware setup during the next boot. This allows us to explicitly select the virtual CD/DVD drive containing the SLES installation media instead of booting the affected operating system again.
For our recovery, we increase the virtual disk by 10 GiB, providing substantial additional unallocated space for Btrfs.
As a practical rule, a balance should not be started when the filesystem is already critically short on unallocated device space; there is no universal minimum, but keeping at least several GiB of Device unallocated space on a filesystem of this size provides much safer working room for relocation and metadata allocation.
In the vSphere Client, under VM Options → Boot Options, enable: During the next boot, force entry into the EFI setup screen.
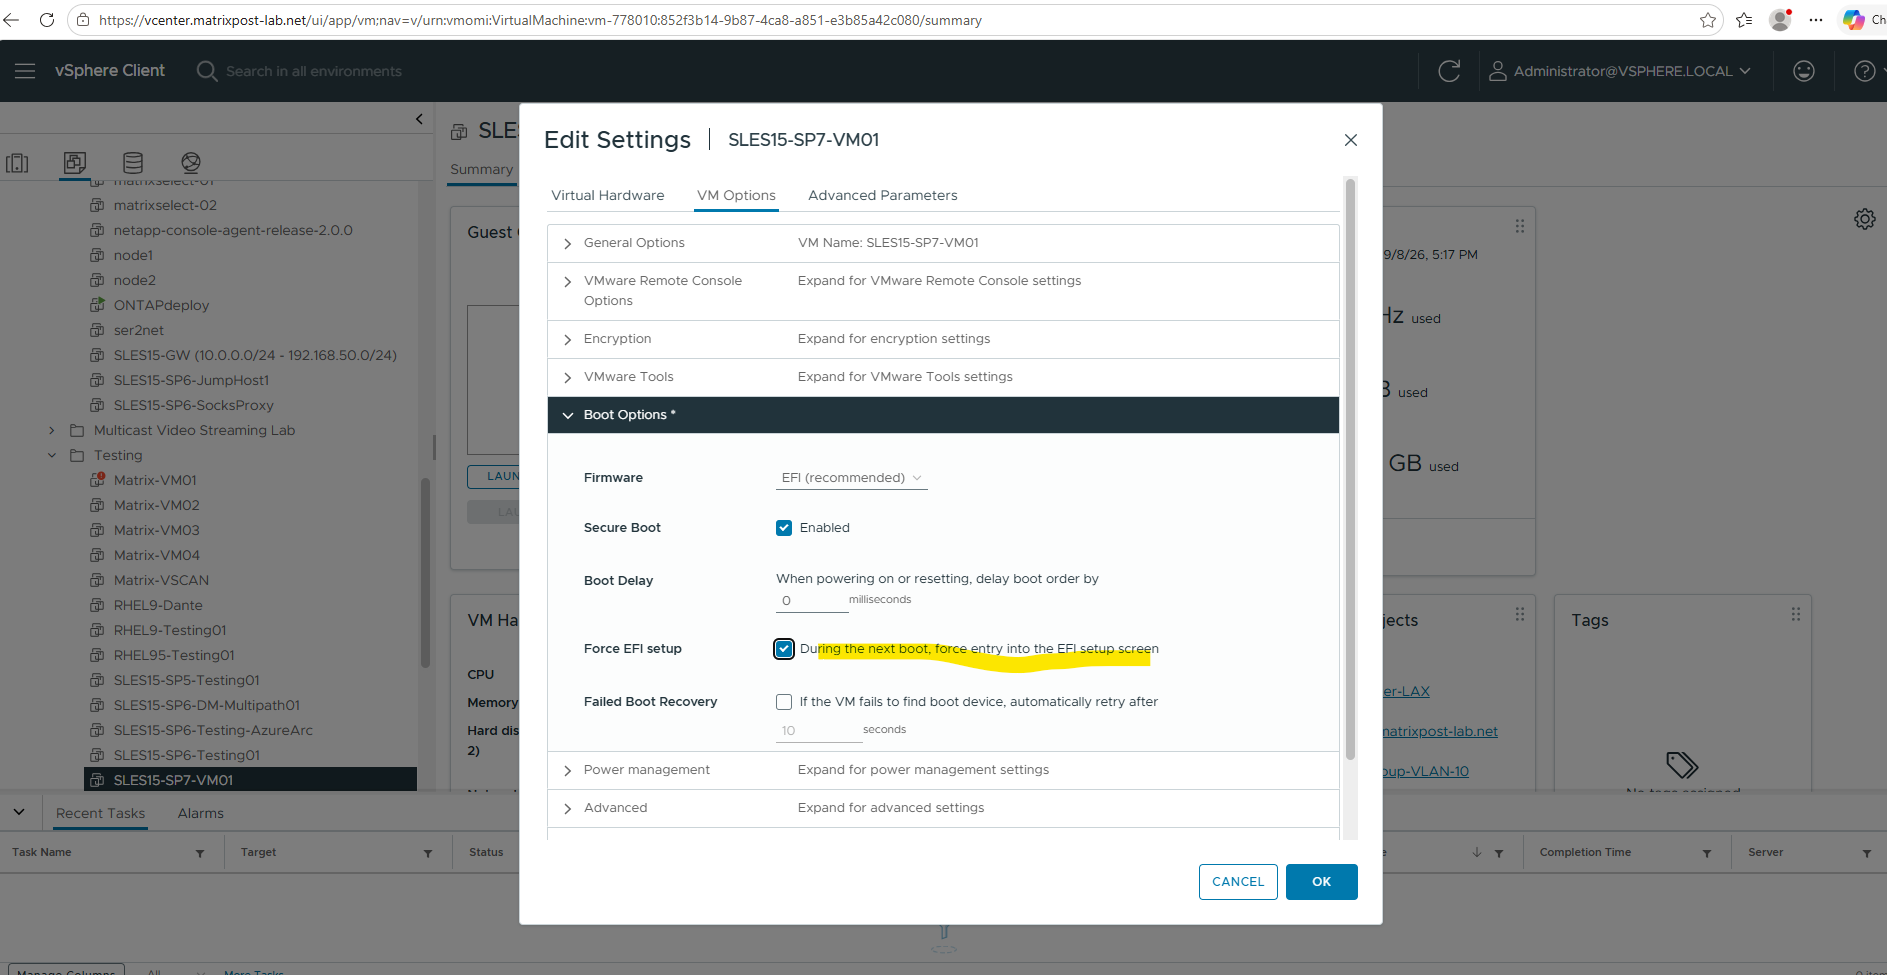
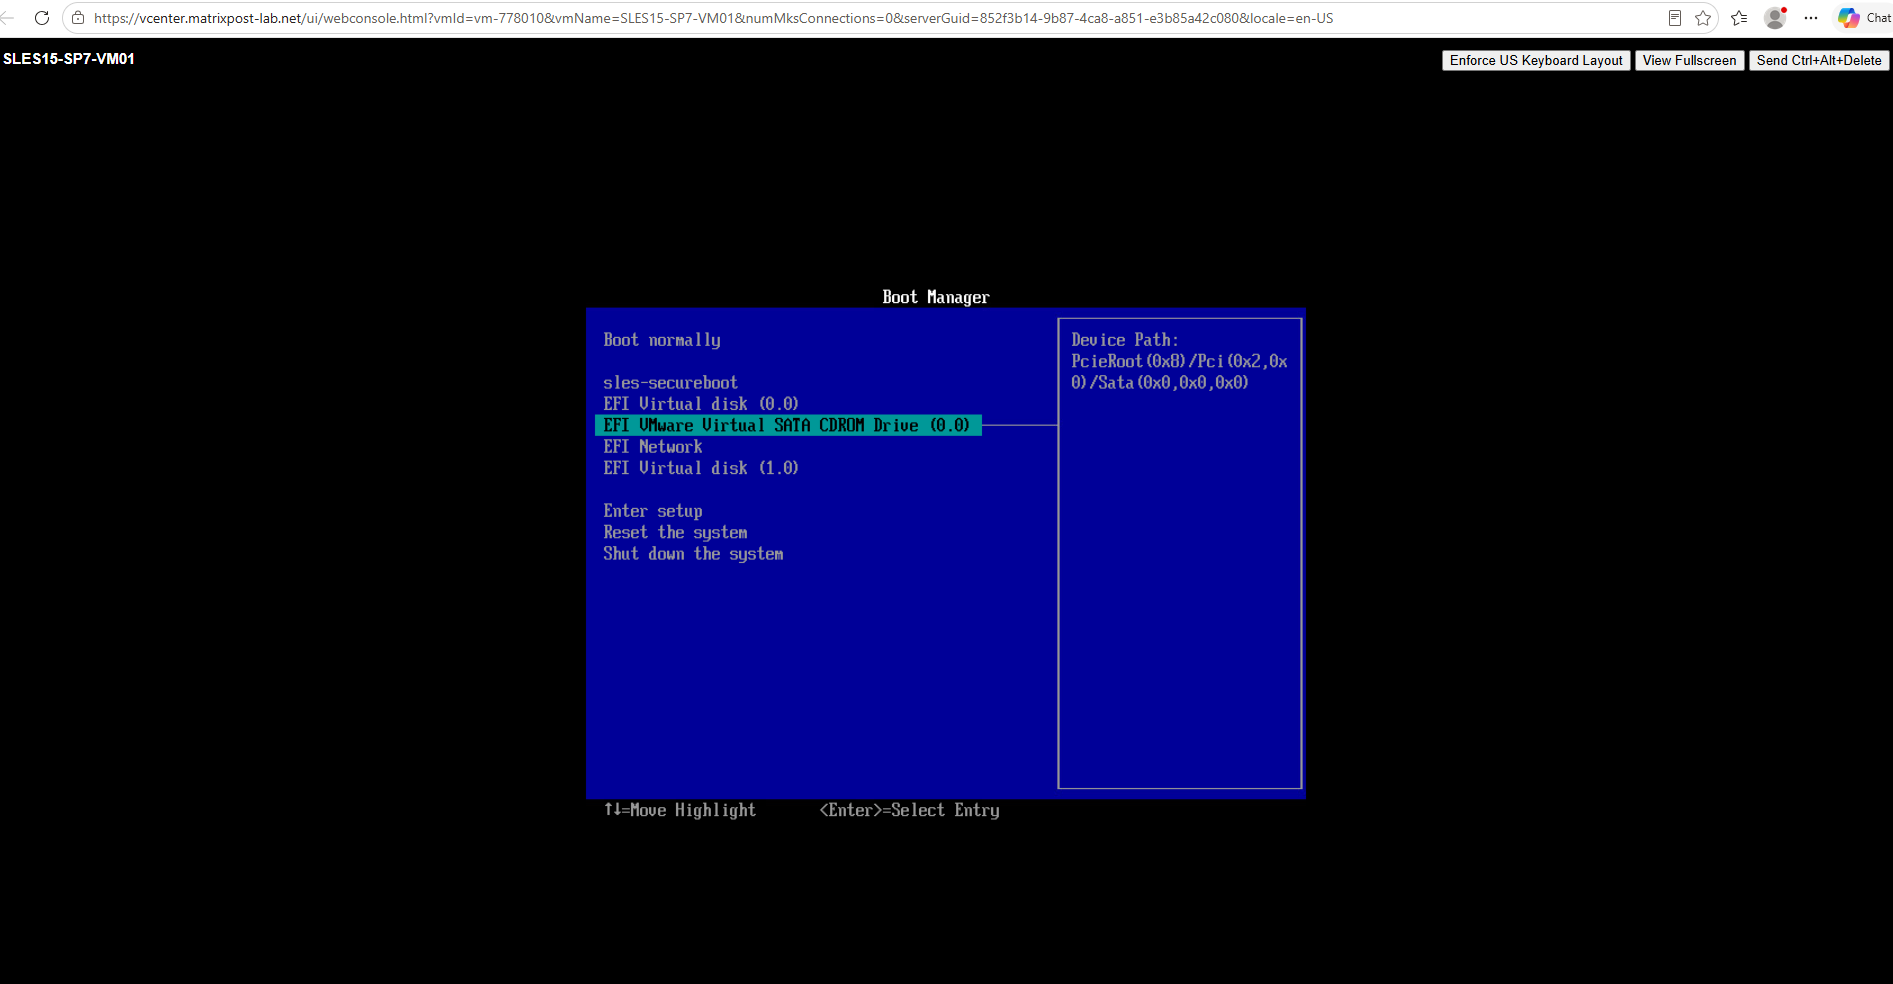
Then power on the VM. From the EFI boot menu we’ll select the virtual CD/DVD drive and start the SLES Rescue System.
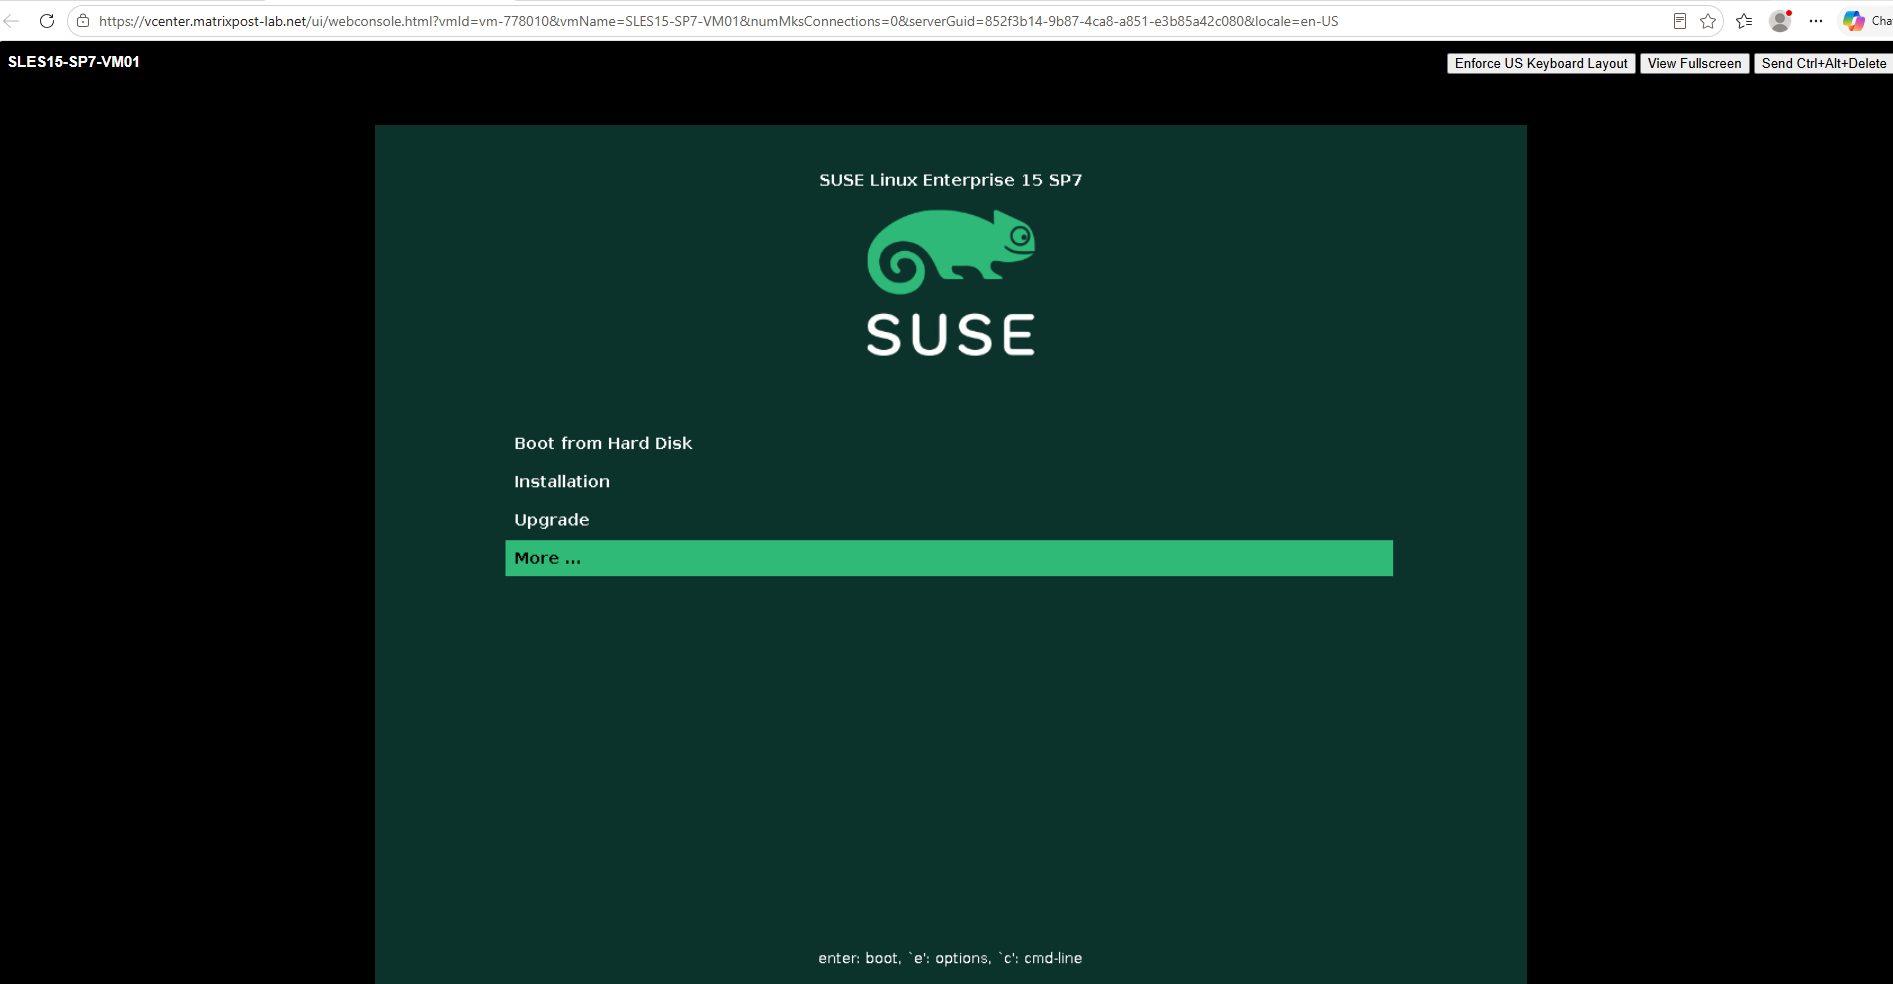
After booting from the SLES 15 SP7 installation media, the boot menu provides installation, upgrade, and additional maintenance options.
Select: More…
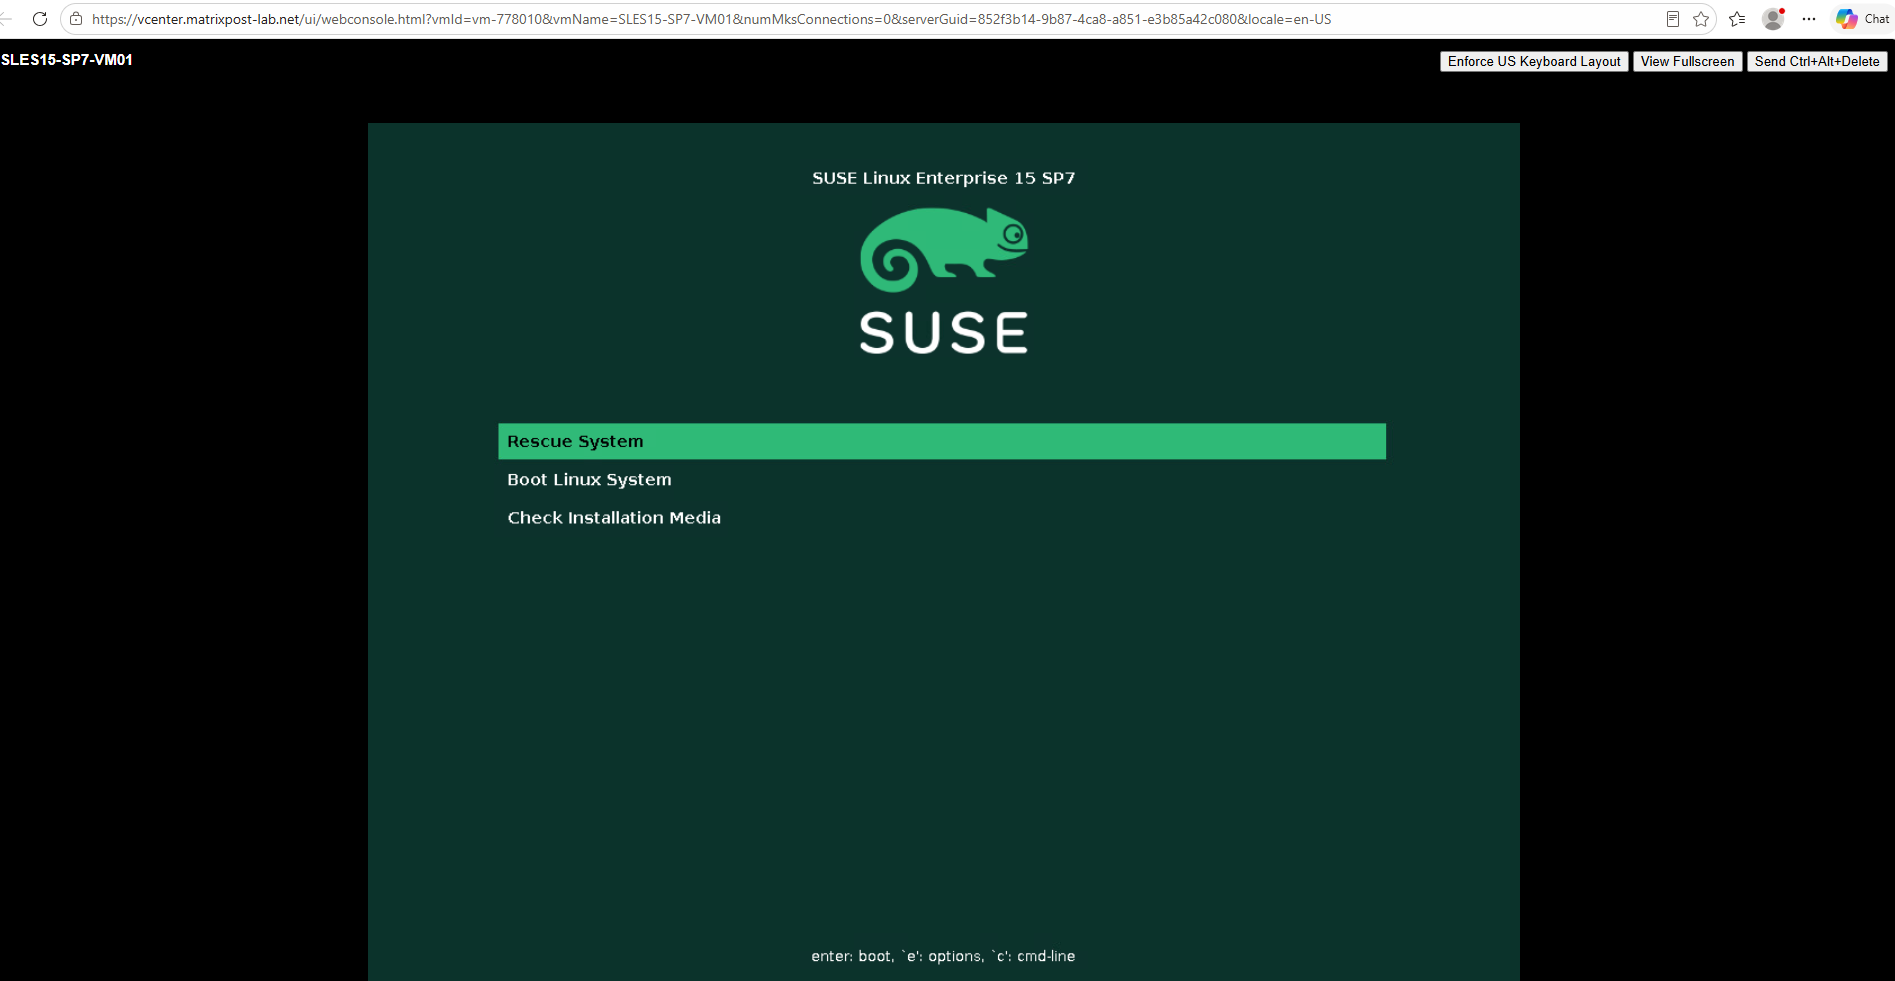
The Rescue System option is located in the following menu. This starts an independent Linux environment from the installation media rather than booting the affected Btrfs root filesystem.
Under More…, select Rescue System.
Unlike the previously tested built-in Recovery Mode, this boots an independent Linux environment from the SLES installation media and does not use the affected Btrfs filesystem as its own root filesystem.
This allows us to work on the installed system from the outside and control when and how the affected Btrfs filesystem is mounted, which is particularly important when dealing with a filesystem that has previously been forced read-only because of an error.
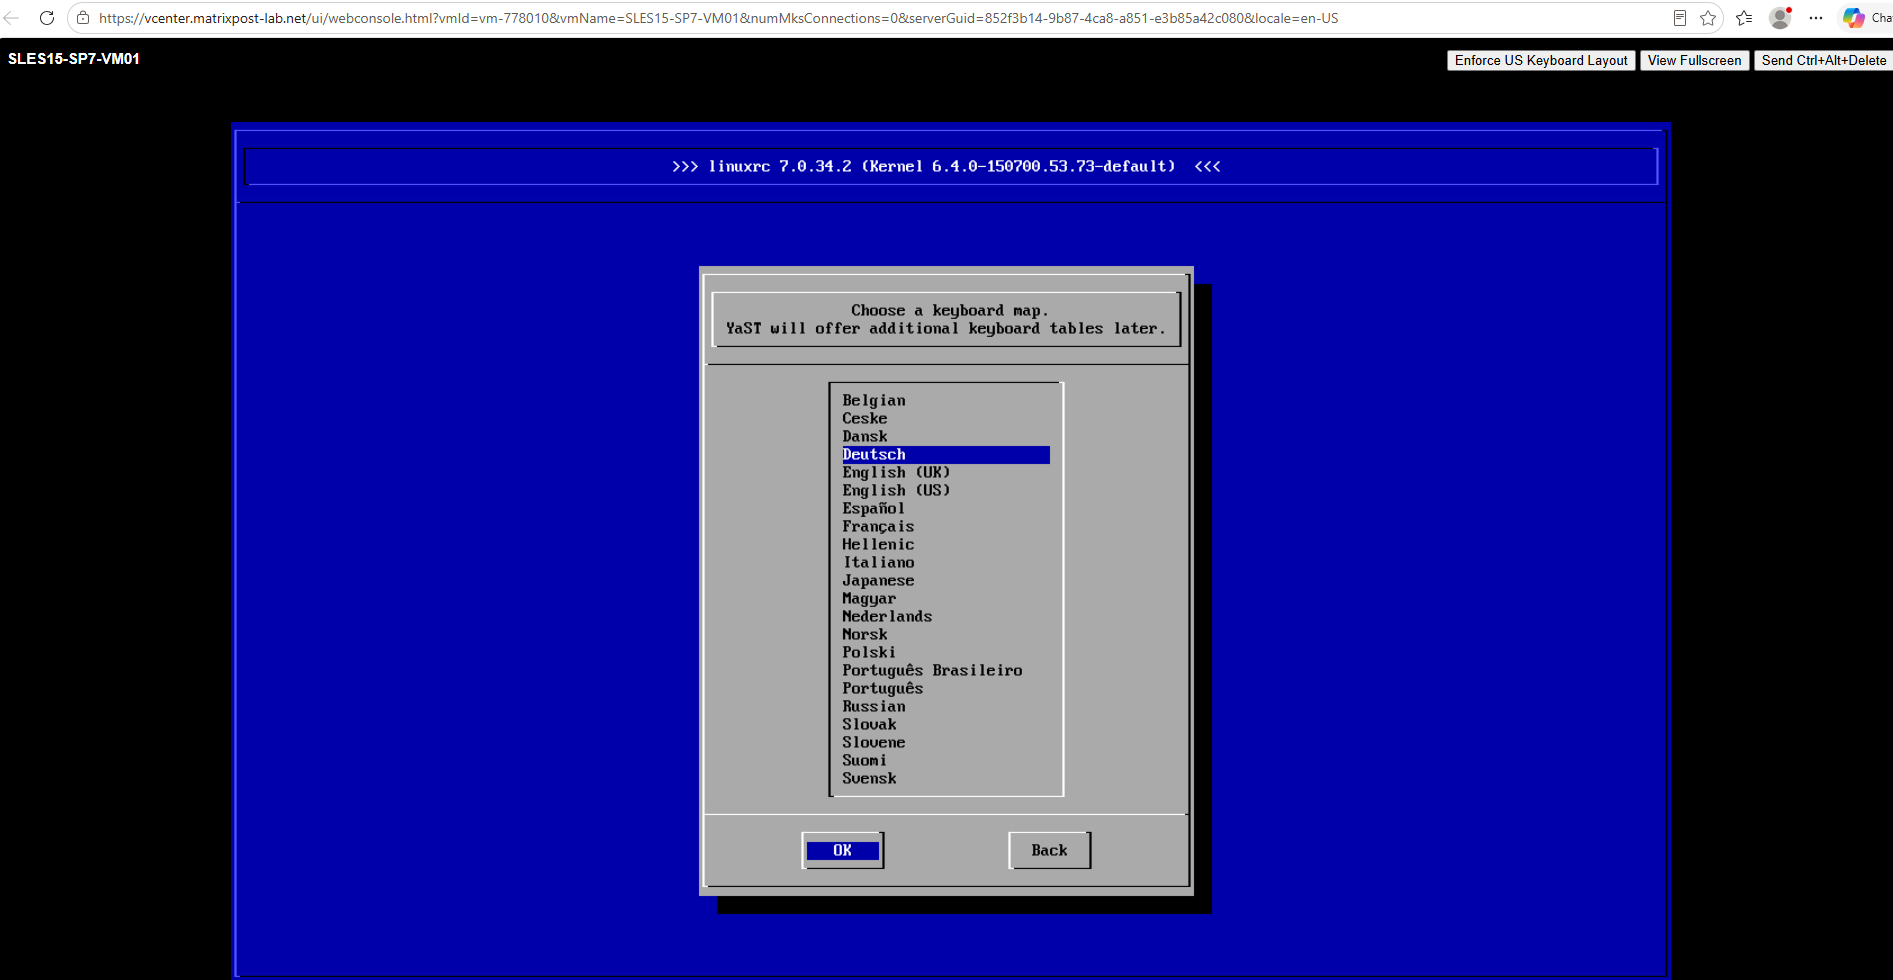
During startup, the SLES Rescue System first asks us to select the appropriate keyboard layout.
This only affects keyboard input within the rescue environment and has no effect on the installed operating system.
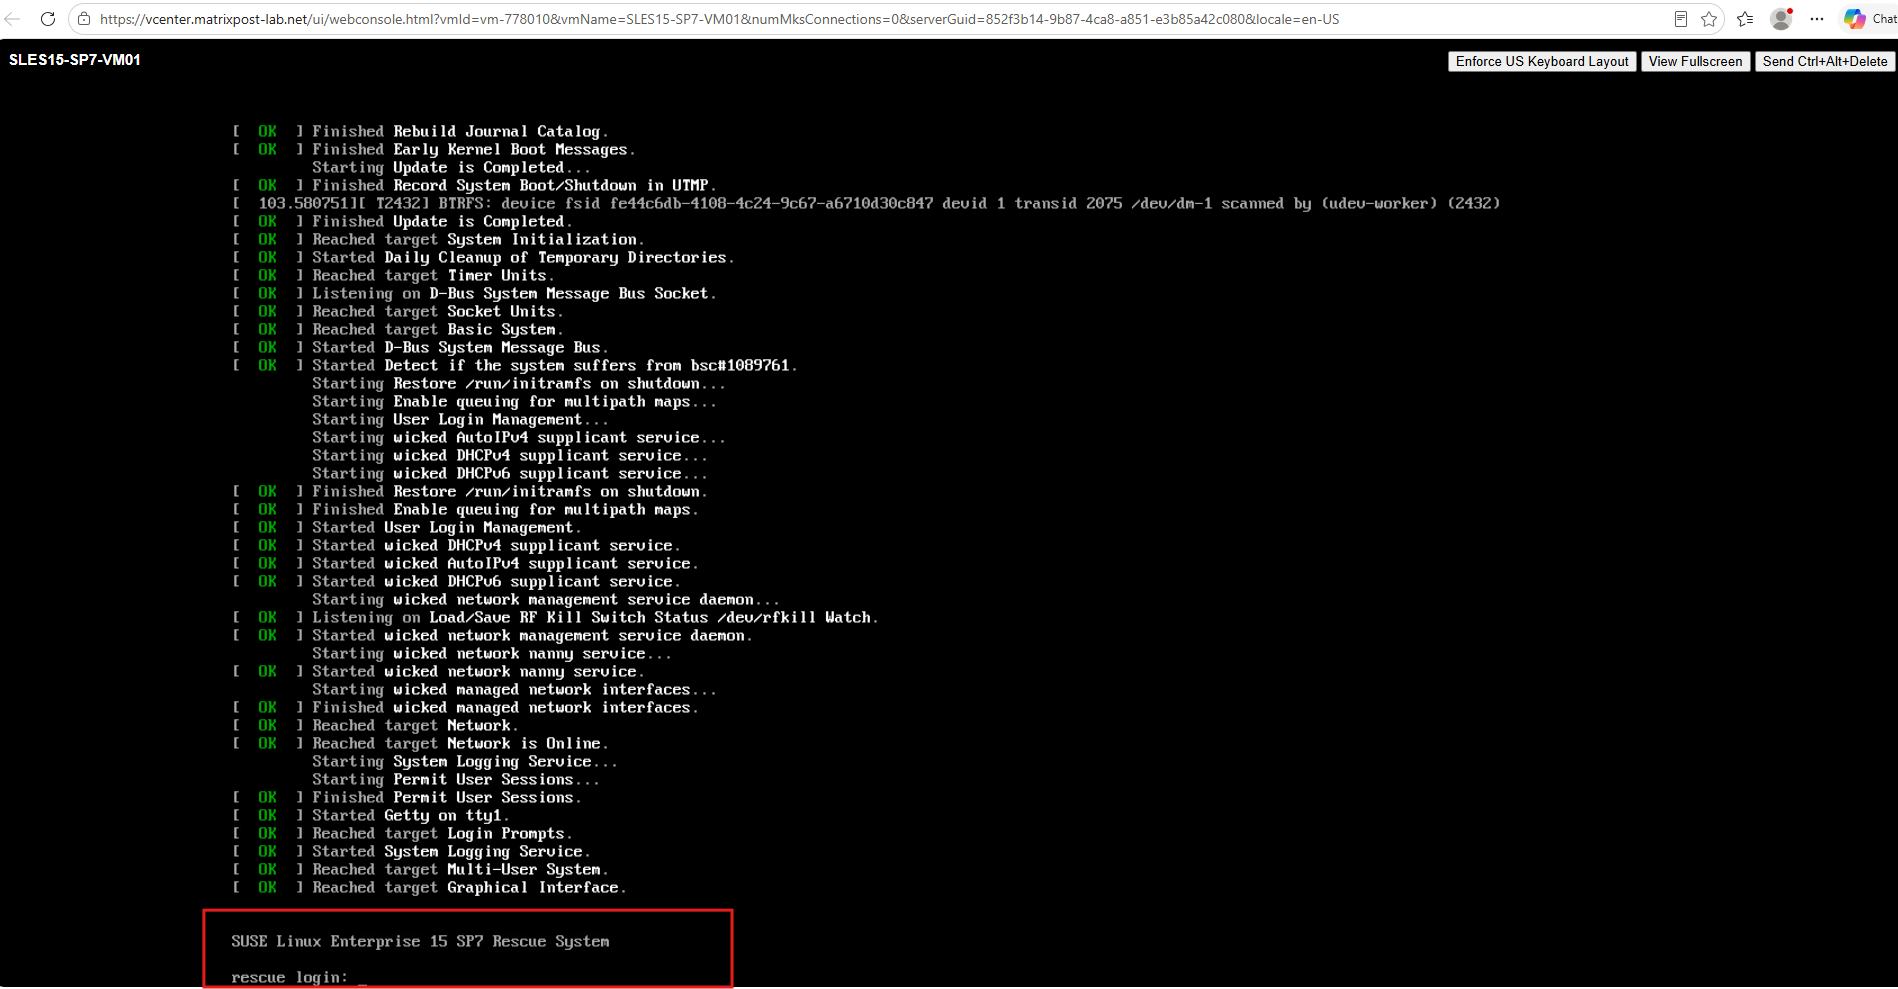
After the Rescue System has finished booting, we are presented with the rescue login: prompt.
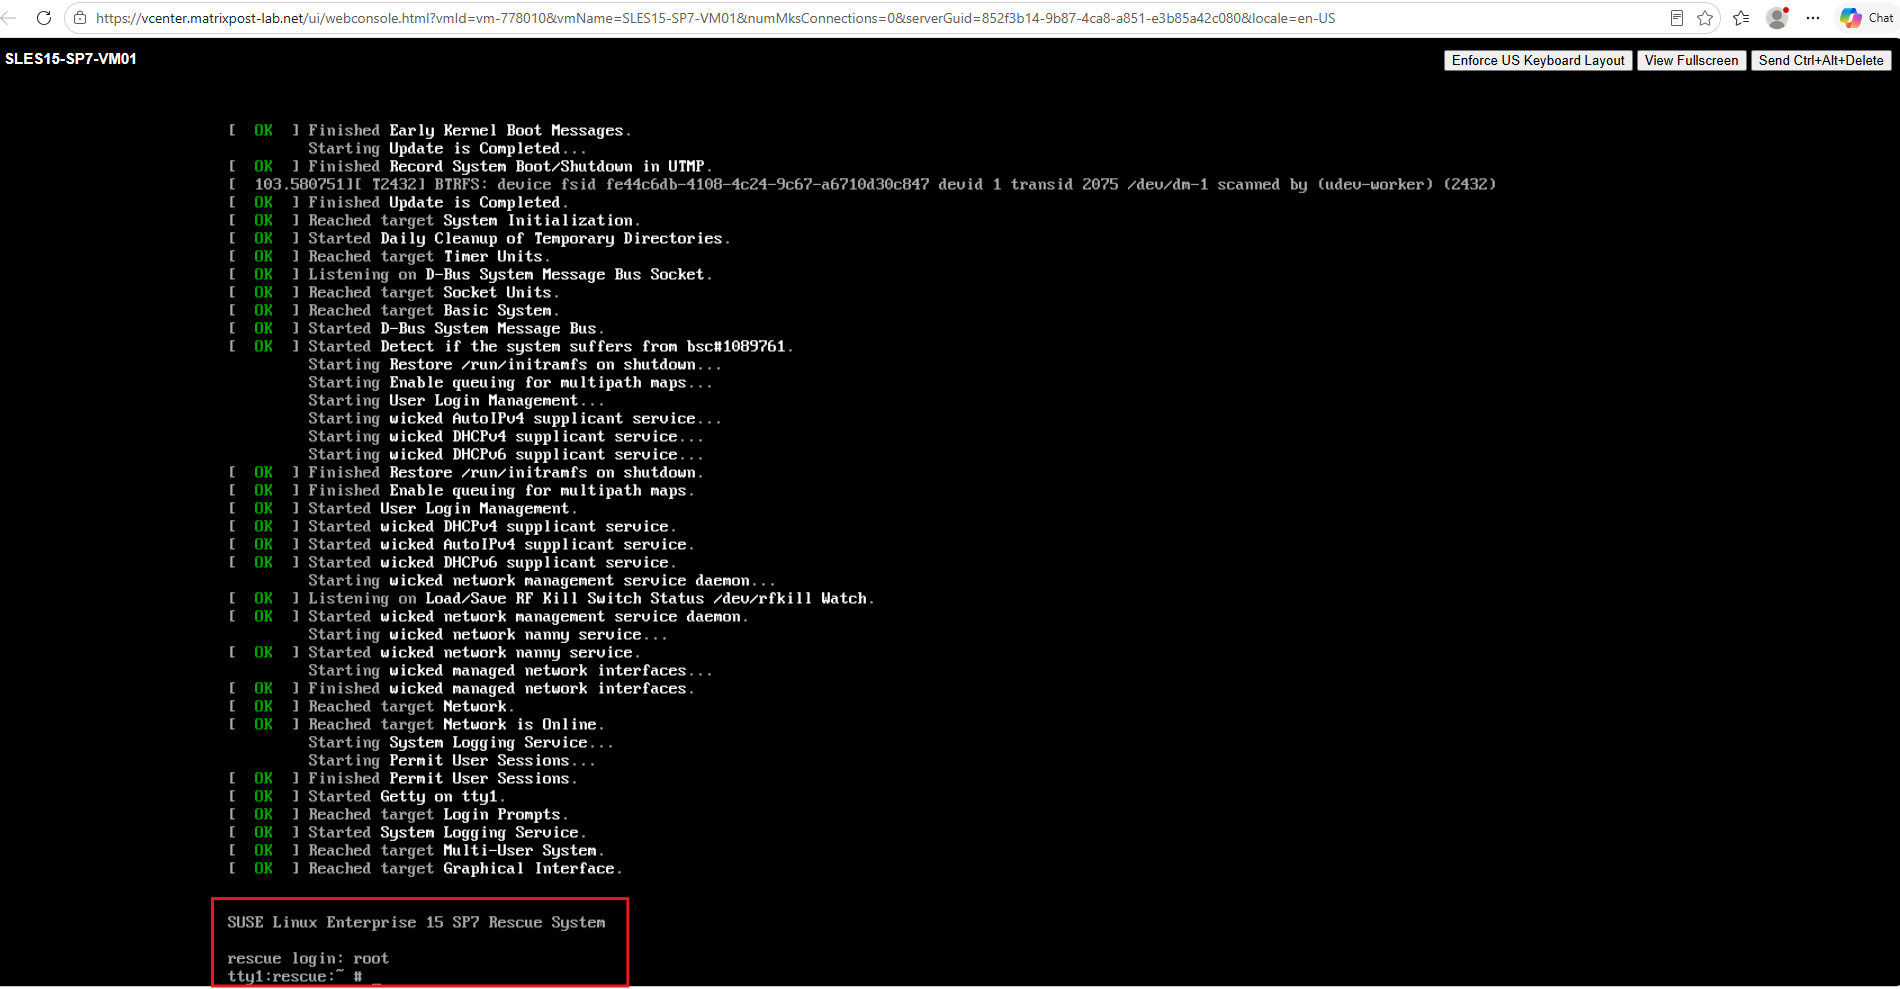
Log in as: root, there is normally no password required for the root account in the SLES Rescue System.
The rescue environment is now running independently from the installed SLES system, so the affected Btrfs root filesystem is not being used as the root filesystem of the running OS.
The shell prompt changes to tty1:rescue:~ #, confirming that we are now working from the independent rescue environment rather than the installed operating system.
Extending the LVM Physical and Logical Volumes
We continue with identifying the storage:
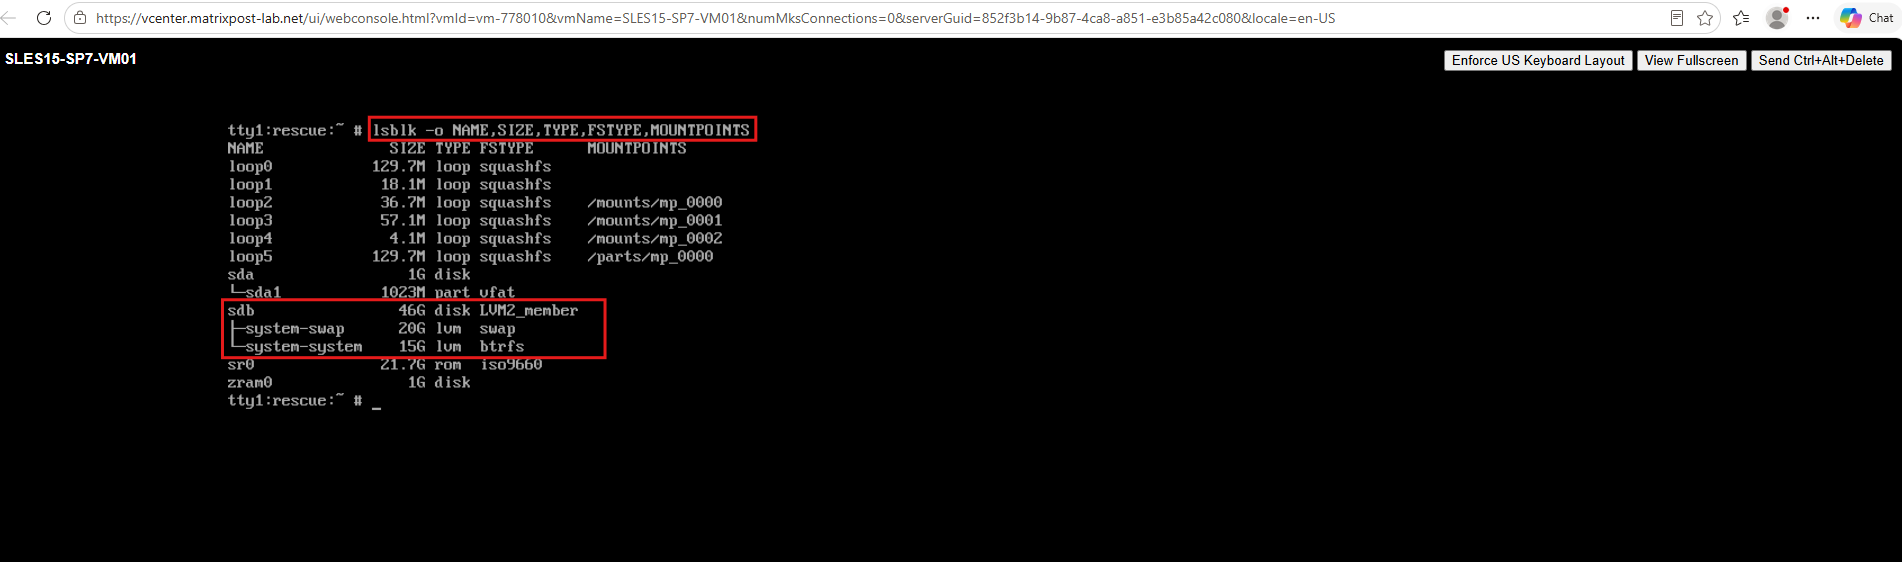
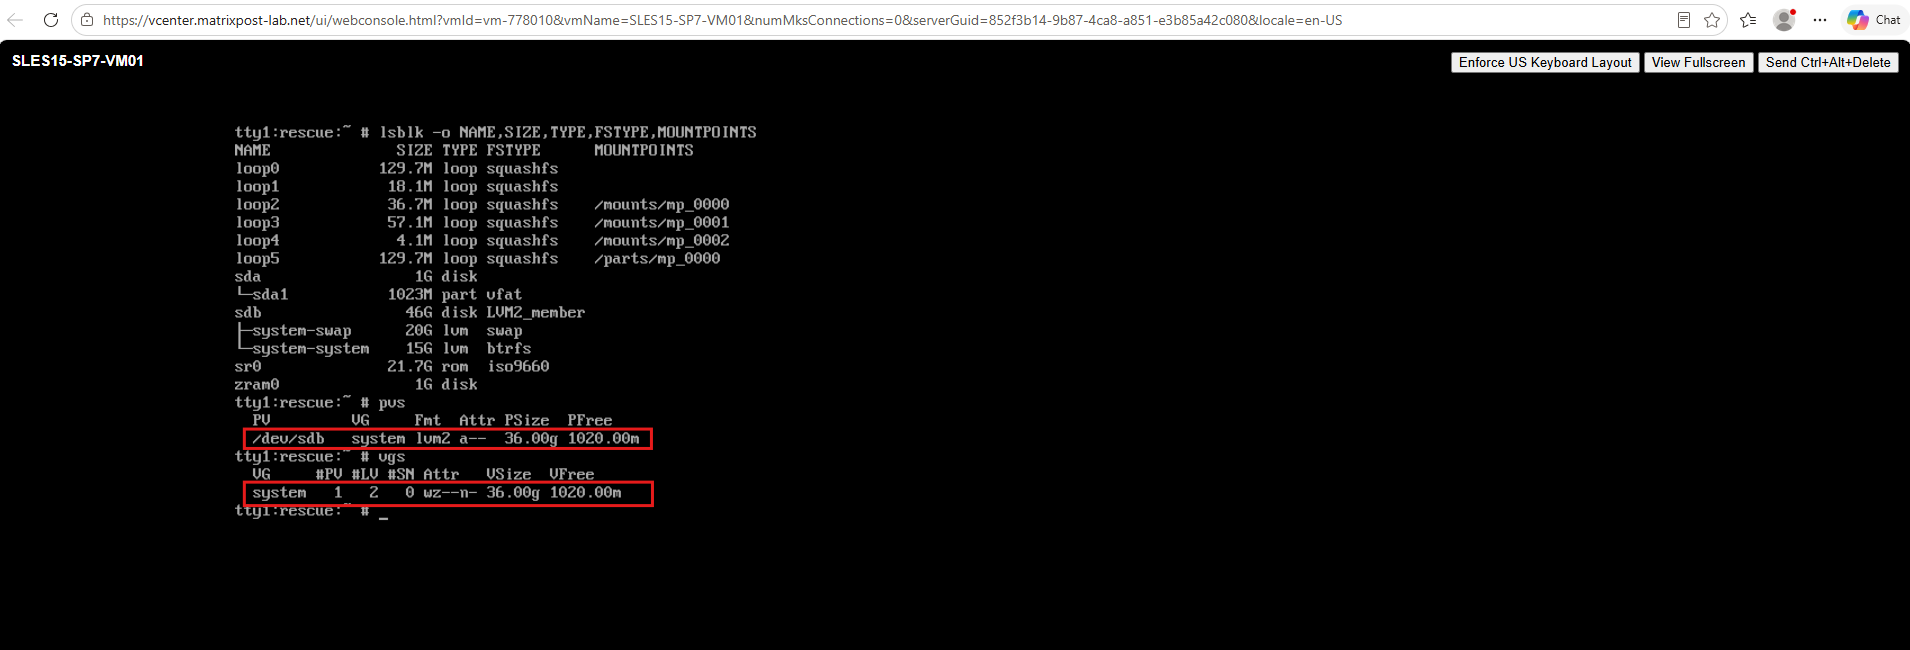
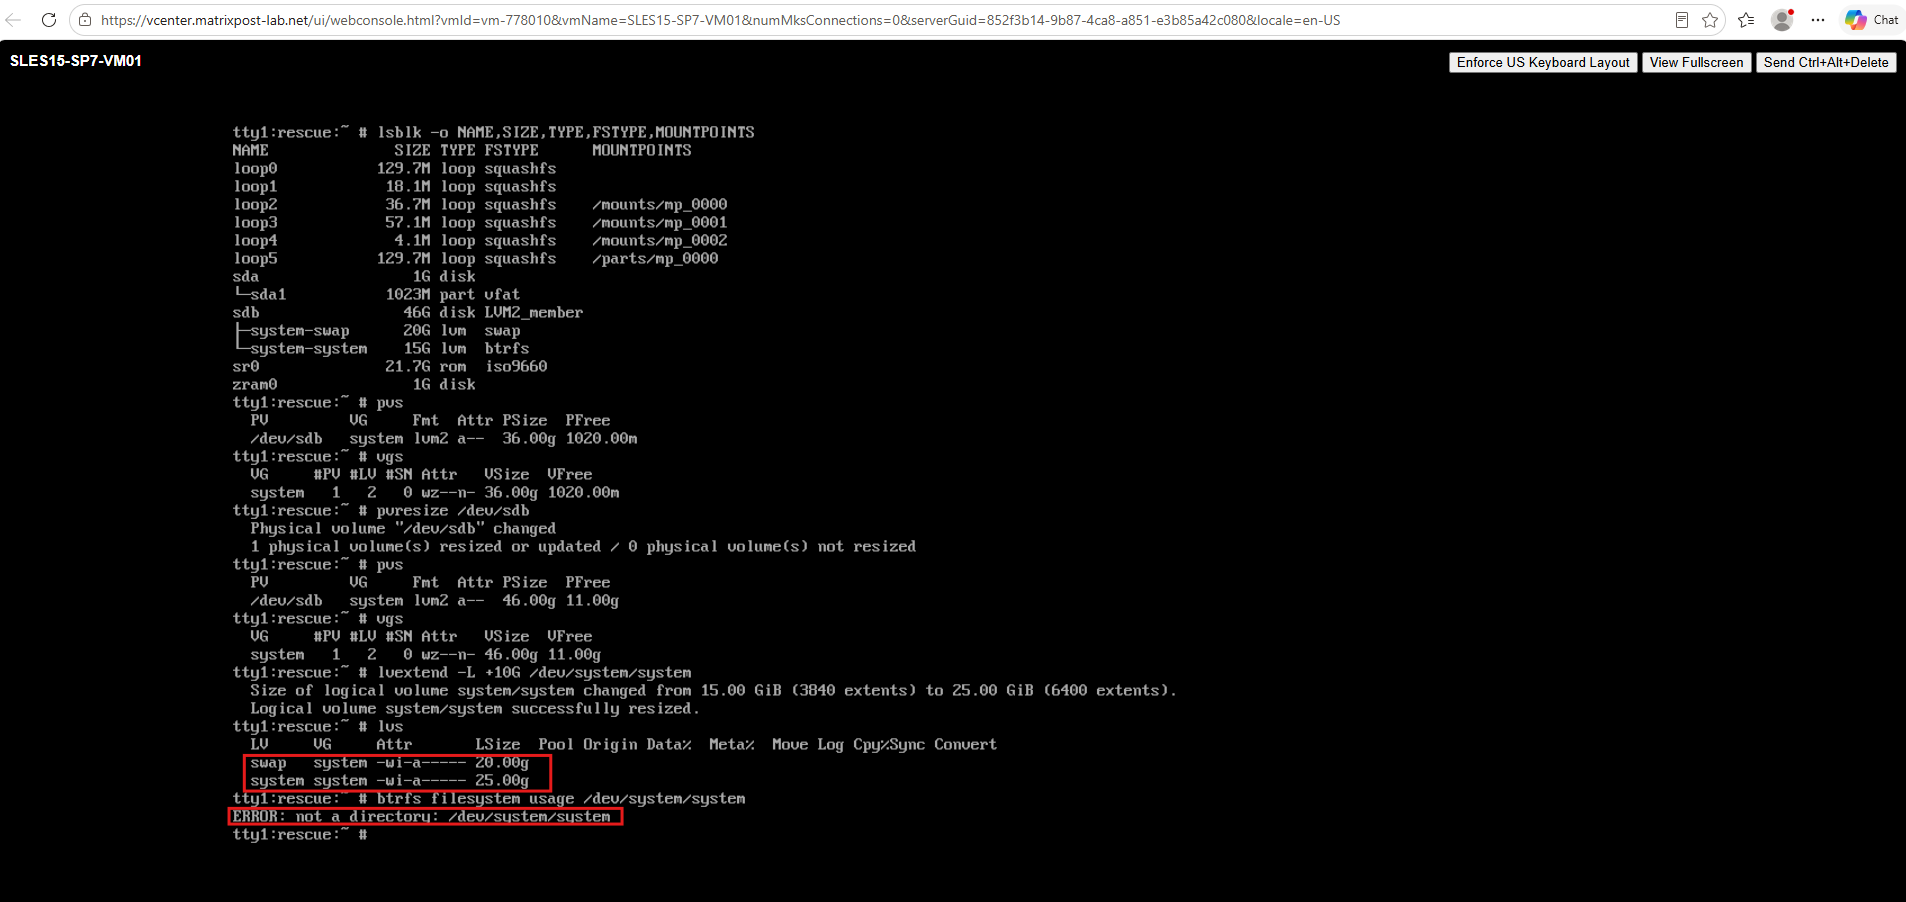
The output shows that
/dev/sdb, which contains our LVM physical volume, is now 46 GiB. The existing logical volumes, however, have not changed yet: the swap LV remains 20 GiB and the Btrfs root LVsystem-systemremains 15 GiB.This is expected. Increasing the VMware virtual disk only enlarged the underlying block device. The additional 10 GiB has not yet propagated through the remaining storage layers.
lsblk -o NAME,SIZE,TYPE,FSTYPE,MOUNTPOINTS
The pvs and vgs output confirms that although the underlying /dev/sdb device has already been increased to 46 GiB, the LVM physical volume and volume group still recognize only 36 GiB.
The volume group therefore still has only approximately 1 GiB of free space available.
pvs
vgs
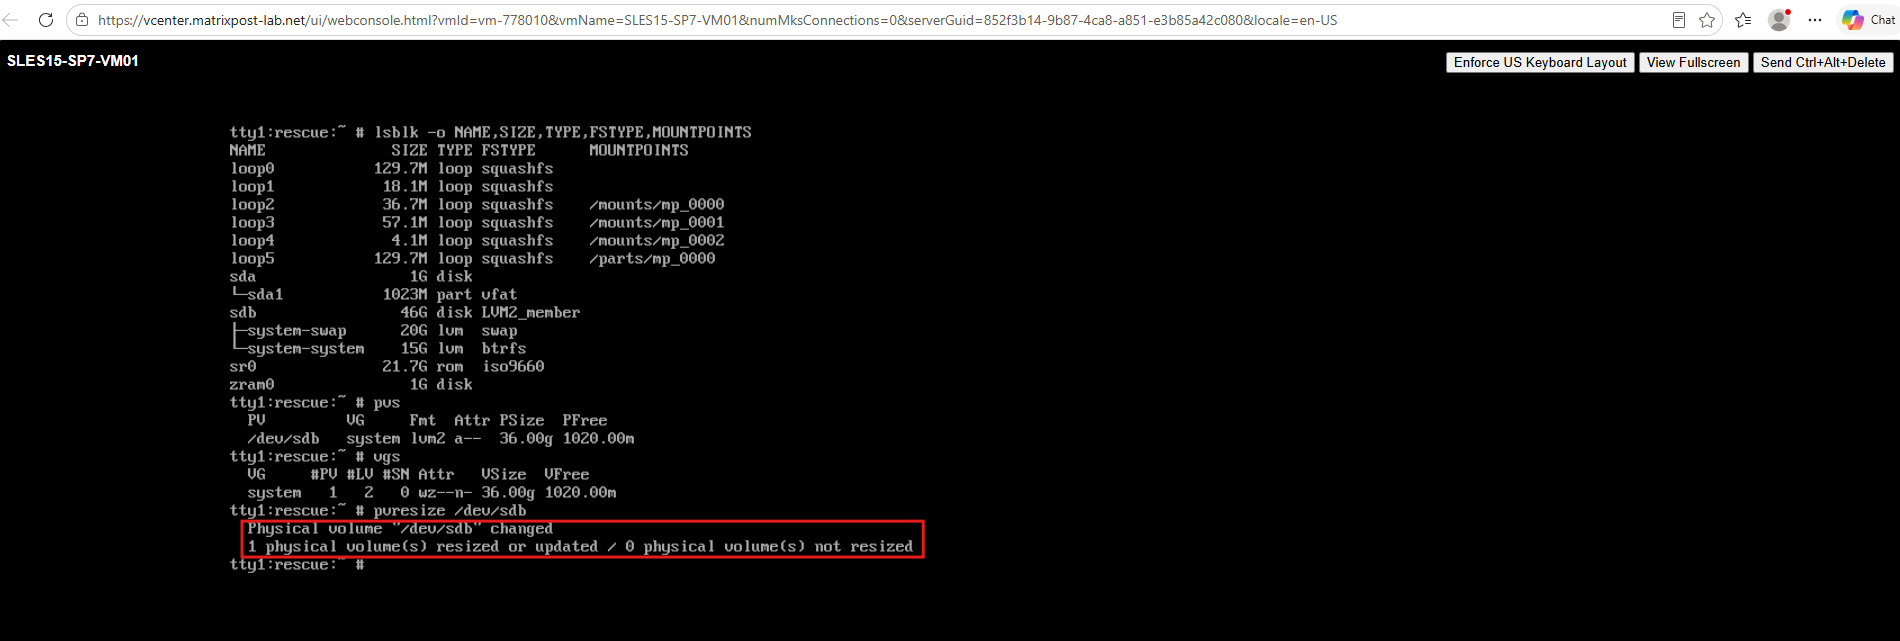
The additional 10 GiB must first be made available to LVM by resizing the physical volume:
LVM confirms that the physical volume was successfully resized.
pvresize /dev/sdb
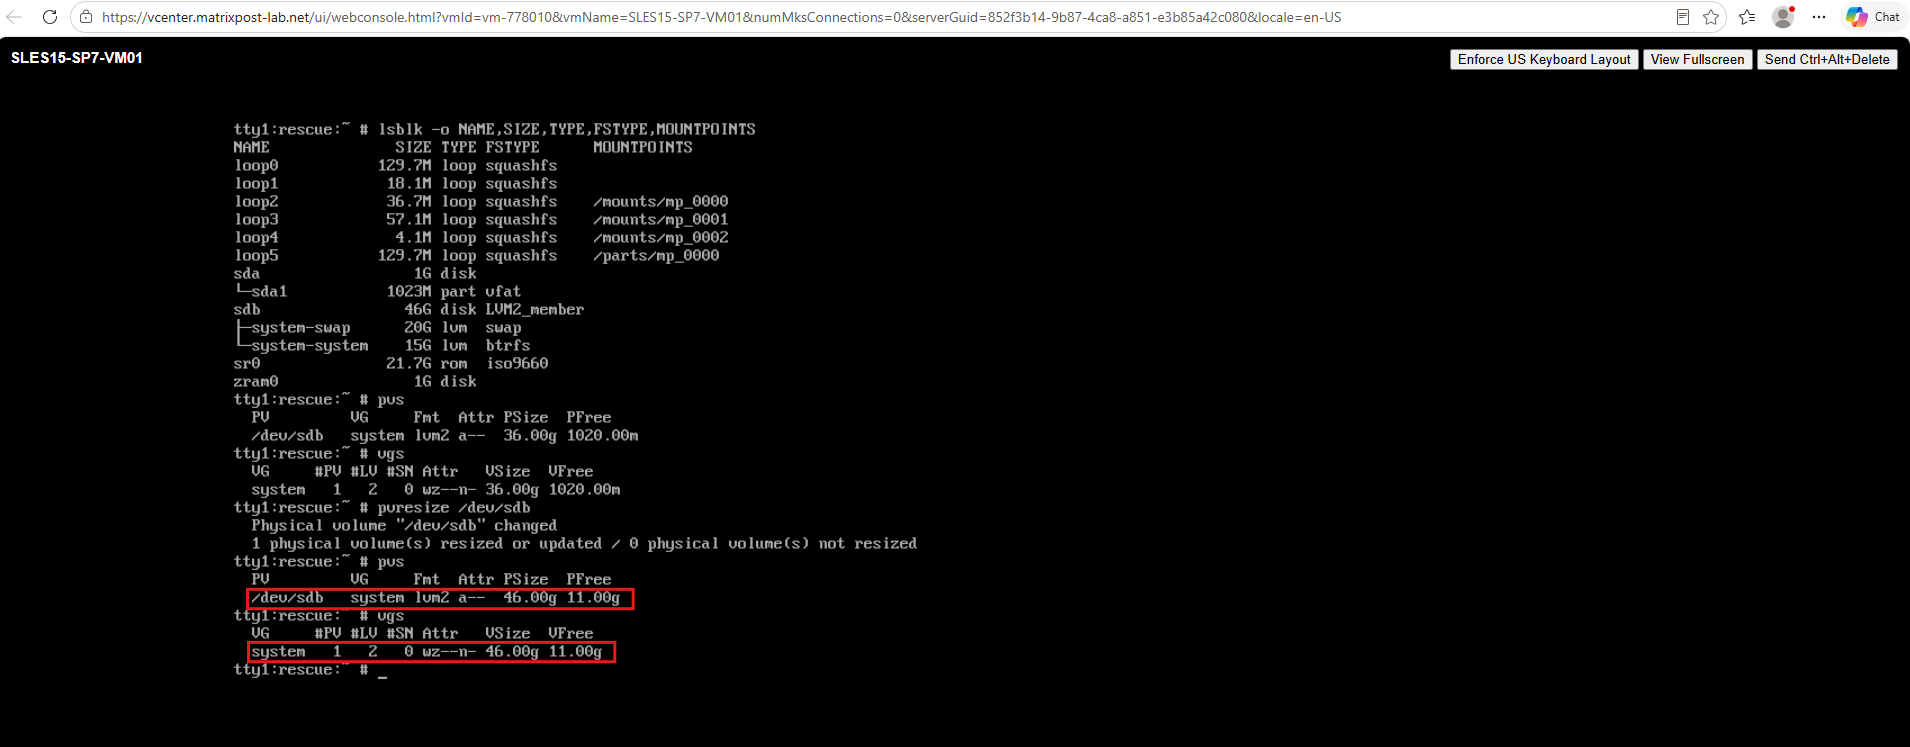
Now verify the result:
The physical volume
/dev/sdband thesystemvolume group now both recognize the full 46 GiB, increasing the available free space from approximately 1 GiB to 11 GiB.
pvs
vgs
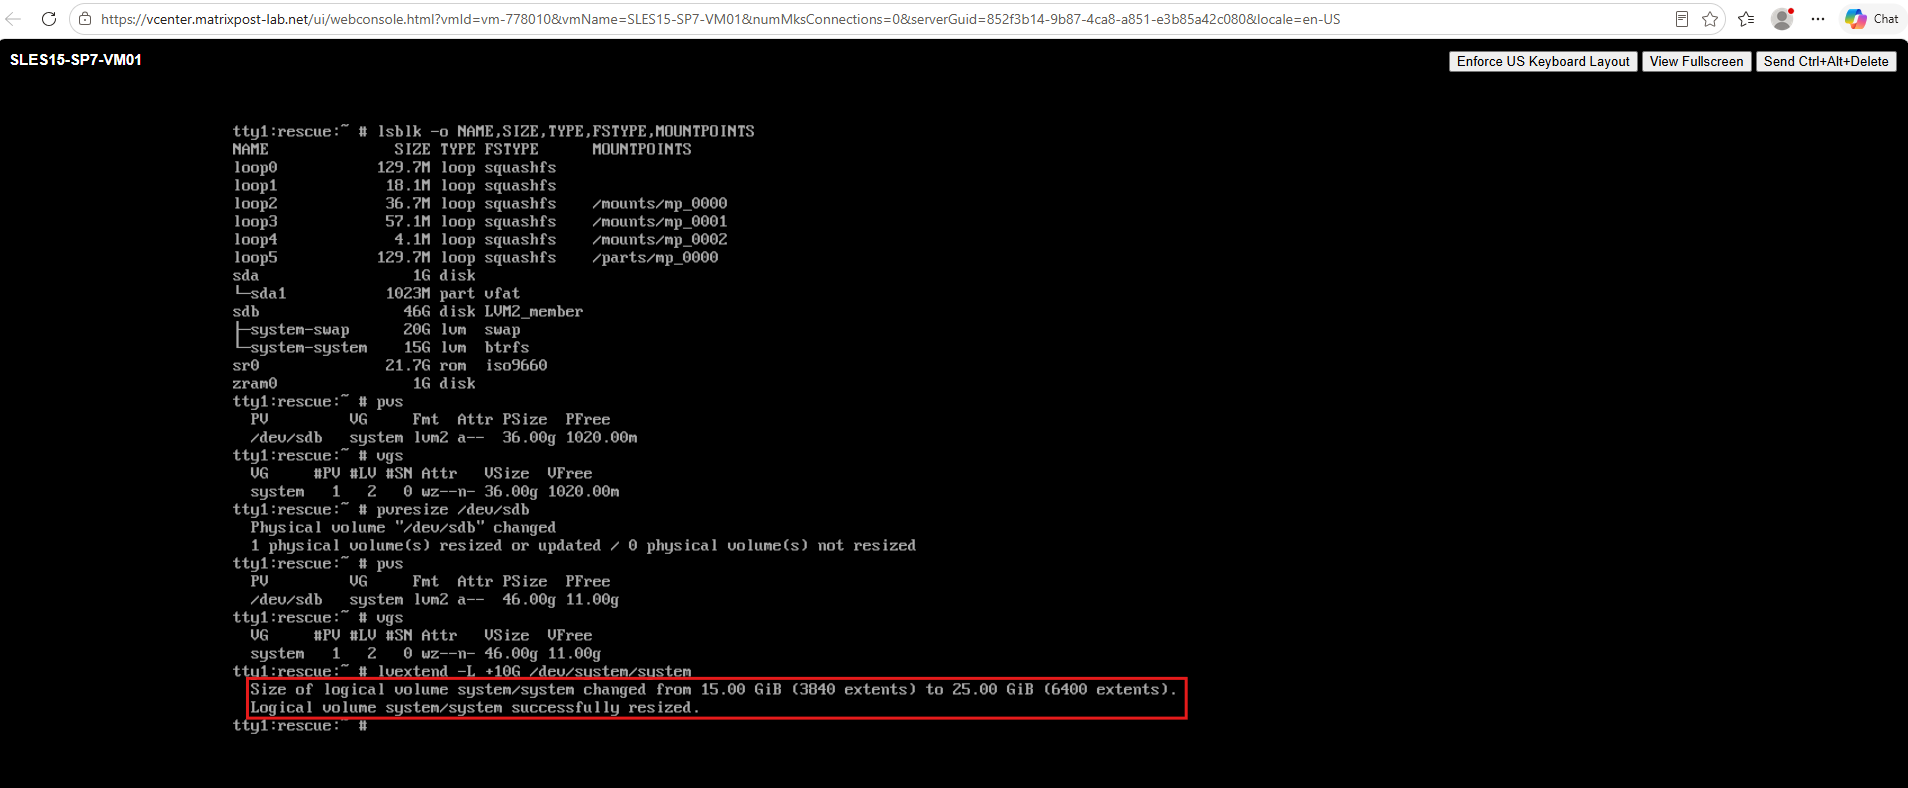
The additional capacity is therefore now available to LVM, but the root logical volume itself is still only 15 GiB. We can now allocate 10 GiB of the newly available space to it:
At this point, however, only the LVM logical volume has been enlarged. The Btrfs filesystem itself still has its original 15 GiB filesystem size and must be resized separately.
lvextend -L +10G /dev/system/system
First we verify the logical volume size and root file system usage:
But because the filesystem is not mounted in the Rescue System,
btrfs filesystem usageneeds a mount point, not the raw LV.So our actual next step should be to mount the Btrfs filesystem with
skip_balance, especially given the persisted/resuming balance behavior we observed earlier.
lvs; btrfs filesystem usage /dev/system/system
For a more detailed walkthrough of extending virtual disks, LVM Physical Volumes (PVs), Volume Groups (VGs), Logical Volumes (LVs), and filesystems on Linux VMs, see my following article.
Mounting the Btrfs Root Filesystem for Recovery
The logical volume now provides 25 GiB of capacity, but the Btrfs filesystem still needs to be mounted before we can inspect and resize it.
Because our filesystem previously encountered an ENOSPC error during a balance operation, we want to prevent any persisted balance from automatically resuming when the filesystem is mounted.
We therefore create a temporary mount point and mount the filesystem read-write with the skip_balance option:
The
skip_balancemount option instructs Btrfs not to resume a previously interrupted or persisted balance during the mount. This is particularly important during recovery, because automatically resuming the same balance could immediately recreate the metadata allocation pressure that caused the original ENOSPC condition.
mkdir /mnt/root
mkdir /mnt/root
mount -o rw,skip_balance /dev/system/system /mnt/root

After mounting the filesystem, we can verify its state with:
The
findmntoutput confirms that the affected Btrfs filesystem has successfully been mounted read-write (rw) and that theskip_balancemount option is active.
findmnt -no SOURCE,FSTYPE,OPTIONS /mnt/root
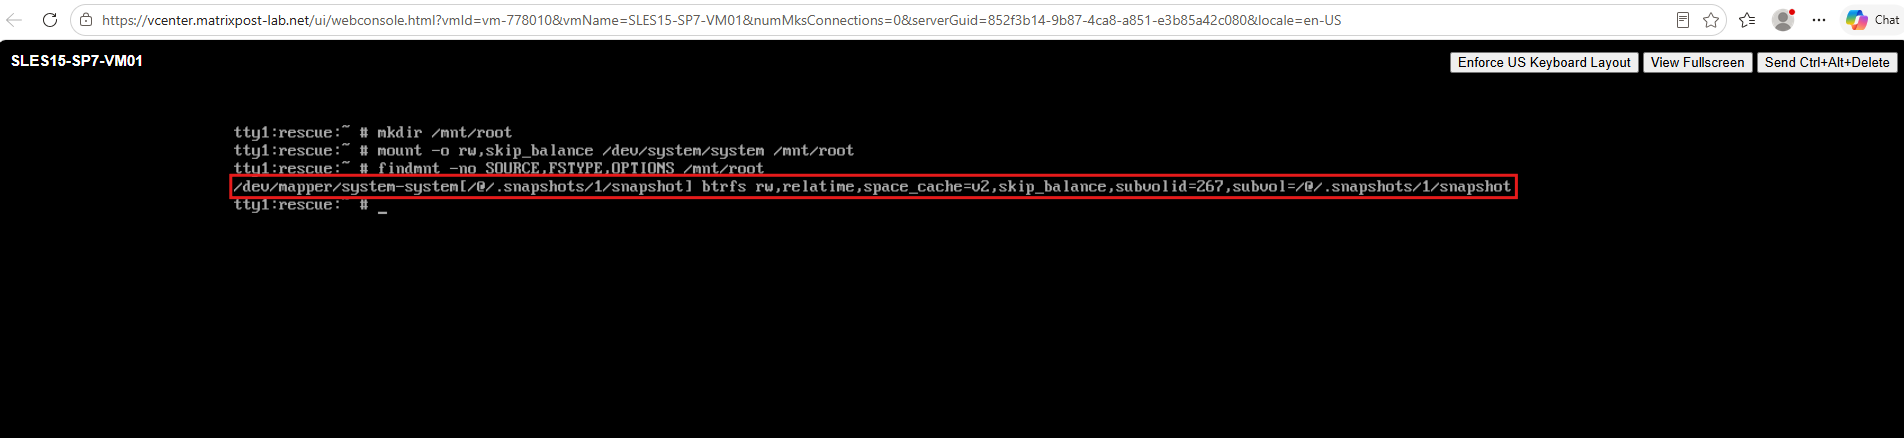
We also verify whether a balance operation is still associated with the filesystem. In our lab system, Btrfs reports below No balance found, confirming that the previously failed balance has already terminated and there is no paused balance that needs to be canceled.
btrfs balance status /mnt/root

Resizing the Btrfs Filesystem
Although the underlying logical volume has already been extended from 15 GiB to 25 GiB, the Btrfs filesystem itself still needs to be expanded to use the additional capacity.
Because the filesystem is mounted read-write at /mnt/root, Btrfs can be resized online using:
btrfs filesystem resize max /mnt/root
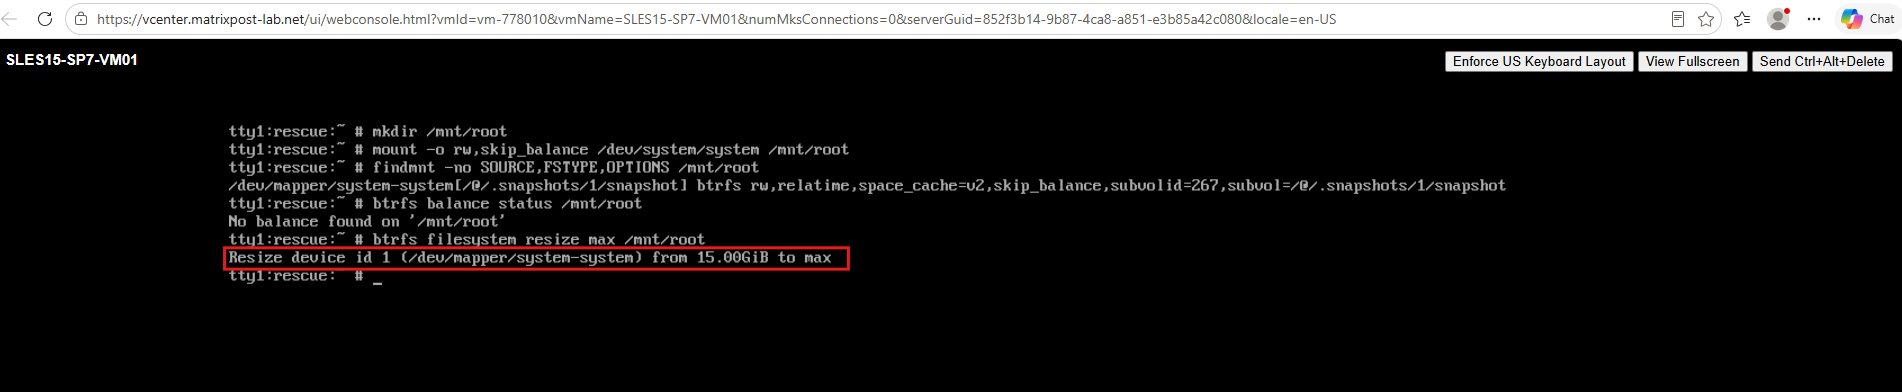
Afterwards, we can verify the new filesystem size and, most importantly, how much unallocated device space is now available:
btrfs filesystem usage /mnt/root
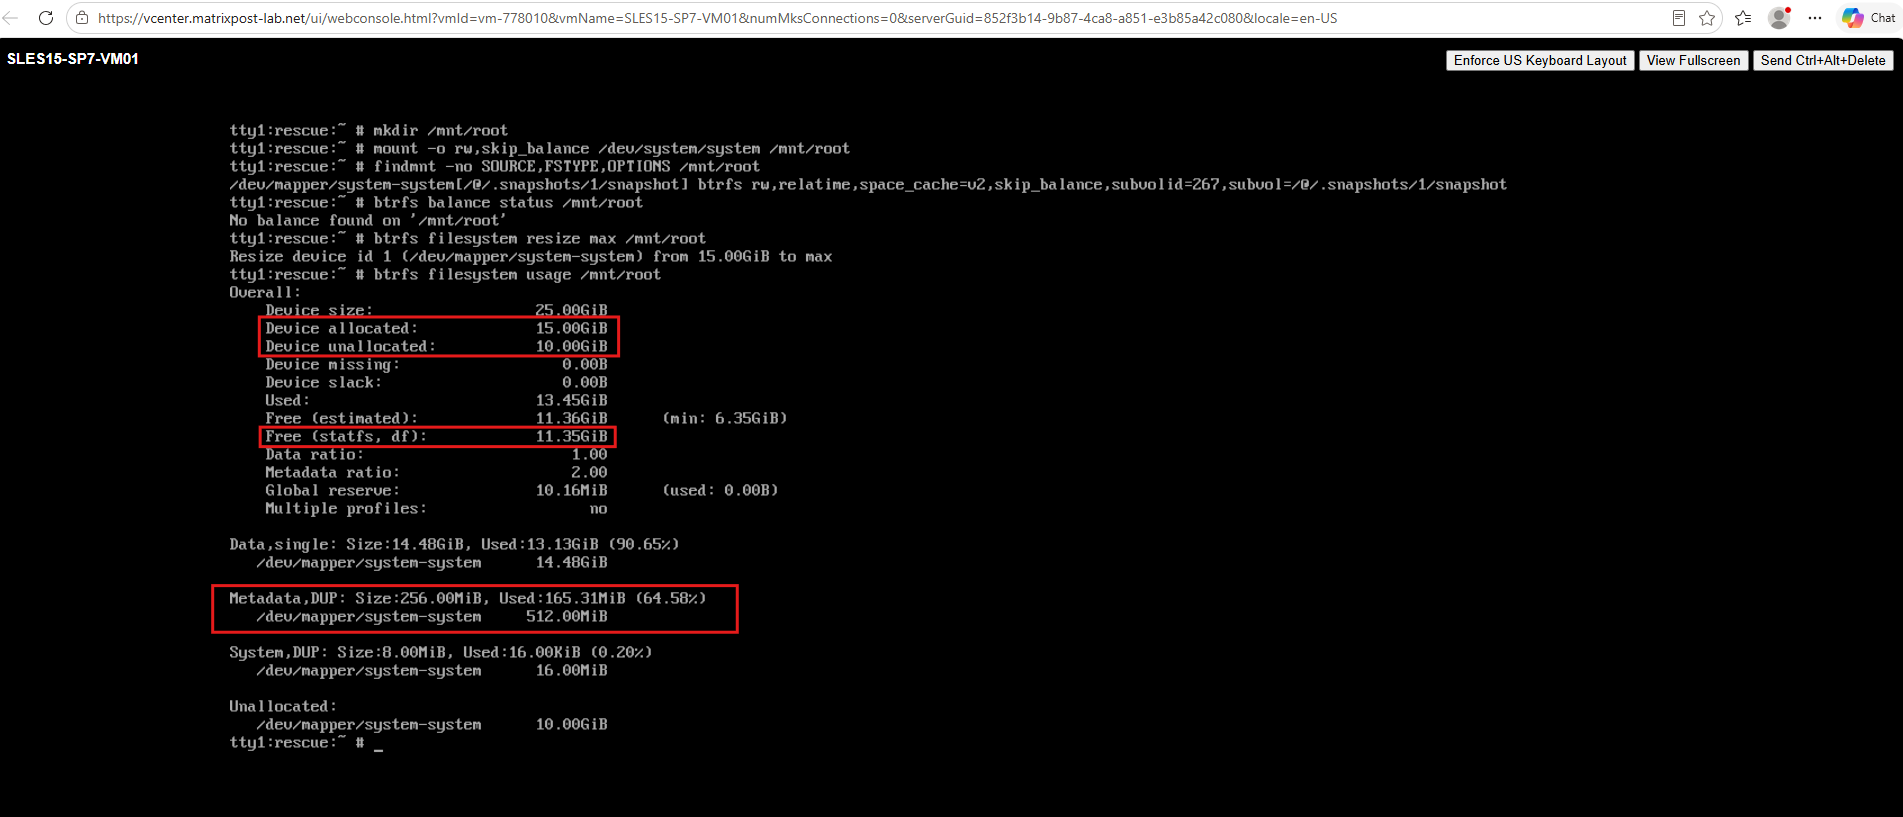
The resize increased the Btrfs filesystem from 15 GiB to 25 GiB. Notice that the existing Data and Metadata block groups were not automatically enlarged.
Instead, the additional 10 GiB appears as Device unallocated. This gives Btrfs sufficient flexible device space from which it can allocate additional Data or Metadata block groups as required.
In particular, the existing Metadata,DUP allocation remains at 256 MiB, with 165.31 MiB currently used. If additional metadata capacity is required, Btrfs can now allocate another Metadata block group from the newly available unallocated device space.
Finally, we check the Btrfs device statistics:
All error counters remain at zero, confirming that Btrfs has not recorded any write, read, flush, corruption, or generation errors for the underlying device. This further supports that our failure was caused by space allocation pressure during the balance operation rather than an underlying storage I/O problem.
btrfs device stats /mnt/root
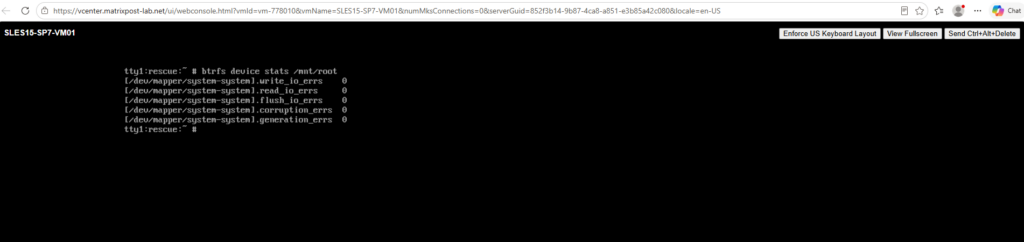
With the filesystem successfully resized and the Btrfs device statistics showing no errors, we can unmount the recovered root filesystem and reboot the system from its normal boot disk.
umount /mnt/root
reboot

After the reboot, we select the normal SLES 15-SP7 boot entry and allow the system to start from the recovered root filesystem.
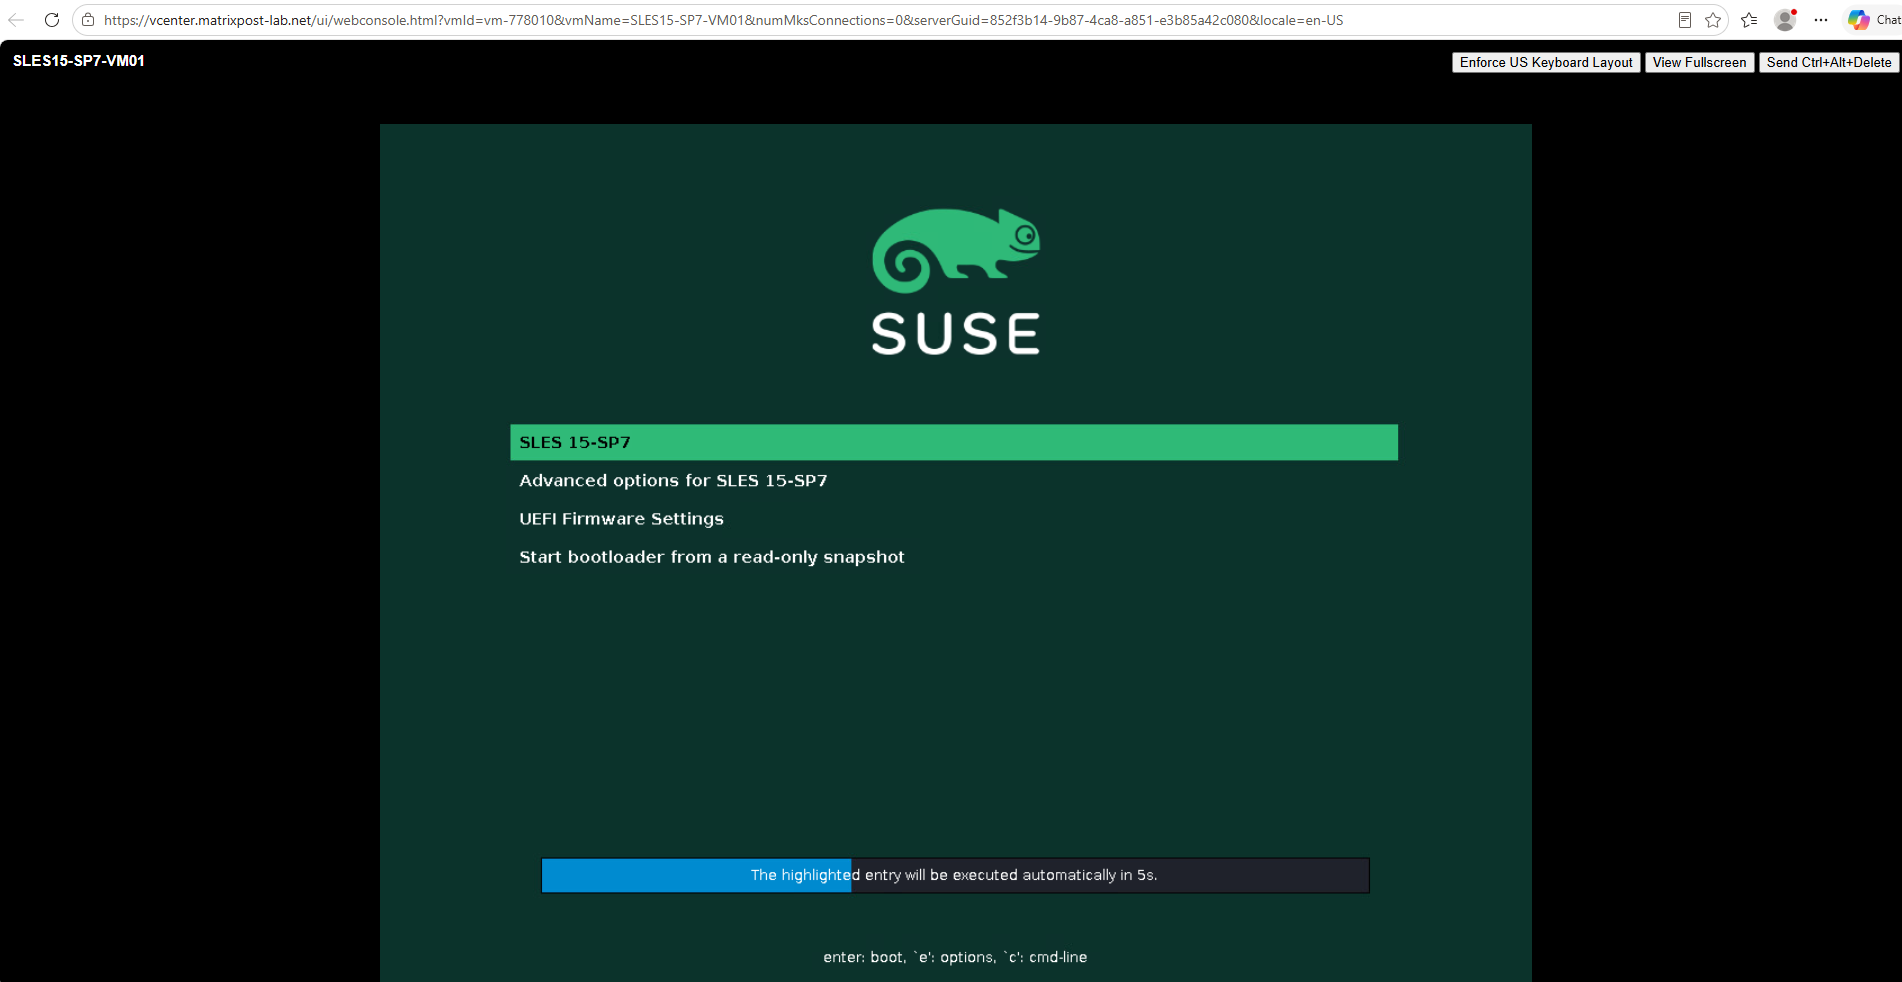
After rebooting from the normal system disk, SLES 15 SP7 now completes the boot successfully and reaches the regular login prompt.
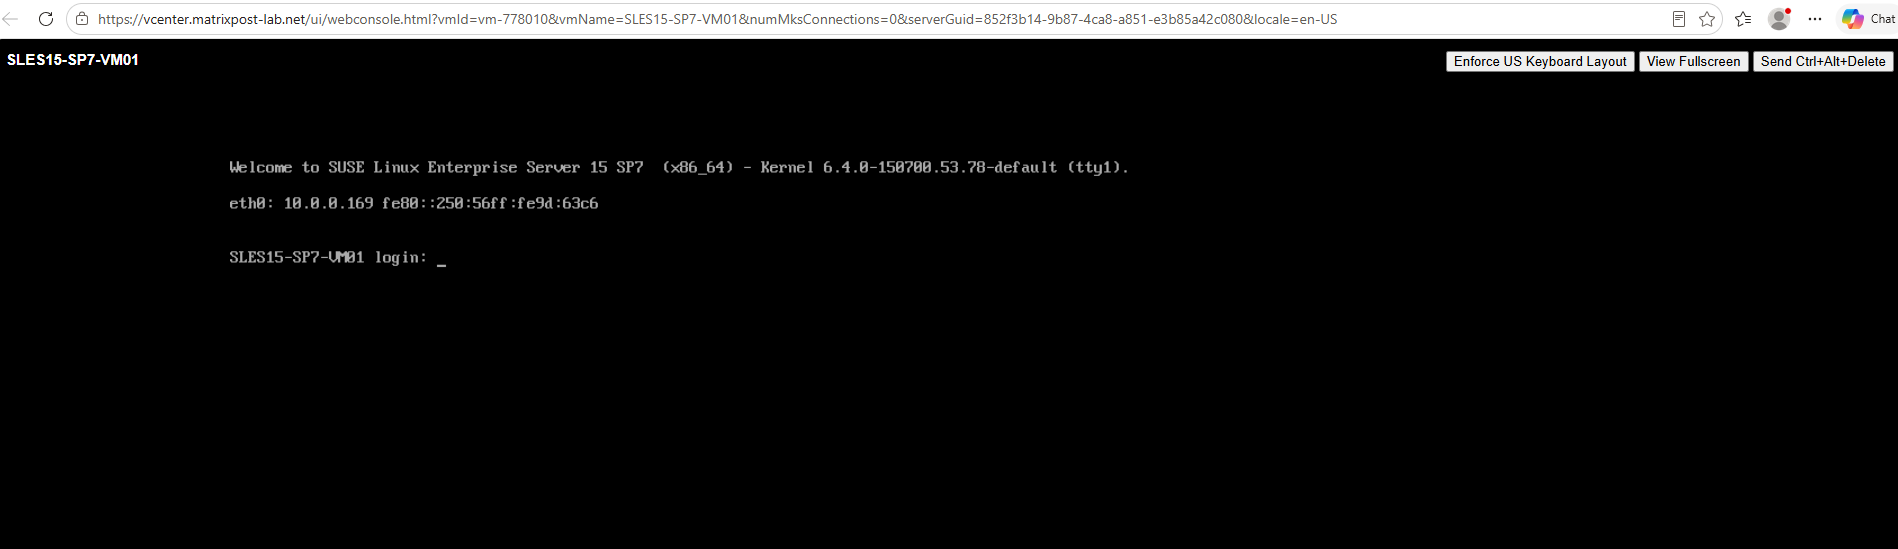
Final Verification After Recovery
Now log in and I would verify only the essential points:
df -hT /
findmnt -no SOURCE,FSTYPE,OPTIONS /
btrfs filesystem usage /
btrfs balance status /
btrfs device stats /
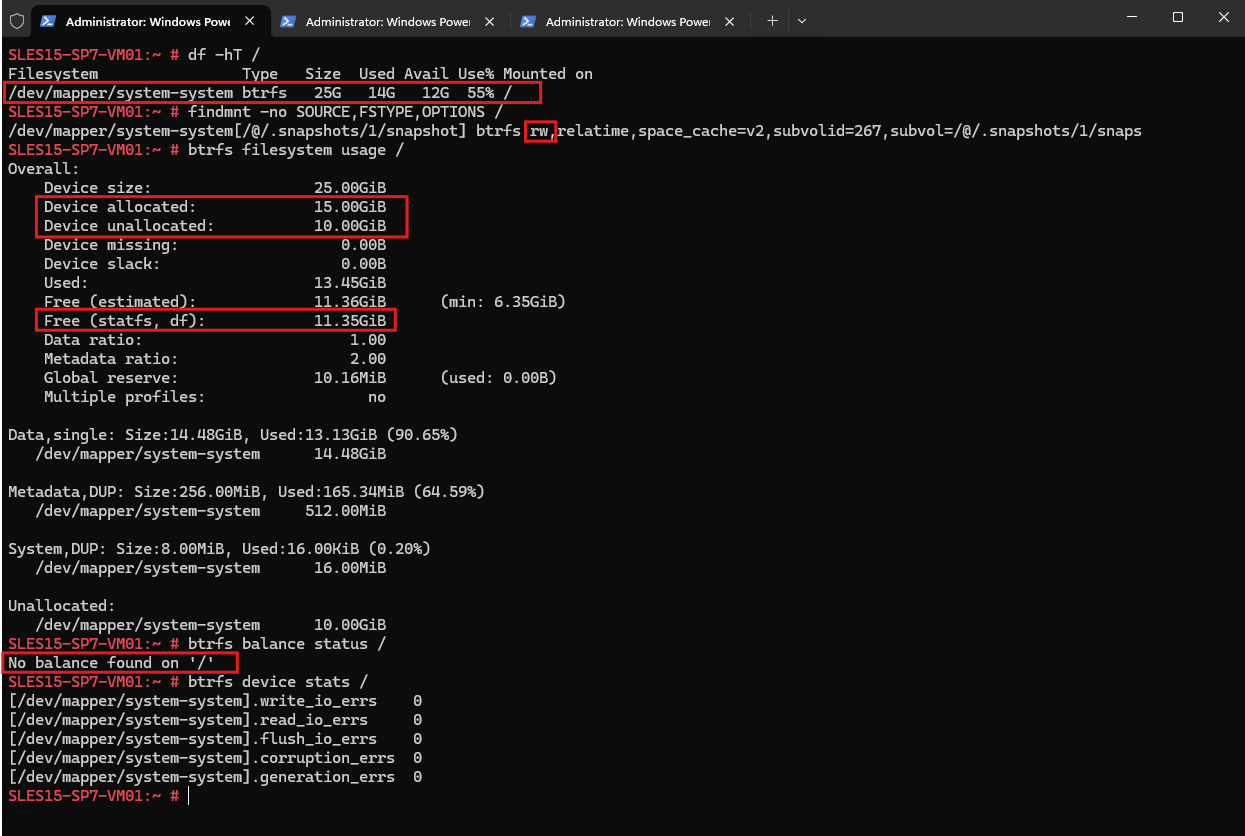
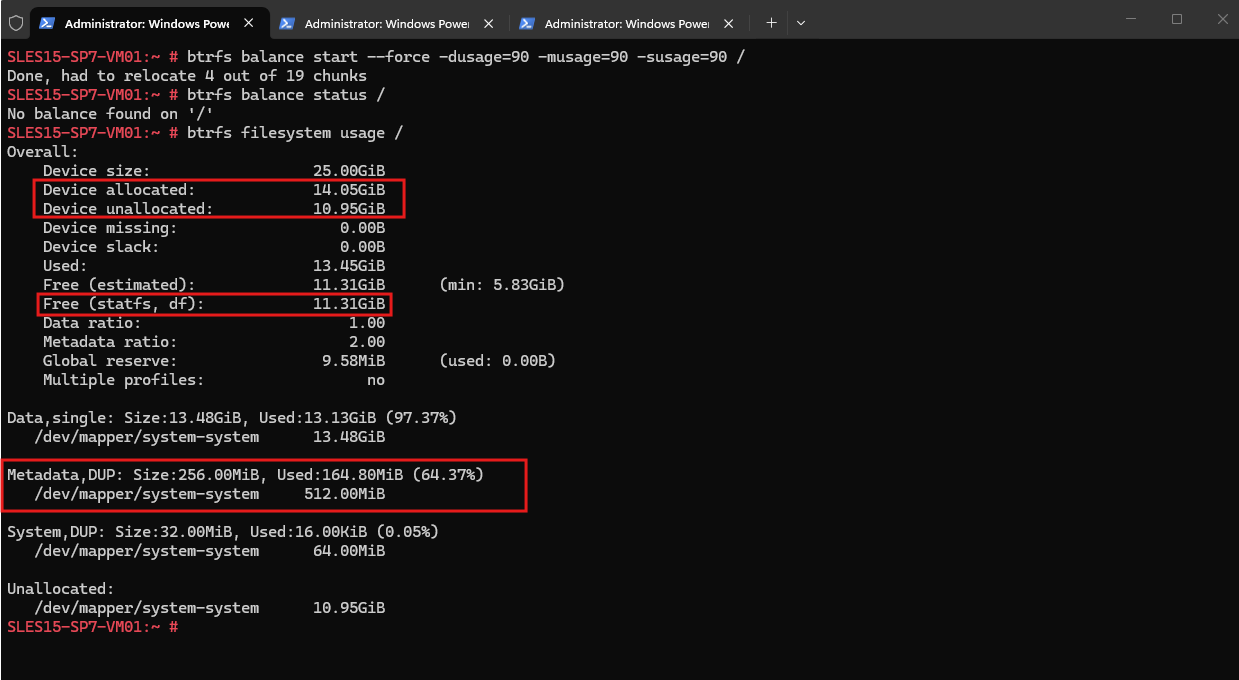
The root filesystem is now 25 GiB, mounted read-write, and provides approximately 12 GiB of available space according to df. More importantly, Btrfs now has 10 GiB of unallocated device space, which can be used to allocate additional Data or Metadata block groups when required.
This confirms that the root filesystem has been successfully recovered: it is writable again, sufficient unallocated device capacity is available, no balance operation remains active, and there is no indication of an underlying storage I/O or corruption problem.
Testing the Balance After Recovery
As a final test, we can start the same filtered balance operation that previously failed with ENOSPC:
Before the recovery, this operation failed when virtually no unallocated device space remained. With the root filesystem now extended to 25 GiB and approximately 10 GiB of Device unallocated space available, Btrfs has substantially more working space for relocating extents and allocating additional block groups as required.
btrfs balance start --force -dusage=90 -musage=90 -susage=90 /

After the balance has completed, we verify its status:
btrfs balance status /

We can then examine how the balance changed the block-group allocation:
The balance consolidated the contents of partially used block groups and was therefore able to release approximately 0.95 GiB of previously allocated device space back to the unallocated pool.
Interestingly, the Metadata,DUP allocation remains at 256 MiB. So Btrfs did not need to permanently allocate an additional Metadata block group to complete this balance. The crucial difference was that sufficient unallocated device space was available as working headroom if additional allocations became necessary.
btrfs filesystem usage /
Accessing the Installed System Using chroot
If administrative changes must be performed against the installed SLES system while booted into the Rescue System, we can change the apparent root directory to our mounted filesystem using chroot:
When no command like
/bin/bashis specified,chrootstarts a shell inside the new root environment, so simply runningchroot /mnt/rootis sufficient.Specifying
/bin/bashis optional and merely explicitly selects Bash as the shell to start.GNU
chrootstarts/bin/shby default when no command is specified. On SLES,/bin/shis normally a link to Bash, so in practice you get Bash running inshcompatibility mode.
# first mounting the root filesystem in the rescue system
mkdir /mnt/root
mount -o rw,skip_balance /dev/system/system /mnt/root

# explicitly select bash as the shell to start
chroot /mnt/root /bin/bash

# start default shell
chroot /mnt/root

The shell now treats /mnt/root as /, allowing commands and configuration changes to operate against the installed system instead of the Rescue System. For example, this can be useful for resetting the root password:
passwd root
When finished, leave the chroot environment and return to the Rescue System:
exit
Links
Storage Administration Guide
https://documentation.suse.com/en-us/sles/15-SP7/html/SLES-all/book-storage.htmlbtrfs-balance(8)
https://btrfs.readthedocs.io/en/latest/btrfs-balance.htmlbtrfs-filesystem
https://btrfs.readthedocs.io/en/latest/btrfs-filesystem.html
