vSphere Linux Virtual Machines – Extend Disks, LVM Logical Volumes and the File System
In this post I want to show how you can extend the virtual hard disks for a virtual machine running in vSphere, then extend the LVM volume groups (VGs) stored on these virtual hard disks and finally also resize the file system for these logical volume groups.
For this post I will use a SUSE Linux Enterprise 15 SP5 virtual machine to which I associated 4 hard disks in vSphere. On the first disk the GRUB2 boot loader is stored, the second disk will store the root file system and swap space and the third and fourth disk is used for data.
Besides the first disk with the GRUB2 boot loader, all other disks are managed by the Logical Volume Manager (LVM).
Logical Volume Manager (LVM) is a flexible, high-level disk management system that allows users to manage disk space more dynamically compared to traditional partitioning methods. It abstracts the physical storage devices (like hard drives or SSDs) into a single logical layer, making it easier to allocate, resize, and manage storage.
- Current Configuration
- Determine mounted Disk/Partition for a specific given Folder or File in Linux
- Determine the vSphere Virtual Hard Disks which we first need to extend
- Extend Virtual Hard Disks by using the vSphere Client
- Rescan and Resize the Disks in Linux
- Extend the LVM Volume Group (VG), Logical Volume (LV) and File System
- Extend Logical Volumes (LVs) and Resize the File System by using the YaST2 (GUI) Partitioner on the Desktop
- Extend Logical Volumes (LVs) and Resize the File System by using the YaST2 Text-based User Interface (TUI) Partitioner on the Command Line
- Extend Logical Volumes (LVs) and Resize the File System by using the Command Line
- Adding a new Disk (PV) to a Volume Group to finally extend a Logical Volume
- How to extend LVM Logical Volumes stored on extended Disk Partitions instead on whole initialized Disks by using Growpart
- Resize the Btrfs Root File System
- Resize an XFS File System
- How to resize/extend a Multipath Disk
- Extend and Resize the Swap Partition
- Swapiness
- Reducing Swap Partition
- File Systems that Support Resizing
- How to Reduce a VMDK and Its Associated Logical Volume in VMware vSphere
- Links
Current Configuration
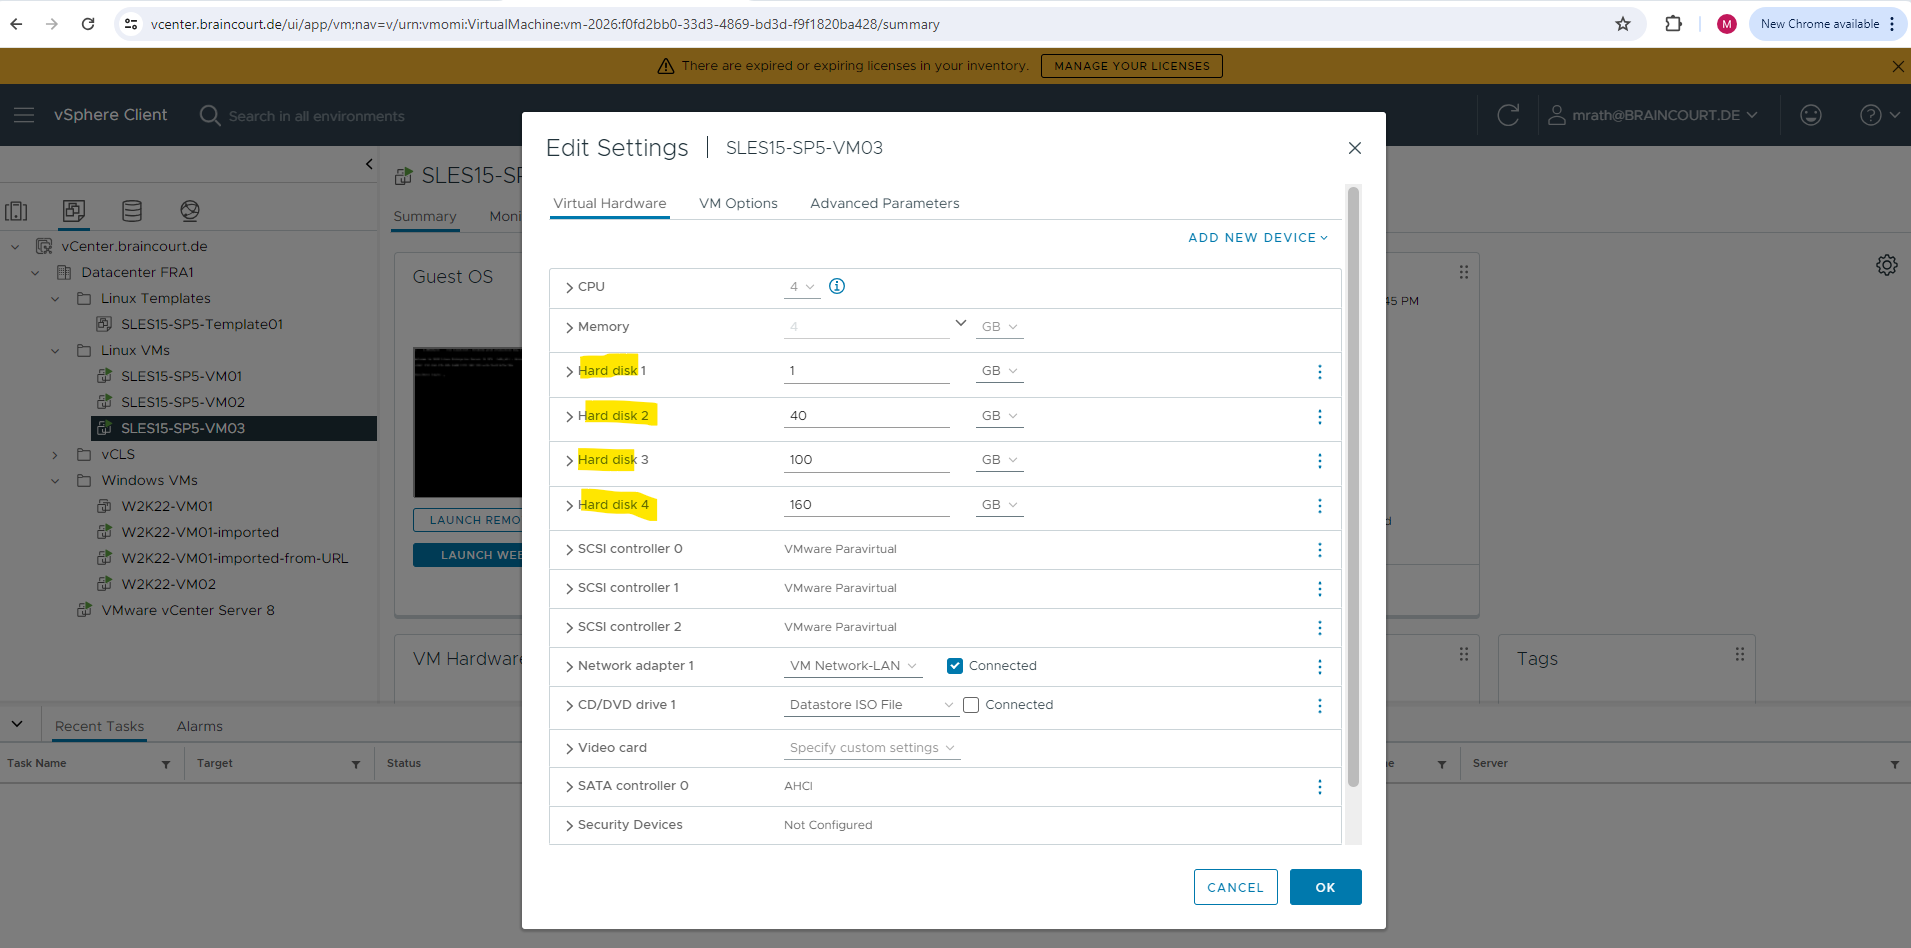
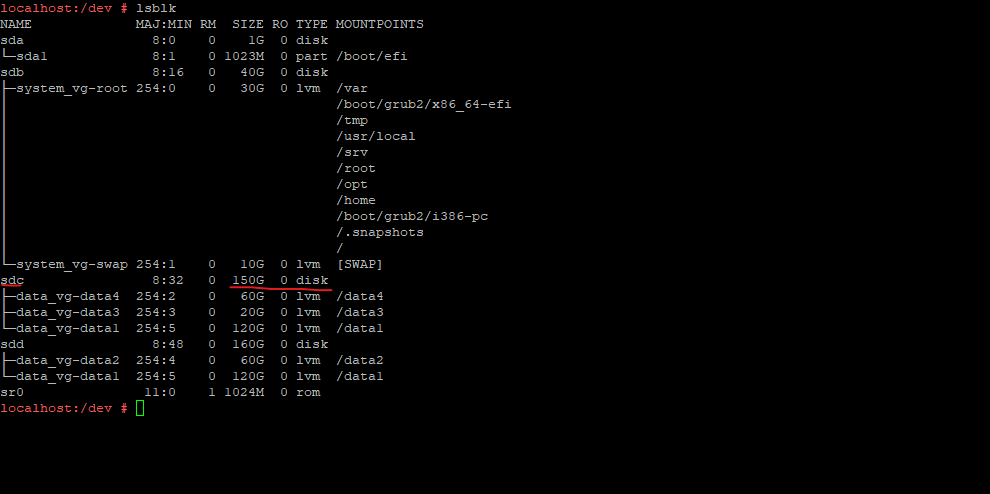
Below you can see the configuration of the disks in vSphere. As mentioned on the first disk the GRUB2 boot loader is stored. The second disk will contain the root file system and swap space configured each as LVM logical volumes in the volume group named system_vg.
The last two disks (Hard disk3 + 4) are used for data and both associated to a LVM logical volume group name data_vg.
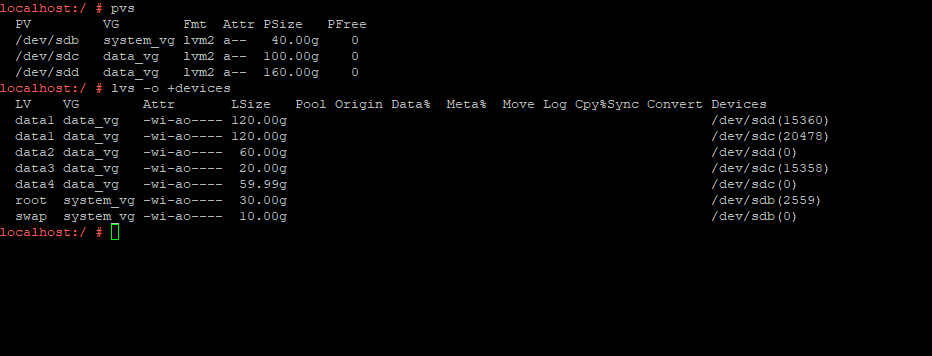
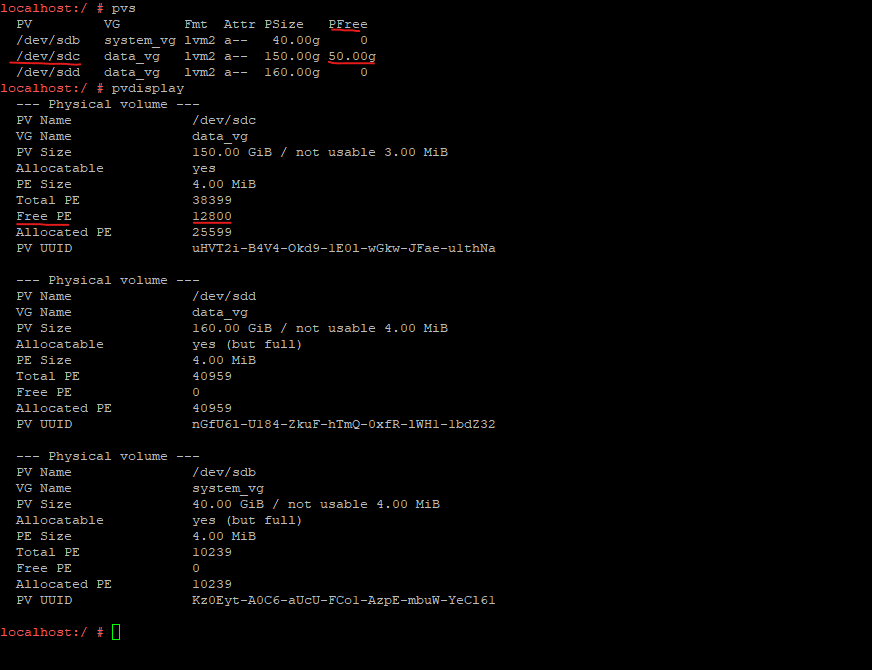
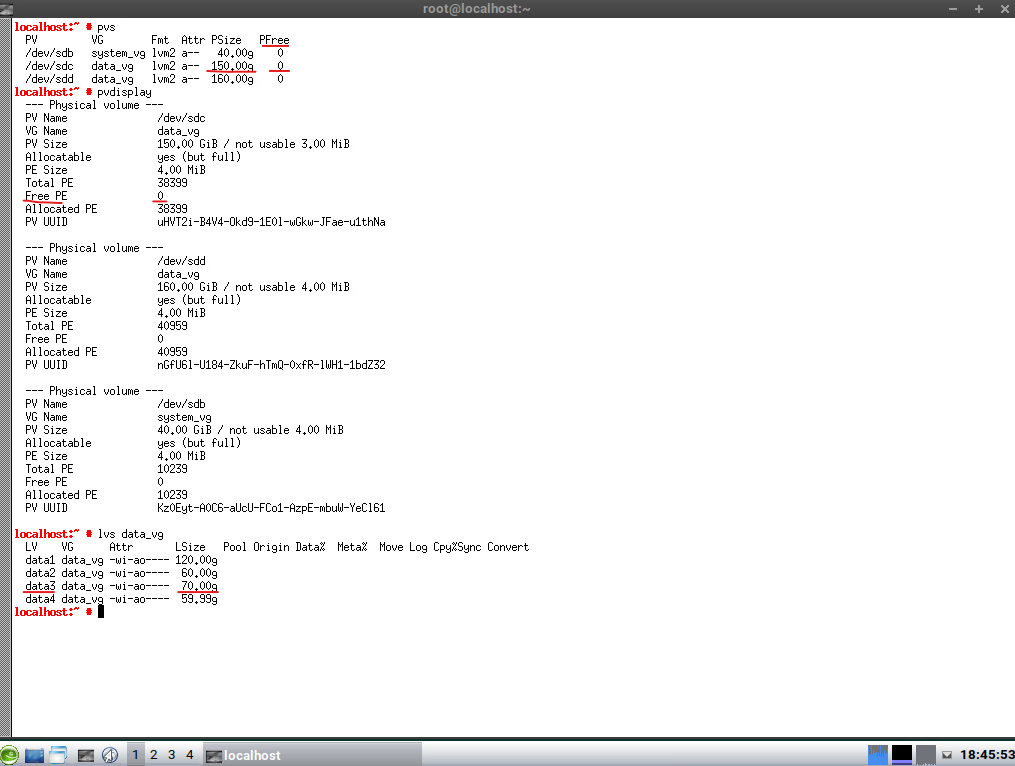
Below you can see first by using the pvs command all physical volumes (PV) associated to a specific volume group (VG).
A physical volume (PV) is any physical storage device like a hard disk drive or solid state drive or partition which was initialized by the Logical Volume Manager (LVM) as physical volume (PV). They are the base where volume groups (VGs) and logical volumes (LVs) are stored on.
As you can see for the data_vg volume group, I have associated the last two disks (3+4) from vSphere. The root file system and swap space resides on the system_vg volume group to which the second disk (hard disk 2) from vSphere is associated to.
The second command lvs -o +devices will list all logical volumes and associated physical volumes (PVs) to.
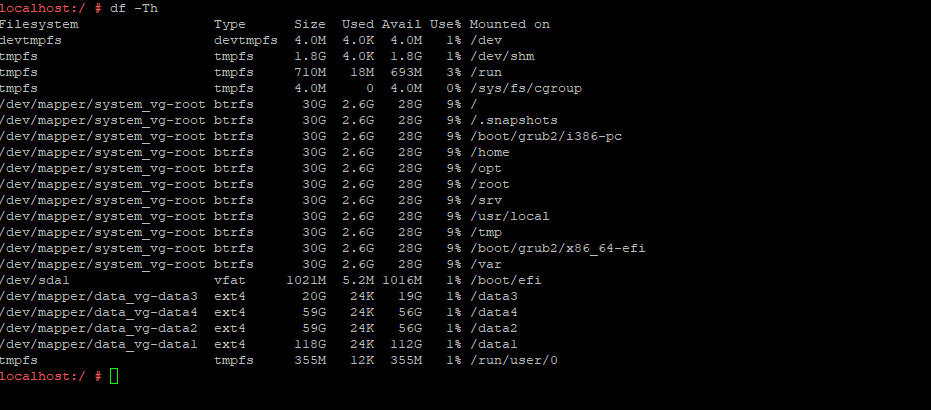
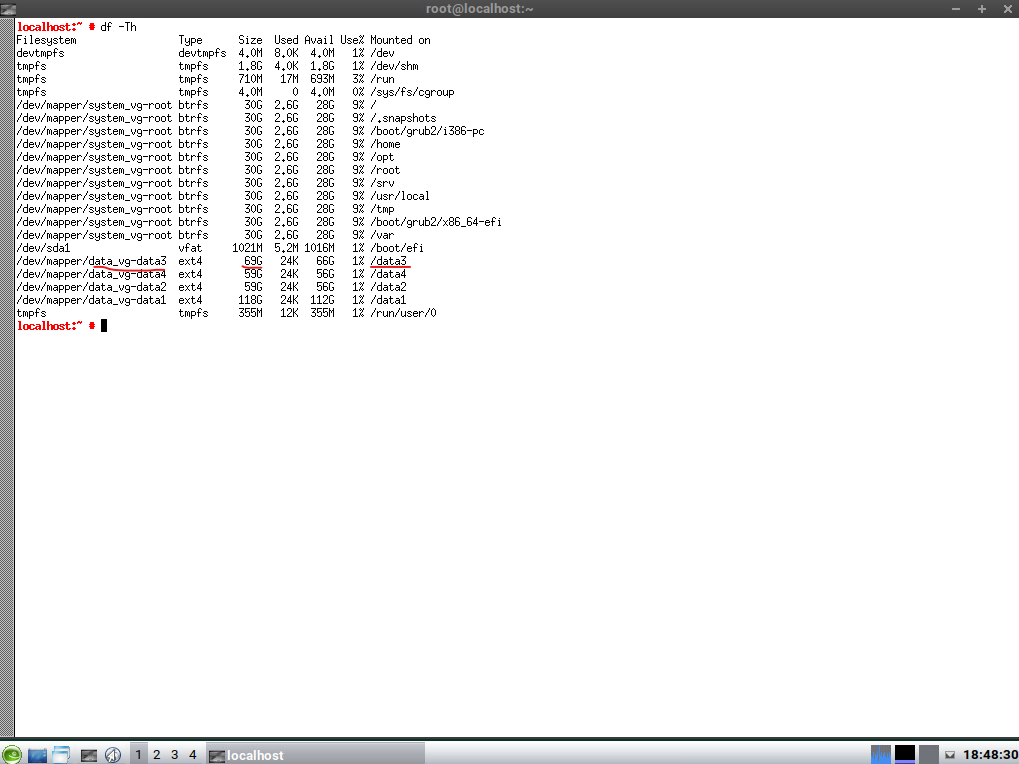
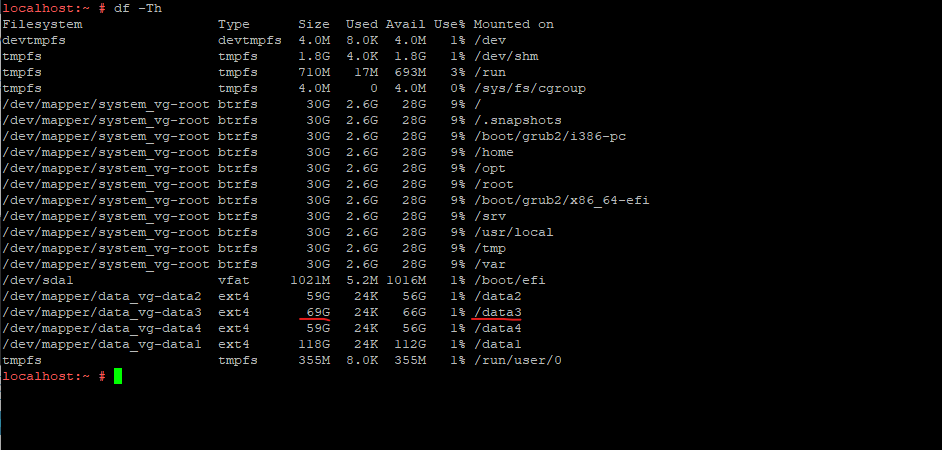
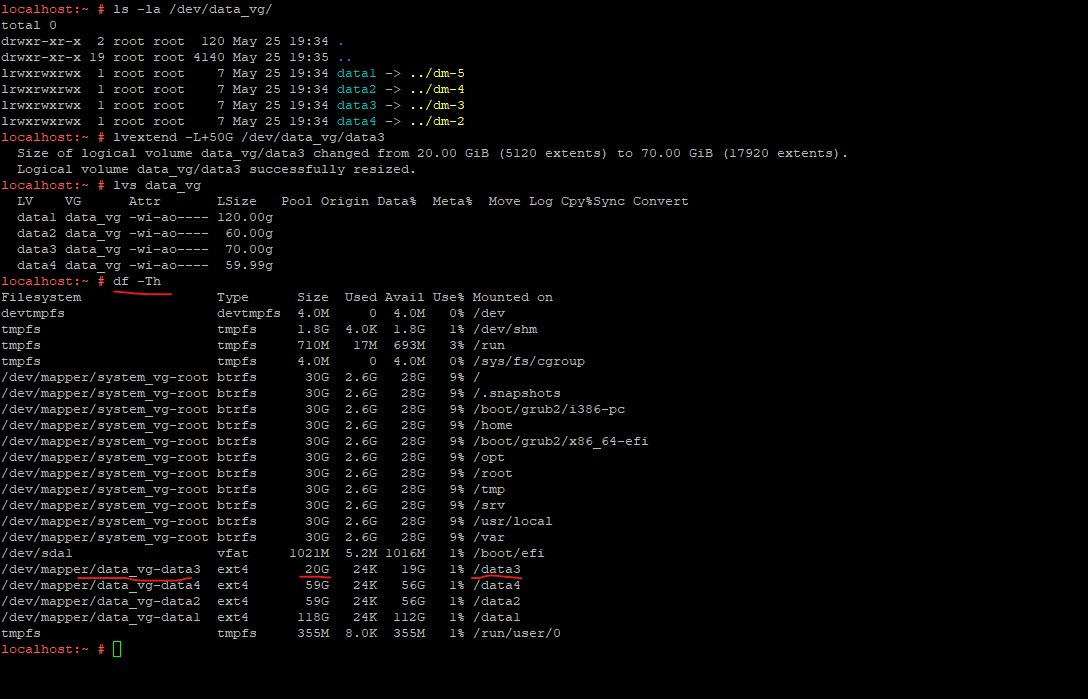
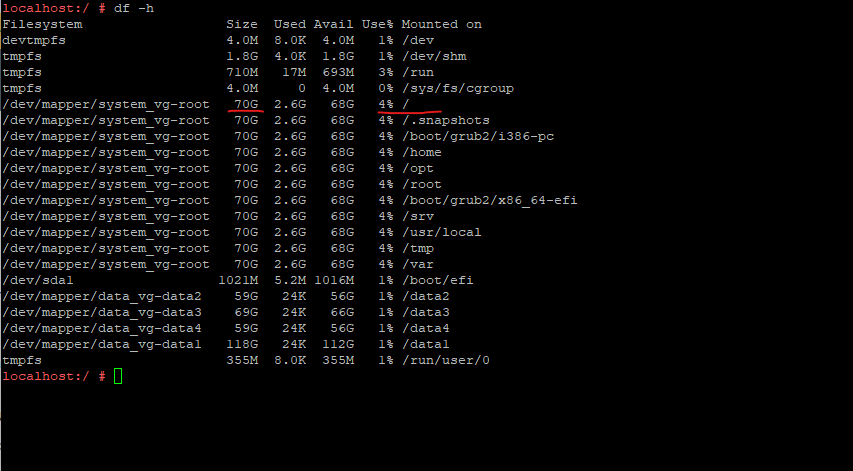
By executing the df -Th command we can display information about the total space and available space on a file system.
The -T flag print the file system type and the -h flag print sizes in powers of 1024.
More about under https://www.ibm.com/docs/en/aix/7.1?topic=d-df-command
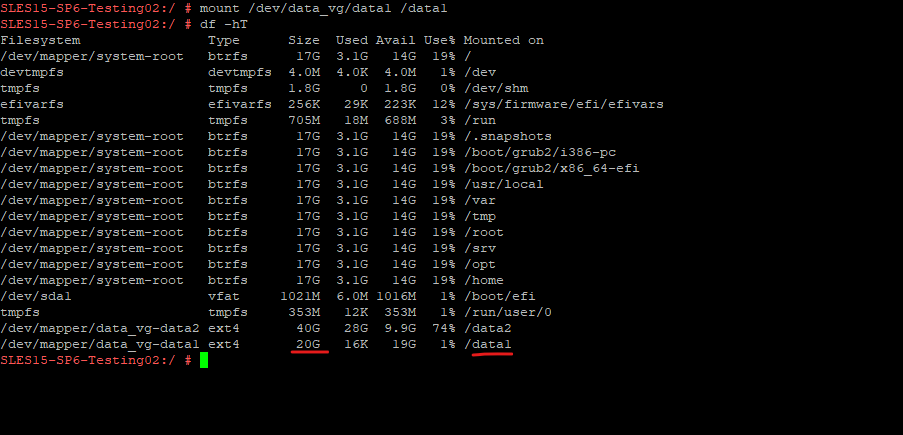
Determine mounted Disk/Partition for a specific given Folder or File in Linux
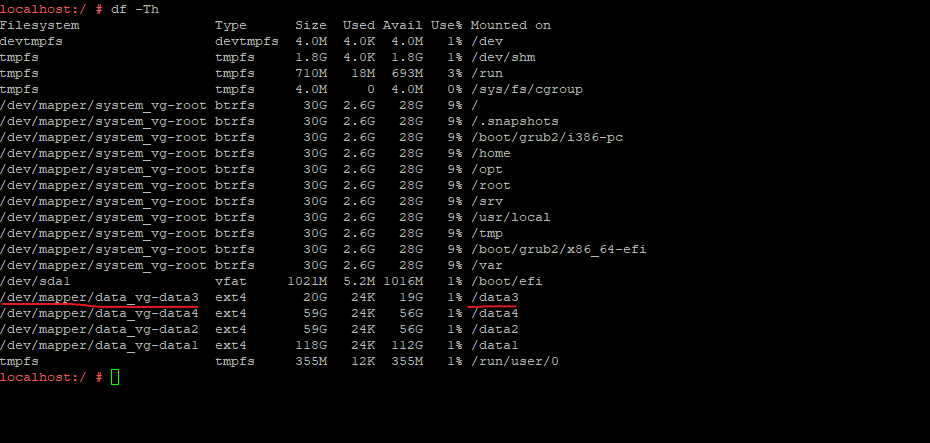
In case you need to extend a partition or logical volume where a specific folder or file is located, you can use the df command shown in my post below to quickly determine on which partition or logical volume they are finally located.
Determine the vSphere Virtual Hard Disks which we first need to extend
In order to extend the file system for a virtual machine in vSpere, which is stored on a logical volume (LV) within a volume group (VG), we first need to determine which disk is finally used for this volume group and logical volume and we then need to extend in vSphere.
For this post I want to extend my /data3 directory by 50 GiB to which the logical volume named data3 from the data_vg volume group is mounted to.
The steps to extend this /data3 directory is to first extend the underlying virtual hard disk in vSphere, then extending the corresponding logical volume and finally resizing the file system.
To extend the the underlying virtual hard disk in vSphere, we first need to determine which virtual hard disk will store our affected logical volume and file system.
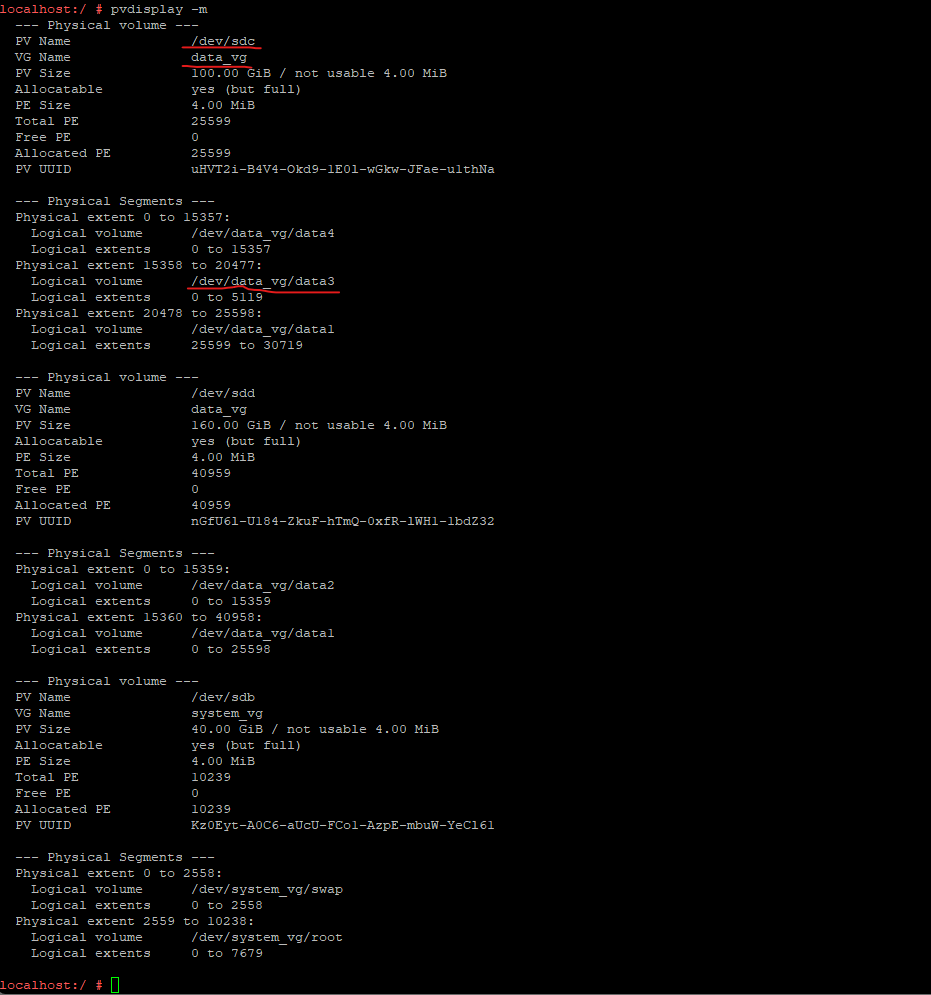
Therefore we can use several commands, one of them is the pvdisplay -m command which will by using the -m flag also display the mapping of physical extents to logical volumes and logical extents.
Below you can see that I finally need to extend the /dev/sdc disk on which my logical volume data3 is stored and mounted to my /data3 directory.
It is also be possible that the logical volume is spread over multiple disks. In that case you can either just extend one of these disks or you split the amount of the extension to all used disks for the logical volume.
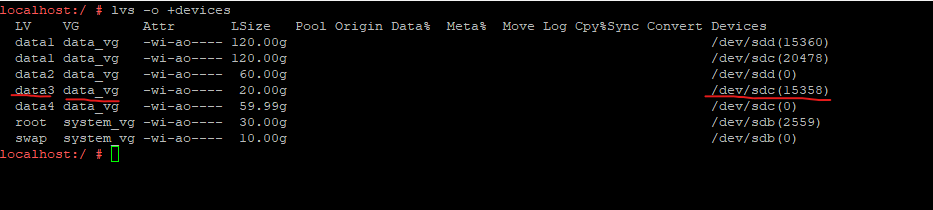
We can also use the lvs -o +devices command to determine all logical volumes and associated physical volumes (PVs), finally our disks we need to extend. Below we can also see that /dev/sdc will store our data3 logical volume which is mounted to the /data3 directory.
To determine on which disks our file system we want to extend is stored, we can use as previously the pvdisplay command again but this time with further parameters as shown below.
pvdisplay -C --separator ' | ' -o pv_name,pv_size,vgname

Here we can see which disks are associated to a specific volume group on which finally our affected logical volume and file system is stored on.
Currently we determined that our logical volume data3 which is mounted to our /data3 directory is so far directly stored on /dev/sdc, but because this logical volume is associated to the data_vg volume group, we can also extend the /dev/sdd disk which also belongs to the data_vg volume group and the Logical Volume Manager (LVM) will finally manage disk allocation for logical volumes within a volume group (VG).
Now as we know which disk on the OS we need to extend, we also need to determine which virtual hard disk this is finally in vSphere. In case the above output is unique just because of the disk size and you have not associated multiple virtual hard disks with the same size to your virtual machine, you can easily identify and pick up the corresponding disk in vSphere just by distinguish between the disk sizes.
In case you have multiple disks with the same size assigned to, you can use the lsscsi command to clearly determine the correct associated and underlaying virtual hard disk shown up in the OS.
lsscsi – list SCSI devices (or hosts) and their attributes
Source: https://linux.die.net/man/8/lsscsiLinux has a four level hierarchical addressing scheme for SCSI devices:
scsi(_adapter_number) : channel number [bus] : id number [target] : lun [lun]
Source: https://tldp.org/HOWTO/SCSI-2.4-HOWTO/scsiaddr.html
# lsscsi

In my case I was already able to identify which virtual hard disk I need to extend just by the size but to finally uniquely identify the disk, the lsscsi command was printing out the exact SCSI IDs.
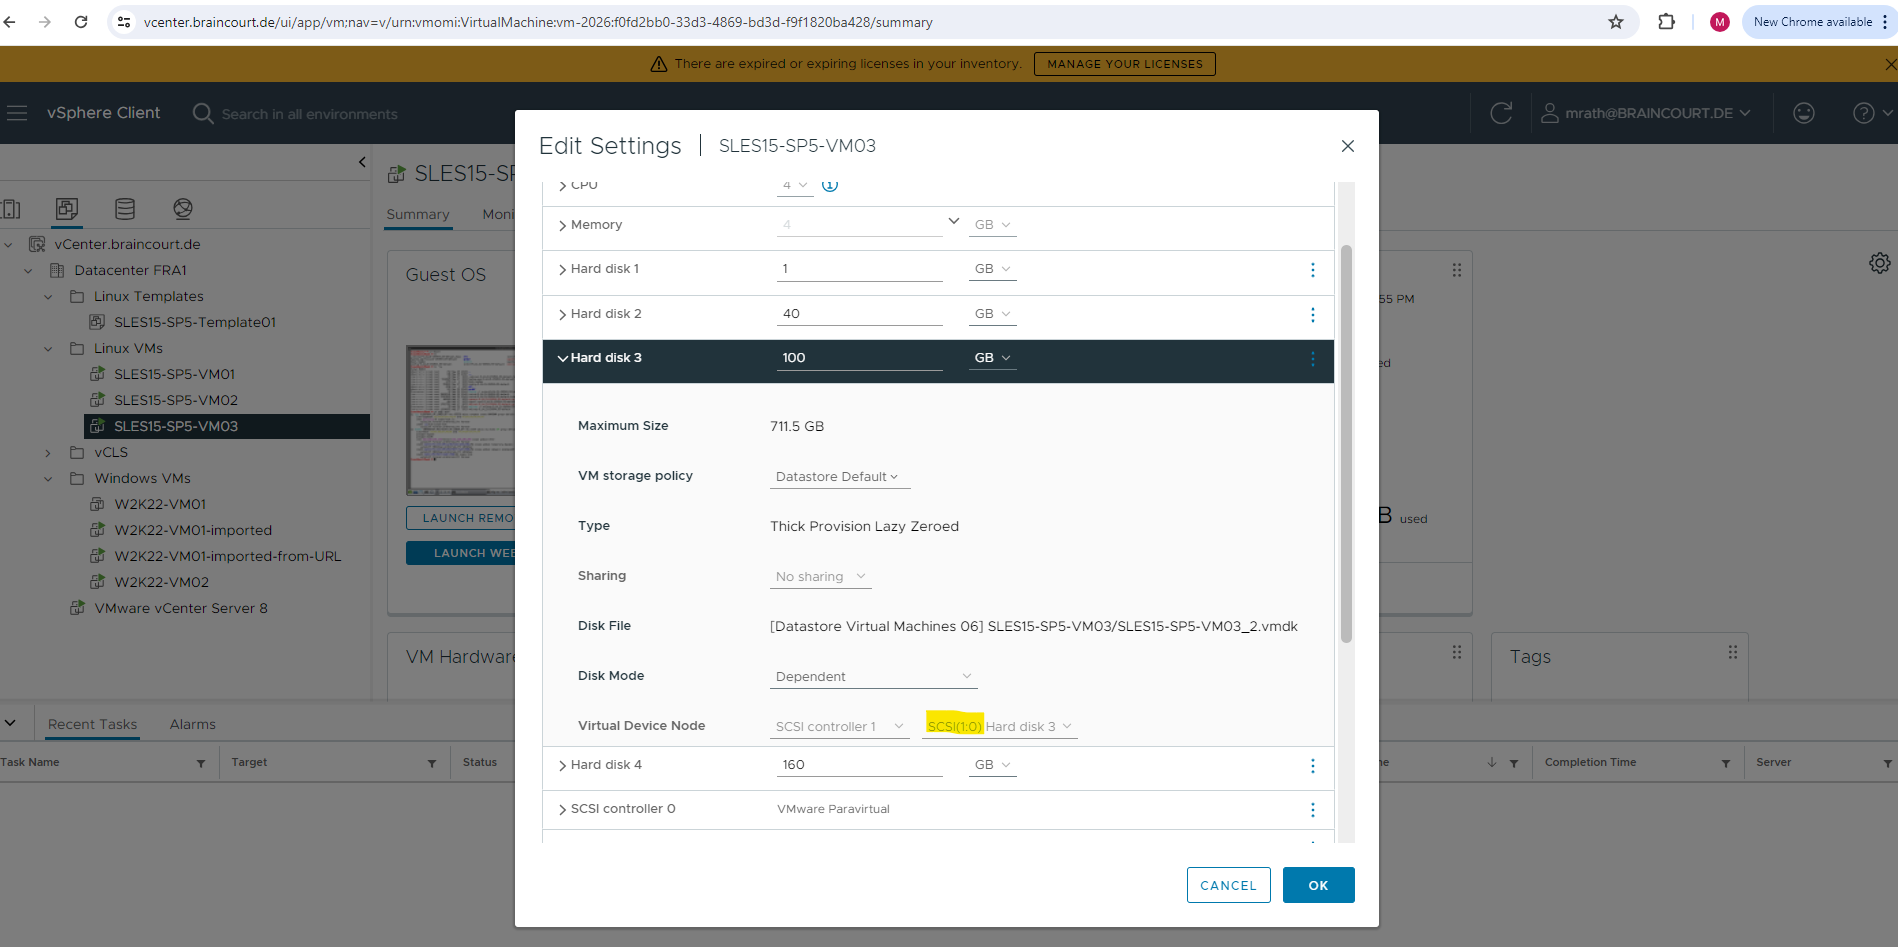
So below you can see that the OS disk /dev/sdc is in vSphere my virtual hard disk 3 connected on SCSI(1:0) -> Adapter 1 and Channel 0.
Extend Virtual Hard Disks by using the vSphere Client
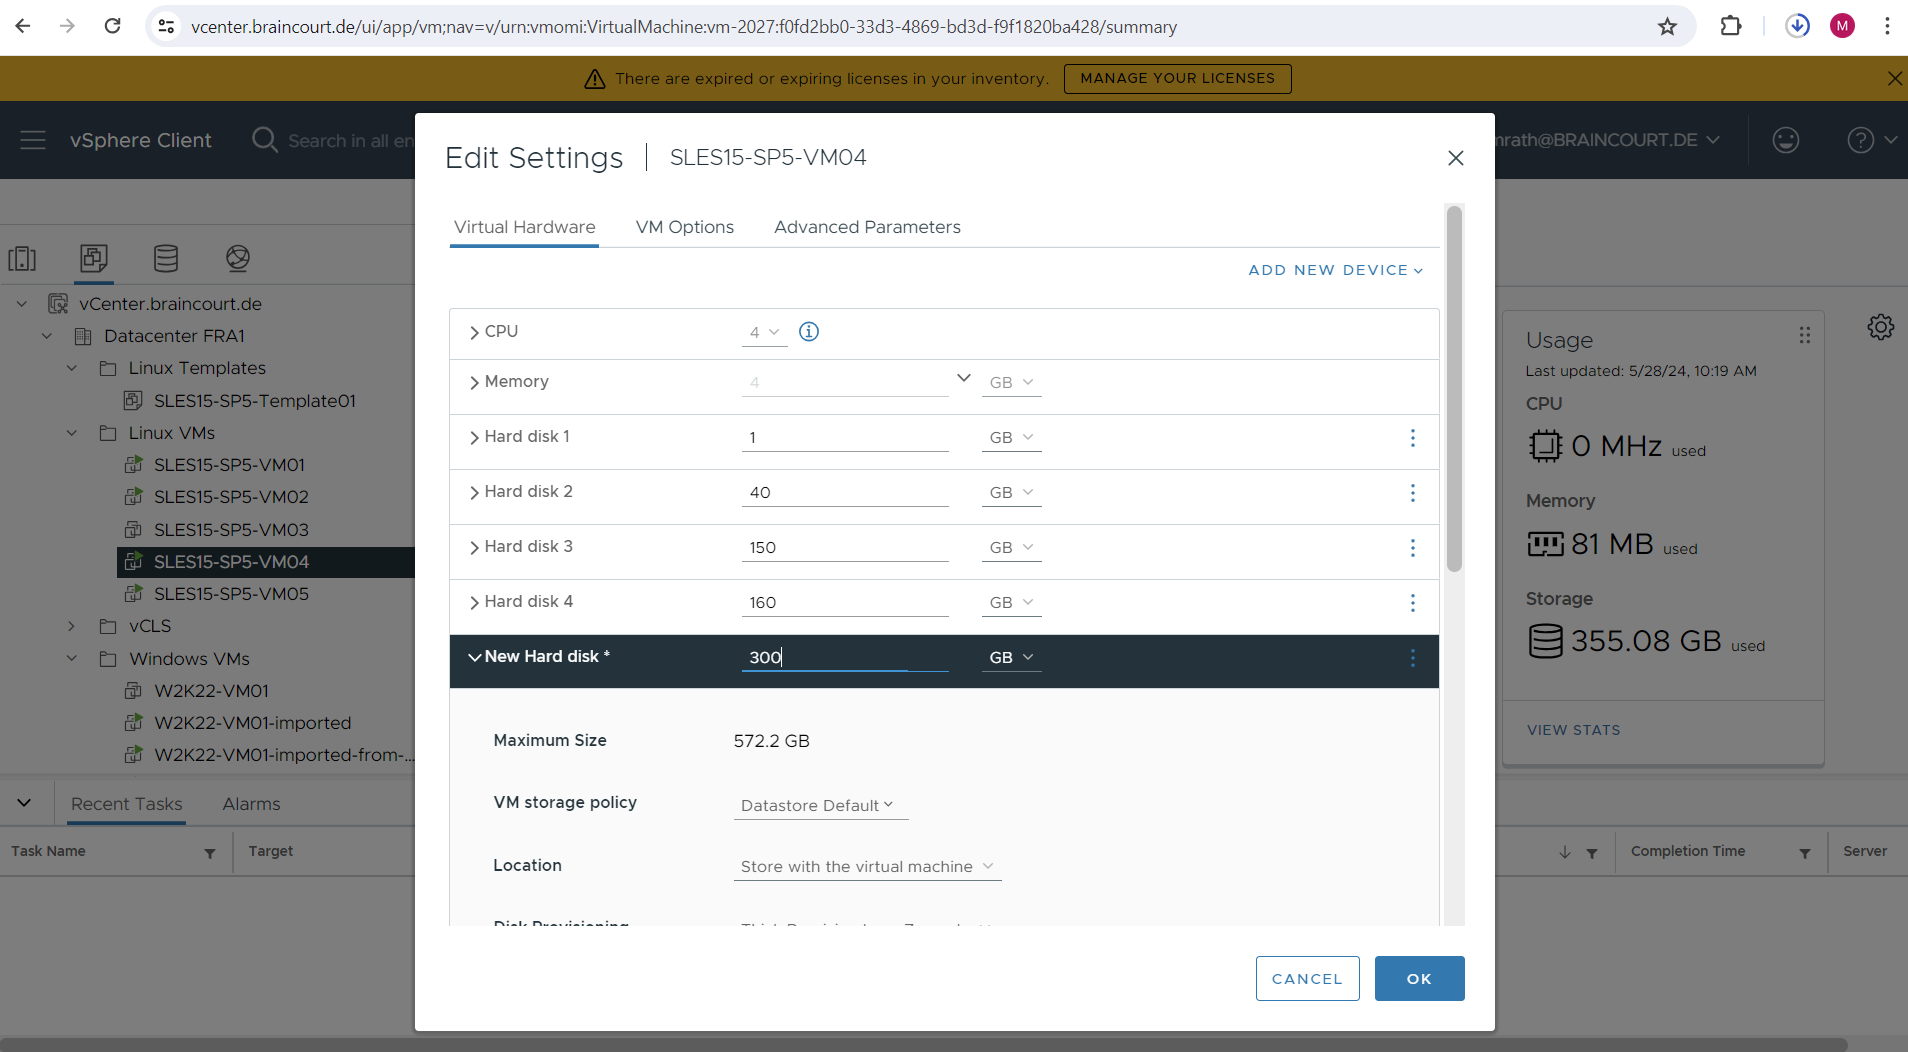
Now as we know which virtual hard disk we need to extend in order to finally extend our LVM logical volume and file system, we need to open the settings dialog of our virtual machine.
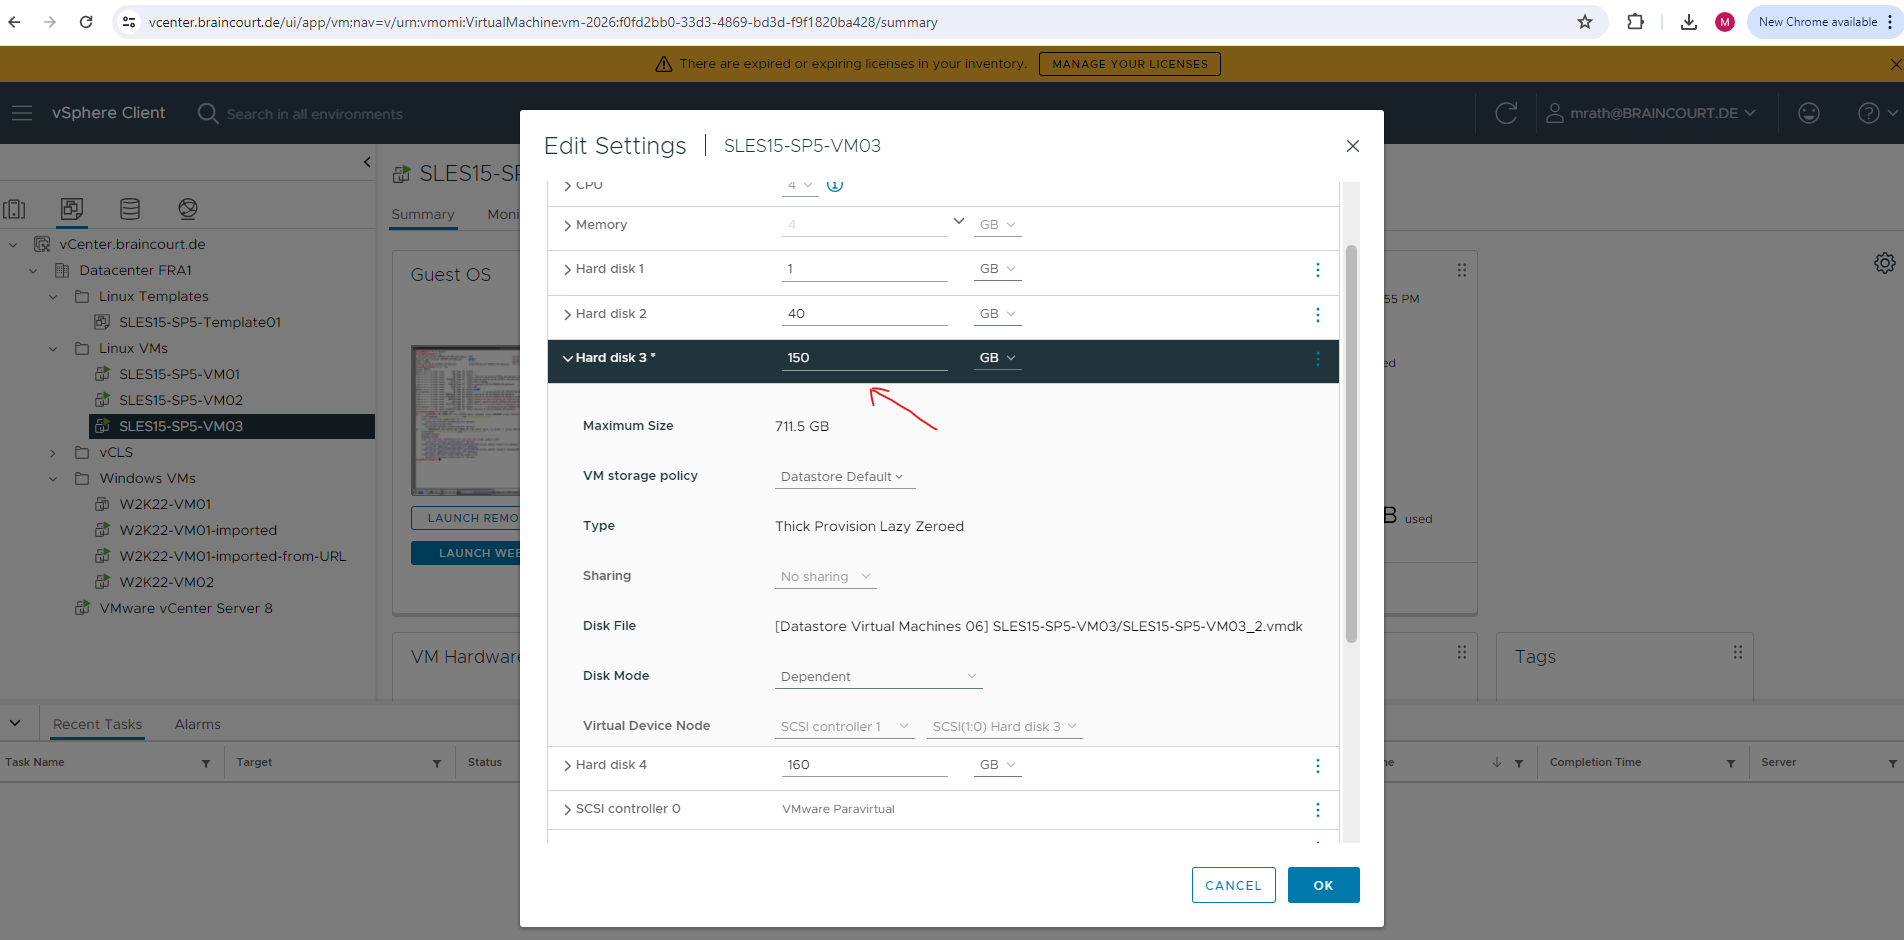
First we need to adjust the new size in the settings of the virtual machine as shown below. Just enter the new desired size for the selected virtual hard disk and click on OK. As mentioned finally I want to extend my /data3 directory on the virtual machine by 50 GiB and therefore need to adjust the new size to 150 GB.
!!! Note !!!
For partitioning purposes, disk space is measured here in binary units, rather than in decimal units. For example, if you enter a size of 100 GB, this will finally signify 100 GiB (Gigibyte) and a size of 1 TB will finally signify 1 TiB (Tebibyte) .More about MiB vs MB or GiB vs. GB you will find in my following post MiB and GiB vs. MB and GB momory size notation – What’s the Difference?
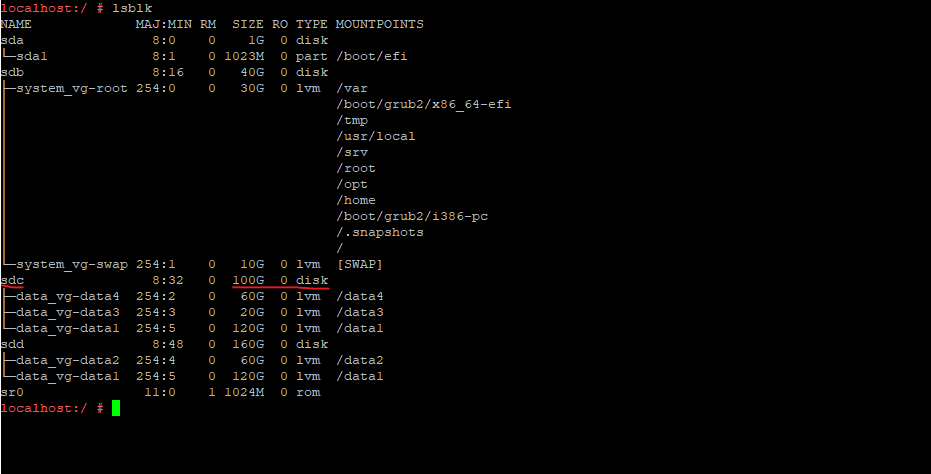
Now I will first check the disk size how the OS it detects and sees so far by using the lsblk command.
lsblk lists information about all available or the specified block devices. The lsblk command reads the sysfs filesystem and udev db to gather information. If the udev db is not available or lsblk is compiled without udev support, then it tries to read LABELs, UUIDs and filesystem types from the block device. In this case root permissions are necessary.
So far the size is not changed within the OS.
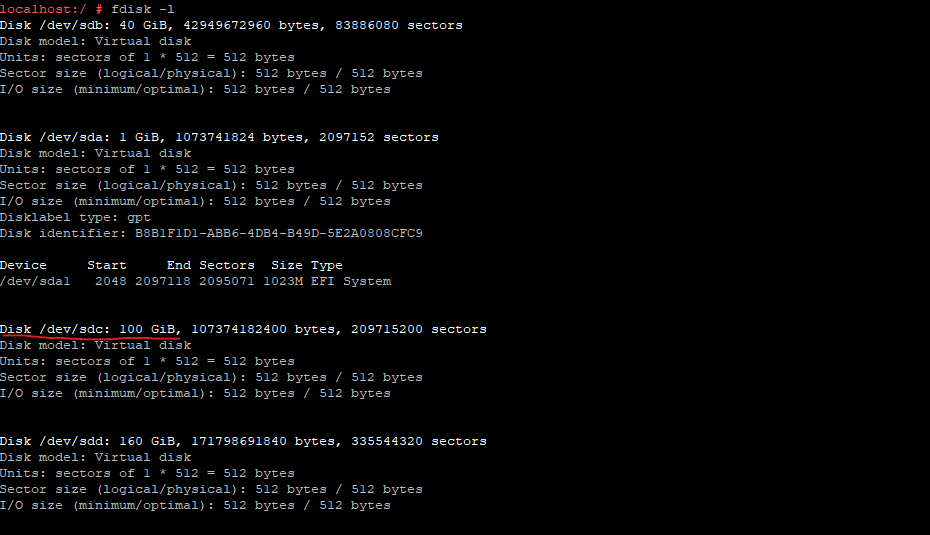
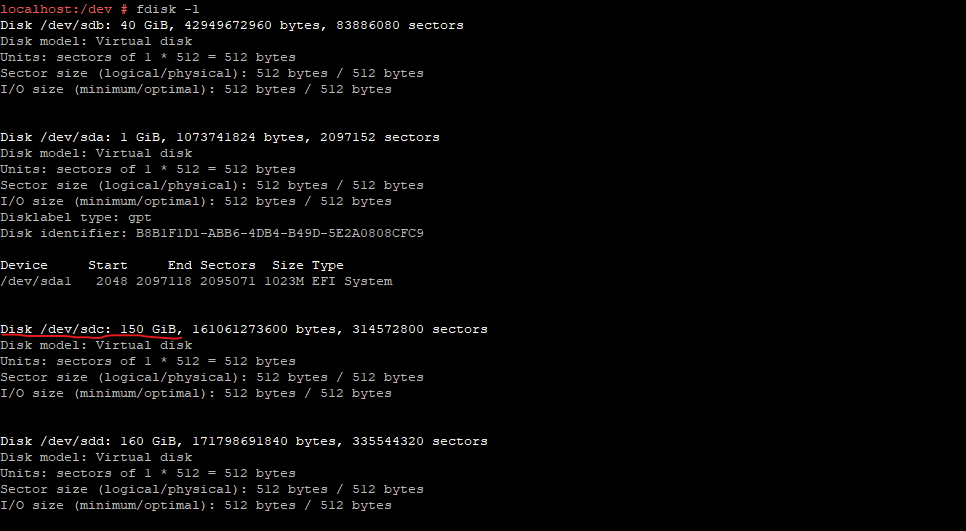
To list all available disks and their partitions we can also use the fdisk -l command. Note here for the output of the disks, that as mentioned before, disk space is measured here in binary units, rather than in decimal units and it will show us here the size in Gib (Gigibyte)
fdisk is a dialog-driven program for creation and manipulation of partition tables. It understands GPT, MBR, Sun, SGI and BSD partition tables.
Block devices can be divided into one or more logical disks called partitions. This division is recorded in the partition table, usually found in sector 0 of the disk. (In the BSD world one talks about disk slices’ and adisklabel’.)
Rescan and Resize the Disks in Linux
In order to make the OS aware of the new size and to detect the changes without first restarting Linux, we have to rescan our extended disk.
For the rescan of the disk we can use either the SCSI bus name to which the disk is attached or we can use the disks block device name.
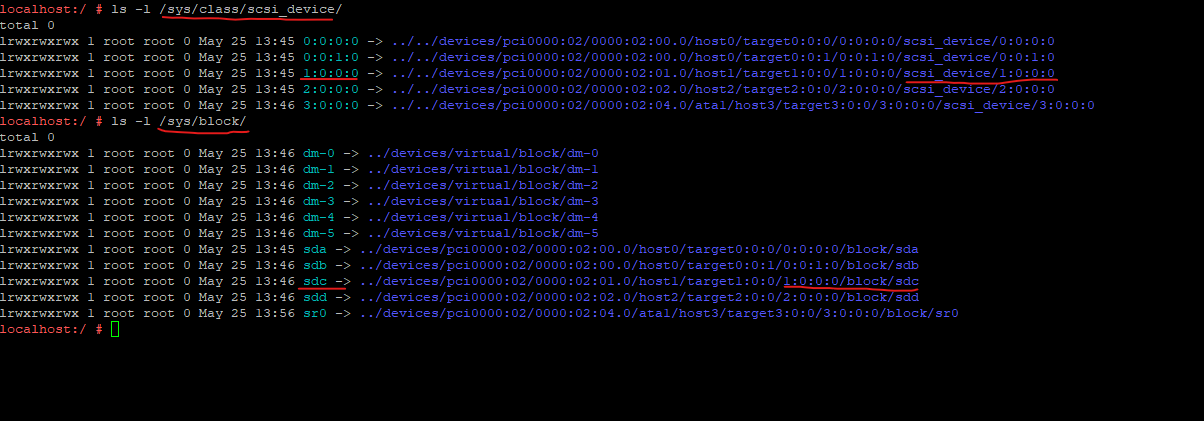
To check the SCSI bus name(s) of your scsi devices use:
# ls -l /sys/class/scsi_device/
To check the block device name(s) you can use:
# ls -l /sys/block
Then either rescan the SCSI bus by using its name:
# echo 1 > /sys/class/scsi_device/1:0:0:0/device/rescan
That will rescan the current SCSI bus and the disk size that has changed will be detected and show up.
Or rescan the block device name like:
# echo 1 > /sys/block/sdc/device/rescan
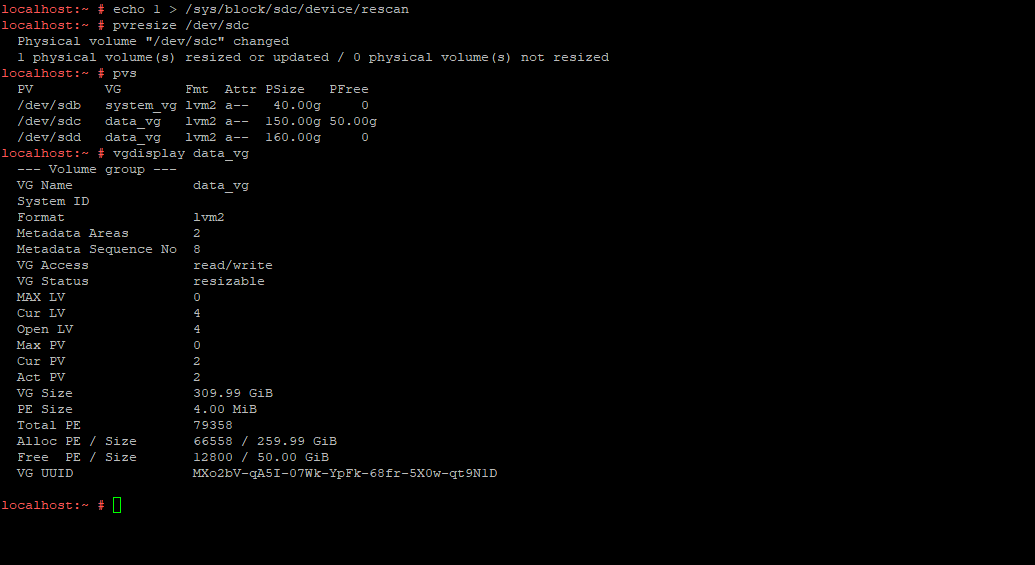
Now we can resize the physical volume (PV)
# pvresize /dev/sdc
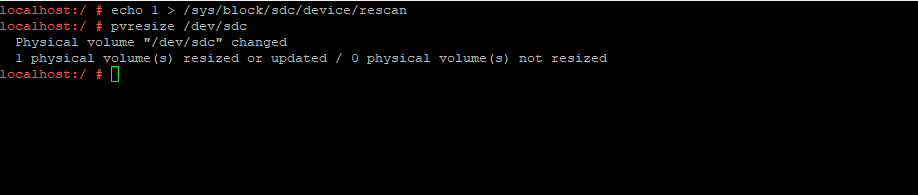
The OS will now display the correct size of the disk.
So far we just extended our disk (physical volume PV), the logical volumes and their file system still have the old size.
Extend the LVM Volume Group (VG), Logical Volume (LV) and File System
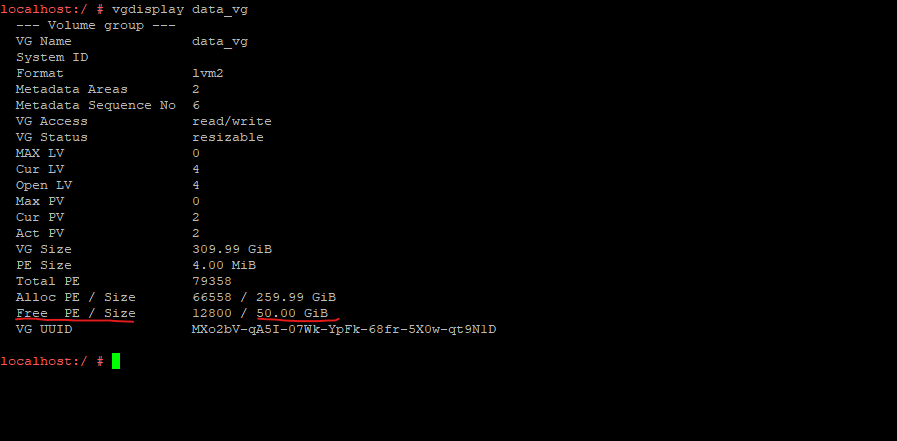
When we now check the size of our volume group (VG), we can see that the assigned disk to our volume group (VG) now will have 50 GiB free (shown under Free PE).
So the physical volumes (PVs) of our volume group (VG) and therefore also the volume group itself is already extended to the new size.
# pvs
# pvdisplay
So also the volume group now will have 50 GiB free which can be used to extend its logical volumes.
# vgdisplay <volume group>
# vgdisplay data_vg
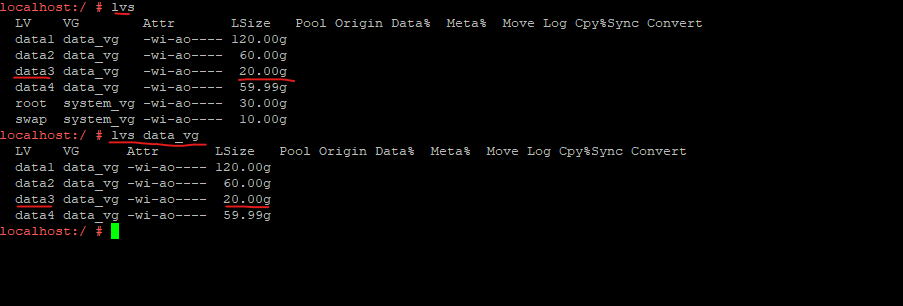
The logical volume data3 within the data_vg volume group is so far not extended and the size is still 20 GiB.
We can now use the FREE PE value to extend our partition resp. the logical volume (LV) within our volume group (VG).
Extend Logical Volumes (LVs) and Resize the File System by using the YaST2 (GUI) Partitioner on the Desktop
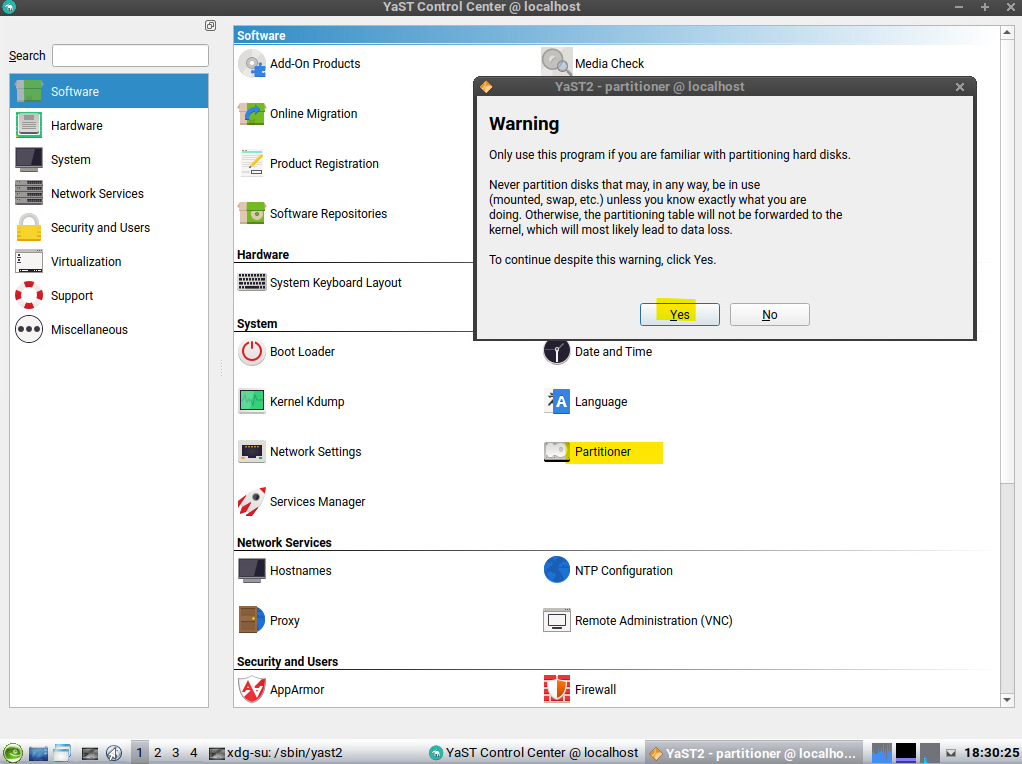
To open the YaST2 (GUI) partitioner on the Desktop click on the Start button and select SUSE -> System -> YaST as shown below.

Open the Partitioner.
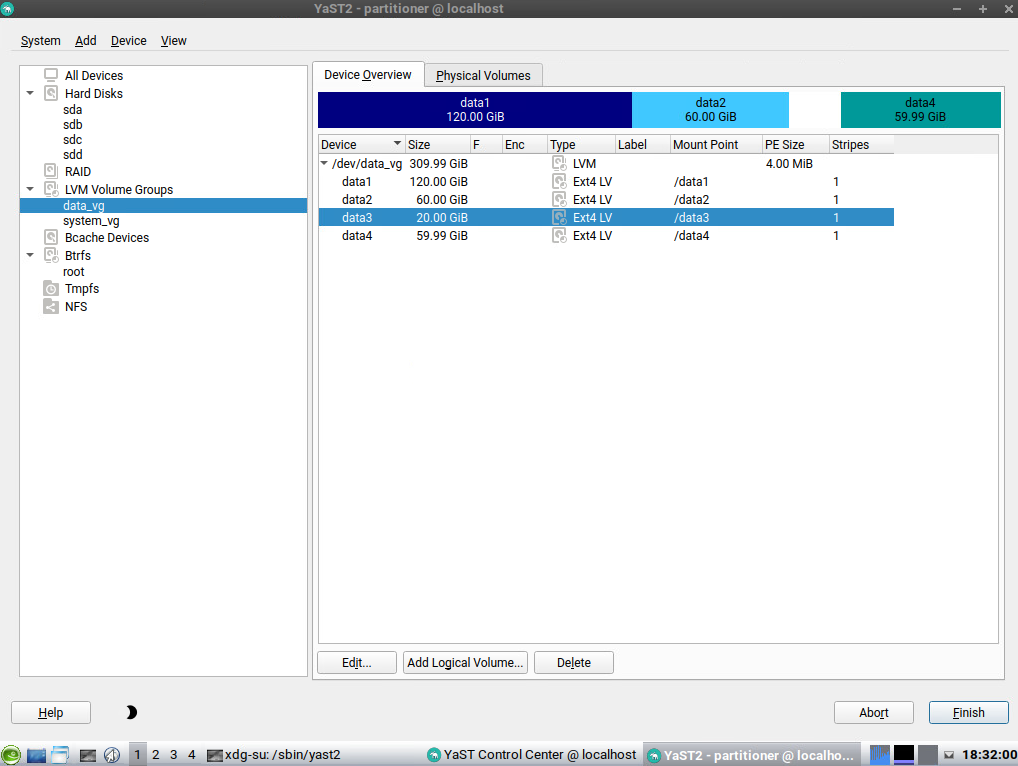
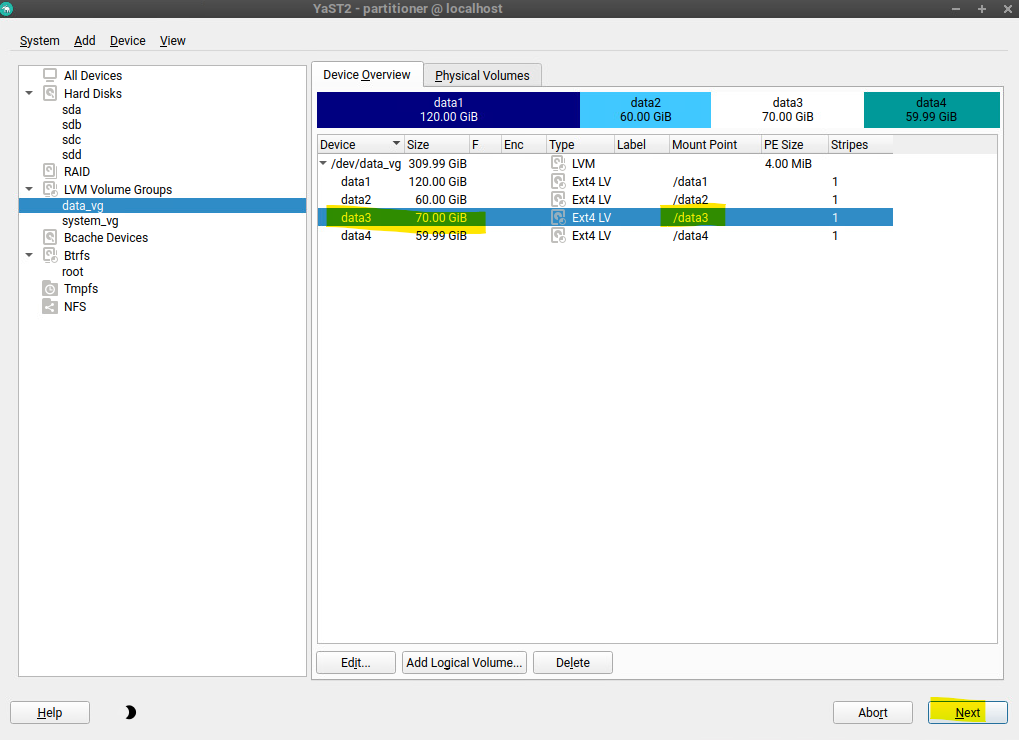
To resize logical volumes by using the YaST2 (GUI) partitioner on the Desktop, just select the logical volume and click on Device -> Resize … in the top menu as shown below.

Then specify the new desired size and click on Next. As mentioned I wanted to extend the /data3 directory by 50 GiB and therefore left the default setting to use the maximum size with 70 GiB.
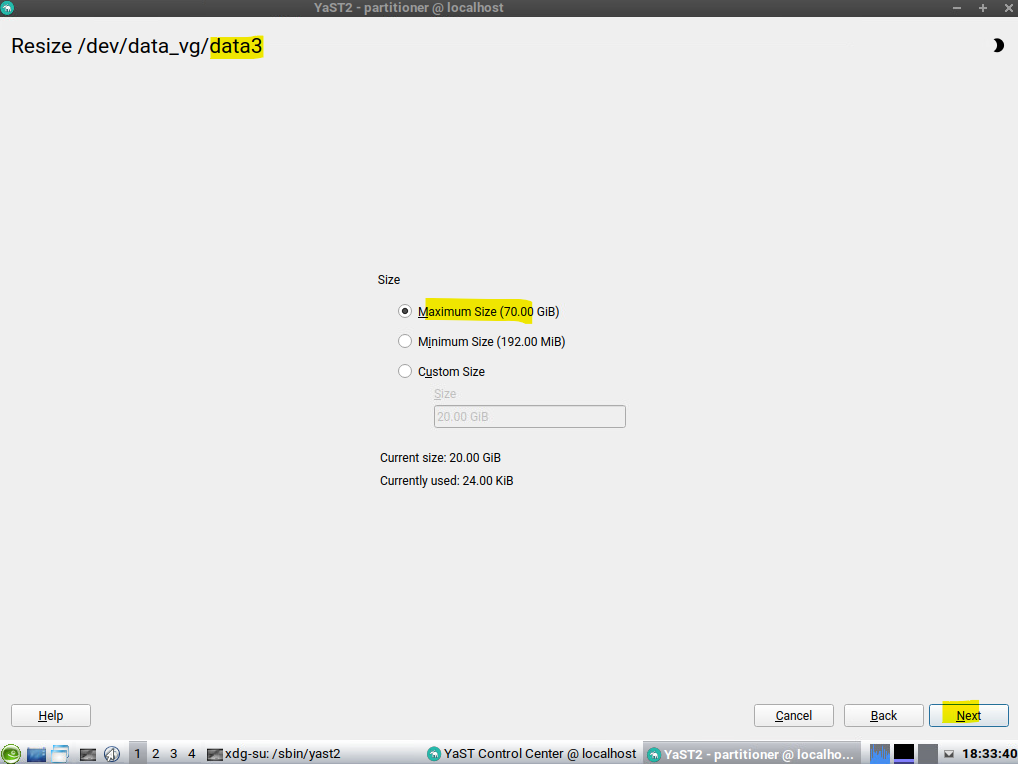
Finally click on Next to apply the new size.
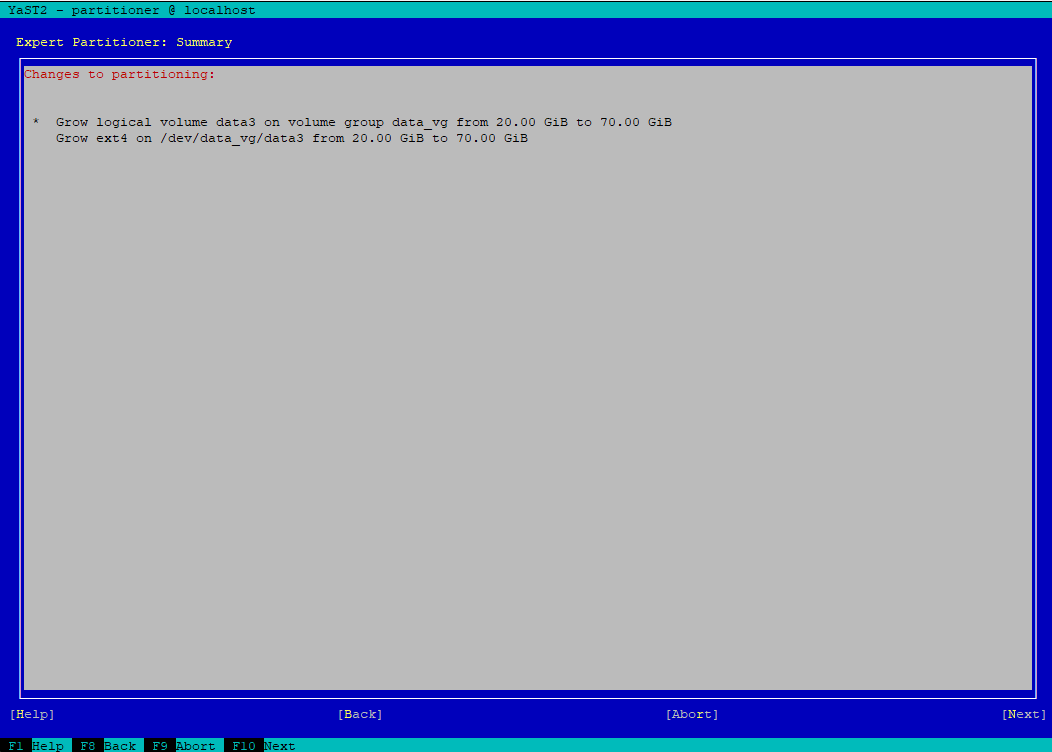
When using the YaST2 (GUI) partitioner to extend the logical volumes (LVs), by default also the file system will be extended as shown and mentioned below (Grow ext4 on /dev/data_vg/data3 from 20.00 GiB to 70.00 GiB).
When using the command line in contrast and its lvextend command as shown further down, we have to resize also the file system in a separate additional step.
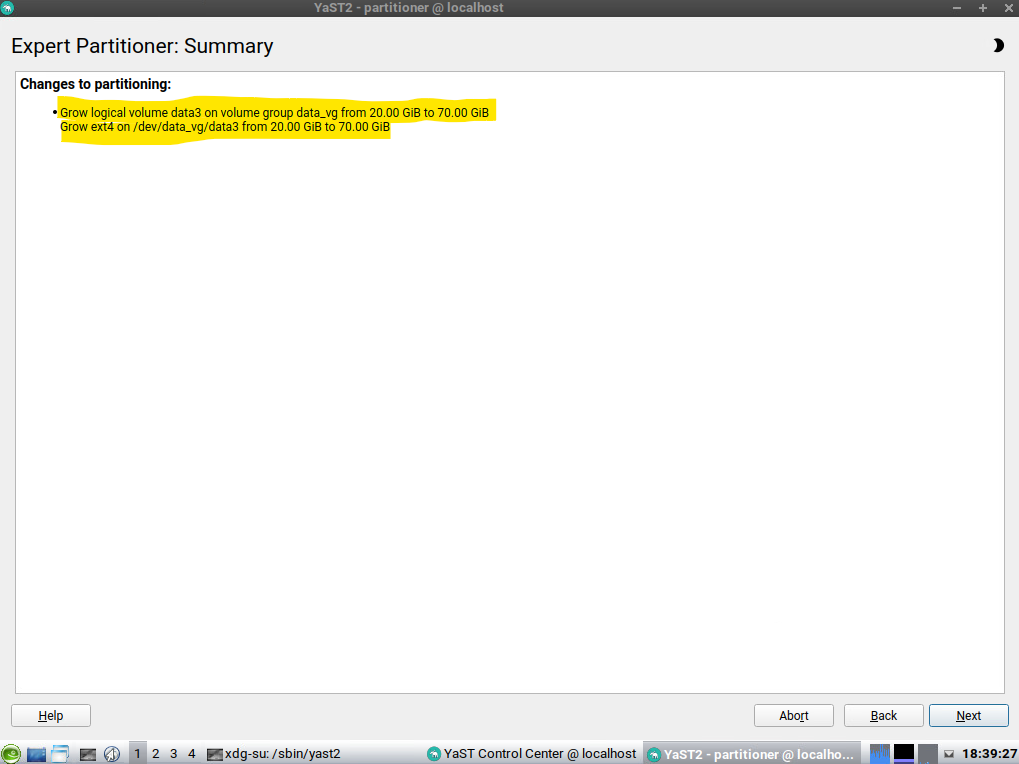
Finally also our logical volume (LV) is extended by 50 GiB to 70 GiB.
And as mentioned also the file system will be resized in the step above.
Extend Logical Volumes (LVs) and Resize the File System by using the YaST2 Text-based User Interface (TUI) Partitioner on the Command Line
We can also resize logical volumes by using the YaST2 (TUI) partitioner on the Command Line.
First we have to rescan our extended disk like previously when using the YaST2 (GUI) partitioner in order to make the OS aware of the new size and to detect the changes without first restarting Linux.

To open the YaST2 (TUI) partitioner, enter yast or yast2 on the command line as shown below. In case you encounter line distortion and corrupted text by using PuTTY or other ssh emulators, you will find how to fix this issue in my following post https://blog.matrixpost.net/yast-yet-another-setup-tool-line-distortion-on-putty-clients/.
# yast
# yast2
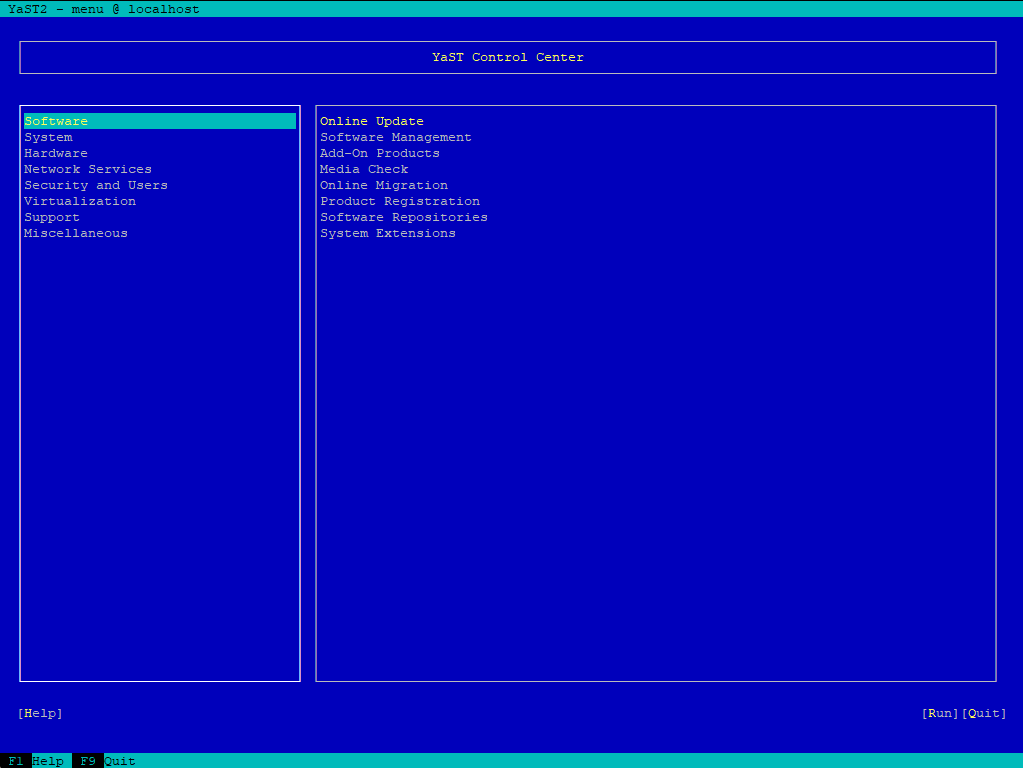
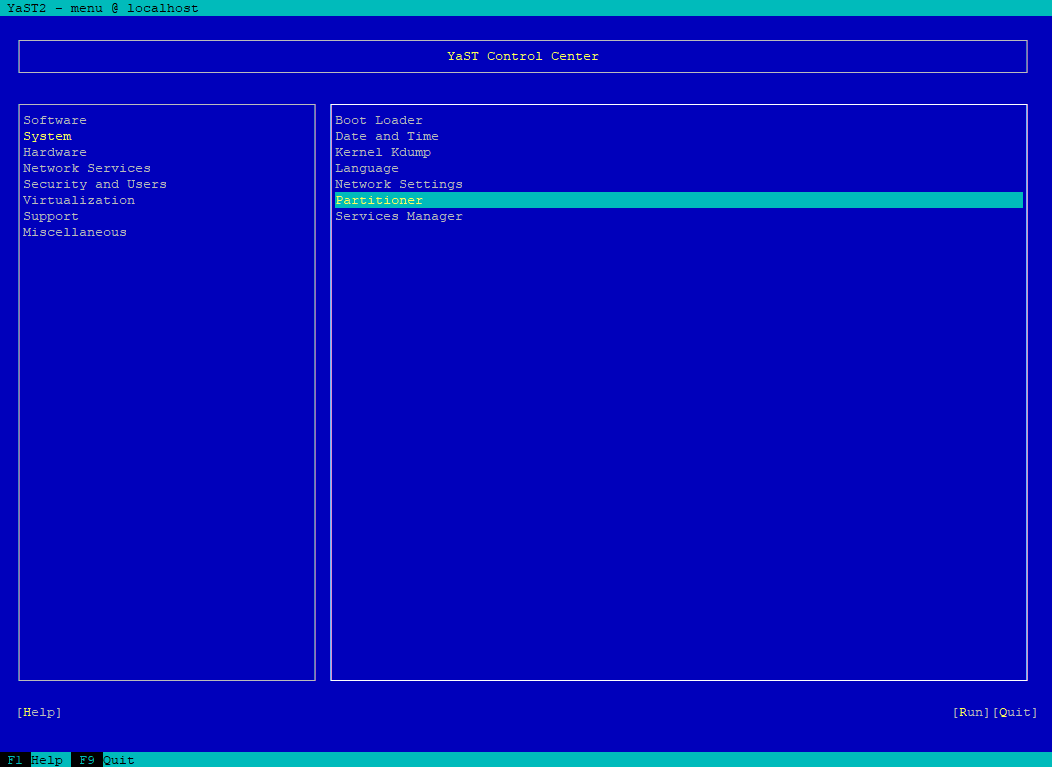
Then we can open the partitioner in YaST2 under System -> Partitioner.
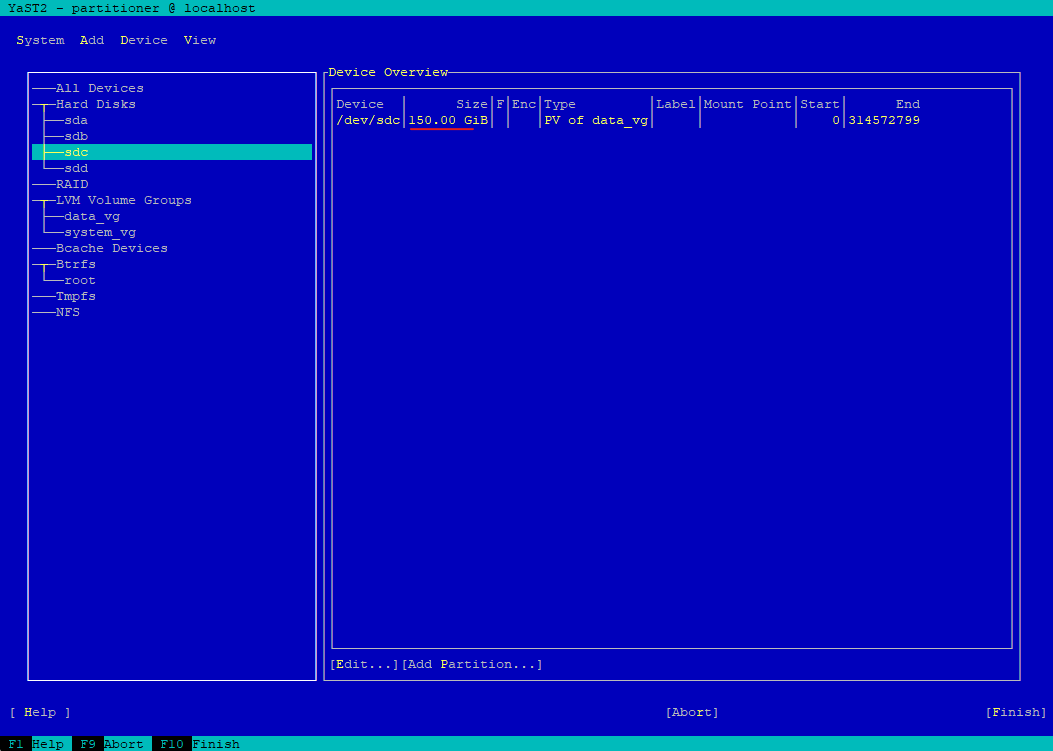
Select the sdc disk and press enter to first check if it was extended correctly to 150 GiB.
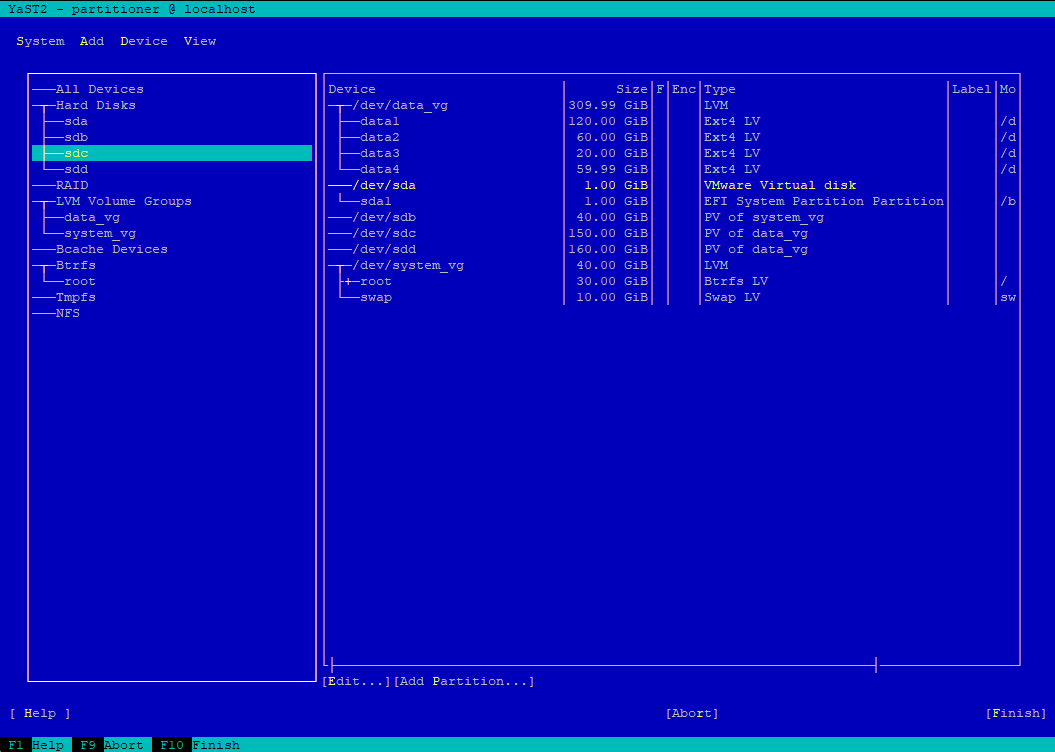
The OS shows the new extended size of 150 GiB.
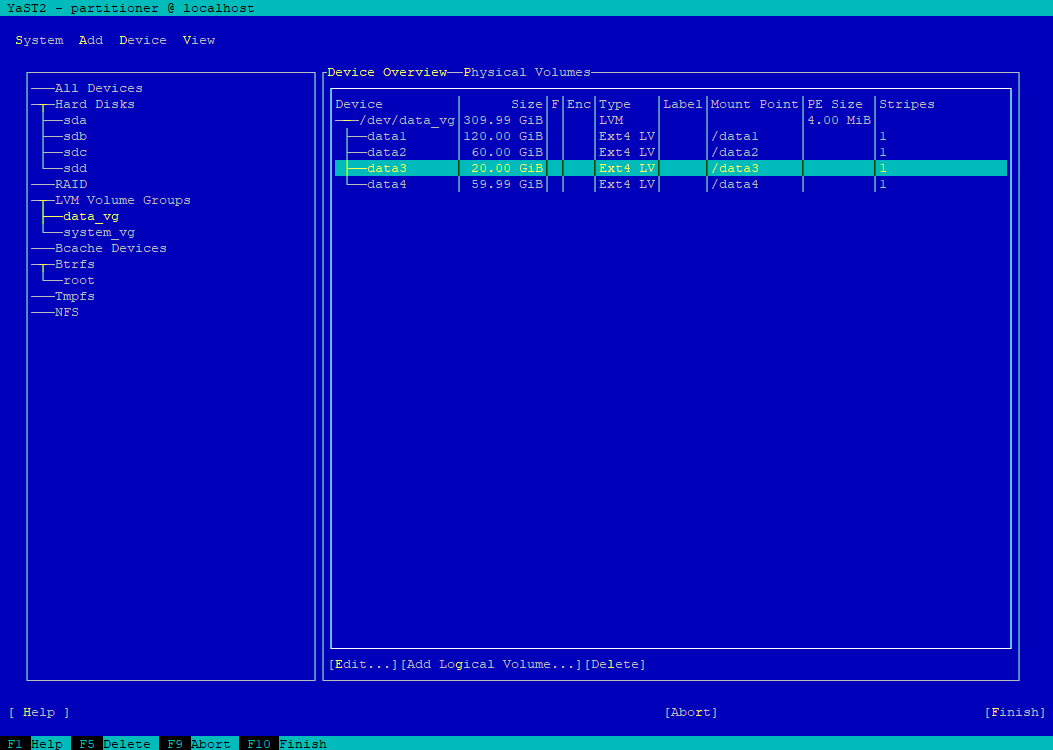
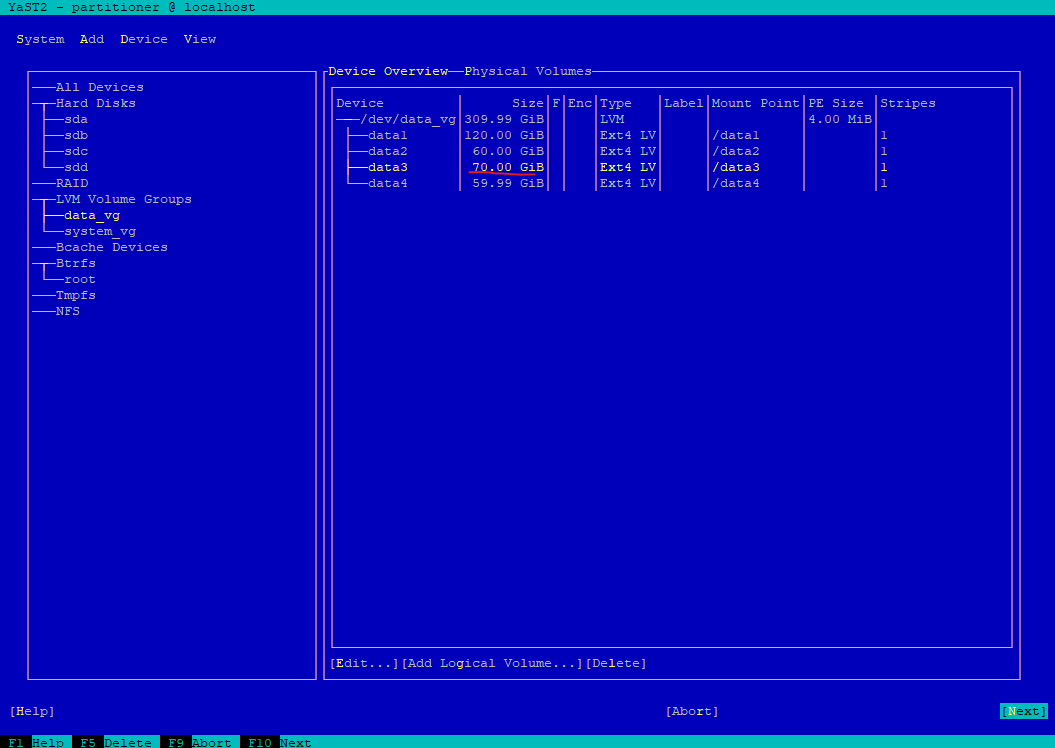
To resize the logical volume data3, first select the volume group data_vg on the left tree.

Then select the logical volume data3 we want to extend by 50 GiB to finally 70 GiB.
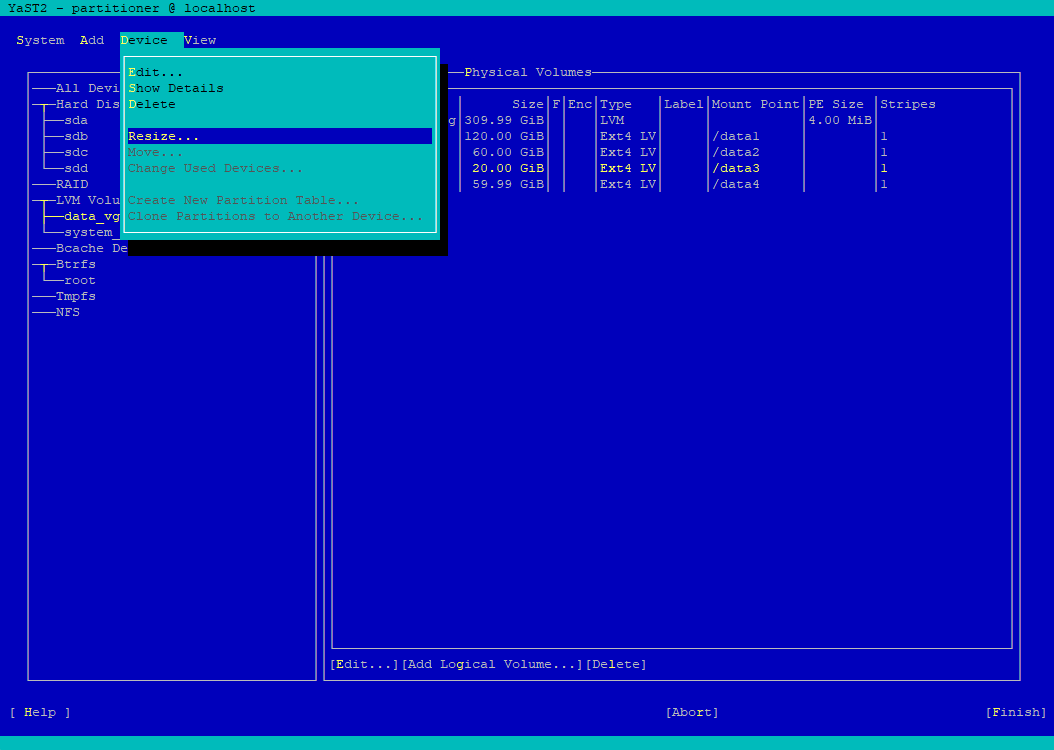
Press the tab key to navigate to Device and select Resize.
I will use the maximum size and then click on Next.
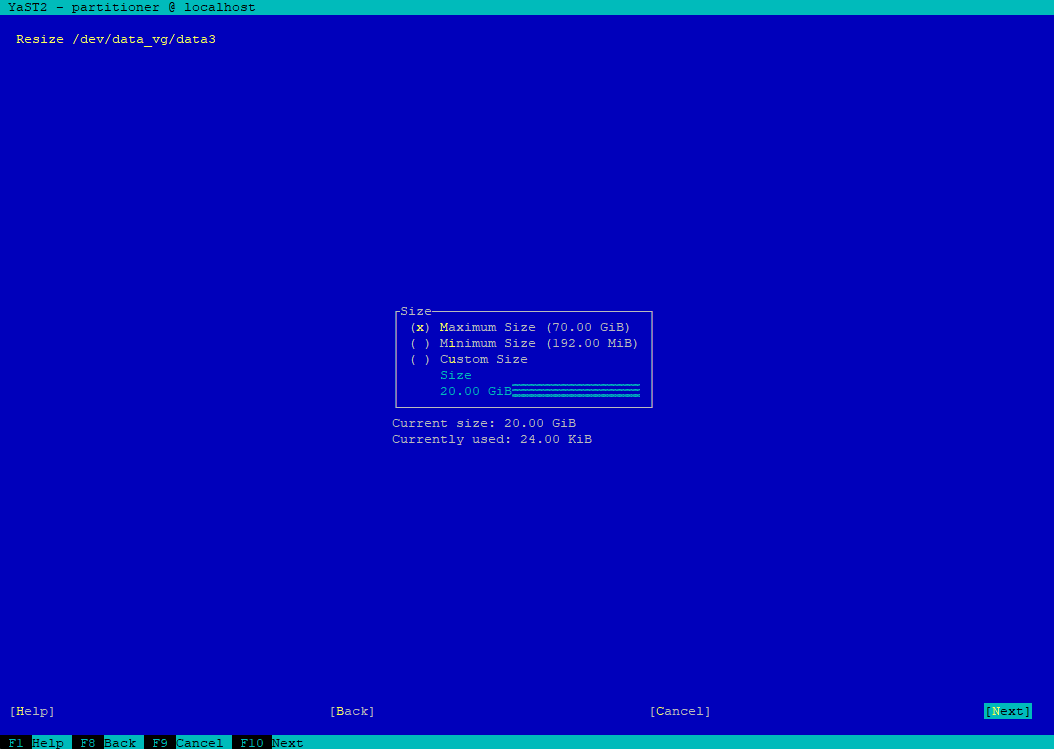
To apply the new size finally click on Next.
As previously when using the YaST2 (GUI) partitioner, by default also the file system will be extended as shown and mentioned below (Grow ext4 on /dev/data_vg/data3 from 20.00 GiB to 70.00 GiB).
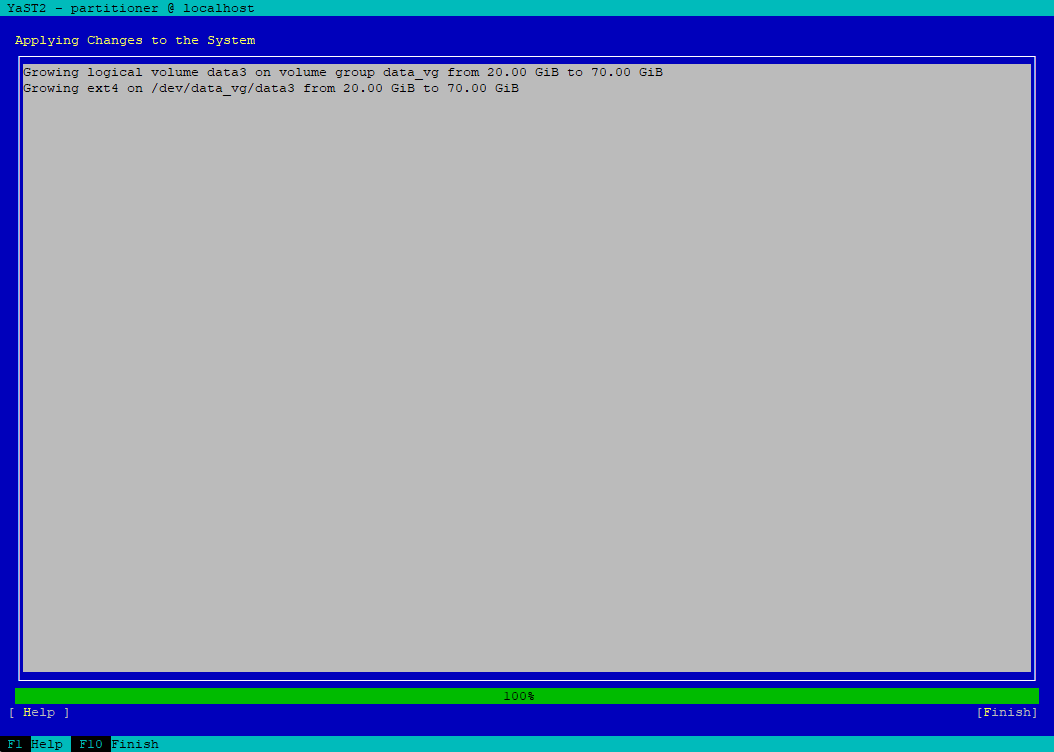
Finally the /data3 directory is extended and resized.
Extend Logical Volumes (LVs) and Resize the File System by using the Command Line
Now I want to show how we can resize our logical volumes (LVs) and the file system by using the command line.
The physical volumes (PVs) and therefore by default also the volume group (VG) are already resized by using the commands as shown below.
# echo 1 > /sys/block/sdc/device/rescan
# pvresize /dev/sdc

!! note !!
Depending on the kernel, driver, and udev behavior, we may also need to run this command
# echo 1 > /sys/class/block/sdc/device/rescan
Our logical volume (LV) named data3 is not extended so far.
To list all logical volumes (LVs) of a specific volume group we can use the lvs <vg name> command.
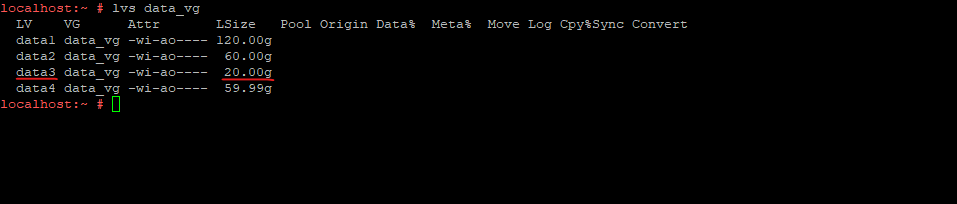
To extend our logical volume (LV) we can use the lvextend command, but first we need to determine the file system path of our logical volume (LV) as shown below.
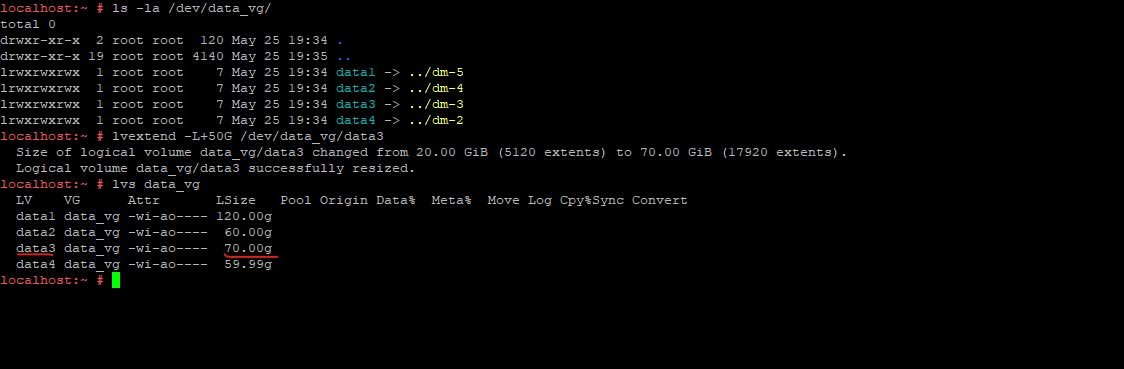
# ls -la /dev/<volume group name>
# ls -la /dev/data_vg
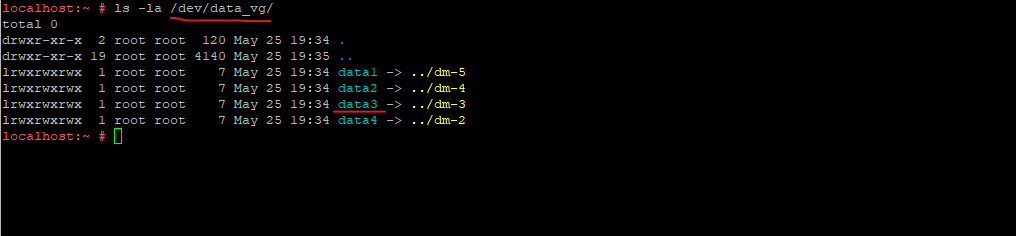
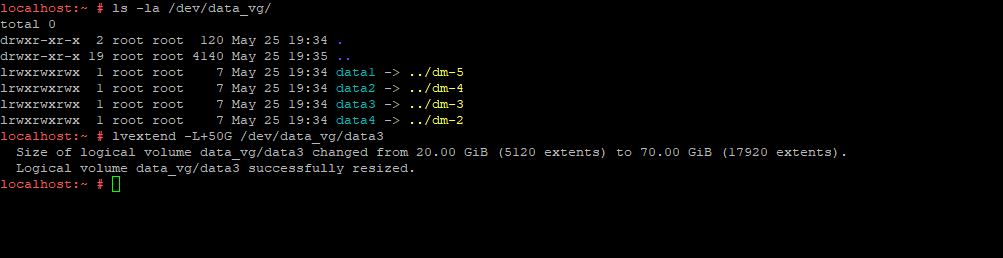
Now we will extend the logical volume by 50 GiB.
To increase the size by 50 GiB we need to execute:
# lvextend -L+50G /dev/data_vg/data3

or by already adding the -r flag to also automatically resize the filesystem on the logical volume after the volume is extended (e.g., ext4, xfs). -r|--resizefs
# lvextend -L+50G -r /dev/data_vg/data3
Set the size fix to 70 GB:
# lvextend -L70G /dev/data_vg/data3

or by already adding the -r flag to also automatically resize the filesystem on the logical volume after the volume is extended (e.g., ext4, xfs). -r|--resizefs
# lvextend -L70G -r /dev/data_vg/data3
The number can also be expressed as a percentage of the total space in the Volume Group with the suffix. So here all available free space in the volume group (VG) will be used to extend the logical volume (LV).
# lvextend -l +100%FREE /dev/data_vg/data3

or by already adding the -r flag to also automatically resize the filesystem on the logical volume after the volume is extended (e.g., ext4, xfs). -r|--resizefs
# lvextend -l +100%FREE -r /dev/data_vg/data3
Now our logical volume (LV) named data3 is extend by 50 GiB to finally 70 GiB.
As already mentioned in contrast to by using the YaST2 (GUI) partitioner or YaST2 (TUI) partitioner, when using the command line, we also need to resize the file system in a further separate step, so far the file system is not resized to 70 GiB.
To resize also the filesystem (here ext4) to reflect the new extended size, we can use the resize2fs command which supports the ext2, ext3 and ext4 file system.
If not already done by using -r flag when running the lvextend commands above
For the btrfs file system, which SLES is used by default for the root partition, we can use here in contrast the btrfs filesystem resize command.
# resize2fs /dev/<volume group>/<logical volume>

Grow the file system with all available space
# resize2fs /dev/data_vg/data3

Resize to a specific size (increase or shrink) the file system to 50 GiB. To shrink we first need to unmount and check the file system as shown further down.
# resize2fs /dev/data_vg/data3 50G

Accepted size units for file system block sizes are:
S - 512 byte sectors
K - kilobytes
M - megabytes
G - gigabytes
Source: https://man7.org/linux/man-pages/man8/resize2fs.8.html
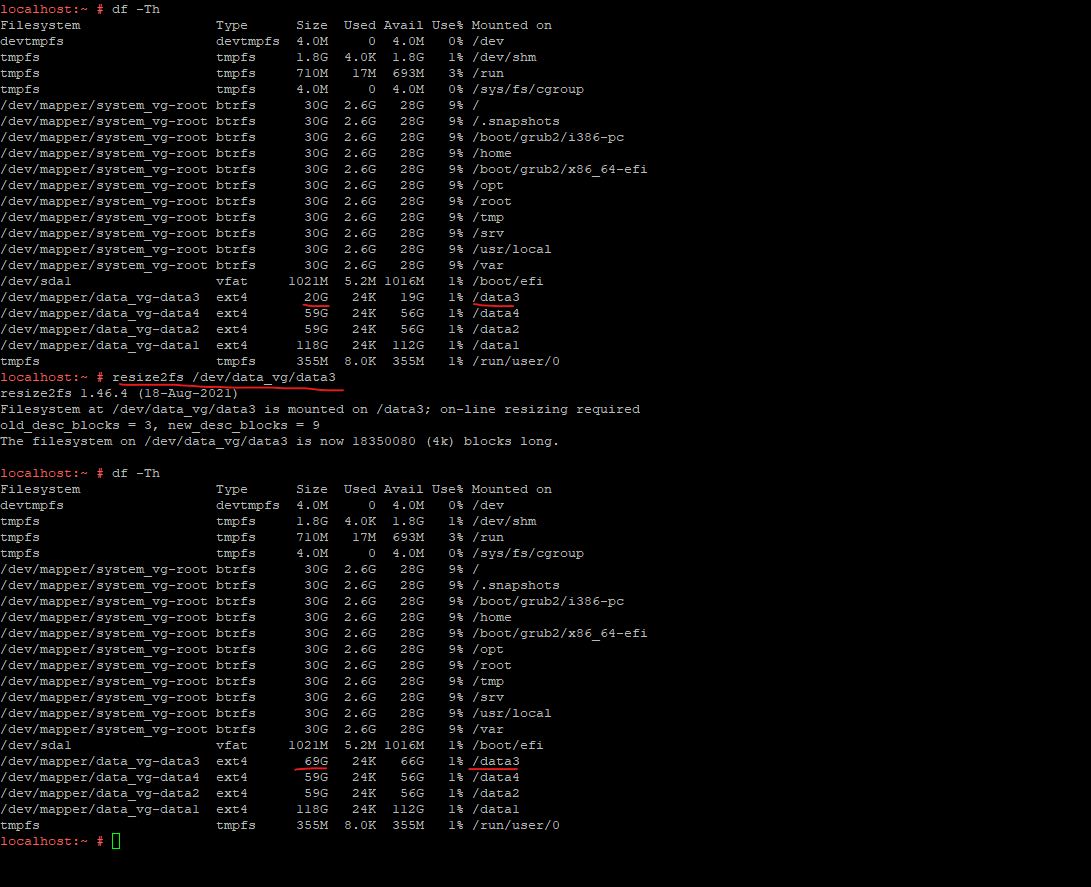
Finally also our file system is resized and shows the new size.
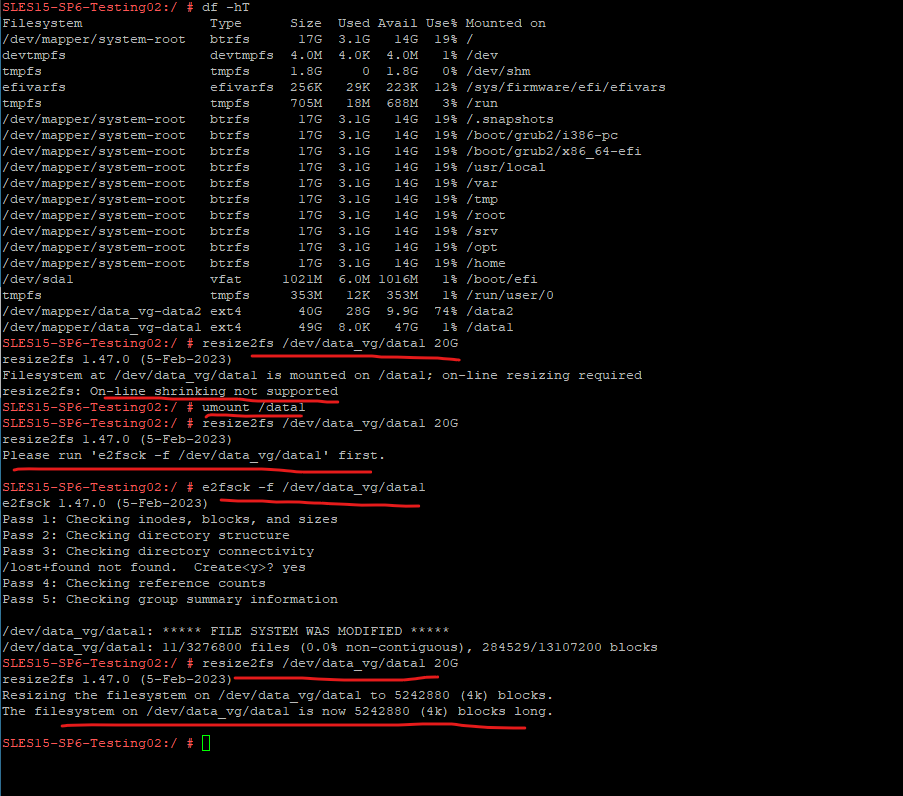
To shrink and ext2/3/4 file system by using resize2fs, we first need to unmount and check the file system. The btrfs file system in contrast you can shrink online as shown next.
First unmount the partition:
# umount /data1

Run fsck on the unmounted file system:
# e2fsck -f /dev/data_vg/data1
Force checking even if filesystem is marked clean

Shrink the file system down to 20 GiB:
# resize2fs /dev/data_vg/data1 20G

Finally mount the partition:
# mount /dev/data_vg/data1 /data1
Adding a new Disk (PV) to a Volume Group to finally extend a Logical Volume
Below I want to add a further new hard disk in vSphere to my virtual machine with the aim of extending a LVM logical volume (LV).
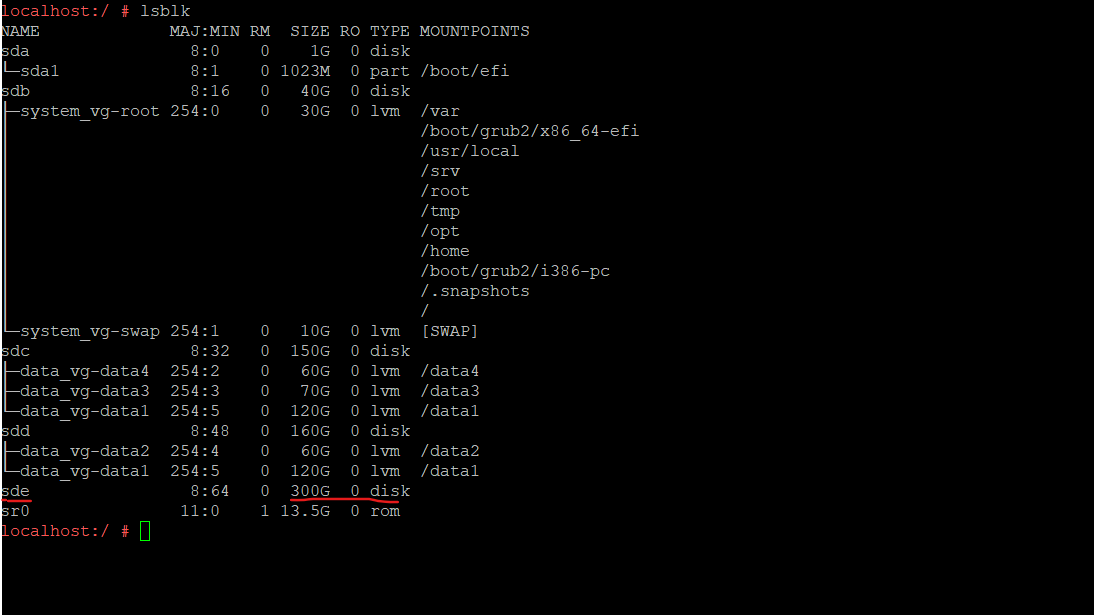
By using the lsblk or fdisk -l command we can determine if the new disk is already detected by the OS and we can also check which hard drive name was assigned to our new disk.
So in my case the new hard drive is listed as /dev/sde.
dev is short for device and sd is short for SCSI mass-storage drive.
Source: https://www.dell.com/support/kbdoc/en-us/000132092/ubuntu-linux-terms-for-your-hard-drive-and-devices-explained
To add our new disk to an exiting volume group (VG), we first need to initialize the new disk (block device) to be used as a physical volume (PV) in LVM.
The following command initializes our new disk /dev/sde as a LVM physical volume (PV) for later use as part of LVM logical volumes (LVs).
# pvcreate /dev/sde

We can also initialize multiple new disks at once like:
# pvcreate /dev/sde /dev/sdf /dev/sdg /dev/sdh
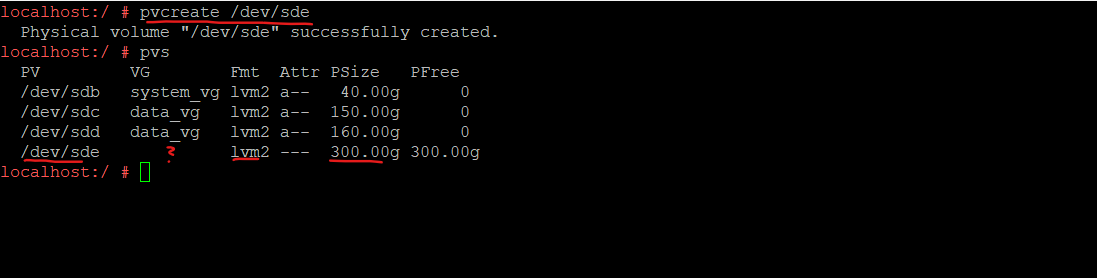
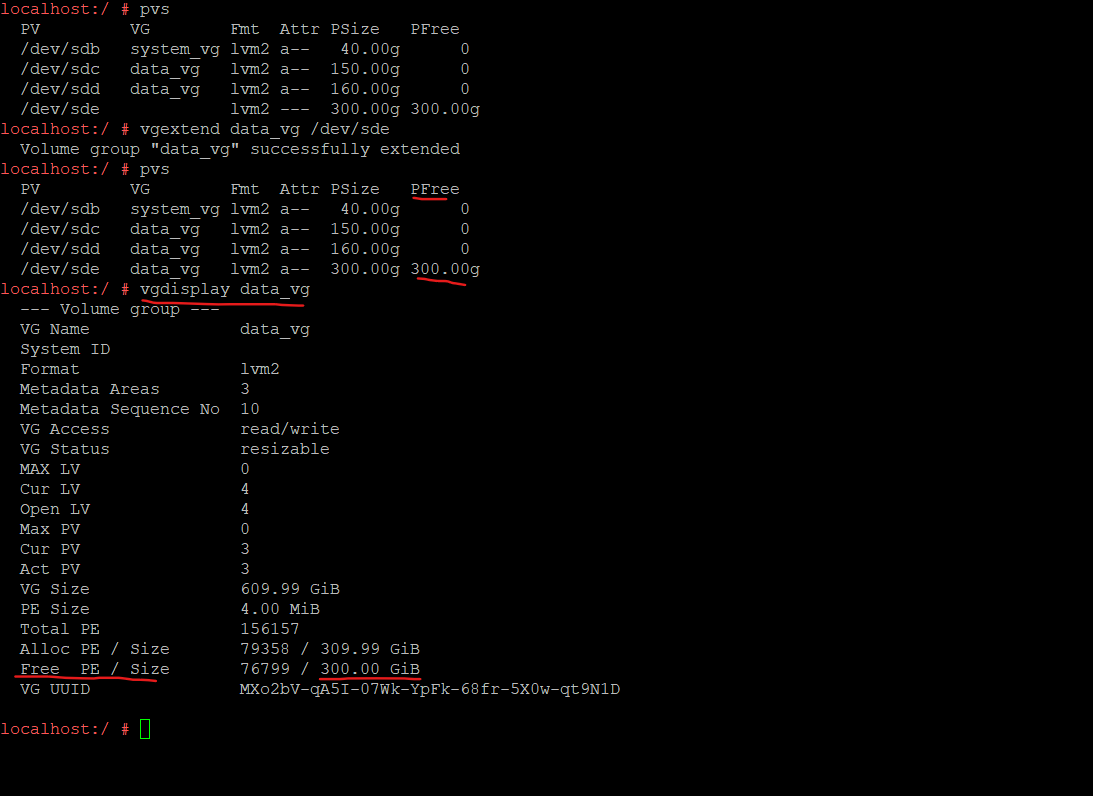
As you can see in the screenshot above, so far our new physical volume (PV) is not assigned to any volume group (VG).
To add additional physical volumes (PVs) to an existing volume group (VG), we can use the vgextend command. The vgextend command increases a volume group’s capacity by adding one or more free physical volumes (PVs) to the volume group (VG).
The following command will add our physical volume /dev/sde to the my existing volume group data_vg.
# vgextend data_vg /dev/sde

We can now use the free space within our volume group (VG) to create new logical volumes or extend existing logical volumes as usual.
How to extend LVM Logical Volumes stored on extended Disk Partitions instead on whole initialized Disks by using Growpart
You can create physical volumes (PVs) out of whole disks or disk partitions by using LVM.
Red Hat recommends that you create a single partition that covers the whole disk to label as an LVM physical volume.
In the post below I will show how we can extend this disk partition our physical volumes (PVs) are placed on.
Resize the Btrfs Root File System
As mentioned already above, to resize the btrfs file system, which SLES is used by default for the root partition, we can use the btrfs filesystem resize command.
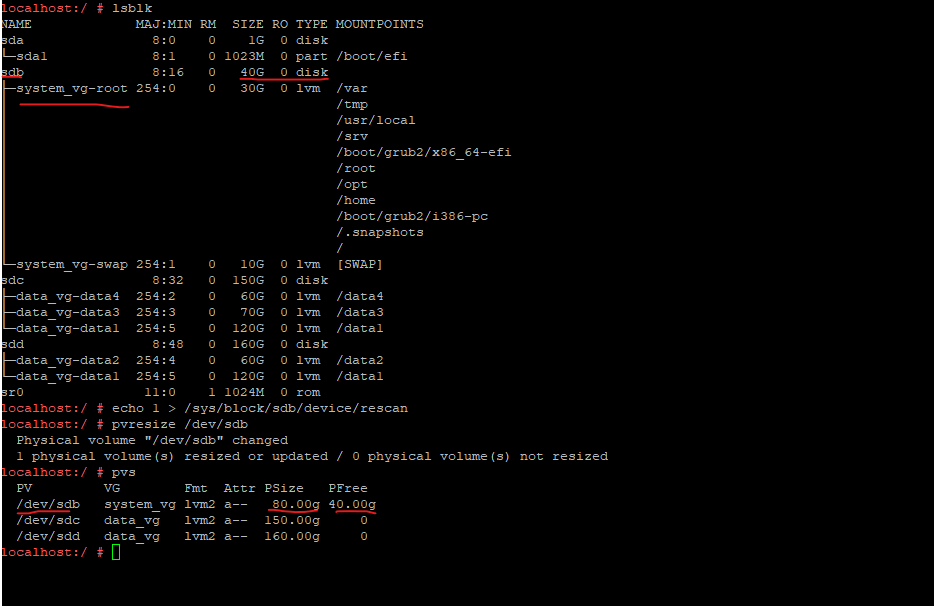
To demonstrate the resizing of the root partition and its btrfs file system, I was first adding 40 GiB on vSphere to the virtual hard disk to finally have 80 GiB for the root and swap disk.
So far the new disk size is not detected and shown up by the OS and is still at 40 GiB.
I will now as usual first need to rescan the disk and then resizing the physical volume (PV).
# echo 1 > /sys/block/sdc/device/rescan
# pvresize /dev/sdc
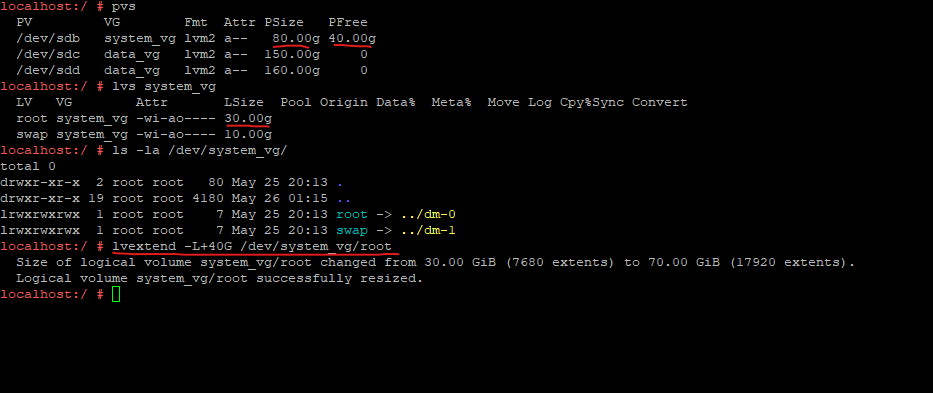
Next I need to extend the logical volume of the root partition. First I will determine the file system path of the logical volume with the root partition and then I can extend the volume by using this path.
# ls -la /dev/system_vg/
# lvextend -L+40G /dev/system_vg/root
Now I can resize the root partition (file system) by executing the following command.
# btrfs filesystem resize amount /mount-point

Increase the size by 40 GiB:
# btrfs filesystem resize +40G /

Decrease the size by 1 GiB: (also Online supported)
# btrfs filesystem resize -1G /

Set a specific fix size e.g. 30 GiB:
# btrfs filesystem resize 30G /

Resize to use all available space
# btrfs filesystem resize max /

Accepted size units for file system block sizes are: (The unit size is not case specific, you can use lower or upper units)
K - kilobytes
M - megabytes
G - gigabytes
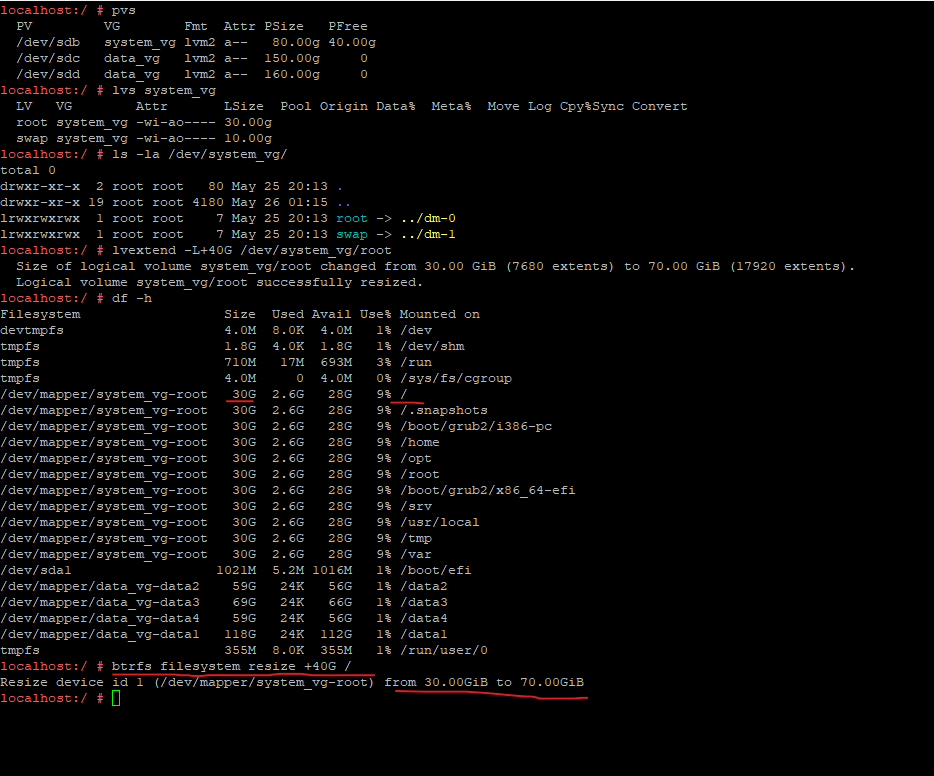
Looks good!
Resize an XFS File System
To resize an XFS file system we can use the xfs_growfs command as shown below.
The following command resizes the size of the file system to the maximum value available.
# xfs_growfs /mnt
!! Note !!
XFS file systems can be grown while mounted but cannot be reduced even when offline.
How to resize/extend a Multipath Disk
Extend and Resize the Swap Partition
Extending a swap partition which is also managed by the Logical Volume Manger (LVM) is the same as previously for the root or data file system.
Swap is a special format that allows the partition to be used as a virtual memory. Create a swap partition of at least 256 MB. However, if you use up your swap space, consider adding memory to your system instead of adding swap space.
Is swap space required?
Strictly speaking, a swap partition is not required for SLES. However, swap space is recommended. The general explanation for this is that swap space allows for infrequently used memory to be swapped to disk, thereby freeing up physical RAM for active processes.In addition to swap space being used to free RAM, having available swap space also changes the behavior of the oom-killer (Out of Memory Killer) in low memory situations. When swap space is available, under low memory conditions, the oom-killer first tries to swap out as many pages as possible.
As a general recommendation, a swap space size of 2GB is typically sufficient. (Some large database environments may require much larger swap spaces.)
First we need to determine on which OS disk the swap partition is stored, then extending the corresponding virtual hard disk in vSphere.
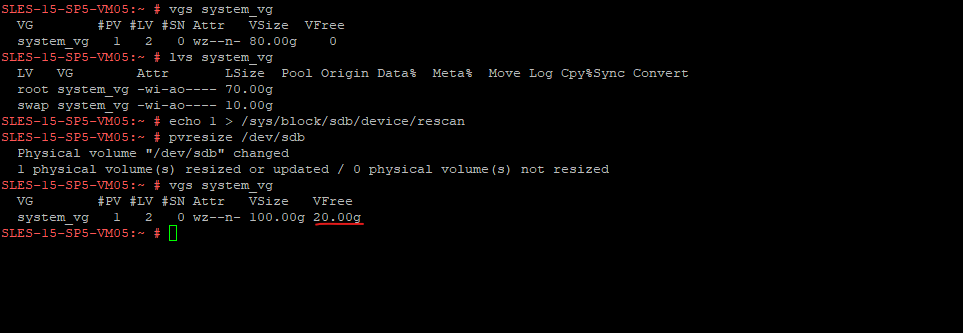
Next we need to rescan and resize the physical volume (PV).
# echo 1 > /sys/block/sdb/device/rescan
# pvresize /dev/sdb
Now we have further 20 GiB free on the volume group (VG) which we can use to extend the logical volume (LV) on which the swap partition is stored.
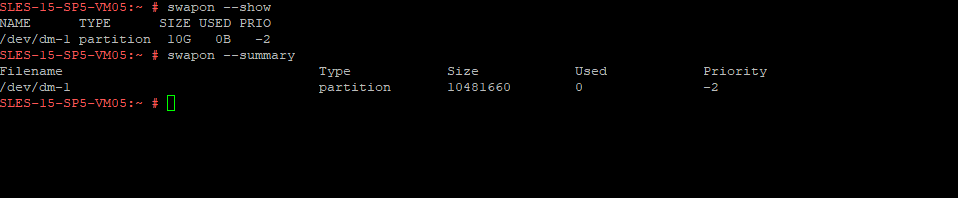
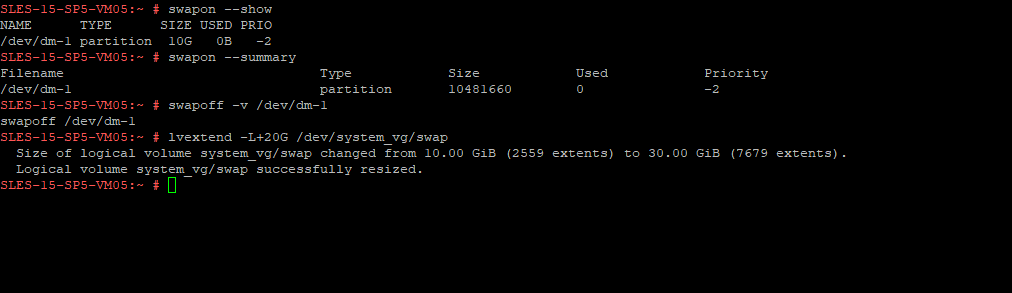
To show the actual size of the swap partition we can also use the following commands:
# swapon --show
# swapon --summary
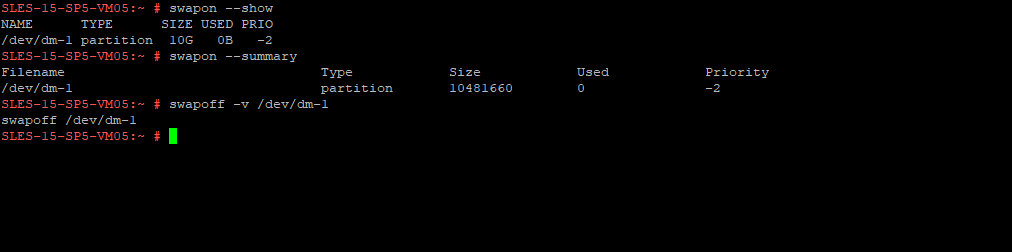
In order to resize the swap partition, we first need to turn off the swap space by executing the swapoff command as shown below. This will move all data from the swap memory back into the RAM. Therefore you should also first check if you have enough RAM free to support the operation.
First check if enough RAM is available to move the swap memory data into
# free -m

# swapoff -v /dev/<swap_partition>
# swapoff -v /dev/system/swap

-v verbose

Or by using the -a flag which will disable all swaps from /proc/swaps
# swapoff -a
Next we can extend the logical volume as usual:
# lvextend -L+20G /dev/<vg name>/<lvs name>
# lvextend -L+20G /dev/system_vg/swap
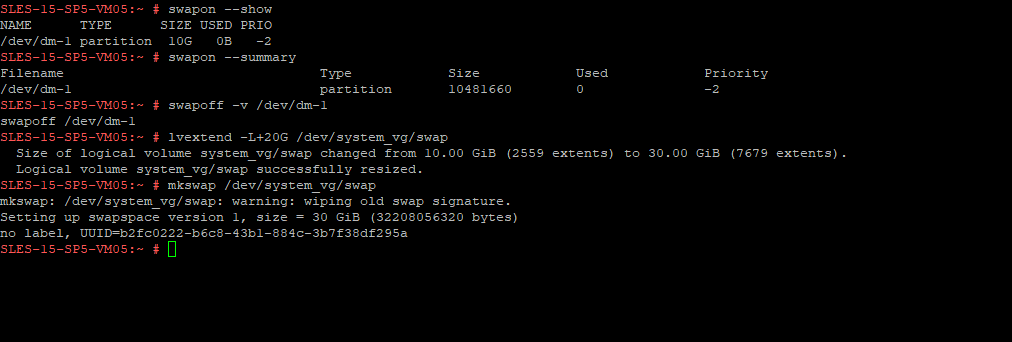
Now we can resize the swap filesystem by using the mkswap command as shown below.
The mkswap command actually prepares a partition or file to be used as swap space by writing a swap signature and metadata.
Below the command initializes the partition /dev/system_vg/swap as swap. So after resizing/extending the disk/volume, we initialize the extended partition as swap.
# mkswap /dev/<swap_partition>
# mkswap /dev/system_vg/swap
Finally we also need to turn on the swap space again by using the swapon command as shown below.
# swapon -v /dev/<swap_partition>
# swapon -v /dev/system_vg/swap

Or by using the -a flag which will re-enable all swaps from /proc/swaps
# swapon -a
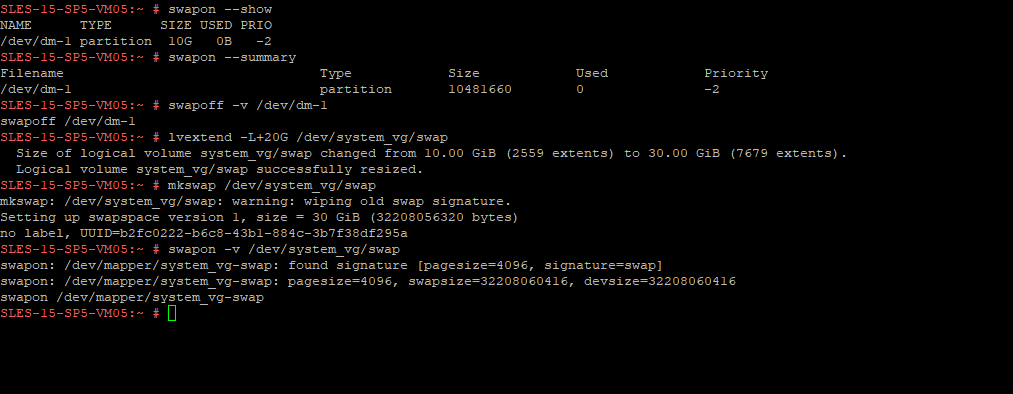
To check if the swap space is turned on or turned off, you can use the swapon command with the summary or show flag as shown below. If the swap space is turned off, the command doesn’t return and display anything.
So in my case below the swap space is turned on.
# swapon --show

Swapiness
Swappiness is a property for the Linux kernel that changes the balance between swapping out runtime memory, as opposed to dropping pages from the system page cache. Swappiness can be set to values between 0 and 100, inclusive. A low value means the kernel will try to avoid swapping as much as possible where a higher value instead will make the kernel aggressively try to use swap space.
Source: https://access.redhat.com/solutions/103833
If you wanted to change up the swappiness of your system, the procedure is very straight-forward. You can check your current swappiness setting by running the following command:
# cat /proc/sys/vm/swappiness
To alter the value, you want to use the following:
# sudo sysctl vm.swappiness=x
(where x is the swap value you wish to set)
Source: https://www.redhat.com/sysadmin/clear-swap-linux
Reducing Swap Partition
To reduce an LVM2 swap logical volume we can use the following commands.
Example path for the swap partition
/dev/<volume group>/<logical volume>

Disable swapping for the associated logical volume:
# swapoff -v /dev/system_vg/swap

Reduce the LVM2 logical volume by 5 GB:
# lvreduce /dev/system_vg/swap -L -5G

or

Reduce the LVM2 logical volume to a desired fix value of 20GB:
# lvreduce /dev/system_vg/swap -L 20G

Format the new swap space:
# mkswap /dev/system_vg/swap

Activate swap on the logical volume:
# swapon -v /dev/system_vg/swap
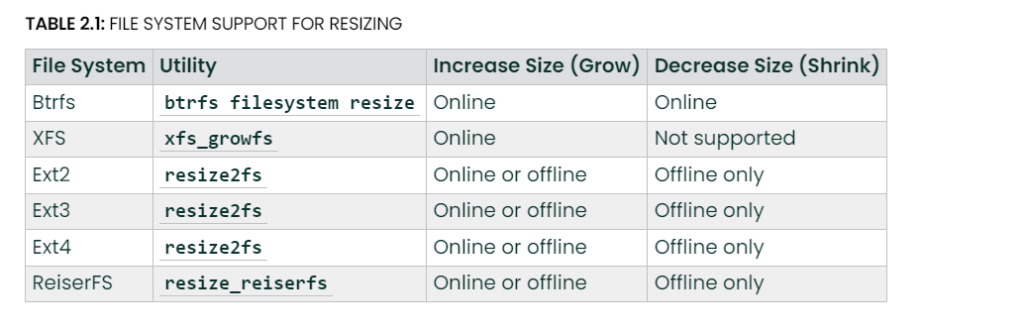
File Systems that Support Resizing
The file system must support resizing to take advantage of increases in available space for the volume. In SUSE Linux Enterprise Server, file system resizing utilities are available for file systems Ext2, Ext3, Ext4, and ReiserFS. The utilities support increasing and decreasing the size as follows:
How to Reduce a VMDK and Its Associated Logical Volume in VMware vSphere
Links
Chapter 4. LVM Administration with CLI Commands
https://access.redhat.com/documentation/en-us/red_hat_enterprise_linux/4/html/cluster_logical_volume_manager/lvm_cliFile Systems that Support Resizing
https://documentation.suse.com/de-de/sles/12-SP5/html/SLES-all/cha-resize-fs.html#sec-resize-fs-guidelines-supportresize2fs(8) — Linux manual page
https://man7.org/linux/man-pages/man8/resize2fs.8.htmlUbuntu Linux Terms for your Hard Drive and Devices Explained
https://www.dell.com/support/kbdoc/en-us/000132092/ubuntu-linux-terms-for-your-hard-drive-and-devices-explainedYaST
https://en.wikipedia.org/wiki/YaSTYaST in Text Mode
https://documentation.suse.com/sles/15-SP2/html/SLES-all/cha-yast-text.html