Step-by-Step Guide Part 4: How to build your own NetApp ONTAP 9 LAB – Day-to-Day Operations
In part 1 we saw how toWe can run the following command to show the currently existing CIFS shares on our SVM. get the ONTAP Simulate appliance and how to deploy it in vSphere. Further we saw the initial cluster setup by using a 2-node cluster (virtual appliances).
In part 2 we saw building the foundational storage setup: aggregates, Storage Virtual Machines (SVMs), logical interfaces (LIFs), and volumes.
In part 3 we saw step by step how to provide block-based storage from a NetApp ONTAP system to VMware vSphere using iSCSI.
Now that the basic infrastructure is in place, it’s time to explore the practical, day-to-day operations you’ll perform when managing a NetApp system.
I will update and adding topics here in future like ONTAP SMB name mapping.
In this fouth part, we’ll cover common administrative tasks such as:
- Creating and managing new volumes
- Configuring NFS exports for Linux and UNIX-based access
- Publishing CIFS/SMB shares for Windows environments
- Introducing Qtrees to support quota enforcement, multi-tenancy, or directory-level access control within a volume
- Creating a new Volume
- Creating and Configuring NFS exports
- Publishing CIFS/SMB shares
- List all SVMs
- List all Network Interfaces
- Checking Client Access on a NFS export
- Verify Export Policy
- Verify CIFS/SMB access
- Check where a Volume is Mounted in the Namespace
- Superuser Setting
- Reverting a LIF to Its Home Port (here Management Interface LIF)
- Links
Creating a new Volume
A volume in NetApp ONTAP is a logical, mountable unit of storage that resides inside an aggregate, is served by a Storage Virtual Machine (SVM), and is accessible to clients via NFS, SMB, iSCSI, or FC.
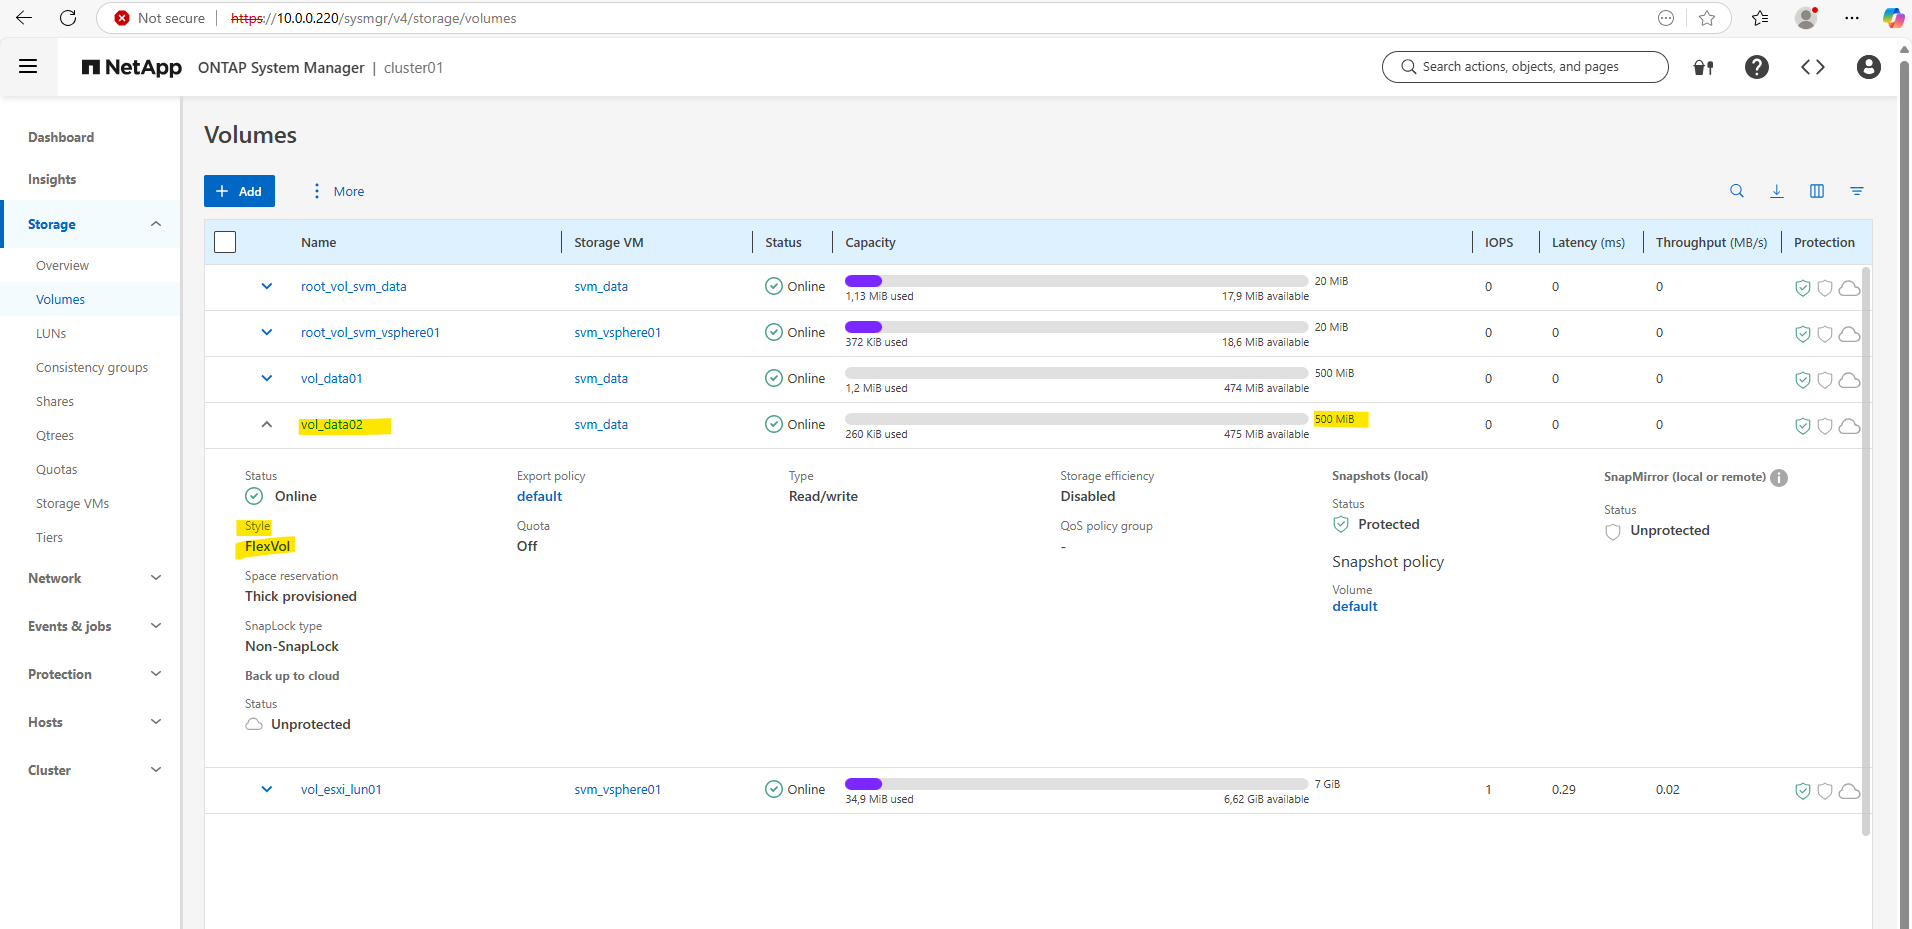
Below we will create a 500MB data volume called vol_data02 on aggr_data01.
cluster01::> volume create -vserver svm_data -volume vol_data02 -aggregate aggr_data01 -size 500MB
In NetApp ONTAP, a FlexVol volume must be created within a specific SVM (Storage Virtual Machine).
This is because the SVM (formerly known as a vserver) acts as the tenant or container that manages the data access protocols (NFS, SMB, iSCSI, etc.), authentication, export policies, and namespace for the volume. The volume doesn’t exist in isolation, it must belong to an SVM.

In NetApp ONTAP, the FlexVol is a type of logical volume that resides inside an aggregate (which is a pool of physical storage). The “FlexVol style” usually refers to the volume style that FlexVol uses, as opposed to older or different types like traditional volumes or newer types like FlexGroup volumes.
A FlexVol volume is a logical container of data (i.e., files, LUNs, etc.). Built inside an aggregate (which is made from RAID groups of physical disks). Thin or thick provisioned (can dynamically grow/shrink within the limits of the aggregate). Isolated in terms of performance and quotas. Can be snapshotted, cloned, mirrored, or replicated.
The WAFL Foundation: One File System, Many Faces
When creating a volume, you don’t need to worry about choosing an underlying file system (like NTFS or XFS) for the storage itself; whether the volume is used for block (LUNs), Windows (SMB), or Linux (NFS) files, NetApp always uses its native WAFL (Write Anywhere File Layout).
Your primary focus is simply selecting the correct Security Style for the volume, which dictates how WAFL handles permissions.
Unlike a local disk where a Windows OS must format a partition as NTFS or a Linux OS must format it as Ext4/XFS, the NetApp SVM abstracts the storage entirely.
On a local server, the OS owns the file system structure directly on the metal; on NetApp, the ONTAP operating system owns the WAFL layer and merely “presents” a compatible interface to the clients, allowing it to store Windows ACLs and Linux permissions side-by-side in the same physical blocks.
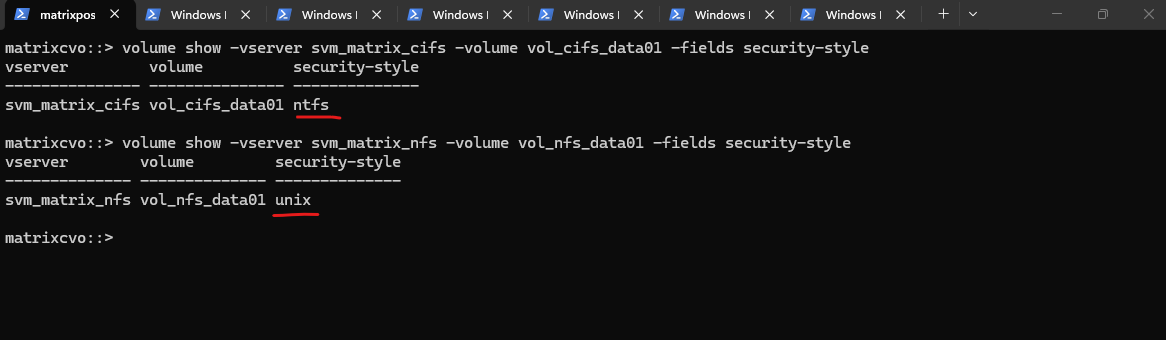
The output above demonstrates how ONTAP uses the security style to define the “personality” of the underlying WAFL volume.
In the first example,
vol_cifs_data01is set to ntfs, telling WAFL to store and honor Windows-style ACLs, whereasvol_nfs_data01is set to unix, directing WAFL to use standard UID/GID mode bits for permissions.Even though both volumes live on the same storage system and use the same physical file layout, these settings ensure each volume behaves exactly like a native local file system for its respective Windows or Linux clients.
# volume used for cifs/smb shares
matrixcvo::> volume show -vserver svm_matrix_cifs -volume vol_cifs_data01 -fields security-style

# volume used for nfs shares (exports)
matrixcvo::> volume show -vserver svm_matrix_nfs -volume vol_nfs_data01 -fields security-style
When you skip the -security-style flag during a volume create command, ONTAP intelligently defaults the new volume to match the Root Volume of the hosting SVM.
This means that if your SVM was provisioned for Windows/CIFS, every new volume automatically inherits the NTFS style, ensuring the WAFL layer is pre-configured to handle Windows SIDs without any manual intervention.
This inheritance streamlines provisioning, as the system aligns the volume’s internal permission structure with the primary protocol used by that specific SVM.
# Overriding the SVM default during creation
matrixcvo::> volume create -vserver svm_matrix_cifs -volume vol_test -aggregate aggr1 -size 10GB -security-style unix
When you first execute the vserver create command, the -rootvolume-security-style parameter establishes the “DNA” for that entire Storage Virtual Machine. This setting ensures that any volume subsequently created within that SVM automatically inherits the correct WAFL metadata structure, whether ntfs or unix, aligning the storage with your primary protocol without further manual configuration.
matrixcvo::> vserver create -vserver svm_matrix_nfs -aggregate aggr1 -rootvolume root_vol_svm_nfs -rootvolume-security-style unix
Creating and Configuring NFS exports
An NFS export in NetApp is a volume (or path) made accessible to NFS clients through an SVM, using a combination of:
- a mounted volume (junction path)
- a logical interface (LIF)
- and an export policy
About how to create and configure NFS exports you will find also in part 2 directly here.
Publishing CIFS/SMB shares
To create a CIFS/SMB share on a NetApp ONTAP system, we need to follow the following steps, either via the CLI or the System Manager GUI. Below we will see by using the CLI, assuming we already have:
- A FlexVol created in a specific SVM (I will use here our previously created vol_data02 volume.)
- CIFS/SMB protocol enabled and configured for the SVM
- A volume junction path mounted in the SVM namespace
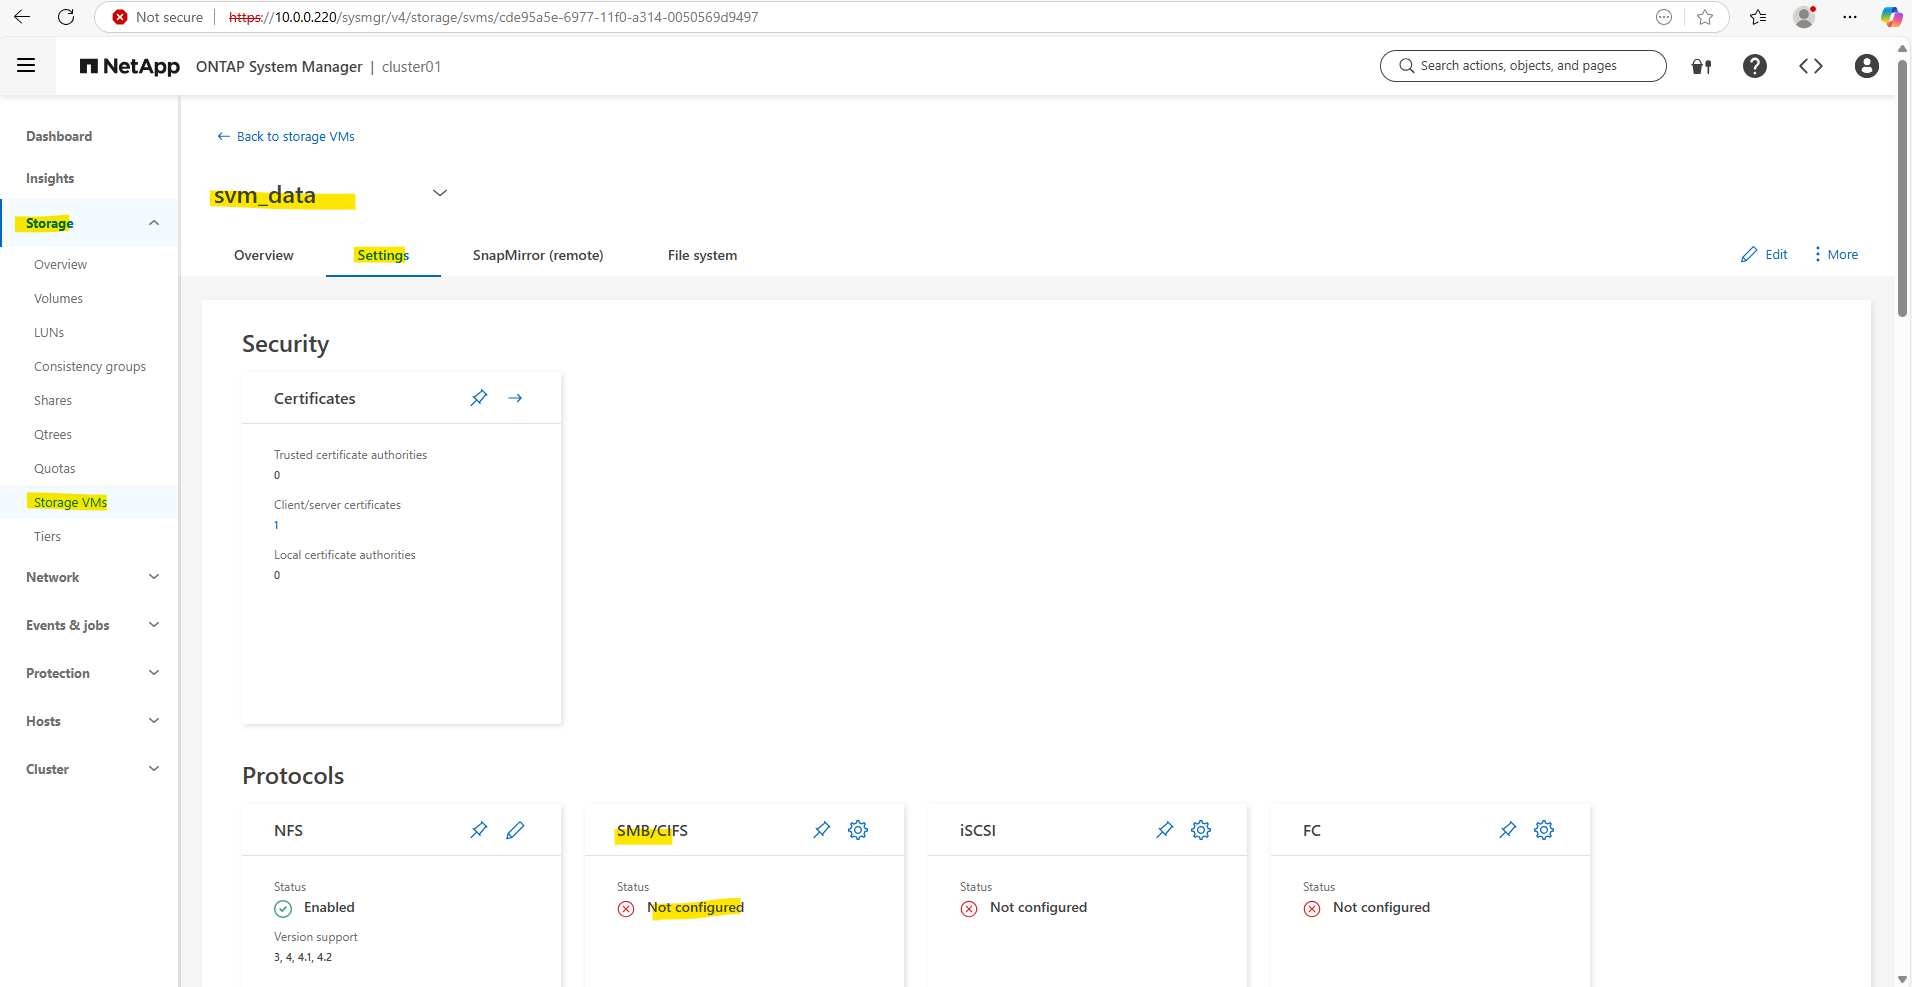
First we ensure if CIFS is already enabled on the SVM, I want to use here also the SVM named svm_data we used already for NFS exports.
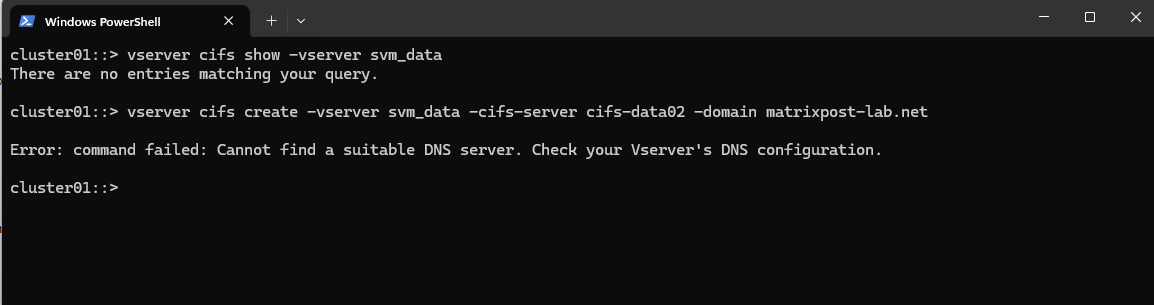
cluster01::> vserver cifs show -vserver svm_data

So far SMB/CIFS is not configured on this SVM.
So if it isn’t configured yet, we can enable it by running.
This requires the SVM to join an Active Directory domain.
vserver cifs create → Enables the CIFS (SMB) protocol service on the SVM
-vserver svm_data → The SVM where CIFS should be activated
-cifs-server cifs-data02 → The NetBIOS/hostname that Windows clients will see when they connect (\\cifs-data02\share)
-domain matrixpost-lab.net → Joins this CIFS server to the specified Active Directory domain
cluster01::> vserver cifs create -vserver svm_data -cifs-server cifs-data02 -domain matrixpost-lab.net
For the CIFS/SMB share (NetBIOS/hostname) I will create a DNS record in my lab environment which points to the IP address of the SVM we enabled CIFS on.
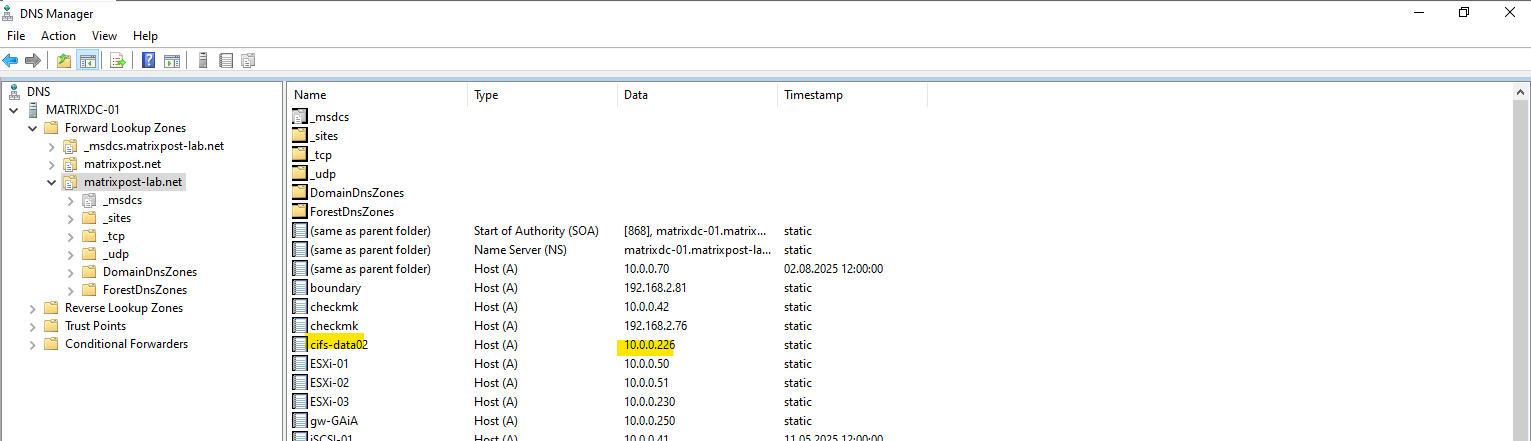
I will also need to set a DNS server first on the Vserver’s DNS configuration.
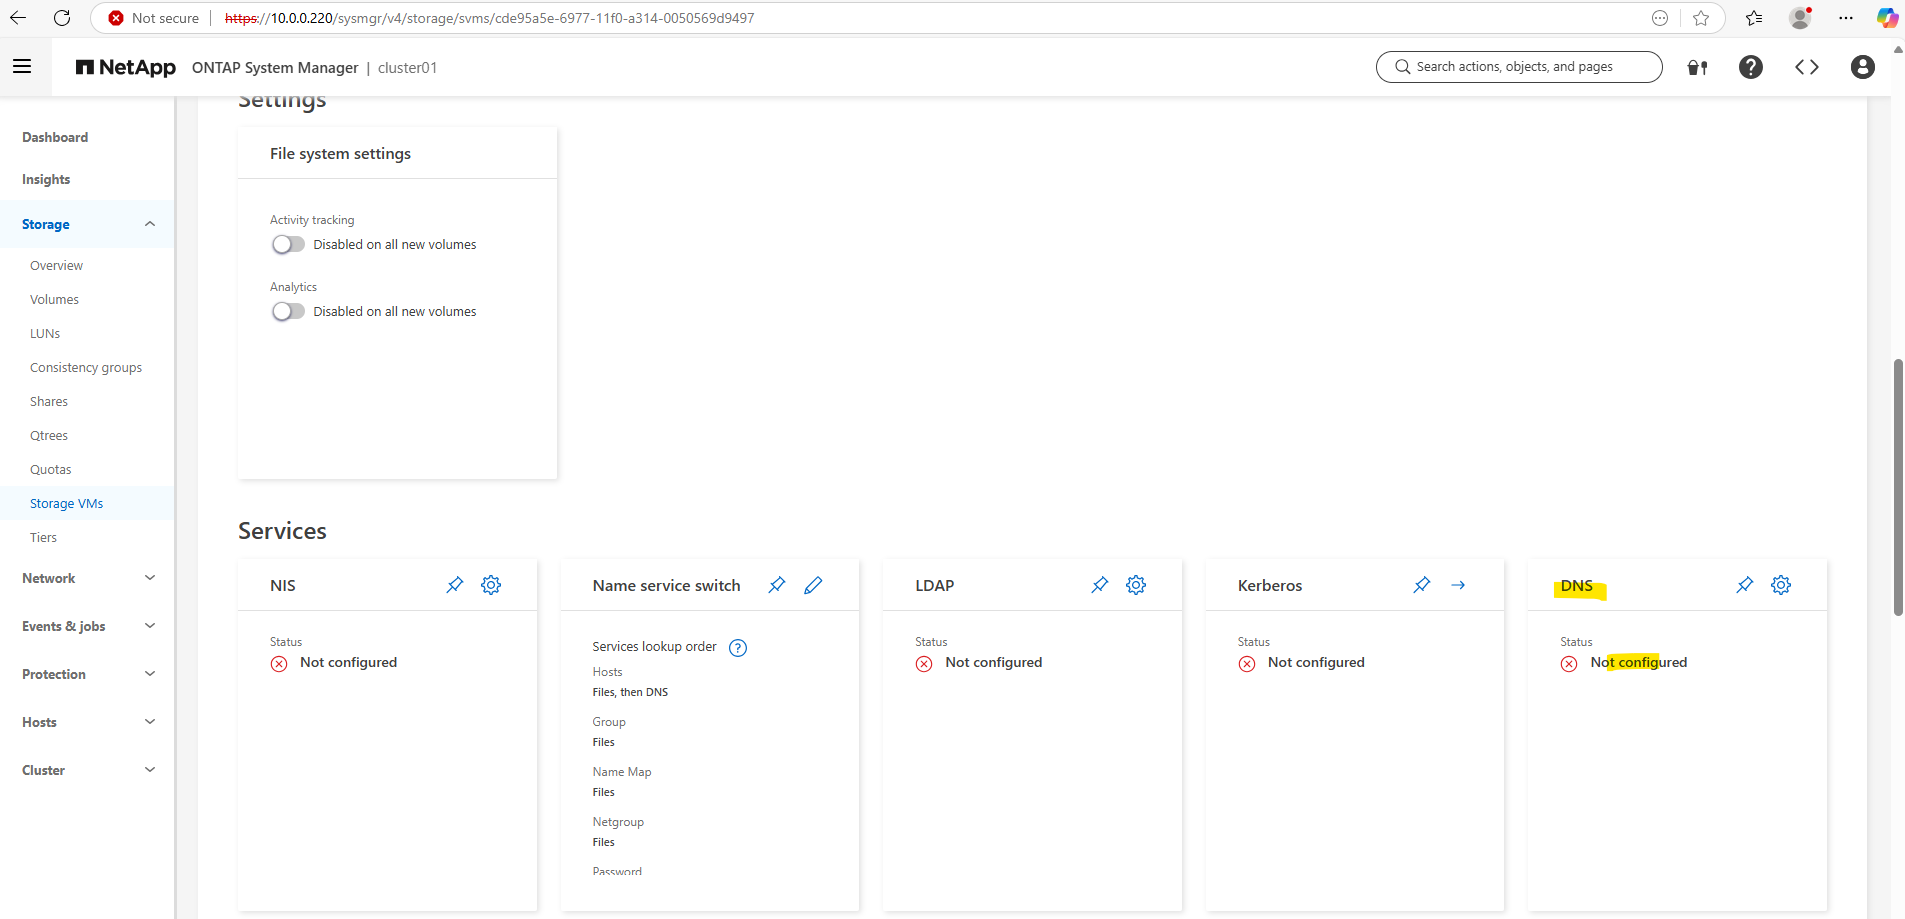
We can configure it by using the CLI or the System Manager GUI. Below we will see by using the CLI.
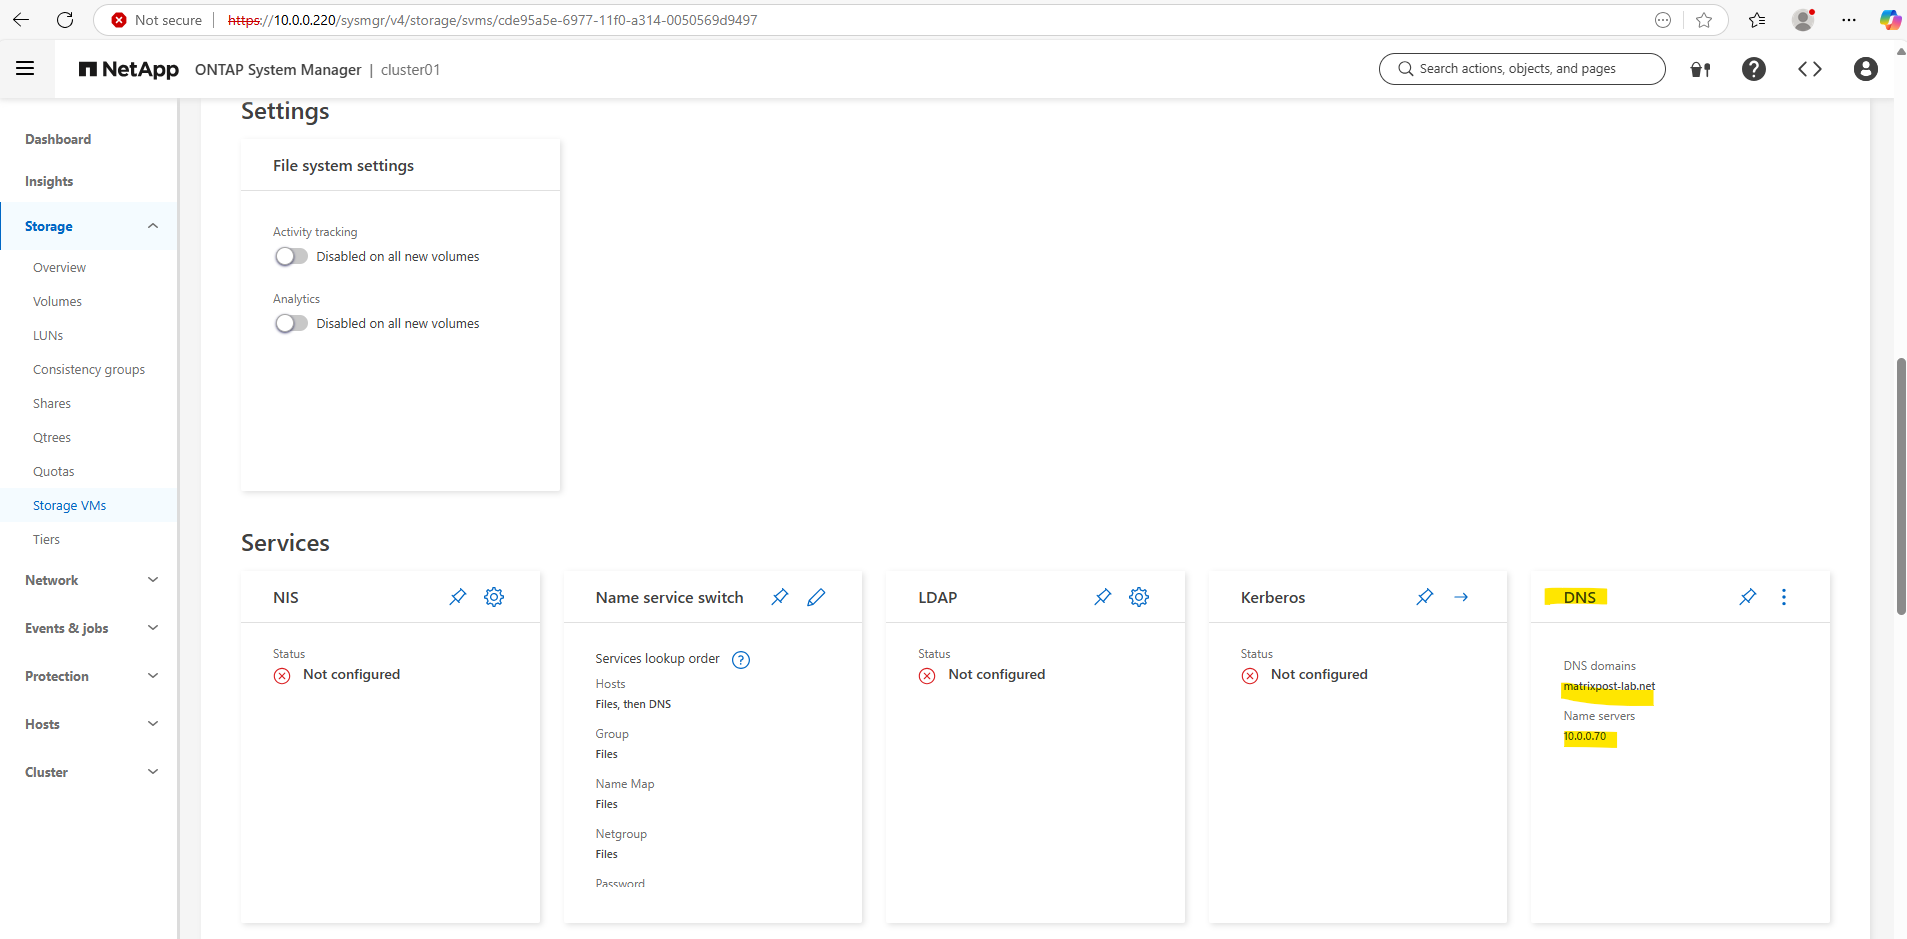
cluster01::> vserver services dns create -vserver svm_data -domains matrixpost-lab.net -name-servers 10.0.0.70
For my lab environment just one DNS server is fine.
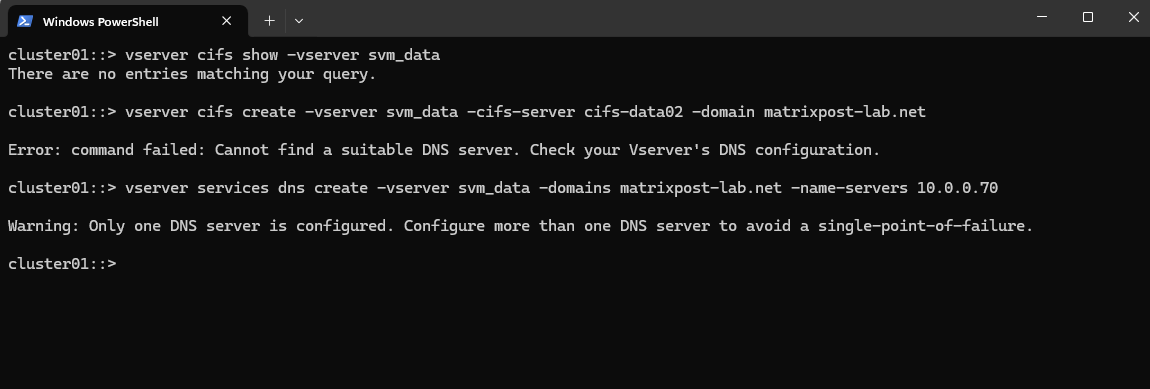
Let’s try it again.
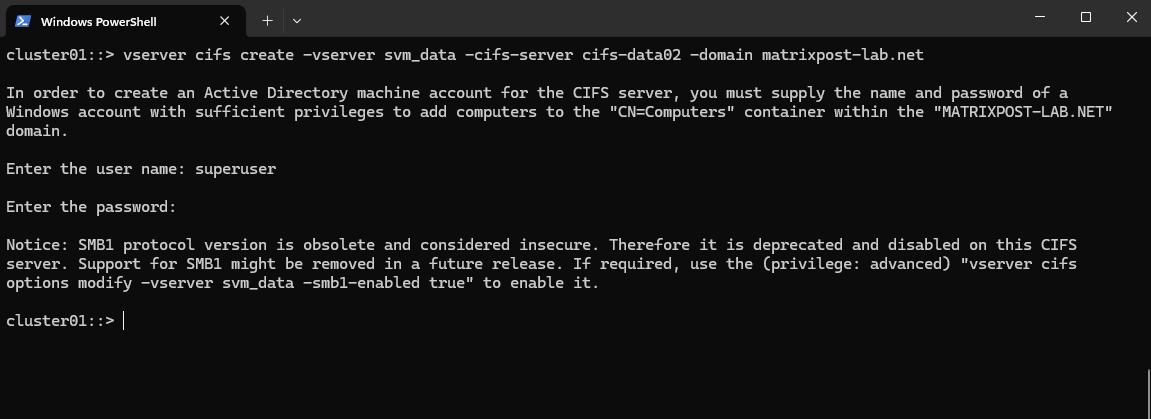
cluster01::> vserver cifs create -vserver svm_data -cifs-server cifs-data02 -domain matrixpost-lab.net
For the domain join and to create a AD machine account for this CIFS server we need to supply the name and password of a Windows account with sufficient privileges to add computers to the AD.
Our new CIFS server is joined to our AD and the default Computers container.
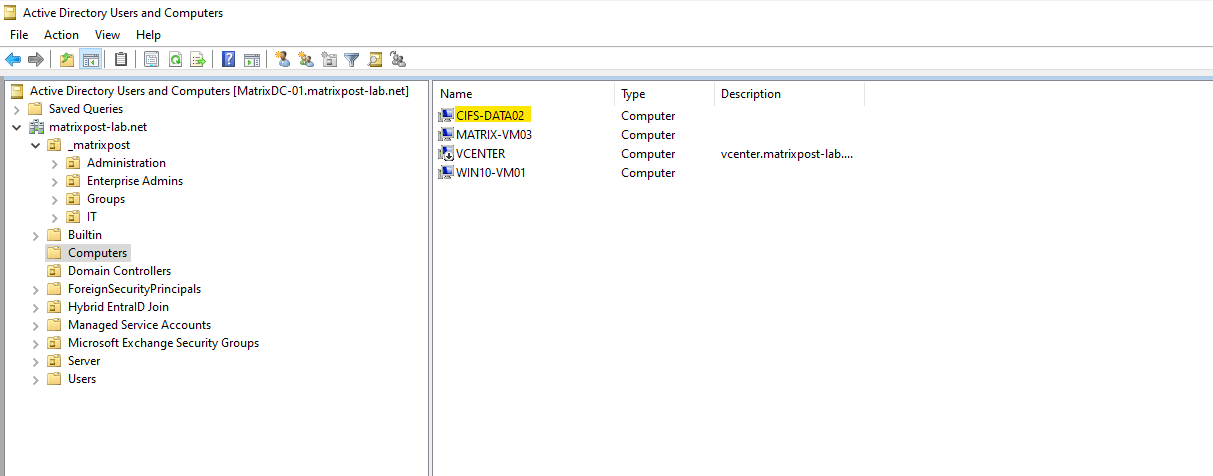
Looks good.
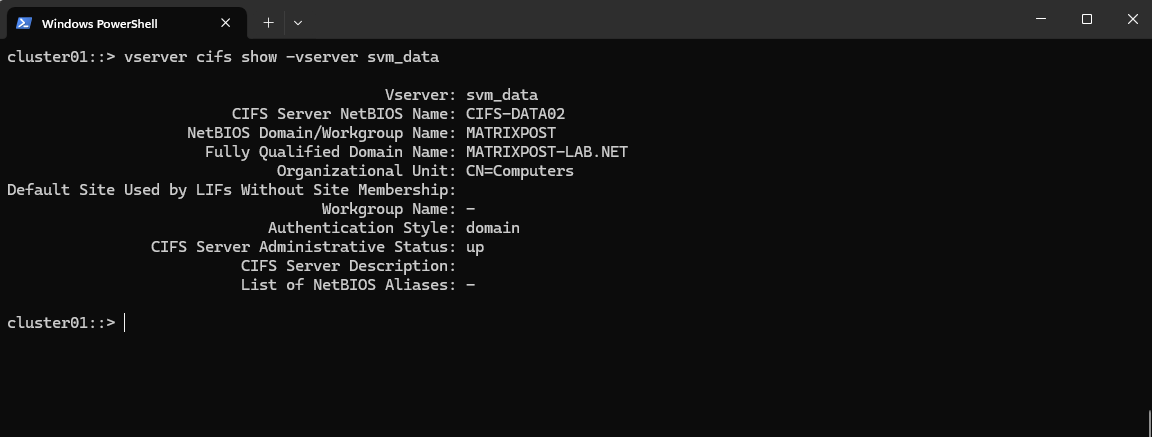
cluster01::> vserver cifs show -vserver svm_data
We can now mount the volume in the namespace.
Mounting a volume in the namespace in NetApp ONTAP is a key concept, especially when working with NAS protocols like NFS and SMB.
In ONTAP, each SVM (Storage Virtual Machine) has its own namespace, which is essentially a virtual file system tree made up of Mounted volumes (like mount points) and Junction paths (like folders or subdirectories).
This allows ONTAP to present multiple volumes as a unified file system to clients.
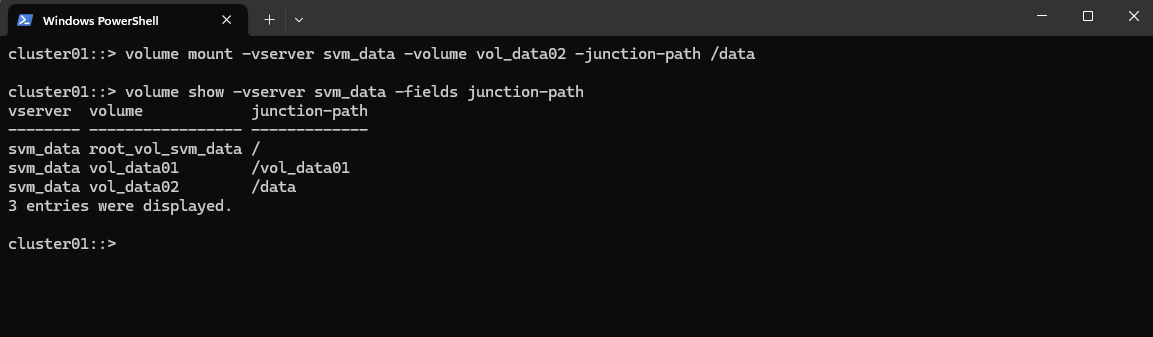
cluster01::> volume mount -vserver svm_data -volume vol_data02 -junction-path /data

When you create a FlexVol volume, it’s not automatically accessible via NFS/SMB unless it’s:
- Mounted into the SVM’s namespace (via a junction path)
- (Optional) Shared via SMB or exported via NFS
So, mounting a volume in the namespace means:
- Assigning the volume a junction path (similar to mounting a filesystem under a directory in Linux)
- Making the volume accessible via NAS protocols (under that path)
By running the command above to mount our new volume named vol_data02 on the SVM,
cluster01::> volume mount -vserver svm_data -volume vol_data02 -junction-path /data
we finally mount the volume into the SVM’s namespace at /data.
Now NFS clients can access it via nfs://<svm-lif-ip>/data or SMB clients can access it if it’s also shared via CIFS: \\<svm-lif-ip>\DataShare.
We can even mount child volumes inside another volume by running e.g.
cluster01::> volume mount -vserver svm_data -volume vol_logs -junction-path /data/logs

/
└── data              (vol_data02)
    └── logs          (vol_logs)
This is powerful for organizing file systems in large environments.
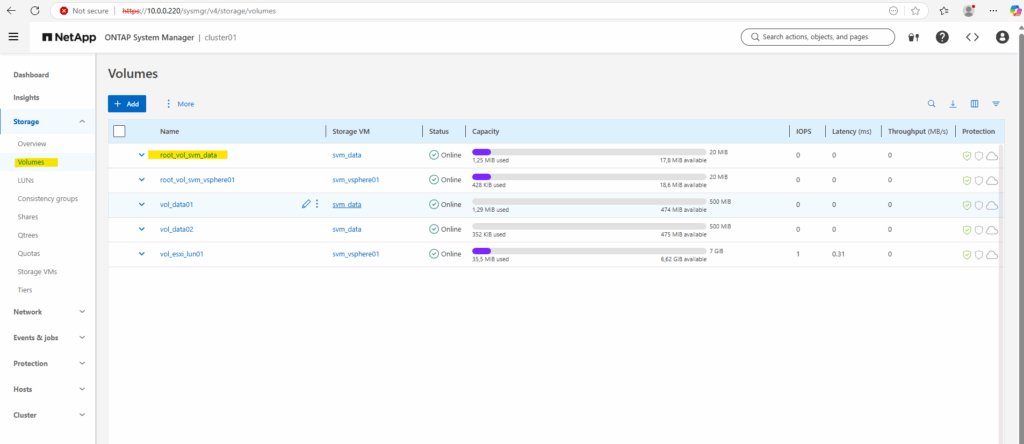
We can run the following command to check what’s finally mounted on our SVM.
cluster01::> volume show -vserver svm_data -fields junction-path
/vol_data01 is from my NFS export shown in part 2 directly here.
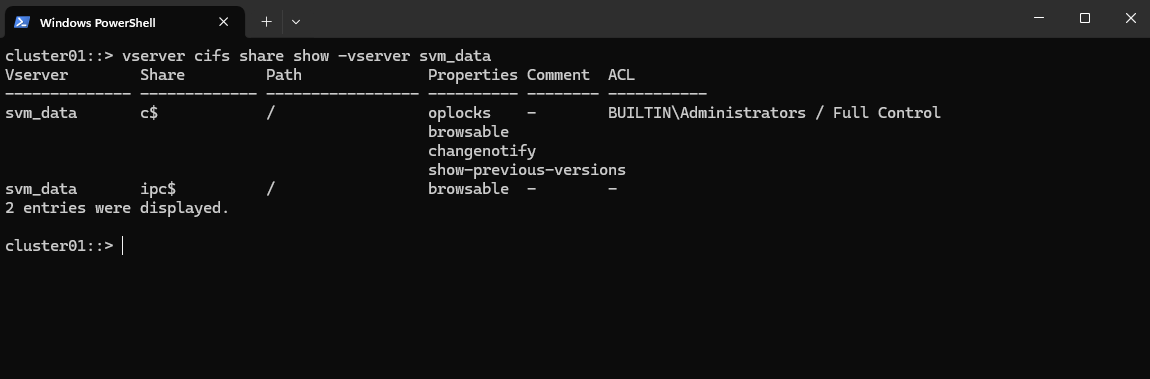
We can run the following command to show the currently existing CIFS shares on our SVM.
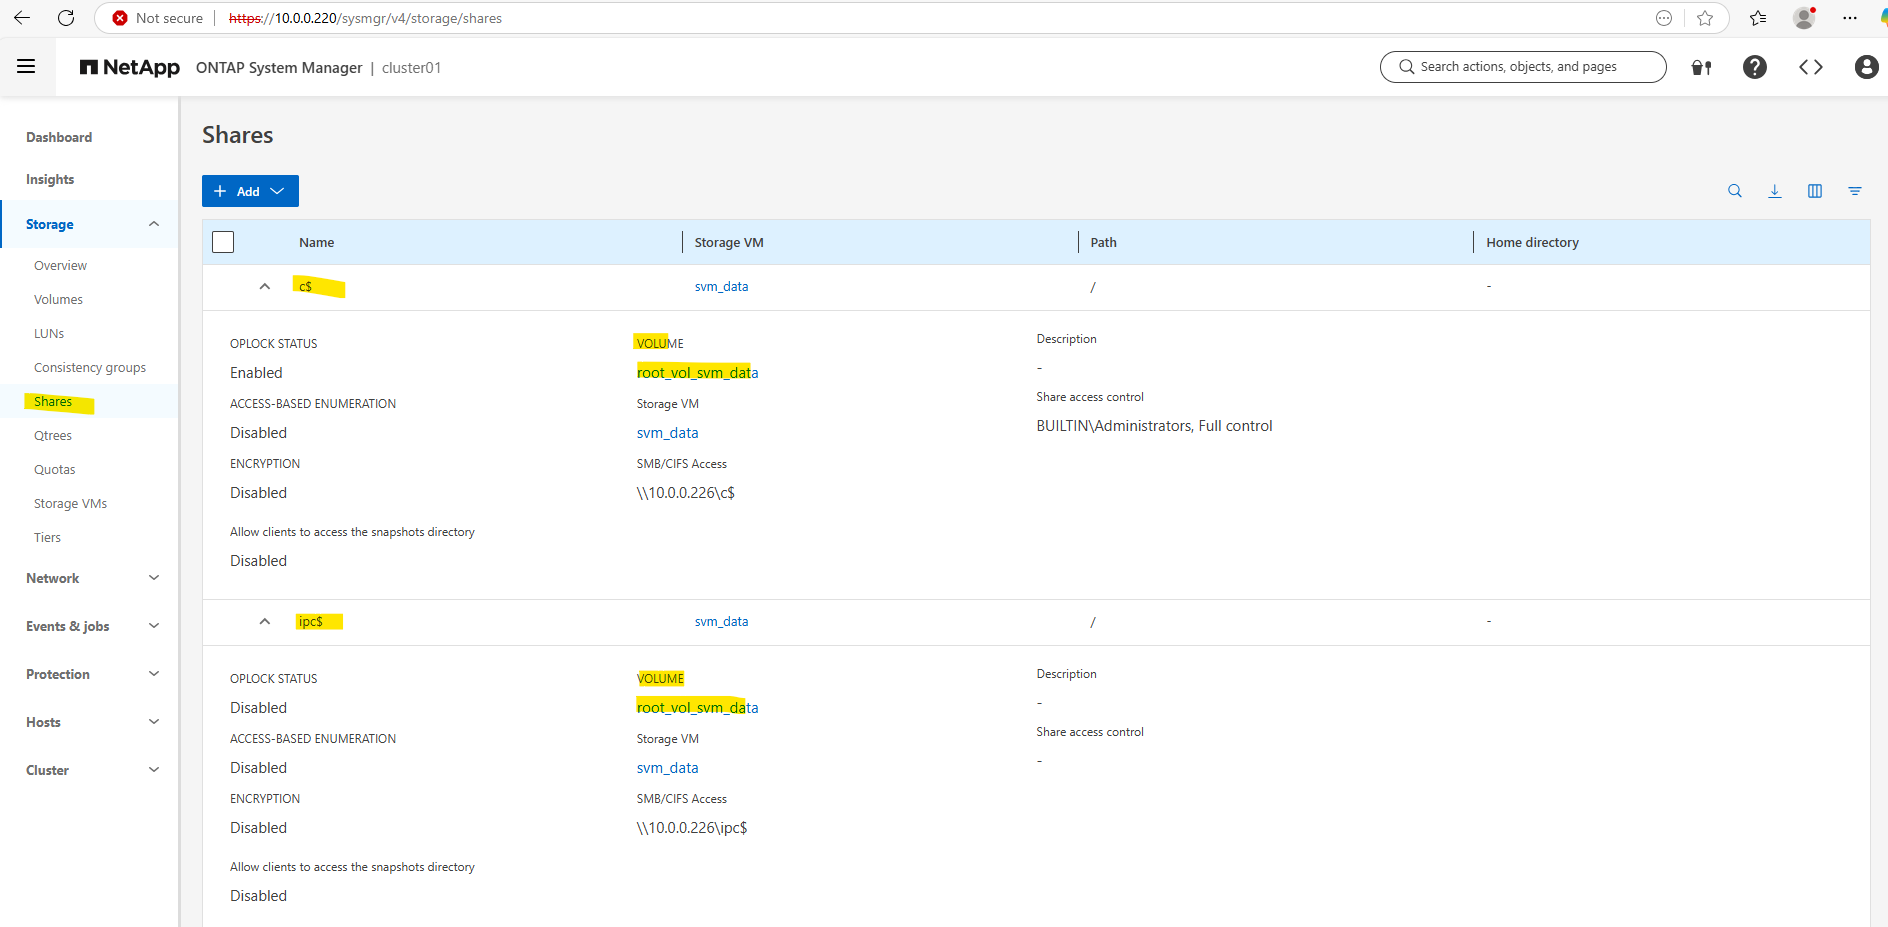
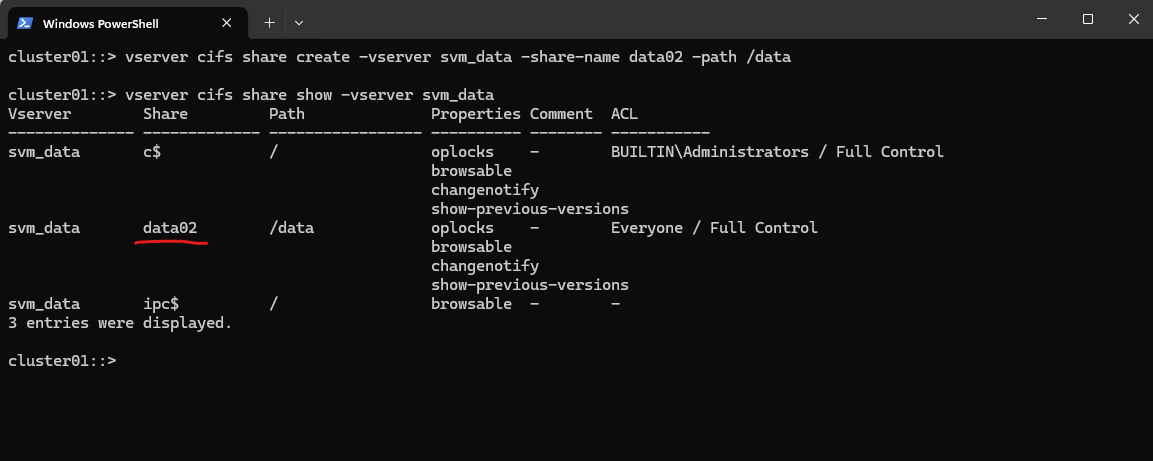
c$ and ipc$ shares here are default administrative shares, very similar to those found on a Windows server.
They are pointing to the root of the SVM namespace, which is the root_vol_svm_data, not our newly mounted volume vol_data02.
cluster01::> vserver cifs share show -vserver svm_data
Every SVM in ONTAP requires a root volume, often named something like root_vol_svm_data. This root volume is mounted at / in the SVM’s namespace.
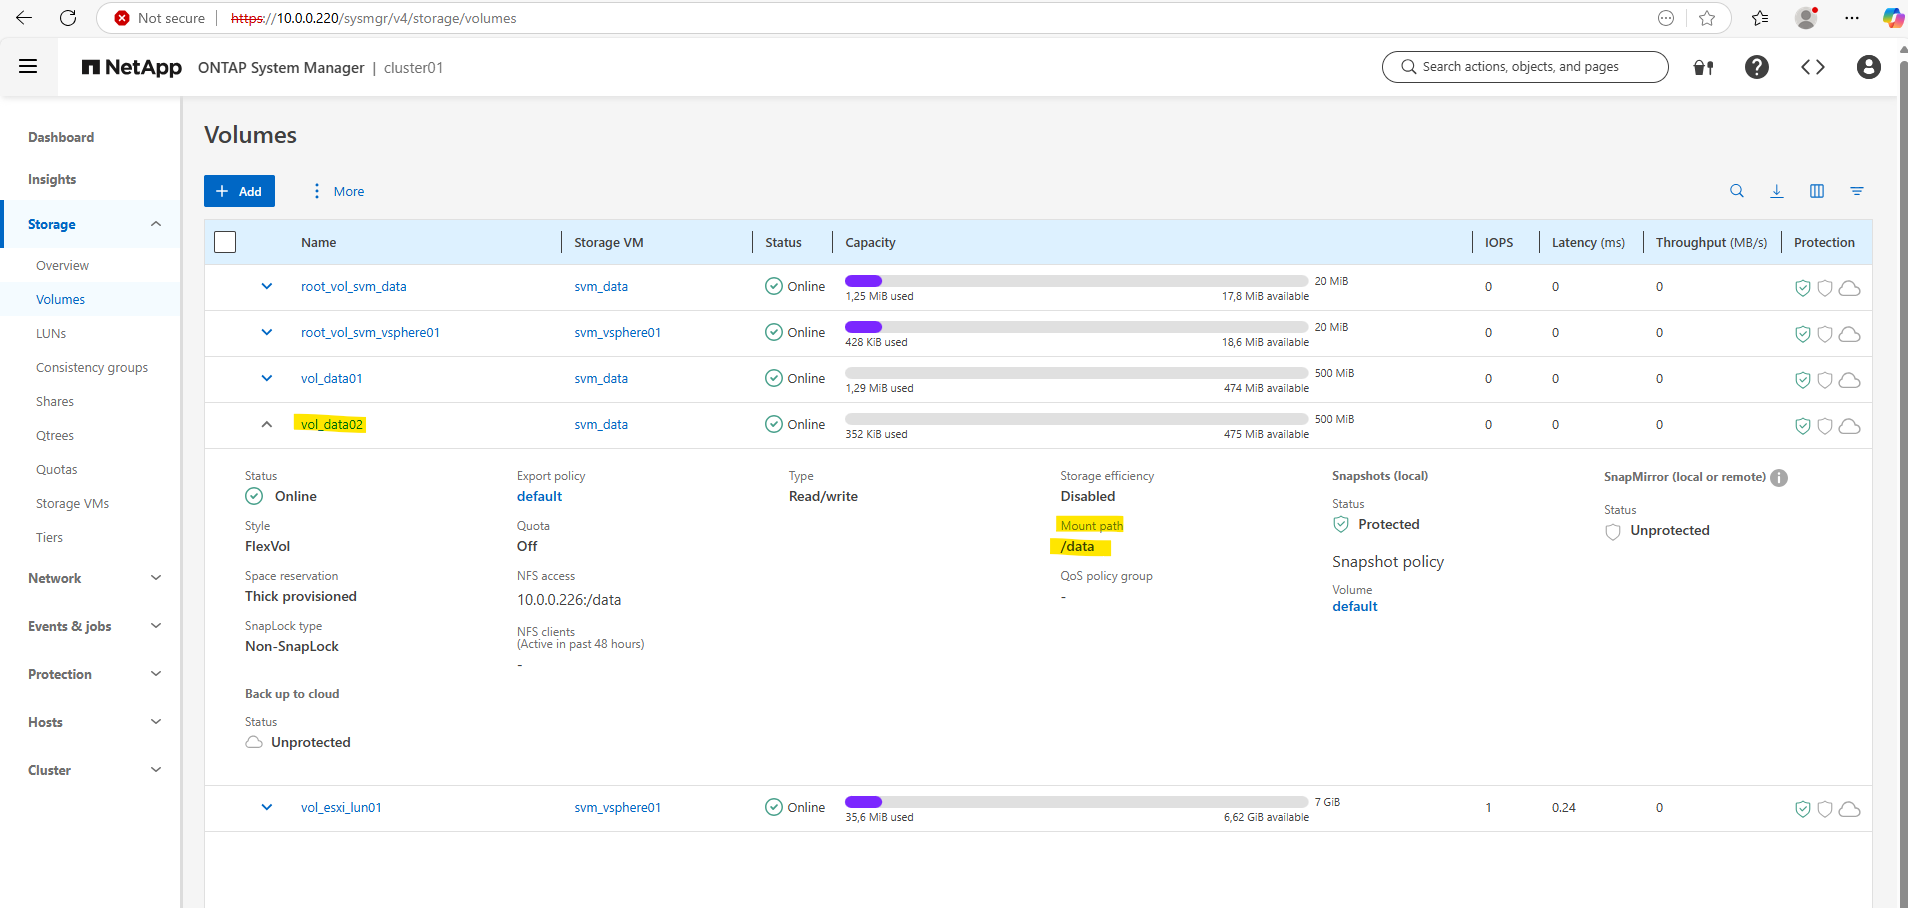
Our new volume vol_data02 is mounted at /data, but unless it’s explicitly shared, it’s not exposed via SMB.
We now need to create an SMB share for our newly created vol_data02 volume.
cluster01::> vserver cifs share create -vserver svm_data -share-name data02 -path /data

By running the command to list all CIFS shares on a specific SVM (Storage Virtual Machine) in NetApp again, we will now see our newly created data02 share.
cluster01::> vserver cifs share show -vserver svm_data
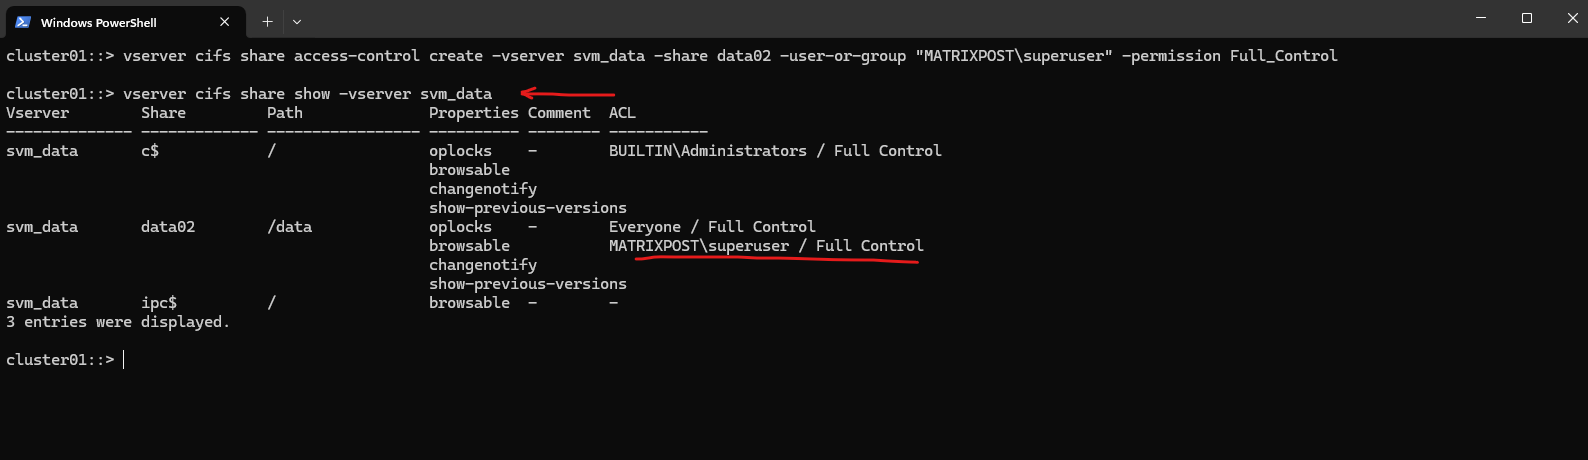
And finally we need to set the share permissions.
For my lab environment I will assign here just my enterprise admin with full control.
cluster01::> vserver cifs share access-control create -vserver svm_data -share data02 -user-or-group "MATRIXPOST\superuser" -permission Full_Control

Checking the share permissions.
cluster01::> vserver cifs share show -vserver svm_data
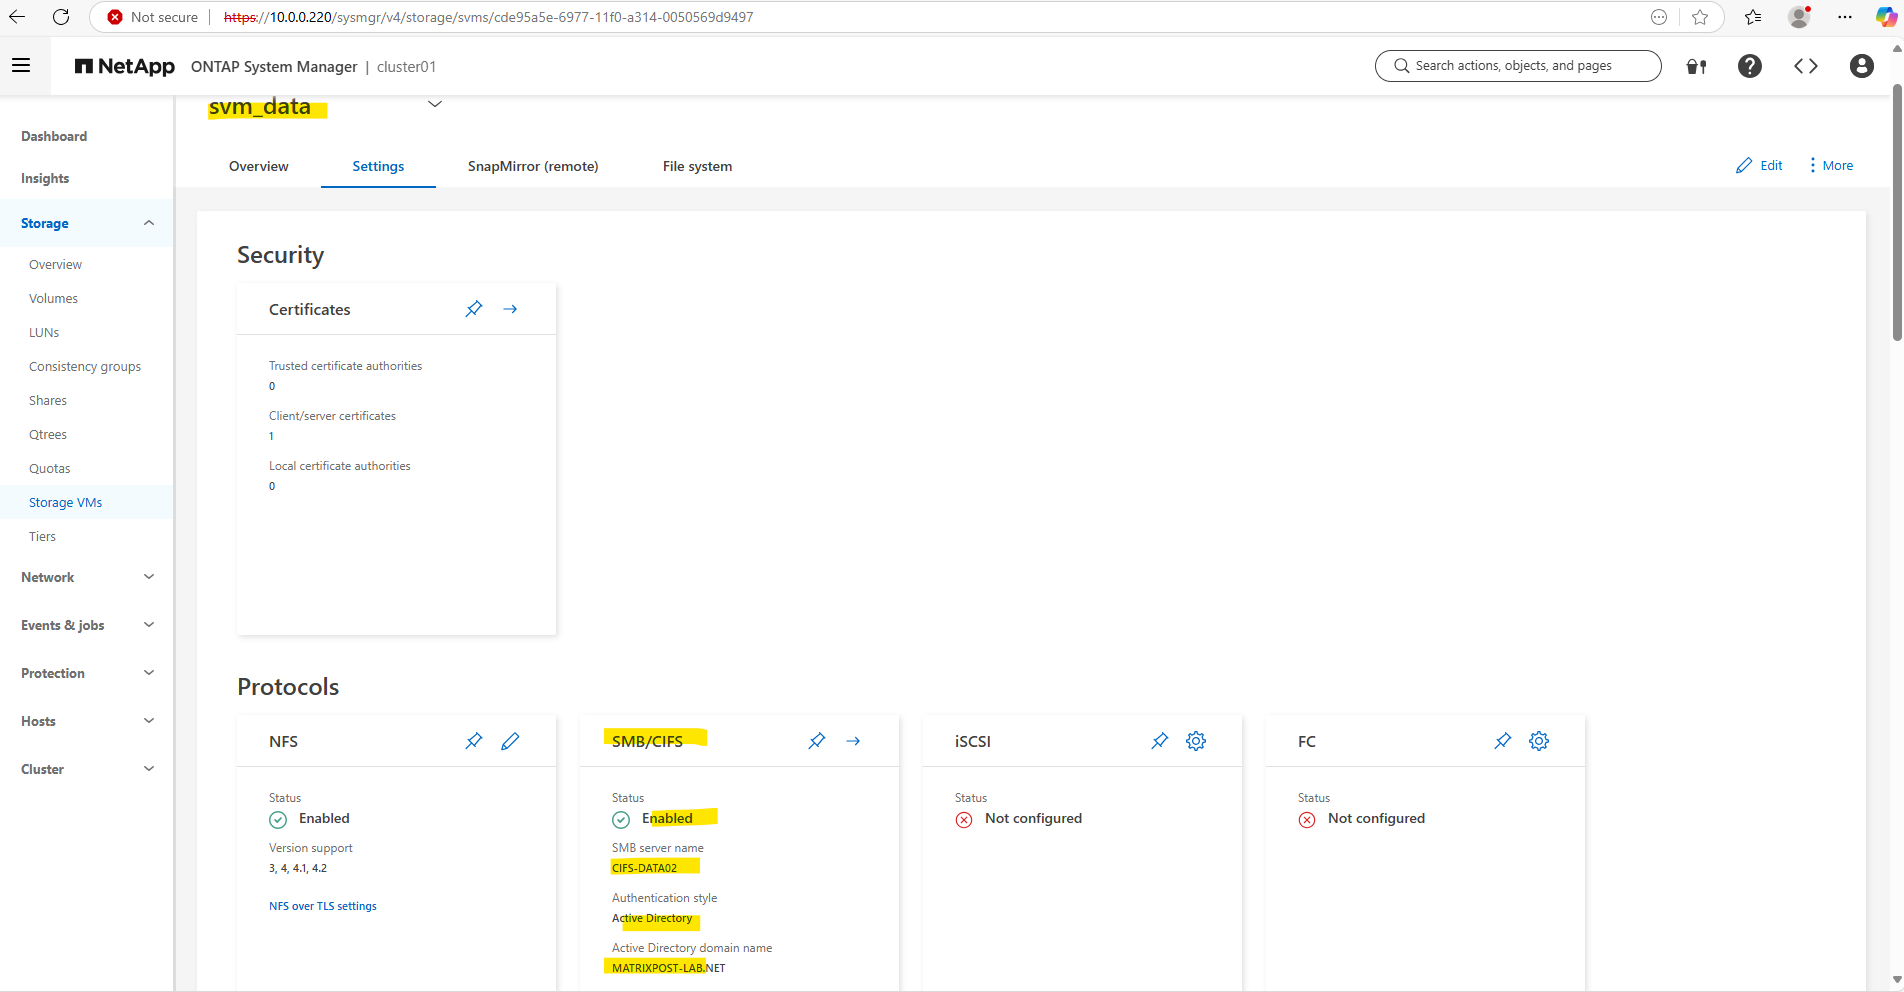
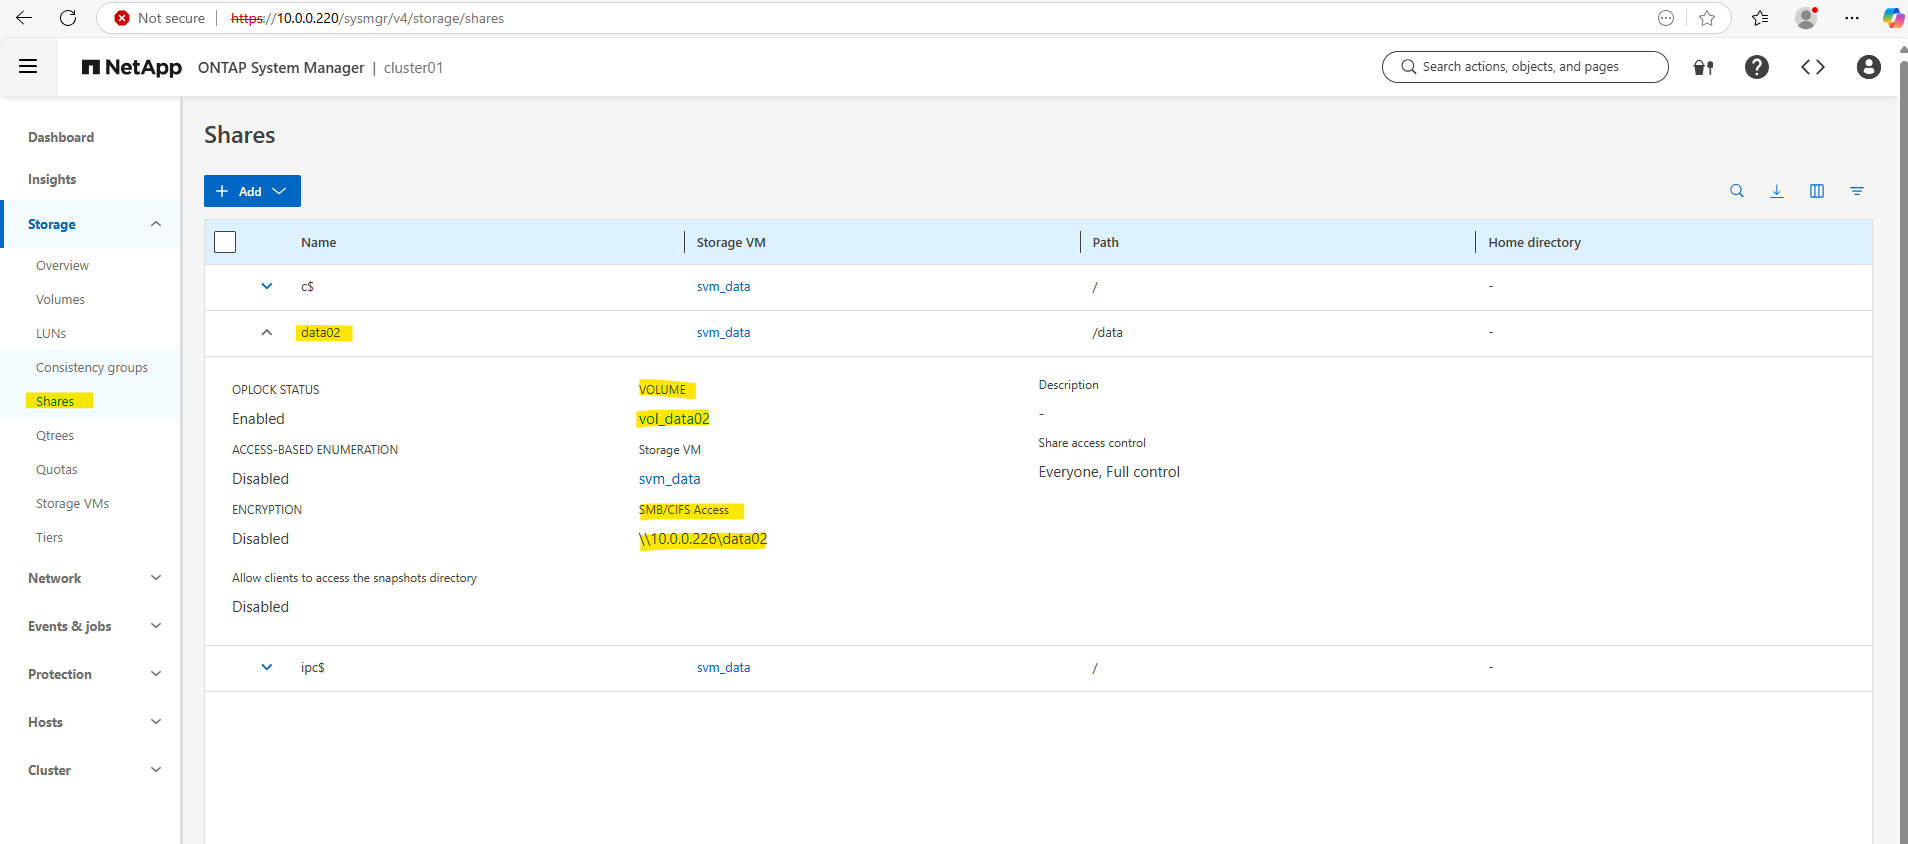
In the System Manager GUI.
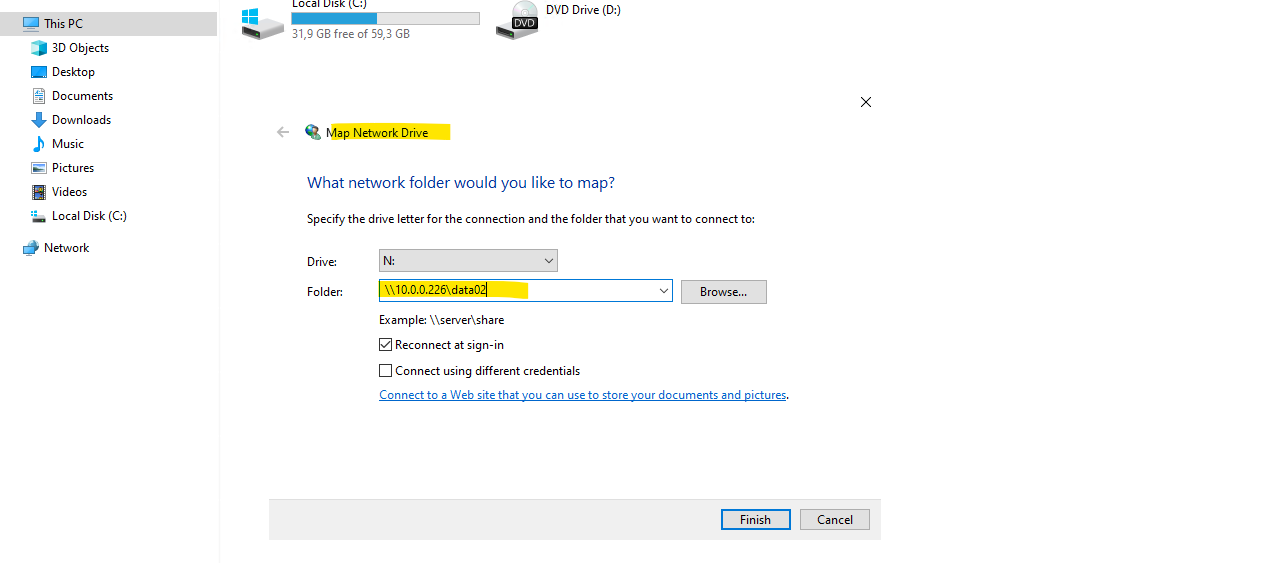
Here we also see the full SMB path to finally mount the share on our clients.
Unfortunately, in the ONTAP CLI, we do have to manually piece together the full SMB share path information that the System Manager GUI shows automatically in a nice, human-readable way.

So to make our vol_data02 accessible over SMB:
👉 We must create a share that explicitly points to its junction path.
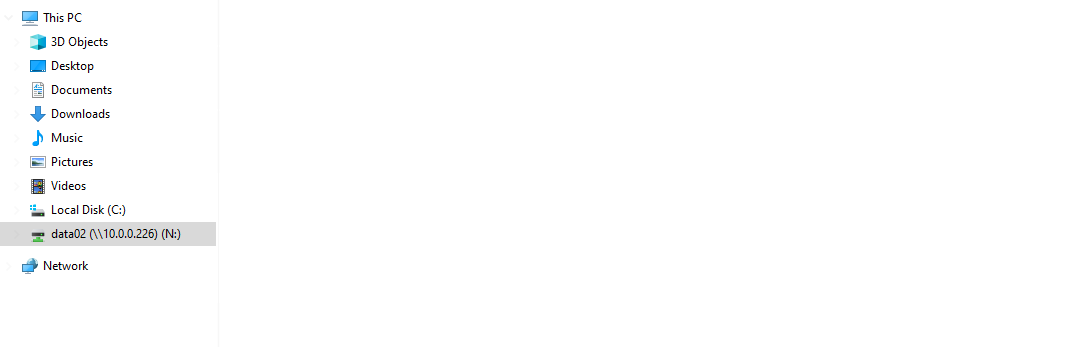
We can now mount our new SMB share when using an account we have authorized previously.
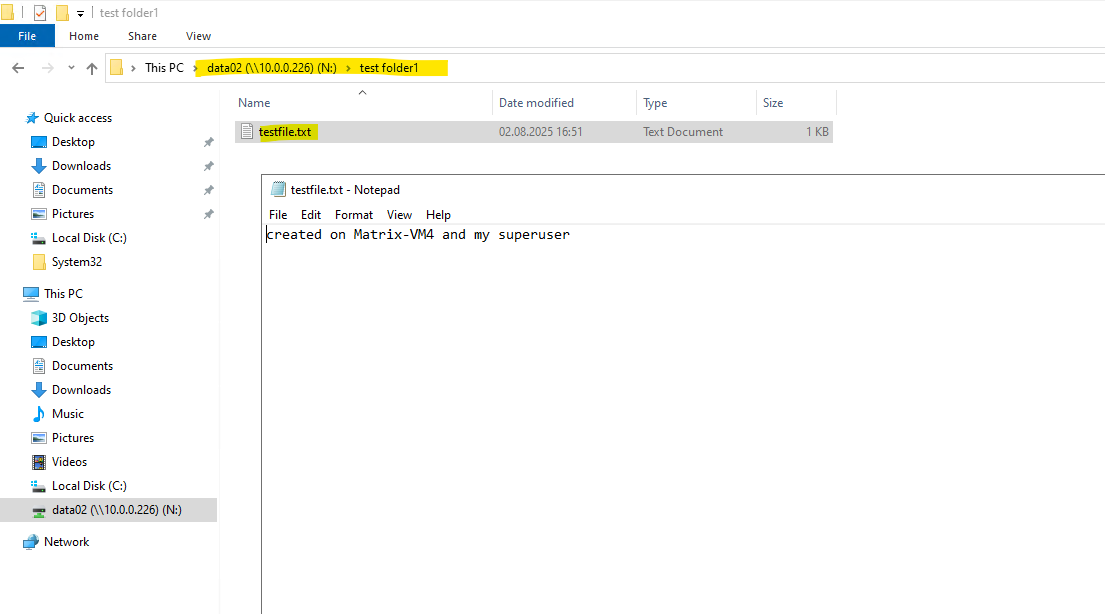
By the way I was creating a first folder and file on the share as shown below.
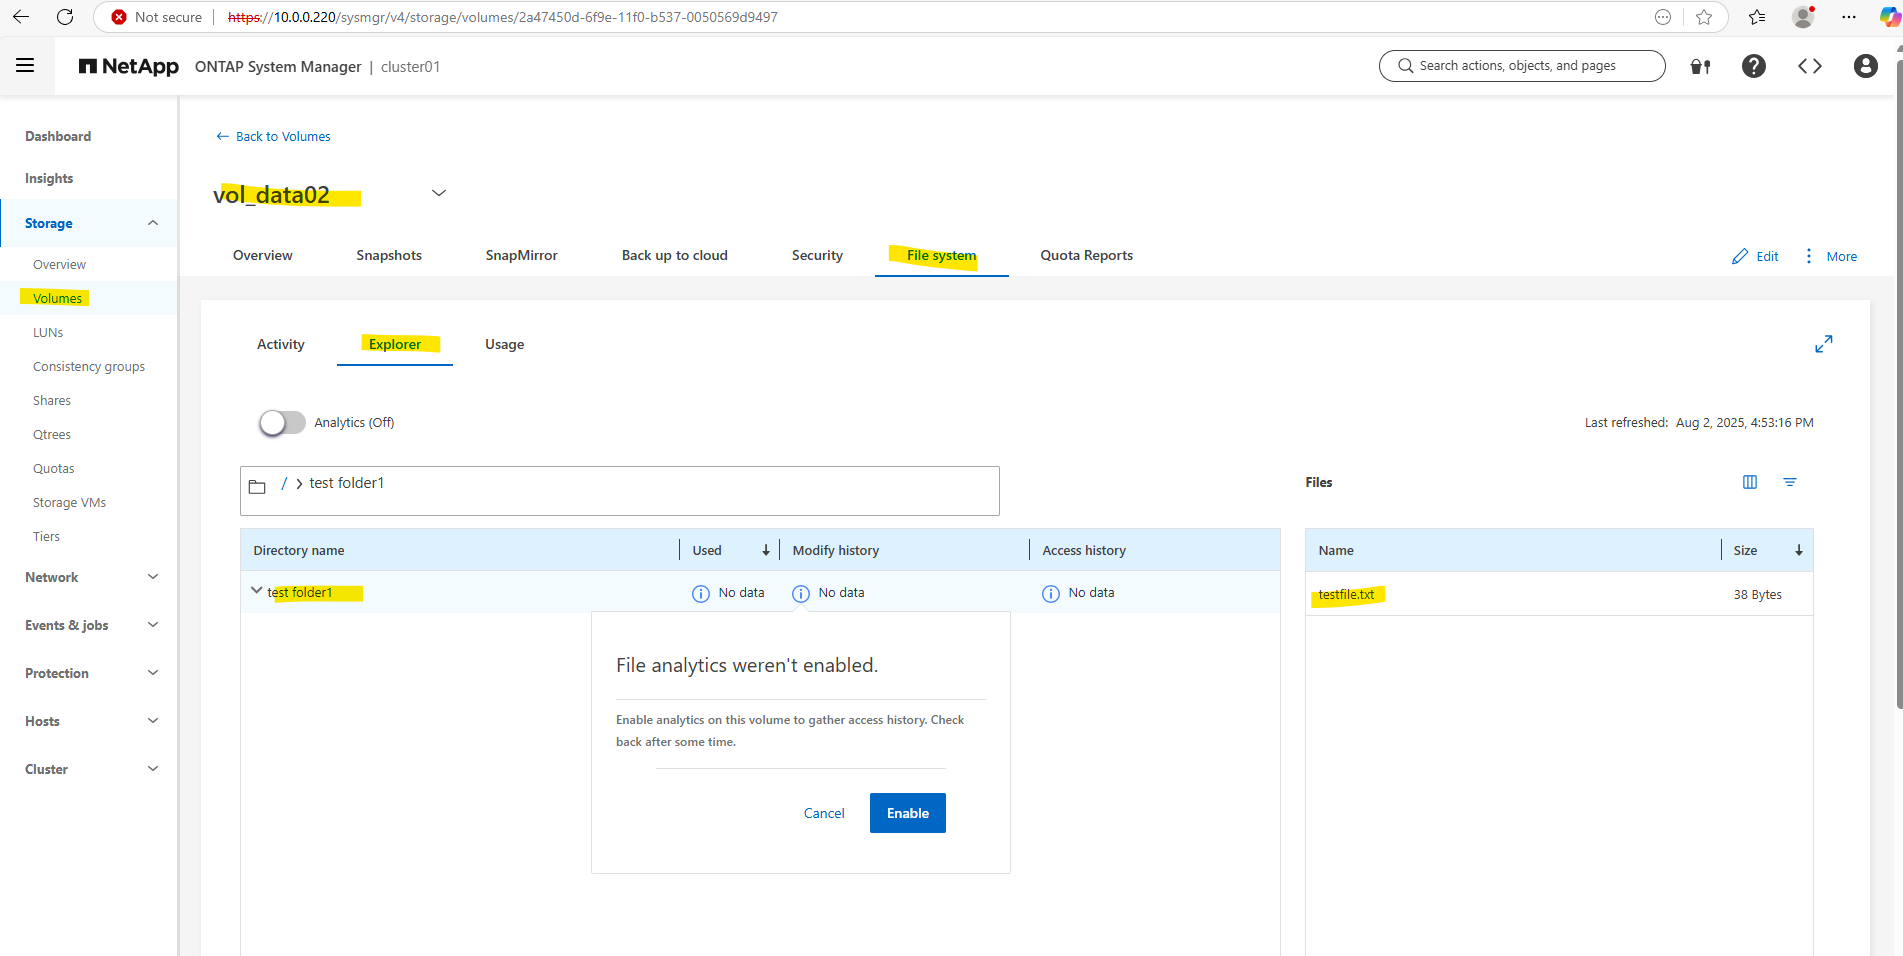
We can also explorer the file system directly in NetApp ONTAP and its corresponding file system like shown below.
List all SVMs
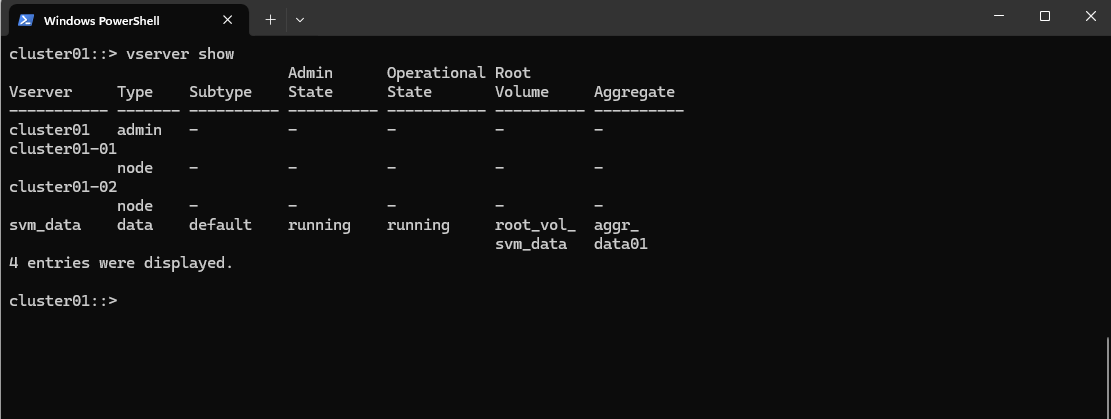
To list all Storage Virtual Machines (SVMs) in NetApp ONTAP, use the following command´.
cluster01::> vserver show

showing also the IP addresses
cluster01::> net int show -fields vserver, address
List all Network Interfaces
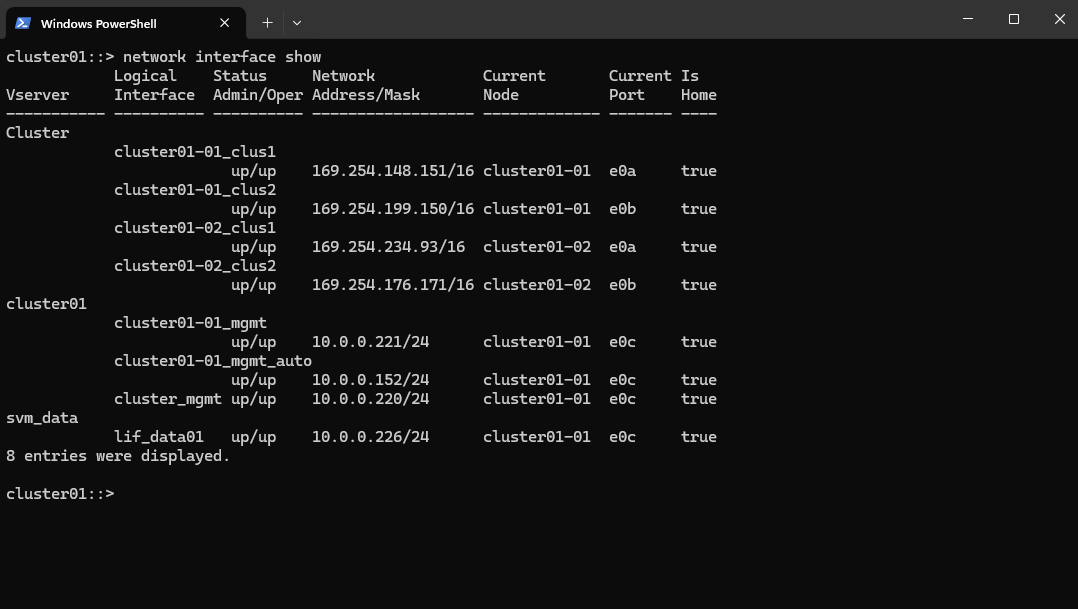
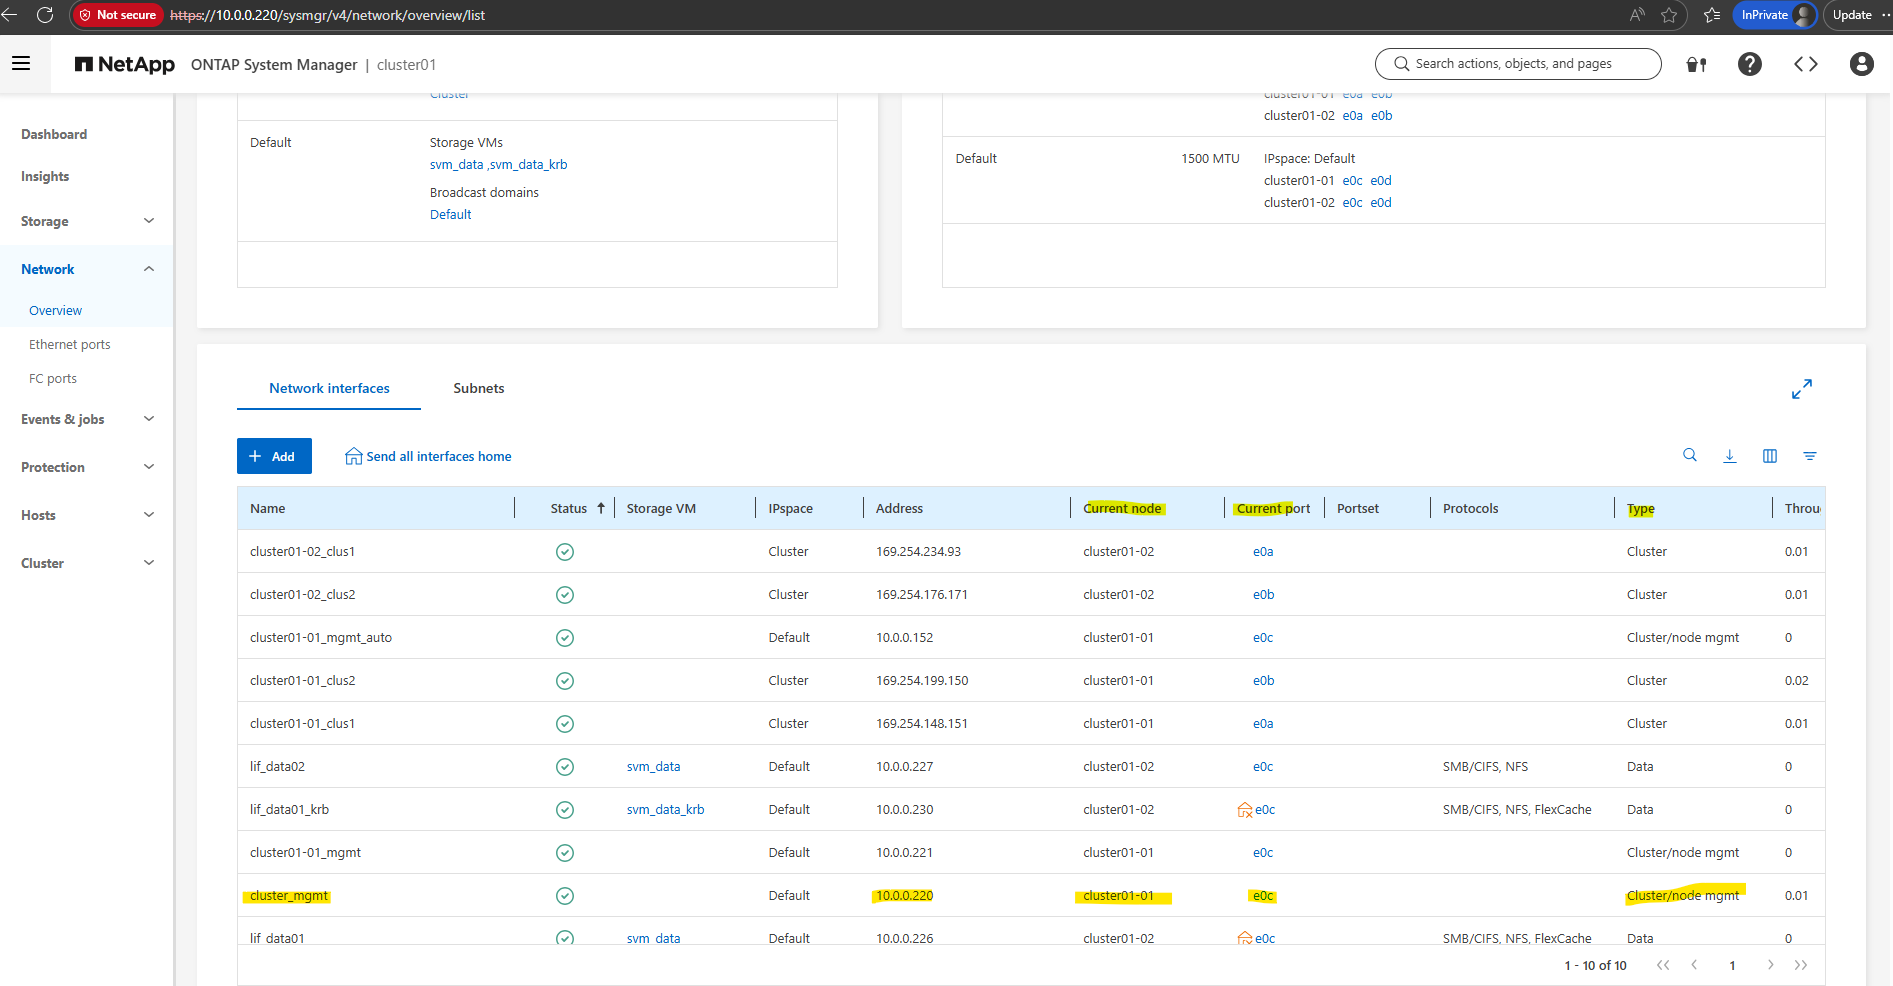
To display information about network interfaces on NetApp we can use the following command.
cluster01::> network interface show
A LIF (Logical Interface) is always bound to a node and a specific port, but it’s associated with an SVM (Storage Virtual Machine) for its operational identity and purpose.
Is Home true ==> The LIF is currently on its designated (home) node and port, where it is supposed to be by default.
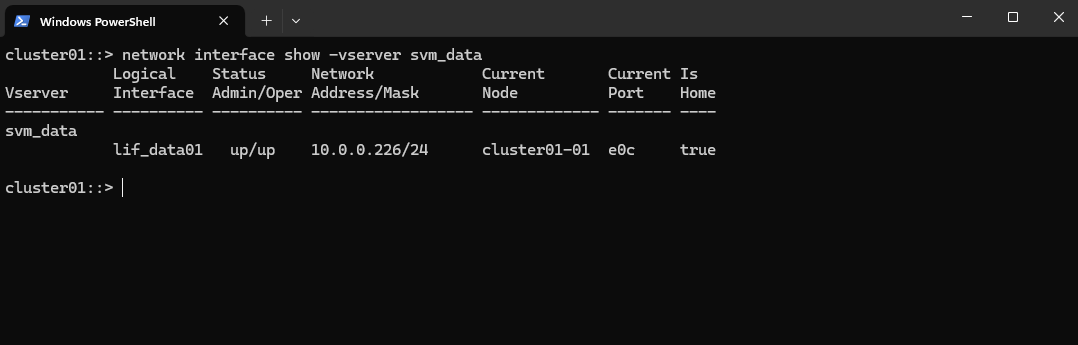
We can also list all LIFs associated with a specific SVM by running.
cluster01::> network interface show -vserver svm_data
Checking Client Access on a NFS export
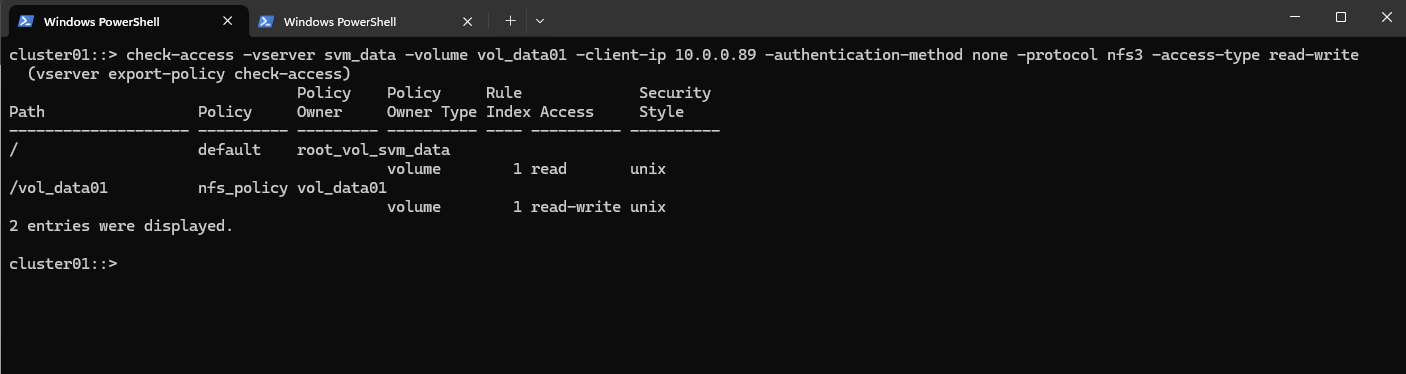
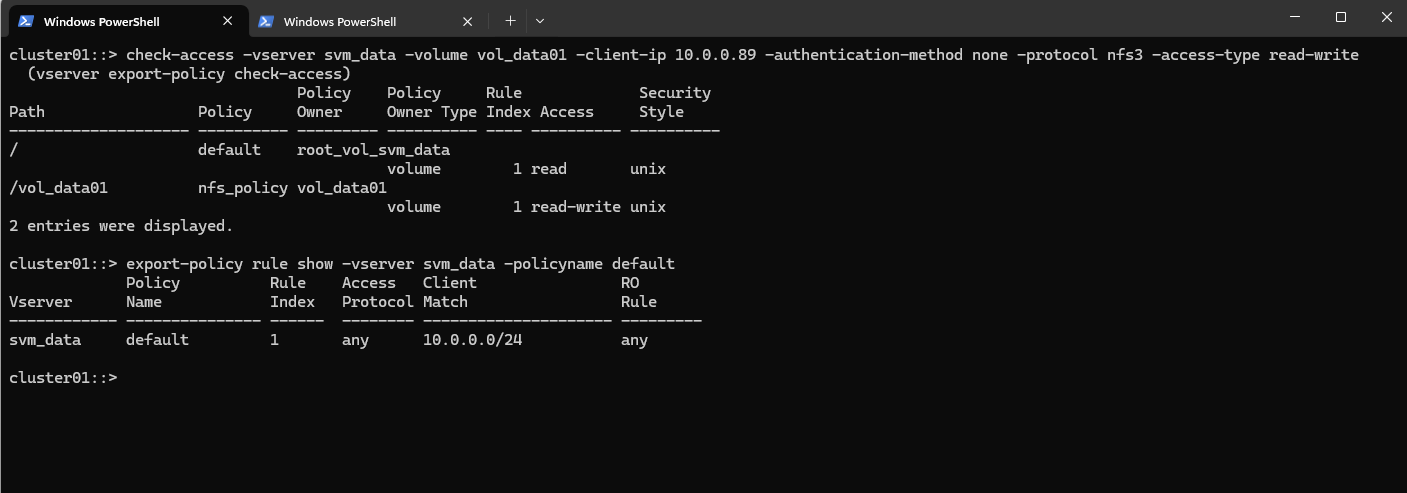
This command is a powerful NetApp ONTAP troubleshooting tool used to simulate and check client access permissions.
cluster01::> check-access -vserver svm_data -volume vol_data01 -client-ip 10.0.0.89 -authentication-method none -protocol nfs3 -access-type read-write
-authentication-method none: The authentication method the client is using for this simulated request. In this case, it’s “none,” meaning unauthenticated access.
The export-policy rule create command previously was using -rorule any option by which No explicit authentication is required. The any option means that the client can use any authentication method (or no authentication at all) and still be granted read-only access.
The primary verification for this read-only access is just the client IP address (which must matching to be within the subnet 10.0.0.0/24).
The default policy settings we can check by using the following command. Also shown in the next section.
When creating a new further policy for this volume to allow e.g. other client IP addresses to access the volume, we first need to determine the latest rule index number in order to create a new one and setting the next rule index number.
cluster01::> export-policy rule show -vserver svm_data -policyname default
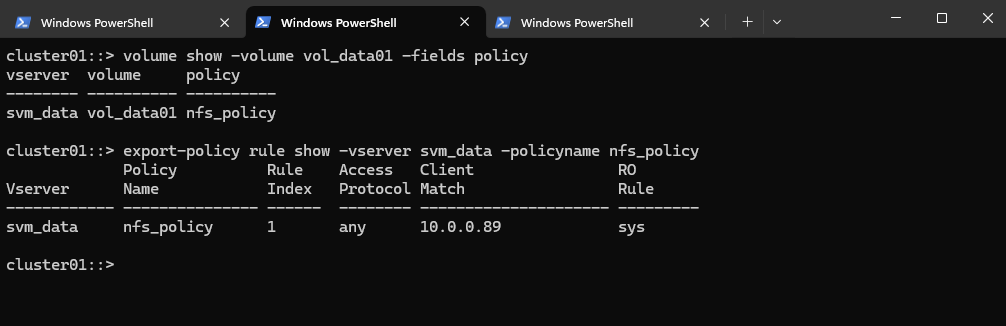
And checking the dedicated volume policy named nfs_policy.
cluster01::> export-policy rule show -vserver svm_data -policyname nfs_policy

Verify Export Policy
Unlike in Linux where /etc/exports defines NFS access, NetApp uses export policies and rules at the volume level to control who can access what, and how.
About how to create a export policy and rules for, you will see in part 2 directly here.
We can first check which export policy is applied to a specific volume, below for the volume named vol_data01. After that we can inspect the rule by using the export-policy rule show command.
cluster01::> volume show -volume vol_data01 -fields policy
cluster01::> export-policy rule show -vserver svm_data -policyname nfs_policy
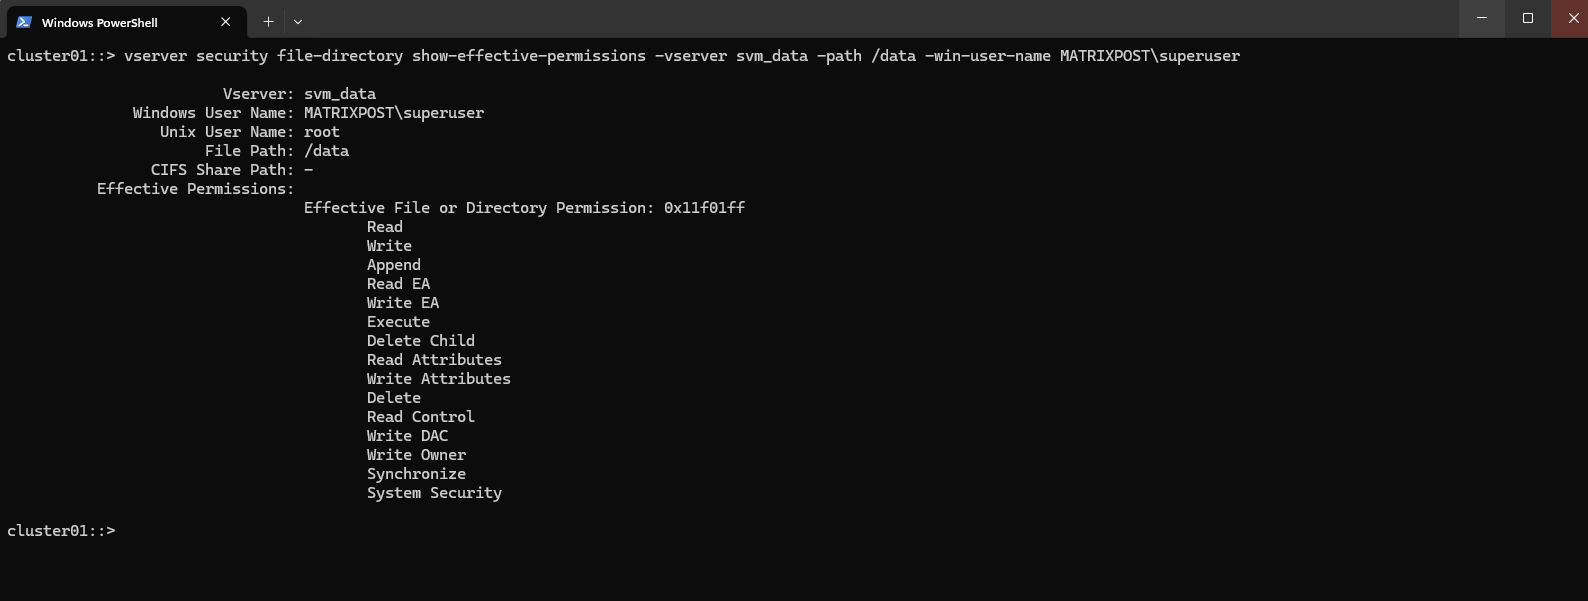
Verify CIFS/SMB access
We can use the vserver security file-directory show-effective-permissions command to verify CIFS/SMB share access, but they evaluate NTFS file permissions, not share-level permissions.
This command simulates file-level access for a given user at a specific path in a volume using NTFS-style security.
cluster01::> vserver security file-directory show-effective-permissions -vserver svm_data -path /data -win-user-name MATRIXPOST\superuser
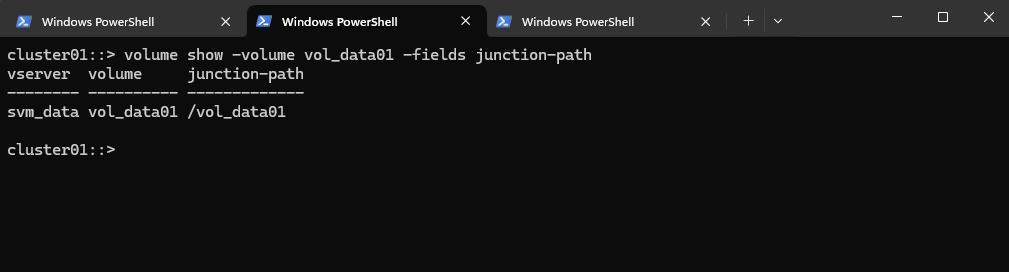
Check where a Volume is Mounted in the Namespace
The following command is asking the ONTAP system to display the junction-path field for a specific volume named here vol_data01.
In NetApp ONTAP, a junction-path is the mount point where a volume is attached to the namespace of a Storage Virtual Machine (SVM, formerly known as Vserver). It’s how clients access the data on that volume.
cluster01::> volume show -volume vol_data01 -fields junction-path
Superuser Setting
More about root squashing you will find in Part 5.
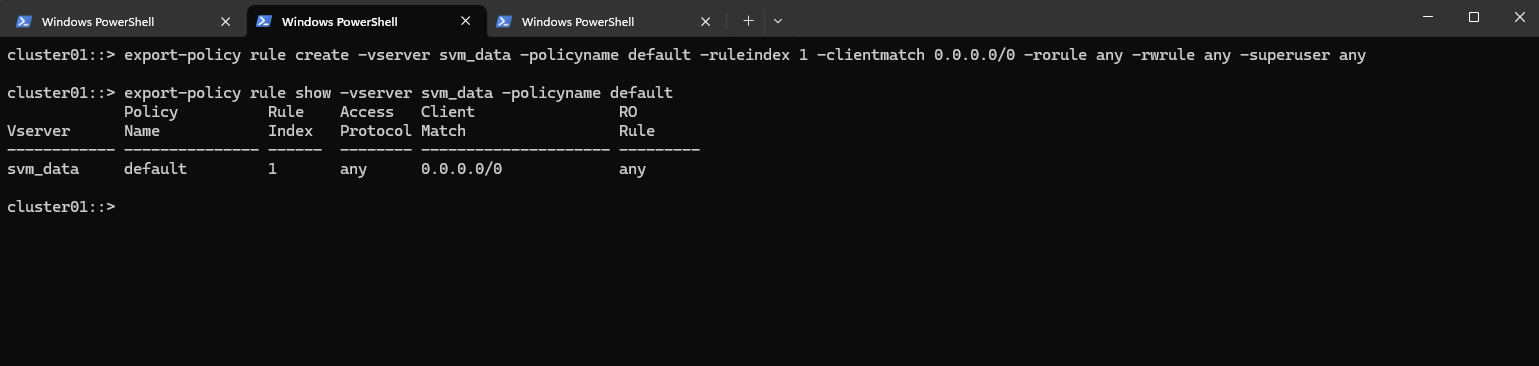
By default, most NFS servers map root to nobody (UID 65534) for security reasons, this is called root squashing. NetApp gives you fine-grained control over this behavior via the superuser setting in export rules.
The superuser field in an export policy rule determines which authentication methods are allowed to preserve root privileges on the NFS client when accessing ONTAP.
none ==> Root squashed (UID 0 becomes 65534 or nobody)
sys ==> root allowed if using AUTH_SYS (typical for Linux clients)
krb5 ==> root allowed if using Kerberos authentication
any ==> root access allowed for all supported auth methods (useful in labs)
cluster01::> export-policy rule create -vserver svm_data -policyname default -ruleindex 1 -clientmatch 0.0.0.0/0 -rorule any -rwrule any -superuser any
cluster01::> export-policy rule show -vserver svm_data -policyname default
Reverting a LIF to Its Home Port (here Management Interface LIF)
When a Logical Interface (LIF) runs on a different node or port, after a takeover, giveback, or manual migration, ONTAP marks it as “is-home = false.”
Using the network interface revert command, you can quickly return the LIF to its designated home node and home port.
This is especially important for the management interface, ensuring it always uses the intended and stable network path.
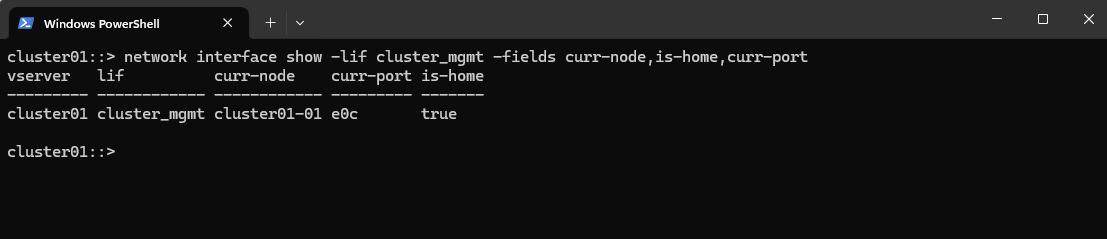
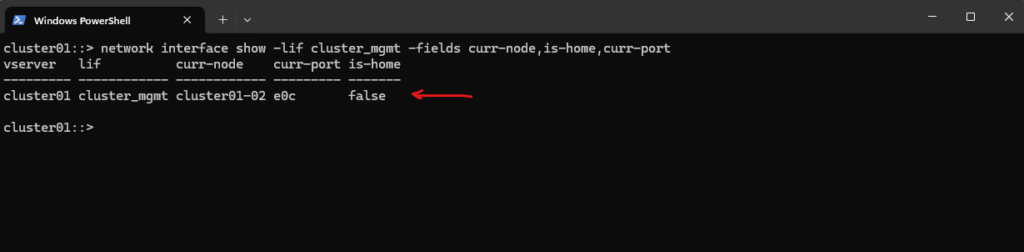
The command below provides a quick view of where the management LIF is currently running. It highlights whether the LIF is on its home node and port, making it easy to identify misplacements after failover or manual migrations.
In my case below, the management LIF is currently running on its home node and port shown in column is-home = true.
cluster01::> network interface show -lif cluster_mgmt -fields curr-node,is-home,curr-port
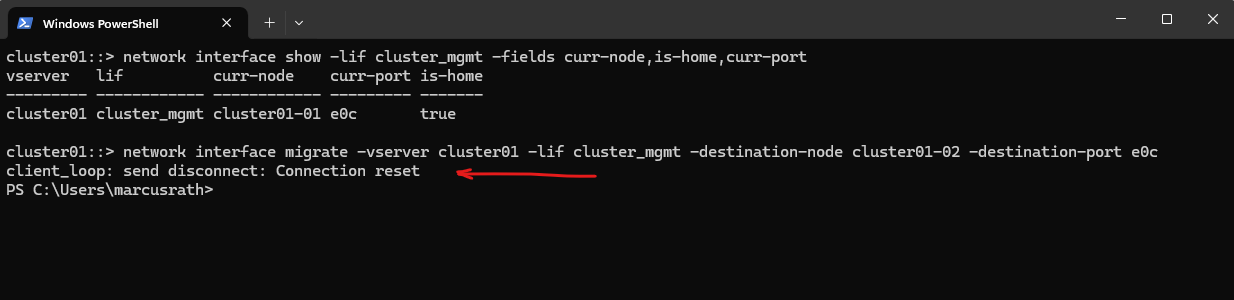
For testing purpose to manually move the cluster_mgmt LIF from cluster01-01 to cluster01-02, you can simply use the network interface migrate command and specify the target node and port:
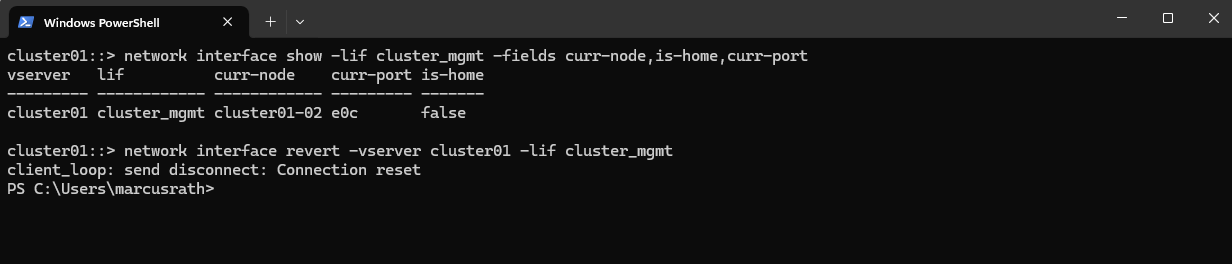
Migrating the cluster_mgmt LIF will immediately disconnect your SSH or System Manager session, because your connection is tied to that very LIF.
That’s why we saw: client_loop: send disconnect: Connection reset
cluster01::> network interface migrate -vserver cluster01 -lif cluster_mgmt -destination-node cluster01-02 -destination-port e0c
After the migration, verify the new location:
This will show the LIF now running on cluster01-02, with
is-home = false, demonstrating a non-home placement.
cluster01::> network interface show -lif cluster_mgmt -fields curr-node,is-home,curr-port
After demonstrating a manual failover, you can return the cluster_mgmt LIF to its original node/port with:
cluster01::> network interface revert -vserver cluster01 -lif cluster_mgmt
You can verify the state with:
cluster01::> network interface show -lif cluster_mgmt -fields curr-node,curr-port,is-home

How Auto-Revert Interacts With Manual LIF Migrations
Auto-revert determines whether a LIF automatically returns to its home node and port once they become healthy again.
If auto-revert is enabled, any manual migration is temporary and ONTAP will move the LIF back to its home location automatically.
If auto-revert is disabled, the LIF remains on the manually selected node until it is moved again by an administrator.
You can check or change the setting with:
cluster01::> network interface show -lif cluster_mgmt -fields auto-revert

To enable or disable it run:
# enable auto-revert
cluster01::> network interface modify -vserver cluster01 -lif cluster_mgmt -auto-revert true

# disable auto-revert
cluster01::> network interface modify -vserver cluster01 -lif cluster_mgmt -auto-revert false
Links
NetApp ONTAP 9 simulator download and support
https://kb.netapp.com/on-prem/ontap/Ontap_OS/OS-KBs/Where_can_the_NetApp_ONTAP_9_Simulator_be_downloadedONTAP 9 Documentation
https://docs.netapp.com/us-en/ontap/index.htmlONTAP licensing overview
https://docs.netapp.com/us-en/ontap/system-admin/manage-licenses-concept.html#licenses-included-with-ontap-one