Set up Google Cloud Directory Sync
In this post I want to go through the separate steps to set up Google Cloud Directory Sync in order to sync your on-premise Active Directory users to Google Cloud.
Google Cloud uses Google identities for authentication and access management. Manually maintaining Google identities for each employee can add unnecessary management overhead when all employees already have an account in Active Directory. By federating user identities between Google Cloud and your existing identity management system, you can automate the maintenance of Google identities and tie their lifecycle to existing users in Active Directory.
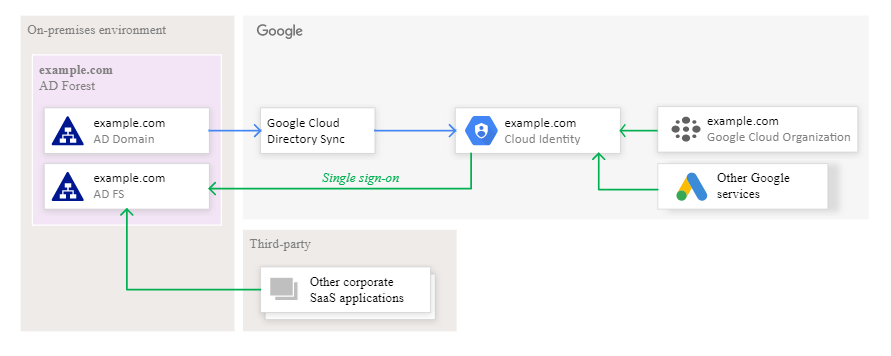
Setting up federation between Active Directory and Cloud Identity or Google Workspace entails two pieces:
- Provisioning users: Relevant users and groups are synchronized periodically from Active Directory to Cloud Identity or Google Workspace. This process ensures that when you create a new user in Active Directory, it can be referenced in Google Cloud even before the associated user has logged in for the first time. This process also ensures that user deletions are being propagated.
Provisioning works one way, which means changes in Active Directory are replicated to Google Cloud but not vice versa. Also, provisioning does not include passwords. In a federated setup, Active Directory remains the only system that manages these credentials. - Single sign-on: Whenever a user needs to authenticate, Google Cloud delegates the authentication to Active Directory by using the Security Assertion Markup Language (SAML) protocol. This delegation ensures that only Active Directory manages user credentials and that any applicable policies or multi-factor authentication (MFA) mechanisms are being enforced. For a sign-on to succeed, however, the respective user must have been provisioned before.
To implement federation, you can use the following tools:
- Google Cloud Directory Sync is a free Google-provided tool that implements the synchronization process. Google Cloud Directory Sync communicates with Google Cloud over Secure Sockets Layer (SSL) and usually runs in the existing computing environment.
- Active Directory Federation Services (AD FS) is provided by Microsoft as part of Windows Server. With AD FS, you can use Active Directory for federated authentication. AD FS usually runs within the existing computing environment.
Source: https://cloud.google.com/architecture/identity/federating-gcp-with-active-directory-introduction
- Install and set up the Google Cloud Directory Sync (GCDS) tool
- Configure Password Sync
- Link
Install and set up the Google Cloud Directory Sync (GCDS) tool
When connecting an on-premises Active Directory infrastructure to Google Cloud, you can run GCDS either on-premises or on a Compute Engine virtual machine in Google Cloud.
In most cases, it’s best to run GCDS on-premises.
Communication from GCDS to Cloud Identity or Google Workspace is conducted through HTTPS and requires little or no change to your firewall configuration.
You can run GCDS on either Windows or Linux. Although it’s possible to deploy GCDS on the domain controller, it’s best to run GCDS on a separate machine. This machine must satisfy the system requirements and have LDAP access to Active Directory. Although it’s not a prerequisite for the machine to be domain joined or to run Windows, this guide assumes that Cloud Directory Sync runs on a domain-joined Windows machine.
To aid with setting up provisioning, GCDS includes a graphical user interface (GUI) called Configuration Manager. If the server on which you intend to run GCDS has a desktop experience, you can run Configuration Manager on the server itself. Otherwise, you must run Configuration Manager locally and then copy the resulting configuration file to the server, where you can use it to run GCDS. This guide assumes that you run Configuration Manager on a server with a GUI.
Deciding where to retrieve data
GCDS uses LDAP to interact with Active Directory and to retrieve information about users and groups. To make this interaction possible, GCDS requires you to provide a hostname and port in the configuration. In a small Active Directory environment that runs only a single global catalog server, providing a hostname and port is not a problem because you can point GCDS directly to the global catalog server.
In a more complex environment that runs redundant global catalog (GC) servers, pointing GCDS to a single server does not make use of the redundancy and is therefore not ideal. Although it’s possible to set up a load balancer that distributes LDAP queries across multiple global catalog servers and keeps track of servers that might be temporarily unavailable, it’s preferable to use the DC Locator mechanism to locate servers dynamically.
By default, GCDS requires you to explicitly specify the endpoint of an LDAP server and does not support using the DC Locator mechanism. In this guide, you complement GCDS with a small PowerShell script that engages the DC Locator mechanism so that you don’t have to statically configure endpoints of global catalog servers.
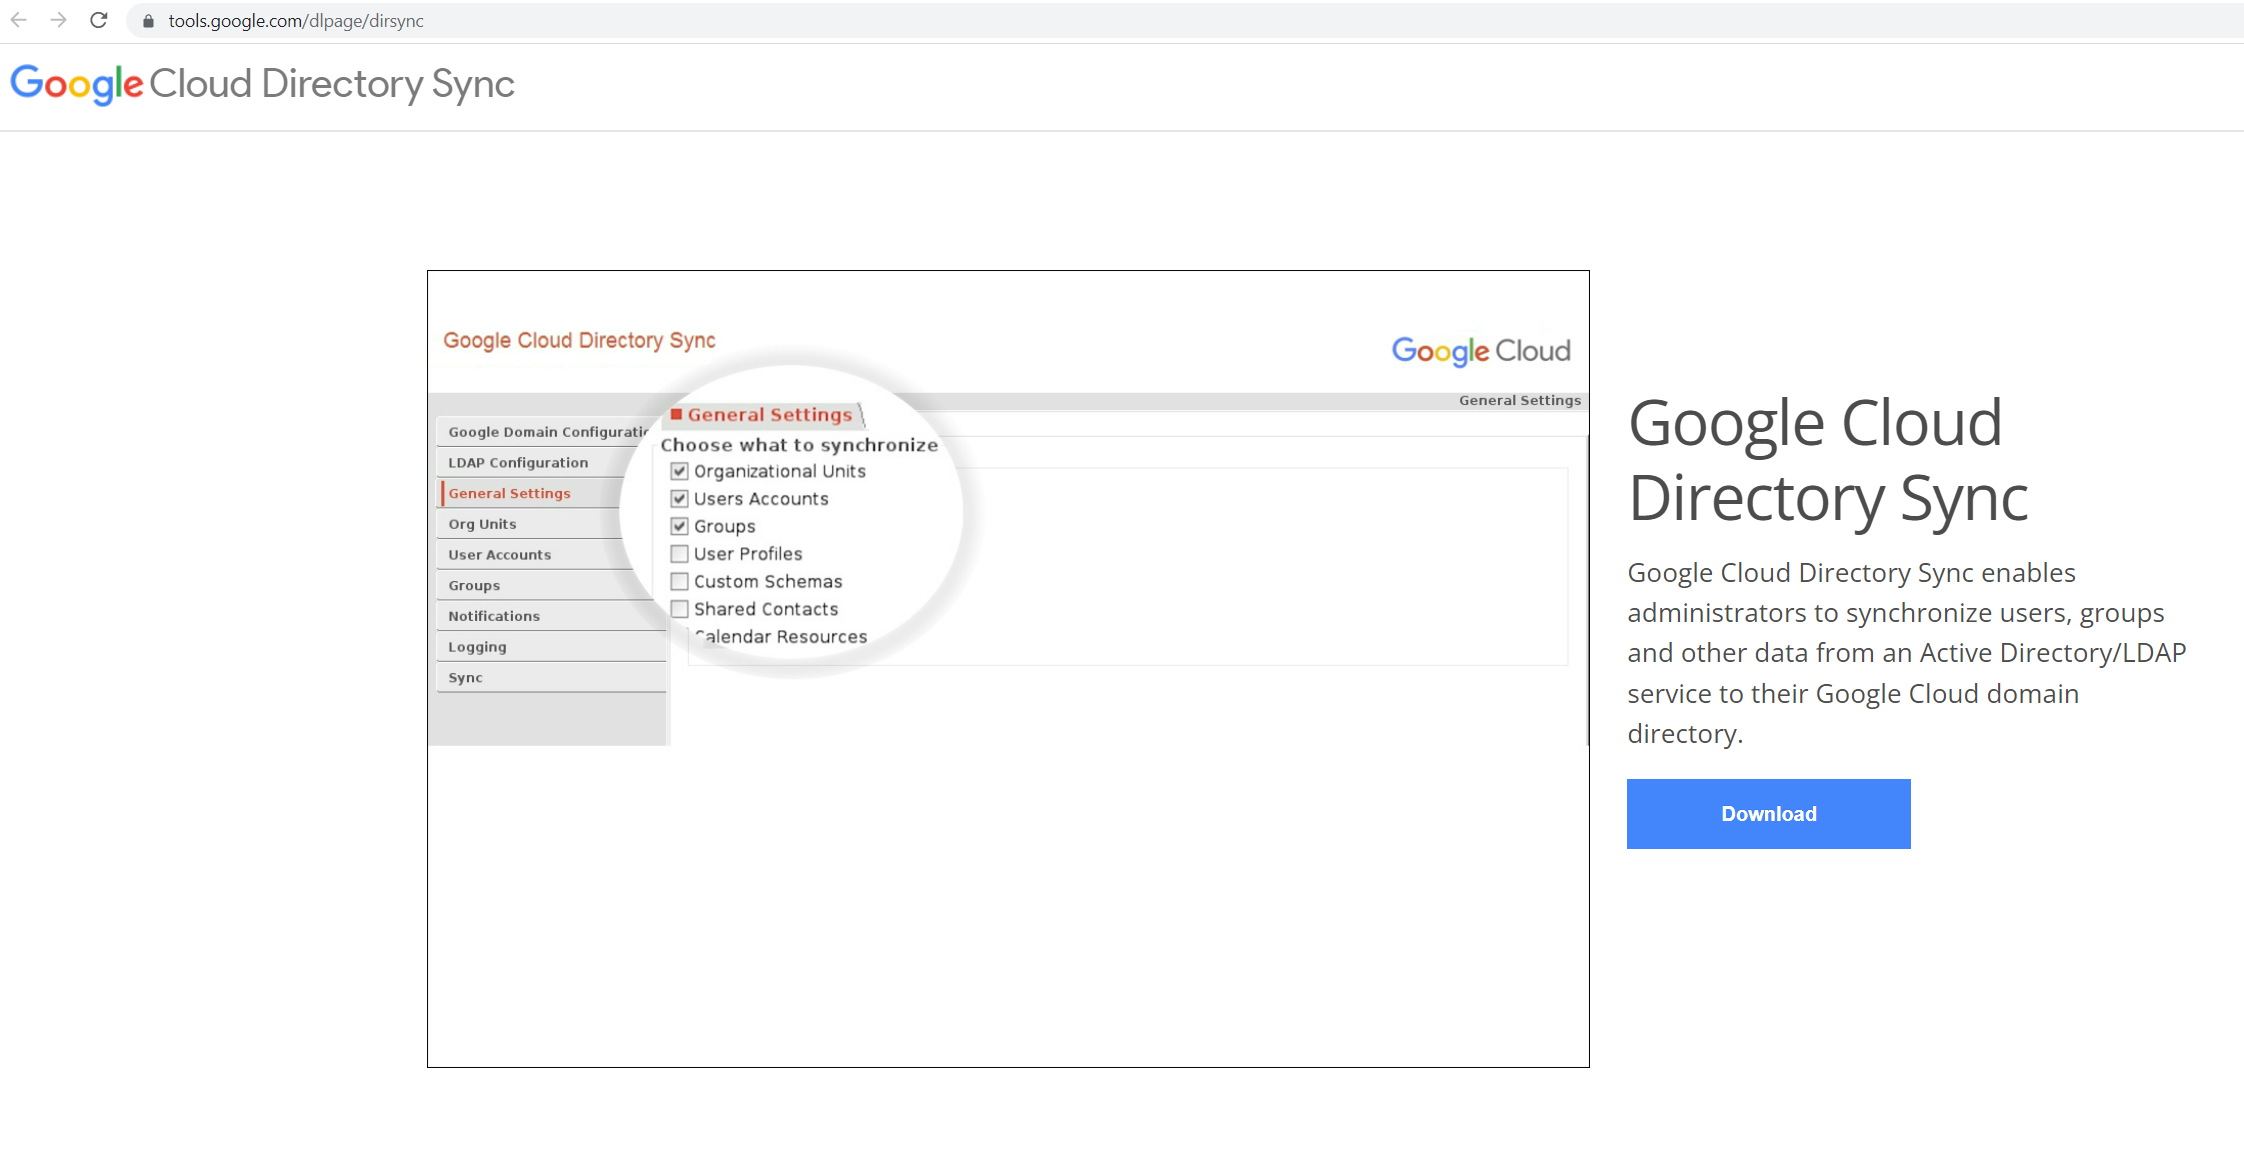
Download Google Cloud Directory Sync at https://tools.google.com/dlpage/dirsync

Google Domain Configuration
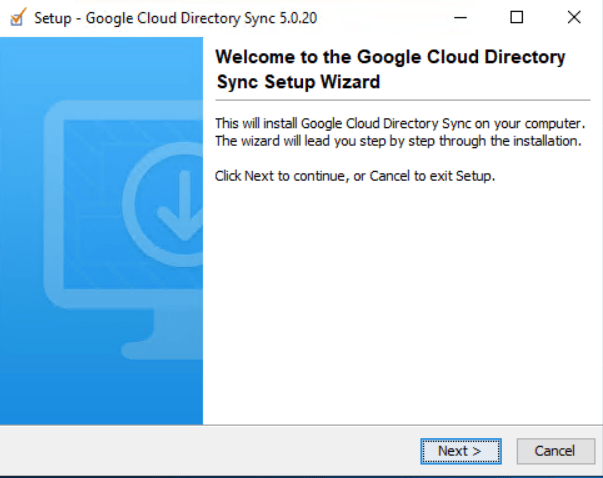
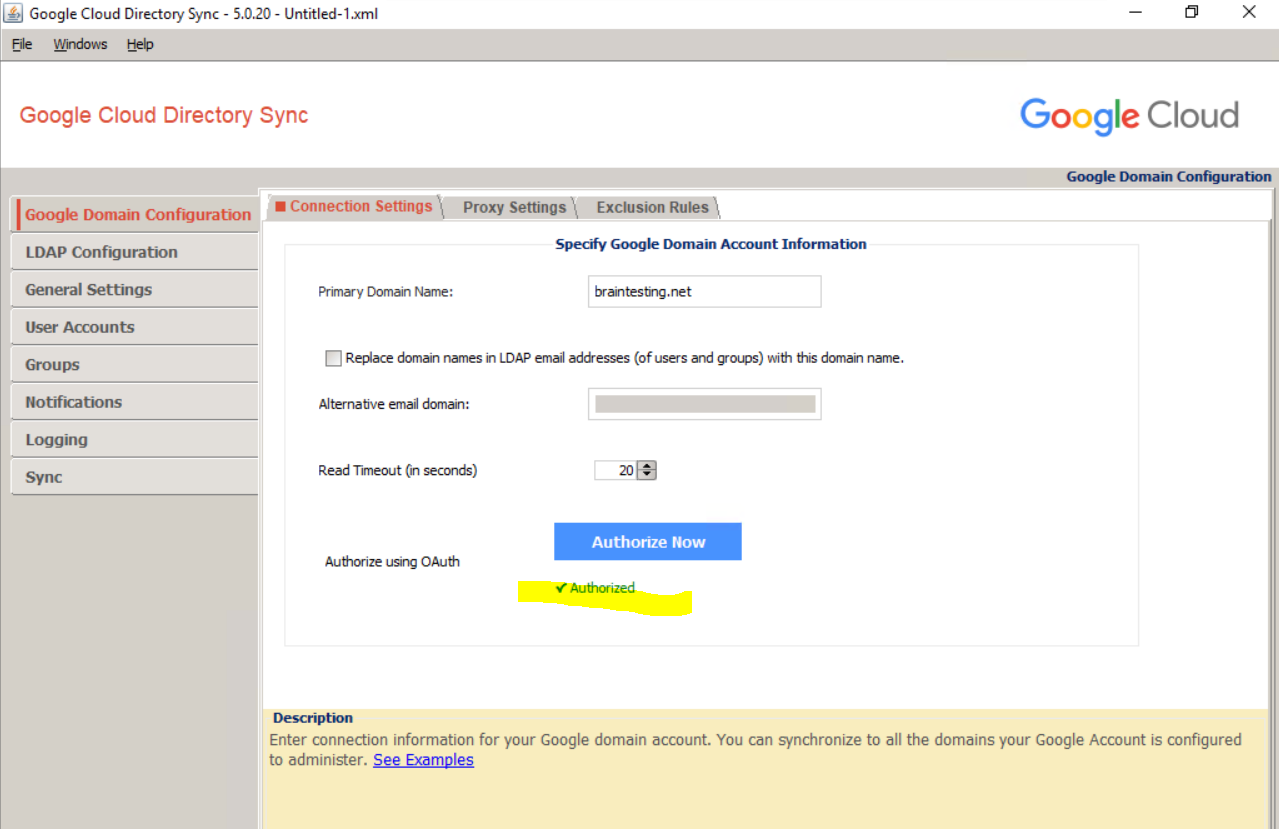
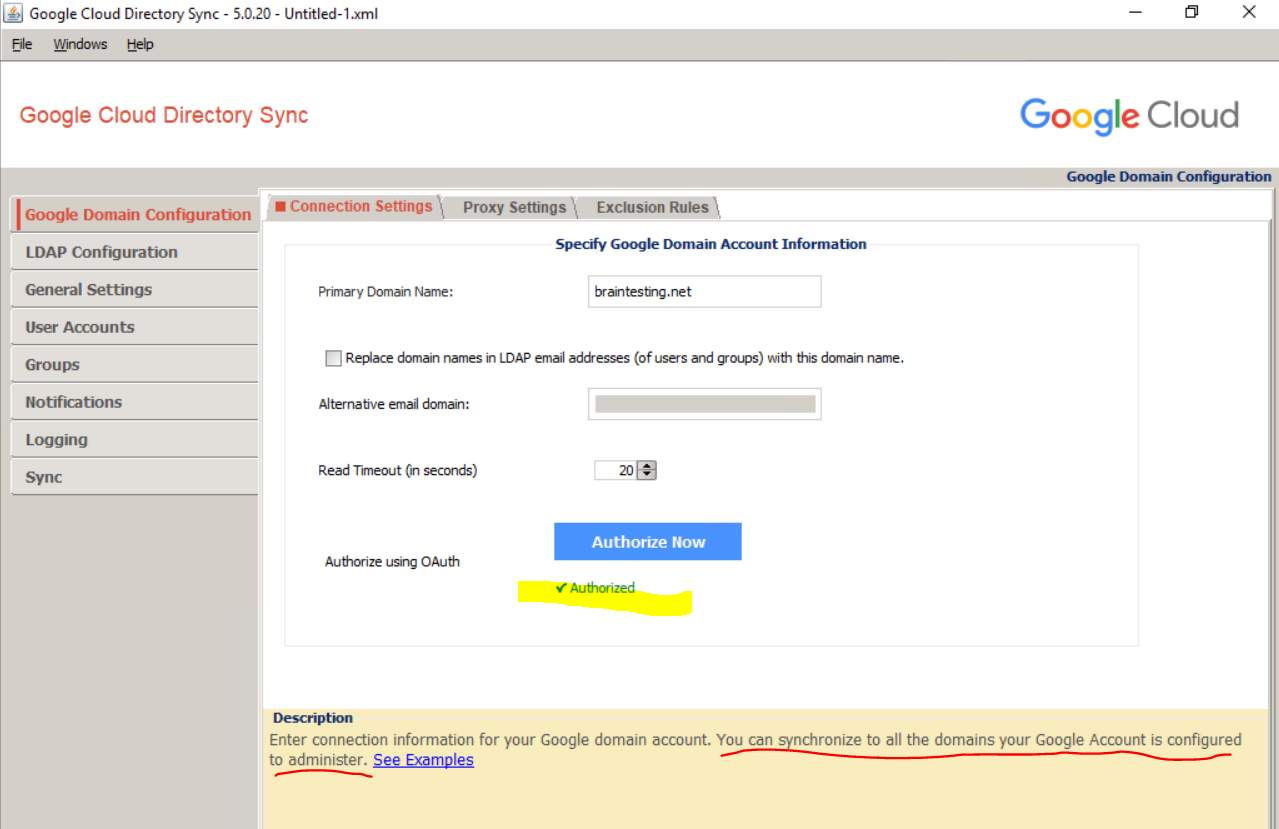
Now we can open the Google Cloud Directory Sync tool.
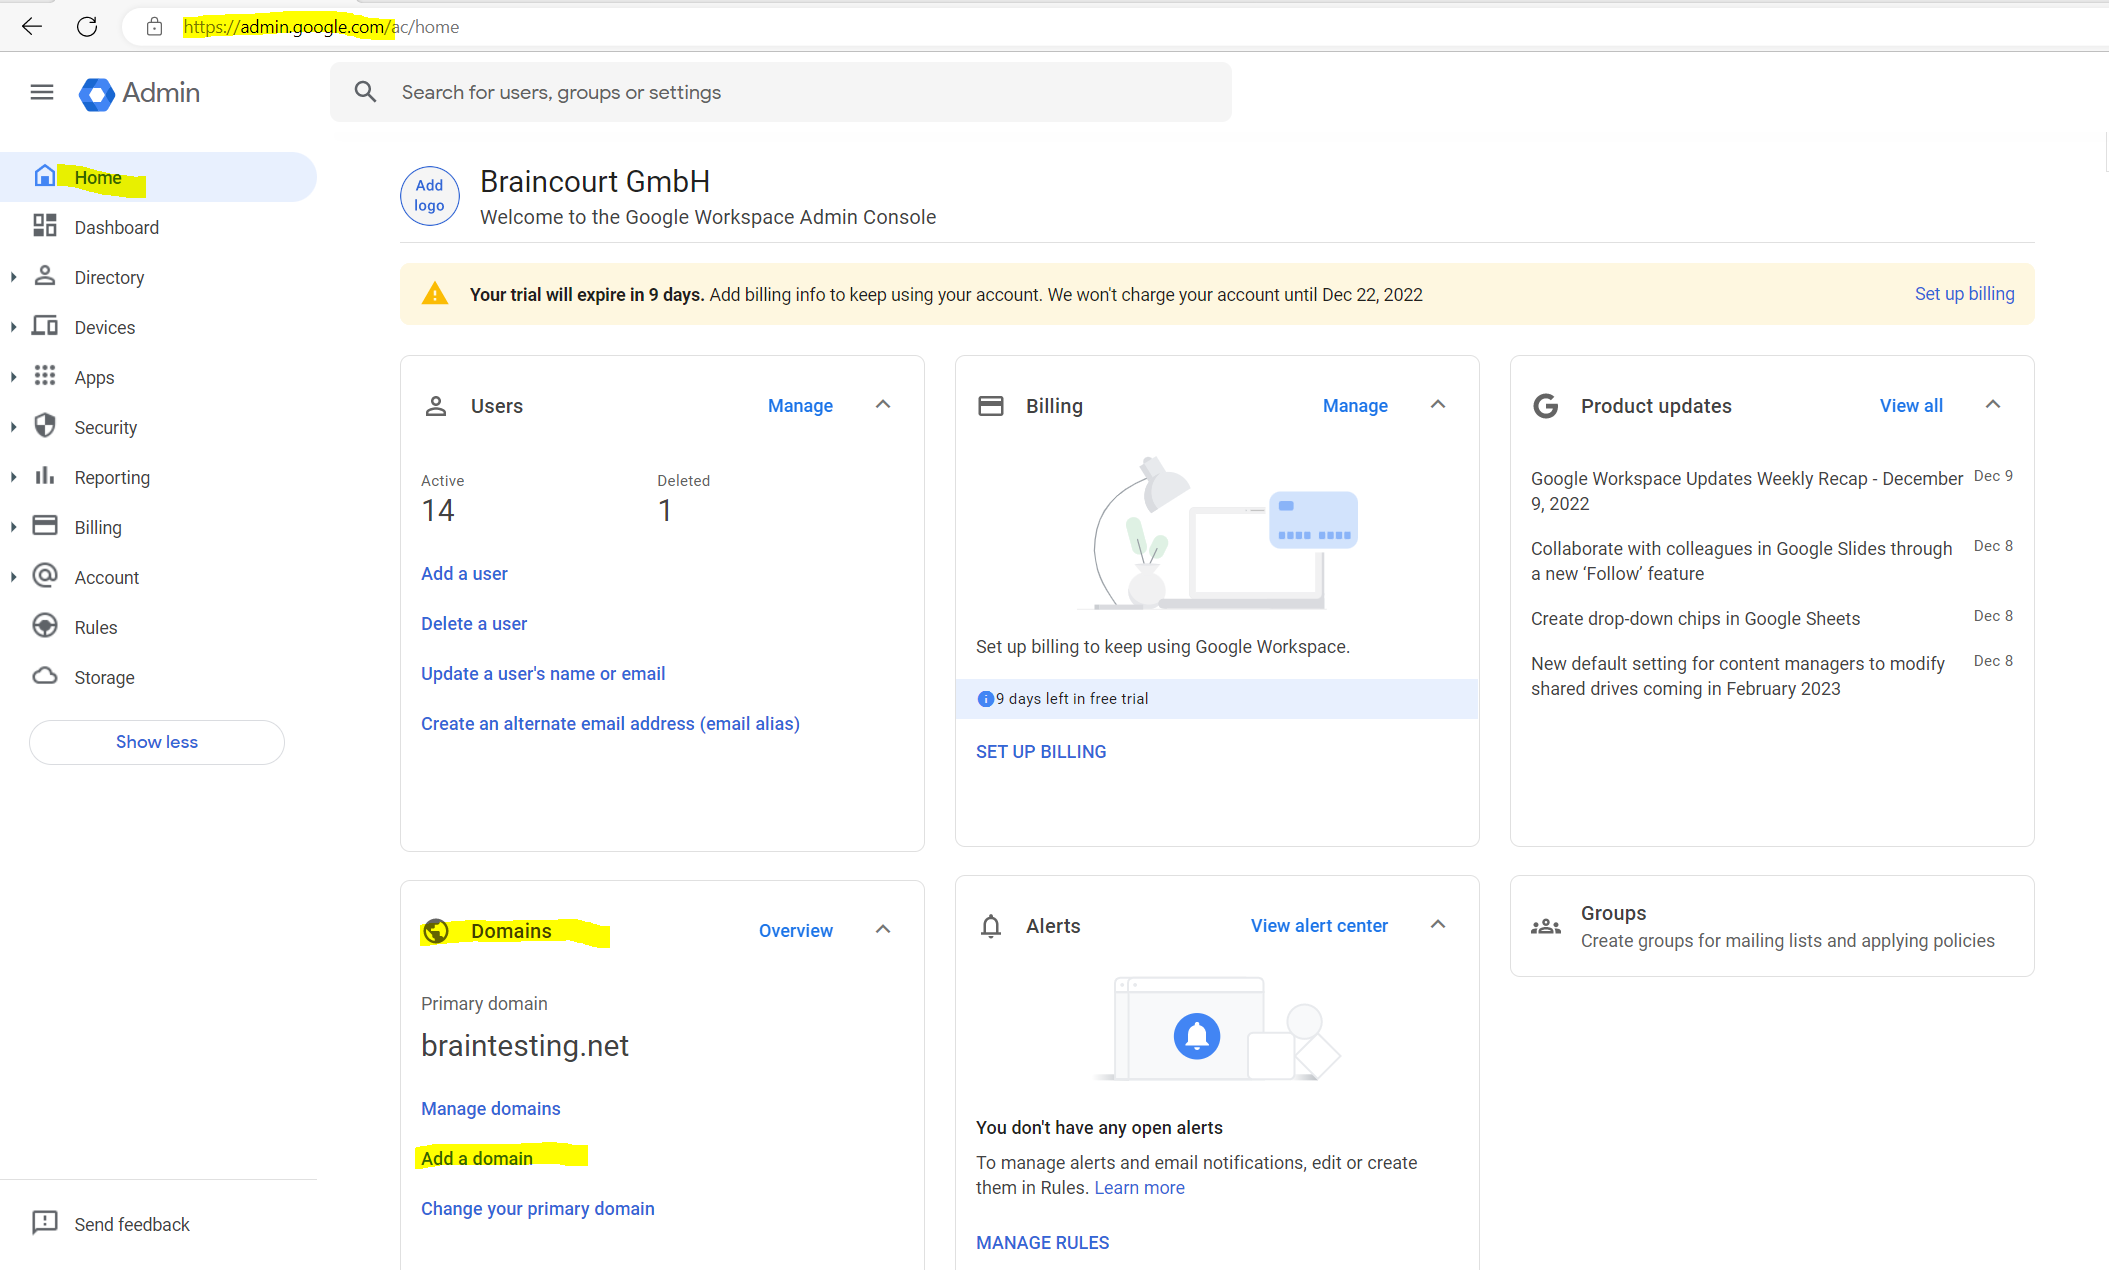
First we need to enter the primary domain name from the Google Account we want to synchronize with our on-premise Active Directory.

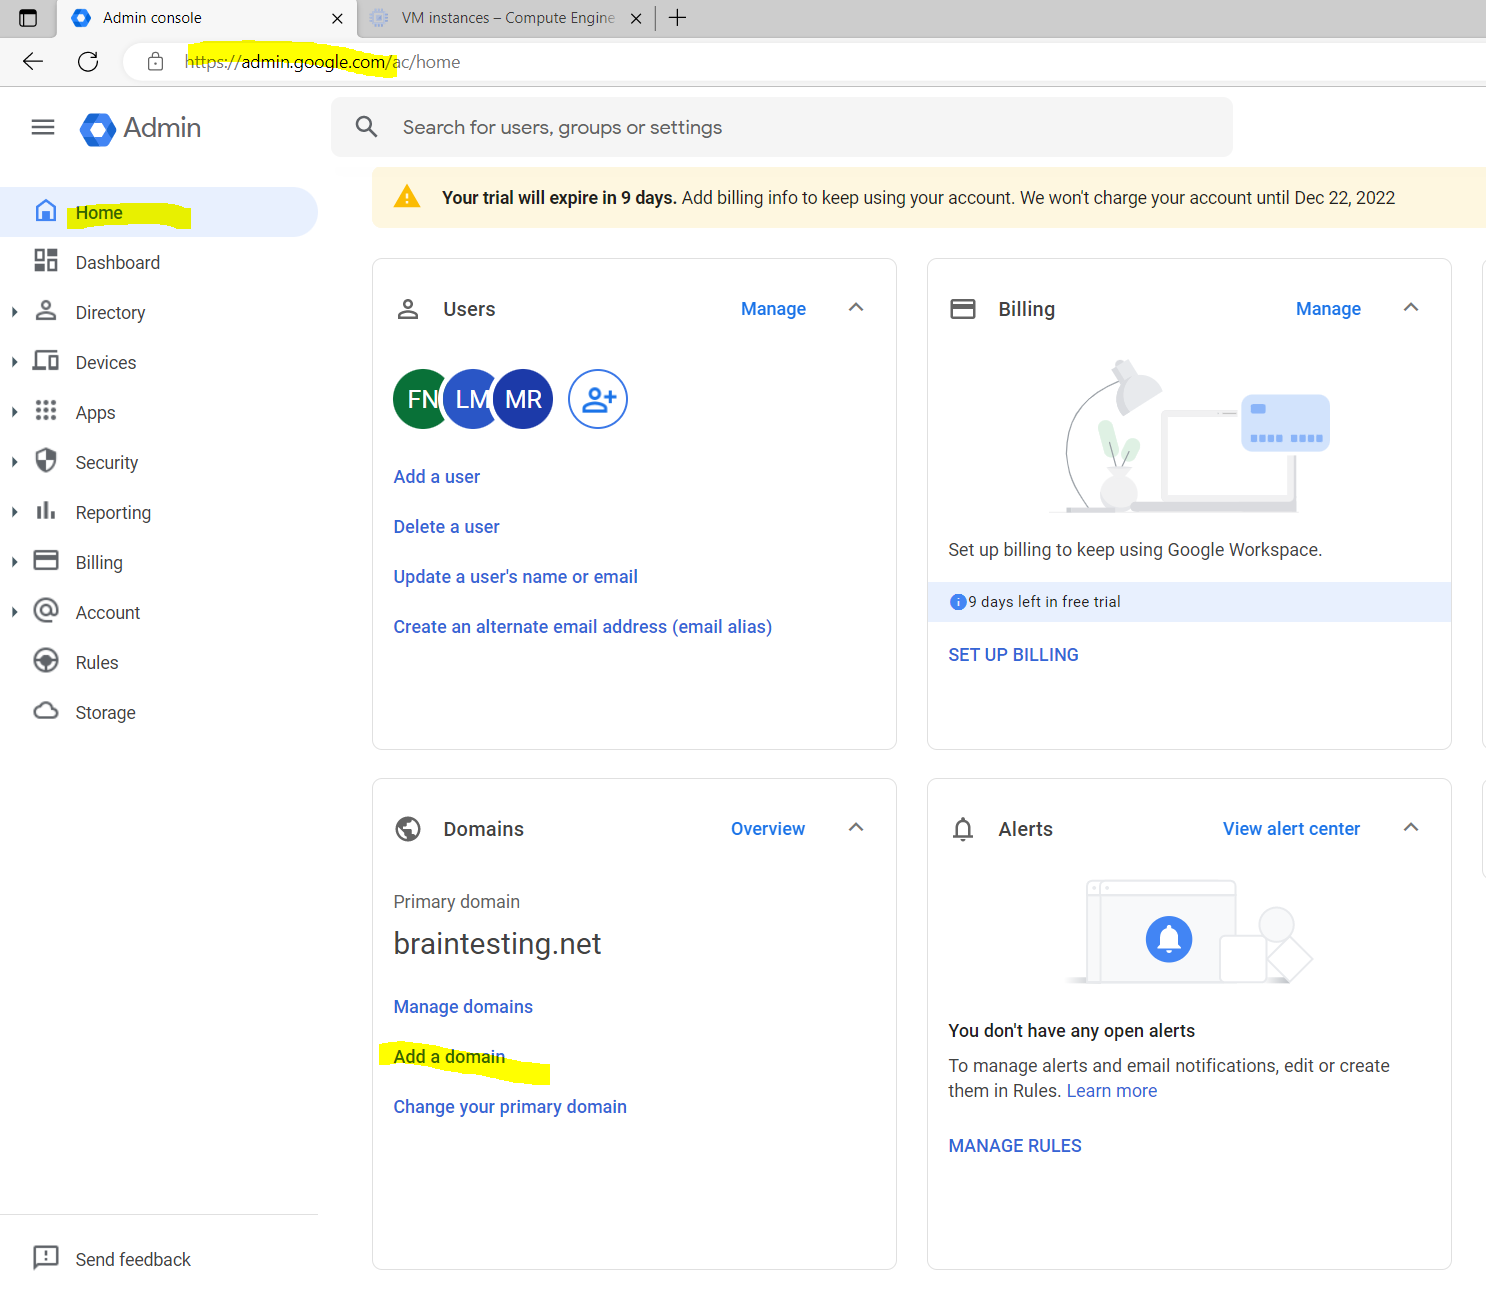
The primary domain name is shown in the Google Admin Console and the Home page.
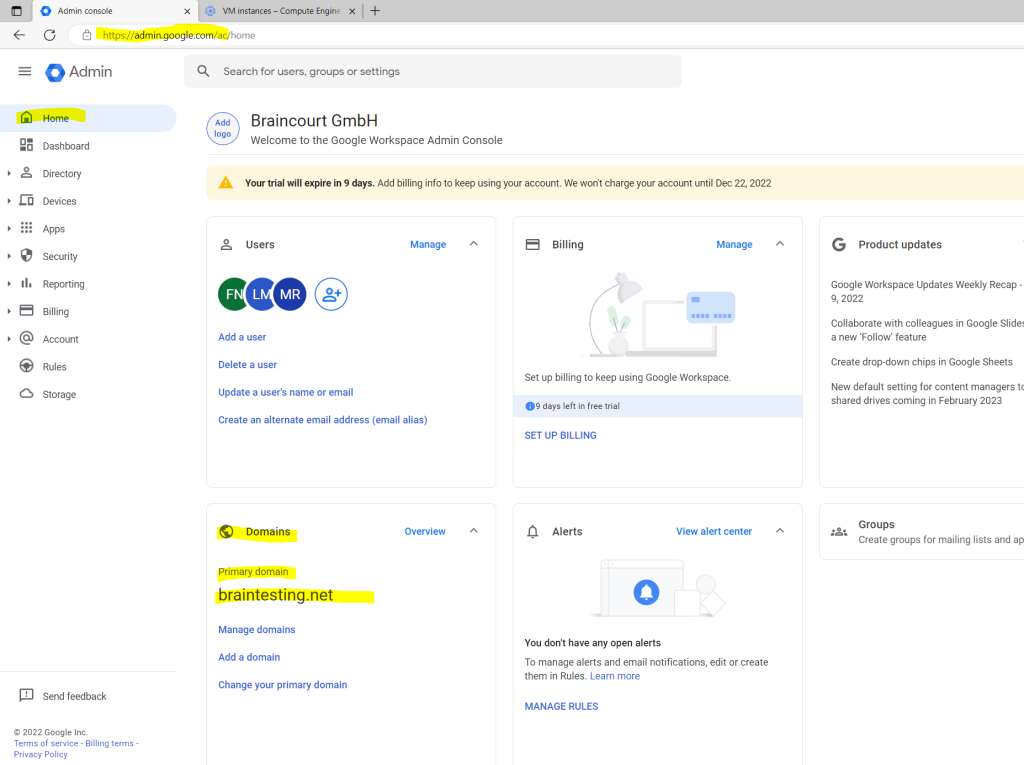
The primary domain I was set up with the Organization setup as shown in my following post.
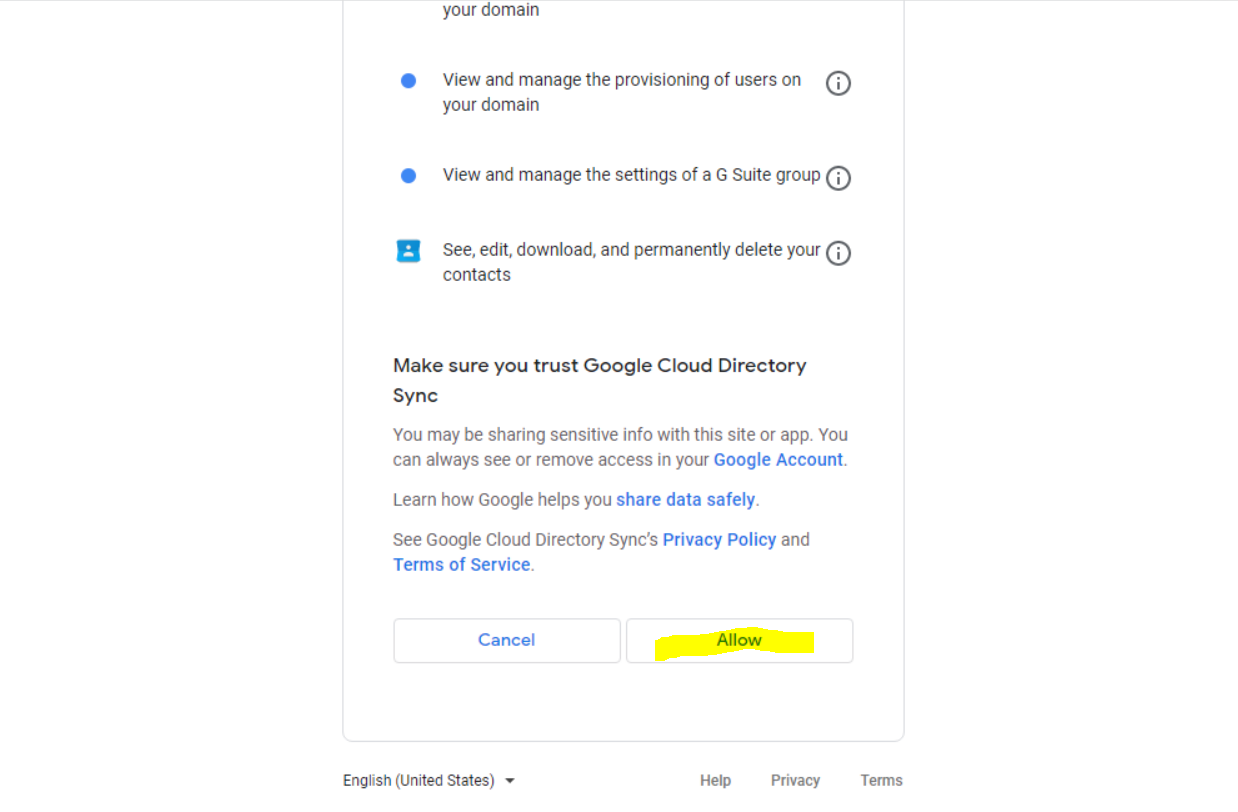
To enable GCDS to interact with the Directory API and Domain Shared Contacts API of Cloud Identity and Google Workspace, the application needs a user account that has administrative privileges.
When signing up for Cloud Identity or Google Workspace, you already created one super-admin user. Although you could use this user for GCDS, it’s preferable to create a separate user that is exclusively used by Cloud Directory Sync.
So before clicking here on Authorize Now, we first create a separate user for.

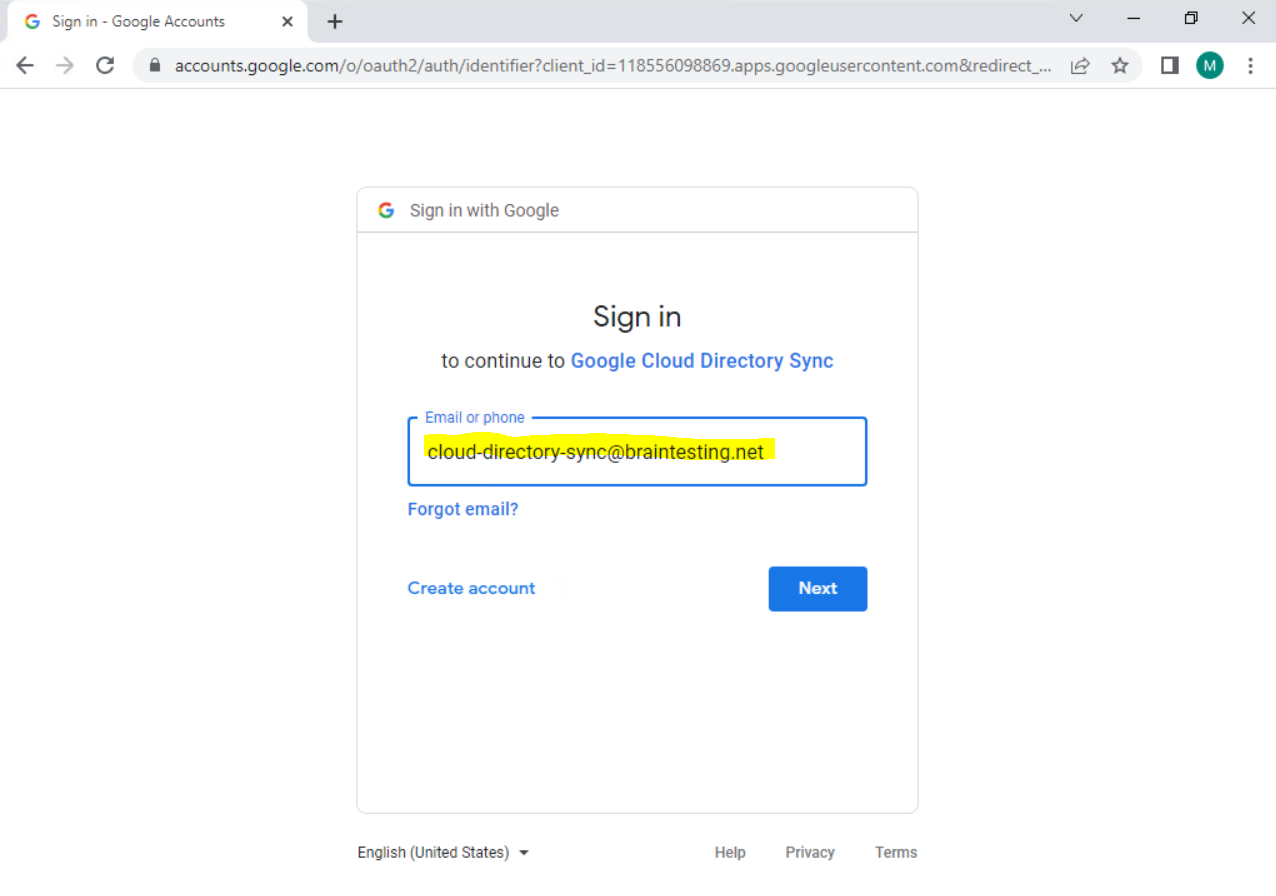
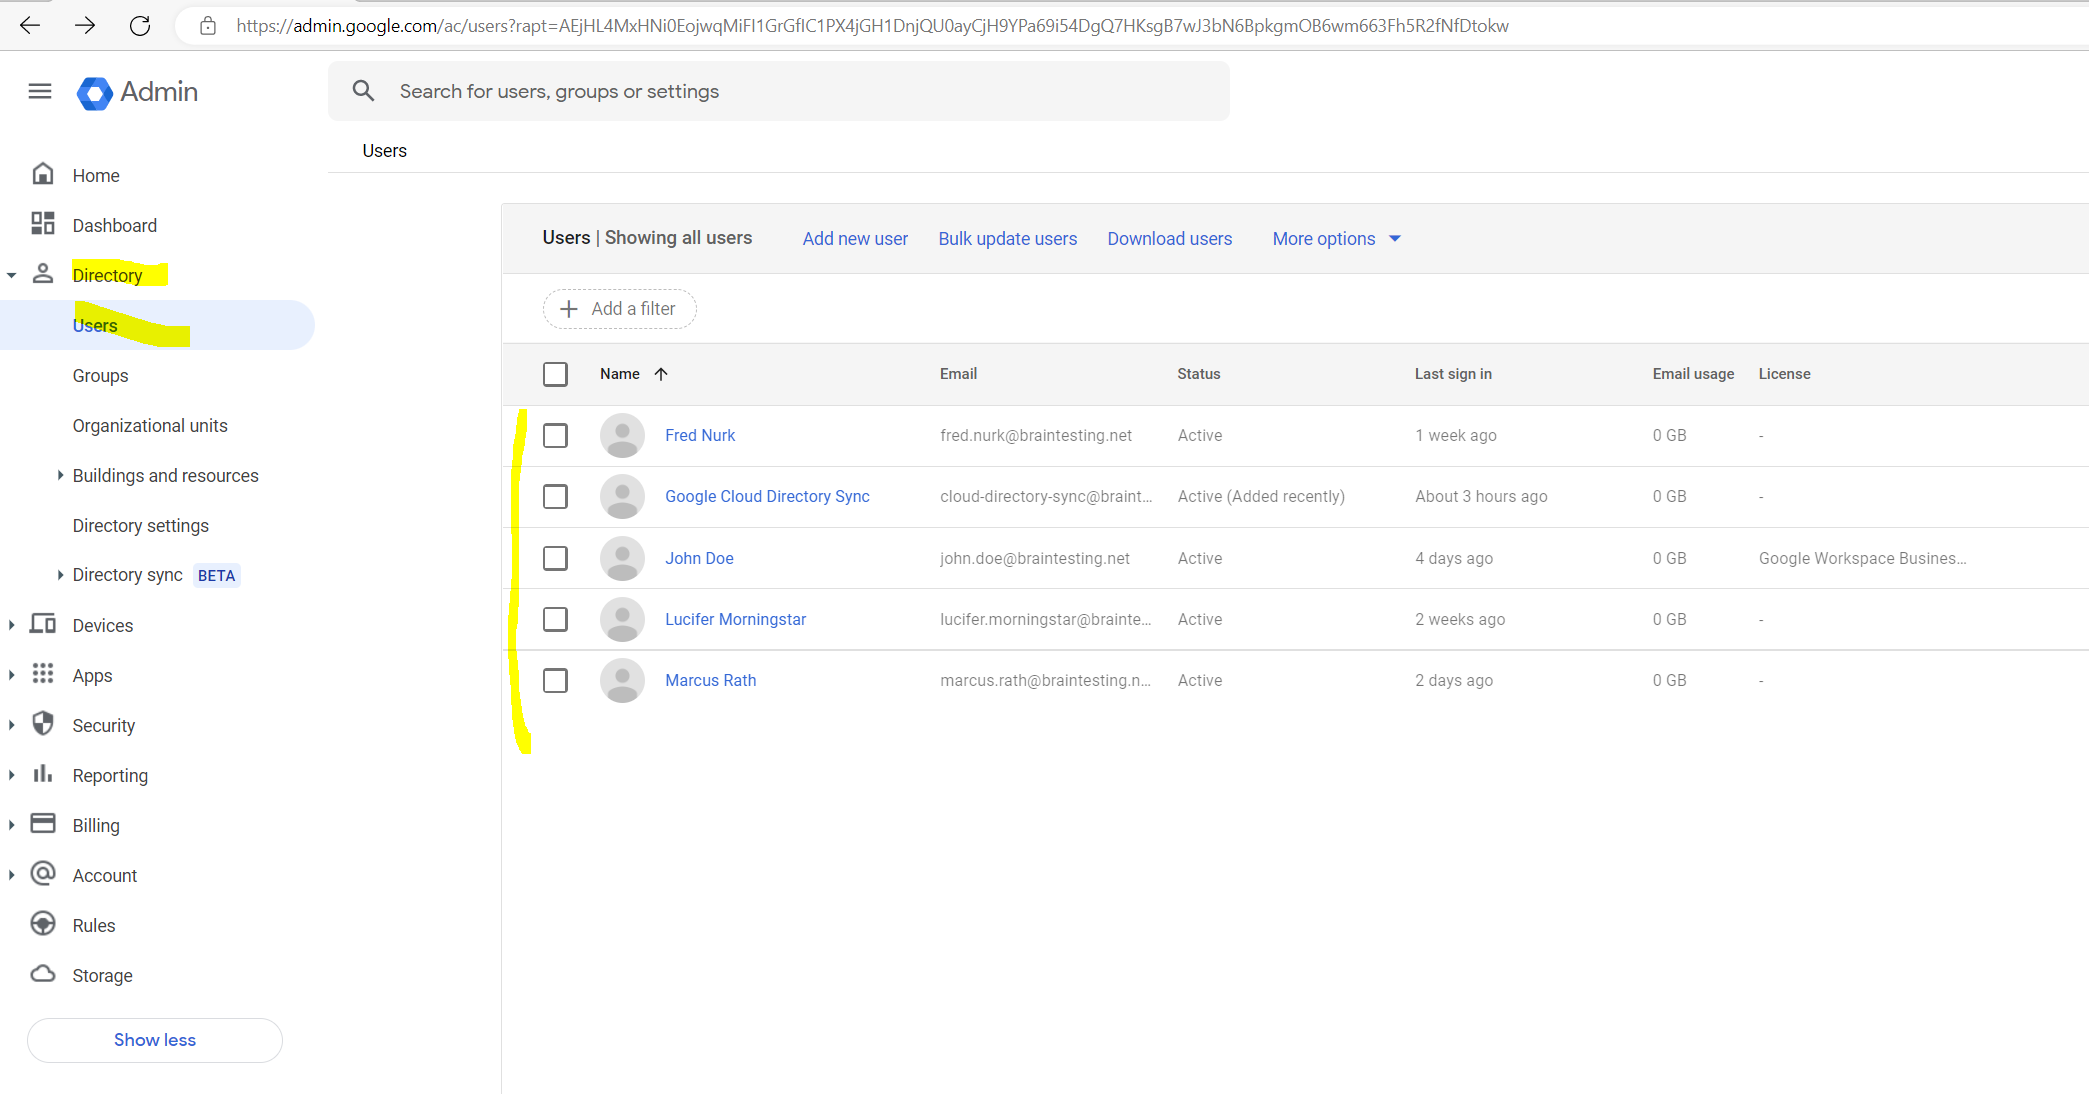
Open the Admin console and sign in by using the super-admin user that you created when signing up for Cloud Identity or Google Workspace.
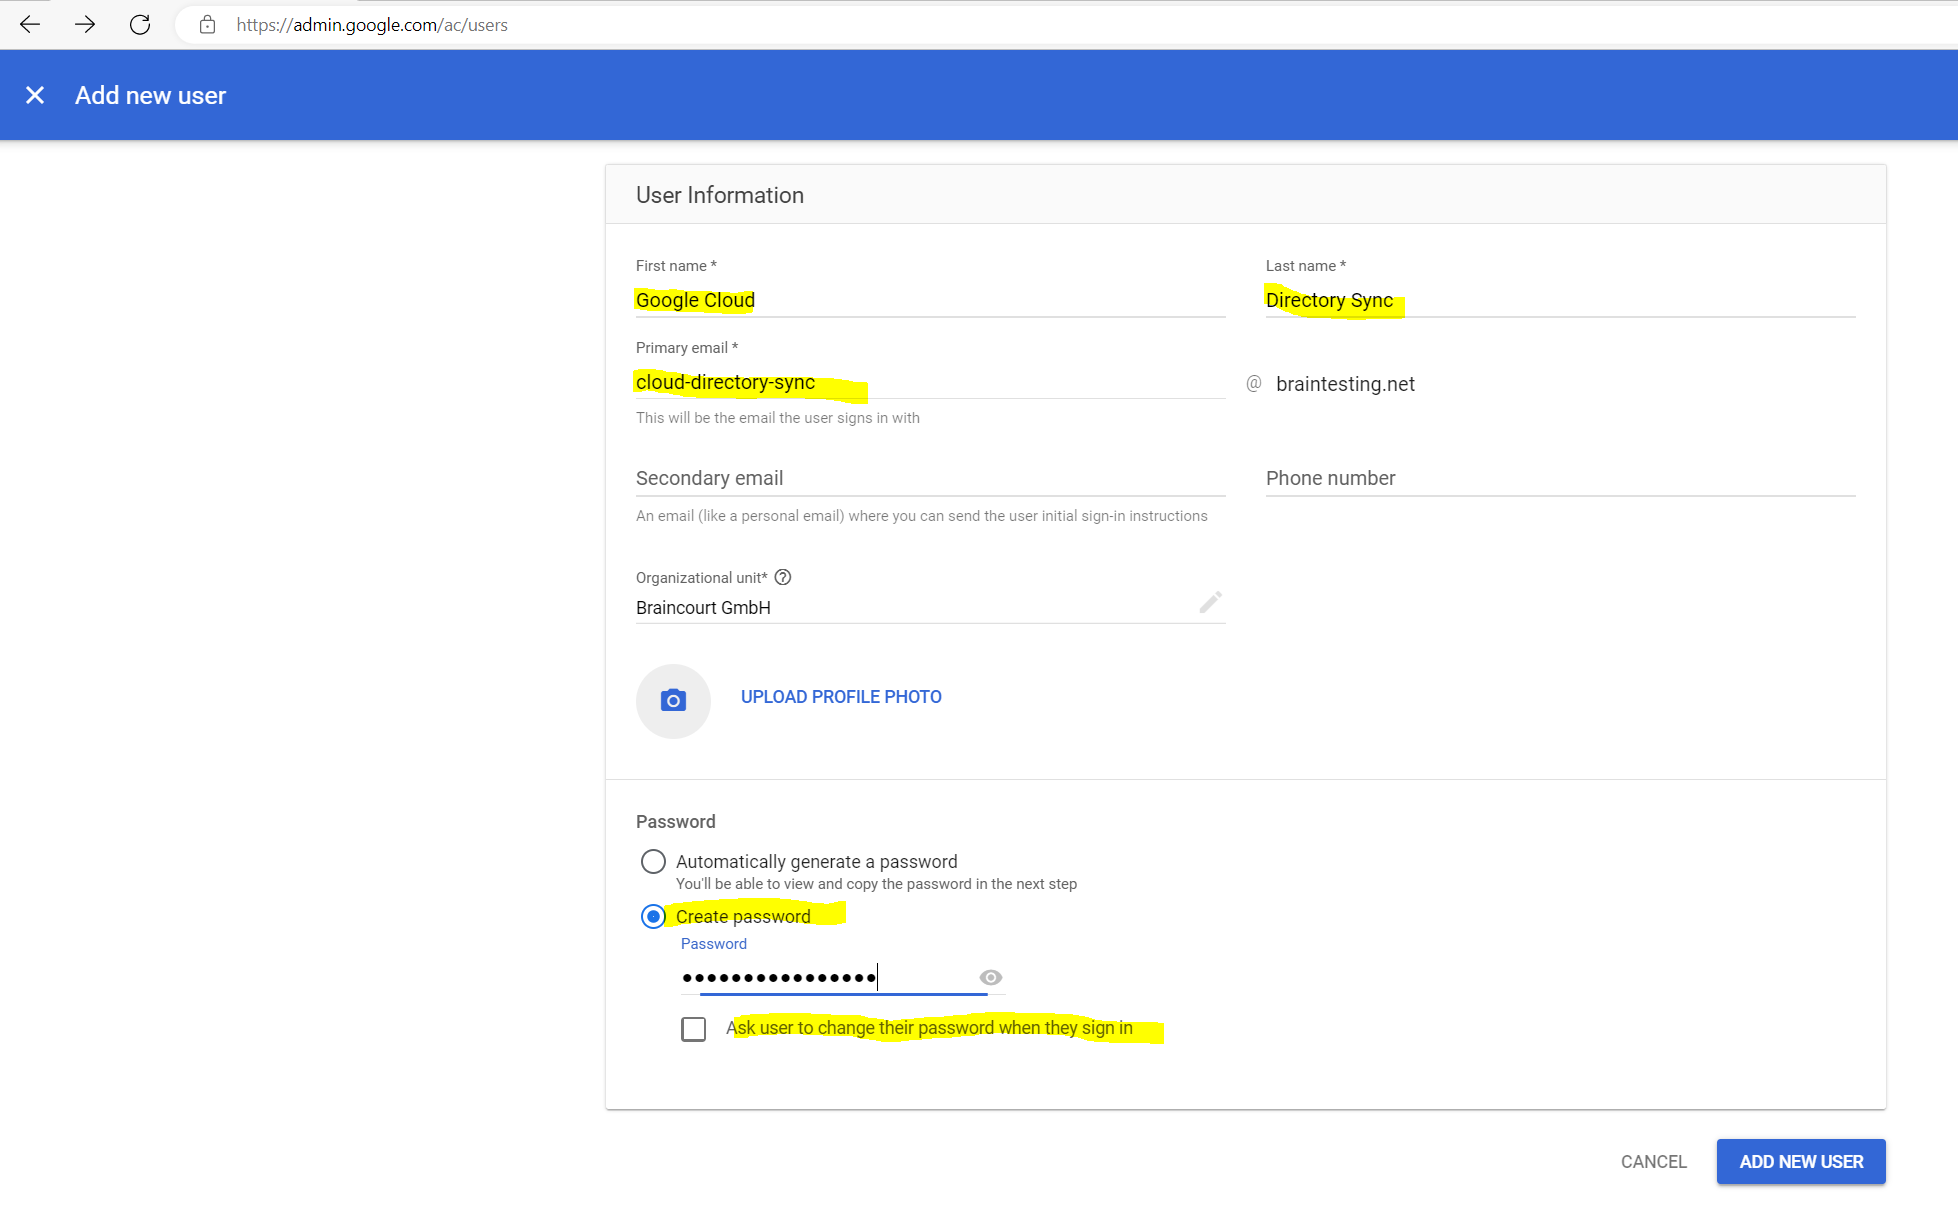
Add a new user under Directory –> Users –> Add new user

Retain the primary domain in the email address, even if the domain does not correspond to the forest that you’re provisioning from.
Ensure that Automatically generate a new password is set to Disabled, and enter a password.
Ensure that Ask for a password change at the next sign-in is set to Disabled.
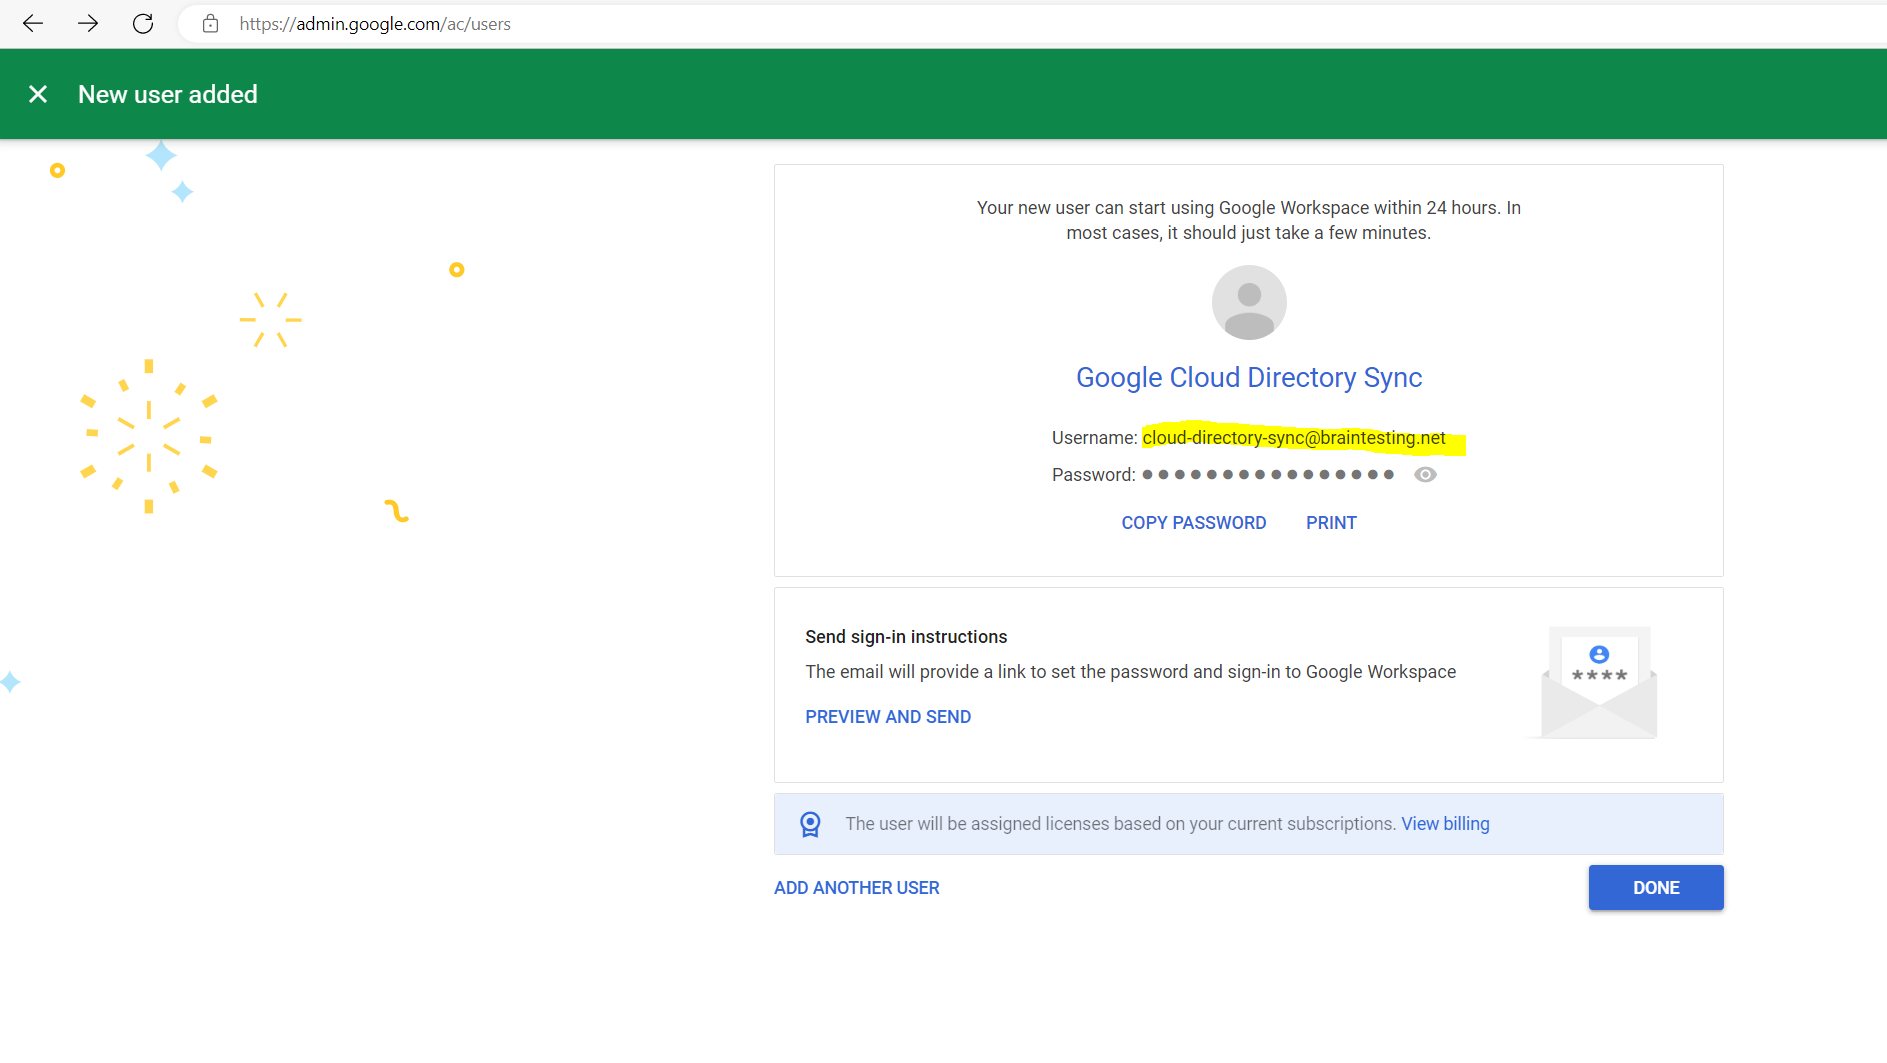
To enable GCDS to create, list, and delete user accounts and groups, the user needs additional privileges. Additionally, it’s a good idea to exempt the user from single sign-on—otherwise, you might not be able to re-authorize GCDS when experiencing single sign-on problems. Both can be accomplished by making the user a super admin:
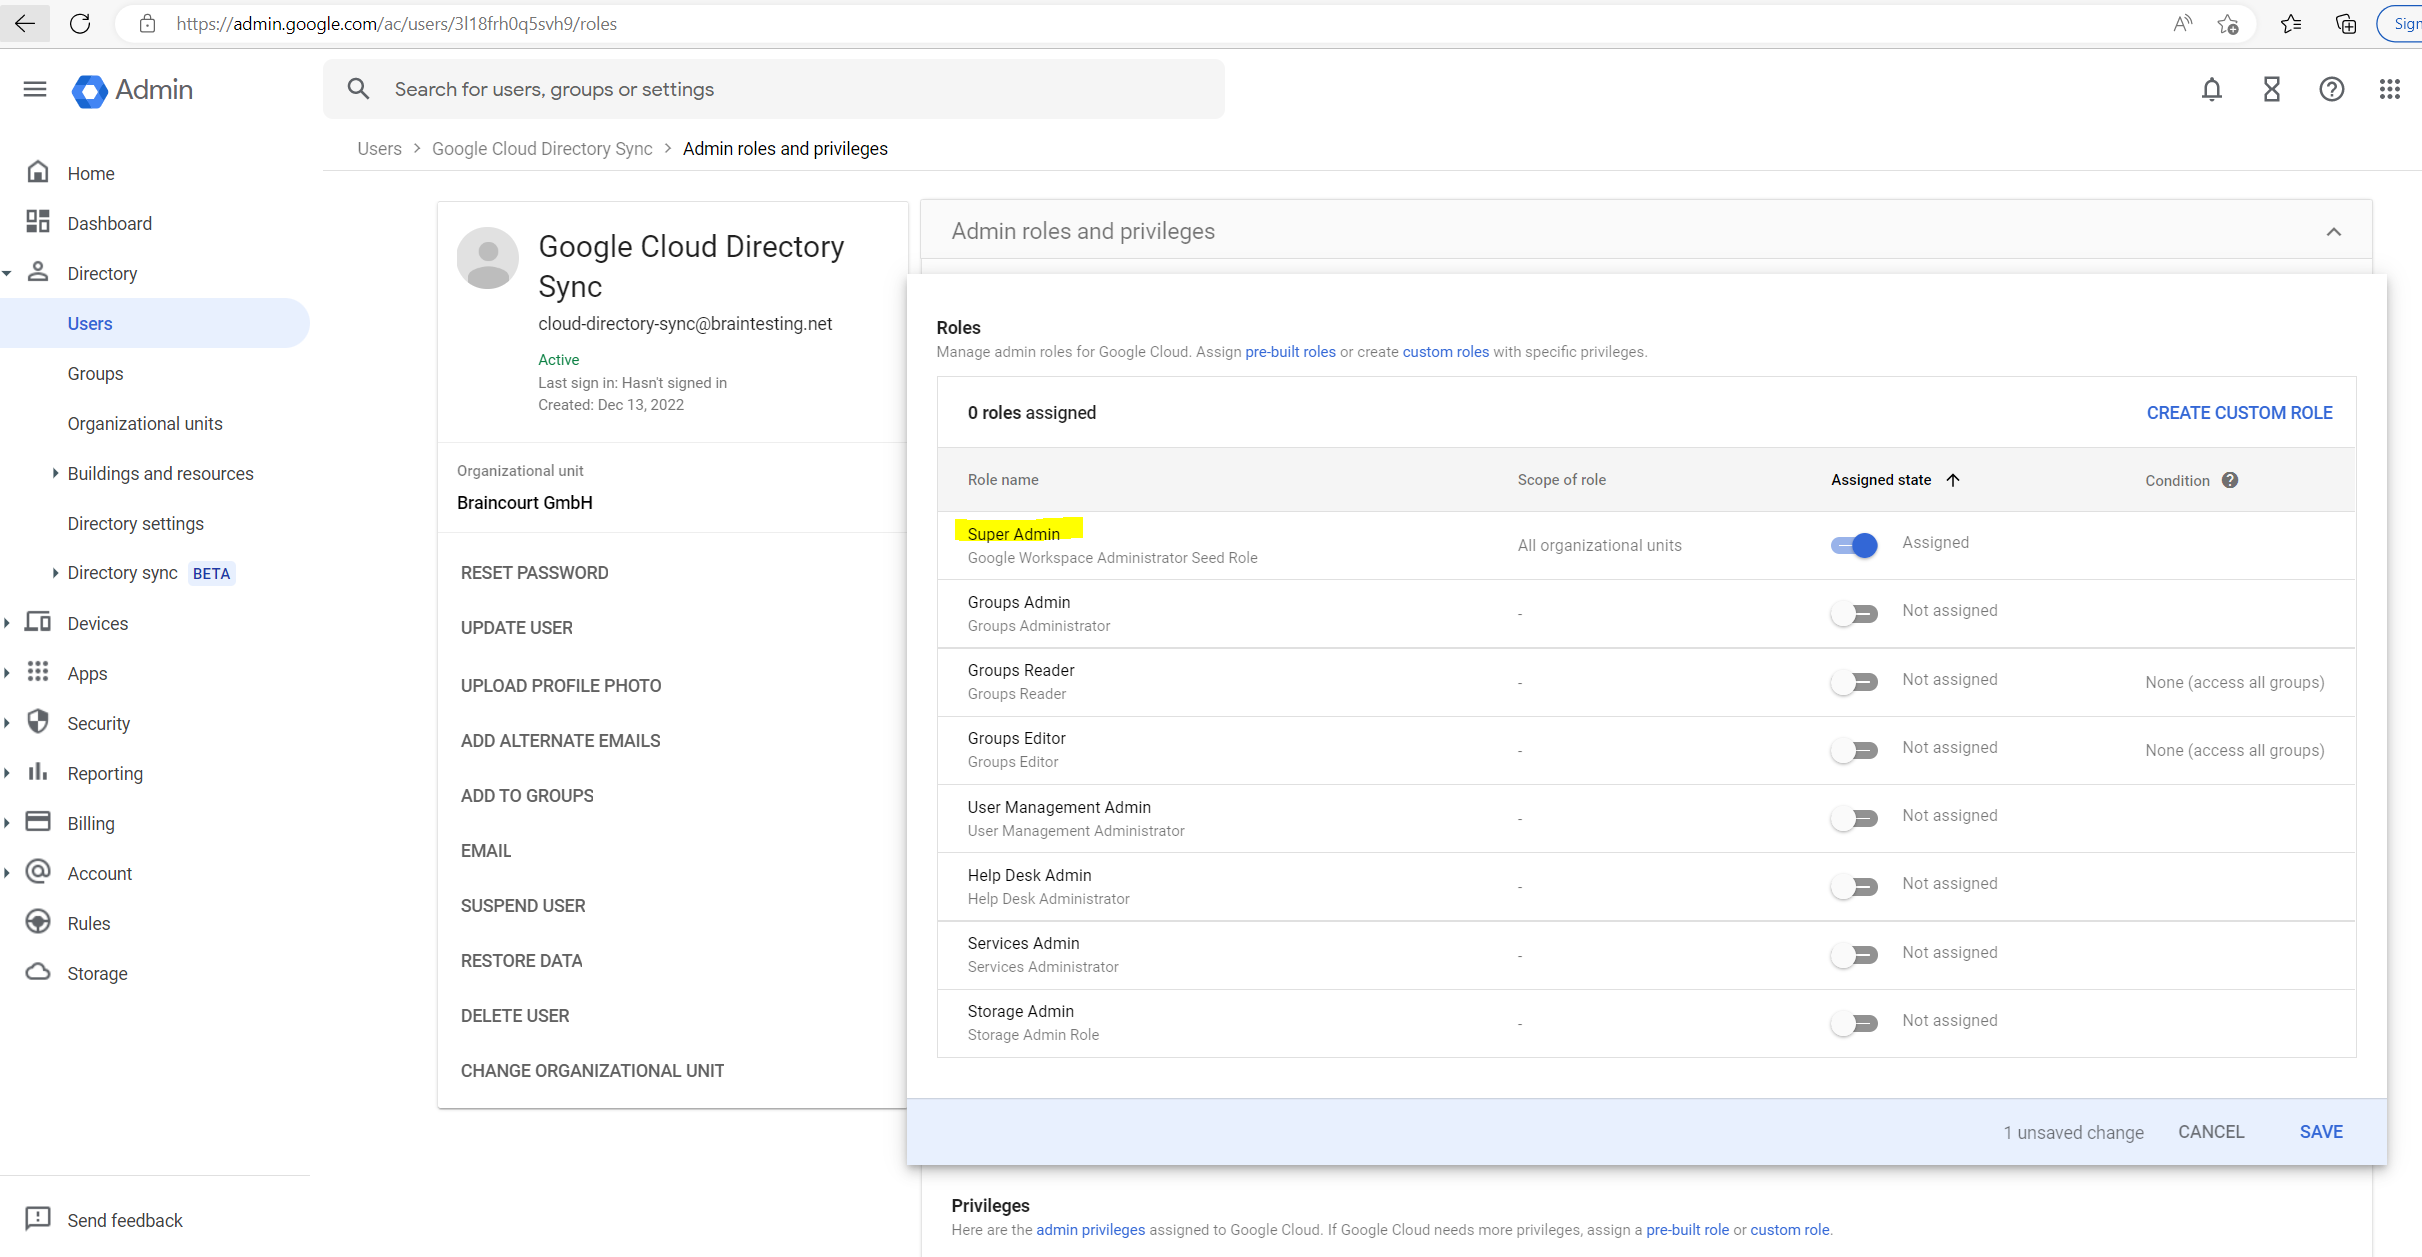
Locate the newly created user in the list and click on it.

Under Admin roles and privileges, click Assign Roles.
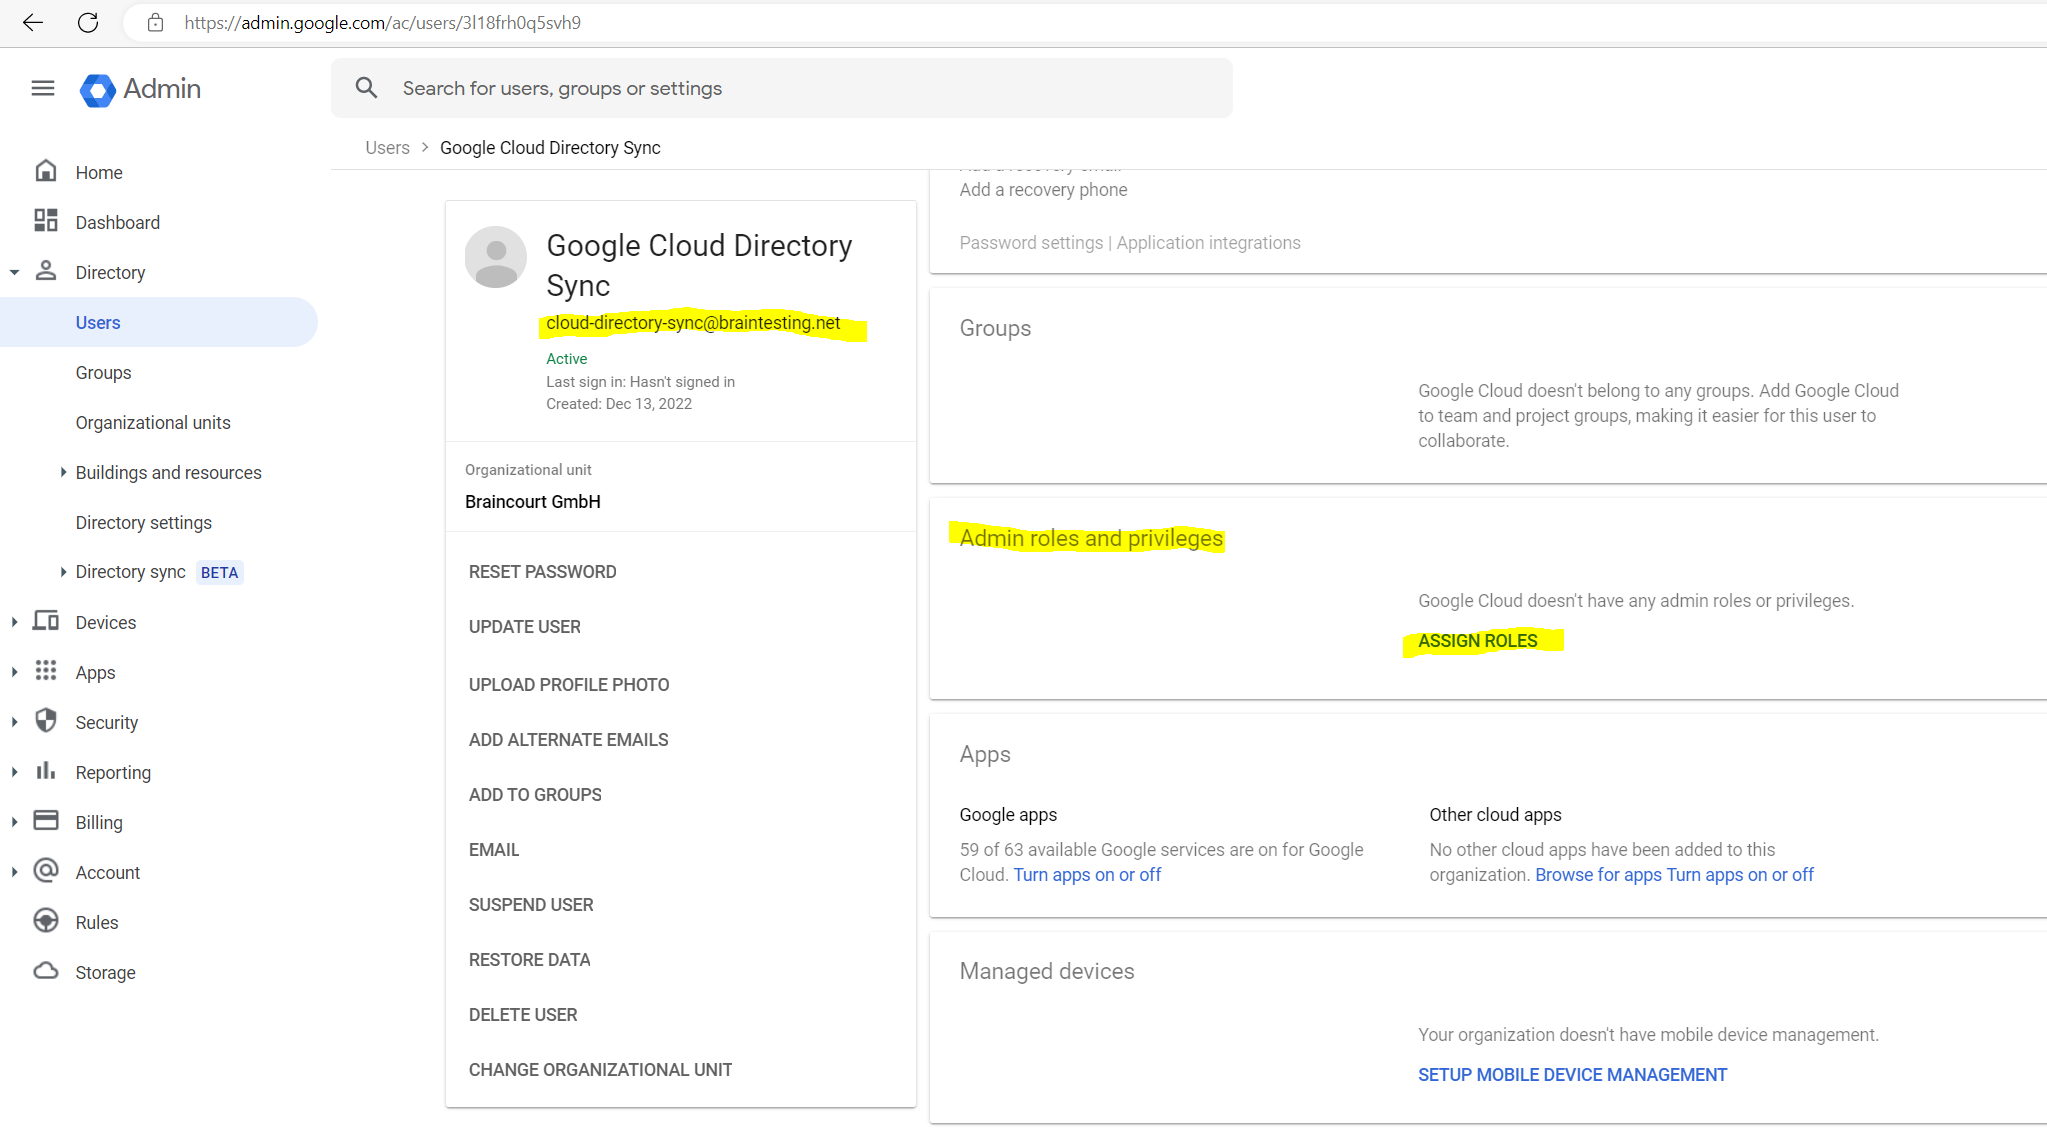
Enable the Super Admin role and click on save.
Warning: The super-admin role grants the user full access to Cloud Identity, Google Workspace, and Google Cloud resources. To protect the user against credential theft and malicious use, we recommend that you enable 2-step verification for the user. For more details on how to protect super-admin users, see Security best practices for administrator accounts.
So now we can use this newly created user to Authorize the GCDS tool in Google Cloud.
Click on Authorize Now.

In my case the on-premise Active Directory domain is braintesting.de and there are two further UPN suffixes which can be used for the User Principal Names (UPN).
By the way the braintesting.net domain will also be used as default email domain in Exchange on-premise and Exchange Online in a Exchange Hybrid Classic Full deployment.
More about Exchange Hybrid Classic Full you will find in my following post.
https://blog.matrixpost.net/migration-from-exchange-and-skype-for-business-onpremise-to-office-365-exchange-online-and-teams-step-by-step-part-2/
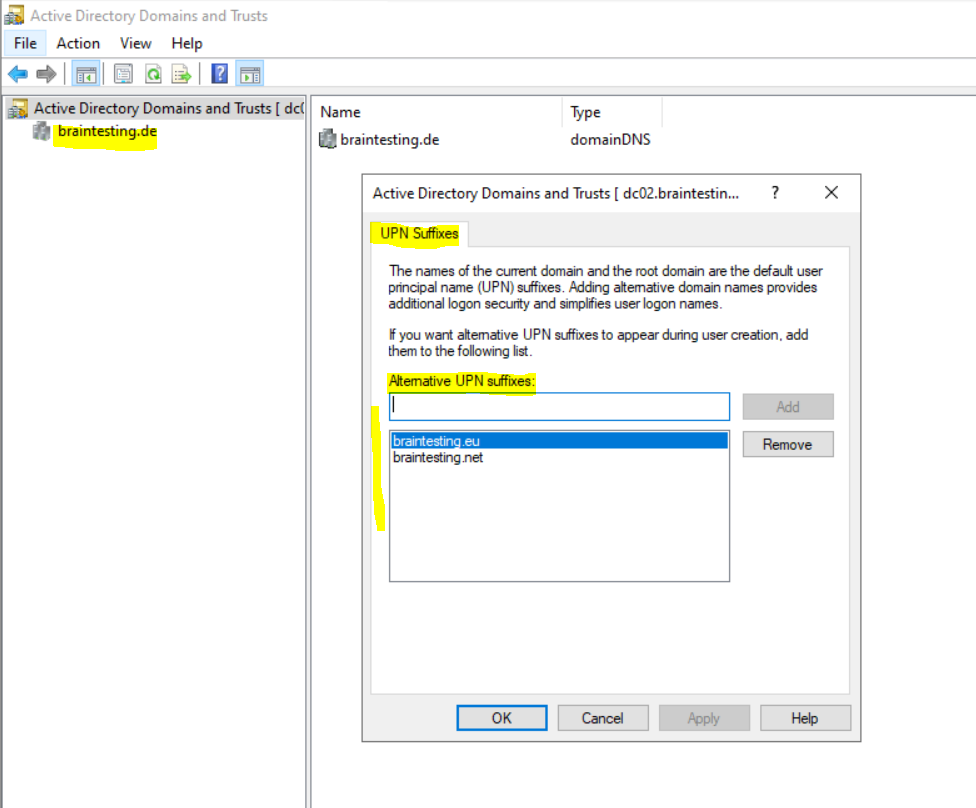
So far I just created the braintesting.net domain in Google Cloud and it is the primary domain. As I will use the email address (mail) attribute from on-premise as common identifier to sync the on-premise users to Google Cloud, I am fine here as the default email in on-premise is also braintesting.net.
In case I want to use the braincourt.de domain as email alias, I need to create it also in Google Cloud.
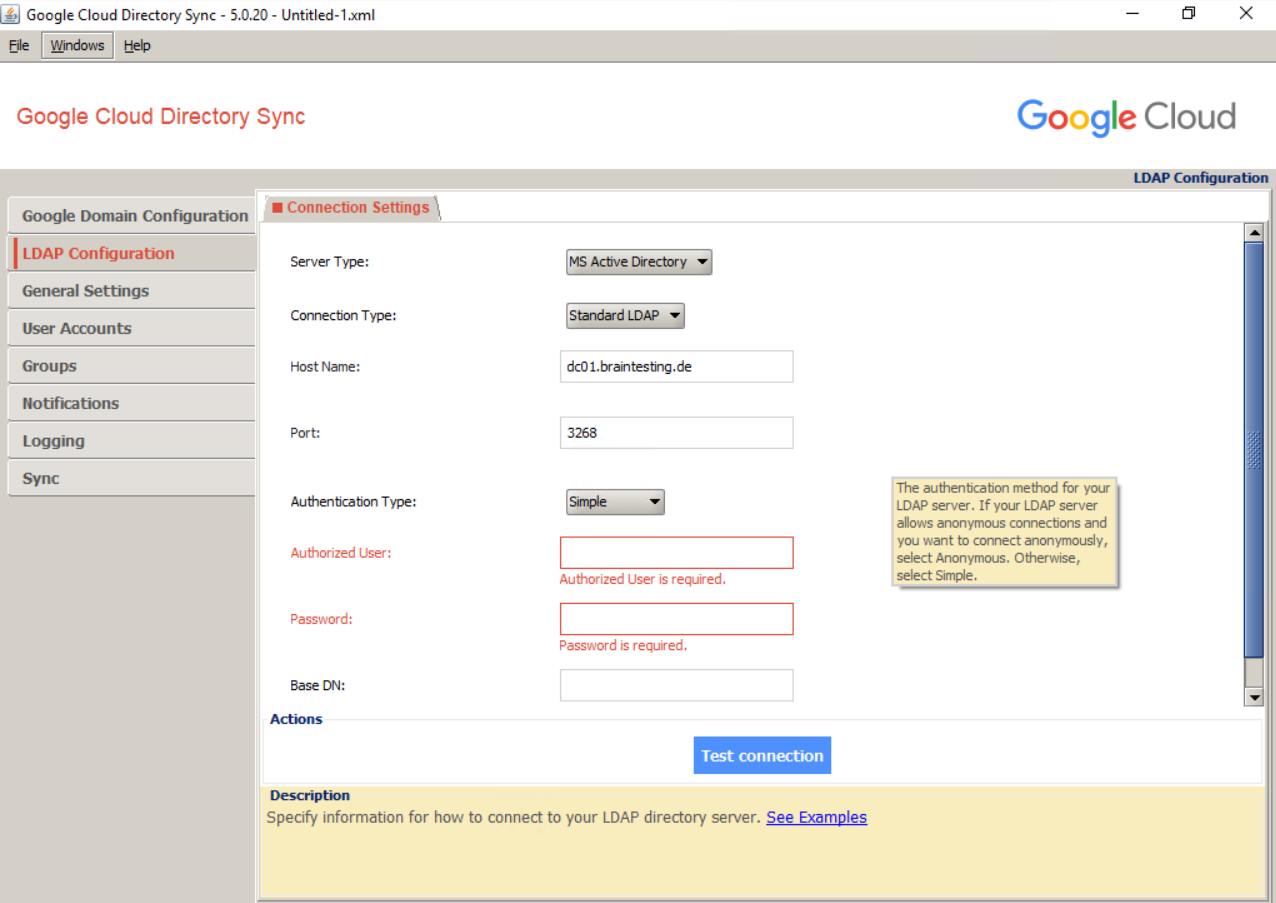
LDAP Configuration
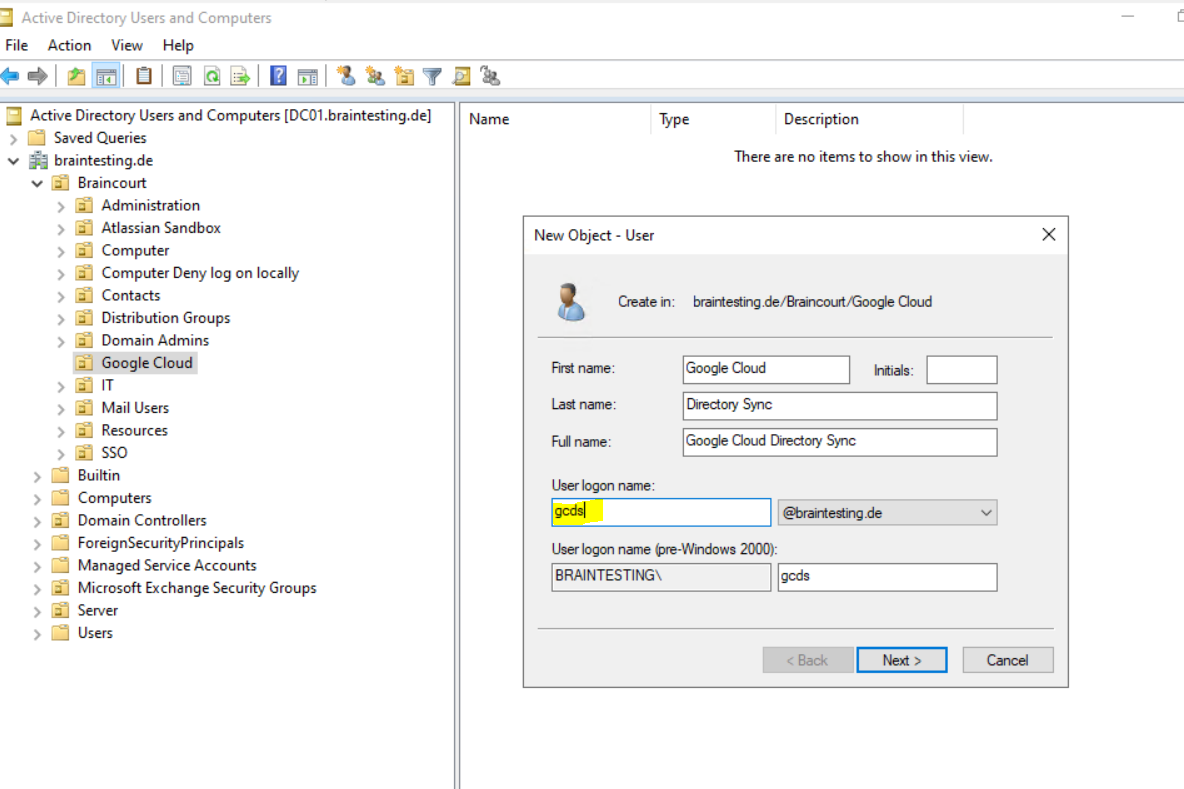
To enable GCDS to retrieve information about users and groups from Active Directory, GCDS also requires a domain user with sufficient access. Rather than reusing an existing Windows user for this purpose, create a dedicated user for GCDS:
Provide an appropriate name and email address. Also provide a password and clear User must change password at next logon. Select Password never expires
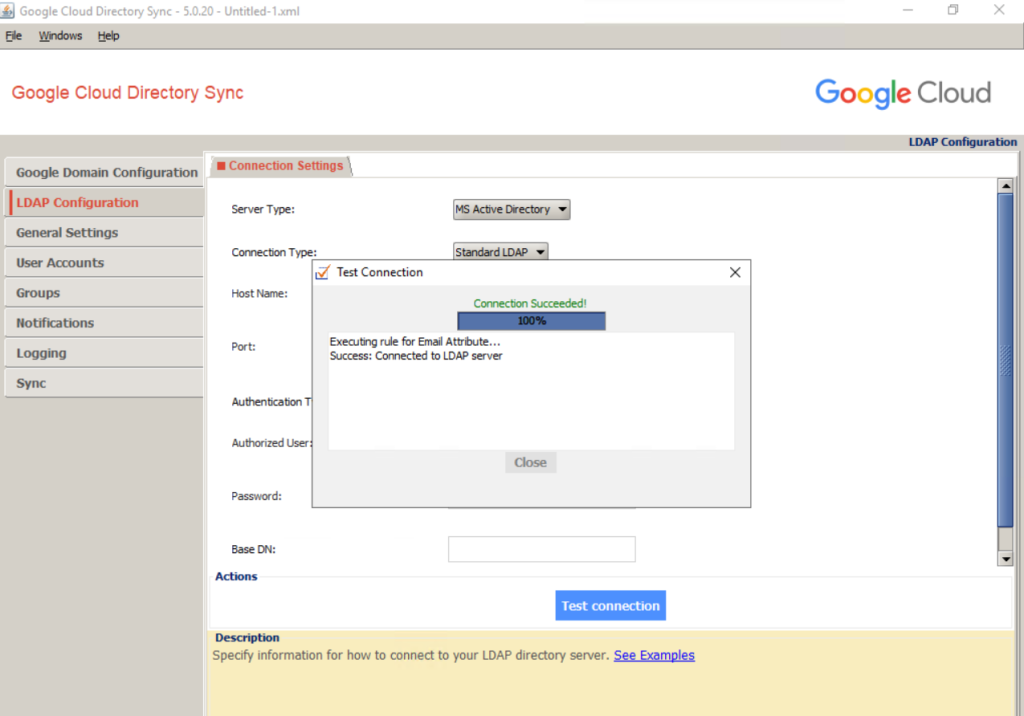
Connection Type: Select either Standard LDAP or LDAP+SSL.
Enter the name of a GC server. This setting is used only for testing. Later, you will automate the discovery of the GC server.
Port: 3268 (GC) or 3269 (GC over SSL). Using a GC server instead of a domain controller helps ensure that you can provision users from all domains of your Active Directory forest. Also, ensure authentication after Microsoft ADV190023 update.
Base DN: Leave this field empty to ensure that searches are performed across all domains in the forest.

To verify the settings, click Test connection. If the connection fails, double-check that you’ve specified the host name of a GC server and that the username and password are correct.
General Setting –> Choose what to synchronize
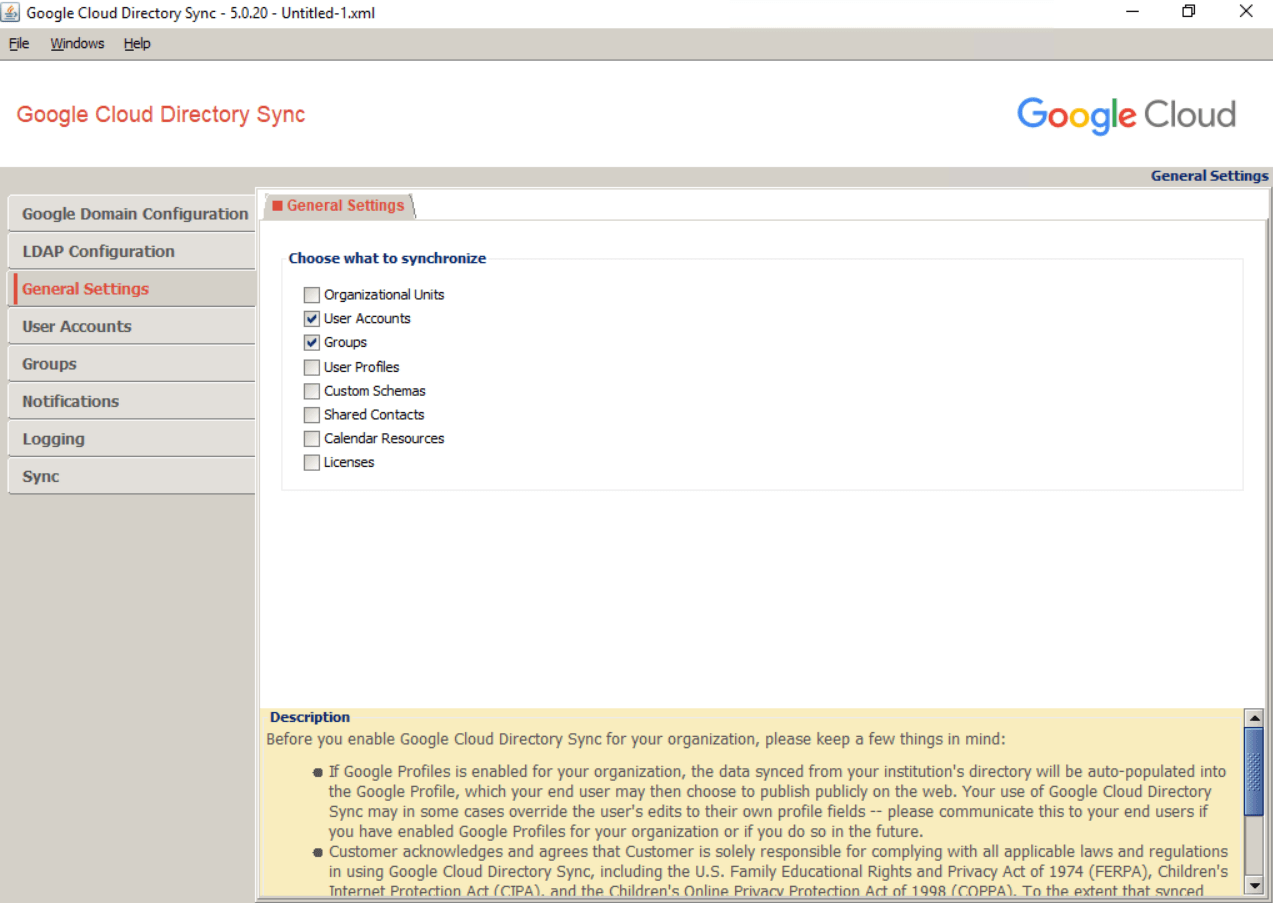
Now that you’ve successfully connected GCDS, you can decide which items to provision.
Ensure that User Accounts is selected. If you intend to provision groups, ensure that Groups is selected; otherwise, clear the checkbox.
Synchronizing organizational units is beyond the scope of this guide, so leave Organizational Units unselected.
Synchronizing organizational units is beyond the scope of this guide, so leave Organizational Units unselected.
User Accounts (Provisioning users)
The next step is to configure how to map users between Active Directory.
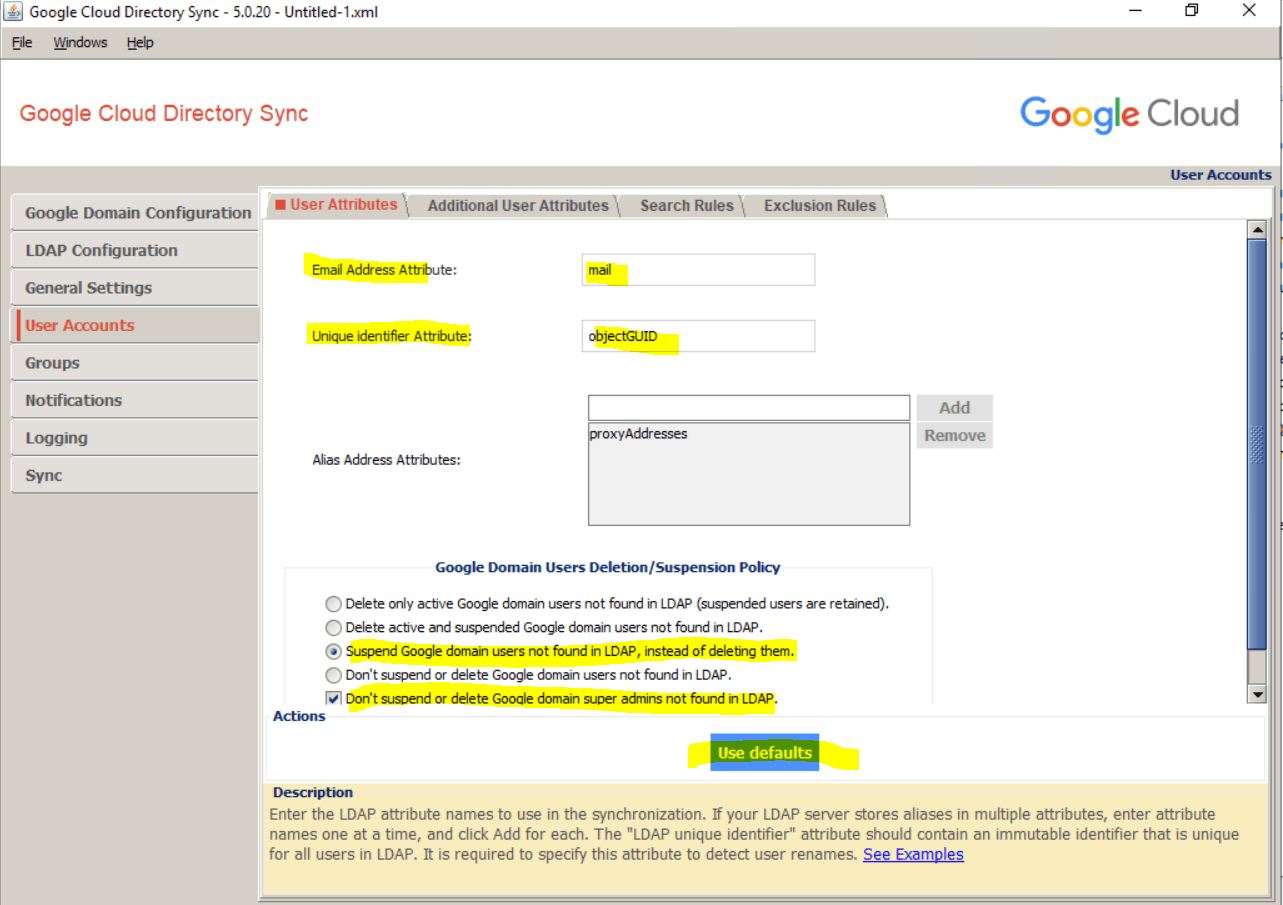
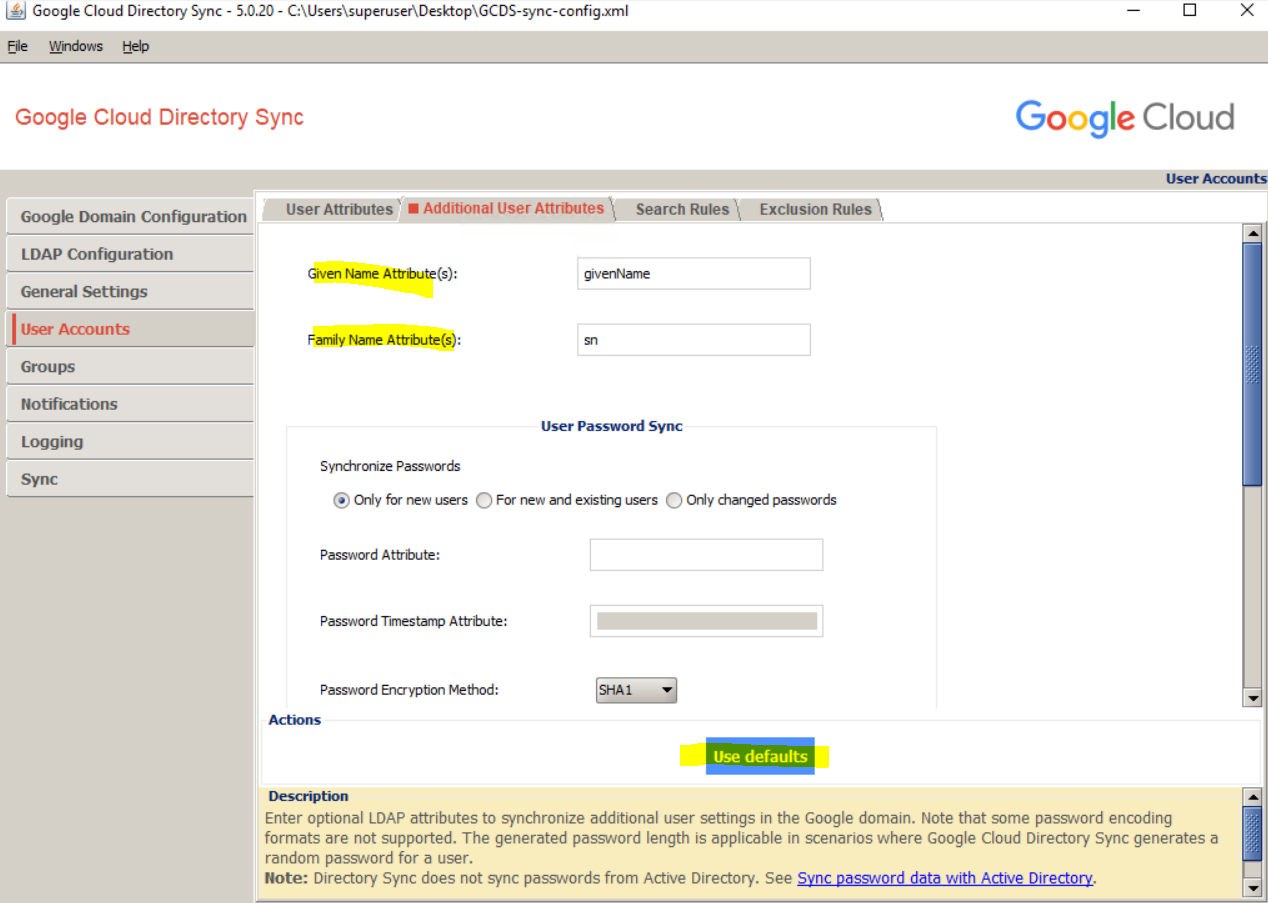
Click Use defaults to automatically populate the attributes for Given Name and Family Name with givenName and sn, respectively.
The remaining settings depend on whether you intend to use the UPN or email address to map Active Directory to users in Cloud Identity or Google Workspace, and whether you need to apply domain name substitutions. If you’re unsure which option is best for you, see the article on how Active Directory identity management can be extended to Google Cloud.
I will use the email address which is already the primary domain in Google Cloud. So I just have to click on Use defaults below.
Under Additional User Attributes I will also click on Use defaults to set the given name and family name for the user.
Synchronize Passwords you can leave blank, for synching Active Directory passwords we need first install another tool which we will see further down in this post.
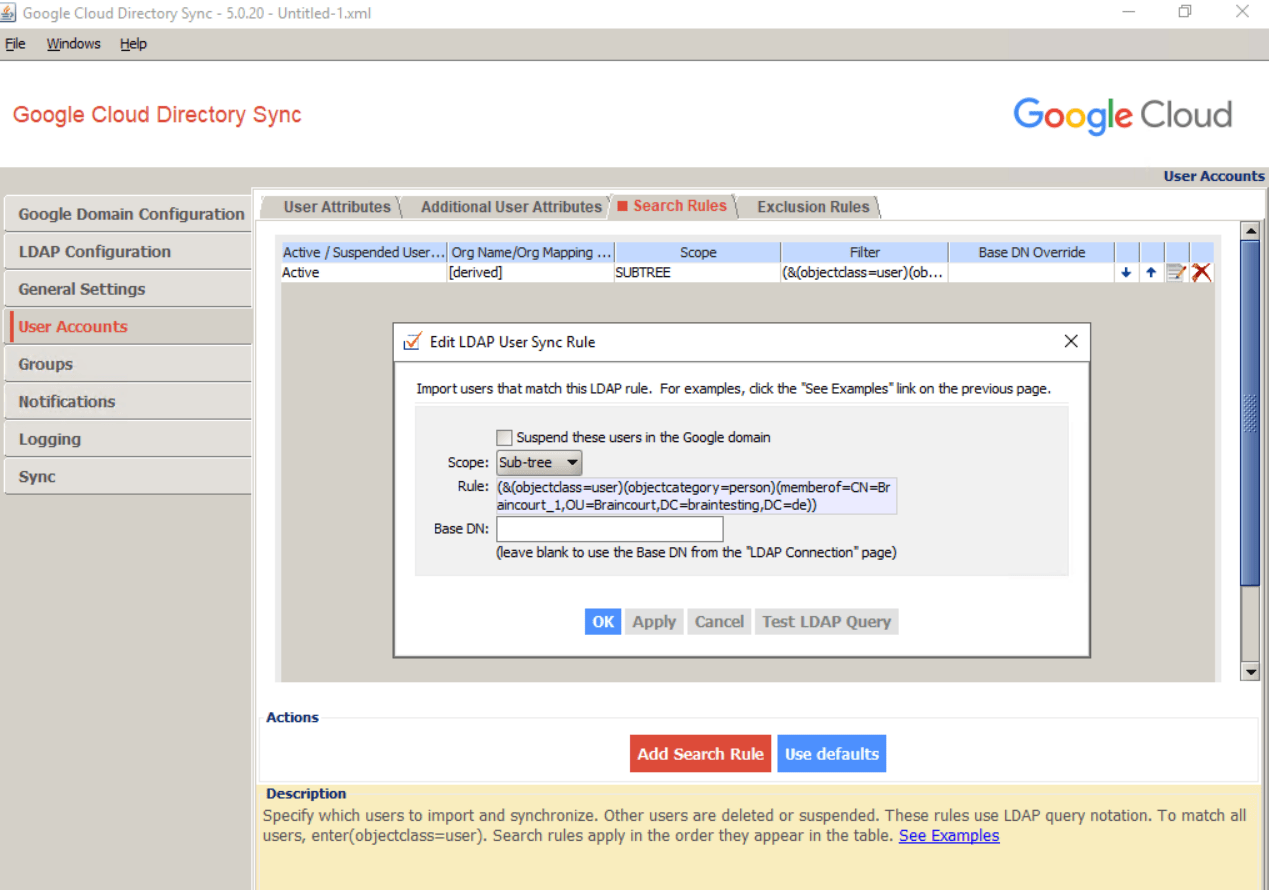
Click the Search Rules tab, and then click Add Search Rule.
(&(objectCategory=person)(objectClass=user)(mail=*)(!(userAccountControl:1.2.840.113556.1.4.803:=2)))
This rule matches all non-disabled users with a non-empty email address but ignores computer and managed service accounts.
I will restrict what users will be synced to Google Cloud by query a specific group here named Braincourt_1.
(&(objectclass=user)(objectcategory=person)(memberof=CN=Braincourt_1,OU=Braincourt,DC=braintesting,DC=de))
Base DN: Leave blank to search all domains in the forest.
Base DN: Leave blank to search all domains in the forest.
For further details on mapping user attributes, see Set up your sync with Configuration Manager.
Groups –> Deletion policy
So far, the configuration has focused on adding and updating users in Cloud Identity or Google Workspace. However, it’s also important that users that are disabled or deleted in Active Directory be suspended or deleted in Cloud Identity or Google Workspace.
As part of the provisioning process, GCDS generates a list of users in Cloud Identity or Google Workspace that don’t have corresponding matches in the Active Directory LDAP query results. Because the LDAP query incorporates the clause (!(userAccountControl:1.2.840.113556.1.4.803:=2)), any users that have been disabled or deleted in Active Directory since the last provisioning was performed will be included in this list.
The default behavior of GCDS is to delete these users in Cloud Identity or Google Workspace, but you can customize this behavior:
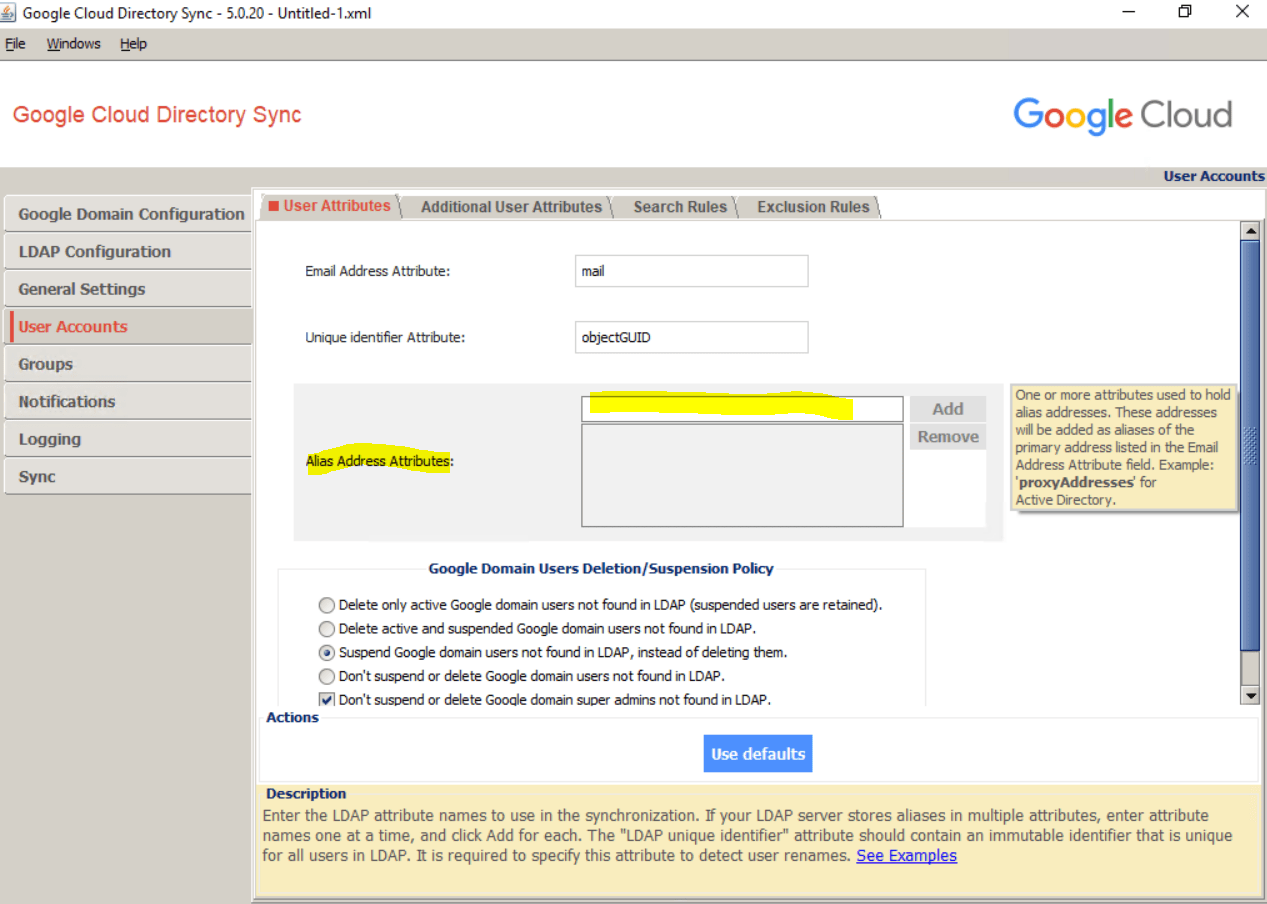
In Configuration Manager, click User Accounts > User Attributes.
Under Google Domain Users Deletion/Suspension Policy, ensure that Don’t suspend or delete Google domain admins not found in LDAP is checked. This setting ensures that GCDS will not suspend or delete the super-admin user that you used to configure your Cloud Identity or Google Workspace account.

If you use multiple separate instances of GCDS to provision different domains or forests to a single Cloud Identity or Google Workspace account, make sure that the different GCDS instances don’t interfere with one another. By default, users in Cloud Identity or Google Workspace that have been provisioned from a different source will wrongly be identified in Active Directory as having been deleted. To avoid this situation, you can move all users that are beyond the scope of the domain or forest that you’re provisioning from to a single OU and then exclude that OU.
The next step is to configure how to map groups between Active Directory and Cloud Identity or Google Workspace. This process differs based on whether you plan to map groups by common name or by email address.
I will map the groups by email address.
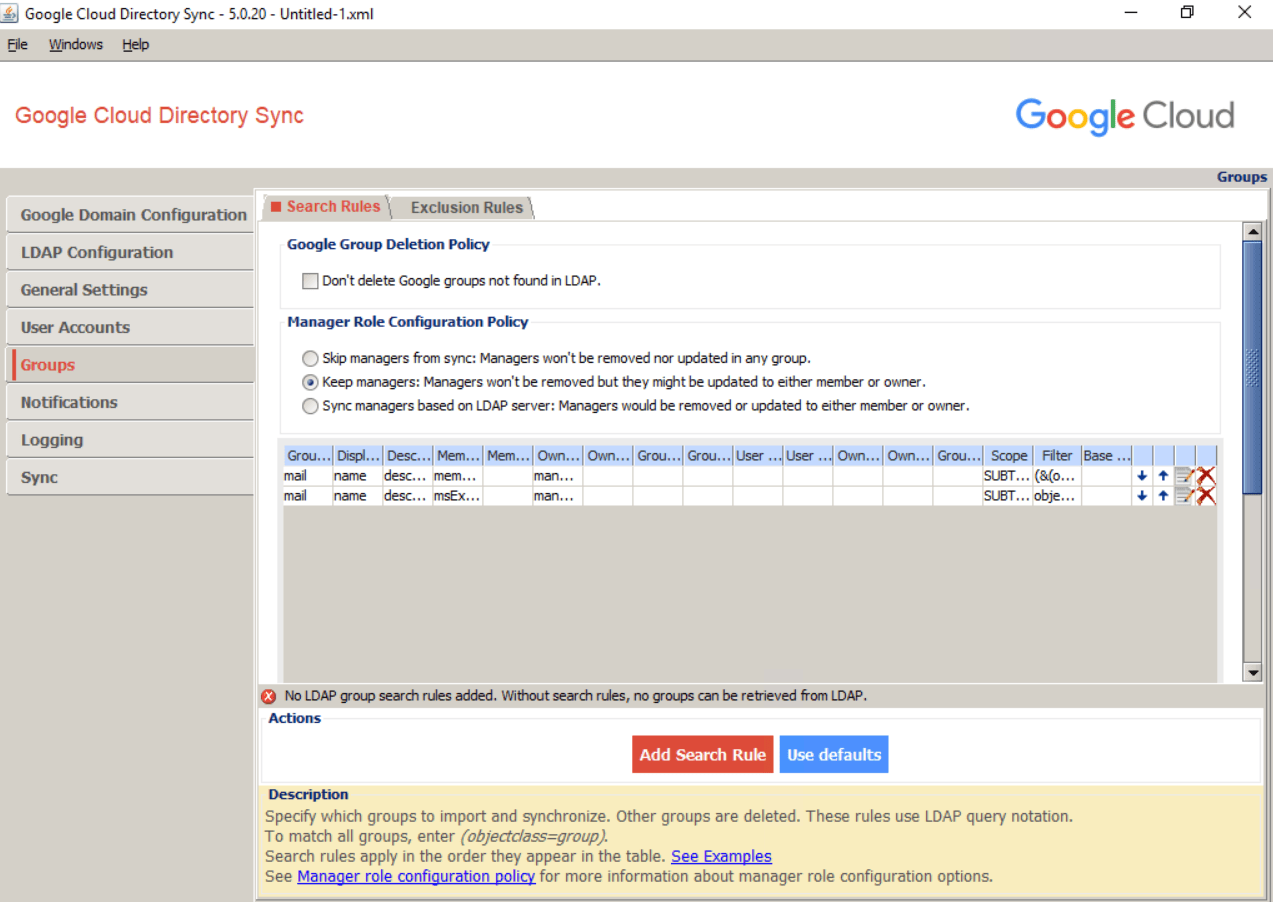
In Configuration Manager, click Groups > Search Rules. Click Use Defaults to add a couple of default rules.
Click the first rule edit icon. Edit Rule to replace the LDAP query. Click OK.
Click the second rule cross icon to remove this rule.
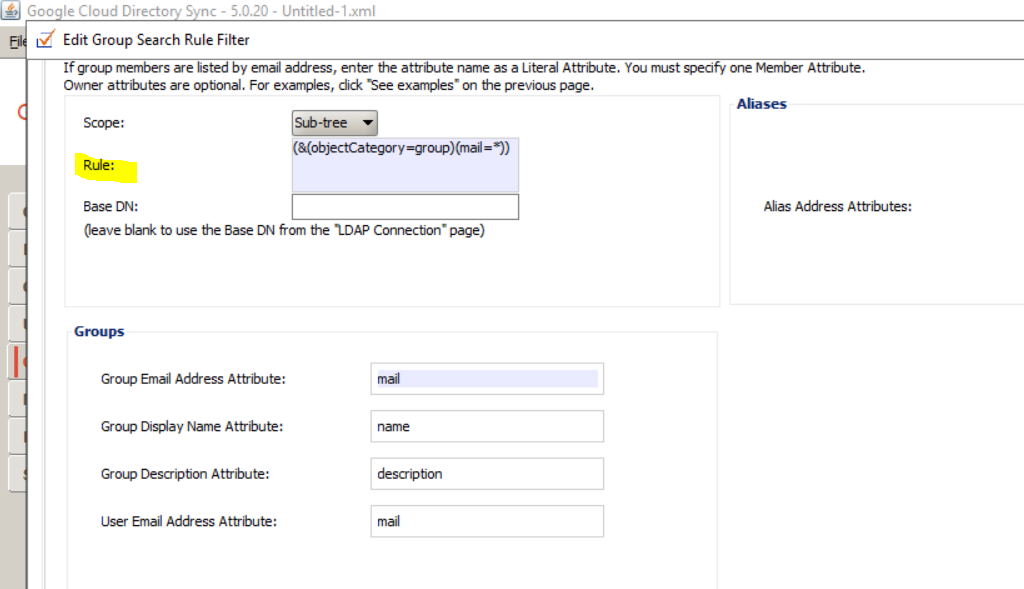
I will edit the first rule and will replacing the LDAP query with the following rule.
(&(objectCategory=group)(mail=*))
This will include all groups with email address
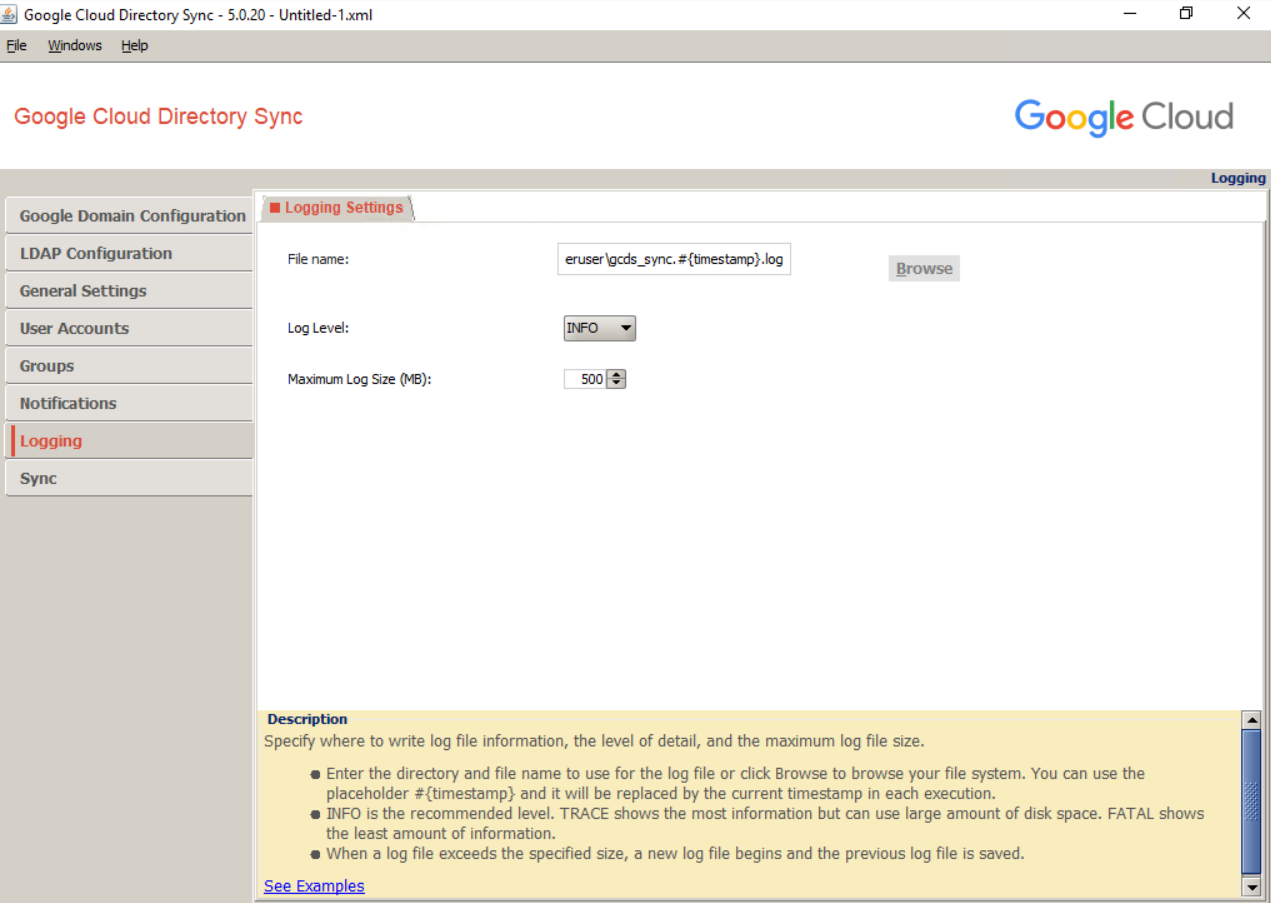
Notifications –> Configure logging and notifications
Under Notifications you can configure SMTP to send notifications with synchronization details.

Keeping users in sync requires that you run GCDS on a scheduled basis. To allow you to keep track of GCDS activity and potential problems, you can control how and when GCDS writes its log file:
Under File name you can set the path where the logs will be written to.
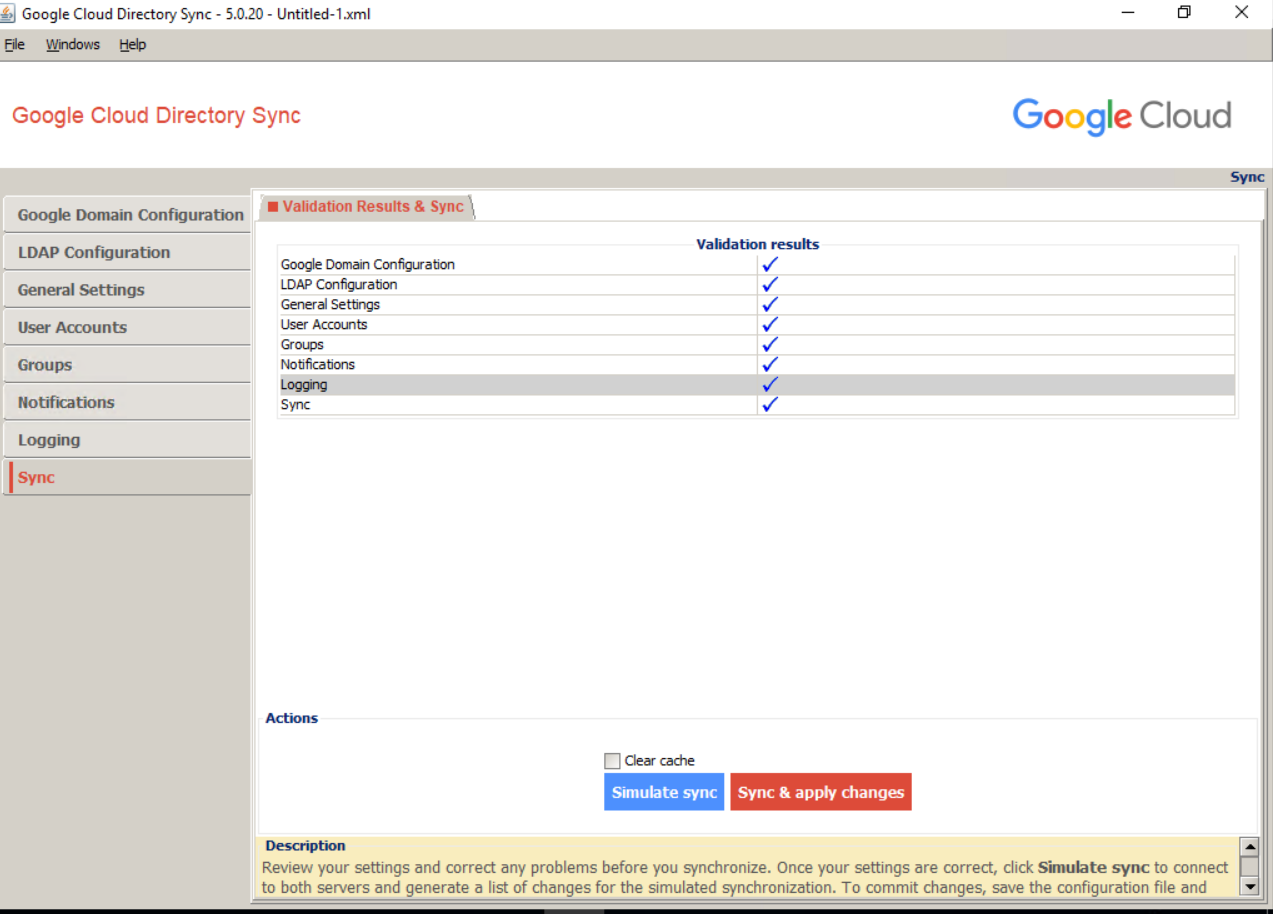
Sync –> Simulating user provisioning
You’ve completed the GCDS configuration. To verify that the configuration works as intended, you need to at first save the configuration to disk then simulate a user provisioning run. During simulation, GCDS won’t perform any changes to your Cloud Identity or Google Workspace account, but will instead report which changes it would perform during a regular provision run.
In Configuration Manager, click Sync.
At the bottom of the screen, select Clear cache, and then click Simulate sync.
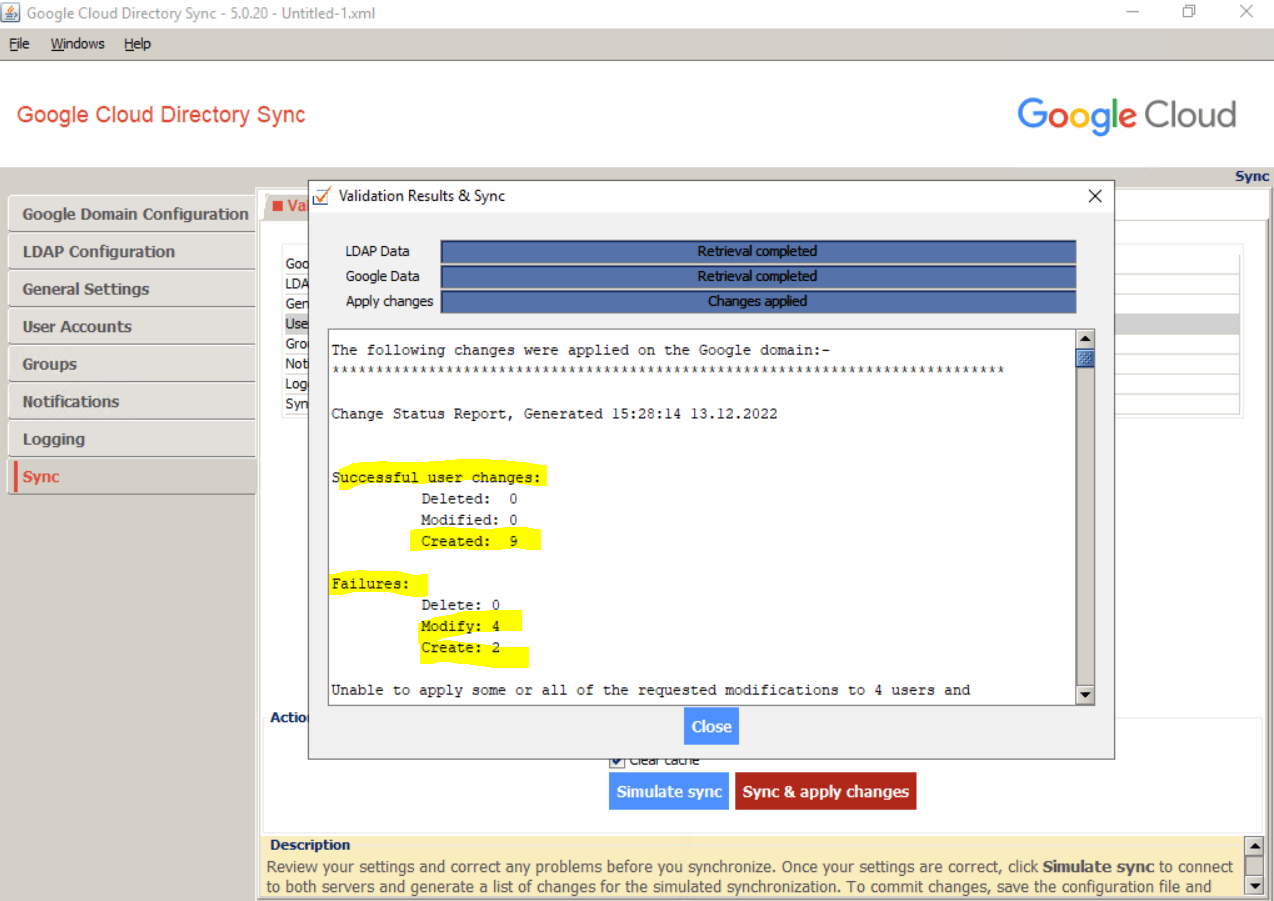
After the process completes, review the Proposed changes section of the log that is shown in the lower half of the dialog and verify that there are no unwanted changes such as deleting or suspending any users or groups.

Under proposed changes you can see that 4 users should be modified, the reason for is that I create these 4 users directly and native in Google Cloud Identity already for testing so far.
These 4 users are also in my on-premsie Active Directory and now therefore needs to be modified with the attributes from the on-premise user object.
My Google Cloud Identity Account and its native cloud only users before I will trigger a sync with on-premise.
You can now trigger the initial user provisioning.
Warnings
Triggering user provisioning will make permanent changes to users and groups in your Cloud Identity or Google Workspace account.
If you have a large number of users to provision, consider temporarily changing the LDAP query to match a subset of these users only. Using this subset of users, you can then test the process and adjust settings if necessary. After you’ve successfully validated results, change back the LDAP query and provision the remaining users.
Avoid repeatedly modifying or deleting a large number of users when testing because such actions might be flagged as abusive behavior.
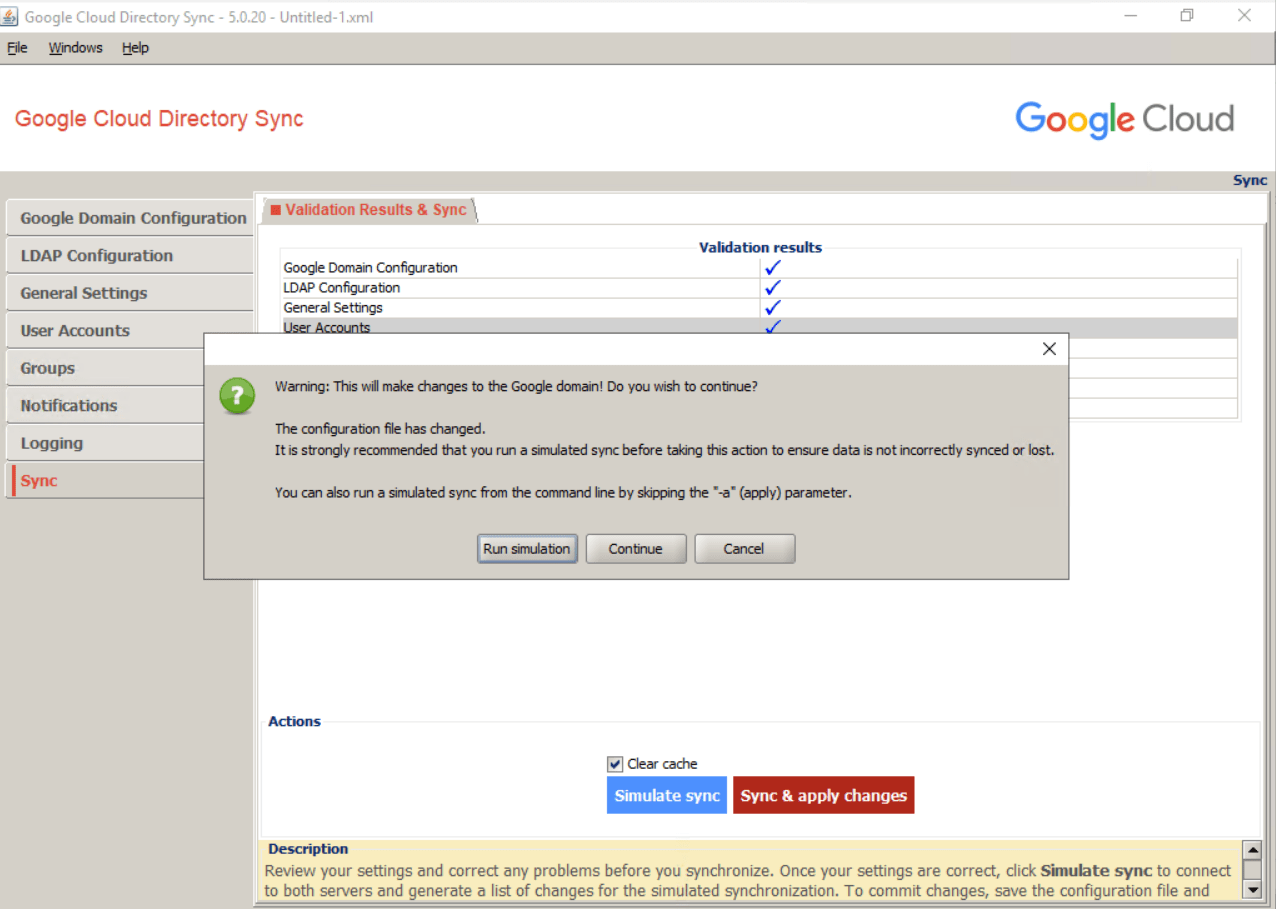
Trigger a provision run as follows:
At the bottom of the screen, select Clear cache, and then click Sync & apply changes. A dialog appears showing the status.
Click on Continue as we already run a simulation previously.
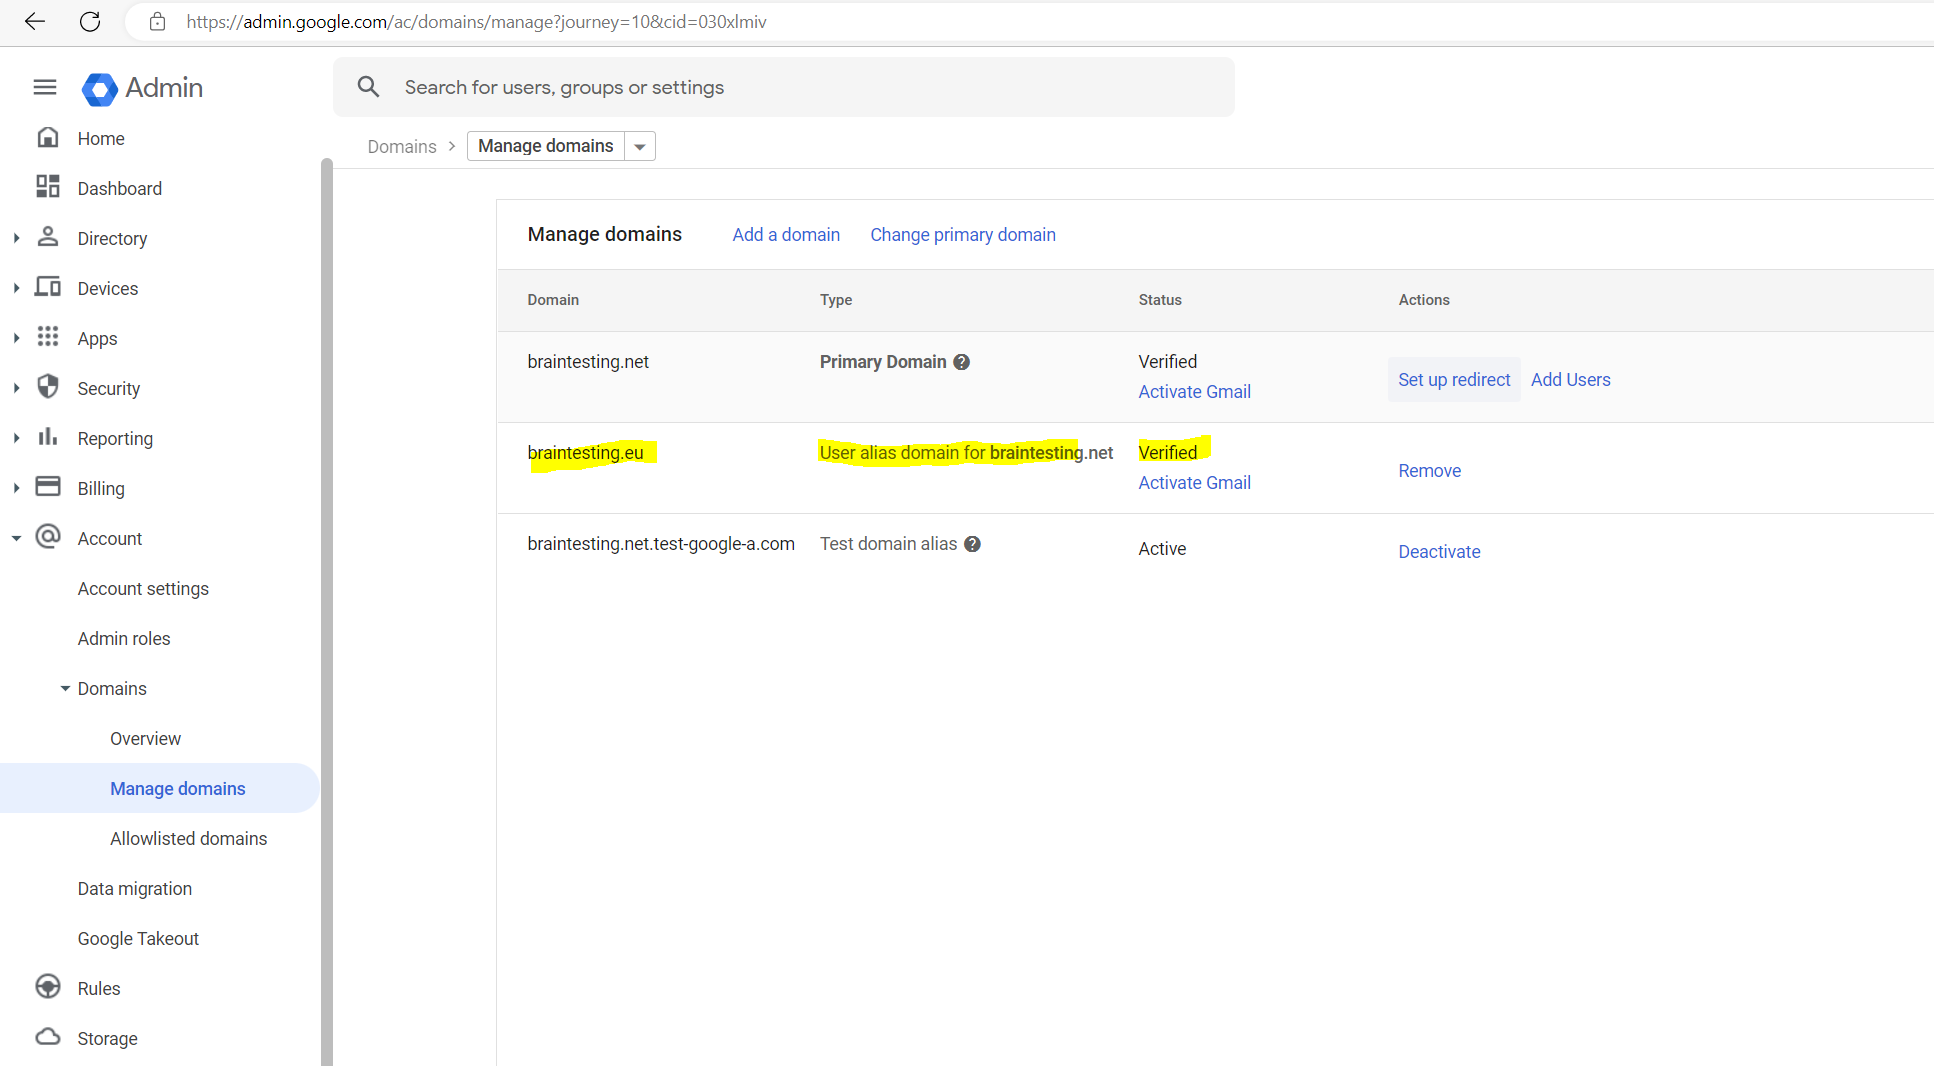
So far I just added the braintesting.net domain to Google Cloud, in order to sync the users from on-premise, I first need to add all email aliases domains from on-premise to Google Cloud.
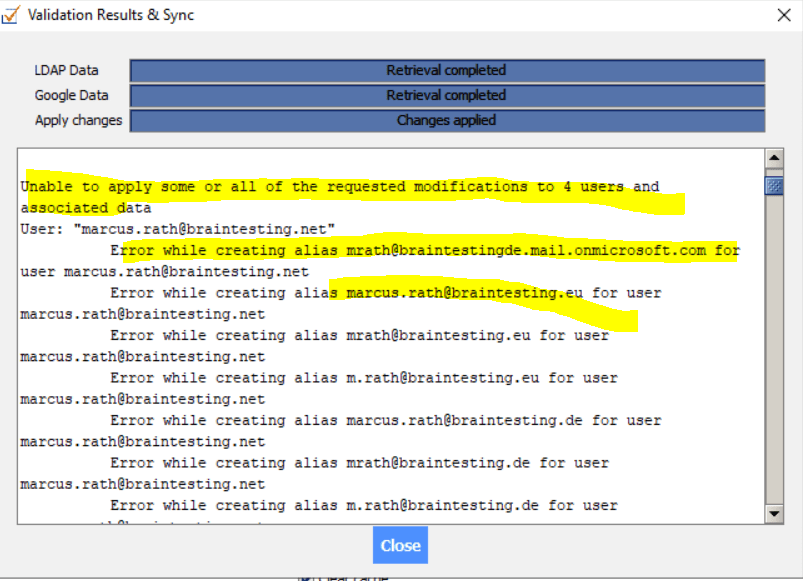
So I need to add the braintesting.eu and braintesting.de domain or remove the proxyAddresses attribute below.
The braintestingde.mail.onmicrosoft.com is the remote domain from Microsoft 365 and not needed here.
So as I don’t need the proxy addresses I will remove them for the sync to Google Cloud.
You can add domains under Home –> Domains –> Add add a domain
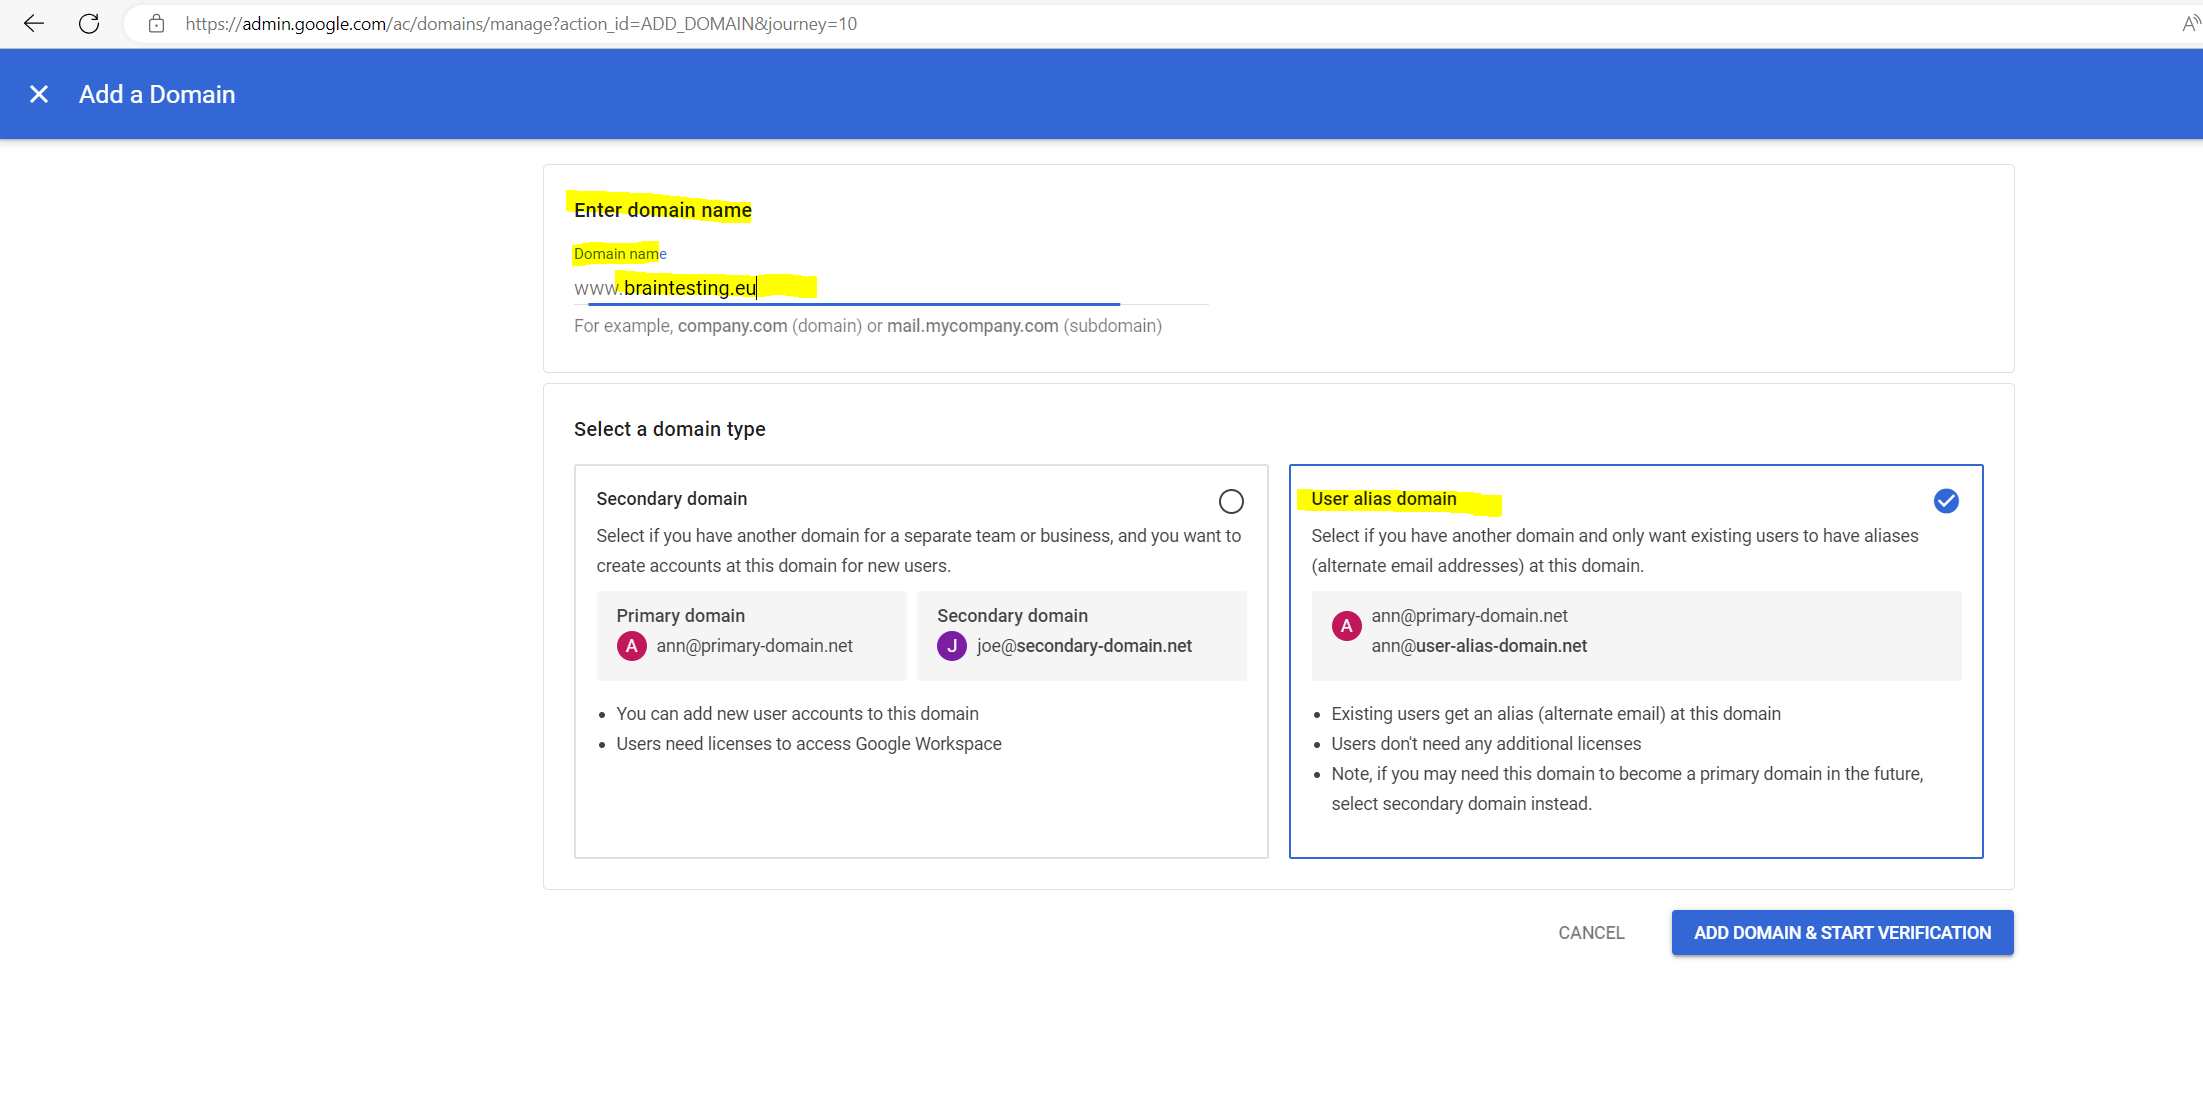
Follow the instructions.

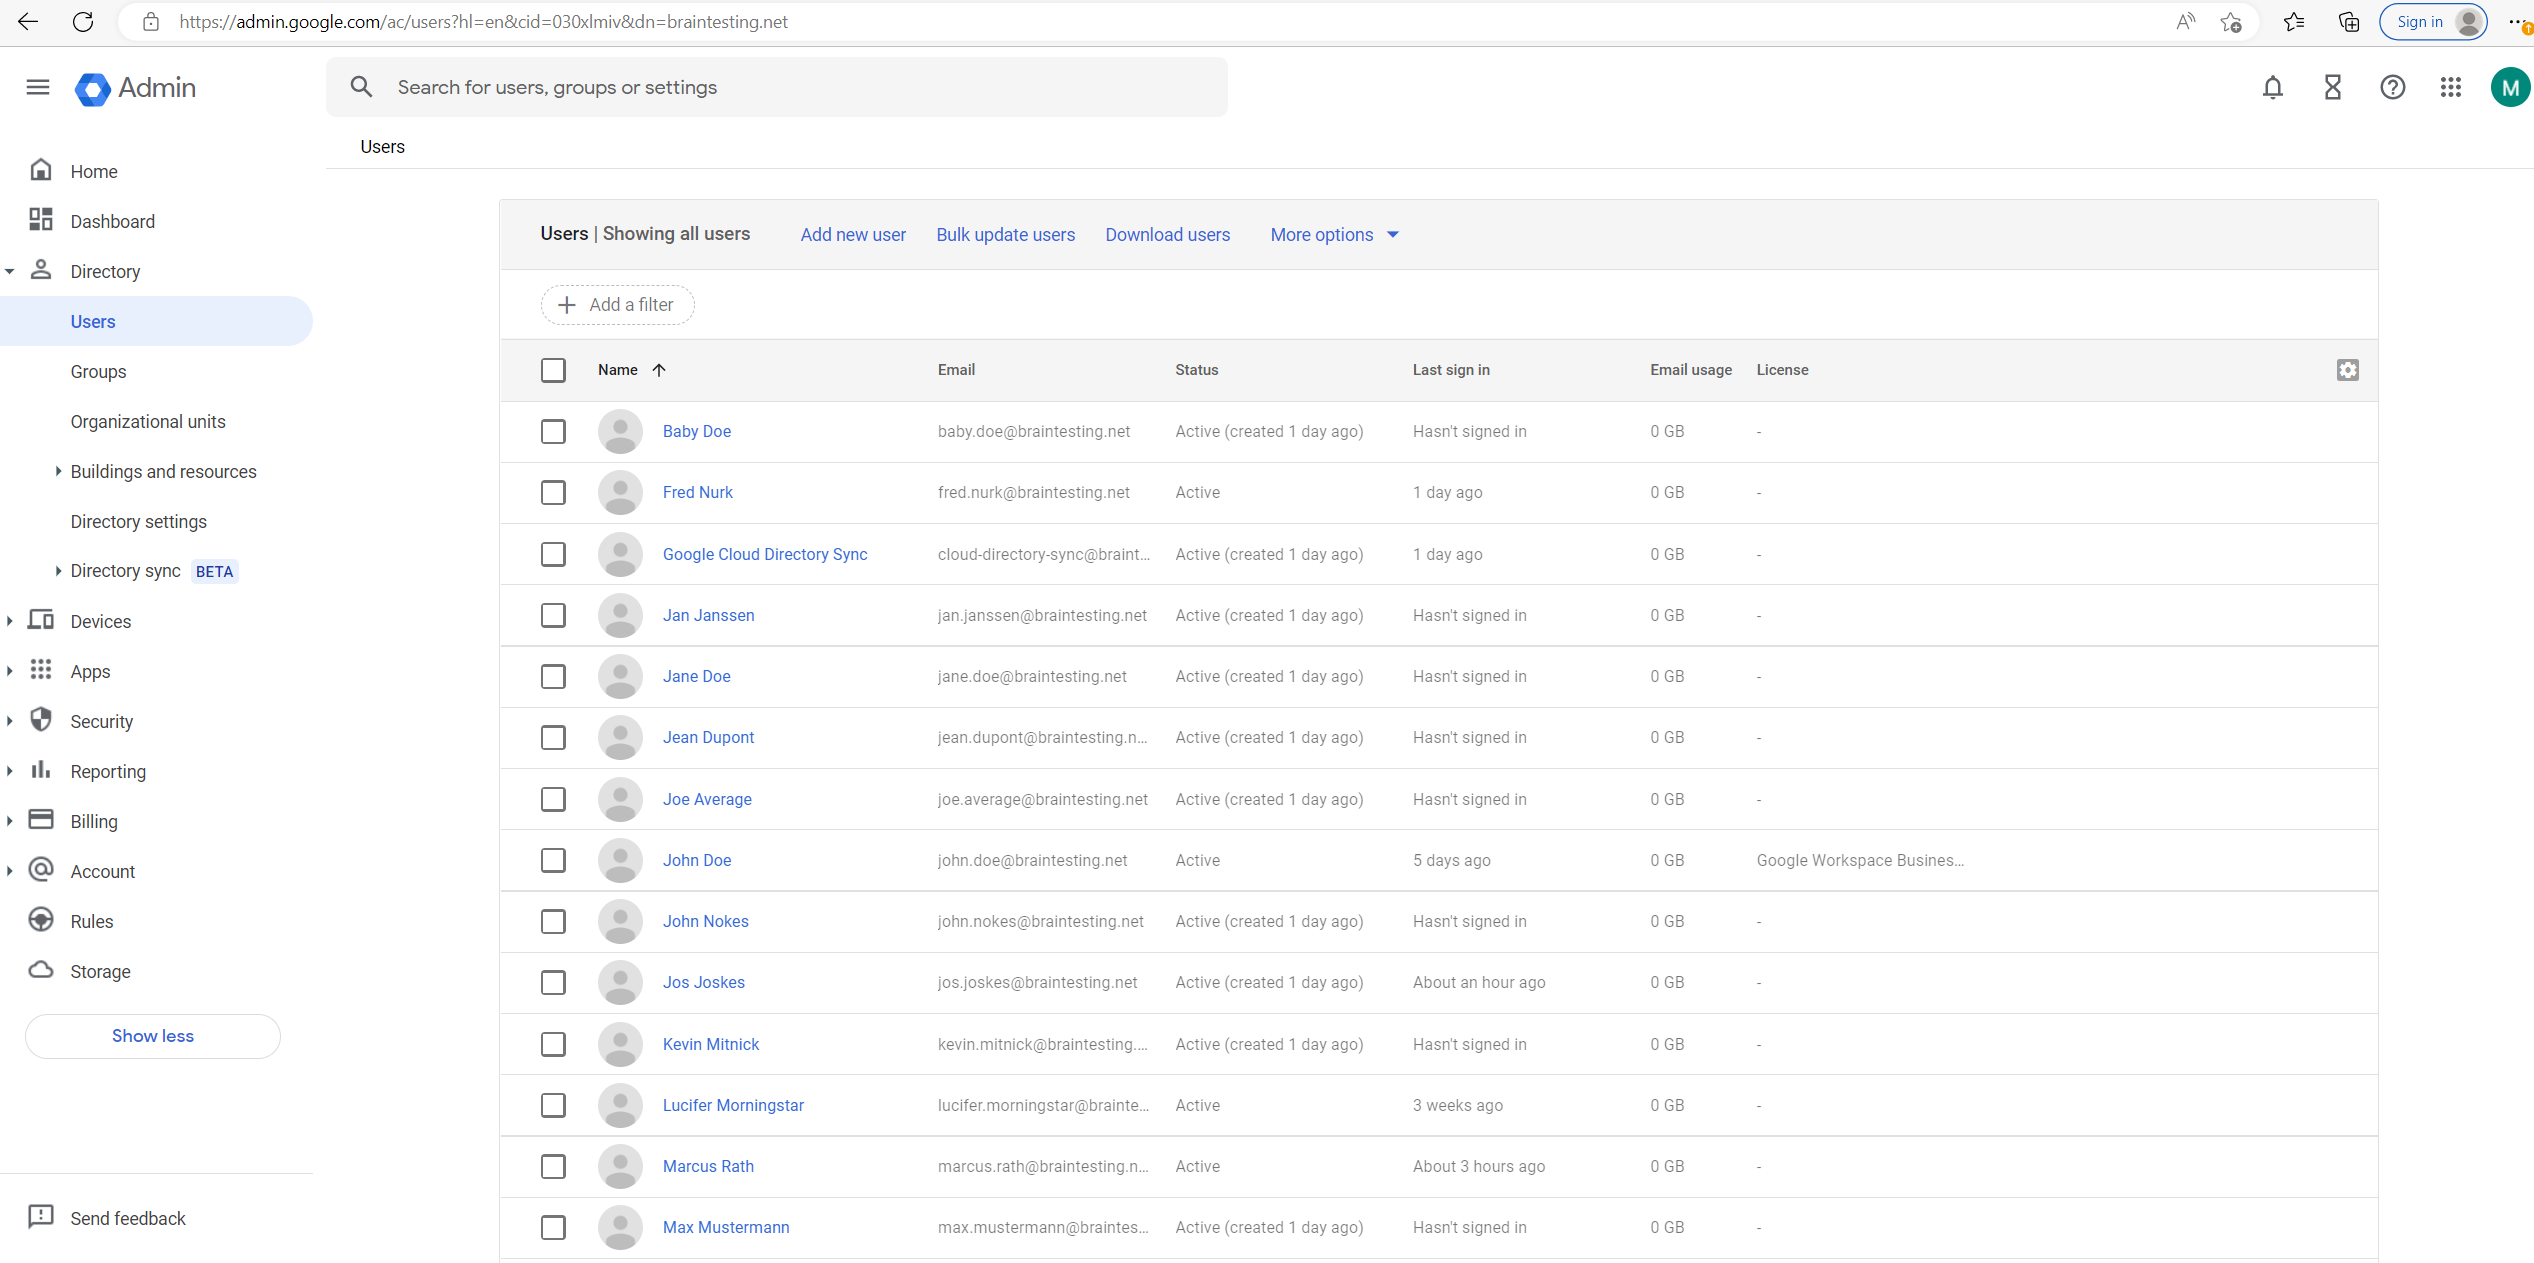
So after trigger a sync with on-premise my user directory will looks like this
Automate synchronization using the command line
You can use the sync-cmd command and Google Cloud Directory Sync (GCDS) to run synchronizations from the command line.
When you set up or modify your configuration, you should run a manual synchronization from Configuration Manager. Doing so allows you to check the synchronized data and make sure it’s in order. For details, go to Perform a manual synchronization.
After you’re done making configuration changes, you can automate your sync process using the command line. You can incorporate synchronizations into any scheduling or batch script you wish to use. Alternatively, you can use a third-party tool to automate syncs. For details, go to Schedule automatic synchronizations.
You run the sync-cmd command from the GCDS installation directory and enter the command on a single line. You can use the command arguments listed below to perform a range of actions, such as:
- Apply any detected changes.
- Read a specified file.
- Set the logging detail level.
You can get information about the available command arguments by entering sync-cmd -h.
Windows
Example 1: Run a simulated sync using the XML configuration file C:Usersusergdcs-config.xml:
sync-cmd -c C:Usersusergdcs-config.xml
Example 2: Run a full sync, including applying any detected changes, using the XML configuration file C:Usersusergdcs-config.xml:
sync-cmd -a -c C:Usersusergdcs-config.xml
Source: https://support.google.com/a/answer/6152425#zippy=%2Ccommand-arguments%2Cexamples
Troubleshooting Sync
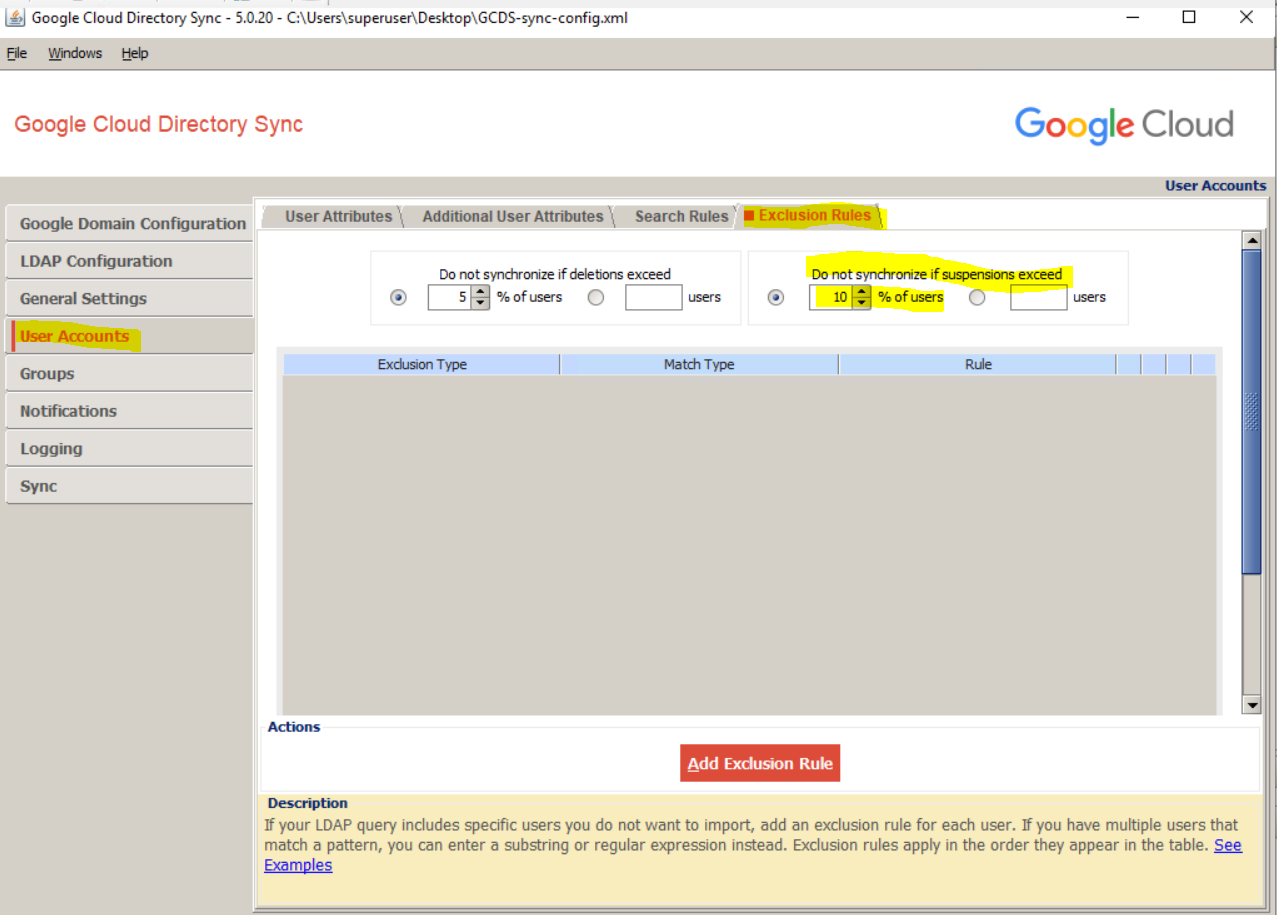
In case you encounter a sync exceeds the configured sync limit as shown below, you can adjust the percentage of suspended or deletions in the Configuration Manger. For users for example you can configure the limit under User Accounts –> Exclusion Rules.
Users sync exceeds the configured sync limits.
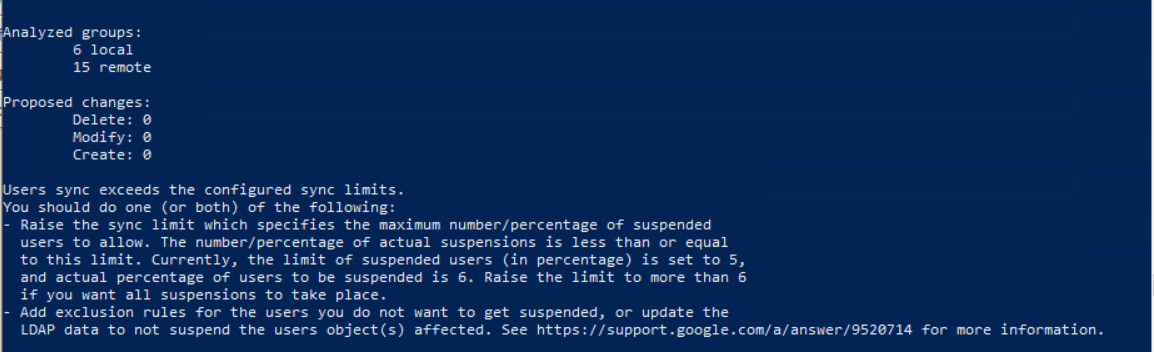
Source: https://support.google.com/a/answer/9520714?hl=en
Configure Password Sync
In order to sync passwords between your on-premis Active Directory and Google Cloud Identity or Google Workspace, you can use the Password Sync from Google Cloud.
You need to install Password Sync on all domain controllers
Google Cloud Director Sync can’t read and access passwords from Active Directory. In Active Directory, passwords are stored as write-only. They can’t be read through any interface, such as LDAP. Therefore, conventional synchronization methods (for example, Google Cloud Directory Sync) can’t access them.
The only way to read passwords is to capture them when they’re set or changed.
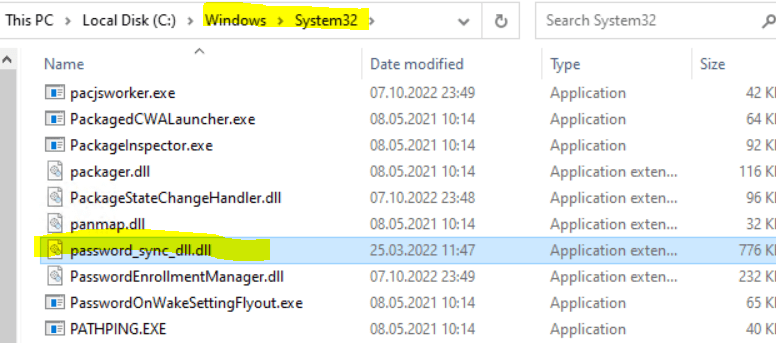
Password Sync has a DLL named password_sync_dll.dll installed as an LSA Notification Package. For more information on LSA Notification Packages, consult this Microsoft article
When installing the Password Sync service, also a DLL named password_sync_dll.dll is installed in the System32 directory as an LSA notification package as shown below.
When a password change occurs on a specific DC, the DLL receives the updated password and the username of the user. Password Sync must be installed on every writable DC because Windows on the DC that receives the password change triggers the password sync. The trigger occurs on every password update, whether it’s done by an administrator or by the end user. For more information about the PasswordChangeNotify callback function, consult this Microsoft article.
When the DLL receives the username and password, it hashes the password as salted SHA512, and sends it to the Password Sync service.
The Password Sync service password_sync_service.exe then finds the user’s email address in Active Directory using LDAP based on the username sent by the DLL. It then updates the Google Account using the Directory API. When passwords are changed through the Directory API, some application OAuth tokens are revoked. Users might be required to sign in again to applications with their username and password.
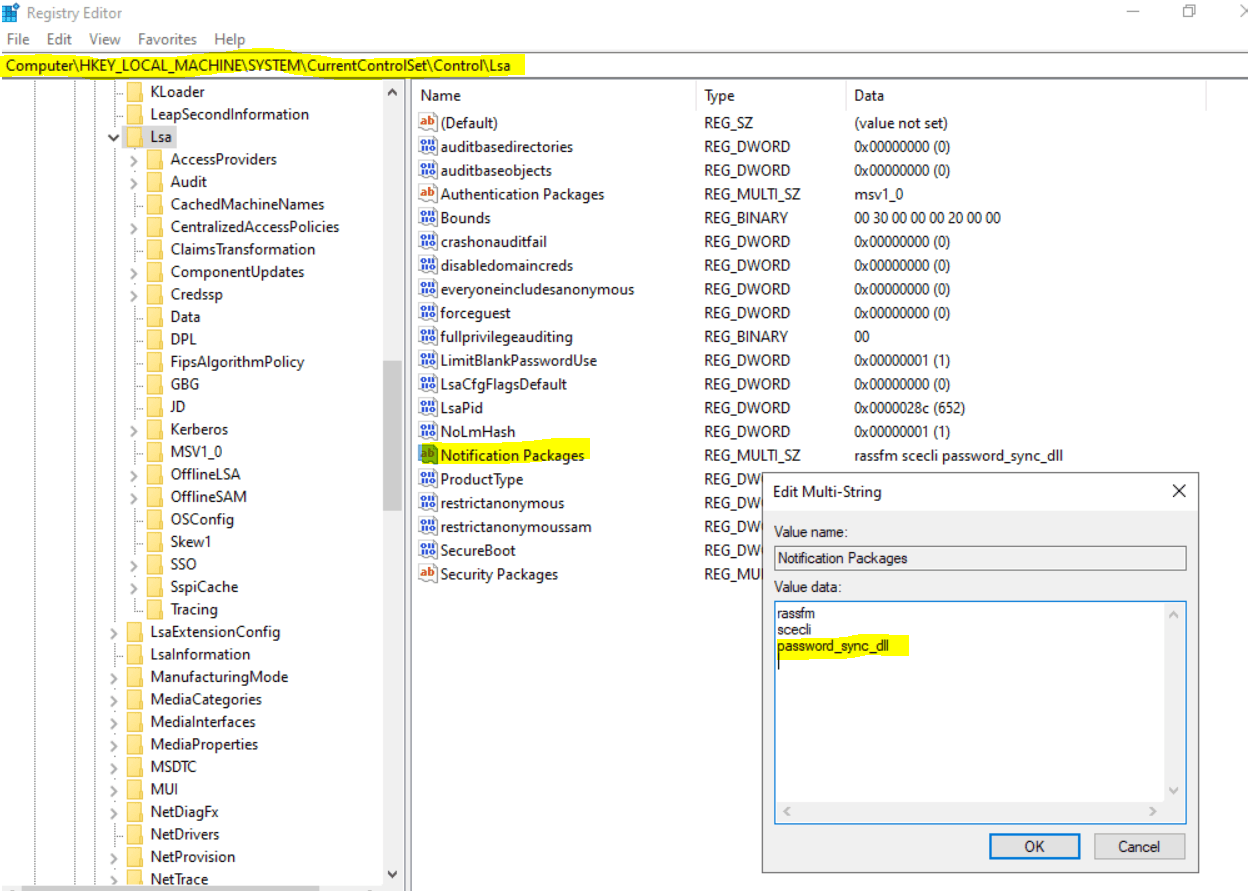
HKLMSYSTEMCurrentControlSetControlLsaNotification Packages
Specifies the dynamic-link libraries (DLLs) that are loaded or called when passwords are set or changed.
Before you now install Password Sync, you first need to create a new service account for the Password Sync service to access Google Cloud.
Create a service account
To use a service account as your authentication method for Password Sync, you need to create an account and set it up before you install Password Sync. How you create the account depends on whether you want to run an automated script (recommended) or manually create a service account.
So I will use the automated script below.
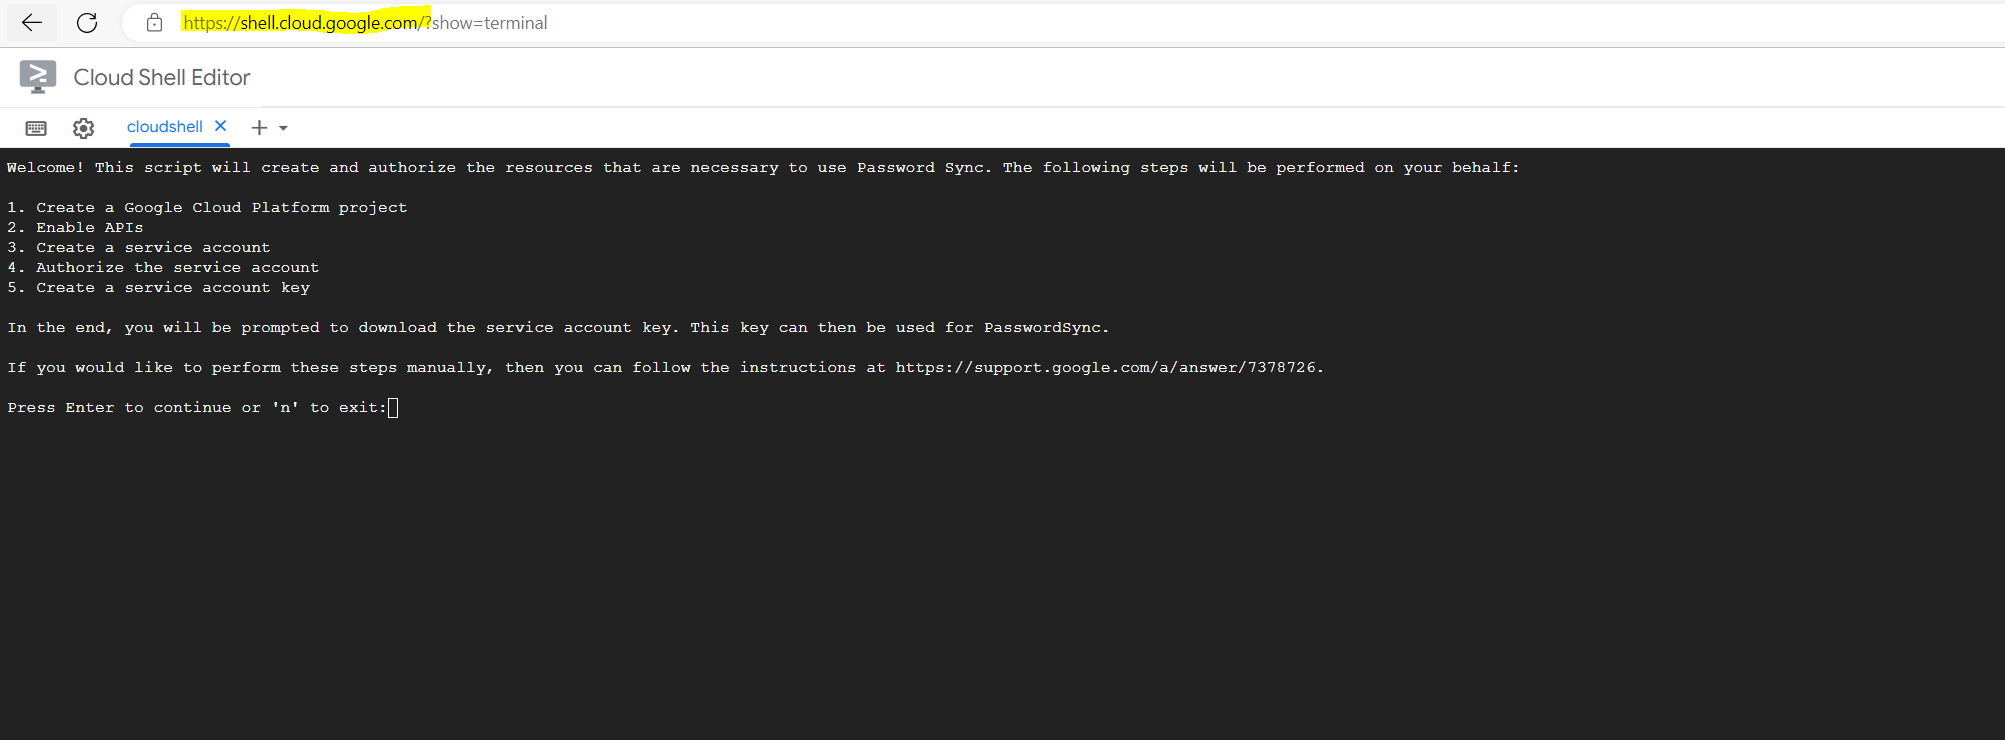
Sign in as a super administrator and, in a browser window, open Cloud Shell.
In the editor, enter
python3 <(curl -s -S -L https://git.io/password-sync-create-service-account)
Complete the steps in the Cloud Shell window by press Enter to run the script.
Before using Password Sync, you must authorize the service account to perform actions on behalf of your users. You can do so by clicking:
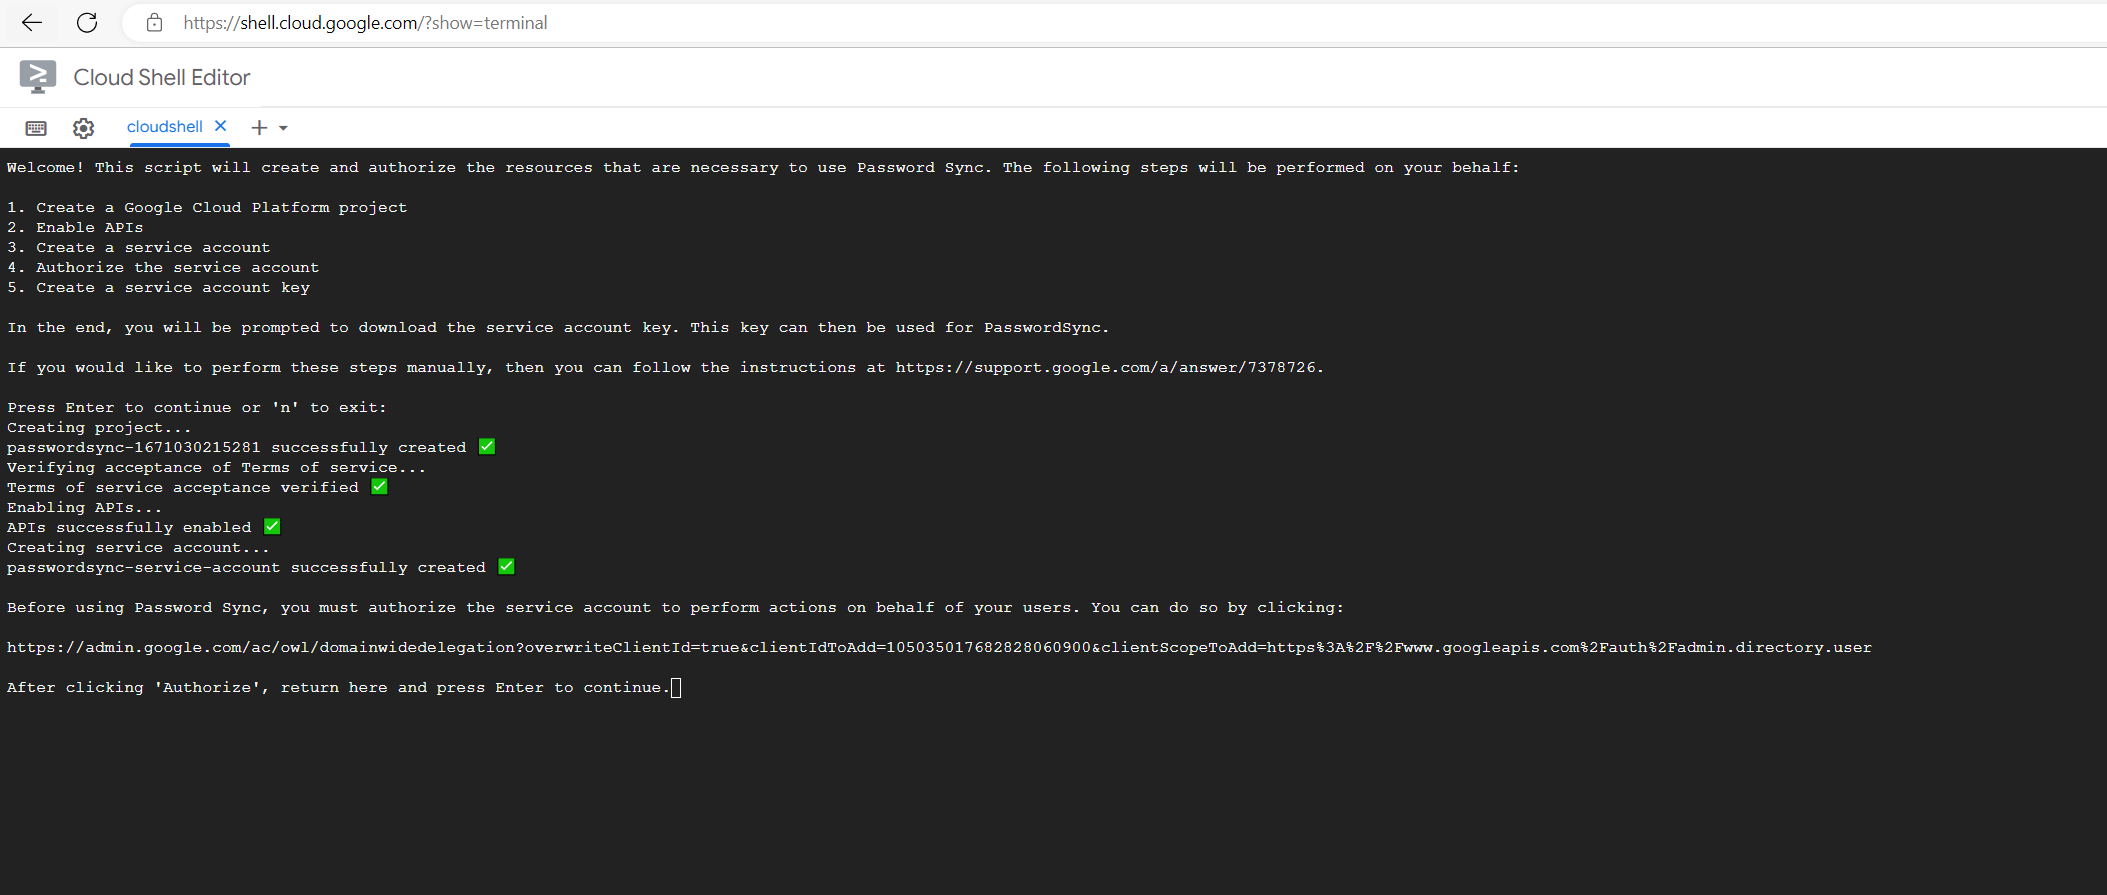
Click Download to download the JSON file that contains the service account’s client ID to your computer.
Please remember that this file is highly sensitve. Any person who gains access to the key file will then have full access to all resources to which the service account has access. You should treat it just like you would a password.

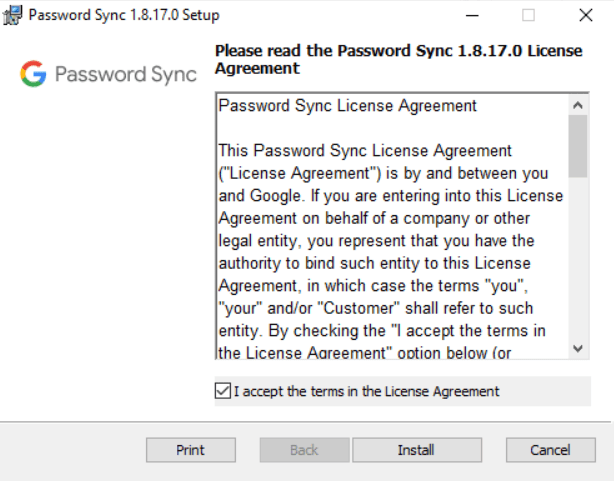
Install Password Sync
Now as we have the corresponding JSON File for the service account, we can install Password sync.
You need to install Password Sync on all domain controllers. Domain controllers must also run supported versions of Windows Server (the version of the Active Directory schema and its functional level are unimportant).
Supported versions of Windows Server
Microsoft Windows Server 2008, 2012, 2016, 2019, or laterMicrosoft Active Directory Domain Services (AD DS)
Active Directory Lightweight Directory Services (AD LDS) is not supported.
- Download the correct MSI for your server’s architecture:
Finally you need to restart the server.
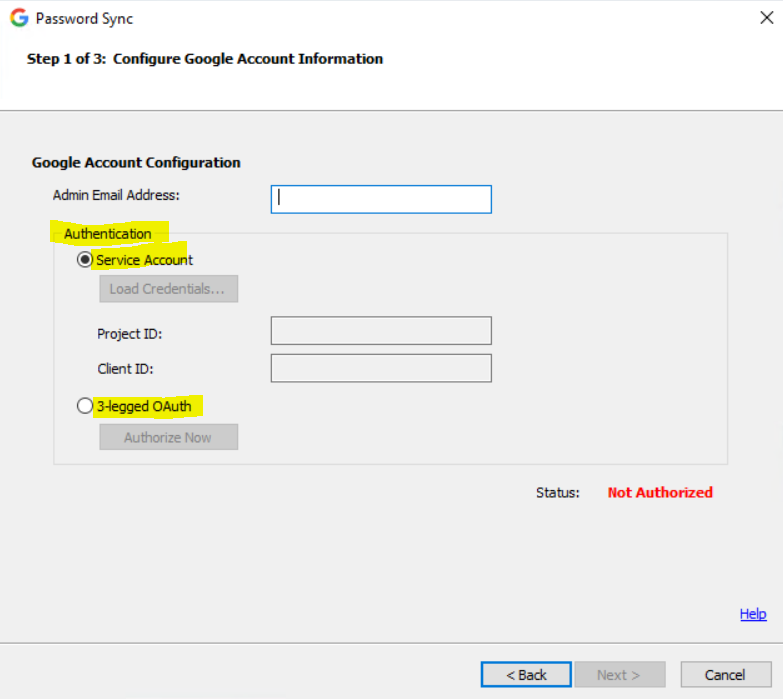
After the restart open the Password Sync tool.
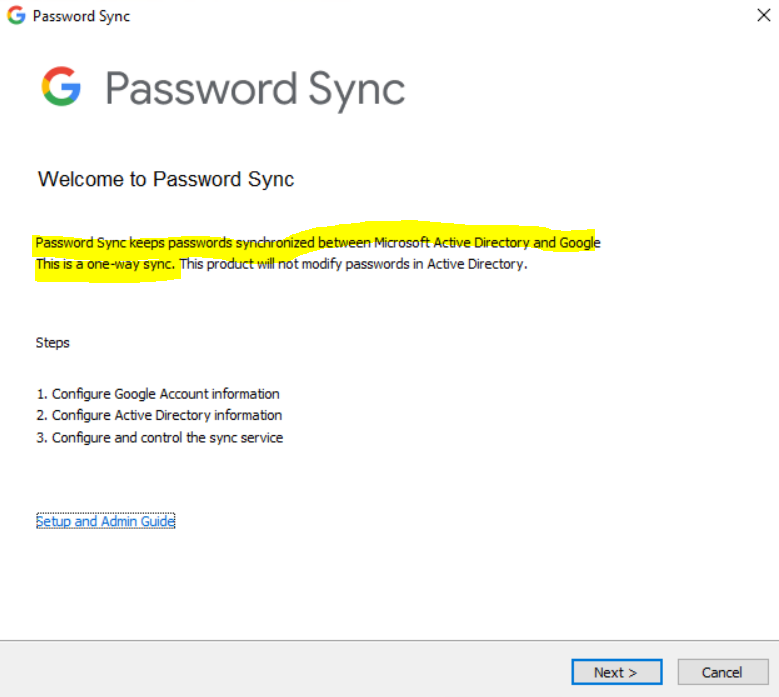
Before you install Password Sync, you need to choose a Google authentication method. We recommend using a service account for authentication. If you’re installing Password Sync from the command line, you must use a service account.
You can also use 3-legged OAuth for authentication, but only on Microsoft Windows Server with Desktop Experience. If you have more than 5 domain controllers, you must authorize each domain controller separately, which can be time-consuming. We recommend using a service account instead.
Add your Google Workspace or Cloud Identity administrator email address.
Password Sync uses this email address to perform password updates. The address also appears in the audit logs in the Google Admin console.
Before you continue, make sure this administrator has signed in to the Admin console and accepted the Terms of Service.
A service account belongs to an application rather than a user. The application sends a request to Google APIs on behalf of the service account, so users aren’t directly involved in the authentication process.
Advantages of a service account:
- Multiple domain administrators can manage and monitor a service account. Therefore, even if an administrator changes, Password Sync is unaffected.
- Service accounts aren’t subject to the refresh token limit that affects 3-legged OAuth.
- Service account credentials are downloaded as a JSON file and can be used on many domain controllers. You don’t need to repeat the authorization process for each domain controller.
- Service accounts don’t require a web browser to authenticate. You can configure Password Sync when using Windows Server Core.
- You can install and configure Password Sync using the command line.
Disadvantages of a service account:
- You must create a project in Google Cloud, which makes the setup more complex.
Select Service Account.
Click Load Credentials and select your service account JSON file. The Status value should change to Authorized.
Note!
The JSON file has a key that allows access to your Google domain. After authentication, remove the file from the system.
Click Next.

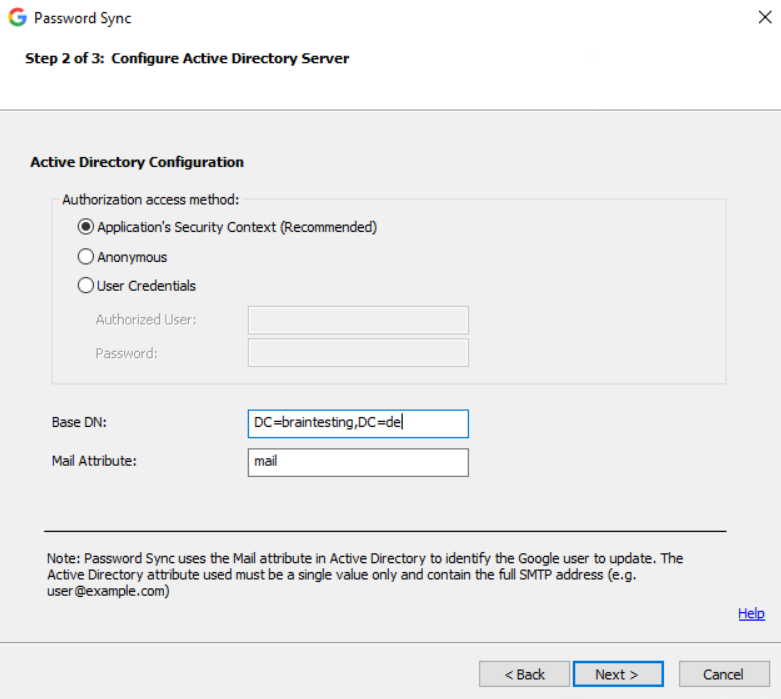
Select the authorization access method for Password Sync to use to query Microsoft Active Directory. For details, go to Authorization access methods.
Application’s Security Context
The default and recommended setting. Password Sync runs in the security context of the NetworkService account, not a user account.The default and recommended setting. Password Sync runs in the security context of the NetworkService account, not a user account.
Source: https://support.google.com/a/answer/2611842?hl=en&ref_topic=4498019
For Base distinguished name (DN), accept the default or enter another base DN.If you’re using Google Cloud Directory Sync (GCDS), this setting is usually identical to the GCDS base DN setting.
For Mail Attribute, enter your Active Directory domain’s mail attribute that contains each user’s Google email address (usually, “mail”).The values in the attribute must exactly match the Google email address, including the domain part of the address. If you’re using the Replace domain names in LDAP email addresses option in GCDS, it might be another attribute.
Click Next.
The Summary screen shows the configuration is saved and the service is running.
Click Finish.
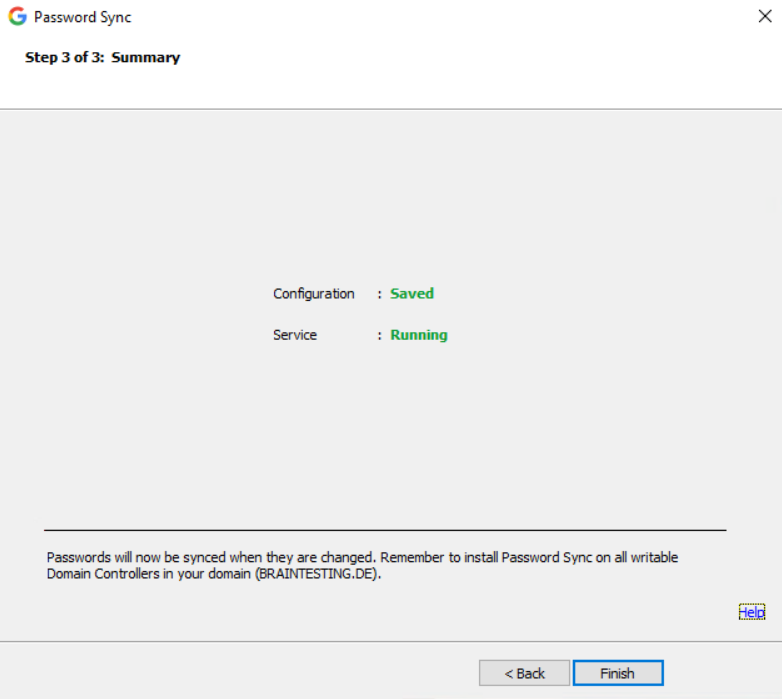
Repeat these steps for each domain controller in your domain.
For Password Sync to synchronize a Microsoft Active Directory (AD) password with a user’s Google Workspace or Cloud Identity account, your users must change their Active Directory password. We recommend that you prompt your users to change their password the next time they sign in to Windows.
Important: User passwords must adhere to Google’s password guidelines. For details, go to Create a strong password & a more secure account.
Source: https://support.google.com/a/answer/2611859?hl=en&ref_topic=4498019
Prevent users from changing their Google passwords
You need to ensure your users change their passwords in Active Directory and not in their Google Workspace or Cloud Identity account.
When users (other than super administrators) try to change their Google password, you can direct them to your internal webpage that instructs them to change their Windows password instead.
This setting applies even if you do not enable single sign-on (SSO). Super admins do not get redirected to the internal webpage. Make sure they know to change their passwords in Active Directory.
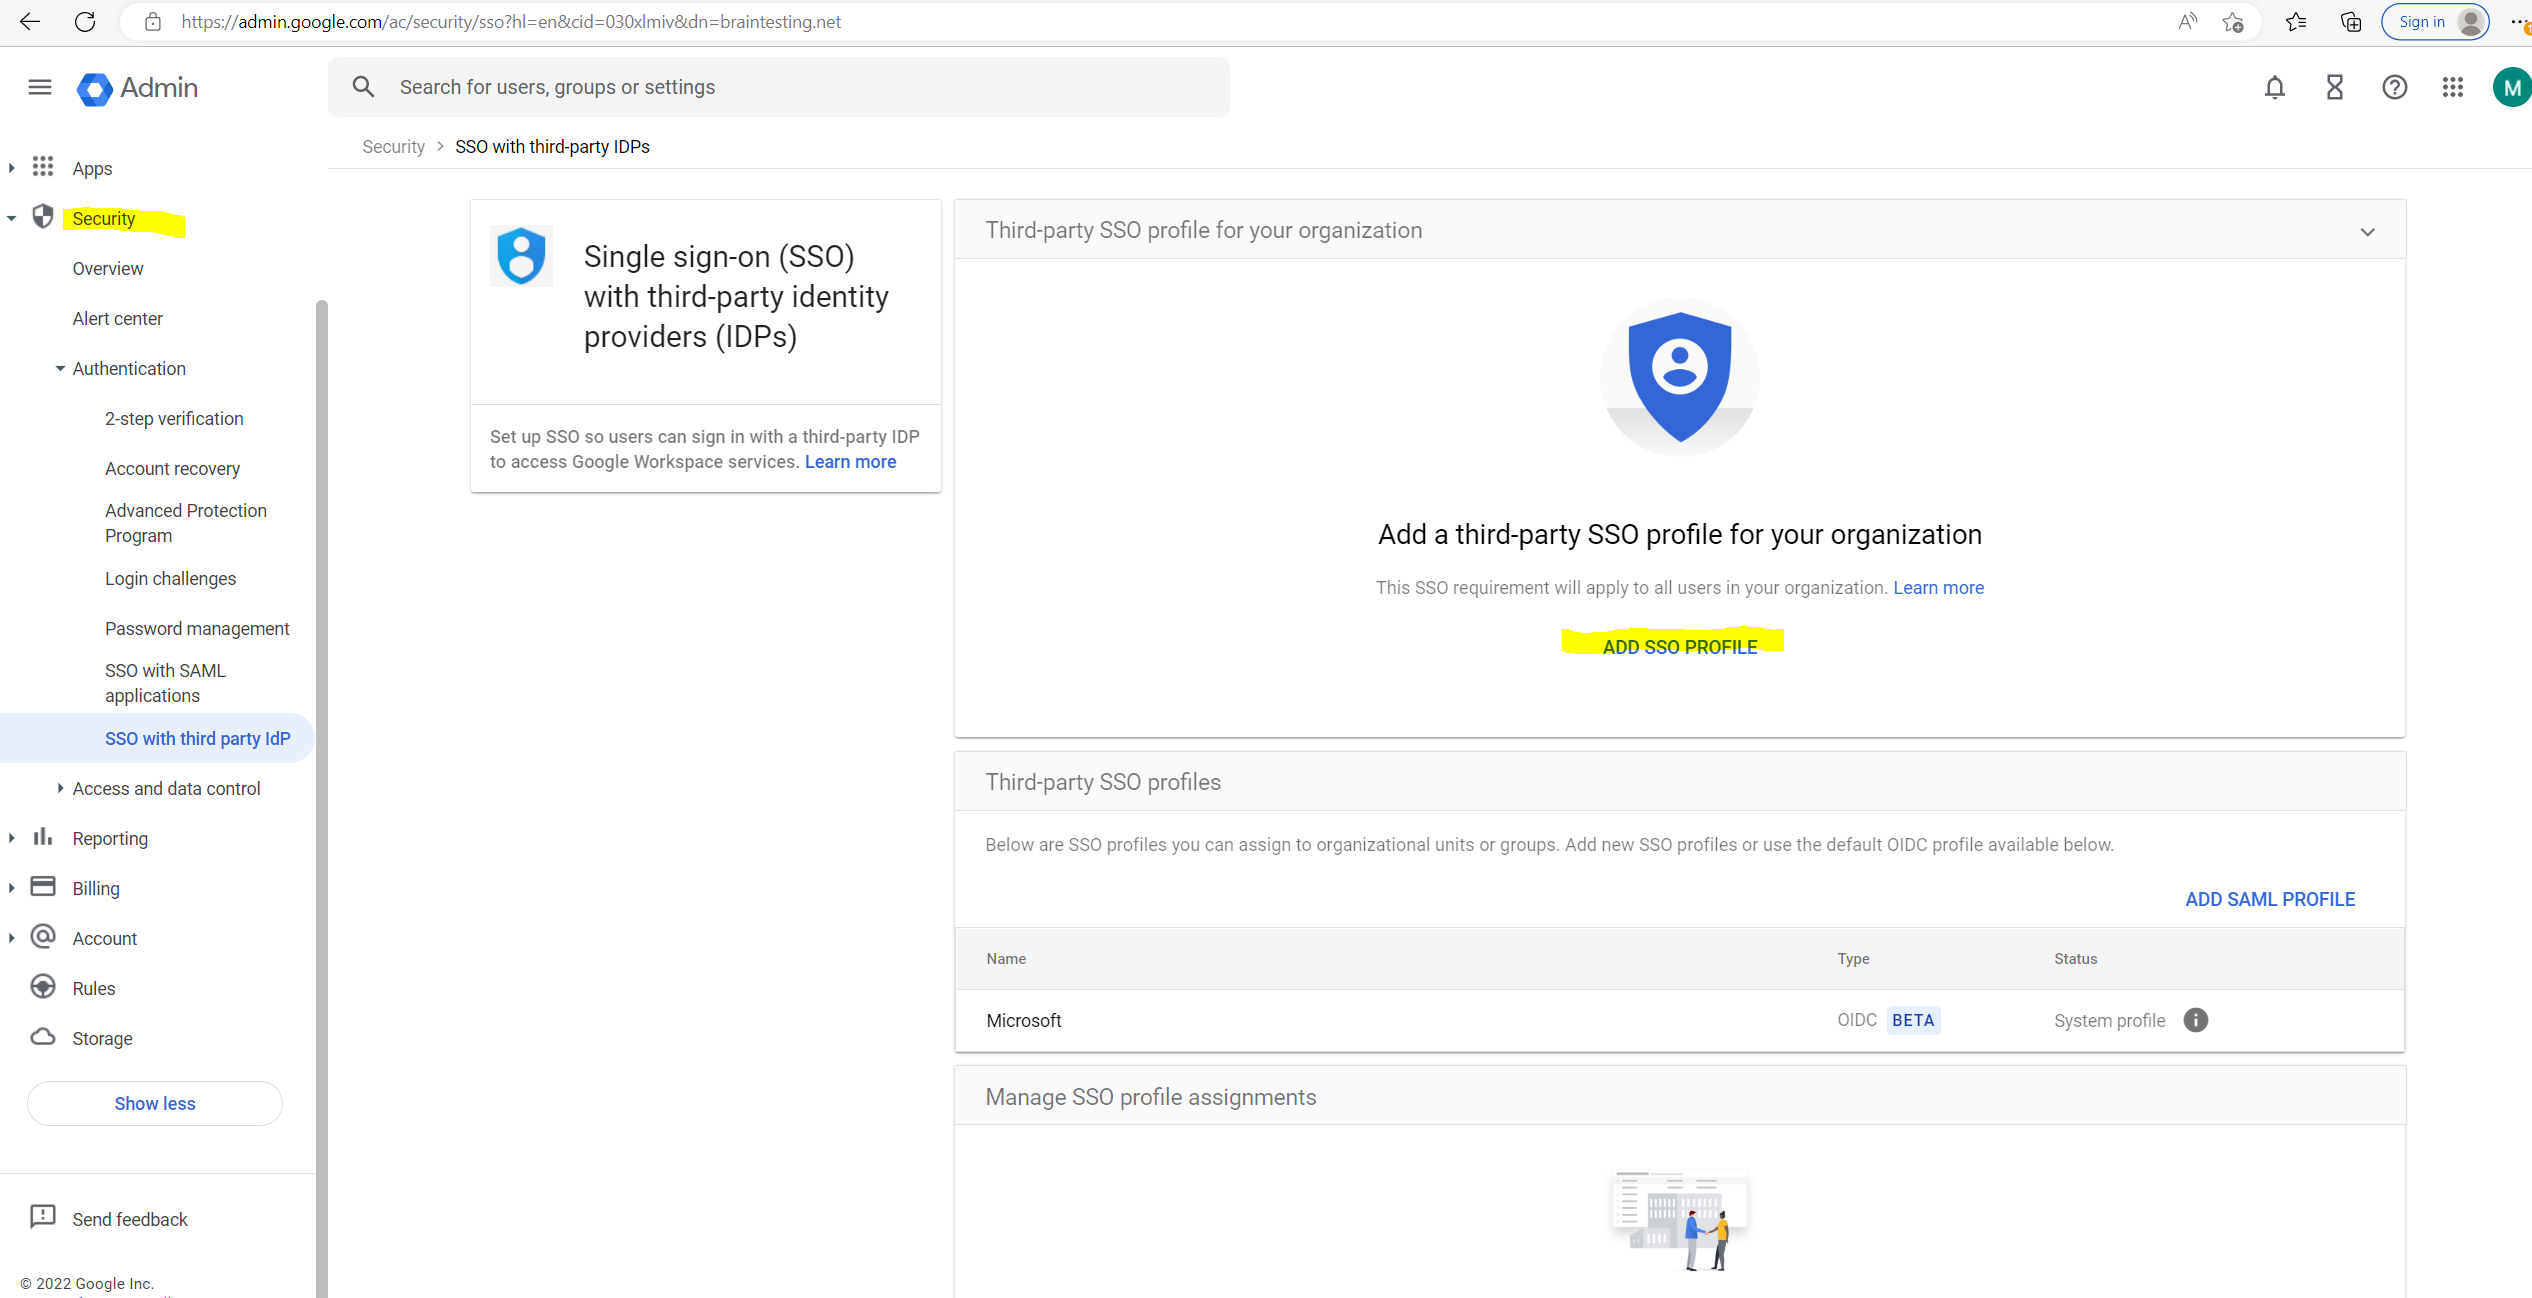
Sign in to your Google Admin console.
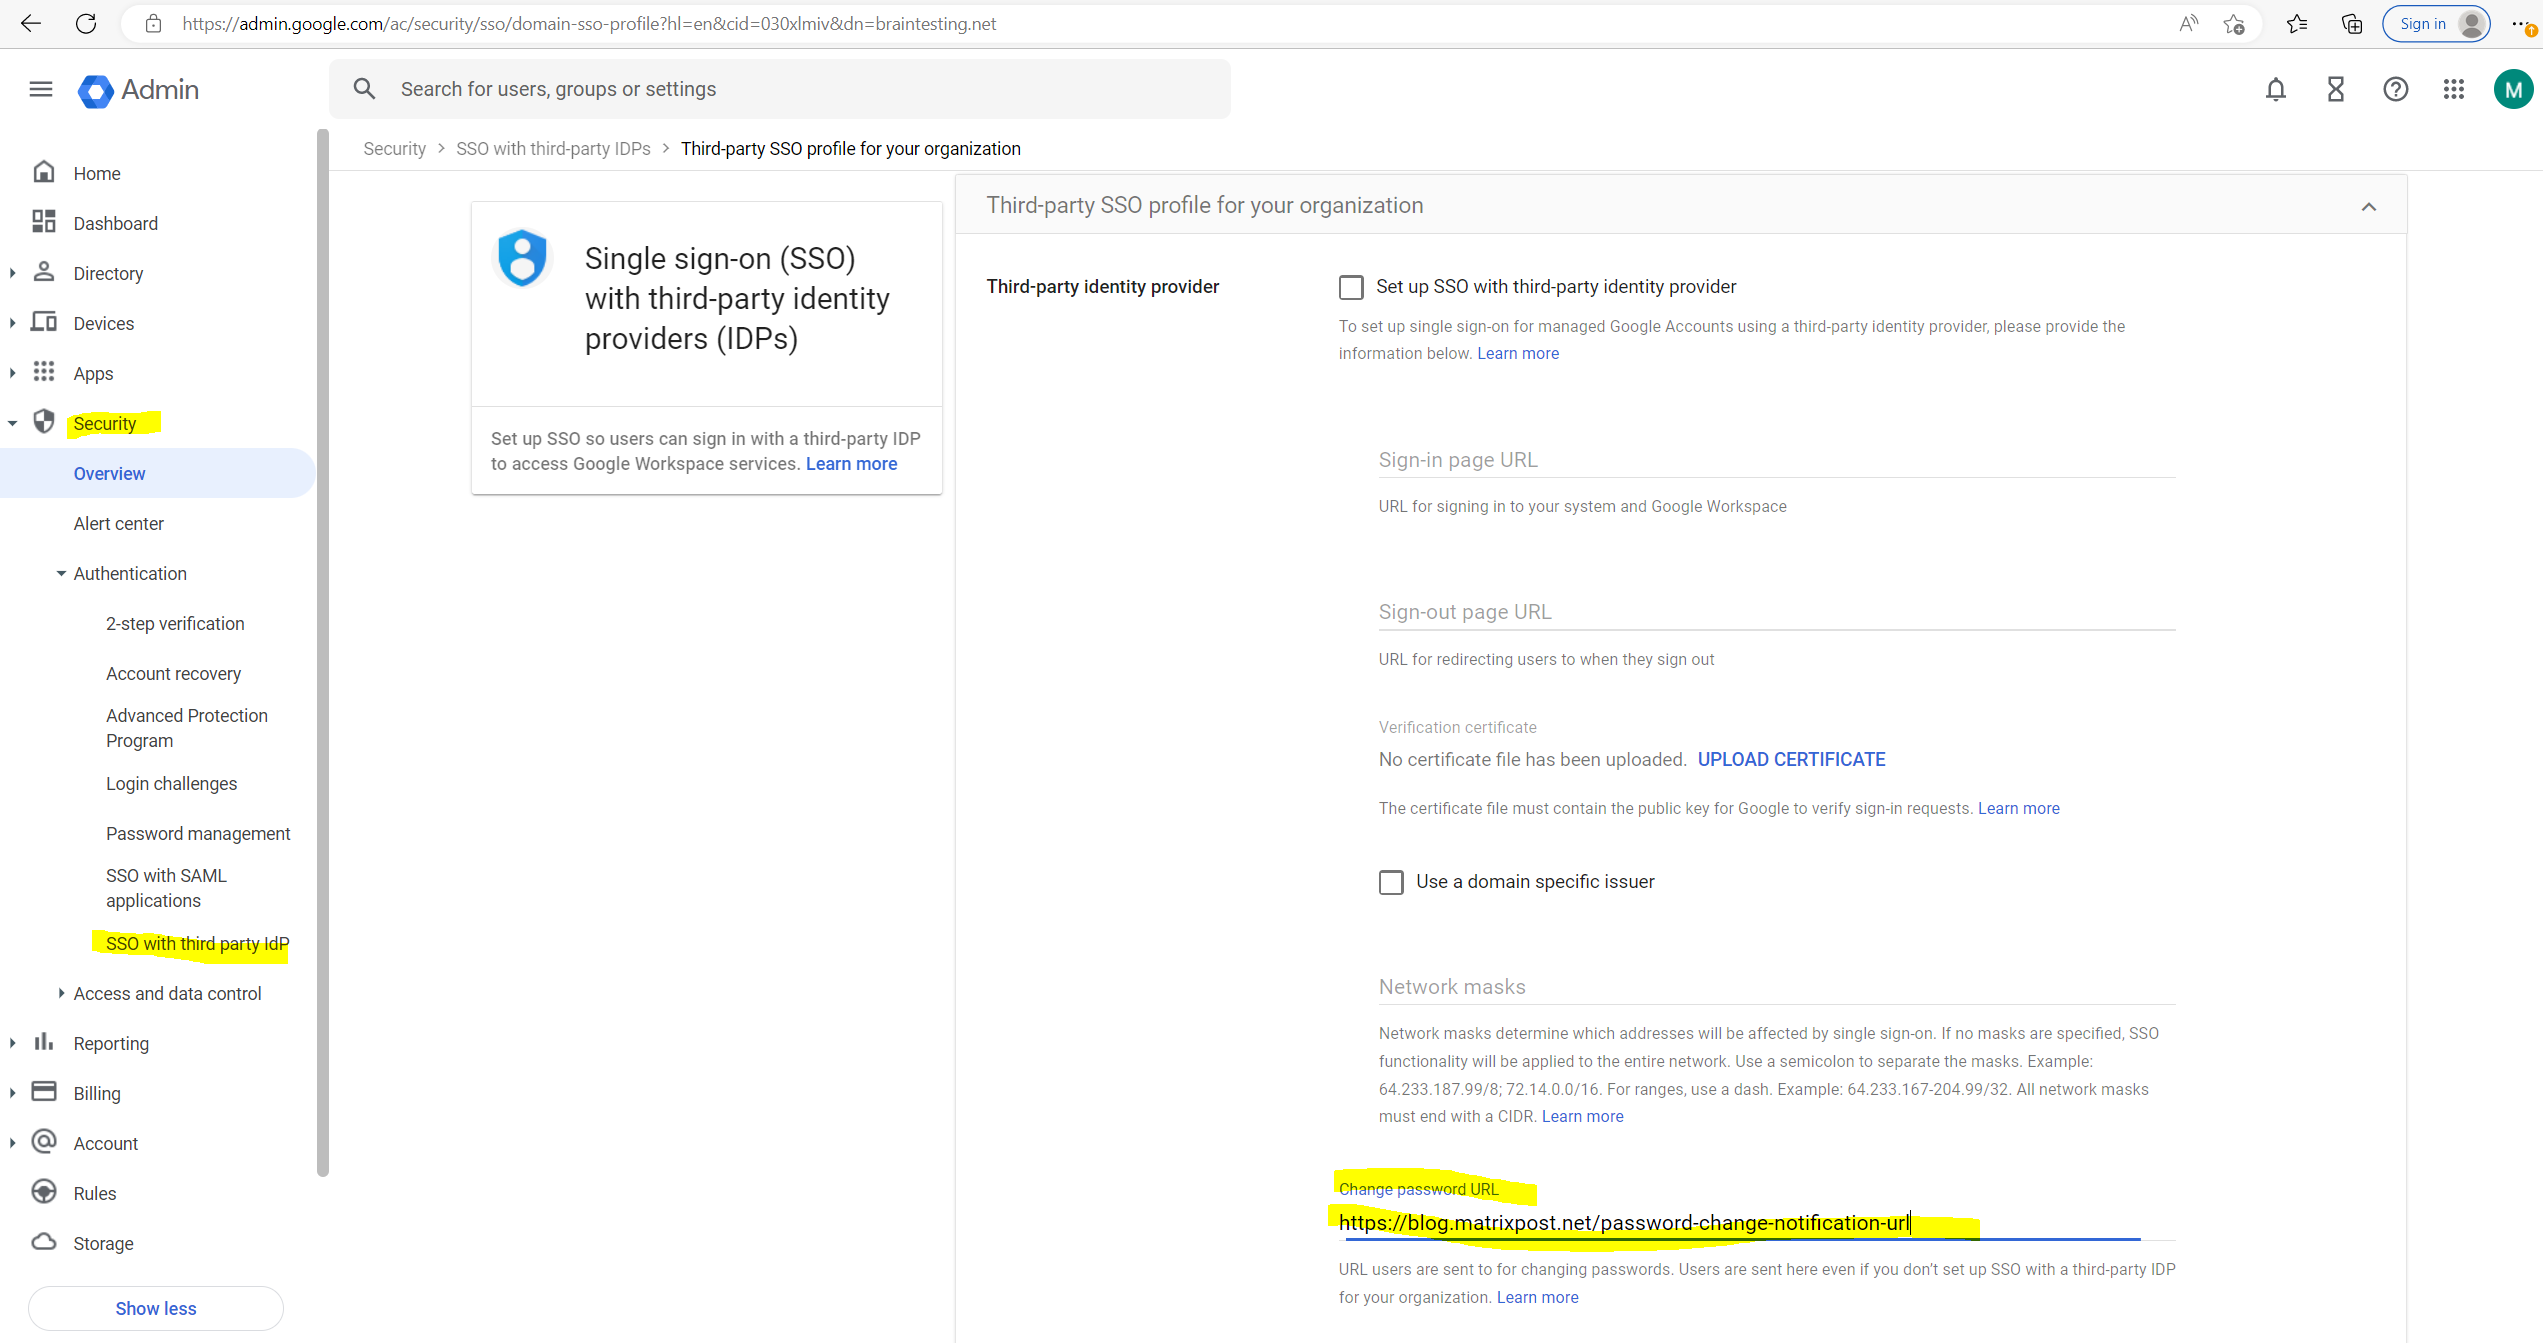
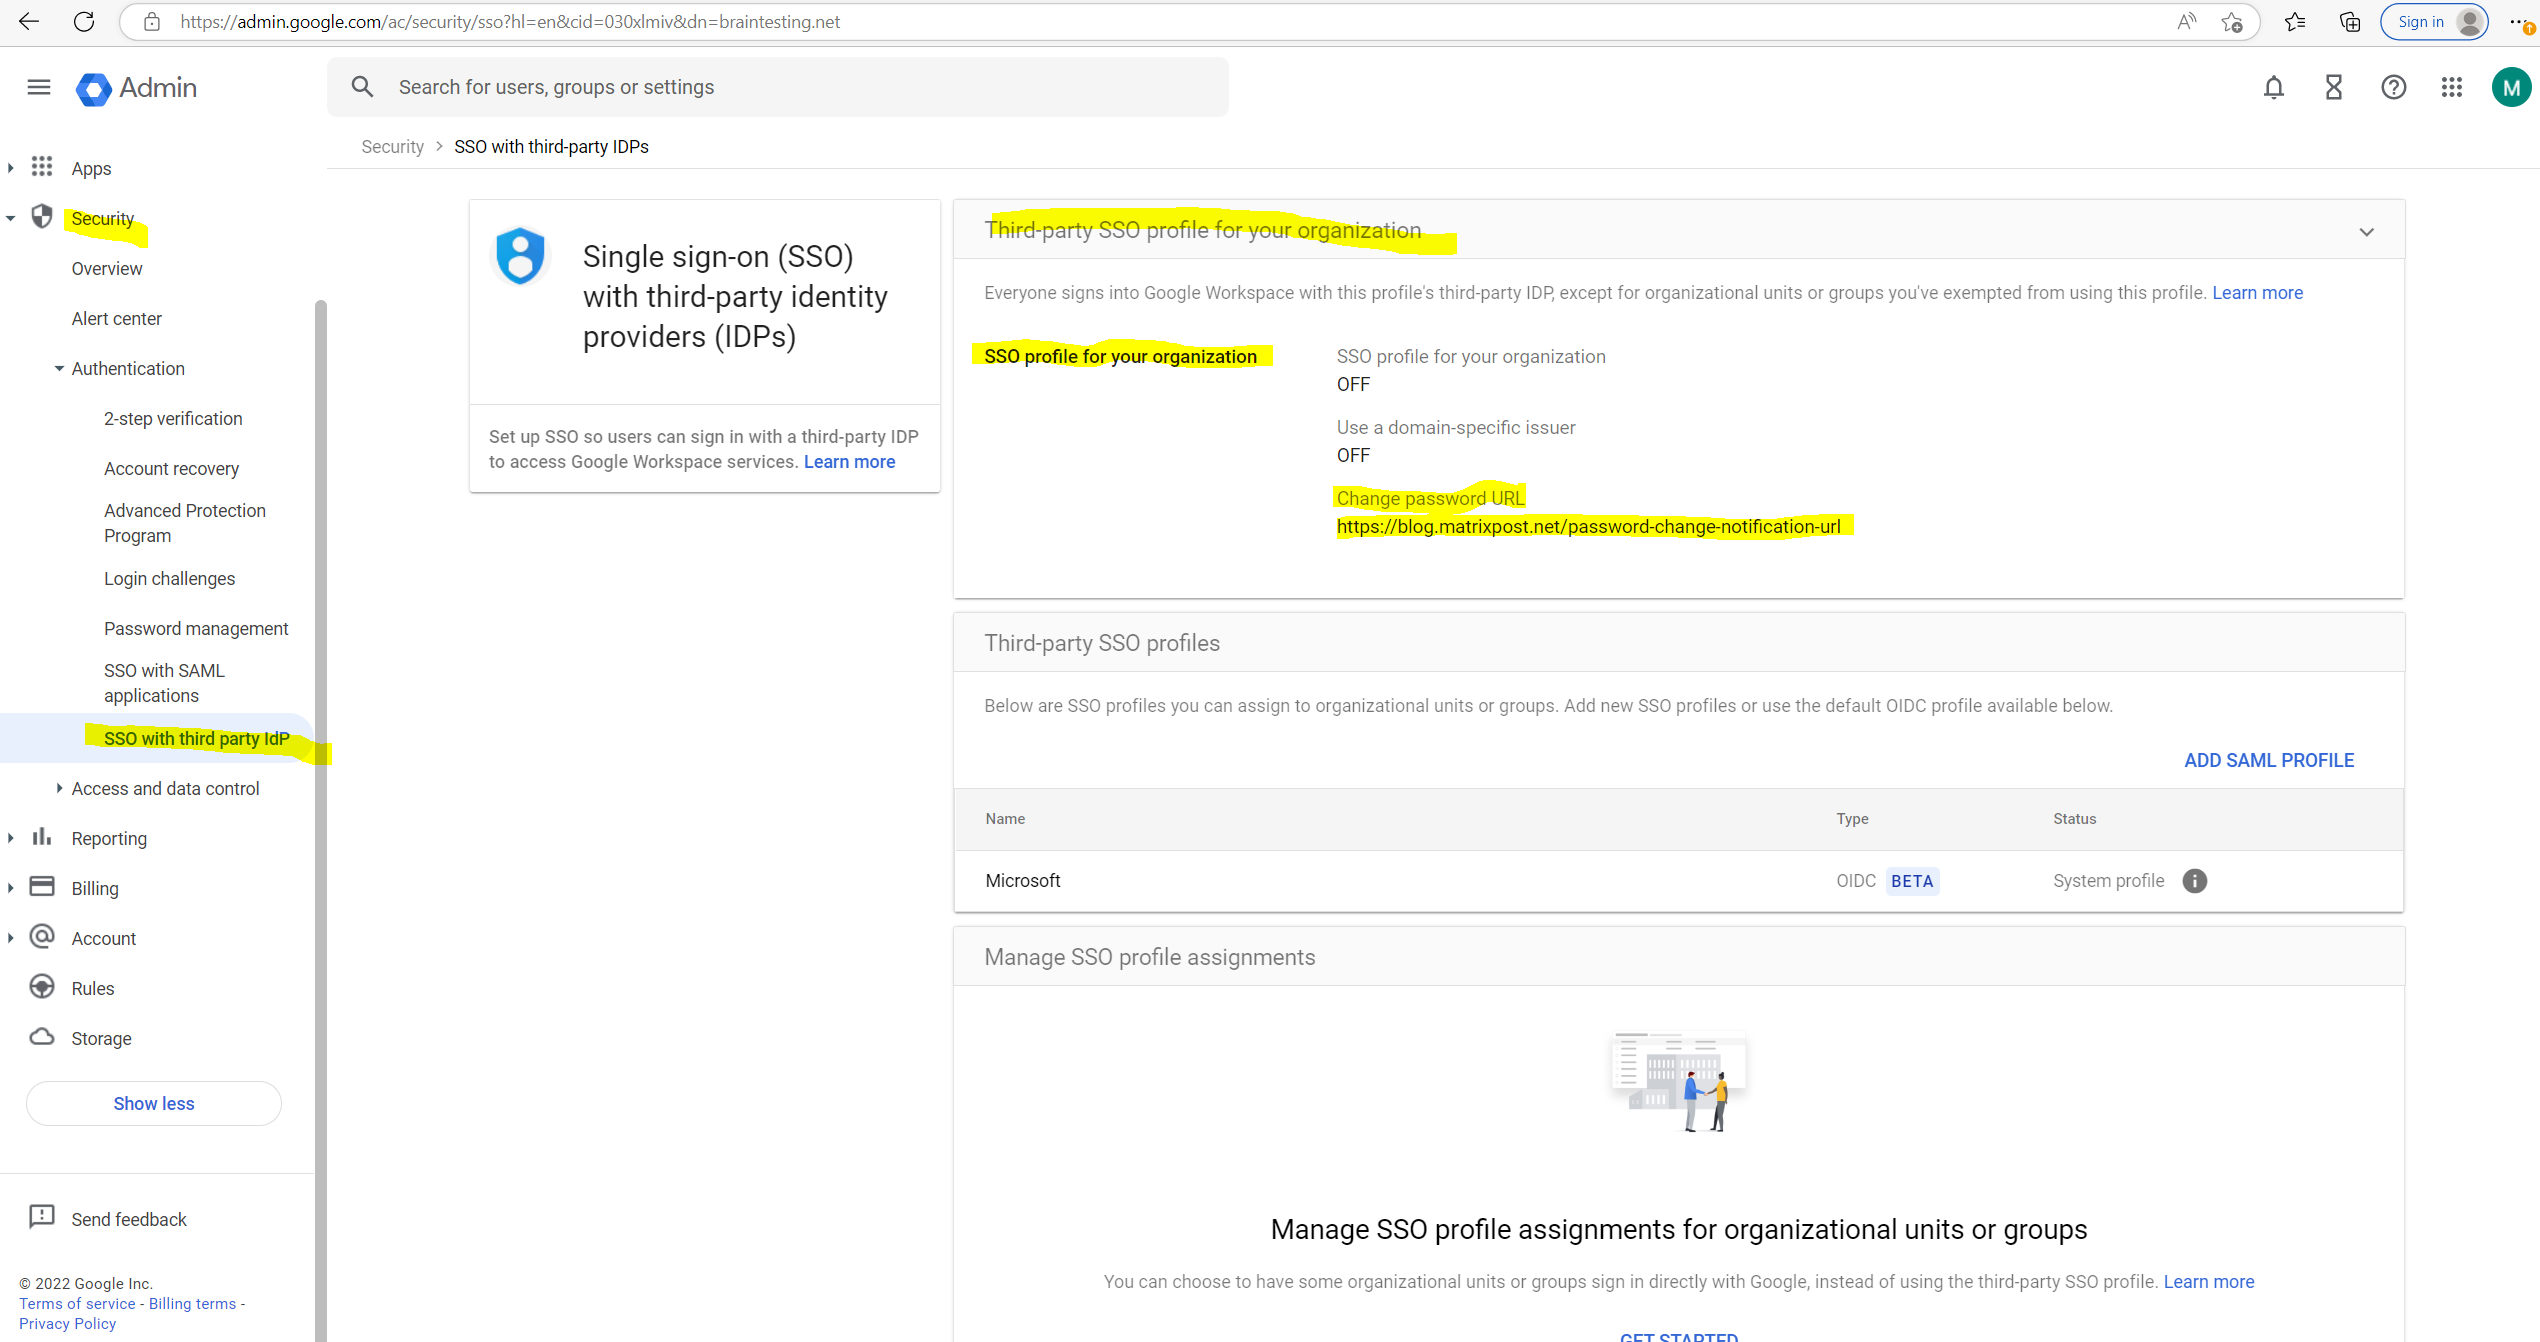
In the Admin console, go to Menu Security –> Overview
Click SSO profile for your organization
In my case I first have to create an SSO profile under Security –> Overview –> Set up single sign-on (SSO) with a third party IdP –> ADD SSO PROFILE
Create an SSO profile
https://support.google.com/cloudidentity/answer/12032922#org_profile
In my case as this is just a lab environment, I will enter an URL from my blog which doesn’t really exists, just to test if the user will get redirected after trying to change its password in Google Cloud as not desired.
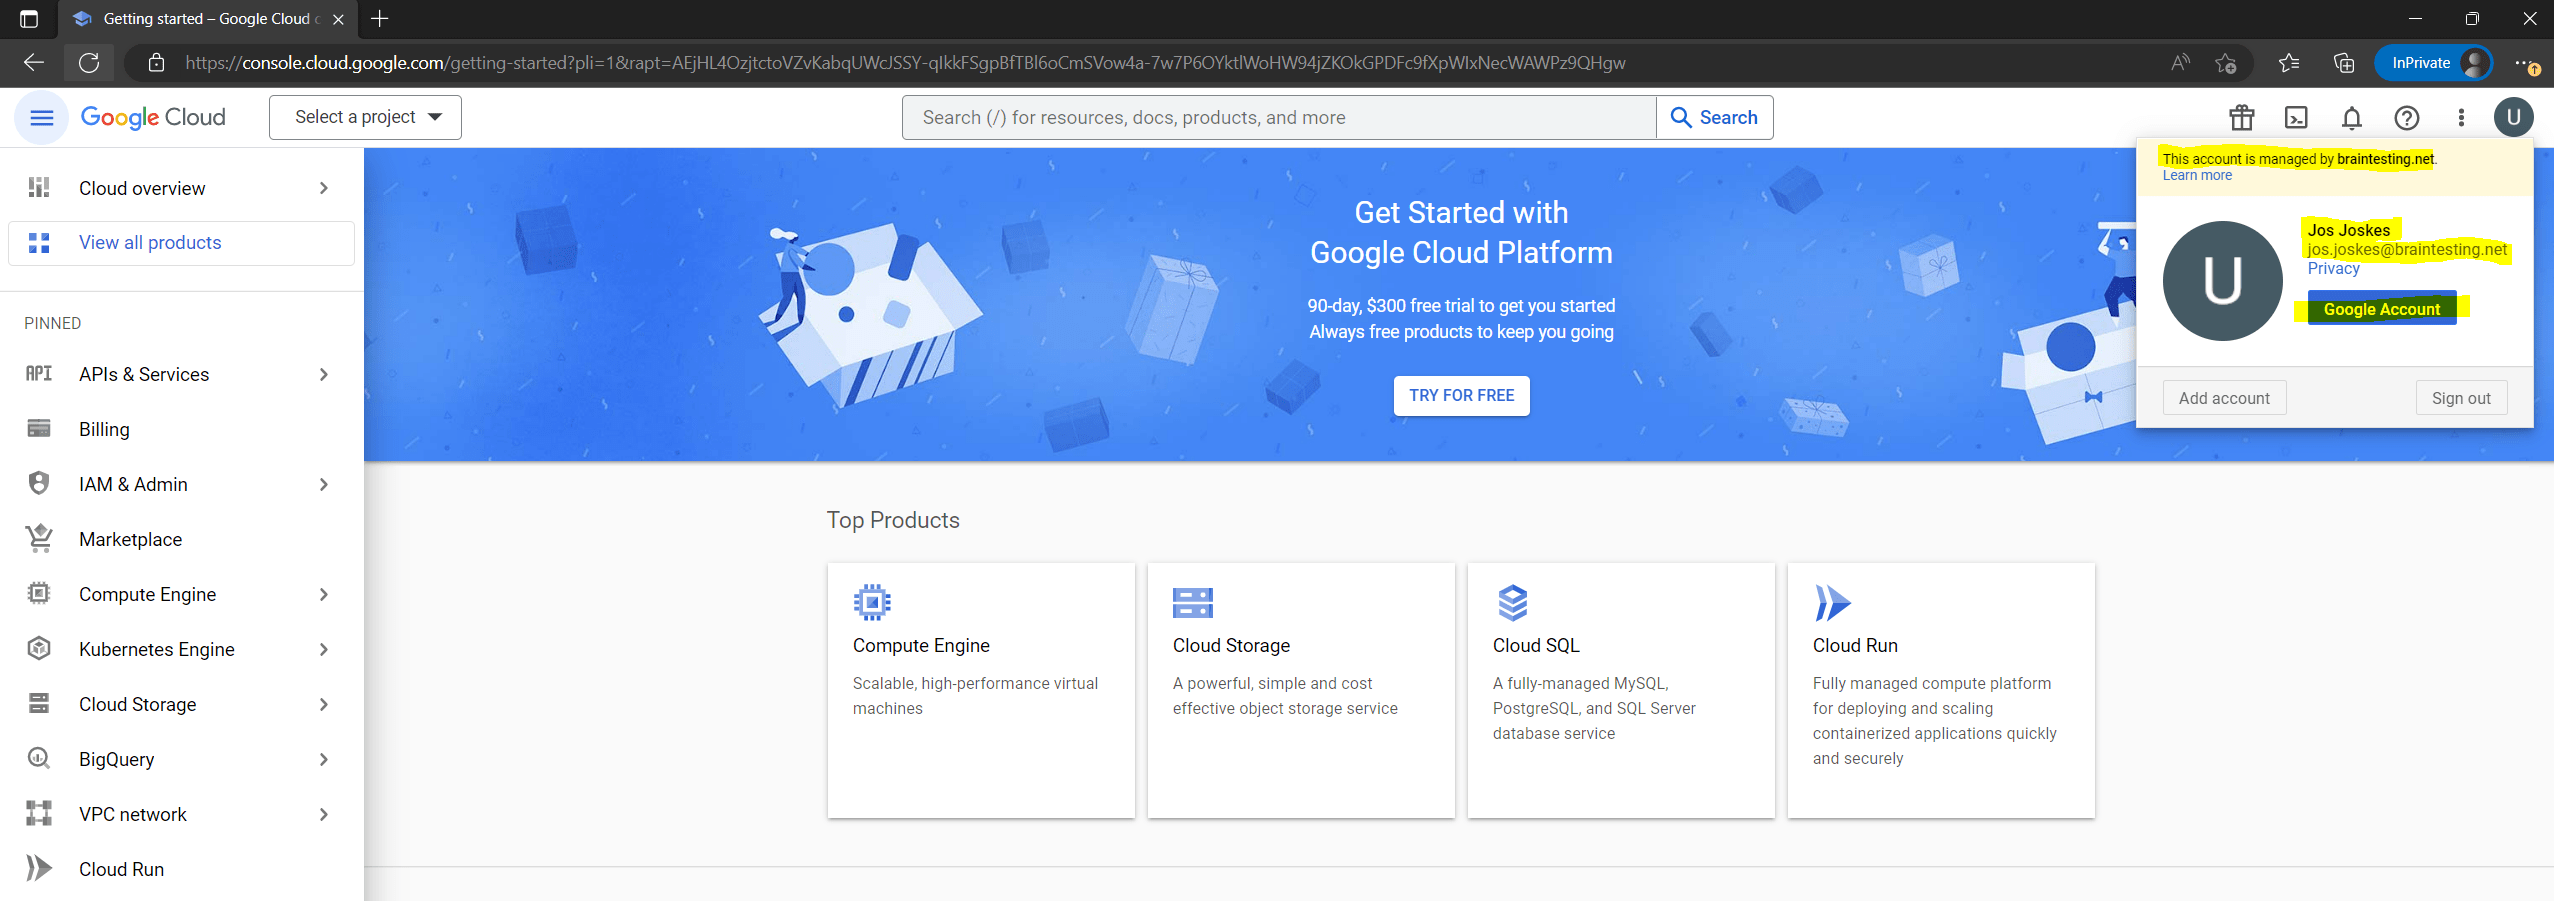
Now I will do a test with the user Jos Joskes, which account and password is synced from on-premise to Google Cloud.
To change the password in Google Gloud, you have to open your Google Account page.
In your Google Account click on Security –> Signing in to Google –> Password
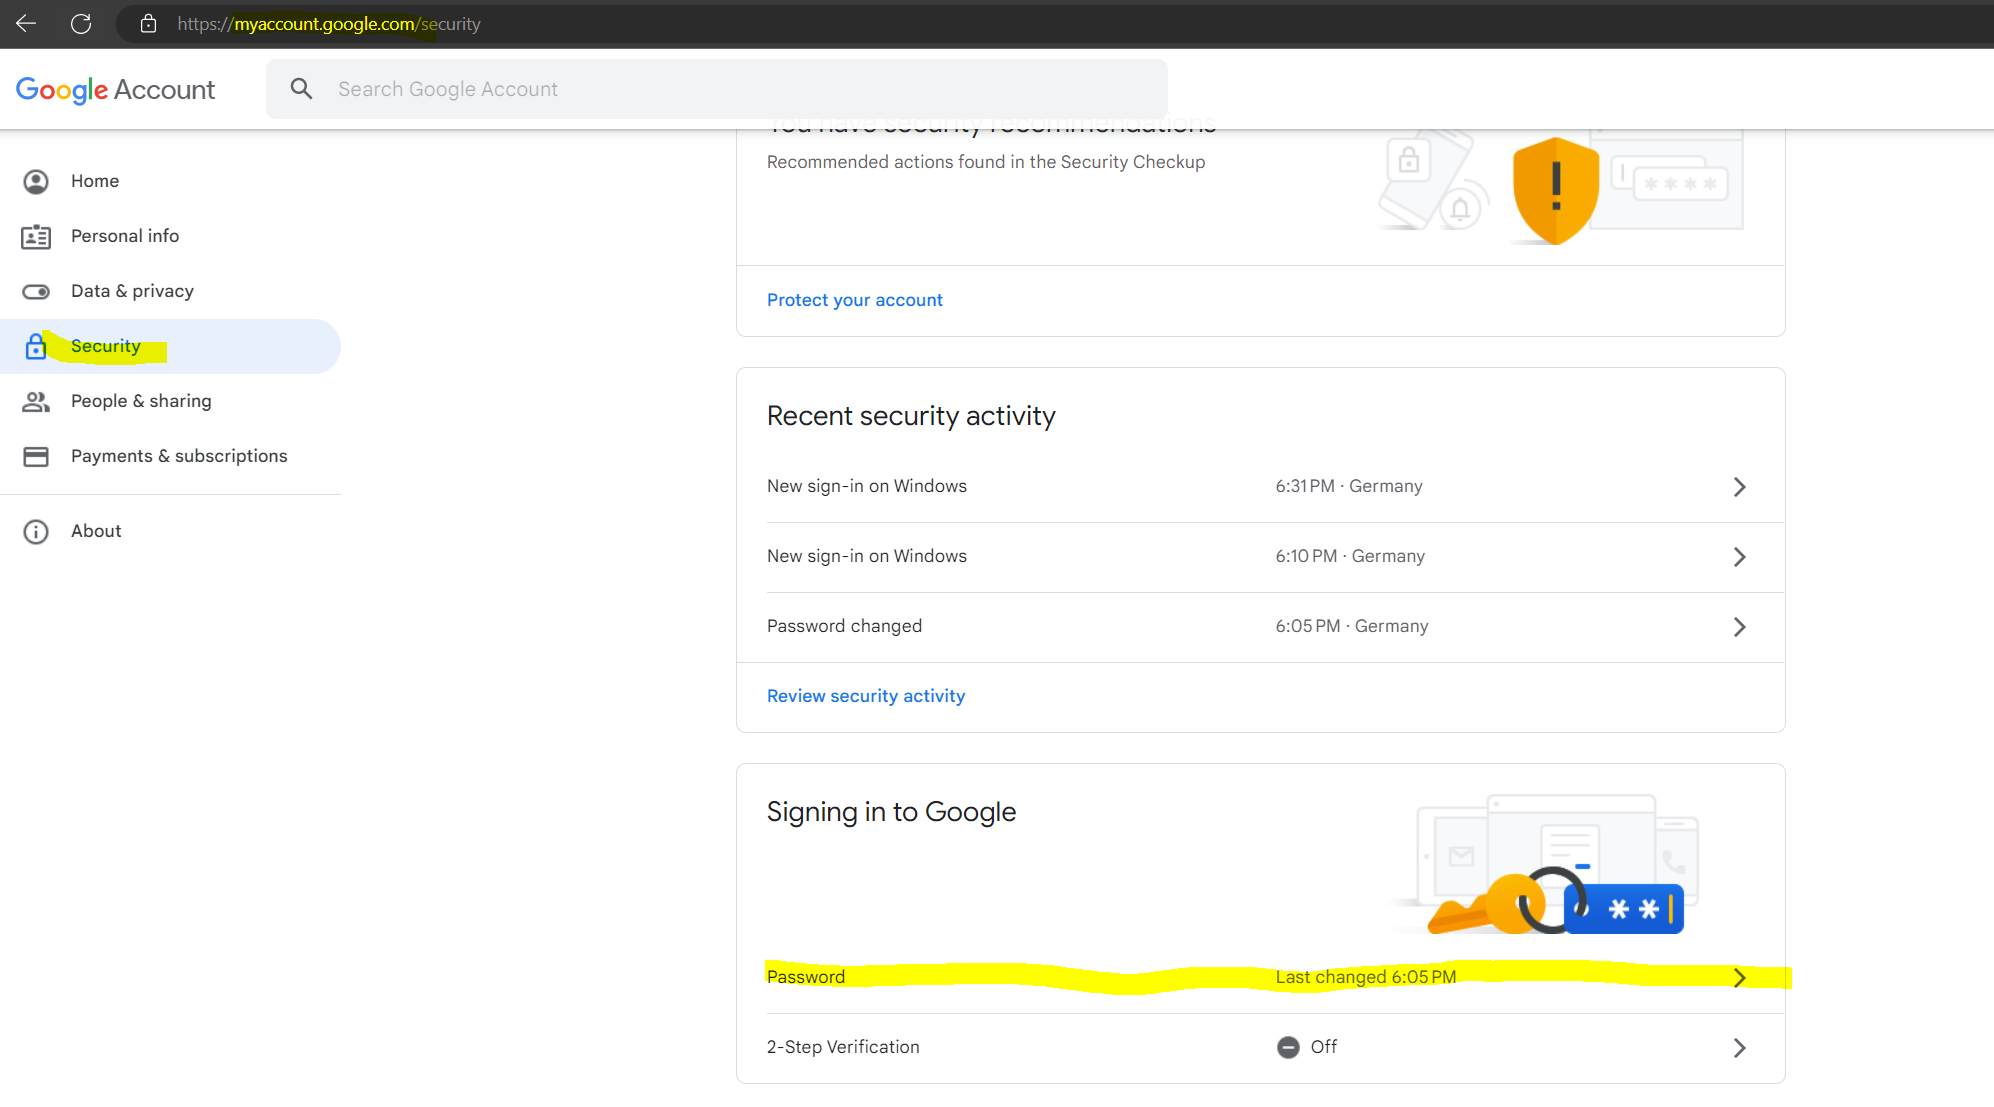
So it works and the user is get redirected to my new Change password URL which normally should inform the user to change its password in on-premise.

Source: https://support.google.com/a/answer/11237847?hl=en&ref_topic=4498019
In case you are interested in how to sync on-premise users to Azure you can read my following posts.
Link
Federating Google Cloud with Active Directory
https://cloud.google.com/architecture/identity/federating-gcp-with-active-directory-introductionAbout Google Cloud Directory Sync
https://support.google.com/a/answer/106368?hl=enGCDS best practices
https://support.google.com/a/answer/7177267?hl=en&ref_topic=2679497Install & prepare GCDS
https://support.google.com/a/answer/6120989?hl=en&visit_id=638064545752140317-2982177567&ref_topic=7106512&rd=1GCDS FAQ
https://support.google.com/a/answer/7177266?hl=en&ref_topic=2679497Configure Password Sync
https://support.google.com/a/answer/2611842?hl=en