Advanced Cross vCenter Server vMotion (XVM) Capability
With vCenter Server 7.0 Update 1c, in the vSphere Client, you can use the Advanced Cross vCenter vMotion (XVM) feature to manage the bulk migration of workloads across vCenter Server systems in different vCenter Single Sign-On domains.
XVM helps to migrate virtual workloads between vCenter Server instances, without the requirement for Enhanced Linked Mode (ELM) or Hybrid Linked Mode (HLM). This means it’s possible to migrate virtual machines (VMs) between vCenter Servers that are in different Single Sign-On (SSO) domains.
Source: https://www.vmware.com/docs/vmw-introducing-the-advanced-cross-vcenter-server-vmotion-capability
From within the vSphere Client, two workflows are available to migrate workloads between vCenter Servers. Either using the Import VMs option in the Hosts and Cluster view to import VMs from a target vCenter Server Appliance (VCSA), or by selecting VMs and opt for Migrate in the menu.
In this post we will see both workflow options step by step to migrate VMs between vCenter Servers that are in different Single Sign-On (SSO) domains.
In a VMware vSphere environment, Single Sign-On (SSO) domains provide a centralized authentication mechanism that allows administrators to log in once and access multiple vCenter Servers and VMware services without needing to reauthenticate.
SSO is a core component of the vCenter Server Appliance (VCSA) and is managed through VMware vSphere Authentication Services.
Prerequisites
To enable migration across vCenter Server instances, your environment must meet these requirements:
- The source and destination vCenter Server instances and ESXi hosts must be running version 6.0 or later. The Advanced Cross vCenter Server vMotion (XVM) capability was one of the most popular VMware Flings (see blow more about). With the vSphere 7 Update 1c release, the XVM capability is embedded into the vSphere Client.
- The cross vCenter Server and long distance vMotion features require an Enterprise Plus license. For more information, see Compare vSphere Editions.
- Both vCenter Server instances must be time-synchronized with each other for correct vCenter Single Sign-On token verification.
- The VMKernel interfaces enabled for vMotion on both, the source and destination ESXi Host must be able to communicate with each other. To test this you can use the vmkping command as shown here.
- TCP 443 between both vCenter Servers
- TCP 8000 and 902 for vMotion and NFC between source and destination ESXi.
VMware Flings
As mentioned above in the prerequisites section, the Advanced Cross vCenter Server vMotion (XVM) capability was one of the most popular VMware Flings before it was embedded with the vSphere 7 Update 1c release into the vSphere Client.
VMware Flings are a collection of free, experimental tools, utilities, and scripts created by VMware engineers and the broader community.
These tools are designed to help users enhance their VMware environments, solve specific challenges, or explore new functionalities. Unlike official VMware products, Flings are not formally supported by VMware, but they provide valuable insights, innovations, and solutions that can be incredibly useful for IT professionals and enthusiasts.
Flings cover a wide range of areas, including automation, monitoring, troubleshooting, and performance optimization.
Since Flings are experimental, they are often updated based on user feedback and may eventually evolve into official VMware products. They are a great way to explore cutting-edge ideas and extend the capabilities of your VMware infrastructure. You can find and download Flings from the new Broadcom Flings Site.
In my following post for exampIe I will use the Flings USB Network Native drivers for ESXi in order to use USB NICs for the ESXi host like when you want to set up a lab environment by using notebooks as ESXi host.
VMware’s native support for USB NICs is limited, but thanks to the VMware Flings community, you can now integrate the USB Network Native Driver into your ESXi installation media.
Cross vCenter Server Export (Migrate Option)
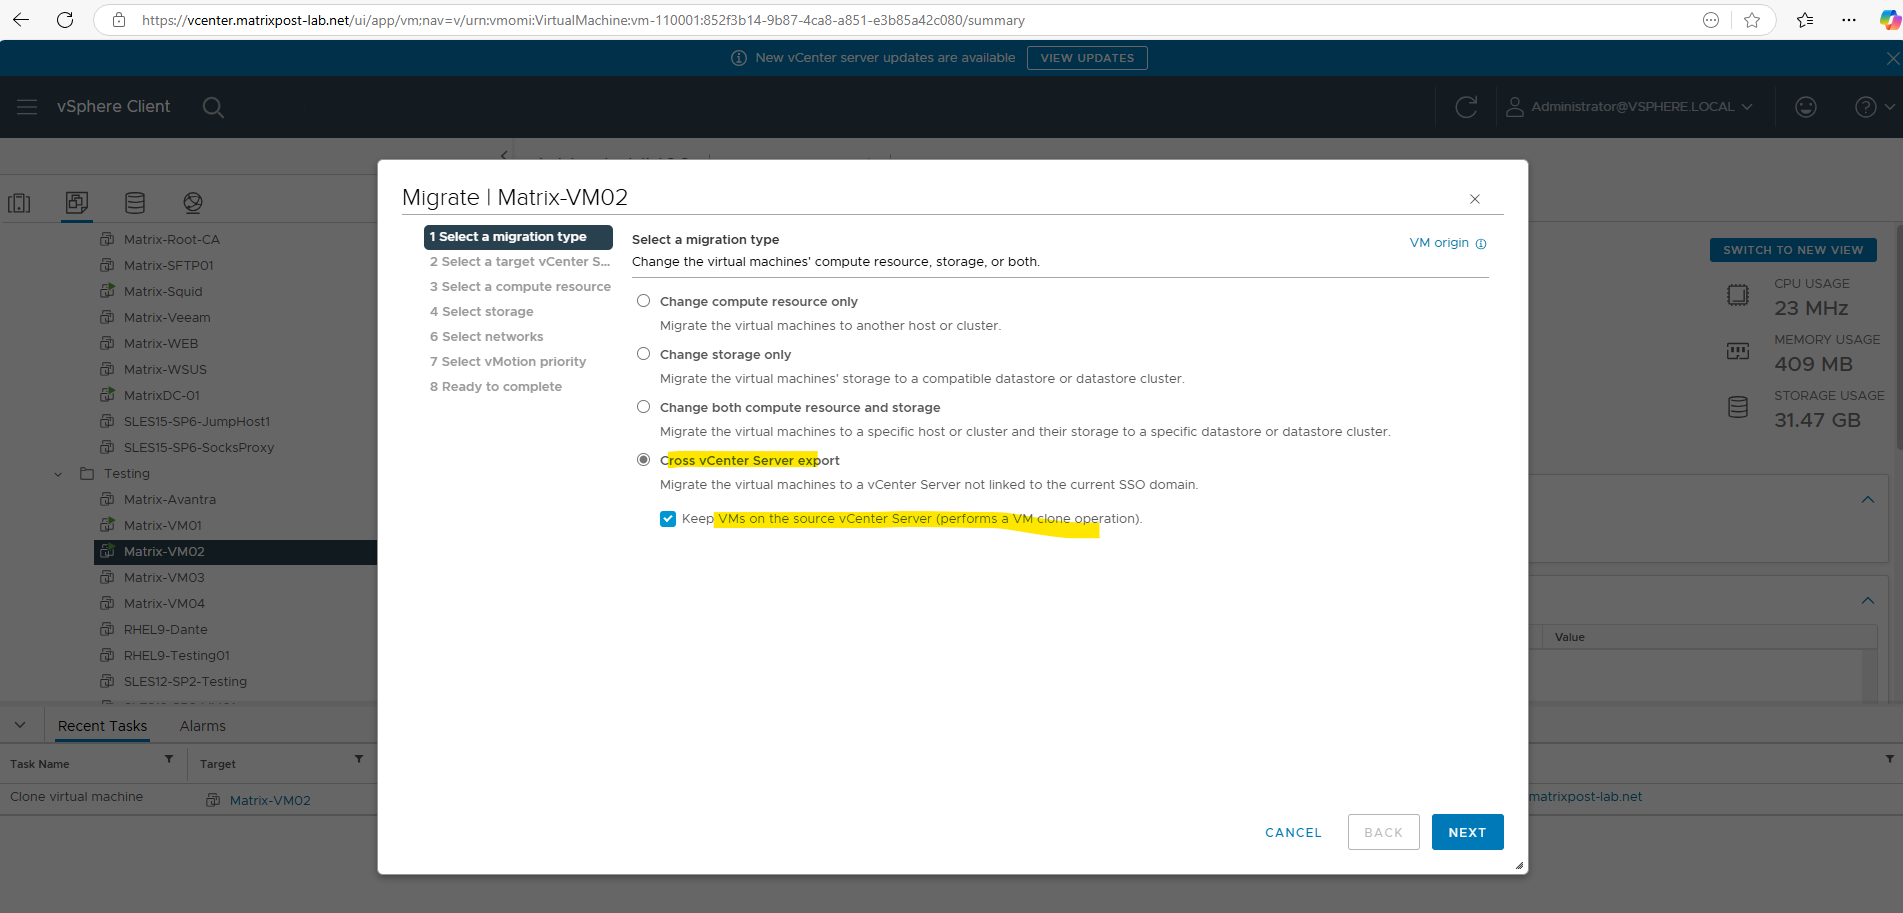
Like with a regular manual vMotion operations, you can select the Migrate option for one or multiple VMs.

Next to the familiar options to change the compute resource, and/or the storage location for that VM, there’s a new option listed.
Choose the new Cross vCenter Server export option to use the XVM functionality.
As you can see below, we can also keep the virtual machine on the source vCenter Server and just perform a VM clone operation.
Therefore we can check: Keep VMs on the source vCenter Server (performs a VM clone operation).
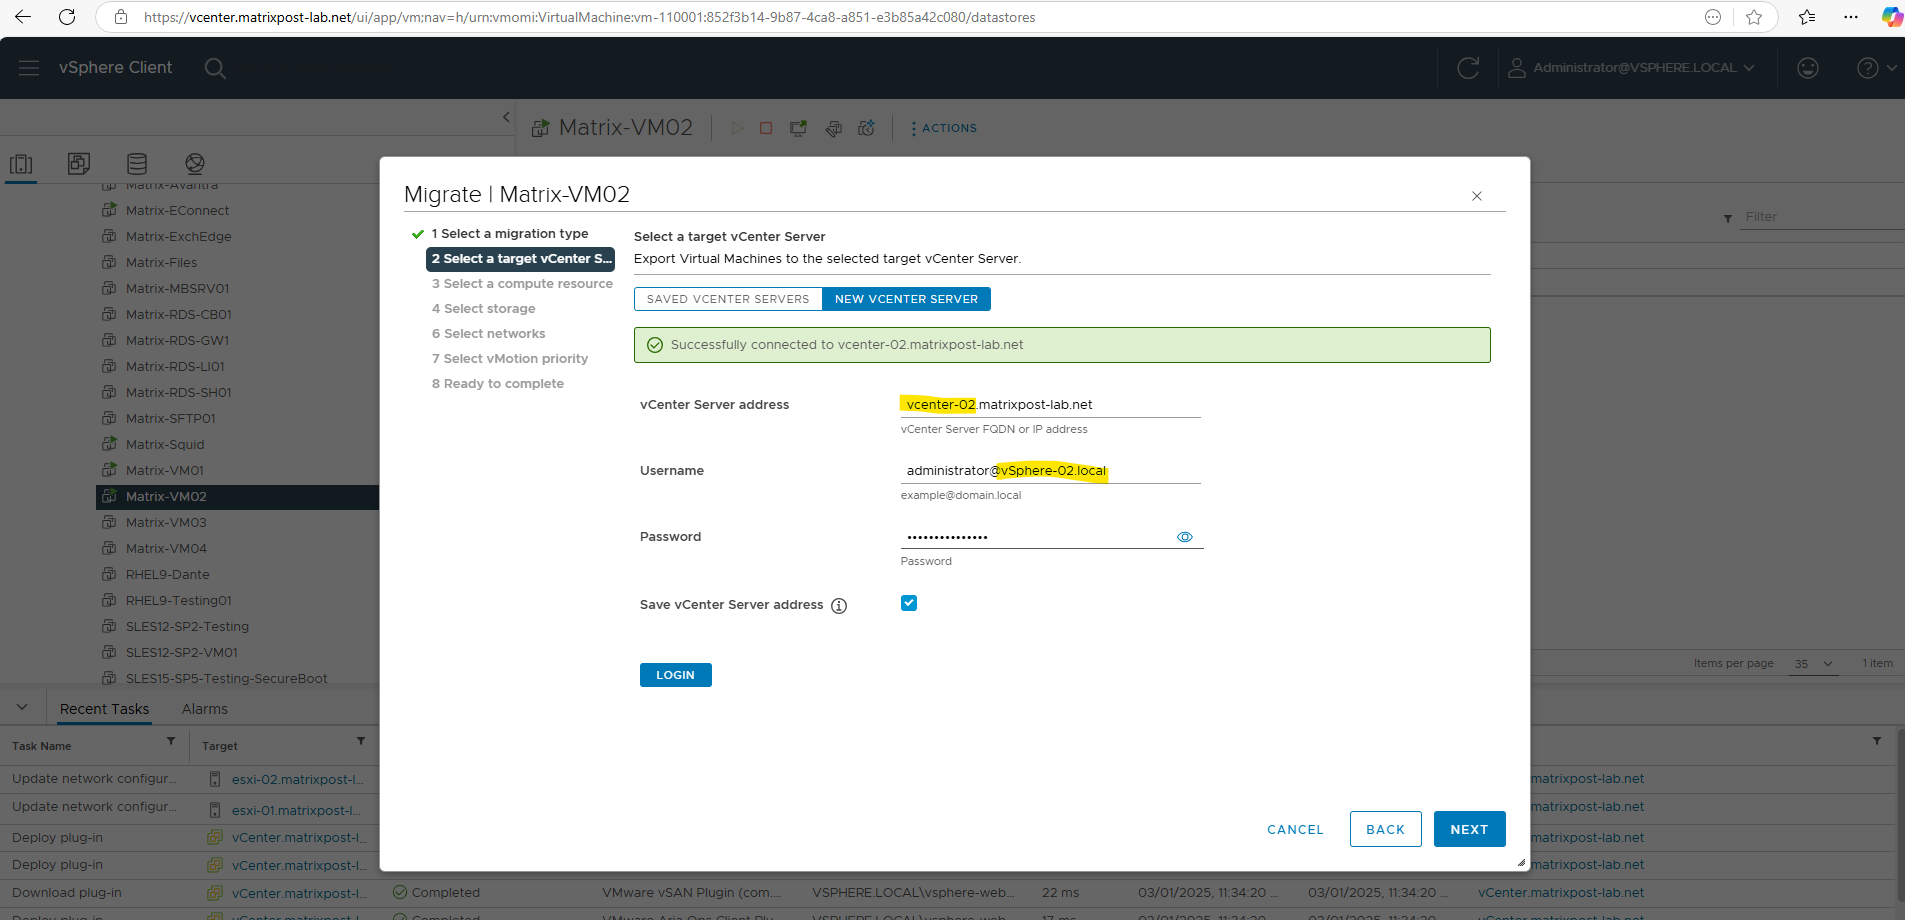
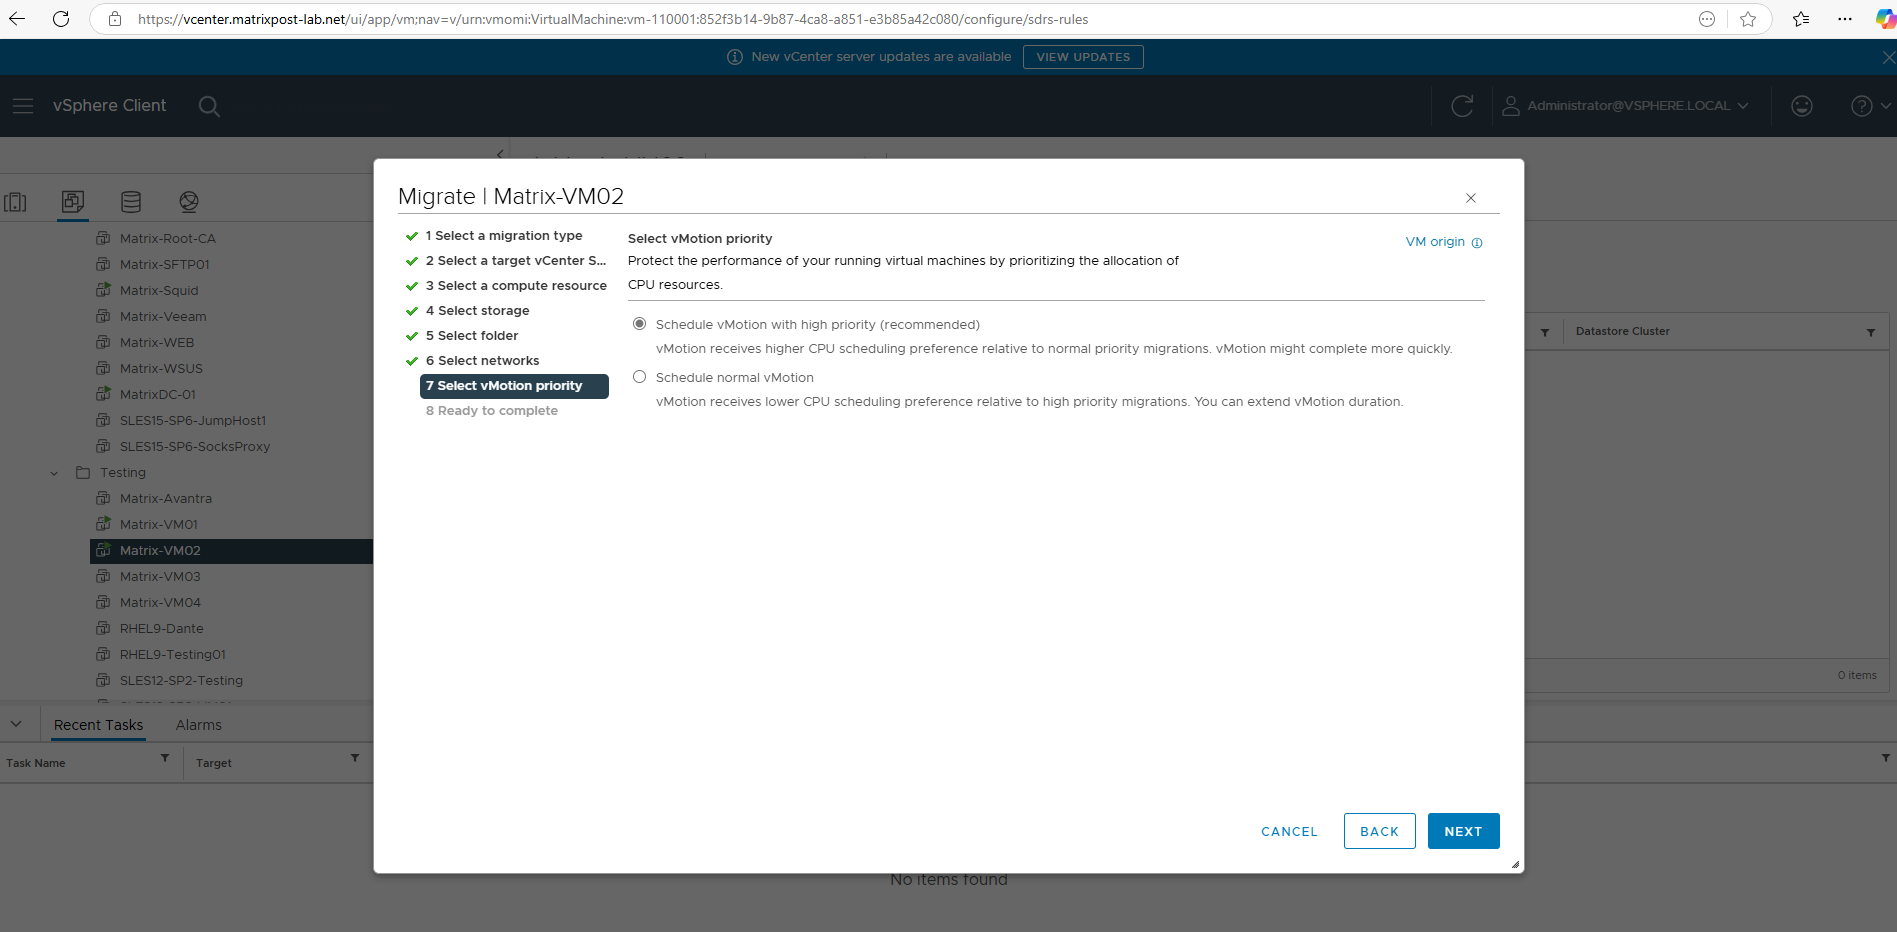
The same known options for the live migration operations apply, with an extra configurable that is the target vCenter Server instance.
This is where you configure the target vCenter Server. Either a new vCenter Server is connected, or a saved connection is chosen in the same user-session.
Saved vCenter Server entries are not persisted but retained only for the current user session. This is
particularly convenient when you need to execute multiple migration operations.
Click on Login and then on Next to select the compute resource.
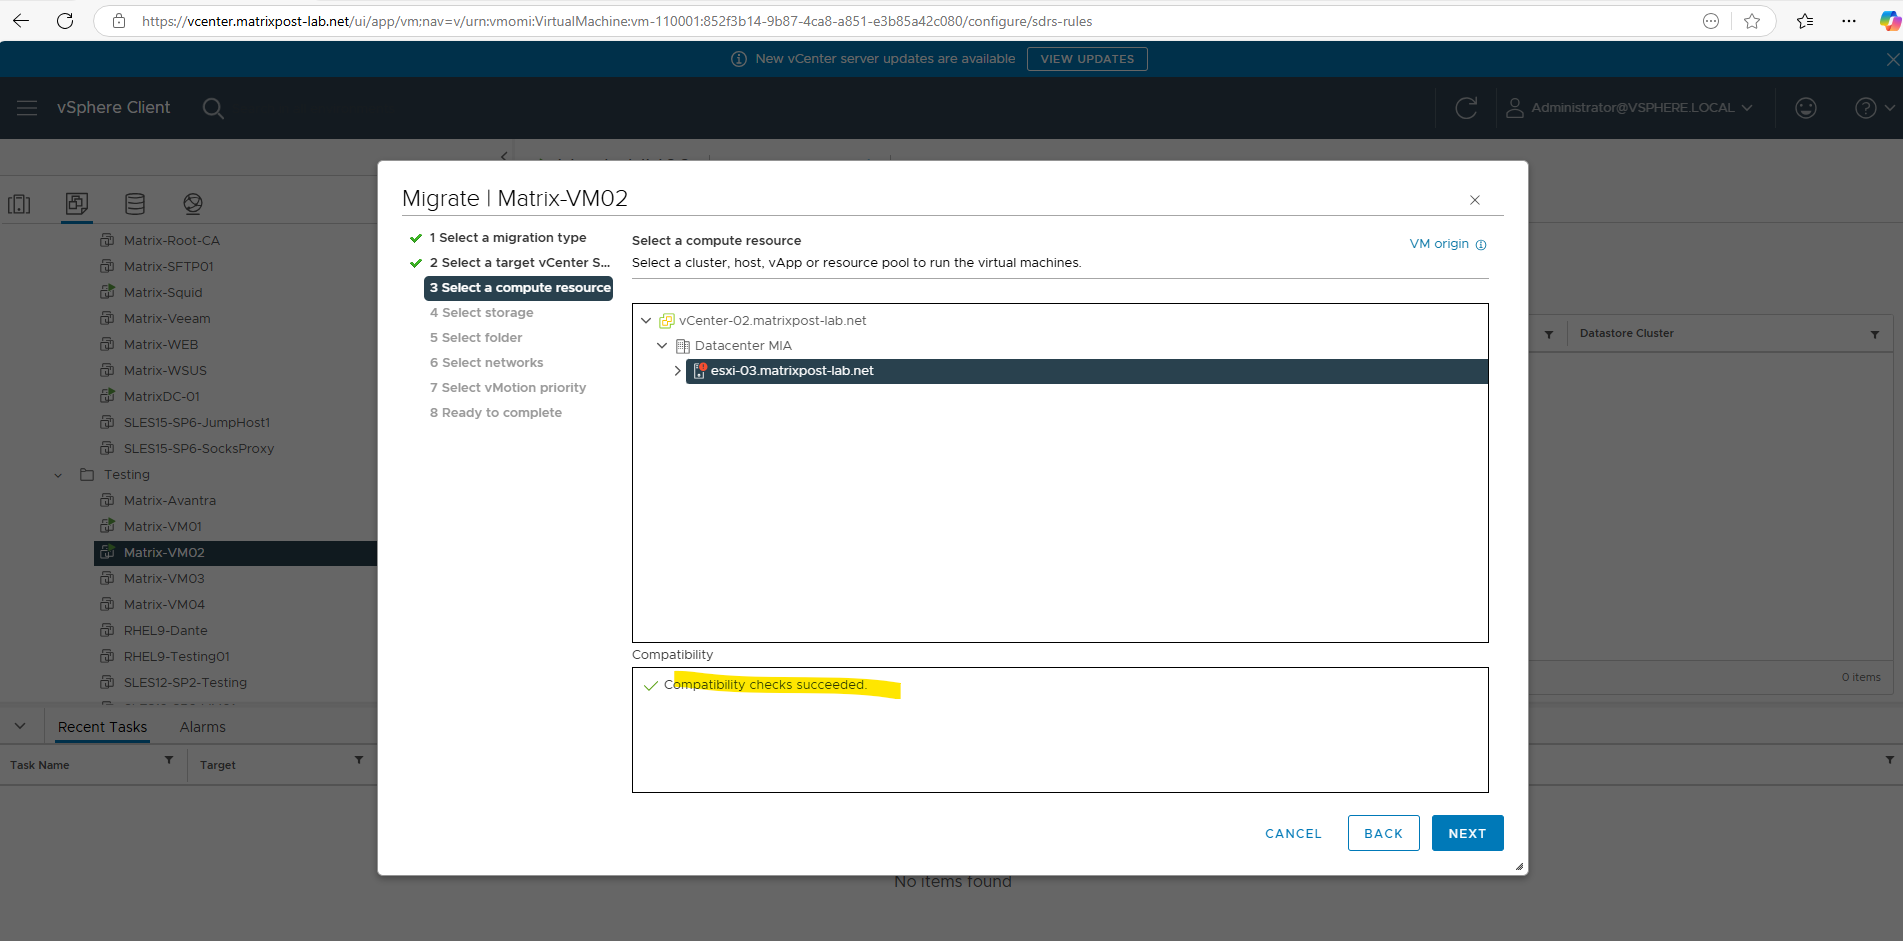
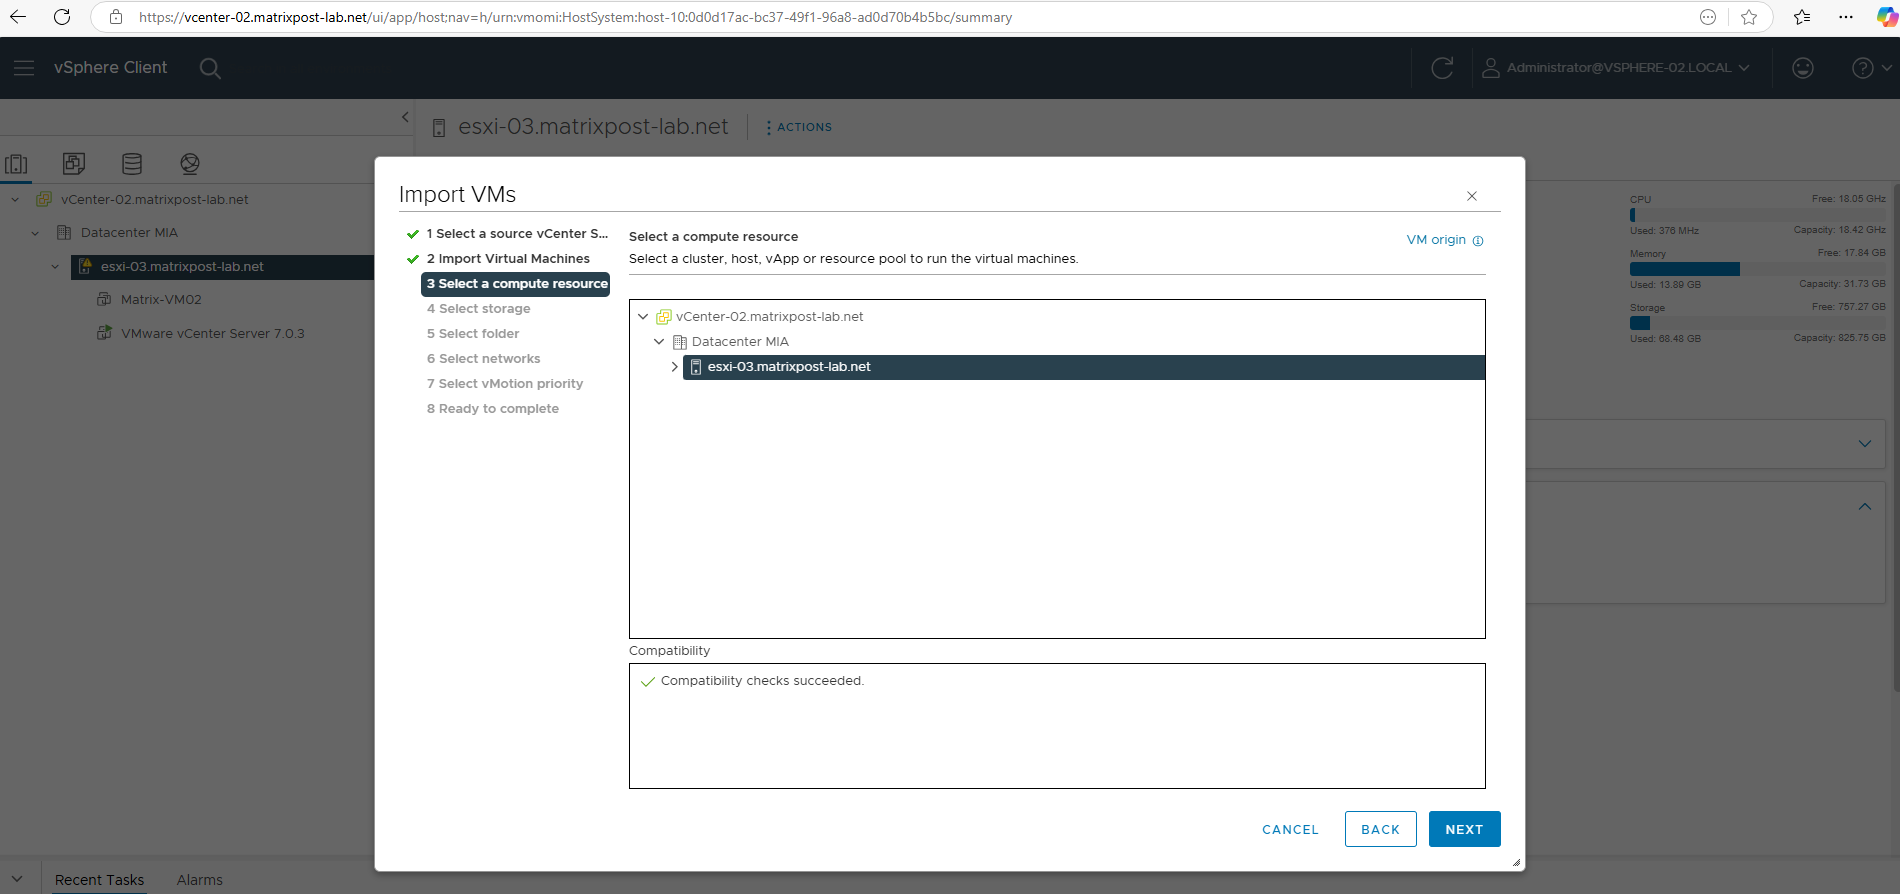
Below we either need to select the cluster or a specific ESXi Host, in my case I will use here my lab environment in which my second vCenter Server is not configured for a cluster and just using one ESXi Host.
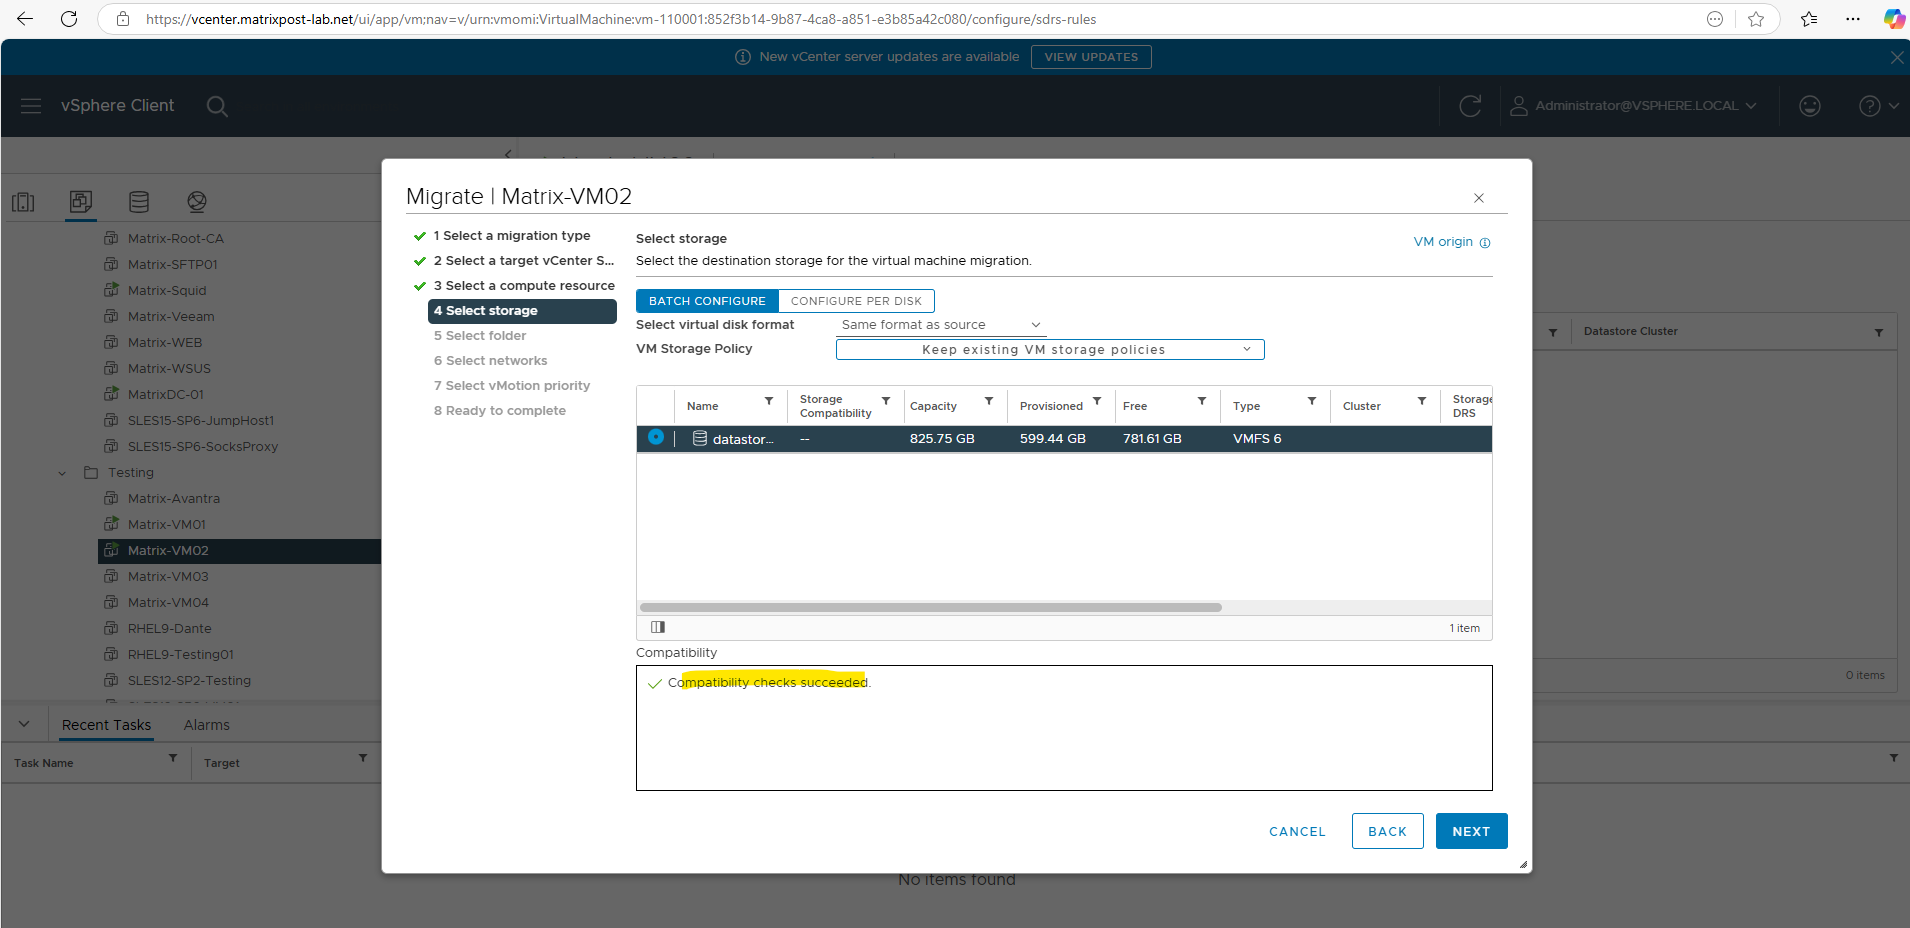
Select the destination storage for the virtual machine migration.
Select the location for the virtual machine migration. I will select here my seconds vCenter Datacenter folder.

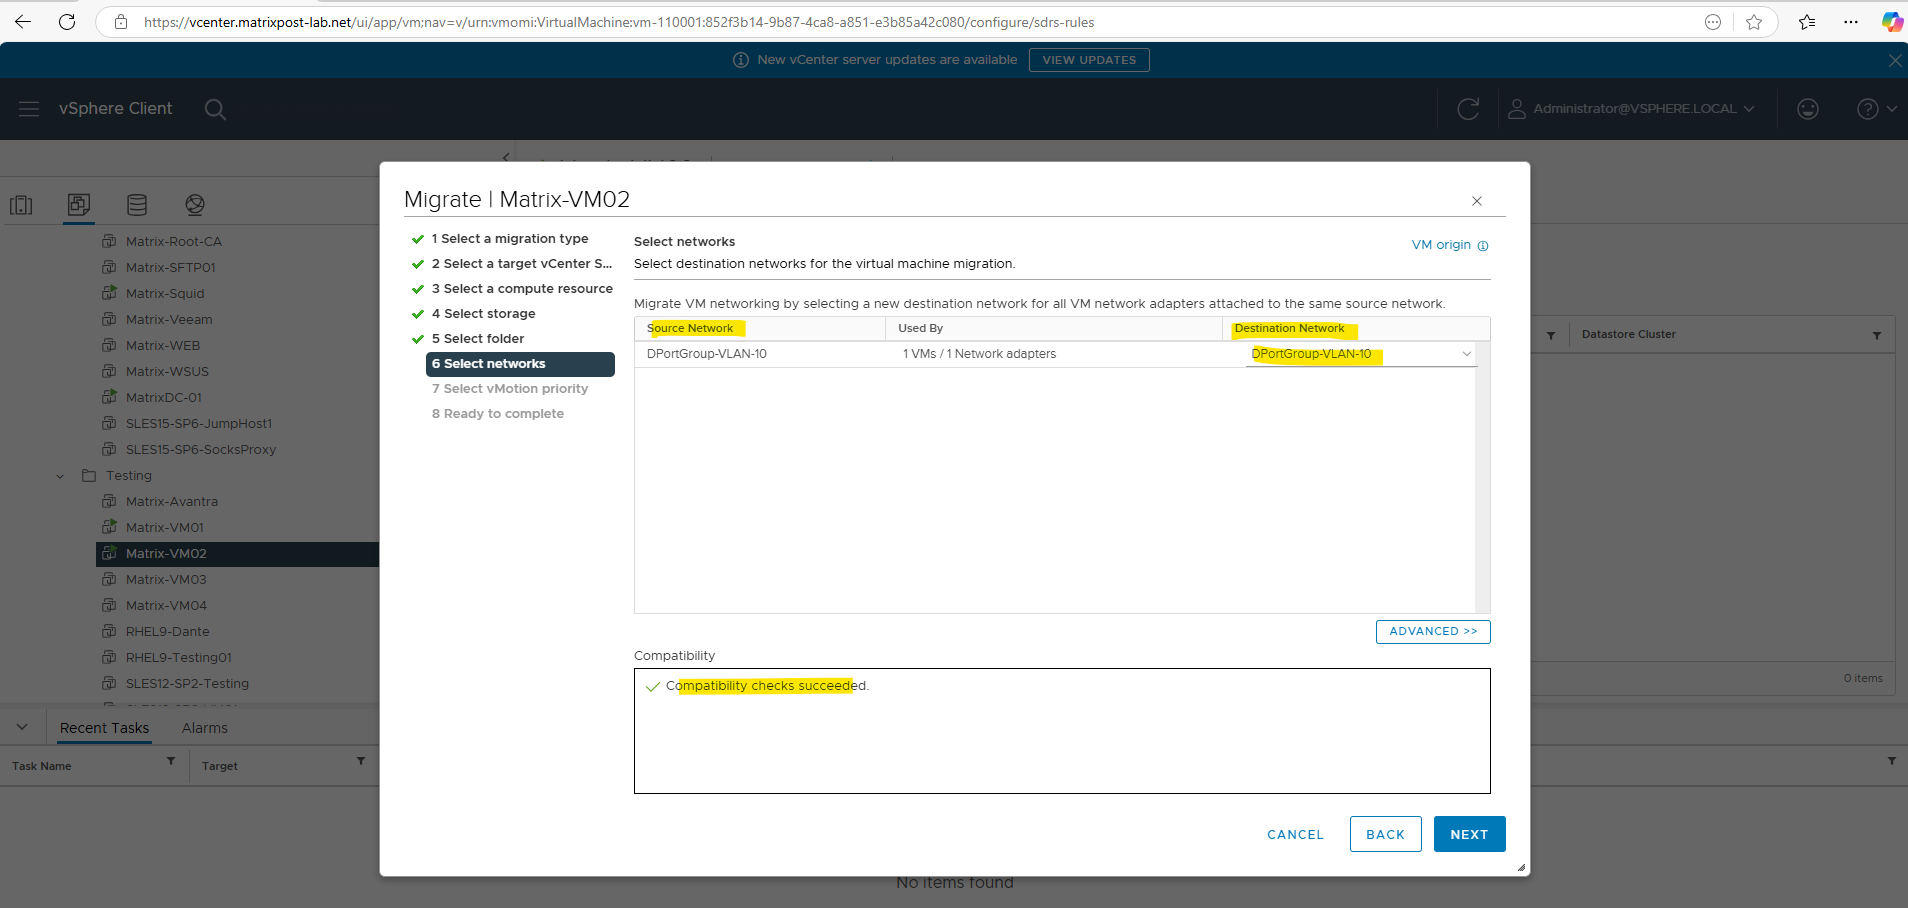
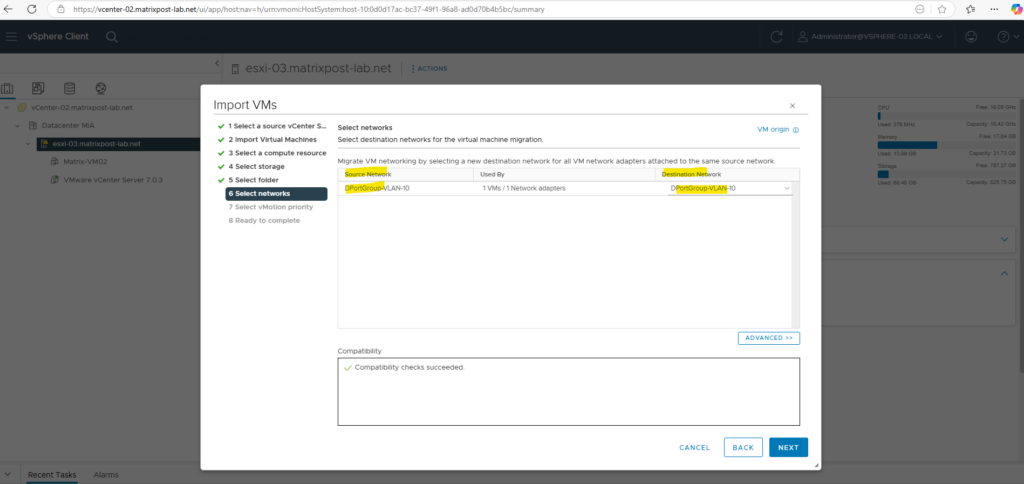
Select the destination networks for the virtual machine migration. The destination network needs to be the same as the source network to function.
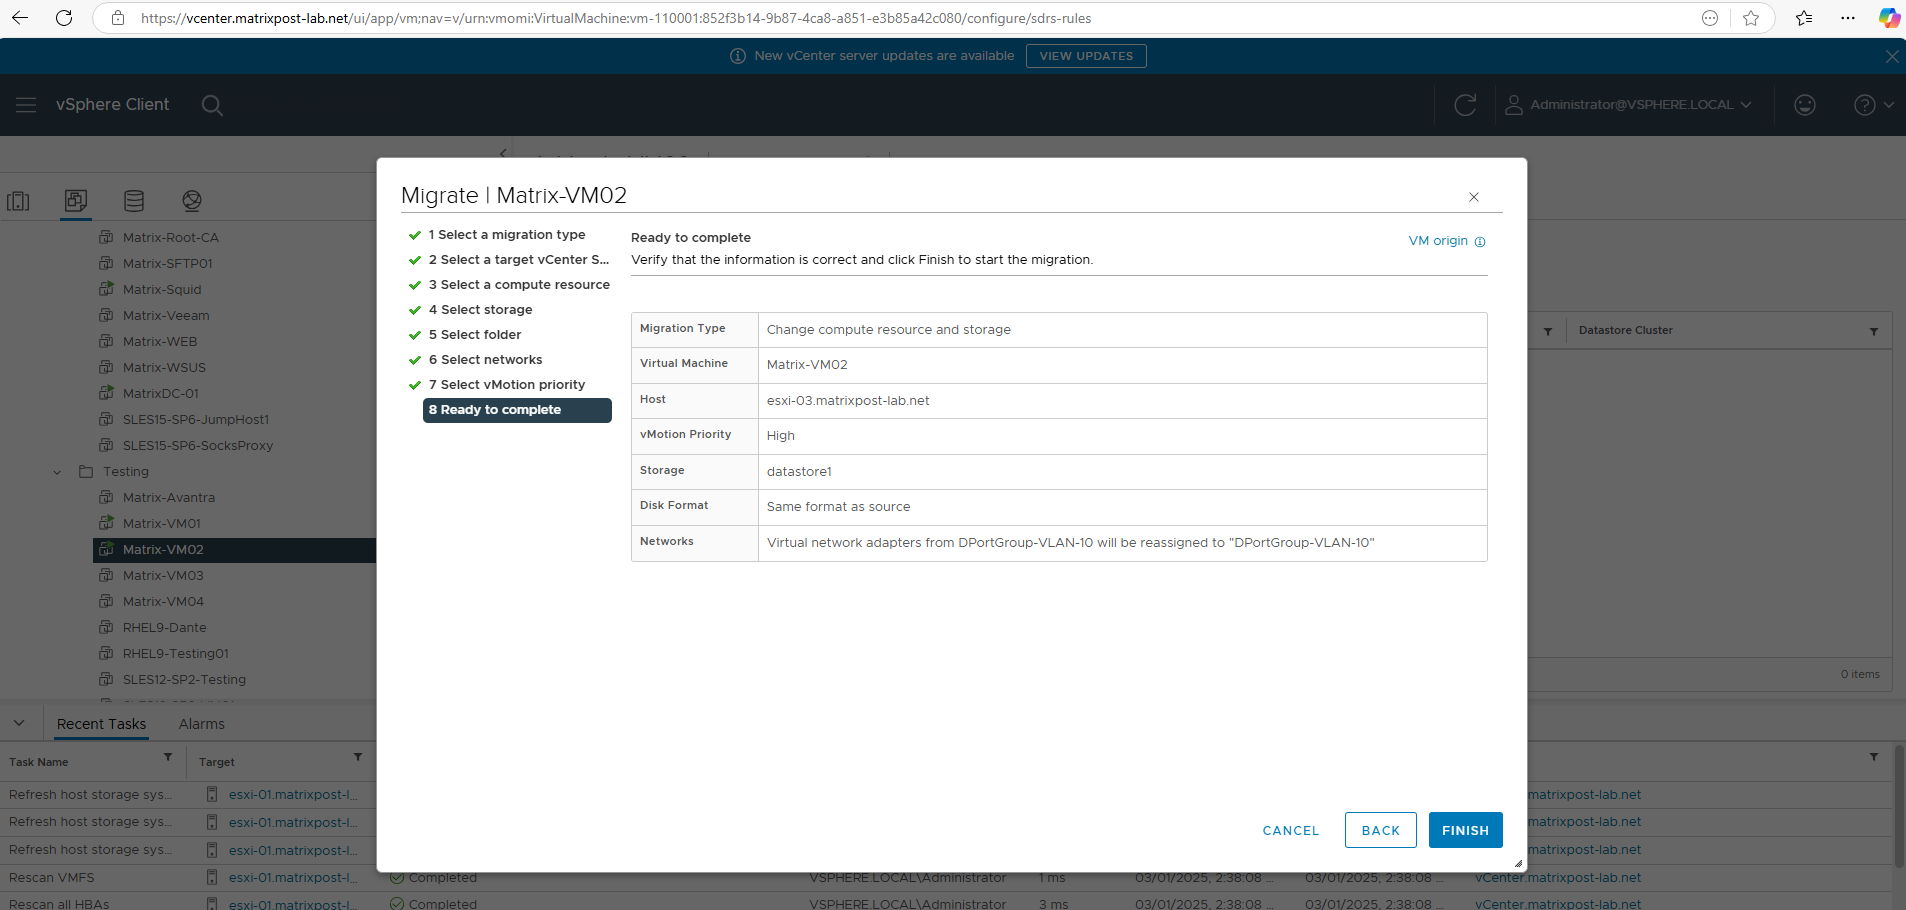
Now first a snapshot is taken from which the virtual machine to ensure data consistency, minimize downtime, and guarantee a smooth migration.
Then the files will be copied to the destination.
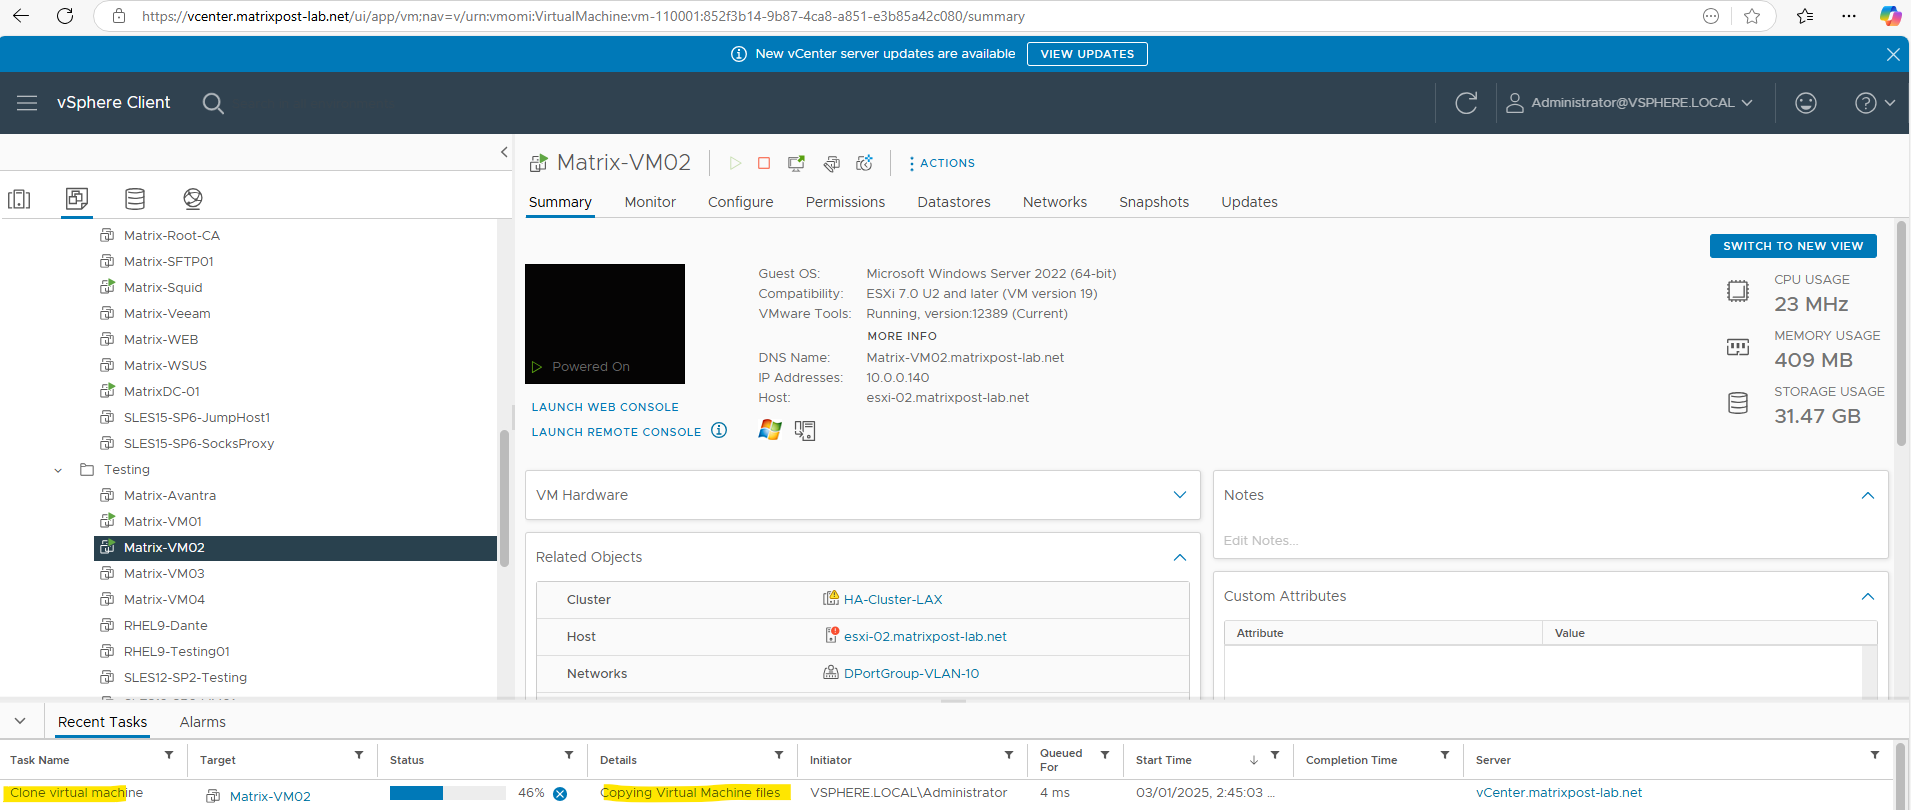

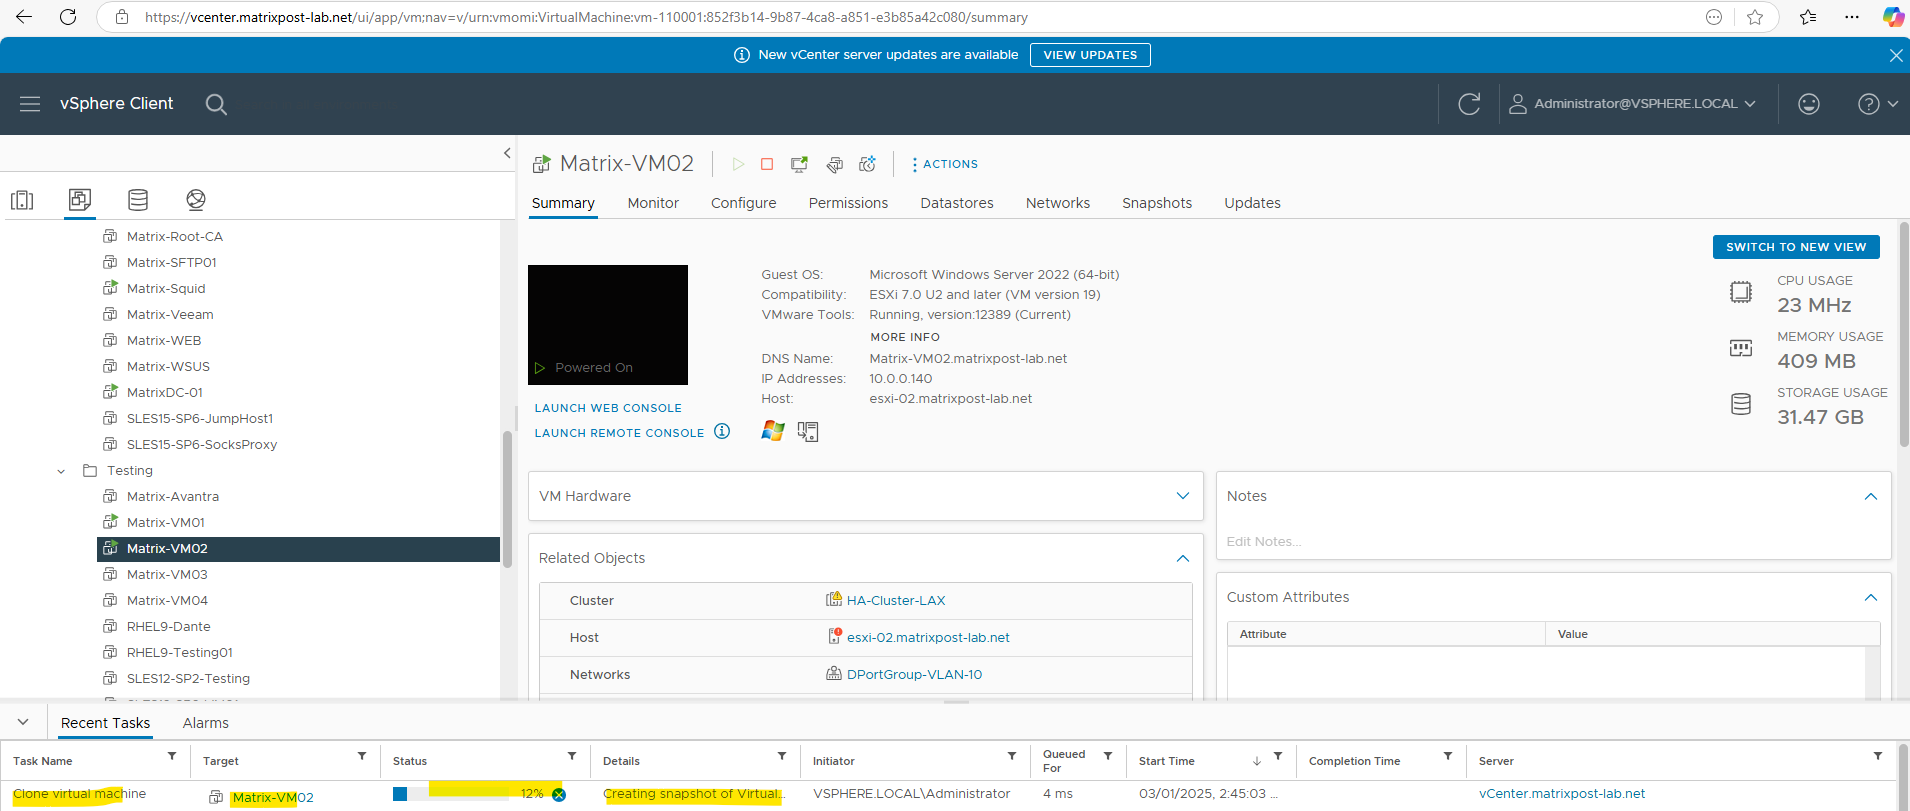
Finally we have a clone on the destination ESXi Host and different vCenter Server and vCenter Single Sign-On domain.

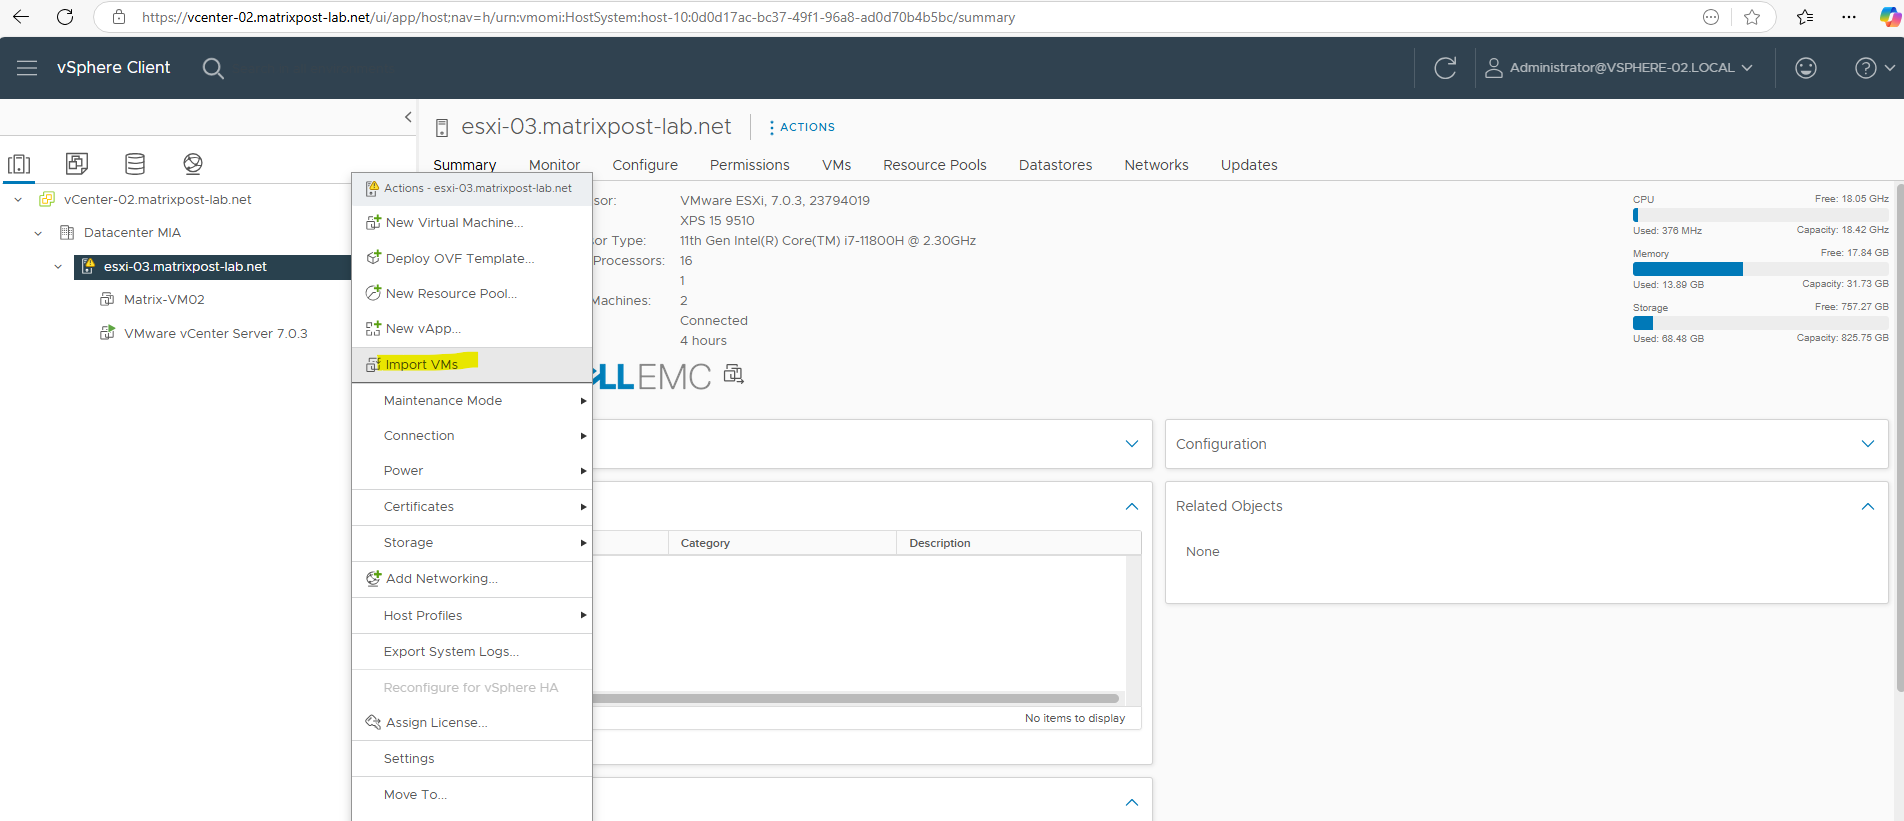
Import VMs Option
Please note one thing right upfront, by using this option we can’t create a clone in the destination vCenter Server and leaving the virtual machine still on the source host as previously when using the Cross vCenter Server Export (Migrate Option).
The menu on a cluster or host level provides the new option to Import VMs. Selecting this option opens a wizard to walk you through the import process.
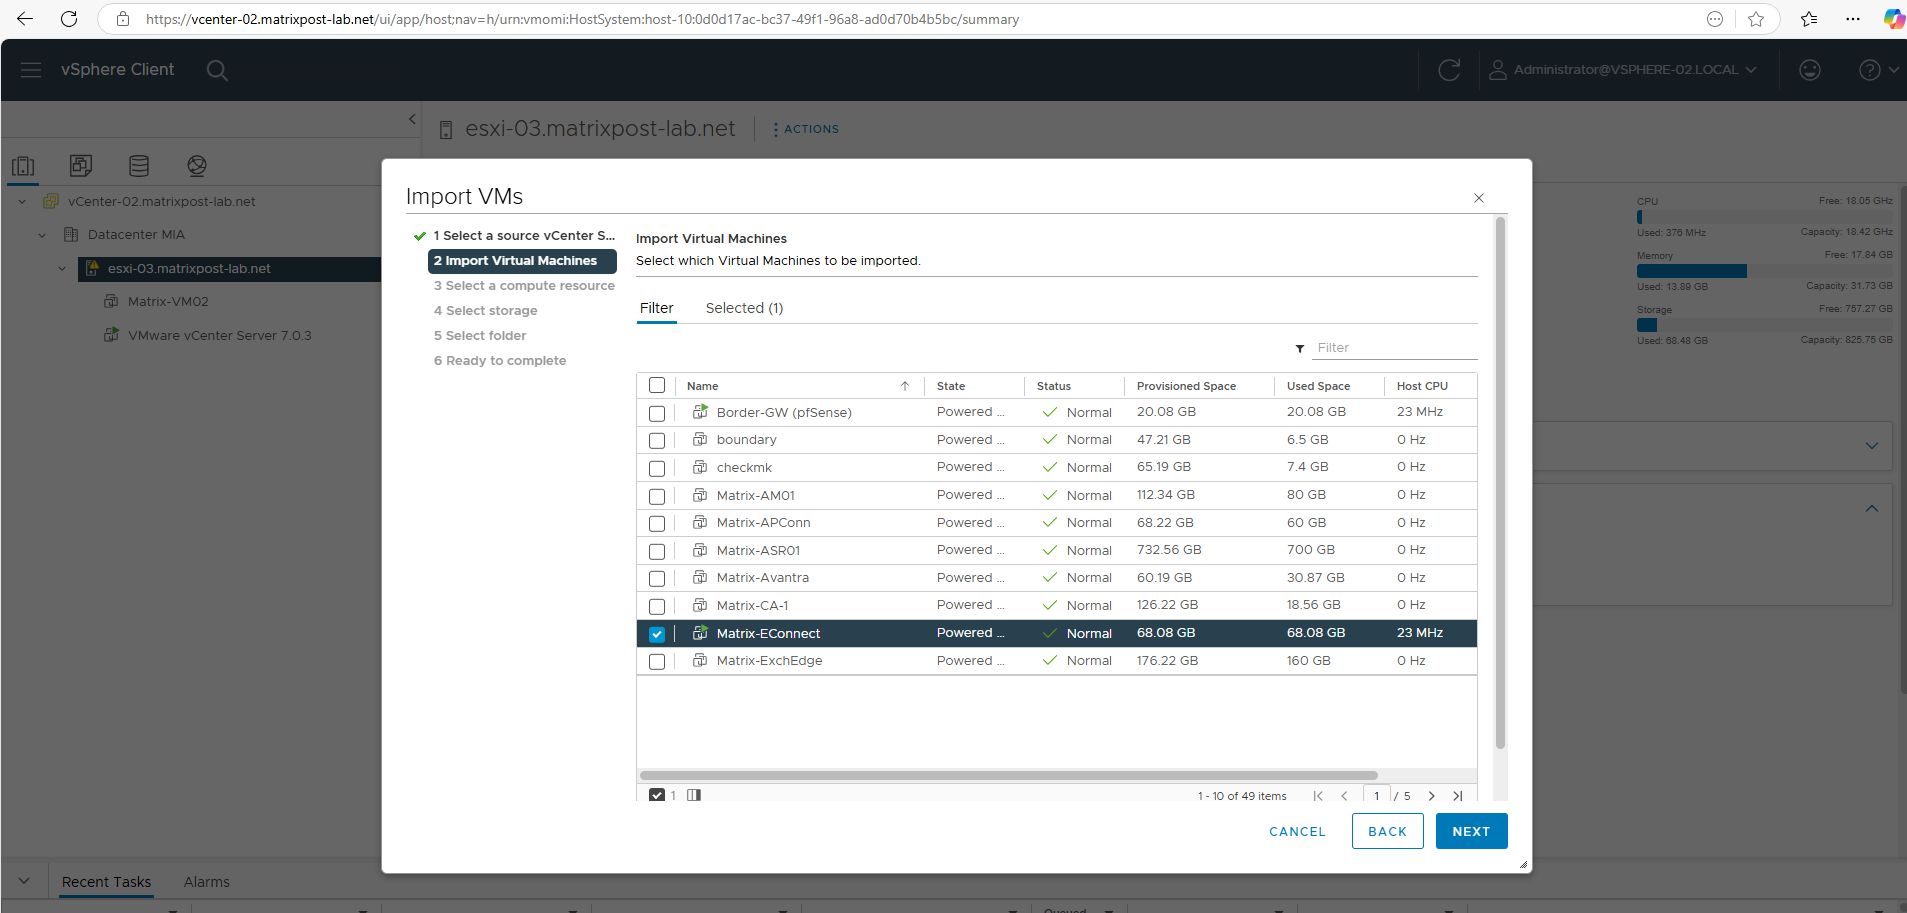
To import VMs from a remote vCenter Server, the source vCenter Server needs to be connected. The option to save the vCenter Server address helps with future migrations as you can just select previous saved vCenter Server instances.
After successfully logging in to the remote vCenter Server, the migration batch is further configured. Either one VM or multiple VMs can be selected and migrated in one go.

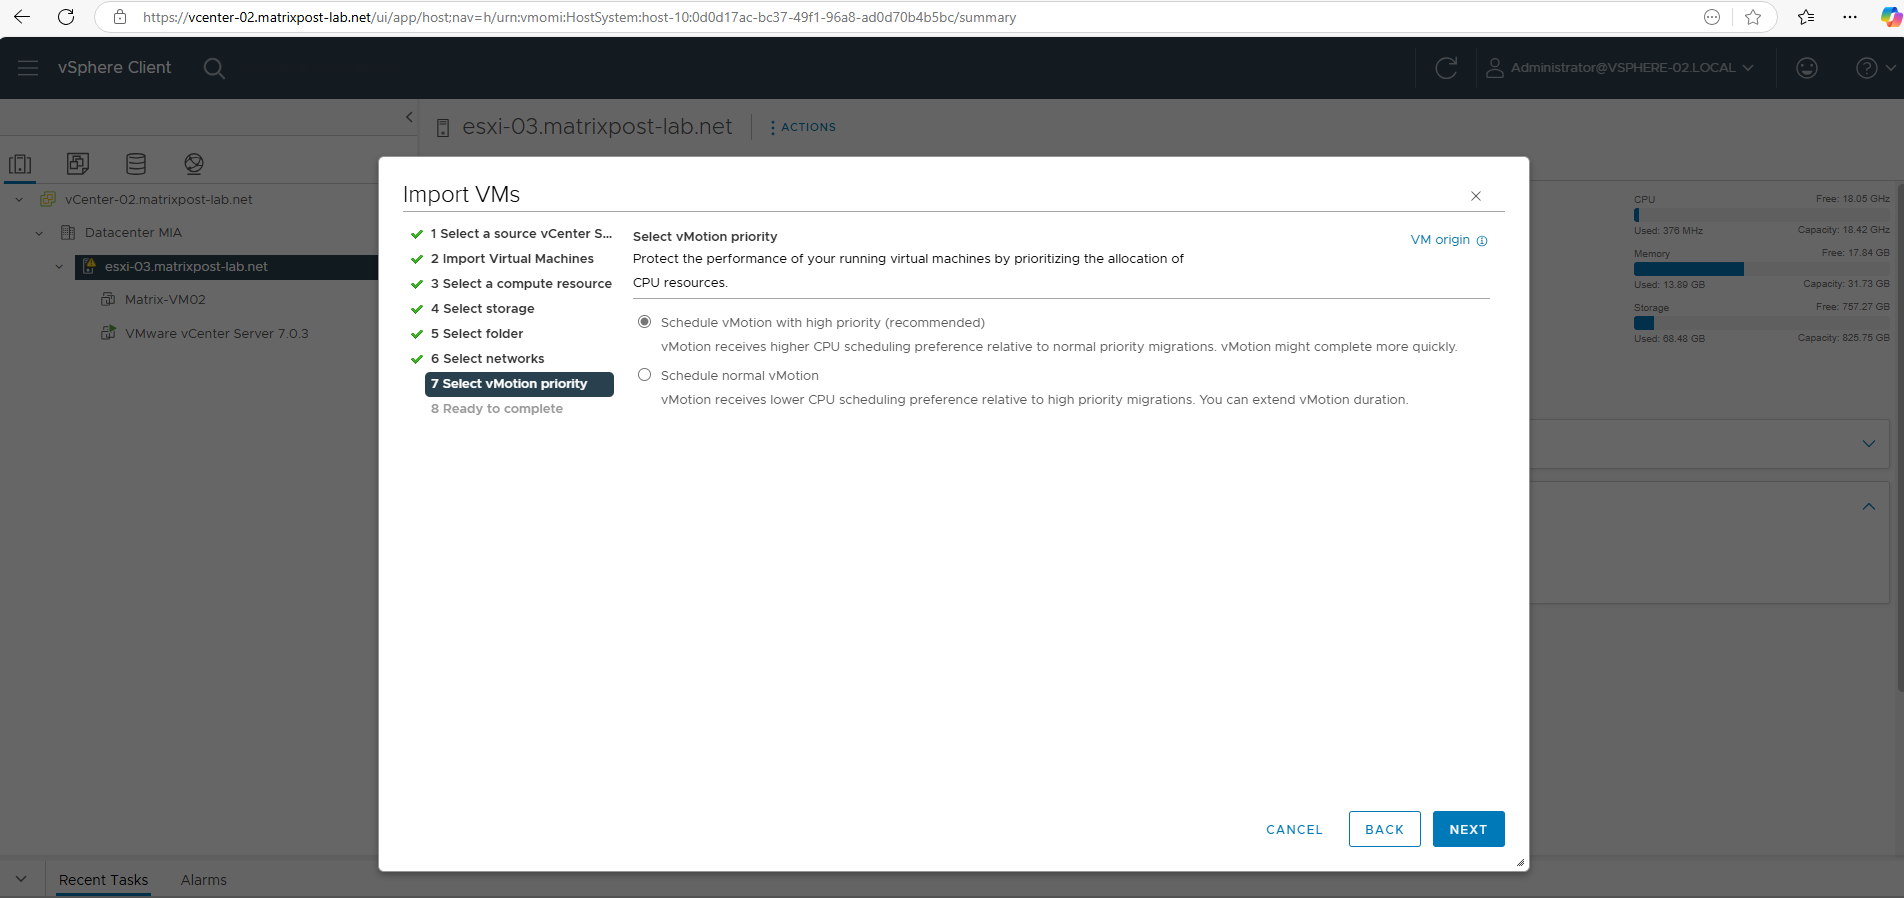
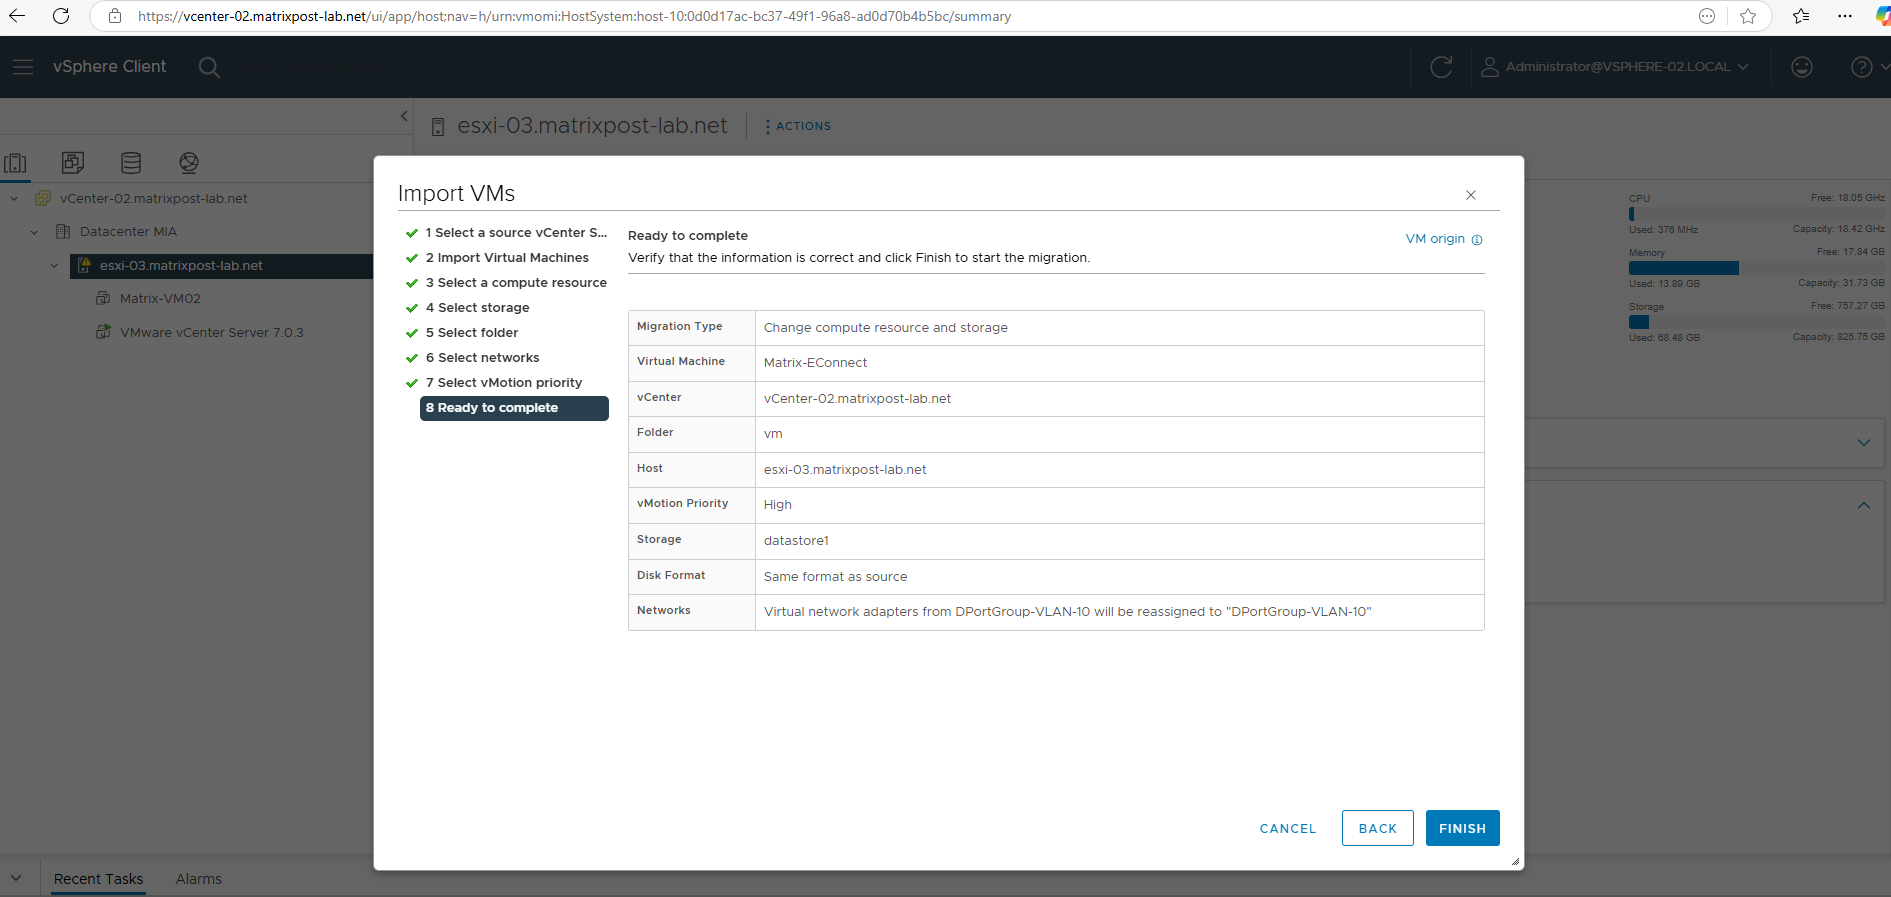
The rest of the wizard is similar to the Migrate option with XVM as shown above. Nevertheless I will walk thought the further steps below.


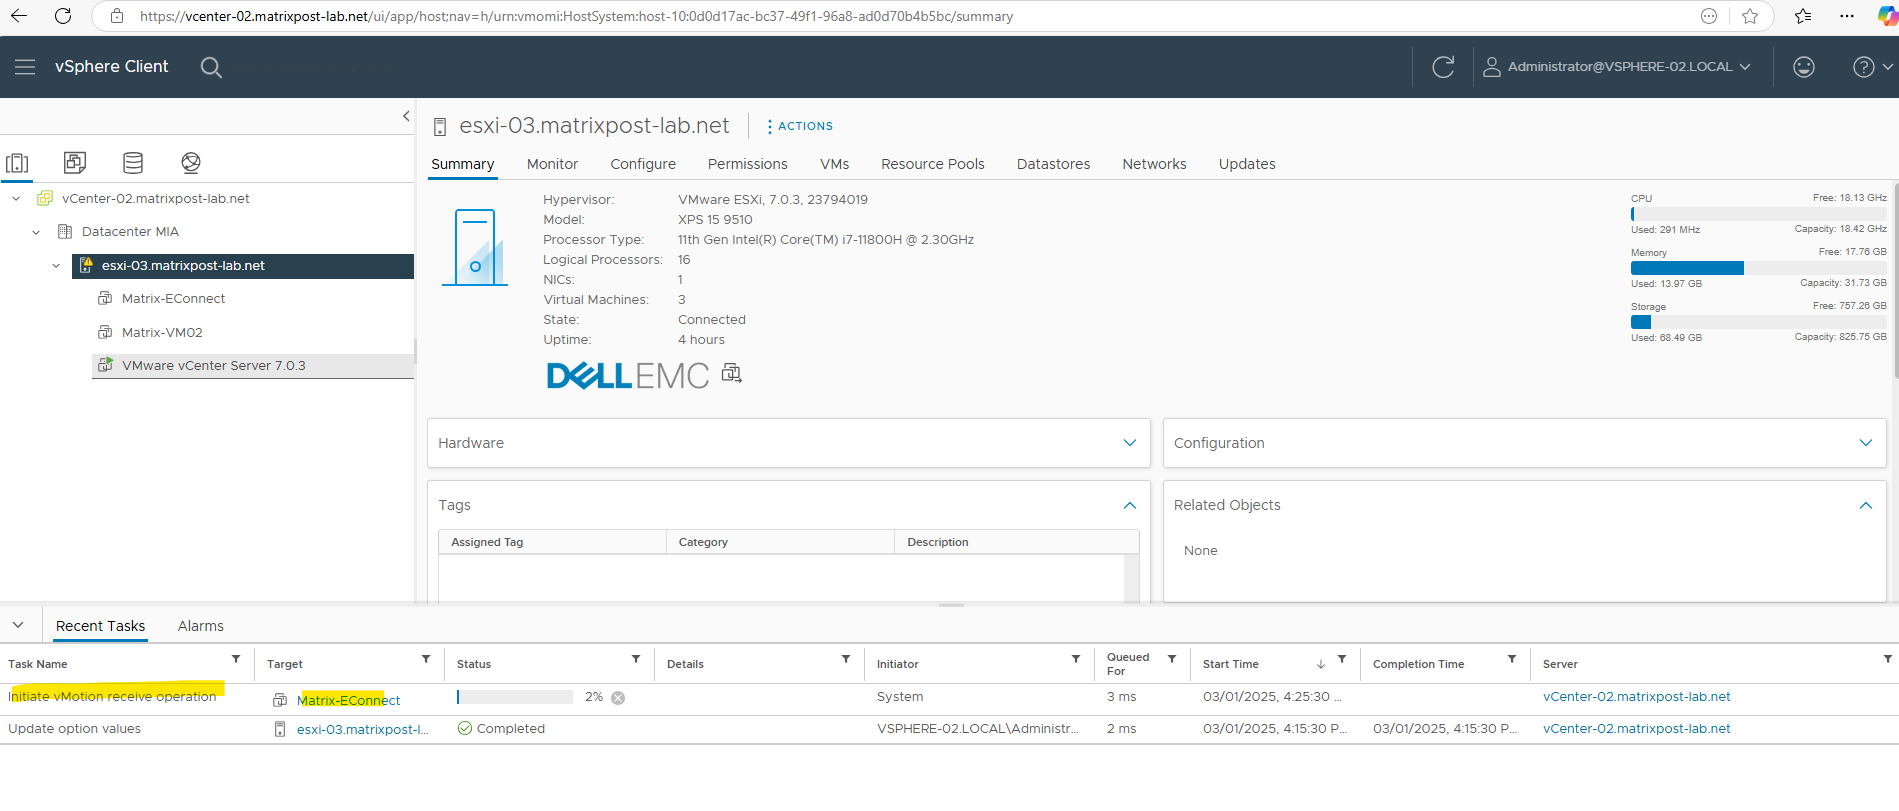
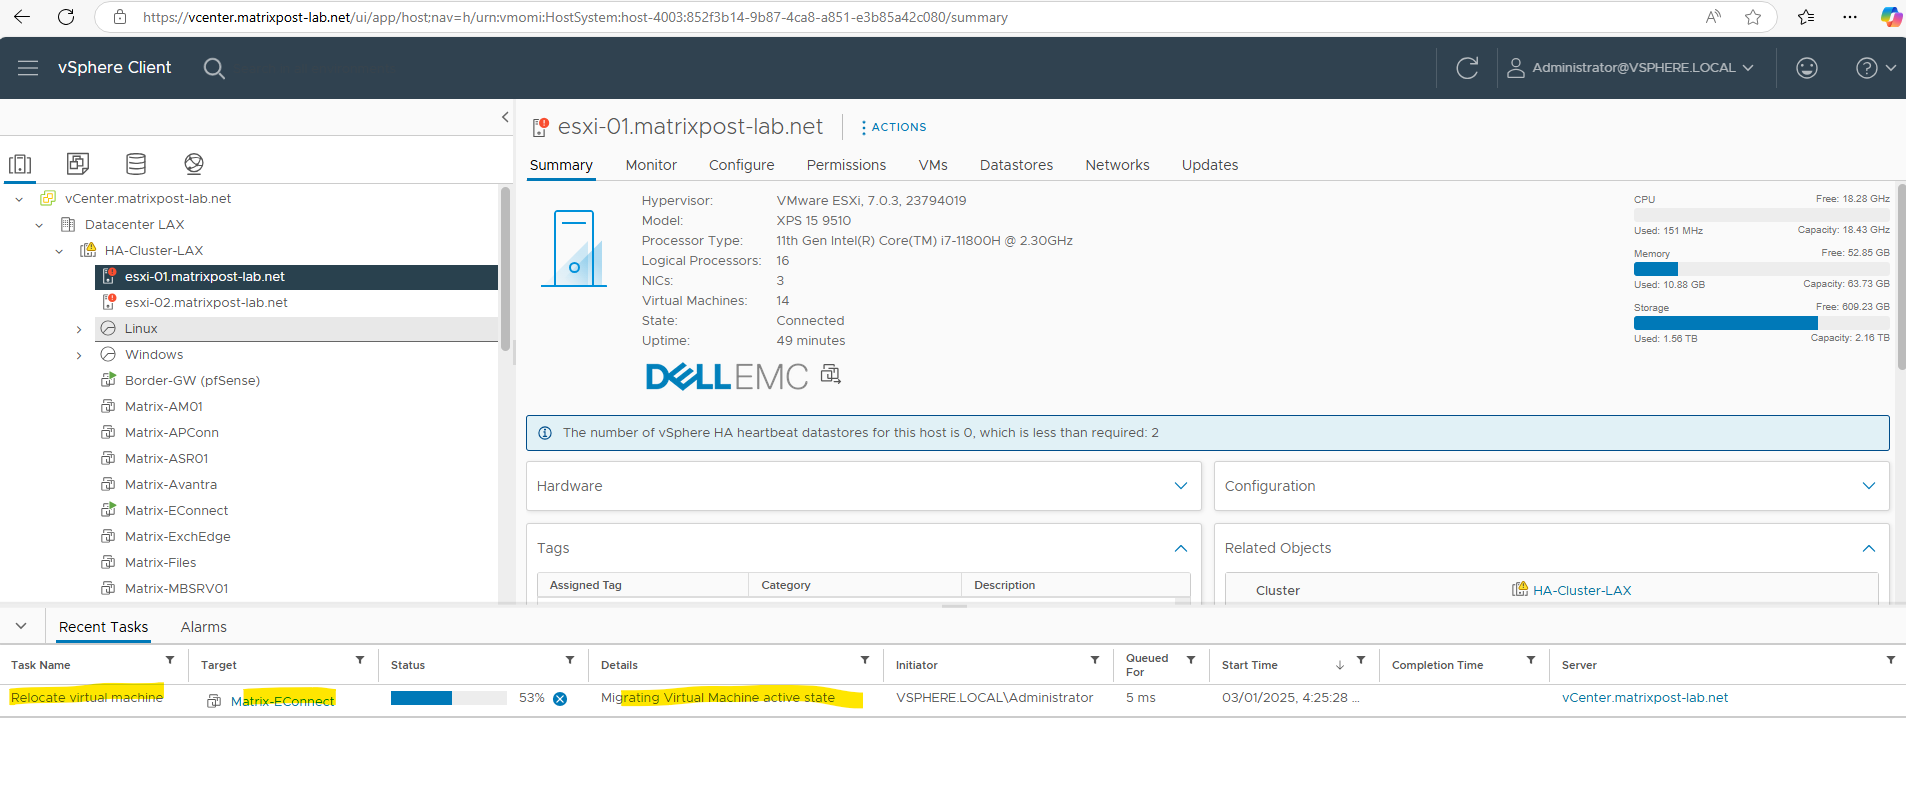
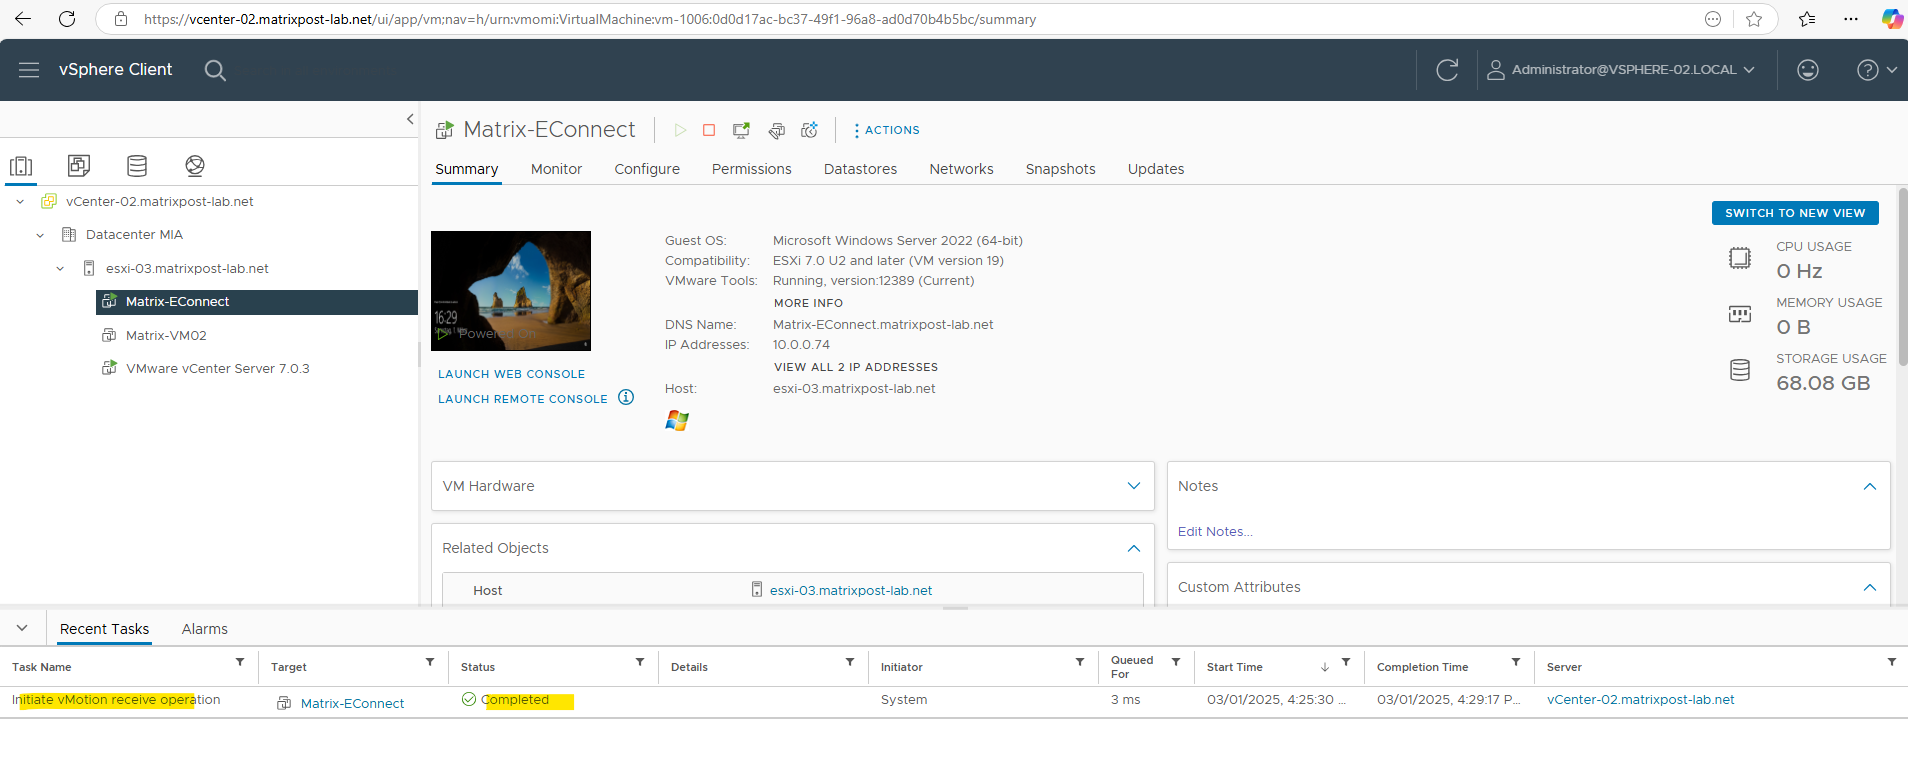
Meanwhile on the source vCenter Server we will see the following task running.
Finally the virtual machine was migrated to the different vCenter Server and vCenter Single Sign-On domain.
Testing vMotion Traffic works for a specific used VMKernel Adapter
vMotion in VMware term is a live migration (running virtual machine) for compute and or storage between ESXi hosts.
To test if traffic between two ESXi hosts for vMotion and the corresponding VMKernel adapter will work, we can use vmkping.
vmkping is a command-line utility in VMware ESXi used to test network connectivity between VMkernel (vmk) interfaces.
It is primarily used for troubleshooting vMotion, vSAN, iSCSI, NFS, and other ESXi network services that rely on VMkernel adapters.
:~] vmkping -I vmk1 <ip address/FQDN destination ESXi Host>

vmk1 (VMKernel adapter number)
By using the following command we can first determine the VMKernel (vmk) interfaces available on the ESXi Host and if vMotion is enabled for.
[root@ESXi-01:~] esxcli network ip interface list
[root@ESXi-01:~] esxcli network ip interface tag get -i vmk0

To display IP addresses assigned to VMkernel interfaces:
[root@ESXi-01:~] esxcli network ip interface ipv4 get
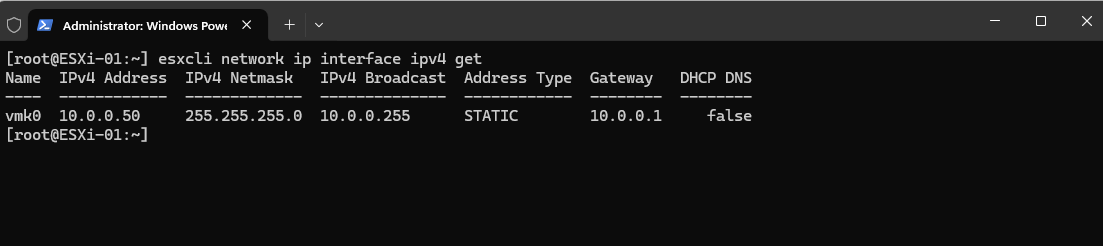
As show already above, by using the following command we can check if vMotion is enabled on a specific VMKernel (vmk) interface.
esxcli network ip interface tag get -i [VMkernel adapter name]
[root@ESXi-01:~] esxcli network ip interface tag get -i vmk0

Troubleshooting
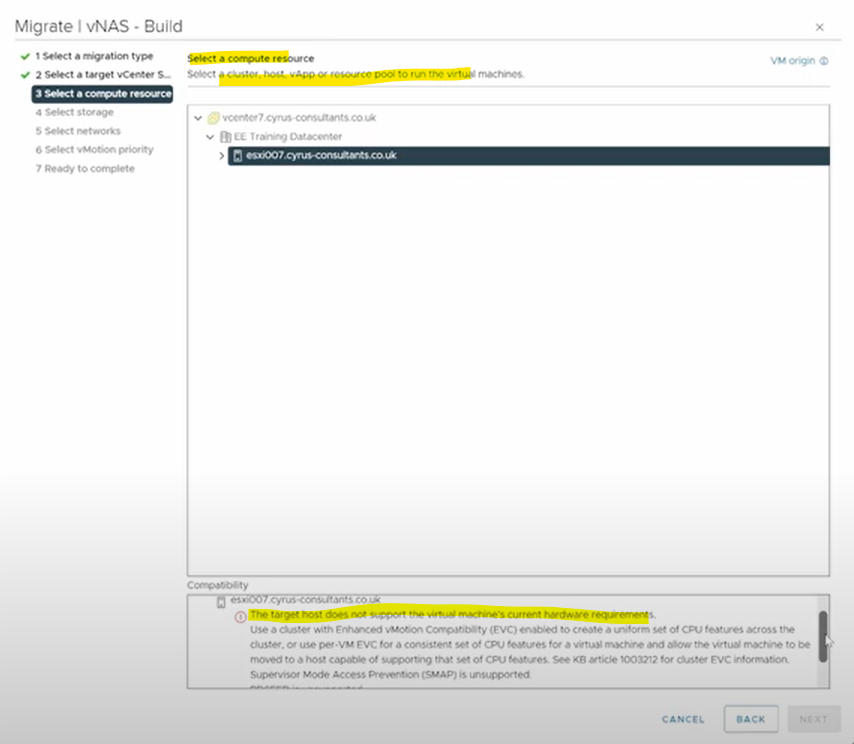
The Target Host does not support the Virtual Machine’s current Hardware Requirements
By using live migrations or so called vSphere vMotion, the target hosts processor should support the same CPU instructions to the virtual machine after migration that the processor of the source host provided before migration.
When you have ESXi hosts in your vSphere cluster, they will use different underlying CPU architectures, you can enable Enhanced vMotion Compatibility (EVC) on the cluster to support vMotion (live migrations) despite of the different CPU architectures.
Use a Cluster with Enhanced vMotion Compatibility (EVC) enabled to create a uniform set of CPU features across the cluster, or use per-VM EVC for a consistent set of CPU features for a virtual machine and allow the virtual machine to be moved to a host capable of supporting that set of CPU features.
See also my following post about Enhanced vMotion Compatibility (EVC).
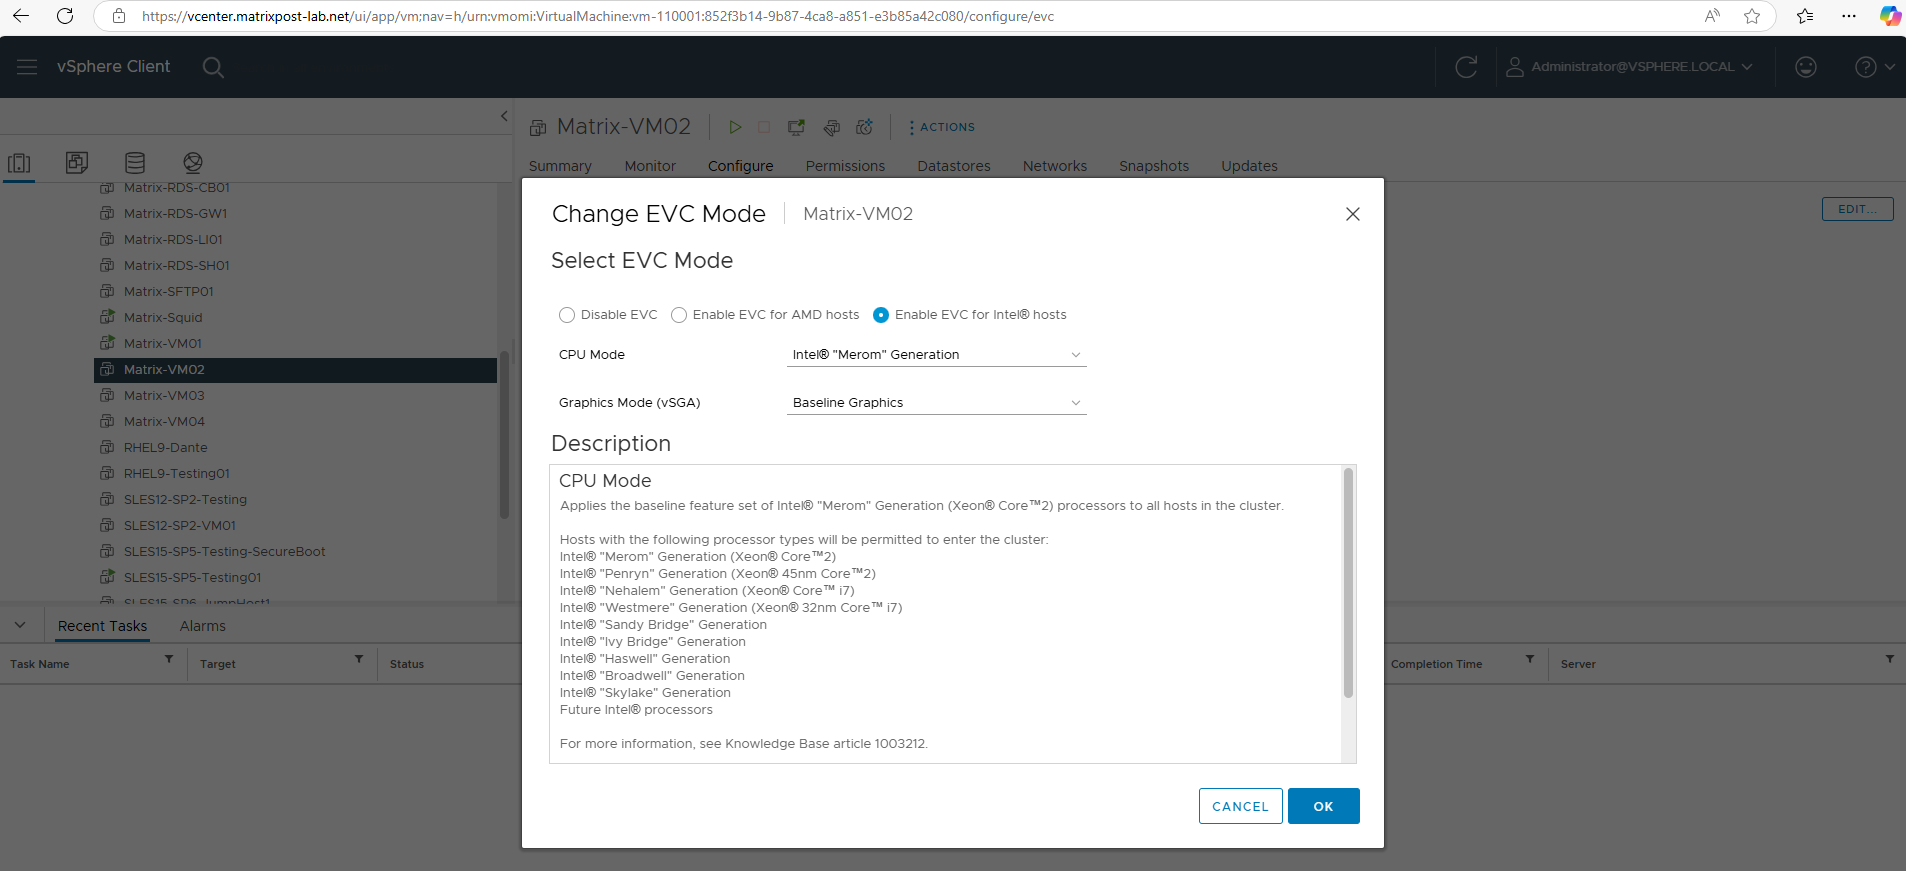
To enable EVC just for a specific virtual machine and not the whole cluster we can use the per-VM EVC feature.
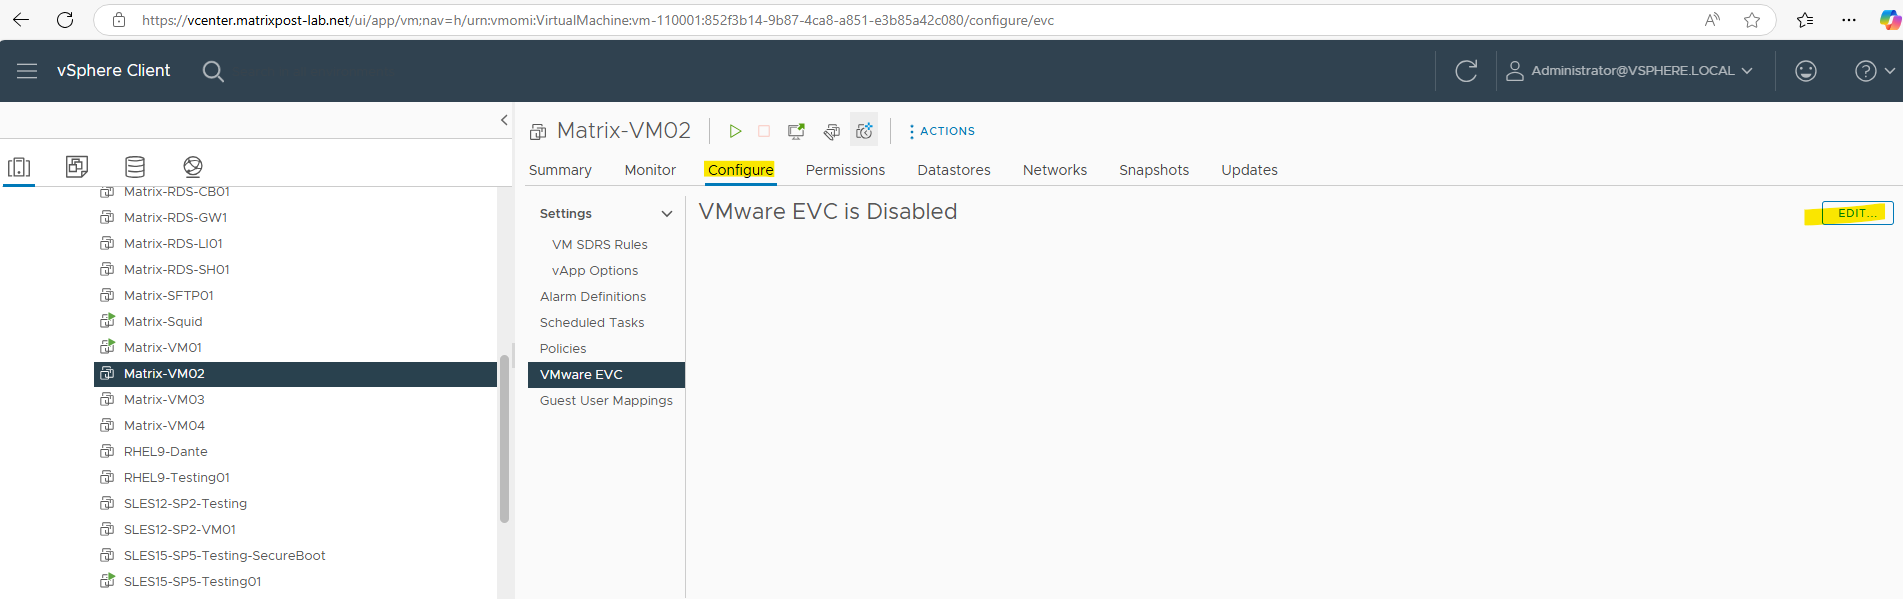
Therefore we first need to poweroff the virtual machine and under the Configure tab -> VMware EVC, click on Edit to enable VMware EVC just for this virtual machine.
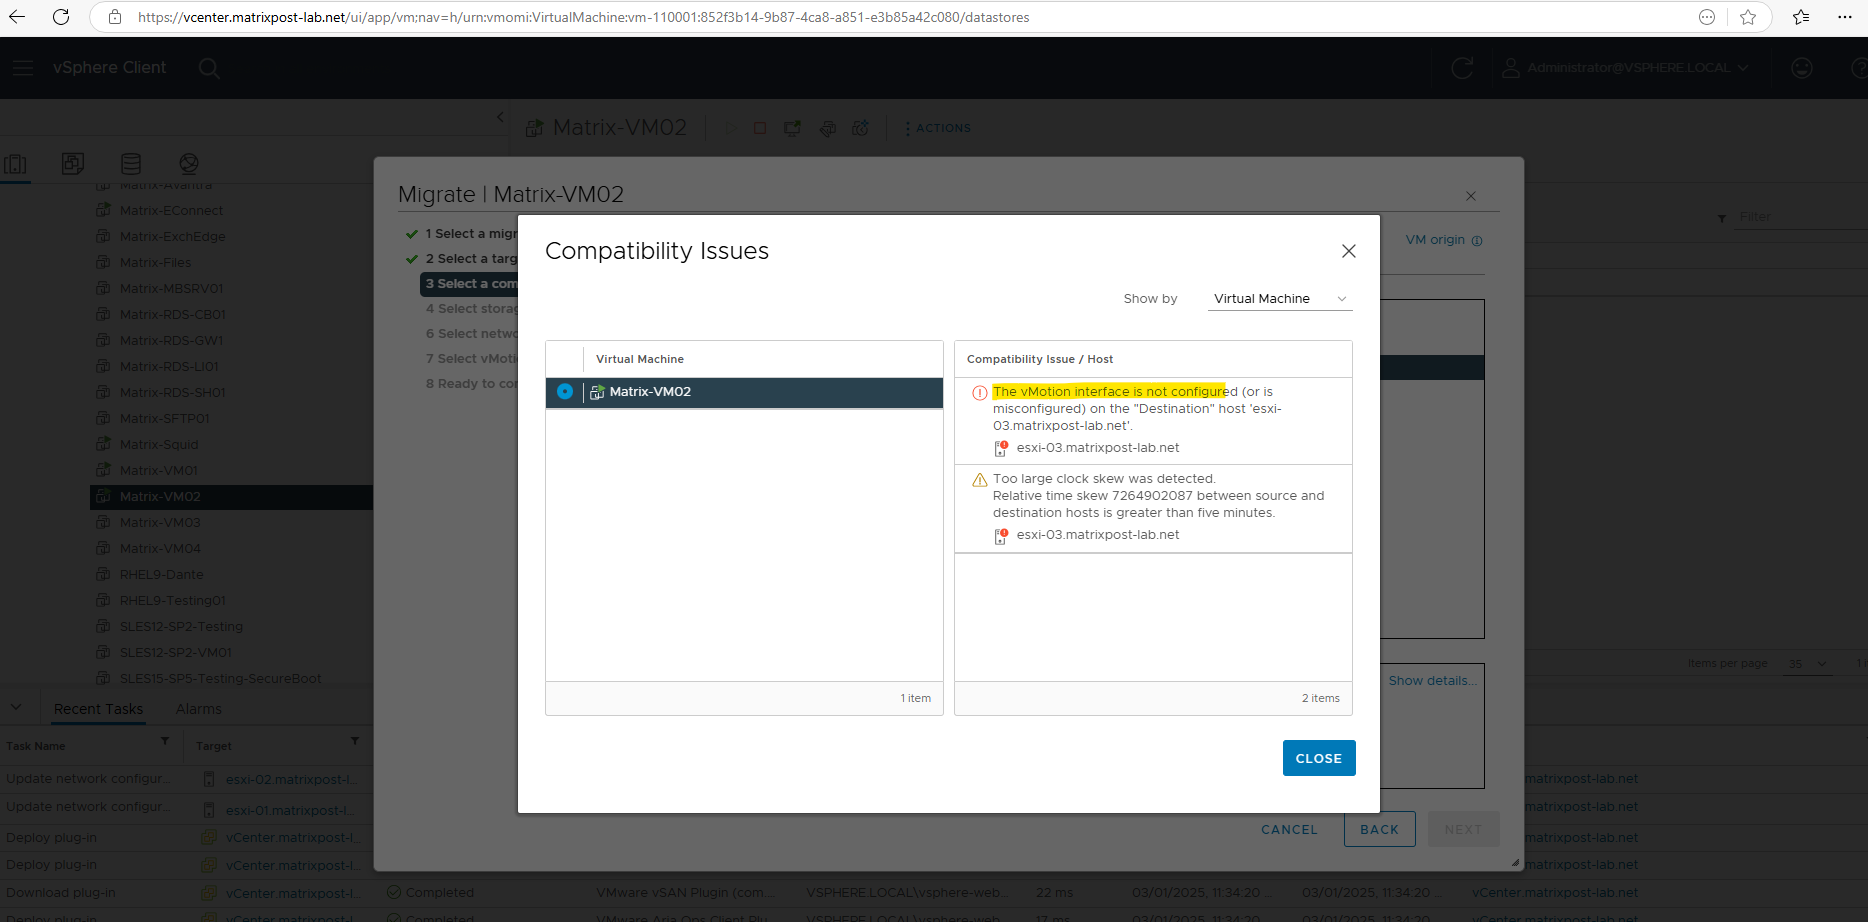
The vMotion Interface is not configured
When selecting the ESXi Host I will get a compatibility error message. To see what’s the exact issue we can click on show details.
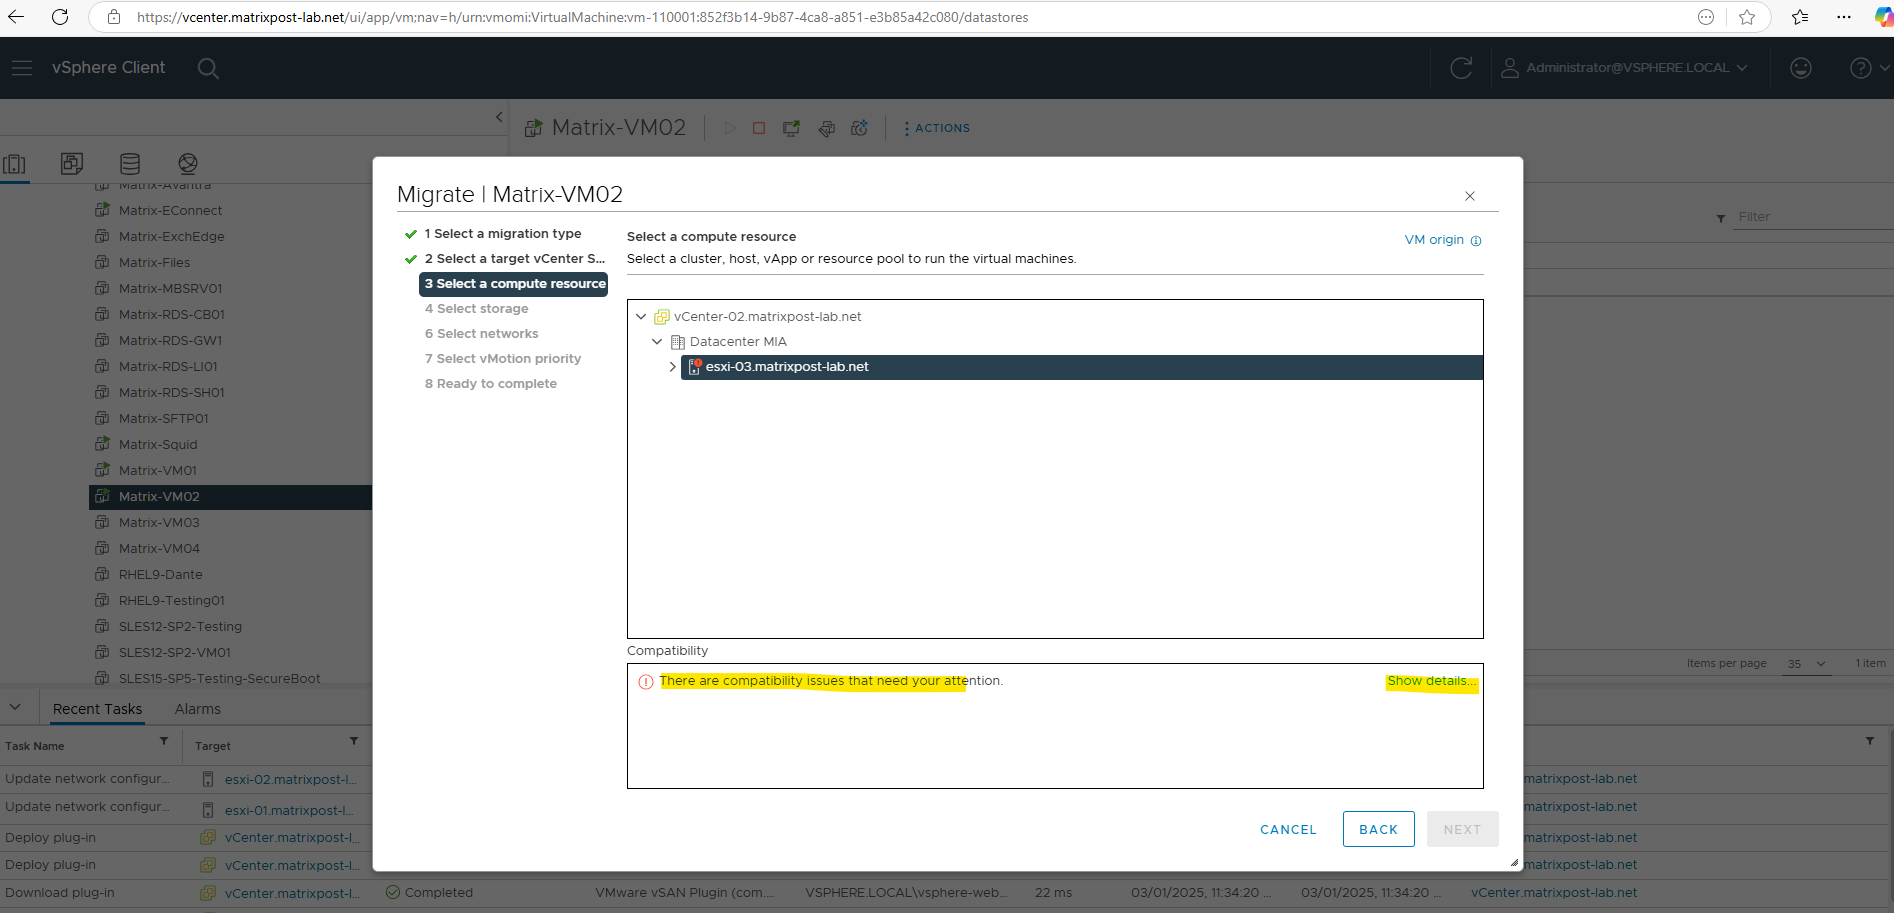
So far I not configured the vMotion interface in this destination vCenter Server.
About how to configure resp. selecting and enabling the vMotion service for a specific network interface, you can read my following post.
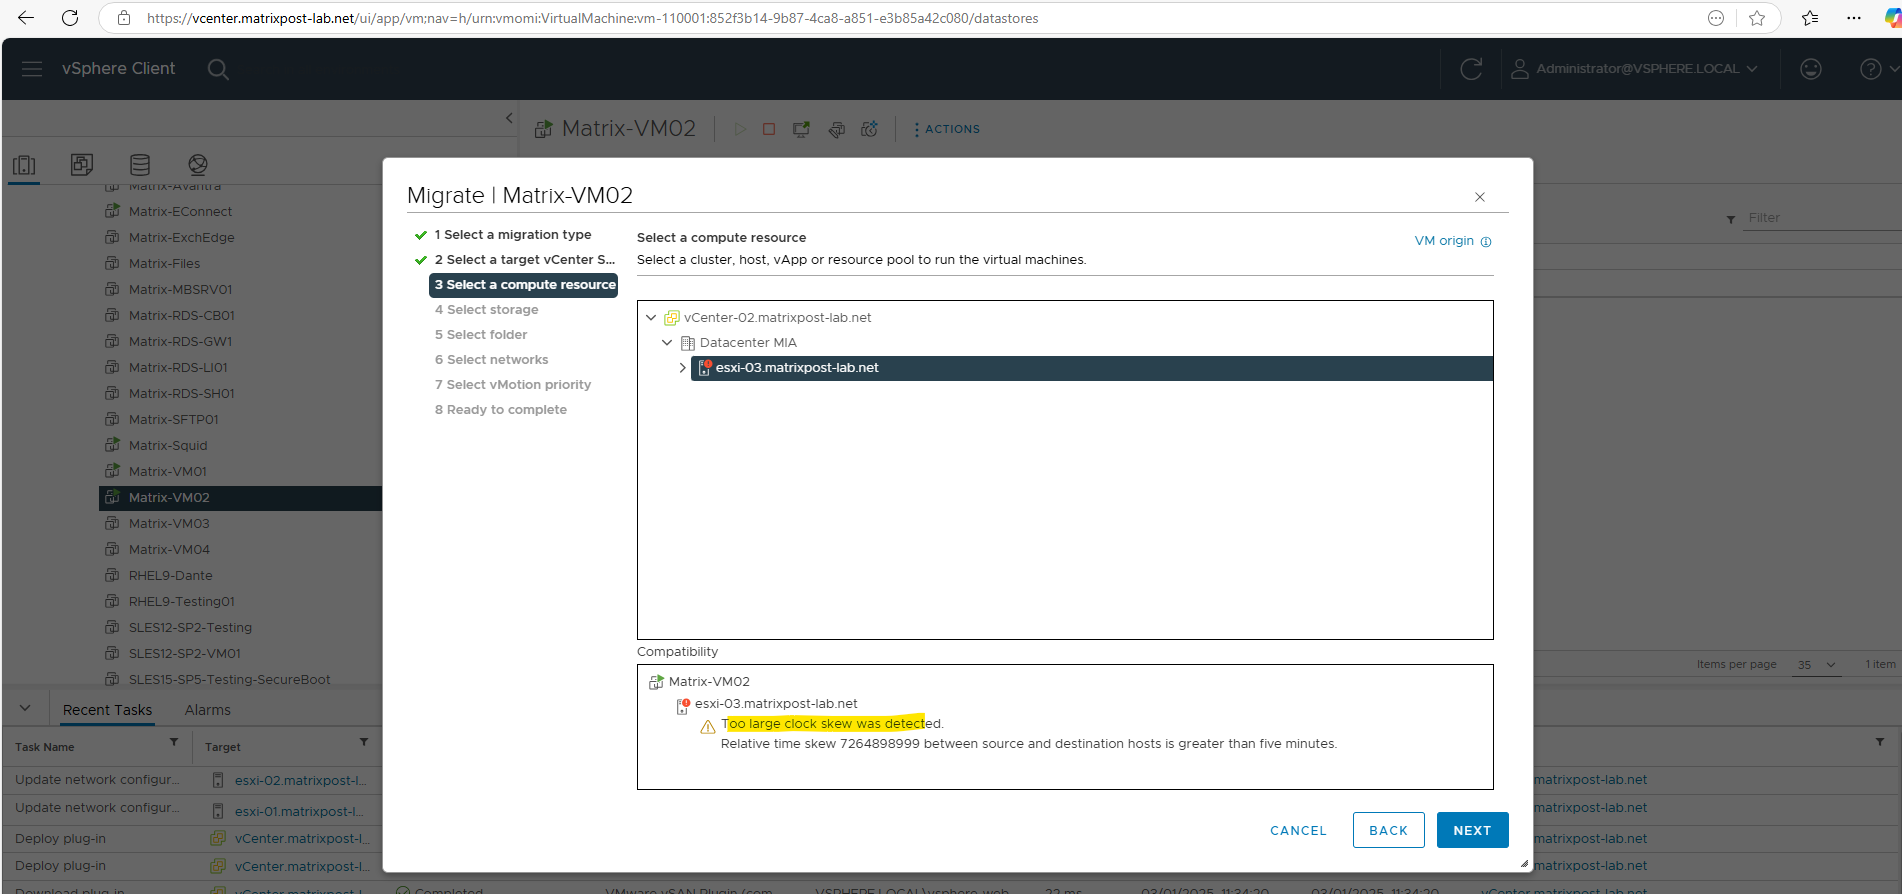
Too large clock skew was detected
While performing vMotion, the warning message arise as – Too large clock skew was detected.
The reason for is that either the source or the destination host doesn’t have the NTP configured.
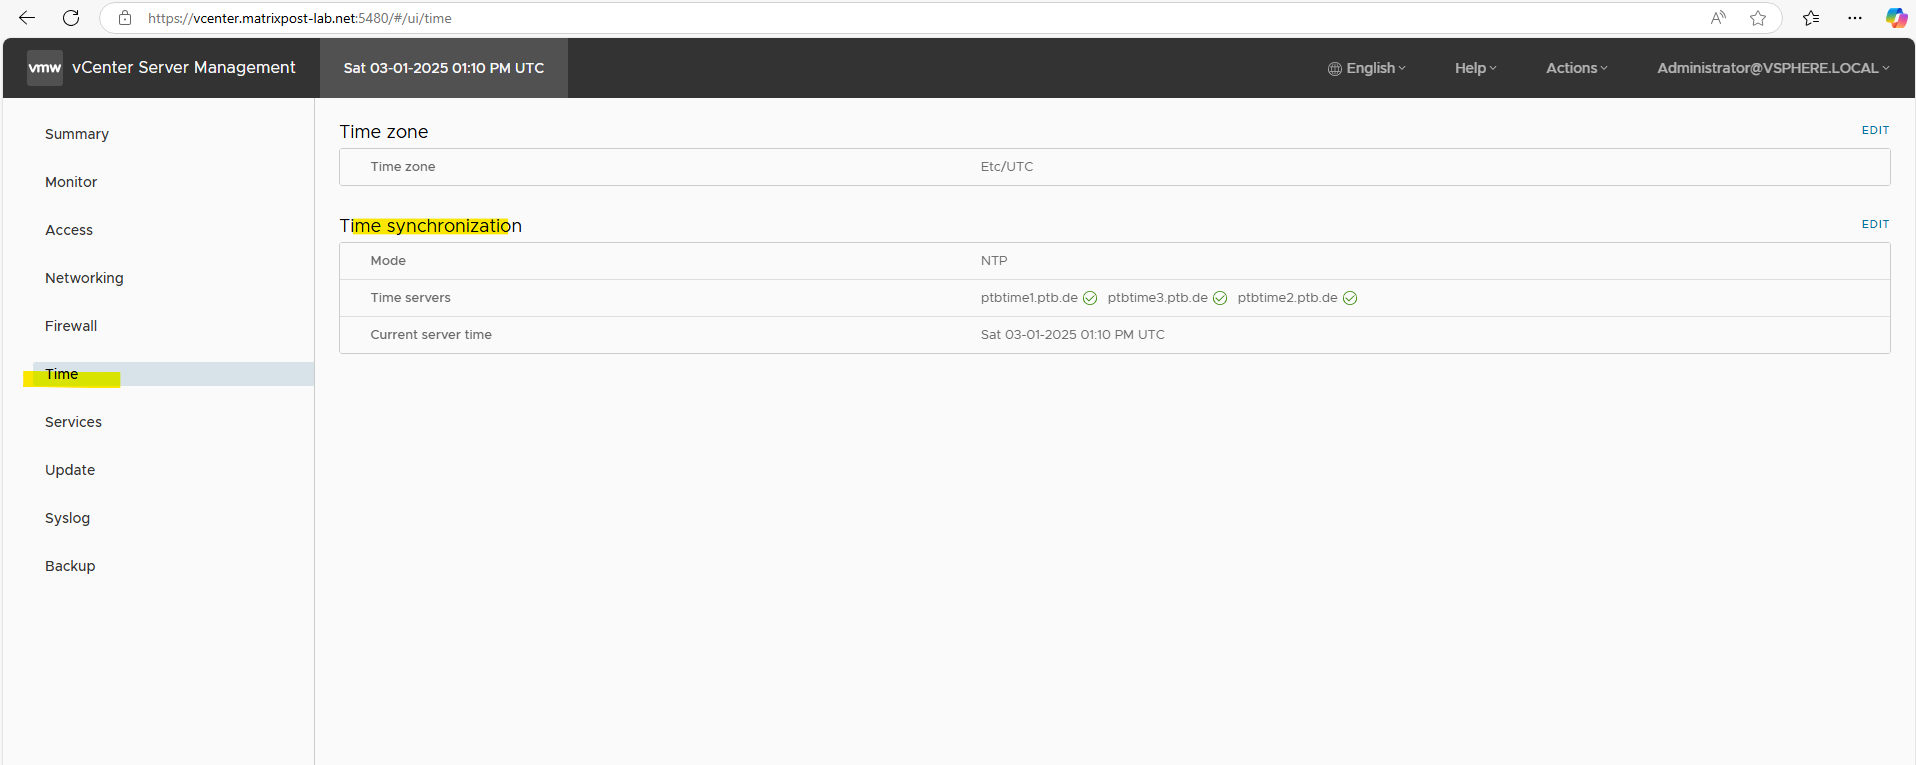
About how to setup the Network Time Protocol (NTP) in vCenter you can read my following post https://blog.matrixpost.net/set-up-a-vmware-vsphere-environment-part-2/#setup_ntp.
Further check that the time synchronization for the vCenter Servers are correct.
https://<FQDN vCenter Server>:5480
Links
Introducing the Advanced Cross vCenter Server vMotion Capability
https://www.vmware.com/docs/vmw-introducing-the-advanced-cross-vcenter-server-vmotion-capability