Set up a VMware vSphere Environment – Part 2
In part 1 we saw how to deploy the vCenter server appliance (VCSA) on an ESXi host in our on-premise data center.
In this part we will now configure the vCenter server appliance to finally set up and run our vSphere environment.
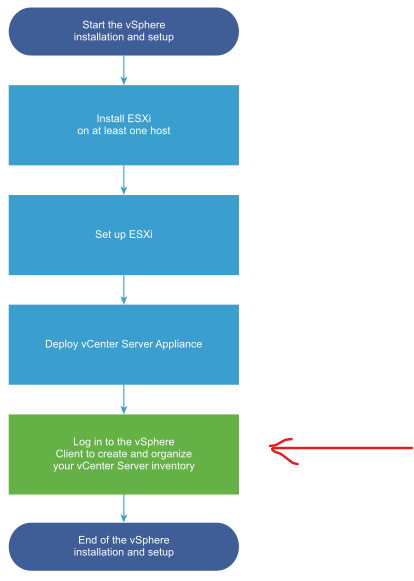
vSphere Installation and Setup Workflow
- vCenter Server Host Configuration
- vSphere Command-Line Interfaces
- Links
vCenter Server Host Configuration
For the configuration of the vCenter server appliance I will here refer also to the following NVIDIA documentation https://docs.nvidia.com/ai-enterprise/deployment-guide-vmware/0.1.0/vcenter.html#post-installation.
Connect to the vCenter appliance by using the IP or FQDN of the vCenter server.
But first download and install the root certificate from VMware Engineering in order to avoid unexpected behavior and errors when for example transferring files through the vSphere Client. You can download the root certificate directly on the root vCenter server URI as shown below and described in the following article from VMware.
https://kb.vmware.com/s/article/2147256

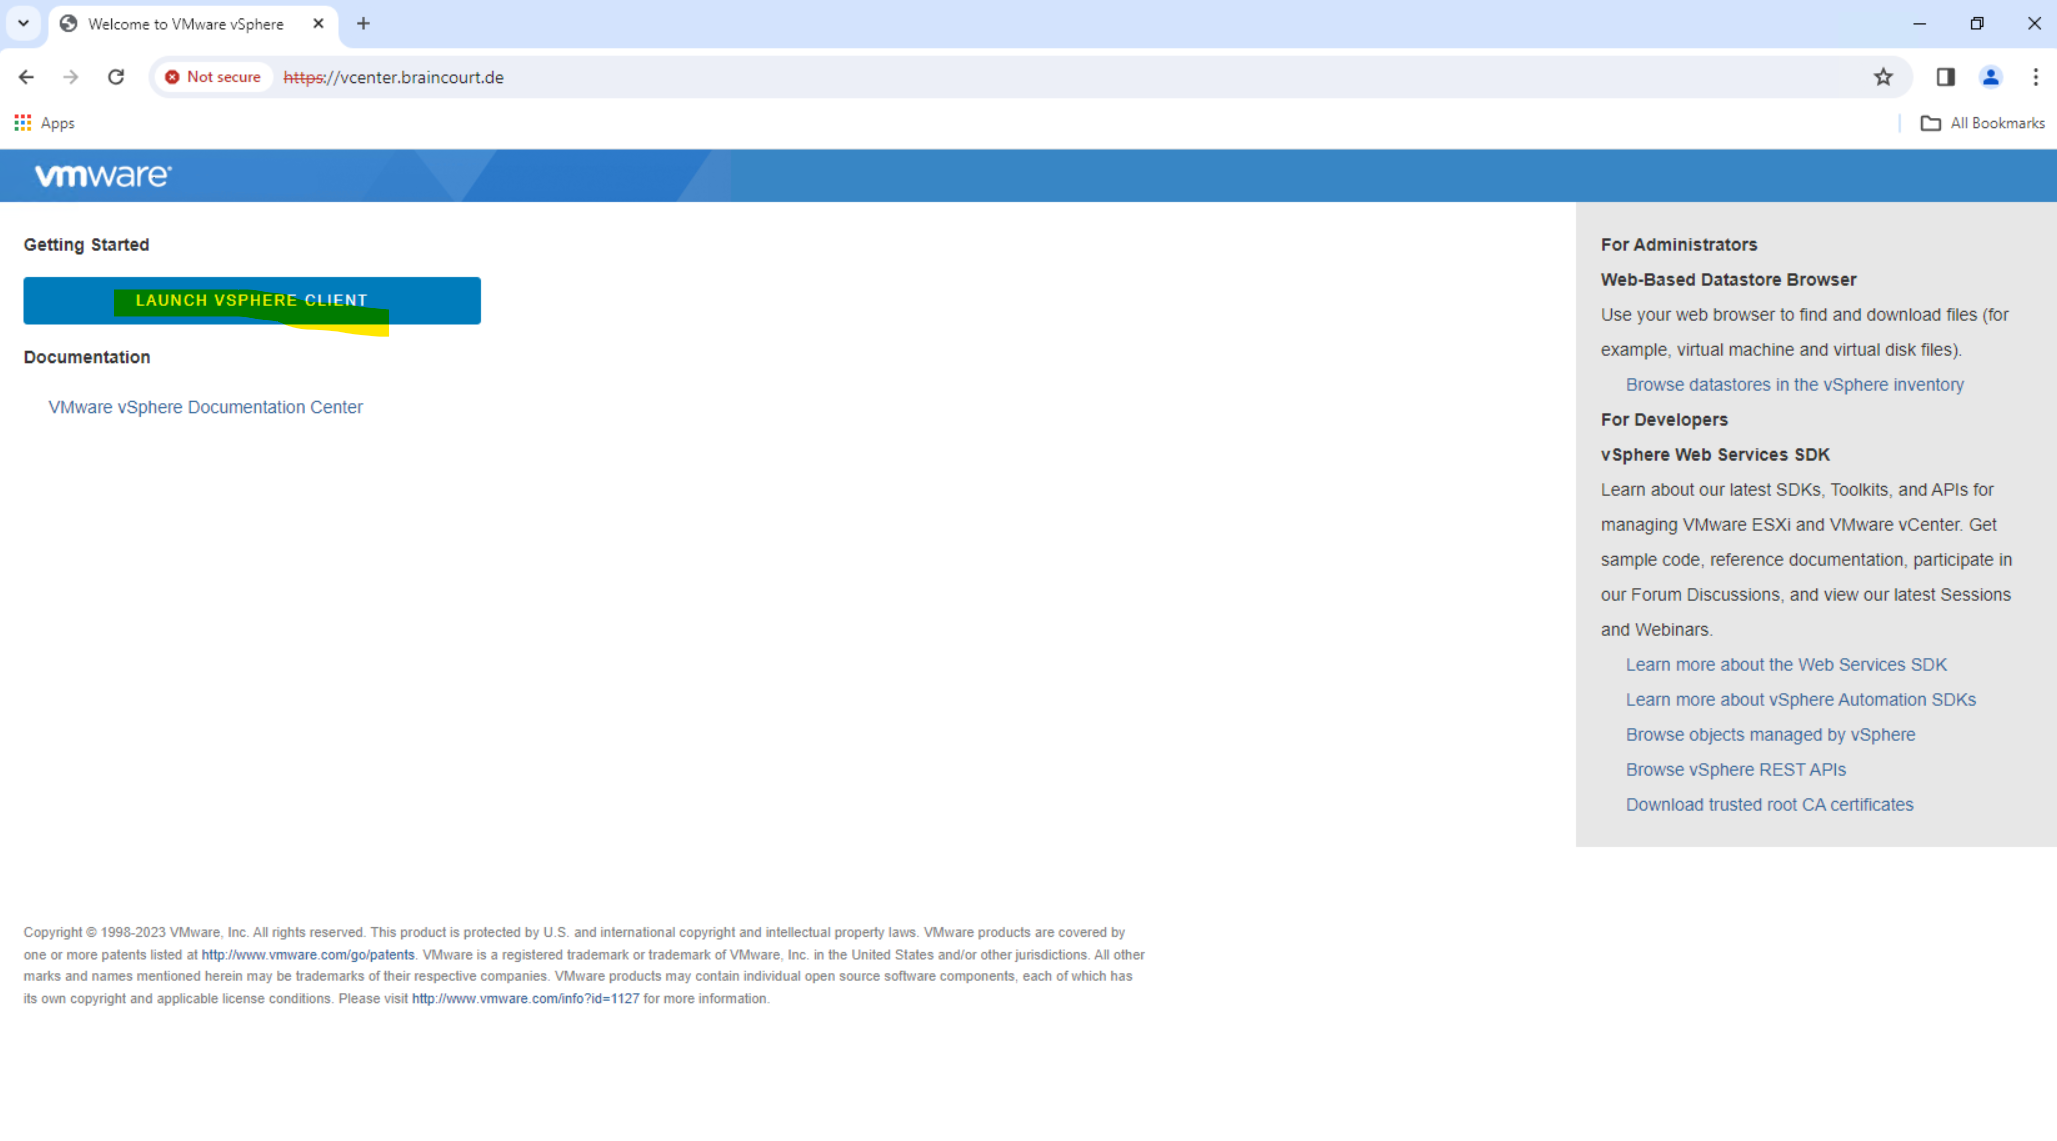
Access vSphere by selecting Launch vSphere Client.
Since vSphere 6.0U2 you will use the vSphere HTML5 Web Client Fling to manage your vSphere environment.
May 18, 2016
Today we have two important announcements. First, the C# client (AKA Desktop Client/thick client/vSphere Client for Windows) will not be available for the next version of vSphere. Current versions of vSphere (6.0, 5.5) will not be affected, as those will follow the standard support period. You’ve heard this from us in the past, but we’ve been waiting for a sufficient replacement before finally moving forward. Second, we want to talk about the recent vSphere HTML5 Web Client Fling, user adoption, and VMware’s focus on bringing a great user experience. Like the Embedded Host Client Fling (which made it into vSphere in 6.0U2), we plan on bringing this product into a supported release soon.We’ll be referring to the new client as the vSphere Client, as it better describes the product, and isn’t a ten syllable mouthful (vSphere HTML5 Web Client).
Goodbye vSphere Client for Windows (C#) – Hello HTML5
Source: https://blogs.vmware.com/partnernews/2016/05/vsphere-client-html5.html
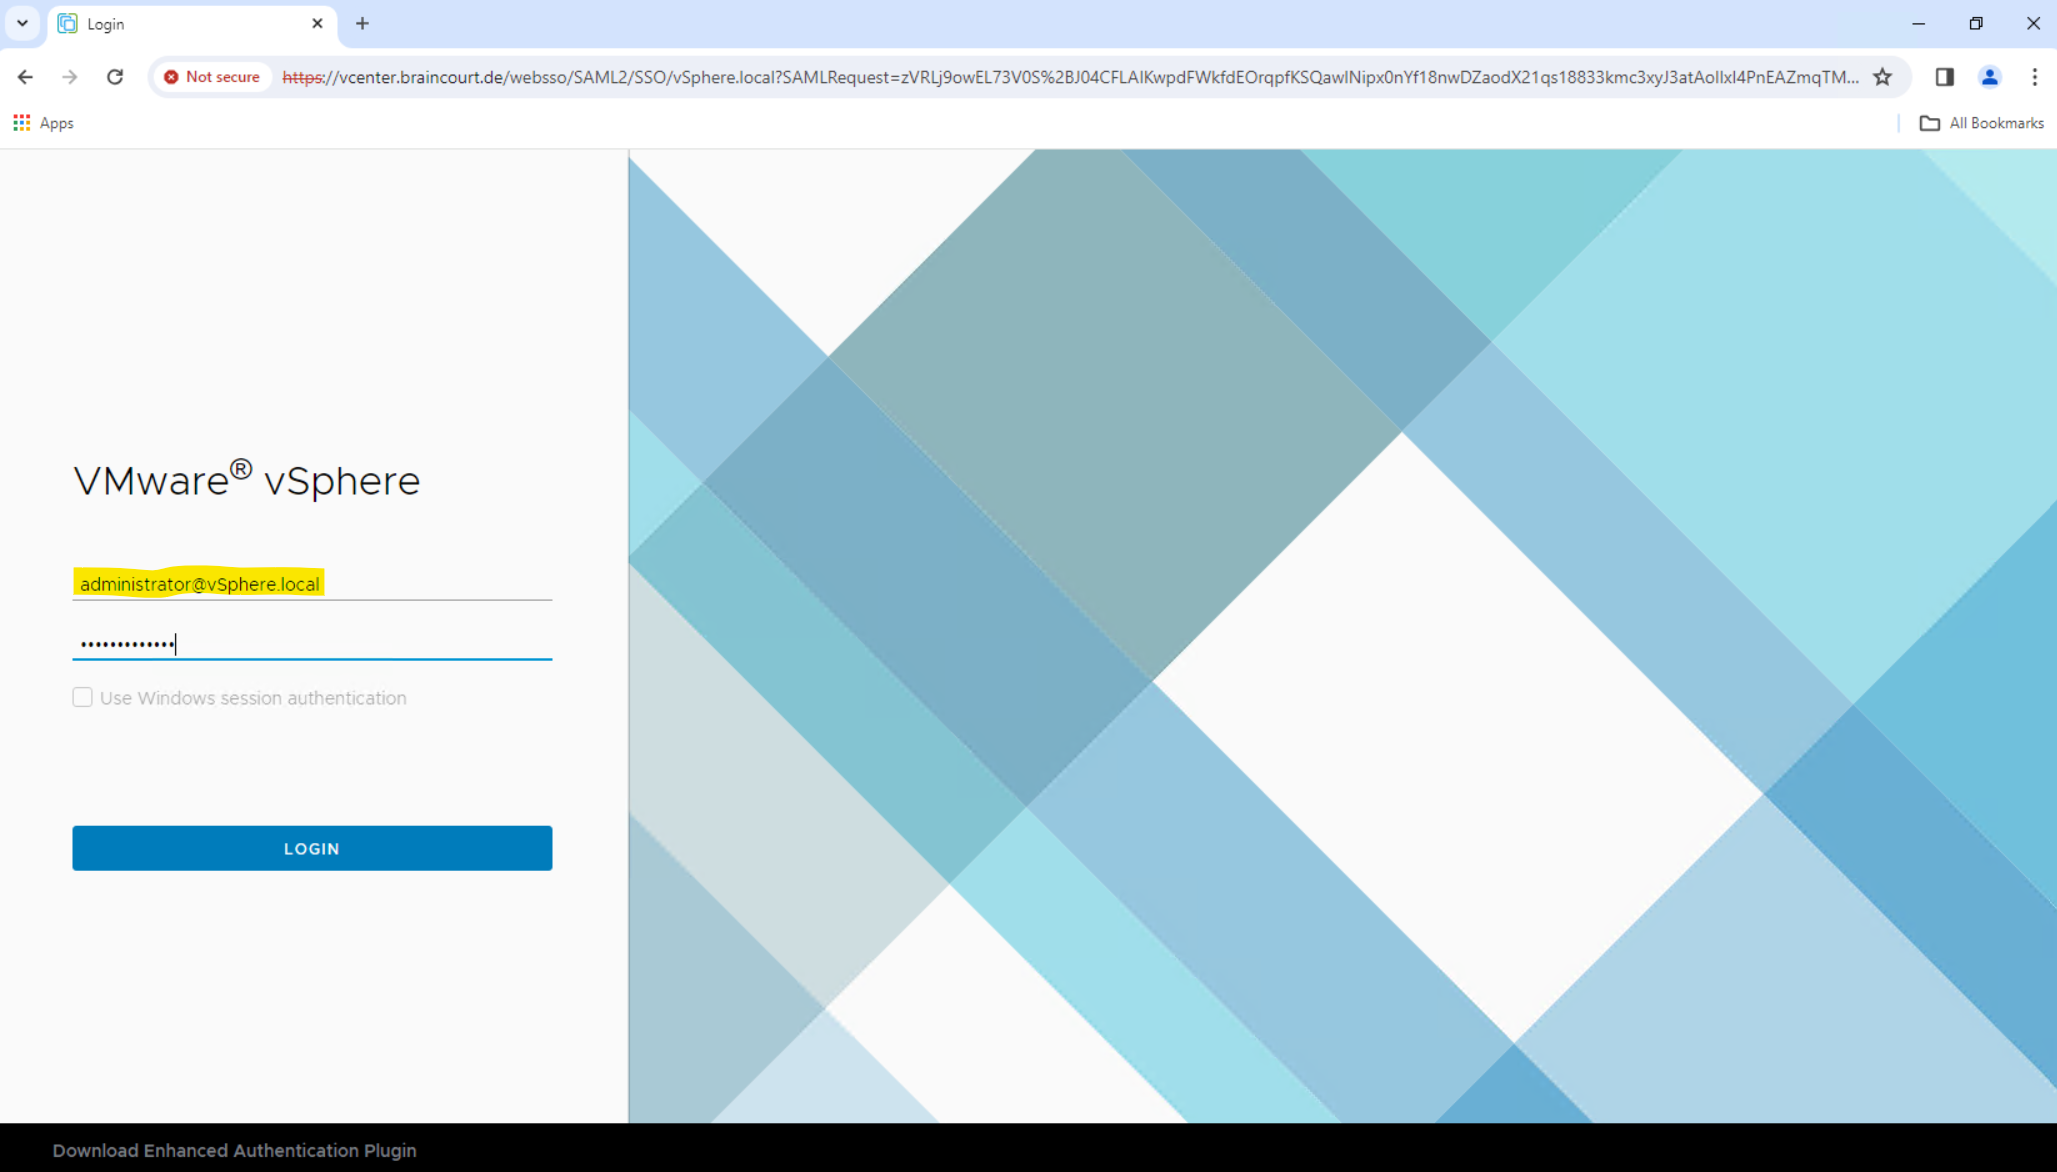
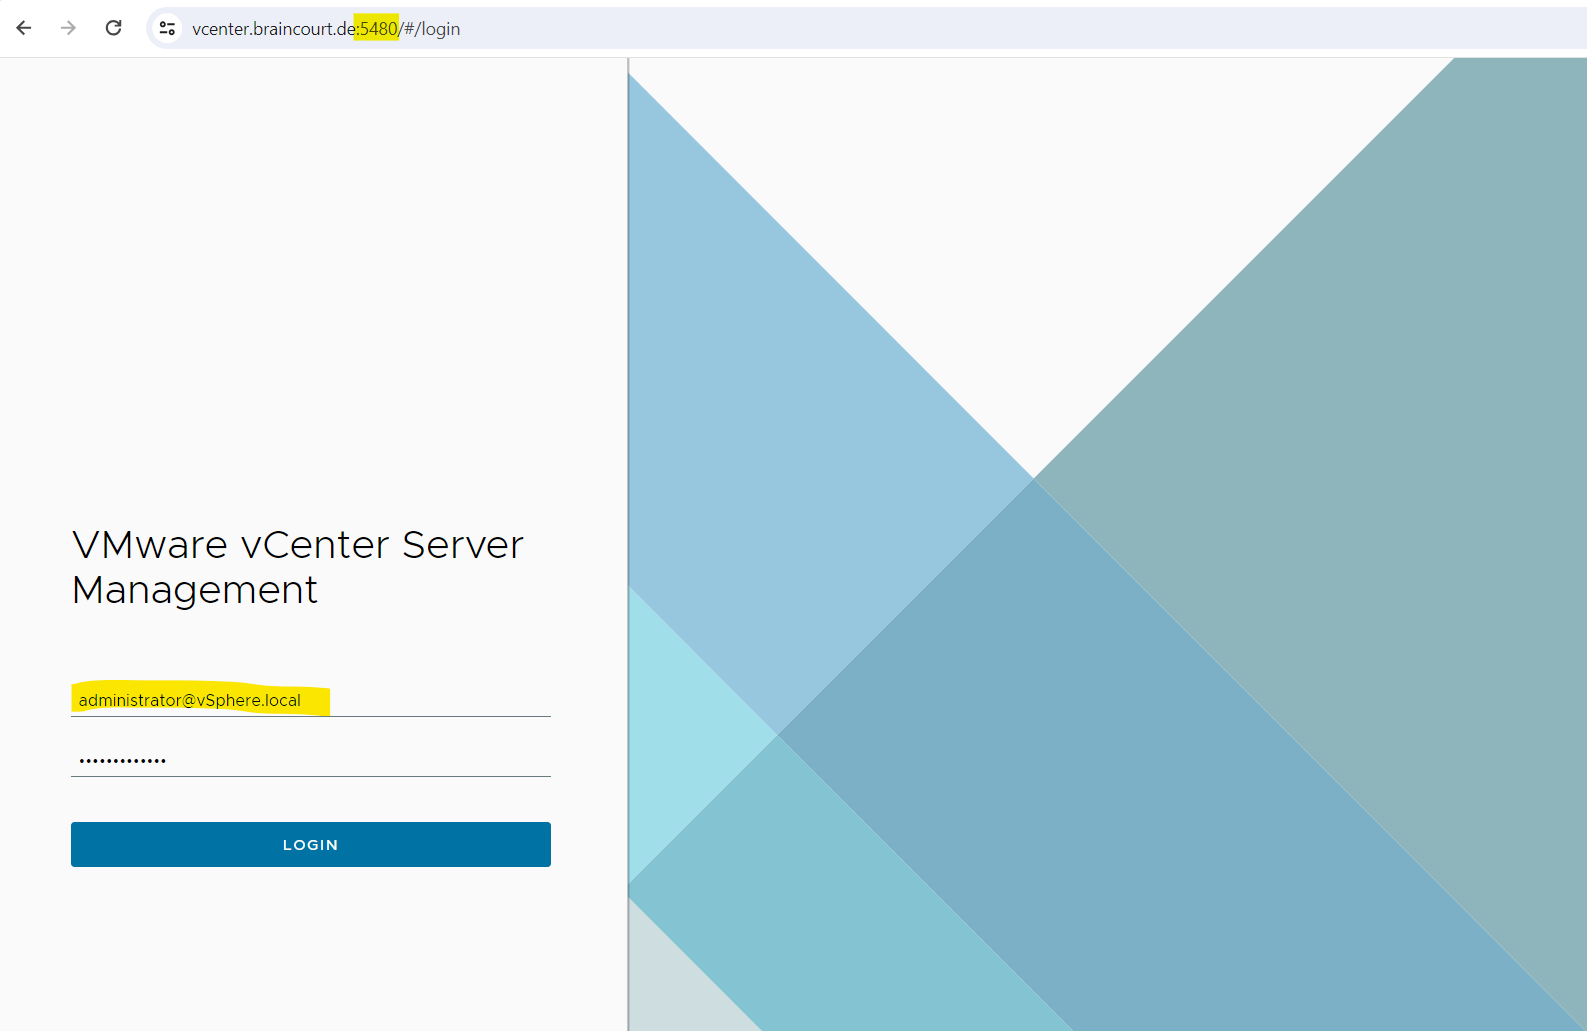
The VMware Single Single-On page displays. Enter the username and password that you specified during installation, then click the Login button.
<Single Sign-on username>@<Single Sign-On domain name>
The VMware vSphere Client page displays.
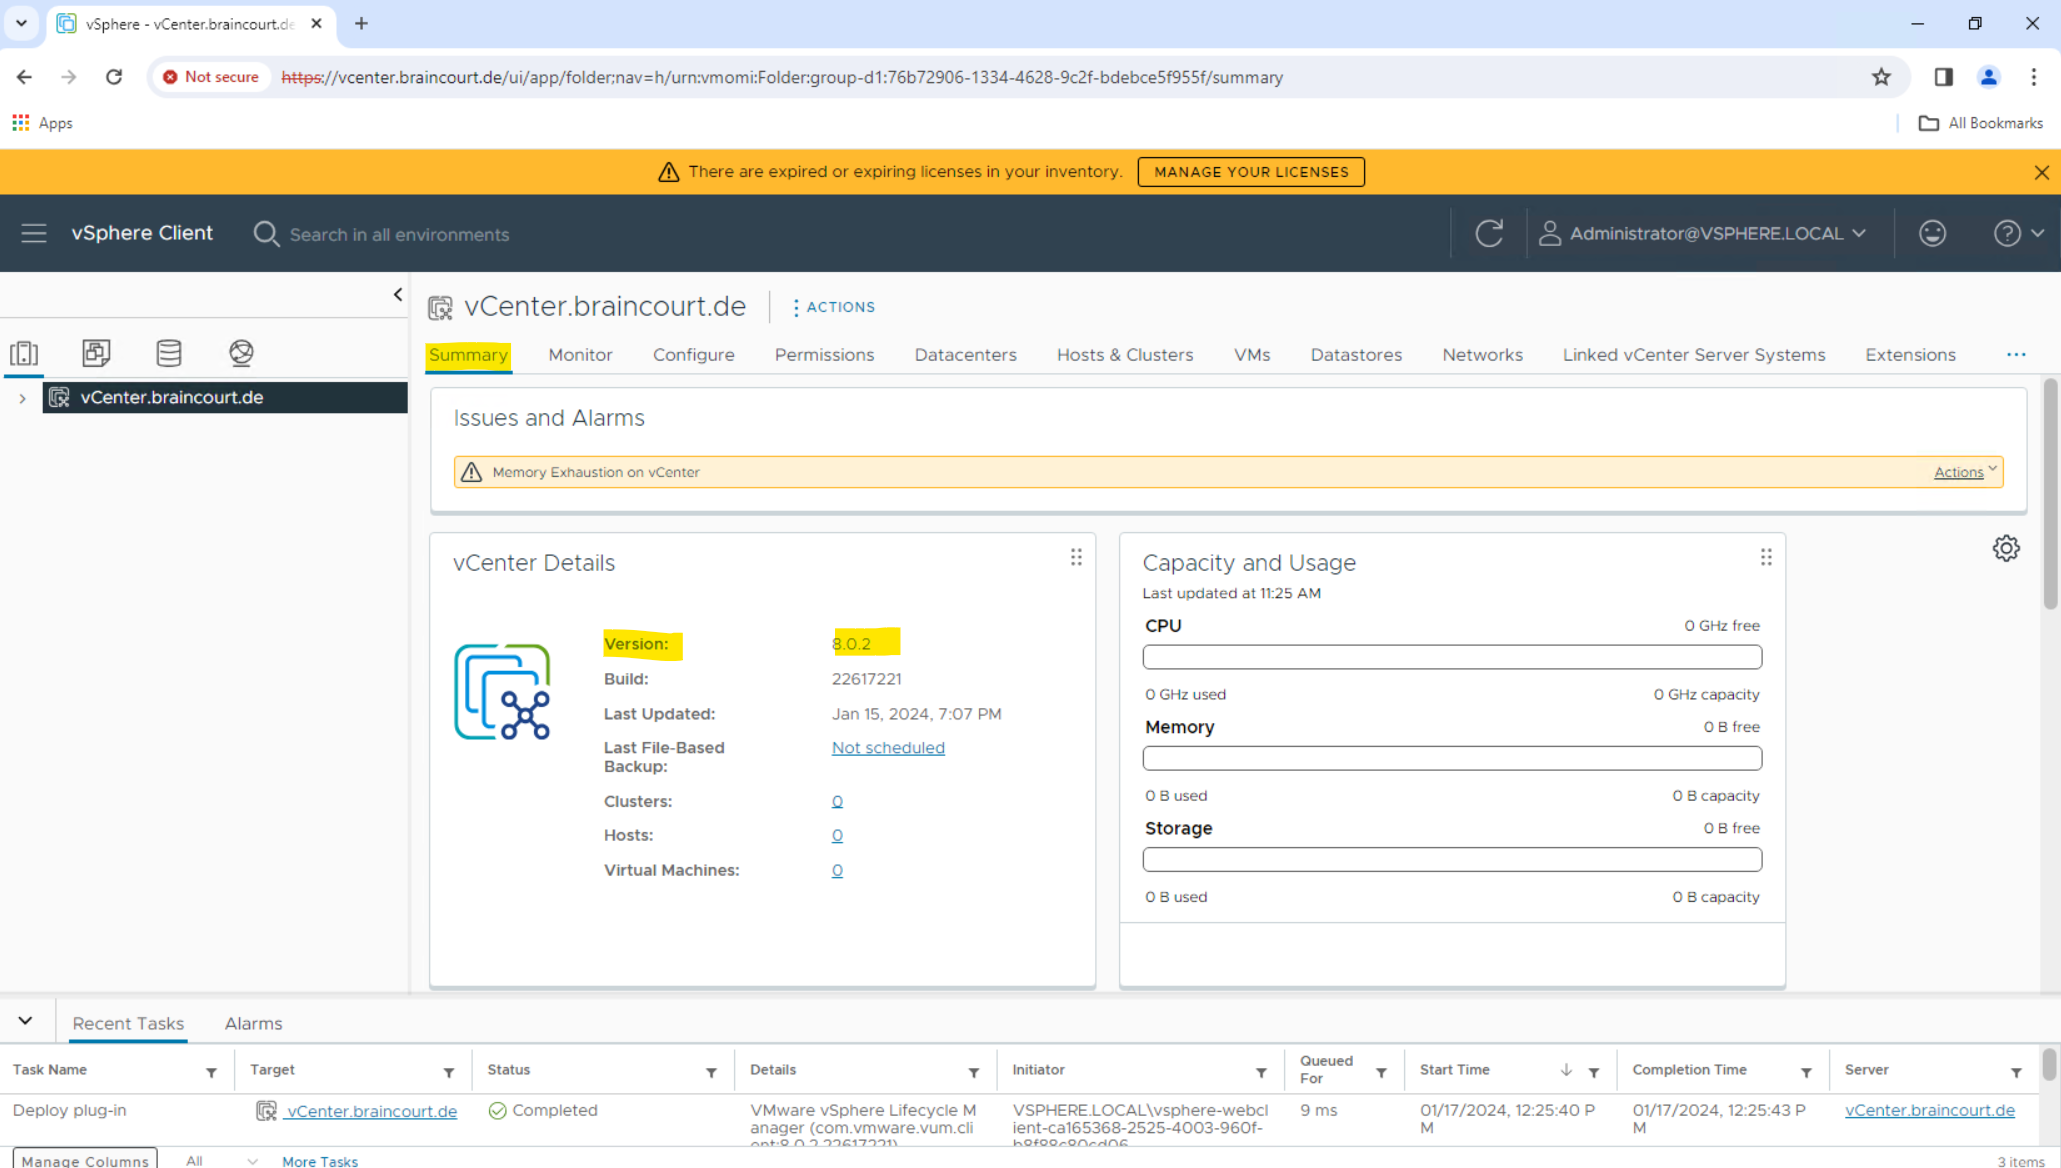
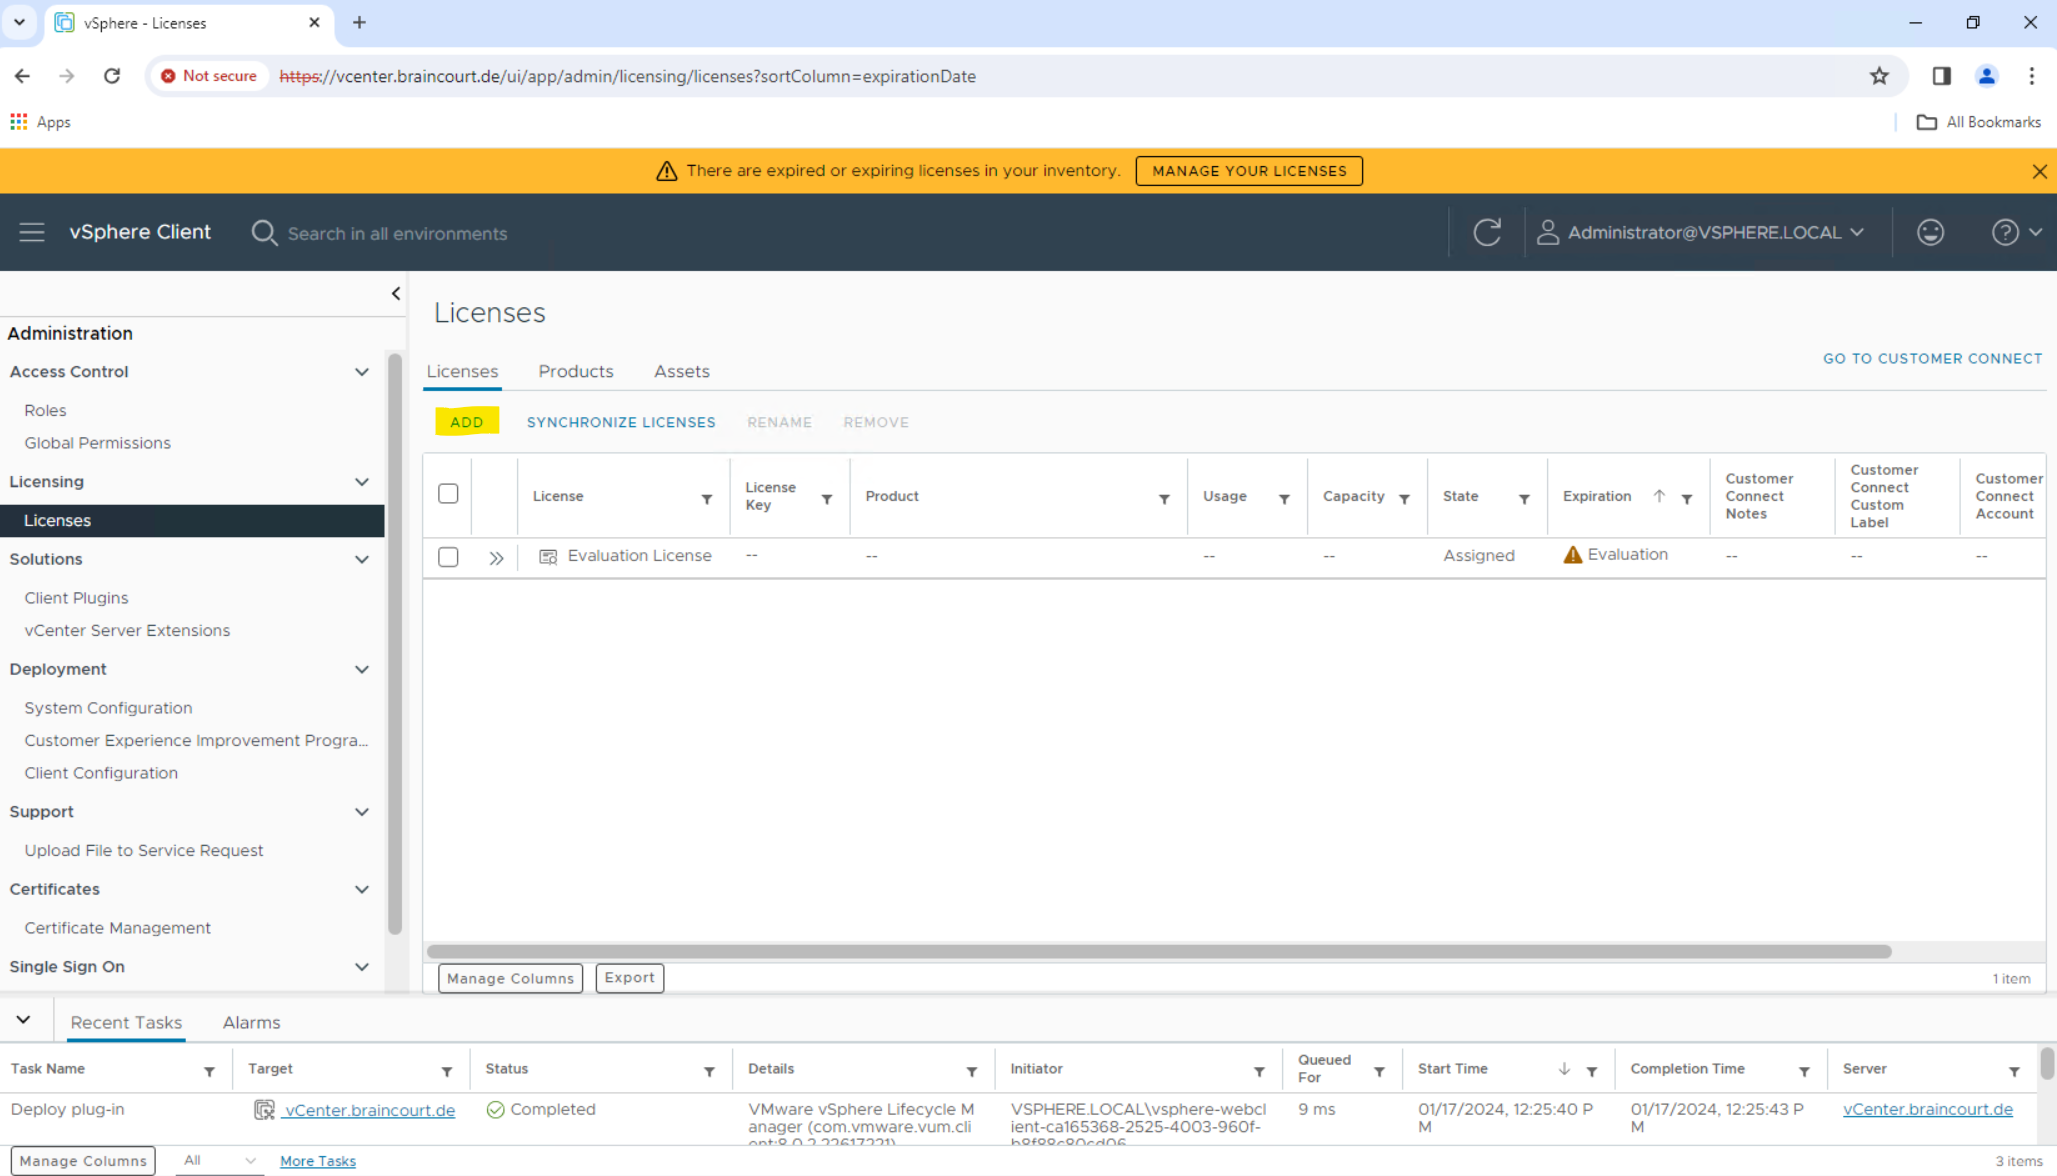
You must apply for a new vCenter license key within 60 days. If you have purchased vCenter Server, log in to your licensing portal. Select your license and log in to the vSphere Client using the SSO administrator login. (If the license key does not appear, then check with your VMware account manager.)
Click the Menu drop-down, then click Administration. Select Licenses from the left-hand menu, then select the Licenses tab. Click Add New Licenses to open the New Licenses dialog.
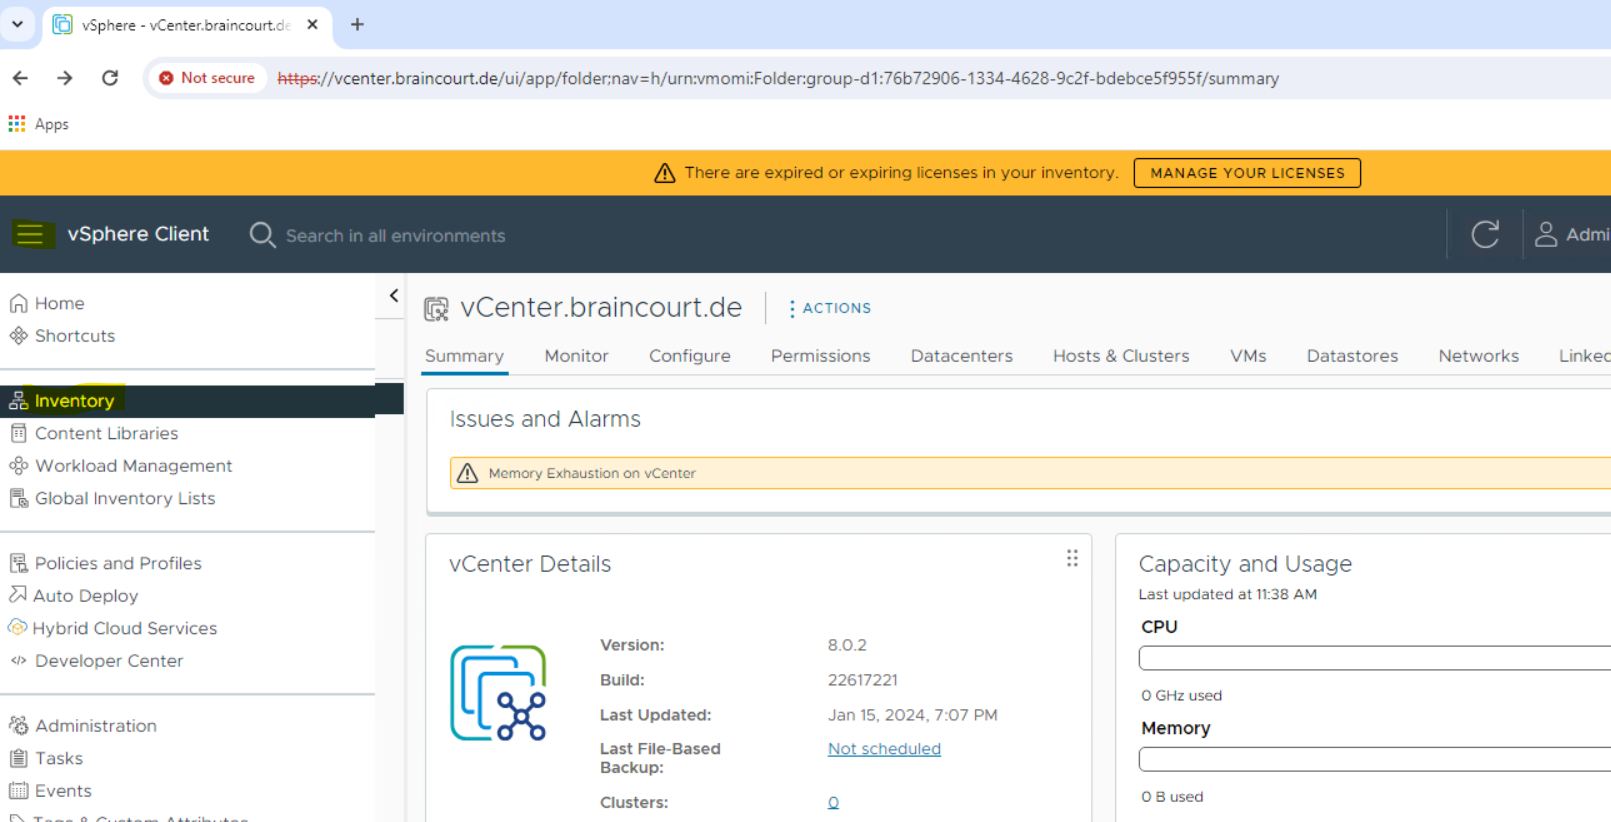
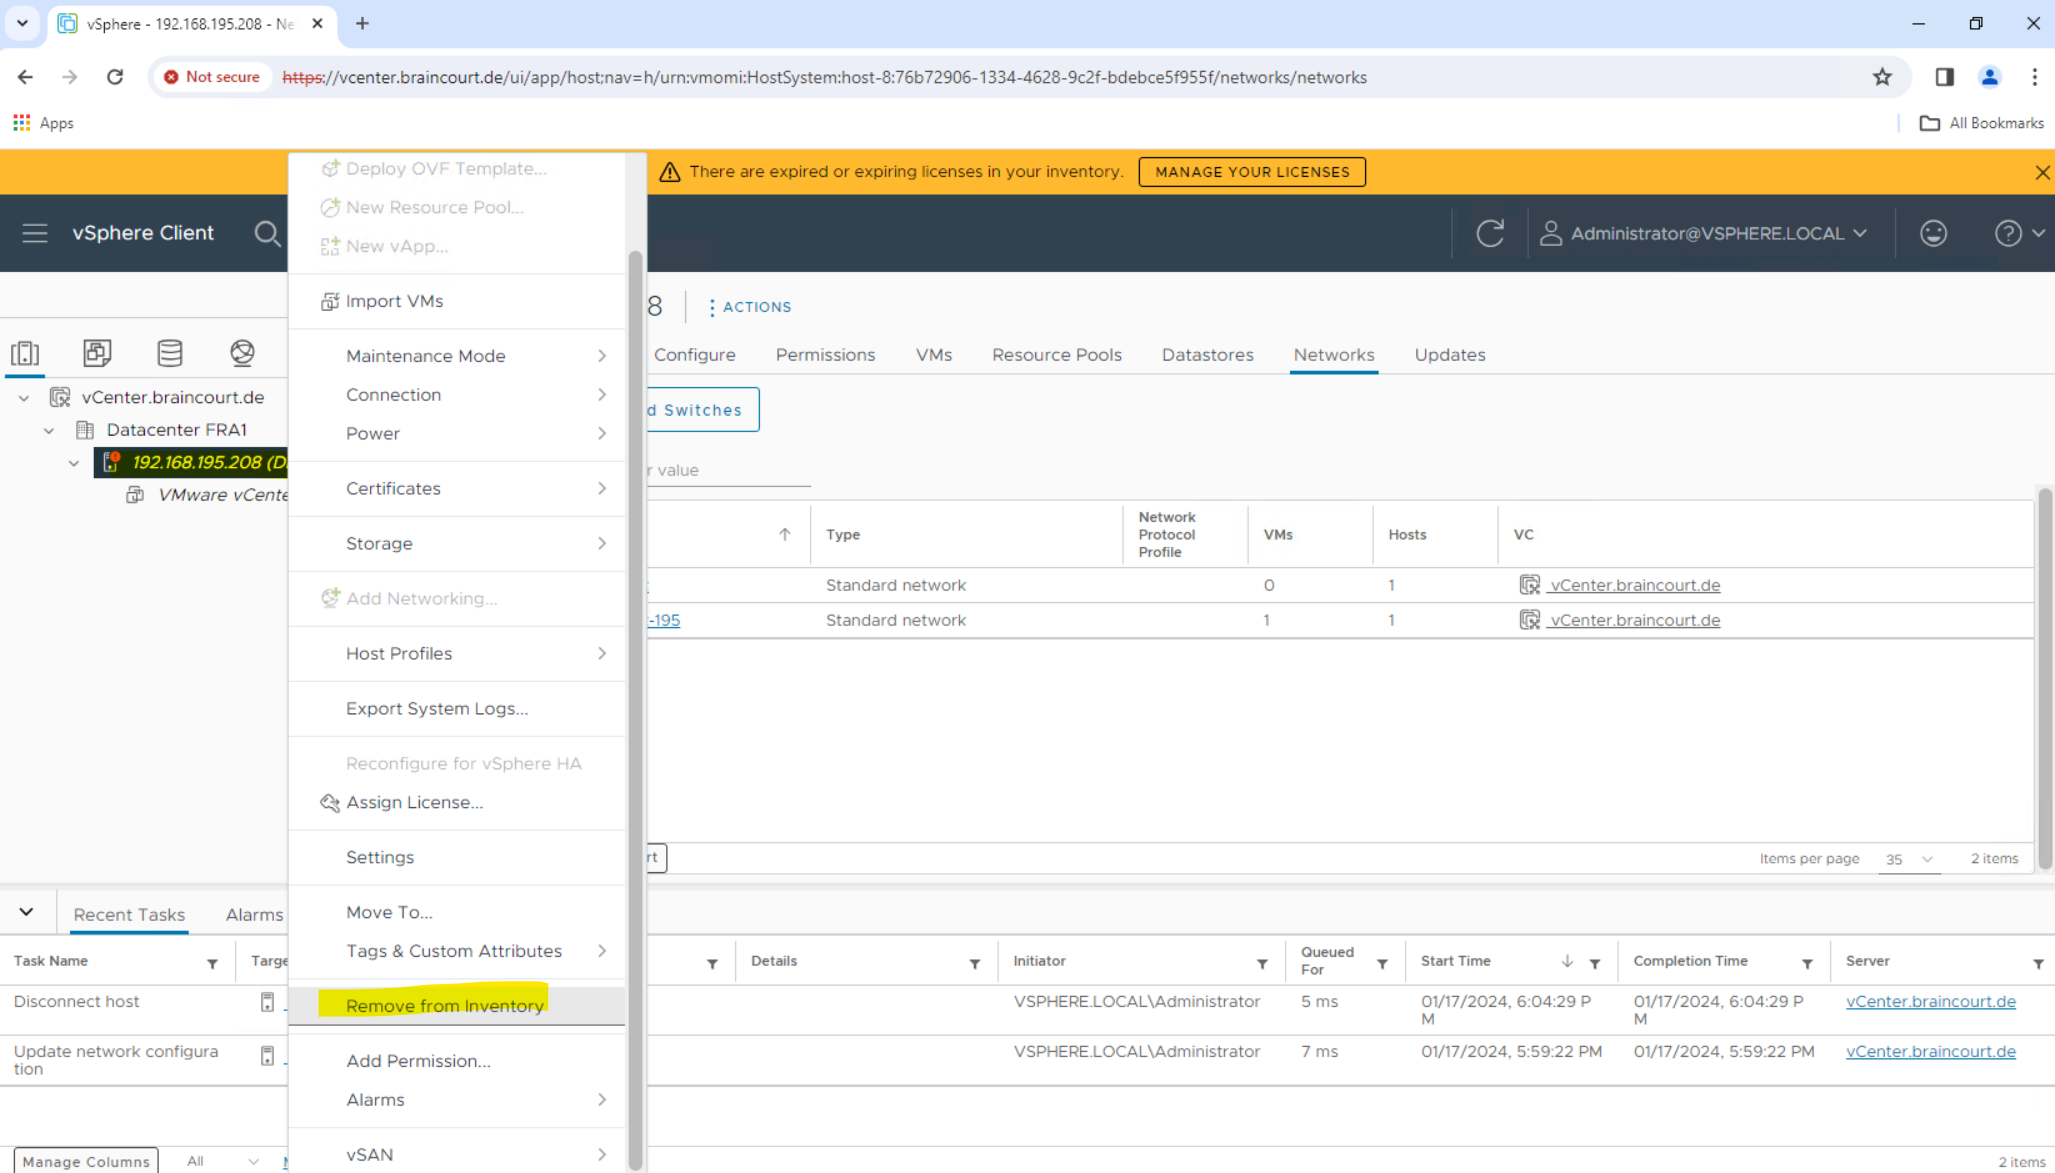
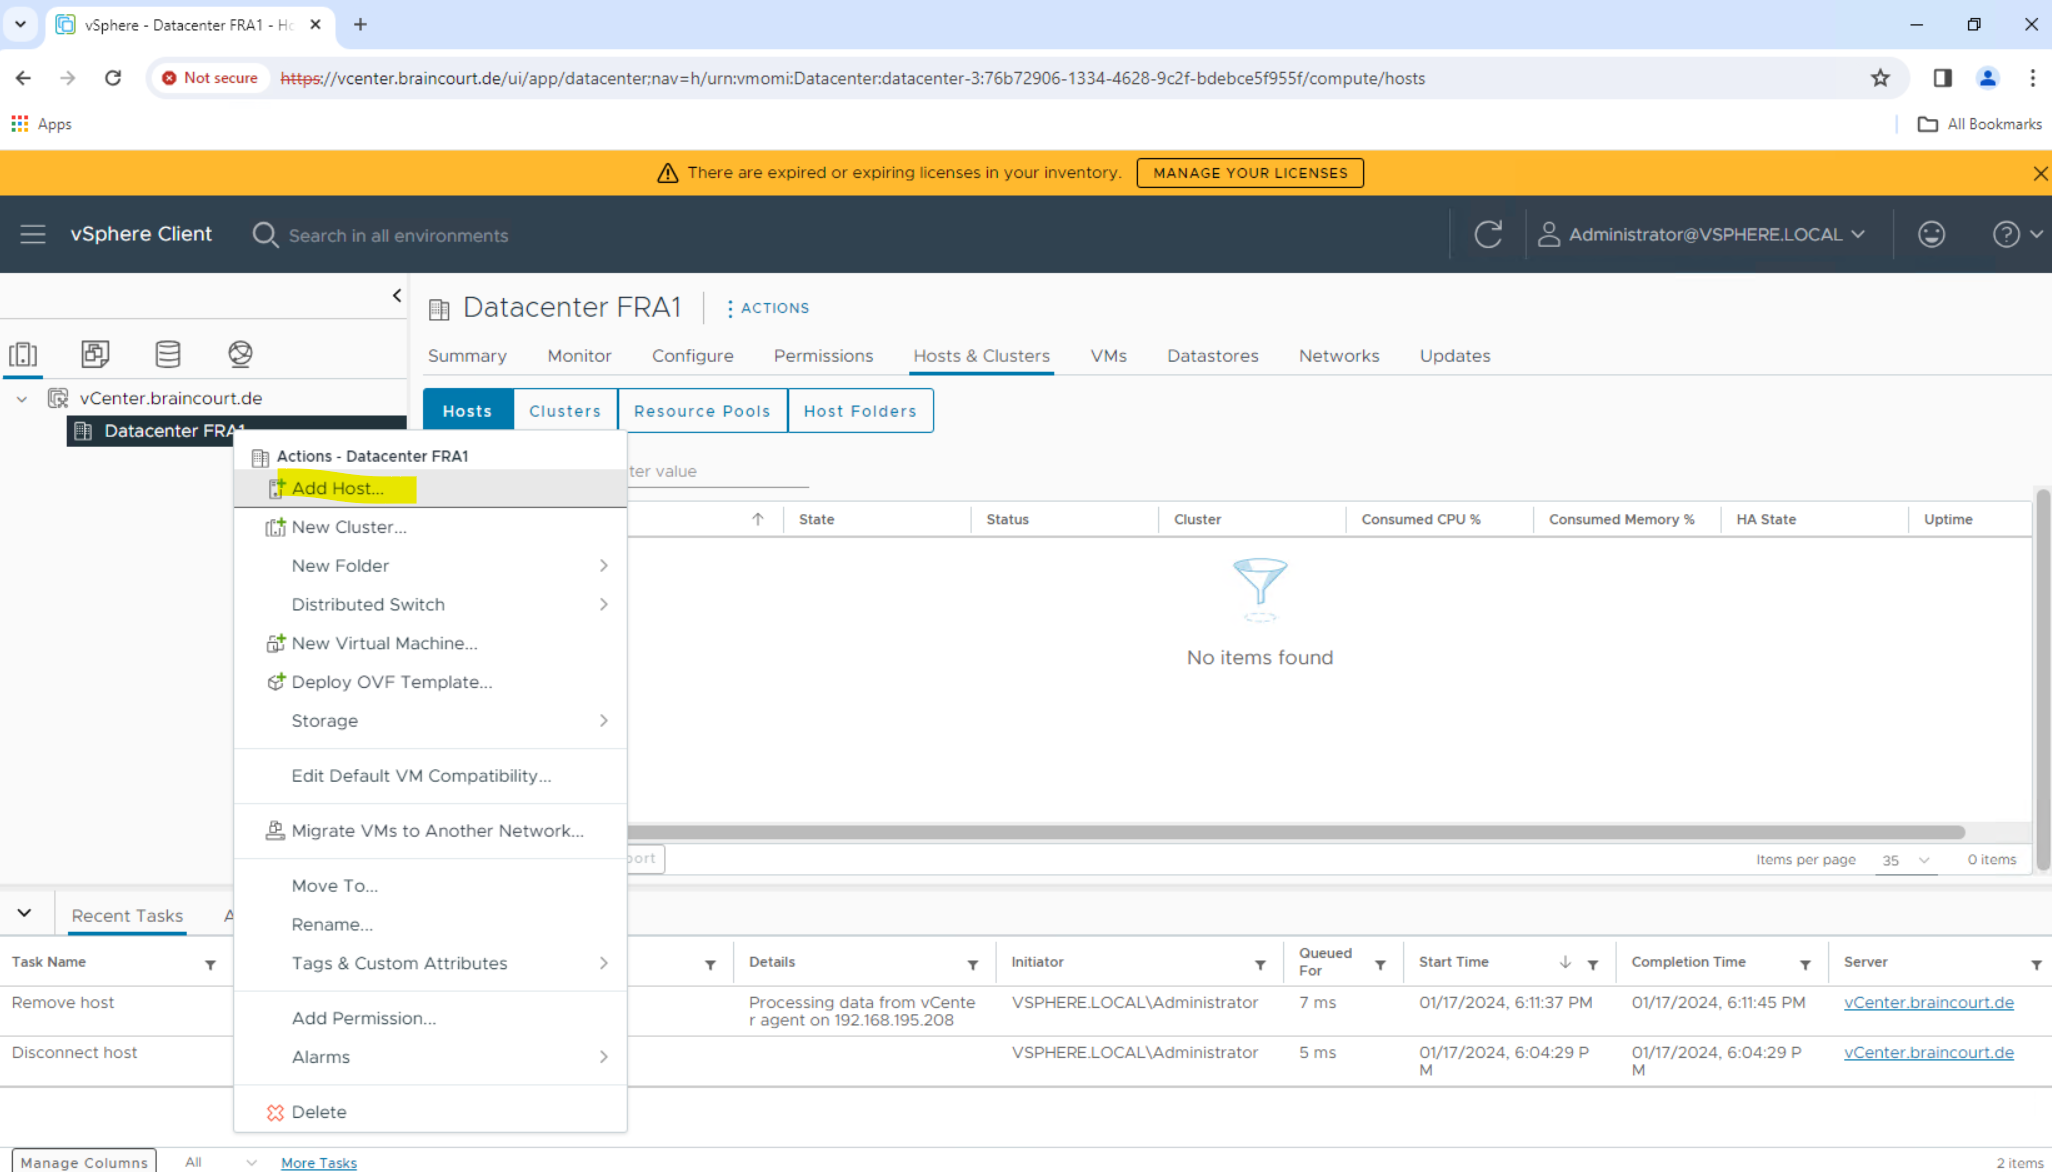
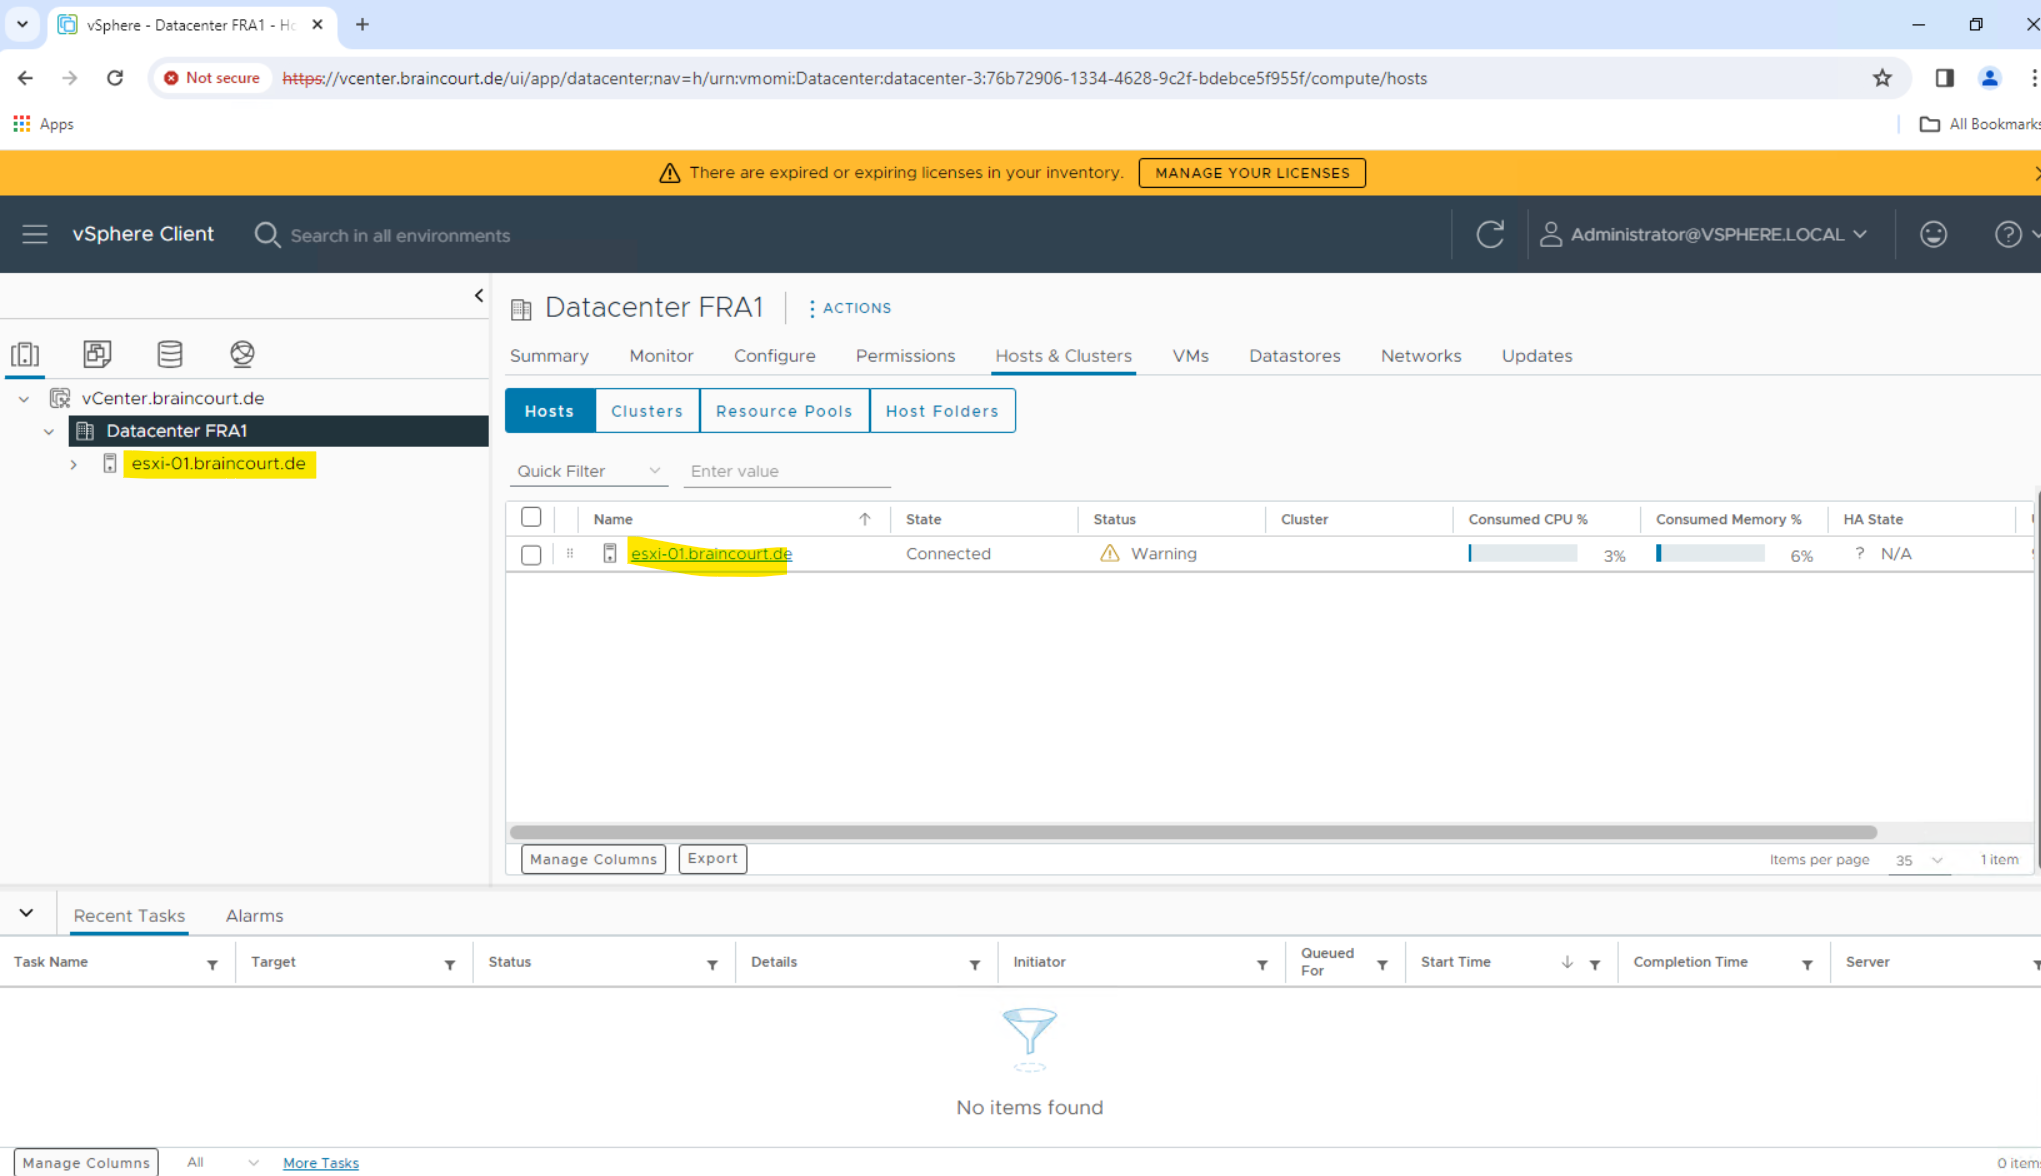
Adding ESXi Hosts in vCenter
Use the following procedure to add an ESXi host in vCenter.
Select the Inventory menu on the VMware vSphere Client as shown below.
From the Actions drop-down list, select New Datacenter.
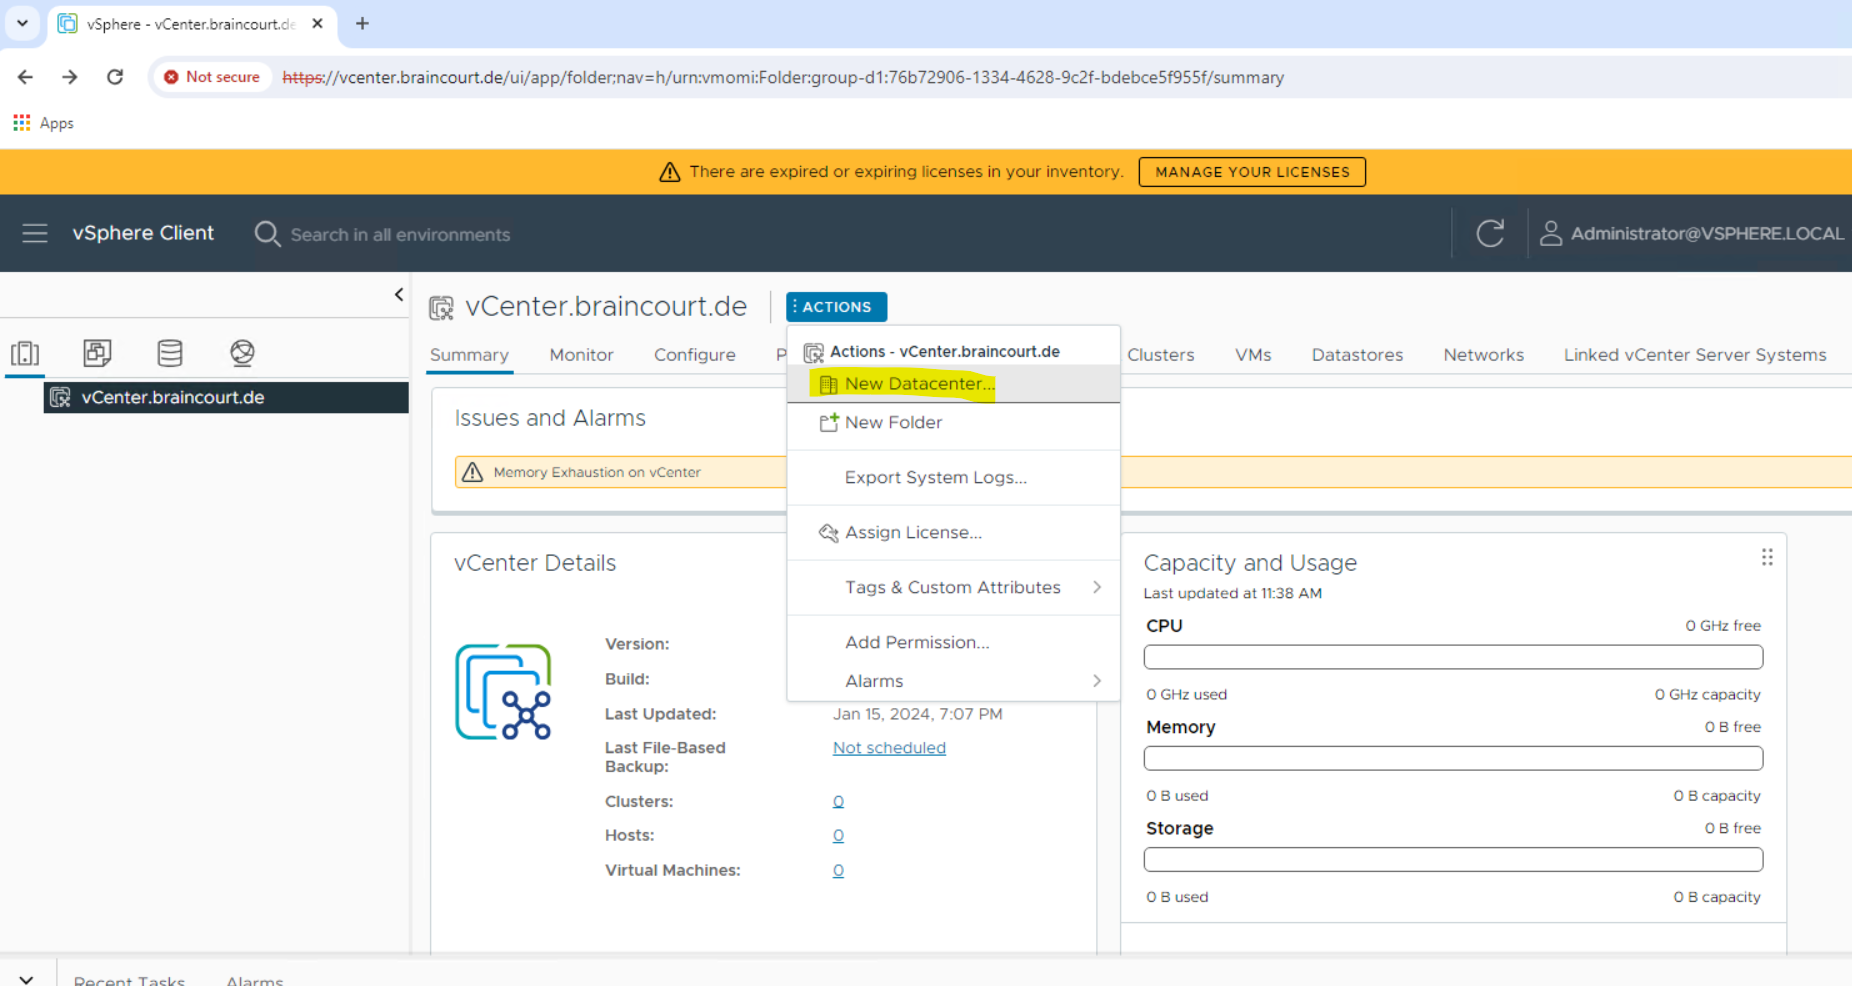
Enter a name for the datacenter in the Datacenter Name field and click Ok.

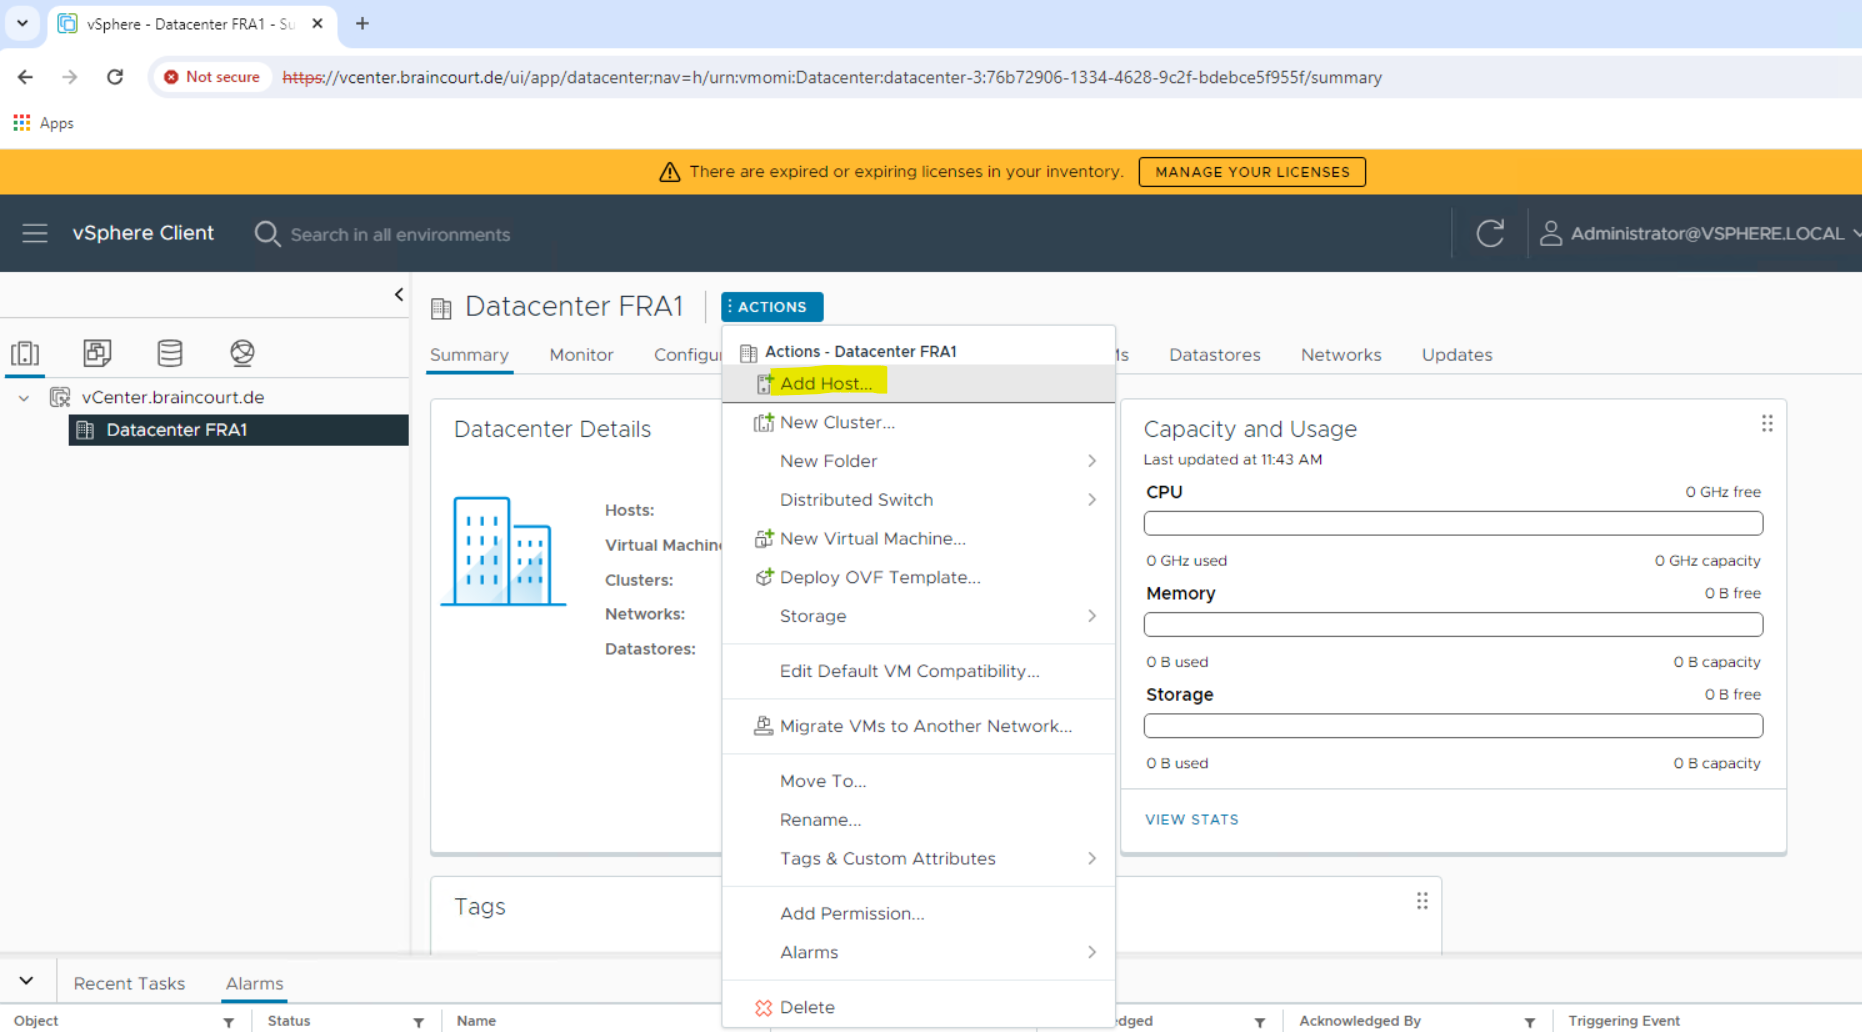
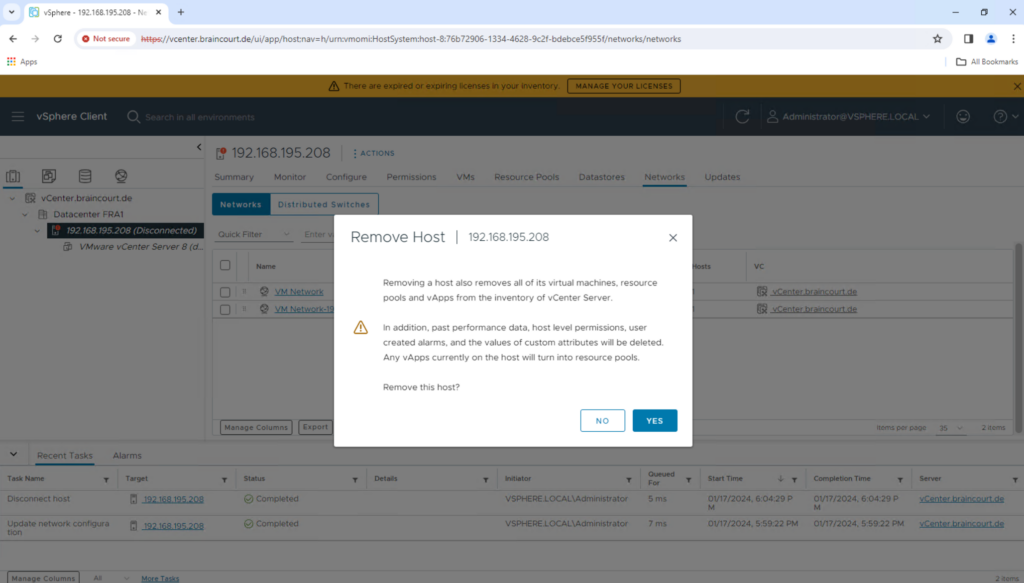
The new datacenter is visible in the left panel of the vSphere Client. Click the actions drop-down and select Add a Host.
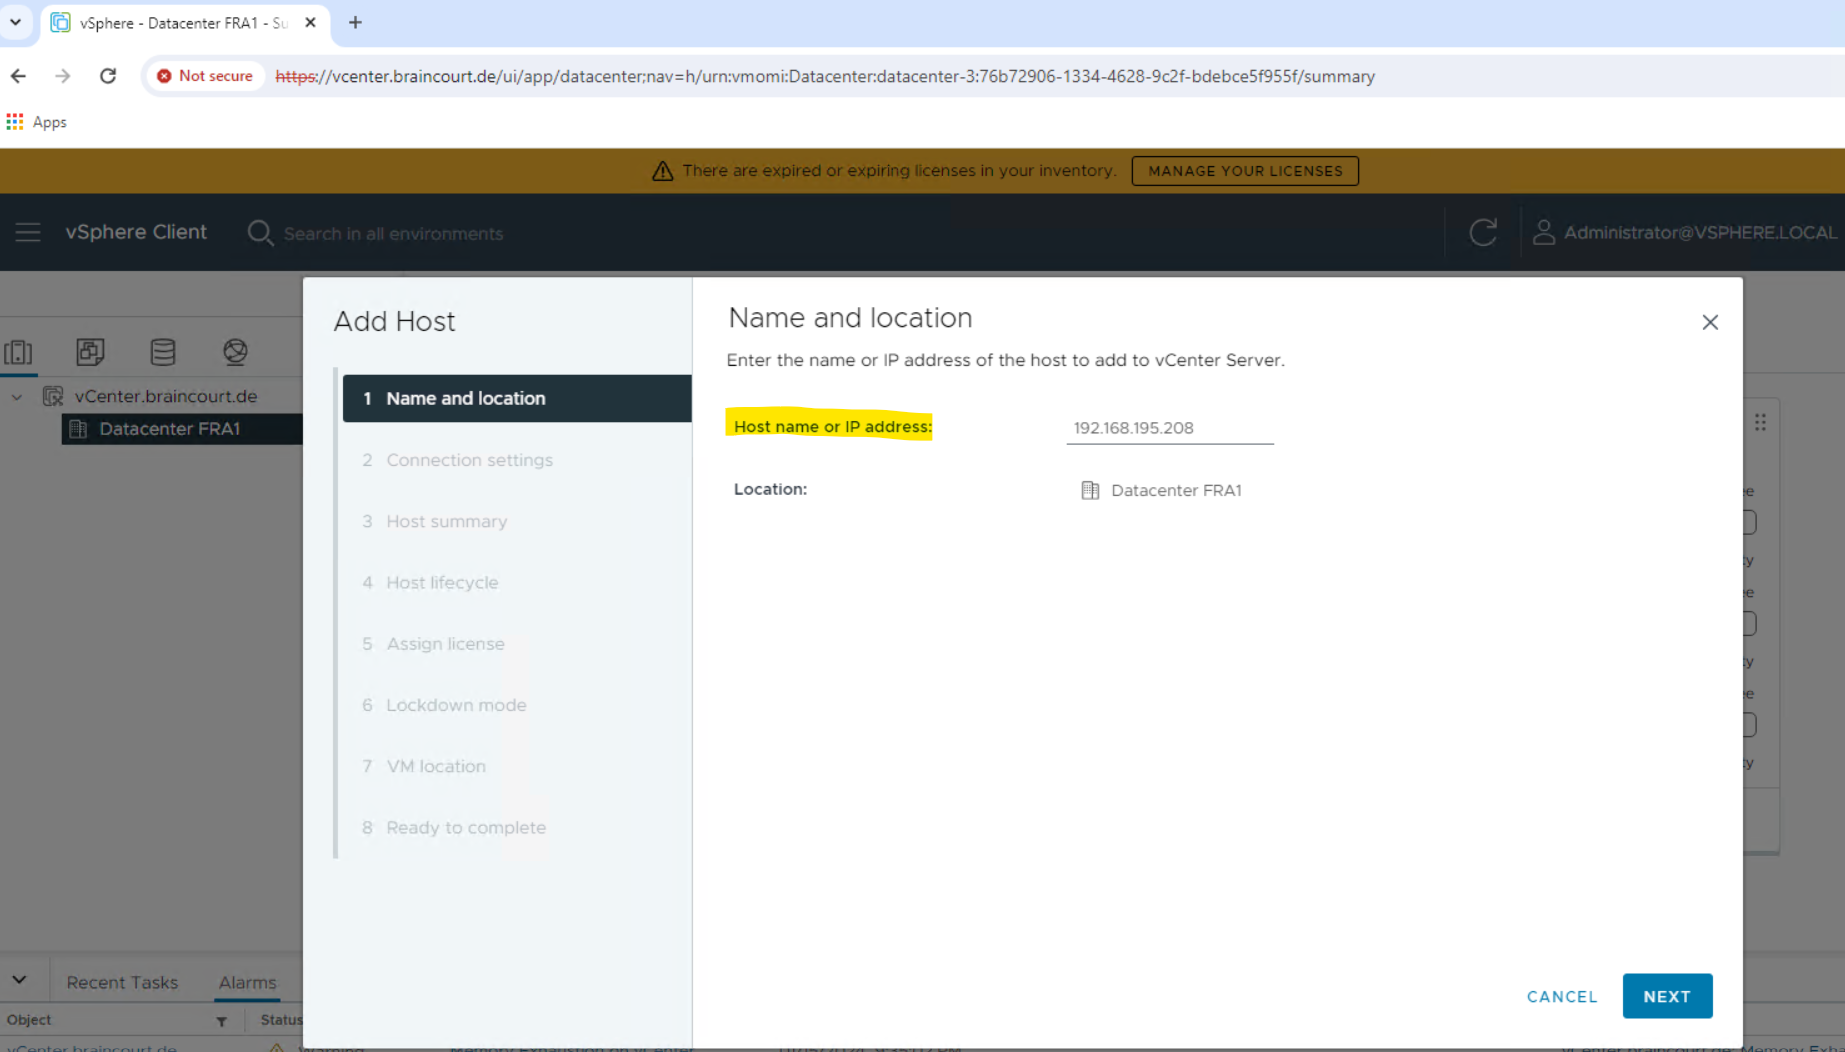
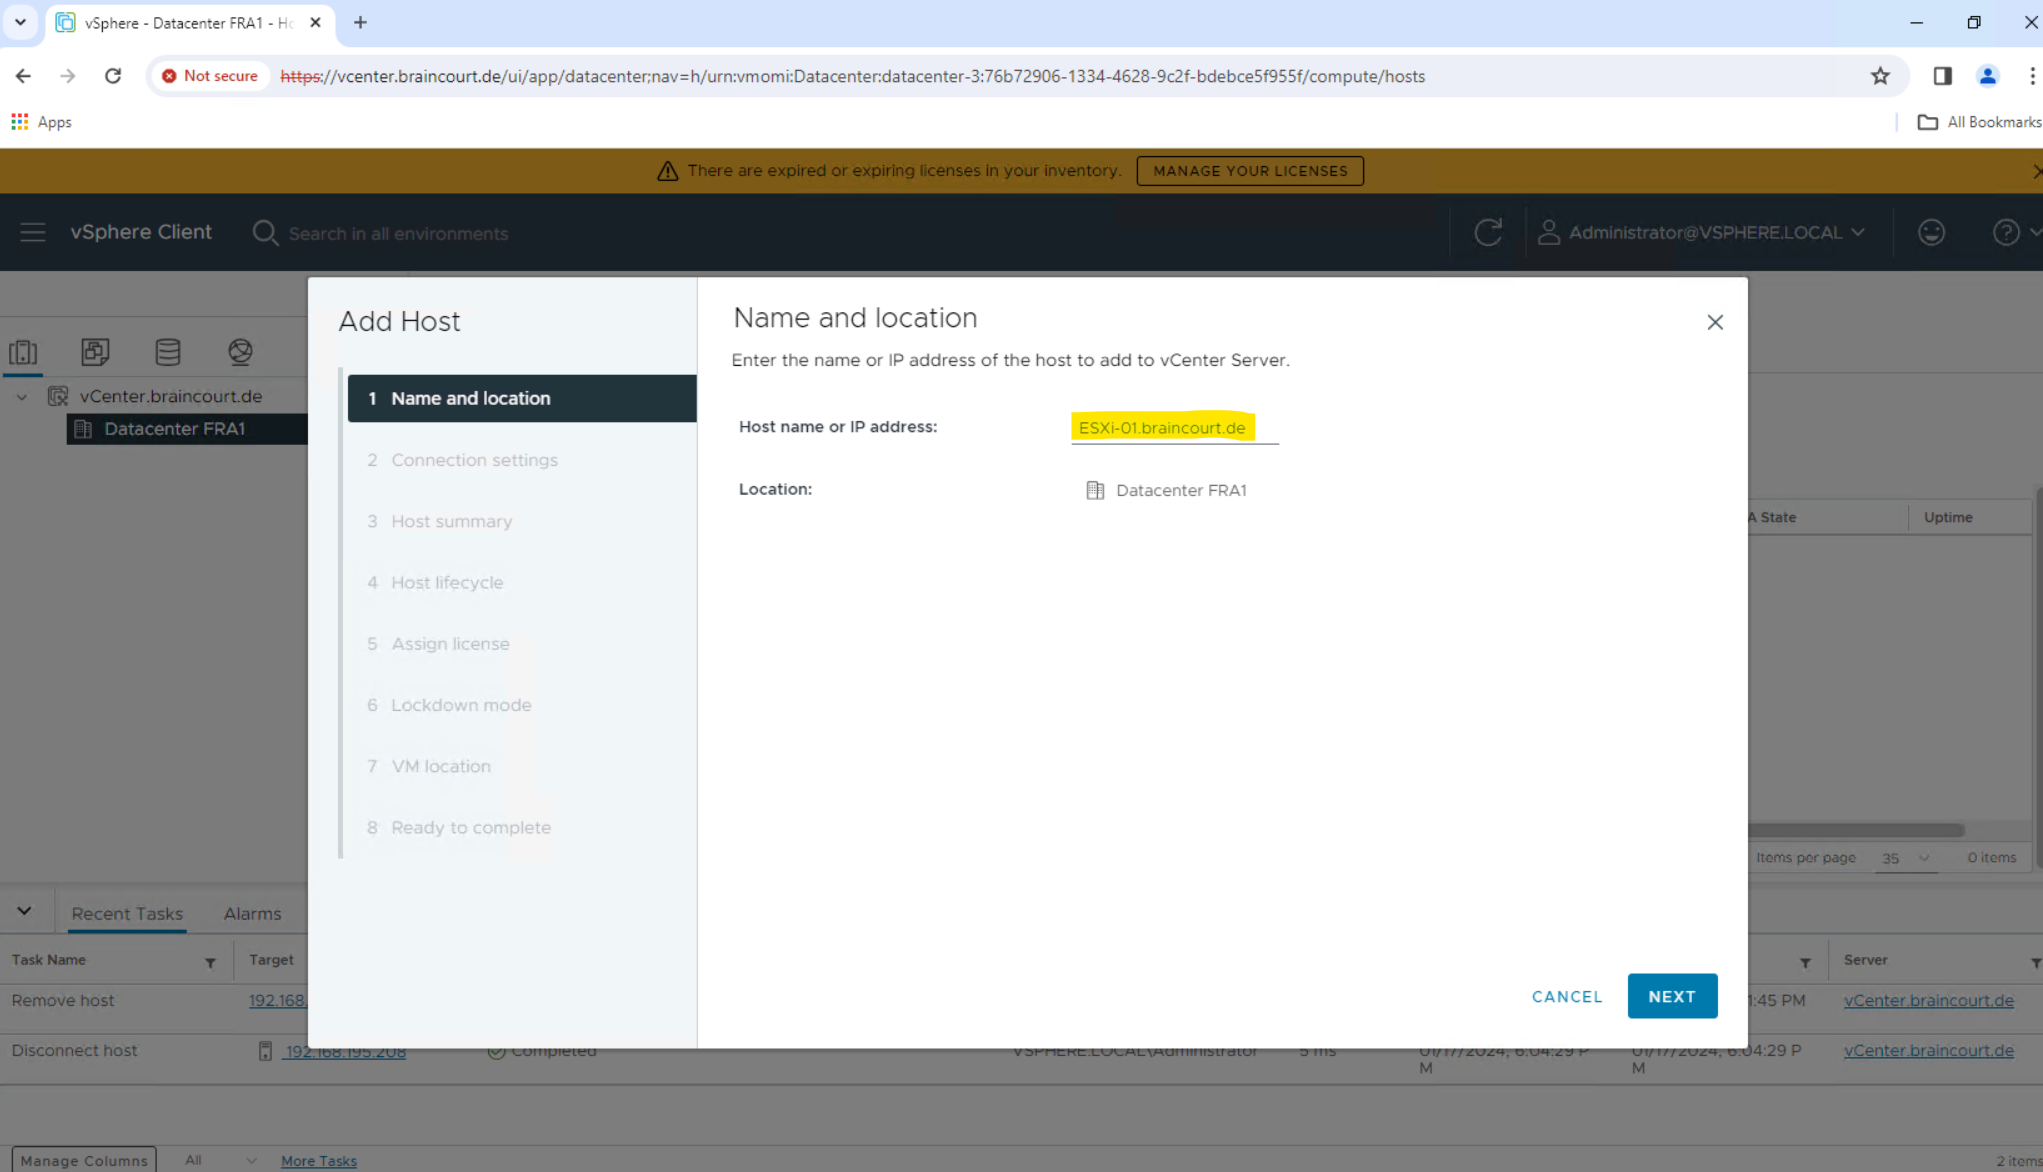
Enter the hostname or IP address of the vSphere host and click Next.
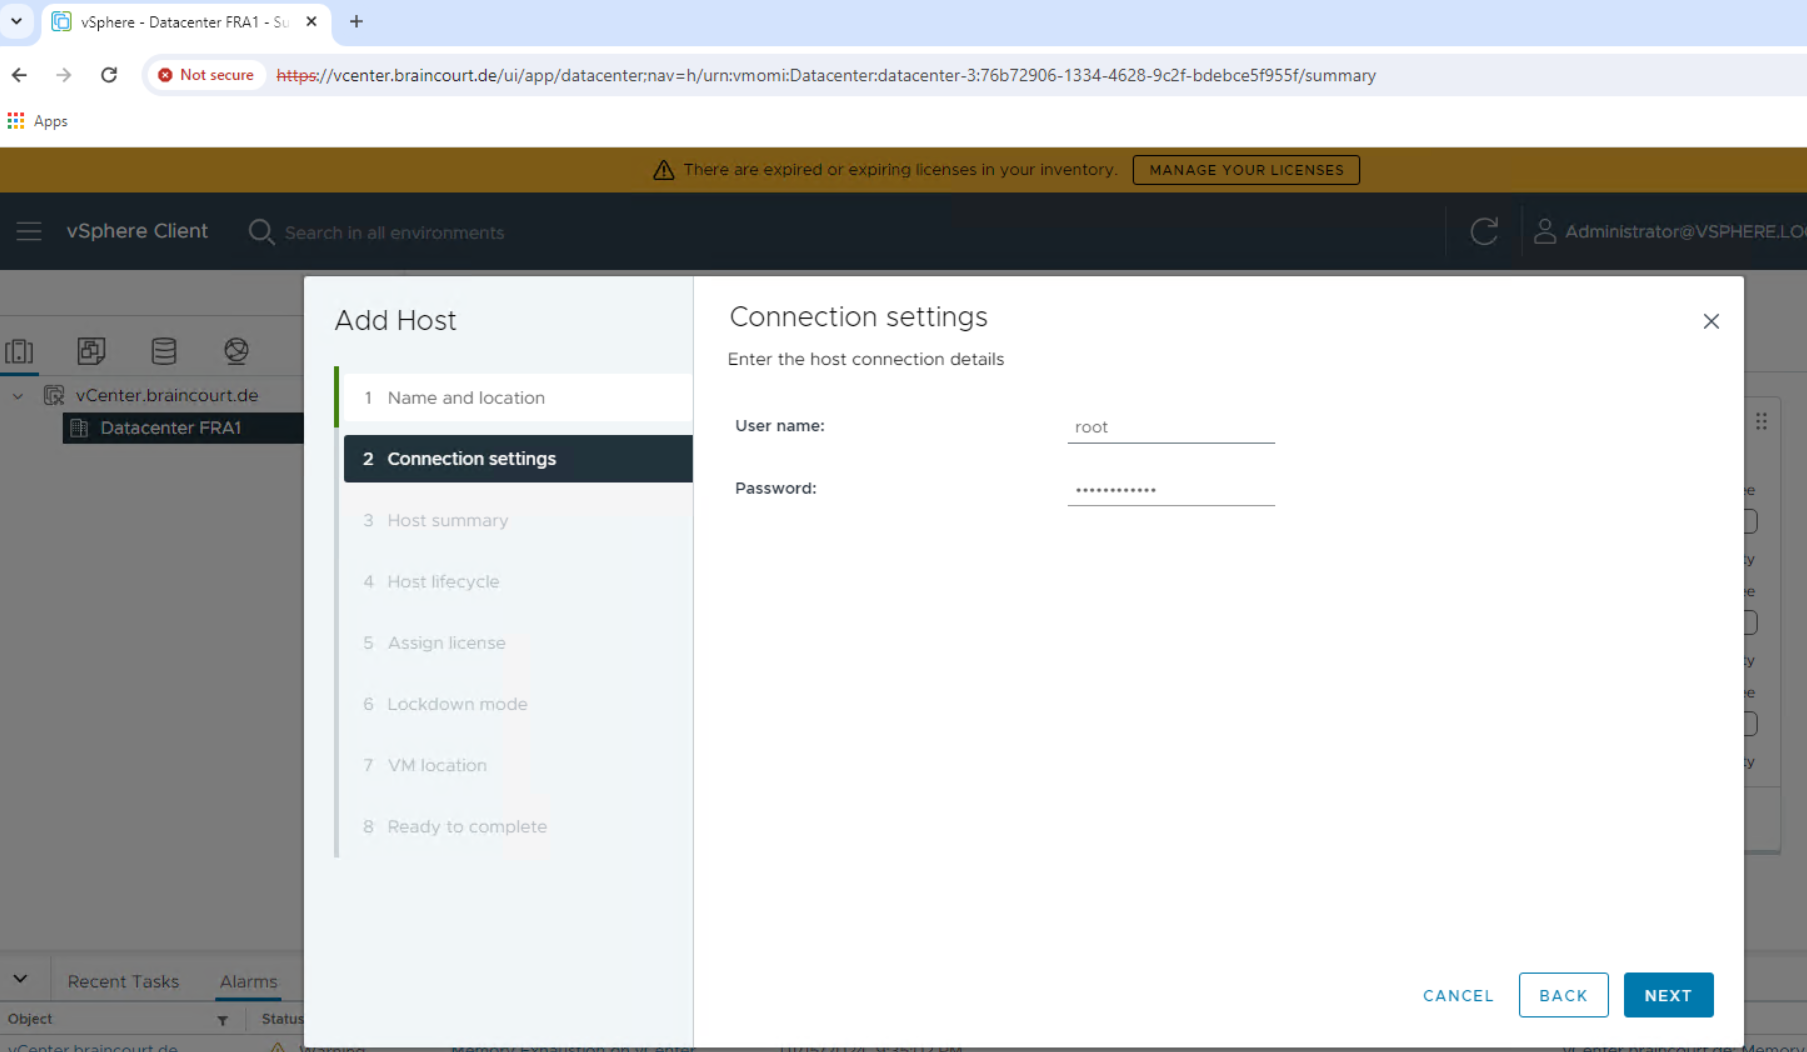
Enter the administrator account credentials (root account of your ESXi host) in the Username and Password fields and click Next
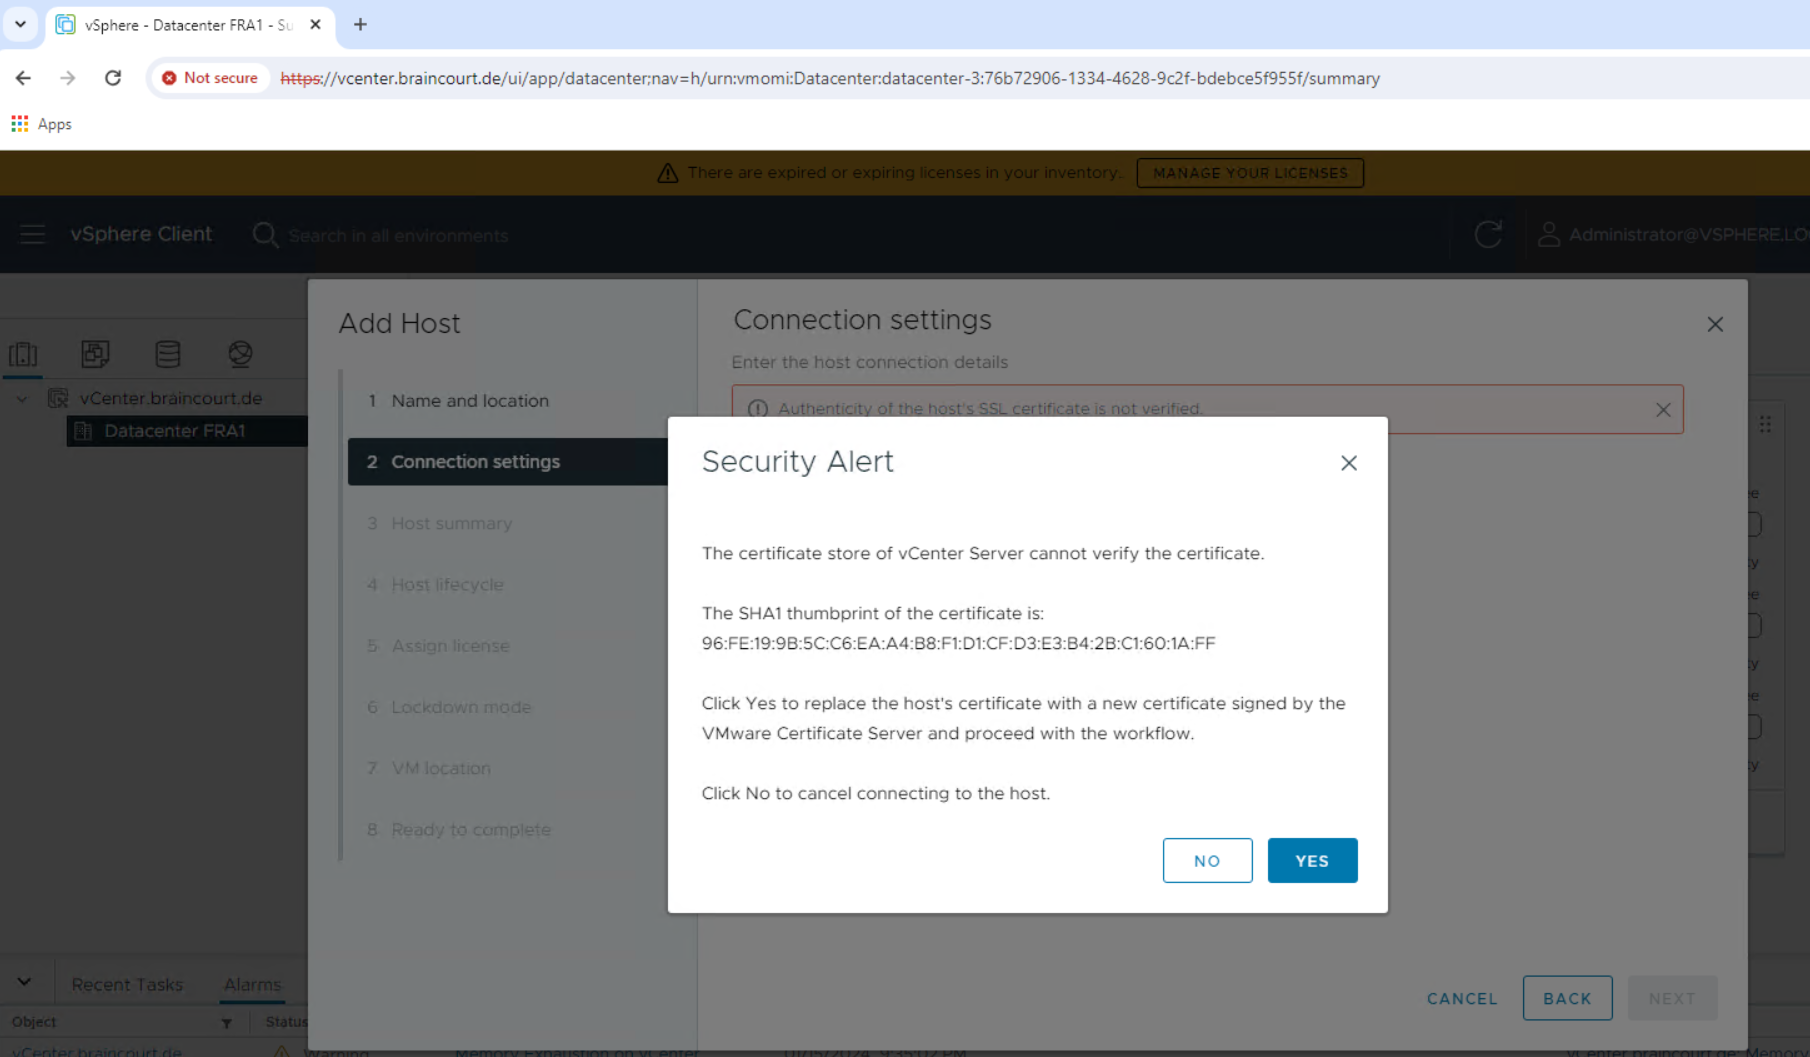
Click Yes to replace the host certificate.
The Host summary dialog displays. Review the settings and click Next to proceed.
Choose how to manage host lifecycle and click on Next.
You use vSphere Lifecycle Manager images to apply software and firmware updates to the ESXi hosts in a cluster. Using a single image to manage all hosts in a cluster ensures cluster-wide host image homogeneity.

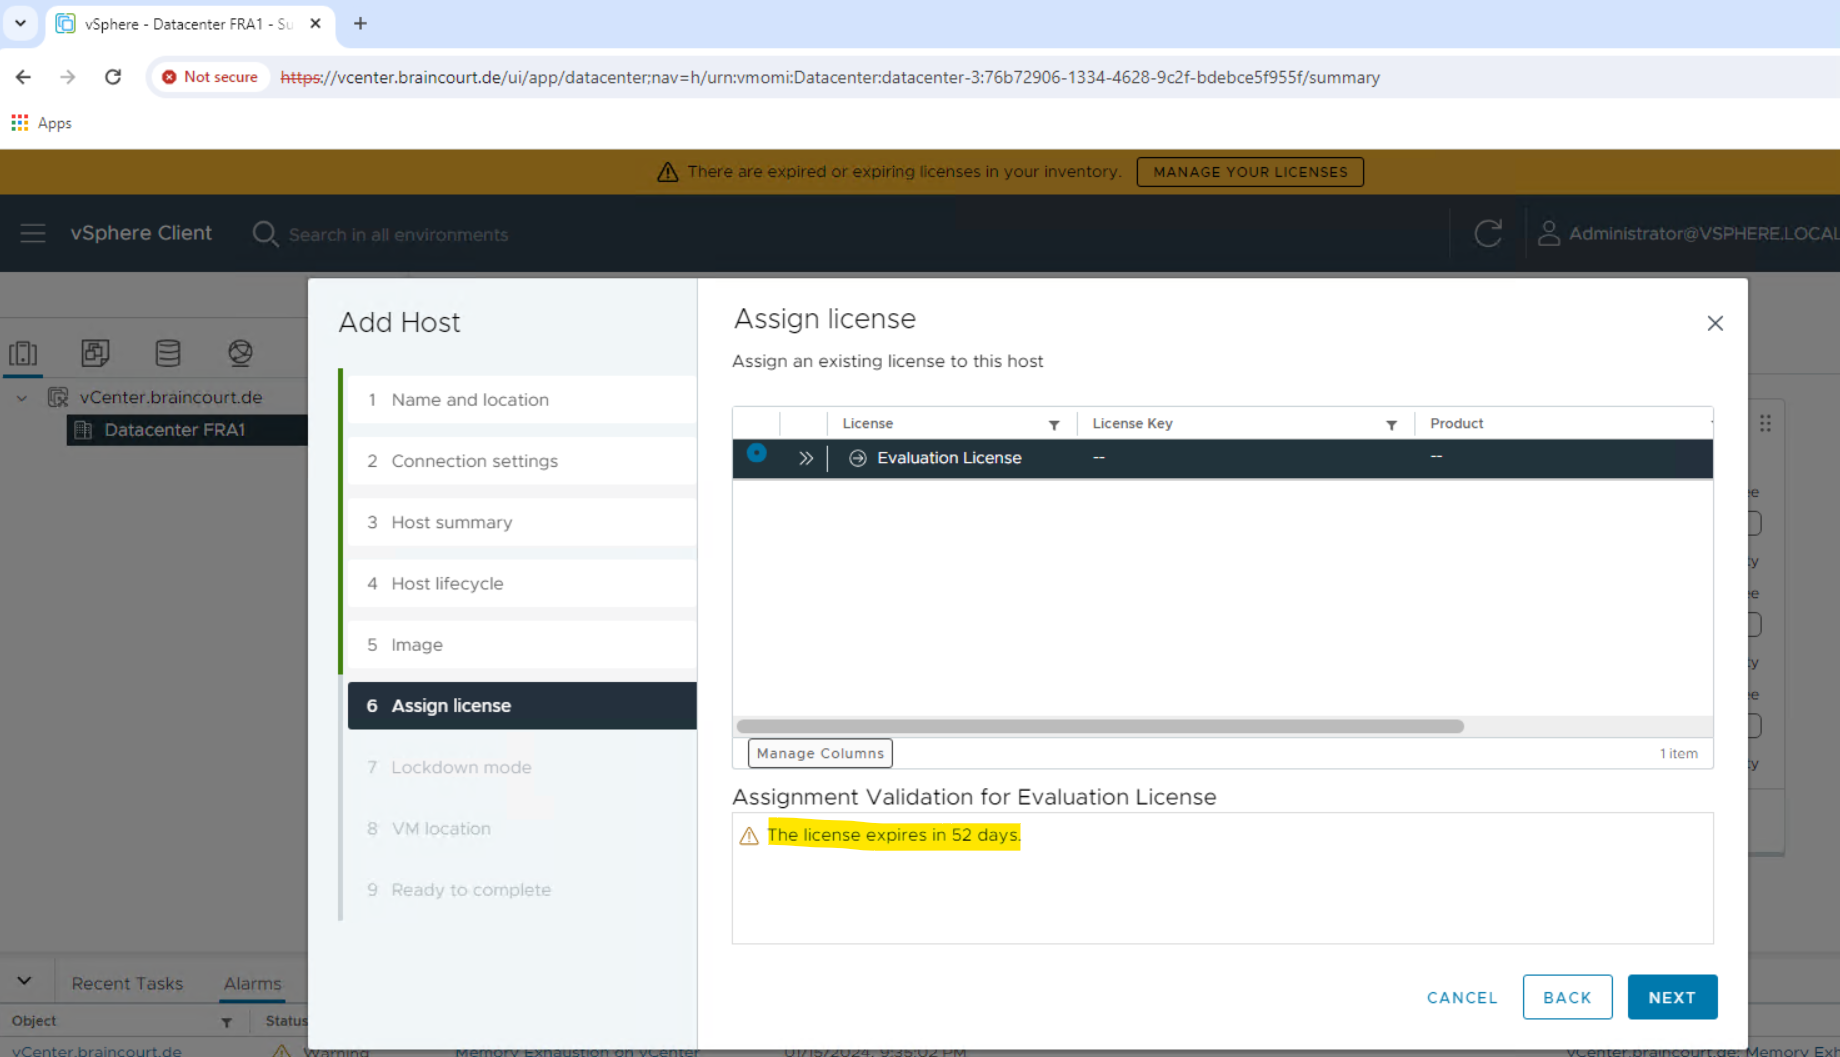
The Assign license dialog displays. Confirm the license selection and click Next.
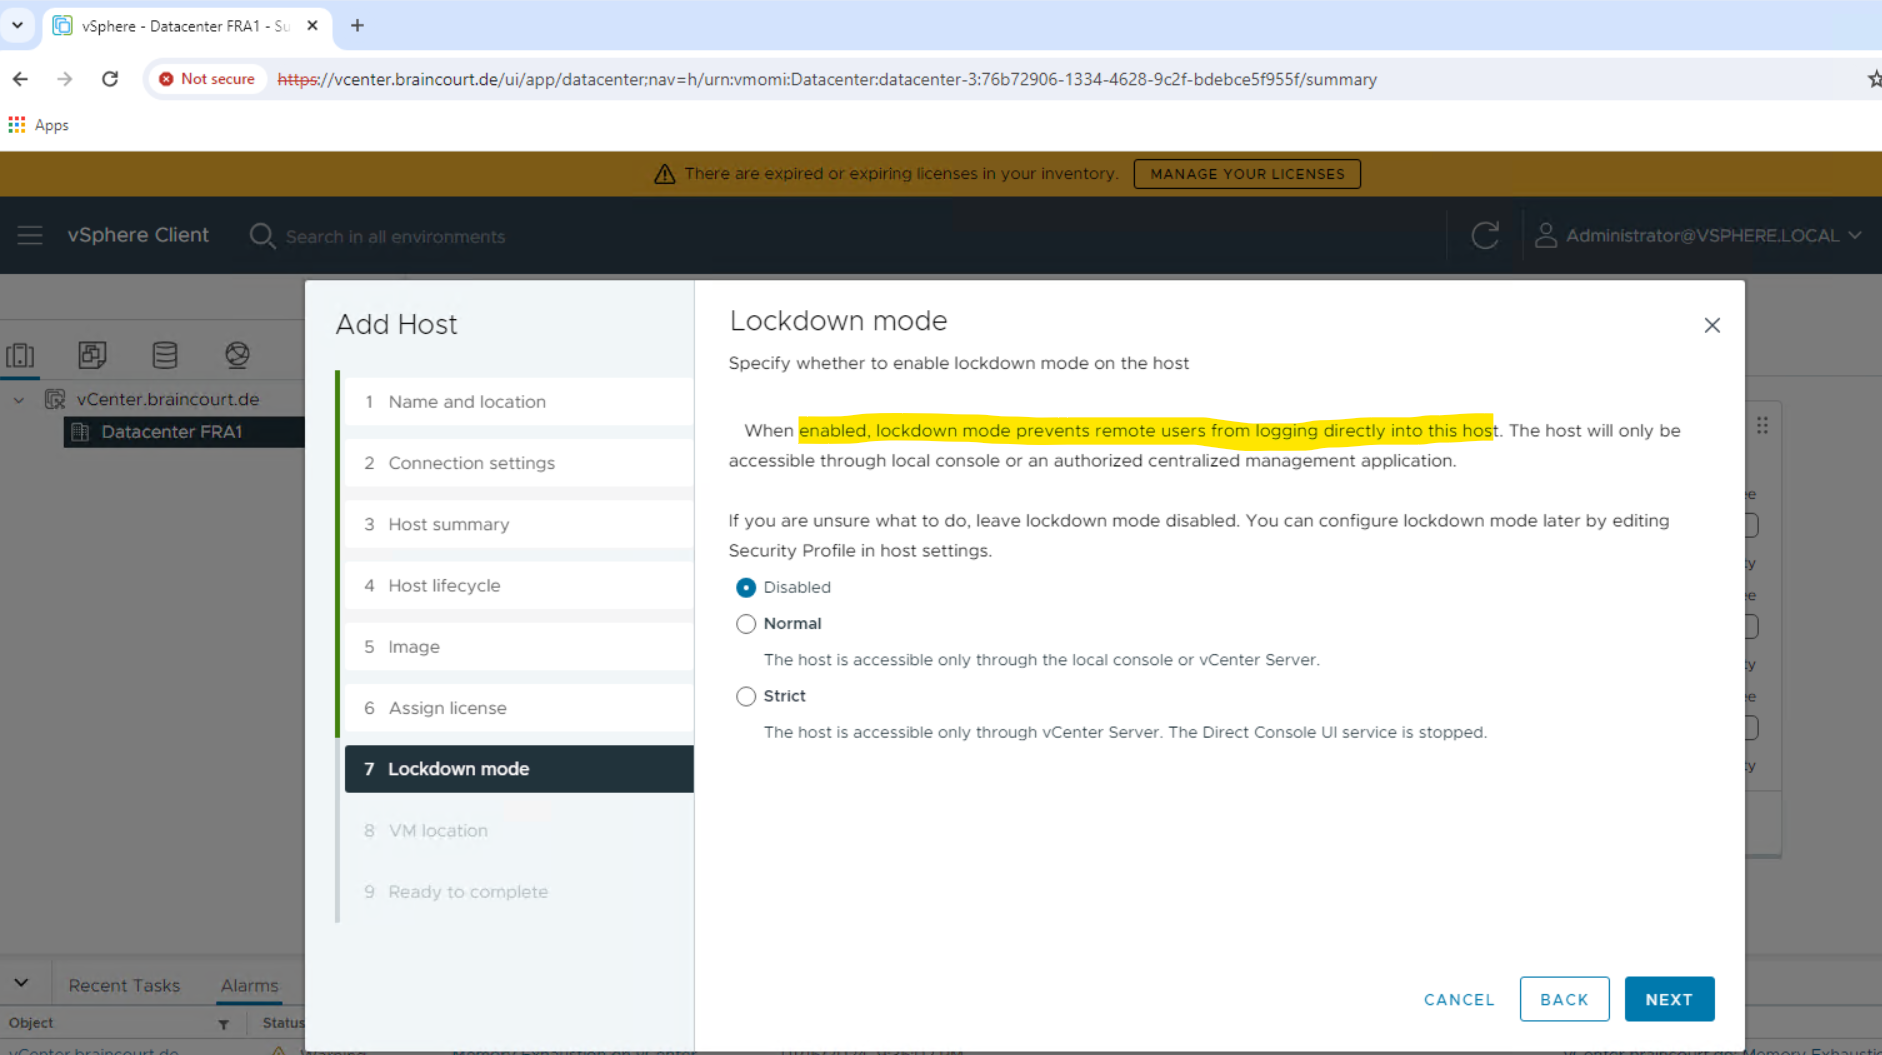
The Lockdown mode dialog displays. Accept the default setting (Disabled) and click Next.
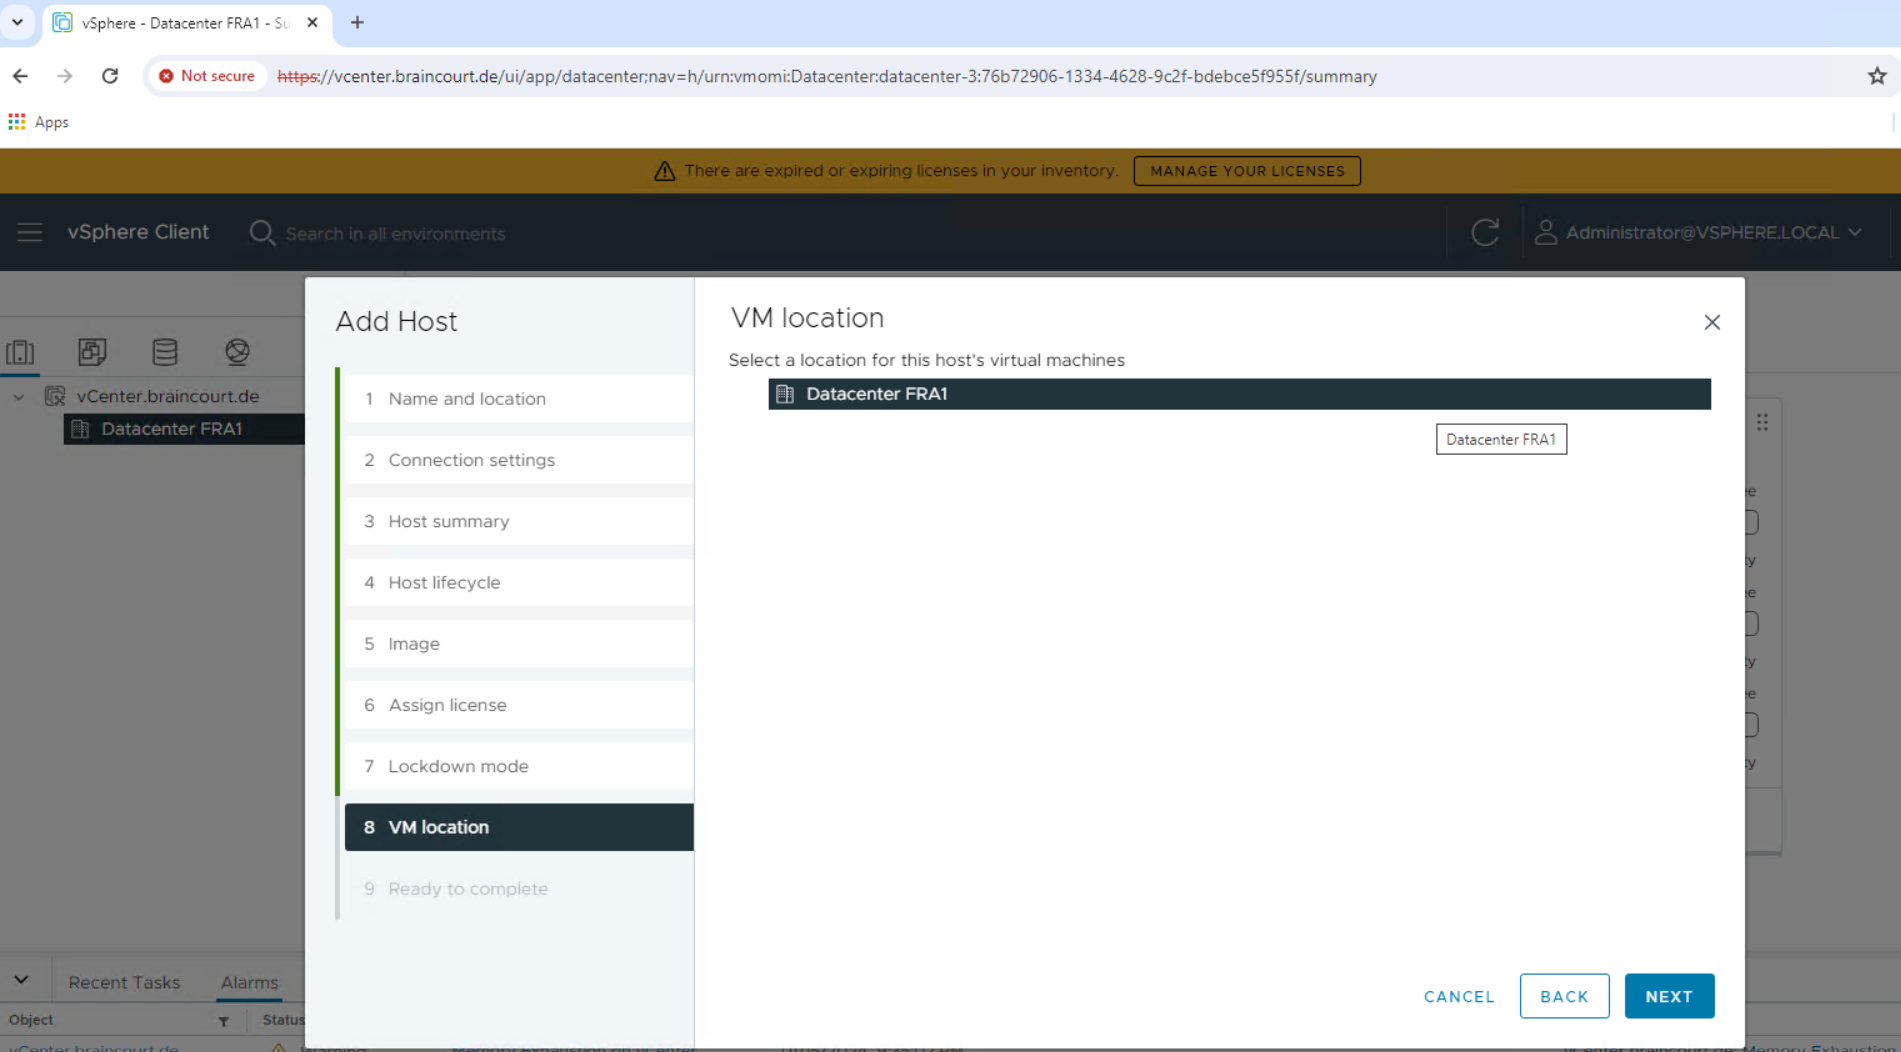
The VM location dialog displays. Select a cluster or accept the default option and click Next to continue.
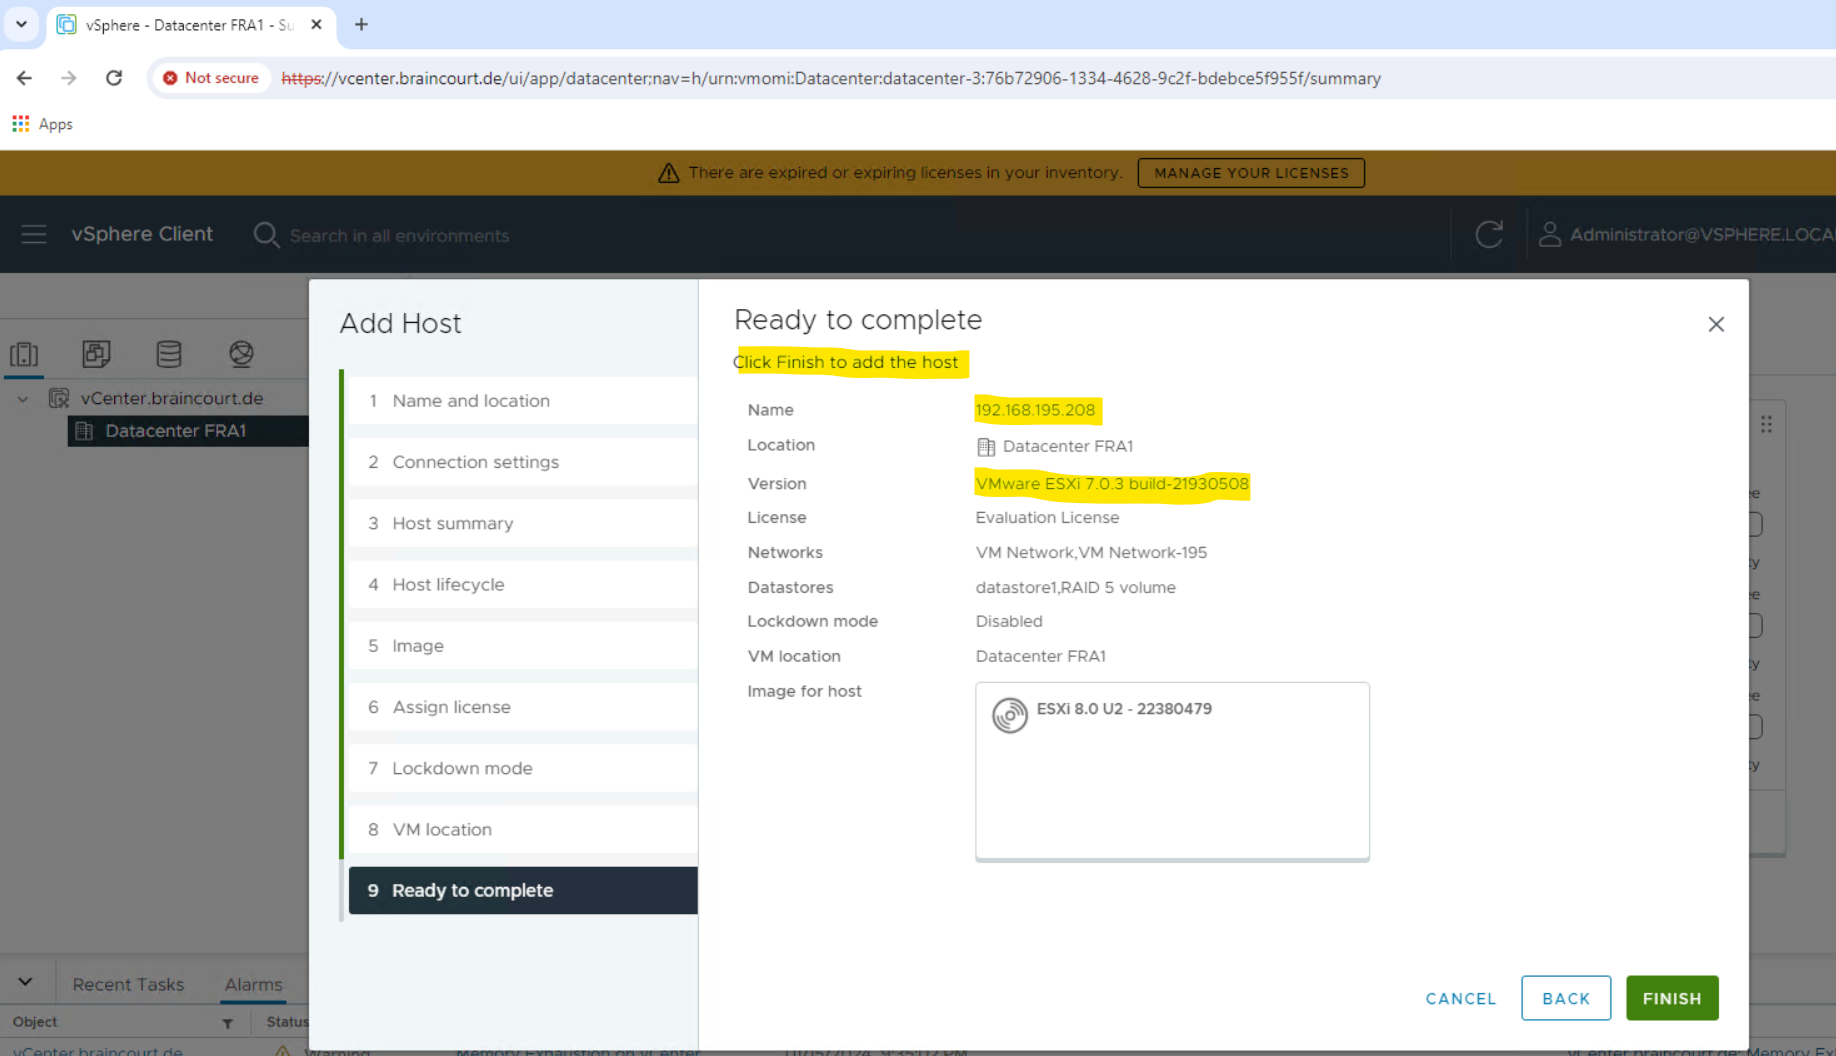
The Ready to Complete dialog displays. Click Finish to complete adding the new host.
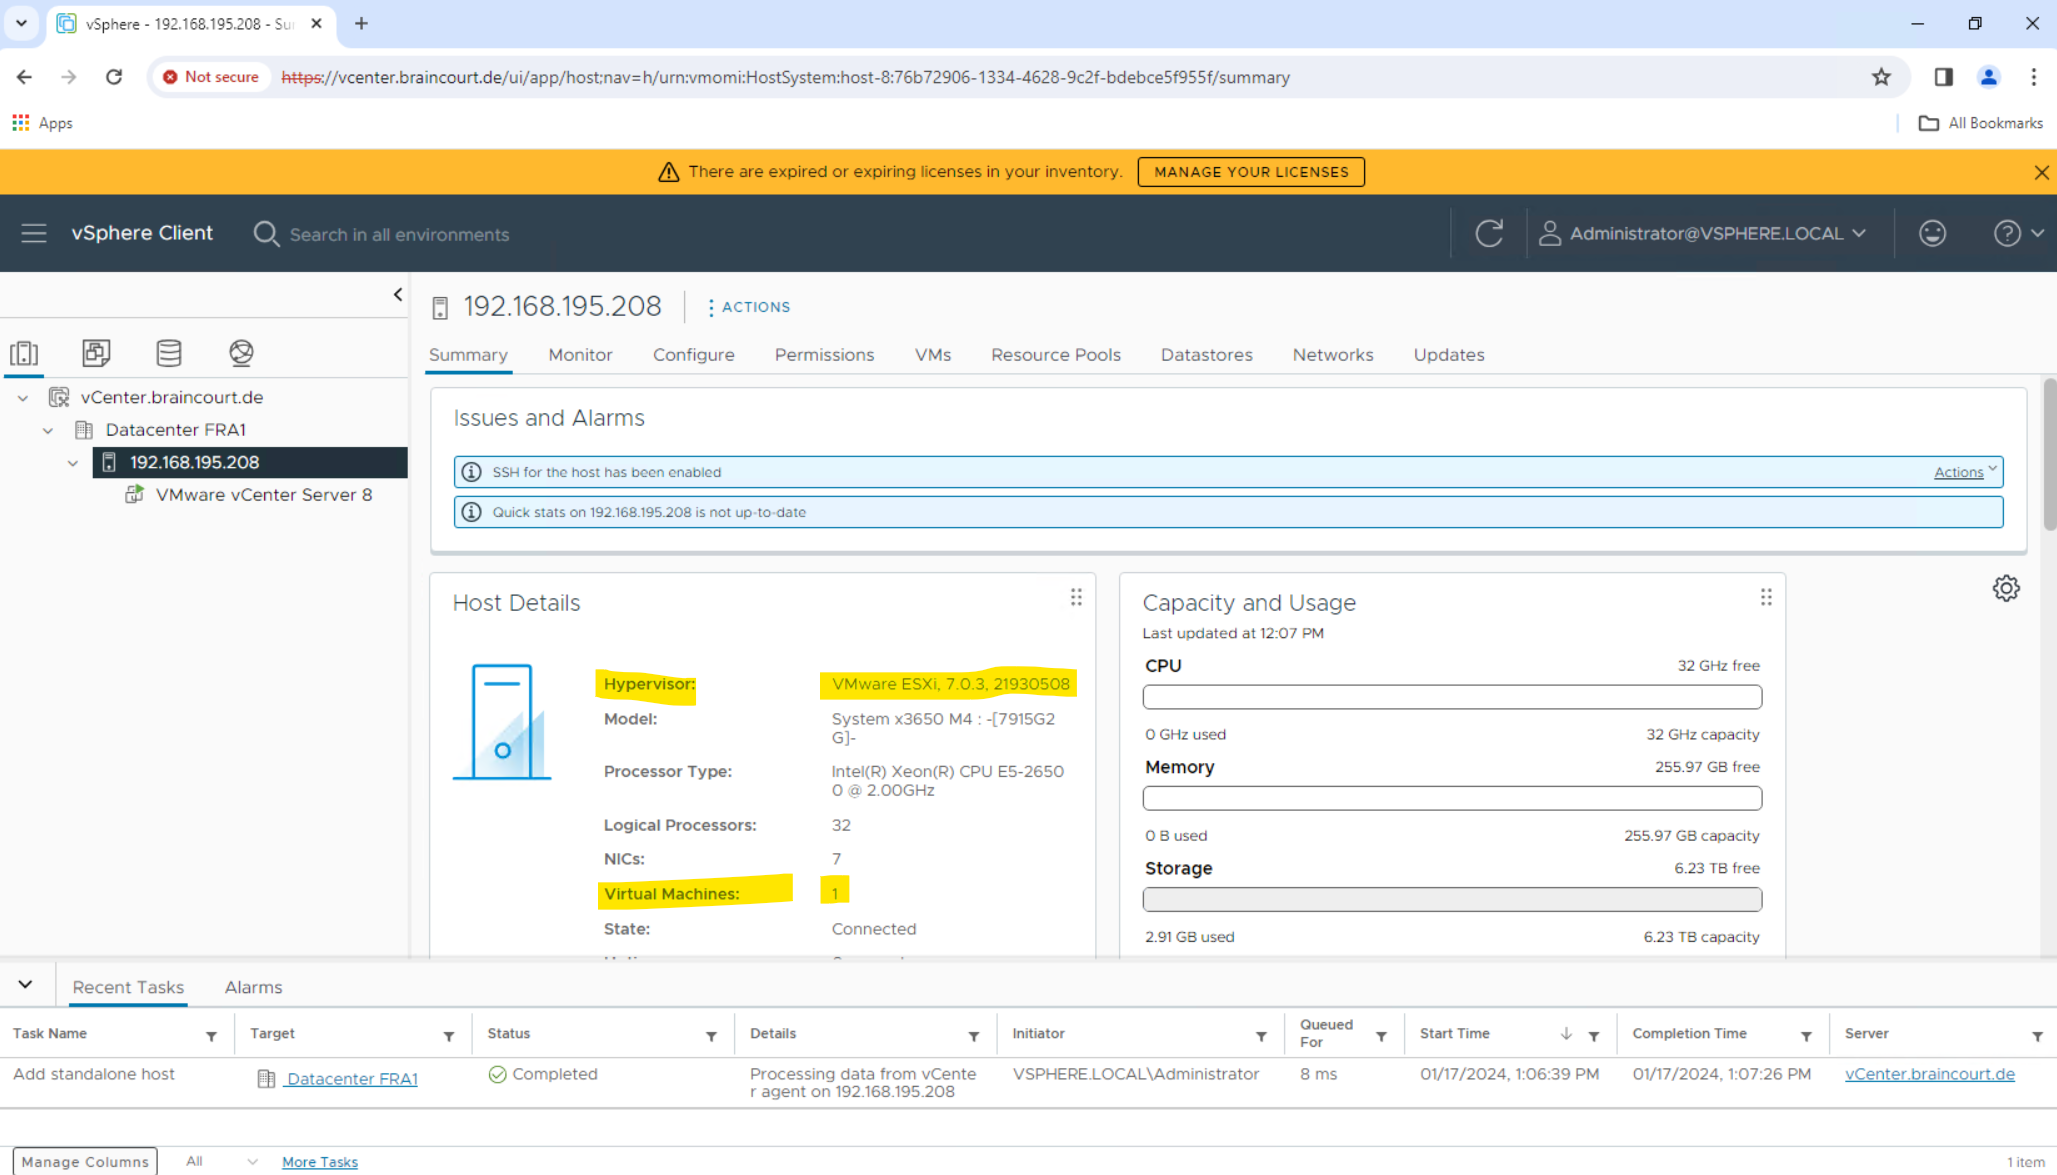
The new ESXi host is now visible in the left panel when you click the datacenter name.
So far just our deployed vCenter Server virtual machine (appliance) is running on this ESXi host.
Setting the NTP Service on the Host
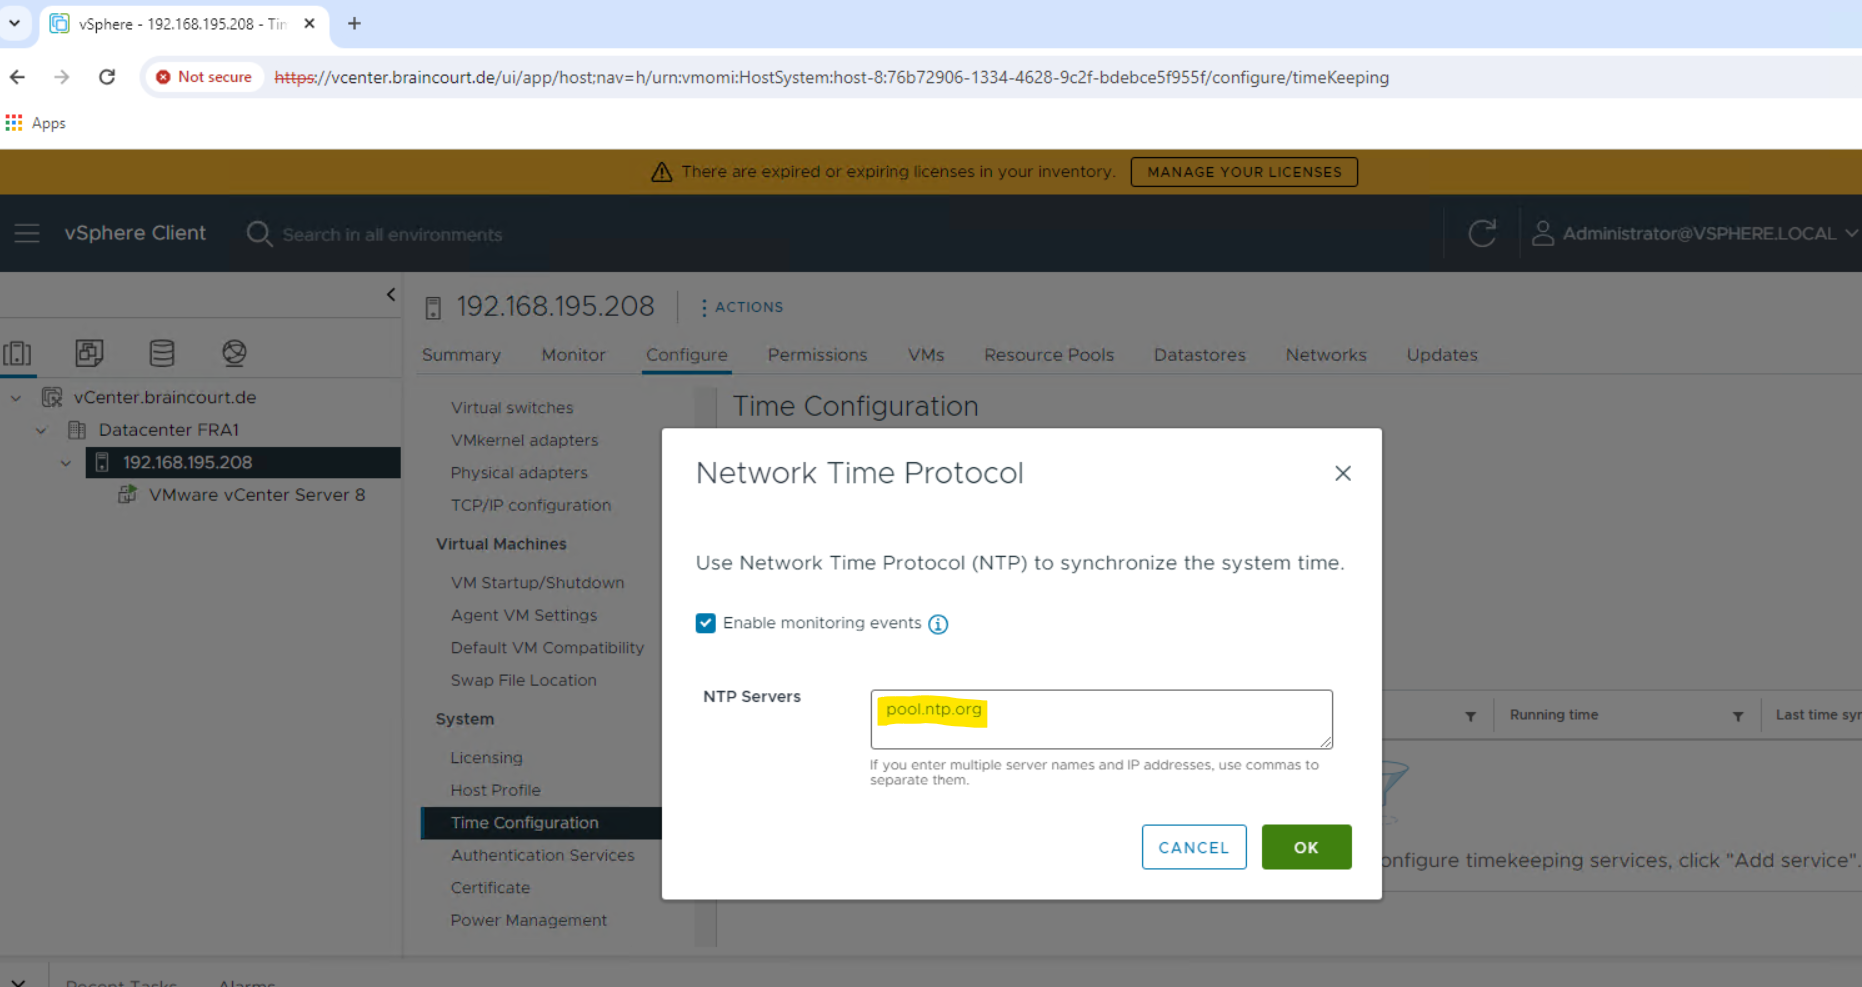
Click a host object in the menu on the left, click Configure > System > Time Configuration > ADD Service -> Network Time Protocol.
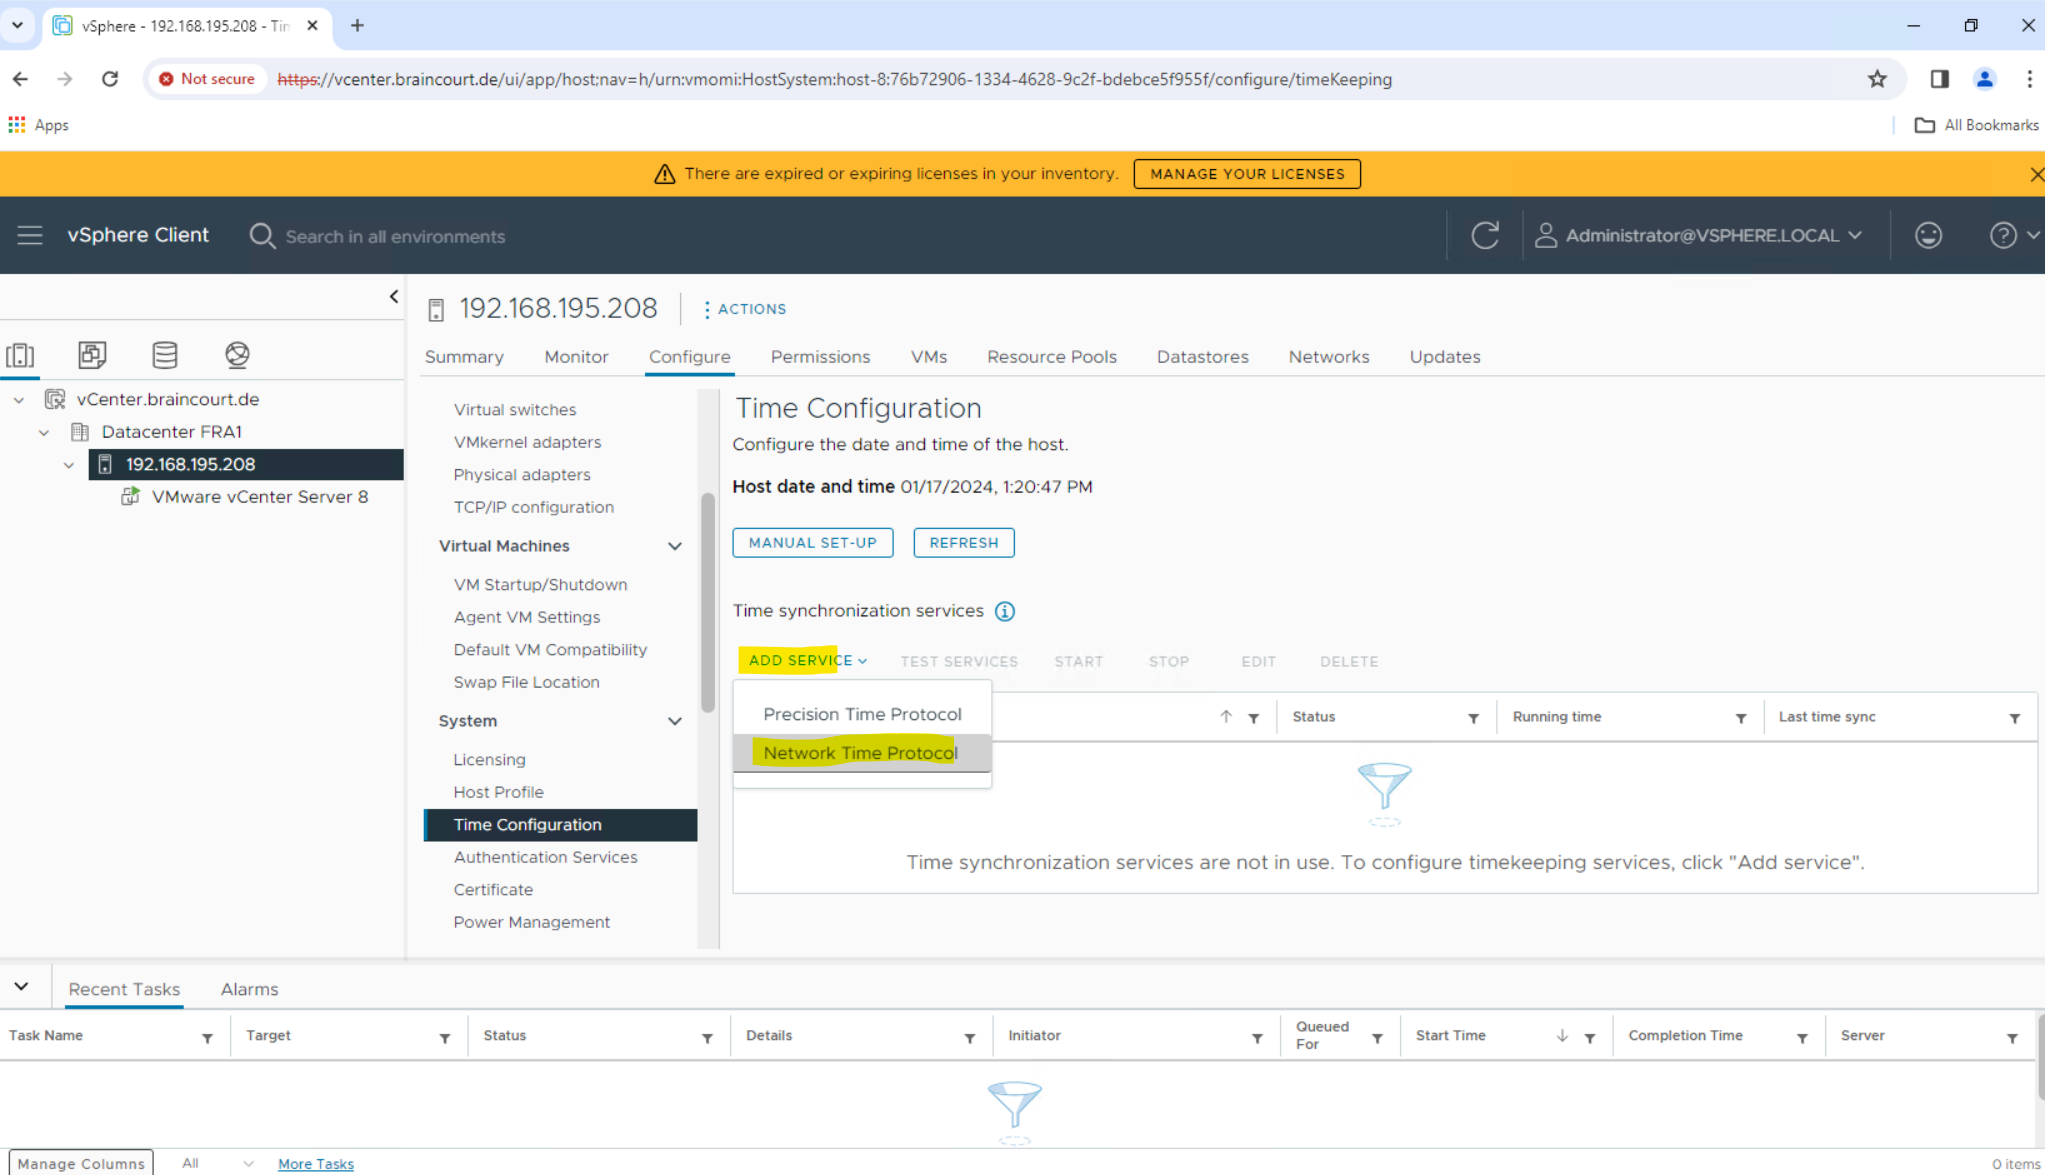
Check the Enable box and enter a valid time server and click OK
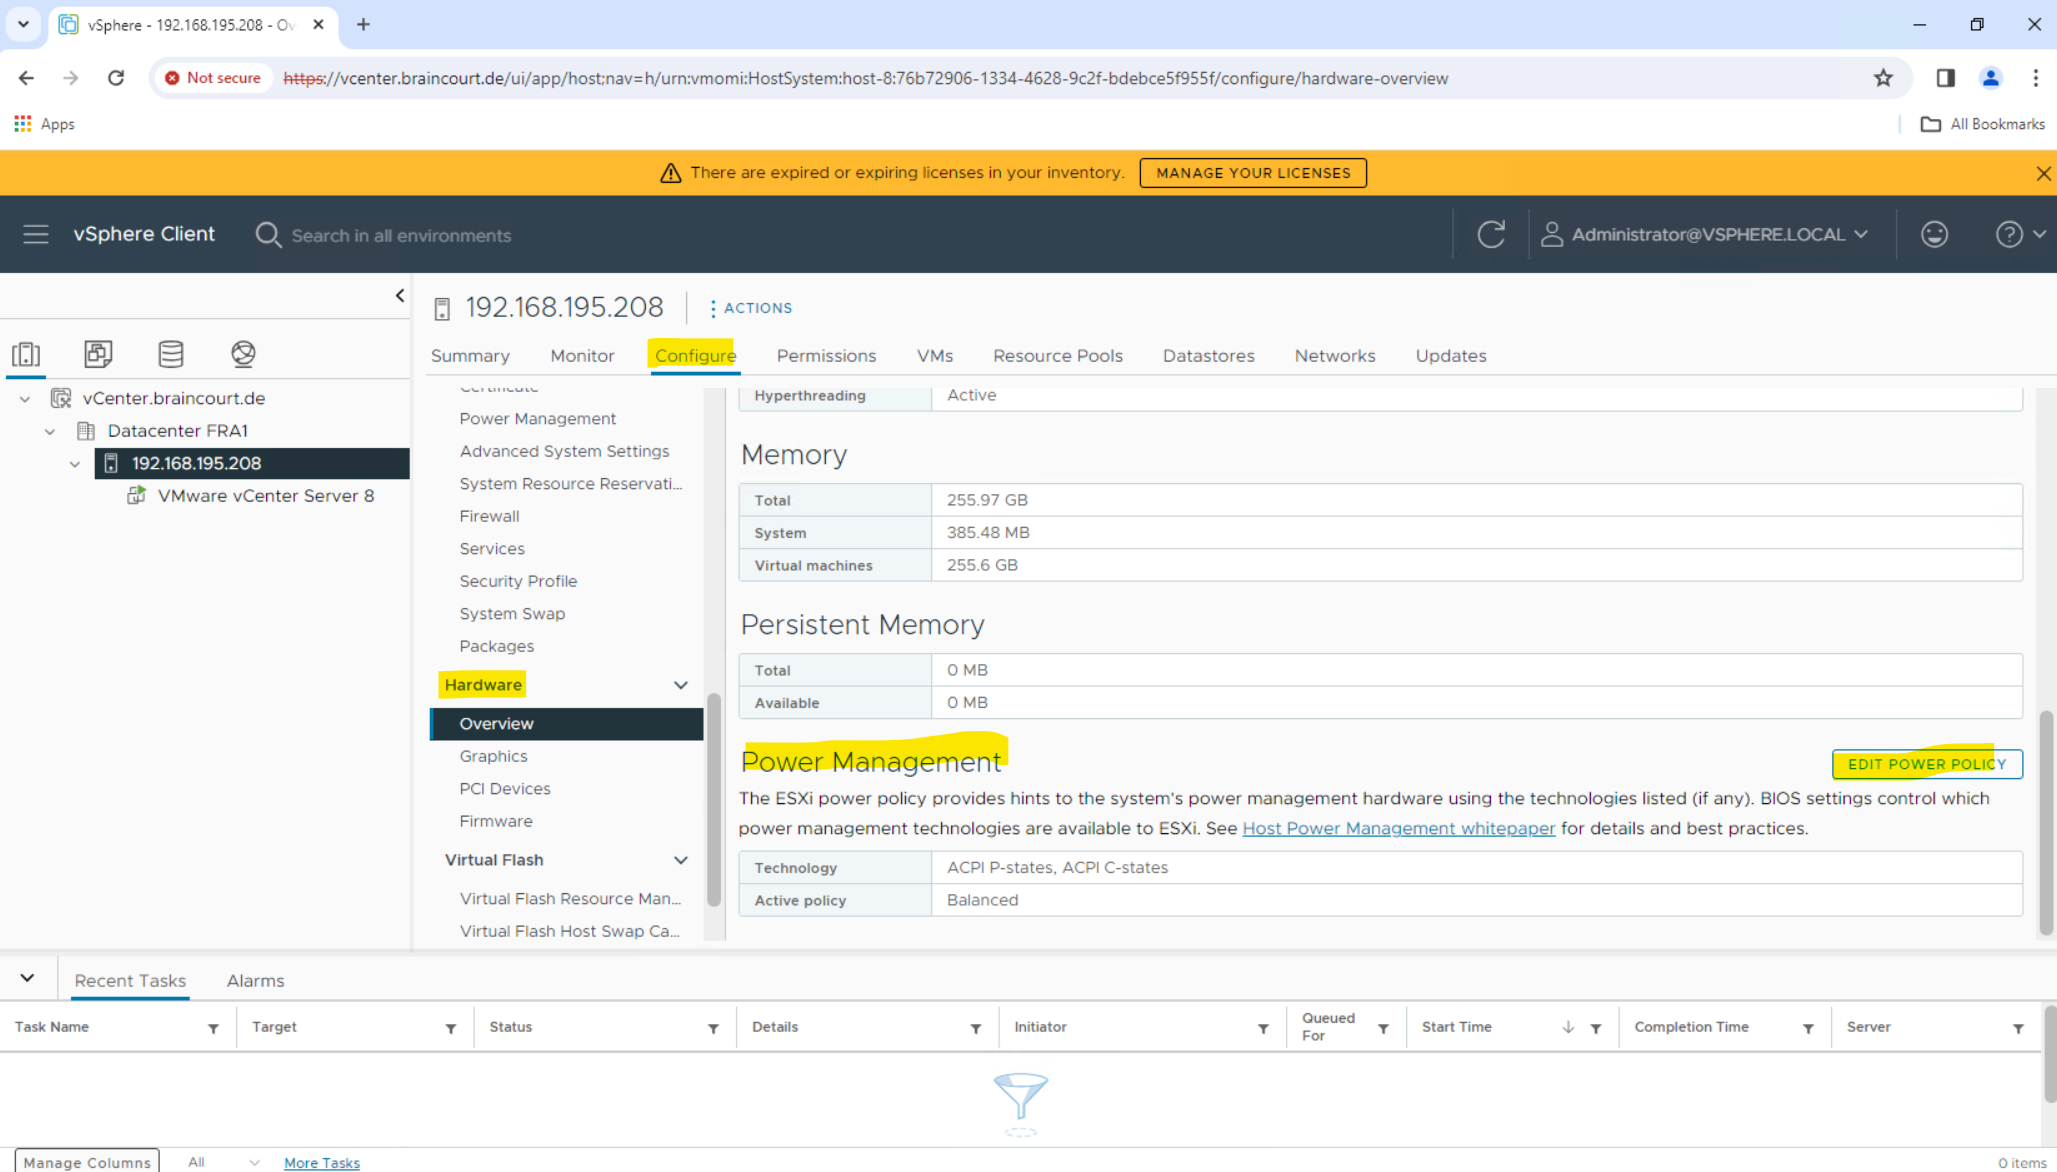
Setting the CPU Power Management Policy
Click a host object in the menu on the left, click Configure > Hardware > Overview > Power Management > Edit Power POLICY.
Host Power Management in VMware vSphere 7.0
https://www.vmware.com/content/dam/digitalmarketing/vmware/en/pdf/techpaper/performance/hpm-vsphere7-perf.pdf
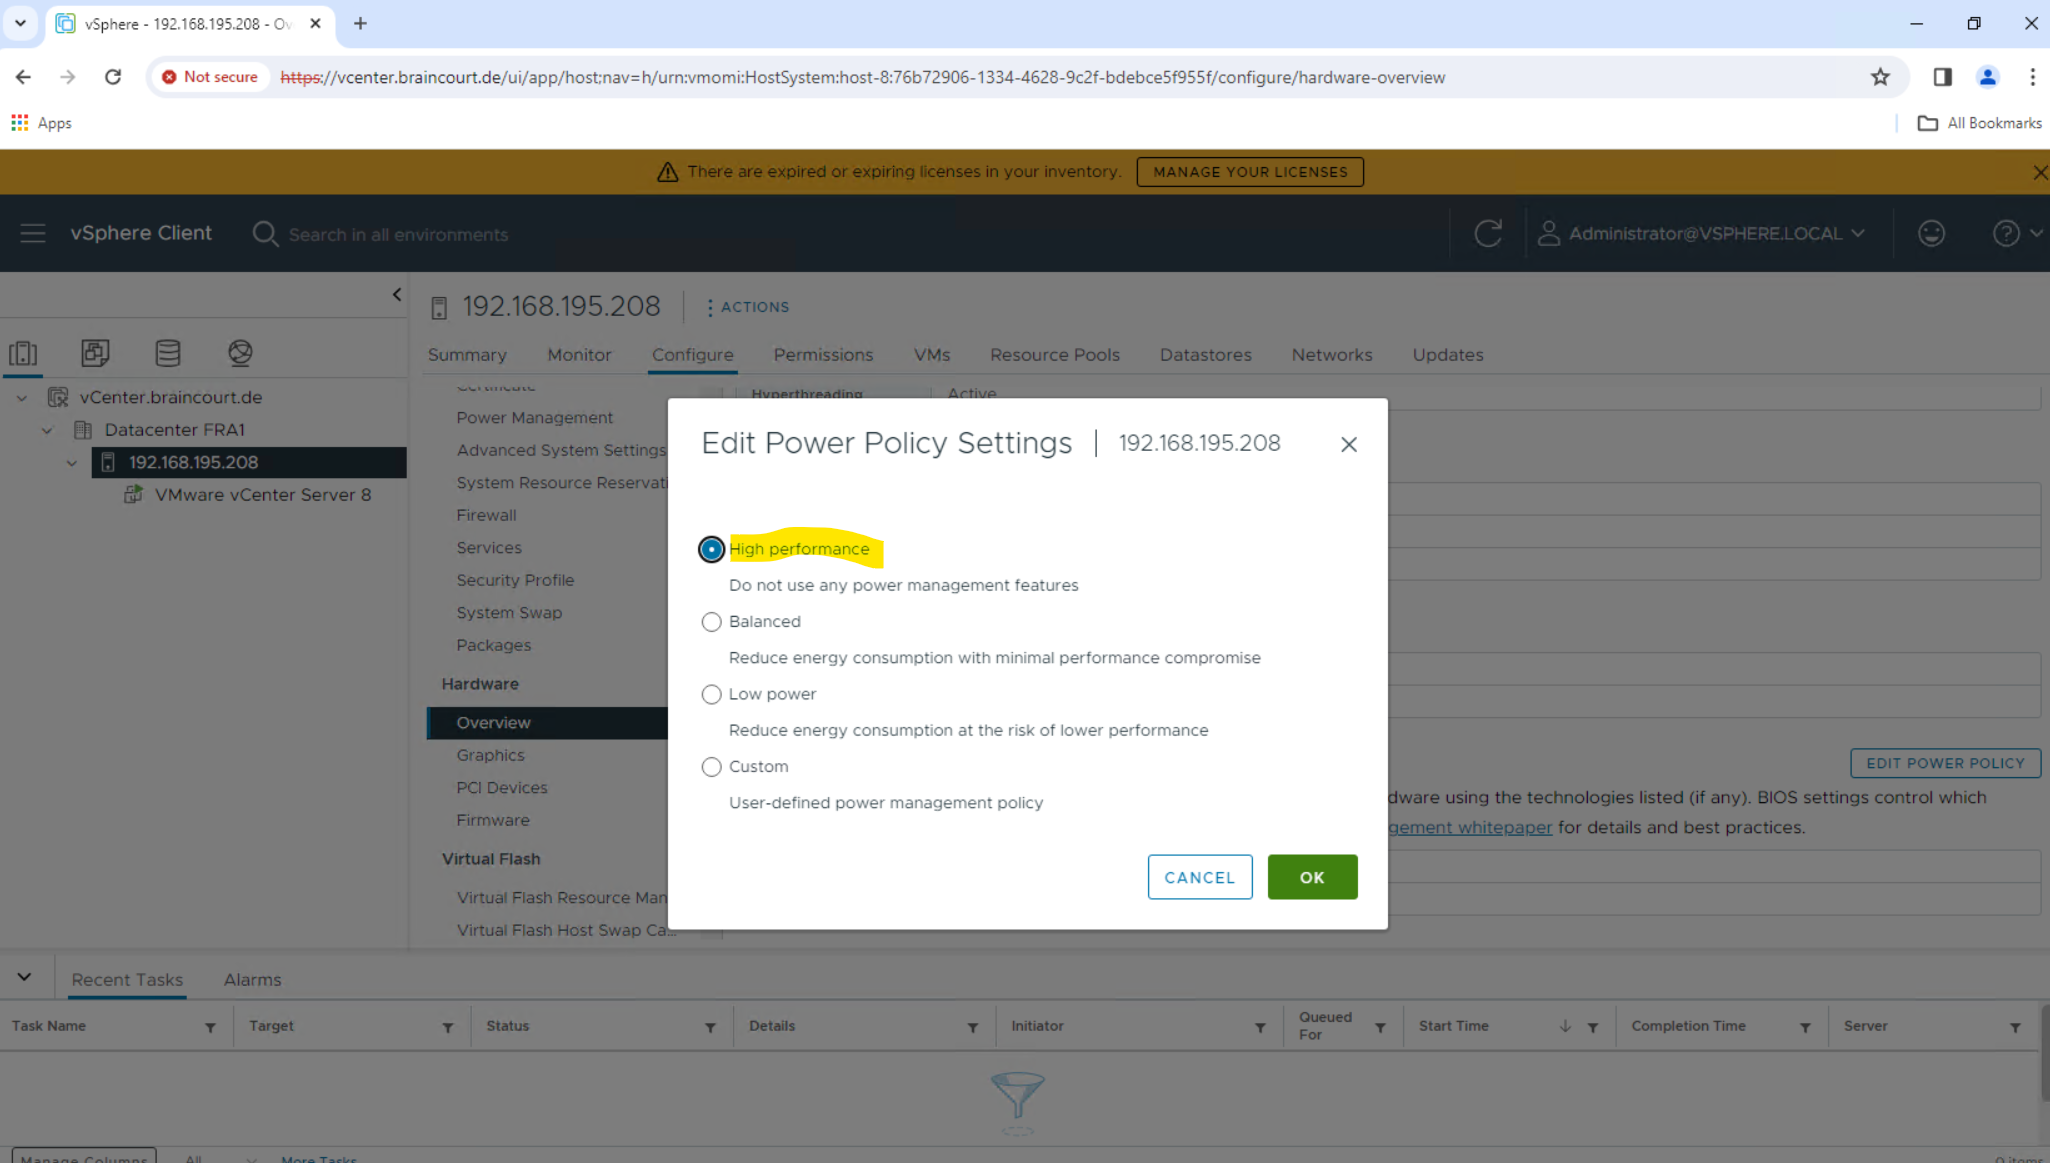
Select the High performance power management policy and click OK.
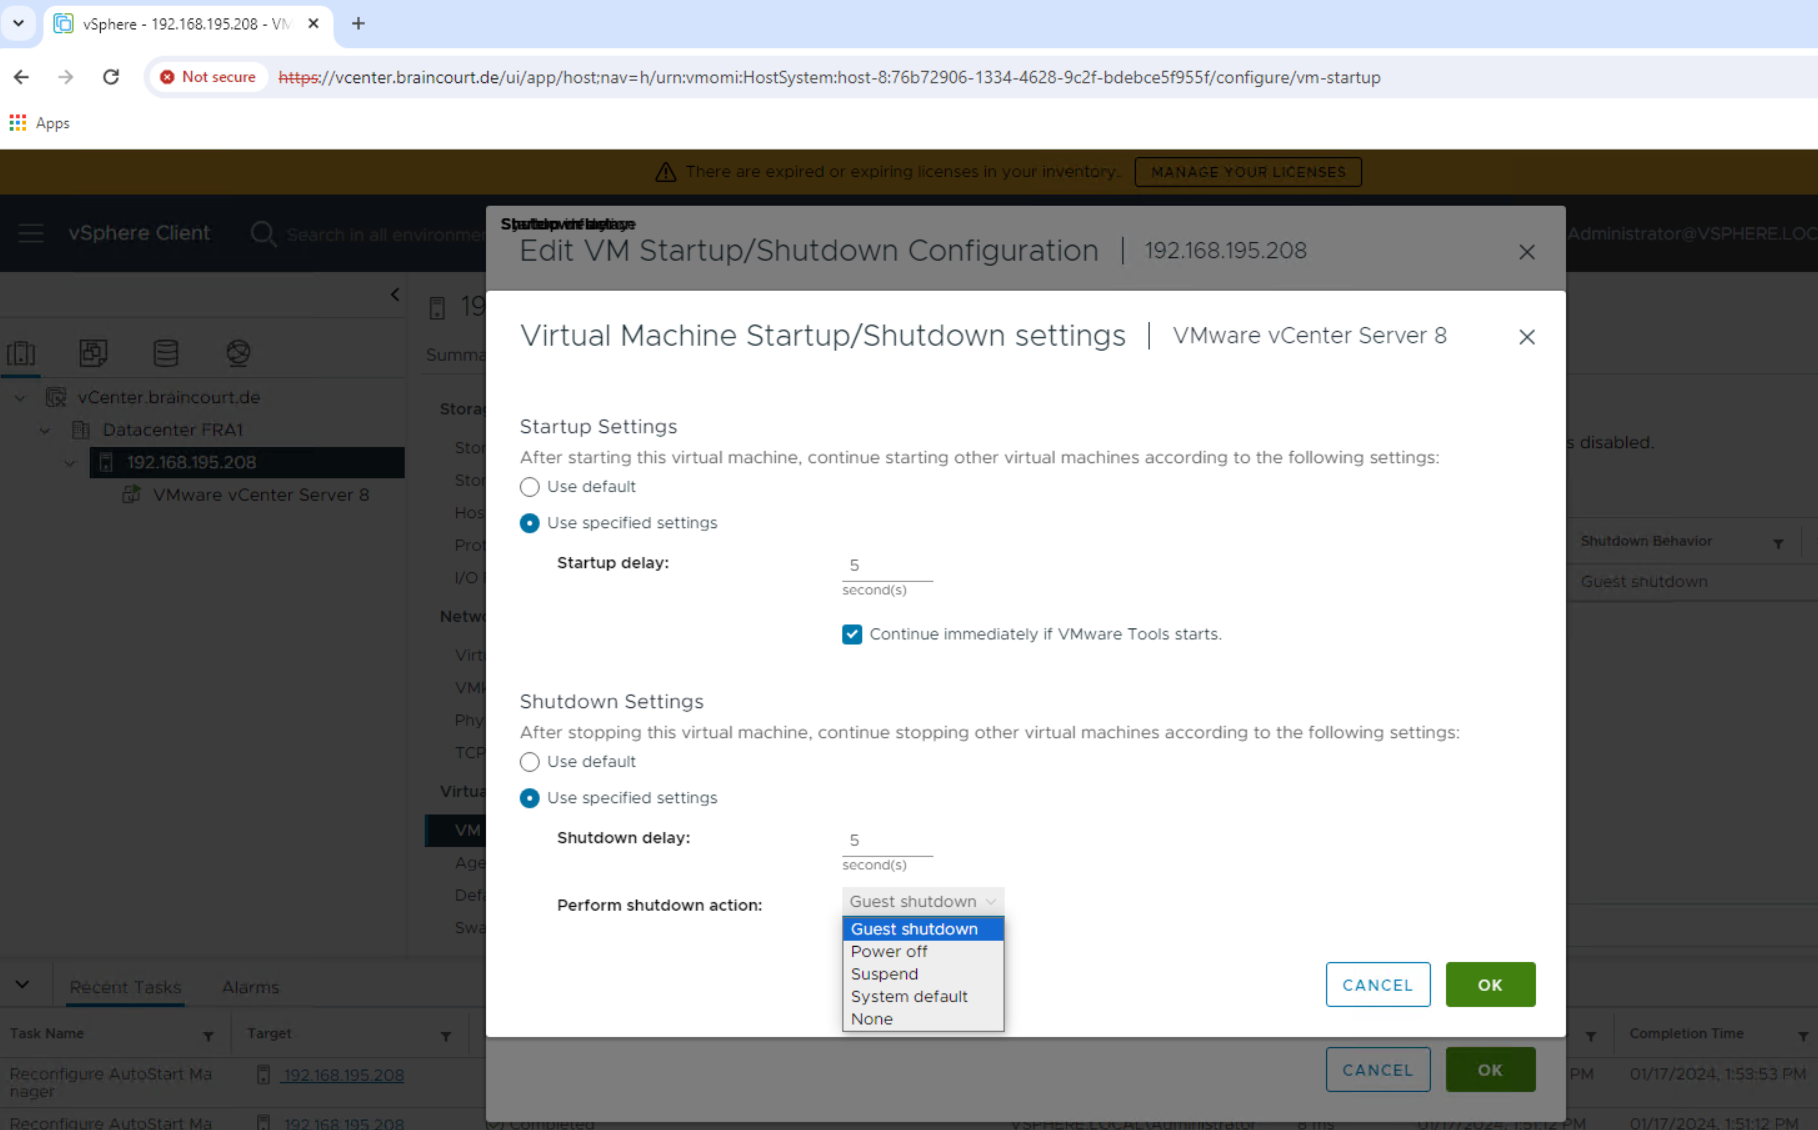
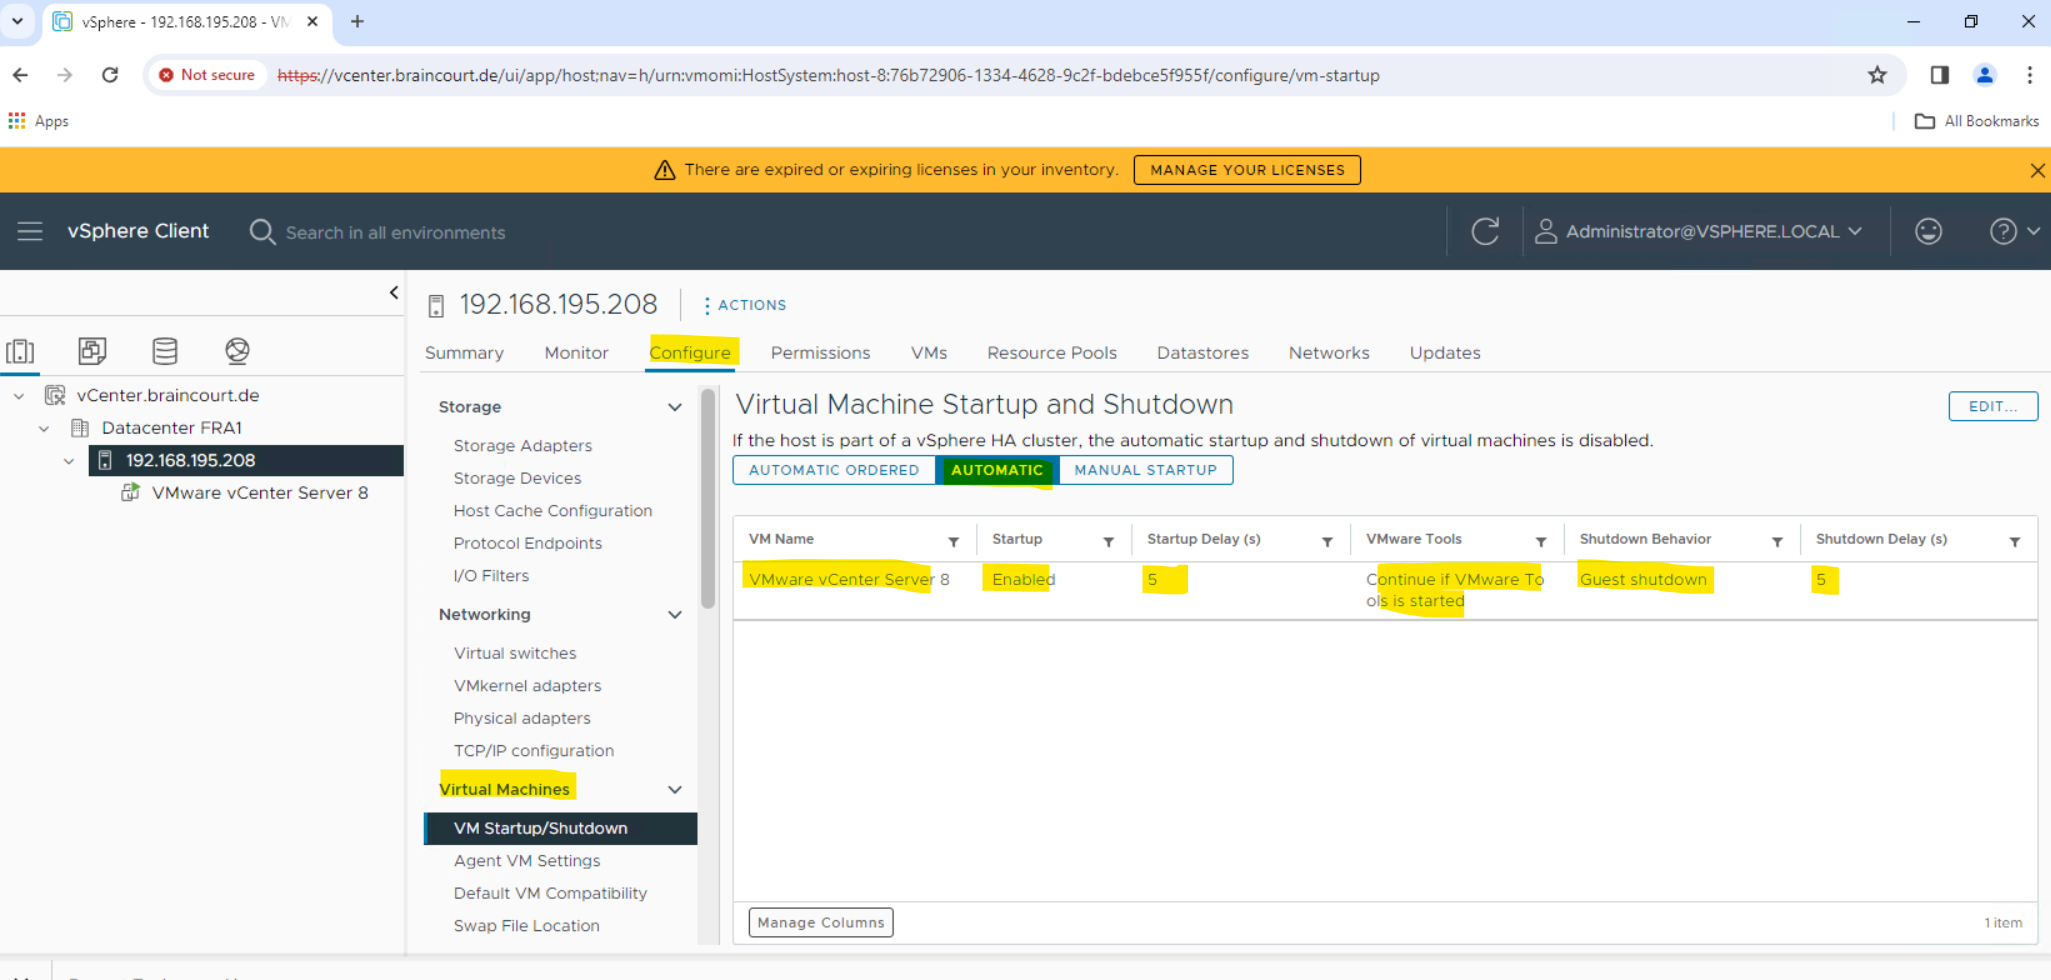
Setting a vCenter Appliance to Auto-Start
In the vSphere Client, select the host then select Configure > Virtual Machines > VM Startup/Shutdown. Click the Edit button.
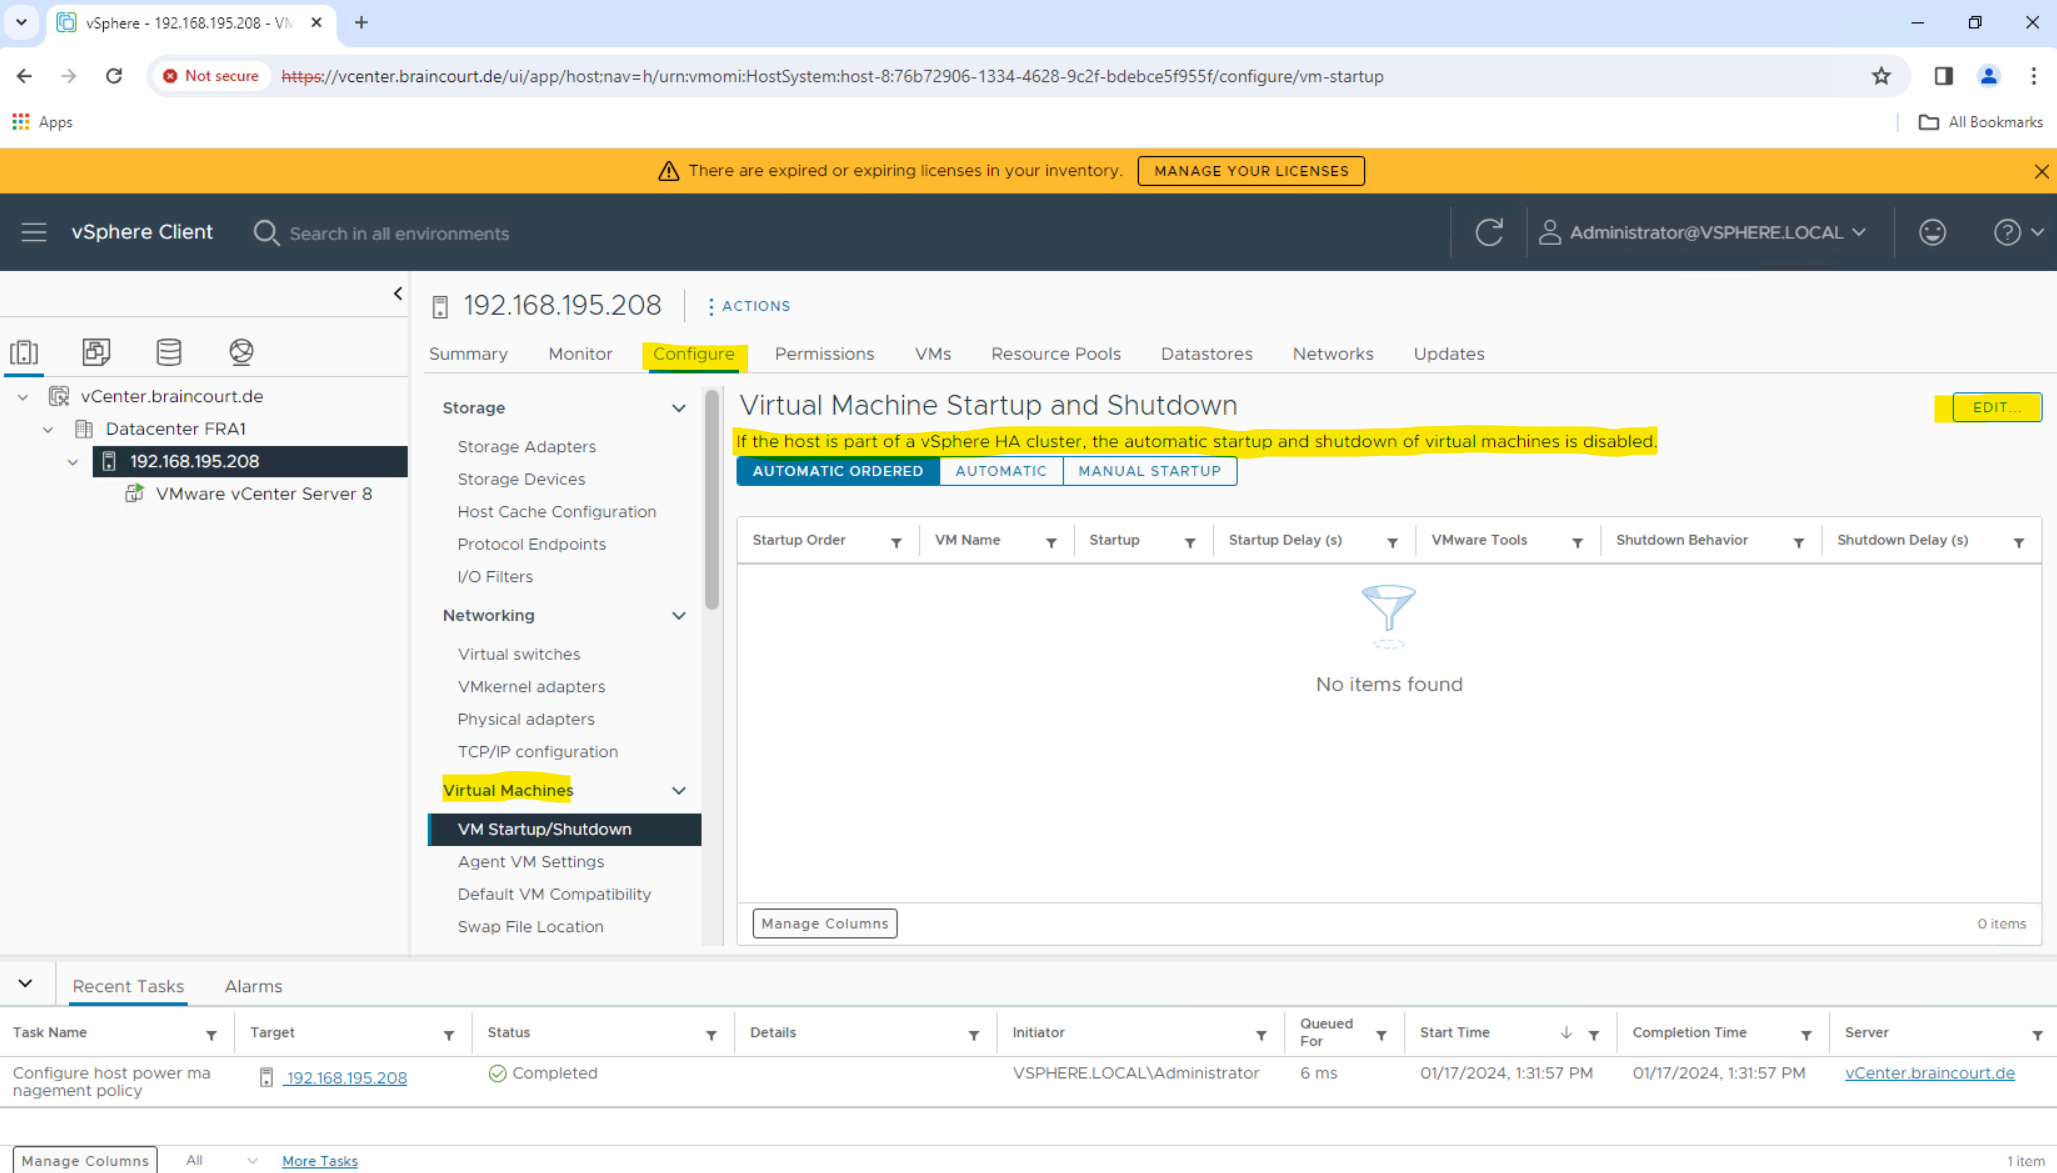
The Edit VM Startup and Shutdown Configuration window displays. The vCenter Server is so far shown up under MANUAL STARTUP. Here select the vCenter Server and then click on MOVE TO button to move that virtual machine up to the Automatic section of the appliance table.
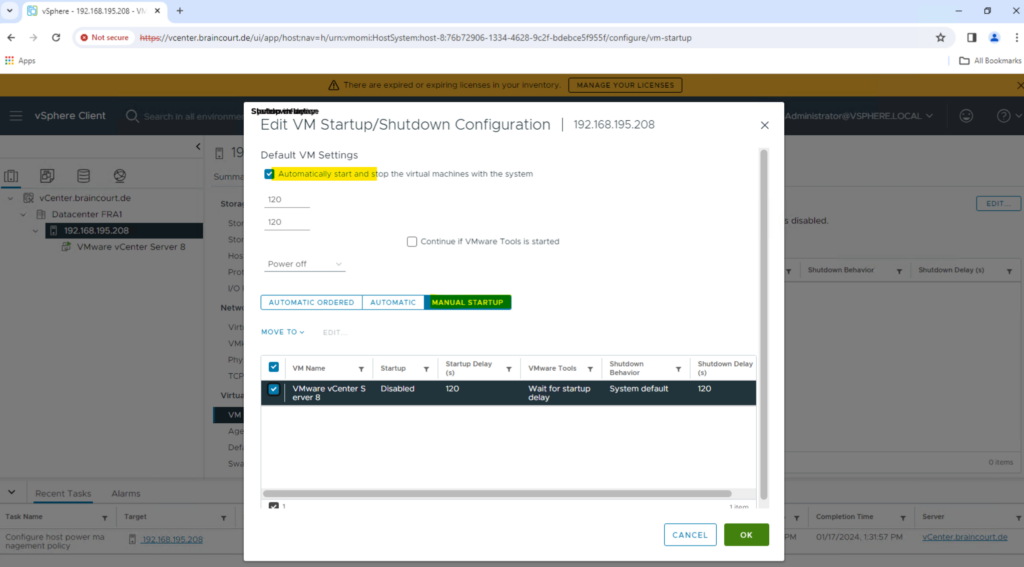
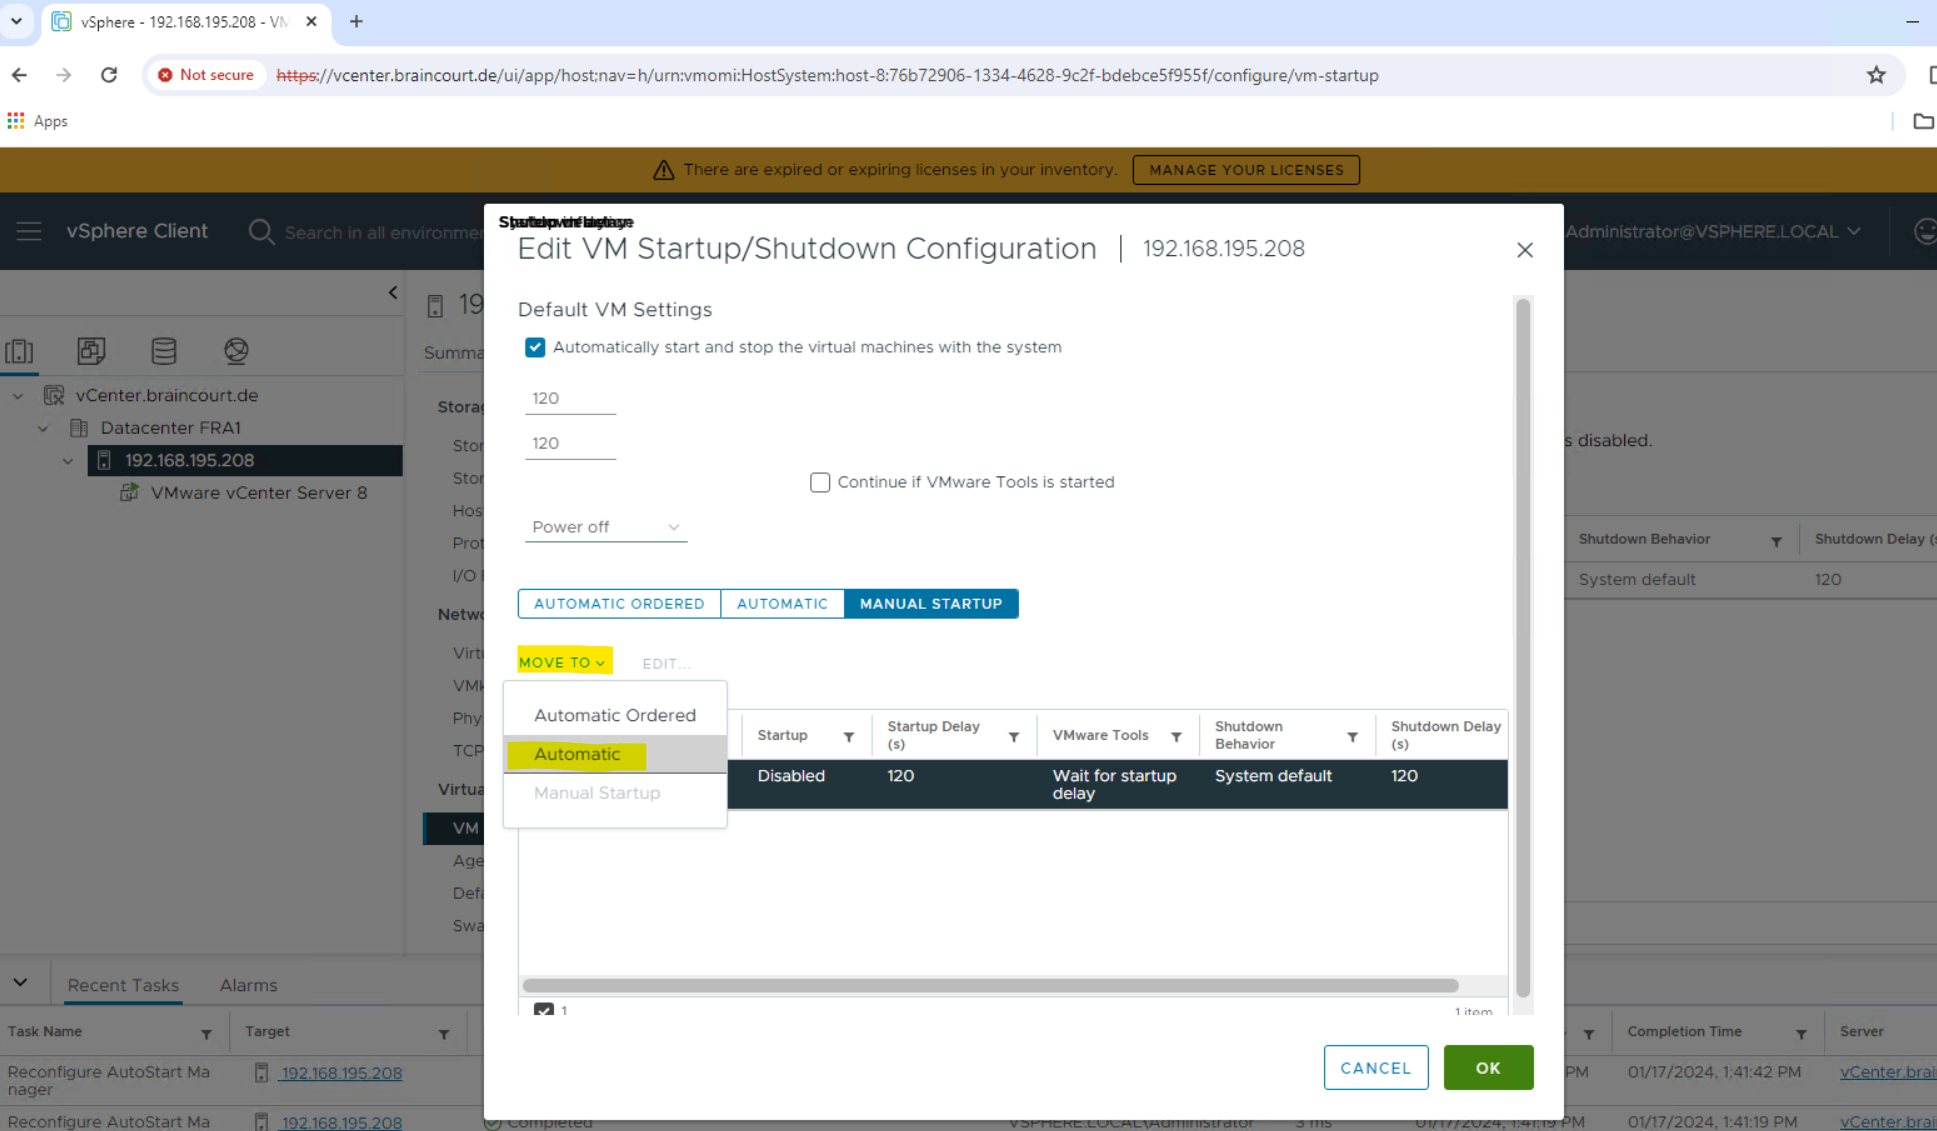
Select and set the following options:
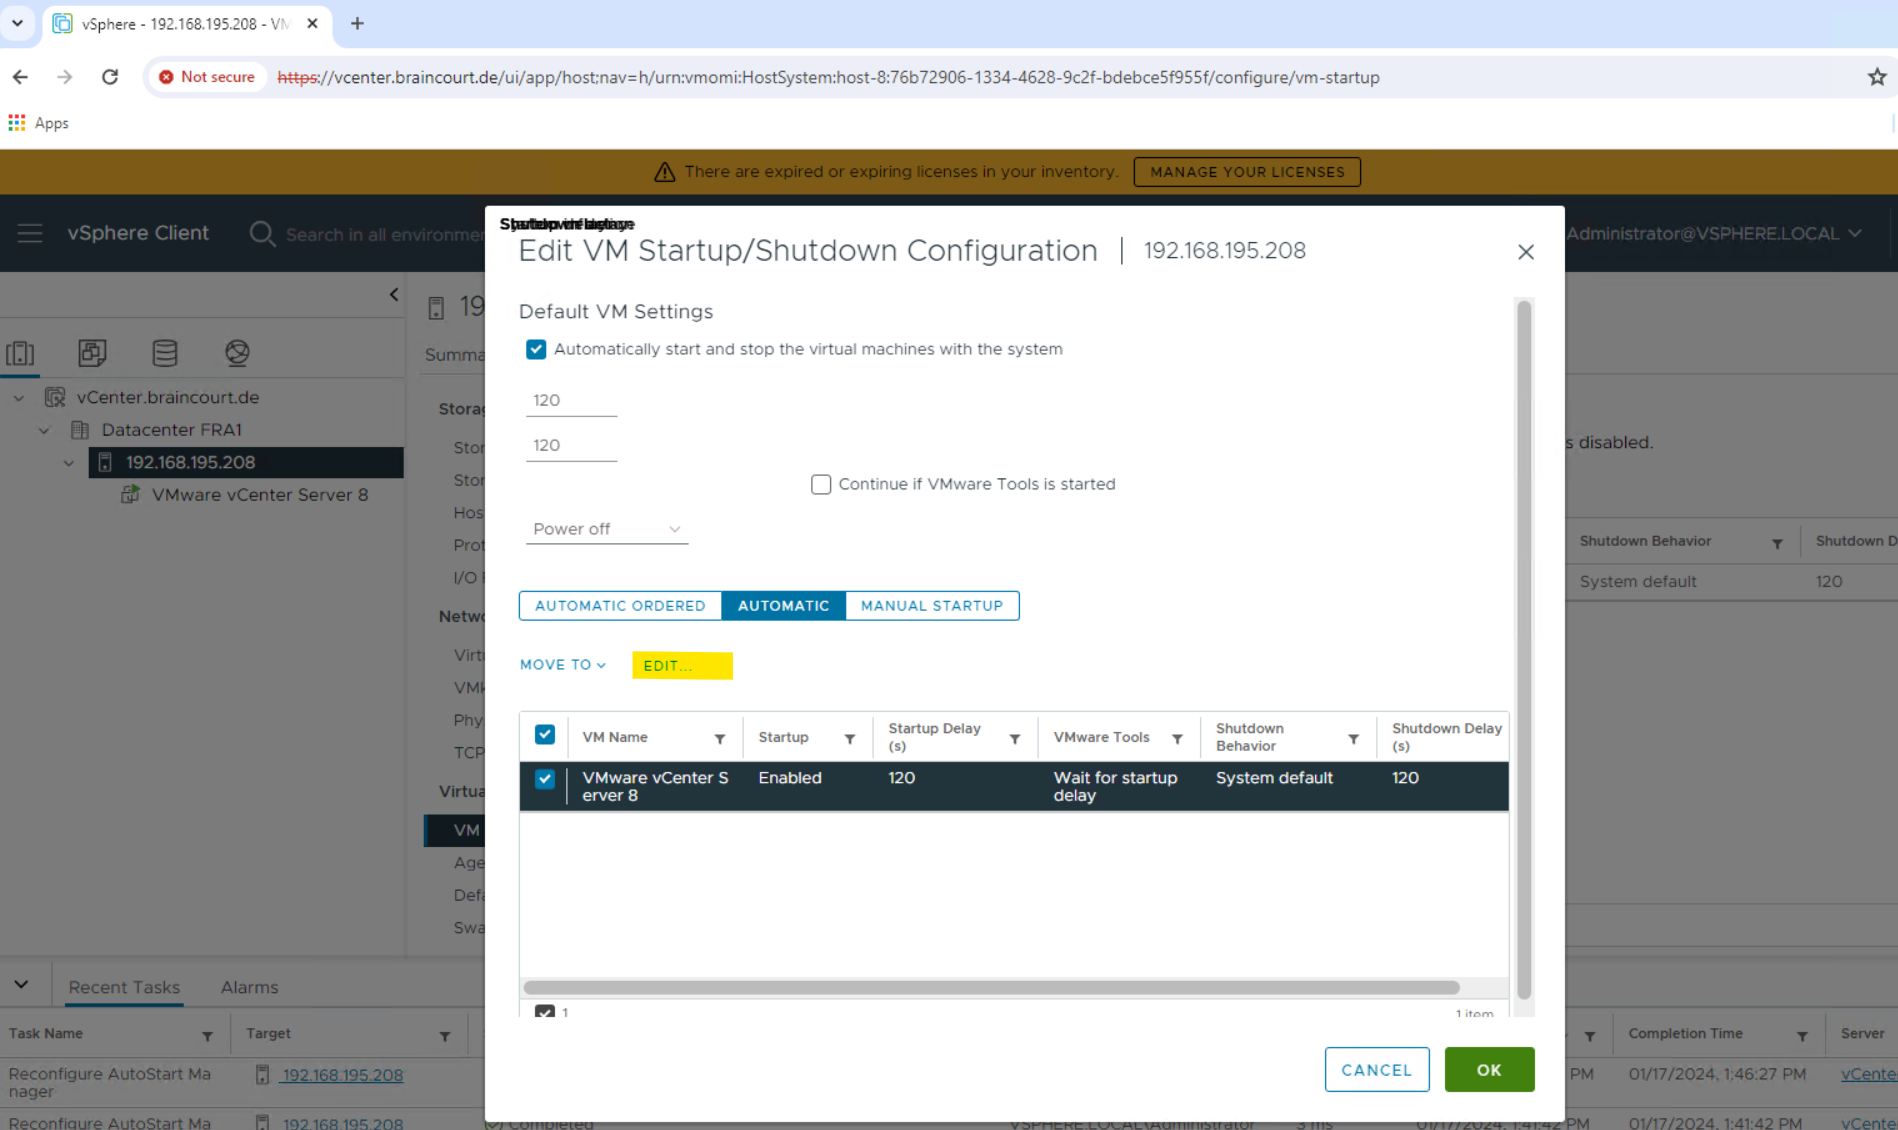
Click Ok to apply the configuration settings.
Mounting an NFS Data Store on an ESXi Host
An NFS client built into ESXi uses the Network File System (NFS) protocol over TCP/IP to access a designated NFS volume that is located on a NAS server. The ESXi host can mount the volume and use it for its storage needs. vSphere supports versions 3 and 4.1 of the NFS protocol.
Typically, the NFS volume or directory is created by a storage administrator and is exported from the NFS server. You do not need to format the NFS volume with a local file system, such as VMFS. Instead, you mount the volume directly on the ESXi hosts and use it to store and boot virtual machines in the same way that you use the VMFS datastores.
In addition to storing virtual disks on NFS datastores, you can use NFS as a central repository for ISO images, virtual machine templates, and so on. If you use the datastore for the ISO images, you can connect the CD-ROM device of the virtual machine to an ISO file on the datastore. You then can install a guest operating system from the ISO file.
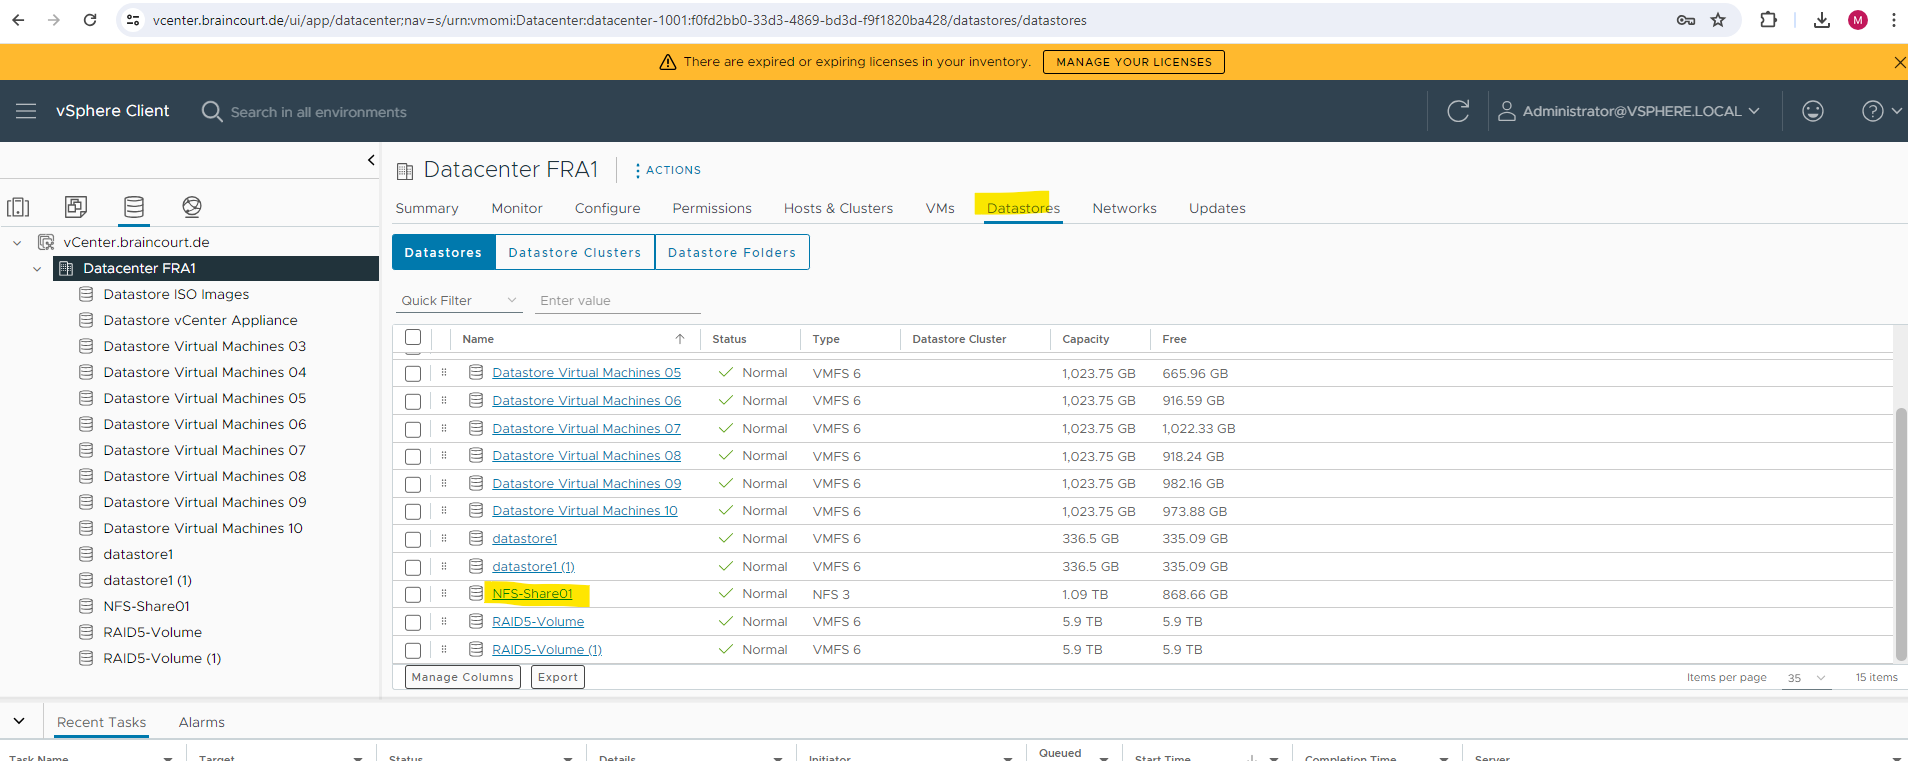
In order to mount an NFS datastore we can navigate to the datastores for our datacenter and here click on Actions -> Storage -> New Datastores … as shown below.
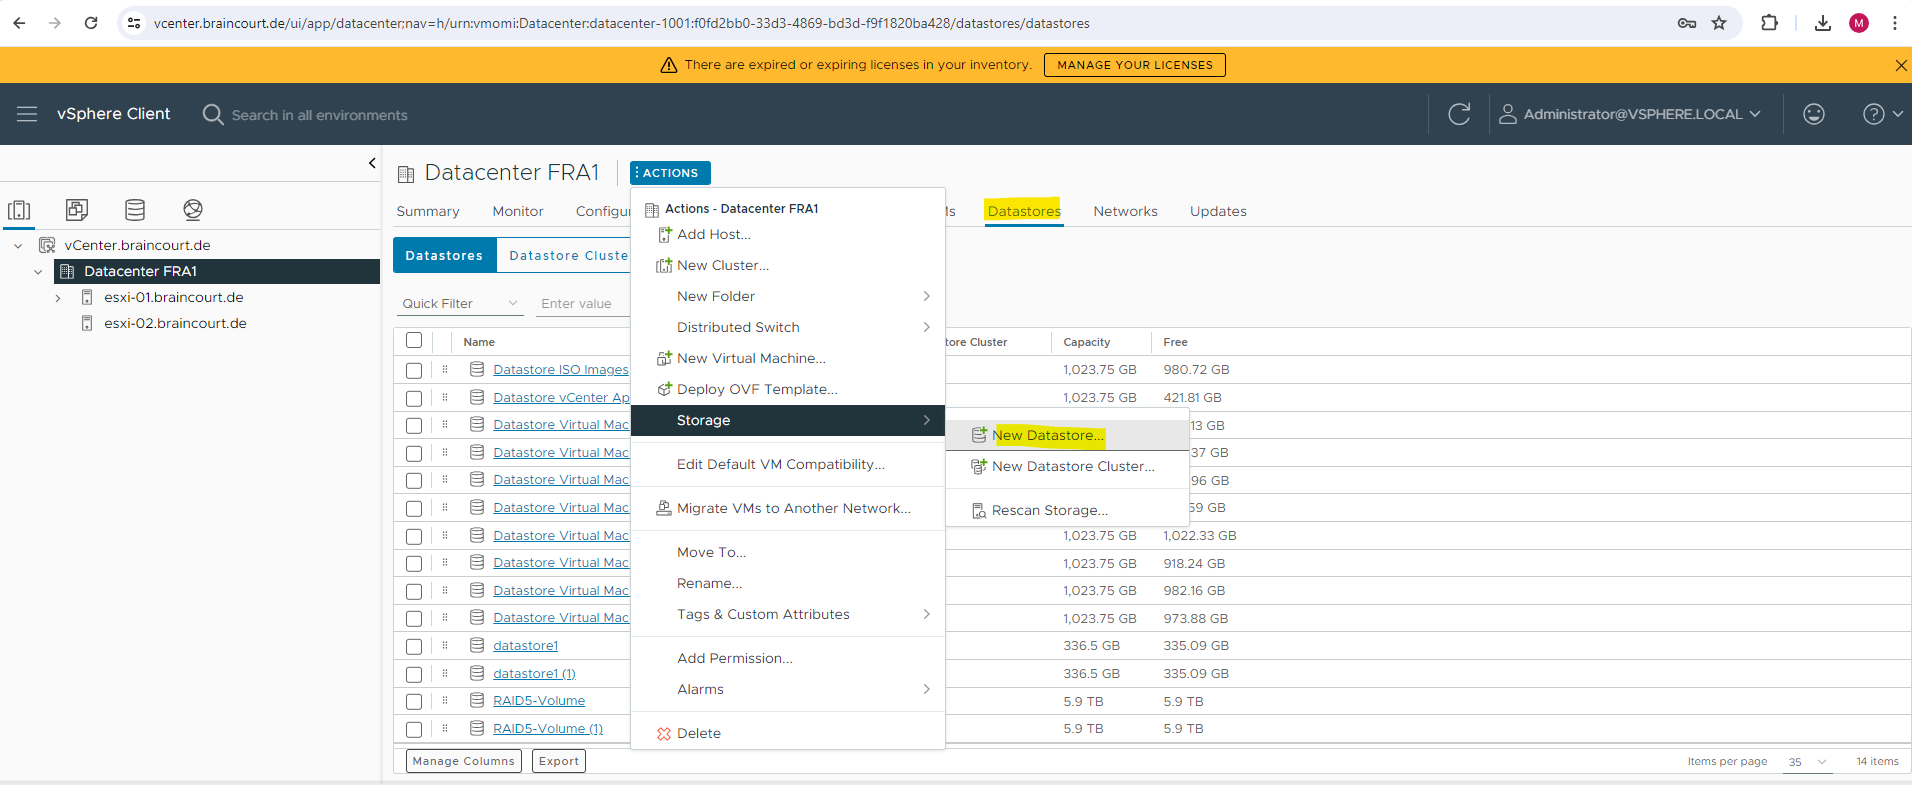
Here we need to select to create a new NFS datastore.

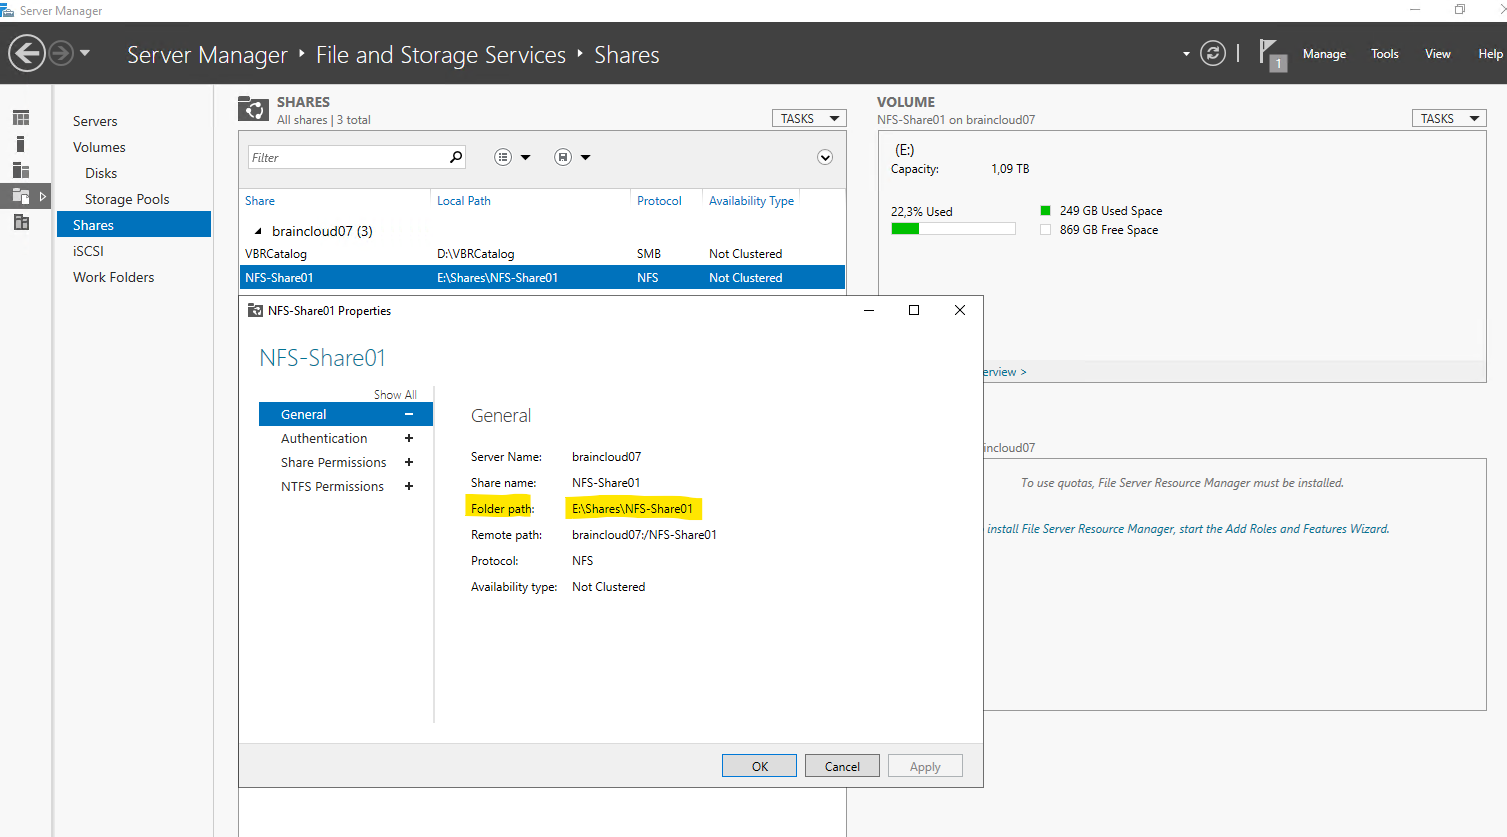
For the folder path I will enter here the local folder path under Windows including the drive letter because the share is hosted on a Windows NFS server. You can also just mount the share as read-only if wanted.
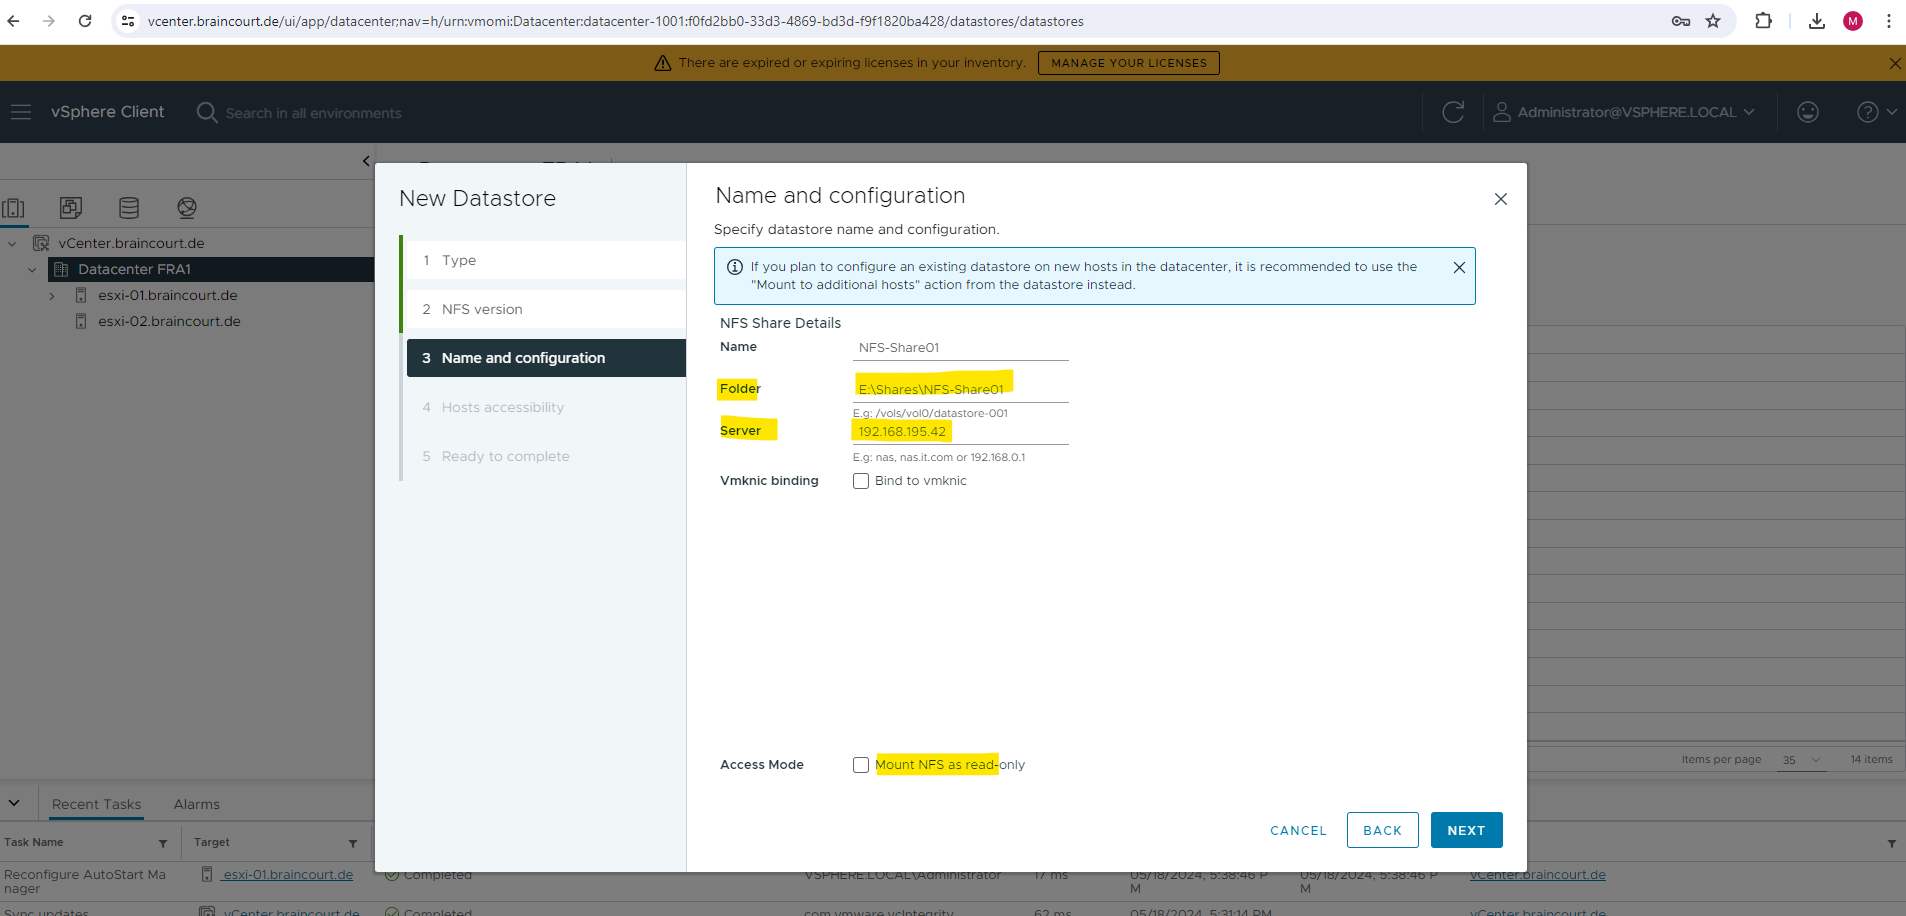
Below you will see the NFS share and its folder path hosted on a Windows Server.
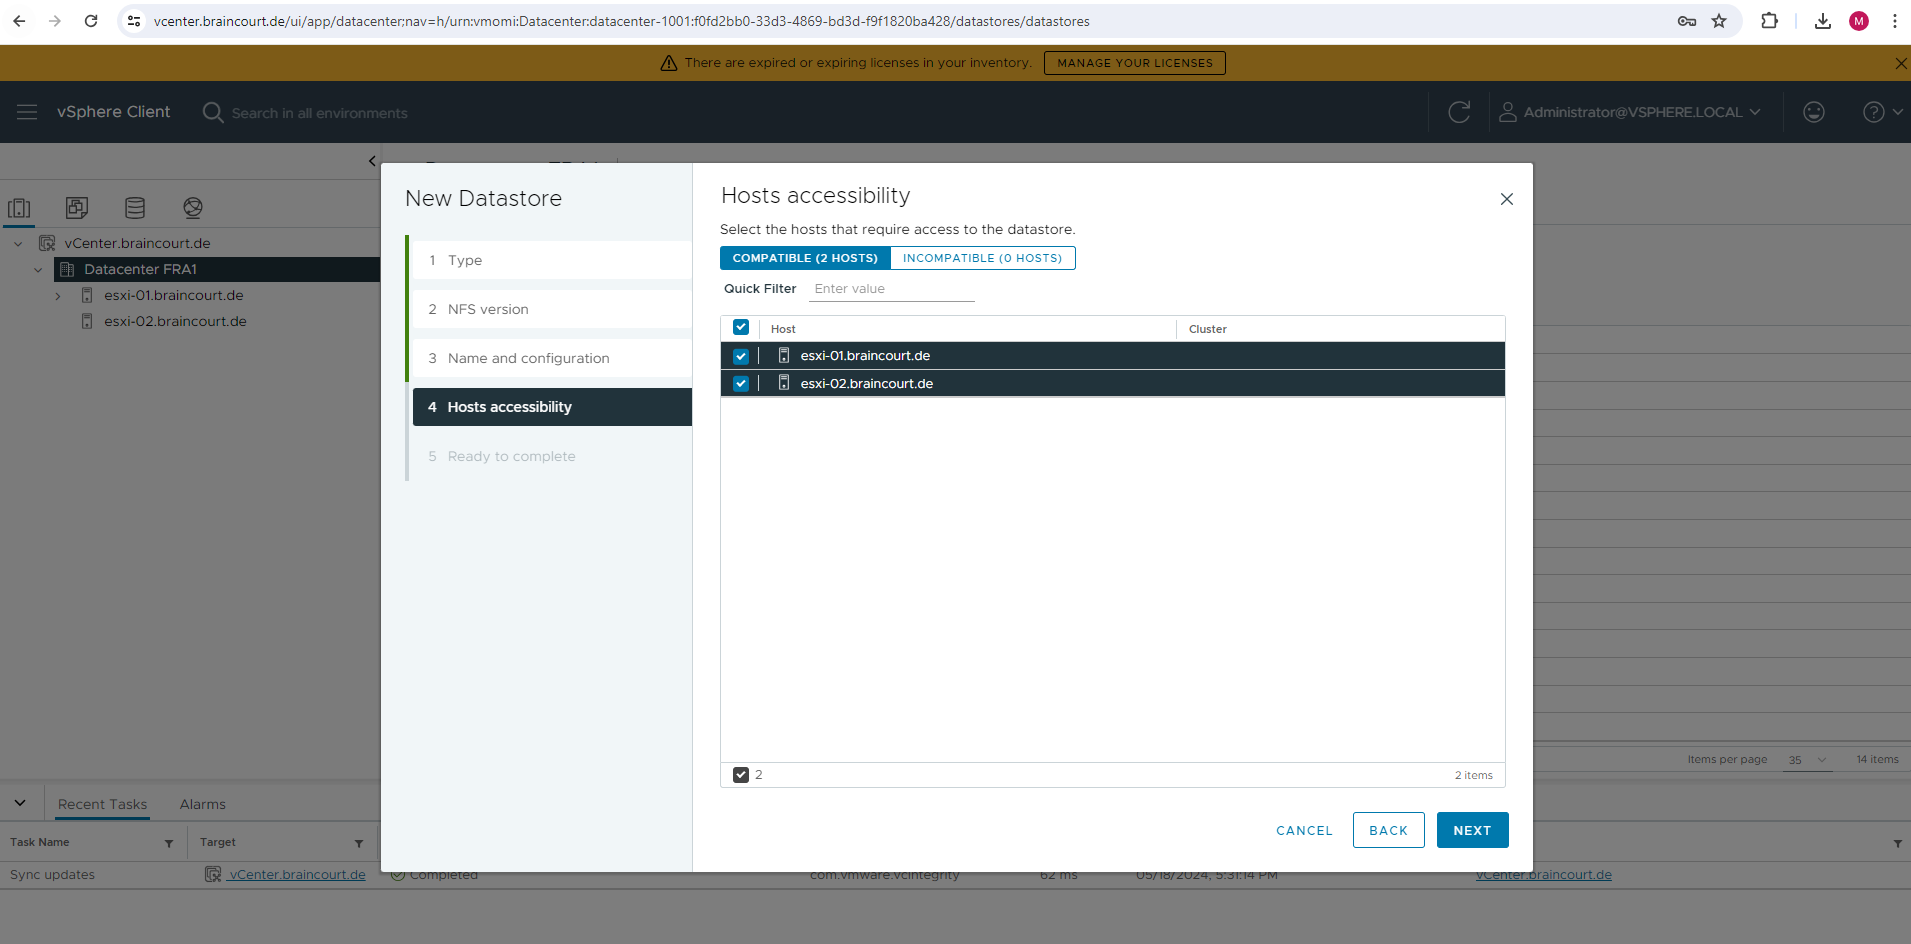
I will give both of my ESXi’s hosts access to this datastore.
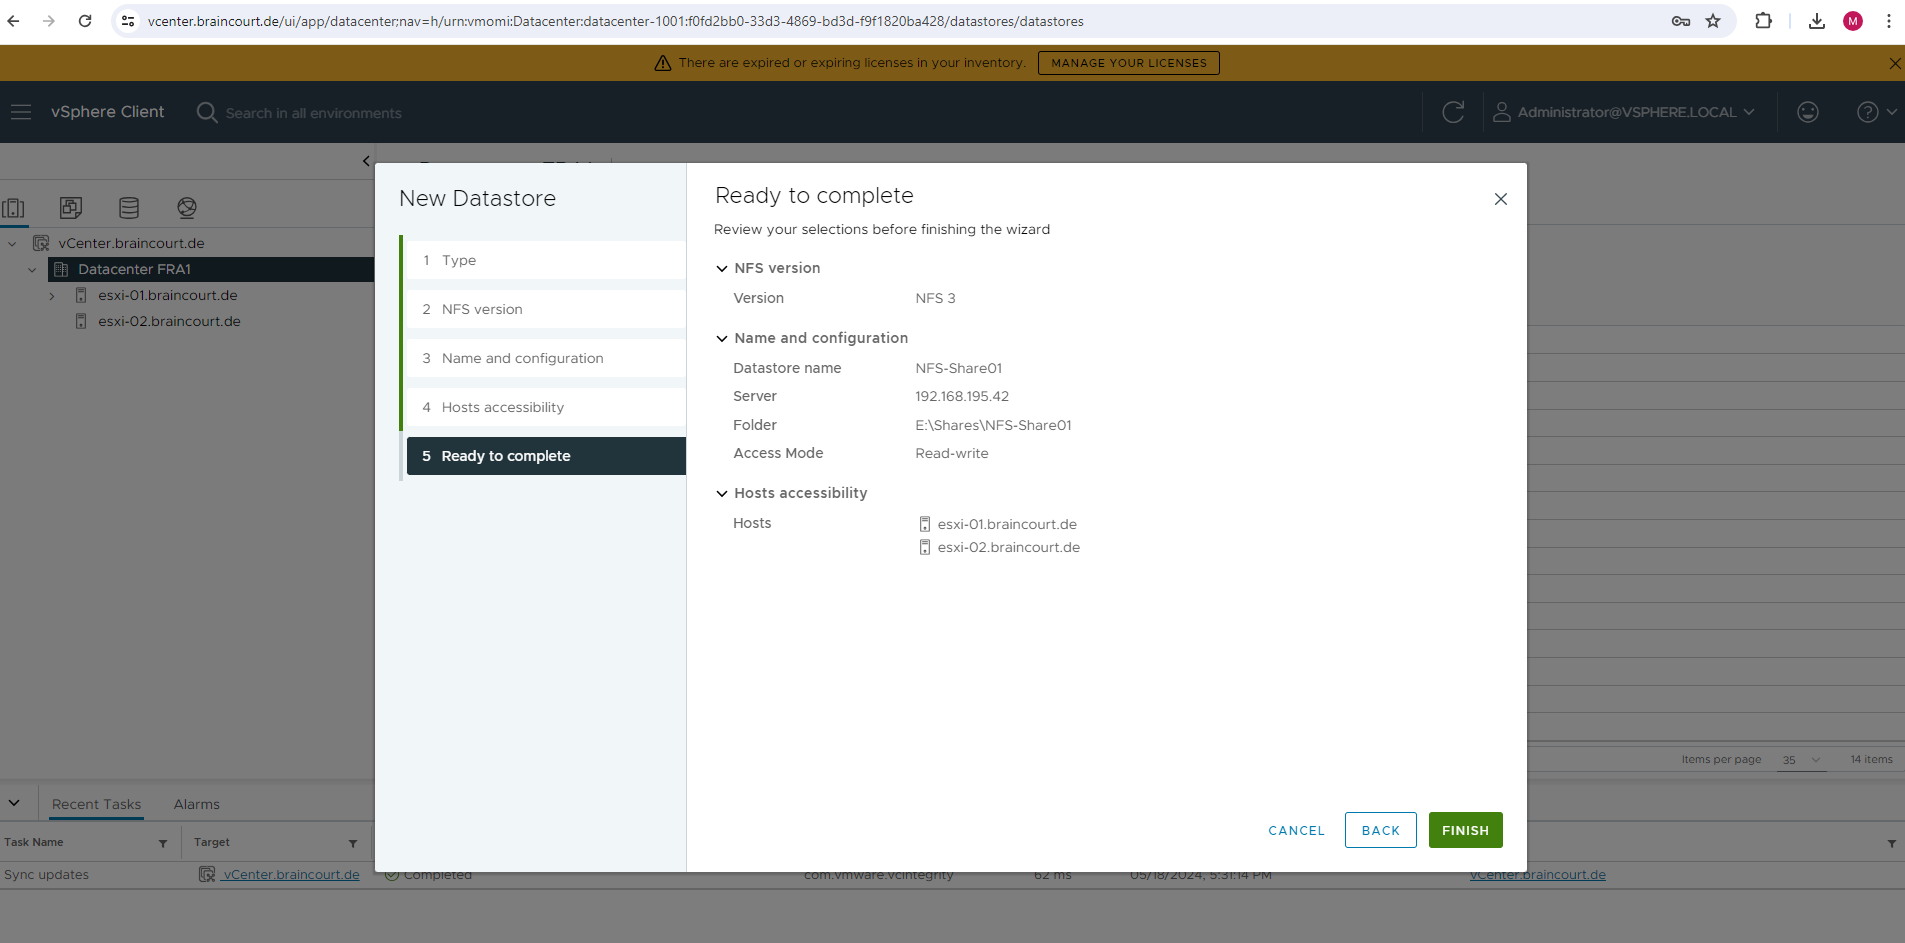
Finally we can click on FINISH to create the new datastore.
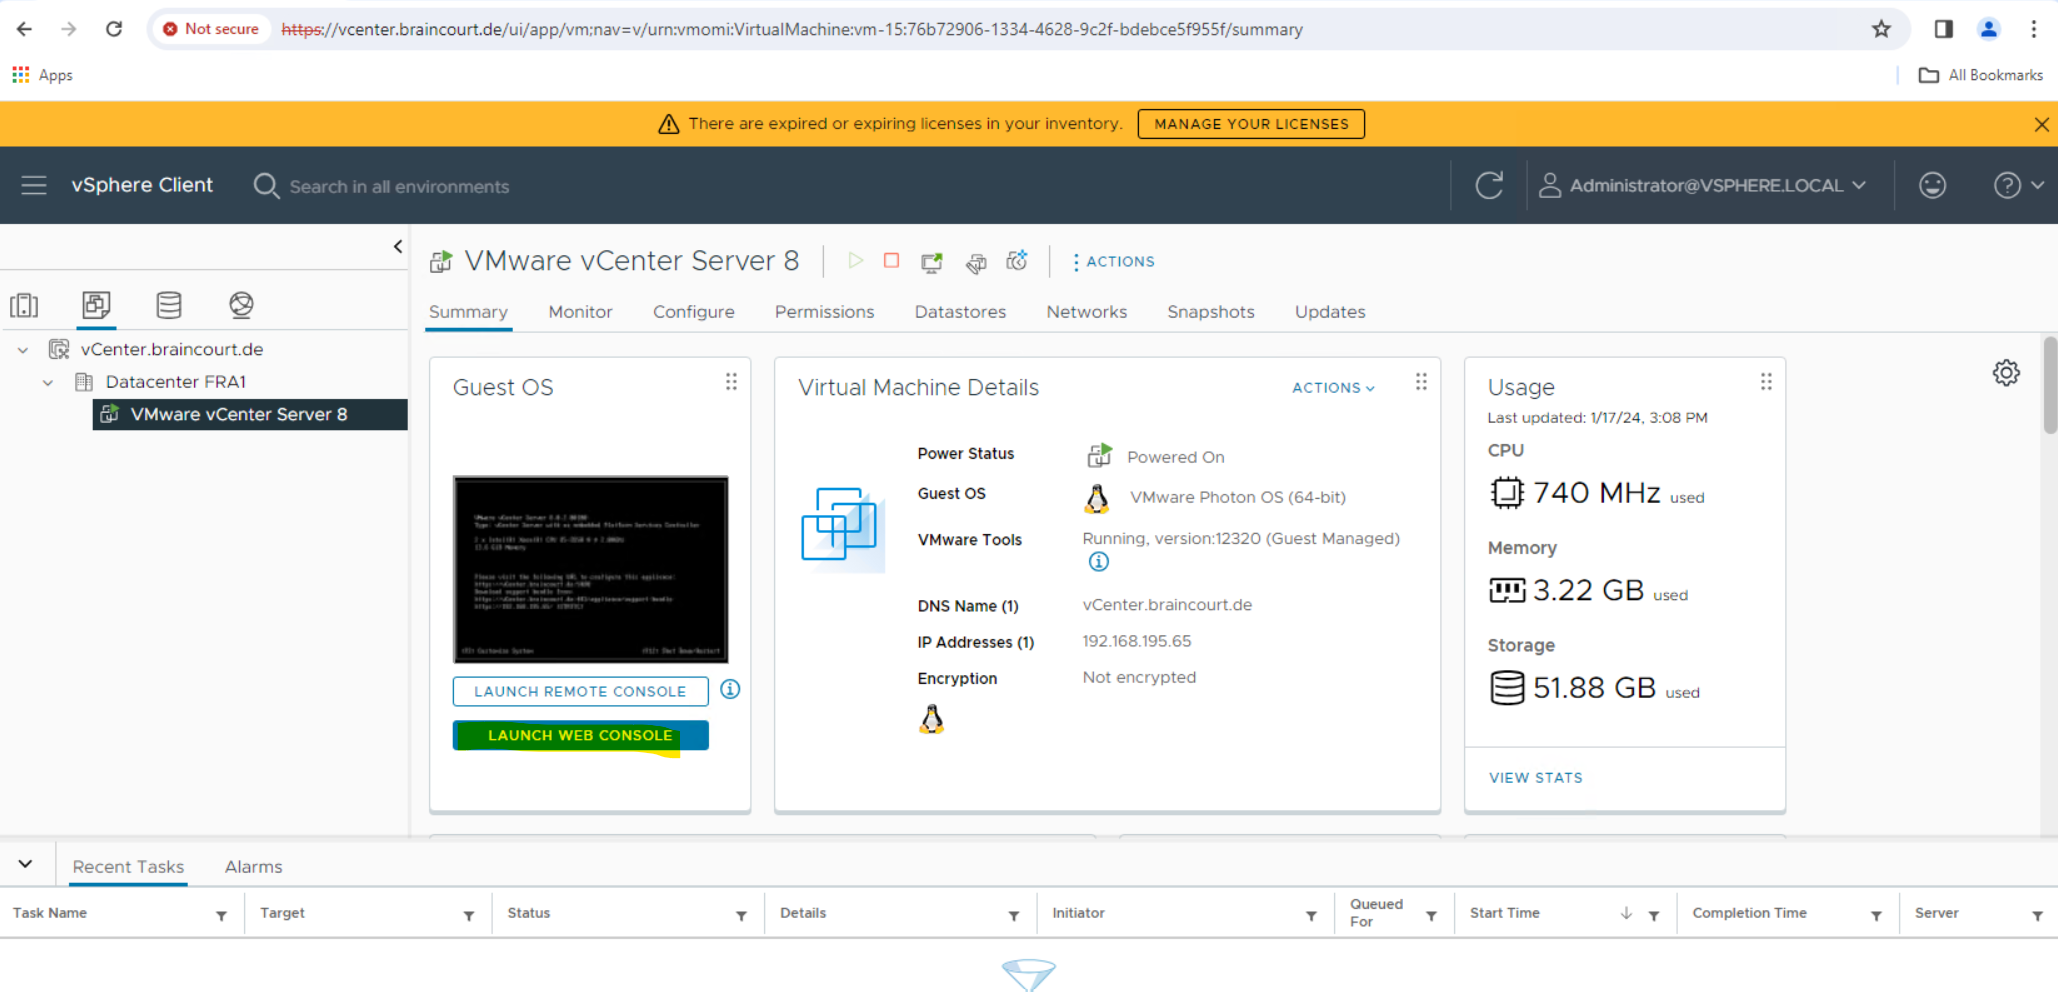
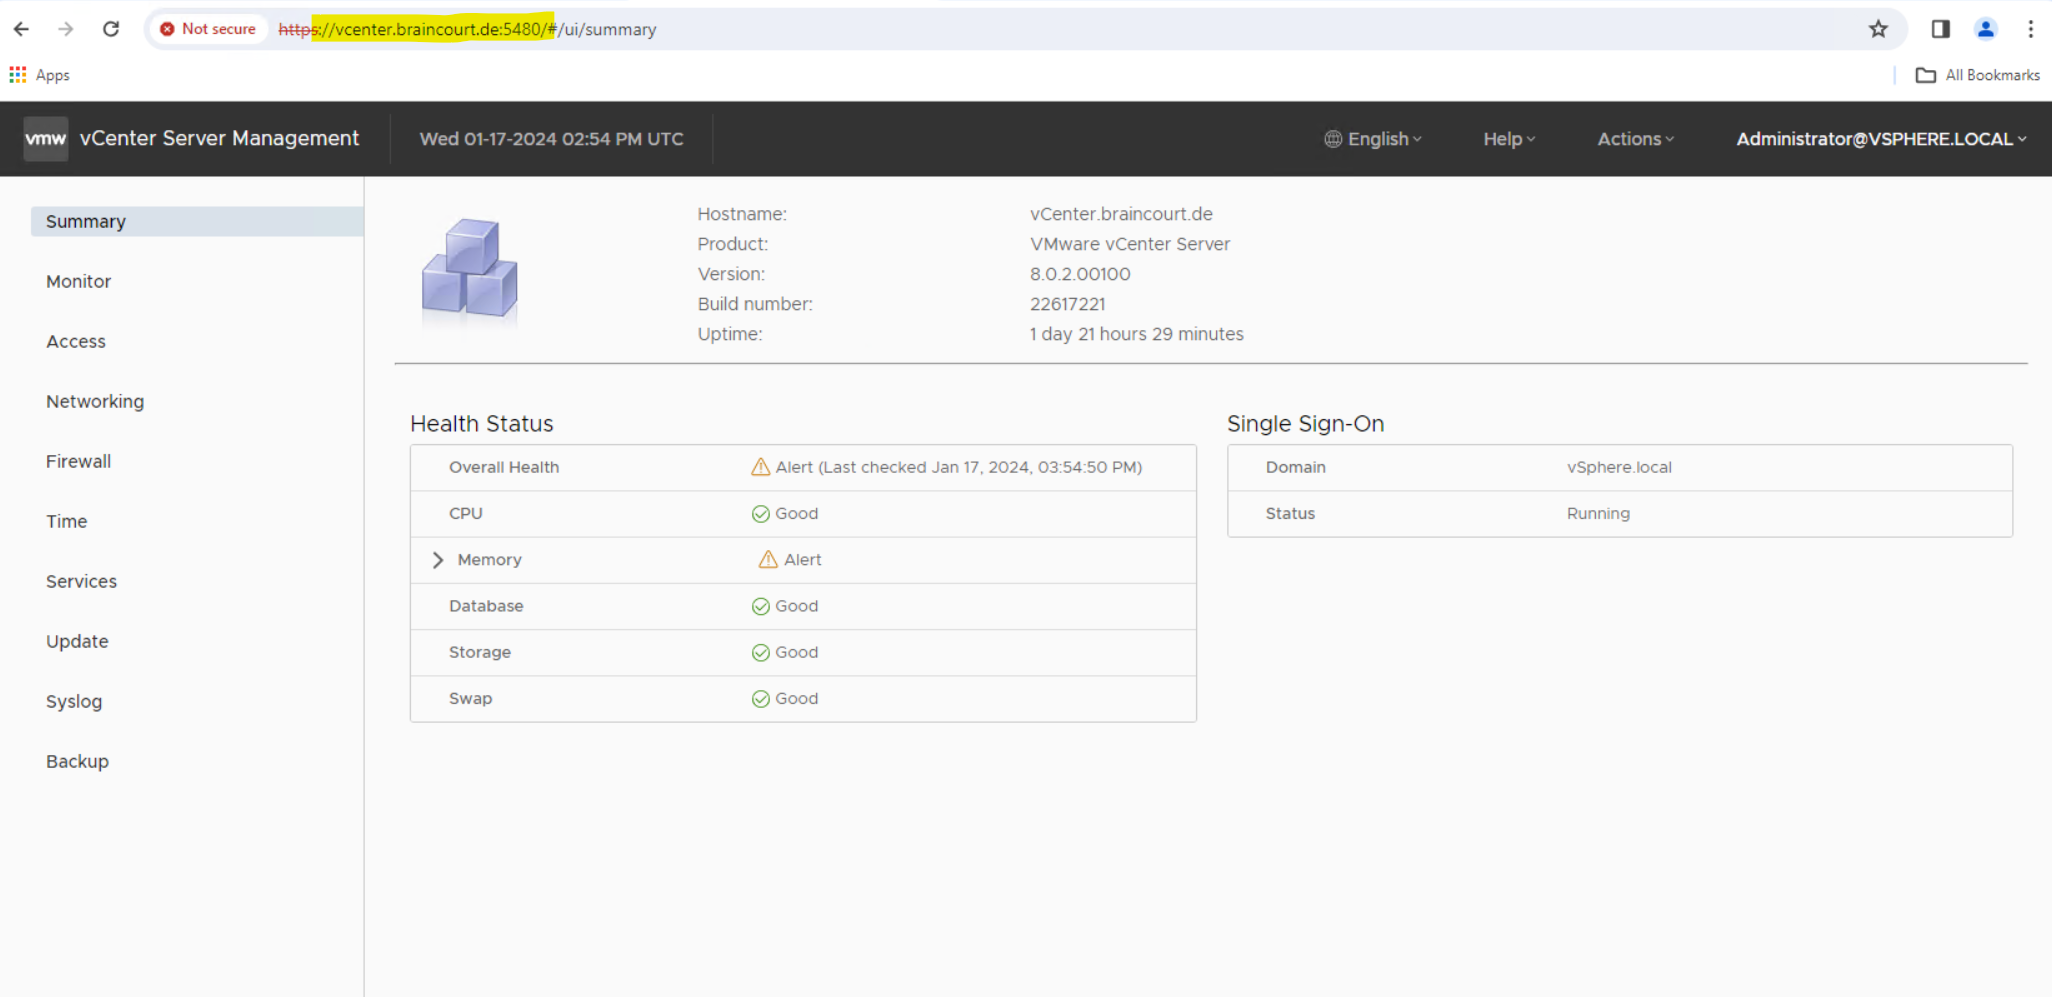
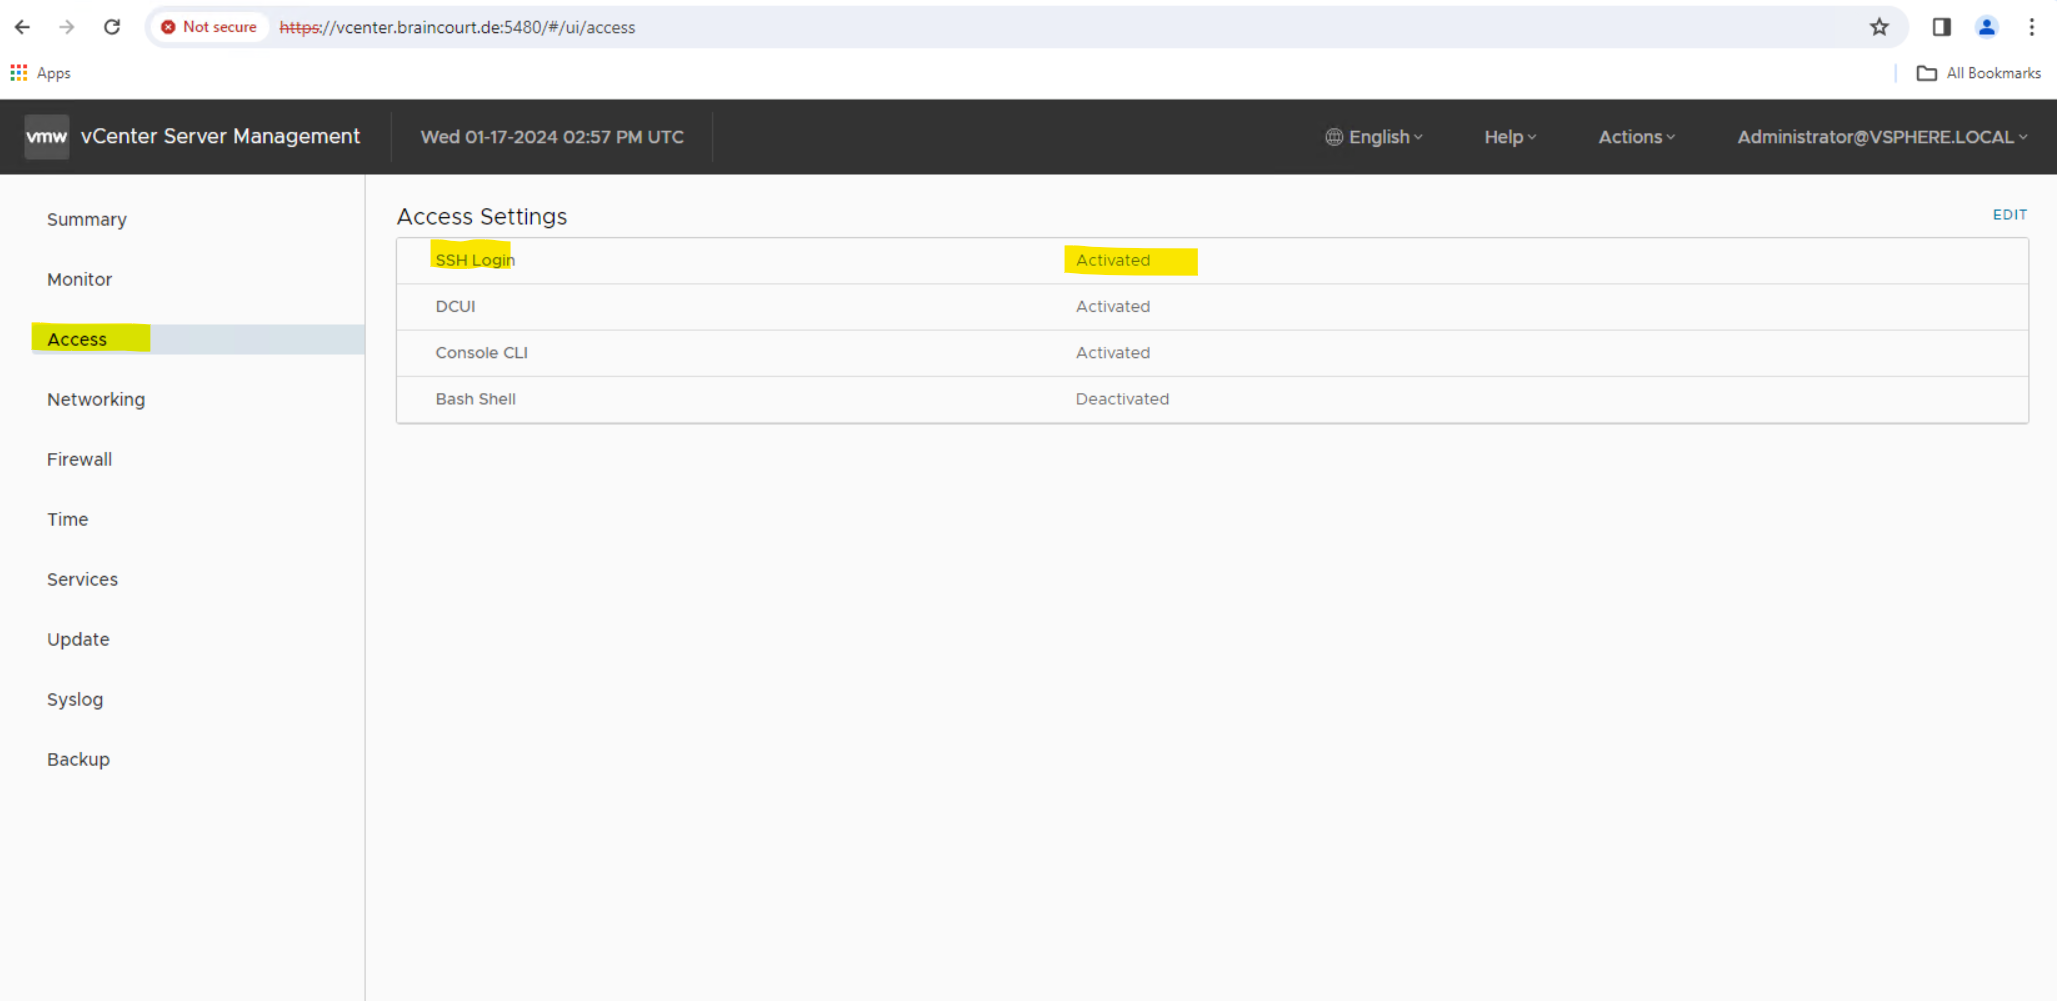
Using the vCenter Server Management Interface
After you deploy vCenter Server, you can log in to the vCenter Server Management Interface and edit the settings. You can use this web interface to perform basic administrative tasks for the vCenter server itself.
Launch the WEB Console of your vCenter Server within the vSphere Client to determine the URL of the vCenter Server Management Interface.
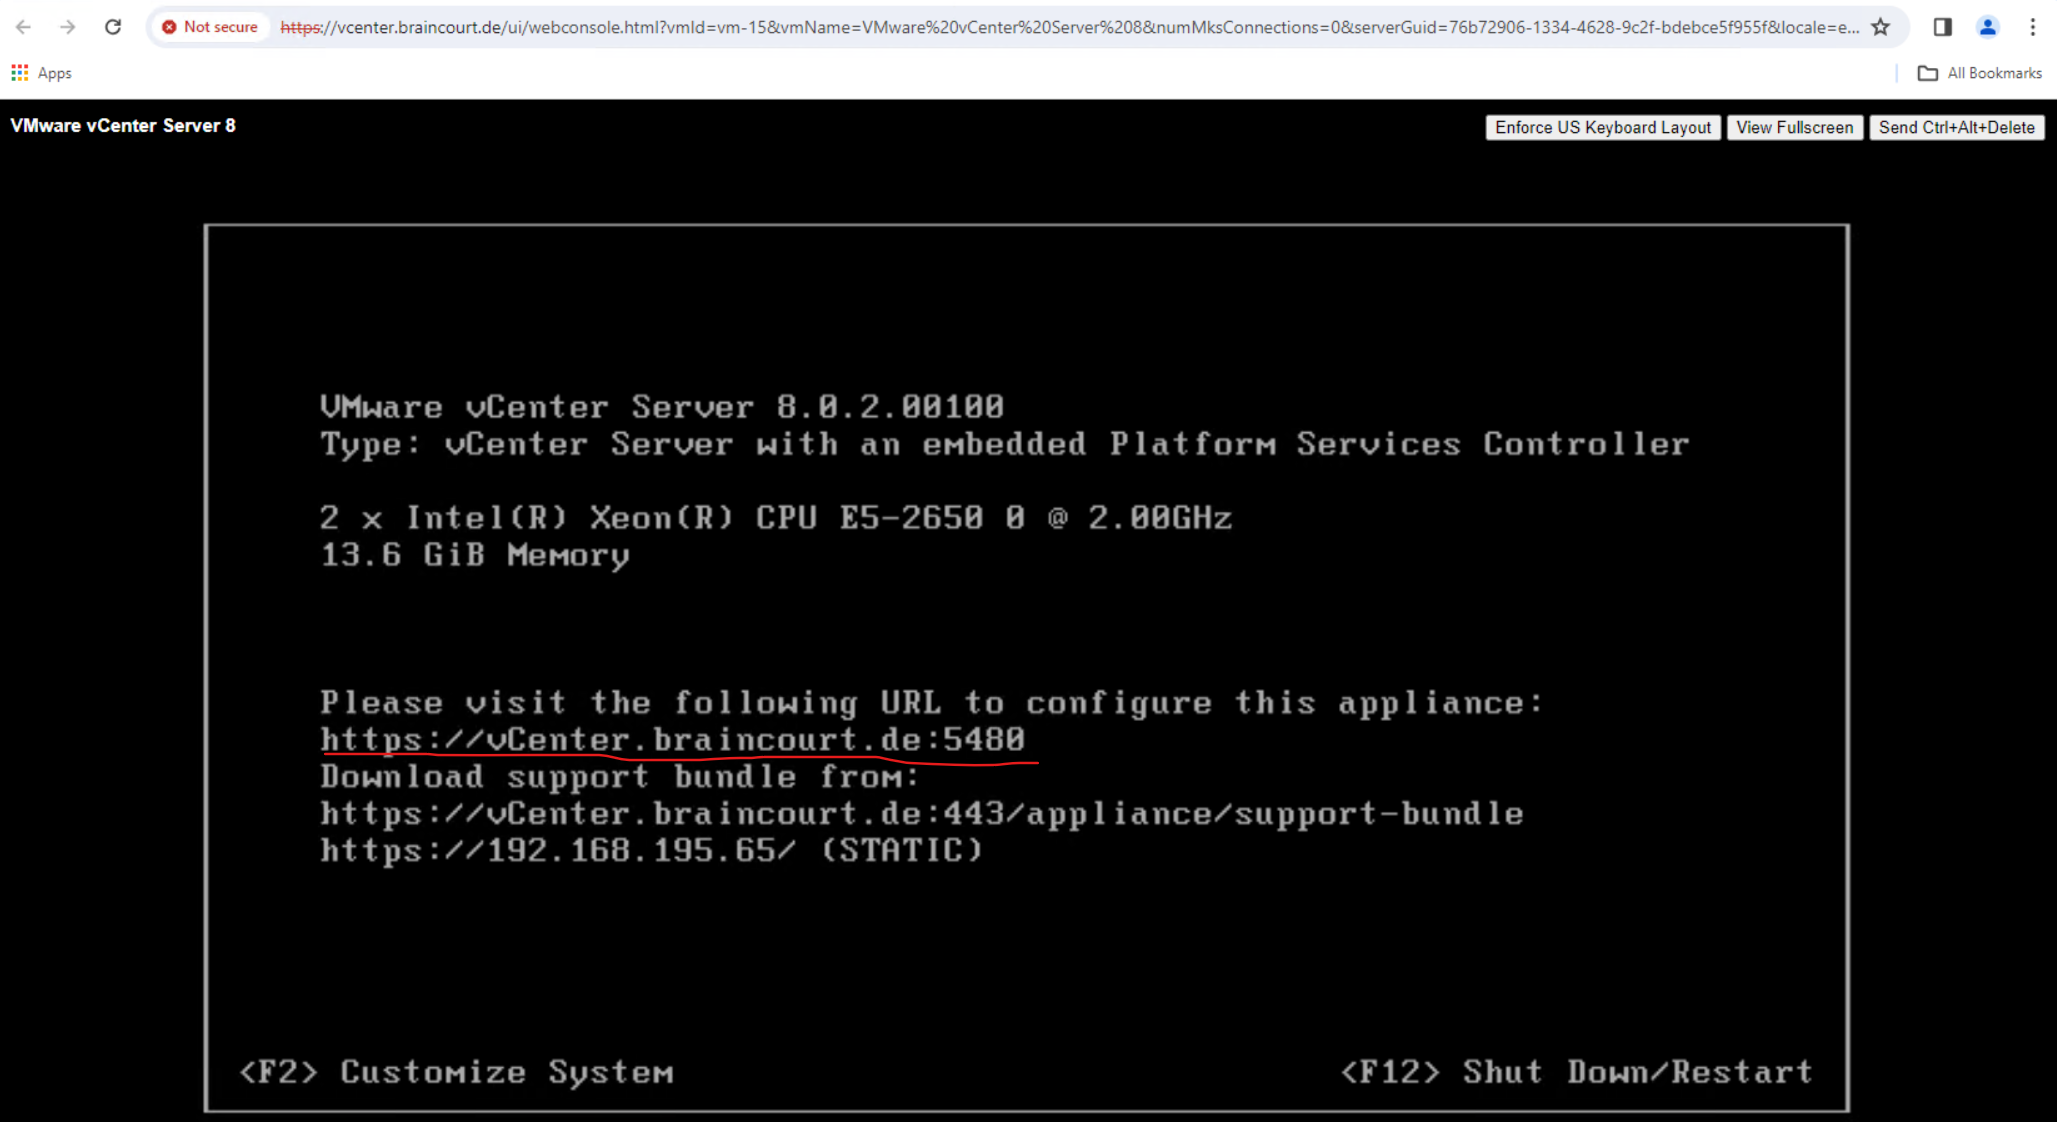
So in my case the URL for the vCenter Server Management Interface is https://vcenter.braincourt.de:5480. In general it is the FQDN of your vCenter Server and port 5480.
More about the vCenter Server Management Interface you will find in the following article from VMware.
Using the vCenter Server Management Interface to Configure vCenter Server
https://docs.vmware.com/en/VMware-vSphere/8.0/vsphere-vcenter-configuration/GUID-B259B969-3E5D-4576-8256-D3BED54B89AF.html
Add static routes on the vCenter Server (Appliance)
For the ESXi host I was adding a static route for my remote VPN network in order to access the host direclty from my remote network.
The same I will now also do for the vCenter Server (applicance). By default SSH Logon is already enabled. This can be set within the vCenter Server Management Interface as shown above.
So I will login to the vCenter Server’s SSH shell using the root user account and from a computer which is homed in the same subnet as my vCenter server.
The password for the vCenter Server’s root account we set previously during the set up of vCenter Server.
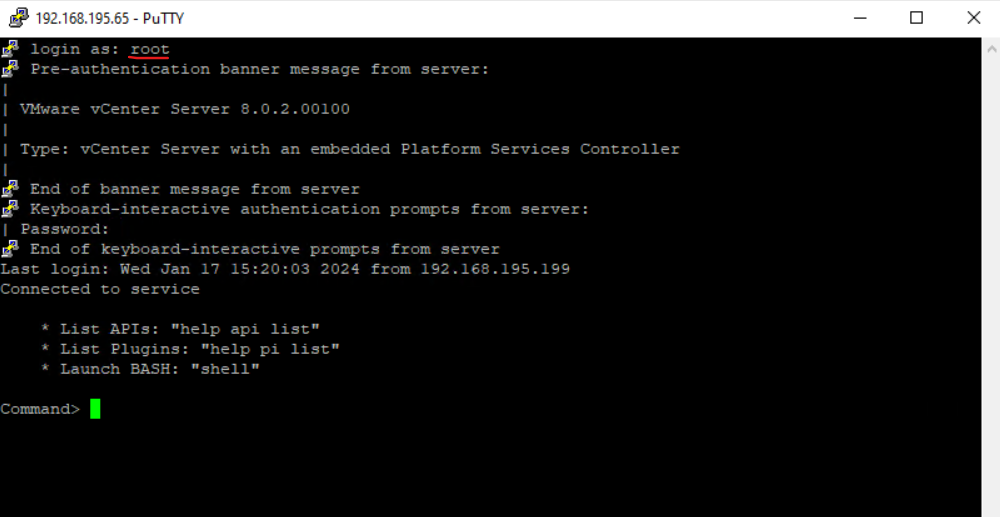
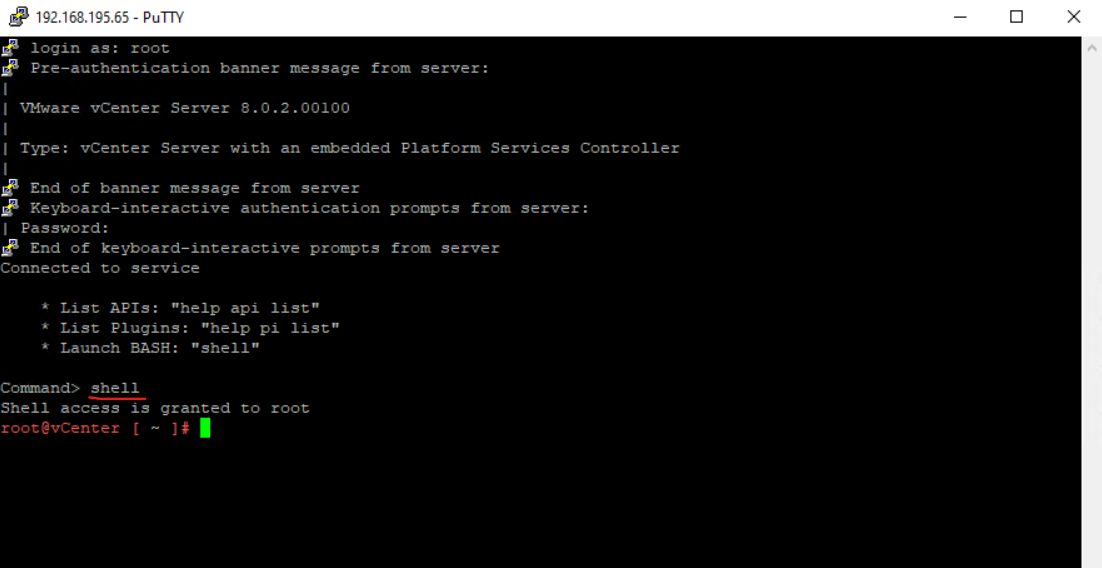
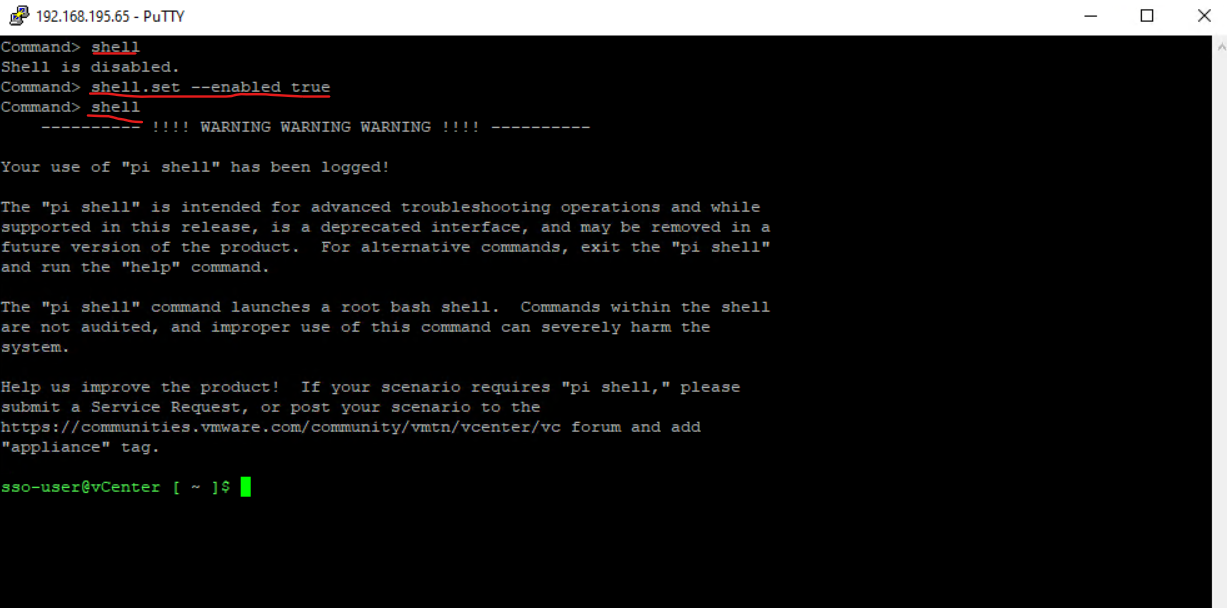
If you log in to the appliance shell as a user who has a super administrator role, you can enable access to the Bash shell of the appliance for other users. The root user has access to the appliance Bash shell by default.
When you will use the SSO-user you first needs to enable the bash shell.
> shell.set --enabled true
Now we can use the usual command for Linux to add and list static routes on the vCenter Server.
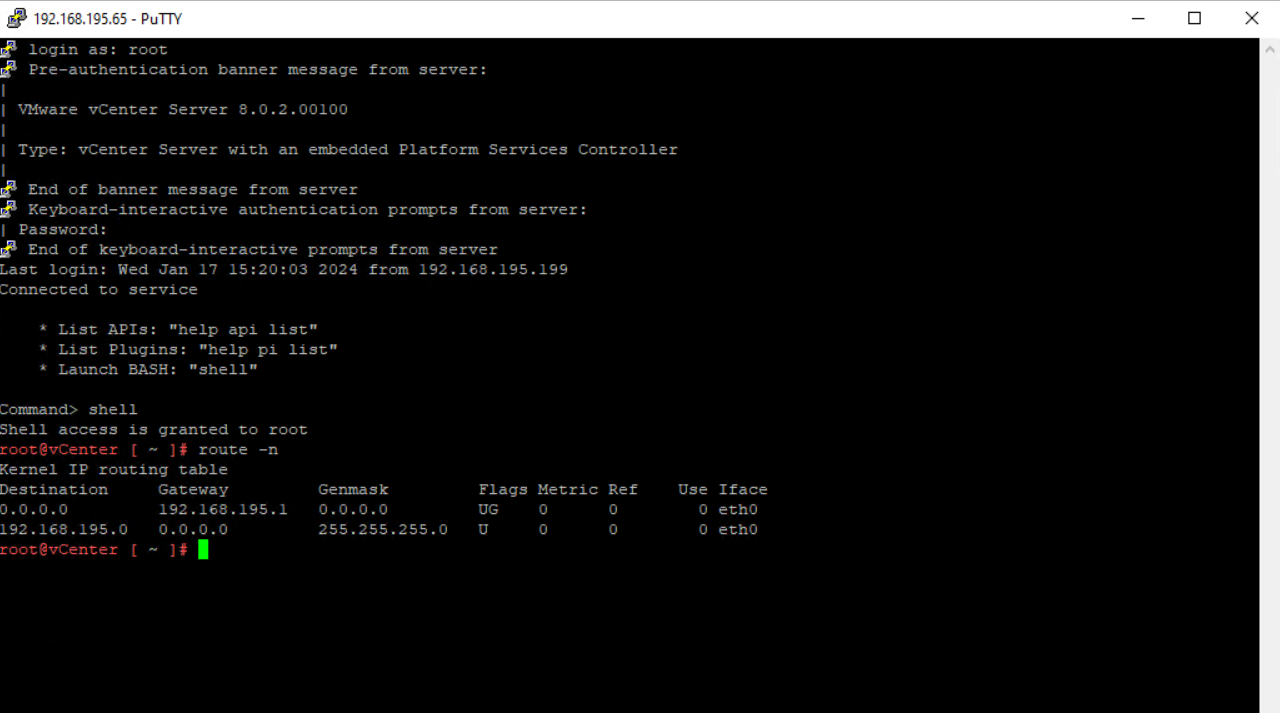
Btw. by executing the lsb_release -a command we can check as usual in Linux the OS version.

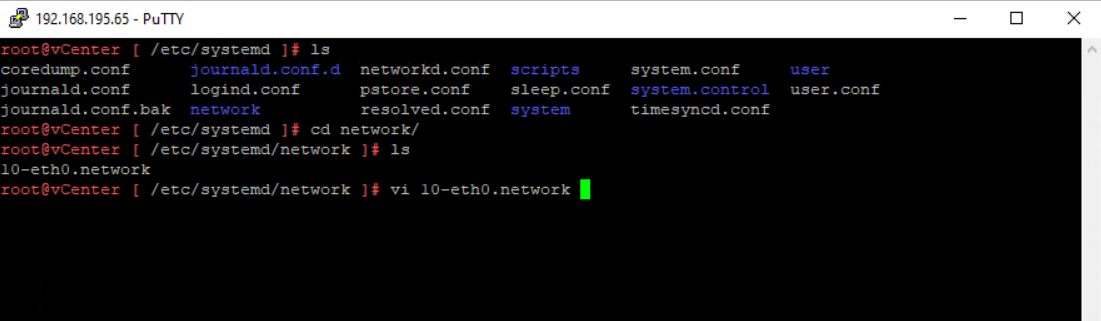
In order to add static routes to our vCenter appliance we nee to open the /etc/systemd/network /10-eth0.network file. The 10-eth0.network represents the eth0 network interface.
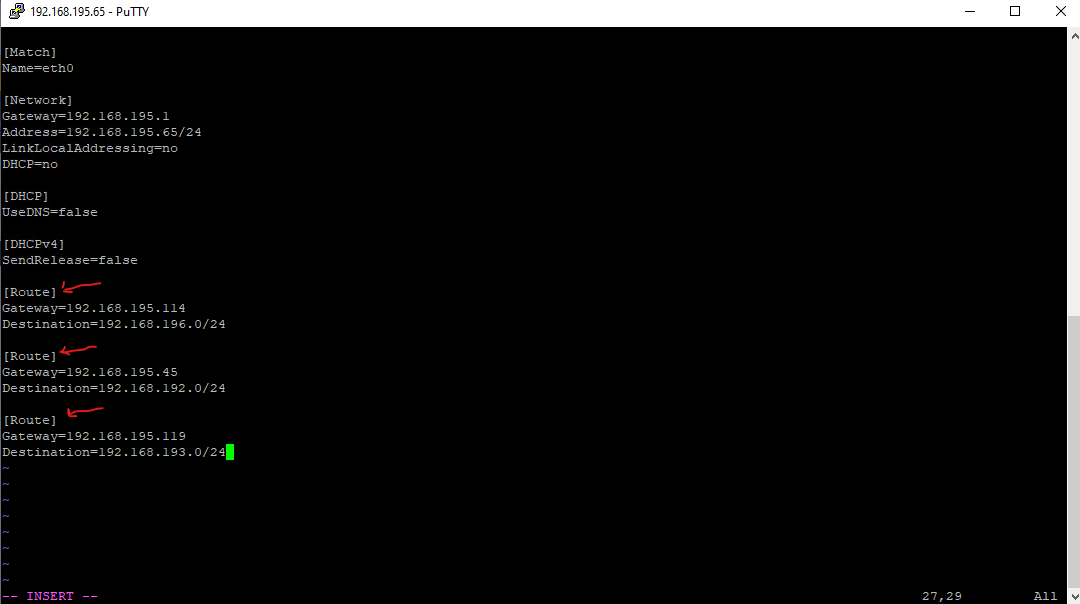
Add the [Route] sections below for each static route you want to add and finally save the file.
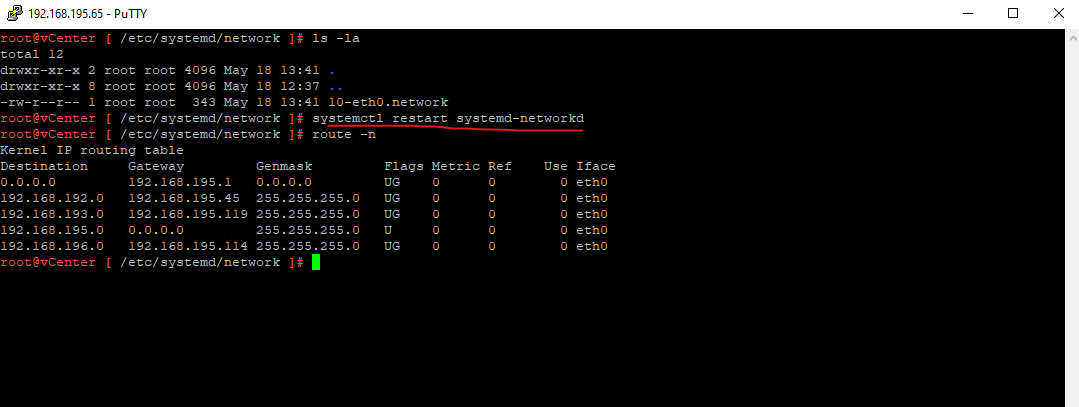
Restart the network in order the new routes to become immediately effective on the vCenter appliance.
# systemctl restart systemd-networkd
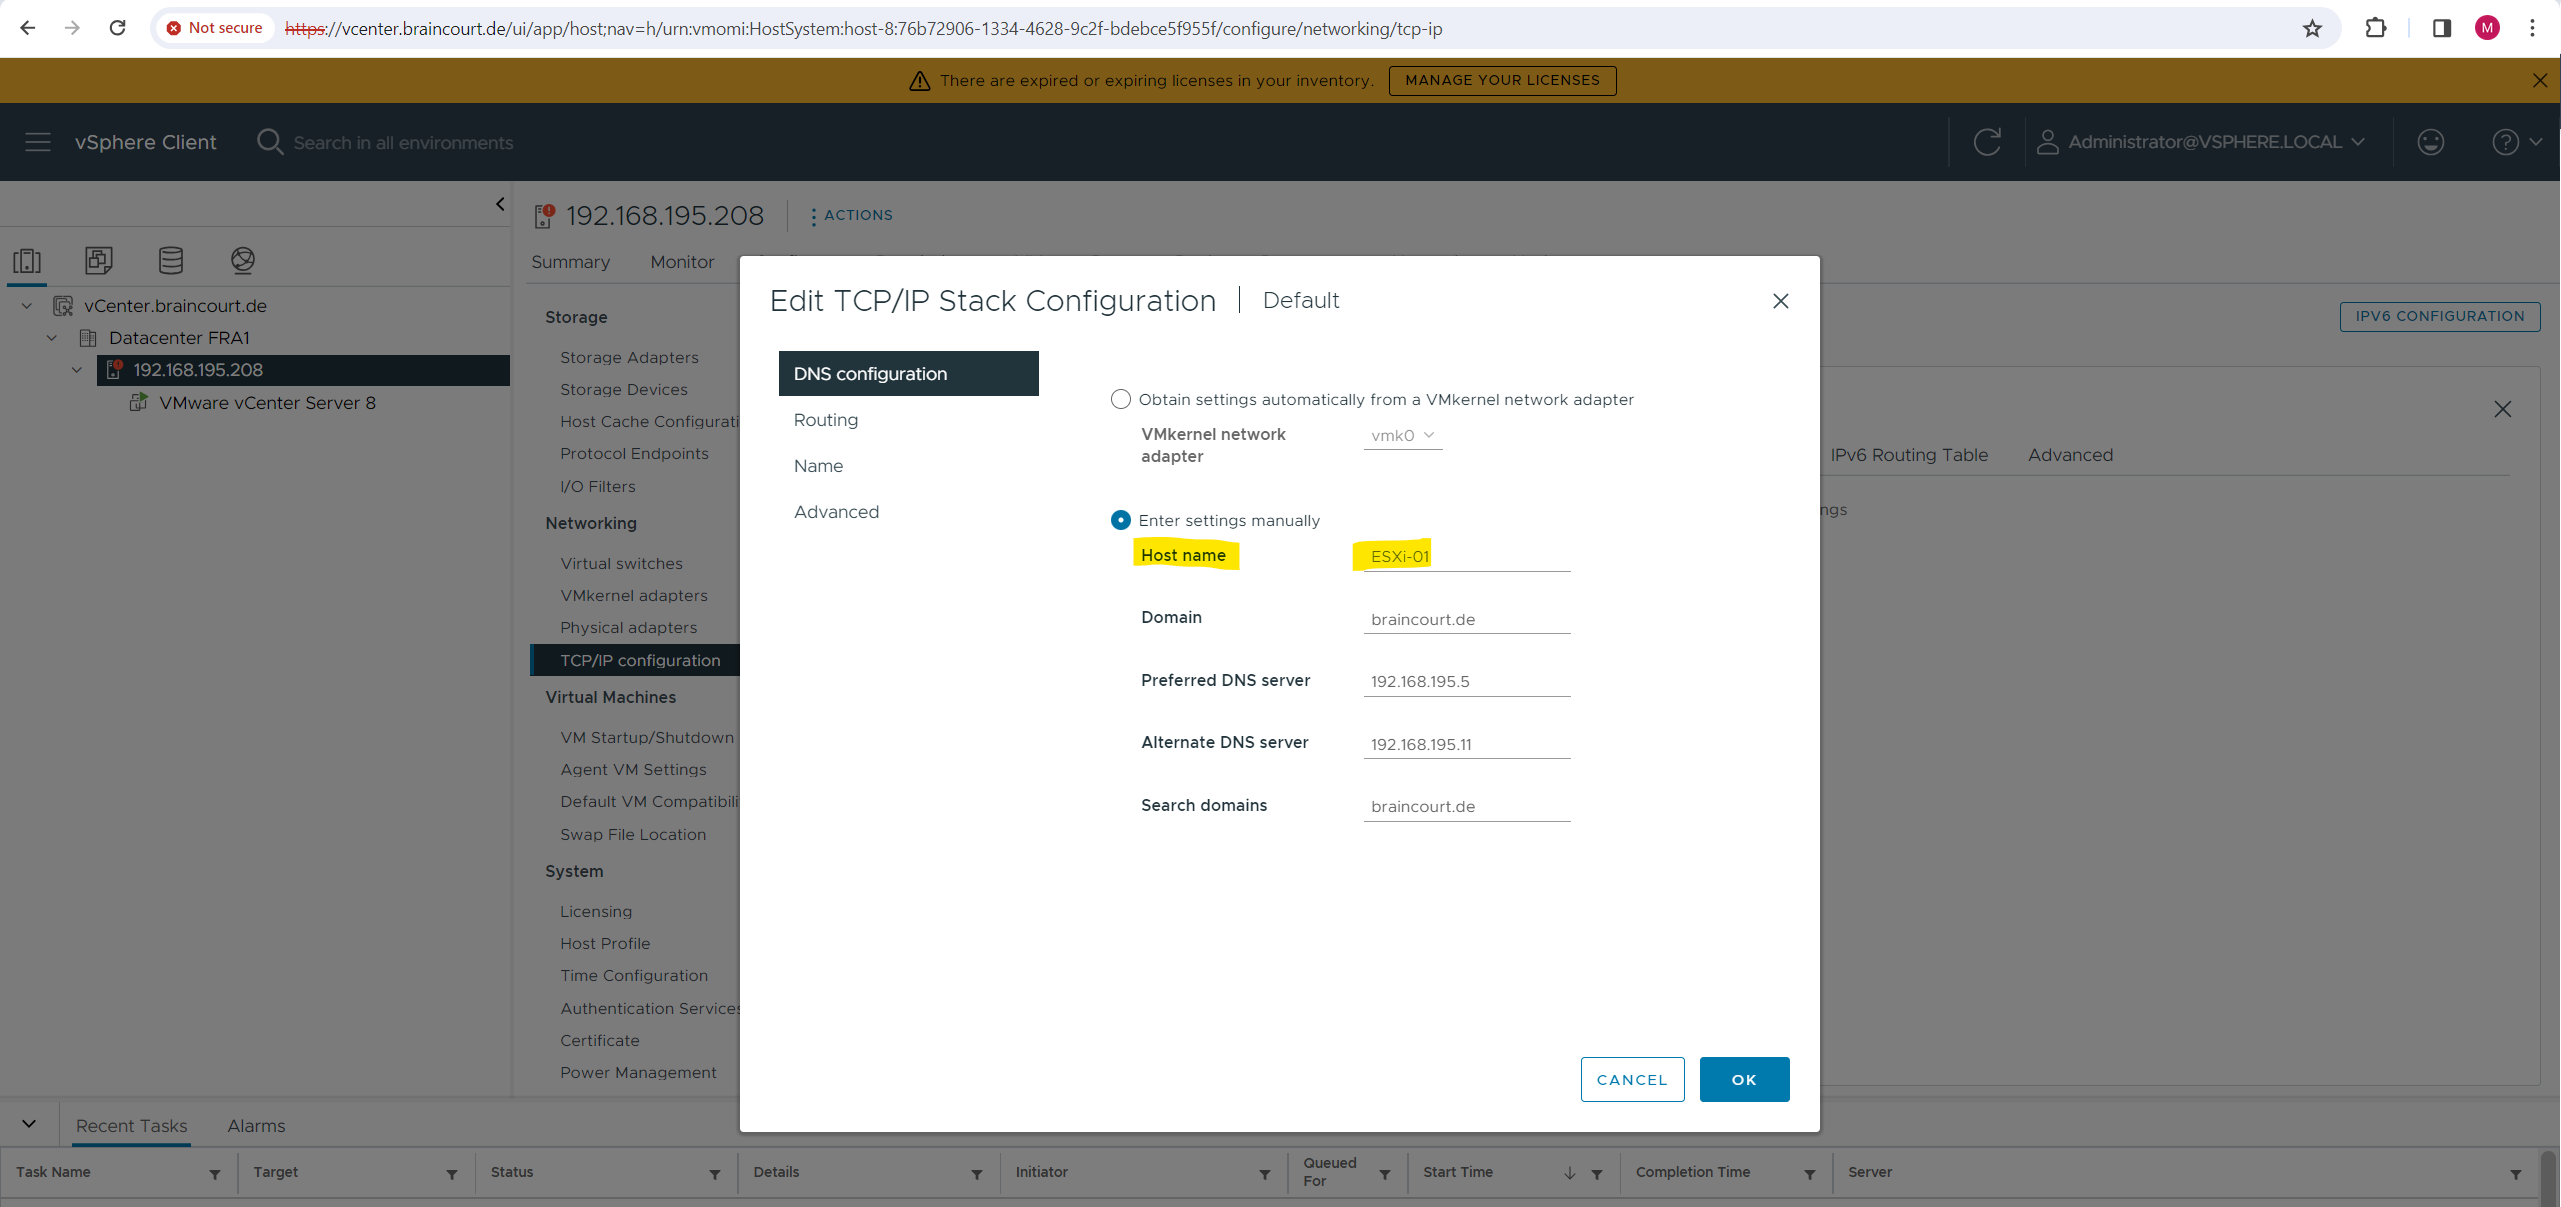
Rename a VMware ESXi Host by using the vSphere Client
Click on the dots of the TCP/IP Stack Default and select Edit.
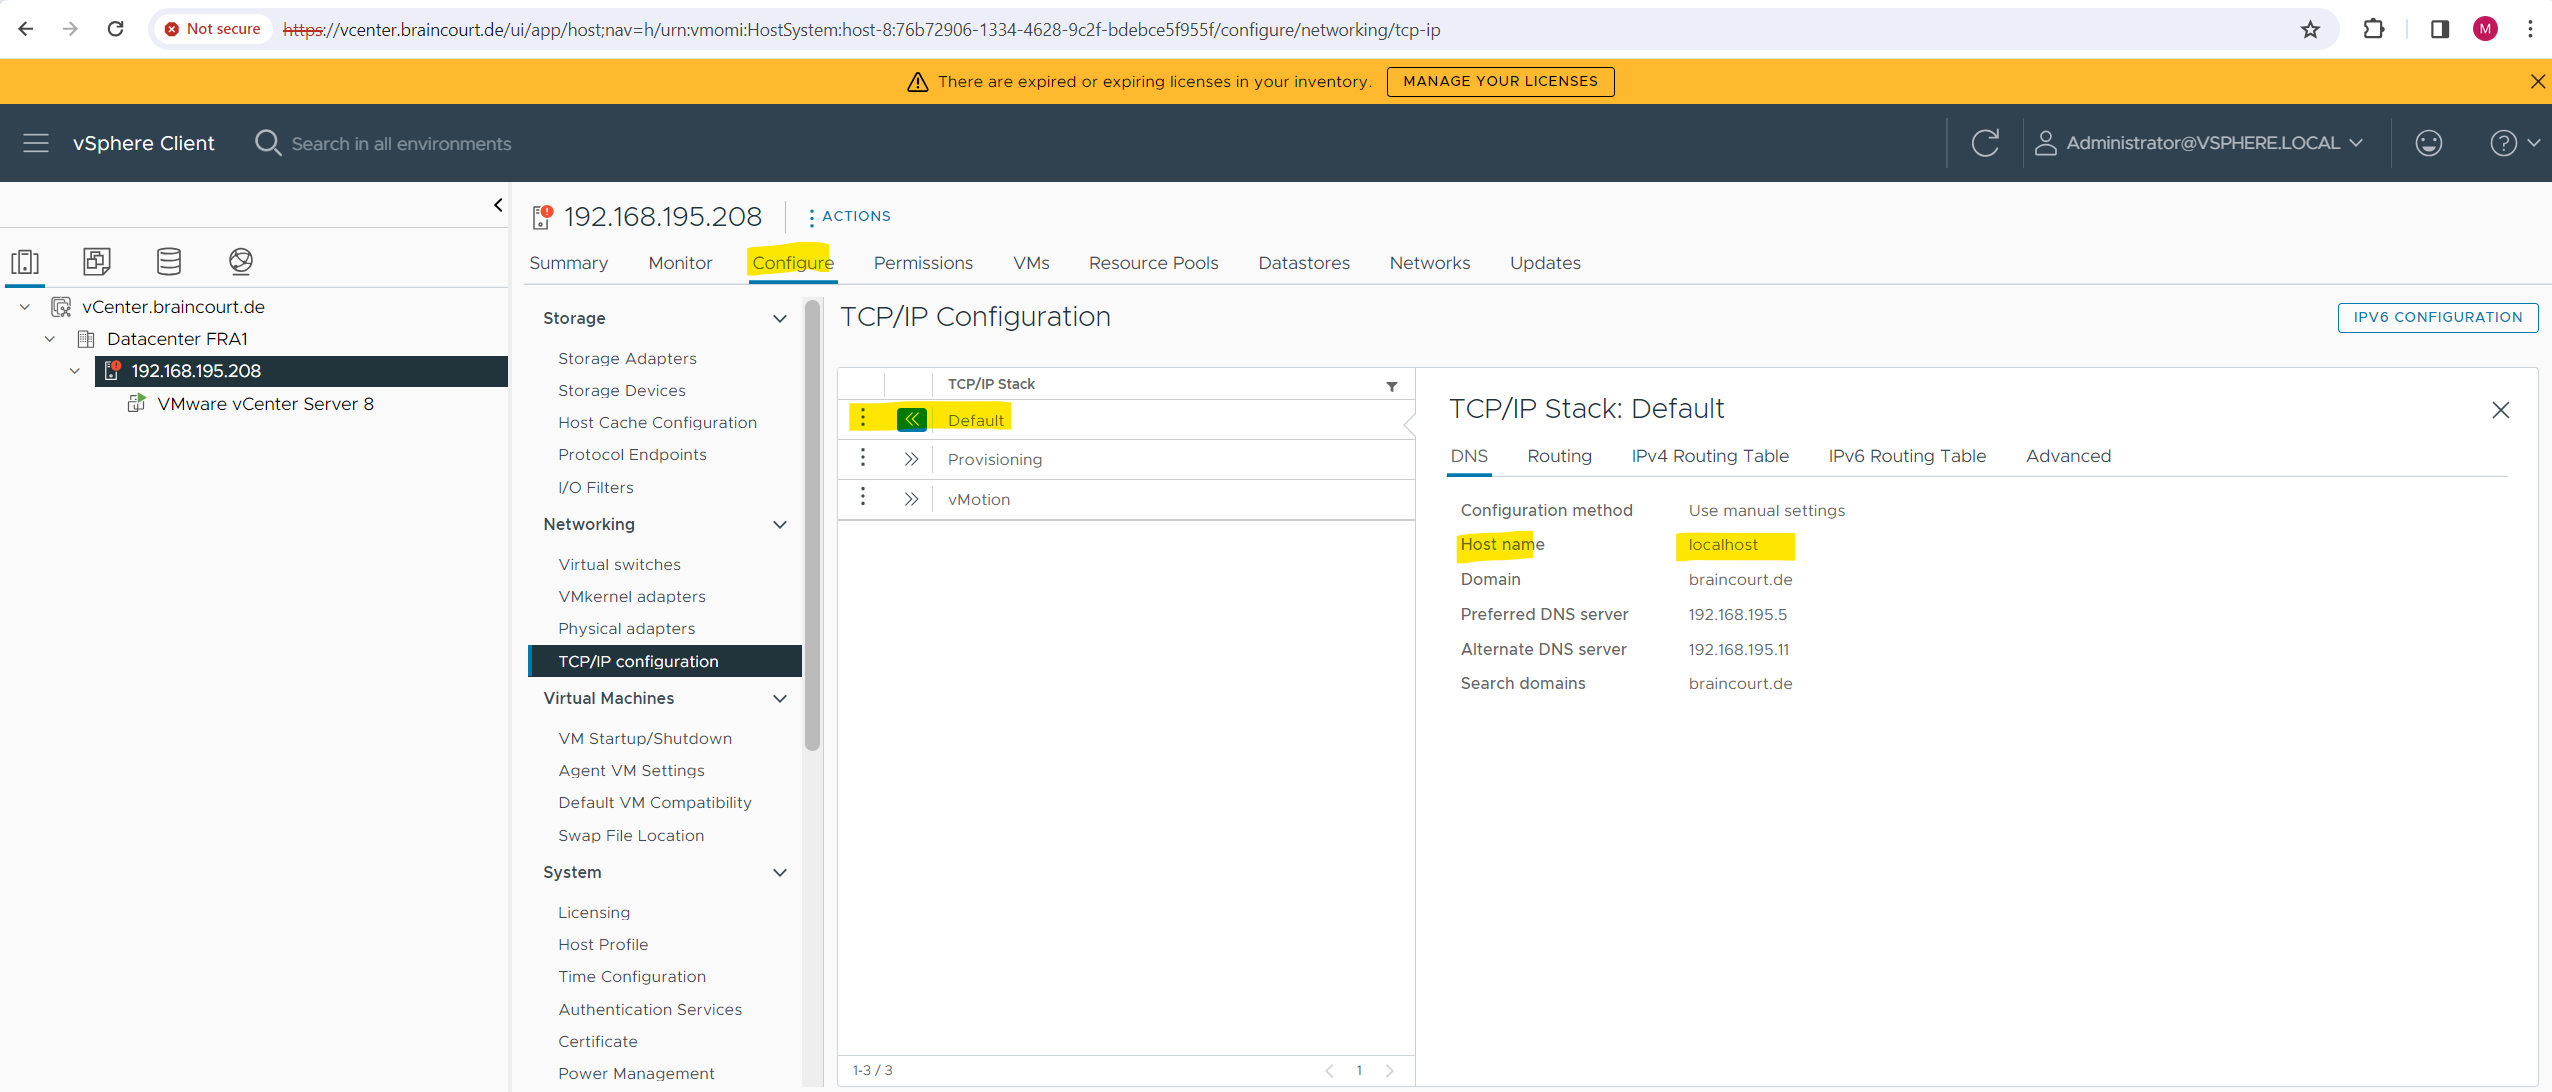
Set hostname and Domain Click OK.

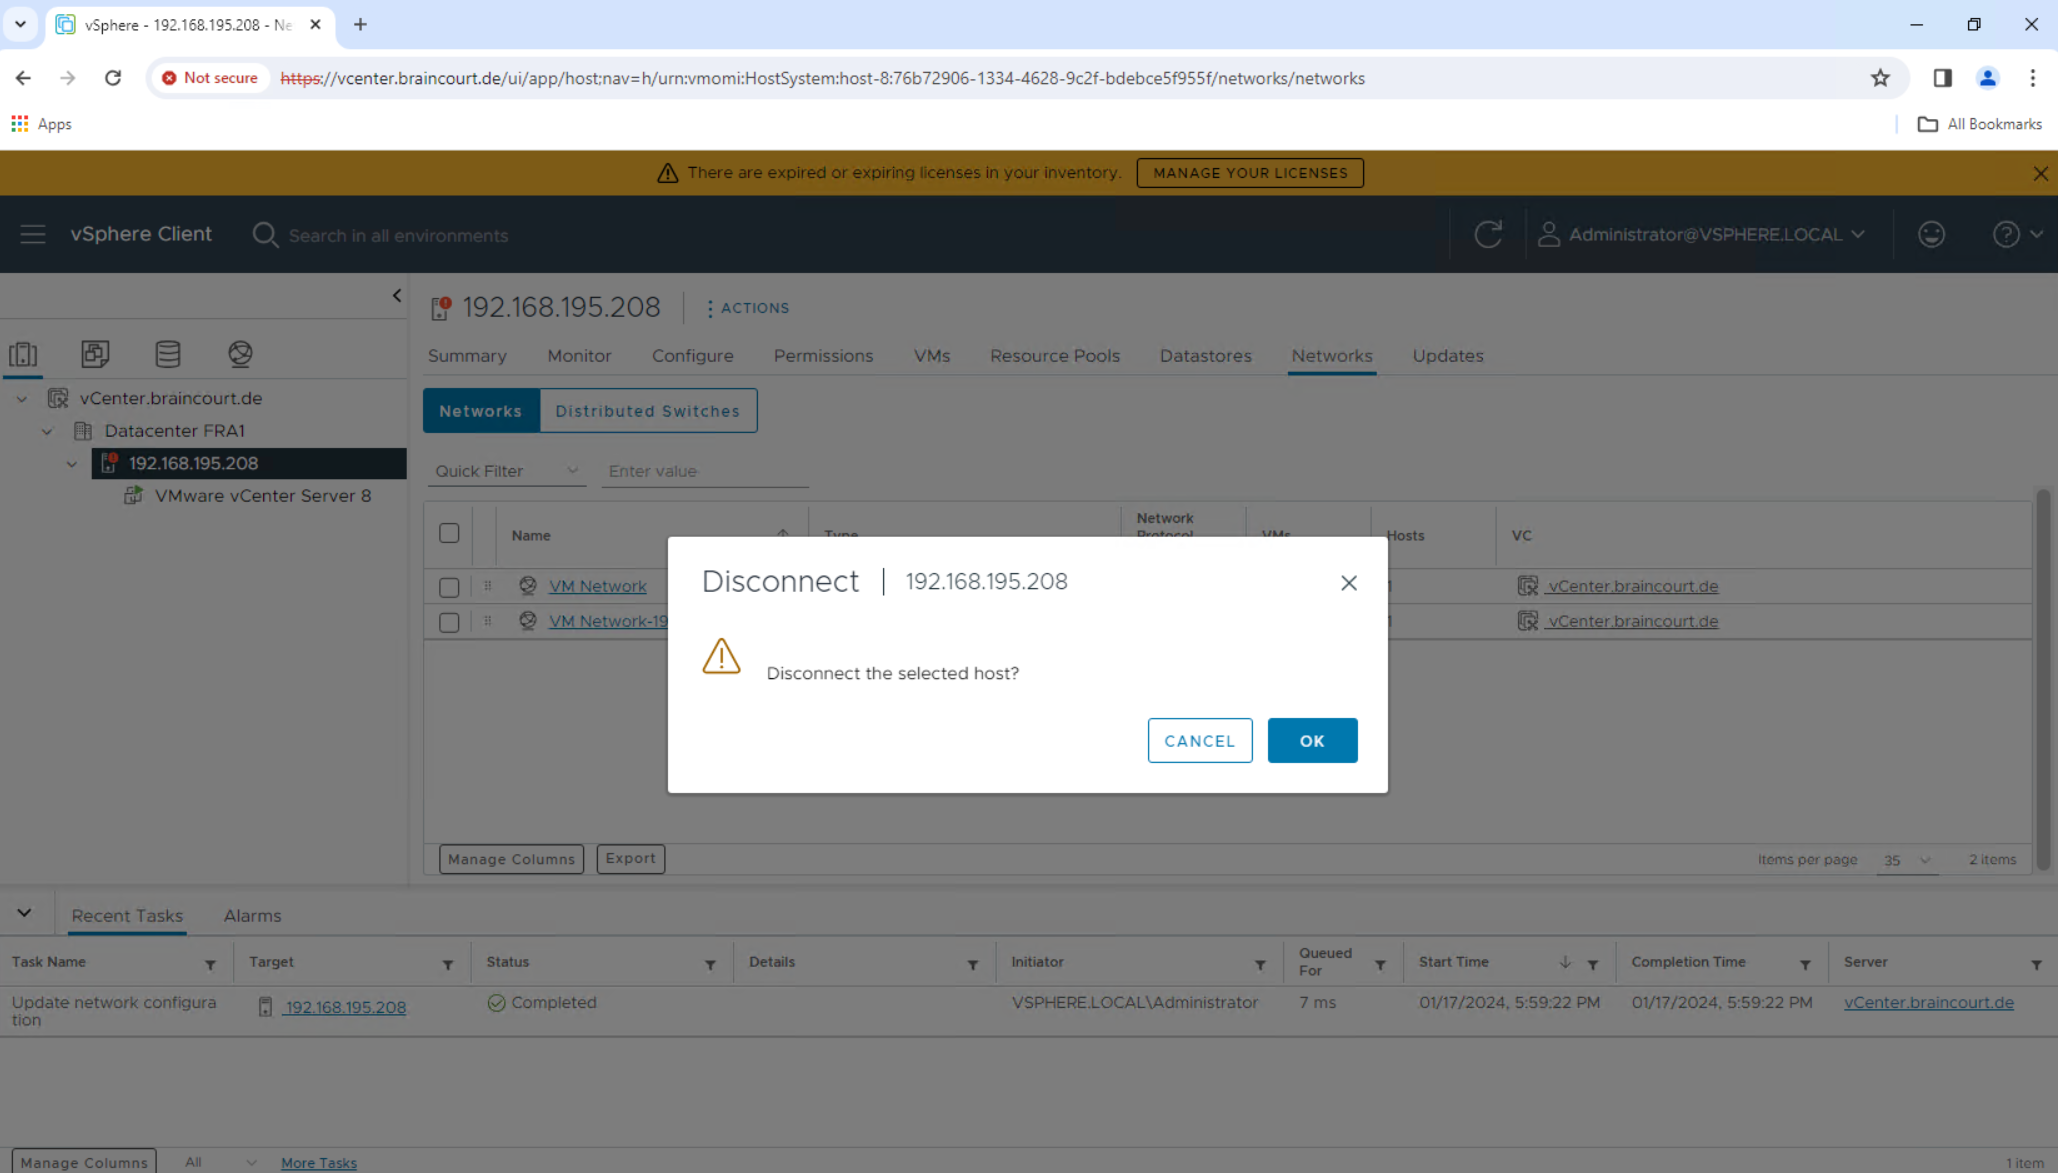
Disconnect the host from vCenter.
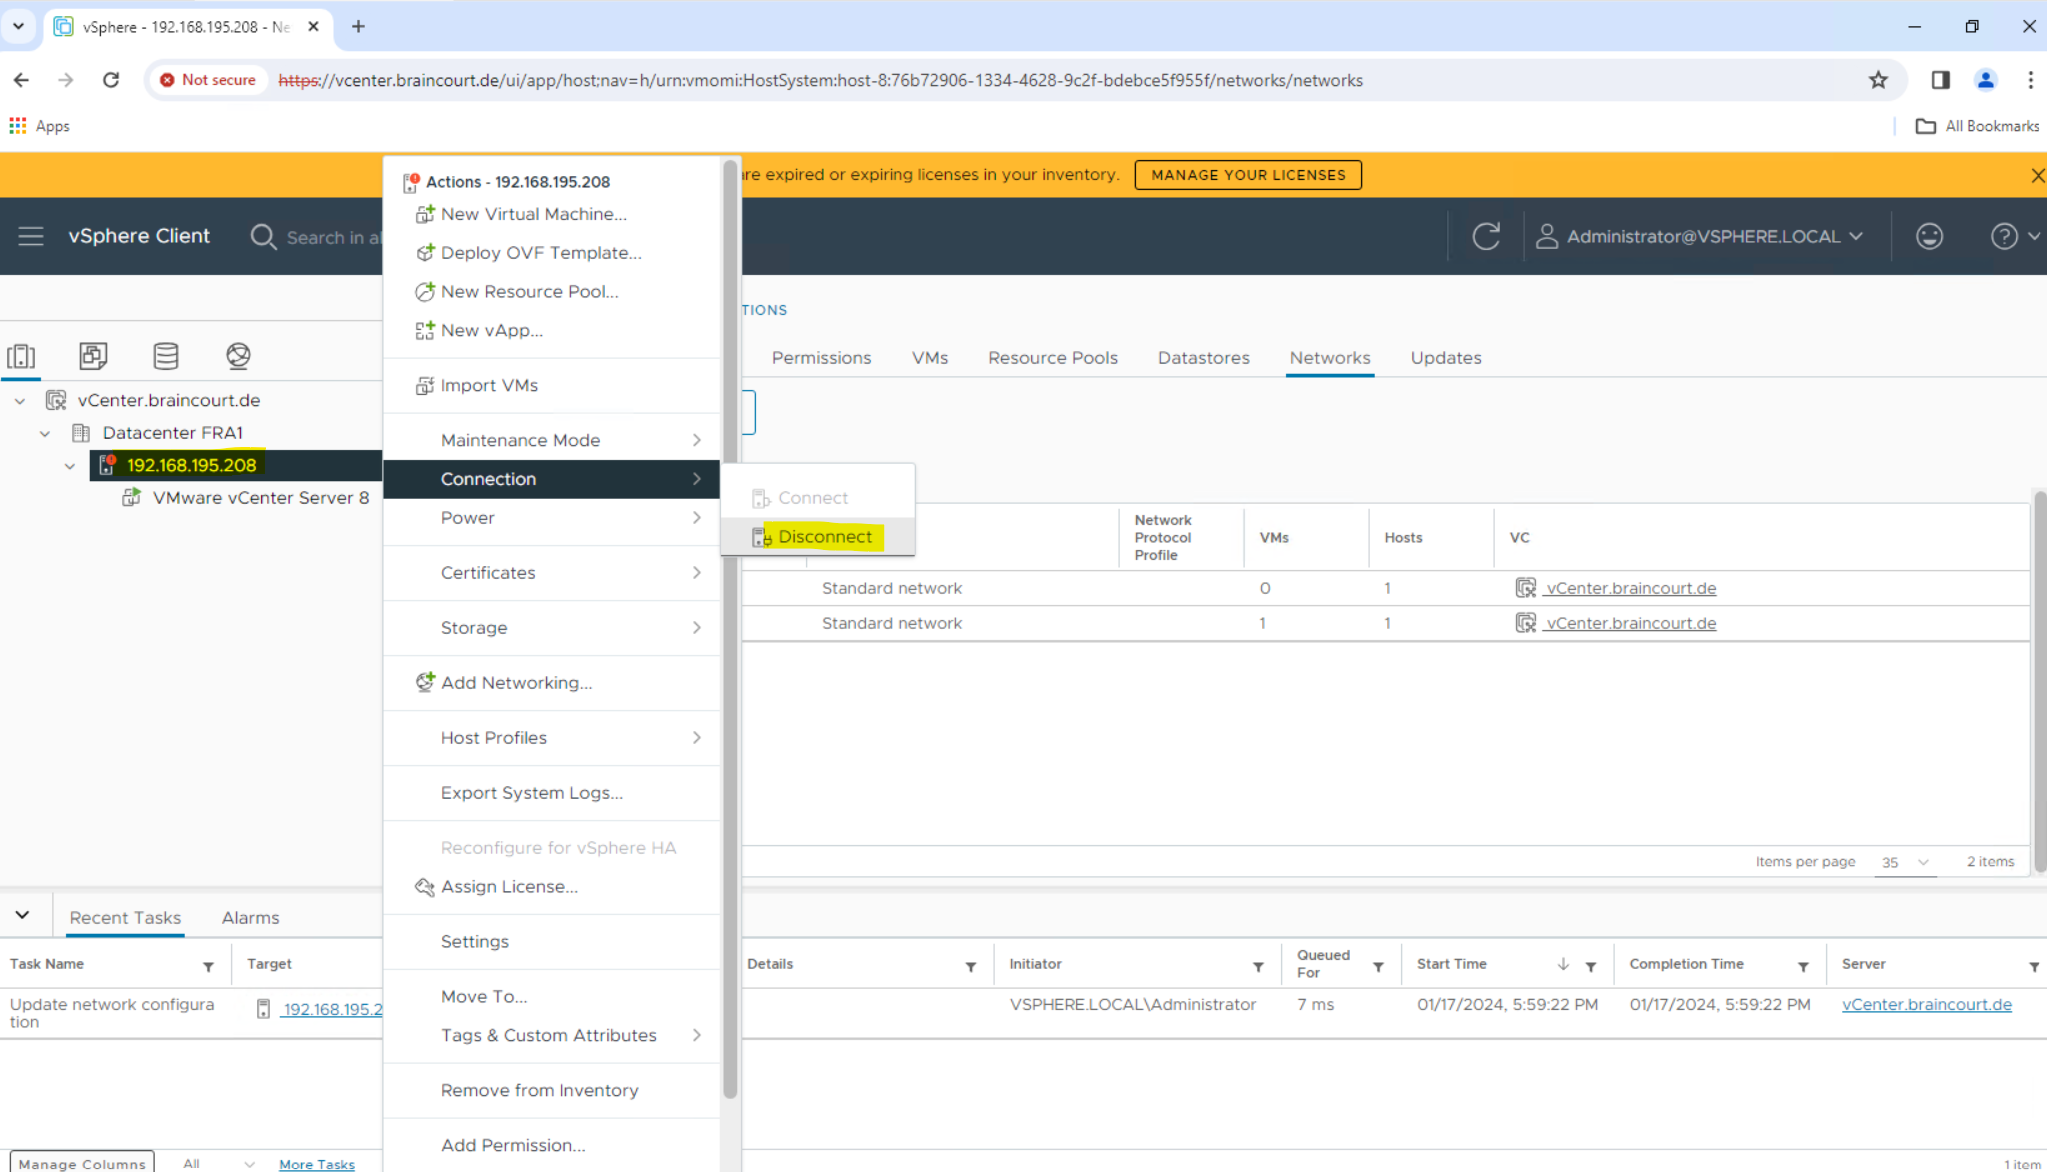
Add all the informations we entered the first time as shown in section Adding a Host (ESXi Hosts) further above.

Rename a VMware ESXi Host by using the command line
If the ESXi host is part of a cluster, first enter the Maintenance mode to remove it from the cluster.
If the ESXi host is managed by vCenter Server, disconnect and remove the ESXi host from the vCenter Server.
esxcli system hostname set --host=hostname
esxcli system hostname set --fqdn=fqdn
Join the ESX host to vCenter Server and clusters again.
vSphere Permission and User Management
Below you can see that vSphere will support different identity providers to manage identity and accessmanagement (IAM) for your vSphere environment.
So far I was just using local users created directly in vSphere.
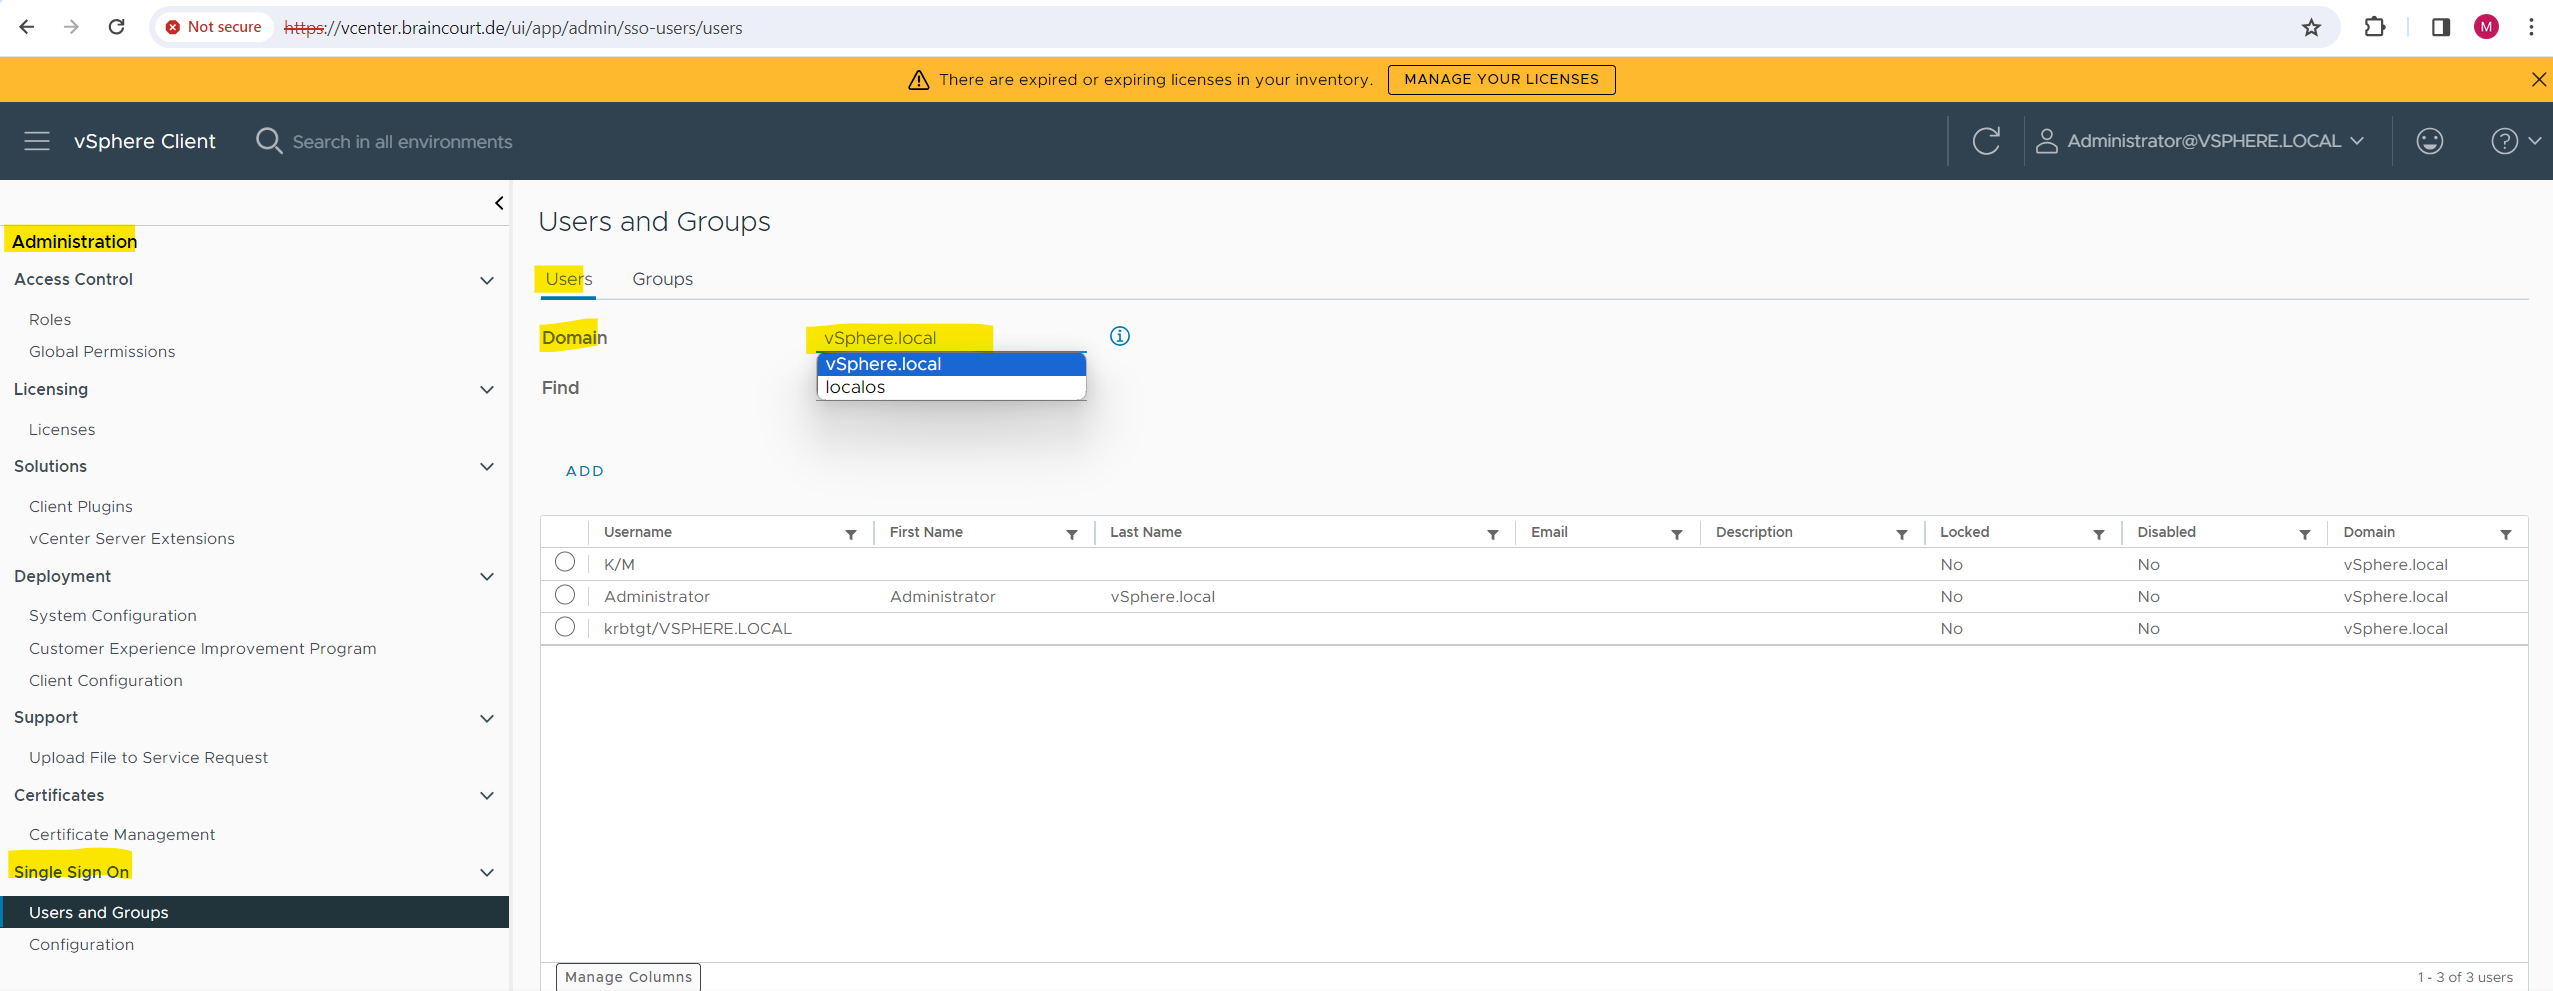
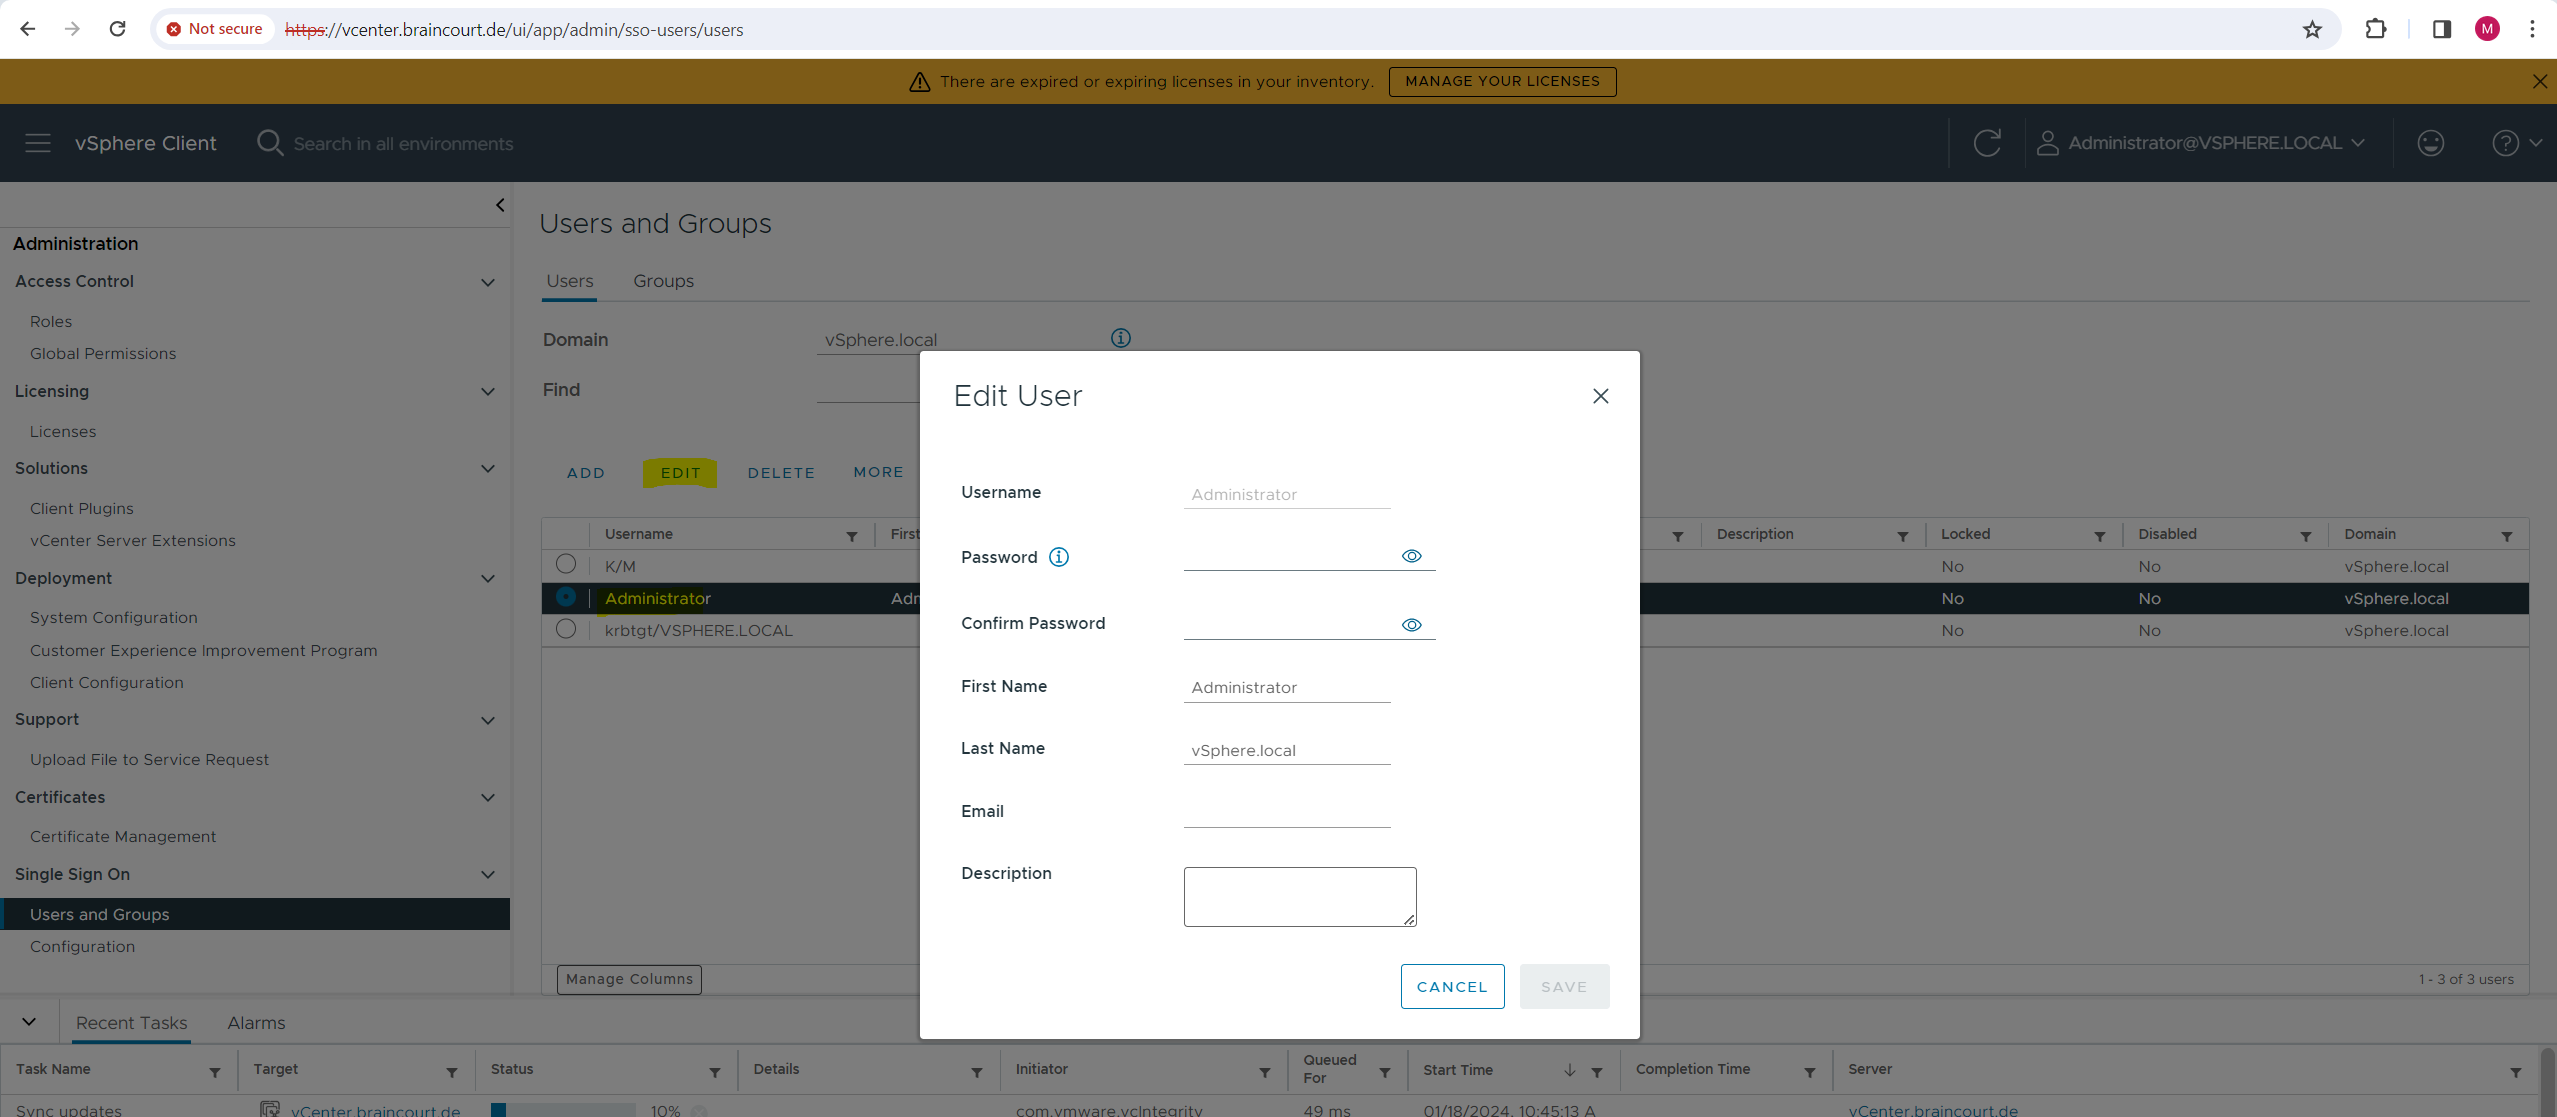
SSO Administrator
vSphere.local is the local domain of the vCenter server or some other domain which will be provided during the installation of vCenter server.
In case some other authentication methods (LDAP or other SSO provider) will fail, you can use this local domain to access the vCenter server and bypass other SSO methods.
Join vCenter Server to your Active Directory on-premise Domain
You can join vCenter Server to an Active Directory domain. You can attach the users and groups from this Active Directory domain to your vCenter Single Sign-On domain.
Joining vCenter Server to an Active Directory domain with a read-only domain controller (RODC) is not supported. You can join vCenter Server only to an Active Directory domain with a writable domain controller.
Source: https://docs.vmware.com/en/VMware-vSphere/6.7/com.vmware.vsphere.vcsa.doc/GUID-08EA2F92-78A7-4EFF-880E-2B63ACC962F3.html
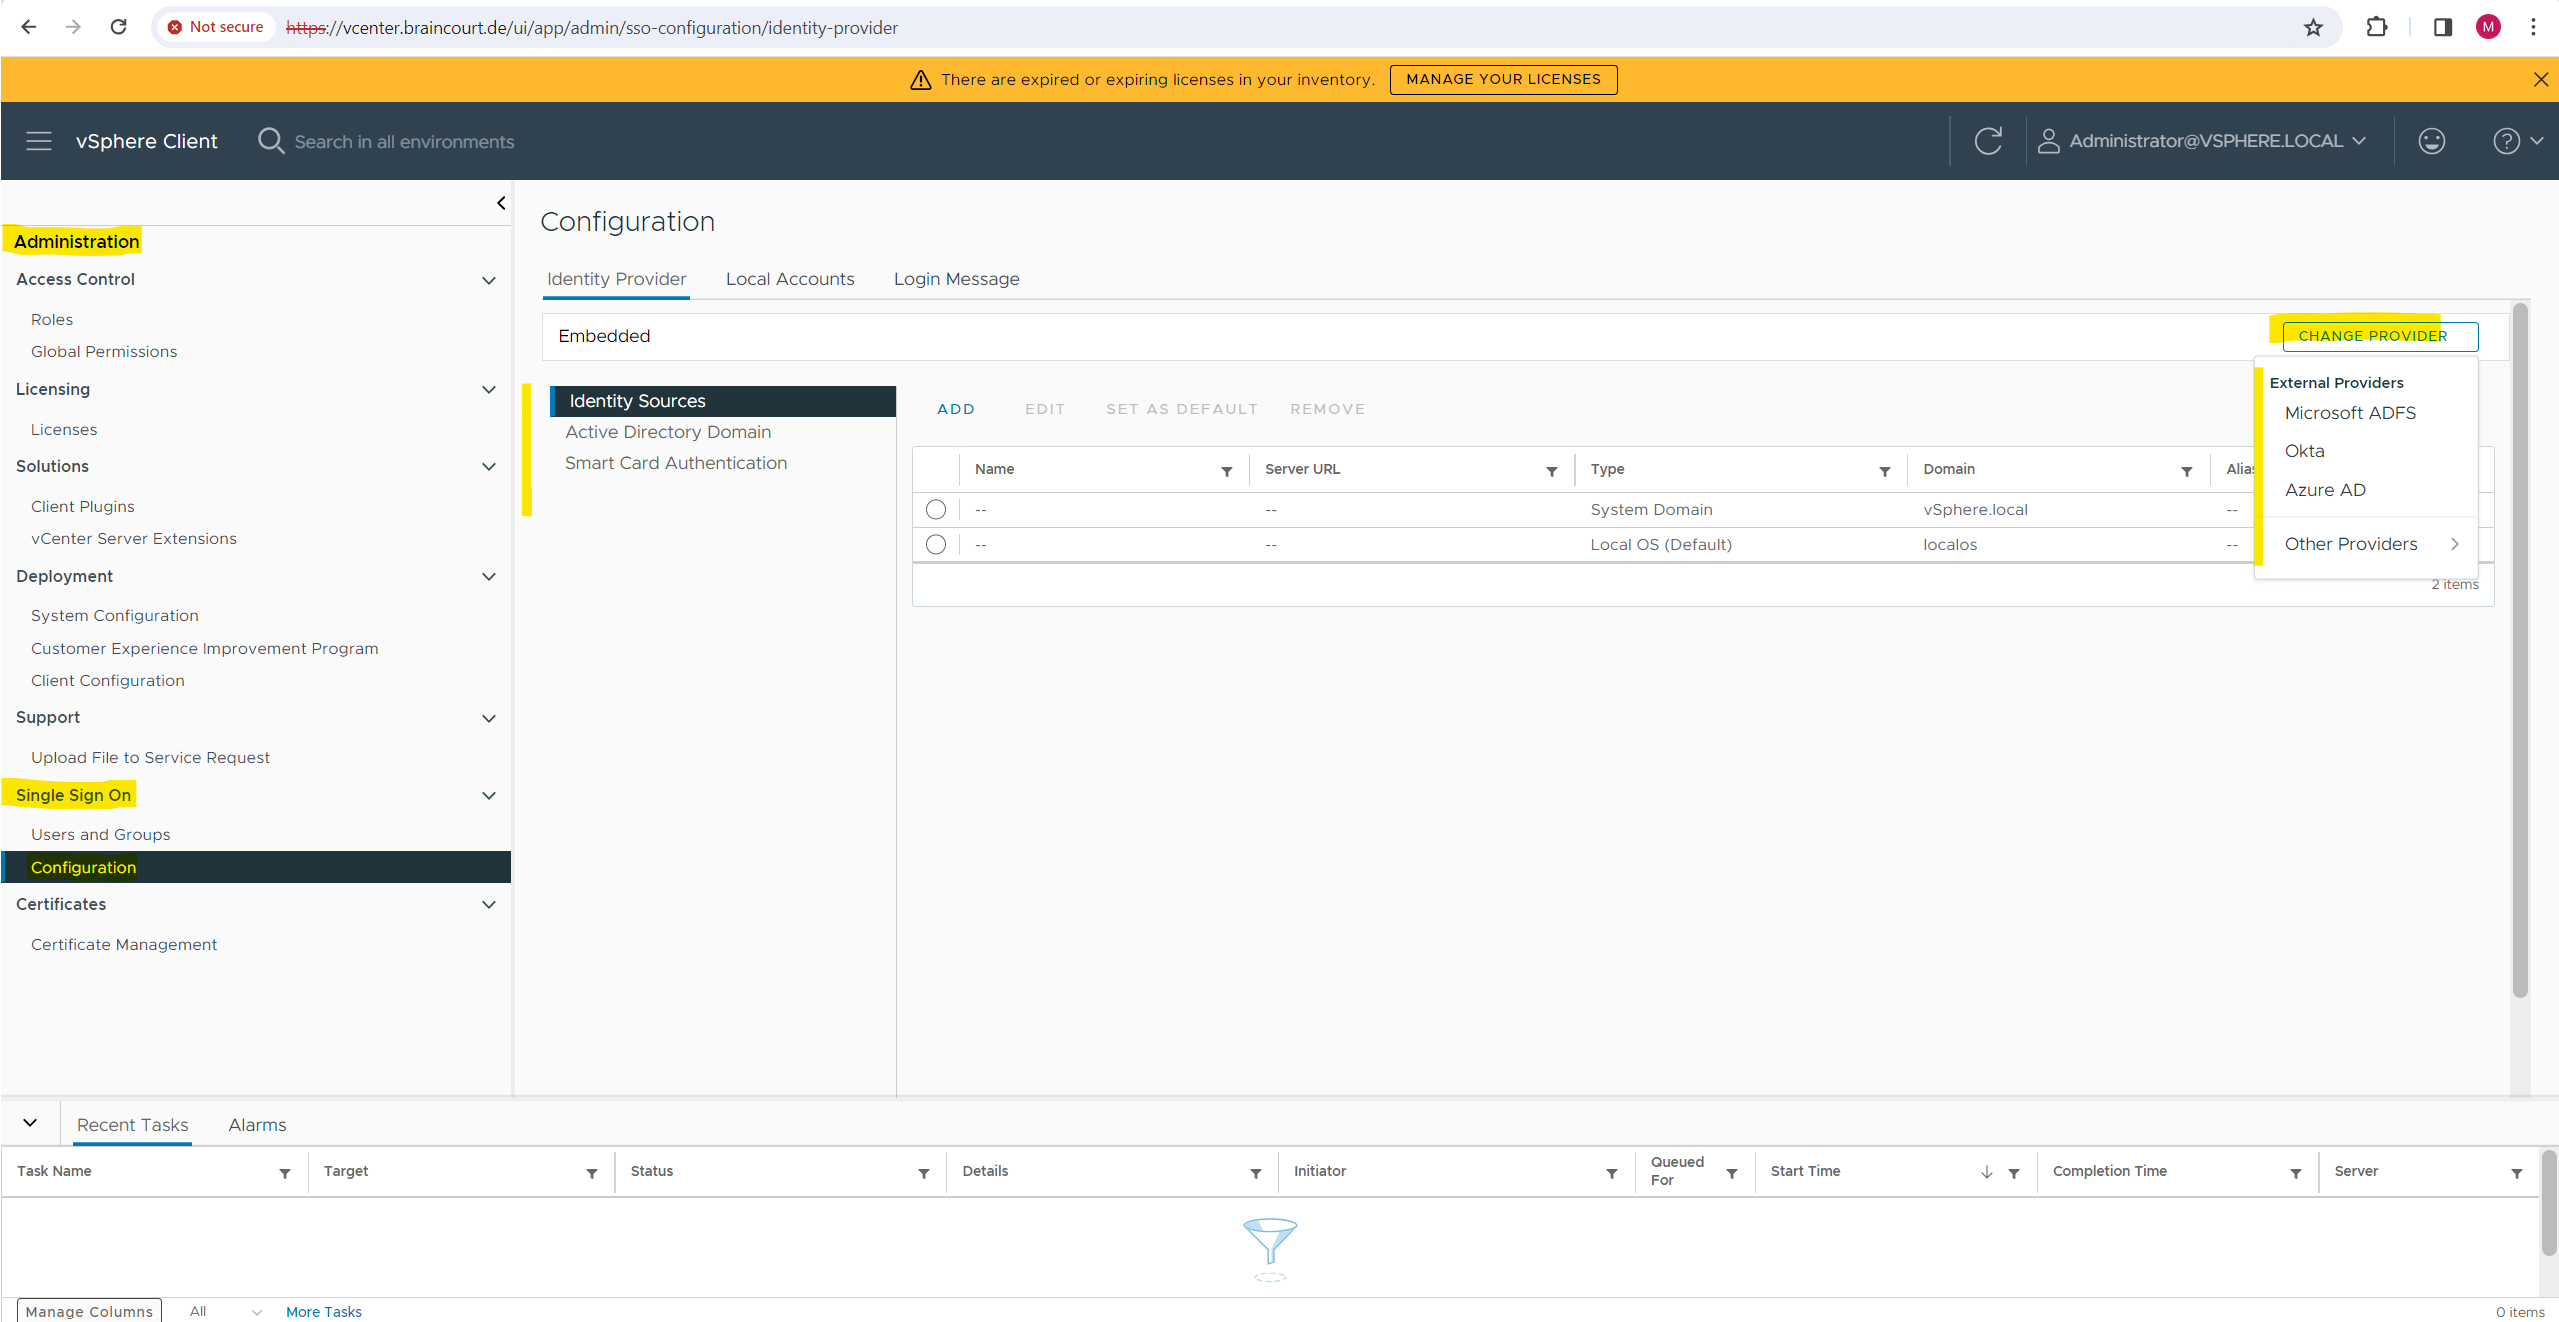
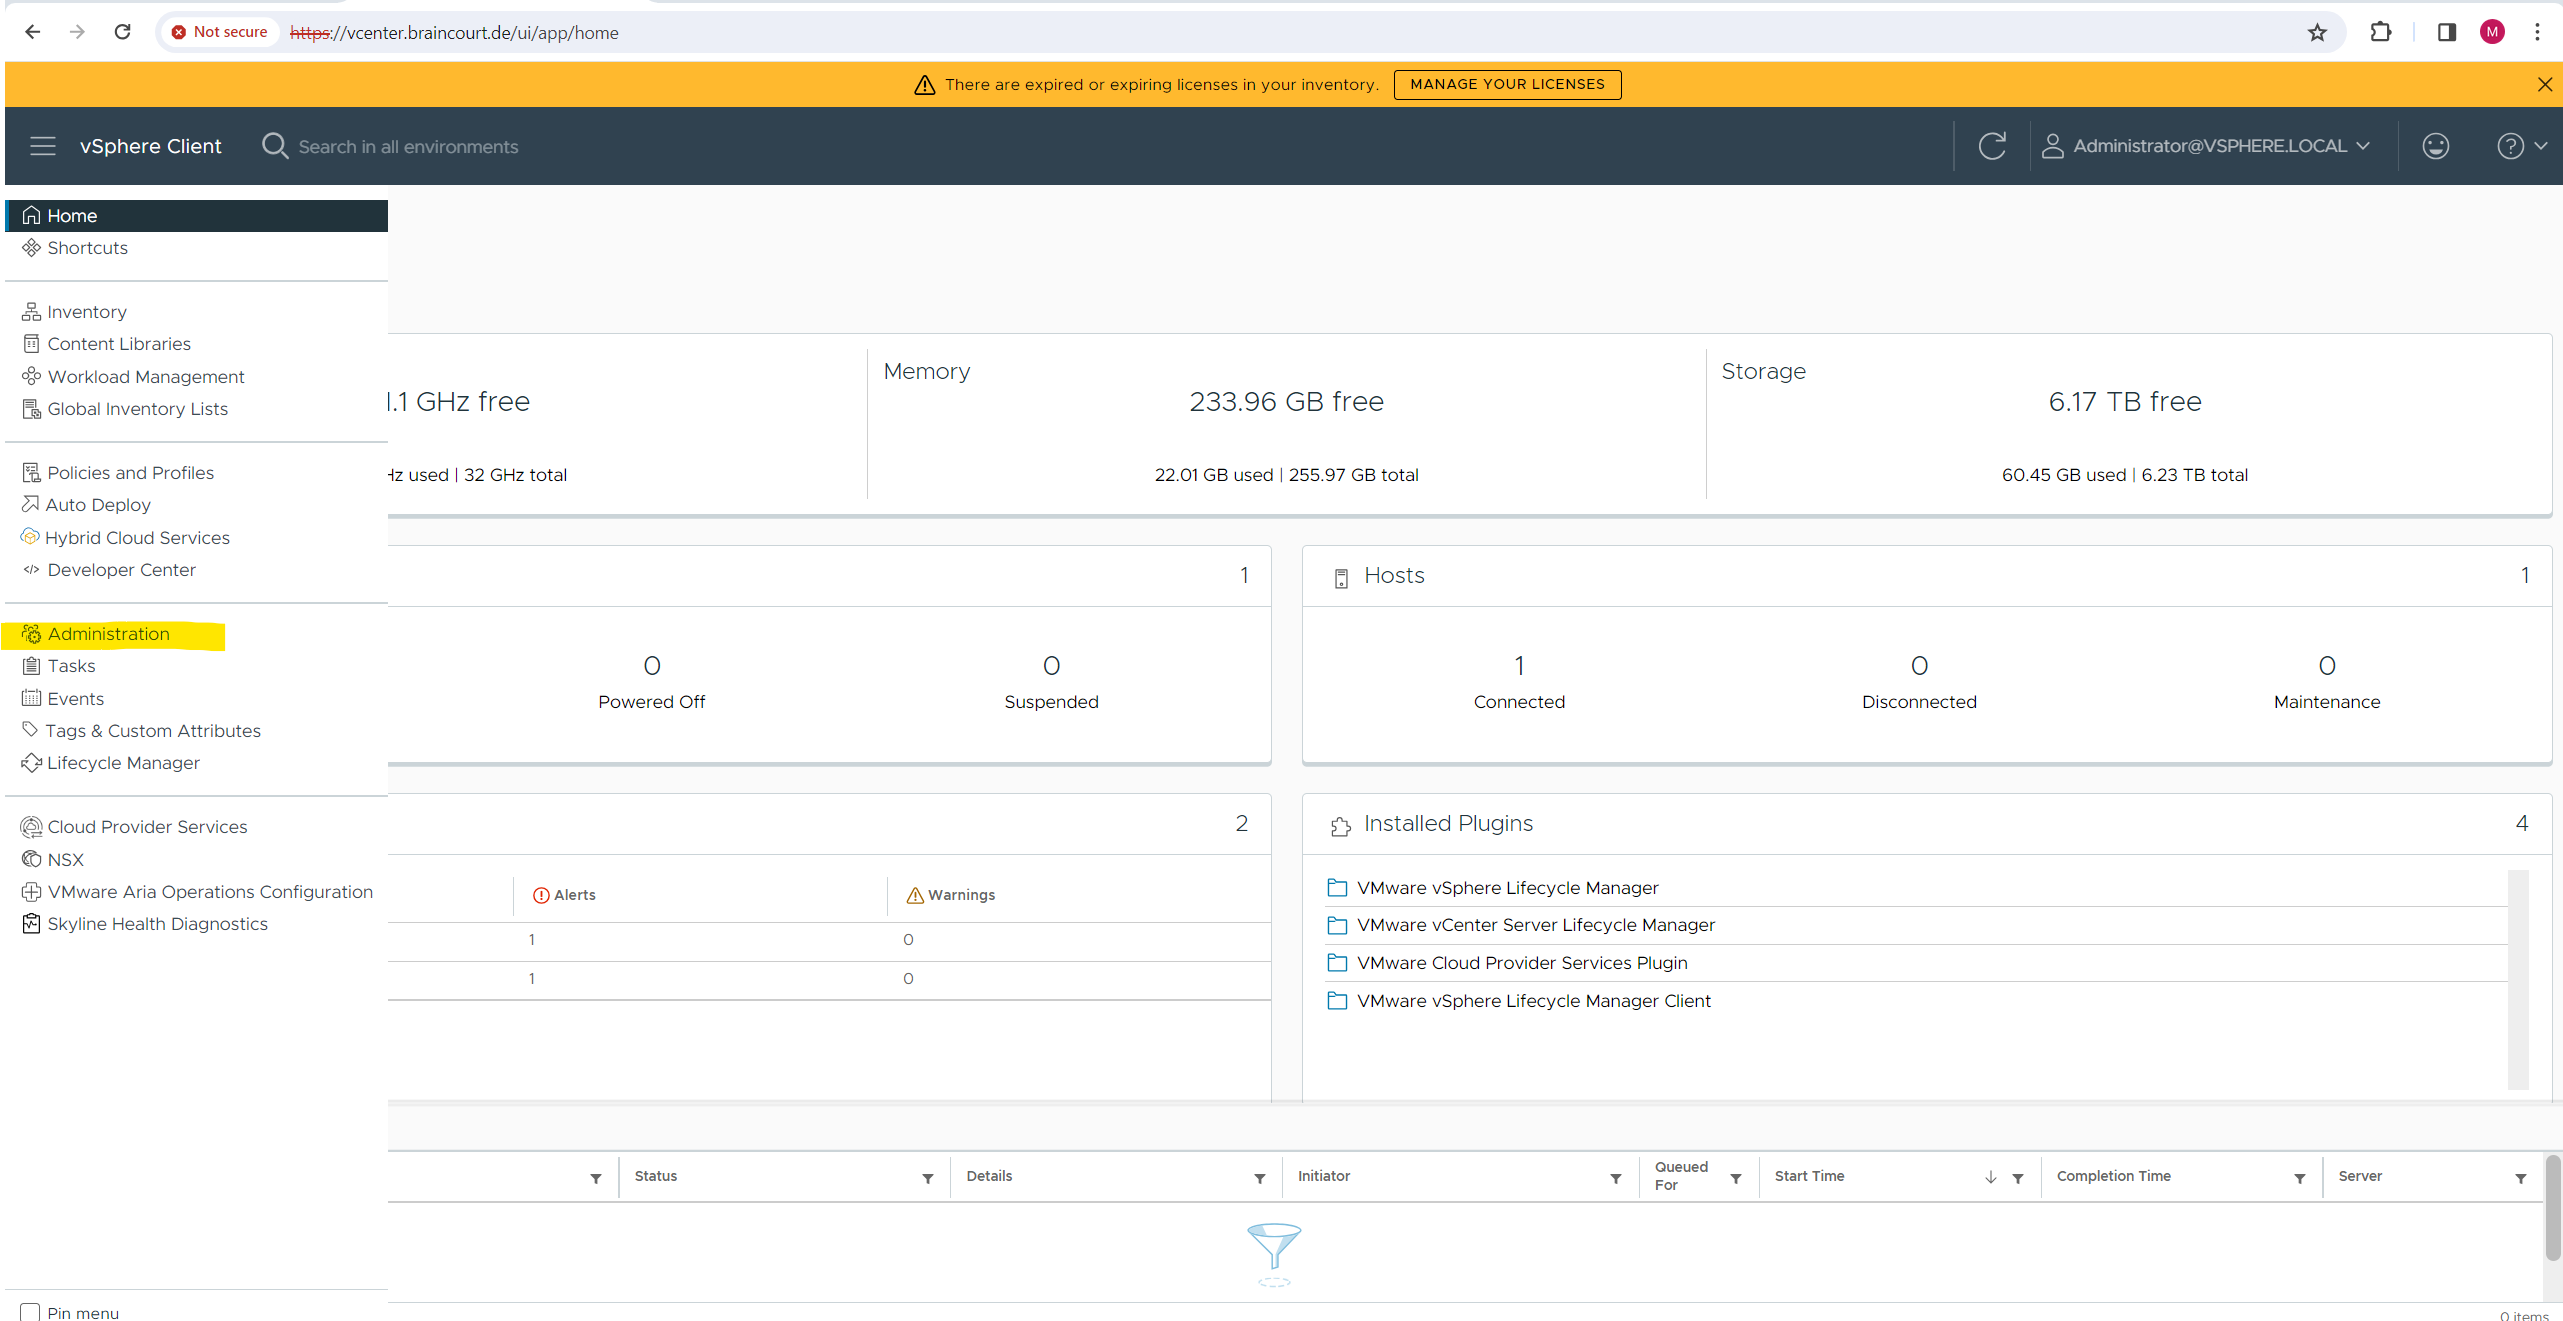
To join the vCenter Server to your Active Directory domain, navigate within the vSphere Client to Administration.
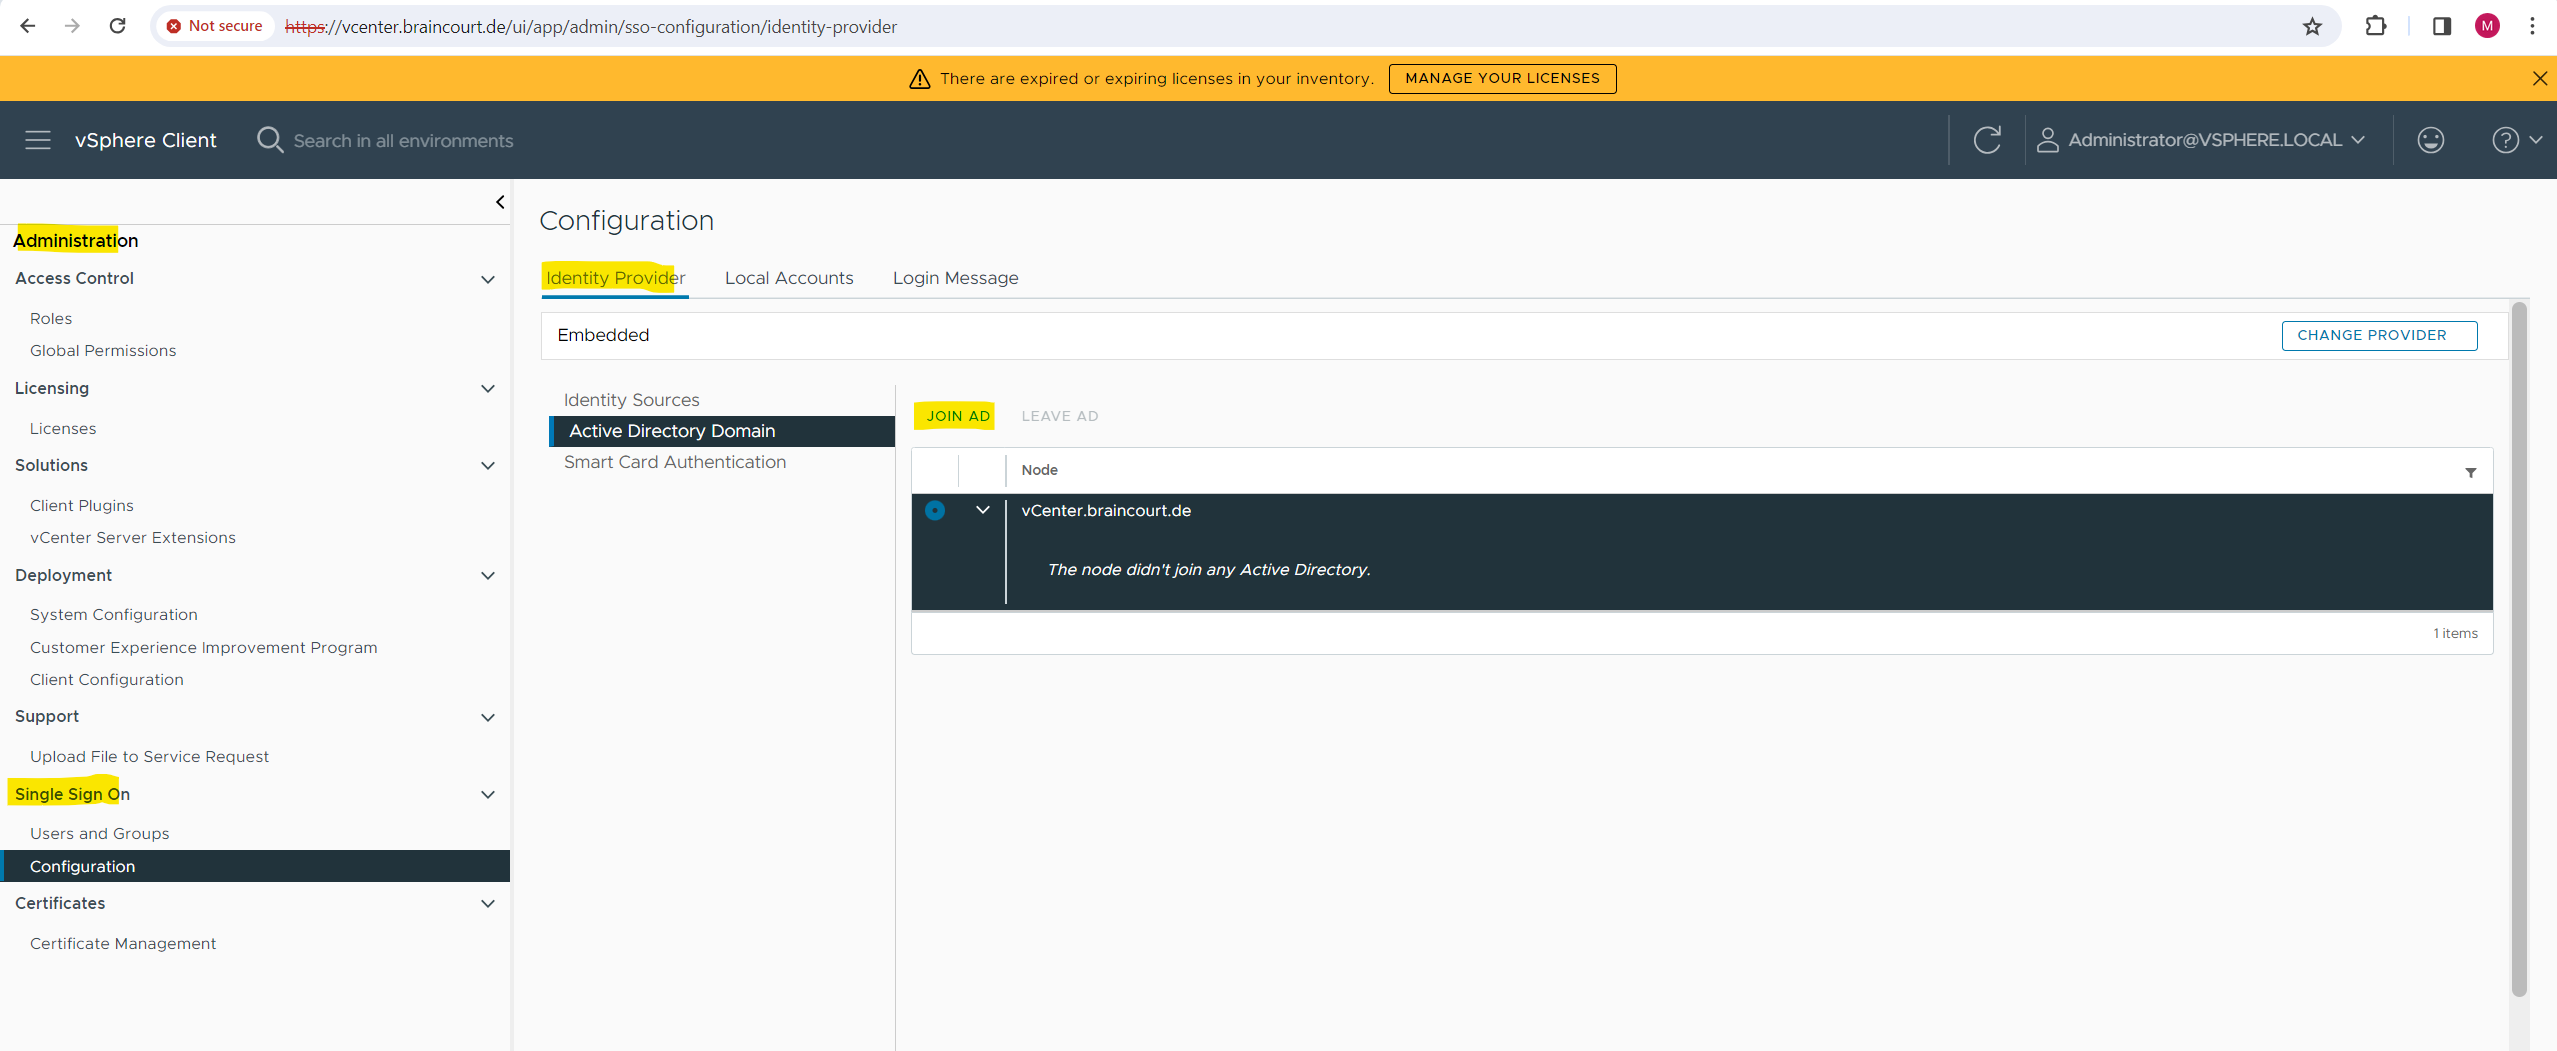
Under Administration select Single Sign On -> Configuration -> Active Directory Domain -> JOIN AD.
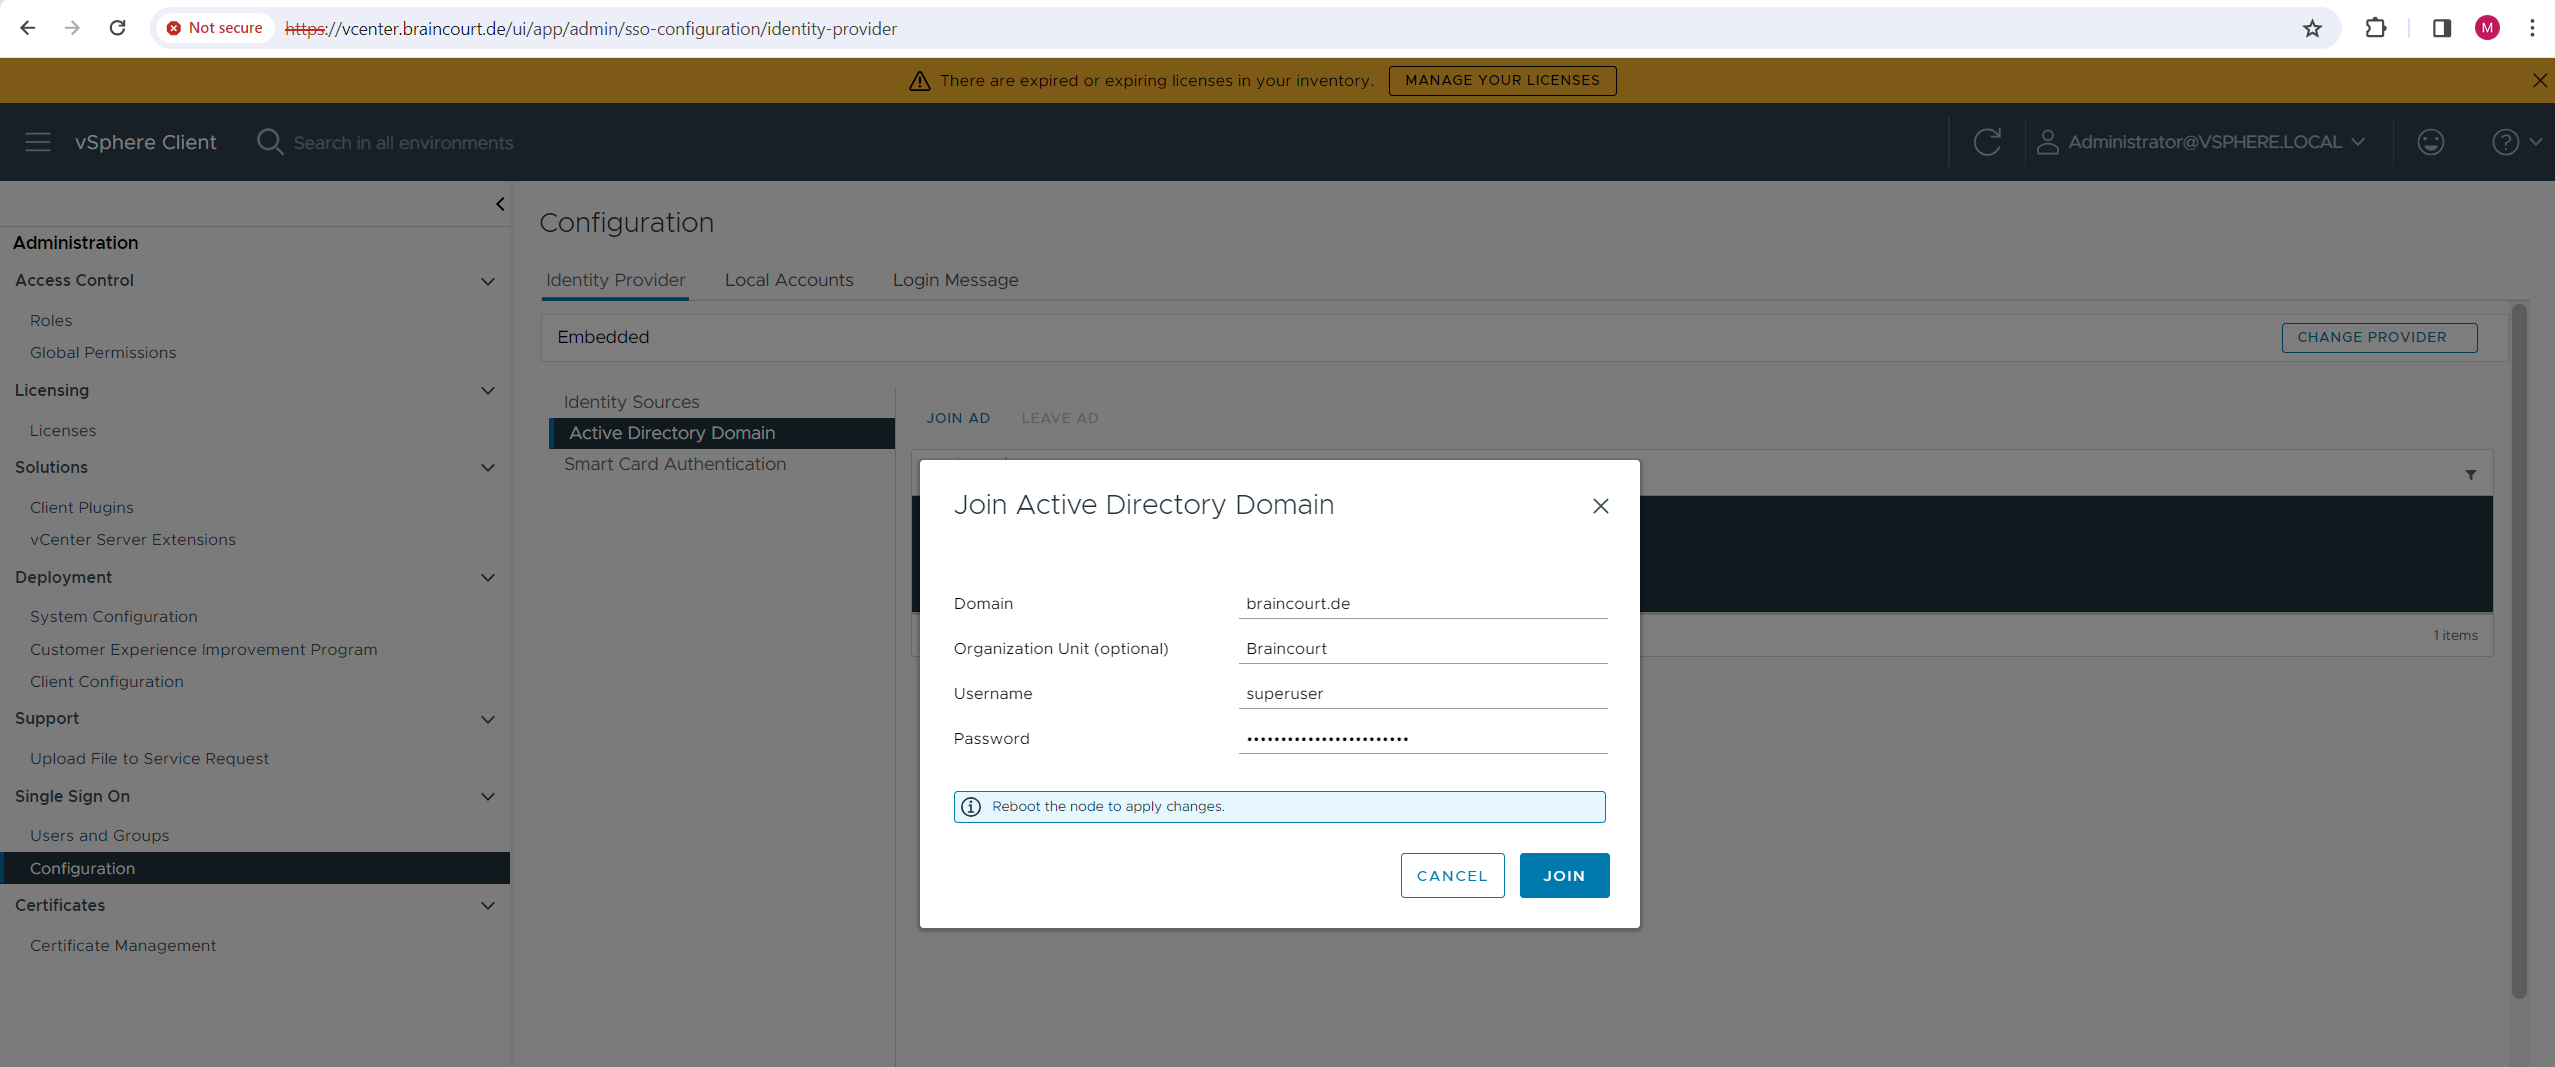
Enter your on-premise Active Directory domain. Your existing local SSO domain (vSphere.local when using the default) must be different, otherwise you won’t be able to join vCenter to your AD domain.
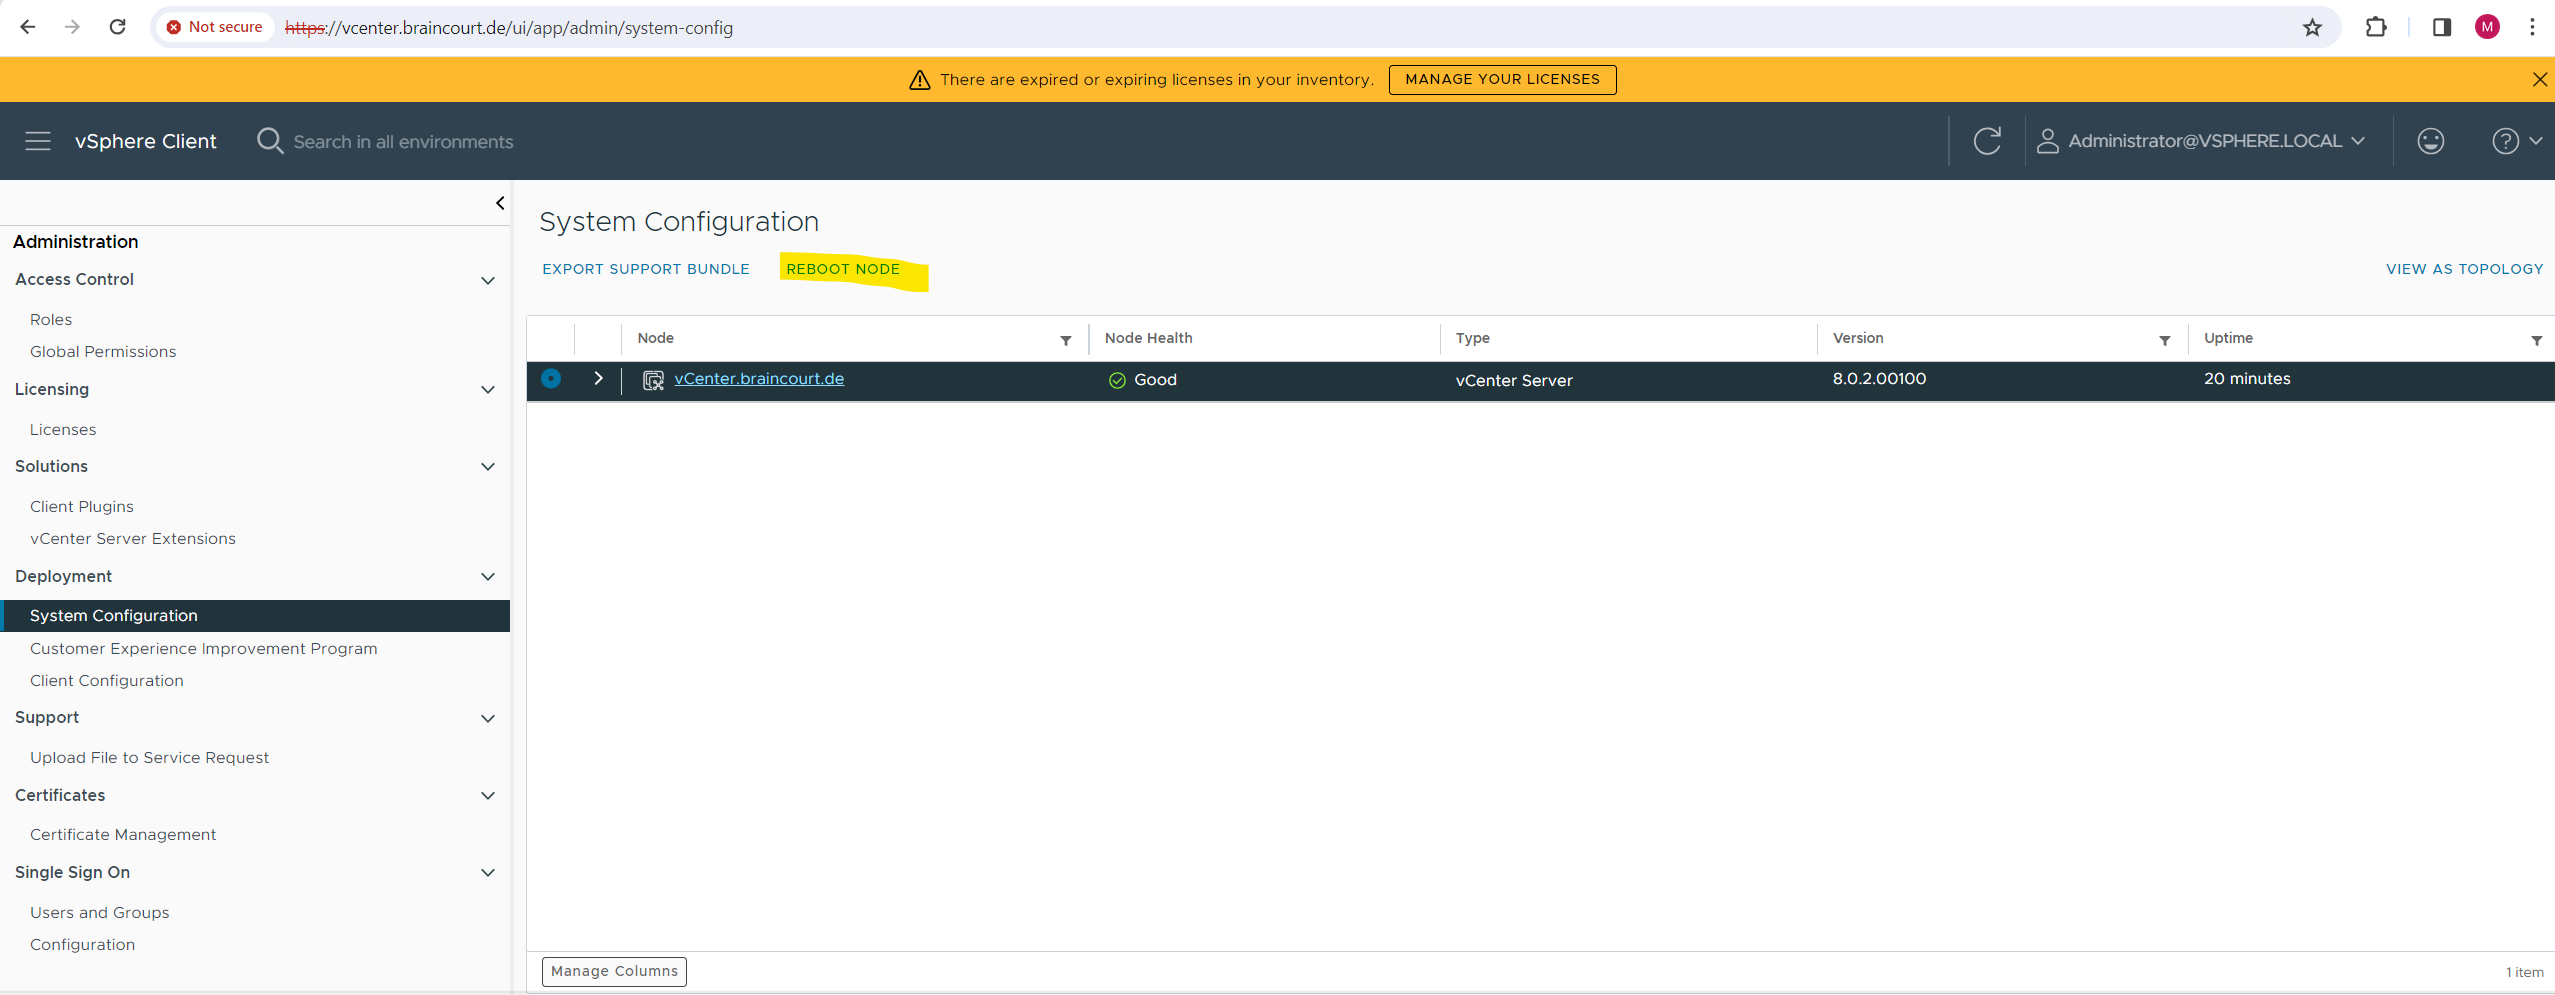
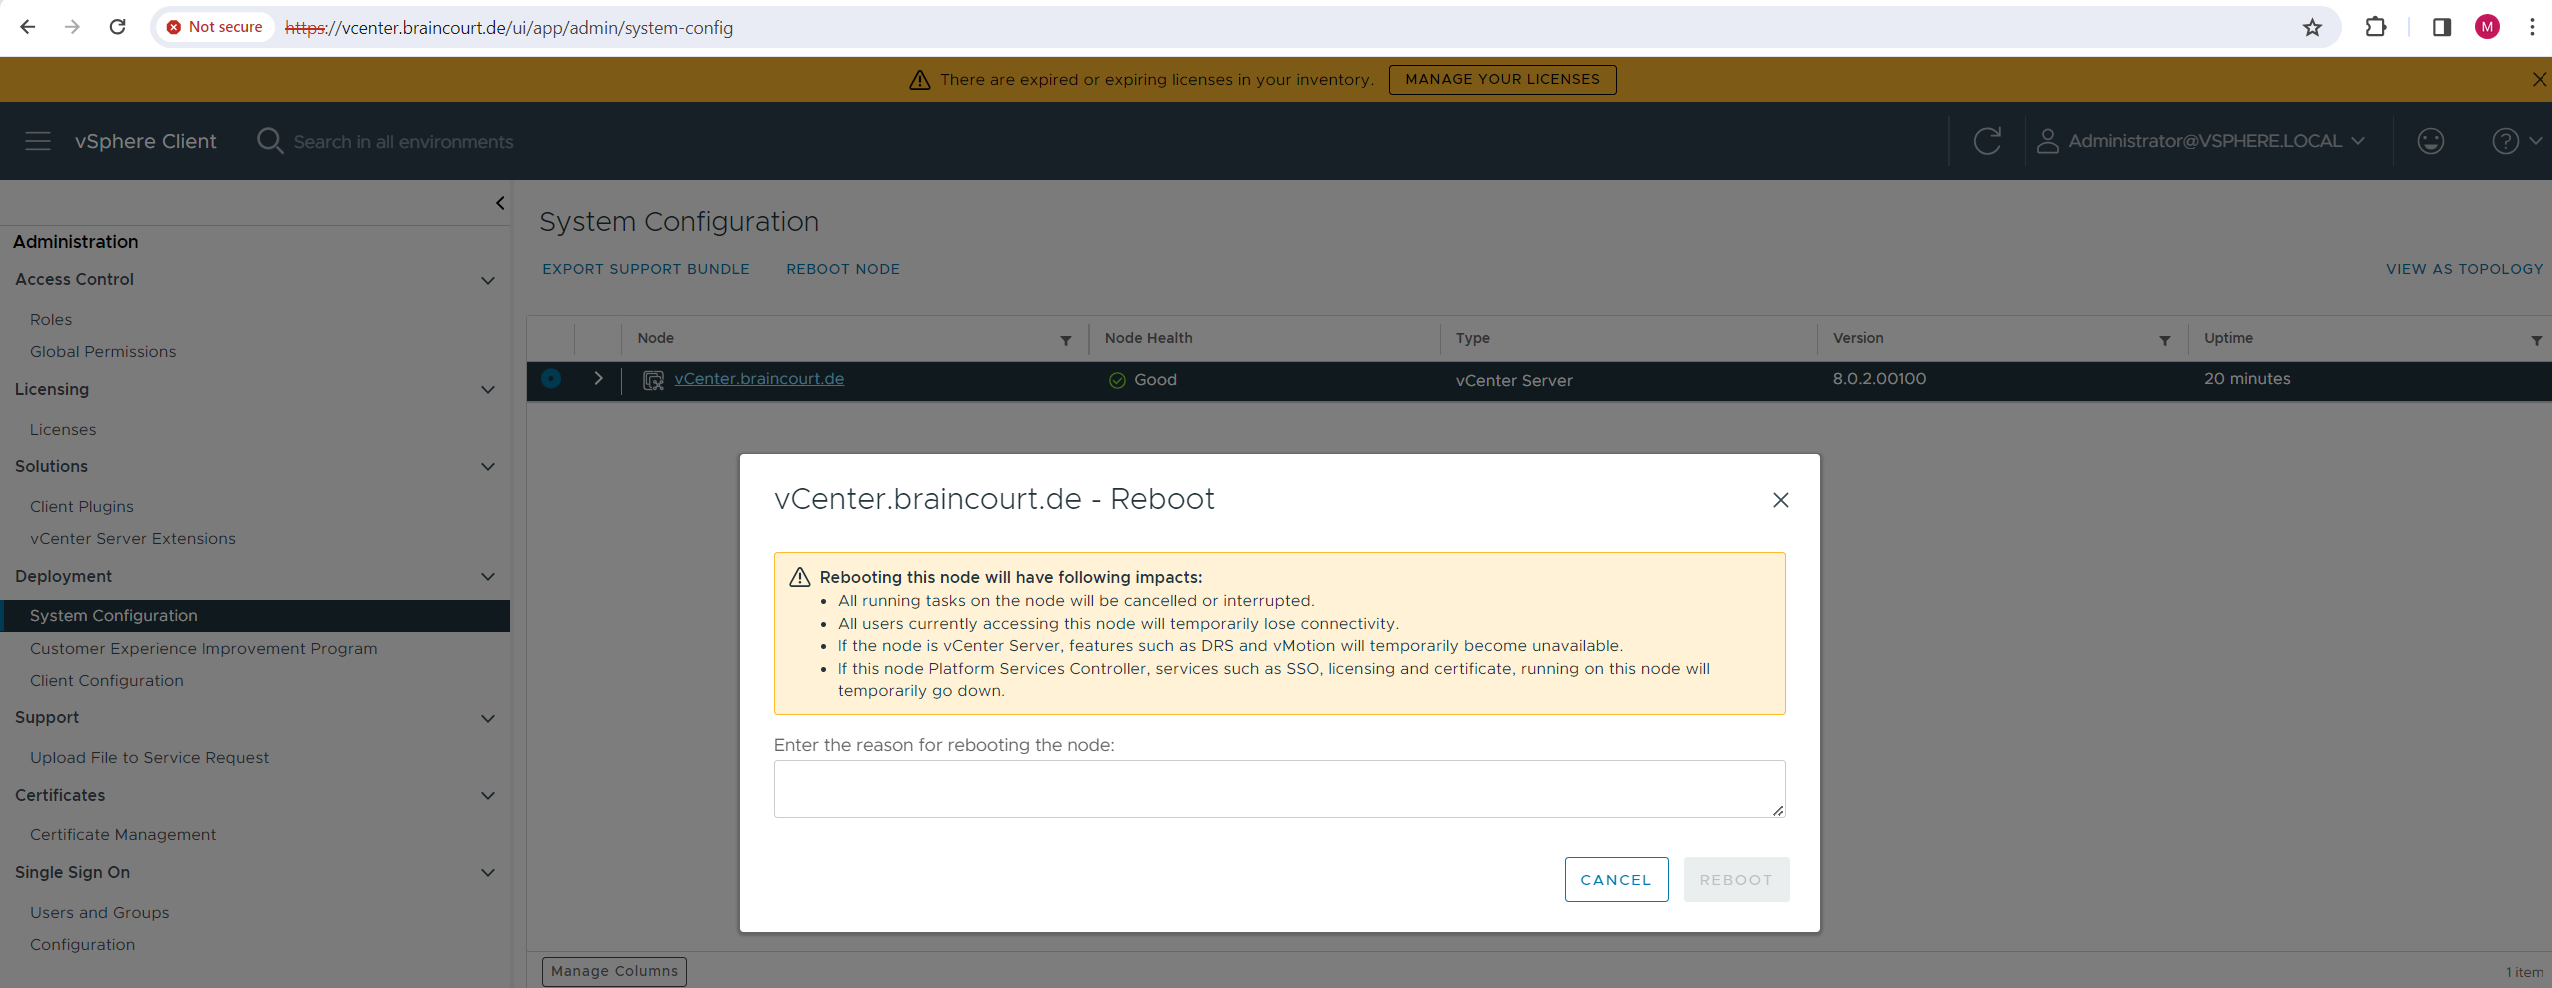
In order to apply the changes we need to reboot the vCenter server (node), therefore we can navigate to the Administration -> Deployment -> System Configuration menu.
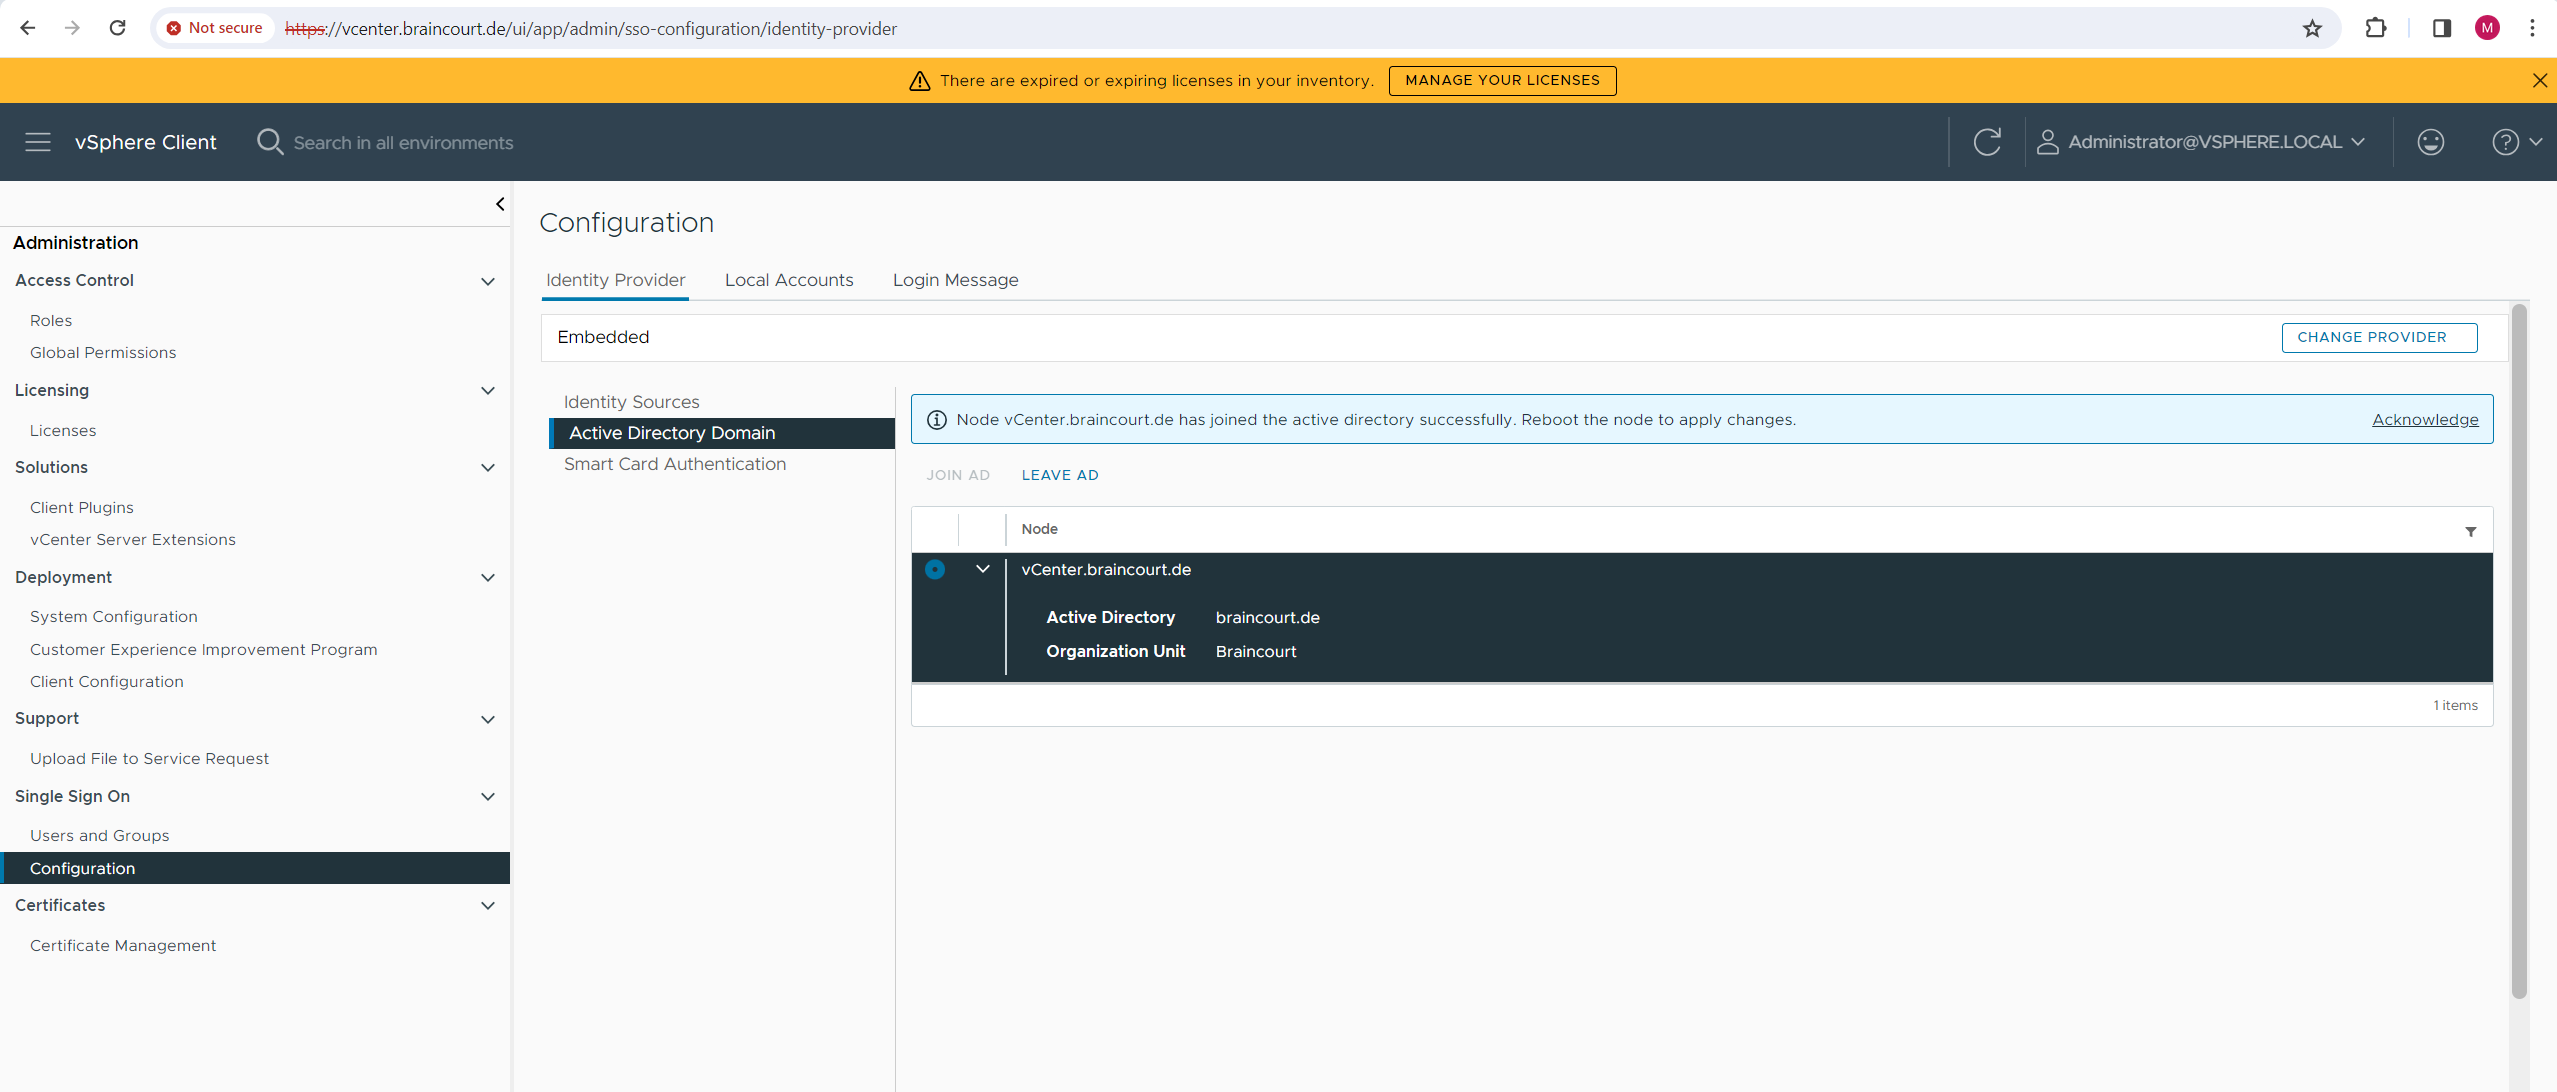
After the reboot we can check that vCenter is connected successfully to our on-premise Active Directory domain.
Administration > Single Sign On > Configuration > Identity Provider > Active Directory Domain

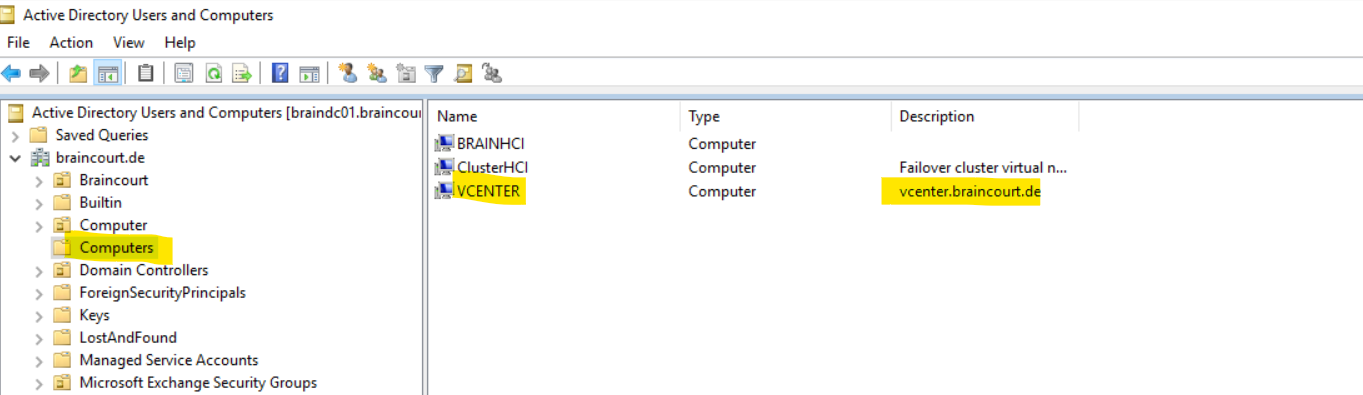
Further we can check if the vCenter server is showing up correctly in the Active Directory Users and Computers snap-in as shown below.
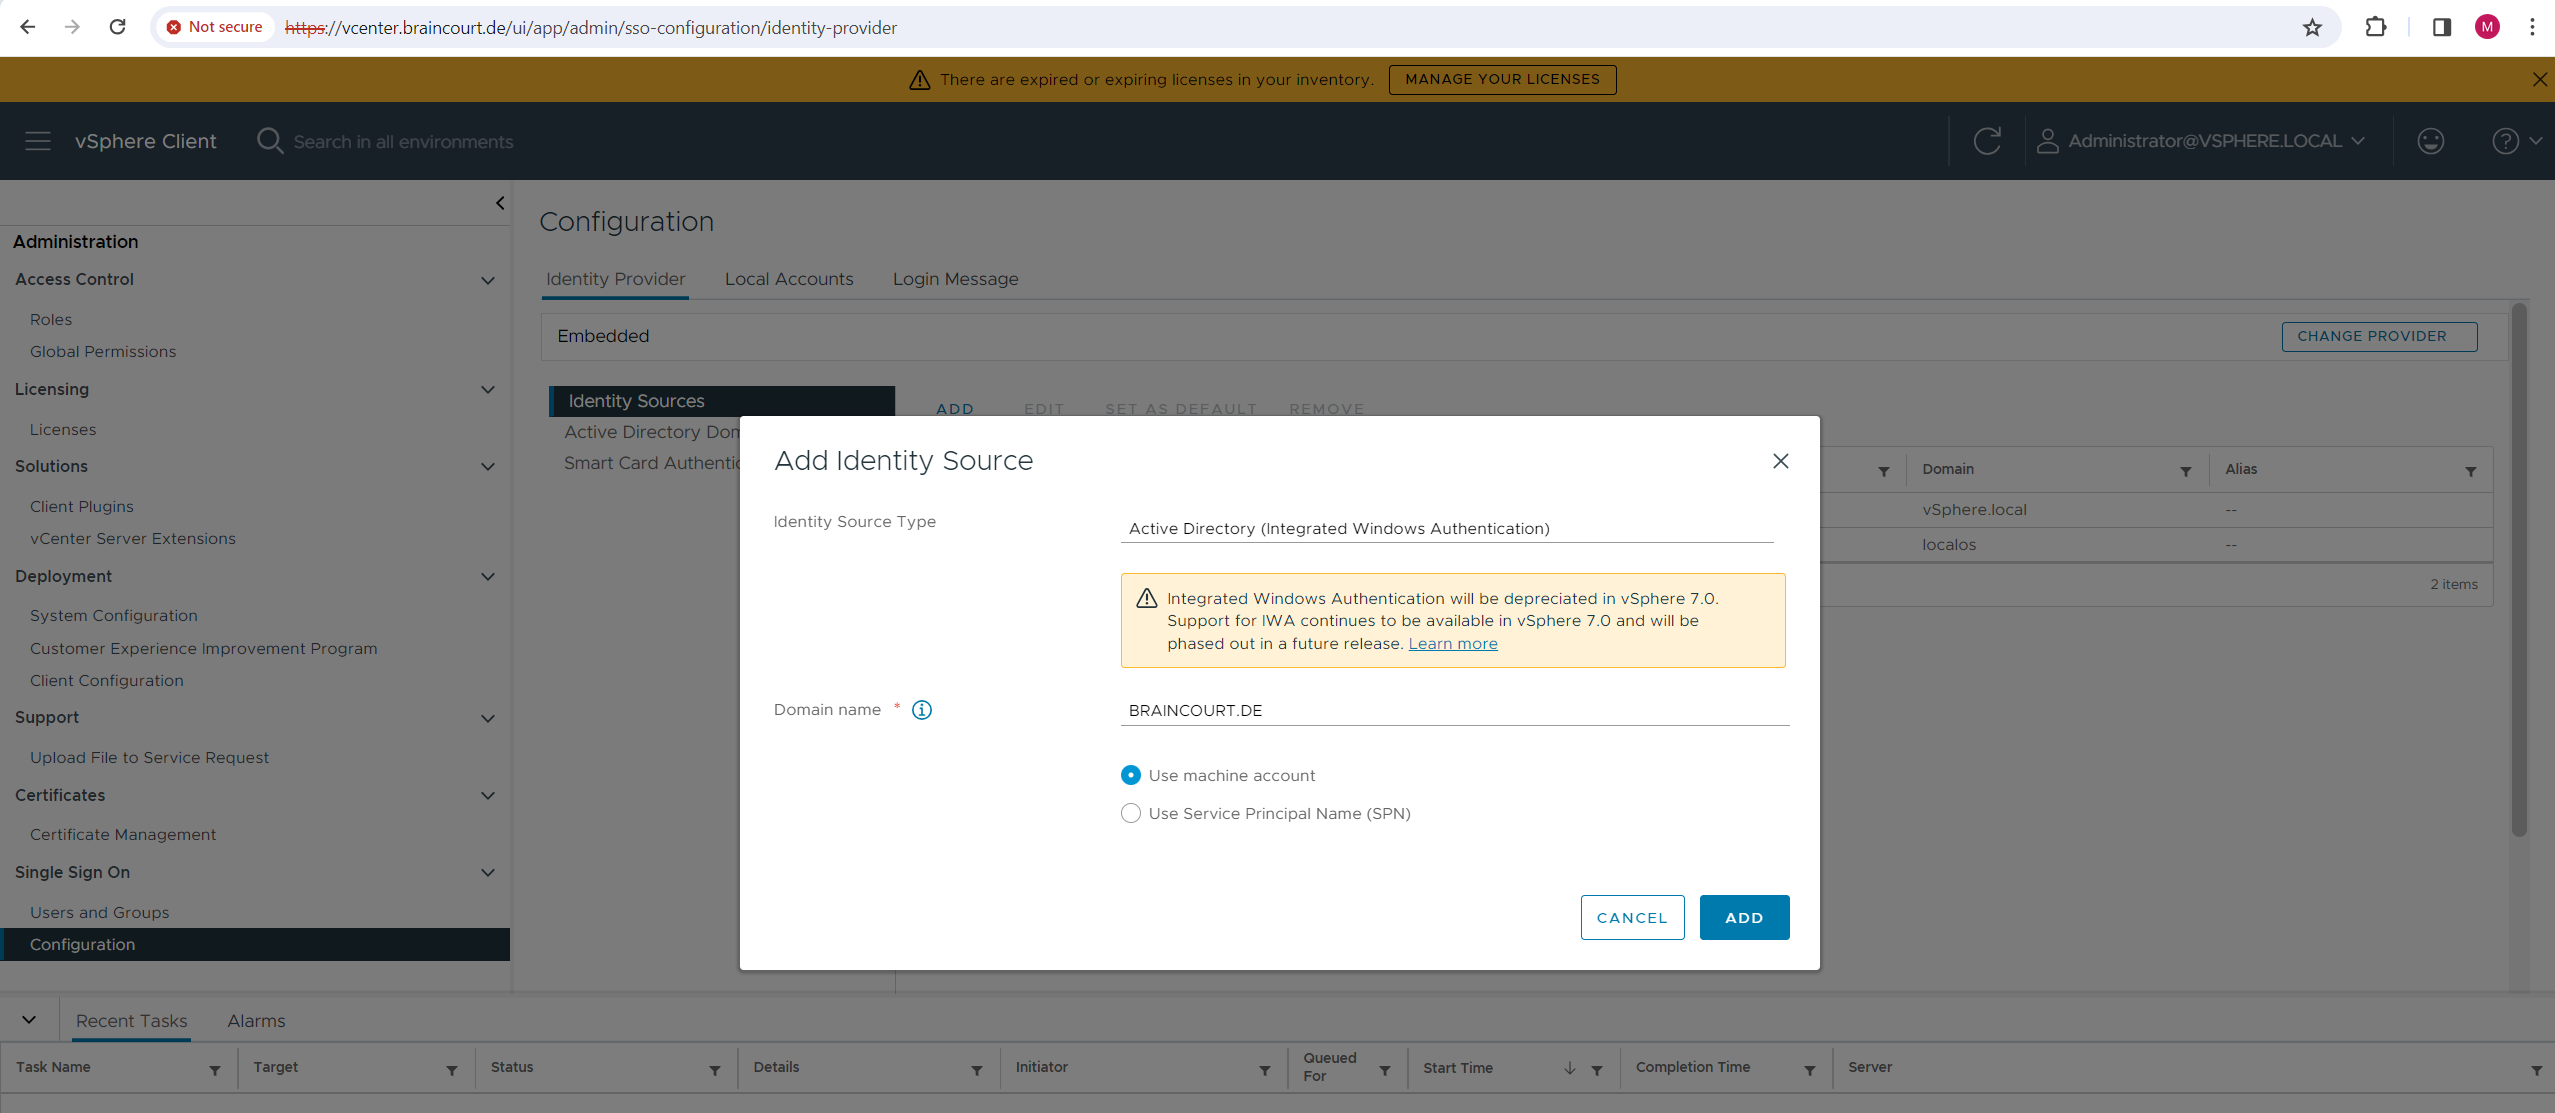
So far our on-premise Active Directory is not shown up as an Identity Provider for our vSphere environment. Therefore we first need to add it by clicking on ADD below.
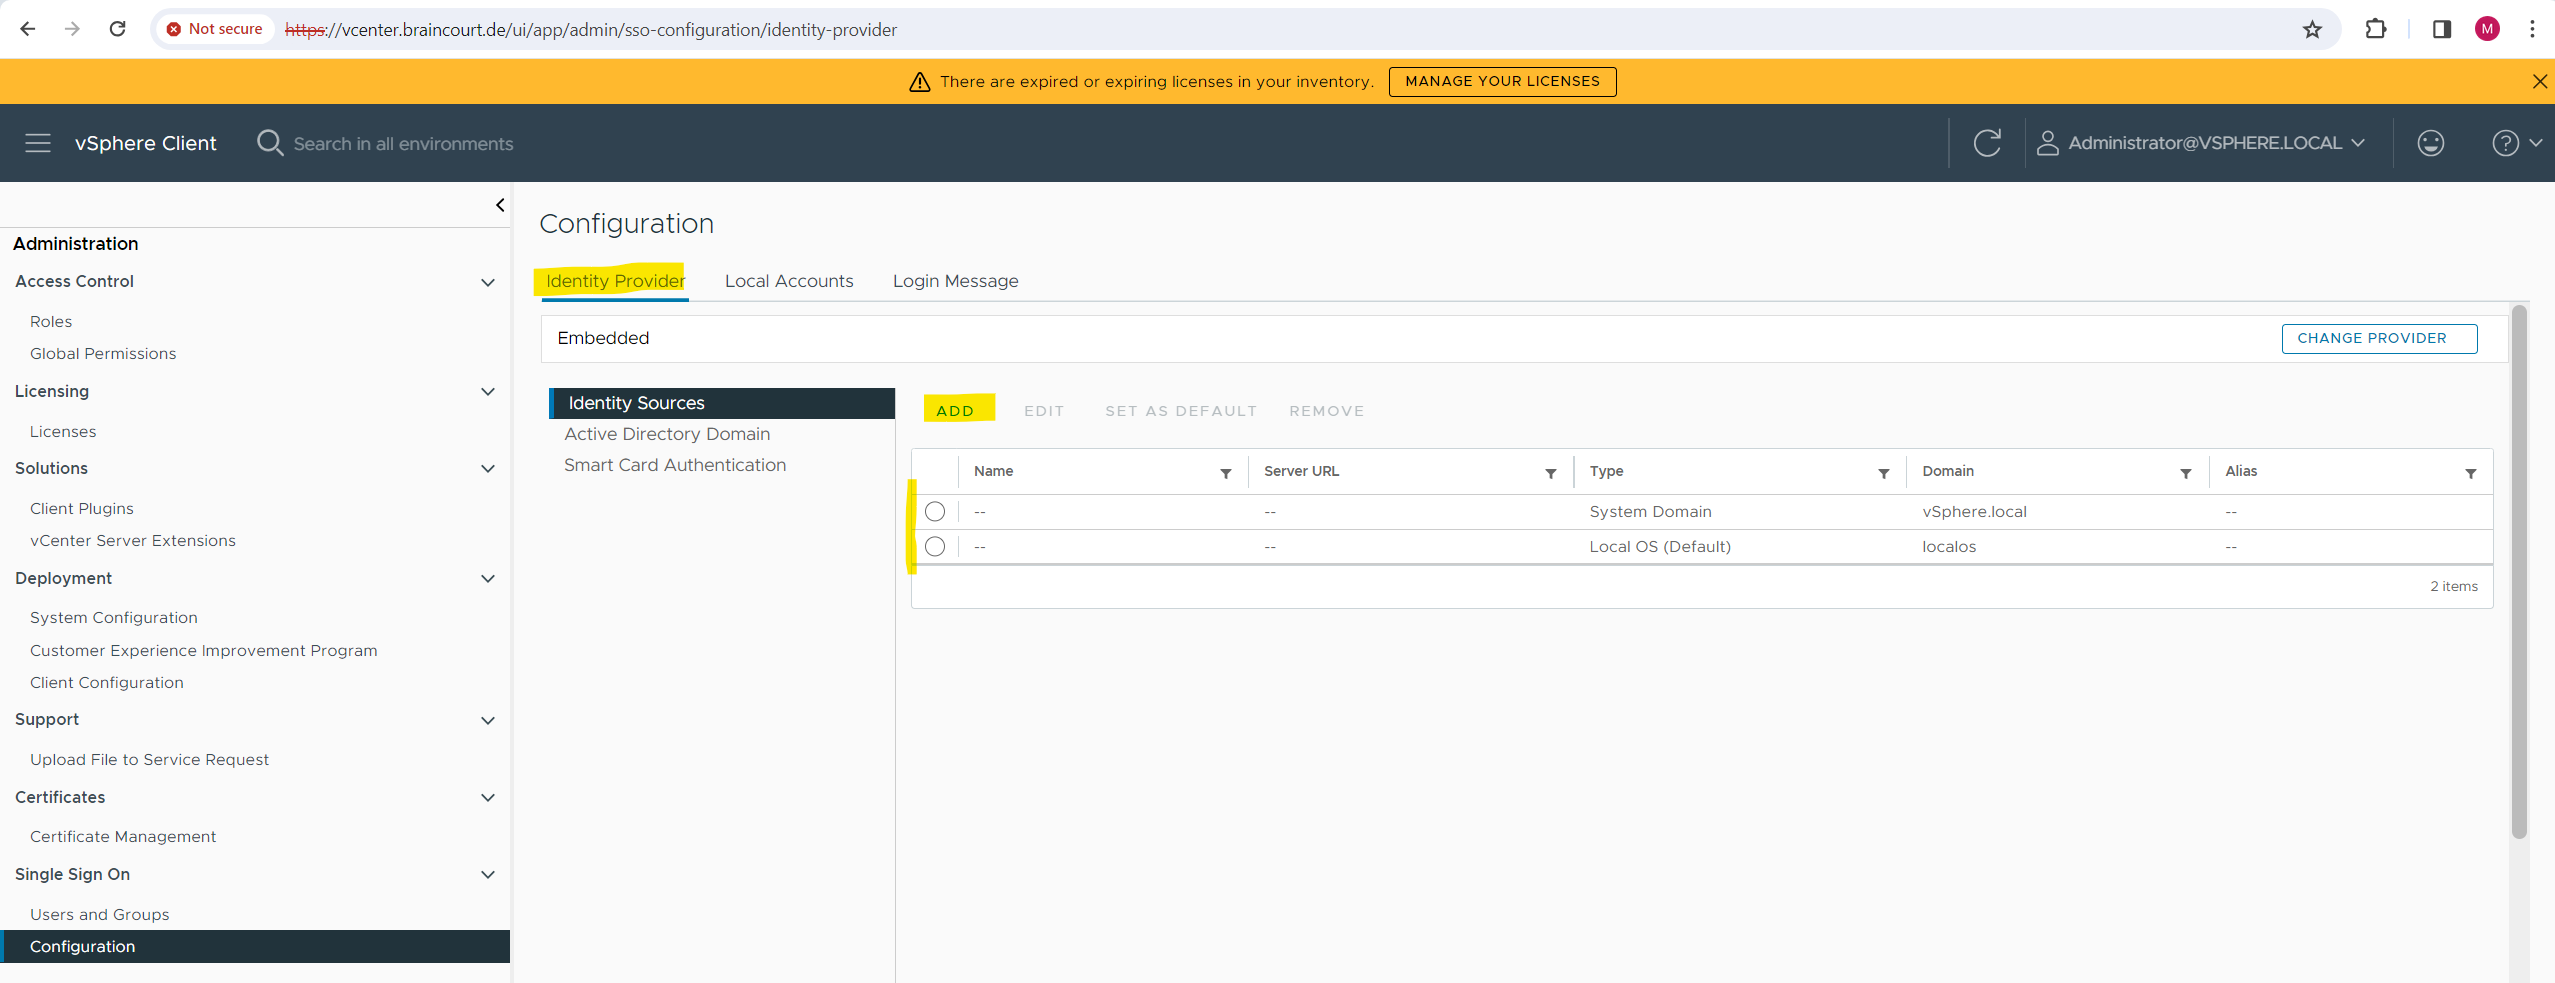
Because I haven’t configured so far further Identity providers in my vSphere environment, the Active Directory (Integrated Windows Authentication) provider is already selected below. Finally click on ADD.
If you select the Active Directory (Integrated Windows Authentication) identity source type, you can use the local machine account as your SPN (Service Principal Name) or specify an SPN explicitly.
I will use the machine account as SPN.
We can now enable Active Directory as default identity source for our vSphere environment.
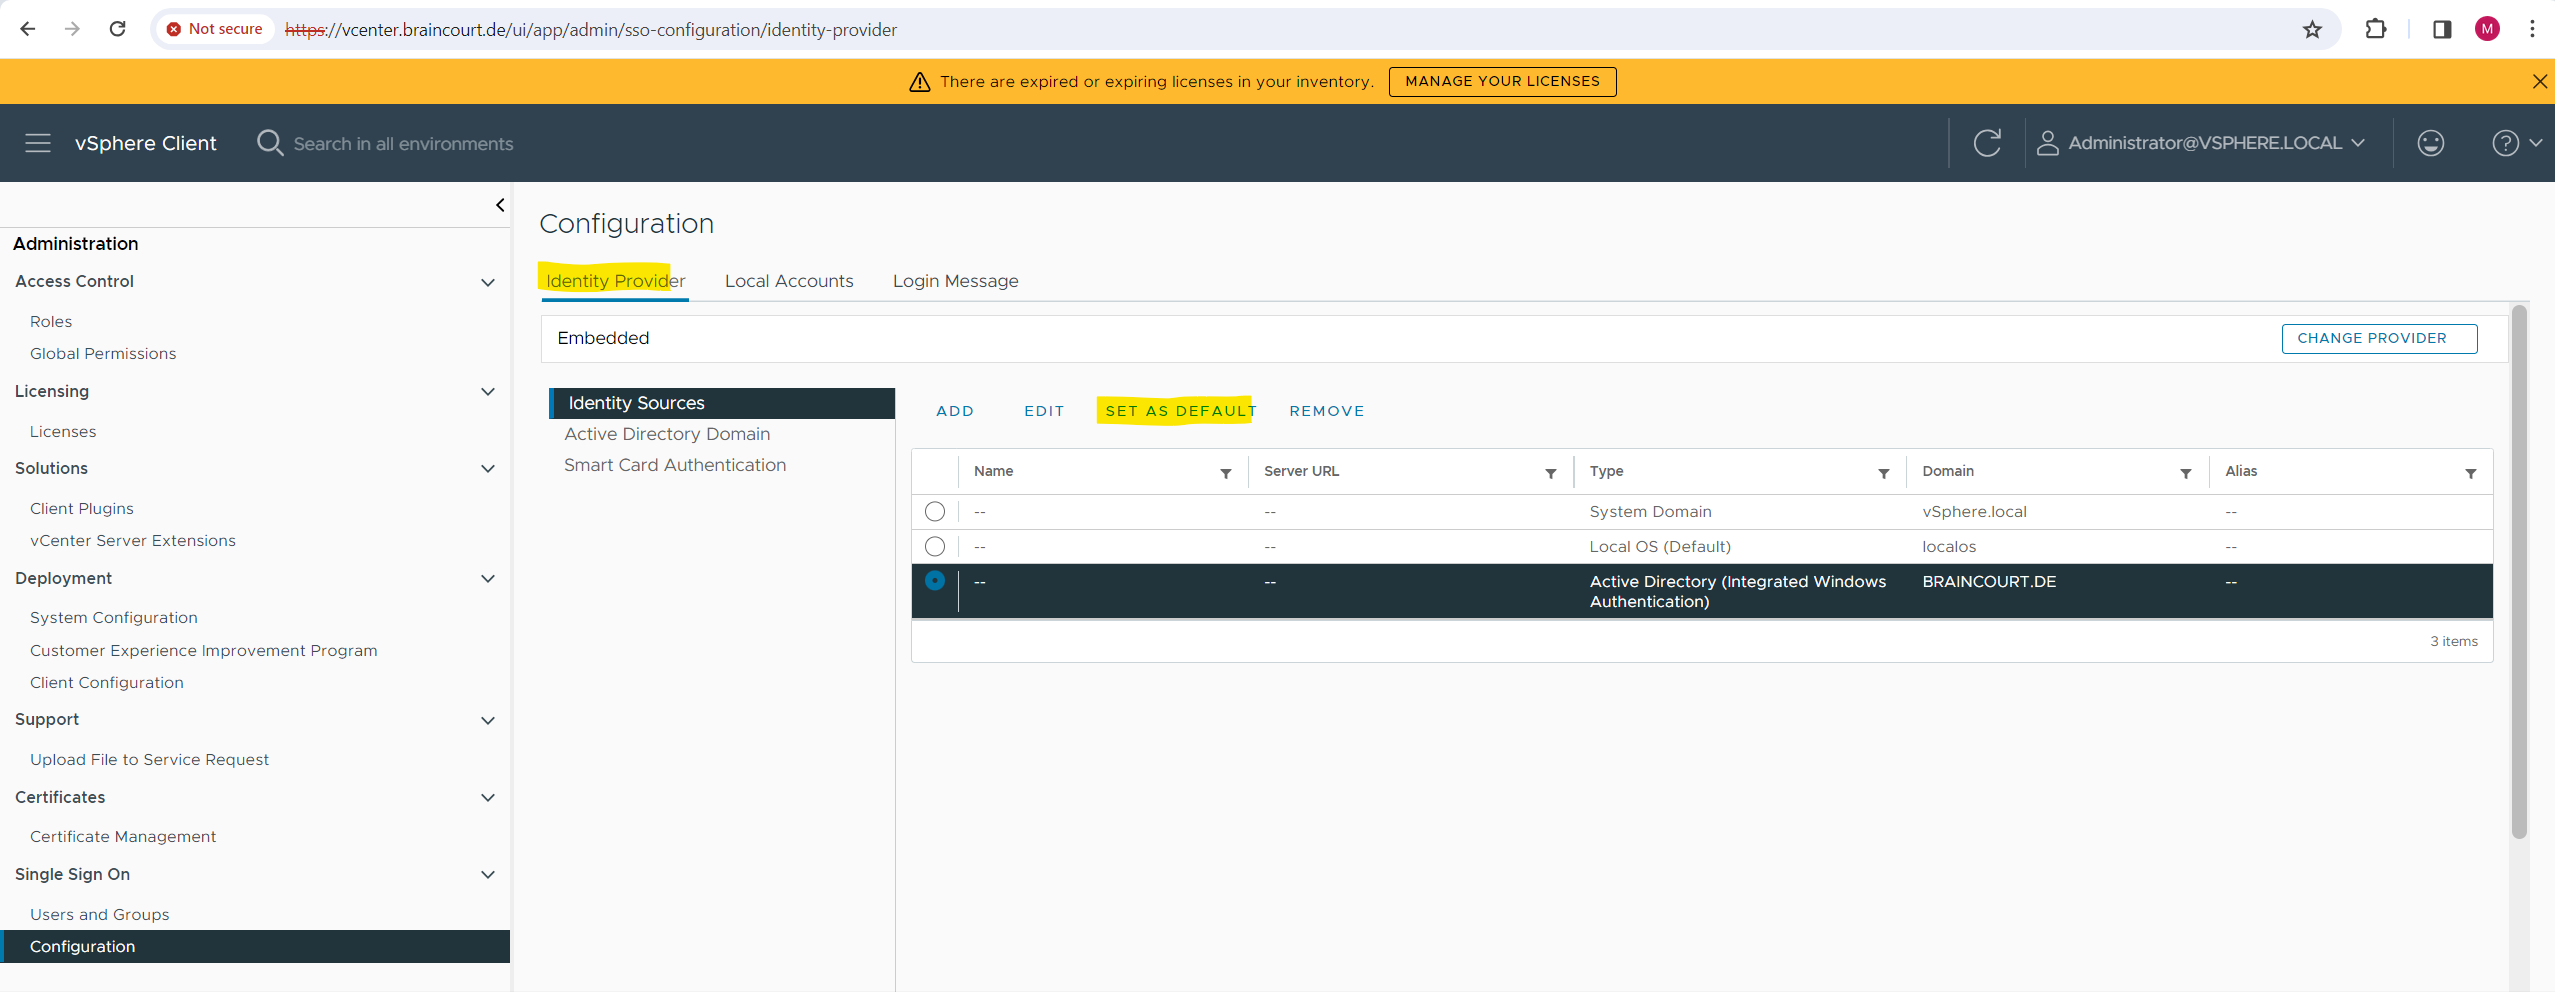
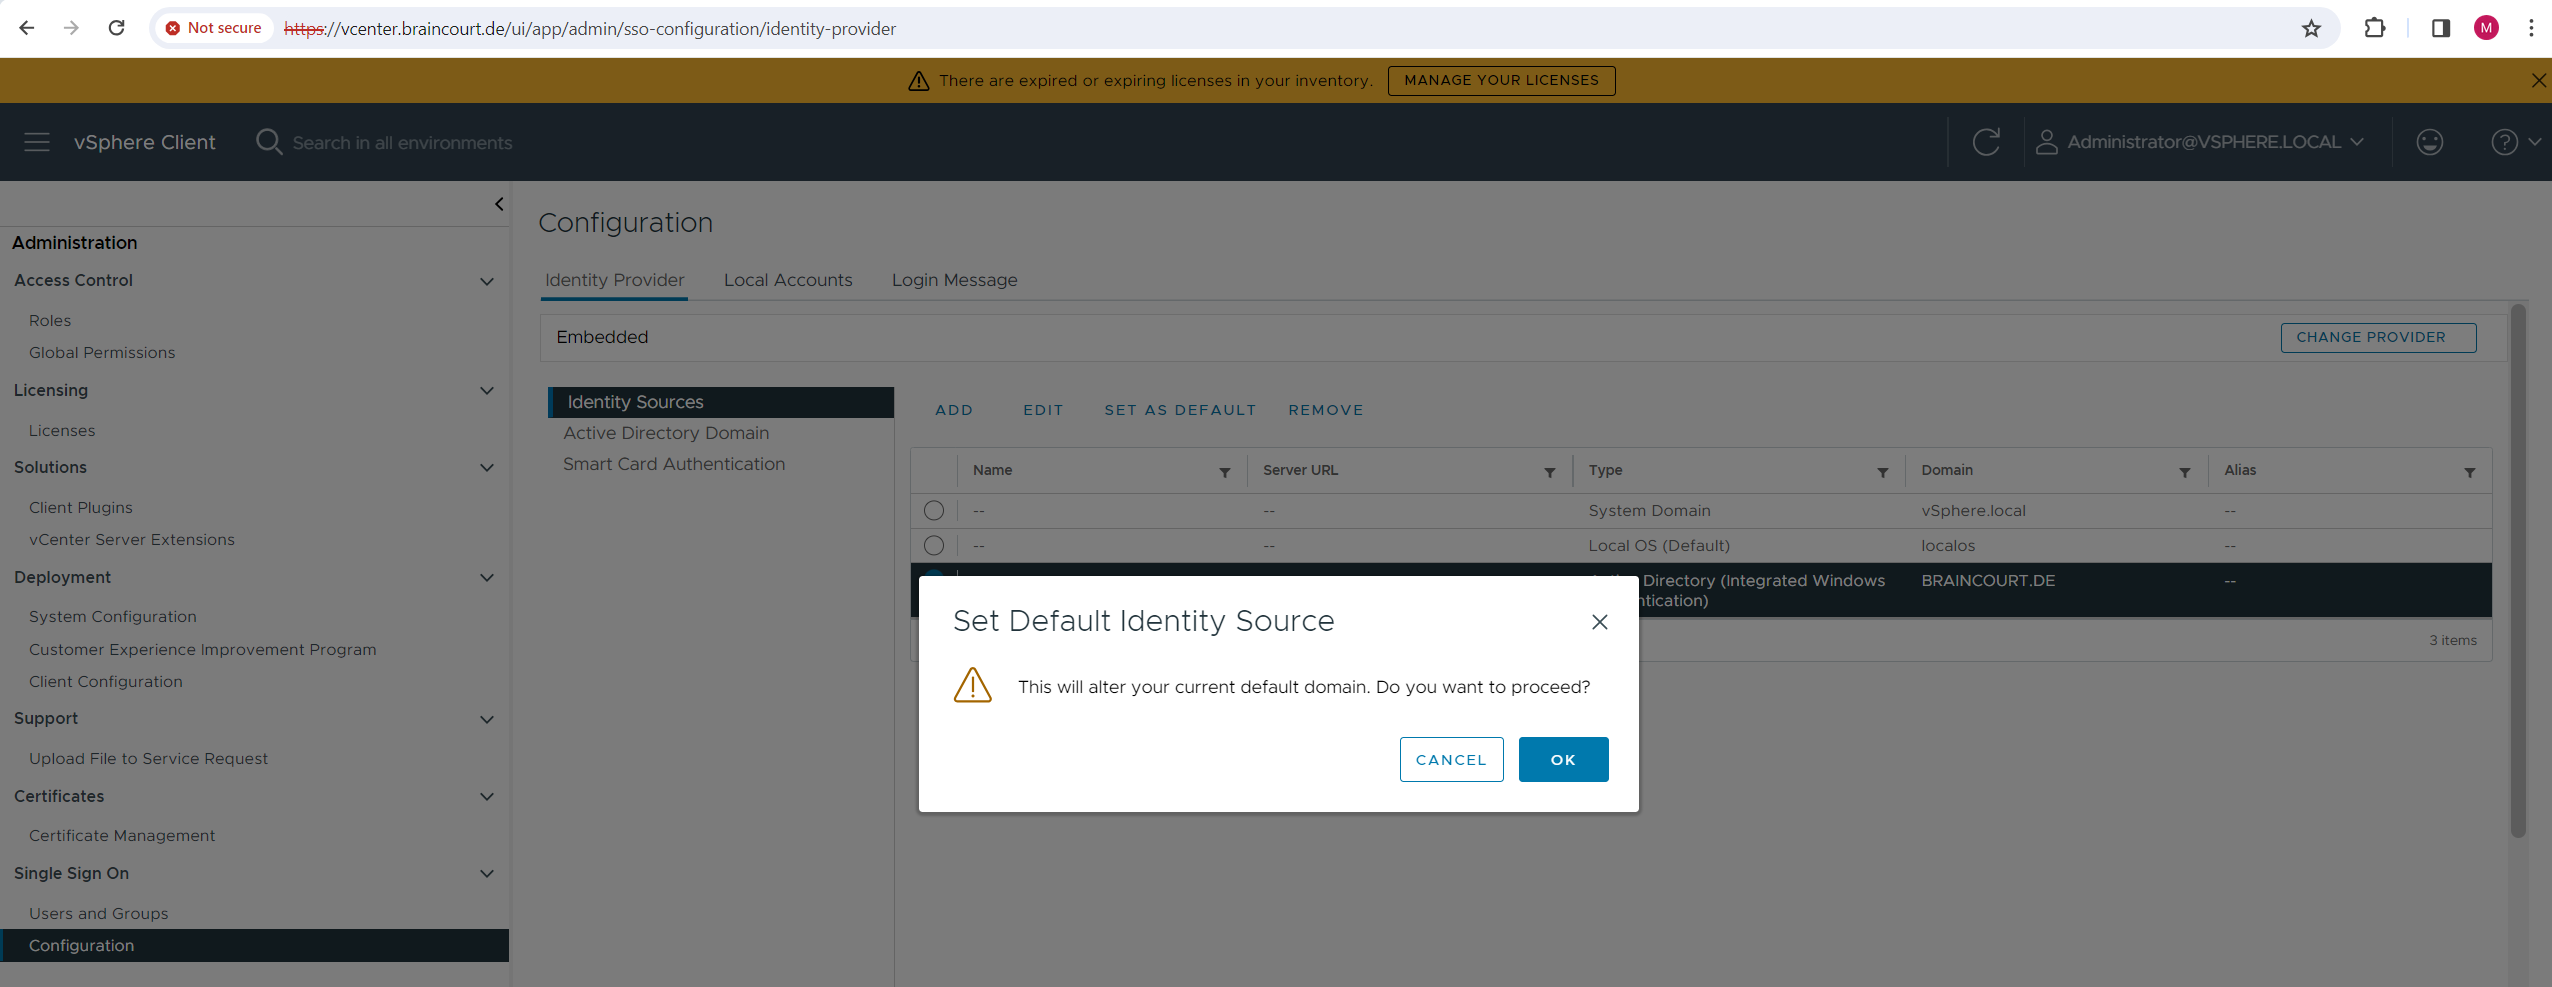
From now on when we navigate to Users and Groups by default our on-premise Active Directory will be used as identity provider.
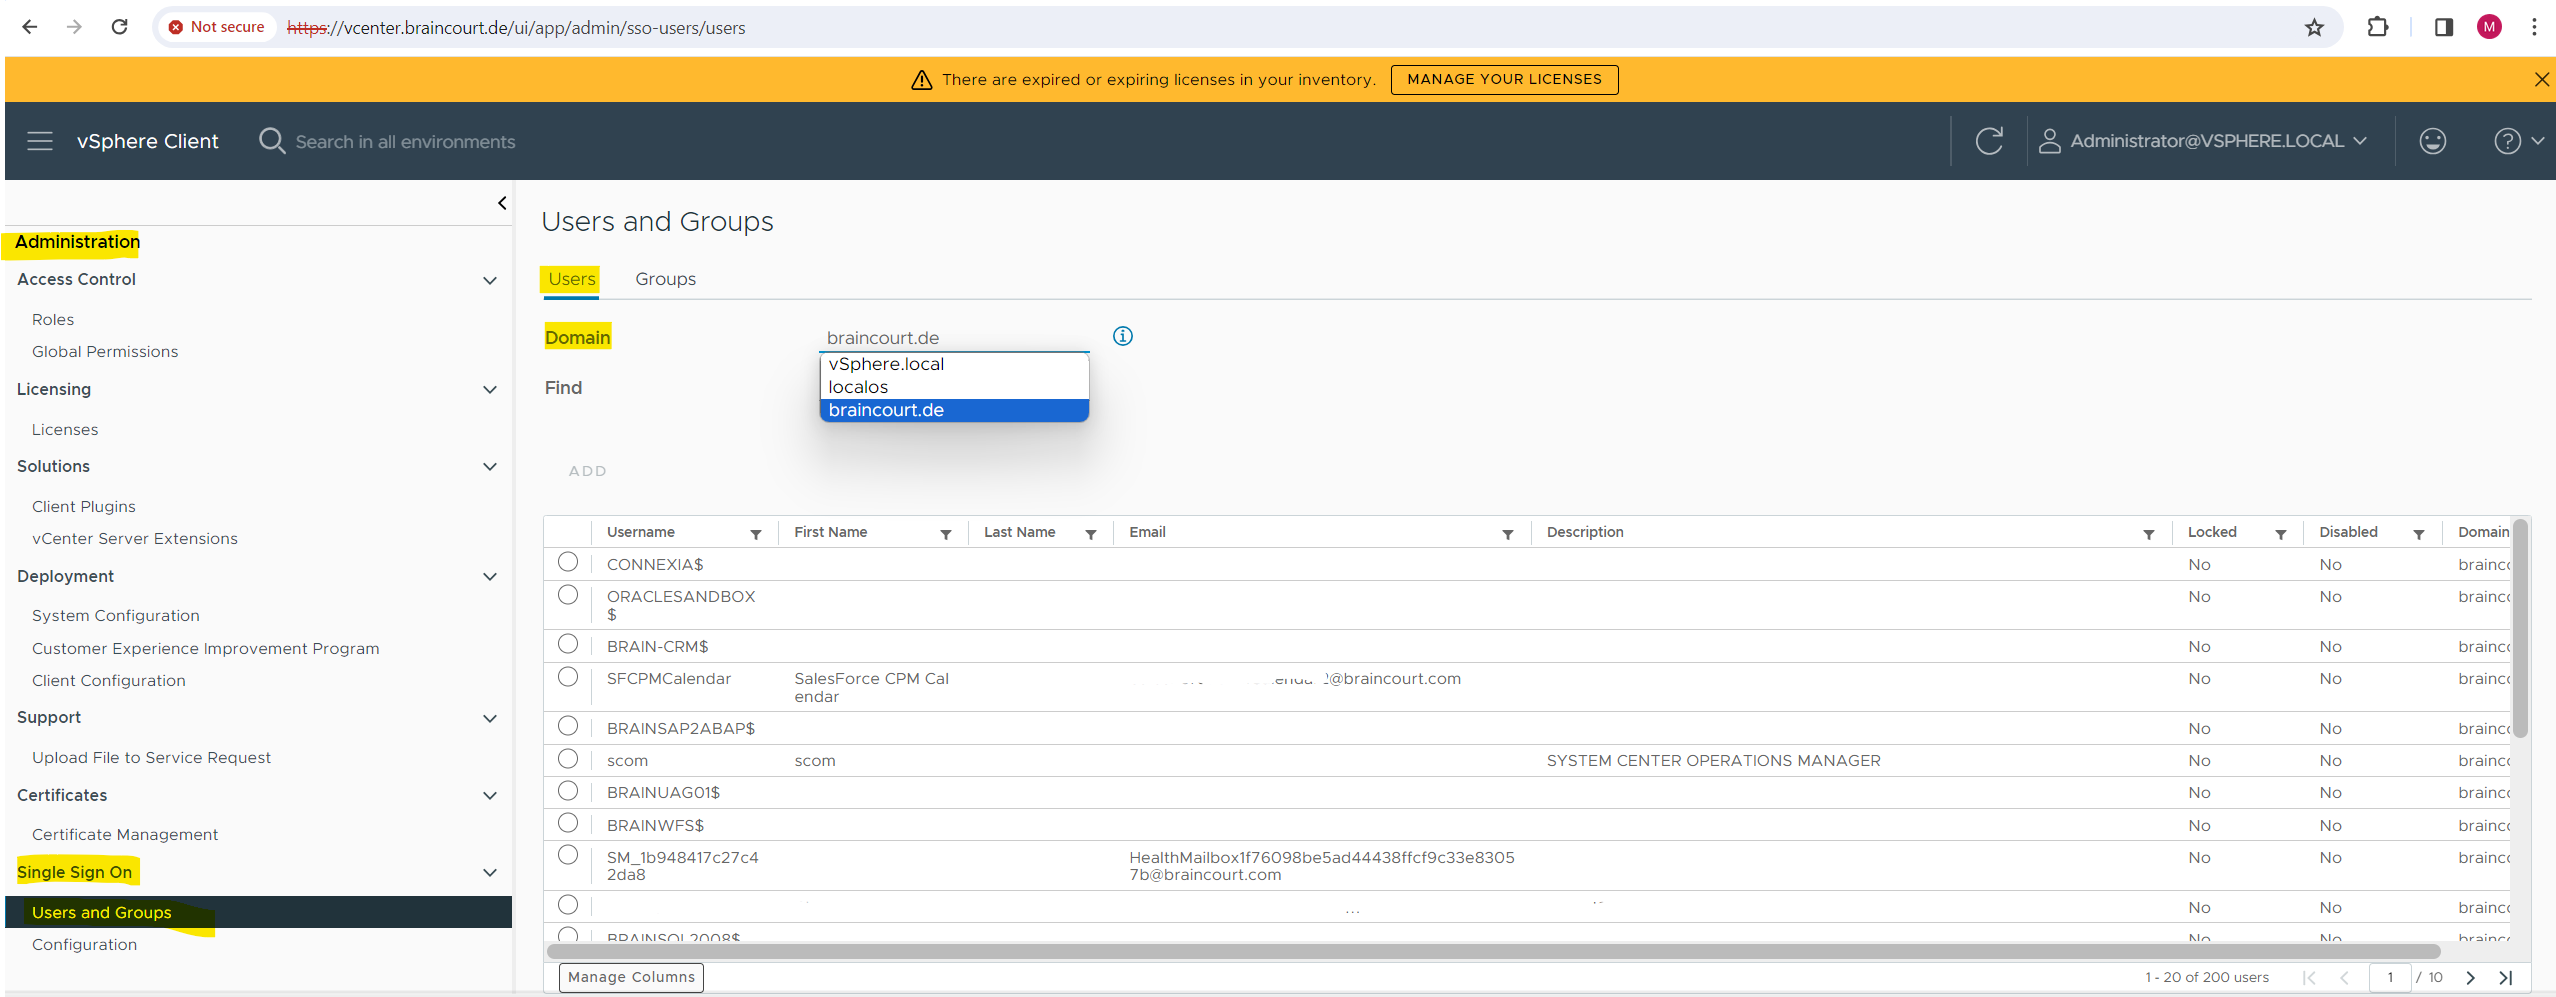
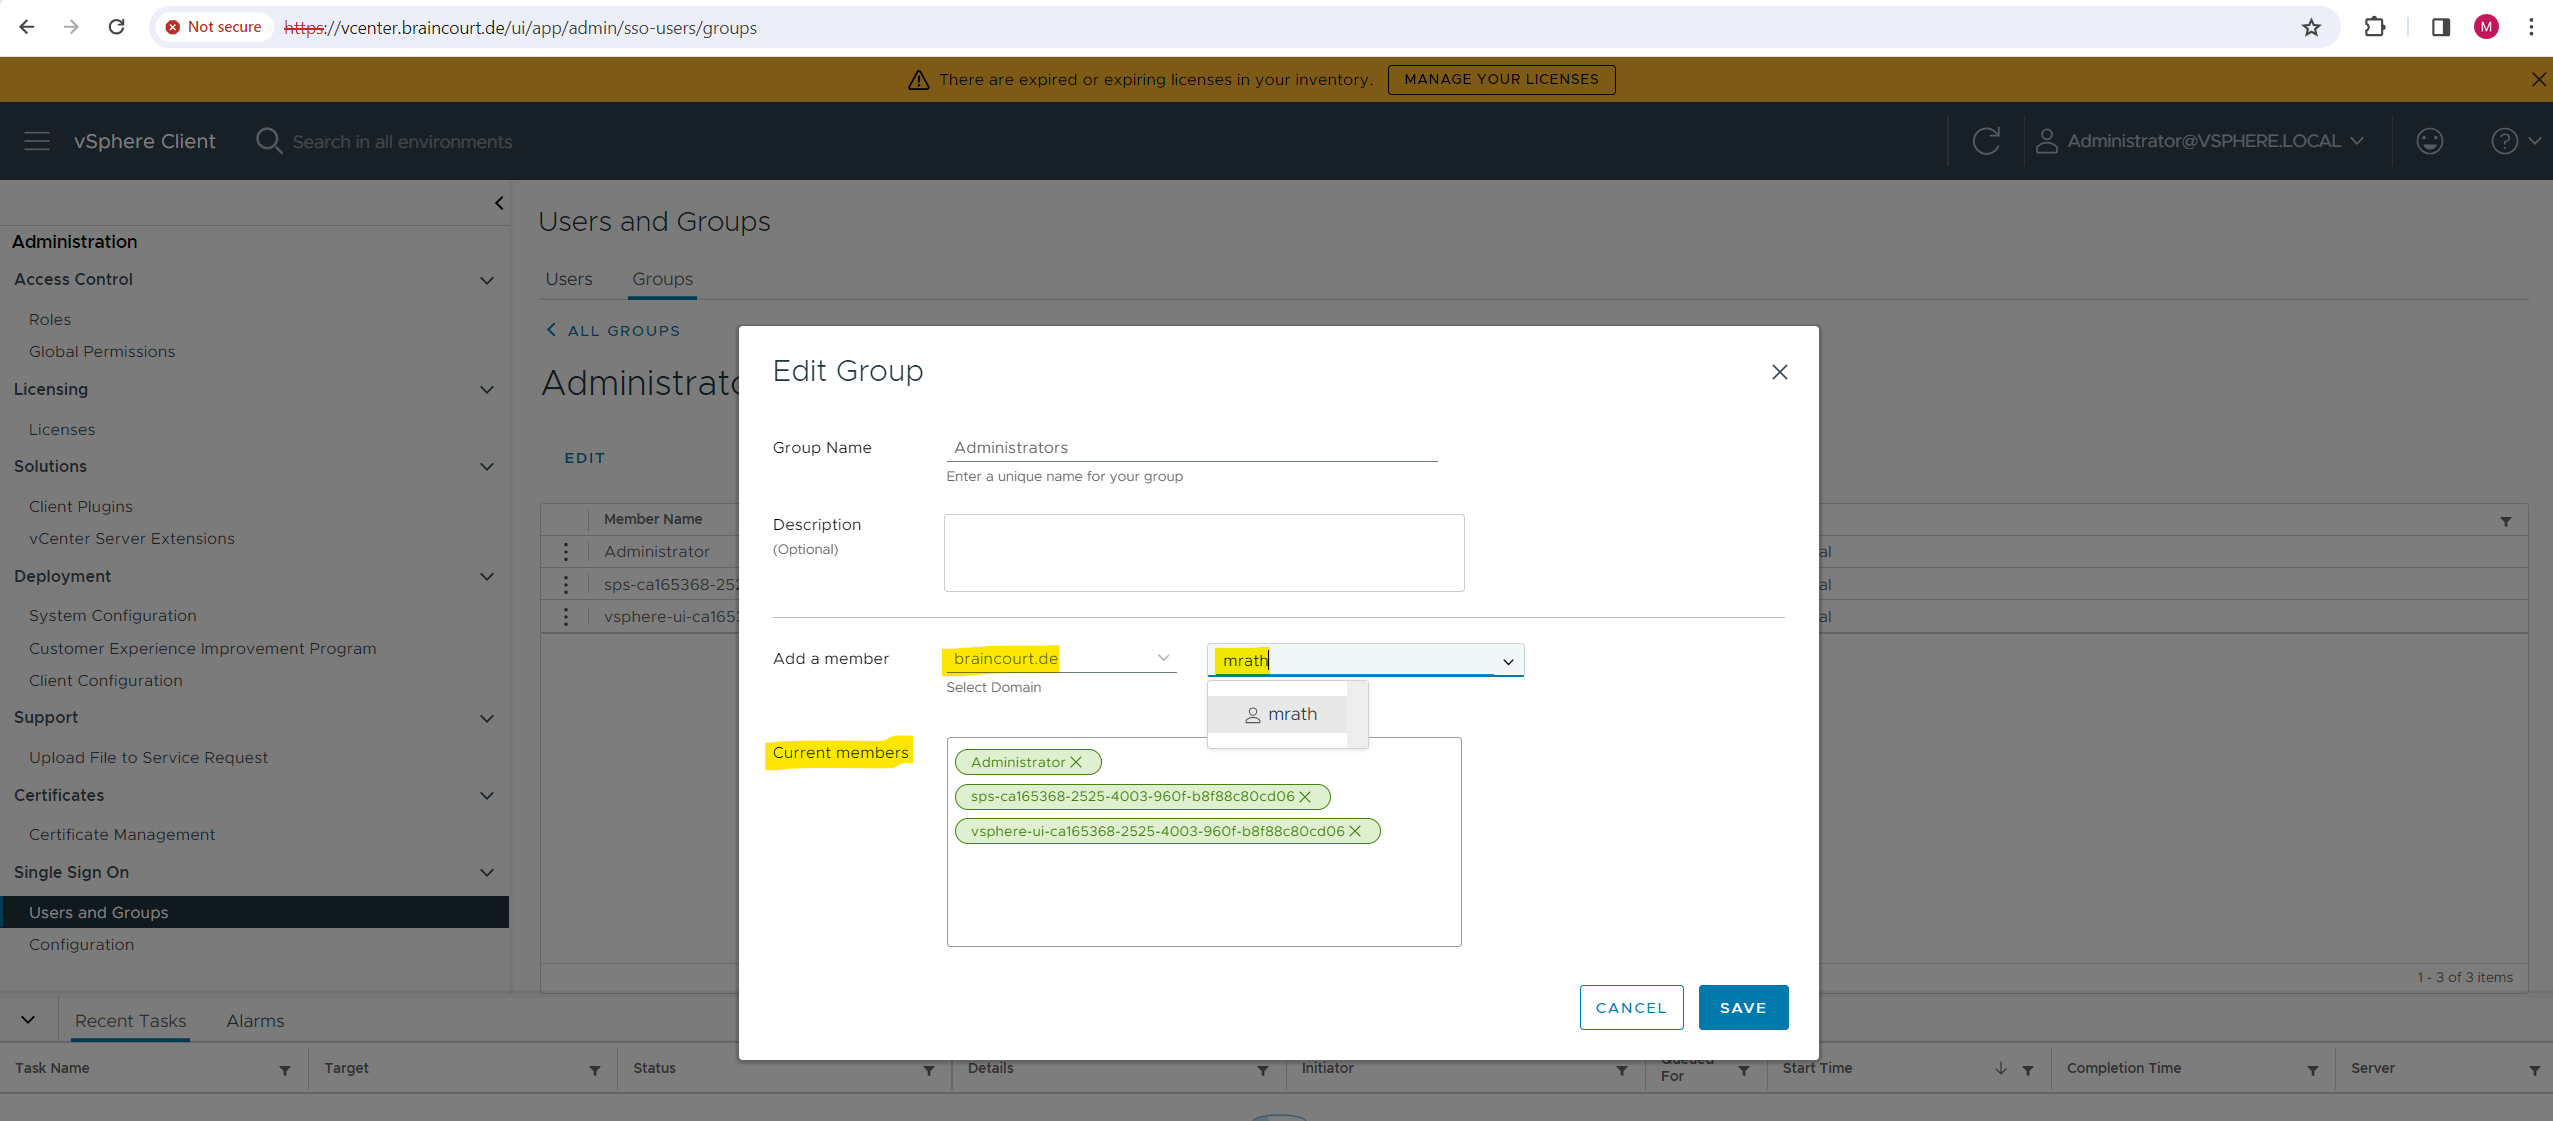
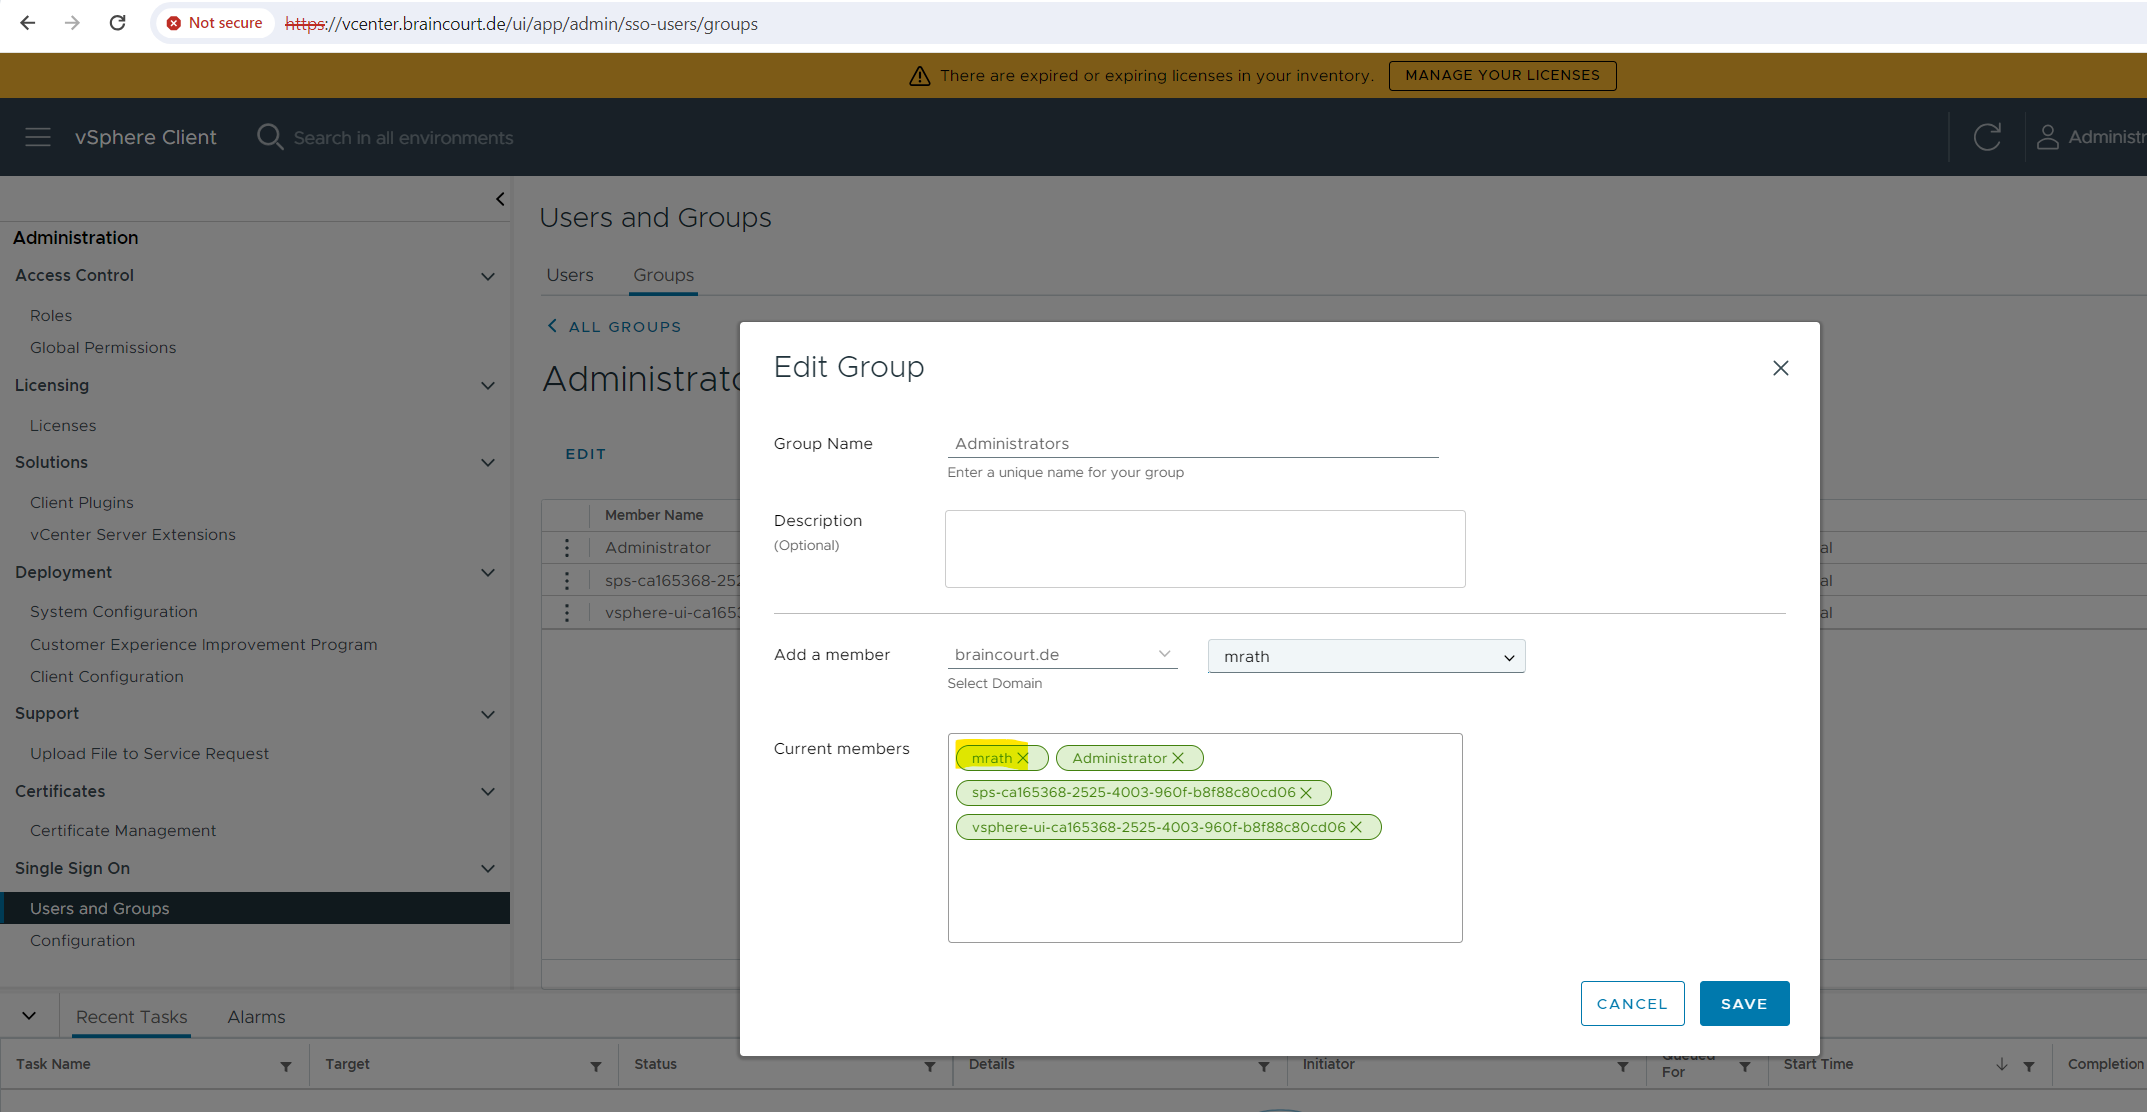
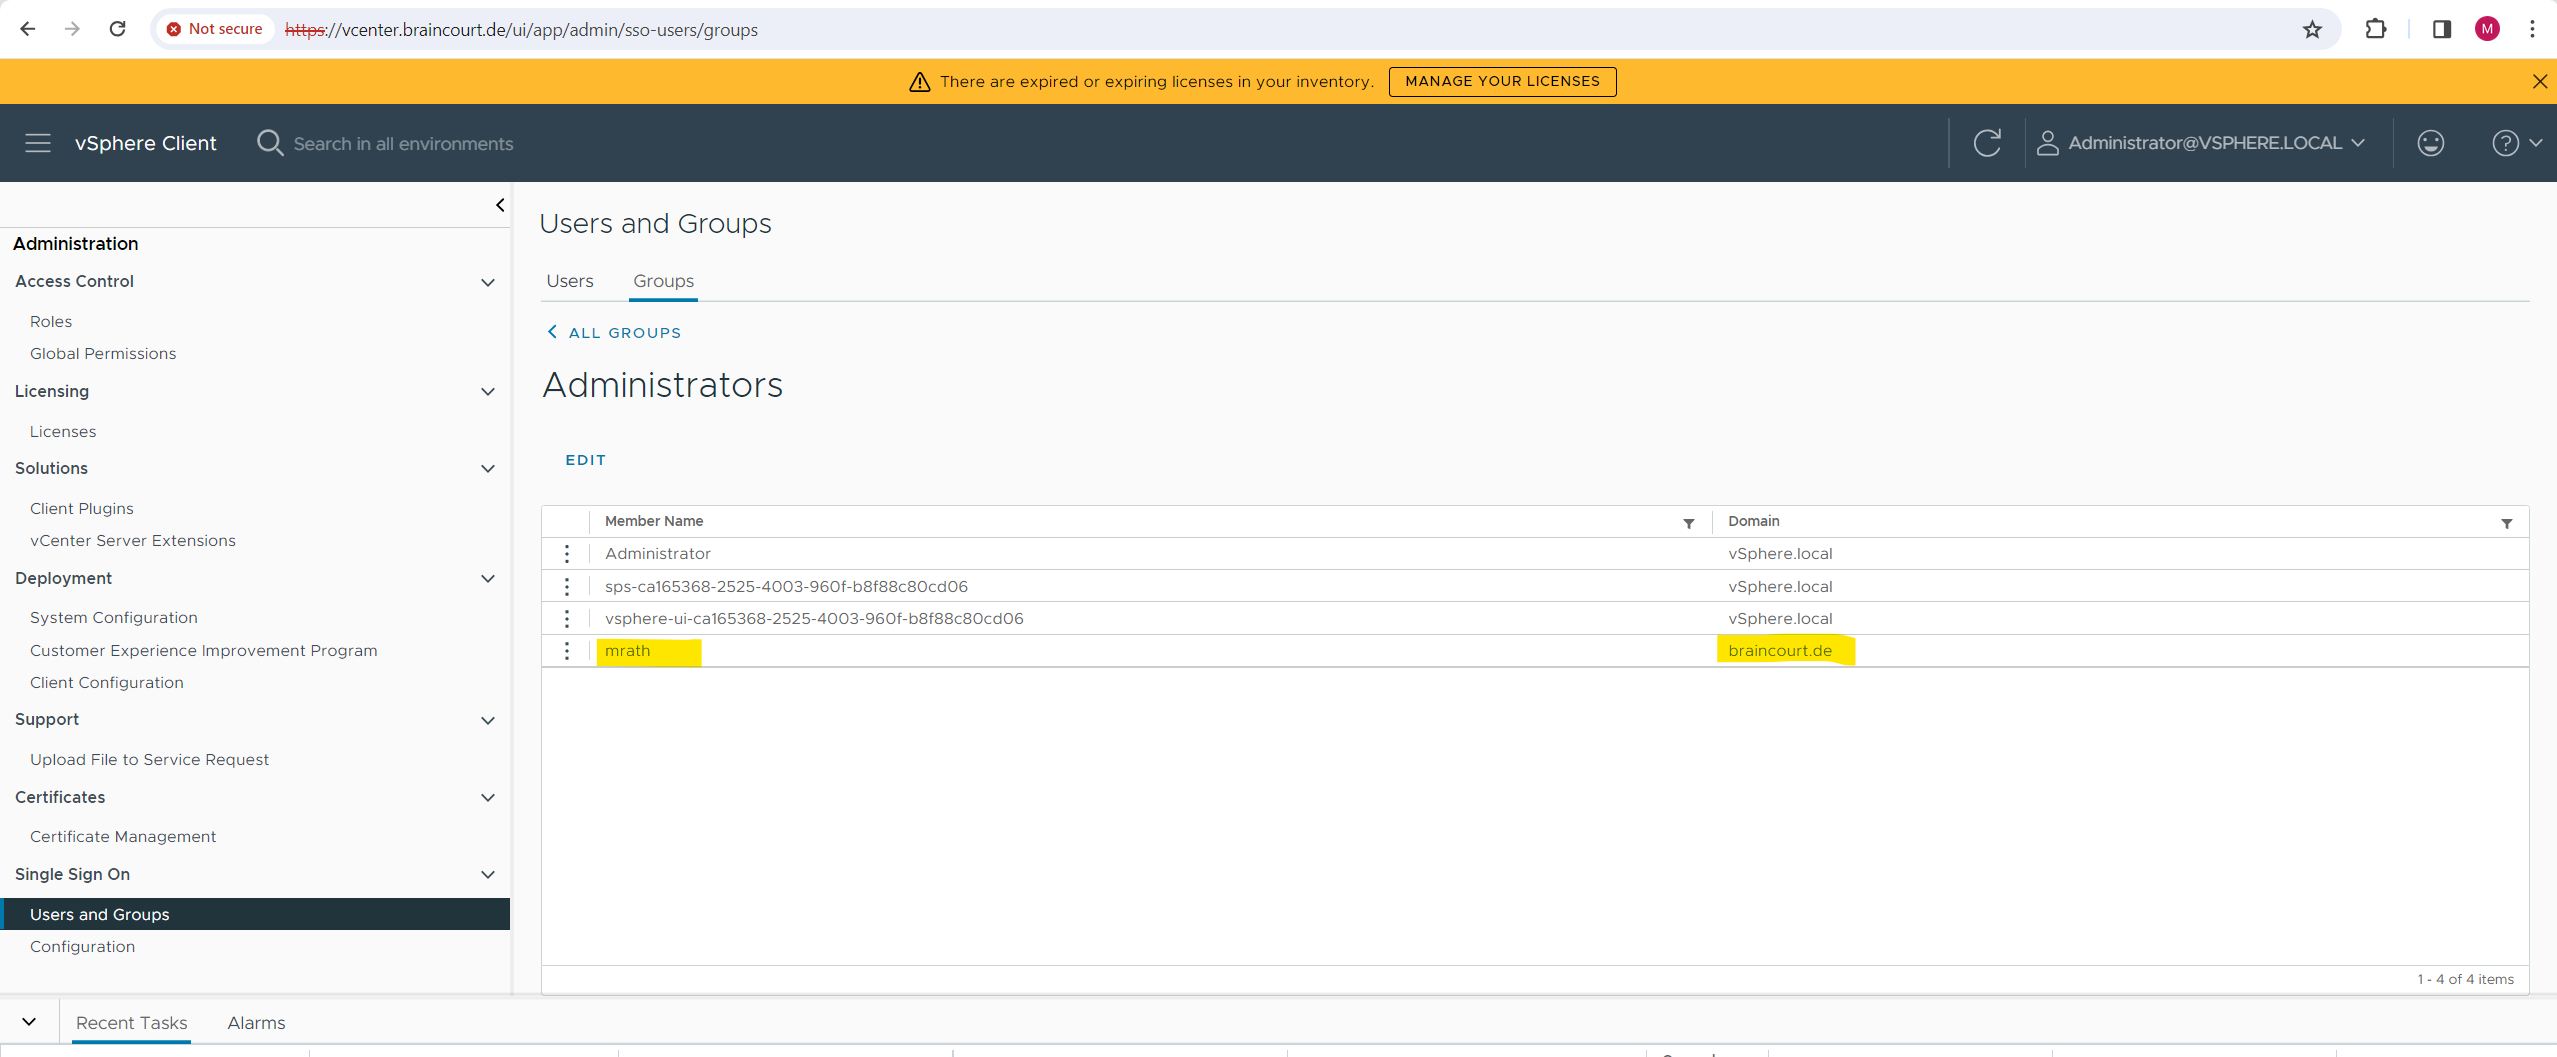
I am now able to add my own Active Directory account as member to vSphere Administrators group as shown below.
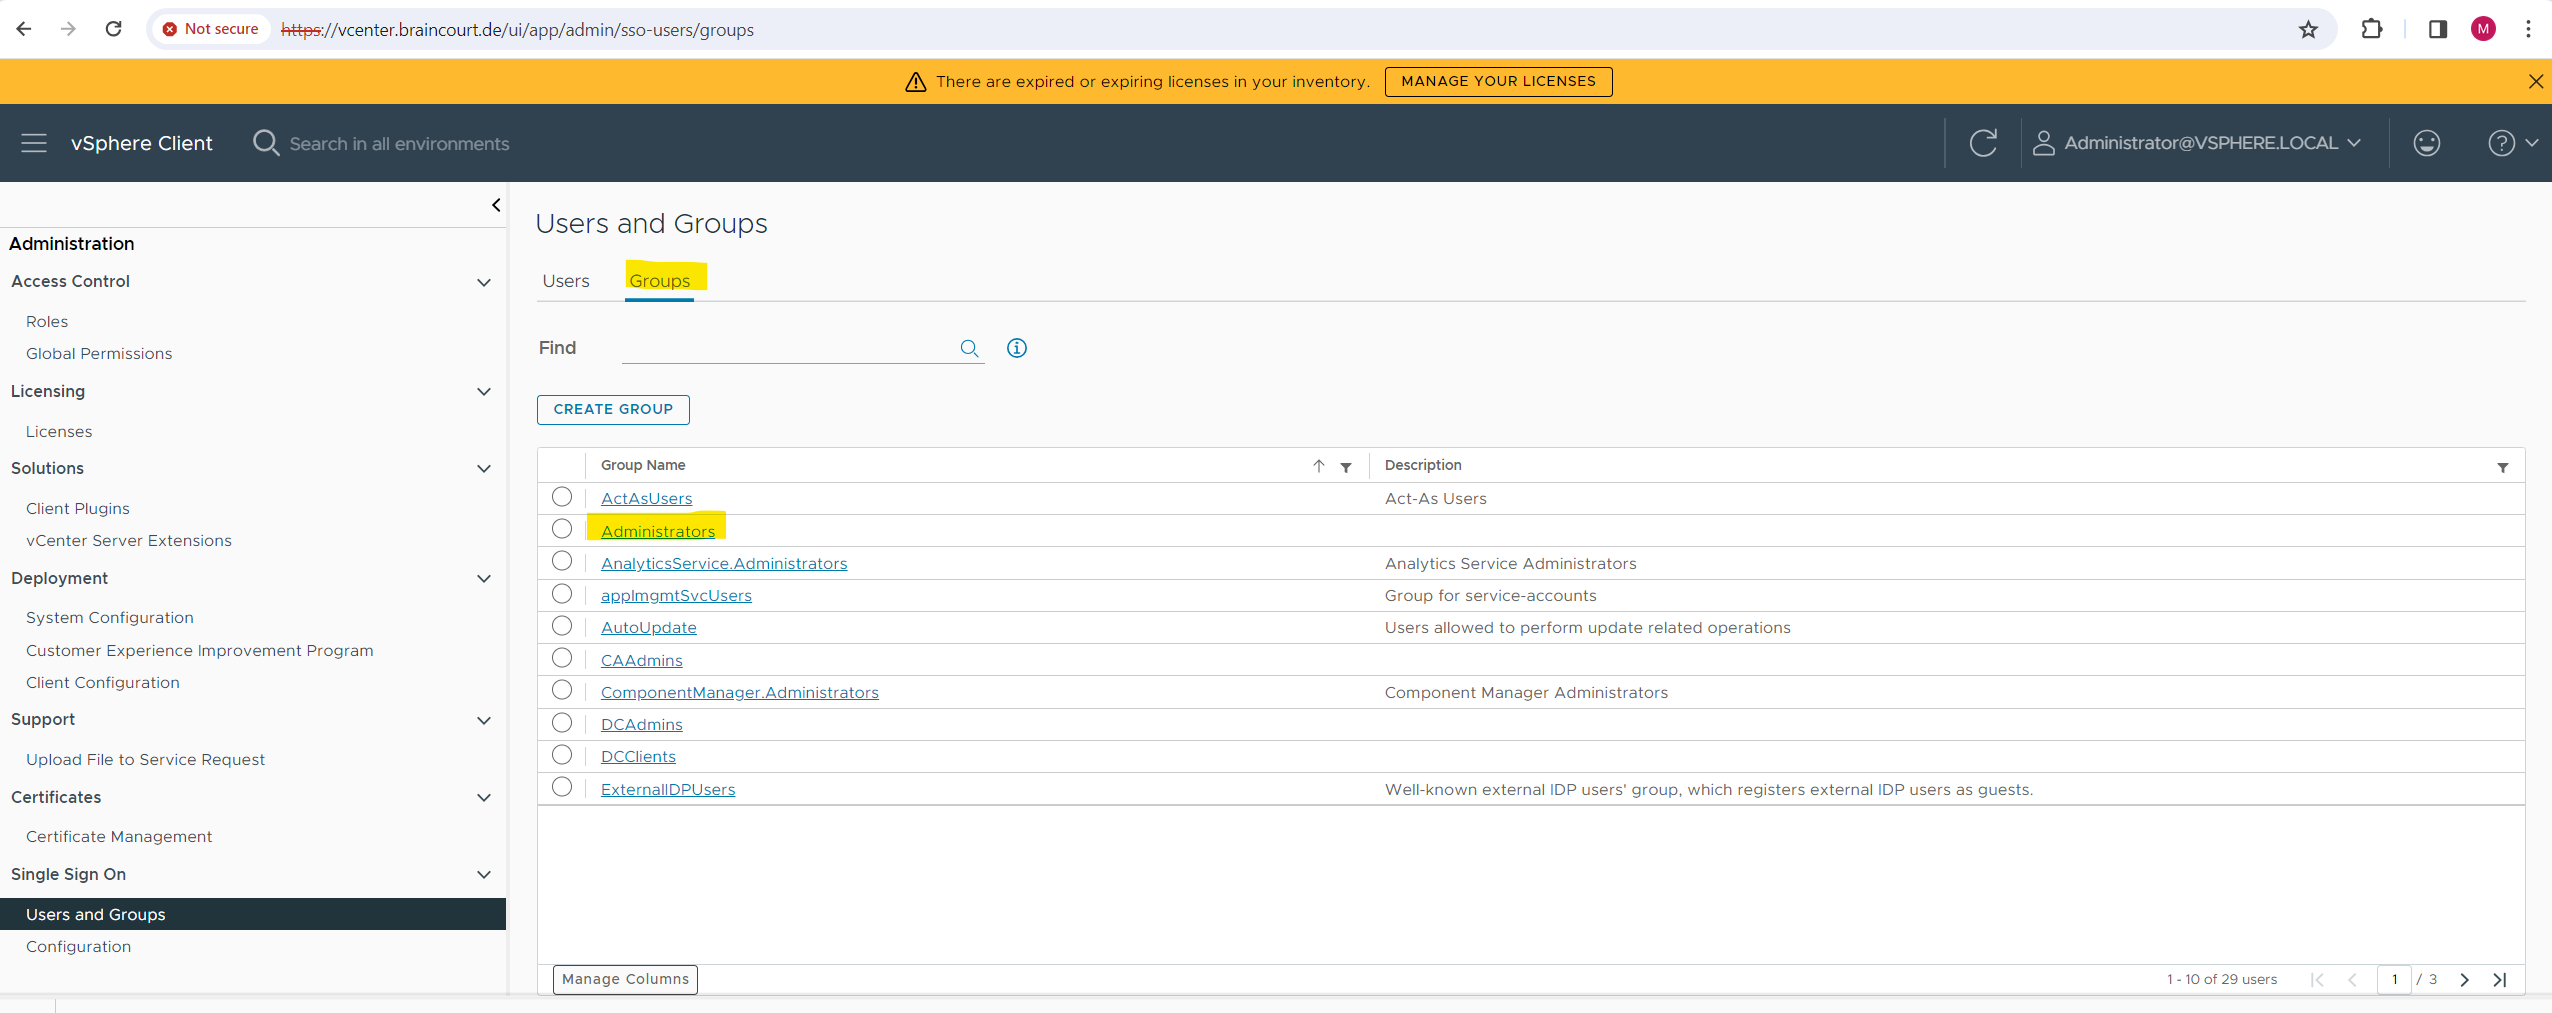
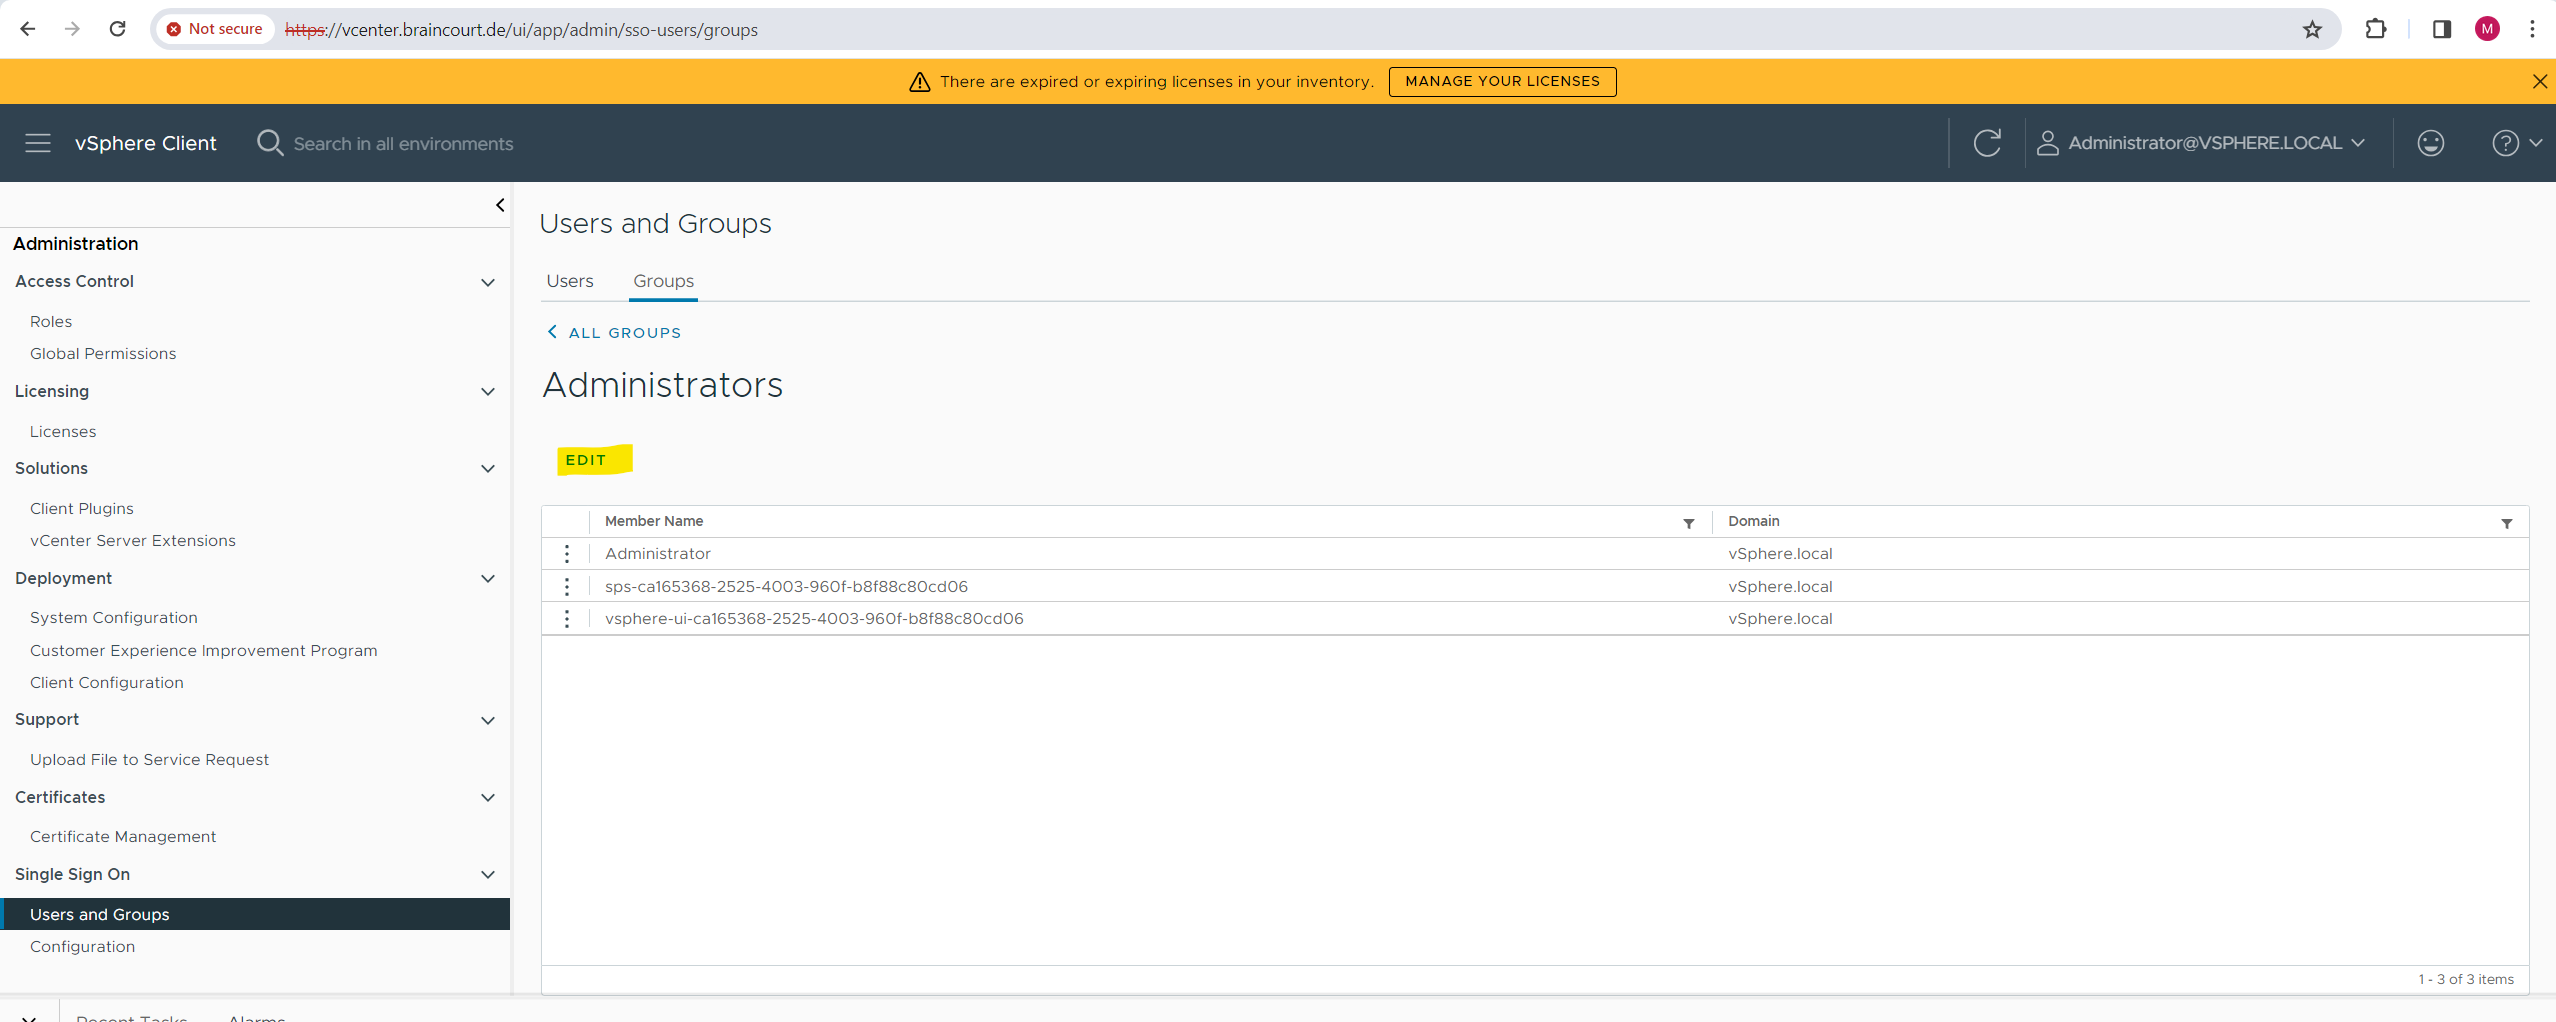
Click on the Administrators group.
Click on EDIT.
Finally click on SAVE.
I can now test if I can use my corporate account to sign-in to vCenter.
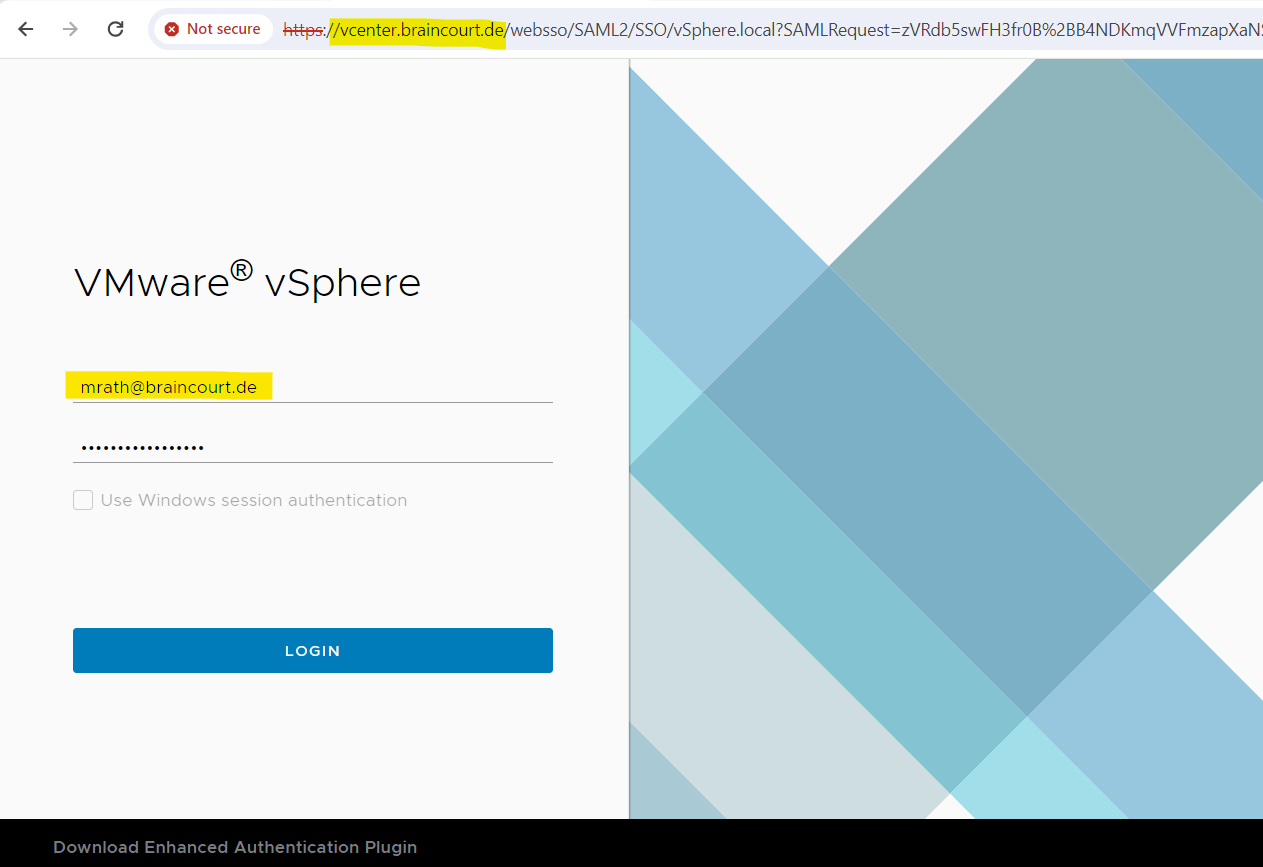
Looks good!
Troubleshooting Domain Join
I was encountering already once the following errors when trying to join a vCenter server (applicance) to Active Directory.
When using the vSphere client:
Idm client exception: Error trying to join AD, error code [2453]When using the command line and following command to join:
/opt/likewise/bin/ # ./domainjoin-cli join braincourt.deERROR_GEN_FAILURE [code 0x0000001f] error while adding VCSA to AD Domain (77531)
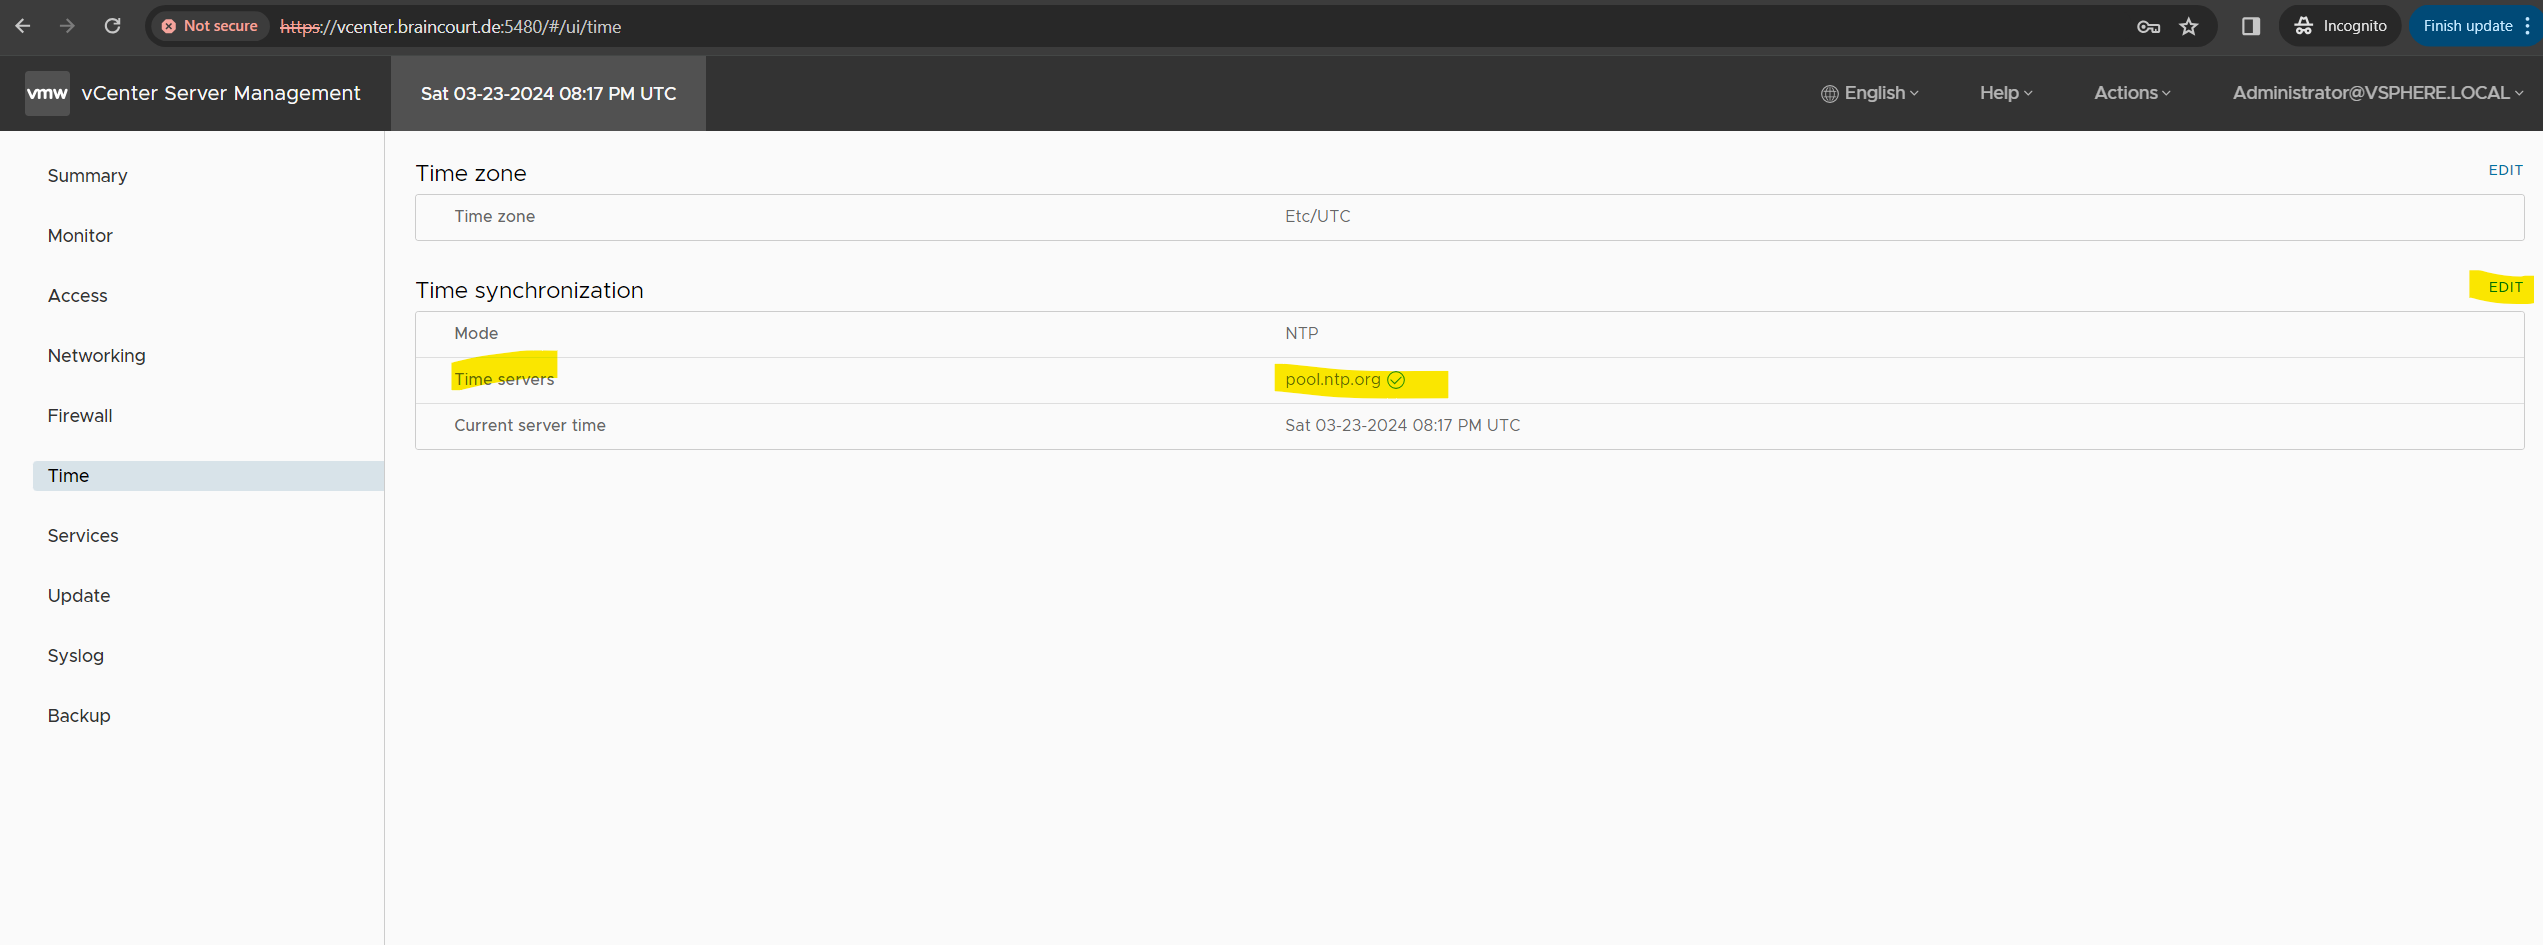
Finally the only reason for that I wasn’t able to join vCenter server to my on-premise Active Directory domain, was that the time of the vCenter server was 6 minutes behind the actual time as on my on-premise domain controllers and the maximum difference which Kerberos v5 tolerates, is 5 minutes.
So in this case you need to adjust the time on the vCenter server by using the vCenter Server Management Interface on port 5480, in my case https://vcenter.braincourt.de:5480/.
Here you can add a time server. After that I was able to join my vCenter server to my on-premise Active Directory domain.
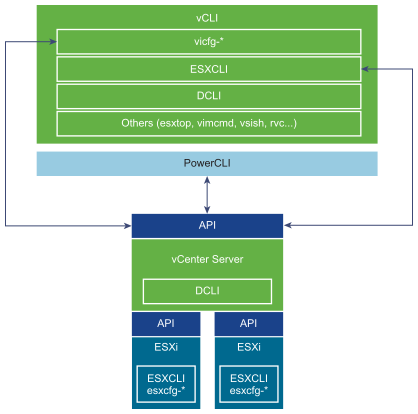
vSphere Command-Line Interfaces
vSphere includes commands for managing different aspects of your environment.
The following CLIs are available for managing hosts, either directly or through the vCenter Server system that manages the host. You can also manage vCenter services by using DCLI.
Announcing End of Life of vSphere CLI package in vSphere 7.0
vSphere CLI (vCLI) is a composite package of tools and libraries. We need to modernize our packaging to individual tool installers, and move more toward API centric tools.
Starting with vSphere 7.0, vSphere CLI package will not be released and it will be end of life, but all existing capabilities of vSphere CLI will be supported with more API centric tools such as esxcli and Perl SDK.
You can download esxcli and/or Perl SDK as separate packages. Vicfg scripts shipped with the vCLI package will no longer be available in the future vSphere releases.
Source: https://kb.vmware.com/s/article/78473
Esxcli
Allows for remote management of ESXi hosts using the ESXCLI command set. You can download the esxcli tool compatible with vSphere 7.0 from VMware Code page.
Perl SDK
Provides an easy-to-use Perl scripting interface to the vSphere API. Administrators and developers can work with vSphere API objects using vSphere SDK for Perl.You can download this tool compatible with vSphere 7.0 from the VMware Code page.
resxtop
A command-line utility or tool that runs on linux and provides a detailed look at how ESXi uses resources in real time. You can download this tool from the VMware Code Page.
Configure the ESXI Server by using the ESXCLI
You can use the commands in the ESXCLI package to manage many aspects of an ESXi host. You can run ESXCLI commands remotely or in the ESXi Shell.
You can install the ESXCLI command set on a supported Linux or Windows system. You can manage ESXi hosts with ESXCLI commands by specifying connection options such as the target host, user, and password or a configuration file.
ESXCLI Concepts and Examples
https://vdc-repo.vmware.com/vmwb-repository/dcr-public/f1284e84-1a34-4727-aaca-af24fb4efb3d/47c628b9-c5f2-46e6-a7cb-68ce15377d78/vsphere-703-esxcli-concepts-examples-guide.pdf
The ESXCLI tool allows for remote management of ESXi hosts by using the ESXCLI command set.
ESXCLI was previously part of the vSphere CLI and is now provided as a separate package.
Note: ESXCLI 8.0 is compatible with ESXCLI commands included in ESXi 6.7.x, ESXi 7.0.x and ESXi 8.0.x.
The available command set depends on the version of the ESXi host and is described in the reference documentation of each version.
Run
esxcli --help
for a list of namespaces supported on the target. You can drill down into the namespaces for additional help.
Source: https://developer.vmware.com/web/tool/8.0/esxcli/
You can run ESXCLI commands remotely or in the ESXi Shell. You can install the ESXCLI command set on a supported Linux or Windows system. After installation, you can run ESXCLI commands from the Linux or Windows system.
You can manage ESXi hosts with ESXCLI commands by specifying connection options such as the target host, user, and password or a configuration file.
ESXCLI 7.0 U3 Concepts and Examples
https://vdc-download.vmware.com/vmwb-repository/dcr-public/f1284e84-1a34-4727-aaca-af24fb4efb3d/47c628b9-c5f2-46e6-a7cb-68ce15377d78/vsphere-703-esxcli-concepts-examples-guide.pdfESXi 7.0 U3 ESXCLI Command Reference
https://developer.vmware.com/docs/14743/
Links
Getting Started with Datacenter CLI
https://blogs.vmware.com/vsphere/2016/12/getting-started-datacenter-cli.htmlESXCLI Concepts and Examples
https://vdc-repo.vmware.com/vmwb-repository/dcr-public/f1284e84-1a34-4727-aaca-af24fb4efb3d/47c628b9-c5f2-46e6-a7cb-68ce15377d78/vsphere-703-esxcli-concepts-examples-guide.pdfOverview of vSphere Command-Line Interfaces
https://vdc-repo.vmware.com/vmwb-repository/dcr-public/bc4fa31a-40ac-4aa9-a6a1-7171d1fff7f4/740990ee-4d65-4627-a9d4-0f046cb78aec/doc/GUID-24E7EEFC-08F1-451C-850C-5F158322BAC9.html
Tags In
Related Posts
Latest posts
How Multicast Traffic Works in VMware vSphere – Testing VSS (Basic Multicast Filtering) vs VDS (IGMP/MLD Snooping) with Video Streaming – Part 2
Follow me on LinkedIn