Deploying NetApp Cloud Volumes ONTAP (CVO) in Azure using NetApp Console (formerly BlueXP) – Part 7 – AutoSupport & Active IQ (Digital Advisor)
In the previous installments of this series, we focused on the architecture and deployment of Cloud Volumes ONTAP (CVO) within the Azure ecosystem.
However, a successful deployment isn’t just about getting the storage “up and running”, it’s about ensuring it stays healthy and supported throughout its lifecycle.
In this part, we dive into NetApp AutoSupport, the critical telemetry system that acts as the heartbeat of our CVO instance.
We will explore how AutoSupport facilitates proactive monitoring, automates risk detection via Active IQ, and most importantly, how to navigate the networking hurdles like proxy configurations and firewall rules that often stand in the way of a successful phone home to NetApp.
Active IQ is NetApp’s AI-driven analytics platform that transforms the raw telemetry sent via AutoSupport into actionable insights and predictive health alerts.
IQ stands for Intelligence Quotient, reflecting the system’s ability to use AI and machine learning to intelligently analyze our storage telemetry for risks and optimizations.
More about further down in this post.
In Part 8 we focus on Disaster Recovery and explore how to protect Cloud Volumes ONTAP in Azure against outages and unexpected failures. This section walks through the architecture, configuration, and validation steps required to ensure your environment remains resilient and recoverable.
Setting up NetApp ONTAP AutoSupport
AutoSupports (ASUP) primary goal is to identify risks and automate the support process, often triggering a disk replacement before you even realize a drive has failed.
Cloud Volumes ONTAP (CVO), AutoSupport is enabled by default.
During the deployment process through the NetApp Console (formely BlueXP), the system automatically configures AutoSupport because it is a prerequisite for several cloud-specific features.
Verify State (Enable AutoSupport)
Before troubleshooting, verify the administrative state. A system can be set to “enabled” but still fail to communicate.
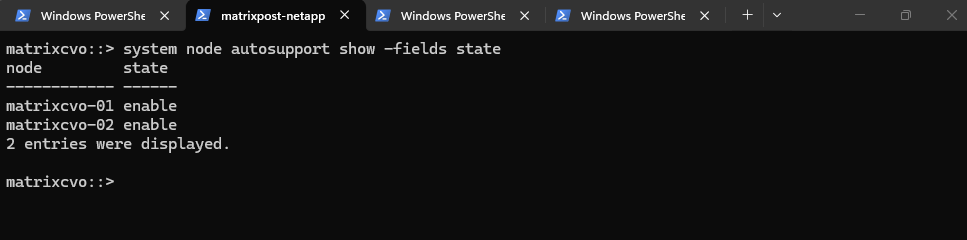
We can check if enabled by running the following command.
matrixcvo::> system node autosupport show -fields state
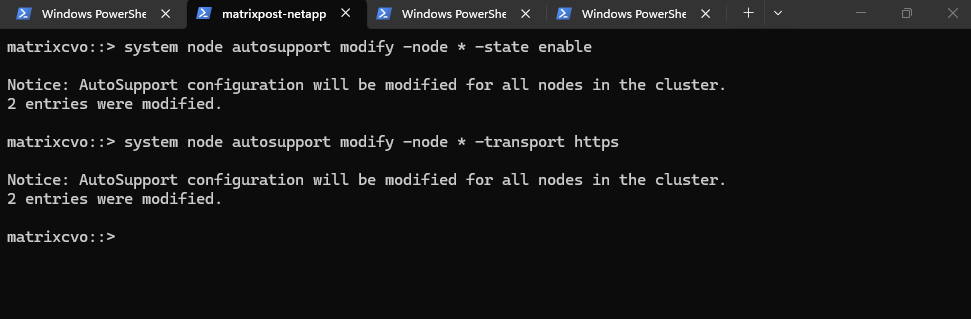
If it is disabled, you can turn it on globally. You also need to define how it should send data (the transport) and who should receive it.
matrixcvo::> system node autosupport modify -node * -state enable

# Set Transport to HTTPS (Best Practice):
matrixcvo::> system node autosupport modify -node * -transport https

# Configure a Proxy (if required):
matrixcvo::> system node autosupport modify -node * -proxy-url http://yourproxy:port
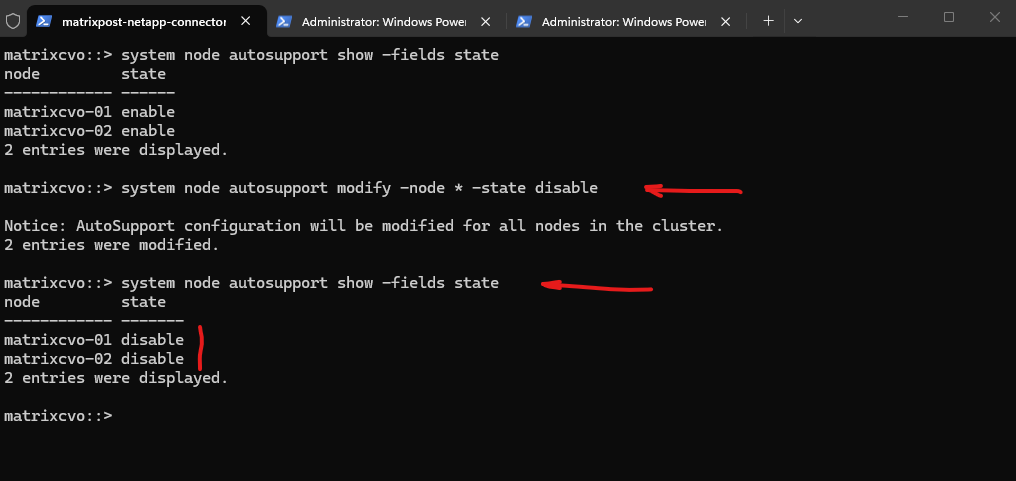
To disable AutoSupport we can run:
For my lab environment, I disabled AutoSupport because I frequently shut down nodes, trigger takeovers, and perform various experiments that generate panic events, which automatically resulted in high-priority proactive support cases from NetApp.
While this behavior is absolutely appreciated in production, it’s not ideal for a constantly changing lab setup. Once AutoSupport is disabled, no further events, panic notifications, or telemetry data are sent to NetApp, and the system simply remains silent from a support perspective.
matrixcvo::> system node autosupport modify -node * -state disable
Testing Connectivity with NetApp
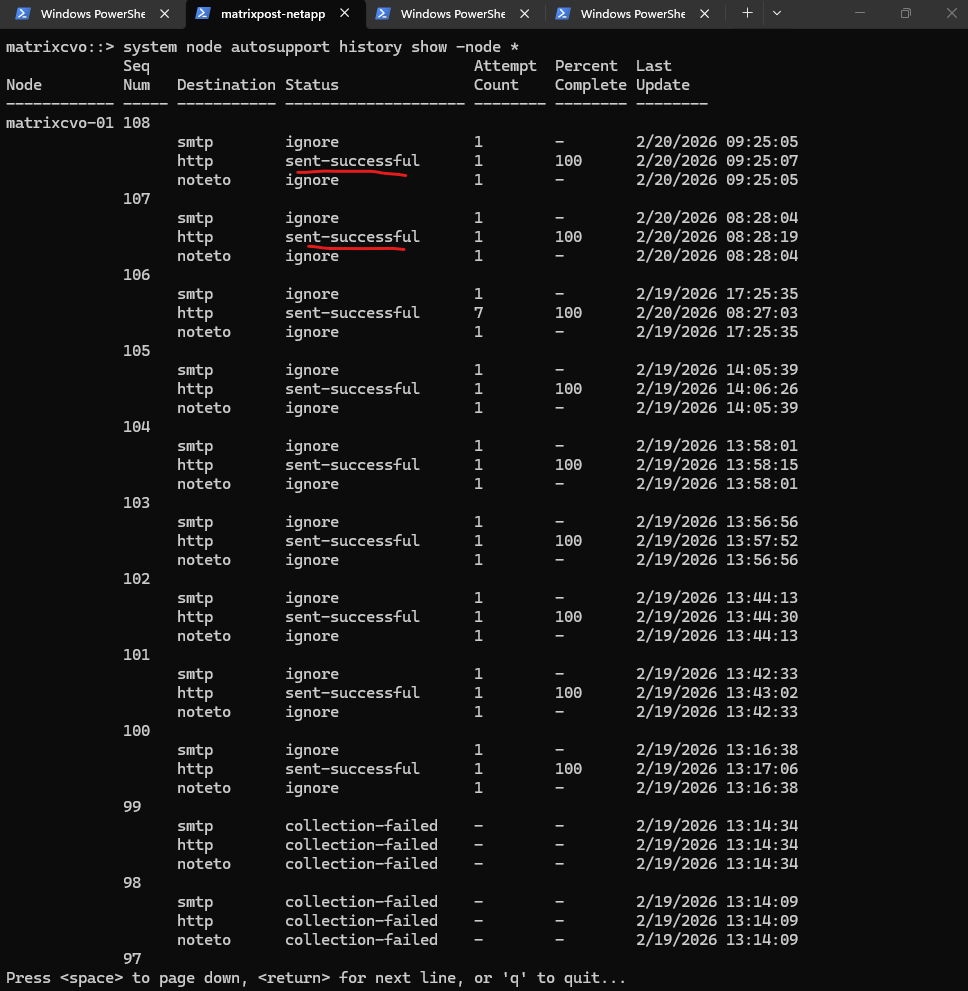
The connectivity with NetApp we can check by running the command below.
In this history log, we see a healthy and operational AutoSupport environment where the majority of diagnostic bundles are reaching NetApp via HTTPS, indicated by the
sent-successfulstatus and 100% completion.While there are some intermittent
collection-failedentries, these appear to be transient “hiccups” since the system recovered immediately to process subsequent sequences. Overall, the cluster is successfully communicating its health data, providing a stark contrast to the persistent transmission timeouts seen in the production environment.
matrixcvo::> system node autosupport history show -node *
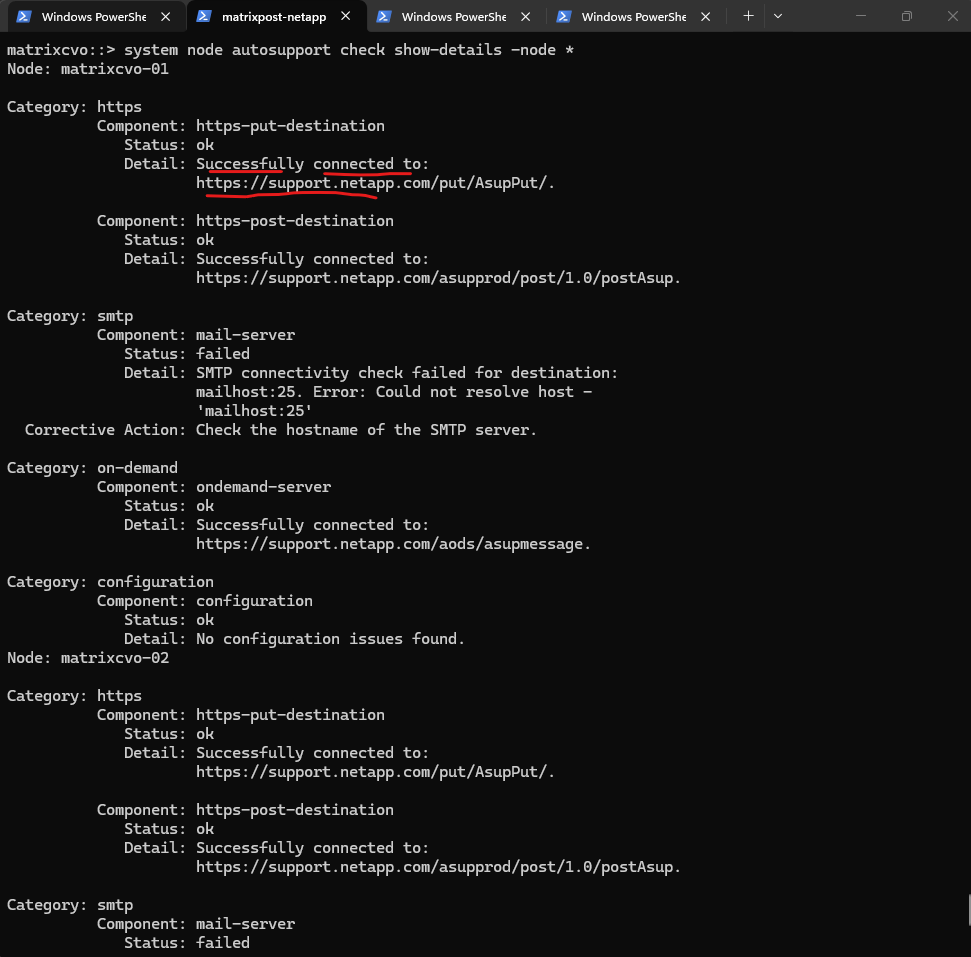
We can verify AutoSupport connectivity by running the command below.
This diagnostic output confirms that my lab cluster has fully functional HTTPS connectivity to NetApp’s support servers, successfully passing both the “PUT” and “POST” transmission tests.
While the SMTP check fails due to an unresolvable “mailhost,” this is irrelevant as long as the HTTPS and On-Demand components show an
okstatus, which ensures logs are reaching their destination.Using this command is the most effective way to validate that a cluster’s networking and proxy configurations are correctly aligned with NetApp’s backend infrastructure.
matrixcvo::> system node autosupport check show-details -node *
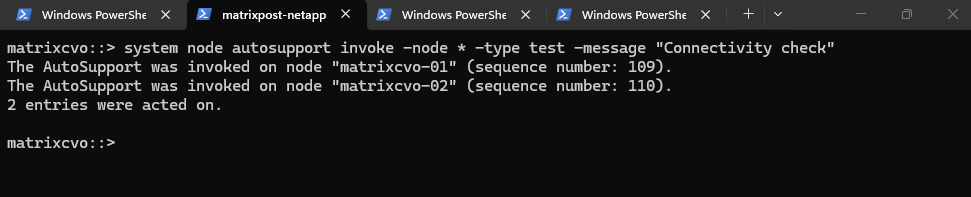
We can also manually invoking a test AutoSupport is the definitive way to confirm that your networking changes have resolved any prior transmission issues.
By checking the generated sequence numbers against the history log, you can verify in real-time that the “sent-successful” status is achieved. This proactive test ensures that the cluster is not just administratively “enabled” but is actively capable of reaching NetApp’s backend for critical support events.
matrixcvo::> system node autosupport invoke -node * -type test -message "Connectivity check"
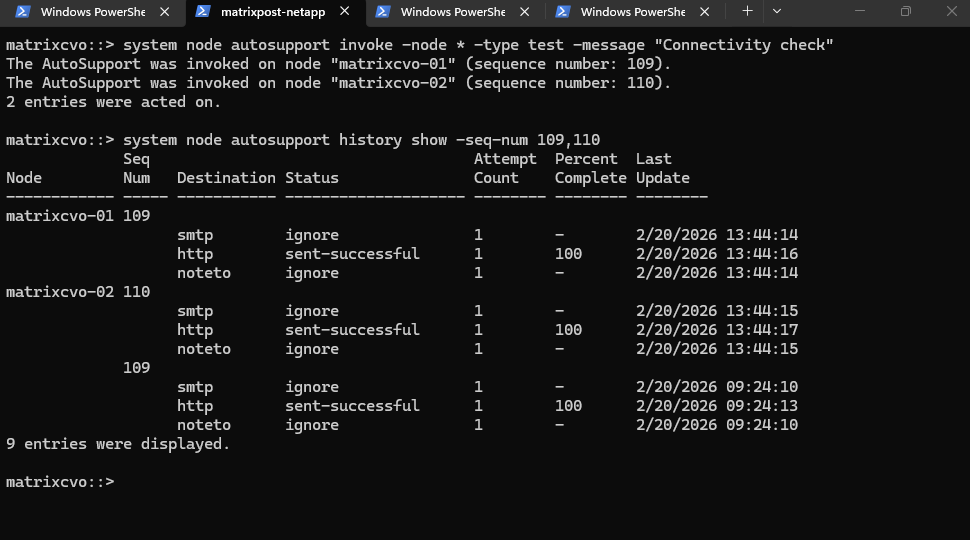
To verify the specific test above we just triggered, we can filter the history by the sequence numbers provided in the command output (109 and 110).
This allows you to cut through the noise of older logs and confirm that our Connectivity check successfully reached NetApp.
matrixcvo::> system node autosupport history show -seq-num 109,110
AutoSupport messages are sent automatically on a regular schedule, typically once per day, in addition to event-triggered messages when specific system events occur.
To immediately verify connectivity or generate a report, an AutoSupport message can also be triggered manually using the command below.
Using
-type alltriggers the collection and transmission of a full AutoSupport report, similar to the regularly scheduled daily AutoSupport message.
matrixcvo::> system node autosupport invoke -node * -type all
When encountering AutoSupport connectivity issues, it is recommended to first verify whether a proxy is configured.
If necessary, the proxy configuration can be removed or changed for all nodes like shown below.
# determine settings
matrixcvo::> system node autosupport show -fields proxy-url

# remove proxy setting
matrixcvo::> system node autosupport modify -node * -proxy-url ""
matrixcvo::> system node autosupport show -fields proxy-url

# to configure or change a proxy
matrixcvo::> system node autosupport modify -node * -proxy-url http://proxy.company.local:8080
AutoSupport is the Heartbeat, Active IQ is the Brain
While AutoSupport acts as the essential heartbeat of our Cloud Volumes ONTAP (CVO) environment, the data it sends requires a “brain” to interpret it.
This is where Active IQ (Digital Advisor) comes into play. By transforming raw telemetry into actionable intelligence, it ensures that our Azure storage isn’t just running, but is optimized,
NetAppDigital Advisor Portal
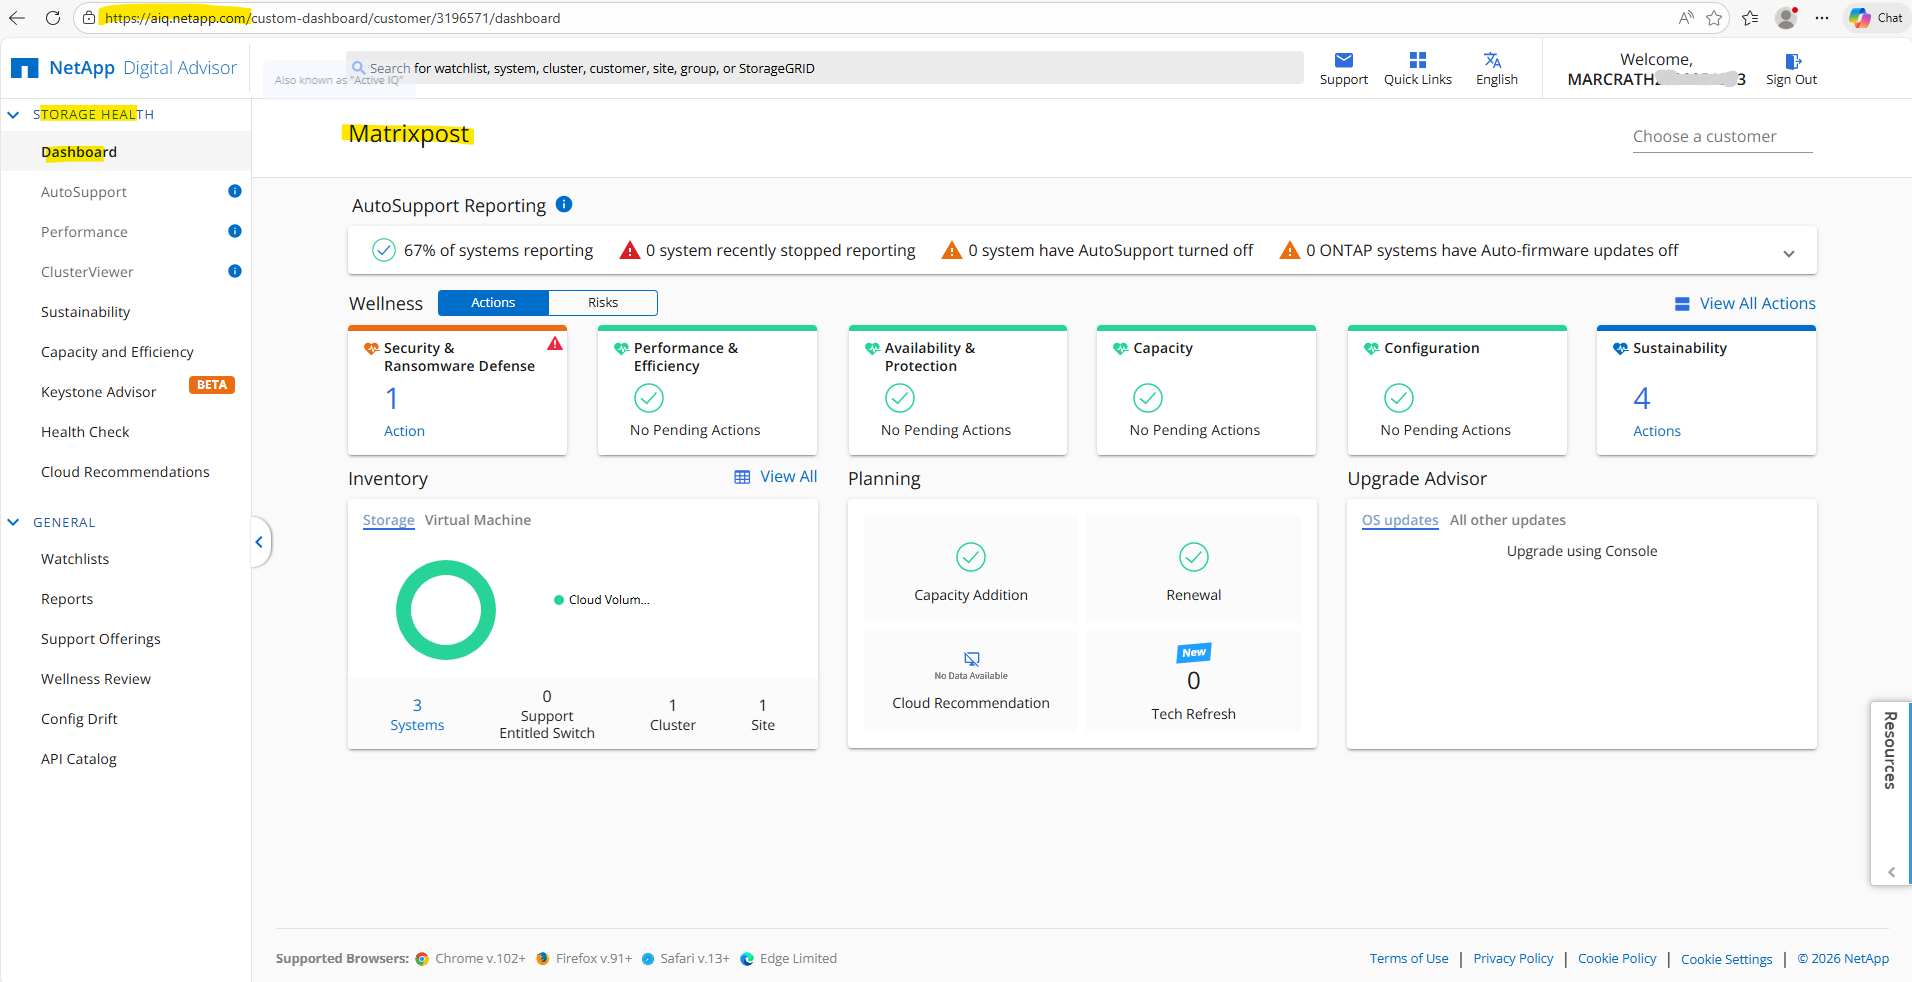
Getting started with the portal is straightforward once our CVO instance is successfully “phoning home.”
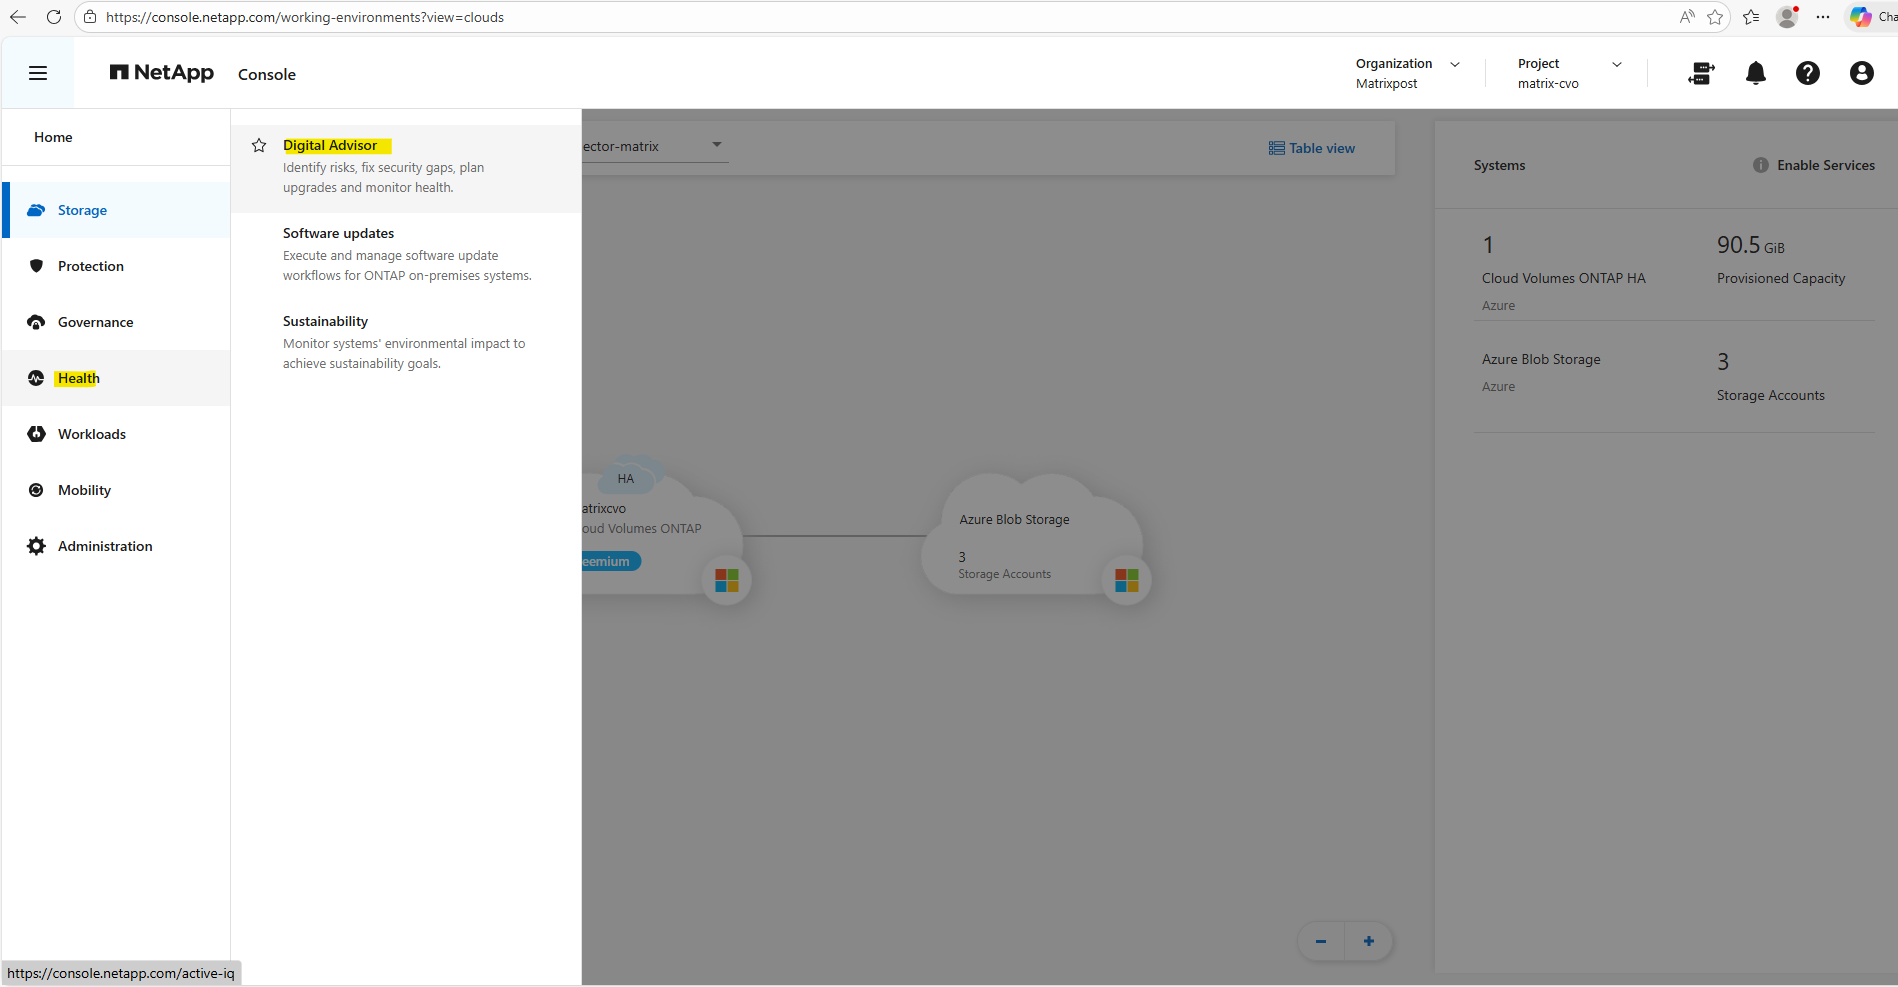
We can access the portal by heading directly to https://aiq.netapp.com and log in with our NetApp Support Site (NSS) credentials or by using the Netapp console and navigating to Health -> Digital Advisor.
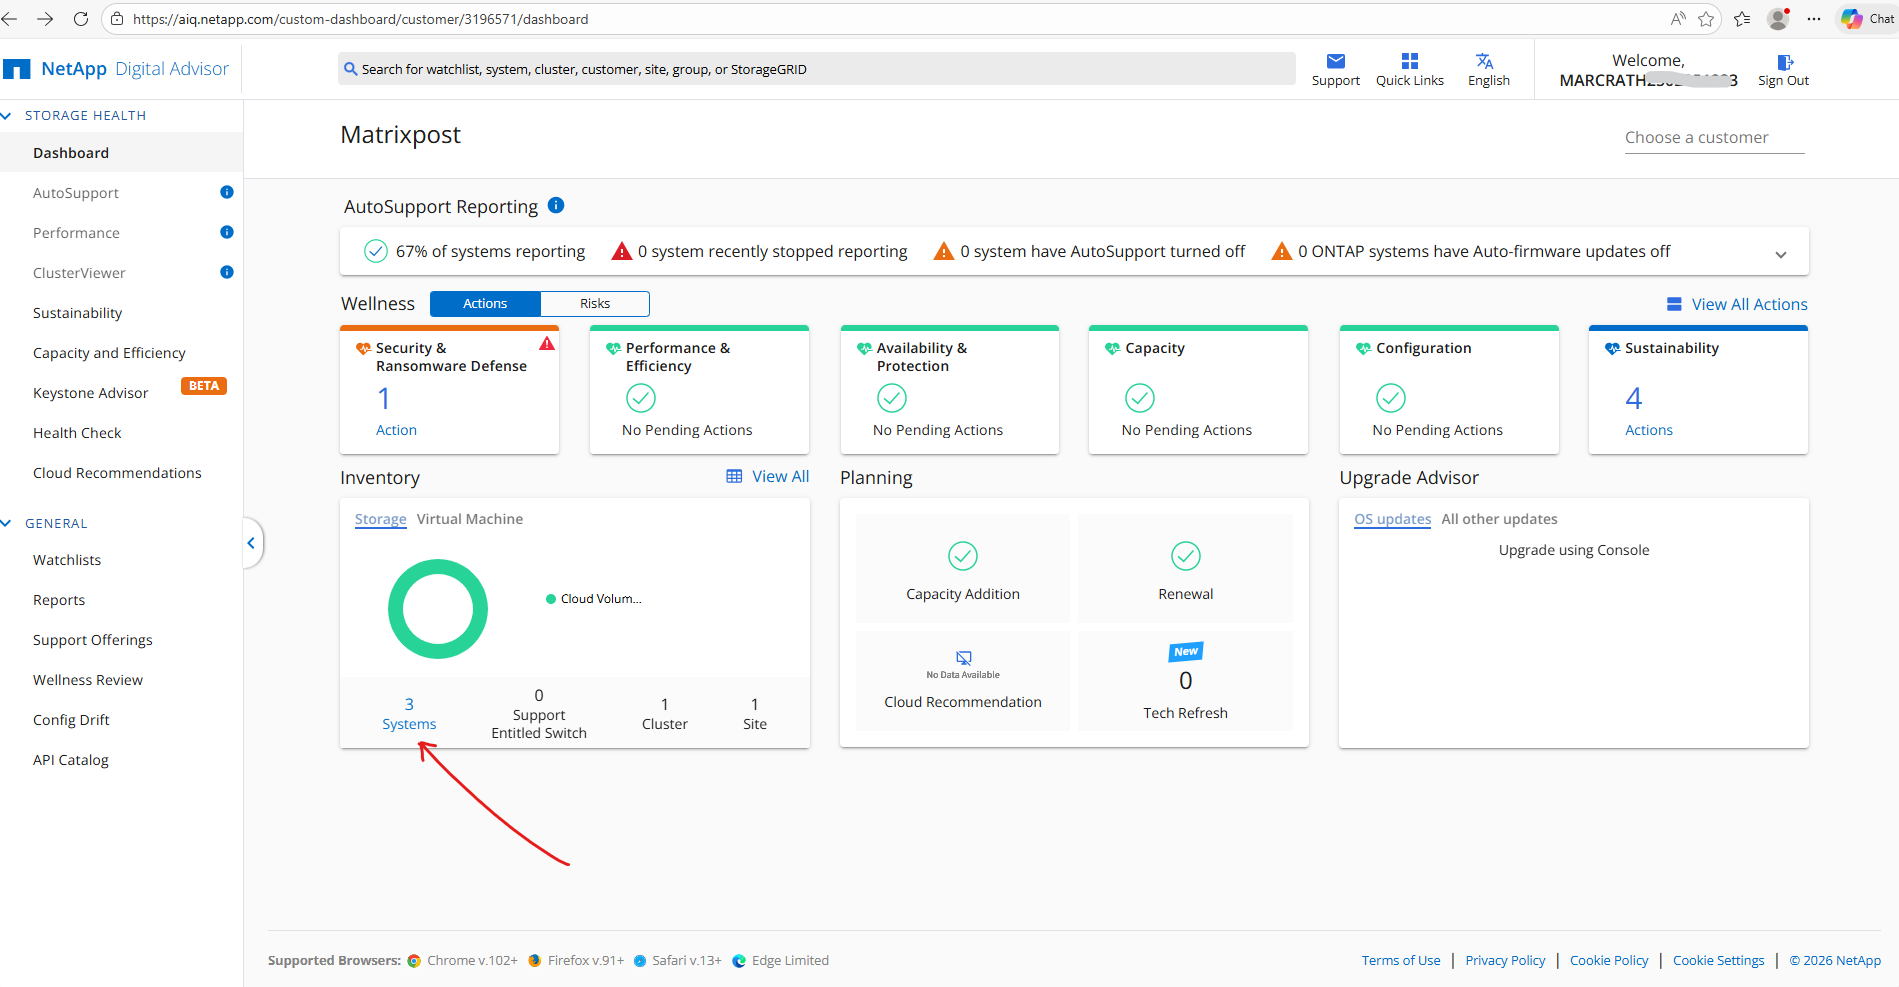
If our AutoSupport is working, our Azure CVO instances will automatically appear in your inventory within 24 hours.
Or as mentioned by using the Netapp console and navigating to Health -> Digital Advisor.
When clicking on the shown systems link within the inventory tile shown below, will get forwarded to the storage overview page.
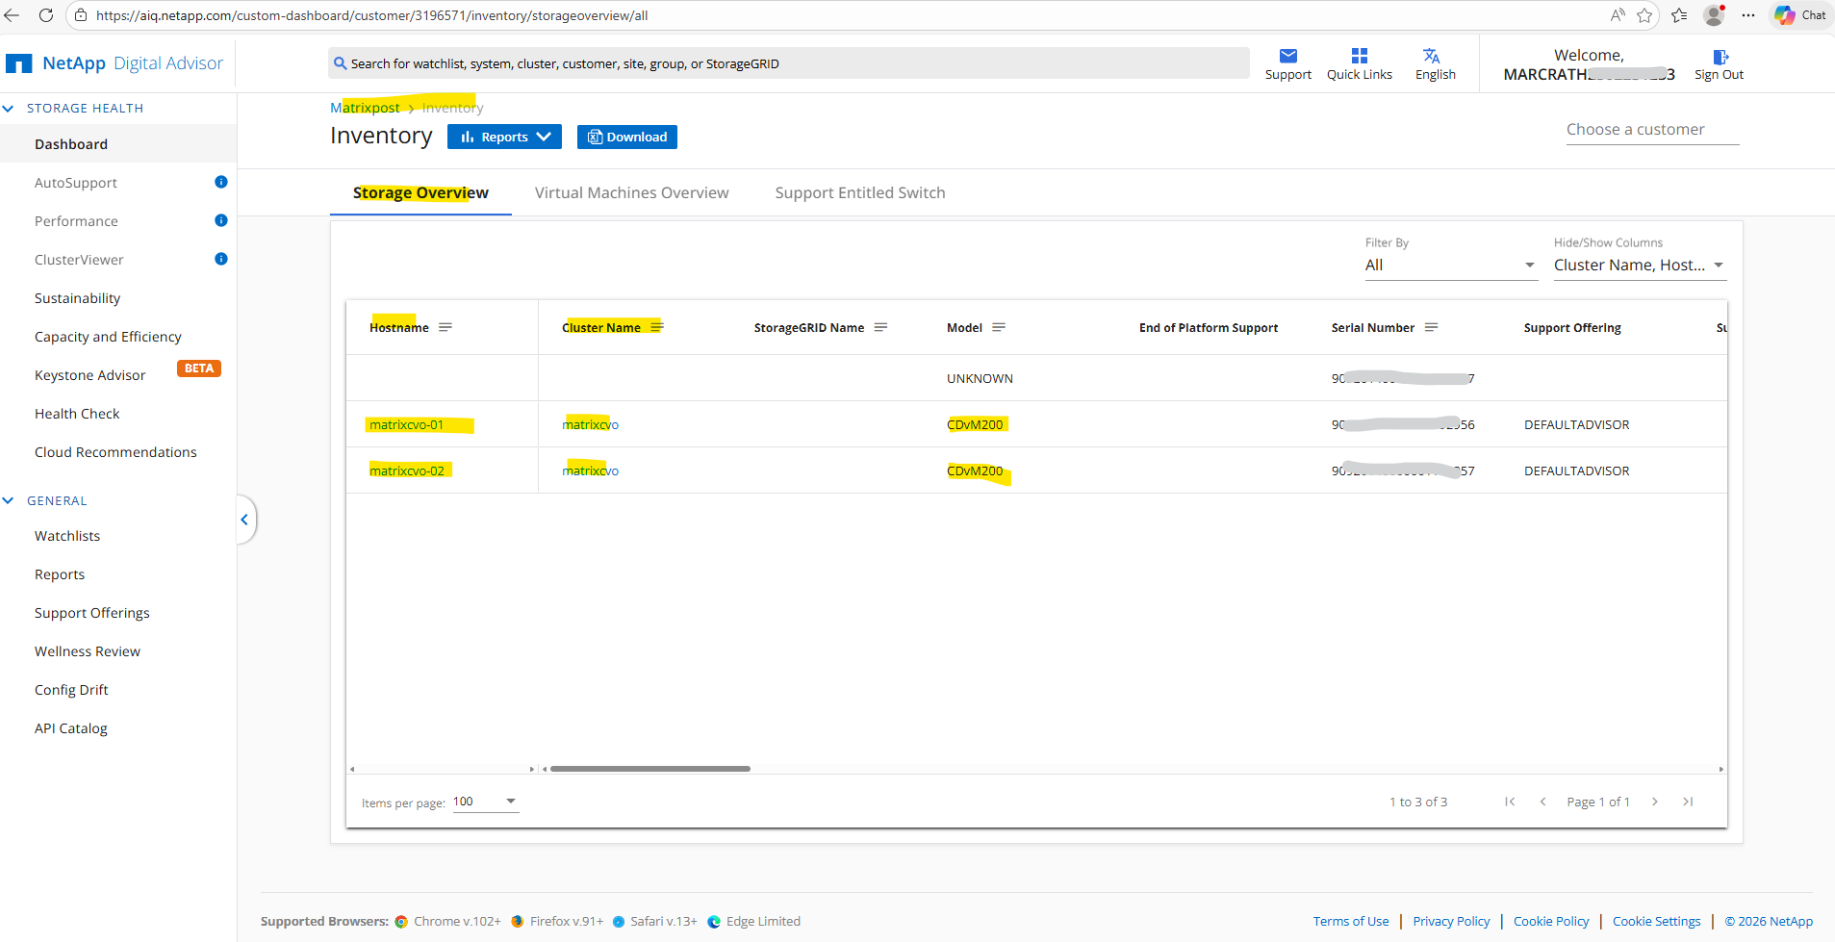
The Inventory Storage Overview page provides a centralized view of our global storage footprint, summarizing total capacity, efficiency ratios, and the physical location of your resources. It allows you to quickly assess the health and utilization of your environment at a glance, helping you identify which clusters are nearing capacity limits or where storage efficiency can be further optimized.
It is very likely that the “unknown” entry is a ghost record from my previous direct Azure deployment.
Because AutoSupport data is stored in the backend database for historical support purposes, systems that were briefly active but not properly decommissioned can linger in the inventory for a period before the portal purges them. This is a common occurrence in lab environments where clusters are frequently created and deleted, but we can safely ignore it as it will eventually drop off our Active IQ dashboard.
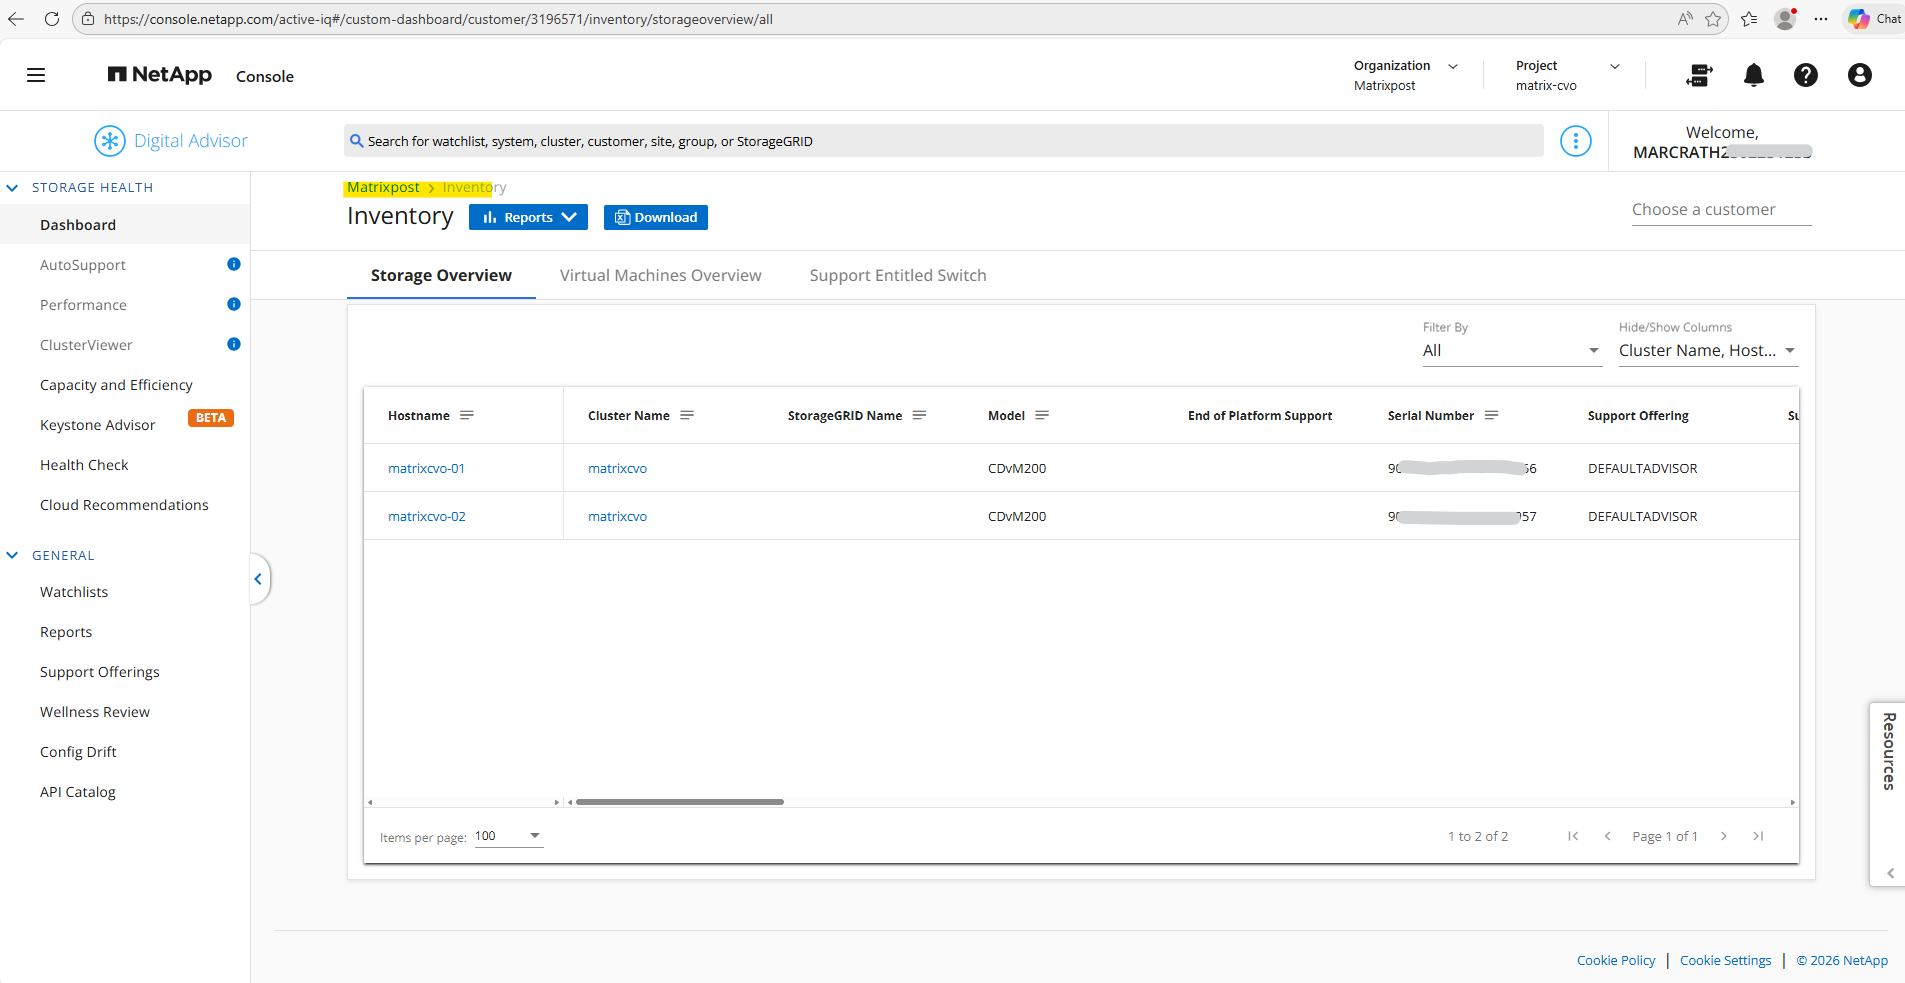
As assumed a few days later the ghost record was drop off our Active IQ dashboard.
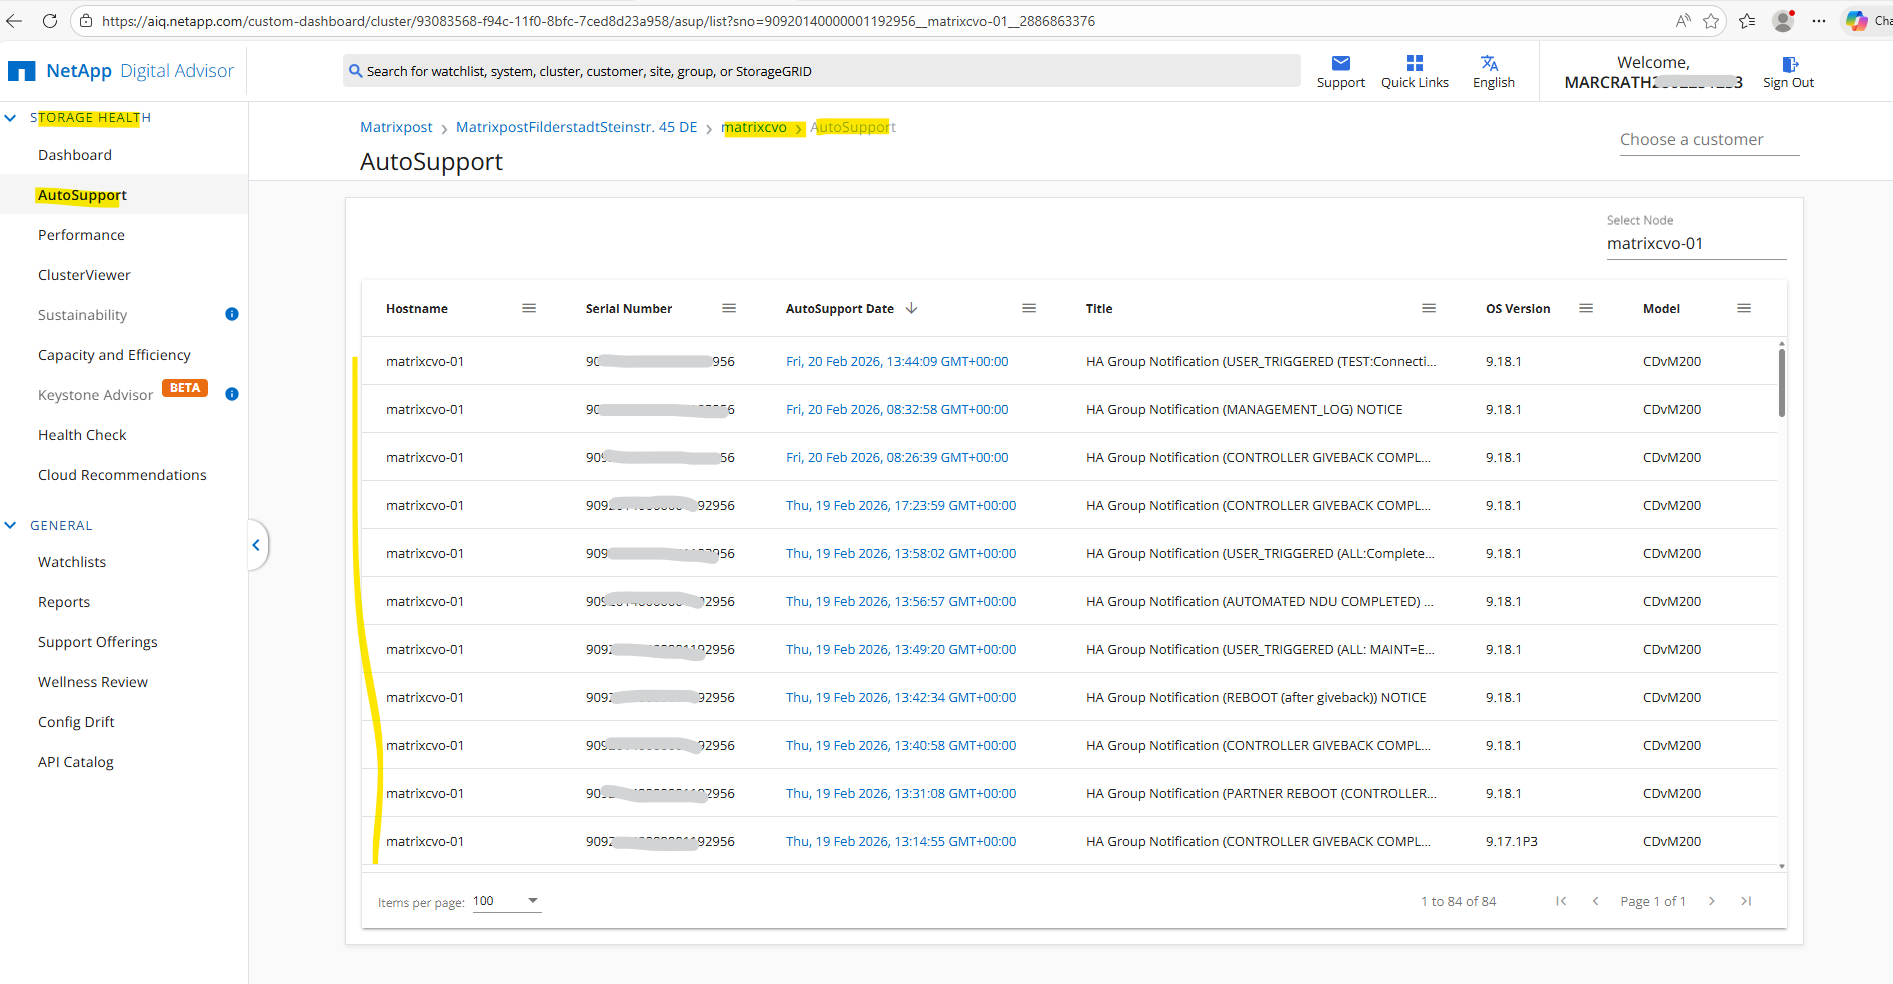
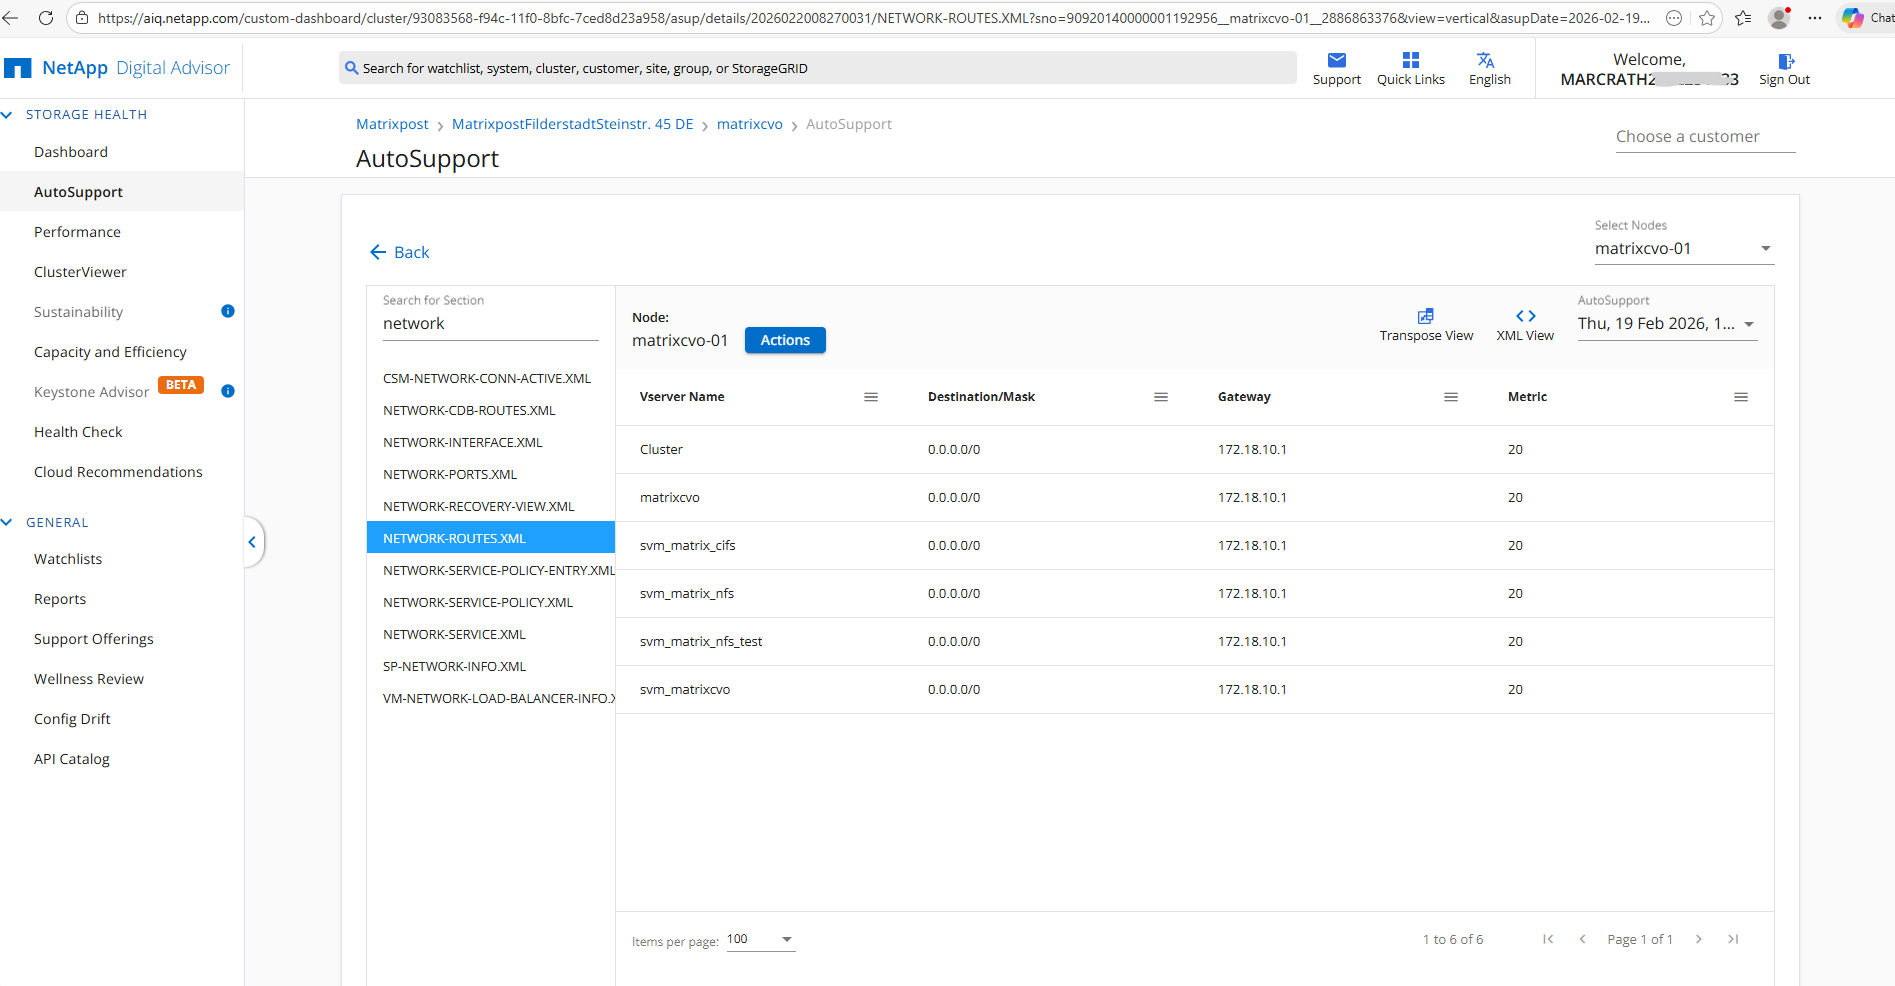
The AutoSupport page within the Storage Health menu serves as a web-based mirror of our cluster’s local history, providing a searchable archive of all telemetry messages received by NetApp.
It allows us to track the delivery status and payload type of every heartbeat, making it an essential tool for verifying that our Azure-based nodes are consistently communicating their status.
By clicking into specific entries, we can even view the detailed results of the analysis performed by Active IQ, bridging the gap between raw logs and actionable health data.
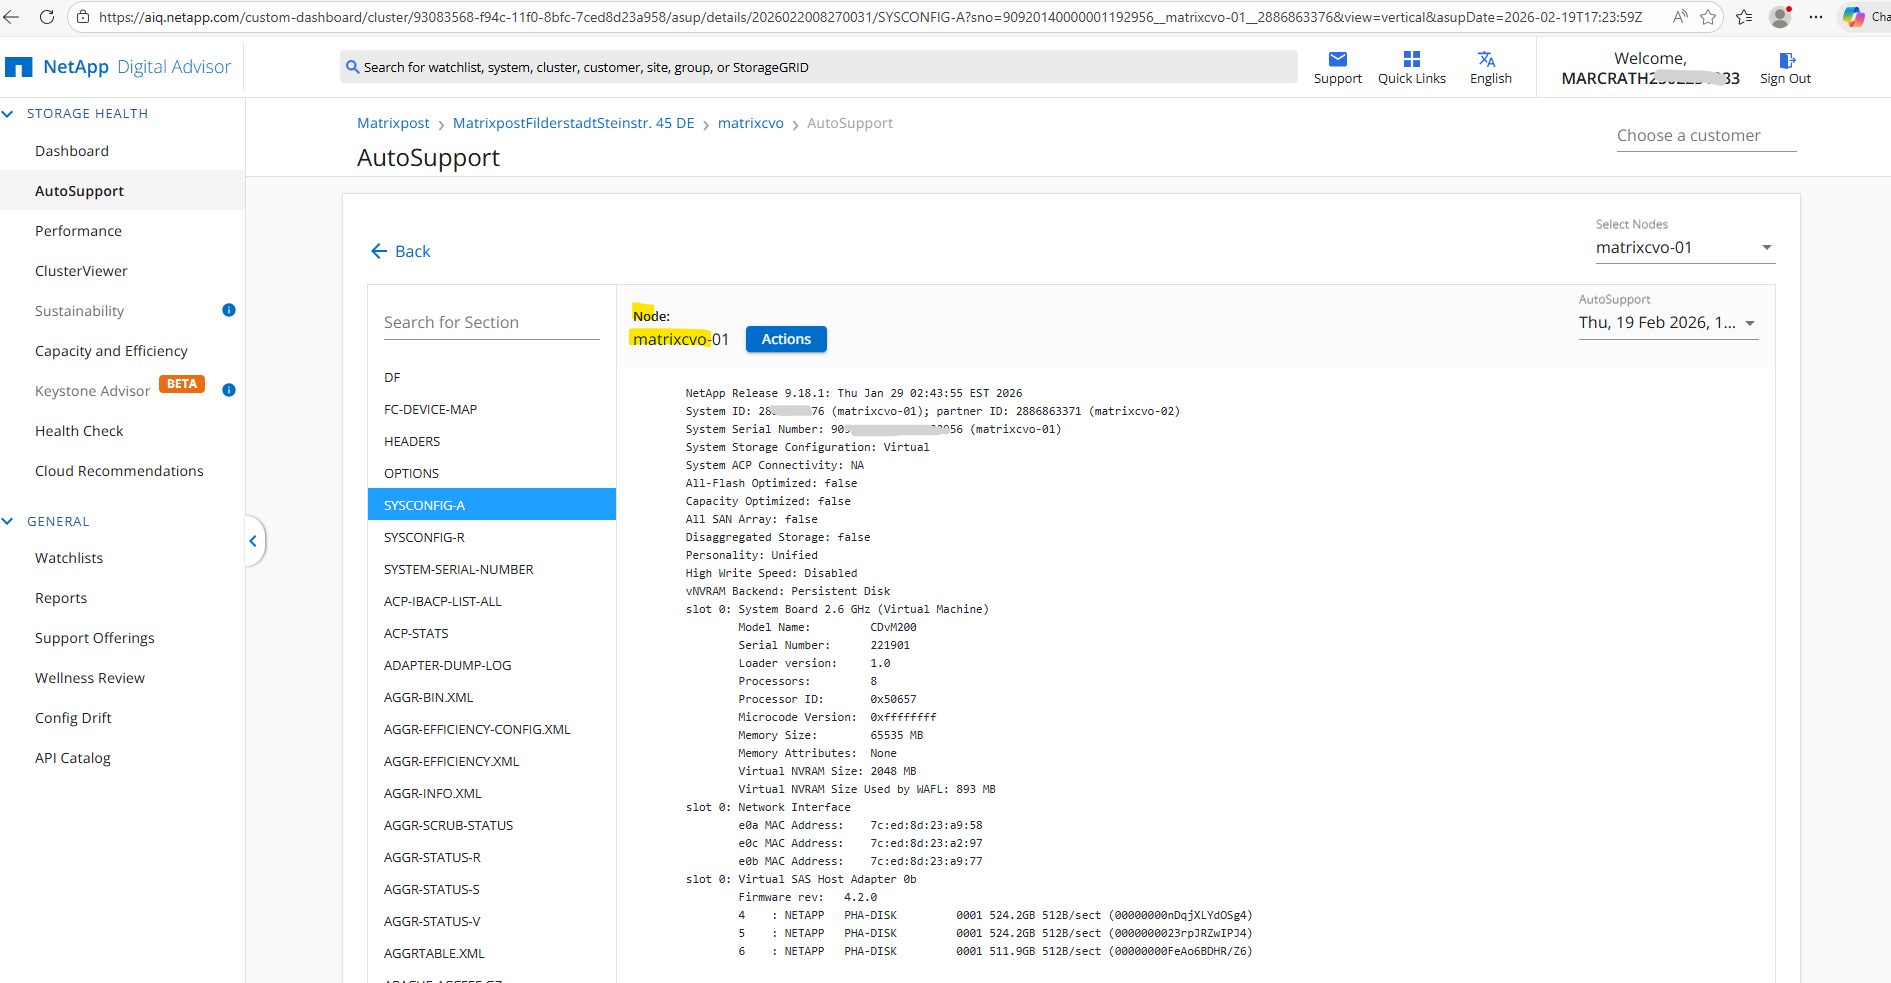
When you drill down into a specific AutoSupport entry, you are essentially looking at the raw diagnostic data that NetApp Support would use to troubleshoot our cluster.
The left-hand sidebar acts as an index for the hundreds of individual files bundled in that payload, with
SYSCONFIG-Aselected by default because it provides the most critical “at-a-glance” view of our hardware configuration, software versions, and shelf connectivity.
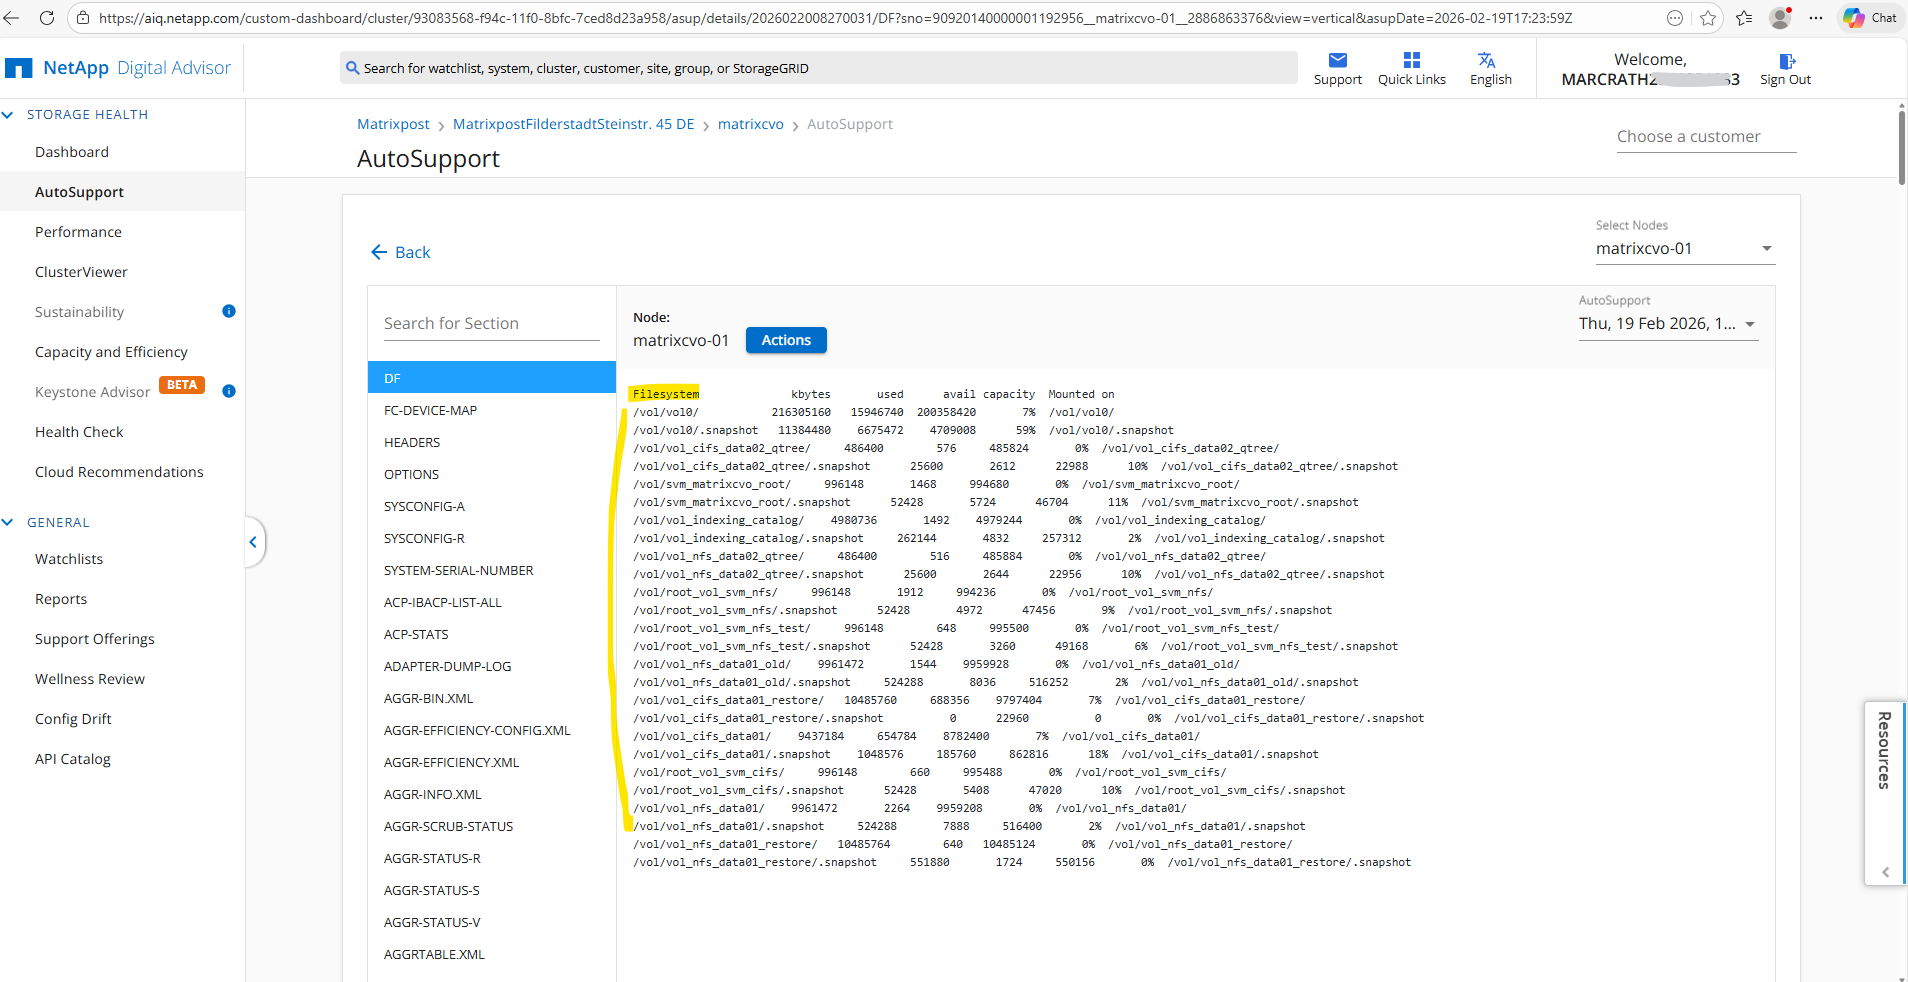
Other sections like DF (Disk Free) provide immediate insights into volume and aggregate space usage like shown below.
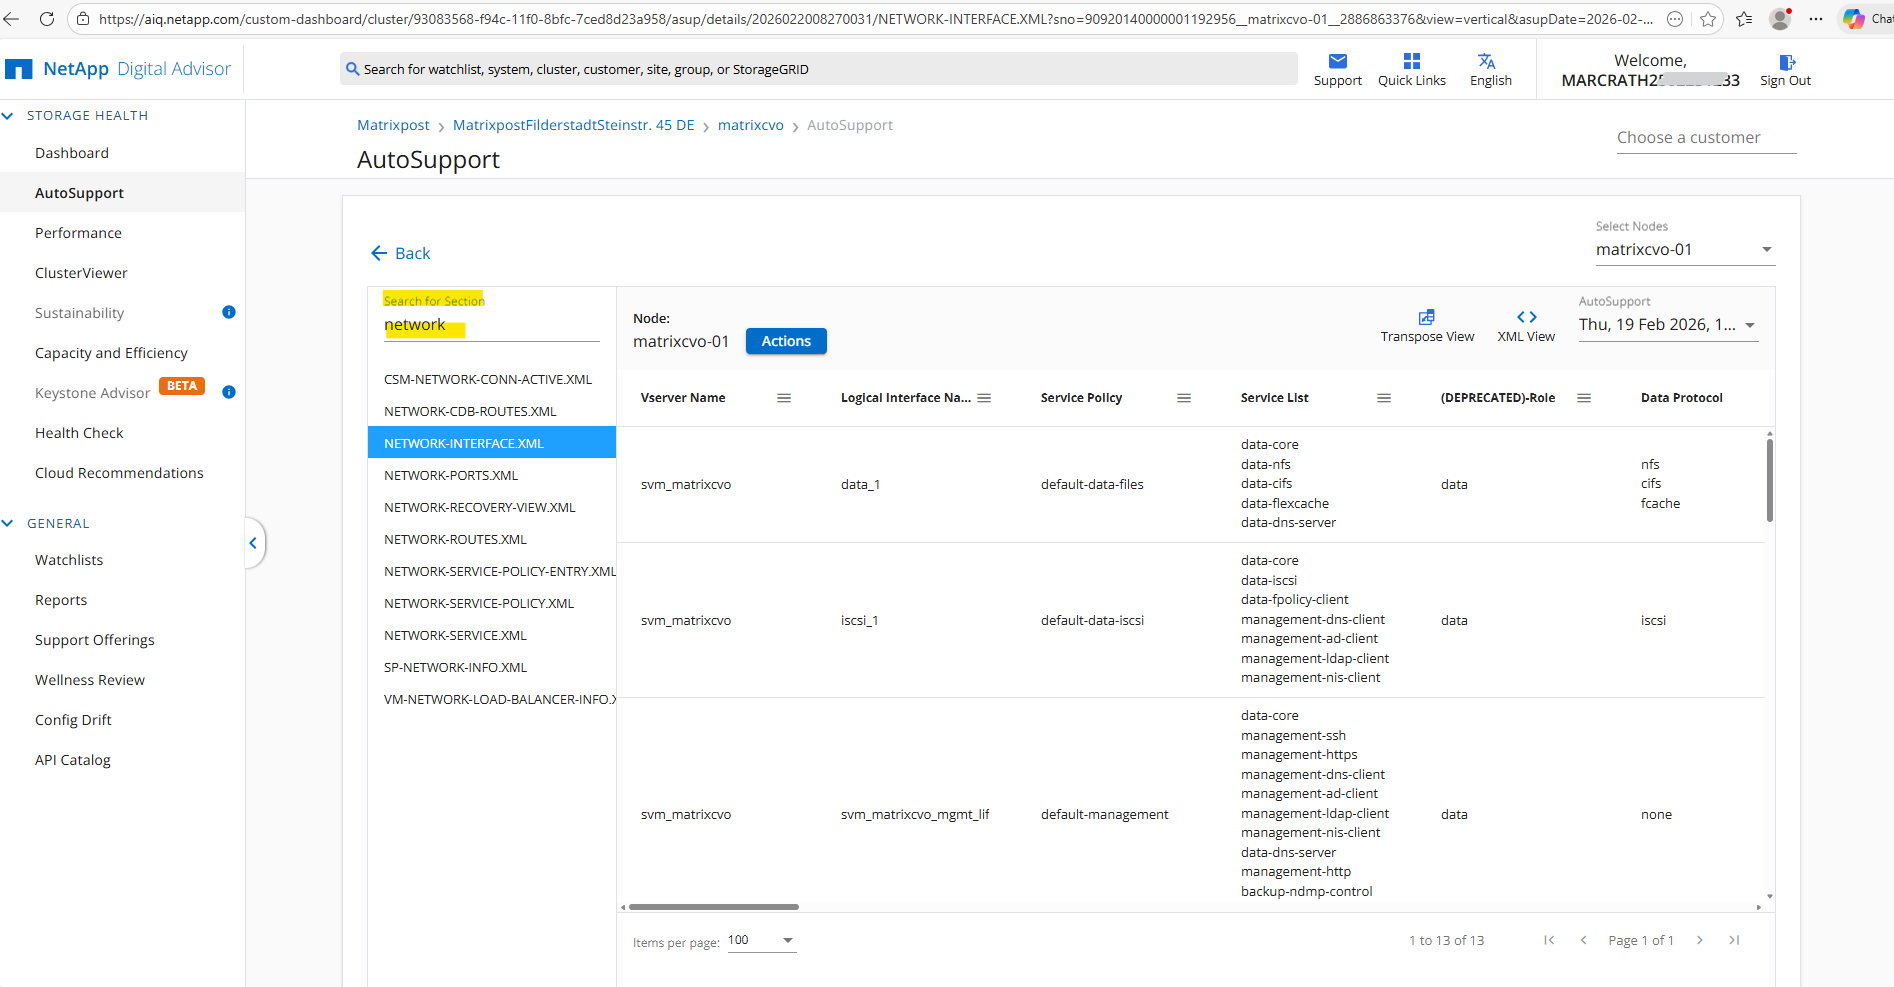
While NETWORK-INTERFACE.XML will list the Logical Interfaces (LIFs) and their associated IP addresses, ensuring that your data and management paths are correctly hosted on the right nodes.
NETWORK-ROUTES.XML: This is crucial for troubleshooting AutoSupport itself; it shows the ONTAP routing table, allowing you to verify if the cluster has the correct “next hop” to reach your Azure-based proxy or the internet gateway.
VM-NETWORK-LOAD-BALANCER-INFO: This is a CVO-specific log that helps verify how the instance is communicating with the Azure Load Balancer, which is the component responsible for “floating” IP addresses during a failover between matrixcvo-01 and matrixcvo-02.
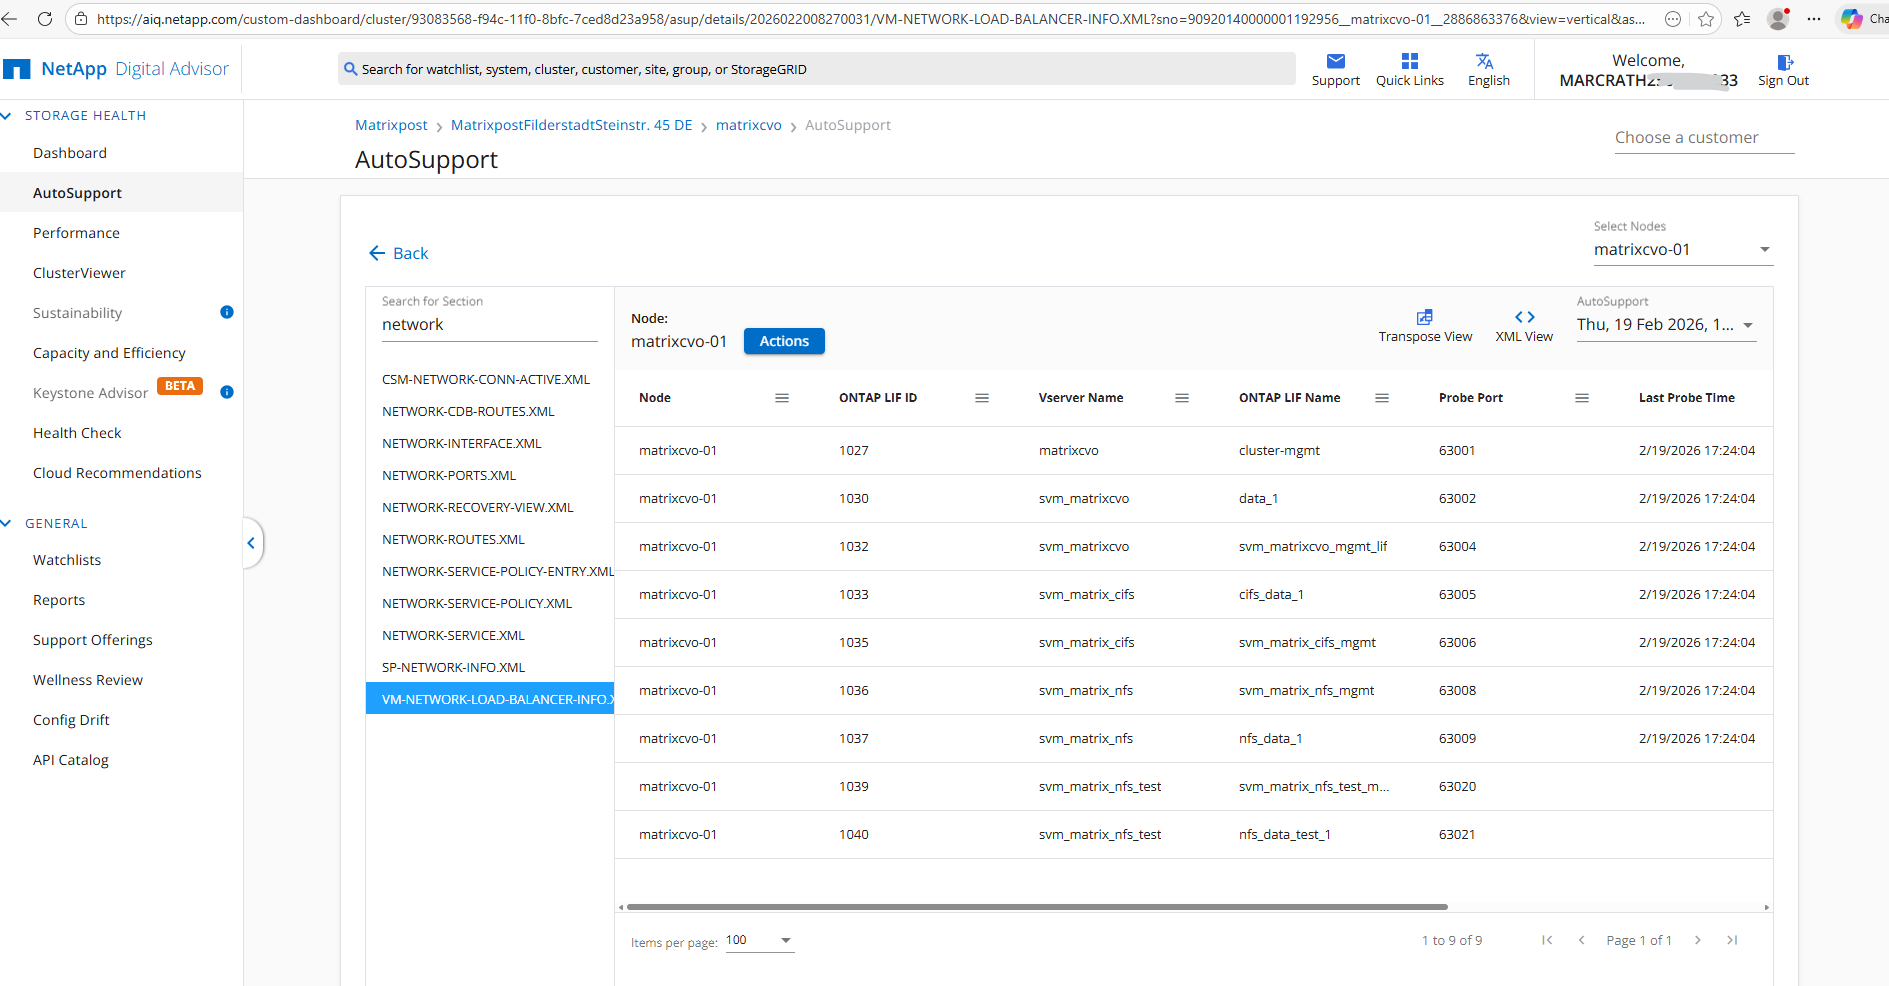
More about the ILB configuration in Azure you will find here https://blog.matrixpost.net/deploying-netapp-cloud-volumes-ontap-part-3/#ilb_config.
You will find an introduction to NetApp Active IQ also here https://youtu.be/wHaON79H_9w.
In Part 8 we focus on Disaster Recovery and explore how to protect Cloud Volumes ONTAP in Azure against outages and unexpected failures. This section walks through the architecture, configuration, and validation steps required to ensure your environment remains resilient and recoverable.
Links
Learn about AutoSupport in Digital Advisor
https://docs.netapp.com/us-en/active-iq/concept_autosupport.htmlSet up ONTAP AutoSupport
https://docs.netapp.com/us-en/ontap/system-admin/setup-autosupport-task.htmlActive IQ: AI-Powered Digital Advisor
https://mysupport.netapp.com/site/info/aboutAIQActive IQ Digital Advisor
https://docs.netapp.com/us-en/data-infrastructure-insights/concept_activeiq.html