How to monitor VMware vSphere Environments in Checkmk
In my last post we saw how to set up Checkmk on SUSE Linux Enterprise Server 15 SP5, now in this post we will see how we can monitor VMware vSphere environments and Windows Clients in Checkmk.
Checkmk includes built-in support for monitoring VMware vSphere environments. This integration allows Checkmk to gather data from VMware vCenter servers and ESXi hosts, giving administrators a complete view of their virtual infrastructure.
Key metrics that can be monitored include CPU and memory usage, disk I/O, network performance, VM statuses, datastore utilization, and more. Checkmk also provides alerts and notifications for issues like resource exhaustion, VM downtimes, or performance bottlenecks.
Checkmk uses VMware’s API to connect to vSphere. This connection enables it to collect detailed performance and configuration data from the vSphere environment. The API integration ensures that Checkmk can monitor all components of the virtual environment, including hosts, clusters, datastores, and individual VMs.
More about VMware’s API you will find in the VMware vSphere API Reference documentation under https://developer.broadcom.com/xapis/vsphere-web-services-api/7.0/.
The vSphere API is exposed as a Web service, running on VMware vSphere server systems. The API provides access to the vSphere management components—the managed objects that you can use to manage, monitor, and control life-cycle operations of virtual machines and other virtual infrastructure components (datacenters, datastores, networks, and so on).
Set up ESXi Hosts
To monitor VMware vSphere environments we first need to create Checkmk Hosts for the ESXi Host and vCenter Appliance. Later we then also need to configure rules which includes parameters like a dedicated monitoring user and password which is finally is accessing the ESXi Host and vCenter.
With Checkmk you can monitor ESXi-Hosts and also its VMs. Thus, for example, on a host it is possible to query Disk-IO, data store performance, the status of physical network interfaces, diverse hardware sensors, and much more. Checkmk likewise offers a series of check plug-ins for the VMs. A comprehensive list of these can be found in the Catalog of check plug-ins.
Using the piggyback mechanism VM data will be displayed directly in its associated host. Thus the VM related data is found right where it is actually required, and where it can be compared to that reported by the VM’s OS:
Access to this data is achieved via the HTTP-based vSphere-API — not over the normal agents or SNMP. This means that no agent or other software needs to be installed on the ESXi-Hosts, and that the access is very simple to set up.
The initial setup for monitoring a ESXi-server is very simple, and can be completed in less than five minutes. Before you can set up the access however, the following prerequisites must be satisfied:
- You must have defined a user on the ESXi-server. It is sufficient that this user only has read access.
- You must have defined the ESXi-server as the host in Checkmk, and configured it as an agent (Checkmk Agent). Tip: Select the host name so that it is the same as that known to the server itself.
Source: https://docs.checkmk.com/latest/en/monitoring_vmware.html
Add the ESXi Host as Host in Checkmk
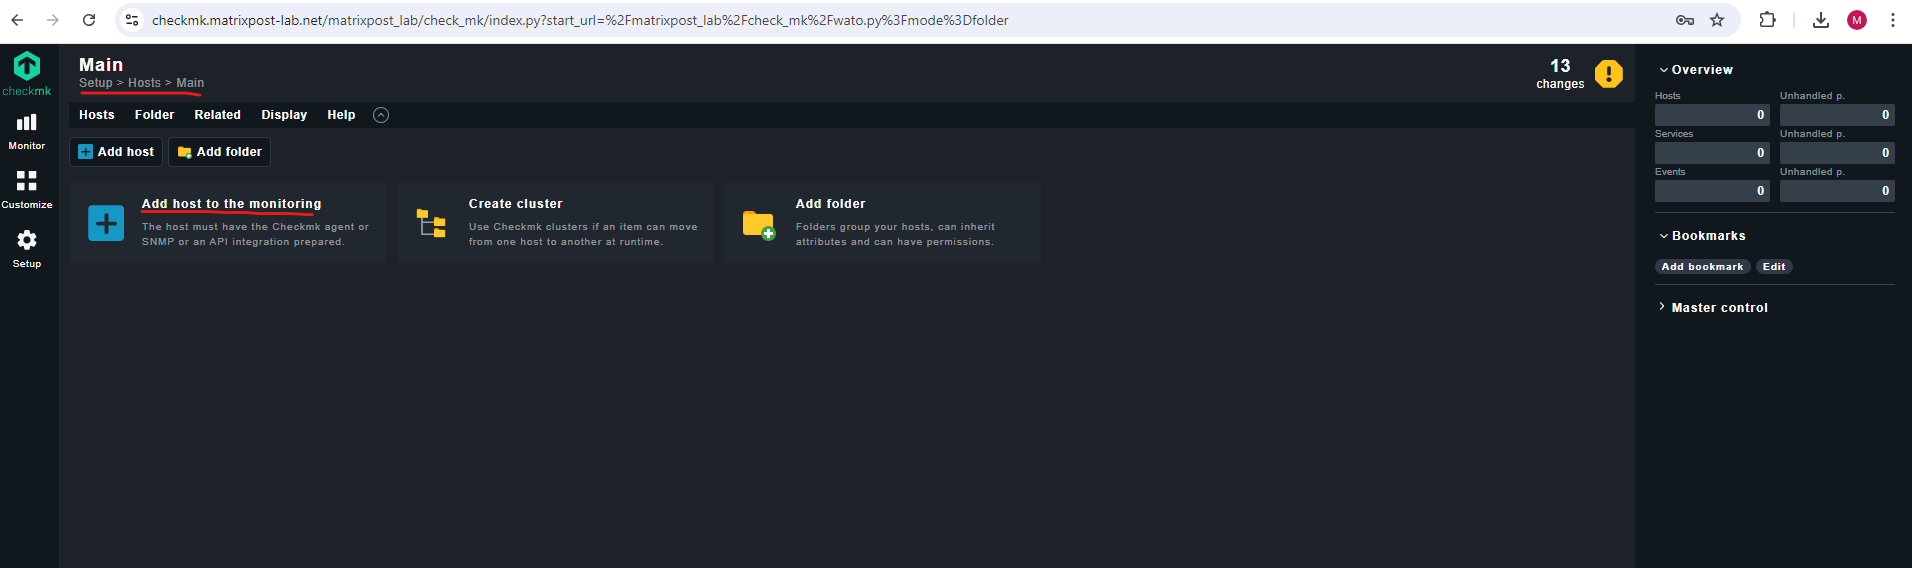
First we need to add our ESXi Host as new Host in checkmk. Therefore select Setup -> Hosts.
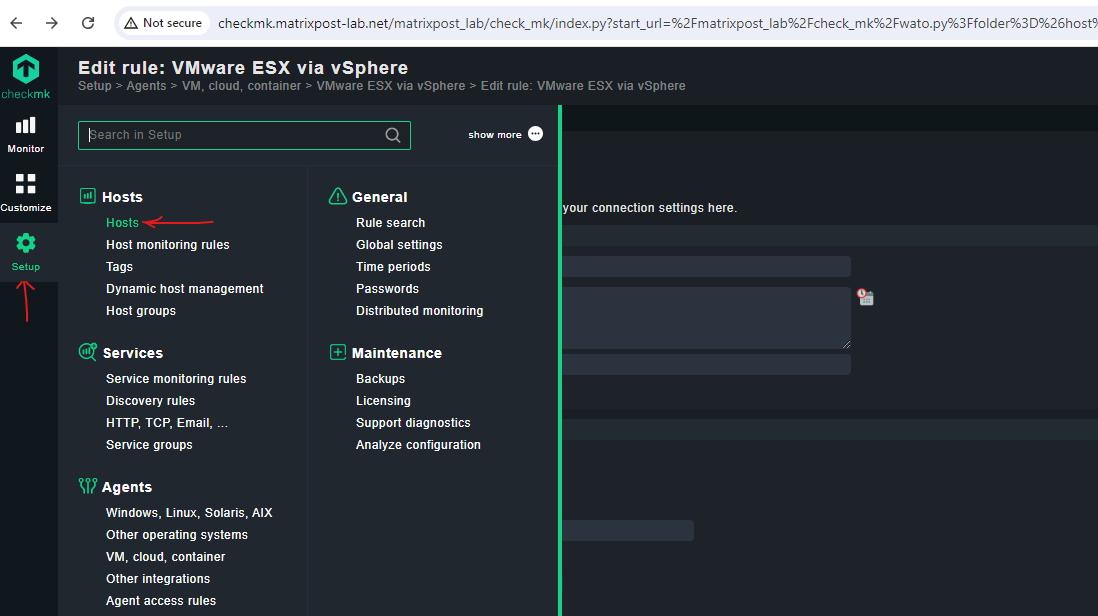
You can create the host directly in the root folder named Main or you can organize your monitored hosts and services in a folder structure by creating folders below.
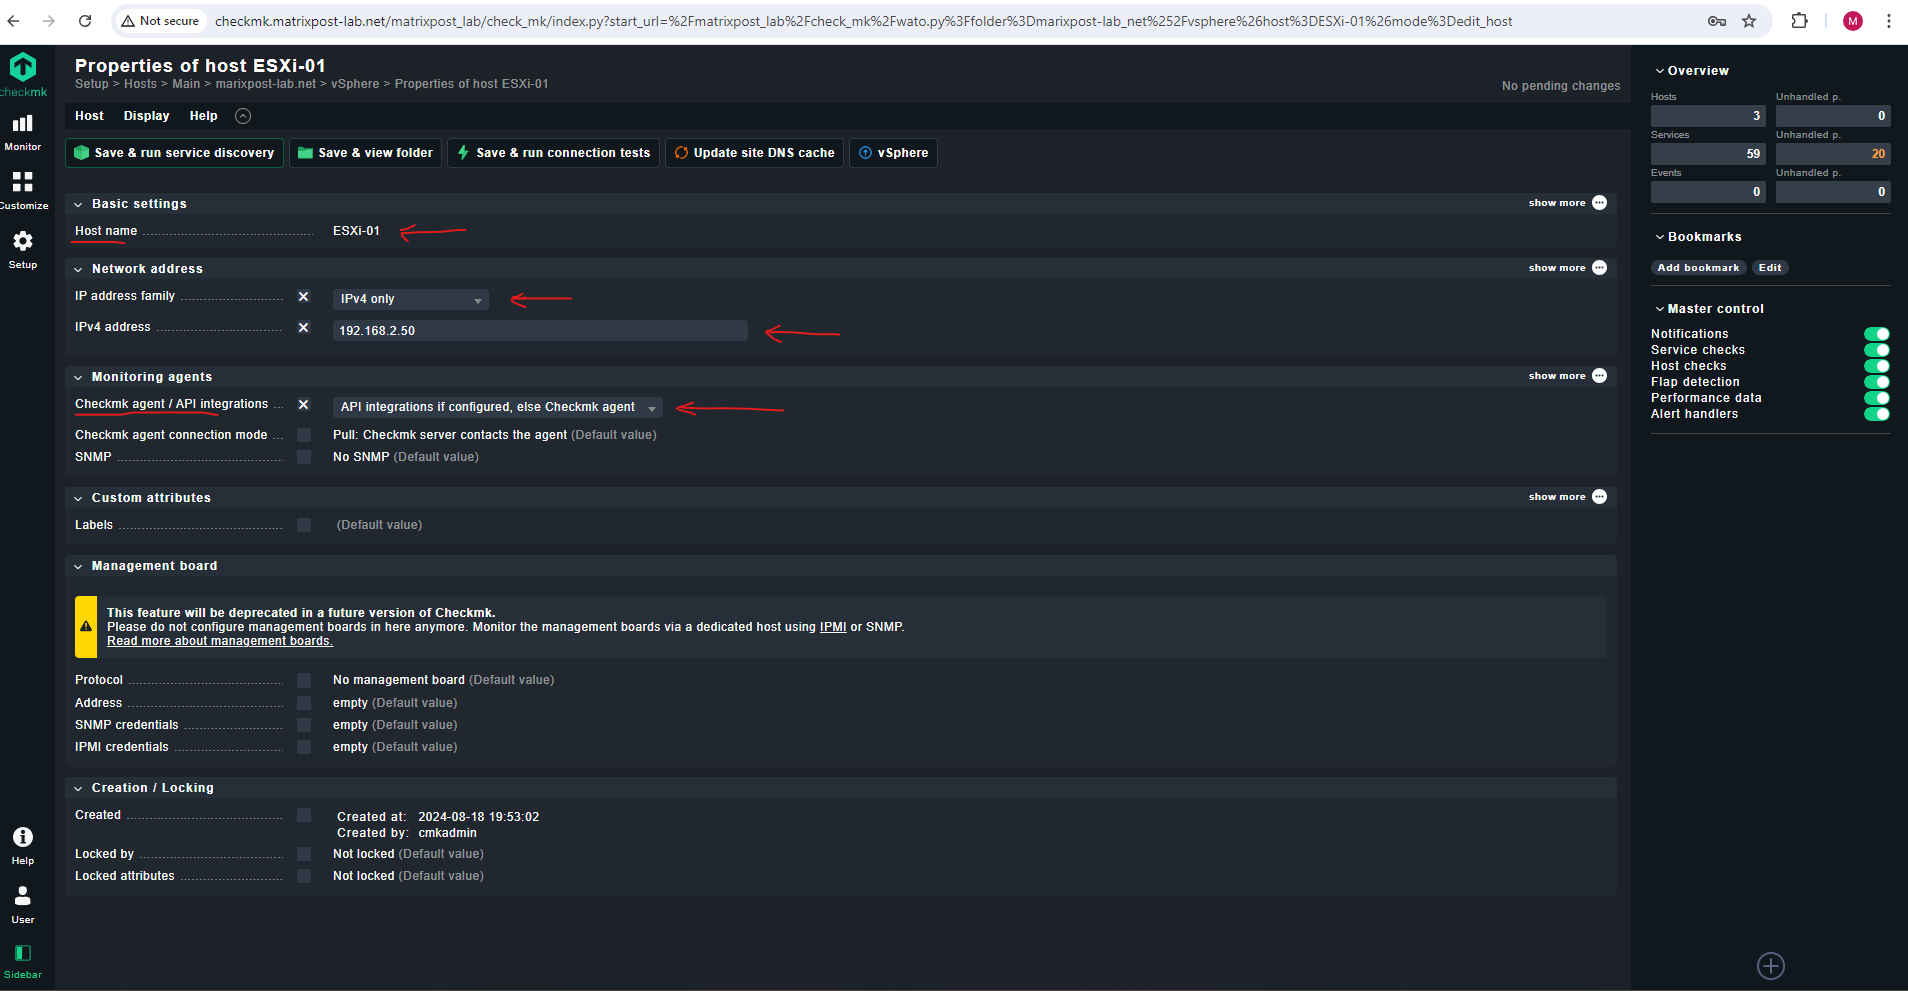
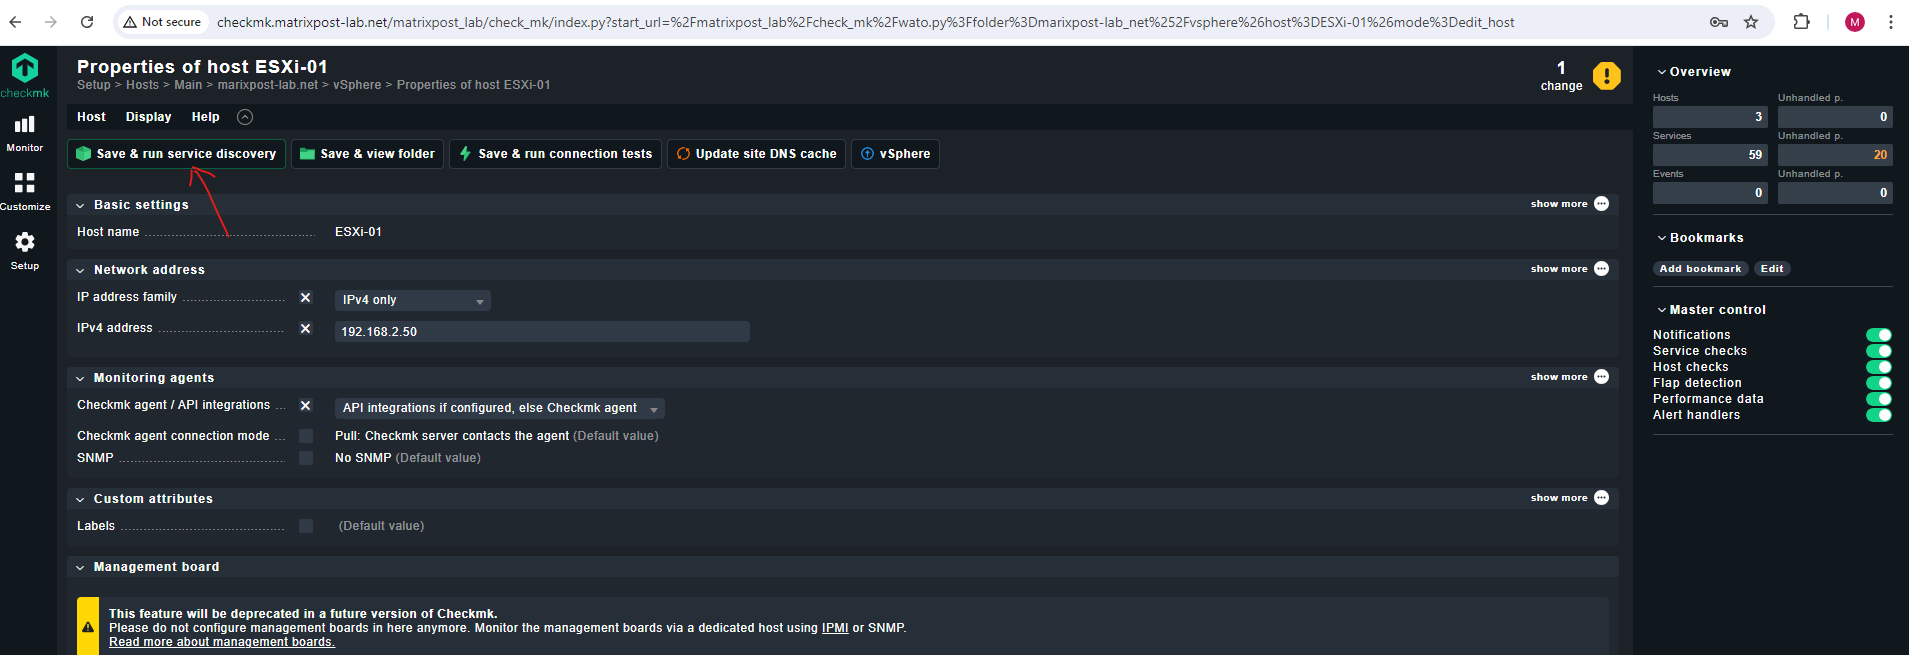
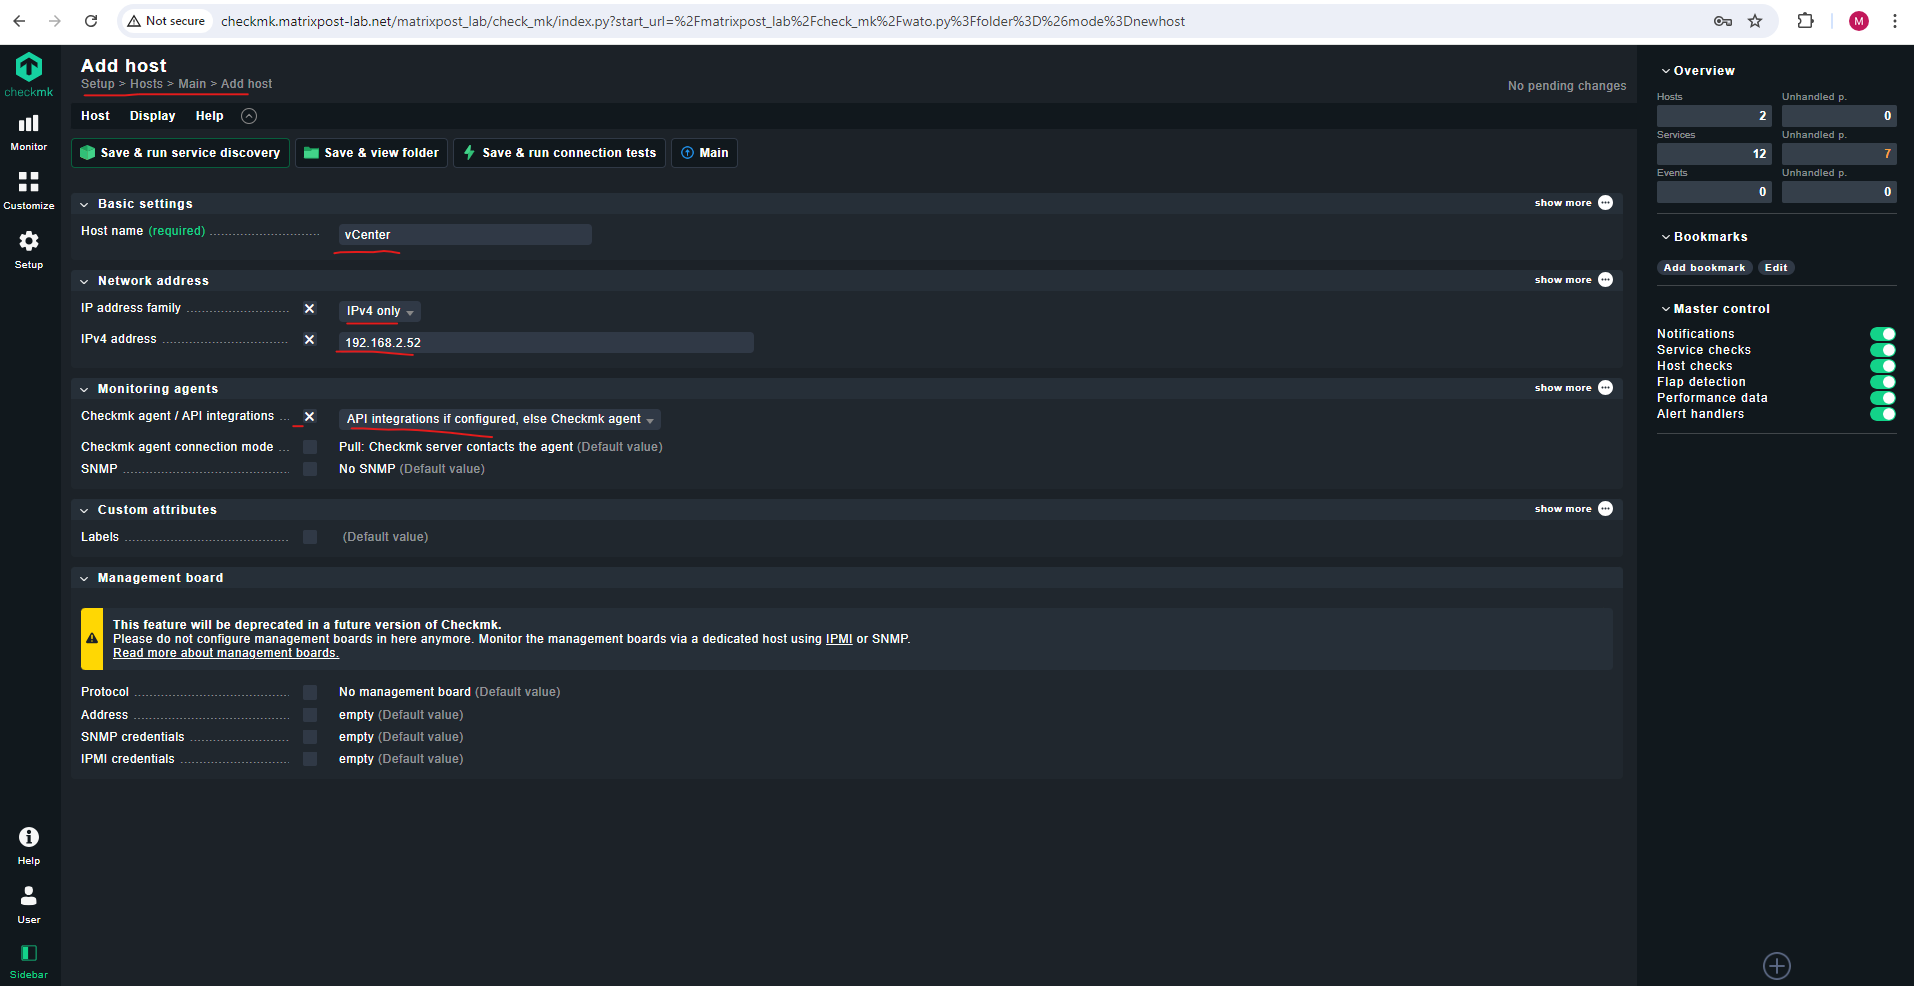
To configure the ESXi Host in checkmk as an agent (Checkmk Agent), we just need to select resp. is already pre-selected (default setting) below under Monitoring agents -> checkmk agent / API integration: API integration if configured, else checkmk agent.
Further we need to enter the host name and IP address or just the FQDN of the ESXi host. The FQDN should be resolvable in your environment by DNS of course.
That’s all here.
Create Read-Only User on the ESXi Hosts
We also need to create a new rule as mentioned on the checkmk server to finally be able to query the ESXi Host.
In Checkmk you configure parameters for hosts and services by using rules. This feature makes Checkmk very effective in complex environments, and also brings a number of advantages to smaller installations.
One crucial parameter for this rule is the user name and password which will be used to access the ESXi Host.
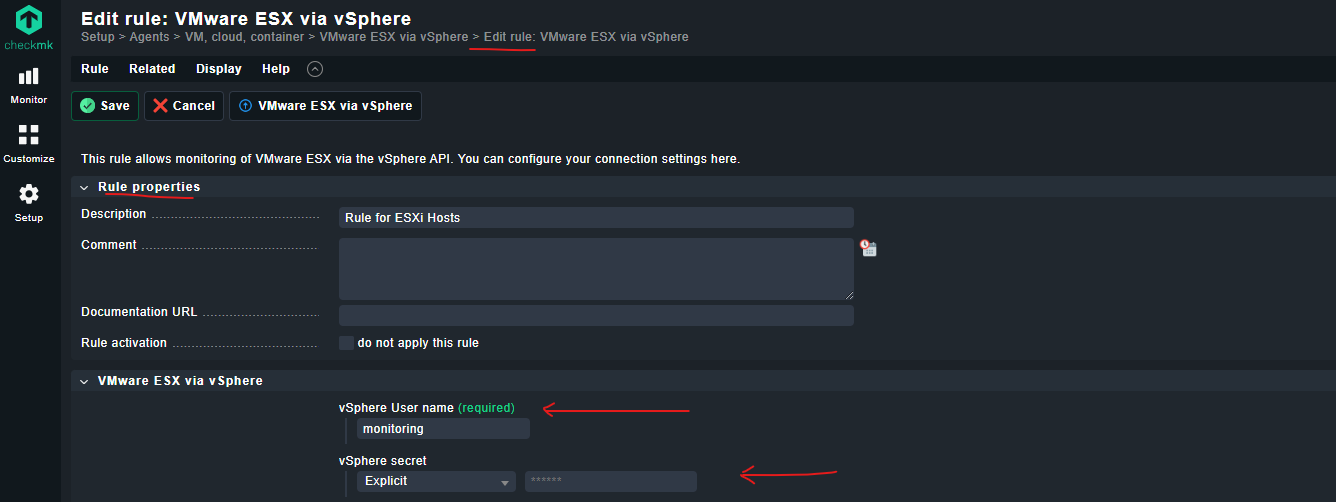
So as you can see above, for this rule I will use a local user on the ESXi Host named monitoring which will be used to access the ESXi Host from Checkmk.
We first need to create this local user on the ESXi Host as shown below.
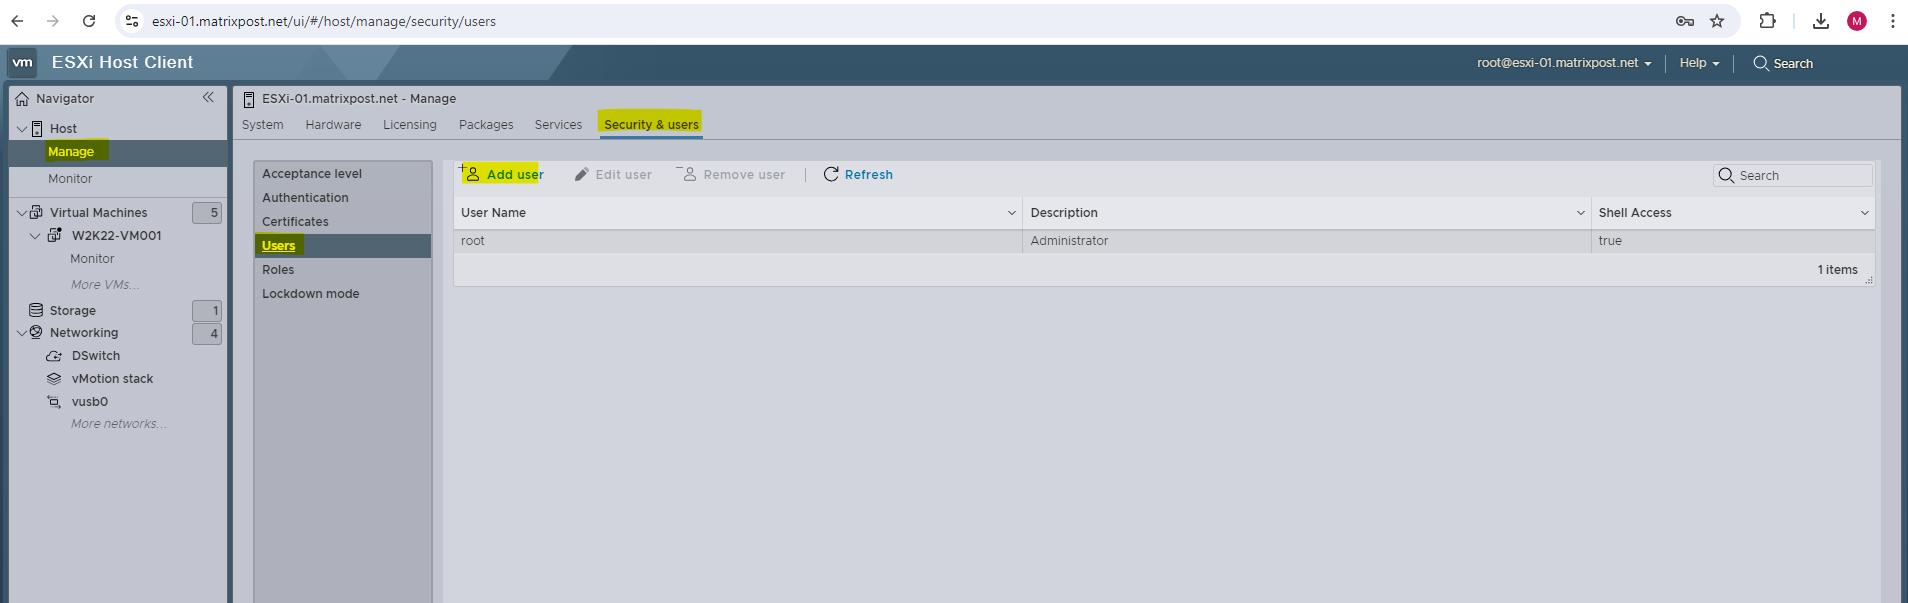
In the ESXi Host Client (Web GUI) under Manage -> Security & users -> Users click on Add user.
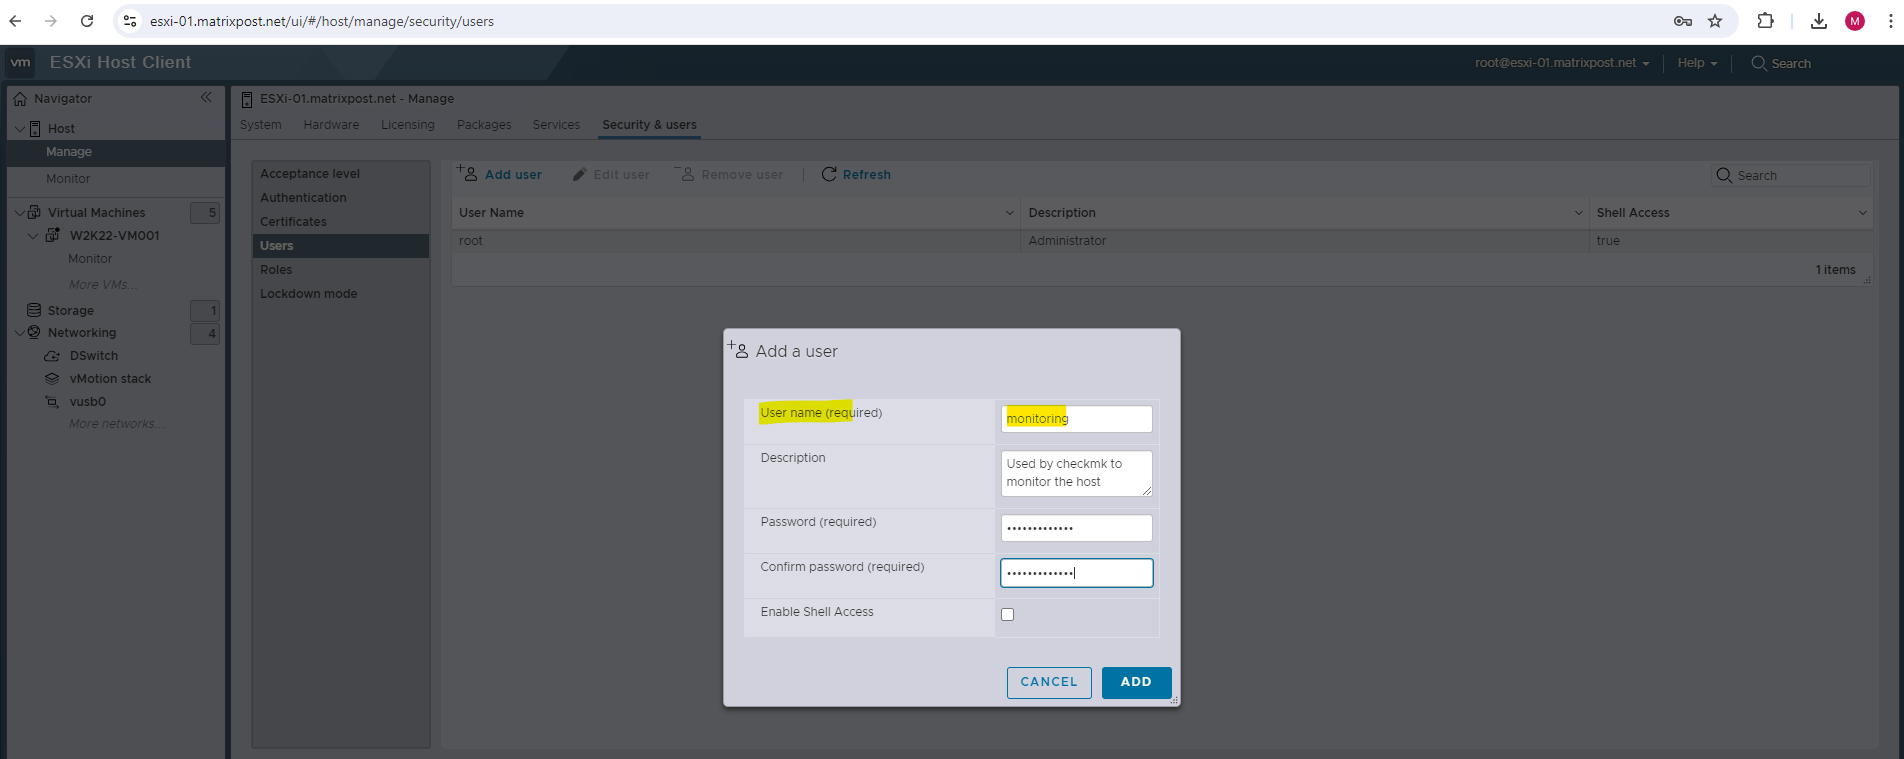
Enter a user name and password and click on ADD.
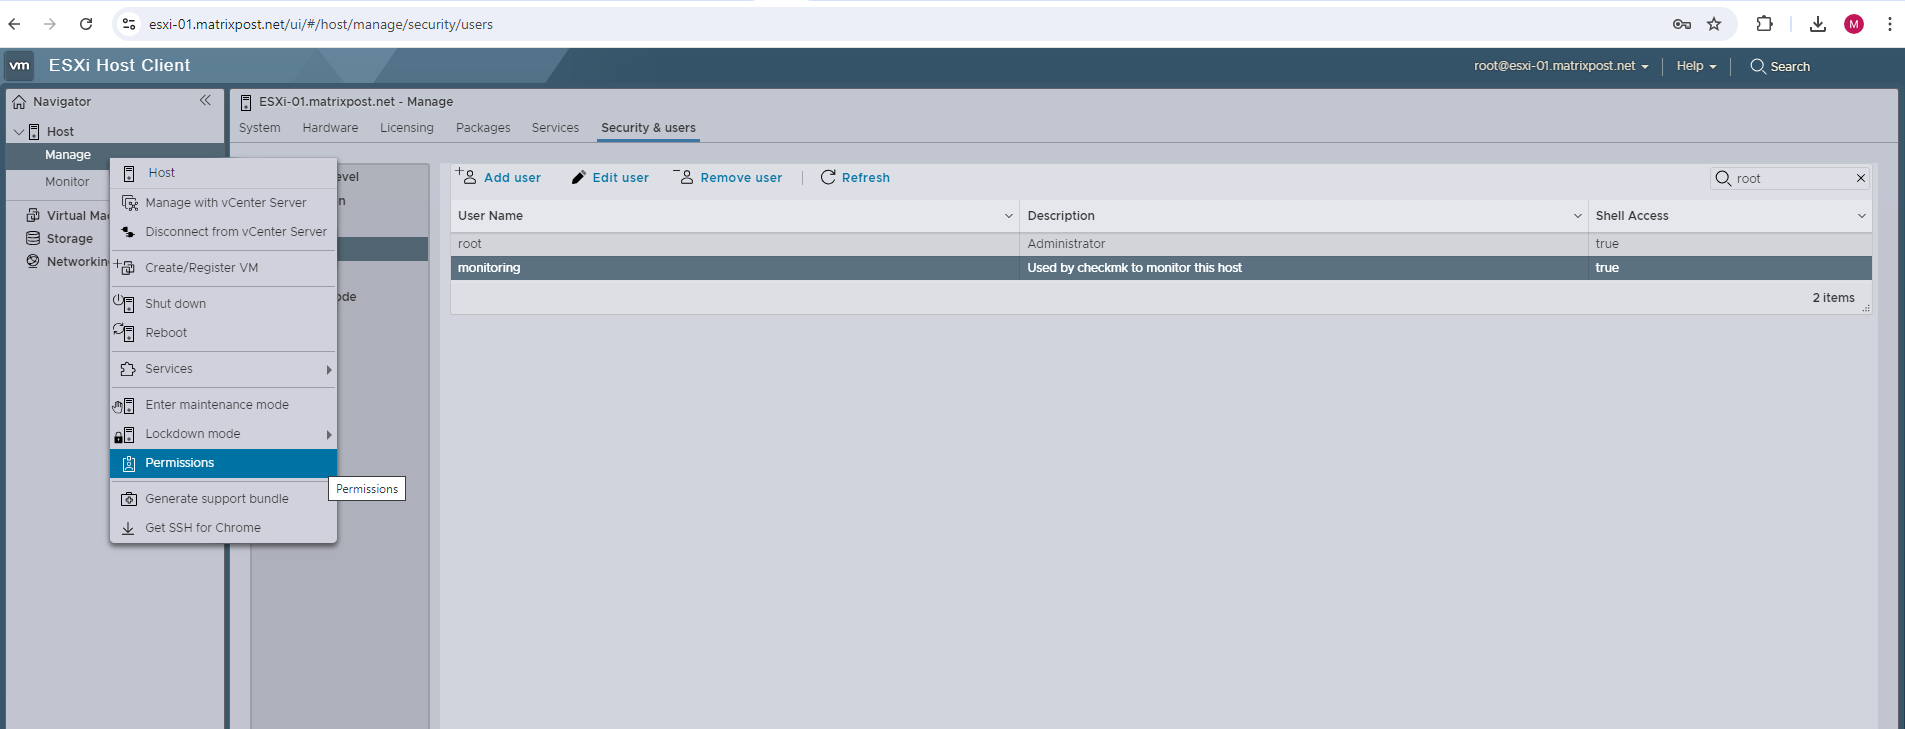
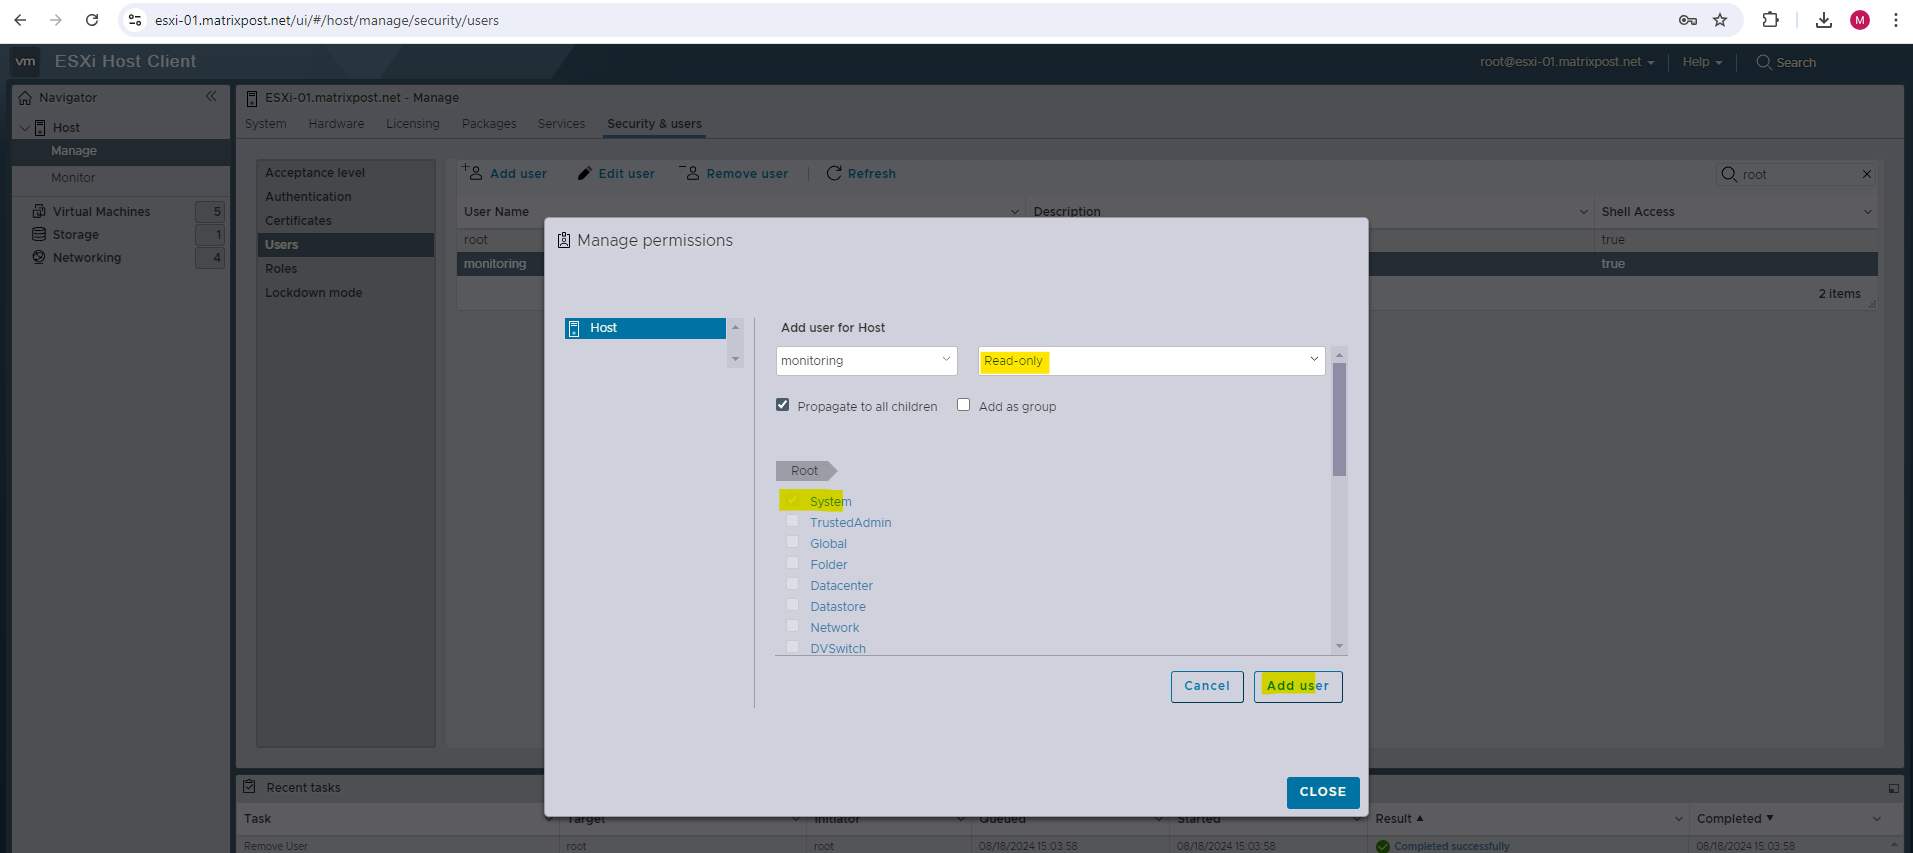
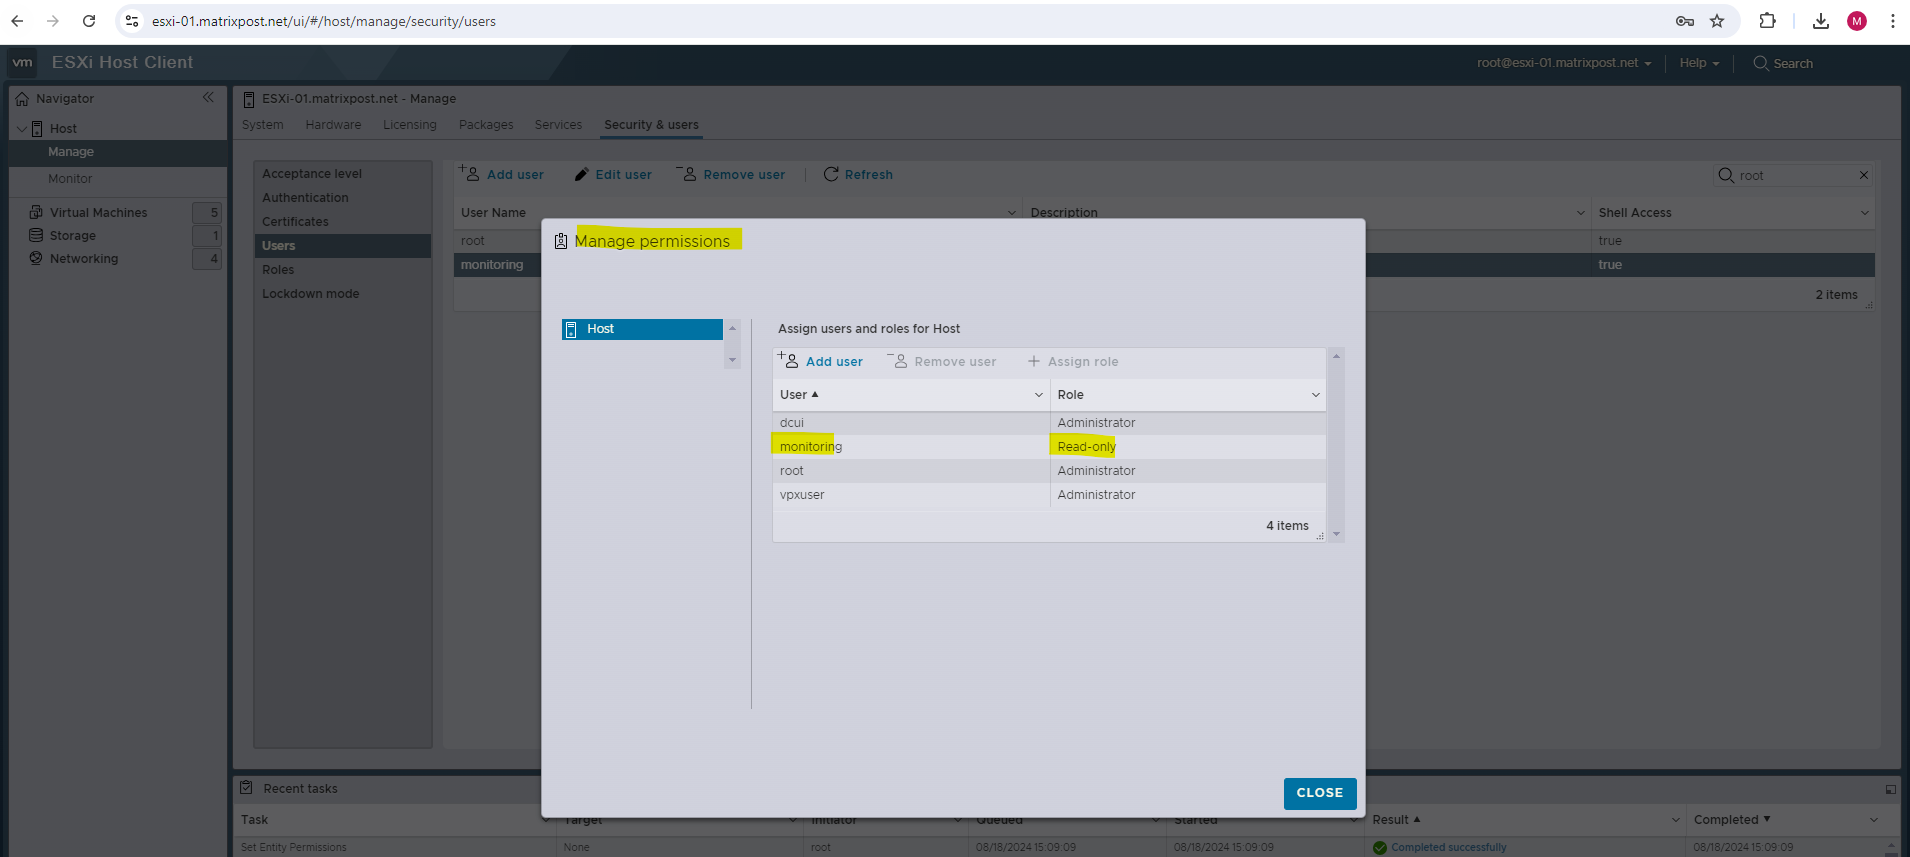
Now we need to assign the read-only permission to our new user which later will be used by checkmk to access and query the ESXi Host.
Right click on Manage and select Permissions.
Click on Add user.
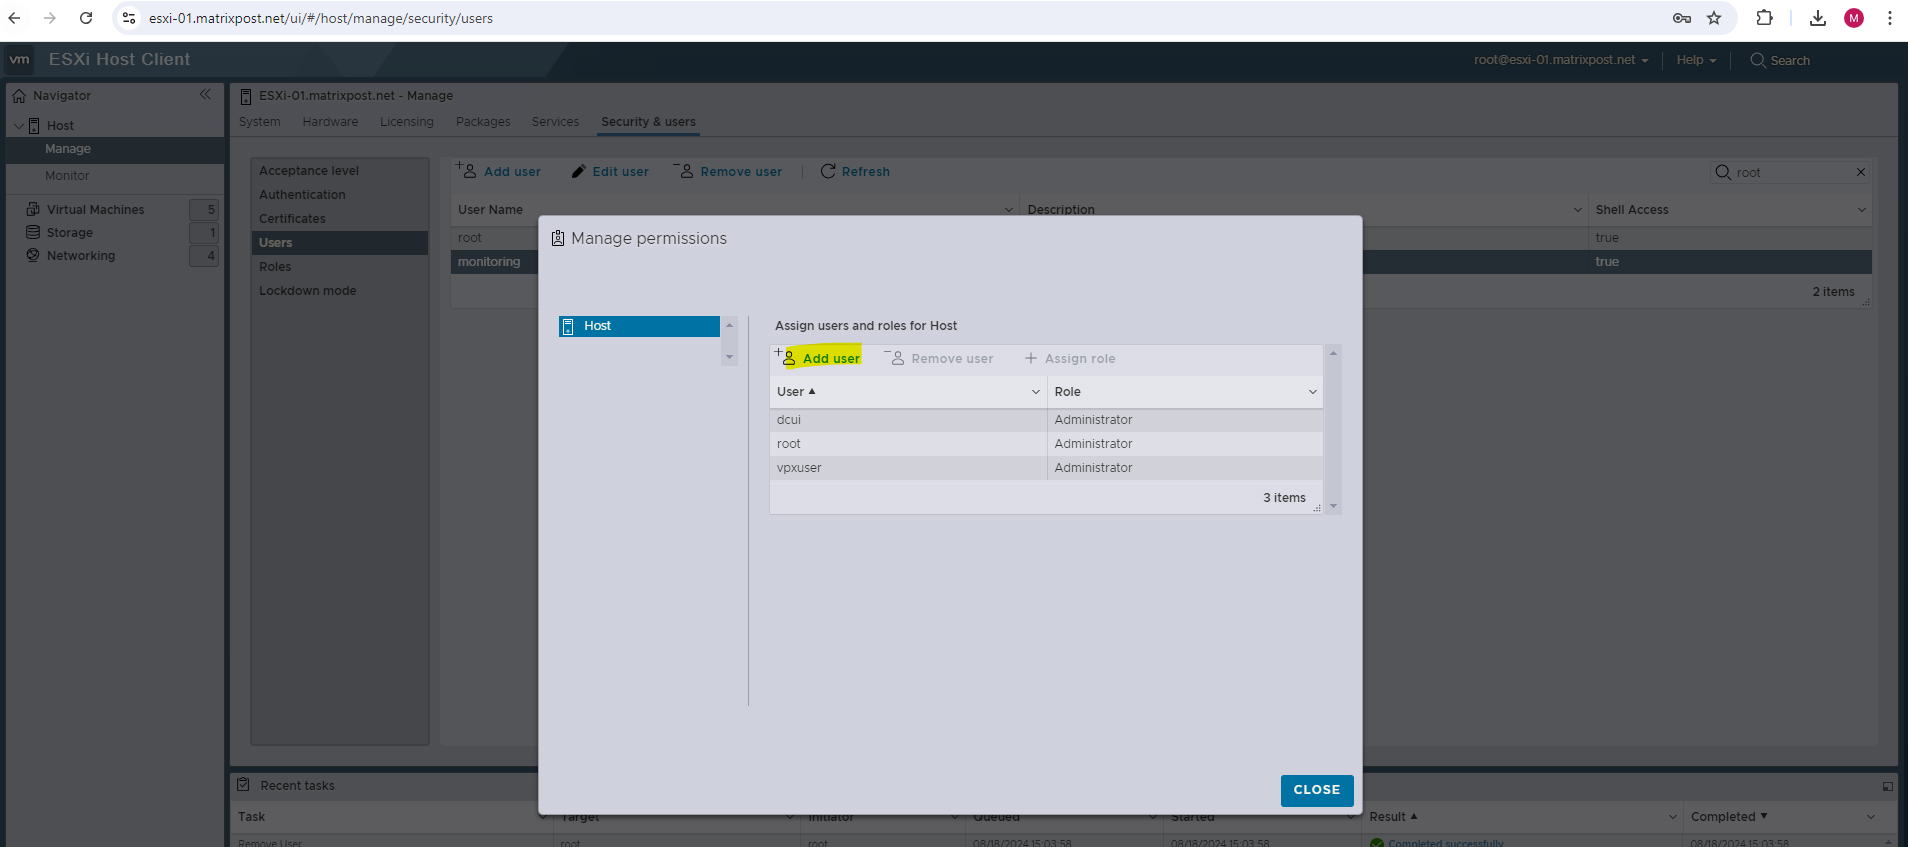
Select the newly created user, in my case here named monitoring. In the second list select the Read-only permission and finally click on Add user.
Creating a new rule to query our ESXi Hosts
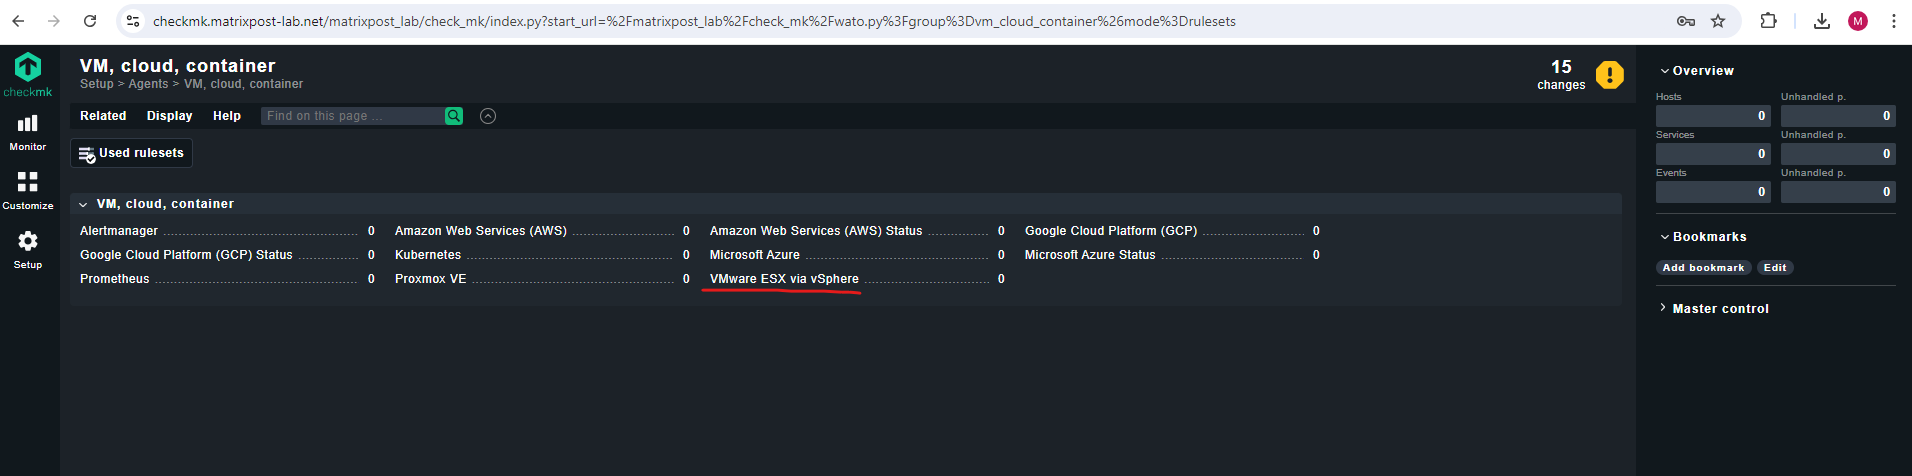
As already mentioned In checkmk we configure parameters for hosts and services by using rules. To create a new rule for our ESXi Host(s) navigate to:
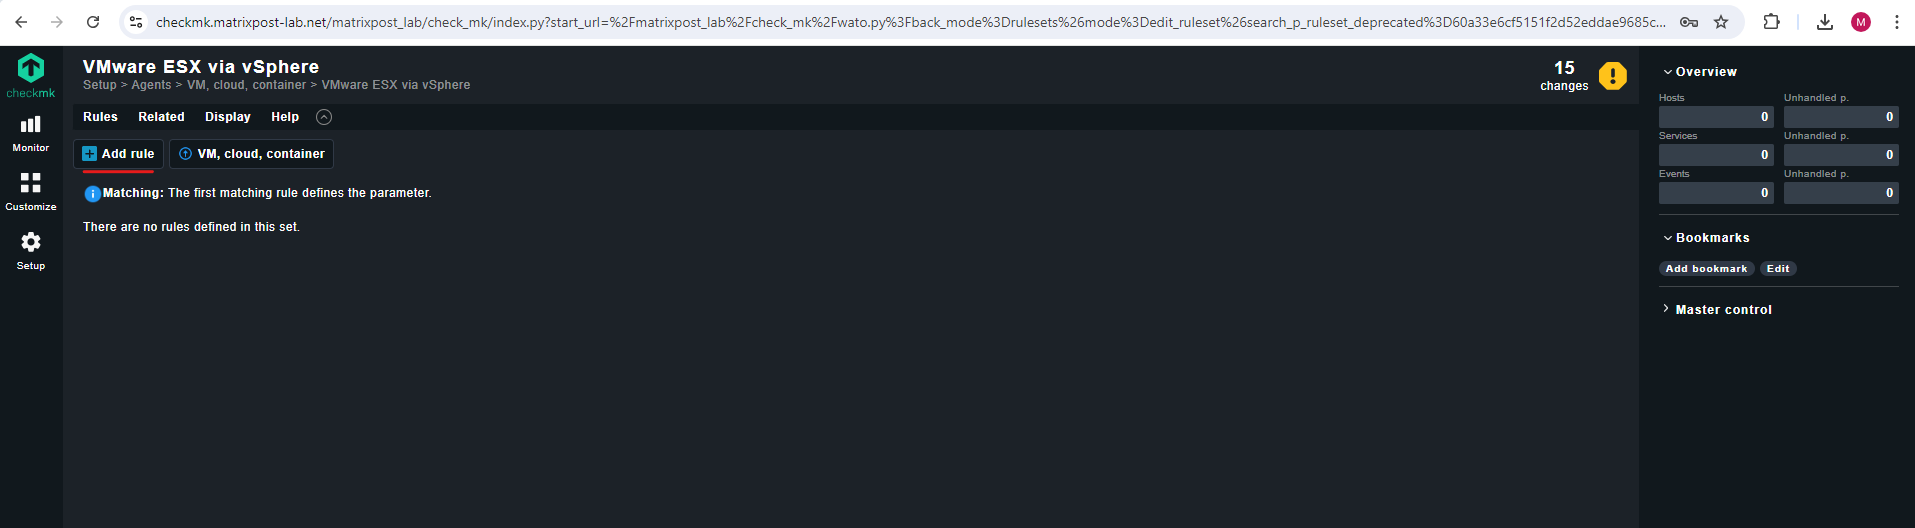
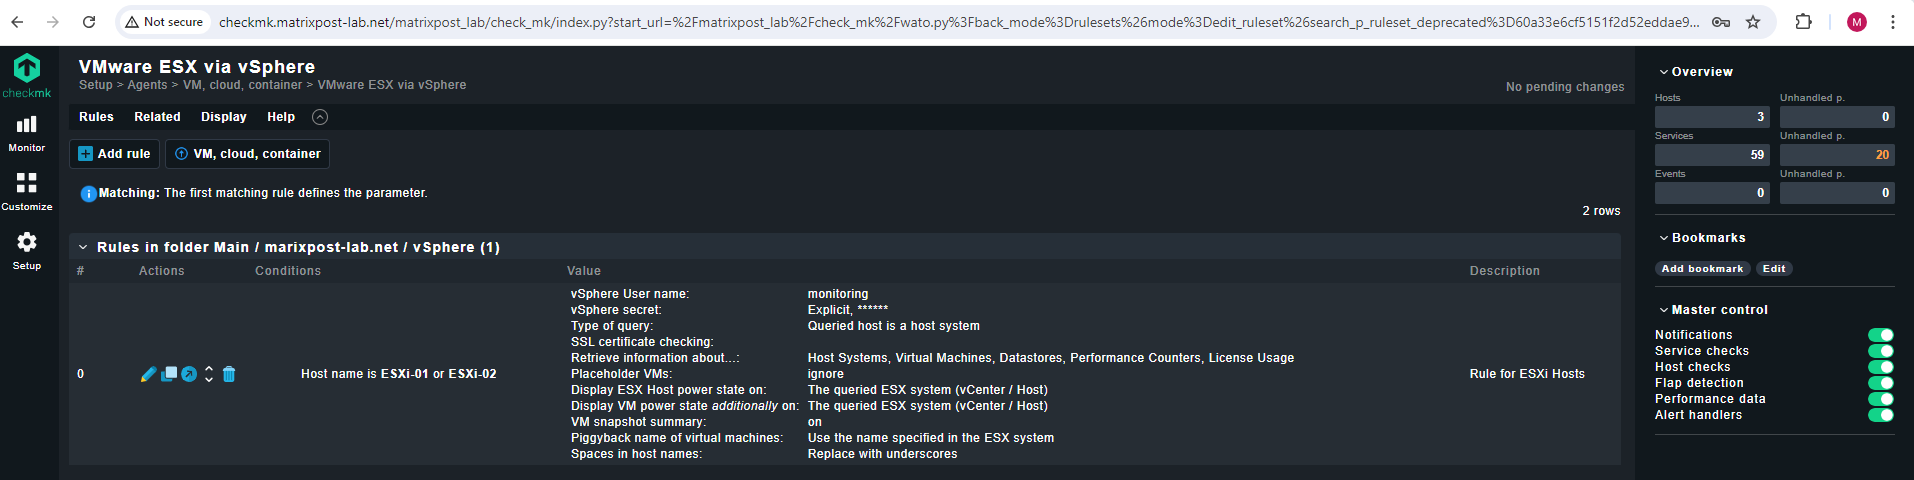
Setup > VM, cloud, container > VMware ESX via vSphere.
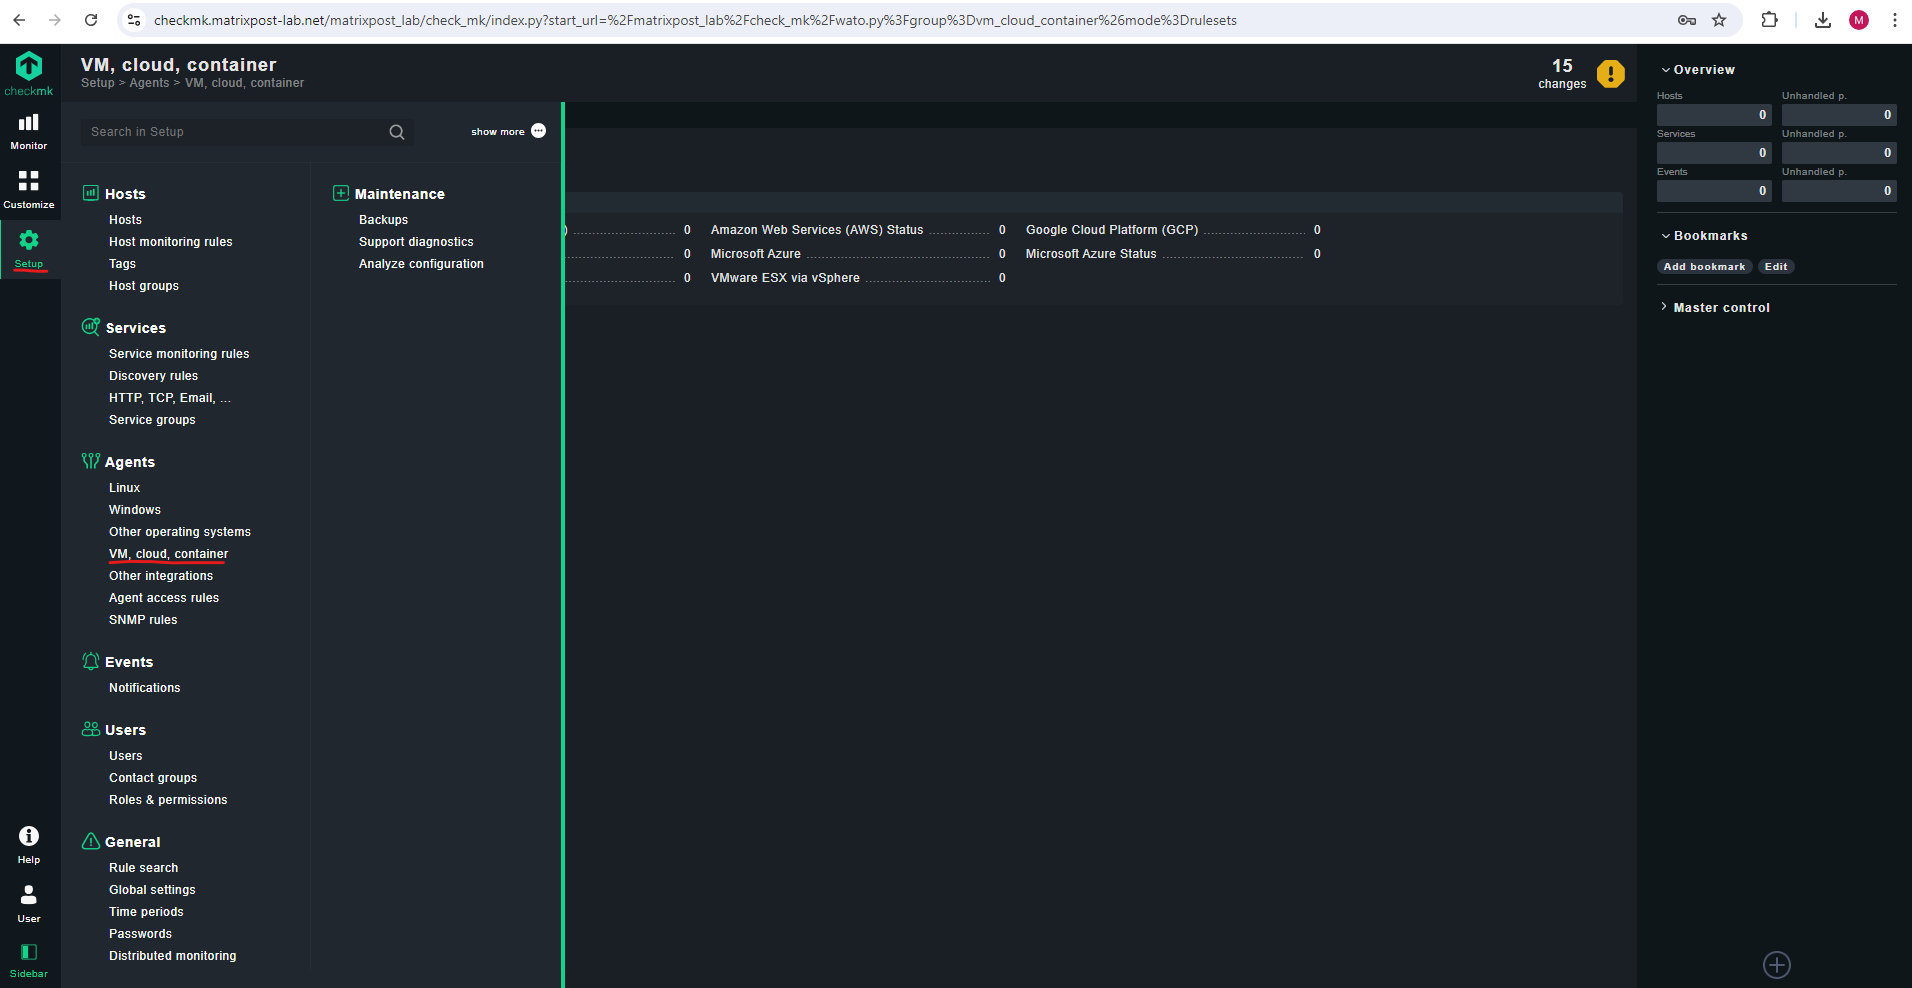
Select VMware ESX via vSphere.
Click on Add rule.
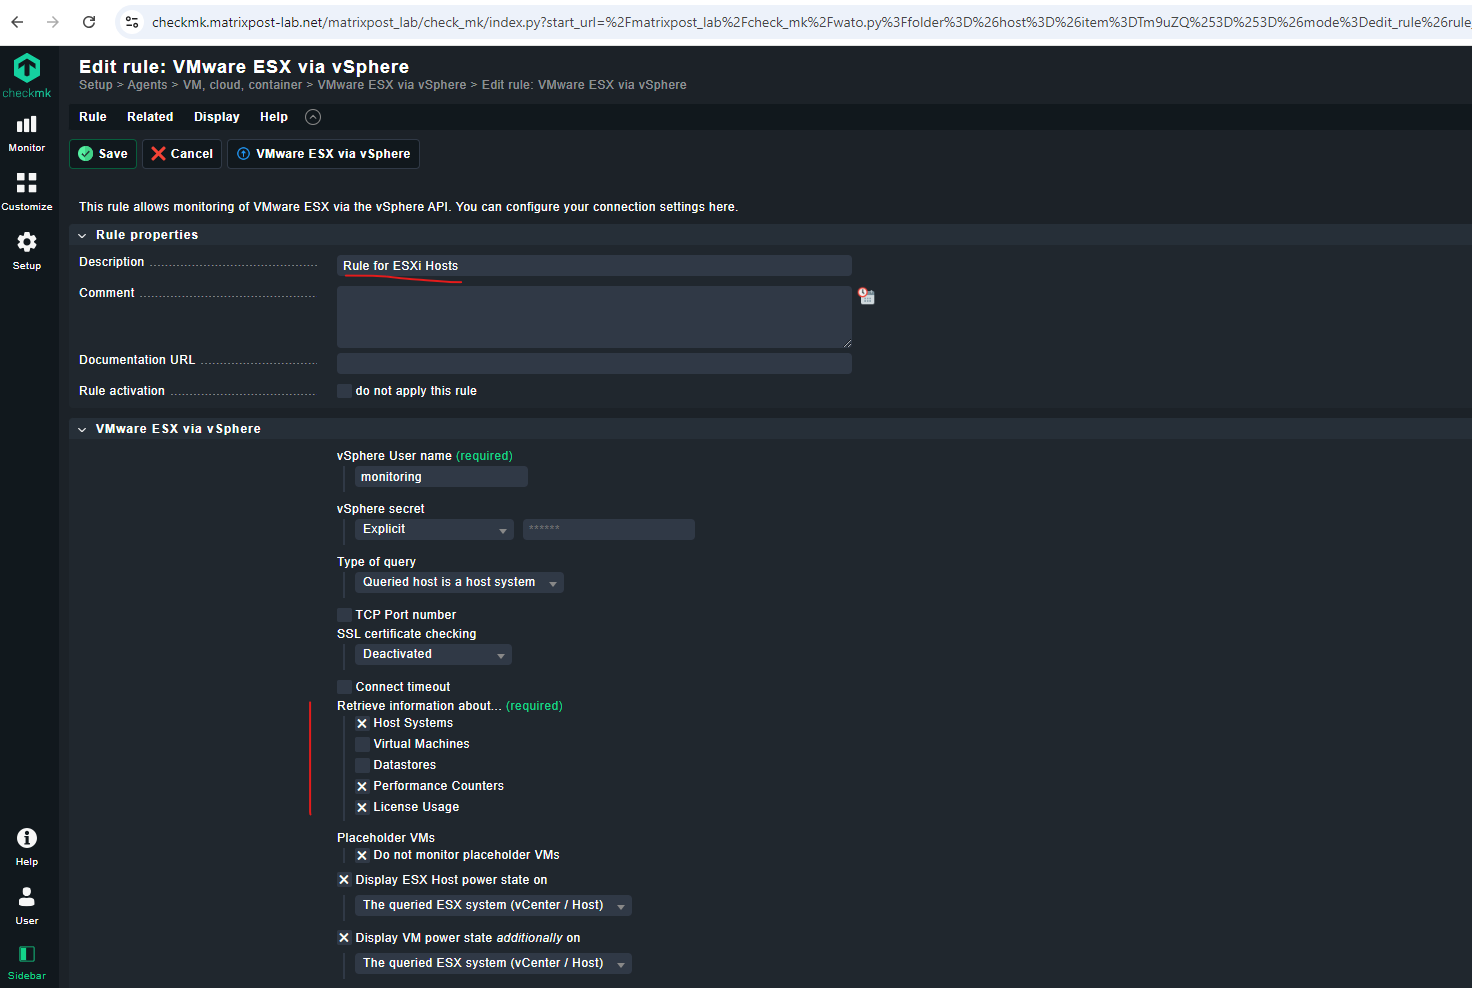
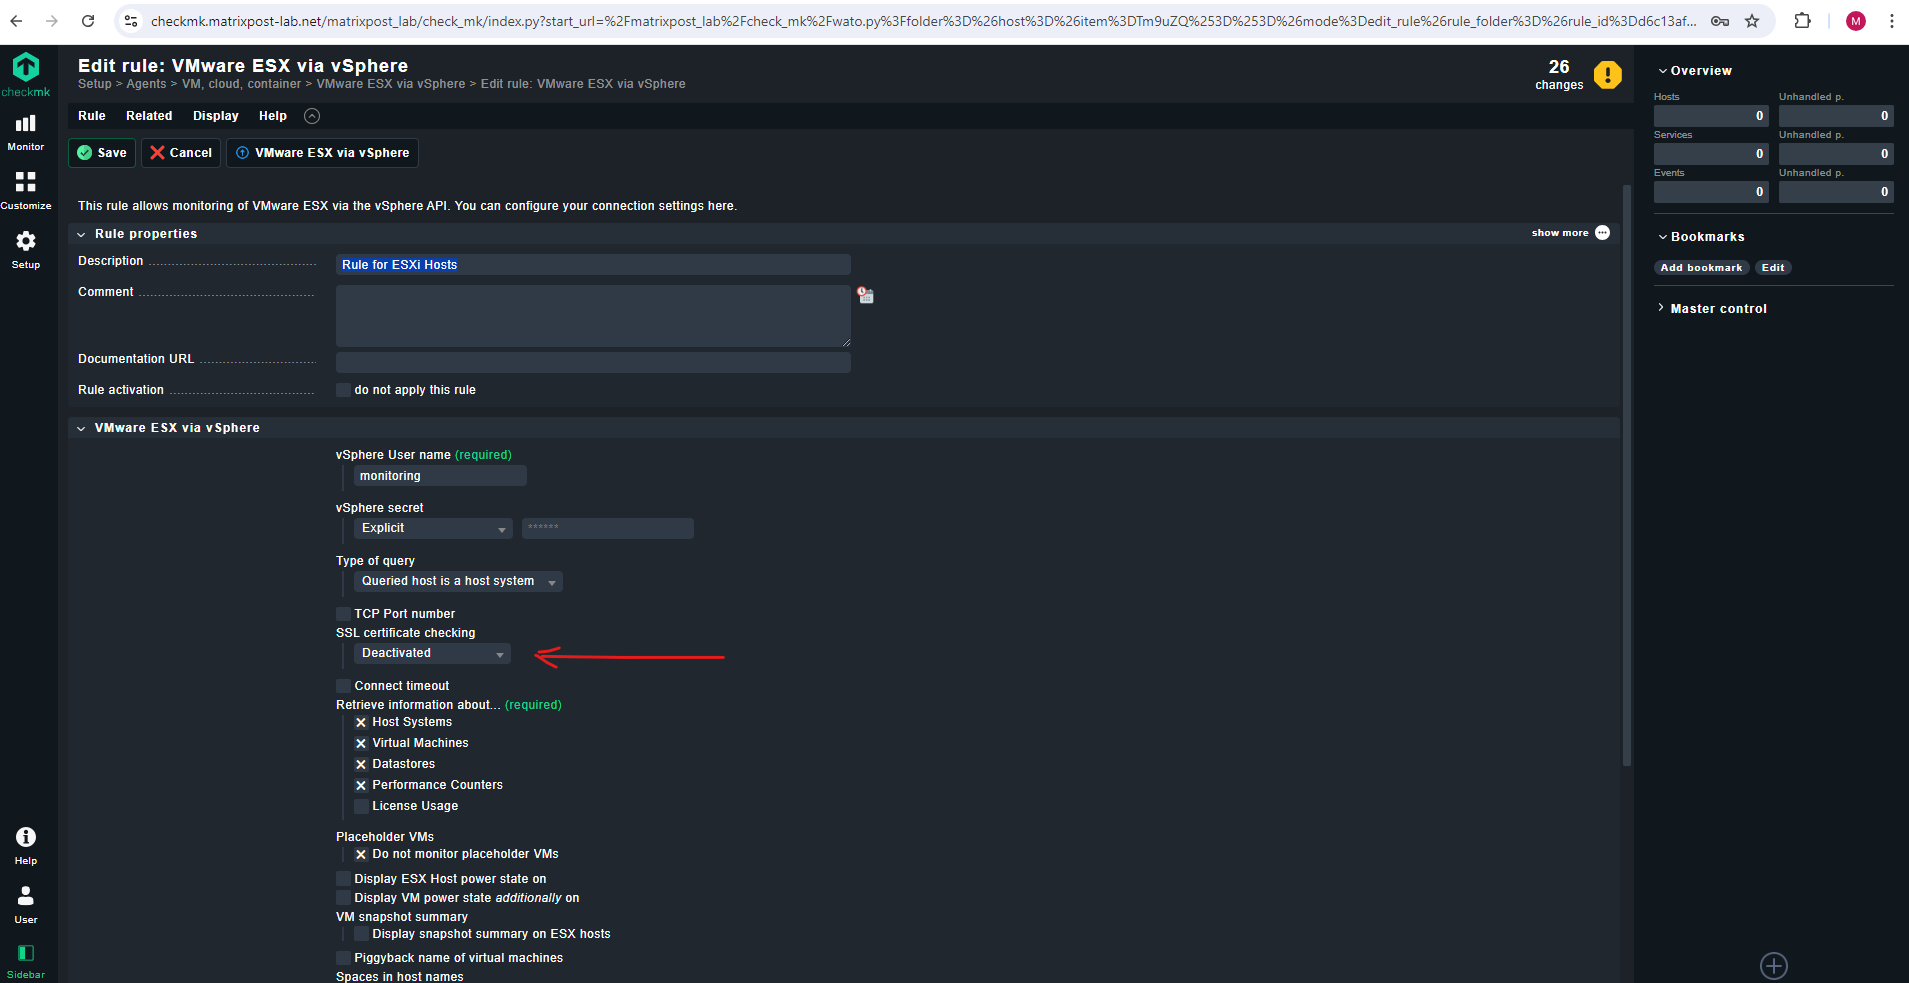
Enter the user’s name and password as they have been defined on the ESXi-Server previously. Click on Save.
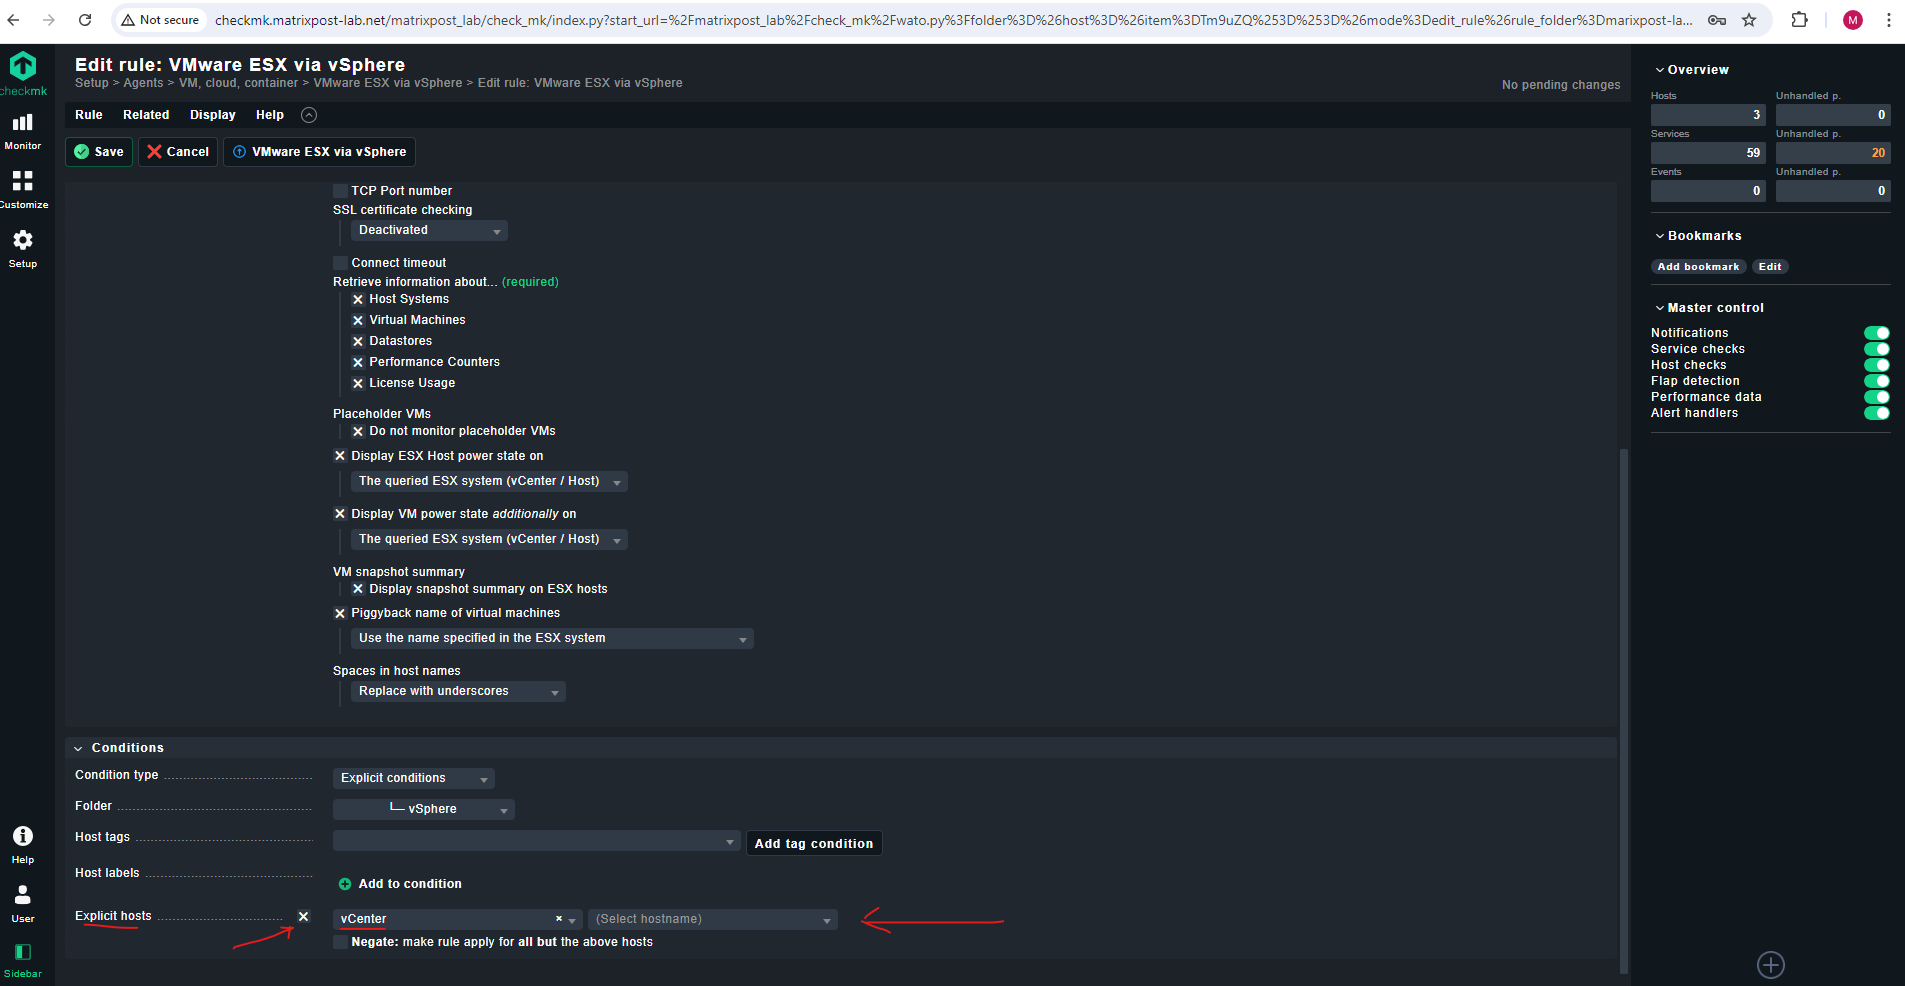
The condition for the rule must be set on the host defined in Checkmk. After this the first installation will be complete and checkmk can retrieve the data from the server.
To avoid connection issues in case the certificates of your vSphere environment are not trusted by the checkmk server, we can below also disable SSL certificate checking.
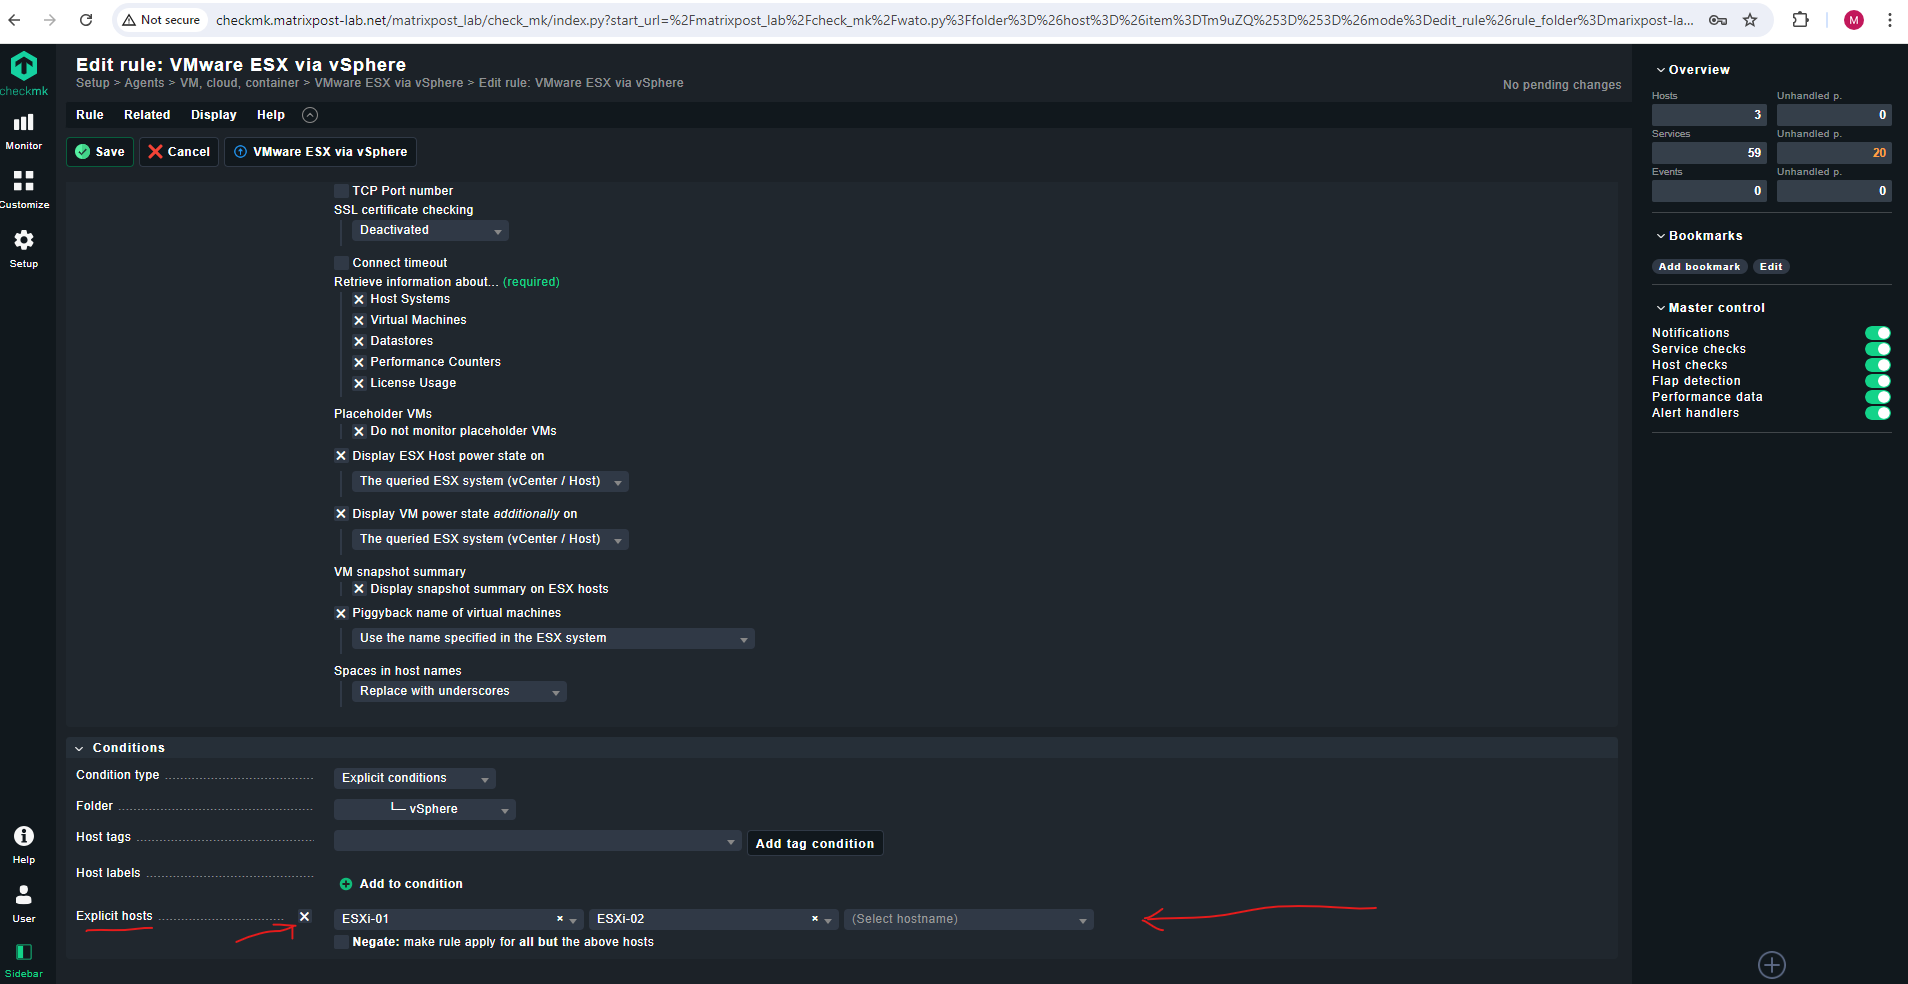
Further we can check which information we want to query and retrieve from our ESXi Host(s).
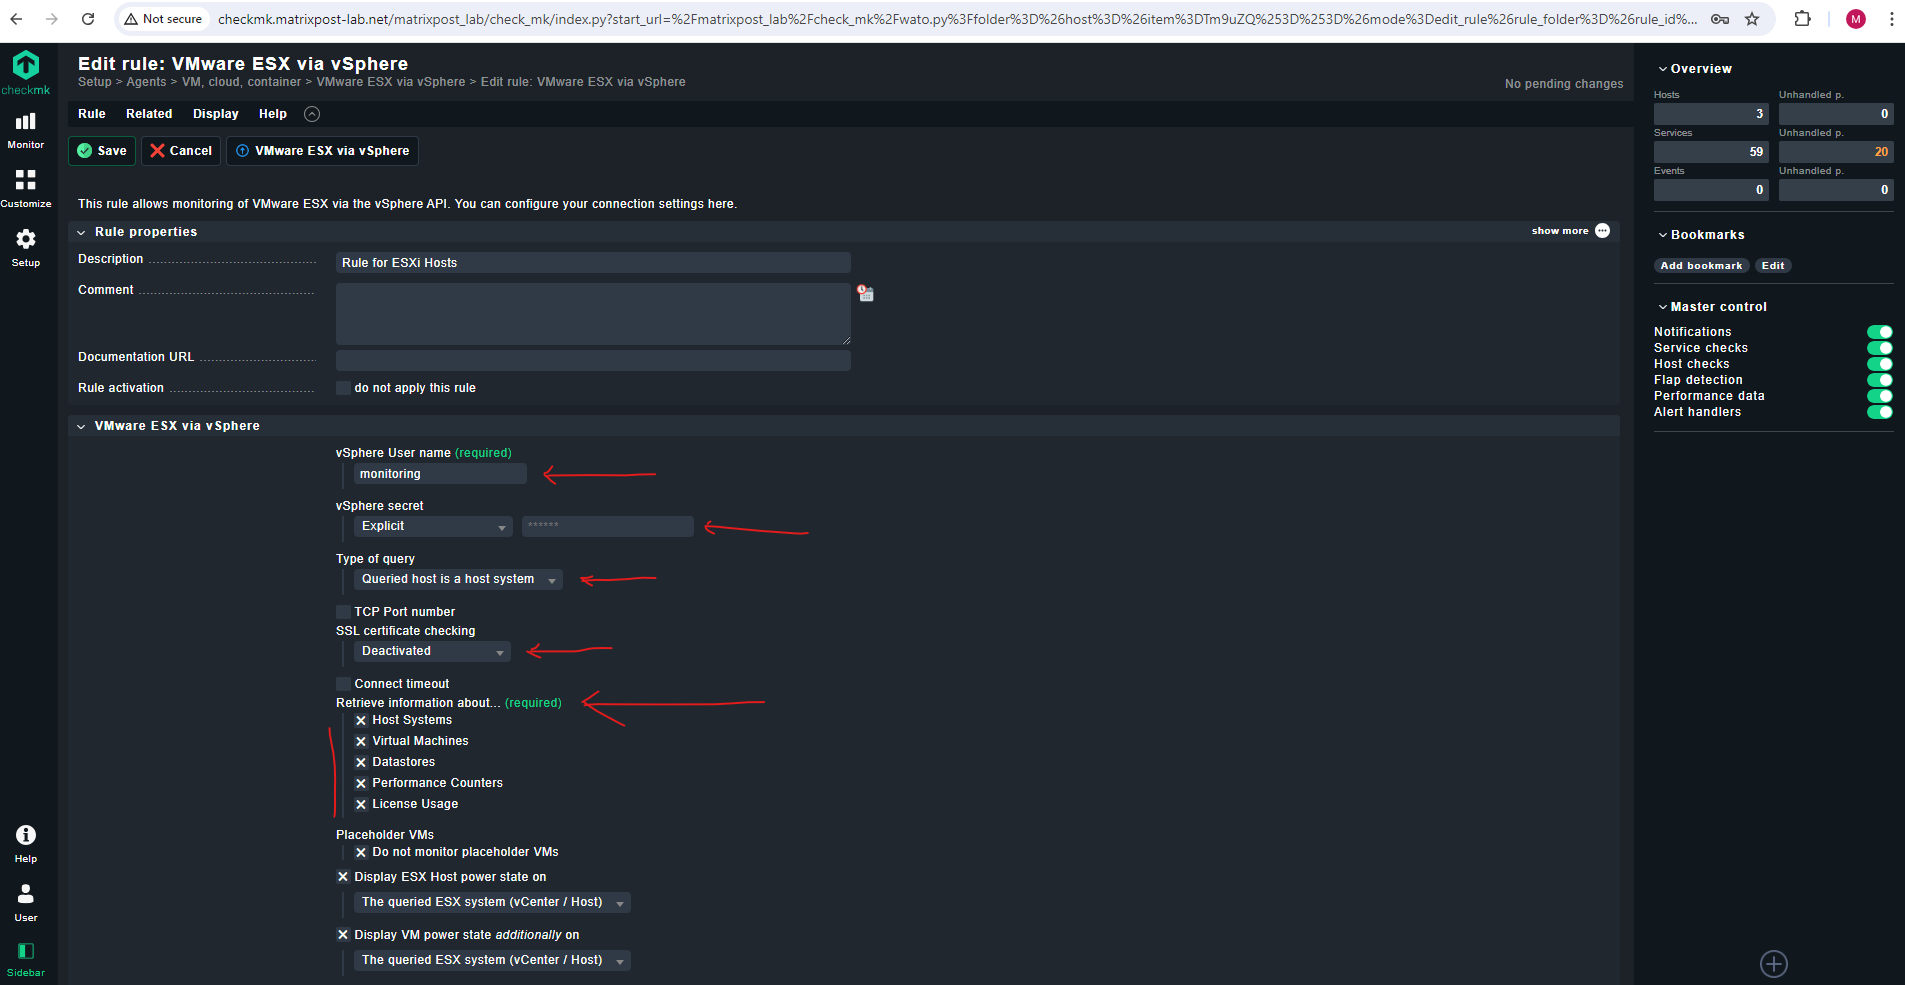
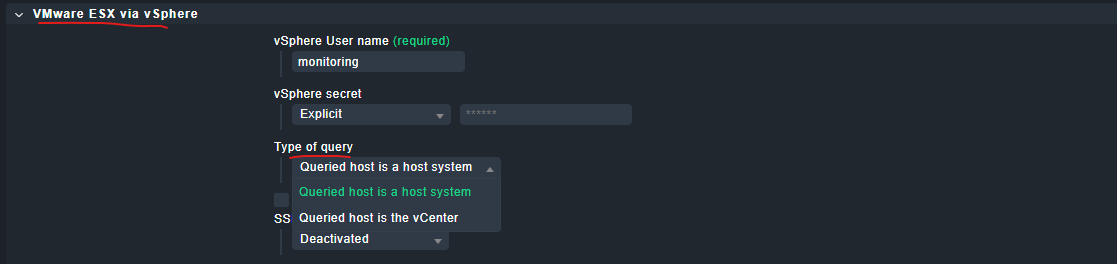
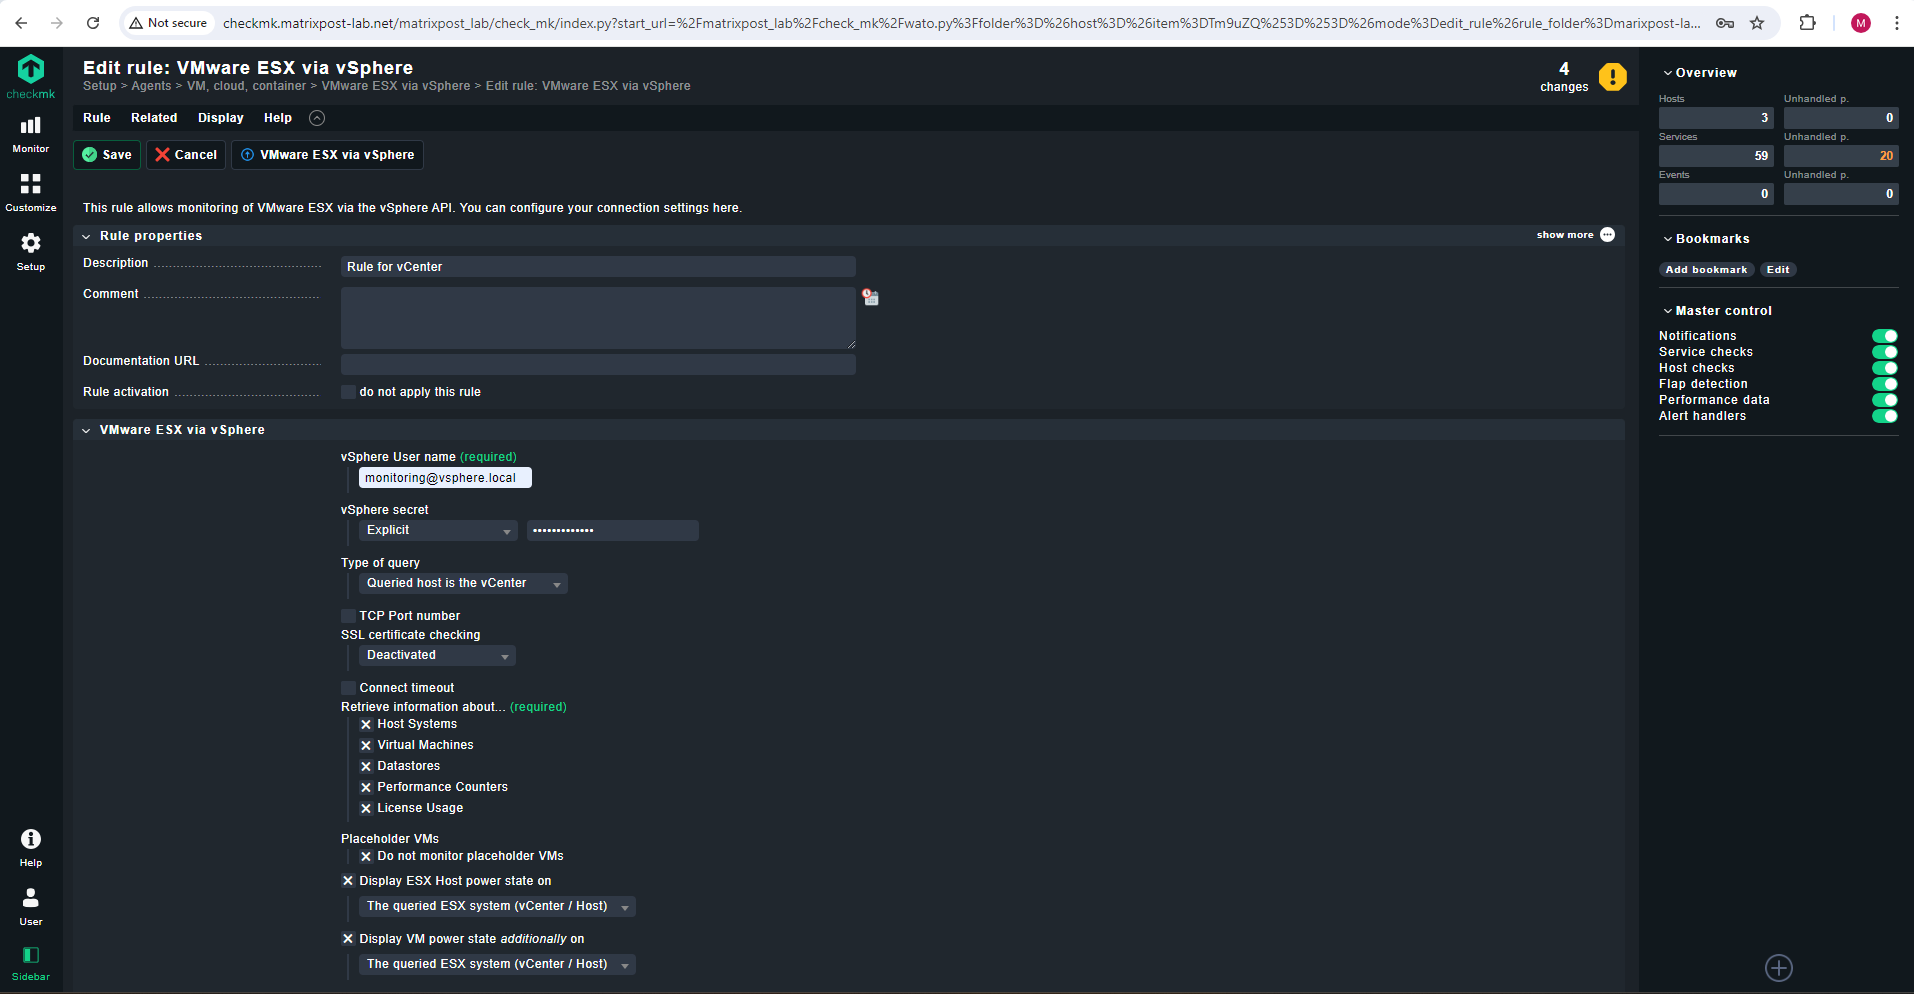
We can also select here the type of query. For ESXi Hosts we need to select Queried host is a host system. Later when creating also a new rule for my vCenter, we need to select Queried host is the vCenter of course.
We can either use this rule for all ESXi Hosts or we can assign the rule explicit to specific ESXi Hosts as shown below.
Here I will explicit assign this rule to both of my ESXi Hosts.
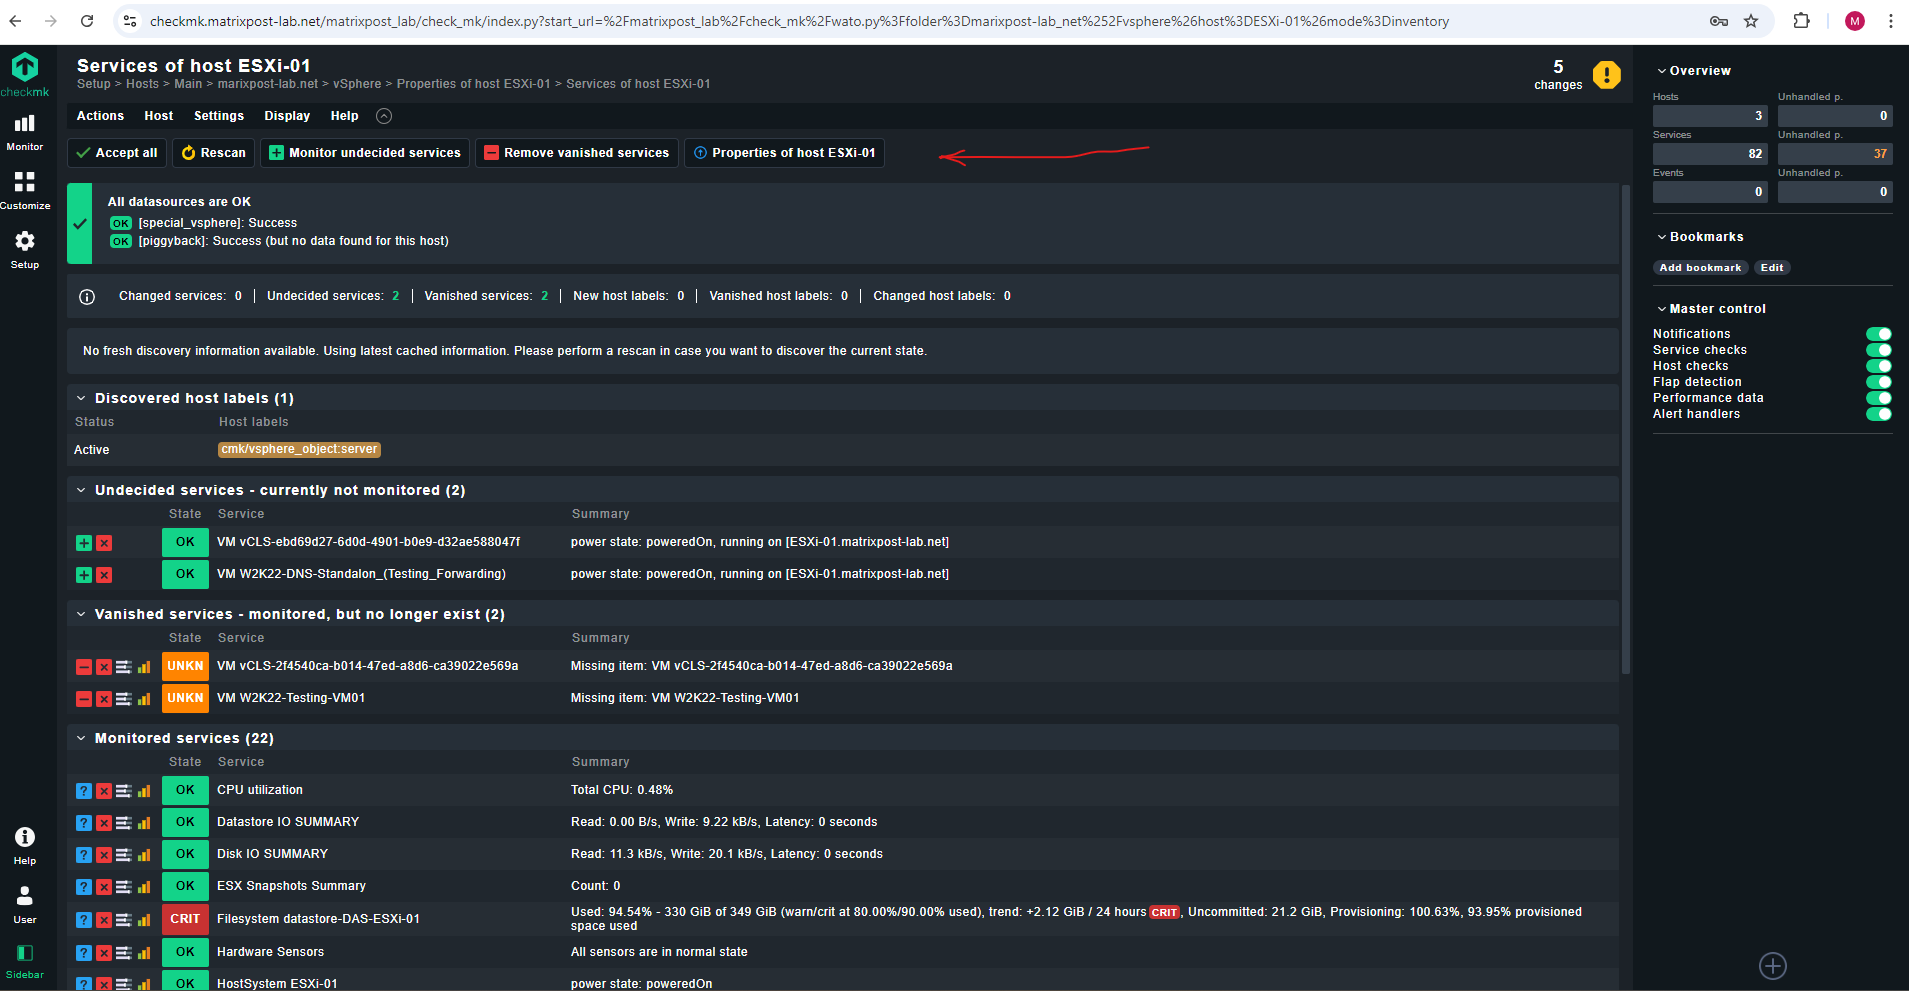
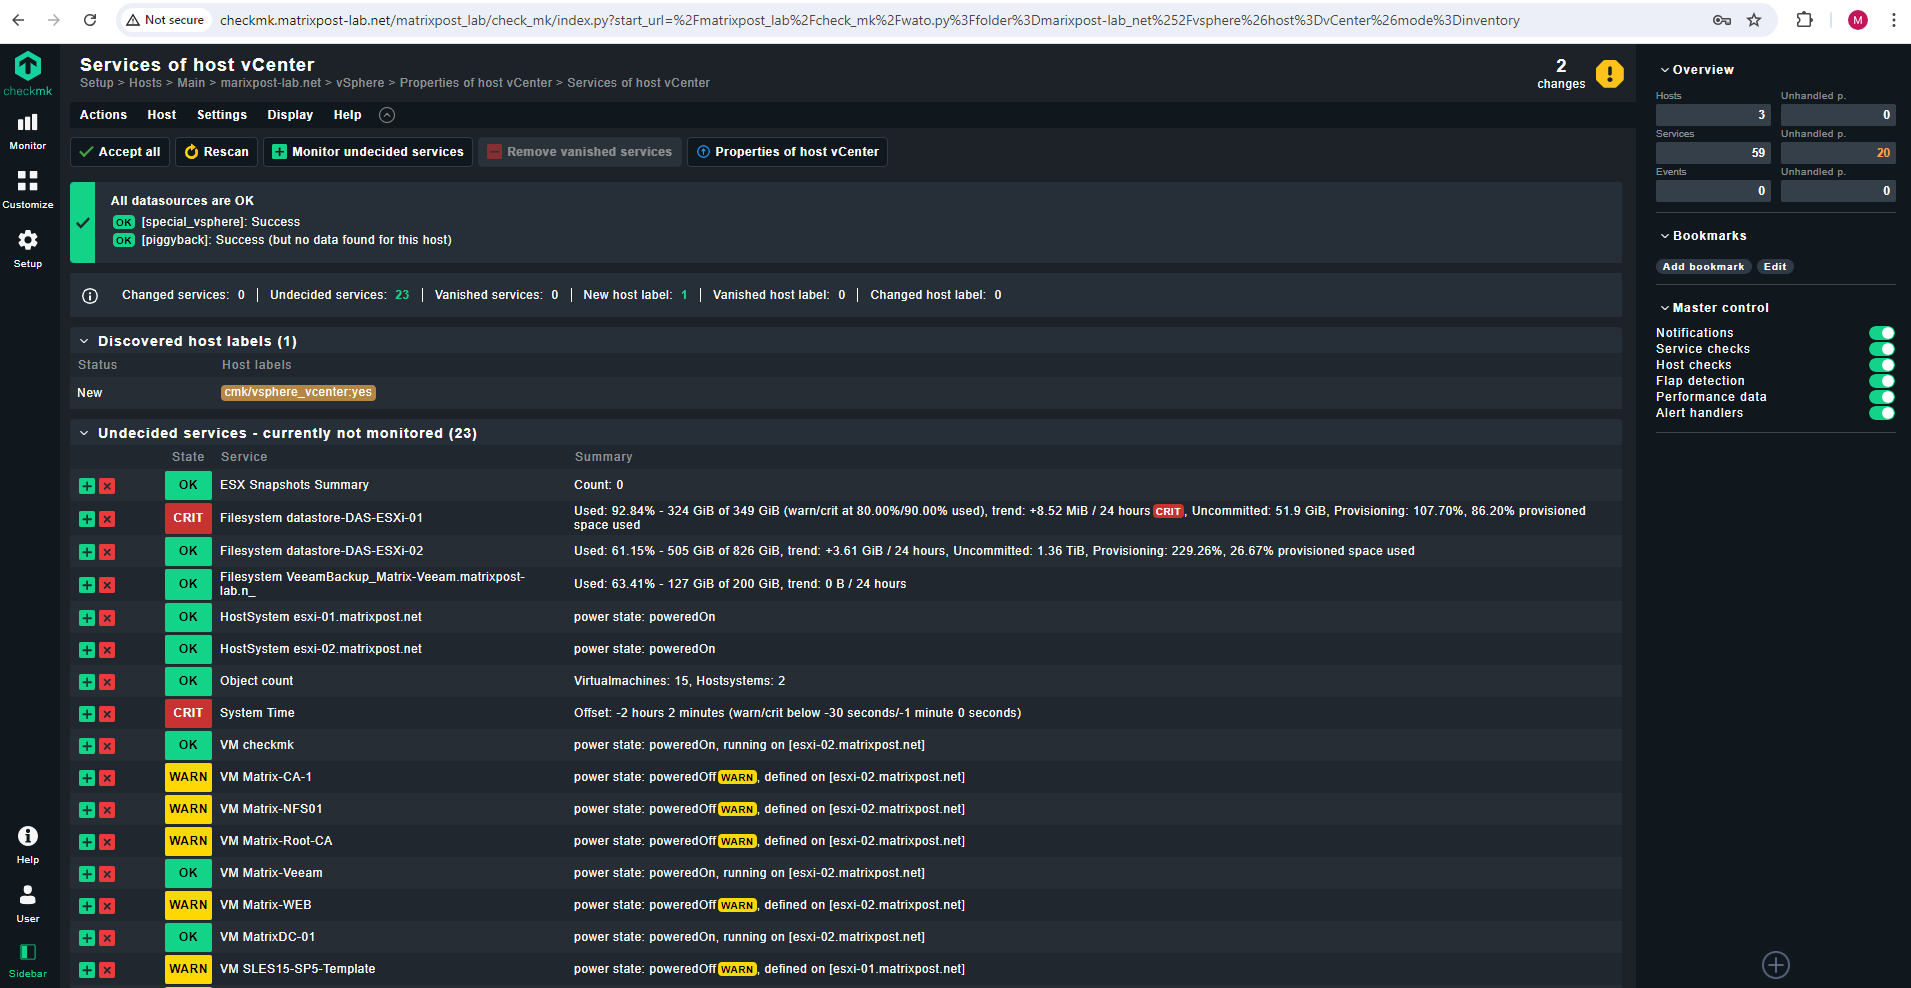
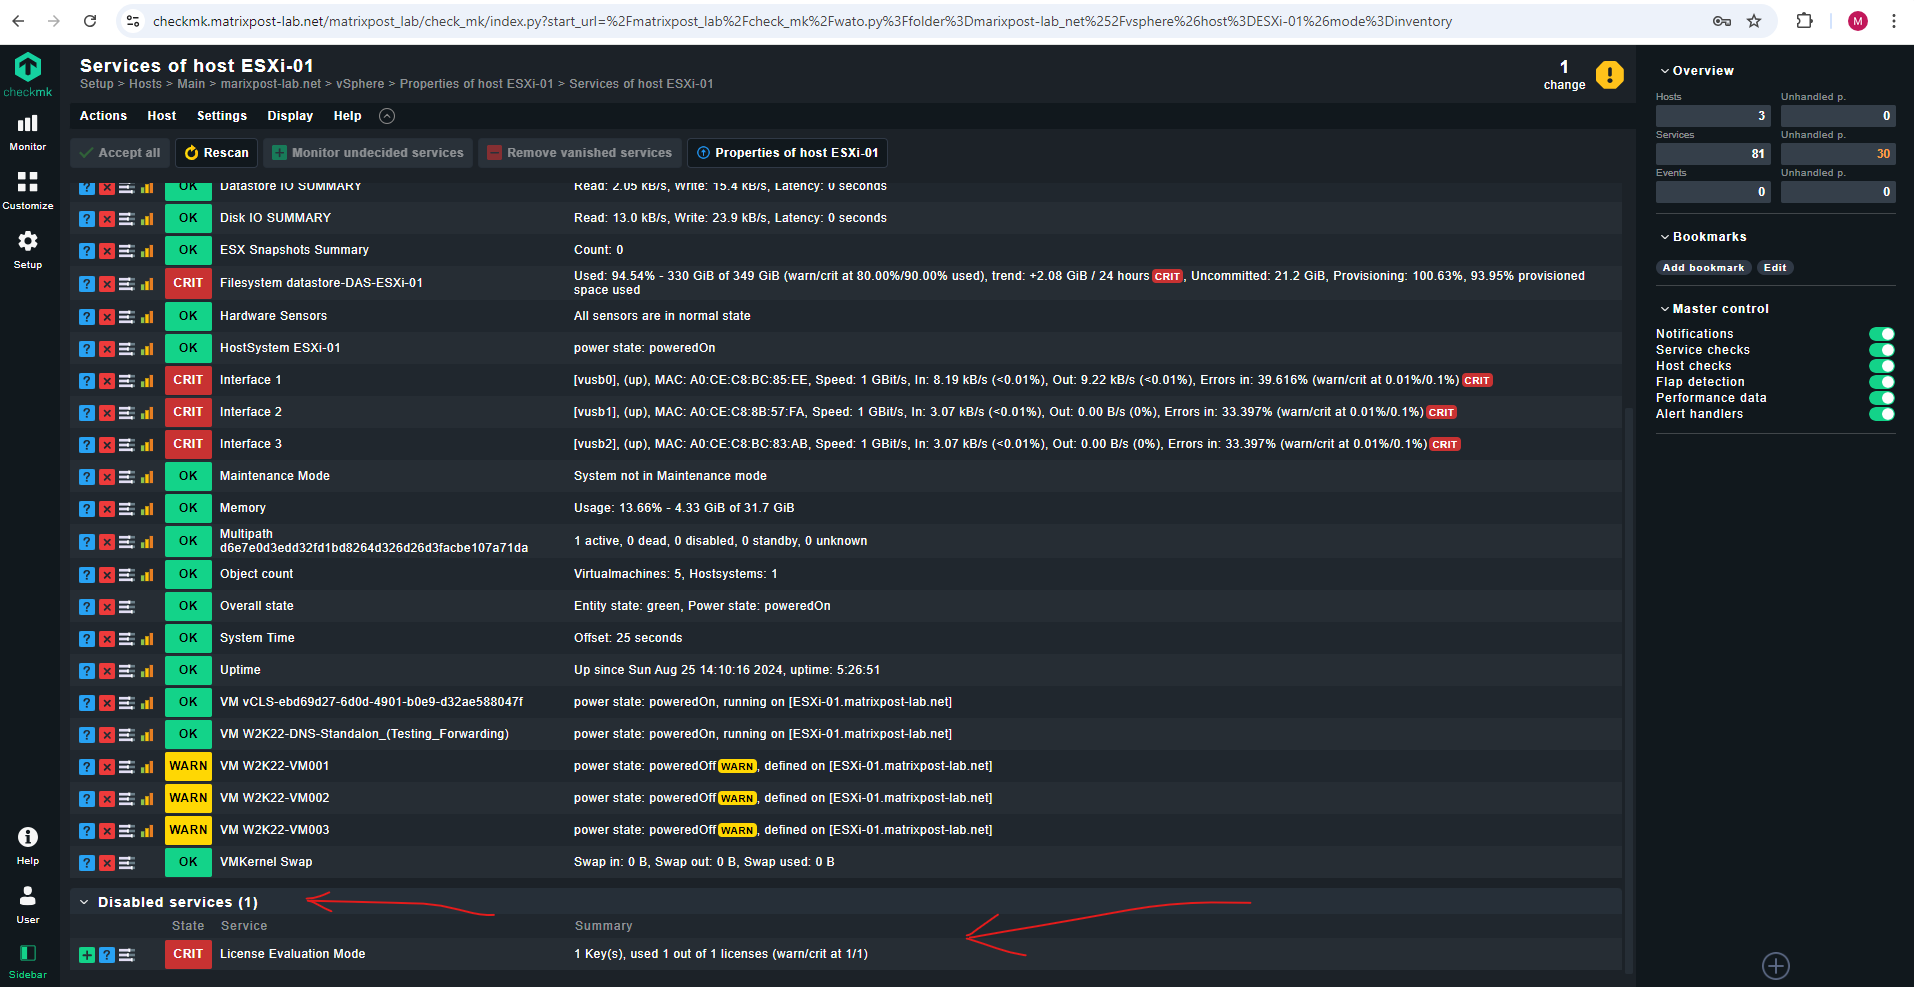
Finally go back to the host configuration and execute a service discovery. This should find a number of services:
The most important actions are available to you in the action bar (red arrow), others can be found in the Actions menu.
The Accept all button is usually the best action for a new host. This is also the right choice for existing hosts in which services are found that are not currently being monitored. These can be found in the Undecided services (currently not monitored) section.
Accept all adds the missing services, removes vanished services and accepts any host labels found.
The Rescan button ensures that fresh, complete data is fetched from the target device. To enable faster page loading, Checkmk works with cached files that are recorded during normal monitoring. For SNMP devices, the button therefore triggers an active search for new check plug-ins and may also find additional services.
The Monitor undecided services button transfers the corresponding services to the monitoring, but without transferring the host labels.
Remove vanished services removes services that no longer exist. This is useful for services that remember a current state on discovery (e.g., the current state of a switch’s ports or of file systems and their mount points).
After each modification an activate changes is required to make them effective.
Clicking Activate on selected sites will create a new configuration for the monitoring core from the configuration files and instruct the core to immediately begin using the new configuration.
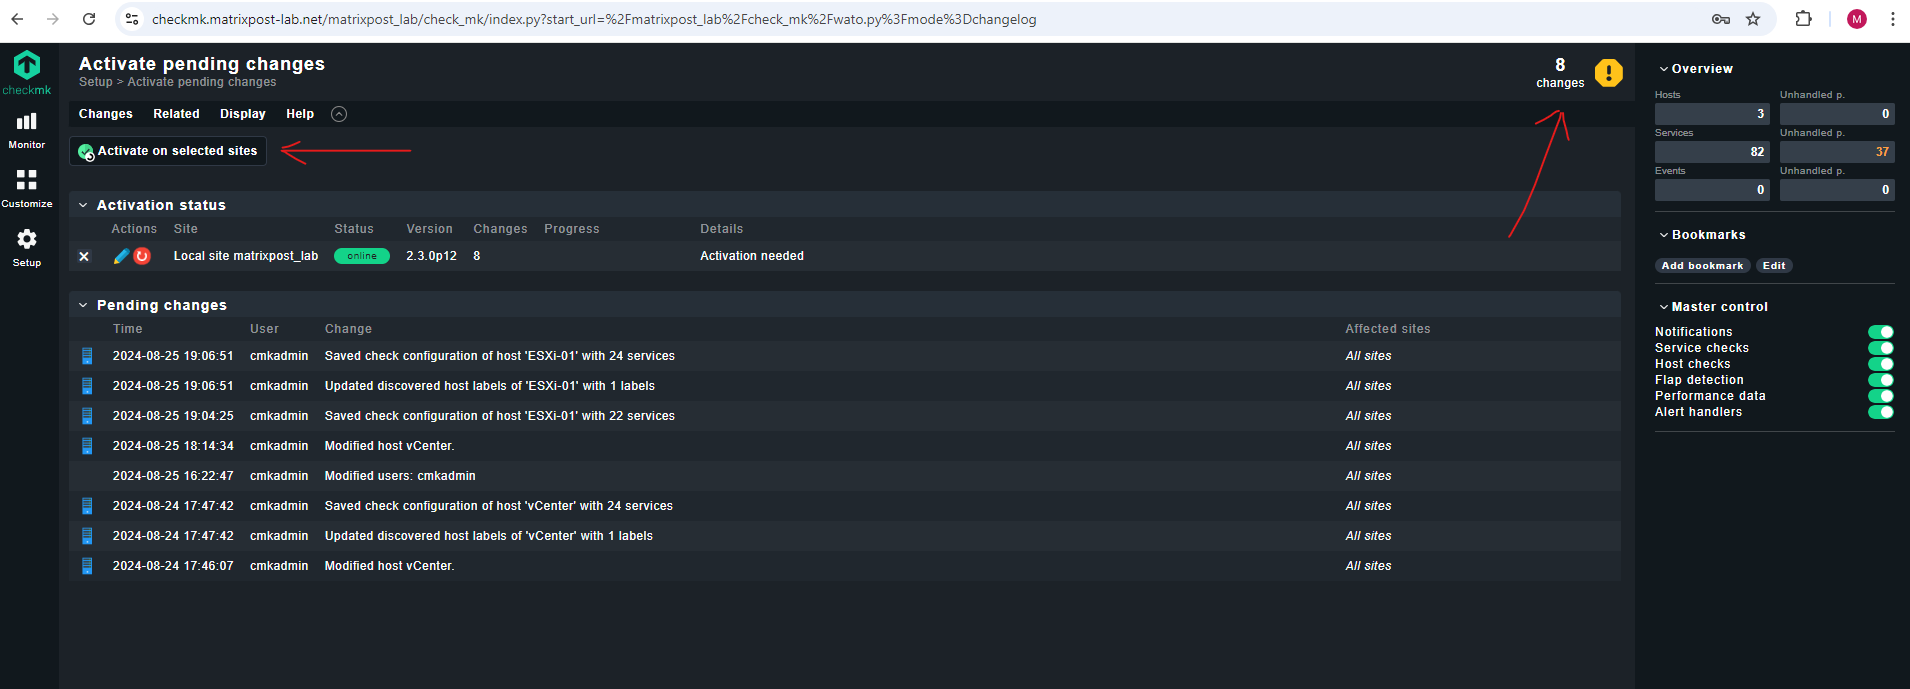
Source: https://docs.checkmk.com/latest/en/wato.html#activate_changes
Set up vCenter
For the vCenter we need to do the same steps as previously for the ESXi Hosts.
Add vCenter as Host in Checkmk
As previously for the ESXi Hosts we also need to add our vCenter as new Host in checkmk. Therefore select Setup -> Hosts.
To configure the vCenter in checkmk as an agent (Checkmk Agent), same as previously for the ESXi Host we just need to select resp. is already pre-selected (default setting) below under Monitoring agents -> checkmk agent / API integration: API integration if configured, else checkmk agent.
Further we need to enter the host name and IP address or just the FQDN of the vCenter. The FQDN should be resolvable in your environment by DNS of course.
That’s all here.
Create Read-Only User on the vCenter
I will first create a read-only user in vSphere which is later used by Checkmk to access the vCenter.
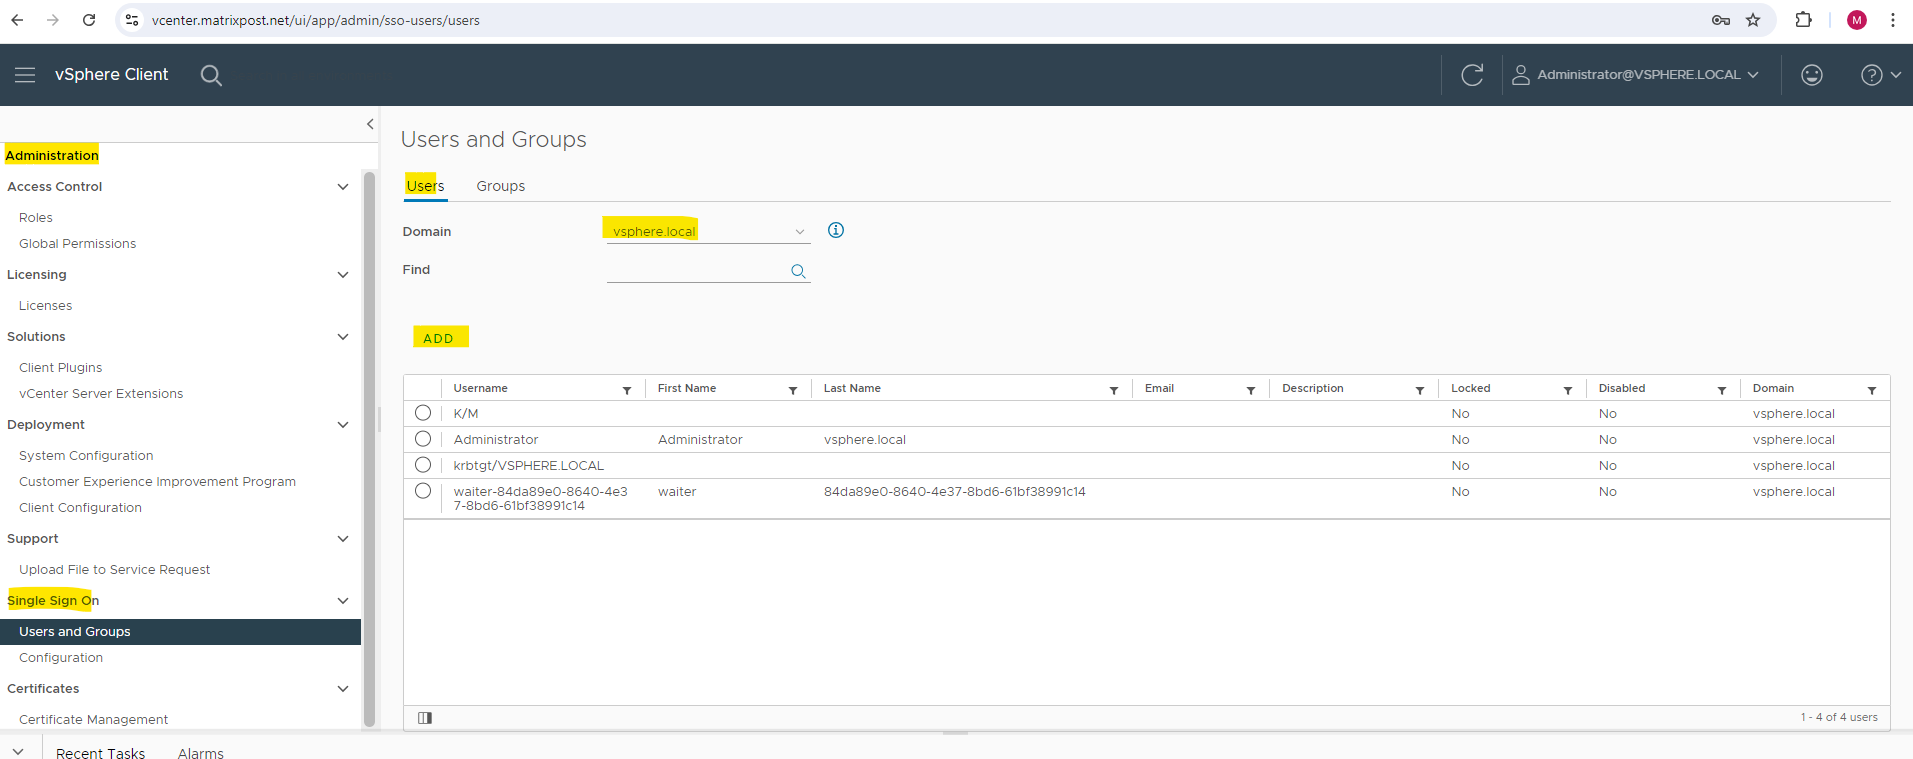
In vSphere browse to Administration -> Single Sign On -> Users and Groups. For the Domain in the Users tab select your local vSphere domain which you setup when installing the vCenter appliance, in my case and default is vsphere.local.
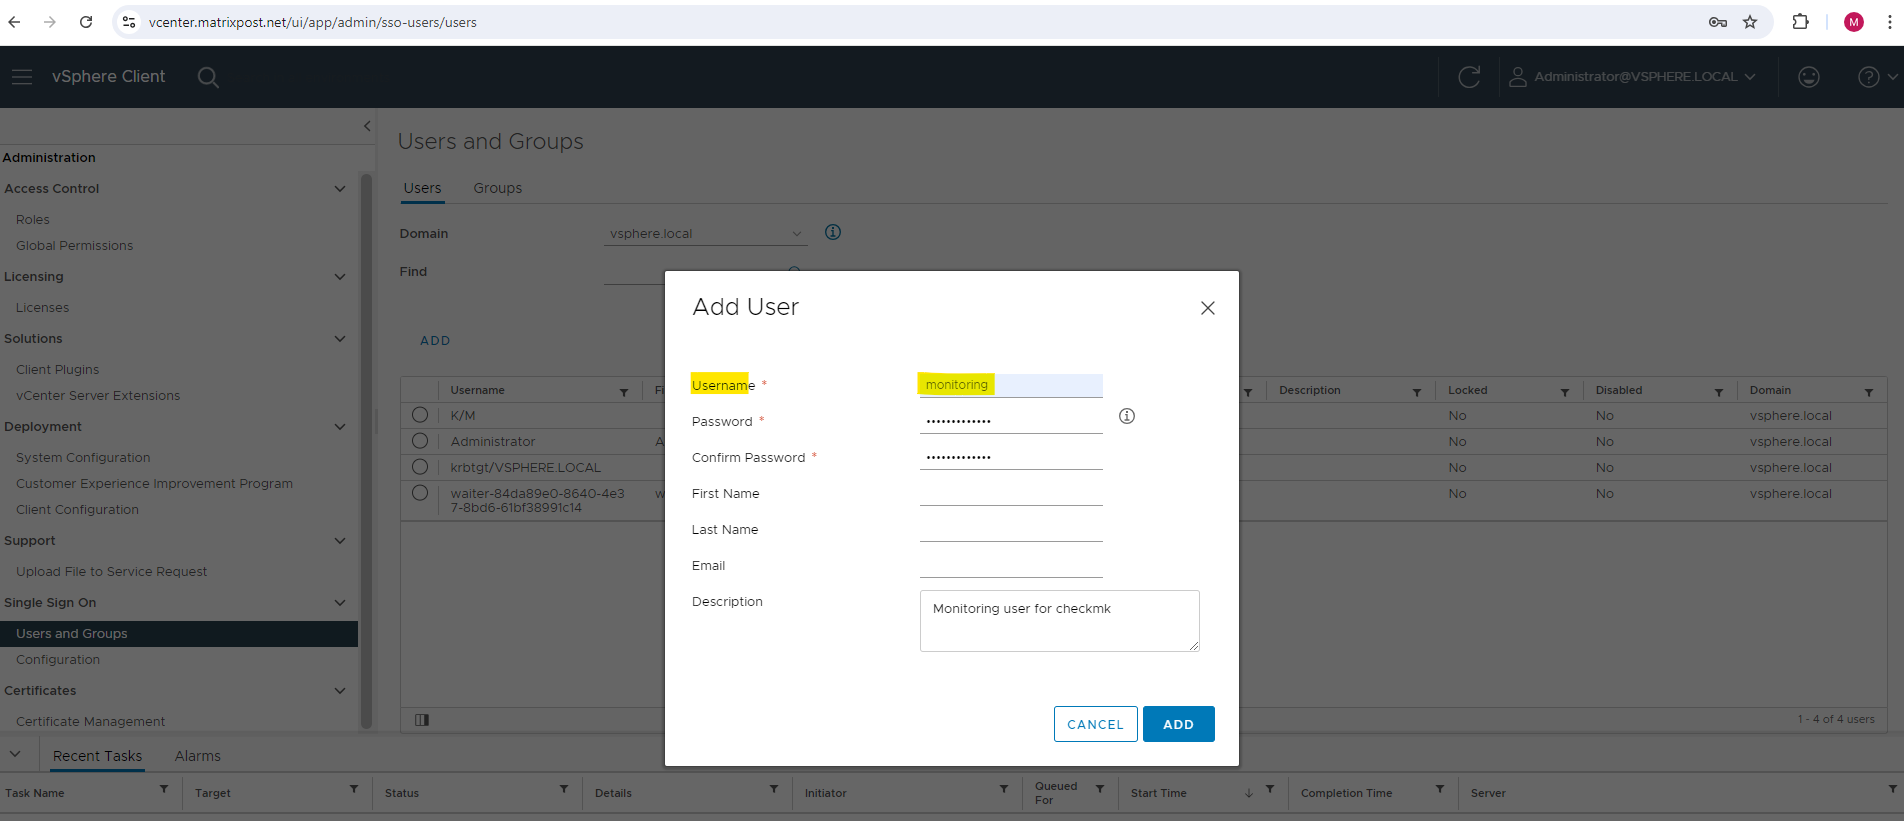
Then click on ADD to add our monitoring user for Checkmk.
Enter a name and password.
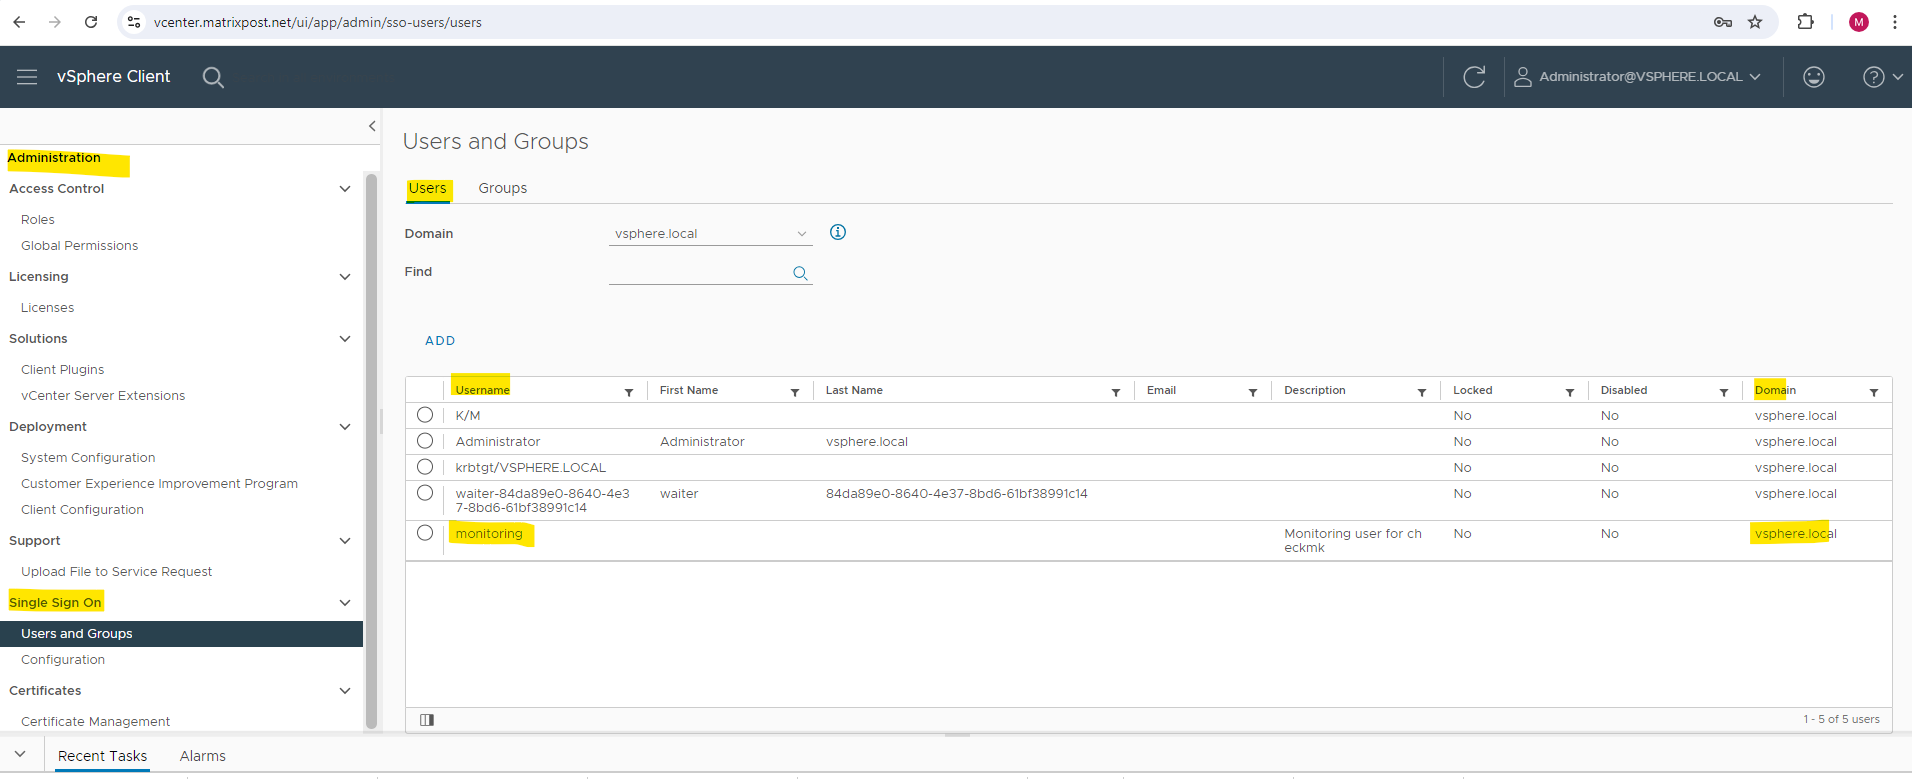
Now we need to assign read-only permissions to our new monitoring user.
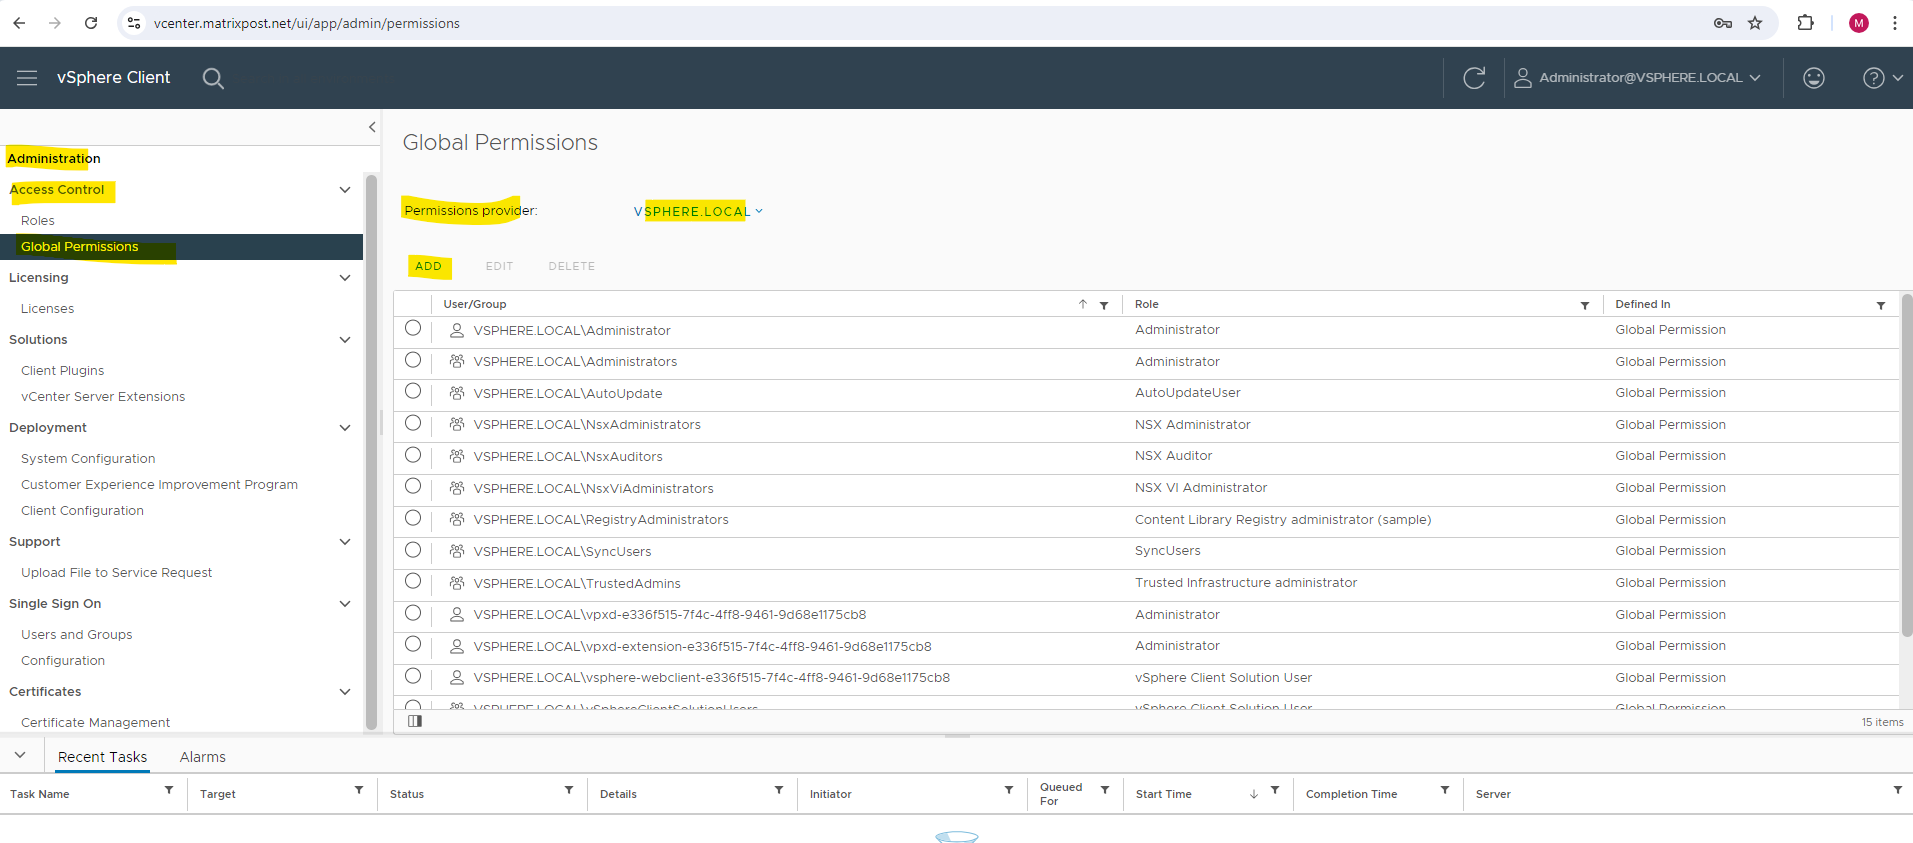
Navigate to Administration -> Access Control -> Global Permissions.
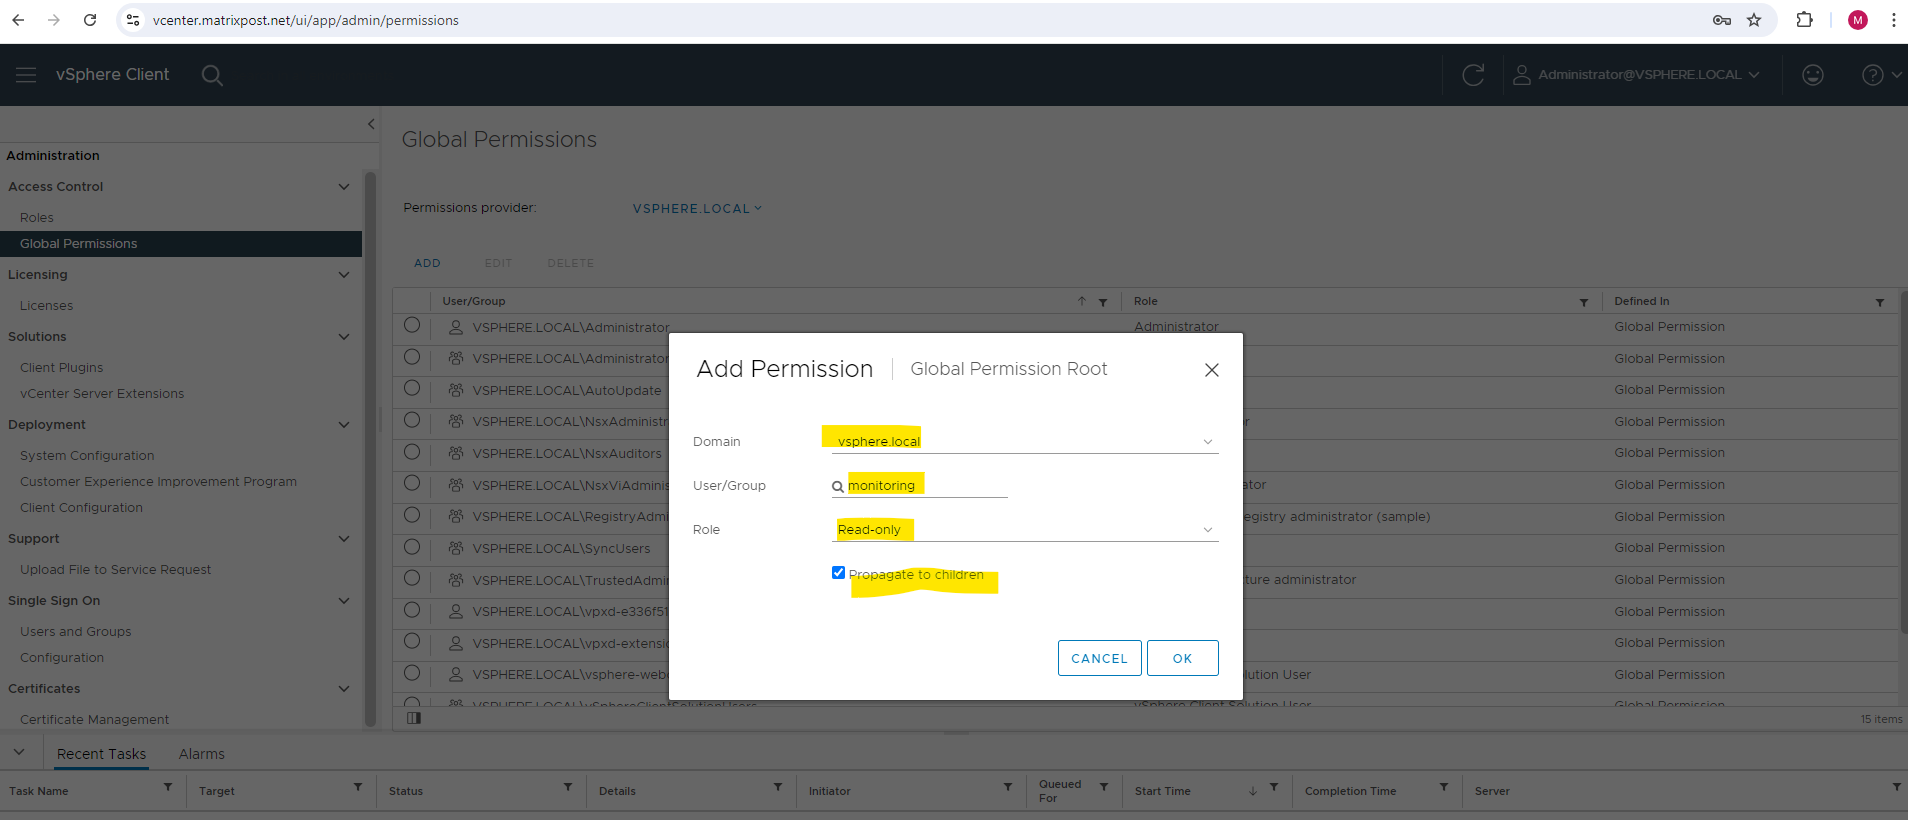
Click on ADD and search for our newly created monitoring user.
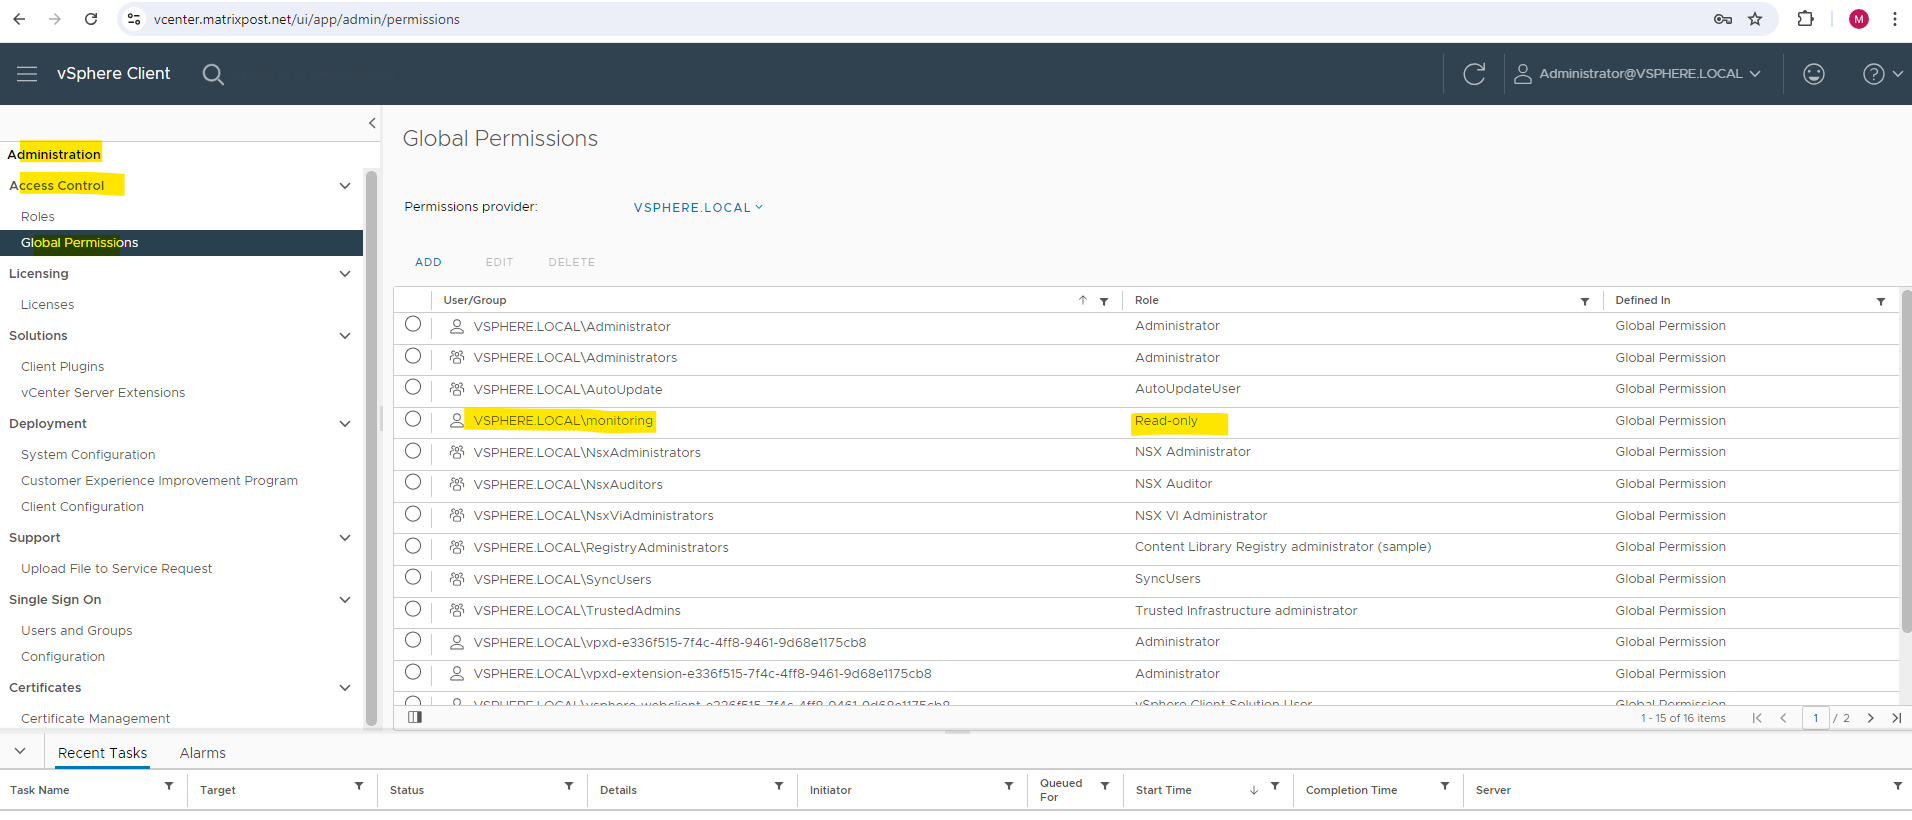
Select the Read-only role for the user.
For the monitoring user read-only rights are sufficient
Creating a new rule to query the vCenter
As previously for the ESXi Hosts, we also nee to create a new rule to be able to query and access the vCenter. So navigate to:
Setup > VM, cloud, container > VMware ESX via vSphere.
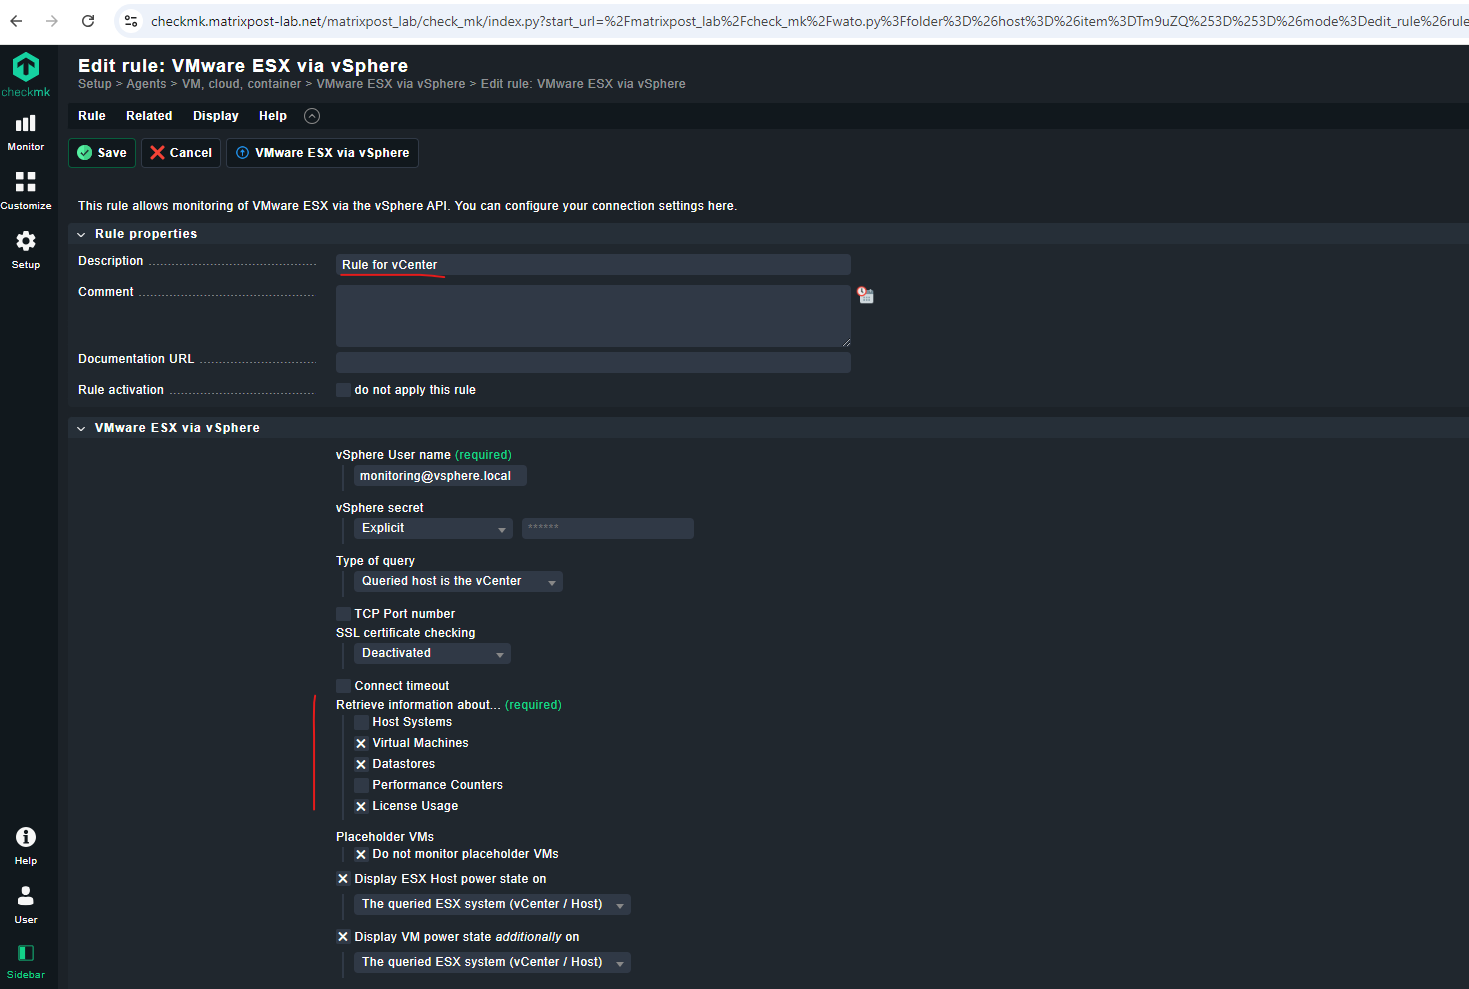
Enter below the monitoring user we created in vSphere. For the user name we need to append our local domain. In my case and default is @vsphere.local.
The condition for the rule must be set on the host defined in Checkmk. After this the first installation will be complete and checkmk can retrieve the data from the server.
To avoid connection issues in case the certificates of your vSphere environment are not trusted by the checkmk server, we can below also disable SSL certificate checking.
Further we can check which information we want to query and retrieve from our vCenter.
As previously also for the ESXi Hosts, we can either use this rule for all vCenter or we can assign the rule explicit to specific ESXi Hosts as shown below.
Here I will explicit assign this rule to my vCenter below.
Finally go back to the host configuration and execute a service discovery as previously for the ESXi Hosts and take the desired actions in the action bar.
Permanently disabling services
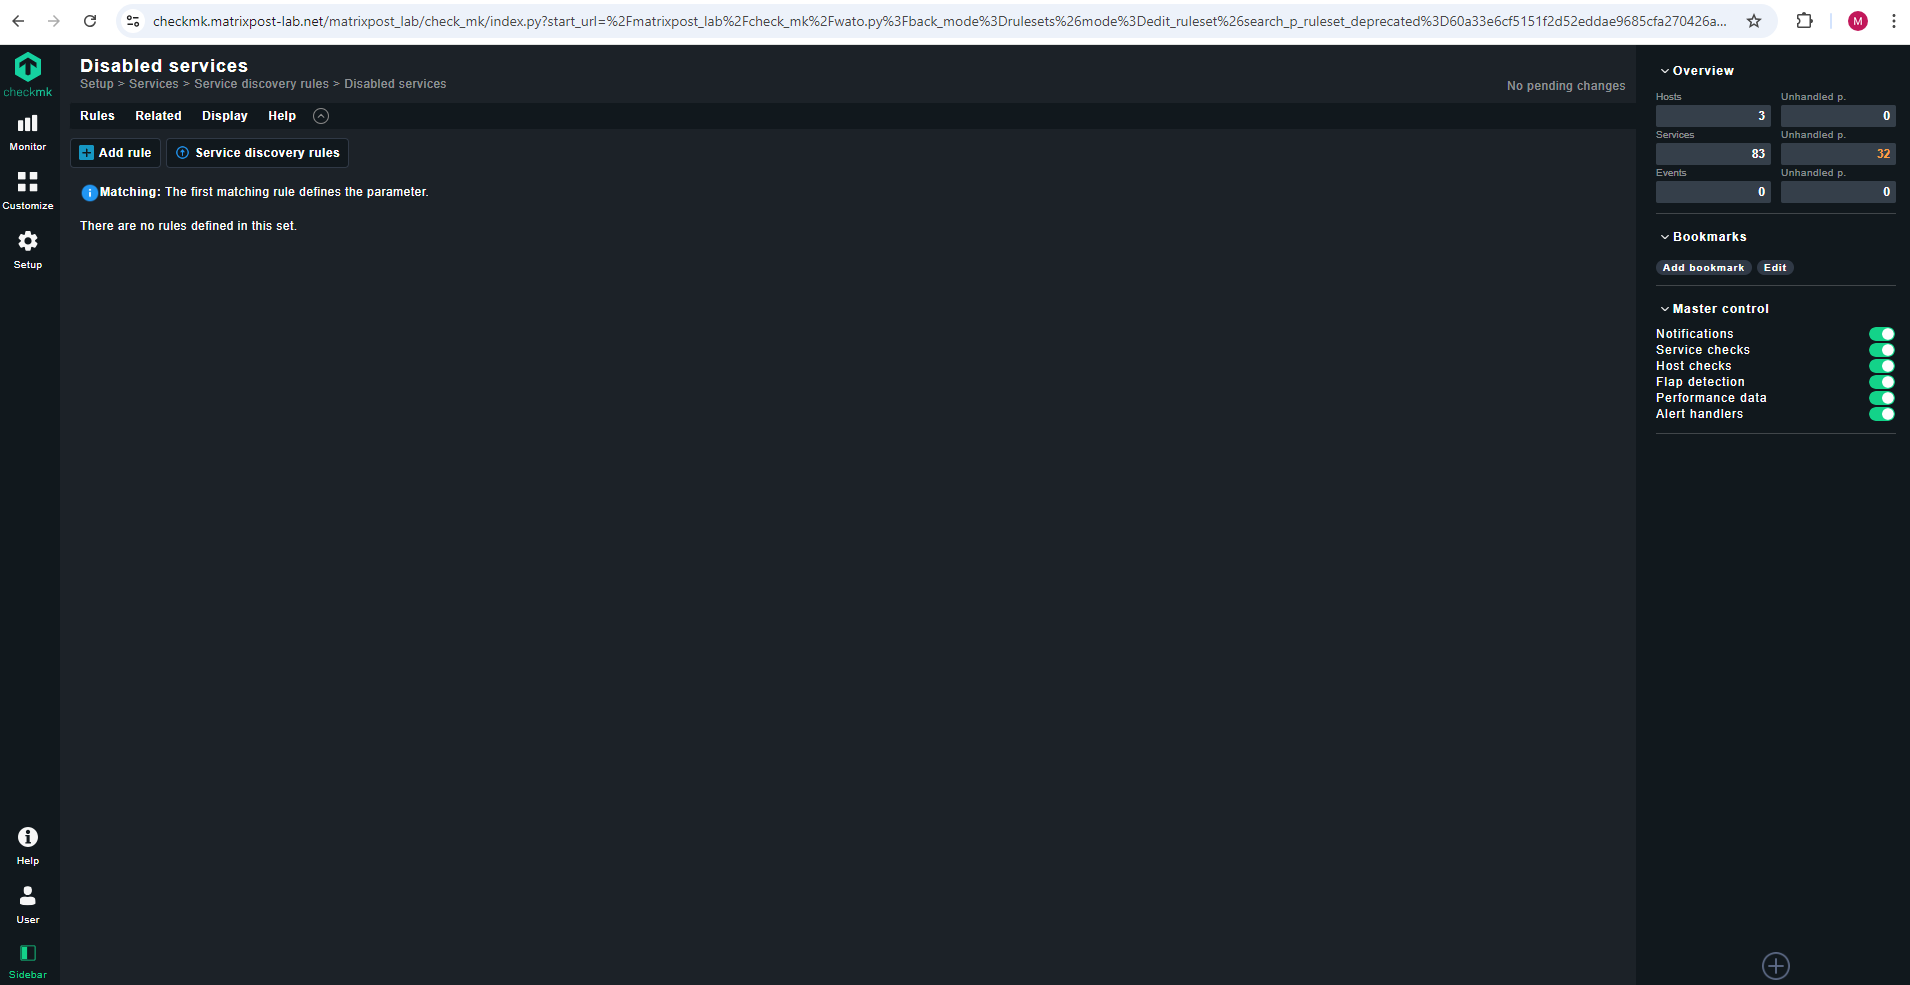
It is far more elegant and enduring to permanently ignore services with the aid of the Disabled services rule set.
Here you can not only exclude individual services from monitoring, but also formulate rules like “I don’t want to monitor services beginning with myservice on the host myserver01.”
You can access the rule via Setup > Services > Discovery rules > Discovery and Checkmk settings > Disabled Services.
Or just search for disabled services.
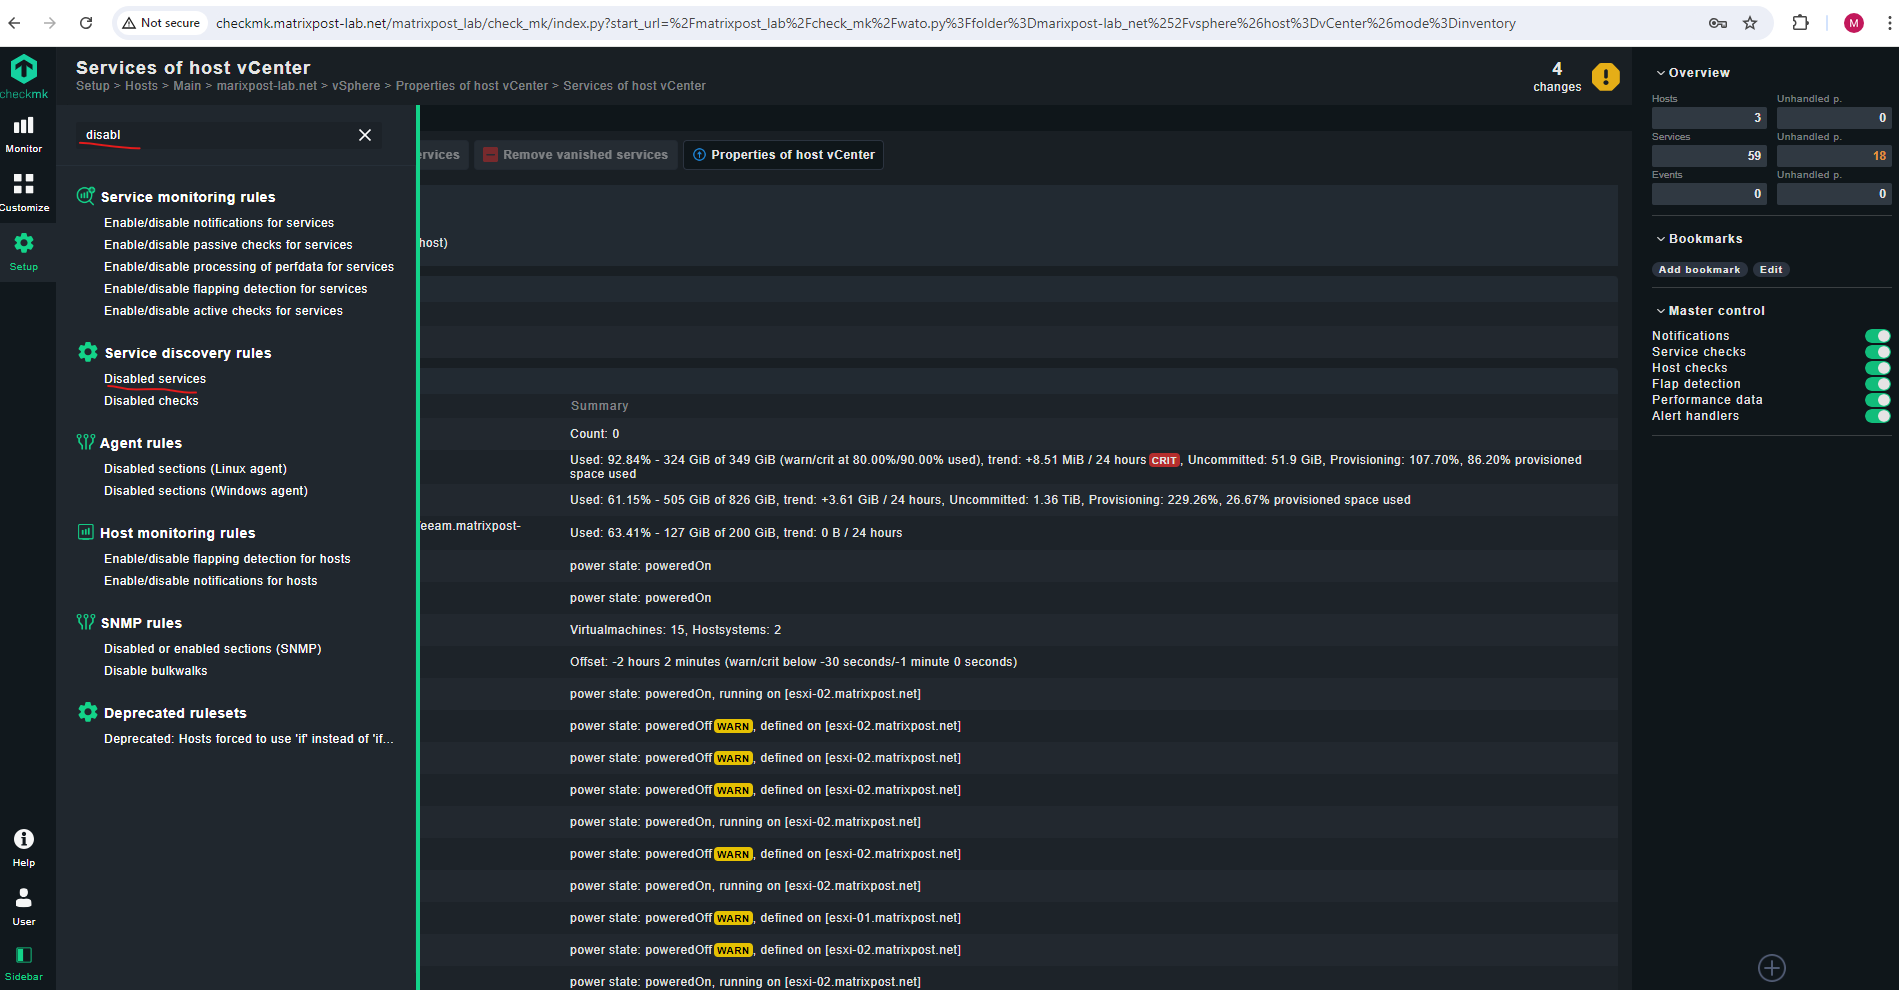
Here I will for example create a new disabled services rule which will finally ignore and not monitor any services beginning with License on my ESXi Hosts and the vCenter.

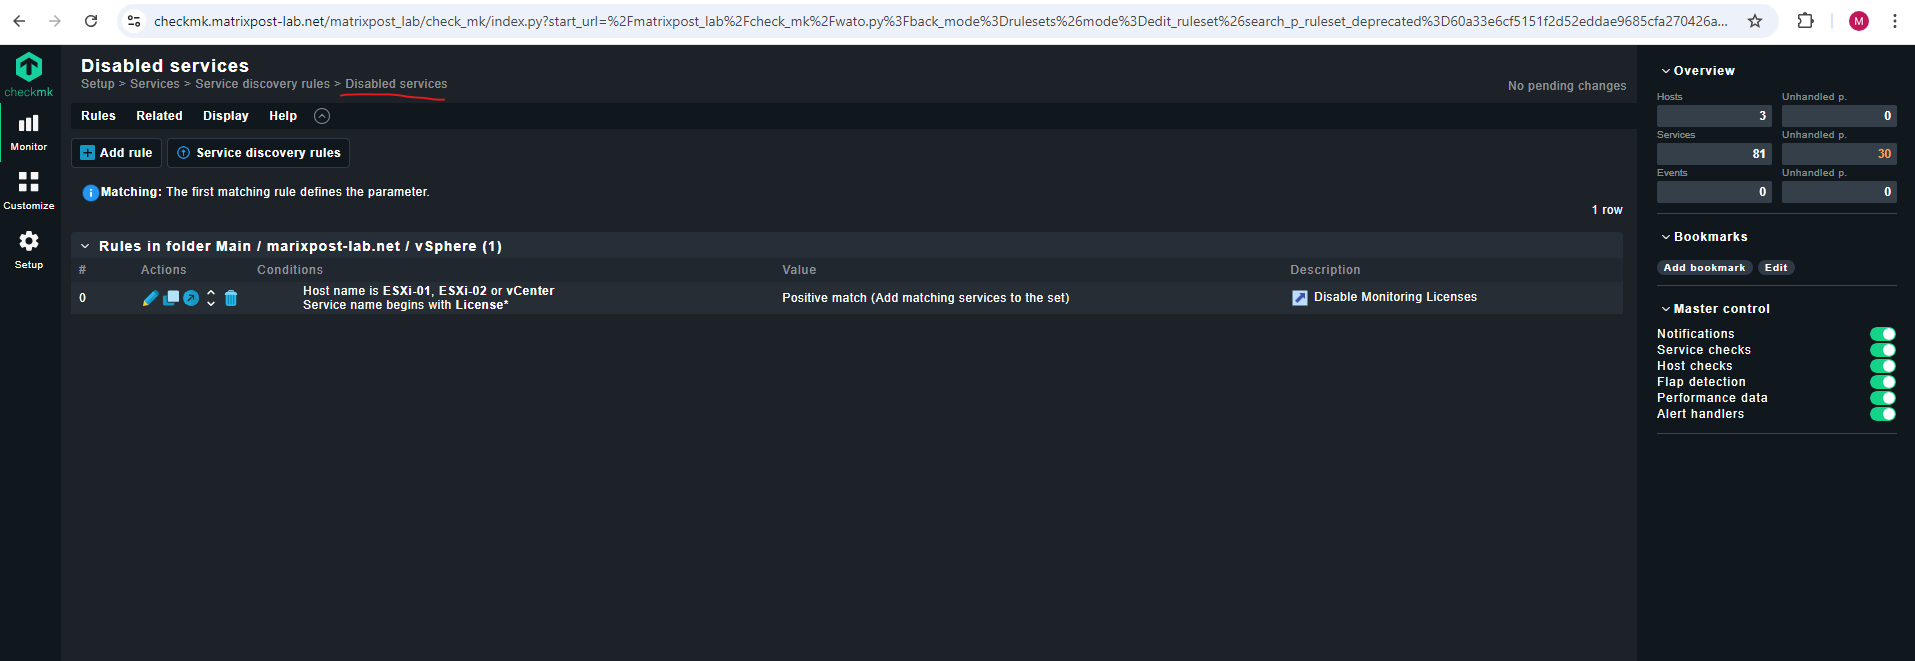
Once you have saved the rules, and return to the host’s service list, you will see the disabled services in the Disabled Services section, together with any service that might have been disabled manually.
More about you will find here https://docs.checkmk.com/latest/en/wato_services.html.
Retrieving from ESXi-Hosts and vCenter – Avoid duplicated Data Retrieval
In order to avoid duplicated data retrieval when using a combination of both configuration methods, the rule for the vCenter can be configured to retrieve only specific data. One possibility is to access the Datastores and the Virtual Machines over the vCenter, and the other data directly from the ESXi-hosts. The license usage can be fetched in both configurations since the vCenter reports an overall status.
Retrieve information from the vCenter:
Retrieve information from the ESXI Hosts:
Source: https://docs.checkmk.com/latest/en/monitoring_vmware.html
Monitor Windows Clients
Troubleshooting
Certificate not trusted
In case you are using certificates for monitored vSphere hosts which are not trusted by the checkmk server, as a workaround you can disable certificate checking on the rules for the affected vSphere Hosts.
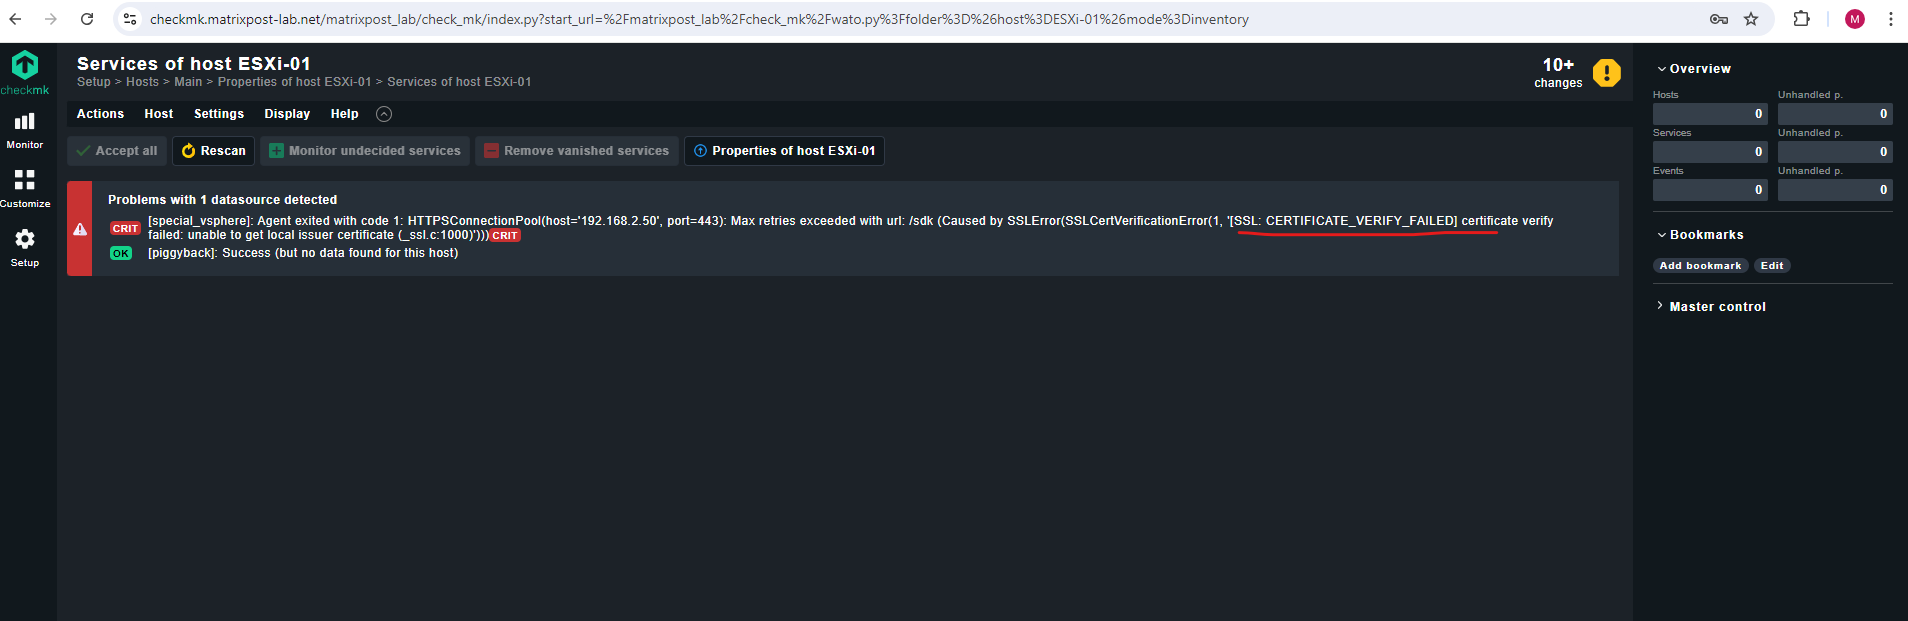
On the rule disable certificate checking.
Links
Monitoring VMware ESXi
https://docs.checkmk.com/latest/en/monitoring_vmware.htmlMonitoring VMware with Checkmk
https://checkmk.com/blog/vmware-monitoring-with-checkmkUnderstanding and configuring services
https://docs.checkmk.com/latest/en/wato_services.html
Follow me on LinkedIn