How to onboard on-premise Server to Azure Arc by using a Site-to-Site IPSec VPN and Azure Arc Private Link Scope
Azure Arc Private Link Scope is a powerful feature that allows organizations to securely connect on-premises or multi-cloud resources to Azure services, leveraging private endpoints to ensure that traffic flows securely over private networks.
By extending Azure’s management and governance capabilities to resources outside the Azure environment, Azure Arc enables centralized control while keeping data secure within your private network.
In this post I will show step by step how to create the Azure Arc Private Link Scope, configure DNS properly that traffic will be routed through our VPN tunnel instead over the public internet, and finally how to onboard Windows and Linux machines to Azure Arc.
To say it right away, when configuring the Azure connected machine agent to communicate with Azure through a private link, some endpoints must still be accessed through the internet.
In the following article by Microsoft you will see which endpoints can be configured with a private endpoint and which must still be accessed through the internet.
Source: https://learn.microsoft.com/en-us/azure/azure-arc/servers/network-requirements?tabs=azure-cloud#urls
Introduction
Azure Arc Private Link Scope connects private endpoints (and the virtual networks they’re contained in) to an Azure resource, in this case Azure Arc-enabled servers.
Connectivity to any other Azure resource from an Azure Arc-enabled server requires configuring Private Link for each service, which is optional, but recommended. Azure Private Link requires separate configuration per service.
The Private Endpoint on your VNet allows it to reach Azure Arc-enabled servers endpoints through private IPs from your network’s pool, instead of using to the public IPs of these endpoints.
That allows you to keep using your Azure Arc-enabled servers resource without opening your VNet to outbound traffic not requested.
Traffic from the Private Endpoint to your resources will go over the Microsoft Azure backbone, and not routed to public networks.
You can configure each of your components to allow or deny ingestion and queries from public networks. That provides a resource-level protection, so that you can control traffic to specific resources.
Source: https://learn.microsoft.com/en-us/azure/azure-arc/servers/private-link-security#how-it-works
Azure Private Link allows you to securely link Azure PaaS services to your virtual network using private endpoints.
For many services, you just set up an endpoint per resource. This means you can connect your on-premises or multicloud servers with Azure Arc and send all traffic over an Azure ExpressRoute or site-to-site VPN connection instead of using public networks.
Starting with Azure Arc-enabled servers, you can use a Private Link Scope model to allow multiple servers or machines to communicate with their Azure Arc resources using a single private endpoint.
Source: https://learn.microsoft.com/en-us/azure/azure-arc/servers/private-link-security
Restrictions and limitations
Network traffic to Microsoft Entra ID and Azure Resource Manager does not traverse the Azure Arc Private Link Scope and will continue to use your default network route to the internet.
You can optionally configure a resource management private link to send Azure Resource Manager traffic to a private endpoint.
Remote access to the server using Windows Admin Center or SSH is not supported over private link at this time.
Checklist Setup Azure Arc Private Link Scope
- Establish a connection between your on-premises network and an Azure virtual network using a site-to-site VPN or ExpressRoute circuit.
- Deploy an Azure Arc Private Link Scope, which controls which machines or servers can communicate with Azure Arc over private endpoints and associate it with your Azure virtual network using a private endpoint.
- Update the DNS configuration on your local network to resolve the private endpoint addresses.
- Configure your local firewall to allow access to Microsoft Entra ID and Azure Resource Manager.
- Associate the machines or servers registered with Azure Arc-enabled servers with the private link scope.
Create a Private Link Scope
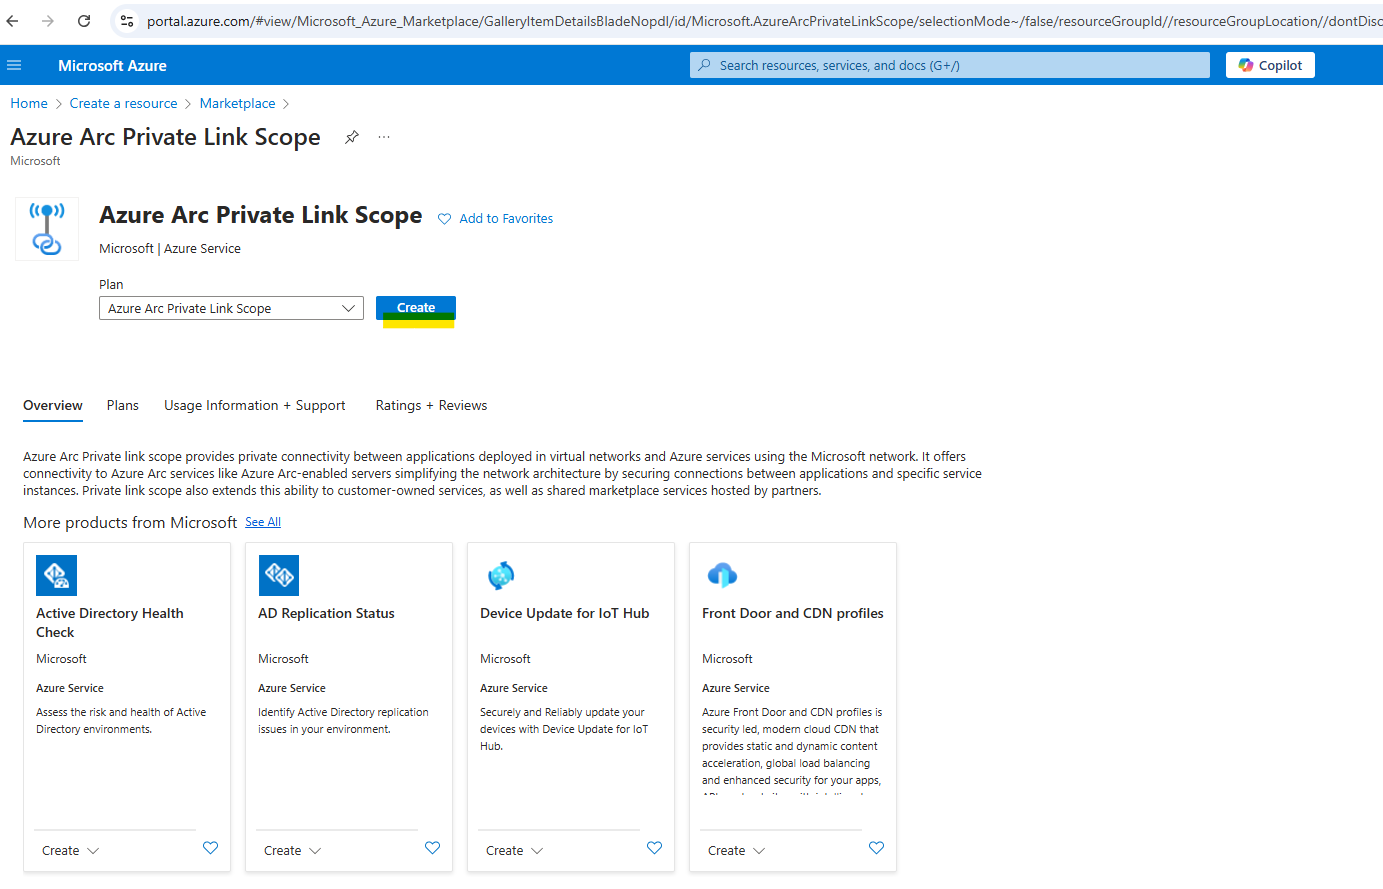
Go to Create a resource in the Azure portal and search for Azure Arc Private Link Scope, then select Create.
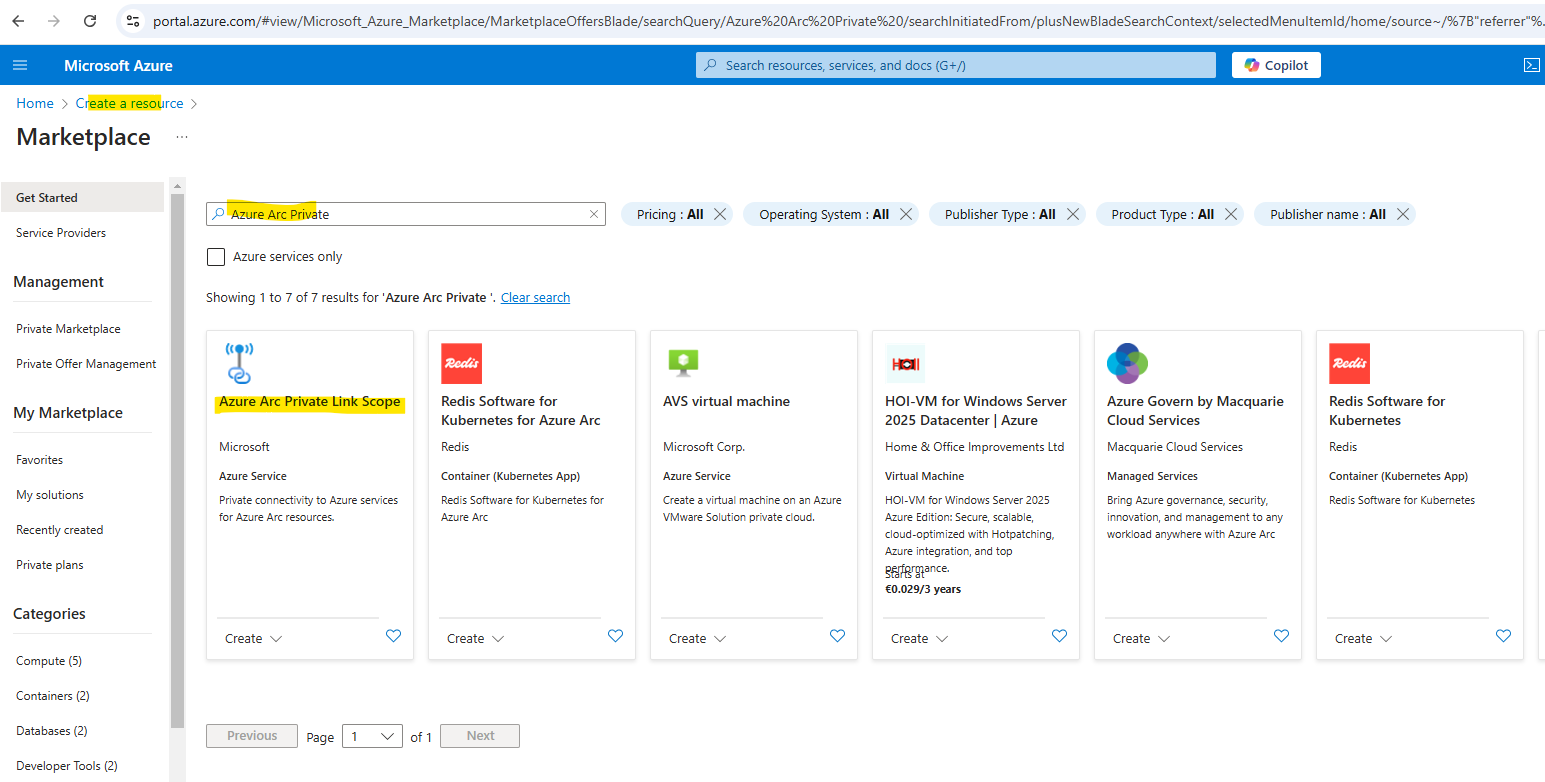
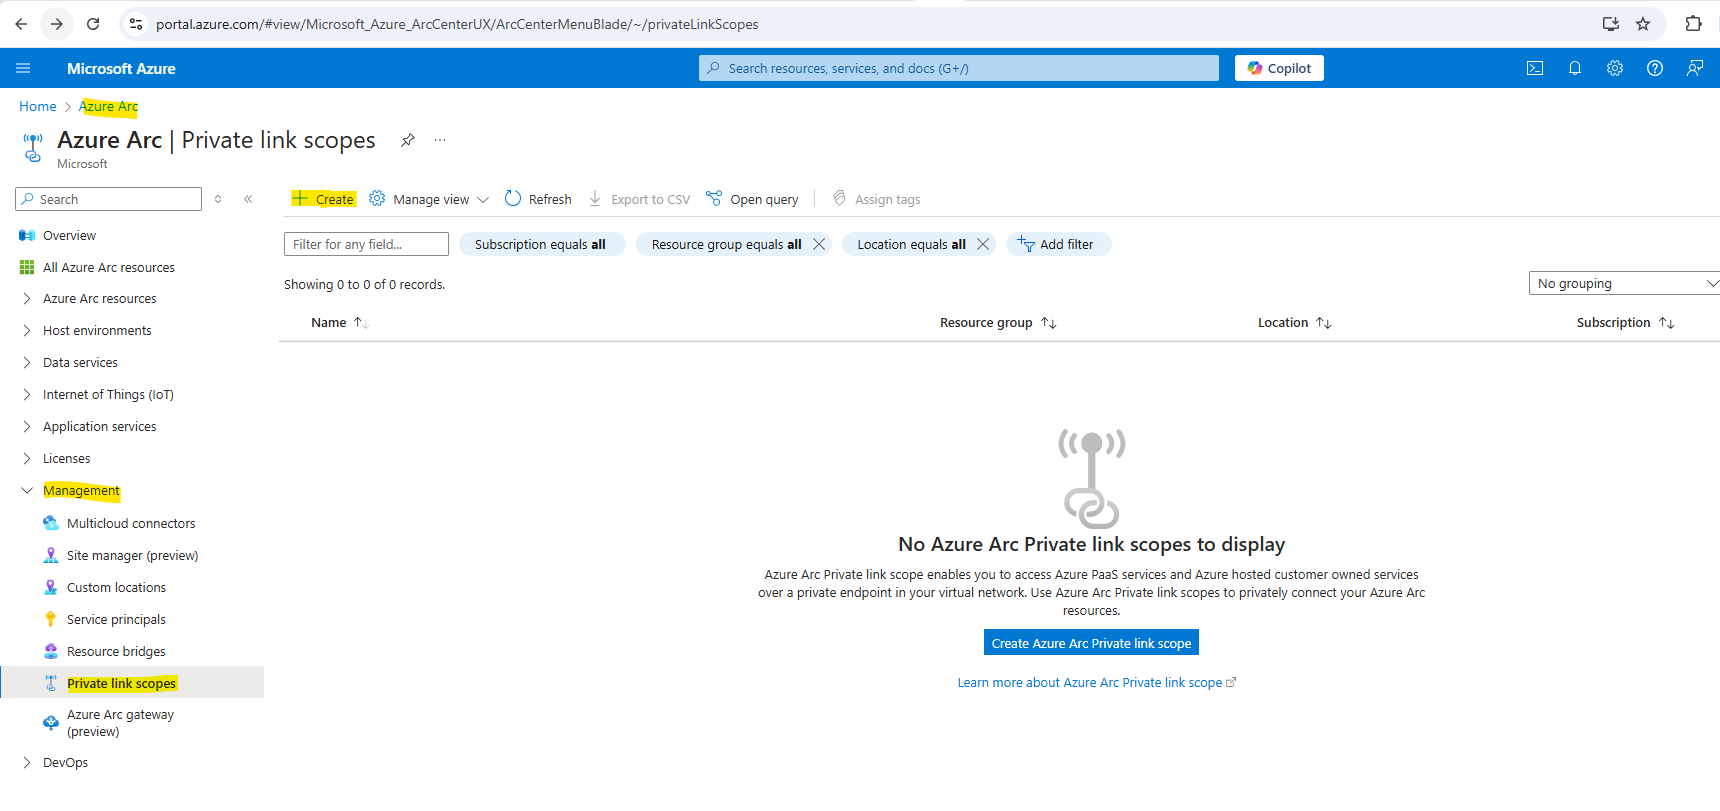
Alternately, go directly to the Azure Arc Private Link Scopes page in the portal, then select Create Azure Arc Private link scope.
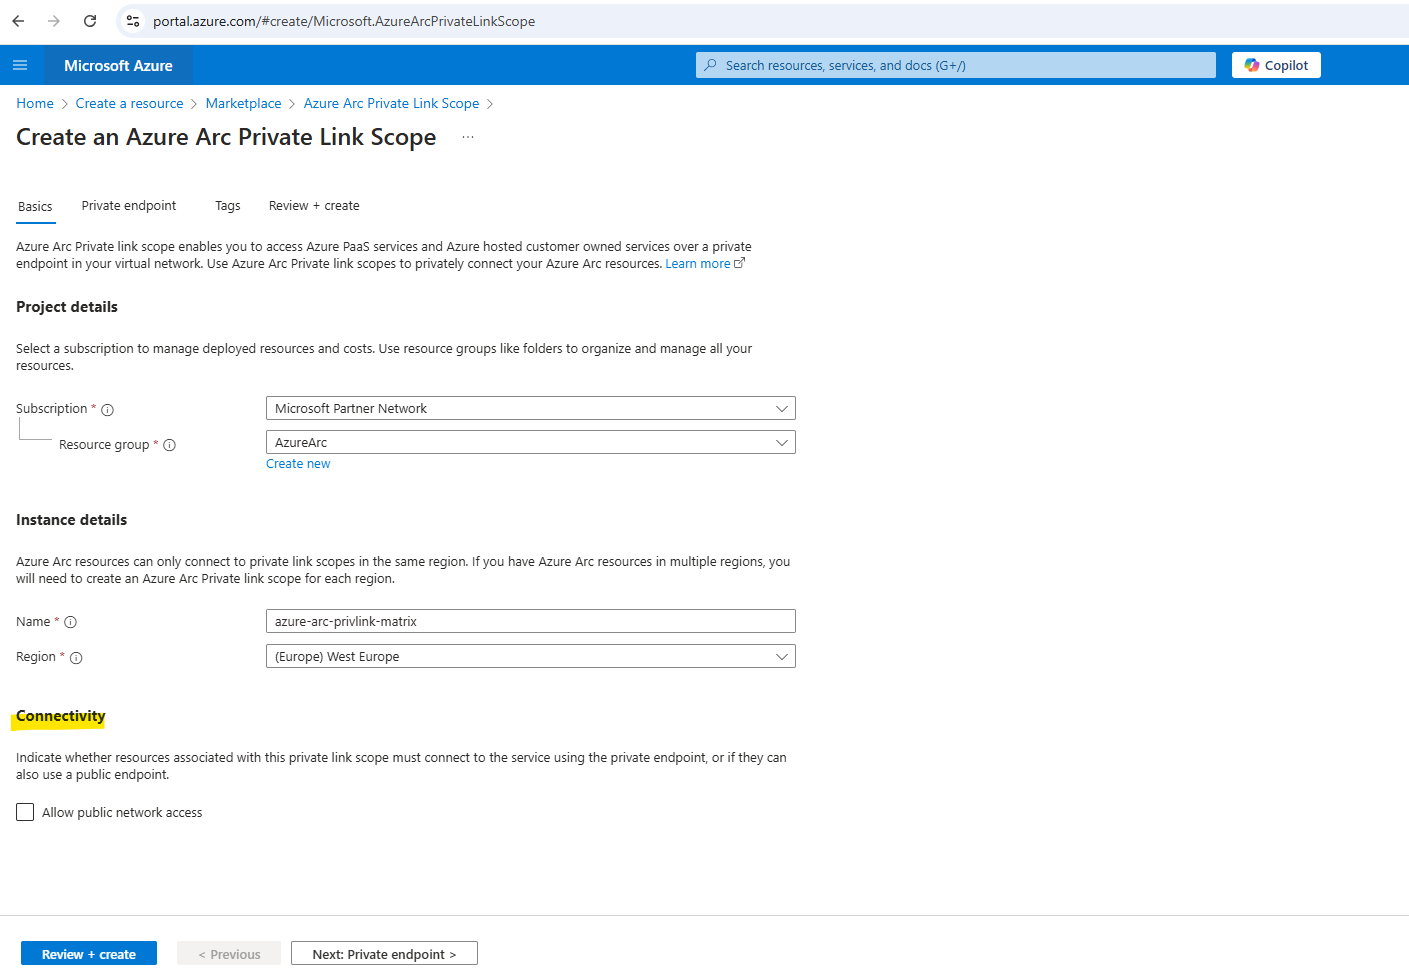
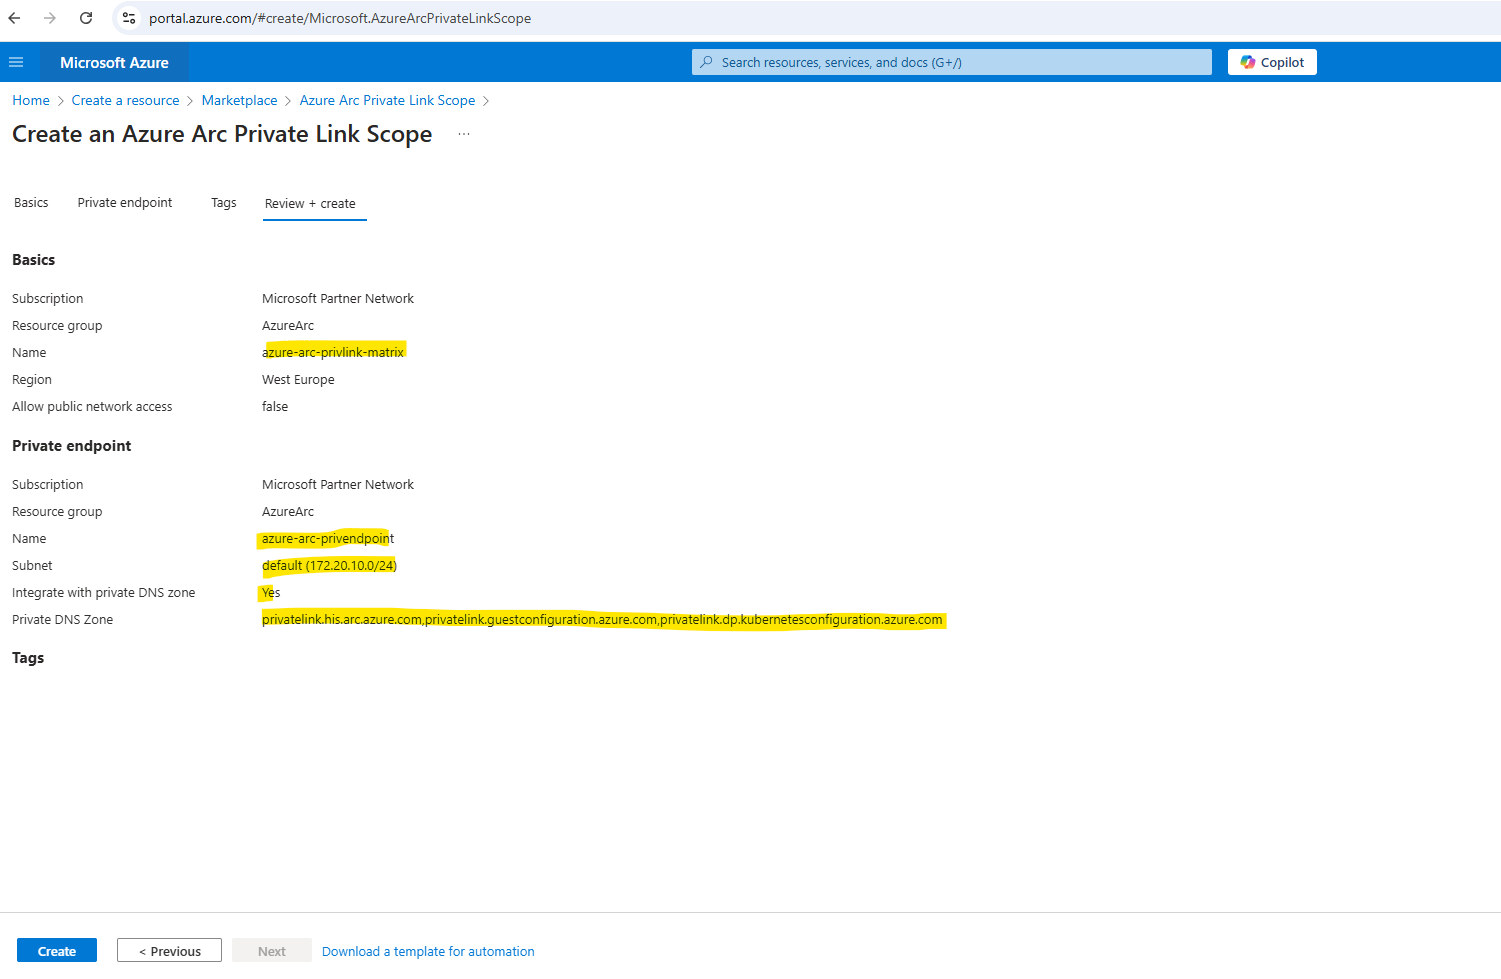
In the Basics tab, select a subscription and resource group. Enter a name for the Azure Arc Private Link Scope. It’s best to use a meaningful and clear name.
Because I want that my Azure Arc-enabled servers are communicate just through a private endpoint, I will not check Allow public network access.
Optionally, you can require every Azure Arc-enabled machine or server associated with this Azure Arc Private Link Scope to send data to the service through the private endpoint. To do so, check the box for Allow public network access, so that machines or servers associated with this Azure Arc Private Link Scope can communicate with the service over both private or public networks. You can change this setting after creating the scope as needed.
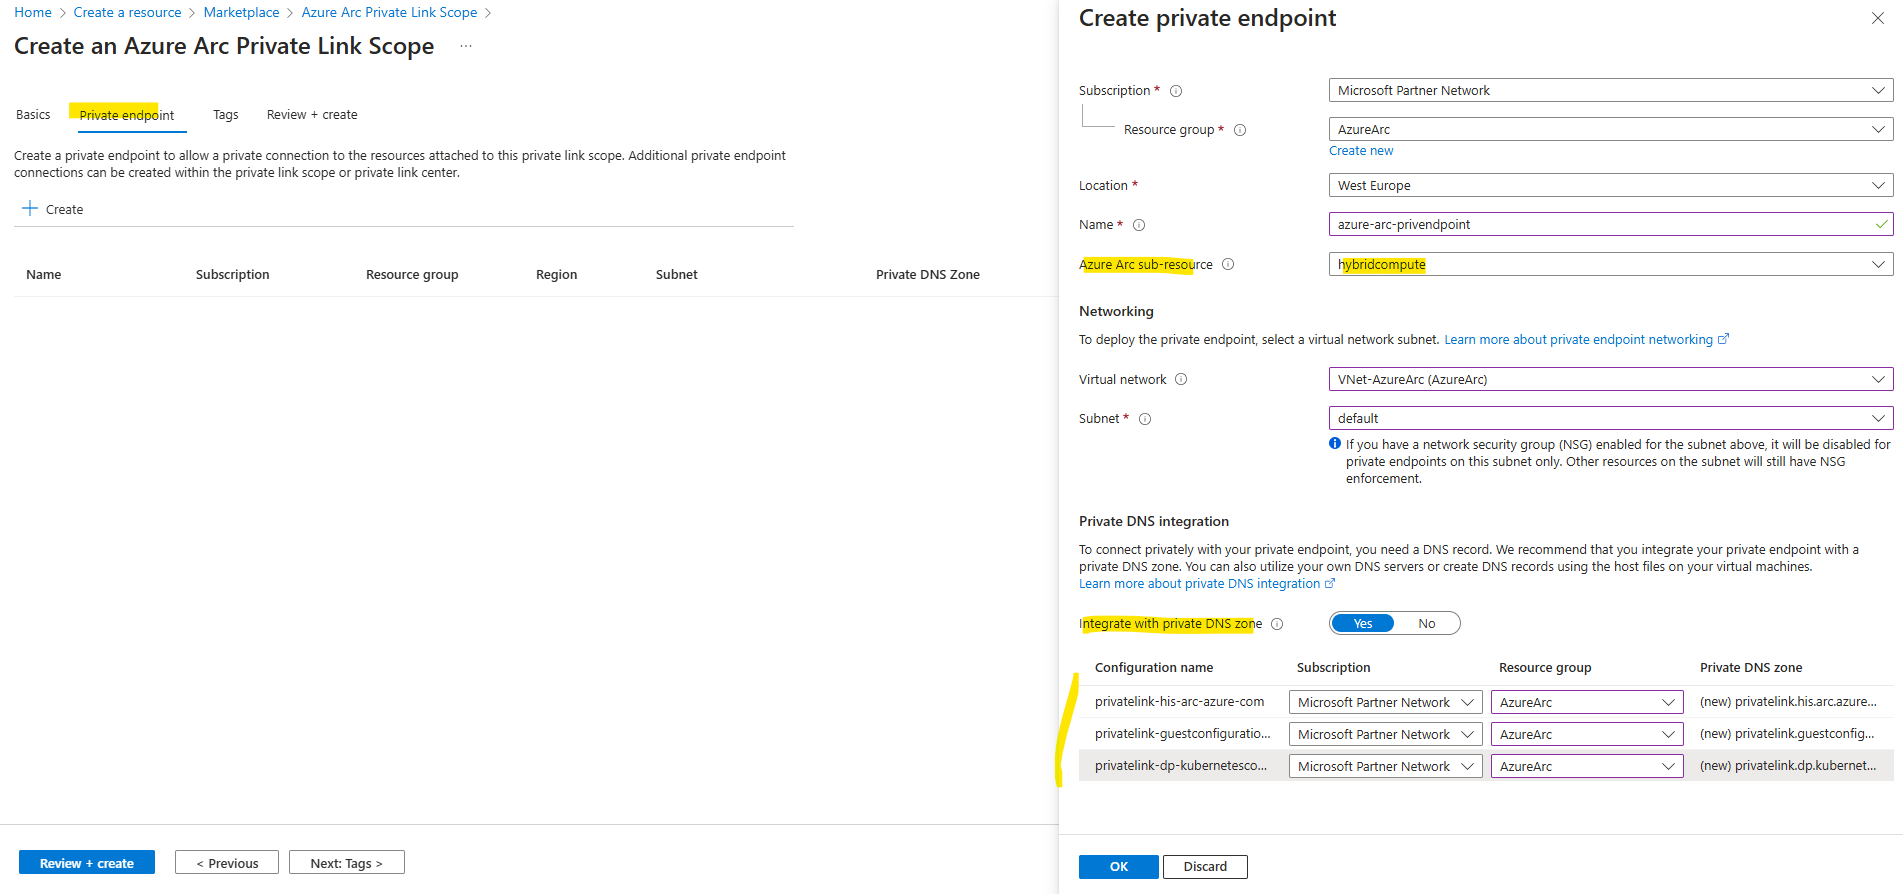
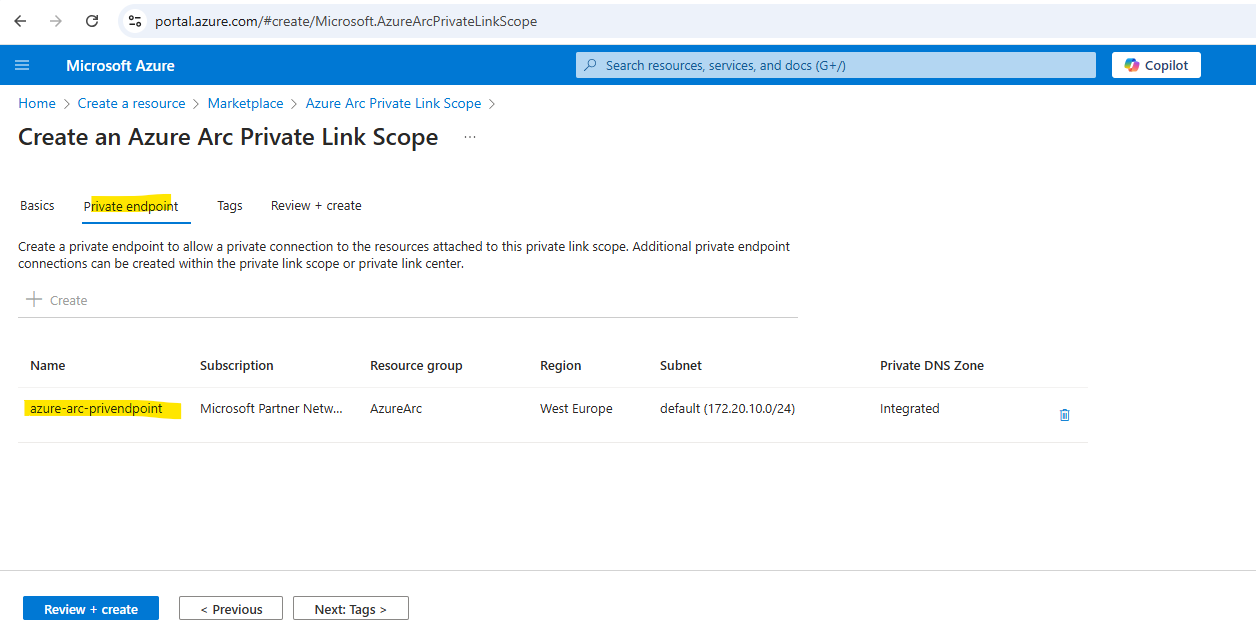
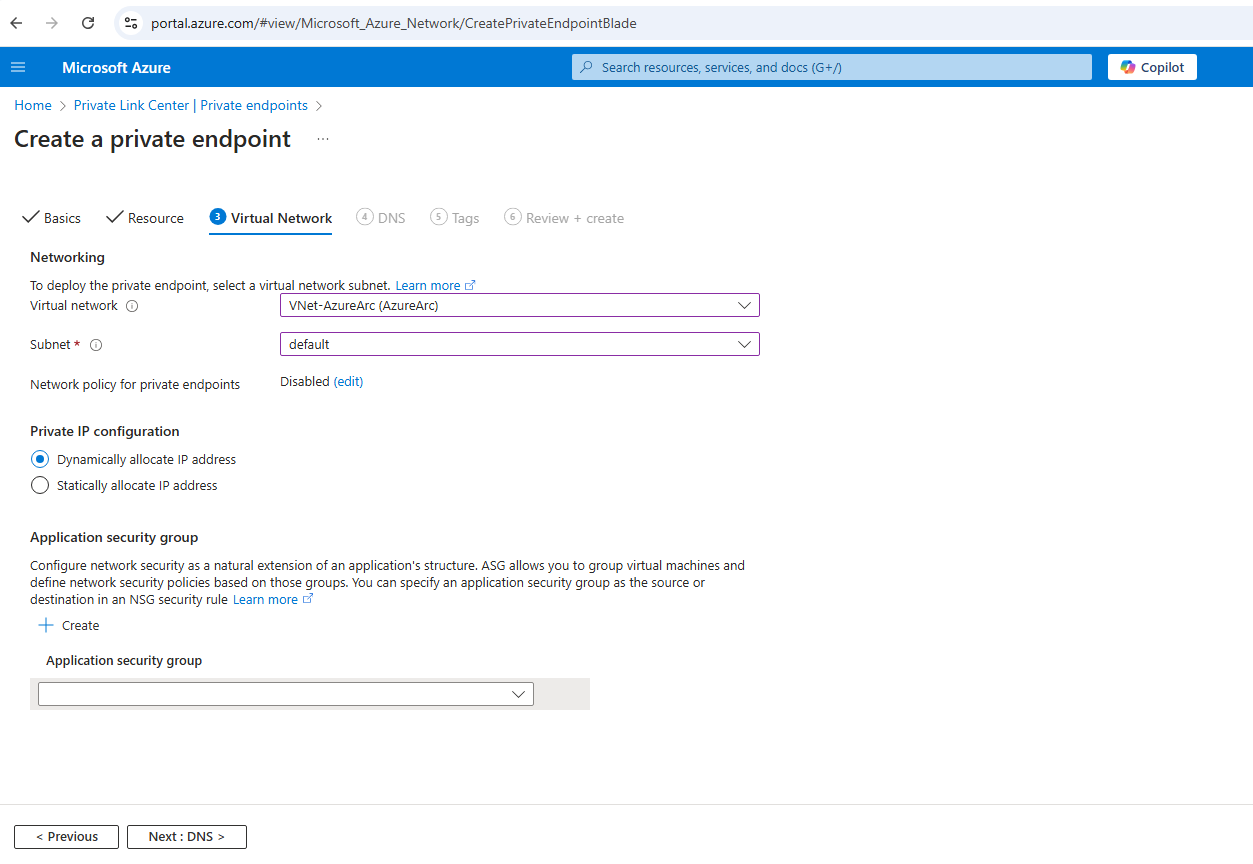
Select the Private endpoint tab, then select Create. Enter a Name for the endpoint.
Choose Yes for Integrate with private DNS zone, and let it automatically create a new Private DNS Zone.
Azure Arc sub-resource
The specific type of Arc resource that the private link scope will be able to access.
Click on Review + create.
Let the validation pass, and then select Create.
The Azure Arc Private Link Scope will create the following resources:
- DNS Zone Group (links private endpoints to one or more Azure Private DNS zones. This allows your private endpoints to automatically register their DNS records in the private DNS zone, enabling seamless name resolution within your private network.)
- Virtual Network Links
- Private DNS zones
- Private endpoint
- Private link

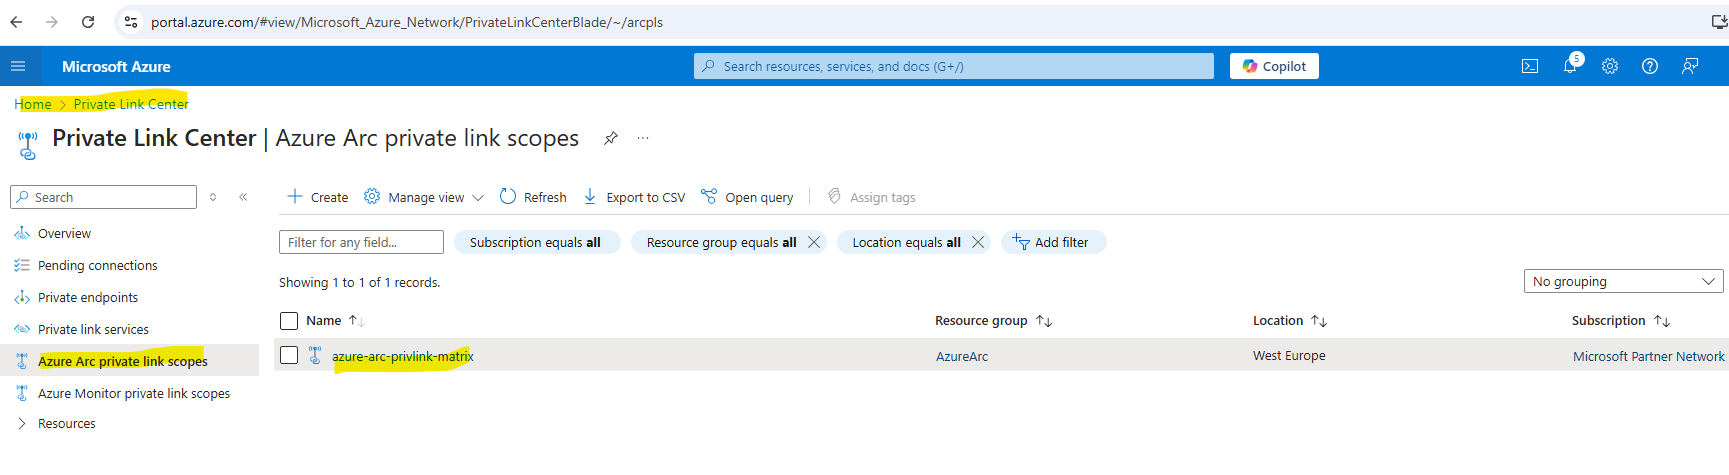
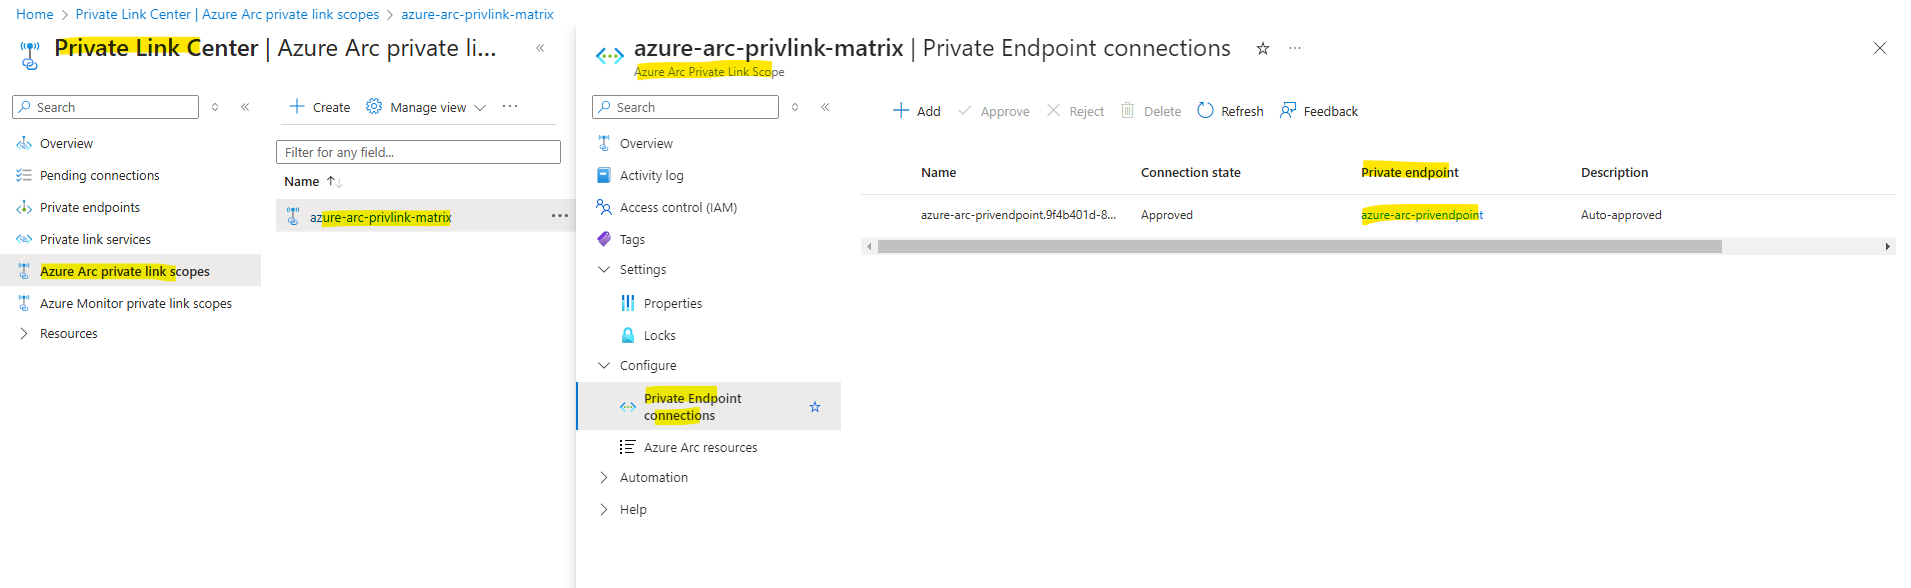
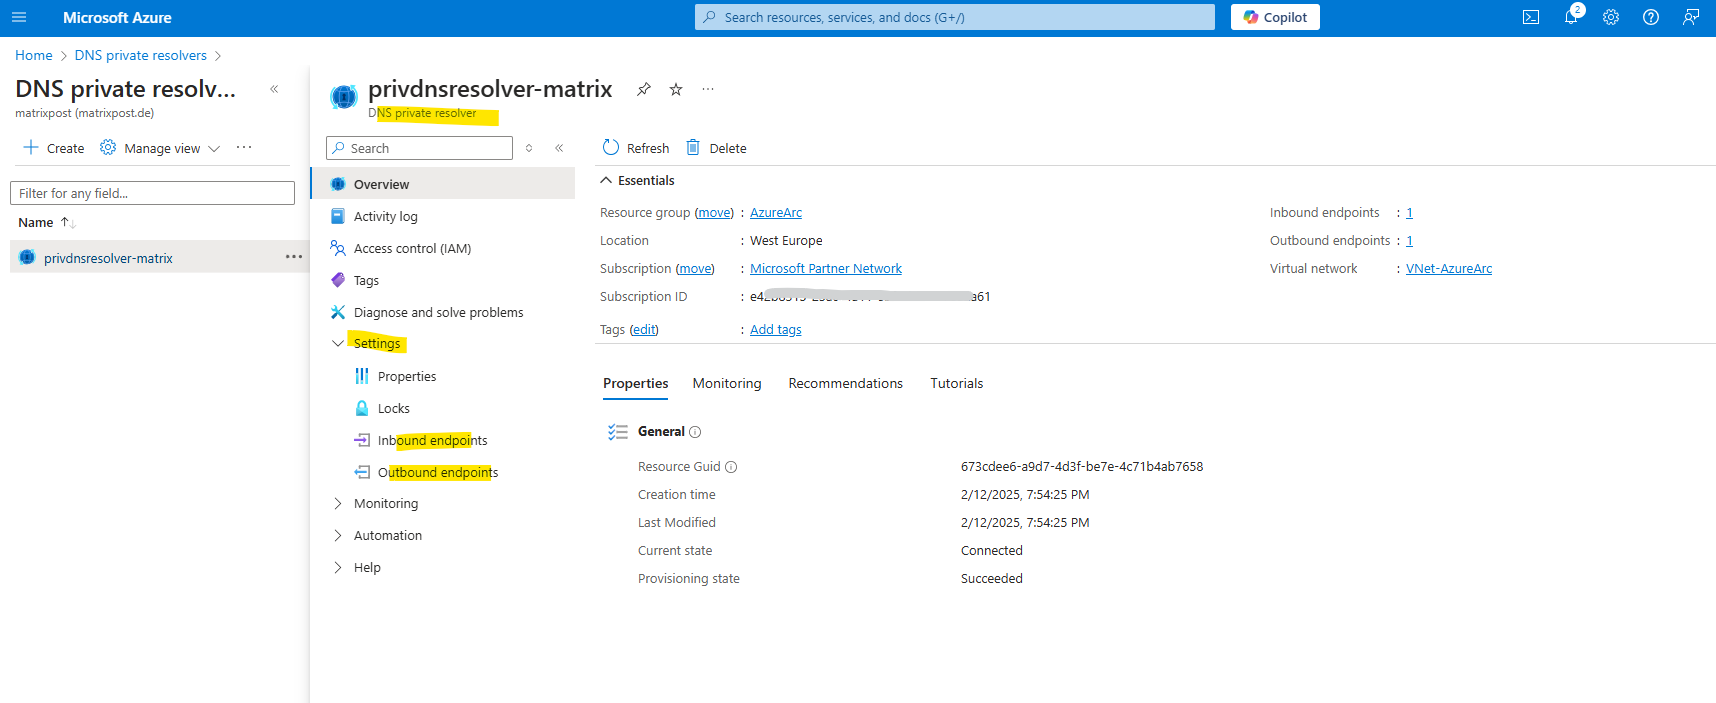
You will find the newly created Azure Arc private link scope in the Private Link Center.
On the Azure Arc private link scope blade you will see our newly created private endpoint under Configure -> Private Endpoint connections.
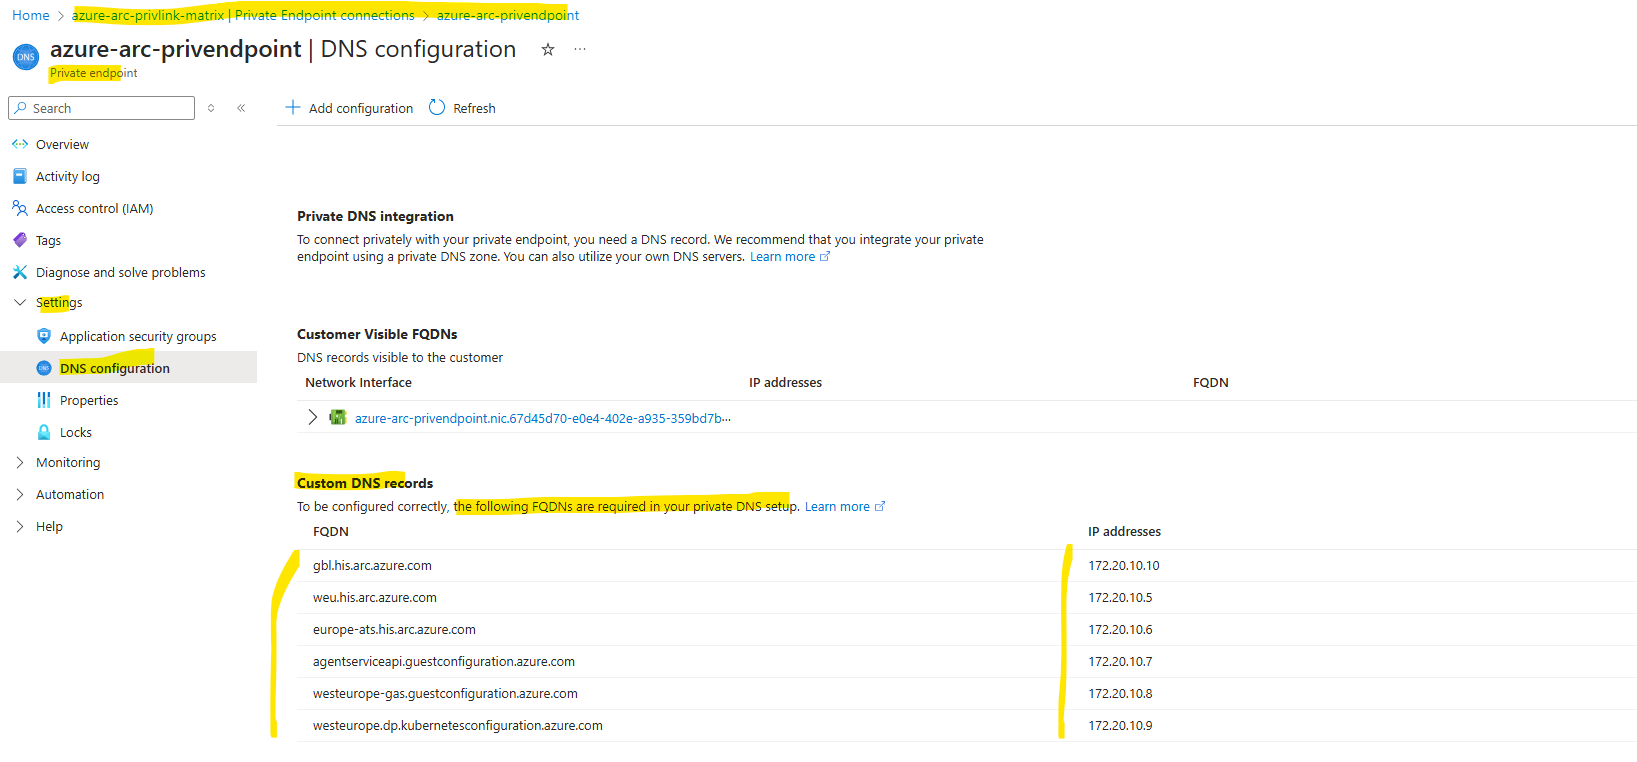
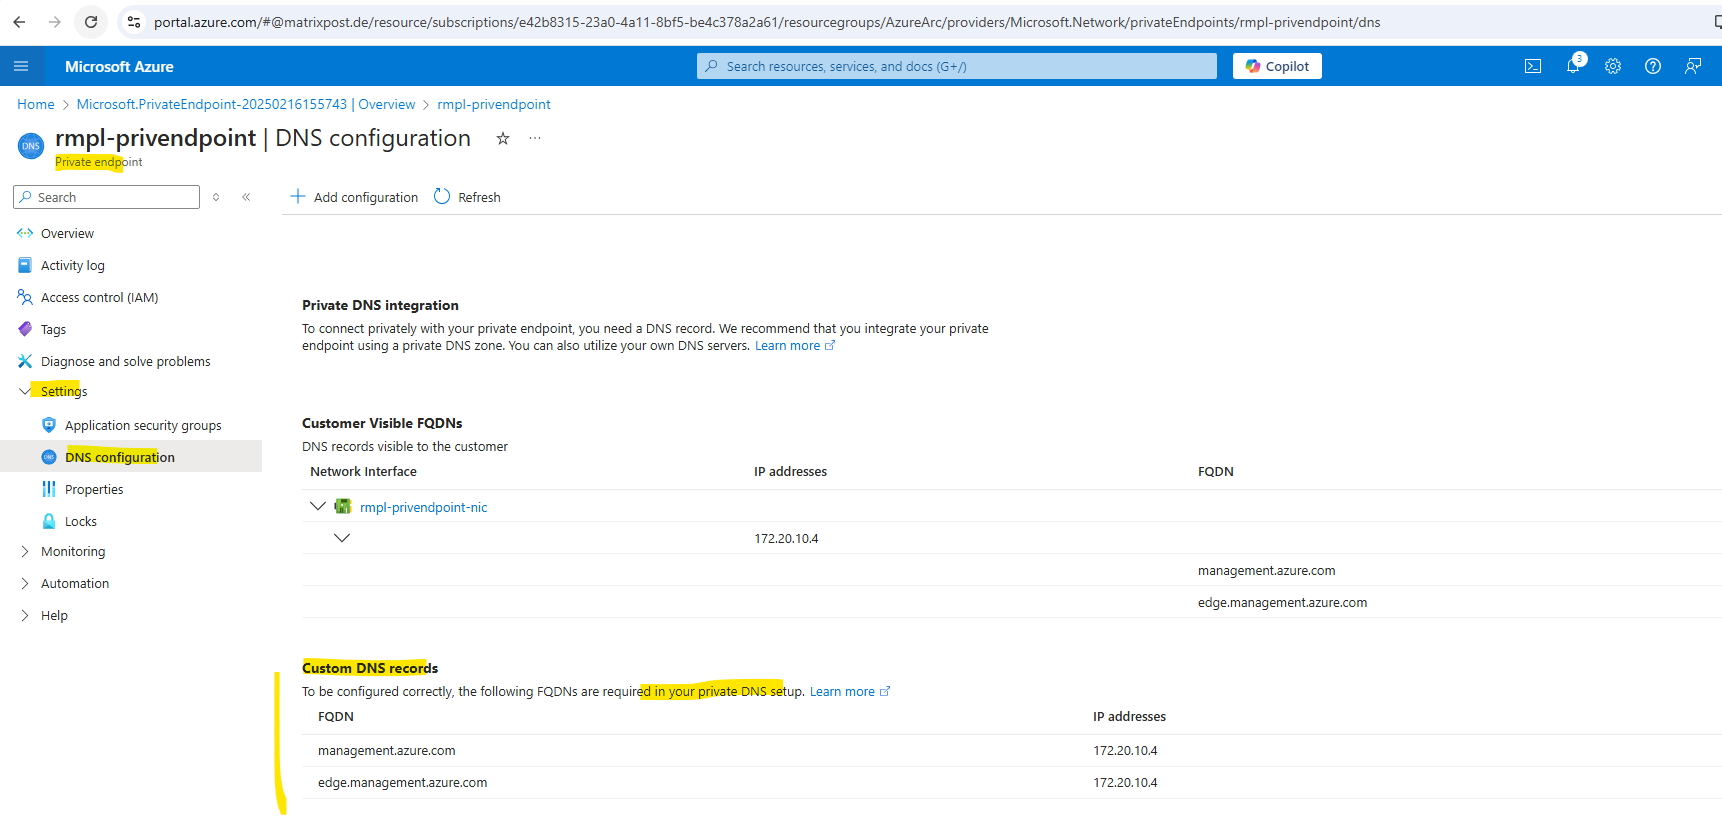
Clicking on the private endpoint above will open the private endpoint blade. Here we will see all private IP addresses and corresponding FQDNs for the Azure Arc services which are now accessible by using these private IP addresses and can be routed through the S2S VPN tunnel.

When setting up our own on-premise DNS server to resolve these FQDNs into its private endpoints (IP addresses), we need to configure the following FQDNs.
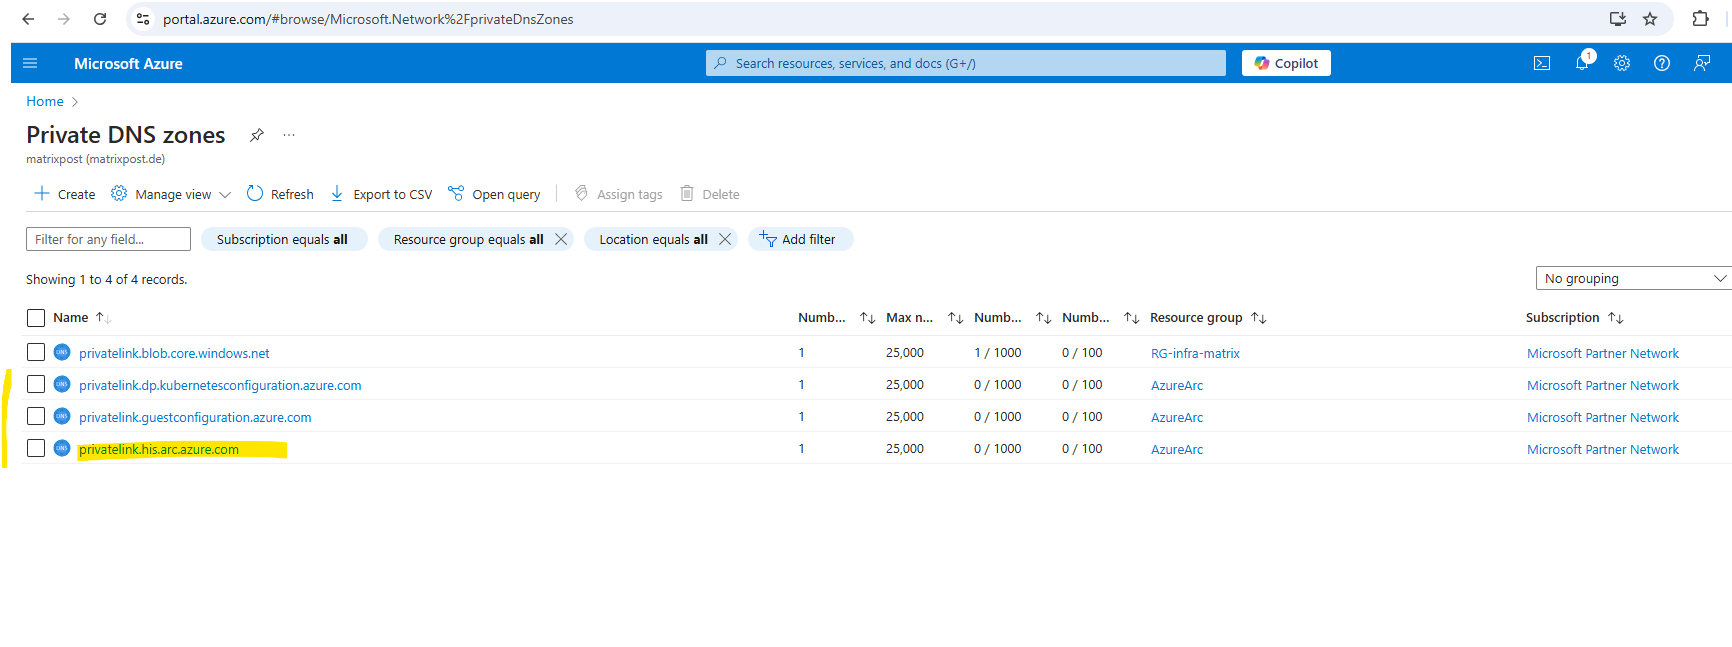
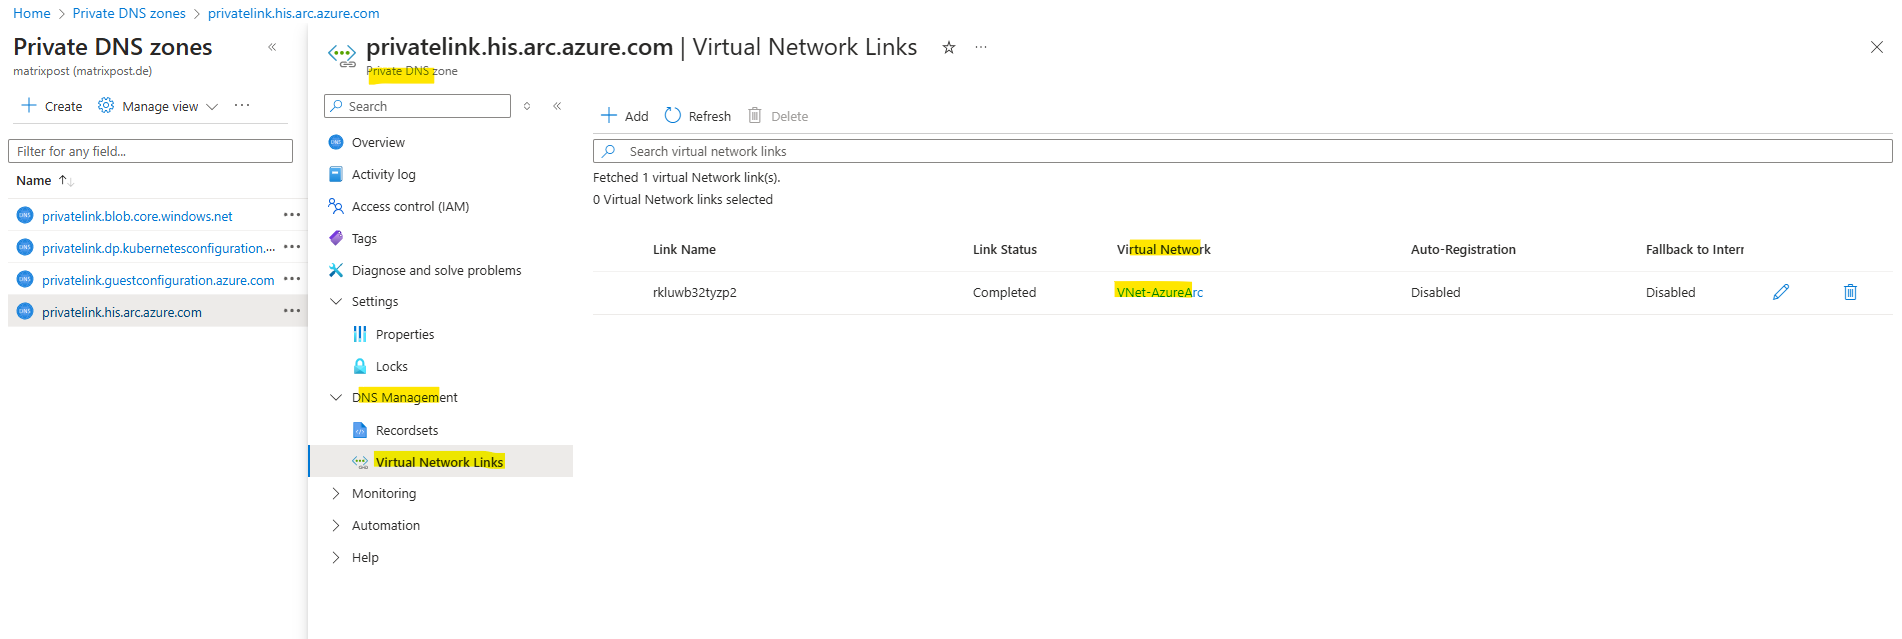
Here we will see our newly created private DNS zones for the Azure Arc Private Link Scope.
Within the private DNS zones we can see the A-records with the private IP addresses for the Azure Arc services.
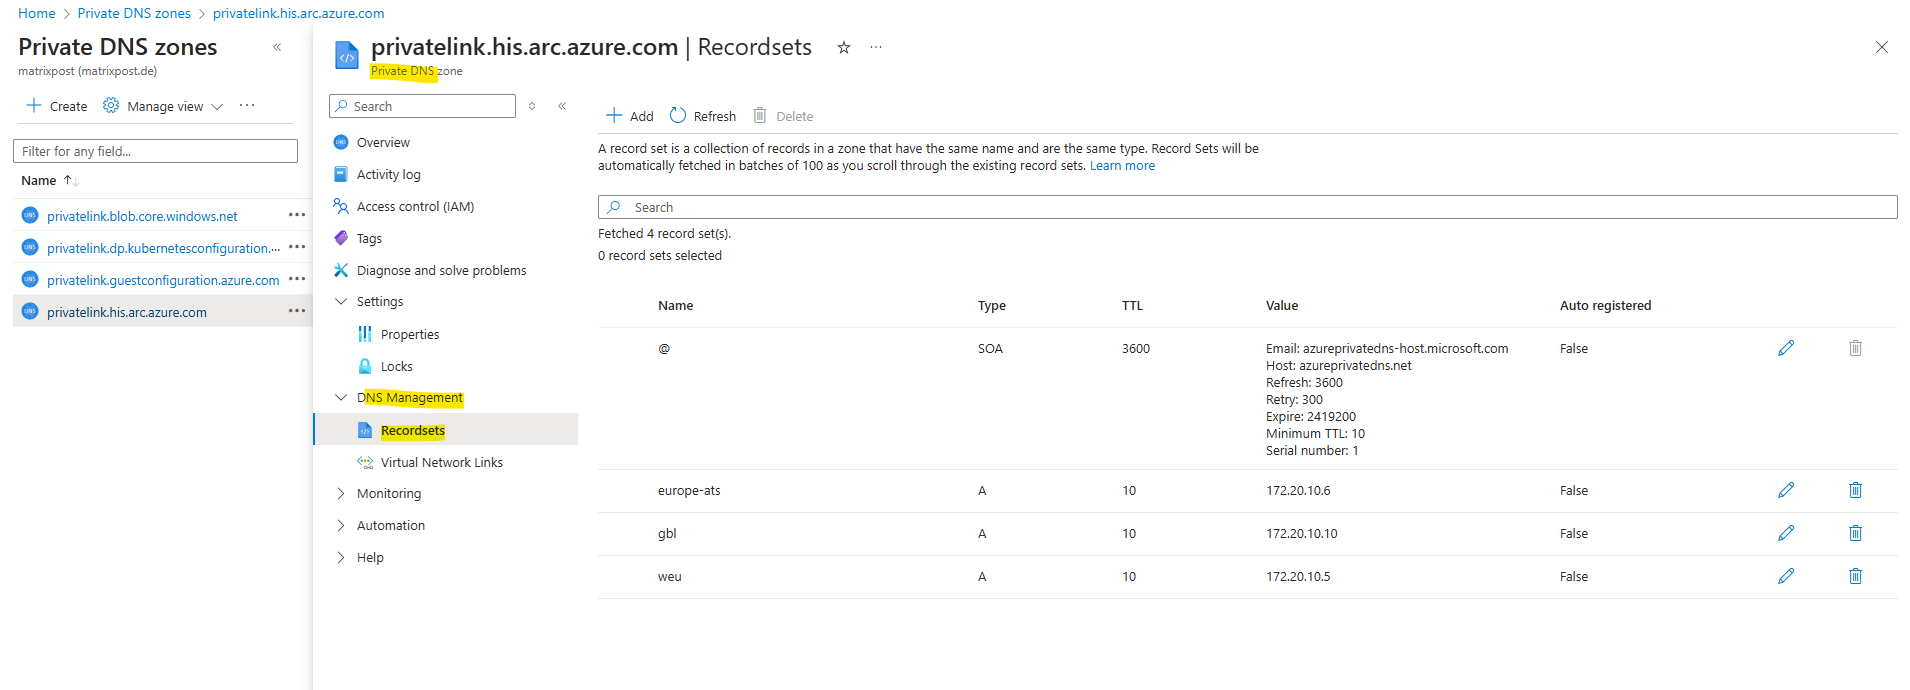
The private DNS zones are linked to our virtual network.
Your on-premises machines or servers need to be able to resolve the private link DNS records to the private endpoint IP addresses. How you configure this depends on whether you’re using Azure private DNS zones to maintain DNS records, or if you’re using your own DNS server on-premises and how many servers you’re configuring.
Further down we will also see how to maintain these DNS records by using both options, on our on-premise DNS servers and by using the Azure private DNS zones in combination with an Azure Private DNS resolver.
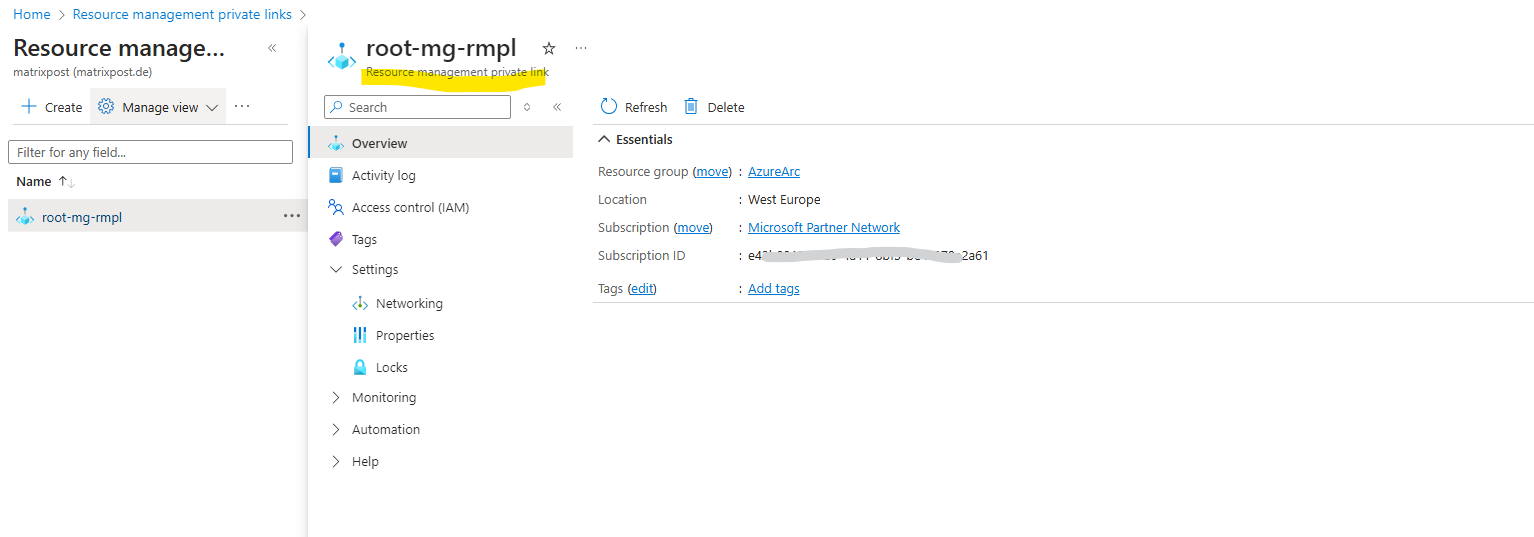
Create resource management private link
The Azure Resource Manager is not included in the Azure Arc Private Link Scope, to also route traffic for the Azure Resource Manager through our S2S VPN tunnel to Azure, we further need to create a resource management private link below.
Private links enable you to access Azure services over a private endpoint in your virtual network. When you combine private links with Azure Resource Manager’s operations, you block users who aren’t at the specific endpoint from managing resources. If a malicious user gets credentials to an account in your subscription, that user can’t manage the resources without being at the specific endpoint.
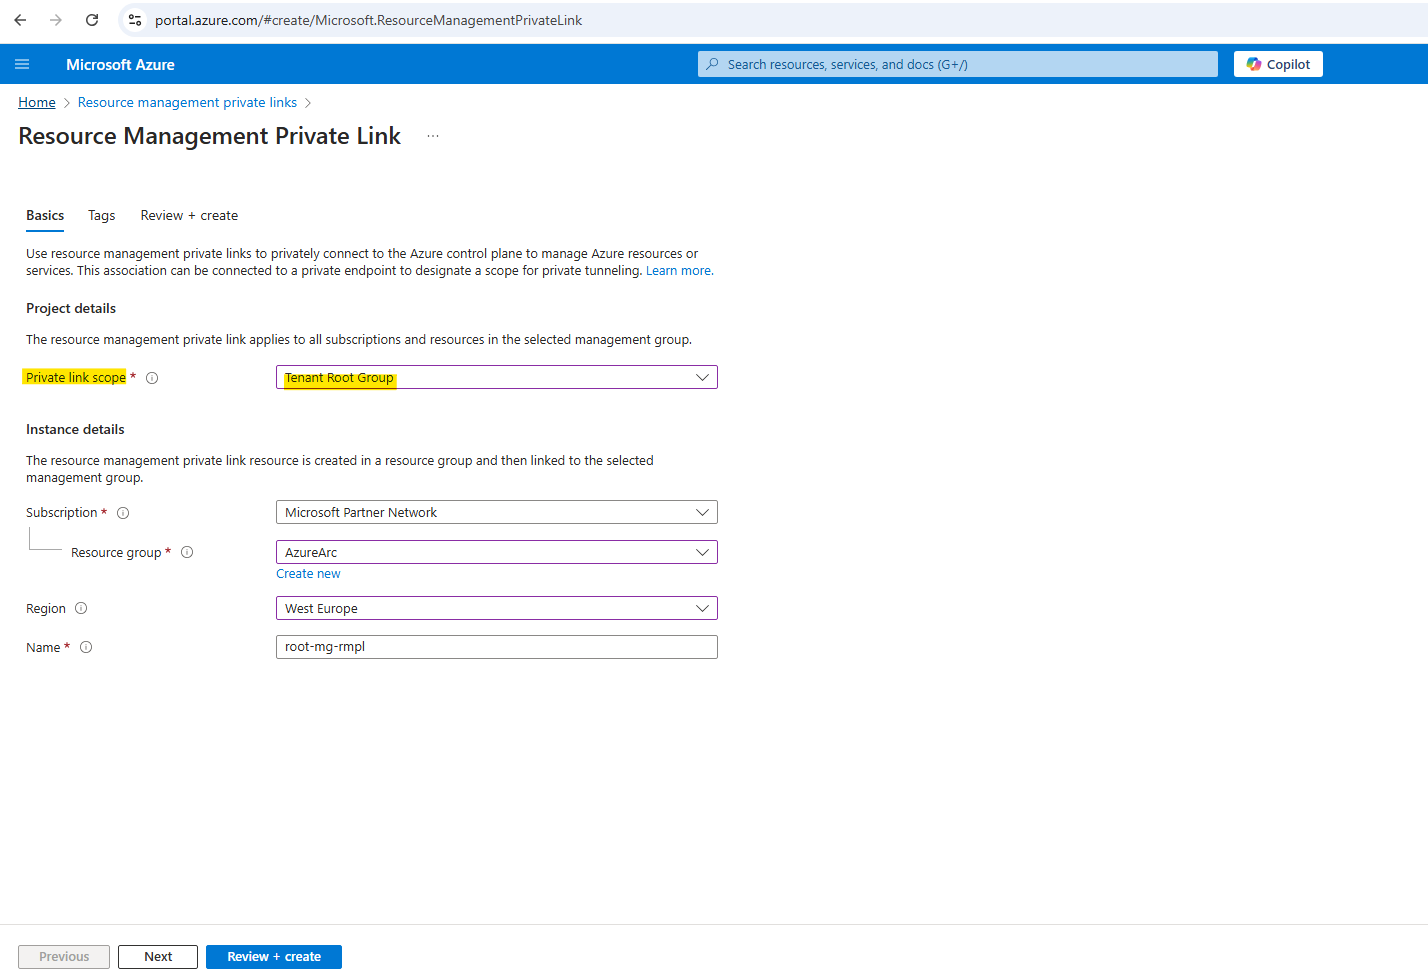
For this release, you can only apply private link management access at the level of the root management group. This limitation means private link access is applied across your tenant.
There are two resource types you’ll use when implementing management through a private link.
- Resource management private link (Microsoft.Authorization/resourceManagementPrivateLinks)
- Private link association (Microsoft.Authorization/privateLinkAssociations)
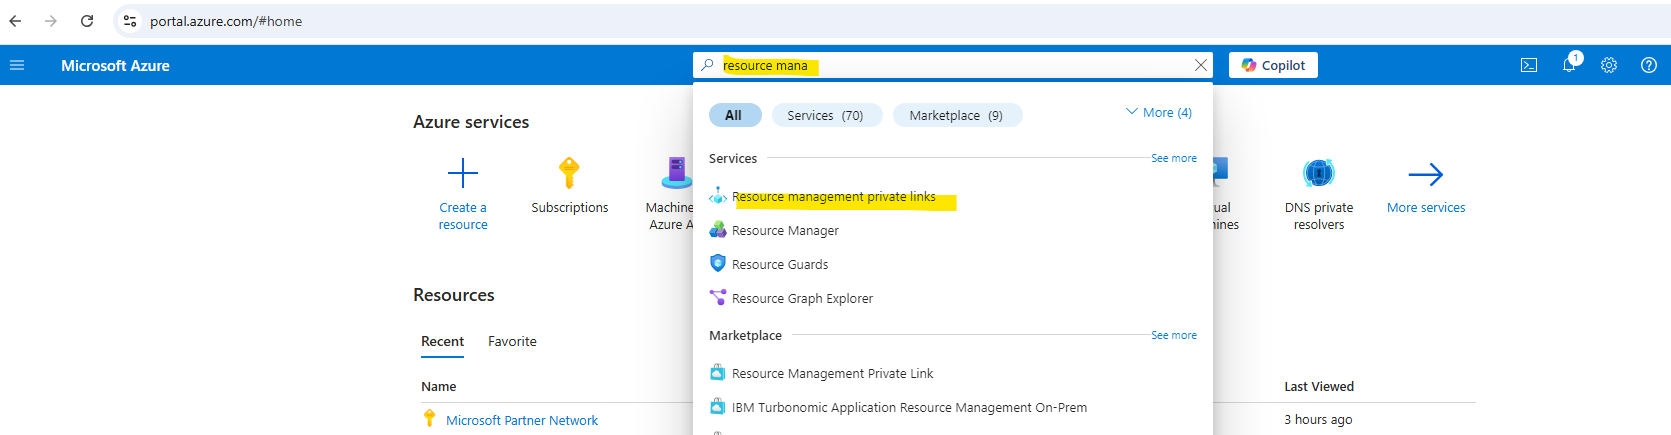
In the portal, search for Resource management private links and select it from the available options.
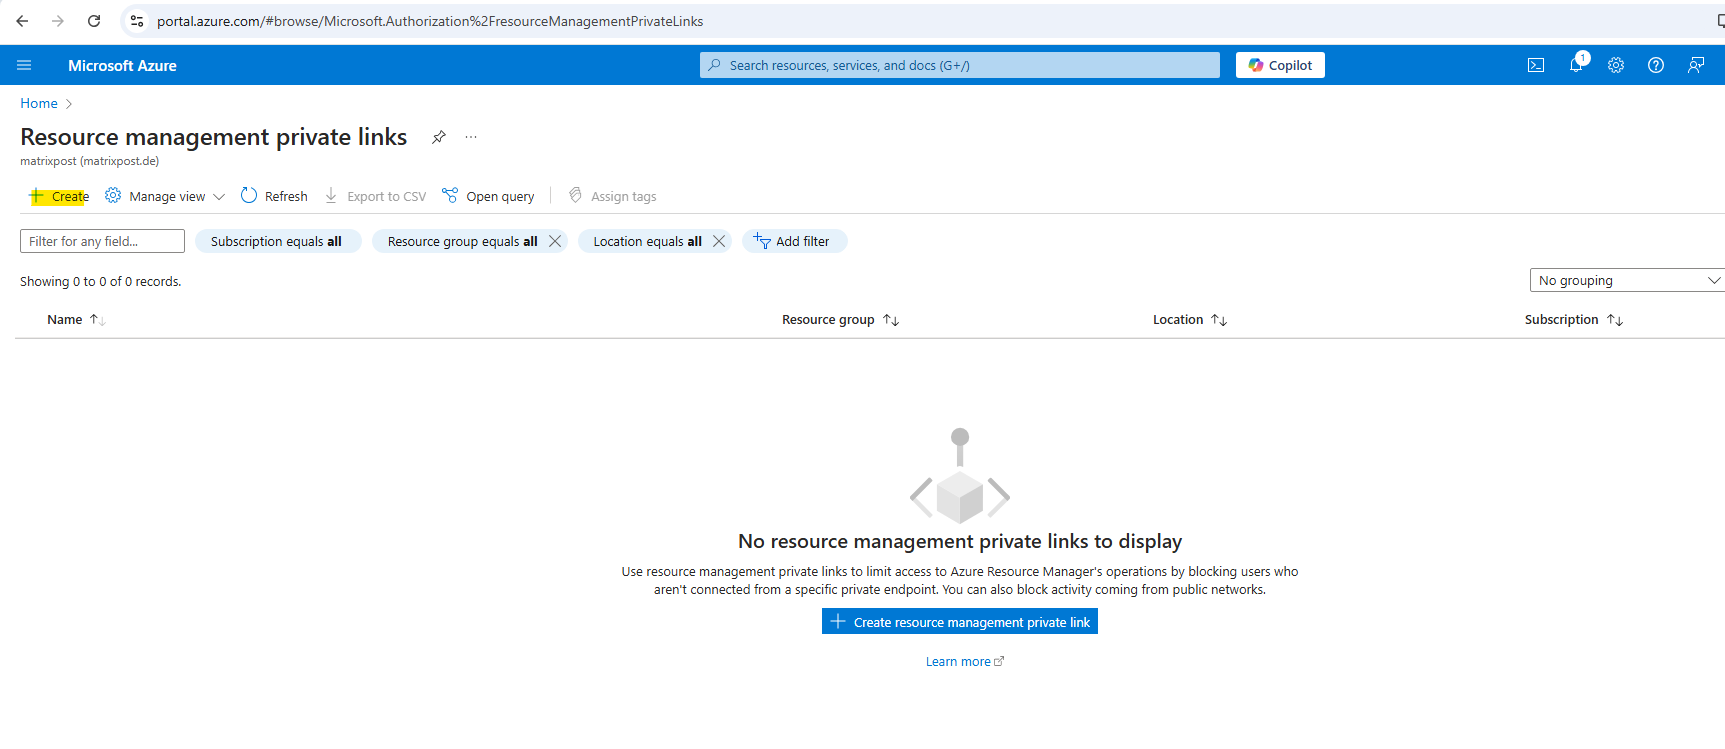
If your subscription doesn’t already have resource management private links, you see a blank page. Select Create resource management private link.
Provide values for the new resource management private link. The root management group for the directory you selected is used for the new resource. Select Review + create.
After validation passes, select Create.
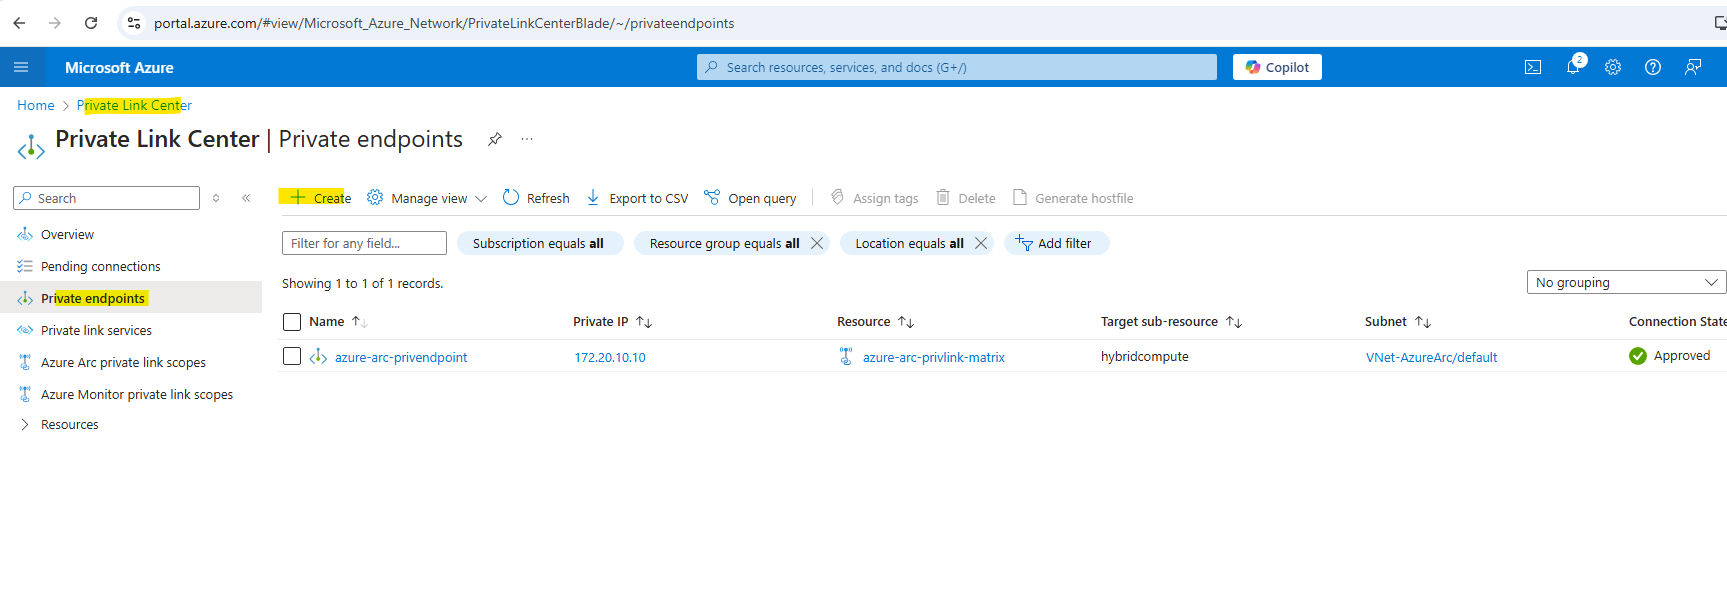
Next, create a private endpoint that references the resource management private link.
Navigate to the Private Link Center. Select Create private endpoint.
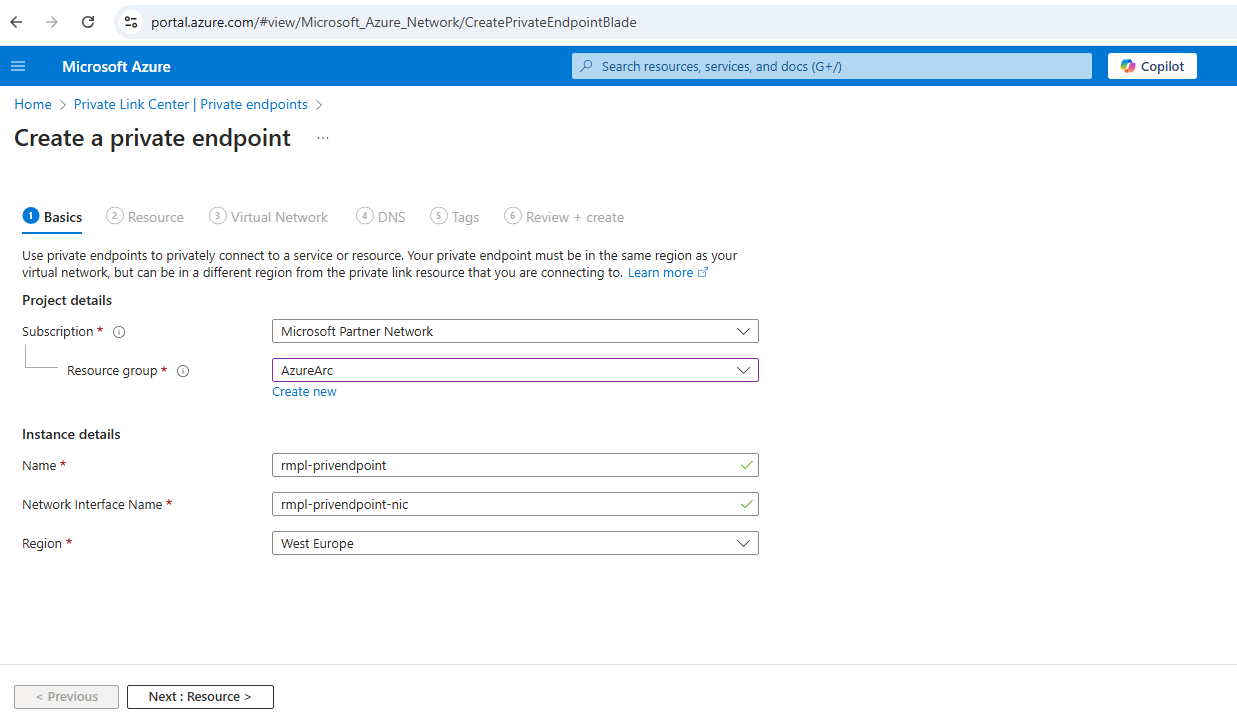
In the Basics tab, provide values for your private endpoint.
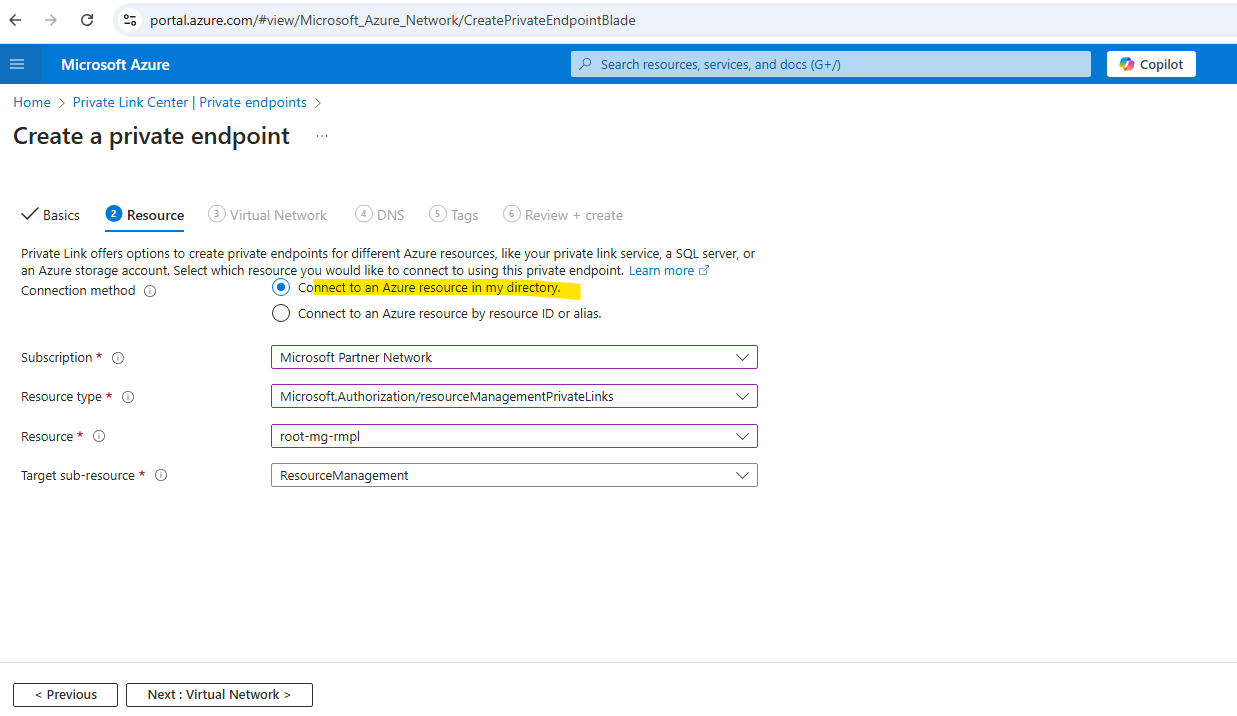
In the Resource tab, select Connect to an Azure resource in my directory. For resource type, select Microsoft.Authorization/resourceManagementPrivateLinks. For target subresource, select ResourceManagement.
In the virtual network tab select your virtual network.
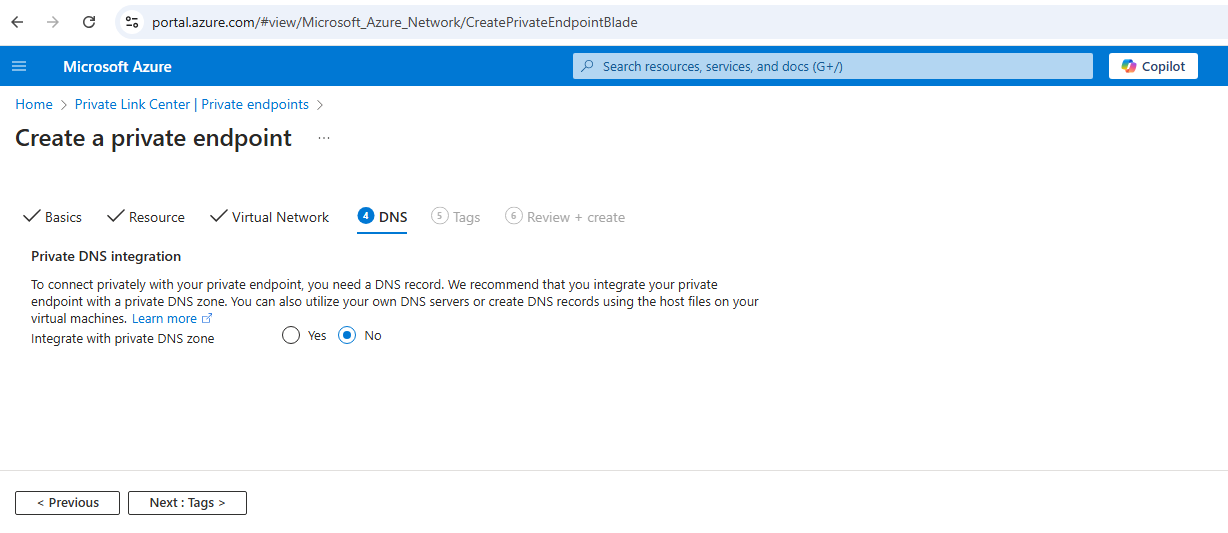
In the DNS tab Microsoft recommends to use a private DNS zone, just for testing purpose in my lab environment I want to save the costs and choose here No. I will configure this on my on-premise DNS server later.
Finally its not about the price of the Azure private DNS zones itself in Azure, but about the Azure DNS Private resolver costs for endpoints and rulesets, which are really expensive. When using here Azure private DNS zones, we also need the Azure DNS Private resolver to forward on-premise DNS queries to Azure as shown further down.
Azure DNS pricing
https://azure.microsoft.com/en-us/pricing/details/dns/
After validation passes, select Create.
We first note the DNS records within the newly created private endpoint. We need to configure them on our on-premise DNS server.
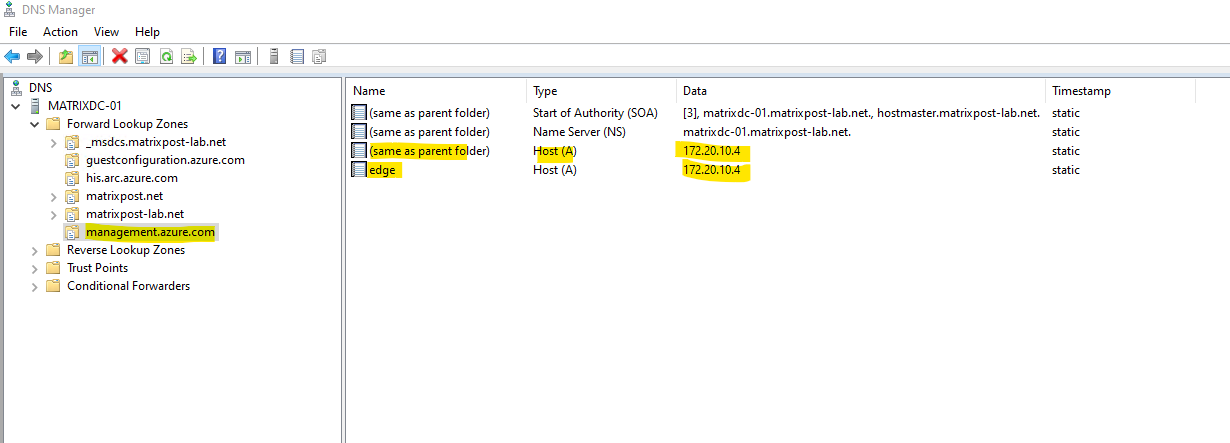
Configured on my on-premise DNS server.
I will also configure my squid proxy to bypass traffic for the *.management.azure.com domain. Traffic should be from now on forwarded directly to the private IP address 172.20.10.4/24 which will be routed through the VPN tunnel with Azure.
And or directly on the client. Depends on your local network configuration.
DNS configuration using Azure-integrated private DNS zones
Below I will show how to use Azure-integrated private DNS zones and Azure DNS Private resolver for our private endpoint in Azure Arc.
Meanwhile I was changing this to use my on-premise DNS server therefore which will not comes with additional costs.
Finally its not about the price of the Azure private DNS zones itself in Azure, but about the Azure DNS Private resolver costs for endpoints and rulesets, which are really expensive. When using here Azure private DNS zones, we also need the Azure DNS Private resolver to forward on-premise DNS queries to Azure.
Azure DNS pricing
https://azure.microsoft.com/en-us/pricing/details/dns/
If you set up private DNS zones for Azure Arc-enabled servers and Guest Configuration when creating the private endpoint, your on-premises machines or servers need to be able to forward DNS queries to the built-in Azure DNS servers to resolve the private endpoint addresses correctly.
You need a DNS forwarder in Azure (either a purpose-built VM or an Azure Firewall instance with DNS proxy enabled), after which you can configure your on-premises DNS server to forward queries to Azure to resolve private endpoint IP addresses.
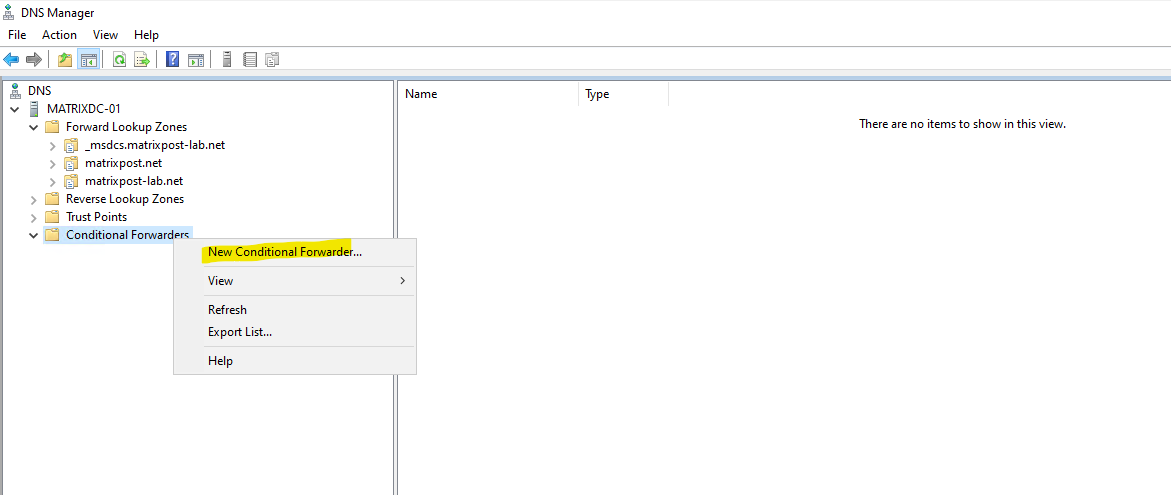
Azure DNS Private Resolver with on-premises DNS Conditional Forwarder
This configuration can be extended for an on-premises network that already has a DNS solution in place.
The on-premises DNS solution is configured to forward DNS traffic to Azure DNS via a conditional forwarder. The conditional forwarder references the Private Resolver deployed in Azure.
Azure DNS Private Resolver is a new service that enables you to query Azure DNS private zones from an on-premises environment and vice versa without deploying VM based DNS servers.
Source: https://learn.microsoft.com/en-us/azure/dns/dns-private-resolver-overview
Create an Azure DNS Private Resolver using the Azure portal
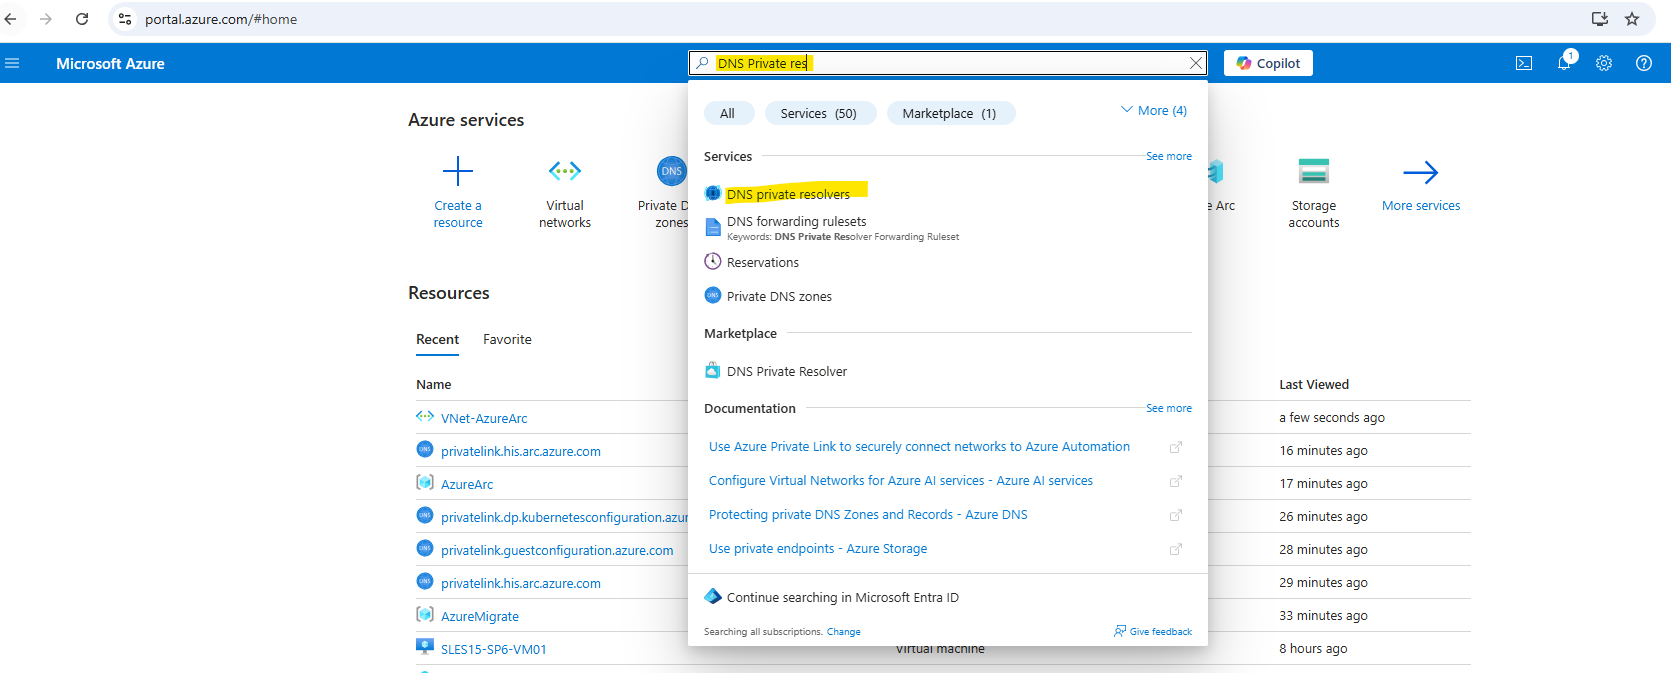
Open the Azure portal and search for DNS Private Resolvers.
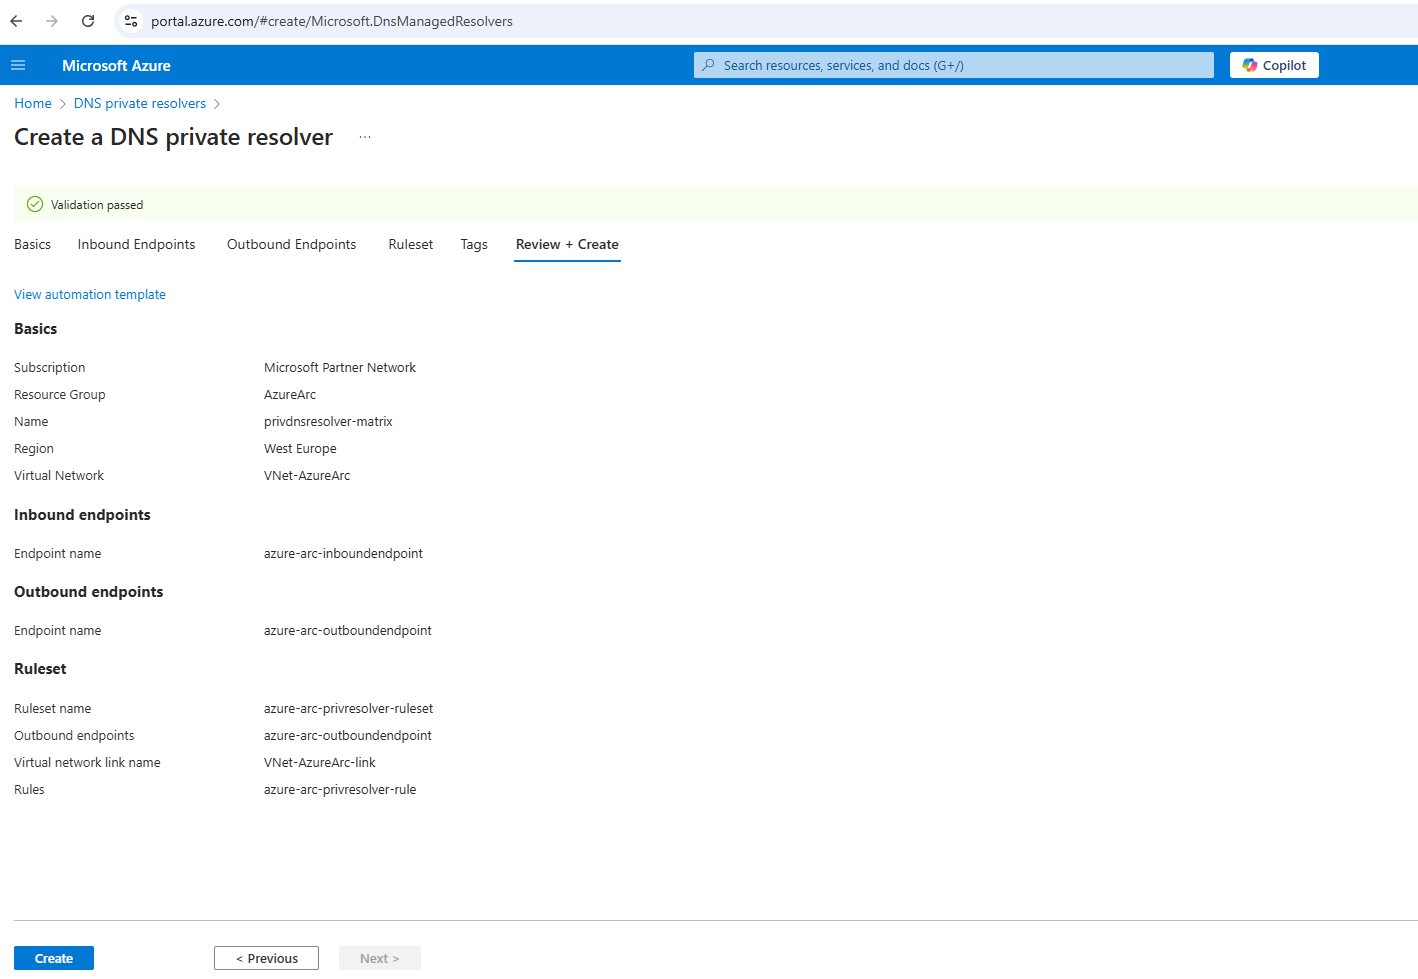
Select DNS Private Resolvers, select Create, and then on the Basics tab for Create a DNS Private Resolver enter the following information a shown.
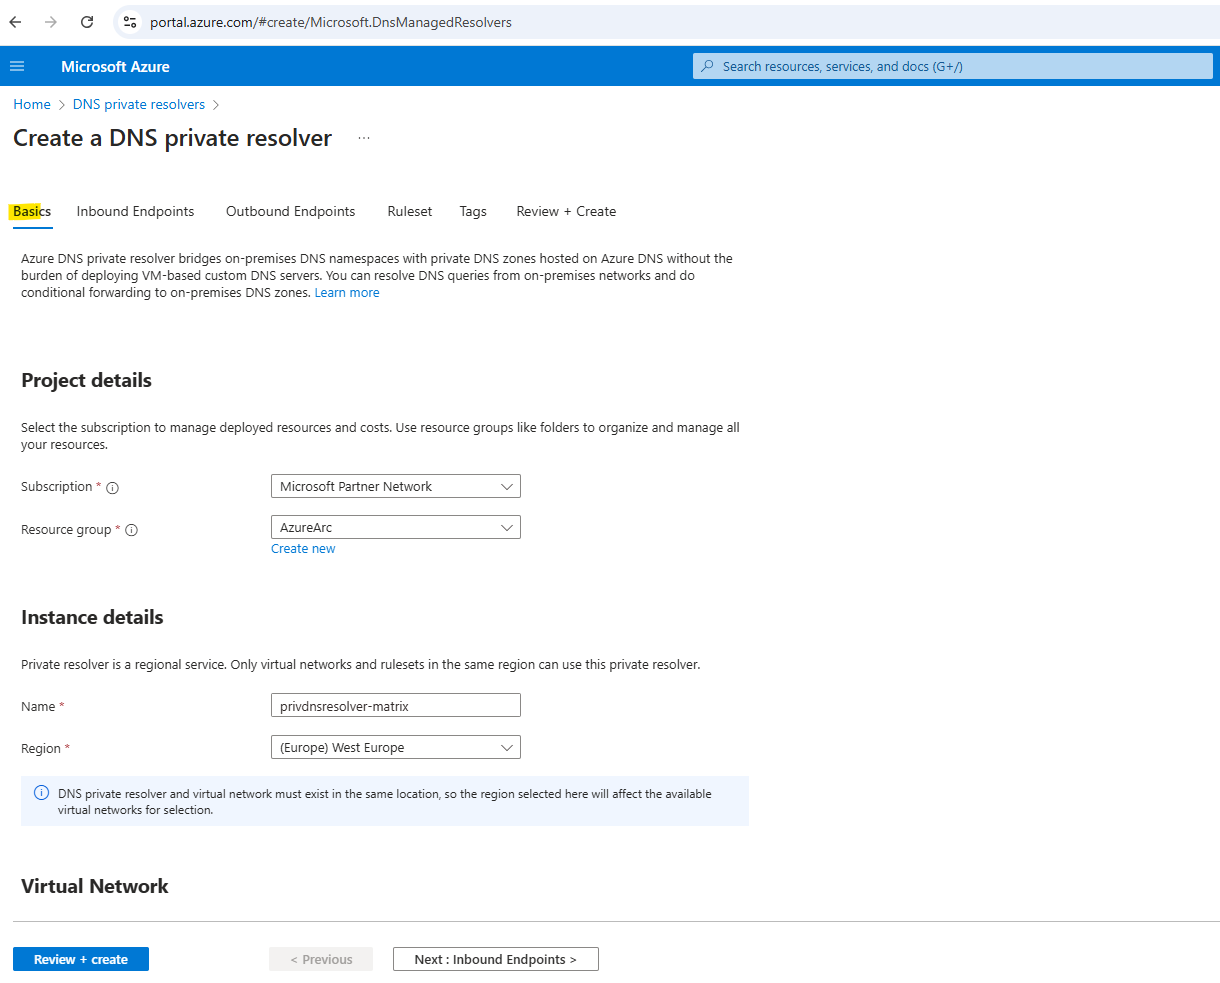
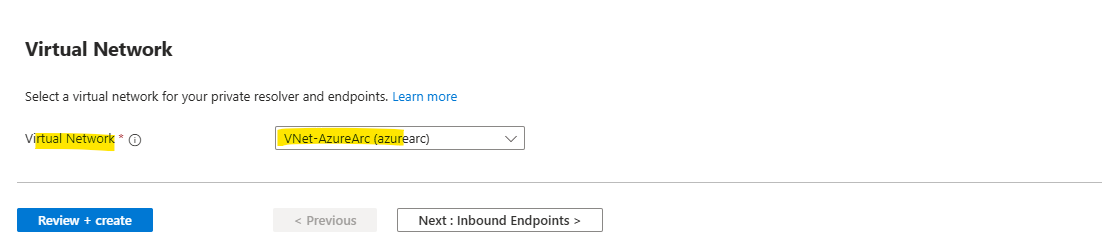
We also need to select here the virtual network for which our private resolver will be provided.
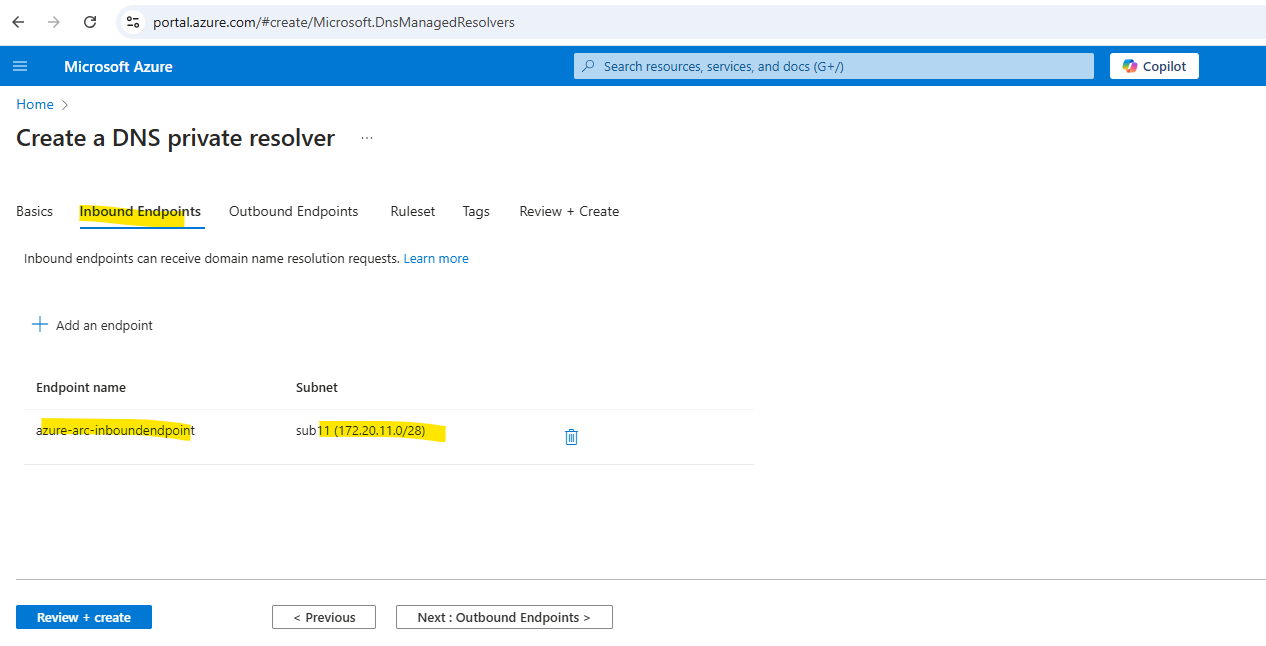
Select the Inbound Endpoints tab, select Add an endpoint, and then enter a name next to Endpoint name (ex: myinboundendpoint).
Static and dynamic endpoint IP addresses
https://learn.microsoft.com/en-us/azure/dns/private-resolver-endpoints-rulesets#static-and-dynamic-endpoint-ip-addressesNo other resources can exist in the same subnet with the inbound endpoint. Best practices is to user here a dedicated /28 subnet for.
Source: https://learn.microsoft.com/en-us/azure/dns/private-resolver-endpoints-rulesets#inbound-endpoints
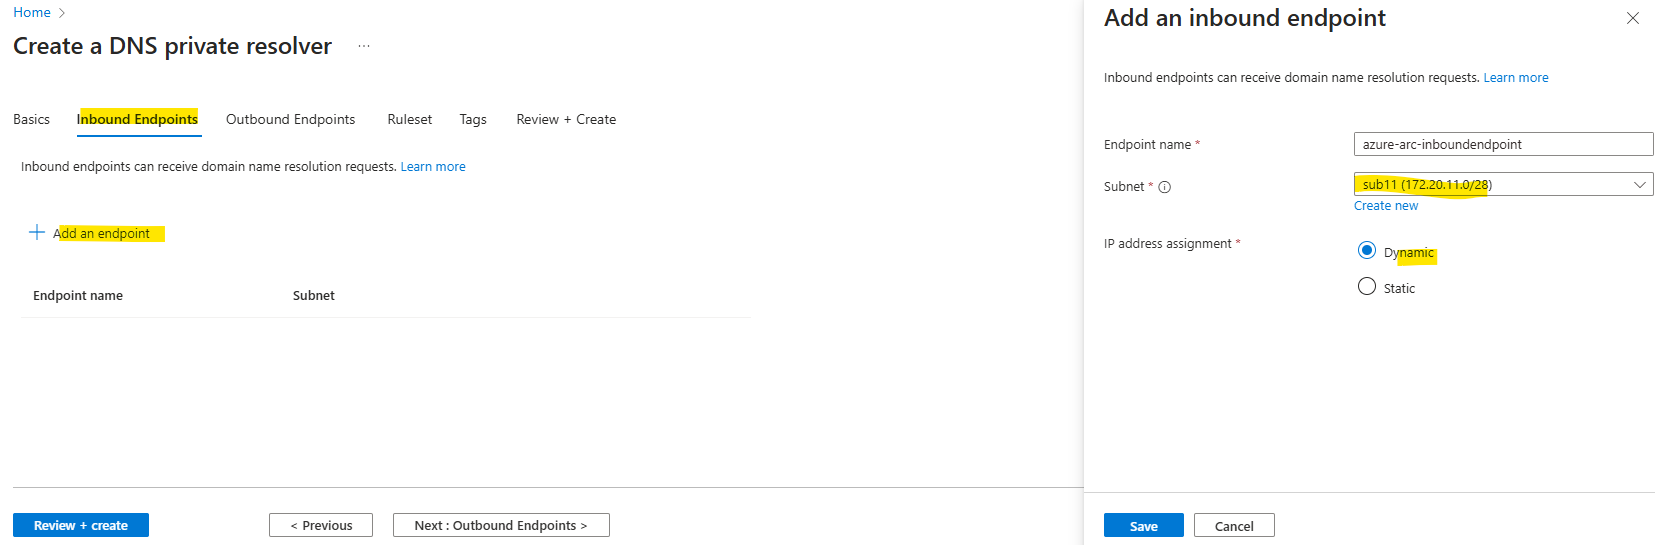
Later we need to configure the conditional DNS forwarder on our on-premise DNS servers to forward requests to this inbound endpoint which will be created in the default subnet of the Azure VNet.
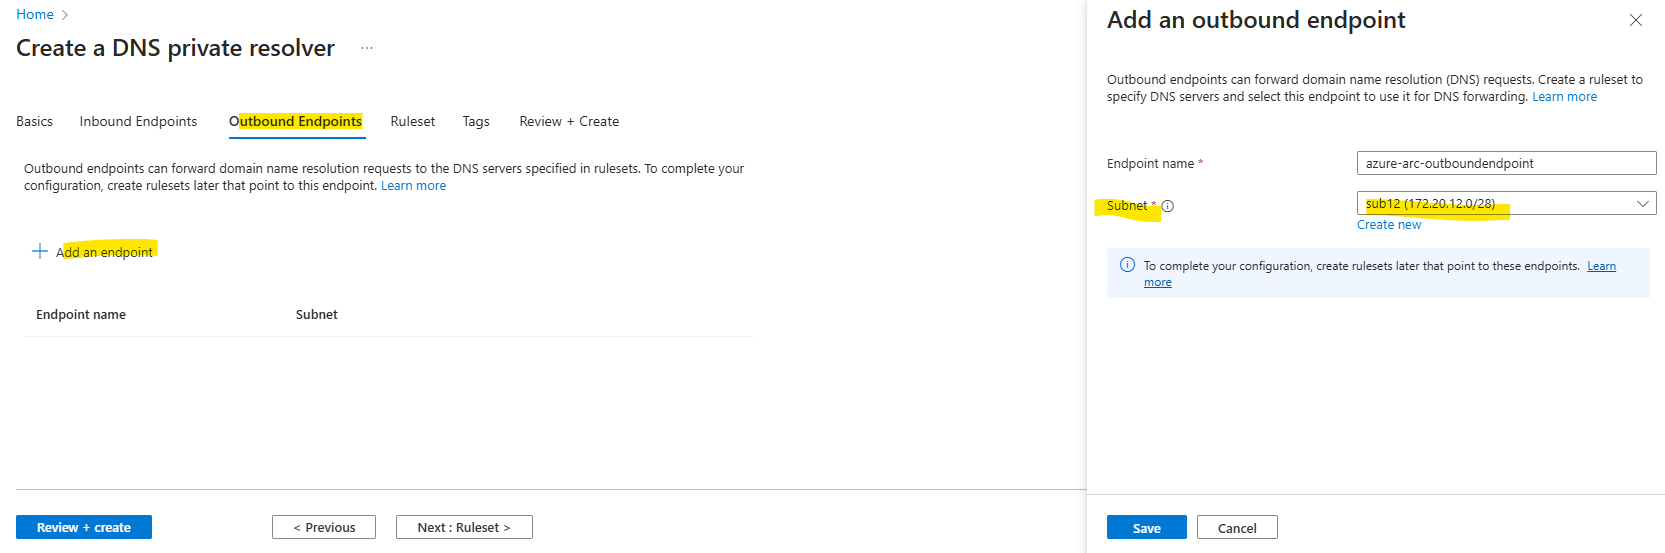
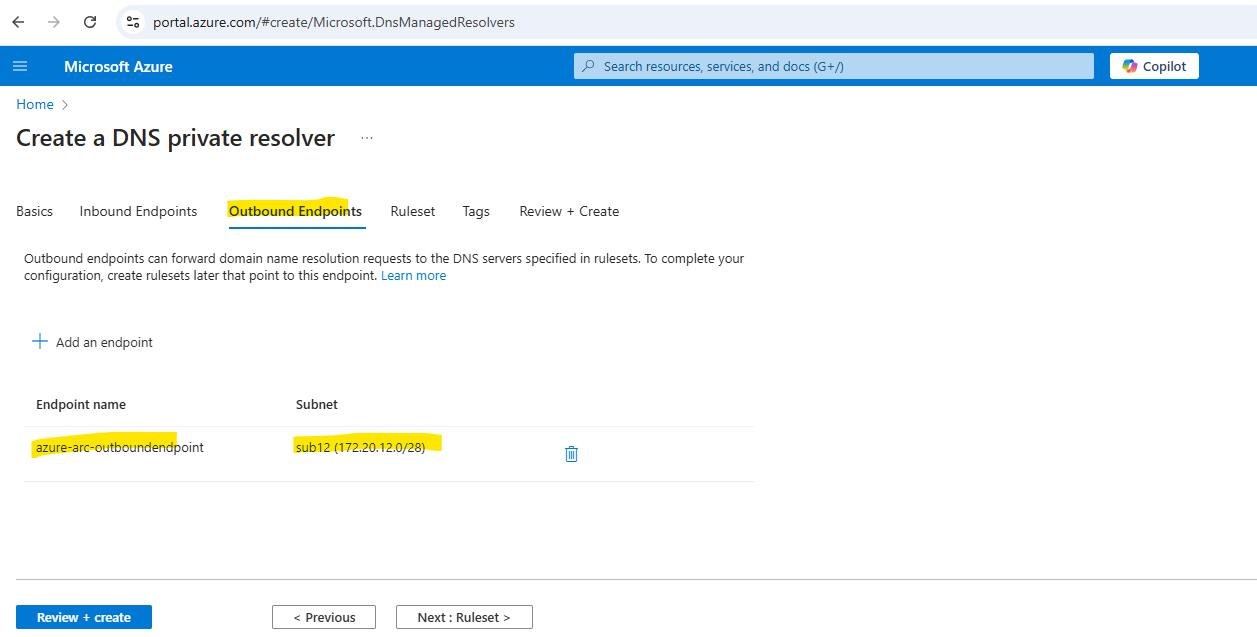
Select the Outbound Endpoints tab, select Add an endpoint, and then enter a name next to Endpoint name (ex: myoutboundendpoint).
Outbound endpoints can forward domain name resolution (DNS) requests. To complete your configuration, create rulesets later that point to these endpoints.
The outbound endpoint must be created in a different dedicated subnet.
An outbound endpoint is associated with a subnet, but isn’t provisioned with an IP address like the inbound endpoint.
No other resources can exist in the same subnet with the outbound endpoint.
Best practices is to user here a dedicated /28 subnet for.
Source: https://learn.microsoft.com/en-us/azure/dns/private-resolver-endpoints-rulesets#outbound-endpoints
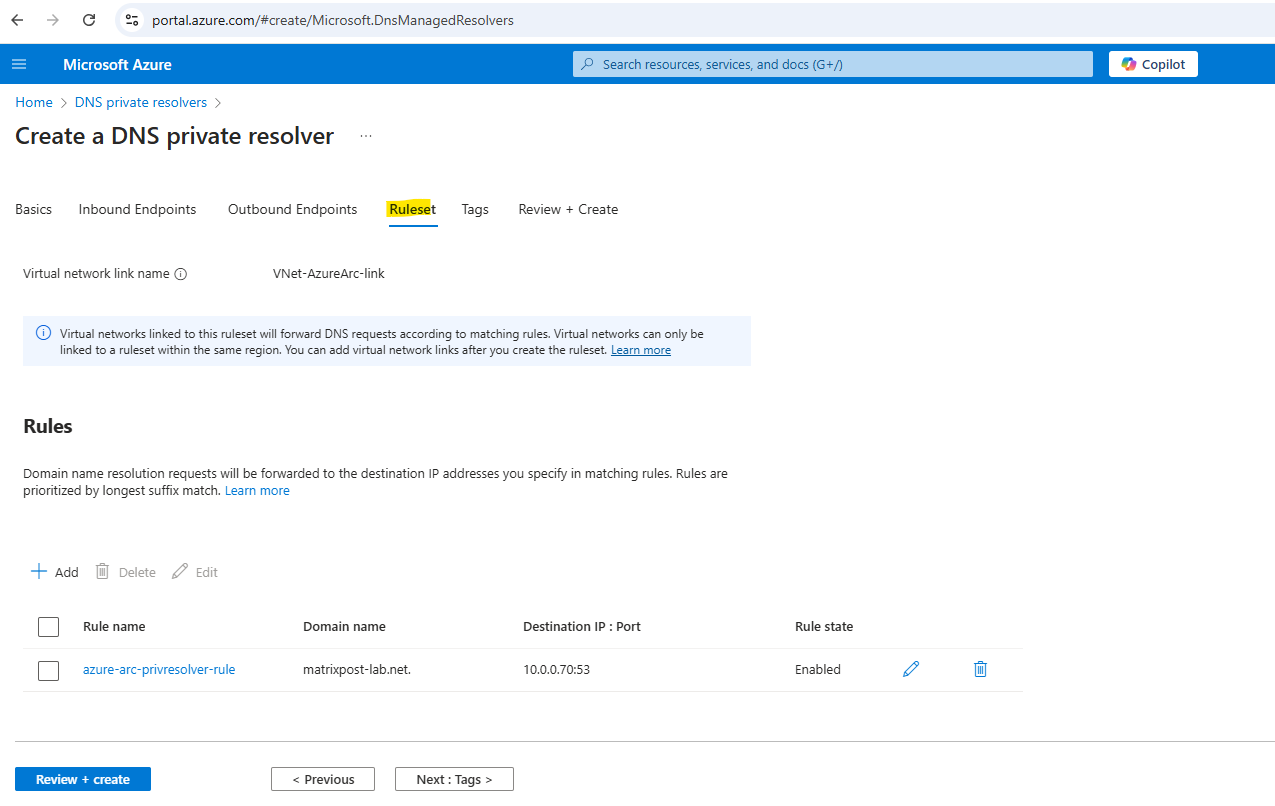
Select the Ruleset tab, select Add a ruleset, and enter the following.
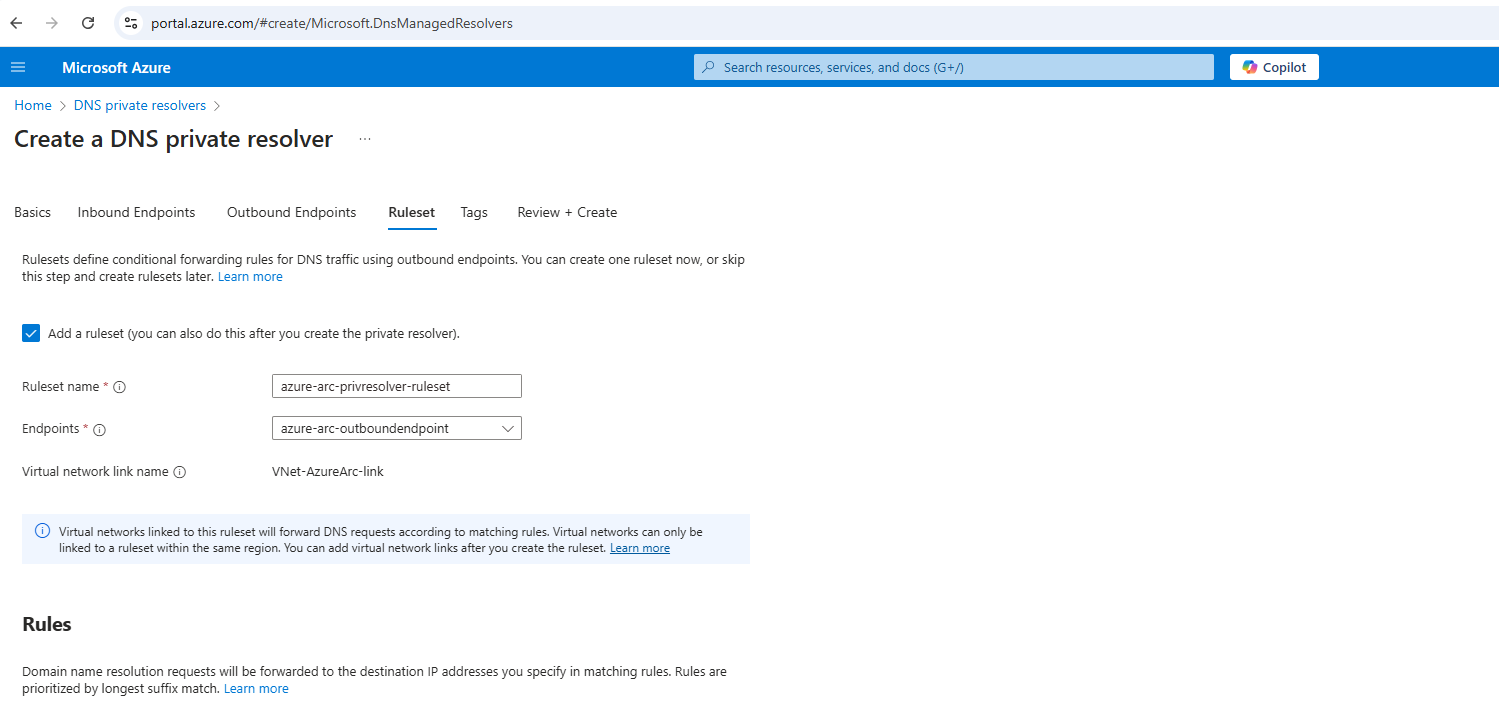
Under Rules, select Add and enter your conditional DNS forwarding rules. For example:
This will forward DNS requests for my internal Active Directory domain matrixpost-lab.net made by virtual machines running in the linked VNet VNet-AzureArc to my on-premise DNS server.
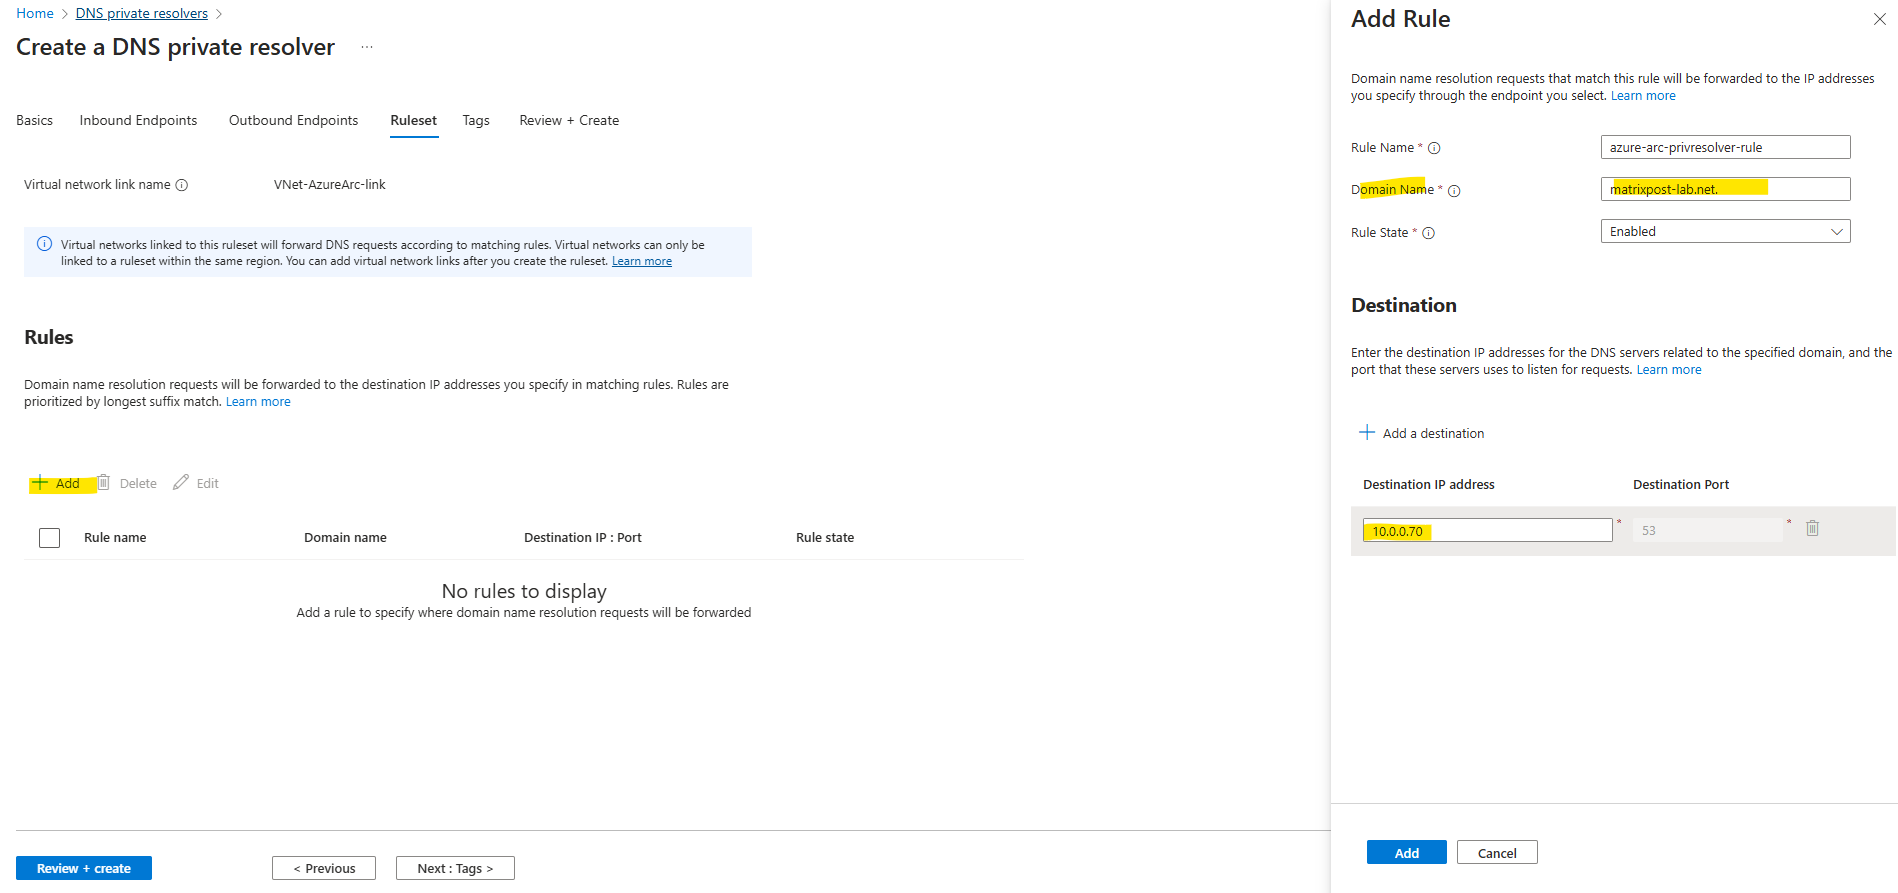
This example has only one conditional forwarding rule, but you can create many. Edit the rules to enable or disable them as needed.
To create a conditional forwarder we need the domain we want to forward dns requests for and the IP address or FQDN of the DNS server for this domain.
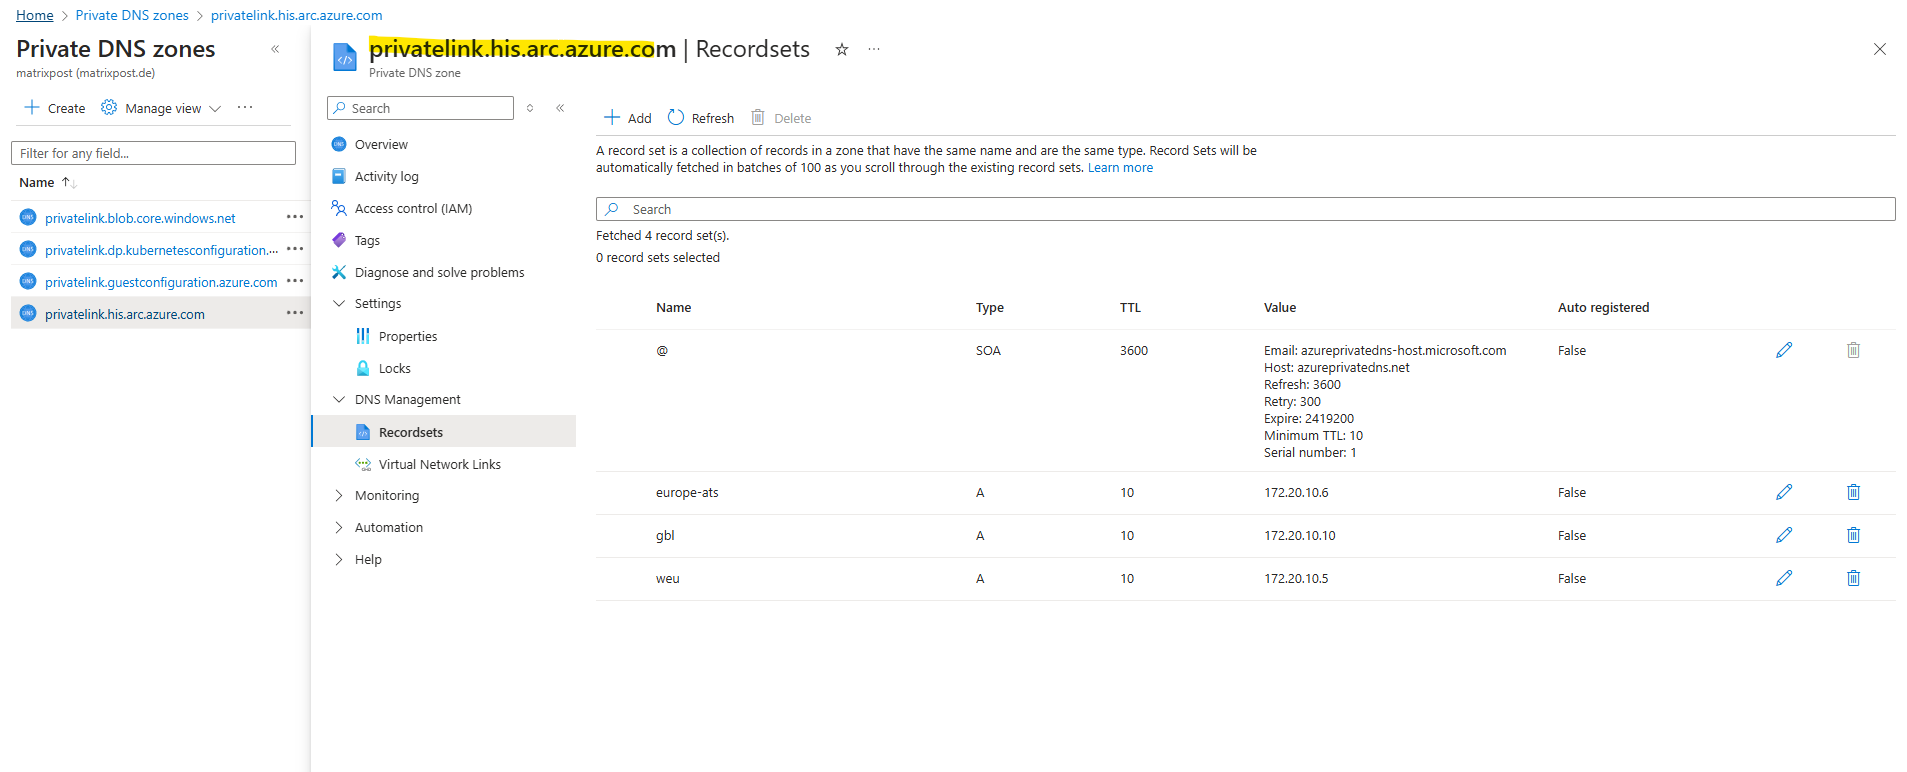
The domain we can see in the previously created private dns zone for Azure Arc enabled servers service as highlighted below.
The IP address we can determine within the DNS private resolver and here our created inbound endpoint.

A quick test if DNS resolution works. Looks good and the A-records from the Azure private DNS zones with the private IP addresses will returned.

Connect to an Azure Arc-enabled server (Windows)
Using private endpoint requires the Azure Connected Machine agent version 1.4 or higher. The Azure Arc-enabled servers deployment script generated in the portal downloads the latest version.
The version of the Azure Connected Machine agent you can determine by running the following command on the affected server.
> azcmagent.exe --version

When connecting a machine or server with Azure Arc-enabled servers for the first time, you can optionally connect it to a Private Link Scope.
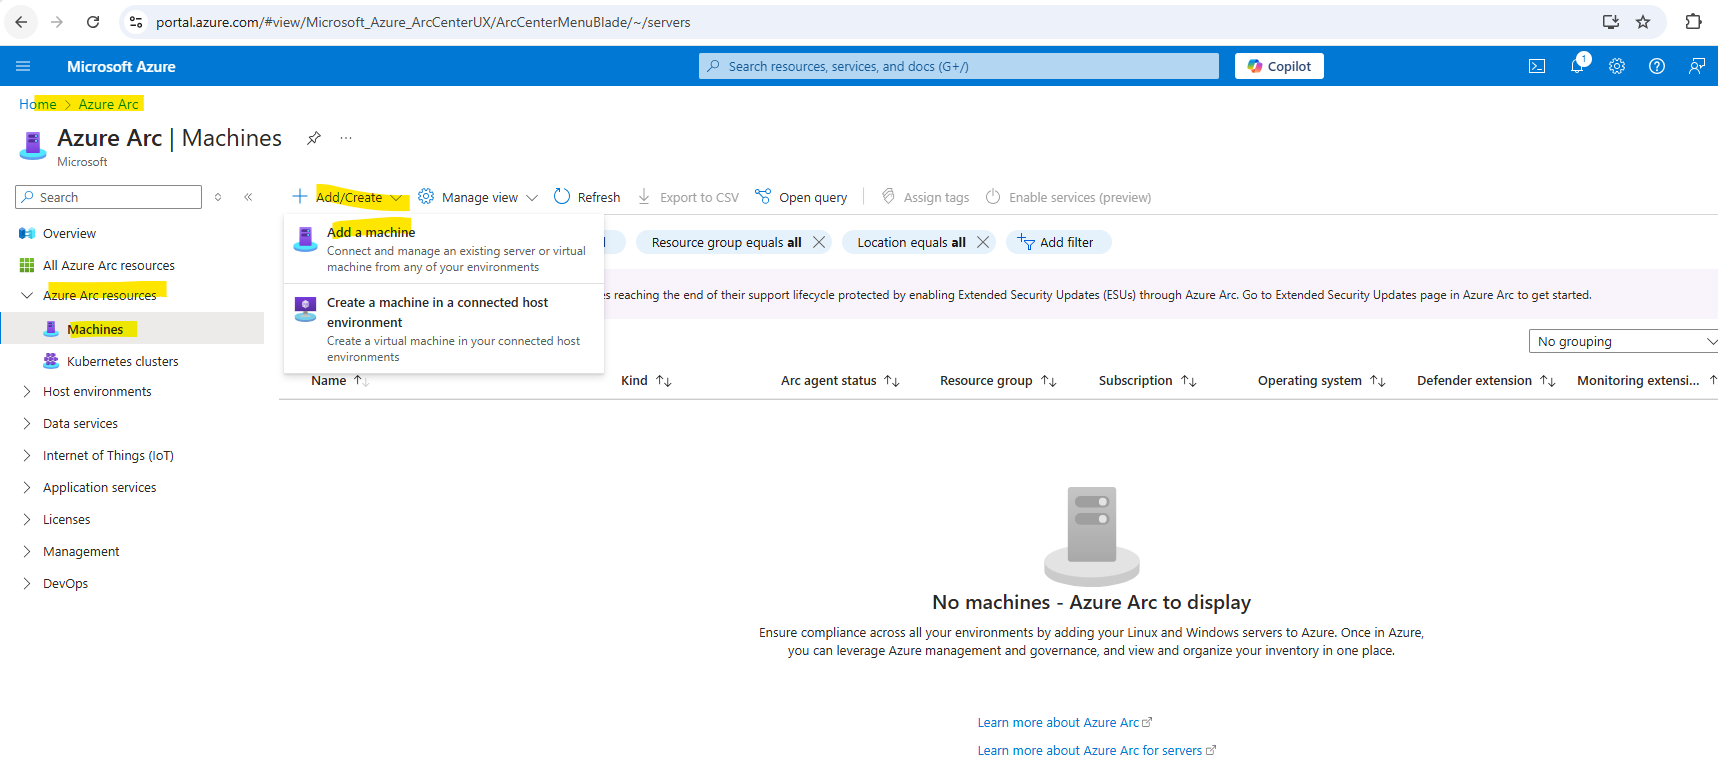
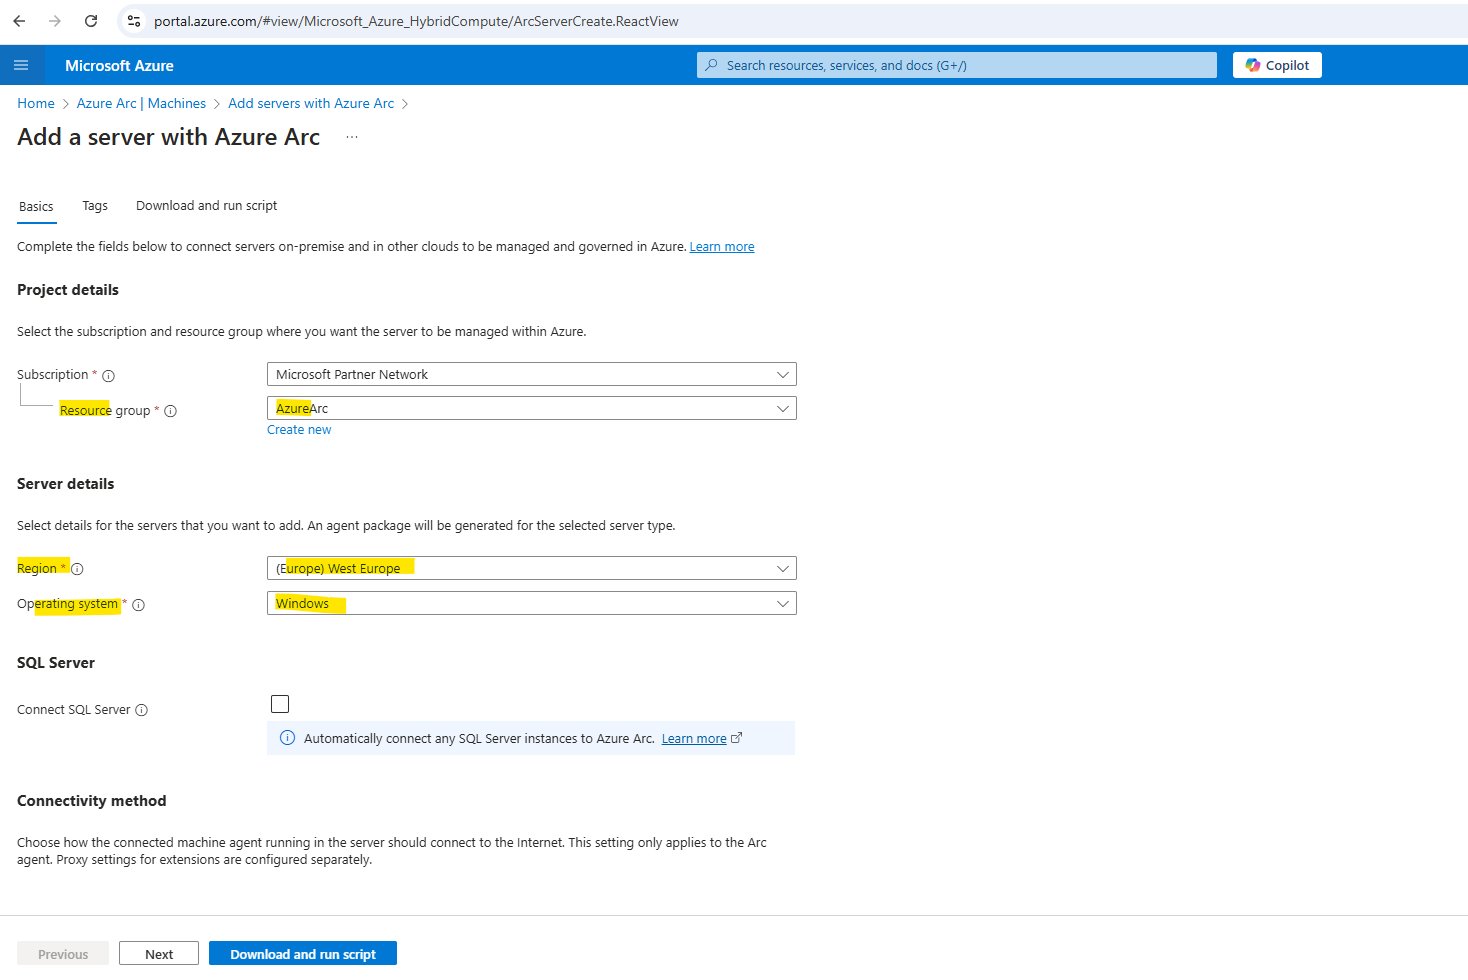
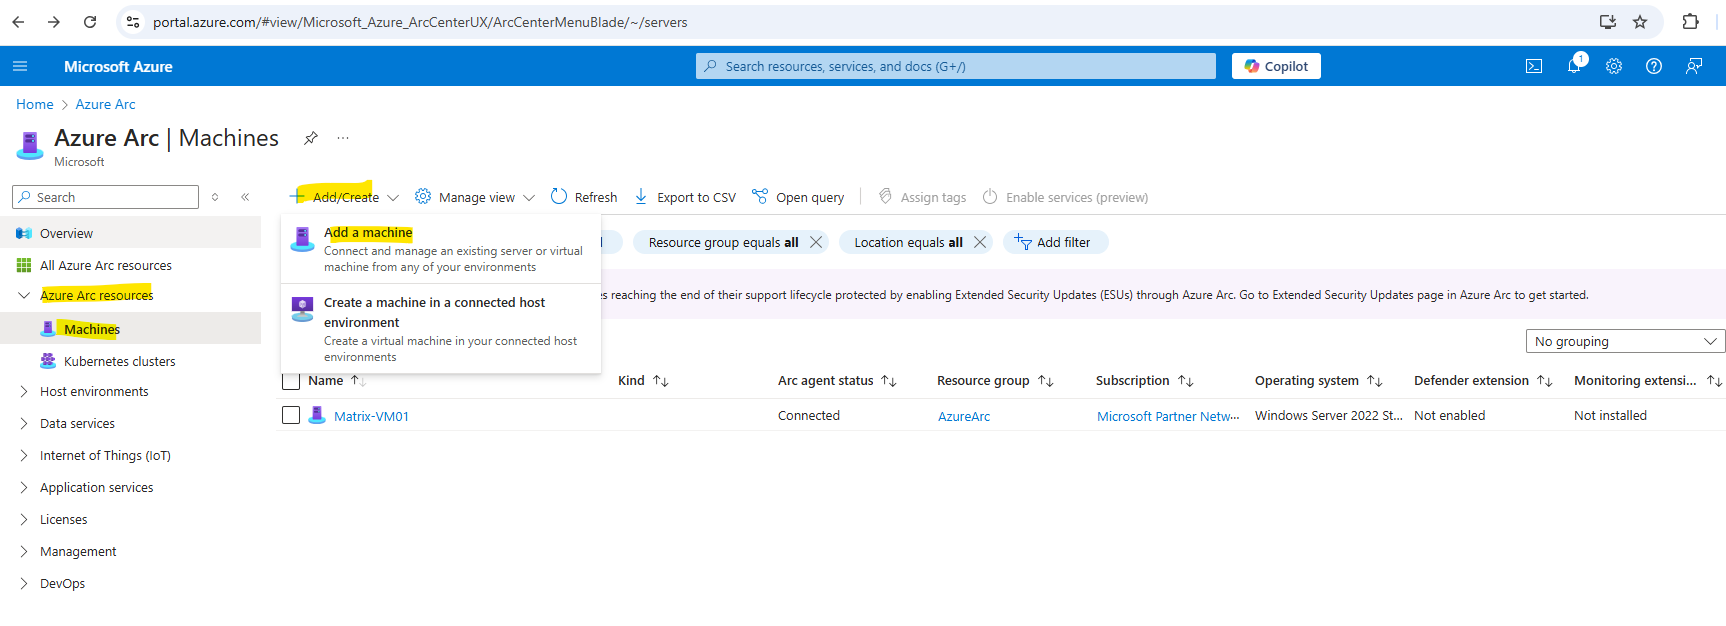
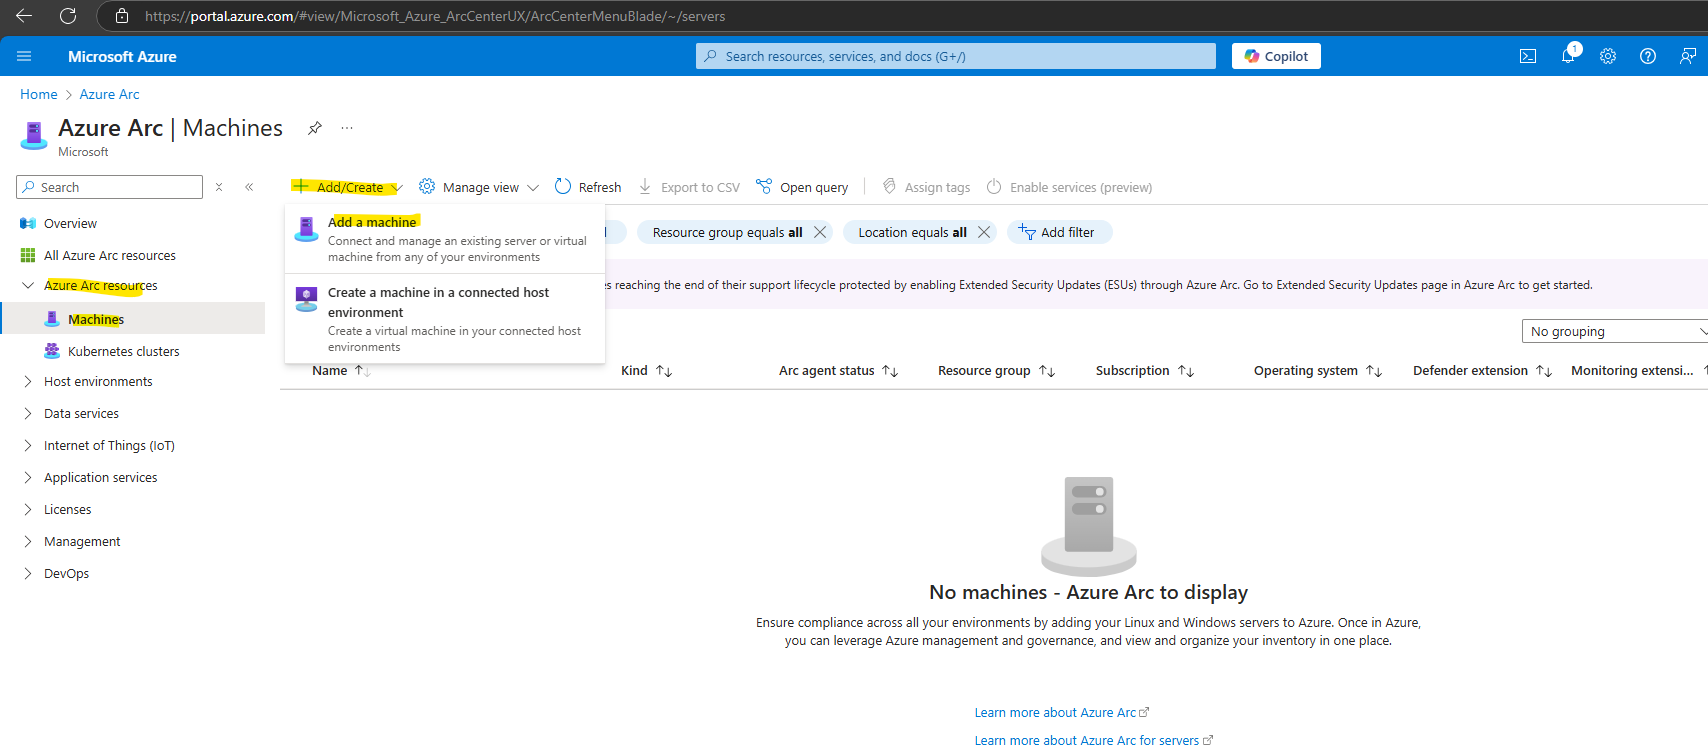
In the Azure portal navigate to Navigate to Machines – Azure Arc.
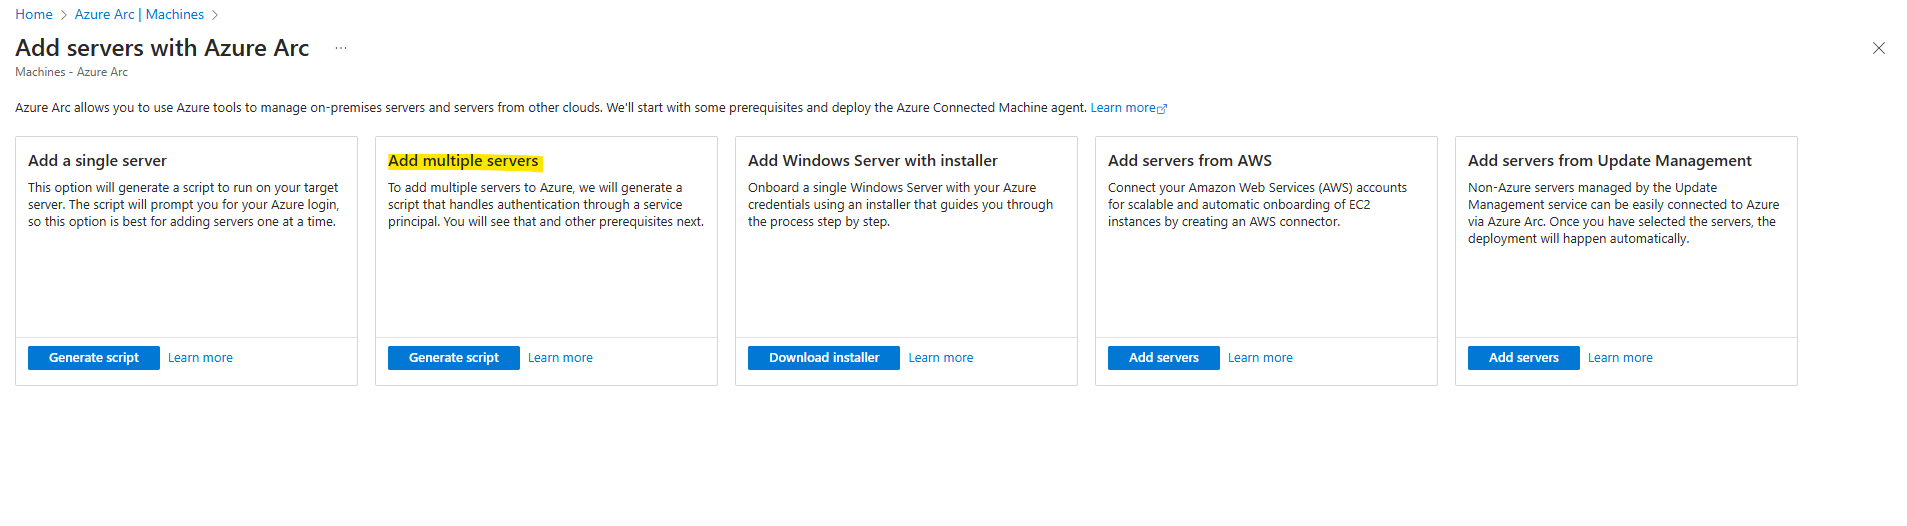
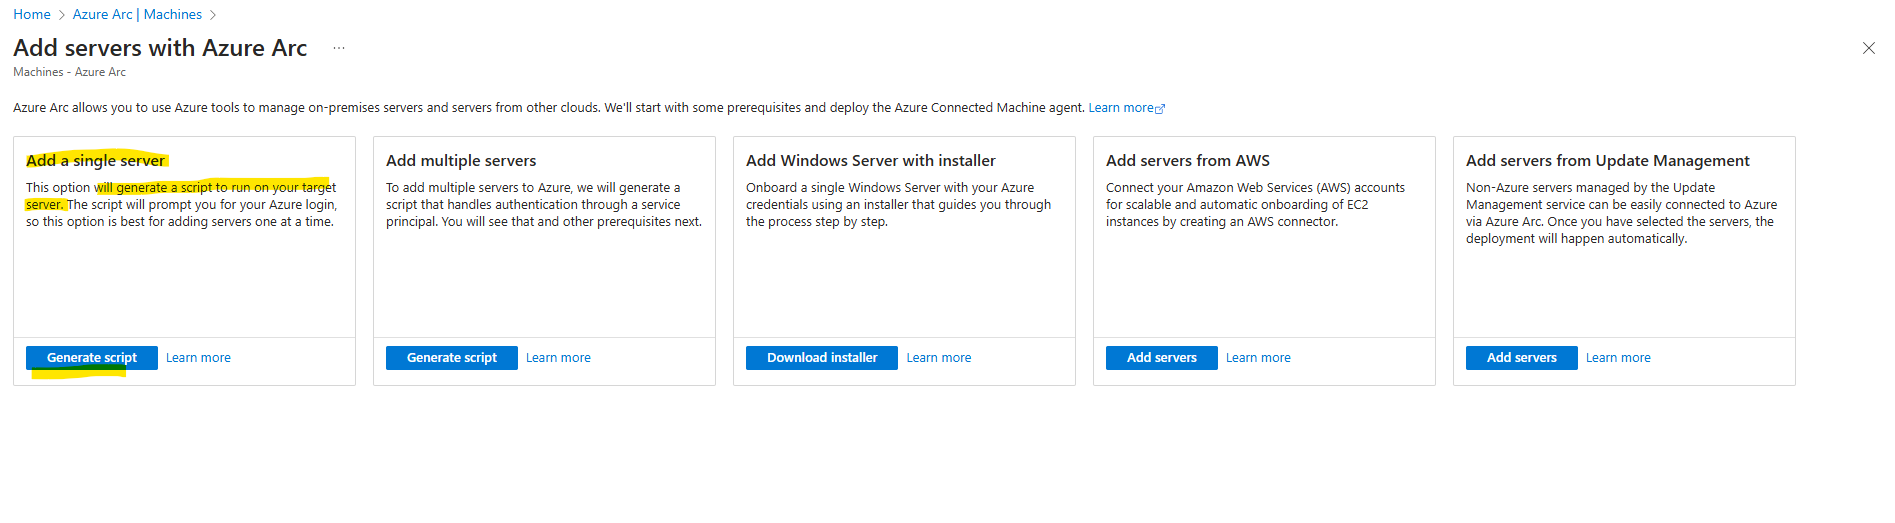
On the Machines – Azure Arc page, select Add/Create at the upper left, and then select Add a machine from the drop-down menu.
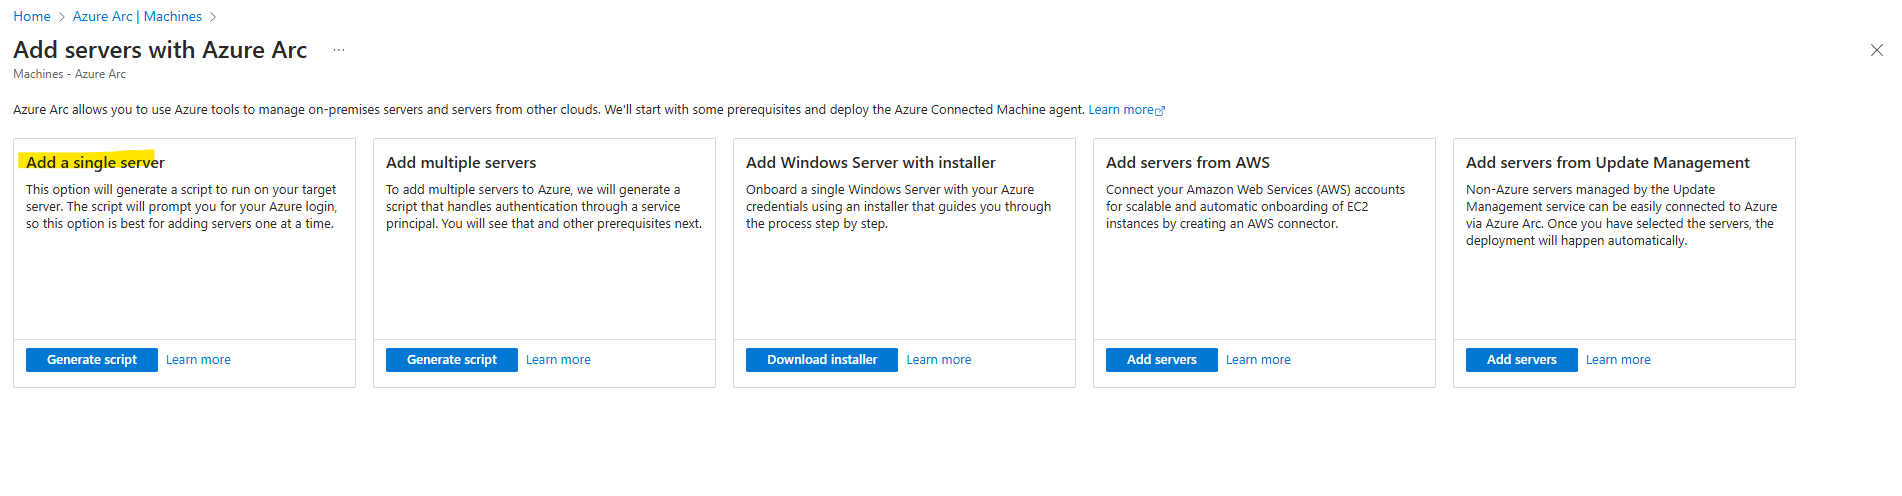
On the Add servers with Azure Arc page, select either the Add a single server or Add multiple servers depending on your deployment scenario, and then select Generate script.
I will first show how to add a single server below. Click on Generate script.
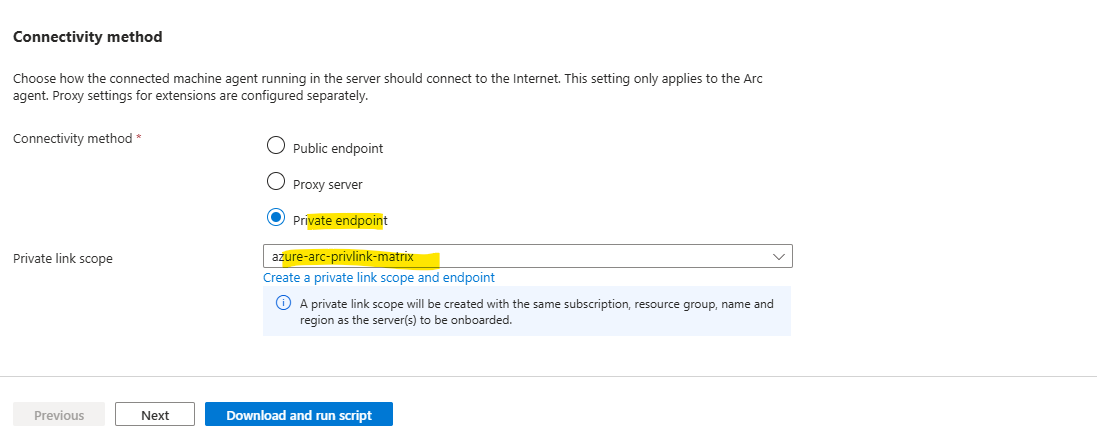
On the Basics page, provide the following.
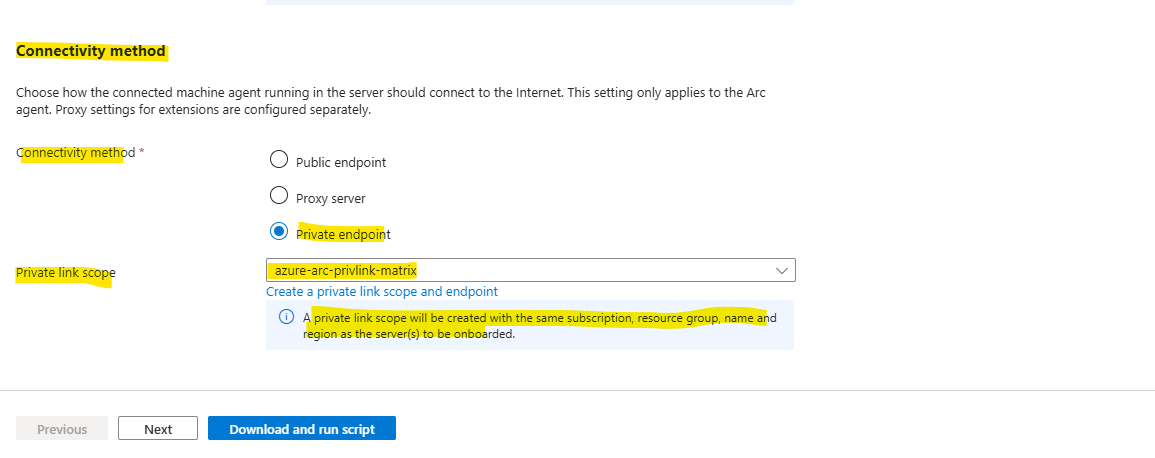
At the bottom of the Basics tab we can configure the connectivity method for the Azure Connected Machine agent.
We want to use our previously configured private endpoint and private link scope which we can select here.
In the Download and run script tab we can download the script to run later on the affected server.
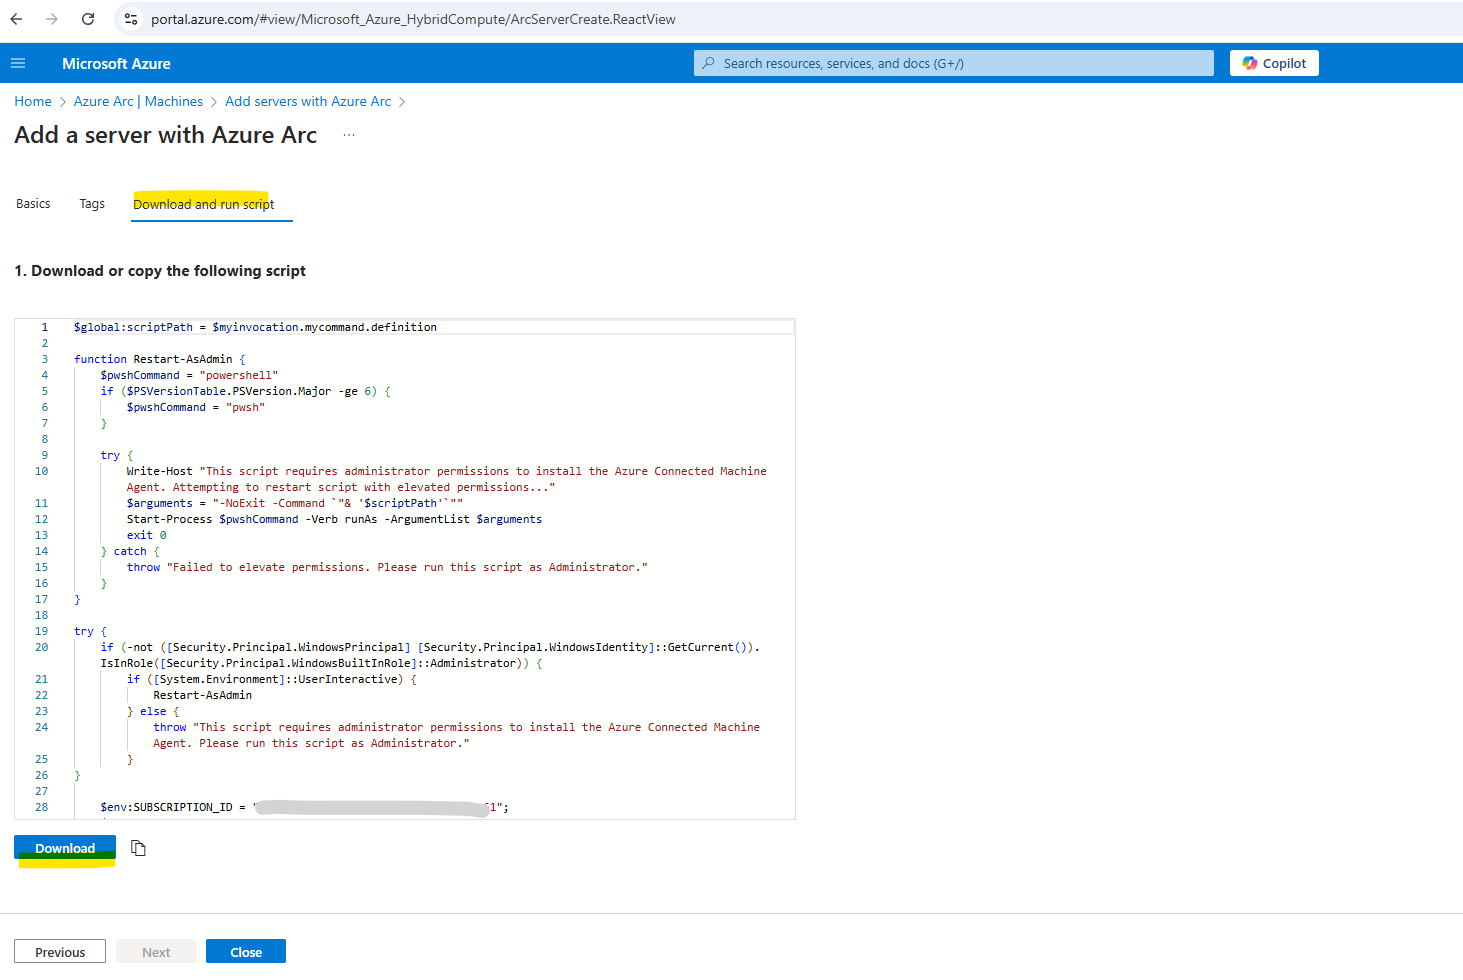
After downloading the script, you have to run it on your machine or server using a privileged (administrator or root) account.
Depending on your network configuration, you might need to download the agent from a computer with internet access and transfer it to your machine or server, and then modify the script with the path to the agent.
The Windows agent can be downloaded from https://aka.ms/AzureConnectedMachineAgent and the Linux agent can be downloaded from https://packages.microsoft.com.
Look for the latest version of the azcmagent under your OS distribution directory and installed with your local package manager.
The script will return status messages letting you know if onboarding was successful after it completes.
Network traffic from the Azure Connected Machine agent to Microsoft Entra ID (login.windows.net, login.microsoftonline.com, pas.windows.net) will continue to use public endpoints.
Most of these services already offer private endpoints, but you need to configure your firewall and routing rules to allow access to Microsoft Entra ID and Azure Resource Manager over the internet until these services offer private endpoints.
In the following article by Microsoft you will see which endpoints can be configured with a private endpoint and which must still be accessed through the internet.
https://learn.microsoft.com/en-us/azure/azure-arc/servers/network-requirements?tabs=azure-cloud#urls
If your server needs to communicate through a proxy server to reach these endpoints, configure the agent with the proxy server URL before connecting it to Azure. You might also need to configure a proxy bypass for the Azure Arc services if your private endpoint is not accessible from your proxy server.
So for machines without direct internet access, we need to allow public access to Microsoft Entra ID and Azure Resource Manager on the proxy.
Therefore we finally need to allow outbound traffic to the following domains in order to connect our on-premise machines and server to Azure Arc by using our existing site-to-site IPSec VPN connection and HTTP proxy. In the URLs link below you will see a description for each domain and if a private link is supported by now.
- download.microsoft.com ==> Used to download the Windows installation package
- packages.microsoft.com ==> Used to download the Linux installation package
- .microsoftonline.com ==> Microsoft Entra ID
- .*login.microsoft.com ==> Microsoft Entra ID
- .pas.windows.net ==> Microsoft Entra ID
- .management.azure.com ==> traffic routed through site-to-site VPN tunnel and private link. (provided a resource management private link is configured as we did further above.)
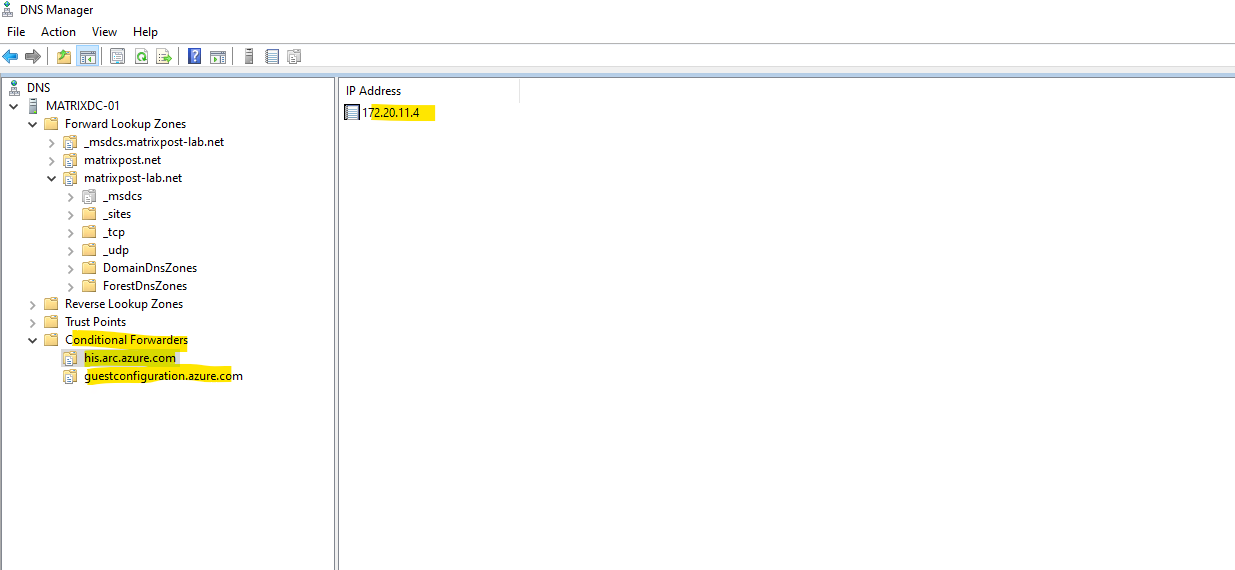
- .his.arc.azure.com ==> traffic routed through site-to-site VPN tunnel and private link.
- .guestconfiguration.azure.com ==> traffic routed through site-to-site VPN tunnel and private link.
- .guestnotificationservice.azure.com ==> Extension management and guest configuration services
- .servicebus.windows.net ==> For Windows Admin Center and SSH scenarios
URLs
When configuring the Azure connected machine agent to communicate with Azure through a private link, some endpoints must still be accessed through the internet.The Private link capable column in the following table shows which endpoints can be configured with a private endpoint.
If the column shows Public for an endpoint, you must still allow access to that endpoint through your organization’s firewall and/or proxy server for the agent to function. Network traffic is routed through private endpoint if a private link scope is assigned.
Source: https://learn.microsoft.com/en-us/azure/azure-arc/servers/network-requirements?tabs=azure-cloud#urls
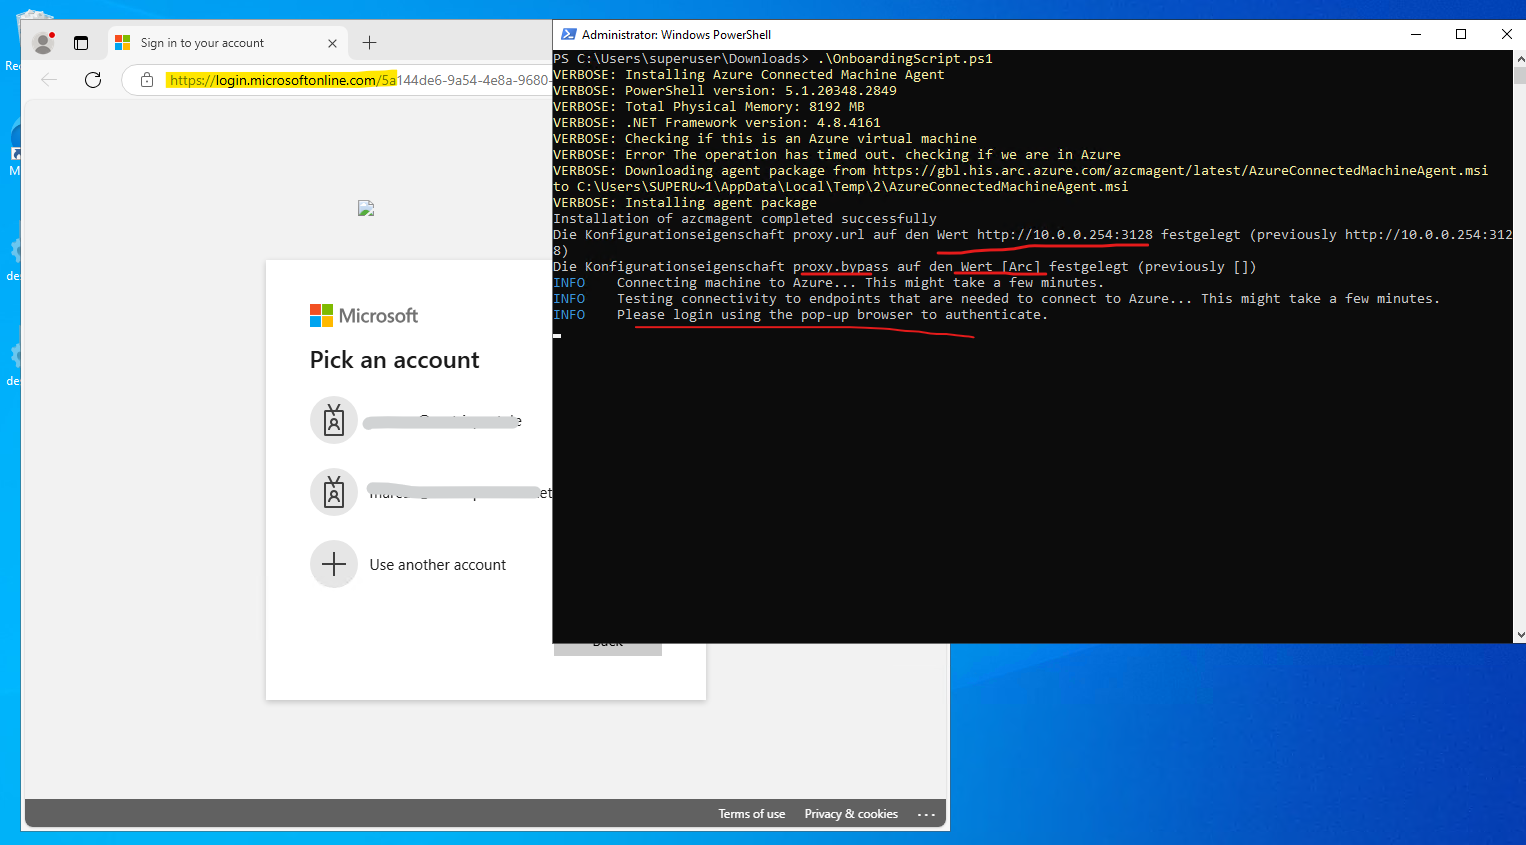
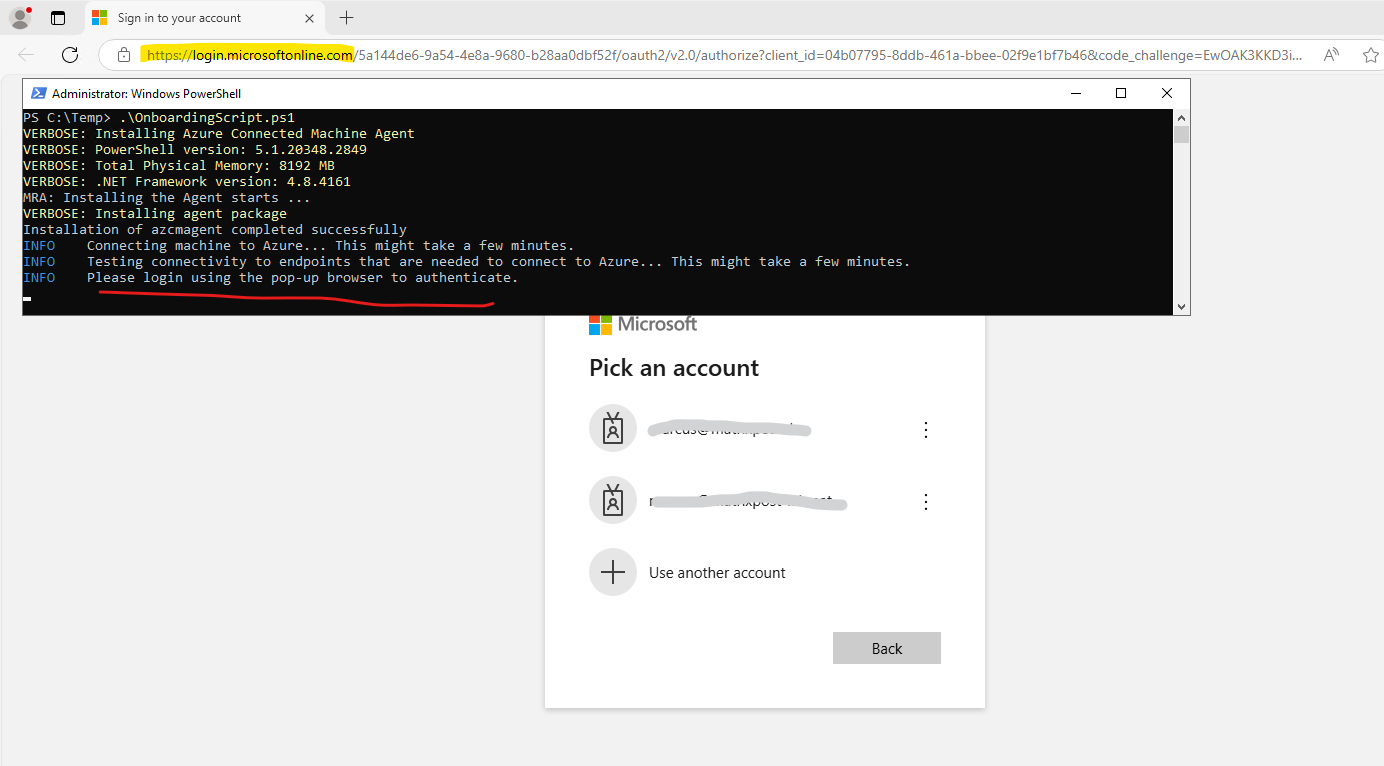
Before executing the downloaded OnboardingScript.ps1 script, we first need to make sure, that the agent can reach the required public endpoints which are only available through the internet like Microsoft Entra ID (login.microsoftonline.com).
Below the server will use the HTTP proxy on which we allowed the required public endpoints shown above.
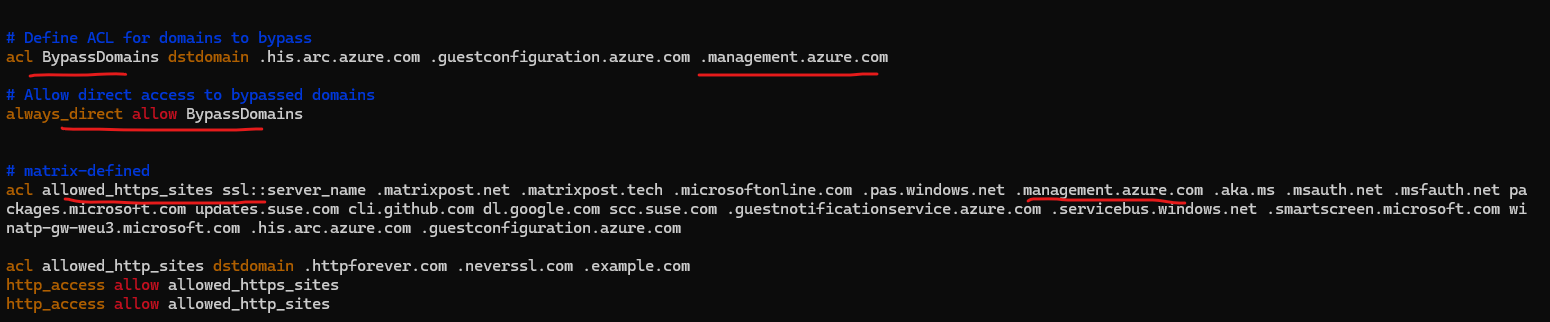
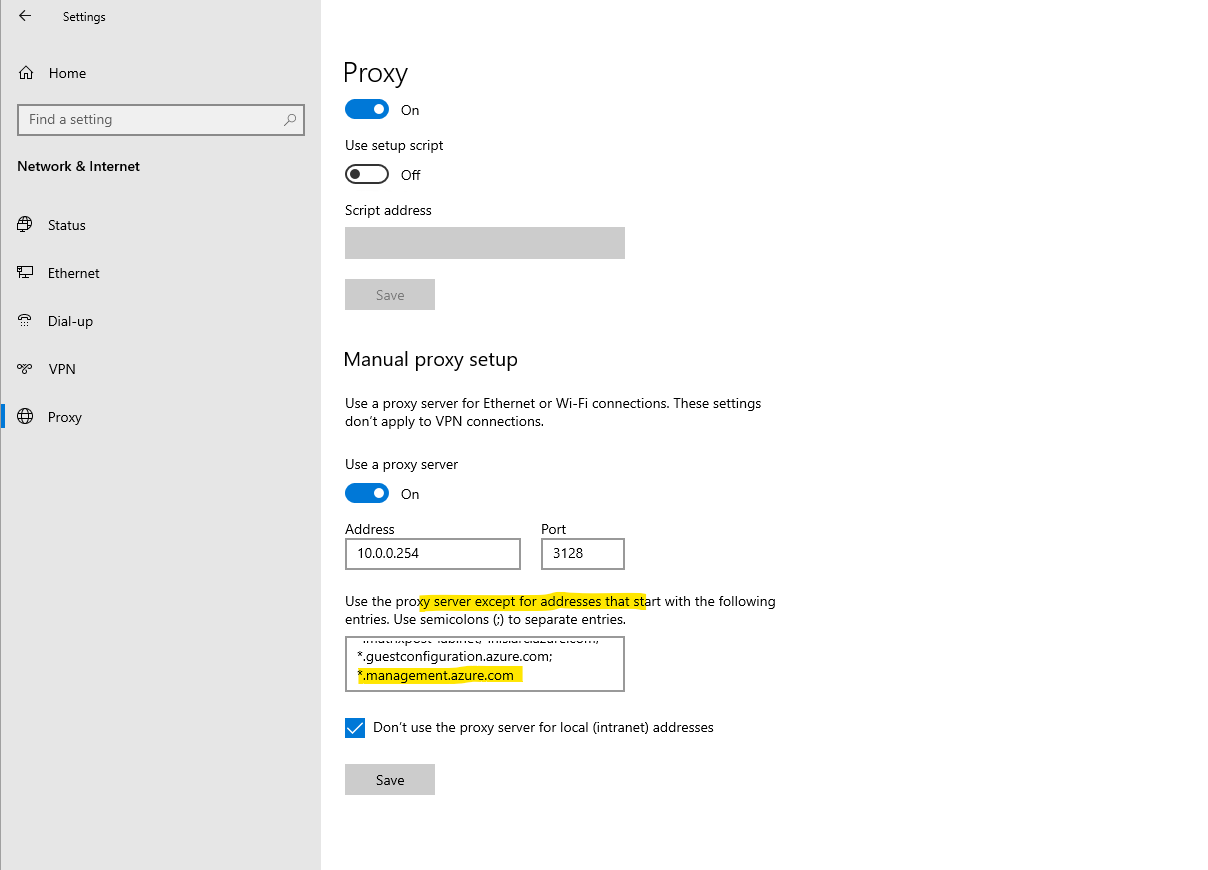
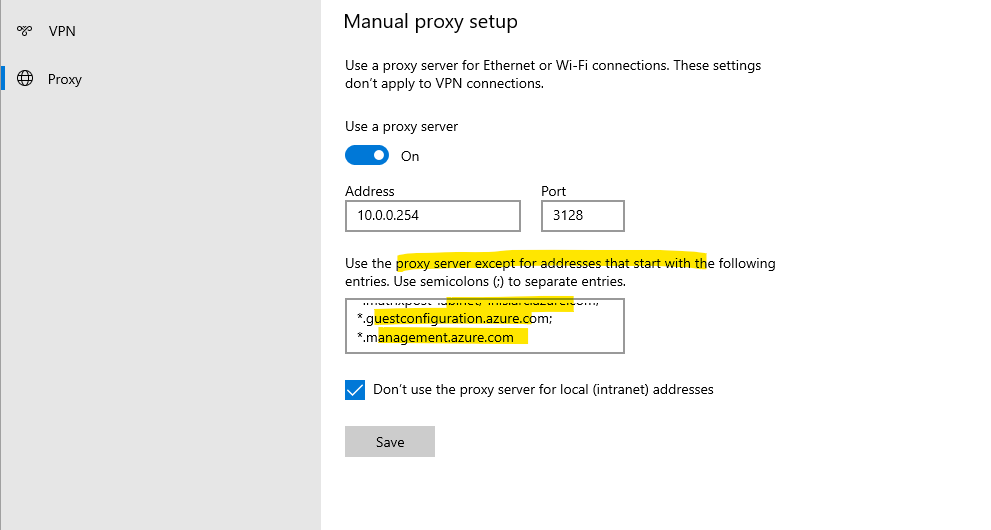
If the private endpoint is not accessible from our proxy server, we also need to bypass these private endpoints to which the agent connects to by using a direct connection to our VPN appliance and its S2S IPSec VPN tunnel with Azure. Then we need to add the*.his.arc.azure.com, *.guestconfiguration.azure.com and *.management.azure.com domain below in the bypass list.
My squid proxy is also able to access the private endpoints through the S2S VPN tunnel and therefore doesn’t need to configure them on the bypass list. Finally my clients can access them by using a direct connection to the internal VPN appliance (pfSense) or through my squid proxy.
Because the Azure Connected Machine agent will not by default use the proxy configuration from the OS above, we also need to set the proxy directly in the OnboardingScript.ps1 script as shown below.
Here we can also add both private endpoints with *.his.arc.azure.com, *.guestconfiguration.azure.com and *.management.azure.com to bypass the proxy if the private endpoint is not accessible from our proxy server.
Therefore we can use here the service name that shouldn’t use the proxy server. For the *.his.arc.azure.com and*.guestconfiguration.azure.com domain we need to use here the Arc value and for the *.management.azure.com domain the ARM value.
Starting with agent version 1.15, you can also specify services which should not use the specified proxy server. This can help with split-network designs and private endpoint scenarios where you want Microsoft Entra ID and Azure Resource Manager traffic to go through your proxy server to public endpoints but want Azure Arc traffic to skip the proxy and communicate with a private IP address on your network.
  # Set Proxy Settings for Azure Connected Machine Agent
    & "$env:ProgramW6432\AzureConnectedMachineAgent\azcmagent.exe" config set proxy.url "http://10.0.0.254:3128"
    & "$env:ProgramW6432\AzureConnectedMachineAgent\azcmagent.exe" config set proxy.bypass "Arc,ARM"

# check configuration
azcmagent.exe config list

# clear the proxy.bypass
azcmagent.exe config clear proxy.bypass

# clear proxy.url
azcmagent.exe config clear proxy.url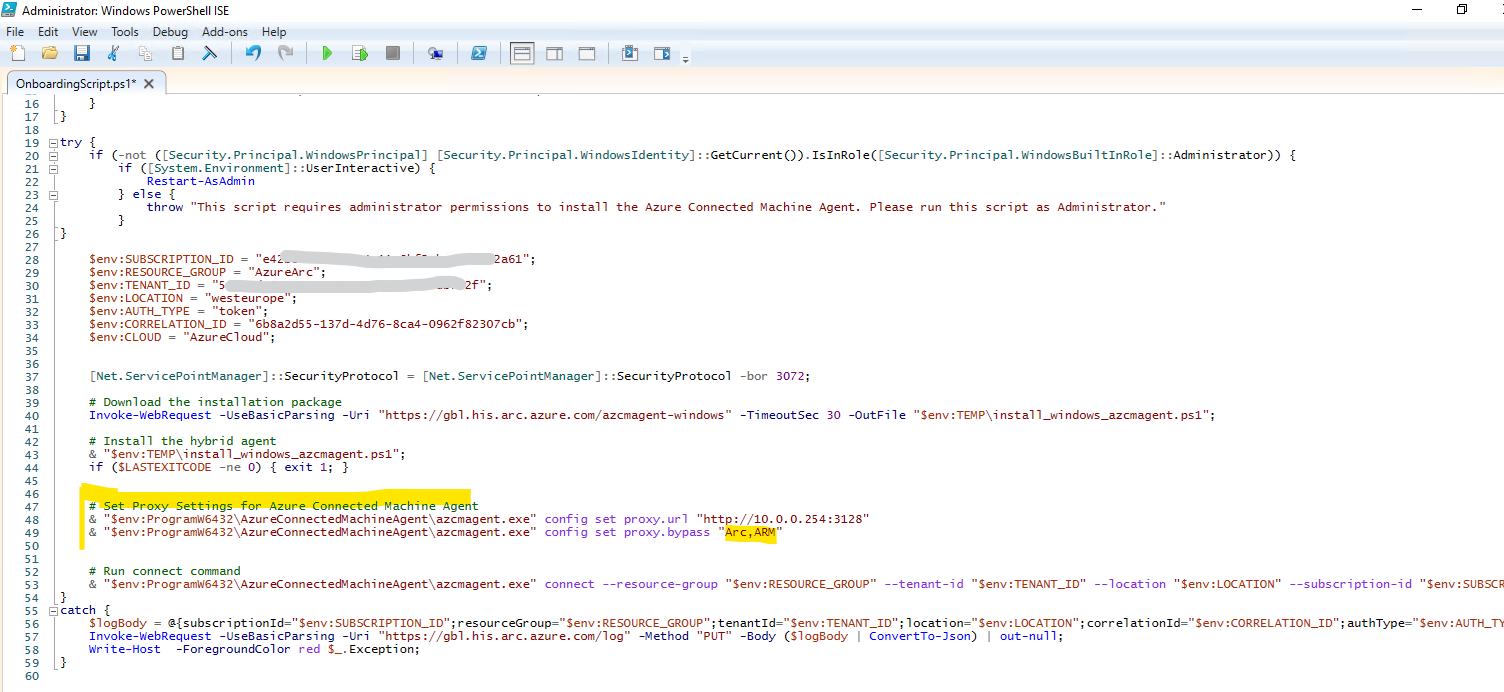
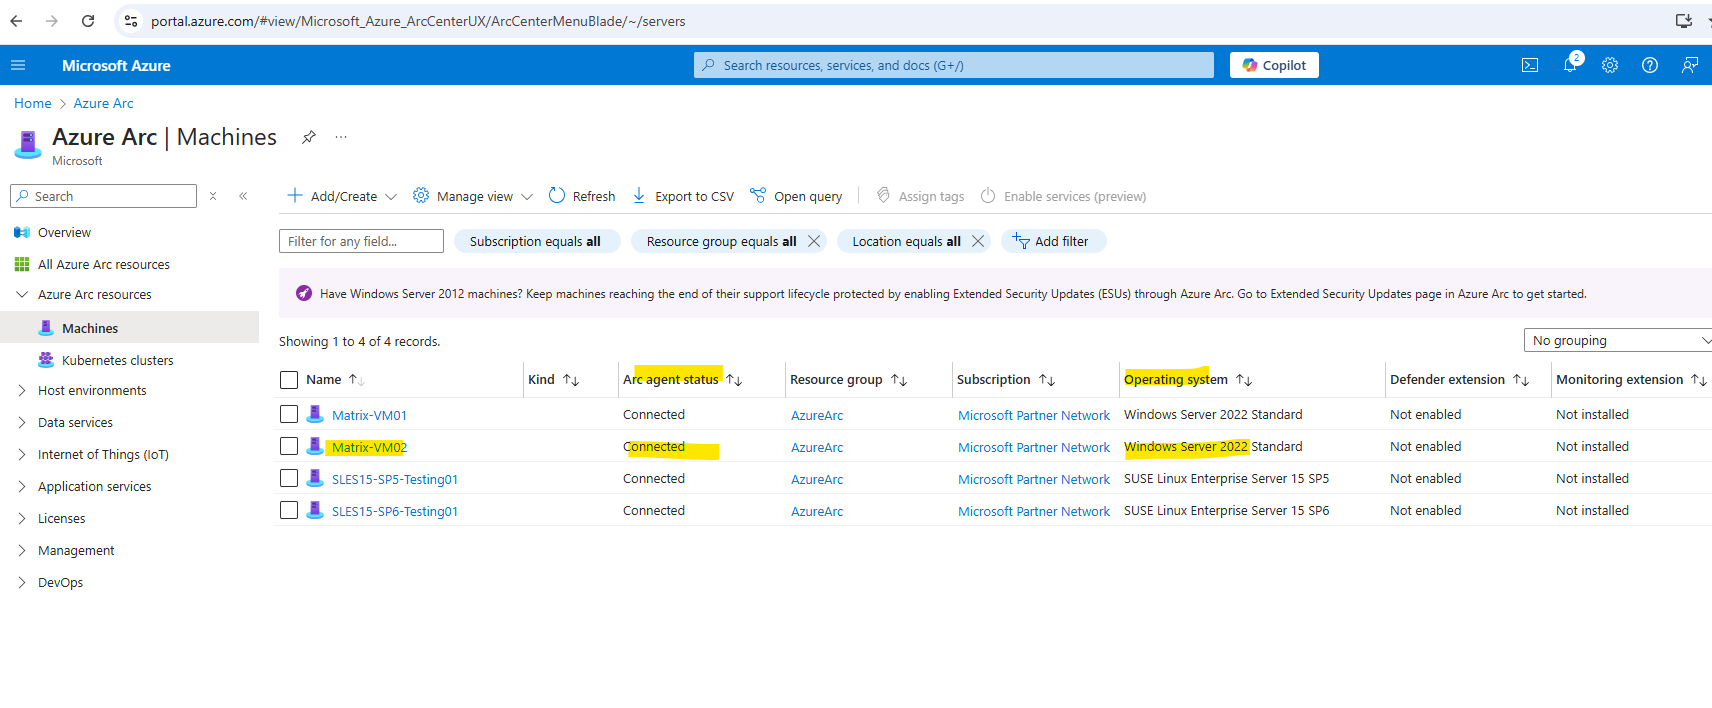
Finally the machine was connected successful to Azure Arc enabled servers.
Looks good!

The server is connected to Azure Arc.


Adding multiple servers to Azure Arc
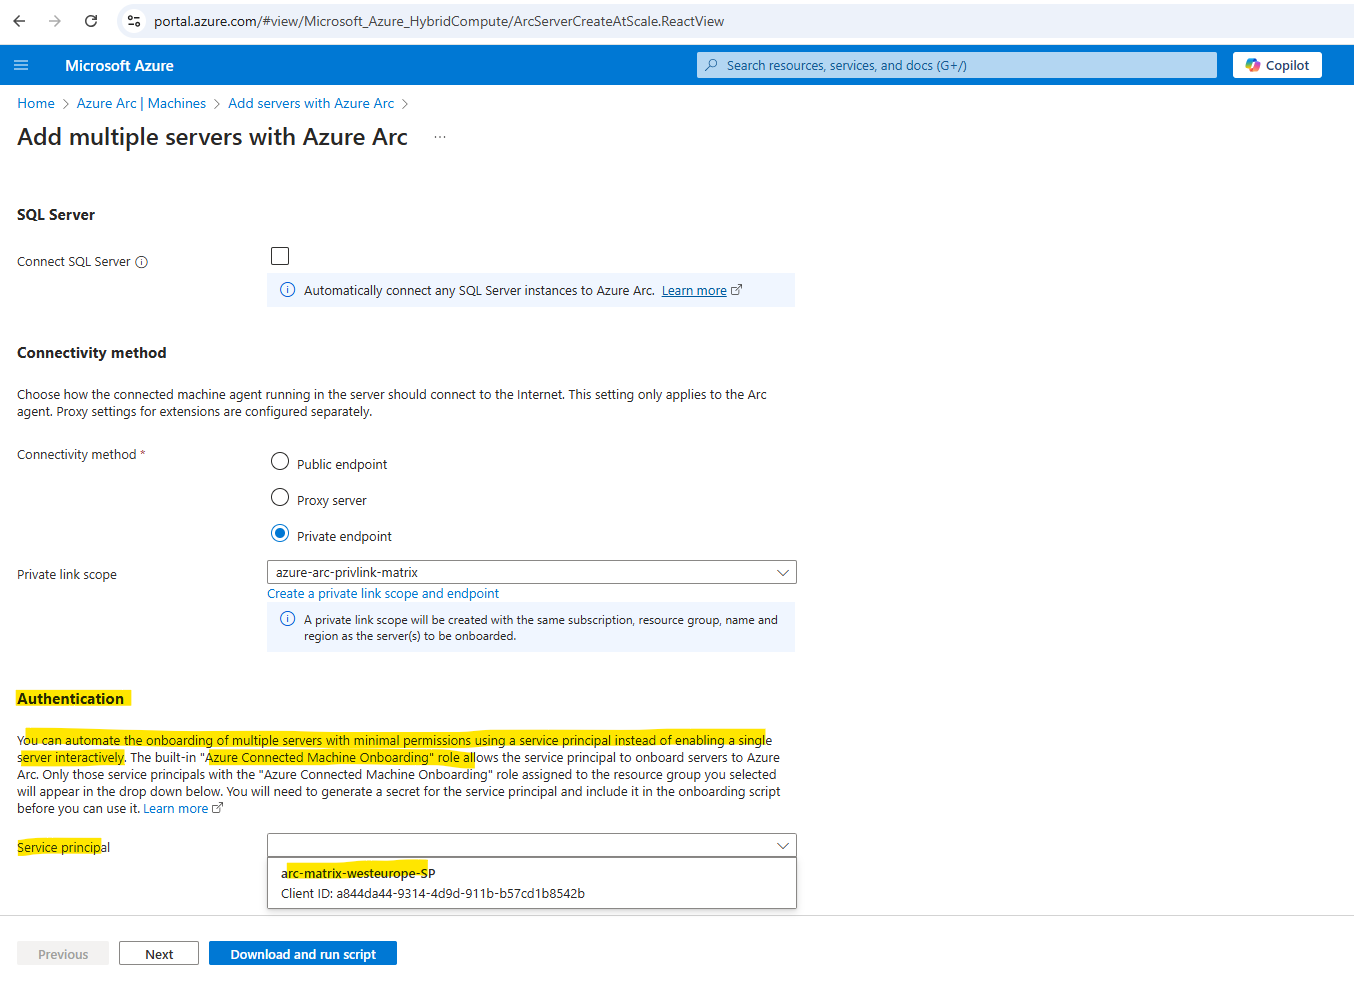
If we select Add multiple servers on the Authentication page, we also need to select a service principal created for Azure Arc-enabled servers from the drop-down list.
If you haven’t created a service principal for Azure Arc-enabled servers, review how to create a service principal to learn about permissions and steps required to create one.
You can automate the onboarding of multiple servers with minimal permissions using a service principal instead of enabling a single server interactively. The built-in “Azure Connected Machine Onboarding” role allows the service principal to onboard servers to Azure Arc.
Select Next: Tags to continue.

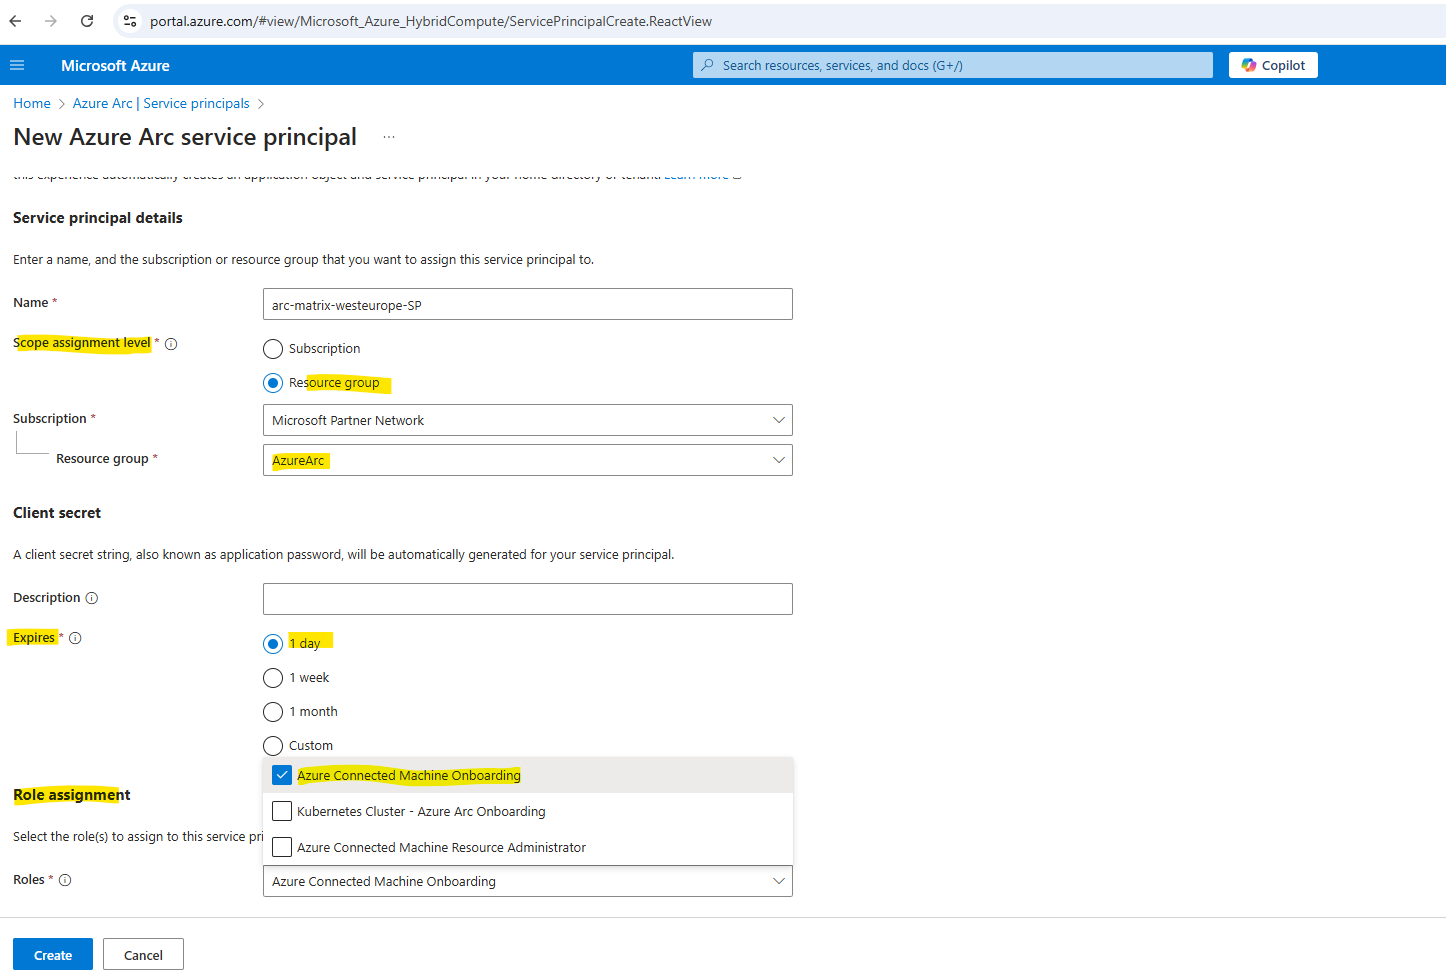
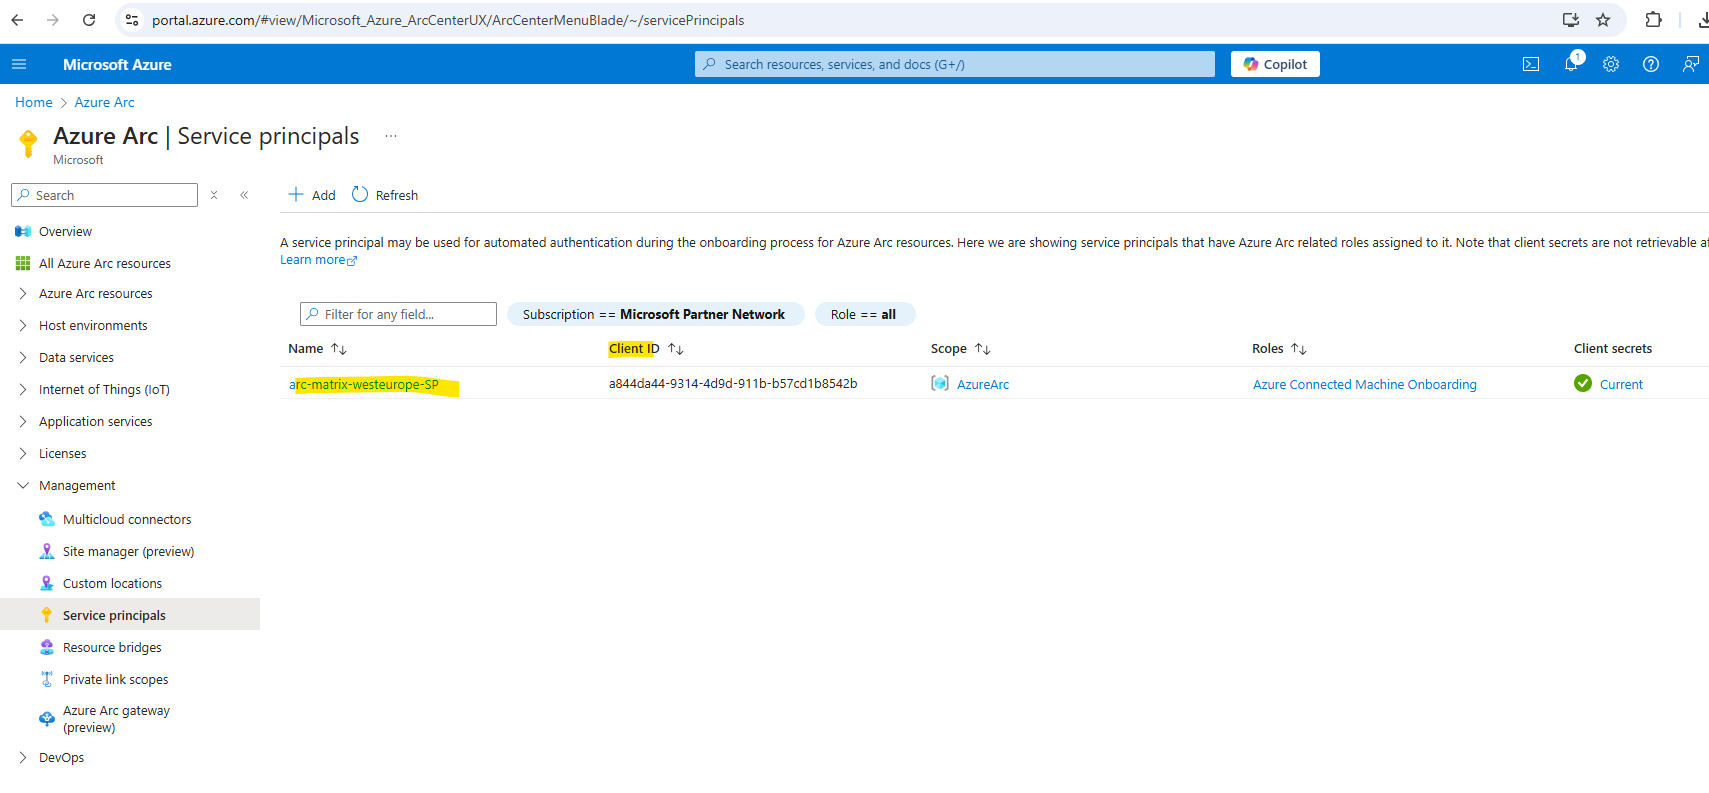
I will first have to create a new service principal. The service principal needs the Azure Connected Machine Role assigned to.
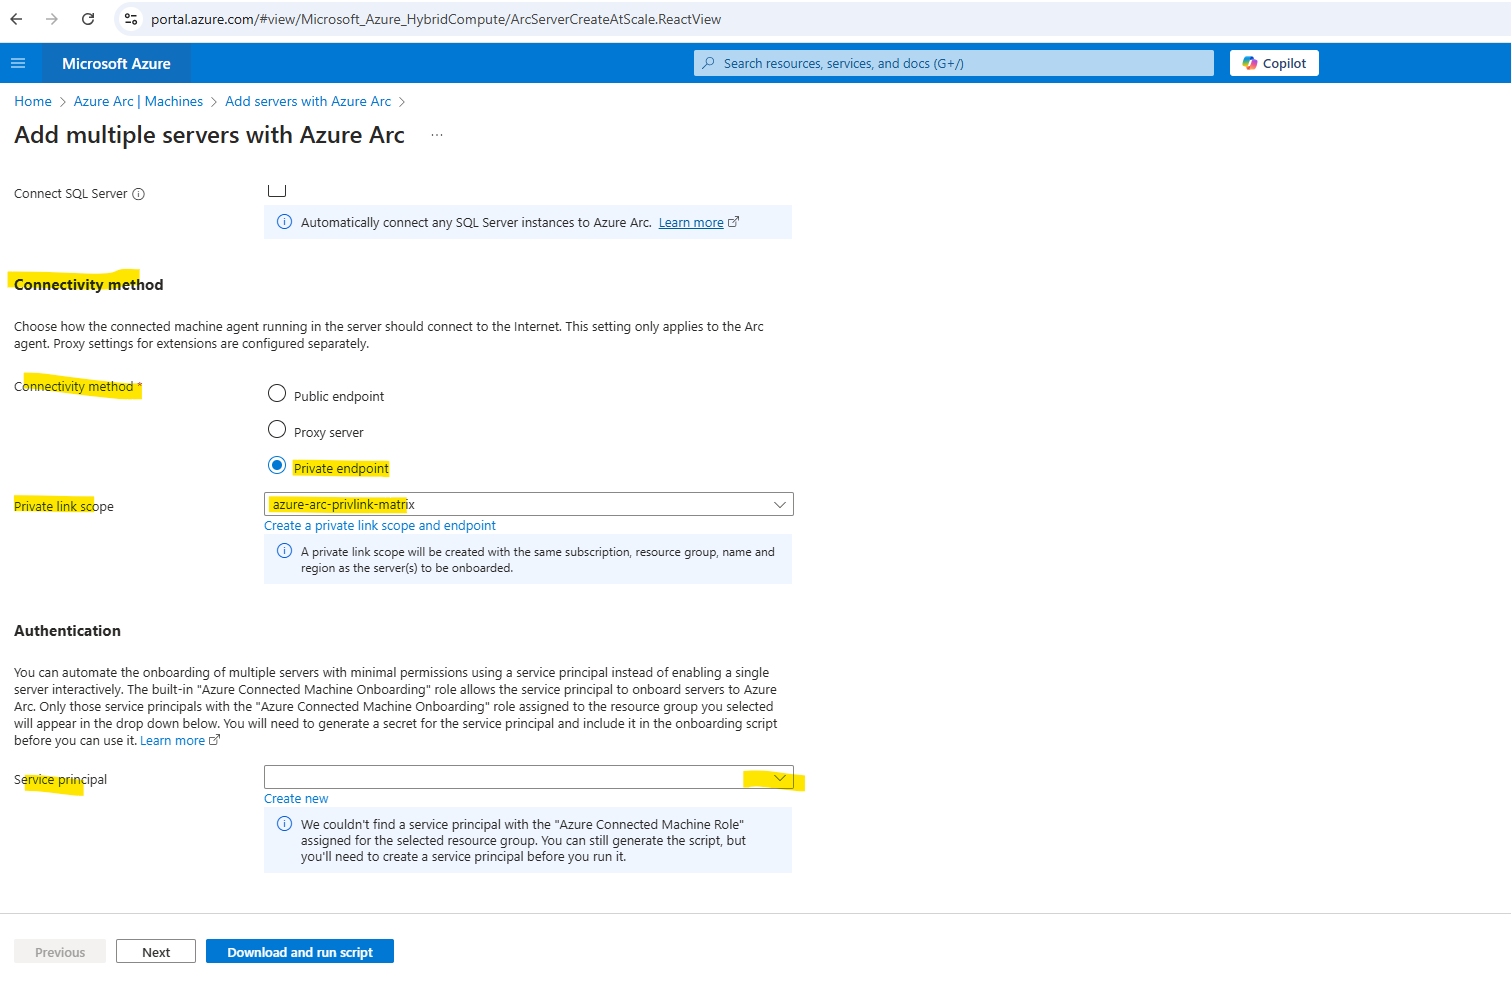
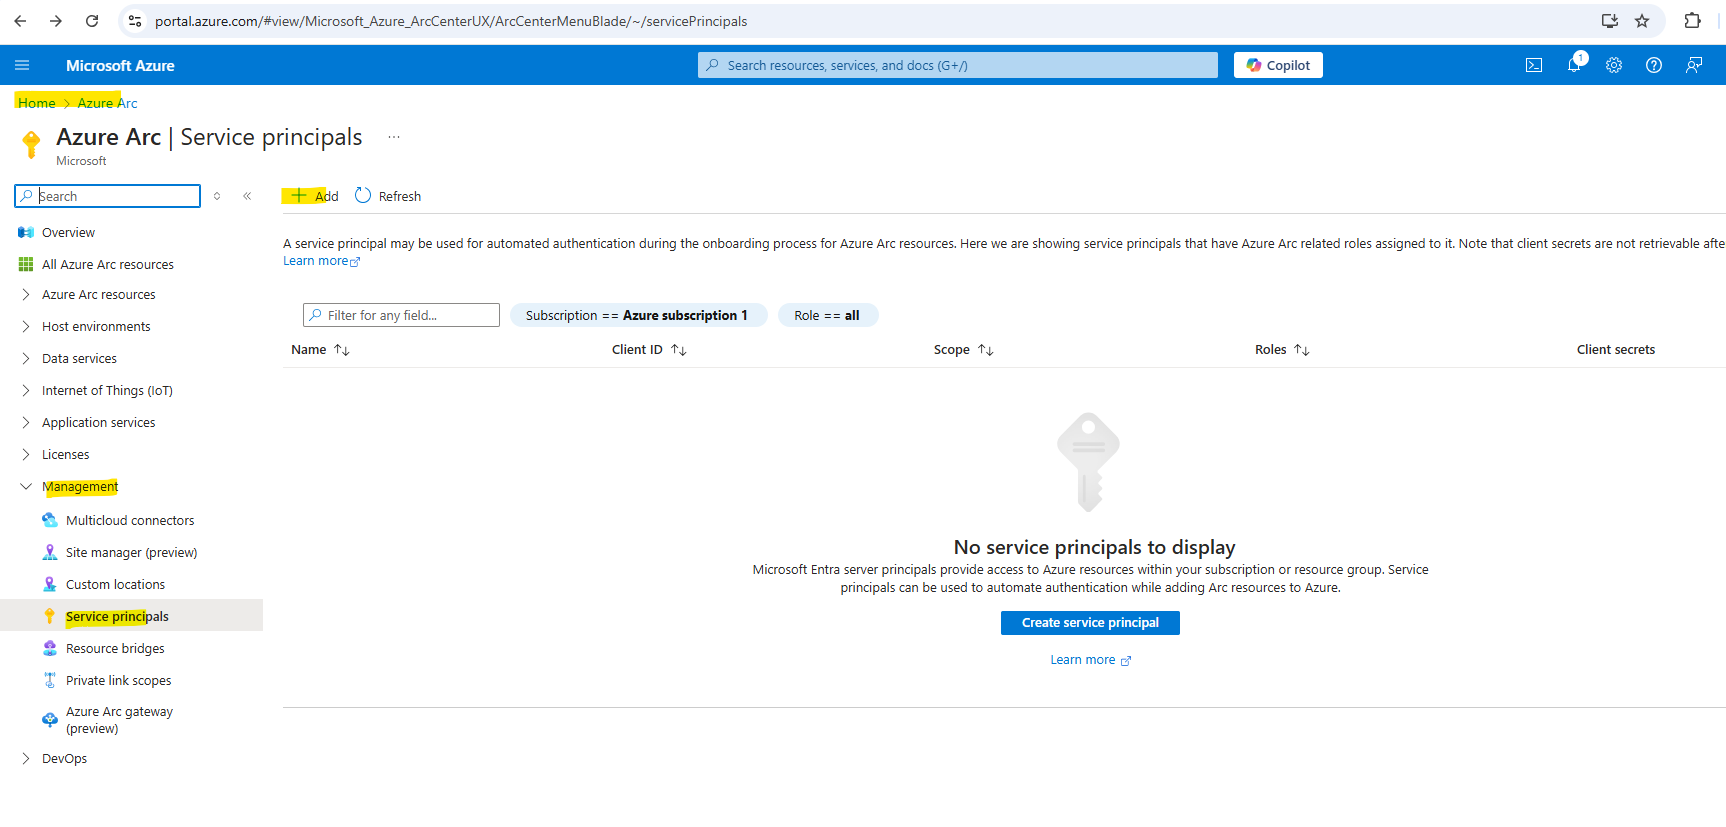
We can either click on the link above with Create new to create a new service principal for the Azure Arc Services authentication or we can navigate to Azure Arc and here expand Management and click on Service principals as shown below.
Choose whether the service principal will have access to an entire subscription, or only to a specific resource group.
In the Client secret section, select the duration for which your generated client secret will be in use. You can optionally enter a friendly name of your choice in the Description field.
In the Role assignment section, select Azure Connected Machine Onboarding and finally click on Create.
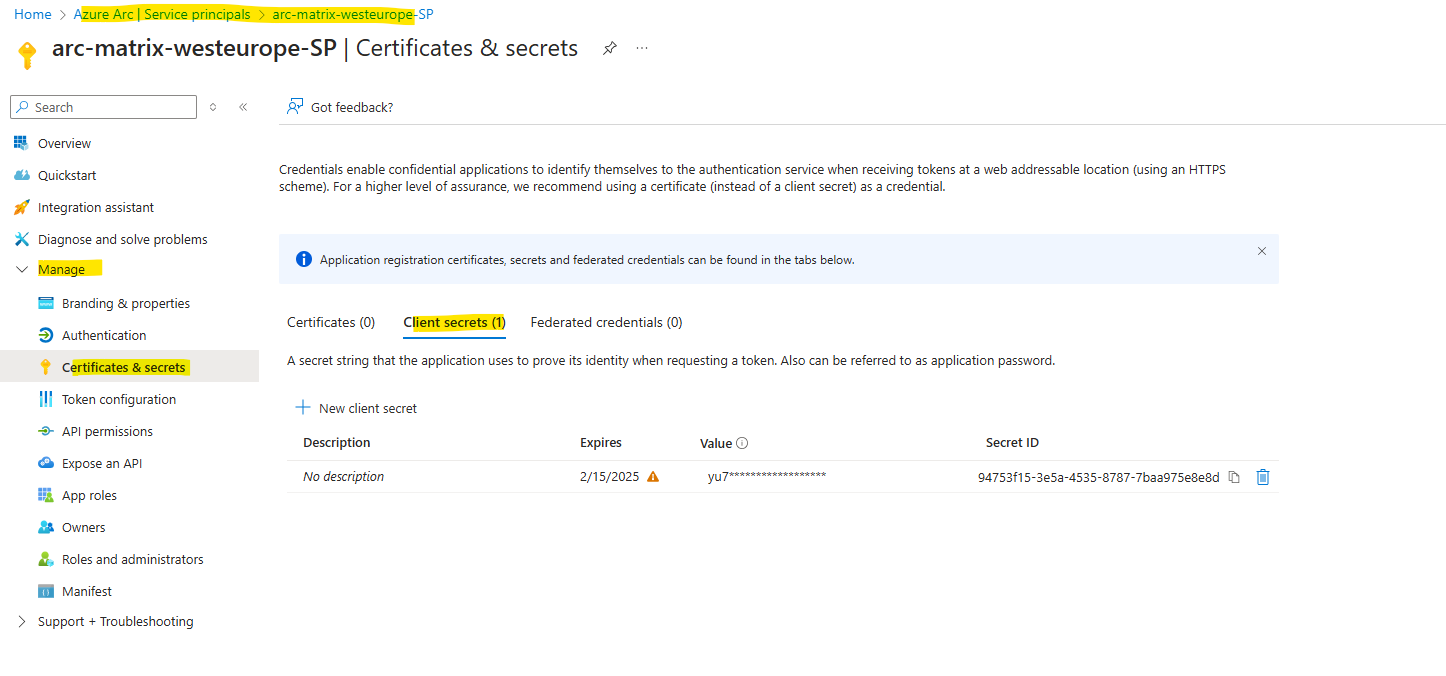
Next we need to download here the service principal ID and secret, we are not able to retrieve the client secret later after leaving this page.
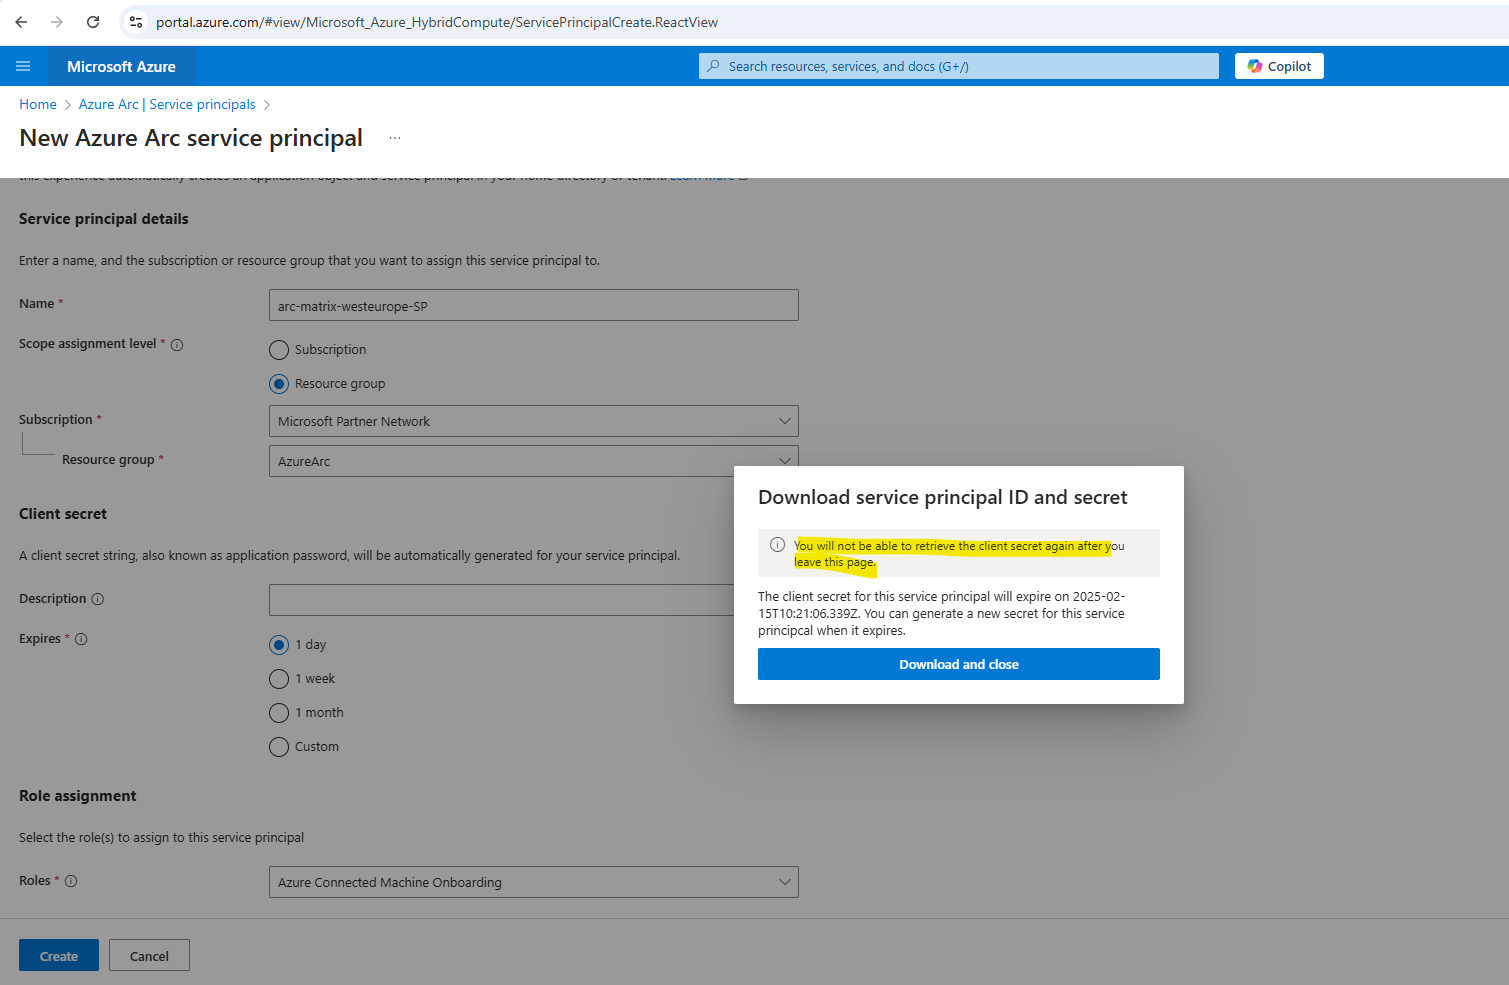
When clicking above on the service principal we can see below that the client secret can’t be retrieved here again.
In case we not noted it, we can create a new one below or also, in case our onboarding delays and the client secret expires, we can also create here a new one.
We can now select this service principal below for adding multiple servers to Azure Arc.
On the Download and run script page, review the summary information, and then select Download.
The process of onboarding multiple servers to Azure Arc finally is nearly the same as previously for a single server.
The only difference is, that for a single server when executing the onboarding PowerShell script named OnboardingScript.ps1, we need to authenticate interactively by using a regular user account.
In contrast when using the OnboardingScript.ps1 generated for adding multiple servers, the authentication will occur automatically transparent by using our previously created and assigned service principal.
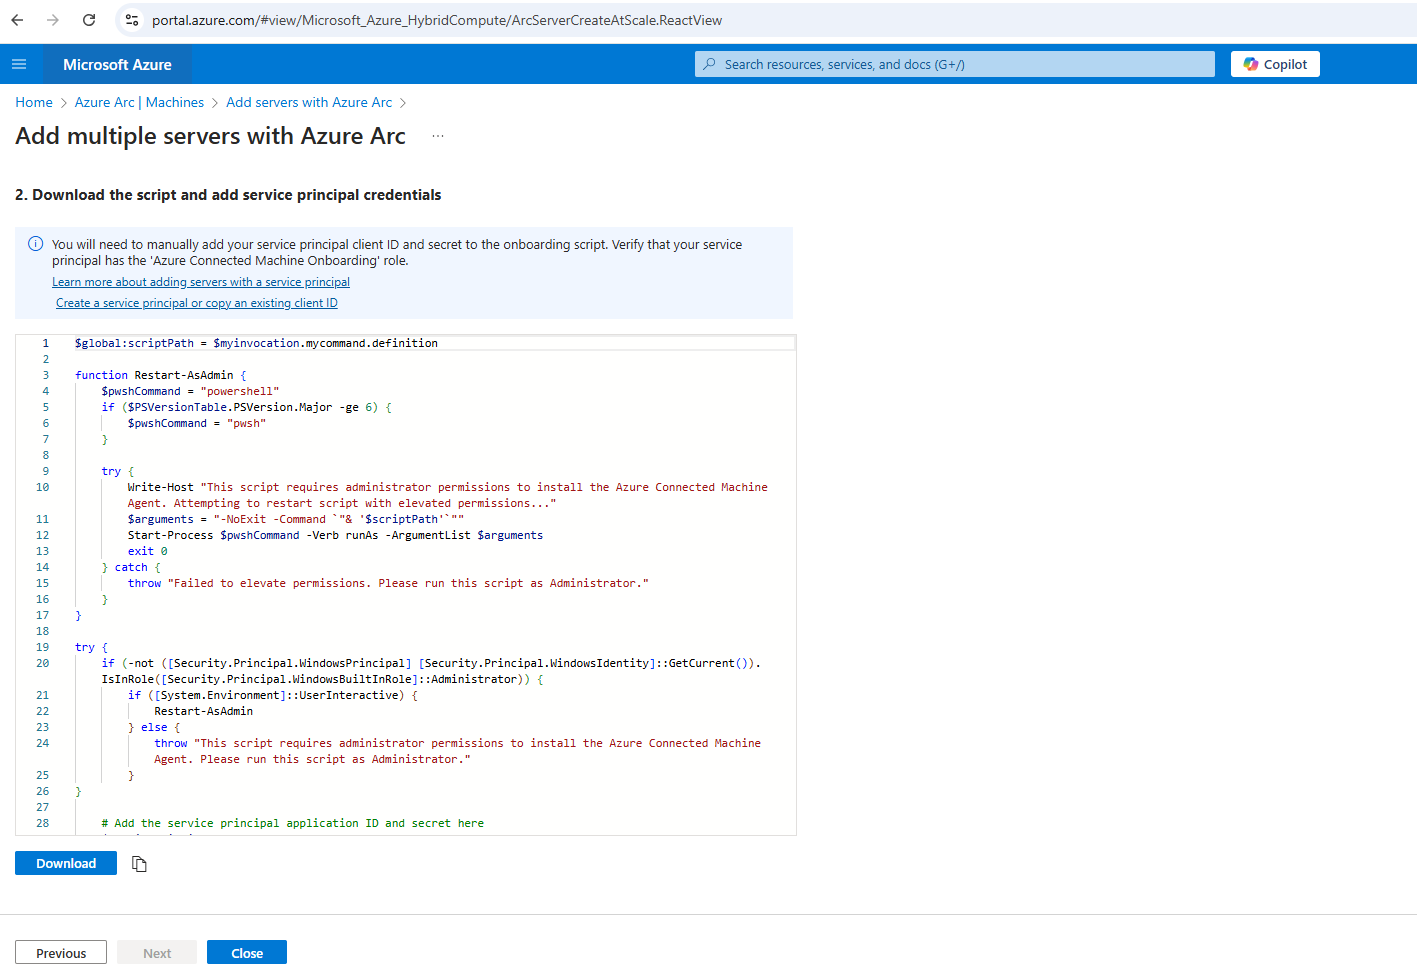
We can now see, that our OnboardingScript.ps1 to add multiple servers and using a service principal to authenticate to Entra ID, will also include the service principal ID and its client secret.
!! Note !! The client secret is not added by default for security reasons and needed to be entered before we can execute the script to install and connect the agent to Azure Arc.

We also first need to add our proxy settings as previously when onboarding a single server.
 # Set Proxy Settings for Azure Connected Machine Agent
    & "$env:ProgramW6432\AzureConnectedMachineAgent\azcmagent.exe" config set proxy.url "http://10.0.0.254:3128"
    & "$env:ProgramW6432\AzureConnectedMachineAgent\azcmagent.exe" config set proxy.bypass "Arc,ARM"
Further we also need to configure the proxy bypass list on the OS directly if the private endpoint is not accessible from our proxy server.
The first the script will try is to download the agent package (AzureConnectedMachineAgent.msi) by using the Invoke-WebRequest cmdlet and URL https://gbl.his.arc.azure.com/azcmagent-windows.
The Invoke-WebRequest cmdlet will use therefore the proxy settings of the OS.
So exclude *.his.arc.azure.com, *.guestconfiguration.azure.com and *.management.azure.com from the proxy as shown below. We can also configure to bypass these domains directly on the proxy.
Now we can finally run the OnboardingScript.ps1 script.
> .\OnboardingScript.ps1

Looks good and the server is connected to Azure Arc.
Connect to an Azure Arc-enabled server (Linux)
The Azure Arc-enabled servers deployment script generated in the portal downloads the latest version.
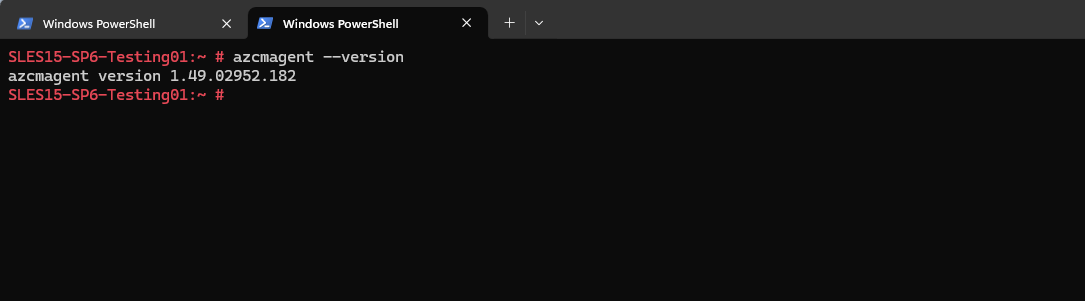
The version of the Azure Connected Machine agent you can determine by running the following command on the affected server.
# azcmagent --version
When connecting a machine or server with Azure Arc-enabled servers for the first time, you can optionally connect it to a Private Link Scope.
In the Azure portal navigate to Navigate to Machines – Azure Arc. Click on Add/Create and select Add a machine.
Select Add a single server and click on Generate script.
Under Operating System we can choose between Windows and Linux. We want to onboard a Linux machine below.
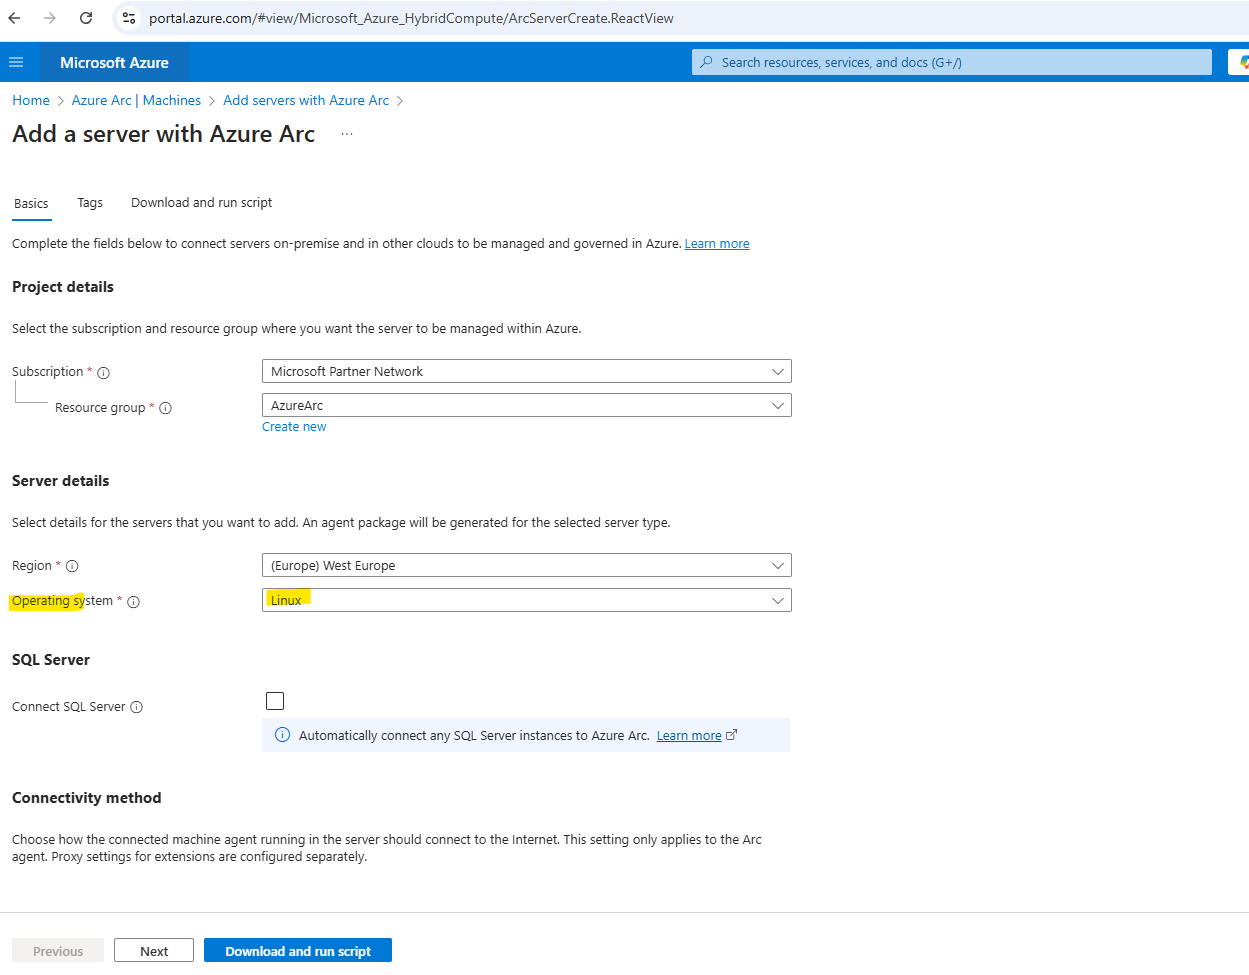
At the bottom of the Basics tab we can configure the connectivity method for the Azure Connected Machine agent.
We want to use our previously configured private endpoint and private link scope which we can select here.
In the Download and run script tab we can download the script to run later on the affected server.
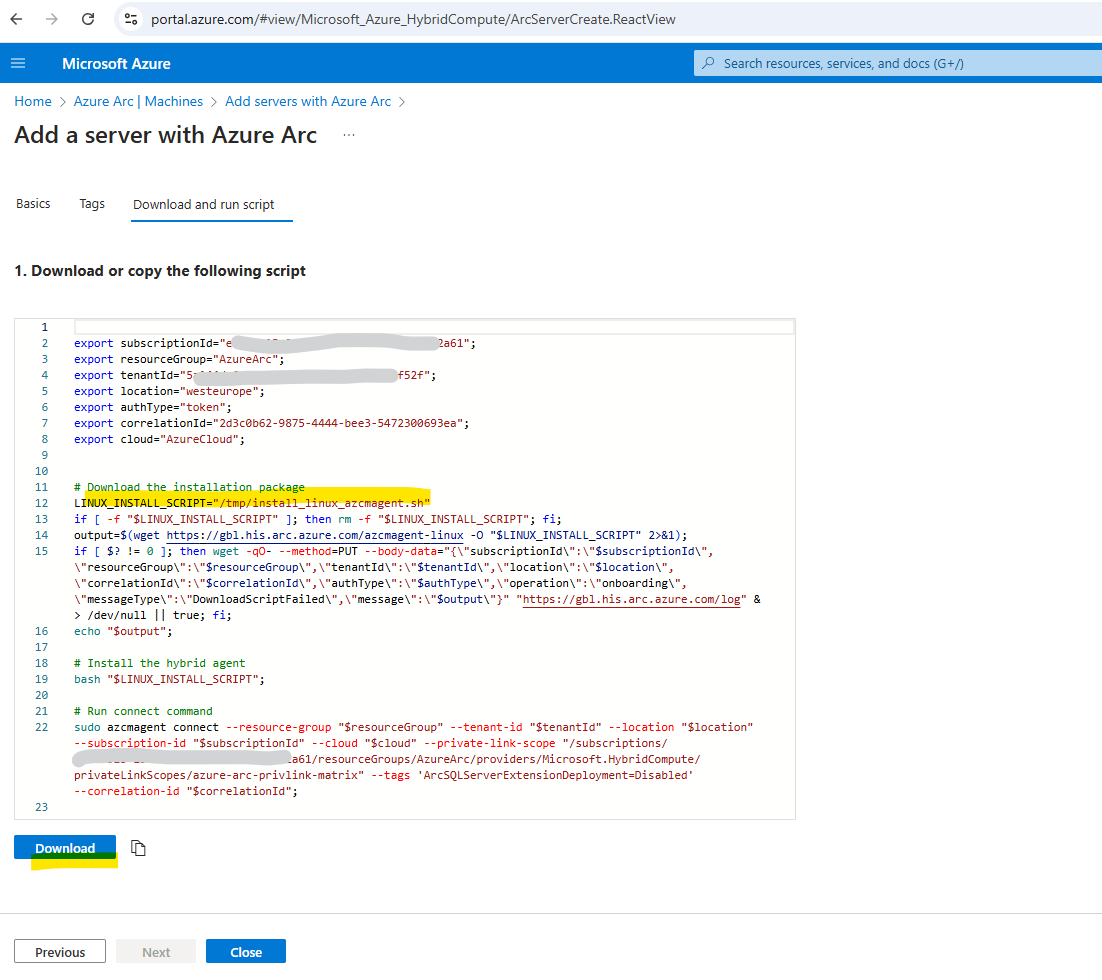
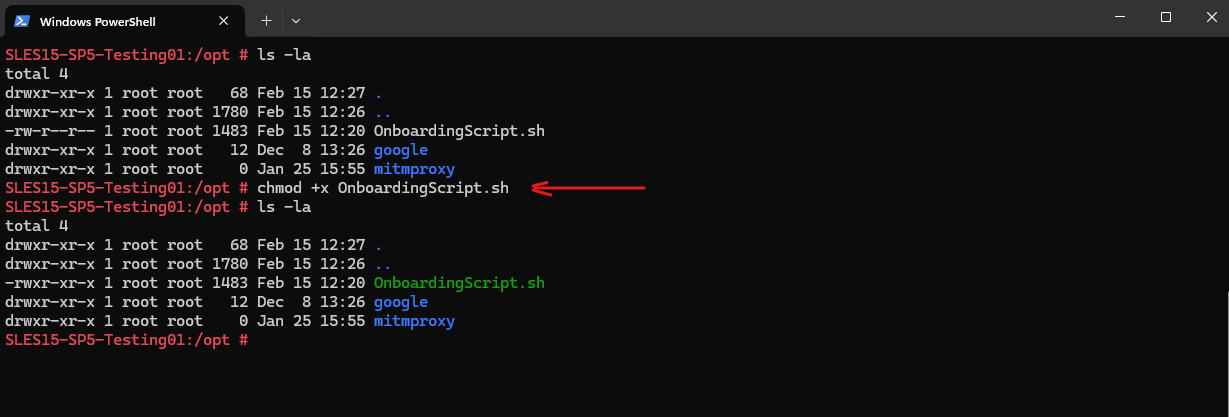
We can now either just run bash OnboardingScript.sh or first make the script explicitly executable to use ./OnboardingScript.sh.
More about using different methods to execute a shell script in Linux you will find in my following post https://blog.matrixpost.net/linux-executing-shell-scripts-different-ways/.
Below I will run into an error because the OS will try to make a connection through the configured HTTP proxy which for this domain not allowed and instead the S2S VPN tunnel with Azure should be used.
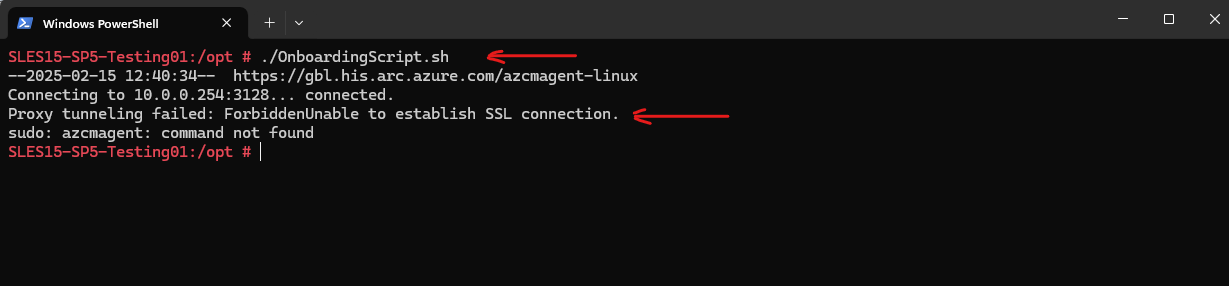
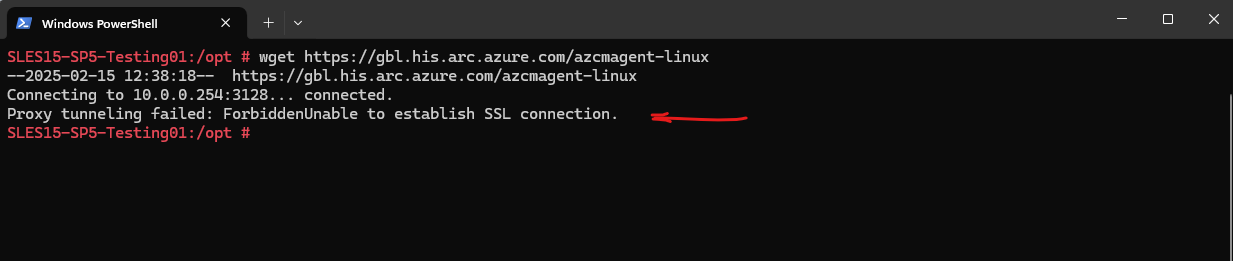
Checking with the wget command again.
Proxy tunneling failed: ForbiddenUnable to establish SSL connection.
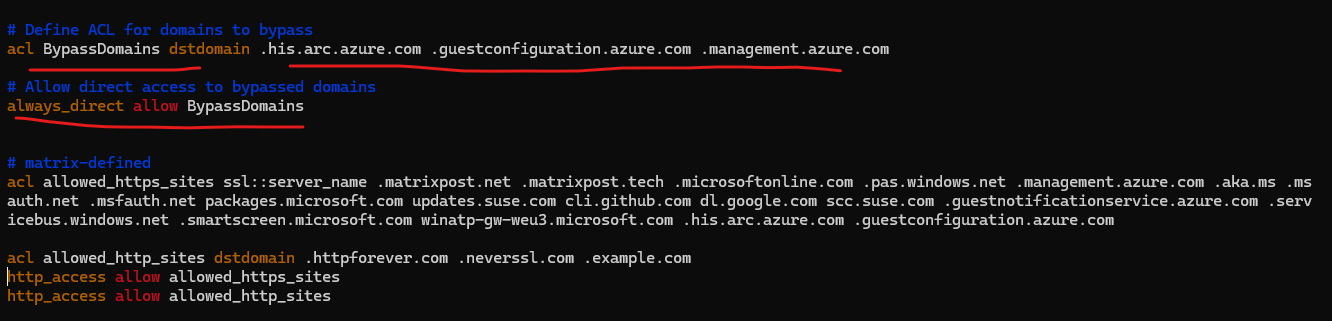
So we also need to configure on Linux the bypass list to exclude traffic for .his.arc.azure.com, .guestconfiguration.azure.com and .management.azure.com to finally route this traffic through the S2S VPN tunnel instead the proxy. Or in case the private endpoint is accessible from our proxy server, we need to allow traffic for these domains.
To bypass them on the client.
# vi /etc/sysconfig/proxy
Note: For the setting to take effect immediately you will need to either log out and back in or export the proxy variables via the terminal session.

Allow traffic on the squid proxy directly.
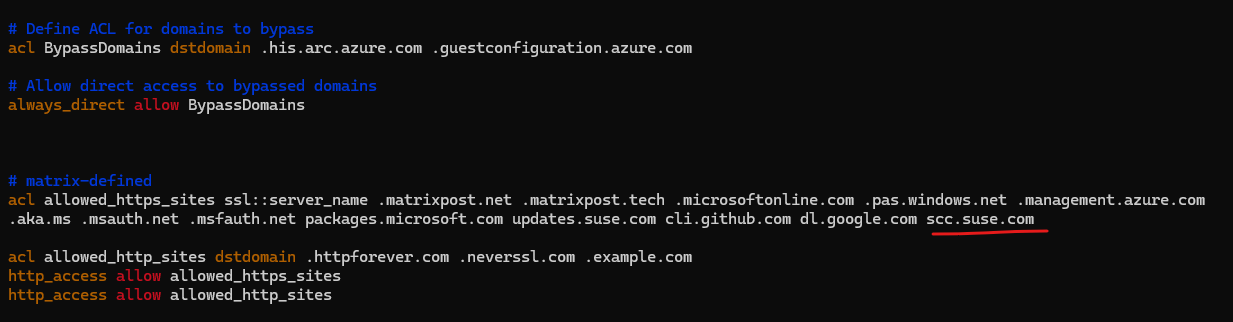
The always_direct directive specifies requests which should ALWAYS be forwarded by Squid to the origin servers without using any peers.
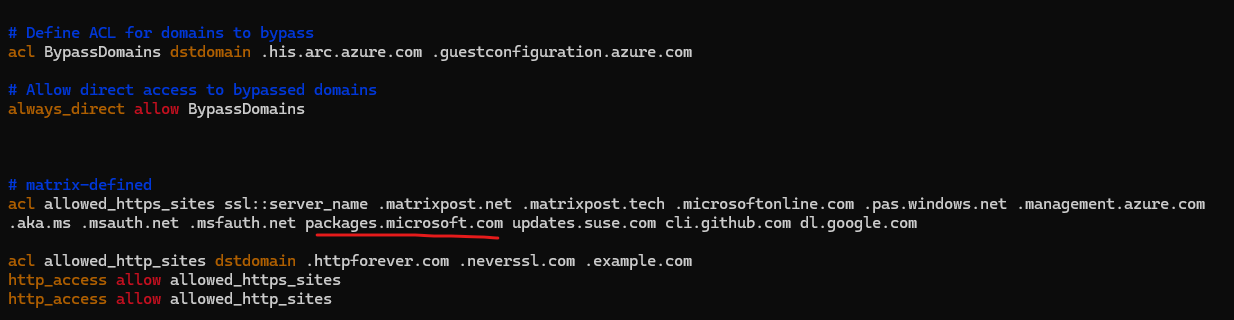
The domains needs to be added also below for the acl named allowed_https_sites.
Failed to connect to packages.microsoft.com port 443.
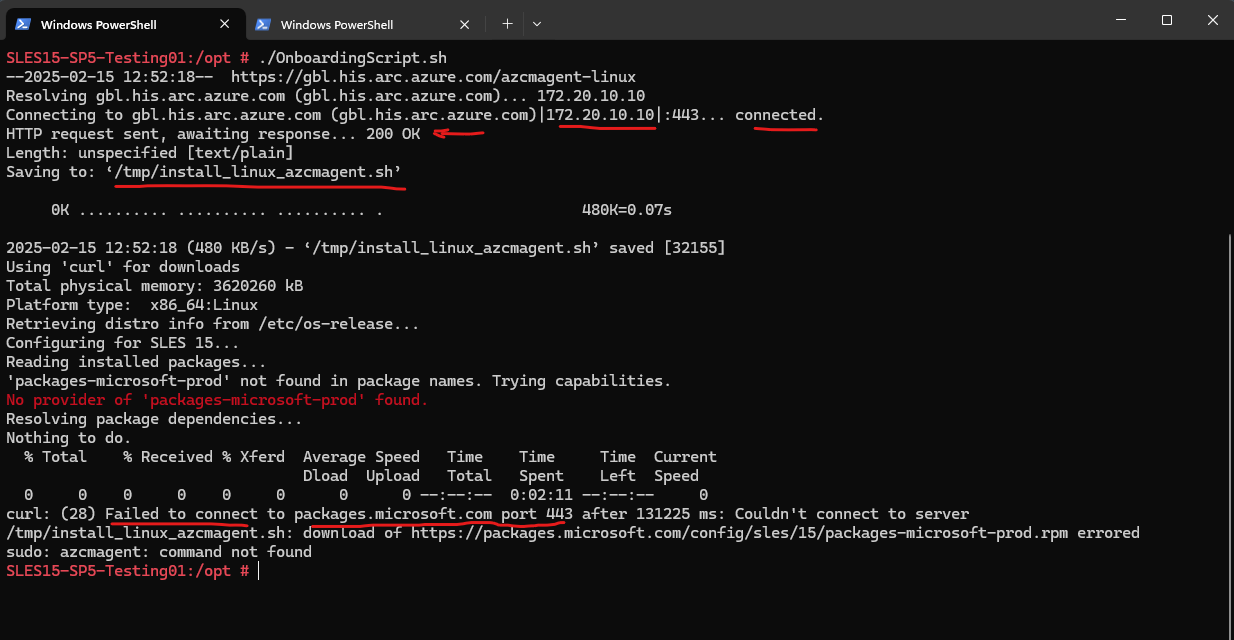
So we also need to allow outbound traffic to https://packages.microsoft.com on the proxy.
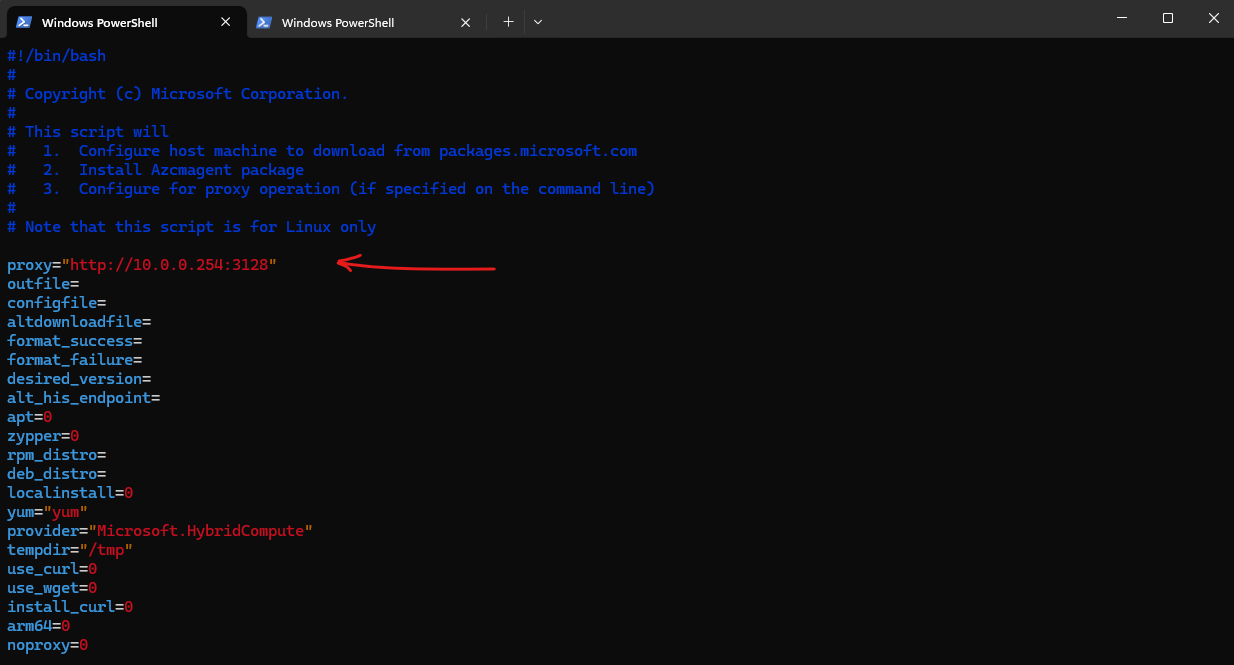
Here we nevertheless run into the same error, the reason for is, that the install_linx_azcmagent.sh script will not use the configured proxy for the OS and instead is using here its own settings, by default no proxy is configured.
So we need to adjust the install_linx_azcmagent.sh script and adding our proxy to the configuration.
# vi /tmp/install_linx_azcmagent.sh

proxy="http://10.0.0.254:3128"
Now instead running again the OnboardingScript.sh, we should directly execute the tmp/install_linux_azcmagent.sh script.
Otherwise when running the OnboardingScript.sh again, the install_linux_azcmagent.sh would be downloaded again and overwrites our adjusted install_linux_azcmagent.sh script.
Ignore the path below with ~/install_linux_azcmagent.sh for the root home folder, the reason for is that I also tried to download the install_linux_azcmagent.sh script directly as described in the article by Microsoft below. The file is the same as when using our in Azure generated OnboardingScript.sh script.
The OnboardingScript.sh we finally nevertheless needs to run to connect the agent to our tenant, subscription and resource group. But before we need to comment out some lines as shown further down to not overwrite and run the install_linux_azcmagent.sh again.
Install and validate the agent on Linux
https://learn.microsoft.com/en-us/azure/azure-arc/servers/onboard-portal#install-and-validate-the-agent-on-linux
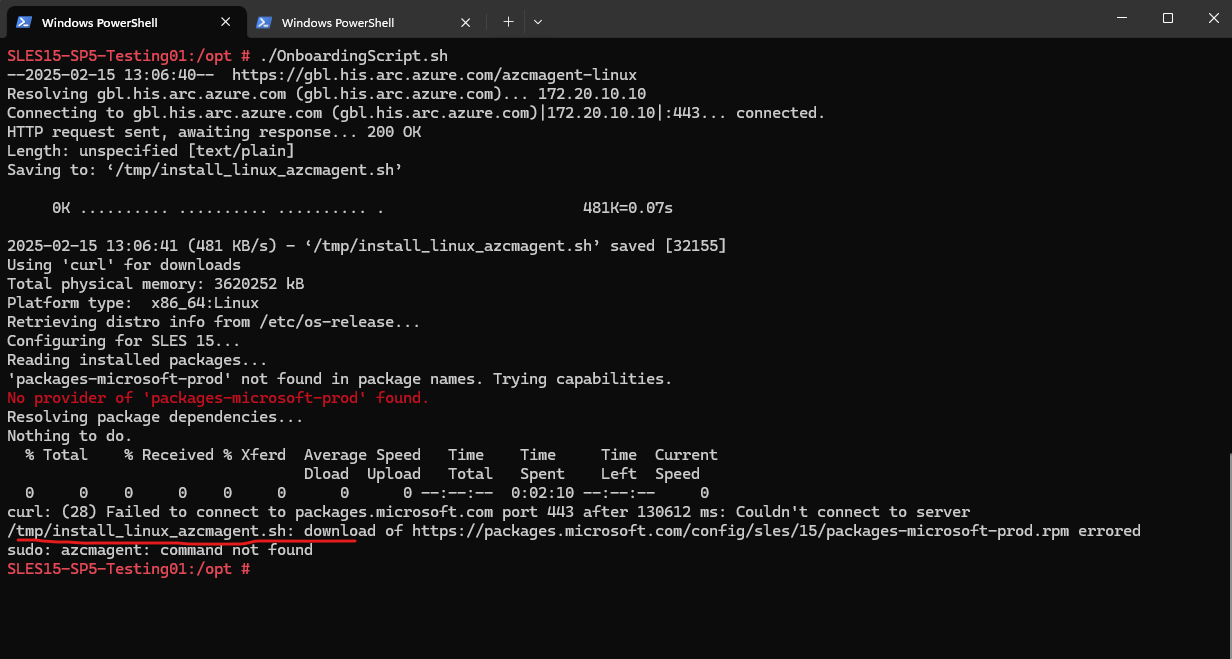
Below I will run into another error because https://scc.suse.com so far is not allowed on the proxy and therefore the SLES OS couldn’t retrieve or update packages.
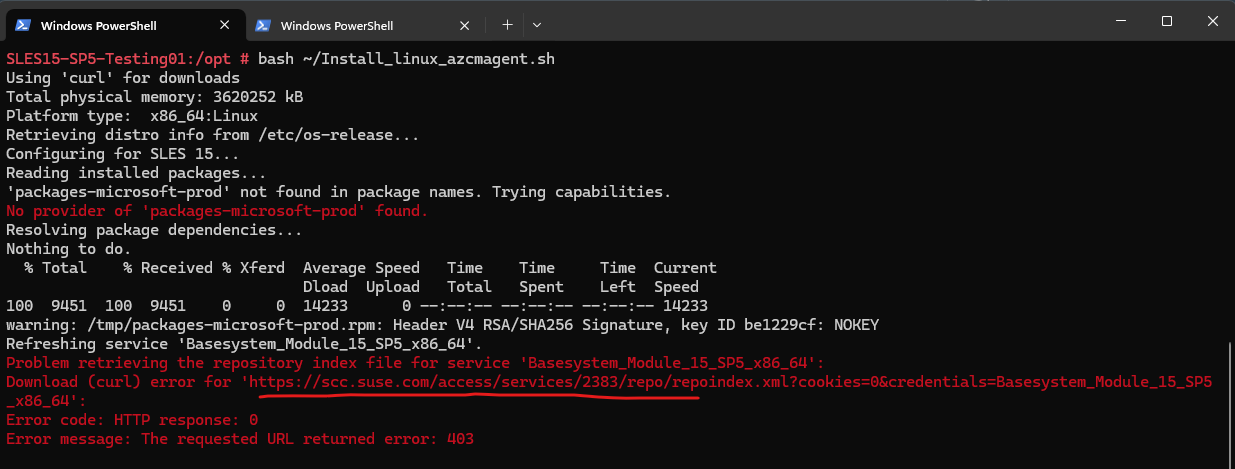
So we also need to allow traffic to https://scc.suse.com on the proxy.
Let’s try it again.
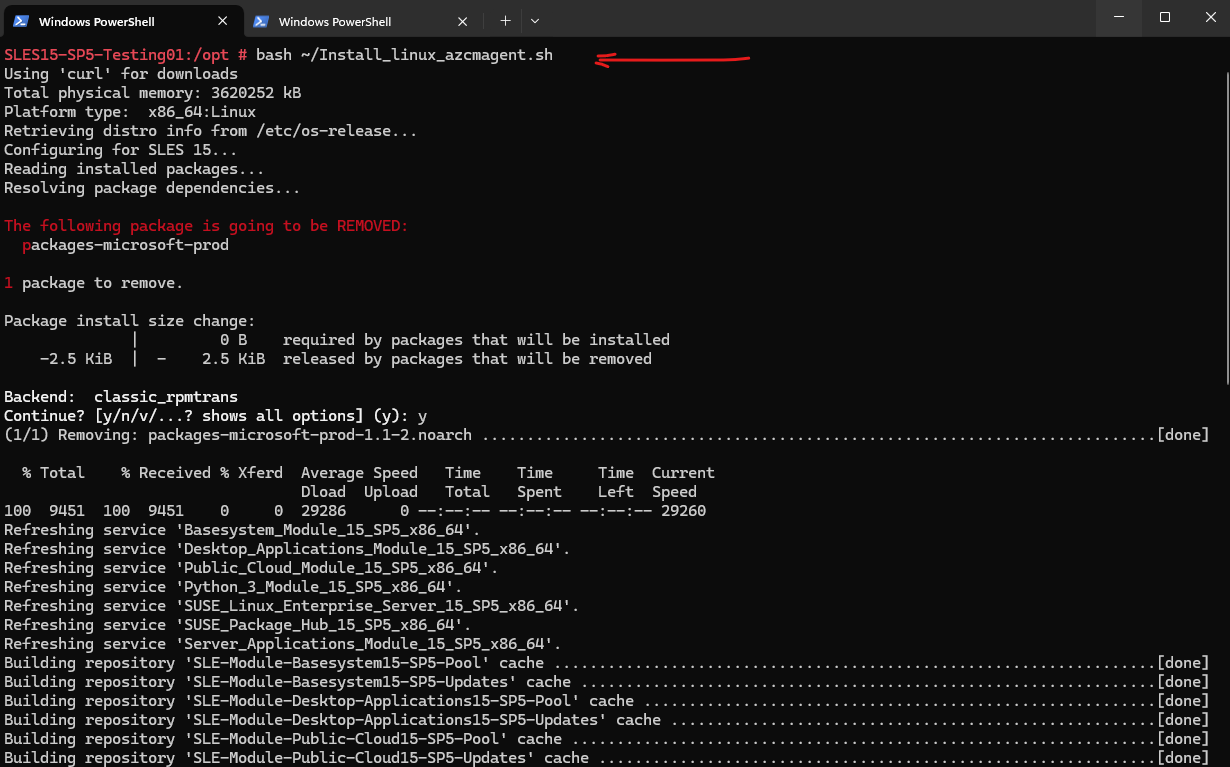
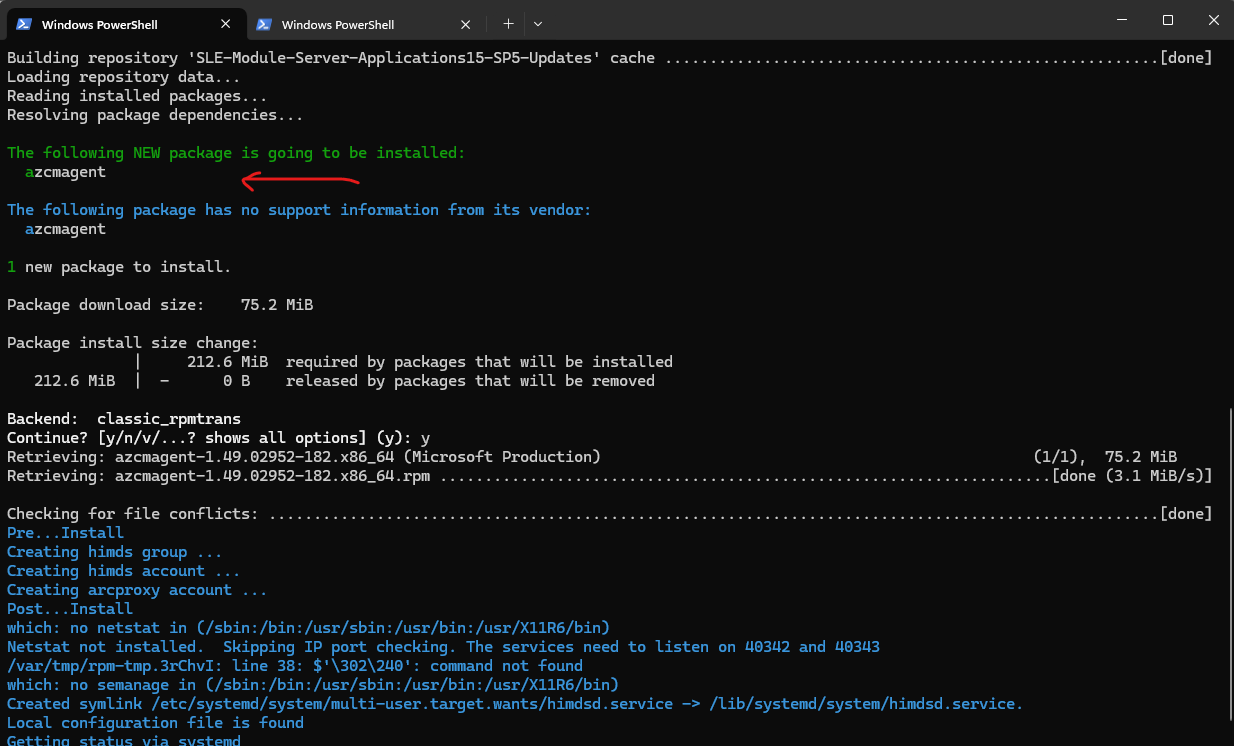
Looks good and the agent was installed successfully.

The next step is to connect the installed agent to Azure Arc, therefore we first need to adjust the OnboardingScript.sh script and commenting some lines out as mentioned.
Below I will comment out the part where the agent and install_linux_azcmagent.sh script will be downloaded and executed.
If not this would overwrite our adjusted install_linux_azcmagent.sh script where we added our proxy previously and then would try to re-install the agent and this time because of the missing proxy setting would run into an error.
So comment the following both sections #Download the installation package andl #Install the hybrid agent as shown below. Finally just the connecting to Azure Arc will be executed.

One final setting before we can run the OnboardingScript.sh again.
By default the Connected Machine agent for Linux will not use the proxy settings of the OS, same as with the Windows agent.
Therefore we first need to execute the following commands to set our proxy settings for the agent.
azcmagent config set proxy.url "http://10.0.0.254:3128"
azcmagent config set proxy.bypass "Arc,ARM"

# checking with
azcmagent config list

Now finally we can run the OnboardingScript.sh again to connect the agent to Azure Arc.
# bash OnboardingScript.sh
By the way as you can see below, to authorize a device that don’t have a keyboard or event don’t have a browser, the device authorization flow will be used in OAuth. More about OAuth and OpenID Connect you will also find in my following post https://blog.matrixpost.net/oauth-2-0-and-openid-connect-deep-dive/.
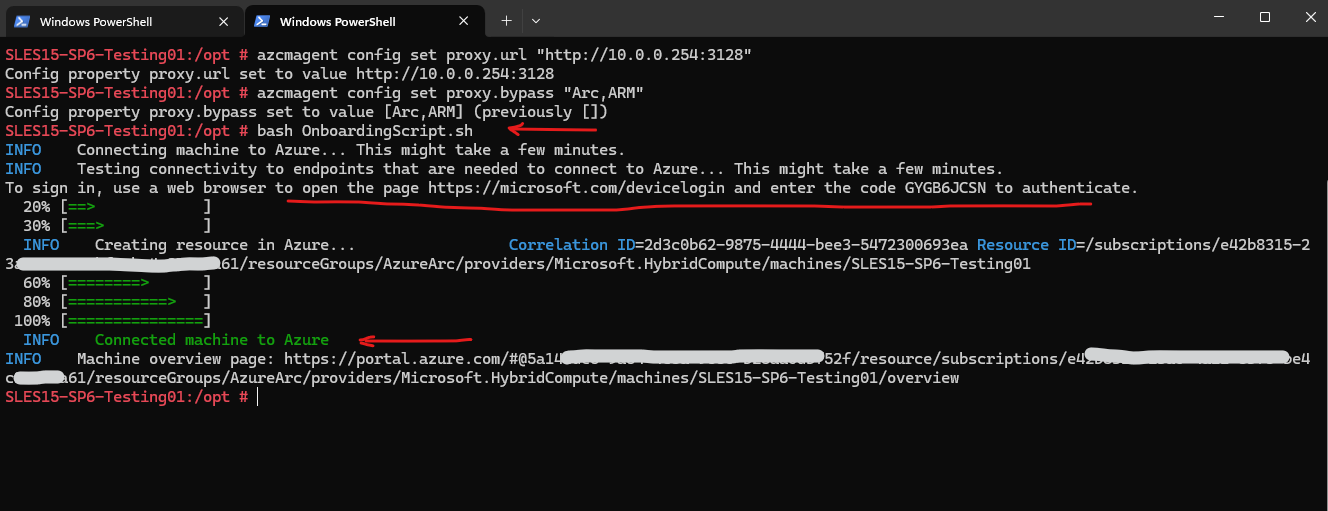
The Linux virtual machine is connected successfully to Azure Arc.

We can check the connection status also directly on the Linux machine by executing the following command.
# azcmagent show | grep -e 'Agent Status' -e 'Agent Version' -e 'Using HTTPS Proxy' -e 'Proxy Bypass List'

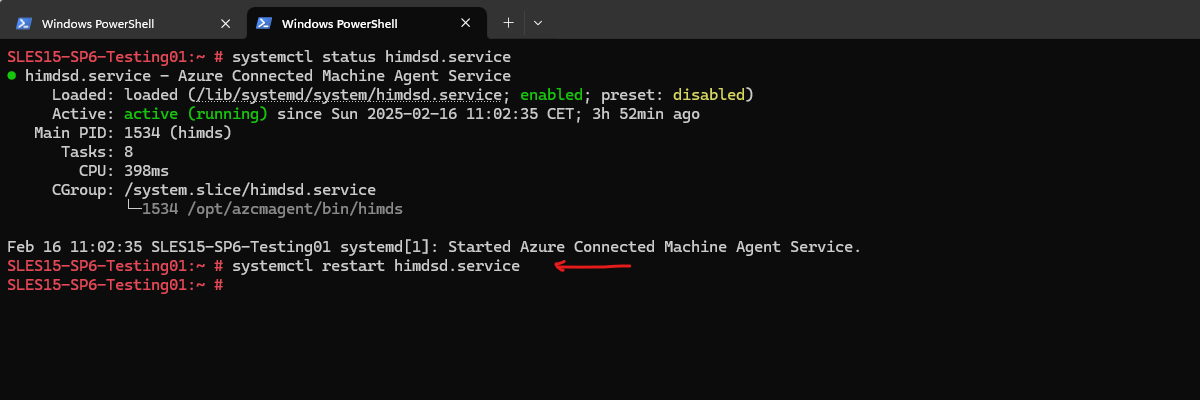
We can also check if the Azure Connected Machine Agent Service is enabled and running on Linux by checking the himdsd.service.
# systemctl status himdsd.service
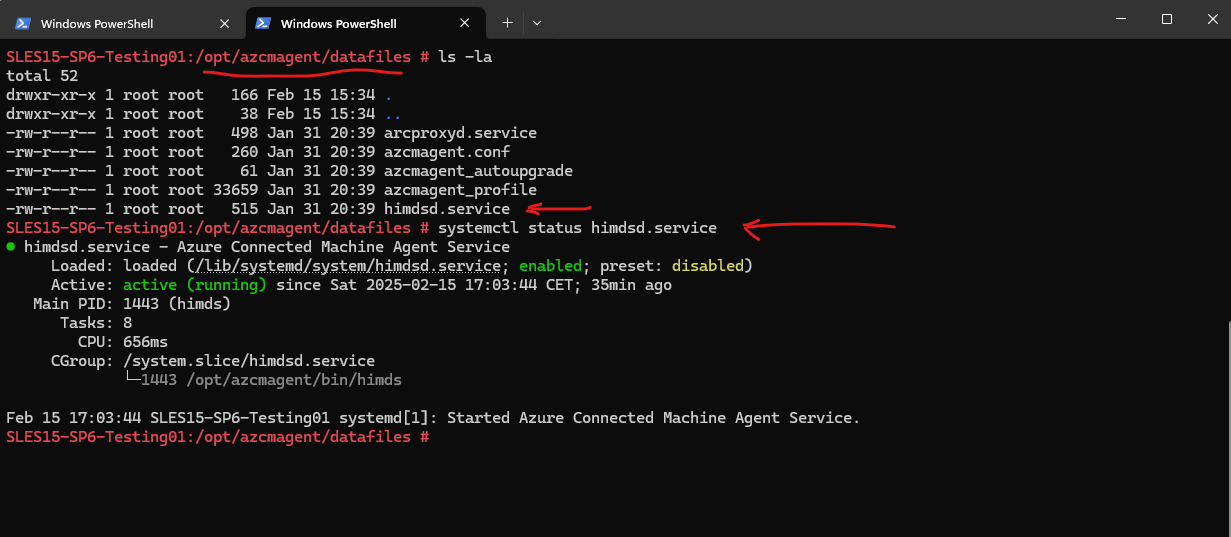
This service implements the Hybrid Instance Metadata service (IMDS) to manage the connection to Azure and the connected machine’s Azure identity.
Linux agent installation details
https://learn.microsoft.com/en-us/azure/azure-arc/servers/agent-overview#linux-agent-installation-details
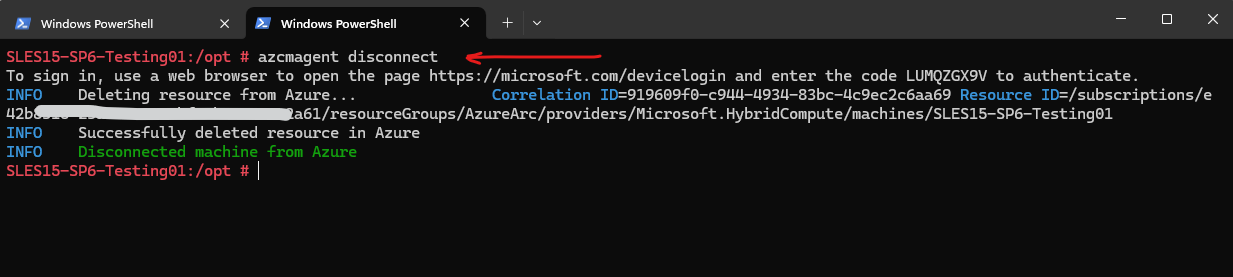
To disconnect the agent we can use the following command.
# azcmagent disconnect
Azure Arc Proxy
In case you also wondering about what the heck is Azure Arc Proxy, especially when we previously configured directly a proxy by using the Azure connected machine agent (azcmagent.exe) itself and the following command.
> azcmagent.exe config set proxy.url "<proxy fqdn or ip address:port>"
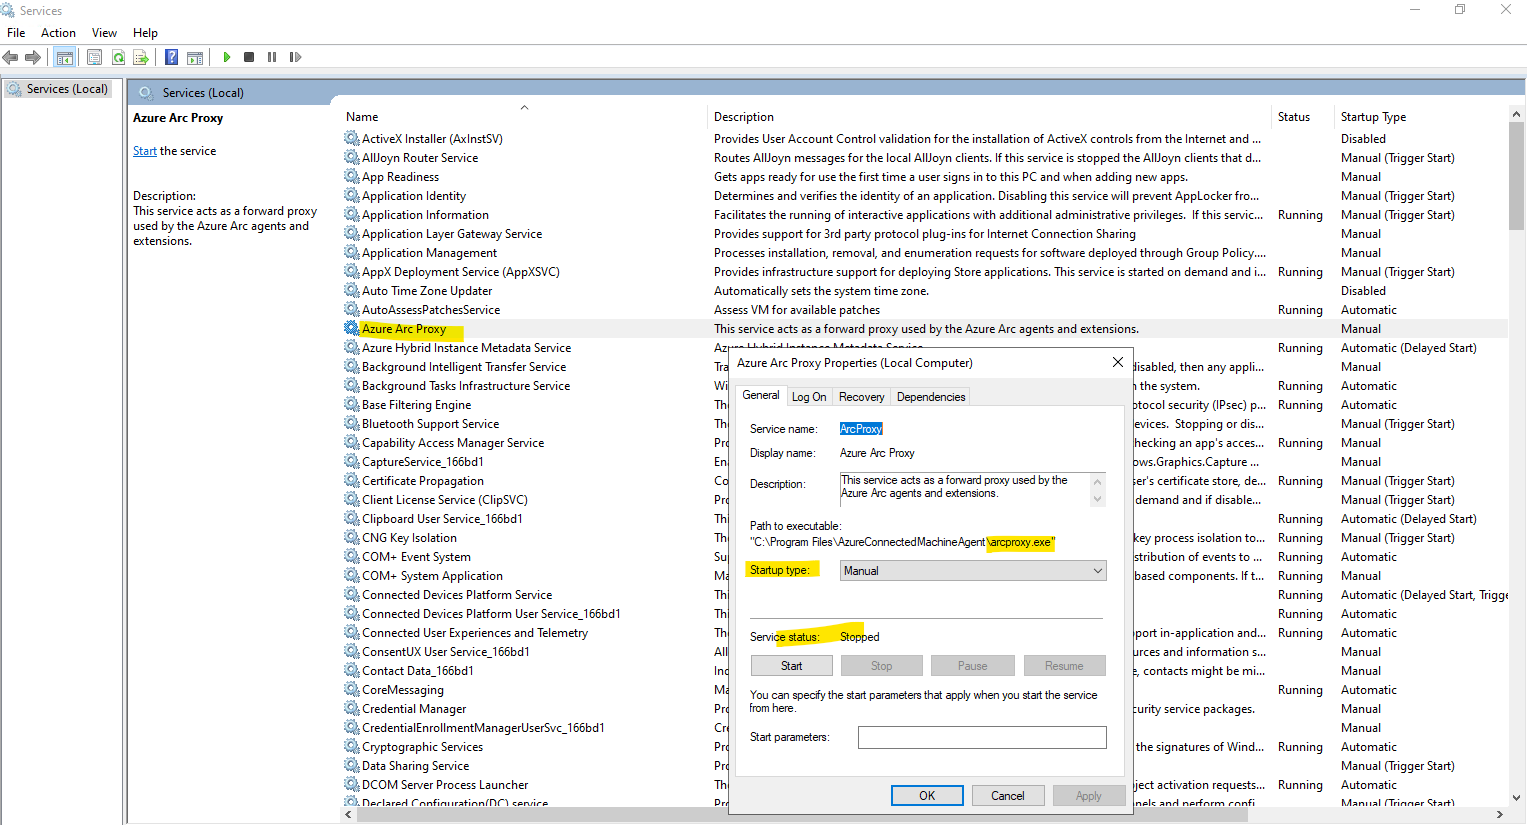
The Azure Arc Proxy runs as a Network Service on Windows and a standard user account (arcproxy) on Linux. It’s disabled by default until you configure the agent to use the Azure Arc gateway (Limited preview).
Source: https://learn.microsoft.com/en-us/azure/azure-arc/servers/agent-overview#azure-arc-proxy
So finally the Azure Arc Proxy is only needed in case you will use the Azure Arc gateway, another way for secure connectivity to Azure Arc instead Azure Arc Private Link Scope.
Azure Arc gateway consists of two main components:
- The Arc gateway resource: An Azure resource that serves as a common front-end for Azure traffic. This gateway resource is served on a specific domain. Once the Arc gateway resource is created, the domain is returned to you in the success response.
- The Arc Proxy: A new component added to Arc agentry. This component runs as a service called “Azure Arc Proxy” and acts as a forward proxy used by the Azure Arc agents and extensions. No configuration is required on your part for the Arc Proxy. This Proxy is part of Arc core agentry and runs within the context of an Arc-enabled resource.
More about the Azure Arc gateway (Public Preview) you will find in the following article by Microsoft https://learn.microsoft.com/en-us/azure/azure-arc/servers/arc-gateway?tabs=portal.
Troubleshoot
Force the Azure Connected Machine agent to connect to Azure Arc
On Windows restart the Azure Hybrid Instance Metadata Service.
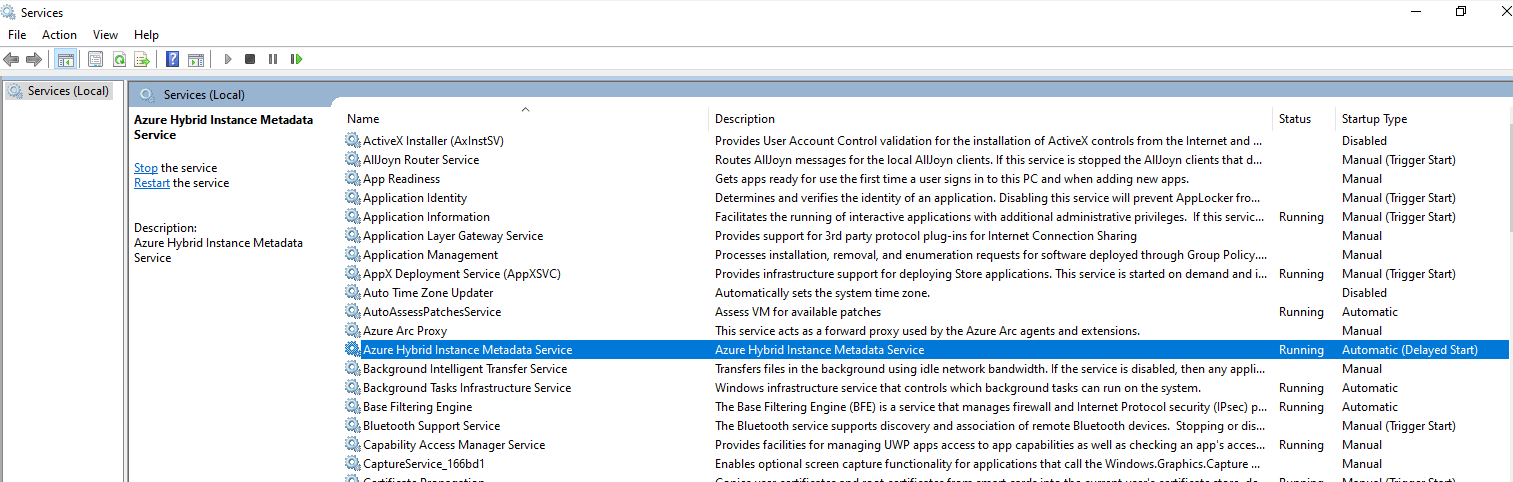
On Linux restart the himdsd.service.
# systemctl restart himdsd.service
About how to configure a S2S IPsec VPN Tunnel between on-premise and Azure, you can read my following posts.
Links
Use Azure Private Link to securely connect servers to Azure Arc
https://learn.microsoft.com/en-us/azure/azure-arc/servers/private-link-securityAzure DNS Private Resolver endpoints and rulesets
https://learn.microsoft.com/en-us/azure/dns/private-resolver-endpoints-rulesetsQuickstart: Create an Azure DNS Private Resolver using the Azure portal
https://learn.microsoft.com/en-us/azure/dns/dns-private-resolver-get-started-portalAzure Private Endpoint DNS integration
https://learn.microsoft.com/en-us/azure/private-link/private-endpoint-dns-integration.ms ccTLD Domain
https://en.wikipedia.org/wiki/.msazcmagent CLI reference
https://learn.microsoft.com/en-us/azure/azure-arc/servers/azcmagentConnect hybrid machines to Azure using a deployment script
https://learn.microsoft.com/en-us/azure/azure-arc/servers/onboard-portal#install-and-validate-the-agent-on-linux