How to onboard on-premise Server (Azure Arc) and native Azure Server (VMs) to Microsoft Defender for Servers
In this post we will see step by step how we can onboard our Azure Arc-enabled on-premise Windows and Linux Servers (bare-metal or virtual machines) and Azure Server (VMs) to Microsoft Defender for Servers.
In order to onboard our on-premise machines to Microsoft Defender for Servers, we first need to onboard and connect them to Azure Arc as shown in my following post.
For virtual machines hosted in vSphere we can also set up Azure Arc-enabled VMware vSphere which will simplify onboarding our on-premise VMware vSphere infrastructure to Azure as shown in my following post.
Microsoft Defender for Servers extends protection to your Windows and Linux machines that run in Azure, Amazon Web Services (AWS), Google Cloud Platform (GCP), and on-premises.
Defender for Servers integrates with Microsoft Defender for Endpoint to provide endpoint detection and response (EDR) and other threat protection features.
Source: https://learn.microsoft.com/en-us/azure/defender-for-cloud/plan-defender-for-servers
Microsoft Defender for Cloud offers two paid plans for Defender for Servers.
Microsoft Defender for Servers Plan 1 is entry-level and must be enabled at the subscription level.
Microsoft Defender for Servers Plan 2 provides all features. The plan must be enabled at the subscription level and at the workspace level to get full feature coverage.More about here https://azure.microsoft.com/en-us/pricing/details/defender-for-cloud/
Select a Defender for Servers plan
https://learn.microsoft.com/en-us/azure/defender-for-cloud/plan-defender-for-servers-select-plan
When you enable Defender for Cloud, you automatically gain access to Microsoft Defender XDR (formerly Microsoft 365 Defender).
You can learn more about the integration between Microsoft Defender for Cloud and Microsoft Defender XDR.
- Introduction
- Enable Microsoft Defender for Cloud on an Azure Subscription
- Verify client connectivity to Microsoft Defender for Endpoint service URLs
- Determine the Antimalware status directly on the Computer
- Determine if the Server is onboarded to Defender for Endpoint directly on the Server
- Security baselines assessment
- Troubleshooting
- Links
Introduction
Defender for Servers in Microsoft Defender for Cloud brings threat detection and advanced defenses to your Windows and Linux machines that run in Azure, Amazon Web Services (AWS), Google Cloud Platform (GCP), and on-premises environments. This plan includes the integrated license for Microsoft Defender for Endpoint, security baselines and OS level assessments, vulnerability assessment scanning, adaptive application controls (AAC), file integrity monitoring (FIM), and more.
Microsoft Defender for Servers includes an automatic, native integration with Microsoft Defender for Endpoint. Learn more, Protect your endpoints with Defender for Cloud’s integrated EDR solution: Microsoft Defender for Endpoint. With this integration enabled, you have access to the vulnerability findings from Microsoft Defender vulnerability management.
Defender for Servers offers two plan options with different levels of protection and their own cost. You can learn more about Defender for Cloud’s pricing on the pricing page.
Source: https://learn.microsoft.com/en-us/azure/defender-for-cloud/tutorial-enable-servers-plan
Prerequisites
- You need a Microsoft Azure subscription. If you don’t have an Azure subscription, you can sign up for a free subscription.
- You must enable Microsoft Defender for Cloud on your Azure subscription.
- Onboard on-premise machines to Azure Arc.
You can enable the Defender for Servers plan on an Azure subscription, AWS account, or GCP project, the Log Analytics workspace level, or enable the plan at the resource level.
When you enable Microsoft Defender for Servers on an Azure subscription or a connected AWS account, all of the connected machines are protected by Defender for Servers. You can enable Microsoft Defender for Servers at the Log Analytics workspace level, but only servers reporting to that workspace will be protected and billed and those servers won’t receive some benefits, such as Microsoft Defender for Endpoint, vulnerability assessment, and just-in-time VM access.
Source: https://learn.microsoft.com/en-us/azure/defender-for-cloud/plan-defender-for-servers
Enable Microsoft Defender for Cloud on an Azure Subscription
You can enable the Defender for Servers plan from the Environment settings page to protect all the machines in an Azure subscription (Azure Arc and Azure native VMs), AWS account, or GCP project.
To enable the Defender for Servers plan sign in to the Azure portal and search for Microsoft Defender for Cloud as shown below.

In the Defender for Cloud menu, select Environment settings.
Select the relevant Azure subscription, AWS account, or GCP project.
Below I will select here my Microsoft Azure Sponsorship subscription to enable a Defender for Servers plan.
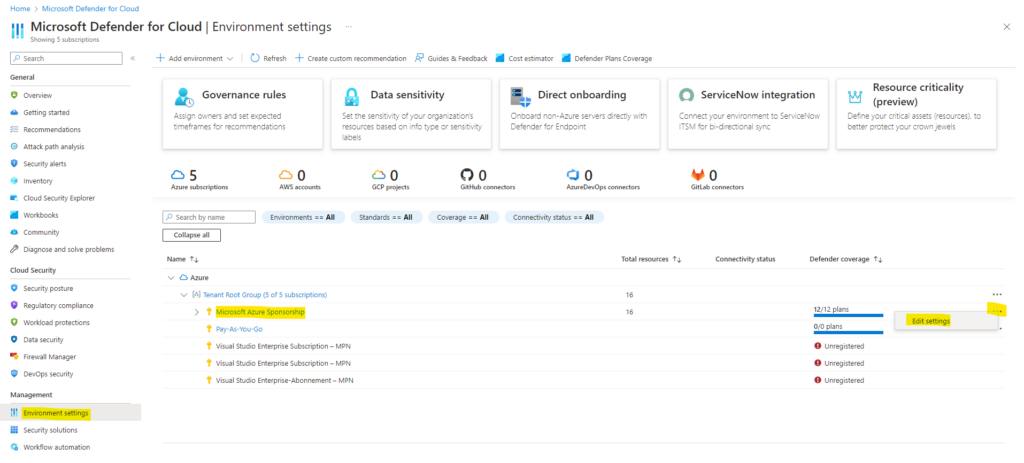
As you can see below I had already enabled Defender for Servers plan 2 on this subscription. There are two plans you can choose from that offer different levels of protections for your resources.
After enabling the plan, you have the ability to configure the features of the plan to suit your needs. When you enable Defender for Servers on a subscription, it doesn’t extend that coverage to an attached workspace. You need to enable Defender for Servers on the Log Analytics workspace level.
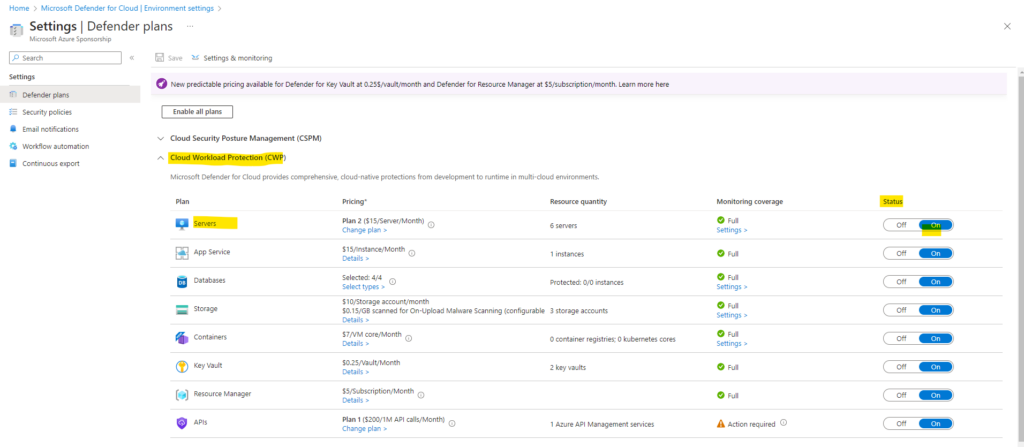
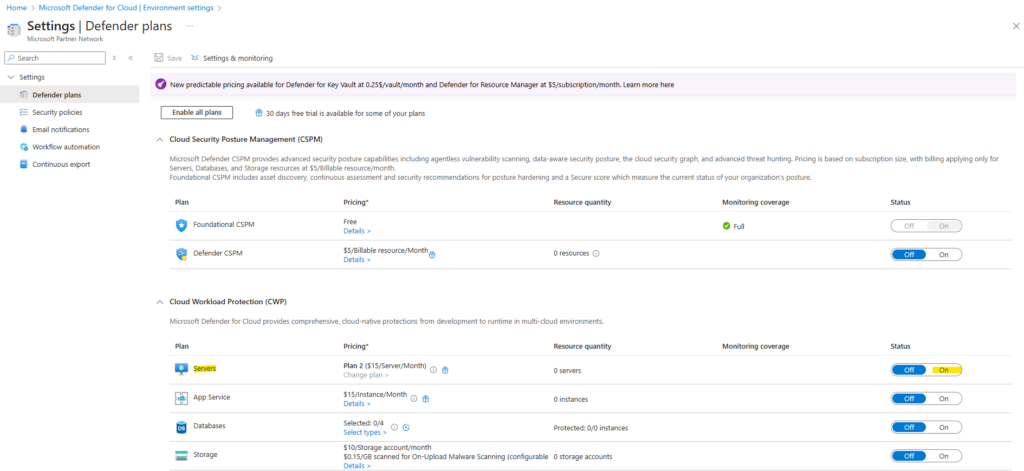
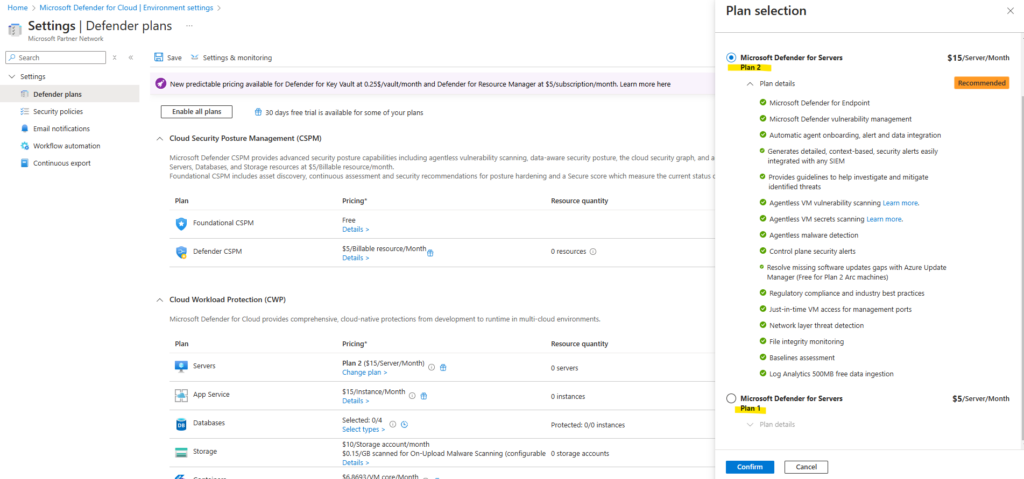
When we enable the Defender for Servers plan, we can choose to enable Plan 1 or Plan 2.
First we need to switch on the Servers plan as shown below.
By default, Plan 2 is enabled, to change to Plan 1, we need to click below on Change plan.
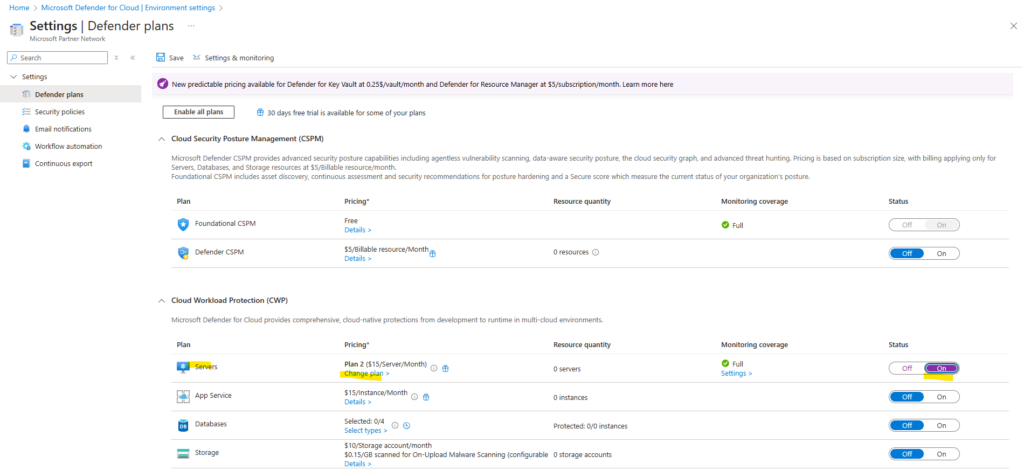
Then we can choose between Plan 1 and Plan 2.
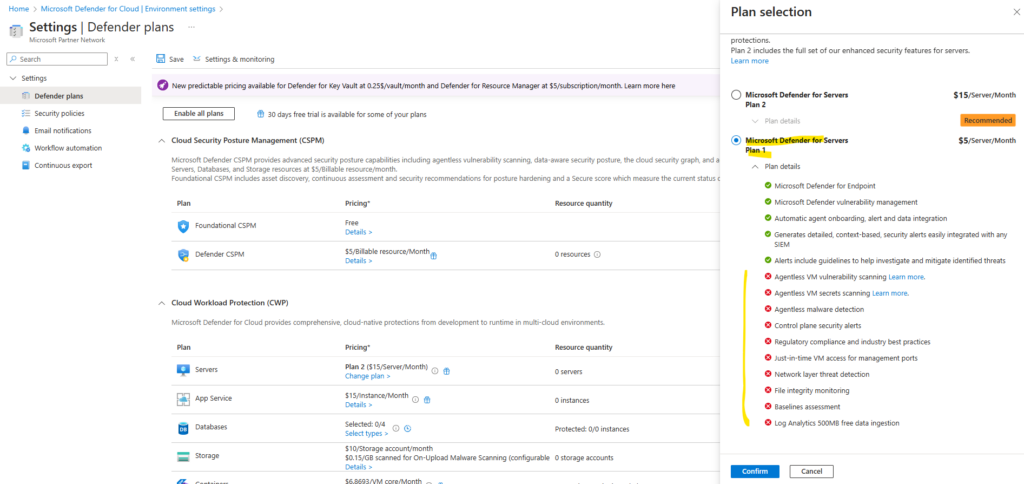
Below we can see which features are not supported by Plan 1 in red.
From now on all native Azure VMs and Azure Arc connected machines within my Microsoft Azure Sponsorship subscription are protected by Defender for Servers.
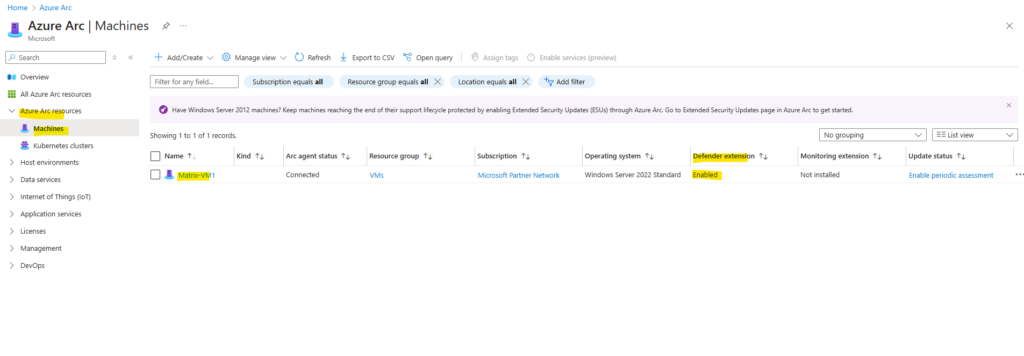
For Azure Arc machines to be finally protected can take a while, here first the Defender extension named MDE. Windows needs to be pushed and installed on the machine by Azure. In my case this took around 20 minutes and further 2-3 minutes till the machine appears in Defender for Cloud.
In Azure Arc we will see when the extension finally is installed.
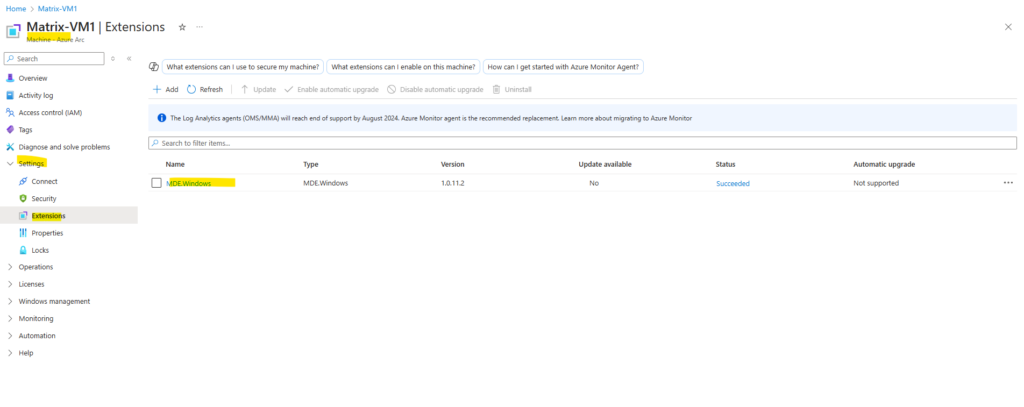
You will see this also in the Settings -> Extensions blade of the machine.
On a Windows machine.
The MDE.Windows (Azure Guest Extension) is responsible for onboarding Defender for Servers
On a Linux machine.
The MDE.Linux (Azure Guest Extension) is responsible for onboarding Defender for Servers
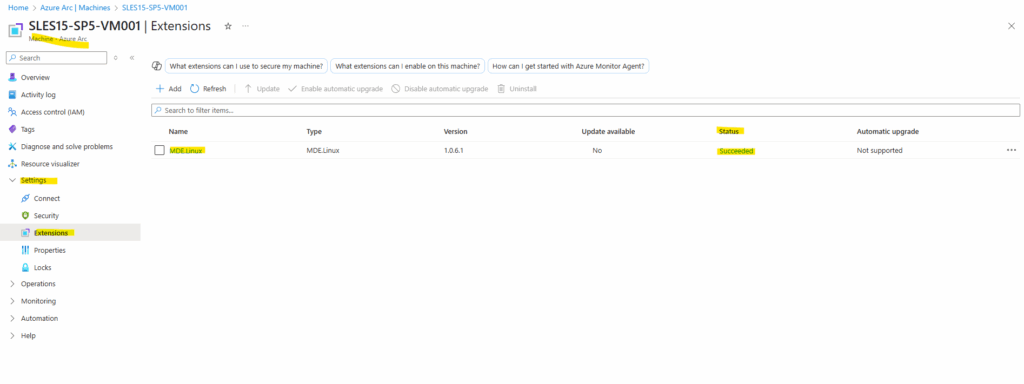
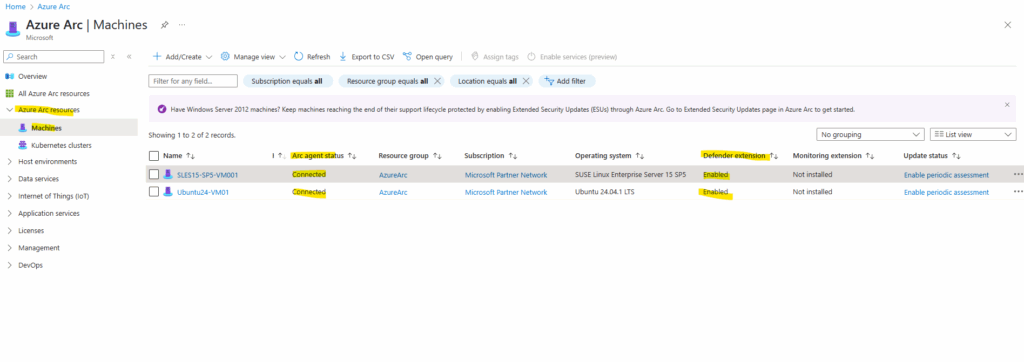
And as mentioned a few minutes later in Defender for Cloud.
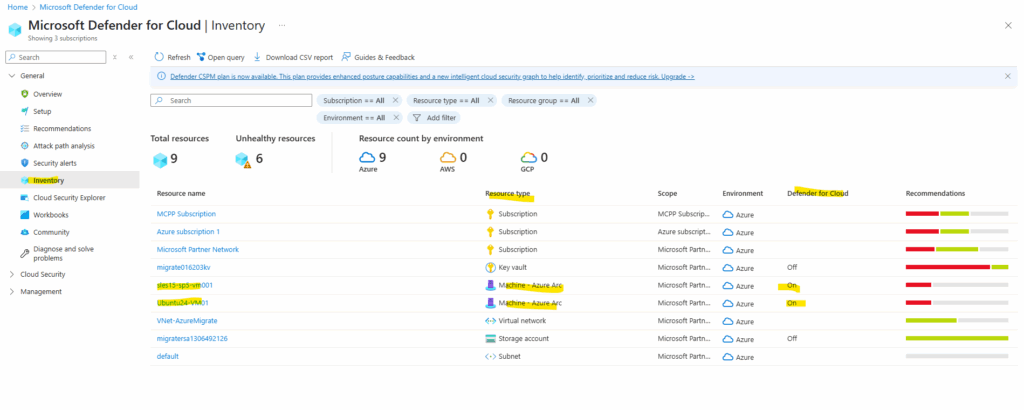
When you enable Microsoft Defender for Servers on an Azure subscription or a connected AWS account, all of the connected machines are protected by Defender for Servers. You can enable Microsoft Defender for Servers at the Log Analytics workspace level, but only servers reporting to that workspace will be protected and billed and those servers won’t receive some benefits, such as Microsoft Defender for Endpoint, vulnerability assessment, and just-in-time VM access.
Defender for Cloud provides you with the ability to check if your resources have Defender for Cloud enabled on them.
Below you will see for example three native Azure virtual machines (the first three) and a few of my on-premises machines which are connected through Azure Arc and protected by Defender for Cloud resp. Defender for Servers.
Defender for Server’s settings for each resource are inherited by the subscription-level settings by default. Once you change settings at the resource level, the resource will no longer inherit settings from its parent subscription unless you delete the settings you configured.
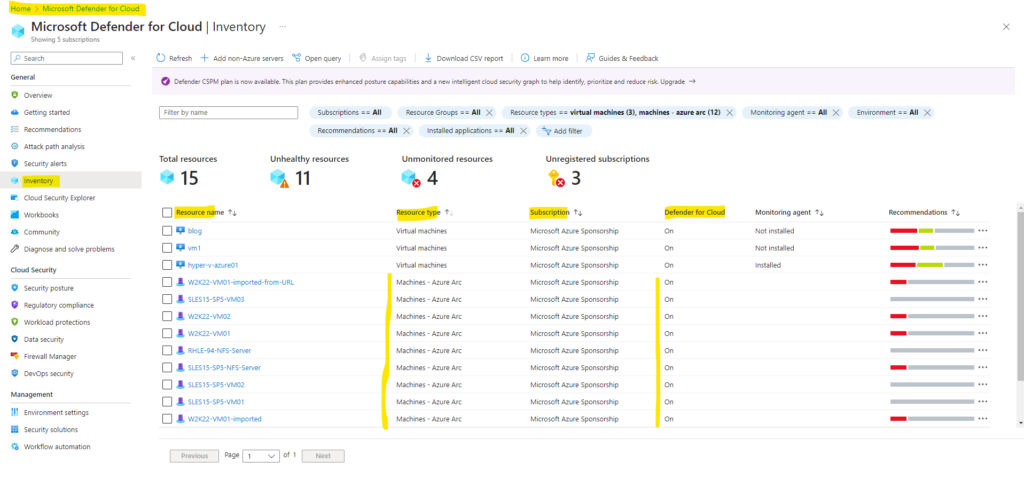
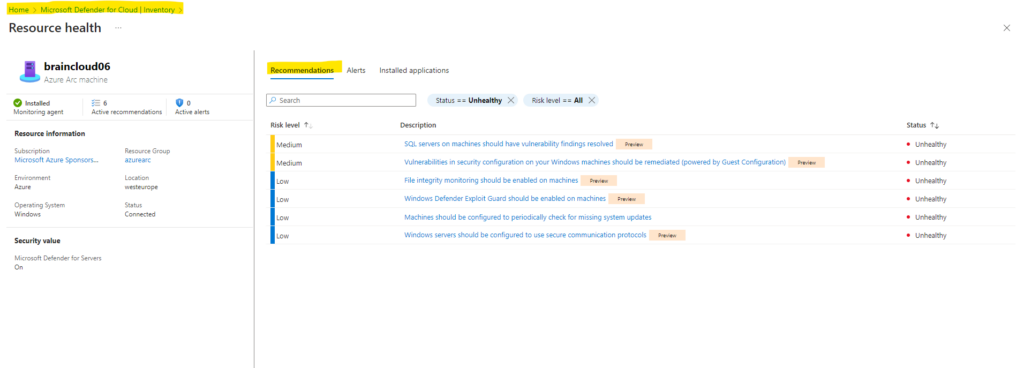
When clicking on one of them we can check its resource health state and will also get some recommendations we should configure for.
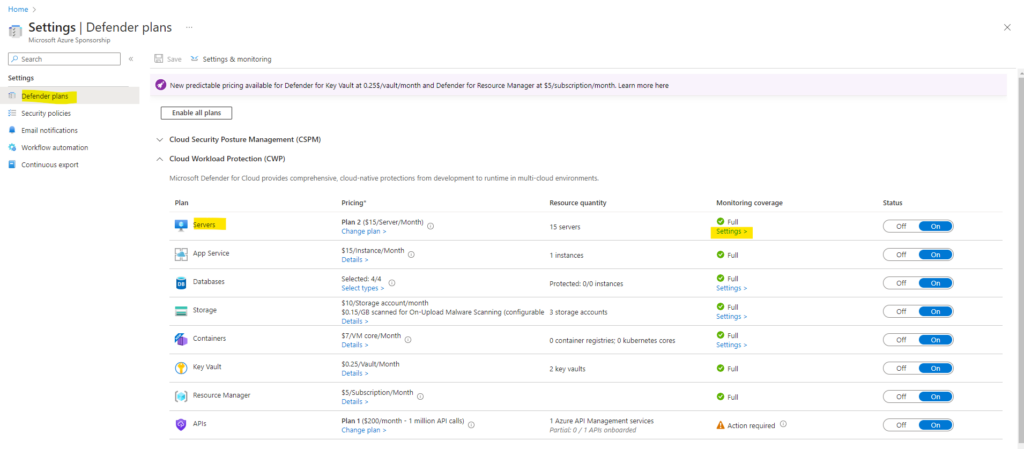
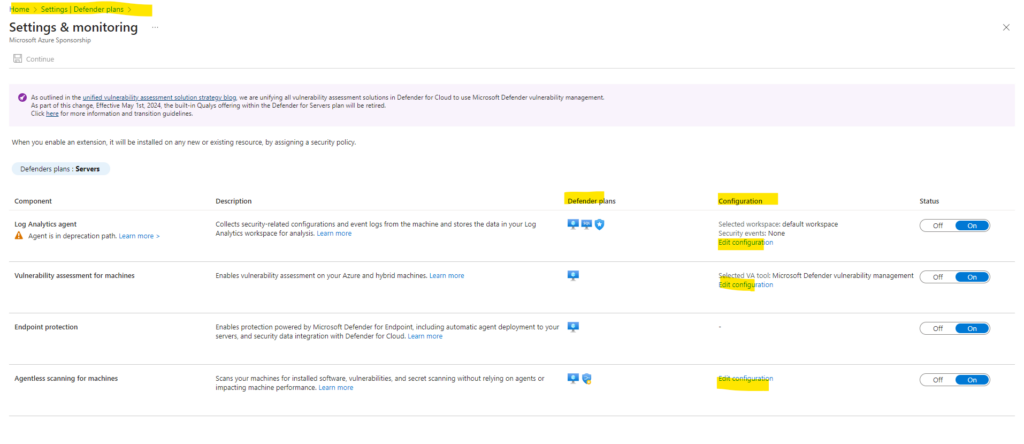
We can change the Defender for Server’s settings directly on the Defender plans as shown below. Select the Servers Plan and click on Settings.
Disable Defender for Servers plan
To disable The Defender for Servers plan or any of the features of the plan, navigate to the Environment settings page of the relevant subscription or workspace and toggle the relevant switch to Off.
When you disable the Defender for Servers plan on a subscription, it doesn’t disable it on a workspace. To disable the plan on a workspace, you must navigate to the plans page for the workspace and toggle the switch to Off.
Microsoft Defender XDR Portal Integration
When you enable Defender for Cloud, Defender for Cloud’s alerts are automatically integrated into the Microsoft Defender Portal. No further steps are needed.
The integration between Microsoft Defender for Cloud and Microsoft Defender XDR brings your cloud environments into Microsoft Defender XDR. With Defender for Cloud’s alerts and cloud correlations integrated into Microsoft Defender XDR, SOC teams can now access all security information from a single interface.
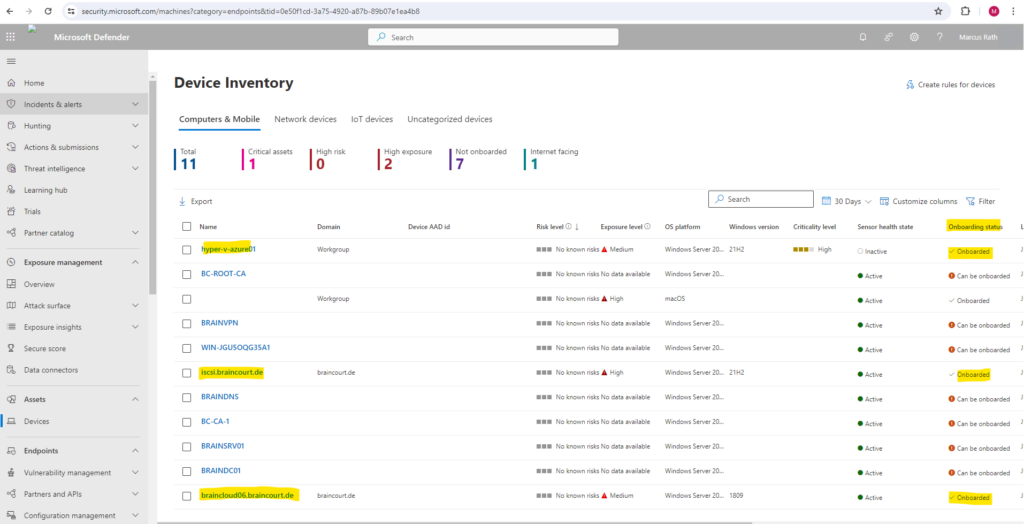
For newly onboarded devices it can take 24-48 hours for the devices to shown up in Microsoft Defender XDR. Recently (December 2024), this took just around 5 minutes for a newly onboarded Azure Arc virtual machine in Microsoft Defender for Cloud.
https://security.microsoft.com -> Assets -> Devices
Verify client connectivity to Microsoft Defender for Endpoint service URLs
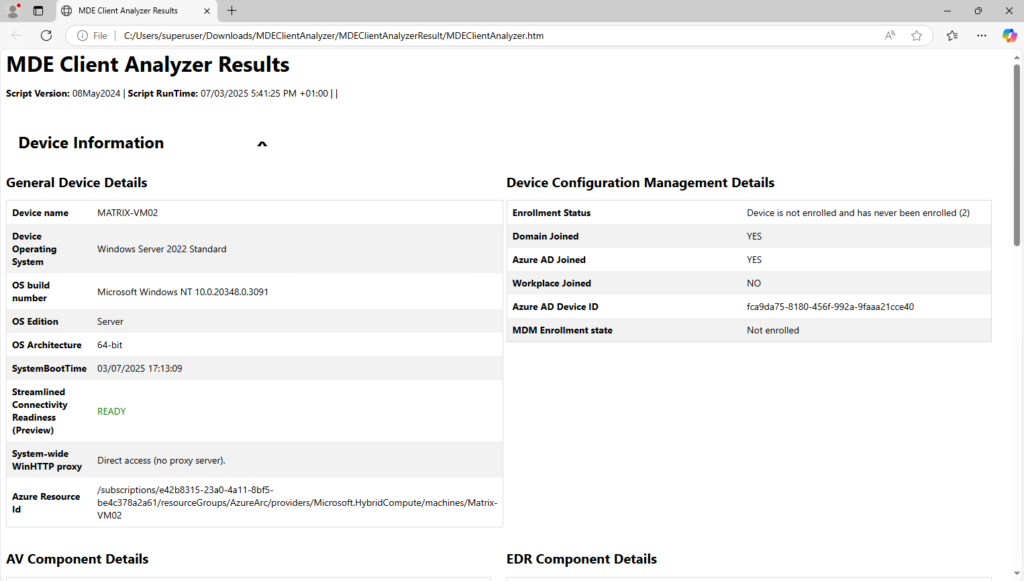
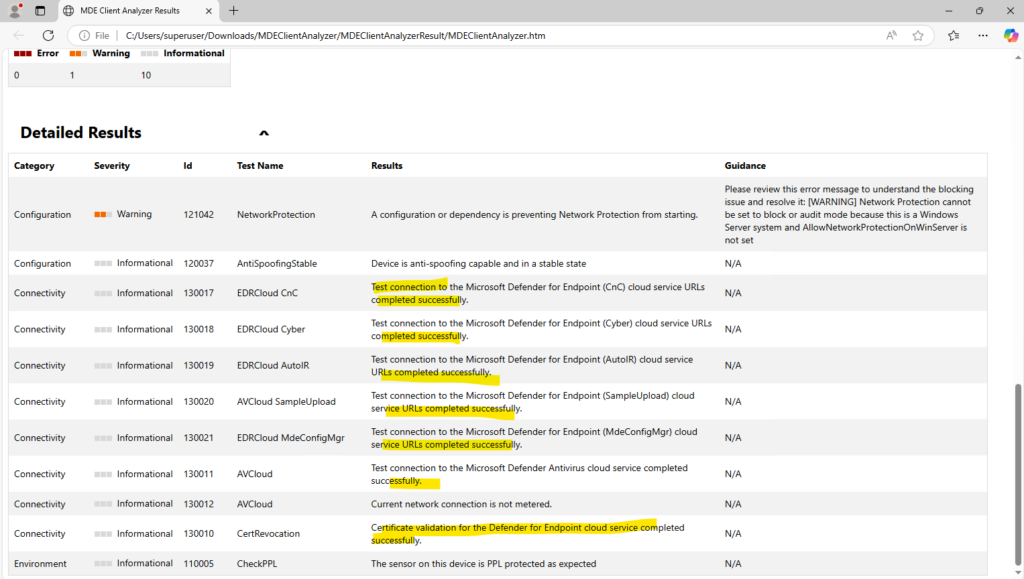
We can check that clients are able to connect to the Defender for Endpoint service URLs using the Defender for Endpoint Client Analyzer to ensure that endpoints are able to communicate telemetry to the service.
For more information on the Defender for Endpoint Client Analyzer, see Troubleshoot sensor health using Microsoft Defender for Endpoint Client Analyzer.
Download the Microsoft Defender for Endpoint Client Analyzer tool where Defender for Endpoint sensor is running on.
Extract the contents of MDEClientAnalyzer.zip on the device and start the MDEClientAnalyzer.cmd script.
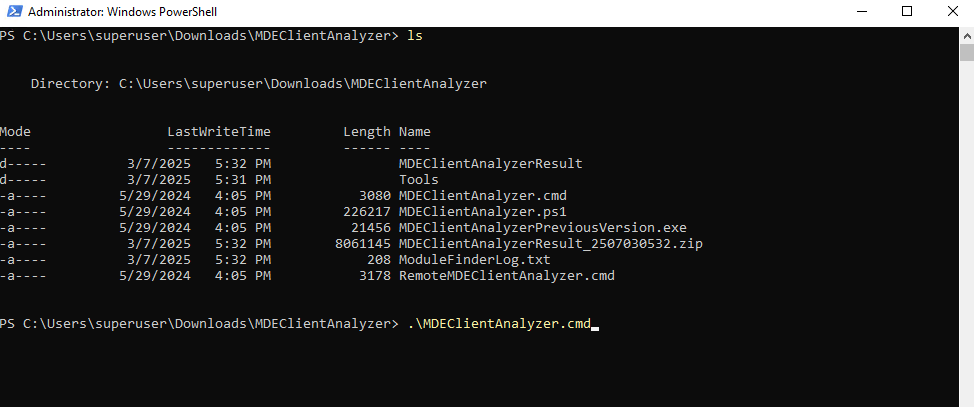
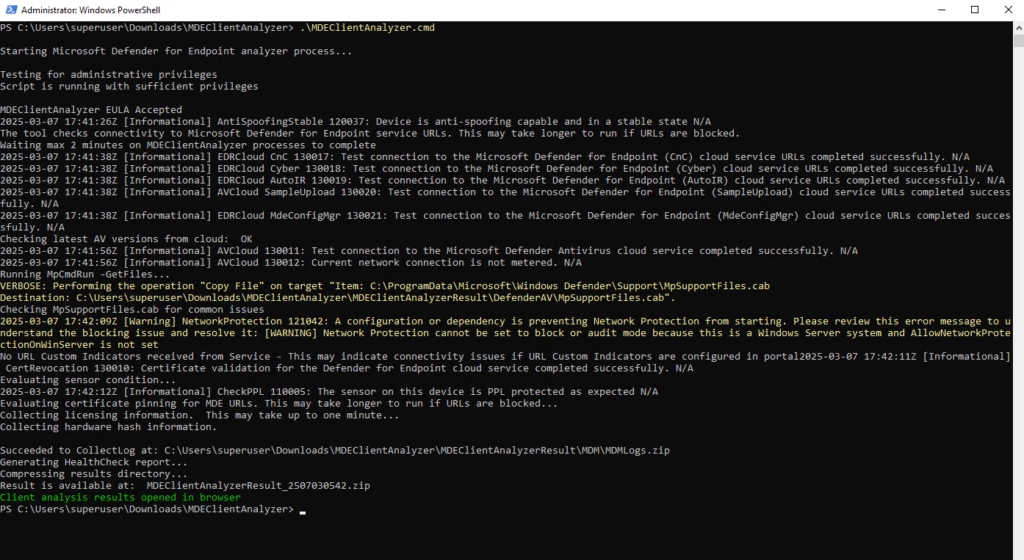
The tool creates and extracts the MDEClientAnalyzerResult.zip file in the folder to use in the HardDrivePath.

Source: https://learn.microsoft.com/en-us/defender-endpoint/verify-connectivity
Determine the Antimalware status directly on the Computer
We can use the Get-MpComputerStatus cmdlet gets the status of antimalware software installed on the computer.
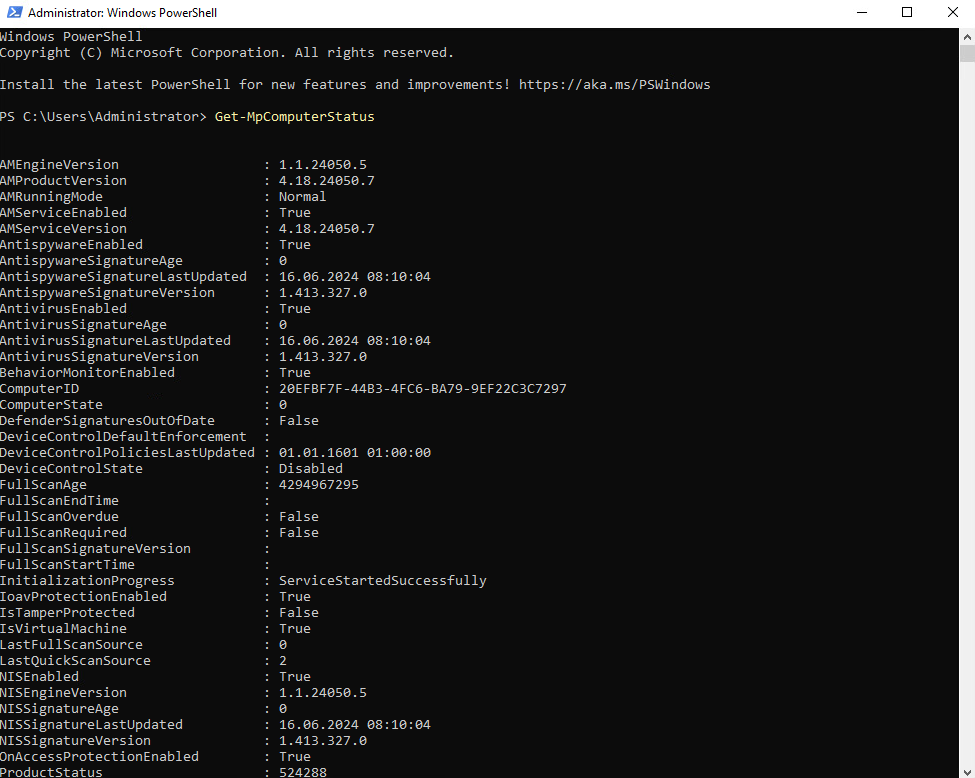
More about under https://learn.microsoft.com/en-us/powershell/module/defender/get-mpcomputerstatus?view=windowsserver2022-ps&viewFallbackFrom=win10-ps.
To check the preferences for the Windows Defender scans and updates we can use the Get-MpPreference cmdlet.
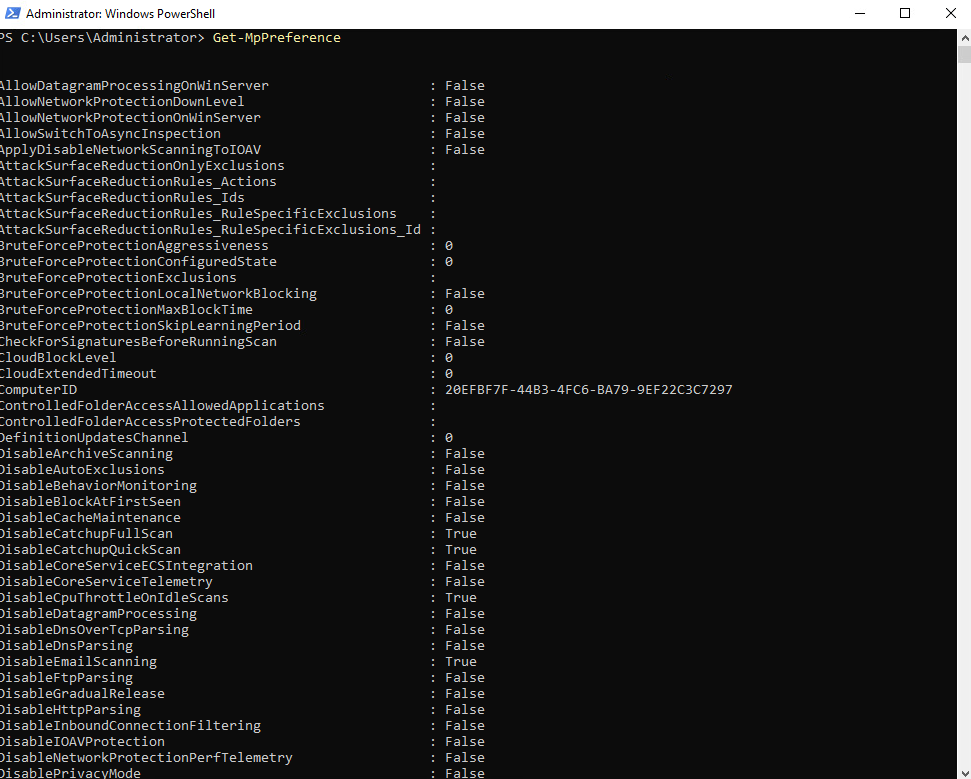
More about under https://learn.microsoft.com/en-us/powershell/module/defender/get-mppreference?view=windowsserver2022-ps.
Use PowerShell to check the status of Microsoft Defender Antivirus
Get-MpComputerStatus | ft AMRunningMode

- Normal means Microsoft Defender Antivirus is running in active mode.
- Passive mode means Microsoft Defender Antivirus running, but is not the primary antivirus/antimalware product on your device. Passive mode is only available for devices that are onboarded to Microsoft Defender for Endpoint and that meet certain requirements. To learn more, see Requirements for Microsoft Defender Antivirus to run in passive mode.
- EDR Block Mode means Microsoft Defender Antivirus is running and Endpoint detection and response (EDR) in block mode, a capability in Microsoft Defender for Endpoint, is enabled. Check the ForceDefenderPassiveMode registry key. If its value is 0, it is running in normal mode; otherwise, it is running in passive mode.
- SxS Passive Mode means Microsoft Defender Antivirus is running alongside another antivirus/antimalware product, and limited periodic scanning is used.
Determine if the Server is onboarded to Defender for Endpoint directly on the Server
As mentioned to the beginning, Microsoft Defender for Servers includes an automatic, native integration with Microsoft Defender for Endpoint.
On Windows
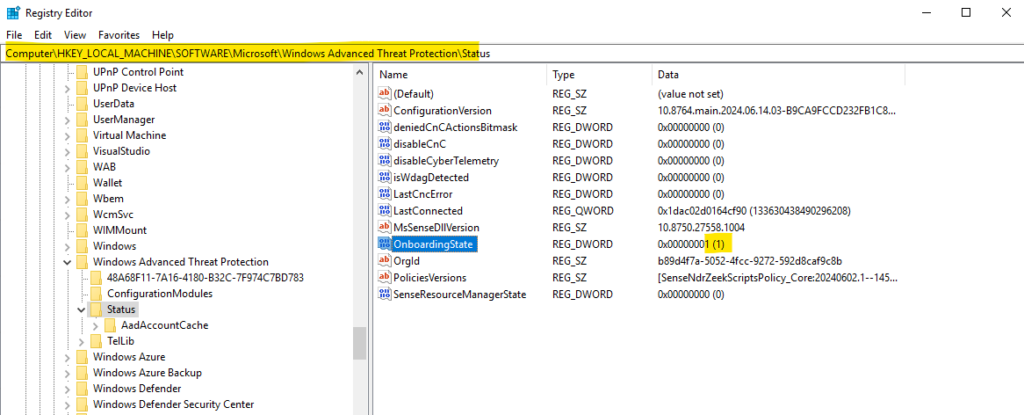
To determine if the server is onboarded to Microsoft Defender for Endpoint directly on the server itself, you can check the following registry entry on the server:
Computer\HKEY_LOCAL_MACHINE\SOFTWARE\Microsoft\Windows Advanced Threat Protection\Status
OnboardingState
If the value for OnboardingState is 1, the server is onboarded to Microsoft Defender for Endpoint.
Windows Defender Advanced Threat Protection (ATP), now known as Microsoft Defender for Endpoint
On Linux
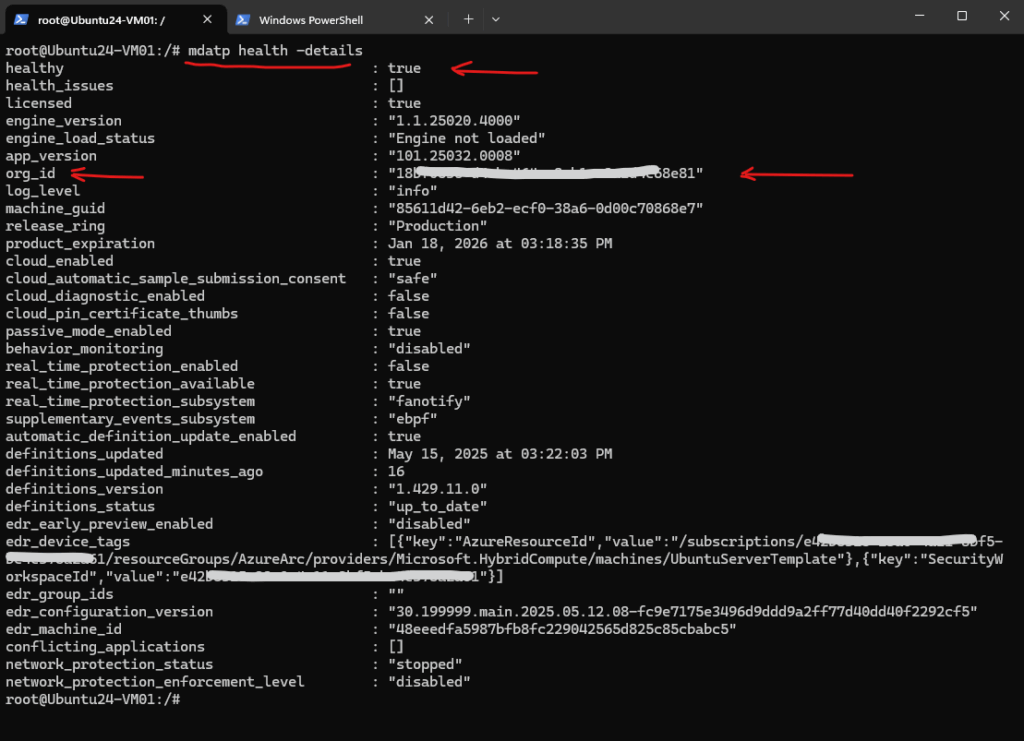
Check the output of the mdatp tool.
org-id ==> Present means it’s onboarded.
The command mdatp health -details shows the status of Microsoft Defender for Endpoint (formerly known as Microsoft Defender Advanced Threat Protection or MDATP).
By using a PowerShell script or the EICAR anti-virus test file
We can also determine if the server are onboarded successfully to Microsoft Defender for Endpoint by executing a PowerShell script within an elevated command-line prompt or the EICAR anti-virus test file as shown here https://blog.matrixpost.net/set-up-microsoft-defender-for-endpoint/#verify_onboarding.
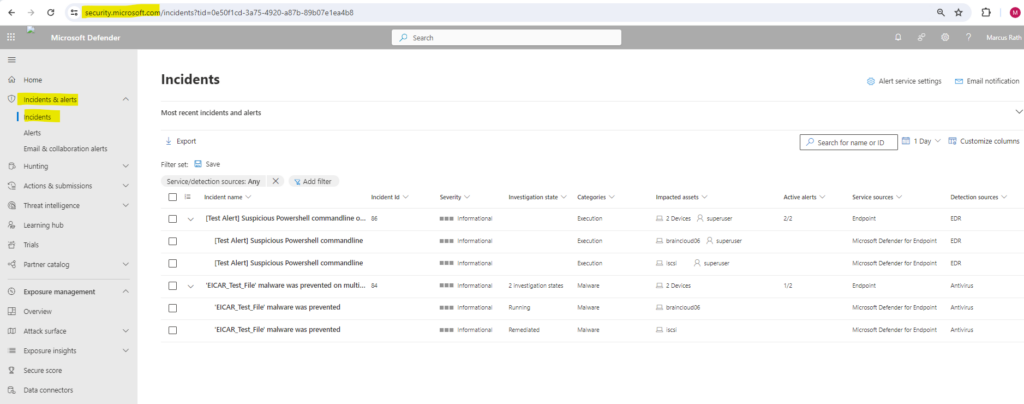
In both cases if our server is onboarded successfully to Microsoft Defender for Endpoint, an alert should show up in Microsoft Defender for Endpoint under Incidents & alerts -> Incidents or Alerts as shown below.
Incidents are groups of related alerts that together create an actionable incident that you can investigate and resolve.
Security baselines assessment
Instead of running never-ending compliance scans, security baselines assessment helps you to continuously and effortlessly monitor your organization’s security baselines compliance and identify changes in real time.
A security baseline profile is a customized profile that you can create to assess and monitor endpoints in your organization against industry security benchmarks. When you create a security baseline profile, you’re creating a template that consists of multiple device configuration settings and a base benchmark to compare against.
Security baselines provide support for Center for Internet Security (CIS) benchmarks for Windows 10, Windows 11, and Windows Server 2008 R2 and above, as well as Security Technical Implementation Guides (STIG) benchmarks for Windows 10 and Windows Server 2019.
The benchmarks currently only support Group Policy Object (GPO) configurations and not Microsoft Configuration Manager (Intune).
To use this feature you’ll require Microsoft Defender Vulnerability Management Standalone or if you’re already a Microsoft Defender for Endpoint Plan 2 customer, the Defender Vulnerability Management add-on.
Source: https://learn.microsoft.com/en-us/defender-vulnerability-management/tvm-security-baselines
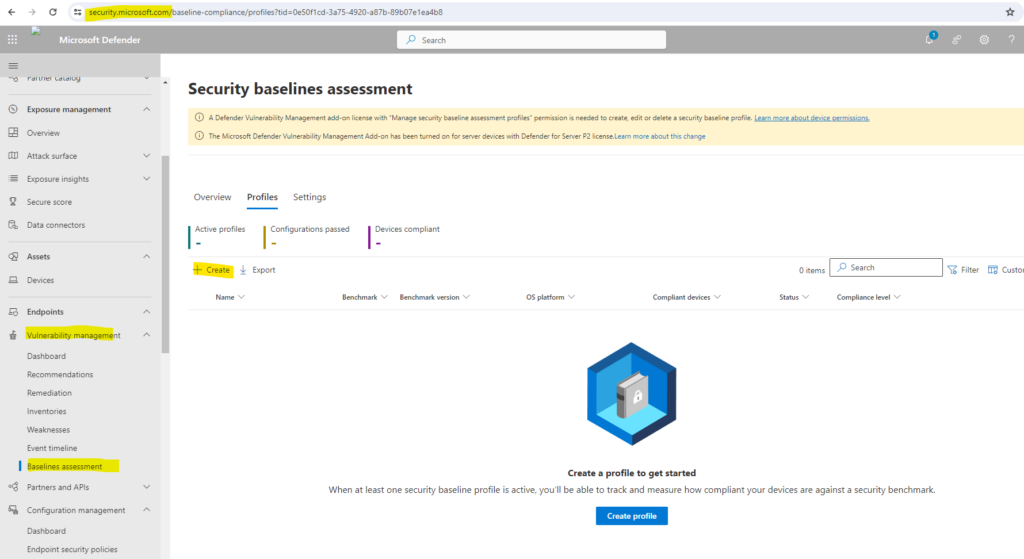
Go to Vulnerability management > Baselines assessment in the Microsoft Defender portal.
Select the Profiles tab at the top, then select the Create profile button.
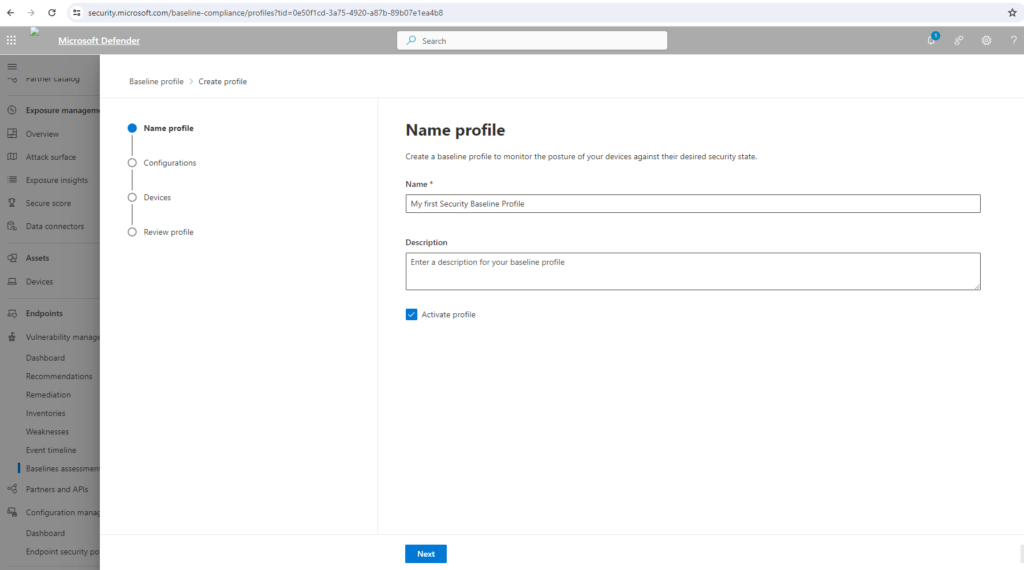
Enter a name and description for your security baselines profile and select Next.
On the Baseline profile scope page set the profile settings such as software, base benchmark (CIS or STIG), and the compliance level and select Next.
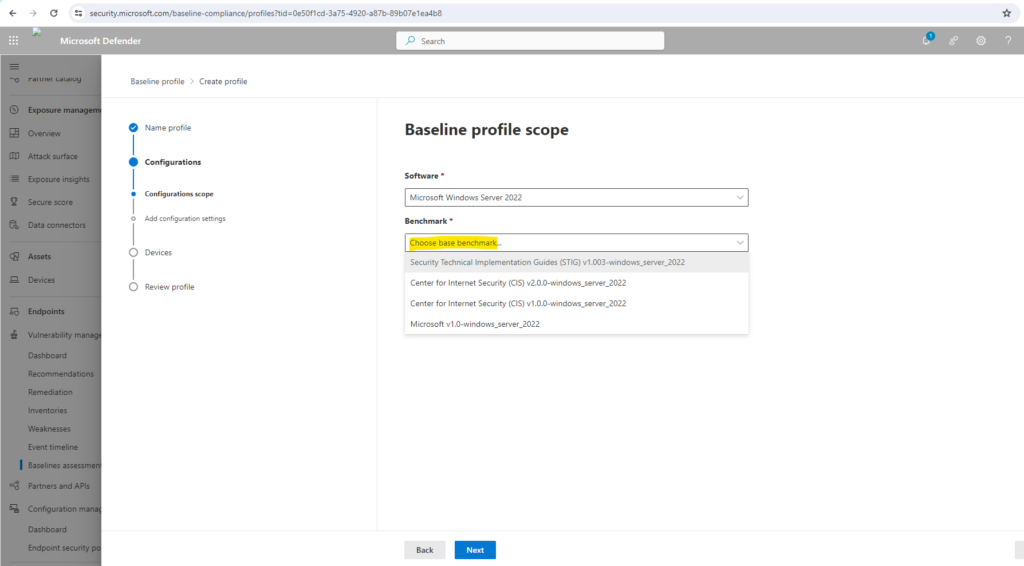
Select the compliance level.
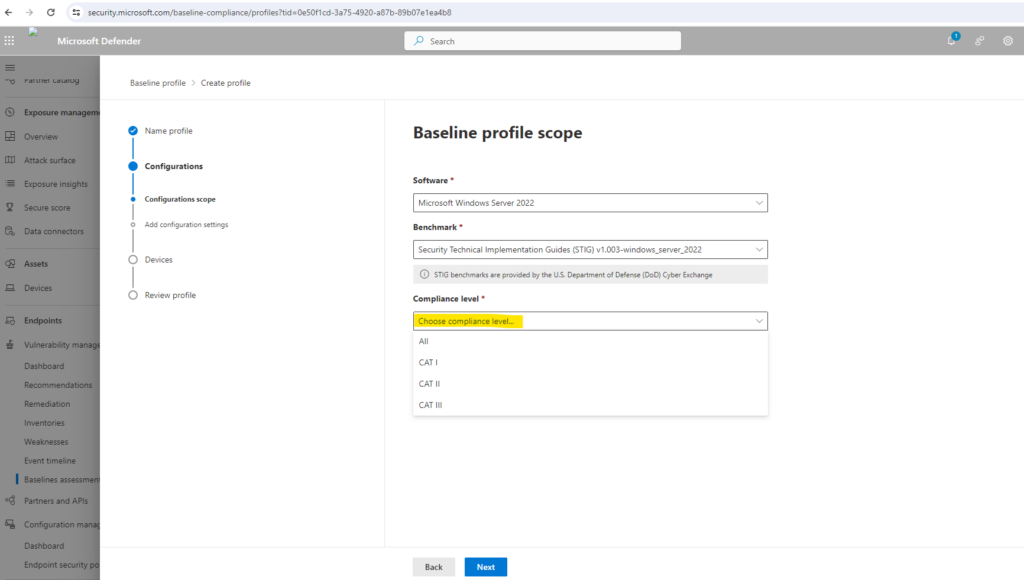
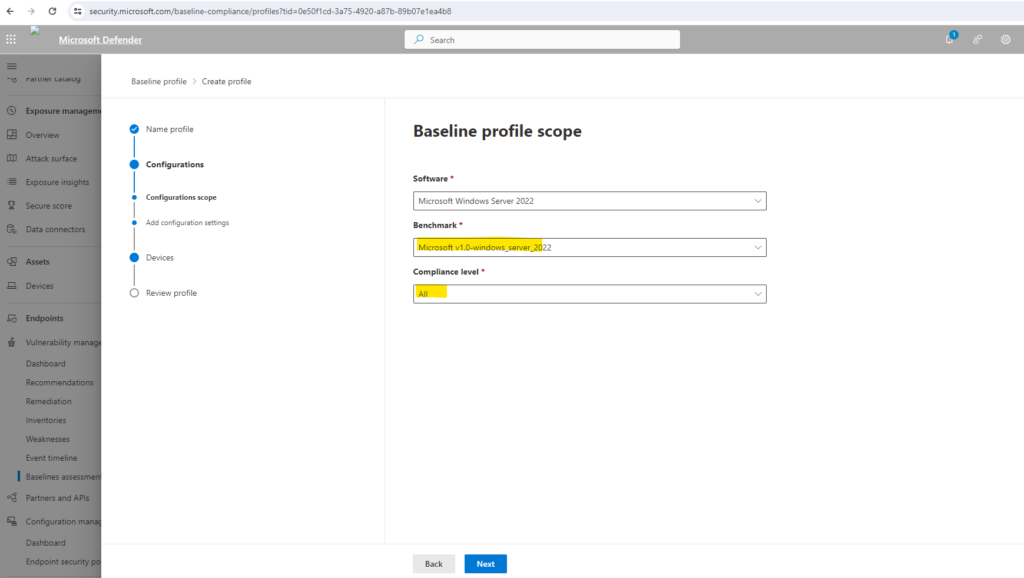
Select the configurations you want to include in the profile.
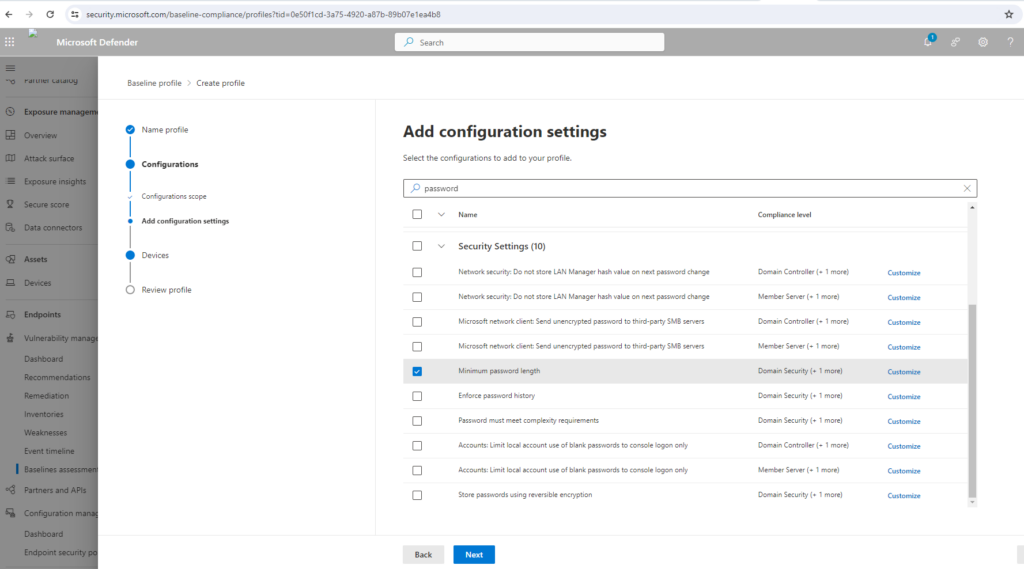
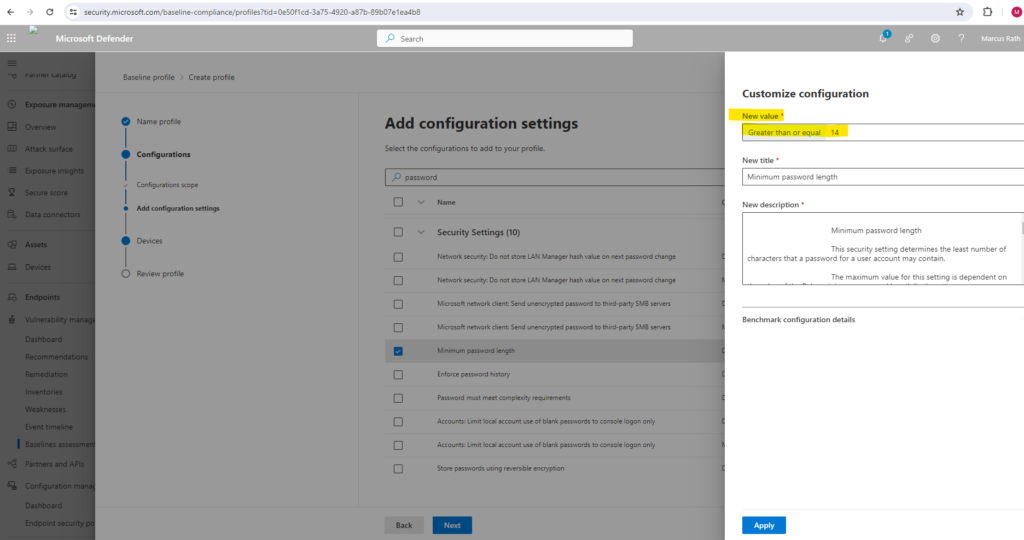
Select Customize if you want to change the threshold configuration value for your organization.
Select Next to choose the device groups and device tags you want to include in the baseline profile. The profile will be automatically applied to devices added to these groups in the future.
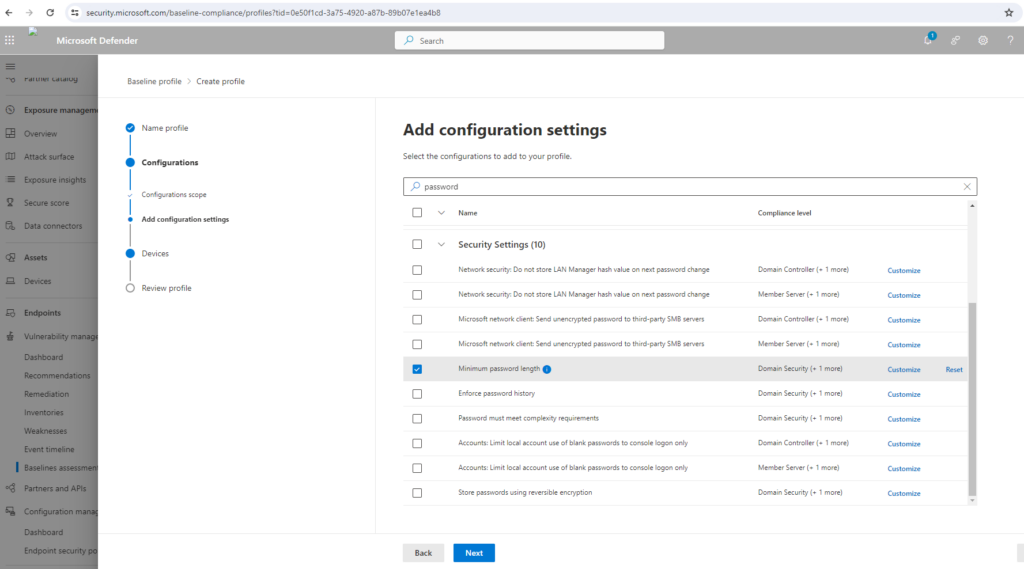
Select Submit to create your profile.
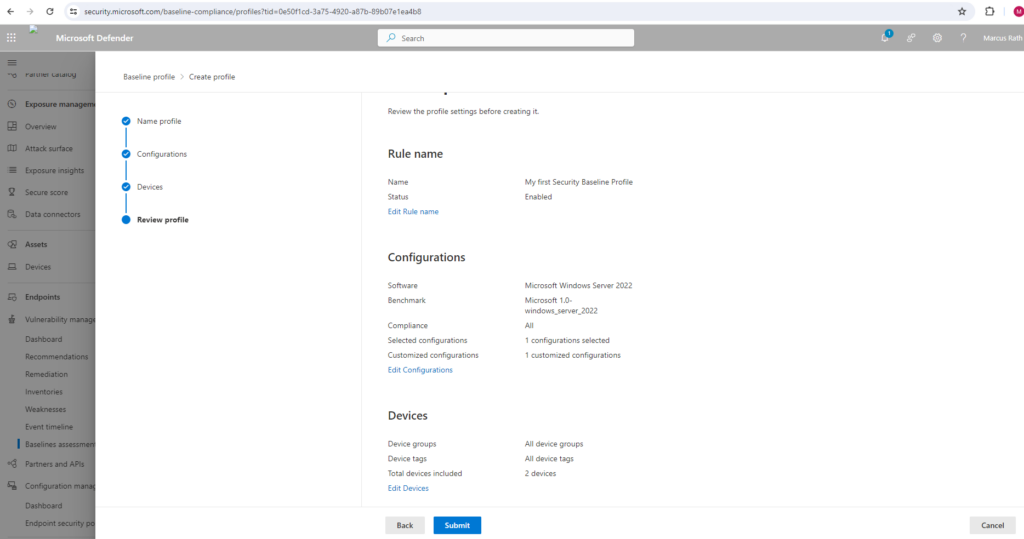
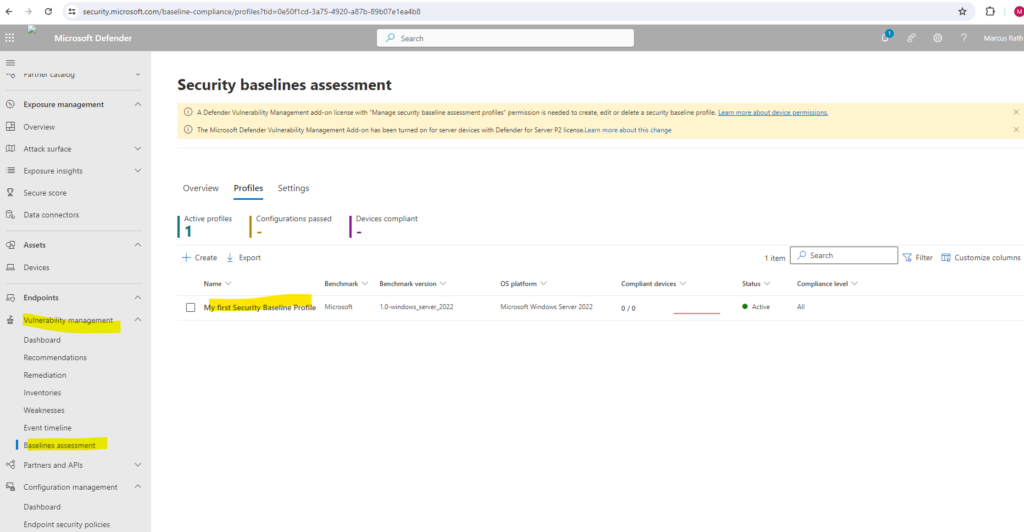
More about Security baselines assessment you will find in the following article https://learn.microsoft.com/en-us/defender-vulnerability-management/tvm-security-baselines.
Troubleshooting
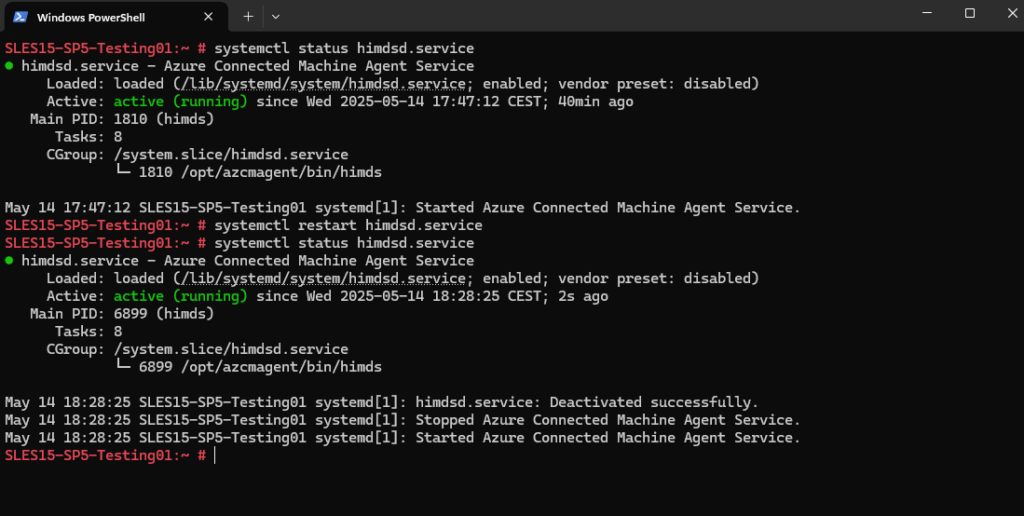
Restart the Azure Connected Machine Agent Service
# systemctl status himdsd.service
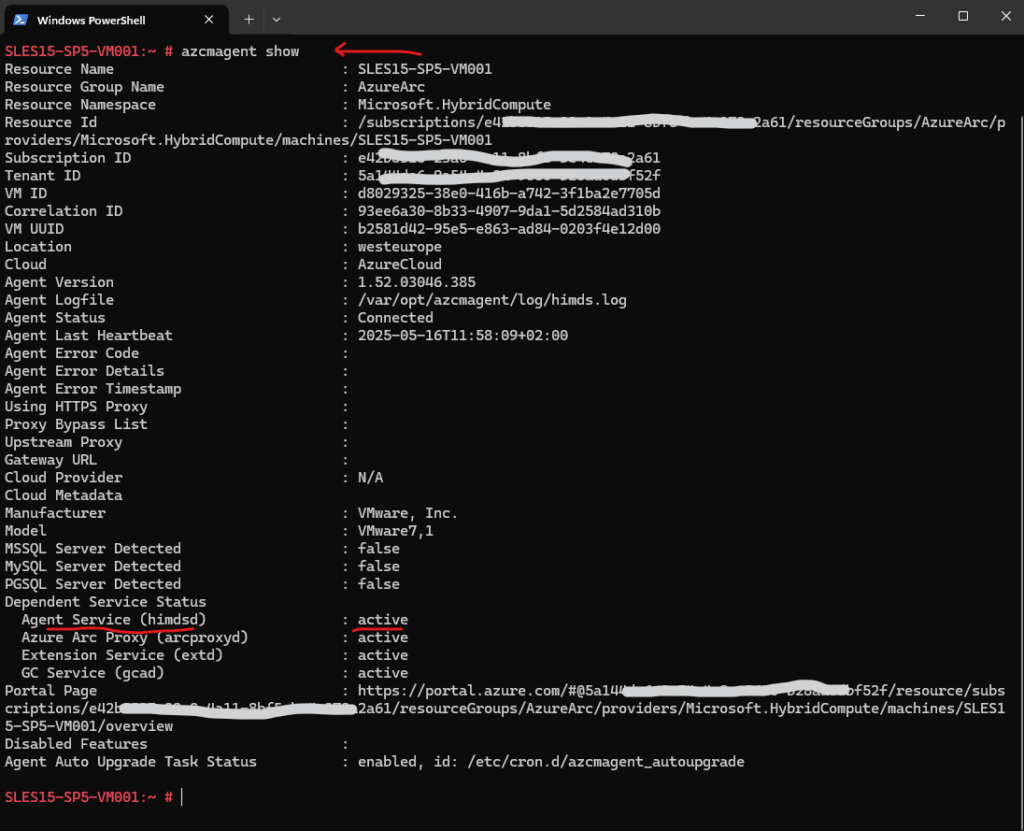
The himdsd.service is the Hybrid Instance Metadata Service (HIMDS), which is a critical component used by Azure Arc for Servers. It works together with the Azure Connected Machine Agent to securely fetch metadata, configuration, and policies from Azure.
# azcmagent show
The azcmagent show command displays the current status of the Azure Connected Machine Agent on a machine that is registered with Azure Arc.
Install MDE.Linux Extension manually by using the Azure CLI
PS> az login
PS> az connectedmachine list --resource-group <resource group>

PS> az connectedmachine extension create --machine-name "<MachineName>" --name "MDE.Linux" --resource-group "<YourResourceGroup>" --location "<AzureRegion>" --publisher "Microsoft.Azure.AzureDefenderForServers" --type "MDE.Linux" --settings '{}'

<AzureRegion>: Must match the Arc server's region (e.g., eastus).
--settings '{}': Optional configuration (usually left empty for defaults).
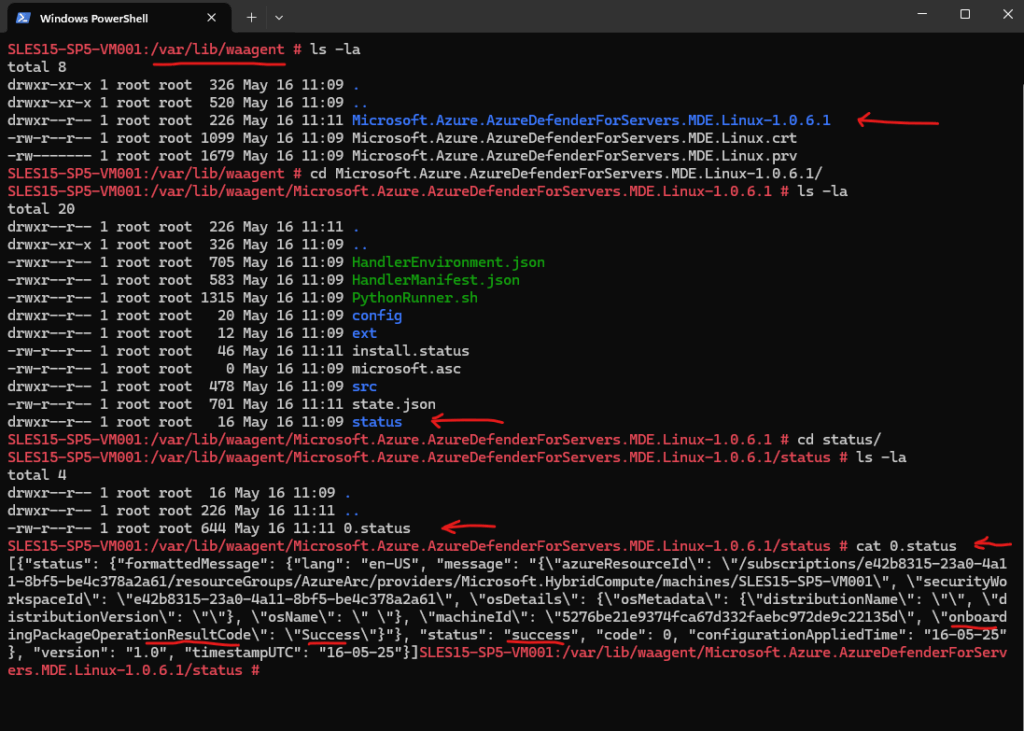
The extension packages will be installed under /var/lib/waagent/.

The Microsoft Azure Linux VM Agent (waagent) manages Linux and FreeBSD provisioning, along with virtual machine (VM) interaction with the Azure fabric controller. In addition to the Linux agent providing provisioning functionality, Azure provides the option of using cloud-init for some Linux operating systems.
The Linux agent provides the following functionality for Linux and FreeBSD Azure Virtual Machines deployments. For more information, see the Azure Linux VM Agent readme on GitHub.
Source: https://learn.microsoft.com/en-us/azure/virtual-machines/extensions/agent-linux
wa stands for Windows Azure (Microsoft’s former cloud branding before it was renamed to Microsoft Azure in 2014). Hence Windows Azure Agent (waagent).
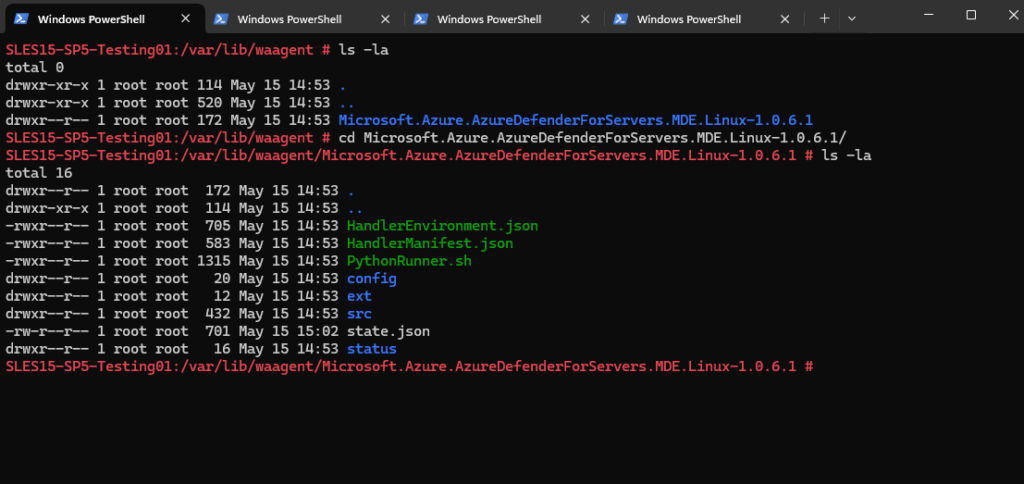
Check the status of the extension installation under /var/lib/waagent/Microsoft.Azure.AzureDefenderForServers.MDE.Linux-1.0.6.1/status
Azure Extensions on Azure Arc enabled Servers
The Azure Connected Machine agent lets you manage Windows and Linux machines hosted outside of Azure, on your corporate network or other cloud providers.
The Azure Connected Machine agent package contains several logical components bundled together:
- The Hybrid Instance Metadata service (HIMDS) manages the connection to Azure and the connected machine’s Azure identity.
- The machine configuration agent provides functionality such as assessing whether the machine complies with required policies and enforcing compliance.Note the following behavior with Azure Policy machine configuration for a disconnected machine:
- An Azure Policy assignment that targets disconnected machines is unaffected.
- Guest assignment is stored locally for 14 days. Within the 14-day period, if the Connected Machine agent reconnects to the service, policy assignments are reapplied.
- Assignments are deleted after 14 days, and aren’t reassigned to the machine after the 14-day period.
- The Extension agent manages VM extensions, including install, uninstall, and upgrade. Azure downloads extensions and copies them to the %SystemDrive%\%ProgramFiles%\AzureConnectedMachineAgent\ExtensionService\downloads folder on Windows, and to /opt/GC_Ext/downloads on Linux. On Windows, the extension installs to the following path %SystemDrive%\Packages\Plugins\<extension>, and on Linux the extension installs to /var/lib/waagent/<extension>.
Source: https://learn.microsoft.com/en-us/azure/azure-arc/servers/agent-overview
Links
Deploy Defender for Servers
https://learn.microsoft.com/en-us/azure/defender-for-cloud/tutorial-enable-servers-planPlan your Defender for Servers deployment
https://learn.microsoft.com/en-us/azure/defender-for-cloud/plan-defender-for-serversSelect a Defender for Servers plan
https://learn.microsoft.com/en-us/azure/defender-for-cloud/plan-defender-for-servers-select-planAzure Monitor Agent overview
https://learn.microsoft.com/en-us/azure/azure-monitor/agents/agents-overviewVerify client connectivity to Microsoft Defender for Endpoint service URLs
https://learn.microsoft.com/en-us/defender-endpoint/verify-connectivityTroubleshoot installation issues for Microsoft Defender for Endpoint on Linux
https://learn.microsoft.com/en-us/defender-endpoint/linux-support-installDeploy Microsoft Defender for Endpoint on Linux manually
https://learn.microsoft.com/en-us/defender-endpoint/linux-install-manuallyVirtual machine extension management with Azure Arc-enabled servers
https://learn.microsoft.com/en-us/azure/azure-arc/servers/manage-vm-extensions
Related Posts
Latest posts
Deploying NetApp Cloud Volumes ONTAP (CVO) in Azure using NetApp Console (formerly BlueXP) – Part 4 – Antivirus VSCAN Configuration
Follow me on LinkedIn


