How to provision Storage to Linux Hosts by the IBM Storwize V3700 Storage System
In my following post I was showing step by step how to provision storage to hosts (Windows Server 2019) by using the IBM Storwize V3700 storage system (disk system).
Now in this post I want to provision the same storage but this time to a Linux Server (SUSE Linux Enterprise Server 15 SP5).
Because I am using the same physical server, an IBM x3650 M4, but this time with SUSE Linux Enterprise Server 15 SP5 instead of Windows Server, I will just show how to access the provisioned volumes by the IBM Storwize V3700 storage system (disk system), the steps on the storage are the same.
Determine the provisioned Volumes in Linux
In order to check if the provisioned volumes are already mounted and shown up in Linux, I will first use the lsblk command to list all available block devices as shown below. lsblk stands for “list block devices”.
By default, the command prints all block devices (except RAM disks) in a tree-like format. The same device can be repeated in the tree if it relates to other devices.
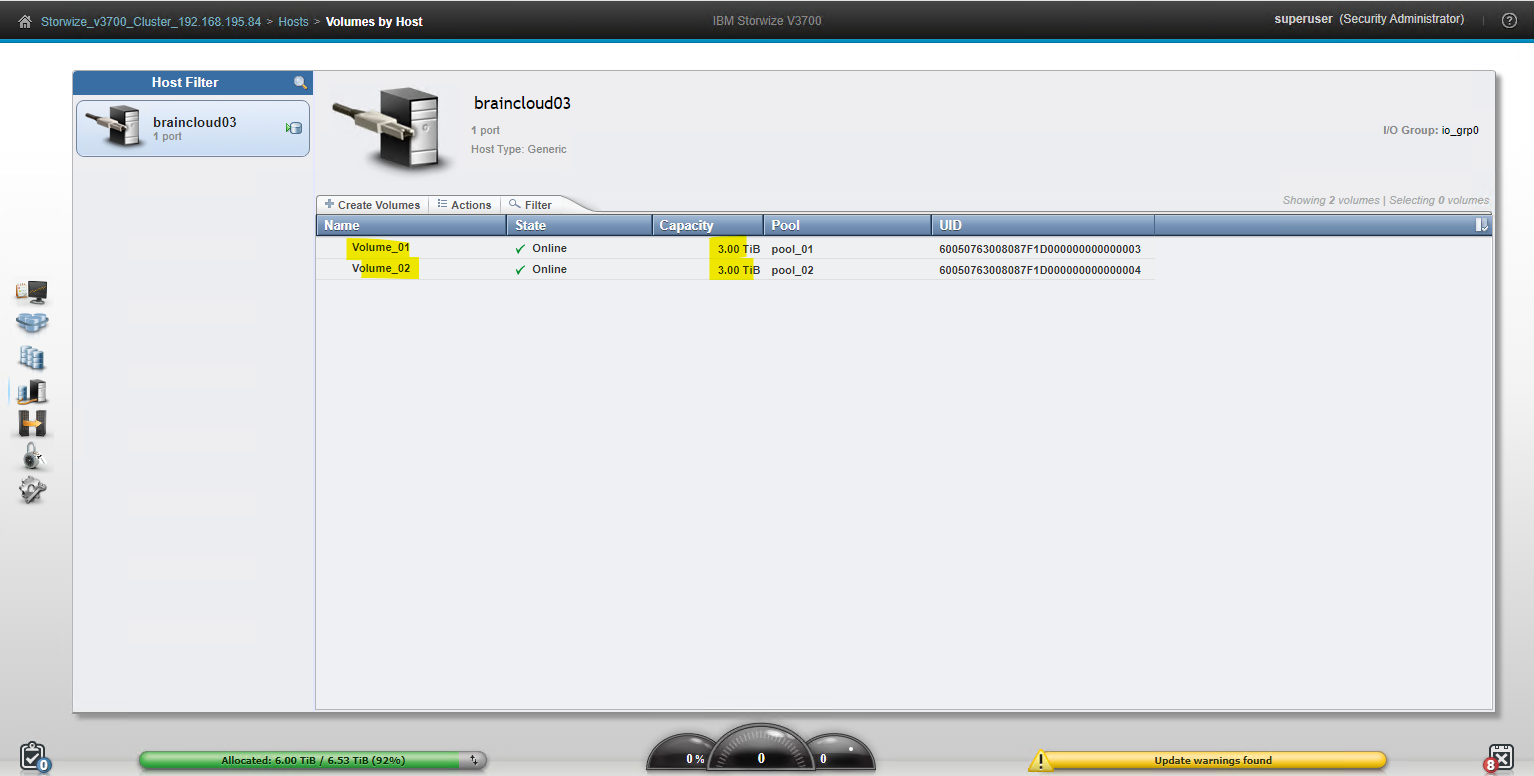
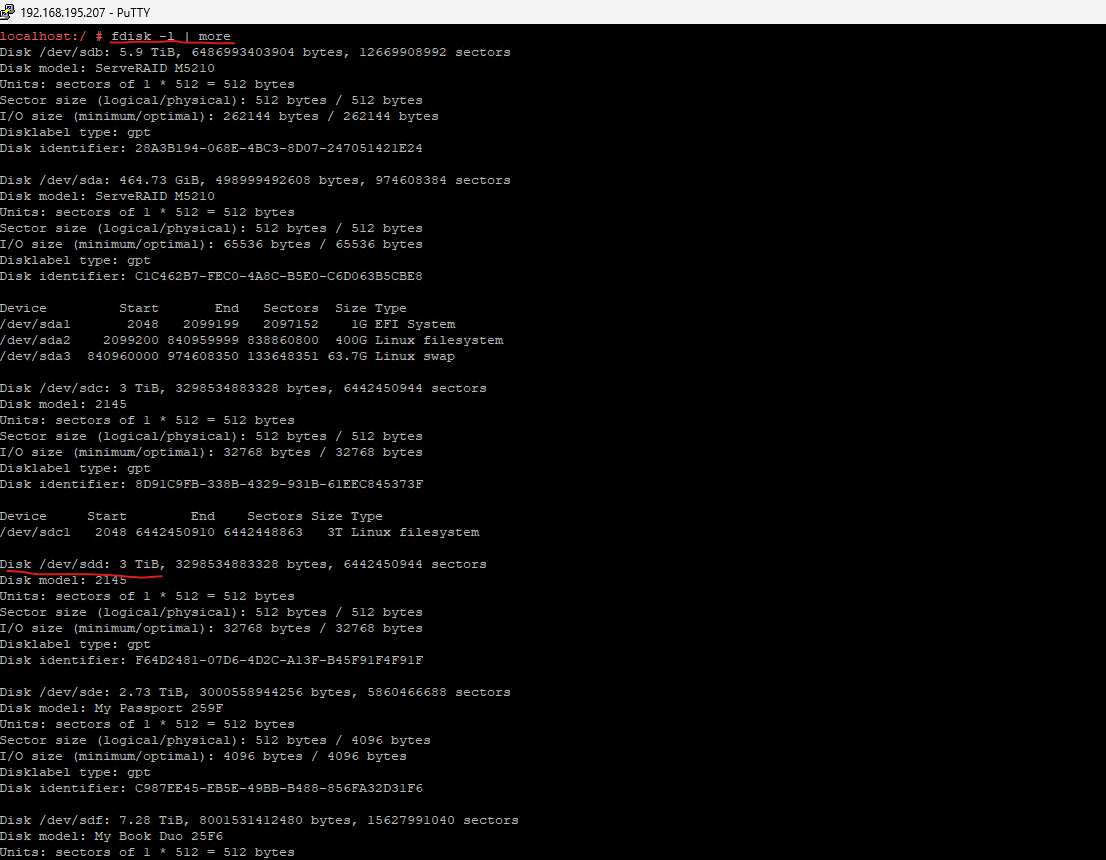
Because each of both volumes have a size of 3.00 TiB, I can see below at first sight that Linux assigned the disk labels sdc and sdd to them.

Here you can see both volumes on the IBM Storwize V3700 storage system (disk system).
Identify SAS HBAs on a Linux host by using dmesg
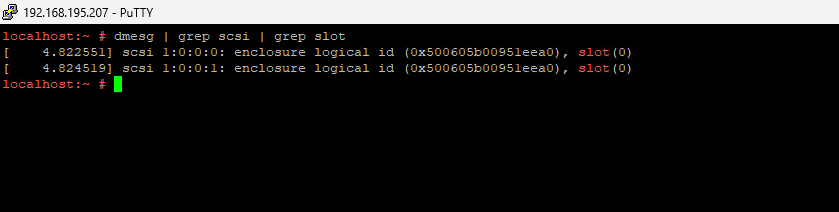
To determine the WWN or WWPN of a host bus adapter (HBA) in Linux, you can use the dmesg command as shown below. More about WWN and WWPN you will find in my previous post about provision storage by the IBM Storwize V3700.
dmesg | grep scsi | grep slot
The name dmesg is derived from display message and provides a convenient way to examine the kernel ring buffer, which stores messages generated by the kernel during the boot process and while the system is running. These messages contain crucial information about hardware detection, device initialization, and any potential issues encountered by the kernel.
Source: https://www.geeksforgeeks.org/how-to-use-the-dmesg-command-on-linux
Identify SAS HBAs on a Linux host
https://www.dell.com/support/manuals/en-us/powervault-me5012/me5_series_dg/identify-sas-hbas-on-a-linux-host?guid=guid-63ab509f-48fd-4938-97ea-0b1b7ab18752&lang=en-us
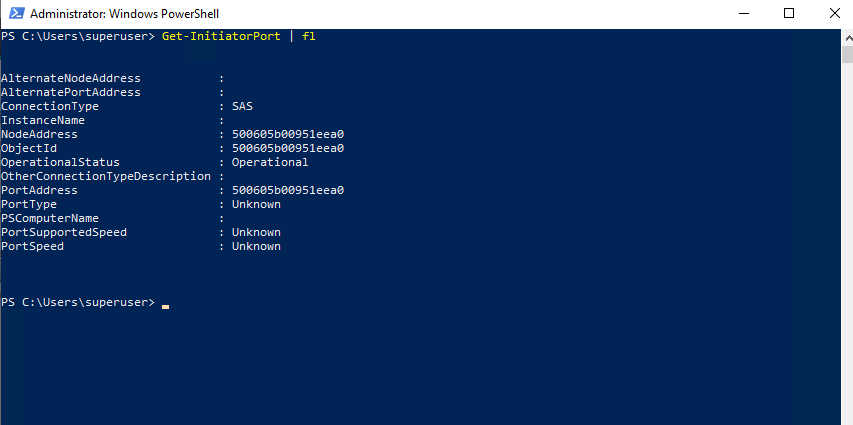
As you can see this is the same WWN as we determined in my previous post by using PowerShell when on this IBM x3650 M4 server was installed Windows Server 2019.
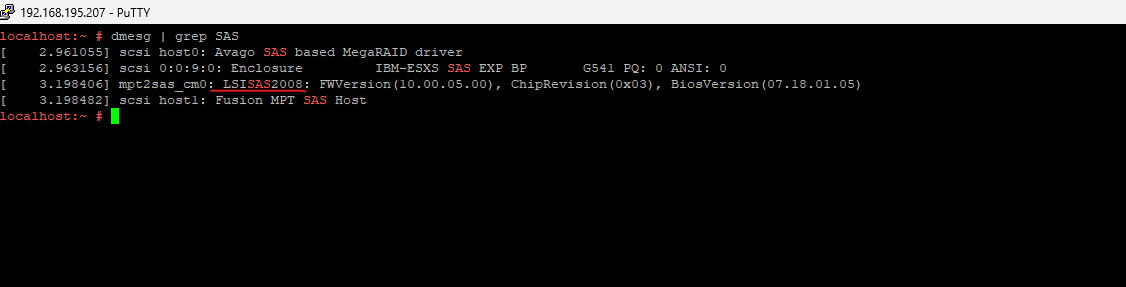
By filter the output of the dmesg command for SAS we will see below the SAS HBA adapter which is connected to my IBM Storwize V3700. The Avago SAS based MegaRAID is a RAID controller where all direct attached SAS disks are connected to.
The HBA is a LSI SAS 2008 Fusion.
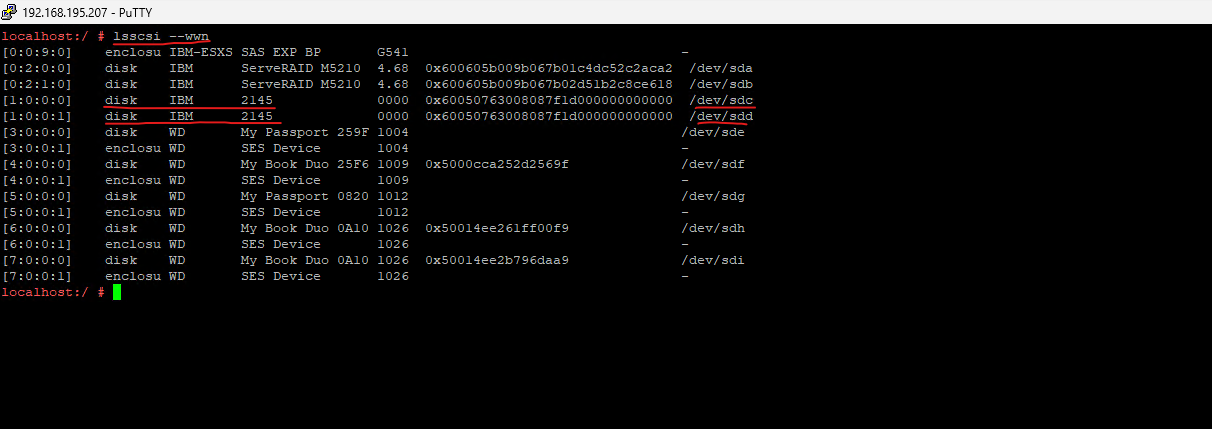
List SCSI Devices
We can also use the lsscsi command to list connected SCSI devices in Linux.
lsscsi is a command line utility that probes sysfs in Linux 2.6, 3 and 4 series kernels in order to list information about SCSI devices and SCSI hosts. The default format is one device (e.g. disk) per line. Other storage devices that use the SCSI subsystem such as SATA disks and USB keys are also listed.
Source: https://lwn.net/Articles/760545/
/proc/scsi/
The primary file in this directory is /proc/scsi/scsi, which contains a list of every recognized SCSI device. From this listing, the type of device, as well as the model name, vendor, SCSI channel and ID data is available.

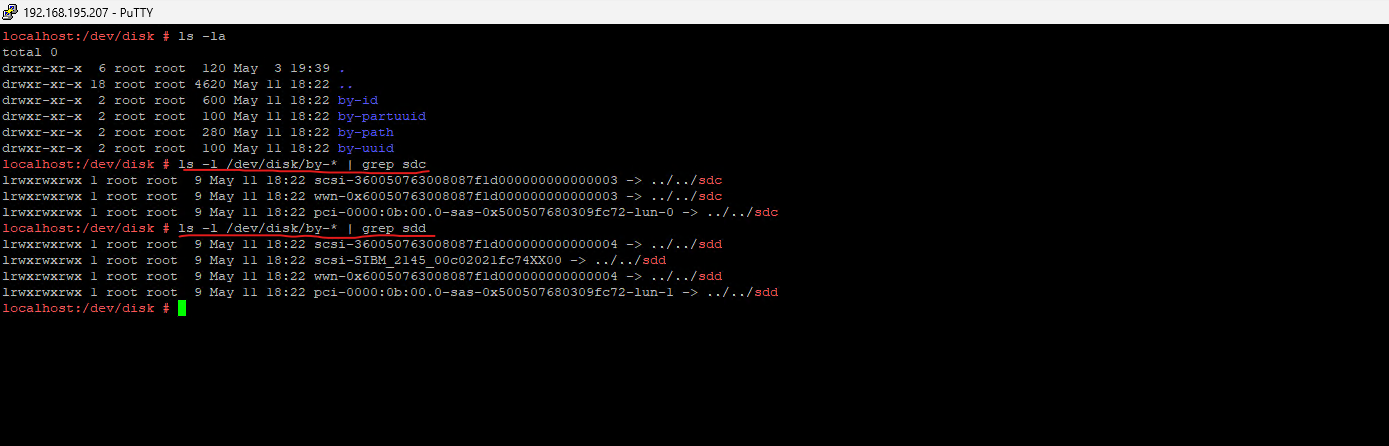
SCSI device names are assigned in the order in which the devices are detected. In a typical SAN environment, this can mean a seemingly arbitrary mapping of names to actual devices that can change between boots. Therefore, using standard device nodes of the form /dev/<device_name> where <device_name> is the device name that the SCSI stack assigns to a device, can be a challenge.
udev creates device nodes that match the device names that are used by the kernel. These standard device nodes have the form /dev/<name>.
To help you identify a particular device, udev creates additional device nodes that are based on the device’s bus ID, the device label, and information about the file system on the device. The file system information can be a universally unique identifier (UUID) and, if available, the file system label.
Source: https://www.ibm.com/docs/en/linux-on-systems?topic=wysk-scsi-device-nodes-4
List all Disks
We can also use the fdisk command to list all disks and partitions which are currently on the system.
fdisk is a dialog-driven program for creation and manipulation of partition tables. It understands GPT, MBR, Sun, SGI and BSD partition tables.
Block devices can be divided into one or more logical disks called partitions. This division is recorded in the partition table, usually found in sector 0 of the disk. (In the BSD world one talks about disk slices’ and adisklabel’.)

Add Partitions
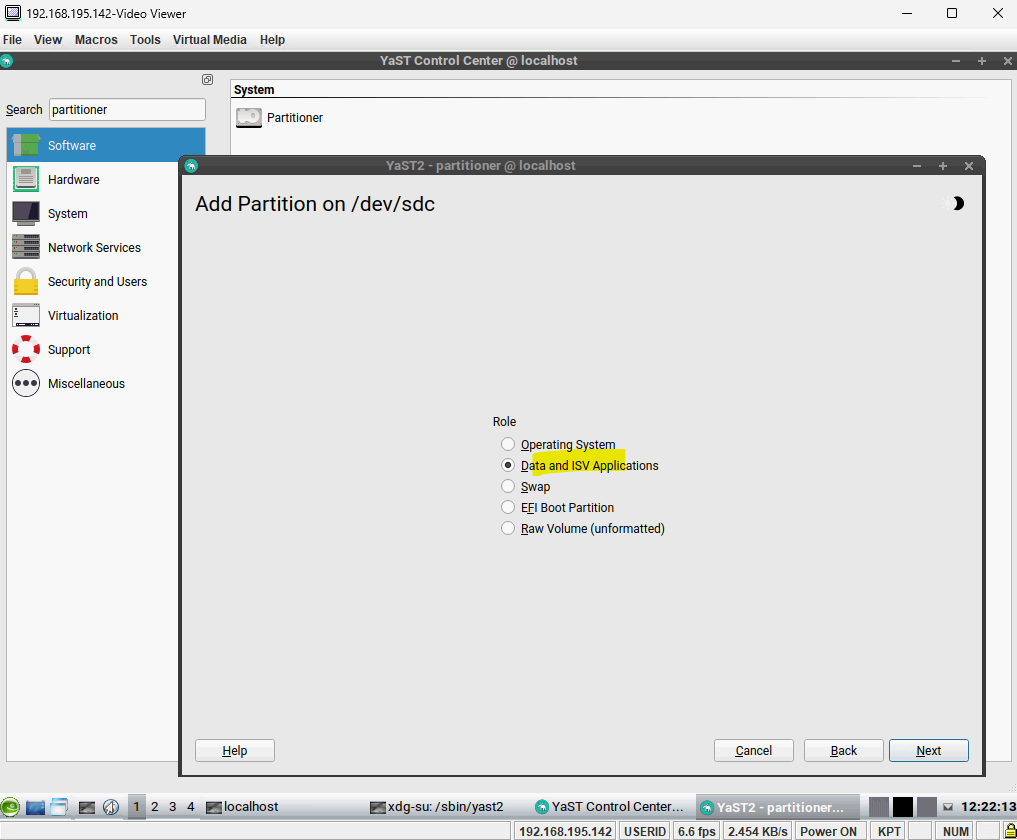
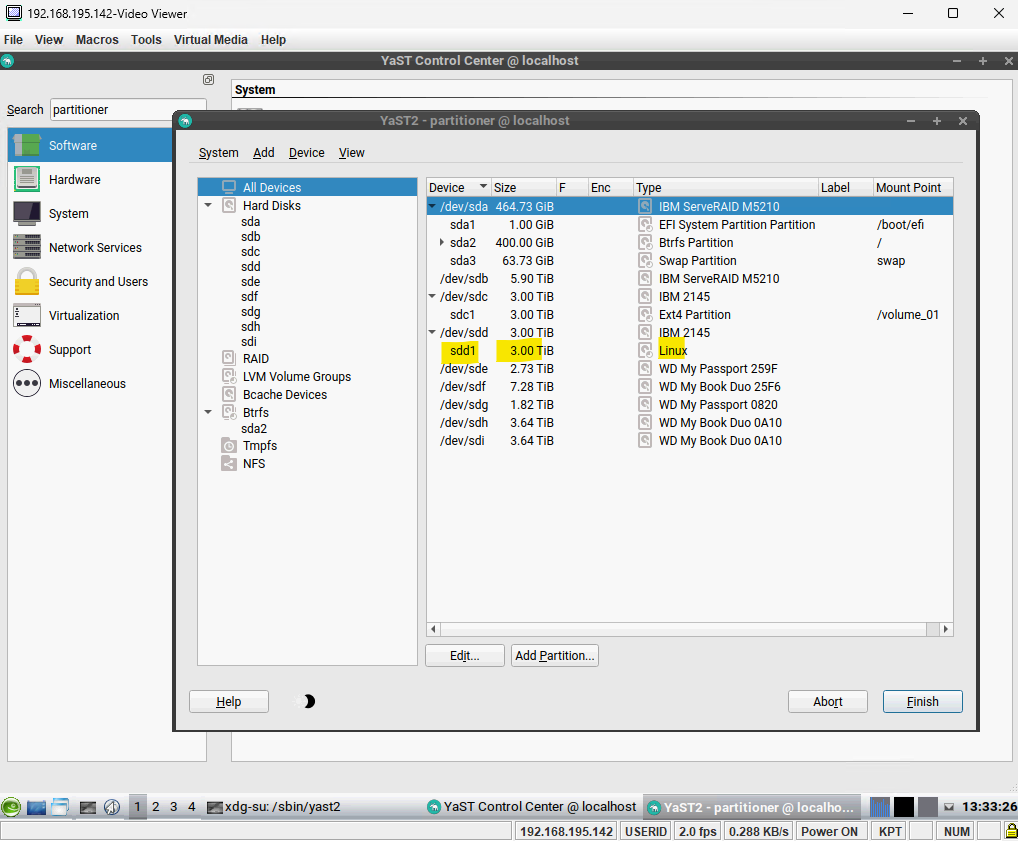
On SUSE Linux Enterprise we can now either use the YAST partitioner to create partitions on our new provisioned volumes or we can create them directly on the command line as shown below.
Using Yast
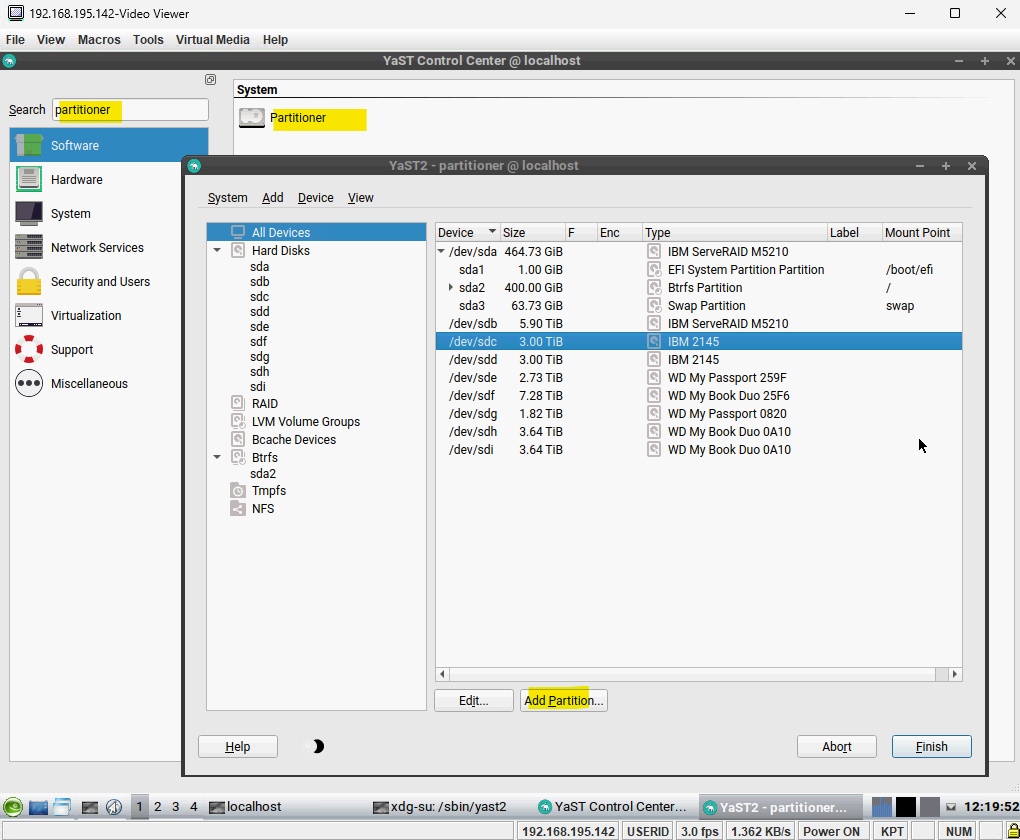
I will use the maximum size of the provisioned volume for this new partition.
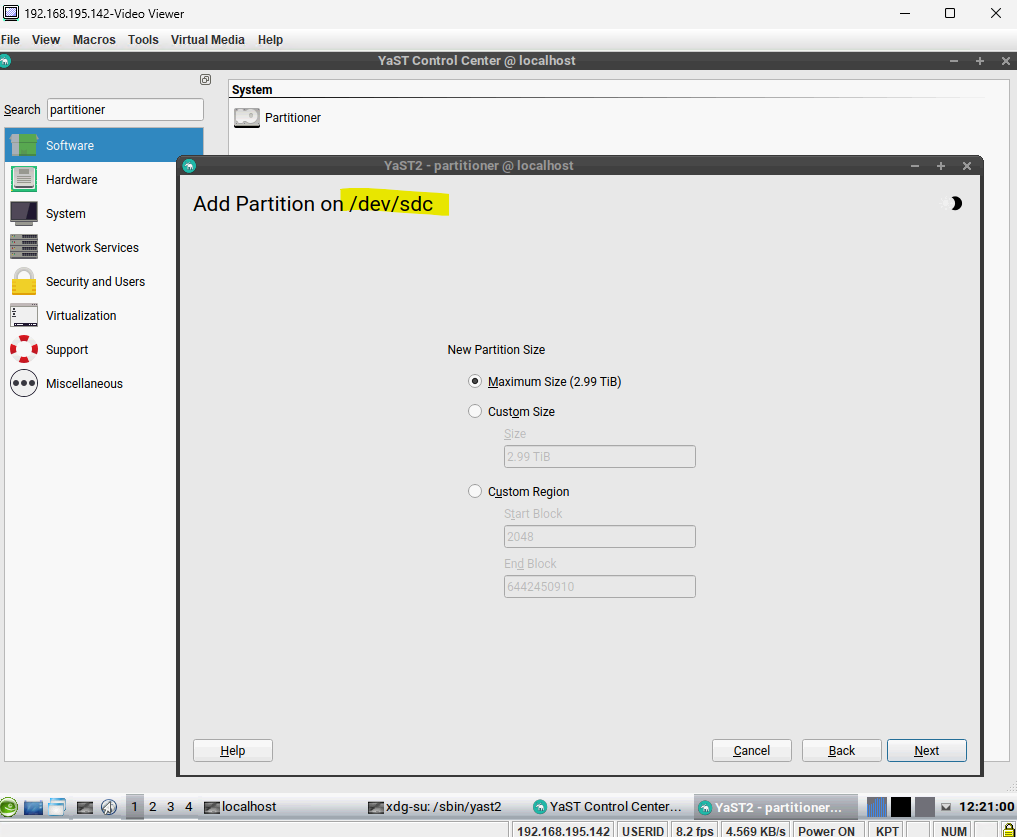
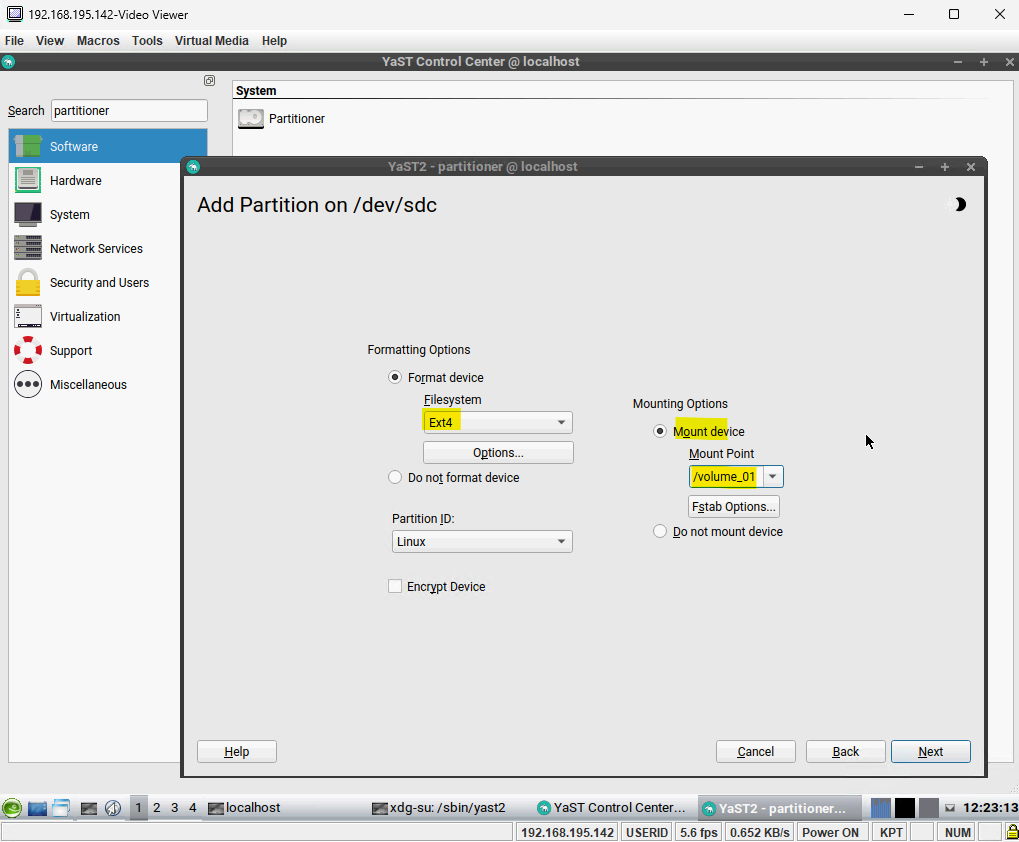
Below I will format the device by using the Ext4 filesystem and then mount the disk under /volume_01.
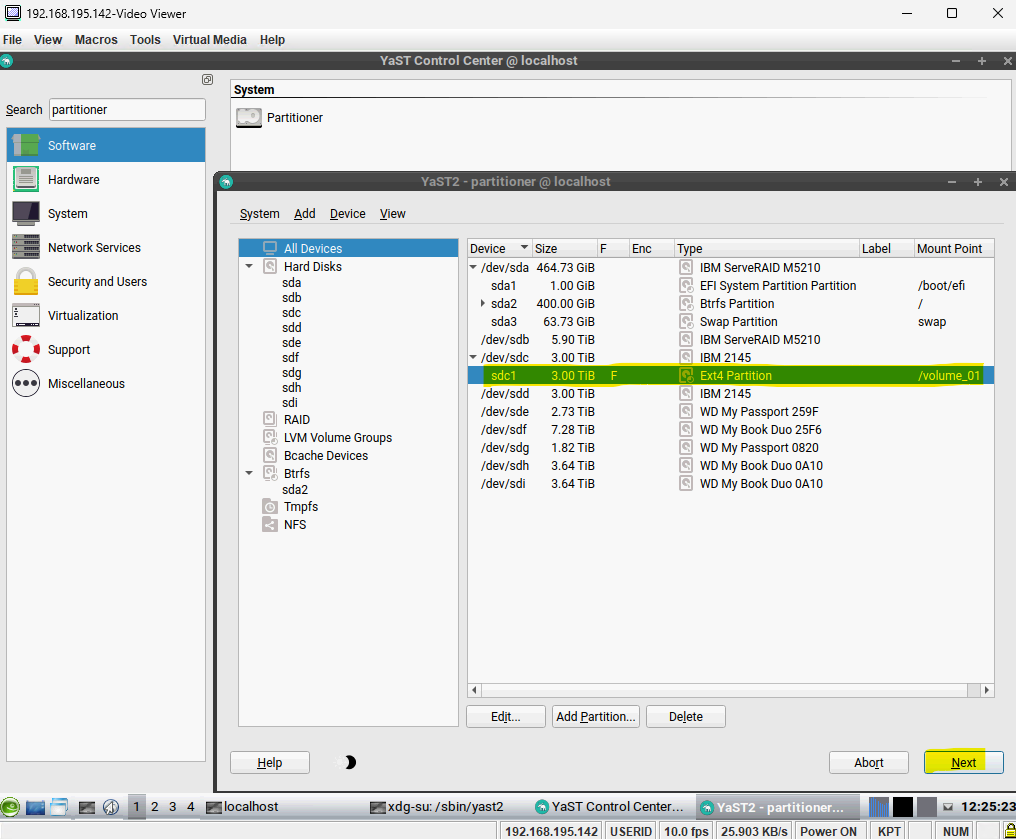
Click on Next to finally execute the new configuration.
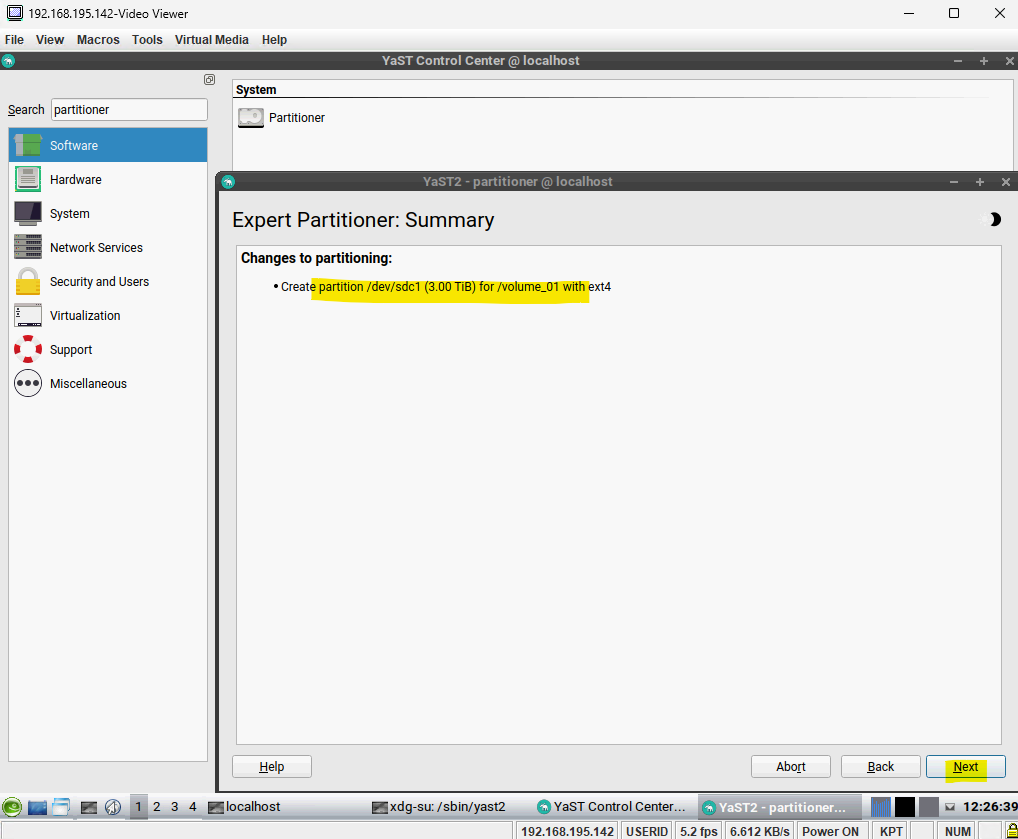
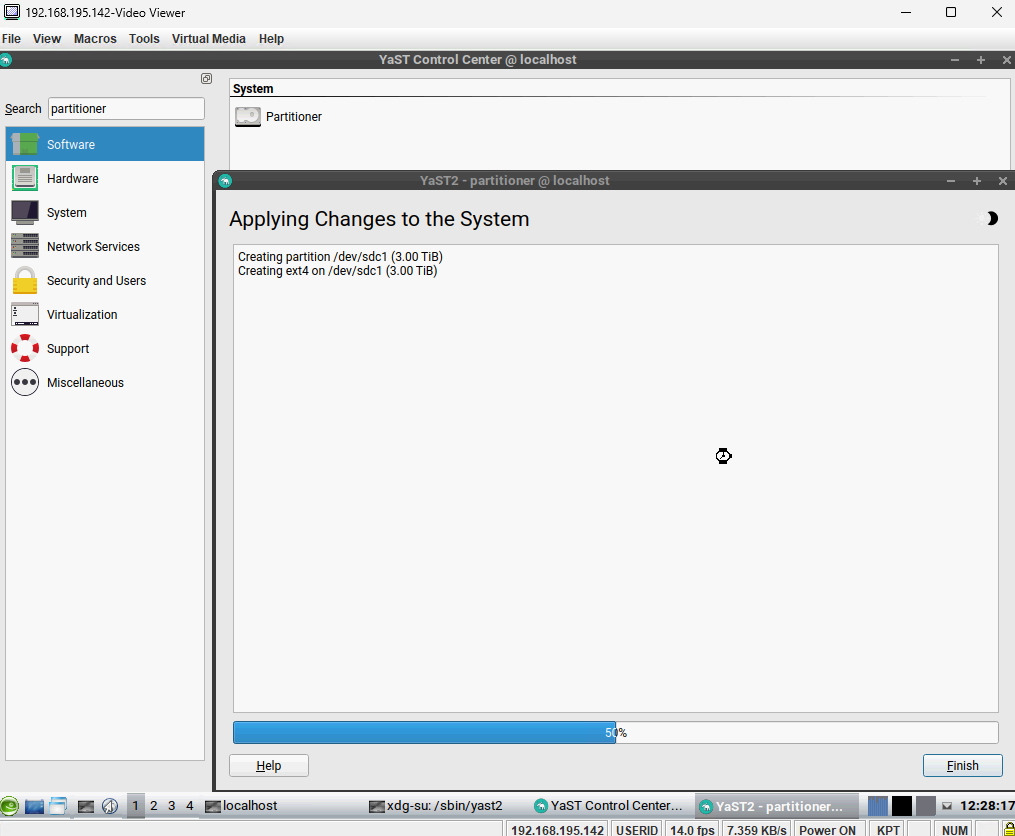
Finally we can use our new disk resp. provisioned volume by the IBM Storwize V3700 storage system (disk system).

Using the Command Line and fdisk Tool
To create a new partition on a disk we can use the fdisk command.
fdisk is a dialog-driven program for creation and manipulation of partition tables. It understands GPT, MBR, Sun, SGI and BSD partition tables.
Block devices can be divided into one or more logical disks called partitions. This division is recorded in the partition table, usually found in sector 0 of the disk. (In the BSD world one talks about disk slices’ and adisklabel’.)
First we need to identify on which disk we want to create a new partition. Therefore we can use the fdisk -l command which lists all disks and partitions they are currently on the system.
This time I will use the disk /dev/sdd to create a new partition. This is the second volume we provisioned on the IBM Storwize V3700 storage system (disk system).
Not to create a new partition on /dev/sdd we enter the following command:
$ sudo fdisk /dev/sdd
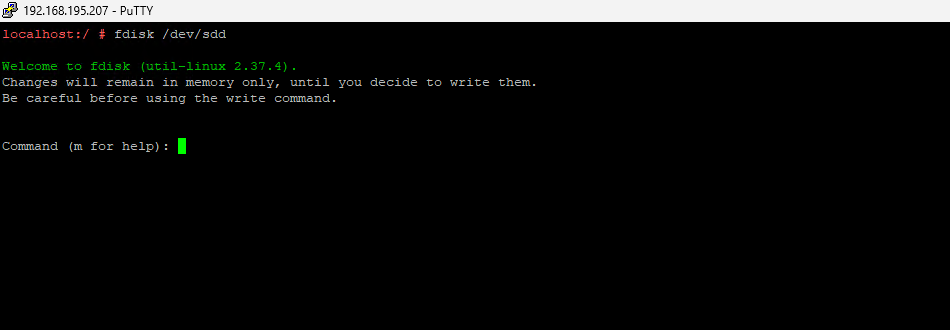
Enter n to create a new partition.

For the partition number, first sector and last sector I will use the default values and therefore just press enter each time.

In order to write the changes onto the disk we now need to enter w command.

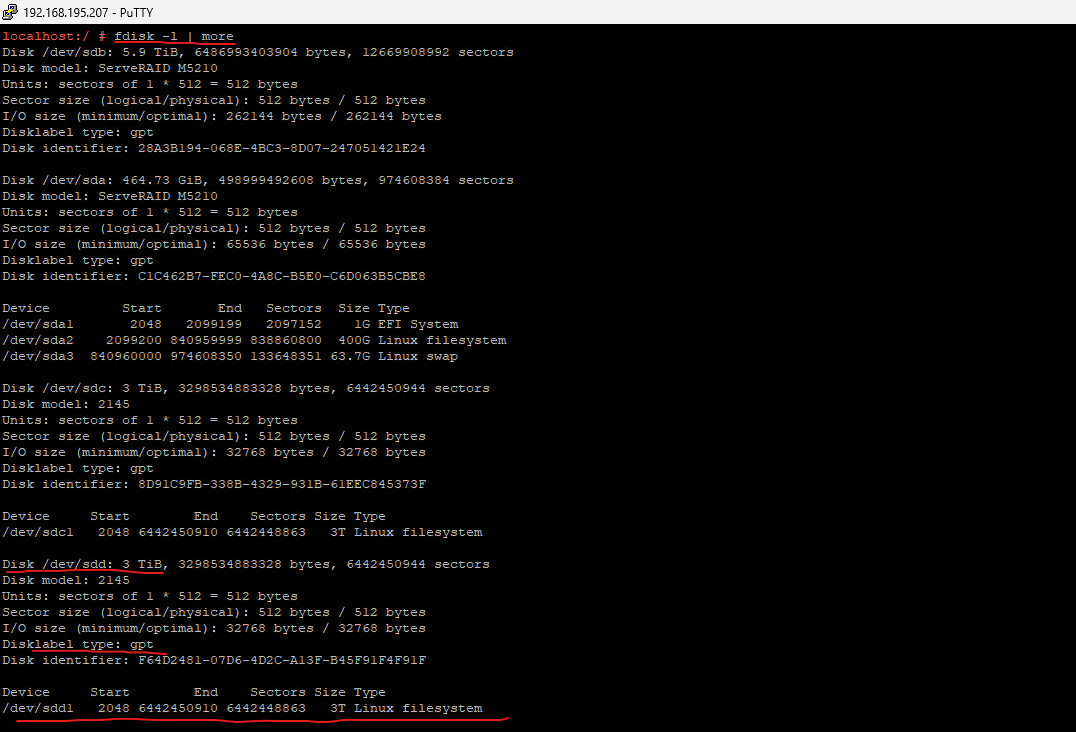
We can now check the creation of the partition by executing the fdisk -l command again.
In my case I can also use the GUI partitioner to check if the partition was created successfully. Looks good but so far no filesystem was created on.
So the next step is to create a new filesystem on this partition and finally mount the new partition.
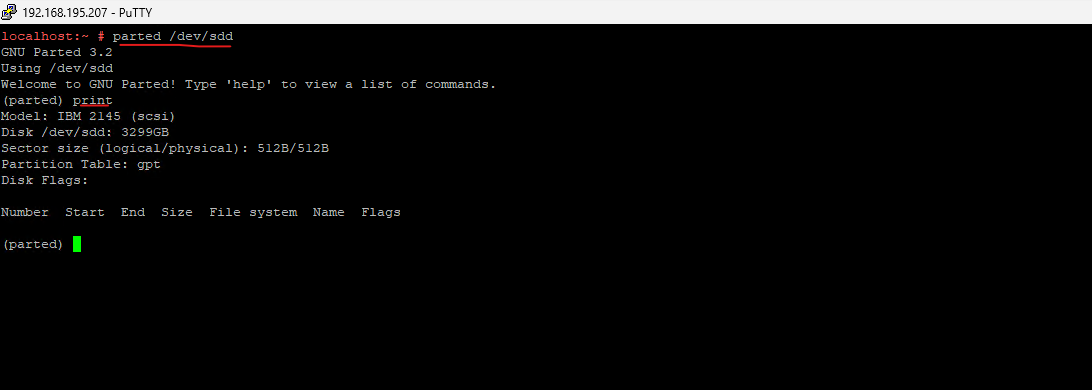
Using the Command Line and parted Tool
Instead using the fdisk tool we can also use the parted command and tool.
Parted allows you to add, shrink, extend, and remove partitions from storage disks on your system.
We can also use parted to first list all partitions of a disk by using the print command. Here you can see that first disk /dev/sdc provisioned by the IBM Storwize V3700 have already a partition and filesystem on. In order to exit the parted tool you can enter the quit command.

I want now to create a new partition for the /dev/sdd disk, my second provisioned volume by the IBM Storwize V3700. I also first check if there are already existing partitions on. So far there is no partition created, just an existing partition table GPT from previously is already created.
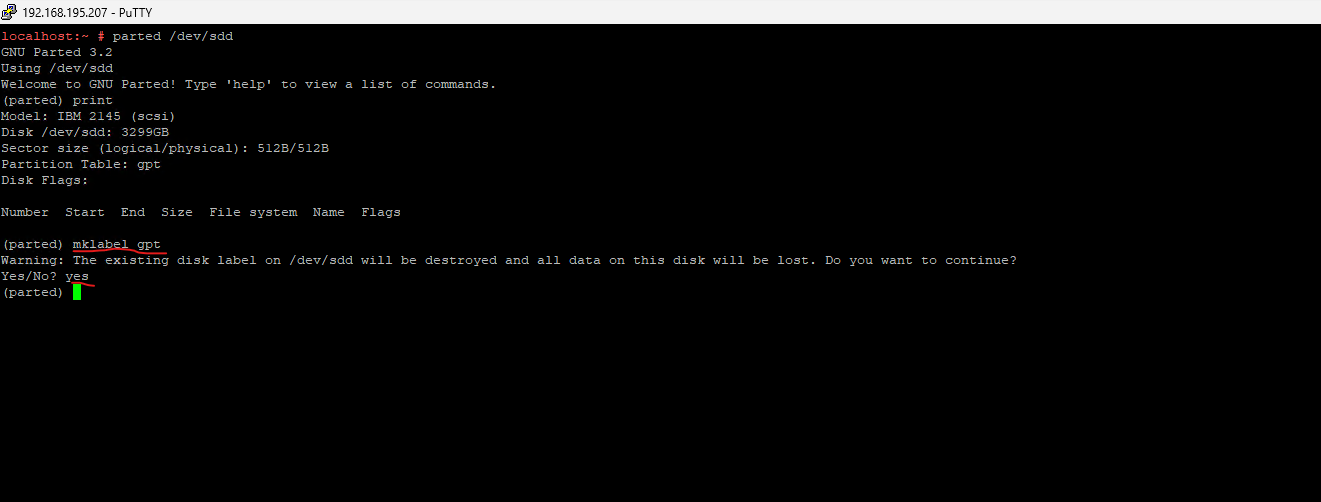
Usually you first create a new partition table and then create the partition. Despite that I already had a partition table created on this disk, to show the process I will ignore it and create a new one because you cannot remove an existing partition table.
To create a partition table execute the mklabel command followed by the label-type, I will use gpt, so I need to enter here mklabel gpt.
mklabel
https://www.gnu.org/software/parted/manual/html_node/mklabel.htmlGUID Partition Table
https://en.wikipedia.org/wiki/GUID_Partition_Table
Next I need to enter mkpart to finally create a new partition on the disk.
In case you want to use the whole disk for the partition you can enter:
(parted) mkpart <optional name> <filesystem type> 1 100%
More about you will find in the following articles.
https://www.redhat.com/sysadmin/partitions-parted
https://opensource.com/article/21/4/linux-parted-cheat-sheet
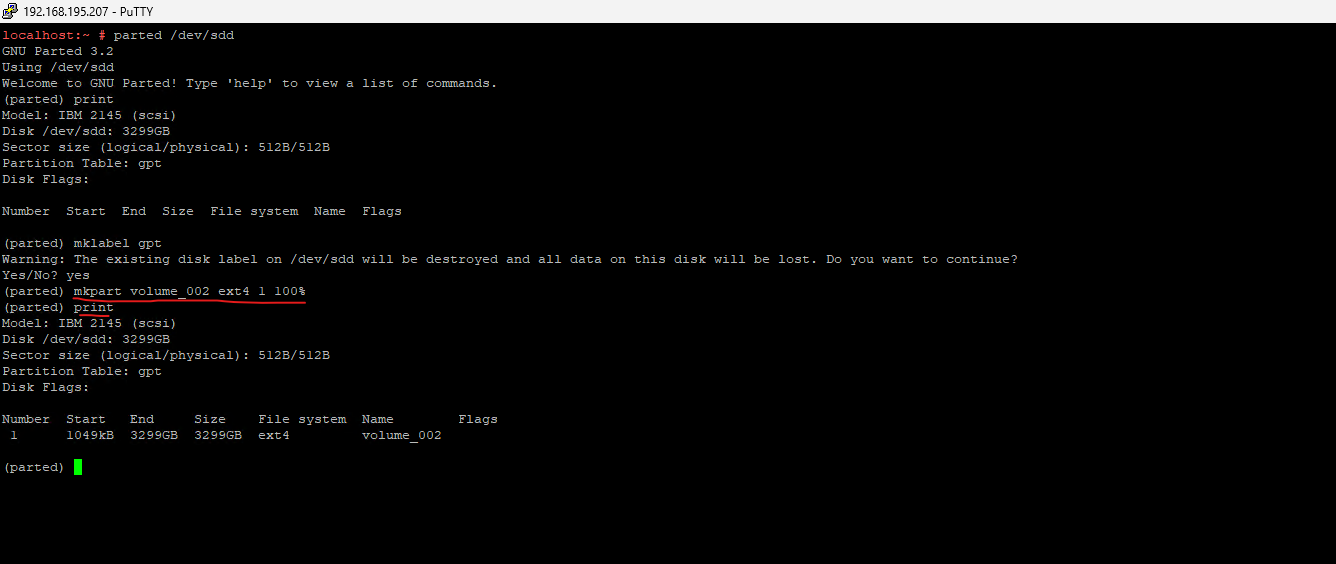
Finally we can exit parted by entering quit.
So the next step is to create a new filesystem on this partition and finally mount the new partition.
Create the Filesystem for the new Partition
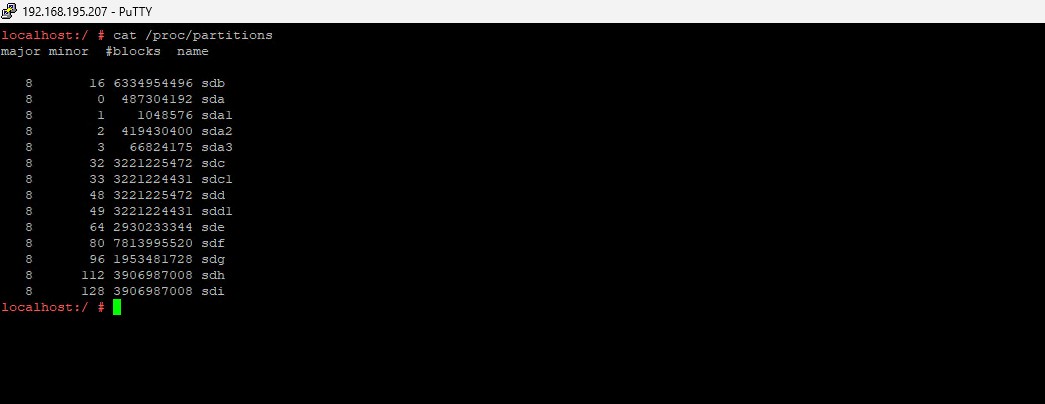
We can list all partitions available on the system by using cat /proc/partitions. I want to create a new filesystem on the sdd1 partition we created previously.
To see a list of filesystem types we can use to create, just enter mkfs. and press two times the tab key.

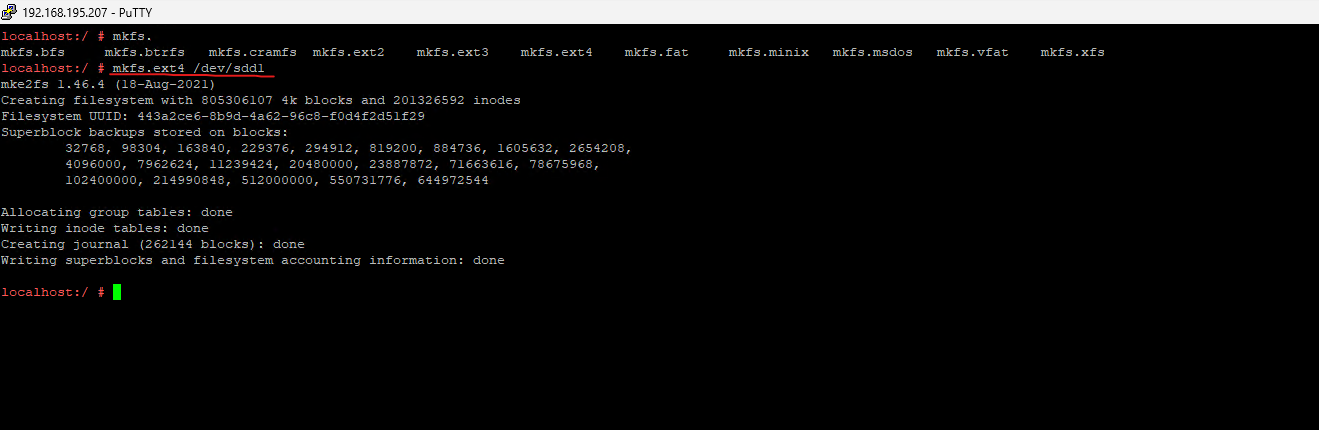
In my case for a data partition I will use the ext4 filesystem type. So I have to enter:
$ sudo mkfs.ext4 /dev/sdd1
Now we finally need to mount our new partition to the OS. Therefore I will first create a new directory to which I will mount the new partition and then executing the mount command as shown below.
$ sudo mkdir /volume_02
$ sudo mount -t ext4 /dev/sdd1 /volume_02

The above mount command will just mount the new partition for the running OS, if we reboot the system the partition will not be mounted afterwards.
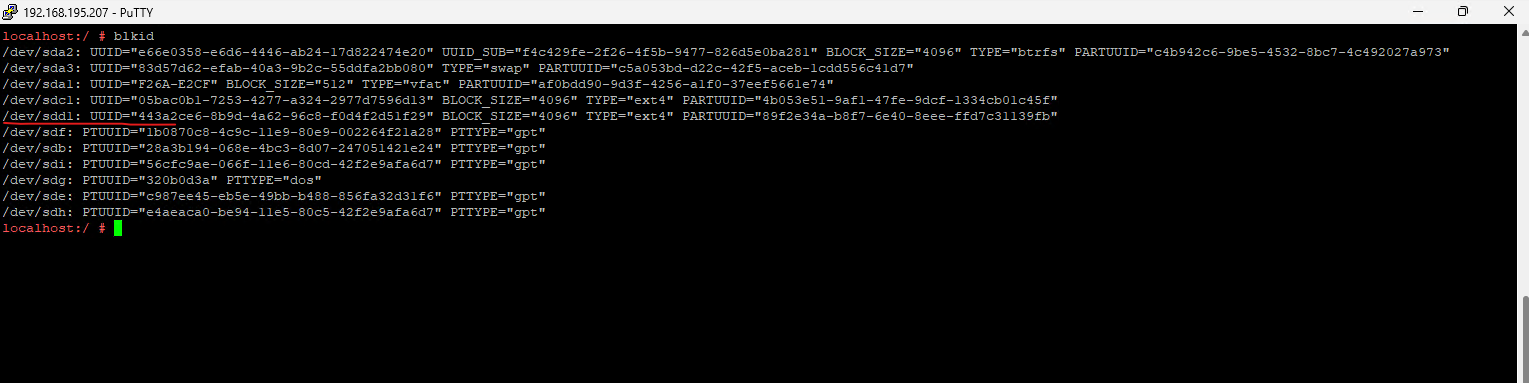
To make this persistent we need to add the partition into the /etc/fstab file. Therefore we first need to determine the UUID of the partition by executing the blkid command.
Copy the UUID of the partition.
Insert the new partition to the /etc/fstab file.
The last two zeros in the line are for dump (legacy backup tool) and pass (filesystem check). The first zero for dump tells the OS to not backup the partition. The last zero pass tells the OS not to check the filesystem during booting the OS.
More about the /etc/fstab file you will find here https://wiki.ubuntuusers.de/fstab/.

Links
How to View Kernel Messages in Linux | dmesg Command
https://www.geeksforgeeks.org/how-to-use-the-dmesg-command-on-linuxlsblk
https://man7.org/linux/man-pages/man8/lsblk.8.htmlIdentify SAS HBAs on a Linux host
https://www.dell.com/support/manuals/en-us/powervault-me5012/me5_series_dg/identify-sas-hbas-on-a-linux-host?guid=guid-63ab509f-48fd-4938-97ea-0b1b7ab18752&lang=en-usudev
https://en.wikipedia.org/wiki/UdevSCSI device nodes
https://www.ibm.com/docs/en/linux-on-systems?topic=wysk-scsi-device-nodes-4Partition a drive on Linux with GNU Parted
https://opensource.com/article/21/4/linux-parted-cheat-sheetCreating and managing partitions in Linux with parted
https://www.redhat.com/sysadmin/partitions-parted
Tags In
Related Posts
Latest posts
Protecting NetApp ONTAP Workloads with Autonomous Ransomware Protection (ARP) – Part 4 – Detecting and Recovering SMB Workloads from Ransomware
Follow me on LinkedIn